Oracle Database 2 Day Developer’s Guide Developer's
Oracle%20Database%202%20Day%20Developer's%20Guide
User Manual:
Open the PDF directly: View PDF ![]() .
.
Page Count: 200 [warning: Documents this large are best viewed by clicking the View PDF Link!]
- Contents
- Preface
- 1 Overview of Oracle Database and Development
- 2 Querying and Manipulating Data
- 3 Creating and Using Database Objects
- 4 Developing and Using Stored Procedures
- Overview of Stored Procedures
- Creating and Using Standalone Procedures and Functions
- Creating and Using Packages
- Using Variables and Constants
- Controlling Program Flow
- Using Composite Data Structures; Records
- Retrieving Data from a Set Using Cursors and Cursor Variables
- Using Collections; Index-By Tables
- Handling Errors and Exceptions
- 5 Using Triggers
- 6 Working in a Global Environment
- Overview of Globalization
- Using NLS Parameter Values in the SQL Developer Environment
- Establishing a Globalization Support Environment
- Developing Globalized Applications
- Using Locale-Dependent Functions with NLS Parameters
- 7 Deploying a Database Application
- Index

Oracle® Database
2 Day Developer's Guide
11g Release 1 (11.1)
B28843-04
March 2008
Oracle Database 2 Day Developer's Guide, 11g Release 1 (11.1)
B28843-04
Copyright © 2005, 2008, Oracle. All rights reserved.
Primary Author: Roza Leyderman
Contributors: Pat Huey, Sharon Kennedy, Simon Law, Bryn Llewellen, Chuck Murray, Mark Townsend
The Programs (which include both the software and documentation) contain proprietary information; they
are provided under a license agreement containing restrictions on use and disclosure and are also protected
by copyright, patent, and other intellectual and industrial property laws. Reverse engineering, disassembly,
or decompilation of the Programs, except to the extent required to obtain interoperability with other
independently created software or as specified by law, is prohibited.
The information contained in this document is subject to change without notice. If you find any problems in
the documentation, please report them to us in writing. This document is not warranted to be error-free.
Except as may be expressly permitted in your license agreement for these Programs, no part of these
Programs may be reproduced or transmitted in any form or by any means, electronic or mechanical, for any
purpose.
If the Programs are delivered to the United States Government or anyone licensing or using the Programs on
behalf of the United States Government, the following notice is applicable:
U.S. GOVERNMENT RIGHTS Programs, software, databases, and related documentation and technical data
delivered to U.S. Government customers are "commercial computer software" or "commercial technical data"
pursuant to the applicable Federal Acquisition Regulation and agency-specific supplemental regulations. As
such, use, duplication, disclosure, modification, and adaptation of the Programs, including documentation
and technical data, shall be subject to the licensing restrictions set forth in the applicable Oracle license
agreement, and, to the extent applicable, the additional rights set forth in FAR 52.227-19, Commercial
Computer Software--Restricted Rights (June 1987). Oracle USA, Inc., 500 Oracle Parkway, Redwood City, CA
94065.
The Programs are not intended for use in any nuclear, aviation, mass transit, medical, or other inherently
dangerous applications. It shall be the licensee's responsibility to take all appropriate fail-safe, backup,
redundancy and other measures to ensure the safe use of such applications if the Programs are used for such
purposes, and we disclaim liability for any damages caused by such use of the Programs.
Oracle, JD Edwards, PeopleSoft, and Siebel are registered trademarks of Oracle Corporation and/or its
affiliates. Other names may be trademarks of their respective owners.
The Programs may provide links to Web sites and access to content, products, and services from third
parties. Oracle is not responsible for the availability of, or any content provided on, third-party Web sites.
You bear all risks associated with the use of such content. If you choose to purchase any products or services
from a third party, the relationship is directly between you and the third party. Oracle is not responsible for:
(a) the quality of third-party products or services; or (b) fulfilling any of the terms of the agreement with the
third party, including delivery of products or services and warranty obligations related to purchased
products or services. Oracle is not responsible for any loss or damage of any sort that you may incur from
dealing with any third party.

iii
Contents
Preface ................................................................................................................................................................. ix
Audience....................................................................................................................................................... ix
Documentation Accessibility..................................................................................................................... ix
Related Documents ..................................................................................................................................... x
Conventions ................................................................................................................................................. x
1 Overview of Oracle Database and Development
Roadmap .................................................................................................................................................... 1-1
Overview of Oracle Database Schemas ............................................................................................... 1-2
Introducing Schema Objects............................................................................................................. 1-2
Introducing the HR Schema ............................................................................................................. 1-3
Overview of Application Development with Oracle Database ...................................................... 1-3
Introducing SQL and PL/SQL Development Languages............................................................ 1-3
Introducing SQL Developer ............................................................................................................. 1-4
Introducing SQL*Plus ....................................................................................................................... 1-5
Connecting to the Database.............................................................................................................. 1-7
Unlocking a User Account......................................................................................................... 1-7
Connecting to Oracle Database from SQL*Plus ..................................................................... 1-7
Connecting to Oracle Database from SQL Developer ........................................................... 1-7
Overview of Other Development Environments............................................................................ 1-10
2 Querying and Manipulating Data
Exploring Database Objects................................................................................................................... 2-1
Looking at Schema Object Types..................................................................................................... 2-1
Exploring Tables and Viewing Data ............................................................................................... 2-3
Retrieving Data with Queries ................................................................................................................ 2-6
Selecting Data from a Table.............................................................................................................. 2-7
Using Column Aliases....................................................................................................................... 2-8
Restricting Data to Match Specific Conditions .............................................................................. 2-8
Searching for Patterns in Data....................................................................................................... 2-11
Sorting Data ..................................................................................................................................... 2-13
Using Built-In and Aggregate Functions..................................................................................... 2-14
Using Arithmetic Operators................................................................................................... 2-14
Using Numeric Functions....................................................................................................... 2-14
Using Character Functions ..................................................................................................... 2-15
iv
Using Datetime Functions ...................................................................................................... 2-18
Using Data Type Conversion Functions............................................................................... 2-20
Using Aggregate Functions.................................................................................................... 2-23
Using NULL Value Functions................................................................................................ 2-25
Using Conditional Functions ................................................................................................. 2-26
Adding, Changing, and Deleting Data ............................................................................................. 2-27
Inserting Information...................................................................................................................... 2-27
Updating Information .................................................................................................................... 2-28
Deleting Information ...................................................................................................................... 2-29
Controlling Transactions...................................................................................................................... 2-30
Committing Transaction Changes................................................................................................ 2-30
Rolling Back Transaction Changes ............................................................................................... 2-31
Setting Savepoints........................................................................................................................... 2-32
3 Creating and Using Database Objects
Using Data Types...................................................................................................................................... 3-1
Creating and Using Tables...................................................................................................................... 3-2
Creating a Table.................................................................................................................................. 3-3
Ensuring Data Integrity..................................................................................................................... 3-6
Understanding Types of Data Integrity Constraints ............................................................. 3-6
Adding Integrity Constraints.................................................................................................... 3-7
Adding Data to a Table, Modifying, and Deleting..................................................................... 3-13
Indexing Tables ............................................................................................................................... 3-17
Dropping Tables.............................................................................................................................. 3-20
Using Views............................................................................................................................................ 3-21
Creating a View............................................................................................................................... 3-21
Updating a View ............................................................................................................................. 3-23
Dropping a View............................................................................................................................. 3-24
Using Sequences.................................................................................................................................... 3-25
Creating a Sequence........................................................................................................................ 3-25
Dropping a Sequence...................................................................................................................... 3-27
Using Synonyms.................................................................................................................................... 3-28
4 Developing and Using Stored Procedures
Overview of Stored Procedures............................................................................................................. 4-1
Creating and Using Standalone Procedures and Functions............................................................. 4-2
Creating Procedures and Functions ................................................................................................ 4-2
Modifying Procedures and Functions............................................................................................. 4-7
Testing Procedures and Functions .................................................................................................. 4-7
Dropping Procedures and Functions .............................................................................................. 4-8
Creating and Using Packages................................................................................................................. 4-9
Guidelines for Packages................................................................................................................. 4-10
Creating a Package.......................................................................................................................... 4-11
Modifying a Package ...................................................................................................................... 4-12
Dropping a Package........................................................................................................................ 4-14
Using Variables and Constants........................................................................................................... 4-15
PL/SQL Data Types........................................................................................................................ 4-15
v
Using Variables and Constants..................................................................................................... 4-16
Using Comments...................................................................................................................... 4-16
Using Identifiers....................................................................................................................... 4-16
Declaring Variables and Constants ....................................................................................... 4-16
Declaring Variables with Structure Identical to Database Columns................................ 4-17
Assigning Values to Variables....................................................................................................... 4-19
Assigning Values with the Assignment Operator .............................................................. 4-19
Assigning Values from the Database.................................................................................... 4-20
Controlling Program Flow................................................................................................................... 4-22
Using Conditional Selection Control............................................................................................ 4-22
Using IF...THEN...ELSE Selection Control........................................................................... 4-22
Using CASE...WHEN Selection Control............................................................................... 4-24
Using Iterative Control................................................................................................................... 4-25
Using the FOR...LOOP ............................................................................................................ 4-25
Using the WHILE...LOOP....................................................................................................... 4-27
Using the LOOP...EXIT WHEN ............................................................................................. 4-28
Using Composite Data Structures; Records ..................................................................................... 4-29
Retrieving Data from a Set Using Cursors and Cursor Variables................................................ 4-32
Using Explicit Cursors.................................................................................................................... 4-33
Using Cursor Variables: REF Cursors.......................................................................................... 4-35
Using Collections; Index-By Tables................................................................................................... 4-38
Creating Cursors for Index-by Tables.......................................................................................... 4-39
Defining Index-by Tables............................................................................................................... 4-40
Populating Index-by PLS_INTEGER Tables; BULK COLLECT............................................... 4-40
Populating Index-by VARCHAR2 Tables................................................................................... 4-40
Iterating Through an Index-by Table........................................................................................... 4-41
Handling Errors and Exceptions......................................................................................................... 4-41
Existing PL/SQL and SQL Exceptions......................................................................................... 4-42
Custom Exceptions ......................................................................................................................... 4-43
5 Using Triggers
Designing Triggers................................................................................................................................... 5-1
Types of Triggers................................................................................................................................ 5-2
Timing Triggers.................................................................................................................................. 5-3
Guidelines and Restrictions for Trigger Design ............................................................................ 5-3
Creating and Using Triggers .................................................................................................................. 5-4
Creating a Statement Trigger ........................................................................................................... 5-4
Creating a Row Trigger..................................................................................................................... 5-5
Creating an INSTEAD OF Trigger................................................................................................... 5-7
Creating LOGON and LOGOFF Triggers ...................................................................................... 5-7
Modifying Triggers............................................................................................................................ 5-8
Disabling and Enabling Triggers ..................................................................................................... 5-8
Compiling Triggers............................................................................................................................ 5-9
Dropping Triggers .......................................................................................................................... 5-10
vi
6 Working in a Global Environment
Overview of Globalization..................................................................................................................... 6-1
Globalization Support Features ....................................................................................................... 6-2
Viewing the Current NLS Parameter Values................................................................................. 6-2
Using NLS Parameter Values in the SQL Developer Environment ............................................... 6-4
Changing NLS Parameter Values for All Sessions........................................................................ 6-6
Establishing a Globalization Support Environment......................................................................... 6-7
Choosing a Locale with the NLS_LANG Parameter..................................................................... 6-8
Setting NLS Parameters..................................................................................................................... 6-8
Setting Language and Territory Parameters.................................................................................. 6-9
Using the NLS_LANGUAGE Parameter................................................................................. 6-9
Using the NLS_TERRITORY Parameter............................................................................... 6-10
Setting Date and Time Parameters ............................................................................................... 6-12
Using Date Formats................................................................................................................. 6-12
Using Time Formats ................................................................................................................ 6-14
Setting Calendar Definitions ......................................................................................................... 6-15
Overview of Calendar Formats.............................................................................................. 6-15
Using the NLS_CALENDAR Parameter .............................................................................. 6-16
Using Numeric Formats................................................................................................................. 6-17
Using the NLS_NUMERIC_CHARACTERS Parameter .................................................... 6-18
Using Monetary Parameters.......................................................................................................... 6-19
Overview of Currency Formats ............................................................................................. 6-19
Using the NLS_CURRENCY Parameter............................................................................... 6-19
Using the NLS_ISO_CURRENCY Parameter...................................................................... 6-20
Using the NLS_DUAL_CURRENCY Parameter................................................................. 6-21
Using Linguistic Sort and Search.................................................................................................. 6-22
Using the NLS_SORT Parameter........................................................................................... 6-22
Using the NLS_COMP Parameter......................................................................................... 6-23
Using Case-Insensitive and Accent-Insensitive Search...................................................... 6-25
Using Length Semantics................................................................................................................. 6-25
Using the NLS_LENGTH_SEMANTICS Parameter........................................................... 6-26
Developing Globalized Applications ............................................................................................... 6-27
Overview of Unicode...................................................................................................................... 6-27
Using SQL Character Data Types................................................................................................. 6-28
Using the NCHAR Data Type................................................................................................ 6-28
Using the NVARCHAR2 Data Type..................................................................................... 6-29
Using Unicode String Literals ....................................................................................................... 6-29
NCHAR Literal Replacement........................................................................................................ 6-30
Using Locale-Dependent Functions with NLS Parameters........................................................... 6-30
Specifying NLS Parameters in SQL Functions............................................................................ 6-31
Unacceptable NLS Parameters in SQL Functions ...................................................................... 6-33
7 Deploying a Database Application
Overview of Deployment ....................................................................................................................... 7-1
Deployment Environments .................................................................................................................... 7-1
Planning for Deployment....................................................................................................................... 7-2
Exporting the Database Objects ............................................................................................................ 7-3
vii
Using SQL Developer to Export Database Objects ....................................................................... 7-3
Special Considerations for Exporting Sequences and Triggers................................................... 7-6
Generating a Script for Creating the Sequence and Tables.......................................................... 7-7
Generating a Script for Creating the PL/SQL Objects.................................................................. 7-8
Generating a Script for Creating a Synonym and a View ............................................................ 7-9
Exporting the Data ................................................................................................................................ 7-10
Performing the Installation ................................................................................................................. 7-11
Validating the Installation................................................................................................................... 7-12
Archiving the Installation Scripts...................................................................................................... 7-13
Index
viii

ix
Preface
This guide explains basic concepts behind application development with Oracle
Database. It provides instructions for using the basic features of Oracle Database
through the Structured Query Language (SQL), and Oracle Corporation's proprietary
server-based procedural extension to the SQL database language, Procedural
Language/Structured Query Language (PL/SQL).
Audience
This guide is intended for anyone who is interested in learning about Oracle Database
application development, and is primarily an introduction to application development
for developers who are new to Oracle.
Before using this guide, you should have a general understanding of relational
database concepts and an understanding of the operating system environment that
you will use to develop applications with Oracle Database.
As you become comfortable with technologies described in this guide, Oracle
recommends that you consult other Oracle Database development guides, in particular
the Oracle Database 2 Day + Application Express Developer's Guide, Oracle Database 2 Day
+ Java Developer's Guide, Oracle Database 2 Day + .NET Developer's Guide, and Oracle
Database 2 Day + PHP Developer's Guide.
Documentation Accessibility
Our goal is to make Oracle products, services, and supporting documentation
accessible, with good usability, to the disabled community. To that end, our
documentation includes features that make information available to users of assistive
technology. This documentation is available in HTML format, and contains markup to
facilitate access by the disabled community. Accessibility standards will continue to
evolve over time, and Oracle is actively engaged with other market-leading
technology vendors to address technical obstacles so that our documentation can be
accessible to all of our customers. For more information, visit the Oracle Accessibility
Program Web site at
http://www.oracle.com/accessibility/
Accessibility of Code Examples in Documentation
Screen readers may not always correctly read the code examples in this document. The
conventions for writing code require that closing braces should appear on an
otherwise empty line; however, some screen readers may not always read a line of text
that consists solely of a bracket or brace.

x
Accessibility of Links to External Web Sites in Documentation
This documentation may contain links to Web sites of other companies or
organizations that Oracle does not own or control. Oracle neither evaluates nor makes
any representations regarding the accessibility of these Web sites.
TTY Access to Oracle Support Services
Oracle provides dedicated Text Telephone (TTY) access to Oracle Support Services
within the United States of America 24 hours a day, 7 days a week. For TTY support,
call 800.446.2398. Outside the United States, call +1.407.458.2479.
Related Documents
For more information, see the following documents in Oracle Database 11g Release 1
(11.1) library:
■Oracle Database Advanced Application Developer's Guide
■Oracle Database Concepts
■Oracle Database SQL Language Reference
■Oracle Database PL/SQL Language Reference
Conventions
The following text conventions are used in this document:
Convention Meaning
boldface Boldface type indicates graphical user interface elements associated
with an action, or terms defined in text or the glossary.
italic Italic type indicates book titles, emphasis, or placeholder variables for
which you supply particular values.
monospace Monospace type indicates commands within a paragraph, URLs, code
in examples, text that appears on the screen, or text that you enter.

Overview of Oracle Database and Development 1-1
1
Overview of Oracle Database and
Development
This chapter introduces you to application development with Oracle Database.
This chapter contains the following sections:
■Roadmap on page 1-1
■Overview of Oracle Database Schemas on page 1-2
■Overview of Application Development with Oracle Database on page 1-3
■Overview of Other Development Environments on page 1-10
Roadmap
You are an Oracle Database developer, someone who has the responsibility of creating
or maintaining the database components of an application that uses the Oracle
technology stack. The discussion in this and following sections assumes that you, or
someone else in your organization, must know how to architect multiuser applications
(two tier or multitier) and understands the advantages of using a relational database
for the data persistence tier.
As a database developer, you need to know how to implement the data model that the
application requires, how to implement the rules for data integrity, and how to
implement the specified functions for accessing and manipulating the application
data.
You know already that you can access an Oracle Database only through a client
program, and that the SQL language is that client program's interface to the Oracle
Database. You will learn how to access the Oracle Database by using two clients that
are packaged with the Oracle Database and designed for developers: SQL Developer
and SQL*Plus. Both allow you to issue the SQL statements you need in order to create
and test your application's database component without doing any client
programming. Programming such clients is outside the scope of this discussion.
To briefly review widely accepted best practices in software engineering, you must
define APIs that model business functions, and hide the implementation. Oracle
Database supports this practice by letting you specify the APIs as PL/SQL
subprograms. The implementation is tables, indexes, constraints, triggers, and the
various SQL statements that modify and fetch table rows. By embedding these SQL
statements in PL/SQL subprograms, and by using Oracle's schema and privilege
mechanisms, you can securely hide the implementation from the client programs.
Many of Oracle's major customers follow this practice strictly: client programs are
allowed to access the database only by calling PL/SQL subprograms. Some customers

Overview of Oracle Database Schemas
1-2 Oracle Database 2 Day Developer's Guide
relax this rule by allowing the client to issue raw SQL SELECT statements, but
requiring it to call PL/SQL subprograms for all business functions that make changes
to the database.
This general discussion sets the charter for your job as an Oracle Database developer:
■You need to know about the various types of objects that you can create in the
database, as described in "Exploring Database Objects" on page 2-1.
■You need to know the SQL that is used to manage these objects: CREATE, ALTER,
TRUNCATE, and DROP. This is known as data definition language (DDL), and is
described in "Creating and Using Database Objects" on page 3-1.
■You need to know the SQL language that is used to maintain application data:
INSERT, UPDATE, DELETE, and MERGE. This is known as data manipulation
language (DML), and is described in "Querying and Manipulating Data" on
page 2-1.
■You need to know the SQL language for querying data: SELECT statement and its
various clauses, as described in "Retrieving Data with Queries" on page 2-6.
■You need to know about transactions, and the SQL language for controlling them:
COMMIT, SAVEPOINT, and ROLLBACK, as described in "Controlling Transactions"
on page 2-30.
■You need to know how to write PL/SQL subprograms and procedural code that
use DDL, DML, transaction control, and queries, as described in "Developing and
Using Stored Procedures" on page 4-1 and "Using Triggers" on page 5-1.
■You need to know how to manage your deliverables and how to instantiate your
application in several different databases for the purposes of development itself,
unit testing, integration testing, end-user acceptance testing, education, and
ultimately for deploying your application in a production environment. This
information is in "Deploying a Database Application" on page 7-1.
Overview of Oracle Database Schemas
This section introduces Oracle Database schemas.
Introducing Schema Objects
Oracle Database groups related types of information into logical structures that are
called schemas. When you connect to the database by providing your user name and
password, you name the schema and indicate that you are its owner. Schemas contain
tables, which are the basic units of data storage in the database. Using a table, you can
query for information, update it, insert additional data, and delete. Each table contains
rows that represent the individual data records. The table rows are composed of
columns that represent the various fields of the record.
In addition to tables, schemas contain many other objects. Indexes are optional
structures that can improve the performance of data retrieval from tables. Indexes are
See Also:
■Oracle Database Concepts for information about application
architecture
See Also:
■Oracle Database Concepts

Overview of Application Development with Oracle Database
Overview of Oracle Database and Development 1-3
created on one or more columns of a table, and are automatically maintained in Oracle
Database. See "Creating and Using Tables" on page 3-2.
Depending on your business needs, you can create a view that combines information
from several different tables into a single presentation. Such views can rely on
information from other views as well as tables. See "Using Views" on page 3-21.
In an application where all records of the table must be distinct, a sequence can
generate a serial list of unique integer numbers for a numeric column that represents
the ID of each record. See "Using Sequences" on page 3-25.
A synonym is an alias for any table, view, sequence, procedure, and so on. Synonyms
are often used for security and convenience, such as masking the ownership of an
object or simplifying SQL statements. See "Using Synonyms" on page 3-28.
Schema-level procedures and functions, and also packages, are collectively known as
stored procedures. Stored procedures are blocks of code that are actually stored in the
database. They are callable from client applications that access a relational database
system. See "Developing and Using Stored Procedures" on page 4-1.
Trigg e r s are procedural code that is automatically executed by the database when
specified events occur in a particular table or view. Triggers can restrict access to
specific data, perform logging, or audit data. See "Using Triggers" on page 5-1.
Introducing the HR Schema
The hr schema is one of the sample schemas that can be installed as part of Oracle
Database. The hr sample schema contains information about employees, their
departments and locations, their work histories, and other related information. Like all
schemas, the hr schema has tables, views, indexes, procedures, functions, and all other
possible attributes of an Oracle Database schema.
You will be using and extending the hr schema to learn how to develop applications
with Oracle Database.
Overview of Application Development with Oracle Database
In this section, you will learn about two programming languages for direct data access
(SQL and PL/SQL), two development tools (SQL Developer and SQL*Plus), a sample
data set (hr schema), and how to connect to an instance of Oracle Database.
Introducing SQL and PL/SQL Development Languages
There are two broad families of computer languages: declarative languages that
describe what should be done, and imperative languages that describe how things
should be done. You are probably already familiar with the Structured Query
See Also:
■Oracle Database Concepts for a comprehensive introduction to all
schema objects
See Also:
■Oracle Database Sample Schemas for an in-depth description of the
hr sample schema
See Also:
■Oracle Database Advanced Application Developer's Guide

Overview of Application Development with Oracle Database
1-4 Oracle Database 2 Day Developer's Guide
Language, or SQL, the database-independent language for defining database objects
and operations. SQL is a set-based, high-level declarative computer language; it
describes a problem by stating criteria for the desired data. Using SQL statements, you
can query tables to display data, create and modify objects, and perform a large
variety of administrative tasks. When you issue a SQL command, the SQL language
compiler automatically generates a procedure to access the database and perform the
desired task.
In contrast, imperative computer languages, such as C, C++, and Java, describe how
to solve the problem by finding the necessary data; they describe computation as
statements that change a program state and can therefore solve a much broader set of
problems.
Procedural Language SQL, or PL/SQL, is a native Oracle language extension to SQL.
It bridges the gap between declarative and imperative program control by adding
procedural elements, such as conditional control and iterative flow constructs. Like
SQL, PL/SQL has a built-in treatment of the relational database domain. PL/SQL
enables you to declare constants and variables, define procedures and functions, use
collections and object types, trap runtime errors, and create functions, packages,
procedures and triggers that can be stored on the database for reuse by applications
that are authored in any of the Oracle programmatic interfaces.
For more information about PL/SQL, see the PL/SQL Oracle Technology Network site
at
http://www.oracle.com/technology/tech/pl_sql/
Introducing SQL Developer
SQL Developer is a graphical user interface for accessing your instance of Oracle
Database. SQL Developer supports development in both the SQL and PL/SQL
languages. It is available in the default installation of Oracle Database. You will use
SQL Developer, both through its navigation hierarchy and through the SQL
worksheet.
Before you run SQL Developer, ensure that you have Java 1.5.0 installed. At a
command prompt, enter the following command:
java -version
Output similar to the following should appear:
java version "1.5.0_06"
Java(TM) 2 Runtime Environment, Standard Edition (build 1.5.0_06-b05)
Java HotSpot(TM) Client VM (build 1.5.0_06-b05, mixed mode, sharing)
To start SQL Developer:
1. In Linux:
■Click the Application menu (on Gnome) or the K menu (on KDE).
See Also:
■Oracle Database SQL Language Reference
■Oracle Database PL/SQL Language Reference
■Oracle Database PL/SQL Packages and Types Reference
■"Overview of Other Development Environments" on page 1-10
Overview of Application Development with Oracle Database
Overview of Oracle Database and Development 1-5
■Select Oracle - ORACLE_HOME, then Application Development, and then
SQL Developer.
In Windows:
■From the Start menu, select All Programs.
■Select Oracle - ORACLE_HOME, then Application Development, and then
SQL Developer.
2. When prompted, enter the full path to the Java executable.
For example: C:\jdk1.5.0\bin\java.exe
You only need to specify this path the first time you start SQL Developer.
After the splash screen appears, SQL Developer starts.
For more information about SQL Developer, see the SQL Developer Oracle Technology
Network site at
http://www.oracle.com/technology/products/database/sql_
developer/index.html
Introducing SQL*Plus
SQL*Plus is installed together with Oracle Database. SQL*Plus has a command-line
interface for accessing Oracle Database. You can also access SQL*Plus within SQL
Developer.
To use SQL*Plus on Windows systems:
1. Click the Start icon at the bottom left corner of your screen, and select Run.
2. In the Run window, in the text prompt, enter cmd. Click OK.
See Also: ■
■Oracle Database SQL Developer User's Guide

Overview of Application Development with Oracle Database
1-6 Oracle Database 2 Day Developer's Guide
3. In the cmd.exe window, at the c:>\ prompt, enter sqlplus and press the Enter
button of your keyboard.
SQL*Plus starts and prompts you to authenticate your connection to the database.
Your screen looks something like this:
C:\>sqlplus
SQL*Plus: Release 11.1.0.1.0 - Production on Tue April 3 10:10:11 2007
Copyright (c) 1982, 2007, Oracle. All rights reserved.
Enter user-name:
4. Enter your user name and press Enter.
Your screen looks something like this:
Enter password:
5. Enter your password and press Enter. Note that entering your user name and
password in this manner is secure because your password is not visible on the
screen.
The system connects you to a database instance, and shows a SQL prompt.
Your screen looks something like this:
Connected to:
Oracle Database 11g Enterprise Edition Release 11.1.0.1.0 - Production
With the Partitioning, OLAP and Data Mining options
You can now start using the SQL command prompt.
6. To close the SQL*Plus session, at the SQL prompt enter the exit command. Note
that you are not shutting down the Oracle Database instance.
SQL> exit
Your screen looks something like this:
Disconnected from Oracle Database 11g Enterprise Edition Release 11.1.0.1.0
With the Partitioning, OLAP and Data Mining options
See Also:
■Oracle Database 2 Day + Security Guide
■SQL*Plus User's Guide and Reference

Overview of Application Development with Oracle Database
Overview of Oracle Database and Development 1-7
Connecting to the Database
Remember that in Oracle Database, the user and the name of the schema to which the
user connects are the same. This section shows how to create a connection to the hr
schema, one of the sample schemas that ship with Oracle Database. To begin, you
must unlock the hr account.
This section contains the following topics:
■Unlocking a User Account
■Connecting to Oracle Database from SQL*Plus
■Connecting to Oracle Database from SQL Developer
Unlocking a User Account
By default, when the hr schema is installed, it is locked and its password is expired.
Before you can connect to Oracle Database using the hr schema, a user with
administrator privileges needs to unlock the hr account and reset its password.
The following steps show how to unlock the hr account and change its password.
To unlock the hr account and change its password:
1. Start a new SQL* Plus session, and login as a user with administrative privileges,
such as user SYSTEM. See "Introducing SQL*Plus" on page 1-5.
2. At the SQL prompt, enter the following statement:
Remember to choose a password that is secure. See Oracle Database Security Guide
for guidelines on choosing passwords.
SQL> ALTER USER hr ACCOUNT UNLOCK IDENTIFIED BY password;
The system confirms that the hr account is unlocked and its password changed:
User altered
Connecting to Oracle Database from SQL*Plus
When the hr account is unlocked, you can create a new hr connection using the new
password that you set in "Unlocking a User Account" on page 1-7.
To create an HR Connection in SQL*Plus:
1. Close the current connection to Oracle database. See step 6 of "Introducing
SQL*Plus" on page 1-5.
2. Start SQL*Plus. In the cmd.exe window, at the c:>\ prompt, enter sqlplus and
press the Enter button of your keyboard.
3. At the SQL prompt, enter hr, and then the password.
The system connects you to a database instance through the hr schema.
You can close both the connection and the command window.
Connecting to Oracle Database from SQL Developer
When the hr account is unlocked, you can use it to access the hr schema inside the
Oracle Database. In this section, you will be working with Oracle SQL Developer.
See Also:
■SQL*Plus User's Guide and Reference
Overview of Application Development with Oracle Database
1-8 Oracle Database 2 Day Developer's Guide
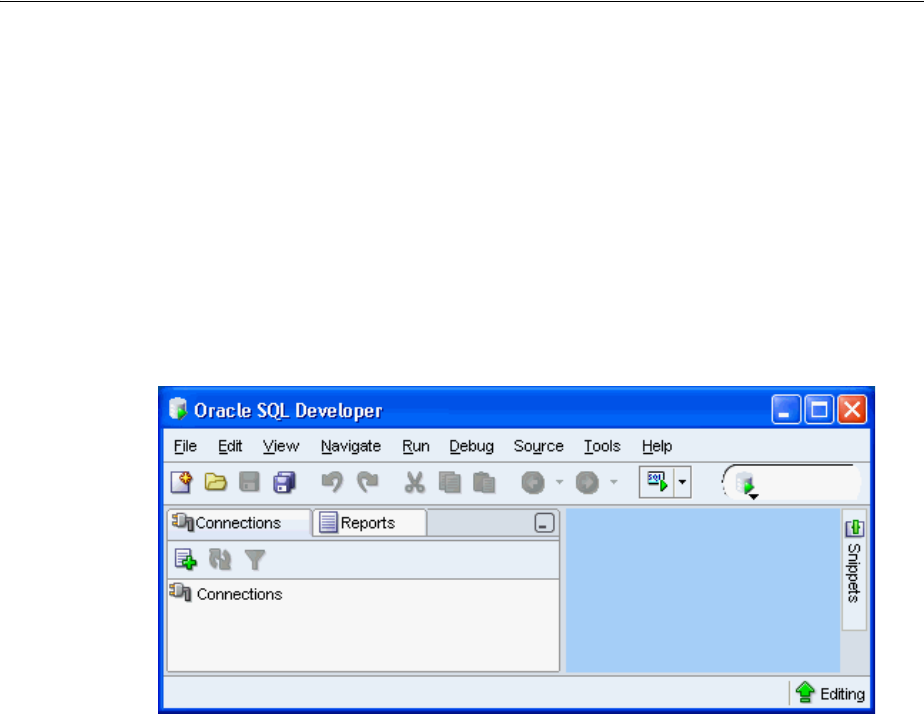
To create an HR connection in SQL Developer:
1. Start SQL Developer.
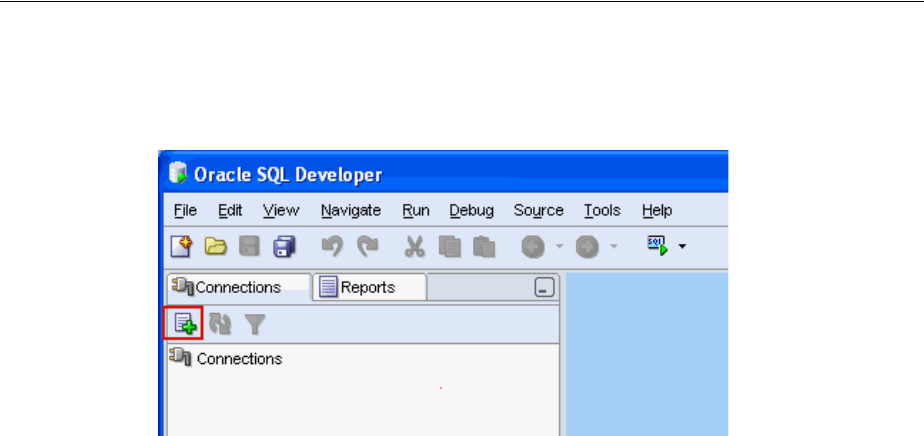
2. In the Connections pane, click the New Connection icon.
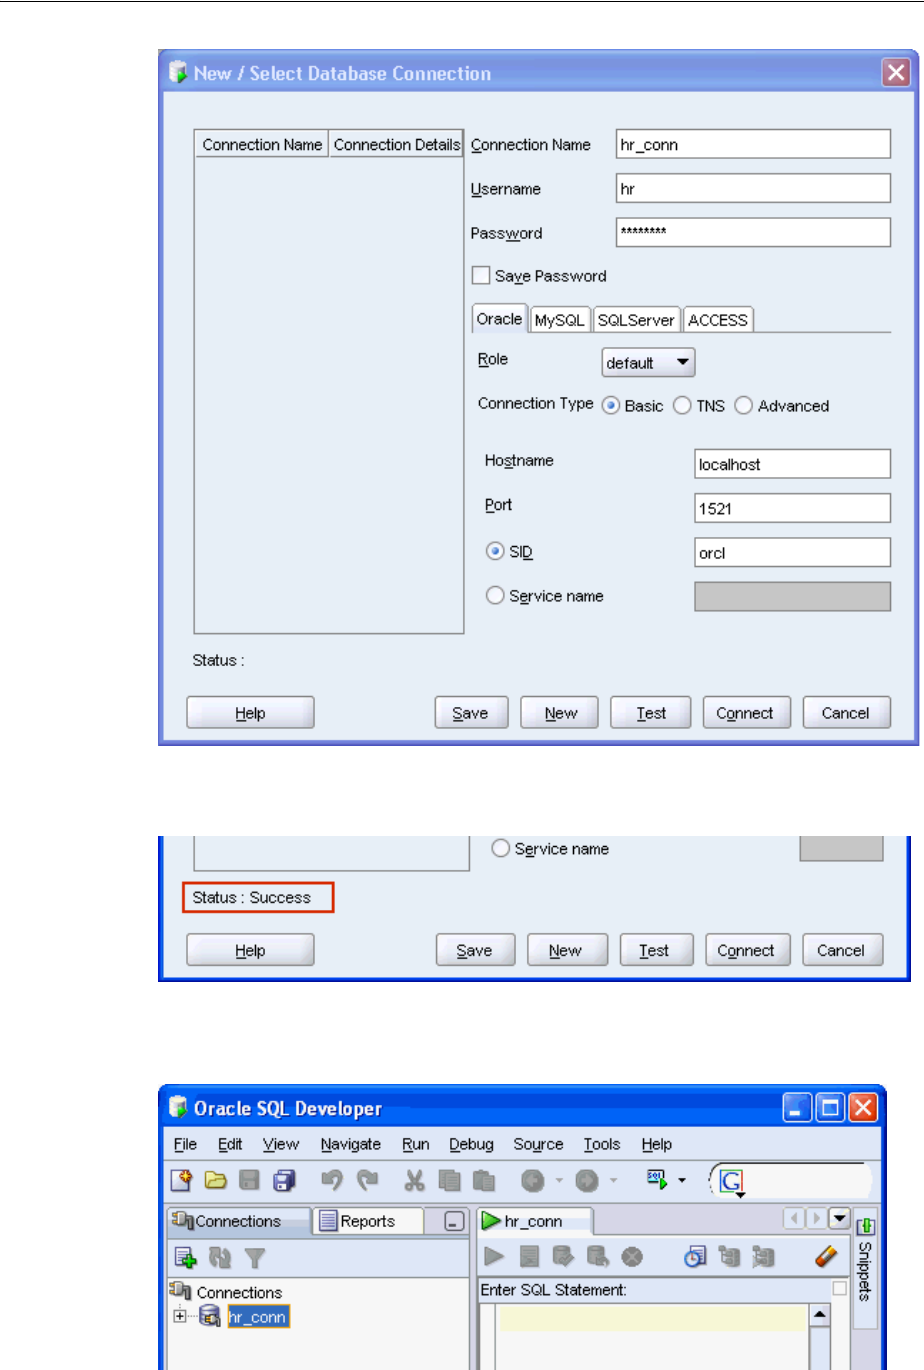
3. In the upper part of the New/Select Database Connection window, enter this
information:
■For Connection Name, enter hr_conn.
■For Username, enter hr.
■For Password, enter the password that the system administrator created after
unlocking the hr account. Note that the password text is masked.
■Leave the Save Password option unchecked.
Under the Oracle tab of the New/Select Database Connection window, enter this
information:
■For Role, select Default.
■For Connection Type, select Basic.
■For Hostname, enter localhost.
■For Port, enter 1521.
■For SID, enter orcl.
At the bottom of the New/Select Database Connection window, click Test.
Overview of Application Development with Oracle Database
Overview of Oracle Database and Development 1-9
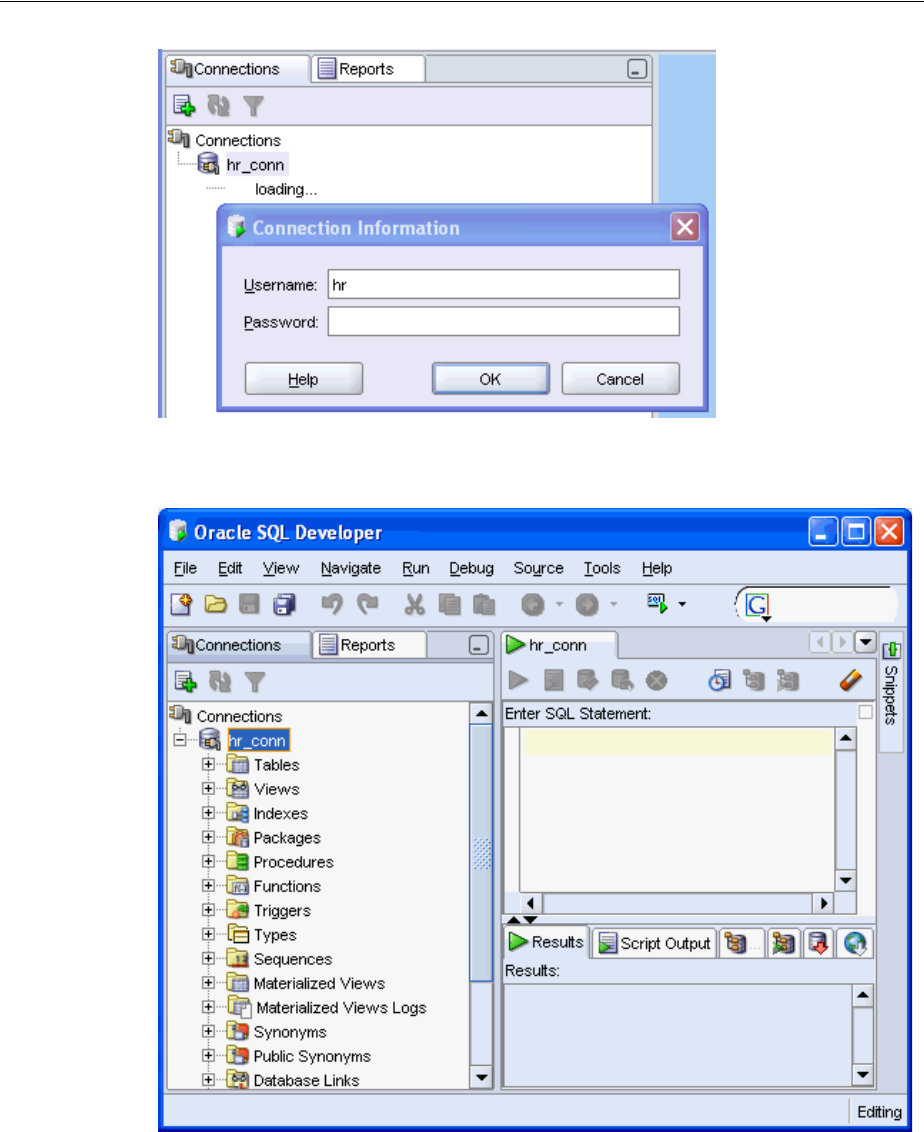
4. The connection is tested. At the bottom of the New/Select Database Connection
window, Status is changed to Success.
5. At the bottom of the New/Select Database Connection window, click Connect.
The Oracle SQL Developer window appears, with a new hr_conn connection.

Overview of Other Development Environments
1-10 Oracle Database 2 Day Developer's Guide
You have successfully established a connection to the hr schema.
Overview of Other Development Environments
This section introduces other development environments and languages that you may
choose for developing your own applications.
Oracle Data Provider for .NET, Oracle Database Extensions for .NET and Oracle
Developer Tools for Visual Studio .NET
Oracle Data Provider for .NET (ODP.NET), is a .NET data provider that uses and
extends the Microsoft .NET Framework Class Library. ODP.NET uses the .NET
Framework to expose provider-specific features and data types, so its use of native
Oracle Database APIs bring the features of Oracle Database to .NET applications.
Oracle Database Extensions for .NET provide a Microsoft Common Language Runtime
(CLR) host for Oracle Database, data access through ODP.NET classes, and the Oracle
Deployment Wizard for Visual Studio .NET. Because CLR runs as an external process
on Oracle Database server, this integration enables you to run .NET stored procedures
and functions on Oracle Database in Microsoft Windows XP, 2000, and 2003. These
stored procedures and functions can be authored in any .NET language, such as C#
and VB.NET, and then deployed in Oracle Database using the Oracle Deployment
Wizard for .NET, just like PL/SQL or Java stored procedures.
Oracle Developer Tools provide a graphical user interface to access Oracle Database
functionality through Visual Studio .NET. Oracle Developer Tools include Oracle
Explorer for browsing the database schema, wizards and designers for creating and
altering schema objects, the ability to automatically generate code by dragging schema
objects onto the .NET design form, and a PL/SQL editor with integrated
context-sensitive help. Additionally, the Oracle Data Window enables you to perform
routine database tasks and test stored procedures in the Visual Studio environment,
while the SQL Query Window executes SQL statements and scripts.
For an introduction to .NET application development with Oracle Database, see Oracle
Database 2 Day + .NET Developer's Guide.
Further Oracle Database .NET documentation includes Oracle Data Provider for .NET
Developer's Guide and Oracle Database Extensions for .NET Developer's Guide.
For complete information about Oracle Database .NET APIs, ODP.NET, Oracle
Developer Tools, downloads, tutorials, and related information, see the .NET Oracle
Technology Network site at
http://www.oracle.com/technology/tech/dotnet/
PHP
The Hypertext Preprocessor, PHP, is a powerful interpreted server-side scripting
language for quick Web application development. PHP is an open source language
that is distributed under a BSD-style license. PHP is designed for embedding Oracle
Database access requests directly into HTML pages.
For an introduction to PHP application development with Oracle Database, see the
Oracle Database 2 Day + PHP Developer's Guide.
For complete information about Oracle Database PHP APIs and related information,
see the PHP Oracle Technology Network site at
http://www.oracle.com/technology/tech/php/

Overview of Other Development Environments
Overview of Oracle Database and Development 1-11
Oracle Application Express
Oracle Application Express, APEX, is an application development and deployment
tool that enables you to quickly create secure and scalable Web applications even if
you have limited previous programming experience. The embedded Application
Builder tool assembles an HTML interface or a complete application that uses database
objects, such as tables or stored procedures, into a collection of pages that are linked
together through tabs, buttons, or hypertext links. See Oracle Database 2 Day +
Application Express Developer's Guide for complete information on APEX.
For complete information about APEX and related information, see the APEX Oracle
Technology Network site at
http://www.oracle.com/technology/products/database/application_
express/
Oracle Call Interface and Oracle C++ Call Interface
Oracle Call Interface (OCI) is the native C language API for accessing Oracle Database
directly from C applications. See Oracle Call Interface Programmer's Guide for complete
information on OCI.
Oracle C++ Call Interface (OCCI) is the native C++ language API for accessing Oracle
Database directly from C++ applications. Very similar to the OCI, OCCI supports both
relational and object-oriented programming paradigms. See Oracle C++ Call Interface
Programmer's Guide for complete information on OCCI.
The OCI and OCCI Software Development Kits are also installed as part of the Oracle
Instant Client, which enables you to run applications without installing the standard
Oracle client or having an ORACLE_HOME. Your applications will work without
modification, while using significantly less disk space. Oracle Instant Client is
available from the Instant Client Oracle Technology Network site at
http://www.oracle.com/technology/tech/oci/instantclient/
For complete information about Oracle Database OCI and related information, see the
OCI Oracle Technology Network site at
http://www.oracle.com/technology/tech/oci/
For complete information about Oracle Database OCCI and related information, see
the OCCI Oracle Technology Network site at
http://www.oracle.com/technology/tech/oci/occi/
Oracle Java Database Connectivity
Oracle Java Database Connectivity (JDBC) is an API that enables Java to send SQL
statements to an object-relational database, such as Oracle Database. Oracle Database
JDBC provides complete support for the JDBC 3.0 and JDBC RowSet (JSR-114)
standards, advanced connection caching for both XA and non-XA connections,
exposure of SQL and PL/SQL data types to Java, and fast SQL data access.
Like OCI and OCCI, JDBC is part of the Oracle Instant Client installation, which is
available from the Instant Client Oracle Technology Network site at
http://www.oracle.com/technology/tech/oci/instantclient/
For more information about JDBC APIs, see the Sun Developer Network site at
http://java.sun.com/javase/technologies/database/
For complete information about Oracle Database JDBC APIs, drivers, support and
de-support notices, and similar information, see the Oracle Technology Network site at

Overview of Other Development Environments
1-12 Oracle Database 2 Day Developer's Guide
http://www.oracle.com/technology/tech/java/sqlj_jdbc/
For an introduction on how to use Java to access and modify data in Oracle Database,
see Oracle Database 2 Day + Java Developer's Guide.
Open Database Connectivity
Open Database Connectivity (ODBC) is a set of database access APIs that connect to
the database, prepare, and then run SQL statements on Oracle Database. An
application that uses an ODBC driver can access non-uniform data sources, such as
spreadsheets and comma-delimited files.
The Oracle ODBC driver conforms to ODBC 3.51 specifications. It supports all core
APIs and a subset of Level1 and Level 2 functions. Microsoft supplies the Driver
manager component for the Windows platform. The Oracle Database driver for UNIX
platforms is available on the ODBC Oracle Technology Network site at
http://www.oracle.com/technology/tech/windows/odbc/
For information about unixODBC standards and the latest Driver manager, see the
unixODBC site at
http://www.unixodbc.org/
For information about using the Oracle ODBC driver with Windows, see Oracle
Services for Microsoft Transaction Server Developer's Guide.
For information about how to use the Oracle ODBC driver on Linux, see Oracle
Database Administrator's Reference for Linux and UNIX.
Like OCI, OCCI, and JDBC, ODBC is part of the Oracle Instant Client installation,
which is available from the Instant Client Oracle Technology Network site at
http://www.oracle.com/technology/tech/oci/instantclient/

Querying and Manipulating Data 2-1
2
Querying and Manipulating Data
This section shows how to explore the database, retrieve information from it, change
the information in existing tables, and control transaction processing.
This chapter contains the following sections:
■Exploring Database Objects on page 2-1
■Retrieving Data with Queries on page 2-6
■Adding, Changing, and Deleting Data on page 2-27
■Controlling Transactions on page 2-30
Exploring Database Objects
In addition to tables, Oracle Database has many other database objects types. While
some objects have many extensive management options, most of them have similar
properties. For example, every object in a database belongs to only one schema, and
has a unique name with that schema. For that reason, Oracle recommends that your
object naming conventions and practices support clear identification of new objects
and object types with appropriate schemas. All objects that you will use here belong to
the same hr schema. Generally, applications work with objects in the same schema.
When you create your own objects, remember that object names cannot exceed 30
characters, and must start with a letter.
■Looking at Schema Object Types on page 2-1
■Exploring Tables and Viewing Data on page 2-3
Looking at Schema Object Types
In this section, you will further familiarize yourself with the hr sample schema and its
attributes, or database objects. You will learn how you can view these objects by
browsing with the Oracle SQL Developer.
Start by examining some of the types of objects that each schema has.
To browse the HR schema:
1. Start Oracle SQL Developer.
2. In the SQL Developer navigation hierarchy, under the Connections tab, click the
'plus' sign next to hr_conn.
3. In the Connection Information dialog, authenticate the connection to the hr
schema by providing the password. Click OK.
Exploring Database Objects
2-2 Oracle Database 2 Day Developer's Guide
4. In Connections navigation hierarchy, click the 'plus' sign next to hr_conn to
expand the view on the hr schema database objects.
The schema contains many objects, including tables, views, indexes, packages,
procedures, functions, triggers, types, sequences, and so on. Briefly, here is a definition
of each type of database object that you are likely to use:
■Tables are basic units of data storage in an Oracle Database, and hold all
user-accessible data.
■Views are customized presentations of data from one or more tables, or even other
views.

Exploring Database Objects
Querying and Manipulating Data 2-3
■Indexes are optional structures that are created to increase the performance of data
retrieval on a table.
■Functions are PL/SQL programming objects that can be stored and executed in the
database. Functions return a value.
■Procedures are PL/SQL programming objects that can be stored and executed in
the database. Procedures do not return a value.
■Packages contains procedures or functions that can be stored and executed in the
database.
■Triggers are stored procedures or functions that are associated with a table, view,
or event. Triggers can be called before or after an event for follow-up action, to
prevent erroneous operations, to modify new data so that it conforms to explicit
business rules, or to log a record of an operation or an event.
■Types associate a fixed set of properties with the values that can be used in a
column of a table, or in an argument of a procedure or function. Oracle Database
treats values of one data type differently from values of another data type.
■Sequences are used to generate unique integers; you can use them to automatically
generate primary key values.
Exploring Tables and Viewing Data
In this section, you will learn how to find out about the properties of database tables,
and how to view the data these tables contain.
An Oracle Database table is its basic data container. All data that a user can access is
inside one of the tables of the database schema. Each table is two-dimensional object
that has rows, which are individual records, and columns, which represent the various
fields of each record.
To view a table:
1. In Connections navigation hierarchy, click the 'plus' sign next to Tables to expand
the list of tables in the hr schema.
The expanded list of tables includes the tables countries, departments,
employees, job_history, jobs, locations, and regions.

Exploring Database Objects
2-4 Oracle Database 2 Day Developer's Guide
2. Click the employees table.
On the right-hand side of the Oracle SQL Developer window, under the Columns
tab, a listing of all columns of this table appears: EMPLOYEE_ID, FIRST_NAME,
LAST_NAME, EMAIL, PHONE_NUMBER, HIRE_DATE, JOB_ID, SALARY,
COMMISSION_PCT, MANAGER_ID, and DEPARTMENT_ID. Each column of a table
has an associated data type that defines it as character data, an integer, a
floating-point number, a date, or time information. To see all properties of the
column, move the horizontal scroll bar to the right.

Exploring Database Objects
Querying and Manipulating Data 2-5
3. Click the Constraints tab.
You will see all the constraints that are used on this table including the type of
constraint, the constraint's referenced table, whether the constraint is enabled, and
other properties.
4. Similarly, you can explore the various table properties by clicking on the
appropriate tabs:
■Grants describes the privileges for the table
Retrieving Data with Queries
2-6 Oracle Database 2 Day Developer's Guide
■Statistics describes the properties of the data in the table, such as number of
records, the number of blocks in memory used by the table, average row
length, and so on.
■Column Statistics lists the number of distinct entries for each column, the low
and high values, and so on.
■Trigg e r s lists the triggers associated with the table together with the type of
trigger, the triggering event, and so on.
■Dependencies lists all the objects that are dependent on this table, such as
triggers and views.
■Details lists other details of the table, such as creation date, owner (hr), name,
partitioning information, and so on.
■Indexes lists the indexes that are defined on the table columns, together with
their status, type, and so on.
■SQL summarizes the preceding information in the definition of the table
employees; it includes column definition, indexes, and so on.
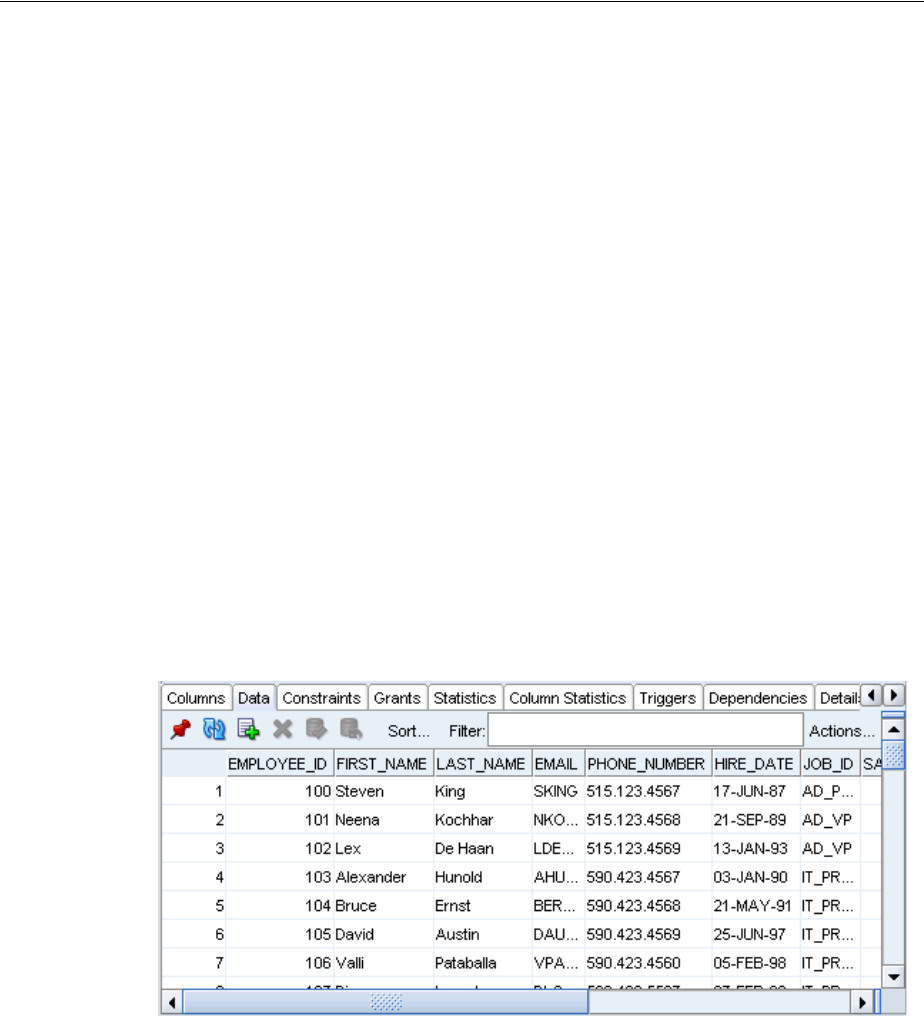
To view data in a table:
On the right-hand side of the Oracle SQL Developer window, click the Data tab.
You will see a listing of all records of this table. Each column of a table has an
associated data type that defines it as character data, an integer, a floating-point
number, a date, or time information. To see all properties of the column, move the
horizontal scroll bar to the right.
Retrieving Data with Queries
A query is an operation that retrieves data from one or more tables or views. A
top-level SELECT statement returns results of a query, and a query nested within
another SQL statement is called a subquery.
This section introduces some types of queries and subqueries.
See Also:
■Oracle Database SQL Language Reference
Retrieving Data with Queries
Querying and Manipulating Data 2-7
Selecting Data from a Table
A simple query form looks like this:
SELECT select_list FROM source_list
Here, select_list specifies the columns from which the data is retrieved, and the
source_list specifies the tables or views where these columns are found. The
number of columns, as well as the data type and length of each column, is determined
by the elements of the select list. Note also that the select list can use SQL functions.
To see all columns in a table, use * for select_list.
Example 2–1uses the SELECT statement to return the information you previously saw
by viewing the employees table in the Data window.
Example 2–1 Selecting All Columns in a Table
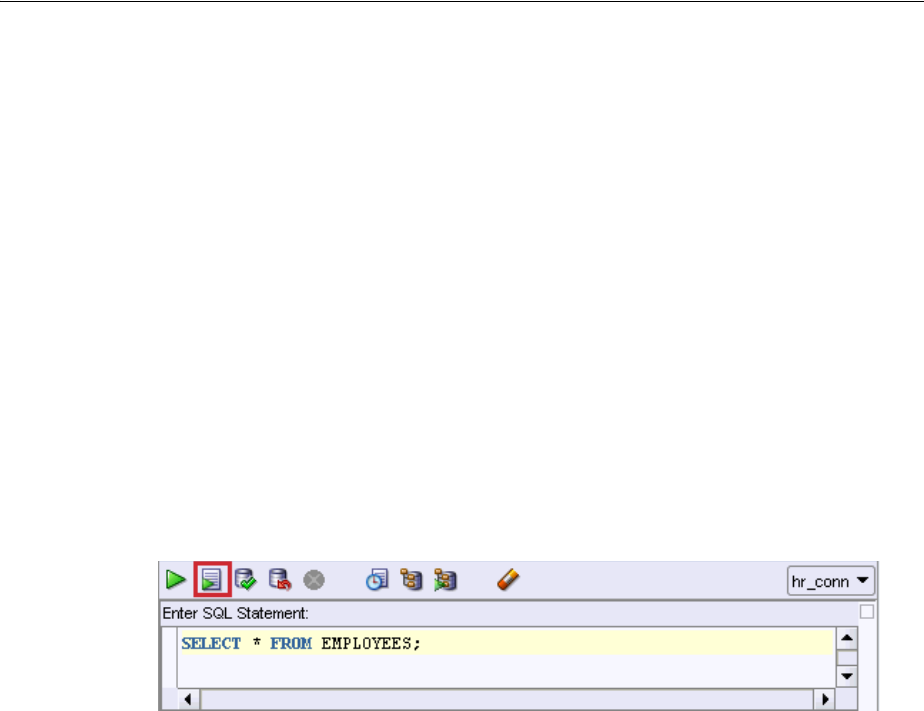
1. In the SQL Worksheet pane, enter:
SELECT * FROM employees;
2. Above the SQL Worksheet pane, click the Run Script icon. Alternatively, you can
use the F5 shortcut key.
3. Click the Script Output tab, below the SQL Worksheet pane, to see the results of
the query.
EMPLOYEE_ID FIRST_NAME LAST_NAME ...
---------------------- -------------------- ------------------------- ...
100 Steven King ...
101 Neena Kochhar ...
102 Lex De Haan ...
...
107 rows selected
Between running different queries, you can clear both the SQL Worksheet and Script
Output panes by clicking the Eraser icon in the toolbar.
Example 2–2 shows how to use the SELECT statement to return only the columns you
requested in your query, namely first_name, last_name, and hire_date.
Example 2–2 Selecting Specific Columns from a Table
SELECT first_name, last_name, hire_date FROM employees;
These are the results of the query.
FIRST_NAME LAST_NAME HIRE_DATE
---------------------- ------------------- -------------------------
Steven King 17-JUN-87
Neena Kochhar 21-SEP-89
Lex De Haan 13-JAN-93
...
107 rows selected

Retrieving Data with Queries
2-8 Oracle Database 2 Day Developer's Guide
Using Column Aliases
To display a column with a new heading, you can rename a column within your report
by using an alias immediately after the correct name of the column. This alias
effectively renames the item for the duration of the query.
In Example 2–3, the SELECT statement returns the columns you request in your query,
but with the column headings that you specified as aliases: name1, name2, and
hired.
Example 2–3 Using a Simple Column Alias
SELECT first_name name1, last_name name2, hire_date hired FROM employees;
The results of the query follow:
NAME1 NAME2 HIRED
--------------------- -------------------- -------------------------
Steven King 17-JUN-87
Neena Kochhar 21-SEP-89
Lex De Haan 13-JAN-93
...
107 rows selected
If the alias that you want to use contains uppercase and lowercase characters or
spaces, or a combination, you must use double quotation marks (").
Example 2–4 uses a SELECT statement to return the columns with column heading
aliases that you specify: First, Last, and Date Started.
Example 2–4 Using Quoted Alias Columns
SELECT first_name "First", last_name "Last", hire_date "Date Started"
FROM employees;
The results of the query follow.
First Last Date Started
---------------------- -------------------- -------------------------
Steven King 17-JUN-87
Neena Kochhar 21-SEP-89
Lex De Haan 13-JAN-93
...
107 rows selected
Restricting Data to Match Specific Conditions
In addition to the SELECT and FROM keywords, other common clauses are used in
queries. The WHERE clause uses comparison operators to select the rows that should be
retrieved, instead of returning all the rows in the tables.
This table lists the comparison operators that can be used in the WHERE clause.
Comparison Operator Definition
=Tests for equality
!=, <> Tests for inequality
>Tests for greater than
>= Tests for greater than or equal

Retrieving Data with Queries
Querying and Manipulating Data 2-9
The WHERE clause can test a single condition at a time, or combine multiple tests using
the AND clause.
Example 2–5 shows how to use the WHERE clause to return the column values that are
restricted to a single department, which has 90 for its department_id.
Example 2–5 Testing for a Single Condition
SELECT first_name "First", last_name "Last"
FROM employees
WHERE department_id=90;
The results of the query appear.
First Last
-------------------- -------------------------
Steven King
Neena Kochhar
Lex De Haan
3 rows selected
Example 2–6 shows how to use the WHERE ... AND clause to return the rows that are
restricted to two separate condition, to match a salary that is greater or equal to
11,000, and an assigned (not null) commission rate.
Example 2–6 Testing Multiple Conditions
SELECT first_name "First", last_name "Last",
SALARY "Salary", COMMISSION_PCT "%"
FROM employees
WHERE salary >=11000 AND commission_pct IS NOT NULL;
The results of the query appear.
First Last Salary %
-------------------- --------------------- -------------------- -----
John Russell 14000 0.4
Karen Partners 13500 0.3
Alberto Errazuriz 12000 0.3
...
6 rows selected
<Tests for less than
<= Tests for less than or equal
BETWEEN a AND bTests for a fit in the range between two values, inclusive
LIKE Tests for a match in a string, using the wildcard symbols (%)
for zero or multiple characters, or underscore (_) for a single
character
IN() Tests for a match in a specified list of values
NOT IN() Tests that there is no match in a specified list of values
IS NULL Tests that the value is null
IS NOT NULL Tests that the value is not null
Comparison Operator Definition

Retrieving Data with Queries
2-10 Oracle Database 2 Day Developer's Guide
Example 2–7 uses the WHERE clause to return the six rows where the last name starts
with Ma: Mallin, Markle, Marlow, Marvins, Matos, and Mavris. If you use a matching
expression '%ma%' instead (the text ma could appear anywhere in the column), your
results would contain only three rows, for Kumar, Urman, and Vollman.
Example 2–7 Testing for a Matching String
SELECT first_name "First", last_name "Last"
FROM employees
WHERE last_name LIKE 'Ma%';
The results of the query appear.
First Last
-------------------- -------------------------
Jason Mallin
Steven Markle
James Marlow
...
6 rows selected
Example 2–8 shows you how to use the WHERE ... IN clause to find employees who
work in several different departments, matching the DEPARTMENT_ID to a list of
values 100, 110, 120. The result will contain eight rows, with four rows matching the
first value in the list, and the other two rows matching the second value in the list;
there are no matches for 120.
Example 2–8 Testing for a Match in a List of Values
SELECT first_name "First", last_name "Last", department_id "Department"
FROM employees
WHERE department_id IN (100, 110, 120);
The results of the query appear.
First Last Department
-------------------- ------------------------- ----------------------
John Chen 100
Daniel Faviet 100
William Gietz 110
...
8 rows selected
If you want to find employees who work in a particular department, but do not know
the corresponding department_id value, you must look in both the employees and
departments tables. Looking at an intersection of two tables is a JOIN operation.
Fully qualified column names, such as employees.employee_id, are optional.
However, when queries use two or more tables that have the same column name, you
must identify these columns with the table. For example, the
employees.department_id and departments.department_id could be used
together to determine the name of a department in which an employee works.
Note that when using fully qualified column names, the query is more readable if you
use an alias for the name of the table, such as d for departments. The column
departments.department_id then becomes d.department_id, and
employees.department_id becomes e.department_id. You must create these
table aliases in the FROM clause of the query.
Example 2–9 shows the result set containing columns from two separate tables.
Because the column names in the report are unique, they did not need to be qualified

Retrieving Data with Queries
Querying and Manipulating Data 2-11
by the table name. However, because the WHERE clause uses the same column name
from two different tables, you must qualify it.
Example 2–9 Testing for a Value in Another Table
SELECT e.first_name "First", e.last_name "Last", d.department_name "Department"
FROM employees e, departments d
WHERE e.department_id = d.department_id;
The results of the query appear.
First Last Department
-------------------- ------------------------- ------------------------------
Jennifer Whalen Administration
Michael Hartstein Marketing
Pat Fay Marketing
...
106 rows selected
Searching for Patterns in Data
Regular expressions allow you to use standard syntax conventions to search for
complex patterns in character sequences. A regular expression defines the search
pattern by using metacharacters that specify search algorithms, and literals that
specify the characters.
Regular expression functions include REGEXP_INSTR, REGEXP_LIKE, REGEXP_
REPLACE, and REGEXP_SUBSTR.
Example 2–10 shows how to find all managers. The metacharacter | indicates an OR
condition, which you must use because the manager position is specified either as '%_
MGR' or '%_MAN', depending on department. The option i specifies that the match
should be case insensitive.
Example 2–10 Finding a Matching Data Pattern
SELECT first_name "First", last_name "Last", job_id "Job"
FROM employees
WHERE REGEXP_LIKE (job_id, '(_m[an|gr])', 'i');
The results of the query appear.
First Last Job
-------------------- ------------------------- ----------
Nancy Greenberg FI_MGR
Den Raphaely PU_MAN
Matthew Weiss ST_MAN
...
14 rows selected
Example 2–11 shows how the REGEXPR_LIKE expression selects rows where the
last_name has a double vowel (two adjacent occurrences of either a, e, i, o, or u).
See Oracle Database SQL Language Reference for information about the REGEXP_LIKE
condition.
Example 2–11 Finding a Matching Data Pattern (Adjacent Characters)
SELECT first_name "First", last_name "Last"
FROM employees
WHERE REGEXP_LIKE (last_name, '([aeiou])\1', 'i');

Retrieving Data with Queries
2-12 Oracle Database 2 Day Developer's Guide
The results of the query appear.
First Last
-------------------- -------------------------
Harrison Bloom
Lex De Haan
Kevin Feeney
...
8 rows selected
To find a data pattern and replace it with another one, use the REGEXPR_REPLACE.
Example 2–12 replaces the phone numbers of the format 'nnn.nnn.nnnn' with the
format '(nnn) nnn-nnnn'. Note that digits are matched with the metacharacter
[:digit], while the metacharacter {n} indicates the number of occurrences. The
metacharacter '.' typically indicates any character in an expression, so the
metacharacter \ is used as an escape character and makes the following character in
the pattern a literal. This result set shows the telephone numbers in the new format.
See Oracle Database SQL Language Reference for information about the REGEXP_
REPLACE condition.
Example 2–12 Replacing a Data Pattern
SELECT first_name "First", last_name "Last",
phone_number "Old Number",
REGEXP_REPLACE(phone_number,
'([[:digit:]]{3})\.([[:digit:]]{3})\.([[:digit:]]{4})',
'(\1) \2-\3') "New Number"
FROM employees
WHERE department_id = 90;
The results of the query appear.
First Last Old Number New Number
-------------------- ---------------------- -------------------- --------------
Steven King 515.123.4567 (515) 123-4567
Neena Kochhar 515.123.4568 (515) 123-4568
Lex De Haan 515.123.4569 (515) 123-4569
3 rows selected
Example 2–13 shows how you can use the REGEXPR_SUBSTR function to find the first
substring that matches a pattern. Note that the metacharacter'+' indicates multiple
occurrences of the pattern. This result set extracts numerals and dashes from the
street_address column. See Oracle Database SQL Language Reference for information
about the REGEXP_SUBSTR expression.
Example 2–13 Returning a Substring
SELECT street_address, REGEXP_SUBSTR(street_address,
'[[:digit:]-]+', 1, 1) "Street Numbers"
FROM locations;
The results of the query appear.
STREET_ADDRESS Street Numbers
---------------------------------------- ----------------------
1297 Via Cola di Rie 1297
93091 Calle della Testa 93091
2017 Shinjuku-ku 2017
...

Retrieving Data with Queries
Querying and Manipulating Data 2-13
23 rows selected
The REGEXPR_INSTR function enables you to find the position of the first substring
that matches a pattern. In Example 2–14, you use REGEXPR_INSTR to find a space
character, ' '. Note that the metacharacter '+' indicates multiple occurrences of the
pattern. This result set shows the position of the first space in each address. See Oracle
Database SQL Language Reference for information about the REGEXP_INSTR expression.
Example 2–14 Returning a Location of a Substring
SELECT street_address, REGEXP_INSTR(street_address, '[ ]+', 1, 1) "Position"
FROM locations;
The results of the query appear.
STREET_ADDRESS Position
---------------------------------------- ----------------------
1297 Via Cola di Rie 5
93091 Calle della Testa 6
2017 Shinjuku-ku 5
...
23 rows selected
The function REGEXPR_COUNT determines the number of times the specified character
pattern repeats in a string. In Example 2–15, REGEXPR_COUNT returns the number of
times the space character occurs in the street_address column of the table
locations. See Oracle Database SQL Language Reference for information about the
REGEXP_COUNT expression.
Example 2–15 Returning the Number of Occurrences of a Substring
SELECT street_address, REGEXP_COUNT(street_address, ' ', 1) "Number of Spaces"
FROM locations;
The results of the query appear.
STREET_ADDRESS Number of Spaces
---------------------------------------- ----------------------
1297 Via Cola di Rie 4
93091 Calle della Testa 3
2017 Shinjuku-ku 1
...
23 rows selected
This result set shows the number of spaces in each address.
Sorting Data
In SQL, the ORDER BY clause is used to identify which columns are used to sort the
resulting data. The sort criteria does not have to be included in the result set, and can
include expressions, column names, arithmetic operations, user-defined functions, and
so on.
Example 2–16 shows an ORDER BY clause that returns the result set sorted in order of
last_name, in ascending order.
See Also:
■Oracle Database SQL Language Reference for syntax of regular
expressions

Retrieving Data with Queries
2-14 Oracle Database 2 Day Developer's Guide
Example 2–16 Use Quoted Alias Columns
SELECT first_name "First", last_name "Last", hire_date "Date Started"
FROM employees
ORDER BY last_name;
The results of the query appear.
First Last Date Started
-------------------- ------------------------- -------------------------
Ellen Abel 11-MAY-96
Sundar Ande 24-MAR-00
Mozhe Atkinson 30-OCT-97
...
107 rows selected
Using Built-In and Aggregate Functions
SQL arithmetic operators and other build-in functions allow you to perform
calculations directly on data stored in the tables.
Using Arithmetic Operators
Oracle Database SQL supports the basic arithmetic operators, such as the plus sign (+)
for addition, the minus sign (-) for subtraction, the asterisk (*) for multiplication, and
the forward slash (/) for division. These are evaluated according to standard
arithmetic rules of evaluation order.
In Example 2–17, the result set show the salary earned by employees who are eligible
for commission earnings, in order of the hire date.
Example 2–17 Evaluating an Arithmetic Expression
SELECT first_name "First", last_name "Last", salary * 12 "Annual Compensation"
FROM employees
WHERE commission_pct IS NOT NULL
ORDER BY hire_date;
The results of the query appear.
First Last Annual Compensation
-------------------- ------------------------- ----------------------
Janette King 120000
Patrick Sully 114000
Ellen Abel 132000
...
35 rows selected
Using Numeric Functions
Oracle Database has many numeric functions for manipulating numeric values, such
as ROUND for rounding to a specified decimal or TRUNC for truncating to a specified
decimal. These functions all return a single value for each row that is evaluated.
Example 2–18 shows how to determine daily pay, rounded off to the nearest cent.
See Also:
■Oracle Database SQL Language Reference for information on all
available SQL functions

Retrieving Data with Queries
Querying and Manipulating Data 2-15
Example 2–18 Rounding off Numeric Data
SELECT first_name "First", last_name "Last",
ROUND(salary/30, 2) "Daily Compensation"
FROM employees;
The results of the query appear.
First Last Daily Compensation
-------------------- ------------------------- ----------------------
Steven King 800
Neena Kochhar 566.67
Lex De Haan 566.67
...
107 rows selected
Example 2–19 shows how to determine daily pay that is truncated at the nearest dollar.
Note that the TRUNC function does not round-up the value.
Example 2–19 Truncating Numeric Data
SELECT first_name "First", last_name "Last",
TRUNC(salary/30, 0) "Daily Compensation"
FROM employees;
The results of the query appear.
First Last Daily Compensation
-------------------- ------------------------- ----------------------
Steven King 800
Neena Kochhar 566
Lex De Haan 566
...
107 rows selected
Using Character Functions
Oracle Database includes an extensive list of character functions for customizing
character values.
These functions can change the case of a character expression to UPPER or LOWER,
remove blanks, concatenate strings, and extract or remove substrings.
Example 2–20 demonstrates how to change the character case of your expression. The
result set shows the results of UPPER, LOWER, and INITCAP functions.
Example 2–20 Changing the Case of Character Data
SELECT UPPER(first_name) "First upper",
LOWER(last_name) "Last lower",
INITCAP(email) "E-Mail"
FROM employees;
The results of the query appear.
First upper Last lower E-Mail
-------------------- ------------------------- -------------------------
STEVEN king Sking
See Also:
■Oracle Database SQL Language Reference for information on numeric
SQL functions

Retrieving Data with Queries
2-16 Oracle Database 2 Day Developer's Guide
NEENA kochhar Nkochhar
LEX de haan Ldehaan
To produce information from two separate columns or expressions in the same column
of the report, you can concatenate the separate results by using the concatenation
operator, ||. Note also that in Example 2–21, you are performing a 4-way join
operation. This result set shows that the simple concatenation function in column
Name listed the last_name value immediately after the first_name value, while the
nested concatenation function in column Location separated the city and
country_name values.
Example 2–21 Concatenating Character Data
SELECT e.first_name || ' ' || e.last_name "Name",
l.city || ', ' || c.country_name "Location"
FROM employees e, departments d, locations l, countries c
WHERE e.department_id=d.department_id AND
d.location_id=l.location_id AND
l.country_id=c.country_id
ORDER BY last_name;
The results of the query appear.
Name Location
----------------------------- --------------------------------------------
Ellen Abel Oxford, United Kingdom
Sundar Ande Oxford, United Kingdom
Mozhe Atkinson South San Francisco, United States of America
...
106 rows selected
You can use RTRIM and LTRIM functions to remove characters (by default, spaces)
from the beginning or the end of character data, respectively. The TRIM function
removes both leading and following characters. In Example 2–22, you use a type
conversion function, TO_CHAR. This result set shows that all employees without a
leading M in their last_name values, the MAN missing from the end of the job_id
values, and the leading 0 is missing from the date_hired values.
Example 2–22 Trimming Character Data
SELECT LTRIM(last_name, 'M') "Last Name",
RTRIM(job_id, 'MAN') "Job",
TO_CHAR(TRIM(LEADING 0 FROM hire_date)) "Hired"
FROM employees
WHERE department_id=50;
The results of the query appear.
Last Name Job Hired
------------------------- ---------- ---------
Weiss ST_ 18-JUL-96
Fripp ST_ 10-APR-97
Kaufling ST_ 1-MAY-95
Vollman ST_ 10-OCT-97
ourgos ST_ 16-NOV-99
...
ikkilineni ST_CLERK 28-SEP-98
Landry ST_CLERK 14-JAN-99
arkle ST_CLERK 8-MAR-00
...

Retrieving Data with Queries
Querying and Manipulating Data 2-17
arlow ST_CLERK 16-FEB-97
...
allin ST_CLERK 14-JUN-96
...
Philtanker ST_CLERK 6-FEB-00
...
Patel ST_CLERK 6-APR-98
...
atos ST_CLERK 15-MAR-98
Vargas ST_CLERK 9-JUL-98
Taylor SH_CLERK 24-JAN-98
...
Geoni SH_CLERK 3-FEB-00
...
Cabrio SH_CLERK 7-FEB-99
...
Bell SH_CLERK 4-FEB-96
Everett SH_CLERK 3-MAR-97
cCain SH_CLERK 1-JUL-98
...
45 rows selected
You can use RPAD to add characters (by default, spaces) to the end of character data.
The LPAD function adds characters to the beginning of character data.
In Example 2–23, the result set shows a simple histogram of relative salary values.
Example 2–23 Padding Character Data
SELECT first_name || ' ' || last_name "Name",
RPAD(' ', salary/1000, '$') "Salary"
FROM employees;
The results of the query appear.
Name Salary
-------------------------------------- ----------------
Steven King $$$$$$$$$$$$$$$$$$$$$$$
Neena Kochhar $$$$$$$$$$$$$$$$
Lex De Haan $$$$$$$$$$$$$$$$
...
107 rows selected
You can use SUBSTR to extract only a substring of data, specified by the starting
character position and the total number of characters.
In Example 2–24, you use SUBSTR to abbreviate the first_name value to an initial,
and strip the area code from the phone_number value.
Example 2–24 Extracting a Substring of Character Data
SELECT SUBSTR(first_name, 1, 1) || '. ' || last_name "Name",
SUBSTR(phone_number, 5, 8) "Phone"
FROM employees;
The results of the query appear.
Name Phone
---------------------------- --------
S. King 123.4567
N. Kochhar 123.4568
L. De Haan 123.4569

Retrieving Data with Queries
2-18 Oracle Database 2 Day Developer's Guide
...
107 rows selected
This result set shows the first_name values abbreviated to an initial, and the
phone_number values without the leading area code component.
You can use REPLACE, in combination with SUBSTR, to replace a specific substring if
you know its relative location in the character data.
In Example 2–25, you use SUBSTR in the WHERE clause to replace the abbreviation for a
job code.
Example 2–25 Replacing Substring of Character Data
SELECT SUBSTR(first_name, 1, 1) || '. ' || last_name "Name",
REPLACE(job_id, 'SH', 'SHIPPING') "Job"
FROM employees
WHERE SUBSTR(job_id, 1, 2) = 'SH';
The results of the query appear.
Name Job
----------------------- ------------------------
W. Taylor SHIPPING CLERK
J. Fleaur SHIPPING_CLERK
M. Sullivan SHIPPING_CLERK
...
20 rows selected
This result set shows the first_name values abbreviated to an initial, and the job_
id values were replaced.
Using Datetime Functions
Oracle Database has data functions for manipulating and calculating date and time
data, including interval functions.
In Example 2–26, you will determine the duration of employment in a particular job
for those employees who have switched to a different position. Note that the names
are not unique because employees may hold more than two different positions over
time. See Oracle Database SQL Language Reference for information about the MONTHS_
BETWEEN function.
Example 2–26 Determining the Number of Months Between Dates
SELECT e.first_name || ' ' || e.last_name "Name",
TRUNC(MONTHS_BETWEEN(j.end_date, j.start_date)) "Months Worked"
FROM employees e, job_history j
WHERE e.employee_id = j.employee_id
ORDER BY "Months Worked";
The results of the query appear.
Name Months Worked
---------------------------------------------- -------------
Jonathon Taylor 9
Payam Kaufling 11
See Also:
■Oracle Database SQL Language Reference for information on
character SQL functions

Retrieving Data with Queries
Querying and Manipulating Data 2-19
Jonathon Taylor 11
...
10 rows selected
You will notice that this result shows that of the employees who left the company, the
shortest and the longest stays were 9 and 69 months, respectively.
In Example 2–27, you will use the EXTRACT function to determine if employees are in
their sixth calendar year of continuous employment. The EXTRACT function can also
be used in combination with MONTH, DATE, and so on.
Note that the SYSDATE function gives the current date of the system clock. See Oracle
Database SQL Language Reference for information about the SYSDATE function.
Example 2–27 Determining the Years Between Dates
SELECT first_name || ' ' || last_name "Name",
(EXTRACT(YEAR from SYSDATE) - EXTRACT(YEAR FROM hire_date)) "Years Employed"
FROM employees;
The results of the query appear.
Name Years Employed
---------------------------------------------- --------------
Steven King 20
Neena Kochhar 18
Lex De Haan 14
...
107 rows selected
You will notice that this result shows that employee 'Steven King' has worked for the
company the longest, 20 years.
In Example 2–28, you will use the last_day function to determine the last day of the
month in which an employee was hired.
Example 2–28 Getting the Last Day of the Month for a Specified date
SELECT first_name || ' ' || last_name "Name", hire_date "Date Started",
LAST_DAY(hire_date) "End of Month"
FROM employees;
The results of the query appear.
Name Date Started End of Month
------------------------------ ------------------ -------------------------
Steven King 17-JUN-87 30-JUN-87
Neena Kochhar 21-SEP-89 30-SEP-89
Lex De Haan 13-JAN-93 31-JAN-93
...
107 rows selected
You will notice that this result shows the correct end of the month for each hire_
date value.
In Example 2–29, you will use the ADD_MONTHS function to add 6 months to the date
on which an employee was hired. See Oracle Database SQL Language Reference for
information about the ADD_MONTH function.
Example 2–29 Adding Months to a Date
SELECT first_name || ' ' || last_name "Name", hire_date "Date Started",

Retrieving Data with Queries
2-20 Oracle Database 2 Day Developer's Guide
ADD_MONTHS(hire_date, 6) "New Date"
FROM employees;
The results of the query appear.
Name Date Started New Date
------------------------ ------------------------- -------------------------
Steven King 17-JUN-87 17-DEC-87
Neena Kochhar 21-SEP-89 21-MAR-90
Lex De Haan 13-JAN-93 13-JUL-93
...
107 rows selected
In Example 2–30, you will use the SYSTIMESTAMP function determine the current
system time and date. SYSTIMESTAMP is similar to SYSDATE, but also contains time of
day information, including the time zone and fractional seconds. See Oracle Database
SQL Language Reference for information about the SYSTIMESTAMP function.
Note that instead of an hr schema table, you are using the table DUAL, a small table in
the data dictionary that you can reference to guarantee a known result. See Oracle
Database Concepts for information about the DUAL table and Oracle Database SQL
Language Reference for information about selecting from the DUAL table.
Example 2–30 Getting the System Date and Time
SELECT EXTRACT(HOUR FROM SYSTIMESTAMP) || ':' ||
EXTRACT(MINUTE FROM SYSTIMESTAMP) || ':' ||
ROUND(EXTRACT(SECOND FROM SYSTIMESTAMP), 0) || ', ' ||
EXTRACT(MONTH FROM SYSTIMESTAMP) || '/' ||
EXTRACT(DAY FROM SYSTIMESTAMP) || '/' ||
EXTRACT(YEAR FROM SYSTIMESTAMP) "System Time and Date"
FROM DUAL;
The results of the query appear.
System Time and Date
------------------------------------------------------------
18:25:56, 4/5/2007
Your result would change, depending on the current SYSTIMESTAMP value.
Using Data Type Conversion Functions
Oracle Database has data functions for converting between different data types. This is
particularly useful when you need to display data of different data types in the same
column.
There are three general types of conversion functions: for characters (TO_CHAR), for
numbers (TO_NUMBER), for dates (TO_DATE) and for timestamps (TO_TIMESTAMP).
You will use the TO_CHAR function to convert a date into a desired format.
Example 2–31 converts the HIRE_DATE values to a 'FMMonth DD YYYY' format; note
that the FM option removes all leading or trailing blanks from the month name. Other
options you could use include 'DD-MON-YYYY AD', 'MM-DD-YYYY HH24:MI:SS', and
so on.
See Also:
■Oracle Database SQL Language Reference for datetime functions

Retrieving Data with Queries
Querying and Manipulating Data 2-21
Example 2–31 Using TO_CHAR to Convert a Date Using a Format Template
SELECT first_name || ' ' || last_name "Name",
TO_CHAR(hire_date, 'FMMonth DD YYYY') "Date Started"
FROM employees;
The results of the query appear.
Name Date Started
---------------------------------------------- -----------------
Steven King June 17 1987
Neena Kochhar September 21 1989
Lex De Haan January 13 1993
...
107 rows selected
Your result set lists all the hire_date values in the new format.
Example 2–32 shows how you can use two standard format tags, Short Date (DS) and
Long Date (DL), to format your date.
Example 2–32 Using TO_CHAR to Convert a Date Using a Standard Format
SELECT first_name || ' ' || last_name "Name",
TO_CHAR(hire_date, 'DS') "Short Date",
TO_CHAR(hire_date, 'DL') "Long Date"
FROM employees;
The results of the query appear.
Name Short Date Long Date
--------------------------- ---------- -------------------------
Steven King 6/17/1987 Wednesday, June 17, 1987
Neera Kochhar 9/21/19889 Thursday, September 21, 1989
Lex De Haen 1/13/1993 Wednesday, January 13, 1993
...
107 rows selected
You can use the TO_CHAR function to convert a number to a desired currency format.
Example 2–33 will convert the salary values to a '$99,999.99' format. See Oracle
Database SQL Language Reference for TO_CHAR.
Example 2–33 Using TO_CHAR to Convert a Number to a Currency Template
SELECT first_name || ' ' || last_name "Name",
TO_CHAR(salary, '$99,999.99') "Salary"
FROM employees;
The results of the query appear.
Name Salary
---------------------------------------------- -----------
Steven King $24,000.00
Neena Kochhar $17,000.00
Lex De Haan $17,000.00
...
107 rows selected
Example 2–34 shows how you can use the TO_NUMBER function to convert a character
into a number that you can subsequently use in calculations. See Oracle Database SQL
Language Reference for TO_NUMBER.

Retrieving Data with Queries
2-22 Oracle Database 2 Day Developer's Guide
Example 2–34 Using TO_NUMBER to Convert a Character to a Number
SELECT first_name || ' ' || last_name "Name",
TO_NUMBER('300') + salary "Proposed Salary"
FROM employees
WHERE SUBSTR(job_id, 4, 5) = 'CLERK';
The results of the query appear.
Name Proposed Salary
---------------------------------------------- ---------------
Alexander Khoo 3400
Shelli Baida 3200
Sigal Tobias 3100
...
45 rows selected
Your result set lists all the proposed salary values for the selected subset of
employees.
You can use the TO_DATE function to convert a character data with a specified format
mode into a date. In Example 2–35, you will use the format model 'Month dd,
YYYY, HH:MI A.M.'; other formats include 'DD-MON-RR', 'FF-Mon-YY
HH24:MI:SI', and so on.
Example 2–35 Using TO_DATE to Convert a Character Data to a Date
SELECT TO_DATE('January 5, 2007, 8:43 A.M.',
'Month dd, YYYY, HH:MI A.M.') "Date"
FROM DUAL;
The results of the query appear.
Date
---------
05-JAN-07
Your result converts the character data, interpreted by the specified format string, into
a DATE type.
Example 2–36 shows how you can use the TO_TIMESTAMP method with format
models such as 'DD-Mon-RR HH24:MI:SS.FF'. See Oracle Database SQL Language
Reference for TO_DATE.
Example 2–36 Using TO_TIMESTAMP to Convert Character Data to a Timestamp
SELECT TO_TIMESTAMP('May 5, 2007, 8:43 A.M.',
'Month dd, YYYY, HH:MI A.M.') "Timestamp"
FROM DUAL;
The results of the query appear.
Timestamp
---------------------------------------------
05-MAY-07 08.43.00.000000000 AM
Your result converts the character data, interpreted by the specified format string, into
a TIMESTAMP type.

Retrieving Data with Queries
Querying and Manipulating Data 2-23
Using Aggregate Functions
Aggregate functions operate on groups of rows, or an entire table or view. By their
nature, these functions provide statistical results for sets, and include average (AVG),
count (COUNT), maximum (MAX), minimum (MIN), standard deviation (STDEV), sum
(SUM), and so on.
Aggregate functions are especially powerful when used it in combination with the
GROUP BY clause, where a query returns a list that is grouped by one or more
columns, with a distinct result for each of the groupings.
You can also use the HAVING clause, which specifies that a query should only return
rows where aggregate values meet the specified conditions.
Example 2–37 shows how you can use the COUNT function and the GROUP BY clause
to determine how many people report to each manager. Note that the wildcard, *, is
used to denote the counting of an entire record.
Example 2–37 Counting the Number of Rows That Satisfy an Expression
SELECT manager_id "Manager",
COUNT(*) "Number of Reports"
FROM employees
GROUP BY manager_id;
The results of the query appear.
Manager Number of Reports
--------- -----------------
1
100 14
123 8
...
19 rows selected
Your result shows how many people report to each manager. Note that one person
does not report to anyone; if you examine the data, you will see that Steven King does
not have a supervisor.
Example 2–38 shows how you can also use the COUNT function with a DISTINCT
option to determine how many distinct values and are in a data set. Here, you will
count the number of departments that have employees.
Example 2–38 Counting a Number of Distinct Values in a Set
SELECT COUNT(DISTINCT department_id) "Number of Departments"
FROM employees;
The results of the query appear.
Number of Departments
---------------------
11
Your result shows that 11 departments have employees. If you look at the
departments table, you will note that it lists 27 departments.
See Also:
■Oracle Database SQL Language Reference for data type conversion
functions

Retrieving Data with Queries
2-24 Oracle Database 2 Day Developer's Guide
You can use basic statistical functions, such as MIN, MAX, MEDIAN, AVG, and so on, to
determine the range of salaries across the set. In Example 2–39, you will examine
salaries grouped by job_id, but a similar query could be used to examine salaries
across departments, locations, and so on.
Example 2–39 Determining Statistical Information
SELECT job_id "Job", COUNT(*) "#", MIN(salary) "Minimum",
ROUND(AVG(salary), 0) "Average",
MEDIAN(salary) "Median", MAX(salary) "Maximum",
ROUND(STDDEV(salary)) "Std Dev"
FROM employees
GROUP BY job_id
ORDER BY job_id;
The results of the query appear.
Job # Minimum Average Median Maximum Std Dev
---------- ---------- ---------- ---------- ---------- ---------- ----------
AC_ACCOUNT 1 8300 8300 8300 8300 0
AC_MGR 1 12000 12000 12000 12000 0
AD_ASST 1 4400 4400 4400 4400 0
AD_PRES 1 24000 24000 24000 24000 0
AD_VP 2 17000 17000 17000 17000 0
FI_ACCOUNT 5 6900 7920 7800 9000 766
FI_MGR 1 12000 12000 12000 12000 0
HR_REP 1 6500 6500 6500 6500 0
IT_PROG 5 4200 5760 4800 9000 1926
MK_MAN 1 13000 13000 13000 13000 0
MK_REP 1 6000 6000 6000 6000 0
...
19 rows selected
Your result shows the statistics for 19 different jobs.
If you use the HAVING clause, you can limit your result set to only the kind of values
that interest you. In Example 2–40, you see the salary budget for departments where
the sum of salaries exceeds $1,000,000 annually.
Example 2–40 Limiting the Results Using the HAVING Clause
SELECT Department_id "Department", SUM(salary*12) "All Salaries"
FROM employees
HAVING SUM(salary * 12) >= 1000000
GROUP BY department_id;
The results of the query appear.
Department All Salaries
---------- ------------
50 1876800
80 3654000
Your result shows that only two departments have salary budgets in excess of
$1,000,000.
You can use the RANK function to determine the relative ordered rank of a number, and
use the PERCENT_RANK function to determine the percentile position. In
Example 2–41, you determine these values for a salary of $3,000 over the subset of all
employees who have a 'CLERK' designation in the job_id.

Retrieving Data with Queries
Querying and Manipulating Data 2-25
You can also examine groups using the WITHIN GROUP function.
Example 2–41 Determining RANK and PERCENT_RANK
SELECT RANK(3000) WITHIN GROUP (ORDER BY salary DESC) "Rank",
ROUND(100 * (PERCENT_RANK(3000)
WITHIN GROUP (ORDER BY salary DESC)), 0) "Percentile"
FROM employees
WHERE job_id LIKE '%CLERK';
The results of the query appear.
Rank Percentile
---------- ----------
20 42
Your result shows that a salary of $3,000 is the 20th highest, and that it is in the 42nd
percentile among all employees who have a 'CLERK' designation.
The DENSE_RANK function works much like the RANK function, but the identical
values receive the same rank, and there are no gaps in the ranking. In Example 2–42,
you will determine the DENSE_RANK of $3,000 over the subset of all employees who
have a 'CLERK' designation in the job_id.
Example 2–42 Determining DENSE_RANK:
SELECT DENSE_RANK(3000) WITHIN GROUP (ORDER BY salary DESC) "Rank"
FROM employees
WHERE job_id LIKE '%CLERK';
The results of the query appear.
Rank
----------
12
Your result shows that a salary of $3,000 is the 12th highest using the DESNE_RANK
function. Contrast it with the 20th rank obtained in the previous example that used the
RANK function.
Using NULL Value Functions
To work with NULL values, Oracle Database supplies two functions. NVL substitutes a
specified value if a NULL is encountered, and NVL2 specifies two possible expressions
that could be evaluated (one if none of its component variables is NULL, and another
one if at least one variable is NULL).
In Example 2–43, you will use the NVL and NVL2 functions to determine what the
whole annual compensation would be for each employee, if they were involved in a
$300,000 sale. Note that the commission rate is a multiplier on sales volume, not on
base salary. Note also that the WHERE clause limits the result set to managers.
Example 2–43 Using the NVL and NVL2 Functions
SELECT first_name || ' ' || last_name "Name",
NVL((commission_pct * 100), 0) "Comm Rate",
NVL2(commission_pct,
See Also:
■Oracle Database SQL Language Reference for aggregate functions

Retrieving Data with Queries
2-26 Oracle Database 2 Day Developer's Guide
ROUND(salary * 12 + commission_pct * 300000, 2),
salary * 12) "With $300K Sales"
FROM employees
WHERE job_id LIKE '%_M%' AND department_id = 80;
The results of the query appear.
Name Comm Rate With $300K Sales
---------------------------------- ---------------------- -----------------
John Russell 40 288000
Karen Partners 30 252000
Alberto Errazuriz 30 234000
Gerald Cambrault 30 222000
Eleni Zlotkey 20 186000
5 rows selected
Your result shows that in the Comm Rate column, the NVL function replaces a NULL
value by 0. In the With $300K Sales column, the NVL2 function generates values
from two different expressions, depending on the value of the COMMISSION_PCT
value.
Using Conditional Functions
Oracle Database provides two functions that can return values based on multiple
condition values.
The CASE function is equivalent to nestled IF ... THEN ... ELSE statements, as it
compares a value, an expression, or a search condition, and returns a result when it
finds a match.
In Example 2–44, you will use the CASE structure to view prospective salary increases
that would be awarded based on the length of service with the company.
Example 2–44 Using the CASE Function
SELECT first_name || ' ' || last_name "Name",
hire_date "Date Started", salary "Current Pay",
CASE
WHEN hire_date < TO_DATE('01-Jan-90') THEN TRUNC(salary*1.15, 0)
WHEN hire_date < TO_DATE('01-Jan-95') THEN TRUNC(salary*1.10, 0)
WHEN hire_date < TO_DATE('01-Jan-00') THEN TRUNC(salary*1.05, 0)
ELSE salary END "Proposed Salary"
FROM employees;
The results of the query appear.
Name Date Started Current Pay Proposed Salary
-------------------------- ---------------- --------------- -------------------
Steven King 17-JUN-87 24000 27600
Neena Kochhar 21-SEP-89 17000 19550
Lex De Haen 13-JAN-93 17000 18700
...
107 rows selected
Your result shows that the values in the Proposed Salary column have been
adjusted based on the values of Date Started.
The DECODE function compares a value or expression to search values, and returns a
result when it finds a match. If a match is not found, then DECODE returns the default
value, or NULL (if a default value is not specified).

Adding, Changing, and Deleting Data
Querying and Manipulating Data 2-27
In Example 2–45, you will use the DECODE function to assign possible salary increases
based on the job_id value.
Example 2–45 Using the DECODE Function
SELECT first_name || ' ' || last_name "Name",
job_id "Job", salary "Current Pay",
DECODE(job_id,
'PU_CLERK', salary * 1.10,
'SH_CLERK', salary * 1.15,
'ST_CLERK', salary * 1.20,
salary) "Proposed Salary"
FROM employees;
The results of the query appear.
Name Job Current Pay Proposed Salary
-------------------------- ---------------- --------------- -------------------
...
Alexander Khoo PU-CLERK 3100 3410
...
Julia Nayer ST_CLERK 3200 3840
...
Winston Taylor SH_CLERK 3200 3680
...
107 rows selected
Your result shows that the values in the 'Proposed Salary' column have been
adjusted based on the job_id value.
Adding, Changing, and Deleting Data
Adding, changing and deleting operations in the database are commonly called Data
Manipulation Language (DML) statements:
■An INSERT statement adds new rows to an existing table.
■An UPDATE statement modifies the values of a set of existing table rows.
■A DELETE statement removes existing rows from a table.
Because these statements change the data in your table, Oracle recommends that you
use transaction management to group all dependent DML statements together.
Inserting Information
When you use the INSERT statement to add a row of data to a table, the data inserted
must be valid for the data type and size of each column of the table.
The general syntax of the INSERT command looks like the following. Note that the list
of values has to be in the same order as the columns of the table.
INSERT INTO table_name VALUES
(list_of_values_for_new_row);
See Also:
■Oracle Database SQL Language Reference for information about the
CASE function
■Oracle Database SQL Language Reference for information about the
DECODE function

Adding, Changing, and Deleting Data
2-28 Oracle Database 2 Day Developer's Guide
In Example 2–46, you will use the INSERT function to add a new row to the
employees table.
Example 2–46 Using the INSERT Statement When All Information Is Available
INSERT INTO employees VALUES
(10, 'George', 'Gordon', 'GGORDON', '650.506.2222',
'01-JAN-07', 'SA_REP', 9000, .1, 148, 80);
The results of the query appear.
1 row created.
Your result shows that the new row has been successfully added to the employees
table.
When all of the information is not available at the time a new record is added to the
database, Example 2–47 shows how you can insert values only into the specified
known columns of the table and then set the remaining columns to NULL.
Note that if the columns that are set to NULL are specified with a NOT NULL constraint,
this would generate an error.
Example 2–47 Using the INSERT Statement When Some Information Is Not Available
INSERT INTO employees VALUES
(20, 'John', 'Keats', 'JKEATS', '650.506.3333',
'01-JAN-07', 'SA_REP', NULL, .1, 148, 80);
The results of the query appear.
1 row created.
Your result shows that the new row has been successfully added to the employees
table.
Updating Information
When you use the UPDATE statement to update data in a row of a table, the new data
must be valid for the data type and size of each column of the table.
The general syntax of the UPDATE command looks like the following. Note that the
columns that are altered must be identified, and the matching conditions must be met.
UPDATE table_name
SET column_name = value;
WHERE condition;
To update information in a row that is missing data, the missing data column should
be specified. In Example 2–48, you will update the salary column for a previously
inserted record.
Example 2–48 Using the UPDATE Statement to Add Missing Data
UPDATE employees
SET salary = 8500
See Also:
■Oracle Database SQL Language Reference for information about
INSERT

Adding, Changing, and Deleting Data
Querying and Manipulating Data 2-29
WHERE last_name = 'Keats';
The results of the query appear.
1 row updated.
Your result shows that the matching row has been updated.
Example 2–49 shows how you can use the UPDATE statement to update multiple rows.
Example 2–49 Using the UPDATE Statement to Change Data
UPDATE employees
SET commission_pct=commission_pct + 0.05
WHERE department_id = 80;
The results of the query appear.
36 rows updated.
Your result shows that the specified rows are updated.
Deleting Information
Using the DELETE statement, you can delete specific rows in a table. If you want to
delete all the rows in the table, the empty table still exists. If you want to remove the
entire table from the database, use the DROP TABLE statement.
Note that if you accidentally delete rows, you can restore the rows with the ROLLBACK
statement.
Example 2–50 shows how you can use the DELETE statement to remove the data you
added previously.
Note the use of the WHERE clause; without it, all the rows are deleted.
Example 2–50 Using the DELETE Statement
DELETE FROM employees
WHERE hire_date = '1-Jan-2007';
The results of the query appear.
2 rows deleted.
Your result shows that the specified rows are deleted.
See Also:
■Oracle Database SQL Language Reference for information about
UPDATE
See Also:
■Oracle Database SQL Language Reference for information about
DELETE statement
■Oracle Database SQL Language Reference for information about
DROP TABLE
■Oracle Database SQL Language Reference for information about
ROLLBACK statement

Controlling Transactions
2-30 Oracle Database 2 Day Developer's Guide
Controlling Transactions
Many applications model business processes that require that several different
operations be performed together, or not at all. For example, if a manager left the
company, a row would be inserted into the job_history table to show when that
person left, and all the employees that report to that manager must be re-assigned
within the employees table. This sequence of operations must be treated as a single
unit, or a transaction.
The following transaction control statements manage the changes made by DML
statements and group them into transactions.
■The COMMIT statement ends the current transaction and makes all changes
performed in the transaction permanent. COMMIT also erases all savepoints in the
transaction, and releases transaction locks.
■The ROLLBACK statement reverses the work done in the current transaction; it
causes all data changes since the last COMMIT or ROLLBACK to be discarded. The
state of the data is then "rolled back" to the state it had prior to the requested
changes.
■The SAVEPOINT statement identifies a point in a transaction to which you can
later roll back.
Oracle recommends that you explicitly end transactions using either a COMMIT or a
ROLLBACK statement. If you do not explicitly commit the transaction and the program
terminates abnormally, then Oracle Database automatically rolls back the last
uncommitted transaction.
Committing Transaction Changes
An explicit COMMIT statement ends your transaction, and makes all the changes in the
database permanent. Until you commit a transaction, you can see all of the changes
made by you to the database, but these changes are not final or visible to other users of
the database instance. Once you commit a transaction, all changes become visible to
other users and their statements that execute after your transaction.
You can undo any changes made prior to an explicit COMMIT by a ROLLBACK
statement.
Example 2–51 shows how to use the COMMIT statement after adding a new row to the
regions table.
Example 2–51 Using the COMMIT Statement
INSERT INTO regions VALUES (5, 'Africa');
COMMIT;
The results of the query and COMMIT statement appear.
Commit complete.
If you manually check the contents of the regions table, you will see that it now has
the new row.
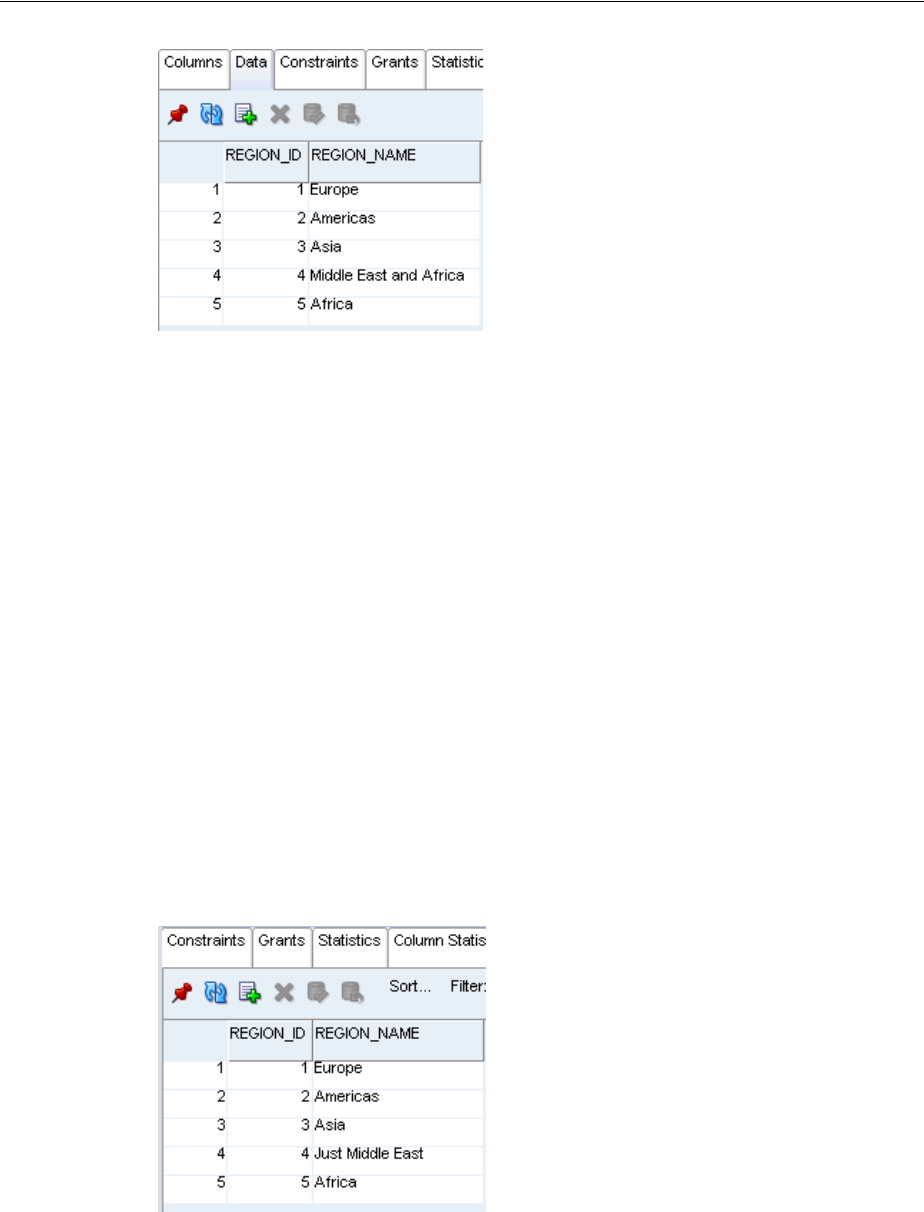
Controlling Transactions
Querying and Manipulating Data 2-31
Rolling Back Transaction Changes
The ROLLBACK statement rolls back all of the transactions you have made since the last
COMMIT statement. If you do not have a preceding COMMIT statement in your
program, it rolls back all operations.
Example 2–52 and Example 2–53 show how to use the ROLLBACK statement to undo
changes to the regions table.
Example 2–52 Changing the REGIONS Table
UPDATE regions
SET region_name = 'Just Middle East'
WHERE region_name = 'Middle East and Africa';
The results of the query appear.
1 row updated.
Manually check the contents of the regions table.
You will see that it now has the updated region_name value.
Example 2–53 Performing a ROLLBACK on the Change to the REGIONS Table
ROLLBACK;
Manually check the contents of the regions table by clicking the Refresh icon. You
will see that the region_name value is changed back to the original value.
See Also:
■Oracle Database SQL Language Reference
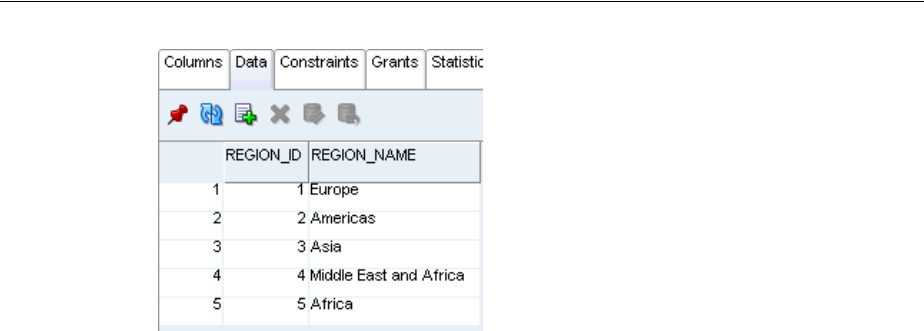
Controlling Transactions
2-32 Oracle Database 2 Day Developer's Guide
Setting Savepoints
You can use the SAVEPOINT statement to identify a point in a transaction to which you
can later roll back. Because you can use as many savepoints as your application
requires, you can implement greater transaction control in your application.
In Example 2–54, you will use the ROLLBACK statement after adding a new row to the
regions table.
Example 2–54 Using the SAVEPOINT Statement
UPDATE regions
SET region_name = 'Middle East'
WHERE region_name = 'Middle East and Africa';
SAVEPOINT reg_rename;
UPDATE countries
SET region_id = 5
WHERE country_id = 'ZM';
SAVEPOINT zambia;
UPDATE countries
SET region_id = 5
WHERE country_id = 'NG';
SAVEPOINT nigeria;
UPDATE countries
SET region_id = 5
WHERE country_id = 'ZW';
SAVEPOINT zimbabwe;
UPDATE countries
SET region_id = 5
WHERE country_id = 'EG';
SAVEPOINT egypt;
ROLLBACK TO SAVEPOINT nigeria;
COMMIT;
The results for each UPDATE and SAVEPOINT statement follow.
1 row updated.
See Also:
■Oracle Database SQL Language Reference

Controlling Transactions
Querying and Manipulating Data 2-33
Savepoint created.
Manually check the contents of the regions table. You may need to click the Refresh
icon. You will see that it now has the updated region_name value.
Next, manually check the contents of the countries table. You may need to click the
Refresh icon. You will see that it now has the updated region_name values for
'Zambia' and 'Nigeria', but not for 'Zimbabwe' and 'Egypt'.

Controlling Transactions
2-34 Oracle Database 2 Day Developer's Guide
You can see that the change in data was reversed by the ROLLBACK to the savepoint
nigeria.
See Also:
■Oracle Database SQL Language Reference

Creating and Using Database Objects 3-1
3
Creating and Using Database Objects
In this chapter, you will create and use the types of database objects that were
discussed in "Querying and Manipulating Data".
Note that the statements CREATE TABLE, ALTER TABLE, DROP TABLE, and so on,
use an implicit commit, and cannot be rolled back.
This chapter contains the following sections:
■Using Data Types on page 3-1
■Creating and Using Tables on page 3-2
■Using Views on page 3-21
■Using Sequences on page 3-25
■Using Synonyms on page 3-28
Using Data Types
Data types associate a set of properties with values so you can use these values in the
database. Depending on the data type, Oracle Database can perform different kinds of
operations on the information in the database. For example, it is possible to calculate a
sum of numeric values but not characters.
Oracle Database supports many kinds of data types, including the most common
VARCHAR2(length), NUMBER(precision, scale), DATE, and also
CHAR(length), CLOB, TIMESTAMP, and others. As you create a table, you must
specify data types for each of its columns and (optionally) indicate the longest value
that can be placed in the column.
Some of the data types and their properties you will use here include the following:
■The VARCHAR2 stores variable-length character literals, and is the most efficient
option for storing character data. When creating a VARCHAR2 column in a table,
you must specify the maximum number of characters in a column, which is a
length between 1 and 4,000. In the employees table, the first_name column
has a VARCHAR(20) data type and the LAST_NAME column has a VARCHAR2(25)
data type.
■An option to the VARCHAR2 data type, NVARCHAR2 stores Unicode variable-length
character literals.
■The CHAR data type stores fixed-length character literals; it uses blanks to pad the
value to the specified string length, which is between 1 and 2,000.
An option to the CHAR2 data type, NCHAR stores Unicode fixed-length character
literals.

Creating and Using Tables
3-2 Oracle Database 2 Day Developer's Guide
■The CLOB data type is a character large object data type that contains single-byte
or multibyte characters. The maximum size of a CLOB is (4 gigabytes - 1) x
(database block size).
■The NUMBER data type stores zero, and integers and real numbers as positive and
negative fixed numbers with absolute values between 1.0 x 10-130 and 1.0 x 10126
using a fixed-point or floating-point format, with decimal-point precision. Oracle
guarantees that NUMBER data types are portable between different operating
systems, and recommends it for most cases where you need to store numeric data.
You can use the precision option to set the maximum number of digits in the
number, and the scale option to define how many of the digits are to the right of
the decimal separator. In the employees table, the salary column is defined as
NUMBER(8,2), providing 6 digits for the primary unit of currency (dollars,
pounds, marks, and so on) and 2 digits for the secondary unit of currency (cents,
pennies, pfennigs, and so on).
■For floating-point numbers, Oracle Database provides the numeric BINARY_
FLOAT and BINARY_DOUBLE data types as enhancements to the basic NUMBER
data type. BINARY_FLOAT (32-bit IEEE 754 format) ranges in absolute value
between 1.17549 x e-38F and 3.40282 x e38Fand BINARY_DOUBLE (64-bit IEEE 754
format) ranges in absolute value between 2.22507485850720 x e-308 and
1.79769313486231 x e308. Both use binary precision that enables faster arithmetic
calculations and often reduces storage requirements.
■The DATE data type stores point-in-time values, dates and times; this includes the
century, year, month, day, hours, minutes, and seconds. The valid date range is
from January 1, 4712 BC to December 31, 9999 AD. Oracle Database supports
many different formats for displaying date and time values. In the employees
table, the hire_date column is defined as a DATE.
■The TIMESTAMP data type stores values that are precise to fractional seconds, and
is therefore useful in applications that must track event order.
■The TIMESTAMP WITH TIME ZONE data type stores time zone information, and
can therefore record date information that must be coordinated across several
geographic regions.
Creating and Using Tables
Tables are the basic unit of data storage in an Oracle database, and hold all
user-accessible data. Tables are two-dimensional objects made up of vertical columns
that represent the fields of the table and horizontal rows that represent the values for
each record in the table.
In this section, you will create all the necessary tables and other schema objects to
implement an employee performance evaluation process for the existing hr schema.
See Also:
■Oracle Database SQL Language Reference
See Also:
■"Exploring Tables and Viewing Data" on page 2-3

Creating and Using Tables
Creating and Using Database Objects 3-3
Creating a Table
To implement the employee evaluation process, you will need to establish three tables,
performance_parts, evaluations, and scores.
■The performance_parts table lists the categories of performance
measurements, and the relative weight for each item.
■The evaluations table will contain the employee's information, evaluation date,
and the job, manager and department at the time of evaluation. You must preserve
this information in this table because at any point in the future, the employee may
change job designation, manager, or department.
■The scores table contains the scores assigned to each performance category for
each evaluation.
To create a table using SQL Developer interface:
You will create the performance_parts table using the SQL Developer graphical
interface.
1. In the Connections navigation hierarchy, click the plus sign (+) next to hr_conn to
expand the list of schema objects.
2. Right-click Ta b les.
3. Select New Table.
4. In the Create Table window, enter the following information:
■For Schema, select HR.
■For Name, enter PERFORMANCE_PARTS.
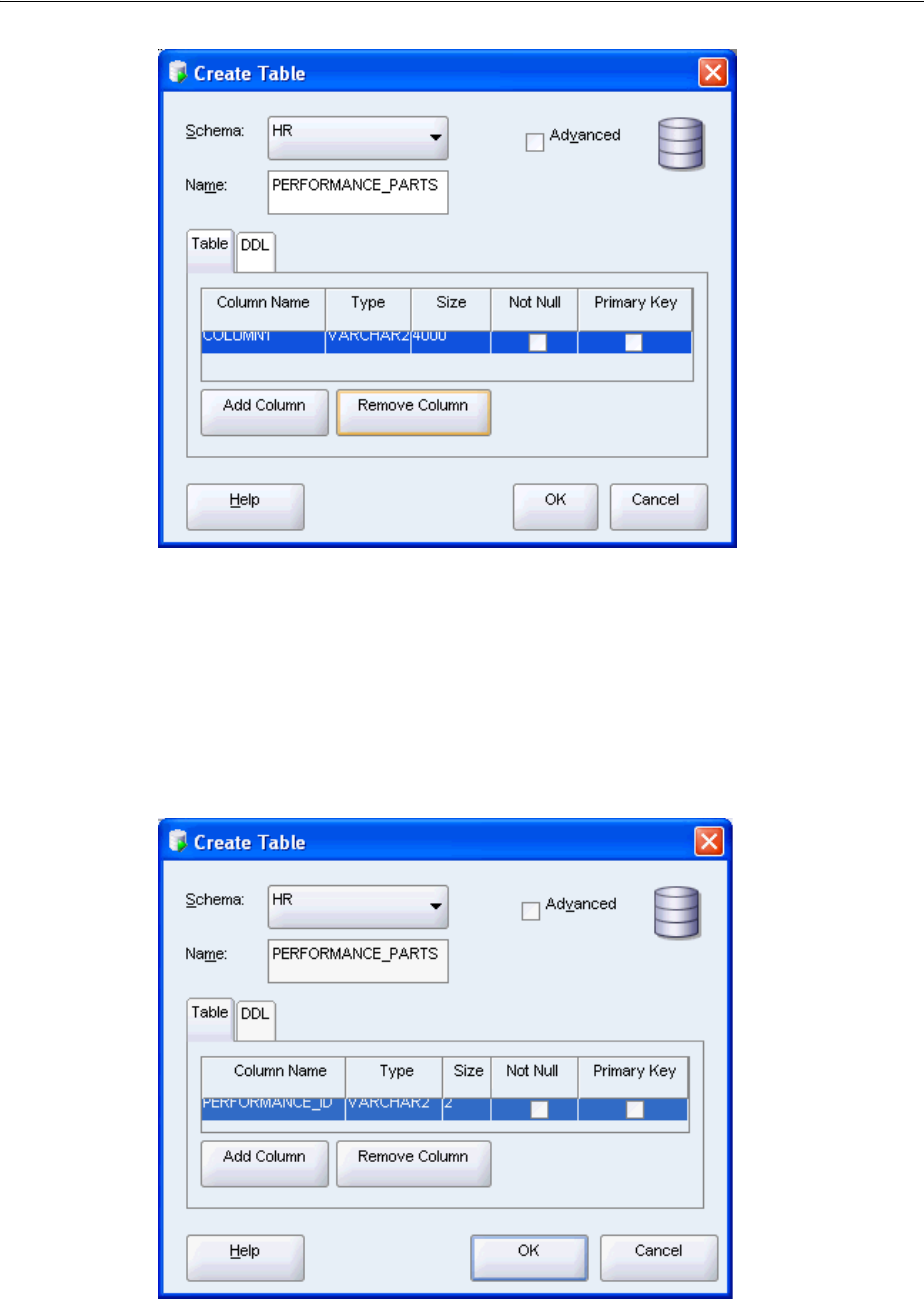
Creating and Using Tables
3-4 Oracle Database 2 Day Developer's Guide
5. Click the default column that was created with the table.
6. Enter the information for the first column in the table as follows:
■For Column Name, enter PERFORMANCE_ID.
■For Type, enter VARCHAR2.
■For Size, enter 2.
Leave the value of Not Null and Primary Key properties. You will come back to
this later, in "Ensuring Data Integrity".
7. Enter information for the second column as follows:

Creating and Using Tables
Creating and Using Database Objects 3-5
Click Add Column.
■For Column Name, enter NAME.
■For Type, enter VARCHAR2.
■For Size, enter 80.
8. Enter information for the third column as follows:
Click Add Column.
■For Column Name, enter WEIGHT.
■For Type, enter NUMBER.
9. Click OK.
SQL Developer generates the new table, performance_parts.
10. In the Connections navigation hierarchy, click the plus sign (+) next to Tables to
expand the list of tables.
performance_parts is a new table in the hr schema, listed between
locations and regions.
You just created a new table, performance_parts. If you click the table, the table
will appear on the right side of the SQL Developer window, showing its new columns.
If you click the SQL tab, you will see the script that created this table.
In Example 3–1, you will create the evaluations table by entering the information
directly in the SQL Worksheet pane.
Example 3–1 Creating a Table in SQL Script
CREATE TABLE evaluations (
evaluation_id NUMBER(8,0),
employee_id NUMBER(6,0),
evaluation_date DATE,
job_id VARCHAR2(10),
manager_id NUMBER(6,0),
department_id NUMBER(4,0),
total_score NUMBER(3,0)
)
The results of the script follow.
CREATE TABLE succeeded.
You created a new table, evaluations. If you click the table, the table will appear on
the right side of the SQL Developer window, showing its new columns. If you click the
SQL tab, you will see the script that created this table. You may need to click the
Refresh icon.
In Example 3–2, you will create another table, scores, by entering the information in
the SQL Worksheet pane.
Example 3–2 Creating the SCORES Table
CREATE TABLE scores (
evaluation_id NUMBER(8,0),
performance_id VARCHAR2(2),
score NUMBER(1,0)
);

Creating and Using Tables
3-6 Oracle Database 2 Day Developer's Guide
The results of the statement follow.
CREATE TABLE succeed.
You created a new table, scores. If you click the table, the table will appear on the
right side of the SQL Developer window, showing its new columns. If you click the
SQL tab, you will see the script that created this table. You may need to click the
Refresh icon.
Ensuring Data Integrity
The data in the table must satisfy the business rules that are modeled in the
application. Many of these rules can be implemented through integrity constraints
that use the SQL language to explicitly state what type of data values are valid for each
column.
When an integrity constraint applies to a table, all data in the table must conform to
the corresponding rule, so when your application includes a SQL statement that
inserts or modifies data in the table, Oracle Database automatically ensures that the
constraint is satisfied. If you attempt to insert, update, or remove a row that violates a
constraint, the system generates an error, and the statement is rolled back. If you
attempt to apply a new constraint to a populated table, the system may generate an
error if any existing row violates the new constraint.
Because Oracle Database checks that all the data in a table obeys an integrity
constraint much faster than an application can, you can enforce the business rules
defined by integrity constraints more reliably than by including this type of checking
in your application logic.
Understanding Types of Data Integrity Constraints
There are five basic types of integrity constraints:
■A NOT NULL constraint ensures that the column contains data (it is not null).
■A unique constraint ensures that multiple rows do not have the same value in the
same column. This type of constraint can also be used on combination of columns,
as a composite unique constraint. This constraint ignores null values.
■A primary key constraint combines NOT NULL and UNIQUE constraints in a single
declaration; it prevents multiple rows from having the same value in the same
column or combination of columns, and prevents null values.
■A foreign key constraint requires that for each value in the column on which the
constraint is defined, there must be a matching value in a specified other table and
column.
■A check constraint ensures that a value satisfies a specified condition. Use check
constraints when you need to enforce integrity rules based on logical expressions,
such as comparisons. Oracle recommends that you never use check constraints
when other types of constraints can provide the necessary checking.
See Also:
■Oracle Database SQL Language Reference for information on the
CREATE TABLE statement
See Also:
■Oracle Database SQL Language Reference for information about
integrity constraints
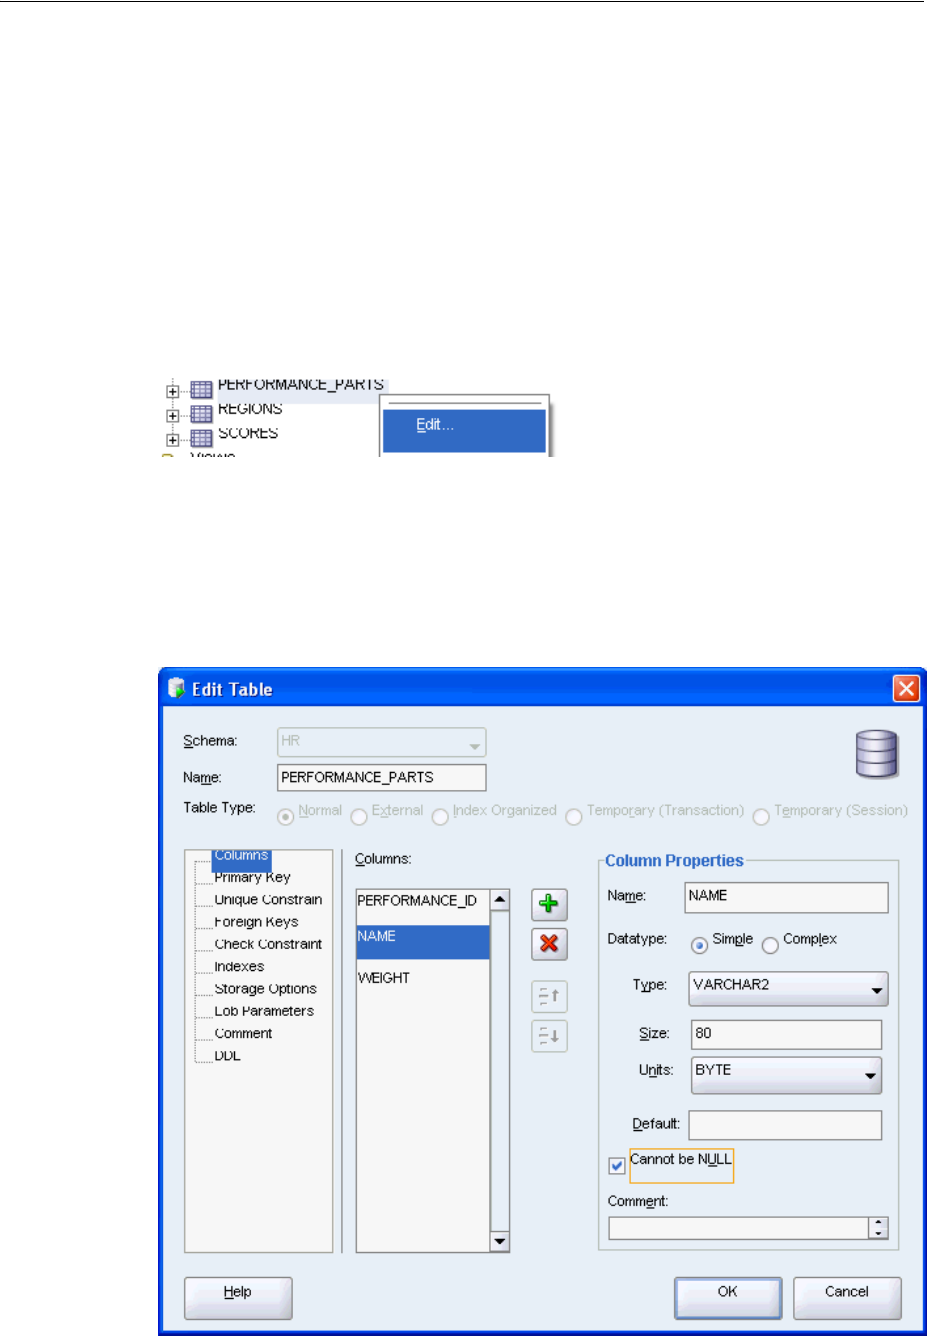
Creating and Using Tables
Creating and Using Database Objects 3-7
Adding Integrity Constraints
You will now add different types of constraints to the tables you created in "Creating a
Table" on page 3-3.
To Add a NOT NULL Constraint Using the SQL Developer Interface:
You will add a NOT NULL constraint to the table using the SQL Developer graphical
interface.
1. In the Connections navigation hierarchy, click the plus sign (+) next to Tables to
expand the list of tables.
2. Right-click the performance_parts table.
3. Select Edit.
4. In the Edit Table window, follow these steps:
■In the Edit Table window, click Columns.
■In the Columns list, select NAME.
■In the Column Properties section, check Cannot be NULL.
Click OK.
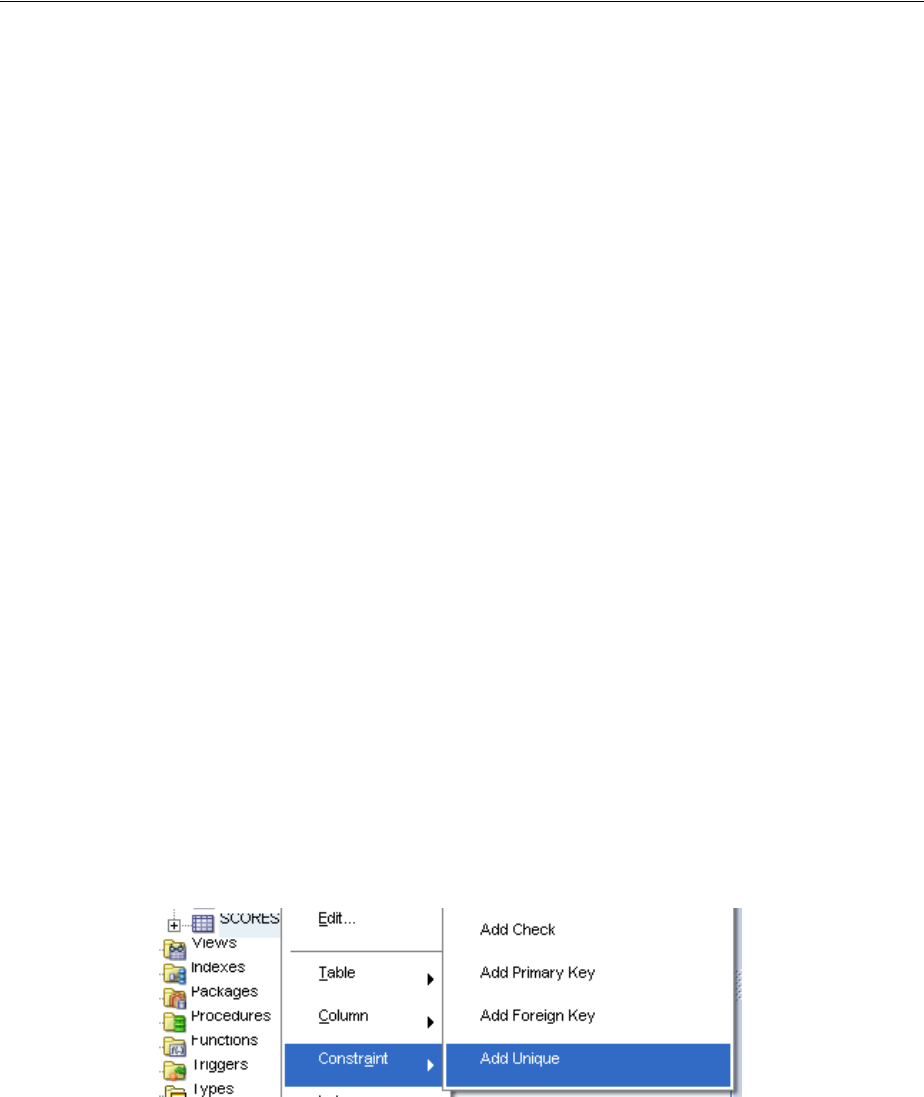
Creating and Using Tables
3-8 Oracle Database 2 Day Developer's Guide
5. In the Confirmation window, click OK.
You have now created a NOT NULL constraint for the name column of the
performance_parts table.
The definition of the name column in the performance_parts table is changed to
the following; note that the constraint is automatically enabled.
"NAME" VARCHAR2(80) NOT NULL ENABLE
Example 3–3 shows how you can add another NOT NULL constraint to the
performance_parts table by entering the required information directly in the SQL
Statement window.
Example 3–3 Adding a NOT NULL Constraint in SQL Script
ALTER TABLE performance_parts
MODIFY weight NOT NULL;
The results of the script follow.
ALTER TABLE performance_parts succeeded.
You just created a NOT NULL constraint for column weight of the performance_
parts table. If you click the SQL tab, you will see that the definition of the weight
column changed. You may need to click the Refresh icon.
"WEIGHT" NUMBER NOT NULL ENABLE
To add a unique constraint using the SQL Developer interface:
You will add a unique constraint to the scores table using the SQL Developer
graphical interface. You could also use the Edit Table window, as in the NOT NULL
constraint, to accomplish this task.
1. In the Connections navigation hierarchy, click the plus sign (+) next to Tables to
expand the list of tables.
2. Right-click the scores table.
3. Select Constraint, and then select Add Unique.
4. In the Add Unique window, enter the following information:
■Set the constraint name to SCORES_EVAL_PERF_UNIQUE.
■Set Column 1 to EVALUATION_ID.
■Set Column 2 to PERFORMANCE _ID.
Click Apply.
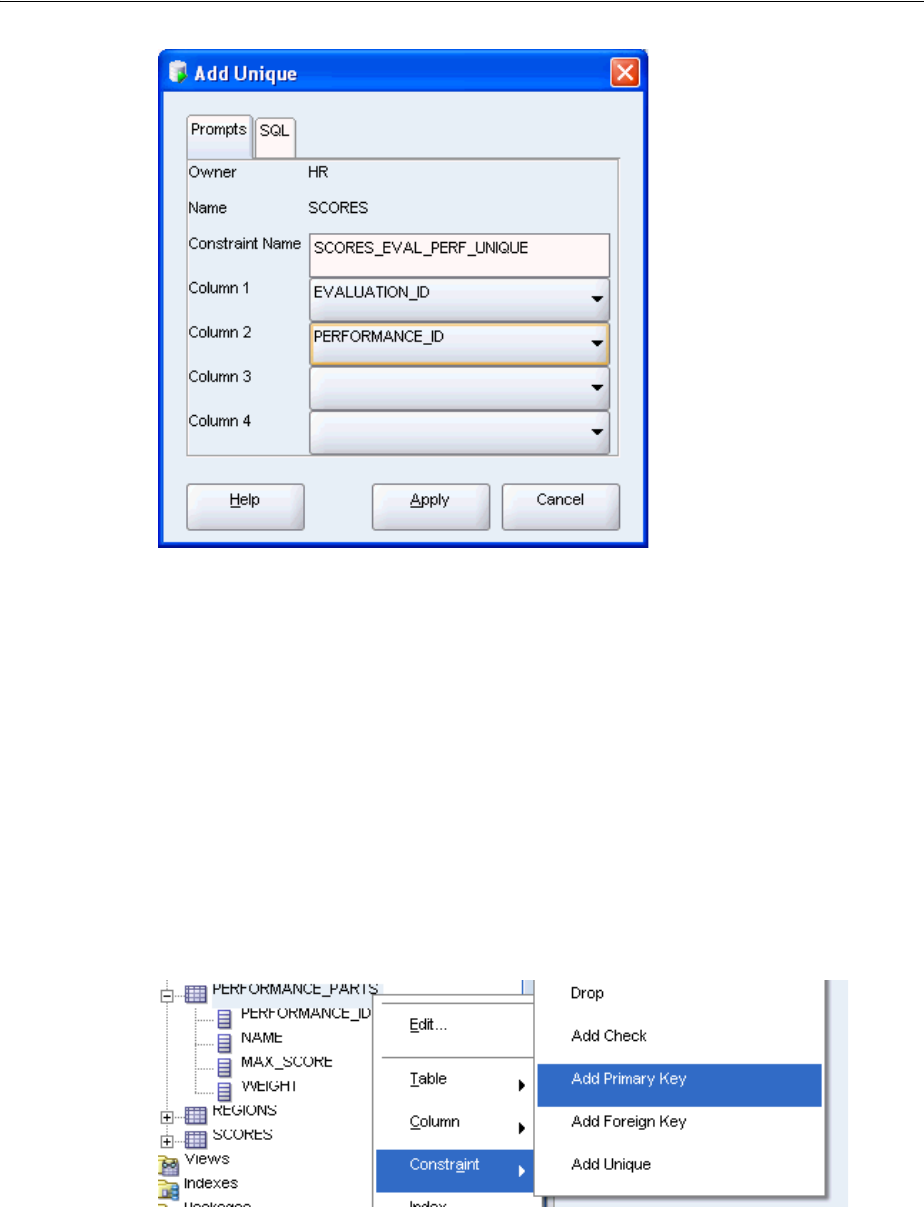
Creating and Using Tables
Creating and Using Database Objects 3-9
5. In the Confirmation window, click OK.
You have now created a unique constraint for the scores table.
The following SQL statement was added to your table definition:
CONSTRAINT "SCORES_EVAL_PERF_UNIQUE" UNIQUE ("EVALUATION_ID", "PERFORMANCE_ID")
To add a primary key constraint using the SQL Developer interface:
You will add a primary key constraint to the performance_parts table using the
SQL Developer graphical interface. You could also use the Edit Table window, as in the
NOT NULL constraint, to accomplish this task.
1. In the Connections navigation hierarchy, click the plus sign (+) next to Tables to
expand the list of tables.
2. Right-click the performance_parts table.
3. Select Constraint, and then select Add Primary Key.
4. In the Add Primary Key window, enter the following information:
■Set the primary key name to PERF_PERF_ID_PK.
■Set Column 1 to PERFORMANCE_ID.
Click Apply.
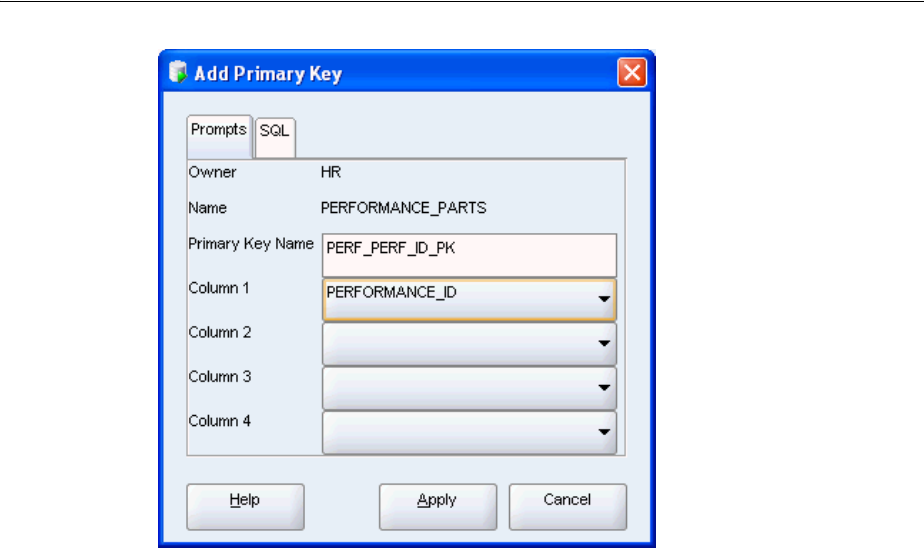
Creating and Using Tables
3-10 Oracle Database 2 Day Developer's Guide
5. In the Confirmation window, click OK.
You have now created a primary key constraint for the performance_parts
table.
The following SQL statement was added to your table definition:
CONSTRAINT "PERF_PERF_ID_PK" PRIMARY KEY ("PERFORMANCE_ID")
In Example 3–4, you will create a primary key constraint on the evaluations table
by entering the required information directly in the SQL Statement window.
Example 3–4 Adding a Primary Key Constraint in SQL Script
ALTER TABLE evaluations
ADD CONSTRAINT eval_eval_id_pk PRIMARY KEY (evaluation_id);
The results of the script follow.
ALTER TABLE evaluations succeeded.
You just created a primary key eval_eval_id_pk on the evaluations table. If you
click the SQL tab, you will see the following SQL statement was added to your table
definition. You may need to click the Refresh icon.
CONSTRAINT "EVAL_EVAL_ID_PK" PRIMARY KEY ("EVALUATION_ID")
To add a foreign key constraint using the SQL Developer interface:
You will add two foreign key constraints to the scores table using the SQL Developer
graphical interface. You could also use the Edit Table window, as in the NOT NULL
constraint, to accomplish this task.
1. In the Connections navigation hierarchy, the plus sign (+) next to Tables to expand
the list of tables.
2. Right-click the scores table.
3. Select Constraint, and then select Add Foreign Key.
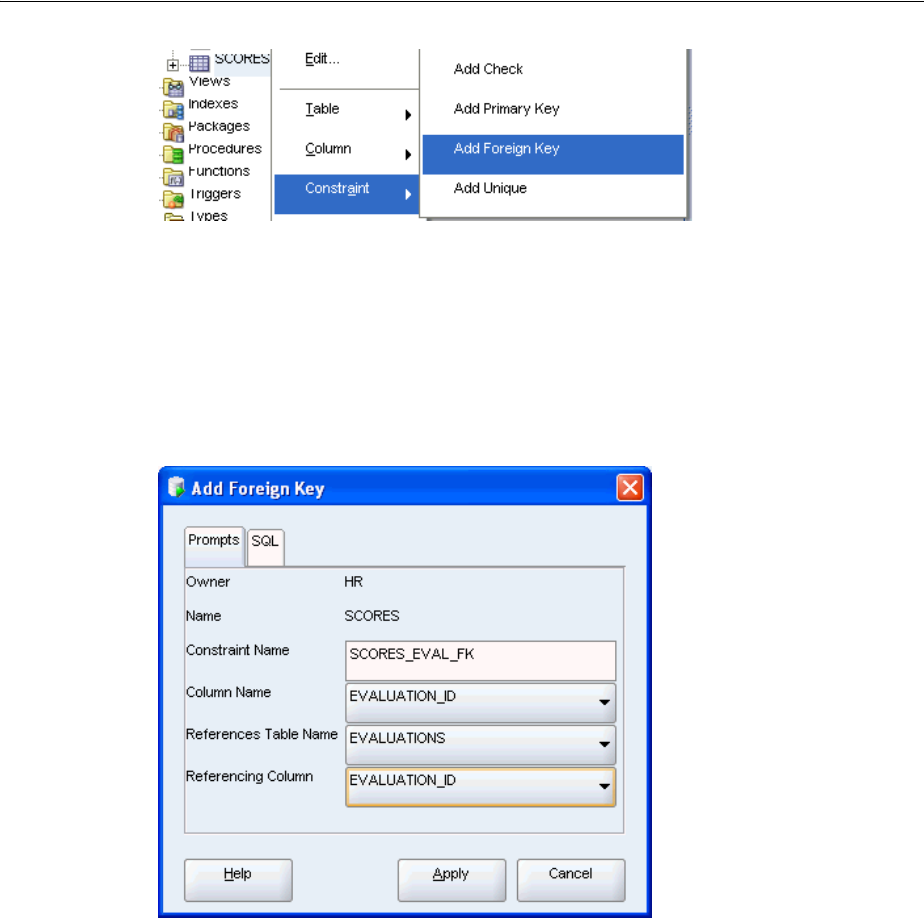
Creating and Using Tables
Creating and Using Database Objects 3-11
4. In the Add Foreign Key window, enter the following information:
■Set the foreign key name to SCORES_EVAL_FK.
■Set Column Name to EVALUATION_ID.
■Set Reference Table Name to EVALUATIONS.
■Set Referencing Column to EVALUATION_ID.
Click Apply.
5. In the Confirmation window, click OK.
You have now created a foreign key constraint on the evalution_id column
from the evaluations table.
6. Add another foreign key constraint by repeating steps 2 through 5, with the
following parameters:
■Set the foreign key name to SCORES_PERF_FK.
■Set Column Name to PERFORMANCE_ID.
■Set Reference Table Name to PERFORMANCE_PARTS.
■Set Referencing Column to PERFORMANCE_ID.
Click Apply.
The following SQL statements were added to your table definition:
CONSTRAINT "SCORES_EVAL_FK" FOREIGN KEY ("EVALUATION_ID")
REFERENCES "HR"."EVALUATIONS" ("EVALUATION_ID") ENABLE
CONSTRAINT "SCORES_PERF_FK" FOREIGN KEY ("PERFORMANCE_ID")
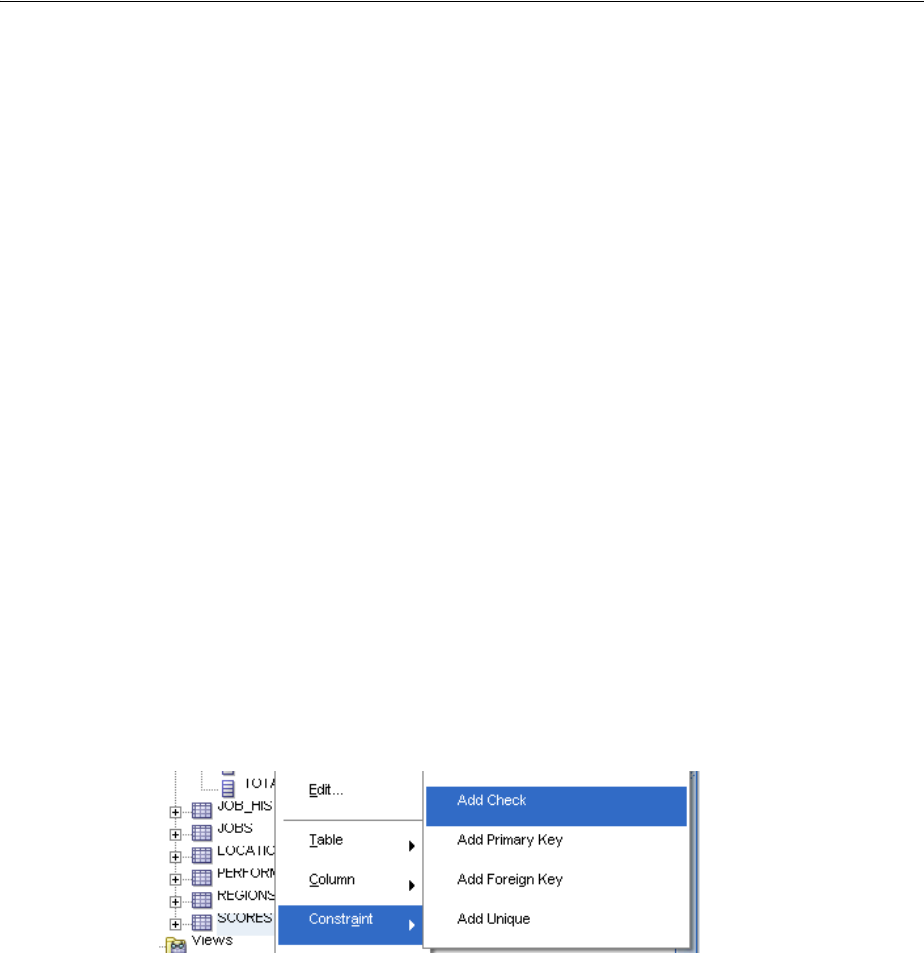
Creating and Using Tables
3-12 Oracle Database 2 Day Developer's Guide
REFERENCES "HR"."PERFORMANCE_PARTS" ("PERFORMANCE_ID") ENABLE
In Example 3–5, you will create a foreign key constraint on the evaluations table by
entering the required information directly in the SQL Statement window.
Example 3–5 Adding a Foreign Key Constraint in SQL Script
ALTER TABLE evaluations
ADD CONSTRAINT eval_emp_id_fk FOREIGN KEY (employee_id)
REFERENCES employees(employee_id);
The results of the script follow.
ALTER TABLE evaluations succeeded
You have now created a foreign key constraint on the employee_id column from the
employees table. If you click the SQL tab, you will see the following SQL statement
was added to your table definition. You may need to click the Refresh icon.
CONSTRAINT "EVAL_EMP_ID_FK" FOREIGN KEY ("EMPLOYEE_ID")
REFERENCES "HR"."EMPLOYEES" ("EMPLOYEE_ID") ENABLE
To add a check constraint using the SQL Developer interface:
You will add a check constraint to the scores table using the SQL Developer
graphical interface. You could also use the Edit Table window, as in the NOT NULL
constraint, to accomplish this task.
1. In the Connections navigation hierarchy, the plus sign (+) next to Tables to expand
the list of tables.
2. Right-click the scores table.
3. Select Constraint, and then select Add Check.
4. In the Add Check window, enter the following information:
■Set the Constraint Name to SCORE_VALID.
■Set Check Condition to score >=0 and score <=9.
■Set Status to ENABLE.
Click Apply.
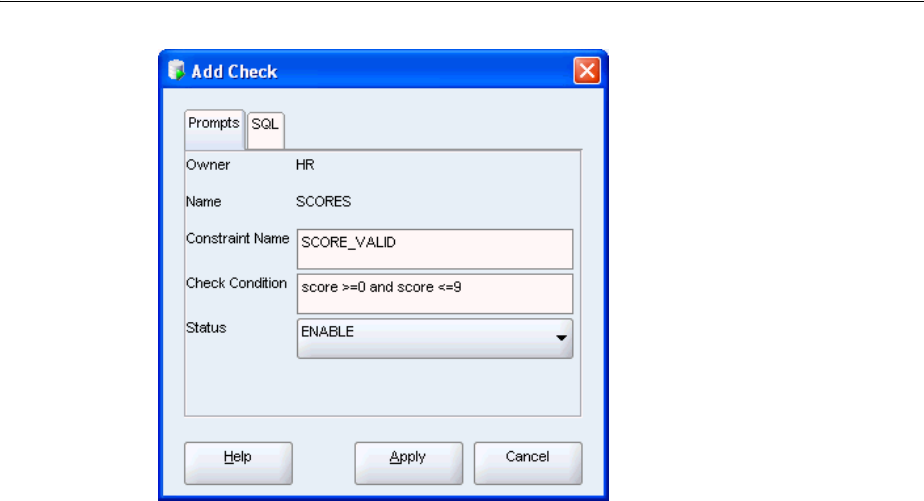
Creating and Using Tables
Creating and Using Database Objects 3-13
5. In the Confirmation window, click OK.
You have now created a check constraint on the score column of the scores
table.
The following SQL statement was added to your table definition:
CONSTRAINT "SCORE_VALID" CHECK (score >=0 and score <=9) ENABLE
Adding Data to a Table, Modifying, and Deleting
You can use SQL Developer to enter data into tables, to edit, and to delete existing
data. The following tasks will show these processes for the performance_parts
table.
To add data to a table using the SQL Developer interface:
Follow these steps to add rows of data to the performance_parts table
1. In the Connections navigation hierarchy, double-click the performance_parts
table.
2. Click the Data tab in the performance_parts table display.
3. In the Data pane, click the New Record icon.
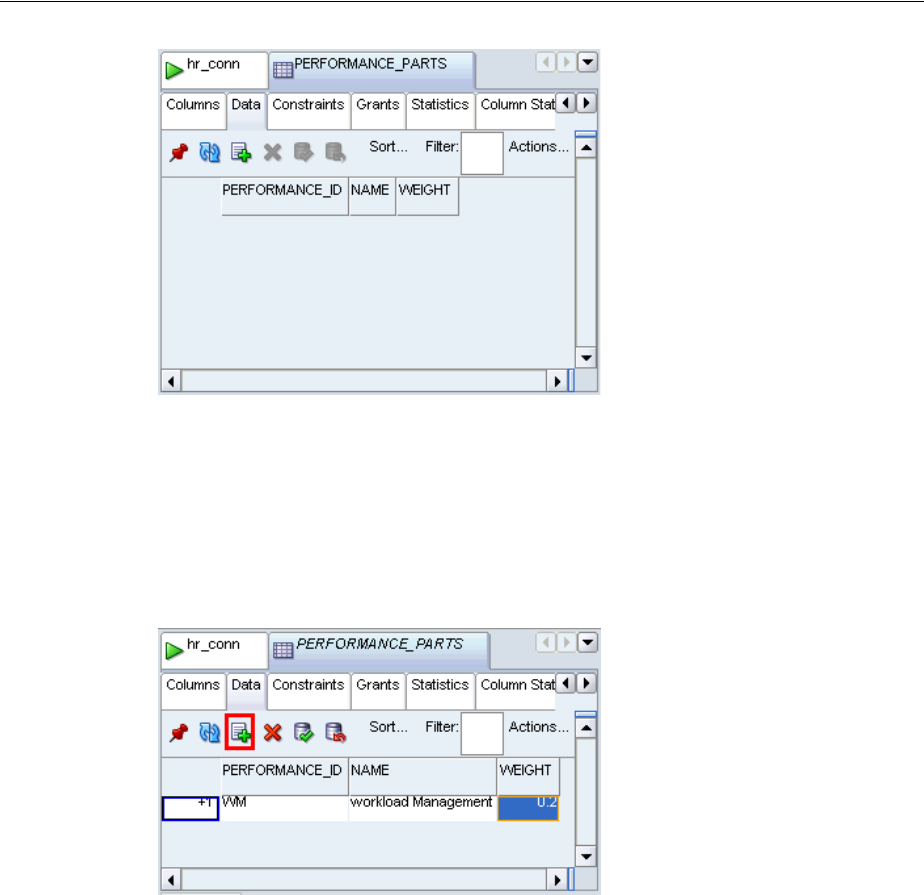
Creating and Using Tables
3-14 Oracle Database 2 Day Developer's Guide
4. In the new row, add the following information; you can click directly into the
column, or tab between columns:
■Set PERFORMANCE_ID to 'WM'
■Set NAME to 'Workload Management'
■Set WEIGHT to 0.2
Press the Enter key.
5. Add a second row with the following information: set PERFORMANCE_ID to 'BR,
set NAME to 'Building Relationships, and set WEIGHT to 0.2.
Press the Enter key.
6. Add a third row with the following information: set PERFORMANCE_ID to 'CF', set
NAME to 'Customer Focus', and set WEIGHT to 0.2.
Press the Enter key.
7. Add a fourth row with the following information: set PERFORMANCE_ID to 'CM',
set NAME to 'Communication', and set WEIGHT to 0.2.
Press the Enter key.
8. Add a fifth row with the following information: set PERFORMANCE_ID to 'TW', set
NAME to 'Teamwork', and set WEIGHT to 0.2.
Press the Enter key.
9. Add a sixth row with the following information: set PERFORMANCE_ID to 'RD', set
NAME to 'Results Orientation', and set WEIGHT to 0.2.
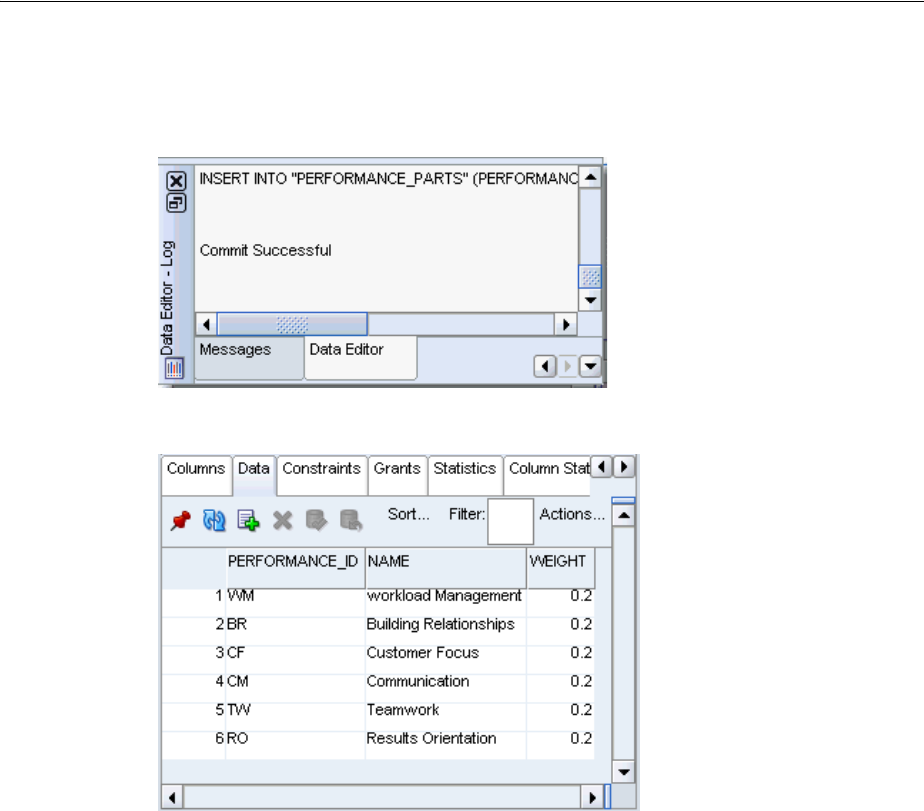
Creating and Using Tables
Creating and Using Database Objects 3-15
Press the Enter key.
10. Click the Commit Changes icon.
11. Review and close the Data Editor Log window.
12. Review the new data in the table performance_parts.
You have added 6 rows to the performance_parts table.
To modify table data using the SQL Developer interface:
Follow these steps to change data to the performance_parts table.
1. In the Connections navigation hierarchy, double-click the performance_parts
table.
2. Click the Data tab in the performance_parts table display.
3. In the Data pane, in the 'Workload Management' row, click the weight value,
and enter a new value for '0.3'.
In the 'Building Relationships' row, click the weight value, and enter a
new value for '0.15'.
In the 'Customer Focus' row, click the weight value, and enter a new value for
'0.15'.
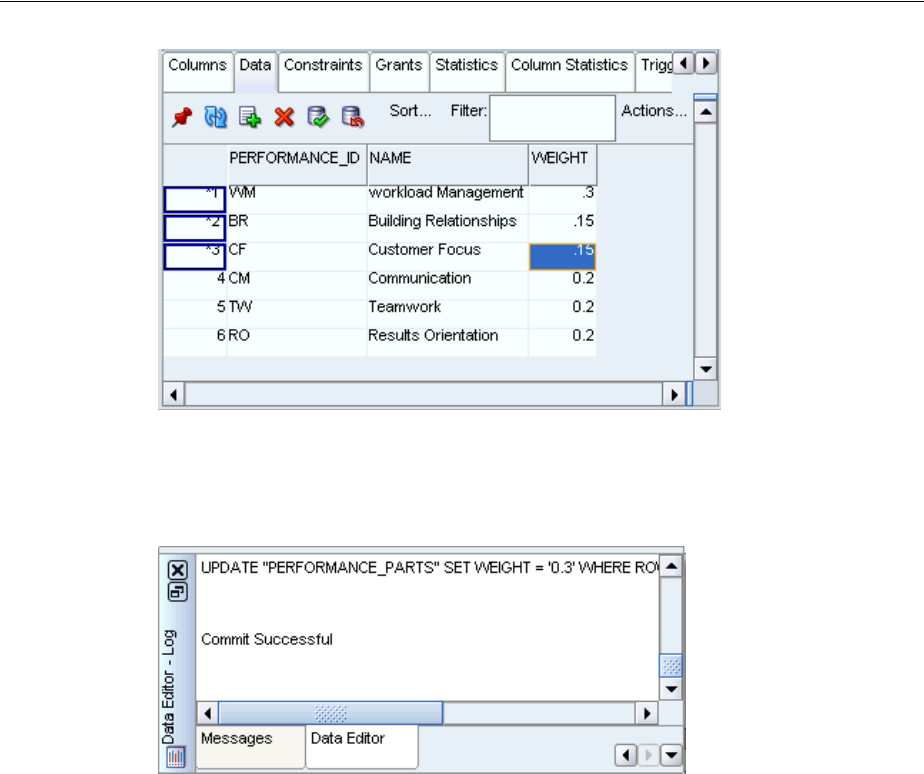
Creating and Using Tables
3-16 Oracle Database 2 Day Developer's Guide
4. Press the Enter key.
5. Click the Commit Changes icon.
6. Review and close the Data Editor Log window.
You have now changed values in three rows of the performance_parts table.
To delete table data using the SQL Developer interface:
Imagine that in the company modeled by the hr schema, management decided that
the categories Workload Management and Results Orientation had too much overlap.
You will now remove the row 'Results Orientation' from the performance_
parts table.
1. In the Connections navigation hierarchy, double-click the performance_parts
table.
2. Click the Data tab in the performance_parts table display.
3. In the Data pane, click the 'Results Orientation' row.
4. Click the Delete Selected Row(s) icon.
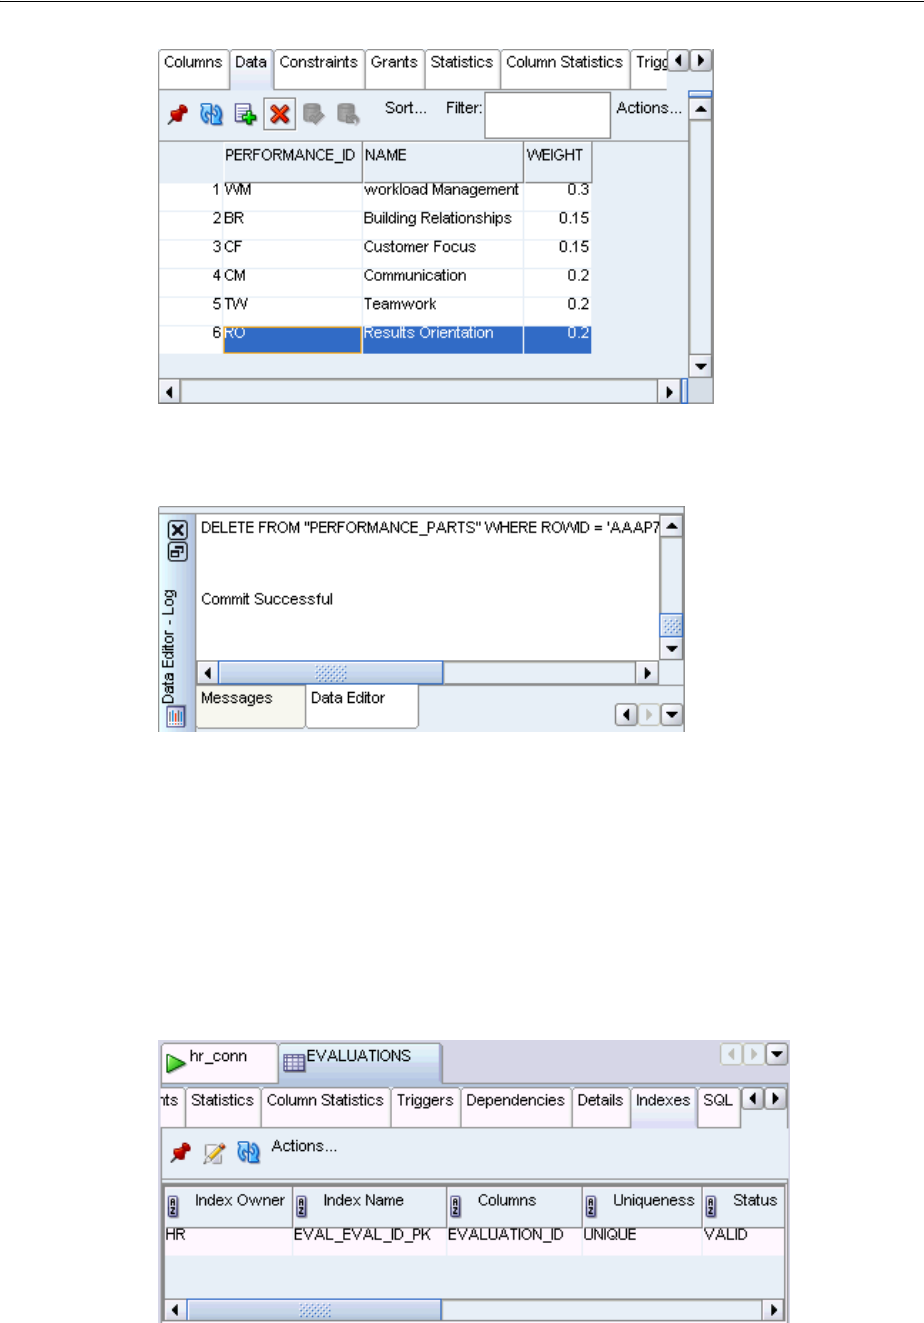
Creating and Using Tables
Creating and Using Database Objects 3-17
5. Click the Commit Changes icon.
6. Review and close the Data Editor Log window.
You have now removed a row from the performance_parts table.
Indexing Tables
When you define a primary key on a table, Oracle Database implicitly creates an index
on the column that contains the primary key. For example, you can confirm that an
index was created for the evaluations table on its primary key, by looking at its
Indexes pane.
See Also:
■Oracle Database SQL Developer User's Guide
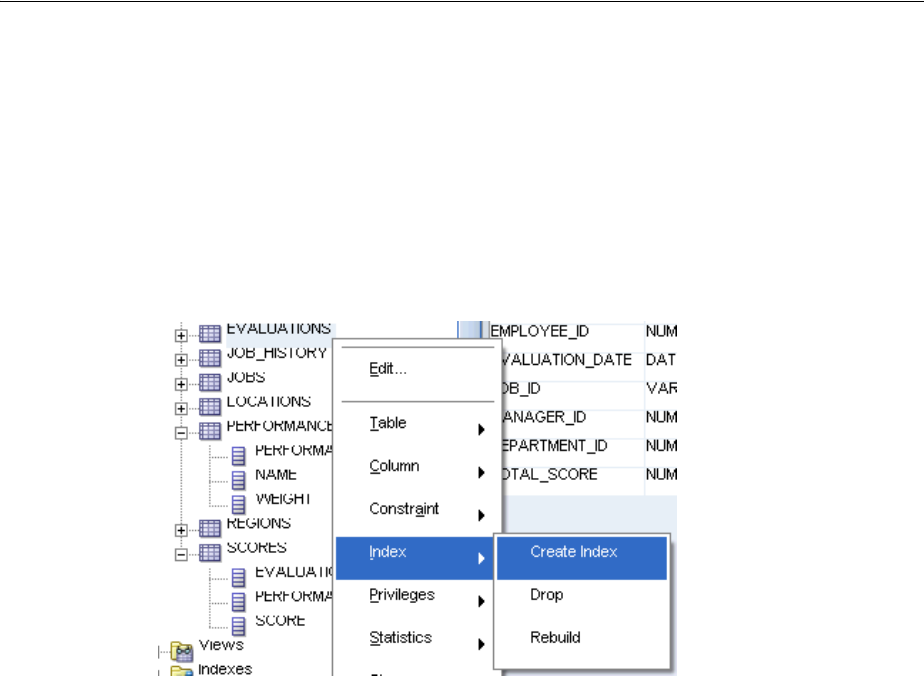
Creating and Using Tables
3-18 Oracle Database 2 Day Developer's Guide
In this section, you will learn how to add different types of indexes to the tables you
created earlier.
To create an index using the SQL Developer interface:
Follow these steps to create a new index for the evaluations table.
1. In the Connections navigation hierarchy, right-click the evaluations table.
2. Select Index and then select Create Index.
Alternatively, in the Connections navigation hierarchy, you can right-click Indexes
and select New Index.
3. In the Create Index window, enter the following parameters:
■Ensure that the Schema is set to HR.
■Set the Name to EVAL_JOB_IX.
Click the Add Column Expression icon, which looks like a 'plus' sign.
■Set the Column Name or Expression to JOB_ID.
■Set the Order to ASC.
Click OK.
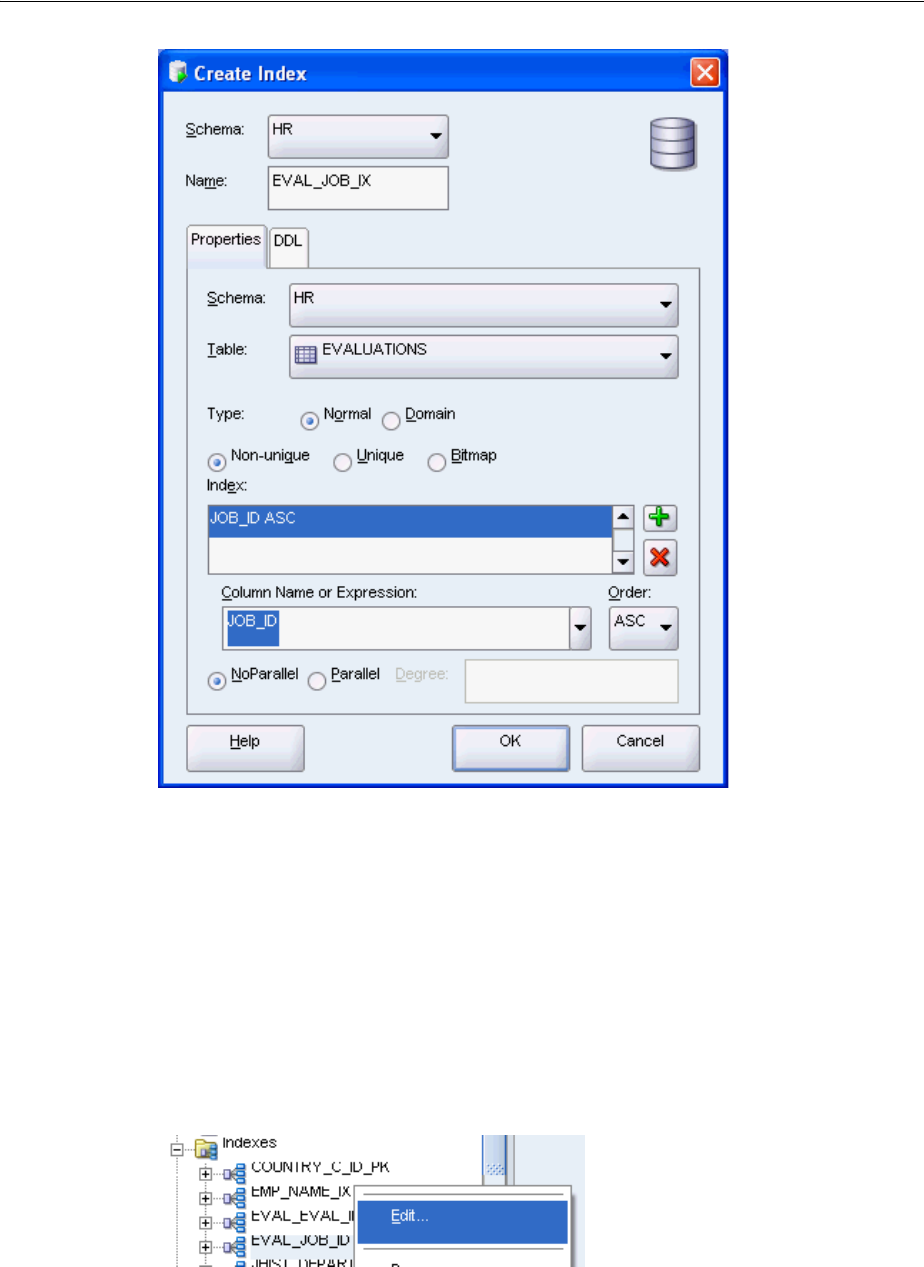
Creating and Using Tables
Creating and Using Database Objects 3-19
You have now created a new index EVAL_JOB_IX on the column JOB_ID in the
evaluations table. You can see this index by finding it in the list of Indexes in the
Connections navigation hierarchy, or by opening the evaluations table and
browsing to the Indexes tab. The following script is the equivalent SQL statement for
creating this index.
CREATE INDEX eval_job_ix ON evaluations (job_id ASC) NOPARALLEL;
To modify an index using SQL Developer interface:
Follow these steps to reverse the sort order of the EVAL_JOB_IX index.
1. In the Connections navigation hierarchy, the plus sign (+) to expand Indexes.
2. Right-click EVAL_JOB_IX, and select Edit.
3. In the Edit Index window, change Order to DESC.
Click OK.

Creating and Using Tables
3-20 Oracle Database 2 Day Developer's Guide
You changed the index. The following script is the equivalent SQL statement for
creating this index:
DROP INDEX eval_job_id;
CREATE INDEX eval_job_ix ON evaluations (job_id DESC) NOPARALLEL;
To delete an index using SQL Developer interface:
Following steps to delete the EVAL_JOB_IX index.
1. In the Connections navigation hierarchy, the plus sign (+) to expand Indexes.
2. Right-click EVAL_JOB_IX, and select Drop.
3. In the Drop window, click Apply.
4. In the Confirmation window, click OK.
You deleted the index EVAL_JOB_IX. The following script is the equivalent SQL
statement for dropping this index.
DROP INDEX "HR"."EVAL_JOB_ID";
Dropping Tables
Sometimes it becomes necessary to delete a table and all its contents from your
schema. To accomplish this, you must use the SQL statement DROP TABLE. You will
use the tables that you already created to learn other concepts, so create a simple table
that you can subsequently delete by running the following script in the SQL Statement
window:
CREATE TABLE temp_table(
id NUMBER(1,0),
name VARCHAR2(10)
);
To delete a table using the SQL Developer interface:
Follow these steps to delete TEMP_TABLE from the hr schema.
1. In the Connections navigation hierarchy, right-click TEMP_TABLE.
2. Select Table, and then select Drop.
See Also:
■Oracle Database SQL Language Reference for information on the
CREATE INDEX statement
■Oracle Database SQL Language Reference for information on the
ALTER INDEX statement
■Oracle Database SQL Language Reference for information on the
DROP INDEX statement
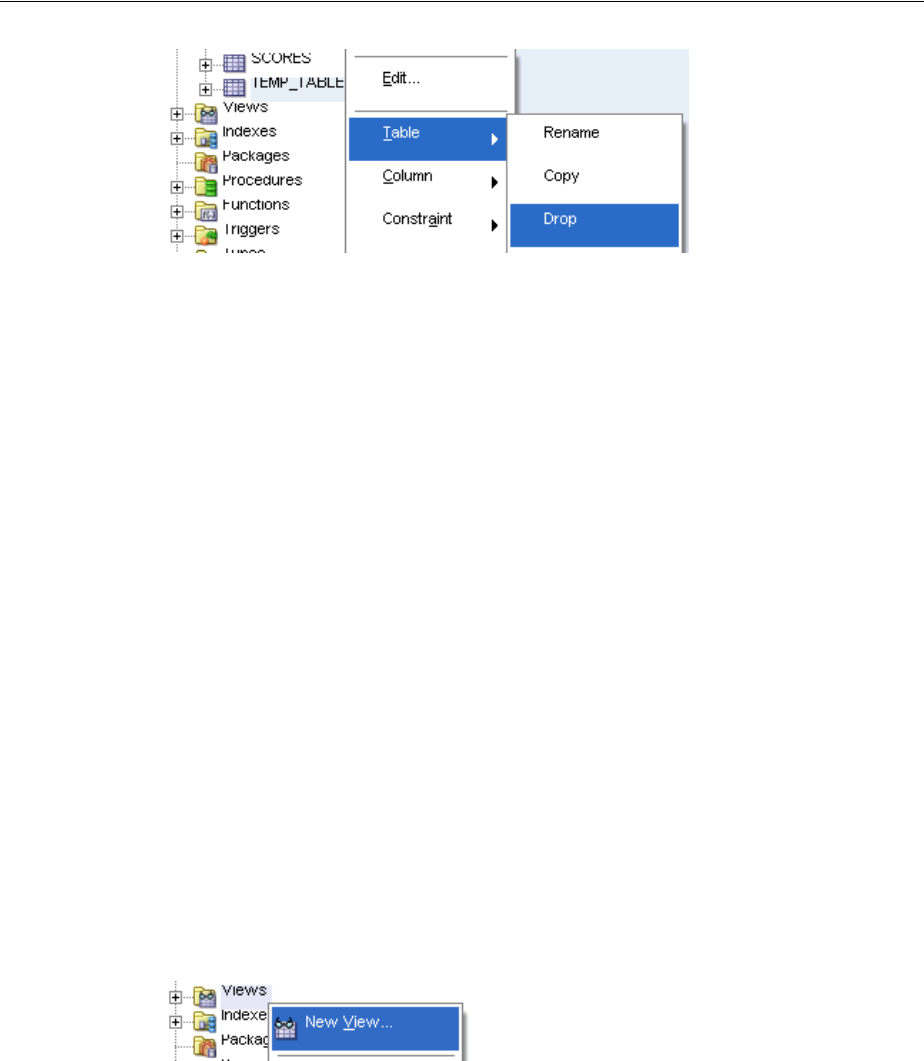
Using Views
Creating and Using Database Objects 3-21
3. In the Drop window, click Apply.
4. In the Confirmation window, click OK.
You deleted the table TEMP_TABLE. The following script is the equivalent SQL
statement for dropping this table.
DROP TABLE "HR"."TEMP_TABLE";
Using Views
Views are logical tables based on one or more tables or views. Views are particularly
useful if your business needs include frequent access to information that is stored in
several different tables.
Creating a View
The standard syntax for creating a view follows:
CREATE VIEW view_name AS query;
To create a view using the SQL Developer interface:
Follow these steps to delete create a new view from the hr schema.
1. In the Connections navigation hierarchy, right-click Views.
2. Select New View.
3. In the Create View window, enter the following parameters:
■Ensure that Schema is set to HR.
■Set Name to SALESFORCE.
■Set the SQL Query to the following:
SELECT first_name || ' ' || last_name "Name", salary*12 "Annual Salary"
FROM employees
WHERE department_id = 80
4. In SQL Parse Results, click Test Synt a x .
See Also:
■Oracle Database SQL Language Reference for information on the
DROP TABLE statement
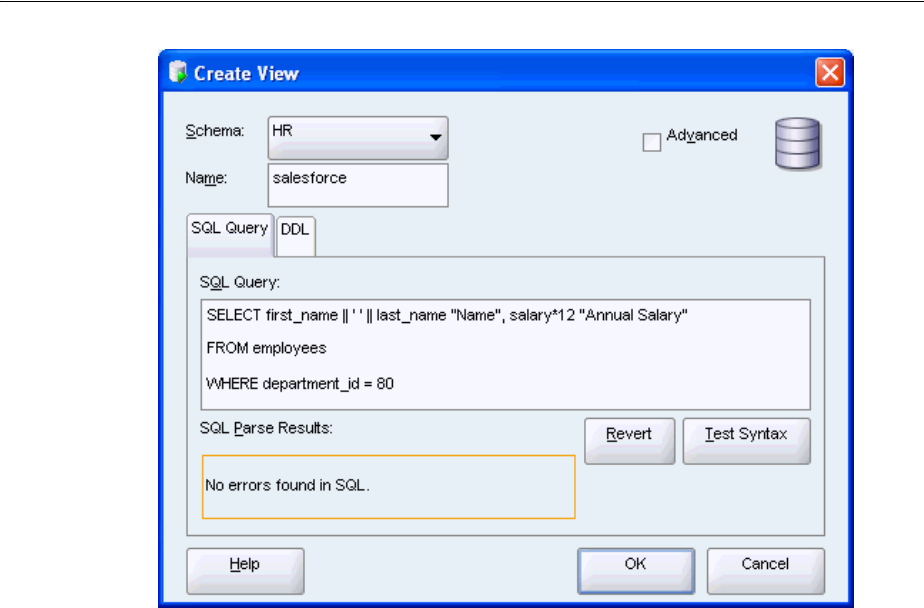
Using Views
3-22 Oracle Database 2 Day Developer's Guide
5. Click OK.
You created a new view. The equivalent SQL statement for creating this view follows:
CREATE VIEW salesforce AS
SELECT first_name || ' ' || last_name "Name",
salary*12 "Annual Salary"
FROM employees
WHERE department_id = 80;
In Example 3–6, you will create a view of all employees in the company and their work
location, similar to the query you used in "Using Character Functions".
Example 3–6 Creating a View in SQL Script
CREATE VIEW emp_locations AS
SELECT e.employee_id,
e.last_name || ', ' || e.first_name name,
d.department_name department,
l.city city,
c.country_name country
FROM employees e, departments d, locations l, countries c
WHERE e.department_id=d.department_id AND
d.location_id=l.location_id AND
l.country_id=c.country_id
ORDER BY last_name;
The results of the script follow.
CREATE VIEW succeeded.
You have now created new view that relies on information in 4 separate tables, or a
4-way JOIN. In the Connections navigation hierarchy, if you click the 'plus' sign next
to Views, you will see emp_locations.

Using Views
Creating and Using Database Objects 3-23
Updating a View
To change the properties of a view in SQL Developer interface:
You will change the salesforce view by adding to it the employees in the Marketing
department, and then rename the view to sales_marketing.
1. In the Connections navigation hierarchy, right-click the salesforce view.
2. Select Edit.
3. In the Edit View window, change the SQL Query by adding the following to the
last line: 'OR department_id = 20'.
Click Tes t S y n t ax.
Click OK.
4. To rename the view, right-click salesforce and select Rename.

Using Views
3-24 Oracle Database 2 Day Developer's Guide
5. In the Rename window, set New View Name to sales_marketing.
Click Apply.
6. In the Confirmation window, click OK.
You changed the view. The equivalent SQL statements for changing and renaming the
view are:
CREATE OR REPLACE VIEW salesforce AS query;
RENAME "SALESFORCE" to SALES_MARKETING;
Dropping a View
To drop a view using the SQL Developer interface:
You will use the DROP VIEW statement to delete the sales_marketing view.
1. In the Connections navigation hierarchy, right-click the sales_marketing view.
2. Select Drop.
3. In the Drop window, click Apply.
4. In the Confirmation window, click OK.

Using Sequences
Creating and Using Database Objects 3-25
You deleted the view. The equivalent SQL statement for dropping the view is:
DROP VIEW sales_marketing;
Using Sequences
Sequences are database objects that generate unique sequential values, which are very
useful when you need unique primary keys. The hr schema already has three such
sequences: departments_seq, employees_seq, and locations_seq.
The sequences are used through these pseudocolumns:
■The CURRVAL pseudocolumn returns the current value of a sequence. CURRVAL
can only be used after an initial call to NEXTVAL initializes the sequence.
■The NEXTVAL pseudocolumn increments the sequence and returns the next value.
The first time that NEXTVAL is used, it returns the initial value of the sequence.
Subsequent references to NEXTVAL increment the sequence value by the defined
increment, and return the new value.
Note that a sequence is not connected to any other object, except for conventions of
use. When you plan to use a sequence to populate the primary key of a table, Oracle
recommends that you use a naming convention to link the sequence to that table.
Throughout this discussion, the naming convention for such sequences is table_
name_seq.
Creating a Sequence
You can create a sequence in the SQL Developer Interface, or using the SQL Statement
window.
To create a sequence using the SQL Developer interface:
The following steps will create a sequence, evaluations_seq, that you can use for
the primary key of the evaluations table.
1. In the Connections navigation hierarchy, right-click Sequences.
2. Select New Sequence.
See Also:
■Oracle Database SQL Language Reference for information on the
CREATE VIEW statement
■Oracle Database SQL Language Reference for information on the
DROP VIEW statement
See Also:
■Oracle Database SQL Language Reference
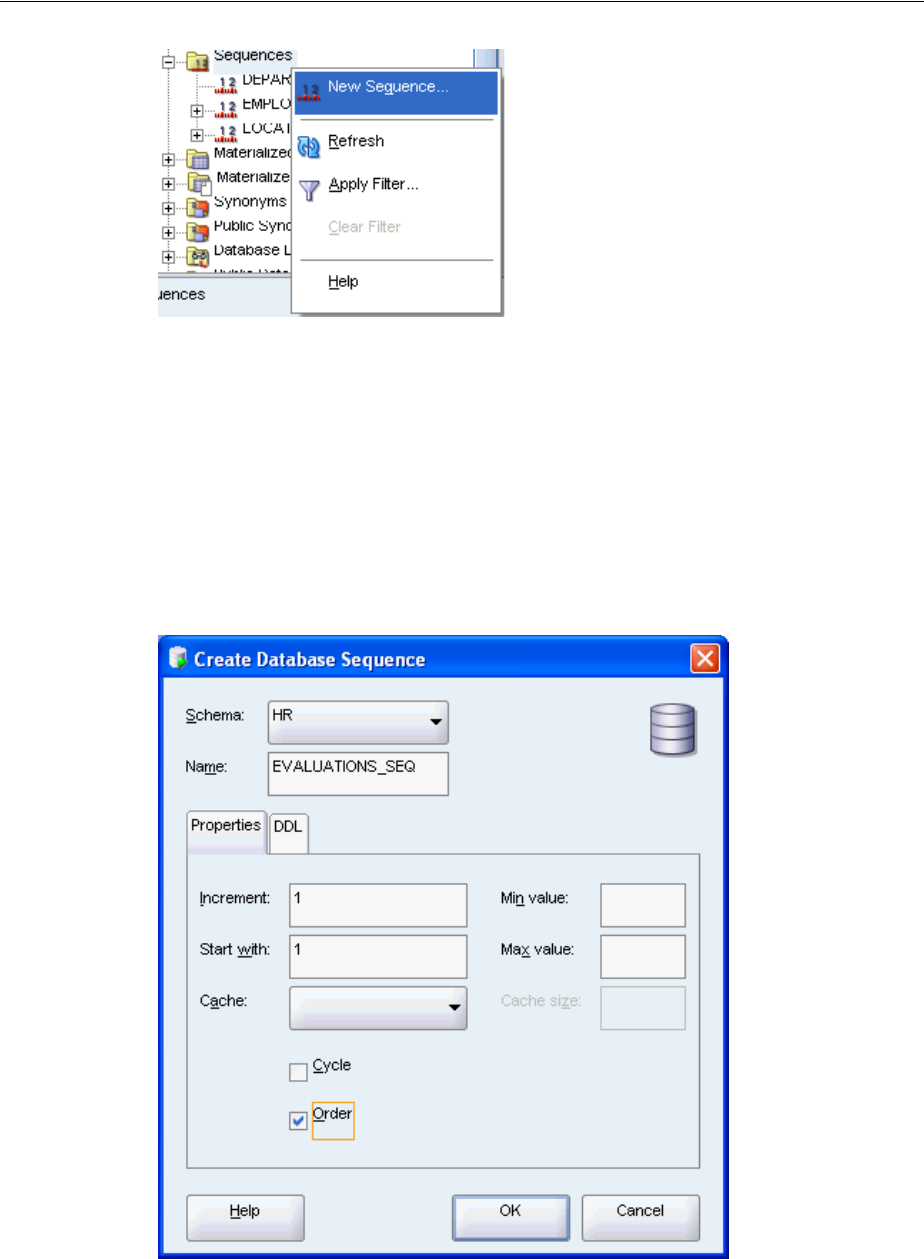
Using Sequences
3-26 Oracle Database 2 Day Developer's Guide
3. In the New Sequence window, enter the following parameters:
■Ensure that Schema is set to HR.
■Set Name to EVALUATIONS_SEQ.
In the Properties tab:
■Set Increment to 1.
■Set Start with to 1.
■Check Order.
Click OK.
You have now created a sequence that can be used for the primary key of the
evaluations table. If you click '+' to expand the Sequence tree, you can see new
sequence. The equivalent SQL statement is:
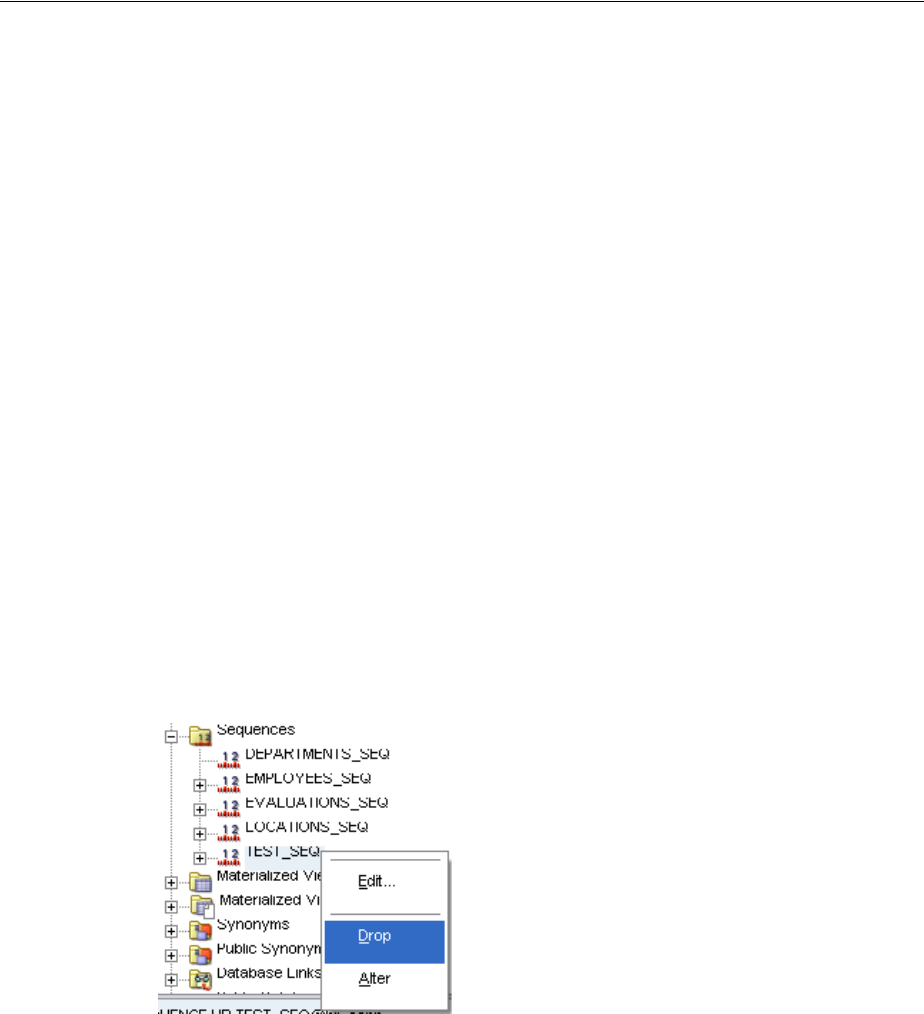
Using Sequences
Creating and Using Database Objects 3-27
CREATE SEQUENCE evaluations_seq INCREMENT BY 1 START WITH 1 ORDER;
In Example 3–7, you will create another sequence by entering the required information
directly in the SQL Statement window.
Example 3–7 Creating a Sequence Using SQL Script
CREATE SEQUENCE test_seq INCREMENT BY 5 START WITH 5 ORDER;
The results of the script follow.
CREATE SEQUENCE succeeded.
Dropping a Sequence
To delete a sequence, you must use the SQL statement DROP SEQUENCE. To see how a
sequence can be deleted in SQL Developer, you can use the test_seq sequence you
created earlier. If the new sequence does not appear in the Connections hierarchy
navigator, click the refresh icon.
To drop a sequence:
Follow these steps to drop a sequence.
1. In the Connections navigator, right-click the test_seq sequence.
2. In the Drop window, click Apply.
See Also:
■Oracle Database SQL Language Reference for information on the
CREATE SEQUENCE statement
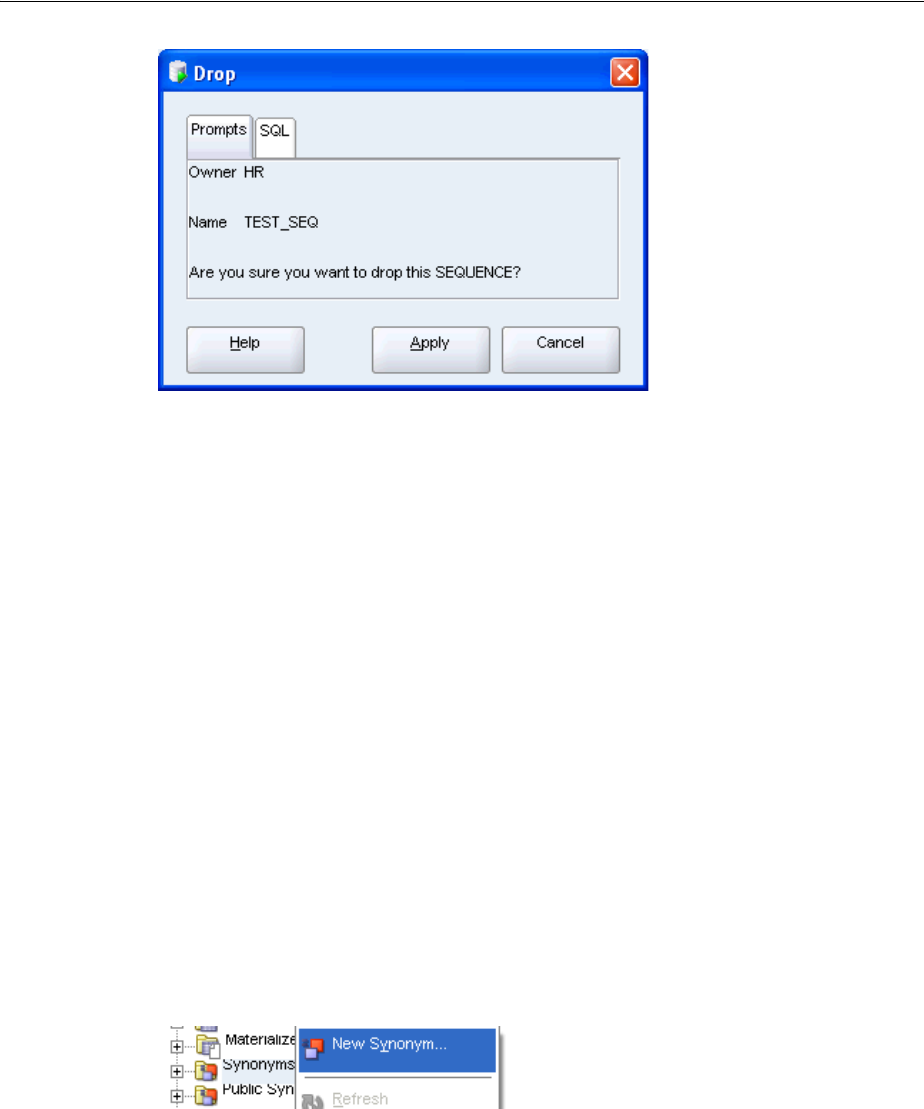
Using Synonyms
3-28 Oracle Database 2 Day Developer's Guide
3. In the Confirmation window, click OK.
You have now deleted the sequence test_seq. The equivalent SQL statement
follows:
DROP SEQUENCE "HR"."TEST_SEQ";
Using Synonyms
A synonym is an alias for any schema object and can be used to simplify SQL
statements or even obscure the names of actual database objects for security purposes.
Additionally, if a table is renamed in the database (departments to divisions), you
could create a departments synonym and continue using your application code as
before.
To create a synonym using the SQL Developer interface:
The following steps will create a synonym, positions, that you can use in place of
the jobs schema object.
1. In the Connections navigation hierarchy, right-click Synonyms.
2. Select New Synonym.
3. In the New Synonym window, set the following parameters:
■Ensure that Schema is set to HR.
■Set Name to POSITIONS.
In the Properties tab:
■Select Object Based. This means that the synonym refers to a specific schema
object, such as a table, a view, a sequence, and so on.
■Set Object Based to JOBS.
See Also:
■ Oracle Database SQL Language Reference for information on the
DROP SEQUENCE statement

Using Synonyms
Creating and Using Database Objects 3-29
Click OK.
You created a synonym positions for the jobs table. The equivalent SQL statement
follows:
CREATE SYNONYM positions FOR jobs;
In Example 3–8, you use the new positions synonym in place of the jobs table
name.
Example 3–8 Using a Synonym
SELECT first_name || ' ' || last_name "Name", p.job_title "Position"
FROM employees e, positions p
WHERE e.job_id = p.job_id
ORDER BY last_name;
The results of the query appear.
Name Position
--------------------- -------------------------
Ellen Abel Sales Representative
Sundar Ande Sales Representative
Mozhe Atkinson Stock Clerk
David Austin Programmer
...
197 rows selected
To drop a synonym:
Follow these steps to drop the positions synonym.
1. In the Connections navigator, right-click the positions synonym.
2. Select Drop.
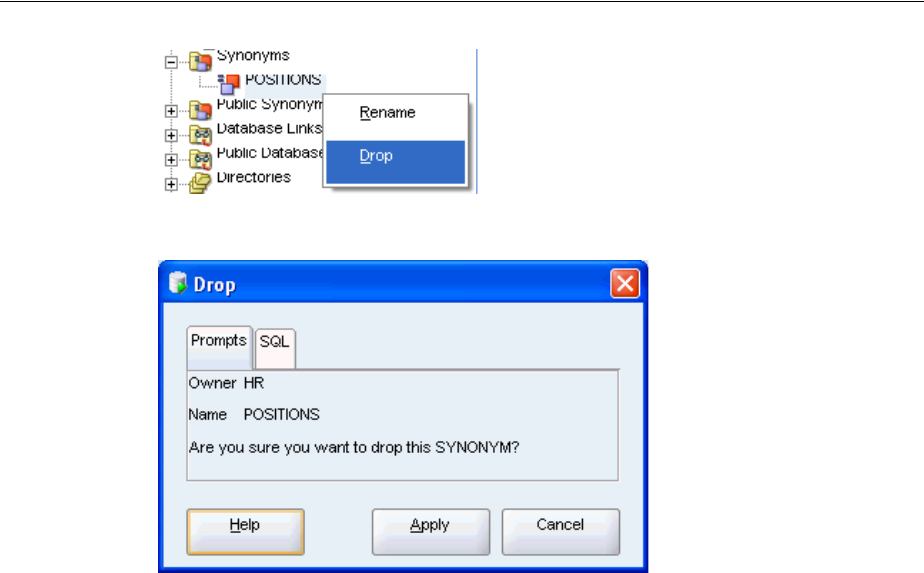
Using Synonyms
3-30 Oracle Database 2 Day Developer's Guide
3. In the Drop window, click Apply.
4. In the Confirmation window, click OK.
You deleted synonym positions. The equivalent SQL statement follows:
DROP SYNONYM positions;
See Also:
■ Oracle Database SQL Language Reference for information on the
CREATE SYNONYM statement
■Oracle Database SQL Language Reference for information on the
DROP SYNONYM statement

Developing and Using Stored Procedures 4-1
4
Developing and Using Stored Procedures
This chapter introduces the use of PL/SQL, the imperative language of Oracle
Database.
This chapter contains the following sections:
■Overview of Stored Procedures on page 4-1
■Creating and Using Standalone Procedures and Functions on page 4-2
■Creating and Using Packages on page 4-9
■Using Variables and Constants on page 4-15
■Controlling Program Flow on page 4-22
■Using Composite Data Structures; Records on page 4-29
■Retrieving Data from a Set Using Cursors and Cursor Variables on page 4-32
■Using Collections; Index-By Tables on page 4-38
■Handling Errors and Exceptions on page 4-41
Overview of Stored Procedures
You already know how to interact with the database using SQL, but it is not sufficient
for building enterprise applications. PL/SQL is a third generation language that has
the expected procedural and namespace constructs, and its tight integration with SQL
makes it possible to build complex and powerful applications. Because PL/SQL is
executed in the database, you can include SQL statements in your code without
having to establish a separate connection.
The main types of program units you can create with PL/SQL and store in the
database are standalone procedures and functions, and packages. Once stored in the
database, these PL/SQL components, collectively known as stored procedures, can be
used as building blocks for several different applications.
While standalone procedures and functions are invaluable for testing pieces of
program logic, Oracle recommends that you place all your code inside a package.
Packages are easier to port to another system, and have the additional benefit of
qualifying the names of your program units with the package name. For example, if
you developed a schema-level procedure called continue in a previous version of
Oracle Database, your code would not compile when you port it to a newer Oracle
Database installation. This is because Oracle recently introduced the statement
CONTINUE that exits the current iteration of a loop and transfers control to the next
iteration. If you developed your procedure inside a package, the procedure package_
name.continue would have been protected from such name capture.

Creating and Using Standalone Procedures and Functions
4-2 Oracle Database 2 Day Developer's Guide
This next section of this chapter is "Creating and Using Standalone Procedures and
Functions" on page 4-2, shows you how to create and use standalone procedures and
functions. You may wish to skip it and move directly to "Creating and Using Packages"
on page 4-9.
Creating and Using Standalone Procedures and Functions
With Oracle Database, you can store programs in the database, so commonly used
code can be written and tested once and then accessed by any application that requires
it. Program units that reside in the database also ensure that when the code is invoked
the data is processed consistently, which leads to ease and consistency of the
application development process.
Schema-level, or standalone subprograms such as functions (which return a value) and
procedures (which do not return a value) are compiled and stored in an Oracle
Database. Once compiled, they become stored procedure or stored function schema
objects, and can be referenced or called by any applications connected to Oracle
Database. At invocation, both stored procedures and functions can accept parameters.
Procedures and functions follow the basic PL/SQL block structure, which consists of
the following elements:
■A declarative part, sometimes starting with the keyword DECLARE, identifies
variables and constants used in the application logic. This part is optional.
■An executable part, starting with BEGIN and ending with END, contains the
application logic. This part is mandatory.
■An exception-handling part, starting with EXCEPTION, handles error conditions
that may be raised in the executable part of the block. This part is optional.
The general form of a PL/SQL block follows. Note also that each stored program unit
has a header that names the unit and identifies it as either a function, procedure, or a
package.
Header AS
[declaration statements
...]
BEGIN
...
[EXCEPTION
...]
END;
Creating Procedures and Functions
The SQL statements for creating procedures and functions are CREATE PROCEDURE
and CREATE FUNCTION, respectively. In practice, it is best to use a CREATE OR
REPLACE statement. The general form of these statements follows.
CREATE OR REPLACE procedure_name(arg1 data_type, ...) AS
BEGIN
....
END procedure_name;
See Also:
■Oracle Database PL/SQL Language Reference for information on the
syntax for declaring procedures
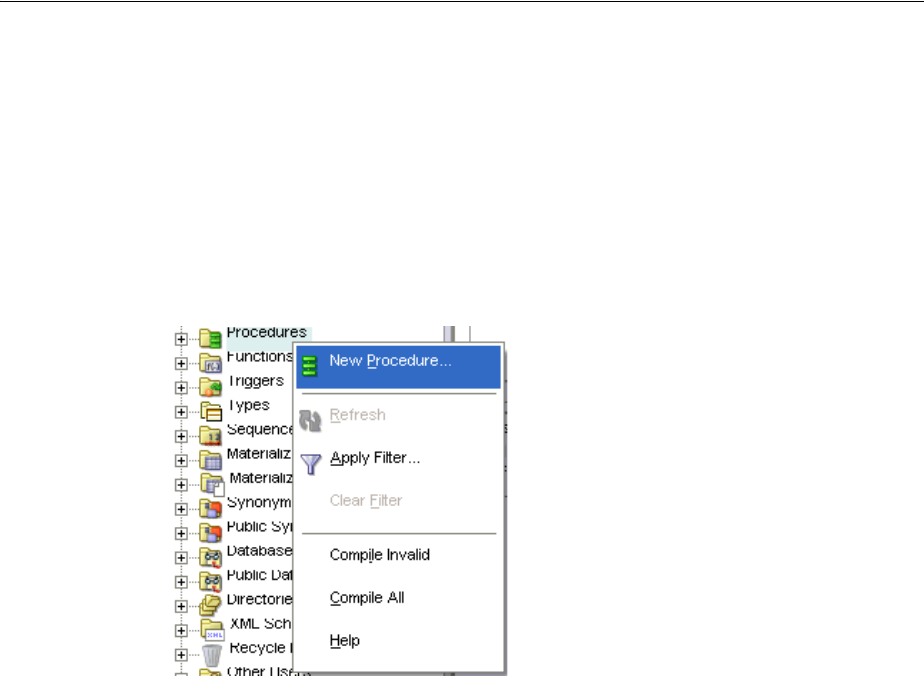
Creating and Using Standalone Procedures and Functions
Developing and Using Stored Procedures 4-3
CREATE OR REPLACE procedure_name(arg1 data_type, ...) AS
BEGIN
....
END procedure_name;
To create a procedure:
You will create a procedure add_evaluation that creates a new row in the
evaluations table.
1. In the Connections navigation hierarchy, right-click Procedures.
2. Select New Procedure.
3. In the New Procedure window, set the following parameters:
■Ensure that Schema is set to HR.
■Set Name to ADD_EVALUATION.
In the Parameters tab, click the Add Column icon ('plus' sign) and specify the first
parameter of the procedure. Set Name to eval_id, set Type to NUMBER, set Mode
to IN, and leave Default Value empty.
Similarly, add the following parameters, in this order:
■employee_id: set Type to NUMBER, set Mode to IN, and leave Default Value
empty.
■evaluation_date: set Type to DATE, set Mode to IN, and leave Default
Value empty.
■job_id: set Type to VARCHAR2, set Mode to IN, and leave Default Value
empty.
■manager_id: set Type to NUMBER, set Mode to IN, and leave Default Value
empty
■department_id: set Type to NUMBER, set Mode to IN, and leave Default
Value empty
Click OK.
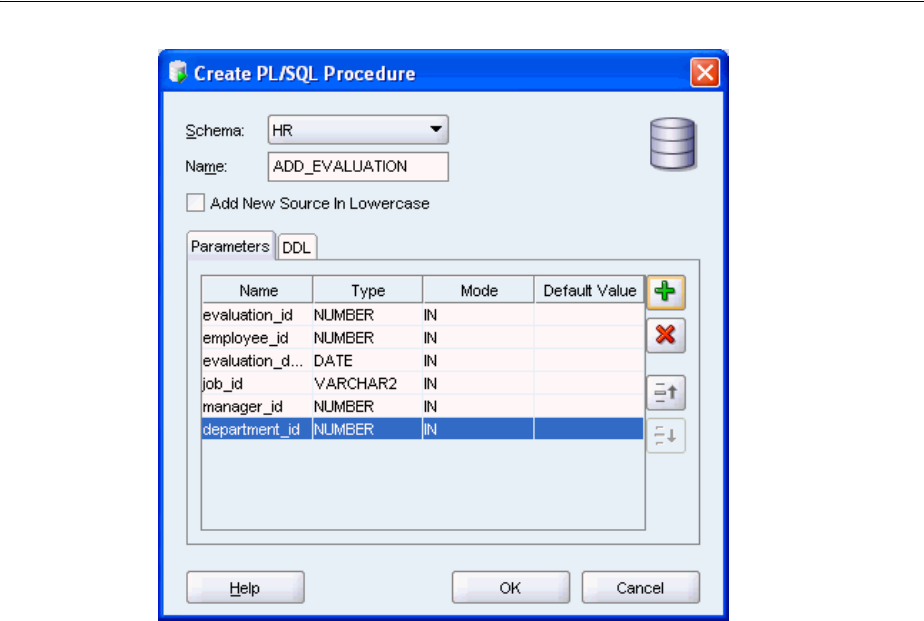
Creating and Using Standalone Procedures and Functions
4-4 Oracle Database 2 Day Developer's Guide
4. The ADD_EVALUATION pane opens with the following code.
Note that the tile of the pane is in italic font, which indicates that the procedure is
not saved in the database.
CREATE OR REPLACE
PROCEDURE ADD_EVALUATION
( evaluation_id IN NUMBER
, employee_id IN NUMBER
, evaluation_date IN DATE
, job_id IN VARCHAR2
, manager_id IN NUMBER
, department_id IN NUMBER
) AS
BEGIN
NULL;
END ADD_EVALUATION;
5. From the File menu, select Save to save the new procedures. Alternatively, use the
CTRL + S key combination.
Note that Oracle Database automatically compiles procedures prior to saving
them.
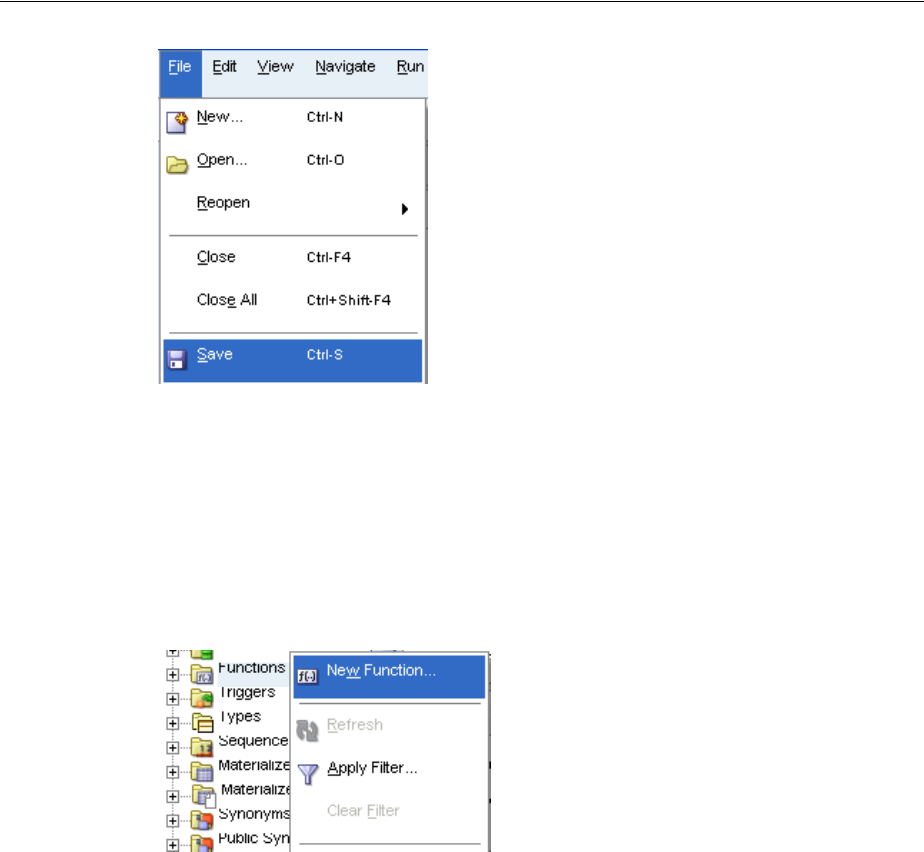
Creating and Using Standalone Procedures and Functions
Developing and Using Stored Procedures 4-5
Note that the tile of the add_evaluation pane is in regular font, not italic; this
indicates that the procedure is saved to the database
To create a function:
You will create a new function calculate_score, which calculates the weighted
score based on the performance in a particular category.
1. In the Connections navigation hierarchy, right-click Functions.
2. Select New Function.
3. In the New Function window, set the following parameters:
■Ensure that Schema is set to HR.
■Set Name to CALCULATE_SCORE.
In the Parameters pane, set the <return> Type to NUMBER.
Similarly, add the following parameters, in this order:
■cat: set Type to VARCHAR2, set Mode to IN, and leave Default Value empty.
■score: set Type to NUMBER, set Mode to IN, and leave Default Value empty
■weight: set Type to NUMBER, set Mode to IN, and leave Default Value empty
Click OK.
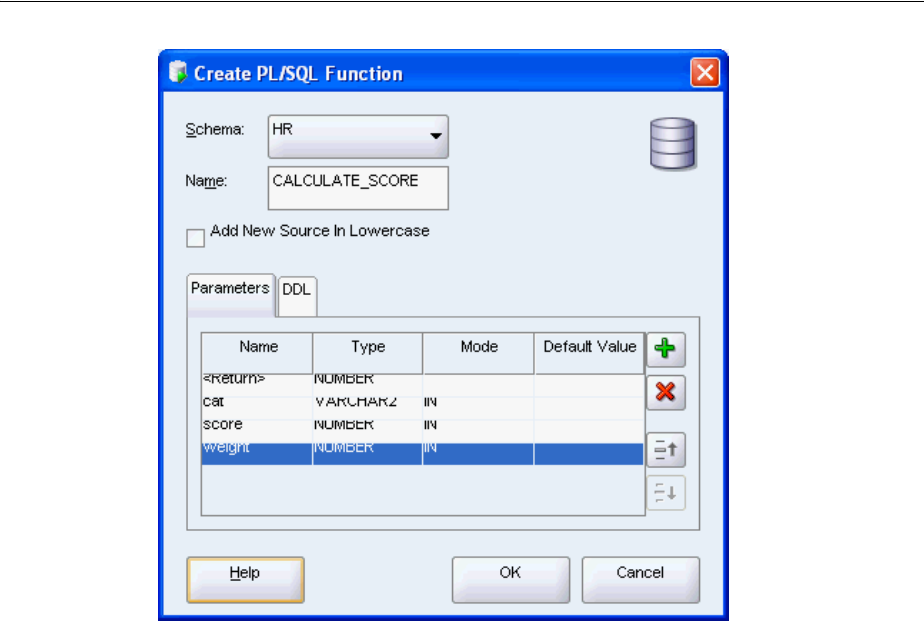
Creating and Using Standalone Procedures and Functions
4-6 Oracle Database 2 Day Developer's Guide
4. The calculate_score pane opens with the following code.
Note that the tile of the pane is in italic font, which indicates that the procedure is
not saved in the database.
CREATE OR REPLACE
FUNCTION calculate_score
( cat IN VARCHAR2
, score IN NUMBER
, weight IN NUMBER
) RETURN NUMBER AS
BEGIN
RETURN NULL;
END calculate_score;
5. From the File menu, select Save to save the new function. Alternatively, use the
CTRL + S key combination.
Note that Oracle Database automatically compiles functions prior to saving them.
Note that the tile of the calculate_score pane is in regular font, not italic; this
indicates that the procedure is saved to the database
See Also:
■Oracle Database SQL Language Reference for information on the
CREATE PROCEDURE statement
■Oracle Database SQL Language Reference for information about the
CREATE FUNCTION statement
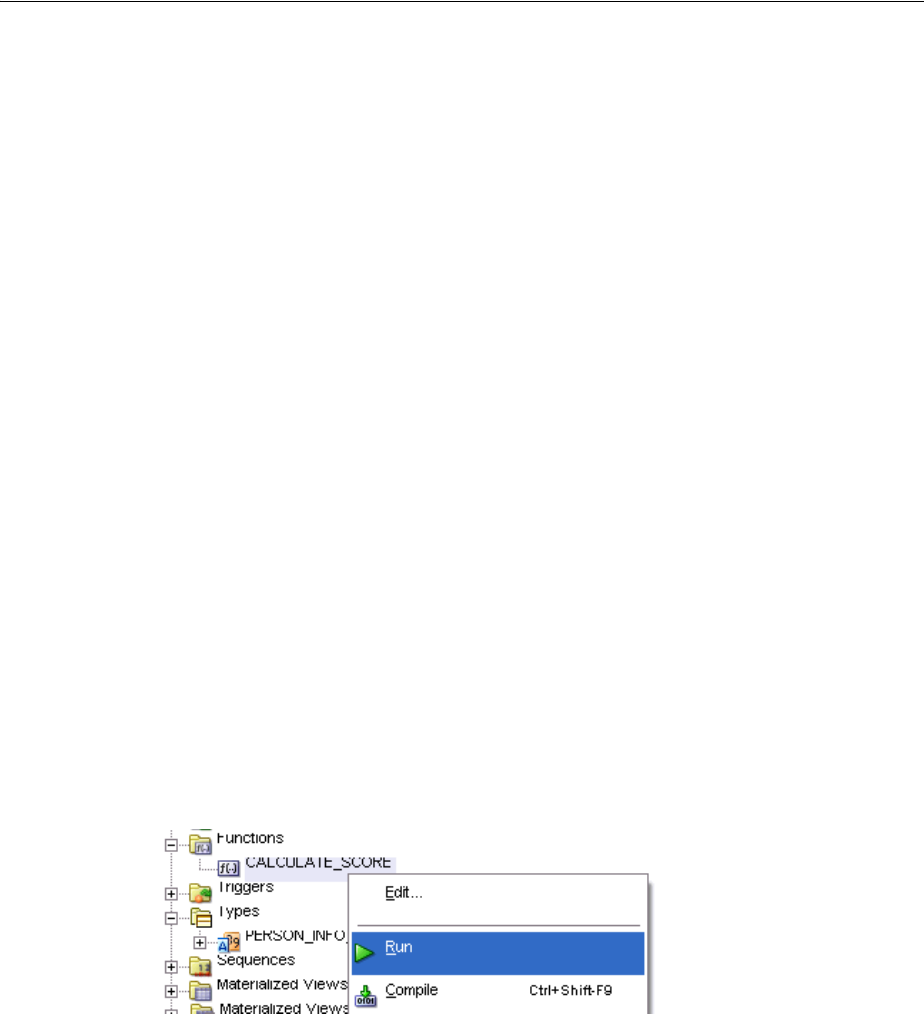
Creating and Using Standalone Procedures and Functions
Developing and Using Stored Procedures 4-7
Modifying Procedures and Functions
You already created a new procedure and a new function. However, they both consist
of only the subprogram signature. In this section, you will edit a subprogram body.
To modify a function:
You will edit the function calculate_score to determine the weighted value of an
evaluation for a particular category.
1. In the calculate_score pane, replace the body of the function with the
following code. The new code is in bold font.
BEGIN
RETURN score * weight;
END calculate_score;
2. Compile and save the function; you may use the CTRL + S key combination.
Testing Procedures and Functions
Next, you will test the function that you just modified.
To test a function:
You will test the function calculate_score.
1. In the Connections navigator hierarchy, right-click the calculate_score
function. Select Run.
2. In the Run PL/SQL window, click inside the PL/SQL Block pane, and edit the
assignments for the score and weight variables. The new code is in bold font.
v_Return := CALCULATE_SCORE(
CAT => CAT,
SCORE => 8,
WEIGHT => 0.2
);
Click OK.
3. In the Running - Log pane, note the following results:
Connecting to the database hr_conn.
v_Return = 1.6
Process exited.
See Also:
■Oracle Database SQL Language Reference for information about the
ALTER PROCEDURE statement
■Oracle Database SQL Language Reference for information about the
ALTER FUNCTION statement
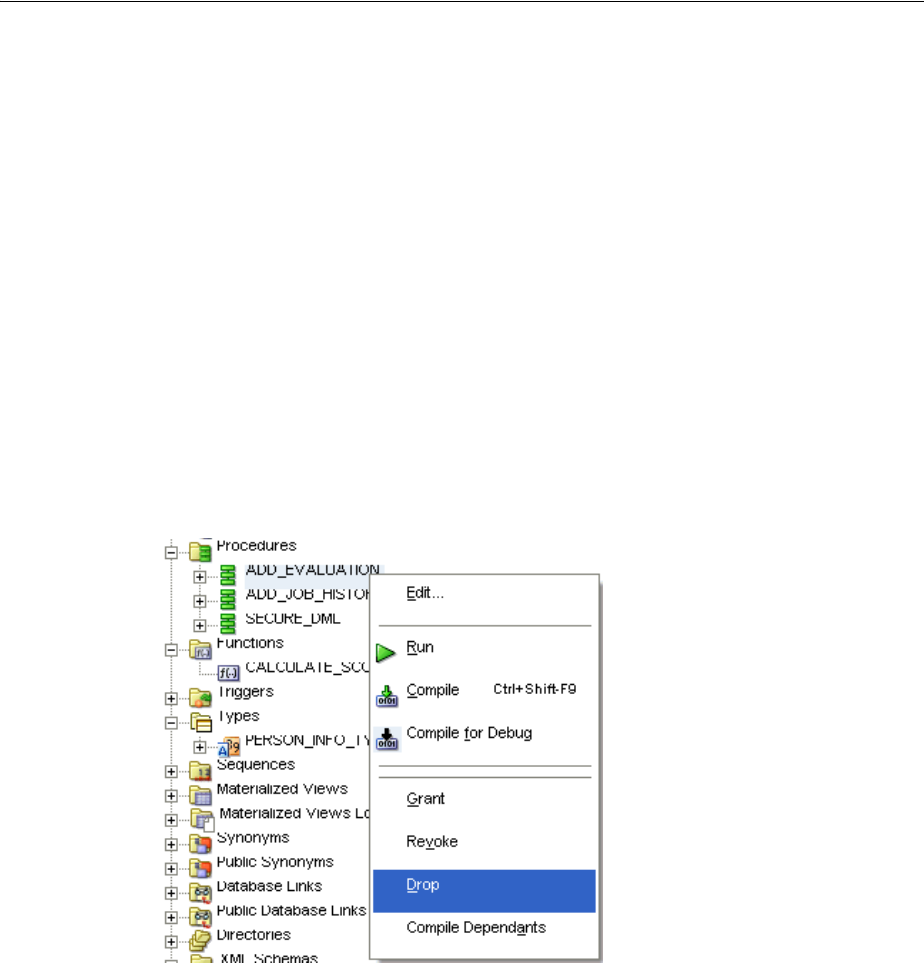
Creating and Using Standalone Procedures and Functions
4-8 Oracle Database 2 Day Developer's Guide
Disconnecting from the database hr_conn.
Dropping Procedures and Functions
You can delete a procedure or function from the database using either the Connection
Navigator, or the SQL DROP statement.
To drop a procedure:
You will drop the procedure ADD_EVALUATION.
1. In the Connections navigator hierarchy, right-click the ADD_EVALUATION
function.
Select Drop.
2. In the Drop window, click Apply.
See Also:
■Oracle Database SQL Language Reference for information on the
system privileges users need to run procedures and functions
■Oracle Database PL/SQL Language Reference for information on how
to use the EXECUTE IMMEDIATE statement for dynamic SQL
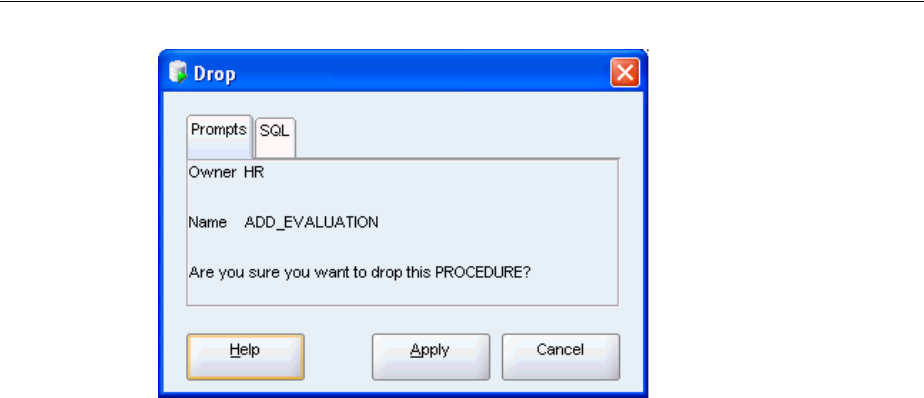
Creating and Using Packages
Developing and Using Stored Procedures 4-9
3. In the Confirmation dialog box, click OK.
You dropped the ADD_EVALUATION procedure from the database.
Creating and Using Packages
In the preceding section, you created and tested procedures and functions that were
schema objects. This approach can be useful for testing subsets or small features of
your application.
Enterprise level applications have much greater complexity: some of the interfaces and
types are directly available to user, while others are used only by ohter functions and
procedures and are never called by the user. PL/SQL enables you to formally state the
relationship between these subprograms by placing them in the same package, which
is a schema object that groups and name-qualifies logically related elements such as
PL/SQL types, variables, functions and procedures. Encapsulating these elements
inside a package also prevents, over the life time of the applications, unintended
consequences such as name capture that is discussed in "Overview of Stored
Procedures" on page 4-1.
Procedures and functions that are defined within a package are known as packaged
subprograms. Procedures and functions that are nested within other subprograms or
within a PL/SQL block are called local subprograms; they exist only inside the
enclosing block and cannot be referenced externally.
Another reason that standalone procedures and functions, like the ones in "Creating
and Using Standalone Procedures and Functions" on page 4-2, are limited to
large-scale development is that they can only send and receive scalar parameters
(NUMBER, VARCHAR2, and DATE), but cannot use a composite structure, RECORD,
unless it is defined in a package specification.
Packages usually have two parts: a specification and a body.
The package is defined by the package specification, which declares the types,
variables, constants, exceptions, cursors, functions and procedures that can be
See Also:
■Oracle Database SQL Language Reference for information on the
DROP PROCEDURE statement
■Oracle Database SQL Language Reference for information on the
DROP FUNCTION statement

Creating and Using Packages
4-10 Oracle Database 2 Day Developer's Guide
referenced from outside of the package. The specification is the interface to the
package. Applications that call the subprograms in a package only need to know the
names and parameters from the package specification.
The standard package specification has this form:
CREATE OR REPLACE PACKAGE package_name AS
type definitions for records, index-by tables
constants
exceptions
global variable declarations
procedure procedure_1(arg1, ...);
...
function function_1(arg1,...) return datat_ype;
...
END package_name;
The package body contains the code that implements these subprograms, the code for
all private subprograms that can only be invoked from within the package, and the
queries for the cursors. You can change the implementation details inside the package
body without invalidating the calling applications.
The package body has this form:
CREATE OR REPLACE PACKAGE BODY package_name AS
PROCEDURE procedure_1(arg1,...) IS
BEGIN
...
EXCEPTION
...
END procedure_1;
...
FUNCTION function_1(arg1,...) RETURN data_type IS result_variable data_type
BEGIN
...
RETURN result_variable;
EXCEPTION
...
END function_1;
...
END package_name;
Guidelines for Packages
You should become familiar with the packages supplied with Oracle Database and
avoid writing code that duplicates existing features.
You should design and define the package specification before writing the
implementation in the package body. In the specification, include only those parts that
must be publicly visible to calling programs, and hide private declarations within the
package body. This prevents unsafe dependencies of other programs on your
implementation details.
Because PL/SQL has a single-pass compiler, you may find that the dependencies
between correct and valid subprograms within the package body prevent you from
See Also:
■Oracle Database PL/SQL Language Reference for more information
on the syntax for creating a package
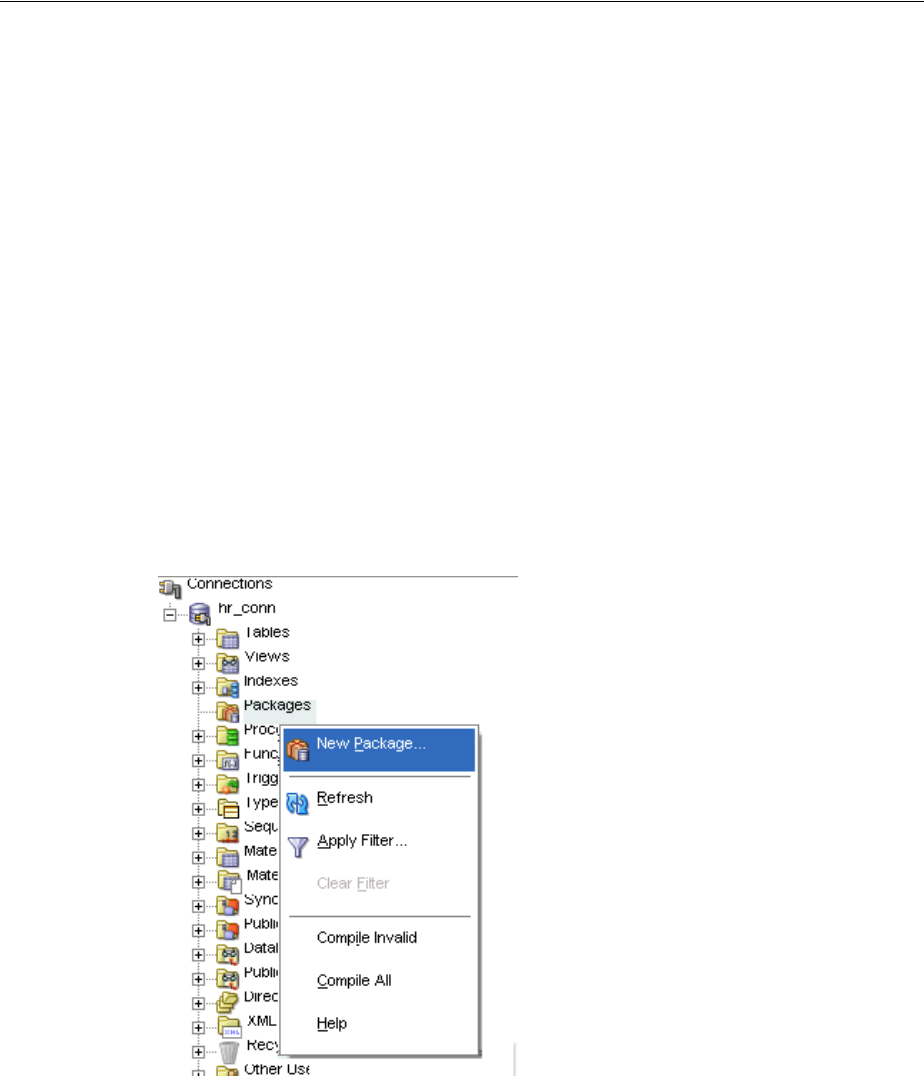
Creating and Using Packages
Developing and Using Stored Procedures 4-11
successfully compiling your package. You then need to declare these unknown
subprograms near the top of the package body, and specify them later. For this reason,
Oracle recommends that you add new elements at the end of the package specification
or body to minimize possible invalidation of dependents.
Creating a Package
You will create a package that encapsulates all the functionality necessary to perform
employee evaluations. After you create the package, "Modifying a Package" on
page 4-12 explains how you modify the package and to create the package body.
To create a package in SQL Developer navigation hierarchy:
1. In the Connections navigation hierarchy, right-click Packages.
2. Select New Package.
3. In the Create PL/SQL Package dialog, set the following parameters:
■Ensure that Schema is set to HR.
■Set Name to EMP_EVAL.
Click OK.
See Also:
■Oracle Database PL/SQL Language Reference for detailed information
on using PL/SQL packages
■Oracle Database PL/SQL Packages and Types Reference for default
packages available with Oracle Database
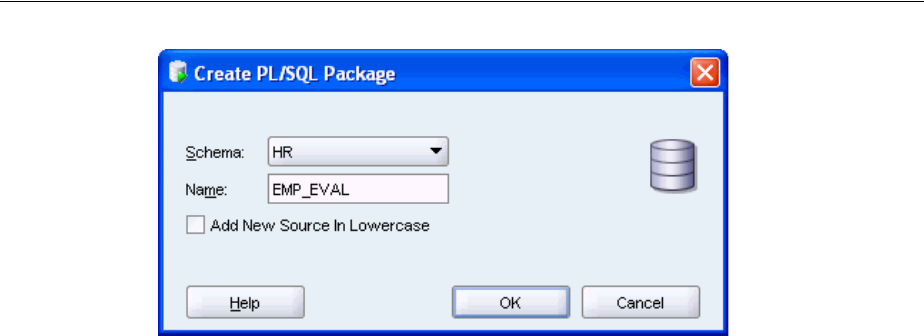
Creating and Using Packages
4-12 Oracle Database 2 Day Developer's Guide
4. The emp_eval pane opens with the following code:
CREATE OR REPLACE PACKAGE emp_eval AS
/* TODO enter package declarations (types, exceptions, methods etc) here */
END emp_eval;
Note that the title of the pane is in italic font, which indicates that the package is
not saved to the database.
5. From the File menu, select Save to compile and save the new package.
Alternatively, use the CTRL + S key combination.
In the Messages - Log pane, the system confirms that the package was created:
EMP_EVAL Compiled.
Note that the title of the emp_eval pane is in regular font, not italic; this indicates
that the procedure is saved to the database.
Example 4–1 shows how to create a package directly in the SQL Worksheet.
Example 4–1 Creating a PL/SQL Package
CREATE OR REPLACE PACKAGE eval AS
/* package */
END eval;
The results of the script follow.
PACKAGE eval Compiled.
Modifying a Package
In this section, you will modify package emp_eval.
To change the package specification:
You will change the package specification of emp_eval by specifying some functions
and procedures.
See Also:
■Oracle Database SQL Language Reference for information on the
CREATE PACKAGE statement (for the package specification)
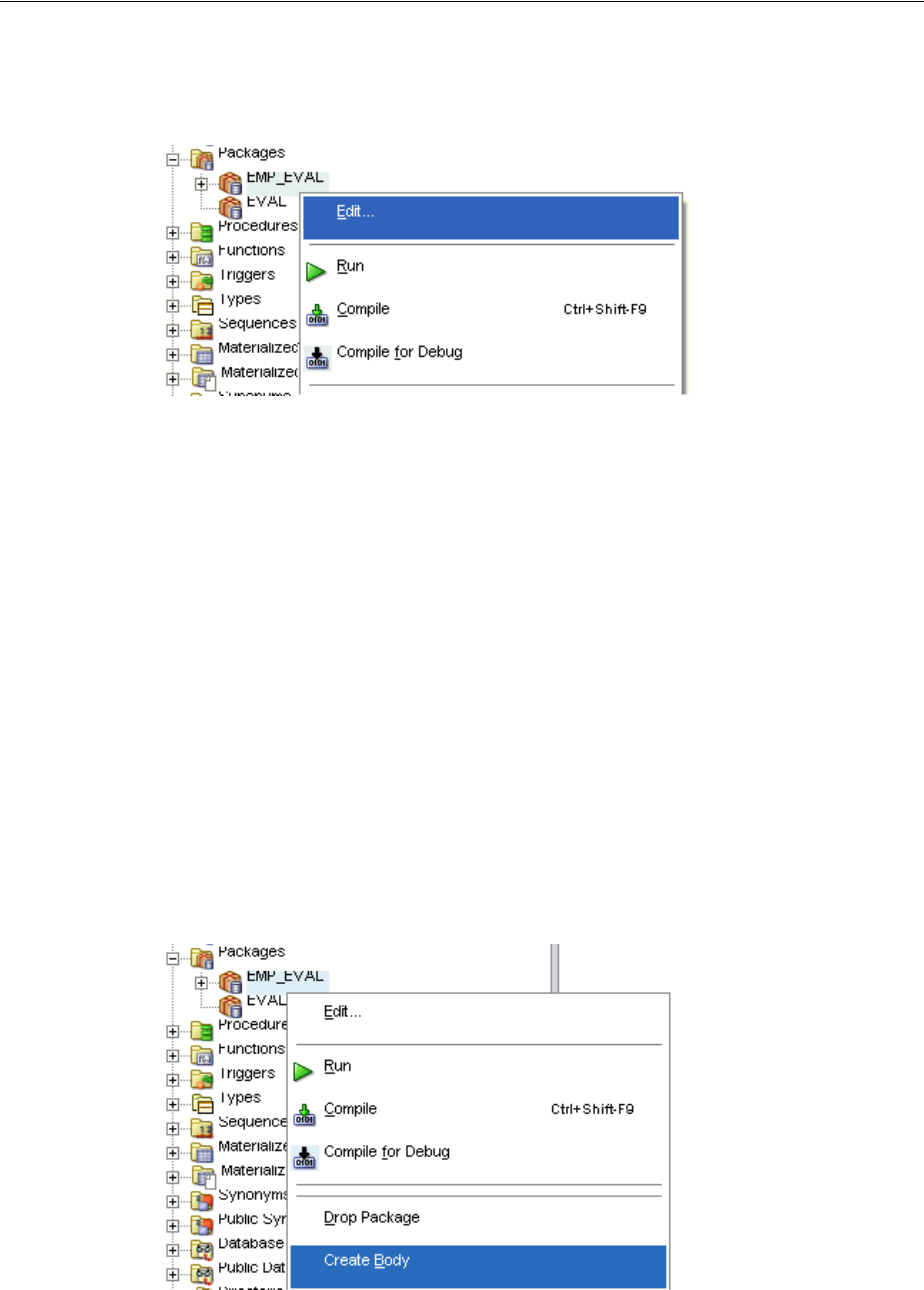
Creating and Using Packages
Developing and Using Stored Procedures 4-13
1. In the Connections navigation hierarchy, select Packages, and then right-click
emp_eval.
2. Select Edit.
3. In the EMP_EVAL pane, edit the package. The new code is in bold font.
create or replace
PACKAGE emp_eval AS
PROCEDURE eval_department(department_id IN NUMBER);
FUNCTION calculate_score(evaluation_id IN NUMBER
, performance_id IN NUMBER)
RETURN NUMBER;
END emp_eval;
4. Compile the package specification.
You will see the following message that confirms that the package compiled
correctly.
EMP_EVAL Compiled.
To create a package body:
You will create a package body for emp_eval by specifying some functions and
procedures.
1. In the Connections navigation hierarchy, right-click emp_eval.
2. Select Create Body.
3. In the emp_eval Body pane, you can see the automatically generated code for the
package body.

Creating and Using Packages
4-14 Oracle Database 2 Day Developer's Guide
CREATE OR REPLACE
PACKAGE BODY emp_eval AS
PROCEDURE eval_department(department_id IN NUMBER) AS
BEGIN
/* TODO implementation required */
NULL;
END eval_department;
FUNCTION calculate_score(evaluation_id IN NUMBER
, performance_id IN NUMBER)
RETURN NUMBER AS
BEGIN
/* TODO implementation required */
RETURN NULL;
END calculate_score;
END emp_eval;
4. Compile and save the package body.
You will see the following message that confirms that the package body compiled
correctly.
EMP_EVAL Body Compiled.
Dropping a Package
You can delete a package from the database either by using the Connections navigator
hierarchy or the SQL DROP statement. When you drop a package, you remove from the
database both the package specification and its package body.
To drop a package:
1. In the Connections navigator hierarchy, select Packages, and then right-click the
EVAL package.
2. Select Drop Package.
See Also:
■Oracle Database SQL Language Reference for information on the
CREATE PACKAGE BODY statement
■Oracle Database SQL Language Reference for information on the
ALTER PACKAGE statement

Using Variables and Constants
Developing and Using Stored Procedures 4-15
3. In the Drop Package dialog, click Apply.
4. In the Confirmation dialog, click OK.
Using Variables and Constants
One of the significant advantages that PL/SQL offers over SQL is its ability to use
variables and constants in programming constructs.
A variable is defined by the user to hold a specified value of a particular data type.
This value is mutable; it can change at runtime.
A constant holds a value that cannot be changed; the compiler ensures that this value
is immutable and does not compile any code that could change it. You should use
constants in your code instead of direct values because they will make it simpler to
maintenance of your code base over time. When you declare all values that do not
change as constants, this optimizes your compiled code.
PL/SQL Data Types
In addition to the SQL data types such as VARCHAR2, DATE, NUMBER, and so on, Oracle
Database supports data types that you can use only through PL/SQL. These data
types include BOOLEAN, composite data types such as RECORD, reference types such as
REF CURSOR and INDEX BY TABLE, and numerous specialized types that represent
numbers, characters, and date elements. One numeric type, PLS_INTEGER, is
especially useful because it performs binary integer arithmetic and has significant
performance benefits. Note that these PL/SQL types cannot be used at the level of the
schema (and therefore, in tables), but only for types and processes that are defined
within a package.
See Also:
■Oracle Database SQL Language Reference for information on the
DROP PACKAGE statement
See Also:
■Oracle Database Concepts for information about variables and
constants

Using Variables and Constants
4-16 Oracle Database 2 Day Developer's Guide
Using Variables and Constants
Variables and constants can have any SQL or PL/SQL data type, and are declared in
the declaration block of a subprogram. By default, any variable that is declared has a
value of NULL. When defining a constant, you must use the CONSTANT clause, and
assign a value immediately.
Using Comments
In PL/SQL, in-line comments start with a double hyphen, --, and extend to the end of
the line. Multi-line comments must start with a slash and asterisk, /*, and terminate
with an asterisk and a slash, */.
Using Identifiers
Identifiers name PL/SQL program units such as constants, variables, and
subprograms. All identifiers must have at most 30 characters, and must start with a
letter that is followed by any combination of letters, numerals, and the signs '$', '_',
and '#'. Other characters cannot be used in identifiers.
Note that because PL/SQL is not case-sensitive except in managing string and
character literals, you can use uppercase and lowercase letters interchangeably. This
means that an identifier last_name is equivalent to LAST_NAME. Declaring the
second identifier generates an error.
You should use meaningful names for your variables and constants, and use a good
naming convention. For example, you could start each constant name with 'cons_'.
Also, remember not to use reserved words as identifiers.
Declaring Variables and Constants
You will update the new function of the emp_eval package, calculate_score,
which calculates the final score for the employee evaluation by combing all weighted
scores in different categories.
See Also:
■Oracle Database PL/SQL Language Reference for general information
on PL/SQL data types
■Oracle Database PL/SQL Language Reference for information about
the PLS_INTEGER
See Also:
■Oracle Database PL/SQL Language Reference
See Also:
■Oracle Database PL/SQL Language Reference
See Also:
■Oracle Database PL/SQL Language Reference for information on the
scope and visibility of identifiers
■Oracle Database PL/SQL Language Reference for information how to
collect data on identifiers
■Oracle Database PL/SQL Language Reference for information on how
PL/SQL resolves identifier names
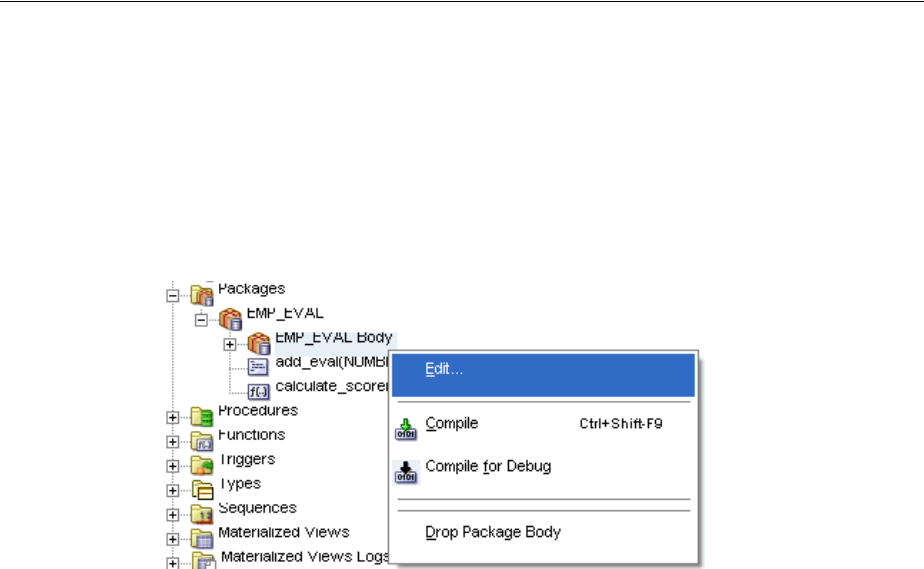
Using Variables and Constants
Developing and Using Stored Procedures 4-17
To declare variables and constants:
1. In the Connections navigation hierarchy, click the plus sign (+) beside Packages to
expand the group.
2. Click the 'plus' beside emp_eval to expand the package.
3. Right-click EMP_EVAL Body.
4. Select Edit.
emp_eval Body pane appears.
5. In the emp_eval Body pane, modify function calculate_score by adding
variables and constants, as shown by the following code. New code is bold font.
FUNCTION calculate_score(evaluation_id IN NUMBER
, performance_id IN NUMBER)
RETURN NUMBER AS
n_score NUMBER(1,0); -- a variable
n_weight NUMBER; -- a variable
max_score CONSTANT NUMBER(1,0) := 9; -- a constant limit check
max_weight CONSTANT NUMBER(8,8) := 1; -- a constant limit check
BEGIN
RETURN NULL;
END calculate_score;
6. Use the key combination 'CTRL'+'S' to save the updated package body.
The following message appears in the Messages-Log pane:
EMP_EVAL Body Compiled
Declaring Variables with Structure Identical to Database Columns
In "Declaring Variables and Constants", you modified function calculate_score by
adding two variables, n_score and n_weight. These variables will represent values
from tables in the database: n_score is stored in the scores table, and n_weight is
stored in the performance_parts table. The data types you used for these variables
match the column data type definitions in the tables.
Over time, applications evolve and the column definitions may change; this may
invalidate the calculate_score function. For easier code maintenance, you should
use special qualifiers that declare variables with data types that match the definitions
of the appropriate columns and rows. These qualifiers are %TYPE and %ROWTYPE.
See Also:
■Oracle Database PL/SQL Language Reference for information on
assigning values to variables
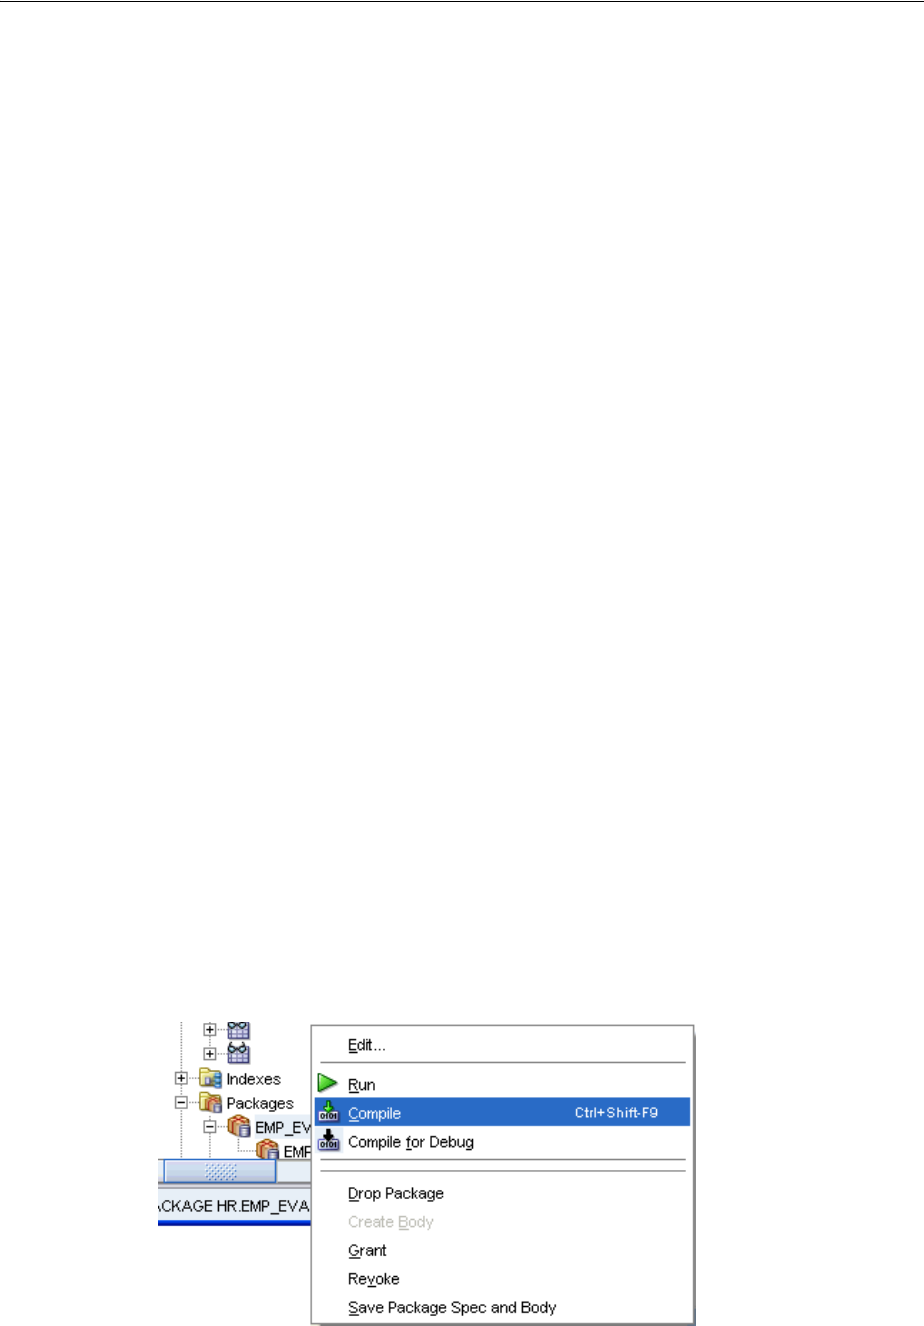
Using Variables and Constants
4-18 Oracle Database 2 Day Developer's Guide
■The %TYPE attribute supplies the data type of a table column or another variable.
This has the advantages of guaranteeing the correct data type assignment, and the
correct implementation of the function at runtime if the data type of the table
column changes.
■The %ROWTYPE attribute supplies the definition of a row in a table to a RECORD
variable. Columns in a table row and the corresponding fields in a RECORD have
the same names and data types. The advantages of using %ROWTYPE are the same
as for %TYPE. See "Using Composite Data Structures; Records" on page 4-29 for a
demonstration.
The following task shows how to use the %TYPE attribute in a function. You will edit
the function calculate_score to assign to variables n_score and n_weight the
data types that match the columns of the source tables. Note that the constants max_
score and max_weight will be used to check equivalence to table values, so they too
must match the table types.
To use the %TYPE attribute:
1. In the emp_eval Body pane, modify function calculate_score by changing
the definition of the variables, as shown by the following code. New code is bold
font.
FUNCTION calculate_score(evaluation_id IN scores.evaluation_id%TYPE
, performance_id IN scores.performance_id%TYPE)
RETURN NUMBER AS
n_score scores.score%TYPE; -- from SCORES
n_weight performance_parts.weight%TYPE; -- from PERFORMANCE_PARTS
max_score CONSTANT scores.score%TYPE := 9; -- a constant limit check
max_weight CONSTANT performance_parts.weight%TYPE := 1;
-- a constant limit check
BEGIN
RETURN NULL;
END calculate_score;
2. In the emp_eval package specification, change the declaration of the function
calculate_score.
FUNCTION calculate_score(evaluation_id IN scores.evaluation_id%TYPE
, performance_id IN scores.performance_id%TYPE)
RETURN NUMBER;
3. In the Connections navigation hierarchy, right-click the emp_eval package, and
select Compile. Alternatively, use the Ctrl+Shift+F9 keyboard shortcut.
The following message appears in the Messages-Log pane:

Using Variables and Constants
Developing and Using Stored Procedures 4-19
EMP_EVAL Body Compiled
To use the %ROWTYPE attribute:
Look at the code used in the eval_department procedure in"Using Explicit Cursors"
on page 4-33.
Assigning Values to Variables
You can assign values to a variable in three general ways: through the assignment
operator, by selecting a value into the variable, or by binding a variable. This section
covers the first two methods. Variable binding is described in 2 Day + guides for
Application Express, Java, .NET, and PHP.
Assigning Values with the Assignment Operator
You can assign values to a variable both in the declaration and the body of a
subprogram.
The following code shows the standard declaration of variables and constants. In
procedures and functions, the declaration block does not use the DECLARE keyword;
instead, it follows the AS keyword of the subprogram definition.
Example 4–2 Assigning variable values in a declaration
In the emp_eval Body pane, modify function calculate_score by adding a new
variable running_total. The value of running_total is also the new return value
of the function. You will set the initial value of the return variable to 0. Note that
running_total is declared as a general NUMBER because it will hold a product of
two NUMBERs with different precision and scale. New code is bold font.
FUNCTION calculate_score(evaluation_id IN scores.evaluation_id%TYPE
, performance_id IN scores.performance_id%TYPE)
RETURN NUMBER AS
n_score scores.score%TYPE; -- from SCORES
n_weight performance_parts.weight%TYPE; -- from PERFORMANCE_PARTS
running_total NUMBER := 0; -- used in calculations
max_score CONSTANT scores.score%TYPE := 9; -- a constant limit check
max_weight CONSTANT performance_parts.weight%TYPE:= 1;
-- a constant limit check
BEGIN
RETURN running_total;
END calculate_score;
Compile the emp_eval Body.
See Also:
■Oracle Database PL/SQL Language Reference
See Also:
■Oracle Database PL/SQL Language Reference
■Oracle Database 2 Day + .NET Developer's Guide
■Oracle Database 2 Day + PHP Developer's Guide
■Oracle Database 2 Day + Java Developer's Guide.
■Oracle Database 2 Day + Application Express Developer's Guide

Using Variables and Constants
4-20 Oracle Database 2 Day Developer's Guide
You can also assign values to variables within the body of a subprogram. You will edit
the function calculate_score by using the running_total variable inside the
body of the function to hold a value of an expression.
Example 4–3 Assigning variable values in the body of a function
In the emp_eval Body pane, modify function calculate_score by assigning to the
running_total variable the value of an expression, as shown by the following code.
New code is bold font.
FUNCTION calculate_score(evaluation_id IN scores.evaluation_id%TYPE
, performance_id IN scores.performance_id%TYPE)
RETURN NUMBER AS
n_score scores.score%TYPE; -- from SCORES
n_weight performance_parts.weight%TYPE; -- from PERFORMANCE_PARTS
running_total NUMBER :=0; -- used in calculations
max_score CONSTANT scores.score%TYPE := 9; -- a constant limit check
max_weight CONSTANT performance_parts.weight%TYPE:= 1;
-- a constant limit check
BEGIN
running_total := max_score * max_weight;
RETURN running_total;
END calculate_score;
Compile and save emp_eval Body.
Assigning Values from the Database
The simplest possible assignment of a value is to use the assignment operator (:=) as
you did for the variable running_total in "Assigning Values with the Assignment
Operator" on page 4-19.
However, the purpose of function calculate_score is to perform a calculation
based on values stored in database tables. To use existing database values in a
procedure, function, or package, you must assign these values to a variable by using a
SELECT INTO statement. You can then use the variable in subsequent computations.
Example 4–4 Assigning to a variable a values from the database
In the emp_eval Body pane, modify function calculate_score by assigning the
table values to the variables n_score and n_weight, and then assigning their
product to the running_total variable, as shown by the following code. New code
is bold font.
FUNCTION calculate_score(evaluation_id IN scores.evaluation_id%TYPE
, performance_id IN scores.performance_id%TYPE)
RETURN NUMBER AS
n_score scores.score%TYPE; -- from SCORES
n_weight performance_parts.weight%TYPE; -- from PERFORMANCE_PARTS
running_total NUMBER := 0; -- used in calculations
max_score CONSTANT scores.score%TYPE := 9; -- a constant limit check
max_weight CONSTANT performance_parts.weight%TYPE:= 1;
-- a constant limit check
BEGIN
See Also:
■Oracle Database PL/SQL Language Reference for information on
assigning values to variables

Using Variables and Constants
Developing and Using Stored Procedures 4-21
SELECT s.score INTO n_score FROM scores s
WHERE evaluation_id = s.evaluation_id
AND performance_id = s.performance_id;
SELECT p.weight INTO n_weight FROM performance_parts p
WHERE performance_id = p.performance_id;
running_total := n_score * n_weight;
RETURN running_total;
END calculate_score;
Compile and save emp_eval Body.
Similarly, add a new add_eval procedure for inserting new records into the
evaluations table, based on the content of the corresponding row in the
employees table. Note that add_eval is using the sequence evaluations_seq.
Example 4–5 Creating a new table row with values from another table
In the emp_eval Body pane, above the line END emp_eval, add procedure add_
eval, which uses some columns from the employees table to insert rows into the
evaluations table. Note also that you will create the local function add_eval in the
body of the emp_eval package, but not declare it in the package specification. This
means that add_eval may be invoked only within the emp_eval package, by
another subprogram.
PROCEDURE add_eval(employee_id IN employees.employee_id%TYPE, today IN DATE) AS
-- placeholders for variables
job_id employees.job_id%TYPE;
manager_id employees.manager_id%TYPE;
department_id employees.department_id%TYPE;
BEGIN
-- extracting values from employees for later insertion into evaluations
SELECT e.job_id INTO job_id FROM employees e
WHERE employee_id = e.employee_id;
SELECT e.manager_id INTO manager_id FROM employees e
WHERE employee_id = e.employee_id;
SELECT e.department_id INTO department_id FROM employees e
WHERE employee_id = e.employee_id;
-- inserting a new row of values into evaluations table
INSERT INTO evaluations VALUES (
evaluations_seq.NEXTVAL, -- evaluation_id
employee_id, -- employee_id
today, -- evaluation_date
job_id, -- job_id
manager_id, -- manager_id
department_id, -- department_id
0); -- total_score
END add_eval;
Compile and save emp_eval Body.
See Also:
■Oracle Database PL/SQL Language Reference for more information
on assigning values to variables
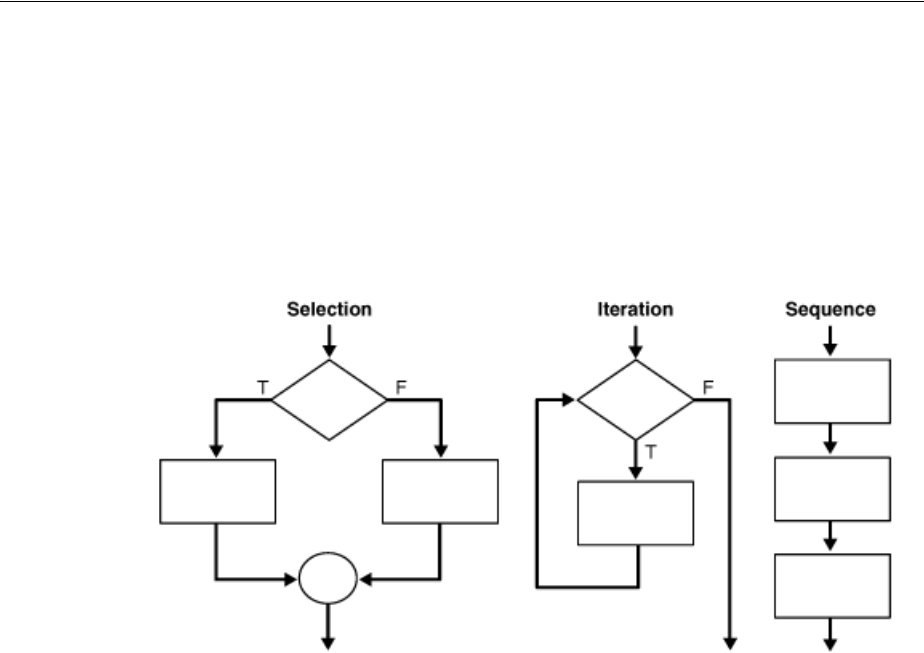
Controlling Program Flow
4-22 Oracle Database 2 Day Developer's Guide
Controlling Program Flow
Control structures are the most powerful feature of the PL/SQL extension to SQL.
They let you manipulate data and process it using conditional selection, iterative
control, and sequential statements. Conditional selection is a situation where you may
have different types of data values, and may need to perform different processing
steps. Iterative control is a situation where you need to perform repetitive process
steps on similar data. In general, all the lines of code in your programs run
sequentially; sequential control means that you are choosing to execute an alternate
labeled programming branch (GOTO statement).
This section will only cover conditional selection and iterative program flow
structures, such as IF...THEN...ELSE, CASE, FOR...LOOP, WHILE...LOOP, and
LOOP...EXIT WHEN.
Using Conditional Selection Control
Conditional selection structures test an expression that evaluates to a BOOLEAN value
TRUE or FALSE. Depending on the value, control structures execute the assigned
sequence of statements. There are two general selection control mechanisms:
IF...THEN...ELSE and its variations, and the CASE statement.
Using IF...THEN...ELSE Selection Control
The IF...THEN...ELSE statement runs a sequence of statements conditionally. If the
test condition evaluates to TRUE, the program runs statements in the THEN clause. If
the condition evaluates to FALSE, the program runs the statements in the ELSE clause.
You can also use this structure for testing multiple conditions if you include the ELSIF
See Also:
■Oracle Database PL/SQL Language Reference for an overview of
PL/SQL control structures
See Also:
■ Oracle Database PL/SQL Language Reference for more information
on IF...THEN...ELSE selection control
■Oracle Database PL/SQL Language Reference for more information
on CASE...WHEN selection control

Controlling Program Flow
Developing and Using Stored Procedures 4-23
keyword. The general form of the IF...THEN...[ELSIF]...ELSE statement
follows:
IF condition_1 THEN
...;
ELSIF condition_2 THEN -- optional
...;
ELSE -- optional
...;
END IF;
For example, the sample company could have a rule that an employee evaluation
should be done twice a year (December 31 and June 30) in the first ten years of
employment, but only once a year (December 31) subsequently. You could implement
this rule in an eval_frequency function that determines how many times in each
year an evaluation should be performed by using the IF...THEN...ELSE clause on
the value of the hire_date column.
The function eval_frequency uses the employees.hire_date value to determine
if evaluations should be performed once each year (over 10 years employment) or
twice each year.
Note also that you will create the function eval_frequency in the body of the emp_
eval package, but not declare it in the package specification. This means that eval_
frequency may be invoked only within the emp_eval package, by another
subprogram.
Example 4–6 Using the IF... THEN...ELSE Selection Control
In the emp_eval Body pane, add eval_frequency function immediately before the
END emp_eval; statement, as shown by the following code. The control structures
are in bold font.
FUNCTION eval_frequency (employee_id IN employees.employee_id%TYPE)
RETURN PLS_INTEGER AS
hire_date employees.hire_date%TYPE; -- start of employment
today employees.hire_date%TYPE; -- today's date
eval_freq PLS_INTEGER; -- frequency of evaluations
BEGIN
SELECT SYSDATE INTO today FROM DUAL; -- set today's date
SELECT e.hire_date INTO hire_date -- determine when employee started
FROM employees e
WHERE employee_id = e.employee_id;
IF((hire_date + (INTERVAL '120' MONTH)) < today) THEN
eval_freq := 1;
ELSE
eval_freq := 2;
END IF;
RETURN eval_freq;
END eval_frequency;
Compile and save emp_eval Body.
See Also:
■Oracle Database PL/SQL Language Reference for more information
on IF...THEN...ELSE selection control

Controlling Program Flow
4-24 Oracle Database 2 Day Developer's Guide
Using CASE...WHEN Selection Control
The CASE...WHEN construct is a good alternative to nested IF...THEN statements if
the variable that determines the course of action has several possible values. The CASE
evaluates a condition, and performs a different action for each possible value.
Whenever possible, use the CASE...WHEN statement instead of IF...THEN, both for
readability and efficiency. The general form of the CASE...WHEN construct follows:
CASE condition
WHEN value_1 THEN expression_1;
WHEN value_2 THEN expression_2;
...
ELSE expression_default;
END CASE;
Suppose that in the make_evaluation function from "Using IF...THEN...ELSE
Selection Control" on page 4-22, you wanted to notify the hr user if a long-time
employee who holds one of a select positions should be considered for a salary raise.
Depending on the value of employees.job_id, the program logic should notify the
user of the suggested salary raise.
Note that you will use the DBMS_OUTPUT.PUT_LINE procedure, described in Oracle
Database PL/SQL Packages and Types Reference.
Example 4–7 Using CASE...WHEN Conditional Control
In the emp_eval Body pane, edit eval_frequency function to add a job_id
variable and a CASE statement that is based on the value of the job_id, as shown by
the following code. New code is in bold font.
FUNCTION eval_frequency (employee_id IN employees.employee_id%TYPE)
RETURN PLS_INTEGER AS
hire_date employees.hire_date%TYPE; -- start of employment
today employees.hire_date%TYPE; -- today's date
eval_freq PLS_INTEGER; -- frequency of evaluations
job_id employees.job_id%TYPE; -- category of the job
BEGIN
SELECT SYSDATE INTO today FROM DUAL; -- set today's date
SELECT e.hire_date INTO hire_date -- determine when employee started
FROM employees e
WHERE employee_id = e.employee_id;
IF((hire_date + (INTERVAL '120' MONTH)) < today) THEN
eval_freq := 1;
/* Suggesting salary increase based on position */
SELECT e.job_id INTO job_id FROM employees e
WHERE employee_id = e.employee_id;
CASE job_id
WHEN 'PU_CLERK' THEN DBMS_OUTPUT.PUT_LINE(
'Consider 8% salary increase for employee number ' || employee_id);
WHEN 'SH_CLERK' THEN DBMS_OUTPUT.PUT_LINE(
'Consider 7% salary increase for employee number ' || employee_id);
WHEN 'ST_CLERK' THEN DBMS_OUTPUT.PUT_LINE(
'Consider 6% salary increase for employee number ' || employee_id);
WHEN 'HR_REP' THEN DBMS_OUTPUT.PUT_LINE(
'Consider 5% salary increase for employee number ' || employee_id);
WHEN 'PR_REP' THEN DBMS_OUTPUT.PUT_LINE(
'Consider 5% salary increase for employee number ' || employee_id);
WHEN 'MK_REP' THEN DBMS_OUTPUT.PUT_LINE(

Controlling Program Flow
Developing and Using Stored Procedures 4-25
'Consider 4% salary increase for employee number ' || employee_id);
ELSE DBMS_OUTPUT.PUT_LINE(
'Nothing to do for employee #' || employee_id);
END CASE;
ELSE
eval_freq := 2;
END IF;
RETURN eval_freq;
END eval_frequency;
Compile and save emp_eval Body.
Using Iterative Control
Iteration structures, or loops, execute a sequence of statements repeatedly. There are
three basic types of loops, the FOR...LOOP, the WHILE...LOOP, and the
LOOP...EXIT WHEN.
Using the FOR...LOOP
The FOR...LOOP repeats a sequence of steps a defined number of times and uses a
counter variable that must be in the defined range of integers to run the loop. The loop
counter is implicitly declared in the FOR...LOOP statement, and implicitly
incremented every time the loop runs. Note that the value of the loop counter can be
used within the body of the loop, but it cannot be changed programmatically. The
FOR...LOOP statement has the following form:
FOR counter IN integer_1..integer_2 LOOP
...
END LOOP;
Suppose that in addition to recommending that some employees receive a raise, as
described in "Using CASE...WHEN Selection Control" on page 4-24, function eval_
frequency prints how the salary for the employee would change over a set number
of years if this increase in salary continued.
Note that you will use the DBMS_OUTPUT.PUT procedure, described in Oracle Database
PL/SQL Packages and Types Reference.
Example 4–8 Using FOR...LOOP iterative control
In the emp_eval Body pane, edit eval_frequency function so that it uses the
proposed salary increase (sal_raise) that is assigned in the CASE block to print the
proposed salary over a number of years, starting with the current salary, salary. The
new code is in bold font.
FUNCTION eval_frequency (employee_id IN employees.employee_id%TYPE)
RETURN PLS_INTEGER AS
See Also:
■Oracle Database PL/SQL Language Reference for more information
on CASE...WHEN selection control
See Also:
■Oracle Database PL/SQL Language Reference for more information
on controlling LOOP iterations

Controlling Program Flow
4-26 Oracle Database 2 Day Developer's Guide
hire_date employees.hire_date%TYPE; -- start of employment
today employees.hire_date%TYPE; -- today's date
eval_freq PLS_INTEGER; -- frequency of evaluations
job_id employees.job_id%TYPE; -- category of the job
salary employees.salary%TYPE; -- current salary
sal_raise NUMBER(3,3) := 0; -- proposed % salary increase
BEGIN
SELECT SYSDATE INTO today FROM DUAL; -- set today's date
SELECT e.hire_date INTO hire_date -- determine when employee started
FROM employees e
WHERE employee_id = e.employee_id;
IF((hire_date + (INTERVAL '120' MONTH)) < today) THEN
eval_freq := 1;
/* Suggesting salary increase based on position */
SELECT e.job_id INTO job_id FROM employees e
WHERE employee_id = e.employee_id;
SELECT e.salary INTO salary FROM employees e
WHERE employee_id = e.employee_id;
CASE job_id
WHEN 'PU_CLERK' THEN sal_raise := 0.08;
WHEN 'SH_CLERK' THEN sal_raise := 0.07;
WHEN 'ST_CLERK' THEN sal_raise := 0.06;
WHEN 'HR_REP' THEN sal_raise := 0.05;
WHEN 'PR_REP' THEN sal_raise := 0.05;
WHEN 'MK_REP' THEN sal_raise := 0.04;
ELSE NULL; -- job type does not match ones that should consider increases
END CASE;
/* If a salary raise is not zero, print the salary schedule */
IF (sal_raise != 0) THEN -- start code for salary schedule printout
BEGIN
DBMS_OUTPUT.PUT_LINE('If the salary ' || salary || ' increases by ' ||
ROUND((sal_raise * 100),0) ||
'% each year over 5 years, it would be ');
FOR loop_c IN 1..5 LOOP
salary := salary * (1 + sal_raise);
DBMS_OUTPUT.PUT (ROUND(salary,2) ||', ');
END LOOP;
DBMS_OUTPUT.PUT_LINE('in successive years.');
END;
END IF;
ELSE
eval_freq := 2;
END IF;
RETURN eval_freq;
END eval_frequency;
Compile the emp_eval Body.

Controlling Program Flow
Developing and Using Stored Procedures 4-27
Using the WHILE...LOOP
The WHILE...LOOP repeats as long as a condition holds TRUE. The condition
evaluates at the top of each loop and if TRUE, the statements in the body of the loop
run. If the condition is FALSE or NULL, the control passes to the next statement after
the loop. The general form of the WHILE...LOOP control structure follows.
WHILE condition LOOP
...
END LOOP;
Note that the WHILE...LOOP may run indefinatelly, so use it with care.
Suppose that the EVAL_FREQUENCY function in "Using the FOR...LOOP" on page 4-25
uses the WHILE...LOOP instead of the FOR...LOOP, and terminates after the
proposed salary reaches the upper salary limit for the job_id.
Example 4–9 Using WHILE...LOOP Iterative Control
In the emp_eval Body pane, edit eval_frequency function so that it uses the
proposed salary increase (sal_raise) that is assigned in the CASE block to print the
proposed salary over a number of years and stops when it reaches the maximum level
possible for the job_id. The new code is in bold font.
FUNCTION eval_frequency (employee_id IN employees.employee_id%TYPE)
RETURN PLS_INTEGER AS
hire_date employees.hire_date%TYPE; -- start of employment
today employees.hire_date%TYPE; -- today's date
eval_freq PLS_INTEGER; -- frequency of evaluations
job_id employees.job_id%TYPE; -- category of the job
salary employees.salary%TYPE; -- current salary
sal_raise NUMBER(3,3) := 0; -- proposed % salary increase
sal_max jobs.max_salary%TYPE; -- maximum salary for a job
BEGIN
SELECT SYSDATE INTO today FROM DUAL; -- set today's date
SELECT e.hire_date INTO hire_date -- determine when employee started
FROM employees e
WHERE employee_id = e.employee_id;
IF((hire_date + (INTERVAL '120' MONTH)) < today) THEN
eval_freq := 1;
/* Suggesting salary increase based on position */
SELECT e.job_id INTO job_id FROM employees e
WHERE employee_id = e.employee_id;
SELECT e.salary INTO salary FROM employees e
WHERE employee_id = e.employee_id;
SELECT j.max_salary INTO sal_max FROM jobs j
WHERE job_id = j.job_id;
CASE job_id
WHEN 'PU_CLERK' THEN sal_raise := 0.08;
WHEN 'SH_CLERK' THEN sal_raise := 0.07;
WHEN 'ST_CLERK' THEN sal_raise := 0.06;
WHEN 'HR_REP' THEN sal_raise := 0.05;
WHEN 'PR_REP' THEN sal_raise := 0.05;
See Also:
■Oracle Database PL/SQL Language Reference for information on the
syntax of LOOP statements

Controlling Program Flow
4-28 Oracle Database 2 Day Developer's Guide
WHEN 'MK_REP' THEN sal_raise := 0.04;
ELSE NULL;
END CASE;
/* If a salary raise is not zero, print the salary schedule */
IF (sal_raise != 0) THEN -- start code for salary schedule printout
BEGIN
DBMS_OUTPUT.PUT_LINE('If the salary ' || salary || ' increases by ' ||
ROUND((sal_raise * 100),0) ||
'% each year, it would be ');
WHILE salary <= sal_max LOOP
salary := salary * (1 + sal_raise);
DBMS_OUTPUT.PUT (ROUND(salary,2) ||', ');
END LOOP;
DBMS_OUTPUT.PUT_LINE('in successive years.');
END;
END IF;
ELSE
eval_freq := 2;
END IF;
RETURN eval_freq;
END eval_frequency;
Using the LOOP...EXIT WHEN
The LOOP...EXIT WHEN structure enables you to exit the loop if further processing is
undesirable. If the EXIT WHEN condition evaluates to TRUE, the loop exits and control
passes to the next statement.
The eval_frequency function in "Using the WHILE...LOOP" on page 4-27 uses the
WHILE...LOOP. Note that the last computed value may (and typically does) exceed
the maximum possible value for a salary in the last iteration of the loop. If you use the
LOOP_EXIT WHEN construct instead of the WHILE...LOOP, you can have finer
control for terminating the loop.
Example 4–10 Using LOOP...EXIT WHEN Iterative Control
In the emp_eval Body pane, edit eval_frequency function so that it uses the
proposed salary increase (sal_raise) that is assigned in the CASE block to print the
proposed salary over a number of years and stops when it reaches the maximum level
possible for the job_id. The new code is in bold font.
FUNCTION eval_frequency (employee_id IN employees.employee_id%TYPE)
RETURN PLS_INTEGER AS
hire_date employees.hire_date%TYPE; -- start of employment
today employees.hire_date%TYPE; -- today's date
eval_freq PLS_INTEGER; -- frequency of evaluations
job_id employees.job_id%TYPE; -- category of the job
salary employees.salary%TYPE; -- current salary
sal_raise NUMBER(3,3) := 0; -- proposed % salary increase
sal_max jobs.max_salary%TYPE; -- maximum salary for a job
See Also:
■Oracle Database PL/SQL Language Reference for more information
on WHILE...LOOP statements

Using Composite Data Structures; Records
Developing and Using Stored Procedures 4-29
BEGIN
SELECT SYSDATE INTO today FROM DUAL; -- set today's date
SELECT e.hire_date INTO hire_date -- determine when employee started
FROM employees e
WHERE employee_id = e.employee_id;
IF((hire_date + (INTERVAL '120' MONTH)) < today) THEN
eval_freq := 1;
/* Suggesting salary increase based on position */
SELECT e.job_id INTO job_id FROM employees e
WHERE employee_id = e.employee_id;
SELECT e.salary INTO salary FROM employees e
WHERE employee_id = e.employee_id;
SELECT j.max_salary INTO sal_max FROM jobs j
WHERE job_id = j.job_id;
CASE job_id
WHEN 'PU_CLERK' THEN sal_raise := 0.08;
WHEN 'SH_CLERK' THEN sal_raise := 0.07;
WHEN 'ST_CLERK' THEN sal_raise := 0.06;
WHEN 'HR_REP' THEN sal_raise := 0.05;
WHEN 'PR_REP' THEN sal_raise := 0.05;
WHEN 'MK_REP' THEN sal_raise := 0.04;
ELSE NULL;
END CASE;
/* If a salary raise is not zero, print the salary schedule */
IF (sal_raise != 0) THEN -- start code for salary schedule printout
BEGIN
DBMS_OUTPUT.PUT_LINE('If the salary ' || salary || ' increases by ' ||
ROUND((sal_raise * 100),0) ||
'% each year, it would be ');
LOOP
salary := salary * (1 + sal_raise);
EXIT WHEN salary > sal_max;
DBMS_OUTPUT.PUT (ROUND(salary,2) ||', ');
END LOOP;
DBMS_OUTPUT.PUT_LINE('in successive years.');
END;
END IF;
ELSE
eval_freq := 2;
END IF;
RETURN eval_freq;
END eval_frequency;
Using Composite Data Structures; Records
A composite data structure, or a record, is a group of related data items stored in
fields, each with its own name and data type. You can think of a record as a variable
that can hold a table row, or some columns from a table row. The fields correspond to
See Also:
■Oracle Database PL/SQL Language Reference for more information
on LOOP...EXIT WHEN statement

Using Composite Data Structures; Records
4-30 Oracle Database 2 Day Developer's Guide
table columns. The record structure is very efficient for passing related items to a
subprogram as a single parameter, and for effectively using related fields from
different tables during run time.
You must define a RECORD as a type, and access its fields through the point notation.
The general form for defining and using a record follows:
TYPE record_name IS RECORD( -- define record type
field_1 data_type, -- define fields in record
...
field_n data_type);
...
variable_name record_name; -- define variable of new type
...
BEGIN
...
...variable_name.field1...; -- use fields of new variable
...variable_name.fieldn...;
...
END...;
In the eval_frequency function from "Using the LOOP...EXIT WHEN" on page 4-28,
you used several related parameters. You can use the RECORD construct to combine
some of these items into a single parameter.
You will create a type that will contain the upper and lower limits for a job
specification.
To create a RECORD type:
1. In the Connections navigation hierarchy, click the plus sign (+) beside Packages to
expand the group.
2. Right-click EMP_EVAL.
3. Select Edit.
The emp_eval pane appears. It shows the specification of the emp_eval package.
4. In the emp_eval package specification, immediately before the closing line of the
package specification, END emp_eval, enter the definition of a record type sal_
info, which contains the fields necessary for evaluating salary levels.
TYPE sal_info IS RECORD -- type for salary, limits, raises, and adjustments
( job_id jobs.job_id%type
, sal_min jobs.min_salary%type
, sal_max jobs.max_salary%type
, salary employees.salary%type
, sal_raise NUMBER(3,3) );
5. Compile and save emp_eval.
The following message appears in the Messages-Log pane:
EMP_EVAL Compiled
Once you declare a new RECORD type in the package specification, you can use it
inside the package body to declare variables of that type. You will create a new
procedure, salary_schedule, and invoke it from the eval_frequency function
using a variable of type sal_info.
Note that PL/SQL compilation is a single path process; if a subprogram is declared
after its client subprogram, PL/SQL compiler throws an error. To work around this

Using Composite Data Structures; Records
Developing and Using Stored Procedures 4-31
situation, you could declare all the subprograms that are not already declared in the
package specification at the top of the package body. The definition of the subprogram
can be anywhere within the package body. See step 2 in the following task on
instructions for declaring function eval_frequency and procedures salary_
schedule and add_eval.
To use a RECORD type:
1. In the emp_eval Body pane, add the definition of the salary_schedule
procedure immediately before the END emp_eval statement, as shown by the
following code. Note that this code is similar to the content of the BEGIN...END
block in eval_frequency that executes if the salary raise is nonzero.
PROCEDURE salary_schedule(emp IN sal_info) AS
accumulating_sal NUMBER; -- accumulator
BEGIN
DBMS_OUTPUT.PUT_LINE('If the salary of ' || emp.salary ||
' increases by ' || ROUND((emp.sal_raise * 100),0) ||
'% each year, it would be ');
accumulating_sal := emp.salary; -- assign value of sal to accumulator
WHILE accumulating_sal <= emp.sal_max LOOP
accumulating_sal := accumulating_sal * (1 + emp.sal_raise);
DBMS_OUTPUT.PUT (ROUND( accumulating_sal,2) ||', ');
END LOOP;
DBMS_OUTPUT.PUT_LINE('in successive years.');
END salary_schedule;
2. In the emp_eval Body pane, near the top of the emp_eval body definition, enter
declarations for eval_frequency and salary_schedule. New code is in bold
font.
create or replace
PACKAGE BODY emp_eval AS
/* local subprogram declarations */
FUNCTION eval_frequency (employee_id employees.employee_id%TYPE) RETURN NUMBER;
PROCEDURE salary_schedule(emp IN sal_info);
PROCEDURE add_eval(employee_id IN NUMBER, today IN DATE);
/* subprogram definition */
PROCEDURE eval_department (dept_id IN NUMBER) AS
...
3. In the emp_eval Body pane, edit eval_frequency function so that it uses the
new sal_info type as variable emp_sal, populates its fields, and invokes
salary_schedule. Note that the code that was previously executed if the salary
raise was nonzero is no longer part of this function; it has been incorporated into
the salary_schedule procedure. Note also that the declarations at the top of the
functions changed. New code is in bold font.
FUNCTION eval_frequency (employee_id employees.employee_id%TYPE)
RETURN PLS_INTEGER AS
hire_date employees.hire_date%TYPE; -- start of employment
today employees.hire_date%TYPE; -- today's date
eval_freq PLS_INTEGER; -- frequency of evaluations
emp_sal SAL_INFO; -- record for fields associated
-- with salary review
BEGIN
SELECT SYSDATE INTO today FROM DUAL; -- set today's date
SELECT e.hire_date INTO hire_date -- determine when employee started

Retrieving Data from a Set Using Cursors and Cursor Variables
4-32 Oracle Database 2 Day Developer's Guide
FROM employees e
WHERE employee_id = e.employee_id;
IF((hire_date + (INTERVAL '120' MONTH)) < today) THEN
eval_freq := 1;
/* populate emp_sal */
SELECT e.job_id INTO emp_sal.job_id FROM employees e
WHERE employee_id = e.employee_id;
SELECT j.min_salary INTO emp_sal.sal_min FROM jobs j
WHERE emp_sal.job_id = j.job_id;
SELECT j.max_salary INTO emp_sal.sal_max FROM jobs j
WHERE emp_sal.job_id = j.job_id;
SELECT e.salary INTO emp_sal.salary FROM employees e
WHERE employee_id = e.employee_id;
emp_sal.sal_raise := 0; -- default
CASE emp_sal.job_id
WHEN 'PU_CLERK' THEN emp_sal.sal_raise := 0.08;
WHEN 'SH_CLERK' THEN emp_sal.sal_raise := 0.07;
WHEN 'ST_CLERK' THEN emp_sal.sal_raise := 0.06;
WHEN 'HR_REP' THEN emp_sal.sal_raise := 0.05;
WHEN 'PR_REP' THEN emp_sal.sal_raise := 0.05;
WHEN 'MK_REP' THEN emp_sal.sal_raise := 0.04;
ELSE NULL;
END CASE;
/* If a salary raise is not zero, print the salary schedule */
IF (emp_sal.sal_raise != 0) THEN salary_schedule(emp_sal);
END IF;
ELSE
eval_freq := 2;
END IF;
RETURN eval_freq;
END eval_frequency;
4. Compile and save emp_eval Body.
The following message appears in the Messages - Log pane:
EMP_EVAL Body Compiled
Retrieving Data from a Set Using Cursors and Cursor Variables
A cursor is a type of pointer that is built into PL/SQL for querying the database,
retrieving a set of records (a result set), and enabling the developer to access these
records one row at a time. A cursor is a handle or a name for a private in-memory SQL
area that holds a parsed statement and related information. Oracle Database implicitly
manages cursors. However, there are a few interfaces that enable you to use cursors
explicitly, as a named resource within a program to more effectively parse embedded
SQL statements. The two main types of cursors are therefore defined as:
See Also:
■Oracle Database PL/SQL Language Reference for information on
collections and records

Retrieving Data from a Set Using Cursors and Cursor Variables
Developing and Using Stored Procedures 4-33
■Implicit cursors can be used in PL/SQL without explicit code to process the
cursor itself. A result set that is returned by the cursors can be used
programmatically, but there is no programmatic control over the cursor itself.
■Explicit cursors allow you to programmatically manage the cursor, and give you a
detailed level of control over record access in the result set.
Each user session may have many open cursors, up to the limit set by the initialization
parameter OPEN_CURSORS, which is 50 by default. You should ensure that your
applications close cursors to conserve system memory. If a cursor cannot be opened
because the OPEN_CURSORS limit is reached, contact the database administrator to
alter the OPEN_CURSORS initialization parameter.
Using Explicit Cursors
The implicit cursor, such as in a FOR...LOOP, are generally more efficient than an
explicit cursor. However, explicit cursors may be more appropriate for your program,
and they also allow you to manage specific in-memory areas as a named resource.
An explicit cursor has the attributes described in the following table:
An explicit cursor must be defined as a variable of the same type as the columns it
fetches; the data type of the record is derived from the cursor definition. Explicit
cursors must be opened and may then retrieve rows within a LOOP...EXIT WHEN
structure and then closed. The general form for using cursors follows:
DECLARE
CURSOR cursor_name type IS query_definition;
OPEN cursor_name
LOOP
FETCH record;
EXIT WHEN cursor_name%NOTFOUND;
...; -- process fetched row
END LOOP;
CLOSE cursor_name;
This is what happens during the life time of a cursor:
■The OPEN statement parses the query identified by the cursor, binds the inputs,
and ensures that you can successfully fetch records from the result set.
■The FETCH statement runs the query, and then finds and retrieves the matching
rows. You will need to define and use local variables as buffers for the data
returned by the cursor, and then process the specific record.
See Also:
■Oracle Database Concepts for information about cursors
Cursor Attribute Description
%NOTFOUND
Returns TRUE or FALSE, based on the results of the last fetch.
%FOUND
Returns TRUE or FALSE, based on the results of the last fetch; negation
of the %NOTFOUND results.
%ROWCOUNT
Returns the number of rows fetched. Can be called at any time after the
first fetch. Also returns the number of rows affected from UPDATE and
DELETE statements.
%ISOPEN
Returns TRUE if a cursor is still open.

Retrieving Data from a Set Using Cursors and Cursor Variables
4-34 Oracle Database 2 Day Developer's Guide
■The CLOSE statement completes cursor processing and closes the cursor. Note that
once a cursor is closed you cannot retrieve additional records from the result set.
You can implement procedure eval_department, which you declared in "Creating a
Package" on page 4-11, using a cursor for each employee record that matches the
query.
Example 4–11 Using a cursor to retrieve rows form a result set
The cursor emp_cursor fetches individual rows from the result set. Depending on the
value of the eval_frequency function for each row and the time of the year that the
eval_department procedure runs, a new evaluation record is created for the
employee by invoking the add_eval procedure. Note that the buffer variable, emp_
record, is defined as a %ROWTYPE.
In the emp_eval package specification, edit the declaration of procedure eval_
department:
PROCEDURE eval_department(department_id IN employees.department_id%TYPE);
In the emp_eval Body pane, edit eval_department procedure.
PROCEDURE eval_department(department_id IN employees.department_id%TYPE) AS
-- declaring buffer variables for cursor data
emp_record employees%ROWTYPE;
-- declaring variable to monitor if all employees need evaluations
all_evals BOOLEAN;
-- today's date
today DATE;
-- declaring the cursor
CURSOR emp_cursor IS SELECT * FROM employees e
WHERE department_id = e.department_id;
BEGIN
-- determine if all evaluations must be done or just for newer employees;
-- this depends on time of the year
today := SYSDATE;
IF (EXTRACT(MONTH FROM today) < 6) THEN all_evals := FALSE;
ELSE all_evals := TRUE;
END IF;
OPEN emp_cursor;
-- start creating employee evaluations in a specific department
DBMS_OUTPUT.PUT_LINE('Determining evaluations necessary in department # ' ||
department_id);
LOOP
FETCH emp_cursor INTO emp_record; -- getting specific record
EXIT WHEN emp_cursor%NOTFOUND; -- all records are been processed
IF all_evals THEN
add_eval(emp_record.employee_id, today); -- create evals for all
ELSIF (eval_frequency(emp_record.employee_id) = 2) THEN
add_eval(emp_record.employee_id, today); -- create evals; newer employees
END IF;
END LOOP;
DBMS_OUTPUT.PUT_LINE('Processed ' || emp_cursor%ROWCOUNT || ' records.');
CLOSE emp_cursor;
END eval_department;

Retrieving Data from a Set Using Cursors and Cursor Variables
Developing and Using Stored Procedures 4-35
Compile the emp_eval package specification, and then the emp_eval Body.
The following message appears in the Messages-Log panes:
EMP_EVAL Body Compiled
Using Cursor Variables: REF Cursors
Cursors are static, as they are defined by the queries that create them. In some cases,
the queries themselves are created at runtime. A cursor variable, known as a REF
CURSOR, is more flexible than a cursor because it is independent of a specific query. It
can be opened for a query, can process the result set, and can be re-used for a query
that returns the same set of columns. This also makes REF CURSORs ideal for passing
results of a query between subprograms.
REF CURSORS can be declared with a return type that specifies the form of the result
set (strongly typed), or without a return type to retrieve any result set (weakly-typed).
Oracle recommends that you declare a REF CURSOR with a return type as it is less
prone to error because of its strong association with correctly formulated queries. If
you need a more flexible cursor that may be associated with several interchangeable
types, use the predefined type SYS_REFCURSOR.
The general form for using a REF CURSORs follows.
DECLARE
TYPE cursor_type IS REF CURSOR RETURN return_type;
cursor_variable cursor_type;
single_record return_type;
OPEN cursor_variable FOR query_definition;
LOOP
FETCH record;
EXIT WHEN cursor_name%NOTFOUND;
...; -- process fetched row
END LOOP;
CLOSE cursor_name;
This is what happens during the life time of a REF CURSOR and a cursor variable:
■The REF CURSOR type [with a return type] is declared.
■ The cursor variable that matches the cursor type is declared.
■The variable for processing individual rows of the result set is declared; its type
must be the same as the return type of the REF CURSOR type definition.
■The OPEN statement parses the query to the cursor variable.
■The FETCH statement inside the loop runs the query, and retrieves the matching
rows into the local variable of the same type as the return type of the REF CURSOR
for further processing.
■The CLOSE statement completes cursor processing and closes the REF CURSOR.
In "Using Explicit Cursors" on page 4-33, the procedure eval_department retrieves
a result set, processes it using a cursor, closes the cursor, and ends. If you declare the
cursor as a REF CURSOR type, you could modify it to process more departments (for
example, three consecutive departments) by re-using the cursor.
See Also:
■Oracle Database PL/SQL Language Reference for information on
declaring cursors

Retrieving Data from a Set Using Cursors and Cursor Variables
4-36 Oracle Database 2 Day Developer's Guide
Note that the fetching loop is part of the new eval_fetch_control procedure, that
uses the cursor variable as input. This has an additional benefit of separating the
processing of the result set from the definition of the query. You could write a
procedure (eval_everyone) that initiates evaluations for all employees in the
company, not just on a department basis.
Note also that eval_department uses a single field of a record to call procedure
add_eval, which runs three separate queries on the same record. This is very
inefficient; you will re-write the add_eval to use the entire record buffer of the REF
CURSOR.
To use a REF CURSOR:
1. In the emp_eval specification, add the REF CURSOR type definition, emp_
refcursor_type. The type is defined at package level for visibility for all
subprograms. Also add a declaration for procedure eval_everyone. The new
code is in bold font.
create or replace
PACKAGE emp_eval AS
PROCEDURE eval_department (department_id IN employees.department_id%TYPE);
PROCEDURE eval_everyone;
FUNCTION calculate_score(eval_id IN scores.evaluation_id%TYPE
, perf_id IN scores.performance_id%TYPE)
RETURN NUMBER;
TYPE SAL_INFO IS RECORD -- type for salary, limits, raises, and adjustments
( job_id jobs.job_id%type
, sal_min jobs.min_salary%type
, sal_max jobs.max_salary%type
, salary employees.salary%type
, sal_raise NUMBER(3,3));
TYPE emp_refcursor_type IS REF CURSOR RETURN employees%ROWTYPE;
-- the REF CURSOR type for result set fetches
END emp_eval;
2. In the emp_eval Body pane, add a forward declaration for procedure eval_
loop_control and edit the declaration of procedure add_eval. New code is in
bold font.
CREATE OR REPLACE PACKAGE BODY emp_eval AS
/* local subprogram declarations */
FUNCTION eval_frequency (employee_id IN employees.employee_id%TYPE)
RETURN NUMBER;
PROCEDURE salary_schedule(emp IN sal_info);
PROCEDURE add_eval(emp_record IN employees%ROWTYPE, today IN DATE);
PROCEDURE eval_loop_control(emp_cursor IN emp_refcursor_type);
...
3. In the emp_eval Body pane, edit eval_department procedure to retrieve three
separate result sets based on the department, and to call the eval_loop_
control procedure.
PROCEDURE eval_department(department_id IN employees.department_id%TYPE) AS
-- declaring the REF CURSOR
emp_cursor emp_refcursor_type;
department_curr departments.department_id%TYPE;
BEGIN
department_curr := department_id; -- starting with the first department
FOR loop_c IN 1..3 LOOP
OPEN emp_cursor FOR

Retrieving Data from a Set Using Cursors and Cursor Variables
Developing and Using Stored Procedures 4-37
SELECT *
FROM employees e
WHERE department_curr = e.department_id;
-- create employee evaluations is specific departments
DBMS_OUTPUT.PUT_LINE('Determining necessary evaluations in department #' ||
department_curr);
eval_loop_control(emp_cursor); -- call to process the result set
DBMS_OUTPUT.PUT_LINE('Processed ' || emp_cursor%ROWCOUNT || ' records.');
CLOSE emp_cursor;
department_curr := department_curr + 10;
END LOOP;
END eval_department;
4. In the emp_eval Body pane, edit add_eval procedure to use the entire retrieved
record of employee%ROWTYPE, instead of an employee_id. Note that you no
longer need any declarations at the beginning of the procedure.
PROCEDURE add_eval(emp_record IN employees%ROWTYPE, today IN DATE) AS
BEGIN
-- inserting a new row of values into evaluations table
INSERT INTO evaluations VALUES (
evaluations_seq.NEXTVAL, -- evaluation_id
emp_record.employee_id, -- employee_id
today, -- evaluation_date
emp_record.job_id, -- job_id
emp_record.manager_id, -- manager_id
emp_record.department_id, -- department_id
0); -- total_score
END add_eval;
5. Towards the end of code in the emp_eval Body pane, add eval_loop_control
procedure to fetch the individual records from the result set and to process them.
Note that much of this code is from an earlier definition of the eval_
department procedure in "Using Explicit Cursors" on page 4-33. New structures
are in bold font.
PROCEDURE eval_loop_control(emp_cursor IN emp_refcursor_type) AS
-- declaring buffer variable for cursor data
emp_record employees%ROWTYPE;
-- declaring variable to monitor if all employees need evaluations
all_evals BOOLEAN;
-- today's date
today DATE;
BEGIN
-- determine if all evaluations must be done or just for newer employees;
-- this depends on time of the year
today := SYSDATE;
IF (EXTRACT(MONTH FROM today) < 6) THEN
all_evals := FALSE;
ELSE all_evals := TRUE;
END IF;
LOOP
FETCH emp_cursor INTO emp_record; -- getting specific record
EXIT WHEN emp_cursor%NOTFOUND; -- all records are been processed
IF all_evals THEN
add_eval(emp_record, today); -- create evaluations for all
ELSIF (eval_frequency(emp_record.employee_id) = 2) THEN
add_eval(emp_record, today); -- create evaluations for newer employees

Using Collections; Index-By Tables
4-38 Oracle Database 2 Day Developer's Guide
END IF;
END LOOP;
END eval_loop_control;
6. In the emp_eval Body pane, add eval_everyone procedure, which retrieves a
result set that contains all employees in the company. Note that its code is similar
to that of procedure eval_department in Step 3.
PROCEDURE eval_everyone AS
-- declaring the REF CURSOR type
emp_cursor emp_refcursor_type;
BEGIN
OPEN emp_cursor FOR SELECT * FROM employees;
-- start creating employee evaluations in a specific department
DBMS_OUTPUT.PUT_LINE('Determining the number of necessary evaluations');
eval_loop_control(emp_cursor); -- call to process the result set
DBMS_OUTPUT.PUT_LINE('Processed ' || emp_cursor%ROWCOUNT || ' records.');
CLOSE emp_cursor;
END eval_everyone;
7. In the emp_eval pane, compile and save emp_eval specification.
The following message appears in the Messages-Log pane:
EMP_EVAL Compiled
8. In the emp_eval body pane, compile and save emp_eval body.
The following message appears in the Messages-Log pane:
EMP_EVAL Body Compiled
Using Collections; Index-By Tables
Another group of user-defined datatypes available in PL/SQL is a collection, which is
Oracle's version of one-dimensional arrays. A collection is a data structure that can
hold a number of rows of data in a single variable. In contrast to a record, which holds
only one row of data of different types, the data in a collection must be of the same
type. In other programming languages, the types of structures represented by
collections are called arrays.
Collections are used to maintain lists of information and can significantly improve
your application's performance because they allow direct access to their elements.
There are three types of collection structures: index-by tables, nested tables, and
variable arrays.
■An index-by table is the most flexible and generally best-performing collection
type for use inside PL/SQL programs.
■A nested table is appropriate for large collections that an application stores and
retrieves in portions.
■A VARRAY is appropriate for small collections that the application stores and
retrieves in their entirety.
See Also:
■Oracle Database PL/SQL Language Reference for information on the
syntax of cursor variables
■Oracle Database PL/SQL Language Reference for information on the
syntax of cursor attributes

Using Collections; Index-By Tables
Developing and Using Stored Procedures 4-39
In this discussion, we will limit ourselves to index-by tables.
Index-by tables are also known as associative arrays, or sets of key-value pairs where
each key is unique and is used to locate a corresponding value in the array. This key, or
index, can be either an integer or a string.
Associative arrays represent data sets of arbitrary size that allow access to individual
elements without knowledge of its relative position within the array, and without
having to loop through all array elements.
For simple temporary storage of lookup data, associative arrays allow you to store
data in memory, without using the disk space and network operations required for
SQL tables. Because associative arrays are intended for temporary rather than
persistent data storage, you cannot use them with SQL statements such as INSERT
and SELECT INTO. You can, however, make them persistent for the life of a database
session by declaring the type in a package and assigning the values in a package body.
Assigning a value using a key for the first time adds that key to the associative array.
Subsequent assignments using the same key update the same entry. It is important to
choose a key that is unique, such as a primary key of a database table, a result of a
good numeric hash function, or a concatenation of strings that forms a unique string
value.
Before declaring an index-by table, you must define its type. In the rest of this section,
we will show you how to use an index-by table as part of our application.
We will show an efficient implementation of two types of associative arrays (indexed
by PLS_INTEGER and VARCHAR2) using the following steps:
■Defining a cursor.
■Defining the structure of an index-by table using the cursor's ROWTYPE or TYPE.
■Fetching cursor data into the index-by table using BULK COLLECT.
■Iterating through index-by table and looking up values using the index of a
particular element.
Creating Cursors for Index-by Tables
It is very convenient to define a cursor that would fetch the data into the index-by
table, and then use its element type to create the index-by table. Example 4–12 shows
how to create two cursors, employees_jobs_cursor for fetching data from the
hr.employees table, and jobs_cursor for fetching data from the hr.jobs table.
Notice that we are not using an ORDER BY clause for the second cursor.
Example 4–12 Declaring cursors for index-by tables
CURSOR employees_jobs_cursor IS
SELECT e.first_name, e.last_name, e.job_id
FROM hr.employees e
ORDER BY e.job_id, e.last_name, e.first_name;
CURSOR jobs_cursor IS
SELECT j.job_id, j.job_title
FROM hr.jobs j;

Using Collections; Index-By Tables
4-40 Oracle Database 2 Day Developer's Guide
Defining Index-by Tables
Now that you have declared your cursors, you can use the %ROWTYPE attribute to
create the index-by PLS_INTEGER tables employees_jobs and jobs, as shown in
Example 4–13:
Example 4–13 Creating index-by PLS_INTEGER tables based on the cursor structure
TYPE employees_jobs_type IS TABLE OF employees_jobs_cursor%ROWTYPE
INDEX BY PLS_INTEGER;
employees_jobs employees_jobs_type;
TYPE jobs_type IS TABLE OF jobs_cursor%ROWTYPE
INDEX BY PLS_INTEGER;
jobs jobs_type;
To create a table that is indexed by a VARCHAR2, such as the job_titles index-by
table of job_id, use the definition of these types from the original table, hr.jobs, as
shown in Example 4–14:
Example 4–14 Creating index-by VARCHAR2 tables
TYPE job_titles_type IS TABLE OF hr.jobs.job_title%TYPE
INDEX BY hr.jobs.job_id%TYPE;
job_titles job_titles_type;
Populating Index-by PLS_INTEGER Tables; BULK COLLECT
If your work requires referencing a large quantity of data as local PL/SQL variables,
the BULK COLLECT clause is much more efficient than looping through a result set
one row at a time. When you query only some columns, you can store all the results
for each column in a separate collection variable. When you query all the columns of a
table, you can store the entire result set in a collection of records.
With the index-by PLS_INTEGER employees_jobs and jobs tables, you can now
open the cursor and use BULK COLLECT to retrieve data, as shown in Example 4–15:
Example 4–15 Populating index-by PLS_INTEGER tables through BULK COLLECT
OPEN employees_jobs_cursor;
FETCH employees_jobs_cursor BULK COLLECT INTO employees_jobs;
CLOSE employees_jobs_cursor;
OPEN jobs_cursor;
FETCH jobs_cursor BULK COLLECT INTO jobs;
CLOSE jobs_cursor;
Populating Index-by VARCHAR2 Tables
Once the jobs table contains data, use the FOR ... LOOP, as shown in
Example 4–16, to build the index-by VARCHAR2 table, job_titles:
Example 4–16 Populating index-by VARCHAR2 tables
FOR i IN 1..jobs.COUNT() LOOP
job_titles(jobs(i).job_id) := jobs(i).job_title;
END LOOP;

Handling Errors and Exceptions
Developing and Using Stored Procedures 4-41
Iterating Through an Index-by Table
The structure employees_jobs is a dense index-by table, because it is indexed by a
PLS_INTEGER. You can iterate through it simply by placing your operations within a
FOR ... LOOP that counts from 1 through the COUNT() value of the table, as
demonstrated in Example 4–17. Note that the line in bold represents a direct look-up of
a value in the job_titles table.
Example 4–17 Iterating through an index-by PLS_INTEGER table
FOR i IN 1..employees_jobs.count() LOOP
DBMS_OUTPUT.PUT_LINE(
RPAD(employees_jobs(i).employee_id, 10)||
RPAD(employees_jobs(i).first_name, 15)||
RPAD(employees_jobs(i).last_name, 15)||
job_titles(employees(i).job_id));
END LOOP;
The structure job_titles is a sparse index-by table, indexed by a VARCHAR2. As
Example 4–18 demonstrates, you can iterate through it within a WHILE ... END
LOOP using a pre-defined counter that is equal to the first key value, and the NEXT()
value of the table. You will notice that the elements are naturally sorted in lexical order
of the index.
Example 4–18 Iterating through an index-by VARCHAR2 table
DECLARE i hr.jobs.job_id%TYPE := job_titles.FIRST();
WHILE i IS NOT NULL LOOP
DBMS_OUTPUT.PUT_LINE(
RPAD(job_titles(i).job_id, 10)||
job_titles(i).job_title);
i := job_titles.NEXT(i);
END LOOP;
Handling Errors and Exceptions
Error conditions, known as exceptions, are easy to detect and process within your
PL/SQL code. When an error occurs, it raises an exception by stopping normal
processing and transferring control to exception-handling code. This code is located at
the end of the PL/SQL block. In PL/SQL, the checks and calls to error routines are
performed automatically, with each exception having its own exception handler.
Predefined exceptions are raised automatically for certain common error conditions
that involve variables or database operations. You can also declare custom exceptions
for conditions that are errors with respect to your program, or as wrappers to existing
Oracle messages.

Handling Errors and Exceptions
4-42 Oracle Database 2 Day Developer's Guide
Existing PL/SQL and SQL Exceptions
Oracle Database will automatically raise an exception if a PL/SQL program violates a
known database rule, such as the predefined exception NO_DATA_FOUND if a SELECT
INTO statement returns no rows. The following table shows some of the common
exceptions.
See Also:
■Oracle Database Concepts for information about exceptions
■Oracle Database PL/SQL Language Reference for information about
handling PL/SQL errors
■Oracle Database Error Messages for a list of standard Oracle
messages
■Oracle Database PL/SQL Language Reference for guidelines on
handling errors and exceptions
■Oracle Database PL/SQL Language Reference for advantages of
PL/SQL exceptions
Exception Description
ACCESS_INTO_NULL A program attempts to assign values to the attributes of an
uninitialized object
CASE_NOT_FOUND None of the choices in the WHEN clauses of a CASE statement is selected,
and there is no ELSE clause.
COLLECTION_IS_
NULL
A program attempts to apply collection methods other than EXISTS to
an uninitialized nested table or varray, or the program attempts to
assign values to the elements of an uninitialized nested table or varray.
CURSOR_ALREADY_
OPEN
A program attempts to open a cursor that is already open. A cursor
must be closed before it can be reopened. A cursor FOR loop
automatically opens the cursor to which it refers, so your program
cannot open that cursor inside the loop.
DUP_VAL_ON_INDEX A program attempts to store duplicate values in a column that is
constrained by a unique index.
INVALID_CURSOR A program attempts a cursor operation that is not allowed, such as
closing an unopened cursor.
INVALID_NUMBER In a SQL statement, the conversion of a character string into a number
fails because the string does not represent a valid number. (In
procedural statements, VALUE_ERROR is raised.) This exception is also
raised when the LIMIT clause expression in a bulk FETCH statement
does not evaluate to a positive number.
LOGIN_DENIED A program attempts to logon to Oracle database with a user name or
password that is not valid.
NO_DATA_FOUND A SELECT INTO statement returns no rows, or your program references
a deleted element in a nested table or an uninitialized element in an
index-by table.
Because this exception is used internally by some SQL functions to
signal completion, do not rely on this exception being propagated if
you raise it within a function that is called as part of a query.
NOT_LOGGED_ON A program issues a database call without being connected to Oracle
database.

Handling Errors and Exceptions
Developing and Using Stored Procedures 4-43
Example 4–19 Handling exceptions
In the emp_eval Body pane, edit eval_department procedure to handle cases
where the query does not return a result set. New code is in bold font.
PROCEDURE eval_department(department_id IN employees.department_id%TYPE) AS
-- declaring the REF CURSOR
emp_cursor emp_refcursor_type;
department_curr departments.department_id%TYPE;
BEGIN
department_curr := department_id; -- starting with the first department
FOR loop_c IN 1..3 LOOP
OPEN emp_cursor FOR
SELECT *
FROM employees e
WHERE department_curr = e.department_id;
-- create employee evaluations is specific departments
DBMS_OUTPUT.PUT_LINE('Determining necessary evaluations in department #'
||
department_curr);
eval_loop_control(emp_cursor); -- call to process the result set
DBMS_OUTPUT.PUT_LINE('Processed ' || emp_cursor%ROWCOUNT || ' records.');
CLOSE emp_cursor;
department_curr := department_curr + 10;
END LOOP;
EXCEPTION
WHEN NO_DATA_FOUND THEN
DBMS_OUTPUT.PUT_LINE ('The query did not return a result set');
END eval_department;
Compile and save emp_eval Body.
Custom Exceptions
A package may contain custom exceptions for handling errors. Exceptions are declared
in the program, in any declarative region, depending on how it is used: a subprogram,
a package body, or a package specification.
ROWTYPE_MISMATCH The host cursor variable and PL/SQL cursor variable involved in an
assignment have incompatible return types. When an open host cursor
variable is passed to a stored subprogram, the return types of the actual
and formal parameters must be compatible.
SUBSCRIPT_
BEYOND_COUNT
A program references a nested table or varray element using an index
number larger than the number of elements in the collection.
SUBSCRIPT_
OUTSIDE_LIMIT
A program references a nested table or varray element using an index
number (-1 for example) that is outside the legal range.
TOO_MANY_ROWS A SELECT INTO statement returns more than one row.
VALUE_ERROR An arithmetic, conversion, truncation, or size-constraint error occurs.
For example, when your program selects a column value into a
character variable, if the value is longer than the declared length of the
variable, PL/SQL cancels the assignment and raises VALUE_ERROR. In
procedural statements, VALUE_ERROR is raised if the conversion of a
character string into a number fails. (In SQL statements, INVALID_
NUMBER is raised.)
ZERO_DIVIDE A program attempts to divide a number by zero.
Exception Description

Handling Errors and Exceptions
4-44 Oracle Database 2 Day Developer's Guide
An exception declaration has the following form:
exception_name EXCEPTION;
To raise custom exceptions programmatically, based on incorrect values, you need to
use the following form:
IF condition THEN
RAISE exception_name;
To trap unexpected Oracle errors, you must include the exception handling
instructions in your code, typically as the last block within the body of your
subprogram or package. You should name the specific exceptions you are handling
(both standard and custom), and use the OTHERS handler to trap unexpected errors.
An exception body has the following form:
EXCEPTION
WHEN exception_name_1 THEN
...;
DBMS_OUTPUT.PUT_LINE(message_1);
...
WHEN OTHERS THEN
...
DBMS_OUTPUT.PUT_LINE(message_others);
Alternatively, you may design your program to continue running after an exception is
raised. You must then enclose the code that may generate an exception in a
BEGIN...END block with its own exception handler. For example, code that traps the
exception within a loop structure can handle the exception for an element that raises
an error, and then continue with the next iteration of the loop.
In the following task, you will redesign the function calculate_score to declare,
raise and trap two possible exceptions, weight_wrong and score_wrong.
Example 4–20 Handling custom exceptions
In the emp_eval Body pane, edit calculate_score function. New code is in bold
font.
FUNCTION calculate_score(evaluation_id IN scores.evaluation_id%TYPE
, performance_id IN scores.performance_id%TYPE)
RETURN NUMBER AS
weight_wrong EXCEPTION;
score_wrong EXCEPTION;
n_score scores.score%TYPE; -- from SCORES
n_weight performance_parts.weight%TYPE; -- from PERFORMANCE_PARTS
running_total NUMBER := 0; -- used in calculations
max_score CONSTANT scores.score%TYPE := 9; -- a constant limit check
max_weight CONSTANT performance_parts.weight%TYPE:= 1;
-- a constant limit check
BEGIN
SELECT s.score INTO n_score FROM scores s
WHERE evaluation_id = s.evaluation_id
AND performance_id = s.performance_id;
SELECT p.weight INTO n_weight FROM performance_parts p
WHERE performance_id = p.performance_id;
BEGIN -- check that weight is valid
IF n_weight > max_weight OR n_weight < 0 THEN
RAISE weight_wrong;
END IF;
END;

Handling Errors and Exceptions
Developing and Using Stored Procedures 4-45
BEGIN -- check that score is valid
IF n_score > max_score OR n_score < 0 THEN
RAISE score_wrong;
END IF;
END;
-- calculate the score
running_total := n_score * n_weight;
RETURN running_total;
EXCEPTION
WHEN weight_wrong THEN
DBMS_OUTPUT.PUT_LINE(
'The weight of a score must be between 0 and ' || max_weight);
RETURN -1;
WHEN score_wrong THEN
DBMS_OUTPUT.PUT_LINE(
'The score must be between 0 and ' || max_score);
RETURN -1;
END calculate_score;
Compile and save emp_eval Body
See Also:
■Oracle Database PL/SQL Language Reference for information on the
syntax of exception declarations

Handling Errors and Exceptions
4-46 Oracle Database 2 Day Developer's Guide

Using Triggers 5-1
5
Using Triggers
This chapter describes database triggers, which are stored procedural code that is
associated with a database table, view, or event.
This chapter contains the following sections:
■"Designing Triggers" on page 5-1
■"Creating and Using Triggers" on page 5-4
Designing Triggers
Triggers are stored procedural code that is fired automatically when specified events
happen in the database. Triggers are associated with tables, views, or events. Unlike
procedures and functions, triggers cannot be invoked directly. Instead, Oracle
Database implicitly fires triggers when a triggering event occurs, regardless of the user
or application. You may never be aware that a trigger is operating unless its operation
causes an error that is not handled properly, when the event that fired the trigger fails.
The correct use of triggers enables you to build and deploy applications that are more
robust, secure, and that use the database more effectively. These gains are possible
because triggers can deliver the following features:
■Data integrity checking and enforcement
■Auditing and logging
■Complex business logic modeling
■Transaction validity checking and enforcement
■Derived column generation
■Table modification enabling and restriction
You can use triggers to enforce low-level business rules that are inherent to the
database, and are therefore common for all client applications. For example, you may
have several client applications that access the employees table in the hr schema. If a
trigger on that table ensures the proper format of all data added to the table, this
business logic does not have to be reproduced and maintained in every client
application. Because the trigger cannot be circumvented by the client application, the
business logic stored in the trigger is used automatically.
Each trigger has the following general form:
TRIGGER trigger_name
triggering_statement
[trigger_restriction]
BEGIN

Designing Triggers
5-2 Oracle Database 2 Day Developer's Guide
triggered_action;
END;
A trigger has four main parts:
■A trigger name, which must be unique with respect to other triggers in the same
schema. Trigger names do not need to be unique with respect to other schema
objects (tables, views, and procedures); however, Oracle recommends that you
adopt a consistent naming convention to avoid confusion.
■A triggering statement is the event that initiates the firing of the trigger. These
events include DML statements (INSERT, UPDATE, and DELETE) on tables and
views, DDL statements (CREATE, ALTER, and DROP) on schema objects, system
errors, startup and shutdown of the database, and miscellaneous system actions.
Triggering statements are subject to trigger restrictions.
■A trigger restriction is the limitation that is placed on the trigger. This means that
the database performs the triggered action only if the restriction evaluates to
TRUE.
■A triggered action is the body of the trigger, or the sequence of steps that are
executed when both the appropriate statement fires the trigger and the restriction
(if any) evaluates to TRUE.
Types of Triggers
There are five different types of Oracle Database triggers.
■Statement triggers are associated with a DML statement, such as DELETE,
INSERT, or UPDATE, on a specified table or view.
Note that statement triggers fire once for each DML statement. For example, an
UPDATE statement trigger will execute only once, regardless of the number of
affected rows in the table.
You can have several different triggers associated with a specific DML statement;
starting with Oracle Database Release 11g R1, you can specify the order in which
they are executed by using the FOLLOWS and PRECEDES clauses of the CREATE
TRIGGER statement.
■Row triggers are fired for each row that is affected by an INSERT, UPDATE, or
DELETE statement on a table.
Row triggers work in the same manner as statement triggers, but with two
additional specifications. Row triggers use a FOR EACH ROW clause in the
triggering statement. They also allow you to reference the values of the rows, and
event set them in the body of the trigger. This is particularly useful for inserting
default values, or for overriding invalid values.
■INSTEAD OF triggers on views run instead of the issuing statement. If an INSERT
statement is used on a view, an INSTEAD OF trigger enables you to exercise fine
control of what actually happens: insertion of data into the base table or another
table, logging an insertion request without inserting data, and so on.
Also, Oracle Database may not be able to process an insert issued against a view,
as in the case of derived columns; you can create a trigger that determines the
See Also:
■Oracle Database PL/SQL Language Reference for general information
about triggers

Designing Triggers
Using Triggers 5-3
values correctly. For example, if view used a column definition last_name ||
', ' || first_name, then you may write an INSTEAD OF trigger that
updates the characters before the comma character into the last_name column,
and the characters after the comma character into the first_name column.
■User event triggers may be used on DDL statements such as CREATE, ALTER, or
DROP, on user LOGON and LOGOFF, and on specific DML actions (analysis and
statistics, auditing, granting and revoking privilege, and so on). LOGON triggers,
which fire when a user connects to the database, are commonly used to set the
environment for the user, and to execute functions that are associated with secure
application roles.
■System event triggers apply to database startup, database shutdown, or server
error events. These events are not associated with specific tables, views, or rows.
Timing Triggers
Triggers can use BEFORE or AFTER clauses in the triggering statement. BEFORE and
AFTER specify that the trigger should execute either before or after the event that fires
the trigger. For statement and row triggers, a BEFORE trigger can enhance security and
enable business rules prior to making changes to the database, while the AFTER trigger
is ideal for logging actions.
INSTEAD OF triggers do not use BEFORE or AFTER options. By default, they use the
same semantics as AFTER row-level triggers.
System and user event triggers can use BEFORE and AFTER clauses, with obvious
exceptions: only AFTER is valid for STARTUP, SUSPEND, and LOGON, and only BEFORE
is valid for SHUTDOWN and LOGOFF.
Guidelines and Restrictions for Trigger Design
You should consider the following guidelines and restrictions when planning triggers
for your application:
■Although triggers are useful for customizing a database, use them only when
necessary. Excessive use of triggers can result in complex interdependencies,
which can be difficult to maintain in a large application.
■Ensure that when an action is performed, all related and dependent actions are
performed.
■Avoid recursive triggers because they can quickly exhaust system memory.
■Be aware of cascading triggers, as they may have unintended effects and
performance implications.
See Also:
■Oracle Database SQL Language Reference for details of the CREATE
TRIGGER statement
■"Creating a Statement Trigger" on page 5-4
■"Creating a Row Trigger" on page 5-5
■"Creating an INSTEAD OF Trigger" on page 5-7
■"Creating LOGON and LOGOFF Triggers" on page 5-7
See Also:
■Oracle Database SQL Language Reference

Creating and Using Triggers
5-4 Oracle Database 2 Day Developer's Guide
■Avoid triggers that duplicate existing Oracle Database offerings; for example, do
not design triggers that reject bad data that can be eliminated through declarative
integrity constraints.
■Ensure that you use the BEFORE and AFTER clauses correctly to efficiently
implement business rules. A BEFORE EACH ROW trigger can change the :NEW
values.
■Limit the size of triggers, as they cannot exceed 32Kb. If a trigger requires many
lines of code, consider moving the business logic to a stored procedure that is
invoked from the trigger.
■Ensure that the triggers you create apply to the database and the business logic
that is correct for the entire enterprise, regardless of specific users or client
applications. If special rules apply only to some users and client applications and
not to others, encapsulate that business logic within the application.
■You cannot use COMMIT, ROLLBACK, or SAVEPOINT inside a trigger. Because DDL
statements have an implicit COMMIT, they are also not allowed in triggers, with the
exception of CREATE, ALTER, DROP TABLE, and ALTER...COMPILE for system
triggers.
■Only committed system triggers are fired.
Creating and Using Triggers
This sections shows how to create and use various types of triggers.
This section has the following topics:
■Creating a Statement Trigger
■Creating a Row Trigger
■Creating an INSTEAD OF Trigger
■Creating LOGON and LOGOFF Triggers
■Modifying Triggers
■Disabling and Enabling Triggers
■Compiling Triggers
■Dropping Triggers
Creating a Statement Trigger
Statement triggers relate to a particular statement, such as INSERT, UPDATE, or
DELETE. You can use a statement trigger for logging such operations as they are
performed on a particular table.
Example 5–1 shows how to create a log table.
Example 5–1 Creating a Log Table for the EVALUATIONS Table
The table evaluations_log stores entries with each INSERT, UPDATE or DELETE on
the evaluations table.
See Also:
■Oracle Database SQL Language Reference for information about
creating triggers

Creating and Using Triggers
Using Triggers 5-5
CREATE TABLE evaluations_log (log_date DATE
, action VARCHAR2(50));
Example 5–2, you will create a trigger that writes to the evaluations_log every
time the evaluations table changes.
Example 5–2 Logging Operations with a Statement Trigger and Predicates
The trigger eval_change_trigger tracks all changes made to the evaluations
table, and tracks them in the evaluations_log table by adding to it a new row
AFTER these changes are made. Note that in this example, the body of the trigger uses
a conditional predicate INSERTING, UPDATING, or DELETING, to determine which of
the three possible statements fired the trigger.
CREATE OR REPLACE TRIGGER eval_modification_trigger
AFTER INSERT OR UPDATE OR DELETE
ON evaluations
DECLARE log_action evaluations_log.action%TYPE;
BEGIN
IF INSERTING THEN log_action := 'Insert';
ELSIF UPDATING THEN log_action := 'Update';
ELSIF DELETING THEN log_action := 'Delete';
ELSE DBMS_OUTPUT.PUT_LINE('This code is not reachable.');
END IF;
INSERT INTO evaluations_log (log_date, action)
VALUES (SYSDATE, log_action);
END;
Creating a Row Trigger
Row triggers are executed for each affected row.
In "Using Sequences" on page 3-25, you created the evaluations_seq sequence as a
primary key number generator for the evaluations table. Oracle Database does not
populate the primary key automatically, as part of the CREATE TABLE statement.
Instead, you must design a trigger that generates the unique number for the primary
key with every INSERT statement.
In the following task, you will use the SQL Developer Connection navigation
hierarchy to create a trigger new_evaluation, which checks if a new row should be
added to the evaluations table, based on whether a row for the same employee
exists for the identical time period.
Example 5–3 Generating Primary Keys FOR EACH ROW Triggers; BEFORE Option
1. In the Connections navigation hierarchy, right-click Triggers.
2. From the drop-down, select New Trigger.
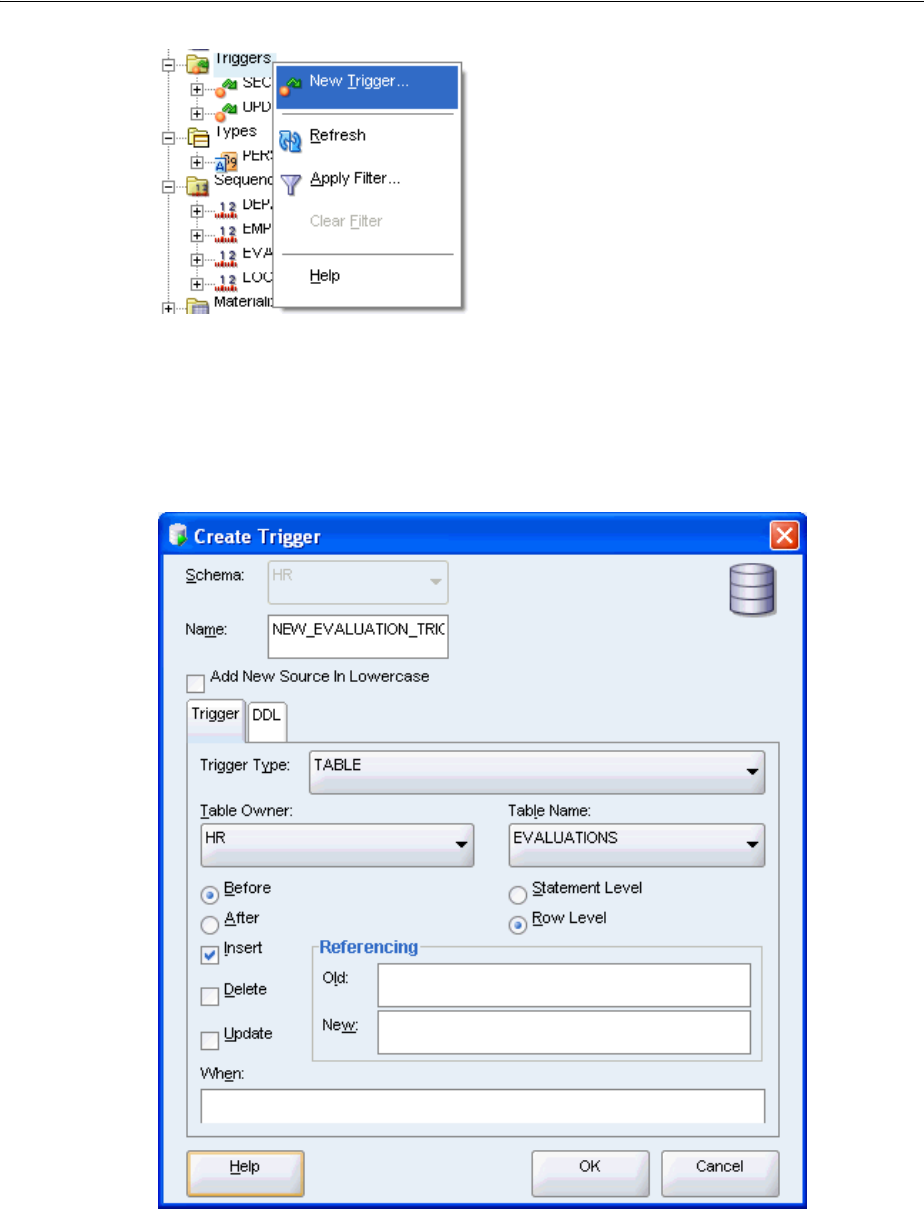
Creating and Using Triggers
5-6 Oracle Database 2 Day Developer's Guide
3. In the Create Trigger window, set the following parameters:
■Set Name to new_evaluation_trigger.
In the Trigger pane: set Tri gger Ty p e to TABLE, set Table Owner to HR, set Ta bl e
Name to evaluations, select Before, select Insert, and select Row Level.
Click OK.
4. The new_evaluation pane opens with the following code.
Note that the tile of the pane is in italic font, which indicates that the trigger is not
saved in the database.
CREATE OR REPLACE
TRIGGER new_evaluation

Creating and Using Triggers
Using Triggers 5-7
BEFORE INSERT ON evaluations
FOR EACH ROW
BEGIN
NULL;
END;
5. From the File menu, select Save to save the new trigger. Alternatively, use the
CTRL + S key combination.
Note that Oracle Database automatically compiles triggers prior to saving them.
Creating an INSTEAD OF Trigger
INSTEAD OF triggers enable you to implement changes to the underlying tables of a
view. Such a trigger may be used on the emp_locations view that you created in
"Creating a View". Remember the definition of emp_locations:
CREATE VIEW emp_locations AS
SELECT e.employee_id,
e.last_name || ', ' || e.first_name name,
d.department_name department,
l.city city,
c.country_name country
FROM employees e, departments d, locations l, countries c
WHERE e.department_id = d.department_id AND
d.location_id = l.location_id AND
l.country_id = c.country_id
ORDER BY last_name;
Example 5–4 implements an INSTEAD OF trigger update_name_view_trigger to
update the name of the employee.
Example 5–4 Updating Values from a View with an INSTEAD OF Trigger
CREATE OR REPLACE TRIGGER update_name_view_trigger
INSTEAD OF UPDATE ON emp_locations
BEGIN
-- allow only the following update(s)
UPDATE employees SET
first_name = substr( :NEW.name, instr( :new.name, ',' )+2),
last_name = substr( :NEW.name, 1, instr( :new.name, ',')-1)
WHERE employee_id = :OLD.employee_id;
END;
Creating LOGON and LOGOFF Triggers
LOGON and LOGOFF triggers monitor who uses the database by writing to a log table.
In Example 5–5, you will create a table hr_users_log for keeping track of LOGON
and LOGOFF events. You will then create triggers note_hr_logon_trigger (in
Example 5–6) and note_hr_logoff_trigger (in Example 5–7) for writing these
events to the log table.
Example 5–5 Creating an access log table, hr_users_log
This table is the log of all logon and logoff events in the hr schema.
CREATE TABLE hr_users_log (user_name VARCHAR2(30), activity VARCHAR2(20),
event_date DATE);

Creating and Using Triggers
5-8 Oracle Database 2 Day Developer's Guide
Example 5–6 Creating a LOGON trigger
This trigger inserts a LOGON event record into the hr_users_log table whenever
someone connects to the hr schema. Note that this is an AFTER trigger.
CREATE OR REPLACE TRIGGER note_hr_logon_trigger
AFTER LOGON
ON HR.SCHEMA
BEGIN
INSERT INTO hr_users_log VALUES (USER, 'LOGON', SYSDATE);
END;
Example 5–7 Creating a LOGOFF trigger
This trigger inserts a LOGOFF event record into the hr_users_log table whenever
someone disconnects from the hr schema. Note that this is a BEFORE trigger.
CREATE OR REPLACE TRIGGER note_hr_logoff_trigger
BEFORE LOGOFF
ON HR.SCHEMA
BEGIN
INSERT INTO hr_users_log VALUES (USER, 'LOGOFF', SYSDATE);
END;
Modifying Triggers
The new_evaluation_trigger has an empty body.
Example 5–8 demonstrates how to modify the trigger to assign to the evaluation_
id the next available value from the evaluations_seq sequence.
Example 5–8 Modifying a Trigger
Replace the new_evaluation_trigger with the following code. New code is in
bold font.
CREATE OR REPLACE TRIGGER new_evaluation_trigger
BEFORE INSERT ON evaluations FOR EACH ROW
BEGIN
:NEW.evaluation_id := evaluations_seq.NEXTVAL;
END;
Disabling and Enabling Triggers
On occasion, you may need to temporarily disable a trigger if an object it references is
unavailable, or if you need to perform a large data upload (such as in recovery
operations) without the delay that triggers cause.
To disable a trigger, you must use the ALTER TRIGGER ... DISABLE statement. To
re-enable the trigger, use the ALTER TRIGGER ... ENABLE statement.
Example 5–9 shows how to temporarily disable a trigger.
Example 5–9 Disabling a Trigger
ALTER TRIGGER eval_change_trigger DISABLE;
Example 5–10 shows how to re-enable a trigger.
Example 5–10 Enabling a Trigger
ALTER TRIGGER eval_change_trigger ENABLE;

Creating and Using Triggers
Using Triggers 5-9
When you need to disable all triggers on a particular table, you must use the statement
ALTER TABLE ... DISABLE ALL TRIGGERS. To re-enable all the triggers for the
table, use the statement ALTER TABLE ... ENABLE ALL TRIGGERS.
Example 5–11 shows how to temporarily disable all triggers that are defined on a
particular table.
Example 5–11 Disabling All Triggers on a Table
ALTER TABLE evaluations DISABLE ALL TRIGGERS;
Example 5–12 shows how to re-enable all triggers that are defined on a particular
table.
Example 5–12 Enable All Triggers on a Table
ALTER TABLE evaluations ENABLE ALL TRIGGERS;
Compiling Triggers
A trigger is fully compiled when the CREATE TRIGGER statement is executed. If a
trigger compilation produces an error, the DML statement fails. To see the relevant
compilation errors, use the USER_ERRORS view.
Example 5–13 shows how to determine which trigger errors exist in the database.
Example 5–13 Displaying Trigger Compilation Errors
SELECT * FROM USER_ERRORS WHERE TYPE = 'TRIGGER';
Once a trigger is compiled, it creates dependencies on the underlying database objects,
and becomes invalid if these objects are either removed or modified so that there is a
mismatch between the trigger and the object. The invalidated triggers are recompiled
during their next invocation.
Example 5–14 shows how to determine the dependencies triggers have on other
objects in the database.
Example 5–14 Displaying Trigger Dependencies
SELECT * FROM ALL_DEPENDENCIES WHERE TYPE = 'TRIGGER';
To re-compile a trigger manually, you must use the ALTER TRIGGER ... COMPILE
statement, as shown in Example 5–15.
Example 5–15 Displaying Trigger Compilation Errors
ALTER TRIGGER update_name_view_trigger COMPILE;
See Also:
■Oracle Database PL/SQL Language Reference for details about
enabling triggers
■Oracle Database PL/SQL Language Reference for details about
disabling triggers

Creating and Using Triggers
5-10 Oracle Database 2 Day Developer's Guide
Dropping Triggers
When you need to delete a trigger, use the DROP TRIGGER statement, as shown in
Example 5–16.
Example 5–16 Dropping a Trigger
DROP TRIGGER eval_change_trigger;
After you drop a trigger, you can drop the dependent object that are no longer needed
by the application.
See Also:
■Oracle Database PL/SQL Language Reference for details about
compiling triggers
See Also:
■Oracle Database SQL Language Reference for information about the
DROP TRIGGER statement

Working in a Global Environment 6-1
6
Working in a Global Environment
This chapter discusses how to develop applications in a globalization support
environment, and shows the use of Unicode programming using both SQL and
PL/SQL. Unicode programming enables you to write SQL and PL/SQL code that is
compatible with multiple languages.
This chapter contains the following sections:
■Overview of Globalization on page 6-1
■Using NLS Parameter Values in the SQL Developer Environment on page 6-4
■Establishing a Globalization Support Environment on page 6-7
■Developing Globalized Applications on page 6-27
■Using Locale-Dependent Functions with NLS Parameters on page 6-30
Overview of Globalization
Oracle Database globalization support enables you to store, process, and retrieve data
in native languages. It ensures that database utilities, error messages, and sort order,
plus date, time, monetary, numeric, and calendar conventions, automatically adapt to
any native language and locale.
Globalization support includes National Language Support (NLS) features. National
Language Support is the ability to choose a national language and store data in a
specific character set. Globalization support enables you to develop multilingual
applications and software products that can be accessed and run simultaneously from
anywhere in the world. An application can render content of the user interface and
process data in the native language and locale preferences of the user.
See Also:
■Oracle Database Globalization Support Guide for a complete
discussion of globalization support with Oracle Database,
including setting up the globalization support environment
■Oracle Database SQL Language Reference for information about date
and time formats
See Also:
■Oracle Database Globalization Support Guide for a complete
discussion of globalization support with Oracle Database,
including setting up the globalization support environment

Overview of Globalization
6-2 Oracle Database 2 Day Developer's Guide
Globalization Support Features
Oracle Database standard features include:
■Language support: This feature enables you to store, process, and retrieve data in
native languages. Through the use of Unicode databases and data types, Oracle
Database supports most contemporary languages. See "Setting NLS Parameters"
on page 6-8.
■Territory support: This feature supports cultural conventions that are specific to
geographical locations. The default local time format, date format, numeric
conventions, and monetary conventions depend on the local territory setting. See
"Setting Language and Territory Parameters" on page 6-9.
■Date and time formats: This feature supports local formats for displaying the
hour, day, month, and year. Time zones and daylight saving support are also
available. See "Setting Date and Time Parameters" on page 6-12.
■Monetary and numeric formats: This feature supports local formats for
representing currency, credit, debit symbols, and numbers. See "Using Monetary
Parameters" on page 6-19 and "Using Numeric Formats" on page 6-17.
■Calendars feature: This feature supports seven different calendar systems in use
around the world: Gregorian, Japanese Imperial, ROC Official (Republic of China),
Thai Buddha, Persian, English Hijrah, and Arabic Hijrah. See "Setting Calendar
Definitions" on page 6-15.
■Linguistic sorting: This feature supports linguistic definitions for culturally
accurate sorting and case conversion. See "Using Linguistic Sort and Search" on
page 6-22.
■Character set support: This feature supports a large number of single-byte,
multibyte, and fixed-width encoding schemes that are based on national,
international, and vendor-specific standards. See Oracle Database Installation Guide
for your platform for a listing of the character sets supported by Oracle Database.
■Character semantics: This feature supports character semantics. It is useful for
defining the storage requirements for multibyte strings of varying widths in terms
of characters instead of bytes. See "Using Length Semantics" on page 6-25.
■Unicode support: This feature supports Unicode, which is a universal encoded
character set that enables you to store information in any language, using a single
character set. You can use SQL and PL/SQL to insert and retrieve Unicode data.
See "Developing Globalized Applications" on page 6-27.
Viewing the Current NLS Parameter Values
In SQL Developer, the National Language Support Parameters report lists the values
of parameters for globalization support.
The NLS parameter values in this report are used at the start of all sessions within SQL
Developer, as explained in "Using NLS Parameter Values in the SQL Developer
Environment" on page 6-4.
See Also:
■Oracle Database Globalization Support Guide for a complete
discussion of globalization support with Oracle Database,
including setting up the globalization support environment
■Oracle Database SQL Language Reference for information about date
and time formats
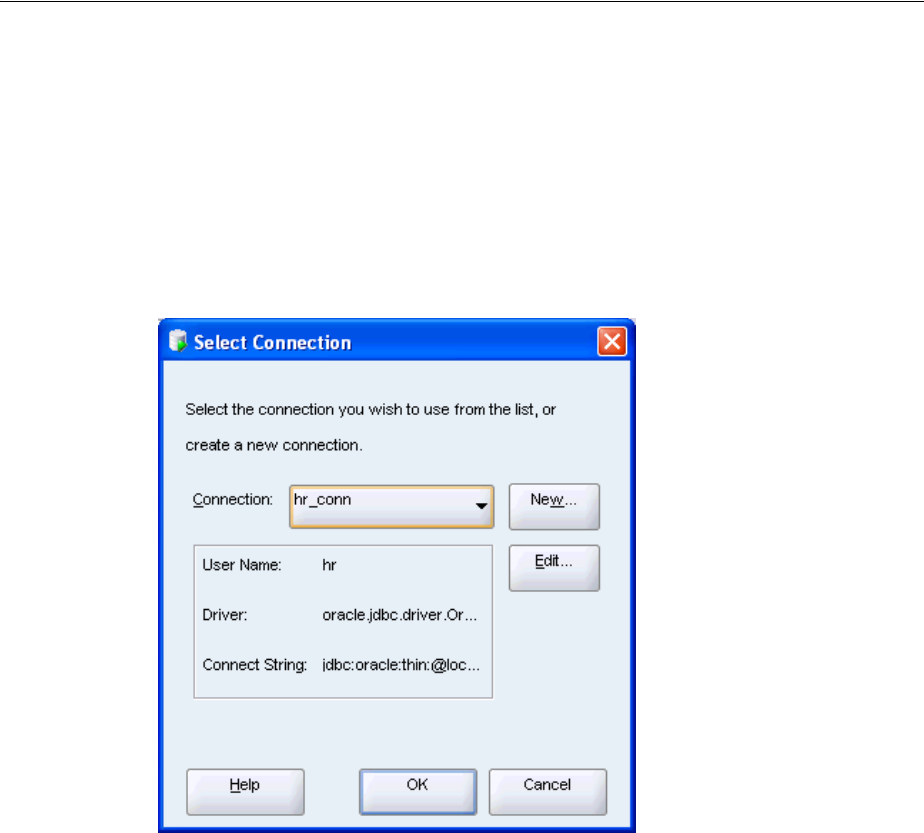
Overview of Globalization
Working in a Global Environment 6-3
To view the National Language Support Parameters report:
1. In the SQL Developer window, click the Reports tab to display the Reports
navigator.
2. Click the plus sign (+) next to the Data Dictionary Reports node to expand it.
3. Click the plus sign (+) next to the About Your Database node to expand it.
4. Click the National Language Support Parameters item.
5. In the Select Connection dialog box, set Connection to hr_conn.
Click OK.
6. The report in the National Language Support Parameters pane shows the current
value for NLS parameters for the database associated with the selected connection:
NLS_CALENDAR, NLS_CHARSET, NLS_COMP, NLS_CURRENCY, NLS_DATE_
FORMAT, and so on.
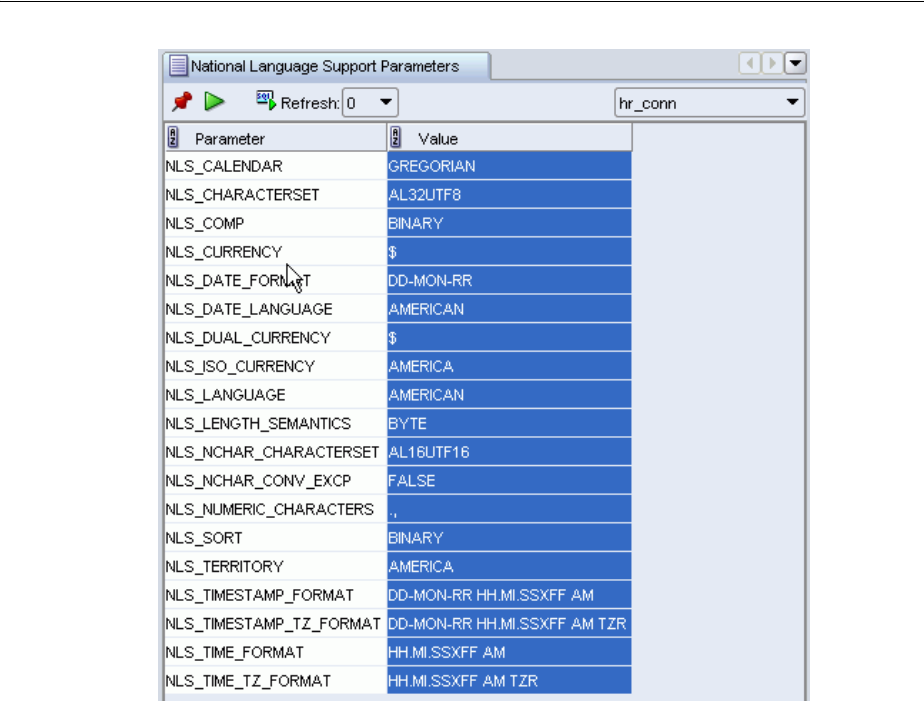
Using NLS Parameter Values in the SQL Developer Environment
6-4 Oracle Database 2 Day Developer's Guide
Using NLS Parameter Values in the SQL Developer Environment
In an Oracle database, NLS parameter values are initially determined by database
initialization parameters. The DBA can set values in the initialization file, and any
changes to that file will take effect at the next database startup. Database users can
change specific parameter values for the current session (the current connection to the
database) by using a statement in the form:
See Also:
■Using NLS Parameter Values in the SQL Developer Environment
on page 6-4
■Oracle Database Reference for information about the V$NLS_
PARAMETERS view, which displays the NLS settings for the
current database instance
■Oracle Database SQL Developer User's Guide for a discussion of SQL
Developer preferences, including NLS parameters
■Oracle Database SQL Developer User's Guide for a discussion of SQL
Developer reports
■Oracle Database Globalization Support Guide for a complete
discussion of globalization support with Oracle Database,
including setting up the globalization support environment
■Oracle Database SQL Language Reference for information about date
and time formats

Using NLS Parameter Values in the SQL Developer Environment
Working in a Global Environment 6-5
ALTER SESSION SET parameter-name = "value";
When you are using SQL Developer, be aware that the parameter values from the
database initialization file are not used. Instead, SQL Developer initially (after
installation) uses parameter values that include the following:
NLS_LANG,"AMERICAN"
NLS_TERR,"AMERICA"
NLS_CHAR,"AL32UTF8"
NLS_SORT,"BINARY"
NLS_CAL,"GREGORIAN"
NLS_DATE_LANG,"AMERICAN"
NLS_DATE_FORM,"DD-MON-RR"
These and other NLS parameter values, which are used for all sessions in SQL
Developer (such as SQL Worksheet windows and the National Language Support
Parameters report, for all connections), are visible in the Database: NLS Parameters
preferences pane.
To change the value of any NLS parameter, you have the following options:
■Change the value for use with all SQL Developer connections (current and future)
by using the Database: NLS Parameters preferences pane, as explained in
"Changing NLS Parameter Values for All Sessions" on page 6-6.
■Change the value for the current connection only by using the ALTER SESSION
statement in the SQL Worksheet window.
Thus, you have great flexibility in testing different language settings during database
application development. For example, you can use ALTER SESSION to see the
output of subsequent PL/SQL statements with different language settings, and then
revert to the SQL Developer default settings by disconnecting and reconnecting.
For example, assume that the NLS_LANGUAGE value in the preferences is set to
FRENCH, and that today is March 1, 2007. If you enter SELECT sysdate FROM
dual; in the SQL Worksheet and click the Run Script icon, the output is:
SYSDATE
-------------------------
01-MARS -07
If you enter ALTER SESSION SET NLS_LANGUAGE='AMERICAN'; and enter the
preceding SELECT statement again, the output is:
SYSDATE
-------------------------
01-MAR-07
Continuing with this example, if you disconnect from the current connection and
reconnect to it, the session NLS_LANGUAGE value is FRENCH (as specified in the
preferences), and the SELECT statement output is:
SYSDATE
-------------------------
01-MARS -07

Using NLS Parameter Values in the SQL Developer Environment
6-6 Oracle Database 2 Day Developer's Guide
Changing NLS Parameter Values for All Sessions
The SQL Developer user preferences for NLS Parameters establish values for use with
all SQL Developer connections (current and future). You can view and change the
parameter values in the Database: NLS Parameters preferences pane.
Note that these preferences are also displayed in the NLS Parameter Values report, as
explained in "Viewing the Current NLS Parameter Values" on page 6-2.
To change National Language Support Parameter values:
1. In the SQL Developer window, click Tools, then Preferences.
2. In the Preferences dialog box, expand the Database node and select NLS
Parameters.
See Also:
■Oracle Database SQL Developer User's Guide for a discussion of SQL
Developer preferences, including NLS parameters
■Oracle Database Globalization Support Guide for a complete
discussion of globalization support with Oracle Database,
including setting up the globalization support environment
■Oracle Database SQL Language Reference for information about date
and time formats
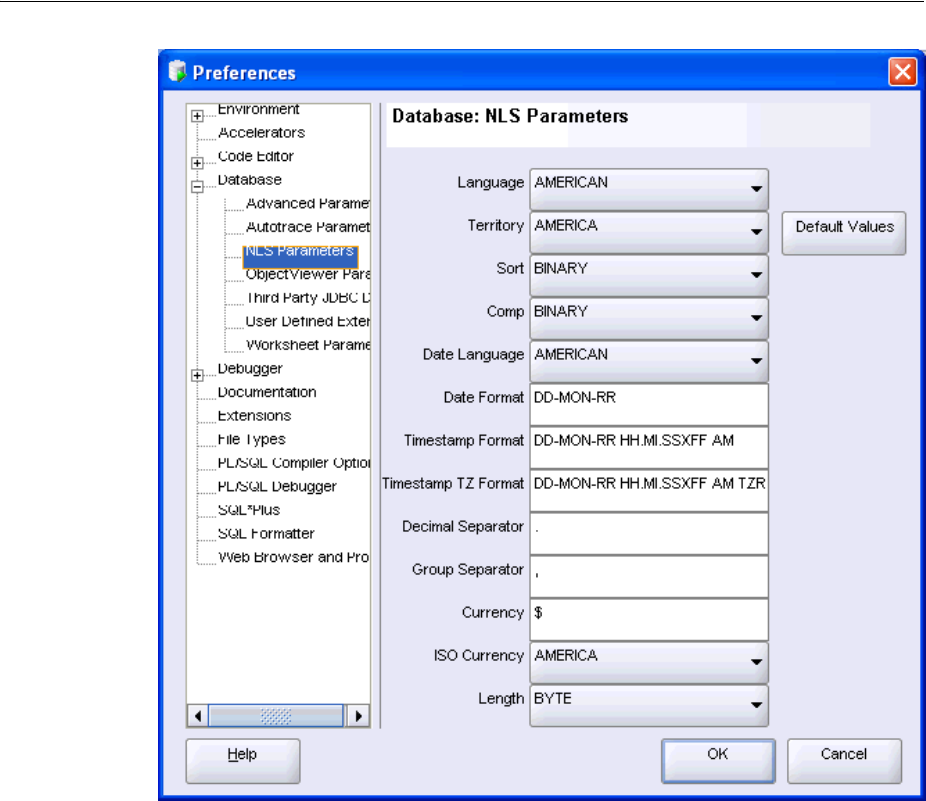
Establishing a Globalization Support Environment
Working in a Global Environment 6-7
Each text label is a descriptive term for a corresponding NLS_xxx parameter.
3. Make any desired changes to the parameter values.
For example, to change the NLS_LANGUAGE parameter value to reflect a Spanish
language environment, for Language select SPANISH.
4. Click OK.
Establishing a Globalization Support Environment
This section describes how to set up a globalization support environment.
See Also:
■Oracle Database SQL Developer User's Guide for a discussion of SQL
Developer preferences, including NLS parameters
■Oracle Database Globalization Support Guide for a complete
discussion of globalization support with Oracle Database,
including setting up the globalization support environment
■Oracle Database SQL Language Reference for information about date
and time formats

Establishing a Globalization Support Environment
6-8 Oracle Database 2 Day Developer's Guide
Choosing a Locale with the NLS_LANG Parameter
A locale is a linguistic and cultural environment in which a system or program is
running. Setting the NLS_LANG parameter is the simplest way to specify locale
behavior for Oracle software. It sets the language and territory used by the client
application and the database. It also sets the client character set, which is the character
set for data entered or displayed by a client program.
The NLS_LANG parameter sets the language and territory environment used by both
the server session (for example, SQL statement processing) and the client application
(for example, display formatting in Oracle tools).
While the default NLS_LANG behavior defined during installation is appropriate for
most situations, you might want to modify the NLS environment dynamically during
the session. To do so, you can use the ALTER SESSION statement to change NLS_
LANGUAGE, NLS_TERRITORY, and other NLS parameters.
Note that you cannot modify the setting for the client character set with the ALTER
SESSION statement. The ALTER SESSION statement modifies only the session
environment. The local client NLS environment is not modified, unless the client
explicitly retrieves the new settings and modifies its local environment.
Setting NLS Parameters
National Language Support (NLS) parameters determine the locale-specific behavior
on both the client and the server. NLS parameters can be specified several ways. You
can alter parameters for the user session and override the parameters in SQL
functions.
You can alter the NLS parameters settings in the following two ways:
■Set NLS parameters in an ALTER SESSION statement to override the default
values that are set for the session in the initialization parameter file, or that are set
by the client with environment variables. For example:
ALTER SESSION SET NLS_SORT = french;
Note that the changes that you make with the ALTER SESSION statement apply
only to the current user session and are not present the next time you log in.
■Use NLS parameters within a SQL function to override the default values that are
set for the session in the initialization parameter file, set for the client with
environment variables, or set for the session by the ALTER SESSION statement.
For example:
TO_CHAR(hiredate,'DD/MON/YYYY','nls_date_language = FRENCH')
Additional methods for setting the NLS parameters include the use of NLS
environment variables on the client, which may be platform-dependent, to specify
See Also:
■Oracle Database Globalization Support Guide for a complete
discussion of globalization support with Oracle Database,
including setting up the globalization support environment
See Also:
■Oracle Database Globalization Support Guide for a complete
discussion of globalization support with Oracle Database,
including setting up the globalization support environment

Establishing a Globalization Support Environment
Working in a Global Environment 6-9
locale-dependent behavior for the client and also to override the default values set for
the session in the initialization parameter file. For example, on a Linux system:
% setenv NLS_SORT FRENCH
Setting Language and Territory Parameters
Setting different NLS parameters for local territories allows the database session to use
different cultural settings. For example, you can set the euro (EUR) as the primary
currency and the Japanese yen (JPY) as the secondary currency for a given database
session, even when the territory is defined as AMERICA.
Using the NLS_LANGUAGE Parameter
The NLS_LANGUAGE parameter can be set to any valid language name. The default is
derived from the NLS_LANG setting. NLS_LANGUAGE specifies the default conventions
for the following session characteristics:
■Language for server messages
■Language for day and month names and their abbreviations (specified in the SQL
functions TO_CHAR and TO_DATE)
■Symbols for equivalents of AM, PM, AD, and BC
■Default sorting sequence for character data when the ORDER BY clause is specified
(the GROUP BY clause uses a binary sort order unless ORDER BY is specified.)
To set the NLS_LANGUAGE parameter:
You can change the NLS_LANGUAGE parameter value and see the effect in the display
of results from a query. The following examples show the effect of setting NLS_
LANGUAGE first to Italian and then to German.
1. In SQL Developer, make a note of the current language in which Oracle Database
was installed.
Under Connections, expand Data Dictionary reports, then About Your Database,
and then National Language Support Parameters. In the Select Connection dialog
See Also:
■"Setting NLS Parameters" in Oracle Database Globalization
Support Guide for details on setting the NLS parameters
■Oracle Database SQL Language Reference for more information
about the ALTER SESSION statement
■Oracle Database SQL Language Reference for more information
about SQL functions, including the TO_CHAR function
■Oracle Database Administrator's Guide for information about the
initialization parameter file
■Oracle Database Reference for information about initialization
parameters used for globalization support
See Also:
■Oracle Database Globalization Support Guide for locale information,
including supported languages and territories
■Choosing a Locale with the NLS_LANG Parameter on page 6-8

Establishing a Globalization Support Environment
6-10 Oracle Database 2 Day Developer's Guide
box, select hr_conn from the list of connections. The current language is listed
after NLS_LANGUAGE.
2. Set the language to Italian.
ALTER SESSION SET NLS_LANGUAGE=ITALIAN;
3. Enter a SELECT statement to check the format of the output after the change to
Italian.
SELECT last_name, hire_date, ROUND(salary/8,2) salary FROM employees
WHERE employee_id IN (111, 112, 113);
The output from the example should be similar to the following. Note that the
abbreviations for month names are in Italian.
LAST_NAME HIRE_DATE SALARY
------------------------- --------- ----------
Sciarra 30-SET-97 962.5
Urman 07-MAR-98 975
Popp 07-DIC-99 862.5
4. Set the language to German.
ALTER SESSION SET NLS_LANGUAGE=GERMAN;
5. Enter the same SELECT statement to check the format of the output after the
change to German.
SELECT last_name, hire_date, ROUND(salary/8,2) salary FROM employees
WHERE employee_id IN (111, 112, 113);
The output from the example should be similar to the following. Note that the
abbreviations for month names are now in German.
LAST_NAME HIRE_DATE SALARY
------------------------- --------- ----------
Sciarra 30-SEP-97 962.5
Urman 07-MRZ-98 975
Popp 07-DEZ-99 862.5
6. Set NLS_LANGUAGE back to its original setting listed in Step 1. For example:
ALTER SESSION SET NLS_LANGUAGE=AMERICAN;
Using the NLS_TERRITORY Parameter
The NLS_TERRITORY parameter can be set to any valid territory name. The default is
derived from the NLS_LANG setting. NLS_TERRITORY specifies the conventions for
the following default date and numeric formatting characteristics:
■Date format
■Decimal character and group separator
■Local currency symbol
See Also:
■Oracle Database Reference for more information on the NLS_
LANGUAGE parameter
■Oracle Database Globalization Support Guide for locale information,
including supported languages and territories

Establishing a Globalization Support Environment
Working in a Global Environment 6-11
■ISO currency symbol
■Dual currency symbol
Modifying the NLS_TERRITORY parameter resets all derived NLS session parameters
to default values for the new territory.
To set the NLS_TERRITORY parameter:
You can change the NLS_LANGUAGE parameter value and see the effect in the display
of results from a query. The following examples show the effect of setting NLS_
TERRITORY to Germany.
1. In SQL Developer, enter a SELECT statement to check the format of the output
with the initial SQL Developer default settings.
SELECT TO_CHAR(salary,'L99G999D99') salary FROM employees
WHERE employee_id IN (100, 101, 102);
For example, if NLS_TERRITORY is AMERICA, the output from the example is
similar to the following.
SALARY
--------------------
$24,000.00
$17,000.00
$17,000.00
3 rows selected
2. Make a note of the current territory in which Oracle Database was installed.
Under Connections, expand Data Dictionary reports, then About Your Database,
and then National Language Support Parameters. In the Select Connection dialog
box, select hr_conn from the list of connections. The current territory is listed
after NLS_TERRITORY.
3. Set NLS_TERRITORY to Germany.
ALTER SESSION SET NLS_TERRITORY=GERMANY;
4. Enter the same SELECT statement to check the format of the output after the
change.
SELECT TO_CHAR(salary,'L99G999D99') salary FROM employees
WHERE employee_id IN (100, 101, 102);
The output from the example should be similar to the following. The thousands
separator changed to a period (.) and the decimal character changed to a comma
(,). The currency symbol changed from dollars ($) to euros (€). However, the
numbers have not changed because the underlying data is the same. (That is,
currency exchange rates are not factored in.)
SALARY
--------------------
€24.000,00
€17.000,00
€17.000,00
3 rows selected
5. Set NLS_TERRITORY back to its original setting listed in Step 2. For example:

Establishing a Globalization Support Environment
6-12 Oracle Database 2 Day Developer's Guide
ALTER SESSION SET NLS_TERRITORY=AMERICA;
Setting Date and Time Parameters
You can control the display of the date and time, allowing different conventions for
displaying the hour, day, month, and year based on the local formats. For example, in
the United Kingdom, the date is displayed using the DD/MM/YYYY format, while
China commonly uses the YYYY-MM-DD format.
Using Date Formats
You can use several different date formats, as shown in the following table.
To use the NLS_DATE_FORMAT parameter:
The NLS_DATE_FORMAT parameter defines the default date format to use with the
TO_CHAR and TO_DATE functions. The NLS_TERRITORY parameter determines the
default value of the NLS_DATE_FORMAT parameter. The value of NLS_DATE_FORMAT
can be any valid date format model. For example:
NLS_DATE_FORMAT = "MM/DD/YYYY"
To add string literals to the date format, enclose the string literal with double
quotation marks. Note that when double quotation marks are included in the date
format, the entire value must be enclosed by single quotation marks. For example:
NLS_DATE_FORMAT = '"Date: "MM/DD/YYYY'
The Oracle default date format may not always correspond to the cultural-specific
convention used in a given territory. You can use the short date and long date format
in SQL, using the 'DS' and 'DL' format models, respectively, to obtain dates in
localized formats. The following example shows the use of the short and long date
formats.
See Also:
■Oracle Database Reference for more information on the NLS_
TERRITORY parameter
■Using the NLS_LANGUAGE Parameter on page 6-9
■Oracle Database Globalization Support Guide for locale information,
including supported languages and territories
See Also:
■Oracle Database Globalization Support Guide for information about
date/time data types and time zone support
■Oracle Database SQL Language Reference for information about date
and time formats
Country Description Example
Estonia dd.mm.yyyy 28.02.2005
Germany dd.mm.rr 28.02.05
China yyyy-mm-dd 2005-02-28
UK dd/mm/yyyy 28/02/2005
U.S. mm/dd/yyyy 02/28/2005

Establishing a Globalization Support Environment
Working in a Global Environment 6-13
1. In SQL Developer, make a note of the current territory and date format in which
Oracle Database was installed.
Under Connections, expand Data Dictionary reports, then About Your Database,
and then National Language Support Parameters. In the Select Connection dialog
box, select hr_conn from the list of connections. The current date format is listed
after NLS_DATE_FORMAT and the current territory is listed after NLS_TERRITORY.
2. Set NLS_TERRITORY to America.
ALTER SESSION SET NLS_TERRITORY = America;
3. Select the dates using the format models.
SELECT hire_date, TO_CHAR(hire_date,'DS') "Short",
TO_CHAR(hire_date,'DL') "Long" FROM employees
WHERE employee_id IN (111, 112, 113);
The output from the example should be similar to the following.
HIRE_DATE Short Long
---------------- -------- -----------------------------------
30-SEP-97 9/30/1997 Tuesday, September 30, 1997
07-MAR-98 3/7/1998 Saturday, March 07, 1998
07-DEC-99 12/7/1999 Tuesday, December 07, 1999
4. Set NLS_TERRITORY and NLS_DATE_FORMAT back to their original settings listed
in Step 1. For example:
ALTER SESSION SET NLS_TERRITORY=AMERICA;
ALTER SESSION SET NLS_DATE_FORMAT="MM/DD/YYYY";
To use the NLS_DATE_LANGUAGE parameter:
The NLS_DATE_LANGUAGE parameter specifies the language for the day and month
produced by the TO_CHAR and TO_DATE functions. NLS_DATE_LANGUAGE overrides
the language that is specified implicitly by NLS_LANGUAGE. The NLS_DATE_
LANGUAGE parameter has the same syntax as the NLS_LANGUAGE parameter, and all
supported languages are valid values.
The NLS_DATE_LANGUAGE parameter also determines the language used for:
■Month and day abbreviations returned by the TO_CHAR and TO_DATE functions
■Month and day abbreviations used by the default date format (NLS_DATE_
FORMAT)
The default date format uses the month abbreviations determined by the NLS_DATE_
LANGUAGE parameter. For example, if the default date format is DD-MON-YYYY and
NLS_DATE_LANGUAGE = FRENCH, then insert a date as follows:
INSERT INTO table_name VALUES ('12-Févr.-2007');
The following example shows the effect of setting NLS_DATE_LANGUAGE to French.
1. In SQL Developer, make a note of the current day and month language in which
Oracle Database was installed.
Under Connections, expand Data Dictionary reports, then About Your Database,
and then National Language Support Parameters. In the Select Connection dialog
box, select hr_conn from the list of connections. The current day and month
language is listed after NLS_DATE_LANGUAGE.
2. Set NLS_DATE_LANGUAGE to French.

Establishing a Globalization Support Environment
6-14 Oracle Database 2 Day Developer's Guide
ALTER SESSION SET NLS_DATE_LANGUAGE = FRENCH;
3. Select the current system date.
SELECT TO_CHAR(SYSDATE, 'Day:Dd Month yyyy') FROM DUAL
The output from the example should be similar to the following.
TO_CHAR(SYSDATE,'DAY:DDMONTHYYYY')
----------------------------------
Lundi :05 Mars 2007
4. Set NLS_DATE_LANGUAGE back to its original setting listed in Step 1. For example:
ALTER SESSION SET NLS_DATE_LANGUAGE=AMERICAN;
Using Time Formats
This section shows how to use the NLS_TIMESTAMP_FORMAT and NLS_TIMESTAMP_
TZ_FORMAT parameters. Some of the time format examples are in the following table.
The NLS_TIMESTAMP_FORMAT parameter defines the default date format for the
TIMESTAMP and TIMESTAMP WITH LOCAL TIME ZONE data types. The NLS_
TERRITORY parameter determines the default value of NLS_TIMESTAMP_FORMAT.
The value of NLS_TIMESTAMP_FORMAT can be any valid datetime format model.
The following example shows a value for NLS_TIMESTAMP_FORMAT:
NLS_TIMESTAMP_FORMAT = 'YYYY-MM-DD HH:MI:SS.FF'
The NLS_TIMESTAMP_TZ_FORMAT parameter defines the default date format for the
TIMESTAMP and TIMESTAMP WITH LOCAL TIME ZONE data types. It is used with
the TO_CHAR and TO_TIMESTAMP_TZ functions. The NLS_TERRITORY parameter
determines the default value of the NLS_TIMESTAMP_TZ_FORMAT parameter. The
value of NLS_TIMESTAMP_TZ_FORMAT can be any valid datetime format model.
The format value must be surrounded by quotation marks. For example:
See Also:
■Oracle Database Reference for more information on the NLS_DATE_
FORMAT parameter
■Oracle Database Reference for more information on the NLS_DATE_
LANGUAGE parameter
■Using Time Formats on page 6-14
■Oracle Database SQL Language Reference for information about date
format models
■Oracle Database Globalization Support Guide for information about
date/time data types and time zone support
Country Description Example
Estonia hh24:mi:ss 13:50:23
Germany hh24:mi:ss 13:50:23
China hh24:mi:ss 13:50:23
UK hh24:mi:ss 13:50:23
U.S. hh:mi:ssxff am 1:50:23.555 PM

Establishing a Globalization Support Environment
Working in a Global Environment 6-15
NLS_TIMESTAMP_TZ_FORMAT = 'YYYY-MM-DD HH:MI:SS.FF TZH:TZM'
To set and use NLS_TIMESTAMP_TZ:
The following example sets the NLS_TIMESTAMP_TZ_FORMAT value. It also shows
the format being set explicitly in a SELECT statement, using the TO_TIMESTAMP_TZ
function.
1. In SQL Developer, make a note of the current time format in which Oracle
Database was installed.
Under Connections, expand Data Dictionary reports, then About Your Database,
and then National Language Support Parameters. In the Select Connection dialog
box, select hr_conn from the list of connections. The current time format is listed
after NLS_TIMESTAMP_TZ_FORMAT.
2. Set NLS_TIMESTAMP_TZ_FORMAT.
ALTER SESSION SET NLS_TIMESTAMP_TZ_FORMAT = 'YYYY-MM-DD HH:MI:SS.FF TZH:TZM';
3. Set NLS_TIMESTAMP_TZ_FORMAT back to its original setting listed in Step 1. For
example:
ALTER SESSION SET NLS_TIMESTAMP_TZ_FORMAT='DD-MON-RR HH.MI.SSXFF AM TZR';
Setting Calendar Definitions
This section describes calendar definition.
Overview of Calendar Formats
The following calendar information is stored for each territory:
■First Day of the Week: Some cultures consider Sunday to be the first day of the
week; others consider Monday to be the first day of the week.
The first day of the week is determined by the NLS_TERRITORY parameter.
■First Calendar Week of the Year: Some countries use week numbers for
scheduling, planning, and bookkeeping. Oracle supports this convention. In the
ISO standard, the week number can be different from the week number of the
calendar year. For example, 1st Jan 2005 is in ISO week number 53 of 2004. An
ISO week starts on Monday and ends on Sunday.
To support the ISO standard, Oracle provides the IW date format element. It
returns the ISO week number.
See Also:
■Oracle Database Reference for more information on the NLS_
TIMESTAMP_TZ_FORMAT parameter
■Using Date Formats on page 6-12
■Oracle Database SQL Language Reference for information about date
format models
■Oracle Database Globalization Support Guide for information about
date/time data types and time zone support
See Also:
■Oracle Database Globalization Support Guide for locale information,
including supported calendars

Establishing a Globalization Support Environment
6-16 Oracle Database 2 Day Developer's Guide
The first calendar week of the year is determined by the NLS_TERRITORY
parameter.
■Number of Days and Months in a Year: Oracle supports six calendar systems in
addition to the Gregorian calendar, which is the default. These additional calendar
systems are:
■Japanese Imperial uses the same number of months and days as the Gregorian
calendar, but the year starts with the beginning of each Imperial Era.
■ROC Official uses the same number of months and days as the Gregorian
calendar, but the year starts with the founding of the Republic of China.
■Persian has 31 days for each of the first 6 months. The next 5 months have 30
days each. The last month has either 29 days or 30 days (leap year).
■Thai Buddha uses a Buddhist calendar.
■Arabic Hijrah has 12 months and 354 or 355 days.
■English Hijrah has 12 months and 354 or 355 days.
The calendar system is specified by the NLS_CALENDAR parameter.
■First Year of Era: The Islamic calendar starts from the year of the Hegira. The
Japanese Imperial calendar starts from the beginning of an Emperor's reign. For
example, 1998 is the tenth year of the Heisei era.
Using the NLS_CALENDAR Parameter
Many different calendar systems are in use throughout the world. The NLS_CALENDAR
parameter specifies which calendar system Oracle Database uses. The default value is
Gregorian. The value can be any valid calendar format name.
The NLS_CALENDAR parameter can have one of the following values:
■Arabic Hijrah
■English Hijrah
■Gregorian
■Japanese Imperial
■Persian
■ROC Official (Republic of China)
■Thai Buddha
To set the NLS_CALENDAR parameter:
The following example sets the NLS_CALENDAR value to English Hijrah, and it
displays the value for the first day of Ramadan in the year 1424 H. The other NLS
parameters reflect the default SQL Developer settings.
1. In SQL Developer, make a note of the current calendar format in which Oracle
Database was installed.
See Also:
■Using the NLS_CALENDAR Parameter on page 6-16
■Oracle Database Globalization Support Guide for locale information,
including supported calendars

Establishing a Globalization Support Environment
Working in a Global Environment 6-17
Under Connections, expand Data Dictionary reports, then About Your Database,
and then National Language Support Parameters. In the Select Connection dialog
box, select hr_conn from the list of connections. The current date format is listed
after NLS_DATE_FORMAT and the current territory is listed after NLS_CALENDAR.
2. Set NLS_CALENDAR to English Hijrah.
ALTER SESSION SET NLS_CALENDAR='English Hijrah';
3. Display the start of Ramadan for the year 1424 H (in Gregorian calendar year
2007).
SELECT TO_DATE('01-Ramadan-1428') FROM DUAL;
The output from the example should be similar to the following.
TO_DATE('01-RAMADAN-1428')
-------------------------
13 September 2007
4. Set NLS_CALENDAR back to its original setting listed in Step 1. For example:
ALTER SESSION SET NLS_CALENDAR='GREGORIAN';
Using Numeric Formats
The database must know the number-formatting convention used in each session to
interpret numeric strings correctly. For example, the database needs to know whether
numbers are entered with a period or a comma as the decimal character (234.00 or
234,00). Similarly, applications must be able to display numeric information in the
format expected at the client site.
Examples of numeric formats are shown in the following table.
Numeric formats are derived from the NLS_TERRITORY parameter setting, but they
can be overridden by the NLS_NUMERIC_CHARACTERS parameter.
See Also:
■Oracle Database Reference for more information on the NLS_
CALENDAR parameter
■Overview of Calendar Formats on page 6-15
■Oracle Database Globalization Support Guide for locale information,
including supported calendars
Country Numeric Formats
Estonia 1 234 567,89
Germany 1.234.567,89
China 1,234,567.89
UK 1,234,567.89
U.S. 1,234,567.89
See Also:
■Oracle Database Globalization Support Guide for a complete
discussion of setting up the globalization support environment

Establishing a Globalization Support Environment
6-18 Oracle Database 2 Day Developer's Guide
Using the NLS_NUMERIC_CHARACTERS Parameter
The NLS_NUMERIC_CHARACTERS parameter specifies the group separator and
decimal character. The group separator is the character that separates integer groups to
show thousands and millions, for example. The group separator is the character
returned by the G number format model. The decimal character separates the integer
and decimal parts of a number. Setting the NLS_NUMERIC_CHARACTERS parameter
overrides the default values derived from the setting of NLS_TERRITORY. The value
can be any two valid numeric characters for the group separator and decimal
character.
Any character can be the decimal character or group separator. The two characters
specified must be single-byte, and the characters must be different from each other.
The characters cannot be a numeric character or any of the following characters: plus
sign (+), minus sign (-), less than sign (<), greater than sign (>). Either character can be
a space.
To set the decimal character to a comma and the grouping separator to a period,
specify the NLS_NUMERIC_CHARACTERS parameter as follows:
ALTER SESSION SET NLS_NUMERIC_CHARACTERS = ",.";
SQL statements can include numbers represented as numeric or text literals. Numeric
literals are not enclosed in quotation marks. They are part of the SQL language syntax,
and always use a period as the decimal character and never contain a group separator.
Text literals are enclosed in single quotation marks. They are implicitly or explicitly
converted to numbers, if required, according to the current NLS settings.
To set the NLS_NUMERIC_CHARACTERS parameter:
The following example formats 4000 with the group separator and decimal character
specified in the ALTER SESSION statement.
1. In SQL Developer, make a note of the current numeric characters format in which
Oracle Database was installed.
Under Connections, expand Data Dictionary reports, then About Your Database,
and then National Language Support Parameters. In the Select Connection dialog
box, select hr_conn from the list of connections. The current numeric characters
format is listed after NLS_NUMERIC_CHARACTERS.
2. Set NLS_NUMERIC_CHARACTERS to the specified group separator and decimal
character.
ALTER SESSION SET NLS_NUMERIC_CHARACTERS = ",.";
Use double quotation marks.
3. Display 4000 using the format mask '9G999D99'.
SELECT TO_CHAR(4000, '9G999D99') FROM DUAL;
The output from the example should be similar to the following. The group
separator is the period (.) and the decimal character is the comma (,).
TO_CHAR(4000,'9G999D99')
------------------------
4.000,00
4. Set NLS_NUMERIC_CHARACTERS back to its original setting listed in Step 1. For
example:
ALTER SESSION SET NLS_NUMERIC_CHARACTERS=". ";

Establishing a Globalization Support Environment
Working in a Global Environment 6-19
Using Monetary Parameters
You can define radix symbols and thousands separators by locales. For example, in the
U.S., the decimal point is a period (.), while it is a comma (,) in France. Because $1,234
has different meanings in different countries, it is important to display the amount
appropriately by locale.
Overview of Currency Formats
Different currency formats are used throughout the world. Some typical formats are
shown in the following table.
Using the NLS_CURRENCY Parameter
The NLS_CURRENCY parameter specifies the character string returned by the L number
format model, the local currency symbol. Setting NLS_CURRENCY overrides the default
setting defined implicitly by NLS_TERRITORY. The value can be any valid currency
symbol string.
To see the effect of changing the NLS_CURRENCY value:
The following example displays salary amounts using a format that includes the L
number format model, which is replaced by the NLS_CURRENCY value.
1. Display salaries with a value greater than eleven thousand.
See Also:
■Oracle Database Reference for more information on the NLS_
NUMERIC_CHARACTERS parameter
■Oracle Database Globalization Support Guide for a complete
discussion of setting up the globalization support environment
See Also:
■Oracle Database Globalization Support Guide for a complete
discussion of setting up the globalization support environment,
including monetary parameters
Country Currency Format
Estonia 1 234,56 kr
Germany 1.234,56€
China ¥1,234.56
UK £1,234.56
U.S. $1,234.56
See Also:
■Using the NLS_CURRENCY Parameter on page 6-19
■Using the NLS_ISO_CURRENCY Parameter on page 6-20
■Using the NLS_DUAL_CURRENCY Parameter on page 6-21
■Oracle Database Globalization Support Guide for a complete
discussion of setting up the globalization support environment,
including monetary parameters

Establishing a Globalization Support Environment
6-20 Oracle Database 2 Day Developer's Guide
SELECT TO_CHAR(salary, 'L099G999D99') "salary" FROM employees
WHERE salary > 11000
The output from the example should be similar to the following. The dollar sign
($) is the L number format model in this case.
salary
---------------------
$024,000.00
$017,000.00
$017,000.00
$012,000.00
$014,000.00
$013,500.00
$012,000.00
$011,500.00
$013,000.00
$012,000.00
10 rows selected
Using the NLS_ISO_CURRENCY Parameter
The NLS_ISO_CURRENCY parameter specifies the character string returned by the C
number format model, the ISO currency symbol. Setting NLS_ISO_CURRENCY
overrides the default value defined implicitly by NLS_TERRITORY. The value can be
any valid string.
Local currency symbols can be ambiguous. For example, a dollar sign ($) can refer to
U.S. dollars or Australian dollars. ISO specifications define unique currency symbols
for specific territories or countries. For example, the ISO currency symbol for the U.S.
dollar is USD, and the ISO currency symbol for the Australian dollar is AUD.
The NLS_ISO_CURRENCY parameter has the same syntax as the NLS_TERRITORY
parameter, and all supported territories are valid values.
To set the NLS_ISO_CURRENCY parameter:
The following example sets the ISO currency symbol for France, and formats salaries
using the appropriate format model.
1. In SQL Developer, make a note of the ISO currency format in which Oracle
Database was installed.
Under Connections, expand Data Dictionary reports, then About Your Database,
and then National Language Support Parameters. In the Select Connection dialog
box, select hr_conn from the list of connections. The current ISO currency format
is listed after NLS_ISO_CURRENCY.
See Also:
■Oracle Database Reference for more information on the NLS_
CURRENCY parameter.
■Overview of Currency Formats on page 6-19
■Using the NLS_ISO_CURRENCY Parameter on page 6-20
■Using the NLS_DUAL_CURRENCY Parameter on page 6-21
■Oracle Database Globalization Support Guide for a complete
discussion of setting up the globalization support environment,
including monetary parameters

Establishing a Globalization Support Environment
Working in a Global Environment 6-21
2. Set NLS_ISO_CURRENCY to France.
ALTER SESSION SET NLS_ISO_CURRENCY=FRANCE;
3. Display selected salaries using that format.
SELECT TO_CHAR(salary, 'C099G999D99') "Salary" FROM employees
WHERE department_id = 60;
The output from the example should be similar to the following.
Salary
------------------
EUR009,000.00
EUR006,000.00
EUR004,800.00
EUR004,800.00
EUR004,200.00
5 rows selected
4. Set NLS_ISO_CURRENCY back to its original setting listed in Step 1. For example:
ALTER SESSION SET NLS_ISO_CURRENCY=AMERICA;
Using the NLS_DUAL_CURRENCY Parameter
Use the NLS_DUAL_CURRENCY parameter to override the default dual currency
symbol defined implicitly by NLS_TERRITORY. The value can be any valid symbol.
NLS_DUAL_CURRENCY was introduced to support the euro currency symbol during
the euro transition period.
See Also:
■Oracle Database Reference for more information on the NLS_ISO_
CURRENCY parameter
■Overview of Currency Formats on page 6-19
■Using the NLS_CURRENCY Parameter on page 6-19
■Using the NLS_DUAL_CURRENCY Parameter on page 6-21
■Oracle Database Globalization Support Guide for a complete
discussion of setting up the globalization support environment,
including monetary parameters
See Also:
■Oracle Database Reference for more information on the NLS_DUAL_
CURRENCY parameter
■Overview of Currency Formats on page 6-19
■Using the NLS_CURRENCY Parameter on page 6-19
■Using the NLS_ISO_CURRENCY Parameter on page 6-20
■Oracle Database Globalization Support Guide for a complete
discussion of setting up the globalization support environment,
including monetary parameters

Establishing a Globalization Support Environment
6-22 Oracle Database 2 Day Developer's Guide
Using Linguistic Sort and Search
Different languages have their own sorting rules. Some languages are collated
according to the letter sequence in the alphabet, some according to the number of
stroke counts in the letter, and some are ordered by the pronunciation of the words.
Treatment of letter accents also differs among languages. For example, in Danish, Æ is
sorted after Z, while Y and Ü are considered to be variants of the same letter.
You can define how to sort data by using linguistic sort parameters. The basic
linguistic definition treats strings as sequences of independent characters.
Using the NLS_SORT Parameter
The NLS_SORT parameter specifies the collating (linguistic sort) sequence for ORDER
BY queries. It overrides the default NLS_SORT value that is derived from the NLS_
LANGUAGE parameter. The value of NLS_SORT can be BINARY or any valid linguistic
sort name:
NLS_SORT = BINARY | sort_name
If the value is BINARY, then the collating sequence is based on the numeric code of the
characters in the underlying encoding scheme. Depending on the data type, this will
either be in the binary sequence order of the database character set or the national
character set. If the value is a named linguistic sort, sorting is based on the order of the
defined sort. Most, but not all, languages supported by the NLS_LANGUAGE parameter
also support a linguistic sort with the same name.
To set the NLS_SORT parameter:
You can change the NLS_SORT parameter value and see the effect in the display of
results from a query. The following examples show the effect of setting NLS_SORT first
to Binary and then to Spanish (SPANISH_M). Spain traditionally treats ch, ll, and ñ as
letters of their own, ordered after c, l, and n, respectively.
1. In SQL Developer, make a note of the current collating format in which Oracle
Database was installed.
Under Connections, expand Data Dictionary reports, then About Your Database,
and then National Language Support Parameters. In the Select Connection dialog
box, select hr_conn from the list of connections. The current collating format is
listed after NLS_SORT.
2. Set NLS_SORT to binary.
ALTER SESSION SET NLS_SORT=BINARY;
3. Enter a SELECT statement with an ORDER BY clause, to check the output after the
change.
SELECT last_name FROM employees
WHERE last_name LIKE 'C%'
ORDER BY last_name;
The output from the example should be similar to the following.
LAST_NAME
-------------------------
See Also:
■Oracle Database Globalization Support Guide for a complete
discussion of linguistic sort and string searching

Establishing a Globalization Support Environment
Working in a Global Environment 6-23
Cabrio
Cambrault
Cambrault
Chen
Chung
Colmenares
6 rows selected
4. Set NLS_SORT to SPANISH_M.
ALTER SESSION SET NLS_SORT=spanish_m;
5. Enter the same SELECT statement, to check the output after the change.
SELECT last_name FROM employees
WHERE last_name LIKE 'C%'
ORDER BY last_name;
The output from the example should be similar to the following. Note that
Colmenares now comes before Chen.
LAST_NAME
-------------------------
Cabrio
Cambrault
Cambrault
Colmenares
Chen
Chung
6 rows selected
6. Set NLS_SORT back to its original setting listed in Step 1. For example:
ALTER SESSION SET NLS_SORT=BINARY;
Using the NLS_COMP Parameter
When using comparison operators, characters are compared according to their binary
codes in the designated encoding scheme. A character is greater than another if it has a
higher binary code. Because the binary sequence of characters may not match the
linguistic sequence for a particular language, those comparisons might not be
linguistically correct.
The value of the NLS_COMP parameter affects the comparison behavior of SQL
operations. The value can be BINARY (default) or LINGUISTIC. You can use the NLS_
COMP parameter to avoid the cumbersome process of using the NLSSORT function in
SQL statements when you want to perform a linguistic comparison instead of a binary
See Also:
■Oracle Database Reference for more information on the NLS_SORT
parameter
■Using the NLS_COMP Parameter on page 6-23
■Using Case-Insensitive and Accent-Insensitive Search on
page 6-25
■Oracle Database Globalization Support Guide for a complete
discussion of linguistic sort and string searching

Establishing a Globalization Support Environment
6-24 Oracle Database 2 Day Developer's Guide
comparison. When NLS_COMP is set to LINGUISTIC, SQL performs a linguistic
comparison based on the value of the NLS_SORT parameter.
To set the NLS_COMP parameter:
You can change the NLS_COMP parameter value and see the effect in the display of
results from a query. The following examples show the effect of performing a binary
comparison followed by a Spanish linguistic sensitive comparison against the
employee names.
1. In SQL Developer, make a note of the current comparison operators format in
which Oracle Database was installed.
Under Connections, expand Data Dictionary reports, then About Your Database,
and then National Language Support Parameters. In the Select Connection dialog
box, select hr_conn from the list of connections. The current comparison
operators format is listed after NLS_COMP.
2. Set NLS_SORT to Spanish and NLS_COMP to BINARY.
ALTER SESSION SET NLS_SORT=spanish_m NLS_COMP=binary;
3. Enter a SELECT statement to return employees whose last name starts with C.
SELECT last_name FROM employees
WHERE last_name LIKE 'C%';
The output from the example should be similar to the following.
LAST_NAME
-------------------------
Cabrio
Cambrault
Cambrault
Chen
Chung
Colmenares
6 rows selected
4. Set NLS_COMP to LINGUISTIC.
ALTER SESSION SET NLS_COMP=linguistic;
5. Enter the same SELECT statement, to check the output after the change.
SELECT last_name FROM employees
WHERE last_name LIKE 'C%';
The output from the example should be similar to the following. Note that two
fewer rows are returned this time. Chen and Chung are not returned because in
Spanish ch is treated as a separate character that follows c, so ch is excluded
when a Spanish linguistic-sensitive comparison is performed.
LAST_NAME
-------------------------
Cabrio
Cambrault
Cambrault
Colmenares
4 rows selected

Establishing a Globalization Support Environment
Working in a Global Environment 6-25
6. Set NLS_COMP back to its original setting listed in Step 1. For example:
ALTER SESSION SET NLS_COMP=BINARY;
Using Case-Insensitive and Accent-Insensitive Search
Operations inside a database are sensitive to the case and the accents of the characters.
Sometimes, you might need to perform case-insensitive or accent-insensitive
comparisons. Use the NLS_SORT session parameter to specify a case-insensitive or
accent-insensitive sort.
To specify a case-insensitive or accent-insensitive sort:
■Append _CI to an Oracle sort name for a case-insensitive sort. For example:
■BINARY_CI: accent-sensitive and case-insensitive binary sort
■GENERIC_M_CI: accent-sensitive and case-insensitive GENERIC_M sort
■Append _AI to an Oracle sort name for an accent-insensitive and case-insensitive
sort. For example:
■BINARY_AI: accent-insensitive and case-insensitive binary sort
■FRENCH_M_AI: accent-insensitive and case-insensitive FRENCH_M sort
Using Length Semantics
In single-byte character sets, the number of bytes and the number of characters in a
string are the same. In multibyte character sets, a character or code point consists of
one or more bytes. Calculating the number of characters based on byte length can be
difficult in a variable-width character set. Calculating column length in bytes is called
byte semantics, while measuring column length in characters is called character
semantics.
Character semantics is useful to define the storage requirements for multibyte strings
of varying widths. For example, in a Unicode database (AL32UTF8), suppose that you
need to define a VARCHAR2 column that can store up to five Chinese characters
together with five English characters. Using byte semantics, this column requires 15
bytes for the Chinese characters, which are 3 bytes long, and 5 bytes for the English
See Also:
■Oracle Database Reference for more information on the NLS_COMP
parameter.
■Using the NLS_SORT Parameter on page 6-22
■Using Case-Insensitive and Accent-Insensitive Search on
page 6-25
■Oracle Database Globalization Support Guide for a complete
discussion of linguistic sort and string searching
See Also:
■Oracle Database Reference for more information on the NLS_SORT
parameter.
■Using the NLS_SORT Parameter on page 6-22
■Using the NLS_COMP Parameter on page 6-23
■Oracle Database Globalization Support Guide for a complete
discussion of linguistic sort and string searching

Establishing a Globalization Support Environment
6-26 Oracle Database 2 Day Developer's Guide
characters, which are 1 byte long, for a total of 20 bytes. Using character semantics, the
column requires 10 characters.
The expressions in the following list use byte semantics. Note the BYTE qualifier in the
VARCHAR2 expression and the B suffix in the SQL function name.
■VARCHAR2(20 BYTE)
■SUBSTRB(string, 1, 20)
The expressions in the following list use character semantics. Note the CHAR qualifier
in the VARCHAR2 expression.
■VARCHAR2(20 CHAR)
■SUBSTR(string, 1, 20)
Using the NLS_LENGTH_SEMANTICS Parameter
The NLS_LENGTH_SEMANTICS parameter specifies BYTE (default) or CHAR semantics.
By default, the character data types CHAR and VARCHAR2 are specified in bytes, not
characters. Therefore, the specification CHAR(20) in a table definition allows 20 bytes
for storing character data.
The NLS_LENGTH_SEMANTICS parameter enables you to create CHAR, VARCHAR2, and
LONG columns using either byte-length or character-length semantics. NCHAR,
NVARCHAR2, CLOB, and NCLOB columns are always character-based. Existing columns
are not affected.
To set the NLS_LENGTH_SEMANTICS parameter:
1. In SQL Developer, make a note of the current semantics format in which Oracle
Database was installed.
Under Connections, expand Data Dictionary reports, then About Your Database,
and then National Language Support Parameters. In the Select Connection dialog
box, select hr_conn from the list of connections. The current semantics format is
listed after NLS_LENGTH_SEMANTICS.
2. Set NLS_LENGTH_SEMANTICS to BYTE.
ALTER SESSION SET NLS_LENGTH_SEMANTICS=BYTE;
3. Create the following table:
CREATE TABLE SEMANTICS_BYTE(SOME_DATA VARCHAR2(20));
4. Check the data types of table SEMANTICS_BYTE.
Select the Connections tab, and then expand the hr_conn connection to display
all the tables under Tables. Select the SEMANTICS_BYTE table. The data type for its
SOME_DATA column is listed as VARCHAR2(20 BYTE).
5. Set NLS_LENGTH_SEMANTICS to CHAR.
ALTER SESSION SET NLS_LENGTH_SEMANTICS=CHAR;
6. Create the following table:
See Also:
■Oracle Database Globalization Support Guide for a complete
discussion of choosing or changing a character set, including
length semantics

Developing Globalized Applications
Working in a Global Environment 6-27
CREATE TABLE SEMANTICS_CHAR(SOME_DATA VARCHAR2(20));
7. Check the data types of table SEMANTICS_CHAR.
Select the Connections tab, and then expand the hr_conn connection to display
all the tables under Tables. Select the SEMANTICS_CHAR table. The data type for its
SOME_DATA column is listed as VARCHAR2(20 CHAR).
8. Drop the SEMANTICS_BYTE and SEMANTICS_CHAR tables.
In the Tables navigation hierarchy, right-click the name of each table, and from the
menu, select Table, and then Drop. Click Apply, and then in the confirmation
dialog box, click OK.
9. Set NLS_LENGTH_SEMANTICS back to its original setting listed in Step 1. For
example:
ALTER SESSION SET NLS_LENGTH_SEMANTICS=BYTE;
Developing Globalized Applications
This section describes Unicode-related features in SQL and PL/SQL that you can
deploy for multiple language applications. You can insert and retrieve Unicode data.
Data is transparently converted among the database and client programs, which
ensures that client programs are independent of the database character set and
national character set.
Overview of Unicode
Unicode is a universal encoded character set that enables you to store information in
any language, using a single character set. Unicode provides a unique code value for
every character, regardless of the platform, program, or language.
Unicode has the following advantages:
■It simplifies character set conversion and linguistic sort functions.
■It improves performance compared with native multibyte character sets.
■It supports the Unicode data type based on the Unicode standard.
You can store Unicode characters in an Oracle database in two ways:
■You can create a Unicode database that enables you to store UTF8 encoded
characters as SQL CHAR data types.
■You can support multiple language data in specific columns by using Unicode
data types. You can store Unicode characters into columns of the SQL NCHAR data
See Also:
■Oracle Database Reference for more information on the NLS_
LENGTH_SEMANTICS parameter.
■Oracle Database Globalization Support Guide for a complete
discussion of choosing or changing a character set, including
length semantics
See Also:
■Oracle Database Globalization Support Guide for a complete
discussion of programming with Unicode

Developing Globalized Applications
6-28 Oracle Database 2 Day Developer's Guide
types regardless of how the database character set has been defined. The NCHAR
data type is an exclusively Unicode data type.
Using SQL Character Data Types
There are two SQL NCHAR data types: NCHAR and NVARCHAR2.
In SQL Developer, you can specify these data types in the dialog box for creating or
editing a table, by selecting the appropriate value for Type for each column. You can
also use the SQL Worksheet to enter a CREATE TABLE statement and specify each
column name and data type.
Using the NCHAR Data Type
When you define a table column or a PL/SQL variable as the NCHAR data type, the
length is specified as the number of characters. For example, the following statement
creates a column with a maximum length of 30 characters:
CREATE TABLE table1 (column1 NCHAR(30));
The maximum number of bytes in a column is the product of the maximum number of
characters and the maximum number of bytes for each character.
For example, if the national character set is UTF8, then the maximum byte length is 30
characters times 3 bytes for each character, or 90 bytes.
The national character set, which is used for all NCHAR data types, is defined when the
database is created. The national character set can be either UTF8 or AL16UTF16. The
default is AL16UTF16.
The maximum column size allowed is 2000 characters when the national character set
is UTF8 and 1000 when it is AL16UTF16. The actual data is subject to the maximum
byte limit of 2000. The two size constraints must be satisfied at the same time. In
PL/SQL, the maximum length of the NCHAR data is 32,767 bytes. You can define an
NCHAR variable of up to 32,767 characters, but the actual data cannot exceed 32,767
bytes. If you insert a value that is shorter than the column length, then Oracle pads the
value with blanks to whichever length is smaller: maximum character length or
maximum byte length.
See Also:
■Using SQL Character Data Types on page 6-28
■Using Unicode String Literals on page 6-29
■NCHAR Literal Replacement on page 6-30
■Oracle Database Globalization Support Guide for a complete
discussion of programming with Unicode
See Also:
■Overview of Unicode on page 6-27
■Using Unicode String Literals on page 6-29
■NCHAR Literal Replacement on page 6-30
■Oracle Database Globalization Support Guide for a complete
discussion of programming with Unicode

Developing Globalized Applications
Working in a Global Environment 6-29
Using the NVARCHAR2 Data Type
The NVARCHAR2 data type specifies a variable-length character string that uses the
national character set. When you create a table with an NVARCHAR2 column, you
specify the maximum number of characters for the column. Lengths for NVARCHAR2
are in units of characters, just as for NCHAR. Oracle Database subsequently stores each
value in the column exactly as you specify it, if the value does not exceed the
maximum length of the column. It does not pad the string value to the maximum
length.
The maximum column size allowed is 4000 characters when the national character set
is UTF8, and it is 2000 when AL16UTF16. The maximum length of an NVARCHAR2
column in bytes is 4000. Both the byte limit and the character limit must be met, so the
maximum number of characters that is allowed in an NVARCHAR2 column is the
number of characters that can be written in 4000 bytes.
In PL/SQL, the maximum length for an NVARCHAR2 variable is 32,767 bytes. You can
define NVARCHAR2 variables up to 32,767 characters, but the actual data cannot exceed
32,767 bytes.
The following statement creates a table with one NVARCHAR2 column whose
maximum length in characters is 2000 and maximum length in bytes is 4000.
CREATE TABLE table2 (column2 NVARCHAR2(2000));
Using Unicode String Literals
You can input Unicode string literals in SQL and PL/SQL as follows:
■Put the letter N before a string literal that is enclosed with single quotation marks.
This explicitly indicates that the following string literal is an NCHAR string literal.
For example, N'résumé' is an NCHAR string literal. See "NCHAR Literal
Replacement" on page 6-30 for limitations of this method.
■Use the NCHR(n) SQL function. The NCHR(n) SQL function returns a unit of
character code in the national character set, which is AL16UTF16 or UTF8. The
result of concatenating several NCHR(n) functions is NVARCHAR2 data. In this
way, you can bypass the client and server character set conversions and create an
NVARCHAR2 string directly. For example, NCHR(32) represents a blank character.
Because NCHR(n) is associated with the national character set, portability of the
resulting value is limited to applications that use the same national character set. If
this is a concern, then use the UNISTR function to remove portability limitations.
■Use the UNISTR('string') SQL function. The UNISTR('string') function
converts a string to the national character set. To ensure portability and to preserve
data, include only ASCII characters and Unicode encoding in the following form:
\xxxx, where xxxx is the hexadecimal value of a character code value in UTF-16
See Also:
■Using the NVARCHAR2 Data Type on page 6-29
■Oracle Database Globalization Support Guide for a complete
discussion of programming with Unicode
See Also:
■Using the NCHAR Data Type on page 6-28
■Oracle Database Globalization Support Guide for a complete
discussion of programming with Unicode

Using Locale-Dependent Functions with NLS Parameters
6-30 Oracle Database 2 Day Developer's Guide
encoding format. For example, UNISTR('G\0061ry') represents 'Gary'. The
ASCII characters are converted to the database character set and then to the
national character set. The Unicode encoding is converted directly to the national
character set.
The last two methods can be used to encode any Unicode string literals.
NCHAR Literal Replacement
As part of a SQL or PL/SQL statement, the text of any literal, with or without the
prefix N, is encoded in the same character set as the rest of the statement. On the client
side, the statement is in the client character set, determined by the character set
defined in the NLS_LANG parameter. On the server side, the statement is in the
database character set.
When the SQL or PL/SQL statement is transferred from client to the database, its
character set is converted accordingly. If the database character set does not contain all
characters used in the text literals, data is lost in this conversion. This affects NCHAR
string literals more than the CHAR text literals, because the N' literal is designed to be
independent of the database character set, and it should be able to include any data
that the client character set allows.
To avoid data loss during conversion to an incompatible database character set, you
can use NCHAR literal replacement by setting the client environment variable ORA_
NCHAR_LITERAL_REPLACE to TRUE. This causes N literals on the client side to be
replaced by an internal format, which the database decodes to Unicode when the
statement is executed. By default, NCHAR literal replacement is disabled, to maintain
backward compatibility.
Using Locale-Dependent Functions with NLS Parameters
All SQL functions whose behavior depends on globalization support conventions
allow NLS parameters to be specified. These functions are TO_CHAR, TO_DATE, TO_
NUMBER, NLS_UPPER, NLS_LOWER, NLS_INITCAP, and NLSSORT.
Specifying NLS parameters for these functions enables the functions to be evaluated
independently of the session's NLS parameters. This feature can be important for SQL
statements that contain numbers and dates as string literals.
See Also:
■Overview of Unicode on page 6-27
■Using SQL Character Data Types on page 6-28
■NCHAR Literal Replacement on page 6-30
■Oracle Database Globalization Support Guide for a complete
discussion of programming with Unicode
See Also:
■Overview of Unicode on page 6-27
■Using SQL Character Data Types on page 6-28
■Using Unicode String Literals on page 6-29
■Oracle Database Globalization Support Guide for a complete
discussion of programming with Unicode

Using Locale-Dependent Functions with NLS Parameters
Working in a Global Environment 6-31
For example, there are two ways to ensure that the following query is evaluated so
that the language specified for dates is AMERICAN.
■Use ALTER SESSION to set the NLS_DATE_LANGUAGE and NLS_CALENDAR
parameters.
ALTER SESSION SET NLS_DATE_LANGUAGE=American;
SELECT last_name FROM employees WHERE hire_date > '01-JAN-1999';
■Specify the NLS_DATE_LANGUAGE parameter in the TO_DATE function in the
WHERE clause of the SQL statement.
SELECT last_name FROM employees
WHERE hire_date > TO_DATE('01-JAN-1999','DD-MON-YYYY',
'NLS_DATE_LANGUAGE = AMERICAN');
This way, SQL statements that are independent of the session language can be
defined where necessary. These statements are necessary when string literals
appear in SQL statements in views, CHECK constraints, or triggers.
Only SQL statements that must be independent of the session NLS parameter values
should explicitly specify optional NLS parameters in locale-dependent SQL functions.
Using session default values for NLS parameters in SQL functions usually results in
better performance.
All character functions support both single-byte and multibyte characters. Except
where explicitly stated, character functions operate character by character, rather than
byte by byte.
When SQL functions evaluate views and triggers, default values from the current
session are used for the NLS function parameters. When SQL functions evaluate
CHECK constraints, they use the default values that were specified for the NLS
parameters when the database was created.
Specifying NLS Parameters in SQL Functions
NLS parameters are specified in SQL functions as 'parameter = value'. For example:
'NLS_DATE_LANGUAGE = AMERICAN'
You can specify the following NLS parameters in SQL functions:
NLS_DATE_LANGUAGE
NLS_NUMERIC_CHARACTERS
NLS_CURRENCY
NLS_ISO_CURRENCY
NLS_DUAL_CURRENCY
NLS_CALENDAR
NLS_SORT
In some languages, some lowercase characters correspond to more than one uppercase
character, or some uppercase characters correspond to more than one lowercase
characters. As a result, the length of the output from the NLS_UPPER, NLS_LOWER,
and NLS_INITCAP functions can differ from the length of the input. The following
table shows which NLS parameters are valid for specific SQL functions.
See Also:
■Oracle Database Globalization Support Guide for a complete
discussion of locale-dependent SQL functions with optional NLS
parameters
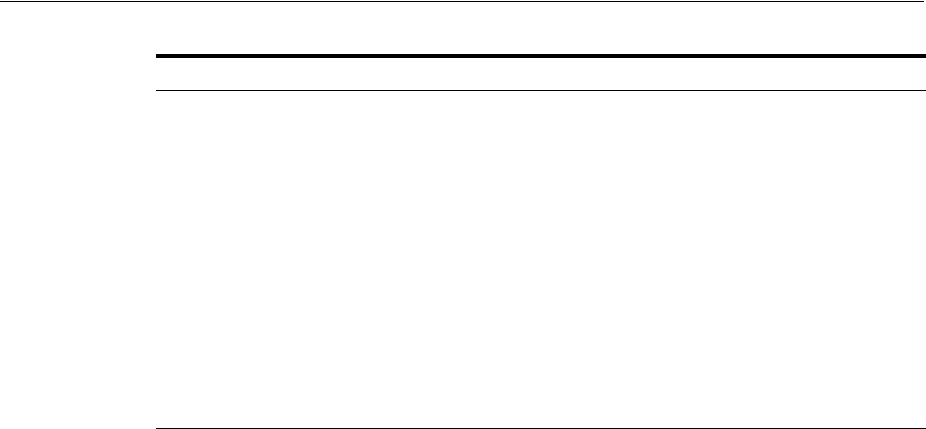
Using Locale-Dependent Functions with NLS Parameters
6-32 Oracle Database 2 Day Developer's Guide
Example 6–1 shows several SELECT statements that demonstrate how to use NLS
parameters in SQL functions. After you perform these SELECT statements (which you
can do as a group in SQL Workshop), examine the output of each statement in the
Script Output pane. (The output for most of the statements is very long.)
Example 6–1 Using NLS Parameters in SQL Functions
SELECT TO_DATE('1-JAN-99', 'DD-MON-YY',
'NLS_DATE_LANGUAGE = American') "01/01/99" FROM DUAL;
SELECT TO_CHAR(hire_date, 'DD/MON/YYYY',
'NLS_DATE_LANGUAGE = French') "Hire Date" FROM employees;
SELECT TO_CHAR(SYSDATE, 'DD/MON/YYYY',
'NLS_DATE_LANGUAGE = ''Traditional Chinese'' ') "System Date" FROM DUAL;
SELECT TO_CHAR(13000, '99G999D99',
'NLS_NUMERIC_CHARACTERS = '',.''') "13K" FROM DUAL;
SELECT TO_CHAR(salary, '99G999D99L', 'NLS_NUMERIC_CHARACTERS = '',.''
NLS_CURRENCY = ''EUR''') salary FROM employees;
SELECT TO_CHAR(salary, '99G999D99C', 'NLS_NUMERIC_CHARACTERS = ''.,''
NLS_ISO_CURRENCY = Japan') salary FROM employees;
SELECT NLS_UPPER(last_name, 'NLS_SORT = Swiss') "Last Name" FROM employees;
SELECT last_name FROM employees
ORDER BY NLSSORT(last_name, 'NLS_SORT = German');
SQL Function Valid NLS Parameters
TO_DATE NLS_DATE_LANGUAGE, NLS_CALENDAR
TO_NUMBER NLS_NUMERIC_CHARACTERS, NLS_CURRENCY, NLS_ISO_CURRENCY,
NLS_DUAL_CURRENCY,
TO_CHAR NLS_DATE_LANGUAGE, NLS_NUMERIC_CHARACTERS, NLS_CURRENCY,
NLS_ISO_CURRENCY, NLS_DUAL_CURRENCY, NLS_CALENDAR
TO_NCHAR NLS_DATE_LANGUAGE, NLS_NUMERIC_CHARACTERS, NLS_CURRENCY,
NLS_ISO_CURRENCY, NLS_DUAL_CURRENCY, NLS_CALENDAR
NLS_UPPER NLS_SORT
NLS_LOWER NLS_SORT
NLS_INITCAP NLS_SORT
NLSSORT NLS_SORT
See Also:
■Unacceptable NLS Parameters in SQL Functions on page 6-33
■Oracle Database Globalization Support Guide for a complete
discussion of locale-dependent SQL functions with optional NLS
parameters

Using Locale-Dependent Functions with NLS Parameters
Working in a Global Environment 6-33
Unacceptable NLS Parameters in SQL Functions
You cannot use the NLS parameters NLS_LANGUAGE, NLS_TERRITORY, and NLS_
DATE_FORMAT in SQL functions except for NLSSORT.
The NLS_LANGUAGE parameter can interfere with the session value of NLS_DATE_
LANGUAGE. For example, if you specify NLS_LANGUAGE in the TO_CHAR function,
Oracle Database will ignore its if it different from the NLS_DATE_LANGUAGE
parameter value for the session.
The NLS_DATE_FORMAT and NLS_TERRITORY_FORMAT parameters are not accepted
as parameters because they can interfere with the required format models. A date
format must be specified if an NLS parameter is used in a TO_CHAR or TO_DATE
function, so NLS_DATE_FORMAT and NLS_TERRITORY_FORMAT parameters are not
valid for these conversion functions. Oracle Database will return an error if you
specify NLS_DATE_FORMAT or NLS_TERRITORY_FORMAT in the TO_CHAR or TO_
DATE functions.
See Also:
■Specifying NLS Parameters in SQL Functions on page 6-31
■Oracle Database Globalization Support Guide for a complete
discussion of locale-dependent SQL functions with optional NLS
parameters

Using Locale-Dependent Functions with NLS Parameters
6-34 Oracle Database 2 Day Developer's Guide

Deploying a Database Application 7-1
7
Deploying a Database Application
This chapter describes how to package and install the database objects that support an
application. For examples, it uses objects that you created if you followed the
instructions earlier in this guide. It takes you through the process of gathering object
definitions and data to deploy on another system. In a real-world environment, the
exercise would probably not be simple as laid out in this guide, but the steps and
considerations discussed would be the same.
Oracle recommends that you use a consistent prefix for all object names. This makes
the objects easy to identify. It groups them together in the SQL Developer Connections
navigator display and when you are reviewing SQL Developer reports and
performance queries against the Oracle Database data dictionary.
This chapter contains the following sections:
■Overview of Deployment on page 7-1
■Deployment Environments on page 7-1
■Planning for Deployment on page 7-2
■Exporting the Database Objects on page 7-3
■Exporting the Data on page 7-10
■Performing the Installation on page 7-11
■Validating the Installation on page 7-12
■Archiving the Installation Scripts on page 7-13
Overview of Deployment
Deployment of an application is typically not complete unless the database objects that
support the application are also deployed. You can deploy these objects by creating
scripts that create both the database objects and any necessary data, such as seed data
for lookup tables. The database objects include tables, views, functions, packages, and
others that you created to implement the application logic.
Deployment Environments
When you deploy an application for Oracle Database, you should create the following
system environments:

Planning for Deployment
7-2 Oracle Database 2 Day Developer's Guide
Step 1: Create a Test Environment
You should always have a test environment, for the initial deployment, for thorough
testing of the application before it is deployed in any other environment, and perhaps
also for training of application users.
Testing checks both the functionality of your application and whether you have
packaged it correctly. If you have missed an object that your application depends
upon, you can catch it during testing rather than after it is deployed to actual users in
the production environment.
Step 2: Create a Quality Assurance (QA) Environment
If the application is sufficiently complex and if you have the resources, create a QA
environment in which changes to the system can be checked in a rigorous manner.
Step 3: Create an Education Environment
An education environment enables you to provide training and practice, for internal or
external users, without affecting any of the other environments. You can create the
education environment before or after the production environment, and you can
update it independently of updates to other environments.
Step 4: Create the Production Environment
The production environment contains the actual data and database objects for the
normal operation of your organization. Test any objects in the test environment before
you move them into the production environment.
Regardless of how the number of environments to which you deploy, the deployment
process is the same.
Planning for Deployment
Before you deploy an application, you must understand the dependencies between the
database objects. You must create the objects in the correct order, so that if any objects
depend on other objects, the dependent objects exist in each case. If a dependent object
is missing, an error or problem such as the following will occur:
■The CREATE statement will fail, such as with constraints.
■The object will be created but left in an invalid state, such as with functions,
procedures, and packages.
To deploy data, you can take one of the following approaches with the data for each
table, depending on how confident you are of the validity of the data:
■Load the data without worrying about any possible validity issues.
You can use this approach if you are confident you are of the following: the data
will not violate any constraint, no duplicate values exist in primary key and
unique key columns, all foreign key references will already exist, and the data in
any column governed by a check constraint meets that constraint. For example, if
you are simply loading lookup data from your development environment, and
load your data in a proper order, the constraints will not need to be disabled
because the constraints will not be violated.
■Disable all constraints before you load the data, and then enable the constraints
after the data loading is complete.
If you want to load data without needing to sequence it (such as when you have
many tables to load and much dependent data) or if you will be loading data from

Exporting the Database Objects
Deploying a Database Application 7-3
an outside source (such as an older application or from a flat file or spreadsheet),
you should disable the constraints before loading the data.
If any data fails to meet the constraints, that constraint will not be enabled and you
will need to correct the data and try again.
The following is a general guideline for the order in which to run the installation
scripts for different types of database objects:
1. Package specifications
2. Tables (with constraints and indexes) in proper order
3. Sequences (because they are most often used by triggers)
4. Triggers
5. Synonyms
6. Views (because they may reference functions, procedures, or synonyms)
7. Package bodies
8. Data (optionally disabling all constraints before loading the data and re-enabling
them afterwards)
Package specifications are listed first because they will always be valid and other
objects might refer to them. Package bodies should be the last object type created
because they will probably refer to other object types. Because of dependency issues,
you are encouraged to put functions and procedures into packages.
If you followed the instructions in other sections of this guide, you created objects in
the sample Oracle HR schema. This section assumes that you are deploying them to
another standard HR schema.
In the tables you have created, scores has foreign keys to both performance_
parts and evaluations. This means that you cannot create those foreign keys until
the primary keys for the referenced tables are created. You will first create the
evaluations table and constraints, then the performance_parts table, and then
the scores table. You will have just one script for tables, sequences, and triggers. This
will minimize the manual editing for this exercise. You will also create just create one
script for the function and the package because you only have one of each. The last
script you will create will be for the synonym and view.
This is obviously a simplistic deployment example. For real-world applications, you
will need to consult with the database designer and map out the order for creating the
objects. If you have a diagram of the design, such as an Entity Relationship Diagram, it
can be very useful during this phase
Exporting the Database Objects
This section demonstrates how to export the database objects.
Using SQL Developer to Export Database Objects
If you have maintained scripts to create your database objects, you can use those. If
you have not maintained scripts, you should generate the data definition language
(DDL) statements for each object based on its definition in the database. To generate
the DDL for your database objects, you can use Oracle SQL Developer, specifically the
Export DDL (and Data) feature. This feature generates DDL statements to create
specified objects and types of objects, and it can generate INSERT statements to insert
exported data into the new tables that are created.

Exporting the Database Objects
7-4 Oracle Database 2 Day Developer's Guide
To export DDL statements and table data:
1. Create a directory in which to export the DDL statements and table data.
Create this directory separate from the Oracle installation directory, for example,
C:\my_exports.
2. From the SQL Developer main menu, select Tools, then Export DDL (and Data).
3. Click the Options tab (it should be selected by default).
4. In the File field, specify the name and location of the export file to be created that
will contain the SQL statements to create the objects and insert data. For example:
C:\my_exports\hr_export.sql
5. Under Options, select from the following options to specify objects within object
types, or to specify options for the generated SQL statements.
■Show Schema: If this option is checked, the schema name is included in
CREATE statements. If this option is not checked, the schema name is not
included in CREATE statements, which is convenient if you want to re-create
the exported objects under a schema that has a different name.
■Storage: If this option is checked, any STORAGE clauses in definitions of the
database objects are preserved in the exported DDL statements. If you do not
want to use the current storage definitions (for example, if you will re-create
the objects in a different system environment), uncheck this option.
■Terminator: If this option is checked, a line terminator character is inserted at
the end of each line.
■Pretty Print: If this option is checked, the statements are attractively formatted
in the output file, and the size of the file will be larger than it would otherwise
be.

Exporting the Database Objects
Deploying a Database Application 7-5
■Include BYTE Keyword: If this option is checked, column length
specifications refer to bytes; if this option is not checked, column length
specifications refer to characters.
■Add Force to Views: If this option is checked, the FORCE option is added to
any CREATE VIEW statements, causing each view to be created even if it
contains errors.
■Constraints as Alters: If this option is checked, constraints for each table are
defined in separate ALTER TABLE statements instead of in the CREATE
TABLE statement.
■Export Data: If this option is checked, statements are included to insert the
data for an exported table or view. If this option is not checked, statements are
not included to insert the data for an exported table or view; that is, only the
DDL statements are included.
■Include Drop Statements: If this option is checked, DROP statements are
included before the CREATE statements, to delete any existing objects with the
same names.
6. Click the Objects tab.
7. In the Objects tab:
■Select hr_conn from the Connection list.
■Under Objects, select All, and then select All My Objects to display the
available objects in the hr_conn connection.
Ensure that the types of objects (Constraints, Database Links, Functions, and
so on) to be exported are checked. If you want INSERT statements created to
insert table data, ensure that Data is checked. If you want certain object types
or the table data not to be exported, uncheck the appropriate options.
Exporting the Database Objects
7-6 Oracle Database 2 Day Developer's Guide
8. Click Apply to generate the script.
Special Considerations for Exporting Sequences and Triggers
Sequences and triggers require special consideration when you export them. For
sequences, the DDL generated will start your sequence relative to the current value. If
you have a sequence that is used to populate a primary key and the data for that table
will be loaded, keep the sequence as it is. However, if you will not be loading data,
you might want to edit your script, after creation, to reset the START WITH value.
For triggers, if you have a before-insert trigger on a table and plan to load data, you
must examine that trigger and decide if you want the actions specified in the trigger to
occur. For example, primary key values are often populated in triggers, and if you
want to preserve the primary key from the INSERT statement, ensure that your trigger
only populates the primary key value if it is null, as in the following example:
IF :new.evaluation_id IS NULL
THEN SELECT evaluations_seq.Nextval
INTO :new.evaluation_id
FROM dual;
END IF;
However, if the trigger is not written as in the preceding example, you must either
rewrite your trigger, or disable the trigger before loading the data and then enable it
after the data load is complete. Also check that the current value of the sequence is
greater than the maximum value in the primary key column.
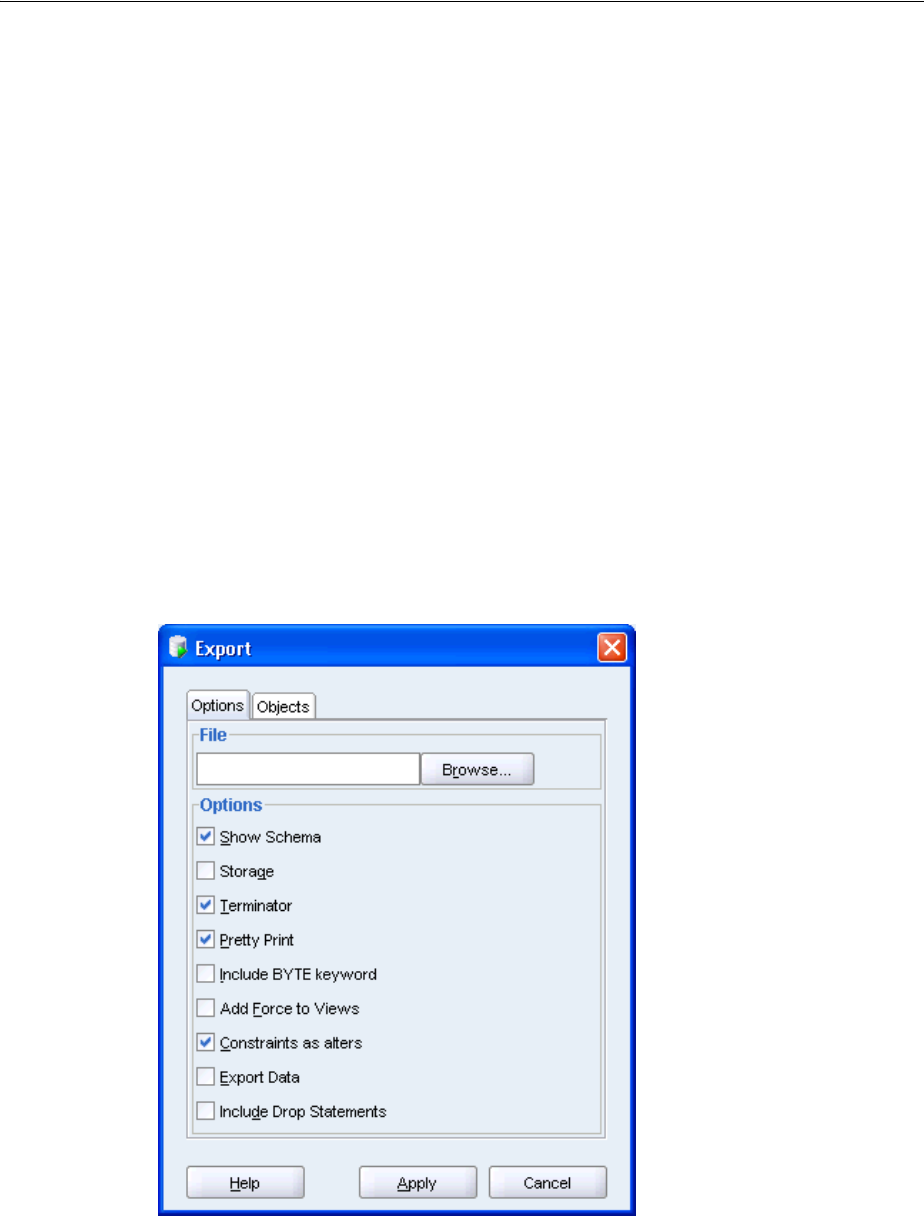
Exporting the Database Objects
Deploying a Database Application 7-7
If triggers populate any auditing columns (such as CREATED_ON or CREATED_BY),
you must preserve the data from your source table by having the trigger set a new
value only if the current value is null, as in the following example:
if :new.created_on is null
then :new.created_on := sysdate;
end if;
The tables that you created using the instructions in this guide did not use any
triggers, so you will not need to edit the code generated if you follow the instructions
in the related topics for generating scripts.
Generating a Script for Creating the Sequence and Tables
Generate a script to create the sequence and tables that you created if you followed the
instructions earlier in this guide. This script will also create any necessary constraints,
indexes, and triggers.
To generate a script for creating the sequence and tables:
1. Create a directory in which to export the DDL statements and table data.
Create this directory separate from the Oracle installation directory, for example,
C:\my_exports.
2. From the SQL Developer main menu, select Tools, then Export DDL (and Data).
3. In the Export dialog box, specify the name and location of the to be created that
will contain the SQL statements to create the objects and insert data. For example:
C:\my_exports\2day_tables.sql
4. Under Options, specify the following options for creating the tables for this
example:

Exporting the Database Objects
7-8 Oracle Database 2 Day Developer's Guide
■Show Schema: Uncheck. In this example, if you check this option, it might be
inappropriate because the schema name in your test or production
environment might not be the same as that in your development environment.
■Storage: Uncheck. If you have specified specific storage clauses for your tables
that you want to preserve, check this option; however, if you have not
specified storage clauses or if you have specified storage clauses that are
specific to your development or test environment (that will be different in the
production environment), uncheck this option.
■Terminator: Check. This is necessary because you want to be able run the
resulting script.
■Pretty Print: Check. If you check this option, the output is more readable.
■Include BYTE Keyword: Uncheck, unless you are working with a multibyte
character set, in which case you should check this option.
■Add Force to Views: Uncheck, because views will be added in another script
for this example.
■Constraints as Alters: Check, to have constraints added in separate SQL
statements after each CREATE TABLE.
■Export Data: Uncheck, because you will export the data separately for this
example.
■Include Drop Statements: Uncheck. If you want these objects to replace any
existing objects with the same name, you can include this. However, a better
practice is to have a separate drop script that can be run to remove an older
version of your objects before creation. This avoids the chance of accidentally
removing an object you did not intend to drop.
5. Click the Objects tab.
6. In the Objects tab:
■Select hr_conn for the database connection to be used.
■For the type of objects to be exported, expand All My Objects. Then expand
Sequences, and select EVALUATIONS_SEQ. Expand Tables, and select
EVALUATIONS, PERFORMANCE_PARTS and SCORES. Uncheck the other
object types.
7. Click Apply to generate the script.
Object definitions are added to the file in alphabetic order by object type. The sequence
will be the first object created, which is good because it is referenced by the trigger on
evaluations. The table dependencies require that evaluations be created first,
then performance_parts, and then scores. These happen to be in alphabetical
order, so you do not need to make any changes. However, if you did need to make
changes, you could edit the generated script with any text editor or by opening it
within SQL Developer.
Generating a Script for Creating the PL/SQL Objects
Generate a script to create the package (including the function) that you created if you
followed the instructions earlier in this guide.
To generate a script for creating the PL/SQL objects:
1. From the SQL Developer main menu, select Tools, then Export DDL (and Data).

Exporting the Database Objects
Deploying a Database Application 7-9
2. In the Export dialog box, specify the name and location of the to be created that
will contain the SQL statements to create the objects and insert data. For example:
C:\my_exports\2day_plsql.sql
3. Under Options, specify the following options for creating the tables for this
example:
■Show Schema: Uncheck. In this example, if you check this option, it might be
inappropriate because the schema name in your test or production
environment might not be the same as that in your development environment.
■Storage: Uncheck, because this does not apply here.
■Terminator: Check. This is necessary because you want to be able run the
resulting script.
■Pretty Print: Check. If you check this option, the output is more readable.
■Include BYTE Keyword: Uncheck, unless you are working with a multibyte
character set, in which case you should check this option.
■Add Force to Views: Uncheck, because this does not apply here.
■Constraints as Alters: Uncheck, because this does not apply here.
■Export Data: Uncheck, because you will export the data separately for this
example.
■Include Drop Statements: Uncheck. If you want these objects to replace any
existing objects with the same name, you can include this. However, a better
practice is to have a separate drop script that can be run to remove an older
version of your objects before creation. This avoids the chance of accidentally
removing an object you did not intend to drop.
4. Click the Objects tab.
5. In the Objects tab:
■Select hr_conn for the database connection to be used.
■For the type of objects to be exported, expand All My Objects. Expand
Functions, and then select CALCULATE_SCORE. Expand Packages, and then
select EMP_EVAL. Uncheck the other object types.
6. Click Apply to generate the script.
Generating a Script for Creating a Synonym and a View
Generate a script to create the synonym and the view that you created if you followed
the instructions earlier in this guide.
To generate a script for creating a synonym and a view:
1. From the SQL Developer main menu, select Tools, then Export DDL (and Data).
2. In the Export dialog box, specify the name and location of the to be created that
will contain the SQL statements to create the objects and insert data. For example:
C:\my_exports\2day_other.sql
3. Under Options, specify the following options for creating the tables for this
example:
■Show Schema: Uncheck. In this example, if you check this option, it might be
inappropriate because the schema name in your test or production
environment might not be the same as that in your development environment.

Exporting the Data
7-10 Oracle Database 2 Day Developer's Guide
■Storage: Uncheck, because this does not apply here.
■Terminator: Check. This is necessary because you want to be able run the
resulting script.
■Pretty Print: Check. If you check this option, the output is more readable.
■Include BYTE Keyword: Uncheck, unless you are working with a multibyte
character set, in which case you should check this option.
■Add Force to Views: Check. This will cause your views will be created, even if
they are invalid. If any views are invalid, you can correct problems later and
then compile these views.
■Constraints as Alters: Uncheck, because this does not apply here.
■Export Data: Uncheck, because you will export the data separately for this
example.
■Include Drop Statements: Uncheck. If you want these objects to replace any
existing objects with the same name, you can include this. However, a better
practice is to have a separate drop script that can be run to remove an older
version of your objects before creation. This avoids the chance of accidentally
removing an object you did not intend to drop.
4. Click the Objects tab.
5. In the Objects tab:
■Select hr_conn for the database connection to be used.
■For the type of objects to be exported, expand All My Objects. Expand
Synonyms, and select POSITIONS. Expand Views, and select EMP_
LOCATION. Uncheck the other object types.
6. Click Apply to generate the script.
After you have generated the scripts to create the tables, PL/SQL objects, synonym,
and view, you can generate the script that retrieves any data that you want to bring to
the target database.
Exporting the Data
To export the data, you must capture the existing table data for insertion into the
deployed tables. As mentioned in "Planning for Deployment" on page 7-2, you have
two options: you can insert data into your target schema if you are confident that all
dependent data exists and there are no validity problems, or you can disable
constraints, load the data, and then enable them again after loading the data.
If you choose to disable and then enable the constraints, then you have the following
options:
■Review the tables and constraints using SQL Developer, and disable and enable
them one at a time.
■Create a copy of the 2day_tables.sql file, find the name of each constraint, and
edit the file so that it contains the SQL statements to disable and enable each
constraint.
■Find the constraints in the Oracle Database data dictionary, and create a SQL script
with the SQL statements to disable and enable each constraint.

Performing the Installation
Deploying a Database Application 7-11
To find and enable the constraints used in the EVALUATIONS, PERFORMANCE_
PARTS, and SCORES tables, enter the following statements into a SQL Worksheet
window:
SELECT 'ALTER TABLE '|| TABLE_NAME || ' DISABLE CONSTRAINT '||
CONSTRAINT_NAME ||';'
FROM user_constraints
WHERE table_name IN ('EVALUATIONS','PERFORMANCE_PARTS','SCORES');
SELECT 'ALTER TABLE '|| TABLE_NAME || ' ENABLE CONSTRAINT '||
CONSTRAINT_NAME ||';'
FROM user_constraints
WHERE table_name IN ('EVALUATIONS','PERFORMANCE_PARTS','SCORES');
If you followed the instructions in this guide, the only table to which you added data
was performance_parts. Use the Export DDL (and Data) feature to export data, but
this method outputs the DDL along with the data. You can also select a table from
within the tree under Connections in the Connections navigator, and then right-click
and select Export Data, and then INSERT. This option enables you to restrict your
export to just select columns and to include a WHERE clause to control which data is
exported. This is the method you will use.
To create INSERT statements for the data:
1. In the Connections navigator in SQL Developer, expand the database connection
that you used for generating scripts (hr_conn) for the database objects.
2. Expand Tables under the hr_conn connection.
3. Right-click the PERFORMANCE_PARTS table name and select Export Data, and
then INSERT.
4. In the Export dialog box, in the File field, enter C:\my_exports\2day_
data.sql to specify the export file name.
5. Click Apply.
If you need to create INSERT statements for another table, rather than exporting the
data for the other tables to separate files, you can also export the data to the Clipboard
and then paste it into your first file. To do this, specify Clipboard for Output, which
causes the statements to be placed on the Clipboard, so that you can add them to a file.
Performing the Installation
At this stage, you now have all the script files necessary to create the objects in another
schema. These scripts must be executed in the following order (the order in which you
created them in this exercise), to ensure that the tables exist before you load the data:
1. 2day_tables.sql
2. 2day_plsql.sql
3. 2day_other.sql
4. 2day_data.sql
If you want, you can create a master script to execute these scripts in the proper order
and log the results to a file. This kind of master script is typically run using SQL*Plus.
The master script for this exercise looks like the following example:
spool my_dir/create_log.txt
@my_dir/2day_tables.sql
@my_dir/2day_plsql.sql

Validating the Installation
7-12 Oracle Database 2 Day Developer's Guide
@my_dir/2day_other.sql
@my_dir/2day_data.sql
commit;
spool off
You can also use SQL Developer to execute the scripts that you created. If a master
script fully specifies the file path and name (for example, C:\my_dir\2day_
tables.sql), you can open and execute the master script. Alternatively, you can
open and execute each script individually.
To run installation scripts in SQL Developer:
1. Right-click in the SQL Worksheet window and select Open File.
2. Find and open the 2day_tables.sql file, which is located in the C:\my_exports
directory.
You now see the DDL statements for creating the tables. In the next step you run
these statements as a script, because you want to monitor the success or failure of
each statement.
3. Click the Run Script icon, or press F5 on your keyboard.
The results of each statement are displayed in the Script Output pane. The results
should show the successful execution of each statement.
4. Click the Clear icon to erase the contents of the SQL Worksheet.
5. Perform the preceding three steps (finding and opening a file, running its contents
as a script, and clearing the SQL Worksheet entry area) for each of the following
additional script files:
■2day_plsql.sql
■2day_other.sql
6. Find and open the 2day_data.sql file.
You now see the DDL statements for inserting the table data. In the next step you
run these statements as a script, because you want to monitor the success or failure
of each statement.
7. Click the Run Script icon (or press F5).
Note that in Oracle, DML statements are not automatically committed, which
means that you can roll back any INSERT, UPDATE, or DELETE statements. To
store the data in the database, you must commit the transaction, which you will do
in the next step.
8. Click the Commit icon to commit the data to the database.
Validating the Installation
After you have created all the database objects that support an application, you can
access the definitions of the new objects, using SQL Developer. You can also use SQL
Developer reports to see information to help you determine whether or not the
installation is valid. These reports include the following:
■All Objects: For each object, lists the owner, name, type (table, view, index, and so
on), status (valid or invalid), the date it was created, and the date when the last
data definition language (DDL) operation was performed on it. The Last DDL date
can help you to find if any changes to the object definitions have been made on or
after a specific time.

Archiving the Installation Scripts
Deploying a Database Application 7-13
■Invalid Objects: Lists all objects that have a status of invalid.
■Object Count by Type: For each type of object associated with a specific owner,
lists the number of objects. This report can be useful in checking that two schemas
match. It might help you to identify users that have created an especially large
number of objects, particularly objects of a specific type.
To display reports to check the validity of an installation:
1. In the Reports navigator in SQL Developer, expand Data Dictionary Reports, and
then expand All Objects.
2. Click each report that you want to see, such as All Objects, Invalid Objects, and
Object Type by Count.
For each report that you specify, select the database connection to use, and click
Apply when you are asked for any bind variables (unless you want to restrict the
display).
Archiving the Installation Scripts
After you have deployed the database application and validated the installation, if you
have creates installation scripts for your application, consider archiving them in a
source code control system, with comments describing the purpose of each script and
when it was created. This archive will be useful if you ever need to deploy to another
environment, because you can use the scripts to re-create a clean installation. To
archive data, you can use Oracle Data Pump.
See Also:
■Oracle Database Utilities for detailed information on Oracle Data
Pump

Archiving the Installation Scripts
7-14 Oracle Database 2 Day Developer's Guide

Index-1
Index
Symbols
%FOUND cursor attribute, 4-33
%ISOPEN cursor attribute, 4-33
%NOTFOUND cursor attribute, 4-33
%ROWCOUNT cursor attribute, 4-33
%ROWTYPE, 4-17, 4-18, 4-37, 4-39
definition, 4-18
%TYPE, 4-17, 4-18
definition, 4-18
A
ACCESS_INTO_NULL exception, 4-42
account, 1-7
SYSTEM, 1-7
unlock, 1-7
ADD_EVAL procedure, 4-21
ADD_EVALUATION procedure, 4-3, 4-4, 4-8
AFTER clause, 5-3
AFTER trigger, 5-3, 5-4, 5-5, 5-8
AL16UTF16 character set, 6-28, 6-29
ALTER FUNCTION statement, 4-7
ALTER INDEX statement, 3-20
ALTER PACKAGE statement, 4-14
ALTER PROCEDURE statement, 4-7
ALTER SESSION statement, 6-5, 6-8, 6-9, 6-10, 6-11,
6-12, 6-13, 6-14, 6-15, 6-17, 6-18, 6-21, 6-22, 6-23,
6-24, 6-25, 6-26, 6-27, 6-31
ALTER statement, 1-2, 5-2, 5-3
ALTER TABLE ... DISABLE ALL TRIGGERS
statement, 5-9
ALTER TABLE ... ENABLE ALL TRIGGERS
statement, 5-9
ALTER TABLE statement, 3-1, 3-8, 3-10, 3-12, 5-4,
5-9, 7-5, 7-11
ALTER TRIGGER ... COMPILE statement, 5-9
ALTER TRIGGER ... DISABLE statement, 5-8
ALTER TRIGGER ... ENABLE statement, 5-8
ALTER TRIGGER statement, 5-8, 5-9
ALTER USER statement, 1-7
ALTER...COMPILE statement, 5-4
APEX, 1-11
application
data, 1-1
deploy, 1-2
development best practices, 1-1
instantiate, 1-2
logic, 7-1
arithmetic error, 4-43
array
definition, 4-38
AS keyword, 4-19
associative array, 4-39
AVG function, 2-24
B
BEFORE clause, 5-3
BEFORE trigger, 5-3, 5-4, 5-5, 5-8
BEGIN, 4-2
best practices, 1-1
BOOLEAN type, 4-15, 4-22
BULK COLLECT clause, 4-39, 4-40
C
CALCULATE_SCORE function, 4-5, 4-6, 4-7, 7-9
CASE function, 2-26
CASE structure, 2-26, 4-22, 4-24, 4-25, 4-42
CASE_NOT_FOUND exception, 4-42
CHAR type, 6-27, 6-30
character set
conversion, 6-30
CHECK constraint, 6-31
check constraint, 3-12, 6-31, 7-2
definition, 3-6
use, 3-12, 3-13
client program, 1-1
CLOSE cursor, 4-33
collection, 1-4, 4-38
definition, 4-38
COLLECTION_IS_NULL exception, 4-42
comment
in PL/SQL, 4-16
commit, 7-12
implicit, 3-1
COMMIT statement, 1-2, 2-30, 2-31, 5-4
definition, 2-30
commit transaction, 2-30
comparison, 3-6
comparison operator, 2-8

Index-2
compile
single-pass, 4-10
composite structure
RECORD, 4-9
composite unique constraint
definition, 3-6
conditional predicate, 5-5
connection
HR_CONN, 2-1, 2-2, 3-3, 4-7, 4-8, 6-3, 6-10, 6-11,
6-13, 6-15, 6-17, 6-18, 6-20, 6-22, 6-24, 6-26,
6-27, 7-5, 7-8, 7-9, 7-10, 7-11
constant, 1-4, 4-16
definition, 4-15
CONSTANT clause, 4-16
constraint, 1-1, 2-5, 3-6, 7-2, 7-3, 7-10
alter, 7-5
check, 3-6
composite unique, 3-6
disable, 7-2, 7-3, 7-10, 7-11
disabled, 2-5
enable, 7-2, 7-10, 7-11
enabled, 2-5
find, 7-11
foreign key, 3-6
integrity, 3-6
NOT NULL, 2-28, 3-6
primary key, 3-6
referenced table, 2-5
type, 2-5
unique, 3-6
CONTINUE statement, 4-1
control
CASE, 4-22, 4-24, 4-25
FOR...LOOP, 4-22, 4-25
IF...THEN, 4-24
IF...THEN...ELSE, 4-22
LOOP...EXIT WHEN, 4-22
WHILE...LOOP, 4-22, 4-31
conversion error, 4-43
COUNT function, 4-41
CREATE FUNCTION statement, 4-2, 4-6
CREATE INDEX statement, 3-19, 3-20
CREATE OR REPLACE FUNCTION statement, 4-6
CREATE OR REPLACE PACKAGE BODY
statement, 4-10, 4-14, 4-36
CREATE OR REPLACE PACKAGE statement, 4-10,
4-12
CREATE OR REPLACE PROCEDURE
statement, 4-2, 4-4
CREATE OR REPLACE PROCREDURE
statement, 4-3
CREATE OR REPLACE TRIGGER statement, 5-5,
5-6
CREATE OR REPLACE VIEW statement, 3-24
CREATE PACKAGE BODY statement, 4-14
CREATE PACKAGE statement, 4-12
create PL/SQL object, 7-8
Create PL/SQL Package, 4-11
CREATE PROCEDURE statement, 4-2, 4-6
CREATE SEQUENCE statement, 3-27
CREATE statement, 1-2, 3-1, 5-2, 5-3, 7-2, 7-4, 7-5
CREATE SYNONYM statement, 3-29, 3-30
CREATE TABLE statement, 3-1, 3-5, 3-6, 3-20, 5-4,
5-5, 6-26, 6-27, 6-28, 6-29, 7-5, 7-8
CREATE TRIGGER statement, 5-2, 5-3, 5-9
CREATE VIEW statement, 3-21, 3-22, 3-25, 5-7, 7-5
CREATED_BY column, 7-7
CREATED_ON column, 7-7
CURRVAL pseudocolumn, 3-25
cursor
CLOSE, 4-34
definition, 4-32
explicit, 4-33
implicit, 4-33
OPEN, 4-33
cursor attribute
%FOUND, 4-33
%ISOPEN, 4-33
%NOTFOUND, 4-33
%ROWCOUNT, 4-33
CURSOR_ALREADY_OPEN exception, 4-42
D
data
manipulate, 2-1
query, 2-1
data definition language, 1-2
data integrity, 1-1
data manipulation language, 1-2
data model, 1-1
data persistence tier, 1-1
data storage, 1-2
database
connect, 1-7
database client
SQL Developer, 1-1
SQL*Plus, 1-1
database components, 1-1
database object
explore, 2-1
DATE type, 4-9, 4-15
DBMS_OUTPUT.PUT procedure, 4-25
DBMS_OUTPUT.PUT_LINE procedure, 4-24
DDL, 1-2
definition, 1-2
declarative computer language
definition, 1-4
declarative language, 1-3
DECLARE CURSOR statement, 4-33
DECLARE keysord, 4-2
DECLARE keyword, 4-19
DECODE function, 2-27
DELETE statement, 1-2, 2-29, 4-33, 5-2, 5-4, 7-12
definition, 2-27
DELETING conditional predicate, 5-5
DENSE_RANK function, 2-25
DEPARTMENTS_SEQ sequence, 3-25
development environment, 1-7, 1-10
Open Database Connectivity, 1-12

Index-3
Oracle Application Express, 1-11
Oracle C++ Call Interface, 1-11
Oracle Call Interface, 1-11
Oracle Data Provider for .NET, 1-10
Oracle Java Database Connectivity, 1-11
PHP, 1-10
DISABLE CONSTRAINT option, 7-11
divide by zero, 4-43
DML, 1-2
definition, 1-2
DROP FUNCTION statement, 4-9
DROP INDEX statement, 3-20
DROP PACKAGE statement, 4-15
DROP PROCEDURE statement, 4-9
DROP SEQUENCE statement, 3-27, 3-28
DROP statement, 1-2, 4-8, 4-14, 5-2, 5-3, 7-5
DROP SYNONYM statement, 3-30
DROP TABLE statement, 2-29, 3-1, 3-20, 3-21, 5-4
DROP TRIGGER statement, 5-10
DROP VIEW statement, 3-24, 3-25
DUP_VAL_ON_INDEX exception, 4-42
E
Edit View, 3-23
education, 1-2
ELSE clause, 4-42
EMP_EVAL package, 7-9
EMP_LOCATIONS view, 3-22, 7-10
EMPLOYEES_SEQ sequence, 3-25
ENABLE CONSTRAINT option, 7-11
END, 4-2
end-user acceptance testing, 1-2
error, 4-41
handling, 4-42
message, 4-42
routine, 4-41
EVAL_DEPARTMENT procedure, 4-19
EVALUATIONS table, 3-3, 3-5, 3-10, 3-11, 3-12, 3-17,
3-18, 3-19, 3-20, 3-25, 3-26, 4-3, 4-11, 4-21, 4-23,
4-37, 5-4, 5-5, 5-6, 5-7, 5-8, 5-9, 7-3, 7-8, 7-11
EVALUATIONS_LOG table, 5-4, 5-5
EVALUATIONS_SEQ sequence, 3-25, 3-26, 4-21, 5-5,
5-8, 7-6, 7-8
exception, 4-41
ACCESS_INTO_NULL, 4-42
CASE_NOT_FOUND, 4-42
COLLECTION_IS_NULL, 4-42
CURSOR_ALREADY_OPEN, 4-42
custom, 4-41
DUP_VAL_ON_INDEX, 4-42
handler, 4-41
INVALID_CURSOR, 4-42
INVALID_NUMBER, 4-42, 4-43
LOGIN_DENIED, 4-42
message, 4-42
NO_DATA_FOUND, 4-42
NOT_LOGGED_ON, 4-42
predefined, 4-41
ROWTYPE_MISMATCH, 4-43
SUBSCRIPT_BEYOND_COUNT, 4-43
SUBSCRIPT_OUTSIDE_LIMIT, 4-43
TOO_MANY_ROWS, 4-43
VALUE_ERROR, 4-42, 4-43
ZERO_DIVIDE, 4-43
EXCEPTION keywod, 4-2
EXECUTE IMMEDIATE statement, 4-8
EXIT WHEN structure, 4-33
explicit cursor, 4-33
F
FETCH record, 4-33
FETCH statement, 4-42
field
definition, 1-2
FOLLOWS clause, 5-2
FOR ... LOOP structure, 4-40
FOR EACH ROW clause, 5-2
FOR EACH ROW trigger, 5-5
FORCE option, 7-5
foreign key constraint
definition, 3-6
use, 3-10, 3-12
FOR...LOOP structure, 4-22, 4-25, 4-41
function, 1-4, 4-12, 4-13, 5-1, 7-1, 7-2, 7-3
CALCULATE_SCORE, 4-5, 4-6, 4-7, 7-9
create, 4-2, 4-5
definition, 1-3, 2-3
drop, 4-8
modify, 4-7
PL/SQL, 4-9
standalone, 4-2
test, 4-7
use, 4-2
G
GOTO statement, 4-22
GROUP BY clause, 2-23, 2-24
H
HAVING clause, 2-24
HR account, 1-7
HR schema, 1-3, 1-7, 1-10, 2-1, 2-2, 2-3, 2-20, 3-2, 3-3,
3-5, 3-16, 3-18, 3-20, 3-21, 3-25, 3-28, 4-3, 4-5, 4-11,
5-1, 5-7, 5-8, 7-3
HR_CONN connection, 2-1, 2-2, 3-3, 4-7, 4-8, 6-3,
6-10, 6-11, 6-13, 6-15, 6-17, 6-18, 6-20, 6-22, 6-24,
6-26, 6-27, 7-5, 7-8, 7-9, 7-10, 7-11
Hypertext Preprocessor, 1-10
I
identifier
collect data, 4-16
name resolution, 4-16
rules, 4-16
scope, 4-16
visibility, 4-16

Index-4
IF...THEN...ELSE structure, 2-26, 4-22, 4-24
imperative computer language
definition, 1-4
imperative language, 1-3
implementation
associative arrays, 4-39
details, 4-10
hiding, 1-1
package, 4-10
runtime, 4-18
implicit cursor, 4-33
index, 1-1, 2-6
create, 3-18
definition, 1-2, 2-3
delete, 3-20
SQL Developer, 3-20
EVAL_JOB_IX, 3-19, 3-20
implicit, 3-17
lexical order, 4-41
maintenance, 1-3
modify, 3-19
mosdify
SQL Developer, 3-19
SQL Developer, 3-18
table, 3-17
unique value, 4-42
value, 4-43
INDEX BY PLS_INTEGER table
iterate, 4-41
populate, 4-40
INDEX BY TABLE, 4-10, 4-38, 4-39, 4-42
create, 4-40
cursor, 4-39
define, 4-40
iterate, 4-41
populate, 4-40
type, 4-15
VARCHAR2
iterate, 4-41
populate, 4-40
INDEX BY TABLE type, 4-38
index table, 3-17
INSERT INTO statement, 2-27, 2-28, 2-30, 4-21, 4-37,
4-39, 5-8, 6-13
INSERT statement, 1-2, 2-27, 2-28, 5-2, 5-4, 5-5, 5-8,
7-3, 7-5, 7-6, 7-11, 7-12
definition, 2-27
INSERTING conditional predicate, 5-5
INSTEAD OF trigger, 5-2, 5-3, 5-7
use, 5-7
integration testing, 1-2
integrity constraint, 3-6, 5-4
definition, 3-6
types, 3-6
use, 3-7
integrity rules, 3-6
INVALID_CURSOR exception, 4-42
INVALID_NUMBER exception, 4-42, 4-43
J
Java stored procedure, 1-10
JDBC, 1-11
join, 3-22
K
key-value pair, 4-39
L
language extension, 1-4
LIMIT clause, 4-42
local subprogram
definition, 4-9
LOCATIONS_SEQ sequence, 3-25
logical expression, 3-6
LOGIN_DENIED exception, 4-42
LOGOFF trigger, 5-7, 5-8
LOGON trigger, 5-7, 5-8
LOOP statement, 4-33
LOOP...EXIT WHEN structure, 4-22, 4-28, 4-33
M
MAX function, 2-24
MEDIAN function, 2-24
MERGE statement, 1-2
multiuser applications, 1-1
N
name capture, 4-1, 4-9
NCHAR type, 6-28, 6-29, 6-30
NCHR function, 6-29
nested table type, 4-38
NEXT function, 4-41
NEXTVAL pseudocolumn, 3-25
NLS parameter, 6-30
NLS_CALENDAR parameter, 6-31
NLS_DATE_LANGUAGE parameter, 6-31
NLS_INITCAP function, 6-30
NLS_LANG parameter, 6-30
NLS_LANGUAGE parameter, 6-5
NLS_LENGTH_SEMANTICS parameter, 6-27
NLS_LOWER function, 6-30
NLS_UPPER function, 6-30
NLSSORT function, 6-30
NO_DATA_FOUND exception, 4-42
NOT NULL constraint, 3-6, 3-7, 3-8
definition, 3-6
use, 3-7, 3-8
NOT_LOGGED_ON exception, 4-42
NULL, 4-16
NUMBER type, 4-9, 4-15
NVARCHAR2 type, 6-28, 6-29
NVL function, 2-25
NVL2 function, 2-25

Index-5
O
object
type, 1-4, 2-1
types, 1-2
OCCI, 1-11
OCCI Software Development Kit, 1-11
OCI, 1-11
OCI Software Development Kit, 1-11
ODBC, 1-12
ODP.NET, 1-10
OPEN cursor, 4-33
Open Database Connectivity, 1-12
ORA_NCHAR_LITERAL_REPLACE environment
variable, 6-30
Oracle Application Express, 1-11
Oracle C++ Call Interface, 1-11
Oracle Call Interface, 1-11
Oracle Data Provider for .NET, 1-10
Oracle Database and Development
overview, 1-1
roadmap, 1-1
Oracle Database Extensions for .NET, 1-10
Oracle Developer Tools for Visual Studio .NET, 1-10
Oracle Java Database Connectivity, 1-11
Oracle technology stack, 1-1
ORDER BY clause, 2-24, 3-22, 5-7
P
package, 1-4, 7-1, 7-2, 7-3
definition, 1-3, 2-3, 4-9
EMP_EVAL, 7-9
encapsulating, 4-9
package body, 4-9
definition, 4-10
package specification, 4-9, 4-10
definition, 4-9
packaged subprogram
definition, 4-9
password, 1-7
change, 1-7
definition, 1-2
security, 1-7
PERCENT_RANK function, 2-25
PERFORMANCE_PARTS table, 3-3, 3-5, 3-7, 3-8, 3-9,
3-10, 3-11, 3-12, 3-13, 3-15, 3-16, 3-17, 4-17, 4-18,
4-19, 4-20, 4-21, 4-44, 7-3, 7-8, 7-11
PHP, 1-10
PLS_INTEGER type, 4-15, 4-16, 4-39, 4-40, 4-41
PL/SQL
block, 4-2, 4-7, 4-9, 4-41
case sensitivity, 4-16
character set properties, 6-28, 6-29
comment, 4-16
compile, 4-10, 4-30
create objects, 7-8
data type, 1-11, 4-15, 4-16
editor, 1-10
exception handling, 4-41
extension, 4-22
function, 4-9
identifier, 4-16
language, 1-2, 1-3, 1-4, 4-1, 4-9, 4-15, 4-22, 4-41,
6-2
definition, 1-4
description, 4-1
literal replacement, 6-30
package, 4-1, 4-11, 4-12
procedure, 4-9
program, 4-38, 4-42
program unit, 4-16
programming object, 2-3
standalone function, 4-1
standalone procedure, 4-1
stored procedure, 1-10, 4-1
subprogram, 1-1
type, 4-9, 4-15
unicode, 6-1, 6-27, 6-29
variable, 4-9, 4-40, 6-28
PL/SQL subprogram, 1-2
POSITIONS synonym, 3-28, 3-29, 7-10
PRECEDES clause, 5-2
primary key, 3-10, 3-25, 5-5
primary key constraint
definition, 3-6
use, 3-9
privilege, 1-1
procedural code, 1-2
Procedural Language SQL
definition, 1-4
procedure, 1-4, 4-9, 4-12, 4-13, 4-21, 5-1, 7-2
ADD_EVAL, 4-21
ADD_EVALUATION, 4-3, 4-4, 4-8
compile, 4-4
create, 4-2
DBMS_OUTPUT.PUT, 4-25
DBMS_OUTPUT.PUT_LINE, 4-24
definition, 1-3, 2-3
drop, 4-8
EVAL_DEPARTMENT, 4-19
Java stored, 1-10
modify, 4-7
.NET stored, 1-10
PL/SQL, 4-9
PL/SQL stored, 1-10
schema-level, 4-1
standalone, 4-2
test, 4-7
use, 4-2
production environment, 1-2
Q
query, 1-2
querying data, 1-2
R
RANK function, 2-25
record

Index-6
access, 4-33
definition, 1-2
FETCH, 4-33
RECORD type, 4-9, 4-15, 4-30, 4-31
RECORD variable, 4-18
REF CURSOR type, 4-15
reference type, 4-15
relational database, 1-1, 1-4
result set, 4-33
definition, 4-32
reuse, 1-4
roll back, 2-30
ROLLBACK statement, 1-2, 2-29, 2-30, 2-31, 2-32, 5-4
definition, 2-30
use, 2-31
ROUND function, 2-24
row
definition, 1-2
row trigger, 5-2
use, 5-5
ROWTYPE, 4-43
ROWTYPE_MISMATCH exception, 4-43
Run PL/SQL, 4-7
runtime error, 1-4
S
SALES_MARKETING view, 3-23, 3-24
SALESFORCE view, 3-21, 3-23, 3-24
savepoint
erase, 2-30
roll back to, 2-34
set, 2-32
SAVEPOINT statement, 1-2, 2-32, 5-4
definition, 2-30
use, 2-32
schema, 1-1, 1-2, 1-7, 2-1, 4-15, 5-2, 7-8, 7-9, 7-11
definition, 1-2
HR, 1-3, 1-7, 1-10, 2-1, 2-2, 2-3, 2-20, 3-2, 3-3, 3-5,
3-16, 3-18, 3-20, 3-21, 3-25, 3-28, 4-3, 4-5, 4-11,
5-1, 5-7, 5-8, 7-3
match, 7-13
object, 1-2, 1-3, 3-2, 3-28, 4-2, 4-9, 5-2
object types, 2-1
overview, 1-2
ownership, 1-2
target, 7-10
SCORES table, 3-3, 3-5, 3-6, 3-8, 3-9, 3-10, 3-12, 3-13,
4-17, 4-18, 4-19, 4-20, 4-36, 4-44, 7-3, 7-8, 7-11
SELECT, 2-14, 3-22
SELECT INTO statement, 4-20, 4-39, 4-42, 4-43
SELECT statement, 1-2, 2-6, 2-7, 3-21, 3-22, 3-29,
4-21, 4-23, 4-24, 4-26, 4-27, 4-29, 4-31, 4-32, 4-34,
4-37, 4-38, 4-39, 4-43, 4-44, 5-7, 5-9, 6-5, 6-10, 6-11,
6-13, 6-14, 6-15, 6-17, 6-18, 6-20, 6-21, 6-22, 6-23,
6-24, 6-31, 6-32, 7-6, 7-11
add time interval, 2-19
alias columns, 2-14
all, 2-7
arithmetic expression, 2-14
case change, 2-15
CASE function, 2-26
column, 2-7, 2-8
concatenate, 2-16
convert type, 2-21, 2-22
count rows, 2-23
currency template, 2-21
date interval, 2-18, 2-19
day of month, 2-19
DECODE function, 2-27
DENSE_RANK function, 2-25
distinct values, 2-23
extract, 2-17
format template, 2-21
GROUP BY clause, 2-23, 2-24
HAVING clause, 2-24
match in a list, 2-10
match in another table, 2-11
match pattern, 2-11
match string, 2-10
multiple conditions, 2-9
NVL function, 2-25
NVL2 function, 2-25
ORDER BY clause, 2-24
pad, 2-17
replace, 2-18
replace pattern, 2-12
restrict, 2-8
return location, 2-13
return number of occurances, 2-13
return substring, 2-12
round off, 2-15
single condition, 2-9
standard format, 2-21
statistics, 2-24
system date, 2-20
trim, 2-16
truncation, 2-15
WHERE clause, 2-8
WITHIN GROUP function, 2-25
sequence, 7-3
create, 3-25
definition, 1-3, 2-3
DEPARTMENTS_SEQ, 3-25
drop, 3-27
EMPLOYEES_SEQ, 3-25
EVALUATIONS_SEQ, 3-25, 4-21
LOCATIONS_SEQ, 3-25
TEST_SEQ, 3-27
use, 3-25
serial list, 1-3
single-pass compile, 4-10
size constraint, 4-43, 6-28
SQL
data type, 4-16
function, 4-42
language, 1-1, 1-2, 1-3, 1-4, 4-1, 4-15, 4-22, 6-2
literal replacement, 6-30
statement, 1-1
unicode, 6-1, 6-27, 6-29

Index-7
SQL Developer, 1-1, 1-3, 1-4, 1-5, 1-7, 1-8, 1-9, 2-1,
2-4, 2-6, 3-3, 3-5, 3-6, 3-7, 3-8, 3-9, 3-10, 3-12, 3-15,
3-16, 3-18, 3-19, 3-20, 3-21, 3-23, 3-24, 3-25, 3-27,
3-28, 5-5, 6-2, 6-3, 6-4, 6-5, 6-6, 6-7, 6-9, 6-11, 6-13,
6-15, 6-16, 6-18, 6-20, 6-22, 6-24, 6-26, 6-28, 7-1,
7-3, 7-4, 7-7, 7-8, 7-9, 7-10, 7-11, 7-12
connect, 1-7, 1-8, 5-5
data dictionary, 7-13
definition, 1-4
deploy application, 7-1
export database objects, 7-3
install scripts, 7-12
National Language Support, 6-2
NLS Parameter Values, 6-4
start, 1-4
user preference, 6-6
SQL Query, 3-23
SQL* Plus, 1-7
SQL*Plus, 1-1, 1-3, 1-5, 1-6, 1-7, 7-11
connect, 1-7
overview, 1-5
standalone function, 4-9
standalone procedure, 4-9
START WITH value, 7-6
statement trigger, 5-2
use, 5-4
statistic functions, 2-24
statistics, 2-24
STDDEV function, 2-24
STORAGE clause, 7-4
stored function, 4-2
stored procedure, 1-11, 2-3, 4-1, 4-2, 5-4
definition, 1-3
develop, 4-1
overview, 4-1
use, 4-1
Structured Query Language, 1-3
subprogram, 4-10, 4-16
invocation, 4-10
private, 4-10
subquery
definition, 2-6
SUBSCRIPT_BEYOND_COUNT exception, 4-43
SUBSCRIPT_OUTSIDE_LIMIT exception, 4-43
synonym, 7-3
create, 3-28
definition, 1-3
deployment script, 7-9
drop, 3-29
POSITIONS, 3-28, 3-29, 7-10
use, 3-28
SYSTEM account, 1-7
system event trigger, 5-3
T
table, 1-1, 2-6, 3-29, 7-1, 7-3
add constraint, 3-7
adding data, 3-13
adding data with SQL Developer, 3-13
aggregate functions, 2-23
alias, 2-10
ALTER TABLE statement, 3-1, 3-8, 3-10, 3-12
check constraint, 3-6
column, 4-30
column data type, 4-17
column statistics, 2-6
composite unique constraint, 3-6
constraint, 2-5
COUNTRIES, 2-33
create, 3-1, 3-2, 3-3
options, 7-9
create column, 3-1
CREATE TABLE statement, 3-1, 3-5
create with SQL Developer, 3-3
create with SQL Worksheet, 3-5
data, 2-3
deleting, 2-27, 2-29, 3-13
export, 7-4, 7-5, 7-10
insert, 2-27, 7-5, 7-12
modify, 3-13
preserve, 7-7
retrieving, 1-2
specified columns, 2-28
update, 2-27, 2-28
view, 2-6
definition, 1-2, 2-2, 2-3, 3-2
delete, 3-20
SQL Developer, 3-20
deleting all rows, 2-29
deleting data with SQL Developer, 3-16
deleting table
DROP TABLE statement, 2-29
DEPARTMENTS, 2-10, 2-23
dependencies, 2-6
details, 2-6
DML statement, 2-27
DROP TABLE statement, 3-1
dropping, 3-20
DUAL, 2-20
edit, 2-1
EMPLOYEES, 2-4, 2-7, 2-28, 2-30, 3-1, 3-2, 3-12,
4-21, 4-39, 5-1
EMPLOYEES_JOBS, 4-40
EVALUATIONS, 3-3, 3-5, 3-10, 3-11, 3-12, 3-17,
3-18, 3-19, 3-25, 3-26, 4-3, 4-21, 5-4, 5-5, 7-3, 7-8,
7-11
EVALUATIONS_LOG, 5-4, 5-5
exploring, 2-3
foreign key constraint, 3-6
grant, 2-5
HR_USERS_LOG, 5-7, 5-8
identifying columns, 2-10
index, 2-6, 3-17
INDEX BY TABLE, 4-10, 4-15, 4-38, 4-39, 4-40,
4-42
BULK COLLECT, 4-40
cursor, 4-39
dense, 4-41
iterate, 4-41
Index-8
JOB_TITLES, 4-40
PLS_INTEGER, 4-40
populate, 4-40
sparse, 4-41
VARCHAR2, 4-40
INSERT INTO...VALUES statement, 6-13
integrity constraint, 3-6
intersection, 2-10
JOB_HISTORY, 2-30
JOB_TITLES, 4-40, 4-41
JOBS, 3-29, 4-39, 4-40
loading data, 7-6
log, 5-7
logical, 3-21
lookup, 7-1
modify data with SQL Developer, 3-15
nested, 4-38, 4-42, 4-43
definition, 4-38
NOT NULL constraint, 3-6
PERFORMANCE_PARTS, 3-3, 3-7, 3-8, 3-9, 3-10,
3-13, 3-15, 3-16, 3-17, 4-17, 7-3, 7-8, 7-11
primary key, 3-17, 3-25
primary key constraint, 3-6
property, 2-3
qualified name, 2-11
query, 1-4
record, 2-6
REGIONS, 2-30, 2-31, 2-32, 2-33
rename, 3-28
return rows, 2-8
rollback, 2-31
row, 1-1, 4-29
create, 4-21
SCORES, 3-3, 3-5, 3-6, 3-8, 3-9, 3-10, 3-12, 3-13,
4-17, 7-3, 7-8, 7-11
script for create, 7-7
SELECT, 2-7
selecting all columns, 2-7
selecting specific columns, 2-7
specify, 2-7
SQL definition, 2-6
statistics, 2-6
storage clause, 7-8
synonym, 3-28
trigger, 2-6, 5-1
disable, 5-9
enable, 5-9
unique constraint, 3-6
view, 2-3
TEST_SEQ sequence, 3-27
tier
data persistence, 1-1
multiuser applications, 1-1
TO_CHAR function, 6-30
TO_DATE function, 6-30
TO_NUMBER function, 6-30
TOO_MANY_ROWS exception, 4-43
transaction, 1-2, 2-32, 7-12
committing, 2-30
control, 2-30
management, 2-27
processing, 2-1
rollback, 2-31
uncommitted, 2-30
use
commit, 2-30
rollback, 2-31
visibility, 2-30
transaction control, 2-30, 2-32
transaction processing, 2-1
trigger, 1-1, 1-4, 7-3
action, 5-2
advantages, 5-1
AFTER, 2-3, 5-3, 5-8
association, 5-1
BEFORE, 2-3, 5-3, 5-8
body, 5-2
cascading, 5-3
commit, 5-4
definition, 1-3, 2-3
dependencies, 2-6
design, 5-1, 5-3, 5-5
dupclicating existing features, 5-4
FOR EACH ROW, 5-2
guideline, 5-3
INSTEAD OF, 5-3
interdependencies, 5-3
invocation, 5-1
log, 5-4
LOGOFF, 5-3
LOGON, 5-3
name, 5-2
predicate, 5-5
recursive, 5-3
restriction, 5-2, 5-3
size, 5-4
statement
use, 5-4
timing, 5-3
restriction, 5-3
triggering statement, 5-2
type, 2-6, 5-2
FOR EACH ROW, 5-5
INSTEAD OF, 5-2, 5-7
row, 5-2, 5-5
statement, 5-2, 5-4
system event, 5-3
user event, 5-3
use, 5-1, 5-4
trigger name, 5-2
trigger restriction, 5-2
triggered action, 5-2
triggering event, 2-6, 5-1
triggering statement, 5-2
triggers, 5-1
TRUNCATE statement, 1-2
truncation error, 4-43
TYPE, 4-39
type
definition, 2-3

Index-9
PL/SQL, 4-9
U
unicode, 6-29
development, 6-30
uninitialized object, 4-42
UNIQUE constraint, 3-6
unique constraint, 3-6
definition, 3-6
use, 3-8
unique number, 5-5
UNISTR function, 6-29
unit testing, 1-2
unlock account, 1-7
UPDATE, 2-31
UPDATE statement, 1-2, 2-28, 2-29, 2-32, 4-33, 5-2,
5-4, 5-7, 7-12
bulk, 2-31
definition, 2-27, 2-28
multiple rows, 2-29
single row, 2-28
UPDATING conditional predicate, 5-5
user event trigger, 5-3
user name
definition, 1-2
USER_ERRORS view, 5-9
user-defined datatype, 4-38
UTF8 character set, 6-27, 6-28, 6-29
V
V$NLS_PARAMETERS view, 6-4
VALUE_ERROR exception, 4-42, 4-43
VARCHAR2 type, 4-9, 4-15, 4-39, 4-40, 4-41
variable, 1-4, 4-16
definition, 4-15
PL/SQL, 4-9
variable array, 4-38
varray, 4-43
VARRAY type, 4-38
definition, 4-38
view, 2-6, 2-7, 2-23, 5-1, 6-31, 7-1, 7-3, 7-5
create, 3-21
definition, 1-3, 2-2
deployment script, 7-9
drop, 3-24
EMP_LOCATIONS, 3-22, 7-10
SALES_MARKETING, 3-23, 3-24
SALESFORCE, 3-21, 3-23
SLAESFORCE, 3-24
trigger on, 5-2
update, 3-23
use, 3-21
USER_ERRORS, 5-9
V$NLS_PARAMETERS, 6-4
W
WHEN clause, 4-42
WHERE clause, 2-8, 2-29, 3-21, 3-22, 4-24, 5-7, 7-11
comaprison operator, 2-8
WHERE cluase, 5-7
WHILE...LOOP structure, 4-22, 4-27, 4-31, 4-41
WITHIN GROUP function, 2-25
Z
ZERO_DIVIDE exception, 4-43
Index-10
