Oidag Oracle Fusion Middleware Administrator Guide For Internet Directors
User Manual:
Open the PDF directly: View PDF ![]() .
.
Page Count: 806 [warning: Documents this large are best viewed by clicking the View PDF Link!]
- Contents
- 1 Introduction to Directory Services
- 2 Understanding Oracle Internet Directory in Oracle Fusion Middleware
- 3 Understanding Oracle Internet Directory Concepts and Architecture
- 4 Understanding Process Control of Oracle Internet Directory Components
- 5 Understanding Oracle Internet Directory Organization
- 6 Understanding Oracle Internet Directory Replication
- 7 Getting Started With Oracle Internet Directory
- 8 Managing Oracle Internet Directory Instances
- 9 Managing System Configuration Attributes
- 10 Managing IP Addresses
- 11 Managing Naming Contexts
- 12 Managing Accounts and Passwords
- 13 Managing Directory Entries
- 14 Managing Dynamic and Static Groups
- 15 Performing Bulk Operations
- 16 Managing Collective Attributes
- 17 Managing Alias Entries
- 18 Managing Attribute Uniqueness Constraint Entries
- 19 Managing Knowledge References and Referrals
- 20 Managing Directory Schema
- 21 Configuring Referential Integrity
- 22 Managing Auditing
- 23 Managing Logging
- 24 Monitoring Oracle Internet Directory
- 25 Backing Up and Restoring Oracle Internet Directory
- 26 Configuring Secure Sockets Layer (SSL)
- 27 Configuring Data Privacy
- 28 Managing Password Policies
- 29 Managing Directory Access Control
- 30 Managing Password Verifiers
- 31 Delegating Privileges for Oracle Identity Management
- 32 Managing Authentication
- 33 Planning, Deploying and Managing Realms
- 34 Tuning and Sizing Oracle Internet Directory
- 35 Managing Garbage Collection
- 36 Migrating Data from Other Data Repositories
- 37 Configuring Server Chaining
- 38 Managing DIT Masking
- 39 Setting Up Replication
- 40 Setting Up Replication Failover
- 41 Managing Replication Configuration Attributes
- 42 Managing and Monitoring Replication
- 43 Configuring a Customized Password Policy Plug-In
- 44 Developing Plug-ins for the Oracle Internet Directory Server
- 45 Configuring a Customized External Authentication Plug-in
- A Differences Between 10g and 11g
- B Managing Oracle Internet Directory Instances by Using OIDCTL
- C Setting Up Oracle Database Advanced Replication-Based Replication
- D How Replication Works
- E Java Server Plug-in Developer's Reference
- F PL/SQL Server Plug-in Developer's Reference
- G The LDAP Filter Definition
- H The Access Control Directive Format
- I Globalization Support in the Directory
- J Setting up Access Controls for Creation and Search Bases for Users and Groups
- K Searching the Directory for User Certificates
- L Adding a Directory Node by Using the Database Copy Procedure
- M Oracle Authentication Services for Operating Systems
- N RFCs Supported by Oracle Internet Directory
- O Managing Oracle Directory Services Manager's Java Key Store
- P Starting and Stopping the Oracle Stack
- Q Performing a Rolling Upgrade
- R Using the Oracle Internet Directory VM Template
- S Troubleshooting Oracle Internet Directory
- Preface
- Audience
- Documentation Accessibility
- Related Documents
- Conventions
- New Features Introduced with Oracle Internet Directory 11g Release 1 (11.1.1.6.0)
- New Features Introduced with Oracle Internet Directory 11g Release 1 (11.1.1.4.0)
- New Features Introduced with Oracle Internet Directory 11g Release 1 (11.1.1)
- New Features Introduced with Oracle Internet Directory 10g (10.1.4.1)
- New Features Introduced with Oracle Internet Directory 10g Release 2 (10.1.2)
- Part I Understanding Directory Services
- 1 Introduction to Directory Services
- 1.1 What Is a Directory?
- 1.2 What Is the Lightweight Directory Access Protocol (LDAP)?
- 1.3 What Is Oracle Internet Directory?
- 1.4 How Oracle Products Use Oracle Internet Directory
- 2.1 WebLogic Server Domain
- 2.2 Oracle Internet Directory as a System Component
- 2.3 Oracle Internet Directory Deployment Options
- 1. Create New Domain-Oracle Internet Directory with a local Oracle WebLogic Server Domain. Oracle WebLogic Server is installed locally with Oracle Internet Directory and an admin domain is created for Oracle Internet Directory.
- 2. Extend Existing Domain-Oracle Internet Directory with a remote Oracle WebLogic Server Domain. Oracle WebLogic Server admin server and domain have been installed and created separately and Oracle Internet Directory registers with the Domain remotely.
- 3. Expand Cluster-Oracle Internet Directory in an Oracle WebLogic Server cluster for High Availability. This option will not be discussed here.
- 4. Configure Without Domain-Oracle Internet Directory without a Oracle WebLogic Server Domain. Oracle Internet Directory can be ...
- 2.4 Middleware Home
- 2.5 WebLogic Server Home
- 2.6 Oracle Common Home
- 2.7 Oracle Home
- 2.8 Oracle Instance
- 2.9 Oracle Enterprise Manager Fusion Middleware Control
- 2.10 Logging, Auditing, and Diagnostics
- 2.11 MBeans and the WebLogic Scripting Tool
- 3.1 Oracle Internet Directory Architecture
- 3.2 How Oracle Internet Directory Processes a Search Request
- 1. The user or client enters a search request that is conditioned by one or more of the following options:
- 2. The C API, using the LDAP protocol, sends a request to a directory server instance to connect to the directory.
- 3. The directory server authenticates the user, a process called binding. The directory server also checks the Access Control Lists (ACLs) to verify that the user is authorized to perform the requested search.
- 4. The directory server converts the search request from LDAP to Oracle Call Interface (OCI)/Oracle Net Services and sends it to the Oracle Database.
- 5. The Oracle Database retrieves the information and passes it back through the chain-to the directory server, then to the C API, and, finally, to the client.
- 3.3 Directory Entries
- 3.4 Attributes
- 3.5 Object Classes
- 3.6 Naming Contexts
- 3.7 Security
- 3.8 Globalization Support
- 3.9 Distributed Directories
- 3.10 Knowledge References and Referrals
- 3.11 Oracle Delegated Administration Services and the Oracle Internet Directory Self-Service Console
- 3.12 The Service Registry and Service to Service Authentication
- 3.13 Oracle Directory Integration Platform
- 3.14 Oracle Internet Directory and Identity Management
- 3.15 Resource Information
- 4.1 Oracle Internet Directory Process Control Architecture
- 4.2 The ODS_PROCESS_STATUS Table
- 4.3 Starting, Stopping, and Monitoring of Oracle Internet Directory Processes
- 4.4 Oracle Internet Directory Process Control-Best Practices
- 5.1 The Directory Information Tree
- 5.2 Planning the Overall Directory Structure
- 5.3 Planning the Names and Organization of Users and Groups
- 5.4 Migrating a DIT from a Third-Party Directory
- 6.1 Why Use Replication?
- 6.2 Replication Concepts
- 6.2.1 Content to be Replicated: Full or Partial
- 6.2.2 Direction: One-Way, Two-Way, or Peer to Peer
- 6.2.3 Transport Mechanism: LDAP or Oracle Database Advanced Replication
- 6.2.4 Directory Replication Group (DRG) Type: Single-master, Multimaster, or Fan-out
- 6.2.5 Loose Consistency Model
- 6.2.6 How the Replication Concepts Fit Together
- 6.2.7 Multimaster Replication with Fan-Out
- 6.3 What Kind of Replication Do You Need?
- 7.1 Patching Your System to 11g Release 1 (11.1.1.6.0)
- 7.2 Postinstallation Tasks and Information
- 7.2.1 Setting Up the Environment
- 7.2.2 Adding Datafiles to the OLTS_CT_STORE and OLTS_ATTRSTORE Tablespaces
- 7.2.3 Changing Settings of Windows Services
- 7.2.4 Starting and Stopping the Oracle Stack
- 7.2.5 Identifying Default URLs and Ports
- 7.2.6 Tuning Oracle Internet Directory
- 7.2.7 Enabling Anonymous Binds
- 7.2.8 Enabling Oracle Internet Directory to run on Privileged Ports
- 1. As the root user, execute ORACLE_HOME/oidRoot.sh.
- 2. Reassign the port numbers in one of the following ways:
- 3. Run opmnctl updatecomponentregistration, as described in Section 8.3.4, "Updating the Component Registration of an Oracle Ins...
- 4. Restart Oracle Internet Directory, as described inSection 8.2.4, "Restarting the Oracle Internet Directory Server by Using Fusion Middleware Control" or Section 8.3.9, "Restarting the Oracle Internet Directory Server by Using opmnctl."
- 7.2.9 Verifying Oracle Database Time Zone
- 7.3 Using Fusion Middleware Control to Manage Oracle Internet Directory
- 7.4 Using Oracle Directory Services Manager
- 7.4.1 Introduction to Oracle Directory Services Manager
- 7.4.2 Configuring ODSM for SSO Integration
- 1. Select Non-SSL or SSL from the Port Type list.
- 2. Select OID or OVD from the Directory Type list.
- 3. Provide the following information:
- 4. Click Validate to verify your directory connection details.
- 5. Click Apply to apply your selections.
- 6. Specify the SSO server's Logout URL in the SSO Logout URL text box.
- 7.4.3 Configuring the SSO Server for ODSM Integration
- 7.4.4 Configuring the Oracle HTTP Server for ODSM-SSO Integration
- 7.4.5 Invoking Oracle Directory Services Manager
- 7.4.6 Connecting to the Server from Oracle Directory Services Manager
- 7.4.6.1 Logging in to the Directory Server from Oracle Directory Services Manager
- 1. Click the small arrow to the right of the label Click to connect to a directory. It opens a dialog box containing the following sections:
- 2. To reconnect to a live connection, click it.
- 3. Select OID or OVD.
- 4. Optionally, enter an alias name to identify this entry on the Disconnected Connections list.
- 5. Enter the server and non-SSL port for the Oracle Internet Directory or Oracle Virtual Directory instance you want to manage.
- 6. Deselect SSL Enabled.
- 7. Enter the user (usually cn=orcladmin) and password.
- 8. Select the Start Page you want to go to after logging in.
- 9. Click Connect.
- 7.4.6.2 Logging Into the Directory Server from Oracle Directory Services Manager Using SSL
- 7.4.6.3 Connecting to an SSO-Enabled Directory as an SSO-Authenticated User
- 7.4.6.1 Logging in to the Directory Server from Oracle Directory Services Manager
- 7.4.7 Configuring Oracle Directory Services Manager Session Timeout
- 7.4.8 Configuring Oracle HTTP Server to Support Oracle Directory Services Manager in an Oracle WebLogic Server Cluster
- 1. Create a backup copy of the Oracle HTTP Server's httpd.conf file. The backup copy provides a source to revert to if you encounter problems after performing this procedure.
- 2. Add the following text to the end of the Oracle HTTP Server's httpd.conf file and replace the variable placeholder values wit...
- 3. Stop, then start the Oracle HTTP Server to activate the configuration change.
- 7.5 Using Command-Line Utilities to Manage Oracle Internet Directory
- 7.6 Basic Tasks for Configuring and Managing Oracle Internet Directory
- 1. Start and stop the LDAP server. See Chapter 8
- 2. Manage system configuration attributes. See Chapter 9.
- 3. Manage directory entries. See Chapter 13.
- 4. Manage directory schema. See Chapter 20.
- 5. Configure auditing. Chapter 22.
- 6. Manage log files. See Chapter 23.
- 7. Configure SSL. See Chapter 26.
- 8. Configure password policies. See Chapter 28.
- 9. Configure access control. See Chapter 29.
- 10. Get sizing and tuning recommendations for Oracle Internet Directory deployments. See the "Obtaining Recommendations by Using...
- 11. Set up replication. See Chapter 39 and Appendix C.
- 12. Convert an Advanced Replication-based replication agreement to an LDAP-based replication agreement. See Section 39.2, "Converting an Advanced Replication-Based Agreement to an LDAP-Based Agreement."
- 13. Modify an existing replication setup. See Chapter 42.
- 8 Managing Oracle Internet Directory Instances
- 8.1 Introduction to Managing Oracle Internet Directory Instances
- 8.2 Managing Oracle Internet Directory Components by Using Fusion Middleware Control
- 8.2.1 Viewing Active Server Information by Using Fusion Middleware Control
- 1. Connect to Oracle Enterprise Manager Fusion Middleware Control as described in Section 7.3, "Using Fusion Middleware Control to Manage Oracle Internet Directory."
- 2. The Domain Home Page displays the status of components, including Oracle Internet Directory.
- 3. Select the Oracle Internet Directory component you want to view.
- 4. View the status information on the Oracle Internet Directory Home page.
- 8.2.2 Starting the Oracle Internet Directory Server by Using Fusion Middleware Control
- 8.2.3 Stopping the Oracle Internet Directory Server by Using Fusion Middleware Control
- 8.2.4 Restarting the Oracle Internet Directory Server by Using Fusion Middleware Control
- 8.2.1 Viewing Active Server Information by Using Fusion Middleware Control
- 8.3 Managing Oracle Internet Directory Components by Using opmnctl
- 8.3.1 Creating an Oracle Internet Directory Component by Using opmnctl
- 8.3.2 Registering an Oracle Instance by Using opmnctl
- 8.3.3 Unregistering an Oracle Instance by Using opmnctl
- 8.3.4 Updating the Component Registration of an Oracle Instance by Using opmnctl
- 8.3.5 Deleting an Oracle Internet Directory Component by Using opmnctl
- 8.3.6 Viewing Active Server Instance Information by Using opmnctl
- 8.3.7 Starting the Oracle Internet Directory Server by Using opmnctl
- 8.3.8 Stopping the Oracle Internet Directory Server by Using opmnctl
- 8.3.9 Restarting the Oracle Internet Directory Server by Using opmnctl
- 8.3.10 Changing the Oracle Database Information in opmn.xml
- 8.4 Starting an Instance of the Replication Server by Using OIDCTL
- 9.1 Introduction to Managing System Configuration Attributes
- 9.2 Managing System Configuration Attributes by Using Fusion Middleware Control
- 9.2.1 Configuring Server Properties
- 9.2.2 Configuring Shared Properties
- 9.2.3 Configuring Other Parameters
- 9.3 Managing System Configuration Attributes by Using WLST
- 1. Invoke WLST
- 2. Connect to the WebLogic server
- 3. To navigate to the custom mbean tree, type:
- 4. To get a one-level list of the MBean in the custom MBean tree, type:
- 5. To get to a domain, use the cd() command. For example:
- 6. To get to a specific MBean, type:
- 7. Once you have navigated to the desired MBean, you can get the current value for an attribute by typing:
- 8. Before you make any changes to attributes, you must ensure that the MBean has the current server configuration. To do that, load the configuration from Oracle Internet Directory server to the mbean. Type:
- 9. Then you can use the set command to set a specific attribute. Type:
- 10. After making changes, you must save the MBean configuration to the Oracle Internet Directory server. Type:
- 9.4 Managing System Configuration Attributes by Using LDAP Tools
- 9.5 Managing System Configuration Attributes by Using ODSM Data Browser
- 10.1 Introduction to Managing IP Addresses
- 10.2 Configuring an IP Address for IP V6, Cold Failover Cluster, or Virtual IP
- 1. Create an LDIF file similar to this:
- 2. Execute the following ldapmodify command:
- 3. Restart Oracle Internet Directory by using opmnctl, as follows:
- 4. Update the registration of the Oracle Internet Directory component, as described in Section 8.3.4, "Updating the Component Registration of an Oracle Instance by Using opmnctl." For example:
- 11 Managing Naming Contexts
- 11.1 Introduction to Managing Naming Contexts
- 11.2 Searching for Published Naming Contexts
- 11.3 Publishing a Naming Context
- 12.1 Introduction to Managing Accounts and Passwords
- 12.2 Managing Accounts and Passwords by Using Command-Line Tools
- 12.3 Managing Accounts and Passwords by Using the Self-Service Console
- 12.4 Listing and Unlocking Locked Accounts by Using Oracle Directory Services Manager
- 1. Invoke Oracle Directory Services Manager as described in Section 7.4.5, "Invoking Oracle Directory Services Manager."
- 2. From the task selection bar, select Data Browser.
- 3. Perform a simple search, as described in Section 13.2.2, "Searching for Entries by Using Oracle Directory Services Manager," using the search string (pwdaccountlockedtime=*). A list of entries with locked accounts appears.
- 4. Select the entry whose account you want to unlock.
- 5. When an account is locked, Unlock Account appears before the Apply and Revert buttons. Click Unlock Account.
- 12.5 Changing the Superuser Password by Using Fusion Middleware Control
- 12.6 Creating Another Account With Superuser Privileges
- 12.7 Managing the Superuser Password by Using ldapmodify
- 12.8 Changing the Oracle Internet Directory Database Password
- 12.9 Resetting the Superuser Password
- 12.10 Changing the Password for the EMD Administrator Account
- 1. Change the userpassword of the account "cn=emd admin,cn=oracle internet directory" in Oracle Internet Directory by using ldapmodify.
- 2. Invoke wlst and connect to the WebLogic server.
- 3. Run the following WLST command:
- 4. On each Oracle instance in the WebLogic domain, execute the following command line:
- 5. Update the component registration of the Oracle instance, as described in Section 8.3.4, "Updating the Component Registration of an Oracle Instance by Using opmnctl."
- 12.11 Changing the Password for the ODSSM Administrator Account
- 1. Use SQLPlus or a similar tool to alter the password in the database.
- 2. Go to ORACLE_HOME/common/bin and run the following command:
- 3. Connect to the WebLogic Administration Server:
- 4. Run the updateCred() command:
- 5. On each Oracle instance in the WebLogic domain, execute the following command line:
- 6. Update the component registration of the Oracle instance, as described in Section 8.3.4, "Updating the Component Registration of an Oracle Instance by Using opmnctl."
- 1. Log in to the WebLogic Administration console at: http://host:port/console
- 2. Select Data Sources -> schedulerDS -> Connection Pool.
- 3. Click Lock & Edit in the top left corner of the screen.
- 4. Enter the new password in the Password and Confirm Password fields.
- 5. Click Activate Changes.
- 13 Managing Directory Entries
- 13.1 Introduction to Managing Directory Entries
- 13.2 Managing Entries by Using Oracle Directory Services Manager
- 13.2.1 Displaying Entries by Using Oracle Directory Services Manager
- 1. Invoke Oracle Directory Services Manager and connect to the Oracle Internet Directory server as described in Section 7.4.5, "Invoking Oracle Directory Services Manager."
- 2. From the task selection bar, select Data Browser.
- 3. If desired, expand items in the data tree in the left panel to view the entries in each subtree.
- 4. If desired, mouse over each icon in the tool bar to read the icon's action.
- 5. Select the Refresh the entry icon to refresh only the entry in the right pane. Select the Refresh subtree entries icon to refresh child entries of the selected entry.
- 6. To limit the number of entries displayed in a subtree, select the entry at the root of the subtree, then click the Filter child entries icon and specify a filter, as follows:
- a. In the Max Results field, specify a number from 1 to 1000, indicating the maximum number of entries to return.
- b. From the list at the left end of the search criteria bar, select an attribute of the entries you want to view.
- c. From the list in the middle of the search criteria bar, select a filter.
- d. In the text box at the right end of the search criteria bar, type the value for the attribute you just selected. For example, if the attribute you selected was cn, you could type the particular common name you want to find.
- e. Click + to add this search criterion to the LDAP Query field.
- f. To view the LDAP filter you have selected, select Show LDAP filter.
- g. To further refine your search, use the list of conjunctions (AND, OR, NOT AND, and NOT OR) and the lists and text fields on t...
- 7. When you have finished configuring the search criteria, click OK. The child entries that match the filter are shown under the...
- 13.2.2 Searching for Entries by Using Oracle Directory Services Manager
- 1. Invoke Oracle Directory Services Manager as described in Section 7.4.5, "Invoking Oracle Directory Services Manager."
- 2. From the task selection bar, choose Data Browser.
- 3. To perform a simple keyword search, enter text in the field next to the Search icon to specify keywords to search for in the attributes cn, uid, sn, givenname, mail and initials.
- 4. Click the Simple Search arrow to the right of the text field or press the Enter key. Search results, if any, are displayed be...
- 5. To perform a more complex search, click Advanced. The Search Dialog appears.
- 6. In the Root of the Search field, enter the DN of the root of your search.
- a. Click Browse to the right of the Root of the Search field. The Select Distinguished Name (DN) Path: Tree View dialog box appears.
- b. Expand an item in the tree view to display its entries.
- c. Continue navigating to the entry that represents the level you want for the root of your search.
- d. Select that entry, then click OK. The DN for the root of your search appears in the Root of the Search text box in the right pane.
- 7. In the Max Results (entries) box, type the maximum number of entries you want your search to retrieve. The default is 200. The directory server retrieves the value you set, up to 1000.
- 8. In the Max Search Time (seconds) box, type the maximum number of seconds for the duration of your search. The value you enter...
- 9. In the Search Depth list, select the level in the DIT to which you want to search.
- 10. Set search criteria.
- a. From the list at the left end of the search criteria bar, select an attribute of the entry for which you want to search. Beca...
- b. From the list in the middle of the search criteria bar, select a filter.
- c. In the text box at the right end of the search criteria bar, type the value for the attribute you just selected. For example, if the attribute you selected was cn, you could type the particular common name you want to find.
- d. Click + to add this search criterion to the LDAP Query field.
- e. To view the LDAP filter you have selected, select Show LDAP filter.
- f. To further refine your search, use the list of conjunctions (AND, OR, NOT AND, and NOT OR) and the lists and text fields on t...
- 11. Click Search. Search results, if any, are displayed below the data tree. If an LDAP error icon appears, mouse over it to see...
- 13.2.3 Importing Entries from an LDIF File by Using Oracle Directory Services Manager
- 1. Invoke Oracle Directory Services Manager and connect to the Oracle Internet Directory server as described in Section 7.4.5, "Invoking Oracle Directory Services Manager."
- 2. Click the Data Browser tab.
- 3. Click the Import LDIF icon. The Import File dialog appears.
- 4. Enter the path to the LDIF file you want to import, or click Browse and navigate to the file, then click Open in the browser window.
- 5. Click OK in the Import File dialog. The LDIF Import Progress window shows the progress of the operation. Expand View Import Progress Table to see detailed progress.
- 13.2.4 Exporting Entries to an LDIF File by Using Oracle Directory Services Manager
- 1. Invoke Oracle Directory Services Manager and connect to the Oracle Internet Directory server as described in Section 7.4.5, "Invoking Oracle Directory Services Manager."
- 2. Click the Data Browser tab.
- 3. Navigate to the top level DN of the subtree you want to export.
- 4. Click the Export LDIF icon. The Export File dialog appears. Select Export Operational Attributes if you want to export them.
- 5. Click OK. The Download LDIF File dialog appears. By default, the entries are exported to a temporary file on the machine wher...
- 13.2.5 Viewing Attributes for a Specific Entry by Using Oracle Directory Services Manager
- 1. Invoke Oracle Directory Services Manager and connect to the Oracle Internet Directory server as described in Section 7.4.5, "Invoking Oracle Directory Services Manager."
- 2. Locate the entry by navigating to it in the data tree or by searching for it, as described in Section 13.2.2, "Searching for Entries by Using Oracle Directory Services Manager."
- 3. Click the entry. Attributes for that entry are displayed in the right pane. The display for the entry has at least the three ...
- 4. To view the attributes of an entry, click the Attributes tab.
- 5. You can switch between Managed Attributes and Show All by using the Views list.
- 6. To change the list of attributes shown as managed attributes, click the icon under Optional Attributes. Select attributes you...
- 7. For information on using the Subtree Access and Local Access tabs to view access control settings, see Section 29.2.4, "Adding or Modifying an ACP by Using the Data Browser in ODSM."
- 13.2.6 Adding a New Entry by Using Oracle Directory Services Manager
- 1. Invoke Oracle Directory Services Manager and connect to the Oracle Internet Directory server as described in Section 7.4.5, "Invoking Oracle Directory Services Manager."
- 2. From the task selection bar, select Data Browser.
- 3. On the toolbar, select the Create a new entry icon. Alternatively, right click any entry and choose Create.
- 4. Specify the object classes for the new entry. Click the Add icon and use the Add Object Class dialog to select object class e...
- 5. In the Parent of the entry field, you can specify the full DN of the parent entry of the entry you are creating. You can also...
- 6. Click Next.
- 7. Choose an attribute which will be the Relative Distinguished Name value for this entry and enter a value for that attribute. ...
- 8. Click Next. The next page of the wizard appears. (Alternatively, you can click Back to return to the previous page.)
- 9. Click Finish.
- 10. To manage optional attributes, navigate to the entry you have just created in the Data Tree
- 11. If the entry is a person, click the Person tab and use it to manage basic user attributes. Click Apply to save your changes or Revert to discard them.
- 12. If this is a person entry, you can upload a photograph. Click Browse, navigate to the photograph, then click Open. To update the photograph, click Update and follow the same procedure. Click the Delete icon to delete the photograph.
- 13. To manage object classes, as well as attributes that are not specific to a person or group entry, click the Attributes tab.
- 14. To add an object class:
- 15. To delete an object class,
- 16. By default, only non-empty attributes are shown. You can switch between Managed Attributes and Show All by using the Views list.
- 17. To change the list of attributes shown as managed attributes, click the icon under Optional Attributes. Select attributes yo...
- 18. Specify values for the optional properties. You can also modify the values of the mandatory properties. For multivalued attributes, you can use the Add and Delete icons to add and delete multiple values.
- 19. Click Apply to save your changes or Revert to discard them.
- 20. For information on using the Subtree Access and Local Access tabs to set access control, see Section 29.2.4, "Adding or Modifying an ACP by Using the Data Browser in ODSM."
- 13.2.7 Deleting an Entry or Subtree by Using Oracle Directory Services Manager
- 1. Invoke Oracle Directory Services Manager and connect to the Oracle Internet Directory server as described in Section 7.4.5, "Invoking Oracle Directory Services Manager."
- 2. From the task selection bar, select Data Browser.
- 3. Navigate to the entry you want to delete.
- 4. To delete only the entry, click the Delete icon. When the Delete dialog appears, click Yes. If the entry has no subentries, d...
- 13.2.8 Adding an Entry by Copying an Existing Entry in Oracle Directory Services Manager
- 1. Invoke Oracle Directory Services Manager and connect to the Oracle Internet Directory server as described in Section 7.4.5, "Invoking Oracle Directory Services Manager."
- 2. From the task selection bar, select Data Browser.
- 3. In the data tree, navigate to the entry you want to use as a template. Alternatively, click Advanced Search, and use it to search for an entry that you want to use as a template.
- 4. In the left panel, click the Create a new entry like this one icon. Alternatively, click the entry you want to use as a templ...
- 5. To add an object class:
- 6. To delete an object class,
- 7. Specify the DN of the parent entry, either by changing the content in the text box or by using the Browse button to locate a different DN.
- 8. Click Next. The next page of the wizard appears.
- 9. Choose an attribute which will be the Relative Distinguished Name value for this entry and enter a value for that attribute. ...
- 10. Click Next.
- 11. Click Finish.
- 12. To manage optional attributes, navigate to the entry you have just created in the Data Tree, then proceed to Step 11 in Section 13.2.6, "Adding a New Entry by Using Oracle Directory Services Manager."
- 13.2.9 Modifying an Entry by Using Oracle Directory Services Manager
- 1. Invoke Oracle Directory Services Manager and connect to the Oracle Internet Directory server as described in Section 7.4.5, "Invoking Oracle Directory Services Manager."
- 2. From the task selection bar, select Data Browser.
- 3. Navigate to an entry in the data tree. Alternatively, perform a search for the entry you want to modify as described inSectio...
- 4. To edit the RDN, select the Edit RDN icon above the Data Tree. Alternatively, you can select the entry in the Data Tree, right click, and select Edit RDN.
- 5. To add an object class:
- 6. To delete an object class,
- 7. If the entry is a person, click the Person tab and use it to manage basic user attributes. Click Apply to save your changes or Revert to discard them.
- 8. If this is a person entry, you can upload a photograph. Click Browse, navigate to the photograph, then click Open. To update the photograph, click Update and follow the same procedure. Click the Delete icon to delete the photograph.
- 9. To modify the values of attributes that are not specific to a person or group, click the Attributes tab in the right pane and make the desired changes.
- 10. To change the list of attributes shown as managed attributes, click the icon under Optional Attributes. Select attributes yo...
- 11. Specify values for the optional properties. You can also modify the values of the mandatory properties. For multivalued attributes, you can use the Add and Delete icons to add and delete multiple values.
- 12. When you have completed all your changes, click Apply to make them take effect. Alternatively, click Revert to abandon your changes.
- 13. You can set an access control point (ACP) on this entry by using the Subtree Access and Local Access tabs. The procedures ar...
- 13.2.1 Displaying Entries by Using Oracle Directory Services Manager
- 13.3 Managing Entries by Using LDAP Command-Line Tools
- 13.3.1 Listing All the Attributes in the Directory by Using ldapsearch
- 13.3.2 Listing Operational Attributes by Using ldapsearch
- 13.3.3 Attribute Case in ldapsearch Output
- 13.3.4 Adding a User Entry by Using ldapadd
- 13.3.5 Modifying a User Entry by Using ldapmodify
- 13.3.6 Adding an Attribute Option by Using ldapmodify
- 13.3.7 Deleting an Attribute Option by Using ldapmodify
- 13.3.8 Searching for Entries with Attribute Options by Using ldapsearch
- 14.1 Introduction to Managing Dynamic and Static Groups
- 14.1.1 Static Groups
- 14.1.2 Dynamic Groups
- 14.1.3 Hierarchies
- 14.1.4 Querying Group Entries
- 14.1.5 orclMemberOf Attribute
- 14.1.6 When to Use Each Kind of Group
- 14.2 Managing Group Entries by Using Oracle Directory Services Manager
- 14.2.1 Creating Static Group Entries by Using Oracle Directory Services Manager
- 1. Invoke Oracle Directory Services Manager and connect to the Oracle Internet Directory server as described in Section 7.4.5, "Invoking Oracle Directory Services Manager."
- 2. From the task selection bar, select Data Browser.
- 3. On the toolbar, choose the Create a new entry icon. Alternatively, right click any entry and choose Create.
- 4. Specify the object classes for the new entry. Click the Add icon and use the Add Object Class dialog to select either groupOfNames or groupOfUniqueNames. (All the superclasses from this object class through top are also added.)
- 5. In the Parent of the entry field, you can specify the full DN of the parent entry of the entry you are creating. You can also click Browse to locate and select the DN of the parent for the entry you want to add, then click Select.
- 6. Click Next.
- 7. Choose an attribute which will be the Relative Distinguished Name value for this entry and enter a value for that attribute. You must enter a value for the cn attribute, even if it is not the RDN value.
- 8. Click Next. The next page of the wizard appears. (Alternatively, you can click Back to return to the previous page.)
- 9. Click Finish.
- 10. To add an owner or member, navigate to the group entry you just created in the Data Tree.
- 11. Select the Group tab.
- 12. To add an owner to the group, click the Add icon next to the Owner box.
- 13. Enter the owner's DN or click the button to select the entry you want to add as owner (usually a user or group entry) in the Select Distinguished Name Path dialog.
- 14. To add a member to the group, click the Add icon next to the Members text box
- 15. Enter the member's DN or click the button to select the entry you want to add as a member (usually a user or group entry) in the Select Distinguished Name Path dialog.
- 16. Optionally, enter a description for the entry.
- 17. Choose Apply to apply your changes or choose Revert to abandon your changes.
- 18. To make other changes to the group entry, see Section 14.2.2, "Modifying a Static Group Entry by Using Oracle Directory Services Manager."
- 14.2.2 Modifying a Static Group Entry by Using Oracle Directory Services Manager
- 1. Select the group in the data tree.
- 2. To add or delete an owner or member, select the Group tab or the Attributes tab.
- 3. To add a member to the group, click the Add icon next to the Members text box.
- 4. Select the entry you want to add as a member (usually a user or group entry) in the Select Distinguished Name Path dialog.
- 5. To add an owner to the group, click the Add icon next to the Owners text box.
- 6. Select the entry you want to add as an owner (usually a user or group entry) in the Select Distinguished Name Path dialog
- 7. To delete an owner or member, select it in the list and click the Delete icon.
- 8. To add or modify an attribute other than an owner or member, select the Attributes tab.
- 9. By default, only non-empty attributes are shown. You can switch between Managed Attributes and Show All by using the Views list.
- 10. To change the list of attributes shown as managed attributes, click the icon under Optional Attributes. Select attributes yo...
- 11. Specify values for the optional properties. You can also modify the values of the mandatory properties. For multivalued attributes, you can use the Add and Delete icons to add and delete multiple values.
- 12. Click Apply to save your changes or Revert to discard them.
- 13. You can set an access control point (ACP) on this entry by using the Subtree Access and Local Access tabs. The procedures ar...
- 14.2.3 Creating Dynamic Group Entries by Using Oracle Directory Services Manager
- 1. Invoke Oracle Directory Services Manager and connect to the Oracle Internet Directory server as described in Section 7.4.5, "Invoking Oracle Directory Services Manager."
- 2. From the task selection bar, select Data Browser.
- 3. On the toolbar, choose Create a new entry. The Create New Entry wizard appears.
- 4. Specify the object classes for the new entry. Select at least the following object class entries.
- 5. In the Parent of the entry field, you can specify the full DN of the parent entry of the entry you are creating. You can also click Browse to locate the DN of the parent for the entry you want to add, then click Select.
- 6. Click Next.
- 7. Choose an attribute which will be the Relative Distinguished Name value for this entry and enter a value for that attribute. You must enter a value for the cn attribute, even if it is not the RDN value.
- 8. Click Next. The next page of the wizard appears. (Alternatively, you can click Back to return to the previous page.)
- 9. Click Finish.
- 10. To add an owner or member, navigate to the group entry you just created in the Data Tree. (You might have to click the Refresh icon to see the new entry).
- 11. Select the Group tab.
- 12. To add an owner to the group, click the Add icon next to the Owner box.
- 13. Select the entry you want to add as owner (usually a user or group entry) in the Select Distinguished Name Path dialog.
- 14. To add a member to the group, click the Add icon next to the Members text box
- 15. Select the entry you want to add as a member (usually a user or group entry) in the Select Distinguished Name Path dialog.
- 16. Optionally, enter a description for the entry.
- 17. Choose Apply to apply your changes or choose Revert to abandon your changes.
- 18. Select the Attributes tab.
- 19. You can switch between Managed Attributes and Show All by using the Views list.
- 20. To change the list of attributes shown as managed attributes, click the icon under Optional Attributes. Select attributes yo...
- 21. If you are using the labeledURI method for dynamically computing membership in the group, you must set the labeledURI attrib...
- 22. Click Apply to save your changes or Revert to discard them.
- 23. You can set an access control point (ACP) on this entry by using the Subtree Access and Local Access tabs. The procedures ar...
- 14.2.4 Modifying a Dynamic Group Entry by Using Oracle Directory Services Manager
- 14.2.1 Creating Static Group Entries by Using Oracle Directory Services Manager
- 14.3 Managing Group Entries by Using the Command Line
- 15.1 Introduction to Performing Bulk Operations
- 15.2 Changing Server Mode
- 15.3 Loading Data Into the Schema by Using bulkload
- 15.4 Modifying Attributes of a Large Number of Entries By Using bulkmodify
- 15.5 Deleting Entries or Attributes of Entries by Using bulkdelete
- 15.6 Dumping Data from Oracle Internet Directory to a File by Using ldifwrite
- 15.7 Creating and Dropping Indexes from Existing Attributes by Using catalog
- 16.1 Introduction to Collective Attributes
- 16.2 Managing Collective Attributes by Using the Command Line
- 17.1 Introduction to Managing Alias Entries
- 17.2 Adding an Alias Entry
- 17.3 Searching the Directory with Alias Entries
- 17.4 Modifying Alias Entries
- 17.5 Interpreting Messages Related to Alias Dereferencing
- 18.1 Introduction to Managing Attribute Uniqueness Constraint Entries
- 18.2 Specifying Attribute Uniqueness Constraint Entries
- Figure 18-1 Example of a Directory Information Tree
- 18.2.1 Specifying Multiple Attribute Names in an Attribute Uniqueness Constraint
- 18.2.2 Specifying Multiple Subtrees in an Attribute Uniqueness Constraint
- 18.2.3 Specifying Multiple Scopes in an Attribute Uniqueness Constraint
- 18.2.4 Specifying Multiple Object Classes in an Attribute Uniqueness Constraint
- 18.2.5 Specifying Multiple Subtrees, Scopes, and Object Classes in an Attribute Uniqueness Constraint
- 18.3 Managing an Attribute Uniqueness Constraint Entry by Using Oracle Directory Services Manager
- 18.3.1 Creating an Attribute Uniqueness Constraint Entry by Using ODSM
- 1. Invoke Oracle Directory Services Manager and connect to the Oracle Internet Directory server as described in Section 7.4.5, "Invoking Oracle Directory Services Manager."
- 2. Select Advanced from the task selection bar.
- 3. Expand Attribute Uniqueness in the left pane.
- 4. On the toolbar, choose the Create an attribute uniqueness constraint icon. This displays the New Constraint window.
- 5. In the New Constraint dialog box, enter values in the text fields and select the Unique Attribute Scope. You can click Browse to select the Unique Attribute Subtree.
- 6. If you want to enable the constraint now, click Enable Unique Attribute.
- 7. Choose OK. The entry you just created appears in the list of attribute uniqueness constraint entries in the left panel.
- 8. Click Apply to apply this constraint or Revert to revert to the state before you created the new entry.
- 18.3.2 Modifying an Attribute Uniqueness Constraint Entry by Using ODSM
- 1. Invoke Oracle Directory Services Manager and connect to the Oracle Internet Directory server as described in Section 7.4.5, "Invoking Oracle Directory Services Manager."
- 2. Select Advanced from the task selection bar.
- 3. Expand Attribute Uniqueness in the left pane.
- 4. Select an existing uniqueness constraint. This displays the General tab of the Attribute Uniqueness Constraint window.
- 5. Enter or modify values.
- 6. If you want to enable the constraint now, click Enable Unique Attribute.
- 7. Click Apply to apply this change or Revert to revert to the state before you modified the entry.
- 18.3.3 Deleting an Attribute Uniqueness Constraint Entry by Using ODSM
- 1. Invoke Oracle Directory Services Manager and connect to the Oracle Internet Directory server as described in Section 7.4.5, "Invoking Oracle Directory Services Manager."
- 2. Select Advanced from the task selection bar.
- 3. Expand Attribute Uniqueness in the left pane.
- 4. In the left panel, select the attribute uniqueness constraint entry you want to delete.
- 5. Choose the Delete icon, then, when prompted, confirm the deletion. The entry you deleted no longer appears in the list of attribute uniqueness constraint entries in the left panel.
- 6. Click Apply to apply this change or Revert to revert to the state before you deleted the entry.
- 18.3.1 Creating an Attribute Uniqueness Constraint Entry by Using ODSM
- 18.4 Managing an Attribute Uniqueness Constraint Entry by Using the Command Line
- 18.4.1 Creating Attribute Uniqueness Across a Directory by Using Command-Line Tools
- 18.4.2 Creating Attribute Uniqueness Across One Subtree by Using Command-Line Tools
- 18.4.3 Creating Attribute Uniqueness Across One Object Class by Using Command-Line Tools
- 18.4.4 Modifying Attribute Uniqueness Constraint Entries by Using Command-Line Tools
- 18.4.5 Deleting Attribute Uniqueness Constraint Entries by Using Command-Line Tools
- 18.4.6 Enabling and Disabling Attribute Uniqueness by Using Command-Line Tools
- 19.1 Introduction to Managing Knowledge References and Referrals
- 19.2 Configuring Smart Referrals
- 19.3 Configuring Default Referrals
- 20.1 Introduction to Managing Directory Schema
- 20.1.1 Where Schema Information is Stored in the Directory
- 20.1.2 Understanding Object Classes
- 20.1.3 Understanding Attributes
- 20.1.4 Extending the Number of Attributes Associated with Entries
- 20.1.4.1 Extending the Number of Attributes before Creating Entries in the Directory
- 20.1.4.2 Extending the Number of Attributes for Existing Entries by Creating an Auxiliary Object Class
- 20.1.4.3 Extending the Number of Attributes for Existing Entries by Creating a Content Rule
- 20.1.4.4 Rules for Creating and Modifying Content Rules
- 20.1.4.5 Schema Enforcement When Using Content Rules
- 20.1.4.6 Searches for Object Classes Listed in Content Rules
- 20.1.5 Understanding Attribute Aliases
- 20.1.6 Object Identifier Support in LDAP Operations
- 20.2 Managing Directory Schema by Using Oracle Directory Services Manager
- 20.2.1 Searching for Object Classes by Using Oracle Directory Services Manager
- 1. Invoke Oracle Directory Services Manager and connect to the Oracle Internet Directory server as described in Section 7.4.5, "Invoking Oracle Directory Services Manager."
- 2. From the task selection bar, choose Schema.
- 3. Expand the Object Classes panel on the left.
- 4. Enter a keyword in the Search field and click Go. The list of object classes matching the keyword is displayed in the left panel.
- 20.2.2 Adding Object Classes by Using Oracle Directory Services Manager
- 1. Invoke Oracle Directory Services Manager and connect to the Oracle Internet Directory server as described in "Invoking Oracle Directory Services Manager" on page 7-9.
- 2. From the task selection bar, choose Schema.
- 3. Expand the Object Classes panel on the left and, in the toolbar, choose Create. The New Object Class dialog box appears.
- 4. In the New Object Class dialog box, enter the information in the fields.
- 5. Choose Create.
- 20.2.3 Modifying Object Classes by Using Oracle Directory Services Manager
- 1. Invoke Oracle Directory Services Manager and connect to the Oracle Internet Directory server as described in Section 7.4.5, "Invoking Oracle Directory Services Manager."
- 2. From the task selection bar, choose Schema.
- 3. Expand the Object Classes panel on the left. Use the scroll bar to move through the alphabetical list of object classes. You ...
- 4. Click the object class you want to modify. The Object Class tab appears on the right side of the page.
- 5. To add or delete a superclass or attribute, select it in the Superclass, Mandatory Attributes, or Optional Attributes list and choose Add or Delete in the toolbar above the list
- 6. Choose Apply in the Object Class page to apply changes, or Revert to abandon changes.
- 20.2.4 Deleting Object Classes by Using Oracle Directory Services Manager
- 1. Invoke Oracle Directory Services Manager and connect to the Oracle Internet Directory server as described in Section 7.4.5, "Invoking Oracle Directory Services Manager."
- 2. From the task selection bar, choose Schema.
- 3. Click + next to Object Classes to expand the Object Classes panel. Use the scroll bar to move through the alphabetical list of Object Classes.
- 4. Select the object class you want to delete.
- 5. Choose Delete from the toolbar, then click Delete in the confirmation dialog.
- 20.2.5 Viewing Properties of Object Classes by Using Oracle Directory Services Manager
- 1. Invoke Oracle Directory Services Manager and connect to the Oracle Internet Directory server as described in Section 7.4.5, "Invoking Oracle Directory Services Manager."
- 2. From the task selection bar, choose Schema.
- 3. Click + next to Object Classes to expand the Object Classes panel. Use the scroll bar to move through the alphabetical list of Object Classes.
- 4. Click the Object Class you want to view. The Object Class tab appears on the right side of the page.
- 5. To see more detail about a superclass or attribute of the object class, select the item and click Edit. Click Cancel to return to the object class panel
- 20.2.6 Adding a New Attribute by Using Oracle Directory Services Manager
- 1. Invoke Oracle Directory Services Manager and connect to the Oracle Internet Directory server as described in Section 7.4.5, "Invoking Oracle Directory Services Manager."
- 2. From the task selection bar, choose Schema.
- 3. If necessary, expand the Attributes pane, on the left, then choose the Create button in the toolbar. The New Attribute Type dialog box appears.
- 4. Enter values in each of the fields.
- 5. Choose Apply.
- 20.2.7 Modifying an Attribute by Using Oracle Directory Services Manager
- 1. Invoke Oracle Directory Services Manager and connect to the Oracle Internet Directory server as described in Section 7.4.5, "Invoking Oracle Directory Services Manager."
- 2. From the task selection bar, choose Schema.
- 3. In the Attributes panel, select an attribute that you would like to modify. The attribute page appears on the right.
- 4. Modify or add information in editable fields, if any, in the attribute tab.
- 5. Choose Apply.
- 20.2.8 Deleting an Attribute by Using Oracle Directory Services Manager
- 1. Invoke Oracle Directory Services Manager and connect to the Oracle Internet Directory server as described in Section 7.4.5, "Invoking Oracle Directory Services Manager."
- 2. From the task selection bar, choose Schema.
- 3. In the Attributes panel, select an attribute that you would like to delete.
- 4. Choose Delete from the toolbar in the left panel, then click Delete in the confirmation dialog.
- 20.2.9 Viewing All Directory Attributes by Using Oracle Directory Services Manager
- 1. Invoke Oracle Directory Services Manager and connect to the Oracle Internet Directory server as described in Section 7.4.5, "Invoking Oracle Directory Services Manager."
- 2. From the task selection bar, choose Schema.
- 3. Expand Attributes.
- 4. Use the scrollbar in the Attributes panel to move through the alphabetical list.
- 20.2.10 Searching for Attributes by Using Oracle Directory Services Manager
- 1. Invoke Oracle Directory Services Manager and connect to the Oracle Internet Directory server as described in Section 7.4.5, "Invoking Oracle Directory Services Manager."
- 2. From the task selection bar, select Schema.
- 3. Expand the Attributes list in the left pane.
- 4. Enter a search term in the Search field in the left pane. You can use an asterisk (*) or question mark (?) as a wildcard. Click the Go icon or press Enter on your keyboard.
- 5. The results of your search appear in the list in the left pane. To dismiss the search and return to the complete list of attributes, click the Clear search text icon.
- 20.2.11 Adding an Index to a New Attribute by Using Oracle Directory Services Manager
- 20.2.12 Adding an Index to an Existing Attribute by Using Oracle Directory Services Manager
- 1. Invoke Oracle Directory Services Manager and connect to the Oracle Internet Directory server as described in Section 7.4.5, "Invoking Oracle Directory Services Manager."
- 2. From the task selection bar, select Schema.
- 3. Select an attribute that is not currently indexed that you want to add the index to.
- 4. Click the The attribute will be cataloged/decataloged icon. When the Confirm Dialog appears, click Confirm.
- 5. The Indexed box indicates that the attribute is indexed.
- 20.2.13 Dropping an Index from an Attribute by Using Oracle Directory Services Manager
- 1. Invoke Oracle Directory Services Manager and connect to the Oracle Internet Directory server as described in Section 7.4.5, "Invoking Oracle Directory Services Manager."
- 2. From the task selection bar, select Schema.
- 3. Select an attribute that is currently indexed that you want to drop the index from.
- 4. Click the The attribute will be cataloged/decataloged icon. When the Confirm Dialog appears, click Confirm.
- 5. The Indexed box indicates that the attribute is no longer indexed.
- 20.2.14 Creating a Content Rule by Using Oracle Directory Services Manager
- 1. Invoke Oracle Directory Services Manager and connect to the Oracle Internet Directory server as described in Section 7.4.5, "Invoking Oracle Directory Services Manager."
- 2. From the task selection bar, choose Schema.
- 3. In the left pane, expand the Content Rules list.
- 4. Choose Create. The New Content Rule dialog box appears.
- 5. In the New Content Rule dialog box, add information in the Structural Object Class and Object ID fields. Optionally, add a label.
- 6. Alternatively, in the Content Rules panel, select a content rule that is similar to one you would like to create, and then ch...
- 7. Choose OK to add the content rule.
- 20.2.15 Modifying a Content Rule by Using Oracle Directory Services Manager
- 1. Invoke Oracle Directory Services Manager and connect to the Oracle Internet Directory server as described in Section 7.4.5, "Invoking Oracle Directory Services Manager."
- 2. From the task selection bar, choose Schema.
- 3. In the left pane, expand the Content Rules list.
- 4. Select the content rule you want to modify. You can search for a content rule by entering a keyword in the search field, in t...
- 5. Modify values in the appropriate fields in the content rule tab.
- 6. Choose Apply to make the changes effective or choose Revert to abandon the changes.
- 20.2.16 Viewing Matching Rules by Using Oracle Directory Services Manager
- 1. Invoke Oracle Directory Services Manager and connect to the Oracle Internet Directory server as described in Section 7.4.5, "Invoking Oracle Directory Services Manager."
- 2. From the task selection bar, choose Schema.
- 3. Expand the Matching Rules list. Matching rules are shown in the list.
- 4. You can search for a matching rule by entering a keyword in the search field, in the same way you search for object classes. See Section 20.2.1, "Searching for Object Classes by Using Oracle Directory Services Manager."
- 5. Select a matching rule to see its details in the matching rule tab page on the right.
- 20.2.17 Viewing Syntaxes by Using Oracle Directory Services Manager
- 1. Invoke Oracle Directory Services Manager and connect to the Oracle Internet Directory server as described in Section 7.4.5, "Invoking Oracle Directory Services Manager."
- 2. From the task selection bar, choose Schema.
- 3. Expand the Syntaxes list. Syntax names are shown in the list.
- 4. Select a syntax to see its details in the syntax tab page on the right.
- 20.2.1 Searching for Object Classes by Using Oracle Directory Services Manager
- 20.3 Managing Directory Schema by Using the Command Line
- 20.3.1 Viewing the Schema by Using ldapsearch
- 20.3.2 Adding a New Object Class by Using Command-Line Tools
- 20.3.3 Adding a New Attribute to an Auxiliary or User-Defined Object Class by Using Command-Line Tools
- 20.3.4 Modifying Object Classes by Using Command-Line Tools
- 20.3.5 Adding and Modifying Attributes by Using ldapmodify
- 20.3.6 Deleting Attributes by Using ldapmodify
- 20.3.7 Indexing an Attribute by Using ldapmodify
- 20.3.8 Dropping an Index from an Attribute by Using ldapmodify
- 20.3.9 Indexing an Attribute by Using the Catalog Management Tool
- 20.3.10 Adding a New Attribute With Attribute Aliases by Using the Command Line
- 20.3.11 Adding or Modifying Attribute Aliases in Existing Attributes by Using the Command Line
- 20.3.12 Deleting Attribute Aliases by Using the Command Line
- 20.3.13 Using Attribute Aliases with LDAP Commands
- 20.3.14 Managing Content Rules by Using Command-Line Tools
- 20.3.15 Viewing Matching Rules by Using ldapsearch
- 20.3.16 Viewing Syntaxes by Using by Using ldapsearch
- 21.1 Introduction to Configuring Referential Integrity
- 21.2 Enabling Referential Integrity by Using Fusion Middleware Control
- 21.3 Disabling Referential Integrity by Using Fusion Middleware Control
- 21.4 Enabling Referential Integrity by Using the Command Line
- 21.5 Configuring Specific Attributes for Referential Integrity by Using the Command Line
- 21.6 Disabling Referential Integrity by Using the Command Line
- 21.7 Detecting and Correcting Referential Integrity Violations
- 22.1 Introduction to Auditing
- 22.2 Managing Auditing by Using Fusion Middleware Control
- 1. From the Oracle Internet Directory menu, select Security, then Audit Policy Settings.
- 2. From the Audit Policy list, select Custom to configure your own filters, or one of the filter presets, None, Low, or Medium. (You cannot set All from Fusion Middleware Control.)
- 3. If you want to audit only failures, click Select Failures Only.
- 4. To configure a filter, click the Edit icon next to its name. The Edit Filter dialog for the filter appears.
- 5. Specify the filter condition using the buttons, selections from the menus, and strings that you enter. Condition subjects inc...
- 6. To add a condition, click the Add icon.
- 7. When you have completed the filter, click Apply to save the changes or Revert to discard the changes.
- 22.3 Managing Auditing by Using WLST
- 22.4 Managing Auditing from the Command Line
- 23.1 Introduction to Logging
- 23.2 Managing Logging by Using Fusion Middleware Control
- 23.2.1 Viewing Log Files by Using Fusion Middleware Control
- 1. From the Oracle Internet Directory menu, select Logs, then View Log Messages. The Log Messages page appears.
- 2. Select the date range for the logs you want to view. You can select Most Recent, by minutes, hours or days. Alternatively, you can select a Time Interval and specify the date and time to start and end.
- 3. Select the Message Types you want to view.
- 4. Specify the Maximum Rows Displayed.
- 5. From the View list, select Columns to change the columns shown. Select Reorder Columns to change the order of the columns.
- 6. Within each column, you can toggle between ascending and descending order by choosing the up or down arrow in the column header.
- 7. From the Show list, choose whether to show all messages, a summary by message type, or a summary by message id.
- 8. To perform a specific search, choose Add Fields and add fields to search on. For each field, select a criterion from the list...
- 9. Use the Broaden Target Scope list to view messages for the Domain.
- 10. Choose Export Messages to File to export the log messages to a file as XML, text, or comma-separated list.
- 11. Click Target Log Files to view information about individual log files.
- 12. You can indicate when to refresh the view. Select Manual Refresh, 30-Second Refresh, or One Minute Refresh from the list on the upper right.
- 13. Use the View list to change the columns listed or to reorder columns.
- 14. Use the Show list to change the grouping of messages.
- 15. Collapse the Search label to view only the list of log messages.
- 16. To view the contents of a log file, double click the file name in the Log File column. The View Log File: filename page is displayed. You can use the up and down arrows in the Time, Message Type, and Message ID to reorder the records in the file.
- 23.2.2 Configuring Logging by Using Fusion Middleware Control
- Table 23-2 Configuration Attributes on Server Properties Page, Logging Tab
- 1. Select Administration, then Server Properties from the Oracle Internet Directory menu, then select Logging.
- 2. Under Debug Level, select the types of activity to be logged.
- 3. Under Operations Enabled for Debug, enable the LDAP operations that you want logged.
- 4. Under Logging, specify values for Maximum log file size (MB) and Maximum number of log files to keep in rotation. The defaults are 1 MB and 100 log files, respectively.
- 23.2.1 Viewing Log Files by Using Fusion Middleware Control
- 23.3 Managing Logging from the Command Line
- 24.1 Introduction to Monitoring Oracle Internet Directory Server
- 24.2 Setting Up Statistics Collection by Using Fusion Middleware Control
- 24.2.1 Configuring Directory Server Statistics Collection by Using Fusion Middleware Control
- 1. Select Administration, then Server Properties from the Oracle Internet Directory menu, then select Statistics.
- 2. In the General section of the page, select Stats Flag to enable statistics collection.
- 3. Specify the number of minutes in the Stats Frequency field to control the frequency of statistics collection.
- 4. Select values from the Bind Security Event Tracking and Compare Security Event Tracking lists.
- 5. To collect statistics about users, select User Statistics Collection in the User Statistics section of the page.
- 6. In the Event Levels section of the page, select the events you want to track.
- 24.2.2 Configuring a User for Statistics Collection by Using Fusion Middleware Control
- 24.2.1 Configuring Directory Server Statistics Collection by Using Fusion Middleware Control
- 24.3 Viewing Statistics Information with Fusion Middleware Control
- 24.4 Viewing Statistics Information from the Oracle Directory Services Manager Home Page
- 24.5 Setting Up Statistics Collection by Using the Command-Line
- 24.5.1 Configuring Health, General, and Performance Statistics Attributes
- 24.5.2 Configuring Security Events Tracking
- 24.5.3 Configuring User Statistics Collection from the Command Line
- 24.5.4 Configuring Event Levels from the Command Line
- 24.5.5 Configuring a User for Statistics Collection by Using the Command Line
- 24.6 Viewing Information with the OIDDIAG Tool
- 26.1 Introduction to Configuring Secure Sockets Layer (SSL)
- 26.2 Configuring SSL by Using Fusion Middleware Control
- 1. Creating a Wallet by Using Fusion Middleware Control
- 2. Configuring SSL Parameters by Using Fusion Middleware Control
- 3. Restarting Oracle Internet Directory.
- 26.2.1 Creating a Wallet by Using Fusion Middleware Control
- 1. From the Oracle Internet Directory menu, select Security, then Wallets. If any wallets exist, you see a list.
- 2. To create a new wallet, click Create Self-signed Wallet. The Create Self-Signed Wallet page appears.
- 3. On the Create Self-Signed Wallet page, enter a name for the new wallet, using lower-case letters only.
- 4. Select Auto Login for an auto login wallet. Deselect Auto Login for a password-protected wallet.
- 5. If you have deselected Auto Login, enter the password in the two fields.
- 6. For Common Name, enter the hostname of the instance.
- 7. Select a Key Size from the list.
- 8. Click Submit.
- 9. A confirmation message is displayed and the new wallet appears in the list of wallets.
- 26.2.2 Configuring SSL Parameters by Using Fusion Middleware Control
- 26.2.3 Setting SSL Parameters with Fusion Middleware Control
- 26.3 Configuring SSL by Using WLST
- 1. Create an Oracle wallet.
- 2. Configure SSL parameters.
- 3. Restart Oracle Internet Directory.
- 1. Invoke wlst and connect to the host, specifying the username, password, and port of the WebLogic administration server.
- 2. Navigate to the custom mbean tree, then to the specific mbean oracle.as.oid, as described in Section 9.3, "Managing System Configuration Attributes by Using WLST."
- 3. Determine what certificates, if any, you already have in the Key Store MBean. See Table 9-7, " Oracle Internet Directory-Related MBeans".
- 4. If Necessary, create a new self-signed certificate.
- 5. Add a self-signed certificate to the wallet for use as the server certificate.
- 6. Configure the oid1 component node's listener/port for SSL, specifying the appropriate authentication mode:
- 7. Restart Oracle Internet Directory, as described in Chapter 8, "Managing Oracle Internet Directory Instances," to activate the changes
- 8. Run opmnctl updatecomponentregistration, as described in Section 8.3.4, "Updating the Component Registration of an Oracle Instance by Using opmnctl"
- 9. Verify that SSL is enabled by using the methods described in Section 26.5, "Testing SSL Connections by Using Oracle Directory Services Manager" and Section 26.6, "Testing SSL Connections From the Command Line."
- 26.4 Configuring SSL by Using LDAP Commands
- 26.5 Testing SSL Connections by Using Oracle Directory Services Manager
- 26.6 Testing SSL Connections From the Command Line
- 26.7 Configuring SSL Interoperability Mode
- 27.1 Introduction to Table Space Encryption
- 27.2 Enabling and Disabling Table Space Encryption
- 1. Make a cold backup of the Oracle Databases that are used by the Oracle Internet Directory instances.
- 2. Make sure you have the JavaVM and XML developer's Kit packages installed in the database Oracle home.
- 3. Log in to SQL*Plus as a user who has the SYSTEM privilege and execute the following command:
- 4. Create the directory object, log directory object used for dumpfiles, and logfiles of the Oracle DataPump utility. Log in to SQL*Plus as the ODS user and execute the following commands:
- 5. Create directory_path and log_directory_path in the file system.
- 6. Set the database wallet location in the sqlnet.ora of the database Oracle home.
- 7. Shut down all the Oracle Internet Directory instances that are using the Oracle Database Oracle home.
- 8. If you are enabling table space encryption for the first time in the Oracle Database Oracle home, log in to SQL*Plus as a user who has the ALTER SYSTEM privilege and execute the following command:
- 9. Whenever the Oracle Database is shut down and restarted, log in to SQL*Plus as a user who has the ALTER SYSTEM privilege and execute the following command:
- 10. Set the environment variable ORACLE_HOME to the Oracle Database home.
- 11. Set the environment variable NLS_LANG to the character set of the Oracle Database server.
- 12. Edit the path of the perl5 executable in the Perl script ORACLE_ HOME/ldap/datasecurity/oidtbltde.pl so that it matches the location of perl5 on your computer.
- 13. If you have not already done so, install the database independent interface module for Perl (DBI) and the Oracle DBD driver for Perl.
- 14. Run the Perl script oidtbltde.pl to enable or disable TDE for Oracle Internet Directory
- 27.3 Introduction to Using Database Vault With Oracle Internet Directory
- 27.4 Configuring Oracle Database Vault to Protect Oracle Internet Directory Data
- 27.4.1 Registering Oracle Database Vault
- 1. Install Oracle Internet Directory as described in Oracle Fusion Middleware Installation Guide for Oracle Identity Management.
- 2. Register Oracle Database Vault as described in Oracle Database Vault Administrator's Guide.
- 3. If the Oracle Database version is 11.1.0.7, download and install the patch for Bug 7244497. This is not necessary for later versions of Oracle Database.
- 4. If the Oracle Database version is 11.1.0.7, download and install the patch for Bug 7291157. This is not necessary for later versions of Oracle Database.
- 1. Disable Oracle Database Vault, if it is enabled. See the appendix entitled "Disabling and Enabling Oracle Database Vault" in Oracle Database Vault Administrator's Guide.
- 2. Install Oracle Internet Directory as described in Oracle Fusion Middleware Installation Guide for Oracle Identity Management.
- 3. Enable Database Vault as described in the Oracle Database Vault Administrator's Guide.
- 4. Download and install the patch for Bug 7244497 if you are using Oracle Database 11.1.0.7.
- 5. Download and install the patch for Bug 7291157 if you are using Oracle Database 11.1.0.7.
- 27.4.2 Adding a Database Vault Realm and Policies for Oracle Internet Directory
- 1. Open dbv_oid_rule.sql in a text editor and replace the dummy IP address in the Check ods connections and Check ods connections 2 rules with the
- 2. Connect to the database as the Database Vault owner and execute dbv_create_ oid_policies.sql.
- 1. Open dbv_oid_rule_sqlplus.sql in a text editor. Replace the dummy IP address in Check ods connections 3 rule with the IP addresses of the hosts from which to allow SQL*Plus access to Oracle Internet Directory Database.
- 2. Connect to the database as the Database Vault owner and execute dbv_oid_ rule_sqlplus.sql.
- 27.4.3 Managing Oracle Database Vault Configuration for Oracle Internet Directory
- 27.4.4 Deleting Database Vault Policies For Oracle Internet Directory
- 27.4.5 Disabling Oracle Database Vault for the Oracle Internet Directory Database
- 27.4.1 Registering Oracle Database Vault
- 27.5 Best Practices for Using Database Vault with Oracle Internet Directory
- 27.6 Introduction to Sensitive Attributes
- 27.7 Configuring Privacy of Retrieved Sensitive Attributes
- 27.8 Introduction to Hashed Attributes
- 27.9 Configuring Hashed Attributes
- 28.1 Introduction to Managing Password Policies
- 28.1.1 What a Password Policy Is
- 28.1.2 Steps Required to Create and Apply a Password Policy
- 1. Create a password policy entry in the appropriate container and associate it with the pwdpolicy object. (Default entries exists when you first install Oracle Internet Directory.)
- 2. Create the desired policy by setting values for attributes defined under the pwdpolicy object class for the entry created in step 1.
- 3. Enable the policy by setting the orclepwdpolicynable attribute to 1. If this is not set to 1, Oracle Internet Directory ignores the policy.
- 4. Determine the subtree to be governed by the policy. Add and populate a pwdpolicysubentry attribute with the policy's DN, at the root of that subtree.
- 28.1.3 Fine-Grained Password Policies
- 28.1.4 Default Password Policy
- 28.1.5 Password Policy Attributes
- 28.1.6 Password Policy-Related Operational Attributes
- 28.1.7 Directory Server Verification of Password Policy Information
- 28.1.8 Password Policy Error Messages
- 28.1.9 Releases Before 10g (10.1.4.0.1)
- 28.2 Managing Password Policies by Using Oracle Directory Services Manager
- 28.2.1 Viewing Password Policies by Using Oracle Directory Services Manager
- 1. Invoke Oracle Directory Services Manager and connect to the Oracle Internet Directory server as described in Section 7.4.5, "Invoking Oracle Directory Services Manager."
- 2. From the task selection bar, select Security.
- 3. Expand Password Policy in the left pane. All of the password policies appear in the left pane, listed by relative DN. Mouse over an entry to see the full DN.
- 4. Select a password policy to display its information in the right pane.
- 28.2.2 Modifying Password Policies by Using Oracle Directory Services Manager
- 1. Invoke Oracle Directory Services Manager and connect to the Oracle Internet Directory server as described in Section 7.4.5, "Invoking Oracle Directory Services Manager."
- 2. From the task selection bar, select Security.
- 3. Expand Password Policy in the left pane. All of the password policies appear in the left pane.
- 4. Select the password policy you want to modify. Five tab pages appear in the right pane.
- 5. In the General tab page, modify the editable attribute fields as needed.
- 6. Select the Account Lockout tab page and, to modify the fields, select Global Lockout. Modify the editable attribute fields as needed.
- 7. Select the IP Lockout tab page and, to modify the fields, select IP Lockout. Modify the editable attribute fields as needed.
- 8. Select the Password Syntax tab page and, to modify the fields, select Check Password Syntax. Modify the editable attribute fields as needed.
- 9. Select the Effective Subtree tab page to modify the subtree to which the policy applies. To add a subtree, select the Add ico...
- 10. When you are finished, choose Apply.
- 28.2.3 Creating a Password Policy and Assigning it to a Subtree by Using ODSM
- 1. Invoke Oracle Directory Services Manager and connect to the Oracle Internet Directory server as described in Section 7.4.5, "Invoking Oracle Directory Services Manager."
- 2. From the task selection bar, select Security.
- 3. Expand Password Policy in the left pane. All of the password policies appear in the left pane.
- 4. To create a new policy, select Create. Alternatively, select an existing password policy in the left pant and select Create Like.
- 5. In the General tab page, set or modify the editable attribute fields as needed.
- 6. Select the Account Lockout tab page and, to modify the fields, select Global Lockout. Modify the editable attribute fields as needed.
- 7. Select the IP Lockout tab page and, to modify the fields, select IP Lockout. Modify the editable attribute fields as needed.
- 8. Select the Password Syntax tab page and, to modify the fields, select Check Password Syntax. Modify the editable attribute fields as needed.
- 9. To assign the password policy to a subtree, select the Effective Subtree tab page, then select Add. Either enter the DN, or s...
- 10. When you are finished, choose Apply.
- 28.2.1 Viewing Password Policies by Using Oracle Directory Services Manager
- 28.3 Managing Password Policies by Using Command-Line Tools
- 28.3.1 Viewing Password Policies by Using Command-Line Tools
- 28.3.2 Creating a New Password Policy by Using Command-Line Tools
- 1. Dump the contents of the default entry, cn=default,cn=pwdPolicies,cn=Common,cn=Products, cn=OracleContext, to an LDIF file, using ldapmodify. For example:
- 2. Modify the LDIF file so that it has the common name and desired values for the new policy. For example, you might change cn=default to cn=policy1 and change pwdMaxFailure from 10 to 5.
- 3. Add the new entry by using ldapadd. You would use a command line of the form:
- 28.3.3 Applying a Password Policy to a Subtree by Using Command-Line Tools
- 28.3.4 Setting Password Policies by Using Command-Line Tools
- 29.1 Introduction to Managing Directory Access Control
- 29.1.1 Access Control Management Constructs
- 29.1.1.1 Access Control Policy Points (ACPs)
- 29.1.1.2 The orclACI Attribute for Prescriptive Access Control
- 29.1.1.3 The orclEntryLevelACI Attribute for Entry-Level Access Control
- 29.1.1.4 Security Groups
- 29.1.1.4.1 ACP groups
- 29.1.1.4.2 Privilege Groups
- 29.1.1.4.3 Users in Both Types of Groups
- 29.1.1.4.4 Constraints on Security Groups
- 29.1.1.4.5 Overview: Granting Access Rights to a Group
- 29.1.1.4.6 How the Directory Server Computes Security Group Membership
- 29.1.1.4.7 Example: Computing Security Group Membership
- 29.1.2 Access Control Information Components
- 29.1.3 Access Level Requirements for LDAP Operations
- 29.1.4 How ACL Evaluation Works
- Table 29-4 Attribute States During ACL Evaluation
- 29.1.4.1 Precedence Rules Used in ACL Evaluation
- 29.1.4.2 Use of More Than One ACI for the Same Object
- 29.1.4.3 Exclusionary Access to Directory Objects
- 29.1.4.4 ACL Evaluation For Groups
- 29.1.1 Access Control Management Constructs
- 29.2 Managing Access Control by Using Oracle Directory Services Manager
- 29.2.1 Viewing an ACP by Using Oracle Directory Services Manager
- 1. Invoke Oracle Directory Services Manager and connect to the Oracle Internet Directory server as described in Section 7.4.5, "Invoking Oracle Directory Services Manager."
- 2. From the task selection bar, select Security.
- 3. Click Access Control in the left pane. All of the defined access control points (ACPs) appear in the left pane, listed by relative DN. Mouse over an entry to see the full DN.
- 4. Select an ACP to display its information in the right pane.
- 5. The Subtree Access Items section of the page shows the access controls on this ACP for entry level operations, that is, for operations on the entry itself.
- 29.2.2 Adding an ACP by Using Oracle Directory Services Manager
- 29.2.2.1 Task 1: Specify the Entry That Will Be the ACP
- 1. Invoke Oracle Directory Services Manager and connect to the Oracle Internet Directory server as described in Section 7.4.5, "Invoking Oracle Directory Services Manager."
- 2. From the task selection bar, select Security.
- 3. Click Access Control in the left pane. All of the defined ACPs appear in the left pane.
- 4. In the left pane, click the Create Access Control Policy Point icon. The New Access Control Point screen appears.
- 5. Enter the path to the entry you want to create, or click Browse, select a DN, and click OK.
- 6. Alternatively, to create an ACP that is similar to an existing ACP, select the existing ACP in the list under Access Control Management in the left pane and click the Create Like icon. The New Access Control Point: Create Like screen appears.
- 29.2.2.2 Task 2: Configure Structural Access Items
- 1. To define a new structural access item, that is, an ACI that pertains to an entry, choose the Create new access item icon in ...
- 2. If you want all entries below the ACP to be governed by the ACP, then you do not need to enter anything on the Entry Filter tab page; simply proceed to the next step. Otherwise, perform this step.
- a. From the list at the left end of the search criteria bar, select an attribute of the entry for which you want to search. Beca...
- b. From the list in the middle of the search criteria bar, select a filter.
- c. In the text box at the right end of the search criteria bar, type the value for the attribute you just selected. For example, if the attribute you selected was cn, you could type the particular common name you want to find.
- d. Click + to add this search criterion to the LDAP Query field.
- e. To further refine your search, use the list of conjunctions (AND, OR, NOT AND, and NOT OR) and the lists and text fields on t...
- 3. Select the Added Object Filter tab page.
- 4. Select the By Whom tab page.
- 5. Select the Access Rights tab page.
- 6. Click OK. The structural access item you just created appears in the list.
- 29.2.2.3 Task 3: Configure Content Access Items
- 1. To define content access items, that is, ACIs that pertain to attributes, choose the Create new access item icon in the Conte...
- 2. If you want all entries below the ACP to be governed by the ACP, then you do not need to enter anything on Entry Filter tab page; simply proceed to the next step. Otherwise, perform this step.
- a. From the list at the left end of the search criteria bar, select an attribute of the entry for which you want to search. Beca...
- b. From the list in the middle of the search criteria bar, select a filter.
- c. In the text box at the right end of the search criteria bar, type the value for the attribute you just selected. For example, if the attribute you selected was cn, you could type the particular common name you want to find.
- d. Click + to add this search criterion to the LDAP Query field.
- e. To further refine your search, use the list of conjunctions (AND, OR, NOT AND, and NOT OR) and the lists and text fields on t...
- 3. Select the By Whom tab page.
- a. In the By Whom field, specify the entity or entities to whom you are granting access.
- b. From the Authentication Choice list under Bind Mode, select the type of authentication to be used by the subject (that is, the entity that seeks access).
- c. Specify the entity or entities to whom you are granting access.
- 4. Select the Attribute tab page.
- 5. Select the Access Rights tab page.
- 6. Click OK. The content access item you just created appears in the list.
- 29.2.2.4 Delete a Structural or Content Access Item
- 29.2.2.1 Task 1: Specify the Entry That Will Be the ACP
- 29.2.3 Modifying an ACP by Using Access Control Management in ODSM
- 1. Invoke Oracle Directory Services Manager and connect to the Oracle Internet Directory server as described in Section 7.4.5, "Invoking Oracle Directory Services Manager."
- 2. From the task selection bar, select Security.
- 3. Click Access Control in the left pane. All of the defined ACPs appear in the left pane.
- 4. In the left pane, select an ACP in the list. A tab page for that ACP appears in the right pane.
- 5. To define a new structural access item, that is, an ACI that pertains to an entry, choose the Create icon in the Structural Access Items section of the entry tab page. The Structural Access Item dialog box appears.
- 6. To modify an existing structural access item, select the item and click Edit. The Structural Access Item dialog box appears. ...
- 7. To define a new content access item, that is, an ACI that pertains to attributes, choose the Create icon in the Content Access Items section of the entry tab page. The Content Access Item dialog box appears.
- 8. To modify an existing content access item, select the item and click Edit. The Content Access Item dialog box appears. It has...
- 9. To delete a structural or content access item, select the item and click the Delete icon.
- 10. Click Apply to effect the changes.
- 29.2.4 Adding or Modifying an ACP by Using the Data Browser in ODSM
- 1. Invoke Oracle Directory Services Manager as described in Section 7.4.5, "Invoking Oracle Directory Services Manager."
- 2. From the task selection bar, choose Data Browser.
- 3. Navigate to the entry you want to set access to.
- 4. In the navigator pane, select the entry to display its properties in the right pane
- 5. Select the Subtree Access tab page, then create and edit local ACIs in the Structural Access Item and Content Access Item tabs as described inSection 29.2.3, "Modifying an ACP by Using Access Control Management in ODSM."
- 6. After you have made the changes, click Apply.
- 29.2.5 Setting or Modifying Entry-Level Access by Using the Data Browser in ODSM
- 1. Invoke Oracle Directory Services Manager as described in Section 7.4.5, "Invoking Oracle Directory Services Manager."
- 2. From the task selection bar, choose Data Browser.
- 3. Navigate to the entry you want to set access to.
- 4. In the navigator pane, select the entry to display its properties in the right pane
- 5. Select the Local Access tab page, then create and edit local ACIs in the Structural Access Item and Content Access Item tabs as described in Section 29.2.3, "Modifying an ACP by Using Access Control Management in ODSM."
- 6. After you have made the changes, click Apply.
- 29.2.1 Viewing an ACP by Using Oracle Directory Services Manager
- 29.3 Managing Access Control by Using Command-Line Tools
- 29.3.1 Restricting the Kind of Entry a User Can Add
- 29.3.2 Setting Up an Inheritable ACP by Using ldapmodify
- 29.3.3 Setting Up Entry-Level ACIs by Using ldapmodify
- 29.3.4 Using Wildcards in an LDIF File with ldapmodify
- 29.3.5 Selecting Entries by DN
- 29.3.6 Using Attribute and Subject Selectors
- 29.3.7 Granting Read-Only Access
- 29.3.8 Granting Selfwrite Access to Group Entries
- 29.3.9 Defining a Completely Autonomous Policy to Inhibit Overriding Policies
- 30.1 Introduction to Password Verifiers for Authenticating to the Directory
- 30.2 Managing Hashing Schemes for Password Verifiers for Authenticating to the Directory
- 30.3 Introduction to Password Verifiers for Authenticating to Components
- 30.3.1 About Password Verifiers for Authenticating to Oracle Components
- 30.3.2 Attributes for Storing Password Verifiers for Authenticating to Oracle Components
- 30.3.3 Default Verifiers for Oracle Components
- 30.3.4 How Password Verification Works for an Oracle Component
- Figure 30-3 How Password Verification Works
- 1. The user tries to log in to an application by entering a user name and a clear text password.
- 2. The application sends the clear text password to the directory server. If the application stores password verifiers in the di...
- 3. The directory server:
- a. Generates a password verifier by using the hashing algorithm specified for the particular application
- b. Compares this password verifier with the corresponding password verifiers in the directory. For the compare operation to be successful, the application must provide its appID as the subtype of the verifier attribute. For example:
- c. Notifies the application of the results of the compare operation.
- 4. Depending on the message from the directory server, the application either authenticates the user or not.
- 1. Hashes the clear text password entered by the user
- 2. Retrieves from the directory the hashed value of the clear text password as entered by the user
- 3. Initiates a challenge to the user to which the client responds. If the response is correct, then the application authenticates the user.
- Figure 30-3 How Password Verification Works
- 30.4 Managing Password Verifier Profiles for Oracle Components by Using ODSM
- 1. Invoke Oracle Directory Services Manager and connect to the Oracle Internet Directory server as described in Section 7.4.5, "Invoking Oracle Directory Services Manager."
- 2. From the task selection bar, select Security.
- 3. Expand Password Verifier in the left pane. All of the password verifiers appear in the left pane.
- 4. Select the password verifier you want to view. The right pane displays the Password Verifier Profile tab page.
- 5. You can modify the hashing algorithm used to generate a password verifier. In the Password Verifier Profile dialog box, specify the hashing algorithm in the Oracle Password Parameters field. The syntax is:
- 30.5 Managing Password Verifier Profiles for Components by Using Command-Line Tools
- 30.6 Introduction to Generating Verifiers by Using Dynamic Parameters
- 30.7 Configuring Oracle Internet Directory to Generate Dynamic Password Verifiers
- 31.1 Introduction to Delegating Privileges for Oracle Identity Management
- 31.2 Delegating Privileges for User and Group Management
- 31.2.1 How Privileges Are Granted for Managing User and Group Data
- 31.2.2 Default Privileges for Managing User Data
- 31.2.3 Default Privileges for Managing Group Data
- 31.3 Delegating Privileges for Deployment of Oracle Components
- 31.4 Delegating Privileges for Component Run Time
- 31.4.1 Default Privileges for Reading and Modifying User Passwords
- 31.4.2 Default Privileges for Comparing User Passwords
- 31.4.3 Default Privileges for Comparing Password Verifiers
- 31.4.4 Default Privileges for Proxying on Behalf of End Users
- 31.4.5 Default Privileges for Managing the Oracle Context
- 31.4.6 Default Privileges for Reading Common User Attributes
- 31.4.7 Default Privileges for Reading Common Group Attributes
- 31.4.8 Default Privileges for Reading the Service Registry
- 31.4.9 Default Privileges for Administering the Service Registry
- 32.1 Introduction to Authentication
- 32.1.1 Direct Authentication
- 32.1.2 Indirect Authentication
- Figure 32-1 Indirect Authentication
- 1. The end user sends to the application or middle tier a request containing a query to Oracle Internet Directory. The application or middle tier authenticates the end user.
- 2. The application or middle tier binds to the directory.
- 3. The application or middle tier performs a second bind, this time using the DN of the end user. It does not enter the end user's password.
- 4. The directory server recognizes this second bind as an attempt by the application or middle tier to switch to the end user's ...
- Figure 32-1 Indirect Authentication
- 32.1.3 External Authentication
- 32.1.4 Simple Authentication and Security Layer (SASL)
- How a SASL-Enabled Client Authenticates to a Directory Server by Using Digest-MD5
- 1. The directory server sends to the LDAP client a digest-challenge that includes various Digest-MD5 authentication options that it supports and a special token.
- 2. The client selects an authentication option, then sends a digest-response to the server indicating the option it has selected...
- 3. The directory server then decrypts and verifies the client credential from the response.
- How a SASL-Enabled Client Authenticates to a Directory Server by Using External Authentication
- How a SASL-Enabled Client Authenticates to a Directory Server by Using Digest-MD5
- 32.2 Configuring Certificate Authentication Method by Using Fusion Middleware Control
- 32.3 Configuring SASL Authentication by Using Fusion Middleware Control
- 1. Select Administration, then Server Properties from the Oracle Internet Directory menu, then select SASL.
- 2. Select the desired types for MD5 SASL Authentication Mode.
- 3. If you select Authentication with Integrity and Privacy Protection, you are presented with choices for SASL Cipher Choice for...
- 4. If desired, select Enable SASL Authentication. Before enabling SASL Authentication, ensure that Oracle Internet Directory is configured to perform mutual authentication. See Section 26.2, "Configuring SSL by Using Fusion Middleware Control."
- 5. Choose Apply.
- 32.4 Configuring Certificate Authentication Method by Using Command-Line Tools
- 32.5 Configuring SASL Authentication by Using the Command Line
- 32.6 Introduction to Anonymous Binds
- 32.7 Managing Anonymous Binds
- 32.7.1 Managing Anonymous Binds by Using Fusion Middleware Control
- 1. Select Administration, then Server Properties from the Oracle Internet Directory menu, then select the General. tab.
- 2. From the Anonymous Binds list, select Allows to enable anonymous binds. Select Disallow except for Read Access on the root DSE to allow only search operations on root DSE entry for anonymous users.
- 1. Select Administration, then Server Properties from the Oracle Internet Directory menu, then select the General. tab.
- 2. From the Anonymous Binds list, select Disallow.
- 32.7.2 Managing Anonymous Binds by Using the Command Line
- 32.7.1 Managing Anonymous Binds by Using Fusion Middleware Control
- 33.1 Introduction to Planning, Deploying and Managing Realms
- 33.1.1 Planning the Identity Management Realm
- 33.1.2 Identity Management Realms in an Enterprise Deployment
- 33.1.3 Identity Management Realms in a Hosted Deployment
- 33.1.4 Identity Management Realm Implementation in Oracle Internet Directory
- 33.1.5 Default Directory Information Tree and the Identity Management Realm
- 33.2 Customizing the Default Identity Management Realm
- Table 33-2 Customizing the Default Identity Management Realm
- Use Case 1:
- Use Case 2:
- Use Case 3:
- Use Case 4:
- Use Case 5:
- 33.2.1 Steps to Update the Existing User and Group Search Base
- 1. Back up the Oracle Internet Directory database.
- 2. Create the user and group containers for the third party directory, using Oracle Directory Services Manager, if the entries do not already exist in the directory.
- 3. Apply appropriate ACLs on the new users container by doing the following:
- 4. Apply appropriate ACLs on the new groups container by doing the following:
- 5. Determine a Lowest Common User Search Base base that is just high enough to include the existing users and the third party users.
- 6. If you must also synchronize groups, determine a group search base that is just high enough to include the existing groups and the third party groups. Lets call this search base the Lowest Common Group Search Base.
- 7. log in to the Self-Service Console as the administrator of the realm (usually orcladmin).
- 8. Go to the Configuration tab and set the user search base to the Lowest Common User Search Base you determined in step 5. If y...
- 9. To make Oracle Single Sign-On recognize these changes, follow the procedure described under Section 33.2.3, "Refresh Oracle Single Sign-On."
- 10. Verify the Oracle Single Sign-On login of users in the original user search base by logging in as orcladmin.
- 11. You must also reconfigure the applications that have been provisioned to reflect the modified user and group bases. Follow the steps described under Section 33.2.4, "Reconfigure Provisioning Profiles."
- Use Case 6:
- 33.2.2 Set up an Additional Search Base
- 1. Back up the Oracle Internet Directory database.
- 2. Create the user and group containers for the third party directory, using Oracle Directory Services Manager, if the entries do not already exist in the directory.
- 3. Apply appropriate ACLs on the new users container by doing the following:
- 4. Apply appropriate ACLs on the new groups container by doing the following:
- 5. log in to the Self-Service Console as the administrator of the realm.
- 6. Go the Configuration tab.
- 7. To make Oracle Single Sign-On recognize these changes, follow the procedure described under Section 33.2.3, "Refresh Oracle Single Sign-On."
- 8. Verify the Oracle Single Sign-On login of users in the original user search base by logging in as orcladmin.
- 9. If mid-tiers have been configured against this identity management configuration, then you must also reconfigure the applicat...
- 33.2.3 Refresh Oracle Single Sign-On
- 33.2.4 Reconfigure Provisioning Profiles
- 33.3 Creating Additional Identity Management Realms for Hosted Deployments
- 35.1 Introduction to Managing Garbage Collection
- 35.1.1 Components of the Oracle Internet Directory Garbage Collection Framework
- 35.1.2 How Oracle Internet Directory Garbage Collection Works
- Figure 35-1 Example: Garbage Collection of Change Log Entries
- 1. An LDAP client sends to the directory server a request for a particular garbage collection operation. The operation could be, for example, to purge the entries of tombstone or, change logs.
- 2. The directory server passes the request to the garbage collection plug-in.
- 3. The garbage collection plug-in sends the request to the garbage collection engine in the Oracle Internet Directory-designated database.
- 4. The garbage collection engine triggers the corresponding background database process-in this case, the change log garbage collector. The background database process runs according to the parameters specified in its configuration.
- Figure 35-1 Example: Garbage Collection of Change Log Entries
- 35.1.3 Garbage Collector Entries and the Oracle Internet Directory Statistics Collector Entry
- 35.1.4 Change Log Purging
- 35.2 Set Oracle Database Time Zone for Garbage Collection
- 1. Invoke PL/SQL:
- 2. Perform a query to get the value of dbtimezone:
- 3. Perform a query to get the displacement from Coordinated Universal Time (UTC):
- 4. If the dbtimezone parameter is equal to last column value of the systimestamp output, you do not need to perform the remaining steps. Otherwise, proceed to Step 5.
- 5. Stop all instances of Oracle Internet Directory that are using the Oracle Database, as described in Chapter 8, "Managing Oracle Internet Directory Instances."
- 6. Set the dbtimezone parameter, using the value you got from the last column the systimestamp query:
- 7. Shut down the Oracle Database:
- 8. Restart the Oracle Database:
- 9. Restart Oracle Internet Directory as described in Chapter 8, "Managing Oracle Internet Directory Instances."
- 35.3 Modifying Oracle Internet Directory Garbage Collectors
- 35.3.1 Modifying a Garbage Collector by Using Oracle Directory Services Manager
- 1. Invoke Oracle Directory Services Manager and connect to the Oracle Internet Directory server as described in Section 7.4.5, "Invoking Oracle Directory Services Manager."
- 2. From the task selection bar, select Advanced.
- 3. Expand Garbage Collection in the left pane, then select the garbage collector you want to modify. The Garbage Collector Window appears in the right pane.
- 4. In the Garbage Collector window, enter the changes you want to make for this garbage collector.
- 5. Choose Apply.
- 35.3.2 Modifying a Garbage Collector by Using Command-Line Tools
- 35.3.3 Modifying the Oracle Internet Directory Statistics Collector
- 35.3.1 Modifying a Garbage Collector by Using Oracle Directory Services Manager
- 35.4 Managing Logging for Oracle Internet Directory Garbage Collectors
- 35.4.1 Enabling Logging for Oracle Internet Directory Garbage Collectors
- 1. Set the orclpurgedebug attribute to 1if needed. When orclpurgedebug is set to 1, extra debugging detail information is logged. This is useful for troubleshooting garbage collection problems.
- 2. Set the orclpurgefilename attribute to a valid file name for the log file, for example: oidgc001.log.
- 3. Set the orclpurgefileloc attribute to the path name of the directory in which the log file is located, for example: /private/qzhou/oracle/ldap/log.
- 4. Enable PL/SQL I/O access to the directory specified in step 3. To do this, include the following in the database:
- 5. Shut down the replication server, then the Oracle Internet Directory server.
- 6. Restart the database.
- 7. Start the Oracle Internet Directory server, then the replication server.
- 35.4.2 Disabling Logging for Oracle Internet Directory Garbage Collectors
- 35.4.3 Monitoring Garbage Collection Logging
- 35.4.1 Enabling Logging for Oracle Internet Directory Garbage Collectors
- 35.5 Configuring Time-Based Change Log Purging
- 36.1 Introduction to Migrating Data from Other Data Repositories
- 36.2 Migrating Data from LDAP-Compliant Directories
- Table 36-1 Features of bulkload and syncProfileBootstrap
- 36.2.1 Migrating LDAP Data by Using an LDIF File and bulkload
- Figure 36-1 Using an LDIF File and bulkload
- Task 1: Export Data from the Non-Oracle Internet Directory Server into LDIF File Format
- Task 2: Analyze the LDIF User Data for Any Required Schema Additions Referenced in the LDIF Data
- Task 3: Extend the Schema in Oracle Internet Directory
- Task 4: Remove Any Proprietary Directory Data from the LDIF File
- Task 5: Remove Operational Attributes from the LDIF File
- Task 6: Remove Incompatible userPassword Attribute Values from the LDIF File
- Task 7: Run the bulkload check =TRUE" Mode and Determine Any Remaining Schema Violations or Duplication Errors
- 36.2.2 Migrating LDAP Data by Using syncProfileBootstrap Directly
- 36.2.3 Migrating LDAP Data by Using an LDIF File and syncProfileBootstrap
- 36.2.4 Migrating LDAP Data by Using syncProfileBootstrap, bulkload, and LDIF Files
- 36.2.5 Migrating LDAP Data by Using the Oracle Directory Integration Platform Server
- 36.3 Migrating User Data from Application-Specific Repositories
- 36.3.1 The Intermediate Template File
- 1. Exporting the application-specific data as an intermediate template file
- 2. You, the directory administrator, using the OID Migration Tool (ldifmigrator) to read these partial LDIF entries and convert them to pure LDIF entries based on the deployment choices
- 3. You, the directory administrator, loading the data, now in pure LDIF, into Oracle Internet Directory
- 4. The application completing the migration process according to its own specifications
- 36.3.2 Reconciling Data in Application Repository with Data Already in the Directory
- 36.3.3 Tasks For Migrating Data from Application-Specific Repositories
- 36.3.1 The Intermediate Template File
- 37.1 Introduction to Configuring Server Chaining
- 37.2 Configuring Server Chaining
- 37.2.1 Configuring Server Chaining by Using Oracle Directory Services Manager
- 1. Invoke Oracle Directory Services Manager and connect to the Oracle Internet Directory server as described in Section 7.4.5, "Invoking Oracle Directory Services Manager."
- 2. From the task selection bar, select Advanced.
- 3. Expand Server Chaining. Server Chaining entries appear in the left panel. Current entries include iPlanet (Oracle Directory Server Enterprise Edition and Sun Java System Directory Server) and Active Directory.
- 4. To modify a server chaining configuration entry, select it. The Server Chaining Management tab appears in the right pane.
- 5. Modify External Host Name, External Port Number, Login User DN, and Login User Password as necessary.
- 6. To enable server chaining authentication, modification, or search, select the corresponding checkbox.
- 7. Modify the other fields as necessary.
- 8. After modifying an external user container, group container, or login credential, verify the value by clicking Verify User Container, Verify Group Container, or Verify Login Credential, respectively.
- 9. If you want to add an attribute mapping, click the Add attribute mappings to list icon under Attribute Mapping. To edit an ex...
- 10. Click OK to create the mapping or click Cancel to abandon it.
- 11. To delete a mapping, select the mapping and click the Delete selected attribute mapping icon. When the Delete Confirm dialog appears, click Delete to delete the mapping or Cancel to abandon deletion.
- 12. Click OK to enable the configuration changes or click Cancel to abandon the changes.
- 37.2.2 Configuring Server Chaining from the Command Line
- 1. Create an LDIF file to manually add the user and group containers. To determine the DNs for these containers, see Section 37....
- 2. Use ldapadd and the LDIF file you just created to add the entries.
- 3. Create another LDIF file to modify and enable the server chaining configuration entries. For example LDIF files, see Section ...
- 4. Modify the server chaining configuration entries using the ldapmodify command and the LDIF file you just created. Use a command line of the form:
- 37.2.1 Configuring Server Chaining by Using Oracle Directory Services Manager
- 37.3 Creating Server Chaining Configuration Entries
- 37.3.1 Configuration Entry Attributes
- 37.3.2 Requirements for User and Group Containers
- 37.3.3 Attribute Mapping
- 37.3.4 Active Directory Example
- 37.3.5 Active Directory with SSL Example
- 1. Configure Active Directory server chaining without SSL, as described in the previous section.
- 2. Create an LDIF file like the following to enable SSL connection to the external directory. Replace the values of orcloidscextsslport, orcloidscwalletlocation and orcloidscwalletpassword with values that match the actual Active Directory server:
- 3. To apply the changes, use a command line such as
- 37.3.6 Active Directory with New Attributes Example
- 37.3.7 Oracle Directory Server Enterprise Edition and Sun Java System Directory Server (iPlanet) Example
- 37.3.8 Oracle Directory Server Enterprise Edition and Sun Java System Directory Server (iPlanet) with SSL Example
- 37.3.9 eDirectory Example
- 37.3.10 eDirectory with SSL Example
- 37.4 Debugging Server Chaining
- 1. Set the Oracle Internet Directory server debug logging level, as described in Section 23.2, "Managing Logging by Using Fusion...
- 2. Modify the Oracle Internet Directory server chaining debugging settings. For both cn=oidscad,cn=oid server chaining,cn=subconfigsubentry and cn=oidsciplanet,cn=oid server chaining, cn=subconfigsubentry. set the attribute orcloidscDebugEnabled to 1.
- 37.5 Configuring an Active Directory Plug-in for Password Change Notification
- 1. In Active Directory, create an attribute called orclCommonAttribute to store the hash password. Use a command line such as:
- 2. Associate the attribute with the user objectclass. Use a command line such as:
- 3. Install the password change notification plug-in, as follows:
- a. Copy %ORACLE_HOME%\ldap\admin\oidpwdcn.dll to the Active Directory WINDOWS\system32 folder.
- b. Use regedt32 to modify the registry. In the line:HKEY_LOCAL_ MACHINE\SYSTEM\CurrentControlSet\Control\Lsa\Notification Packages, add oidpwdcn to the end. It should look like the following:
- c. Restart Active Directory.
- d. Verify that the plug-in is installed properly by resetting the password of a user. The orclCommonAttribute should contain the hash password value.
- 4. Reset the password for all the Active Directory users so that the password verifier is present for all the users.
- 38 Managing DIT Masking
- 38.1 Configuring Masking
- 38.2 Masking Examples
- 39.1 Introduction to Setting Up Replication
- 39.1.1 Replication Transport Mechanisms
- 39.1.2 Replication Setup Methods
- 39.1.3 Bootstrap Rules
- 39.1.4 The Replication Agreement
- 39.1.5 Other Replication Configuration Attributes
- 39.1.6 Replication Process and Architecture
- 39.1.7 Rules for Configuring LDAP-Based Replication
- 1. If you have multiple Oracle Internet Directory instances that use the same Oracle Database, only one of the instances can be set up for replication.
- 2. LDAP Multimaster replication is not backward compatible. It is only supported between replicas that are running 11g Release 1 (11.1.1).
- 3. For either multimaster replication or two-way fan-out replication, all nodes must be running the same release of Oracle Internet Directory. Therefore, you must turn off replication while performing rolling upgrades.
- 4. You can add a one-way fan-out replica that is running a newer release than its supplier. For example, in Figure 6-5, "Example of Fan-Out Replication", Node F can be running a newer release than the other nodes.
- 5. In general, do not replicate changes generated on a newer version of Oracle Internet Directory to a node that has not yet upgraded to that version. If you do, the changes can contain information that the earlier version cannot properly interpret.
- 6. More specifically, if you add a new Oracle Internet Directory 11g Release 1 (11.1.1.6) node to an existing DRG as a one-way f...
- 7. In LDAP-based replication, only the naming contexts listed in the namingcontexts attribute of the root DSE can be replicated to the consumer.
- 8. The supplier of an LDAP-based replica can be a master node that is not a member of any replication group, a member of a multimaster replication group, or another LDAP-based replica.
- 9. An LDAP-based replica can be a consumer for another LDAP-based replica. That consumer is then called a fan-out replica.
- 10. The new consumer node must be empty. That is, Oracle Internet Directory must be newly installed.
- 39.1.8 Replication Security
- 39.1.9 LDAP Replication Filtering for Partial Replication
- 39.1.9.1 Included and Excluded Naming Contexts in LDAP Replication Filtering
- 39.1.9.2 Attributes that Control Naming Contexts
- 39.1.9.3 Rules for LDAP Replication Filtering
- 1. The overall included naming context is the union of all included naming contexts defined in each naming context object.
- 2. The overall excluded naming contexts is the union of all excluded naming contexts defined in each naming context object.
- 3. The attribute exclusions in a naming context object are specific only to that naming context object.
- 4. If there is a conflict between an included naming context and an excluded naming context, the excluded naming context overrul...
- 5. If you configure partial replication between two different versions of Oracle Internet Directory (for example 10g (10.1.4.0.1...
- 39.1.9.4 Examples of LDAP Replication Filtering
- Figure 39-1 A Sample Naming Context
- Scenario A: The Included Naming Context in One Naming Context Object Is a Subtree of the Included Naming Context in Another Naming Context Object
- Scenario B: The Included Naming Context in One Naming Context Object Is a Subtree of An Excluded Naming Context in Another Naming Context Object
- 39.1.9.5 Rules for Managing Naming Contexts and Attributes
- 39.1.9.6 Optimization of Partial Replication Naming Context for Better Performance
- 39.2 Converting an Advanced Replication-Based Agreement to an LDAP-Based Agreement
- 39.3 Setting Up an LDAP-Based Replication Agreement by Using the Replication Wizard
- 1. From the Oracle Internet Directory menu on the home page, select Administration, then Replication Management.
- 2. You are prompted to log into the replication DN account. Provide the host, port, replication DN, and replication DN password....
- 3. Click the Create icon.
- 4. On the Type screen, select the replication type: One Way Replication, Two Way Replication, or Multimaster Replication.
- 5. Click Next. The Replicas screen displays the replication type you selected.
- 6. Provide an agreement name. This must be unique across all the nodes.
- 7. For one way or two way replication, enter the host, port, user name (replication DN), and replication password for the consumer node. Fields for the supplier node are populated and greyed out.
- 8. Click Next to go the Settings page.
- 9. In the LDAP Connection field, select Keep Alive if you want the replication server to use same connection for performing mult...
- 10. Enter the Replication Frequency.
- 11. Enter the Human Intervention Queue Schedule. This is the interval, in seconds, at which the directory replication server repeats the change application process.
- 12. If you have specified Two Way Replication or Multimaster Replication as the agreement type, the settings page contains a sec...
- 13. Click Next to go to the Scope page. The default primary naming context is filled in.
- 14. To exclude a secondary naming context within the default primary naming context, select the primary naming context and click the Create button. Then proceed to Step 16.
- 15. To create another primary naming context, click the Create Primary Naming Context button. This invokes the Primary Naming Context dialog.
- 16. To exclude a secondary naming context, click the Add icon below the Excluded Secondary Naming Contexts field. This invokes t...
- 17. To exclude an attribute, click the Add icon below the ExcludedAttributes field. This invokes the Select Excluded Attributes screen. Select the attributes you want to exclude and click OK. The attribute now appears in the Excluded Attributes field.
- 18. Click OK. The primary naming context is now listed on the Scope page.
- 19. Click Next. The Summary page displays a summary of the replication agreement you are about to create.
- 20. Click Finish to create the replication agreement.
- 39.4 Testing Replication by Using Oracle Directory Services Manager
- 1. Invoke Oracle Directory Services Manager and connect to the Oracle Internet Directory server as described in Section 7.4.5, "Invoking Oracle Directory Services Manager."
- 2. From the task selection bar, select Data Browser.
- 3. Create a single entry on the MDS node, as described in Section 13.2.6, "Adding a New Entry by Using Oracle Directory Services Manager."
- 39.5 Setting Up an LDAP-Based Replication by Using the Command Line
- 39.5.1 Copying Your LDAP Data by Using ldifwrite and bulkload
- 39.5.2 Setting Up an LDAP-Based Replica with Customized Settings
- Table 39-1 Data Migration Using ldifwrite/bulkload versus Automatic Bootstrapping
- 39.5.2.1 Setting Up an LDAP-Based Replica by Using Automatic Bootstrapping
- 39.5.2.1.1 Task 1: Identify and Start the Directory Server on the Supplier Node
- 39.5.2.1.2 Task 2: Create the New Consumer Node by Installing Oracle Internet Directory
- 39.5.2.1.3 Task 3: Back Up the Metadata from the New Consumer Node
- 39.5.2.1.4 Task 4: Add an LDAP-Based Replica by Using the Replication Environment Management Tool
- 1. Determine the replica ID of the supplier and consumer replica nodes by executing the following search command on both nodes:
- 2. Determine the replication agreement entry, which is of the form:
- 3. For each naming context that you plan to include in replication, add an entry like the following on both the consumer and sup...
- 4. Repeat Step3 for each naming context (subtree) to be configured in partial replication.
- 39.5.2.1.5 Task 5: On the Consumer, Configure the Consumer Replica for Automatic Bootstrapping
- 39.5.2.1.6 Task 6: Optional: Change Default Replication Parameters
- 39.5.2.1.7 Task 7: Ensure the Directory Replication Servers are Started
- 39.5.2.1.8 Task 8: If Oracle Delegated Administration Services or Oracle Single Sign-On Are Installed on the New Node, Restore Their Entries in the New Node's Directory
- 1. In the ocbkup.new_replicaid.TO.master_ replicaid.timestamp.ldif file created by Task 3, locate and copy the DAS URL. The DN o...
- 2. Create an LDIF file called change_das_url.ldif with the following contents:
- 3. Execute the following command to change the DAS URL:
- 1. In the ocbkup.timestamp.dat file created by Task 3, locate and copy the SSO container entry. Copy only the attributes shown i...
- 2. Create an LDIF file add_SSO_container.ldif with the following contents:
- 3. Execute the following command to add the SSO container entry:
- 4. Create an LDIF file mod.ldif with the following contents:
- 5. Execute the following command to apply mod.ldif:
- 6. Using a browser, test the Oracle Delegated Administration Services and Oracle Single Sign-On pages.
- 39.5.2.2 Setting Up an LDAP-Based Replica by Using the ldifwrite Tool
- 39.5.2.2.1 Task 1: Start the Directory Server on Both the Supplier and the Consumer Nodes
- 39.5.2.2.2 Task 2: Back Up the Metadata from the New Consumer Node
- 39.5.2.2.3 Task 3: Change the Directory Server at the Supplier to Read-Only Mode
- 39.5.2.2.4 Task 4: Add an LDAP-Based Replica by Using the Replication Environment Management Tool
- 39.5.2.2.5 Task 5: Back Up the Naming Contexts to Be Replicated
- 1. Identify the replication agreement DN created in "Task 4: Add an LDAP-Based Replica by Using the Replication Environment Management Tool".
- 2. On the supplier, ensure that ORACLE_INSTANCE is set, the use the following command to get the data from the supplier. Data loaded into the file will be based on the agreement configured:
- 39.5.2.2.6 Task 6: Change the Directory Server at the Supplier to Read/Write Mode
- 39.5.2.2.7 Task 7: Load the Data on the New Consumer
- 39.5.2.2.8 Task 8: If Oracle Delegated Administration Services or Oracle Single Sign-On Are Installed on the New Node, Restore Their Entries in the New Node's Directory
- 39.5.2.2.9 Task 9: Optional: Change Default Replication Parameters
- 39.5.2.2.10 Task 10: Ensure the Directory Replication Servers are Started
- 39.5.3 Password Policy and Fan-out Replication
- 39.5.4 Deleting an LDAP-Based Replica
- 39.6 Setting Up a Multimaster Replication Group with Fan-Out
- Table 39-3 Nodes in Example of Partial Replication Deployment
- Figure 39-11 Example of Fan-Out Replication
- Task 1: Set up the Multimaster Replication Group for Node1 and Node2
- Task 2: Configure the Replication Agreement
- Task 3: Start the Replication Servers on Node1 and Node2
- Task 4: Test the Directory Replication Between Node1 and Node2.
- Task 5: Install and Configure Node3 as a Partial Replica of Node2
- Task 6: Customize the Partial Replication Agreement
- Task 7: Start the Replication Servers on All Nodes in the DRG
- Task 8: Install and Configure Node4 as a Full Replica of Node2
- Task 9: Test the Replication from Node2 to Node4
- Task 10: Install and Configure Node5 as a Two-Way Replica of Node1
- Task 11: Test the Two-Way Replication Between Node1 and Node5
- 40.1 Introduction to Replication Failover
- Figure 40-1 Replication Failover Scenario
- Figure 40-2 Consumer and New Supplier Connected to Old Supplier by LDAP
- Figure 40-3 Old and New Suppliers in the Same Advanced Replication Group
- 40.1.1 Limitations and Warnings for Replication Failover
- 40.1.2 Determining Which Type of Replication Failover to Use
- 40.2 Performing a Stateless Replication Failover
- 40.2.1 Task 1: Stop all Directory Replication Server on related Nodes
- 40.2.2 Task 2: Break Old Replication Agreement and Set up New Agreement
- 40.2.3 Task 3: Save Last Change Number
- 40.2.4 Task 4: Compare and Reconcile New Supplier and Consumer
- 40.2.5 Task 5: Update Last Applied Change Number of New Agreement
- 40.2.6 Task 6: Clean Up Old Agreement on Old Supplier
- 40.2.7 Task 7: Start All Directory Replication Server on related Nodes
- 40.3 Performing a Time-Based Replication Failover
- 40.3.1 Task 1: Configure Change Log Garbage Collection Object on New Supplier
- 40.3.2 Task 2: Save Last Change Number from New Supplier
- 40.3.3 Task 3: Enable Change Log Regeneration on New Supplier
- 40.3.4 Task 4: Wait for the Desired Time Period to Elapse
- 40.3.5 Task 5: Stop all Directory Replication Servers on Related Nodes
- 40.3.6 Task 6: Break Old Replication Agreement and Set Up New Agreement
- 40.3.7 Task 7: Update Last Applied Change Number of New Agreement
- 40.3.8 Task 8: Clean Up Old Agreement on Old Supplier
- 40.3.9 Task 9: Start All Directory Replication Servers on Related Nodes
- 41.1 Introduction to Replication Configuration Attributes
- 41.1.1 The Replication Configuration Container
- 41.1.2 The Replica Subentry
- 41.1.3 The Replication Agreement Entry
- 1. Oracle Database Advanced Replication-based replication agreement. The replication agreement for Advanced Replication nodes re...
- 2. LDAP-based replication agreement. The replication agreement for LDAP nodes resides under the supplier's replica subentry. For...
- 41.1.3.1 Replication Agreement Entry Attributes
- 41.1.3.2 Oracle Database Advanced Replication-Based Replication Agreements
- 41.1.3.3 LDAP Replication Agreements
- 41.1.3.4 Two-Way LDAP Replication Agreements
- 41.1.4 The Replication Naming Context Container Entry
- 41.1.5 The Replication Naming Context Object Entry
- 41.1.6 The Replication Configuration Set
- 41.1.7 Examples of Replication Configuration Objects in the Directory
- 41.2 Configuring Replication Configuration Attributes by Using Fusion Middleware Control
- 41.3 Managing Replication Configuration Attributes From the Command Line
- 42.1 Introduction to Managing and Monitoring Replication
- 42.1.1 Modifying What Is to Be Replicated in LDAP-Based Partial Replication
- 42.1.2 Managing Worker Threads
- 42.1.3 Change Logs in Directory Replication
- 42.1.4 The Human Intervention Queue
- 42.1.5 Pilot Mode
- 42.1.6 Conflict Resolution in Oracle Replication
- 42.1.6.1 Levels at Which Replication Conflicts Occur
- 42.1.6.2 Automatic Conflict Resolution
- 42.1.6.3 How Automated Conflict Resolution Works
- 1. The conflict is detected when a change is applied.
- 2. The replication process attempts to reapply the change a specific number of times or repetitively for a specific amount of time after a specific waiting period.
- 3. If the replication process reaches the retry limit without successfully applying the change, it flags the change as a conflic...
- 42.2 Managing and Monitoring Replication by Using ODSM and Fusion Middleware Control
- 42.2.1 Enabling or Disabling Change Log Generation by Using Fusion Middleware Control
- 42.2.2 Viewing the Local Change Logs by Using Oracle Directory Services Manager
- 42.2.3 Viewing and Modifying Replica Naming Context Objects
- 1. From the Oracle Internet Directory menu on the home page, select Administration, then Replication Management.
- 2. You are prompted to log into the replication DN account. Provide the host, port, replication DN, and replication DN password.
- 3. The Replication Agreements page lists information about each replication agreement: name, type, supplier, consumer, and statu...
- 4. On the Scope tab, you can change the scope settings.
- 5. To exclude a secondary naming context, select it in the Secondary Naming Contexts field and click Exclude to move it to the Excluded Secondary Naming Contexts field.
- 6. To exclude an attribute, select it in the Attributes field and click Exclude to move it to the Excluded Attributes field.
- 7. To apply your changes, click Apply.
- 8. To effect the changes you have made, you must start or restart the replication server. For one-way replication, you must rest...
- 42.2.4 Viewing or Modifying a Replication Setup by Using the Replication Wizard
- 1. From the Oracle Internet Directory menu on the home page, select Administration, then Replication Management.
- 2. You are prompted to log into the replication DN account. Provide the host, port, replication DN, and replication DN password.
- 3. To view queue statistics for a replication agreement, select the replication agreement, select Queue Statistics and proceed as described in Section 42.2.10, "Viewing Queue Statistics by Using Fusion Middleware Control."
- 4. To view or edit a replication agreement, select the name of the replication agreement you want to edit and click the Edit icon. At the bottom of the screen, three tabs appear.
- 5. To view or edit the replication configuration, select the Replication Configuration tab.
- a. In the LDAP Connection field, select Keep Alive if you want the replication server to use same connection for performing mult...
- b. Enter the Replication Frequency.
- c. Enter the Human Intervention Queue Schedule. This is the interval, in seconds, at which the directory replication server repeats the change application process.
- d. Click Apply to apply your changes, or click Cancel to discard your changes.
- 6. To view or change the Scope settings, click the Scope tab. Proceed as described in Section 42.2.3, "Viewing and Modifying Replica Naming Context Objects."
- 7. To view the type, host, port, and user name for each node, click the Replicas tab of the Edit Replication Definition page.
- 8. To view or edit Replica Primary URI, Replica Secondary URI, or Replica State for a node:
- 9. To make a node the primary node in a multimaster replication group:
- 10. To add a node to a multimaster replication group:
- 11. To delete a node from a multimaster replication group containing three or more nodes:
- 42.2.5 Deleting an LDAP-Based Replication Agreement by Using the Replication Wizard
- 1. From the Oracle Internet Directory menu on the home page, select Administration, then Replication Management. The Replication Agreements page lists information about each replication agreement: name, type, supplier, consumer, and status.
- 2. You are prompted to log into the replication DN account. Provide the host, port, replication DN, and replication DN password.
- 3. To delete a replication agreement, select the agreement and click the Delete icon. When the Delete Popup appears, click Delete.
- 42.2.6 Configure Replication Attributes by Using Fusion Middleware Control
- 42.2.7 Activating or Inactivating a Replication Server by Using Fusion Middleware Control
- 1. Select Administration, then Shared Properties from the Oracle Internet Directory menu, then select Replication.
- 2. In the Replication Server Status section of the page, select the Oracle Internet Directory component that you want to activat...
- 3. If the replication status of the selected Oracle Internet Directory component is inactive, you can click Activate to activate...
- 42.2.8 Configuring the Replication Debug Level by Using Fusion Middleware Control
- 42.2.9 Configuring Replica Details by Using Fusion Middleware Control
- 42.2.10 Viewing Queue Statistics by Using Fusion Middleware Control
- 1. From the Oracle Internet Directory menu on the home page, select Administration, then Replication Management.
- 2. You are prompted to log into the replication DN account. Provide the host, port, replication DN, and replication DN password.
- 3. The Replication Agreements page lists information about each replication agreement. Click the name of the replication agreement for which you want to view the queue statistics, then click the Queue Statistics icon.
- 4. The bottom of the page lists the following statistics:
- 42.2.11 Managing Changelog Processing by Using Fusion Middleware Control
- 1. Select Administration, then Shared Properties from the Oracle Internet Directory menu
- 2. Select Replication.
- 3. Change the parameter Maximum Number of Entries to Process per Replication Cycle.
- 4. Choose Apply.
- 1. Select Administration, then Server Properties from the Oracle Internet Directory menu.
- 2. Select General.
- 3. Change the value of Maximum number of entries to be returned by a search.
- 4. Choose Apply.
- 42.2.12 Monitoring Conflict Resolution Messages by Using Fusion Middleware Control
- 42.3 Managing and Monitoring Replication by Using the Command Line
- 42.3.1 Enabling and Disabling Change Log Generation by Using the Command Line
- 42.3.2 Viewing Change Logs by Using ldapsearch
- 42.3.3 Configuring Attributes of the Replica Subentry by Using ldapmodify
- 42.3.4 Specifying Pilot Mode for a Replica by Using remtool
- 42.3.5 Configuring Replication Agreement Attributes by Using ldapmodify
- 42.3.6 Modifying Replica Naming Context Object Parameters by Using ldapmodify
- Example 42-1 Adding a Naming Context Object for an LDAP-Based Replica
- Example 42-2 Deleting a Naming Context Object
- Example 42-3 Modifying the orclIncludedNamingContexts Attribute for a Replica Naming Context Object
- Example 42-4 Modifying the orclExcludedNamingContexts Attribute for a Replica Naming Context Object
- Example 42-5 Modifying the orclExcludedAttributes Attribute for a Replica Naming Context Object
- 42.3.7 Configuring Attributes of the Replication Configuration Set by Using ldapmodify
- 42.3.8 Monitoring Conflict Resolution Messages by Using the Command Line
- 42.3.9 Managing the Human Intervention Queue
- 1. Examine the change in the human intervention queue.
- 2. Reconcile the conflicting changes using the Compare and Reconcile Tool (see Section 42.4, "Comparing and Reconciling Inconsistent Data by Using oidcmprec."
- 3. Either place the change back into the retry queue using ManageHiq.retry or into the purge queue using ManageHiq.purge.
- 42.3.10 Monitoring Replication Progress in a Directory Replication Group by Using remtool -pthput
- 42.3.11 Viewing Queue Statistics and Verifying Replication by Using remtool
- 42.3.12 Managing the Number of Entries the Human Intervention Queue Tools Can Process
- 42.3.13 Changing the Replication Administrator's Password for Advanced Replication
- 42.4 Comparing and Reconciling Inconsistent Data by Using oidcmprec
- 1. Set the supplier and the consumer to read-only mode. Use one of the procedures in"Changing Server Mode" on page 15-3.
- 2. Ensure that the supplier and the consumer are in a tranquil state-that is, that neither is supplying or applying changes. If they are not in a tranquil state, then wait until they have finished updating.
- 3. Identify the inconsistent entries or subtree on the consumer.
- 4. Use the Oracle Internet Directory Comparison and Reconciliation Tool to fix the inconsistent entries or subtree on the consumer.
- 5. Set the participating supplier and consumer back to read/write mode.
- 42.4.1 Conflict Scenarios
- 42.4.2 Operations Supported by oidcmprec
- 42.4.3 Output from oidcmprec
- 42.4.4 How oidcmprec Works
- 42.4.5 Setting the Source and Destination Directories
- 42.4.6 Selecting the DIT for the Operation
- 42.4.7 Selecting the Attributes for the Operation
- 42.4.8 Controlling Change Log Generation
- 42.4.9 Using a Text or XML Parameter File
- 42.4.10 Including Directory Schema
- 42.4.11 Overriding Predefined Conflict Resolution Rules
- 42.4.12 Using the User-Defined Compare and Reconcile Operation
- 42.4.13 Known Limitations of the oidcmprec Tool
- 43.1 Introduction to Configuring a Customized Password Policy Plug-in
- 1. The client sends the directory server either an ldapadd or ldapmodify request.
- 2. Before the directory server makes the addition or modification, it passes the password value to the plug-in.
- 3. The plug-in
- 4. If the password meets the specification, then the plug-in notifies the directory server accordingly, and the directory server makes the addition or modification.
- 43.2 Installing, Configuring, and Enabling a Customized Password Policy Plug-in
- 44.1 Introduction to Developing Plug-ins for the Oracle Internet Directory Server
- Figure 44-1 Oracle Internet Directory Plug-in Framework
- 44.1.1 Passing Options to the JVM
- 44.1.2 Supported Languages for Server Plug-ins
- 44.1.3 Server Plug-in Prerequisites
- 44.1.4 Server Plug-in Benefits
- 44.1.5 Guidelines for Designing Plug-ins
- 44.1.6 The Server Plug-in Framework
- 44.1.7 LDAP Operations and Timings Supported by the Directory
- 44.1.8 Using Plug-ins in a Replication Environment
- 44.2 Creating a Plug-in
- 44.3 Registering a Plug-in From the Command Line
- 44.4 Managing Plug-ins by Using Oracle Directory Services Manager and Oracle Enterprise Manager Fusion Middleware Control
- 1. Section 44.4.1, "Creating a New Plug-in by Using Oracle Directory Services Manager"
- 2. Section 44.4.2, "Registering a Plug-in by Using Oracle Directory Services Manager"
- 3. Section 44.4.3, "Editing a Plug-in by Using Oracle Directory Services Manager"
- 4. Section 44.4.4, "Deleting a Plug-in by Using Oracle Directory Services Manager"
- 5. Section 44.4.5, "Managing JVM Options by Using Oracle Enterprise Manager Fusion Middleware Control"
- 44.4.1 Creating a New Plug-in by Using Oracle Directory Services Manager
- 1. Invoke Oracle Directory Services Manager and connect to the Oracle Internet Directory server as described in Section 7.4.5, "Invoking Oracle Directory Services Manager."
- 2. From the task selection bar, select Advanced.
- 3. Expand Plug-in. Entries appear in the left panel.
- 4. To enable a plug-in management configuration entry, select it.
- 5. Click the Create icon.The New Plug-in window appears in the right pane.
- 6. Select Plug-in Enable if you want to enable the plug-in now.
- 7. Enter the Plug-in Name.
- 8. Select values for the other mandatory properties.
- 9. When you have finished entering the values, select OK. The plug-in you just created is now listed on the left side of the page.
- 44.4.2 Registering a Plug-in by Using Oracle Directory Services Manager
- 1. Invoke Oracle Directory Services Manager and connect to the Oracle Internet Directory server as described in Section 7.4.5, "Invoking Oracle Directory Services Manager."
- 2. From the task selection bar, select Advanced.
- 3. Expand Plug-in. Entries appear in the left panel.
- 4. To enable a plug-in management configuration entry, select it. The Plug-in Management tab appears in the right pane.
- 5. Select Plug-in Enable.
- 6. Click Apply.
- 7. When you have finished entering the values, select OK. The plug-in you just created is now listed on the left side of the page.
- 44.4.3 Editing a Plug-in by Using Oracle Directory Services Manager
- 44.4.4 Deleting a Plug-in by Using Oracle Directory Services Manager
- 44.4.5 Managing JVM Options by Using Oracle Enterprise Manager Fusion Middleware Control
- 45.1 Introduction to Configuring a Customized External Authentication Plug-in
- 45.2 Installing, Configuring, and Enabling the External Authentication Plug-in
- 1. Implement your standalone external authentication PL/SQL program. For example, if you want to authenticate users by using user names and passwords, then you should have a PL/SQL program which takes these two parameters.
- 2. Integrate this standalone program into the plug-in modules.
- 3. Load the plug-in package into database. In this example, we enter:
- 4. Register the plug-ins. Do this by creating and uploading an LDIF file that provides the directory server with the necessary information to invoke the plug-in.
- 5. This example uses a file named oidexauth.ldif, which contains the following:
- 45.3 Debugging the External Authentication Plug-in
- 45.4 Creating the PL/SQL Package oidexaup.sql
- A.1 Instance Creation and Process Management
- A.2 Locations of Configuration Attributes
- A.3 Default Ports
- A.4 Enabling Server Debugging
- A.5 Command Line Tools
- A.6 Path Names
- A.7 Graphical User Interfaces
- A.8 Audit
- A.9 Referential Integrity
- A.10 Server Chaining
- A.11 Replication
- A.12 Oracle Directory Integration Platform
- A.13 Oracle Single Sign-On and Oracle Delegated Administration Services
- A.14 Java Containers
- B.1 Introduction to Managing Oracle Internet Directory by Using OIDCTL
- B.2 Creating and Starting an Oracle Internet Directory Server Instance by Using OIDCTL
- B.3 Stopping an Oracle Internet Directory Server Instance by Using OIDCTL
- B.4 Starting an Oracle Internet Directory Server Instance by Using OIDCTL
- B.5 Viewing Status Information by Using OIDCTL
- B.6 Deleting an Oracle Internet Directory Server Instance by Using OIDCTL
- C.1 Introduction to Setting up Oracle Database Advanced Replication-Based Replication
- C.2 Setting Up Advanced Replication-Based Replication
- C.2.1 Rules for Setting Up Advanced Replication
- 1. In this type of Directory Replication Group (DRG), there must be one node identified as the Master Definition Site (MDS): thi...
- 2. When you configure Multimaster replication, the master node for a Directory Replication Group (DRG) and each node that is to ...
- 3. When you add an Oracle Database Advanced Replication-based replica, the new replica must be empty. That is, Oracle Internet Directory must be newly installed.
- 4. The sponsor node for each Oracle Database Advanced Replication-based replica can be any of the following:
- 5. An Oracle Database Advanced Replication-based replica cannot be a consumer of an LDAP replica.
- 6. In Oracle Internet Directory 11g Release 1, a node cannot be part of more than one multimaster replication group.
- 7. The data replicated between servers in a directory replication group does not include DSE root-specific data, server configuration data, and replication agreement data.
- 8. When an multimaster replication group is configured, the Oracle Single Sign-On database schema is automatically configured in replication.
- 9. When you add a node to a DRG, it must be running the same version of Oracle Internet Directory as the other nodes in the DRG....
- C.2.2 Setting Up an Advanced Replication-Based Multimaster Replication Group
- C.2.2.1 Task 1: Install Oracle Internet Directory on the Master Definition Site (MDS)
- C.2.2.2 Task 2: Install the Oracle Internet Directory on the Remote Master Sites (RMS)
- C.2.2.3 Task 3: Set Up Advanced Replication for a Directory Replication Group
- C.2.2.3.1 On All Nodes, Prepare the Oracle Net Services Environment for Replication
- 1. Configure sqlnet.ora.
- 2. Configure tnsnames.ora in each Oracle Internet Directory ORACLE_ INSTANCE and Oracle Database ORACLE_INSTANCE.
- 3. Stop and restart the listener, both in the Oracle Internet Directory ORACLE_ HOME and in the Oracle Database ORACLE_HOME.
- 4. Test Oracle Net connections to all nodes from each node in the DRG.
- C.2.2.3.2 From the MDS, Configure Advanced Replication For Directory Replication
- 1. From the MDS console, connect as the system user on all nodes, including the MDS. Ensure the following on all nodes:
- 2. Ensure the following wallets exist on the remote sites:
- 3. Check the prerequisites in the attached Note. Then, at a command prompt in the MDS, use remtool (the Replication Environment Management Tool) to configure Advanced Replication by running the following command:
- C.2.2.3.1 On All Nodes, Prepare the Oracle Net Services Environment for Replication
- C.2.2.4 Task 4 (Optional): Load Data into the Directory
- C.2.2.5 Task 5: Ensure that Oracle Directory Server Instances are Started on All the Nodes
- C.2.2.6 Task 6: Start the Replication Servers on All Nodes in the DRG
- C.2.2.7 Task 7: Test Directory Replication
- C.2.3 Adding a Node for Advanced Replication-Based Multimaster Replication
- C.2.3.1 Prepare the Oracle Net Services Environment
- C.2.3.2 Task 1: Stop the Directory Replication Server on All Nodes
- C.2.3.3 Task 2: Identify a Sponsor Node and Install Oracle Internet Directory
- C.2.3.4 Task 3: Switch the Sponsor Node to Read-Only Mode
- C.2.3.5 Task 4: Back up the Sponsor Node by Using ldifwrite
- C.2.3.6 Task 5: Perform Advanced Replication Add Node Setup
- C.2.3.7 Task 6: Switch the Sponsor Node to Updatable Mode
- C.2.3.8 Task 7: Start the Directory Replication Server on All Nodes Except the New Node
- C.2.3.9 Task 8: Load Data into the New Node by Using bulkload
- C.2.3.10 Task 9: Start the Directory Server on the New Node
- C.2.3.11 Task 10: Start the Directory Replication Server on the New Node
- C.2.4 Deleting a Node from a Multimaster Replication Group
- C.2.1 Rules for Setting Up Advanced Replication
- D.1 Features of Oracle Database Advanced Replication-Based Replication
- D.2 Architecture for Oracle Database Advanced Replication-Based Replication
- Figure D-1 Advanced Replication Process
- 1. A change request is made on the Oracle Internet Directory server of Replica A.
- 2. The change is accepted and committed to storage in the Oracle Internet Directory Database.
- 3. The replication server on Replica A queries for new outbound change logs from the local ods_chg_log table. The filter used for the query is:
- 4. The new change log retrieved from ods_chg_log is copied to local asr_chg_ log.
- 5. The replication server requests Oracle Internet Directory server to update the Change log retry_cnt status properly.
- 6. The new change log is pushed From Replica A to Replica B through Oracle Database Advanced Replication.
- 7. If the last transported number is greater than last applied change number on Replica B, it indicates that there are new chang...
- 8. The replication server applies the new change at Replica B.
- 9. Oracle Internet Directory server at Replica B accepts and commits the change to storage in the Oracle Database.
- 10. The replication server request Oracle Internet Directory server to update the shadow change log retry_cnt status properly.
- Figure D-1 Advanced Replication Process
- D.3 Architecture of LDAP-Based Replication
- Figure D-2 LDAP Replication Process
- 1. An LDAP change request is made on the Oracle Internet Directory server of Replica A.
- 2. The change is accepted and committed to Oracle Internet Directory database storage.
- 3. The replication server on Replica B queries for new inbound change logs from the supplier replica, Replica A's ods_chg_log table]. The filter used for the query is:
- 4. The replication Server at B requests that the Oracle Internet Directory at Replica B store the new change log as a shadow change log.
- 5. The replication server at Replica B checks whether the last transported number is greater than the last applied change number...
- 6. The replication server at Replica B request that the Oracle Internet Directory server at Replica B apply the retrieved change to storage.
- 7. Oracle Internet Directory server at Replica B accepts and commits the change to Oracle Internet Directory database storage.
- 8. The replication server requests that the server update the shadow change log retry_cnt status properly.
- Figure D-2 LDAP Replication Process
- D.4 LDAP Replica States
- D.5 The Replication Process
- D.5.1 How the Multimaster Replication Process Adds a New Entry to a Consumer
- 1. The directory replication server looks in the consumer for the DN of the parent of the target entry. Specifically, it does this by looking for a global unique identifier (GUID) assigned to the DN of the parent.
- 2. If the parent entry exists, then the directory replication server composes a DN for the new entry and places the new entry under its parent in the consumer. It then places the change entry in the purge queue.
- D.5.2 How the Multimaster Replication Process Deletes an Entry
- D.5.3 How the Multimaster Replication Process Modifies an Entry
- 1. The directory replication server looks in the consumer for an entry with a GUID matching the one in the change entry.
- 2. If the matching entry exists in the consumer, then the directory replication server compares each attribute in the change entry with each attribute in the target entry.
- 3. The directory replication server then applies the following conflict resolution rules:
- 4. The directory replication server applies the filtered modification, and places the change entry in the purge queue.
- D.5.4 How the Multimaster Replication Process Modifies a Relative Distinguished Name
- D.5.5 How the Multimaster Replication Process Modifies a Distinguished Name
- 1. The directory replication server looks in the consumer for the DN with a GUID that matches the GUID in the change entry.
- 2. If both the DN and the parent DN of the target entry exist in the consumer, then the directory replication server modifies the DN of that entry and places the change entry in the purge queue.
- E Java Server Plug-in Developer's Reference
- D.5.1 How the Multimaster Replication Process Adds a New Entry to a Consumer
- E.1 Advantages of Java Plug-ins
- E.2 Setting Up a Java Plug-in
- 1. Create the standalone Java program using the pre-defined class definition and methods. You can implement the plug-in as a jar file or as a package.
- 2. Compile the plug-in file or package. Before compiling, ensure that your CLASSPATH is set to $ORACLE_HOME/ldap/jlib/ospf.jar. Make sure the compilation completes without error.
- 3. Place the class file, jar, or package in the pre-defined class location $ORACLE_ HOME/ldap/server/plugin.
- 4. Register the Java plug-in by adding the plug-in configuration entry.
- E.3 Java Plug-in API
- E.3.1 Communication Between the Server and Plug-in
- E.3.2 Java Plug-in Structure
- E.3.3 PluginDetail
- E.3.3.1 Server
- E.3.3.2 LdapBaseEntry
- E.3.3.3 LdapOperation
- Table E-3 Behavior of Operation Result Code
- Table E-4 Subclasses of LdapOperation and Class-specific information.
- E.3.3.3.1 AddLdapOperation
- E.3.3.3.2 BindLdapOperation
- E.3.3.3.3 CompareLdapOperation
- E.3.3.3.4 DeleteLdapOperation
- E.3.3.3.5 ModdnLdapOperation
- E.3.3.3.6 ModifyLdapOperation
- E.3.3.3.7 SearchLdapOperation
- E.3.3.4 PluginFlexfield
- E.3.4 PluginResult
- E.3.5 ServerPlugin Interface
- E.4 Java Plug-in Error and Exception Handling
- E.5 Java Plug-in Debugging and Logging
- E.6 Java Plug-in Examples
- F.1 Designing, Creating, and Using PL/SQL Server Plug-ins
- F.1.1 PL/SQLPlug-in Caveats
- F.1.2 Creating PL/SQLPlug-ins
- F.1.3 Compiling PL/SQLPlug-ins
- F.1.4 Managing PL/SQL Plug-ins
- F.1.5 Enabling and Disabling PL/SQL Plug-ins
- F.1.6 Exception Handling in a PL/SQL Plug-in
- F.1.7 PL/SQL Plug-in LDAP API
- F.1.8 PL/SQL Plug-in and Database Tools
- F.1.9 PL/SQL Plug-in Security
- F.1.10 PL/SQL Plug-in Debugging
- F.1.11 PL/SQL Plug-in LDAP API Specifications
- F.1.12 Database Limitations
- F.2 Examples of PL/SQL Plug-ins
- F.2.1 Example 1: Search Query Logging
- F.2.2 Example 2: Synchronizing Two DITs
- 1. Assume that the entries under both DITs have been added to the directory. For example, the entry id=12345,cn=DIT1,cn=products,cn=oraclecontext is in DIT1, and id=12345,cn=DIT2,cn=products,cn=oraclecontext is in DIT2.
- 2. Create the plug-in package specification.
- 3. Create the plug-in package body.
- 4. Register the plug-in entry with Oracle Internet Directory.
- F.3 Binary Support in the PL/SQLPlug-in Framework
- F.4 Database Object Types Defined
- F.5 Specifications for PL/SQL Plug-in Procedures
- H.1 Schema for orclACI
- H.2 Schema for orclEntryLevelACI
- I.1 About Character Sets and the Directory
- I.2 The NLS_LANG Environment Variable
- I.3 Using Non-AL32UTF8 Databases
- I.4 Using Globalization Support with LDIF Files
- I.5 Using Globalization Support with Command-Line LDAP Tools
- I.6 Setting NLS_LANG in the Client Environment
- I.7 Using Globalization Support with Bulk Tools
- J.1 Setting up Access Controls for the User Search Base and the User Creation Base
- J.2 Setting up Access Controls for the Group Search Base and the Group Creation Base
- 1. Create an ldif (group_aci.ldif) file with the following entry:
- 2. Replace %subscriberdn% with the DN of the subscriber and %groupsearch_ or_createbase_dn% with the new value of the container DN where the new group search base or group create base points to.
- 3. Run the ldapmodify command as follows:
- K Searching the Directory for User Certificates
- K.1 Certificate Mapping
- K.2 Search Types
- L.1 Definitions
- L.2 Prerequisites
- 1. The operating system, version, and patch level of the new directory site must be the same as that of the sponsor directory site. This procedure might not work if the patch levels of the operating systems differ.
- 2. Oracle strongly recommends that you back up the sponsor directory's repository before you employ this procedure.
- 3. Because this procedure involves copying Oracle data files, performance depends on the underlying network. If the underlying n...
- 4. Only a person familiar with the Oracle database should perform this procedure.
- 5. If the sponsor site is already a part of an Advanced Replication group, the sponsor node must be the Master definition site (MDS).
- L.3 Sponsor Directory Site Environment
- L.4 New Directory Site Environment
- L.5 Addition of a Directory Node
- 1. Install the node and check its status, as follows:
- 2. Shut down Oracle Internet Directory and all other opmn processes on the sponsor node, as follows:
- 3. Perform the following steps on the sponsor node.
- a. At the command line prompt execute the following SQL*Plus commands:
- b. Shut down the database and Oracle Net Services listener on the sponsor node. By default, the listener name is LISTENER. Type:
- c. If the copied node is part of an Advanced Replication-based DRG, perform the following steps:
- d. Rename the trace file created in Step 3a to newdb.sql, under the same directory.
- 4. On the sponsor node, open newdb.sql in a text editor and delete all the lines except the STARTUP NOMOUNT and CREATE CONTROLFILE statements. After deleting those lines, newdb.sql should look like this:
- 5. Continue editing the file newdb.sql on the sponsor node, as follows:
- 6. Copy the initialization parameter file init$ORACLE_SID.ora from the sponsor directory's database to init$ORACLE_SID_NEW_DIR_D...
- 7. In the new initialization parameter file on the sponsor, make the following changes:
- a. Comment out the parameter JOB_QUEUE_PROCESSES, if it exists.
- b. Change the parameter dbname from LDAP to NLDAP.
- c. If the new site's domain name is different from the sponsor directory's domain name, alter the parameter db_domain also.
- d. Alter the location of the following parameters to point to the location of the new site.
- e. In addition to the parameters listed in Step 7d, if your initialization parameter file has any parameters that are node specific, such as DB_RECOVERY_FILE_ DEST and DB_CREATE_FILE_DEST, alter those parameters as well.
- 8. Edit the tnsnames.ora file to include connection details for the new node. Refer to the following sample file:
- 9. Create an archive of all the data files and compress the archived file. Be sure to include all the files listed under DATAFILE in newdb.sql.
- 10. Install Oracle Database on the new node using the software only option. See the Oracle Database Installation Guide for your platform and Oracle Fusion Middleware Installation Guide for Oracle Identity Management.
- 11. When the software-0nly install on the new node has completed, the following directory exists:
- 12. Copy the archived file created on the sponsor node in Step 9 to the new node, using FTP or another appropriate tool. Change directory to the database file location on the new node, then use FTP to copy the archived file from rst-sun.
- 13. If the sponsor node is part of an Advanced replication group, then perform the following steps:
- a. Copy the initialization parameter file initLDAP.ora from the sponsor node (rst-sun) to the new node under the UNIX directory $ORACLE_HOME/dbs using a tool such as FTP. Rename the file to initNLDAP.ora.
- b. Using a tool such as FTP, copy the file newdb.sql you created on the sponsor node in Step 5 to the new node. Rename newdb.sql to olddb.sql.
- c. Make a copy of tnsnames.ora called tnsnames.ora.bk.
- d. At the shell prompt on the new node, set the ORACLE_BASE, ORACLE_HOME, and ORACLE_SID environment variables. For example (using the C shell):
- e. In the same shell, execute olddb.sql using SQL*Plus as shown in the following example:
- f. Start up the database and listener as follows:
- g. If you have performed a database copy from a node that has Advanced replication configured with another node, you must delete the LDAP_REP replication group in the new node. To do so, execute the following commands:
- 14. Copy the initialization parameter file initLDAP.ora from the sponsor node (rst-sun) to the new node under the UNIX directory...
- 15. On the new node, ensure that the following files do not exist in the directory $ORACLE_HOME/dbs on UNIX or ORACLE_HOME\database in Windows:
- 16. Using FTP or another appropriate tool, copy the file newdb.sql you created on the sponsor node in Step 5 to the new node. For example:
- 17. At the UNIX shell prompt on the new node, set ORACLE_BASE, ORACLE_ HOME and ORACLE_SID environment variables. For example (using the C shell):
- 18. In the same UNIX shell, execute newdb.sql using SQL*Plus as shown in the following example:
- 19. Complete the changes on the new node.
- 20. Configure Oracle Internet Directory on the new node
- 21. On the new node, delete the wallet files oidpwdlldap1 and oidpwdr* at the new node and reset the ODS password
- 22. On the new node, reset the password and start the Oracle Internet Directory processes.
- 23. At this point, Oracle Internet Directory on the new node is up and running. The replicaid value in new Oracle Internet Direc...
- 24. Because the replica id of the new node was changed in Step 23, you must re-create the relative replica entries for the new node, as follows:
- 25. ) In addition to renaming the replica subentry, you must change the orclreplicauri, orclreplicasecondaryuri and orclreplicas...
- 26. Stop Oracle Internet Directory processes.
- 27. Clean up the changelog tables at the new node.
- 28. If the new node is part of an Advanced Replication-based DRG, proceed as follows.
- 29. If the new node is a full LDAP-based replication replica, configure LDAP-based Replication and add the full replica as fan-out, as follows:
- a. Make sure that the database and Oracle Internet Directory server is running at the sponsor node.
- b. Configure LDAP-based replication using remtool, as follows:
- c. Initialize the replication change status of the new replication agreement.
- d. Start up Oracle Internet Directory and the replication server on all the nodes. For one-way replication, you only need to start the replication server on the consumer node.
- M Oracle Authentication Services for Operating Systems
- N RFCs Supported by Oracle Internet Directory
- O Managing Oracle Directory Services Manager's Java Key Store
- O.1 Introduction to Managing ODSM's Java Key Store
- O.2 Retrieving ODSM's Java Key Store Password
- O.3 Listing the Contents of odsm.cer Java Key Store
- O.4 Deleting Expired Certificates
- P.1 Starting the Stack
- 1. Start the Oracle Database
- 2. Start the Oracle WebLogic Administration Server.
- 3. Ensure that the Node Manager is running. Normally, the Oracle WebLogic Administration Server starts the Node Manager. If, for some reason, the Node Manager is not running, start it.
- 4. Start system components, such as Oracle Internet Directory and Oracle Virtual Directory.
- 5. Start WebLogic managed components, such as Oracle Directory Integration Platform and Oracle Directory Services Manager.
- P.2 Stopping the Stack
- 1. Stop WebLogic managed components, such as Oracle Directory Integration Platform and Oracle Directory Services Manager.
- 2. Stop system components, such as Oracle Internet Directory and Oracle Virtual Directory.
- 3. Stop the WebLogic Administration Server.
- 4. If you want to stop the Node Manager, you can use the kill command.
- 5. Stop the Oracle Database.
- Q Performing a Rolling Upgrade
- Q.1 Prerequisites for Rolling Upgrade
- Q.2 Rolling Upgrade Instructions
- 1. Stop the replication server on the first node you want to upgrade.
- 2. Suspend the replication from the first node to each of the other nodes:
- 3. Validate that replication has been suspended from the first node to all the other nodes in the DRG by running the following ldapsearch command:
- 4. Stop Oracle Internet Directory on the node you are about to upgrade.
- 5. Patch the node to Release 11.1.1.4.0. Refer to the instructions in the Oracle Fusion Middleware Patching Guide:
- 6. Start Oracle Internet Directory on the node you have just upgraded.
- 7. Because no other nodes have been upgraded yet, do not resume replication between the first node and any other node.
- 8. Stop the replication server on the second node you want to upgrade.
- 9. Suspend replication from the second node to each of the nodes that have not been upgraded.
- 10. Validate that replication has been suspended from the node you are about to upgrade to each node that has not been upgraded, using the same command as in Step 3 against the second node.
- 11. Stop Oracle Internet Directory on the node you are about to upgrade.
- 12. Patch the node to Release 11.1.1.4.0 as in Step 5.
- 13. Start Oracle Internet Directory on the node you have just upgraded.
- 14. Now two nodes have been upgraded, so resume replication from the first node you upgraded to the second node you upgraded.
- 15. Validate that replication has been resumed from first upgraded node to the second upgraded nodes in DRG by running the following ldapsearch command:
- 16. Start replication server on the second upgraded replica.
- 17. Shut down the replication server on the third node you want to upgrade.
- 18. Suspend replication from the third node to each node that has not yet been upgraded, if any.
- 19. Validate that replication has been suspended from the third node to each node that has not been upgraded.
- 20. Stop Oracle Internet Directory and other processes on the third node to be upgraded.
- 21. Patch the node to Release 11.1.1.4.0 as in Step 5.
- 22. Start Oracle Internet Directory on the third node.
- 23. Resume replication from each node that has already been upgraded to the third node.
- 24. Validate that replication has been resumed from each upgraded node to the third node.
- 25. Start replication on the third node
- Q.3 Rolling Upgrade Example
- 1. Stop the replication server on Node A.
- 2. Suspend the replication from:
- 3. Validate that replication has been suspended from Node A to Node B by running the following ldapsearch command:
- 4. Stop Oracle Internet Directory and other processes on Node A.
- 5. Run the PSA on Node A to upgrade it to 11g Release 1 (11.1.1.4.0).
- 6. Bring up Oracle Internet Directory and the replication server on Node A. Note that there is no node with which Node A should resume replication.
- 7. Stop the replication server on Node B.
- 8. Suspend replication from Node B to Node C by executing the following command:
- 9. Validate that replication has been suspended from Node B to Node C by running the following ldapsearch command:
- 10. Stop Oracle Internet Directory and other processes on Node B.
- 11. Run the PSA on Node B to upgrade it to 11g Release 1 (11.1.1.4.0).
- 12. Bring up Oracle Internet Directory on Node B.
- 13. Validate that replication has been resumed from Node A to Node B by running the following ldapsearch command:
- 14. Bring up the replication server on Node B.
- 15. Shut down the replication server on Node C.
- 16. There is no other node to be upgraded so there is no need to suspend replication. Stop Oracle Internet Directory and other processes on Node C.
- 17. Run PSA on Node C to upgrade it to 11g Release 1 (11.1.1.4.0).
- 18. Bring up Oracle Internet Directory on Node C.
- 19. Validate that replication has been resumed successfully by performing an ldapsearch on Node A and Node B similar to Step 13. Validate replication:
- 20. Bring up the replication server on Node C.
- R Using the Oracle Internet Directory VM Template
- R.1 Installing Operating System, Oracle Database, and Oracle Internet Directory
- 1. Install the Oracle VM server as described in Oracle VM Server Installation Guide.
- 2. Download the VM template files for Oracle Internet Directory, oidhome.tgz and OVM_EL5U2_X86_64_ORACLE11G_PVM_1.tgz, from http://edelivery.oracle.com.
- 3. Copy the template files to dom0 /OVS/seed_pool.
- 4. Change to that directory and extract the files, as follows:
- 5. Change to the directory containing the configuration file vm.cfg.
- 6. Edit vm.cfg, setting VCPU, Memory, and network (VIF) values appropriately for this VM. Recommendations for sizing and tuning ...
- 7. Start Oracle VM by typing:
- 8. By default, Oracle VM starts a VNC server on port 5900. From another window, using a VNC client, connect to the host where Oracle VM is running, at port 5900.
- 9. You are prompted for installation and configuration information. Provide the information to set up the Oracle 11g database.
- 10. Log into the host as user root, password ovsroot. Changing the password is recommended.
- 11. Oracle Internet Directory is now installed in the home directory /oidhome/app/mwhome.
- R.2 Installing Oracle Internet Directory Template with an Existing Oracle VM that has Oracle Database
- 1. Download the VM template file oidhome.tgz from http://edelivery.oracle.com.
- 2. Copy the file to dom0 /OVS/seed_pool.
- 3. Change to that directory and extract the file, as follows:
- 4. Change to the directory containing the configuration file vm.cfg. For example:
- 5. Edit vm.cfg, adding oidhome.img as a disk, as shown in bold:
- 6. Restart the guest OS by typing:
- 7. Create the /oidhome directory:
- 8. Mount the Oracle Internet Directory image:
- 9. Set the owner and group for the /mntPoint/app directory tree:
- 10. Run oidRoot.sh:
- 11. Switch to the user oracle:
- 12. Set the DISPLAY environment variable.
- 13. Set the ORACLE_HOME environment variable to: /mntPoint/app/mwhome/Oracle_ IDM1
- 14. Change to the directory containing config.sh and execute it:
- 15. You are prompted for information. Provide the information to configure the environment.
- R.3 Registering Oracle Internet Directory for Oracle Enterprise Manager Fusion Middleware Control and ODSM Management
- R.4 Using the Oracle Internet Directory OVM image in a Non-OVM Environment
- 1. Download the VM template file oidhome.tgz from http://edelivery.oracle.com.
- 2. Extract the file, as follows:
- 3. Copy oidhome.img to a directory. For example:
- 4. Switch to root user
- 5. Create /oidhome.
- 6. Mount the image. For example:
- 7. Change to the directory /oidhome and set the owner and group for the /oidhome/app tree:
- 8. Run oidRoot.sh:
- 9. Set the DISPLAY environment variable.
- 10. Set the ORACLE_HOME environment variable to: /oidhome/app/mwhome/Oracle_IDM1
- 11. Install the Oracle database, as described in the Oracle Database Installation Guide for your platform.
- 12. Run /oidhome/app/mwhome/Oracle_IDM1/bin/config.sh to configure Oracle Internet Directory.
- R.5 Default Values
- S.1 Problems and Solutions
- S.1.1 Installation Errors
- S.1.2 Oracle Database Server Errors
- S.1.3 Directory Server Error Messages and Causes
- S.1.4 Getting a Core Dump and Stack Trace When Oracle Internet Directory Crashes
- S.1.5 TCP/IP Problems
- S.1.6 Troubleshooting Password Policies
- S.1.7 Troubleshooting Directory Performance
- S.1.7.1 Poor LDAP Search Performance
- S.1.7.2 Poor LDAP Add or Modify Performance
- S.1.7.3 Poor Oracle Database Server Performance
- Problem
- Solution
- 1. Identify the LDAP operations that are processor-intensive by running:
- 2. Tune the database appropriately for this kind of query. See the Oracle Internet Directory chapter in Oracle Fusion Middleware Performance and Tuning Guide.
- 3. If possible, change the applications's search signature. If that is not possible, tune the Oracle Internet Directory attribute orclinmemfiltprocess. See the Oracle Internet Directory chapter in Oracle Fusion Middleware Performance and Tuning Guide.
- S.1.8 Troubleshooting Port Configuration
- S.1.9 Troubleshooting Creating Oracle Internet Directory Component with opmnctl
- S.1.10 Troubleshooting Starting Oracle Internet Directory
- S.1.10.1 Oracle Internet Directory is Down
- Problem
- Solution
- Problem
- Solution
- 1. The oidmon log, ORACLE_ INSTANCE/diagnostics/logs/OID/componentName/oidmon-0000.log contains details as to why oidmon cannot start the oidldapd process. The most common issues are
- 2. The Oracle Internet Directory dispatcher log, ORACLE_ INSTANCE/diagnostics/logs/OID/componentName/oidldapd01-0000.l og contains information about why oidldapd server processes fail to start. The most common reasons are:
- 3. The Oracle Internet Directory server log, ORACLE_ INSTANCE/diagnostics/logs/OID/componentName/oidldapd01sPID-00 00.log contains information about why the server processes fail to run. Common issues include:
- S.1.10.2 Oracle Internet Directory is Read-Only
- S.1.10.1 Oracle Internet Directory is Down
- S.1.11 Troubleshooting Starting, Stopping, and Restarting of the Directory Server
- S.1.12 Troubleshooting Oracle Internet Directory Replication
- S.1.13 Troubleshooting Change Log Garbage Collection
- S.1.14 Troubleshooting Dynamic Password Verifiers
- S.1.15 Troubleshooting Oracle Internet Directory Password Wallets
- S.1.16 Troubleshooting bulkload
- S.1.17 Troubleshooting bulkdelete, bulkmodify, and ldifwrite
- S.1.18 Troubleshooting catalog
- S.1.19 Troubleshooting remtool
- S.1.20 Troubleshooting Server Chaining
- S.1.21 Viewing Version Information
- S.1.22 Troubleshooting Fusion Middleware Control and WLST
- S.1.23 Troubleshooting Oracle Directory Services Manager
- S.1.23.1 Cannot Invoke ODSM from Fusion Middleware Control
- S.1.23.2 Cannot Invoke ODSM from Fusion Middleware Control in Multiple NIC and DHCP Enabled Environment
- Problem
- Solution
- 1. Using a web browser, access the WebLogic Server Administration Console.
- 2. In the left pane of the WebLogic Server Administration Console, click Lock & Edit to edit the server configuration.
- 3. In the left pane of the WebLogic Server Administration Console, expand Environment and select Servers.
- 4. On the Summary of Servers page, click the link for the WebLogic Managed Server where Oracle Directory Services Manager is deployed.
- 5. On the Settings page for the WebLogic Managed Server, update the Listen Address to the host name of the server where Oracle Directory Services Manager is deployed.
- 6. Click Save to save the configuration.
- 7. Click Activate Changes to update the server configuration.
- S.1.23.3 Various Failover Issues
- Problem
- 1. Oracle Directory Services Manager is deployed in a High Availability active-active configuration using Oracle HTTP Server.
- 2. Display an Oracle Directory Services Manager page using the Oracle HTTP Server name and port number.
- 3. Make a connection to an Oracle Internet Directory server.
- 4. Work with the Oracle Internet Directory server using the current Oracle Directory Services Manager Oracle HTTP Server host and port.
- 5. Shut down one managed server at a time using the WebLogic Server Administration Console.
- 6. Go back to the Oracle Directory Services Manager page and port, and the connection which was established earlier with Oracle ...
- Solution
- 1. In your web browser, exit the current Oracle Directory Services Manager page.
- 2. Launch a new web browser page and specify the same Oracle Directory Services Manager Oracle HTTP Server name and port.
- 3. Re-establish a new connection to the Oracle Internet Directory server you were working with earlier.
- Problem
- Solution
- Problem
- Solution
- Problem
- S.1.23.4 ODSM Displays an Error Message
- S.1.23.5 Cursor Loses Focus
- S.2 Need More Help?
- Symbols
- Numerics
- A
- B
- C
- D
- E
- F
- G
- H
- I
- J
- K
- L
- M
- N
- O
- P
- Q
- R
- S
- T
- U
- V
- W
- X

Oracle® Fusion Middleware
Administrator's Guide for Oracle Internet Directory
11g Release 1 (11.1.1)
E10029-05
October 2012
Documentation for Oracle Internet Directory administrators
that describes how to manage Oracle Internet Directory
using Oracle Directory Services Manager, Oracle
Enterprise Manager Fusion Middleware Control, and
command-line utilities.

Oracle Fusion Middleware Administrator's Guide for Oracle Internet Directory, 11g Release 1 (11.1.1)
E10029-05
Copyright © 1999, 2012, Oracle and/or its affiliates. All rights reserved.
Primary Author: Ellen Desmond
Contributors: Olfat Aly, Krishna Chander, Giriraj Chauhan, Margaret Chou, Quan Dinh, Maud
Jamati-Bartlett, Vinoth Janakiraman, Buddhika Kottahachchi, Venkat Medam, Vishal Parashar, Karthi
Purushothaman, Lakshmi Ramadoss, Loganathan Ramasamy, Ramaprakash Sathyanarayan, Daniel Shih,
Olaf Stullich, Dipankar Thakuria, Arun Theebaprakasam, Vinay Thulasidas, Satishkumar Venkatasamy,
Frances Wu
This software and related documentation are provided under a license agreement containing restrictions on
use and disclosure and are protected by intellectual property laws. Except as expressly permitted in your
license agreement or allowed by law, you may not use, copy, reproduce, translate, broadcast, modify, license,
transmit, distribute, exhibit, perform, publish, or display any part, in any form, or by any means. Reverse
engineering, disassembly, or decompilation of this software, unless required by law for interoperability, is
prohibited.
The information contained herein is subject to change without notice and is not warranted to be error-free. If
you find any errors, please report them to us in writing.
If this is software or related documentation that is delivered to the U.S. Government or anyone licensing it
on behalf of the U.S. Government, the following notice is applicable:
U.S. GOVERNMENT RIGHTS Programs, software, databases, and related documentation and technical data
delivered to U.S. Government customers are "commercial computer software" or "commercial technical data"
pursuant to the applicable Federal Acquisition Regulation and agency-specific supplemental regulations. As
such, the use, duplication, disclosure, modification, and adaptation shall be subject to the restrictions and
license terms set forth in the applicable Government contract, and, to the extent applicable by the terms of
the Government contract, the additional rights set forth in FAR 52.227-19, Commercial Computer Software
License (December 2007). Oracle America, Inc., 500 Oracle Parkway, Redwood City, CA 94065.
This software or hardware is developed for general use in a variety of information management
applications. It is not developed or intended for use in any inherently dangerous applications, including
applications that may create a risk of personal injury. If you use this software or hardware in dangerous
applications, then you shall be responsible to take all appropriate fail-safe, backup, redundancy, and other
measures to ensure its safe use. Oracle Corporation and its affiliates disclaim any liability for any damages
caused by use of this software or hardware in dangerous applications.
Oracle is a registered trademark of Oracle Corporation and/or its affiliates. Other names may be trademarks
of their respective owners.
This software and documentation may provide access to or information on content, products, and services
from third parties. Oracle Corporation and its affiliates are not responsible for and expressly disclaim all
warranties of any kind with respect to third-party content, products, and services. Oracle Corporation and
its affiliates will not be responsible for any loss, costs, or damages incurred due to your access to or use of
third-party content, products, or services.
RSA and RC4 are trademarks of RSA Data Security. Portions of Oracle
Internet Directory have been licensed by Oracle Corporation from RSA Data
Security.
This product contains SSLPlus Integration SuiteTM version 1.2, from Consensus Development Corporation.

iii
Contents
Preface ........................................................................................................................................................... xxxix
Audience................................................................................................................................................. xxxix
Documentation Accessibility............................................................................................................... xxxix
Related Documents ............................................................................................................................... xxxix
Conventions ................................................................................................................................................. xl
What's New in Oracle Internet Directory?................................................................................... xliii
New Features Introduced with Oracle Internet Directory 11g Release 1 (11.1.1.6.0)..................... xliii
New Features Introduced with Oracle Internet Directory 11g Release 1 (11.1.1.4.0)..................... xliv
New Features Introduced with Oracle Internet Directory 11g Release 1 (11.1.1)............................ xlv
New Features Introduced with Oracle Internet Directory 10g (10.1.4.1) ........................................ xlvii
New Features Introduced with Oracle Internet Directory 10g Release 2 (10.1.2)........................... xlix
Part I Understanding Directory Services
1 Introduction to Directory Services
1.1 What Is a Directory? ................................................................................................................... 1-1
1.1.1 The Expanding Role of Online Directories ...................................................................... 1-1
1.1.2 The Problem: Too Many Special-Purpose Directories.................................................... 1-2
1.2 What Is the Lightweight Directory Access Protocol (LDAP)? ............................................. 1-3
1.2.1 LDAP and Simplified Directory Management................................................................ 1-3
1.2.2 LDAP Version 3 ................................................................................................................... 1-3
1.3 What Is Oracle Internet Directory?........................................................................................... 1-4
1.3.1 Overview of Oracle Internet Directory............................................................................. 1-4
1.3.2 Components of Oracle Internet Directory........................................................................ 1-5
1.3.3 Advantages of Oracle Internet Directory ......................................................................... 1-5
1.3.3.1 Scalability....................................................................................................................... 1-6
1.3.3.2 High Availability .......................................................................................................... 1-6
1.3.3.3 Security........................................................................................................................... 1-6
1.3.3.4 Integration with the Oracle Environment................................................................. 1-6
1.4 How Oracle Products Use Oracle Internet Directory ............................................................ 1-6
1.4.1 Easier and More Cost-Effective Administration of Oracle Products ........................... 1-7
1.4.2 Tighter Security Through Centralized Security Policy Administration...................... 1-7
1.4.3 Integration of Multiple Directories ................................................................................... 1-8
iv
2 Understanding Oracle Internet Directory in Oracle Fusion Middleware
2.1 WebLogic Server Domain.......................................................................................................... 2-1
2.2 Oracle Internet Directory as a System Component................................................................ 2-2
2.3 Oracle Internet Directory Deployment Options..................................................................... 2-2
2.4 Middleware Home...................................................................................................................... 2-3
2.5 WebLogic Server Home ............................................................................................................. 2-3
2.6 Oracle Common Home .............................................................................................................. 2-3
2.7 Oracle Home ............................................................................................................................... 2-3
2.8 Oracle Instance ........................................................................................................................... 2-3
2.9 Oracle Enterprise Manager Fusion Middleware Control ..................................................... 2-4
2.10 Logging, Auditing, and Diagnostics ........................................................................................ 2-4
2.11 MBeans and the WebLogic Scripting Tool .............................................................................. 2-4
3 Understanding Oracle Internet Directory Concepts and Architecture
3.1 Oracle Internet Directory Architecture.................................................................................... 3-1
3.1.1 An Oracle Internet Directory Node................................................................................... 3-2
3.1.2 An Oracle Directory Server Instance ................................................................................ 3-3
3.1.3 Oracle Internet Directory Ports.......................................................................................... 3-4
3.1.4 Directory Metadata.............................................................................................................. 3-4
3.2 How Oracle Internet Directory Processes a Search Request ................................................ 3-6
3.3 Directory Entries ......................................................................................................................... 3-7
3.3.1 Distinguished Names (DNs) and Directory Information Trees (DITs) ....................... 3-7
3.3.2 Entry Caching....................................................................................................................... 3-8
3.4 Attributes ..................................................................................................................................... 3-8
3.4.1 Kinds of Attribute Information.......................................................................................... 3-9
3.4.2 Single-Valued and Multivalued Attributes .................................................................. 3-10
3.4.3 Common LDAP Attributes.............................................................................................. 3-10
3.4.4 Attribute Syntax ................................................................................................................ 3-11
3.4.5 Attribute Matching Rules ................................................................................................ 3-11
3.4.6 Attribute Options.............................................................................................................. 3-12
3.5 Object Classes ........................................................................................................................... 3-12
3.5.1 Subclasses, Superclasses, and Inheritance .................................................................... 3-12
3.5.2 Object Class Types............................................................................................................ 3-13
3.5.2.1 Structural Object Classes .......................................................................................... 3-13
3.5.2.2 Auxiliary Object Classes........................................................................................... 3-13
3.5.2.3 Abstract Object Classes............................................................................................. 3-13
3.6 Naming Contexts ..................................................................................................................... 3-14
3.7 Security ...................................................................................................................................... 3-15
3.8 Globalization Support ............................................................................................................. 3-15
3.9 Distributed Directories............................................................................................................ 3-16
3.9.1 Directory Replication ....................................................................................................... 3-16
3.9.2 Directory Partitioning ...................................................................................................... 3-17
3.10 Knowledge References and Referrals ................................................................................... 3-18
3.11 Oracle Delegated Administration Services and the Oracle Internet Directory Self-Service
Console 3-19
3.12 The Service Registry and Service to Service Authentication ............................................ 3-20
3.13 Oracle Directory Integration Platform.................................................................................. 3-20
v
3.14 Oracle Internet Directory and Identity Management......................................................... 3-21
3.14.1 About Identity Management........................................................................................... 3-21
3.14.2 Oracle Identity Management Products ......................................................................... 3-22
3.14.3 Identity Management Realms......................................................................................... 3-23
3.14.3.1 Default Identity Management Realm ..................................................................... 3-23
3.14.3.2 Identity Management Policies ................................................................................. 3-24
3.15 Resource Information .............................................................................................................. 3-24
3.15.1 Resource Type Information............................................................................................. 3-24
3.15.2 Resource Access Information.......................................................................................... 3-24
3.15.3 Location of Resource Information in the DIT............................................................... 3-25
4 Understanding Process Control of Oracle Internet Directory Components
4.1 Oracle Internet Directory Process Control Architecture ....................................................... 4-1
4.2 The ODS_PROCESS_STATUS Table........................................................................................ 4-2
4.3 Starting, Stopping, and Monitoring of Oracle Internet Directory Processes...................... 4-3
4.3.1 Oracle Internet Directory Snippet in opmn.xml.............................................................. 4-3
4.3.2 OPMN Starting Oracle Internet Directory ....................................................................... 4-4
4.3.3 OPMN Stopping of Oracle Internet Directory................................................................. 4-4
4.3.4 Process Monitoring.............................................................................................................. 4-5
4.4 Oracle Internet Directory Process Control–Best Practices .................................................... 4-5
5 Understanding Oracle Internet Directory Organization
5.1 The Directory Information Tree................................................................................................ 5-1
5.2 Planning the Overall Directory Structure................................................................................ 5-2
5.3 Planning the Names and Organization of Users and Groups.............................................. 5-3
5.3.1 Organizing Users ................................................................................................................. 5-3
5.3.2 Organizing Groups.............................................................................................................. 5-4
5.4 Migrating a DIT from a Third-Party Directory....................................................................... 5-5
6 Understanding Oracle Internet Directory Replication
6.1 Why Use Replication? ................................................................................................................ 6-2
6.2 Replication Concepts.................................................................................................................. 6-2
6.2.1 Content to be Replicated: Full or Partial .......................................................................... 6-2
6.2.2 Direction: One-Way, Two-Way, or Peer to Peer ............................................................. 6-3
6.2.3 Transport Mechanism: LDAP or Oracle Database Advanced Replication ................. 6-4
6.2.4 Directory Replication Group (DRG) Type: Single-master, Multimaster, or Fan-out. 6-4
6.2.4.1 Single-Master Replication Example........................................................................... 6-5
6.2.4.2 Multimaster Replication Example.............................................................................. 6-5
6.2.4.3 Fan-out Replication Example...................................................................................... 6-6
6.2.5 Loose Consistency Model................................................................................................... 6-6
6.2.6 How the Replication Concepts Fit Together.................................................................... 6-6
6.2.7 Multimaster Replication with Fan-Out ............................................................................ 6-7
6.3 What Kind of Replication Do You Need? ............................................................................... 6-8
Part II Basic Administration
vi
7 Getting Started With Oracle Internet Directory
7.1 Patching Your System to 11g Release 1 (11.1.1.6.0)................................................................ 7-1
7.1.1 Upgrading a Directory Replication Group ...................................................................... 7-1
7.2 Postinstallation Tasks and Information................................................................................... 7-1
7.2.1 Setting Up the Environment .............................................................................................. 7-2
7.2.2 Adding Datafiles to the OLTS_CT_STORE and OLTS_ATTRSTORE Tablespaces... 7-2
7.2.3 Changing Settings of Windows Services.......................................................................... 7-2
7.2.4 Starting and Stopping the Oracle Stack............................................................................ 7-2
7.2.5 Identifying Default URLs and Ports ................................................................................. 7-2
7.2.6 Tuning Oracle Internet Directory...................................................................................... 7-2
7.2.7 Enabling Anonymous Binds .............................................................................................. 7-3
7.2.8 Enabling Oracle Internet Directory to run on Privileged Ports .................................... 7-3
7.2.9 Verifying Oracle Database Time Zone ............................................................................ 7-3
7.3 Using Fusion Middleware Control to Manage Oracle Internet Directory ........................ 7-4
7.4 Using Oracle Directory Services Manager .............................................................................. 7-5
7.4.1 Introduction to Oracle Directory Services Manager....................................................... 7-6
7.4.1.1 Using the JAWS Screen Reader with Oracle Directory Services Manager........... 7-6
7.4.1.2 Non-Super User Access to Oracle Directory Services Manager ............................ 7-6
7.4.1.3 Single Sign-On Integration with Oracle Directory Services Manager .................. 7-6
7.4.2 Configuring ODSM for SSO Integration .......................................................................... 7-7
7.4.3 Configuring the SSO Server for ODSM Integration ....................................................... 7-8
7.4.4 Configuring the Oracle HTTP Server for ODSM-SSO Integration............................... 7-9
7.4.5 Invoking Oracle Directory Services Manager.................................................................. 7-9
7.4.6 Connecting to the Server from Oracle Directory Services Manager ......................... 7-10
7.4.6.1 Logging in to the Directory Server from Oracle Directory Services Manager . 7-10
7.4.6.2 Logging Into the Directory Server from Oracle Directory Services Manager Using
SSL 7-11
7.4.6.2.1 SSL No Authentication ...................................................................................... 7-11
7.4.6.2.2 SSL Server Only Authentication ...................................................................... 7-11
7.4.6.2.3 SSL Client and Server Authentication............................................................. 7-12
7.4.6.3 Connecting to an SSO-Enabled Directory as an SSO-Authenticated User........ 7-12
7.4.7 Configuring Oracle Directory Services Manager Session Timeout........................... 7-12
7.4.8 Configuring Oracle HTTP Server to Support Oracle Directory Services Manager in an
Oracle WebLogic Server Cluster 7-13
7.5 Using Command-Line Utilities to Manage Oracle Internet Directory............................. 7-13
7.5.1 Using Standard LDAP Utilities ...................................................................................... 7-14
7.5.2 Using Bulk Tools............................................................................................................... 7-14
7.5.3 Using WLST....................................................................................................................... 7-14
7.6 Basic Tasks for Configuring and Managing Oracle Internet Directory .......................... 7-15
8 Managing Oracle Internet Directory Instances
8.1 Introduction to Managing Oracle Internet Directory Instances .......................................... 8-1
8.1.1 The Instance-Specific Configuration Entry...................................................................... 8-1
8.1.2 Creating the First Oracle Internet Directory Instance .................................................... 8-2
8.1.3 Creating Additional Oracle Internet Directory Instances.............................................. 8-3
8.1.4 Registering an Oracle Instance or Component with the WebLogic Server................. 8-4
vii
8.2 Managing Oracle Internet Directory Components by Using Fusion Middleware Control ....
8-4
8.2.1 Viewing Active Server Information by Using Fusion Middleware Control .............. 8-5
8.2.2 Starting the Oracle Internet Directory Server by Using Fusion Middleware Control ......
8-5
8.2.3 Stopping the Oracle Internet Directory Server by Using Fusion Middleware Control.....
8-5
8.2.4 Restarting the Oracle Internet Directory Server by Using Fusion Middleware Control ..
8-5
8.3 Managing Oracle Internet Directory Components by Using opmnctl................................ 8-5
8.3.1 Creating an Oracle Internet Directory Component by Using opmnctl ...................... 8-6
8.3.2 Registering an Oracle Instance by Using opmnctl.......................................................... 8-7
8.3.3 Unregistering an Oracle Instance by Using opmnctl ..................................................... 8-7
8.3.4 Updating the Component Registration of an Oracle Instance by Using opmnctl ..... 8-8
8.3.5 Deleting an Oracle Internet Directory Component by Using opmnctl........................ 8-9
8.3.6 Viewing Active Server Instance Information by Using opmnctl.................................. 8-9
8.3.7 Starting the Oracle Internet Directory Server by Using opmnctl ................................. 8-9
8.3.8 Stopping the Oracle Internet Directory Server by Using opmnctl ............................ 8-10
8.3.9 Restarting the Oracle Internet Directory Server by Using opmnctl .......................... 8-10
8.3.10 Changing the Oracle Database Information in opmn.xml ......................................... 8-10
8.4 Starting an Instance of the Replication Server by Using OIDCTL.................................... 8-10
9 Managing System Configuration Attributes
9.1 Introduction to Managing System Configuration Attributes............................................... 9-1
9.1.1 What are Configuration Attributes? ................................................................................. 9-1
9.1.2 What are Operational Attributes? ..................................................................................... 9-2
9.1.3 Attributes of the Instance-Specific Configuration Entry ............................................... 9-2
9.1.4 Attributes of the DSA Configuration Entry..................................................................... 9-9
9.1.5 Attributes of the DSE........................................................................................................ 9-11
9.2 Managing System Configuration Attributes by Using Fusion Middleware Control .... 9-12
9.2.1 Configuring Server Properties........................................................................................ 9-12
9.2.2 Configuring Shared Properties....................................................................................... 9-14
9.2.3 Configuring Other Parameters ....................................................................................... 9-15
9.3 Managing System Configuration Attributes by Using WLST........................................... 9-15
9.4 Managing System Configuration Attributes by Using LDAP Tools................................ 9-17
9.4.1 Setting System Configuration Attributes by Using ldapmodify .............................. 9-17
9.4.2 Listing Configuration Attributes with ldapsearch ...................................................... 9-18
9.5 Managing System Configuration Attributes by Using ODSM Data Browser ................ 9-19
9.5.1 Navigating to the Instance-Specific Configuration Entry........................................... 9-19
9.5.2 Navigating to the DSA Configuration Entry ................................................................ 9-19
9.5.3 Navigating to the DSE Root ............................................................................................ 9-19
10 Managing IP Addresses
10.1 Introduction to Managing IP Addresses .............................................................................. 10-1
10.2 Configuring an IP Address for IP V6, Cold Failover Cluster, or Virtual IP.................... 10-1
viii
11 Managing Naming Contexts
11.1 Introduction to Managing Naming Contexts ...................................................................... 11-1
11.2 Searching for Published Naming Contexts .......................................................................... 11-1
11.3 Publishing a Naming Context................................................................................................ 11-2
12 Managing Accounts and Passwords
12.1 Introduction to Managing Accounts and Passwords ......................................................... 12-1
12.2 Managing Accounts and Passwords by Using Command-Line Tools ............................ 12-2
12.2.1 Enabling and Disabling Accounts by Using Command-Line Tools ......................... 12-2
12.2.2 Unlocking Accounts by Using Command-Line Tools ................................................ 12-3
12.2.3 Forcing a Password Change by Using Command-Line Tools ................................... 12-3
12.3 Managing Accounts and Passwords by Using the Self-Service Console......................... 12-3
12.3.1 Enabling and Disabling Accounts by Using the Oracle Internet Directory Self-Service
Console 12-4
12.3.2 Unlocking Accounts by Using the Oracle Internet Directory Self-Service Console 12-4
12.3.3 Resetting Your Own Password by Using the Oracle Internet Directory Self-Service
Console 12-4
12.4 Listing and Unlocking Locked Accounts by Using Oracle Directory Services Manager.........
12-5
12.5 Changing the Superuser Password by Using Fusion Middleware Control.................... 12-5
12.6 Creating Another Account With Superuser Privileges ...................................................... 12-5
12.7 Managing the Superuser Password by Using ldapmodify................................................ 12-6
12.8 Changing the Oracle Internet Directory Database Password ........................................... 12-6
12.9 Resetting the Superuser Password ........................................................................................ 12-7
12.10 Changing the Password for the EMD Administrator Account......................................... 12-7
12.11 Changing the Password for the ODSSM Administrator Account.................................... 12-8
13 Managing Directory Entries
13.1 Introduction to Managing Directory Entries ....................................................................... 13-1
13.2 Managing Entries by Using Oracle Directory Services Manager ..................................... 13-1
13.2.1 Displaying Entries by Using Oracle Directory Services Manager............................. 13-2
13.2.2 Searching for Entries by Using Oracle Directory Services Manager......................... 13-3
13.2.3 Importing Entries from an LDIF File by Using Oracle Directory Services Manager.........
13-5
13.2.4 Exporting Entries to an LDIF File by Using Oracle Directory Services Manager ... 13-5
13.2.5 Viewing Attributes for a Specific Entry by Using Oracle Directory Services Manager....
13-5
13.2.6 Adding a New Entry by Using Oracle Directory Services Manager ........................ 13-6
13.2.7 Deleting an Entry or Subtree by Using Oracle Directory Services Manager ........... 13-8
13.2.8 Adding an Entry by Copying an Existing Entry in Oracle Directory Services Manager..
13-8
13.2.9 Modifying an Entry by Using Oracle Directory Services Manager........................... 13-9
13.3 Managing Entries by Using LDAP Command-Line Tools .............................................. 13-11
13.3.1 Listing All the Attributes in the Directory by Using ldapsearch............................. 13-11
13.3.2 Listing Operational Attributes by Using ldapsearch ................................................ 13-11
13.3.3 Attribute Case in ldapsearch Output........................................................................... 13-12
13.3.4 Adding a User Entry by Using ldapadd...................................................................... 13-12
ix
13.3.5 Modifying a User Entry by Using ldapmodify .......................................................... 13-13
13.3.6 Adding an Attribute Option by Using ldapmodify................................................... 13-13
13.3.7 Deleting an Attribute Option by Using ldapmodify ................................................. 13-13
13.3.8 Searching for Entries with Attribute Options by Using ldapsearch ....................... 13-13
14 Managing Dynamic and Static Groups
14.1 Introduction to Managing Dynamic and Static Groups..................................................... 14-1
14.1.1 Static Groups ..................................................................................................................... 14-2
14.1.1.1 Schema Elements for Creating Static Groups........................................................ 14-2
14.1.2 Dynamic Groups............................................................................................................... 14-2
14.1.2.1 Cached and Uncached Dynamic Groups............................................................... 14-2
14.1.2.2 Enhancements to and Limitations of Dynamic Groups in Oracle Internet Directory
14-3
14.1.2.3 Schema Elements for Creating a Dynamic Group................................................ 14-4
14.1.3 Hierarchies......................................................................................................................... 14-7
14.1.4 Querying Group Entries .................................................................................................. 14-7
14.1.5 orclMemberOf Attribute.................................................................................................. 14-7
14.1.6 When to Use Each Kind of Group.................................................................................. 14-8
14.2 Managing Group Entries by Using Oracle Directory Services Manager......................... 14-9
14.2.1 Creating Static Group Entries by Using Oracle Directory Services Manager.......... 14-9
14.2.2 Modifying a Static Group Entry by Using Oracle Directory Services Manager.... 14-10
14.2.3 Creating Dynamic Group Entries by Using Oracle Directory Services Manager . 14-11
14.2.4 Modifying a Dynamic Group Entry by Using Oracle Directory Services Manager ..........
14-13
14.3 Managing Group Entries by Using the Command Line .................................................. 14-14
14.3.1 Creating a Static Group Entry by Using ldapadd...................................................... 14-14
14.3.2 Modifying a Static Group by Using ldapmodify ....................................................... 14-15
14.3.3 Creating a Dynamic Group Entry by Using ldapadd ............................................... 14-15
14.3.3.1 Creating a Cached Dynamic Group Using labeledURI Attribute.................... 14-15
14.3.3.2 Creating an Uncached Dynamic List Using labeledURI Attribute .................. 14-16
14.3.3.3 Creating a Dynamic Group Using CONNECT BY String ................................. 14-16
14.3.4 Modifying a Dynamic Group by Using ldapmodify................................................. 14-17
15 Performing Bulk Operations
15.1 Introduction to Performing Bulk Operations ...................................................................... 15-1
15.2 Changing Server Mode ........................................................................................................... 15-3
15.2.1 Setting the Server Mode by Using Fusion Middleware Control ............................... 15-3
15.2.2 Setting the Server Mode by Using ldapmodify............................................................ 15-3
15.3 Loading Data Into the Schema by Using bulkload ............................................................. 15-3
15.3.1 Importing an LDIF File by Using bulkload................................................................... 15-6
15.3.2 Loading Data in Incremental or Append Mode By Using bulkload......................... 15-8
15.3.3 Performing Index Verification By Using bulkload ...................................................... 15-8
15.3.4 Re-Creating Indexes By Using bulkload ....................................................................... 15-8
15.3.5 Recovering Data After a Load Failure By Using bulkload ........................................ 15-8
15.4 Modifying Attributes of a Large Number of Entries By Using bulkmodify................... 15-8
15.4.1 Adding a Description for All Entries Under a Specified Naming Context.............. 15-9
x
15.4.2 Adding an Attribute for Entries Under a Specified Naming Context Matching a Filter..
15-9
15.4.3 Replacing an Attribute for All Entries Under a Specified Naming Context............ 15-9
15.5 Deleting Entries or Attributes of Entries by Using bulkdelete........................................ 15-10
15.5.1 Deleting All Entries Under a Specified Naming Context by Using bulkdelete..... 15-10
15.5.2 Deleting Entries Under Naming Contexts and Making them Tombstone Entries 15-10
15.6 Dumping Data from Oracle Internet Directory to a File by Using ldifwrite................. 15-11
15.6.1 Dumping Part of a Specified Naming Context to an LDIF File ............................... 15-11
15.6.2 Dumping Entries Under a Specified Naming Context to an LDIF File .................. 15-11
15.7 Creating and Dropping Indexes from Existing Attributes by Using catalog................ 15-12
15.7.1 Changing a Searchable Attribute into a Non-searchable Attribute ........................ 15-13
15.7.2 Changing a Non-searchable Attribute into a Searchable Attribute ........................ 15-13
16 Managing Collective Attributes
16.1 Introduction to Collective Attributes.................................................................................... 16-1
16.1.1 The RFC Definition and Oracle Extensions ................................................................. 16-1
16.1.1.1 RFC 3671 ..................................................................................................................... 16-1
16.1.1.2 Oracle Extensions ...................................................................................................... 16-1
16.1.2 Defining the Collective Attribute Subentry .................................................................. 16-2
16.1.3 Using subtreeSpecification .............................................................................................. 16-2
16.1.3.1 Base .............................................................................................................................. 16-2
16.1.3.2 Minimum and Maximum......................................................................................... 16-2
16.1.3.3 Specific Exclusions..................................................................................................... 16-3
16.1.4 Overriding a Collective Attribute .................................................................................. 16-4
16.2 Managing Collective Attributes by Using the Command Line......................................... 16-4
16.2.1 Adding a Subentry by Using ldapadd........................................................................... 16-4
16.2.2 Modifying a Subentry by Using ldapmodify ............................................................... 16-4
17 Managing Alias Entries
17.1 Introduction to Managing Alias Entries............................................................................... 17-1
17.2 Adding an Alias Entry ............................................................................................................ 17-2
17.3 Searching the Directory with Alias Entries.......................................................................... 17-3
17.3.1 Searching the Base with Alias Entries ........................................................................... 17-3
17.3.2 Searching One-Level with Alias Entries........................................................................ 17-4
17.3.3 Searching a Subtree with Alias Entries ......................................................................... 17-5
17.4 Modifying Alias Entries ......................................................................................................... 17-6
17.5 Interpreting Messages Related to Alias Dereferencing...................................................... 17-6
18 Managing Attribute Uniqueness Constraint Entries
18.1 Introduction to Managing Attribute Uniqueness Constraint Entries ............................. 18-1
18.2 Specifying Attribute Uniqueness Constraint Entries.......................................................... 18-3
18.2.1 Specifying Multiple Attribute Names in an Attribute Uniqueness Constraint....... 18-4
18.2.2 Specifying Multiple Subtrees in an Attribute Uniqueness Constraint...................... 18-4
18.2.3 Specifying Multiple Scopes in an Attribute Uniqueness Constraint......................... 18-5
18.2.4 Specifying Multiple Object Classes in an Attribute Uniqueness Constraint ........... 18-5
xi
18.2.5 Specifying Multiple Subtrees, Scopes, and Object Classes in an Attribute Uniqueness
Constraint 18-6
18.3 Managing an Attribute Uniqueness Constraint Entry by Using Oracle Directory Services
Manager 18-6
18.3.1 Creating an Attribute Uniqueness Constraint Entry by Using ODSM..................... 18-6
18.3.2 Modifying an Attribute Uniqueness Constraint Entry by Using ODSM ................. 18-7
18.3.3 Deleting an Attribute Uniqueness Constraint Entry by Using ODSM..................... 18-7
18.4 Managing an Attribute Uniqueness Constraint Entry by Using the Command Line ... 18-7
18.4.1 Creating Attribute Uniqueness Across a Directory by Using Command-Line Tools .......
18-7
18.4.2 Creating Attribute Uniqueness Across One Subtree by Using Command-Line Tools .....
18-8
18.4.3 Creating Attribute Uniqueness Across One Object Class by Using Command-Line
Tools 18-9
18.4.4 Modifying Attribute Uniqueness Constraint Entries by Using Command-Line Tools ....
18-9
18.4.5 Deleting Attribute Uniqueness Constraint Entries by Using Command-Line Tools ........
18-9
18.4.6 Enabling and Disabling Attribute Uniqueness by Using Command-Line Tools.. 18-10
19 Managing Knowledge References and Referrals
19.1 Introduction to Managing Knowledge References and Referrals .................................... 19-1
19.2 Configuring Smart Referrals .................................................................................................. 19-3
19.3 Configuring Default Referrals................................................................................................ 19-3
20 Managing Directory Schema
20.1 Introduction to Managing Directory Schema ...................................................................... 20-1
20.1.1 Where Schema Information is Stored in the Directory ............................................... 20-2
20.1.2 Understanding Object Classes ........................................................................................ 20-2
20.1.2.1 About Adding Object Classes.................................................................................. 20-3
20.1.2.2 About Modifying Object Classes............................................................................. 20-4
20.1.2.3 About Deleting Object Classes ................................................................................ 20-4
20.1.3 Understanding Attributes .............................................................................................. 20-4
20.1.3.1 About Adding Attributes ......................................................................................... 20-5
20.1.3.2 About Modifying Attributes.................................................................................... 20-5
20.1.3.3 About Deleting Attributes........................................................................................ 20-5
20.1.3.4 About Indexing Attributes ...................................................................................... 20-6
20.1.4 Extending the Number of Attributes Associated with Entries .................................. 20-7
20.1.4.1 Extending the Number of Attributes before Creating Entries in the Directory 20-8
20.1.4.2 Extending the Number of Attributes for Existing Entries by Creating an Auxiliary
Object Class 20-8
20.1.4.3 Extending the Number of Attributes for Existing Entries by Creating a Content
Rule 20-9
20.1.4.4 Rules for Creating and Modifying Content Rules ................................................ 20-9
20.1.4.5 Schema Enforcement When Using Content Rules.............................................. 20-10
20.1.4.6 Searches for Object Classes Listed in Content Rules.......................................... 20-10
20.1.5 Understanding Attribute Aliases ................................................................................ 20-11
xii
20.1.6 Object Identifier Support in LDAP Operations.......................................................... 20-11
20.2 Managing Directory Schema by Using Oracle Directory Services Manager ................ 20-12
20.2.1 Searching for Object Classes by Using Oracle Directory Services Manager.......... 20-12
20.2.2 Adding Object Classes by Using Oracle Directory Services Manager.................... 20-13
20.2.3 Modifying Object Classes by Using Oracle Directory Services Manager............... 20-13
20.2.4 Deleting Object Classes by Using Oracle Directory Services Manager .................. 20-14
20.2.5 Viewing Properties of Object Classes by Using Oracle Directory Services Manager........
20-14
20.2.6 Adding a New Attribute by Using Oracle Directory Services Manager ................ 20-15
20.2.7 Modifying an Attribute by Using Oracle Directory Services Manager .................. 20-15
20.2.8 Deleting an Attribute by Using Oracle Directory Services Manager...................... 20-16
20.2.9 Viewing All Directory Attributes by Using Oracle Directory Services Manager . 20-16
20.2.10 Searching for Attributes by Using Oracle Directory Services Manager ................. 20-16
20.2.11 Adding an Index to a New Attribute by Using Oracle Directory Services Manager ........
20-17
20.2.12 Adding an Index to an Existing Attribute by Using Oracle Directory Services Manager
20-17
20.2.13 Dropping an Index from an Attribute by Using Oracle Directory Services Manager.......
20-17
20.2.14 Creating a Content Rule by Using Oracle Directory Services Manager................. 20-17
20.2.15 Modifying a Content Rule by Using Oracle Directory Services Manager ............. 20-18
20.2.16 Viewing Matching Rules by Using Oracle Directory Services Manager................ 20-18
20.2.17 Viewing Syntaxes by Using Oracle Directory Services Manager ............................ 20-19
20.3 Managing Directory Schema by Using the Command Line............................................ 20-19
20.3.1 Viewing the Schema by Using ldapsearch.................................................................. 20-19
20.3.2 Adding a New Object Class by Using Command-Line Tools.................................. 20-20
20.3.3 Adding a New Attribute to an Auxiliary or User-Defined Object Class by Using
Command-Line Tools 20-20
20.3.4 Modifying Object Classes by Using Command-Line Tools ..................................... 20-21
20.3.5 Adding and Modifying Attributes by Using ldapmodify ........................................ 20-21
20.3.6 Deleting Attributes by Using ldapmodify .................................................................. 20-21
20.3.7 Indexing an Attribute by Using ldapmodify.............................................................. 20-22
20.3.8 Dropping an Index from an Attribute by Using ldapmodify .................................. 20-22
20.3.9 Indexing an Attribute by Using the Catalog Management Tool ............................. 20-23
20.3.10 Adding a New Attribute With Attribute Aliases by Using the Command Line... 20-23
20.3.11 Adding or Modifying Attribute Aliases in Existing Attributes by Using the Command
Line 20-23
20.3.12 Deleting Attribute Aliases by Using the Command Line......................................... 20-24
20.3.13 Using Attribute Aliases with LDAP Commands....................................................... 20-24
20.3.13.1 Using Attribute Aliases with ldapsearch ............................................................. 20-25
20.3.13.2 Using Attribute Aliases with ldapadd ................................................................. 20-25
20.3.13.3 Using Attribute Aliases with ldapmodify ........................................................... 20-26
20.3.13.4 Using Attribute Aliases with ldapdelete.............................................................. 20-26
20.3.13.5 Using Attribute Aliases with ldapmoddn ........................................................... 20-26
20.3.14 Managing Content Rules by Using Command-Line Tools ...................................... 20-27
20.3.15 Viewing Matching Rules by Using ldapsearch .......................................................... 20-28
20.3.16 Viewing Syntaxes by Using by Using ldapsearch ..................................................... 20-28
xiii
21 Configuring Referential Integrity
21.1 Introduction to Configuring Referential Integrity .............................................................. 21-1
21.2 Enabling Referential Integrity by Using Fusion Middleware Control ............................ 21-2
21.3 Disabling Referential Integrity by Using Fusion Middleware Control ........................... 21-2
21.4 Enabling Referential Integrity by Using the Command Line............................................ 21-2
21.5 Configuring Specific Attributes for Referential Integrity by Using the Command Line .........
21-3
21.6 Disabling Referential Integrity by Using the Command Line........................................... 21-3
21.7 Detecting and Correcting Referential Integrity Violations................................................ 21-3
22 Managing Auditing
22.1 Introduction to Auditing ........................................................................................................ 22-1
22.1.1 Configuring the Audit Store ........................................................................................... 22-2
22.1.2 Oracle Internet Directory Audit Configuration ........................................................... 22-2
22.1.3 Replication and Oracle Directory Integration Platform Audit Configuration ........ 22-3
22.1.4 Audit Record Fields.......................................................................................................... 22-3
22.1.5 Audit Record Storage....................................................................................................... 22-3
22.1.6 Generating Audit Reports ............................................................................................... 22-4
22.2 Managing Auditing by Using Fusion Middleware Control.............................................. 22-4
22.3 Managing Auditing by Using WLST .................................................................................... 22-5
22.4 Managing Auditing from the Command Line .................................................................... 22-5
22.4.1 Viewing Audit Configuration from the Command Line............................................ 22-5
22.4.2 Configuring Oracle Internet Directory Auditing from the Command Line............ 22-6
22.4.3 Enabling Replication and Oracle Directory Integration Platform Auditing............ 22-6
23 Managing Logging
23.1 Introduction to Logging.......................................................................................................... 23-1
23.1.1 Features of Oracle Internet Directory Debug Logging................................................ 23-2
23.1.2 Interpreting Log Messages .............................................................................................. 23-2
23.1.2.1 Log Messages for Specified LDAP Operations ..................................................... 23-3
23.1.2.2 Log Messages Not Associated with Specified LDAP Operations ...................... 23-3
23.1.2.3 Example: Trace Messages in Oracle Internet Directory Server Log File ........... 23-3
23.2 Managing Logging by Using Fusion Middleware Control ............................................... 23-4
23.2.1 Viewing Log Files by Using Fusion Middleware Control.......................................... 23-5
23.2.2 Configuring Logging by Using Fusion Middleware Control .................................... 23-5
23.3 Managing Logging from the Command Line...................................................................... 23-6
23.3.1 Viewing Log Files from the Command Line ................................................................ 23-6
23.3.2 Setting Debug Logging Levels by Using the Command Line.................................... 23-6
23.3.3 Setting the Debug Operation by Using the Command Line ...................................... 23-7
23.3.4 Force Flushing the Trace Information to a Log File..................................................... 23-8
24 Monitoring Oracle Internet Directory
24.1 Introduction to Monitoring Oracle Internet Directory Server........................................... 24-1
24.1.1 Capabilities of Oracle Internet Directory Server Manageability ............................... 24-1
24.1.2 Oracle Internet Directory Server Manageability Architecture and Components ... 24-2
xiv
24.1.3 Purging of Security Events and Statistics Entries ........................................................ 24-4
24.1.4 Account Used for Accessing Server Manageability Information .............................. 24-4
24.2 Setting Up Statistics Collection by Using Fusion Middleware Control........................... 24-4
24.2.1 Configuring Directory Server Statistics Collection by Using Fusion Middleware
Control 24-4
24.2.2 Configuring a User for Statistics Collection by Using Fusion Middleware Control ........
24-5
24.3 Viewing Statistics Information with Fusion Middleware Control ................................... 24-6
24.3.1 Viewing Statistics Information on the Oracle Internet Directory Home Page ........ 24-6
24.3.2 Viewing Information on the Oracle Internet Directory Performance Page ............. 24-6
24.4 Viewing Statistics Information from the Oracle Directory Services Manager Home Page .....
24-7
24.5 Setting Up Statistics Collection by Using the Command-Line.......................................... 24-7
24.5.1 Configuring Health, General, and Performance Statistics Attributes....................... 24-8
24.5.2 Configuring Security Events Tracking .......................................................................... 24-8
24.5.3 Configuring User Statistics Collection from the Command Line.............................. 24-9
24.5.4 Configuring Event Levels from the Command Line .................................................. 24-9
24.5.5 Configuring a User for Statistics Collection by Using the Command Line ........... 24-10
24.6 Viewing Information with the OIDDIAG Tool ................................................................. 24-10
25 Backing Up and Restoring Oracle Internet Directory
Part III Advanced Administration: Security
26 Configuring Secure Sockets Layer (SSL)
26.1 Introduction to Configuring Secure Sockets Layer (SSL) ................................................. 26-1
26.1.1 Supported Cipher Suites.................................................................................................. 26-2
26.1.2 Supported Protocol Versions .......................................................................................... 26-2
26.1.3 SSL Authentication Modes.............................................................................................. 26-3
26.1.4 Limitations of the Use of SSL in11g Release 1 (11.1.1) ................................................ 26-4
26.1.5 Oracle Wallets ................................................................................................................... 26-4
26.1.6 Other Components and SSL ........................................................................................... 26-4
26.1.7 SSL Interoperability Mode............................................................................................... 26-5
26.1.8 StartTLS .............................................................................................................................. 26-5
26.2 Configuring SSL by Using Fusion Middleware Control.................................................... 26-5
26.2.1 Creating a Wallet by Using Fusion Middleware Control ........................................... 26-6
26.2.2 Configuring SSL Parameters by Using Fusion Middleware Control ....................... 26-7
26.2.3 Setting SSL Parameters with Fusion Middleware Control......................................... 26-8
26.3 Configuring SSL by Using WLST .......................................................................................... 26-8
26.4 Configuring SSL by Using LDAP Commands .................................................................. 26-10
26.5 Testing SSL Connections by Using Oracle Directory Services Manager ....................... 26-11
26.6 Testing SSL Connections From the Command Line......................................................... 26-11
26.6.1 Testing SSL With Encryption Only .............................................................................. 26-12
26.6.2 Testing SSL With Server Authentication..................................................................... 26-12
26.6.3 Testing SSL With Client and Server Authentication ................................................. 26-12
26.7 Configuring SSL Interoperability Mode............................................................................. 26-13
xv
27 Configuring Data Privacy
27.1 Introduction to Table Space Encryption............................................................................... 27-1
27.2 Enabling and Disabling Table Space Encryption ................................................................ 27-1
27.3 Introduction to Using Database Vault With Oracle Internet Directory........................... 27-3
27.4 Configuring Oracle Database Vault to Protect Oracle Internet Directory Data ............. 27-3
27.4.1 Registering Oracle Database Vault................................................................................. 27-3
27.4.2 Adding a Database Vault Realm and Policies for Oracle Internet Directory .......... 27-4
27.4.3 Managing Oracle Database Vault Configuration for Oracle Internet Directory ..... 27-5
27.4.4 Deleting Database Vault Policies For Oracle Internet Directory ............................... 27-5
27.4.5 Disabling Oracle Database Vault for the Oracle Internet Directory Database ........ 27-5
27.5 Best Practices for Using Database Vault with Oracle Internet Directory ........................ 27-5
27.6 Introduction to Sensitive Attributes...................................................................................... 27-6
27.6.1 List of Sensitive Attributes .............................................................................................. 27-6
27.6.2 Encryption Algorithm for Sensitive Attributes............................................................ 27-6
27.7 Configuring Privacy of Retrieved Sensitive Attributes...................................................... 27-7
27.8 Introduction to Hashed Attributes........................................................................................ 27-7
27.9 Configuring Hashed Attributes............................................................................................. 27-8
27.9.1 Configuring Hashed Attributes by Using Fusion Middleware Control .................. 27-8
27.9.2 Configuring Hashed Attributes by Using ldapmodify............................................... 27-8
28 Managing Password Policies
28.1 Introduction to Managing Password Policies...................................................................... 28-1
28.1.1 What a Password Policy Is .............................................................................................. 28-1
28.1.2 Steps Required to Create and Apply a Password Policy ............................................ 28-2
28.1.3 Fine-Grained Password Policies..................................................................................... 28-2
28.1.4 Default Password Policy.................................................................................................. 28-4
28.1.5 Password Policy Attributes............................................................................................. 28-5
28.1.6 Password Policy-Related Operational Attributes ........................................................ 28-7
28.1.7 Directory Server Verification of Password Policy Information ................................. 28-7
28.1.8 Password Policy Error Messages.................................................................................... 28-8
28.1.9 Releases Before 10g (10.1.4.0.1) ....................................................................................... 28-8
28.2 Managing Password Policies by Using Oracle Directory Services Manager.................. 28-9
28.2.1 Viewing Password Policies by Using Oracle Directory Services Manager.............. 28-9
28.2.2 Modifying Password Policies by Using Oracle Directory Services Manager.......... 28-9
28.2.3 Creating a Password Policy and Assigning it to a Subtree by Using ODSM ........ 28-10
28.3 Managing Password Policies by Using Command-Line Tools....................................... 28-11
28.3.1 Viewing Password Policies by Using Command-Line Tools................................... 28-11
28.3.2 Creating a New Password Policy by Using Command-Line Tools ........................ 28-11
28.3.3 Applying a Password Policy to a Subtree by Using Command-Line Tools .......... 28-11
28.3.4 Setting Password Policies by Using Command-Line Tools ..................................... 28-12
29 Managing Directory Access Control
29.1 Introduction to Managing Directory Access Control ........................................................ 29-1
29.1.1 Access Control Management Constructs ...................................................................... 29-2
29.1.1.1 Access Control Policy Points (ACPs)...................................................................... 29-3
29.1.1.2 The orclACI Attribute for Prescriptive Access Control ....................................... 29-3
xvi
29.1.1.3 The orclEntryLevelACI Attribute for Entry-Level Access Control.................... 29-3
29.1.1.4 Security Groups ......................................................................................................... 29-4
29.1.1.4.1 ACP groups ......................................................................................................... 29-4
29.1.1.4.2 Privilege Groups................................................................................................. 29-4
29.1.1.4.3 Users in Both Types of Groups......................................................................... 29-5
29.1.1.4.4 Constraints on Security Groups ....................................................................... 29-5
29.1.1.4.5 Overview: Granting Access Rights to a Group.............................................. 29-5
29.1.1.4.6 How the Directory Server Computes Security Group Membership .......... 29-5
29.1.1.4.7 Example: Computing Security Group Membership ..................................... 29-5
29.1.2 Access Control Information Components..................................................................... 29-7
29.1.2.1 Object: To What Are You Granting Access?.......................................................... 29-7
29.1.2.2 Subject: To Whom Are You Granting Access? ...................................................... 29-8
29.1.2.2.1 Entity .................................................................................................................... 29-8
29.1.2.2.2 Bind Mode ........................................................................................................... 29-9
29.1.2.2.3 Bind IP Filter ....................................................................................................... 29-9
29.1.2.2.4 Added Object Constraint ................................................................................ 29-10
29.1.2.3 Operations: What Access Are You Granting? ..................................................... 29-10
29.1.3 Access Level Requirements for LDAP Operations.................................................... 29-11
29.1.4 How ACL Evaluation Works ........................................................................................ 29-11
29.1.4.1 Precedence Rules Used in ACL Evaluation......................................................... 29-12
29.1.4.1.1 Precedence at the Entry Level ........................................................................ 29-13
29.1.4.1.2 Precedence at the Attribute Level .................................................................. 29-13
29.1.4.2 Use of More Than One ACI for the Same Object ................................................ 29-13
29.1.4.3 Exclusionary Access to Directory Objects............................................................ 29-14
29.1.4.4 ACL Evaluation For Groups .................................................................................. 29-15
29.2 Managing Access Control by Using Oracle Directory Services Manager ..................... 29-15
29.2.1 Viewing an ACP by Using Oracle Directory Services Manager.............................. 29-15
29.2.2 Adding an ACP by Using Oracle Directory Services Manager ............................... 29-16
29.2.2.1 Task 1: Specify the Entry That Will Be the ACP.................................................. 29-16
29.2.2.2 Task 2: Configure Structural Access Items .......................................................... 29-16
29.2.2.3 Task 3: Configure Content Access Items.............................................................. 29-18
29.2.2.4 Delete a Structural or Content Access Item ......................................................... 29-19
29.2.3 Modifying an ACP by Using Access Control Management in ODSM ................... 29-19
29.2.4 Adding or Modifying an ACP by Using the Data Browser in ODSM.................... 29-21
29.2.5 Setting or Modifying Entry-Level Access by Using the Data Browser in ODSM . 29-21
29.3 Managing Access Control by Using Command-Line Tools ............................................ 29-21
29.3.1 Restricting the Kind of Entry a User Can Add........................................................... 29-22
29.3.2 Setting Up an Inheritable ACP by Using ldapmodify............................................... 29-23
29.3.3 Setting Up Entry-Level ACIs by Using ldapmodify.................................................. 29-23
29.3.4 Using Wildcards in an LDIF File with ldapmodify ................................................... 29-23
29.3.5 Selecting Entries by DN ................................................................................................. 29-24
29.3.6 Using Attribute and Subject Selectors ......................................................................... 29-24
29.3.7 Granting Read-Only Access .......................................................................................... 29-25
29.3.8 Granting Selfwrite Access to Group Entries .............................................................. 29-25
29.3.9 Defining a Completely Autonomous Policy to Inhibit Overriding Policies .......... 29-25
xvii
30 Managing Password Verifiers
30.1 Introduction to Password Verifiers for Authenticating to the Directory ........................ 30-1
30.1.1 Userpassword Verifiers and Authentication to the Directory ................................... 30-2
30.1.2 Hashing Schemes for Creating Userpassword Verifiers............................................. 30-3
30.2 Managing Hashing Schemes for Password Verifiers for Authenticating to the Directory......
30-3
30.3 Introduction to Password Verifiers for Authenticating to Components ......................... 30-4
30.3.1 About Password Verifiers for Authenticating to Oracle Components..................... 30-4
30.3.2 Attributes for Storing Password Verifiers for Authenticating to Oracle Components .....
30-5
30.3.3 Default Verifiers for Oracle Components ..................................................................... 30-7
30.3.4 How Password Verification Works for an Oracle Component.................................. 30-8
30.4 Managing Password Verifier Profiles for Oracle Components by Using ODSM........... 30-9
30.5 Managing Password Verifier Profiles for Components by Using Command-Line Tools........
30-10
30.5.1 Viewing a Password Verifier Profile by Using Command-Line Tools................... 30-10
30.5.2 Example: Modifying a Password Verifier Profile by Using Command-Line Tools...........
30-10
30.6 Introduction to Generating Verifiers by Using Dynamic Parameters ........................... 30-10
30.7 Configuring Oracle Internet Directory to Generate Dynamic Password Verifiers ...... 30-11
31 Delegating Privileges for Oracle Identity Management
31.1 Introduction to Delegating Privileges for Oracle Identity Management ....................... 31-1
31.1.1 How Delegation Works ................................................................................................... 31-1
31.1.2 Delegation in an Oracle Fusion Middleware Environment ....................................... 31-2
31.1.3 About the Default Configuration ................................................................................... 31-3
31.1.4 Privileges for Administering the Oracle Technology Stack ....................................... 31-3
31.2 Delegating Privileges for User and Group Management .................................................. 31-4
31.2.1 How Privileges Are Granted for Managing User and Group Data ......................... 31-4
31.2.2 Default Privileges for Managing User Data.................................................................. 31-5
31.2.2.1 Creating Users for a Realm ...................................................................................... 31-5
31.2.2.2 Modifying Attributes of a User ............................................................................... 31-5
31.2.2.3 Deleting a User........................................................................................................... 31-6
31.2.2.4 Delegating User Administration ............................................................................. 31-6
31.2.3 Default Privileges for Managing Group Data .............................................................. 31-7
31.2.3.1 Creating Groups ........................................................................................................ 31-7
31.2.3.2 Modifying the Attributes of Groups....................................................................... 31-7
31.2.3.3 Deleting Groups......................................................................................................... 31-7
31.2.3.4 Delegating Group Administration.......................................................................... 31-8
31.3 Delegating Privileges for Deployment of Oracle Components......................................... 31-8
31.3.1 How Deployment Privileges Are Granted.................................................................... 31-9
31.3.2 Oracle Application Server Administrators ................................................................... 31-9
31.3.3 User Management Application Administrators......................................................... 31-10
31.3.4 Trusted Application Administrators ........................................................................... 31-10
31.4 Delegating Privileges for Component Run Time.............................................................. 31-10
31.4.1 Default Privileges for Reading and Modifying User Passwords............................. 31-11
31.4.2 Default Privileges for Comparing User Passwords................................................... 31-12
xviii
31.4.3 Default Privileges for Comparing Password Verifiers.............................................. 31-12
31.4.4 Default Privileges for Proxying on Behalf of End Users........................................... 31-13
31.4.5 Default Privileges for Managing the Oracle Context ................................................ 31-13
31.4.6 Default Privileges for Reading Common User Attributes........................................ 31-13
31.4.7 Default Privileges for Reading Common Group Attributes .................................... 31-14
31.4.8 Default Privileges for Reading the Service Registry.................................................. 31-14
31.4.9 Default Privileges for Administering the Service Registry ...................................... 31-14
32 Managing Authentication
32.1 Introduction to Authentication ............................................................................................. 32-1
32.1.1 Direct Authentication....................................................................................................... 32-1
32.1.2 Indirect Authentication.................................................................................................... 32-3
32.1.3 External Authentication................................................................................................... 32-4
32.1.4 Simple Authentication and Security Layer (SASL) ..................................................... 32-5
32.2 Configuring Certificate Authentication Method by Using Fusion Middleware Control ........
32-6
32.3 Configuring SASL Authentication by Using Fusion Middleware Control..................... 32-6
32.4 Configuring Certificate Authentication Method by Using Command-Line Tools ........ 32-6
32.5 Configuring SASL Authentication by Using the Command Line .................................... 32-7
32.6 Introduction to Anonymous Binds........................................................................................ 32-8
32.7 Managing Anonymous Binds ................................................................................................ 32-8
32.7.1 Managing Anonymous Binds by Using Fusion Middleware Control ..................... 32-8
32.7.2 Managing Anonymous Binds by Using the Command Line..................................... 32-8
Part IV Advanced Administration: Managing Directory Deployment
33 Planning, Deploying and Managing Realms
33.1 Introduction to Planning, Deploying and Managing Realms ........................................... 33-1
33.1.1 Planning the Identity Management Realm ................................................................... 33-1
33.1.2 Identity Management Realms in an Enterprise Deployment..................................... 33-3
33.1.2.1 Single Identity Management Realm in the Enterprise ......................................... 33-3
33.1.2.2 Multiple Identity Management Realms in the Enterprise................................... 33-4
33.1.3 Identity Management Realms in a Hosted Deployment ............................................ 33-4
33.1.4 Identity Management Realm Implementation in Oracle Internet Directory ........... 33-5
33.1.5 Default Directory Information Tree and the Identity Management Realm ............. 33-6
33.2 Customizing the Default Identity Management Realm ..................................................... 33-8
33.2.1 Steps to Update the Existing User and Group Search Base...................................... 33-10
33.2.2 Set up an Additional Search Base................................................................................. 33-11
33.2.3 Refresh Oracle Single Sign-On...................................................................................... 33-12
33.2.4 Reconfigure Provisioning Profiles................................................................................ 33-12
33.3 Creating Additional Identity Management Realms for Hosted Deployments............. 33-13
34 Tuning and Sizing Oracle Internet Directory
35 Managing Garbage Collection
35.1 Introduction to Managing Garbage Collection.................................................................... 35-1
xix
35.1.1 Components of the Oracle Internet Directory Garbage Collection Framework ..... 35-1
35.1.1.1 Garbage Collection Plug-in ...................................................................................... 35-1
35.1.1.2 Background Database Processes ............................................................................. 35-2
35.1.1.2.1 Garbage Collectors ............................................................................................. 35-2
35.1.1.2.2 Predefined Garbage Collectors......................................................................... 35-2
35.1.1.2.3 Oracle Internet Directory Statistics Collector................................................. 35-3
35.1.2 How Oracle Internet Directory Garbage Collection Works ....................................... 35-3
35.1.3 Garbage Collector Entries and the Oracle Internet Directory Statistics Collector Entry ..
35-4
35.1.4 Change Log Purging ........................................................................................................ 35-5
35.2 Set Oracle Database Time Zone for Garbage Collection ................................................... 35-6
35.3 Modifying Oracle Internet Directory Garbage Collectors ................................................. 35-7
35.3.1 Modifying a Garbage Collector by Using Oracle Directory Services Manager....... 35-7
35.3.2 Modifying a Garbage Collector by Using Command-Line Tools.............................. 35-7
35.3.2.1 Example 1: Modifying a Garbage Collector........................................................... 35-7
35.3.2.2 Example 2: Disabling a Garbage Collector Change Log...................................... 35-7
35.3.3 Modifying the Oracle Internet Directory Statistics Collector..................................... 35-8
35.4 Managing Logging for Oracle Internet Directory Garbage Collectors ............................ 35-8
35.4.1 Enabling Logging for Oracle Internet Directory Garbage Collectors ....................... 35-8
35.4.2 Disabling Logging for Oracle Internet Directory Garbage Collectors ...................... 35-9
35.4.3 Monitoring Garbage Collection Logging ...................................................................... 35-9
35.5 Configuring Time-Based Change Log Purging................................................................... 35-9
36 Migrating Data from Other Data Repositories
36.1 Introduction to Migrating Data from Other Data Repositories ....................................... 36-1
36.2 Migrating Data from LDAP-Compliant Directories........................................................... 36-1
36.2.1 Migrating LDAP Data by Using an LDIF File and bulkload...................................... 36-2
36.2.2 Migrating LDAP Data by Using syncProfileBootstrap Directly................................ 36-4
36.2.3 Migrating LDAP Data by Using an LDIF File and syncProfileBootstrap................. 36-5
36.2.4 Migrating LDAP Data by Using syncProfileBootstrap, bulkload, and LDIF Files . 36-5
36.2.5 Migrating LDAP Data by Using the Oracle Directory Integration Platform Server..........
36-6
36.3 Migrating User Data from Application-Specific Repositories........................................... 36-6
36.3.1 The Intermediate Template File...................................................................................... 36-7
36.3.2 Reconciling Data in Application Repository with Data Already in the Directory.. 36-7
36.3.3 Tasks For Migrating Data from Application-Specific Repositories........................... 36-7
36.3.3.1 Task 1: Create an Intermediate Template File....................................................... 36-7
36.3.3.1.1 Example: User Entries in an Intermediate Template File............................. 36-8
36.3.3.1.2 Attributes in User Entries.................................................................................. 36-9
36.3.3.2 Task 2: Run the OID Migration Tool ...................................................................... 36-9
37 Configuring Server Chaining
37.1 Introduction to Configuring Server Chaining ..................................................................... 37-1
37.1.1 Supported External Servers............................................................................................. 37-2
37.1.2 Integrated Oracle Products.............................................................................................. 37-2
37.1.2.1 Oracle Single Sign-On............................................................................................... 37-2
xx
37.1.2.2 Enterprise User Security........................................................................................... 37-2
37.1.3 Supported Operations...................................................................................................... 37-3
37.1.4 Server Chaining with Replication ................................................................................. 37-3
37.2 Configuring Server Chaining................................................................................................. 37-3
37.2.1 Configuring Server Chaining by Using Oracle Directory Services Manager .......... 37-4
37.2.2 Configuring Server Chaining from the Command Line............................................. 37-5
37.3 Creating Server Chaining Configuration Entries................................................................ 37-5
37.3.1 Configuration Entry Attributes ...................................................................................... 37-6
37.3.2 Requirements for User and Group Containers ............................................................ 37-8
37.3.3 Attribute Mapping............................................................................................................ 37-8
37.3.4 Active Directory Example ............................................................................................... 37-9
37.3.5 Active Directory with SSL Example............................................................................. 37-10
37.3.6 Active Directory with New Attributes Example........................................................ 37-11
37.3.7 Oracle Directory Server Enterprise Edition and Sun Java System Directory Server
(iPlanet) Example 37-11
37.3.8 Oracle Directory Server Enterprise Edition and Sun Java System Directory Server
(iPlanet) with SSL Example 37-12
37.3.9 eDirectory Example ........................................................................................................ 37-13
37.3.10 eDirectory with SSL Example ...................................................................................... 37-14
37.4 Debugging Server Chaining................................................................................................. 37-14
37.5 Configuring an Active Directory Plug-in for Password Change Notification ............. 37-14
38 Managing DIT Masking
38.1 Configuring Masking .............................................................................................................. 38-1
38.2 Masking Examples................................................................................................................... 38-1
38.2.1 Restricting Access by Container Name ......................................................................... 38-1
38.2.2 Restricting Access by Entry Data ................................................................................... 38-2
Part V Advanced Administration: Directory Replication
39 Setting Up Replication
39.1 Introduction to Setting Up Replication................................................................................. 39-2
39.1.1 Replication Transport Mechanisms ............................................................................... 39-2
39.1.2 Replication Setup Methods ............................................................................................. 39-2
39.1.2.1 Replication Wizard.................................................................................................... 39-2
39.1.2.2 Command Line Tools................................................................................................ 39-3
39.1.2.3 Database Copy Procedure ........................................................................................ 39-3
39.1.3 Bootstrap Rules ................................................................................................................. 39-3
39.1.4 The Replication Agreement............................................................................................. 39-4
39.1.5 Other Replication Configuration Attributes................................................................. 39-5
39.1.6 Replication Process and Architecture............................................................................ 39-5
39.1.7 Rules for Configuring LDAP-Based Replication.......................................................... 39-5
39.1.8 Replication Security.......................................................................................................... 39-6
39.1.8.1 Authentication and the Directory Replication Server.......................................... 39-6
39.1.8.2 Secure Sockets Layer (SSL) and Oracle Internet Directory Replication ............ 39-7
39.1.9 LDAP Replication Filtering for Partial Replication ..................................................... 39-7
39.1.9.1 Included and Excluded Naming Contexts in LDAP Replication Filtering....... 39-7
xxi
39.1.9.2 Attributes that Control Naming Contexts ............................................................. 39-8
39.1.9.3 Rules for LDAP Replication Filtering..................................................................... 39-8
39.1.9.4 Examples of LDAP Replication Filtering ............................................................... 39-8
39.1.9.5 Rules for Managing Naming Contexts and Attributes ...................................... 39-12
39.1.9.6 Optimization of Partial Replication Naming Context for Better Performance............
39-13
39.2 Converting an Advanced Replication-Based Agreement to an LDAP-Based Agreement .....
39-15
39.3 Setting Up an LDAP-Based Replication Agreement by Using the Replication Wizard...........
39-16
39.4 Testing Replication by Using Oracle Directory Services Manager................................. 39-17
39.5 Setting Up an LDAP-Based Replication by Using the Command Line ......................... 39-17
39.5.1 Copying Your LDAP Data by Using ldifwrite and bulkload................................... 39-18
39.5.2 Setting Up an LDAP-Based Replica with Customized Settings .............................. 39-18
39.5.2.1 Setting Up an LDAP-Based Replica by Using Automatic Bootstrapping....... 39-19
39.5.2.1.1 Task 1: Identify and Start the Directory Server on the Supplier Node..... 39-19
39.5.2.1.2 Task 2: Create the New Consumer Node by Installing Oracle Internet
Directory 39-19
39.5.2.1.3 Task 3: Back Up the Metadata from the New Consumer Node ................ 39-19
39.5.2.1.4 Task 4: Add an LDAP-Based Replica by Using the Replication Environment
Management Tool 39-20
39.5.2.1.5 Task 5: On the Consumer, Configure the Consumer Replica for Automatic
Bootstrapping 39-21
39.5.2.1.6 Task 6: Optional: Change Default Replication Parameters........................ 39-22
39.5.2.1.7 Task 7: Ensure the Directory Replication Servers are Started ................... 39-22
39.5.2.1.8 Task 8: If Oracle Delegated Administration Services or Oracle Single Sign-On
Are Installed on the New Node, Restore Their Entries in the New Node's
Directory 39-23
39.5.2.2 Setting Up an LDAP-Based Replica by Using the ldifwrite Tool ..................... 39-24
39.5.2.2.1 Task 1: Start the Directory Server on Both the Supplier and the Consumer
Nodes 39-25
39.5.2.2.2 Task 2: Back Up the Metadata from the New Consumer Node ................ 39-25
39.5.2.2.3 Task 3: Change the Directory Server at the Supplier to Read-Only Mode ...........
39-26
39.5.2.2.4 Task 4: Add an LDAP-Based Replica by Using the Replication Environment
Management Tool 39-26
39.5.2.2.5 Task 5: Back Up the Naming Contexts to Be Replicated ............................ 39-26
39.5.2.2.6 Task 6: Change the Directory Server at the Supplier to Read/Write Mode.........
39-27
39.5.2.2.7 Task 7: Load the Data on the New Consumer ............................................. 39-27
39.5.2.2.8 Task 8: If Oracle Delegated Administration Services or Oracle Single Sign-On
Are Installed on the New Node, Restore Their Entries in the New Node's
Directory 39-27
39.5.2.2.9 Task 9: Optional: Change Default Replication Parameters........................ 39-28
39.5.2.2.10 Task 10: Ensure the Directory Replication Servers are Started ................. 39-28
39.5.3 Password Policy and Fan-out Replication .................................................................. 39-28
39.5.4 Deleting an LDAP-Based Replica................................................................................. 39-29
39.5.4.1 Task 1: Stop the Directory Replication Server on the Node to be Deleted...... 39-29
39.5.4.2 Task 2: Delete the Replica from the Replication Group..................................... 39-30
xxii
39.6 Setting Up a Multimaster Replication Group with Fan-Out ........................................... 39-30
40 Setting Up Replication Failover
40.1 Introduction to Replication Failover..................................................................................... 40-1
40.1.1 Limitations and Warnings for Replication Failover .................................................... 40-4
40.1.2 Determining Which Type of Replication Failover to Use........................................... 40-5
40.2 Performing a Stateless Replication Failover ........................................................................ 40-5
40.2.1 Task 1: Stop all Directory Replication Server on related Nodes ............................... 40-5
40.2.2 Task 2: Break Old Replication Agreement and Set up New Agreement.................. 40-6
40.2.3 Task 3: Save Last Change Number................................................................................. 40-6
40.2.4 Task 4: Compare and Reconcile New Supplier and Consumer................................. 40-6
40.2.5 Task 5: Update Last Applied Change Number of New Agreement ......................... 40-6
40.2.6 Task 6: Clean Up Old Agreement on Old Supplier ..................................................... 40-7
40.2.7 Task 7: Start All Directory Replication Server on related Nodes............................... 40-7
40.3 Performing a Time-Based Replication Failover .................................................................. 40-8
40.3.1 Task 1: Configure Change Log Garbage Collection Object on New Supplier......... 40-8
40.3.2 Task 2: Save Last Change Number from New Supplier ............................................. 40-8
40.3.3 Task 3: Enable Change Log Regeneration on New Supplier...................................... 40-8
40.3.4 Task 4: Wait for the Desired Time Period to Elapse .................................................... 40-9
40.3.5 Task 5: Stop all Directory Replication Servers on Related Nodes ............................. 40-9
40.3.6 Task 6: Break Old Replication Agreement and Set Up New Agreement ................. 40-9
40.3.7 Task 7: Update Last Applied Change Number of New Agreement ......................... 40-9
40.3.8 Task 8: Clean Up Old Agreement on Old Supplier ..................................................... 40-9
40.3.9 Task 9: Start All Directory Replication Servers on Related Nodes.......................... 40-10
41 Managing Replication Configuration Attributes
41.1 Introduction to Replication Configuration Attributes........................................................ 41-1
41.1.1 The Replication Configuration Container..................................................................... 41-1
41.1.2 The Replica Subentry ....................................................................................................... 41-2
41.1.3 The Replication Agreement Entry.................................................................................. 41-3
41.1.3.1 Replication Agreement Entry Attributes ............................................................... 41-3
41.1.3.2 Oracle Database Advanced Replication-Based Replication Agreements ......... 41-5
41.1.3.3 LDAP Replication Agreements ............................................................................... 41-5
41.1.3.4 Two-Way LDAP Replication Agreements............................................................. 41-5
41.1.4 The Replication Naming Context Container Entry ..................................................... 41-6
41.1.5 The Replication Naming Context Object Entry............................................................ 41-6
41.1.6 The Replication Configuration Set ................................................................................. 41-8
41.1.7 Examples of Replication Configuration Objects in the Directory.............................. 41-9
41.2 Configuring Replication Configuration Attributes by Using Fusion Middleware Control ....
41-12
41.2.1 Configuring Attributes on the Shared Properties, Replication Tab ........................ 41-12
41.2.2 Configuring Replication Wizard Parameters ............................................................. 41-13
41.3 Managing Replication Configuration Attributes From the Command Line................. 41-14
42 Managing and Monitoring Replication
42.1 Introduction to Managing and Monitoring Replication .................................................... 42-1
xxiii
42.1.1 Modifying What Is to Be Replicated in LDAP-Based Partial Replication................ 42-2
42.1.2 Managing Worker Threads ............................................................................................. 42-2
42.1.3 Change Logs in Directory Replication........................................................................... 42-3
42.1.4 The Human Intervention Queue ................................................................................... 42-3
42.1.4.1 Managing the Queues............................................................................................... 42-3
42.1.4.2 Queue Statistics.......................................................................................................... 42-4
42.1.4.3 The Number of Entries the Human Intervention Queue Tools Can Process ... 42-4
42.1.5 Pilot Mode.......................................................................................................................... 42-4
42.1.6 Conflict Resolution in Oracle Replication .................................................................... 42-4
42.1.6.1 Levels at Which Replication Conflicts Occur ........................................................ 42-5
42.1.6.2 Automatic Conflict Resolution ................................................................................ 42-6
42.1.6.3 How Automated Conflict Resolution Works ........................................................ 42-6
42.2 Managing and Monitoring Replication by Using ODSM and Fusion Middleware Control ...
42-7
42.2.1 Enabling or Disabling Change Log Generation by Using Fusion Middleware Control ...
42-7
42.2.2 Viewing the Local Change Logs by Using Oracle Directory Services Manager ..... 42-8
42.2.3 Viewing and Modifying Replica Naming Context Objects ........................................ 42-8
42.2.4 Viewing or Modifying a Replication Setup by Using the Replication Wizard........ 42-9
42.2.5 Deleting an LDAP-Based Replication Agreement by Using the Replication Wizard ......
42-10
42.2.6 Configure Replication Attributes by Using Fusion Middleware Control.............. 42-11
42.2.7 Activating or Inactivating a Replication Server by Using Fusion Middleware Control...
42-12
42.2.8 Configuring the Replication Debug Level by Using Fusion Middleware Control 42-12
42.2.9 Configuring Replica Details by Using Fusion Middleware Control....................... 42-13
42.2.10 Viewing Queue Statistics by Using Fusion Middleware Control............................ 42-13
42.2.11 Managing Changelog Processing by Using Fusion Middleware Control.............. 42-14
42.2.12 Monitoring Conflict Resolution Messages by Using Fusion Middleware Control............
42-14
42.3 Managing and Monitoring Replication by Using the Command Line .......................... 42-14
42.3.1 Enabling and Disabling Change Log Generation by Using the Command Line .. 42-15
42.3.2 Viewing Change Logs by Using ldapsearch............................................................... 42-15
42.3.3 Configuring Attributes of the Replica Subentry by Using ldapmodify ................. 42-16
42.3.4 Specifying Pilot Mode for a Replica by Using remtool............................................. 42-17
42.3.5 Configuring Replication Agreement Attributes by Using ldapmodify.................. 42-17
42.3.6 Modifying Replica Naming Context Object Parameters by Using ldapmodify.... 42-18
42.3.7 Configuring Attributes of the Replication Configuration Set by Using ldapmodify ........
42-21
42.3.8 Monitoring Conflict Resolution Messages by Using the Command Line.............. 42-22
42.3.9 Managing the Human Intervention Queue ............................................................... 42-24
42.3.10 Monitoring Replication Progress in a Directory Replication Group by Using remtool
-pthput 42-25
42.3.11 Viewing Queue Statistics and Verifying Replication by Using remtool ............... 42-26
42.3.12 Managing the Number of Entries the Human Intervention Queue Tools Can Process....
42-27
42.3.13 Changing the Replication Administrator's Password for Advanced Replication 42-27
42.4 Comparing and Reconciling Inconsistent Data by Using oidcmprec ............................ 42-28
xxiv
42.4.1 Conflict Scenarios ........................................................................................................... 42-29
42.4.2 Operations Supported by oidcmprec........................................................................... 42-29
42.4.3 Output from oidcmprec................................................................................................. 42-30
42.4.4 How oidcmprec Works.................................................................................................. 42-31
42.4.5 Setting the Source and Destination Directories.......................................................... 42-31
42.4.6 Selecting the DIT for the Operation ............................................................................. 42-32
42.4.7 Selecting the Attributes for the Operation .................................................................. 42-32
42.4.8 Controlling Change Log Generation............................................................................ 42-33
42.4.9 Using a Text or XML Parameter File............................................................................ 42-33
42.4.10 Including Directory Schema.......................................................................................... 42-34
42.4.11 Overriding Predefined Conflict Resolution Rules..................................................... 42-34
42.4.12 Using the User-Defined Compare and Reconcile Operation ................................... 42-35
42.4.13 Known Limitations of the oidcmprec Tool ................................................................. 42-35
Part VI Advanced Administration: Directory Plug-ins
43 Configuring a Customized Password Policy Plug-In
43.1 Introduction to Configuring a Customized Password Policy Plug-in............................. 43-1
43.2 Installing, Configuring, and Enabling a Customized Password Policy Plug-in............. 43-2
43.2.1 Loading and Registering the PL/SQL Program .......................................................... 43-2
43.2.2 Coding the Password Policy Plug-in ............................................................................. 43-3
43.2.3 Debugging the Password Policy Plug-in....................................................................... 43-3
43.2.4 Contents of Sample PL/SQL Package pluginpkg.sql.................................................. 43-4
44 Developing Plug-ins for the Oracle Internet Directory Server
44.1 Introduction to Developing Plug-ins for the Oracle Internet Directory Server.............. 44-1
44.1.1 Passing Options to the JVM ........................................................................................... 44-2
44.1.2 Supported Languages for Server Plug-ins .................................................................... 44-2
44.1.3 Server Plug-in Prerequisites............................................................................................ 44-3
44.1.4 Server Plug-in Benefits..................................................................................................... 44-3
44.1.5 Guidelines for Designing Plug-ins ................................................................................. 44-3
44.1.6 The Server Plug-in Framework....................................................................................... 44-4
44.1.7 LDAP Operations and Timings Supported by the Directory..................................... 44-4
44.1.7.1 Pre-Operation Server Plug-ins................................................................................. 44-4
44.1.7.2 Post-Operation Server Plug-ins ............................................................................... 44-5
44.1.7.3 When-Operation Server Plug-ins ............................................................................ 44-5
44.1.7.4 When_Replace-Operation Server Plug-ins ............................................................ 44-5
44.1.8 Using Plug-ins in a Replication Environment .............................................................. 44-5
44.2 Creating a Plug-in .................................................................................................................... 44-6
44.3 Registering a Plug-in From the Command Line ................................................................. 44-6
44.3.1 Creating a Plug-in Configuration Entry........................................................................ 44-6
44.3.2 Adding a Plug-in Configuration Entry by Using Command-Line Tools................. 44-8
44.4 Managing Plug-ins by Using Oracle Directory Services Manager and Oracle Enterprise
Manager Fusion Middleware Control 44-9
44.4.1 Creating a New Plug-in by Using Oracle Directory Services Manager.................... 44-9
44.4.2 Registering a Plug-in by Using Oracle Directory Services Manager ...................... 44-10
44.4.3 Editing a Plug-in by Using Oracle Directory Services Manager.............................. 44-10
xxv
44.4.4 Deleting a Plug-in by Using Oracle Directory Services Manager............................ 44-10
44.4.5 Managing JVM Options by Using Oracle Enterprise Manager Fusion Middleware
Control 44-11
45 Configuring a Customized External Authentication Plug-in
45.1 Introduction to Configuring a Customized External Authentication Plug-in ............... 45-1
45.2 Installing, Configuring, and Enabling the External Authentication Plug-in .................. 45-2
45.3 Debugging the External Authentication Plug-in................................................................. 45-3
45.4 Creating the PL/SQL Package oidexaup.sql ....................................................................... 45-4
Part VII Appendixes
A Differences Between 10g and 11g
A.1 Instance Creation and Process Management ........................................................................ A-1
A.2 Locations of Configuration Attributes.................................................................................... A-3
A.3 Default Ports ............................................................................................................................... A-5
A.4 Enabling Server Debugging ..................................................................................................... A-6
A.5 Command Line Tools ................................................................................................................ A-6
A.6 Path Names................................................................................................................................. A-7
A.7 Graphical User Interfaces ......................................................................................................... A-7
A.8 Audit ............................................................................................................................................ A-7
A.9 Referential Integrity................................................................................................................... A-8
A.10 Server Chaining.......................................................................................................................... A-8
A.11 Replication .................................................................................................................................. A-8
A.12 Oracle Directory Integration Platform.................................................................................... A-8
A.13 Oracle Single Sign-On and Oracle Delegated Administration Services ............................ A-8
A.14 Java Containers........................................................................................................................... A-9
B Managing Oracle Internet Directory Instances by Using OIDCTL
B.1 Introduction to Managing Oracle Internet Directory by Using OIDCTL.......................... B-1
B.2 Creating and Starting an Oracle Internet Directory Server Instance by Using OIDCTL B-3
B.3 Stopping an Oracle Internet Directory Server Instance by Using OIDCTL ...................... B-3
B.4 Starting an Oracle Internet Directory Server Instance by Using OIDCTL ........................ B-4
B.5 Viewing Status Information by Using OIDCTL .................................................................... B-4
B.6 Deleting an Oracle Internet Directory Server Instance by Using OIDCTL ....................... B-4
C Setting Up Oracle Database Advanced Replication-Based Replication
C.1 Introduction to Setting up Oracle Database Advanced Replication-Based Replication . C-1
C.1.1 Database Version Compatibility....................................................................................... C-1
C.1.2 Advanced Replication Filtering for Partial Replication ................................................ C-1
C.1.2.1 Excluded Naming Contexts ....................................................................................... C-1
C.1.2.2 Rules for Advanced Replication Filtering................................................................ C-2
C.2 Setting Up Advanced Replication-Based Replication .......................................................... C-2
C.2.1 Rules for Setting Up Advanced Replication ................................................................... C-3
C.2.2 Setting Up an Advanced Replication-Based Multimaster Replication Group ......... C-4
xxvi
C.2.2.1 Task 1: Install Oracle Internet Directory on the Master Definition Site (MDS).. C-4
C.2.2.2 Task 2: Install the Oracle Internet Directory on the Remote Master Sites (RMS) .......
C-5
C.2.2.2.1 If an Existing Master is Used as a Remote Master Site ................................... C-5
C.2.2.3 Task 3: Set Up Advanced Replication for a Directory Replication Group.......... C-6
C.2.2.3.1 On All Nodes, Prepare the Oracle Net Services Environment for Replication....
C-6
C.2.2.3.2 From the MDS, Configure Advanced Replication For Directory Replication......
C-8
C.2.2.4 Task 4 (Optional): Load Data into the Directory..................................................... C-9
C.2.2.5 Task 5: Ensure that Oracle Directory Server Instances are Started on All the Nodes
C-10
C.2.2.6 Task 6: Start the Replication Servers on All Nodes in the DRG ......................... C-10
C.2.2.7 Task 7: Test Directory Replication .......................................................................... C-10
C.2.3 Adding a Node for Advanced Replication-Based Multimaster Replication ........... C-11
C.2.3.1 Prepare the Oracle Net Services Environment ..................................................... C-11
C.2.3.2 Task 1: Stop the Directory Replication Server on All Nodes .............................. C-12
C.2.3.3 Task 2: Identify a Sponsor Node and Install Oracle Internet Directory ............ C-12
C.2.3.4 Task 3: Switch the Sponsor Node to Read-Only Mode........................................ C-12
C.2.3.5 Task 4: Back up the Sponsor Node by Using ldifwrite ........................................ C-12
C.2.3.6 Task 5: Perform Advanced Replication Add Node Setup................................... C-12
C.2.3.7 Task 6: Switch the Sponsor Node to Updatable Mode ........................................ C-13
C.2.3.8 Task 7: Start the Directory Replication Server on All Nodes Except the New Node .
C-13
C.2.3.9 Task 8: Load Data into the New Node by Using bulkload ................................. C-14
C.2.3.10 Task 9: Start the Directory Server on the New Node ........................................... C-14
C.2.3.11 Task 10: Start the Directory Replication Server on the New Node .................... C-14
C.2.4 Deleting a Node from a Multimaster Replication Group........................................... C-14
C.2.4.1 Task 1: Stop the Directory Replication Server on All Nodes .............................. C-15
C.2.4.2 Task 2: Stop All Oracle Internet Directory Processes in the Node to be Deleted........
C-15
C.2.4.3 Task 3: Delete the Node from the Master Definition Site .................................... C-15
C.2.4.4 Task 4: Start the Directory Replication Server on All Nodes .............................. C-15
D How Replication Works
D.1 Features of Oracle Database Advanced Replication-Based Replication ........................... D-1
D.2 Architecture for Oracle Database Advanced Replication-Based Replication ................... D-2
D.3 Architecture of LDAP-Based Replication............................................................................... D-4
D.4 LDAP Replica States.................................................................................................................. D-5
D.5 The Replication Process ............................................................................................................ D-8
D.5.1 How the Multimaster Replication Process Adds a New Entry to a Consumer......... D-8
D.5.2 How the Multimaster Replication Process Deletes an Entry ....................................... D-9
D.5.3 How the Multimaster Replication Process Modifies an Entry..................................... D-9
D.5.4 How the Multimaster Replication Process Modifies a Relative Distinguished Name......
D-10
D.5.5 How the Multimaster Replication Process Modifies a Distinguished Name .......... D-11
xxvii
E Java Server Plug-in Developer's Reference
E.1 Advantages of Java Plug-ins .................................................................................................... E-1
E.2 Setting Up a Java Plug-in.......................................................................................................... E-1
E.3 Java Plug-in API ........................................................................................................................ E-2
E.3.1 Communication Between the Server and Plug-in.......................................................... E-3
E.3.2 Java Plug-in Structure ........................................................................................................ E-3
E.3.3 PluginDetail......................................................................................................................... E-4
E.3.3.1 Server............................................................................................................................. E-4
E.3.3.2 LdapBaseEntry............................................................................................................. E-4
E.3.3.3 LdapOperation............................................................................................................. E-5
E.3.3.3.1 AddLdapOperation.............................................................................................. E-6
E.3.3.3.2 BindLdapOperation ............................................................................................. E-7
E.3.3.3.3 CompareLdapOperation .................................................................................... E-7
E.3.3.3.4 DeleteLdapOperation ......................................................................................... E-7
E.3.3.3.5 ModdnLdapOperation ........................................................................................ E-8
E.3.3.3.6 ModifyLdapOperation ........................................................................................ E-9
E.3.3.3.7 SearchLdapOperation ......................................................................................... E-9
E.3.3.4 PluginFlexfield........................................................................................................... E-10
E.3.4 PluginResult ...................................................................................................................... E-11
E.3.5 ServerPlugin Interface...................................................................................................... E-11
E.3.5.1 ServerPlugin Methods for Ldapbind...................................................................... E-11
E.3.5.2 ServerPlugin Methods for Ldapcompare............................................................... E-12
E.3.5.3 ServerPlugin Methods for Ldapadd ....................................................................... E-12
E.3.5.4 ServerPlugin Methods for Ldapmodify................................................................. E-12
E.3.5.5 ServerPlugin Methods for Ldapmoddn................................................................. E-12
E.3.5.6 ServerPlugin Methods for Ldapsearch................................................................... E-12
E.3.5.7 ServerPlugin Methods for Ldapdelete ................................................................... E-12
E.4 Java Plug-in Error and Exception Handling ........................................................................ E-12
E.4.1 Run-time Exception Example ......................................................................................... E-13
E.4.2 Run-time Error Example.................................................................................................. E-13
E.4.3 PluginException Example ............................................................................................... E-13
E.5 Java Plug-in Debugging and Logging .................................................................................. E-13
E.6 Java Plug-in Examples ............................................................................................................ E-14
E.6.1 Example 1: Password Validation Plug-in...................................................................... E-14
E.6.1.1 Password Validation Plug-in Configuration Entry .............................................. E-15
E.6.1.2 Password Validation Plug-in Code Example ........................................................ E-15
E.6.2 Example 2: External Authentication Plug-in for Active Directory............................ E-16
E.6.2.1 External Authentication Plug-in Configuration Entry......................................... E-16
E.6.2.2 External Authentication Plug-in Code ................................................................... E-16
F PL/SQL Server Plug-in Developer's Reference
F.1 Designing, Creating, and Using PL/SQL Server Plug-ins................................................... F-1
F.1.1 PL/SQLPlug-in Caveats .................................................................................................... F-1
F.1.1.1 Types of PL/SQL Plug-in Operations ...................................................................... F-2
F.1.1.2 Naming PL/SQL Plug-ins.......................................................................................... F-2
F.1.2 Creating PL/SQLPlug-ins ................................................................................................. F-2
xxviii
F.1.2.1 Package Specifications for Plug-in Module Interfaces........................................... F-2
F.1.3 Compiling PL/SQLPlug-ins.............................................................................................. F-4
F.1.3.1 Dependencies .............................................................................................................. F-4
F.1.3.2 Recompiling Plug-ins ................................................................................................. F-4
F.1.4 Managing PL/SQL Plug-ins.............................................................................................. F-4
F.1.4.1 Modifying Plug-ins ..................................................................................................... F-4
F.1.4.2 Debugging Plug-ins .................................................................................................... F-4
F.1.5 Enabling and Disabling PL/SQL Plug-ins...................................................................... F-5
F.1.6 Exception Handling in a PL/SQL Plug-in ...................................................................... F-5
F.1.6.1 Error Handling............................................................................................................. F-5
F.1.6.2 Program Control Handling between Oracle Internet Directory and Plug-ins ... F-5
F.1.7 PL/SQL Plug-in LDAP API .............................................................................................. F-6
F.1.8 PL/SQL Plug-in and Database Tools............................................................................... F-6
F.1.9 PL/SQL Plug-in Security................................................................................................... F-6
F.1.10 PL/SQL Plug-in Debugging ............................................................................................. F-7
F.1.11 PL/SQL Plug-in LDAP API Specifications ..................................................................... F-7
F.1.12 Database Limitations.......................................................................................................... F-8
F.2 Examples of PL/SQL Plug-ins ................................................................................................. F-8
F.2.1 Example 1: Search Query Logging................................................................................... F-8
F.2.2 Example 2: Synchronizing Two DITs ............................................................................ F-10
F.3 Binary Support in the PL/SQLPlug-in Framework............................................................ F-12
F.3.1 Binary Operations with ldapmodify.............................................................................. F-12
F.3.2 Binary Operations with ldapadd.................................................................................... F-14
F.3.3 Binary Operations with ldapcompare ........................................................................... F-16
F.4 Database Object Types Defined ............................................................................................. F-20
F.5 Specifications for PL/SQL Plug-in Procedures ................................................................... F-21
G The LDAP Filter Definition
H The Access Control Directive Format
H.1 Schema for orclACI.................................................................................................................... H-1
H.2 Schema for orclEntryLevelACI ................................................................................................ H-2
I Globalization Support in the Directory
I.1 About Character Sets and the Directory................................................................................... I-1
I.1.1 About Unicode ...................................................................................................................... I-2
I.1.2 About Oracle and UTF-8...................................................................................................... I-2
I.1.3 Migration from UTF8 to AL32UTF8 when Upgrading Oracle Internet Directory ..... I-3
I.2 The NLS_LANG Environment Variable................................................................................... I-3
I.3 Using Non-AL32UTF8 Databases.............................................................................................. I-4
I.4 Using Globalization Support with LDIF Files ......................................................................... I-4
I.4.1 An LDIF file Containing Only ASCII Strings ................................................................... I-4
I.4.2 An LDIF file Containing UTF-8 Encoded Strings ............................................................ I-4
I.4.2.1 CASE 1: Native Strings (Non-UTF-8) ......................................................................... I-5
I.4.2.2 CASE 2: UTF-8 Strings .................................................................................................. I-5
I.4.2.3 CASE 3: BASE64 Encoded UTF-8 Strings .................................................................. I-5
xxix
I.4.2.4 CASE 4: BASE64 Encoded Native Strings.................................................................. I-5
I.5 Using Globalization Support with Command-Line LDAP Tools......................................... I-5
I.5.1 Specifying the -E Argument When Using Each Tool ...................................................... I-6
I.5.2 Examples: Using the -E Argument with Command-Line LDAP Tools........................ I-6
I.6 Setting NLS_LANG in the Client Environment ...................................................................... I-7
I.7 Using Globalization Support with Bulk Tools......................................................................... I-8
I.7.1 Using Globalization Support with bulkload .................................................................... I-8
I.7.2 Using Globalization Support with ldifwrite..................................................................... I-8
I.7.3 Using Globalization Support with bulkdelete.................................................................. I-9
I.7.4 Using Globalization Support with bulkmodify ............................................................... I-9
J Setting up Access Controls for Creation and Search Bases for Users and
Groups
J.1 Setting up Access Controls for the User Search Base and the User Creation Base .......... J-1
J.2 Setting up Access Controls for the Group Search Base and the Group Creation Base..... J-3
K Searching the Directory for User Certificates
K.1 Certificate Mapping................................................................................................................... K-1
K.2 Search Types ............................................................................................................................... K-2
L Adding a Directory Node by Using the Database Copy Procedure
L.1 Definitions.................................................................................................................................... L-1
L.2 Prerequisites ................................................................................................................................ L-1
L.3 Sponsor Directory Site Environment ....................................................................................... L-2
L.4 New Directory Site Environment ............................................................................................. L-2
L.5 Addition of a Directory Node .................................................................................................. L-2
M Oracle Authentication Services for Operating Systems
N RFCs Supported by Oracle Internet Directory
O Managing Oracle Directory Services Manager's Java Key Store
O.1 Introduction to Managing ODSM's Java Key Store .............................................................. O-1
O.2 Retrieving ODSM's Java Key Store Password ....................................................................... O-2
O.3 Listing the Contents of odsm.cer Java Key Store .................................................................. O-2
O.4 Deleting Expired Certificates ................................................................................................... O-3
O.4.1 Determining the Expiration Date of a Certificate .......................................................... O-4
O.4.2 Deleting a Certificate.......................................................................................................... O-4
P Starting and Stopping the Oracle Stack
P.1 Starting the Stack........................................................................................................................ P-1
P.2 Stopping the Stack ..................................................................................................................... P-2
xxx
Q Performing a Rolling Upgrade
Q.1 Prerequisites for Rolling Upgrade........................................................................................... Q-1
Q.2 Rolling Upgrade Instructions................................................................................................... Q-1
Q.3 Rolling Upgrade Example ........................................................................................................ Q-3
R Using the Oracle Internet Directory VM Template
R.1 Installing Operating System, Oracle Database, and Oracle Internet Directory................ R-1
R.2 Installing Oracle Internet Directory Template with an Existing Oracle VM that has Oracle
Database R-2
R.3 Registering Oracle Internet Directory for Oracle Enterprise Manager Fusion Middleware
Control and ODSM Management R-3
R.4 Using the Oracle Internet Directory OVM image in a Non-OVM Environment ............. R-3
R.5 Default Values ............................................................................................................................ R-4
S Troubleshooting Oracle Internet Directory
S.1 Problems and Solutions ............................................................................................................ S-1
S.1.1 Installation Errors ............................................................................................................... S-2
S.1.2 Oracle Database Server Errors.......................................................................................... S-2
S.1.2.1 Oracle Database Server Connection is Down.......................................................... S-2
S.1.2.2 Oracle Database Server Error Due to Interrupted Client Connection................. S-2
S.1.2.3 Oracle Database Server Error Due to Schema Modifications ............................... S-3
S.1.3 Directory Server Error Messages and Causes ................................................................ S-3
S.1.3.1 Inappropriate Authentication Error ......................................................................... S-3
S.1.3.2 Constraint Violation Error Due to Editing a User or Group or Creating a Realm......
S-3
S.1.3.3 Standard Error Messages Returned from Oracle Directory Server...................... S-4
S.1.3.4 Additional Directory Server Error Messages .......................................................... S-5
S.1.4 Getting a Core Dump and Stack Trace When Oracle Internet Directory Crashes .... S-8
S.1.5 TCP/IP Problems................................................................................................................ S-8
S.1.5.1 Do Not Use TCP-Based Monitoring of Server Availability on Windows 2003 Server
S-9
S.1.5.2 Do Not Install DaimondCS Port Explorer ............................................................... S-9
S.1.6 Troubleshooting Password Policies ................................................................................. S-9
S.1.6.1 Password Policy is Not Enforced .............................................................................. S-9
S.1.6.2 Password Policy Error Messages .............................................................................. S-9
S.1.7 Troubleshooting Directory Performance....................................................................... S-10
S.1.7.1 Poor LDAP Search Performance ............................................................................. S-10
S.1.7.2 Poor LDAP Add or Modify Performance .............................................................. S-11
S.1.7.3 Poor Oracle Database Server Performance............................................................ S-11
S.1.8 Troubleshooting Port Configuration ............................................................................. S-12
S.1.9 Troubleshooting Creating Oracle Internet Directory Component with opmnctl ... S-12
S.1.10 Troubleshooting Starting Oracle Internet Directory.................................................... S-12
S.1.10.1 Oracle Internet Directory is Down.......................................................................... S-13
S.1.10.2 Oracle Internet Directory is Read-Only.................................................................. S-14
S.1.11 Troubleshooting Starting, Stopping, and Restarting of the Directory Server.......... S-14
S.1.11.1 About the Tools for Starting, Stopping, and Restarting the Directory Server
Instance S-14
xxxi
S.1.11.2 Problems Starting, Stopping, and Restarting the Directory Server.................... S-16
S.1.11.2.1 OIDCTL or OIDMON fails................................................................................ S-16
S.1.12 Troubleshooting Oracle Internet Directory Replication ............................................. S-18
S.1.12.1 Replication Server Does Not Start........................................................................... S-19
S.1.12.2 Repository Creation Assistant Error....................................................................... S-20
S.1.12.3 Errors in Replication Bootstrap ............................................................................... S-21
S.1.12.4 Changes Are Not Replicated.................................................................................... S-23
S.1.12.5 Replication Stops Working....................................................................................... S-23
S.1.13 Troubleshooting Change Log Garbage Collection ...................................................... S-24
S.1.14 Troubleshooting Dynamic Password Verifiers ............................................................ S-25
S.1.15 Troubleshooting Oracle Internet Directory Password Wallets.................................. S-25
S.1.15.1 Oracle Internet Directory Server Does Not Start .................................................. S-25
S.1.15.2 Password Not Synchronized.................................................................................... S-26
S.1.16 Troubleshooting bulkload ............................................................................................... S-27
S.1.17 Troubleshooting bulkdelete, bulkmodify, and ldifwrite ............................................ S-28
S.1.18 Troubleshooting catalog .................................................................................................. S-28
S.1.19 Troubleshooting remtool................................................................................................. S-28
S.1.20 Troubleshooting Server Chaining .................................................................................. S-29
S.1.21 Viewing Version Information ......................................................................................... S-29
S.1.22 Troubleshooting Fusion Middleware Control and WLST.......................................... S-29
S.1.23 Troubleshooting Oracle Directory Services Manager ................................................. S-30
S.1.23.1 Cannot Invoke ODSM from Fusion Middleware Control .................................. S-30
S.1.23.2 Cannot Invoke ODSM from Fusion Middleware Control in Multiple NIC and
DHCP Enabled Environment S-31
S.1.23.3 Various Failover Issues............................................................................................. S-31
S.1.23.4 ODSM Displays an Error Message.......................................................................... S-32
S.1.23.5 Cursor Loses Focus.................................................................................................... S-33
S.2 Need More Help?..................................................................................................................... S-33
Index
xxxii
xxxiii
List of Figures
1–1 Oracle Internet Directory Overview ........................................................................................ 1-5
3–1 A Typical Oracle Internet Directory Node.............................................................................. 3-2
3–2 Oracle Directory Server Instance Architecture....................................................................... 3-4
3–3 A Directory Information Tree ................................................................................................... 3-7
3–4 Attributes of the Entry for Anne Smith ................................................................................... 3-9
3–5 Correct and Incorrect Naming Contexts............................................................................... 3-14
3–6 A Partitioned Directory........................................................................................................... 3-17
3–7 Using Knowledge References to Point to Naming Contexts............................................. 3-18
3–8 Placement of Resource Access and Resource Type Information in the DIT ................... 3-25
4–1 Oracle Internet Directory Process Control .............................................................................. 4-2
5–1 Planning the Directory Information Tree................................................................................ 5-2
6–1 A Replicated Directory............................................................................................................... 6-1
6–2 Example of Partial Replication.................................................................................................. 6-3
6–3 Example of Single-Master Replication..................................................................................... 6-5
6–4 Example of Multimaster Replication ....................................................................................... 6-5
6–5 Example of Fan-Out Replication............................................................................................... 6-6
6–6 Example of Multimaster Replication with Fan-Out............................................................... 6-8
8–1 DIT Showing Two Instance-Specific Configuration Entries................................................. 8-2
8–2 Oracle Internet Directory Process Control .............................................................................. 8-3
17–1 Alias Entries Example ............................................................................................................. 17-2
17–2 Resulting Tree when Creating the My_file.ldif ................................................................... 17-3
18–1 Example of a Directory Information Tree ............................................................................ 18-4
20–1 Location of Schema Components in Entries of Type subSchemaSubentry..................... 20-2
24–1 Architecture of Oracle Internet Directory Server Manageability...................................... 24-3
28–1 Location of Password Policy Entries..................................................................................... 28-3
28–2 pwdPolicy subentry Attributes Populated with DN of Password Policy....................... 28-3
30–1 Location of the Password Verifier Profile Entry ................................................................. 30-5
30–2 Authentication Model ............................................................................................................. 30-7
30–3 How Password Verification Works....................................................................................... 30-9
31–1 Delegation Flow in an Oracle Fusion Middleware Environment..................................... 31-2
32–1 Indirect Authentication........................................................................................................... 32-3
33–1 Example of an Identity Management Realm ....................................................................... 33-3
33–2 Enterprise Use Case: Single Identity Management Realm ................................................ 33-4
33–3 Enterprise Use Case: Multiple Identity Management Realms .......................................... 33-4
33–4 Hosted Deployment Use Case ............................................................................................... 33-5
33–5 Default Identity Management Realm.................................................................................... 33-6
35–1 Example: Garbage Collection of Change Log Entries......................................................... 35-4
35–2 Garbage Collection Entries in the DIT .................................................................................. 35-5
36–1 Using an LDIF File and bulkload .......................................................................................... 36-2
36–2 Using syncProfileBootstrap Directly..................................................................................... 36-5
36–3 Using an LDIF File and syncProfileBootstrap ..................................................................... 36-5
36–4 Using syncProfileBootstrap, bulkload, and LDIF Files ...................................................... 36-6
36–5 Using the Oracle Directory Integration Server.................................................................... 36-6
36–6 Structure of the Intermediate User File ................................................................................ 36-8
39–1 A Sample Naming Context..................................................................................................... 39-8
39–2 Naming Context Object #1...................................................................................................... 39-9
39–3 Naming Context Object #2.................................................................................................... 39-10
39–4 Result of Combining Naming Context Objects #1 and #2................................................ 39-10
39–5 Naming Context Object #3.................................................................................................... 39-11
39–6 Naming Context Object #4.................................................................................................... 39-11
39–7 Result of Combining Naming Context Objects #3 and #4................................................ 39-12
39–8 Naming Context Object #5.................................................................................................... 39-14
39–9 Naming Context Object #6.................................................................................................... 39-14
39–10 Naming Context Object #7.................................................................................................... 39-15
xxxiv
39–11 Example of Fan-Out Replication.......................................................................................... 39-31
40–1 Replication Failover Scenario................................................................................................. 40-2
40–2 Consumer and New Supplier Connected to Old Supplier by LDAP............................... 40-3
40–3 Old and New Suppliers in the Same Advanced Replication Group................................ 40-3
40–4 Failover Preserving Replica Type.......................................................................................... 40-4
40–5 Compare and Reconcile All Connected Replicas ................................................................ 40-5
41–1 Example: Multimaster Replication and Fan-Out Replication ......................................... 41-10
41–2 Example: Replication Configuration Entries for Node C................................................. 41-11
41–3 Example: Replication Configuration Entries for Node D ............................................... 41-12
44–1 Oracle Internet Directory Plug-in Framework .................................................................... 44-2
B–1 A Component with Two Instances.......................................................................................... B-2
C–1 Example of a Naming Context Container and Its Objects ................................................... C-2
D–1 Advanced Replication Process................................................................................................. D-2
D–2 LDAP Replication Process........................................................................................................ D-4
E–1 Communication Between the Server and the Java Plug-in.................................................. E-3
xxxv
List of Tables
1–1 Comparison of Online Directories and Relational Databases............................................. 1-2
3–1 An Oracle Internet Directory Node......................................................................................... 3-3
3–2 Attributes Created with Each New Entry ........................................................................... 3-10
3–3 Common LDAP Attributes.................................................................................................... 3-10
4–1 Process Control Items in the ODS_PROCESS_STATUS Table............................................ 4-3
6–1 Full or Partial Replication ......................................................................................................... 6-3
6–2 Direction of Replication ............................................................................................................ 6-3
6–3 Transport Protocols ................................................................................................................... 6-4
6–4 Types of Directory Replication Groups .................................................................................. 6-4
6–5 Types of Data Transfer Between Nodes in a Directory Replication Group ...................... 6-7
7–1 Using the Oracle Internet Directory Menu............................................................................. 7-5
8–1 Attribute Changes Requiring Update of Component Registration.................................... 8-8
9–1 Attributes of the Instance-Specific Configuration Entry...................................................... 9-3
9–2 Attributes in the DSA Configuration Entry ........................................................................... 9-9
9–3 Attributes of the DSE.............................................................................................................. 9-12
9–4 Configuration Attributes on Server Properties Page, General Tab. ................................ 9-12
9–5 Configuration Attributes on Server Properties Page, Performance Tab......................... 9-13
9–6 Configuration Attributes on Shared Properties Page, General Tab ................................ 9-14
9–7 Oracle Internet Directory-Related MBeans ......................................................................... 9-16
12–1 Configuration Attributes on Shared Properties, Change Superuser Password Tab..... 12-5
14–1 orclDynamicGroup Attributes for "Connect By" Assertions............................................ 14-5
14–2 Static and Dynamic Group Considerations ........................................................................ 14-8
17–1 Flags for Searching the Directory with Alias Entries......................................................... 17-3
17–2 Entry Alias Dereferencing Messages ................................................................................... 17-6
18–1 Attribute Uniqueness Constraint Entry............................................................................... 18-2
20–1 Attribute Aliases Used in Examples................................................................................... 20-24
20–2 Content Rule Parameters ..................................................................................................... 20-27
22–1 Oracle Internet Directory Audit Configuration Attributes............................................... 22-2
22–2 Audit Configuration Attributes in Fusion Middleware Control ..................................... 22-4
23–1 Oracle Internet Directory Log File Locations...................................................................... 23-1
23–2 Configuration Attributes on Server Properties Page, Logging Tab ................................ 23-5
23–3 Values for OrclDebugFlag ..................................................................................................... 23-7
23–4 Debug Operations................................................................................................................... 23-7
24–1 Components of Oracle Internet Directory Server Manageability.................................... 24-3
24–2 Configuration Attributes on Server Properties Page, Statistics Tab................................ 24-5
24–3 Values of orcloptracklevel ..................................................................................................... 24-8
24–4 Metrics Recorded by Each orcloptracklevel Value ............................................................ 24-9
24–5 Event Levels............................................................................................................................. 24-9
26–1 SSL Cipher Suites Supported in Oracle Internet Directory .............................................. 26-2
26–2 SSL Authentication Modes .................................................................................................... 26-3
26–3 SSL-Related Attributes in Fusion Middleware Control .................................................... 26-8
26–4 SSL Attributes........................................................................................................................ 26-11
27–1 Sensitive Attributes Stored in orclencryptedattributes ..................................................... 27-6
27–2 LDAP and Bulk Operations on Attributes in orclhashedattributes ................................ 27-7
28–1 Password Policy Attributes ................................................................................................... 28-5
28–2 Password Policy-Related Operational Attributes .............................................................. 28-7
29–1 Sample Security Groups......................................................................................................... 29-6
29–2 Types of Access ..................................................................................................................... 29-10
29–3 LDAP Operations and Access Needed to Perform Each One ........................................ 29-11
29–4 Attribute States During ACL Evaluation .......................................................................... 29-12
29–5 DNs Used in Example .......................................................................................................... 29-25
30–1 Attributes for Storing Password Verifiers in User Entries................................................ 30-5
31–1 Default Privileges Granted to Everyone and to Each User............................................... 31-3
xxxvi
31–2 Privileges for Administering the Oracle Technology Stack.............................................. 31-4
31–3 Characteristics of the Subscriber DAS Create User Group............................................... 31-5
31–4 Characteristics of the Subscriber DAS Edit User Group................................................... 31-6
31–5 Characteristics of the DAS Delete User Group................................................................... 31-6
31–6 Characteristics of the User Privilege Assignment Group ................................................. 31-6
31–7 Characteristics of the Group Creation Group..................................................................... 31-7
31–8 Characteristics of the Group Edit Group............................................................................. 31-7
31–9 Characteristics of the Group Delete Group......................................................................... 31-8
31–10 Characteristics of the Group Privilege Assignment Group.............................................. 31-8
31–11 Characteristics of the Oracle Application Server Administrators Group....................... 31-9
31–12 Characteristics of the User Management Application Administrators Group............ 31-10
31–13 Characteristics of the Trusted Application Administrators Group............................... 31-10
31–14 Characteristics of the User Security Administrators Group........................................... 31-12
31–15 Characteristics of the Authentication Services Group..................................................... 31-12
31–16 Characteristics of the Verifier Services Group.................................................................. 31-12
31–17 Characteristics of the User Proxy Privilege Group .......................................................... 31-13
31–18 Characteristics of the Oracle Context Administrators Group........................................ 31-13
31–19 Characteristics of the Common User Attributes Group.................................................. 31-13
31–20 Characteristics of the Common Group Attributes Group .............................................. 31-14
31–21 Characteristics of the Service Registry Viewers Group................................................... 31-14
31–22 Characteristics of the Common Group Attributes Group .............................................. 31-14
32–1 Configuration Attributes on Server Properties, SASL Tab............................................... 32-6
32–2 SASL Authentication Attributes........................................................................................... 32-7
32–3 SASL Authentication Modes ................................................................................................. 32-7
32–4 Orclanonymousbindsflag Value and Directory Server Behavior .................................... 32-8
33–1 Oracle Identity Management Objects................................................................................... 33-5
33–2 Customizing the Default Identity Management Realm .................................................... 33-8
36–1 Features of bulkload and syncProfileBootstrap ................................................................. 36-2
36–2 Mandatory Attributes in a User Entry................................................................................. 36-9
37–1 Configuration Entry Attributes for Server Chaining......................................................... 37-6
37–2 Default Attribute Mapping to Active Directory................................................................. 37-8
37–3 Default Attribute Mapping to Sun Java System Directory Server................................... 37-9
37–4 Default Attribute Mapping to Novell eDirectory .............................................................. 37-9
38–1 Masking Configuration Attributes....................................................................................... 38-1
39–1 Data Migration Using ldifwrite/bulkload versus Automatic Bootstrapping.............. 39-18
39–2 Command-line Parameters to OIDUpgradePasswordPolicies ...................................... 39-29
39–3 Nodes in Example of Partial Replication Deployment.................................................... 39-30
41–1 Attributes of the Replica Subentry ....................................................................................... 41-2
41–2 Attributes of the Replication Agreement Entry.................................................................. 41-3
41–3 Attributes of the Replication Naming Context Entry........................................................ 41-7
41–4 Replication Configuration Set Attributes............................................................................ 41-8
41–5 Configuration Attributes on Shared Properties, Replication Tab.................................. 41-13
41–6 Replication Schedule Attributes ......................................................................................... 41-13
42–1 Configuration Attributes Controlling Worker Threads.................................................... 42-2
42–2 Types of Replication Conflict ................................................................................................ 42-5
42–3 Properties on the Change Log Page .................................................................................... 42-8
42–4 Replication Configset Attributes on Shared Properties, Replication Tab..................... 42-11
42–5 Replication Server Status Attributes on Shared Properties, Replication Tab .............. 42-12
42–6 Replica Details on Shared Properties, Replication Tab ................................................... 42-13
42–7 Important Attributes in the Change Log........................................................................... 42-16
42–8 Replica Subentry Attributes ................................................................................................ 42-16
42–9 Replication Agreement Options ......................................................................................... 42-18
42–10 Replication Configuration Attributes ................................................................................ 42-21
42–11 Replication Debug Levels .................................................................................................... 42-22
42–12 Conflict Resolution Messages ............................................................................................. 42-23
xxxvii
44–1 Plug-in Configuration Objects and Attributes.................................................................... 44-6
A–1 New Locations of 10g Attributes ............................................................................................ A-4
A–2 Some Path Names that Changed ............................................................................................ A-7
D–1 LDAP Replica States................................................................................................................. D-6
E–1 Plug-in Names and Corresponding Paths............................................................................. E-2
E–2 The Meaning of the DN Information for Each LDAP Operation....................................... E-5
E–3 Behavior of Operation Result Code........................................................................................ E-5
E–4 Subclasses of LdapOperation and Class-specific information. .......................................... E-6
E–5 Behavior of LdapEntry Information for Each Plug-in Timing ........................................... E-6
E–6 Behavior of the AttributeName for Each Plug-in Timing................................................... E-7
E–7 Behavior of the Attribute Value for Each Plug-in Timing .................................................. E-7
E–8 Behavior of the Delete DN for Each Plug-in Timing ........................................................... E-8
E–9 Behavior of New Parent DN Information for Each Plug-in Timing.................................. E-8
E–10 Behavior of New Relative Dn Information for Each Plug-in Timing................................ E-8
E–11 Behavior of Delete Old RDN Information for Each Plug-in Timing ................................. E-9
E–12 Behavior of LdapModification Information for Each Plug-in Timing .............................. E-9
E–13 Behavior of the Required Attributes for Each Plug-in Timing........................................... E-9
E–14 Behavior of the Scope for Each Plug-in Timing.................................................................. E-10
E–15 Behavior of the SearchResultSet for Each Plug-in Timing................................................ E-10
E–16 Debug Levels for Java Plug-in Logging............................................................................... E-14
F–1 Plug-in Module Interface......................................................................................................... F-2
F–2 Operation-Based and Attribute-Based Plug-in Procedure Signatures.............................. F-2
F–3 Valid Values for the plug-in Return Code ............................................................................ F-5
F–4 Program Control Handling when a Plug-in Exception Occurs ......................................... F-5
F–5 Program Control Handling when an LDAP Operation Fails............................................. F-6
I–1 Unicode Implementations ......................................................................................................... I-2
I–2 Components of the NLS_LANG Parameter............................................................................ I-3
I–3 Examples: Using the -E Argument with Command-Line Tools .......................................... I-7
N–1 Supported RFCs ........................................................................................................................ N-1
S–1 Standard Error Messages......................................................................................................... S-4
S–2 Additional Error Messages...................................................................................................... S-6
S–3 Password Policy Violation Error Messages........................................................................... S-9
S–4 Error Messages for Dynamic Password Verifiers .............................................................. S-25
xxxviii

xxxix
Preface
Welcome to Oracle Fusion Middleware Administrator's Guide for Oracle Internet Directory.
Audience
This document is intended for anyone who performs administration tasks for the
Oracle Internet Directory. You should be familiar with either the UNIX operating
system or the Microsoft Windows operating system to understand the line-mode
commands and examples. You can perform all of the tasks through the command line
utilities, and you can perform most of the tasks through Oracle Directory Services
Manager and Oracle Enterprise Manager Fusion Middleware Control, which are
operating system-independent.
To use this document, you need some familiarity with the Lightweight Directory
Access Protocol (LDAP).
Documentation Accessibility
For information about Oracle's commitment to accessibility, visit the Oracle
Accessibility Program website at
http://www.oracle.com/pls/topic/lookup?ctx=acc&id=docacc.
Access to Oracle Support
Oracle customers have access to electronic support through My Oracle Support. For
information, visit
http://www.oracle.com/pls/topic/lookup?ctx=acc&id=info or visit
http://www.oracle.com/pls/topic/lookup?ctx=acc&id=trs if you are
hearing impaired.
Related Documents
For more information, see the following documents:
■Online help available through Oracle Directory Services Manager and Oracle
Fusion Middleware
■The Oracle Fusion Middleware and Oracle Database documentation sets,
especially:
–Oracle Fusion Middleware Installation Guide for Oracle Identity Management
–Oracle Fusion Middleware Getting Started with Oracle Identity Management
–Oracle Fusion Middleware Reference for Oracle Identity Management
xl
–Oracle Fusion Middleware Administrator's Guide for Oracle Directory Integration
Platform
–Oracle Fusion Middleware Administrator's Guide for Oracle Virtual Directory
–Oracle Fusion Middleware Application Developer's Guide for Oracle Identity
Management
–Oracle Fusion Middleware High Availability Guide
–Oracle Fusion Middleware Administrator's Guide
–Oracle Database Administrator's Guide
–Oracle Database Net Services Administrator's Guide
–Oracle Real Application Clusters Administration and Deployment Guide
–Oracle Database Advanced Replication
–Oracle Fusion Middleware Application Security Guide
–Oracle Fusion Middleware Administrator's Guide for Oracle Identity Federation
–Oracle Fusion Middleware Reference for Oracle Security Developer Tools
–Oracle Fusion Middleware Security Overview
If you are using Oracle Delegated Administration Services or Oracle Single Sign-On
10g (10.1.4.3.0) or later, please refer to the following documents in the Oracle
Application Server 10g (10.1.4.0.1) library:
■Oracle Identity Management Guide to Delegated Administration
■Oracle Application Server Single Sign-On Administrator's Guide
For additional information, see:
■Chadwick, David. Understanding X.500—The Directory. Thomson Computer Press,
1996.
■Howes, Tim and Mark Smith. LDAP: Programming Directory-enabled Applications
with Lightweight Directory Access Protocol. Macmillan Technical Publishing, 1997.
■Howes, Tim, Mark Smith and Gordon Good, Understanding and Deploying LDAP
Directory Services. Macmillan Technical Publishing, 1999.
■Internet Assigned Numbers Authority home page, http://www.iana.org for
information about object identifiers
■Internet Engineering Task Force (IETF) documentation available at:
http://www.ietf.org, especially:
■The LDAPEXT charter and LDAP drafts
■The LDAP charter and drafts
■RFC 2254, "The String Representation of LDAP Search Filters"
■RFC 1823, "The LDAP Application Program Interface"
■The OpenLDAP Community, http://www.openldap.org
Conventions
The following text conventions are used in this document:

xli
Convention Meaning
boldface Boldface type indicates graphical user interface elements associated
with an action, or terms defined in text or the glossary.
italic Italic type indicates book titles, emphasis, or placeholder variables for
which you supply particular values.
monospace Monospace type indicates commands within a paragraph, URLs, code
in examples, text that appears on the screen, or text that you enter.
xlii

xliii
What's New in Oracle Internet Directory?
This section provides a brief description of new features introduced with the latest
releases of Oracle Internet Directory, and points you to more information about each
one. It contains these topics:
■New Features Introduced with Oracle Internet Directory 11g Release 1 (11.1.1.6.0)
■New Features Introduced with Oracle Internet Directory 11g Release 1 (11.1.1.4.0)
■New Features Introduced with Oracle Internet Directory 11g Release 1 (11.1.1)
■New Features Introduced with Oracle Internet Directory 10g (10.1.4.1)
■New Features Introduced with Oracle Internet Directory 10g Release 2 (10.1.2)
New Features Introduced with Oracle Internet Directory 11g Release 1
(11.1.1.6.0)
■Transaction Support: The Oracle Internet Directory SDK now supports
transactions, as defined in RFC 5805. See Using LDAP Transactions in Oracle
Fusion Middleware Application Developer's Guide for Oracle Identity Management.
■Shared Entry Cache: The entry cache now resides in shared memory, so multiple
Oracle Internet Directory server instances on the same host can share a cache. If
the host is part of a cluster, all hosts are notified to remove an entry when it
changes on one host. Not all search types are cached, only those that benefit from
the performance improvement. Attributes for configuring the cache now reside in
the DSA configuration entry. See the Server Entry Cache section of the Oracle
Internet Directory chapter in Oracle Fusion Middleware Performance and Tuning
Guide for more information.
■Autocatalog: A new autocatalog feature is enabled by default in fresh Release 1
(11.1.1.6.0) installs. When this feature is enabled, Oracle Internet Directory
automatically invokes the catalog command to index attributes when you search
for them.
If the autocatalog feature is not enabled, and you want to use previously
uncataloged attributes in search filters, you must add them to the catalog entry, as
in previous releases. You can now use ldapmodify instead of catalog to index
an attribute. The ldapmodify command invokes catalog to perform the
operation.
See Section 20.1.3.4, "About Indexing Attributes."
■DIT Masking: You can now restrict the DIT content that is exposed in an Oracle
Internet Directory server instance. This enables you to present different views of
xliv
the DIT to different users, depending on which instance they connect to. See
Section 38, "Managing DIT Masking."
■Oracle Virtual Machine Template: The Oracle Internet Directory 11.1.1.6.0 VM
Template is a ready-to-go environment that you can quickly install and run on
Oracle VM Server or in a non-VM environment. See Appendix R, "Using the
Oracle Internet Directory VM Template."
New Features Introduced with Oracle Internet Directory 11g Release 1
(11.1.1.4.0)
■Security Enhancements
– AES encryption of sensitive attributes: The algorithm for encrypting
sensitive attributes is now AES. See "Encryption Algorithm for Sensitive
Attributes" on page 27-6.
– Support for more SHA-2 variants: Several variants of the SHA-2 hashing
algorithm are now available for protecting user passwords. See Chapter 30,
"Managing Password Verifiers."
– Account expiration based on period of inactivity: You can now expire an
account based on user inactivity. See "Password Policy Attributes" on
page 28-5.
– Access control constrained by IP address: You can create ACIs with
constraint on the IP address of the client. See "Bind IP Filter" on page 29-9 and
Appendix H, "The Access Control Directive Format."
■Oracle Directory Services Manager Capabilities
– SSO Integration: You can configure ODSM to use Oracle Access Manager 11g
or Oracle Access Manager 10g for single sign on. See "Single Sign-On
Integration with Oracle Directory Services Manager" on page 7-6.
– Unlocking locked accounts: You can list and unlock locked accounts from
ODSM. See "Listing and Unlocking Locked Accounts by Using Oracle
Directory Services Manager" on page 12-5.
– Importing entries from an LDIF file and exporting entries to an LDIF file:
You can import and export from/to an LDIF file. See "Importing Entries from
an LDIF File by Using Oracle Directory Services Manager" on page 13-5 and
"Exporting Entries to an LDIF File by Using Oracle Directory Services
Manager" on page 13-5 .
– Deleting a subtree: You can delete an entire subtree at once. "Deleting an
Entry or Subtree by Using Oracle Directory Services Manager" on page 13-8.
– Configurable session timeout: You can control the length of time before an
inactive session times out. "Configuring Oracle Directory Services Manager
Session Timeout" on page 7-12.
■LDAP Protocol Features
– Support for the "+" option: You can use this option to return operational
attributes on a search. See "Listing Operational Attributes by Using
ldapsearch" on page 13-11.
– Support for collective attributes: You can configure an attribute that is
common to multiple entries. See Chapter 16, "Managing Collective Attributes."
■Groups Features
xlv
– Support for non-cached dynamic groups: Dynamic lists are similar to
dynamic groups, but are not cached. See "Dynamic Groups" on page 14-2.
– Support for OrclMemberOf attribute: Members of some types of groups are
automatically assigned a value for this attribute. See"orclMemberOf Attribute"
on page 14-7
■Upgrade Requirement
– Rolling Upgrade of Directory Replication Groups: If multimaster replication
is configured in your existing Oracle Internet Directory environment, you
must follow the procedure in Appendix Q, "Performing a Rolling Upgrade."
■Performance and Footprint Improvements
– Improved performance: Performance enhancements have been made in
LDAP add, LDAP search, and privilege group update.
– Reduced storage footprint: Certain multi valued attributes are now stored in
one row.
– Automatic run of oidstats.sql: An administrator is no longer required to run
oidstats.sql manually. OIDMON runs it, based on the number of updates
in the database. See "Updating Database Statistics by Using oidstats.sql" in
Oracle Fusion Middleware Performance and Tuning Guide.
New Features Introduced with Oracle Internet Directory 11g Release 1
(11.1.1)
■WebLogic Server Integration: Oracle Internet Directory in 11g Release 1 (11.1.1) is
a system component that can use the WebLogic Administrative Domain for
management services.
■Fusion Middleware Control: You can manage Oracle Internet Directory by using
a graphical user interface called Oracle Enterprise Manager Fusion Middleware
Control
■Oracle Directory Services Manager: The old graphical user interface for
managing directories, Oracle Directory Manager, has been replaced by this
web-based administration tool. Use it to manage Oracle Internet Directory and
Oracle Virtual Directory. You can invoke it directly or from Oracle Enterprise
Manager Fusion Middleware Control.
■LDAP-Based Multimaster Replication: You can now use LDAP-based replication
for multimaster directory replication groups. You no longer need Oracle Database
Advanced Replication-based replication for this purpose. If you want to replicate
See Also:
■Chapter 2, "Understanding Oracle Internet Directory in Oracle
Fusion Middleware"
■Oracle Fusion Middleware Concepts
See Also: Chapter 7, "Getting Started With Oracle Internet
Directory"
See Also: Chapter 7, "Getting Started With Oracle Internet
Directory"
xlvi
Oracle Single Sign-On, however, you still must use Oracle Database Advanced
Replication-based replication.
■Improved Replication Manageability: You can set up and manage LDAP-based
replication by using the replication wizard in Oracle Enterprise Manager Fusion
Middleware Control. A separate Replication page enables you to adjust attributes
that control the replication server.
■Sizing and Tuning Wizard: You can obtain recommendations for tuning and
sizing by running the Sizing and Tuning wizard in Oracle Enterprise Manager
Fusion Middleware Control.
■Integration with Common Auditing Infrastructure: Oracle Internet Directory is
now integrated with the Oracle Fusion Middleware common audit framework.
You can configure auditing from the command line or by using Oracle Enterprise
Manager Fusion Middleware Control.
■Improvements to Referential Integrity: Referential Integrity has been completely
reimplemented. You can configure it from the command line or by using Oracle
Enterprise Manager Fusion Middleware Control.
■Updates to Password Policy Controls and Error Messages: New controls and
error messages were added to the LDAP API.
■Configuration Parameter Changes: Most configuration attributes for the LDAP
server now reside in two entries. Instance-specific attributes are in the
instance-specific configuration entry and shared attributes are in the DSA
Configuration entry. You can manage most of these from the command line or by
using Oracle Enterprise Manager Fusion Middleware Control or Oracle Directory
Services Manager.
■Improvements to Attribute and Entry Alias Support: Oracle Internet Directory
now supports several different options for dereferencing aliases in a search.
See Also: Chapter 6, "Understanding Oracle Internet Directory
Replication"
See Also: Part V, "Advanced Administration: Directory Replication"
See Also: The Oracle Internet Directory chapter in Oracle Fusion
Middleware Performance and Tuning Guide.
See Also: Chapter 22, "Managing Auditing"
See Also: Chapter 21, "Configuring Referential Integrity"
See Also:
■"Password Policies" in the "Extensions to the LDAP Protocol"
chapter in Oracle Fusion Middleware Application Developer's Guide
for Oracle Identity Management
■Chapter 28, "Managing Password Policies"
See Also: Chapter 9, "Managing System Configuration Attributes"
xlvii
■Extensible Matching in Search Filters: Oracle Internet Directory now supports
search filters of the form: attr:dn:=value. With this filter, dn attributes are
considered part of the entry for search purposes. Oracle Internet Directory does
not support extensible matching using matching rules specified in the filter.
While Oracle Internet Directory supports extensible filters, ldapsearch and the
Oracle LDAP API do not. You must use a different API, such as JNDI, to use this
type of filter.
■Support for Oracle Single Sign-On and Oracle Delegated Administration
Services 10g (10.1.4.3.0) or later: Oracle Fusion Middleware 11g Release 1 (11.1.1)
does not include Oracle Single Sign-On or Oracle Delegated Administration
Services. Oracle Internet Directory 11g Release 1 (11.1.1), however, is compatible
with Oracle Single Sign-On and Oracle Delegated Administration Services 10g
(10.1.4.3.0) or later.
New Features Introduced with Oracle Internet Directory 10g (10.1.4.1)
■Links to Procedural Information: This document contains a table of links to
important tasks.
■Identity Management Grid Control Plug-in: This new interface enables you to
monitor and manage Oracle Internet Directory, Oracle Single Sign-On, Oracle
Delegated Administration Services, and Oracle Directory Integration Platform,
using the features of the Oracle Enterprise Manager 10g Grid Control Console.
■Improved Bulk Tools: The following bulk tools have been converted into C
executables:
–bulkload
–bulkmodify
–bulkdelete
–catalog
–ldifwrite
Examples and descriptions in this document and in Oracle Fusion Middleware
Reference for Oracle Identity Management have been updated to reflect the new
features of these tools.
■Application-Specific Schema Containers: A product that adds schema to Oracle
Internet Directory can have its own subSchemaSubentry under
cn=subSchemaSubentry.
See Also: Chapter 17, "Managing Alias Entries"
See Also: "Developing Applications with Standard LDAP APIs" in
Oracle Fusion Middleware Application Developer's Guide for Oracle
Identity Management
See Also:
Chapter 15, "Performing Bulk Operations"
The chapter on Oracle Internet Directory server administration tools in Oracle
Fusion Middleware Reference for Oracle Identity Management
xlviii
■Support for Attribute Aliases: You can create user-friendly aliases for attribute
names.
■Caching of Dynamic Groups: Dynamic group members are computed when the
dynamic group is added, and the member list is kept consistent when the dynamic
group is later modified.
■Optimizing Searches for Large Group Entries: There is an additional technique
for optimizing searches by increasing the size of the entry cache instead of
disabling the entry cache.
■Referential Integrity: If you enable Referential Integrity, whenever you update an
entry in the directory, the server also updates other entries that refer to that entry.
■New Monitoring Capabilities for Server Manageability: You can enable
additional health statistics, user statistics, and security events tracking.
■New Password Policy Features: You can apply a password policy to any subtree,
or even a single entry. There are also more password policy attributes to choose
from.
■Server Chaining: This feature enables you to map entries that reside in third party
LDAP directories to part of the directory tree and access them through Oracle
Internet Directory, without synchronization or data migration.
■Paging and Sorting of LDAP Search Results: The ldapsearch command now
has a -T option for sorting and a -j option for paging.
See Also: "Introduction to Managing Directory Schema" in
Chapter 20, "Managing Directory Schema"
See Also: "Understanding Attribute Aliases" in Chapter 20,
"Managing Directory Schema"
See Also: "Dynamic Groups" in Chapter 14, "Managing Dynamic
and Static Groups"
See Also: The Oracle Internet Directory chapter in Oracle Fusion
Middleware Performance and Tuning Guide.
See Also: Chapter 21, "Configuring Referential Integrity"
See Also: Chapter 24, "Monitoring Oracle Internet Directory"
See Also: Chapter 28, "Managing Password Policies"
See Also: Chapter 37, "Configuring Server Chaining"
See Also:
The ldapsearch command-line reference in Oracle Fusion Middleware
Reference for Oracle Identity Management
The chapter on extensions to the LDAP protocol in Oracle Fusion Middleware
Application Developer's Guide for Oracle Identity Management

xlix
■New Replication Features: Oracle Internet Directory Replication has been
enhanced with the following features:
– Two-way LDAP-Based Replication: This feature enables you to deploy
fan-out replication groups where replication flows in both directions and
updates at any node are replicated to the whole group.
– Replication Failover: Failover of LDAP replicas from one supplier to another
is supported, with administrator intervention.
– Oracle Internet Directory Comparison and Reconciliation Tool: A new
oidcmprec command, with improved functionality, replaces the old
oidreconcile tool.
■Java Server Plug-ins: The Oracle Internet Directory Plug-in Framework now
supports plug-ins written in Java and in PL/SQL.
New Features Introduced with Oracle Internet Directory 10g Release 2
(10.1.2)
■Improved integration with other components: New features provide better
integration with components such as Oracle Collaboration Suite. These features
include service-to-service authentication, the service registry, and verifier
generation using dynamic parameters.
See Also:
Chapter 39, "Setting Up Replication"
Chapter 42, "Managing and Monitoring Replication"
The oidcmprec command-line tool reference in Oracle Fusion Middleware
Reference for Oracle Identity Management
See Also: Chapter 44, "Developing Plug-ins for the Oracle Internet
Directory Server"
Notes:
The following chapters have been moved to Oracle Fusion Middleware
High Availability Guide:
■"High Availability And Failover Considerations"
■"Oracle Application Server Cluster (Identity Management)
Configurations"
■"Oracle Application Server Cold Failover Cluster (Identity
Management)"
■"The Directory in an Oracle Real Application Clusters
Environment"
The following appendixes have been rewritten as chapters in Oracle
Fusion Middleware Reference for Oracle Identity Management:
■"Syntax for LDIF and Command-Line Tools"
■"Oracle Internet Directory Schema Elements"
l
■Support for Certificate Matching Rule: External authentication using certificates
can now take either of two forms: an exact match, in which the subject DN of the
client certificate is used to authenticate the user, or a certificate hash, in which the
client certificate is hashed and is then compared with a certificate hash stored in
the directory.
■Ease of deployment for Replication: Replication is now much easier to install,
configure, and manage.
■Ease of deployment for Clusters: Cluster configurations are now much easier to
install, configure, and manage.
■Enforcing access control for Oracle Internet Directory superuser: The superuser
is now subject to access control policies like any other user. New ACL keywords
allow you to restrict superuser access through privileged groups.
■Oracle Internet Directory Server Diagnostic Tool: The OID Diagnostic Tool
collects diagnostic information that helps triage issues reported on Oracle Internet
Directory.
See Also:
■"The Service Registry and Service to Service Authentication" on
page 3-20
■"Introduction to Generating Ver i fiers by Using Dyna mic
Parameters" on page 30-10
See Also: "Direct Authentication" on page 32-1
See Also:
Chapter 39, "Setting Up Replication"
See Also: Chapter 29, "Managing Directory Access Control"
See Also: The oiddiag command-line tool reference in Oracle
Fusion Middleware Reference for Oracle Identity Management

Part I
Part I Understanding Directory Services
Part I explains what Oracle Internet Directory is and some of the concepts you must
know before using it. It contains these chapters:
■Chapter 1, "Introduction to Directory Services"
■Chapter 2, "Understanding Oracle Internet Directory in Oracle Fusion
Middleware"
■Chapter 3, "Understanding Oracle Internet Directory Concepts and Architecture"
■Chapter 4, "Understanding Process Control of Oracle Internet Directory
Components"
■Chapter 5, "Understanding Oracle Internet Directory Organization"
■Chapter 6, "Understanding Oracle Internet Directory Replication"

1
Introduction to Directory Services 1-1
1Introduction to Directory Services
This chapter introduces online directories, provides an overview of the Lightweight
Directory Application Protocol (LDAP) version 3, and explains some of the unique
features and benefits of Oracle Internet Directory.
This chapter contains these topics:
■Section 1.1, "What Is a Directory?"
■Section 1.2, "What Is the Lightweight Directory Access Protocol (LDAP)?"
■Section 1.3, "What Is Oracle Internet Directory?"
■Section 1.4, "How Oracle Products Use Oracle Internet Directory"
1.1 What Is a Directory?
A directory is a hierarchically organized collection of entries with similar attributes.
Directories list resources—for example, people, books in a library, or merchandise in a
department store—and give details about each one. A directory can be either
offline—for example, a telephone book or a department store catalog—or online.
Online directories are used by enterprises with distributed computer systems for fast
searches, management of users and security, and integration of multiple applications
and services. Online directories have become critical to e-businesses and hosted
environments.
This section contains these topics:
■Section 1.1.1, "The Expanding Role of Online Directories"
■Section 1.1.2, "The Problem: Too Many Special-Purpose Directories"
1.1.1 The Expanding Role of Online Directories
An online directory is a specialized database that stores and retrieves collections of
information about objects. Such information can represent any resources that require
management: employee names, titles, and security credentials; information about
partners; or information about shared network resources such as conference rooms
and printers.
Online directories can be used by a variety of users and applications, and for a variety
of purposes, including:
■An employee searching for corporate white page information, and, through a mail
client, looking up e-mail addresses
■An application, such as a message transport agent, locating a user's mail server

What Is a Directory?
1-2 Oracle Fusion Middleware Administrator's Guide for Oracle Internet Directory
■A database application identifying role information for a user
Although an online directory is a database—that is, a structured collection of data—it
is not a relational database. The following table contrasts online directories with
relational databases.
1.1.2 The Problem: Too Many Special-Purpose Directories
In the past, some large companies had more than a hundred different directories, each
designated for a special purpose. In addition, some applications had their own
additional directories of user names.
Managing so many special purpose directories caused several problems, including:
■High cost of administration: Administrators had to maintain essentially the same
information in many different places. For example, when an enterprise hired a
new employee, administrators created a new user identity on the network, created
a new e-mail account, added the user to the human-resources database, and set up
all applications that the employee might need—for example, user accounts on
development, testing, and production database systems. Later, if the employee left
the company, administrators had to reverse the process to disable all these user
accounts.
■Inconsistent data: Because of the large administrative overhead, it was difficult for
multiple administrators, entering redundant information in multiple systems, to
synchronize this employee information across all systems. The result was
inconsistent data across the enterprise.
Table 1–1 Comparison of Online Directories and Relational Databases
Online Directories Relational Databases
Designed to handle relatively simple
transactions on relatively small units of data.
For example, an application might use a
directory simply to store and retrieve an
e-mail address, a telephone number, or a
digital portrait.
Designed to handle large and diverse
transactions using many operations on large
units of data.
Designed to be location-independent.
Directory-enabled applications expect, at all
times, to see the same information throughout
the deployment environment—regardless of
which server they are querying. If a queried
server does not store the information locally,
then it must either retrieve the information or
point the client application to it transparently.
Typically designed to be location-specific.
While a relational database can be distributed,
it usually resides on a particular database
server.
Designed to store information in entries.
These entries might represent any resource
customers want to manage: employees,
e-commerce partners, conference rooms, or
shared network resources such as printers.
Associated with each entry are several
attributes, each of which may have one or
more values assigned. For example, typical
attributes for a person entry might include
first and last names, e-mail addresses, the
address of a preferred mail server, passwords
or other login credentials, or a digitized
portrait.
Designed to store information as rows in
relational tables.

What Is the Lightweight Directory Access Protocol (LDAP)?
Introduction to Directory Services 1-3
■Security issues: Each separate directory had its own password policy—which
means that a user had to learn a variety of user names and passwords, each for a
different system.
Today's enterprises need a more general purpose directory infrastructure, one based
on a common standard for supporting a wide variety of applications and services.
1.2 What Is the Lightweight Directory Access Protocol (LDAP)?
LDAP is a standard, extensible directory access protocol that directory clients and
servers use to communicate.
This section contains these topics:
■Section 1.2.1, "LDAP and Simplified Directory Management"
■Section 1.2.2, "LDAP Version 3"
1.2.1 LDAP and Simplified Directory Management
LDAP was conceived as an Internet-ready, lightweight implementation of the
International Standardization Organization (ISO) X.500 standard for directory
services. It requires a minimal amount of networking software on the client side,
which makes it particularly attractive for Internet-based, thin client applications.
The LDAP standard simplifies management of directory information in three ways:
■It provides all users and applications in the enterprise with a single, well-defined,
standard interface to a single, extensible directory service. This makes it easier to
rapidly develop and deploy directory-enabled applications.
■It reduces the need to enter and coordinate redundant information in multiple
services scattered across the enterprise.
■Its well-defined protocol and array of programmatic interfaces make it more
practical to deploy Internet-ready applications that leverage the directory.
1.2.2 LDAP Version 3
The most recent version of LDAP, Version 3, was approved as a proposed Internet
Standard by the Internet Engineering Task Force (IETF) in December 1997. LDAP
Version 3 improves on LDAP Version 2 in several important areas:
■Globalization Support: LDAP Version 3 allows servers and clients to support
characters used in every language in the world.
■Knowledge references (also called referrals): LDAP Version 3 implements a
referral mechanism that allows servers to return references to other servers as a
result of a directory query. This makes it possible to distribute directories globally
by partitioning a directory information tree (DIT) across multiple LDAP servers.
■Security: LDAP Version 3 adds a standard mechanism for supporting Simple
Authentication and Security Layer (SASL), providing a comprehensive and
extensible framework for data security.
■Extensibility: LDAP Version 3 enables vendors to extend existing LDAP
operations by using mechanisms called controls. These are extra pieces of
information carried along with existing operations, altering the behavior of the
operation. When a client application passes a control along with the standard
LDAP command, the behavior of the commanded operation is altered accordingly.

What Is Oracle Internet Directory?
1-4 Oracle Fusion Middleware Administrator's Guide for Oracle Internet Directory
For example, when a client wants to modify meta-information hidden in the
directory, it can send the manageDSAIT control along with the LDAP command.
■Feature and schema discovery: LDAP Version 3 enables publishing information
useful to other LDAP servers and clients, such as the supported LDAP protocols
and a description of the directory schema.
1.3 What Is Oracle Internet Directory?
Oracle Internet Directory is a general purpose directory service that enables fast
retrieval and centralized management of information about dispersed users and
network resources. It combines Lightweight Directory Access Protocol (LDAP)
Version 3 with the high performance, scalability, robustness, and availability of an
Oracle Database.
This section contains these topics:
■Section 1.3.1, "Overview of Oracle Internet Directory"
■Section 1.3.2, "Components of Oracle Internet Directory"
■Section 1.3.3, "Advantages of Oracle Internet Directory"
1.3.1 Overview of Oracle Internet Directory
Oracle Internet Directory runs as an application on an Oracle Database. It
communicates with the database by using Oracle Net Services, Oracle's operating
system-independent database connectivity solution. The database may or may not be
on the same host. Figure 1–1 illustrates this relationship.
See Also:
■RFCs (Requests for Comments) 2251-2256 of the IETF, available
at: http://www.ietf.org
■Appendix N, "RFCs Supported by Oracle Internet Directory"
■"Related Documents" on page -xxxix for an additional list of
resources on LDAP
■Chapter 3, "Understanding Oracle Internet Directory Concepts
and Architecture" for a conceptual discussion of directory
information trees and knowledge references
■"About LDAP Controls" in Oracle Fusion Middleware Reference
for Oracle Identity Management for a list and description of
controls supported by Oracle Internet Directory
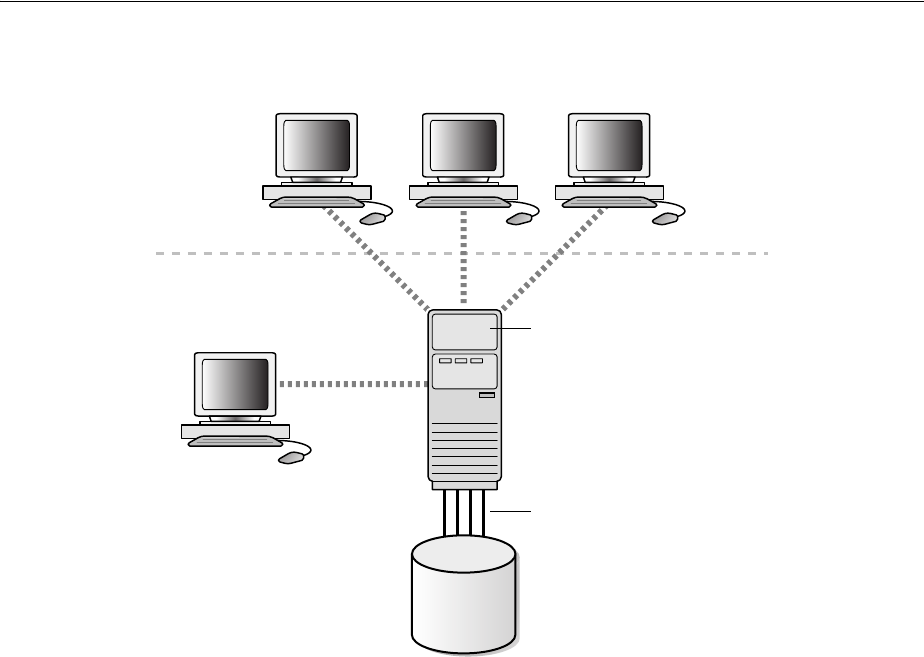
What Is Oracle Internet Directory?
Introduction to Directory Services 1-5
Figure 1–1 Oracle Internet Directory Overview
1.3.2 Components of Oracle Internet Directory
Oracle Internet Directory includes:
■Oracle directory server, which responds to client requests for information about
people and resources, and to updates of that information, by using a multitiered
architecture directly over TCP/IP
■Oracle directory replication server, which replicates LDAP data between Oracle
directory servers
■Directory administration tools, which include:
–The Oracle Internet Directory pages in Oracle Enterprise Manager Fusion
Middleware Control
–Oracle Directory Services Manager
–Command-line administration and data management tools
■Oracle Internet Directory Software Developer's Kit
1.3.3 Advantages of Oracle Internet Directory
Among its more significant benefits, Oracle Internet Directory provides scalability,
high availability, security, and tight integration with the Oracle environment.
See Also: Oracle Fusion Middleware Application Developer's Guide for
Oracle Identity Management for information about the Oracle Internet
Directory Software Developer's Kit
Oracle
Directory
Server
Oracle
Database
Oracle Net
Connections
LDAP Clients
Directory
Administration
LDAP over SSL

How Oracle Products Use Oracle Internet Directory
1-6 Oracle Fusion Middleware Administrator's Guide for Oracle Internet Directory
1.3.3.1 Scalability
Oracle Internet Directory exploits the strengths of an Oracle Database, enabling
support for terabytes of directory information. In addition, such technologies as
shared LDAP servers and database connection pooling enable it to support thousands
of concurrent clients with subsecond search response times.
Oracle Internet Directory has a multi-threaded, multi-process and multi-instance
physical architecture. This brings great flexibility to deployment options. Oracle
Internet Directory can scale with a very high number of CPUs on SMP or NUMA
hardware. With Oracle RAC database and the Oracle Internet Directory cluster
configuration, you can deploy a single directory on multiple hardware nodes for
horizontal scalability.
Oracle Internet Directory also provides data management tools, such as Oracle
Directory Services Manager and a variety of command-line tools, for manipulating
large volumes of LDAP data.
1.3.3.2 High Availability
Oracle Internet Directory offers the most comprehensive high availability
configurations. Directory replication, active/passive cluster configuration,
active/active cluster configuration with Oracle RAC Database, and Disaster Recovery
configurations with Oracle Data Guard.
Oracle Internet Directory also takes advantage of all the availability features of the
Oracle Database. Because directory information is stored securely in the Oracle
Database, it is protected by Oracle's backup capabilities. Additionally, the Oracle
Database, running with large data stores and heavy loads, can recover from system
failures quickly.
1.3.3.3 Security
Oracle Internet Directory offers comprehensive and flexible access control. An
administrator can grant or restrict access to a specific directory object or to an entire
directory subtree. Moreover, Oracle Internet Directory implements three levels of user
authentication: anonymous, password-based, and certificate-based using Secure
Sockets Layer (SSL) Version 3 for authenticated access and data privacy.
With Oracle Database Vault, Oracle Internet Directory can restrict administrators and
privileged users from accessing Directory data. With Oracle Transparent Data
Encryption, Oracle Internet Directory can ensure protection of data on disk as well as
on backups.
1.3.3.4 Integration with the Oracle Environment
Through Oracle Directory Integration Platform, Oracle Internet Directory provides a
single point of integration between the Oracle environment and other directories such
as NOS directories, third-party enterprise directories, and application-specific user
repositories.
1.4 How Oracle Products Use Oracle Internet Directory
Oracle products use Oracle Internet Directory for easier administration, tighter
security, and simpler integration between multiple directories.
This section contains these topics:
See Also: Oracle Fusion Middleware High Availability Guide

How Oracle Products Use Oracle Internet Directory
Introduction to Directory Services 1-7
■Section 1.4.1, "Easier and More Cost-Effective Administration of Oracle Products"
■Section 1.4.2, "Tighter Security Through Centralized Security Policy
Administration"
■Section 1.4.3, "Integration of Multiple Directories"
1.4.1 Easier and More Cost-Effective Administration of Oracle Products
Oracle Platform Security Services stores users and groups in an embedded LDAP
repository by default. Domains can be configured, however, to use identity data in
LDAP repositories, such as Oracle Internet Directory. In addition, Oracle WebLogic
Server provides a generic LDAP authenticator that can be used with other LDAP
servers.By default, OPSS stores policies and credentials in file-based stores. These
stores can be changed (or reassociated) to an LDAP repository backed by an Oracle
Internet Directory or an Oracle Virtual Directory server.
Oracle Webcenter Suite bases its security on OPSS. It can delegate enforcement to
Oracle Internet Directory for identity, policy, and credential storage. You can use
LDAP commands to add or modify users and to search the directory, which can be
useful when exporting and importing user accounts.
Oracle Access Manager supports storing user, configuration, and policy data in
directories, such as Oracle Internet Directory (multiple realms). You can store data
either together on the same directory server or on different directory servers.
Oracle Net Services uses Oracle Internet Directory to store and resolve database
services and the simple names, called net service names, that can be used to represent
them.
1.4.2 Tighter Security Through Centralized Security Policy Administration
The Oracle Database uses Oracle Internet Directory to store user names and
passwords, along with authorization information such as enterprise roles. It uses
Oracle Internet Directory to store a password verifier along with the entry of each
user.
Oracle Enterprise User Security uses Oracle Internet Directory for:
■Central Management of user authentication credentials
Instead of storing a user's database password in each database, Oracle Advanced
Security stores it in one place: the directory. It stores the password as an attribute
of the user entry.
■Central management of user authorizations
Oracle Advanced Security uses directory entries, called enterprise roles, to
determine the privileges for a given enterprise user within a given schema,
whether that schema is shared or owned. Enterprise roles are containers for
database-specific global roles. For example, a user might be assigned the
enterprise role of clerk, which might contain the global role of hrclerk with its
attendant privileges on the human resources database and the global role of
analyst with its attendant privileges on the payroll database.
■Mappings to shared schemas
Oracle Advanced Security uses mappings—that is, directory entries that point an
enterprise user to shared application schemas on the database instead of to an
individual account. For example, you might map several enterprise users to the
schema sales_application instead of to separate accounts in their names.

How Oracle Products Use Oracle Internet Directory
1-8 Oracle Fusion Middleware Administrator's Guide for Oracle Internet Directory
■Single password authentication
In the Oracle Database, Oracle Advanced Security enables enterprise users to
authenticate to multiple databases by using a single, centrally managed password.
The password is stored in the directory as an attribute of the user's entry and is
protected by encryption and access control lists. This spares you from setting up
Secure Sockets Layer (SSL) on clients and users from having to remember multiple
passwords.
■Central storage of PKI credentials
In Oracle Database and Oracle Application Server, user wallets can be stored in
the directory as an attribute of the user's entry. Storing wallets in this manner
enables mobile users to retrieve and open their wallets by using Enterprise Login
Assistant. While the wallet is open, authentication is transparent—that is, users
can access any database on which they own or share a schema without having to
authenticate again.
1.4.3 Integration of Multiple Directories
Another directory services product, Oracle Virtual Directory, provides a single,
dynamic access point to multiple data sources through LDAP or XML protocols. It
does this by providing a real-time data join and an abstraction layer that exposes a
single logical directory, without the need to synchronize or move data from its native
location. Oracle Virtual Directory can provide multiple application-specific views of
identity data stored in, for example, Oracle Internet Directory, Microsoft Active
Directory and Sun Java Systems Directory instances, and can also be used to secure
data access to the application-specific sources and enhance high-availability to existing
data-sources. These capabilities accelerate the deployment of applications and reduce
costs by eliminating the need to consolidate user information before an application can
be deployed. Oracle Virtual Directory can constantly adapt those applications to a
changing identity landscape as user repositories are added, changed, or removed.
Oracle Virtual Directory provides the following benefits:
■Consolidates multiple directories
■Provides virtualization and distribution of directory services
■Reduces administrative cost and improves security
■Extends enterprise applications quickly
■Provides ubiquitous access to information
■Lowers cost of implementation
Oracle Directory Integration Platform is a collection of interfaces and services for
integrating multiple directories by using Oracle Internet Directory and several
associated plug-ins and connectors. It provides these benefits:
■All Oracle components are pre-certified to work with Oracle Internet Directory.
■You can integrate the entire Oracle environment with third-party directories
simply by integrating each third-party directory with Oracle Internet Directory.
This saves you from having to integrate each application with each directory.
See Also: Oracle Fusion Middleware Administrator's Guide for Oracle
Virtual Directory
See Also: Oracle Fusion Middleware Administrator's Guide for Oracle
Directory Integration Platform

2
Understanding Oracle Internet Directory in Oracle Fusion Middleware 2-1
2Understanding Oracle Internet Directory in
Oracle Fusion Middleware
As of 11g Release 1 (11.1.1), Oracle Internet Directory has been integrated with a
common management infrastructure that in turn uses Oracle WebLogic Server. This
product set is called Oracle Fusion Middleware.
This chapter describes some features of Oracle Fusion Middleware that affect Oracle
Internet Directory management.
This chapter contains the following sections:
■Section 2.1, "WebLogic Server Domain"
■Section 2.2, "Oracle Internet Directory as a System Component"
■Section 2.3, "Oracle Internet Directory Deployment Options"
■Section 2.4, "Middleware Home"
■Section 2.5, "WebLogic Server Home"
■Section 2.7, "Oracle Home"
■Section 2.8, "Oracle Instance"
■Section 2.9, "Oracle Enterprise Manager Fusion Middleware Control"
■Section 2.10, "Logging, Auditing, and Diagnostics"
■Section 2.11, "MBeans and the WebLogic Scripting Tool"
2.1 WebLogic Server Domain
A WebLogic Server administration domain is a logically related group of Java
components. Domains include a special WebLogic Server instance called the
Administration Server, which is the central point from which you configure and
manage all resources in the domain. Usually, you configure a domain to include
additional WebLogic Server instances called managed servers. You deploy Java
components, such as Web applications and Web services, and other resources onto the
managed servers and use the Administration Server for configuration and
management purposes only. The managed servers can be grouped together into a
cluster.
See Also: The chapter entitled "Understanding Oracle Fusion
Middleware Concepts" in Oracle Fusion Middleware Administrator's
Guide.

Oracle Internet Directory as a System Component
2-2 Oracle Fusion Middleware Administrator's Guide for Oracle Internet Directory
2.2 Oracle Internet Directory as a System Component
Oracle Internet Directory is a system component. That is, it is a manageable process
that is not an Oracle WebLogic Server. System components can use the WebLogic
Administrative Domain for management services, including Oracle Enterprise
Manager Fusion Middleware Control, Audit Framework, configuration management
through MBeans and Secure Sockets Layer and Wallet Management. The Oracle
WebLogic Server Administration Server controls Oracle Internet Directory and other
system components through OPMN.
Oracle Internet Directory itself is a C-based process. Its only run time dependency is
the Oracle Database. To be managed by the Oracle Fusion Middleware management
framework, Oracle Internet Directory must register itself with a local or a remote
Oracle WebLogic Server administration domain during installation or from the
command line after installation. Therefore, an Oracle Internet Directory 11g
installation requires either a local or a remote installation of Oracle WebLogic Server.
Also, the Directory Management user interface, ODSM, is a Java component deployed
on Oracle WebLogic Server.
If you must manage Oracle Internet Directory in your deployment using only
command-line tools and a remote ODSM, there is also an option to install and
configure Oracle Internet Directory without registering with a Oracle WebLogic Server
Domain.
2.3 Oracle Internet Directory Deployment Options
During installation, there are four deployment options for Oracle Internet Directory:
1. Create New Domain–Oracle Internet Directory with a local Oracle WebLogic
Server Domain. Oracle WebLogic Server is installed locally with Oracle Internet
Directory and an admin domain is created for Oracle Internet Directory.
2. Extend Existing Domain–Oracle Internet Directory with a remote Oracle
WebLogic Server Domain. Oracle WebLogic Server admin server and domain
have been installed and created separately and Oracle Internet Directory registers
with the Domain remotely.
3. Expand Cluster–Oracle Internet Directory in an Oracle WebLogic Server cluster
for High Availability. This option will not be discussed here.
4. Configure Without Domain–Oracle Internet Directory without a Oracle
WebLogic Server Domain. Oracle Internet Directory can be installed and
configured without Oracle WebLogic Server Server and without registering to any
Oracle WebLogic Server Admin Domains. In this case, Oracle Internet Directory
cannot be managed by Oracle Enterprise Manager Fusion Middleware Control or
other common Oracle Fusion Middleware management services. You must rely on
command-line utilities such as opmnctl and the LDAP tools. ODSM can be
deployed separately and used to manage Oracle Internet Directory.
If you choose Create New Domain or Extend Existing Domain, the Oracle Internet
Directory component you create is registered with that domain when the installation is
complete.
If you choose Configure Without Domain, the Oracle Internet Directory component is
not registered with any domain when the installation is complete. You will be unable
to manage Oracle Internet Directory, or any other component in that Oracle instance,
with Oracle Enterprise Manager Fusion Middleware Control until you register the
component with a WebLogic domain by using the command-line tool opmnctl.

Oracle Instance
Understanding Oracle Internet Directory in Oracle Fusion Middleware 2-3
2.4 Middleware Home
A Middleware home consists of the WebLogic Server home, and optionally one or
more other Oracle product homes (also known as Oracle homes). A middleware home
can reside on a local file system or on a remote shared disk that is accessible through
NFS. The Oracle Fusion Middleware home is represented in path names as MW_HOME.
2.5 WebLogic Server Home
A WebLogic Server home contains installed files necessary to host a WebLogic Server.
The WebLogic Server home directory is a peer of other Oracle home directories
underneath the middleware home directory. In path names, it is represented as WLS_
HOME.
2.6 Oracle Common Home
The Oracle home that contains the binary and library files required for the Oracle
Enterprise Manager Fusion Middleware Control and Java Required Files (JRF). There
can be only one Oracle Common home within each Middleware home. In path names,
it is represented as ORACLE_COMMON_HOME.
2.7 Oracle Home
An Oracle home contains installed files necessary to host a specific software suite. An
Oracle home resides within the directory structure of the Middleware home. Each
Oracle home can be associated with multiple Oracle instances
The Oracle home is usually represented in path names as ORACLE_HOME. Each Oracle
home can be associated with multiple Oracle instances or Weblogic server domains.
2.8 Oracle Instance
In 11g Release 1, product configuration data has been separated from product binaries.
The product binaries reside in the Oracle home, ORACLE_HOME, while updatable files
reside in an Oracle instance, represented in path names as ORACLE_INSTANCE.
Most Oracle Internet Directory commands require that you set the environment
variable ORACLE_INSTANCE to the value of ORACLE_INSTANCE. You dereference this
variable as $ORACLE_INSTANCE on UNIX or Linux systems and as %ORACLE_
INSTANCE% on Windows.
All configuration files, repositories, log files, deployed applications, and temporary
files reside in a oracle instance. Keeping updatable files separate from non-updatable
files facilitates administrative tasks such as patching, upgrades, backup and restore,
and cloning. It allows administrators to have their run-time and install-time binaries
follow independent life cycles.
Oracle instance refers not only to a physical location on disk but also encompasses the
associated processes. An Oracle instance contains one or more active middleware
system components, such as Oracle Virtual Directory or Oracle Internet Directory. You
determine which components are part of an instance, either at install time or by
creating and configuring an instance at a later time.
When you install Oracle Internet Directory on a host computer, Oracle Identity
Management 11g Installer creates an Oracle Fusion Middleware component of type
OID in a new or existing Oracle instance. The component name for the first Oracle
Internet Directory component is oid1.

Oracle Enterprise Manager Fusion Middleware Control
2-4 Oracle Fusion Middleware Administrator's Guide for Oracle Internet Directory
Oracle Identity Management 11g Installer also creates some directories in the
filesystem under the Oracle instance, including the following, when you install Oracle
Internet Directory:
ORACLE_INSTANCE/config/OID/componentName
ORACLE_INSTANCE/diagnostics/logs/OID/componentName
ORACLE_INSTANCE/diagnostics/logs/OID/tools
ORACLE_INSTANCE/OID/admin
ORACLE_INSTANCE/OID/admin/SSLwallet-name
ORACLE_INSTANCE/OID/load
ORACLE_INSTANCE/tmp
2.9 Oracle Enterprise Manager Fusion Middleware Control
As of release 11g, you create, configure, and manage many Oracle Internet Directory
features by using Oracle Enterprise Manager Fusion Middleware Control and Oracle
Directory Services Manager.
Fusion Middleware Control enables you to configure and manage all Oracle products
from one user interface. You can perform most configuration functions in Fusion
Middleware Control that you can perform from the command line. Oracle Enterprise
Manager Fusion Middleware Control also includes wizards for setting up replication
and for estimating sizing and tuning needs.
Oracle Directory Services Manager is an additional administrative interface for Oracle
Internet Directory and Oracle Virtual Directory. It is accessible from Oracle Enterprise
Manager Fusion Middleware Control or directly from its own URL.
2.10 Logging, Auditing, and Diagnostics
Using Oracle Enterprise Manager Fusion Middleware Control, you can monitor the
Oracle Internet Directory Server and related components and activities.
Using the monitoring functions, you can gain insight into system activity and
performance, for example, total logins, successful and unsuccessful logins, average
login time, request latencies, LDAP connections, and so on.
You can monitor the following items:
■Metrics: To monitor system health
■General: A high-level rollup of load, performance, security, login, CPU utilization,
and other data
■Performance: Key metrics for the directory server and its host
■Reports: Data on operation success and failure
■Topol o g y : Information on the Oracle HTTP Server instances, directory server
instances, associated databases, and other components
2.11 MBeans and the WebLogic Scripting Tool
The Oracle WebLogic Scripting Tool (WLST) is a command-line scripting environment
that you can use to create, manage, and monitor Oracle WebLogic Server domains. It is
based on the Java scripting interpreter, Jython. You can use WLST to perform some
Oracle Internet Directory management operations.

MBeans and the WebLogic Scripting Tool
Understanding Oracle Internet Directory in Oracle Fusion Middleware 2-5
A managed bean (MBean) is a Java object that represents a JMX manageable resource
in a distributed environment, such as an application, a service, a component or a
device. When Oracle Internet Directory is registered with an Oracle WebLogic Server
Admin Domain, Oracle Internet Directory MBeans are deployed in the Oracle
WebLogic Server Admin Server. These MBeans enable management of Oracle Internet
Directory configuration through Oracle Enterprise Manager Fusion Middleware
Control or WLST.
See Also: Oracle Fusion Middleware Administrator's Guide

MBeans and the WebLogic Scripting Tool
2-6 Oracle Fusion Middleware Administrator's Guide for Oracle Internet Directory

3
Understanding Oracle Internet Directory Concepts and Architecture 3-1
3 Understanding Oracle Internet Directory
Concepts and Architecture
This chapter provides conceptual descriptions of the basic elements of Oracle Internet
Directory and discusses Oracle Internet Directory architecture.
This chapter contains these topics:
■Section 3.1, "Oracle Internet Directory Architecture"
■Section 3.2, "How Oracle Internet Directory Processes a Search Request"
■Section 3.3, "Directory Entries"
■Section 3.4, "Attributes"
■Section 3.5, "Object Classes"
■Section 3.6, "Naming Contexts"
■Section 3.7, "Security"
■Section 3.8, "Globalization Support"
■Section 3.9, "Distributed Directories"
■Section 3.10, "Knowledge References and Referrals"
■Section 3.11, "Oracle Delegated Administration Services and the Oracle Internet
Directory Self-Service Console"
■Section 3.12, "The Service Registry and Service to Service Authentication"
■Section 3.13, "Oracle Directory Integration Platform"
■Section 3.14, "Oracle Internet Directory and Identity Management"
■Section 3.15, "Resource Information"
3.1 Oracle Internet Directory Architecture
This section contains these topics:
■Section 3.1.1, "An Oracle Internet Directory Node"
■Section 3.1.2, "An Oracle Directory Server Instance"
■Section 3.1.3, "Oracle Internet Directory Ports"
■Section 3.1.4, "Directory Metadata"
See Also: "Related Documents" on page -xxxix for suggestions on
further reading about LDAP-compliant directories
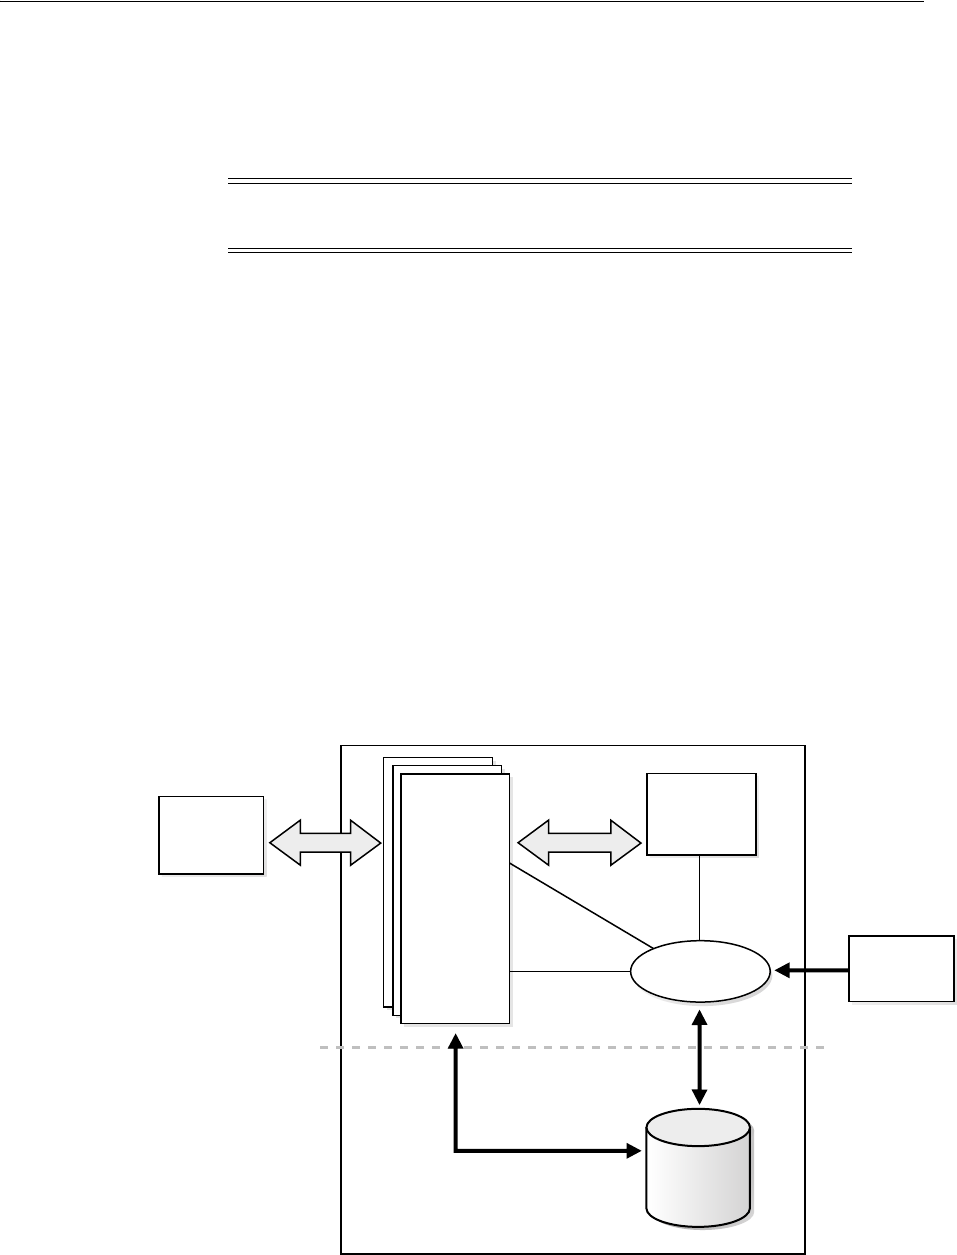
Oracle Internet Directory Architecture
3-2 Oracle Fusion Middleware Administrator's Guide for Oracle Internet Directory
3.1.1 An Oracle Internet Directory Node
An Oracle Internet Directory node consists of one or more directory server instances
connected to the same directory store. The directory store—that is, the repository of
the directory data—is an Oracle Database.
Figure 3–1 on page 3-2 shows the various directory server elements and their
relationships running on a single node.
Oracle Net Services is used for all connections between the Oracle database server and:
■The Oracle directory server non-SSL port (3060 by default)
■The Oracle directory server SSL-enabled port (3131 by default)
■The OID Monitor
LDAP is used for connections between directory server and:
■Oracle Directory Services Manager
■Oracle directory replication server
The Oracle directory server instance and the Oracle directory replication server
connect to OID Monitor by way of the operating system.
Figure 3–1 A Typical Oracle Internet Directory Node
As shown in Figure 3–1, an Oracle Internet Directory node includes the following
major elements:
Note: All Oracle Internet Directory instances in the same domain
connect to the same Oracle Database.
Oracle
Directory
Services
Manager
Oracle
Directory
Replication
Server
OID
Monitor
(oidmon)
LDAP LDAP
OPMN
Oracle
Database
Server
Oracle
Net
Oracle
Net
Oracle
Directory
Server
Instance 1
SSL port 3131
non-SSL
port 3060

Oracle Internet Directory Architecture
Understanding Oracle Internet Directory Concepts and Architecture 3-3
The Oracle directory replication server uses LDAP to communicate with an Oracle
directory (LDAP) server instance. To communicate with the database, all components
use OCI/Oracle Net Services. Oracle Directory Services Manager and the
command-line tools communicate with the Oracle directory servers over LDAP.
3.1.2 An Oracle Directory Server Instance
Figure 3–2 illustrates an Oracle directory server instance, also called an LDAP server
instance.
Table 3–1 An Oracle Internet Directory Node
Element Description
Oracle directory server
instance
Also called either an LDAP server instance or a directory server
instance, it services directory requests through a single Oracle
Internet Directory dispatcher process listening at specific
TCP/IP ports. There can be more than one directory server
instance on a node, listening on different ports.
Oracle directory
replication server
Also called a replication server, it tracks and sends changes to
replication servers in another Oracle Internet Directory system.
There can be only one replication server on a node. You can
choose whether to configure the replication server.
Oracle Database Server Stores the directory data. Oracle strongly recommends that you
dedicate a database for use by the directory. The database can
reside on the same node as the directory server instances.
Oracle Process Manager
and Notification Server
(OPMN)
Manages Oracle Internet Directory as an Oracle Fusion
Middleware system component. OPMN uses the directives in
the OID component snippet in ORACLE_
INSTANCE/config/OPMN/opmn/opmn.xml and invokes
OIDMON and OIDCTL as required. The command-line utility is
ORACLE_INSTANCE/bin/opmnctl.
OID Monitor (OIDMON) Initiates, monitors, and terminates the LDAP server and
replication server processes. When you invoke process
management commands, such as oidctl or opmnctl, or when
you use Fusion Middleware Control to start or stop server
instances, your commands are interpreted by this process.
OIDMON also monitors servers and restarts them if they have
stopped running for abnormal reasons.
OIDMON starts a default instance of OIDLDAPD. If the default
instance of OIDLDAPD is stopped using the OIDCTL command,
then OIDMON stops the instance. However, when OIDMON is
restarted by OPMN, OIDMON restarts the default instance.
All OID Monitor activity is logged in the file ORACLE_
INSTANCE/diagnostics/logs/OID/Component_
Name/oidmon-xxxx.log. This file is on the Oracle Internet
Directory server file system.
OID Monitor checks the state of the servers through mechanisms
provided by the operating system.
OID Control Utility
(OIDCTL)
Communicates with OID Monitor by placing message data in
Oracle Internet Directory server tables. This message data
includes configuration parameters required to run each Oracle
directory server instance. Normally used from the command line
only to stop and start the replication server. OIDCTL is also used
for checking the status of Oracle Internet Directory.
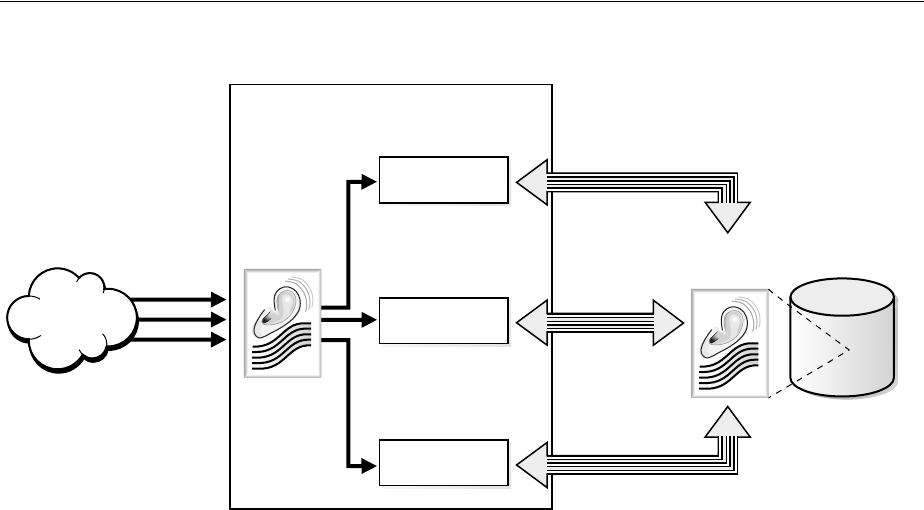
Oracle Internet Directory Architecture
3-4 Oracle Fusion Middleware Administrator's Guide for Oracle Internet Directory
Figure 3–2 Oracle Directory Server Instance Architecture
One instance comprises one dispatcher process and one or more server processes. The
Oracle Internet Directory dispatcher and server processes can use multiple threads to
distribute the load. LDAP clients send LDAP requests to an Oracle Internet Directory
listener/dispatcher process listening for LDAP commands at its port.
Oracle Internet Directory listener/dispatcher starts a configured number server
process at startup time. The number of server processes is controlled by the
orclserverprocs attribute in the instance-specific configuration entry. The default
value for orclserverprocs is 1. Multiple server processes enable Oracle Internet
Directory to take advantage of multiple processor systems.
The Oracle Internet Directory dispatcher process sends the LDAP connections to the
Oracle Internet Directory server process in a round robin fashion. The maximum
number of LDAP connections accepted by each server is 1024 by default. This number
can be increased by changing the attribute orclmaxldapconns in the
instance-specific configuration entry, which has a DN of the form:
cn=componentname,cn=osdldapd,cn=subconfigsubentry
3.1.3 Oracle Internet Directory Ports
An Oracle Internet Directory component can be created by Oracle Identity
Management 11g Installer or by a command-line tool. The program that creates Oracle
Internet Directory follows specific steps in assigning the SSL and non-SSL port. First, it
attempts to use 3060 as the non-SSL port. If that port is unavailable, it tries ports in the
range 3061 to 3070, then 13060 to 13070.
Similarly, the program that creates Oracle Internet Directory attempts to use 3131 as its
SSL port, then ports in the range 3132 to 3141, then 13131 to 13141.
3.1.4 Directory Metadata
Directory metadata is the information used by the directory server during run time for
processing LDAP requests. It is stored in the underlying data repository. During
startup, the directory server reads this information and stores it in a local metadata
Oracle Directory
Server
LDAP Server Instance
Oracle Directory
Server
Oracle Net
Oracle Directory
Server
Oracle Net
OID
Listener/
Dispatcher Oracle Net
Listener/
Dispatcher
Oracle Net
LDAP
Clients
LDAP
Requests
.
.
.
Oracle Fusion
Middleware

Oracle Internet Directory Architecture
Understanding Oracle Internet Directory Concepts and Architecture 3-5
cache. It then uses this cache during its run time to process incoming LDAP operation
requests.
The directory server has the following types of metadata in its local metadata cache:
■Directory Schema
The definitions of object classes, attributes, and matching rules supported by the
directory server. The directory server uses this information during creation and
modification of directory objects. A directory object is a collection of object classes
and their associated attributes and matching rules. See Chapter 20, "Managing
Directory Schema."
■Access control policy point (ACP)
A directory administrative domain for defining and controlling access to the
information in that domain. The directory server uses ACPs when determining
whether to allow a certain LDAP operation performed by a user. See Chapter 29,
"Managing Directory Access Control."
■Root DSE entry
The root DSE (Directory Service Agent-Specific Entry) contains several attributes
that store information about the directory server itself. For example, these
attributes contain the following information items, to mention just a few:
–Naming contexts DNs
–Sub Schema Subentry DN
–Superior references (referrals) DNs
–Special entry DNs like Oracle Internet Directory configuration and registry
containers
–Special Entry DNs like change log and change status containers
–DN of replications agreement container
See "Attributes of the DSE" on page 9-11.
■Privilege groups
Groups that can be used in access control policies.
The directory schema supports directory group objects through the standard
groupofuniquenames and groupofnames object classes. These object classes
hold information for such groups as distribution lists and mailing lists to mention
just two.
Oracle Internet Directory extends these standard group objects through an
auxiliary object class called orclprivilegegroup. This object class, which
supports privilege groups that can be used in access control policies, provides
flexibility to grant or deny access to groups of users. The directory server uses this
information during:
–LDAP bind operations to find out the subscribed privileged groups for a given
user
Note: The metadata cache is a write-through cache. An LDAP
operation first writes to the database and then invalidates the
corresponding cache entry. A subsequent search of that entry causes
the cache to be refreshed.

How Oracle Internet Directory Processes a Search Request
3-6 Oracle Fusion Middleware Administrator's Guide for Oracle Internet Directory
–Access control policy evaluation if the policy has directives that grant or deny
access to privileged groups
■Catalog entry
A special entry containing information about indexed attributes in the underlying
database. The directory uses this information during directory search operations.
See "About Indexing Attributes" on page 20-6.
■Common entry
A special entry containing information about hosted companies. A hosted
company is an enterprise to which another enterprise provides services. The
metadata in this entry includes the hosted company DN, user search base,
nickname and other attributes, all of which are described in Chapter 33, "Planning,
Deploying and Managing Realms".
■Plug-in entry
A special entry containing information about the kind of operation that triggers a
plug-in event, and the point in the operation when that plug-in is to be triggered.
Chapter 44, "Developing Plug-ins for the Oracle Internet Directory Server,"
describes this information.
■Password verifier entry
A special entry containing information about the encryption and verifier attribute
types. Chapter 30, "Managing Password Verifiers," describes this information.
■Password policy entry
One or more special entries containing information about policies enforced by the
directory server for the user password credentials. The directory server uses this
information during run time to enforce the password policies. See Chapter 28,
"Managing Password Policies".
3.2 How Oracle Internet Directory Processes a Search Request
This example shows you how Oracle Internet Directory processes a search request.
1. The user or client enters a search request that is conditioned by one or more of the
following options:
■SSL: The client and server can establish a session that uses SSL encryption and
authentication, or SSL encryption only. If SSL is not used, the client's message
is sent in clear text.
■Type of user: The user can seek access to the directory either as a particular
user or as an anonymous user, depending on which of the two has the
necessary privileges to perform the desired function.
■Filters: The user can narrow the search by using one or more search filters,
including those that use the Boolean conditions "and," "or," and "not," and
those that use other operators such as "greater than, "equal to," and "less than."
2. The C API, using the LDAP protocol, sends a request to a directory server instance
to connect to the directory.
See Also: Chapter 14, "Managing Dynamic and Static Groups"

Directory Entries
Understanding Oracle Internet Directory Concepts and Architecture 3-7
3. The directory server authenticates the user, a process called binding. The directory
server also checks the Access Control Lists (ACLs) to verify that the user is
authorized to perform the requested search.
4. The directory server converts the search request from LDAP to Oracle Call
Interface (OCI)/Oracle Net Services and sends it to the Oracle Database.
5. The Oracle Database retrieves the information and passes it back through the
chain—to the directory server, then to the C API, and, finally, to the client.
3.3 Directory Entries
In an online directory, each collection of information about an object is called an entry.
An entry can include, for example, information about an employee, a conference room,
an e-commerce partner, or a shared network resource such as a printer.
This section contains these topics:
■Section 3.3.1, "Distinguished Names (DNs) and Directory Information Trees
(DITs)"
■Section 3.3.2, "Entry Caching"
3.3.1 Distinguished Names (DNs) and Directory Information Trees (DITs)
Each entry in an online directory is uniquely identified by a distinguished name (DN).
The distinguished name tells you exactly where the entry resides in the directory
hierarchy. This hierarchy is represented by a directory information tree (DIT).
To understand the relation between a distinguished name and a directory information
tree, look at Figure 3–3.
Figure 3–3 A Directory Information Tree
The DIT in Figure 3–3 includes entries for two employees of Acme Corporation who
are both named Anne Smith. It is structured along geographical and organizational
lines. The Anne Smith contained in the left branch works in the Sales division in the
United States, while the other works in the Server Development division in the United
Kingdom.
The Anne Smith contained in the right branch has the common name (cn) Anne Smith.
She works in an organizational unit (ou) named Server Development, in the country
(c) of United Kingdom of Great Britain and Northern Ireland (uk), in the organization
(o) Acme.
Note: The maximum number of attributes you can specify in a
search filter is 255.
c=us
ou=Sales ou=Server Developmen
t
cn=Anne Smith cn=Anne Smith
c=uk
root
o=acme

Attributes
3-8 Oracle Fusion Middleware Administrator's Guide for Oracle Internet Directory
The DN for this "Anne Smith" entry is:
cn=Anne Smith,ou=Server Development,c=uk,o=acme
Note that the conventional format of a distinguished name places the lowest DIT
component at the left, then follows it with the next highest component, moving
progressively up to the root.
Within a distinguished name, the lowest component is called the relative
distinguished name (RDN). For example, in the previous entry for Anne Smith, the
RDN is cn=Anne Smith. Similarly, the RDN for the entry immediately above Anne
Smith's RDN is ou=Server Development, the RDN for the entry immediately
above ou=Server Development is c=uk, and so on. A DN is thus a concatenation
of RDNs that reflects parent-child relationships in the DIT. Within the DN, RDNs are
separated by commas.
To locate a particular entry within the overall DIT, a client uniquely identifies that
entry by using the full DN—not simply the RDN—of that entry. For example, within
the global organization in Figure 3–3, to avoid confusion between the two Anne
Smiths, you would use each one's full DN. If there are potentially two employees with
the same name in the same organizational unit, you could use additional
mechanisms—for example, you could identify each employee with a unique number.
3.3.2 Entry Caching
To make operations on entries quick and efficient, Oracle Internet Directory uses entry
caching. When you enable this feature, Oracle Internet Directory assigns a unique
identifier to each entry, then stores a specified number of those identifiers in cache
memory. When a user performs an operation on an entry, the directory server looks in
the cache for the entry identifier, then retrieves the corresponding entry from the
directory. This method enhances Oracle Internet Directory performance, and is
especially useful in smaller and medium-sized enterprises.
3.4 Attributes
In a typical telephone directory, an entry for a person contains such information items
as an address and a phone number. In an online directory, such an information item is
Notes:
■Beginning with Release 11gR1 (11.1.1.6), the entry cache resides
in shared memory, so multiple Oracle Internet Directory server
instances on the same host can share the same cache. Attributes
for confuring the cache now reside in the DSA configuration
entry.
■The entry cache is a write-through cache. An LDAP operation
first writes to the database and then invalidates the
corresponding cache entry. A subsequent search of that entry
causes the cache to be refreshed.
See Also:
■The Server Entry Cache section of the Oracle Internet
Directory chapter in Oracle Fusion Middleware Performance and
Tuning Guide.
■Chapter 19, "Managing Knowledge References and Referrals."
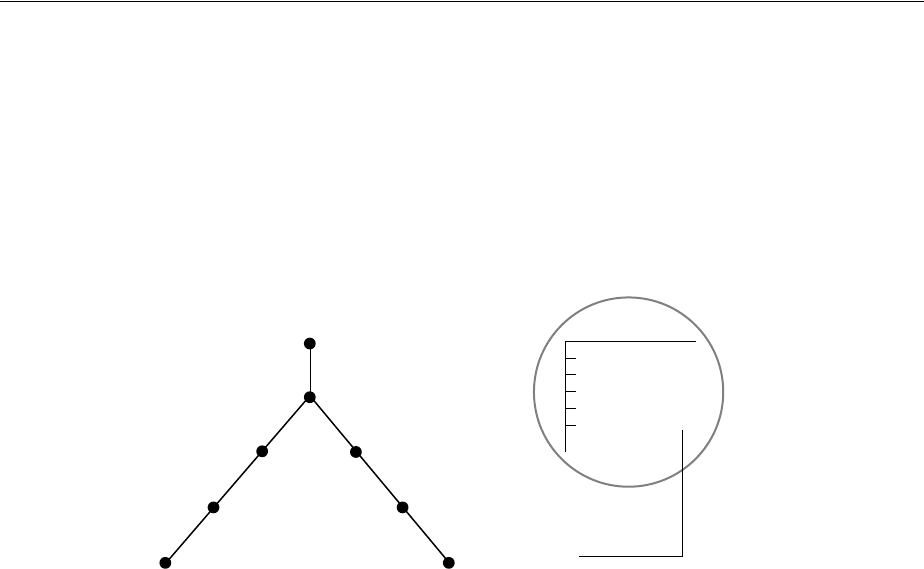
Attributes
Understanding Oracle Internet Directory Concepts and Architecture 3-9
called an attribute. Attributes in a typical employee entry can include, for example, a
job title, an e-mail address, or a phone number.
For example, in Figure 3–4, the entry for Anne Smith in Great Britain (uk) has several
attributes, each providing specific information about her. These are listed in the
balloon to the right of the tree, and they include emailaddrs, printername,
jpegPhoto, and app preferences. Moreover, each bullet in Figure 3–4 is also an
entry with attributes, although the attributes for each are not shown.
Figure 3–4 Attributes of the Entry for Anne Smith
Each attribute consists of an attribute type and one or more attribute values. The
attribute type is the kind of information that the attribute contains—for example,
jobTitle. The attribute value is the particular occurrence of information appearing
in that entry. For example, the value for the jobTitle attribute could be manager.
This section contains these topics:
■Section 3.4.1, "Kinds of Attribute Information"
■Section 3.4.2, "Single-Valued and Multivalued Attributes"
■Section 3.4.3, "Common LDAP Attributes"
■Section 3.4.4, "Attribute Syntax"
■Section 3.4.5, "Attribute Matching Rules"
■Section 3.4.6, "Attribute Options"
3.4.1 Kinds of Attribute Information
Attributes contain two kinds of information.
■Application Attributes
This information is maintained and retrieved by directory clients and is
unimportant to the operation of the directory. A telephone number, for example, is
application information.
■System Configuration Attributes
This information pertains to the operation of the directory itself. Some operational
information is specified by the directory to control the server—for example, the
time stamp for the creation or modification of an entry, or the name of the user
who creates or modifies an entry. Other operational information, such as access
c=us
ou=Sales ou=Server Development
cn=Anne Smith cn=Anne Smith
c=uk
root emailaddrs=
printername=
jpegPhoto=
app preferences=
...
cn=Anne Smith
o=acme

Attributes
3-10 Oracle Fusion Middleware Administrator's Guide for Oracle Internet Directory
information, is defined by administrators and is used by the directory program in
its processing.
To enhance your ability to search for entries, Oracle Internet Directory automatically
creates several system configuration attributes when you add an entry to the directory.
These include:
Moreover, when a user modifies an entry, Oracle Internet Directory automatically
updates the modifiersName and modifyTimestamp attributes to, respectively, the
name of the person modifying the entry, and the time of the entry modification in
UTC.
3.4.2 Single-Valued and Multivalued Attributes
Attributes can be either single-valued or multivalued. Single-valued attributes carry
only one value in the attribute, whereas multivalued attributes can have several. An
example of a multivalued attribute is a group membership list with names of everyone
in the group.
3.4.3 Common LDAP Attributes
Oracle Internet Directory implements all of the standard LDAP attributes. Some of the
more common ones defined by RFC 2798 of the Internet Engineering Task Force (IETF)
are shown in Table 3–3.
See Also: Chapter 9, "Managing System Configuration Attributes"
for more information about system configuration attributes.
Table 3–2 Attributes Created with Each New Entry
Attribute Description
creatorsName Name of the person creating the entry
createTimestamp Time of entry creation in UTC (Coordinated Universal Time)
modifiersName Name of person modifying the entry
modifyTimestamp Time of last entry modification in UTC
See Also: Chapter 9, "Managing System Configuration
Attributes" for instructions on configuring system configuration
attributes.
Table 3–3 Common LDAP Attributes
Attribute Type Attribute String Description
commonName cn Common name of an entry—for example, Anne Smith.
domainComponent dc The DN of the component in a Domain Name System
(DNS)—for example, dc=uk,dc=acme,dc=com.
jpegPhoto jpegPhoto Photographic image in JPEG format. This is stored in binary
format.
organization oName of an organization—for example, my_company.
organizationalUnitName ou Name of a unit within an organization—for example, Server
Development.

Attributes
Understanding Oracle Internet Directory Concepts and Architecture 3-11
3.4.4 Attribute Syntax
Attribute syntax is the format of the data that can be loaded into each attribute. For
example, the syntax of the telephoneNumber attribute might require a telephone
number to be a string of numbers containing spaces and hyphens. However, the
syntax for another attribute might require specifying whether the data has to be in the
form of a date, or whether the data can consist of numbers only. Each attribute must
have one and only one syntax.
Oracle Internet Directory recognizes most of the syntaxes specified in RFC 2252 of the
Internet Engineering Task Force (IETF), allowing you to associate most of the syntaxes
described in that document with an attribute. In addition to recognizing the syntaxes
in RFC 2252, Oracle Internet Directory also enforces some LDAP syntaxes. You cannot
add new syntaxes beyond those already supported by Oracle Internet Directory.
3.4.5 Attribute Matching Rules
In response to most incoming client requests, the directory server performs search and
compare operations. During these operations, the directory server consults the
relevant matching rule to determine equality between the attribute value sought and
the attribute value stored. For example, matching rules associated with the
telephoneNumber attribute could cause "(650) 123-4567" to be matched with either
"(650) 123-4567" or "6501234567" or both. When you create an attribute, you associate a
matching rule with it.
Oracle Internet Directory implements all the standard LDAP matching rules. You
cannot add new matching rules beyond those already supported by Oracle Internet
Directory.
owner owner Distinguished name of the person who owns the entry, for
example, cn=Anne Smith, ou=Server Development,
o= Acme, c=uk.
surname, sn sn Last name of a person—for example, Smith.
telephoneNumber telephoneNumber Telephone number—for example, (650) 123-4567 or
6501234567.
See Also: "Oracle Identity Management LDAP Attribute
Reference" in Oracle Fusion Middleware Reference for Oracle Identity
Management for a list of several attributes Oracle Internet Directory
provides.
See Also: "About LDAP Attribute Syntax" in Oracle Fusion
Middleware Reference for Oracle Identity Management.
See Also:
■Chapter 20, "Managing Directory Schema" for information on
viewing matching rules.
■"About LDAP Matching Rules" in Oracle Fusion Middleware
Reference for Oracle Identity Management.
Table 3–3 (Cont.) Common LDAP Attributes
Attribute Type Attribute String Description

Object Classes
3-12 Oracle Fusion Middleware Administrator's Guide for Oracle Internet Directory
3.4.6 Attribute Options
An attribute type can have various options that enable you to specify how the value
for that attribute is made available in a search or a compare operation. For example,
suppose that an employee has two addresses, one in London, the other in New York.
Options for that employee's address attribute could allow you to store both
addresses.
Moreover, attribute options can include language codes. For example, options for John
Doe's givenName attribute could enable you to store his given name in both French
and Japanese.
For clarity, we can distinguish between an attribute with an option and its base
attribute, which is the same attribute without an option. For example, in the case of
givenName;lang-fr=Jean, the base attribute is givenName; the French value for
that base attribute is givenName;lang-fr=Jean.
An attribute with one or more options inherits the properties—for example, matching
rules and syntax— of its base attribute. To continue the previous example, the
attribute with the option cn;lang-fr=Jean inherits the properties of cn.
3.5 Object Classes
An object class is a group of attributes that define the structure of an entry. When you
define a directory entry, you assign one or more object classes to it. Some of the
attributes in these object classes are mandatory and must have values, others are
optional and can be empty.
For example, the organizationalPerson object class includes the mandatory
attributes commonName (cn) and surname (sn), and the optional attributes
telephoneNumber, uid, streetAddress, and userPassword. When you define
an entry by using the organizationalPerson object class, you must specify values
for commonName (cn) and surname (sn). You do not need to provide values for
telephoneNumber, uid, streetAddress, and userPassword.
This section contains these topics:
■Section 3.5.1, "Subclasses, Superclasses, and Inheritance"
■Section 3.5.2, "Object Class Types"
3.5.1 Subclasses, Superclasses, and Inheritance
A subclass is an object class derived from another object class. The object class from
which a subclass is derived is called its superclass. For example, the object class
organizationalPerson is a subclass of the object class person. Conversely, the
object class person is the superclass of the object class organizationalPerson.
Subclasses inherit all of the attributes belonging to their superclasses. For example, the
subclass organizationalPerson inherits the attributes of its superclass, person.
Entries also inherit attributes that their superclasses have inherited.
Note: You cannot use an attribute option within a DN. For
example, the following DN is incorrect: cn;lang-fr=Jean,
ou=sales,o=acme,c=uk.
See Also: Chapter 13, "Managing Directory Entries."

Object Classes
Understanding Oracle Internet Directory Concepts and Architecture 3-13
One special object class, called top, has no superclasses. It is one of the superclasses of
every object class in the directory, and its attribute definitions are inherited by every
entry.
3.5.2 Object Class Types
There are three types of object classes:
■Structural
■Auxiliary
■Abstract
3.5.2.1 Structural Object Classes
Structural object classes describe the basic aspects of an object. Most of the object
classes that you use are structural object classes, and every entry should belong to at
least one structural object class. Examples of structural object classes are person and
groupOfNames.
These object classes model real-world entities and their physical or logical attributes.
Examples include people, printers, and database connections.
Structural object classes use structure rules to place restrictions on the kinds of objects
you can create under any given object class. For example, a structure rule might
require all objects below the organization (o) object class to be organizational
units (ou). Following this rule, you could not enter person objects directly below an
organization object class. Similarly, a structure rule might disallow you from
placing an organizational unit (ou) object below a person object.
3.5.2.2 Auxiliary Object Classes
Auxiliary object classes are groupings of optional attributes that expand the existing
list of attributes in an entry. Unlike structural object classes, they do not place
restrictions on where an entry may be stored, and you can attach them to any entry
regardless of that entry's location in the DIT.
3.5.2.3 Abstract Object Classes
An abstract object class is a virtual object class. It is used only for convenience when
specifying the highest levels of the object class hierarchy. It cannot be the only object
class for an entry. For example, the object class top is an abstract object class. It is
required as a superclass for all structural object classes, but it cannot be used alone.
The top object class includes the mandatory attribute objectClass and several
optional attributes. The optional attributes in top are:
■orclGuid: Global identification which remains constant if the entry is moved
Note: In itself, an object class contains no values. Only an instance
of an object class—that is, an entry—contains values. When a
subclass inherits attributes from a superclass, it inherits only the
attribute definitions of the superclass.
Note: Oracle Internet Directory does not enforce structure rules. It
therefore handles both structural and auxiliary object classes in the
same way.
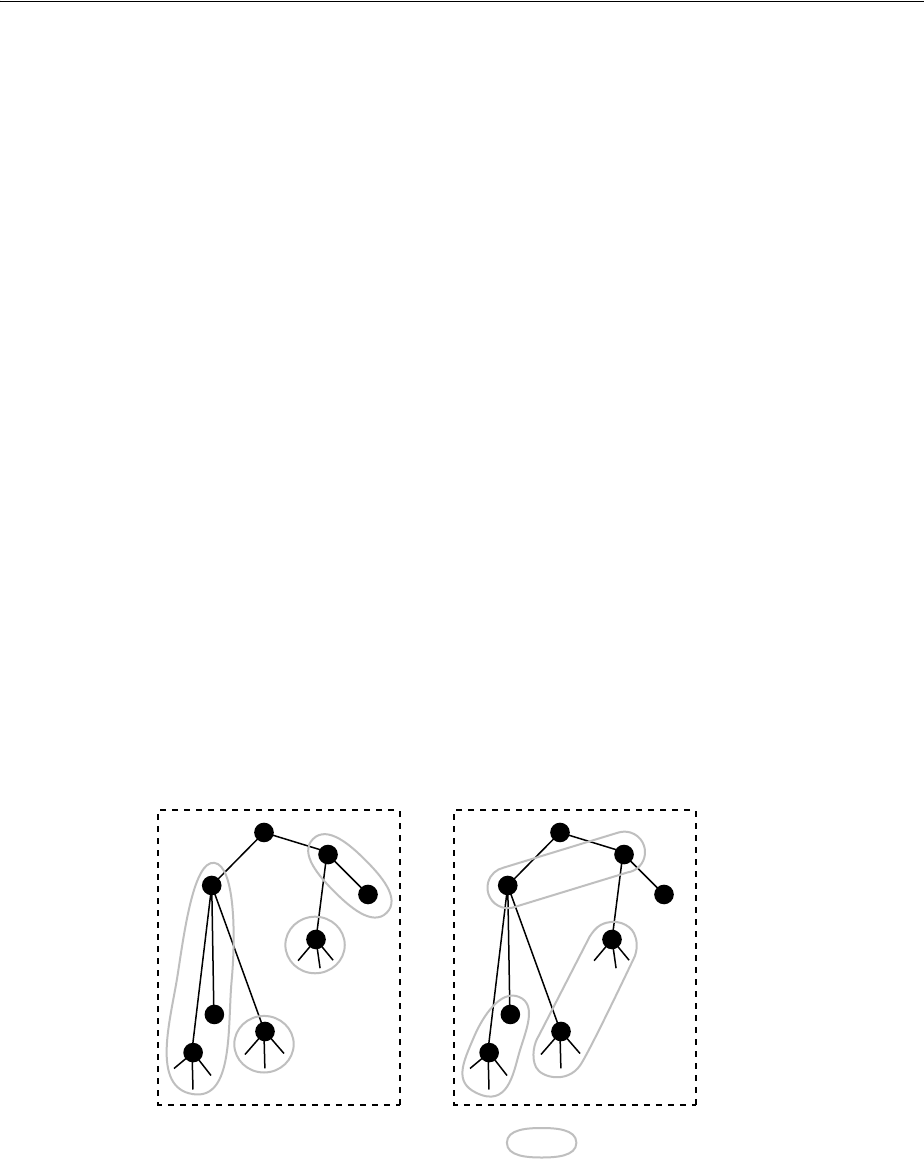
Naming Contexts
3-14 Oracle Fusion Middleware Administrator's Guide for Oracle Internet Directory
■creatorsName: Name of the creator of the object class
■createTimestamp: Time when the object class was created
■modifiersName: Name of the last person to modify the object class
■modifyTimestamp: Time when the object class was last modified
■orclACI: access control list (ACL) directives that apply to all entries in the
subtree below the access control policy point (ACP) where this attribute is defined
■orclEntryLevelACI: Access control policy pertaining to only a specific entity,
for example, a special user
3.6 Naming Contexts
A directory naming context is a subtree that resides entirely on one server. It must be a
complete subtree, that is, it must begin at an entry that serves as the top of the subtree,
and extend downward to either leaf entries or references to subordinate naming
contexts. It can range in size from a single entry to the entire directory information tree
(DIT).
Figure 3–5 illustrates correct and incorrect naming contexts. Notice that the correct
ones on the left are contiguous, and the incorrect ones on the right are not.
Figure 3–5 Correct and Incorrect Naming Contexts
To enable users to discover specific naming contexts, you can publish those naming
contexts in Oracle Internet Directory by using ldapmodify.
See Also:
■Section 3.8, "Globalization Support" for more information on
access control policies and ACLs
■Section 20.1.3, "Understanding Attributes" for a discussion of
how to add additional content to entries
See Also: Chapter 11, "Managing Naming Contexts" for
instructions on how to publish a naming context
Naming context
Correct Incorrect

Globalization Support
Understanding Oracle Internet Directory Concepts and Architecture 3-15
3.7 Security
Oracle Internet Directory is a key element of Oracle Identity Management. You can
deploy multiple Oracle components to work against a shared instance of Oracle
Internet Directory. This sharing allows an enterprise to simplify security management
across all applications.
In addition to the role it plays in the Oracle Identity Management infrastructure,
Oracle Internet Directory provides many powerful features for protecting information.
Security features within Oracle Internet Directory itself include:
■The Secure Sockets layer: Ensuring that data is not modified, deleted, or replayed
during transmission
■Data privacy: Ensuring that data is not inappropriately observed while it is stored
in Oracle Internet Directory
■Password policies: Establishing and enforcing rules for how passwords are
defined and used
■Authorization: Ensuring that a user reads or updates only the information for
which that user has privileges
■Password protection: Ensuring that passwords are not easily discovered by others
■Authentication: Ensuring that the identities of users, hosts, and clients are
correctly validated
You can use all these features to enforce a uniform security policy for multiple
applications enabled for Oracle Internet Directory, and do so in either an enterprise or
hosted environment. You do this by deploying the directory for administrative
delegation. This deployment allows, for example, a global administrator to delegate to
department administrators access to the metadata of applications in their departments.
These department administrators can then control access to their department
applications.
You can also use security features of the underlying Oracle Database, such as
Transparent Data Encryption and Database Vault, to protect Oracle Internet Directory
data.
3.8 Globalization Support
Oracle Internet Directory follows LDAP Version 3 internationalization (I18N)
standards. These standards require that the database storing directory data use
Unicode Transformation Format 8-bit (UTF-8) character set. With Oracle9i, Oracle
added a new UTF-8 character set called AL32UTF8. This database character set
supports the latest version of Unicode (3.2), including the latest supplementary
characters. This allows Oracle Internet Directory to store the character data of almost
any language supported by Oracle Globalization Support. Moreover, although several
different application program interfaces are involved in the Oracle Internet Directory
implementation, Oracle Internet Directory ensures that the correct character encoding
is used with each API.
Globalization Support means support for both single-byte and multibyte characters. A
single-byte character is represented by one byte of memory. ASCII text, for example,
uses single-byte characters. By contrast, a multibyte character can be represented by
more than one byte. Simplified Chinese, for example, uses multibyte characters. An
See Also: Part III, "Advanced Administration: Security"

Distributed Directories
3-16 Oracle Fusion Middleware Administrator's Guide for Oracle Internet Directory
ASCII representation of a simplified Chinese directory entry definition might look like
this:
dn: o=\274\327\271\307\316\304,c=\303\300\271\372
objectclass: top
objectclass: organization
o: \274\327\271\307\316\304
Where the attribute values correspond to an ASCII representation of a simplified
Chinese directory entry definition.
By default, the main Oracle Internet Directory components—OID Monitor (OIDMON),
OID Control Utility (OIDCTL), Oracle directory server (OIDLDAPD), and Oracle
directory replication server (OIDREPLD)—accept only the UTF-8 character set. The
Oracle character set name is AL32UTF8.
The Oracle directory server and database tools are no longer restricted to run on a
UTF8 database. However, you must ensure that all characters in the client character set
are included in the database character set (with same or different character codes) if
the database underlying the Oracle Internet Directory server is not AL32UTF8 or
UTF8. Otherwise, there may be data loss during LDAP add, delete, modify, or
modifydn operations if the client data cannot be mapped to the database character set.
Oracle Directory Services Manager uses Unicode (UTF-16—that is, fixed-width 16-bit
Unicode). It can support internationalized character sets.
3.9 Distributed Directories
Although an online directory is logically centralized, it can be physically distributed
onto several servers. This distribution reduces the work a single server would
otherwise have to do, and enables the directory to accommodate a larger number of
entries.
A distributed directory can be either replicated or partitioned. When information is
replicated, the same naming contexts are stored by more than one server. When
information is partitioned, one or more unique, non-overlapping naming contexts are
stored on each directory server. In a distributed directory, some information may be
partitioned and some may be replicated.
This section contains these topics:
■Section 3.9.1, "Directory Replication"
■Section 3.9.2, "Directory Partitioning"
3.9.1 Directory Replication
Replication is the process of copying and maintaining the same naming contexts on
multiple directory servers. See Chapter 6, "Understanding Oracle Internet Directory
Replication" for a discussion of replication concepts.
See Also:
■Appendix I, "Globalization Support in the Directory."
■Oracle Database Globalization Support Guide in the Oracle
Database Documentation Library for a detailed discussion of
Globalization Support.
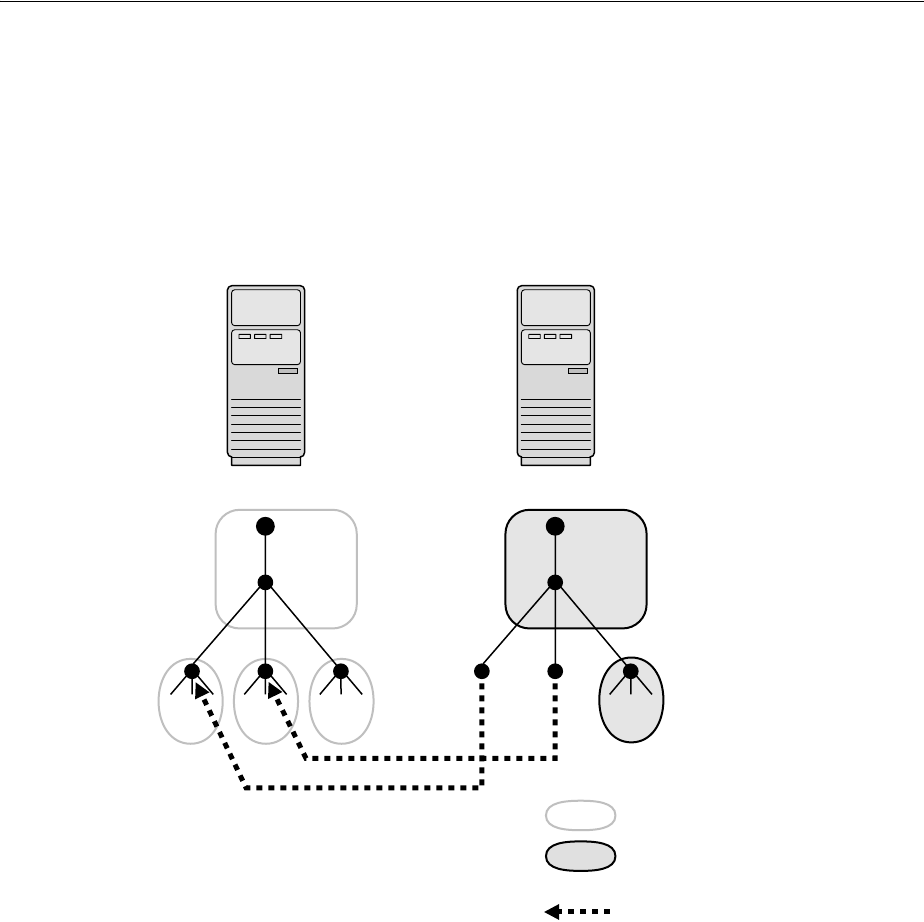
Distributed Directories
Understanding Oracle Internet Directory Concepts and Architecture 3-17
3.9.2 Directory Partitioning
Partitioning, in which each directory server stores one or more unique,
non-overlapping naming contexts, is another way of distributing directory
information.
Figure 3–6 shows a partitioned directory in which some naming contexts reside on
different servers.
Figure 3–6 A Partitioned Directory
In Figure 3–6 on page 3-17, four naming contexts reside on Server A:
■dc=acme,dc=com
■c=us,dc=acme,dc=com
■c=uk,dc=acme,dc=com
■c=au,dc=acme,dc=com
Two naming contexts on Server A are replicated on Server B:
■dc=acme,dc=com
■c=au,dc=acme,dc=com
The directory uses one or more knowledge references to locate information that is
requested of Server B, but that resides on Server A. It passes this information to a
client in the form of a referral.
Server A
Naming context
Knowledge reference
Replicated naming
context
dc=com
dc=acme
Server B
dc=com
dc=acme
c=us c=uk c=au c=us c=uk c=au
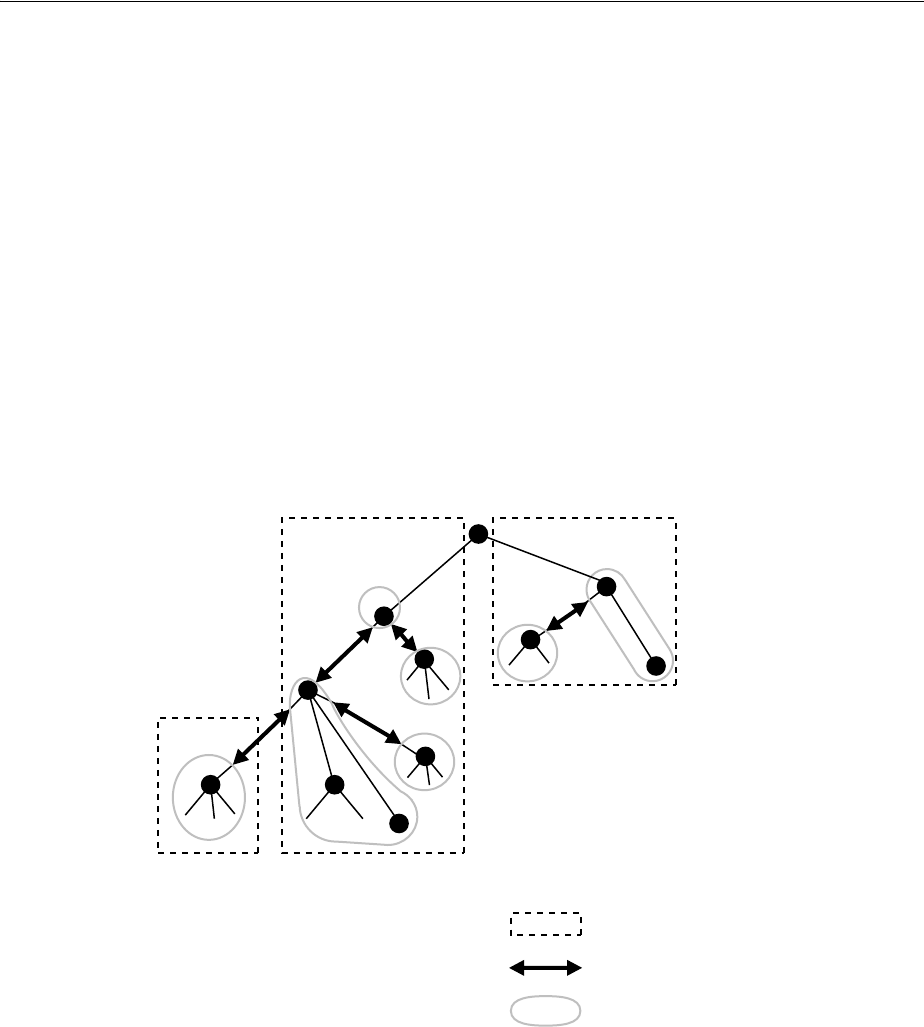
Knowledge References and Referrals
3-18 Oracle Fusion Middleware Administrator's Guide for Oracle Internet Directory
3.10 Knowledge References and Referrals
A knowledge reference provides the names and addresses of the various naming
contexts held in another partition. For example, in Figure 3–6 on page 3-17, Server B
uses knowledge references to point to the c=us and c=uk naming contexts on Server
A. When Server B is asked for information residing on Server A, it sends back one or
more referrals to Server A. Clients can then use these referrals to contact Server A.
Typically, each directory server contains both superior and subordinate knowledge
references. Superior knowledge references point upward in the DIT toward the root.
They tie the partitioned naming context to its parent. Subordinate knowledge
references point downward in the DIT to other partitions.
For example, in Figure 3–7 on page 3-18, Server B holds four naming contexts, two of
which are superior to the others. These two superior naming contexts use subordinate
knowledge references to point to their subordinate naming contexts. Conversely, the
naming context on Server A has an immediate superior residing on Server B. Server A
therefore uses a superior knowledge reference to point to its parent on Server B.
Figure 3–7 Using Knowledge References to Point to Naming Contexts
Naming contexts that start at the top of the DIT obviously cannot have a knowledge
reference to a superior naming context.
Server A
Server B Server C
Separate servers
Naming context
Subordinate - Immediate superio
r
reference pair

Oracle Delegated Administration Services and the Oracle Internet Directory Self-Service Console
Understanding Oracle Internet Directory Concepts and Architecture 3-19
There are two kinds of referrals:
■Smart referrals
These are returned to the client when the knowledge reference entry is in the
scope of the search. It points the client to the server that stores the requested
information.
For example, suppose that:
■Server A holds the naming context, ou=server
development,c=us,o=acme, and has a knowledge reference to Server B.
■Server B holds the naming context ou=sales,c=us,o=acme.
When a client sends a request to Server A for information in
ou=sales,c=us,o=acme, Server A provides the user with a referral to Server B.
■Default referrals
These are returned when the base object is not in the directory, and the operation
is performed in a naming context on another server. A default referral typically
sends the client to a server that has more detailed information about the directory
partitioning arrangement.
For example, suppose that Server A holds:
■The naming context c=us,o=acme
■A knowledge reference to Server PQR that has more knowledge about the
overall directory partitioning arrangement
Now suppose that a client requests information on c=uk,o=acme. When Server A
finds that it does not have the c=uk,o=acme naming context, it provides the
client with a referral to Server PQR. From there, the client can find the server
holding the requested naming context.
3.11 Oracle Delegated Administration Services and the Oracle Internet
Directory Self-Service Console
Oracle Delegated Administration Services is a set of pre-defined, Web-based units for
performing directory operations on behalf of a user. This set of services frees directory
administrators from the routine tasks of directory management by enabling them to
delegate specific functions to other administrators and to end users. It provides most
Notes:
■There are presently no Internet standards for enforcing the
validity of knowledge references, and Oracle Internet Directory
does not do so. It is up to the administrator to ensure
consistency among knowledge references within an enterprise
network.
■Oracle recommends that permission for managing knowledge
reference entries be restricted, as is the case with any other
privileged administrative function such as schema or access
control.
See Also: Chapter 19, "Managing Knowledge References and
Referrals."

The Service Registry and Service to Service Authentication
3-20 Oracle Fusion Middleware Administrator's Guide for Oracle Internet Directory
of the functionality that directory-enabled applications require, such as creating a user
entry, creating a group entry, searching for entries, changing user passwords, and
other employee-specific data.
You can use Oracle Delegated Administration Services to develop your own tools for
administering application data in the directory. Or you can use the Oracle Internet
Directory Self-Service Console, a tool based on Oracle Delegated Administration
Services that comes ready-to-use with Oracle Internet Directory. This console is used
by several Oracle components to provide delegated administration.
3.12 The Service Registry and Service to Service Authentication
The Service Registry and the Service to Service Authentication framework are Oracle
Internet Directory features that facilitate integration between Oracle technology
components that request services from one another. The Service Registry provides a
place to store information, so that the components can discover each other. The Service
to Service Authentication framework allows one component to authenticate to another
and establishes trust among them.
The Service Registry is a container in Oracle Internet Directory (under cn=Services,
Cn=OracleContext) where components store connectivity information, such as
protocol, and other information, such as type of service. During installation, each OCS
component registers its information in the Registry. At run-time the components
discover information registered by other components. Service Registry objects are
stored in the Oracle Internet Directory DIT in a component-specific Services container
in the rootOracleContext.
Service to Service Authentication is a framework that allows one service to
authenticate to another and establish trusts among the services. At install time, each of
the client services is provisioned with a username and password in Oracle Internet
Directory. In addition, each target service defines an authorization role in Oracle
Internet Directory to control which components should it trust. When a component
requests services of another component, the requestor must authenticate to the target
service like any other client, using its own identity and credentials. The requesting
service must also be listed in the Target services Trusted Application group (Default
Group: contrasted Applications, counterpoise, cn=OracleContext). The requesting
service also must send the user's identity so that the target service can authenticate the
user as well. The data is sent securely, using either Digest authentication or the target
service's native secure authentication.
3.13 Oracle Directory Integration Platform
Oracle Directory Integration Platform enables an enterprise to integrate its
applications and other directories with Oracle Internet Directory. It provides all the
interfaces and infrastructure necessary to keep the data in Oracle Internet Directory
consistent with that in enterprise applications and connected directories. It also makes
it easier for third-party vendors and developers to develop and deploy their own
connectivity agents.
Note: All references to Oracle Delegated Administration Services in
this chapter refer to Oracle Delegated Administration Services 10g
(10.1.4.3.0) or later.
See Also: Oracle Identity Management Guide to Delegated
Administration in the 10g (10.1.4.0.1) library.

Oracle Internet Directory and Identity Management
Understanding Oracle Internet Directory Concepts and Architecture 3-21
For example, an enterprise might want employee records in its HR database to be
synchronized with Oracle Internet Directory. In addition, the enterprise may deploy
certain LDAP-enabled applications (such as Oracle Portal) that must be notified
whenever changes are applied to Oracle Internet Directory.
Based on the nature of integration, Oracle Directory Integration Platform provides two
distinct services:
■The synchronization integration service, which keeps connected directories
consistent with the central Oracle Internet Directory
■The provisioning integration service, which sends notifications to target
applications to reflect changes made to a entries of interest, such as users and
groups
3.14 Oracle Internet Directory and Identity Management
This section contains these topics:
■Section 3.14.1, "About Identity Management"
■Section 3.14.2, "Oracle Identity Management Products"
■Section 3.14.3, "Identity Management Realms"
3.14.1 About Identity Management
Identity management usually refers to the management of an organization's
application users. Steps in their security life cycle include account creation,
suspension, privilege modification, and account deletion. The managed entities may
also include devices, processes, applications, or anything else that must interact in a
networked environment. They may also include users outside of the organization, for
example customers, trading partners, or Web services.
Identity management is important to IT deployments because it can reduce
administrative costs while at the same time improving security.
The Oracle Identity Management products enable deployments to manage centrally
and securely all enterprise identities and their access to various applications in the
enterprise. Identity management comprises these tasks:
■Creating enterprise identities and managing shared properties of these identities
through a single enterprise-wide console
■Creating groups of enterprise identities
■Provisioning these identities in various services available in the enterprise. This
includes:
–Account creation
–Account suspension
–Account deletion
■Managing policies associated with these identities. These include:
–Authorization policies
–Authentication Policies
See Also: Oracle Fusion Middleware Administrator's Guide for Oracle
Directory Integration Platform.

Oracle Internet Directory and Identity Management
3-22 Oracle Fusion Middleware Administrator's Guide for Oracle Internet Directory
–Privileges delegated to existing identities
3.14.2 Oracle Identity Management Products
The Oracle Identity Management products include the following:
■Oracle Internet Directory, a scalable, robust LDAP Version 3-compliant directory
service implemented on the Oracle Database.
■Oracle Virtual Directory, which provides access to multiple data sources without
the need to synchronize or move data from its native location. Oracle Virtual
Directory can provide multiple application-specific views of identity data and can
also be used to secure data access to the application-specific sources and enhance
high-availability to existing data-sources.
■Oracle Directory Integration Platform, which permits synchronization between
Oracle Internet Directory and other directories and user repositories.
■Oracle Delegated Administration Services, which provides trusted proxy-based
administration of directory information by users and application administrators.
(Oracle Internet Directory 11g Release 1 is compatible with Oracle Single Sign-On
10g (10.1.4.3.0) or later.)
■Oracle Single Sign-On, which provides single sign-on access to Oracle and third
party web applications. (Oracle Internet Directory 11g Release 1 is compatible with
Oracle Delegated Administration Services 10g (10.1.4.3.0) or later.)
■Oracle Identity Federation, which provides a self-contained federation solution
that combines the ease of use and portability of a standalone application with a
scalable, standards-based proven interoperable architecture.
■Oracle Identity Manager is a provisioning system for automatically granting and
revoking access to enterprise applications and managed systems.
■Oracle Role Manager is an enterprise-class application for managing business and
organizational relationships, roles, and entitlements.
■Oracle Enterprise Single Sign-On is an access management system for delivering
enterprise authentication and single sign-on for mainframe, client/server and Web
applications
■Oracle Access Manager is a management system for configuring digital identities
and controlling access to protected applications and content in heterogeneous
environments, primarily on the Web.
■Oracle Adaptive Access Manager is the solution for web access real-time fraud
detection and multi-factor online authentication security for the enterprise.
■Oracle Entitlements Server, which enables application developers to externalize
and centralize fine-grained authorization policies that would previously have been
embedded within applications.
■Oracle Authentication Services for Operating Systems, which enables you to
centralize storage, authentication, and management of user identities on Linux
and UNIX systems using Oracle Internet Directory.
While Oracle Identity Management is designed to provide an enterprise infrastructure
for Oracle products, it can also serve as a general-purpose identity management
solution for user-written and third-party enterprise applications. It provides a robust
and scalable enterprise-wide identity management platform for third-party
applications, hardware, and network operating systems. Custom applications can

Oracle Internet Directory and Identity Management
Understanding Oracle Internet Directory Concepts and Architecture 3-23
leverage Oracle Identity Management through a set of documented and supported
services and APIs, for example:
■Oracle Internet Directory provides LDAP APIs for C, Java, and PL/SQL, and is
compatible with other LDAP SDKs.
■Oracle Delegated Administration Services provide a core self-service console that
may be customized to support third-party applications. In addition, it provides
several services for building customized administration interfaces that manipulate
directory data.
■The Oracle Directory Synchronization Service facilitates the development and
deployment of custom solutions for synchronizing Oracle Internet Directory with
third-party directories and other user repositories.
■The Oracle Directory Integration Platform enables you to provision third-party
applications and integrate the Oracle environment with other provisioning
systems.
■Oracle Single Sign-On provides APIs for developing and deploying partner
applications that share a single sign-on session with other Oracle Web
applications.
In addition, Oracle works with third-party application vendors to ensure that their
applications can leverage Oracle Identity Management out of the box.
3.14.3 Identity Management Realms
An identity management realm defines an enterprise scope over which certain identity
management policies are defined and enforced by the deployment. It comprises:
■A well-scoped collection of enterprise identities—for example, all employees in
the US domain.
■A collection of identity management policies associated with these identities. An
example of an identity management policy would be to require that all user
passwords have at least one alphanumeric character.
■A collection of groups—that is, aggregations of identities—that simplifies the
setting of the identity management policies.
You can define multiple identity management realms within the same Oracle Identity
Management infrastructure. Multiple realms enable you to isolate user populations
and enforce a different identity management policy—for example, password policy,
naming policy, self-modification policy—in each realm.
Each identity management realm is uniquely named to distinguish it from other
realms. It also has a realm-specific administrator with complete administrative control
over the realm.
3.14.3.1 Default Identity Management Realm
For all Oracle components to function, an identity management realm is required. One
particular realm, created during installation of Oracle Internet Directory, is called the
default identity management realm. It is where Oracle components expect to find
users, groups, and associated policies whenever the name of a realm is not specified.
There can be only one default identity management realm in the directory. If a
deployment requires multiple identity management realms, then one of them must be
chosen as the default.

Resource Information
3-24 Oracle Fusion Middleware Administrator's Guide for Oracle Internet Directory
3.14.3.2 Identity Management Policies
The Oracle Identity Management infrastructure supports a flexible set of management
policies which comprise:
■Directory structure and naming policies that enable you to:
–Customize the directory structure in Oracle Internet Directory for your
deployment.
–Specify where various identities are to be located and how they are uniquely
identified.
■Authentication policies that enable you to specify authentication methods and
protocols supported by the Oracle Identity Management infrastructure
■Identity management authorizations that enable you to control access to certain
privileged services and delegate administration wherever necessary
3.15 Resource Information
To fulfill the requests of users, some Oracle components gather data from various
repositories and services. To gather the data, these components require the following
information:
■Information specifying the type of resource from which the data is to be gathered.
The type of resource could be, for example, an Oracle Database. This is called
resource type information.
■Information for connecting and authenticating users to the resources. This is called
resource access information.
This section contains these topics:
■Section 3.15.1, "Resource Type Information"
■Section 3.15.2, "Resource Access Information"
■Section 3.15.3, "Location of Resource Information in the DIT"
3.15.1 Resource Type Information
Information about the resources that an application uses to service a user request is
called resource type information. A resource type can be, for example, an Oracle
Database or a Java Database Connectivity Pluggable Data Source. Resource type
information includes such items as the class used to authenticate a user, the user
identifier, and the password.
You specify resource type information by using the Oracle Internet Directory
Self-Service Console.
3.15.2 Resource Access Information
Information for connecting and authenticating users to the databases is called resource
access information. It is stored in an entry called a resource access descriptor (RAD)
from which it can be retrieved and shared by various Oracle components.
Note: In Oracle Internet Directory Release 9.0.2, the equivalent
term for "identity management realm" was "subscriber."
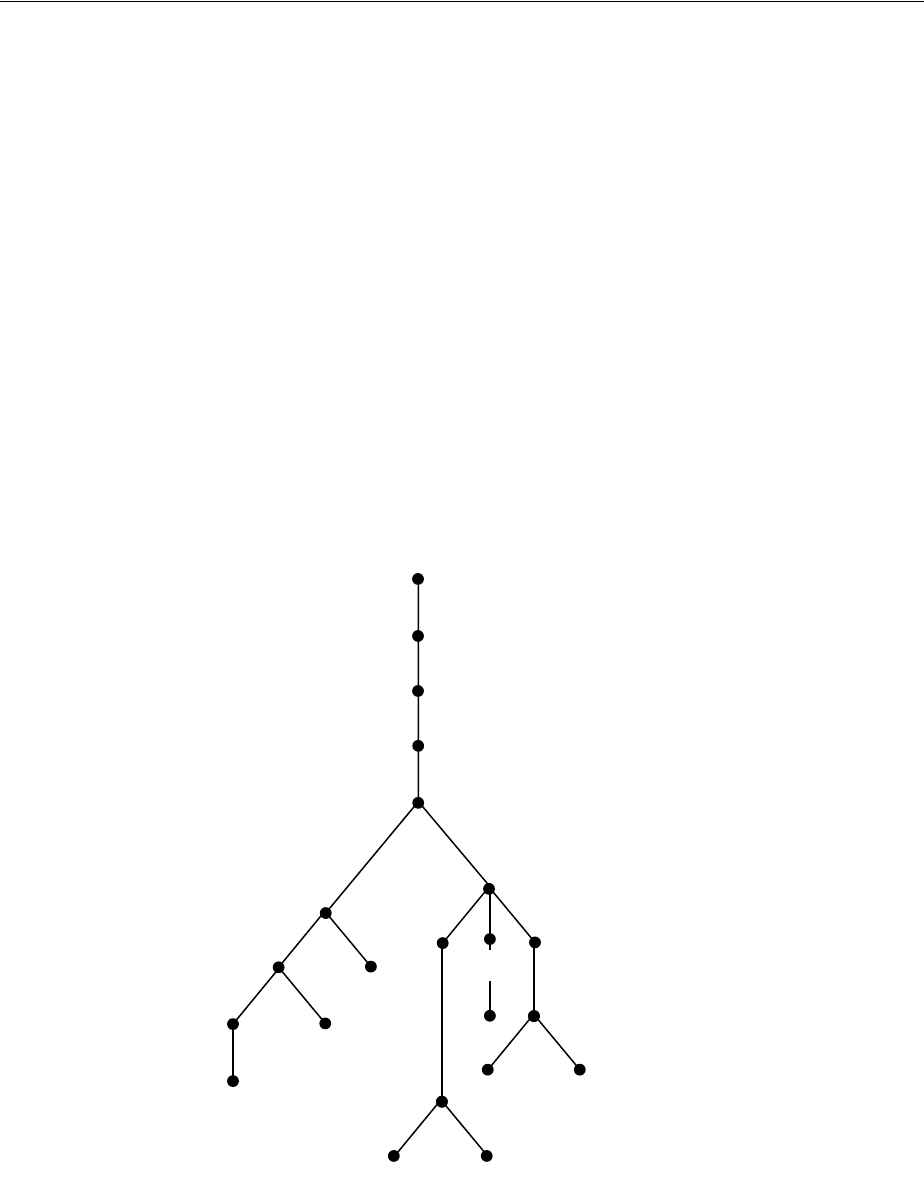
Resource Information
Understanding Oracle Internet Directory Concepts and Architecture 3-25
For example, to service the request of a user for a sales report, Oracle Reports queries
multiple databases. When it does this, it does the following:
1. Retrieves the necessary connect information from the RAD
2. Uses that information to connect to those databases and to authenticate the user
requesting the data
After it has done this, it compiles the report.
You specify resource access information by using the Oracle Internet Directory
Self-Service Console. You can specify resource access information for each individual
user or commonly for all users. In the latter case, all users connecting to a given
application use, by default, the same information to connect to the necessary
databases. Oracle recommends defining default resource access information whenever
an application has its own integrated account management—for example, where each
user is defined within the application itself with a unique single sign-on user name.
3.15.3 Location of Resource Information in the DIT
Figure 3–8 shows where resource information is located in the DIT.
Figure 3–8 Placement of Resource Access and Resource Type Information in the DIT
As Figure 3–8 shows, the resource access and resource type information is stored in the
Oracle Context.
Resource access information for each user is stored in the cn=User Extensions
node in the Oracle Context. In this example, the cn=User Extensions node
contains resource access information for both the default user and for specific users. In
User Extensions
Products
dc=us
OracleContext
dc=acme
dc=com
root
RADs
Default
User
RADs
RADs
Oracle
Database
Server
User 2
User 1
Sales
Database
Bug
Database
Sales
Database
Bug
Database
Common
Oracle Application
Server Reports
Services
Resource
Types Common
Information

Resource Information
3-26 Oracle Fusion Middleware Administrator's Guide for Oracle Internet Directory
the latter cases, the resource access information includes that needed for accessing
both the Sales and the Bug databases.
Resource access information for each application is stored in the object identified by
the application name—in this example, cn=Oracle Reports Services,
cn=Products,cn=Oracle Context,dc=us,dc=acme,dc=com. This is the user
information specific to that product.
Resource type information is stored in the container cn=resource types,
cn=common,cn=products,cn=Oracle Context.
See Also:
■The sections about managing your own resource information,
creating user entries, configuring default resources, and
creating new resource types in Oracle Identity Management Guide
to Delegated Administration in the 10g (10.1.4.0.1) library for
instructions for an end user to specify resource access
information
■"Plug-in Schema Elements" in Oracle Fusion Middleware
Reference for Oracle Identity Management
■Oracle Fusion Middleware Publishing Reports to the Web with
Oracle Reports Services

4
Understanding Process Control of Oracle Internet Directory Components 4-1
4Understanding Process Control of Oracle
Internet Directory Components
This chapter describes the Oracle Internet Directory process control model and related
concepts. The process control model applies to the Oracle Internet Directory LDAP
server and the replication server.
This chapter contains these topics:
■Section 4.1, "Oracle Internet Directory Process Control Architecture"
■Section 4.2, "The ODS_PROCESS_STATUS Table"
■Section 4.3, "Starting, Stopping, and Monitoring of Oracle Internet Directory
Processes"
■Section 4.4, "Oracle Internet Directory Process Control–Best Practices"
For information on creating and destroying Oracle Internet Directory server instances,
see Chapter 8, "Managing Oracle Internet Directory Instances."
For information on starting and stopping the Oracle Directory Integration and
Provisioning server, see the chapter on managing the Oracle Directory Integration and
Provisioning server in Oracle Fusion Middleware Administrator's Guide for Oracle
Directory Integration Platform.
4.1 Oracle Internet Directory Process Control Architecture
The Oracle Process Manager and Notification Server (OPMN) is a daemon process that
monitors Oracle Fusion Middleware system components, including Oracle Internet
Directory. Oracle Enterprise Manager Fusion Middleware Control uses OPMN to stop
or start instances of Oracle Internet Directory. If you stop or start Oracle Internet
Directory components from the command line, you use opmnctl, the command-line
interface to OPMN
OPMN is responsible for the direct start, stop, restart and monitoring of the daemon
process, OIDMON (ORACLE_HOME/bin/oidmon). OIDMON is responsible for the
process control of an Oracle Internet Directory instance. In 11g Release 1, you can have
multiple instances of Oracle Internet Directory on the same Oracle instance on the
See Also:
■Chapter 8, "Managing Oracle Internet Directory Instances"
■Oracle Fusion Middleware Oracle Process Manager and Notification
Server Administrator's Guide for more information about the Oracle
Process Manager and Notification Server
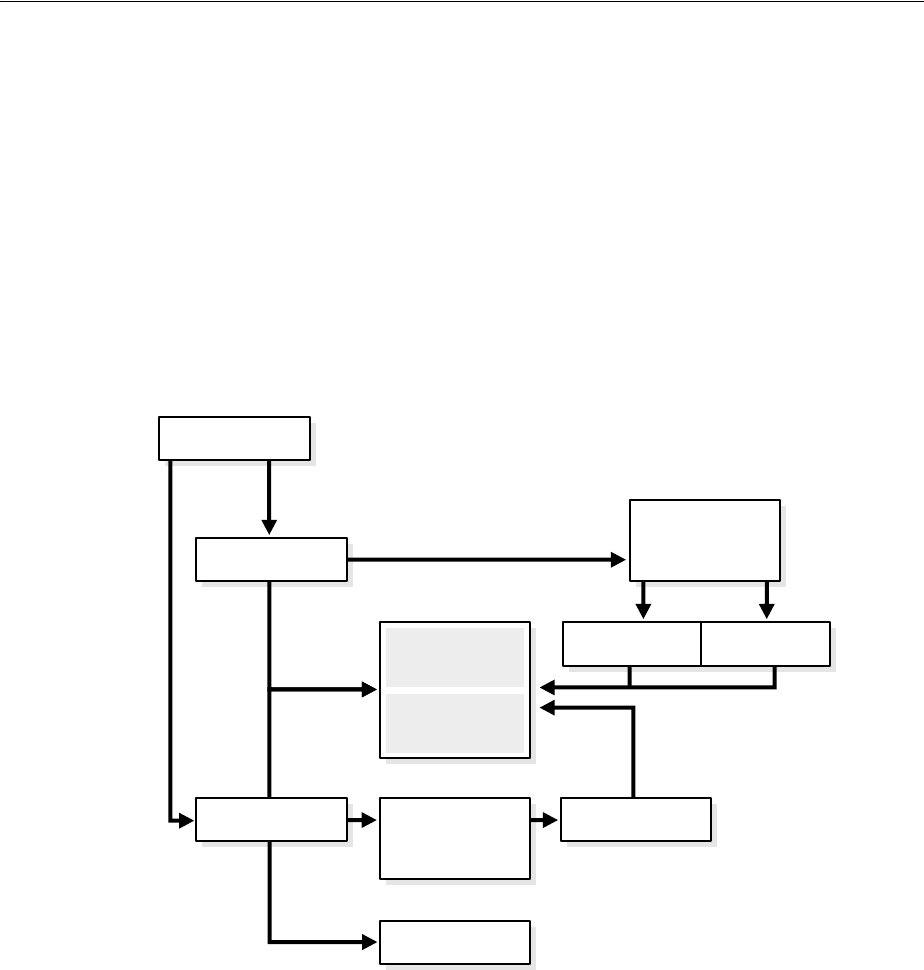
The ODS_PROCESS_STATUS Table
4-2 Oracle Fusion Middleware Administrator's Guide for Oracle Internet Directory
same node. The recommended way to create a new Oracle Internet Directory instance
is to create a Oracle Fusion Middleware component of type OID. Each Oracle Internet
Directory instance created in this manner has its own OIDMON.
Figure 4–1 shows the overall architecture for Oracle Internet Directory process control.
For each Oracle Fusion Middleware component of type OID, OPMN spawns an
OIDMON process. The figure shows two components, oid1 and oid2. OIDMON
spawns the OIDLDAPD dispatcher process, then the dispatcher process spawns one or
more OIDLDAPD server processes. If replication is configured for that instance,
OIDMON spawns a replication server process. Each dispatcher process has its own
non-SSL and SSL port for receiving requests. The number of OIDLDAPD server
processes that the dispatcher spawns for a component is controlled by the attribute
orclserverprocs in the instance-specific configuration entry for the component.
Figure 4–1 Oracle Internet Directory Process Control
4.2 The ODS_PROCESS_STATUS Table
Oracle Internet Directory process information is maintained in the ODS_PROCESS_
STATUS table in the ODS database user schema. OIDMON reads the contents of the
table at a specified interval and acts upon the intent conveyed by the contents of that
table. The interval is controlled by the value of the sleep command line argument
used at OIDMON startup, and the default value is 10 seconds.
Table 4–1 describes the information in the ODS_PROCESS_STATUS table that is
relevant to process control:
See Also: Chapter 8, "Managing Oracle Internet Directory Instances"
for information about creating new Oracle Internet Directory
instances.
OIDLDAPD
Server2
OIDLDAPD
Server1
OIDLDAPD
Server
OIDLDAPD
Dispatcher
non-SSL Port = 3061
SSL Port = 3132
OIDREPLD
OIDMON
ias_component=oid2
OIDMON
ias_component=oid1
OIDLDAPD
Dispatcher
non-SSL Port = 3060
SSL Port = 3131
OPMN
Oracle Database
Shared Memory

Starting, Stopping, and Monitoring of Oracle Internet Directory Processes
Understanding Process Control of Oracle Internet Directory Components 4-3
4.3 Starting, Stopping, and Monitoring of Oracle Internet Directory
Processes
This section describes the events that occur when OPMN starts and stops Oracle
Internet Directory. It also describes process monitoring. This section includes the
following topics:
■Section 4.3.1, "Oracle Internet Directory Snippet in opmn.xml"
■Section 4.3.2, "OPMN Starting Oracle Internet Directory"
■Section 4.3.3, "OPMN Stopping of Oracle Internet Directory"
■Section 4.3.4, "Process Monitoring"
4.3.1 Oracle Internet Directory Snippet in opmn.xml
When OPMN starts OIDMON, it determines what arguments to use based on the
Oracle Internet Directory snippet in the OPMN configuration file, ORACLE_
INSTANCE/config/OPMN/opmn/opmn.xml. The following is a sample Oracle
Internet Directory snippet:
<ias-component id="<componentName>">
<process-type id="OID" module-id="OID">
<process-set id="OID" numprocs="1">
<environment>
<variable id="TNS_ADMIN" value="ORACLE_INSTANCE/config" />
<variable id="DB_CONNECT_STR" value="db_alias" />
Table 4–1 Process Control Items in the ODS_PROCESS_STATUS Table
Item Meaning
Instance Unique instance number for a given server ID on a given host
PID Process ID of the server that is up and running
ServerID Server ID (2=OIDLDAPD, 3=OIDREPLD)
Flags Command line arguments that must be passed to the server
instance
Hostname Name of the host on which this server must be present
State State of the Server Instance (0=stop, 1=start, 2=running,
3=restart, 4=shutdown, 5=failed-over, 7=delete, 8=add).
OIDMON updates the state.
RetryCount Number of attempts to start the server instance before it could
be started successfully
Instancename Name of the server instance, for example: server1
Compname Name of the server component, for example: OID1
Notes:
■There is a uniqueness constraint on: Instance,Instancename,
Compname, ServerID,Hostname.
■Details about ODS_PROCESS_STATUS are provided here for
informational purposes only. Do not attempt to modify this table
directly.

Starting, Stopping, and Monitoring of Oracle Internet Directory Processes
4-4 Oracle Fusion Middleware Administrator's Guide for Oracle Internet Directory
</environment>
<module-data>
<category id="oidmon-parameters">
<data id="start-cmdline-opts" value="connect=$DB_CONNECT_STR start"/>
<data id="stop-cmdline-opts" value="connect=$DB_CONNECT_STR stop"/>
</category>
</module-data>
</process-set>
</process-type>
</ias-component>
Two tags are specific to Oracle Internet Directory:
■Oracle Internet Directory component-specific directives for OPMN are located
under the tag <ias-component id="OID" status="enabled>.
■OIDMON-related requirements are located under the tag <category
id="oidmon parameters">. There should be only one such directive.
4.3.2 OPMN Starting Oracle Internet Directory
Oracle Internet Directory is started as follows:
■You start an Oracle Internet Directory instance with Oracle Enterprise Manager
Fusion Middleware Control or with the command opmnctl.
■OPMN issues an oidmon start command with appropriate arguments, as
specified in the "oidmon parameters" in the OID Snippet in opmn.xml.
■OIDMON then starts all Oracle Internet Directory Server instances whose
information in the ODS_PROCESS_STATUS table has state value 1 or 4 and
ORACLE_INSTANCE, COMPONENT_NAME, INSTANCE_NAME values matching
the environment parameters set by OPMN.
4.3.3 OPMN Stopping of Oracle Internet Directory
Oracle Internet Directory is stopped as follows:
■You stop an Oracle Internet Directory instance with Oracle Enterprise Manager
Fusion Middleware Control or with opmnctl.
See Also:
■Section 8.2.2, "Starting the Oracle Internet Directory Server by
Using Fusion Middleware Control"
■Section 8.3.7, "Starting the Oracle Internet Directory Server by
Using opmnctl"
Note: When you use opmnctl to start only Oracle Internet Directory
instances, the opmn.xmlparameters are not reloaded as they are when
you use opmnctl startall. Execute opmnctl reload to reload
the changes in the file ORACLE_
INSTANCE/config/OPMN/opmn/opmn.xml.

Oracle Internet Directory Process Control–Best Practices
Understanding Process Control of Oracle Internet Directory Components 4-5
■OPMN issues an oidmon stop.
■For each row in the ODS_PROCESS_STATUS table that matches the environment
parameters ORACLE_INSTANCE, COMPONENT_NAME, and INSTANCE_
NAME, the oidmon stop command kills OIDMON, OIDLDAPD, and OIDREPLD
processes and updates the state to 4.
4.3.4 Process Monitoring
OPMN does not monitor server processes directly. OPMN monitors OIDMON and
OIDMON monitors the server processes. The events are as follows:
■When you start OIDMON through OPMN, OPMN starts OIDMON and ensures
that OIDMON is up and running.
■If OIDMON goes down for some reason, OPMN brings it back up.
■OIDMON monitors the status of the Oracle Internet Directory dispatcher process,
LDAP server processes, and replication server process and makes this status
available to OPMN and Fusion Middleware Control. The opmnctl status
command can show OIDLDAPD process PIDS because OIDMON sends OPMN
that information.
4.4 Oracle Internet Directory Process Control–Best Practices
The recommended approach for using opmnctl and oidctl is as follows:
■Use opmnctl to stop or start Oracle Internet Directory as a component. That is,
use it to stop or start all Oracle Internet Directory LDAP and replication server
instances.
–Using opmnctl to stop Oracle Internet Directory causes OPMN to issue an
oidmon stop, which results in OIDMON shutting down all configured
LDAP and replication server instances.
–Using opmnctl to start Oracle Internet Directory causes OPMN to issue an
oidmon start, which results in OIDMON starting up all configured LDAP
and replication server instances.
See Also:
■Section 8.2.3, "Stopping the Oracle Internet Directory Server by
Using Fusion Middleware Control"
■Section 8.3.8, "Stopping the Oracle Internet Directory Server by
Using opmnctl"
Note: When you use opmnctl to start only Oracle Internet Directory
instances, the opmn.xmlparameters are not reloaded as they are when
you use opmnctl startall. Execute opmnctl reload to reload
the changes in the file ORACLE_
INSTANCE/config/OPMN/opmn/opmn.xml.
See Also:
■Chapter 8, "Managing Oracle Internet Directory Instances"
■Chapter 39, "Setting Up Replication" for more information on
starting and stopping Oracle Internet Directory

Oracle Internet Directory Process Control–Best Practices
4-6 Oracle Fusion Middleware Administrator's Guide for Oracle Internet Directory
■Use oidctl to stop and start an Oracle Internet Directory Replication Server
Instance without affecting the associated OIDMON and LDAP server instance
managed by OIDMON.
See Also:
■Chapter 39, "Setting Up Replication" for more information on
starting and stopping a replication server.
■Appendix B, "Managing Oracle Internet Directory Instances by
Using OIDCTL."

5
Understanding Oracle Internet Directory Organization 5-1
5Understanding Oracle Internet Directory
Organization
This chapter discusses further details to consider when designing the logical
organization of directory information. It contains these topics:
■Section 5.1, "The Directory Information Tree"
■Section 5.2, "Planning the Overall Directory Structure"
■Section 5.3, "Planning the Names and Organization of Users and Groups"
■Section 5.4, "Migrating a DIT from a Third-Party Directory"
5.1 The Directory Information Tree
Oracle Internet Directory serves as a shared repository for the entire Oracle Identity
Management infrastructure. A carefully planned logical structure of the directory
enables:
■Enforcement of security policies that meet the requirements of your deployment
■An efficient physical deployment of the directory service
■Easier configuration of synchronization of a third-party directory with Oracle
Internet Directory
Figure 5–1 shows a directory information tree for a hypothetical company, called
MyCompany, that is deploying identity management.
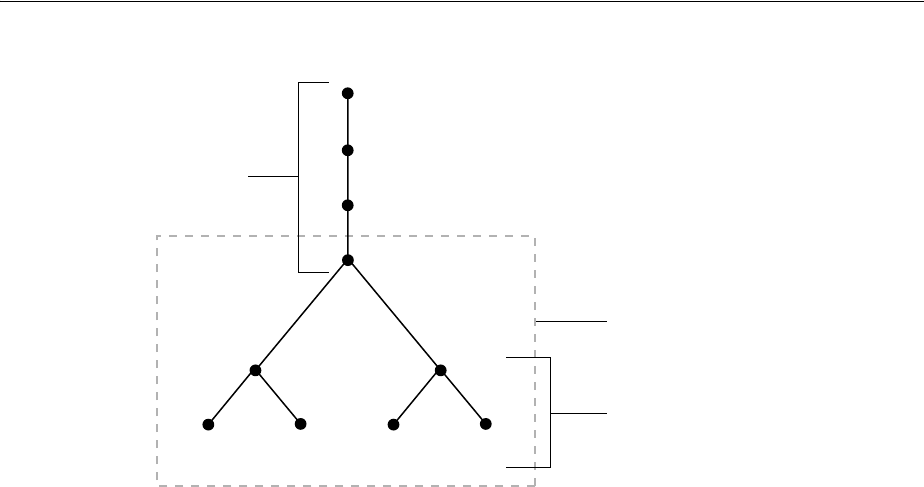
Planning the Overall Directory Structure
5-2 Oracle Fusion Middleware Administrator's Guide for Oracle Internet Directory
Figure 5–1 Planning the Directory Information Tree
MyCompany makes the following decisions with respect to the logical organization of
the directory in their U.S. deployment:
■A domain name-based scheme is to represent the overall DIT hierarchy. Because
the identity management infrastructure is being rolled out in the us domain, the
root of the DIT is dc=us,dc=mycompany,dc=com.
■Within the naming context chosen, all users are represented under a container
called cn=users. Within this container, all users are represented at the same
level—that is, there is no organization-based hierarchy. In addition, the uid
attribute is chosen as the unique identifier for all users.
■Within the naming context chosen, all enterprise groups are represented under a
container called cn=groups. Within this container, all enterprise groups are
represented at the same level. The naming attribute for all group entries is cn.
■Finally, the container dc=us is chosen as the root of the identity management
realm. In this case, the name of the realm is us. The deployment expects to enforce
similar security policies for all users who fall under the scope of the us realm.
Planning the logical organization of the directory for Oracle Identity Management
involves planning:
■The overall structure of the directory information tree
■The directory containment and naming for users and groups
■The identity management realm
5.2 Planning the Overall Directory Structure
This task involves designing the basic directory information tree that all identity
management-integrated applications in the enterprise are to use. As you do this, keep
these considerations in mind:
■The directory organization should facilitate clean and effective access control. If
either full or partial replication is planned, then proper boundaries and policies for
replication can be enforced only if the design of the DIT brings out the separation.
cn=Groups
cn=Users
dc=us
dc=MyCompany
dc=com
root
cn=
group2
cn=
group1
uid=
user1
uid=
user2
Identity Management Realm
Realm name: 'US'
User / Group Naming
and Containment
Overall
DIT
Structure

Planning the Names and Organization of Users and Groups
Understanding Oracle Internet Directory Organization 5-3
■If the enterprise is integrating with a third-party directory server, then it is best to
align the DIT design of Oracle Internet Directory with the existing DIT. This
consideration also applies to deployments that are rolling out Oracle Internet
Directory now but plan to roll out another directory later—for example, Microsoft
Active Directory that is required for the operation of software from Microsoft. In
each case, choosing an Oracle Internet Directory DIT design that is more consistent
with that of the third-party directory makes management of user and group
objects easier through Oracle Delegated Administration Services and other
middle-tier applications.
■In a single enterprise scenario, choosing a DIT design that aligns with the DNS
domain name of the enterprise suffices. For example, if Oracle Internet Directory is
set up in a company having the domain name mycompany.com, then a directory
structure that has dc=mycompany,dc=com is recommended. Oracle recommends
that you not use departmental or organization level domain components such as
engineering in engineering.mycompany.com.
■If the enterprise has an X.500 directory service, and no other third-party LDAP
directories in production, then it may benefit by choosing a country-based DIT
design. For example, a DIT design with the root of o=mycompany, c=US might
be more suitable for enterprises which already have an X.500 directory service.
■Because the directory can be used by several applications—both from Oracle and
from third-parties alike—the naming attributes used in relative distinguished
names (RDNs) constituting the overall DIT structure should be restricted to
well-known attributes. The following attributes are generally well-known among
most directory-enabled applications:
–c: The name of a country
–dc: A component of a DNS domain name
–l: The name of a locality, such as a city, county or other geographic region
–o: The name of an organization
–ou: The name of an organizational unit
–st: The name of a state or province
■A common mistake is to design the DIT to reflect either the corporate divisional or
organizational structure. Because most corporations undergo frequent
reorganization and divisional restructuring, this is not advisable. It is important to
insulate the corporate directory from organizational changes as much as possible.
5.3 Planning the Names and Organization of Users and Groups
This section offers some things to consider when modeling users and groups in Oracle
Internet Directory. Most of the design considerations that are applicable to the overall
DIT design are also applicable to the naming and containment of users and groups.
5.3.1 Organizing Users
The Oracle Identity Management infrastructure uses Oracle Internet Directory as the
repository for all user identities. Even though a user might have account access to
multiple applications in the enterprise, there is only one entry in Oracle Internet
Directory representing that user's identity. The location and content of these entries in
the overall DIT must be planned before deploying Oracle Internet Directory and other
components of the Oracle Identity Management infrastructure.

Planning the Names and Organization of Users and Groups
5-4 Oracle Fusion Middleware Administrator's Guide for Oracle Internet Directory
■As mentioned in the previous section, it is tempting to organize users according to
their current departmental affiliations and hierarchy. However, this is not
advisable because most corporations undergo frequent reorganization and
divisional restructuring. It is more manageable to capture a person's
organizational information as an attribute of that person's directory entry.
■There are no performance benefits derived from organizing users in a hierarchy
according to organizational affiliations or management chain. Oracle recommends
that you keep the DIT containing users as flat as possible.
■If the deployment has different user populations with each one maintained and
managed by a different organization, then Oracle recommends subdividing users
into containers based on these administrative boundaries. This simplifies the
setting of access controls and helps in cases where replication is needed.
■The out-of-the-box default nickname attribute for uniquely identifying users in
lookup operations is uid. This is the default attribute used for logins. The
out-of-the-box default naming attribute for constructing a DN is cn.
■The default attribute for uniquely identifying users is cn or CommonName. The
typical value of CommonName is the person's full name. People's names or email
addresses, however, can change and therefore might not be suitable as values of
this attribute. If possible, choose a value that will not change and that uniquely
identifies a user, such as the employee id.
■Typically, most enterprises have a Human Resources department that establishes
rules for assigning unique names and numbers for employees. When choosing a
unique naming component for directory entries, it is good to exploit this
administrative infrastructure and use its policies.
■It is required that all user entries created in the directory belong to the following
object classes: inetOrgPerson, orclUserV2.
■If you already have a third-party directory, or plan to integrate with one in the
future, then it is beneficial to align the user naming and directory containment in
Oracle Internet Directory with the one used in the third-party directory. This
simplifies the synchronization and subsequent administration of the distributed
directories.
5.3.2 Organizing Groups
Some applications integrated with the Oracle Identity Management infrastructure can
also base their authorizations on enterprise-wide groups created by the deployment in
Oracle Internet Directory. Like user entries, the location and content of these group
entries should also be carefully planned. When you design groups, consider the
following:
■There are no performance benefits to be gained from organizing enterprise groups
in a hierarchy based on the organizational affiliations or ownership. Oracle
recommends keeping the DIT that contains groups as flat as possible. This
facilitates easy discovery of groups by all applications and fosters sharing of these
groups across applications.
■It is preferable to separate the users and groups in the DIT so that different
management policies can be applied to each set of entries.
Note: In Oracle Internet Directory Release 9.0.2, the default value
for the nickname attribute was cn. As of Release 9.0.4, the default
value for this attribute is uid.

Migrating a DIT from a Third-Party Directory
Understanding Oracle Internet Directory Organization 5-5
■The attribute used to uniquely identify a group should be cn or CommonName.
■All group entries created by the enterprise in the directory should belong to the
following object classes: groupOfUniqueNames and orclGroup. The former
object class is an internet standard for representing groups. The latter is useful
when using the Oracle Internet Directory Self-Service Console to manage groups.
■Instead of creating new directory access controls for each enterprise-wide group,
consider doing the following:
1. Use the owner attribute of the group to list which users own this group.
2. Create an access control policy at a higher level that grants all users listed in
the owner attribute special privileges to perform the various operations.
■In the description attribute, provide information for users to understand the
purpose of the group.
■Consider using the displayName attribute from the orclGroup object class. This
attribute enables Oracle Delegated Administration Services and Oracle Internet
Directory Self-Service Console to display a more readable name for the group.
■If you have different sets of groups, each of which is maintained and managed by
a different organization with its own administrative policies, then sub-divide the
groups into containers based on these administrative boundaries. This simplifies
the setting of access controls. It also helps when replication is needed.
■If you already have a third-party directory, or plan to integrate with one in the
future, then align the group naming and directory containment in Oracle Internet
Directory with the one used in the third-party directory. This simplifies the
synchronization and subsequent administration of the distributed directories.
5.4 Migrating a DIT from a Third-Party Directory
To migrate a DIT from a third-party directory, use the techniques described in
Chapter 36, "Migrating Data from Other Data Repositories" and in Oracle Fusion
Middleware Administrator's Guide for Oracle Directory Integration Platform for
synchronizing with third-party metadirectory solutions and integrating with
third-party directories. If you are migrating a DIT from a Microsoft Active Directory
environment, also see the chapter on integration with the Microsoft Active Directory
Environment. Oracle recommends that you configure the Oracle Internet Directory
DIT to be identical to the third-party DIT.

Migrating a DIT from a Third-Party Directory
5-6 Oracle Fusion Middleware Administrator's Guide for Oracle Internet Directory
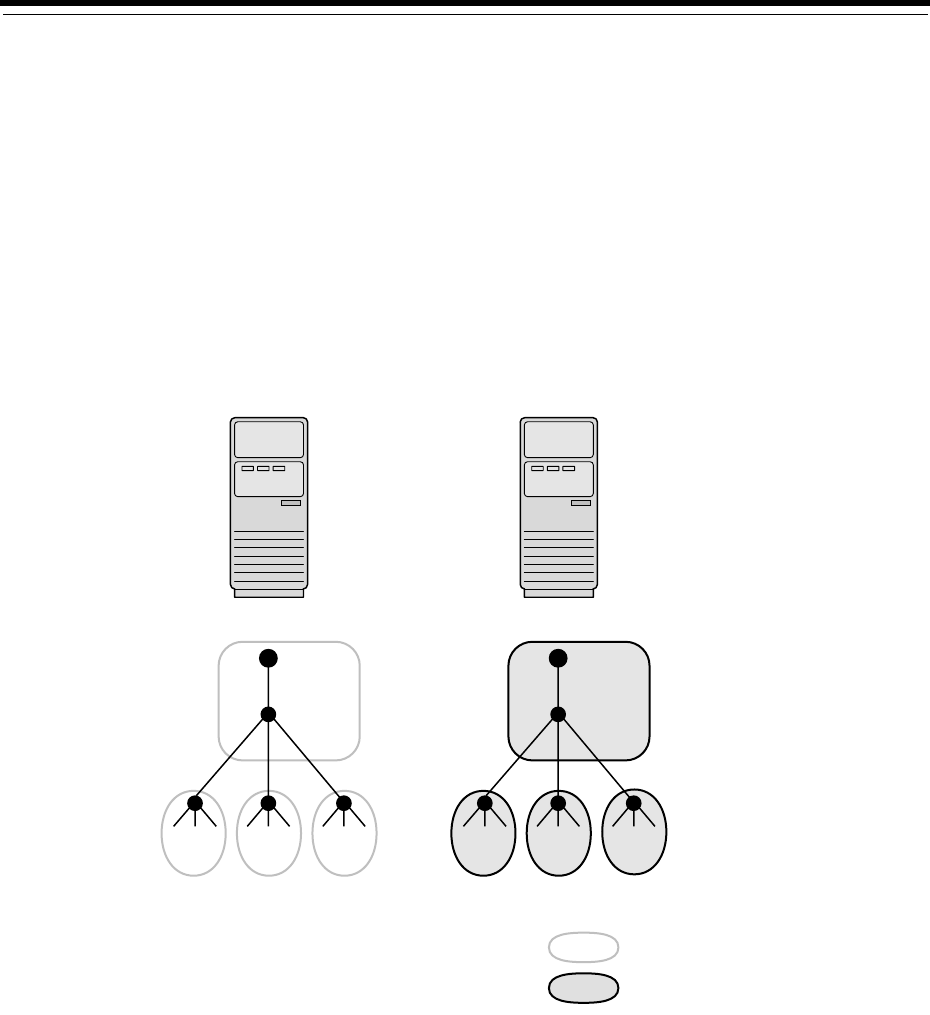
6
Understanding Oracle Internet Directory Replication 6-1
6 Understanding Oracle Internet Directory
Replication
This chapter provides an introduction to Oracle Internet Directory replication.
Replication is the process of copying and maintaining the same naming contexts on
multiple directory servers. It can improve performance by providing more servers to
handle queries and by bringing the data closer to the client. It improves reliability by
eliminating risks associated with a single point of failure.
Figure 6–1 shows a replicated directory.
Figure 6–1 A Replicated Directory
This chapter contains the following topics:
■Section 6.1, "Why Use Replication?"
■Section 6.2, "Replication Concepts"
Server A
Naming context
Replicated naming
context
dc=com
dc=acme
Server B
dc=com
dc=acme
c=us c=uk c=au c=us c=uk c=au

Why Use Replication?
6-2 Oracle Fusion Middleware Administrator's Guide for Oracle Internet Directory
■Section 6.3, "What Kind of Replication Do You Need?"
6.1 Why Use Replication?
There are many reasons to implement replication, including the following:
■Local accessibility and performance requirements
Most corporations have operations in many regions in the world, and those
operations need a common directory. Suppose that the regions were
interconnected with low bandwidth links involving multiple intermediate routers.
A client accessing a directory server from outside the region could experience a
very high latency, and even inadequate throughput. In such cases, a regional
replica is essential.
■Load balancing
When directory access exceeds the capacity of an existing server, an additional
server can share the load. Even if the deployment meets the load, it can be less
costly to maintain two relatively low-end systems than one high-end system.
■Failure tolerance and higher overall system availability
One of the most important reasons to implement directory replication is to
increase overall system availability. When one server is unavailable, the traffic can
be routed to other available servers. This can be transparent to clients.
6.2 Replication Concepts
This section briefly introduces some basic concepts.
This section contains the following topics:
■Section 6.2.1, "Content to be Replicated: Full or Partial"
■Section 6.2.2, "Direction: One-Way, Two-Way, or Peer to Peer"
■Section 6.2.3, "Transport Mechanism: LDAP or Oracle Database Advanced
Replication"
■Section 6.2.4, "Directory Replication Group (DRG) Type: Single-master,
Multimaster, or Fan-out"
■Section 6.2.5, "Loose Consistency Model"
■Section 6.2.6, "How the Replication Concepts Fit Together"
■Section 6.2.7, "Multimaster Replication with Fan-Out"
6.2.1 Content to be Replicated: Full or Partial
One decision you must make when setting up replication is how much of the DIT to
replicate from one node to another. The choices are:
See Also:
■Part V, "Advanced Administration: Directory Replication"
■Appendix C, "Setting Up Oracle Database Advanced
Replication-Based Replication"
■Appendix D, "How Replication Works"
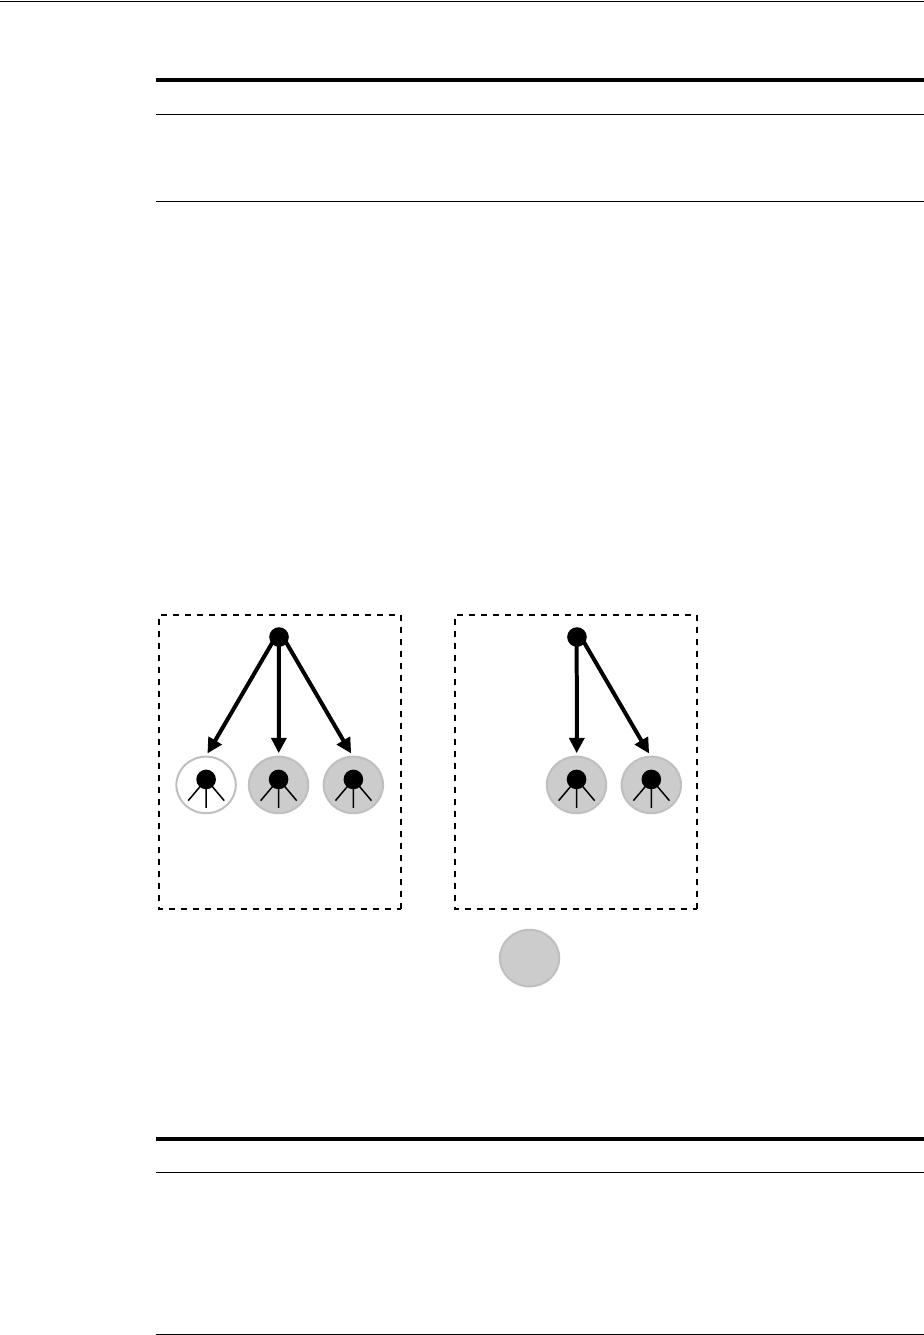
Replication Concepts
Understanding Oracle Internet Directory Replication 6-3
Full replication involves propagating the entire DIT to another node. This type of
replication ensures the high availability of the entire directory. You can also use it to
distribute operations on the entire directory among different nodes. Full replication
can be based on either LDAP or Oracle Database Advanced Replication.
Partial replication enables you to propagate one or more subtrees, rather than the
entire DIT, to another node. Decentralizing a directory in this way enables you to
balance the workload between servers and build a highly available distributed
directory, complete with fault tolerance and failover. You can set up partial replication
by using command-line tools or the Replication Wizard in Oracle Enterprise Manager.
Partial replication is most often LDAP-based.
Figure 6–2 shows an example of partial replication.
Figure 6–2 Example of Partial Replication
6.2.2 Direction: One-Way, Two-Way, or Peer to Peer
The direction of replication can be one-way, two-way or peer-to-peer:
Table 6–1 Full or Partial Replication
Content to Replicate Description
Full Propagates the entire DIT to another node.
Partial Propagates one or more subtrees, rather than the entire DIT, to
another node.
Table 6–2 Direction of Replication
Direction Description
One-Way One node is configured as the supplier and the other as the
consumer. The consumer is read-only.
Two-Way Both nodes are both supplier and consumer. They are both
read/write, or updatable.
Peer-to-Peer All nodes in a replication group are both supplier and consumer
to all other nodes
Replicated Naming
Context
Server 1 Server 2
AB C BC

Replication Concepts
6-4 Oracle Fusion Middleware Administrator's Guide for Oracle Internet Directory
Sometimes the terms read-only and read/write are used to describe direction of
replication. In a one-way replication agreement, the consumer node is said to be
read-only. That is, you cannot propagate changes to other nodes by writing to that
node. In a two-way replication agreement, both nodes are considered to be
read/write. Another term for read/write is updatable.
Sometimes the term multimaster is used instead of peer-to-peer. Multimaster actually
refers to the type of replication group, as described in Section 6.2.4, "Directory
Replication Group (DRG) Type: Single-master, Multimaster, or Fan-out."
6.2.3 Transport Mechanism: LDAP or Oracle Database Advanced Replication
Oracle Internet Directory supports two protocols you can use for replicating data from
one node to another. The protocols are:
LDAP replication can be configured as peer-to-peer, one-way or two-way. Advanced
Replication is usually peer-to-peer.
6.2.4 Directory Replication Group (DRG) Type: Single-master, Multimaster, or Fan-out
The directory servers that participate in the replication of a given naming context form
a directory replication group (DRG). The relationship among the directory servers in a
DRG is represented on each node by a special directory entry called a replication
agreement. A replication agreement can be either one-way or two-way.
Each copy of a naming context contained within a server is called a replica. A server
that sends the updates made to it to other servers is known as a supplier. A server that
accepts those changes is called a consumer. A server can be both a supplier and a
consumer.
A directory replication group can be single-master, multimaster, or fan-out as
described in Table 6–4.
Table 6–3 Transport Protocols
Transport Mechanism Description
LDAP Uses the industry-standard Lightweight Directory Access
Protocol Version 3. This is the recommended protocol to use for
replication, unless you are also performing Oracle Single
Sign-On replication.
Oracle Database Advanced
Replication
Uses the replication feature of Oracle Database. Also called
Advanced Replication. This replication protocol is currently
required for Oracle Single Sign-On replication.
Table 6–4 Types of Directory Replication Groups
Group Description
Single-master Has only one supplier replicating changes to one or more consumers.
Clients can update only the master node, and can only read data on any
of the consumers. This type of group typically uses LDAP. It is also
possible to configure Advanced Replication as single-master, by
switching all nodes in a group except one to read-only mode.
Multimaster Enables multiple sites, acting as equals, to manage groups of replicated
data. In a multimaster replication environment, each node is both a
supplier and a consumer node. Multimaster replication can use either
LDAP or Advanced Replication as its transport mechanism. The full
DIT is replicated on each node. Replication is always peer-to-peer.

Replication Concepts
Understanding Oracle Internet Directory Replication 6-5
6.2.4.1 Single-Master Replication Example
Figure 6–3, "Example of Single-Master Replication" shows a single-master replication
environment.
Figure 6–3 Example of Single-Master Replication
In Figure 6–3, each bullet represents a node of Oracle Internet Directory. Node A is a
supplier that replicates consumer nodes B and C. Node A is read/write, and Nodes B
and C are read-only. The data transfer protocol is LDAP.
6.2.4.2 Multimaster Replication Example
The example in Figure 6–4 shows three nodes—A, B, and C—that update each other in
a multimaster replication group. Replication between nodes is two-way.
Figure 6–4 Example of Multimaster Replication
In Figure 6–4, all replication is two-way.
Fan-out Also called a point-to-point replication group, has a supplier replicating
directly to a consumer. That consumer can then replicate to one or more
other consumers. Fan-out uses LDAP as its transport mechanism. The
replication can be either full or partial. It can be either one-way or
two-way.
Table 6–4 (Cont.) Types of Directory Replication Groups
Group Description
Read-Write
Read-Only
One -Way LDAP
A
CB
Read-Write
Multimaster Replication
A
CB
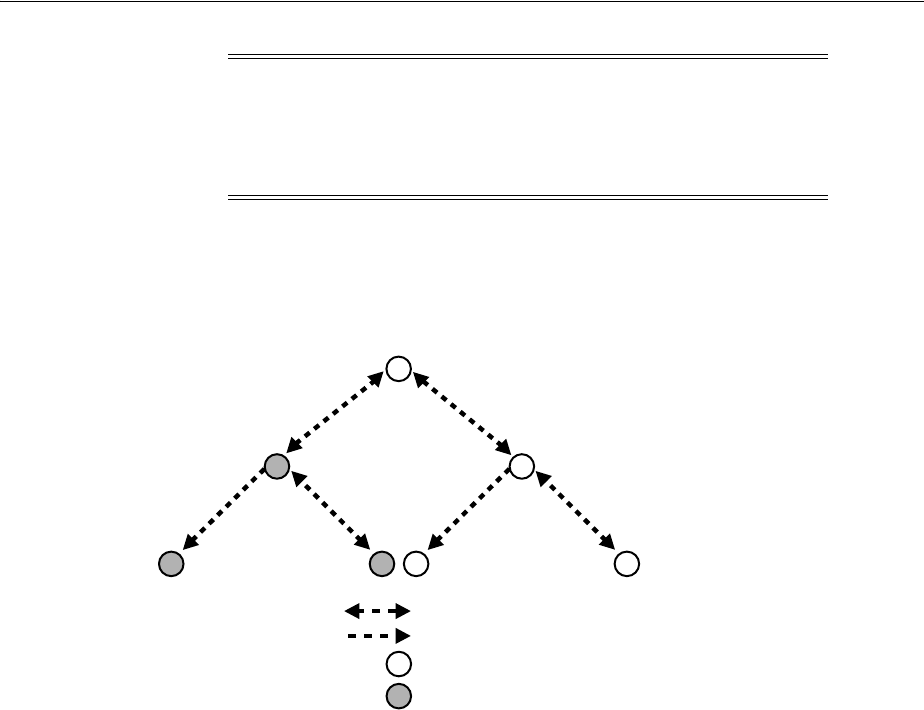
Replication Concepts
6-6 Oracle Fusion Middleware Administrator's Guide for Oracle Internet Directory
6.2.4.3 Fan-out Replication Example
Figure 6–5 shows a fan-out replication environment.
Figure 6–5 Example of Fan-Out Replication
In Figure 6–5, supplier A replicates to two consumers, B and C. Consumer node B
contains a partial replica of A, whereas consumer node C contains a full replica of A.
Each of these nodes, in turn, serves as a supplier that replicates data to two other
consumers: Node B partially replicates to nodes D and E, and node C fully replicates
to nodes F and G. Nodes D and F are read-only.
In fan-out replication, nodes transfer data by using LDAP.
6.2.5 Loose Consistency Model
Directory replication architecture is based on a loose consistency model: Two
replicated nodes in a replication agreement are not guaranteed to be consistent in real
time. This increases the overall flexibility and availability of the directory network,
because a client can modify data without all interconnected nodes being available.
Suppose, for example, that one node is unavailable or heavily loaded. With
multimaster replication, the operation can be performed on an alternate node, and all
interconnected nodes synchronize in due course.
6.2.6 How the Replication Concepts Fit Together
Table 6–5 shows each of the two transport mechanisms, LDAP and Oracle Database
Advanced Replication, and describes how each type can be combined with other
replication concepts.
Note: Multimaster replication is the only replication mechanism
supported in Oracle Single Sign-On, as described in the section
"Configuring Oracle Single Sign-On for Replication" in the chapter
on high availability in the Oracle Application Server Single Sign-On
Administrator's Guide in the 10g (10.1.4.0.1) library.
Full Replica
Partial Replica
One-Way LDAP
A
F
BC
Two-Way LDAP
ED GF

Replication Concepts
Understanding Oracle Internet Directory Replication 6-7
6.2.7 Multimaster Replication with Fan-Out
Oracle Internet Directory enables any node in a multimaster replication group to also
participate in a fan-out replication agreement. Within the multimaster replication
agreement, data transfer between the nodes occurs by way of Oracle Database
Advanced Replication or LDAP. Within the fan-out replication agreement, data
transfer from supplier to consumer occurs by way of LDAP and can be either one-way
or two-way.
Figure 6–6 shows an example of multimaster replication used with fan-out replication.
Table 6–5 Types of Data Transfer Between Nodes in a Directory Replication Group
Concept LDAP-Based Replication
Oracle Database Advanced
Replication-Based Replication
Content replicated Full replica
Partial replica
Full replica (usually)
Direction of replication Peer-to-peer
One-way
Two-way
Peer-to-peer
DRG Type Multimaster replication
Single-master replication
Fan-out replication
Multimaster replication
Single-master replication, by
switching all masters in a
multimaster configuration except one
to read-only mode.
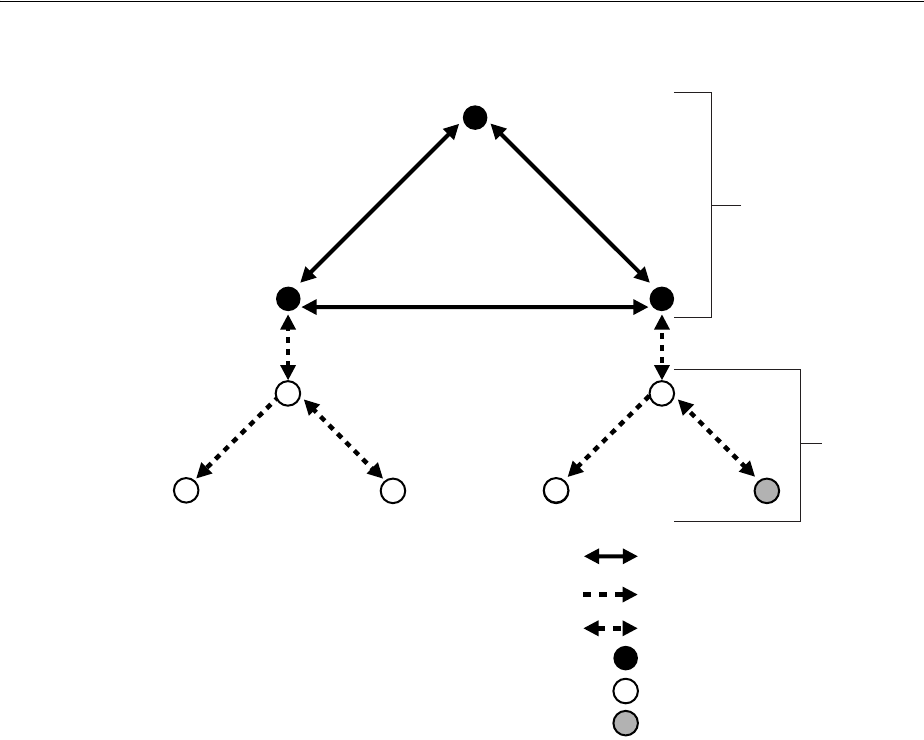
What Kind of Replication Do You Need?
6-8 Oracle Fusion Middleware Administrator's Guide for Oracle Internet Directory
Figure 6–6 Example of Multimaster Replication with Fan-Out
In the example in Figure 6–6, nodes A, B, and C form a multimaster replication group.
They transfer data among them by using either LDAP or Advanced Replication.
Node B supplies changes to Node D, a replica of the entire directory. Node D, in turn,
supplies changes to Nodes F and G by using LDAP-based replication. Both Nodes F
and G are replicas of the entire directory. Similarly, Node E is a full replica of Node C.
Node E, in turn supplies changes to Node H, a replica of the entire directory, and
Node I, a partial replica, by using LDAP-based replication. Nodes F and H are
read-only.
6.3 What Kind of Replication Do You Need?
The type of replication you need depends on the features that are important in your
enterprise. This section discusses the types of replication to use to achieve three
features: local availability, load balancing, and high availability
Local Availability
Local availability is important in the following situations:
■You need a local copy of the master data that is specific to the local site. This might
be the entire DIT or a partial DIT.
See Also: "LDAP-Based Replication" on page 29-23 for more
information about fan-out replication
Multimaster Replication-based replica
Full Replica
Partial Replica
One-Way LDAP
F
E
I
Multimaster Replication
A
CB
H
D
G
F
Multimaster
Replication
Fan-Out
Replication
Two-Way LDAP

What Kind of Replication Do You Need?
Understanding Oracle Internet Directory Replication 6-9
■You need the increased scalability and performance that you can get by
distributing the work load among multiple servers.
■You want to reduce the network dependency and network load caused by users
from local sites connecting to the master site.
If the local site does not update the data, use one-way replication from master node to
local nodes
If the local site does need to update the data and the updates must be replicated back
to the master site, use two-way replication between master node and local nodes.
Load Balancing
Load Balancing is important in the following situations:
■You want to increase scalability and performance by distributing work load
among multiple servers
■You want to dedicate specific servers to certain applications, such as single sign-on
or e-mail applications
■You require network load balancing.
You can use LDAP multi-master replication to replicate the data between two or more
nodes. If Oracle Single Sign-On10g (10.1.4.3.0) or later is also installed and Oracle
Single Sign-On schema must be replicated for load balancing, use Oracle Database
Advanced Replication-based multimaster replication. Otherwise, you can use
LDAP-based multimaster replication.
High Availability
High availability is important in the following situations:
■You require a high availability solution with at least one backup server to prevent
loss from single server failure
■You need a disaster recovery solution that uses geographically distributed
deployments to protect applications from disasters.
Usually, you can use LDAP-based multimaster replication to replicate the data
between two or more nodes. If Oracle Single Sign-On 10g (10.1.4.3.0) or later is also
installed along with Oracle Internet Directory, however, then use Oracle Database
Advanced Replication-based multimaster replication.
Note: When you configure a load balancer for use with replication,
use sticky routing and not round-robin routing. Replication is
asynchronous in nature, so changes made on one node are not
available immediately on the other nodes.

What Kind of Replication Do You Need?
6-10 Oracle Fusion Middleware Administrator's Guide for Oracle Internet Directory

Part II
Part II Basic Administration
This part guides you through common Oracle Internet Directory configuration and
maintenance tasks. This part contains these chapters:
■Chapter 7, "Getting Started With Oracle Internet Directory"
■Chapter 8, "Managing Oracle Internet Directory Instances"
■Chapter 9, "Managing System Configuration Attributes"
■Chapter 10, "Managing IP Addresses"
■Chapter 11, "Managing Naming Contexts"
■Chapter 12, "Managing Accounts and Passwords"
■Chapter 13, "Managing Directory Entries"
■Chapter 14, "Managing Dynamic and Static Groups"
■Chapter 15, "Performing Bulk Operations"
■Chapter 16, "Managing Collective Attributes"
■Chapter 17, "Managing Alias Entries"
■Chapter 18, "Managing Attribute Uniqueness Constraint Entries"
■Chapter 19, "Managing Knowledge References and Referrals"
■Chapter 20, "Managing Directory Schema"
■Chapter 21, "Configuring Referential Integrity"
■Chapter 22, "Managing Auditing"
■Chapter 23, "Managing Logging"
■Chapter 24, "Monitoring Oracle Internet Directory"
■Chapter 25, "Backing Up and Restoring Oracle Internet Directory"

7
Getting Started With Oracle Internet Directory 7-1
7Getting Started With Oracle Internet
Directory
This chapter assumes you have installed and configured Oracle Internet Directory as
described in: Oracle Fusion Middleware Installation Guide for Oracle Identity Management.
This chapter describes the management interfaces and documents the first tasks you
must perform as an administrator of Oracle Internet Directory.
It contains the following sections:
■Section 7.1, "Patching Your System to 11g Release 1 (11.1.1.6.0)"
■Section 7.2, "Postinstallation Tasks and Information"
■Section 7.3, "Using Fusion Middleware Control to Manage Oracle Internet
Directory"
■Section 7.4, "Using Oracle Directory Services Manager"
■Section 7.5, "Using Command-Line Utilities to Manage Oracle Internet Directory"
■Section 7.6, "Basic Tasks for Configuring and Managing Oracle Internet Directory"
7.1 Patching Your System to 11g Release 1 (11.1.1.6.0)
To patch an existing system to 11g Release 1 (11.1.1.6.0), follow the procedures in
Oracle Fusion Middleware Patching Guide. In addition, perform the following task:
7.1.1 Upgrading a Directory Replication Group
If replication is configured in your existing Oracle Internet Directory environment,
you must follow the procedure in Appendix Q, "Performing a Rolling Upgrade."
7.2 Postinstallation Tasks and Information
Perform these tasks after you complete installation and basic configuration of Oracle
Internet Directory.
■Section 7.2.1, "Setting Up the Environment"
■Section 7.2.2, "Adding Datafiles to the OLTS_CT_STORE and OLTS_ATTRSTORE
Tablespaces"
■Section 7.2.3, "Changing Settings of Windows Services"
■Section 7.2.4, "Starting and Stopping the Oracle Stack"
■Section 7.2.5, "Identifying Default URLs and Ports"

Postinstallation Tasks and Information
7-2 Oracle Fusion Middleware Administrator's Guide for Oracle Internet Directory
■Section 7.2.6, "Tuning Oracle Internet Directory"
■Section 7.2.7, "Enabling Anonymous Binds"
■Section 7.2.8, "Enabling Oracle Internet Directory to run on Privileged Ports"
■Section 7.2.9, "Verifying Oracle Database Time Zone"
7.2.1 Setting Up the Environment
Set the environment variables described at the beginning of Section 7.5, "Using
Command-Line Utilities to Manage Oracle Internet Directory."
7.2.2 Adding Datafiles to the OLTS_CT_STORE and OLTS_ATTRSTORE Tablespaces
You can skip this step if you have a fresh installation of Oracle Internet Directory 11g
Release 1 (11.1.1.6.0) or newer. In that case your Oracle Internet Directory schemas
were created by using the Release 1 (11.1.1.6.0) or newer versions of RCU and
config.sh.
If your schema were created during installation of a version prior to 11g Release 1
(11.1.1.6.0), you must add datafiles to the OLTS_CT_STORE and OLTS_ATTRSTORE
tablespaces if you intend to add more than a million entries to Oracle Internet
Directory. Perform this step prior to the bulkload or ldapadd operation. For details,
see the section "Creating Datafiles and Adding Datafiles to a Tablespace" in Oracle
Database Administrator's Guide.
7.2.3 Changing Settings of Windows Services
Change the Startup type of the following Windows services from Automatic to
Manual: Oracle Database, TNS Listener, OPMN. This is necessary to ensure that the
services start in the correct order.
7.2.4 Starting and Stopping the Oracle Stack
See Appendix P, "Starting and Stopping the Oracle Stack" for information.
7.2.5 Identifying Default URLs and Ports
This section lists some default URLs and ports:
7.2.6 Tuning Oracle Internet Directory
The default Oracle Internet Directory configuration must be tuned in almost all
deployments. You must change the values of the certain configuration attributes,
based on your deployment. See the "Basic Tuning Recommendations" section of the
Oracle Internet Directory chapter in Oracle Fusion Middleware Performance and Tuning
URL or Port Default Value
Oracle Directory Services Manager (ODSM) http://host:7005/odsm
Oracle Enterprise Manager Fusion Middleware
Control
http://host:7001/em/
Oracle WebLogic Server Administrative Console http://host:7001/console/
Oracle Internet Directory LDAP 3060
Oracle Internet Directory LDAPS 3131

Postinstallation Tasks and Information
Getting Started With Oracle Internet Directory 7-3
Guide especially the tables " Minimum Values for Oracle Database Instance
Parameters" and "LDAP Server Attributes to Tune."
For more information about tuning, see the Oracle Internet Directory chapter in Oracle
Fusion Middleware Performance and Tuning Guide. For descriptions of all the attributes,
see Chapter 9, "Managing System Configuration Attributes" and Chapter 41,
"Managing Replication Configuration Attributes."
7.2.7 Enabling Anonymous Binds
Anonymous searches, except those on the root DSE, are disabled by default. In some
deployment environments, clients might need access to more than the root DSE. If you
have such a deployment, set the orclanonymousbindsflag attribute to 1. See
"Managing Anonymous Binds" on page 32-8 for more information.
7.2.8 Enabling Oracle Internet Directory to run on Privileged Ports
On many operating systems, only processes running with superuser privilege can use
port numbers less than 1024. By default, Oracle Identity Management 11g Installer
does not assign privileged ports to Oracle Internet Directory, although you can
override the default by using staticports.ini. (See Oracle Fusion Middleware
Installation Guide for Oracle Identity Management.)
If you want to change the SSL and non-SSL ports to numbers in the privileged range
after installation, proceed as follows:
1. As the root user, execute ORACLE_HOME/oidRoot.sh.
2. Reassign the port numbers in one of the following ways:
■Change the SSL Port and Non-SSL Port values on the General tab of the
Server Properties page in Oracle Enterprise Manager Fusion Middleware
Control, as described in"Configuring Server Properties" on page 9-12.
■Change the values of orclnonsslport and orclsslport in the
instance-specific configuration entry by using ldapmodify, as described in
Section 9.4.1, "Setting System Configuration Attributes by Using ldapmodify."
3. Run opmnctl updatecomponentregistration, as described in Section 8.3.4,
"Updating the Component Registration of an Oracle Instance by Using opmnctl."
(This step is not necessary if you are running a standalone instance of Oracle
Internet Directory, as described in "Creating Additional Oracle Internet Directory
Instances" on page 8-3.)
4. Restart Oracle Internet Directory, as described inSection 8.2.4, "Restarting the
Oracle Internet Directory Server by Using Fusion Middleware Control" or
Section 8.3.9, "Restarting the Oracle Internet Directory Server by Using opmnctl."
7.2.9 Verifying Oracle Database Time Zone
To ensure that the Oracle Internet Directory garbage collection logic works correctly,
verify the Oracle Database dbtimezone parameter, as described in Section 35.2, "Set
Oracle Database Time Zone for Garbage Collection."
See Also: Oracle Database Net Services Administrator's Guide

Using Fusion Middleware Control to Manage Oracle Internet Directory
7-4 Oracle Fusion Middleware Administrator's Guide for Oracle Internet Directory
7.3 Using Fusion Middleware Control to Manage Oracle Internet Directory
Oracle Enterprise Manager Fusion Middleware Control is a graphical user interface
that provides a comprehensive systems management platform for Oracle Fusion
Middleware. Fusion Middleware Control organizes a wide variety of performance
data and administrative functions into distinct, Web-based home pages for the
domain, Oracle instances, middleware system components, and applications.
Oracle Internet Directory is a target type in Oracle Enterprise Manager Fusion
Middleware Control. To use the interface to Oracle Internet Directory:
1. Connect to Fusion Middleware Control.
The URL is of the form:
https://host:port/em
2. In the left panel topology tree, expand the domain, then Fusion Middleware, then
Identity and Access. Alternatively, from the domain home page, expand Fusion
Middleware, then Identity and Access. Instances of Oracle Internet Directory are
listed in both places. To view the full name of a component instance, move the
mouse over the instance name.
3. Select the Oracle Internet Directory component you want to manage.
4. Use the Oracle Internet Directory menu to select tasks.
Notes:
■If you selected Configure Without a Domain when prompted for
a domain while installing Oracle Internet Directory, Oracle
Enterprise Manager Fusion Middleware Control will not be
available.
■Oracle Enterprise Manager Fusion Middleware Control manages
Oracle Internet Directory through its SSL port. The Oracle Internet
Directory SSL port must be configured for no authentication or
server authentication. In addition, the ciphers configured must
include one or more of the Diffie-Hellman no-auth ciphers:
■SSL_DH_anon_WITH_3DES_EDE_CBC_SHA
■SSL_DH_anon_WITH_RC4_128_MD5
■SSL_DH_anon_WITH_DES_CBC_SHA
If the Oracle Internet Directory SSL port is configured for mutual
authentication, or if the appropriate ciphers are not configured,
you will not be able to change Oracle Internet Directory
parameters by using Oracle Enterprise Manager Fusion
Middleware Control. See Section 26.1.3, "SSL Authentication
Modes."
■For information about supported browsers for Fusion Middleware
Control and Oracle Directory Services Manager, refer to System
Requirements and Supported Platforms for Oracle Fusion
Middleware 11gR1, which is linked from:
http://www.oracle.com/technetwork/middleware/ias/
downloads/fusion-certification-100350.html

Using Oracle Directory Services Manager
Getting Started With Oracle Internet Directory 7-5
You can use the Oracle Internet Directory menu to navigate to other Fusion
Middleware Control pages for Oracle Internet Directory, navigate to Oracle Directory
Services Manager pages for Oracle Internet Directory, and perform other tasks, as
described in Table 7–1.
7.4 Using Oracle Directory Services Manager
This section contains the following topics:
■Section 7.4.1, "Introduction to Oracle Directory Services Manager"
■Section 7.4.2, "Configuring ODSM for SSO Integration"
Table 7–1 Using the Oracle Internet Directory Menu
Task Select
Return to Home page Home
View a performance summary Monitoring, then Performance
Start, stop, or restart the Oracle Internet Directory
component
Control, then Start Up, Shut Down,
or Restart, respectively.
View Oracle Internet Directory logs Logs, then View Log Messages
View non-SSL and SSL port information. Port Usage
Manage properties that are specific to this Oracle Internet
Directory component
Administration, then Server
Properties
Manage properties that are shared by all Oracle Internet
Directory components that are connected to the same
Oracle Database
Administration, then Shared
Properties
Set up replication Administration, then Replication
Management
Get tuning and sizing recommendations, Administration, then Tuning and
Sizing
Manage Oracle Internet Directory entries by using Oracle
Directory Services Manager
Directory Services Manager, then
Data Browser
Manage the Oracle Internet Directory schema by using
Oracle Directory Services Manager
Directory Services Manager, then
Schema
Manage Oracle Internet Directory security by using
Oracle Directory Services Manager
Directory Services Manager, then
Security
Manage Oracle Internet Directory advanced features by
using Oracle Directory Services Manager
Directory Services Manager, then
Advanced
Configure auditing for Oracle Internet Directory Security, then Audit Policy Settings
Create wallets for Oracle Internet Directory Security, then Wallets
View target name, software version, Oracle home, Oracle
instance, Oracle Enterprise Manager Fusion Middleware
Control agent, and host
General Information.
See Also:
■Oracle Enterprise Manager Concepts
■Oracle Enterprise Manager Advanced Configuration
■Oracle Fusion Middleware Installation Guide for Oracle Identity
Management

Using Oracle Directory Services Manager
7-6 Oracle Fusion Middleware Administrator's Guide for Oracle Internet Directory
■Section 7.4.3, "Configuring the SSO Server for ODSM Integration"
■Section 7.4.4, "Configuring the Oracle HTTP Server for ODSM-SSO Integration"
■Section 7.4.5, "Invoking Oracle Directory Services Manager"
■Section 7.4.6, "Connecting to the Server from Oracle Directory Services Manager"
■Section 7.4.7, "Configuring Oracle Directory Services Manager Session Timeout"
■Section 7.4.8, "Configuring Oracle HTTP Server to Support Oracle Directory
Services Manager in an Oracle WebLogic Server Cluster"
7.4.1 Introduction to Oracle Directory Services Manager
Oracle Directory Services Manager is a web-based interface for managing instances of
Oracle Internet Directory and Oracle Virtual Directory. It is a replacement for Oracle
Directory Manager, which is now deprecated. Oracle Directory Services Manager
enables you to configure the structure of the directory, define objects in the directory,
add and configure users, groups, and other entries. ODSM is the interface you use to
manage entries, schema, security, and other directory features.
You can also use ODSM to manage system configuration attributes, which can be
useful if Fusion Middleware Control is not available or if you must modify an
attribute that has no Fusion Middleware Control interface. See Section 9.5, "Managing
System Configuration Attributes by Using ODSM Data Browser" and Section 13.2,
"Managing Entries by Using Oracle Directory Services Manager."
7.4.1.1 Using the JAWS Screen Reader with Oracle Directory Services Manager
When you use JAWS with ODSM, whenever a new window pops up, JAWS reads
"popup." To read the entire page, enter the keystrokes Insert+b.
7.4.1.2 Non-Super User Access to Oracle Directory Services Manager
Oracle Directory Services Manager allows you to connect to Oracle Internet Directory
as any user with a valid DN and password in the directory. If you connect as the super
user, cn=orcladmin, or as a user who is a member of
cn=DirectoryAdminGroup,cn=oracle internet directory, you can access
all the tabs in the interface. If you log in as any other user, you can access only the
Home and Data Browser tabs.
7.4.1.3 Single Sign-On Integration with Oracle Directory Services Manager
You can configure Oracle Directory Services Manager to use Single Sign-On (SSO).
When configured with SSO, Oracle Directory Services Manager allows a user who has
been authenticated by the SSO server to connect to an SSO-enabled directory without
logging in, provided that user has privileges to manage the directory.
Oracle Directory Services Manager maintains a list of Oracle Internet Directory servers
that SSO-authenticated users can manage. To validate whether an SSO-authenticated
user has the required privileges to manage Oracle Internet Directory, Oracle Directory
Services Manager maps the SSO-authenticated user to a DN in the Oracle Internet
Directory server.
Oracle Directory Services Manager uses proxy authentication to connect to the
directory. The proxy user's DN and password are stored in a secure storage
framework called the Credential Store Framework (CSF).
See Also: Appendix O, "Managing Oracle Directory Services
Manager's Java Key Store."

Using Oracle Directory Services Manager
Getting Started With Oracle Internet Directory 7-7
To map an SSO-authenticated user, Oracle Directory Services Manager authenticates
to the Oracle Virtual Directory server using the credentials of a user with proxy
privileges. Oracle Directory Services Manager then tries to map the SSO-authenticated
user's unique identifier to the Oracle Virtual Directory user's unique identifier.
The WLS Administrator configures the proxy user's credentials, unique identifier
attribute, and the base DN under which Oracle Directory Services Manager searches
for the user, which are stored in the CSF. If Oracle Directory Services Manager gets a
valid DN, it maps the SSO-authenticated user to that DN. When the SSO-authenticated
user is mapped to a valid DN, Oracle Directory Services Manager uses proxy
authentication to connect to the Oracle Virtual Directory server with the
SSO-authenticated user's mapped DN.
To configure SSO integration, see the following sections:
■Section 7.4.2, "Configuring ODSM for SSO Integration"
■Section 7.4.3, "Configuring the SSO Server for ODSM Integration"
■Section 7.4.4, "Configuring the Oracle HTTP Server for ODSM-SSO Integration".
7.4.2 Configuring ODSM for SSO Integration
To configure ODSM-SSO integration, use the ODSM Proxy Bind Configuration Screen,
at http://host:port/odsm-config. Log in as the WebLogic administrator.
On this screen, you provide Oracle Directory Services Manager with the set of
directory servers that SSO users can manage. This screen lists the Single Sign-On
accessible directories.
Use the View list to modify the number and order of the columns. To remove an
existing directory, click Remove.
To modify an existing directory, click Modify.
To add a new Single Sign-On accessible directory, click Add.
When you click Modify or Add, the Directory Details screen appears. Proceed as
follows:
1. Select Non-SSL or SSL from the Port Type list.
2. Select OID or OVD from the Directory Type list.
3. Provide the following information:
■Host and Port of the directory.
■Proxy User's DN and Password: The DN and password that Oracle Directory
Services Manager uses for proxy authentication.
■User Container DN: The DN under which user entries are located in the
directory.
■User Lookup Attribute: A unique attribute for looking up a user's DN in the
directory. For example, if the SSO server sends the user's mail ID to Oracle
Directory Services Manager as the user's unique identifier, you can configure
mail as the user look-up attribute.
4. Click Validate to verify your directory connection details.
Oracle Directory Services Manager authenticates to the directory server with the
credentials provided.
5. Click Apply to apply your selections.

Using Oracle Directory Services Manager
7-8 Oracle Fusion Middleware Administrator's Guide for Oracle Internet Directory
Click Revert to abandon your selections.
6. Specify the SSO server's Logout URL in the SSO Logout URL text box.
For example, http://myoamhost.mycompany.com:14100/oam/server/logout is the
default Logout URL for the Oracle Access Manager 11g server. If you only
configure this field, Oracle Directory Services Manager displays the Login link at
the top right corner of the Oracle Directory Services Manager page.
7.4.3 Configuring the SSO Server for ODSM Integration
To make SSO-ODSM integration work correctly, you must configure specific ODSM
URLs as protected or unprotected.
ODSM's home page must be an unprotected URL. That is, all users must be able to
access the ODSM home page, including those who have not gone through the SSO
authentication process.
The URL /odsm/odsm-sso.jsp must be protected by the SSO server. When a user
clicks the Login link appearing on the top right corner of the home page, ODSM
redirects the user to /odsm/odsm-sso.jsp. The SSO server challenges the user for a
username and password, if the user is not already authenticated. Upon successful
authentication, the user is directed back to the ODSM home page.
You must configure /odsm/odsm-sso.jsp as a protected URL. In addition you must
configure the following URLs as unprotected URLs:
■/odsm/faces/odsm.jspx
■/odsm/.../
You can use either Oracle Access Manager 11g or Oracle Access Manager 10g as your
SSO provider.
To configure Oracle Access Manager 11g, see "Deploying the OAM 11g SSO Solution"
in Oracle Fusion Middleware Application Security Guide.
You must configure an Oracle Access Manager server to send the SSO-authenticated
user's unique identifier through an HTTP header to Oracle Directory Services
Manager. Oracle Directory Services Manager looks for the OAM_REMOTE_USER HTTP
header. The Oracle Access Manager server sets the OAM_REMOTE_USER header by
default. If this header is not available, Oracle Directory Services Manager looks for the
odsm-sso-user-unique-id HTTP header. If Oracle Directory Services Manager
cannot find any of these headers, Oracle Directory Services Manager SSO integration
will not work.
In addition to sending the user's unique identifier through HTTP header, you can
optionally configure Oracle Access Manager to send following HTTP headers:
■Configure the odsm-sso-user-firstname HTTP header to send the user's first
name.
■Configure the odsm-sso-user-lastname HTTP header to send the user's last
name.
If these headers are available, Oracle Directory Services Manager displays the user's
first name and last name in the "Logged in as" section located in the top right corner of
Oracle Directory Services Manager. If the first name or the last name is not available,
Oracle Directory Services Manager displays the user's unique identifier in the "Logged
in as" section.
To configure Oracle Access Manager 11g, see "Deploying the OAM 11g SSO
Solution" in Oracle Fusion Middleware Application Security Guide.

Using Oracle Directory Services Manager
Getting Started With Oracle Internet Directory 7-9
To configure Oracle Access Manager 10g, see "Deploying SSO Solutions with OAM
10g" in Oracle Fusion Middleware Application Security Guide.
7.4.4 Configuring the Oracle HTTP Server for ODSM-SSO Integration
If you are using Oracle HTTP Server to host the SSO server's WebGate agent and as a
front end to the WebLogic server hosting ODSM, you must configure Oracle HTTP
Server's mod_wl_ohs module to forward all requests starting with /odsm to the
WebLogic server hosting ODSM. The mod_wl_ohs module allows requests to be
proxied from Oracle HTTP Server to Oracle WebLogic Server.
To configure mod_wl_ohs, see "Configuring the mod_wl_ohs Module" in Oracle
Fusion Middleware Administrator's Guide for Oracle HTTP Server.
7.4.5 Invoking Oracle Directory Services Manager
You can invoke Oracle Directory Services Manager directly or from Oracle Enterprise
Manager Fusion Middleware Control.
■To invoke Oracle Directory Services Manager directly, enter the following URL
into your browser's address field:
http://host:port/odsm
In the URL to access Oracle Directory Services Manager, host is the name of the
managed server where Oracle Directory Services Manager is running. port is the
managed server port number from the WebLogic server. You can determine the
exact port number by examining the $Fusion_Middleware_Home/Oracle_Identity_
Management_domain/servers/wls_ods/data/nodemanager/wls_ods1.url file,
where Fusion_Middleware_Home represents the root directory where Fusion
Middleware is installed.
■To invoke Oracle Directory Services Manager from Fusion Middleware Control,
select Directory Services Manager from the Oracle Internet Directory menu in the
Oracle Internet Directory target, then Data Browser, Schema, Security, or
Advanced. (You can connect from the Oracle Virtual Directory menu in a similar
manner.)
A new browser window, containing the ODSM Welcome screen, pops up. Connect
to the server as described in the next section.
Notes:
■If you selected Configure Without a Domain when prompted for
a domain while installing Oracle Internet Directory, Oracle
Directory Services Manager will not be available.
■For information about supported browsers for Fusion Middleware
Control and Oracle Directory Services Manager, refer to System
Requirements and Supported Platforms for Oracle Fusion
Middleware 11gR1, which is linked from:
http://www.oracle.com/technetwork/middleware/ias/
downloads/fusion-certification-100350.html
See Also: Section S.1.23, "Troubleshooting Oracle Directory Services
Manager."

Using Oracle Directory Services Manager
7-10 Oracle Fusion Middleware Administrator's Guide for Oracle Internet Directory
7.4.6 Connecting to the Server from Oracle Directory Services Manager
When the ODSM Welcome screen appears, you can connect to either an Oracle
Internet Directory server or a Oracle Virtual Directory server.
This section contains the following topics:
■Section 7.4.6.1, "Logging in to the Directory Server from Oracle Directory Services
Manager"
■Section 7.4.6.2, "Logging Into the Directory Server from Oracle Directory Services
Manager Using SSL"
7.4.6.1 Logging in to the Directory Server from Oracle Directory Services Manager
You log in to a directory server's non-SSL port from Oracle Directory Services
Manager as follows:
1. Click the small arrow to the right of the label Click to connect to a directory. It
opens a dialog box containing the following sections:
■Live Connections–current connections that you can return to.
■Disconnected Connections–a list of directory servers you have connected to
and then disconnected from. Oracle Directory Services Manager saves
information about connections that you've used previously and lists them, by
optional Name or by server, so that you can select them again.
■New Connections–used to initiate a new connection
If you are SSO-authenticated, you might see an additional section, described in
Section 7.4.6.3, "Connecting to an SSO-Enabled Directory as an SSO-Authenticated
User."
2. To reconnect to a live connection, click it.
Notes:
■After you have logged into ODSM, you can connect to multiple
directory instances from the same browser window.
■Avoid using multiple windows of the same browser program to
connect to different directories at the same time. Doing so can
cause a Target unreachable error.
■You can log in to the same ODSM instance from different browser
programs, such as Internet Explorer and Firefox, and connect each
to a different directory instance.
■If you change the browser language setting, you must update the
session in order to use the new setting. To update the session,
either reenter the ODSM URL in the URL field and press Enter or
quit and restart the browser.
Note: If the connection information changes, for example, if the
server's port number changes, Oracle Directory Services Manager's
connection information becomes incorrect and the connection fails.
You cannot edit connection information, so you must delete the
connection from the list and create a new connection.

Using Oracle Directory Services Manager
Getting Started With Oracle Internet Directory 7-11
To select a disconnected connection, click the entry. You see a short version of the
Login Dialog with most fields filled in. To remove a selection from the list, select it
and then select Delete.
To initiate a connection to a new directory server, click Create a New Connection
or type Ctrl+N. The New Connection Dialog appears.
3. Select OID or OVD.
4. Optionally, enter an alias name to identify this entry on the Disconnected
Connections list.
5. Enter the server and non-SSL port for the Oracle Internet Directory or Oracle
Virtual Directory instance you want to manage.
6. Deselect SSL Enabled.
7. Enter the user (usually cn=orcladmin) and password.
8. Select the Start Page you want to go to after logging in.
9. Click Connect.
After you have logged in to an Oracle Internet Directory or Oracle Virtual Directory
server, you can use the navigation tabs to select other pages.
The Oracle Directory Services Manager home pages for Oracle Internet Directory and
Oracle Virtual Directory list version information about Oracle Directory Services
Manager itself, as well as the directory and database. It also lists directly statistics.
7.4.6.2 Logging Into the Directory Server from Oracle Directory Services Manager
Using SSL
If you are unfamiliar with SSL authentication modes, see "SSL Authentication Modes"
on page 26-3.
When you log in to the server's SSL port, you follow the procedure in Section 7.4.6.1,
"Logging in to the Directory Server from Oracle Directory Services Manager," except
that you specify the SSL port in Step 5 and do not deselect SSL Enabled in Step 6.
After you click Connect in Step 9, you might be presented with a certificate,
depending on the type of SSL authentication.
7.4.6.2.1 SSL No Authentication If the directory server is using SSL No Authentication
mode (the default), you are not presented with a certificate. SSL No Authentication
provides data confidentiality and integrity only but no authentication using X509
certificates.
7.4.6.2.2 SSL Server Only Authentication If the directory server is using SSL Server
Authentication Only Mode, when you click connect in Step 9, you are presented with
the server's certificate. After manually verifying the authenticity of the server
certificate, you can accept the certificate permanently, accept the certificate for the
current session only, or reject the certificate. If you accept the certificate permanently,
the certificate is stored in its Java Key Store (JKS). From then on, you are not prompted
to accept the certificate when you connect to that server. If you accept the certificate
only for the current session, you are prompted to accept or reject the certificate every
time you connect to the server. If you reject the certificate, ODSM closes the connection
to the server.
See Also: Section S.1.23, "Troubleshooting Oracle Directory Services
Manager."

Using Oracle Directory Services Manager
7-12 Oracle Fusion Middleware Administrator's Guide for Oracle Internet Directory
7.4.6.2.3 SSL Client and Server Authentication If the server is using SSL Client and Server
Authentication Mode, when you click Connect in Step 9, you are presented with a
certificate. Follow the instructions in Section 7.4.6.2.2, "SSL Server Only
Authentication."
After OSDM accepts the server's certificate, ODSM sends its own certificate to the
server for authentication. The server accepts ODSM's certificate if that certificate is
present in its trusted list of certificates.
If the DN of ODSM's certificate is present in the server, you do not need to provide the
username and password in the connection dialog.
If the DN of ODSM's certificate is not present in the server, you must provide the user
name and password.
ODSM's certificate is a self-signed certificate. You must use the keytool command to
assign a CA signed certificate to ODSM. See Appendix O, "Managing Oracle Directory
Services Manager's Java Key Store."
7.4.6.3 Connecting to an SSO-Enabled Directory as an SSO-Authenticated User
If you have already been authenticated by the single sign-on server, ODSM allows you
to connect to SSO-enabled directories without logging in, provided you have an entry
in that directory. When you access the ODSM Welcome page, if you have an entry in
only one SSO-enabled directory, ODSM connects you to it. If you have entries in more
than one SSO-enabled directory ODSM allows you to select directory you want to
connect to, as follows.
Click the small arrow to the right of the label Click to connect to a directory. In this
case, the dialog box contains an extra section, listing SSO-enabled directories you are
authorized to connect to. Select the directory you want. ODSM connects you without
requesting a username or password.
If the port you connected to is an SSL port, you still must perform the appropriate
steps in Section 7.4.6.2.1, "SSL No Authentication," Section 7.4.6.2.2, "SSL Server Only
Authentication," or Section 7.4.6.2.3, "SSL Client and Server Authentication."
7.4.7 Configuring Oracle Directory Services Manager Session Timeout
The default session timeout for Oracle Directory Services Manager is 35 minutes. You
can change it by editing the file web.xml, which resides in DOMAIN_
HOME/servers/wls_ods1/tmp/_WL_user/odsm_
11.1.1.2.0/randomid/war/WEB-INF. (This assumes your managed server is
named wls_ods1. Adjust the pathname if your managed server has a different name.)
The file fragment containing the timeout value looks like this:
<session-config>
<session-timeout>35</session-timeout>
</session-config>
After you change the value, restart the managed server or restart Oracle Directory
Services Manager through the WebLogic console.
If you edit the file web.xml, keep in mind that the change you make might not be
permanent. Oracle Directory Services Manager is deployed from ORACLE_
HOME/ldap/odsm/odsm.ear to the WebLogic server. The WebLogic server expands
See Also: Section O.1, "Introduction to Managing ODSM's Java Key
Store."

Using Command-Line Utilities to Manage Oracle Internet Directory
Getting Started With Oracle Internet Directory 7-13
odsm.ear into the DOMAIN_HOME/servers/wls_ods1/tmp/_WL_user/odsm_
11.1.1.2.0 directory for performance reasons. This is a temporary cache directory
for WebLogic server. If you apply a patch that overwrites ORACLE_
HOME/ldap/odsm/odsm.ear, the changes you made to web.xml in the temporary
cache directory are also overwritten.
7.4.8 Configuring Oracle HTTP Server to Support Oracle Directory Services Manager in
an Oracle WebLogic Server Cluster
Perform the following steps to configure Oracle HTTP Server to route Oracle Directory
Services Manager requests to multiple Oracle WebLogic Servers in a clustered Oracle
WebLogic Server environment:
1. Create a backup copy of the Oracle HTTP Server's httpd.conf file. The backup
copy provides a source to revert to if you encounter problems after performing
this procedure.
2. Add the following text to the end of the Oracle HTTP Server's httpd.conf file
and replace the variable placeholder values with the host names and managed
server port numbers specific to your environment. Be sure to use the <Location
/odsm/ > as the first line in the entry. Using <Location /odsm/faces > or
<Location /odsm/faces/odsm.jspx > can distort the appearance of the
Oracle Directory Services Manager interface.
<Location /odsm/ >
SetHandler weblogic-handler
WebLogicCluster host-name-1:managed-server-port,host-name_2:managed_server_port
</Location>
3. Stop, then start the Oracle HTTP Server to activate the configuration change.
7.5 Using Command-Line Utilities to Manage Oracle Internet Directory
To use most Oracle Internet Directory command-line utilities and Database client
utilities like sqlplus, you must set the following environmental variables:
■ORACLE_HOME - The location of non-writable files in your Oracle Identity
Management installation.
■ORACLE_INSTANCE - The location of writable files in your Oracle Identity
Management installation.
■TNS_ADMIN - The directory where the database connect string is defined in the
tnsnames.ora file. By default it is the $ORACLE_INSTANCE/config directory. The
database connect alias as defined in tnsnames.ora is OIDDB by default.
■NLS_LANG (APPROPRIATE_LANGUAGE.AL32UTF8) - The default language set at
installation is AMERICAN_AMERICA.
■PATH - The following directory locations should be added to your PATH:
$ORACLE_HOME/bin
Note: Oracle Directory Services Manager loses its connection and
displays a session time-out message if the Oracle WebLogic Server in
the cluster that it is connected to fails. Oracle Directory Services
Manager requests are routed to the secondary Oracle WebLogic
Server in the cluster that you identified in the httpd.conf file after you
log back in to Oracle Directory Services Manager.

Using Command-Line Utilities to Manage Oracle Internet Directory
7-14 Oracle Fusion Middleware Administrator's Guide for Oracle Internet Directory
$ORACLE_HOME/ldap/bin
$ORACLE_INSTANCE/bin
Many of the activities that you can perform at the command line can also be
performed in Oracle Enterprise Manager Fusion Middleware Control or Oracle
Directory Services Manager. A few functions are only available from the command
line.
7.5.1 Using Standard LDAP Utilities
Oracle Internet Directory supports the standard LDAP command-line utilities
ldapadd, ldapaddmt, ldapbind, ldapcompare, ldapdelete, ldapmoddn,
ldapmodify, ldapmodifymt, and ldapsearch. For example:
ldapbind -D "cn=orcladmin" -q -h "myserver.example.com" -p 3060
ldapsearch -b "cn=subschemasubentry" -s base "objectclass=*" -p 3060 \
-D "cn=orcladmin" -q
This book contains many examples of LDAP tool use.
For security reasons, avoid supplying a password on the command line whenever
possible. A password typed on the command line is visible on your screen and might
appear in log files or in the output from the ps command. When you supply a
password at a prompt, it is not visible on the screen, in ps output, or in log files. Use
the -q and -Q options, respectively, instead of the -P password and -w password
options.
The LDAP tools have been modified to disable the options -w password and -P
password when the environment variable LDAP_PASSWORD_PROMPTONLY is set to
TRUE or 1. Use this feature whenever possible.
7.5.2 Using Bulk Tools
Oracle Internet Directory provides several tools to help you manage large numbers of
entries. See Chapter 15, "Performing Bulk Operations."
7.5.3 Using WLST
The Oracle WebLogic Scripting Tool (WLST) is a Jython-based command-line scripting
environment that you can use to manage and monitor WebLogic Server domains. To
use it to manage and monitor Oracle Internet Directory, you must navigate to the
See Also:
■Section 13.3, "Managing Entries by Using LDAP Command-Line
Tools."
■The chapter "Oracle Internet Directory Data Management Tools"
in Oracle Fusion Middleware Reference for Oracle Identity Management
for a detailed description of each tool.
See Also: "Using Passwords with Command-Line Tools" in Oracle
Fusion Middleware Reference for Oracle Identity Management.
See Also: The chapter "Oracle Internet Directory Data Management
Tools" in Oracle Fusion Middleware Reference for Oracle Identity
Management for a detailed description of each tool.

Basic Tasks for Configuring and Managing Oracle Internet Directory
Getting Started With Oracle Internet Directory 7-15
custom MBean tree where Oracle Internet Directory is located. Then you can list, get
values, and change values of the managed beans (MBeans) that represent Oracle
Internet Directory resources. See Section 9.3, "Managing System Configuration
Attributes by Using WLST" and Section 26.3, "Configuring SSL by Using WLST."
7.6 Basic Tasks for Configuring and Managing Oracle Internet Directory
The following provides a summary of the steps you must take to configure and
manage a basic Oracle Internet Directory environment:
1. Start and stop the LDAP server. See Chapter 8
2. Manage system configuration attributes. See Chapter 9.
3. Manage directory entries. See Chapter 13.
4. Manage directory schema. See Chapter 20.
5. Configure auditing. Chapter 22.
6. Manage log files. See Chapter 23.
7. Configure SSL. See Chapter 26.
8. Configure password policies. See Chapter 28.
9. Configure access control. See Chapter 29.
10. Get sizing and tuning recommendations for Oracle Internet Directory
deployments. See the "Obtaining Recommendations by Using the Tuning and
Sizing Wizard" section of the Oracle Internet Directory chapter in Oracle Fusion
Middleware Performance and Tuning Guide.
11. Set up replication. See Chapter 39 and Appendix C.
12. Convert an Advanced Replication-based replication agreement to an LDAP-based
replication agreement. See Section 39.2, "Converting an Advanced
Replication-Based Agreement to an LDAP-Based Agreement."
13. Modify an existing replication setup. See Chapter 42.
This guide describes other tasks that you might need to perform, depending on your
Oracle Fusion Middleware environment.
Note: WLST manages Oracle Internet Directory through its SSL port.
The Oracle Internet Directory SSL port must be configured for no
authentication or server authentication. If the Oracle Internet
Directory SSL port is configured for mutual authentication, you will
not be able to change Oracle Internet Directory attributes by using
WLST. See "SSL Authentication Modes" on page 26-3.

Basic Tasks for Configuring and Managing Oracle Internet Directory
7-16 Oracle Fusion Middleware Administrator's Guide for Oracle Internet Directory

8
Managing Oracle Internet Directory Instances 8-1
8Managing Oracle Internet Directory
Instances
This chapter describes how to create and manage server instances. It contains these
topics:
■Section 8.1, "Introduction to Managing Oracle Internet Directory Instances"
■Section 8.2, "Managing Oracle Internet Directory Components by Using Fusion
Middleware Control"
■Section 8.3, "Managing Oracle Internet Directory Components by Using opmnctl"
■Section 8.4, "Starting an Instance of the Replication Server by Using OIDCTL"
8.1 Introduction to Managing Oracle Internet Directory Instances
This introduction contains the following topics:
■Section 8.1.1, "The Instance-Specific Configuration Entry"
■Section 8.1.2, "Creating the First Oracle Internet Directory Instance"
■Section 8.1.3, "Creating Additional Oracle Internet Directory Instances"
■Section 8.1.4, "Registering an Oracle Instance or Component with the WebLogic
Server"
8.1.1 The Instance-Specific Configuration Entry
In 11g Release 1 (11.1.1), configuration information for an Oracle Internet Directory
instance resides in an instance-specific configuration entry, which has a DN of the
form
cn=componentname,cn=osdldapd,cn=subconfigsubentry
where componentname is the name of a Oracle Fusion Middleware system
component of Type=OID, for example, oid2. You do not manually create an
instance-specific configuration entry. Instead, you create a Oracle Fusion Middleware
system component of Type=OID. Creating the Oracle Internet Directory component
automatically generates an instance-specific configuration entry.
Figure 8–1 shows the configuration entries for two Oracle Internet Directory
components in the DIT. The DNs for the instance-specific configuration entries are:
cn=oid1,cn=osdldapd,cn=subconfigsubentry
See Also: Appendix B, "Managing Oracle Internet Directory
Instances by Using OIDCTL,"

Introduction to Managing Oracle Internet Directory Instances
8-2 Oracle Fusion Middleware Administrator's Guide for Oracle Internet Directory
cn=oid2,cn=osdldapd,cn=subconfigsubentry
Figure 8–1 DIT Showing Two Instance-Specific Configuration Entries
The attributes in the instance-specific configuration specify information such as
hostname, ports, events to be audited, number of child processes, and security
configuration. For a complete list, see Section 9.1.3, "Attributes of the Instance-Specific
Configuration Entry."
8.1.2 Creating the First Oracle Internet Directory Instance
When you install Oracle Internet Directory on a host computer, Oracle Identity
Management 11g Installer creates an Oracle Fusion Middleware system component of
Type=OID in a new or existing Oracle instance (ASINST). The Oracle Internet
Directory component contains an OIDMON process and an Oracle Internet Directory
instance (inst=1). The Oracle Internet Directory instance consists of a dispatcher
process and one or more OIDLDAPD processes. The component name for the first
Oracle Internet Directory component is usually oid1 and the Oracle instance name is
chosen during the installation, usually asinst_1.
Oracle Identity Management 11g Installer creates the following instance-specific
configuration entry for this component during installation:
cn=oid1,cn=osdldapd,cn=subconfigsubentry
In addition, Oracle Identity Management 11g Installer creates some file system
directories under the Oracle instance directory. Some of the pathnames it creates are
are specific to the component name. For example, the pathnames under your Oracle
instance on UNIX or Linux include:
ORACLE_INSTANCE/config/OID/oid1
ORACLE_INSTANCE/diagnostics/logs/OID/oid1
If you selected Create New Domain or Extend Existing Domain during installation,
the Oracle Internet Directory component is registered with a WebLogic domain. If you
selected Configure Without a Domain during installation, the Oracle Internet
Directory component is not registered with a domain. You can register it later from the
command line. Registering with a domain in this case is optional.
Note: Oracle Internet Directory is frequently configured in a cluster
where instances on different hosts are all connected to the same
Oracle Database. Oracle Identity Management 11g Installer detects
that other OID components are using the same Oracle Database and
increments the component name for the new component by 1. That is,
successive installations in the cluster will have the component names
oid2, oid3, and so forth.
cn=osdldapd
cn=oid2
cn=osdrepld
cn=subConfigSubEntry
root DSE
cn=oid1
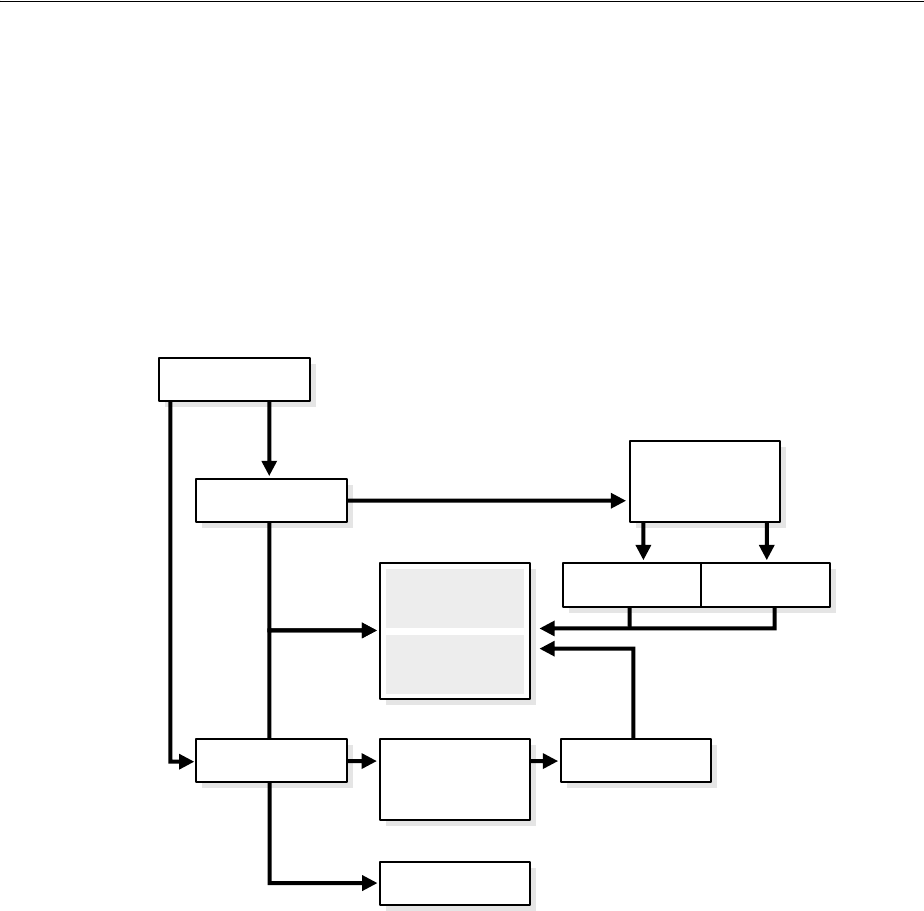
Introduction to Managing Oracle Internet Directory Instances
Managing Oracle Internet Directory Instances 8-3
8.1.3 Creating Additional Oracle Internet Directory Instances
The recommended way to add another Oracle Internet Directory instance is to add an
additional system component of Type=OID in the Oracle instance.
To do this, you use opmnctl createcomponent, specifying the component type
Type=OID, the component name for the new component, and the instance name of the
Oracle instance. This new Oracle Internet Directory component consists of an
OIDMON process, an OIDLDAPD dispatcher process, and one or more OIDLDAPD
server processes. For example, see ias_component=oid2 at the bottom of
Figure 8–2.
Figure 8–2 Oracle Internet Directory Process Control
You use an OPMN command, opmnctl createcomponent, to create a new
instance-specific configuration entry in the DIT. If the new component name is oid2,
the new entry looks like this:
cn=oid2,cn=osdldapd,cn=subconfigsubentry
You can change the values of attributes in this entry to customize the instance.
The opmnctl command also creates additional pathnames in the filesystem under the
ORACLE_INSTANCE directory for the Oracle instance asinst_1. If the new
component name is oid2, the pathnames include:
ORACLE_INSTANCE/config/OID/oid2
ORACLE_INSTANCE/diagnostics/logs/OID/oid2
You can use opmnctl process control commands to manage the components oid1
and oid2 individually. You can register the new Oracle Internet Directory instance
with the WebLogic domain, either at creation time or later.
OIDLDAPD
Server2
OIDLDAPD
Server1
OIDLDAPD
Server
OIDLDAPD
Dispatcher
non-SSL Port = 3061
SSL Port = 3132
OIDREPLD
OIDMON
ias_component=oid2
OIDMON
ias_component=oid1
OIDLDAPD
Dispatcher
non-SSL Port = 3060
SSL Port = 3131
OPMN
Oracle Database
Shared Memory

Managing Oracle Internet Directory Components by Using Fusion Middleware Control
8-4 Oracle Fusion Middleware Administrator's Guide for Oracle Internet Directory
8.1.4 Registering an Oracle Instance or Component with the WebLogic Server
If you want to manage an Oracle Internet Directory component with Oracle Enterprise
Manager Fusion Middleware Control, you must register the component and the
Oracle instance that contains it with a WebLogic domain. You can register an Oracle
instance with a WebLogic domain during installation or Oracle instance creation, but
you are not required to do so. If an Oracle instance was not previously registered with
a WebLogic domain, you can register it by using opmnctl registerinstance.
If the Oracle instance is already registered, and you are adding a new Oracle Internet
Directory system component to the Oracle instance, opmnctl automatically registers
the component as part of that Oracle instance.
If you change the configuration of a registered component, you must update the
information by running opmnctl updatecomponentregistration. See
Managing Oracle Internet Directory Components by Using opmnctl.
8.2 Managing Oracle Internet Directory Components by Using Fusion
Middleware Control
You can view, stop, and start Oracle Internet Directory components by using Oracle
Enterprise Manager Fusion Middleware Control. This section contains the following
topics:
■Section 8.2.1, "Viewing Active Server Information by Using Fusion Middleware
Control"
■Section 8.2.2, "Starting the Oracle Internet Directory Server by Using Fusion
Middleware Control"
■Section 8.2.3, "Stopping the Oracle Internet Directory Server by Using Fusion
Middleware Control"
■Section 8.2.4, "Restarting the Oracle Internet Directory Server by Using Fusion
Middleware Control"
Note: You can use oidctl to create an instance if you are running
Oracle Internet Directory as a standalone server, not part of a
WebLogic domain. When you create an instance with oidctl, you
must use oidctl to stop and start the instance. An Oracle Internet
Directory instance created with oidctl cannot be registered with a
WebLogic server, so you cannot use Oracle Enterprise Manager
Fusion Middleware Control to manage the instance. See Appendix B,
"Managing Oracle Internet Directory Instances by Using OIDCTL."
See Also:
■Oracle Fusion Middleware Oracle Process Manager and Notification
Server Administrator's Guide for more information about OPMN
and the opmnctl command.
■Chapter 4, "Understanding Process Control of Oracle Internet
Directory Components" for information about Oracle Internet
Directory processes.
See Also: "WebLogic Server Domain" on page 2-1.

Managing Oracle Internet Directory Components by Using opmnctl
Managing Oracle Internet Directory Instances 8-5
8.2.1 Viewing Active Server Information by Using Fusion Middleware Control
To view information about any Oracle Internet Directory component—including type,
debug level, host name, and configuration parameters—use Oracle Enterprise
Manager Fusion Middleware Control. To do this:
1. Connect to Oracle Enterprise Manager Fusion Middleware Control as described in
Section 7.3, "Using Fusion Middleware Control to Manage Oracle Internet
Directory."
2. The Domain Home Page displays the status of components, including Oracle
Internet Directory.
3. Select the Oracle Internet Directory component you want to view.
4. View the status information on the Oracle Internet Directory Home page.
8.2.2 Starting the Oracle Internet Directory Server by Using Fusion Middleware Control
Start the Oracle Internet Directory server as follows:
1. Go to the Oracle Internet Directory home page in Oracle Enterprise Manager
Fusion Middleware Control.
2. From the Oracle Internet Directory menu, select Availability, then Start Up.
3. When the confirmation dialog appears, click OK.
If Fusion Middleware Control cannot start the server, an error dialog appears.
8.2.3 Stopping the Oracle Internet Directory Server by Using Fusion Middleware
Control
Stop the Oracle Internet Directory server as follows:
1. Go to the Oracle Internet Directory home page in Oracle Enterprise Manager
Fusion Middleware Control.
2. From the Oracle Internet Directory menu, select Availability, then Shut Down.
3. When the confirmation dialog appears, click OK.
If Fusion Middleware Control cannot stop the server, an error dialog appears.
8.2.4 Restarting the Oracle Internet Directory Server by Using Fusion Middleware
Control
Restart the Oracle Internet Directory server as follows:
1. Go to the Oracle Internet Directory home page in Oracle Enterprise Manager
Fusion Middleware Control.
2. From the Oracle Internet Directory menu, select Availability, then Restart.
3. When the confirmation dialog appears, click OK.
If Fusion Middleware Control cannot restart the server, an error dialog appears.
8.3 Managing Oracle Internet Directory Components by Using opmnctl
You can perform the following Oracle Internet Directory-related tasks from the
command line by using opmnctl:

Managing Oracle Internet Directory Components by Using opmnctl
8-6 Oracle Fusion Middleware Administrator's Guide for Oracle Internet Directory
■Section 8.3.1, "Creating an Oracle Internet Directory Component by Using
opmnctl"
■Section 8.3.2, "Registering an Oracle Instance by Using opmnctl"
■Section 8.3.3, "Unregistering an Oracle Instance by Using opmnctl"
■Section 8.3.4, "Updating the Component Registration of an Oracle Instance by
Using opmnctl"
■Section 8.3.5, "Deleting an Oracle Internet Directory Component by Using
opmnctl"
■Section 8.3.6, "Viewing Active Server Instance Information by Using opmnctl"
■Section 8.3.7, "Starting the Oracle Internet Directory Server by Using opmnctl"
■Section 8.3.8, "Stopping the Oracle Internet Directory Server by Using opmnctl"
■Section 8.3.9, "Restarting the Oracle Internet Directory Server by Using opmnctl"
■Section 8.3.10, "Changing the Oracle Database Information in opmn.xml"
8.3.1 Creating an Oracle Internet Directory Component by Using opmnctl
You create an Oracle Internet Directory system component in an Oracle instance by
using opmnctl createcomponent. This command automatically registers the
component with a WebLogic domain at the time you create the component, as long as
the instance is in a registered state. The syntax is:
ORACLE_INSTANCE/bin/opmnctl createcomponent
-componentType OID
-componentName componentName
-adminHost webLogicHostName
-adminPort webLogicPort
[-adminUsername weblogicAdminUsername]
[-adminPasswordFile text_file_containing_admin_password]
-Db_info "DBHostName:Port:DBSvcName"
[-Ods_Password_File 'File_with_DB_ODS_USER_PASSWORD']
Note: Arguments to opmnctl are case sensitive. Be sure to type
them exactly as shown. For example, createcomponent must be in
all lower case and -adminUsername must have only the letter U in
upper case.
For more information about options to an opmnctl command, type:
ORACLE_INSTANCE/bin/opmnctl usage command
For example:
$ORACLE_INSTANCE/bin/opmnctl usage createcomponent
See Also:
■"Oracle Internet Directory Administration Tools" in Oracle Fusion
Middleware Reference for Oracle Identity Management for more
information on the syntax of the commands used in the examples
■Oracle Fusion Middleware Oracle Process Manager and Notification
Server Administrator's Guide for more information about opmnctl
commands, such as opmnctl createinstance.

Managing Oracle Internet Directory Components by Using opmnctl
Managing Oracle Internet Directory Instances 8-7
[-Sm_Password_File 'File_with_DB_ODSSM_USER_PASSWD']
[-Admin_Password_File 'File_with_OID_Admin_Passwd']
-Namespace "dc=domain_component1,dc=domain_component2..."
[-Port nonSSLPort]
[-Sport SSLPort]
The DBHostName:Port:DBSvcName argument to the -DB_info parameter must be
the same as that provided during installation. If it is not, the command will fail. You
can find this value in the file ORACLE_INSTANCE/config/tnsnames_copy.ora.
If the Oracle Database is based on Real Application Clusters, the argument to the -DB_
info parameter is of the form:
DBHostName1:Port1^DBHostName2:Port2@DBSvcName
The opmnctl command prompts for the WebLogic administrator's user name if you
do not supply it. It also prompts for the passwords if you do not supply password file
names on the command line. The opmnctl command also uses available ports if you
do not specify -Port or -Sport, as described in Section 3.1.3, "Oracle Internet
Directory Ports."
8.3.2 Registering an Oracle Instance by Using opmnctl
During an Oracle Internet Directory installation, Oracle Identity Management 11g
Installer requests domain information. If you choose Configure Without a Domain,
your Oracle Internet Directory instance is not registered with a WebLogic domain.
After the installation is complete, you can choose to register an Oracle instance and all
the components in that Oracle instance by using opmnctl registerinstance. The
syntax is:
ORACLE_INSTANCE/bin/opmnctl registerinstance
-adminHost hostname
-adminPort weblogic_port
-adminUsername weblogic_admin_username
You are prompted for the WebLogic administrator's user name and password.
For example:
ORACLE_INSTANCE/bin/opmnctl registerinstance \
-adminHost myhost \
-adminPort 7001 \
-adminUsername weblogic \
The default administrative port on the WebLogic Administration Server is 7001.
8.3.3 Unregistering an Oracle Instance by Using opmnctl
If you registered an Oracle instance with a WebLogic domain during installation, you
can unregister it after the install is complete. You might want to do this if you decide
to use Oracle Internet Directory in standalone mode. (In standalone mode, you cannot
use Fusion Middleware Control or wlst to manage Oracle Internet Directory.)
To unregister an Oracle instance and all the components in that Oracle instance, you
use opmnctl unregisterinstance. The syntax is:
ORACLE_INSTANCE/bin/opmnctl unregisterinstance
-adminHost hostname
-adminPort weblogic_port
-adminUsername weblogic_admin

Managing Oracle Internet Directory Components by Using opmnctl
8-8 Oracle Fusion Middleware Administrator's Guide for Oracle Internet Directory
you are prompted for the WebLogic administrator's user name and password if you
do not supply them.
For example:
$ORACLE_INSTANCE/bin/opmnctl unregisterinstance \
-adminHost myhost \
-adminPort 7001 \
-adminUsername weblogic \
The default administrative port on the WebLogic Administration Server is 7001.
8.3.4 Updating the Component Registration of an Oracle Instance by Using opmnctl
You must update the registration of an Oracle Internet Directory component in a
registered Oracle instance whenever you change any of the configuration attributes in
Table 8–1. If you do not update the component registration, you will be unable to use
Fusion Middleware Control or wlst to manage that component.
To update the registration of an Oracle Internet Directory component, you use
opmnctl updatecomponentregistration. The syntax is:
ORACLE_INSTANCE/bin/opmnctl updatecomponentregistration
-adminHost hostname
-adminPort weblogic_port
-adminUsername weblogic_admin
-componentType OID
-componentName compName
-Port non-sslport
-Sport sslport
For example:
$ORACLE_INSTANCE/bin/opmnctl updatecomponentregistration \
-adminHost myhost \
-adminPort 7001 \
-adminUsername weblogic \
-componentType OID \
-componentName oid2 \
-Port 3061 \
-Sport 3131
You are prompted for the WebLogic administrator's user name and password if you
do not supply them.
The default administrative port on the WebLogic Administration Server is 7001.
Table 8–1 Attribute Changes Requiring Update of Component Registration
Attribute See Also
orclhostname Section 9.1.3, "Attributes of the Instance-Specific Configuration
Entry"
orclnonsslport Section 9.1.3, "Attributes of the Instance-Specific Configuration
Entry"
orclsslport Section 9.1.3, "Attributes of the Instance-Specific Configuration
Entry"
userpassword Section 12.10, "Changing the Password for the EMD
Administrator Account"

Managing Oracle Internet Directory Components by Using opmnctl
Managing Oracle Internet Directory Instances 8-9
You must supply both a non-SSL port and an SSL port.
8.3.5 Deleting an Oracle Internet Directory Component by Using opmnctl
You remove an Oracle Internet Directory component by using opmnctl
deletecomponent. This also unregisters the component with the WebLogic server.
The syntax is:
$ORACLE_INSTANCE/bin/opmnctl deletecomponent
-adminHost webLogicHostName
-adminPort webLogicPort
-adminUsername weblogicAdminUsername
-adminPasswordFile text_file_containing_admin_password
-componentType OID
-componentName componentName
you are prompted for the WebLogic administrator's user name and password if you
do not supply them.
8.3.6 Viewing Active Server Instance Information by Using opmnctl
To view the status of components and processes by using opmnctl, type:
opmnctl status -l
For example:
$ ./opmnctl status -l
Processes in Instance: asinst_2
---------------------------------+--------------------+---------+----------+------
------+----------+-----------+------
ias-component | process-type | pid | status |
uid | memused | uptime |
ports---------------------------------+--------------------+---------+----------+-
-----------+----------+-----------+------
oid2 | oidldapd | 24760 | Alive |
988238800 | 102744 | 0:01:12 | N/A
oid2 | oidldapd | 24756 | Alive |
988238799 | 55052 | 0:01:12 | N/A
oid2 | oidmon | 24745 | Alive |
988238796 | 48168 | 0:01:14 | LDAPS:6789,LDAP:6788
oid1 | oidldapd | 21590 | Alive |
988238048 | 103716 | 19:51:48 | N/A
oid1 | oidldapd | 21586 | Alive |
988238047 | 54420 | 19:51:49 | N/A
oid1 | oidmon | 21577 | Alive |
988238046 | 48168 | 19:51:49 | LDAPS:3133,LDAP:3060
8.3.7 Starting the Oracle Internet Directory Server by Using opmnctl
The component name of the first Oracle Internet Directory component is oid1.
To start the first Oracle Internet Directory instance, type:
opmnctl startproc ias-component=oid1
To start all Oracle Internet Directory instances, type

Starting an Instance of the Replication Server by Using OIDCTL
8-10 Oracle Fusion Middleware Administrator's Guide for Oracle Internet Directory
opmnctl startproc process-type=OID
To start all components, type
opmnctl startall
8.3.8 Stopping the Oracle Internet Directory Server by Using opmnctl
To stop the first Oracle Internet Directory server component, type:
opmnctl stopproc ias-component=oid1
To stop all Oracle Internet Directory instances, type
opmnctl stopproc process-type=OID
To stop all components, type
opmnctl stopall
8.3.9 Restarting the Oracle Internet Directory Server by Using opmnctl
To restart the first Oracle Internet Directory instance, type:
opmnctl restartproc ias-component=oid1
To restart all Oracle Internet Directory instances, type
opmnctl restartproc process-type=OID
8.3.10 Changing the Oracle Database Information in opmn.xml
By default, ORACLE_INSTANCE/config/OPMN/opmn/opmn.xml contains an XML
snippet that opmnctl uses when it attempts to start the default Oracle Internet
Directory LDAP server instance. Occasionally, you might need to edit the opmn.xml
file. For example, if you change the Oracle Database instance in ORACLE_
INSTANCE/config/tnsnames.ora, you must add the Oracle Database DB_
CONNECT_STR to ORACLE_INSTANCE/config/OPMN/opmn/opmn.xml. You can
use a text editor to edit opmn.xml.
8.4 Starting an Instance of the Replication Server by Using OIDCTL
To configure an instance of Oracle Internet Directory Replication Server, use the
oidctl start command with server=oidrepld. Best practice is to create a
separate instance of Oracle Internet Directory to use for replication.
First create a new instance of Oracle Internet Directory as described in Section 8.1.3,
"Creating Additional Oracle Internet Directory Instances." Then, ensure that the
environment variable ORACLE_INSTANCE is set and type:
oidctl connect=connStr server=oidrepld inst=1 componentname=Component_Name \
name=Instance_Name start
The componentname value must be the component name of the running oidldapd
server. The name value must be the instance name of the running oidldapd server.
See Also: Section 4.3.1, "Oracle Internet Directory Snippet in
opmn.xml."

Starting an Instance of the Replication Server by Using OIDCTL
Managing Oracle Internet Directory Instances 8-11
Do not start more than one instance of oidrepld on a host. Do not start oidrepld on
more than one Oracle Internet Directory instance sharing the same Oracle Database.
Note: The environment variables ORACLE_INSTANCE, ORACLE_
HOME, and COMPONENT_NAME must be set before you run the oidctl
command to start or stop the replication server.
See Also:
■Chapter 6, "Understanding Oracle Internet Directory Replication"
■Chapter 39, "Setting Up Replication"

Starting an Instance of the Replication Server by Using OIDCTL
8-12 Oracle Fusion Middleware Administrator's Guide for Oracle Internet Directory

9
Managing System Configuration Attributes 9-1
9Managing System Configuration Attributes
This chapter describes attributes that control the LDAP server. See Chapter 41,
"Managing Replication Configuration Attributes" for information about attributes that
control the replication server.
This chapter contains the following topics:
■Section 9.1, "Introduction to Managing System Configuration Attributes"
■Section 9.2, "Managing System Configuration Attributes by Using Fusion
Middleware Control"
■Section 9.3, "Managing System Configuration Attributes by Using WLST"
■Section 9.4, "Managing System Configuration Attributes by Using LDAP Tools"
■Section 9.5, "Managing System Configuration Attributes by Using ODSM Data
Browser"
9.1 Introduction to Managing System Configuration Attributes
This introduction contains the following topics:
■Section 9.1.1, "What are Configuration Attributes?"
■Section 9.1.2, "What are Operational Attributes?"
■Section 9.1.3, "Attributes of the Instance-Specific Configuration Entry"
■Section 9.1.4, "Attributes of the DSA Configuration Entry"
■Section 9.1.5, "Attributes of the DSE"
9.1.1 What are Configuration Attributes?
Most Oracle Internet Directory configuration information is stored in the directory
itself. The information is stored as attributes of specific configuration entries. You
must have superuser privileges to set system configuration attributes.
Some configuration attributes are specific to an individual instance of the Oracle
Internet Directory server. Instance-specific attributes are located in the
instance-specific configuration entry, a specific subentry of the Oracle Internet
Directory instance entry. Figure 8–1, "DIT Showing Two Instance-Specific
Configuration Entries" show s the location of these entries in the DIT.
Some configuration attributes are shared by all Oracle Internet Directory server
instances in a WebLogic Server domain that are connected to the same database.
See Also: Section 3.4.1, "Kinds of Attribute Information."

Introduction to Managing System Configuration Attributes
9-2 Oracle Fusion Middleware Administrator's Guide for Oracle Internet Directory
Shared attributes reside in the DSA Configuration entry. Replication-specific attributes
reside in the Replica Subentry, Replication Configuration, and Replication Agreement
Entry.
Some attributes reside in the DSE Root. Most of those are non-configurable.
You can manage all the configuration attributes from the command-line. In addition,
many of the configuration attributes have specific, task-oriented management
interfaces in Oracle Enterprise Manager Fusion Middleware Control or Oracle
Directory Services Manager. You can also use the Data Browser feature of Oracle
Directory Services Manager to manage the entries directly.
9.1.2 What are Operational Attributes?
Do not confuse configuration attributes with operational attributes. Operational
attributes have special meaning to the directory server and they are used for storing
information needed for processing by the server itself or for holding other data
maintained by the server that is not explicitly provided by clients. These are attributes
that are maintained by the server and either reflect information the server manages
about an entry or affect server operation.
Operational attributes are not returned by a search operation unless you specifically
request them by name or with the "+" option in the search request. See Section 13.3.2,
"Listing Operational Attributes by Using ldapsearch" for more information.
Examples of operational attributes include the time stamp for an entry and the state
values needed for enforcing password policies, described in Section 28.1.6, "Password
Policy-Related Operational Attributes." You cannot modify operational attributes.
9.1.3 Attributes of the Instance-Specific Configuration Entry
During installation, Oracle Identity Management 11g Installer creates an
instance-specific configuration entry for the first Oracle Internet Directory instance. It
copies default values from a read-only entry under cn=configset0. (You can specify
different values for the SSL port and non-SSL during the install.)
The DN of an instance-specific configuration entry has the form:
cn=componentname,cn=osdldapd,cn=subconfigsubentry
For example, if the component name for a server instance is oid1,then the DIT of the
instance-specific configuration entry would be:
cn=oid1,cn=osdldapd,cn=subconfigsubentry
See Also: Chapter 4, "Understanding Process Control of Oracle
Internet Directory Components".
See Also:
■Section 9.2, "Managing System Configuration Attributes by Using
Fusion Middleware Control"
■Section 9.4, "Managing System Configuration Attributes by Using
LDAP Tools"
■Section 9.5, "Managing System Configuration Attributes by Using
ODSM Data Browser"

Introduction to Managing System Configuration Attributes
Managing System Configuration Attributes 9-3
Table 9–1 lists the attributes of the instance-specific configuration entry. The Update
Mechanism column contains the following abbreviations:
■EM – Oracle Enterprise Manager Fusion Middleware Control. See Section 9.2,
"Managing System Configuration Attributes by Using Fusion Middleware
Control."
■WLST–WebLogic Scripting tool. See Section 9.3, "Managing System Configuration
Attributes by Using WLST."
■LDAP–LDAP command-line tools, such as ldapmodify and ldapadd. See
Section 9.4, "Managing System Configuration Attributes by Using LDAP Tools."
Table 9–1 Attributes of the Instance-Specific Configuration Entry
Attribute Description
Update
Mechanism Default Possible Values
orclserverprocs Number of Server
Processes.
Restart the server after
changing.
See Chapter 4.
EM, LDAP,
WLST
1 Integer, up to 1024.
orclreqattrcase Preserve the case of
required attribute names
specified in an
ldapsearch request.
See Chapter 7.
EM, LDAP 0 0: Do not preserve
attribute case
1: Preserve attribute case
orclhostname Hostname or IP address.
See Chapter 10.
If you change the
hostname, run opmnctl
updatecomponentregi
stration and restart the
server. See Chapter 8,
"Managing Oracle Internet
Directory Instances"
LDAP Set during
install
Host or IP address
orclnonsslport Non-SSL port
See Section 9.2.1,
"Configuring Server
Properties." If you change
the port number, restart
the server and run
opmnctl
updatecomponentregi
stration. See Chapter 8,
"Managing Oracle Internet
Directory Instances".
EM, LDAP,
WLST
3060 Port number
orclsslport SSL port
See Section 9.2.1,
"Configuring Server
Properties." If you change
the port number, restart
the server and run
opmnctl
updatecomponentregi
stration. See Chapter 8,
"Managing Oracle Internet
Directory Instances".
EM, LDAP,
WLST
3131 Port number

Introduction to Managing System Configuration Attributes
9-4 Oracle Fusion Middleware Administrator's Guide for Oracle Internet Directory
orcltxntimelimit Maximum time allowed in
a transaction (seconds).
See Using LDAP
Transactions in Oracle
Fusion Middleware
Application Developer's
Guide for Oracle Identity
Management and
Section 9.2.1, "Configuring
Server Properties."
EM, LDAP,
WLST
0 Positive integer (seconds)
orcltxnmaxoperations Maximum number of
operations allowed in a
transaction. See Using
LDAP Transactions in
Oracle Fusion Middleware
Application Developer's
Guide for Oracle Identity
Management and
Section 9.2.1, "Configuring
Server Properties."
EM, LDAP,
WLST
0 Positive integer
orclservermode Server Mode
See Chapter 15.
EM, LDAP,
WLST
rw R: read-only
rw: read/write
rm: read-modify
orclaudcustevents A comma-separated list of
events and category
names to be audited.
Custom events are only
applicable when
orclAudFilterPreset
is Custom. See Chapter 22.
EM, LDAP,
WLST
Empty Examples include:
Authentication.SUCCESSE
SONLY,
Authorization(Permissio
n -eq 'CSFPerfmission")
orclaudfilterpreset Replaces the audit levels
used in 10g (10.1.4.0.1) and
earlier releases. See
Chapter 22.
EM, LDAP,
WLST
None None, Low, Medium, All,
and Custom.
orclaudsplusers A comma separated list of
users for whom auditing is
always enabled, even if
orclAudFilterPreset
is None. See Chapter 22.
EM, LDAP,
WLST
Empty Valid users. For example:
cn=orcladmin.
orcldebugflag Debug Flag
See Chapter 23.
EM, LDAP,
WLST
0 0 ~ 117440511
See Table 23–3.
orcldebugforceflush Force flush debug
messages
See Chapter 23.
LDAP 0 0: Disable
1: Enable
orcldebugop Operations Enabled for
Debug
See Chapter 23.
EM, LDAP,
WLST
511 See Table 23–4, " Debug
Operations". on page 23-7
orclmaxlogfiles Maximum Number of Log
Files to Keep in Rotation
See Chapter 23.
EM, LDAP,
WLST
100 Integer
Table 9–1 (Cont.) Attributes of the Instance-Specific Configuration Entry
Attribute Description
Update
Mechanism Default Possible Values

Introduction to Managing System Configuration Attributes
Managing System Configuration Attributes 9-5
orclmaxlogfilesize Maximum Log File Size
(MB)
See Chapter 23.
EM, LDAP,
WLST
1 MB Size, in MB
orcleventlevel Statistics collection event
level
See Chapter 24.
EM, LDAP,
WLST
0 See Table 24–5, " Event
Levels" on page 24-9.
orcloptracklevel Security event tracking
level
See Chapter 24.
EM, LDAP,
WLST
0Table 24–3, " Values of
orcloptracklevel" on
page 24-8
orclstatsflag Flag to turn on or off OID
statistics data
See Chapter 24.
EM, LDAP,
WLST
1 0: disable
1: enable
orclstatslevel Enable user statistics
collection
See Chapter 24.
EM, LDAP,
WLST
0 0: disable
1: enable
orclstatsperiodicity Frequency of flushing
statistics to data bases
See Chapter 24.
EM, LDAP,
WLST
30 60
orclsslauthentication SSL Authentication
Restart the server after
changing
See Chapter 26.
EM, LDAP,
WLST
1 1: No SSL authentication
32: One-way
authentication
64: Two-way
authentication
orclsslciphersuite SSL Cipher Suite
Restart the server after
changing
See Chapter 26.
EM, LDAP,
WLST
Empty See Table 26–1, " SSL
Cipher Suites Supported
in Oracle Internet
Directory" on page 26-2,
left column.
orclsslenable SSL Enable
Restart the server after
changing. Do not set
orclsslenable to 1 if
you use WLST or EM to
configure the server.
See Chapter 26.
EM, LDAP,
WLST
2 0: Non-SSL only
1: SSL only,
2: Non-SSL & SSL mode
orclsslinteropmode SSL Interoperability Mode
Restart the server after
changing
See Chapter 26
LDAP 1 0: disabled
1: enabled
orclsslversion SSL Version
Restart the server after
changing
See Chapter 26.
EM, LDAP,
WLST
33
Table 9–1 (Cont.) Attributes of the Instance-Specific Configuration Entry
Attribute Description
Update
Mechanism Default Possible Values

Introduction to Managing System Configuration Attributes
9-6 Oracle Fusion Middleware Administrator's Guide for Oracle Internet Directory
orclsslwalleturl SSL Wallet URL
Restart the server after
changing
See Chapter 26.
EM, LDAP,
WLST
File SSL wallet file location.
orclanonymousbindsflag Allow Anonymous binds
See Chapter 32,
EM, LDAP,
WLST
2 See Table 32–4,
" Orclanonymousbindsflag
Value and Directory Server
Behavior" on page 32-8.
orclsaslauthenticationm
ode
SASL Authentication
Restart the server after
changing Mode
See Chapter 32.
EM, LDAP,
WLST
1auth, auth-int, auth-conf.
Specify all three or a
subset of these 3 as a
comma separated string.
orclsaslcipherchoice SASL Cipher Choice
Restart the server after
changing
See Chapter 32.
EM, LDAP,
WLST
Rc4-56,rc4-40,r
c4,des,3des
Any combination of
Rc4-56, des, 3des, rc4,
rc4-40
orclsaslmechanism SASL Mechanism
Restart the server after
changing
See Chapter 32.
EM, LDAP,
WLST
DIGEST-MD5,
EXTERNAL
DIGEST-MD5,
EXTERNAL
orclmaskrealm DIT Masking
See Chapter 38.
LDAP No value List of DIT subtrees.
orclmaskfilter DIT Masking
See Chapter 38.
LDAP No value LDAP attribute filter.
orclmaskattribute DIT Masking
See Chapter 38.
LDAP No value List of attributes, possibly
preceded by !.
orcldispthreads Maximum number of
dispatcher threads per
server process.
See the Oracle Internet
Directory chapter in
Oracle Fusion Middleware
Performance and Tuning
Guide
Restart server after
changing.
EM, LDAP,
WLST
1 Integer (Max 16)
orclldapconntimeout LDAP Connection
Timeout, in minutes
See the Oracle Internet
Directory chapter in
Oracle Fusion Middleware
Performance and Tuning
Guide.
EM, LDAP,
WLST
0 Integer
Note: Users configured for
statistics tracking do not
time out as per this setting.
Table 9–1 (Cont.) Attributes of the Instance-Specific Configuration Entry
Attribute Description
Update
Mechanism Default Possible Values

Introduction to Managing System Configuration Attributes
Managing System Configuration Attributes 9-7
orclmaxcc Maximum Number of DB
Connections
Restart the server after
changing.
See the Oracle Internet
Directory chapter in
Oracle Fusion Middleware
Performance and Tuning
Guide.
EM, LDAP,
WLST
2 Integer, maximum128
orclmaxconnincache Maximum number of
cached user group
connections
See the Oracle Internet
Directory chapter in
Oracle Fusion Middleware
Performance and Tuning
Guide.
EM, LDAP,
WLST
100000 Integer
orclmaxldapconns Maximum number of
concurrent connections
per server process
See the Oracle Internet
Directory chapter in
Oracle Fusion Middleware
Performance and Tuning
Guide.
EM, LDAP,
WLST
1024 Int (Max system max file
descriptors per process)
orclmaxserverresptime Maximum Time in
seconds for Server process
to respond back to
Dispatcher process
See the Oracle Internet
Directory chapter in
Oracle Fusion Middleware
Performance and Tuning
Guide.
EM, LDAP,
WLST
300 seconds Number of Seconds
0: Dispatcher does not
detect the server hang.
orclnwrwtimeout Maximum time in seconds
for OID Server to wait for
LDAP client respond to a
Read/Write operation.
See the Oracle Internet
Directory chapter in
Oracle Fusion Middleware
Performance and Tuning
Guide.
EM, LDAP,
WLST
30 seconds Integer
Table 9–1 (Cont.) Attributes of the Instance-Specific Configuration Entry
Attribute Description
Update
Mechanism Default Possible Values

Introduction to Managing System Configuration Attributes
9-8 Oracle Fusion Middleware Administrator's Guide for Oracle Internet Directory
orcloptrackmaxtotalsize Maximum number of
bytes of RAM that security
events tracking can use for
each type of operation.
See the Oracle Internet
Directory chapter in
Oracle Fusion Middleware
Performance and Tuning
Guide.
LDAP 100000000
Bytes
Available RAM, in bytes
orcloptracknumelemcontainers;
1stlevel
Number of in-memory
cache containers for
storing information about
users performing
operations.
See the Oracle Internet
Directory chapter in
Oracle Fusion Middleware
Performance and Tuning
Guide.
LDAP 256 Integer
orcloptracknumelemcontainers;
2ndlevel
Number of in-memory
cache containers for
storing information about
users whose user
password is compared
and tracked when detailed
compare operation
statistics is programmed.
See the Oracle Internet
Directory chapter in
Oracle Fusion Middleware
Performance and Tuning
Guide.
LDAP 256 Integer
orclpluginworkers Maximum number of
plug-in worker threads
per server process
Restart the server after
changing.
See the Oracle Internet
Directory chapter in
Oracle Fusion Middleware
Performance and Tuning
Guide.
EM, LDAP,
WLST
2 Int (Max 64)
Table 9–1 (Cont.) Attributes of the Instance-Specific Configuration Entry
Attribute Description
Update
Mechanism Default Possible Values

Introduction to Managing System Configuration Attributes
Managing System Configuration Attributes 9-9
9.1.4 Attributes of the DSA Configuration Entry
The DSA configuration entry has the DN:
cn=dsaconfig,cn=configsets,cn=oracle internet directory
Table 9–2 shows shared attributes in the DSA configuration entry. The Update
Mechanism column contains the following abbreviations:
■EM – Oracle Enterprise Manager Fusion Middleware Control. See Section 9.2,
"Managing System Configuration Attributes by Using Fusion Middleware
Control."
■LDAP–LDAP command-line tools, such as ldapmodify and ldapadd. See
Section 9.4, "Managing System Configuration Attributes by Using LDAP Tools."
orclsizelimit Number of entries that can
be returned in an
ldapsearch result
See the Oracle Internet
Directory chapter in
Oracle Fusion Middleware
Performance and Tuning
Guide.
LDAP 10000 Integer
orcltimelimit Maximum time that server
can spend for a given
ldapsearch operation
EM, LDAP,
WLST
3600 Integer (seconds)
orclsdumpflag Generate stack dump.
See Appendix S.
LDAP 0 0: Generate stack trace file.
1: Do not generate stack
trace file, but generate a
core file.
Note: DSA is an X.500 term for the directory server.
Table 9–2 Attributes in the DSA Configuration Entry
Attribute Description Update Mechanism Default Possible Values
orclmaxfiltsize Maximum Filter Size
See Section 9.2.2, "Configuring
Shared Properties."
EM, LDAP 24576 Integer
orclrefreshdgrmems Refresh Dynamic Group
Memberships. See Chapter 14.
LDAP 0 Set to 1 to cause a
refresh. Server will
reset it to 0.
orclautocatalog Index attributes on first
search. See Section 20.1.3.4,
"About Indexing Attributes."
EM, LDAP 1 0: Disabled
1: Enabled
orclrienabled Referential Integrity. See
Chapter 21.
EM, LDAP 0 0: Disabled
1: Enabled
orclstatsdn User DNs for statistics
collection. See Chapter 24.
EM, LDAP Empty DNs of entries
Table 9–1 (Cont.) Attributes of the Instance-Specific Configuration Entry
Attribute Description
Update
Mechanism Default Possible Values

Introduction to Managing System Configuration Attributes
9-10 Oracle Fusion Middleware Administrator's Guide for Oracle Internet Directory
orcldataprivacymod
e
Sensitive attributes encrypted
when returned
See Chapter 27.
LDAP 0 0: Disabled
1: Enabled
orclencryptedattri
butes
Sensitive attributes stored in
encrypted format.
See Chapter 27.
LDAP See Table 27–1
on page 27-6.
Attributes
orclhashedattribut
es
Attributes stored in hashed
format.
See Chapter 27.
EM, LDAP Empty Attributes
orclpkimatchingrul
e
PKI Matching Rule for
mapping user's PKI certificate
DN to the user's entry DN. See
Chapter 32.
EM, LDAP 2 0: Exact match.
1: Certificate search.
2: Combination of 0
and 1.
3: Mapping rule only.
4: Try in order: 3, 2
orclgeneratechange
log
Whether to generate change
logs for user operations.
See Chapter 42 and the
Oracle Internet Directory
chapter of Oracle Fusion
Middleware Performance and
Tuning Guide
LDAP 1 1: enable
0: disable
orcljvmoptions Options passed to the JVM
when a server plug-in is
invoked. See Chapter 44.
EM, LDAP -Xmx64M Valid JVM options
orclinmemfiltproce
ss
Search Filters to be processed
in memory See the Oracle
Internet Directory chapter
in Oracle Fusion Middleware
Performance and Tuning Guide.
EM, LDAP See list in
Oracle Fusion
Middleware
Performance and
Tuning Guide
Valid search filters
orclmatchdnenabled Whether to provide detailed
MatchDN information when
base DN of a search is not
present. See the Oracle
Internet Directory chapter
of Oracle Fusion Middleware
Performance and Tuning Guide
EM, LDAP 1 0: Do not match
1: Match
orclskewedattribut
e
Skewed attributes.
Server restart recommended
after changing.
See the Oracle Internet
Directory chapter in Oracle
Fusion Middleware Performance
and Tuning Guide.
EM, LDAP objectclass List of attributes
Table 9–2 (Cont.) Attributes in the DSA Configuration Entry
Attribute Description Update Mechanism Default Possible Values

Introduction to Managing System Configuration Attributes
Managing System Configuration Attributes 9-11
9.1.5 Attributes of the DSE
The DSA-specific entry (DSE) is the root of the DIT. This is where Oracle Internet
Directory publishes information about itself, such as naming contexts, supported
controls, and matching rules. Most attributes of the DSE should not be modified
directly. Some attributes that you might need to modify are listed in Table 9–3.
orclskiprefinsql Skip referral for search.
Server restart recommended
after changing. See the
Oracle Internet Directory
chapter in Oracle Fusion
Middleware Performance and
Tuning Guide.
EM, LDAP 0 0: Disabled
1: Enabled
orcltlimitmode Specify search time limit
mode to be either accurate or
approximate. See the Oracle
Internet Directory chapter
in Oracle Fusion Middleware
Performance and Tuning Guide.
LDAP 0 0: Accurate
1: Approximate
orclecacheenabled Enable Entry Cache. See the
Oracle Internet Directory
chapter in Oracle Fusion
Middleware Performance and
Tuning Guide.
EM, LDAP, WLST 1 1: Enable, 0: Disable
orclecachemaxentri
es
Maximum Entries in Entry
Cache. See the Oracle
Internet Directory chapter
in Oracle Fusion Middleware
Performance and Tuning Guide.
EM, LDAP, WLST 100000 Integer
orclecachemaxsize Entry Cache Size in bytes. See
the Oracle Internet
Directory chapter in Oracle
Fusion Middleware Performance
and Tuning Guide.
EM, LDAP, WLST 200000000
Bytes
Size_t (can be
specified using K, M,
or G as Kilo, Mega
and Giga bytes
respectively). For
example, 200M is a
valid value.
orclrscacheattr Result Set Cache Attributes
See the Oracle Internet
Directory chapter in Oracle
Fusion Middleware Performance
and Tuning Guide.
EM, LDAP, WLST cn, mail, uid,
orclguid
Comma-separated list
of attributes.
Typically these
attributes are not
modified for the life
of the entry.
orclenablegroupcac
he
Enable/Disable Group cache
See the Oracle Internet
Directory chapter in Oracle
Fusion Middleware Performance
and Tuning Guide.
LDAP 1 1 Enable,
0 Disable
Table 9–2 (Cont.) Attributes in the DSA Configuration Entry
Attribute Description Update Mechanism Default Possible Values

Managing System Configuration Attributes by Using Fusion Middleware Control
9-12 Oracle Fusion Middleware Administrator's Guide for Oracle Internet Directory
9.2 Managing System Configuration Attributes by Using Fusion
Middleware Control
You can view and set most of the configuration attributes for an Oracle directory
server by using Oracle Enterprise Manager Fusion Middleware Control.
This section contains the following topics:
■Section 9.2.1, "Configuring Server Properties"
■Section 9.2.2, "Configuring Shared Properties"
■Section 9.2.3, "Configuring Other Parameters"
9.2.1 Configuring Server Properties
You can configure most of the attributes in the instance-specific configuration entry by
using the Oracle Internet Directory Server Properties pages of Fusion Middleware
Control., as follows:
1. Select Administration, then Server Properties from the Oracle Internet Directory
menu.
2. Select General, Performance, SASL, Statistics, or Logging, depending on which
parameters you want to configure.
3. After changing the configuration, choose Apply.
The correspondence between server properties and configuration attributes on the
General tab of the Server Properties page is shown in Table 9–4.
General
Table 9–3 Attributes of the DSE
Attribute Description
Update
Mechanism Default Possible Values
namingcontexts Naming contexts. See
Chapter 11.
LDAP c=us
dc=com
Any valid naming context.
ref Referral specification.
See Chapter 19.
LDAP
orclaci Access control at the
root DSE level. See
Chapter 29.
LDAP
orclcryptoscheme Hashing algorithm for
protecting passwords.
See Chapter 30.
LDAP SHA MD4, MD5, SHA, SSHA,
SHA256, SHA384, SHA512,
SSHA256, SSHA384, SSHA512,
SMD5, UNIX Crypt
subentry Contains DN of
password policy
governing the DSE
root. See Chapter 28.
LDAP cn=default,cn=pw
dPolicies,cn=Com
mon,cn=Products,
cn=OracleContext
Table 9–4 Configuration Attributes on Server Properties Page, General Tab.
Field or Heading Configuration Attribute
Server Mode orclservermode

Managing System Configuration Attributes by Using Fusion Middleware Control
Managing System Configuration Attributes 9-13
Performance
The correspondence between server properties and configuration attributes on the
Performance tab of the Server Properties page is shown in Table 9–5
Restart the server after changing orclserverprocs, orclmaxcc,
orcldispthreads, or orclpluginworkers.
SASL
The correspondence between server properties and configuration attributes on the
SASL tab of the Server Properties page is shown in Table 32–1, " Configuration
Attributes on Server Properties, SASL Tab".
Maximum number of entries to be returned by a
search
orclsizelimit
Maximum time allowed for a search to complete
(sec)
orcltimelimit
Preserve Case of Required Attribute Name
specified in Search Request
orclreqattrcase
Anonymous Bind orclanonymousbindsflag
Maximum time allowed in a Transaction (sec) orcltxntimelimit
Maximum Number of Operations allowed in a
Transaction
orcltxnmaxoperations
Non-SSL Port orclnonsslport
SSL Port orclsslport
Table 9–5 Configuration Attributes on Server Properties Page, Performance Tab
Field or Heading Configuration Attribute
Number of OID LDAP Server Processes orclserverprocs
Number of DB Connections per Server Process orclmaxcc
Number of users in privilege Group membership
Cache
orclmaxconnincache
LDAP Idle Connection Timeout (minutes) orclldapconntimeout
OID server Network Read/Write Retry Timeout
(sec)
orclnwrwtimeout
Maximum Number of LDAP connections per
Server Process
orclmaxldapconns
Maximum Time in seconds for Server process to
respond back to Dispatcher process
orclMaxServerRespTime
Number of Dispatcher Threads per Server Process orcldispthreads
Number of Plugin Threads per Server Process orclpluginworkers
Enable Change Log Generation orclgeneratechangelog
Table 9–4 (Cont.) Configuration Attributes on Server Properties Page, General Tab.
Field or Heading Configuration Attribute

Managing System Configuration Attributes by Using Fusion Middleware Control
9-14 Oracle Fusion Middleware Administrator's Guide for Oracle Internet Directory
Statistics
The correspondence between server properties and configuration attributes on the
Statistics tab of the Server Properties page is shown in Table 24–2, " Configuration
Attributes on Server Properties Page, Statistics Tab".
Logging
The correspondence between server properties and configuration attributes on the
Logging tab of the Server Properties page is shown in Table 23–2, " Configuration
Attributes on Server Properties Page, Logging Tab".
9.2.2 Configuring Shared Properties
You can configure some of the shared system configuration attributes in the DSA
configuration entry by using the Oracle Internet Directory Shared Properties page of
Fusion Middleware Control. Select Administration, then Shared Properties, then
select General, Change Superuser Password, or Replication from the Oracle Internet
Directory menu. After changing the configuration, choose Apply. The correspondence
is as follows:
General
A server restart is recommended after changing orclskiprefinsql or
orclskewedattribute.
Change Superuser Password
See Section 12.5, "Changing the Superuser Password by Using Fusion Middleware
Control."
Table 9–6 Configuration Attributes on Shared Properties Page, General Tab
Field or Heading Configuration Attribute
User DN orclstatsdn
Skip referral for search orclskiprefinsql
Skewed attributes orclskewedattribute
Search Filters to be processed in memory orclinmemfiltprocess
Hashed attributes orclhashedattributes
Match DN orclMatchDnEnabled
PKI Matching Rule orclPKIMatchingRule
Referential Integrity orclrienabled
Maximum Filter Size orclmaxfiltsize
Enable Entry Cache orclecacheenabled
Maximum Entries in Entry Cache orclecachemaxentries
Maximum Entry Cache Size (MB) orclecachemaxsize
Number of users in privilege group
membership cache NOT on EM page
orclmaxconnincache
Result Set Cache Attributes orclrscacheattr
Java Plug-in VM Options orcljvmoptions

Managing System Configuration Attributes by Using WLST
Managing System Configuration Attributes 9-15
Replication
Replication-related attributes are described in Chapter 41, "Managing Replication
Configuration Attributes." See Section 41.2.1, "Configuring Attributes on the Shared
Properties, Replication Tab."
9.2.3 Configuring Other Parameters
You can configure SSL parameters by using the Oracle Internet Directory SSL
Configuration Page. See Section 26.2, "Configuring SSL by Using Fusion Middleware
Control." You must restart the server for SSL configuration changes to take effect.
You can configure Audit attributes by using the Oracle Internet Directory Audit Policy
Settings page. See Section 22.2, "Managing Auditing by Using Fusion Middleware
Control."
9.3 Managing System Configuration Attributes by Using WLST
A managed bean (MBean) is a Java object that represents a JMX manageable resource
in a distributed environment, such as an application, a service, a component or a
device. The WebLogic server uses custom MBeans as its interface to OPMN-managed
components, such as Oracle Internet Directory. You can use the WebLogic Scripting
Tool (wlst) in the Oracle Common home to manage the attributes of the Oracle
Internet Directory instance-specific configuration entry that have Oracle Enterprise
Manager Fusion Middleware Control interfaces.
You use WLST as follows:
1. Invoke WLST
ORACLE_COMMON_HOME/common/bin/wlst.sh
2. Connect to the WebLogic server
connect('username', 'password', 'localhost:7001')
3. To navigate to the custom mbean tree, type:
custom()
at the wlst prompt.
4. To get a one-level list of the MBean in the custom MBean tree, type:
Note: WLST manages Oracle Internet Directory through its SSL port.
The Oracle Internet Directory SSL port must be configured for no
authentication or server authentication. If the Oracle Internet
Directory SSL port is configured for mutual authentication, you will
not be able to change Oracle Internet Directory attributes by using
WLST. See Section 26.1.3, "SSL Authentication Modes."
See Also:
■Oracle Fusion Middleware Administrator's Guide
■Oracle Fusion Middleware Oracle WebLogic Scripting Tool
■Section 26.3, "Configuring SSL by Using WLST"
■Section 22.3, "Managing Auditing by Using WLST"

Managing System Configuration Attributes by Using WLST
9-16 Oracle Fusion Middleware Administrator's Guide for Oracle Internet Directory
ls()
In the ls() output, you see two domains that contain MBeans that are related to
Oracle Internet Directory configuration. The domains are
oracle.as.management.mbeans.register and oracle.as.oid.
5. To get to a domain, use the cd() command. For example:
cd('oracle.as.management.mbeans.register')
or
cd('oracle.as.oid')
If you type ls(), you see a list of MBeans in that domain. There are three MBeans
related to Oracle Internet Directory configuration under
oracle.as.management.mbeans.register and two under
oracle.as.oid. Table 9–7lists them.
INSTANCE and COMPONENT_NAME refer to the Oracle instance where your
Oracle Internet Directory component is located and the name of the component,
respectively.
6. To get to a specific MBean, type:
cd('MBEAN_NAME')
For example, if you are in the domain
oracle.as.management.mbeans.register, and you want to manage the
Root Proxy MBean for Oracle Internet Directory component oid1 in Oracle
instance instance1, type:
cd('oracle.as.management.mbeans.register:type=OID,name=oid1,instance=instance1'
)
Table 9–7 Oracle Internet Directory-Related MBeans
MBean Name MBean Domain MBean Format in ls() Output
Root Proxy MBean
oracle.as.management.mbeans
.register
oracle.as.management.mbeans.register:type=comp
onent,name=COMPONENT_NAME,instance=INSTANCE
Non-SSL Port
MBean
oracle.as.management.mbeans
.register
oracle.as.management.mbeans.register:type=comp
onent.nonsslport,name=nonsslport1,instance=INS
TANCE,component=COMPONENT_NAME
Audit MBean
oracle.as.management.mbeans
.register
oracle.as.management.mbeans.register:type=comp
onent.auditconfig,name=auditconfig1,instance=I
NSTANCE,component=COMPONENT_NAME
SSL Port MBean
oracle.as.oid oracle.as.oid:type=component.sslconfig,name=ss
lport1,instance=INSTANCE,component=COMPONENT_
NAME
Key Store MBean
oracle.as.oid oracle.as.oid:type=component.keystore,name=key
store,instance=INSTANCE,component=COMPONENT_
NAME
Note: The Audit MBean is shown here for completeness, but you use
different commands for managing auditing by using wlst. See
"Managing Auditing by Using WLST" on page 22-5.

Managing System Configuration Attributes by Using LDAP Tools
Managing System Configuration Attributes 9-17
7. Once you have navigated to the desired MBean, you can get the current value for
an attribute by typing:
get('ATTRIBUTE_NAME')
For example, to get the value for orclserverprocs, type:
get('orclserverprocs')
8. Before you make any changes to attributes, you must ensure that the MBean has
the current server configuration. To do that, load the configuration from Oracle
Internet Directory server to the mbean. Type:
invoke('load',jarray.array([],java.lang.Object),jarray.array([],java.lang.Strin
g))
9. Then you can use the set command to set a specific attribute. Type:
set('ATTRIBUTE_NAME', ATTRIBUTE_VALUE)
For example, to set orclserverprocs = 12, type:
set('orclserverprocs', 12)
10. After making changes, you must save the MBean configuration to the Oracle
Internet Directory server. Type:
invoke('save',jarray.array([],java.lang.Object),jarray.array([],java.lang.Strin
g))
9.4 Managing System Configuration Attributes by Using LDAP Tools
From the command line, you can modify most system configuration attributes by
using ldapmodify and list most system configuration by using ldapsearch.
9.4.1 Setting System Configuration Attributes by Using ldapmodify
You can modify most attributes in Table 9–1, Table 9–2, and Table 9–3 by using the
command-line:
ldapmodify -D cn=orcladmin -q -p portNum -h hostname -f ldifFile
The contents of the LDIF file depends on the DN and the operation being performed.
The LDIF file for changing the value of the orclgeneratechangelog attribute in
the instance-specific entry to 1 would be:
dn: cn=componentname,cn=osdldapd,cn=subconfigsubentry
changetype: modify
replace: orclgeneratechangelog
orclgeneratechangelog: 1
The LDIF file for adding the orclinmemfiltprocess attribute to the DSA
configuration entry would be:
dn: cn=dsaconfig, cn=configsets, cn=oracle internet directory
changetype: modify
add: orclinmemfiltprocess
orclinmemfiltprocess: (objectclass=inetorgperson)(orclisenabled=TRUE)

Managing System Configuration Attributes by Using LDAP Tools
9-18 Oracle Fusion Middleware Administrator's Guide for Oracle Internet Directory
9.4.2 Listing Configuration Attributes with ldapsearch
You can use ldapsearch to list most attributes.
Instance-Specific Configuration Entry
If the component name for a server instance is oid1,then you can list the attributes in
the instance-specific configuration entry with a command line such as:
ldapsearch -p 3060 -h myhost.example.com -D cn=orcladmin -q \
-b "cn=oid1,cn=osdldapd,cn=subconfigsubentry" -s base "objectclass=*"
DSA Configuration Entry
You can list the attributes with the command line:
ldapsearch -p 3060 -h myhost.example.com -D cn=orcladmin -q \
-b "cn=dsaconfig,cn=configsets,cn=oracle internet directory" \
-s base "objectclass=*"
DSE
You can list the attributes with the command line:
ldapsearch -p 3060 -h myhost.example.com -D cn=orcladmin -q \
-b "" -s base "objectclass=*"
Notes:
■In 11g Release 1 (11.1.1), consecutive settings of orcldebugflag
and of orcloptracklevel are additive.
■Restart the server after changing orclskiprefinsql,
orclskewedattribute, orclserverprocs,
orcldispthreads, orclmaxcc, orclpluginworkers, or any
attribute with a name that begins with "orclssl" or "orclsasl."
■After changing orclnonsslport or orclsslport, restart the
server and run opmnctl updatecomponentregistration, as
described in Section 8.3.4, "Updating the Component Registration
of an Oracle Instance by Using opmnctl."
See Also:
■The Oracle Internet Directory chapter of Oracle Fusion
Middleware Performance and Tuning Guide for more examples of
LDIF files
■The ldapmodify command-line tool reference in Oracle Fusion
Middleware Reference for Oracle Identity Management for a more
detailed discussion of ldapmodify, and a list of its options
■The "Oracle Identity Management LDAP Attribute Reference"
in Oracle Fusion Middleware Reference for Oracle Identity
Management for descriptions of the modifiable system
configuration attributes.

Managing System Configuration Attributes by Using ODSM Data Browser
Managing System Configuration Attributes 9-19
9.5 Managing System Configuration Attributes by Using ODSM Data
Browser
Oracle Enterprise Manager Fusion Middleware Control is the recommended graphical
user interface for managing system configuration attributes. You can also use ODSM
to manage system configuration attributes, which can be useful if Fusion Middleware
Control is not available or if you must modify an attribute that has no Fusion
Middleware Control interface.
See Section 13.2, "Managing Entries by Using Oracle Directory Services Manager" for
detailed instructions for changing the attributes of a directory entry. The following
sections explain how to get to the entries that contain system configuration attributes
in ODSM.
9.5.1 Navigating to the Instance-Specific Configuration Entry
On the Data Browser tab, in the navigation tree, expand subconfigsubentry, then
osdldapd. Then select the name of the Oracle Internet Directory component you want
to manage.
9.5.2 Navigating to the DSA Configuration Entry
On the Data Browser tab, in the navigation tree, expand oracle internet
directory, then configsets, then select the entry dsaconfig.
9.5.3 Navigating to the DSE Root
On the Data Browser tab, click Root in the navigation tree to select the DSE.

Managing System Configuration Attributes by Using ODSM Data Browser
9-20 Oracle Fusion Middleware Administrator's Guide for Oracle Internet Directory

10
Managing IP Addresses 10-1
10Managing IP Addresses
This chapter discusses how to manage Oracle Internet Directory's IP addresses. It
contains the following sections:
■Section 10.1, "Introduction to Managing IP Addresses"
■Section 10.2, "Configuring an IP Address for IP V6, Cold Failover Cluster, or
Virtual IP"
10.1 Introduction to Managing IP Addresses
When you install Oracle Internet Directory on a dual stack (IPV4/IPV6) host, Oracle
Internet Directory listens on both addresses. You cannot install Oracle Internet
Directory on a host with only an IPV6 address because the Oracle Database requires
an IPV4 address to connect to.
If you install Oracle Internet Directory on an IPV4 host and then change the host's
address to IPV6, you must configure Oracle Internet Directory's IP address separately
to the IPV6 address by changing the orclhostname attribute in the instance-specific
configuration entry.
If you must have Oracle Internet Directory listen on a specific address for some other
reason, you also do that by changing the orclhostname attribute in the
instance-specific configuration entry.
10.2 Configuring an IP Address for IP V6, Cold Failover Cluster, or Virtual
IP
Perform the following steps to configure Oracle Internet Directory to listen on a
specific IP address:
1. Create an LDIF file similar to this:
dn: cn=COMPONENT_NAME, cn=osdldapd, cn=subconfigsubentry
changetype: modify
replace: orclhostname
orclhostname: IP_address
2. Execute the following ldapmodify command:
ldapmodify -D cn=orcladmin -q -p portNum -h hostname -f ldifFile
3. Restart Oracle Internet Directory by using opmnctl, as follows:
opmnctl stopall
opmnctl startall

Configuring an IP Address for IP V6, Cold Failover Cluster, or Virtual IP
10-2 Oracle Fusion Middleware Administrator's Guide for Oracle Internet Directory
4. Update the registration of the Oracle Internet Directory component, as described
in Section 8.3.4, "Updating the Component Registration of an Oracle Instance by
Using opmnctl." For example:
$ORACLE_INSTANCE/bin/opmnctl updatecomponentregistration \
-adminHost myhost \
-adminPort 7001 \
-adminUsername weblogic \
-componentType OID \
-componentName oid2\
-Port 3061
If you fail to perform this step, you will be unable to use Fusion Middleware
Control or wlst to manage that component.
You can also use ODSM to change the orclhostname attribute in the
instance-specific configuration entry. See Section 9.5, "Managing System Configuration
Attributes by Using ODSM Data Browser."

11
Managing Naming Contexts 11-1
11Managing Naming Contexts
To enable users to search for specific naming contexts, you can publish those naming
contexts. This section contains these topics:
■Section 11.1, "Introduction to Managing Naming Contexts"
■Section 11.2, "Searching for Published Naming Contexts"
■Section 11.3, "Publishing a Naming Context"
11.1 Introduction to Managing Naming Contexts
See "Naming Contexts" on page 3-14 for a description of naming contexts.
To publish a naming context, you specify the topmost entry of each naming context as
a value of the namingContexts attribute in the root DSE. For example, suppose you
have a DIT with three major naming contexts, the topmost entries of which are c=uk,
c=us, and c=de. If these entries are specified as values in the namingContexts
attribute, then a user, by specifying the appropriate filter, can find information about
them by searching the root DSE. The user can then focus the search—for example, by
concentrating on the c=de naming context in particular.
11.2 Searching for Published Naming Contexts
To search for published naming contexts, perform a base search on the root DSE with
objectClass =* specified as a search filter. The retrieved information includes
those entries specified in the namingContexts attribute. For example:
ldapsearch -p 3060 -q -D cn=orcladmin -b "" -s base -L "objectclass=*" \
namingcontexts
Before you publish a naming context, be sure that:
■You are a directory administrator with the necessary access to the root DSE.
■The topmost entry of that naming context exists in the directory.
Note: This command will not return anything unless naming
contexts have been published.

Publishing a Naming Context
11-2 Oracle Fusion Middleware Administrator's Guide for Oracle Internet Directory
11.3 Publishing a Naming Context
You use ldapmodify to publish a naming context. The namingContexts attribute is
multi-valued, so you can specify multiple naming contexts.
You can modify namingContexts by using the command-line:
ldapmodify -D cn=orcladmin -q -p portNum -h hostname -f ldifFile
The following sample LDIF file specifies the entry c=uk as a naming context.
dn:
changetype: modify
add: namingcontexts
namingcontexts: c=uk

12
Managing Accounts and Passwords 12-1
12Managing Accounts and Passwords
This chapter contains these topics:
■Section 12.1, "Introduction to Managing Accounts and Passwords"
■Section 12.2, "Managing Accounts and Passwords by Using Command-Line Tools"
■Section 12.3, "Managing Accounts and Passwords by Using the Self-Service
Console"
■Section 12.4, "Listing and Unlocking Locked Accounts by Using Oracle Directory
Services Manager"
■Section 12.5, "Changing the Superuser Password by Using Fusion Middleware
Control"
■Section 12.6, "Creating Another Account With Superuser Privileges"
■Section 12.7, "Managing the Superuser Password by Using ldapmodify"
■Section 12.8, "Changing the Oracle Internet Directory Database Password"
■Section 12.9, "Resetting the Superuser Password"
■Section 12.10, "Changing the Password for the EMD Administrator Account"
■Section 12.11, "Changing the Password for the ODSSM Administrator Account"
12.1 Introduction to Managing Accounts and Passwords
This chapter describes some administrative tasks related to accounts and passwords.
See Also:
■Chapter 13, "Managing Directory Entries"
■Chapter 28, "Managing Password Policies"
■Section 42.3.13, "Changing the Replication Administrator's
Password for Advanced Replication"
Note: All references to the Self-Service console in this chapter refer to
the console included with Oracle Delegated Administration Services
10g (10.1.4.3.0) or later, which is compatible with Oracle Internet
Directory 11g Release 1 (11.1.1). See Oracle Identity Management Guide
to Delegated Administration in the 10g (10.1.4.0.1) Library for more
information.

Managing Accounts and Passwords by Using Command-Line Tools
12-2 Oracle Fusion Middleware Administrator's Guide for Oracle Internet Directory
Using command-line tools or the Self-Service console, you can temporarily disable a
user's account, then enable it again. If you are a member of the Security
Administrators Group, then you can unlock an account without resetting the user
password. This saves you from having to explicitly tell the user the new password.
The user can simply log in using the old password.
Using command-line tools, you can force users to change their passwords when they
log in for the first time.
If you forget your password or become locked out of your account, then you can reset
your password. You do this by using the Self-Service Console. This involves
identifying yourself to the server by providing values for a set of password validation
attributes. This takes the form of answering a password hint question to which you
had earlier specified an answer.
The Superuser is a special directory administrator with full access to directory
information. The default user name of the superuser is orcladmin. The password is
set by the administrator during installation.
You can use either Oracle Enterprise Manager or ldapmodify to administer the
Superuserpassword.
Another privileged account is the administrator, "cn=emd admin,cn=oracle
internet directory". This account is used for starting and stopping Oracle
Internet Directory server manageability information collection. It is also used by
Oracle Enterprise Manager Fusion Middleware Control to make configuration changes
to Oracle Internet Directory. These changes are made over a secure connection.
The only way you can change this account's password is to use the procedure
documented in Section 12.10, "Changing the Password for the EMD Administrator
Account." There is no support in the oidpasswd tool for changing this password.
12.2 Managing Accounts and Passwords by Using Command-Line Tools
This section contains these topics:
■Section 12.2.1, "Enabling and Disabling Accounts by Using Command-Line Tools"
■Section 12.2.2, "Unlocking Accounts by Using Command-Line Tools"
■Section 12.2.3, "Forcing a Password Change by Using Command-Line Tools"
12.2.1 Enabling and Disabling Accounts by Using Command-Line Tools
You can temporarily disable a user's account, then enable it again, by using
command-line tools.
To permanently disable the account, set the orclisenabled attribute to DISABLED.
Setting this attribute to any other value enables the account.
To enable the account after you have disabled it, delete this attribute from the entry.
Note: Oracle recommends that you change the password
immediately after installation.
See Also: Chapter 29, "Managing Directory Access Control" for
information on how to set access rights

Managing Accounts and Passwords by Using the Self-Service Console
Managing Accounts and Passwords 12-3
To enable the account for a specific period, set the orclActiveStartDate and
orclActiveEndDate attributes in the user entry to the proper value in UTC
(Coordinated Universal Time) format. For example, you could use a command line
such as:
ldapmodify -p port -h host -D cn=orcladmin -q -v -f my.ldif
where my.ldif contains:
dn:cn=John Doe,cn=users,o=my_company,dc=com
orclactivestartdate:20030101000000z
orclactiveenddate: 20031231000000z
In this example, John Doe can log in only between January 1, 2003 and December 31,
2003. He cannot login before January 1, 2003 or after December 31, 2003. If you want to
disable his account for the period between these dates, then set the orclisenabled
attribute to DISABLED.
12.2.2 Unlocking Accounts by Using Command-Line Tools
If you are a member of the Security Administrators Group, then you can unlock an
account without resetting the user password. This saves you from having to explicitly
tell the user the new password. The user can simply log in using the old password.
To unlock an account, set the orclpwdaccountunlock attribute to 1.
The following example unlocks the account for user John Doe.
ldapmodify -p port -h host -D cn=orcladmin -q -v -f file.ldif
where file.ldif contains:
dn: cn=John Doe,cn=users,o=my_company,dc=com
changetype: modify
add: orclpwdaccountunlock
orclpwdaccountunlock: 1
12.2.3 Forcing a Password Change by Using Command-Line Tools
You can force users to change their passwords when they log in for the first time. To
do this, set the pwdMustChange attribute in the pwdpolicy entry to 1, and then reset
the password. If you do this, you must explicitly tell the user the new password so that
the user can log in to change that password.
12.3 Managing Accounts and Passwords by Using the Self-Service
Console
For administrators, Oracle Directory Services Manager is the primary tool for
managing users and passwords.
See Also:
■Section 12.3.3, "Resetting Your Own Password by Using the
Oracle Internet Directory Self-Service Console"for instructions
on resetting passwords
■Section 28.3.4, "Setting Password Policies by Using
Command-Line Tools" for instructions on setting attributes of a
password policy

Managing Accounts and Passwords by Using the Self-Service Console
12-4 Oracle Fusion Middleware Administrator's Guide for Oracle Internet Directory
You can also use Oracle Identity Manager to centralize user and account provisioning
to Oracle Internet Directory 11g Release 1 (11.1.1). For end user self-service, Oracle
Identity Manager is the recommended solution. The Oracle Identity Manager
documentation is available on Oracle Technology Network at:
http://www.oracle.com/technology/documentation/oim.html
Customers who already have Oracle Delegated Administration Services in their
environment can use it for end user self-service with Oracle Internet Directory 11g
Release 1 (11.1.1). However, 10g is the terminal release for Oracle Delegated
Administration Services, and the component is deprecated in 11g and later releases.
This section contains these topics:
■Section 12.3.1, "Enabling and Disabling Accounts by Using the Oracle Internet
Directory Self-Service Console"
■Section 12.3.2, "Unlocking Accounts by Using the Oracle Internet Directory
Self-Service Console"
■Section 12.3.3, "Resetting Your Own Password by Using the Oracle Internet
Directory Self-Service Console"
12.3.1 Enabling and Disabling Accounts by Using the Oracle Internet Directory
Self-Service Console
You can temporarily disable a user's account, then enable it again, by using the Oracle
Internet Directory Self-Service Console.
12.3.2 Unlocking Accounts by Using the Oracle Internet Directory Self-Service Console
If you are a member of the Security Administrators Group, then, if an account becomes
locked, you can unlock it without resetting the user password. This saves you from
having to explicitly tell the user the new password. The user can simply log in by
using the old password.
12.3.3 Resetting Your Own Password by Using the Oracle Internet Directory
Self-Service Console
If you forget your password or become locked out of your account, then you can reset
your password. This involves identifying yourself to the server by providing values
for a set of password validation attributes. This takes the form of answering a
password hint question to which you had earlier specified an answer.
See Also: The section on managing accounts in Oracle Identity
Management Guide to Delegated Administration in the 10g (10.1.4.0.1)
library for instructions on enabling and disabling accounts by using
the Oracle Internet Directory Self-Service Console
See Also: The section on managing accounts in Oracle Identity
Management Guide to Delegated Administration in the 10g (10.1.4.0.1)
library for instructions on using the Oracle Internet Directory
Self-Service Console to unlock accounts
See Also: The section on resetting your password if you forget it
in Oracle Identity Management Guide to Delegated Administration in
the 10g (10.1.4.0.1) library for instructions on using the Oracle
Internet Directory Self-Service Console to reset your password

Creating Another Account With Superuser Privileges
Managing Accounts and Passwords 12-5
12.4 Listing and Unlocking Locked Accounts by Using Oracle Directory
Services Manager
You can use Oracle Directory Services Manager to list and unlock locked accounts.
1. Invoke Oracle Directory Services Manager as described in Section 7.4.5, "Invoking
Oracle Directory Services Manager."
2. From the task selection bar, select Data Browser.
3. Perform a simple search, as described in Section 13.2.2, "Searching for Entries by
Using Oracle Directory Services Manager," using the search string
(pwdaccountlockedtime=*). A list of entries with locked accounts appears.
4. Select the entry whose account you want to unlock.
5. When an account is locked, Unlock Account appears before the Apply and Revert
buttons. Click Unlock Account.
12.5 Changing the Superuser Password by Using Fusion Middleware
Control
To change the password for the superuser by using Oracle Enterprise Manager Fusion
Middleware Control:
1. Select Administration, then Shared Properties from the Oracle Internet Directory
menu.
2. Click the Change Superuser Password tab.
3. Specify the old password.
4. Specify the new password.
5. Confirm the new password.
6. Click Apply.
The configuration attribute orclsupassword is an attribute of the DSE root.
12.6 Creating Another Account With Superuser Privileges
The Superuser, cn=orcladmin, gets its privileges from membership in several
privileged groups. You can query for those groups by using the following ldapsearch
command:
ldapsearch -h host -p port -D "cn=orcladmin" -q -b "" -L \
-s sub "(|(uniquemember=cn=orcladmin)(member=cn=orcladmin)" dn
To create a second account with Superuser privilege, create another user entry that
belongs to the same groups. Also add the user as member of the group
cn=directoryadmingroup,cn=oracle internet directory.
After you have created additional users with Superuser privileges, you no longer need
to use cn=orcladmin to administer Oracle Internet Directory. The privileged
Table 12–1 Configuration Attributes on Shared Properties, Change Superuser Password
Tab.
Field or Heading Configuration Attribute
Superuser Password orclsupassword

Managing the Superuser Password by Using ldapmodify
12-6 Oracle Fusion Middleware Administrator's Guide for Oracle Internet Directory
accounts should be sufficient. The attribute orclsuname, however, must have the
value cn=orcladmin.
12.7 Managing the Superuser Password by Using ldapmodify
You should never change the Superuser's name. The value of orclsuname must
remain cn=orcladmin
To set or modify the password for the superuser, use ldapmodify to modify the
attribute orclsuname or orclsupassword, respectively, in the DSE root. Changing
the user name of the superuser can have serious repercussions and is not
recommended.
To change the password of the superuser to superuserpassword, use an LDIF file
such as the following:
dn:
changetype:modify
replace:orclsupassword
orclsupassword:superuserpassword
12.8 Changing the Oracle Internet Directory Database Password
The Oracle Internet Directory uses a password when connecting to its own designated
Oracle database. The default for this password when you install Oracle Internet
Directory is the same as that for the Oracle Fusion Middleware administrator. You can
change this password by using oidpasswd.
The following example shows how to change the Oracle Internet Directory database
password, assuming the database in on the same machine.
oidpasswd connect=dbs1 change_oiddb_pwd=true
current password: oldpassword
new password: newpassword
confirm password: newpassword
password set.
See Also: Chapter 13, "Managing Directory Entries" to learn how to
create a user entry and Chapter 14, "Managing Dynamic and Static
Groups" to learn how to add a user to a group.
Note: To maintain system security, keep the number of privileged
users to a minimum and ensure that all privileged accounts are
audited. See Chapter 22, "Managing Auditing."
See Also: The ldapmodify command-line tool reference in
Oracle Fusion Middleware Reference for Oracle Identity Management for
ldapmodify syntax and usage notes.
See Also: The oidpasswd command-line tool reference in Oracle
Fusion Middleware Reference for Oracle Identity Management

Changing the Password for the EMD Administrator Account
Managing Accounts and Passwords 12-7
12.9 Resetting the Superuser Password
If you forget the Oracle Internet Directory superuser (cn=orcladmin) password, you
can use the oidpasswd tool to reset it. You must provide the Oracle Internet Directory
database password. When you first install Oracle Internet Directory, the superuser
password and Oracle Internet Directory database password are the same. After
installation, however, you can change the Oracle Internet Directory superuser
password using ldapmodify. If you forget the Oracle Internet Directory superuser
password, you can reset it using the oidpasswd tool separately.
The following example shows how to reset the Oracle Internet Directory superuser
password. The oidpasswd tool prompts you for the Oracle Internet Directory
database password.
Example:
oidpasswd connect=dbs1 reset_su_password=true
OID DB user password: oid_db_password
password: new_su_password
confirm password: new_su_password
OID superuser password reset successfully
12.10 Changing the Password for the EMD Administrator Account
The EMD administrator account, "cn=emd admin,cn=oracle internet
directory", has very limited privilege and is used primarily by for starting and
stopping Oracle Internet Directory server manageability information collection.
To change the password for the EMD administrator, you must change it in Oracle
Internet Directory, then change it on both the WebLogic domain server and on each
Oracle instance in the domain. Use the following procedure:
1. Change the userpassword of the account "cn=emd admin,cn=oracle internet
directory" in Oracle Internet Directory by using ldapmodify.
2. Invoke wlst and connect to the WebLogic server.
java weblogic.WLST
connect('weblogic', 'weblogic_user_password', 'protocol:host:port')
3. Run the following WLST command:
upupdateCred(map='emd',keu='EMD_instance_name',
password='newpassword',user='EMD')
4. On each Oracle instance in the WebLogic domain, execute the following command
line:
Note: The account described here is different from the ODSSM
account used for accessing server manageability information.
Section 24.1.4, "Account Used for Accessing Server Manageability
Information" describes that account. For information about changing
that account, see Section 12.11, "Changing the Password for the
ODSSM Administrator Account."
See Also: Chapter 24, "Monitoring Oracle Internet Directory" for
information about Oracle Internet Directory server manageability
information collection.

Changing the Password for the ODSSM Administrator Account
12-8 Oracle Fusion Middleware Administrator's Guide for Oracle Internet Directory
ORACLE_HOME/ldap/bin/oidcred emd update [instanceName]
5. Update the component registration of the Oracle instance, as described in
Section 8.3.4, "Updating the Component Registration of an Oracle Instance by
Using opmnctl."
12.11 Changing the Password for the ODSSM Administrator Account
Oracle Internet Directory connects to its Oracle Database, using the password
specified for the ODS schema during schema creation. It also connects to retrieve its
metrics using the ODSSM schema password, given during schema creation as well.The
Oracle Enterprise Manager Fusion Middleware Control default password, at the end
of install, is the same as the ODSSM password.
To change the password for the ODSSM administrator, you must change it in the
Oracle Database and then change it on both the WebLogic domain server and on each
Oracle instance in the domain. Use the following procedure:
1. Use SQLPlus or a similar tool to alter the password in the database.
2. Go to ORACLE_HOME/common/bin and run the following command:
sh wlst.sh
3. Connect to the WebLogic Administration Server:
connect('weblogic_username','pwd', 't3://host:port')
4. Run the updateCred() command:
updateCred(map='odssm', key='ODSSM_instance_name', password='newpassword',
user='ODSSM')
where instance_name is the instance name provided during installation, for
example, asinst_1.
5. On each Oracle instance in the WebLogic domain, execute the following command
line:
ORACLE_HOME/ldap/bin/oidcred odssm update [instance_name]
6. Update the component registration of the Oracle instance, as described in
Section 8.3.4, "Updating the Component Registration of an Oracle Instance by
Using opmnctl."
If Oracle Directory Integration Platform is also configured in the instance, then you
must update this new ODSSM password in one additional place. Proceed as follows:
1. Log in to the WebLogic Administration console at:
http://host:port/console
2. Select Data Sources -> schedulerDS -> Connection Pool.
3. Click Lock & Edit in the top left corner of the screen.
4. Enter the new password in the Password and Confirm Password fields.
Click Save.
5. Click Activate Changes.

13
Managing Directory Entries 13-1
13Managing Directory Entries
This chapter contains these topics:
■Section 13.1, "Introduction to Managing Directory Entries"
■Section 13.2, "Managing Entries by Using Oracle Directory Services Manager"
■Section 13.3, "Managing Entries by Using LDAP Command-Line Tools"
13.1 Introduction to Managing Directory Entries
The primary function of most directories is to store information about users and return
that information in response to requests. Applications that request information from
the directory server are called clients of the server.
As administrator, you manage users, groups, and other types of entries by using
Oracle Directory Services manager or the command-line tools.
13.2 Managing Entries by Using Oracle Directory Services Manager
You display entries, including users and groups, by using the Data Browser in Oracle
Directory Services Manager.
The current chapter focuses on users and other types of entries. Chapter 14, "Managing
Dynamic and Static Groups" discusses groups and group entries in more detail.
This section contains these topics:
■Section 13.2.1, "Displaying Entries by Using Oracle Directory Services Manager"
■Section 13.2.2, "Searching for Entries by Using Oracle Directory Services Manager"
■Section 13.2.3, "Importing Entries from an LDIF File by Using Oracle Directory
Services Manager"
■Section 13.2.4, "Exporting Entries to an LDIF File by Using Oracle Directory
Services Manager"
■Section 13.2.5, "Viewing Attributes for a Specific Entry by Using Oracle Directory
Services Manager"
■Section 13.2.7, "Deleting an Entry or Subtree by Using Oracle Directory Services
Manager"
Section 13.2.6, "Adding a New Entry by Using Oracle Directory Services Manager"
See Also: Chapter 3, "Understanding Oracle Internet Directory
Concepts and Architecture," for introductory information about
entries, object classes, and attributes.
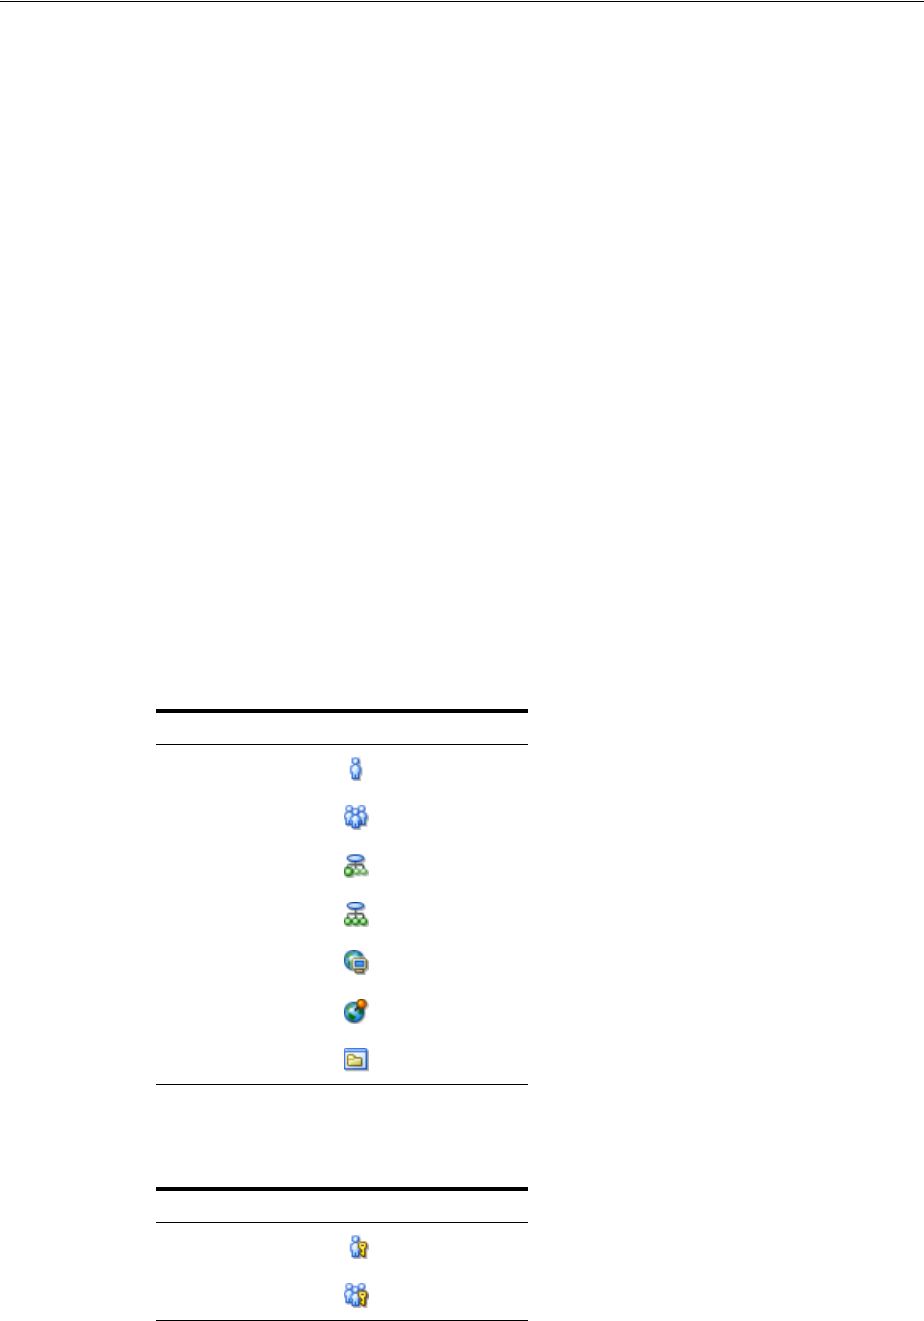
Managing Entries by Using Oracle Directory Services Manager
13-2 Oracle Fusion Middleware Administrator's Guide for Oracle Internet Directory
■Section 13.2.8, "Adding an Entry by Copying an Existing Entry in Oracle Directory
Services Manager"
■Section 13.2.9, "Modifying an Entry by Using Oracle Directory Services Manager"
13.2.1 Displaying Entries by Using Oracle Directory Services Manager
To display entries by using the Data Browser in Oracle Directory Services Manager
proceed as follows:
1. Invoke Oracle Directory Services Manager and connect to the Oracle Internet
Directory server as described in Section 7.4.5, "Invoking Oracle Directory Services
Manager."
2. From the task selection bar, select Data Browser.
3. If desired, expand items in the data tree in the left panel to view the entries in each
subtree.
Entries of some object class types have generic icons in the data tree. Others are
shown with a specific icon. For example:
When an access control list (ACL) has been set on an entry, the icon changes; a
small key appears to the right of the icon. For example:
See Also:
■Section 29.2.4, "Adding or Modifying an ACP by Using the Data
Browser in ODSM"
■Section 29.2.5, "Setting or Modifying Entry-Level Access by Using
the Data Browser in ODSM"
for information on setting or modifying access control on an entry.
Object Class Icon
User
Group
OrganizationalUnit
Organization
Domain
Country
Generic
Object Class Icon with ACL
User
Group
See Also: Chapter 29, "Managing Directory Access Control."

Managing Entries by Using Oracle Directory Services Manager
Managing Directory Entries 13-3
4. If desired, mouse over each icon in the tool bar to read the icon's action.
5. Select the Refresh the entry icon to refresh only the entry in the right pane. Select
the Refresh subtree entries icon to refresh child entries of the selected entry.
6. To limit the number of entries displayed in a subtree, select the entry at the root of
the subtree, then click the Filter child entries icon and specify a filter, as follows:
a. In the Max Results field, specify a number from 1 to 1000, indicating the
maximum number of entries to return.
b. From the list at the left end of the search criteria bar, select an attribute of the
entries you want to view.
c. From the list in the middle of the search criteria bar, select a filter.
d. In the text box at the right end of the search criteria bar, type the value for the
attribute you just selected. For example, if the attribute you selected was cn,
you could type the particular common name you want to find.
e. Click + to add this search criterion to the LDAP Query field.
f. To view the LDAP filter you have selected, select Show LDAP filter.
g. To further refine your search, use the list of conjunctions (AND, OR, NOT
AND, and NOT OR) and the lists and text fields on the search criteria bar to
add additional search criteria. Click + to add a search criterion to the LDAP
Query field.Click X to delete a search criterion from the LDAP Query field.
7. When you have finished configuring the search criteria, click OK. The child entries
that match the filter are shown under the selected entry. The filter is applied for
first level children only, not for the entire subtree. Click the Refresh icon to
remove the filter.
13.2.2 Searching for Entries by Using Oracle Directory Services Manager
To search for a directory entry:
1. Invoke Oracle Directory Services Manager as described in Section 7.4.5, "Invoking
Oracle Directory Services Manager."
2. From the task selection bar, choose Data Browser.
3. To perform a simple keyword search, enter text in the field next to the Search icon
to specify keywords to search for in the attributes cn, uid, sn, givenname, mail
and initials.
4. Click the Simple Search arrow to the right of the text field or press the Enter key.
Search results, if any, are displayed below the data tree. Click the information icon
to view information about this search. Click the Refresh the search results entries
icon to refresh the results. Click the Close search result icon to dismiss the search.
5. To perform a more complex search, click Advanced. The Search Dialog appears.
6. In the Root of the Search field, enter the DN of the root of your search.
For example, suppose you want to search for an employee who works in the
Manufacturing division in the IMC organization in the Americas. The DN of the
root of your search would be:
ou=Manufacturing,ou=Americas,o=IMC,c=US
You would therefore type that DN in the Root of the Search text box.
You can also select the root of your search by browsing the data tree. To do this:

Managing Entries by Using Oracle Directory Services Manager
13-4 Oracle Fusion Middleware Administrator's Guide for Oracle Internet Directory
a. Click Browse to the right of the Root of the Search field. The Select
Distinguished Name (DN) Path: Tree View dialog box appears.
b. Expand an item in the tree view to display its entries.
c. Continue navigating to the entry that represents the level you want for the
root of your search.
d. Select that entry, then click OK. The DN for the root of your search appears in
the Root of the Search text box in the right pane.
7. In the Max Results (entries) box, type the maximum number of entries you want
your search to retrieve. The default is 200. The directory server retrieves the value
you set, up to 1000.
8. In the Max Search Time (seconds) box, type the maximum number of seconds for
the duration of your search. The value you enter here must be at least that of the
default, namely, 25. The directory server searches for the amount of time you
specify, up to one hour.
9. In the Search Depth list, select the level in the DIT to which you want to search.
The options are:
■Base: Retrieves a particular directory entry. Along with this search depth, you
use the search criteria bar to select the attribute objectClass and the filter
Present.
■One Level: Limits your search to all entries beginning one level down from
the root of your search.
■Subtree: Searches entries within the entire subtree, including the root of your
search. This is the default.
10. Set search criteria.
Optionally, select Show LDAP filter, then type a query string directly into the
LDAP Query text field.
Alternatively, use the lists and text fields on the search criteria bar to focus your
search.
a. From the list at the left end of the search criteria bar, select an attribute of the
entry for which you want to search. Because not all attributes are used in
every entry, be sure that the attribute you specify actually corresponds to one
in the entry for which you are looking. Otherwise, the search fails.
b. From the list in the middle of the search criteria bar, select a filter.
c. In the text box at the right end of the search criteria bar, type the value for the
attribute you just selected. For example, if the attribute you selected was cn,
you could type the particular common name you want to find.
d. Click + to add this search criterion to the LDAP Query field.
e. To view the LDAP filter you have selected, select Show LDAP filter.
f. To further refine your search, use the list of conjunctions (AND, OR, NOT
AND, and NOT OR) and the lists and text fields on the search criteria bar to
to add additional search criteria. Click + to add a search criterion to the LDAP
Query field. Click X to delete a search criterion from the LDAP Query field.
11. Click Search. Search results, if any, are displayed below the data tree. If an LDAP
error icon appears, mouse over it to see the error. Search again with different
criteria, if necessary, to correct the error. Click the Search Filter icon to see

Managing Entries by Using Oracle Directory Services Manager
Managing Directory Entries 13-5
information about the search. Chick the Refresh the search result entries icon to
refresh the results. You can delete the search results by clicking the Close search
result icon.
13.2.3 Importing Entries from an LDIF File by Using Oracle Directory Services Manager
You can import entries from an LDIF file, as follows:
1. Invoke Oracle Directory Services Manager and connect to the Oracle Internet
Directory server as described in Section 7.4.5, "Invoking Oracle Directory Services
Manager."
2. Click the Data Browser tab.
3. Click the Import LDIF icon. The Import File dialog appears.
4. Enter the path to the LDIF file you want to import, or click Browse and navigate to
the file, then click Open in the browser window.
5. Click OK in the Import File dialog. The LDIF Import Progress window shows the
progress of the operation. Expand View Import Progress Table to see detailed
progress.
Click Cancel to stop importing entries. Entries already imported are not aborted.
The Data Browser tree refreshes to show the new entries.
13.2.4 Exporting Entries to an LDIF File by Using Oracle Directory Services Manager
You can export entries to an LDIF file, as follows:
1. Invoke Oracle Directory Services Manager and connect to the Oracle Internet
Directory server as described in Section 7.4.5, "Invoking Oracle Directory Services
Manager."
2. Click the Data Browser tab.
3. Navigate to the top level DN of the subtree you want to export.
4. Click the Export LDIF icon. The Export File dialog appears. Select Export
Operational Attributes if you want to export them.
5. Click OK. The Download LDIF File dialog appears. By default, the entries are
exported to a temporary file on the machine where Oracle Directory Services
Manager is deployed. If you want to save a copy of the LDIF file to your
computer, click Click here to open the LDIF file and save the file.
Click OK.
13.2.5 Viewing Attributes for a Specific Entry by Using Oracle Directory Services
Manager
You can view the attributes for a specific entry as follows:
1. Invoke Oracle Directory Services Manager and connect to the Oracle Internet
Directory server as described in Section 7.4.5, "Invoking Oracle Directory Services
Manager."
See Also: Section 8.3.6, "Viewing Active Server Instance Information
by Using opmnctl" on page 8-9For instructions on setting the number
of entries to display in searches, and to set the time limit for searches

Managing Entries by Using Oracle Directory Services Manager
13-6 Oracle Fusion Middleware Administrator's Guide for Oracle Internet Directory
2. Locate the entry by navigating to it in the data tree or by searching for it, as
described in Section 13.2.2, "Searching for Entries by Using Oracle Directory
Services Manager."
3. Click the entry. Attributes for that entry are displayed in the right pane. The
display for the entry has at least the three tabs: Attributes, Subtree Access, and
Local Access. If the entry is a person, the display in the right pane also has an
Person tab, which displays basic user information. If the entry is a group, the
display screen has a Group tab, which displays basic group information.
4. To view the attributes of an entry, click the Attributes tab.
5. You can switch between Managed Attributes and Show All by using the Views
list.
6. To change the list of attributes shown as managed attributes, click the icon under
Optional Attributes. Select attributes you want to move from the All Attributes
list to the Shown Attributes lists and use the Move and Move All arrows to move
the attributes. Select attributes you want to move from the shown Attributes list to
the All Attributes lists and use the Remove and Remove All arrows to move the
attributes. Click Add Attributes to make your changes take effect or click Cancel
to discard your changes. After you click Add Attributes, only the attributes that
were on the Shown Attributes list are shown in the Managed Attributes view.
7. For information on using the Subtree Access and Local Access tabs to view access
control settings, see Section 29.2.4, "Adding or Modifying an ACP by Using the
Data Browser in ODSM."
13.2.6 Adding a New Entry by Using Oracle Directory Services Manager
To add or delete entries with Oracle Directory Services Manager, you must have write
access to the parent entry and you must know the DN to use for the new entry.
To add a group entry, follow the procedure described in Section 14.2, "Managing
Group Entries by Using Oracle Directory Services Manager." For other entry types,
proceed as follows:
1. Invoke Oracle Directory Services Manager and connect to the Oracle Internet
Directory server as described in Section 7.4.5, "Invoking Oracle Directory Services
Manager."
2. From the task selection bar, select Data Browser.
3. On the toolbar, select the Create a new entry icon. Alternatively, right click any
entry and choose Create.
The Create New Entry wizard appears.
4. Specify the object classes for the new entry. Click the Add icon and use the Add
Object Class dialog to select object class entries. Optionally, use the search box to
filter the list of object classes. To add the object class, select it and then click OK.
(All the superclasses from this object class through top are also added.)
Note: When you add or modify an entry, the Oracle directory server
does not verify the syntax of the attribute values in the entry.

Managing Entries by Using Oracle Directory Services Manager
Managing Directory Entries 13-7
5. In the Parent of the entry field, you can specify the full DN of the parent entry of
the entry you are creating. You can also click Browse to locate and select the DN of
the parent for the entry you want to add. If you leave the Parent of the entry field
blank, the entry is created under the root entry.
6. Click Next.
7. Choose an attribute which will be the Relative Distinguished Name value for this
entry and enter a value for that attribute. You must enter values for attributes that
are required for the object class you are using, even if none of them is the RDN
value. For example, for object class inetorgperson, attributes cn (common
name) and sn (surname or last name) are required, even if neither of them is the
Relative Distinguished Name value.
8. Click Next. The next page of the wizard appears. (Alternatively, you can click
Back to return to the previous page.)
9. Click Finish.
10. To manage optional attributes, navigate to the entry you have just created in the
Data Tree
11. If the entry is a person, click the Person tab and use it to manage basic user
attributes. Click Apply to save your changes or Revert to discard them.
If the entry is a group, see Section 14.2, "Managing Group Entries by Using Oracle
Directory Services Manager."
12. If this is a person entry, you can upload a photograph. Click Browse, navigate to
the photograph, then click Open. To update the photograph, click Update and
follow the same procedure. Click the Delete icon to delete the photograph.
13. To manage object classes, as well as attributes that are not specific to a person or
group entry, click the Attributes tab.
14. To add an object class:
a. Click the Attributes tab.
b. Click the Add icon next to objectclass and use the Add Object Class dialog
to select object class entries. Optionally, use the search box to filter the list of
object classes. To add the object class, click it and then click OK.
15. To delete an object class,
a. Click the Attributes tab.
b. Select the object class you want to delete.
c. Click the Delete icon next to objectclass. The Delete Object Class dialog
lists the attributes that will be deleted with that class.
d. Click Delete to proceed.
16. By default, only non-empty attributes are shown. You can switch between
Managed Attributes and Show All by using the Views list.
17. To change the list of attributes shown as managed attributes, click the icon under
Optional Attributes. Select attributes you want to move from the All Attributes
Note: You must assign user entries to the inetOrgPerson object
class in order for the entries to appear in the Oracle Internet Directory
Self-Service Console in Oracle Delegated Administration Services.

Managing Entries by Using Oracle Directory Services Manager
13-8 Oracle Fusion Middleware Administrator's Guide for Oracle Internet Directory
list to the Shown Attributes lists and use the Move and Move All arrows to move
the attributes. Select attributes you want to move from the shown Attributes list to
the All Attributes lists and use the Remove and Remove All arrows to move the
attributes. Click Add Attributes to make your changes take effect or click Cancel
to discard your changes. After you click Add Attributes, only the attributes that
were on the Shown Attributes list are shown in the Managed Attributes view.
18. Specify values for the optional properties. You can also modify the values of the
mandatory properties. For multivalued attributes, you can use the Add and
Delete icons to add and delete multiple values.
19. Click Apply to save your changes or Revert to discard them.
20. For information on using the Subtree Access and Local Access tabs to set access
control, see Section 29.2.4, "Adding or Modifying an ACP by Using the Data
Browser in ODSM."
13.2.7 Deleting an Entry or Subtree by Using Oracle Directory Services Manager
You can delete an entry, including an entire subtree, as follows:
1. Invoke Oracle Directory Services Manager and connect to the Oracle Internet
Directory server as described in Section 7.4.5, "Invoking Oracle Directory Services
Manager."
2. From the task selection bar, select Data Browser.
3. Navigate to the entry you want to delete.
4. To delete only the entry, click the Delete icon. When the Delete dialog appears,
click Yes. If the entry has no subentries, deletion succeeds. If the entry has
subentries, the deletion fails and ODSM displays an error message. Click OK to
dismiss the error message.
To delete an entire subtree, click the icon labelled Delete the selected entry and its
subtree. When the Delete Subtree dialog appears, read the contents of the dialog.
Click Yes to proceed with the deletion or No to abort.
13.2.8 Adding an Entry by Copying an Existing Entry in Oracle Directory Services
Manager
You can use Oracle Directory Services Manager to create a new entry by copying from
an existing entry and changing its DN. When you do this, you should also change the
attributes, such as name and address, so that they correspond with the new DN. To
add an entry, you must have write access to its parent.
To add a group entry, follow the procedure described in Section 14.2, "Managing
Group Entries by Using Oracle Directory Services Manager." For other entry types,
proceed as follows:
1. Invoke Oracle Directory Services Manager and connect to the Oracle Internet
Directory server as described in Section 7.4.5, "Invoking Oracle Directory Services
Manager."
2. From the task selection bar, select Data Browser.
Tip: You can find a template for the new DN by looking up other
similar entries in the search pane.

Managing Entries by Using Oracle Directory Services Manager
Managing Directory Entries 13-9
3. In the data tree, navigate to the entry you want to use as a template. Alternatively,
click Advanced Search, and use it to search for an entry that you want to use as a
template.
4. In the left panel, click the Create a new entry like this one icon. Alternatively,
click the entry you want to use as a template, right click, and choose Create Like.
A New Entry: Create Like wizard appears. The object classes and the DN of the
parent entry are already filled in.
5. To add an object class:
a. Click the Attributes tab.
b. Click the Add icon next to objectclass and use the Add Object Class dialog
to select object class entries. Optionally, use the search box to filter the list of
object classes. To add the object class, click it and then click OK.
6. To delete an object class,
a. Click the Attributes tab.
b. Select the object class you want to delete.
c. Click the Delete icon next to objectclass. The Delete Object Class dialog
lists the attributes that will be deleted with that class.
d. Click Delete to proceed.
7. Specify the DN of the parent entry, either by changing the content in the text box
or by using the Browse button to locate a different DN.
8. Click Next. The next page of the wizard appears.
9. Choose an attribute which will be the Relative Distinguished Name value for this
entry and enter a value for that attribute. You must enter values for attributes that
are required for the object class you are using, even if none of them is the RDN
value. For example, for object class inetorgperson, attributes cn (common
name) and sn (surname or last name) are required, even if neither of them is the
Relative Distinguished Name value.
10. Click Next.
11. Click Finish.
12. To manage optional attributes, navigate to the entry you have just created in the
Data Tree, then proceed to Step 11 in Section 13.2.6, "Adding a New Entry by
Using Oracle Directory Services Manager."
13.2.9 Modifying an Entry by Using Oracle Directory Services Manager
You can add auxiliary object classes to an existing entry.
To modify a group entry, follow the procedure described in Section 14.2, "Managing
Group Entries by Using Oracle Directory Services Manager." For other entry types,
proceed as follows:
1. Invoke Oracle Directory Services Manager and connect to the Oracle Internet
Directory server as described in Section 7.4.5, "Invoking Oracle Directory Services
Manager."
Note: When you add or modify an entry, the Oracle directory server
does not verify the syntax of the attribute values in the entry.

Managing Entries by Using Oracle Directory Services Manager
13-10 Oracle Fusion Middleware Administrator's Guide for Oracle Internet Directory
2. From the task selection bar, select Data Browser.
3. Navigate to an entry in the data tree. Alternatively, perform a search for the entry
you want to modify as described inSection 13.2.2, "Searching for Entries by Using
Oracle Directory Services Manager." In the search result in the left pane, select the
entry you want to modify.
4. To edit the RDN, select the Edit RDN icon above the Data Tree. Alternatively, you
can select the entry in the Data Tree, right click, and select Edit RDN.
Specify the new RDN value. For a multivalued RDN you can use the Delete Old
RDN checkbox to specify whether the old RDN should be deleted. Select OK to
save the change or Cancel to abandon the change.
5. To add an object class:
a. Click the Attributes tab.
b. Click the Add icon next to objectclass and use the Add Object Class dialog
to select object class entries. Optionally, use the search box to filter the list of
object classes. To add the object class, click it and then click OK.
6. To delete an object class,
a. Click the Attributes tab.
b. Select the object class you want to delete.
c. Click the Delete icon next to objectclass. The Delete Object Class dialog
lists the attributes that will be deleted with that class.
d. Click Delete to proceed or Cancel to cancel the deletion.
7. If the entry is a person, click the Person tab and use it to manage basic user
attributes. Click Apply to save your changes or Revert to discard them.
If the entry is a group, see Section 14.2, "Managing Group Entries by Using Oracle
Directory Services Manager."
8. If this is a person entry, you can upload a photograph. Click Browse, navigate to
the photograph, then click Open. To update the photograph, click Update and
follow the same procedure. Click the Delete icon to delete the photograph.
9. To modify the values of attributes that are not specific to a person or group, click
the Attributes tab in the right pane and make the desired changes.
By default, only non-empty attributes are shown. You can switch between
Managed Attributes and Show All by using the Views list.
10. To change the list of attributes shown as managed attributes, click the icon under
Optional Attributes. Select attributes you want to move from the All Attributes
list to the Shown Attributes lists and use the Move and Move All arrows to move
the attributes. Select attributes you want to move from the shown Attributes list to
the All Attributes lists and use the Remove and Remove All arrows to move the
attributes. Click Add Attributes to make your changes take effect or click Cancel
to discard your changes. After you click Add Attributes, only the attributes that
were on the Shown Attributes list are shown in the Managed Attributes view.
11. Specify values for the optional properties. You can also modify the values of the
mandatory properties. For multivalued attributes, you can use the Add and
Delete icons to add and delete multiple values.
12. When you have completed all your changes, click Apply to make them take effect.
Alternatively, click Revert to abandon your changes.

Managing Entries by Using LDAP Command-Line Tools
Managing Directory Entries 13-11
13. You can set an access control point (ACP) on this entry by using the Subtree
Access and Local Access tabs. The procedures are described in Section 29.2.4,
"Adding or Modifying an ACP by Using the Data Browser in ODSM" and
Section 29.2.5, "Setting or Modifying Entry-Level Access by Using the Data
Browser in ODSM."
13.3 Managing Entries by Using LDAP Command-Line Tools
This section contains the following topics:
■Section 13.3.1, "Listing All the Attributes in the Directory by Using ldapsearch"
■Section 13.3.2, "Listing Operational Attributes by Using ldapsearch"
■Section 13.3.3, "Attribute Case in ldapsearch Output"
■Section 13.3.4, "Adding a User Entry by Using ldapadd"
■Section 13.3.5, "Modifying a User Entry by Using ldapmodify"
■Section 13.3.6, "Adding an Attribute Option by Using ldapmodify"
■Section 13.3.7, "Deleting an Attribute Option by Using ldapmodify"
■Section 13.3.8, "Searching for Entries with Attribute Options by Using ldapsearch"
13.3.1 Listing All the Attributes in the Directory by Using ldapsearch
Use the following command line to list of all the attributes, including those that do not
have values:
ldapsearch -p port -h host -D "cn=orcladmin" -q -b "cn=subschemasubentry" \
-s base "objectclass=*"
13.3.2 Listing Operational Attributes by Using ldapsearch
By default, ldapsearch does not return operational attributes. If you add the
character "+" to the list of attributes in the search request, however, ldapsearch
returns all operational attributes.
Searching for an entry with "+" returns only operational attributes. For example:
$ ldapsearch -h adc2190517 -p 3060 -D cn=orcladmin -w welcome -b "c=uk" -L -s base
"(objectclass=*)" +
dn: c=UK
orclguid: 8EB5730F5852DECBE040E80A7452694E
creatorsname: cn=orcladmin
createtimestamp: 20100826065339z
modifytimestamp: 20100826065339z
modifiersname: cn=orcladmin
orclnormdn: c=uk
By comparison, a search with "*" but not "+" returns all user attributes:
$ ldapsearch -h adc2190517 -p 3060 -D cn=orcladmin -w welcome -b "c=uk" -L -s base
"(objectclass=*)"
dn: c=UK
c: uk
objectclass: top
objectclass: country

Managing Entries by Using LDAP Command-Line Tools
13-12 Oracle Fusion Middleware Administrator's Guide for Oracle Internet Directory
13.3.3 Attribute Case in ldapsearch Output
In the output from the ldapsearch command, the attribute names are shown in
lower case if the attribute orclReqattrCasein the instance-specific configuration
entry is 0. If orclReqattrCase is set to 1, the attribute names in the output are
shown in the same case in which they were entered on the command line.
Example:
ldapsearch -h localhost -p 389 -b "dc=oracle,dc=com" -s base -L "objectclass=*" DC
If orclReqattrCase is 0 the output looks like this:
dn: dc=oracle,dc=comdc: oracle
If orclReqattrCase is 1, the output looks like this:
dn: dc=oracle,dc=comDC: oracle
If an attribute is specified more than once on the same command line, the attribute
names in the output will match the case of the first attribute specification.
13.3.4 Adding a User Entry by Using ldapadd
The following example shows how to add an entry for an employee named John.
Use ldapadd as follows:
ldapadd -p port_number -h host -D cn=orcladmin -q -f entry.ldif
where entry.ldif looks like this:
dn: cn=john, c=us
objectclass: top
objectclass: person
objectclass: organizationalPerson
objectclass: inetOrgPerson
cn: john
cn;lang-fr:Jean
cn;lang-en-us:John
sn: Doe
jpegPhoto: /photo/john.jpg
userpassword: password
This file contains the cn, sn, jpegPhoto, and userpassword attributes.
For the cn attribute, it specifies two options: cn;lang-fr, and cn;lang-en-us.
These options return the common name in either French or American English.
For the jpegPhoto attribute, it specifies the path and file name of the corresponding
JPEG image you want to include as an entry attribute.
Notes:
■When you add or modify an entry, the Oracle directory server
does not verify the syntax of the attribute values in the entry.
■Do not insert a tilde (~) in a user name.

Managing Entries by Using LDAP Command-Line Tools
Managing Directory Entries 13-13
13.3.5 Modifying a User Entry by Using ldapmodify
The following example changes the password for a user to a new value. As in the
previous example, the data for this user entry is in the entry.ldif file. This file
contains the following:
dn: cn=audrey,c=us
changetype: modify
replace: userpassword
userpassword: password
Substitute the new password for password in the file.
Issue this command to modify the file:
ldapmodify -p 3060 -D "cn=orcladmin" -q -v -f entry.ldif
where -v specifies verbose mode.
13.3.6 Adding an Attribute Option by Using ldapmodify
The following entry adds the Spanish equivalent of an entry for John. The data for this
user entry is in the entry.ldif file. This file contains the following:
dn: cn=john,c=us
changetype: modify
add: cn;lang-sp
cn;lang-sp: Juan
Issue this command to modify the file:
ldapmodify -D "cn=orcladmin" -q -p 3060 -v -f entry.ldif
13.3.7 Deleting an Attribute Option by Using ldapmodify
The following example deletes the cn;lang-fr attribute option from the entry for
John. As in the previous example, assume that the data for this user entry is in the
entry.ldif file. This file contains the following:
dn: cn=john, c=us
changetype: modify
delete: cn;lang-fr
cn;lang-fr: Jean
Issue this command to modify the file:
ldapmodify -D "cn=orcladmin" -q -p 3060 -v -f entry.ldif
13.3.8 Searching for Entries with Attribute Options by Using ldapsearch
The following example retrieves entries with common name (cn) attributes that have
an option specifying a language code attribute option. This particular example
retrieves entries in which the common names are in French and begin with the letter R.
ldapsearch -D "cn=orcladmin" -q -p 3060 -h myhost -b "c=US" -s sub "cn;lang-fr=R*"
Suppose that, in the entry for John, no value is set for the cn;lang-it language code
attribute option. In this case, the following example fails:
Note: When you add or modify an entry, the Oracle directory server
does not verify the syntax of the attribute values in the entry.

Managing Entries by Using LDAP Command-Line Tools
13-14 Oracle Fusion Middleware Administrator's Guide for Oracle Internet Directory
ldapsearch -D "cn=orcladmin" -q -p 3060 -h myhost -b "c=us" \
-s sub "cn;lang-it=Giovanni"
You can use the -X or -B options to ldapsearch to print binary values.
See Also: Section 3.4.6, "Attribute Options."
See Also: The ldapsearch command reference in Oracle Fusion
Middleware Reference for Oracle Identity Management.

14
Managing Dynamic and Static Groups 14-1
14Managing Dynamic and Static Groups
This chapter explains how to administer both static and dynamic groups in Oracle
Internet Directory. This chapter contains these topics:
■Section 14.1, "Introduction to Managing Dynamic and Static Groups"
■Section 14.2, "Managing Group Entries by Using Oracle Directory Services
Manager"
■Section 14.3, "Managing Group Entries by Using the Command Line"
14.1 Introduction to Managing Dynamic and Static Groups
Oracle Internet Directory enables you to assign and manage membership in two types
of groups—namely, static groups and dynamic groups. Each type of group suited for a
different purpose.
This section contains these topics:
■Section 14.1.1, "Static Groups"
■Section 14.1.2, "Dynamic Groups"
■Section 14.1.3, "Hierarchies"
■Section 14.1.4, "Querying Group Entries"
■Section 14.1.5, "orclMemberOf Attribute"
■Section 14.1.6, "When to Use Each Kind of Group"
Note: If you are creating a hierarchy of groups, be sure that it is a
true hierarchy as described in Section 14.1.3, "Hierarchies."
See Also:
■Section 29.1.1.4, "Security Groups" for instructions on setting
access control policies for group entries
■Section 3.8, "Globalization Support" on page 3-15 and
Chapter 29, "Managing Directory Access Control" for
information about access privileges.

Introduction to Managing Dynamic and Static Groups
14-2 Oracle Fusion Middleware Administrator's Guide for Oracle Internet Directory
14.1.1 Static Groups
A static group is one whose entry contains a list of members that you explicitly
administer.
A static group requires you to explicitly administer its membership. For example, if a
member changes his name, then you must change that user's DN for each group he
belongs to. For this reason, a static group is best suited for a group whose membership
is unlikely to change frequently.
14.1.1.1 Schema Elements for Creating Static Groups
When you create the entry for this kind of group, you associate it with either the
groupOfNames or groupOfUniqueNames object class.
Each of these object classes has a multivalued attribute for storing the names of group
members. To assign a user as a member of a group, you add the DN of each member
to the respective multivalued attribute. Conversely, to remove a member from a
group, you delete the member's DN from the respective attribute. In the
groupOfNames object class, this multivalued attribute is member, and, in the
groupOfUniqueNames object class, it is uniqueMember.
14.1.2 Dynamic Groups
A dynamic group is one whose membership, rather than being maintained in a list, is
computed, based on rules and assertions you specify. Oracle Internet Directory
supports the following methods for dynamically computing the membership of the
group:
■Using orclDynamicGroup object class and labeleduri attribute
■Using orclDynamicGroup object class and CONNECT_BY attributes
■Using orclDynamicList object class and labeleduri attribute (referred as
dynamic list)
Dynamic groups can have static and dynamic members. The static members are listed
as values of the member or uniquemember attribute.
14.1.2.1 Cached and Uncached Dynamic Groups
Dynamic groups can be cached or uncached. By cached, we mean that dynamic group
members are computed and stored when the dynamic group is added, and that the
member list is kept consistent when the dynamic group is later modified. As entries
are added, modified, deleted, and renamed, the member lists of all dynamic groups
are kept consistent. For example, if there is a dynamic group containing all person
entries under "c=us", when we add "cn=user1,c=us", that entry is automatically
added to the member list of the dynamic group. Similarly, when we delete
"cn=user1,c=us", the entry is removed from the dynamic group's member list. This
feature ensures that whenever a search is performed for a dynamic group, the member
list can be fetched from the stored data without any additional computation. The
search performance for cached dynamic groups is almost the same as for static groups.
Cached Dynamic Group
Starting with Oracle Internet Directory 10g (10.1.4.0.1), dynamic groups based on
orclDynamicGroup object class using labeleduri attribute are cached

Introduction to Managing Dynamic and Static Groups
Managing Dynamic and Static Groups 14-3
Uncached Dynamic Group
■Dynamic groups based on orclDynamicGroup object class using CONNECT_BY
attributes are not cached.
■As of Oracle Internet Directory 11g Release 1 (11.1.1.4), a second type of dynamic
group based on labeleduri attribute is available. It is referred to as a dynamic
list, and its members are not cached. You determine whether a dynamic group
based on the labeleduri attribute is cached or uncached by selecting the type of
auxiliary object class your group is associated with, as described in
Section 14.1.2.3, "Schema Elements for Creating a Dynamic Group." If you want a
cached group, associate your group with the auxiliary object class
orclDynamicGroup. If you want an uncached group, associate your group with
the auxiliary object class or orclDynamicList object class.
14.1.2.2 Enhancements to and Limitations of Dynamic Groups in Oracle Internet
Directory
In Oracle Internet Directory 10g (10.1.4.1) and later releases, you can use dynamic
groups in the same ways you use static groups. For example, you can use them in:
Notes:
■You cannot add a dynamic group based on the labeledURI
attribute with scope base. Only scope sub and one are
supported.
■To refresh dynamic group memberships for dynamic groups
using the orclDynamicGroup object class and labeleduri
attribute, set the attribute orclrefreshdgrmems in the DSA
Configuration entry to 1. Oracle Internet Directory recomputes
the member lists for all dynamic groups and resets the value of
orclrefreshdgrmems to 0. If there are many groups, this
operation can take a long time to complete.
■When you query for the groups that a user belongs to, dynamic
groups based on the labeledURI attribute are automatically
included in the result. Dynamic groups based on the CONNECT_
BY assertion and dynamic lists must be explicitly queried. For
example, assume nc=jdoe,cn=users,o=oracle is a member
of three groups: labeleduri dynamic group dgrouplab1,
CONNECT BY dynamic group dgroupcby1, and dynamic list
dlist1. The search
uniquemember=cn=jdoe,cn=users,o=oracle finds only the
cached labeleduri dynamic group dgrouplab1.
See Also:
■"About LDAP Controls" in Oracle Fusion Middleware Reference for
Oracle Identity Management for more information on controls used
by Oracle Internet Directory
■The C API chapter in Oracle Fusion Middleware Application
Developer's Guide for Oracle Identity Management
■Performing Hierarchical Searches in Oracle Fusion Middleware
Application Developer's Guide for Oracle Identity Management

Introduction to Managing Dynamic and Static Groups
14-4 Oracle Fusion Middleware Administrator's Guide for Oracle Internet Directory
■Access control lists, by associating the group with either the orclACPgroup or
the orclPrivilegeGroup object class.
■Hierarchical group resolution queries
Dynamic groups have the following limitations in Oracle Internet Directory:
■Hierarchical queries and queries involving specific attributes of members can only
be done on cached dynamic groups.
■Dynamic groups can only be added using ldapadd or ODSM. They cannot be
added by using bulkload.
■The attributes used in the LDAP filter part of the labeleduri must be indexed.
See Section 20.3.7, "Indexing an Attribute by Using ldapmodify," Section 15.7,
"Creating and Dropping Indexes from Existing Attributes by Using catalog," and
Section 20.1.3.4, "About Indexing Attributes."
■You cannot change the objectclass of a dynamic group after the group has been
created. You must delete the group and re-create it.
■Searches for the uniquemember attribute will not pick up dynamic lists or
CONNECT BY assertion-based dynamic groups.
14.1.2.3 Schema Elements for Creating a Dynamic Group
When you create a dynamic group, you begin as when creating a static group—that is,
you associate its entry with either the groupOfNames or groupOfUniqueNames
object class. You then associate that object class with the auxiliary object class
orclDynamicGroup or orclDynamicList.
The auxiliary object class orclDynamicGroup has various attributes in which you
specify one of two methods for dynamically computing the membership of the group:
using the labeledURI attribute and using a CONNECT BY assertion. The auxiliary
object class orclDynamicList supports only the labeledURI attribute method of
computing membership.
The two methods of computing membership are:
■Using the labeledURI attribute
Both of the auxiliary object classes orclDynamicGroup and orclDynamicList
have the labeledURI attribute. If you associate your group with
orclDynamicGroup and use the labeledURI attribute to compute membership,
the group is cached. If you associate your group with orclDynamicList and use
the labeledURI attribute to compute membership, the group is not cached. This
uncached type, using orclDynamicList objectclass, is referred to as a dynamic
list.
When using the labeledURI method, the directory server performs a typical
search based on the hierarchy of the DIT. It requires you to provide a value for one
of the attributes of the orclDynamicGroup or orclDynamicList object class,
namely labeledURI. In this attribute, you specify the base of the query, the
filters, and any required attributes. For example, suppose that you have entered
the following value for the labeledURI attribute:
labeledURI:ldap://host:port/ou=NewUnit,o=MyCompany,c=US??sub?(objectclass=perso
n)
When you use this method, a search for the entry returns entries for all members
of the group.

Introduction to Managing Dynamic and Static Groups
Managing Dynamic and Static Groups 14-5
Do not set orclConnectByAttribute or orclConnectByStartingValue
when using the labeledURI attribute method.
■Using a CONNECT BY assertion
Unlike the labeledURI attribute method, this method relies not on the hierarchy
of the DIT, but on attributes that implicitly connect entries to each other,
regardless of their location in the DIT. For example, the manager attribute
connects the entries of employees with those of their managers, and this
connection applies regardless of the location of the employee entries in the DIT.
This method uses a CONNECT BY clause in which you specify the attribute to use
for building the hierarchy—for example, manager—and the starting value for
such a hierarchy—for example, cn=Anne
Smith,cn=users,dc=example,dc=com.
More specifically, to use this method, you specify in the orclDynamicGroup
object class a value for each of the single-valued attributes in Table 14–1.
For example, to retrieve the entries of all employees who report to Anne Smith in
the MyOrganizational Unit in the Americas, you would provide values for these
attributes as follows:
orclConnectByAttribute=manager
orclConnectByStartingValue= "cn=Anne
Smith,ou=MyOrganizationalUnit,o=MyCompany,c=US"
Do not set labeledURI when using the CONNECT BY assertion method.
You can also develop an application specifying that you want the values for a
particular attribute—for example, the email attribute—of all the members.
Note: In the labeledURI attribute, the host:port section is present
for syntax purposes alone. Irrespective of the host and port settings in
the labeledURI attribute, the directory server always computes
members of dynamic group from the local directory server. It cannot
retrieve members from other directory servers.
See Also: "The LDAP URL Format" (RFC 2255). T. Howes, M.
Smith, December 1997. This RFC provides more information about
how LDAP URLs are to be represented—as, for example, in the
labeledURI attribute. It is available at http://www.ietf.org.
See Also: Performing Hierarchical Searches in Oracle Fusion
Middleware Application Developer's Guide for Oracle Identity Management
Table 14–1 orclDynamicGroup Attributes for "Connect By" Assertions
Attribute Description
orclConnectByAttribute The attribute that you want to use as the filter for the
query—for example, manager. This attributed must be
indexed.
orclConnectByStartingValue The DN of the attribute you specified in the
orclConnectByAttribute attribute—for example,
cn=Anne Smith,cn=users,dc=example,dc=com

Introduction to Managing Dynamic and Static Groups
14-6 Oracle Fusion Middleware Administrator's Guide for Oracle Internet Directory
The following examples show the two kinds of dynamic group entries.
Example: a Dynamic Group Entry Using the labeledURI Attribute
The following is an example of a dynamic group entry using the labeledURI
attribute.
dn: cn=dgroup1
cn: dgroup1
description: this is an example of a dynamic group
labeleduri:ldap://hostname:7777/ou=oid,l=amer,dc=oracle,
dc=dgrptest??sub?objectclass=person
objectclass: orcldynamicgroup
objectclass: groupOfUniqueNames
objectclass: top
This group will have uniquemember values that are the DNs of all entries associated
with the object class person in the subtree
ou=oid,l=amer,dc=oracle,dc=dgrptest.
Example: a Dynamic List Entry Using the labeledURI Attribute
The following is an example of a dynamic list entry using the labeledURI attribute.
(Dynamic lists are not cached.) It is the same as the previous example, except that the
auxiliary object class is orclDynamicList instead of orclDynamicGroup
dn: cn=dgroup1
cn: dgroup1
description: this is an example of a dynamic group
labeleduri:ldap://hostname:7777/ou=oid,l=amer,dc=oracle,
dc=dgrptest??sub?objectclass=person
objectclass: orcldynamiclist
objectclass: groupOfUniqueNames
objectclass: top
This group will have uniquemember values that are the DNs of all entries associated
with the object class person in the subtree
ou=oid,l=amer,dc=oracle,dc=dgrptest. Searches for the uniquemember
attribute, however, will not pick up dynamic lists
Example: a Dynamic Group Entry Using the CONNECT BY Assertion
The following is an example of a dynamic group entry that uses the CONNECT_BY
assertion.
dn: cn=dgroup2
cn: dgroup2
description: this is connect by manager assertion dynamic group
orclconnectbyattribute: manager
orclconnectbystartingvalue: cn=john doe sr,l=amer,dc=oracle,dc=dgrptest
objectclass: orcldynamicgroup
objectclass: groupOfUniqueNames
objectclass: top
This dynamic group has unique members with values that are DNs of all the entries
whose manager attribute is cn=john doe sr. either indirectly or directly. If several
See Also: Oracle Fusion Middleware Application Developer's Guide
for Oracle Identity Management for more information about how to
develop applications that retrieve values for particular attributes

Introduction to Managing Dynamic and Static Groups
Managing Dynamic and Static Groups 14-7
individuals have cn=john doe JR. as their manager, and he, in turn, has cn=john
doe SR. as his manager, then all the lower-level individuals are returned.
14.1.3 Hierarchies
Hierarchies can be either explicit or implicit.
In explicit hierarchies, the relationship is determined by the location of the entry in the
DIT—for example, Group A may reside higher in the DIT than Group B.
In implicit hierarchies, the relationship between entries is determined not by the
location in the DIT, but by the values of certain attributes. For example, suppose that
you have a DIT in which the entry for John Doe is at the same level of the hierarchy as
Anne Smith. However, suppose that, in the entry for John Doe, the manager attribute
specifies Anne Smith as his manager. In this case, although their locations in the DIT
are at an equal level, their rankings in the hierarchy are unequal because Anne Smith
is specified as John Doe's manager.
14.1.4 Querying Group Entries
An application can query either kind of group to do the following:
■List all members of a group
■List all groups of which a user is a member
■Check to see if a user is a member of a particular group
In addition, you can query dynamic groups, but not static ones, for whatever member
attributes you specify.
14.1.5 orclMemberOf Attribute
orclMemberOf is a mutivalued attribute containing the groups to which the entry
belongs. The groups in orclMemberOf include static groups and labeleduri-based
dynamic groups. CONNECT BY assertion-based dynamic groups and dynamic lists are
not included. The membership includes both direct groups and nested groups.
Note: In a query based on an implicit hierarchy, the client can
specify in the search request the control 2.16.840.1.113894.1.8.3. The
filter in this query specifies the attribute used to build the implicit
hierarchy. For example, (manager=cn=john doe, o=foo)
specifies the query for all people reporting directly or indirectly to
John Doe. The implicit hierarchy is based on the manager attribute.
The base of the search is ignored for such queries.
For more information on controls used by Oracle Internet
Directory, see "About LDAP Controls" in Oracle Fusion Middleware
Reference for Oracle Identity Management.
See Also: The C API chapter in Oracle Fusion Middleware Application
Developer's Guide for Oracle Identity Management
See Also: The GSL_REQDATTR_CONTROL entry under "LDAP
Controls" in Oracle Fusion Middleware Reference for Oracle Identity
Management.

Introduction to Managing Dynamic and Static Groups
14-8 Oracle Fusion Middleware Administrator's Guide for Oracle Internet Directory
For example, suppose Mary is a member of the static group directors and the group
directors is a member of the static group managers. If you do a specific query for
the attribute orclMemberOf on Mary's DN, it will show the value:
managers,directors
The attribute values are computed during search and are not stored. This attribute
cannot be used in search filters. orclMemberOf is not returned in a search unless
explicitly requested by name.
orclMemberOf has the aliases memberof and ismemberof for compatibility with
Active Directory and Oracle Directory Server Enterprise Edition (formerly Sun Java
System Directory Server and SunONE iPlanet).
Examples:
■Search single user:
ldapsearch -h host -p 3060 -D binddn -q -b "cn=jdoe,cn=users,o=oracle" -s base
"(objectclass=*)" orclmemberof
■Search with alias:
ldapsearch -h host -p 3060 -D binddn -q -b "cn=jdoe,cn=users,o=oracle" -s base
"(objectclass=*)" memberof
■Get all attributes and orclmemberof:
ldapsearch -h host -p 3060 -D binddn -q -b "cn=jdoe,cn=users,o=oracle" -s base
"(objectclass=*)" orclmemberof *
■Search multiple users:
ldapsearch -h host -p 3060 -D binddn -q -b "cn=users,o=oracle" -s sub
"(objectclass=person)" orclmemberof
14.1.6 When to Use Each Kind of Group
When deliberating about which kind of group to use, you must weigh the ease of
administration against higher performance. For example, dynamic groups provide for
easier administration, but cause a decrease in performance. Table 14–2 lists some
things to consider when deliberating whether to use static or dynamic groups.
See Also: Chapter 17, "Managing Alias Entries."
Table 14–2 Static and Dynamic Group Considerations
Consideration Static Groups Dynamic Groups
Ease of administration More difficult to administer
if group memberships are
large and change frequently
Easier to use, especially
when group memberships
are large and change
frequently

Managing Group Entries by Using Oracle Directory Services Manager
Managing Dynamic and Static Groups 14-9
14.2 Managing Group Entries by Using Oracle Directory Services
Manager
You can manage static and dynamic group entries by using the Data Browser page in
Oracle Directory Services Manager. You can display group entries, search for groups,
and view groups using the procedures described in Section 13.2, "Managing Entries by
Using Oracle Directory Services Manager." The procedures for creating and modifying
groups are described in this section. This section contains the following topics:
■Section 14.2.1, "Creating Static Group Entries by Using Oracle Directory Services
Manager"
■Section 14.2.2, "Modifying a Static Group Entry by Using Oracle Directory Services
Manager"
■Section 14.2.3, "Creating Dynamic Group Entries by Using Oracle Directory
Services Manager"
■Section 14.2.4, "Modifying a Dynamic Group Entry by Using Oracle Directory
Services Manager"
14.2.1 Creating Static Group Entries by Using Oracle Directory Services Manager
If the static group entry belongs to the groupOfNames object class, then you
determine membership in the group by adding DNs to the multivalued attribute
member. If the entry belongs to the groupOfUniqueNames object class, then you
determine membership in the group by adding DNs to the multivalued attribute
uniqueMember.
To add a static group entry:
1. Invoke Oracle Directory Services Manager and connect to the Oracle Internet
Directory server as described in Section 7.4.5, "Invoking Oracle Directory Services
Manager."
2. From the task selection bar, select Data Browser.
3. On the toolbar, choose the Create a new entry icon. Alternatively, right click any
entry and choose Create.
You can, alternatively, select a group that is similar to the one you want to create,
then choose the Create a new entry like this one icon. Alternatively, right click
any entry and choose Create.
The Create New Entry wizard appears.
Search Performance Higher level of performance
because you explicitly
administer the membership
list
Slightly decreased level of
performance with dynamic
groups using labeleduri,
but almost same when
compared to static groups,
because memberships are
cached. Decrease in
performance with uncached
groups, when compared to
static groups and cached
dynamic groups because
memberships are computed
as needed.
Table 14–2 (Cont.) Static and Dynamic Group Considerations
Consideration Static Groups Dynamic Groups

Managing Group Entries by Using Oracle Directory Services Manager
14-10 Oracle Fusion Middleware Administrator's Guide for Oracle Internet Directory
4. Specify the object classes for the new entry. Click the Add icon and use the Add
Object Class dialog to select either groupOfNames or groupOfUniqueNames.
(All the superclasses from this object class through top are also added.)
Click OK.
5. In the Parent of the entry field, you can specify the full DN of the parent entry of
the entry you are creating. You can also click Browse to locate and select the DN of
the parent for the entry you want to add, then click Select.
If you leave the Parent of the entry field blank, the entry is created under the root
entry.
6. Click Next.
7. Choose an attribute which will be the Relative Distinguished Name value for this
entry and enter a value for that attribute. You must enter a value for the cn
attribute, even if it is not the RDN value.
8. Click Next. The next page of the wizard appears. (Alternatively, you can click
Back to return to the previous page.)
9. Click Finish.
10. To add an owner or member, navigate to the group entry you just created in the
Data Tree.
11. Select the Group tab.
12. To add an owner to the group, click the Add icon next to the Owner box.
13. Enter the owner's DN or click the button to select the entry you want to add as
owner (usually a user or group entry) in the Select Distinguished Name Path
dialog.
Click OK.
14. To add a member to the group, click the Add icon next to the Members text box
15. Enter the member's DN or click the button to select the entry you want to add as a
member (usually a user or group entry) in the Select Distinguished Name Path
dialog.
Click OK.
16. Optionally, enter a description for the entry.
17. Choose Apply to apply your changes or choose Revert to abandon your changes.
18. To make other changes to the group entry, see Section 14.2.2, "Modifying a Static
Group Entry by Using Oracle Directory Services Manager."
14.2.2 Modifying a Static Group Entry by Using Oracle Directory Services Manager
To modify an attribute, such as the member list, for a group entry:
1. Select the group in the data tree.
2. To add or delete an owner or member, select the Group tab or the Attributes tab.
See Also:
■Section 14.1.2, "Dynamic Groups"
■Section 29.1.1.4, "Security Groups"
■Section 3.8, "Globalization Support"

Managing Group Entries by Using Oracle Directory Services Manager
Managing Dynamic and Static Groups 14-11
3. To add a member to the group, click the Add icon next to the Members text box.
4. Select the entry you want to add as a member (usually a user or group entry) in
the Select Distinguished Name Path dialog.
Click OK.
5. To add an owner to the group, click the Add icon next to the Owners text box.
6. Select the entry you want to add as an owner (usually a user or group entry) in the
Select Distinguished Name Path dialog
Click OK.
7. To delete an owner or member, select it in the list and click the Delete icon.
8. To add or modify an attribute other than an owner or member, select the
Attributes tab.
9. By default, only non-empty attributes are shown. You can switch between
Managed Attributes and Show All by using the Views list.
10. To change the list of attributes shown as managed attributes, click the icon under
Optional Attributes. Select attributes you want to move from the All Attributes
list to the Shown Attributes lists and use the Move and Move All arrows to move
the attributes. Select attributes you want to move from the shown Attributes list to
the All Attributes lists and use the Remove and Remove All arrows to move the
attributes. Click Add Attributes to make your changes take effect or click Cancel
to discard your changes. After you click Add Attributes, only the attributes that
were on the Shown Attributes list are shown in the Managed Attributes view.
11. Specify values for the optional properties. You can also modify the values of the
mandatory properties. For multivalued attributes, you can use the Add and
Delete icons to add and delete multiple values.
12. Click Apply to save your changes or Revert to discard them.
13. You can set an access control point (ACP) on this entry by using the Subtree
Access and Local Access tabs. The procedures are described in Section 29.2.4,
"Adding or Modifying an ACP by Using the Data Browser in ODSM" and
Section 29.2.5, "Setting or Modifying Entry-Level Access by Using the Data
Browser in ODSM."
14.2.3 Creating Dynamic Group Entries by Using Oracle Directory Services Manager
Dynamic groups can have static and dynamic members. The static members are listed
as values of the member or uniquemember attribute. If the dynamic group entry
belongs to the groupOfNames object class, then add static members to the group by
adding DNs to the multivalued attribute member. If the dynamic group entry belongs
to the groupOfUniqueNames object class, then add static members to the group by
adding DNs to the multivalued attribute uniqueMember.
For dynamic groups, you must also set attributes to specify how the group
membership is computed. You must choose either the labeledURI or the CONNECT
BY method for dynamically computing membership in the group. You cannot use both
methods. If you are using the labeledURI method, you must set the labeledURI
attribute, but not the orclConnectByAttribute and
orclConnectByStartingValue attributes. If you are using the CONNECT BY
method, you must set the orclConnectByAttribute and
orclConnectByStartingValue attributes, but not the labeledURI attribute.
To add a dynamic group entry:

Managing Group Entries by Using Oracle Directory Services Manager
14-12 Oracle Fusion Middleware Administrator's Guide for Oracle Internet Directory
1. Invoke Oracle Directory Services Manager and connect to the Oracle Internet
Directory server as described in Section 7.4.5, "Invoking Oracle Directory Services
Manager."
2. From the task selection bar, select Data Browser.
3. On the toolbar, choose Create a new entry. The Create New Entry wizard appears.
4. Specify the object classes for the new entry. Select at least the following object class
entries.
■Either groupOfNames or groupOfUniqueNames
■orclDynamicGroup or orclDynamicList
Use orclDynamicGroup for a cached dynamic group based on labeledURI or a
dynamic group based on CONNECT BY. Use orclDynamicList for an uncached
dynamic list based on labeledURI.
Click the Add icon and use the Add Object Class dialog to select object class
entries. Optionally, use the search box to filter the list of object classes. To add the
object class, select it and then click OK. (All the superclasses from this object class
through top are also added.)
5. In the Parent of the entry field, you can specify the full DN of the parent entry of
the entry you are creating. You can also click Browse to locate the DN of the
parent for the entry you want to add, then click Select.
If you leave the Parent of the entry field blank, the entry is created under the root
entry.
6. Click Next.
7. Choose an attribute which will be the Relative Distinguished Name value for this
entry and enter a value for that attribute. You must enter a value for the cn
attribute, even if it is not the RDN value.
8. Click Next. The next page of the wizard appears. (Alternatively, you can click
Back to return to the previous page.)
9. Click Finish.
10. To add an owner or member, navigate to the group entry you just created in the
Data Tree. (You might have to click the Refresh icon to see the new entry).
11. Select the Group tab.
12. To add an owner to the group, click the Add icon next to the Owner box.
13. Select the entry you want to add as owner (usually a user or group entry) in the
Select Distinguished Name Path dialog.
Click OK.
14. To add a member to the group, click the Add icon next to the Members text box
15. Select the entry you want to add as a member (usually a user or group entry) in
the Select Distinguished Name Path dialog.
Click OK.
16. Optionally, enter a description for the entry.
17. Choose Apply to apply your changes or choose Revert to abandon your changes.
18. Select the Attributes tab.

Managing Group Entries by Using Oracle Directory Services Manager
Managing Dynamic and Static Groups 14-13
19. You can switch between Managed Attributes and Show All by using the Views
list.
20. To change the list of attributes shown as managed attributes, click the icon under
Optional Attributes. Select attributes you want to move from the All Attributes
list to the Shown Attributes lists and use the Move and Move All arrows to move
the attributes. Select attributes you want to move from the shown Attributes list to
the All Attributes lists and use the Remove and Remove All arrows to move the
attributes. Click Add Attributes to make your changes take effect or click Cancel
to discard your changes. After you click Add Attributes, only the attributes that
were on the Shown Attributes list are shown in the Managed Attributes view.
21. If you are using the labeledURI method for dynamically computing
membership in the group, you must set the labeledURI attribute, but not the
orclConnectByAttribute and orclConnectByStartingValue attributes.
In the Attributes tab page, in the labeledURI field, specify the following:
ldap:ldap_URL
For example:
ldap://my_host:3000/ou=MyNeworganizationalUnit,
o=MyCompany,c=US??sub?(objectclass=person)
If you are using the CONNECT BY method for dynamically computing
membership in the group, you must set the orclConnectByAttribute and
orclConnectByStartingValue attributes, but not the labeledURI attribute.
In the orclConnectByAttribute field, specify the attribute that you want to
use as the filter for the query—for example, manager. In the
orclConnectByStartingValue field, specify the DN of the attribute you
specified in the orclConnectByAttribute attribute—for example, cn=Anne
Smith.
For information about specifying the other attributes that appear in the Attributes
tab page, see "User and Group Schema Elements" in Oracle Fusion Middleware
Reference for Oracle Identity Management.
22. Click Apply to save your changes or Revert to discard them.
23. You can set an access control point (ACP) on this entry by using the Subtree
Access and Local Access tabs. The procedures are described in Section 29.2.4,
"Adding or Modifying an ACP by Using the Data Browser in ODSM" and
Section 29.2.5, "Setting or Modifying Entry-Level Access by Using the Data
Browser in ODSM."
14.2.4 Modifying a Dynamic Group Entry by Using Oracle Directory Services Manager
Remember that you must choose either the labeledURI or the CONNECT BY method
for dynamically computing membership in the group. You cannot use both methods.
If you are using the labeledURI method, you must set the labeledURI attribute,
but not the orclConnectByAttribute and orclConnectByStartingValue
attributes. If you are using the CONNECT BY method, you must set the
See Also:
■"Dynamic Groups" on page 14-2
■"Security Groups" on page 29-4
■"Globalization Support" on page 3-15

Managing Group Entries by Using the Command Line
14-14 Oracle Fusion Middleware Administrator's Guide for Oracle Internet Directory
orclConnectByAttribute and orclConnectByStartingValue attributes, but
not the labeledURI attribute.
To modify an attribute for a dynamic group entry, proceed as for a static group entry,
as described in Section 14.2.2, "Modifying a Static Group Entry by Using Oracle
Directory Services Manager." You can add static members to a dynamic group, but you
are not required to do so.
14.3 Managing Group Entries by Using the Command Line
You can manage static and dynamic groups from the command line by using LDAP
tools. This section contains the following topics:
■Section 14.3.1, "Creating a Static Group Entry by Using ldapadd"
■Section 14.3.2, "Modifying a Static Group by Using ldapmodify"
■Section 14.3.3, "Creating a Dynamic Group Entry by Using ldapadd"
■Section 14.3.4, "Modifying a Dynamic Group by Using ldapmodify"
14.3.1 Creating a Static Group Entry by Using ldapadd
The syntax for the LDIF file is:
dn: DN_of_group_entry
objectclass: top
objectclass: groupOfNames | groupOfUniqueNames
member: DN of member 1
member: DN of member 2
.
.
.
member: DN of member N
The following command adds the group and members in this LDIF file to the
directory:
ldapadd -p port_number -h host -D cn=orcladmin -q -f file_name.ldif
Example: Creating a Static Group Entry by Using ldapadd The following example
shows an LDIF file named myStaticGroup.ldif for the entry for a group named
MyStaticGroup:
dn: cn=myStaticGroup,c=us
objectclass: top
objectclass: groupOfNames
member: cn=John Doe
member: cn=Anne Smith
The following command adds the group and members in this LDIF file to the
directory:
ldapadd -p 3060 -h myhost -D cn=orcladmin -q -f myStaticGroup.ldif
Notes:
■When you create a group, specifying members is optional and is
shown here for the sake of completeness.
■It is uncommon to have dynamic groups with static membership.

Managing Group Entries by Using the Command Line
Managing Dynamic and Static Groups 14-15
14.3.2 Modifying a Static Group by Using ldapmodify
To add a member to a group, the syntax of the LDIF file is:
dn: DN_of_group_entry
changetype: modify
add: member
member: DN of member entry
To delete a member from a group, the syntax of the LDIF file is:
dn: DN of group entry
changetype: modify
delete:member
member:DN of member entry
Issue this command to modify the file:
ldapmodify -D "cn=orcladmin" -q -p 3060 -v -f file_name.ldif
where -v specifies verbose mode.
Example: Modifying a Static Group by Using ldapmodify The following example
adds John Doe to a group named MyStaticGroup. As in the previous example, the data
for this user entry is in the myStaticGroup.ldif file. This file contains the
following:
dn: cn=myStaticGroup,c=us
changetype: modify
add:member
member: cn=John Doe
Issue this command to modify the file:
ldapmodify -D "cn=orcladmin" -q -p 3060 -v -f myStaticGroup.ldif
where -v specifies verbose mode.
14.3.3 Creating a Dynamic Group Entry by Using ldapadd
You can use ldapadd to create a dynamic group from the command line.
14.3.3.1 Creating a Cached Dynamic Group Using labeledURI Attribute
If you use the labeledURI attribute to create a cached dynamic group, then the
syntax for the LDIF file is:
dn: DN_of_group_entry
objectclass: top
objectclass: groupOfNames | groupOfUniqueNames
objectclass: orcldynamicgroup
labeledURI:ldap:ldap_URL
member: DN of member 1
member: DN of member 2
.
.
Note: When you add or modify an entry, the Oracle directory
server does not verify the existence of the entry. However, if the
attribute value must contain a DN, then the directory server verifies
that the DN is specified.

Managing Group Entries by Using the Command Line
14-16 Oracle Fusion Middleware Administrator's Guide for Oracle Internet Directory
.
member: DN of member N
Use the following command to add the group and members in this LDIF file to the
directory:
ldapadd -p port_number -h host -f file_name.ldif
14.3.3.2 Creating an Uncached Dynamic List Using labeledURI Attribute
If you use the labeledURI attribute to create an uncached dynamic list, then the
syntax for the LDIF file is:
dn: DN_of_group_entry
objectclass: top
objectclass: groupOfNames | groupOfUniqueNames
objectclass: orcldynamiclist
labeledURI:ldap:ldap_URL
member: DN of member 1
member: DN of member 2
.
.
.
member: DN of member N
Use the same command as in the previous example to add the group and members in
this LDIF file to the directory:
ldapadd -p port_number -h host -f file_name.ldif
14.3.3.3 Creating a Dynamic Group Using CONNECT BY String
If you use the CONNECT BY string, then the syntax for the LDIF file is:
dn: DN_of_group_entry
objectclass: top
objectclass: groupOfNames | groupOfUniqueNames
objectclass: orclDynamicGroup
orclConnectByAttribute:attribute_name
orclConnectByStartingValue:DN_of_attribute
member: DN of member 1
member: DN of member 2
.
.
.
member: DN of member N
When specifying entries in this syntax, do not use double quotes around distinguished
names.
The following example shows an LDIF file for the entry for a dynamic group:
dn: cn=myDynamicGroup,c=us
objectclass: top
objectclass: groupOfNames
objectclass: orcldynamicgroup
labeledURI:ldap://my_host:3000/ou=MyNeworganizationalUnit,
o=MyCompany,c=US??sub?(objectclass=person)
member: cn=John Doe
member: cn=Anne Smith

Managing Group Entries by Using the Command Line
Managing Dynamic and Static Groups 14-17
The following command adds this LDIF file to the directory:
ldapadd -p 3060 -h myhost -f myDynamicGroup.ldif
14.3.4 Modifying a Dynamic Group by Using ldapmodify
To change the organizational unit of the group created in the previous example, the
syntax of the LDIF file is:
dn: DN_of_group_entry
changetype: modify
replace:labeledURI
labeledURI:ldap://my_host:3000/
ou=MyNeworganizationalUnit,o=MyCompany,c=US??sub?(objectclass=person)
Note: When you add or modify an entry, the Oracle directory
server does not verify the syntax of the attribute values in the entry.

Managing Group Entries by Using the Command Line
14-18 Oracle Fusion Middleware Administrator's Guide for Oracle Internet Directory

15
Performing Bulk Operations 15-1
15Performing Bulk Operations
This chapter consists of the following sections:
■Section 15.1, "Introduction to Performing Bulk Operations"
■Section 15.2, "Changing Server Mode"
■Section 15.3, "Loading Data Into the Schema by Using bulkload"
■Section 15.4, "Modifying Attributes of a Large Number of Entries By Using
bulkmodify"
■Section 15.5, "Deleting Entries or Attributes of Entries by Using bulkdelete"
■Section 15.6, "Dumping Data from Oracle Internet Directory to a File by Using
ldifwrite"
■Section 15.7, "Creating and Dropping Indexes from Existing Attributes by Using
catalog"
15.1 Introduction to Performing Bulk Operations
For processing large quantities of data, bulk operations are typically more efficient
than standard LDAP operations You can perform bulk operations only by using the
command-line bulk tools.
Before you begin using the Oracle Identity Management command-line tools, you
must configure your environment. This involves setting the appropriate environment
variables.
The syntax and examples provided in this guide require that you have the following
environment variables set:
■ORACLE_HOME - The location of non-writable files in your Oracle Identity
Management installation.
■ORACLE_INSTANCE - The location of writable files in your Oracle Identity
Management installation.
■NLS_LANG (APPROPRIATE_LANGUAGE.AL32UTF8) - The default language set at
installation is AMERICAN_AMERICA.
■WLS_HOME - The location where the WebLogic Server is installed. This
environment variable is required for Oracle Directory Integration Platform
commands but not Oracle Internet Directory commands.
■PATH - The following directory locations should be added to your PATH:
ORACLE_HOME/bin

Introduction to Performing Bulk Operations
15-2 Oracle Fusion Middleware Administrator's Guide for Oracle Internet Directory
ORACLE_HOME/ldap/bin
ORACLE_HOME/ldap/admin
In addition to this chapter, bulk tools are also discussed in the following sections of
this book:
■Section 20.3.9, "Indexing an Attribute by Using the Catalog Management Tool"
■Section 23.1, "Introduction to Logging"
■Section 36.2, "Migrating Data from LDAP-Compliant Directories"
■Chapter 39, "Setting Up Replication"
Notes:
■The bulk tools do not support attribute uniqueness.
■If your schemas were created during installation of a version prior
to 11g Release 1 (11.1.1.6.0), you must add datafiles to the OLTS_
CT_STORE and OLTS_ATTRSTORE tablespaces if you intend to
add more than a million entries to Oracle Internet Directory.
Perform this step prior to the bulkload or ldapadd operation.
For details, see the section "Creating Datafiles and Adding
Datafiles to a Tablespace" in Oracle Database Administrator's Guide.
See Also: The chapter on Oracle Internet Directory administration
tools in Oracle Fusion Middleware Reference for Oracle Identity
Management.
Notes:
■Stop all instances of Oracle Internet Directory before using
bulkload. Before using any of the other bulk tools, either stop all
instances of Oracle Internet Directory or disable the entry cache.
■Do not start Oracle Internet Directory while a bulk tool is
executing.
Tip: The syntax descriptions in this chapter show true or false
arguments in the following format:
check="TRUE"
You can type true or false in uppercase or lowercase, you can
specify just the first letter, and you can omit the double quotes. That
is, the following specifications are equivalent:
check=t
check=true
check="true"
check=T
check=TRUE
check="TRUE"

Loading Data Into the Schema by Using bulkload
Performing Bulk Operations 15-3
15.2 Changing Server Mode
Some bulk tool operations and replication setup procedures require you to switch an
Oracle Internet Directory instance from read/write to read-only mode or from
read-only to read/write mode. You can do so by using either Oracle Enterprise
Manager Fusion Middleware Control or ldapmodify.
While the server is in read-only mode, only the administrator cn=orcladmin can
write to the directory. As a result, you can only make changes to the directory by using
utilities that enable you to connect as cn=orcladmin. These include:
■Oracle Directory Services Manager
■Command line tools
You cannot make changes while the server is in read-only mode by using WLST or
Oracle Enterprise Manager Fusion Middleware Control because they connect to the
Oracle Internet Directory server as the user cn=emd admin, cn=oracle
internet directory.
15.2.1 Setting the Server Mode by Using Fusion Middleware Control
To set the server mode to read-only from Fusion Middleware Control:
1. Select Administration, then Server Properties from the Oracle Internet Directory
menu.
2. Select General.
3. Choose Read-only for Server Mode.
4. Click Apply.
To set the server mode to read/write mode from Fusion Middleware Control, use the
same procedure but choose Read/Write in Step 3.
15.2.2 Setting the Server Mode by Using ldapmodify
To set the server mode to Read-Only by using ldapmodify, run the following
command:
ldapmodify -D "cn=orcladmin" -q -h host_name \
-p port -f change_mode.ldif
where the file change_mode.ldif has the following content:
dn: cn=componentname,cn=osdldapd,cn=subconfigsubentry
changetype: modify
replace: orclservermode
orclservermode: r
To set the server mode to Read/Write by using ldapmodify, use the same command
but change the last line in the LDIF file to:
orclservermode: rw
15.3 Loading Data Into the Schema by Using bulkload
The bulk loader, bulkload, is a bulk management tool. It takes input data in LDIF or
SQL*Loader format and loads the data directly into Oracle Internet Directory's schema
in the metadata repository. It has three main phases: check, generate and load.

Loading Data Into the Schema by Using bulkload
15-4 Oracle Fusion Middleware Administrator's Guide for Oracle Internet Directory
In the check phase, bulkload parses and verifies the LDIF input data for the
schema.
In the generate phase, bulkload generates intermediate files in SQL*Loader
format.
In the load phase, bulkload can use either of two methods: bulk mode loading or
incremental mode loading.
■When using bulk mode loading, bulkload loads generated intermediate files into
the database. As it does so, it drops old indexes and generates new ones.
■When using incremental mode loading, bulkload loads intermediate files to
tables in the database using insert mode. While it loads the data, bulkload updates
the indexes.
Bulk mode loading is faster than incremental mode loading.
The bulk loader also supports the following features:
■It enables you to specify the number of threads in order to achieve parallelism
during the generate and load phases.
■It has an encode option that enables you to use data in other languages.
■It has a restore option that enables you to retain the operational attributes
specified in the LDIF file.
■It has an index option for index recreation and a missing option for creation of
missing indexes.
■It has a recover option that is useful for recovering from bulkload failures.
■When appending the data to existing directories, bulkload supports both bulk
mode and incremental mode loading.
■The append option enables you to load data while the LDAP server is up and
running.
At the beginning of the generate phase, the server's orclServerMode, in the
instance-specific configuration entry, is changed from read/write to read-modify.
At the end of the generate phase, it is left in the read-modify state so that you
cannot add entries to Oracle Internet Directory between the generate and load
phases. This is necessary to maintain internal sequence numbers. You are expeced to
run the load phase immediately after the generate phase. At the end of the load
phase, the servers' orclServerMode is set back to read/write. Using bulkload
with the recover option also sets orclServerMode back to read/write.
At the start of the load operation, bulkload determines the current configured value
of orclRIenabled, then disables referential integrity. At the end of load phase,
bulkload returns orclRIenabled to its original value. If is any referential integrity
violations occurred, however, referential integrity is disabled, and you see the
message:
There is a violation of Referential Integrity and hence it is Disabled now. Run
the OIDDIAG tool with diagnostic option to collect the Entries which have dangling
DN attribute values and Fix the violation
Fix the violation and then set orclRIenabled to the desired value.
The bulkload tool generates the following output files in the ORACLE_
INSTANCE/diagnostics/logs/OID/tools directory:
■An output log, bulkload.log
■A list of duplicate DNs, duplicateDN.log

Loading Data Into the Schema by Using bulkload
Performing Bulk Operations 15-5
■Intermediate files, *.ctl and *.dat
The bulkload tool generates the following output files in the ORACLE_
INSTANCE/OID/load directory:
■A list of bad LDIF entries, badentry.ldif
■A list of all dynamic group entries that can be added using ldapadd,
dynGrp.ldif
■Intermediate log files generated by the SQL*Loader, bsl_*.log
The bulkload tool has the following syntax:
bulkload [connect=connect_string]
{[check="TRUE"|"FALSE" [file=ldif_file]] [generate="TRUE"|"FALSE"
[append="TRUE"|"FALSE"] [restore="TRUE"|"FALSE"] [thread=num_of_threads]
file=ldif_file] [load="TRUE"|"FALSE" [append="TRUE"|"FALSE"]
[threads=num_of_threads]] [index="TRUE"|"FALSE"] [missing="TRUE"|"FALSE"]
[recover="TRUE"|"FALSE"]} [encode=character_set] [debug="TRUE"|"FALSE"]
[verbose="TRUE"|"FALSE"]
Some of the parameter combinations are valid while others are invalid.
You must set the environment variable ORACLE_INSTANCE. Specify the fully qualified
path to the Oracle Instance where the intermediate file is generated.
You must specify at least one of the following actions when you invoke bulkload:
check, generate, load, append, recover, or index.
If check is TRUE, bulkload performs a schema check.
If generate is TRUE, bulkload generates intermediate files.
When using the check or generate action, you must specify the path name to the
LDIF data file.
Notes:
■If a directory server instance is participating in a replication
agreement, do not use the bulkload tool to add data into the
node. Instead, use ldapadd.
■Before using bulkload, ensure that the environment variable
ORACLE_INSTANCE has been set to the full path name of the
Oracle instance.
■Running the bulkload load operation sets the server mode to
read/write. If you require a different mode, reset it after
performing the load operation.
■If the applicable password policy has the pwdmustchange
attribute set to 1, then for every new entry loaded by bulkload,
the pwdreset attribute is set to 1 by default. See Chapter 28,
"Managing Password Policies" for more information.
■If you do not use the bulkload utility to populate the directory,
then you must run the oidstats.sql tool to avoid significant
search performance degradation.
See Also: The oidstats.sql command-line tool reference in
Oracle Fusion Middleware Reference for Oracle Identity Management for
a description and syntax for the oidstats.sql tool

Loading Data Into the Schema by Using bulkload
15-6 Oracle Fusion Middleware Administrator's Guide for Oracle Internet Directory
If load is TRUE, bulkload loads intermediate files.
When append is TRUE, bulkload can perform its actions while the server is up and
running.
Use the restore flag only when the LDIF file contains operational attributes, such as
orclguid or creatorsname. Avoid having operational attributes in the LDIF file
when the restore flag is not specified or is set to FALSE.
Do not specify recover with any other option.
The option combination check index verifies the existing indexes.
15.3.1 Importing an LDIF File by Using bulkload
To import an LDIF file, you use the bulkload utility. This section discusses the tasks
to process an LDIF file through bulkload.
This section contains these topics:
■Task 1: Stopping Oracle Internet Directory Processes
■Task 2: Backing Up the Oracle Database Server
■Task 3: Finding Out the Oracle Internet Directory Password
■Task 4: Checking Input for Schema and Data Consistency Violations and
Generating the Input Files for SQL*Loader
■Task 5: Loading the Input Files
Task 1: Stopping Oracle Internet Directory Processes
Stop all Oracle Internet Directory server instances by using either Fusion Middleware
Control or the command line.
Task 2: Backing Up the Oracle Database Server
Before you import the file, back up the Oracle database server as a safety precaution.
Task 3: Finding Out the Oracle Internet Directory Password
To use bulkload, you must provide the Oracle Internet Directory ODS schema
password.
Task 4: Checking Input for Schema and Data Consistency Violations and
Generating the Input Files for SQL*Loader
On UNIX, the bulkload tool usually resides in $ORACLE_HOME/ldap/bin. On
Microsoft Windows, this tool usually resides in ORACLE_HOME\ldap\bin.
Check the input file and generate files for the SQL*Loader by typing:
See Also: The bulkload command-line tool reference in Oracle
Fusion Middleware Reference for Oracle Identity Management.
See Also: Chapter 8, "Managing Oracle Internet Directory Instances"
See Also: Oracle Database Backup and Recovery Basics in the Oracle
Database Documentation Library
See Also: The oidpasswd command-line tool reference in Oracle
Fusion Middleware Reference for Oracle Identity Management

Loading Data Into the Schema by Using bulkload
Performing Bulk Operations 15-7
bulkload connect="connect_string" \
check="TRUE" generate="TRUE" file="full_path_to_ldif-file_name"
When you specify both the check and generate options, the entries are checked for
schema compliance.
All check-related errors are reported as command line output. All schema violations
are reported in ORACLE_
INSTANCE/diagnostics/logs/OID/tools/bulkload.log. All bad entries are
logged in ORACLE_INSTANCE/OID/load/badentry.ldif.
If there are duplicate entries, their DNs are logged in ORACLE_
INSTANCE/diagnostics/logs/OID/tools/duplicateDN.log. This is just for
information purpose. The bulkload tool does not generate duplicate data for
duplicate entries. It ignores duplicate entries.
Use a text editor to fix all bad entries, then re-run bulkload with the check and
generate options. Repeat until there are no errors, or until the remaining errors are
acceptable to you. For example, you might be willing to load a small number of entries
with ldapadd.
The bulkload tool generates intermediate *.ctl and *.dat files in the ORACLE_
INSTANCE/OID/load directory. Even when errors occur, bulkload generates the
intermediate files for those entries that had no check errors.
When bulkload completes successfully or with acceptable errors, you can use the
intermediate files with the SQL*Loader in load mode. Do not modify these files.
Task 5: Loading the Input Files
After you have generated the input files, run bulkload with the load option. During
this step, bulkload loads the *.dat files, which are in Oracle SQL*Loader specific
format, into the database, creates attribute indexes, and generates database statistics.
The syntax is:
bulkload connect="connect_string" load="TRUE"
The tool will indicate any errors on the screen. All loading errors are reported in the
ORACLE_INSTANCE/diagnostics/logs/OID/tools directory. They reside in
bulkload.log and in the SQL*Loader-generated files *.bad and bsl_*.log.If
load fails, the database might be in an inconsistent state. Restore the database to its
state prior to the bulkload operation, either by using bulkload with the recover
option or by restoring Oracle Internet Directory directory from a backup taken before
you invoked bulkload. Then repeat the command:
bulkload connect="connect_string" load="TRUE"
If you encounter an error during the indexing phase, you can use:
bulkload coonect="con_str" index=true
to re-create all indexes.
Note: Always use the check and generate options together if you
plan to ignore check-related errors. If you use the generate option
without the check option, none of the validation checks are
performed. In that case, the intermediate files will contain erroneous
entries. Loading such files can lead to data inconsistency and index
creation failures.

Modifying Attributes of a Large Number of Entries By Using bulkmodify
15-8 Oracle Fusion Middleware Administrator's Guide for Oracle Internet Directory
If you encounter an error during database statistics generation, you can use the
oidstats.sql command to generate statistics.
15.3.2 Loading Data in Incremental or Append Mode By Using bulkload
If you must add entries to an Oracle Internet Directory server that already contains
data, and the server must be up and running at the same time, then you must use the
incremental or append mode. This mode is usually faster than other methods of
adding entries to the directory. However, you must ensure that the Oracle Internet
Directory LDAP instances are in read-modify mode so that bulkload can append data.
You invoke bulkload in incremental or append mode with command lines similar to
these:
bulkload connect="conn_str" \
check="TRUE" generate="TRUE" append="TRUE" file="LDIF_file"
bulkload connect="conn_str" \
load="TRUE" append="TRUE"
15.3.3 Performing Index Verification By Using bulkload
The bulkload operation can either update indexes or create indexes. Sometimes,
however, bulkload does not update or create the indexes properly. This is typically
due to issues like improper sizing. If this happens, you can use bulkload to verify
and re-create all the indexes.
Use the following syntax to invoke bulkload for verification of indexes:
bulkload connect="conn_str" \
check="TRUE" index="TRUE"
15.3.4 Re-Creating Indexes By Using bulkload
To re-create indexes, use the following syntax:
bulkload connect="conn_str" index="TRUE"
15.3.5 Recovering Data After a Load Failure By Using bulkload
The load phase of bulkload can fail because of issues like improper disk sizing. After
such a failure, the directory data might be inconsistent. You can use the recover
option to return the directory data to its pre-bulkload state. The syntax is:
bulkload connect="conn_str" recover="TRUE"
15.4 Modifying Attributes of a Large Number of Entries By Using
bulkmodify
The bulkmodify tool is useful for modifying the attributes of a large number of
entries in an existing directory. It can perform add and replace operations on attribute
values. It can operate on a naming context. Using filters, it can also operate selectively
on a few entries under a specified naming context.
The bulkmodify tool does not allow add or replace operations on the following
attributes:
■dn
See Also: The "oidstats.sql" command reference in Oracle Fusion
Middleware Reference for Oracle Identity Management

Modifying Attributes of a Large Number of Entries By Using bulkmodify
Performing Bulk Operations 15-9
■cn
■userpassword
■orclpassword
■orclentrylevelaci
■orclaci
■orclcertificatehash
■orclcertificatematch
■any binary attribute
It does not allow replace operation on the attribute objectclass.
It does not allow add for single-valued attributes.Output from bulkmodify is logged
in ORACLE_INSTANCE/diagnostics/logs/OID/tools/bulkmodify.log.
bulkmodify has the following syntax.
bulkmodify connect=connect_string basedn=Base_DN
{[add="TRUE"|"FALSE"]|[replace="TRUE"|"FALSE"]} attribute=attribute_name
value=attribute_value [filter=filter_string] [size=transaction_size]
[threads=num_of_threads] [debug="TRUE"|"FALSE"] [encode=character_set]
[verbose="TRUE"|"FALSE"]
The number of threads should be from one to six times the number of processors.
Select either the add or the replace option. By default both are set to FALSE.
15.4.1 Adding a Description for All Entries Under a Specified Naming Context
This example adds descriptions for all the entries under "c=us".
bulkmodify connect="connect_str" baseDN="c=us" add="TRUE" \
attribute="description" value="US citizen" filter="objectclass=*"
15.4.2 Adding an Attribute for Entries Under a Specified Naming Context Matching a
Filter
This example adds telephonenumber for all the entries under "c=us" that have the
manager Anne Smith.
bulkmodify connect="connect_str" baseDN="c=us" add="TRUE" \
attribute="telephoneNumber" \
value="408-123-4567" filter="manager=cn=Anne Smith"
15.4.3 Replacing an Attribute for All Entries Under a Specified Naming Context
This example replaces pwdreset for all the entries under "c=us".
See Also: The bulkmodify command-line tool reference inOracle
Fusion Middleware Reference for Oracle Identity Management
Note: Before using bulkmodify, ensure that the environment
variable ORACLE_INSTANCE has been set to the full path name of the
Oracle instance.

Deleting Entries or Attributes of Entries by Using bulkdelete
15-10 Oracle Fusion Middleware Administrator's Guide for Oracle Internet Directory
bulkmodify connect="connect_str" baseDN="c=us" replace="TRUE" \
attribute="pwdreset" value="1" filter="objectclass=*"
15.5 Deleting Entries or Attributes of Entries by Using bulkdelete
bulkdelete is useful for deleting the attributes of a large number of entries in an
existing directory. bulkdelete can delete entries specified under a naming context. By
default, it deletes entries completely. It removes all traces of an entry from the
database. If you use the option cleandb FALSE, bulkdelete turns all entries into
tombstone entries instead of deleting them completely.
Bulkdelete output is logged in ORACLE_
INSTANCE/diagnostics/logs/OID/tools/bulkdelete.log.
The bulkdelete tool has the following syntax.
bulkdelete connect=connect_string {[basedn=Base_DN] | [file=file_name]}
[cleandb="TRUE"|"FALSE"] [size=transaction_size] [encode=character_set]
[debug="TRUE"|"FALSE"] [threads=num_of_threads] [verbose="TRUE"|"FALSE"]
Select either the basedn or the file option. If cleandb is TRUE, bulkdelete
removes entries completely from the database. By default cleandb is set to TRUE. The
number of threads should be from one to six times the number of CPUs.
15.5.1 Deleting All Entries Under a Specified Naming Context by Using bulkdelete
This example deletes all the entries under "c=us".
bulkdelete connect="connect_str" baseDN="c=us" cleandb="TRUE"
15.5.2 Deleting Entries Under Naming Contexts and Making them Tombstone Entries
This example deletes all the entries under "c=us" and leaves them as tombstone
entries.
bulkdelete connect="connect_str" baseDN="c=us" cleandb=FALSE
This example deletes all the entries under given base DNs specified in file and leaves
them as tombstone entries.
bulkdelete connect="connect_str" file="file" cleandb=FALSE
See Also: The bulkdelete command-line tool reference in Oracle
Fusion Middleware Reference for Oracle Identity Management
Notes:
■Before using bulkdelete, ensure that the environment variable
ORACLE_INSTANCE has been set to the full path name of the
Oracle instance.
■If the number of entries to be deleted in the specified naming
context is large, you must tune the Oracle Database as specified in
the Oracle Internet Directory chapter of Oracle Fusion Middleware
Performance and Tuning Guide.

Dumping Data from Oracle Internet Directory to a File by Using ldifwrite
Performing Bulk Operations 15-11
15.6 Dumping Data from Oracle Internet Directory to a File by Using ldifwrite
The ldifwrite tool is used to dump of data from an Oracle Internet Directory
store to a file. Having the data in a file facilitates loading the data into another node for
replication or backup storage. As it writes to the output file, the ldifwrite tool
performs a subtree search, including all entries below the specified DN, and the DN
itself. It dumps data in LDIF format. It can also dump entries under a specified
replication agreement DN.
The ldifwrite tool can dump entries located by using specified filters.Output from
ldifwrite is logged in ORACLE_
INSTANCE/diagnostics/logs/OID/tools/ldifwrite.log.
The ldifwrite tool has the following syntax.
ldifwrite connect=connect_string basedn=Base_DN ldiffile=LDIF_Filename
[filter=LDAP_Filter] [threads=num_of_threads] [debug="TRUE"|"FALSE"]
[encode=character_set] [verbose="TRUE"|"FALSE"]
Use the basedn option to specify the base DN or replication agreement DN.
The number of threads should be from one to six times the number of CPUs.
15.6.1 Dumping Part of a Specified Naming Context to an LDIF File
This example uses the following naming context objects defined in partial replication:
dn: cn=includednamingcontext000001, cn=replication namecontext,
orclagreementid=000001, orclreplicaid=node replica identifier,
cn=replication configuration
orclincludednamingcontexts: c=us
orclexcludednamingcontexts: ou=Americas, c=us
orclexcludedattributes: userpassword
objectclass: top
objectclass: orclreplnamectxconfig
In this example, all entries under "c=us" are backed up except "ou=Americas,c=us".
The userpassword attribute is also excluded. The command is:
ldifwrite connect="conn_str" \
baseDN="cn=includednamingcontext000001, cn=replication namecontext, \
orclagreementid=000001,orclreplicaid=node replica identifier,\
cn=replication configuration" ldiffile="ldif_file_name"
15.6.2 Dumping Entries Under a Specified Naming Context to an LDIF File
This example writes all the entries that satisfy LDAP search filter criteria under
"ou=Europe, o=imc, c=us" into the output.ldif file.
ldifwrite connect="connect_str" baseDN="ou=Europe, o=imc, c=us"\
filter="uid=abc" ldiffile="output.ldif"
See Also: The ldifwrite command-line tool reference in Oracle
Fusion Middleware Reference for Oracle Identity Management
Note: Before using ldifwrite, ensure that the environment
variable ORACLE_INSTANCE has been set to the full path name of the
Oracle instance.

Creating and Dropping Indexes from Existing Attributes by Using catalog
15-12 Oracle Fusion Middleware Administrator's Guide for Oracle Internet Directory
15.7 Creating and Dropping Indexes from Existing Attributes by Using
catalog
As of Oracle Internet Directory 11g Release 1 (11.1.1.6.0) a new autocatalog feature is
enabled by default in fresh installs. You can also enable it if you have upgraded from a
previous release. When this feature is enabled, Oracle Internet Directory automatically
invokes the catalog command to index attributes when you search for them. If the
autocatalog feature is not enabled, and you want to use previously uncataloged
attributes in search filters, you must add them to the catalog entry, as in previous
releases.
You can now use ldapmodify to create and drop indexes. See Section 20.3.7,
"Indexing an Attribute by Using ldapmodify." The ldapmodify command invokes
catalog to perform the operation. You can still use catalog for this purpose.
The catalog tool is useful for creating indexes for or dropping indexes from existing
attributes. The catalog tool makes an attribute searchable. Output from catalog is
logged in ORACLE_INSTANCE/diagnostics/logs/OID/tools/catalog.log.
catalog has the following syntax.
catalog connect=connect_string {[add="TRUE"|"FALSE"]|[delete="TRUE"|"FALSE"]}
{[attribute=attribute_name]|[file=file_name]} [logging="TRUE"|"FALSE"]
[threads=num_of_threads] [debug="TRUE"|"FALSE"] [verbose="TRUE"|"FALSE"]
Select either the add or the delete option. By default both are set to FALSE.
The number of threads should be from one to six times the number of CPUs.
If logging is TRUE, catalog generates a redo log.
You can specify only one attribute argument on the command line at a time. To
add or delete more than one attribute in a single command invocation, use the file
option and specify a list of attributes in the file. Use one line for each attribute, for
example:
description
sn
title
Notes:
■As of Oracle Internet Directory 11g Release 1 (11.1.1.6.0), you can
use the LDAP tool ldapmodify to create and drop indexes from
attributes. See Section 20.3.7, "Indexing an Attribute by Using
ldapmodify." The ldapmodify tool actually invokes catalog,
and you can still use catalog for this purpose.
■Before using catalog, ensure that the environment variable
ORACLE_INSTANCE has been set to the full path name of the
Oracle instance.
■The catalog command cannot index more than 1000 attributes at
a time. If more than 1000 attributes are present in the file, the tool
throws an error. If you need to index more than 1000 attributes,
use multiple files.

Creating and Dropping Indexes from Existing Attributes by Using catalog
Performing Bulk Operations 15-13
15.7.1 Changing a Searchable Attribute into a Non-searchable Attribute
This example drops an index from the attribute title.
catalog connect="connect_str" delete="TRUE" attribute="title"
15.7.2 Changing a Non-searchable Attribute into a Searchable Attribute
This example adds an index to the attribute title.
catalog connect="connect_str" add="TRUE" attribute="title"
Note: Unless you are absolutely sure that the indexes were not
created by the base schema that was installed with Oracle Internet
Directory, be careful not to use the catalog delete=T option to
remove indexes from attributes. Removing indexes from base
schema attributes can adversely impact the operation of Oracle
Internet Directory.
See Also:
■Section 20.3.9, "Indexing an Attribute by Using the Catalog
Management Tool"
■Section 20.2.11, "Adding an Index to a New Attribute by Using
Oracle Directory Services Manager"
■Section 20.2.12, "Adding an Index to an Existing Attribute by
Using Oracle Directory Services Manager"
■Section 21.5, "Configuring Specific Attributes for Referential
Integrity by Using the Command Line"

Creating and Dropping Indexes from Existing Attributes by Using catalog
15-14 Oracle Fusion Middleware Administrator's Guide for Oracle Internet Directory

16
Managing Collective Attributes 16-1
16Managing Collective Attributes
This chapter describes collective attributes in Oracle Internet Directory and explains
how to manage them.
This chapter contains the following topics:
■Section 16.1, "Introduction to Collective Attributes"
■Section 16.2, "Managing Collective Attributes by Using the Command Line"
16.1 Introduction to Collective Attributes
Attributes shared by the entries comprising an entry collection are called collective
attributes. Values of collective attributes are visible but not updatable to clients
accessing entries within the collection. As administrator, you manage collective
attributes by defining and modifying the associated collective attributes sub entry.
16.1.1 The RFC Definition and Oracle Extensions
RFC 3671 describes a specific schema for collective attributes. If you want to, you can
define and use the collective attribute schema exactly as described in the RFC. Oracle
Internet Directory, however, extends the definition of collective attributes to make
them easier to use.
16.1.1.1 RFC 3671
According to RFC 3671, you must define each collective attribute schema before you
can use it in the collective subentry. For example, if you want to use the telephone
number attribute as a collective attribute, then you define the schema for the
c-telephoneNumber in the directory like this:
( 2.5.4.20.1 NAME 'c-TelephoneNumber' SUP telephoneNumber
COLLECTIVE )
In addition, the collective attribute must be multivalued.
16.1.1.2 Oracle Extensions
Oracle extends the usage as follows:
■You do not need a schema definition for a collective attribute. You can use any
attribute as a collective attribute.
See Also : RFC 3671 "Collective Attributes in the Lightweight
Directory Access Protocol (LDAP)" and RFC 3672 "Subentries in the
Lightweight Directory Access Protocol (LDAP)" at
http://www.ietf.org for more information.

Introduction to Collective Attributes
16-2 Oracle Fusion Middleware Administrator's Guide for Oracle Internet Directory
■To make an attribute a collective attribute, create it in the collective subentry with
the subtype collective.
■A collective attribute can be either multivalued or single valued.
The rest of this chapter describes Oracle Internet Directory usage.
16.1.2 Defining the Collective Attribute Subentry
You create a collective attribute by defining a subentry. The following example defines
a collective subentry for the entries under dc=mycompany,dc=com. This subentry
causes TelephoneNumber and postalCode to be included as collective attributes in
all the entries under dc=mycompany,dc=com:
Dn: cn=collective attributes, dc=mycompany,dc=com
Cn: collective attributes
Objectclass: subentry
Objectclass: collectiveAttributeSubentry
Objectclass: top
Objectclass: extensibleobject
TelephoneNumber;collective: 1234560000
PostalCode;collective: 98765
16.1.3 Using subtreeSpecification
You can control which specific entries actually get collective attributes. You do this by
using the subtreeSpecification attribute in the collective subentry. If no
subtreeSpecification attribute is specified in the collective subentry then the
collective attributes are included in all the child entries where the collective subentry is
defined.
The next three sections provide examples of how to use the subtreeSpecification
attribute.
16.1.3.1 Base
You use the base keyword in the subtreeSpecification to limit a collective
attribute to a subtree.
For example, to restrict collective attributes only to the subtree
cn=users,dc=mycompany,dc=com, you can use the subentry previously shown for
dc=mycompany,dc=com, but add a base value to the subtreeSpecification
attribute in the collective subentry like this:
SubtreeSpecification: {base "cn=users"}
16.1.3.2 Minimum and Maximum
You use the minimum and maximum keywords in the subtreeSpecification
attribute to control the number of RDNs from the base where collective attributes
apply.
For example, if you want collective attributes to be added to the entries under
ou=Americas,cn=users,dc=mycompany,dc=com but not to one level child
See Also : RFC 3672 "Subentries in the Lightweight Directory Access
Protocol (LDAP)" at http://www.ietf.org for more details about
the subtreeSpecification attribute.

Introduction to Collective Attributes
Managing Collective Attributes 16-3
entries of cn=users,dc=mycompany,dc=com, or two levels down from cn=users,
dc=mycompany,dc=com, then define the subtreeSpecification as follows:
SubtreeSpecification: {base "cn=users", minimum 2, maximum 4}
In this configuration, cn=john doe,
ou=Americas,cn=users,dc=mycompany,dc=com gets the collective attributes,
but cn=inbox,cn=2009,cn=emailFolder,cn=john doe,
ou=Americas,cn=users,dc=mycompany,dc=com does not get the collective
attributes because it is more than four levels from the base cn=users.
16.1.3.3 Specific Exclusions
You can further exclude collective attributes from specific entries by using the
specificExclusions, chopBefore, and chopAfter keywords. For example, if
you do not want to add collective attributes to ou=Europe, define the
subtreeSpecification as follows:
SubtreeSpecification: {base "cn=users", minimum 2, maximum 4, specificExclusions {
chopBefore: "ou=Europe"} }
If you want the collective attributes to be included in a parent DN but not its child
entries, define the specification filter like this:
SubtreeSpecification: {base "cn=users", minimum 2, maximum 4, specificExclusions {
chopBefore: "ou=Europe", chopAfter: "cn=Global User" } }
In this example, the entry cn=Global User,ou=all
region,cn=users,dc=mycompany,dc=com gets the collective attributes, but the
entry cn=emailFolder, cn=GlobalUser,ou=all
region,cn=users,dc=mycompany,dc=com does not get the collective attributes.
If you want collective attributes to be included for a certain object class only, then
specify the Object Identifier or name of the object class in the
specificationFilter for the subtreeSpecicfication attribute. For example,
to include the collective attributes to the objectclass person only, define the
specification filter like this:
SubtreeSpecification: {base "cn=users", minimum 2, maximum 4, specificExclusions {
chopBefore: "ou=Europe", chopAfter: "cn=GlobalUser"}, specificationFilter
item:person }
Alternatively, you could use:
SubtreeSpecification: {base "cn=users", minimum 2, maximum 4, specificExclusions {
chopBefore: "ou=Europe", chopAfter: "cn=GlobalUser"}, specificationFilter
item:2.5.6.6 }
where 2.5.6.6 is the Object Identifier for objectclass person.
Examples of SpecificationFilter
You can use the keywords and, or, and not to further refine your
subtreeSpecicfication, as follows:
SubtreeSpecification: {base "cn=users", minimum 2, maximum 4, specificExclusions {
chopBefore: "ou=Europe", chopAfter: "cn=GlobalUser"}, specificationFilter and:{
item:2.5.6.6, item:2.5.6.7} }
SubtreeSpecification: {base "cn=users", minimum 2, maximum 4, specificExclusions {
chopBefore: "ou=Europe", chopAfter: "cn=GlobalUser"}, specificationFilter or:{
item:2.5.6.6, item:2.5.6.7} }

Managing Collective Attributes by Using the Command Line
16-4 Oracle Fusion Middleware Administrator's Guide for Oracle Internet Directory
SubtreeSpecification: {base "cn=users", minimum 2, maximum 4, specificExclusions {
chopBefore: "ou=Europe", chopAfter: "cn=GlobalUser"}, specificationFilter not:{
item:2.5.6.7} }
16.1.4 Overriding a Collective Attribute
If you want some entries to have their own values for an attribute, instead of the
collective attribute value, you can specifically add that attribute to those entries and
add attribute collectiveExclusions:attributeName to that entry.If all the
collective attributes needs to be excluded then add attribute
excludeAllCollectiveAttributes: true to those entries. Doing so overrides
the value of the collective attribute value. For example, if you add the
TelephoneNumber attribute and the excludeAllCollectiveAttributes:
true attribute to the entry cn=jane smith,
ou=Americas,cn=users,dc=mycompany,dc=com, this entry will have its own
value for TelephoneNumber instead of the collective attribute.
16.2 Managing Collective Attributes by Using the Command Line
You can manage a collective attributes sub entry from the command line, like any
other directory entry.
16.2.1 Adding a Subentry by Using ldapadd
To create collective attributes, you define the collective subentry in an LDIF file using
ldapadd, as follows:
ldapadd -p port_number -h host -D cn=orcladmin -q -f subentry.ldif
where the contents of subentry.ldif is something like this:
Dn: cn=collective attributes, dc=mycompany,dc=com
Cn: collective attributes
Objectclass: subentry
Objectclass: collectiveAttributeSubentry
Objectclass: top
Objectclass: extensibleobject
TelephoneNumber;collective: 1234560000
PostalCode;collective: 98765
SubtreeSpecification: {base "cn=users", minimum 2, maximum 4, specificExclusions {
chopBefore: "ou=Europe", chopAfter: "cn=GlobalUser"}, specificationFilter not:{
item:2.5.6.7} }
16.2.2 Modifying a Subentry by Using ldapmodify
Issue this command to modify the file:
ldapmodify -p 3060 -D "cn=orcladmin" -q -f mod_subentry.ldif
where mod_subentry.ldif is something like this:
dn: cn=collective attributes, dc=mycompany,dc=com
changetype: modify
replace: PostalCode;collective
PostalCode;collective: 98768

17
Managing Alias Entries 17-1
17 Managing Alias Entries
This chapter provides examples of how to add, search for, and modify alias entries,
and it includes a list of messages. It contains these topics:
■Section 17.1, "Introduction to Managing Alias Entries"
■Section 17.2, "Adding an Alias Entry"
■Section 17.3, "Searching the Directory with Alias Entries"
■Section 17.4, "Modifying Alias Entries"
■Section 17.5, "Interpreting Messages Related to Alias Dereferencing"
For information about attribute aliases, seeSection 20.1.5, "Understanding Attribute
Aliases."
17.1 Introduction to Managing Alias Entries
Entries sometimes have distinguished names that are long and cumbersome. Oracle
Internet Directory makes it easier to administer long names by using alias objects.
When someone looks up—that is, references—an object by using an alias, the alias is
dereferenced, and what is returned is the object to which the alias points. For example,
the alias, Server1, can be dereferenced so that it points to the fully qualified
DN—namely, dc=server1,dc=us,dc=myCompany,dc=com. This feature also
enables you to devise structures that are not strictly hierarchical.
An alias entry uses the object class alias to distinguish it from object entries in a
directory. The definition of that object class is as follows:
(2.5.6.1 NAME 'alias' SUP top STRUCTURAL MUST aliasedObjectName)
An alias entry also contains the aliasedObjectName attribute that, in turn, contains
the DN of the object to which it is pointing. The definition of that attribute is as
follows:
(2.4.5.1 NAME 'aliasedObjectName" EQUALITY distinguishedNmameMatch SYNTAX
1.3.6.1.4.1.1466.115.121.1.12 SINGLE-VALUE)
Figure 17–1 and the accompanying text provides an example of alias entry
dereferencing.

Adding an Alias Entry
17-2 Oracle Fusion Middleware Administrator's Guide for Oracle Internet Directory
Figure 17–1 Alias Entries Example
In Figure 17–1, ou=uk sales,ou=global sales,o=myCompany,c=us is an alias
entry pointing to the ou=sales,o=myCompany,c=uk entry.
When anyone references ou=uk sales,ou=global sales,o=oracle,c=us, the
directory server automatically reroutes them to the real entry,
ou=sales,o=oracle,c=uk.
17.2 Adding an Alias Entry
To add an alias entry, you create a normal entry in LDIF and an alias entry pointing to
the real entry. Following the steps in this example produces the tree in Figure 17–2 on
page 17-3.
1. Create a sample LDIF file, My_file.ldif, with the following entries:
dn: c=us
c: us
objectclass: country
dn: o=MyCompany, c=us
o: MyCompany
objectclass:organization
dn: ou=Area1, c=us
objectclass: alias
objectclass: extensibleobject
ou: Area1
aliasedObjectName: o=MyCompany, c=us
dn: cn=John Doe, o=MyCompany, c=us
cn: John Doe
sn: Doe
objectclass: person
dn: cn=President, o=MyCompany, c=us
objectclass: alias
objectclass: extensibleobject
cn: President
aliasedobjectname: cn=John Doe, o=MyCompany, c=us
2. Add these entries to the directory by using the following command:
ldapadd -p port -h host -D cn=orcladmin -q -f My_file.ldif
o=MyCompany
c=uk
c=us
o=
MyCompany
Root
ou=Global
Sales
Alias Entry
ou=UK sales
ou=st
ou=sales ou=marketing
cn=James cn=Adams

Searching the Directory with Alias Entries
Managing Alias Entries 17-3
Figure 17–2 Resulting Tree when Creating the My_file.ldif
In Figure 17–2, the letter A represents an alias entry, where:
■ou=Area1 is an alias pointing to o=MyCompany
■cn=President is an alias pointing to cn=John Doe
17.3 Searching the Directory with Alias Entries
In each search you specify, there are flags you can set. The search is performed based
on the flag you specify, as shown in Table 17–1.
By default, the dereference flag in ldapsearch is -a never and thus the directory
server does not perform any dereferencing for alias entries.
17.3.1 Searching the Base with Alias Entries
A base search finds the top level of the alias entry you specify.
Base Search with the Dereferencing Flag -a find
This example shows a base search of ou=Area1,c=us with a filter of
"objectclass=*" with the dereferencing flag set to -a find.
ldapsearch -p port -h host -b "ou=Area1,c=us" -a find -s base "objectclass=*"
Note: If you attempt to add an alias entry whose parent is an alias
entry, the directory server returns an error.
See Also: Section 17–2, " Entry Alias Dereferencing Messages" for
error messages.
Table 17–1 Flags for Searching the Directory with Alias Entries
Flag Search Behavior of LDAP Server
-a never Never dereferences aliases.
-a find Dereferences the base object in a search, but does not
dereference alias entries that are under the base.
-a search Dereferences aliases in subordinates of the base object in search
but not in locating the base object of the search.
-a always Dereferences aliases both in searching and in locating the base
object of the search.
c=US
ou=Area1 o=MyCompany
cn=President cn=John Doe
A
A

Searching the Directory with Alias Entries
17-4 Oracle Fusion Middleware Administrator's Guide for Oracle Internet Directory
The directory server, during the base search, looks up the base specified in the search
request and returns it to the user. However, if the base is an alias entry and, as in the
example, -a find is specified in the search request, then the directory server
automatically dereferences the alias entry and returns the entry it points to. In this
example, the search dereferences ou=Area1,c=us, which is an alias entry, and
returns o=MyCompany,c=us.
Base Search with the Dereferencing Flag -a search
This example shows a base search of ou=Area1,c=us with a filter of
"objectclass=*" with the dereferencing flag set to -a search.
ldapsearch -p port -h host -b "ou=Area1,c=us" -a search -s base "objectclass=*"
The directory server, during the base search, looks up the base specified in the search
request and returns it to the user without dereferencing it. It returns ou=Area1,c=us.
Base Search with the Dereferencing Flag -a always
This example shows a base search of ou=Area1,c=us with a filter of
"objectclass=*" with the dereferencing flag set to -a always.
ldapsearch -p port -h host -b "ou=Area1,c=us" -a always -s base "objectclass=*"
The directory server, during the base search, looks up the base specified in the search
request. If it is an alias entry, the directory server automatically dereferences the alias
entry and returns the entry it points to. In this example, the search dereferences
ou=Area1,c=us, which is an alias entry, and returns o=MyCompany,c=us.
17.3.2 Searching One-Level with Alias Entries
A one-level search finds only the children of the base level you specify.
One-Level Search with the Dereferencing Flag -a find
This example shows a one-level search of "ou=Area1,c=us" with a filter of
"objectclass=*" with the dereferencing flag set to -a find.
ldapsearch -p port -h host -b "ou=Area1,c=us" -a find -s one "objectclass=*"
The directory server returns one-level entries under the base that match the filter
criteria. In the example, -a find is specified in the search request, and thus the
directory server automatically dereferences while looking up the base (the first step),
but does not dereference alias entries that are one level under the base. Therefore, the
search dereferences ou=Area1,c=us, which is an alias entry, and then looks up
one-level entries under o=MyCompany,c=us. One of the one-level entries is
cn=President,o=MyCompany,c=us that is not dereferenced and is returned as is.
Thus, the search returns cn=President,o=MyCompany,c=us and cn=John
Doe,o=MyCompany,c=us.
One-Level Search with the Dereferencing Flag -a search
This example shows a one-level search of "ou=Area1,c=us" with a filter of
"objectclass=*" with the dereferencing flag set to -a search.
ldapsearch -p port -h host -b "ou=Area1,c=us" -a search -s one "objectclass=*"
The directory server searches for the base that is specified in the search request. If the
base entry is an alias entry, it returns nothing. (Alias entries cannot have children.)
Otherwise, it returns the base entry's immediate children after dereferencing them. In

Searching the Directory with Alias Entries
Managing Alias Entries 17-5
this example, the base entry is "ou=Area1,c=us", which is an alias entry, so the
search returns nothing
One-Level Search with the Dereferencing Flag -a always
This example shows a one-level search of "ou=Area1,c=us" with a filter of
"objectclass=*" with the dereferencing flag set to -a always.
ldapsearch -p port -h host -b "ou=Area1,c=us" -a always -s one "objectclass=*"
In the example, -a always is specified in the search request, and thus the directory
server automatically dereferences while looking up the base (the first step), then
dereference alias entries that are one level under the base. Therefore, the search
dereferences ou=Area1,c=us, which is an alias entry, and then looks up one-level
entries under o=MyCompany,c=us. One of the one-level entries is
cn=President,o=MyCompany,c=us. That is dereferenced and is returned as
cn=John Doe,o=MyCompany,c=us. The other one-level entry is cn=John
Doe,o=MyCompany,c=us, which has already been returned.
Thus, the search returns cn=John Doe,o=MyCompany,c=us.
17.3.3 Searching a Subtree with Alias Entries
A subtree search finds the base, children, and grand children.
Subtree Search with the Dereferencing Flag -a find
This example shows a subtree search of "ou=Area1,c=us" with a filter of
"objectclass=*" with the dereferencing flag set to -a find.
ldapsearch -p port -h host -b "ou=Area1,c=us" -a find -s sub "objectclass=*"
The directory server returns all entries under the base that match the filter criteria. In
the example, -a find is specified in the search request, and thus the directory server
automatically dereferences while looking up the base (the first step), but does not
dereference alias entries that are under the base. Therefore, the search dereferences
ou=Area1,c=us, which is an alias entry, and then looks up entries under
o=MyCompany,c=us. One of the entries is cn=President,o=MyCompany,c=us
that is not dereferenced and is returned as is.
Thus, the search returns:
■o=MyCompany,c=us
■cn=John doe,o=MyCompany,c=us
■cn=President,o=MyCompany,c=us
Subtree Search with the Dereferencing Flag -a search
This example shows a subtree search of "ou=Area1,c=us" with a filter of
"objectclass=*" with the dereferencing flag set to -a search.
ldapsearch -p port -h host -b "ou=Area1,c=us" -a search -s sub "objectclass=*"
The directory searches for the base that is specified in the search request.If the base is
an alias entry, then it returns the base entry without dereferencing it. (Alias entries
cannot have children.) Otherwise it returns all entries under the base. If any alias
entries are found, it dereferences them and returns all entries under them as well.
In this example, the base entry is an alias entry, ou=Area1,c=us, so the directory
returns ou=Area1,c=us.

Modifying Alias Entries
17-6 Oracle Fusion Middleware Administrator's Guide for Oracle Internet Directory
Subtree Search with the Dereferencing Flag -a always
This example shows a subtree search of "ou=Area1,c=us" with a filter of
"objectclass=*" with the dereferencing flag set to -a always.
ldapsearch -p port -h host -b "ou=Area1,c=us" -a always -s sub "objectclass=*"
The directory server dereferences the base entry and returns it. It also returns all
entries under the dereferenced base. If any alias entries are found, it dereferences them
and returns all entries under them as well.
In this example, the base entry is ou=Area1,c=us, which is dereferenced to
o=MyCompany,c=us, which is returned. There are two entries under
o=MyCompany,c=us. One is cn=President,o=MyCompany,c=us, which is
returned and also dereferenced to cn=John Doe,o=MyCompany,c=us, which is
returned. The other entry under o=MyCompany,c=us, which has already been
returned. So the result is o=MyCompany,c=us and cn=John
Doe,o=MyCompany,c=us.
17.4 Modifying Alias Entries
This example shows how to modify alias entries. It creates a sample LDIF file, My_
file.ldif with following entries:
dn: cn=President, o=MyCompany, c=us
changetype : modify
replace: aliasedobjectname
aliasedobjectname: cn=XYZ, o=MyCompany, c=us
Modify the alias entry using the following command:
ldapmodify -D "cn=orcladmin" -q -p port -h host -f My_file.ldif
17.5 Interpreting Messages Related to Alias Dereferencing
Table 17–2 lists the messages related to alias entry dereferencing and the
corresponding meaning for each message.
Table 17–2 Entry Alias Dereferencing Messages
Message Meaning
Alias Problem Either of the following have occurred:
■An alias was dereferenced, but it did not point to an entry in
the DIT.
■The user tries to add an alias entry whose parent is an alias.
Alias Dereferencing
Problem
The user cannot dereference an alias because of access control
issues.
No Such Object The server cannot find the base DN specified in the search
request.
Invalid DN Syntax When adding or modifying an alias entry, if the value specified
for aliasedObjectName has invalid DN syntax, then the
directory server returns this error message to the client.
Success The client operation successfully completes.
When the dereferenced target does exist but does not match the
filter specified in the search request, the server returns a success
message with no matched entry.

Interpreting Messages Related to Alias Dereferencing
Managing Alias Entries 17-7
Insufficient Access Rights The user does not have access to the dereferenced entry.
Table 17–2 (Cont.) Entry Alias Dereferencing Messages
Message Meaning

Interpreting Messages Related to Alias Dereferencing
17-8 Oracle Fusion Middleware Administrator's Guide for Oracle Internet Directory

18
Managing Attribute Uniqueness Constraint Entries 18-1
18Managing Attribute Uniqueness Constraint
Entries
This chapter explains attribute uniqueness in Oracle Internet Directory. It contains
these topics:
■Section 18.1, "Introduction to Managing Attribute Uniqueness Constraint Entries"
■Section 18.2, "Specifying Attribute Uniqueness Constraint Entries"
■Section 18.3, "Managing an Attribute Uniqueness Constraint Entry by Using
Oracle Directory Services Manager"
■Section 18.4, "Managing an Attribute Uniqueness Constraint Entry by Using the
Command Line"
18.1 Introduction to Managing Attribute Uniqueness Constraint Entries
When you use the LDAP tools, the attribute uniqueness feature prevents duplication
of attribute values, both when adding and modifying them. For example, it prevents
you from assigning to a new employee an identifier already assigned to another
employee. Instead, the directory server terminates the operation and returns an error
message.
You can define attribute uniqueness:
■Across the entire directory
For example, to ensure that every entry in your directory that includes a mail
attribute has a unique value for that attribute, you create an instance of attribute
uniqueness associated with mail.
■Across one subtree for each attribute
For example, suppose that MyCompany hosts the directories for
SubscriberCompany1 and SubscriberCompany2. You can choose to enforce
attribute uniqueness in SubscriberCompany1 only.
■Across one object class
For example, suppose that ID is an attribute in both the machine object class and
the person object class. If attribute uniqueness is enabled, then the directory
server prevents you from adding either two machines or two people with the
same ID. You can, however, add a machine ID attribute that has the same value
as an existing person ID attribute. Similarly, you can add a person ID attribute
that has the same value as an existing machine ID attribute.

Introduction to Managing Attribute Uniqueness Constraint Entries
18-2 Oracle Fusion Middleware Administrator's Guide for Oracle Internet Directory
To implement attribute uniqueness, you create an attribute uniqueness constraint
entry in which you provide values for the attributes in Table 18–1 on page 18-2.
Attribute uniqueness constraint entries are stored under
cn=unique,cn=Common,cn=Products,cn=OracleContext.
When you have created the entry and specified the attributes, before it performs an
operation, the directory server:
■Uses the attribute uniqueness constraint to check all update operations
■Determines whether the operation applies to a monitored attribute, subtree, or
object class
If an operation applies to a monitored attribute, suffix, or object class, and would cause
two entries to have the same attribute value, then the directory server terminates the
operation and returns a constraint violation error message to the client.
When an attribute uniqueness constraint is present in the Oracle Internet Directory
replication environment, be careful about configuring the attribute uniqueness
constraints on each server.
This section contains these topics:
■Section , "Simple Replication Scenario"
■Section , "Multimaster Replication Scenario"
Note: The LDAP tools support attribute uniqueness. The bulk tools
do not.
Table 18–1 Attribute Uniqueness Constraint Entry
Attribute Name Mandatory? Valid Value Default Value Default Effect
orcluniqueattrname Yes Any string N/A N/A
orcluniquescope No One of the following:
■base: Searches the root
entry only
■onelevel: Searches one
level only
■sub: Searches the entire
directory
sub Searches the entire
directory
orcluniqueenable No Either 0 (disable) or 1
(enable)
0Disables attribute
uniqueness
orcluniquesubtree No Any string " " Searches the entire
directory
orcluniqueobjectclass No Any string " " Searches all object
classes
Note: The attribute uniqueness feature works on indexed
attributes only.

Specifying Attribute Uniqueness Constraint Entries
Managing Attribute Uniqueness Constraint Entries 18-3
Simple Replication Scenario
Because all modifications by client applications are performed on the supplier server,
the attribute uniqueness constraint should be enabled on that server. It is not
necessary to enable the attribute uniqueness constraint on the consumer server.
Enabling the attribute uniqueness constraint on the consumer server does not prevent
the directory server from operating correctly, but it can cause a performance
degradation.
Multimaster Replication Scenario
In a multimaster replication scenario, nodes serve as both suppliers and consumers of
the same replica. Multimaster replication uses a loosely consistent replication model.
Enabling an attribute uniqueness constraint on one of the servers does not ensure that
attribute values are unique across both masters at any given time. Enabling an
attribute uniqueness constraint on only one server can cause inconsistencies in the
data held on each replica.
The attribute uniqueness constraint must be enabled on both masters. However, there
may still be an inconsistent state. For example, in both masters we can successfully
modify entries to the same attribute value. However, when the changes are later
replicated to the other node, the conflict becomes apparent. You must take this type of
conflict resolution into consideration as well, deciding whether conflict resolution
should be the replication server's responsibility.
18.2 Specifying Attribute Uniqueness Constraint Entries
Attribute uniqueness constraint entries are stored under
cn=unique,cn=Common,cn=Products,cn=OracleContext.
This section describes and gives examples of rules you follow when creating attribute
uniqueness constraints. It contains these topics:
■Section 18.2.1, "Specifying Multiple Attribute Names in an Attribute Uniqueness
Constraint"
■Section 18.2.2, "Specifying Multiple Subtrees in an Attribute Uniqueness
Constraint"
■Section 18.2.3, "Specifying Multiple Scopes in an Attribute Uniqueness Constraint"
■Section 18.2.4, "Specifying Multiple Object Classes in an Attribute Uniqueness
Constraint"
■Section 18.2.5, "Specifying Multiple Subtrees, Scopes, and Object Classes in an
Attribute Uniqueness Constraint"
To understand the examples in this section, refer to Figure 18–1.
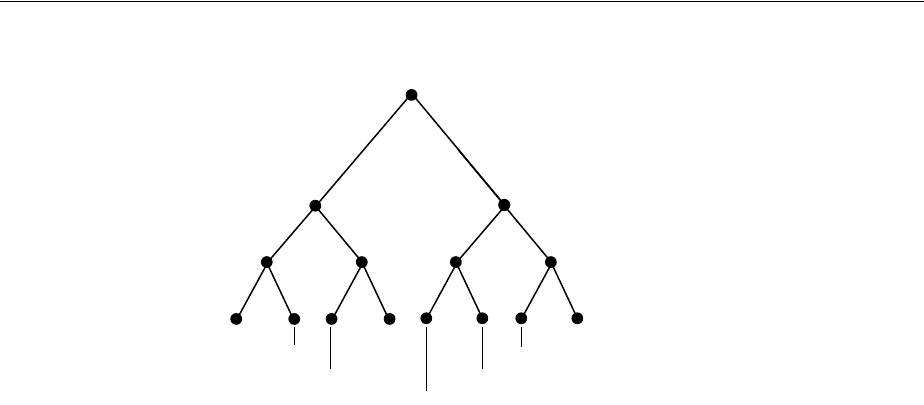
Specifying Attribute Uniqueness Constraint Entries
18-4 Oracle Fusion Middleware Administrator's Guide for Oracle Internet Directory
Figure 18–1 Example of a Directory Information Tree
18.2.1 Specifying Multiple Attribute Names in an Attribute Uniqueness Constraint
When multiple attribute uniqueness constraints have different values in
orcluniqueattrname, their effects are independent of each other.
For example, suppose that a user defines two attribute uniqueness constraints as
follows:
Constraint1:
orcluniqueattrname: employee_id
Constraint2:
orcluniqueattrname: email_id
In this example, Constraint1 and Constraint2 enforce uniqueness on the specified
attribute within their own attribute uniqueness scopes. Constraint1 and Constraint2
are independent of each other.
18.2.2 Specifying Multiple Subtrees in an Attribute Uniqueness Constraint
When multiple attribute uniqueness constraints have the same values in
orcluniqueattrname, orcluniquescope and orcluniqueobjectclass, but
different values in orcluniquesubtree, the subtree scopes specified by those
attribute uniqueness constraints are checked individually.
For example, refer to Figure 18–1 on page 18-4. Suppose that a user defines two
attribute uniqueness constraints as follows:
Constraint1:
orcluniqueattrname: employee_id
orcluniquesubtree: o=sales, c=us, cn=root
orcluniquescope: onelevel
Constraint2:
orcluniqueattrname: employee_id
orcluniquesubtree: o=hr, c=euro, cn=root
orcluniquescope: onelevel
In this example, the attribute uniqueness on employee_id is enforced against all
entries under subtree o=sales,c=us,cn=root. Attribute uniqueness on
c=euro c=
us
cn=Root
ou=sales
o=hr o=hr
o=sales
employee4
employee3
employee5
employee8
employee2
employee1
employee6
employee7

Specifying Attribute Uniqueness Constraint Entries
Managing Attribute Uniqueness Constraint Entries 18-5
employee_id is also enforced against all entries under o=hr,c=euro,cn=root
independent of the entries under the subtree o=sales,c=us,cn=root—that is, the
directory server enforces the unique value of the employee_id attribute for
employee3 and employee4. Unique employee_id is enforced for employee7 and
employee8 as well while employee7 could have the same employee_id as
employee4.
18.2.3 Specifying Multiple Scopes in an Attribute Uniqueness Constraint
When multiple attribute uniqueness constraints have the same values in
orcluniqueattrname, orcluniquesubtree and orcluniqueobjectclass, but
different values in orcluniquescope, the attribute uniqueness constraint with the
largest search scope takes effect.
For example, referring to Figure 18–1 on page 18-4, suppose that a user defines two
attribute uniqueness constraints as follows:
Constraint1:
orcluniqueattrname: employee_id
orcluniquesubtree: c=us, cn=root
orcluniquescope: onelevel
Constraint2:
orcluniqueattrname: employee_id
orcluniquesubtree: c=us, cn=root
orcluniquescope: sub
In this example, the attribute uniqueness on employee_id is enforced against all
entries under the subtree c=us,cn=root and the entry c=us,cn=root itself. Note
that this is the same as if the user had defined only Constraint2.
18.2.4 Specifying Multiple Object Classes in an Attribute Uniqueness Constraint
When multiple attribute uniqueness constraints have the same values in
orcluniqueattrname, orcluniquesubtree, and orcluniquescope, but
different values in orcluniqueobjectclass, then the union of attributes belonging
to those object classes is checked.
For example, look at Figure 18–1 on page 18-4. Suppose that a user defines two
attribute uniqueness constraints as follows:
Constraint1:
orcluniqueattrname: employee_id
orcluniquesubtree: c=us, cn=root
orcluniqueobjectclass: person
Constraint2:
orcluniqueattrname: employee_id
orcluniquesubtree: c=us, cn=root
In this example, the attribute uniqueness on employee_id is enforced against all
entries under the subtree c=us,cn=root and the entry c=us,cn=root itself, no
matter what object class those entries belong to. Note that Constraint2 specifies no
orcluniqueobjectclass attribute, which is the same as specifying all object
classes.

Managing an Attribute Uniqueness Constraint Entry by Using Oracle Directory Services Manager
18-6 Oracle Fusion Middleware Administrator's Guide for Oracle Internet Directory
18.2.5 Specifying Multiple Subtrees, Scopes, and Object Classes in an Attribute
Uniqueness Constraint
When multiple attribute uniqueness constraints have the same values in
orcluniqueattrname, but different values in orcluniquesubtree,
orcluniquescope, and orcluniqueobjectclass, the entries that belong to the
attribute uniqueness scopes of different constraints are checked individually.
For example, referring to Figure 18–1 on page 18-4, suppose that a user defines two
attribute uniqueness constraints as follows:
Constraint1:
orcluniqueattrname: employee_id
orcluniquesubtree: o=sales, c=us, cn=root
orcluniquescope: onelevel
orcluniqueobjectclass: person
Constraint2:
orcluniqueattrname: employee_id
orcluniquesubtree: c=euro, cn=root
orcluniquescope: sub
orcluniqueobjectclass: organization
In this example, the attribute uniqueness on employee_id is enforced against each of
the following independent of each other:
■All entries one level under the entry o=sales,c=us,cn=root with the object
class person
■All entries under subtree c=euro,cn=root and the entry c=euro,cn=root
itself with the object class organization
18.3 Managing an Attribute Uniqueness Constraint Entry by Using Oracle
Directory Services Manager
You can manage an attribute uniqueness constraint policy by using Oracle Directory
Services Manager.
18.3.1 Creating an Attribute Uniqueness Constraint Entry by Using ODSM
1. Invoke Oracle Directory Services Manager and connect to the Oracle Internet
Directory server as described in Section 7.4.5, "Invoking Oracle Directory Services
Manager."
2. Select Advanced from the task selection bar.
3. Expand Attribute Uniqueness in the left pane.
4. On the toolbar, choose the Create an attribute uniqueness constraint icon. This
displays the New Constraint window.
5. In the New Constraint dialog box, enter values in the text fields and select the
Unique Attribute Scope. You can click Browse to select the Unique Attribute
Subtree.
6. If you want to enable the constraint now, click Enable Unique Attribute.
7. Choose OK. The entry you just created appears in the list of attribute uniqueness
constraint entries in the left panel.

Managing an Attribute Uniqueness Constraint Entry by Using the Command Line
Managing Attribute Uniqueness Constraint Entries 18-7
8. Click Apply to apply this constraint or Revert to revert to the state before you
created the new entry.
18.3.2 Modifying an Attribute Uniqueness Constraint Entry by Using ODSM
1. Invoke Oracle Directory Services Manager and connect to the Oracle Internet
Directory server as described in Section 7.4.5, "Invoking Oracle Directory Services
Manager."
2. Select Advanced from the task selection bar.
3. Expand Attribute Uniqueness in the left pane.
4. Select an existing uniqueness constraint. This displays the General tab of the
Attribute Uniqueness Constraint window.
5. Enter or modify values.
6. If you want to enable the constraint now, click Enable Unique Attribute.
7. Click Apply to apply this change or Revert to revert to the state before you
modified the entry.
18.3.3 Deleting an Attribute Uniqueness Constraint Entry by Using ODSM
To delete an attribute uniqueness constraint policy:
1. Invoke Oracle Directory Services Manager and connect to the Oracle Internet
Directory server as described in Section 7.4.5, "Invoking Oracle Directory Services
Manager."
2. Select Advanced from the task selection bar.
3. Expand Attribute Uniqueness in the left pane.
4. In the left panel, select the attribute uniqueness constraint entry you want to
delete.
5. Choose the Delete icon, then, when prompted, confirm the deletion. The entry you
deleted no longer appears in the list of attribute uniqueness constraint entries in
the left panel.
6. Click Apply to apply this change or Revert to revert to the state before you
deleted the entry.
18.4 Managing an Attribute Uniqueness Constraint Entry by Using the
Command Line
You can manage an attribute uniqueness constraint policy by using the command line.
18.4.1 Creating Attribute Uniqueness Across a Directory by Using Command-Line
Tools
To create an instance of attribute uniqueness across an entire directory, specify an
attribute name for which you want to enforce value uniqueness.
For example, to make employee identifiers unique for all US employees at
MyCompany, you would follow these steps:
1. Create an attribute uniqueness constraint entry (in LDIF format) as follows:
dn: cn=constraint1, cn=unique, cn=common, cn=products, cn=oraclecontext

Managing an Attribute Uniqueness Constraint Entry by Using the Command Line
18-8 Oracle Fusion Middleware Administrator's Guide for Oracle Internet Directory
objectclass: orclUniqueConfig
orcluniqueattrname: employeenumber
orcluniquesubtree: o=MyCompany, c=US
orcluniqueobjectclass: person
2. Apply the attribute uniqueness feature by loading the attribute uniqueness
constraint entry as follows:
ldapadd –h host -p port -D DN -q -f constraint1.ldif
3. Restart the directory server.
Example:
The following LDIF file, uniquenessConstraint.ldif, specifies a uniqueness
constraint for the orclcommonusernickname attribute:
# Use this LDIF file to set up a uniqueness constraint on the nickname
# attribute within the user search base.
# Before running the script, change the following parameters in the LDIF file.
# <userid_attribute> - Specify the name of the attribute that holds the user
# id. This value should be the same as the orclcommonusernickname attribute
# configured for the realm.# <dn _f_user_serach_base> - Specify the user search
base in which the
# uniqueness constraint should be enforced.
#
dn: cn=<userid_attribute> ,cn=unique,cn=common,cn=Products, cn=OracleContext
changetype: add
objectclass: orclUniqueConfig
orcluniqueattrname: <userid _ttribute>
orcluniquesubtree: <dn_of_user_search_base>
orcluniqueenable:1
18.4.2 Creating Attribute Uniqueness Across One Subtree by Using Command-Line
Tools
To create an instance of attribute uniqueness across one or more subtrees, specify:
■An attribute name for which you want to enforce value uniqueness
■Subtree locations under which you want the uniqueness constraint to be enforced
For example, suppose that MyCompany hosts the directories for SubscriberCompany1
and SubscriberCompany2, and you want to enforce the uniqueness of the employee
identifier attribute in SubscriberCompany1 only. When you add an entry such as
uid=dlin,ou=people,o=SubscriberCompany1,dc=MyCompany, dc=com, you
must enforce uniqueness only in the
o=SubscriberCompany1,dc=MyCompany,dc=com subtree. Do this by listing the
DN of the subtree explicitly in the attribute uniqueness constraint configuration.
In this case, the LDIF file would look like this:
dn: cn=constraint1, cn=unique, cn=common, cn=products, cn=oraclecontext
objectclass: orclUniqueConfig
orcluniqueattrname: employeenumber
orcluniquesubtree: o=SubscriberCompany1,dc=MyCompany,dc=com

Managing an Attribute Uniqueness Constraint Entry by Using the Command Line
Managing Attribute Uniqueness Constraint Entries 18-9
18.4.3 Creating Attribute Uniqueness Across One Object Class by Using
Command-Line Tools
To create an instance of attribute uniqueness across one object class, specify:
■An attribute name for which you want to enforce value uniqueness
■Object class name
In this case, the LDIF file would look like this:
dn: cn=constraint1, cn=unique, cn=common, cn=products, cn=oraclecontext
objectclass: orclUniqueConfig
orcluniqueattrname: employeenumber
orcluniqueobjectclass: person
Use ldapadd to add the entry.
ldapadd -D "cn=orcladmin" -q -p port -D user -f file_name
18.4.4 Modifying Attribute Uniqueness Constraint Entries by Using Command-Line
Tools
To modify an attribute uniqueness entry, use create an LDIF file for the entry, then use
ldapmodify to upload it into the directory.
For example, suppose there is an existing attribute uniqueness constraint entry:
dn: cn=constraint1, cn=unique, cn=common, cn=products, cn=oraclecontext
objectclass: orclUniqueConfig
orcluniqueattrname: employeenumber
orcluniquesubtree: o=MyCompany, c=US
orcluniqueobjectclass: person
To enforce the constraint against c=US, instead of o=MyCompany, you would perform
these steps:
1. Create an LDIF entry to change the orcluniquenesssubtree:
dn: cn=constraint1, cn=unique, cn=common, cn=products, cn=oraclecontext
changetype: modify
replace: orcluniquesubtree
orcluniquesubtree: o=Oracle Corporation, c=US
2. Use ldapmodify to apply the change to directory server.
ldapmodify -D "cn=orcladmin" -q -p port -D user -f file_name
3. Restart the directory server to effect this change.
18.4.5 Deleting Attribute Uniqueness Constraint Entries by Using Command-Line Tools
Use the ldapdelete command-line tool to delete an attribute uniqueness constraint
policy.
1. Remove the attribute uniqueness constraint entry from the directory by using
ldapdelete.
ldapdelete -D "cn=orcladmin" -q -p port -D bind_DN \
"cn=constraint1,cn=unique,cn=common,cn=products,cn=oraclecontext"
2. Restart the directory server to effect this change.

Managing an Attribute Uniqueness Constraint Entry by Using the Command Line
18-10 Oracle Fusion Middleware Administrator's Guide for Oracle Internet Directory
18.4.6 Enabling and Disabling Attribute Uniqueness by Using Command-Line Tools
You can enable or disable attribute uniqueness for an existing attribute uniqueness
constraint entry.
To enable attribute uniqueness for an existing attribute uniqueness constraint entry:
1. Set the orcluniqueenable attribute to 1 by using ldapmodify.
2. Restart the directory server to enable the policy.
To disable attribute uniqueness:
1. Set the orcluniqueenable attribute to 0 by using ldapmodify.
2. Restart the directory server to disable the policy.

19
Managing Knowledge References and Referrals 19-1
19Managing Knowledge References and
Referrals
This chapter explains how to configure knowledge references and referrals.
This Chapter contains these topics:
■Introduction to Managing Knowledge References and Referrals
■Section 19.2, "Configuring Smart Referrals"
■Section 19.3, "Configuring Default Referrals"
19.1 Introduction to Managing Knowledge References and Referrals
A knowledge reference, also called a referral, is represented in the directory as a
particular type of entry. When you create a knowledge reference entry, you associate it
with the referral object class the and extensibleObject object class. Typically,
you create knowledge reference entries at the place in the DIT where you want to
establish the partition.
A knowledge reference provides users with a referral containing an LDAP URL. You
enter these URLs as values for the ref attribute. There can be multiple ref attributes
specified for any knowledge reference entry. Similarly, there can be multiple
knowledge reference entries in the DIT.
Referral caching is the process of storing referral information so that it can be easily
accessed again and again. Suppose that a client queries Server A, which returns a
referral to Server B. The client chases this referral and contacts Server B which
performs the operation and returns the results to the client. Without referral caching,
the next time the client makes the same query to Server A, the entire procedure is
repeated, an unnecessary consumption of time and system resources.
However, if the referral information can be cached, then, in each subsequent query, the
referral information can be obtained from cache and Server B can be contacted
directly. This speeds up the operation.
See Also: Section 3.10, "Knowledge References and Referrals" for an
overview of directory entries, directory information trees,
distinguished names, and relative distinguished names
See Also: Chapter 3, "Understanding Oracle Internet Directory
Concepts and Architecture" for an overview of directory partitioning
and knowledge references and a description of a smart knowledge
reference and a default knowledge reference

Introduction to Managing Knowledge References and Referrals
19-2 Oracle Fusion Middleware Administrator's Guide for Oracle Internet Directory
Client-side referral caching enables each client to cache this referral information and
use it to speed up of referral processing.
Referral entries are stored in a configuration file on the client. When a client
establishes a session, it reads the referral information from this configuration file and
stores them in a cache. This cache remains static, with no further updates being added
during the session. From this point on, for every operation, the client looks up referral
information in the cache.
The directory administrator prepares this configuration file for clients to use.
The configuration file consists of one or more referral sets. Each referral set consists of:
■The host name where a particular directory server is running
■One or more referral entries residing on that server
Each referral entry consists of a sequence of lines, each of which corresponds to one
referral URL. The line separator is CR or LF.
ref_file=ref_file_content
ref_file_content=1*(referral_set)
referral_set=hostname SEP ref_entry_set SEP
ref_entry_set=ref_entry *(SEP ref_entry)
ref_entry=1*(referralurl SEP)
SEP=CR LF / LF
CR=0x0D
LF=0x0A
For example, consider two referral entries in a directory server running on host
serverX:
dn: dc=example, dc=com
ref: ldap://serverA:3060/dc=example, dc=com
ref: ldap://serverB:3060/dc=example, dc=com
dn: dc=oracle, dc=com
ref: ldap://serverC:3060/dc=oracle, dc=com
ref: ldap://serverD:3060/dc=oracle, dc=com
Consider the following referral entry in a directory server running on host serverY:-
dn: dc=fiction, dc=com
ref: ldap://serverE:3060/dc=fiction, dc=com
The corresponding referral.ora file looks like this:
ServerX
ldap://serverA:3060/dc=example, dc=com
ldap://serverB:3060/dc=example, dc=com
ldap://serverC:3060/dc=oracle, dc=com
ldap://serverD:3060/dc=oracle, dc=com
ServerY
Note: The configuration file is optional for clients. If a file is not
present, then client operations involving referrals still behave
correctly. Thus it is not mandatory for administrator to prepare this
file. The advantage of using the configuration file is that it speeds up
the client/server operations involving referrals.

Configuring Default Referrals
Managing Knowledge References and Referrals 19-3
ldap://serverE:3060/dc=fiction, dc=com
19.2 Configuring Smart Referrals
A search result can contain regular entries along with knowledge references. When a
user performs a search operation, Oracle Internet Directory looks for the knowledge
reference entry within the specified scope of the search. If it finds the knowledge
reference, then Oracle Internet Directory returns a referral to the client.
If a user performs an add, delete, or modify operation on an entry located below the
knowledge reference entry, then Oracle Internet Directory returns the referral.
For example, suppose you want to partition the DIT based on the geographical
location of the directory servers. In this example, assume that:
■The c=us naming context is held locally on Server A and Server B in the United
States.
■The c=uk naming context is held locally on Server C and Server D in the United
Kingdom.
In this case, you would configure knowledge references between these two naming
contexts as follows:
1. On Server A and B in the United States, configure a knowledge reference for the
c=uk object on Server C and Server D:
dn: c=uk
c: uk
ref: ldap://host C:3060/c=uk
ref: ldap://host D:600/c=uk
objectclass: top
objectclass: referral
objectClass: extensibleObject
2. Configure a similar knowledge reference on Server C and D in the United
Kingdom for the c=us object on Server A and Server B:
dn: c=us
c: us
ref: ldap://host A:4000/c=us
ref: ldap://host B:5000/c=us
objectclass: top
objectclass: referral
objectClass: extensibleObject
Use the command-line:
ldapmodify -D cn=orcladmin -q -p portNum -h hostname -f ldifFile
Results:
■A client querying Server A or Server B with base o=foo,c=uk receives a referral.
■A client querying Server C or Server D with base o=foo,c=us receives a referral.
■An add operation of o=foo,c=uk on either Server A or Server B fails. Instead,
Oracle Internet Directory returns a referral.
19.3 Configuring Default Referrals
Oracle Internet Directory uses the namingcontext attribute in the DSE to determine
every directory naming context held locally by the server. Be sure that the
namingContext attribute correctly reflects the naming context information.

Configuring Default Referrals
19-4 Oracle Fusion Middleware Administrator's Guide for Oracle Internet Directory
You specify default referrals by entering a value for the ref attribute in the DSE entry.
If the ref attribute is not in the DSE entry, then no default referral is returned.
When configuring a default referral, do not specify the DN in the LDAP URL.
For example, suppose that the DSE entry on Server A contains the following
namingContext value:
namingcontext: c=us
Further, suppose that the default referral is:
Ref: ldap://host PQR:3060
Now, suppose that a user enters an operation on Server A that has a base DN in the
naming context c=canada, for example:
ou=marketing,o=foo,c=canada
This user would receive a referral to the host PQR. This is because Server A does not
hold the c=canada base DN, and the namingcontext attribute in its DSE does not
hold the value c=canada.
See Also: Chapter 11, "Managing Naming Contexts."
See Also: Section 3.10, "Knowledge References and Referrals" for a
conceptual discussion of knowledge references

20
Managing Directory Schema 20-1
20 Managing Directory Schema
This chapter explains how to administer the Oracle Internet Directory object classes
and attributes.
This chapter contains these topics:
■Section 20.1, "Introduction to Managing Directory Schema"
■Section 20.2, "Managing Directory Schema by Using Oracle Directory Services
Manager"
■Section 20.3, "Managing Directory Schema by Using the Command Line"
20.1 Introduction to Managing Directory Schema
Oracle recommends that you understand the basic concepts of directory components
before attempting to add to or modify the base schema in the directory.
A directory schema:
■Contains rules about the kinds of objects you can store in the directory
■Contains rules for how directory servers and clients treat information during
operations such as a search
■Helps to maintain the integrity and quality of the data stored in the directory
■Reduces duplication of data
■Provides a predictable way for directory-enabled applications to access and
modify directory objects
This section contains the following topics:
■Section 20.1.1, "Where Schema Information is Stored in the Directory"
■Section 20.1.2, "Understanding Object Classes"
■Section 20.1.3, "Understanding Attributes"
■Section 20.1.4, "Extending the Number of Attributes Associated with Entries"
■Section 20.1.5, "Understanding Attribute Aliases"
Note: Every schema object in the Oracle Internet Directory has
certain limitations. For example, some objects cannot be changed.
These limitations are explained as constraints and rules in this
chapter.

Introduction to Managing Directory Schema
20-2 Oracle Fusion Middleware Administrator's Guide for Oracle Internet Directory
■Section 20.1.6, "Object Identifier Support in LDAP Operations"
20.1.1 Where Schema Information is Stored in the Directory
The directory schema contains all information about how data is organized in the
DIT—that is, metadata such as that for an object class, an attribute, a matching rule,
and syntax. This information is stored in a special class of entry called a subentry.
More specifically, Oracle Internet Directory, following LDAP Version 3 standards,
stores this information in subentries of type subSchemaSubentry.
You can add new object classes and attribute types to a subentry of type
subSchemaSubentry. You cannot add new matching rules and syntaxes beyond
those already supported by Oracle Internet Directory.
before 10g (10.1.4.0.1) there was only one subSchemaSubentry, directly under the
root DSE entry, called cn=subSchemaSubentry, and you always added object
classes and attribute types directly to it. As of 10g (10.1.4.0.1), the entry
cn=subSchemaSubentry can now have subordinate entries. Any application using
Oracle Internet Directory that must add schema components can create its own
subSchemaSubentry under cn=subSchemaSubentry and add the schema
components to it. Figure 20–1 shows some subSchemaSubentry entries that were
defined by applications, such as cn=userdefined1,cn=subschemasubentry and
cn=userdefined2,cn=subschemasubentry.
Best practice is to create one subordinate entry under subschemasubentry for one
application or a group of applications. All the attributeTypes and objectClasses related
to the application should be put under its corresponding entry under
cn=subschemasubentry.
All the schema entries are listed in the root DSE attribute subschemasubentry.
Figure 20–1 Location of Schema Components in Entries of Type subSchemaSubentry
You cannot use bulkload to add subSchemaSubentry entries. You must use
ldapadd.
20.1.2 Understanding Object Classes
When you add an entry, you associate it with one or more object classes. Each object
class contains attributes that you want to associate with the new entry. For example, if
you are creating an entry for an employee, you can associate it with the person object
class. This object class contains many of the attributes that you want to associate with
that employee entry, including, for example, name, address, and telephone number.
See Also: "LDAP Schema Overview" in Oracle Fusion Middleware
Reference for Oracle Identity Management.
cn=userdefined1,
cn=subSchemaSubentry
cn=subSchemaSubentry
Root DSE entry
cn=userdefined2,
cn=subSchemaSubentry
subSchemaSubentries containing
user-defined schema components
for LDAP standard or OID
schema components

Introduction to Managing Directory Schema
Managing Directory Schema 20-3
Each object class derives from a hierarchy of superclasses, and it inherits attributes
from these superclasses. By default, all object classes inherit from the top object class.
When you assign an object class to an entry, the entry inherits all of the attributes of
both that object class and its superclasses.
The attributes that entries inherit from a super class may be either mandatory or
optional. Values for optional attributes need not be present in the directory entry.
You can specify for any object class whether an attribute is mandatory or optional;
however, the characteristic you specify is binding only for that object class. If you
place the attribute in another object class, you can again specify whether the attribute
is mandatory or optional for that object class. You can:
■Add a new, nonstandard object class and assign it existing attributes
■Select from existing standard object classes
■Modify an existing object class, assigning it a different set of attributes
■Add and modify existing attributes
Entries must be added in a top-down sequence—that is, when you add an entry, all of
its parent entries must already exist in the directory. Similarly, when you add entries
that reference object classes and attributes, those referenced object classes and
attributes must already exist in the directory schema. In most cases this is not a
problem because the directory server is delivered with a full set of standard directory
objects.
When you add or perform an operation on an entry, you do not need to specify the
entire hierarchy of superclasses associated with that entry. You can specify only the
leaf object classes. Oracle Internet Directory resolves the hierarchy for the leaf object
classes and enforces the information model constraints. This is often called object class
explosion. For example, the inetOrgPerson object class has top, person and
organizationalPerson as its superclasses. When you create an entry for a person,
you must specify only inetOrgPerson as the object class. Oracle Internet Directory
then enforces the schema constraints defined by the respective superclasses, namely,
top, person, and organizationalPerson.
20.1.2.1 About Adding Object Classes
When you add object classes, keep the following in mind:
■Every structural object class must have top as a superclass.
■The name and the object identifier of an object class must be unique across all the
schema components. The actual attribute name and any attribute name aliases
must be unique across all attribute names and attribute aliases. The Object
Identifier must begin with the unique identifier 2.16.840.1.113894 followed by
either the Oracle-supplied prefix.9999 or a site-specific prefix.
Note: The attribute page in the Schema tab in Oracle Directory
Services Manager includes a Referenced By section that lists the
object classes that directly reference an attribute
See Also: "LDAP Schema Overview" in Oracle Fusion Middleware
Reference for Oracle Identity Management for a list of schema elements
installed with Oracle Internet Directory

Introduction to Managing Directory Schema
20-4 Oracle Fusion Middleware Administrator's Guide for Oracle Internet Directory
■Schema components referred to in the object class, such as superclasses, must
already exist.
■The superclass of an abstract object class must be abstract also.
■It is possible to redefine mandatory attributes in a superclass into optional
attributes in the new object class. Conversely, optional attributes in a superclass
can be redefined into mandatory attributes in the new object class.
20.1.2.2 About Modifying Object Classes
This section discusses the types of modifications you can make to an existing object
class. You can perform modifications through Oracle Directory Services Manager and
through the command-line tools.
You can make these changes to an object class:
■Change a mandatory attribute into an optional attribute
■Add optional attributes
■Add additional superclasses
■Convert abstract object classes into structural or auxiliary object classes unless the
abstract object class is a superclass to another abstract object class
When you modify object classes, keep these guidelines in mind:
■You cannot modify an object class that is part of the standard LDAP schema. You
can, however, modify user-defined object classes.
■If existing object classes do not have the attributes you need, you can create an
auxiliary object class and associate the needed attributes with that object class.
■You cannot add additional mandatory attributes to an existing object class.
■You should not modify object classes in the base schema.
■You cannot remove attributes or superclasses from an existing object class.
■You cannot convert structural object classes to other object class types.
■You should not modify an object class if there are entries already associated with
it.
20.1.2.3 About Deleting Object Classes
There are also some limitations on deleting object classes:
■You cannot delete object classes from the base schema.
■You can delete object classes that are not in the base schema if they are not directly
or indirectly referenced by other schema components. For example, there may be
some directory entries referring to these object classes. Deleting these object
classes renders these entries inaccessible.
20.1.3 Understanding Attributes
You must understand attributes from a conceptual standpoint before attempting
operations involving attributes.
See Also: Section 3.5.1, "Subclasses, Superclasses, and Inheritance"
for a conceptual discussion of these terms

Introduction to Managing Directory Schema
Managing Directory Schema 20-5
In most cases, the attributes available in the base schema will suit the needs of your
organization. However, if you decide to use an attribute not in the base schema, you
can add a new attribute or modify an existing one.
By default, attributes are multivalued. You can specify an attribute as single-valued by
using either Oracle Directory Services Manager or command-line tools.
20.1.3.1 About Adding Attributes
The rules for adding attributes are:
■The name and the object identifier of an attribute must be unique across all the
schema components.
■Syntax and matching rules must agree.
■Any super attributes must already exist.
■The length of an attribute name must not exceed 127 characters.
20.1.3.2 About Modifying Attributes
The rules for modifying attributes are:
■The name and the object identifier of an attribute must be unique across all the
schema components.
■The syntax of an attribute cannot be modified.
■A single-valued attribute can be made multi-valued, but a multi-valued attribute
cannot be made single-valued.
■You cannot modify or delete base schema attributes.
20.1.3.3 About Deleting Attributes
The rules for deleting attributes are:
■You can delete only user-defined attributes. Do not delete attributes from the base
schema.
■You can delete any attribute that is not referenced directly or indirectly by some
other schema component.
If you delete an attribute that is referenced by any entry, that entry will no longer
be available for directory operations.
Note: The maximum length of a non-binary attribute value is 4000
bytes.
See Also:
■Section 3.4, "Attributes" for a conceptual discussion of
attributes
■Section 3.4.6, "Attribute Options" for information about
attribute options
■"Attribute Syntax" inOracle Fusion Middleware Reference for
Oracle Identity Management for information about using syntax
to specify the size of the attribute value

Introduction to Managing Directory Schema
20-6 Oracle Fusion Middleware Administrator's Guide for Oracle Internet Directory
20.1.3.4 About Indexing Attributes
Oracle Internet Directory uses indexes to make attributes available for searches. When
Oracle Internet Directory is installed, the entry cn=catalogs lists available attributes
that can be used in a search.
As of Oracle Internet Directory 11g Release 1 (11.1.1.6.0), a new autocatalog feature is
enabled by default in fresh installs. You can also enable it if you have upgraded from a
previous release. When this feature is enabled, Oracle Internet Directory automatically
indexes attributes when you search for them. You can disable the feature by setting
the orclautocatalog attribute of the DSA configuration entry to 0. To modify this
attribute from the command line, see Section 9.4.1, "Setting System Configuration
Attributes by Using ldapmodify." To modify this attribute by using Oracle Enterprise
Manager Fusion Middleware Control, see Section 9.2.2, "Configuring Shared
Properties."
If the autocatalog feature is not enabled, and you want to use additional attributes in
search filters, you must add them to the catalog entry.
You can index an attribute or drop an index from an attribute by using either
ldapmodify or or catalog. You can also manage attribute indexes by using Oracle
Directory Services Manager.
Note: The attribute page in the Schema tab in Oracle Directory
Services Manager includes a Referenced By section that lists the
object classes that directly reference an attribute
See Also: ""Attribute Syntax" in Oracle Fusion Middleware Reference
for Oracle Identity Management for information about using syntax to
specify the size of the attribute value

Introduction to Managing Directory Schema
Managing Directory Schema 20-7
20.1.4 Extending the Number of Attributes Associated with Entries
You can extend the number of attributes for entries. The method you use depends on
whether the entries already exist.
If the entry does not yet exist, you can extend the number of attributes before creating
the entry in the directory.
For an existing entry, there are two ways to extend the attributes associated with it.
Notes:
■When autocatalog is disabled, if you attempt to perform a search
with a non-indexed attribute specified as a required attribute, the
server returns a Function not implemented or DSA
unwilling to perform error.
■Autocatalog is performed only when a valid user connects to
Oracle Internet Directory. Anonymous bind search does not
trigger the autocatalog feature. Also, this event is audited.
■When two or more clients search the same non-cataloged attribute
at the same time, only one thread initiates the catalog process. The
other threads return LDAP error 53 and the additional
information: OID-5018: Cataloging for attribute is
already in progress. The cataloging thread waits for the
cataloging (separate) process to finish or until configured
orclmaxserverresptime. When orclmaxserverresptime
has elapsed, thecataloging thread returns LDAP error 53 and the
additional info: "OID-5018: Cataloging for attribute
is already in progress.
■The catalog of each attribute is created once only on every
directory so this is a one time effect for every non-cataloged
attribute. If a search is interrupted due to a client side time-out or
an explicit kill command, the in-progress catalog will continue
and the subsequent searches on same attribute will succeed once
the catalog processing completes.
■You can use Oracle Directory Services Manager to index an
attribute only if it has not been used yet. You cannot use Oracle
Directory Services Manager to index an attribute that is already in
use. To index an attribute that is in use, use ldapmodify as
described in Section 20.3.7, "Indexing an Attribute by Using
ldapmodify," or the Catalog Management tool, as described in
Section 20.3.9, "Indexing an Attribute by Using the Catalog
Management Tool."
Notes: You can index only those attributes that have:
■An equality matching rule
■Matching rules supported by Oracle Internet Directory as listed in
"Attribute Matching Rules" in Oracle Fusion Middleware Reference
for Oracle Identity Management
■Less than 128 characters in their names

Introduction to Managing Directory Schema
20-8 Oracle Fusion Middleware Administrator's Guide for Oracle Internet Directory
■Add names of object classes to the list in the objectclass attribute for each
entry. If your directory is relatively small, then this can be a desirable method
because it enables searches for entries based on that attribute. However, if your
directory is large, then entering the names of object classes to the objectclass
attribute can be very painstaking.
■Use content rules. This may be a more efficient way to extend the content of
entries in a large directory.
This section contains these topics:
■Section 20.1.4.1, "Extending the Number of Attributes before Creating Entries in
the Directory"
■Section 20.1.4.2, "Extending the Number of Attributes for Existing Entries by
Creating an Auxiliary Object Class"
■Section 20.1.4.3, "Extending the Number of Attributes for Existing Entries by
Creating a Content Rule"
20.1.4.1 Extending the Number of Attributes before Creating Entries in the
Directory
At installation, Oracle Internet Directory provides standard LDAP object classes and
several proprietary object classes. You cannot add mandatory attributes to the sets of
attributes belonging to these predefined object classes. If a given object class does not
contain all the attributes that you want for an entry, then you can do one of the
following:
■Define a new (base) object class
■Define an object subclass
20.1.4.2 Extending the Number of Attributes for Existing Entries by Creating an
Auxiliary Object Class
You can create an auxiliary object class containing the additional attributes you want
for your entry, and then associate that auxiliary object class with the entry. You
associate the auxiliary object class with the entry by specifying it in the objectclass
attribute for the entry.
See Also:
■"Oracle Identity Management LDAP Object Classes" in Oracle
Fusion Middleware Reference for Oracle Identity Management for a
list of object classes in the schema installed with Oracle Internet
Directory
■Section 20.2.2, "Adding Object Classes by Using Oracle
Directory Services Manager" for instructions on how to define a
new object class or object subclass
See Also:
■Section 20.2.2, "Adding Object Classes by Using Oracle
Directory Services Manager" for instructions on creating
auxiliary object classes
■Chapter 13, "Managing Directory Entries" for instructions on
associating an object class with an entry

Introduction to Managing Directory Schema
Managing Directory Schema 20-9
20.1.4.3 Extending the Number of Attributes for Existing Entries by Creating a
Content Rule
A content rule, following your specifications, determines the kind of content allowed
in any entry that is associated with a particular structural object class. For example,
you can specify that any entry associated with the person object class must have, in
addition to the attributes in that object class, other attributes as well. The additional
attributes can be those of an auxiliary object class, and they can be either mandatory or
optional.
Whereas you must list auxiliary classes in the entry—which can be an administrative
burden—you do not need to list content rules in the entry.
In addition to the structural object class to which it applies, a content rule can also
indicate:
■Auxiliary object classes allowed for entries governed by the rule
■Mandatory attributes, in addition to those called for by the structural and
auxiliary object classes, required for entries governed by the DIT content rule
■Optional attributes permitted for entries governed by the DIT content rule, in
addition to those called for by structural and auxiliary object classes
This section tells you how to manage content rules by using Oracle Directory Services
Manager and command-line tools.
During the process of defining a new content rule, the directory server validates the
syntax and ensures that the attributes and object classes listed in the content rule have
been defined in the directory.
Content rules can be specified for structural object classes only. The name of the object
class is case-insensitive.
You can specify more than one content rule for each structural object class provided
the content rules have different labels associated with them.
To modify an existing definition of a content rule, the client must first delete the
existing definition and then add the new definition. Simple replacement of a content
rule by using the replace command is not allowed.
To delete a content rule, the client must specify only the structural object class and the
alphanumeric object identifier of the content rule. Optionally, the client can also
specify the associated version of the content rule to be deleted.
20.1.4.4 Rules for Creating and Modifying Content Rules
Content rules are defined as values of the DITContentRule attribute in the
subschema subentry (cn=subschemasubentry). They must conform to these rules:
■The structural object class of the entry identifies the content rule applicable for the
entry. If no content rule is present for a structural object class, then entries
associated with that object class contain only the attributes permitted by the
structural object class definition.
■Because a content rule is associated with a structural object class, all entries of the
same structural object class have the same content rule regardless of their location
in the DIT.
■The content of an entry must be consistent with the object classes listed in the
objectClass attribute of that entry. More specifically:
–Mandatory attributes of object classes listed in the objectClass attribute
must always be present in the entry.

Introduction to Managing Directory Schema
20-10 Oracle Fusion Middleware Administrator's Guide for Oracle Internet Directory
–Optional attributes of auxiliary object classes indicated by the content rule can
also be present even if the objectClass attribute does not list these auxiliary
object classes.
20.1.4.5 Schema Enforcement When Using Content Rules
When validating an object for schema consistency, the directory server uses the
content rule for the structural object class of the entry. It also uses all the other object
classes listed in the entry.
If more than one content rule exists for an object class, then, when adding or
modifying an entry, or when bulkloading data, the following rules apply.
■An entry can have attributes from all the auxiliary object classes listed in the
various content rules. Not specifying an object class in the content rule does not
restrict a client from explicitly adding an auxiliary object class in directory entries.
■An entry must contain values for all the mandatory attributes listed in:
–The content rules
–The object classes associated with the entry
–The auxiliary object classes listed in the content rule applicable to the entry
■Optionally, an entry can contain values for any or all the optional attributes listed
in:
–The content rule
–The object classes listed in the entry
–The auxiliary object classes listed in the content rule applicable for the entry
■If any attribute is specified as mandatory, then it overrides any other definition
that defines it as optional.
20.1.4.6 Searches for Object Classes Listed in Content Rules
Because the auxiliary object classes listed in content rules are not listed in the
objectclass attribute for an entry, you cannot list those object classes as filters
when you search for entries. Instead, base your searches on the structural object class
that you are interested in. If you must base your search on an auxiliary object class,
then add that auxiliary object class to the objectclass attribute in the user objects
explicitly.
For example, a content rule for structural object class inetOrgPerson may specify an
auxiliary object class orclUser. However, this does not mean that every
inetOrgPerson entry in the directory contains orclUser as a value of the
objectclass attribute. As a result, the search with the filter
objectclass=orclUser fails. Instead of querying for an auxiliary object class
contained in the content rule, you should query for structural object classes—for
example, objectclass=inetOrgPerson.
To base a search on objectclass=orcluser, add orclUser as one of the values of
objectclass attribute in each entry.
See Also: Section 20.1.4.2, "Extending the Number of Attributes
for Existing Entries by Creating an Auxiliary Object Class" for
instructions on creating and managing content rules

Introduction to Managing Directory Schema
Managing Directory Schema 20-11
These considerations apply also to filters used in access control policies. If you are
using a content rule to associate additional auxiliary object classes, then use only the
structural object classes in the search filters.
20.1.5 Understanding Attribute Aliases
As of 10g (10.1.4.0.1), you can create aliases for attribute names. For example. you
could create the user-friendly alias surname for the attribute sn. After you create an
alias for an attribute name, a user can specify the alias instead of the attribute name in
an LDAP operation.
You define an alias for an attribute in the LDAP schema definition of the attribute. The
directory schema operational attribute attributeTypes has been enhanced to allow
you to include aliases in the attribute name list. In previous releases, the format for an
attribute name list was:
attributeTypes=( ObjectIdentifier NAME 'AttributeName' ... )
As of 10g (10.1.4.0.1), you may optionally specify:
attributeTypes=( ObjectIdentifier NAME ( 'AttributeName' 'Alias1' 'Alias2' ...)
... )
This is consistent with the LDAP protocol as specified by RFC 2251 and RFC 2252. In
the attribute name list, the first item is recognized as the name of the attribute and rest
of the items in the list are recognized as attribute aliases. For example, to specify the
alias surname for the attribute sn, you would change the schema definition for sn
from:
attributeTypes=( 2.5.4.4 NAME 'sn' SUP name )
to:
attributeTypes=( 2.5.4.4 NAME ( 'sn' 'surname') SUP name )
The following rules apply to attribute aliases:
■An attribute alias name must be unique throughout all the actual attribute names
and other attribute aliases across all the schema components.When you define an
attribute, the first value in the attributeTypes definition NAME field must be
the actual attribute name. You define attribute aliases in the NAME field after the
actual attribute name.
■Attribute alias names follow the same syntax rules as attribute names.
■You delete an attribute alias by redefining the attribute without the alias.
See Section 20.3, "Managing Directory Schema by Using the Command Line."
20.1.6 Object Identifier Support in LDAP Operations
Users can substitute object identifiers for attribute names in the same way as attribute
aliases.
See Also: Chapter 17, "Managing Alias Entries" for information
about alias entries.

Managing Directory Schema by Using Oracle Directory Services Manager
20-12 Oracle Fusion Middleware Administrator's Guide for Oracle Internet Directory
20.2 Managing Directory Schema by Using Oracle Directory Services
Manager
This section contains the following topics:
■Section 20.2.1, "Searching for Object Classes by Using Oracle Directory Services
Manager"
■Section 20.2.2, "Adding Object Classes by Using Oracle Directory Services
Manager"
■Section 20.2.4, "Deleting Object Classes by Using Oracle Directory Services
Manager"
■Section 20.2.5, "Viewing Properties of Object Classes by Using Oracle Directory
Services Manager"
■Section 20.2.6, "Adding a New Attribute by Using Oracle Directory Services
Manager"
■Section 20.2.7, "Modifying an Attribute by Using Oracle Directory Services
Manager"
■Section 20.2.8, "Deleting an Attribute by Using Oracle Directory Services Manager"
■Section 20.2.9, "Viewing All Directory Attributes by Using Oracle Directory
Services Manager"
■Section 20.2.10, "Searching for Attributes by Using Oracle Directory Services
Manager"
■Section 20.2.11, "Adding an Index to a New Attribute by Using Oracle Directory
Services Manager"
■Section 20.2.12, "Adding an Index to an Existing Attribute by Using Oracle
Directory Services Manager"
■Section 20.2.12, "Adding an Index to an Existing Attribute by Using Oracle
Directory Services Manager"
■Section 20.2.14, "Creating a Content Rule by Using Oracle Directory Services
Manager"
■Section 20.2.15, "Modifying a Content Rule by Using Oracle Directory Services
Manager"
■Section 20.2.16, "Viewing Matching Rules by Using Oracle Directory Services
Manager"
■Section 20.2.17, "Viewing Syntaxes by Using Oracle Directory Services Manager"
20.2.1 Searching for Object Classes by Using Oracle Directory Services Manager
To search for object classes by using Oracle Directory Services Manager:
1. Invoke Oracle Directory Services Manager and connect to the Oracle Internet
Directory server as described in Section 7.4.5, "Invoking Oracle Directory Services
Manager."
2. From the task selection bar, choose Schema.
3. Expand the Object Classes panel on the left.
4. Enter a keyword in the Search field and click Go. The list of object classes
matching the keyword is displayed in the left panel.

Managing Directory Schema by Using Oracle Directory Services Manager
Managing Directory Schema 20-13
You can use "*" and "?" as wildcards. For example, if you enter *person, the
search returns all the object classes ending with person.
Select Clear search text to dismiss the search and return to the complete list of
object classes.
20.2.2 Adding Object Classes by Using Oracle Directory Services Manager
To add object classes by using Oracle Directory Services Manager:
1. Invoke Oracle Directory Services Manager and connect to the Oracle Internet
Directory server as described in "Invoking Oracle Directory Services Manager" on
page 7-9.
2. From the task selection bar, choose Schema.
3. Expand the Object Classes panel on the left and, in the toolbar, choose Create. The
New Object Class dialog box appears.
Alternatively, in the Object Classes panel, select an object class that is similar to
one you would like to create, and then choose Create Like. The New Object Class
dialog box displays the attributes of the selected object class. You can create the
new object class by using this one as a template.
4. In the New Object Class dialog box, enter the information in the fields.
5. Choose Create.
20.2.3 Modifying Object Classes by Using Oracle Directory Services Manager
You can add optional, but not mandatory, attributes to an object class already in use
by entries. If you add optional attributes to an object class already in use, then no
special rules apply, and they are added as empty attributes to those entries.
To modify an object class:
1. Invoke Oracle Directory Services Manager and connect to the Oracle Internet
Directory server as described in Section 7.4.5, "Invoking Oracle Directory Services
Manager."
2. From the task selection bar, choose Schema.
3. Expand the Object Classes panel on the left. Use the scroll bar to move through the
alphabetical list of object classes. You can also search for an object class as
described in Section 20.2.1, "Searching for Object Classes by Using Oracle
Directory Services Manager."
4. Click the object class you want to modify. The Object Class tab appears on the
right side of the page.
5. To add or delete a superclass or attribute, select it in the Superclass, Mandatory
Attributes, or Optional Attributes list and choose Add or Delete in the toolbar
above the list
See Also:
■Section 3.5.2, "Object Class Types"
■Section 3.5.1, "Subclasses, Superclasses, and Inheritance"
■Oracle Directory Services Manager online help for further details
about adding object classes

Managing Directory Schema by Using Oracle Directory Services Manager
20-14 Oracle Fusion Middleware Administrator's Guide for Oracle Internet Directory
Choose Make Optional in the Mandatory Attributes toolbar to make the attribute
optional.
To edit a superclass or attribute, select it in the Superclass, Mandatory Attributes,
or Optional Attributes list and choose Edit. An Object Class or Attribute dialog
appears. Use it to make changes to the superclass or attribute. In the Object Class
dialog, you can add, delete, or edit the superclass, mandatory attributes, or
optional attributes of the superclass. Click OK in each dialog after making change.
6. Choose Apply in the Object Class page to apply changes, or Revert to abandon
changes.
20.2.4 Deleting Object Classes by Using Oracle Directory Services Manager
To delete an object class by using Oracle Directory Services Manager:
1. Invoke Oracle Directory Services Manager and connect to the Oracle Internet
Directory server as described in Section 7.4.5, "Invoking Oracle Directory Services
Manager."
2. From the task selection bar, choose Schema.
3. Click + next to Object Classes to expand the Object Classes panel. Use the scroll
bar to move through the alphabetical list of Object Classes.
4. Select the object class you want to delete.
5. Choose Delete from the toolbar, then click Delete in the confirmation dialog.
20.2.5 Viewing Properties of Object Classes by Using Oracle Directory Services
Manager
To view all object classes in the schema:
1. Invoke Oracle Directory Services Manager and connect to the Oracle Internet
Directory server as described in Section 7.4.5, "Invoking Oracle Directory Services
Manager."
See Also:
■Section 3.5, "Object Classes"
■Section 3.5.1, "Subclasses, Superclasses, and Inheritance"
Note: You can add attributes to an auxiliary object class or a
user-defined structural object class.
See Also: Section 20.3.3, "Adding a New Attribute to an Auxiliary
or User-Defined Object Class by Using Command-Line Tools" for
an example of adding attributes to an auxiliary object class
Caution: Oracle recommends that you not delete object classes
from the base schema. If you delete an object class that is referenced
by any entries, those entries then become inaccessible.
Deleting object classes from the base schema might also cause
Oracle Directory Services Manager to malfunction.

Managing Directory Schema by Using Oracle Directory Services Manager
Managing Directory Schema 20-15
2. From the task selection bar, choose Schema.
3. Click + next to Object Classes to expand the Object Classes panel. Use the scroll
bar to move through the alphabetical list of Object Classes.
4. Click the Object Class you want to view. The Object Class tab appears on the right
side of the page.
5. To see more detail about a superclass or attribute of the object class, select the item
and click Edit. Click Cancel to return to the object class panel
20.2.6 Adding a New Attribute by Using Oracle Directory Services Manager
To add a new attribute:
1. Invoke Oracle Directory Services Manager and connect to the Oracle Internet
Directory server as described in Section 7.4.5, "Invoking Oracle Directory Services
Manager."
2. From the task selection bar, choose Schema.
3. If necessary, expand the Attributes pane, on the left, then choose the Create
button in the toolbar. The New Attribute Type dialog box appears.
Alternatively, in the Attributes panel, select an attribute that is similar to one you
would like to create, and then choose Create Like. The New Attribute Type dialog
box displays the attributes of the selected attribute. You can create the new
attribute by using this one as a template.
4. Enter values in each of the fields.
5. Choose Apply.
20.2.7 Modifying an Attribute by Using Oracle Directory Services Manager
To modify an attribute by using Oracle Directory Services Manager:
1. Invoke Oracle Directory Services Manager and connect to the Oracle Internet
Directory server as described in Section 7.4.5, "Invoking Oracle Directory Services
Manager."
2. From the task selection bar, choose Schema.
3. In the Attributes panel, select an attribute that you would like to modify. The
attribute page appears on the right.
4. Modify or add information in editable fields, if any, in the attribute tab.
5. Choose Apply.
Tip: Because equality, syntax, and matching rules are numerous
and complex, it may be simpler to copy these characteristics from a
similar existing attribute.
Notes: To use this attribute, remember to declare it to be part of
the attribute set for an object class. You do this in the Object Classes
pane. For further instructions, seeSection 20.2.3, "Modifying Object
Classes by Using Oracle Directory Services Manager" and
Section 20.3.4, "Modifying Object Classes by Using Command-Line
Tools."

Managing Directory Schema by Using Oracle Directory Services Manager
20-16 Oracle Fusion Middleware Administrator's Guide for Oracle Internet Directory
20.2.8 Deleting an Attribute by Using Oracle Directory Services Manager
To delete an attribute:
1. Invoke Oracle Directory Services Manager and connect to the Oracle Internet
Directory server as described in Section 7.4.5, "Invoking Oracle Directory Services
Manager."
2. From the task selection bar, choose Schema.
3. In the Attributes panel, select an attribute that you would like to delete.
4. Choose Delete from the toolbar in the left panel, then click Delete in the
confirmation dialog.
20.2.9 Viewing All Directory Attributes by Using Oracle Directory Services Manager
To view attributes by using Oracle Directory Services Manager:
1. Invoke Oracle Directory Services Manager and connect to the Oracle Internet
Directory server as described in Section 7.4.5, "Invoking Oracle Directory Services
Manager."
2. From the task selection bar, choose Schema.
3. Expand Attributes.
4. Use the scrollbar in the Attributes panel to move through the alphabetical list.
20.2.10 Searching for Attributes by Using Oracle Directory Services Manager
To search for attributes by using Oracle Directory Services Manager:
1. Invoke Oracle Directory Services Manager and connect to the Oracle Internet
Directory server as described in Section 7.4.5, "Invoking Oracle Directory Services
Manager."
2. From the task selection bar, select Schema.
3. Expand the Attributes list in the left pane.
4. Enter a search term in the Search field in the left pane. You can use an asterisk (*)
or question mark (?) as a wildcard. Click the Go icon or press Enter on your
keyboard.
5. The results of your search appear in the list in the left pane. To dismiss the search
and return to the complete list of attributes, click the Clear search text icon.
Caution: Oracle recommends that you not delete attributes or
object classes from the base schema.
Deleting attributes or object classes from the base schema might
cause Oracle Directory Services Manager to malfunction.
See Also: Section 20.2.5, "Viewing Properties of Object Classes by
Using Oracle Directory Services Manager" for instructions about
how to view attributes for a specific object class.

Managing Directory Schema by Using Oracle Directory Services Manager
Managing Directory Schema 20-17
20.2.11 Adding an Index to a New Attribute by Using Oracle Directory Services
Manager
To add an index to an attribute:
1. Create an attribute as described in Section 20.2.6, "Adding a New Attribute by
Using Oracle Directory Services Manager" or in Section 20.3.5, "Adding and
Modifying Attributes by Using ldapmodify."
2. In the New Attribute Type dialog box, select the Indexed box.
20.2.12 Adding an Index to an Existing Attribute by Using Oracle Directory Services
Manager
You can use Oracle Directory Services Manager to add an index to an existing attribute
only if that attribute is not in use yet.
To add an index to an existing attribute:
1. Invoke Oracle Directory Services Manager and connect to the Oracle Internet
Directory server as described in Section 7.4.5, "Invoking Oracle Directory Services
Manager."
2. From the task selection bar, select Schema.
3. Select an attribute that is not currently indexed that you want to add the index to.
4. Click the The attribute will be cataloged/decataloged icon. When the Confirm
Dialog appears, click Confirm.
5. The Indexed box indicates that the attribute is indexed.
20.2.13 Dropping an Index from an Attribute by Using Oracle Directory Services
Manager
To drop an index from an attribute:
1. Invoke Oracle Directory Services Manager and connect to the Oracle Internet
Directory server as described in Section 7.4.5, "Invoking Oracle Directory Services
Manager."
2. From the task selection bar, select Schema.
3. Select an attribute that is currently indexed that you want to drop the index from.
4. Click the The attribute will be cataloged/decataloged icon. When the Confirm
Dialog appears, click Confirm.
5. The Indexed box indicates that the attribute is no longer indexed.
20.2.14 Creating a Content Rule by Using Oracle Directory Services Manager
To create a content rule:
1. Invoke Oracle Directory Services Manager and connect to the Oracle Internet
Directory server as described in Section 7.4.5, "Invoking Oracle Directory Services
Manager."
2. From the task selection bar, choose Schema.
3. In the left pane, expand the Content Rules list.
4. Choose Create. The New Content Rule dialog box appears.

Managing Directory Schema by Using Oracle Directory Services Manager
20-18 Oracle Fusion Middleware Administrator's Guide for Oracle Internet Directory
5. In the New Content Rule dialog box, add information in the Structural Object
Class and Object ID fields. Optionally, add a label.
Choose the Add, Delete, or Edit icons in the toolbar above the Auxiliary Classes,
Mandatory Attributes, or Optional Attributes list to add or delete an item. When
adding, select the auxiliary class, mandatory attribute or optional attribute from
the dialog. Use the search function if necessary.
6. Alternatively, in the Content Rules panel, select a content rule that is similar to
one you would like to create, and then choose Create Like. The New Content Rule
dialog box displays the attributes of the selected content rule. You can create the
new content rule by using this one as a template.
7. Choose OK to add the content rule.
20.2.15 Modifying a Content Rule by Using Oracle Directory Services Manager
To modify a content rule:
1. Invoke Oracle Directory Services Manager and connect to the Oracle Internet
Directory server as described in Section 7.4.5, "Invoking Oracle Directory Services
Manager."
2. From the task selection bar, choose Schema.
3. In the left pane, expand the Content Rules list.
4. Select the content rule you want to modify. You can search for a content rule by
entering a keyword in the search field, in the same way you search for object
classes. See Section 20.2.1, "Searching for Object Classes by Using Oracle Directory
Services Manager."
5. Modify values in the appropriate fields in the content rule tab.
Choose the Add, Delete, or Edit icons in the toolbar above the Auxiliary Classes,
Mandatory Attributes, or Optional Attributes list to add or delete an item. When
adding, select the auxiliary class, mandatory attribute or optional attribute from
the dialog. Use the search function if necessary
6. Choose Apply to make the changes effective or choose Revert to abandon the
changes.
20.2.16 Viewing Matching Rules by Using Oracle Directory Services Manager
1. Invoke Oracle Directory Services Manager and connect to the Oracle Internet
Directory server as described in Section 7.4.5, "Invoking Oracle Directory Services
Manager."
2. From the task selection bar, choose Schema.
3. Expand the Matching Rules list. Matching rules are shown in the list.
4. You can search for a matching rule by entering a keyword in the search field, in
the same way you search for object classes. See Section 20.2.1, "Searching for
Object Classes by Using Oracle Directory Services Manager."
5. Select a matching rule to see its details in the matching rule tab page on the right.
Note: Matching rules cannot be modified.

Managing Directory Schema by Using the Command Line
Managing Directory Schema 20-19
20.2.17 Viewing Syntaxes by Using Oracle Directory Services Manager
To view syntaxes by using Oracle Directory Services Manager:
1. Invoke Oracle Directory Services Manager and connect to the Oracle Internet
Directory server as described in Section 7.4.5, "Invoking Oracle Directory Services
Manager."
2. From the task selection bar, choose Schema.
3. Expand the Syntaxes list. Syntax names are shown in the list.
4. Select a syntax to see its details in the syntax tab page on the right.
20.3 Managing Directory Schema by Using the Command Line
This section contains the following topics:
■Section 20.3.1, "Viewing the Schema by Using ldapsearch"
■Section 20.3.2, "Adding a New Object Class by Using Command-Line Tools"
■Section 20.3.3, "Adding a New Attribute to an Auxiliary or User-Defined Object
Class by Using Command-Line Tools"
■Section 20.3.4, "Modifying Object Classes by Using Command-Line Tools"
■Section 20.3.5, "Adding and Modifying Attributes by Using ldapmodify"
■Section 20.3.6, "Deleting Attributes by Using ldapmodify"
■Section 20.3.7, "Indexing an Attribute by Using ldapmodify"
■Section 20.3.8, "Dropping an Index from an Attribute by Using ldapmodify"
■Section 20.3.9, "Indexing an Attribute by Using the Catalog Management Tool"
■Section 20.3.10, "Adding a New Attribute With Attribute Aliases by Using the
Command Line"
■Section 20.3.11, "Adding or Modifying Attribute Aliases in Existing Attributes by
Using the Command Line"
■Section 20.3.12, "Deleting Attribute Aliases by Using the Command Line"
■Section 20.3.13, "Using Attribute Aliases with LDAP Commands"
■Section 20.3.14, "Managing Content Rules by Using Command-Line Tools"
■Section 20.3.15, "Viewing Matching Rules by Using ldapsearch"
■Section 20.3.16, "Viewing Syntaxes by Using by Using ldapsearch"
20.3.1 Viewing the Schema by Using ldapsearch
You can write the schema to a file by typing:
ldapsearch -h OID_host -p OID_port -q -L -D "cn=orcladmin" \
-b "cn=subschemasubentry" -s base "objectclass=*" > schema.ldif
Note: Syntaxes cannot be modified.

Managing Directory Schema by Using the Command Line
20-20 Oracle Fusion Middleware Administrator's Guide for Oracle Internet Directory
20.3.2 Adding a New Object Class by Using Command-Line Tools
In this example, an LDIF input file, new_object_class.ldif, contains data similar
to this:
dn: cn=subschemasubentry
changetype: modify
add: objectclasses
objectclasses: ( 2.16.840.1.113894.9999.12345 NAME 'myobjclass' SUP top STRUCTURAL
MUST ( cn $ sn )
MAY ( telephonenumber $ givenname $ myattr ) )
Be sure to leave the mandatory space between the opening and closing parentheses
and the object identifier.
To load the file, enter this command:
ldapmodify -D "cn=orcladmin" -q -h myhost -p 3060 -f new_object_class.ldif
This example:
■Adds the structural object class named myobjclass
■Gives it an object identifier of 2.16.840.1.113894.9999.12345.
■Specifies top as its superclass
■Specifies cn and sn as mandatory attributes
■Allows telephonenumber, givenname, and myattr as optional attributes
Note that all the attributes mentioned must exist before the execution of the command.
To create an abstract object class, follow the previous example, replacing the word
STRUCTURAL with the word ABSTRACT.
20.3.3 Adding a New Attribute to an Auxiliary or User-Defined Object Class by Using
Command-Line Tools
To add a new attribute to either an auxiliary object class or a user-defined structural
object class, use ldapmodify. This example deletes the old object class definition and
adds the new definition in a compound modify operation. The change is committed by
the directory server in one transaction. Existing data is not affected. The input file
should be as follows:
dn: cn=subschemasubentry
changetype: modify
delete: objectclasses
objectclasses: old value
-
add: objectclasses
objectclasses: new value
For example, to add the attribute changes to the existing object class country, the
input file would be:
dn: cn=subschemasubentry
changetype: modify
delete: objectclasses
objectclasses:
( 2.16.840.1.113894.9999.12345 NAME 'country' SUP top STRUCTURAL MUST c MAY
( searchGuide $ description ) )
-
add: objectclasses

Managing Directory Schema by Using the Command Line
Managing Directory Schema 20-21
objectclasses:
( 2.16.840.1.113894.9999.12345 NAME 'country' SUP top STRUCTURAL MUST c MAY
( searchGuide $ description $ changes ) )
To load the file, enter this command:
ldapmodify -D "cn=orcladmin" -q -h myhost -p 3060 -f new_attribute.ldif
20.3.4 Modifying Object Classes by Using Command-Line Tools
To add or modify schema components, use ldapmodify.
20.3.5 Adding and Modifying Attributes by Using ldapmodify
To add a new attribute to the schema by using ldapmodify, type a command similar
to the following at the system prompt:
ldapmodify -D "cn=orcladmin" -q -h host -p port -f ldif_file_name
The LDIF file contains data similar to this:
dn: cn=subschemasubentry
changetype: modify
add: attributetypes
attributetypes: ( 1.2.3.4.5 NAME 'myattr' SYNTAX
'1.3.6.1.4.1.1466.115.121.1.38' )
To specify an attribute as single-valued, include in the attribute definition entry in the
LDIF file the keyword SINGLE-VALUE with surrounding white space.
You can find a given syntax Object ID by using either Oracle Directory Services
Manager or the ldapsearch command line tool.
20.3.6 Deleting Attributes by Using ldapmodify
To delete an attribute by using ldapmodify, type a command similar to the following
at the system prompt:
ldapmodify -D "cn=orcladmin" -q -h host -p port -f ldif_file_name
The LDIF file contains data similar to this:
dn: cn=subschemasubentry
See Also: The ldapmodify command-line tool reference in
Oracle Fusion Middleware Reference for Oracle Identity Management
See Also:
■The ldapmodify command-line tool reference in Oracle Fusion
Middleware Reference for Oracle Identity Management for a
detailed explanation of ldapmodify and its options
■Section 20.3.16, "Viewing Syntaxes by Using by Using
ldapsearch" for instructions on how to view syntaxes by using
either Oracle Directory Services Manager or ldapsearch
Note: You can delete only user-defined attributes. Do not delete
attributes from the base schema.

Managing Directory Schema by Using the Command Line
20-22 Oracle Fusion Middleware Administrator's Guide for Oracle Internet Directory
changetype: modify
delete: attributetypes
attributetypes: ( 1.2.3.4.5 NAME 'myattr' SYNTAX
'1.3.6.1.4.1.1466.115.121.1.38' )
You can find a given syntax Object ID by using either Oracle Directory Services
Manager or the ldapsearch command line tool.
20.3.7 Indexing an Attribute by Using ldapmodify
As of Oracle Internet Directory 11g Release 1 (11.1.1.6.0) a new autocatalog feature is
enabled by default in fresh installs. You can also enable it if you have upgraded from
a previous release. When this feature is enabled, Oracle Internet Directory
automatically invokes the catalog command to index attributes when you search for
them. If the autocatalog feature is not enabled, and you want to use previously
uncataloged attributes in search filters, you must add them to the catalog entry, as in
previous releases.
You can add an attribute to the catalog entry by using ldapmodify.
To add an attribute, import an LDIF file by using ldapmodify. For example, to index
the attribute displayName, import the following LDIF file by using ldapmodify:
dn: cn=catalogs
changetype: modify
add: orclindexedattribute
orclindexedattribute: displayName
Type a command similar to the following at the system prompt:
ldapmodify -D "cn=orcladmin" -q -h host -p port -f ldif_file_name
To index the attribute, the ldapmodify command invokes the Catalog Management
tool, catalog. For information about that tool, see Section 15.7, "Creating and
Dropping Indexes from Existing Attributes by Using catalog."
20.3.8 Dropping an Index from an Attribute by Using ldapmodify
To drop an index from an attribute by using ldapmodify, specify delete in the
LDIF file. For example:
dn: cn=catalogs
changetype: modify
delete: orclindexedattribute
orclindexedattribute: displayName
See Also:
■The ldapmodify command-line tool reference in Oracle Fusion
Middleware Reference for Oracle Identity Management for a
detailed explanation of ldapmodify and its options
■Section 20.3.16, "Viewing Syntaxes by Using by Using
ldapsearch" or Section 20.2.17, "Viewing Syntaxes by Using
Oracle Directory Services Manager" for instructions on how to
view syntaxes
See Also: The ldapmodify command-line tool reference in
Oracle Fusion Middleware Reference for Oracle Identity Management

Managing Directory Schema by Using the Command Line
Managing Directory Schema 20-23
20.3.9 Indexing an Attribute by Using the Catalog Management Tool
You can use the Catalog Management tool instead of ldapmodify to index an
attribute and to drop an index from an attribute. See Section 15.7, "Creating and
Dropping Indexes from Existing Attributes by Using catalog."
20.3.10 Adding a New Attribute With Attribute Aliases by Using the Command Line
You add, modify, or delete attribute aliases by creating an LDIF file, then using
ldapmodify with the following syntax:
ldapmodify -D "cn=orcladmin" -q -h host -p port -f ldif_file_name
The following LDIF file adds the attribute myattr with the attribute aliases
myalias1 and myalias2:
dn: cn=subschemasubentry
changetype: modify
add: attributetypes
attributetypes: ( 1.2.3.4.5 NAME ( 'myattr' 'myalias1' 'myalias2' ) SYNTAX
'1.3.6.1.4.1.1466.115.121.1.38' )
20.3.11 Adding or Modifying Attribute Aliases in Existing Attributes by Using the
Command Line
The following LDIF file adds the attribute aliases surname and mysurName to the
existing attribute sn:
dn: cn=subschemasubentry
changetype: modify
delete: attributeTypes
attributeTypes: ( 2.5.4.4 NAME 'sn' SUP name )
-
add: attributeTypes
attributeTypes: ( 2.5.4.4 NAME ( 'sn' 'surname' 'mysurName' ) SUP name )
Type a command similar to the following at the system prompt:
ldapmodify -D "cn=orcladmin" -q -h host -p port -f ldif_file_name
See Also: The catalog command-line tool reference in Oracle
Fusion Middleware Reference for Oracle Identity Management
Note: Unless you are absolutely sure that the indexes were not
created by the base schema that was installed with Oracle Internet
Directory, be careful not to use the catalog delete=T option to
remove indexes from attributes. Removing indexes from base
schema attributes can adversely impact the operation of Oracle
Internet Directory.
Note: DN is not an attribute. You cannot define dn in the schema.
Therefore you cannot create an alias for dn.

Managing Directory Schema by Using the Command Line
20-24 Oracle Fusion Middleware Administrator's Guide for Oracle Internet Directory
20.3.12 Deleting Attribute Aliases by Using the Command Line
Use the ldapmodify command to delete attribute aliases. The following LDIF file
deletes the attribute alias mysurName but not the attribute alias surName from the
attribute sn:
dn: cn=subschemasubentry
changetype: modify
delete: attributeTypes
attributeTypes: ( 2.5.4.4 NAME ( 'sn' 'surname' 'mysurName' ) SUP name )
-
add: attributeTypes
attributeTypes: ( 2.5.4.4 NAME ( 'sn' 'surname' ) SUP name )
The following LDIF file deletes both attribute aliases, surname and mysurName, from
the attribute sn:
dn: cn=subschemasubentry
changetype: modify
delete: attributeTypes
attributeTypes: ( 2.5.4.4 NAME ( 'sn' 'surname' 'mysurName' ) SUP name )
-
add: attributeTypes
attributeTypes: ( 2.5.4.4 NAME 'sn' SUP name )
20.3.13 Using Attribute Aliases with LDAP Commands
After you define attribute aliases in the LDAP schema, users can substitute the aliases
for attribute names in LDAP operations. The following examples show the commands
to use and the results to expect:
■Section 20.3.13.1, "Using Attribute Aliases with ldapsearch"
■Section 20.3.13.2, "Using Attribute Aliases with ldapadd"
■Section 20.3.13.3, "Using Attribute Aliases with ldapmodify"
■Section 20.3.13.4, "Using Attribute Aliases with ldapdelete"
■Section 20.3.13.5, "Using Attribute Aliases with ldapmoddn"
Table 20–1 shows the aliases used in the examples and the attributes names they
represent:
Table 20–1 Attribute Aliases Used in Examples
Alias Attribute Name
userid uid
organizationalunit ou
country c
organization o
surname sn
commonname cn
phone telephonenumber

Managing Directory Schema by Using the Command Line
Managing Directory Schema 20-25
20.3.13.1 Using Attribute Aliases with ldapsearch
The LDAP server recognizes attribute aliases in the search filter string, in the base DN,
and in the required attributes list in ldapsearch operations. The search result
contains the actual attribute names, unless the user explicitly asks for an alias using
the required attributes list. For example, suppose the user specifies the following
search, using the aliases organizationalUnit, country, and organization in
the base DN and the alias surname in the filter string:
ldapsearch -p 3060 -h myhost \
-b "organizationalUnit=dev,country=us,organization=myorg" \
-s sub "surname=brown"
The search returns a result similar to this:
uid=mbrown,ou=dev,c=us,o=myorg
uid=mbrown
sn=Brown
cn=Mark Brown
telephonenumber;office=444006
telephonenumber;mobile=555006
objectclass=organizationalPerson
objectclass=top
objectclass=person
Now suppose the user specifically asks for the aliases surname, commonname, and
userid by including them in a required attributes list, like this:
ldapsearch -p 3060 -h myhost \
-b "organizationalUnit=dev,country=us,organization=myorg" \
-s sub "surname=brown" surname commonname userid phone
Because the user specifically included the aliases, the search returns a result similar to
this:
uid=mbrown,ou=dev,c=us,o=myorg
surname=Brown
commonname=Mark Brown
userid=mbrown
phone;office=444006
phone;mobile=555006
20.3.13.2 Using Attribute Aliases with ldapadd
The LDAP server recognizes attribute aliases in place of attribute names during the
add operation. When the LDAP server stores the entry, it replaces the alias with the
actual attribute name.
The command-line format is:
ldapadd -h host -p port -D cn=orcladmin -q -f ldif_file_name
The user could provide an LDIF file like this:
dn: userid=mbrown,organizationalUnit=dev,country=us,organization=myorg
objectclass: account
objectclass: organizationalPerson
userID: mbrown
surname: Brown
commonName: Mark Brown
userpassword: password
phone;office: 444006

Managing Directory Schema by Using the Command Line
20-26 Oracle Fusion Middleware Administrator's Guide for Oracle Internet Directory
phone;mobile: 555006
The entry is stored as if the file contained the attribute names instead of the aliases. On
subsequent LDAP searches, however, the DN is returned as it was entered when
added or modified:
dn: userid=mbrown,organizationalUnit=dev,country=us,organization=myorg
This is standard behavior for LDAP search results. The DN is always returned with
the same format that was used when the entry was created.
20.3.13.3 Using Attribute Aliases with ldapmodify
The LDAP server recognizes attribute aliases in place of attribute names during the
modify operation.
The command-line format is:
ldapmodify -D "cn=orcladmin" -q -h host -p port -f ldif_file_name
The user could provide an LDIF file like this:
dn:
userid=mbrown,organizationalUnit=dev,country=us,organization=myorg
changetype: modify
replace: surname
surname: davis
The entry is stored as if the file contained the attribute names instead of the aliases. On
subsequent LDAP searches, however, the DN is returned as it was entered when
added or modified:
dn: userid=mbrown,organizationalUnit=dev,country=us,organization=myorg
This is standard behavior for LDAP search results. The DN is always returned with
the same format that was used when the entry was created.
20.3.13.4 Using Attribute Aliases with ldapdelete
The LDAP server recognizes attribute aliases in the DN provided for delete
operations. For example, suppose the user provides a request like this, with the aliases
userid, organizationalUnit, country, and organization in the search filter:
ldapdelelete -D "cn=orcladmin" -q -p 3060 \
-h myhost "userid=mbrown,organizationalUnit=dev,country=us,organization=myorg"
The server deletes the entry as if the user had typed:
ldapdelelete -D "cn=orcladmin" -q -p 3060 \
-h myhost "uid=mbrown,ou=dev,c=us,o=myorg"
20.3.13.5 Using Attribute Aliases with ldapmoddn
The LDAP server recognizes attribute aliases in the DN, the new RDN, and the new
parent DN options. For example, suppose the user types the command line:
ldapmoddn -D "cn=orcladmin" -q \
-b "userid=mbrown,organizationalUnit=dev,country=us,organization=myorg"\
-R "userid=mdavis"
The LDAP server interpret the command line as if the user had typed
ldapmoddn -D "cn=orcladmin" -q -b "uid=mbrown,ou=dev,c=us,o=myorg" \

Managing Directory Schema by Using the Command Line
Managing Directory Schema 20-27
-R "uid=mdavis"
The entry is stored as if the file contained the attribute names instead of the aliases. On
subsequent LDAP searches, however, the DN is returned as it was entered when
added or modified:
dn: userid=mbrown,organizationalUnit=dev,country=us,organization=myorg
This is standard behavior for LDAP search results. The DN is always returned with
the same format that was used when the entry was created.
20.3.14 Managing Content Rules by Using Command-Line Tools
The format of a content rule is:
DITContentRule ::= SEQUENCE {
oids ALPHA-NUMERIC-OID,
structuralObjectClass OBJECT-CLASS,
LABEL CONTENT-LABEL OPTIONAL,
auxiliaries SET (1..MAX) OF OBJECT-CLASS OPTIONAL,
mandatory SET (1..MAX) OF ATTRIBUTE OPTIONAL,
optional SET (1..MAX) OF ATTRIBUTE OPTIONAL,
precluded SET (1..MAX) OF ATTRIBUTE OPTIONAL
}
You can use ldapmodify with an LDIF file such as the following to add a content
rule:
dn: cn=subschemasubentrychangetype: modify
add: contentrules
contentrules: ( 2.16.840.1.113894.9999.1.1 OBJECTCLASS 'exampleObjClassName'
LABEL abc AUX exampleAuxObjClassName MUST businessCategory MAY ( description $
host ) )
Table 20–2 describes the parameters. Note that the attribute and object class names are
case-insensitive.
Table 20–2 Content Rule Parameters
Parameter Description
oids A unique object identifier (oids) for the content rule similar to the
one for an object class or attribute definition. It must be a unique
numeric value that begins with 2.16.840.1.113894 followed
by .9999 or a site-specific prefix.
LABEL The content label of the content rule as applied in the directory
structuralObjectClass The structural object class to which the content rule applies
auxiliaries The auxiliary object classes allowed for an entry to which the
content rule applies
mandatory User attribute types contained in an entry to which the content
rule applies. These are in addition to those mandatory attributes
that the entry contains as a result of its association with its
specified structural and auxiliary object classes.
optional User attribute types that may be contained in an entry to which
the content rule applies. These are in addition to those that the
entry may contain as a result of its association with its specified
structural and auxiliary object classes.

Managing Directory Schema by Using the Command Line
20-28 Oracle Fusion Middleware Administrator's Guide for Oracle Internet Directory
20.3.15 Viewing Matching Rules by Using ldapsearch
To view matching rules, type:
ldapsearch -L -D "cn=orcladmin" -p port -q -b "cn=subschemasubentry" -s base
"objectclass=*" matchingrules
20.3.16 Viewing Syntaxes by Using by Using ldapsearch
To view syntaxes, type:
ldapsearch -L -D "cn=orcladmin" -p port -q -b "cn=subschemasubentry" -s base
"objectclass=*" ldapsyntaxes
Note: Matching rules cannot be modified.
See Also: The ldapsearch command-line tool reference in
Oracle Fusion Middleware Reference for Oracle Identity Management
Note: Syntaxes cannot be modified.
See Also: The ldapsearch command-line tool reference in
Oracle Fusion Middleware Reference for Oracle Identity Management

21
Configuring Referential Integrity 21-1
21Configuring Referential Integrity
This chapter contains the following topics:
■Section 21.1, "Introduction to Configuring Referential Integrity"
■Section 21.2, "Enabling Referential Integrity by Using Fusion Middleware Control"
■Section 21.3, "Disabling Referential Integrity by Using Fusion Middleware
Control"
■Section 21.4, "Enabling Referential Integrity by Using the Command Line"
■Section 21.5, "Configuring Specific Attributes for Referential Integrity by Using the
Command Line"
■Section 21.6, "Disabling Referential Integrity by Using the Command Line"
■Section 21.7, "Detecting and Correcting Referential Integrity Violations"
21.1 Introduction to Configuring Referential Integrity
Referential integrity is the process of maintaining consistent relationships among sets
of data. If referential Integrity is enabled in Oracle Internet Directory, whenever you
update an entry in the directory, the server also updates other entries that refer to that
entry. For example, if you remove a user's entry from the directory, and the user is a
member of a group, the server also removes the user from the group. If referential
integrity is not enabled, the user remains a member of the group until manually
removed. Referential integrity is not enabled by default.
Referential integrity takes effect in two situations:
■Delete–When an entry is deleted, all the DN attributes that refer to this entry DN
are removed.
■Modify–When an entry's DN is modified (renamed), all the attributes that refer to
this entry DN are modified.
Beginning with 11g Release 1 (11.1.1), the Oracle Internet Directory server can enforce
referential integrity. For every LDAP add, modify, delete, and rename operation, the
server monitors the request and updates the necessary DN references.
Two configuration parameters control referential integrity: orclRIenabled and
orclRIattr.
Note: Disable referential integrity during the replication
bootstrapping process. If referential integrity is enabled,
bootstrapping fails.

Enabling Referential Integrity by Using Fusion Middleware Control
21-2 Oracle Fusion Middleware Administrator's Guide for Oracle Internet Directory
■The parameter orclRIenabled controls the referential integrity level. Values for
orclRIenabled are:
■0–Referential integrity is disabled
■1–Referential integrity is enabled for member and uniquemember attributes
only.
■2–Referential Integrity is enabled for a list of DN syntax attributes as specified
in orclRIattr and for attributes member and uniquemember.
■When orclRIenabled is set to 2, the value of the parameter orclRIattr takes
effect. The value of orclRIattr is a list of referential integrity-enabled attributes.
If referential integrity is enabled, it is strictly enforced. For example, you cannot add a
group entry whose member or uniquemember attributes are not currently part of the
DIT.
21.2 Enabling Referential Integrity by Using Fusion Middleware Control
To configure and enable referential integrity by using Oracle Enterprise Manager
Fusion Middleware Control, perform the following steps:
1. Select Administration, then Shared Properties from the Oracle Internet Directory
menu, then select General.
2. Select a value from the Referential Integrity list:
■Enabled for GroupofNames and GroupofUniqueNames
■Enabled for GroupofNames, GroupofUniqueNames, and configured DN
attributes
3. Choose Apply.
21.3 Disabling Referential Integrity by Using Fusion Middleware Control
To disable referential integrity by using Oracle Enterprise Manager Fusion
Middleware Control, perform the following steps:
1. Select Administration, then Shared Properties from the Oracle Internet Directory
menu, then select General.
2. Select Disabled from the Enable Referential Integrity list.
21.4 Enabling Referential Integrity by Using the Command Line
You enable referential integrity in the directory by using ldapmodify to change the
value of the parameter orclRIenabled in the DSA Configuration entry:
cn=dsaconfig,cn=configsets,cn=oracle internet directory.
You can set the value to either 1 or 2.
Setting a value of 1 enables referential integrity for GroupofNames and
GroupofUniqueNames.
Setting a value of 2 for orclRIenabled enables referential integrity for
GroupofNames and GroupofUniqueNames and for specific configured attributes.
The next section describes configuring specific attributes.
For example:, you would use a command line such as:

Detecting and Correcting Referential Integrity Violations
Configuring Referential Integrity 21-3
ldapmodify -D cn=orcladmin -q -p portNum -h hostname -f ldifFile
with an LDIF file such as:
dn: cn=dsaconfig, cn=configsets, cn=oracle internet directory
changetype: modify
replace: orclRIenabled
orclRIenabled: 2
Changes to orclRIenabled take effect immediately.
21.5 Configuring Specific Attributes for Referential Integrity by Using the
Command Line
When orclRIenabled is set to 2, referential integrity is enabled for GroupofNames,
GroupofUniqueNames, and for specific configured attributes.
You configure specific attributes for referential integrity by using catalog with the
arguments rienable=TRUE, add=true, and attribute=name_of_attribute.
This adds the attribute to orclRIattr, which contains the list of DN syntax attributes
to which referential integrity applies. You remove an attribute from referential
integrity by using catalog with the arguments rienable=TRUE, delete=true,
and attribute=name_of_attribute. This removes the attribute from
orclRIattr.
This example enables referential integrity for the attribute manager.
catalog connect="connect_str" add=true rienable="TRUE" attribute="manager"
This example disables referential integrity for the attribute manager.
catalog connect="connect_str" delete=true rienable="TRUE" attribute="manager"
21.6 Disabling Referential Integrity by Using the Command Line
To disable referential integrity in the directory, set the value of orclRIenabled to 0
in the DSA Configuration entry:
cn=dsaconfig,cn=configsets,cn=oracle internet directory.
21.7 Detecting and Correcting Referential Integrity Violations
When you try to enable referential integrity, if there are underlying violations in the
DIT, you get an error. You must run the oiddiag tool to look at the violations, rectify
them, and then enable referential integrity. The oiddiag tool has an option,
OidDiagDC10, to report all the referential integrity violations. in LDIF format. That
LDIF file can be used with ldapmodify tool to fix all reported entries. The steps are as
follows:
Notes:
■You cannot change the value of orclRIattr by using
ldapmodify. You must use the catalog command.
■Remember that the ORACLE_INSTANCE environment variable
must be set when you use catalog.

Detecting and Correcting Referential Integrity Violations
21-4 Oracle Fusion Middleware Administrator's Guide for Oracle Internet Directory
1. Run oiddiag with the option listdiags=true. The default output file is
ORACLE_INSTANCE/diagnostics/logs/OID/tools/oiddiag.txt.
2. Edit the output file, oiddiag.txt so that it contains only the line:
oracle.ldap.oiddiag.dc.OidDiagDC10
3. Run oiddiag with the option collect_sub=true
See Also:
■The oiddiag command reference in Oracle Fusion Middleware
Reference for Oracle Identity Management.
■The oiddiag usage message. Type:
oiddiag -help
Note: On Windows, the filename of the oiddiag command is
oiddiag.bat.

22
Managing Auditing 22-1
22Managing Auditing
This chapter covers only Oracle Internet Directory-specific information. See Oracle
Fusion Middleware Application Security Guide for complete coverage of Audit
Administration Tasks.
This chapter contains the following topics:
■Section 22.1, "Introduction to Auditing"
■Section 22.2, "Managing Auditing by Using Fusion Middleware Control"
■Section 22.3, "Managing Auditing by Using WLST"
■Section 22.4, "Managing Auditing from the Command Line"
22.1 Introduction to Auditing
This introduction contains the following topics:
■Section 22.1.1, "Configuring the Audit Store"
■Section 22.1.2, "Oracle Internet Directory Audit Configuration"
■Section 22.1.3, "Replication and Oracle Directory Integration Platform Audit
Configuration"
■Section 22.1.4, "Audit Record Fields"
■Section 22.1.5, "Audit Record Storage"
■Section 22.1.6, "Generating Audit Reports"
Auditing is the process that collects and stores information about security requests
and the outcome of those requests, thus providing an electronic trail of selected system
activity for non-repudiation purposes. Auditing can be configured to track particular
security events and management operations based on specific audit criteria. Audit
records are kept in a centralized repository (LDAP, database, or file) that allows the
creation, viewing, and storage of audit reports.As of release 11g Release 1 (11.1.1),
Oracle Internet Directory uses an audit framework that is integrated with Oracle
Fusion Middleware. Oracle Internet Directory uses this framework to audit its critical
security related operations.The features of the framework are:
■APIs for collecting audit information from AS components
■Common audit record format to be used by all AS components
■Audit repository database that collects audit records produced by components in
the enterprise. (The customer also has an option to use the Audit vault as a
repository)

Introduction to Auditing
22-2 Oracle Fusion Middleware Administrator's Guide for Oracle Internet Directory
■Administrative interface for controlling the type of information captured by the
audit facility.
Before reading this chapter, please read the auditing chapters in the Oracle Fusion
Middleware Application Security Guide.
The new Oracle Internet Directory audit framework has the following advantages:
■It uses the same record format as other Oracle Application Server components.
■Records are stored in Oracle Database tables for better performance and security.
■Records can be stored in Audit Vault for increased security.
■As administrator, you can configure the type of information captured in the audit
records by using Enterprise Manager.
■Configuration changes are effective immediately.
■An administrator can view audit records:
–In Enterprise Manager
–In summary reports based on XML Publisher
All audit configuration performed by the instance administrator is audited. This
cannot be disabled.
22.1.1 Configuring the Audit Store
You must configure an audit store to ensure that audit records are saved in a database.
See the "Configuring and Managing Auditing" chapter in Oracle Fusion Middleware
Application Security Guide for complete coverage of Audit Administration Tasks,
including:
■Managing the Audit Store
■Advanced Management of Database Store
22.1.2 Oracle Internet Directory Audit Configuration
Audit configuration for Oracle Internet Directory consists of three attributes of the
instance-specific entry:
cn=componentname,cn=osdldapd,cn=subconfigsubentry
Table 22–1 describes these attributes.
See Also: Oracle Fusion Middleware Application Security Guide for
information about configuring the audit repository and audit filters.
Table 22–1 Oracle Internet Directory Audit Configuration Attributes
Attribute Description
orclAudFilterPreset Presets are None, Low, Medium, All, and Custom, where Low
specifies Account Management, Change Password and
ModifyDataItemAttributes events and Medium specifies all
events in Low plus Failed authentication events.

Introduction to Auditing
Managing Auditing 22-3
For more information, see the Oracle Fusion Middleware Application Security Guide.
22.1.3 Replication and Oracle Directory Integration Platform Audit Configuration
Replication and Oracle Directory Integration Platform auditing can be enabled by
changing the value of the attribute orclextconfflag in the instance-specific
configuration entry. The default value is 3, which disables both replication and Oracle
Directory Integration Platform auditing. To enable both, change it to 7. This is the only
change you can make to orclextconfflag, which is otherwise an internal attribute.
See Section 22.4.3, "Enabling Replication and Oracle Directory Integration Platform
Auditing."
22.1.4 Audit Record Fields
Audit records contain the following fields:
■Event category–the class of event, such as authentication or authorization.
■Event name
■Initiator–the user who initiates the operation
■Status–success or failure
■Authentication method
■Session ID–Connection ID
■Target–the user on whom the operation is performed
■Event date and time
■Remote IP–source IP address of client
■Component type–OID
■ECID
■Resource–entry or attribute on which operation is performed.
22.1.5 Audit Record Storage
Audit information is held temporarily in a location called a busstop before it is written
to its final location.
The file is in the directory ORACLE_
INSTANCE/auditlogs/componentType/componentName.
orclAudCustEvents A comma-separated list of events and category names to be
audited. Examples include:
Authentication.SUCCESSESONLY,
Authorization(Permission -eq 'CSFPerfmission")
Custom events are only applicable when
orclAudFilterPreset is Custom.
orclAudSplUsers A comma separated list of users for whom auditing is always
enabled, even if orclAudFilterPreset is None. For example:
cn=orcladmin.
Table 22–1 (Cont.) Oracle Internet Directory Audit Configuration Attributes
Attribute Description

Managing Auditing by Using Fusion Middleware Control
22-4 Oracle Fusion Middleware Administrator's Guide for Oracle Internet Directory
Audit files are permanently stored in either XML files or a database. XML files are the
default storage mechanism for audit records. There is one XML repository for each
Oracle instance. Audit records generated for all components running in a givenOracle
instance are stored in the same repository. If using a database repository, audit records
generated by all components in all Oracle instances in the domain are stored in the
same repository.
22.1.6 Generating Audit Reports
See theOracle Fusion Middleware Application Security Guide chapter on audit analysis
and reporting for information about generating audit reports.
22.2 Managing Auditing by Using Fusion Middleware Control
You can use Oracle Enterprise Manager Fusion Middleware Control to manage
auditing. The interface is basically the same for all Oracle Fusion Middleware
components, as documented in the Oracle Fusion Middleware Application Security Guide.
1. From the Oracle Internet Directory menu, select Security, then Audit Policy
Settings.
2. From the Audit Policy list, select Custom to configure your own filters, or one of
the filter presets, None, Low, or Medium. (You cannot set All from Fusion
Middleware Control.)
3. If you want to audit only failures, click Select Failures Only.
4. To configure a filter, click the Edit icon next to its name. The Edit Filter dialog for
the filter appears.
5. Specify the filter condition using the buttons, selections from the menus, and
strings that you enter. Condition subjects include HostID, HostNwaddr,
InitiatorDN, TargetDN, Initiator, Remote IP, and Roles. Condition tests include
-contains, -contains_case, endswith, endswith_case, -eq, -ne, -startswith, and
-startswith-case. Enter values for the tests as strings. Parentheses are used for
grouping and AND and OR for combining.
6. To add a condition, click the Add icon.
7. When you have completed the filter, click Apply to save the changes or Revert to
discard the changes.
Oracle Internet Directory stores its audit configuration in the three instance-specific
configuration entry attributes described in Table 22–1, " Oracle Internet Directory
Audit Configuration Attributes". The correspondence between the fields on the Audit
Policy Page and the attributes is shown in Table 22–2.
Table 22–2 Audit Configuration Attributes in Fusion Middleware Control
Field or Heading Configuration attribute
Audit Policy orclAudFilterPreset
Name, Select Failures Only,
Enable Audit, Filter
orclAudCustEvents
Users to always audit orclAudSplUsers

Managing Auditing from the Command Line
Managing Auditing 22-5
22.3 Managing Auditing by Using WLST
You can use wlst to manage auditing, as described in "Manage Audit Policies with
WLST" in the Oracle Fusion Middleware Application Security Guide. You use the
commands getAuditPolicy(),setAuditPolicy(), or listAuditEvents().
For component that manage their audit policy locally, such as Oracle Internet
Directory, you must include an MBean name as an argument to the command. The
name for an Audit MBean is of the form:
oracle.as.management.mbeans.register:type=component.auditconfig,name=auditconfig1,
instance=INSTANCE,component=COMPONENT_NAME
For example:
oracle.as.management.mbeans.register:type=component.auditconfig,name=auditconfig1,
instance=instance1,component=oid1
Another wlst command you must use is invoke(). As described in Section 9.3,
"Managing System Configuration Attributes by Using WLST," before you make any
changes to attributes, you must ensure that the MBean has the current server
configuration. To do that, you must use the invoke() command to load the
configuration from Oracle Internet Directory server to the mbean. After making
changes, you must use the invoke() command to save the MBean configuration to
the Oracle Internet Directory server. In order to use invoke() in this way, you must
navigate to the Root Proxy MBean in the tree. The name for a Root Proxy MBean is of
the form:
oracle.as.management.mbeans.register:type=component,name=COMPONENT_
NAME,instance=INSTANCE
For example:
oracle.as.management.mbeans.register:type=component,name=oid1,instance=instance1
Here is an example of a wlst session using setAuditPolicy() and invoke():
ORACLE_COMMON_HOME/common/bin/wlst.sh
connect('username', 'password', 'localhost:7001')
custom()
cd('oracle.as.management.mbeans.register')
cd('oracle.as.management.mbeans.register:type=component,name=oid1,instance=instanc
e1')
invoke('load',jarray.array([],java.lang.Object),jarray.array([],java.lang.String))
setAuditPolicy(filterPreset='None',
on='oracle.as.management.mbeans.register:type=component.auditconfig,
name=auditconfig1,instance=instance1,component=oid1')
invoke('save',jarray.array([],java.lang.Object),jarray.array([],java.lang.String))
22.4 Managing Auditing from the Command Line
You can manage auditing by using LDAP tools.
22.4.1 Viewing Audit Configuration from the Command Line
You can use ldapsearch to view audit configuration. For example:
ldapsearch -p 3060 -h myhost.example.com -D cn=orcladmin -q \
-b "cn=oid1,cn=osdldapd,cn=subconfigsubentry" \
-s base "objectclass=*" > /tmp/oid1-config.txt
grep orclaud oid1-config.txt

Managing Auditing from the Command Line
22-6 Oracle Fusion Middleware Administrator's Guide for Oracle Internet Directory
orclaudsplusers=cn=orcladmin
orclaudcustevents=UserLogin.FAILURESONLY, UserLogout, CheckAuthorization,
ModifyDataItemAttributes, CompareDataItemAttributes, ChangePassword.FAILURESONLY
orclaudfilterpreset=custom
22.4.2 Configuring Oracle Internet Directory Auditing from the Command Line
You can use ldapmodify commands to manage auditing. You must create an LDIF
file to make the required changes to the attributes orclAudFilterPreset,
orclAudCustEvents, and orclAudSplUsers.
The command is:
ldapmodify -D cn=orcladmin -q -p portNum -h hostname -f ldifFile
For example to enable auditing for user login events only, use this LDIF file with the
preceding ldapmodify command:
dn: cn=componentname,cn=osdldapd,cn=subconfigsubentry
changetype: modify
replace: orclaudFilterPreset
orclaudFilterPreset: Custom
-
replace: orclaudcustevents
orclaudcustevents: UserLogin
For more information, see the Oracle Fusion Middleware Application Security Guide.
22.4.3 Enabling Replication and Oracle Directory Integration Platform Auditing
The following LDIF file enables both replication and Oracle Directory Integration
Platform auditing.
dn: cn=oid1,cn=osdldapd,cn=subconfigsubentry
changetype: modify
replace: orclextconfflag
orclextconfflag: 7
The following LDIF file disables both:
dn: cn=oid1,cn=osdldapd,cn=subconfigsubentry
changetype: modify
replace: orclextconfflag
orclextconfflag: 3
Use a command line similar to this:
ldapmodify -h host -p port -D "cn=orcladmin" -q -f ldiffile

23
Managing Logging 23-1
23Managing Logging
This chapter describes logging by Oracle Internet Directory. For general information
about logging in Oracle Fusion Middleware, see the Managing Log Files and
Diagnostic Data chapter in the Oracle Fusion Middleware Administrator's Guide.This
chapter contains these topics:
■Section 23.1, "Introduction to Logging"
■Section 23.2, "Managing Logging by Using Fusion Middleware Control"
■Section 23.3, "Managing Logging from the Command Line"
23.1 Introduction to Logging
Like other Oracle Fusion Middleware components, Oracle Internet Directory writes
diagnostic log files in the Oracle Diagnostic Logging (ODL) format.
Oracle Internet Directory tools and servers output their log and trace information to
log files in the ORACLE_INSTANCE. Table 23–1 lists each component and the location
of its corresponding log file.
See Also: Oracle Fusion Middleware Administrator's Guide for
information about ODL.
Table 23–1 Oracle Internet Directory Log File Locations
Tool or Server Name Log File Name
Bulk Loader (bulkload)ORACLE_
INSTANCE/diagnostics/logs/OID/tools/bulkload.log
Bulk Modifier
(bulkmodify)
ORACLE_
INSTANCE/diagnostics/logs/OID/tools/bulkmodify.l
og
Bulk Delete Tool
(bulkdelete
ORACLE_
INSTANCE/diagnostics/logs/OID/tools/bulkdelete.l
og
Catalog Management Tool
(catalog)
ORACLE_
INSTANCE/diagnostics/logs/OID/tools/catalog.log
Data Export Tool
(ldifwrite)
ORACLE_
INSTANCE/diagnostics/logs/OID/tools/ldifwrite.lo
g
Directory replication server
(oidrepld)
ORACLE_INSTANCE/diagnostics/logs/OID/
componentName/oidrepld-XXXX.log where XXXX is a
number from 0000 to orclmaxlogfilesconfigured.

Introduction to Logging
23-2 Oracle Fusion Middleware Administrator's Guide for Oracle Internet Directory
23.1.1 Features of Oracle Internet Directory Debug Logging
Oracle Internet Directory enables you to:
■View logging information for the directory server, the directory replication server,
and the directory integration server
■Set the logging level
■Specify one or more operations for which you want logging to occur
■Search messages in a standard format to determine remedial action for fatal and
serious errors
■View trace messages according to their severity and order of importance
■Diagnose Oracle Internet Directory components by examining trace messages with
relevant information about, for example, entry DN, ACP evaluation, and the
context of an operation
23.1.2 Interpreting Log Messages
This section discusses log messages—those associated with specified LDAP operations
and those not. It provides an example of a trace log and explains how to interpret it.
Like other Oracle Fusion Middleware components, Oracle Internet Directory writes
diagnostic log files in the Oracle Diagnostic Logging (ODL) format. The Oracle Fusion
Middleware Administrator's Guide describes ODL format.
Directory server
(oidldapd)
ORACLE_
INSTANCE/diagnostics/logs/OID/componentName/oidlda
pd01sPID-XXXX.log where:
■01 is the instance number, which is 01 by default
■s stands for server
■PID is the server process identifier
■XXXX is a number from 0000 to
orclmaxlogfilesconfigured
ORACLE_
INSTANCE/diagnostics/logs/OID/componentName/oidstackI
nstNumberPID.log
Note: The oidstackInstNumber log files pertain to
SIGSEGV/SIGBUS tracing. Also, empty files with this name are
created during directory instance startup, and can be ignored.
LDAP dispatcher
(oidldapd)
ORACLE_
INSTANCE/diagnostics/logs/OID/componentName/oidl
dapd01-XXXX.log where 01 is the instance number, which
defaults to 01, and XXXX is a number from 0000 to
orclmaxlogfilesconfigured.
OID Monitor (OIDMON) ORACLE_
INSTANCE/diagnostics/logs/OID/componentName/oidm
on-XXXX.log where XXXX is a number from 0000 to
orclmaxlogfilesconfigured.
Table 23–1 (Cont.) Oracle Internet Directory Log File Locations
Tool or Server Name Log File Name

Introduction to Logging
Managing Logging 23-3
23.1.2.1 Log Messages for Specified LDAP Operations
Log messages for a specified operation are stored as a trace object. This object tracks
the operation from start to finish across the various Oracle Internet Directory modules.
It is entered in the log file when one of the following occur:
■An LDAP operation completes
■A high priority message is logged
■The trace messages buffer is full
Each thread has one contiguous block of information for each operation, and that
block is clearly delimited. This makes it easy, in a shared server environment, to
follow the messages of different threads, operations, and connections.
If, because of an internal message buffer overflow, a single trace object cannot contain
all the information about an operation, then the information is distributed among
multiple trace objects. Each distributed piece of information is clearly delimited and
has a common header. To track the progress of the operation, you follow the trace
objects and their common header to the end, which is marked with the trace message
"Operation Complete".
23.1.2.2 Log Messages Not Associated with Specified LDAP Operations
Messages not associated with any LDAP operation are represented in a simple format,
which is not object-based. It is entered in the log file when either the operation
completes or a high priority message is encountered.
A thread that does not perform an operation logs only trace messages. Its header
contains the date, time, and the thread identifier. It does not contain the Execution
Context ID (ECID) or connection and operation-related information.
A trace object starts with the keyword BEGIN and ends with the keyword END.
23.1.2.3 Example: Trace Messages in Oracle Internet Directory Server Log File
[2008-11-14T15:28:01-08:00] [OID] [NOTIFICATION:16] [] [OIDLDAPD] [host:
srvhst.us.abccorp.com] [pid: 7043] [tid: 0] Main:: Starting up the OiD Server, on
node srvhst.us.abccorp.com.
[2008-11-14T15:28:01-08:00] [OID] [NOTIFICATION:16] [] [OIDLDAPD] [host:
srvhst.us.abccorp.com] [pid: 7043] [tid: 0] Main:: Oid Server Connected to DB
store via inst1 connect string.
[2008-11-14T15:28:01-08:00] [OID] [NOTIFICATION:16] [] [OIDLDAPD] [host:
srvhst.us.abccorp.com] [pid: 7043] [tid: 0] Main:: Loading Root DSE ...
[2008-11-14T15:28:01-08:00] [OID] [NOTIFICATION:16] [] [OIDLDAPD] [host:
srvhst.us.abccorp.com] [pid: 7043] [tid: 0] Main:: Loading subschema subentry ...
[2008-11-14T15:28:01-08:00] [OID] [NOTIFICATION:16] [] [OIDLDAPD] [host:
srvhst.us.abccorp.com] [pid: 7043] [tid: 0] Main:: Loading catalog entry ...
[2008-11-14T15:28:01-08:00] [OID] [NOTIFICATION:16] [] [OIDLDAPD] [host:
srvhst.us.abccorp.com] [pid: 7043] [tid: 0] Main:: OiD LDAP server started.
[2008-11-14T15:28:02-08:00] [OID] [NOTIFICATION:16] [] [OIDLDAPD] [host:
srvhst.us.abccorp.com] [pid: 7043] [tid: 2] ServerDispatcher : Thread Started
[2008-11-14T15:28:02-08:00] [OID] [NOTIFICATION:16] [] [OIDLDAPD] [host:

Managing Logging by Using Fusion Middleware Control
23-4 Oracle Fusion Middleware Administrator's Guide for Oracle Internet Directory
srvhst.us.abccorp.com] [pid: 7043] [tid: 1] ServerDispatcher : Thread Started
[2008-11-14T15:28:02-08:00] [OID] [NOTIFICATION:16] [] [OIDLDAPD] [host:
srvhst.us.abccorp.com] [pid: 7043] [tid: 3] ServerWorker (REG): Thread Started
[2008-11-14T15:28:02-08:00] [OID] [NOTIFICATION:16] [] [OIDLDAPD] [host:
srvhst.us.abccorp.com] [pid: 7043] [tid: 4] ServerWorker (REG): Thread Started
[2008-11-14T15:28:02-08:00] [OID] [NOTIFICATION:16] [] [OIDLDAPD] [host:
srvhst.us.abccorp.com] [pid: 7043] [tid: 5] ServerWorker (SPW): Thread Started
[2008-11-14T15:28:47-08:00] [OID] [TRACE:16] [] [OIDLDAPD] [host:
srvhst.us.abccorp.com] [pid: 7043] [tid: 3] [ecid:
004MuuNFY7UCknT6uBU4UH0001i30000Ee,0] ServerWorker (REG):[[
BEGIN
ConnID:87 mesgID:2 OpID:1 OpName:bind ConnIP:170.90.11.210 ConnDN:cn=orcladmin
15:28:47-08:00 * gslfbiADoBind * Entry
15:28:47-08:00 * gslfbiGetControlInfo * Entry
15:28:47-08:00 * gslfbiGetControlInfo * Exit
15:28:47-08:00 * gslfbidbDoBind * Version=3 BIND dn="cn=orcladmin" method=128
15:28:47-08:00 * gslsbnrNormalizeString * String to Normalize: "orcladmin"
15:28:47-08:01 * gslsbnrNormalizeString * Normalized value: "orcladmin"
15:28:47-08:01 * gslfrsBSendLdapResult * Entry
15:28:47-08:01 * gslfrsASendLdapResult2 * Entry
15:28:47-08:01 * sgslunwWrite * Entry
15:28:47-08:01 * sgslunwWrite * Exit
15:28:47-08:01 * gslfrsASendLdapResult2 * Exit
15:28:47-08:01 * gslfrsBSendLdapResult * Exit
15:28:47-08:01 * gslfbiADoBind * Exit
TOTAL Worker time : 4402 micro sec
END
]]
[2008-11-14T15:28:56-08:01] [OID] [TRACE:16] [] [OIDLDAPD] [host:
srvhst.us.abccorp.com] [pid: 7043] [tid: 4] [ecid:
004MuuNqbefCknT6uBU4UH0001i30000Lf,0] ServerWorker (REG):[[
BEGIN
ConnID:126 mesgID:1 OpID:0 OpName:bind ConnIP:170.90.11.210 ConnDN:Anonymous
15:28:56-08:01 * gslfbiADoBind * Entry
15:28:56-08:01 * gslfbiGetControlInfo * Entry
15:28:56-08:01 * gslfbiGetControlInfo * Exit
15:28:56-08:01 * gslfbidbDoBind * Version=3 BIND dn="" method=128
15:28:56-08:01 * gslfrsBSendLdapResult * Entry
15:28:56-08:01 * gslfrsASendLdapResult2 * Entry
15:28:56-08:01 * sgslunwWrite * Entry
15:28:56-08:02 * sgslunwWrite * Exit
15:28:56-08:02 * gslfrsASendLdapResult2 * Exit
15:28:56-08:02 * gslfrsBSendLdapResult * Exit
15:28:56-08:02 * gslfbiADoBind * Exit
TOTAL Worker time : 2591 micro sec
END
]]
23.2 Managing Logging by Using Fusion Middleware Control
You can view log files and configure debug logging with Oracle Enterprise Manager
Fusion Middleware Control.

Managing Logging by Using Fusion Middleware Control
Managing Logging 23-5
23.2.1 Viewing Log Files by Using Fusion Middleware Control
Select Log Messages to view as follows:
1. From the Oracle Internet Directory menu, select Logs, then View Log Messages.
The Log Messages page appears.
2. Select the date range for the logs you want to view. You can select Most Recent,
by minutes, hours or days. Alternatively, you can select a Time Interval and
specify the date and time to start and end.
3. Select the Message Types you want to view.
4. Specify the Maximum Rows Displayed.
5. From the View list, select Columns to change the columns shown. Select Reorder
Columns to change the order of the columns.
6. Within each column, you can toggle between ascending and descending order by
choosing the up or down arrow in the column header.
7. From the Show list, choose whether to show all messages, a summary by message
type, or a summary by message id.
8. To perform a specific search, choose Add Fields and add fields to search on. For
each field, select a criterion from the list, then enter text into the box. Choose the
red X to delete a field. Choose Add Fields to add additional fields. When you have
finished adding criteria, choose Search.
9. Use the Broaden Target Scope list to view messages for the Domain.
10. Choose Export Messages to File to export the log messages to a file as XML, text,
or comma-separated list.
11. Click Tar g e t Log Files to view information about individual log files.
12. You can indicate when to refresh the view. Select Manual Refresh, 30-Second
Refresh, or One Minute Refresh from the list on the upper right.
13. Use the View list to change the columns listed or to reorder columns.
14. Use the Show list to change the grouping of messages.
15. Collapse the Search label to view only the list of log messages.
16. To view the contents of a log file, double click the file name in the Log File column.
The View Log File: filename page is displayed. You can use the up and down
arrows in the Time, Message Type, and Message ID to reorder the records in the
file.
23.2.2 Configuring Logging by Using Fusion Middleware Control
To configure logging:
Table 23–2 Configuration Attributes on Server Properties Page, Logging Tab
Field or Heading Configuration Attribute
Debug Level orcldebugflag
Operations Enabled for Debug orcldebugop
Maximum Log File Size (MB) orclmaxlogfilesize
Maximum Number of Log Files to Keep in
Rotation
orclmaxlogfiles

Managing Logging from the Command Line
23-6 Oracle Fusion Middleware Administrator's Guide for Oracle Internet Directory
1. Select Administration, then Server Properties from the Oracle Internet Directory
menu, then select Logging.
2. Under Debug Level, select the types of activity to be logged.
3. Under Operations Enabled for Debug, enable the LDAP operations that you want
logged.
4. Under Logging, specify values for Maximum log file size (MB) and Maximum
number of log files to keep in rotation. The defaults are 1 MB and 100 log files,
respectively.
23.3 Managing Logging from the Command Line
This section contains the following topics:
■Section 23.3.1, "Viewing Log Files from the Command Line"
■Section 23.3.2, "Setting Debug Logging Levels by Using the Command Line"
■Section 23.3.3, "Setting the Debug Operation by Using the Command Line"
■Section 23.3.4, "Force Flushing the Trace Information to a Log File"
23.3.1 Viewing Log Files from the Command Line
You can view Oracle Internet Directory log files in a text editor. See Table 23–1, " Oracle
Internet Directory Log File Locations".
23.3.2 Setting Debug Logging Levels by Using the Command Line
You set debug logging levels by using the ldapmodify command.
Because debug levels are additive, you must add the numbers representing the
functions that you want to activate, and use the sum of those in the command-line
option.
By default, debug logging is turned off. To turn it on, modify the attribute
orcldebugflag in the instance-specific configuration entry to the level you want.
You can configure debug levels to one of the following levels.
Table 23–3 shows values for OrclDebugFlag.
Note: Values you set on the Logging tab of the Server Properties
page control LDAP server debugging. To set a value for Replication
server debugging, use the Replication tab of the Shared properties
page as described in Section 42.2.8, "Configuring the Replication
Debug Level by Using Fusion Middleware Control."
Note: The DN of an instance-specific configuration entry has the
form:
cn=componentname,cn=osdldapd, cn=subconfigsubentry

Managing Logging from the Command Line
Managing Logging 23-7
For example, to trace search filter processing (512) and connection management (256),
enter 768 as the debug level (512 + 256 = 768).
23.3.3 Setting the Debug Operation by Using the Command Line
To make logging more focused, set the debug operations. For example, to limit logging
to particular directory server operations, specify those operations. Table 23–4 shows
these operations. Any subset of these values can be configured by adding the codes
together. For example, to set debugging for ldapbind and ldapadd, set the value 5
because 1 + 4 = 5.
Table 23–3 Values for OrclDebugFlag
Value Operation
1 Heavy trace debugging
128 Debug packet handling
256 Connection management
512 Search filter processing
1024 Entry parsing
2048 Configuration file processing
8192 Access control list processing
491520 Log of communication with DB
524288 Schema related operations
4194304 Replication specific ops
8388608 Log of entries, operations, and results for each connection
16777216 Trace function call arguments
67108864 Number and identity of clients connected to this server
117440511 All possible operations and data
134217728 All Java plug-in debug messages and internal server messages
related to the Java plug-in framework
268435456 All messages passed by a Java plug-in using the ServerLog
object.
402653184 Both of the above
Note: The value of orcldebugflag controls LDAP server
debugging. To control Replication server debugging, set the value of
orcldebuglevel, as described in Section 42.3.7, "Configuring
Attributes of the Replication Configuration Set by Using ldapmodify."
Table 23–4 Debug Operations
Debug Operation Provides Information Regarding
1 ldapbind
2 ldapunbind
4 ldapadd
8 ldapdelete

Managing Logging from the Command Line
23-8 Oracle Fusion Middleware Administrator's Guide for Oracle Internet Directory
To log more than one operation, add the values of their dimensions. For example, if
you want to trace ldapbind (1), ldapadd (4) and ldapmodify (16) operations, then
create an LDIF file setting the orcldebugop attribute to 21 (1 + 4 + 16 = 21). The LDIF
file is as follows:
dn: cn=componentname,cn=osdldapd,cn=subconfigsubentry
changetype:modify
replace:orcldebugop
orcldebugop:21
To load this file, enter:
ldapmodify -D "cn=orcladmin" -q -h host_name -p port_number -f file_name
23.3.4 Force Flushing the Trace Information to a Log File
To minimize the performance overhead in I/O operations, debug messages are
flushed to the log file periodically instead of every time a message is logged by the
directory server. Writing to the log file is performed when one of the following occur:
■An LDAP operation completes
■A high priority message is logged
■The trace messages buffer is full
You can, however, view the trace messages in the log file as they are logged without
having to wait for the periodic flush. To do this, set the instance-specific configuration
entry attribute orcldebugforceflush to 1. Do this by using ldapmodify as shown
in the following example.
Example 23–1 Enabling Force Flushing
To enable force flushing by using ldapmodify:
1. Create an LDIF file as follows:
dn: cn=componentname,cn=osdldapd,cn=subconfigsubentry
changetype: modify
replace: orcldebugforceflush
orcldebugforceflush: 1
2. Load this file by entering the following:
ldapmodify -D "cn=orcladmin" -q -h host_name -p port_number -f file_name
16 ldapmodify
32 ldapmodrdn
64 ldapcompare
128 ldapsearch
256 ldapabandon
511 All LDAP operations
Table 23–4 (Cont.) Debug Operations
Debug Operation Provides Information Regarding

Managing Logging from the Command Line
Managing Logging 23-9
Notes:
■When force flushing is enabled, the format of the trace message
object for every operation becomes fragmented.
■By default, force flushing is disabled. After you have flushed
the necessary information to the log file, you should disable
force flushing.
See Also: "Oracle Identity Management LDAP Attribute Reference"
in Oracle Fusion Middleware Reference for Oracle Identity Management for
information about the orcldebugforceflush attribute

Managing Logging from the Command Line
23-10 Oracle Fusion Middleware Administrator's Guide for Oracle Internet Directory

24
Monitoring Oracle Internet Directory 24-1
24Monitoring Oracle Internet Directory
This chapter describes Oracle Internet Directory Manageability framework, which
enables you to monitor Oracle Internet Directory. For information on monitoring other
Oracle Fusion Middleware components, see the Monitoring Oracle Fusion Middleware
chapter in the Oracle Fusion Middleware Administrator's Guide.
■Section 24.1, "Introduction to Monitoring Oracle Internet Directory Server"
■Section 24.2, "Setting Up Statistics Collection by Using Fusion Middleware
Control"
■Section 24.3, "Viewing Statistics Information with Fusion Middleware Control"
■Section 24.4, "Viewing Statistics Information from the Oracle Directory Services
Manager Home Page"
■Section 24.5, "Setting Up Statistics Collection by Using the Command-Line"
■Section 24.6, "Viewing Information with the OIDDIAG Tool"
24.1 Introduction to Monitoring Oracle Internet Directory Server
This introduction contains the following topics:
■Section 24.1.1, "Capabilities of Oracle Internet Directory Server Manageability"
■Section 24.1.2, "Oracle Internet Directory Server Manageability Architecture and
Components"
■Section 24.1.3, "Purging of Security Events and Statistics Entries"
■Section 24.1.4, "Account Used for Accessing Server Manageability Information"
24.1.1 Capabilities of Oracle Internet Directory Server Manageability
The Oracle Internet Directory Server Manageability framework enables you to monitor
the following directory server statistics:
■Server health statistics about LDAP request queues, percent CPU usage, memory,
LDAP sessions, and database sessions. For example, you can view the number of
active database sessions over a period. You can also view the total number of
connections opened to Oracle Internet Directory server instances over a period.
■Performance statistics. Average latency in millisecond is provided for bind,
compare, messaging search, and all search operations over a period.
■General statistics about specific server operations, such as add, modify, or delete.
For example, you can view the number of directory server operations over a
period. You can also view the failed bind operation count.

Introduction to Monitoring Oracle Internet Directory Server
24-2 Oracle Fusion Middleware Administrator's Guide for Oracle Internet Directory
■User statistics comprising successful and failed operations to the directory and the
user performing each one. All LDAP operations are tracked for configured users.
Also, the connections held by users at the ends of the statistics collection period
are tracked.
■Critical events related to system resources and security—for example, occasions
when a user provided the wrong password or had inadequate access rights to
perform an operation. Other critical events include ORA errors other than
expected errors including 1, 100 or 1403 and abnormal termination of the LDAP
server.
■Security events tracking of users' successful and unsuccessful bind and
userpassword compare operations.
Because bind and user password compare are among the most security sensitive
operations, an exclusive category security event is used to track these two
operations. This event tracks the number of these operations performed by LDAP
users and applications. The basic information recorded is user DN and source IP
address. For failed user password compare, additional information is tracked,
specifically, the number of failed compares of one user's password by another user
from a given IP address.
■Status information of the directory server and the directory replication server—for
example, the date and time at which the directory replication server was invoked
24.1.2 Oracle Internet Directory Server Manageability Architecture and Components
The relationship between the various components of directory server manageability is
explained in Figure 24–1 and the accompanying text in Table 24–1.
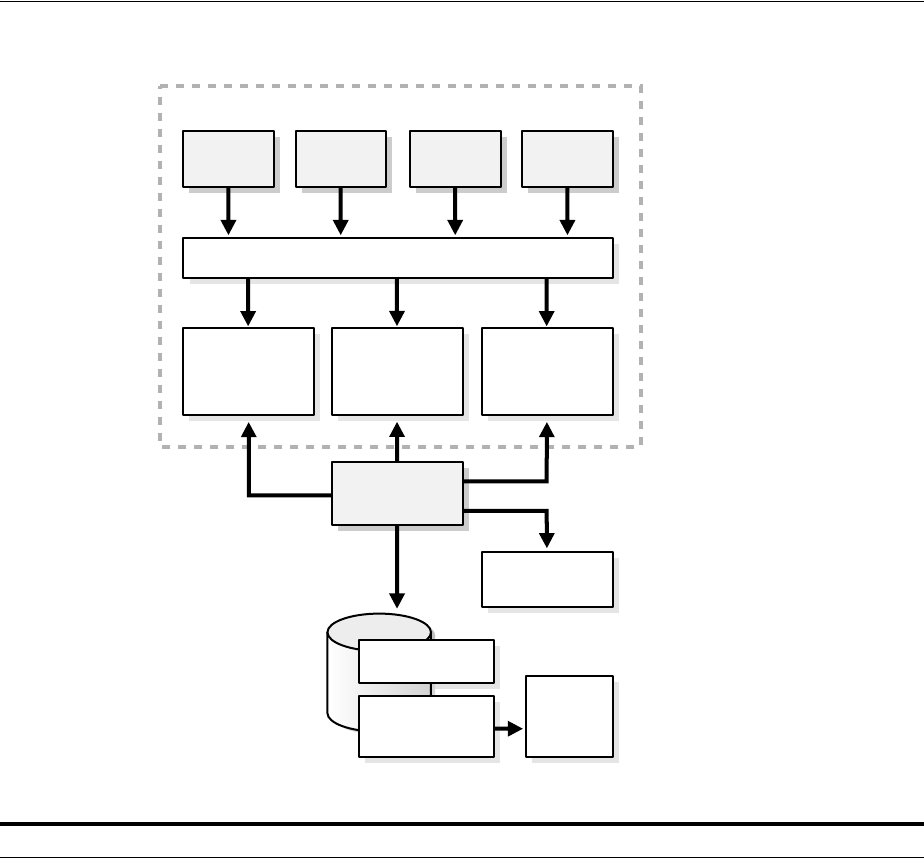
Introduction to Monitoring Oracle Internet Directory Server
Monitoring Oracle Internet Directory 24-3
Figure 24–1 Architecture of Oracle Internet Directory Server Manageability
Table 24–1 Components of Oracle Internet Directory Server Manageability
Component Description
Oracle Internet Directory A directory server responds to directory requests from clients. It has four kinds of
functional threads: controller, worker, dispatcher, and listener. It accepts LDAP
requests from clients, processes them, and sends the LDAP response back to the
clients.
When you use the Oracle Internet Directory Server Manageability framework to set
run-time monitoring, the four functional threads of the server record the specified
information and store it in local memory.
See Also: Section 3.1.2, "An Oracle Directory Server Instance" for a description of the
directory server
Memory Resident Storage This is a local process memory. The Oracle Internet DirectoryServer Manageability
framework assigns one each for statistics, tracing, and security events. Each has its
own separate data structure maintained in the local memory storage.
Low Priority Write
Threads
These dedicated write threads differ from server functional threads in that they write
server statistics, security events logging, and tracing information to the repository. To
maintain reduced system overhead, their priorities are kept low.
External Monitoring
Application
This module, which is proprietary and external to the server manageability
framework, collects the gathered statistics through a standard LDAP interface with
the directory server and stores it in its own repository.
External Repository for
Server Management
Information
This is the repository that the monitoring agent uses to store the gathered directory
server statistics. The monitoring agent determines how this repository is
implemented.
Oracle Internet Directory
Controller
Thread
Worker
Thread
Dispatcher
Thread
Listener
Thread
Memory Resident
Storage for
Server Statistics
Queue
Memory Resident
Storage for
Server Tracing
Queue
Low Priority
Write Threads
Memory Resident
Storage for Server
Security Events
Queue
Logging
Repository
Oracle
Fusion
Middleware
Control
Common Interface for Memory Resident Storage
Directory Data
Repository
Logging Statistics
and Events
Repository

Setting Up Statistics Collection by Using Fusion Middleware Control
24-4 Oracle Fusion Middleware Administrator's Guide for Oracle Internet Directory
24.1.3 Purging of Security Events and Statistics Entries
Obsolete statistics entries are removed from Oracle Internet Directory by the Oracle
Internet Directory purge tool, described in Chapter 35, "Managing Garbage
Collection".
24.1.4 Account Used for Accessing Server Manageability Information
The Oracle Internet Directory database account ODSSM is used to access server
manageability information from the database. During installation, this account's
password is set to a value provided by the user at a prompt. The credentials for this
account, including the password, are stored in the Oracle Internet Directory snippet in
the Oracle Enterprise Manager Fusion Middleware Control file targets.xml.
The only way you can change this account's password is to use the procedure
documented in Section 12.11, "Changing the Password for the ODSSM Administrator
Account." There is no support in the oidpasswd tool for changing this password.
24.2 Setting Up Statistics Collection by Using Fusion Middleware Control
This section contains the following topics:
■Section 24.2.1, "Configuring Directory Server Statistics Collection by Using Fusion
Middleware Control"
■Section 24.2.2, "Configuring a User for Statistics Collection by Using Fusion
Middleware Control"
24.2.1 Configuring Directory Server Statistics Collection by Using Fusion Middleware
Control
To configure statistics collection from Oracle Enterprise Manager Fusion Middleware
Control, follow these steps:
1. Select Administration, then Server Properties from the Oracle Internet Directory
menu, then select Statistics.
Fusion Middleware
Control
extracts monitored data from the statistics and events repository, presenting it in a
Web-based graphical user interface. Users can view the data in a normal browser. A
repository can store the collected data for generic and custom queries.
Logging Repository (File
System)
This repository uses a file system to store information traced across various modules
of the directory server. By using a file system for this purpose, the Oracle Internet
Directory Server Manageability framework uses the features and security of the
operating system.
Directory Data Repository This repository contains all user-entered data—for example, user and group entries.
Statistics and Events
Repository
This repository is like the tracing repository except that it stores the information in
the same database as the directory data repository rather than in a file system. In this
way, the Oracle Internet Directory Server Manageability framework uses:
■Normal LDAP operations to store and retrieve the information
■Existing access control policies to manage the security of the gathered
information
The directory manageability framework isolates the gathered information from the
directory data by storing the two separately.
Table 24–1 (Cont.) Components of Oracle Internet Directory Server Manageability
Component Description

Setting Up Statistics Collection by Using Fusion Middleware Control
Monitoring Oracle Internet Directory 24-5
2. In the General section of the page, select Stats Flag to enable statistics collection.
3. Specify the number of minutes in the Stats Frequency field to control the
frequency of statistics collection.
4. Select values from the Bind Security Event Tracking and Compare Security Event
Tracking lists.
5. To collect statistics about users, select User Statistics Collection in the User
Statistics section of the page.
6. In the Event Levels section of the page, select the events you want to track.
24.2.2 Configuring a User for Statistics Collection by Using Fusion Middleware Control
To configure a user so that Server Manageability collects statistics for that user:
1. From the Oracle Internet Directory menu, select Administration, then Shared
Properties.
2. Select the General tab.
3. Add the user's distinguished name to User DN. (This adds the user's DN to the
attribute orclstatsdn.) For example:
Table 24–2 Configuration Attributes on Server Properties Page, Statistics Tab
Field or Heading Configuration Attribute
Stats Flag orclstatsflag
Stats Frequency (min) orclstatsperiodicity
Bind Security Event Tracking and Compare
Security Event Tracking
orcloptracklevel
User Statistics orclstatslevel
Event Levels orcleventlevel
Notes:
■After you enable User Statistics collection, you also must specify
individual users for statistics collection. See Section 24.2.2,
"Configuring a User for Statistics Collection by Using Fusion
Middleware Control."
■If you do not select SuperUser Login as an event level, the
corresponding Security values on the Oracle Internet Directory
home page is always 0.
■In 11g Release 1 (11.1.1), consecutive settings of orcldebugflag
and of orcloptracklevel are additive.
Note: If you have configured orclldapconntimeout so that idle
LDAP connections are closed after a period of time, as described in the
Oracle Internet Directory chapter of Oracle Fusion Middleware
Performance and Tuning Guide, be aware that connections do not time
out as per this setting for users who are configured for statistics
collection.

Viewing Statistics Information with Fusion Middleware Control
24-6 Oracle Fusion Middleware Administrator's Guide for Oracle Internet Directory
cn=Mary Lee, ou=Product Testing, c=uscn=Michael Smith, ou=Product Testing,
c=uscn=Raj Sharma, ou=Human Resources, c=us
24.3 Viewing Statistics Information with Fusion Middleware Control
You can use Oracle Enterprise Manager Fusion Middleware Control to view many of
the features of Oracle Internet Directory Server Manageability, as explained in this
section.
24.3.1 Viewing Statistics Information on the Oracle Internet Directory Home Page
The Oracle Internet Directory Home Page displays the following information:
■Performance
–Average Operation Response Time(ms)
–Messaging Search Response Time(ms)
–Bind Response Time(ms)
■Load
–Total LDAP Connections
–Operations Completed
–Operations in progress
■Security
–Failed Bind Operations
–Failed SuperUser Logins
–Successful SuperUser Logins
■Resource Usage
–CPU Utilization %
–Memory Utilization %
■Average Response and Load
–LDAPserverResponse
–numCompletedOps
Click Table View if you want to see values in tabular form.
In the Security section of the page, the values for Failed Bind Operations, Failed
SuperUser Logins, and Successful SuperUser Logins are 0 if you have not enabled
collection of these metrics. See Section 24.2, "Setting Up Statistics Collection by Using
Fusion Middleware Control" for more information.
24.3.2 Viewing Information on the Oracle Internet Directory Performance Page
From the Oracle Internet Directory menu, select Monitoring, then Performance
Summary. The following metrics are shown by default:
■Server Response
See Also: Section 42.2.10, "Viewing Queue Statistics by Using Fusion
Middleware Control" for information on replication queue statistics.

Setting Up Statistics Collection by Using the Command-Line
Monitoring Oracle Internet Directory 24-7
■Total Operations
■Messaging Search Operation Response Time
■Bind Operation Response Time
■Compare Operation Response Time
■Total Number of Security Events Objects in Purge Queue
■Total Number of Security Refresh Events Objects in Purge Queue
■Total Number of System Resource Events Objects in Purge Queue
To display other metrics, expand the Metrics Palette by clicking the arrow on the right
edge of the window. You can collapse the Metrics Palette by clicking the arrow on the
left edge of the window.
The default time interval is 15 minutes. To change the time interval, click Slider, then
use the sliders to set the time interval. You can also click the Date and Time icon, set
the start and end date and time on the Enter Date and Time dialog, then click OK.
Click the Refresh icon to refresh the page.
The View list enables you to view and save charts.
The Overlay list enables you to overlay the metrics for a different Oracle Internet
Directory target.
24.4 Viewing Statistics Information from the Oracle Directory Services
Manager Home Page
The Oracle Directory Services Manager home page for Oracle Internet Directory lists
the following information:
■Uptime
■LDAP Connections
■OID Procs
■Number of Entries
■LDAP Change Log Entries
■Replication Agreements
■Debug Enabled
■Operation Latency
24.5 Setting Up Statistics Collection by Using the Command-Line
This section contains the following topics:
Notes:
■For non-critical events, there is a time lag of several minutes, up to
orclstatsperiodicity, before the corresponding metric is
updated.
■You must click the Refresh icon to see updated metrics.

Setting Up Statistics Collection by Using the Command-Line
24-8 Oracle Fusion Middleware Administrator's Guide for Oracle Internet Directory
■Section 24.5.1, "Configuring Health, General, and Performance Statistics
Attributes"
■Section 24.5.3, "Configuring User Statistics Collection from the Command Line"
24.5.1 Configuring Health, General, and Performance Statistics Attributes
You can use ldapmodify and ldapsearch to set and view statistics
collection-related configuration attributes. These attributes are in the instance-specific
configuration entry, as described in Chapter 9, "Managing System Configuration
Attributes."
To enable the collection of health, general, and performance statistics, set the
orclStatsFlag and orclStatsPeriodicity attributes.
For example, to enable the Oracle Internet Directory Server Manageability framework
for the component oid1, you create an LDIF file that looks like this:
dn:cn=oid1,cn=osdldapd,cn=subconfigsubentry
changetype: modify
replace: orclstatsflag
orclstatsflag:1
To upload this file, enter the following command:
ldapmodify -h host -p port_number -D bind_DN -q -f file_name
where the bind DN authorized to perform server manageability configuration is
cn=emd admin,cn=oracle internet directory.
24.5.2 Configuring Security Events Tracking
To configure security events tracking, set the attribute orcloptracklevel. This
attribute is located in the instance-specific configuration entry, as described in
Chapter 9, "Managing System Configuration Attributes." Table 24–3 lists the values of
orcloptracklevel to configure different levels of bind and compare information
collection:
The metrics recorded by each orcloptracklevel value are listed in the following
table:
Table 24–3 Values of orcloptracklevel
orcloptracklevel value Configuration
1Bind DN only
2Bind DN and IP address
4Compare DN only
8Compare DN and IP address
16 Compare DN, IP address and failure details

Setting Up Statistics Collection by Using the Command-Line
Monitoring Oracle Internet Directory 24-9
The attributes orcloptrackmaxtotalsize and
orcloptracknumelemcontainers enable you to tune memory used for tracking
statistics and events. See the Oracle Internet Directory chapter in Oracle Fusion
Middleware Performance and Tuning Guide.
24.5.3 Configuring User Statistics Collection from the Command Line
To enable user statistics, set the orclstatslevel attribute to 1. The
orclStatsPeriodicity attribute must also be set for user statistics collection to occur.
To configure users for statistics collection, see Section 24.5.5, "Configuring a User for
Statistics Collection by Using the Command Line."
24.5.4 Configuring Event Levels from the Command Line
The orclstatsflag attribute must be set to 1 for event level tracking to occur.
To configure event levels, use ldapmodify to set the orcleventlevel attribute to
one or more of the event levels listed in Table 24–5. The attribute orcleventlevel is
in the instance-specific configuration entry, as described in Chapter 9, "Managing
System Configuration Attributes."
Table 24–4 Metrics Recorded by Each orcloptracklevel Value
Configuration Metrics Recorded
DN only Date and time stamp
EID of DN performing the operation
Success counts
Failure counts
DN and IP address All metrics listed under DN only
Source IP Address
DN, IP address and failure
details
All metrics listed under DN and IP address
Distinct success counts
Distinct failure counts
Failure details for each DN performing password compare from
an IP Address:
■Date and time stamp
■Source IP Address
■EID of DN whose password is compared
■Failure counts
Note: When you are collecting statistics for Oracle Enterprise
Manager Fusion Middleware Control, set orclStatsPeriodicity to be the
same as the collection periodicity of the Enterprise Manager agent,
which is 10 minutes by default.
Table 24–5 Event Levels
Level Value Critical Event Information It Provides
1SuperUser login Super uses bind (successes or failures)

Viewing Information with the OIDDIAG Tool
24-10 Oracle Fusion Middleware Administrator's Guide for Oracle Internet Directory
24.5.5 Configuring a User for Statistics Collection by Using the Command Line
To configure a user by using the command line, add the user's DN to the DSA
Configset entry's multivalued attribute orclstatsdn (DN:
cn=dsaconfig,cn=configsets,cn=oracle internet directory) by using the ldapmodify
command line tool. For example, this LDIF file adds Mary Lee to orclstatsdn:
dn: cn=dsaconfig,cn=configsets,cn=oracle internet directory
changetype:modify
add: orclstatsdn
orclstatsdn: cn=Mary Lee, ou=Product Testing, c=us
Use a command line such as:
ldapmodify -h host -p port -f ldifFile -D cn=orcladmin -q
24.6 Viewing Information with the OIDDIAG Tool
Reports for all the statistics can be viewed using the oiddiag tool, as follows:
Security Events
oiddiag audit_report=true [outfile=file_name]
2Proxy user login Proxy user bind (failures)
4Replication login Replication bind (failures)
8 Add access Add access violation
16 Delete access Delete access violation
32 Write access Write access violation
64 ORA 3113 error Loss of connection to database
128 ORA 3114 error Loss of connection to database
256 ORA 28 error ORA-28 Error
512 ORA error ORA errors other an expected 1, 100, or 1403
1024 Oracle Internet
Directory server
termination count
2047 All critical events
Note: If you have configured orclldapconntimeout so that idle
LDAP connections are closed after a period of time, as described in the
Oracle Internet Directory chapter of Oracle Fusion Middleware
Performance and Tuning Guide, be aware that connections do not time
out as per this setting for users who are configured for statistics
collection.
Table 24–5 (Cont.) Event Levels
Level Value Critical Event Information It Provides

Viewing Information with the OIDDIAG Tool
Monitoring Oracle Internet Directory 24-11
All Statistics and Events
oiddiag collect_all=true, [outfile=file_name]
Subset of Statistics and Events
oiddiag collect_sub=true [infile=input_file_name, outfile=file_name ]
where input_file_name is created by taking the output from
oiddiag listdiags=true
and removing unwanted statistics classes.
Note: On Windows, the filename of the oiddiag command is
oiddiag.bat.
See Also:
■The oiddiag command tool reference in Oracle Fusion Middleware
Reference for Oracle Identity Management.
■The chapter about administration tools in the Oracle Fusion
Middleware Administrator's Guide

Viewing Information with the OIDDIAG Tool
24-12 Oracle Fusion Middleware Administrator's Guide for Oracle Internet Directory

25
Backing Up and Restoring Oracle Internet Directory 25-1
25Backing Up and Restoring Oracle Internet
Directory
All the Oracle Internet Directory data you need to back up and restore is in the
underlying Oracle Database. To learn how to back up and restore Oracle Database,
see: Oracle Database Backup and Recovery User's Guide.
You can back up a small directory or a specific naming context by using ldifwrite.
To back up and restore your Oracle home and Oracle instance, see Oracle Fusion
Middleware Administrator's Guide.
Note: If you back up data from an earlier version of Oracle Internet
Directory, such as 10g Release 2 (10.1.2.0.2), then restore it on a node
running 10g (10.1.4.0.1) or later, you must update the password policy
entries as described in "Password Policy and Fan-out Replication" on
page 30-32.

25-2 Oracle Fusion Middleware Administrator's Guide for Oracle Internet Directory

Part III
Part III Advanced Administration: Security
This part explains how to:
■Secure data within the directory
■Establish access controls for administering applications in enterprises and hosted
environments
■Establish and manage policies governing passwords
■Manage password verifiers used to authenticate users to other Oracle components
■Store data for users, groups, and services in one repository, and delegate the
administration of that data to various administrators
It contains these chapters:
■Chapter 26, "Configuring Secure Sockets Layer (SSL)"
■Chapter 27, "Configuring Data Privacy"
■Chapter 28, "Managing Password Policies"
■Chapter 29, "Managing Directory Access Control"
■Chapter 30, "Managing Password Verifiers"
■Chapter 31, "Delegating Privileges for Oracle Identity Management"
■Chapter 32, "Managing Authentication"

26
Configuring Secure Sockets Layer (SSL) 26-1
26Configuring Secure Sockets Layer (SSL)
This chapter explains how to configure Secure Sockets Layer (SSL) for use with Oracle
Internet Directory. If you use Secure Sockets Layer (SSL), you may also configure
strong authentication, data integrity, and data privacy.
This chapter contains these topics:
■Section 26.1, "Introduction to Configuring Secure Sockets Layer (SSL)"
■Section 26.2, "Configuring SSL by Using Fusion Middleware Control"
■Section 26.3, "Configuring SSL by Using WLST"
■Section 26.4, "Configuring SSL by Using LDAP Commands"
■Section 26.5, "Testing SSL Connections by Using Oracle Directory Services
Manager"
■Section 26.6, "Testing SSL Connections From the Command Line"
■Section 26.7, "Configuring SSL Interoperability Mode"
26.1 Introduction to Configuring Secure Sockets Layer (SSL)
Oracle Internet Directory ensures that data has not been modified, deleted, or replayed
during transmission by using Secure Sockets Layer (SSL). SSL generates a
cryptographically secure message digest—through cryptographic checksums using
either the MD5 algorithm or the Secure Hash Algorithm (SHA)—and includes it with
each packet sent across the network. SSL provides authentication, encryption, and
data integrity using message digest.
This introduction contains the following topics:
■Section 26.1.1, "Supported Cipher Suites"
See Also:
■Section 3.7, "Security" for a conceptual overview of SSL in relation
to Oracle Internet Directory
■Chapter 32, "Managing Authentication".
■The SSL Configuration Service chapter in Oracle Fusion Middleware
Administrator's Guide.
■The SSL Automation Tool chapter in Oracle Fusion Middleware
Administrator's Guide. The SSL Automation Tool enables you to
configure SSL for multiple components using a domain-specific
CA.

Introduction to Configuring Secure Sockets Layer (SSL)
26-2 Oracle Fusion Middleware Administrator's Guide for Oracle Internet Directory
■Section 26.1.2, "Supported Protocol Versions"
■Section 26.1.3, "SSL Authentication Modes"
■Section 26.1.4, "Limitations of the Use of SSL in11g Release 1 (11.1.1)"
■Section 26.1.6, "Other Components and SSL"
■Section 26.1.7, "SSL Interoperability Mode"
■Section 26.1.8, "StartTLS"
Oracle Internet Directory ensures that data is not disclosed during transmission by
using public key encryption available with SSL. In public-key encryption, the sender
of a message encrypts the message with the public key of the recipient. Upon delivery,
the recipient decrypts the message using the recipient's private key.
26.1.1 Supported Cipher Suites
A cipher suite is a set of authentication, encryption, and data integrity algorithms used
for exchanging messages between network nodes. During an SSL handshake, the two
nodes negotiate to determine which cipher suite they will use when transmitting
messages back and forth.
Table 26–1 lists the SSL cipher suites supported by Oracle Internet Directory and their
corresponding authentication, encryption, and data integrity mechanisms. These are
stored in the attribute orclsslciphersuite in the instance-specific configuration
entry.
26.1.2 Supported Protocol Versions
Oracle Internet Directory supports the following TLS/SSL protocols:
■SSLv3
■TLSv1
■SSLv3 with SSLv2 Hello
Oracle Internet Directory does not support SSLv2.
Table 26–1 SSL Cipher Suites Supported in Oracle Internet Directory
Cipher Suite Authentication Encryption
Data
Integrity
SSL_RSA_WITH_3DES_EDE_CBC_SHA RSA 3DES SHA
SSL_RSA_WITH_RC4_128_SHA RSA RC4 SHA
SSL_RSA_WITH_RC4_128_MD5 RSA RC4 MD5
SSL_RSA_WITH_DES_CBC_SHA RSA DES SHA
SSL_RSA_EXPORT_WITH_RC4_40_MD5 RSA RC4_40 MD5
SSL_RSA_EXPORT_WITH_DES40_CBC_SHA RSA DES40 SHA
SSL_DH_anon_WITH_3DES_EDE_CBC_SHA None 3DES SHA
SSL_DH_anon_WITH_RC4_128_MD5 None RC4 MD5
SSL_DH_anon_WITH_DES_CBC_SHA None DES SHA
SSL_RSA_WITH_AES_128_CBC_SHA RSA AES SHA
SSL_RSA_WITH_AES_256_CBC_SHA RSA AES SHA

Introduction to Configuring Secure Sockets Layer (SSL)
Configuring Secure Sockets Layer (SSL) 26-3
TLSv1 can use all of the cipher suites listed in Table 26–1. SSLv3 and SSLv3 with SSLv2
Hello can use the first 10 cipher suites listed inTable 26–1. They cannot use the AES
ciphers.SL_RSA_WITH_AES_128_CBC_SHA or SSL_RSA_WITH_AES_256_CBC_
SHA.
26.1.3 SSL Authentication Modes
The SSL protocol provides transport layer security with authenticity, integrity, and
confidentiality, for a connection between a client and server. Three authentication
modes are supported, as described in Table 26–2. The SSL authentication mode is
controlled by the attribute orclsslauthentication in the instance-specific
configuration entry.
By default, Oracle Internet Directory uses SSL No Authentication Mode
(orclsslauthentication=1).
When both a client and server authenticate themselves with each other, SSL derives
the identity information it requires from the X509v3 digital certificates.
During start-up of a directory server instance, the directory reads a set of
configuration parameters, including the parameters for the SSL profile.
To run a server instance in secure mode, configure a single listening endpoint to
communicate using LDAPS. To allow the same instance to run non-secure connections
concurrently, configure a second listening endpoint to communicate using LDAP.
During installation of Oracle Internet Directory, Oracle Identity Management 11g
Installer follows specific steps in assigning the SSL and non-SSL port. First, it attempts
Table 26–2 SSL Authentication Modes
SSL Authentication
Method
Value of
orclsslauthentication Authentication Behavior
SSL No
Authentication Mode,
Confidentiality mode
1Neither the client nor the server authenticates itself
to the other. No certificates are sent or exchanged.
Only SSL encryption and decryption is used.
SSL Server
Authentication Only
Mode
32 The directory server authenticates itself to the client.
The directory server sends the client a certificate
asserting the server's identity.
SSL Client and Server
Authentication Mode
64 The client and server authenticate themselves with
each other and send certificates to each other.
See Also: Chapter 32, "Managing Authentication".
Notes:
■By default, the SSL authentication mode is set to authentication
mode 1 (encryption only, no authentication). Be sure at least one
Oracle Internet Directory server instance has this default
authentication mode. Otherwise, you break Oracle Delegated
Administration Services and other applications that expect to
communicate with Oracle Internet Directory on the encrypted SSL
port.
■Replication does not work with SSL Server Authentication or SSL
Client and Server Authentication.

Introduction to Configuring Secure Sockets Layer (SSL)
26-4 Oracle Fusion Middleware Administrator's Guide for Oracle Internet Directory
to use 3060 as the non-SSL port. If that port is unavailable, it tries ports in the range
3061 to 3070, then 13060 to 13070. Similarly, it attempts to use 3131 as its SSL port, then
ports in the range 3132 to 3141, then 13131 to 13141.
You can create and modify multiple Oracle Internet Directory instances with differing
values, using a different SSL parameters. This is a useful way to accommodate clients
with different security needs.
26.1.4 Limitations of the Use of SSL in11g Release 1 (11.1.1)
The Oracle directory replication server cannot communicate directly with an
SSL-enabled LDAP server that supports two way (mutual) authentication. The
replication server startup fails and hangs if the LDAP server is configured for SSL
mutual authentication.
26.1.5 Oracle Wallets
Oracle Wallet is a secure software container that is used to store X509 certificates,
Private key, and trusted CA certificates A self-signed certificate can be stored in Oracle
Wallet that can be within an enterprise.
Before removing the reference to the wallet from the instance-specific configuration,
you must disable SSL by setting orclsslenable to 0.
Never delete a wallet currently in use, as defined in the attribute
orclsslwalleturl, from the file system. Doing so prevents the server from starting
successfully. Remove the reference to the wallet from the instance-specific
configuration entry attribute orclsslwalleturl before you delete the file.
In 11g, you do not need to directly manipulate orclsslwalleturl because the SSL
configuration service abstracts this out, both in WLST and Oracle Enterprise Manager
Fusion Middleware Control. The SSL configuration service traps any attempts to
delete a wallet that is currently in use, provided you do so by using the SSL
configuration service.
26.1.6 Other Components and SSL
At installation, Oracle Internet Directory starts up in dual mode. That is, some
components can access Oracle Internet Directory using non-SSL connections, while
others use SSL when connecting to the directory. By default, Oracle Application Server
components are configured to run in this dual mode environment when
communicating with Oracle Internet Directory. If you want, you can remove the
non-SSL mode and change all middleware instances to use SSL.
Enterprise User Security or a customer application might need an SSL channel with a
different configuration from the default. For example, it might need SSL server
Note: If you perform an upgrade from an earlier version of Oracle
Internet Directory to 11g Release 1 (11.1.1), your port numbers from
the earlier version are retained.
See Also: Chapter 8, "Managing Oracle Internet Directory
Instances"for information about creating a new server instance.
See Also: Oracle Fusion Middleware Administrator's Guide for
information on using Oracle wallets with middleware components.

Configuring SSL by Using Fusion Middleware Control
Configuring Secure Sockets Layer (SSL) 26-5
authentication mode or SSL mutual authentication mode. In this case, you must create
another Oracle Internet Directory component instance listening on a different SSL
mode and port.
For more information about Enterprise User Security SSL configuration, please see the
section on enterprise user security configuration in Oracle Database Enterprise User
Administrator's Guide.
26.1.7 SSL Interoperability Mode
In no-auth mode, Oracle components developed before 11g Release 1 (11.1.1) can only
connect with Oracle Internet Directory using an instance that has interoperability
mode enabled (orclsslinteropmode = 1). For compatibility with those
components, SSL interoperability mode is enabled by default.
New clients using JSSE (Java Secure Socket Extensions), and non-Oracle clients, need
an SSL instance with the interopmode disabled. Oracle Internet Directory is fully
compliant with the Sun JDK's SSL, provided SSL interoperability mode is disabled
(orclsslinteropmode = 0).
If Oracle Internet Directory is set to the wrong mode for a client, you might observe
rare an non-deterministic failures of client SSL connections to the server.
26.1.8 StartTLS
Beginning with 11g Release 1 (11.1.1), Oracle Internet Directory supports startTLS.
This feature enables the on-demand negotiation of an SSL session on a non-SSL port.
No special configuration is required for the non-SSL port. If Oracle Internet Directory
has an SSL endpoint configured, a client can use startTLS on the non-SSL port to
negotiate an SSL connection on the non-SSL port with the same configuration that is
on the SSL port. That is, if the SSL port uses mutual authentication, startTLS tries to
negotiate mutual authentication on the non-SSL port.
26.2 Configuring SSL by Using Fusion Middleware Control
Configuring SSL by using Fusion Middleware Control consists of three basic tasks:
1. Creating a Wallet by Using Fusion Middleware Control
2. Configuring SSL Parameters by Using Fusion Middleware Control
3. Restarting Oracle Internet Directory.
See Also: Chapter 8, "Managing Oracle Internet Directory
Instances" for instructions on how to configure server instances
See Also: "Configuring SSL Interoperability Mode" on page 26-13.
See Also:
■Chapter 8, "Managing Oracle Internet Directory Instances" for
instructions on how to stop and start the server.
■"Configuring Certificate Authentication Method by Using
Fusion Middleware Control" on page 32-6
■Oracle Fusion Middleware Reference for Oracle Identity
Management for descriptions of the SSL parameters

Configuring SSL by Using Fusion Middleware Control
26-6 Oracle Fusion Middleware Administrator's Guide for Oracle Internet Directory
26.2.1 Creating a Wallet by Using Fusion Middleware Control
To create a self-signed wallet to use when configuring SSL, perform the following
steps:
1. From the Oracle Internet Directory menu, select Security, then Wallets. If any
wallets exist, you see a list.
2. To create a new wallet, click Create Self-signed Wallet. The Create Self-Signed
Wallet page appears.
3. On the Create Self-Signed Wallet page, enter a name for the new wallet, using
lower-case letters only.
4. Select Auto Login for an auto login wallet. Deselect Auto Login for a
password-protected wallet.
5. If you have deselected Auto Login, enter the password in the two fields.
6. For Common Name, enter the hostname of the instance.
7. Select a Key Size from the list.
8. Click Submit.
9. A confirmation message is displayed and the new wallet appears in the list of
wallets.
See Also: Oracle Fusion Middleware Administrator's Guide for more
information about Oracle wallets.
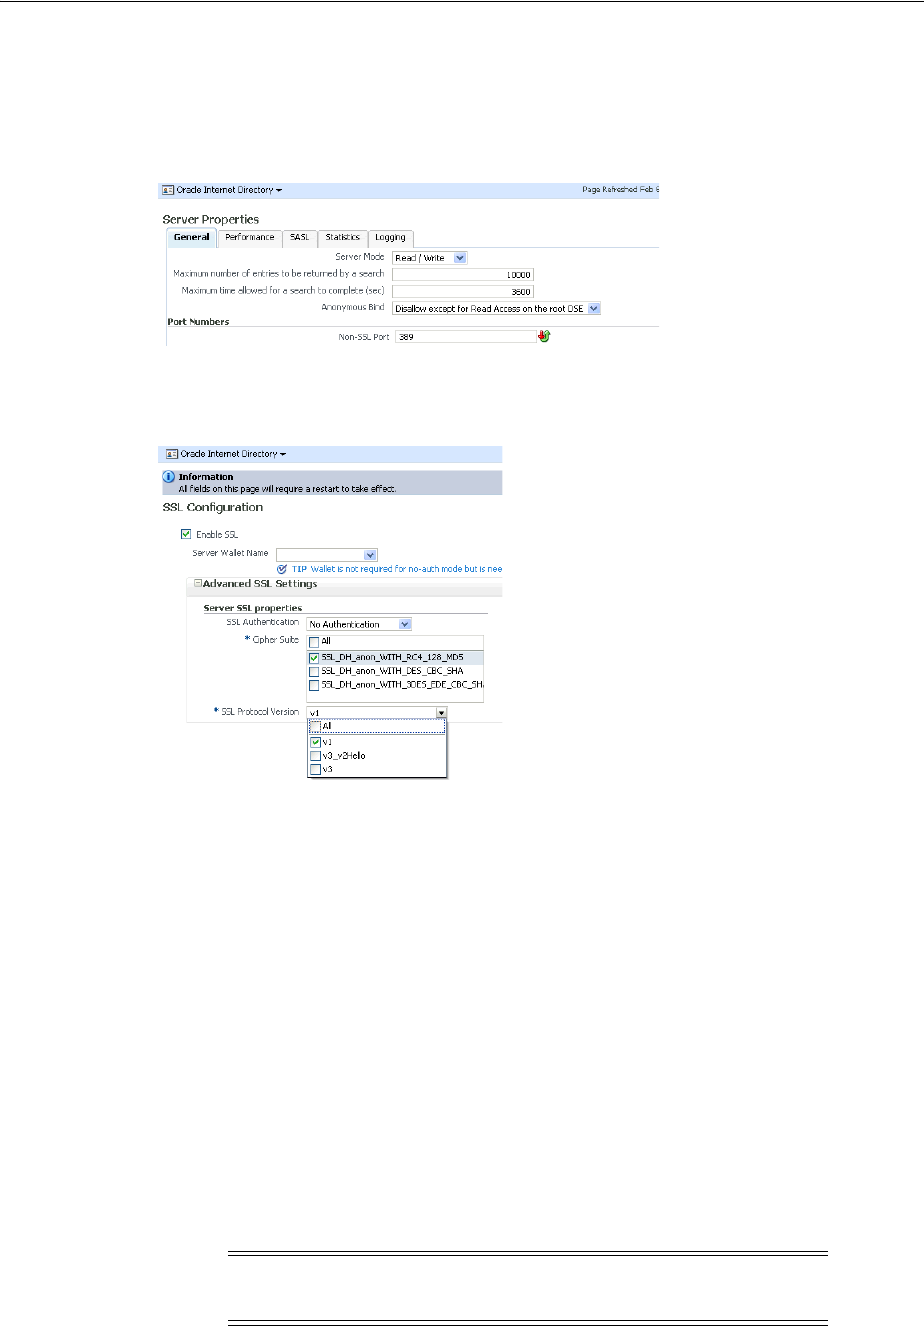
Configuring SSL by Using Fusion Middleware Control
Configuring Secure Sockets Layer (SSL) 26-7
26.2.2 Configuring SSL Parameters by Using Fusion Middleware Control
After you have a wallet to use for configuring SSL, perform the following steps:
1. From the Oracle Internet Directory menu, select Administration, then Server
Properties.
2. Click Change SSL Settings.
3. On the SSL Settings dialog:
■Select Enable SSL.
■Select a wallet.
■If this is a non auto login wallet, supply the wallet password in the Server
Wallet Password field.
■If necessary, expand Advanced SSL Settings.
■Set SSL Authentication to Server.
■Set Cipher Suite to All.
■Set SSL protocol version to the appropriate version, usually v3.
■Click OK.
4. Restart the Oracle Internet Directory instance by navigating to Oracle Internet
Directory, then Availability, then Restart.
The steps for SSL-enabling in mutual-auth mode are the same, except that in the SSL
Settings dialog, you would set SSL Authentication to Mutual instead of Server.
Note: You cannot directly change the parameters for an active
instance.

Configuring SSL by Using WLST
26-8 Oracle Fusion Middleware Administrator's Guide for Oracle Internet Directory
26.2.3 Setting SSL Parameters with Fusion Middleware Control
Table 26–3 lists the SSL parameters in Oracle Enterprise Manager Fusion Middleware
Control that are applicable to Oracle Internet Directory. All of them are in the
instance-specific configuration entry, which has a DN of the form:
"cn=componentname,cn=osdldapd,cn=subconfigsubentry."
SSL Attributes
You must restart the server for SSL configuration changes to take effect.
26.3 Configuring SSL by Using WLST
You must perform the following steps to configure SSL:
1. Create an Oracle wallet.
2. Configure SSL parameters.
3. Restart Oracle Internet Directory.
To create an Oracle wallet and configure SSL parameters by using wlst, perform the
following steps:
1. Invoke wlst and connect to the host, specifying the username, password, and
port of the WebLogic administration server.
ORACLE_COMMON_HOME/common/bin/wlst.sh
connect('username', 'password', 'localhost:7001')
2. Navigate to the custom mbean tree, then to the specific mbean oracle.as.oid,
as described in Section 9.3, "Managing System Configuration Attributes by Using
WLST."
custom()
ls()
cd('oracle.as.oid')
ls()
3. Determine what certificates, if any, you already have in the Key Store MBean. See
Table 9–7, " Oracle Internet Directory-Related MBeans".
listWallets('app_server_instance', 'oid_component', 'oid')
For example:
listWallets('inst1', 'oid1', 'oid')
4. If Necessary, create a new self-signed certificate.
Table 26–3 SSL-Related Attributes in Fusion Middleware Control
Field or Heading Configuration Attribute
Server SSL Protocol Version orclsslversion
SSL Wallet URL orclsslwalleturl
Enable SSL orclsslenable
SSL Authentication Mode orclsslauthentication
Server Cipher Suite orclsslciphersuite

Configuring SSL by Using WLST
Configuring Secure Sockets Layer (SSL) 26-9
createWallet('inst1',
'oid1',
'oid',
'WALLET_NAME',
'WALLET_PASSWORD')
5. Add a self-signed certificate to the wallet for use as the server certificate.
addSelfSignedCertificate('inst1',
'oid1',
'oid',
'WALLET_NAME',
'WALLET_PASSWORD',
'cn=INSTANCE_HOST_NAME',
'key_size',
'alias=server-cert')
If you want to use a third-party or custom Certificate Authority-issued certificate,
instead of a self-signed certificate, you must first import the certificate. See the
chapter on managing keystores, wallets, and certificates in Oracle Fusion
Middleware Administrator's Guide for instructions.
6. Configure the oid1 component node's listener/port for SSL, specifying the
appropriate authentication mode:
configureSSL('app_server_instance',
'oid_component',
'oid',
'sslport1',
'property_file.prop')
For an Oracle Internet Directory component the listener port is always sslport1
and the component type is always oid. For example:
configureSSL('inst1',
'oid1',
'oid',
'sslport1',
'myfile.prop')
where myfile.prop contains:
KeyStore=WALLET_NAME
AuthenticationType=auth-type
SSLVersions=version
Ciphers=cipher
SSLEnabled=true
See Oracle Fusion Middleware Administrator's Guide for information about property
files for SSL.
7. Restart Oracle Internet Directory, as described in Chapter 8, "Managing Oracle
Internet Directory Instances," to activate the changes
8. Run opmnctl updatecomponentregistration, as described in Section 8.3.4,
"Updating the Component Registration of an Oracle Instance by Using opmnctl"
9. Verify that SSL is enabled by using the methods described in Section 26.5, "Testing
SSL Connections by Using Oracle Directory Services Manager" and Section 26.6,
"Testing SSL Connections From the Command Line."

Configuring SSL by Using LDAP Commands
26-10 Oracle Fusion Middleware Administrator's Guide for Oracle Internet Directory
26.4 Configuring SSL by Using LDAP Commands
You must perform the following steps to configure SSL:
1. Create an Oracle wallet.
2. Configure SSL parameters.
3. Restart Oracle Internet Directory.
If you already have created a wallet, you can use the ldapmodify command instead
of wlst to change SSL parameters.
For example, to change the value of orclsslinteropmode to 1 for the instance
oid1, you would type:
ldapmodify -D cn=orcladmin -q -p portNum -h hostname -f ldifFile
where ldifFile contains:
dn: cn=oid1,cn=osdldapd,cn=subconfigsubentry
changetype: modify
replace: orclsslinteropmode
orclsslinteropmode: 1
SSL parameters are attributes of an instance-specific configuration entry. These
configuration entries have DNs of the form:
cn=componentname,cn=osdldapd,cn=subconfigsubentry
Note: WLST manages Oracle Internet Directory through its SSL port.
The Oracle Internet Directory SSL port must be configured for no
authentication or server authentication. If the Oracle Internet
Directory SSL port is configured for mutual authentication, you will
not be able to change Oracle Internet Directory parameters by using
WLST. See Section 26.1.3, "SSL Authentication Modes."
See Also:
■Oracle Fusion Middleware Administrator's Guide for more
information about wlst commands.
■Oracle Fusion Middleware Administrator's Guide for information on
using Oracle wallets with middleware components.
See Also:
■Chapter 8, "Managing Oracle Internet Directory Instances" for
instructions on how to stop and start the server.
■Section 32.4, "Configuring Certificate Authentication Method
by Using Command-Line Tools"
■Oracle Fusion Middleware Reference for Oracle Identity
Management for descriptions of the SSL parameters
Note: You can also use orapki to configure a wallet. See Oracle
Fusion Middleware Administrator's Guide

Testing SSL Connections From the Command Line
Configuring Secure Sockets Layer (SSL) 26-11
for example:
cn=oid1,cn=osdldapd,cn=subconfigsubentry
The SSL attributes are shown in Table 26–4.
You can use the ldapsearch command to list the SSL attributes and their values. For
example, to list attributes containing the string orclssl in the instance oid1, you
would type:
ldapsearch -p 3060 -D cn=orcladmin -q \
-b "cn=oid1,cn=osdldapd,cn=subconfigsubentry" \
-s base "objectclass=*" | grep -i orclssl
After you have configured SSL Parameters, restart Oracle Internet Directory., as
described in Chapter 8, "Managing Oracle Internet Directory Instances."
26.5 Testing SSL Connections by Using Oracle Directory Services
Manager
To test the SSL connection by using Oracle Directory Services Manager:
1. Invoke ODSM as described in Section 7.4.5, "Invoking Oracle Directory Services
Manager."
2. Connect to the Oracle Internet Directory server. On the login screen, enable SSL
and specify the SSL port.
If you can connect, the SSL connection is working correctly.
26.6 Testing SSL Connections From the Command Line
You can use the ldapbind command to test SSL connections. On UNIX, the syntax is:
ldapbind -D cn=orcladmin -q -U authentication_mode -h host -p SSL_port \
-W "file://DIRECTORY_CONTAINING_WALLET" -Q
and on Windows, the syntax is:
ldapbind -D cn=orcladmin -q -U authentication_mode -h host -p SSL_port \
Table 26–4 SSL Attributes
Attribute Meaning
orclsslversion SSL Version
orclsslwalleturl SSL Wallet URL
orclsslenable SSL Enable
orclsslauthentication SSL Authentication
orclsslinteropmode SSL Interoperability Mode
orclsslciphersuite SSL Cipher Suite
Note: Do not set orclsslenable to 1 (SSL only) if you use Oracle
Enterprise Manager Fusion Middleware Control or WLST to manage
Oracle Internet Directory. Those utilities manage the server through
MBeans, which use SASL over a non-SSL connection.

Testing SSL Connections From the Command Line
26-12 Oracle Fusion Middleware Administrator's Guide for Oracle Internet Directory
-W "file:device:\DIRECTORY_CONTAINING_WALLET" -Q
where authentication_mode is one of:
26.6.1 Testing SSL With Encryption Only
Use this method to test an SSL configuration with SSL no authentication required. The
syntax is:
ldapbind -D cn=orcladmin -q -U 1 -h host -p SSL_Port
26.6.2 Testing SSL With Server Authentication
Use this method to test an SSL configuration with SSL server authentication
configured. A client can request either server authentication or no authentication.
For an anonymous bind with server authentication, the syntax is:
ldapbind -U 2 -h host -p port -W "file:DIRECTORY_CONTAINING_WALLET" -Q
For a bind with user cn=orcladmin, wallet file ORACLE_
INSTANCE/OID/admin/mywallet, and server authentication, the syntax is:
ldapbind -D cn=orcladmin -q -U 2 -h host -p port \
-W "file:ORACLE_INSTANCE/OID/admin/mywallet" -Q
For a bind without SSL authentication, the syntax is:
ldapbind -D cn=orcladmin -q -U 1 -h host -p SSL_Port
26.6.3 Testing SSL With Client and Server Authentication
Use this method to test an SSL configuration with SSL client and server authentication
configured.
Oracle Internet Directory supports the Certificate Matching Rule. The DN and
password passed on the ldapbind command line are ignored. Only the DN from the
certificate or the certificate hash is used for authorization.
To use the bind DN (Distinguished Name) from the client certificate, the syntax is:
ldapbind -U 3 -h host -p port -W "file:DIRECTORY_CONTAINING_WALLET" -Q
Number Authentication
1 SSL No authentication required.
2 One-way (server only) SSL authentication required.
3 Two-way (client and server) SSL authentication required.
See Also: The ldapbind command-line tool reference in Oracle
Fusion Middleware Reference for Oracle Identity Management.
See Also: Section 32.1.1, "Direct Authentication."

Configuring SSL Interoperability Mode
Configuring Secure Sockets Layer (SSL) 26-13
26.7 Configuring SSL Interoperability Mode
See Section 26.1.7, "SSL Interoperability Mode" for a description of interoperability
mode.
To set SSL interoperability mode for compatibility with Oracle components developed
before 11g Release 1 (11.1.1) use the command:
ldapmodify -D cn=orcladmin -q -p portNum -h hostname -f ldifFile
where ldifFile contains:
dn: cn=oid1,cn=osdldapd,cn=subconfigsubentry
changetype: modify
replace: orclsslinteropmode
orclsslinteropmode: 1
After you have configured SSL Parameters, restart Oracle Internet Directory, as
described in Chapter 8, "Managing Oracle Internet Directory Instances."

Configuring SSL Interoperability Mode
26-14 Oracle Fusion Middleware Administrator's Guide for Oracle Internet Directory

27
Configuring Data Privacy 27-1
27Configuring Data Privacy
Data privacy is a concern both during transmission and after the data is received.
During transmission, data is protected with SSL. This chapter explains how Oracle
Internet Directory protects data after it is received.
This Chapter contains the following topics:
■Section 27.1, "Introduction to Table Space Encryption"
■Section 27.2, "Enabling and Disabling Table Space Encryption"
■Section 27.3, "Introduction to Using Database Vault With Oracle Internet
Directory"
■Section 27.4, "Configuring Oracle Database Vault to Protect Oracle Internet
Directory Data"
■Section 27.5, "Best Practices for Using Database Vault with Oracle Internet
Directory"
■Section 27.6, "Introduction to Sensitive Attributes"
■Section 27.7, "Configuring Privacy of Retrieved Sensitive Attributes"
■Section 27.8, "Introduction to Hashed Attributes"
■Section 27.9, "Configuring Hashed Attributes"
27.1 Introduction to Table Space Encryption
Oracle Database Transparent Data Encryption (TDE), a component of Oracle
Enterprise User Security, transparently encrypts data when it is written to disk and
decrypts it when it is read back to the authorized user. TDE helps protect data stored
on media if the storage media or data file gets stolen Applications don't have to be
modified, and the data encryption on the storage media is transparent to users.
Oracle Database 11g Advanced Security Transparent Data Encryption introduced
support for encryption of database table spaces. All objects created in an encrypted
tablespace are automatically encrypted. All data in an encrypted tablespace is stored
in encrypted format on the disk. Data blocks are transparently decrypted as they are
accessed by the Oracle Database. Table space encryption eliminates the foreign key
restriction of column encryption and enables index range scans on encrypted data.
27.2 Enabling and Disabling Table Space Encryption
To enable or disable table space encryption on Oracle Databases used by Oracle
Internet Directory, follow these steps:

Enabling and Disabling Table Space Encryption
27-2 Oracle Fusion Middleware Administrator's Guide for Oracle Internet Directory
1. Make a cold backup of the Oracle Databases that are used by the Oracle Internet
Directory instances.
2. Make sure you have the JavaVM and XML developer's Kit packages installed in
the database Oracle home.
To verify whether the specified packages are installed, execute the following
SQL*Plus:
SELECT comp_id, status FROM dba_registry;
Execute the following PL/SQL procedure:
sys.dbms_metadata_util.load_stylesheets
3. Log in to SQL*Plus as a user who has the SYSTEM privilege and execute the
following command:
GRANT CREATE ANY DIRECTORY TO ods;
4. Create the directory object, log directory object used for dumpfiles, and logfiles of
the Oracle DataPump utility. Log in to SQL*Plus as the ODS user and execute the
following commands:
CREATE OR REPLACE DIRECTORY directory_object_name as directory_path;
CREATE OR REPLACE DIRECTORY log_directory_object_name as log_directory_path;
5. Create directory_path and log_directory_path in the file system.
6. Set the database wallet location in the sqlnet.ora of the database Oracle home.
Oracle recommends that you use a separate wallet exclusively for table space
encryption.
a. To use a separate database wallet for table space encryption, set the parameter
ENCRYPTION_WALLET_LOCATION in sqlnet.ora. For example:
ENCRYPTION_WALLET_LOCATION=(SOURCE=(METHOD=FILE)(METHOD_
DATA=(DIRECTORY=/install/db11g/dbs)))
b. To use the same database wallet shared by all Oracle components, set the
parameter WALLET_LOCATION in sqlnet.ora. For example:
WALLET_LOCATION= (SOURCE=(METHOD=FILE)(METHOD_
DATA=(DIRECTORY=/install/db11g/dbs)))
7. Shut down all the Oracle Internet Directory instances that are using the Oracle
Database Oracle home.
8. If you are enabling table space encryption for the first time in the Oracle Database
Oracle home, log in to SQL*Plus as a user who has the ALTER SYSTEM privilege
and execute the following command:
ALTER SYSTEM SET ENCRYPTION KEY IDENTIFIED BY yourwalletpassword;
Note: If you have previously enabled and disabled table space
encryption, and you are enabling it again, skip to Step 7.
Note: Do not confuse the database wallet with the Oracle Internet
Directory wallet described in Chapter 26.

Configuring Oracle Database Vault to Protect Oracle Internet Directory Data
Configuring Data Privacy 27-3
9. Whenever the Oracle Database is shut down and restarted, log in to SQL*Plus as a
user who has the ALTER SYSTEM privilege and execute the following command:
ALTER SYSTEM SET ENCRYPTION WALLET OPEN IDENTIFIED BY yourwalletpassword;
Be sure to execute the command before starting Oracle Internet Directory and before
running the Perl script shown in Step 12.
10. Set the environment variable ORACLE_HOME to the Oracle Database home.
11. Set the environment variable NLS_LANG to the character set of the Oracle Database
server.
12. Edit the path of the perl5 executable in the Perl script ORACLE_
HOME/ldap/datasecurity/oidtbltde.pl so that it matches the location of
perl5 on your computer.
13. If you have not already done so, install the database independent interface module
for Perl (DBI) and the Oracle DBD driver for Perl.
14. Run the Perl script oidtbltde.pl to enable or disable TDE for Oracle Internet
Directory
27.3 Introduction to Using Database Vault With Oracle Internet Directory
Oracle Internet Directory enforces access control in the LDAP protocol layer.
However, a privileged user such as DBA can normally access the Oracle Internet
Directory data in the underlying database by using SQL*Plus.
You can use Oracle Database Vault to prevent unauthorized access to Oracle Internet
Directory data by a privileged user. To do so, you must install and enable Oracle
Database Vault, set up a Database Vault realm containing the ODS database schema
used by Oracle Internet Directory, and set up a policy to allow only the ODS database
account to access the data.
27.4 Configuring Oracle Database Vault to Protect Oracle Internet
Directory Data
You must install and register Oracle Database Vault before you configure it for Oracle
Internet Directory. You install Database Vault as part of the Oracle Database
installation.
27.4.1 Registering Oracle Database Vault
If you do not know whether Oracle Database Vault was registered with your Oracle
Database 11g, type:
SELECT * FROM V$OPTION WHERE PARAMETER = 'Oracle Database Vault';
at a SQL*Plus prompt. If the query returns Oracle Database Vault, then Oracle
Database Vault has been installed and registered. Note that the query is case-sensitive.
See Also:
■Oracle Database 2 Day + Security Guide for a quick guide to
installing, enabling, and disabling Oracle Database Vault
■Oracle Database Vault Administrator's Guide for detailed
information about administering Oracle Database Vault

Configuring Oracle Database Vault to Protect Oracle Internet Directory Data
27-4 Oracle Fusion Middleware Administrator's Guide for Oracle Internet Directory
If Oracle Database Vault is not registered with your Oracle Database 11g, proceed as
follows:
1. Install Oracle Internet Directory as described in Oracle Fusion Middleware
Installation Guide for Oracle Identity Management.
2. Register Oracle Database Vault as described in Oracle Database Vault
Administrator's Guide.
3. If the Oracle Database version is 11.1.0.7, download and install the patch for Bug
7244497. This is not necessary for later versions of Oracle Database.
4. If the Oracle Database version is 11.1.0.7, download and install the patch for Bug
7291157. This is not necessary for later versions of Oracle Database.
If Oracle Database Vault was registered with your Oracle Database, proceed as
follows:
1. Disable Oracle Database Vault, if it is enabled. See the appendix entitled
"Disabling and Enabling Oracle Database Vault" in Oracle Database Vault
Administrator's Guide.
2. Install Oracle Internet Directory as described in Oracle Fusion Middleware
Installation Guide for Oracle Identity Management.
3. Enable Database Vault as described in the Oracle Database Vault Administrator's
Guide.
4. Download and install the patch for Bug 7244497 if you are using Oracle Database
11.1.0.7.
5. Download and install the patch for Bug 7291157 if you are using Oracle Database
11.1.0.7.
27.4.2 Adding a Database Vault Realm and Policies for Oracle Internet Directory
Oracle Internet Directory provides scripts to apply the required Database Vault
policies. These scripts are located in the Oracle Internet Directory installation under
$ORACLE_HOME/ldap/datasecurity.
To apply the Database Vault policies to the Oracle Internet Directory database, you
must create the default Database Vault realm for Oracle Internet Directory, as follows:
1. Open dbv_oid_rule.sql in a text editor and replace the dummy IP address in
the Check ods connections and Check ods connections 2 rules with the
IP address of the computer where Oracle Internet Directory is running.
2. Connect to the database as the Database Vault owner and execute dbv_create_
oid_policies.sql.
The policies in dbv_create_oid_policies.sql completely disable SQL*Plus
access to the Oracle Internet Directory database. For some tasks, you might require
SQL*Plus access to the database by the ODS user. If so, enable SQL*Plus access to the
Oracle Internet Directory Database from a specific host or hosts only.
To enable connectivity to the Oracle Internet Directory Database, follow these steps:
1. Open dbv_oid_rule_sqlplus.sql in a text editor. Replace the dummy IP
address in Check ods connections 3 rule with the IP addresses of the hosts
from which to allow SQL*Plus access to Oracle Internet Directory Database.
2. Connect to the database as the Database Vault owner and execute dbv_oid_
rule_sqlplus.sql.

Best Practices for Using Database Vault with Oracle Internet Directory
Configuring Data Privacy 27-5
If you want to block SQL*Plus access completely to the Oracle Internet Directory
database at some point, connect to the Database as the Database Vault owner and
execute dbv_oid_delete_rule_sqlplus.sql.
27.4.3 Managing Oracle Database Vault Configuration for Oracle Internet Directory
The "Oracle Database Vault Objects" chapter in the Oracle Database Vault
Administrator's Guide explains how to use data dictionary views. This section describes
some views that report Oracle Internet Directory-related information.
The name of the Database Vault realm that Oracle Internet Directory uses is OID
Realm. You can verify that the realm exists by querying the DBA_DV_REALM data
dictionary view.
The Database Vault rules defined for Oracle Internet Directory are Check ods
connections, Check ods connections 2, Check odssm connections, and
Allow other connections. If you ran dbv_oid_rule_sqlplus.sql, the rule
Check ods connection 3 is also defined. These rules are added to a rule set
named OID App Access. To check the names of the existing rules, query the DBA_
DV_RULE_SET_RULE view.
A CONNECT command rule is firing this rule set. You can verify this by querying the
DBA_DV_COMMAND_RULE view. This CONNECT rule does not overwrite existing
CONNECT command rules when you run the Oracle Internet Directory scripts on an
existing Oracle Database Vault installation.
27.4.4 Deleting Database Vault Policies For Oracle Internet Directory
To remove the Database Vault policies for OID installed in the prior section, execute
dbv_delete_oid_policies.sql while connected to the database as the Database
Vault Owner.
27.4.5 Disabling Oracle Database Vault for the Oracle Internet Directory Database
See the appendix entitled "Enabling and Disabling Oracle Database Vault" in Oracle
Database Vault Administrator's Guide.
27.5 Best Practices for Using Database Vault with Oracle Internet
Directory
The following administrative tasks require special attention when Oracle Database
Vault is in use:
■Upgrading Products and Installing Patchsets–disable Oracle Database Vault
before performing Oracle Internet Directory or Oracle Database upgrades or
patchset installations. Enable Oracle Database Vault again after the upgrade or
installation is complete.
■Bulk Loading Data–when Oracle Database Vault is enabled, the SQL*Loader direct
path mode is unavailable, which reduces the performance of the bulkload tool.
Disable Oracle Database Vault before using bulkload to load more than 100KB of
data or more than one million entries. Enable Oracle Database Vault again after
the operation is complete.
■Modifying a Multimaster DRG–before adding or deleting a node in an Oracle
Database Advanced Replication-based multimaster directory replication group,
disable Oracle Database Vault on that node. Enable Oracle Database Vault again
after the operation is complete.

Introduction to Sensitive Attributes
27-6 Oracle Fusion Middleware Administrator's Guide for Oracle Internet Directory
27.6 Introduction to Sensitive Attributes
Oracle Internet Directory stores sensitive attributes in an encrypted format. Examples
of sensitive attributes are: orclpasswordattribute, orclrevpwd, the plug-in
attribute orclpluginsecuredflexfield and the server chaining attribute
orclOIDSCExtPassword.
27.6.1 List of Sensitive Attributes
The list of sensitive attributes is stored in the attribute orclencryptedattributes
in the DSA configuration entry. The list is shown in Table 27–1.
For information about the last three entries, see the "Attribute Reference" chapter in
Oracle Fusion Middleware Reference for Oracle Identity Management.
The orcldataprivacymode attribute controls whether these attributes are
encrypted when the data is received. When orcldataprivacymode is enabled, the
sensitive attributes are encrypted.When privacy mode is disabled, the sensitive data is
returned in the clear.
27.6.2 Encryption Algorithm for Sensitive Attributes
Prior to 11g Release 1 (11.1.1.4.0), Oracle Internet Directory used the 3DES encryption
algorithm for the storage of sensitive attributes. As of 11g Release 1 (11.1.1.4.0), Oracle
Internet Directory uses AES-256.
Customers who have patched their systems from an earlier release might already have
stored values encrypted with the 3DES algorithm. In such cases, the following rules
apply:
Table 27–1 Sensitive Attributes Stored in orclencryptedattributes
Sensitive Attribute Attribute Usage
orclpluginsecuredflexfield Sensitive attributes passed to a plug-in. See
Chapter 44–1.
orcloidscextpassword Server admin password for plug-in connection.
See Chapter 44–1.
orcloidscwalletpassword Plug-in sslwallet password. See Chapter 37
orclrevpwd User password in reversible encrypted format. See
Chapter 30.
orclunsyncrevpwd Encrypted reversible password NOT synchronized
with the related userpassword. See Chapter 30.
orclodipprofileinterfaceconne
ctinformation
Oracle Directory Integration Platform: Information
used to connect to an application for event
propagation.
orclodipcondiraccesspassword Oracle Directory Integration Platform: Used by
third-party directory to connect to directory.
orclodipagentpassword Oracle Directory Integration Platform: Password that
the synchronization profile uses to bind to the
directory.
Note: This list should not be modified. Do not attempt to add
sensitive attributes.

Introduction to Hashed Attributes
Configuring Data Privacy 27-7
■At decryption time, Oracle Internet Directory uses the appropriate algorithm
(3DES or AES-256) to decrypt the value.
■At encryption time, Oracle Internet Directory always encrypts using AES-256.
This ensures that, over time, all encrypted values are converted to AES-256.
27.7 Configuring Privacy of Retrieved Sensitive Attributes
Privacy mode is disabled by default. That is, the value of orcldataprivacymode is
0. To provide security protection, you must enable privacy mode by changing the
value of orcldataprivacymode from 0 to 1 in the DSA configuration entry
To determine the value of orcldataprivacymode, perform the following search:
$ORACLE_HOME/bin/ldapsearch -h host -p port -D cn=orcladmin -q \
-b "cn=dsaconfig,cn=configsets,cn=oracle internet directory" -s base \
"objectclass=*" orcldataprivacymode
To enable privacy mode, use an LDIF file containing the following entries:
dn: cn=dsaconfig,cn=configsets,cn=oracle internet directory
changetype: modify
replace: orcldataprivacymode
orcldataprivacymode: 1
Load the LDIF file with a command line similar to this:
$ORACLE_HOME/bin/ldapmodify -h host -p port -D cn=orcladmin -q -v \
-f LDIF_file_name
27.8 Introduction to Hashed Attributes
Unlike encryption, hashing is a one-way operation. It is not possible to derive the
original value from the hashed value. Oracle Internet Directory supports hashed
attributes in addition to sensitive attributes. The list of hashed attributes is contained
in orclhashedattributes, a multivalued attribute of the DSA configuration entry.
Hashing is performed using the cryptographic scheme set in the root DSE attribute
orclcryptoscheme.
LDAP operations and bulkload automatically perform the transformations described
in Table 27–2. You cannot use the bulkmodify command with hashed attributes.
Table 27–2 LDAP and Bulk Operations on Attributes in orclhashedattributes
Operation
When incoming attribute value is
already hashed
When incoming attribute value is
not yet hashed
ldapadd Use value as it is. Hash incoming value by using
orclcryptoscheme before
performing operation.
ldapmodify Use value as it is. For an add or replace operation, hash
incoming value by using
orclcryptoscheme before
performing operation.
For a delete operation, hash the
incoming value using the crypto
scheme that was in use at the time the
attribute was stored in the directory
before performing operation.

Configuring Hashed Attributes
27-8 Oracle Fusion Middleware Administrator's Guide for Oracle Internet Directory
27.9 Configuring Hashed Attributes
You can manage the list of attributes in orclhashedattributes by using Oracle
Enterprise Manager Fusion Middleware Control or the command line.
27.9.1 Configuring Hashed Attributes by Using Fusion Middleware Control
You can configure hashed attributes by using the Shared Properties page in Oracle
Enterprise Manager Fusion Middleware Control.
Select Administration, then Shared Properties from the Oracle Internet Directory
menu.
27.9.2 Configuring Hashed Attributes by Using ldapmodify
To configure hashed attributes by using the command line, add the attribute names to
the DSA configuration entry's multivalued attribute orclhashedattribute.
For example, the following LDIF file adds three attributes to
orclhashedattributes.
dn: cn=dsaconfig,cn=configsets,cn=oracle internet directory
changetype:modify
add: orclhashedattributes
orclhashedattributes: attributeName1
orclhashedattributes: attributeName2
orclhashedattributes: attributeName3
Load the LDIF file with a command line similar to this:
$ORACLE_HOME/bin/ldapmodify -h host -p port -D cn=orcladmin -q -v \
-f LDIF_file_name
ldapcompare Compare incoming value with value
stored in directory.
Hash the incoming value by using the
crypto scheme that was in use at the
time the attribute was stored in the
directory and then compare it with the
stored value.
bulkload Use value as it is. Hash incoming value by using
orclcryptoscheme before
performing operation.
bulkmodify Do not allow bulkmodify. Do not allow bulkmodify.
Notes:
■Never include the same attribute in both
orclhashedattributes and orclencryptedattributes.
■Only single-valued attributes can be hashed attributes.
Table 27–2 (Cont.) LDAP and Bulk Operations on Attributes in orclhashedattributes
Operation
When incoming attribute value is
already hashed
When incoming attribute value is
not yet hashed

28
Managing Password Policies 28-1
28Managing Password Policies
Password policies are sets of rules that govern how passwords are used. This chapter
contains these topics:
■Section 28.1, "Introduction to Managing Password Policies"
■Section 28.2, "Managing Password Policies by Using Oracle Directory Services
Manager"
■Section 28.3, "Managing Password Policies by Using Command-Line Tools"
28.1 Introduction to Managing Password Policies
A password policy is a set of rules governing how passwords are used. When a user
attempts to bind to the directory, the directory server ensures that the password meets
the various requirements set in the password policy.
When you establish a password policy, you set the following types of rules, to mention
just a few:
■The maximum length of time a given password is valid
■The minimum number of characters a password must contain
■The number of numeric characters required in a password
This section contains these topics:
■Section 28.1.1, "What a Password Policy Is"
■Section 28.1.3, "Fine-Grained Password Policies"
■Section 28.1.4, "Default Password Policy"
■Section 28.1.5, "Password Policy Attributes"
■Section 28.1.7, "Directory Server Verification of Password Policy Information"
28.1.1 What a Password Policy Is
Password polices are sets of rules that govern password syntax and how passwords
are used. Password policies enforced by Oracle Internet Directory include:
■The maximum length of time a given password is valid
Note: All references to Oracle Delegated Administration Services in
this chapter refer to Oracle Delegated Administration Services 10g
(10.1.4.3.0) or later.

Introduction to Managing Password Policies
28-2 Oracle Fusion Middleware Administrator's Guide for Oracle Internet Directory
■The minimum number of characters a password must contain
■The minimum number of numeric characters required in a password
■The minimum number of alphabetic characters
■The minimum number of repeated characters
■The use of uppercase and lowercase
■The minimum number of non-alphanumeric characters (that is, special characters)
■That users change their passwords periodically
■The minimum and maximum time between password changes
■The grace period for logins after password expiration, by time or by number of
logins
■That users cannot reuse previously used passwords
28.1.2 Steps Required to Create and Apply a Password Policy
In general, establishing a password policy requires the following steps:
1. Create a password policy entry in the appropriate container and associate it with
the pwdpolicy object. (Default entries exists when you first install Oracle Internet
Directory.)
2. Create the desired policy by setting values for attributes defined under the
pwdpolicy object class for the entry created in step 1.
3. Enable the policy by setting the orclepwdpolicynable attribute to 1. If this is
not set to 1, Oracle Internet Directory ignores the policy.
4. Determine the subtree to be governed by the policy. Add and populate a
pwdpolicysubentry attribute with the policy's DN, at the root of that subtree.
28.1.3 Fine-Grained Password Policies
In 10g (10.1.4.0.1) and later, Oracle Internet Directory supports multiple password
policies in each realm. You can apply these policies to any subtree within that realm.
This means that you can have entry-specific password policies.
You can specify password policies as realm-specific or directory-wide in scope. To
achieve the desired scope, you must create the password policy entry in the
appropriate container. Password policies are populated under a "cn=pwdPolicies"
container created under the "cn=common" entry in each realm. By default these
containers contain a password policy with the RDN "cn=default". The directory
specific default password policy, for example, has the DN:
cn=default,cn=pwdPolicies,cn=Common,cn=Products,
cn=OracleContext.
You can create other policies under the pwdPolicies container, with different RDNs.
Figure 28–1 illustrates this scenario.
See Also: "Object Class Reference" in Oracle Fusion Middleware
Reference for Oracle Identity Management for a list and descriptions of
the attributes of the pwdPolicy object class, and those of the top
object class that pertain to password policies
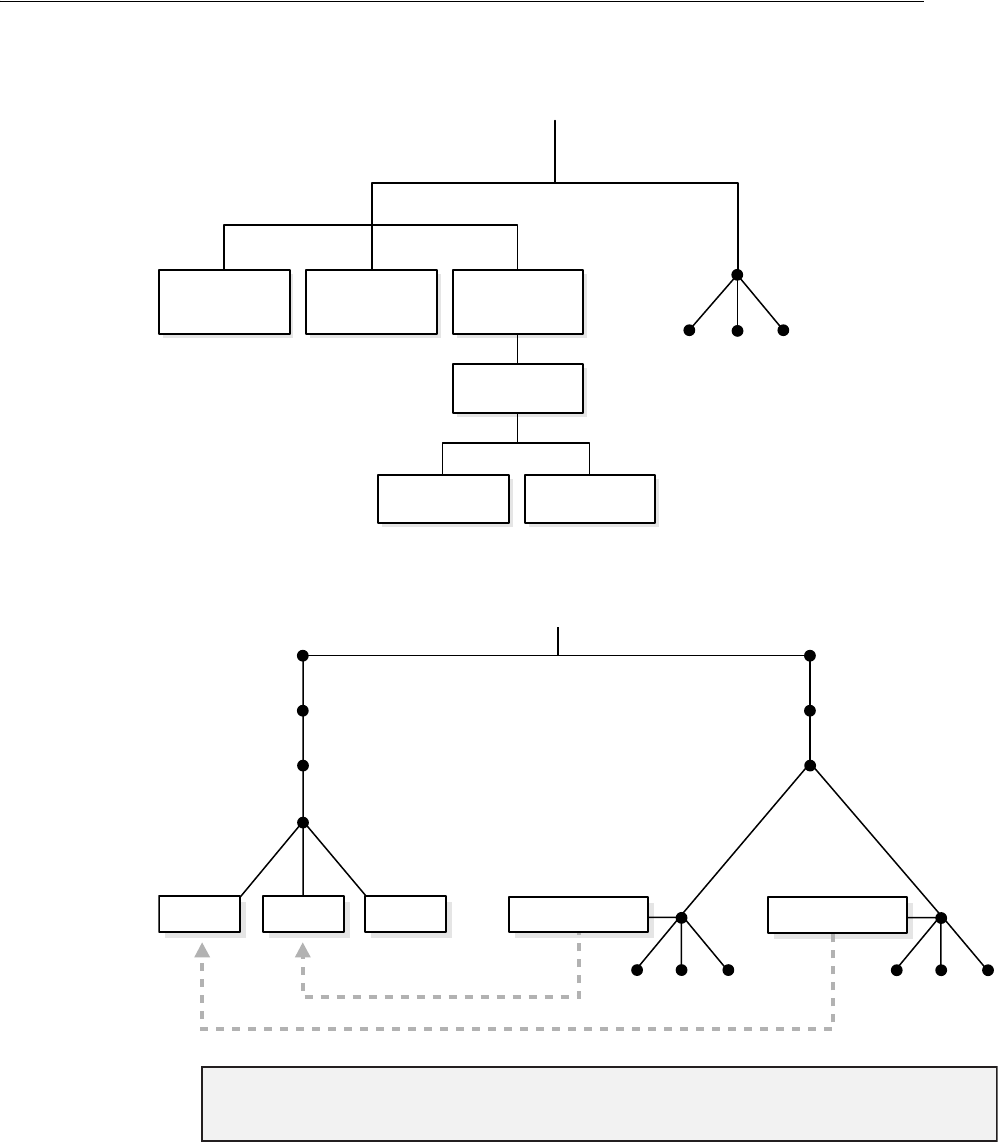
Introduction to Managing Password Policies
Managing Password Policies 28-3
Figure 28–1 Location of Password Policy Entries
Figure 28–2 pwdPolicy subentry Attributes Populated with DN of Password Policy
At run time, Oracle Internet Directory resolves the applicable password policy on an
entry by looking for a populated pwdpolicysubentry attribute in the entry and
applying the policy pointed to by its value. If a populated pwdPolicysubentry
attribute does not exist, Oracle Internet Directory traverses up the directory tree until
it finds the nearest ancestor entry with a populated pwdPolicysubentry. Oracle
Internet Directory applies the password policy pointed to by the value at that entry.
Application
2Common
pwdPolicies
Application
1
GroupsProducts
Subscriber or Default
Realm Oracle Context
default policy 1
cn = Common
cn = pwdPolicies
cn = Products
cn = OracleContext
default policy1policy2
dc = acme
cn = users
dc = com
DSE Root
l = uk
l = us
pwdPolicySubentry pwdPolicySubentry
At l=us, pwdPolicySubentry="cn=default, cn=pwdPolicies, cn=Common, cn=Products, cn=OracleContext"
At l=uk, pwdPolicySubentry="cn=policy2, cn=pwdPolicies, cn=Common, cn=Products, cn=OracleContext"

Introduction to Managing Password Policies
28-4 Oracle Fusion Middleware Administrator's Guide for Oracle Internet Directory
28.1.4 Default Password Policy
The default password policy for Oracle Internet Directory enforces:
■Password expiration in 120 days
■Account lockout after 10 login failures. Except for the superuser account, all
accounts remain locked for a duration of 24 hours unless the passwords are reset
by the directory administrator. A user account stays locked even after the lockout
duration has passed unless the user binds with the correct password
If the superuser account, cn=orcladmin, becomes locked, it stays locked until
you unlock it by using the OID Database Password utility. This utility prompts
you for the ODS user password. After you enter the ODS password, it unlocks the
account.
■A minimum password length of five characters with at least one numeric character
■Password expiry warning seven days before expiry
■Five grace logins allowed after password expiry
Beginning in Oracle Internet Directory, Release 9.0.4, the password policy entry in the
Root Oracle Context applies to the superuser, but only the password policy governing
account lockout is enforced on that account.
Notes:
■Password policies applied to groups are not automatically applied
to group members. You must apply the policy to individual
entries or to an ancestor entry.
■You can disable a password policy by setting
orclpwdpolicyenable to 0. Doing so leaves that portion of the
directory without an applicable password policy. Oracle Internet
Directory does not traverse up the DIT to find an enabled policy
that is applicable. Setting this attribute to 0 enables you to leave
portions of the directory free of password policies when
necessary. However you should consider the implications of
making such a change before doing so.
■You must protect password policy entries from anonymous access
using Oracle Internet Directory's ACI infrastructure, described in
Chapter 29, "Managing Directory Access Control". This is
particularly important when a password policy is weak, as that
information can assist an attacker in compromising the directory.
See Also:
■The oidpasswd command-line tool reference in Oracle Fusion
Middleware Reference for Oracle Identity Management for information
on unlocking a superuser account
■Section S.1.6, "Troubleshooting Password Policies".

Introduction to Managing Password Policies
Managing Password Policies 28-5
The Oracle Internet Directory password policy is applicable to simple binds (based on
the userpassword attribute), compare operations on the userpassword attribute,
and SASL binds. It does not apply to SSL and proxy binds.
28.1.5 Password Policy Attributes
The following attributes affect password policy:
Note: Oracle Identity Management has two distinct types of
privileged user. Both privileged user accounts can be locked if certain
password policies are activated.
The first type of privileged user, the superuser with the DN
cn=orcladmin, is represented as a special user entry found within
the default identity management realm. It enables directory
administrators to make any modifications to the DIT and any changes
to the configuration of Oracle Internet Directory servers. If the
superuser (orcladmin) account is locked—for example, as a result of
too many attempts to bind with an incorrect password—then an
administrator with DBA privileges to the Oracle Internet Directory
repository can unlock it by using the oidpasswd tool. To unlock the
orcladmin account execute the command:
oidpasswd unlock_su_acct=TRUE
The second privileged user, a realm-specific privileged user, governs
capabilities such as creation and deletion of users and groups within a
realm and all the functionality related to Oracle Delegated
Administration Services. This account is represented by an entry with
the DN cn=orcladmin,cn=users,realm DN. Note that, in
contrast to the single superuser account, each realm has its own
realm-specific privileged user. To unlock the realm-specific privileged
account, the first type of privileged user, cn=orcladmin, can modify
the account password by using Oracle Directory Services Manager.
Table 28–1 Password Policy Attributes
Name Function
pwdMinAge The number of seconds that must elapse between user
modifications to the password. The default is 0.
pwdMaxAge The maximum time, in seconds, that a password can be valid.
Upon reaching this age, the password is considered to have
expired. The default is 10368000 seconds (120 days).
pwdLockout When this is true, the server locks out a user after a number of
consecutive invalid login attempts. The number is specified by
pwdMaxFailure. The default value of pwdLockout is 1 (true).
orclpwdIPLockout When this is true, the server locks out a user after a number of
consecutive invalid login attempts from the same IP address.
The number is specified by orclpwdIPMaxFailure.The
default is false.
pwdLockoutDuration The time period in seconds to lock out a user account when the
threshold of invalid login attempts is reached. The default is
86400 seconds (24 hours).

Introduction to Managing Password Policies
28-6 Oracle Fusion Middleware Administrator's Guide for Oracle Internet Directory
orclpwdIPLockoutDurat
ion
The time period in seconds to lock out a user account when the
threshold of invalid login attempts from the same IP address is
reached. The default is 0.
pwdMaxFailure The maximum number of invalid login attempts the server
should allow before locking out a user account. The default
value is 10.
orclpwdIPMaxFailure The maximum number of invalid login attempts the server
should allow from a particular IP address before locking the
user account. The default is 0.
pwdFailureCountInterv
al
The time in seconds after which the password failures are
purged from the failure counter, even though no successful
authentication occurred. The default is 0.
pwdExpireWarning The maximum number of seconds before a password is due to
expire that expiration warning messages are returned to an
authenticating user. The default value is 604800 seconds (seven
days).
pwdCheckSyntax Enables or disables password syntax check
0–Disable all syntax checks
1–Enable password syntax value checks, except for encrypted
passwords (default)
pwdMinLength The minimum length of a password governed by this policy.
The default is 5 characters
pwdGraceLoginLimit The maximum number of grace logins allowed after a password
expires. The default is 5. The maximum is 250.
orclpwdGraceLoginTime
Limit
The maximum period in seconds where grace logins are allowed
after a password expires. If orclpwdGraceLoginTimeLimit
is nonzero, then pwdGraceloginLimit must be zero. If
pwdGraceloginLimit is nonzero, then
orclpwdGraceLoginTimeLimit must be zero (the default).
pwdMustChange Requires users to reset their password upon their first login after
account creation or after a password has been reset by the
administrator. The default is 0 (false).
orclpwdIllegalValues A list of values that are not allowed as passwords.
orclpwdAlphaNumeric The minimum number of numeric characters required i in a
password. The default is 1.
orclpwdMinAlphaChars The minimum number of alphabetic characters required in a
password. The default is 0.
orclpwdMinSpecialChar
s
The minimum number of non-alphanumeric characters (that is,
special characters) required in a password. The default is 0.
orclpwdMinUppercase The minimum number of uppercase characters required in a
password. The default is 0.
orclpwdMinLowercase The minimum number of lowercase characters required in a
password. The default is 0.
orclpwdMaxRptChars The maximum number of repeated characters allowed in a
password. The default is 0.
pwdInHistory The maximum number of used passwords stored in the
pwdHistory attribute of a given entry. Passwords stored in
pwdHistory cannot be used as a new password until they are
purged from it. The default is 0.
Table 28–1 (Cont.) Password Policy Attributes
Name Function

Introduction to Managing Password Policies
Managing Password Policies 28-7
28.1.6 Password Policy-Related Operational Attributes
The Oracle Internet Directory server stores user-specific password policy-related
information in operational attributes of the user entry. Only the server can modify
these attributes. They are shown in Table 28–2.
To determine the last login attempt, compare orcllastlogintime with the last
timestamp in pwdfailuretime. The most recent of these is the time of the last login
attempt.
28.1.7 Directory Server Verification of Password Policy Information
As explained in Section 28.1.3, "Fine-Grained Password Policies," Oracle Internet
Directory determines the applicable policy for an entry by locating the appropriate
pwdAllowUserChange Not currently used.
orclpwdPolicyEnable When this is true, the server evaluates this policy. Otherwise, the
policy is ignored and not enforced. The default is 1 (true).
orclpwdEncryptionEnab
le
When set to true, enables password encryption. The default is 0
(false).
orclpwdAllowHashCompa
re
Enables or disables logins using the hashed password value. 0 =
disabled (default). 1 = enabled.
orclPwdTrackLogin Enables or disables tracking of user's last login time. 0 = disabled
(default). 1= enabled.
orclPwdMaxInactivity Amount of inactive time, in seconds, before an account is
automatically expired. 0=disabled (default). The attribute
orclPwdTrackLogin must be enabled if
orclPwdMaxInactivity is non-zero.
Table 28–2 Password Policy-Related Operational Attributes
Attribute Description
orcllastlogintime Timestamp of last successful login. Tracked only if the password
policy attribute orclPwdTrackLogin is enabled.
pwdfailuretime A space-delimited set of timestamps of failed login attempts,
cleared upon successful login.
orclpwdipaccountlocke
dtime
Time when account was locked for logins from this IP address.
This can be a multivalued attribute.
orclpwdipfailuretime A space-delimited set of timestamps of failed login attempts
from a specific IP address, cleared upon successful login. This
can be a multivalued attribute.
pwdaccountlockedtime Time when account was locked.
pwdchangedtime Time of last password change.
pwdexpirationwarned Time when user was warned of password expiration.
pwdgraceusetime A space-delimited set of timestamps of logins during the grace
period.
pwdreset If the value is 1, the user must reset the password at the next
login.
pwdhistory List of previously used passwords.
Table 28–1 (Cont.) Password Policy Attributes
Name Function

Introduction to Managing Password Policies
28-8 Oracle Fusion Middleware Administrator's Guide for Oracle Internet Directory
populated pwdPolicysubentry. To ensure that the user password meets the
requirements of a given policy, the directory server verifies:
■That the password policy is enabled. It does this by checking the value of the
attribute orclpwdpolicyenable in the password policy entry. A value of 1
indicates that the password policy is enabled. A value of 0 indicates that it is
disabled.
■Correctness of password policy syntax information, which includes, for example,
the correct number of alphabetic and numeric characters, or the correct password
length. The directory server checks the syntax during ldapadd and ldapmodify
operations on the userpassword attribute.
■Password policy state information, which, for example, includes:
–The timestamp of the user password creation or modification
–That the minimum password age is greater than the current time minus the
time of password creation
–The timestamp of consecutive failed login attempts by the user
–The time at which the user account was locked
–Indicator that the password has been reset and must be changed by the user
on first authentication
–A history of user's previously used passwords
–Time stamps of grace logins
If the grace login is set by time period, the server checks the time discrepancy
between the current time and the expiration.
The directory server checks the state information during ldapbind and
ldapcompare operations, but does so only if the orclpwdpolicyenable
attribute is set to 1.
To enable password value syntax checking, set the attributes
orclpwdpolicyenable and pwdchecksyntax in the password policy entry to
TRUE.
28.1.8 Password Policy Error Messages
Whenever there are password policy violations, the directory server sends to the client
various error and warning messages. In Oracle Internet Directory, 10g (10.1.4.0.1) or
later, the directory server can send these messages as LDAP controls only if the client
sends a password policy request control as a part of an LDAP bind or compare
operation. If the client does not send the request control, then the directory server does
not send the response controls. Instead, it sends errors and warnings as part of
additional information.
28.1.9 Releases Before 10g (10.1.4.0.1)
In releases before 10g (10.1.4.0.1), password policies were controlled by the
orclcommonusersearchbase attribute in a realm-specific Common Entry. If you
upgraded from an earlier release, the existing password policies were migrated to the
new architecture during the upgrade. With the new architecture, simply adding a DN
See: Section S.1.6, "Troubleshooting Password Policies" for a list
of the messages and information about how to resolve them

Managing Password Policies by Using Oracle Directory Services Manager
Managing Password Policies 28-9
to the orclcommonusersearchbase no longer guarantees that the realm's default
password policy is applied to the subtree rooted at that DN.
In Oracle Internet Directory 10g (10.1.4.0.1) and later, when you define a password
policy, you must perform a second step to apply the password policy to a subtree of
the directory. You must populate the pwdPolicysubentry attribute with the DN of
the desired password policy on an entry that is the root of a subtree you want the
policy to be applicable to. Figure 28–2 illustrates this. The pwdPolicy at l=us
contains the DN of the default policy,
"cn=default,cn=pwdPolicies,cn=Common,cn=Products,
cn=OracleContext", so the default policy applies to the users in the US. The
pwdPolicysubentry at l=uk contains the DN of the policy
"cn=policy2,cn=pwdPolicies,cn=Common,cn=Products,
cn=OracleContext", so policy2 applies to the users in the UK.
28.2 Managing Password Policies by Using Oracle Directory Services
Manager
You can use Oracle Directory Services Manager to create, assign, and modify
password policies.
This section contains these topics:
■Section 28.2.1, "Viewing Password Policies by Using Oracle Directory Services
Manager"
■Section 28.2.2, "Modifying Password Policies by Using Oracle Directory Services
Manager"
■Section 28.2.3, "Creating a Password Policy and Assigning it to a Subtree by Using
ODSM"
28.2.1 Viewing Password Policies by Using Oracle Directory Services Manager
1. Invoke Oracle Directory Services Manager and connect to the Oracle Internet
Directory server as described in Section 7.4.5, "Invoking Oracle Directory Services
Manager."
2. From the task selection bar, select Security.
3. Expand Password Policy in the left pane. All of the password policies appear in
the left pane, listed by relative DN. Mouse over an entry to see the full DN.
4. Select a password policy to display its information in the right pane.
28.2.2 Modifying Password Policies by Using Oracle Directory Services Manager
To modify the password policies:
Note: Password policy entries for subtrees and users are replicated.
Replicating the 11g Release 1 (11.1.1) or 10g (10.1.4.0.1) policies to a
pre-10g (10.1.4.0.1) node does not adversely impact the functionality
of that node. A pre-10g (10.1.4.0.1) node, however, cannot
meaningfully interpret the new password policies. It continues to
enforce the password policy in the realm Oracle context.

Managing Password Policies by Using Oracle Directory Services Manager
28-10 Oracle Fusion Middleware Administrator's Guide for Oracle Internet Directory
1. Invoke Oracle Directory Services Manager and connect to the Oracle Internet
Directory server as described in Section 7.4.5, "Invoking Oracle Directory Services
Manager."
2. From the task selection bar, select Security.
3. Expand Password Policy in the left pane. All of the password policies appear in
the left pane.
4. Select the password policy you want to modify. Five tab pages appear in the right
pane.
5. In the General tab page, modify the editable attribute fields as needed.
6. Select the Account Lockout tab page and, to modify the fields, select Global
Lockout. Modify the editable attribute fields as needed.
7. Select the IP Lockout tab page and, to modify the fields, select IP Lockout. Modify
the editable attribute fields as needed.
8. Select the Password Syntax tab page and, to modify the fields, select Check
Password Syntax. Modify the editable attribute fields as needed.
9. Select the Effective Subtree tab page to modify the subtree to which the policy
applies. To add a subtree, select the Add icon. Either enter the DN, or select
Browse, then use the Select Distinguished Name (DN) Path window to navigate
to the subtree to which you want the policy to apply.
10. When you are finished, choose Apply.
28.2.3 Creating a Password Policy and Assigning it to a Subtree by Using ODSM
To create a new password policy:
1. Invoke Oracle Directory Services Manager and connect to the Oracle Internet
Directory server as described in Section 7.4.5, "Invoking Oracle Directory Services
Manager."
2. From the task selection bar, select Security.
3. Expand Password Policy in the left pane. All of the password policies appear in
the left pane.
4. To create a new policy, select Create. Alternatively, select an existing password
policy in the left pant and select Create Like.
5. In the General tab page, set or modify the editable attribute fields as needed.
6. Select the Account Lockout tab page and, to modify the fields, select Global
Lockout. Modify the editable attribute fields as needed.
7. Select the IP Lockout tab page and, to modify the fields, select IP Lockout. Modify
the editable attribute fields as needed.
8. Select the Password Syntax tab page and, to modify the fields, select Check
Password Syntax. Modify the editable attribute fields as needed.
9. To assign the password policy to a subtree, select the Effective Subtree tab page,
then select Add. Either enter the DN, or select Browse, then use the Select
Distinguished Name (DN) Path window to navigate to the subtree to which you
want the policy to apply.
10. When you are finished, choose Apply.

Managing Password Policies by Using Command-Line Tools
Managing Password Policies 28-11
28.3 Managing Password Policies by Using Command-Line Tools
This section contains these topics:
■Section 28.3.1, "Viewing Password Policies by Using Command-Line Tools"
■Section 28.3.2, "Creating a New Password Policy by Using Command-Line Tools"
■Section 28.3.3, "Applying a Password Policy to a Subtree by Using Command-Line
Tools"
■Section 28.3.4, "Setting Password Policies by Using Command-Line Tools"
28.3.1 Viewing Password Policies by Using Command-Line Tools
The following example retrieves password policies under a specific password policy
container:
ldapsearch -p port -h host \
-b "cn=pwdPolicies,cn=common,cn=products,cn=OracleContext, \
o=my_company,dc=com" \
-s sub "(objectclass=pwdpolicy)"
The following example retrieves all password policy entries:
ldapsearch -p port -h host -b " " -s sub "(objectclass=pwdpolicy)"
28.3.2 Creating a New Password Policy by Using Command-Line Tools
You create a new password policy by adding a policy entry to the appropriate
container. A good way to do this is as follows:
1. Dump the contents of the default entry,
cn=default,cn=pwdPolicies,cn=Common,cn=Products,
cn=OracleContext, to an LDIF file, using ldapmodify. For example:
ldapsearch -p port -h host -D cn=orcladmin -q -L \
-b 'cn=default,cn=pwdPolicies,cn=Common,cn=Products, cn=OracleContext' \
-s base '(objectclass=pwdpolicy)' >> pwdpolicy.ldif
As an alternative to ldapsearch, you could use ldifwrite. Ensure ORACLE_
INSTANCE is set, then type:
ldifwrite connect="conn_str" \
baseDN="cn=default,cn=pwdPolicies,cn=Common,cn=Products, cn=OracleContext" \
ldiffile="pwpolicy.ldif"
2. Modify the LDIF file so that it has the common name and desired values for the
new policy. For example, you might change cn=default to cn=policy1 and
change pwdMaxFailure from 10 to 5.
3. Add the new entry by using ldapadd. You would use a command line of the
form:
ldapadd -p port_number -h host -D cn=orcladmin -q -f pwdpolicy.ldif
28.3.3 Applying a Password Policy to a Subtree by Using Command-Line Tools
To apply the new password policy to the subtree "dn: cn=accounting,c=us" you would
use a command line such as:
ldapmodify -D "cn=orcladmin" -q -p port -h host -f my_file.ldif
with an LDIF file such as this:

Managing Password Policies by Using Command-Line Tools
28-12 Oracle Fusion Middleware Administrator's Guide for Oracle Internet Directory
dn: cn=accounting,c=us
changetype: modify
replace: pwdPolicysubentry
pwdPolicysubentry:cn=policy1,cn=pwdPolicies,cn=common,cn=products,
cn=OracleContext,o=my_company,dc=com
28.3.4 Setting Password Policies by Using Command-Line Tools
The following example disables the pwdLockout attribute in the default password
policy. It changes the attribute from its default setting of 1 to 0.
The file my_file.ldif contains:
dn: cn=default,cn=pwdPolicies,cn=common,cn=products,cn=OracleContext,
o=my_company,dc=com
changetype:modify
replace: pwdlockout
pwdlockout: 0
The following command loads this file into the directory:
ldapmodify -D "cn=orcladmin" -q -p port -h host -f my_file.ldif
The following example modifies pwdMaxAge in the default password policy entry.
ldapmodify -D "cn=orcladmin" -q -p port -h host -q -f file
where file contains:
dn: cn=default,cn=pwdPolicies,cn=common,cn=products,cn=OracleContext,
o=my_company,dc=com
changetype: modify
replace: pwdMaxAge
pwdMaxAge: 10000

29
Managing Directory Access Control 29-1
29Managing Directory Access Control
This chapter provides an overview of access control policies and describes how to
administer directory access control by using either Oracle Directory Services Manager
or the command-line tool, ldapmodify.
This chapter contains these topics:
■Section 29.1, "Introduction to Managing Directory Access Control"
■Section 29.2, "Managing Access Control by Using Oracle Directory Services
Manager"
■Section 29.3, "Managing Access Control by Using Command-Line Tools"
29.1 Introduction to Managing Directory Access Control
Authorization is the permission given to a user, program, or process to access an object
or set of objects. When directory operations are attempted within a directory session,
the directory server ensures that the user has the permissions to perform those
operations. If the user does not have the permissions, then the directory server
disallows the operation. The directory server protects directory data from
unauthorized operations by directory users by using access control information.
Access control information is the directory metadata that captures the administrative
policies relating to access control. This information is stored in Oracle Internet
Directory as user-modifiable configuration attributes, each of which is called an access
control item (A CI).
Typically, a list of these ACI attribute values, called an access control list (ACL), is
associated with directory objects. The attribute values on that list represent the
permissions that various directory user entities (or subjects) have on a given object.
An ACI consists of:
■The object to which you are granting access
■The entities or subjects to whom you are granting access
■The kind of access you are granting
See Also:
■Section 3.7, "Security" and Chapter 32, "Managing
Authentication" for a conceptual explanation before you begin
implementing and administering access control policies
■Appendix H, "The Access Control Directive Format" for
information about the format or syntax of Access Control Items
(ACIs)

Introduction to Managing Directory Access Control
29-2 Oracle Fusion Middleware Administrator's Guide for Oracle Internet Directory
Access control policies can be prescriptive, that is, their security directives can be set to
apply downward to all entries at lower positions in the directory information tree
(DIT). The point from which such an access control policy applies is called an access
control policy point (ACP).
ACIs are represented and stored as text strings in the directory. These strings must
conform to a well-defined format, called the ACI directive format. Each valid value of
an ACI attribute represents a distinct access control policy.
The following features of directory access control can be used by applications running
in a hosted environment.
■Prescriptive access control
Enables the service provider to specify access control lists (ACLs) for a collection
of directory objects, instead of having to state the policies for each individual
object. This feature simplifies the administration of access control, especially in
large directories where many objects are governed by identical or similar policies.
■Hierarchical access control administration model
Enables the service provider to delegate directory administration to hosted
companies. The realm could in turn delegate further if necessary.
■Administrative override control for delegated domains
Enables the service provider to perform diagnosis and recovery from
unintentional account lockout or accidental security exposure.
■Dynamic evaluation of access control entities
Enables subtree administrators to identify both subjects and objects in terms of
their namespace and their association with other objects in the directory. For
example, the administrator of one realm can allow only a user's manager to
update that user's salary attribute. The administrator of another realm can
establish and enforce a different policy regarding salary attributes.
You manage access control policies by configuring the values of the ACI attributes
within appropriate entries. You can do this by using either Oracle Directory Services
Manager or ldapmodify.
This section contains these topics:
■Section 29.1.1, "Access Control Management Constructs"
■Section 29.1.2, "Access Control Information Components"
■Section 29.1.3, "Access Level Requirements for LDAP Operations"
29.1.1 Access Control Management Constructs
This section discusses the structures used for access control in Oracle Internet
Directory. These include:
■Access Control Policy Points (ACPs)
■The orclACI attribute for prescriptive access control
■The orclEntryLevelACI attribute for entry-level access control
■Privilege Groups

Introduction to Managing Directory Access Control
Managing Directory Access Control 29-3
29.1.1.1 Access Control Policy Points (ACPs)
ACPs are entries in which the orclACI attribute has been given a value. The
orclACI attribute value represents the access policies that are inherited by the subtree
of entries starting with the ACP as the root of the subtree.
When a hierarchy of multiple ACPs exists in a directory subtree, a subordinate entry
in that subtree inherits the access policies from all of the superior ACPs. The resulting
policy is an aggregation of the policies within the ACP hierarchy above the entry.
For example, if an ACP is established in the HR department entry, and the Benefits,
Payroll, and Insurance groups are entries within the HR department, then any entry
within those groups inherits the access rights specified in the HR department entry.
When there are conflicting policies within a hierarchy of ACPs, the directory applies
well-defined precedence rules in evaluating the aggregate policy.
29.1.1.2 The orclACI Attribute for Prescriptive Access Control
The orclACI attribute contains access control list (ACL) directives that are
prescriptive—that is, these directives apply to all entries in the subtree below the ACP
where this attribute is defined. Any entry in the directory can contain values for this
attribute. Access to this attribute itself is controlled in the same way as access to any
other attribute.
29.1.1.3 The orclEntryLevelACI Attribute for Entry-Level Access Control
When a policy pertains only to a specific entity—for example, a special user—you can
maintain the ACL directives within the entry for that entity. You do this by using a
user-modifiable configuration attribute called orclEntryLevelACI. This attribute
contains ACL directives only for the entry with which it is associated.
Any directory entry can optionally carry a value for this attribute. This is because
Oracle Internet Directory extends the abstract object class top to include
orclEntryLevelACI as an optional attribute.
The orclEntryLevelACI attribute is multi-valued and has a structure similar to that
of orclACI.
See Also: Section 29.1.4, "How ACL Evaluation Works."
Note: It is possible to represent ACL directives specific to a single
entry in the orclACI attribute. However, in such scenarios, for
administrative convenience and performance advantages, Oracle
recommends using orclEntryLevelACI—discussed in
Section 29.1.1.3, "The orclEntryLevelACI Attribute for Entry-Level
Access Control." This is because the LDAP configuration overhead
increases with the number of directives represented through
orclACI. You can reduce this overhead by moving entry specific
directives from orclACI to orclEntryLevelACI.
See Also: "Object: To What Are You Granting Access?" on
page 29-7 for the structure definition of the orclEntryLevelACI
attribute

Introduction to Managing Directory Access Control
29-4 Oracle Fusion Middleware Administrator's Guide for Oracle Internet Directory
29.1.1.4 Security Groups
Group entries in Oracle Internet Directory are associated with either the
groupOfNames or the groupOfUniqueNames object class. Membership in the group
is specified as a value of the member or uniqueMember attribute respectively.
To specify access rights for a group of people or entities, you identify them in security
groups. There are two types of security groups: ACP groups and privilege groups.
29.1.1.4.1 ACP groups If an individual is a member of an ACP group, then the
directory server simply grants to that individual the privileges associated with that
ACP group.
Use ACP groups to resolve access at the level of an ACP. For example, suppose you
want to give to several hundred users access to browse an entry. You could assign the
browse privilege to each entry individually, but this could require considerable
administrative overhead. Moreover, if you later decide to change that privilege, you
would have to modify each entry individually. A more efficient solution is to assign
the privilege collectively. To do this, you create a group entry, designate it as an ACP
group, assign the desired privilege to that group, then assign users as members of that
group. If you later change the access rights, you must do it in one place, for the group,
rather than for each individual user. Similarly, you can remove that privilege from
multiple users by removing them from the group, rather than having to access
multiple individual entries.
ACP groups are associated with the orclacpgroup object class.
29.1.1.4.2 Privilege Groups A privilege group is a higher-level access group. It is similar
to an ACP group in that it lists users with similar rights. However, it also provides for
additional checking beyond a single ACP, as follows: if an ACP denies access, an
attribute in the user's entry tells the directory server whether the user being denied is
in any privilege group. If so, then this user has additional rights at a higher
administration level, and all higher administration levels in the DIT are checked. If the
directory server finds a higher ACP that grants to the privilege group access to the
requested object, then it overrides the denials by the subordinate ACP, and grants
access to the user. If, however, the orclACI or orclEntryLevelACI attribute of a
subordinate ACP contains the keyword DenyGroupOverride, the higher level ACP
does not override the subordinate ACP. Use DenyGroupOverride to restrict
superuser access through privileged groups.
Normally, you would implement only ACP groups. The additional checking that
privilege groups provide can degrade performance. Use privilege groups only when
access control at higher levels needs the right to override standard controls at lower
levels.
Use privilege groups to grant access to administrators who are not recognized by
ACPs lower in the DIT. For example, suppose that the global administrator in a hosted
environment must perform operations in a realm. Because the global administrator's
identity is not recognized in the realm of the hosted company, the directory server,
relying only on the ACPs in that realm, denies the necessary access. However, if the
global administrator is a member of a privilege group, then the directory server looks
higher in the DIT for an ACP that grants to this privilege group the access rights to
that subtree. If it finds such an ACP, then the directory server overrides the denials by
ACPs in the hosted company's realm.
Add the DenyGroupOverride keyword to an ACI to deny access to members of
privileged groups.
Privilege groups are associated with the orclPrivilegeGroup object class.

Introduction to Managing Directory Access Control
Managing Directory Access Control 29-5
29.1.1.4.3 Users in Both Types of Groups If a user is a member of both an ACP group and
a privilege group, then the directory server performs an evaluation for each type of
group. It resolves access rights for the privilege group by looking to ACPs higher in
the DIT.
29.1.1.4.4 Constraints on Security Groups Do not create a security group that is of both
object classes orclacpgroup and orclPrivilegeGroup.
In nested security groups, the parent group and child group must always be of the
same objectclass either orclacpgroup or orclPrivilegeGroup.
Violating either of these constrains can result in non-deterministic ACI evaluation.
29.1.1.4.5 Overview: Granting Access Rights to a Group To grant access rights to a group
of users, you do the following:
1. Create a group entry in the usual way.
2. Associate the group entry with either the orclPrivilegeGroup object class or
the orclACPgroup object class.
3. Specify the access policies for that group.
4. Assign members to the group.
29.1.1.4.6 How the Directory Server Computes Security Group Membership Entries can have
either direct memberships in groups, or indirect memberships in other ACP or
privilege groups by means of nested groups, thus forming a forest of privilege groups.
Access policies specified at a given level are applicable to all the members directly or
indirectly below that level.
Because Oracle Internet Directory evaluates for access control purposes only security
groups, it does not allow setting access policies for other types of groups. When a user
binds with a specific distinguished name (DN), Oracle Internet Directory computes the
user's direct membership in security groups. If it knows the first level groups for the
given DN, Oracle Internet Directory computes nesting of all these first level groups
into other security groups. This process continues until there are no more nested
groups to be evaluated.
Each security group, nested or otherwise, must be associated with a security group
object class—either orclACPgroup or orclPrivilegeGroup. Even if a group is a
member of a security group, the directory server does not consider it for access control
purposes unless it is associated with a security group object class. When it has
determined the user's membership in security groups, the directory server uses that
information for the lifetime of the session.
29.1.1.4.7 Example: Computing Security Group Membership For example, consider the
sample group of entries in Table 29–1, each of which, except Group 4, is marked as a
privilege group (objectclass:orclprivilegegroup). You can set access control
policies that apply to the members of group1, group2, and group3.

Introduction to Managing Directory Access Control
29-6 Oracle Fusion Middleware Administrator's Guide for Oracle Internet Directory
Group 3 contains the following nested groups:
■cn=group2,c=us
■cn=group1,c=us
■cn=group4,c=us
Access control policies for Group 3 are applicable to members of Group 3, Group 1,
and Group 2 because each of them is marked as a privilege group. These same access
control policies are not applicable to the members of Group 4 because Group 4 is not
marked as a privilege group.
For example, suppose that the user binds to Oracle Internet Directory as a member of
Group 4 with the DN cn=john doe,c=uk. None of the access policies applicable to
the members of Group 3 apply to this user. This is because his only direct membership
is to a non-privilege group. By contrast, if the user were to bind as cn=john
smith,c=us—that is, as a member of Group 1 and Group 2—then his access rights
are governed by access policies set up for members of Group 1, Group 2, and Group 3
(in which Group 1 and Group 2 are nested). This is because all three groups are
associated with the object class orclPrivilegeGroup.
Table 29–1 Sample Security Groups
Group Entry
Group 1
dn: cn=group1,c=us
cn: group1
objectclass: top
objectclass: groupofUniqueNames
objectclass: orclPrivilegeGroup
uniquemember: cn=mary smith,c=us
uniquemember: cn=bill smith,c=us
uniquemember: cn=john smith,c=us
Group 2
dn: cn=group2,c=us
cn: group2
objectclass: top
objectclass: groupofUniqueNames
objectclass: orclPrivilegeGroup
uniquemember: cn=mary jones,c=us
uniquemember: cn=joe jones,c=us
uniquemember: cn=bill jones,c=us
uniquemember: cn=john smith,c=us
Group 3
dn:cn=group3,c=us
cn: group3
objectclass: top
objectclass: groupofUniqueNames
objectclass: orclPrivilegeGroup
uniquemember: cn=group2,c=us
uniquemember: cn=group1,c=us
uniquemember: cn=group4,c=us
Group 4
dn: cn=group4,c=us
cn: group4
objectclass: top
objectclass: groupofUniqueNames
uniquemember: cn=john doe,c=uk
uniquemember: cn=jane doe,c=uk
uniquemember: cn=anne smith,c=us

Introduction to Managing Directory Access Control
Managing Directory Access Control 29-7
29.1.2 Access Control Information Components
Access control information represents the permissions that various entities or subjects
have to perform operations on a given object in the directory. Thus, an ACI consists of
three components:
■The object to which you are granting access
■The entities or subjects to whom you are granting access
■The kind of access you are granting
29.1.2.1 Object: To What Are You Granting Access?
The object part of the access control directive determines the entries and attributes to
which the access control applies. It can be either an entry or an attribute.
Entry objects associated with an ACI are implicitly identified by the entry or the
subtree where the ACI itself is defined. Any further qualification of objects at the level
of attributes is specified explicitly in the ACL expressions.
In the orclACI attribute, the entry DN component of the object of the ACI is
implicitly that of all entries within the subtree starting with the ACP as its topmost
entry. For example, if dc=com is an ACP, then the directory area governed by its ACI
is:
.*, dc=com.
However, since the directory area is implicit, the DN component is neither required
nor syntactically allowed.
In the orclEntryLevelACI attribute, the entry DN component of the object of the
ACL is implicitly that of the entry itself. For example, if dc=example,dc=com has an
entry level ACI associated with it, then the entry governed by its ACI is exactly:
dc=example,dc=com. Since it is implicit, the DN component is neither required nor
syntactically allowed.
The object portion of the ACL allows entries to be optionally qualified by a filter
matching some attribute(s) in the entry:
filter=(ldapFilter)
where ldapFilter is a string representation of an LDAP search filter. The special entry
selector * is used to specify all entries.
Attributes within an entry are included in a policy by including a comma-delimited
list of attribute names in the object selector.
attr=(attribute_list)
Attributes within an entry are excluded from a policy by including a comma-delimited
list of attribute names in the object selector.
attr!=(attribute_list)
The object part of an access control directive may also include special keywords. These
are:
■DenyGroupOverride, which prevents access from being overridden by higher
level ACPs
See Also: Either Section 14.2, "Managing Group Entries by Using
Oracle Directory Services Manager" or Section 14.3, "Managing Group
Entries by Using the Command Line" for instructions on how to
modify a group entry to associate it with or disassociate it from either
the orclPrivilegeGroup or the orclACPgroup object class

Introduction to Managing Directory Access Control
29-8 Oracle Fusion Middleware Administrator's Guide for Oracle Internet Directory
■AppendToAll, which causes the subject of an ACI to be added to all other ACIs in
that ACP during evaluation.
29.1.2.2 Subject: To Whom Are You Granting Access?
This section describes:
■The entity being granted access
■The bind mode—that is, the authentication mode used to verify the identity of that
entity
■The bind IP filter—that is, the IP address filter used to verify the identity of that
entity
■The added object constraint, which limits the kind of objects a user can add below
the parent when access is granted.
29.1.2.2.1 Entity Access is granted to entities, not entries. The entity component
identifies the entity or entities being granted access.
You can specify entities either directly or indirectly.
Directly specifying an entity: This method involves entering the actual value of the
entity, for example group=managers. You can do this by using:
■The wildcard character (*), which matches any entry
■The keyword SELF, which matches the entry protected by the access
■The keyword SuperUser, which matches the SuperUser DN specified in the
directory.
■A regular expression, which matches an entry's distinguished name, for example,
dn=regex
■The members of a privilege group object: group=dn
Indirectly specifying an entity: This is a dynamic way of specifying entities. It
involves specifying a DN-valued attribute that is part of the entry to which you are
granting access. There are three types of DN-valued attributes:
■dnattr: Use this attribute to contain the DN of the entity to which you are
granting or denying access for this entry.
■groupattr: Use this attribute to contain the DNs of the administrative groups to
which you are granting or denying access for this entry.
■guidattr: Use this attribute to contain the global user identifier (orclGUID) of
the entry to which you want to grant or deny access for this entry.
For example, suppose you want to specify that Anne Smith's manager can modify the
salary attribute in her entry. Instead of specifying the manager DN directly, you
Note: Access to the entry itself must be granted or denied by
using the special object keyword ENTRY. Note that giving access to
an attribute is not enough; access to the entry itself through the
ENTRY keyword is necessary.
See Also: Appendix H, "The Access Control Directive Format" for
information about the format or syntax of ACIs

Introduction to Managing Directory Access Control
Managing Directory Access Control 29-9
specify the DN-valued attribute: dnattr=manager. Then, when John Doe seeks to
modify Anne's salary attribute, the directory server:
1. Looks up the value for her manager attribute and finds it to be John Doe
2. Verifies that the bind DN matches the manager attribute
3. Assigns to John Doe the appropriate access
29.1.2.2.2 Bind Mode The bind mode specifies the methods of authentication and of
encryption to be used by the subject.
There are four authentication modes:
■MD5Digest
■PKCS12
■Proxy
■Simple: Simple password-based authentication
There are three encryption options:
■SASL
■SSL No Authentication
■SSL One Way
Specifying the encryption mode is optional. If it is not specified, then no encryption is
used, unless the selected authentication mode is PKCS12. Data transmitted by using
PKCS12 is always encrypted.
There is a precedence rule among authentication choices, and it is as follows:
Anonymous < Proxy < Simple < MD5Digest < PKCS12
This rule means that:
■Proxy authentication blocks anonymous access
■Simple authentication blocks both Proxy and Anonymous access
■MD5Digest authentication blocks Simple, Proxy and Anonymous access
■PKCS12 authentication blocks MD5Digest, Simple, Proxy and Anonymous access
The bind mode syntax is:
BINDMODE =(LDAP_AUTHENTICATION_CHOICE + [ LDAP_ENCRYPTION_CHOICE ] )
LDAP_AUTHENTICATION_CHOICE = Proxy | Simple | MD5Digest | PKCS12
LDAP_ENCRYPTION_CHOICE = SSLNoAuth | SSLOneway | SASL
The LDAP_ENCRYPTION_CHOICE is an optional parameter. If you do not specify it,
then the directory server assumes that no encryption is to be used.
29.1.2.2.3 Bind IP Filter IP address or IP address range of the subject, defined using a
standard LDAP filter on the orclipaddress attribute. If the subject's IP address
matches the filter defined, then the ACI on which it is defined is applicable for that
operation.
The bind ip filter syntax is:
BINDIPFILTER =(LDAPFILTER_FOR_ORCLIPADDRESS)
For example:

Introduction to Managing Directory Access Control
29-10 Oracle Fusion Middleware Administrator's Guide for Oracle Internet Directory
The filter (|(orclipaddress=1.2.3.*)(orclipaddress=1.2.4.*)) applies
when the subject's IP address begins with 1.2.3 or begins with1.2.4.
The filter (&(orclipaddress!=1.2.*)(orclipaddress!=3.4.*)) applies
when the subject's IP address does not begin with 1.2 and does not begin with 3.4.
29.1.2.2.4 Added Object Constraint When a parent entry has add access, it can add objects
as entries lower in the hierarchy. The added object constraint can be used to limit that
right by specifying an ldapfilter.
29.1.2.3 Operations: What Access Are You Granting?
The kind of access granted can be one of the following:
■None
■Compare/nocompare
■Search/nosearch
■Read/noread
■Selfwrite/noselfwrite
■Write/nowrite
■Add/noadd
■Proxy/noproxy
■Browse/nobrowse
■Delete/nodelete
Note that each access level can be independently granted or denied. The noxxx means
xxx permission is denied.
Note also that some access permissions are associated with entries and others with
attributes.
See Also: Appendix H, "The Access Control Directive Format"
and Appendix G, "The LDAP Filter Definition"
Table 29–2 Types of Access
Access Level Description Type of Object
Compare Right to perform compare operation on the attribute value Attributes
Read Right to read attribute values. Even if read permission is available for an
attribute, it cannot be returned unless there is browse permission on the entry
itself.
Attributes
Search Right to use an attribute in a search filter Attributes
Selfwrite Right to add yourself to, delete yourself from, or modify your own entry in a
list of DNs group entry attribute. Use this to allow members to maintain
themselves on lists. For example, the following command allows people
within a group to add or remove only their own DN from the member
attribute:
access to attr=(member) by dnattr=(member) (selfwrite)
The dnattr selector indicates that the access applies to entities listed in the
member attribute. The selfwrite access selector indicates that such
members can add or delete only their own DN from the attribute.
Attributes
Write Right to modify/add/delete the attributes of an entry. Attributes

Introduction to Managing Directory Access Control
Managing Directory Access Control 29-11
The entry level access directives are distinguished by the keyword ENTRY in the object
component.
29.1.3 Access Level Requirements for LDAP Operations
Table 29–3 lists the various LDAP operations and the access required to perform each
one.
29.1.4 How ACL Evaluation Works
When a user tries to perform an operation on a given object, the directory server
determines whether that user has the appropriate access to perform that operation on
that object. If the object is an entry, it evaluates the access systematically for the entry
and each of its attributes.
Evaluating access to an object—including an attribute of an entry—can involve
examining all the ACI directives for that object. This is because of the hierarchical
None No access rights. The effect of granting no access rights to a subject-object pair
is to make the directory appear to the subject as though the object were not
present in the directory.
Both entries and
attributes
Add Right to add entries under a target directory entry Entries
Proxy Allows the subject to impersonate another user Entries
Browse Permission to return the DNs in the search result. It is equivalent to the list
permission in X.500. This permission is also required for a client to use an
entry DN as the base DN in an ldapsearch operation.
Entries
Delete Right to delete the target entry Entries
Note: The default access control policy grants the following to
both entries and attributes: Everyone is given access to read, search,
write, and compare all attributes in an entry, and selfwrite
permissions are unspecified. If an entry is unspecified, access is
determined at the next highest level in which access is specified.
Table 29–3 LDAP Operations and Access Needed to Perform Each One
Operation Required Access
Create an object Add access to the parent entry
Modify Write access to the attributes that are being modified
ModifyDN Delete access to the current parent and Add access to the new parent
ModifyDN (RDN) Write access to the naming attribute—that is, the RDN attribute
Remove an object Delete access to the object being removed
Compare Compare access to the attribute and Browse access to the entry
Search ■Search access on the filter attributes and Browse access on the entry (if
only the entry DN must be returned as a result)
■Search access on the filter attributes, Browse access on the entry, and
Read permission on the attributes (for all attributes whose values
must be returned as a result)
Table 29–2 (Cont.) Types of Access
Access Level Description Type of Object

Introduction to Managing Directory Access Control
29-12 Oracle Fusion Middleware Administrator's Guide for Oracle Internet Directory
nature of ACPs and the inheritance of policies from superior ACPs to subordinate
ACPs.
The directory server first examines the ACI directives in the entry-level ACI,
orclEntryLevelACI. It proceeds to the nearest ACP, then considers each superior
ACP in succession until the evaluation is complete.
During ACL evaluation, an attribute is said to be in one of the states described in
Table 29–4:
In all operations except search, the evaluation stops if:
■Access to the entry itself is denied
■Any of the attributes reach the resolved with denial state
In this case the operation would fail and the directory server would return an error to
the client.
In a search operation, the evaluation continues until all the attributes reach the
resolved state. Attributes that are resolved with denial are not returned.
This section contains these topics:
■Section 29.1.4.1, "Precedence Rules Used in ACL Evaluation"
■Section 29.1.4.2, "Use of More Than One ACI for the Same Object"
■Section 29.1.4.3, "Exclusionary Access to Directory Objects"
■Section 29.1.4.4, "ACL Evaluation For Groups"
29.1.4.1 Precedence Rules Used in ACL Evaluation
An LDAP operation requires the BindDN, or subject, of the LDAP session to have
certain permissions to perform operations on the objects—including the entry itself
and the individual attributes of the entry.
Typically, there could be a hierarchy of access control administration authorities,
starting from the root of a naming context down to successive administrative points
(or access control policy points). An ACP is any entry which has a defined value for
the orclACI attribute. Additionally, the access information specific to a single entry
can also be represented within the entry itself (orclEntryLevelACI).
ACL evaluation involves determining whether a subject has sufficient permissions to
perform an LDAP operation. Typically an orclentryLevelACI or orclACI might
not contain all the necessary information for ACL evaluation. Hence, all available ACL
information is processed in a certain order until the evaluation is fully resolved.
That order of processing follows these rules:
■The entry level ACI is examined first. ACIs in the orclACI are examined starting
with the ACP closest to the target entry and then its superior ACP and so on.
Table 29–4 Attribute States During ACL Evaluation
State Description
Resolved with permission The required access for the attribute has been granted in the
ACI.
Resolved with denial The required access for the attribute has been explicitly denied
in the ACI.
Unresolved No applicable ACI has yet been encountered for the attribute in
question.

Introduction to Managing Directory Access Control
Managing Directory Access Control 29-13
■At any point, if all the necessary permissions have been determined, the
evaluation stops; otherwise, the evaluation continues.
■Within a single ACI, if the entity associated with the session DN matches more
than one item identified in the by clause, the effective access evaluates to:
–The union of all the granted permissions in the matching by clause items
ANDed with
–The union of all the denied permissions in the matching by clause items
29.1.4.1.1 Precedence at the Entry Level ACIs at the entry level are evaluated in the
following order:
1. With a filter. For example:
access to entry filter=(cn=p*)
by group1 (browse, add, delete)
2. Without a filter. For example:
access to entry
by group1 (browse, add, delete)
29.1.4.1.2 Precedence at the Attribute Level At the attribute level, specified ACIs have
precedence over unspecified ACIs.
1. ACIs for specified attributes are evaluated in the following order:
a. Those with a filter. For example:
access to attr=(salary) filter=(salary > 10000)
by group1 (read)
b. Those without a filter. For example:
access to attr=(salary)
by group1 (search, read)
2. ACIs for unspecified attributes are evaluated in the following order:
a. With a filter. For example:
access to attr=(*) filter (cn=p*)
by group1 (read, write)
b. Without a filter. For example:
access to attr=(*)
by group1 (read, write)
29.1.4.2 Use of More Than One ACI for the Same Object
Oracle Internet Directory, enables you to define more than one ACI in the ACP of an
object. It processes the ACIs associated with that object and stores them as a single ACI
in its internal ACP cache. It then applies all the relevant policies in the multiple ACIs
specified in the ACP.
The following example of an ACP illustrates how this works.
Access to entry by dn="cn=john" (browse,noadd,nodelete)
Access to entry by group="cn=admingroup" (browse,add,nodelete)
Access to entry by dn=".*,c=us" (browse,noadd,nodelete)

Introduction to Managing Directory Access Control
29-14 Oracle Fusion Middleware Administrator's Guide for Oracle Internet Directory
In this ACP, there are three ACIs for the object entry. When it loads this ACP, Oracle
Internet Directory merges these three ACIs as one ACI in its internal ACP cache.
The ACI syntax is:
Access to OBJECT> by SUBJECT ACCESSLIST
OBJECT = [ entry | attr [EQ-OR-NEQ] ( * | ATTRLIST ) ]
[ filter = ( LDAFILTER ) ]
This syntax makes possible the following types of objects:
■Entry
■Entry + filter = ( LDAPFILTER )
■Attr = ( ATTRLIST )
■Attr = ( ATTRLIST) + filter = ( LDAPFILTER )
■Attr != ( ATTRLIST )
■Attr != ( ATTRLIST ) + filter = ( LDAPFILTER )
■Attr = ( * )
■Attr = ( * ) + filter = ( LDAPFILTER )
You can define multiple ACIs for any of the above types of objects. During initial
loading of the ACP, the directory server merges the ACIs based on which of these
object types are defined. The matching criterion is the exact string comparison of the
object strings in the ACIs.
If one ACI specifies ATTR=(ATTRLIST) and another ATTR!=(ATTRLIST), then
ATTR=(*) must not be specified as an ACI in the entry. Also, if an ACI specifies
ATTR=(ATTRLIST), then, to specify the access rights to attributes not in ATTRLIST,
ATTR=(*) must be used and not ATTR!=(ATTRLIST). ATTR=(*) implies all
attributes other than those specified in ATTRLIST.
29.1.4.3 Exclusionary Access to Directory Objects
If an ACI exists for a given object, you can specify access to all other objects except that
one. You do this either by granting access to all the objects, or by denying access to the
one object.
In the following example, access is granted to all attributes:
access to attr=(*) by group2 (read)
In the following example, access is denied to the userpassword attribute:
access to attr!=(userpassword) by group2 (read)
Note: When you define multiple ACIs on the same attribute with the
same filter, Oracle Internet Directory merges them to create a single
ACI in the run-time structure.
When you define multiple ACIs on the same attribute with different
filters, Oracle Internet Directory treats them as separate ACIs. In such
cases, the precedence order is non-deterministic.
To prevent ambiguous behavior, if you define multiple ACIs with
different filters against the same attribute, ensure that the filters yield
non-overlapping sets of results.

Managing Access Control by Using Oracle Directory Services Manager
Managing Directory Access Control 29-15
29.1.4.4 ACL Evaluation For Groups
If an operation on an attribute or the entry itself is explicitly denied at an ACP low in
the DIT, then, typically, the ACL evaluation for that object is considered "Resolved
with Denial." However, if the user of the session (bindDN) is a member of a group
object, then the evaluation continues as if it is still unresolved. If permissions are
granted to the user of the session at an ACP higher in the tree through a group subject
selector, then such grants have precedence over any denials lower in the DIT.
This scenario is the only case in which an ACL policy at a higher level ACP has
precedence over an ACP policy lower in the DIT.
29.2 Managing Access Control by Using Oracle Directory Services
Manager
You can view and modify access control information within ACPs by using either
Oracle Directory Services Manager or command-line tools. This section explains how
to accomplish these tasks by using Oracle Directory Services Manager.
This section contains these topics:
■Section 29.2.1, "Viewing an ACP by Using Oracle Directory Services Manager"
■Section 29.2.2, "Adding an ACP by Using Oracle Directory Services Manager"
■Section 29.2.3, "Modifying an ACP by Using Access Control Management in
ODSM"
■Section 29.2.4, "Adding or Modifying an ACP by Using the Data Browser in
ODSM"
■Section 29.2.5, "Setting or Modifying Entry-Level Access by Using the Data
Browser in ODSM"
29.2.1 Viewing an ACP by Using Oracle Directory Services Manager
You can locate and view an ACP as follows:
1. Invoke Oracle Directory Services Manager and connect to the Oracle Internet
Directory server as described in Section 7.4.5, "Invoking Oracle Directory Services
Manager."
2. From the task selection bar, select Security.
3. Click Access Control in the left pane. All of the defined access control points
(ACPs) appear in the left pane, listed by relative DN. Mouse over an entry to see
the full DN.
4. Select an ACP to display its information in the right pane.
5. The Subtree Access Items section of the page shows the access controls on this
ACP for entry level operations, that is, for operations on the entry itself.
Note: Immediately after installing Oracle Internet Directory, be
sure to reset the default security configuration as described in "Task
1: Reset the Default Security Configuration" on page 4-1
See Also: "Oracle Identity Management Command-line Tool
Reference" in Oracle Fusion Middleware Reference for Oracle Identity
Management for a description of command-line tools

Managing Access Control by Using Oracle Directory Services Manager
29-16 Oracle Fusion Middleware Administrator's Guide for Oracle Internet Directory
The Content Access Items section of the page shows the access controls on this
ACP for attribute level operations, that is, for operations on the attributes of the
entry.
29.2.2 Adding an ACP by Using Oracle Directory Services Manager
ACPs are entries that contain prescriptive, that is, inheritable, access control
information. This information affects the entry itself and all entries below it. You will
most likely create ACPs to broadcast large-scale access control throughout a subtree.
Adding an ACP by using Oracle Directory Services Manager involves three tasks:
■Task 1: Specify the Entry That Will Be the ACP
■Task 2: Configure Structural Access Items—that is, ACIs that pertain to entries
■Task 3: Configure Content Access Items—that is, ACIs that pertain to attributes
29.2.2.1 Task 1: Specify the Entry That Will Be the ACP
1. Invoke Oracle Directory Services Manager and connect to the Oracle Internet
Directory server as described in Section 7.4.5, "Invoking Oracle Directory Services
Manager."
2. From the task selection bar, select Security.
3. Click Access Control in the left pane. All of the defined ACPs appear in the left
pane.
4. In the left pane, click the Create Access Control Policy Point icon. The New
Access Control Point screen appears.
5. Enter the path to the entry you want to create, or click Browse, select a DN, and
click OK.
If the entry is already defined as an ACP, you see an error dialog
6. Alternatively, to create an ACP that is similar to an existing ACP, select the
existing ACP in the list under Access Control Management in the left pane and
click the Create Like icon. The New Access Control Point: Create Like screen
appears.
29.2.2.2 Task 2: Configure Structural Access Items
1. To define a new structural access item, that is, an ACI that pertains to an entry,
choose the Create new access item icon in the Structural Access Items section of
the New Access Control Point pane or the New Access Control Point: Create Like
pane. The Structural Access Item dialog box appears.
Alternatively, you can create a structural access item similar to an existing item.
Select an existing structural access item and choose the Create Copy of Selected
Access Item icon in the Structural Access Items section of the he New Access
Control Point or New Access Control Point: Create Like pane. The Structural
Access Item dialog box appears. Some of the tabs are populated with
configuration information, which you can modify as necessary.
The structural Access Item dialog box has four tabs: Entry Filter, Added Object
Filter, By Whom, and Access Rights. You can use the Entry Filters tab page to
limit the subtree entries to which an ACI pertains. Use the Added Object Filter,
By Whom, and Access Rights tabs to specify the access control.
See Also: "Delete a Structural or Content Access Item" on page 29-19

Managing Access Control by Using Oracle Directory Services Manager
Managing Directory Access Control 29-17
2. If you want all entries below the ACP to be governed by the ACP, then you do not
need to enter anything on the Entry Filter tab page; simply proceed to the next
step. Otherwise, perform this step.
You might restrict access to an entry based on one or more of that entry's
attributes. For example, you might choose to restrict access to all entries in which
the title is manager and in which the organization unit is Americas.
To use an existing filter, select Existing from the Filter Type menu., then select one
of the existing filters.
To create a new filter, select Create New from the Filter Type menu, then either
type a query string directly into the LDAP Query text field, or use the lists and
text fields on the search criteria bar to focus your search.
a. From the list at the left end of the search criteria bar, select an attribute of the
entry for which you want to search. Because not all attributes are used in
every entry, be sure that the attribute you specify actually corresponds to one
in the entry for which you are looking. Otherwise, the search fails.
b. From the list in the middle of the search criteria bar, select a filter.
c. In the text box at the right end of the search criteria bar, type the value for the
attribute you just selected. For example, if the attribute you selected was cn,
you could type the particular common name you want to find.
d. Click + to add this search criterion to the LDAP Query field.
e. To further refine your search, use the list of conjunctions (AND, OR, NOT
AND, and NOT OR) and the lists and text fields on the search criteria bar to
to add additional search criteria. Click + to add a search criterion to the LDAP
Query field.Click X to delete a search criterion from the LDAP Query field.
3. Select the Added Object Filter tab page.
You can specify ACIs to restrict the kind of entries a user can add. For example,
you can specify an ACI in the DSE root entry that allows users to add only entries
with objectclass=country. The directory server then verifies that any new
entry complies with the constraints in this filter.
To restrict the kind of entries a user can add either type a query string directly into
the LDAP Query text field, or use the lists and text fields on the search criteria bar
to focus your search, following the same steps as in the Entry Filter tab page.
4. Select the By Whom tab page.
a. In the By Whom field, specify the entity or entities to whom you are granting
access.
b. From the Authentication Choice list under Bind Mode, select the type of
authentication to be used by the subject (that is, the entity that seeks access).
If you do not choose an authentication method, then any kind of
authentication is accepted. The authentication method specified on one node
should match the one specified on the node it is communicating with.
From the Encryption Choice list under Bind Mode, select the type of
encryption to be used.
5. Select the Access Rights tab page.
Specify the kinds of rights to be granted:
■Browse: Allows the subject to see the entry

Managing Access Control by Using Oracle Directory Services Manager
29-18 Oracle Fusion Middleware Administrator's Guide for Oracle Internet Directory
■Add: Allows the subject to add other entries below this entry
■Delete: Allows the subject to delete the entry
■Proxy: Allows the subject to impersonate another user
6. Click OK. The structural access item you just created appears in the list.
Repeat Task 2: Configure Structural Access Items to configure additional structural
access items in this ACP.
29.2.2.3 Task 3: Configure Content Access Items
1. To define content access items, that is, ACIs that pertain to attributes, choose the
Create new access item icon in the Content Access Items section of the New
Access Control Point pane or the New Access Control Point: Create Like pane. The
Content Access Item dialog box appears.
Alternatively, you can create a content access item similar to an existing item.
Select an existing content access item and choose the Create copy of selected
access item icon in the Content Access Items section of the he New Access
Control Point or New Access Control Point: Create Like pane. The Content Access
Item dialog box appears. Some of the tabs are populated with configuration
information, which you can modify as necessary.
The Content Access Item dialog box has four tabs: Entry Filter, By Whom,
Attribute, and Access Rights. You can use the Entry Filters tab page to limit the
subtree entries to which an ACI pertains. Use the By Whom, Attribute, and
Access Rights tabs to specify the access control.
2. If you want all entries below the ACP to be governed by the ACP, then you do not
need to enter anything on Entry Filter tab page; simply proceed to the next step.
Otherwise, perform this step.
In an ACP, the access rights apply to the entry and all its subentries unless other
filters restrict access further. If appropriate, use the Entry Filters tab page to
identify the entries to which you are specifying access.
You might restrict access to an entry based on one or more of that entry's
attributes. For example, you might choose to restrict access to all entries in which
the title is manager and in which the organization unit is Americas.
To use an existing filter, select Existing from the Filter Type menu, then select one
of the existing filters.
To create a new filter, select Create New from the Filter Type menu, then either
type a query string directly into the LDAP Query text field, or use the lists and
text fields on the search criteria bar to focus your search.
a. From the list at the left end of the search criteria bar, select an attribute of the
entry for which you want to search. Because not all attributes are used in
every entry, be sure that the attribute you specify actually corresponds to one
in the entry for which you are looking. Otherwise, the search fails.
b. From the list in the middle of the search criteria bar, select a filter.
c. In the text box at the right end of the search criteria bar, type the value for the
attribute you just selected. For example, if the attribute you selected was cn,
you could type the particular common name you want to find.
d. Click + to add this search criterion to the LDAP Query field.
e. To further refine your search, use the list of conjunctions (AND, OR, NOT
AND, and NOT OR) and the lists and text fields on the search criteria bar to

Managing Access Control by Using Oracle Directory Services Manager
Managing Directory Access Control 29-19
to add additional search criteria. Click + to add a search criterion to the LDAP
Query field. Click X to delete a search criterion from the LDAP Query field.
3. Select the By Whom tab page.
a. In the By Whom field, specify the entity or entities to whom you are granting
access.
b. From the Authentication Choice list under Bind Mode, select the type of
authentication to be used by the subject (that is, the entity that seeks access).
If you do not choose an authentication method, then any kind of
authentication is accepted. The authentication method specified on one node
should match the one specified on the node it is communicating with.
From the Encryption Choice list under Bind Mode, select the type of
encryption to be used.
c. Specify the entity or entities to whom you are granting access.
4. Select the Attribute tab page.
a. From Attribute list, select the attribute to which you want to grant or deny
access.
b. From the Operator list, select the matching operation to be performed against
the attribute. Choices are EQ (Equal (=)) and NEQ (Not Equal (!=)).
For example, if you select EQ and cn, then the access rights you grant apply to
the cn attribute. If you select NEQ and cn, then the access rights you grant do
not apply to the cn attribute.
5. Select the Access Rights tab page.
Specify the kinds of rights to be granted or denied:
■Read: Allows the subject to read the attribute
■Search: Allows the subject to search for the attribute
■Write: Allows the subject to change the attribute
■Selfwrite: Allows the subject specified by the entry itself to change the
attribute
■Compare: Allows the subject to compare the value of the attribute with that of
other attributes.
6. Click OK. The content access item you just created appears in the list.
Repeat Task 3: Configure Content Access Itemsto configure additional content access
items in this ACP.
29.2.2.4 Delete a Structural or Content Access Item
To delete a structural or content access item, select the item and click the Delete icon.
29.2.3 Modifying an ACP by Using Access Control Management in ODSM
1. Invoke Oracle Directory Services Manager and connect to the Oracle Internet
Directory server as described in Section 7.4.5, "Invoking Oracle Directory Services
Manager."
2. From the task selection bar, select Security.

Managing Access Control by Using Oracle Directory Services Manager
29-20 Oracle Fusion Middleware Administrator's Guide for Oracle Internet Directory
3. Click Access Control in the left pane. All of the defined ACPs appear in the left
pane.
4. In the left pane, select an ACP in the list. A tab page for that ACP appears in the
right pane.
5. To define a new structural access item, that is, an ACI that pertains to an entry,
choose the Create icon in the Structural Access Items section of the entry tab page.
The Structural Access Item dialog box appears.
Alternatively, you can create a structural access item similar to an existing item.
Select an existing structural access item and choose the Create Like icon in the
Structural Access Items section of the he New Access Control Point or New
Access Control Point: Create Like pane. The Structural Access Item dialog box
appears. Some of the tabs are populated with configuration information, which
you can modify as necessary.
The Structural Access Item dialog box has four tabs: Entry Filter, Added Object
Filter, By Whom, and Access Rights. You can use the Entry Filters tab page to
limit the subtree entries to which an ACI pertains. Use the Added Object Filter,
By Whom, and Access Rights tabs to specify the access control. Follow the steps
beginning with Step 2 under Section 29.2.2.2, "Task 2: Configure Structural Access
Items."
6. To modify an existing structural access item, select the item and click Edit. The
Structural Access Item dialog box appears. Some of the tabs are populated with
configuration information, which you can modify as necessary. The tabs are:Entry
Filter, Added Object Filter, By Whom, and Access Rights. You can use the Entry
Filters tab page to limit the subtree entries to which an ACI pertains. Use the
Added Object Filter, By Whom, and Access Rights tabs to specify the access
control. Follow the steps beginning with Step 2 under "Task 2: Configure
Structural Access Items" on page 29-16. When you click OK, the changes you
made to the structural access item are reflected in the list.
7. To define a new content access item, that is, an ACI that pertains to attributes,
choose the Create icon in the Content Access Items section of the entry tab page.
The Content Access Item dialog box appears.
Alternatively, you can create a content access item similar to an existing item.
Select an existing content access item and choose the Create Like icon in the
Content Access Items section of the he New Access Control Point or New Access
Control Point: Create Like pane. The Content Access Item dialog box appears.
Some of the tabs are populated with configuration information, which you can
modify as necessary.
The Content Access Item dialog box has four tabs: Entry Filter, By Whom,
Attribute, and Access Rights. You can use the Entry Filters tab page to limit the
subtree entries to which an ACI pertains. Use the By Whom, Attribute, and
Access Rights tabs to specify the access control. Follow the steps beginning with
Step 2under "Task 3: Configure Content Access Items" on page 29-18.
8. To modify an existing content access item, select the item and click Edit. The
Content Access Item dialog box appears. It has four tabs: Entry Filter, By Whom,
Attribute, and Access Rights. You can use the Entry Filters tab page to limit the
subtree entries to which an ACI pertains. Use the By Whom, Attribute, and
Access Rights tabs to specify the access control.hey are:Entry Filter, Added
Object Filter, By Whom, and Access Rights. You can use the Entry Filters tab
page to limit the subtree entries to which an ACI pertains. Use the Added Object
Filter, By Whom, and Access Rights tabs to specify the access control. Follow the

Managing Access Control by Using Command-Line Tools
Managing Directory Access Control 29-21
steps under "Task 3: Configure Content Access Items" on page 29-18. When you
click OK, the changes you made appear in the list.
9. To delete a structural or content access item, select the item and click the Delete
icon.
10. Click Apply to effect the changes.
29.2.4 Adding or Modifying an ACP by Using the Data Browser in ODSM
To set subtree-level access by using the Data Browser in Oracle Directory Services
Manager:
1. Invoke Oracle Directory Services Manager as described in Section 7.4.5, "Invoking
Oracle Directory Services Manager."
2. From the task selection bar, choose Data Browser.
3. Navigate to the entry you want to set access to.
4. In the navigator pane, select the entry to display its properties in the right pane
5. Select the Subtree Access tab page, then create and edit local ACIs in the
Structural Access Item and Content Access Item tabs as described
inSection 29.2.3, "Modifying an ACP by Using Access Control Management in
ODSM."
6. After you have made the changes, click Apply.
29.2.5 Setting or Modifying Entry-Level Access by Using the Data Browser in ODSM
To set entry-level access by using Oracle Directory Services Manager:
1. Invoke Oracle Directory Services Manager as described in Section 7.4.5, "Invoking
Oracle Directory Services Manager."
2. From the task selection bar, choose Data Browser.
3. Navigate to the entry you want to set access to.
4. In the navigator pane, select the entry to display its properties in the right pane
5. Select the Local Access tab page, then create and edit local ACIs in the Structural
Access Item and Content Access Item tabs as described in Section 29.2.3,
"Modifying an ACP by Using Access Control Management in ODSM."
6. After you have made the changes, click Apply.
29.3 Managing Access Control by Using Command-Line Tools
As described in Section 29.1, "Introduction to Managing Directory Access Control,"
directory access control policy information is represented as user-modifiable
Note: You must click Apply to send the information you just
entered to the directory server. Otherwise, the information is
simply held in the Oracle Directory Services Manager cache.
Note: You must click Apply to send the information you just
entered to the directory server.

Managing Access Control by Using Command-Line Tools
29-22 Oracle Fusion Middleware Administrator's Guide for Oracle Internet Directory
configuration attributes. You can manage it by using command-line tools, including
ldapmodify and ldapmodifymt, to set and alter the values of these attributes.
To directly edit the ACI, you should understand the format and semantics of the
directory representation of the ACI as described in Appendix H, "The Access Control
Directive Format".
This section contains these topics:
■Section 29.3.1, "Restricting the Kind of Entry a User Can Add"
■Section 29.3.2, "Setting Up an Inheritable ACP by Using ldapmodify"
■Section 29.3.3, "Setting Up Entry-Level ACIs by Using ldapmodify"
■Section 29.3.4, "Using Wildcards in an LDIF File with ldapmodify"
■Section 29.3.5, "Selecting Entries by DN"
■Section 29.3.6, "Using Attribute and Subject Selectors"
■Section 29.3.7, "Granting Read-Only Access"
■Section 29.3.8, "Granting Selfwrite Access to Group Entries"
■Section 29.3.9, "Defining a Completely Autonomous Policy to Inhibit Overriding
Policies"
29.3.1 Restricting the Kind of Entry a User Can Add
You can specify ACIs to restrict the kind of entries a user can add. For example, you
can specify an ACI in the DSE root entry that allows users to add only entries with
objectclass=country. To do this, you use the added_object_constraint
filter. The directory server then verifies that any new entry complies with the
constraints in this filter.
The following example specifies that:
■The subject cn=admin,c=us can browse, add, and delete under organization
entries.
■The subject cn=admin,c=us can add organizationalUnit objects under
organization entries
■All others can browse under organization entries
access to entry filter=(objectclass=organization)
by group="cn=admin,c=us"
constraintonaddedobject=(objectclass=organisationalunit)
(browse,add,delete)
by * (browse)
See Also:
■"LDIF File Formatting Rules and Examples" in Oracle Fusion
Middleware Reference for Oracle Identity Management for
information about how to format input by using LDIF, the
required input format for line mode commands
■The ldapmodify command-line tool reference in Oracle Fusion
Middleware Reference for Oracle Identity Management for
information about how to run ldapmodify
■Appendix H, "The Access Control Directive Format" for
information about the format or syntax of ACI

Managing Access Control by Using Command-Line Tools
Managing Directory Access Control 29-23
29.3.2 Setting Up an Inheritable ACP by Using ldapmodify
This example sets up subtree access permissions in an orclACI at the root DSE by
using an LDIF file named my_ldif_file. Because this example refers to the
orclACI attribute, this access directive governs all the entries in the DIT.
ldapmodify -v -h myhost -D "cn=Directory Manager, o=IMC, c=US" -q -f my_ldif_file
The LDIF file, my_ldif_file, contains the following:
dn:
changetype: modify
replace: orclaci
orclaci: access to entry
by dn="cn=directory manager, o=IMC, c=us" (browse, add, delete)
by * (browse, noadd, nodelete)
orclaci: access to attr=(*)
by dn="cn=directory manager, o=IMC, c=us" (search, read, write, compare)
by self (search, read, write, compare)
by * (search, read, nowrite, nocompare)
29.3.3 Setting Up Entry-Level ACIs by Using ldapmodify
This example sets up entry-level access permissions in the orclEntryLevelACI
attribute by using an LDIF file named my_ldif_file. Because this example refers to
the orclentrylevelACI attribute, this access directive governs only the entry in
which it resides.
ldapmodify -v -h myhost -D "cn=Directory Manager, o=IMC, c=US" -q -f my_ldif_file
The LDIF file, my_ldif_file, contains the following:
dn:
changetype: modify
replace: orclentrylevelaci
orclentrylevelaci: access to entry
by dn="cn=directory manager, o=IMC, c=us" (browse, add, delete)
by * (browse, noadd, nodelete)
orclentrylevelaci: access to attr=(*)
by dn="cn=directory manager, o=IMC, c=us" (search, read, write, compare)
by * (search, read, nowrite, nocompare)
29.3.4 Using Wildcards in an LDIF File with ldapmodify
This example shows the use of wildcards (*) in the object and subject specifiers. For all
entries within the example.com domain, it grants to everyone browse permission on
all entries, and read and search permissions on all attributes.
ldapmodify -v -h myhost -D "cn=Directory Manager, o=IMC, c=US" -q -f my_ldif_file
In the ACP at dc=com, the orclACI attribute is specified as follows:
access to entry by * (browse)
access to attr=(*) by * (search, read)
Note that, in order to enable reading the attributes, you must grant permission to
browse the entries.
Note: In this example, no DN value is specified. This means that
this ACI pertains to the root DSE and its attributes only.

Managing Access Control by Using Command-Line Tools
29-24 Oracle Fusion Middleware Administrator's Guide for Oracle Internet Directory
29.3.5 Selecting Entries by DN
This example shows the use of a regular expression to select the entries by DN in two
access directives. It grants to everyone read-only access to the address book attributes
under dc=example,dc=com access.
ldapmodify -v -h myhost -D "cn=Directory Manager, o=IMC, c=US" -q -f my_ldif_file
The orclACI attribute of dc=example,dc=com is specified as follows:
access to entry by * (browse)
access to attr=(cn, telephone, email) by * (search, read)
The orclACI attribute of dc=us, dc=example,dc=com is specified as follows:
access to entry by * (browse)
access to attr=(*) by dn=".*,dc=us,dc=example,dc=com" (search, read)
29.3.6 Using Attribute and Subject Selectors
This example shows the use of an attribute selector to grant access to a specific
attribute, and various subject selectors. The example applies to entries in the
dc=us,dc=example,dc=com subtree. The policy enforced by this ACI can be
described as follows:
■For all entries within the subtree, the administrator has add, delete, and browse
permissions. Others within the dc=us subtree can browse, but those outside it
have no access to the subtree.
■The salary attribute can be modified by your manager and viewed by yourself. No
one else has access to the salary attribute.
■The userPassword attribute can be viewed and modified by yourself and the
administrator. Others can only compare this attribute.
■The homePhone attribute can be read and written by yourself and viewed by
anyone else.
■For all other attributes, only the administrator can modify values. Everyone else
can compare, search, read, but cannot update attribute values.
ldapmodify -v -h myhost -D "cn=Directory Manager, o=IMC, c=US" -q -f my_ldif_file
The orclACI attribute of dc=us,dc=example,dc=com is specified as follows:
access to entry
by dn="cn=admin, dc=us,dc=example,dc=com" (browse, add, delete)
by dn=".*, dc=us,dc=example,dc=com" (browse)
by * (none)
access to attr=(salary)
by dnattr=(manager) (read, write)
by self (read)
by * (none)
access to attr=(userPassword)
by self (search, read, write)
by dn="cn=admin, dc=us,dc=example,dc=com" (search, read, write)
by * (compare)
access to attr=(homePhone)

Managing Access Control by Using Command-Line Tools
Managing Directory Access Control 29-25
by self (search, read, write)
by * (read)
access to attr != (salary, userPassword, homePhone)
by dn="cn=admin, dc=us,dc=example,dc=com" (compare, search, read, write)
by * (compare, search, read)
29.3.7 Granting Read-Only Access
This example gives to everyone read-only access to address book attributes under
dc=example,dc=com. It also extends to everyone read access to all attributes within
the dc=us,dc=example,dc=com subtree only.
ldapmodify -v -h myhost -D "cn=Directory Manager, o=IMC, c=US" -q -f my_ldif_file
The orclACI attribute of dc=example,dc=com is specified as follows:
access to entry by * (browse)
access to attr=(cn, telephone, email) by * (search, read)
The orclACI attribute of dc=us,dc=example,dc=com is specified as follows:
access to entry by * (browse)
access to attr=(*) by dn=".*,dc=us,dc=example,dc=com" (search, read)
29.3.8 Granting Selfwrite Access to Group Entries
This example enables people within the US domain to add or remove only their own
name (DN) to or from the member attribute of a particular group entry— for example,
a mailing list.
ldapmodify -v -h myhost -D "cn=Directory Manager, o=IMC, c=US" -q -f my_ldif_file
The orclEntryLevelACI attribute of the group entry is specified as follows:
access to attr=(member)
by dn=".*, dc=us,dc=example,dc=com" (selfwrite)
29.3.9 Defining a Completely Autonomous Policy to Inhibit Overriding Policies
This example denies group override.
ldapmodify -v -h myhost -D "cn=Directory Manager, o=IMC, c=US" -q -f my_ldif_file
The example uses the following DNs:
Table 29–5 DNs Used in Example
Container DN
Naming context to be
restricted from Group
overriding policies
c=us
User container cn=users,c=us
Sensitive data cn=appdata
User admin group for this
naming context
cn= user admin group, cn=users,c=us
Security admin group or
this naming context
cn= security admin group, cn=users,c=us

Managing Access Control by Using Command-Line Tools
29-26 Oracle Fusion Middleware Administrator's Guide for Oracle Internet Directory
The policy requirements for c=us are as follows:
■Users can browse and read their information.
■The user security admin can modify the information under c=us except for
passwords and ACPs.
■The security admin group can modify policies under c=us.
■The global password admin and the user can reset a password.
■All other users have no permissions.
■This policy cannot be overridden.
Required ACP:
Access to entry DenyGroupOverride
by dn=".*,c=us" (browse,noadd,nodelete)
by group="cn=User admin group,cn=users,c=us" (browse,add,delete)
Access to attr=(orclaci) DenyGroupOverride
by group="cn=security admin group,cn=users,c=us" (search,read,write,compare)
by * (none)
Access to attr=(userpassword) DenyGroupOverride
by self (search,read,write,compare)
by group="cn=password admin group" (search,read,write,compare)
by * (none)
Access to attr=(*) DenyGroupOverride
by self (search,read,nowrite,compare)
by group="cn= User admin group,cn=users,c=us" (search,read,write,compare)
by * (none)
Global password admin
group for all naming
contexts that reset
passwords
cn=password admin group
Table 29–5 (Cont.) DNs Used in Example
Container DN

30
Managing Password Verifiers 30-1
30Managing Password Verifiers
Password verifiers are the security credentials used to authenticate users to Oracle
Internet Directory and other Oracle components. This chapter explains how Oracle
Internet Directory centrally stores these password verifiers.
This chapter contains these topics:
■Section 30.1, "Introduction to Password Verifiers for Authenticating to the
Directory"
■Section 30.2, "Managing Hashing Schemes for Password Verifiers for
Authenticating to the Directory"
■Section 30.3, "Introduction to Password Verifiers for Authenticating to
Components"
■Section 30.4, "Managing Password Verifier Profiles for Oracle Components by
Using ODSM"
■Section 30.5, "Managing Password Verifier Profiles for Components by Using
Command-Line Tools"
■Section 30.6, "Introduction to Generating Verifiers by Using Dynamic Parameters"
■Section 30.7, "Configuring Oracle Internet Directory to Generate Dynamic
Password Verifiers"
30.1 Introduction to Password Verifiers for Authenticating to the
Directory
When a user leaves a company or changes jobs, that user's privileges should change
the same day to guard against misuse of old or unused accounts and privileges.
Without centralized password administration, an administrator in a large enterprise
with user accounts and passwords distributed over many databases may not be able to
make the changes as quickly as good security requires.
Oracle Internet Directory centrally stores security credentials to make their
administration easy for both end users and administrators. It stores:
■Passwords for authenticating users to the directory itself
■Password verifiers for authenticating users to other Oracle components
Users can store non-Oracle authentication credentials if the non-Oracle applications
are directory enabled. These applications must create their own container under the
Products entry.

Introduction to Password Verifiers for Authenticating to the Directory
30-2 Oracle Fusion Middleware Administrator's Guide for Oracle Internet Directory
Oracle Internet Directory stores a user's directory password in the userPassword
attribute. You can protect this password by storing it as a Base64 encoded string of a
one-way hashed value by using one of Oracle Internet Directory's supported hashing
algorithms. Storing passwords as one-way hashed values—rather than as encrypted
values—more fully secures them because a malicious user can neither read nor
decrypt them.
The default userPassword hashing algorithm for Oracle Internet Directory has been
changed from MD4 to SHA. This default scheme is in effect for new installations only.
All userPassword attributes created after a new install are one-way hashed using
SHA, then stored in Oracle Internet Directory.
When you perform an upgrade, the default hashing scheme in effect before upgrade is
retained. For example, if the default scheme before the upgrade was MD4, then MD4
remains the default scheme after the upgrade. To ensure greater security of
userPasswords, change the default scheme to SHA immediately after the upgrade.
When you change the default scheme to SHA, user login is unaffected. For greater
security, require users to reset their passwords so that SHA values hash values are
stored in Oracle Internet Directory.
Oracle Internet Directory stores the user password in a reversible encrypted format in
a configuration attribute called orclrevpwd. This attribute is generated only if the
attribute orclpwdencryptionenable in the password policy entry is set to 1. The
orclrevpwd attribute is maintained securely within the server and cannot be queried.
This section contains these topics:
■Section 30.1.1, "Userpassword Verifiers and Authentication to the Directory"
■Section 30.1.2, "Hashing Schemes for Creating Userpassword Verifiers"
■Section 30.2, "Managing Hashing Schemes for Password Verifiers for
Authenticating to the Directory"
30.1.1 Userpassword Verifiers and Authentication to the Directory
Oracle Internet Directory can protect a user's directory password by storing it in the
userPassword attribute as a one-way hashed value. You select the hashing algorithm
you want to use. Storing passwords as one-way hashed values—rather than as
encrypted values—more fully secures them because a malicious user can neither read
nor decrypt them.
During authentication to a directory server, clients supply a password to the directory
server in clear text. The directory server hashes this password by using the hashing
algorithm specified in the DSE attribute orclcryptoscheme. It then verifies it
against the hashed password stored in the binding entry's userPassword attribute. If
the hashed password values match, then the server authenticates the user. If they do
not match, then the server sends the user an "Invalid Credentials" error message.
For external users, Oracle Internet Directory generates the attribute orclrevpwd
during authentication. In particular this attribute is generated when clients
authenticate using ldapcompare on the user's cleartext password. If the attribute
orclrevpwd does not exist, then the Oracle Internet Directory server generates this
attribute using the cleartext password provided for authentication. However this
Note: For even greater security, three variants of the more secure
SHA-2 algorithm, as well as salted versions of those variants, are
available, as of 11g Release 1 (11.1.1.4.0).

Managing Hashing Schemes for Password Verifiers for Authenticating to the Directory
Managing Password Verifiers 30-3
attribute is not generated if external users are authenticated against Oracle Internet
Directory using ldapbind
30.1.2 Hashing Schemes for Creating Userpassword Verifiers
During installation, Oracle Identity Management 11g Installer sets the one-way
hashing scheme for protecting user passwords to the directory to SHA. This value is
stored in the orclCryptoScheme attribute in the root DSE. You can change that
value to any of the following hashing schemes:
■MD4: A one-way hash function that produces a 128-bit hash, or message digest
■MD5: An improved and more complex version of MD4
■SHA-1: Secure Hash Algorithm, which produces a 160-bit hash, longer than MD5.
The algorithm is slightly slower than MD5, but the larger message digest makes it
more secure against brute-force collision and inversion attacks.
■SSHA: Salted Secure Hash Algorithm. This is similar to SHA, but is generated by
using a random salt with the password.
■SHA256, SHA384, SHA512: Variants of the more secure SHA-2 algorithm. The
numbers refer to the digest sizes of the hash functions.
■SSHA256, SSHA384, SSHA512: Salted versions of the three SHA-2 algorithms.
■SMD5: Salted MD5. This is similar to MD5, but is generated by using a random
salt with the password.
■UNIX Crypt: The UNIX hashing algorithm
■None: Passwords are stored in clear text.
See Section 30.2, "Managing Hashing Schemes for Password Verifiers for
Authenticating to the Directory" and Section 9.5, "Managing System Configuration
Attributes by Using ODSM Data Browser."
30.2 Managing Hashing Schemes for Password Verifiers for
Authenticating to the Directory
The following example changes the password hashing algorithm to SHA512 by using
an LDIF file named my_ldif_file:
ldapmodify -D cn=orcladmin -q -h myhost -p 3060 -v -f my_ldif_file
The LDIF file, my_ldif_file, contains:
dn:
changetype: modify
replace: orclcryptoscheme
orclcryptoscheme: SHA512
Note: In the past Oracle Internet Directory supported the DES
variant of UNIX Crypt. In 11g Release 1 (11.1.1) Oracle Internet
Directory has the capability to understand the MD5 and Blowfish
variants of UNIX Crypt. This means pre-hashed passwords using
these other variants can be imported into Oracle Internet Directory
as-is and will continue to work. However, selecting UNIX Crypt as
orclcryptoscheme will continue to only generate the DES variant
of UNIX Crypt.

Introduction to Password Verifiers for Authenticating to Components
30-4 Oracle Fusion Middleware Administrator's Guide for Oracle Internet Directory
30.3 Introduction to Password Verifiers for Authenticating to
Components
Oracle components store both passwords and password verifiers in Oracle Internet
Directory. This section contains these topics:
■Section 30.3.1, "About Password Verifiers for Authenticating to Oracle
Components"
■Section 30.3.2, "Attributes for Storing Password Verifiers for Authenticating to
Oracle Components"
■Section 30.3.3, "Default Verifiers for Oracle Components"
■Section 30.3.4, "How Password Verification Works for an Oracle Component"
■Section 30.4, "Managing Password Verifier Profiles for Oracle Components by
Using ODSM"
■Section 30.5, "Managing Password Verifier Profiles for Components by Using
Command-Line Tools"
30.3.1 About Password Verifiers for Authenticating to Oracle Components
Oracle components can store their password values in Oracle Internet Directory as
password verifiers. A password verifier is a hashed version of a clear text password,
which is then encoded as a BASE64 encoded string.
You can choose one of these hashing algorithms to derive a password verifier:
■MD5: An improved, and more complex, version of MD4
■SHA-1: Secure Hash Algorithm, which produces a 160-bit hash, longer than MD5.
The algorithm is slightly slower than MD5, but the larger message digest makes it
more secure against brute-force collision and inversion attacks.
■SSHA and SMD5
■SHA256, SHA384, SHA512: Variants of the more secure SHA-2 algorithm. The
numbers refer to the digest sizes of the hash functions.
■SSHA256, SSHA384, SSHA512: Salted versions of the three SHA-2 algorithms.
■UNIX Crypt: The UNIX hashing algorithm
■SASL/MD5: Simple Authentication and Security Layer/MD5, which adds
authentication support to connection-based protocols and uses a
challenge-response protocol.
■O3LOGON: A proprietary Oracle algorithm for generating verifiers. It is similar to
SASL/MD5 in that it uses a challenge-response protocol.
■ORCLWEBDAV: A proprietary algorithm identical to SASL/MD5 which takes the
user name in the format username@realm.
■ORCLLM: Oracle's representation of the SMBLM algorithm. The SMBLM
algorithm is Oracle's representation of the LM variant of the SMB/CIFS
challenge/response authentication algorithm.
■ORCLNT: Oracle's representation of the SMBNT algorithm. The SMBNT
algorithm is Oracle's representation of the NT variant of the SMB/CIFS
challenge/response authentication algorithm.
During Oracle application installation, the Oracle Identity Management 11g Installer
creates for that application a password verifier profile entry containing all the
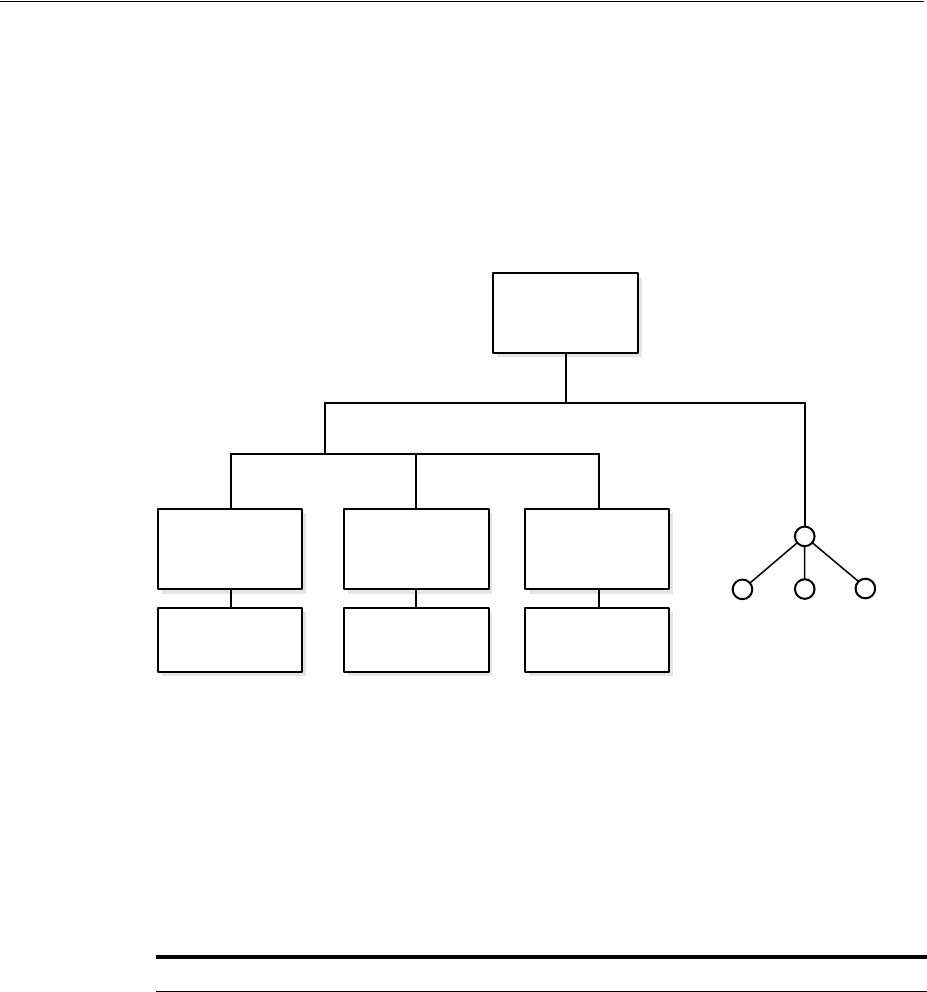
Introduction to Password Verifiers for Authenticating to Components
Managing Password Verifiers 30-5
necessary password verification information. It places this entry, as shown in
Figure 30–1, immediately below the application entry, which resides under the
products entry, which, in turn, resides under the realm-specific Oracle Context.
This verifier profile entry is applicable to users in the specified realm only. For verifier
generation to take effect, you must set the orclcommonusersearchbase attribute in
the common entry of the realm-specific Oracle context to the appropriate value.
Figure 30–1 Location of the Password Verifier Profile Entry
30.3.2 Attributes for Storing Password Verifiers for Authenticating to Oracle
Components
Both the directory and Oracle components store the user password in the user entry,
but in different attributes. Whereas the directory stores user passwords in the
userPassword attribute, Oracle components store user password verifiers in the
authPassword, orclPasswordVerifier, or orclpassword attribute. Table 30–1
describes each of the attributes used by Oracle components.
Table 30–1 Attributes for Storing Password Verifiers in User Entries
Attribute Description
authPassword Attribute for storing a password to an Oracle component when
that password is the same as that used to authenticate the user to
the directory, namely, userpassword. The value in this
attribute is synchronized with that in the userpassword
attribute.
Several different applications can require the user to enter the
same clear text password used for the directory, but each
application may hash it with a different algorithm. In this case,
the same clear text password can become the source of several
different password verifiers.
This attribute is multivalued and can contain all the other
verifiers that different applications use for this user's clear text
password. If the userpassword attribute is modified, then the
authpasswords for all applications are regenerated.
Password
Verifier
Profile Entry
Password
Verifier
Profile Entry
Password
Verifier
Profile Entry
Subscriber or
Default
Subscriber
Oracle Context
Application
1
Application
2
Application
3
Products Groups

Introduction to Password Verifiers for Authenticating to Components
30-6 Oracle Fusion Middleware Administrator's Guide for Oracle Internet Directory
Each of these attribute types has appID as an attribute subtype. This attribute subtype
uniquely identifies a particular application. For example, the appID can be the
ORCLGUID of the application entry. This attribute subtype is generated during
application installation.
In Figure 30–2 on page 30-7, various Oracle components store their password verifiers
in Oracle Internet Directory. Oracle Single Sign-On uses the same password as that for
the directory, and hence stores it in the authPassword attribute.The other
applications use different passwords and hence store their verifiers in
orclPasswordVerifier attribute.
The following is an example of an application-specific verifier profile entry. Any
application that chooses not to use the common verifier framework must create its
own verifier profile entry, similar to the one given in the following example. The
orclappid is set to the GUID of the application container and it will also be used as a
subtype in the verifier attributes authpassword and orclpasswordverifier.
dn: cn=IFSVerifierProfileEntry,cn=IFS,cn=Products,cn=OracleContext,o=Oracle,dc=com
objectclass:top
objectclass:orclpwdverifierprofile
cn:IFSVerifierProfileEntry
orclappid:8FF2DFD8203519C0E034080020C34C50
orclpwdverifierparams;authpassword: crypto:SASL/MDS $ realm:dc=com
orclpwdverifierparams;orclpasswordverifier: crypto:ORCLLM
orclpwdverifierparams;authpassword: crypto:ORCLWEBDAV $ realm:dc=com
$ usernameattribute: mail $ usernamecase: lower $ nodomain: TRUE
SASL/MD5 and ORCLWEBDAV verifiers are generated by using user name, realm,
and password. The user name attribute to be used can be specified in the verifier
profile entry. The case of the user name can also be specified as either upper or lower.
The ORLWEBDAV verifier is generated by appending the name of the identity
management realm to the user name. If this is not required, then the verifier profile
entry must specify nodomain: TRUE.
In the previous example, ORCLWEBDAV verifier is generated by using the value of
the mail attribute without appending the name of the realm. Also, the user name is
converted to lowercase before generating the verifier.
orclPasswordVerifier Attribute for storing a password to an Oracle component when
that password is different from that used to authenticate the user
to the directory, namely, userpassword. The value in this
attribute is not synchronized with that in the userpassword
attribute.
Like authPassword, this attribute is multivalued and can
contain all the other verifiers that different applications use for
this user's clear text password.
orclPassword Attribute for storing only the 03LOGON verifier for enterprise
users. The 03LOGON verifier is synchronized with the
userpassword attribute, and it is generated by default for all
user entries associated with the orcluserv2 object class.
When Oracle Internet Directory is installed, a database security
profile entry is created by default in the Root Oracle Context.
The presence of this entry triggers the generation of 03LOGON
verifiers for user entries associated with the orcluserv2 object
class.
Table 30–1 (Cont.) Attributes for Storing Password Verifiers in User Entries
Attribute Description
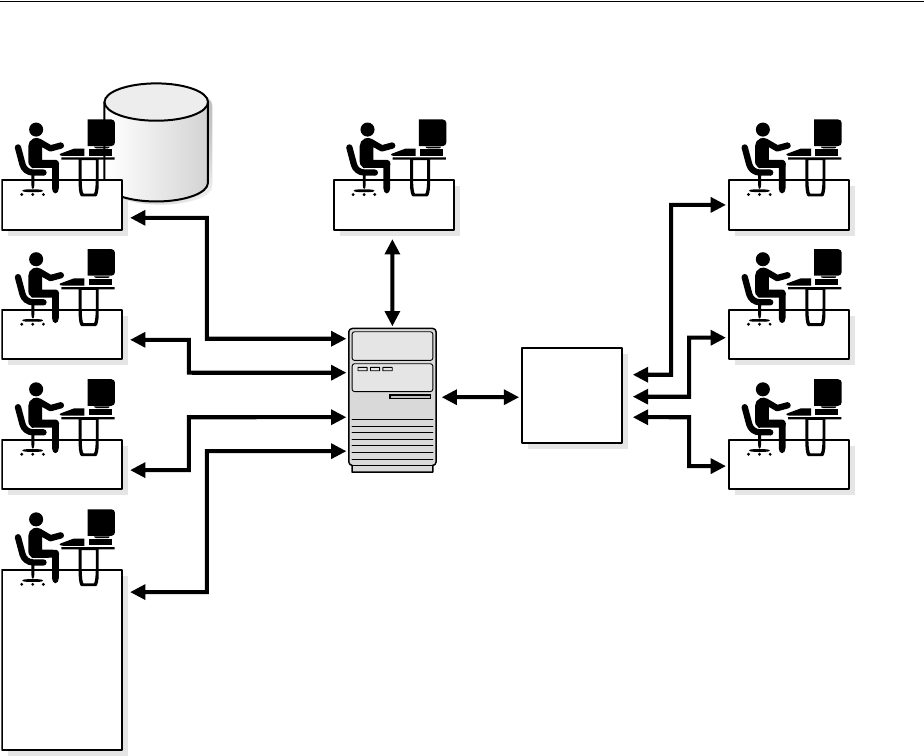
Introduction to Password Verifiers for Authenticating to Components
Managing Password Verifiers 30-7
Figure 30–2 Authentication Model
This illustration shows the authentication model used in password storage. At the
center is an OID Password Store. To the right are applications 1, 2, and 3, each of
which authenticates to the directory by way of Oracle9iAS Single Sign-On. The latter
connects to the directory by way of a secure channel. On the other side of the OID
Password Store, a database, three applications, and the directory administrator
authenticate directly to the OID Password Store.
***********************************************************************************************
30.3.3 Default Verifiers for Oracle Components
To save you from having to create a profile for each Oracle component, and to enable
sharing of password verifiers across all components, Oracle Internet Directory
provides a default set of password verifiers. The default verifier types are MD5,
MD5-IFS (SASL/MD5 with the user name set to the value of the nickname attribute
and realm = Authorized_Users), WEBDAV, ORCLLM, and ORCLNT.
Two profile entries are required: one for applications using personal identification
numbers (PINs), which use numeric values only, and another for applications using
alphanumeric passwords.
The verifiers for PIN-based applications—for example, the voice mail application in
OracleAS Unified Messaging—are stored in the
orclpasswordverifier;orclcommonpin attribute. The subtype
orclcommonpin is used to distinguish numeric PINs from alphanumeric passwords.
Application 4
OID Password
Store
Secure
channel
Application 1
Application 2
Oracle
Application
Server
Single
Sign-On
Application 3
Database
Application 5
Application 6
Directory
Administration
:
Application
Administration,
Delegation,
and
Provisioning
User Transfer
and Migration
Secure
channel
Secure channel
Secure channel
Secure channel
Secure channel

Introduction to Password Verifiers for Authenticating to Components
30-8 Oracle Fusion Middleware Administrator's Guide for Oracle Internet Directory
Any application that uses numeric PINs can directly query or compare against the
attribute orclpasswordverifier;orclcommonpin.
The verifiers for alphanumeric password-based applications can be stored in either:
■The authpassword;orclcommonpwd attribute—If an application requires its
verifier to be synchronized with the userpassword attribute
■The orclpasswordverifier;orclcommonpwd attribute—If synchronization
with the userpassword attribute is not required
The subtype orclcommonpwd is used to distinguish alphanumeric passwords from
numeric PINs. The verifier attributes subtyped by orclcommonpwd can be queried
against.
These profile entries also contain the list of subscribed applications and these are
specified as values in the uniquemember attribute in the profile entries. By default,
the DN of the Oracle Single Sign-On identity is one of the subscribed applications. This
means that Oracle Single Sign-On is a proxy member for all its partner applications.
All applications not based on Oracle Single Sign-On must add their identities (DNs) to
the uniquemember attribute in the appropriate profile entry.
The following is an example of the profile entries.
Cn=defaultSharedPwdProfileEntry, cn=common, cn=products, cn=oraclecontext
Objectclass: orclpwdverifierprofile
Objectclass: orclcommonpwdprofile
Cn: defaultSharedPwdProfileEntry
Orclappid: orclcommonpwd
Orclpwdverifierparams;authpassword: crypto:SASL/MD5 $ realm:Authorized_Users
Orclpwdverifierparams;authpassword: crypto:ORCLWEBDAV $ realm:Authorized_Users
Orclpwdverifierparams;authpassword: crypto:ORCLLM
Orclpwdverifierparams;authpassword: crypto:ORCLNT
Orclpwdverifierparams;orclpasswordverifier: crypto:SSHA
Uniquemember: cn=SSO,cn=Products,cn=OracleContext
Uniquemember: cn=IFS,cn=Products,cn=OracleContext
Cn=defaultSharedPINProfileEntry, cn=common, cn=products, cn=oraclecontext
Objectclass: orclpwdverifierprofile
Objectclass: orclcommonpwdprofile
Cn: defaultSharedPinProfileEntry
Orclappid: orclcommonpin
Orclpwdverifierparams;orclpasswordverifier: crypto:MD5
Orclpwdverifierparams;orclpasswordverifier: crypto:SSHA
Uniquemember: cn=SSO,cn=Products,cn=OracleContext
Uniquemember: cn=Unified Messaging,cn=Products,cn=OracleContext
For PIN-based applications, authpassword is not an option. Such applications use
the orclpasswordverifier attribute.
30.3.4 How Password Verification Works for an Oracle Component
Figure 30–3 shows an example of password verification for an Oracle component. In
this example, the Oracle component stores its password verifiers in the directory.
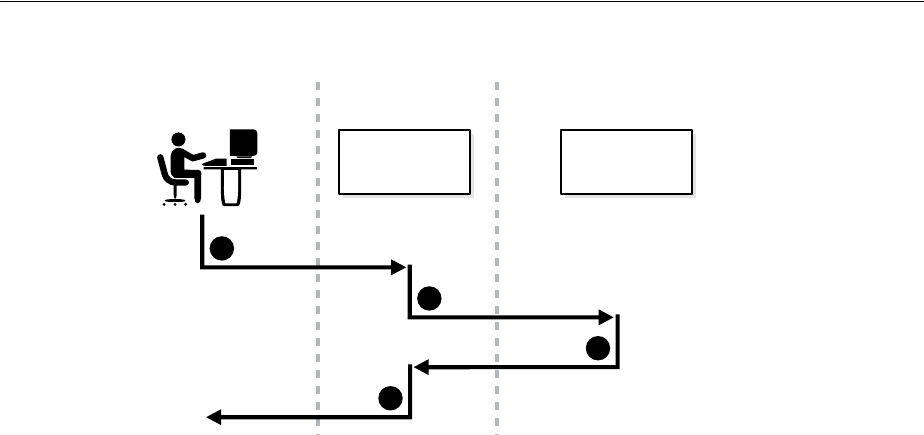
Managing Password Verifier Profiles for Oracle Components by Using ODSM
Managing Password Verifiers 30-9
Figure 30–3 How Password Verification Works
1. The user tries to log in to an application by entering a user name and a clear text
password.
2. The application sends the clear text password to the directory server. If the
application stores password verifiers in the directory, then the application
requests the directory server to compare this password value with the
corresponding one in the directory.
3. The directory server:
a. Generates a password verifier by using the hashing algorithm specified for the
particular application
b. Compares this password verifier with the corresponding password verifiers in
the directory. For the compare operation to be successful, the application must
provide its appID as the subtype of the verifier attribute. For example:
ldapcompare -p 3060 -D "DN_of_the_appplication_entity" -q \
-b "DN_of_the_user" -a orclpasswordverifier; appID \
-v password_of_the_user
c. Notifies the application of the results of the compare operation.
4. Depending on the message from the directory server, the application either
authenticates the user or not.
If an application does not use the compare operation, then it:
1. Hashes the clear text password entered by the user
2. Retrieves from the directory the hashed value of the clear text password as entered
by the user
3. Initiates a challenge to the user to which the client responds. If the response is
correct, then the application authenticates the user.
30.4 Managing Password Verifier Profiles for Oracle Components by
Using ODSM
You can use Oracle Directory Services Manager to view and modify password verifier
profile entries, including password hashing schemes.
To view and modify an application's password verifiers:
Oracle
Internet
Directory
Application
user
1
2
3
6

Managing Password Verifier Profiles for Components by Using Command-Line Tools
30-10 Oracle Fusion Middleware Administrator's Guide for Oracle Internet Directory
1. Invoke Oracle Directory Services Manager and connect to the Oracle Internet
Directory server as described in Section 7.4.5, "Invoking Oracle Directory Services
Manager."
2. From the task selection bar, select Security.
3. Expand Password Verifier in the left pane. All of the password verifiers appear in
the left pane.
4. Select the password verifier you want to view. The right pane displays the
Password Verifier Profile tab page.
5. You can modify the hashing algorithm used to generate a password verifier. In the
Password Verifier Profile dialog box, specify the hashing algorithm in the Oracle
Password Parameters field. The syntax is:
crypto:hashing_algorithm
For example, if you are using the ORCLLM hashing algorithm, then you would
enter:
crypto:ORCLLM
If you are using SASL/MD5, for example, you can enter the following:
crypto:SASL/MD5 $ realm:dc=com
30.5 Managing Password Verifier Profiles for Components by Using
Command-Line Tools
You can view and modify password verifier profiles by using command-line tools.
30.5.1 Viewing a Password Verifier Profile by Using Command-Line Tools
To view an application's password verifier, perform a search specifying the DN of the
password verifier profile.
30.5.2 Example: Modifying a Password Verifier Profile by Using Command-Line Tools
This example changes the hashing algorithm in an application password verifier
profile entry. This password verifier synchronizes with the user's directory password.
Type:
ldapmodify -D "cn=orcladmin" -q -p 3060 -h my_host -v -f file.ldif
where file.ldif contains:
dn: cn=MyAppVerifierProfileEntry,cn=MyApp,cn=Products,cn=OracleContext,
o=my_company,dc=com
changetype: modify
replace: orclPwdVerifierParams
orclPwdVerifierParams;authPassword: crypto:SASL/MD5 $ realm:dc=com
30.6 Introduction to Generating Verifiers by Using Dynamic Parameters
The password verifiers described previously are static password verifiers. That is, they
are generated with preconfigured parameters, typically during application
installation. Some applications, including Oracle Calendar, Oracle Email, and Oracle

Configuring Oracle Internet Directory to Generate Dynamic Password Verifiers
Managing Password Verifiers 30-11
Wireless and Voice, require Oracle Internet Directory to generate dynamic password
verifiers.
Oracle Internet Directory generates a dynamic password verifier when an application
requests one. Dynamic verifiers are based on application parameters that are not
available until run time.
In order to generate a dynamic password verifier, Oracle Internet Directory needs a
user password that was previously stored in a reversible encrypted format. Oracle
Internet Directory stores such values in the configuration attributes orclrevpwd and
orclunsyncrevpwd. Encrypted values based on userpassword are stored in the
parameter orclrevpwd. Encrypted values based on passwords other than
userpassword, such as the numeric PINs used by Oracle Calendar, are stored in the
parameter orclunsyncrevpwd.
30.7 Configuring Oracle Internet Directory to Generate Dynamic
Password Verifiers
If you are deploying applications that use userpassword and that need dynamic
password verifiers, you must ensure that Oracle Internet Directory generates the
orclrevpwd attribute. Oracle Internet Directory generates the attribute orclrevpwd
when you provision a user if the attribute orclpwdencryptionenable in the realm
password policy entry is set to 1. Therefore, you must set
orclpwdencryptionenableto 1 before you provision users.
To check the value of orclpwdencryptionenable, you can use ldapsearch to
query the pwdpolicy entry effective on the entry being examined. For example, to
query the default pwdpolicy, you would type:
$ ldapsearch -p port -q -D "cn=orcladmin" \
-b "cn=default,cn=pwdPolicies,cn=Common,cn=Products,cn=OracleContext" \
-s base "objectclass=*"
If orclpwdencryptionenable is not listed or is equal to 0, set it to 1 by using
ldapmodify with an LDIF file similar to this:
dn: cn=DefaultSharedPinProfileEntry,cn=Common,cn=Products,cn=Oraclecontext
cn: DefaultSharedPinProfileEntry
orclappid: orclpwdencryptionenable
orclpwdencryptionenable: 1
Alternatively, if users were provisioned before you set orclpwdencryptionenable,
all users must reset their user passwords to trigger the generation of the encrypted
value.
If you are deploying applications that use a numeric PIN and that need dynamic
password verifiers, you must ensure that Oracle Internet Directory can use the crypto
type 3DES in order to generate the value stored in orclunsyncrevpwd. You must
specify 3DES as a value of the attribute
orclpwdverifierparams;orclpasswordverifier in the common verifier
profile entry under the root oracle context. The default DN of this entry is
cn=DefaultSharedPINProfileEntry,cn=Common,cn=Products,
cn=OracleContext. To set the value, you would use the following LDIF file:
dn: cn=DefaultSharedPinProfileEntry,cn=Common,cn=Products,cn=Oraclecontext
cn: DefaultSharedPinProfileEntry
orclappid: orclcommonpin
orclpwdverifierparams;orclpasswordverifier: crypto:MD5
orclpwdverifierparams;orclpasswordverifier: crypto:3DES

Configuring Oracle Internet Directory to Generate Dynamic Password Verifiers
30-12 Oracle Fusion Middleware Administrator's Guide for Oracle Internet Directory
Use a command-line such as:
ldapmodify -D cn=orcladmin -q -p portNum -h hostname -f ldifFile

31
Delegating Privileges for Oracle Identity Management 31-1
31Delegating Privileges for Oracle Identity
Management
This chapter explains how to store all the data for users, groups, and services in one
repository, and delegate the administration of that data to various administrators. It
also explains the default security configuration in Oracle Internet Directory.
This chapter contains these topics:
■Section 31.1, "Introduction to Delegating Privileges for Oracle Identity
Management"
■Section 31.2, "Delegating Privileges for User and Group Management"
■Section 31.3, "Delegating Privileges for Deployment of Oracle Components"
■Section 31.4, "Delegating Privileges for Component Run Time"
31.1 Introduction to Delegating Privileges for Oracle Identity
Management
Oracle Identity Management enables you to store all the data for users, groups, and
services in one repository, and to delegate a particular administrator for each set of
data. By providing both a centralized repository and customized delegated access,
Oracle Identity Management is both secure and scalable.
This section contains these topics:
■Section 31.1.1, "How Delegation Works"
■Section 31.1.2, "Delegation in an Oracle Fusion Middleware Environment"
■Section 31.1.3, "About the Default Configuration"
■Section 31.1.4, "Privileges for Administering the Oracle Technology Stack"
31.1.1 How Delegation Works
Using the delegation model, a global administrator can delegate to realm
administrators the privileges to create and manage the identity management realms
for hosted companies. Realm administrators can, in turn, delegate to end users and
Note: All references to Oracle Delegated Administration Services in
this chapter refer to Oracle Delegated Administration Services 10g
(10.1.4.3.0) or later.
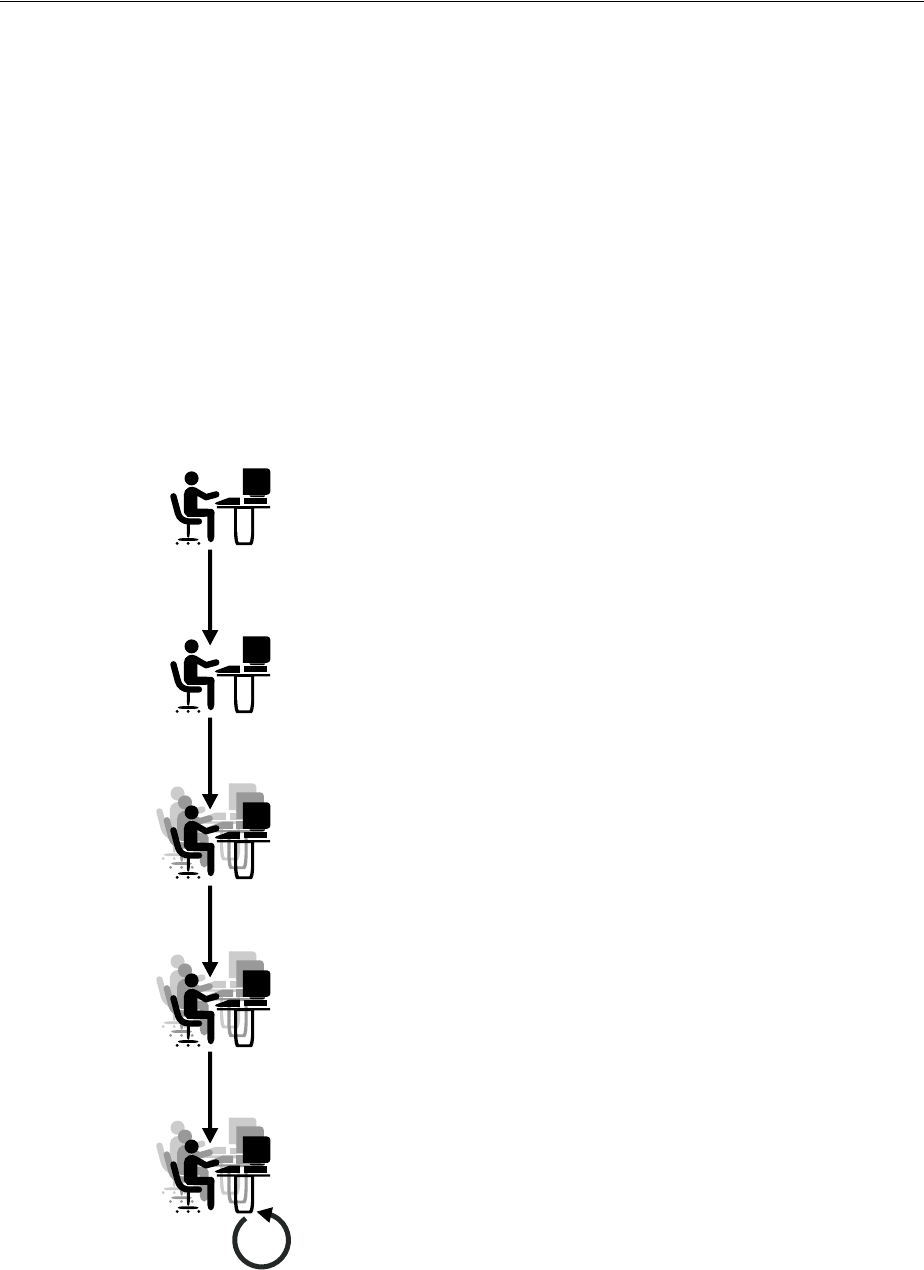
Introduction to Delegating Privileges for Oracle Identity Management
31-2 Oracle Fusion Middleware Administrator's Guide for Oracle Internet Directory
groups the privileges to change their application passwords, personal data, and
preferences. Each type of user can thus be given the appropriate level of privileges.
To delegate the necessary privileges, you assign the user to the appropriate
administrative group. For example, suppose that you store data for both enterprise
users and the e-mail service in the directory, and must specify a unique administrator
for each set of data. To specify a user as the administrator of enterprise users, you
assign that user to, say, the Enterprise User Administrators Group. To specify a user as
the administrator of the e-mail services, you assign that user to, say, the E-mail Service
Administrators Group.
31.1.2 Delegation in an Oracle Fusion Middleware Environment
Figure 31–1 shows the flow of delegation in an Oracle Fusion Middleware
environment.
Figure 31–1 Delegation Flow in an Oracle Fusion Middleware Environment
As Figure 31–1 on page 31-2 shows, in an Oracle Fusion Middleware environment the
directory superuser (cn=orcadmin) creates:
Oracle Internet Directory Superuser (cn=orcladmin)
· Creates Oracle Context
· Creates Realm
· Creates Realm Oracle Context
Realm Administrator
(cn=orcladmin, cn=users, <Enterprise DN>)
Oracle Context Administrators
Oracle Application Server Administrators
(you can have an administrator for each component)
· Install components
· Manage component security and configuration
User and Group Administrators
Create users and groups
These administrators can also grant user and group
administrator privileges to other users.
Creates
Delegates Oracle Context administration to
Delegates Application Server administration to
Delegates user and group administration to

Introduction to Delegating Privileges for Oracle Identity Management
Delegating Privileges for Oracle Identity Management 31-3
■The Oracle Context
■The realm
■The realm-specific Oracle Context
■The entry for the realm administrator (cn=orcladmin, cn=users,
Enterprise DN)
The realm administrator, in turn, delegates administration of the Oracle Context to
specific users by assigning those users to the Oracle Context Administrators Group.
Oracle Context Administrators then delegate administration of the Oracle Application
Server to one or more users by assigning them to the Oracle Fusion Middleware
Administrators Group. The Oracle Fusion Middleware Administrators install and
administer Oracle Fusion Middleware components and delegate administration of
user and group data to the User and Group Administrators group. The User and
Group Administrators create users and groups. They can also grant user and group
administrator privileges to other users.
31.1.3 About the Default Configuration
When you first install Oracle Internet Directory, the default configuration establishes
access control policies at various points in the directory information tree (DIT). Default
access controls are placed on the User and Group containers as described later in this
chapter. Likewise, default privileges for specific directory entities are discussed later
in this chapter. In addition, certain default privileges are granted to Everyone and to
each user as described in Table 31–2.
You can customize this default configuration to meet the security requirements of your
enterprise.
31.1.4 Privileges for Administering the Oracle Technology Stack
Administering the Oracle technology stack requires the privileges described in
Table 31–2.
Table 31–1 Default Privileges Granted to Everyone and to Each User
Subject Default Privileges
Everyone The following privileges at the Root DSE:
■Permission to browse user entries
■Search, read, and compare access for all user attributes except
the following userpkcs12, orcluserpkcs12hint, userpassword,
orclpassword, and orclpasswordverifier
Each user Complete access to his or her own attributes—including the
userpassword, orclpassword, and orclpasswordverifier
attributes.

Delegating Privileges for User and Group Management
31-4 Oracle Fusion Middleware Administrator's Guide for Oracle Internet Directory
31.2 Delegating Privileges for User and Group Management
Administrative privileges are delegated to either Oracle components that use the
identity management infrastructure or to end users themselves. A privilege can be
delegated to either an identity—for example, a user or application—or to a role or
group.
This section contains these topics:
■Section 31.2.1, "How Privileges Are Granted for Managing User and Group Data"
■Section 31.2.2, "Default Privileges for Managing User Data"
■Section 31.2.3, "Default Privileges for Managing Group Data"
31.2.1 How Privileges Are Granted for Managing User and Group Data
To delegate administrative privileges, the Oracle Internet Directory superuser does the
following:
1. Creates an identity management realm
Table 31–2 Privileges for Administering the Oracle Technology Stack
Type of Privilege Description More Information
User and group
management privileges
These are delegated to either Oracle
components that use the identity
management infrastructure or to end
users themselves
Section 31.2, "Delegating Privileges for
User and Group Management"
Deployment-time
privileges
These are required to deploy any Oracle
component. They may include privileges
to create appropriate entries inside the
directory, or to store metadata in a
common repository. Such privileges must
be given, for example, to an administrator
of Oracle Portal.
Section 31.3, "Delegating Privileges for
Deployment of Oracle Components"
Run-time privileges These are required to facilitate the
run-time interactions of Oracle
components within the identity
management infrastructure. These
include privileges to view user attributes,
add new users, and modify the group
membership. Such privileges must be
given to the administration tool specific
to each Oracle component, enabling it to
access or create entries inside Oracle
Internet Directory.
Section 31.4, "Delegating Privileges for
Component Run Time"
Caution: Be careful when modifying the default ACLs in any
Oracle Context. Doing so can disable the security of Oracle
components in your environment. See component-specific
documentation for details on whether you can safely modify the
default ACLs in an Oracle Context.
See Also: Section 36.1, "Introduction to Migrating Data from
Other Data Repositories" if you have an existing directory structure
that you now want to migrate to an Oracle Application Server
environment

Delegating Privileges for User and Group Management
Delegating Privileges for Oracle Identity Management 31-5
2. Identifies a special user in that realm who is called the realm administrator
3. Delegates all privileges to that realm administrator
This realm administrator, in turn, delegates certain privileges that Oracle components
require to the Oracle defined roles—for example, Oracle Fusion Middleware
administrators. The Oracle components receive these roles when they are deployed.
In addition to delegating privileges to roles specific to Oracle components, the realm
administrator can also define roles specific to the deployment—for example, a role for
help desk administrators—and grant privileges to those roles. These delegated
administrators can, in turn, grant these roles to end users. In fact, because a majority of
user management tasks involve self-service—like changing a phone number or
specifying application-specific preferences—these privileges can be delegated to end
users by both the realm administrator and Oracle component administrators.
In the case of a group, one or more owners—typically end users—can be identified. If
they are granted the necessary administrative privileges, then these owners can
manage the group by using Oracle Internet Directory Self-Service Console, Oracle
Directory Services Manager, or command-line tools.
31.2.2 Default Privileges for Managing User Data
Managing users involves privileges to:
■Create and delete user entries
■Modify user attributes
■Delegate user administration to other users
The access control policy point (ACP) for creating users is at the Users container in the
identity management realm.
This section describes each of these privileges in more detail.
31.2.2.1 Creating Users for a Realm
To create users for a realm, an administrator must be a member of the Subscriber DAS
Create User Group. Table 31–3 describes the characteristics of this group.
31.2.2.2 Modifying Attributes of a User
To modify user attributes, an administrator must be a member of the Subscriber DAS
Edit User Group. Table 31–4 describes the characteristics of this group.
Table 31–3 Characteristics of the Subscriber DAS Create User Group
Characteristic Description
Default ACP The ACL at the Users container in the default realm allows the Subscriber
DAS Create User Group in the realm Oracle Context to create users
under the Users container.
Administrators The Oracle Internet Directory superuser
Members of the Oracle Context Administrators Group
Members of the User Privilege Assignment Group
Members of the DAS Administrators Group
Owners of this group
DN cn=oracleDASCreateUser,cn=groups,Oracle_Context_DN.

Delegating Privileges for User and Group Management
31-6 Oracle Fusion Middleware Administrator's Guide for Oracle Internet Directory
31.2.2.3 Deleting a User
To delete a user in a realm, an administrator must be a member of the DAS Delete
User Group. Table 31–5 describes the characteristics of this group.
31.2.2.4 Delegating User Administration
A delegated administrator can perform specified operations within the directory and
requires permission to add any user to the User Creation, User Edit, or User Delete
Groups described previously.
To grant user administration privileges to a delegate administrator, the granting
administrator must be a member of the User Privilege Assignment Group. Table 31–6
describes the characteristics of this group.
Table 31–4 Characteristics of the Subscriber DAS Edit User Group
Characteristic Description
Default ACP The ACL at the Users container in the default identity management realm
allows the Subscriber DAS Edit User Group in the realm Oracle Context
to modify various attributes of users.
Administrators The Oracle Internet Directory superuser
Members of the Oracle Context Administrators Group
Members of the User Privilege Assignment Group
Members of the DAS Administrators Group
Owners of this group
DN cn=oracleDASEditUser,cn=groups,Oracle_Context_DN
Table 31–5 Characteristics of the DAS Delete User Group
Characteristic Description
Default ACP The ACL at the Users container in the default identity management
realm allows the DAS Delete User Group in the realm Oracle Context to
delete a user from the realm.
Administrators The Oracle Internet Directory superuser
Members of the Oracle Context Administrators Group
Members of the User Privilege Assignment Group
Members of the DAS Administrators Group
Owners of this group
DN cn=oracleDASDeleteUser,cn=groups,Oracle_Context_DN
Table 31–6 Characteristics of the User Privilege Assignment Group
Characteristic Description
Default ACP The ACL policy for each of the groups previously mentioned allows
members of the User Privilege Assignment Group to add users to or
remove them from those groups.
Administrators The Oracle Internet Directory superuser
Oracle Context Administrators Group
Owners of this group. The DNs of these owners are listed as values of
the owner attribute in the group.
DN cn=oracleDASUserPriv,cn=groups,Oracle_Context_DN

Delegating Privileges for User and Group Management
Delegating Privileges for Oracle Identity Management 31-7
31.2.3 Default Privileges for Managing Group Data
Managing users and groups involves privileges to:
■Create and delete group entries
■Modify group attributes
■Delegate group administration to other users
The ACP for creating groups is at the Groups container in the identity management
realm.
31.2.3.1 Creating Groups
To create groups in Oracle Internet Directory, an administrator must be a member of
the Group Creation Group. Table 31–7 describes the characteristics of this group.
31.2.3.2 Modifying the Attributes of Groups
To modify the attributes of groups under the Groups container in a realm, an
administrator must be a member of the Group Edit Group. Table 31–8 describes the
characteristics of this group.
31.2.3.3 Deleting Groups
To delete groups, an administrator must have membership in the Group Delete
Group. Table 31–9 describes the characteristics of this group.
Table 31–7 Characteristics of the Group Creation Group
Characteristic Description
Default ACP The ACL at the Groups container in the realm allows the Group Creation
Group to add new groups in the realm.
Administrators The Oracle Internet Directory superuser
Members of the Oracle Context Administrators Group
Members of the Oracle Fusion Middleware Administrators Group
Members of the Group Privilege Assignment Group
Members of the DAS Administrators Group
Owners of this group
DN cn=oracleDASCreateGroup,cn=groups,Oracle_Context_DN
Table 31–8 Characteristics of the Group Edit Group
Characteristic Description
Default ACP The ACL at the Groups container in the realm allows the Group Edit
Group to modify various attributes of groups in the realm.
Administrators The Oracle Internet Directory superuser
Members of the Oracle Context Administrators Group
Members of the Oracle Fusion Middleware Administrators Group
Members of Group Privilege Assignment Group
Members of the DAS Administrators Group
Owners of this group
DN cn=oracleDASEditGroup,cn=groups,Oracle_Context_DN

Delegating Privileges for Deployment of Oracle Components
31-8 Oracle Fusion Middleware Administrator's Guide for Oracle Internet Directory
31.2.3.4 Delegating Group Administration
To delegate group administration to other users—that is, to add or remove users from
the Group Creation, Group Edit, or Group Delete Groups described previously—an
administrator must be a member of the Group Privilege Assignment Group.
Table 31–10 describes the characteristics of this group.
31.3 Delegating Privileges for Deployment of Oracle Components
This section discusses the groups responsible for deploying Oracle components. It
describes the tasks these administrators perform and the privileges they can grant. It
includes these topics:
■Section 31.3.1, "How Deployment Privileges Are Granted"
■Section 31.3.2, "Oracle Application Server Administrators"
■Section 31.3.3, "User Management Application Administrators"
■Section 31.3.4, "Trusted Application Administrators"
Table 31–9 Characteristics of the Group Delete Group
Characteristic Description
Default ACP The ACL at the Groups container in the realm allows the Group Delete
Group to delete groups in the realm.
Administrators The Oracle Internet Directory superuser
Members of the Oracle Context Administrators Group
Members of the Group Privilege Assignment Group
Members of the DAS Administrators Group
Owners of this group
DN cn=oracleDASDeleteGroup,cn=groups,Oracle_Context_DN
Table 31–10 Characteristics of the Group Privilege Assignment Group
Characteristic Description
Default ACP The ACL policy for the Group Creation, Group Edit, or Group Delete
Groups allows members of Group Privilege Assignment Group to add
users to or remove them from those groups.
Administrators The Oracle Internet Directory superuser
Members of the Oracle Context Administrators Group
Owners of the group. The DNs of these owners are listed as values of the
owner attribute in the group.
DN cn=oracleDASUserPriv,cn=groups,Oracle_Context_DN

Delegating Privileges for Deployment of Oracle Components
Delegating Privileges for Oracle Identity Management 31-9
31.3.1 How Deployment Privileges Are Granted
To enable administrators to deploy Oracle components, the superuser:
1. Grants certain deployment privileges to various groups—for example, the Oracle
Fusion Middleware Administrators Group
2. Adds the administrators to those privileged groups
The delegated administrators, in turn, can delegate privileges to other administrators.
31.3.2 Oracle Application Server Administrators
Table 31–11 describes the characteristics of the Oracle Application Server
Administrators Group.
Note: Oracle Internet Directory superusers have all the privileges
of Oracle Fusion Middleware Administrators and Trusted
Application administrators, and must be members of the Oracle
Fusion Middleware Administrators Group. They can:
■Assign the Oracle Fusion Middleware Administrator role to a
user
■Assign the Trusted Application role to a user
■Assign the User Management Application Administrator role
to a user
Table 31–11 Characteristics of the Oracle Application Server Administrators Group
Characteristic Description
Tasks Perform repository database installation that creates a repository
database registration entry in the directory
Perform mid-tier installation. To associate a mid-tier with a repository,
the user must have the appropriate privileges with a specific repository
database.
Install and configure Oracle Fusion Middleware components that create
application entities in Oracle Internet Directory
Grant to component entities the run-time privileges listed later in this
section
Configure provisioning profiles for components so that the components
can receive update notifications
Privileges this group
can delegate to
components
Read Common User Attributes—except passwords, certificates, and
similar security credentials
Read common group attributes
Create, edit, and delete groups
Authenticate a user
Read application verifiers
Administrators Oracle Internet Directory superuser
Oracle Context Administrator
Owners of this group
DN cn=IASAdmins,cn=groups,Oracle_Context_DN

Delegating Privileges for Component Run Time
31-10 Oracle Fusion Middleware Administrator's Guide for Oracle Internet Directory
31.3.3 User Management Application Administrators
User Management Application Administrators must be members of the Oracle Fusion
Middleware Administrators Group.
Table 31–12 describes the characteristics of the User Management Application
Administrators Group.
31.3.4 Trusted Application Administrators
Trusted Application administrators must be members of the Oracle Fusion
Middleware Administrators Group.
Table 31–13 describes the characteristics of the Trusted Application Administrators
Group.
31.4 Delegating Privileges for Component Run Time
Many Oracle components administer user entries in Oracle Internet Directory and
need the corresponding privileges. For example:
■When the Oracle Single Sign-On server authenticates a user, that server:
–Connects to Oracle Internet Directory using its own identity
Table 31–12 Characteristics of the User Management Application Administrators Group
Characteristic Description
Tasks User Management Application administrators install specific
applications that have interfaces to perform user management
operations—for example, Oracle Portal and Oracle Application Server
Wireless.
Privileges this group
can delegate to
components
Create, edit, and delete user attributes
Administrators Oracle Internet Directory superuser
Oracle Context Administrator
Owners of this group
DN cn=IAS & User Mgmt Admins,cn=groups,Oracle_Context_DN
Table 31–13 Characteristics of the Trusted Application Administrators Group
Characteristic Description
Tasks Install specific identity management components—for example, Oracle
Single Sign-On, Oracle Delegated Administration Services, and Oracle
Application Server Certificate Authority
Privileges this group
can delegate to
components
Read, compare, or reset the user password
Proxy as the end-user
Read, compare, or modify the user's certificate and SMIME certificate
Administrators Oracle Internet Directory superuser
Oracle Context Administrator
Owners of this group
DN cn=Trusted Application Admins,cn=groups,Oracle_
Context_DN

Delegating Privileges for Component Run Time
Delegating Privileges for Oracle Identity Management 31-11
–Verifies that the password entered by the user matches that user's password
stored in the directory
To do this, the Oracle Single Sign-On server needs permission to compare user
passwords. To set up the Oracle Single Sign-On cookie, it needs permission to read
user attributes.
■To grant access to a user, Oracle Portal must retrieve that user's attributes. To do
this, it logs in to Oracle Internet Directory as a proxy user, impersonating the user
seeking access. It therefore needs the privileges of a proxy user.
In general, Oracle components can require these privileges:
■Read and modify user passwords
■Compare user passwords
■Proxy on behalf of users accessing applications
■Administer the Oracle Context where all Oracle components store their metadata
Most Oracle components ship with a preconfigured set of privileges. You can change
these default privileges to satisfy specific business requirements—for example, by
removing privileges to create and delete user entries.
This section describes the security privileges required by Oracle components. It
contains these topics:
■Section 31.4.1, "Default Privileges for Reading and Modifying User Passwords"
■Section 31.4.2, "Default Privileges for Comparing User Passwords"
■Section 31.4.3, "Default Privileges for Comparing Password Verifiers"
■Section 31.4.4, "Default Privileges for Proxying on Behalf of End Users"
■Section 31.4.5, "Default Privileges for Managing the Oracle Context"
■Section 31.4.6, "Default Privileges for Reading Common User Attributes"
■Section 31.4.7, "Default Privileges for Reading Common Group Attributes"
■Section 31.4.8, "Default Privileges for Reading the Service Registry"
■Section 31.4.9, "Default Privileges for Administering the Service Registry"
31.4.1 Default Privileges for Reading and Modifying User Passwords
Reading and modifying user passwords requires administrative privileges on the
security-related attributes in the directory—for example, the userPassword attribute.
It requires membership in the User Security Administrators Group described in
Table 31–14.
See Also: Oracle Application Server Security Guide in the 10g
(10.1.4.0.1) library for further information about the component
delegation model.

Delegating Privileges for Component Run Time
31-12 Oracle Fusion Middleware Administrator's Guide for Oracle Internet Directory
31.4.2 Default Privileges for Comparing User Passwords
Comparing user passwords requires permission to compare a user's userPassword
attribute. This operation is performed by components such as Oracle Unified
Messaging that authenticate end users by using their passwords stored in Oracle
Internet Directory.
Comparing user passwords requires membership in the Authentication Services
Group described in Table 31–15.
31.4.3 Default Privileges for Comparing Password Verifiers
To compare password verifiers, a user must have permission to compare the
userpassword attribute. Comparing password verifiers requires membership in the
Verifier Services Group described in Table 31–16.
Table 31–14 Characteristics of the User Security Administrators Group
Characteristic Description
Default ACP The default ACL policy at the Root (DSE Entry) allows members of the
User Security Administrators Group to read, write, compare, and search
on userpkcs12, orclpkcs12hint, userpassword, orclpassword,
and orclpasswordverifier attributes at the Root Oracle Context.
However, directory administrators can grant similar administrative
privileges to the User Security Administrators Group in the realm Oracle
Context.
Administrators The Oracle Internet Directory superuser
Members of the Oracle Context Administrators Group
Members of the Trusted Application Administrators Group
DN cn=oracleUserSecurityAdmins,cn=groups,Oracle_Context_
DN
Table 31–15 Characteristics of the Authentication Services Group
Characteristic Description
Default ACP The ACL policy at the Users container in the default identity
management realm allows the Authentication Services Group to perform
compare operation on the userPassword attribute of users.
Administrators The Oracle Internet Directory superuser
Members of the Oracle Context Administrators Group
Members of the Application Server Administrators Group
Owners of this group
DN cn=authenticationServices,cn=groups,Oracle_Context_DN
Table 31–16 Characteristics of the Verifier Services Group
Characteristic Description
Administrators The Oracle Internet Directory superuser
Members of the Oracle Context Administrators group
Members of the Application Server Administrators group
Owners of this group
DN cn=verifierServices,cn=groups,Oracle_Context_DN

Delegating Privileges for Component Run Time
Delegating Privileges for Oracle Identity Management 31-13
31.4.4 Default Privileges for Proxying on Behalf of End Users
A proxy user has the privilege to impersonate an end user, performing on that user's
behalf those operations for which that user has privileges. In an Oracle Fusion
Middleware environment, the Oracle Delegated Administration Services proxies on
behalf of the end user, and, through the Oracle Internet Directory Self-Service Console,
performs operations on that user's behalf. In such a case, the access controls on the
directory server eventually govern the operations that the user can perform.
Proxying on behalf of end users requires membership in the User Proxy Privilege
Group described in Table 31–17.
31.4.5 Default Privileges for Managing the Oracle Context
To manage a specific Oracle Context, a user must have complete access to it. Managing
an Oracle Context requires membership in the Oracle Context Administrators Group
described in Table 31–18. An Oracle Context Administrators Group exists for each
Oracle Context and has administrative permission in the specific Oracle Context.
31.4.6 Default Privileges for Reading Common User Attributes
Common user attributes are: mail, orclguid, displayname,
preferredlanguage, orcltime, gender, dateofbirth, telephonenumber,
wirelessaccountnumber. To read these attributes requires membership in the
Common User Attributes Group described in Table 31–19.
Table 31–17 Characteristics of the User Proxy Privilege Group
Characteristic Description
Default ACP The ACL at the Users container in the default identity management realm
allows User Proxy Privilege Group to proxy on behalf of the end user.
Administrators The Oracle Internet Directory superuser
Members of the Oracle Context Administrators Group
Owners of the groups. The DNs of these owners are listed as values of the
owner attribute in the group or members of the Oracle Fusion
Middleware Administrators Group.
Members of the Trusted Application Administrators Group
DN cn=userProxyPrivilege,cn=groups,OracleContextDN
Table 31–18 Characteristics of the Oracle Context Administrators Group
Characteristic Description
Default ACP The ACL policy at the root node of the Oracle Context allows members of
Oracle Context Administrators Group to perform all administrative
operations within the Oracle Context. Such a policy is set up when a new
Oracle Context is created in the directory.
Administrators The Oracle Internet Directory superuser
Members of the Oracle Context Administrators Group
DN cn=oracleContextAdmins,cn=groups,Oracle_Context_DN
Table 31–19 Characteristics of the Common User Attributes Group
Characteristic Description
Default ACP The default ACL is on the User container in the realm and grants
permission to read common user attributes.

Delegating Privileges for Component Run Time
31-14 Oracle Fusion Middleware Administrator's Guide for Oracle Internet Directory
31.4.7 Default Privileges for Reading Common Group Attributes
Common group attributes are: cn, uniquemember, displayname, and
description. To read these attributes requires membership in the Common Group
Attributes Group described in Table 31–20 on page 31-14.
31.4.8 Default Privileges for Reading the Service Registry
To view the contents of the Service Registry requires membership in the Service
Registry Viewers Group described in Table 31–21 on page 31-14.
31.4.9 Default Privileges for Administering the Service Registry
To administer the Service Registry requires membership in the Service Registry
Administrators Group described in Table 31–22 on page 31-14.
Administrators The Oracle Internet Directory superuser
Members of the Application Server Administrators Group
Owners of this group
DN cn=commonuserattributes,cn=users,Oracle_Context_DN
Table 31–20 Characteristics of the Common Group Attributes Group
Characteristic Description
Default ACP The default ACL is on the Group container in the realm and grants
permission to read these attributes: cn, uniquemember,
displayname, and description.
Administrators The Oracle Internet Directory superuser
Members of the Application Server Administrators Group
Owners of this group
DN cn=commongroupattributes,cn=groups,Oracle_Context_DN
Table 31–21 Characteristics of the Service Registry Viewers Group
Characteristic Description
Default ACP The default ACL is on the Services container in the root Oracle
Context.
Administrators The Oracle Internet Directory superuser
Members of the Application Server Administrators Group
Owners of this group
DN cn=service registry
viewers,cn=services,cn=rootoraclecontext,
Table 31–22 Characteristics of the Common Group Attributes Group
Characteristic Description
Default ACP The default ACL is on the Services container in the root Oracle
Context.
Table 31–19 (Cont.) Characteristics of the Common User Attributes Group
Characteristic Description

Delegating Privileges for Component Run Time
Delegating Privileges for Oracle Identity Management 31-15
Administrators The Oracle Internet Directory superuser
Members of the Application Server Administrators Group
Owners of this group
DN cn=service registry
admins,cn=services,cn=rootoraclecontext,
Table 31–22 (Cont.) Characteristics of the Common Group Attributes Group
Characteristic Description

Delegating Privileges for Component Run Time
31-16 Oracle Fusion Middleware Administrator's Guide for Oracle Internet Directory

32
Managing Authentication 32-1
32Managing Authentication
This chapter gives a conceptual overview of Oracle Internet Directory authentication
features. It contains these topics:
■Section 32.1, "Introduction to Authentication"
■Section 32.3, "Configuring SASL Authentication by Using Fusion Middleware
Control"
■Section 32.6, "Introduction to Anonymous Binds"
■Section 32.7, "Managing Anonymous Binds"
32.1 Introduction to Authentication
Authentication is the process by which the directory server establishes the true
identity of the user connecting to the directory. It occurs when an LDAP session is
established with the bind operation. Thus every session has an associated user
identity.
To verify the identities of users, hosts, and clients, Oracle Internet Directory enables
three general kinds of authentication, and these are described in these topics:
■Section 32.1.1, "Direct Authentication"
■Section 32.1.2, "Indirect Authentication"
■Section 32.1.3, "External Authentication"
32.1.1 Direct Authentication
This section describes the three kinds of direct authentication available within Oracle
Internet Directory, and about how SASL-enabled clients authenticate to a directory
server. The three kinds of direct authentication options are:
■Anonymous authentication
When users authenticate anonymously, they simply leave the user name and
password fields blank when they log in. Each anonymous user then exercises
whatever privileges are specified for anonymous users.
■Simple authentication
When using simple authentication, the client identifies itself to the server with a
DN and a password that are not encrypted when sent over the network.
■Authentication by using Simple Authentication and Security Layer (SASL)

Introduction to Authentication
32-2 Oracle Fusion Middleware Administrator's Guide for Oracle Internet Directory
This is a method for adding authentication support to connection-based protocols.
To use SASL, a protocol includes a command for identifying and authenticating a
user to a server and for optionally negotiating protection of subsequent protocol
interactions. If the use of SASL is successfully negotiated, then a security layer is
inserted between the protocol and the connection.
Oracle Internet Directory supports two authentication mechanisms with SASL:
–Digest MD5: The required authentication mechanism within LDAP Version 3
(RFC 2829). It uses the MD5 hash function to convert a message of any length
to a 128 bit message digest that can be used as a verifier for client/server
authentication.
–External authentication: Mechanism using SSL mutual authentication. In this
case, the client, in lieu of a user name and password, authenticates to the
server with a certificate, token, or some other device. Certificate authentication
can take the following forms:
*Exact match: the subject DN in the client certificate is compared with the
user DN in the directory. If the two values match, a bind occurs.
*Certificate hash: The client certificate is hashed and is then compared with
the hashed value of the certificate stored in the directory. If the two values
match and only one DN is associated with the pair, a bind occurs. If two
or more DNs are associated, an error is returned because certificate hash
and user DN is an n-to-1 mapping and not a 1-to-n mapping. That is, you
can have many certificates associated with one DN, but only one DN
associated with a certificate.
*Exact match/certificate hash: An exact-match search is performed first. If
this search yields nothing, a certificate hash is performed.
To choose one of these methods, edit the DSA configuration attribute
orclpkimatchingrule as prescribed in "Oracle Identity Management
LDAP Attribute Reference" in Oracle Fusion Middleware Reference for Oracle
Identity Management. (For authentication, an orclpkimatchingrule value of
3 or 4 is equivalent to a value of 2.)
Notes:
■The introduction in 10g (10.1.4.0.1) of a certificate hash value
requires that user certificates be upgraded from earlier releases.
To learn how to upgrade certificates, see the upgradecert.pl
command-line tool reference in Oracle Fusion Middleware Reference
for Oracle Identity Management.
■You can search for the binary attribute usercertificate. To
learn how to conduct a search, see Appendix K, "Searching the
Directory for User Certificates".
■The usercertificate attribute is intended to contain DER
format certificates only.
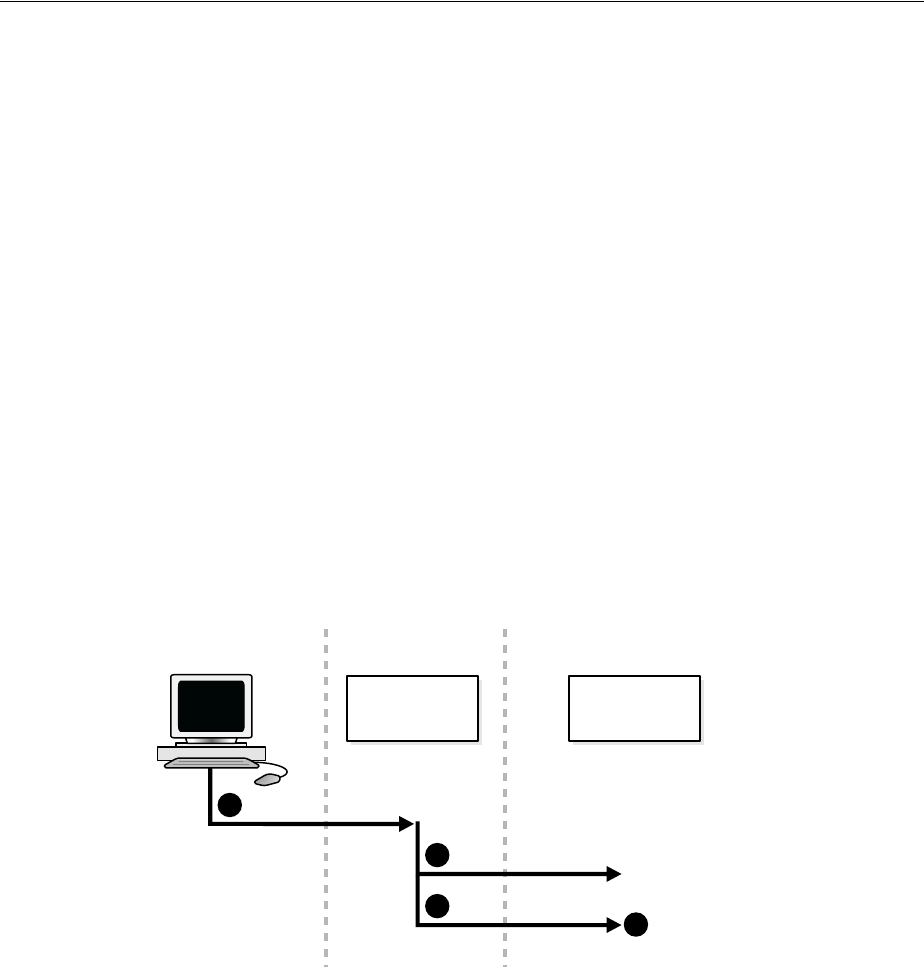
Introduction to Authentication
Managing Authentication 32-3
32.1.2 Indirect Authentication
Indirect authentication occurs through any entity that has credentials in the
directory—for example, an application such as the Oracle Internet Directory
Self-Service Console, or a middle tier such as a firewall or a RADIUS server. The
application or middle tier becomes a proxy user. A proxy user has the privilege to
impersonate an end user, performing on that user's behalf those operations for which
that user has privileges.
Figure 32–1 and the accompanying text explain how indirect authentication takes
place.
Figure 32–1 Indirect Authentication
Indirect authentication takes place as follows:
1. The end user sends to the application or middle tier a request containing a query
to Oracle Internet Directory. The application or middle tier authenticates the end
user.
2. The application or middle tier binds to the directory.
3. The application or middle tier performs a second bind, this time using the DN of
the end user. It does not enter the end user's password.
4. The directory server recognizes this second bind as an attempt by the application
or middle tier to switch to the end user's identity. It trusts the authentication
granted to the end user by the application or middle tier, but must verify that the
application or middle tier has the right to be the proxy for this user. It checks to
see whether the ACP governing the end user entry gives this application or
middle tier the proxy right for this end user.
See Also:
■Section 32.1.4, "Simple Authentication and Security Layer (SASL)"
■The Web site of the Internet Engineering Task Force (IETF) at
http://www.ietf.org for the following RFCs: RFC 2829,
which specifies SASL Digest-MD5 as the required authentication
mechanism for LDAP Version 3 servers; RFC 2831, which
describes the Digest-MD5 mechanism; RFC 2617, which describes
the HTTP Digest authentication mechanism on which SASL
Digest-MD5 is based
Oracle
Internet
Directory
Application
or Middle Tier
1
2
3
4
Browser
End User

Introduction to Authentication
32-4 Oracle Fusion Middleware Administrator's Guide for Oracle Internet Directory
■If the end user entry does give the application or middle tier the necessary
proxy right, then the directory server changes the authorization identity to
that of the end user. All subsequent operations occur as if that end user had
connected directly to the server and had been directly authenticated.
■If the end user entry does not give the application or middle tier the necessary
proxy right, then the directory server returns an "Insufficient Access" error
message.
The directory server can, in the same session, authenticate and authorize other end
users. It can also switch the session from the end user to the application or middle tier
that opened the session.
To close the session, the application or middle tier sends an unbind request to the
directory server.
For example, suppose you have:
■A middle tier that binds to the directory as cn=User1, which has proxy access on
the entire directory
■An end user that can bind to the directory as cn=User2
When this end user sends to the application or middle tier a request containing a
query to the directory, the application or middle tier authenticates the end user. The
middle tier service then binds to the directory by using its own identity, cn=User1,
then performs a second bind, this time by using only the DN of the end user,
cn=User2. The Oracle directory server recognizes this second bind as an attempt by
the proxy user to impersonate the end user. After the directory server verifies that
cn=user1 has proxy access, it allows this second bind to succeed. It does not require
any further validation of the end-user DN, such as a password. For the rest of the
session, all LDAP operations are access-controlled as if cn=User2 were performing
them.
If one user is being serviced by an application, and another user subsequently requests
a service of that same application, then the application can establish a new connection
and proceed as previously described without disrupting that prior session. If,
however, no prior user is still being serviced, then the existing established connection
can be re-used again and again without the need for a new connection.
32.1.3 External Authentication
Perhaps your enterprise stores user security credentials in a repository other than
Oracle Internet Directory—for example, a database or another LDAP directory. With
Oracle Internet Directory external authentication and password modification plug-ins,
you can use these credentials for user authentication to Oracle components. You do
not need to store the credentials in Oracle Internet Directory and then worry about
keeping them synchronized.
See Also: Section 29.1.2.3, "Operations: What Access Are You
Granting?."
See Also: Chapter 45, "Configuring a Customized External
Authentication Plug-in"

Introduction to Authentication
Managing Authentication 32-5
32.1.4 Simple Authentication and Security Layer (SASL)
The section "Direct Authentication" on page 32-1 introduced the use of SASL within an
Oracle Internet Directory environment. This section describes more fully how SASL
works. It contains these topics:
■Section , "How a SASL-Enabled Client Authenticates to a Directory Server by
Using Digest-MD5"
■Section , "How a SASL-Enabled Client Authenticates to a Directory Server by
Using External Authentication"
How a SASL-Enabled Client Authenticates to a Directory Server by Using
Digest-MD5
When a SASL-enabled client seeks Digest-MD5 authentication to a server, the
authentication process is as follows:
1. The directory server sends to the LDAP client a digest-challenge that includes
various Digest-MD5 authentication options that it supports and a special token.
2. The client selects an authentication option, then sends a digest-response to the
server indicating the option it has selected. The response includes some secure
tokens and a client credential in encrypted format. This allows it to authenticate
itself to the server.
3. The directory server then decrypts and verifies the client credential from the
response.
How a SASL-Enabled Client Authenticates to a Directory Server by Using
External Authentication
Oracle Internet Directory provides SASL-external authentication over an SSL
connection in which both client and server authenticate themselves to each other by
providing certificates. The DN is derived from the client certificate used in the SSL
network negotiation.
When a client seeks authentication to a directory server by using an external
authentication mechanism such as SSL, the authentication process is as follows:
1. The client sends an initial message with the authorization identity.
2. The directory server uses information external to SASL to determine whether the
client can validly authenticate as the authorization identity. If the client can validly
authenticate, then the directory server indicates successful completion of the
authentication exchange. Otherwise, the directory server indicates failure.
The system providing the external information may be IPsec or SSL/TLS. The
authorization identity is derived as follows:
■In case of exact match, the authorization identity is derived from the client
authentication credentials in the system providing external authentication—for
example, the client SSL certificate.
■If the client sends an empty string as the authorization identity, then the
authorization identity is derived from the client authentication credentials in the
system providing external authentication—for example, the SSL certificate.

Configuring Certificate Authentication Method by Using Fusion Middleware Control
32-6 Oracle Fusion Middleware Administrator's Guide for Oracle Internet Directory
32.2 Configuring Certificate Authentication Method by Using Fusion
Middleware Control
To configure the value of the DSA configuration attribute orclPKIMatchingRule,
which determines the method used for certificate authentication, use the Oracle
Internet Directory Shared Properties page of Oracle Enterprise Manager Fusion
Middleware Control. Select Administration, then Shared Properties from the Oracle
Internet Directory menu. Select the desired matching method from the list for PKI
Matching Rule.
32.3 Configuring SASL Authentication by Using Fusion Middleware
Control
To configure SASL Authentication by using Oracle Enterprise Manager Fusion
Middleware Control:
1. Select Administration, then Server Properties from the Oracle Internet Directory
menu, then select SASL.
2. Select the desired types for MD5 SASL Authentication Mode.
3. If you select Authentication with Integrity and Privacy Protection, you are
presented with choices for SASL Cipher Choice for Privacy Protection. Select the
desired types. Choices are: rc4-56, des, 3des, rc4, and rc4-40. All five are
enabled by default. At least des and 3des must be configured, or SASL
authentication fails.
4. If desired, select Enable SASL Authentication. Before enabling SASL
Authentication, ensure that Oracle Internet Directory is configured to perform
mutual authentication. See Section 26.2, "Configuring SSL by Using Fusion
Middleware Control."
5. Choose Apply.
Restart the server after changing any of the attributes on the SASL tab.
32.4 Configuring Certificate Authentication Method by Using
Command-Line Tools
To configure the value of the DSA configuration attribute orclPKIMatchingRule,
which determines the method used for certificate authentication, use ldapmodify,
with a command line similar to this
ldapmodify -D cn=orcladmin -q -p portNum -h hostname -f ldifFile
and with an LDIF file similar to this:
dn: cn=dsaconfig, cn=configsets, cn=oracle internet directory
changetype: modify
replace: orclPKIMatchingRule
orclPKIMatchingRule: 1
Table 32–1 Configuration Attributes on Server Properties, SASL Tab
Field or Heading Configuration Attribute
MD5 SASL Authentication Mode orclsaslauthenticationmode
SASL Cipher Choice for Privacy Protection orclsaslcipherchoice
External SASL Authentication Mode orclsaslmechanism

Configuring SASL Authentication by Using the Command Line
Managing Authentication 32-7
The values are:
■0 - Exact match. The PKI certificate DN must match the user entry DN.
■1 - Certificate search. Check to see if the user has a PKI certificate provisioned into
Oracle Internet Directory.
■2 - A combination of exact match and certificate search. If the exact match fails,
then a certificate search is performed.
■3 - Mapping rule only. Use a mapping rule to map user PKI certificate DNs to
Oracle Internet Directory DNs.
■4 - Try in order: 1 (mapping rule), 2 (certificate search), 3 (exact match).
32.5 Configuring SASL Authentication by Using the Command Line
Table 32–2 lists the SASL authentication attributes. They reside in the instance-specific
configuration entry.
MD5 SASL Authentication Mode is controlled by the attribute
orclsaslauthenticationmode. Table 32–3 lists the possible modes. You can
specify all three values or any subset as a comma separated string.
If you set orclsaslauthenticationmode to 3 (auth-conf), you must also choose
values for orclsaslcipherchoice. Choices are: rc4-56, des, 3des, rc4, and
rc4-40. All five are enabled by default. At least des and 3des must be configured, or
SASL authentication fails.
The variable orclsaslmechanism controls which authentication mechanisms are
supported with SASL. The values DIGEST-MD5 and EXTERNAL are set by default. Do
not disable Digest-MD5 authentication. It is the required authentication mechanism
for LDAP Version 3 servers. You can disable external authentication by using
ldapmodify. Disable external authentication if you do not configure Oracle Internet
Directory to perform SSL client and server authentication.
Table 32–2 SASL Authentication Attributes
Attribute Description Default Possible Values
orclsaslauthent
icationmode
SASL Authentication
Mode
1 auth, auth-int,
auth-conf.
orclsaslcipherc
hoice
SASL Cipher Choice Rc4-56,rc4-40,rc4,des,3
des
Any combination of
Rc4-56, des, 3des, rc4,
rc4-40
orclsaslmechani
sm
SASL Mechanism DIGEST-MD5,
EXTERNAL
DIGEST-MD5,
EXTERNAL
Table 32–3 SASL Authentication Modes
orclsaslauthenticati
onmode Value Mode Description
1auth Authentication only.
2auth-int Authentication with integrity protection. A
checksum is performed on the channel.
3auth-conf Authentication with integrity protection and
encryption. The channel is encrypted.

Introduction to Anonymous Binds
32-8 Oracle Fusion Middleware Administrator's Guide for Oracle Internet Directory
Restart the server after changing any of the SASL attributes.
32.6 Introduction to Anonymous Binds
An anonymous bind is one that uses simple authentication with no password. By
default, the directory server allows anonymous bind, but allows only search
operations on root DSE entry for anonymous users. You can configure the server to
allow all anonymous binds or to disallow anonymous binds. This behavior is
controlled by the orclanonymousbindsflag attribute of the s server
instance-specific configuration entry. Table 32–4 lists the allowed values for
orclanonymousbindsflag and the resulting directory server behavior.
32.7 Managing Anonymous Binds
In Oracle Internet Directory 11g Release 1 (11.1.1), anonymous binds are allowed by
default, but anonymous users can only perform search operations on the root DSE
entry. You can use either Fusion Middleware Control or the command line to change
the server's behavior with respect to anonymous binds.
32.7.1 Managing Anonymous Binds by Using Fusion Middleware Control
To manage anonymous binds by using Oracle Enterprise Manager Fusion Middleware
Control:
1. Select Administration, then Server Properties from the Oracle Internet Directory
menu, then select the General. tab.
2. From the Anonymous Binds list, select Allows to enable anonymous binds. Select
Disallow except for Read Access on the root DSE to allow only search operations
on root DSE entry for anonymous users.
To disable anonymous binds by using:
1. Select Administration, then Server Properties from the Oracle Internet Directory
menu, then select the General. tab.
2. From the Anonymous Binds list, select Disallow.
32.7.2 Managing Anonymous Binds by Using the Command Line
To enable all anonymous bind on the Oracle Internet Directory instance with
componentName oid1 using ldapmodify, you would type:
ldapmodify -D cn=orcladmin -q -p portNum -h hostname -f ldifFile
with an LDIF file such as:
dn: cn=oid1,cn=osdldapd,cn=subconfigsubentry
Table 32–4 Orclanonymousbindsflag Value and Directory Server Behavior
orclAnonymousBindsFlag
Value Directory Server Behavior
0 Disallows anonymous bind
1 Allows anonymous bind
2 Allows anonymous bind but allows only search
operations on root DSE entry for anonymous users
(default)

Managing Anonymous Binds
Managing Authentication 32-9
changetype: modify
replace: orclAnonymousBindsFlag
orclAnonymousBindsFlag: 1
To disable all anonymous binds, you would use a similar LDIF file with the last line
changed to:
orclAnonymousBindsFlag: 0
See Also: "Section 9.1.3, "Attributes of the Instance-Specific
Configuration Entry"

Managing Anonymous Binds
32-10 Oracle Fusion Middleware Administrator's Guide for Oracle Internet Directory

Part IV
Part IV Advanced Administration: Managing
Directory Deployment
This part discusses important deployment considerations. It includes these chapters:
■Chapter 33, "Planning, Deploying and Managing Realms"
■Chapter 34, "Tuning and Sizing Oracle Internet Directory"
■Chapter 35, "Managing Garbage Collection"
■Chapter 36, "Migrating Data from Other Data Repositories"
■Chapter 37, "Configuring Server Chaining"

33
Planning, Deploying and Managing Realms 33-1
33 Planning, Deploying and Managing Realms
This chapter discusses identity management realms and how to plan and configure
them for both enterprise and hosted deployments.
This chapter contains these topics:
■Section 33.1, "Introduction to Planning, Deploying and Managing Realms"
■Section 33.2, "Customizing the Default Identity Management Realm"
■Section 33.3, "Creating Additional Identity Management Realms for Hosted
Deployments"
33.1 Introduction to Planning, Deploying and Managing Realms
This introduction includes the following topics:
■Section 33.1.1, "Planning the Identity Management Realm"
■Section 33.1.2, "Identity Management Realms in an Enterprise Deployment"
■Section 33.1.3, "Identity Management Realms in a Hosted Deployment"
■Section 33.1.4, "Identity Management Realm Implementation in Oracle Internet
Directory"
■Section 33.1.5, "Default Directory Information Tree and the Identity Management
Realm"
33.1.1 Planning the Identity Management Realm
Chapter 5, "Understanding Oracle Internet Directory Organization"describes
guidelines for you to structure the overall DIT and the placement of users and groups
for your deployment. Because implementing these guidelines can lead to an infinite
number of deployment configurations, you must capture the intent of your
deployment in metadata in the directory itself. This metadata enables Oracle software
and other third-party software relying on the Oracle Identity Management
infrastructure to understand the deployment intent and successfully function in
customized environments.
In Oracle Internet Directory, this deployment intent is captured in the identity
management realm. The realm also helps set identity management policies for users
and groups whose placement is described in the previous section.
Note: All references to Oracle Single Sign-On in this chapter refer to
Oracle Single Sign-On 10g (10.1.4.3.0) or later.

Introduction to Planning, Deploying and Managing Realms
33-2 Oracle Fusion Middleware Administrator's Guide for Oracle Internet Directory
The identity management realm is a well-scoped area in the directory that consists of:
■A well-scoped collection of enterprise identities—for example, all employees in
the US
■A collection of identity management policies associated with these identities
■A collection of groups—that is, aggregations of identities—that makes it easier to
set identity management policies
When you have decided on the overall DIT structure and the placement of users and
groups, you must identify the directory entry to serve as the root of the identity
management realm. This entry determines the scope of the identity management
policies defined in the realm. By default, the scope is the entire directory subtree under
the root of the identity management realm. Under this entry, a special entry called
OracleContext is created. It contains the following:
■The deployment-specific DIT design, including user and group naming and
placement, as described in previous sections
■The identity management policies associated with this realm
■Additional realm-specific information specific to Oracle applications
When planning the identity management realm, consider the following:
■The security needs of your enterprise must dictate the choice of the root of the
identity management realm. Typically, most enterprises need only one realm.
However, multiple realms may be required when multiple user populations are
managed with different identity management policies.
■If you already have a third-party directory, or plan to integrate with one in the
future, then align the choice of the identity management realm root with the DIT
design of the third-party directory. This simplifies the synchronization and
subsequent administration of the distributed directories.
■To configure and administer identity management realms, use the administrative
tools provided by Oracle Internet Directory. These include the Oracle Internet
Directory Self-Service Console in Oracle Delegated Administration Services 10g
(10.1.4.3.0) or later, and command-line tools.
■After you have used the Oracle Internet Directory tools to configure the identity
management realm, plan on updating the directory naming and containment
policies to reflect the customizations made by the deployment. This update must
happen before installing and using other Oracle components that use the Oracle
Identity Management infrastructure.
Figure 33–1 shows an example of an identity management realm for an enterprise
called MyCompany.
See Also: The command reference for oidrealm in Oracle Fusion
Middleware Reference for Oracle Identity Management.

Introduction to Planning, Deploying and Managing Realms
Planning, Deploying and Managing Realms 33-3
Figure 33–1 Example of an Identity Management Realm
In the example in Figure 33–1, the deployment uses a domain name-based DIT
structure. The container dc=us,dc=mycompany,dc=com is the root of the identity
management realm. This results in the creation of a new identity management realm
whose scope, by default, is restricted to the entire directory subtree under the entry
dc=us. The name of the identity management realm is US.
33.1.2 Identity Management Realms in an Enterprise Deployment
This section discusses deployments with single identity management realms and those
with multiple ones. It contains these topics:
■Section 33.1.2.1, "Single Identity Management Realm in the Enterprise"
■Section 33.1.2.2, "Multiple Identity Management Realms in the Enterprise"
33.1.2.1 Single Identity Management Realm in the Enterprise
In this scenario, an enterprise has a single set of users, all of whom are managed with
the same identity management policies. This is the default configuration of all Oracle
products. It includes only one default identity management realm in Oracle Internet
Directory and all Oracle components in the enterprise serve users in that realm.
Figure 33–2 illustrates this usage.
cn=Groups
cn=Users
dc=us
cn=
OracleContext
dc=MyCompany
dc=com
root
cn=
group2
cn=
group1
uid=
user1
uid=
user2
Identity Management Realm
Realm name: 'US'
User / Group Naming
and Containment
Root of the Identity Management Realm
Typically signifying the scope of the
policies defined for the Realm
Oracle Specific container holding
the Realm specific policies
including the User/Group
Naming and Containment
policies
Overall
DIT
Structure
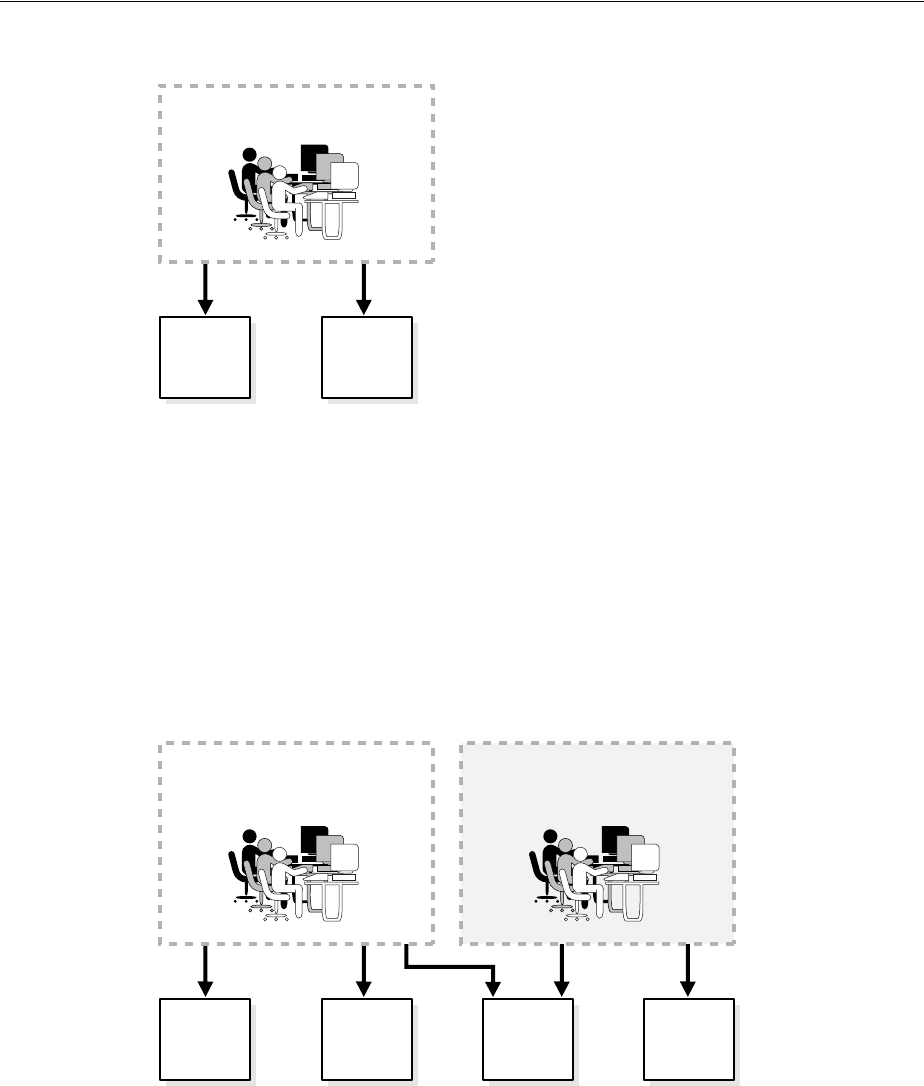
Introduction to Planning, Deploying and Managing Realms
33-4 Oracle Fusion Middleware Administrator's Guide for Oracle Internet Directory
Figure 33–2 Enterprise Use Case: Single Identity Management Realm
In the example in Figure 33–2, there is a single, default identity management realm
containing employees only. In that realm all users and groups are managed and all
share access to the same applications, Application A and Application B.
33.1.2.2 Multiple Identity Management Realms in the Enterprise
You can use the same identity management infrastructure to serve both internal and
external self-registered users. Because the identity management policies for internal
and external users are different, you can deploy two realms, one for internal and one
for external users. Figure 33–3 on page 33-4 illustrates this usage.
Figure 33–3 Enterprise Use Case: Multiple Identity Management Realms
In the example in Figure 33–3, the default identity management realm is for internal
users—namely, employees—and these have access to Applications A, B, and C. The
external identity management realm is for external users, and they have access to
Applications C and D.
33.1.3 Identity Management Realms in a Hosted Deployment
In a hosted deployment, the application service provider (ASP) supplies one or more
companies with identity management services and hosts applications for them. Each
hosted company is associated with a separate identity management realm where users
Default Identity Mgmt Realm
Application
A
Application
B
Employees Only
Default Identity
Management Realm
Application
C
(Shared)
Application
D
Application
A
Application
B
Employees
External Identity
Management Realm
External Users
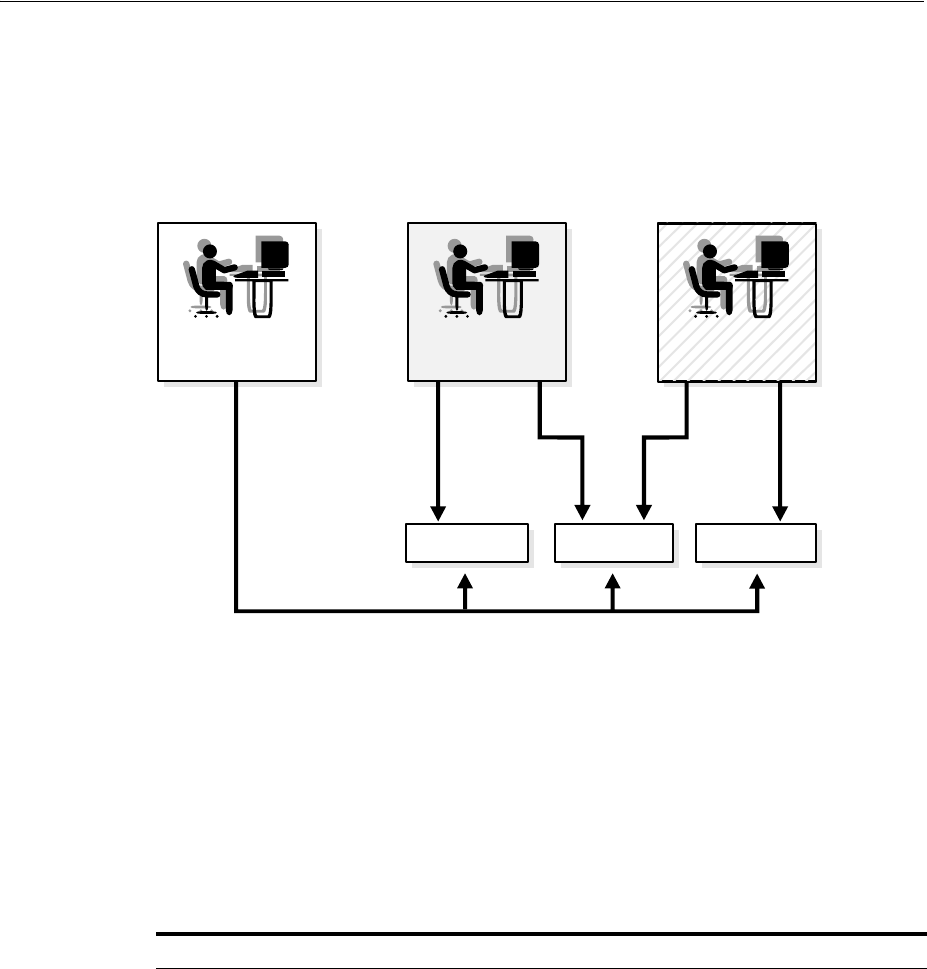
Introduction to Planning, Deploying and Managing Realms
Planning, Deploying and Managing Realms 33-5
of that company are managed. Users belonging to the application service provider are
managed in a different realm, typically the default realm.
Figure 33–4 shows a hosted deployment with two hosted companies.
Figure 33–4 Hosted Deployment Use Case
In the example in Figure 33–4, the ASP users are in the default identity management
realm. The ASP manages its users, groups and associated policies in that realm. ASP
users manage Applications A, B, and C for the hosted companies. Hosted company
MyCompany users are in the Mycompany identity management realm. They use
Applications A and B. Hosted company XY Corp users are in the XY Corp identity
management realm. They use Applications B and C.
33.1.4 Identity Management Realm Implementation in Oracle Internet Directory
Table 33–1 describes the objects in an identity management realm.
Table 33–1 Oracle Identity Management Objects
Object Description
Root Oracle Context This object contains:
■A pointer to the default identity management realm in the
infrastructure
■Information on how to locate a realm given a simple name of
the realm
Identity Management
Realm
A normal directory entry with a special object class associated
with it.
Manage
Applications
Use
Applications
Mycompany ID
Management
Realm
Default ID
Management
Realm
Default Users MyCompany Users XY Corp Users
XY Corp ID
Management
Realm
Application BApplication A Application C
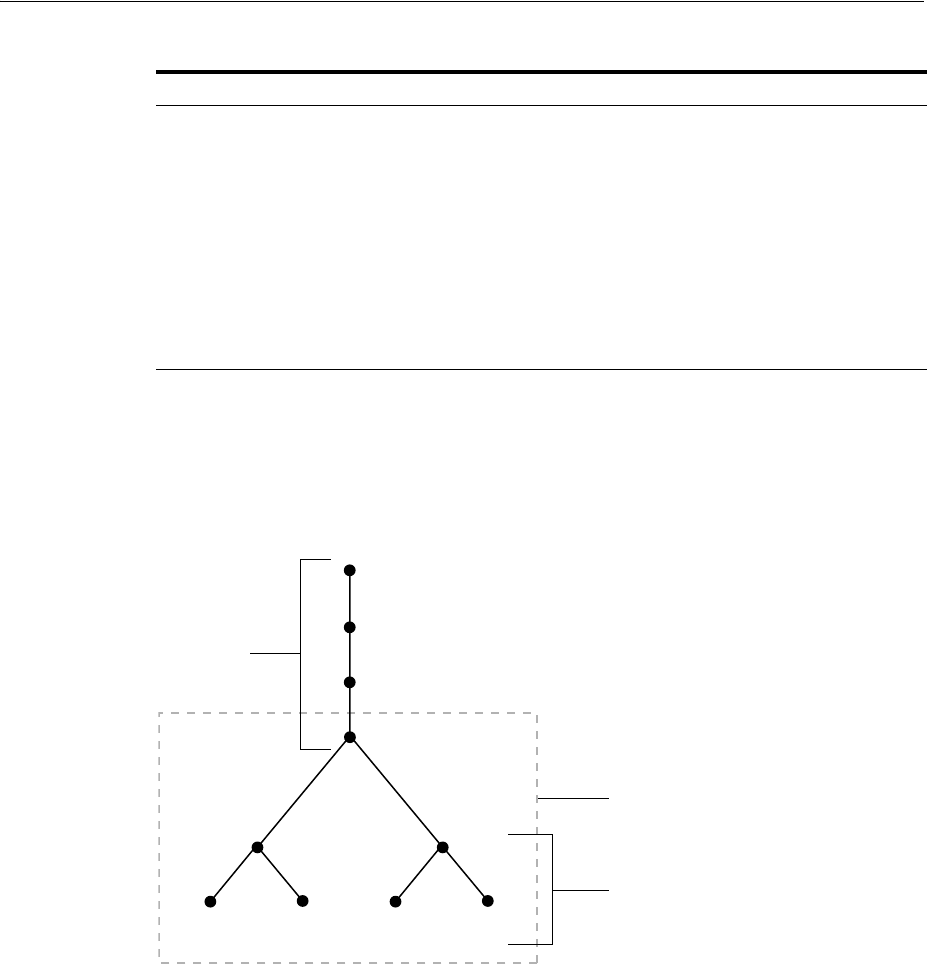
Introduction to Planning, Deploying and Managing Realms
33-6 Oracle Fusion Middleware Administrator's Guide for Oracle Internet Directory
33.1.5 Default Directory Information Tree and the Identity Management Realm
To make configuration easier, Oracle Internet Directory, at installation, creates a
default DIT and sets up a default identity management realm.
Figure 33–5 Default Identity Management Realm
As Figure 33–5 shows, the default identity management realm is part of a global DIT.
The node just below the root DSE is dc=com, followed by dc=MyCompany, then
dc=us. These four nodes represent the overall DIT structure. The node dc=us is the
root of the default identity management realm. It has two subtrees for containing user
and group information: cn=Users and cn=Groups. For purposes of illustration, the
cn=Users node contains two leaves: uid=user1 and uid=user2. Similarly, the
cn=Groups node contains cn=group1 and cn=group2
Oracle Internet Directory gives you the option of setting up a DIT based on the
domain of the computer on which the installation is performed. For example, if the
installation is on a computer named oidhost.us.mycompany.com, then the root of
the default identity management realm is dc=us,dc=mycompany,dc=com.
It also gives you the option of specifying a different DN that meets your deployment
needs as the root of your default identity management realm on the Specify
Namespace in Internet Directory install screen. For example, if you plan to integrate
your Identity Management installation with a third-party directory, it is recommended
Identity Management
Realm-Specific Oracle
Context
In each realm, this object contains:
■User naming policy of the identity management realm—that
is, how users are named and located
■Mandatory authentication attributes
■Location of groups in the identity management realm
■Privilege assignments for the identity management
realm—for example: who has privileges to add more users to
the realm.
■Application-specific data for that realm including
authorizations
Table 33–1 (Cont.) Oracle Identity Management Objects
Object Description
cn=Groups
cn=Users
dc=us
dc=MyCompany
dc=com
[Root DSE]
cn=
group2
cn=
group1
uid=
user1
uid=
user2
Identity Management Realm
Realm name: 'US'
User / Group Naming
and Containment
Overall
DIT
Structure

Introduction to Planning, Deploying and Managing Realms
Planning, Deploying and Managing Realms 33-7
that you specify a DN that matches the DN of the default naming context in the
third-party directory. For more details on obtaining the default naming context from a
third-party directory, refer to the chapter on integrating with third-party directories in
the Oracle Fusion Middleware Administrator's Guide for Oracle Directory Integration
Platform.
During configuration, Oracle Internet Directory creates the following:
■An Oracle Context associated with the default identity management realm. The
Oracle Context stores all the realm-specific policies and metadata. Using the
example in the previous paragraph, it creates the Oracle Context with the
distinguished name cn=OracleContext,dc=us,dc=mycompany,dc=com.
This entry and the nodes under it enable Oracle software to detect realm-specific
policies and settings.
■A directory structure and naming policies in the default identity management
realm. These enable Oracle components to locate various identities. The default
values for these are:
–All users are located in the container cn=users under the base of the identity
management realm. In this example, it is
cn=users,dc=us,dc=mycompany,dc=com.
–Any new users created in the identity management realm using the Oracle
Identity Management infrastructure are also created under the cn=users
container.
–All new users created in the identity management realm using the Oracle
Identity Management infrastructure belong to the object classes orclUserV2
and inetOrgPerson.
–All groups are located in the container cn=groups under the base of the
identity management realm. In this example, it is
cn=groups,dc=us,dc=mycompany,dc=com.
■Identity management realm administrator. This user is located under the users
container. In this example, the fully qualified DN of the realm administrator is
cn=orcladmin,cn=users,dc=us,dc=mycompany,dc=com.
■Default authentication policies, which enable authentication services to perform
the appropriate actions. These include:
–The default directory password policy—for example, password length,
lockout, and expiration
–Additional password verifiers that need to be automatically generated when
provisioning the user
■Identity management authorizations. Oracle Internet Directory grants these to the
realm administrator who can further delegate these authorizations through the
Oracle Internet Directory Self-Service Console. Some of these authorizations
include:
–Common identity management configuration privileges—for example, user
creation, user profile modification, group creation
Note: If the realm administrator's account becomes locked, the
Oracle Internet Directory superuser can unlock it by modifying the
realm administrator's account password, using Oracle Directory
Manager.

Customizing the Default Identity Management Realm
33-8 Oracle Fusion Middleware Administrator's Guide for Oracle Internet Directory
–Privileges to install new Oracle components by using the Oracle Identity
Management infrastructure.
–Privileges to administer Oracle Internet Directory Self-Service Console
33.2 Customizing the Default Identity Management Realm
After a realm is created, you can further customize various aspects of it. Table 33–2
lists the aspects you can customize, the tools available for each type of customization,
and where to look for more information.
A typical scenario where this might be required is one where you must integrate your
Oracle Identity Management installation with a third-party directory.
For example, assume the default Identity Management Realm is
dc=mycompany,dc=com and there are users under
cn=users,dc=mycompany,dc=com.
If the third party directory naming context does not match the current user and group
search base in the default realm, then you can alter the user and group search base of
the default realm so that both the existing users and the third party users can log in
using Oracle Single Sign-On. Select a user search base just high enough to include the
existing users and the third party users. Let us call this search base the Lowest
Common User Search Base.
See Also:
■"Oracle Identity Management LDAP Object Classes" in Oracle
Fusion Middleware Reference for Oracle Identity Management for
more information about the orclUserV2 object class
■Chapter 31, "Delegating Privileges for Oracle Identity
Management" for a fuller description of the default access
control policies in Oracle Identity Management
Table 33–2 Customizing the Default Identity Management Realm
What You Can Customize Tools Information
Directory structure and naming
policies
Oracle Internet Directory Self-Service
Console
Oracle Directory Services Manager
Command-line tools
This section.
Section 33.1.5, "Default Directory
Information Tree and the Identity
Management Realm"
The chapter on using the Oracle
Internet Directory Self-Service
Console in Oracle Identity
Management Guide to Delegated
Administration in the 10g (10.1.4.0.1)
library
Authentication policies Oracle Directory Services Manager
Command-line tools
Chapter 28, "Managing Password
Policies"
Identity management authorizations Oracle Internet Directory Self-Service
Console
Oracle Directory Services Manager
Command-line tools
Chapter 31, "Delegating Privileges
for Oracle Identity Management"
The chapter on using the Oracle
Internet Directory Self-Service
Console in Oracle Identity
Management Guide to Delegated
Administration in the 10g (10.1.4.0.1)
library

Customizing the Default Identity Management Realm
Planning, Deploying and Managing Realms 33-9
If your deployment scenario matches any of the use cases from 1 to 5, follow the
procedure described in Section 33.2.1, "Steps to Update the Existing User and Group
Search Base."
Use Case 1:
The third party naming context is under the default realm, but in a different container
than the realm user search base
For example, the existing users are under cn=users,dc=mycompany,dc=com and
the third party naming context is under
cn=users,o=employees,dc=mycompany,dc=com. In this case, the Lowest
Common User Search Base is dc=mycompany,dc=com.
Use Case 2:
The third party naming context is outside the default realm, but there is a Lowest
Common User Search Base.
For example, the existing users are under cn=users,dc=mycompany,dc=com and
the third party naming context is under cn=users, dc=mycompanyecorp,dc=com.
In this case, the Lowest Common User Search Base is dc=com.
If the Lowest Common User Search Base is the root DSE, then use the procedures
described in the following sections for Use Case 6::
1. Section 33.2.2, "Set up an Additional Search Base"
2. Section 33.2.3, "Refresh Oracle Single Sign-On"
3. Section 33.2.4, "Reconfigure Provisioning Profiles"
Use Case 3:
The third party naming context is the same as the default realm DN.
For example, the existing users are under cn=users,dc=mycompany,dc=com and
the third party naming context is directly under dc=mycompany,dc=com. In this case,
the Lowest Common User Search Base is dc=mycompany,dc=com.
Use Case 4:
The third party naming context contains the parent of the default realm DN.
For example, you might have a default realm with DN:
dc=us,dc=mycompany,dc=com, existing users under
cn=users,dc=us,dc=mycompany,dc=com and the third party naming context
directly under dc=com. In this case, the Lowest Common User Search Base is dc=com.
Use Case 5:
The third party naming context is under the existing user search base.
For example, existing users are under cn=users,dc=mycompany,dc=com and the
third party naming context is directly under
Note: This approach assumes that the user nickname attribute
selected for Oracle Single Sign-On Login is unique across the existing
user search base and the third party directory naming context.
Otherwise, Oracle Single Sign-On authentication fails for all those
users whose nickname attribute values clash.

Customizing the Default Identity Management Realm
33-10 Oracle Fusion Middleware Administrator's Guide for Oracle Internet Directory
l=emea,cn=users,dc=mycompany,dc=com. In this case, the Lowest Common
User Search Base is cn=users,dc=mycompany,dc=com. In this use case, you do not
need to change the user search base.
33.2.1 Steps to Update the Existing User and Group Search Base
You must perform the following steps before you set up synchronization with the
third party directory.
1. Back up the Oracle Internet Directory database.
2. Create the user and group containers for the third party directory, using Oracle
Directory Services Manager, if the entries do not already exist in the directory.
3. Apply appropriate ACLs on the new users container by doing the following:
a. Instantiate the variables %USERBASE% and %REALMBASE% in the ACL
template file $ORACLE_HOME/ldap/schema/oid/oidUserAdminACL.sbs
and create the file usracl.ldif. Set the variable %USERBASE% to the DN of
the new user container and the variable %REALMBASE% to the default realm
DN.
b. Upload the instantiated LDIF file usracl.ldif using the ldapmodify
command.
4. Apply appropriate ACLs on the new groups container by doing the following:
a. Instantiate the variables %GRPBASE% and %REALMBASE% in the ACL template
file $ORACLE_HOME/ldap/schema/oid/oidGroupAdminACL.sbs and
create the file grpacl.ldif. Set the variable %USERBASE% to the DN of the
new user container and the variable %REALMBASE% to the default realm
DN.
b. Upload the instantiated LDIF file grpacl.ldif using the ldapmodify
command.
5. Determine a Lowest Common User Search Base base that is just high enough to
include the existing users and the third party users.
For example, if existing users are under cn=users,dc=mycompany,dc=com and
the third party users are under l=emea,dc=mycompany,dc=com, then the
Lowest Common User Search Base is dc=mycompany,dc=com.
The Lowest Common User Search Base might be the root entry. That is the case if,
for example, the existing users are under cn=users,dc=mycompany,dc=com
and the third party users are under dc=mycompanycorp,dc=net. In that case,
skip to the deployment scenario described in Section 33.2.2, "Set up an Additional
Search Base."
6. If you must also synchronize groups, determine a group search base that is just
high enough to include the existing groups and the third party groups. Lets call
this search base the Lowest Common Group Search Base.
For example, if existing groups are under cn=groups,dc=mycompany,dc=com
and the third party groups are under l=emea,dc=mycompany,dc=com, then the
Lowest Common Group Search Base is dc=mycompany,dc=com.
7. log in to the Self-Service Console as the administrator of the realm (usually
orcladmin).
8. Go to the Configuration tab and set the user search base to the Lowest Common
User Search Base you determined in step 5. If you must also synchronize groups,

Customizing the Default Identity Management Realm
Planning, Deploying and Managing Realms 33-11
then also then set the group search base to the Lowest Common Group Search
Base that you determined in step 6.
9. To make Oracle Single Sign-On recognize these changes, follow the procedure
described under Section 33.2.3, "Refresh Oracle Single Sign-On."
10. Verify the Oracle Single Sign-On login of users in the original user search base by
logging in as orcladmin.
11. You must also reconfigure the applications that have been provisioned to reflect
the modified user and group bases. Follow the steps described under
Section 33.2.4, "Reconfigure Provisioning Profiles."
Use Case 6:
In this case, the third party naming context is outside the default realm and the Lowest
Common User Search Base is the root DSE.
For example, if existing users are under cn=users,dc=mycompany,dc=com and the
third party naming context is under cn=users,dc=mycompanycorp,dc=net, then
the Lowest Common User Search Base is the root DSE.
In this case, you must add the third party naming context as an additional search base.
The steps are as follows:
1. "Set up an Additional Search Base"
2. "Refresh Oracle Single Sign-On"
3. "Reconfigure Provisioning Profiles"
33.2.2 Set up an Additional Search Base
Perform the following steps before setting up synchronization with the third party
directory.
1. Back up the Oracle Internet Directory database.
2. Create the user and group containers for the third party directory, using Oracle
Directory Services Manager, if the entries do not already exist in the directory.
3. Apply appropriate ACLs on the new users container by doing the following:
a. Instantiate the variables %USERBASE% and %REALMBASE% in the ACL
template file $ORACLE_HOME/ldap/schema/oid/oidUserAdminACL.sbs
and create the file usracl.ldif. Set the variable %USERBASE% to the DN of
the new user container and the variable %REALMBASE% to the default realm
DN.
b. Upload the instantiated LDIF file usracl.ldif using the ldapmodify
command.
4. Apply appropriate ACLs on the new groups container by doing the following:
Note: In addition to the user and group search base attributes, you
can also modify other configuration settings of an identity
management realm, such as the attribute for Login Name (nickname)
or the attribute for RDN, using the Self-Service Console. See:
"Modifying Configuration Settings for an Identity Management
Realm" in the chapter "Using the Oracle Internet Directory Self-Service
Console" of Oracle Identity Management Guide to Delegated
Administration in the 10g (10.1.4.0.1) library for more details.

Customizing the Default Identity Management Realm
33-12 Oracle Fusion Middleware Administrator's Guide for Oracle Internet Directory
a. Instantiate the variables %GRPBASE% and %REALMBASE% in the ACL template
file $ORACLE_HOME/ldap/schema/oid/oidGroupAdminACL.sbs and
create the file grpacl.ldif. Set the variable %USERBASE% to the DN of the
new user container and the variable %REALMBASE% to the default realm
DN.
b. Upload the instantiated LDIF file grpacl.ldif using the ldapmodify
command.
5. log in to the Self-Service Console as the administrator of the realm.
6. Go the Configuration tab.
a. Add cn=users,dc=mycompanycorp,dc=net to the usersearchbase for
the current realm.
b. Add cn=groups,dc=mycompanycorp,dc=net to the groupsearchbase
for the current realm.
7. To make Oracle Single Sign-On recognize these changes, follow the procedure
described under Section 33.2.3, "Refresh Oracle Single Sign-On."
8. Verify the Oracle Single Sign-On login of users in the original user search base by
logging in as orcladmin.
9. If mid-tiers have been configured against this identity management configuration,
then you must also reconfigure the applications that have been provisioned to
reflect the modified user and group bases. Follow the steps described under
Section 33.2.4, "Reconfigure Provisioning Profiles."
33.2.3 Refresh Oracle Single Sign-On
To make Oracle Single Sign-On recognize your configuration changes, execute the
Oracle Single Sign-On refresh script by changing to the directory $ORACLE_
HOME/sso/admin/plsql/sso/ and typing:
sqlplus orasso@ssoreoid.sql
you are prompted for the password. To get the orasso schema password, refer to the
appendix "Obtaining the Single Sign-On Schema Password" in the Oracle Application
Server Single Sign-On Administrator's Guide.in the 10g (10.1.4.0.1) library.
33.2.4 Reconfigure Provisioning Profiles
If you installed middle-tier applications against this default identity management
realm before changing its user and group search bases, then the provisioning profiles
created by the middle-tier installations become invalid. This happens because the
profiles have the old user or group search base information in the event
subscriptions attribute. You must modify all the profiles by using oidprovtool.
Execute the following steps for every provisioning profile:
Note: In addition to the user and group search base attributes, you
can also modify other configuration settings of an identity
management realm, such as the attribute for Login Name (nickname)
or the attribute for RDN, using the Self-Service Console. See:
"Modifying Configuration Settings for an Identity Management
Realm" in the chapter "Using the Oracle Internet Directory Self-Service
Console" of Oracle Identity Management Guide to Delegated
Administration in the 10g (10.1.4.0.1) library for more details.

Creating Additional Identity Management Realms for Hosted Deployments
Planning, Deploying and Managing Realms 33-13
1. Use ldapsearch to put all the provisioning profile information into an LDIF file:
ldapsearch -h oid_host -p oid_port \
-D "cn=orcladmin" -q -s sub \
-b "cn=provisioning profiles,cn=changelog subscriber,\
cn=oracle internet directory" \
"objectclass=*" > provprofiles.ldif
The event subscriptions look something like this:
USER:cn=users,dc=mycompany,dc=com:MODIFY(list_of_
attributes)USER:cn=users,dc=mycompany,dc=com:DELETEGROUP:cn=groups,dc=mycompany
,dc=com:MODIFY(list_of_attributes)GROUP:cn=groups,dc=mycompany,dc=com:DELETE
where cn=users,dc=mycompany,dc=com and
cn=groups,dc=mycompany,dc=com are the user and group search bases,
respectively, that were created when you installed and configured the application.
2. Get the actual DNs of the application identity by searching the Oracle Internet
Directory server based on the GUID. To get the application DN, type:
ldapsearch -h host -p port -D cn=orcladmin -q \
-s sub -b "" \
"orclguid=Value_of_orclODIPProvisioningAppGuid" dn
You can get the GUID values for each profile from the attribute values in
provprofiles.ldif.
3. Modify each of the returned profiles as follows:
$ORACLE_HOME/bin/oidprovtool operation=MODIFY \
ldap_host=host ldap_port=port \
ldap_user_dn="cn=orcladmin" \
ldap_user_passwd=password \
interface_version=interfaceVersion \
application_dn=applicationDN \
organization_dn=identity_Realm_DN \
event_subscription=New_Event_Subscription_1
event_ subscription=New_Event_Subscription_2
.
.
.
event_subscription=New_Event_Subscription_n
The New_Event_Subscription arguments should be of the form:
USER: new_user_search_base:MODIFY(list_of_attributes)
USER: new_user_search_base:DELETE
GROUP: new_group_search_base:MODIFY(list_of_attributes)
GROUP: new_group_search_base:DELETE
Here, the organization_dn value should be the original identity realm DN
33.3 Creating Additional Identity Management Realms for Hosted
Deployments
You can create additional identity management realms by using the Self-Service
Console in Oracle Delegated Administration Services 10g (10.1.4.3.0) or later or by
using oidrealm.

Creating Additional Identity Management Realms for Hosted Deployments
33-14 Oracle Fusion Middleware Administrator's Guide for Oracle Internet Directory
Only members of the ASPAdmins group can create a new identity management realm.
Use Oracle Directory Services Manager to add a user to that group by adding the
userDN to the uniquemember attribute of group ASPAdmins in the Default Identity
Management Realm-specific OracleContext. Refer to the section on "Modifying a Static
Group Entry by Using Oracle Directory Services Manager" for details.
Note: Not all applications can work with multiple identity
management realms.
Whenever you add an additional realm, you may need to make
existing applications aware of it by using a manual procedure. For
more information, see the application-specific documentation.
In the Oracle Identity Management infrastructure, the single
sign-on server must be made aware of an additional realm by using
a special administrative procedure. Please refer to the chapter
"Single Sign-On in Multiple Realms" in the Oracle Application Server
Single Sign-On Administrator's Guide in the 10g (10.1.4.0.1) library
for instructions on enabling multiple realms in Oracle Single
Sign-On.
See Also:
■The oidrealm command reference in Oracle Fusion Middleware
Reference for Oracle Identity Management.
■Section 14.2.2, "Modifying a Static Group Entry by Using Oracle
Directory Services Manager."
■The chapter on the Oracle Internet Directory Self-Service Console
in the Oracle Identity Management Guide to Delegated Administration
in the 10g (10.1.4.0.1) library for information about creating an
additional identity management realm.

34
Tuning and Sizing Oracle Internet Directory 34-1
34Tuning and Sizing Oracle Internet Directory
Recommendations for sizing and tuning Oracle Internet Directory are documented in
the Oracle Internet Directory chapter in the Oracle Fusion Middleware Performance and
Tuning Guide.
Note: Oracle Internet Directory's out of box configuration is not
optimal for most production or test deployments. You must follow at
least the basic tuning steps listed in the Oracle Internet Directory
chapter of Oracle Fusion Middleware Performance and Tuning Guide to
achieve optimal performance and availability.

34-2 Oracle Fusion Middleware Administrator's Guide for Oracle Internet Directory

35
Managing Garbage Collection 35-1
35Managing Garbage Collection
The term "garbage" refers to any data not needed by the directory but still occupying
space in it. This unwanted or obsolete data can eventually fill up the disk and decrease
directory performance. The process of removing this unwanted data from the
directory is called garbage collection.
This chapter contains these topics:
■Section 35.1, "Introduction to Managing Garbage Collection"
■Section 35.2, "Set Oracle Database Time Zone for Garbage Collection"
■Section 35.3, "Modifying Oracle Internet Directory Garbage Collectors"
■Section 35.4, "Managing Logging for Oracle Internet Directory Garbage Collectors"
■Section 35.5, "Configuring Time-Based Change Log Purging"
35.1 Introduction to Managing Garbage Collection
A garbage collector is a background database process that removes unwanted data
from the directory. The Oracle Internet Directory garbage collection framework
provides a default set of garbage collectors, and enables you to modify them. The
Oracle Internet Directory statistics collector also uses the Oracle Internet Directory
garbage collection framework.
This introduction contains these topics:
■Section 35.1.1, "Components of the Oracle Internet Directory Garbage Collection
Framework"
■Section 35.1.2, "How Oracle Internet Directory Garbage Collection Works"
■Section 35.1.3, "Garbage Collector Entries and the Oracle Internet Directory
Statistics Collector Entry"
■Section 35.1.4, "Change Log Purging"
35.1.1 Components of the Oracle Internet Directory Garbage Collection Framework
This section describes the components that make up the Oracle Internet Directory
garbage collection framework, namely, the garbage collection plug-in and the
background database processes.
35.1.1.1 Garbage Collection Plug-in
Garbage collection in Oracle Internet Directory relies on a garbage collection plug-in
that receives requests to manage garbage collectors. This plug-in is installed with

Introduction to Managing Garbage Collection
35-2 Oracle Fusion Middleware Administrator's Guide for Oracle Internet Directory
Oracle Internet Directory, and is enabled by default. The entry for this plug-in is
cn=plugin,cn=subconfigsubentry.
This plug-in has three triggers:
■The DN of the plug-in trigger used to create a garbage collection job is: cn=Add
PurgeConfig,cn=plugin,cn=subconfigsubentry.
■The DN of the plug-in trigger used to modify a garbage collection job is:
cn=Modify PurgeConfig,cn=plugin,cn=subconfigsubentry.
■The DN of the plug-in trigger used to delete a garbage collection job is:
cn=Delete PurgeConfig,cn=plugin,cn=subconfigsubentry.
35.1.1.2 Background Database Processes
The background database processes that are invoked by the garbage collection plug-in
include garbage collectors and the Oracle Internet Directory statistics collector.
35.1.1.2.1 Garbage Collectors You can set and manage these behaviors of a garbage
collector:
■The time it starts
■The age of the data you want it to purge
■How often it runs
■The type of data you want it to purge
■The number of entries to purge at a time
35.1.1.2.2 Predefined Garbage Collectors A default installation of Oracle Internet
Directory includes these predefined garbage collectors:
■Change log garbage collector: Cleans up the consumed change log entries in the
directory. The container for this garbage collector is cn=changelog
purgeconfig, cn=purgeconfig,cn=subconfigsubentry.
■General statistics garbage collector: Cleans up obsolete entries created by Oracle
Internet Directory Server Manageability for monitoring general statistics of the
directory. The container for this garbage collector is cn=general stats
purgeconfig, cn=purgeconfig,cn=subconfigsubentry.
■Health statistics garbage collector: Cleans up obsolete entries created by Oracle
Internet Directory Server Manageability for monitoring health statistics of the
directory. The container for this garbage collector is cn=health stats
purgeconfig, cn=purgeconfig,cn=subconfigsubentry.
■Security and refresh events garbage collector: Cleans up obsolete entries created
by Oracle Internet Directory Server Manageability for monitoring security and
refresh events of the directory. The container for this garbage collector is
cn=secrefresh events purgeconfig,
cn=purgeconfig,cn=subconfigsubentry.
■System resource events garbage collector: Cleans up obsolete entries created by
Oracle Internet Directory Server Manageability for monitoring system resource
events of the directory. The container for this garbage collector is
See Also: "Oracle Internet Directory Configuration Schema
Elements" in Oracle Fusion Middleware Reference for Oracle Identity
Management for a list and descriptions of the attributes of the
garbage collection plug-in

Introduction to Managing Garbage Collection
Managing Garbage Collection 35-3
cn=sysresource events purgeconfig,
cn=purgeconfig,cn=subconfigsubentry.
■Tombstone garbage collector: Cleans up obsolete entries marked as deleted in the
directory. The container for this garbage collector is cn=tombstone
purgeconfig, cn=purgeconfig,cn=subconfigsubentry.
■LDAP performance monitoring garbage collector: Cleans up LDAP server
performance statistics data. The container for this garbage collector is cn=perf
stats purgeconfig,cn=purgeconfig,cn=subconfigsubentry.
■LDAP bind performance monitoring garbage collector: Cleans up bind
performance data gathered for security events tracking. The container for this
garbage collector is cn=bindsec stats purgeconfig,cn=purgeconfig,
cn=subconfigsubentry.
■LDAP compare performance monitoring garbage collector: Cleans up compare
performance data gathered for security events tracking. The container for this
garbage collector is cn=comparesec stats purgeconfig,
cn=purgeconfig,cn=subconfigsubentry.
■LDAP compare failure performance monitoring garbage collector: Cleans up
compare failure performance data gathered for security events tracking. The
container for this garbage collector is cn=comparefailure stats
purgeconfig,cn=purgeconfig,cn=subconfigsubentry.
35.1.1.2.3 Oracle Internet Directory Statistics Collector You can set and manage these
behaviors of the Oracle Internet Directory statistics collector:
■The time it starts
■How often it runs
The Oracle Internet Directory statistics collector collects statistics about Oracle Internet
Directory. The container for this background database process is cn=oidstats_
config, cn=purgeconfig,cn=subconfigsubentry.
35.1.2 How Oracle Internet Directory Garbage Collection Works
Figure 35–1 shows an example of a garbage collector operation that purges change log
entries.
See Also:
■Section 24.1.1, "Capabilities of Oracle Internet Directory Server
Manageability"
■"Oracle Internet Directory Configuration Schema Elements" in
Oracle Fusion Middleware Reference for Oracle Identity Management
Note: Oracle recommends that you not delete any of the predefined
garbage collectors. Deleting one or more of them can result in the
proliferation of obsolete data, eventually exhausting all the available
disk space.
You may, however, modify predefined garbage collectors to
customize their behavior.
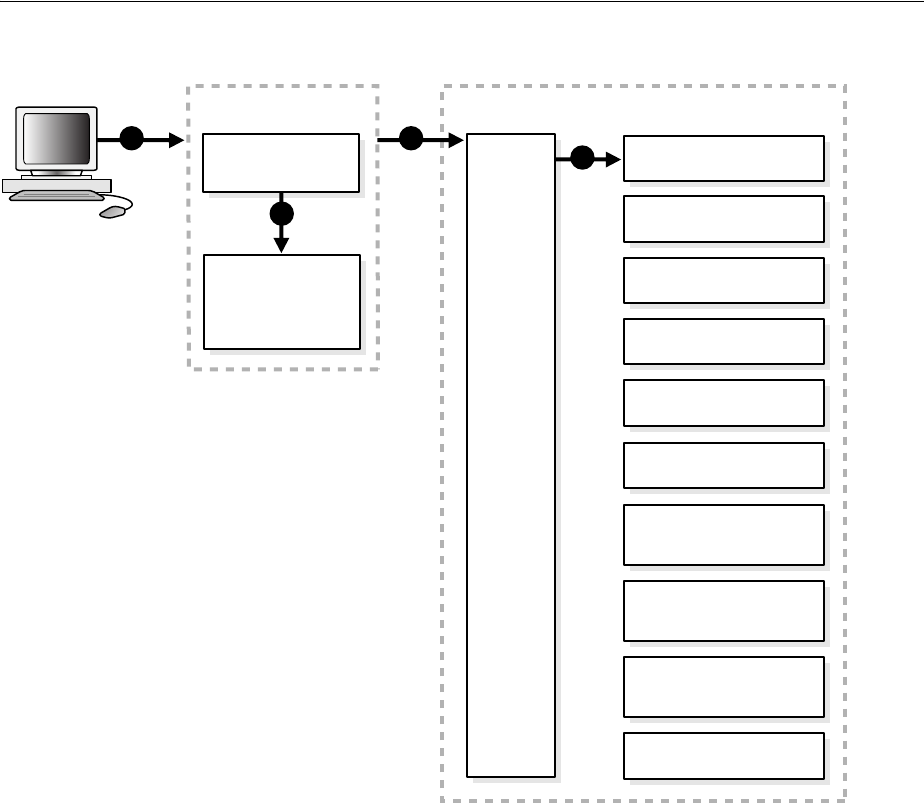
Introduction to Managing Garbage Collection
35-4 Oracle Fusion Middleware Administrator's Guide for Oracle Internet Directory
Figure 35–1 Example: Garbage Collection of Change Log Entries
As the example in Figure 35–1 on page 35-4 shows, the garbage collection process is as
follows:
1. An LDAP client sends to the directory server a request for a particular garbage
collection operation. The operation could be, for example, to purge the entries of
tombstone or, change logs.
2. The directory server passes the request to the garbage collection plug-in.
3. The garbage collection plug-in sends the request to the garbage collection engine
in the Oracle Internet Directory-designated database.
4. The garbage collection engine triggers the corresponding background database
process—in this case, the change log garbage collector. The background database
process runs according to the parameters specified in its configuration.
35.1.3 Garbage Collector Entries and the Oracle Internet Directory Statistics Collector
Entry
Garbage collector entries, each with attributes specifying how it is to behave, are
located in the entry cn=purgeconfig, which is located immediately below the entry
cn=subconfigsubentry.
Oracle Internet Directory Database
1
Directory
Server
Garbage
Collection
Plug-in
Framework
Oracle Directory
Server Instance
3
4
Garbage
Collection
Engine
Garbage Collector
(Change Log)
Garbage Collector
(General Statistics)
Garbage Collector
(Health Statistics)
Garbage Collector
(Security Refresh Events)
Garbage Collector
(System Resource Events)
Garbage Collector
(Tombstone)
Garbage Collector
(Bind performance
monitoring)
Garbage Collector
(Compare performance
monitoring)
Garbage Collector
(Compare failure
performance monitoring)
Statistics Collector
LDAP
Client 2
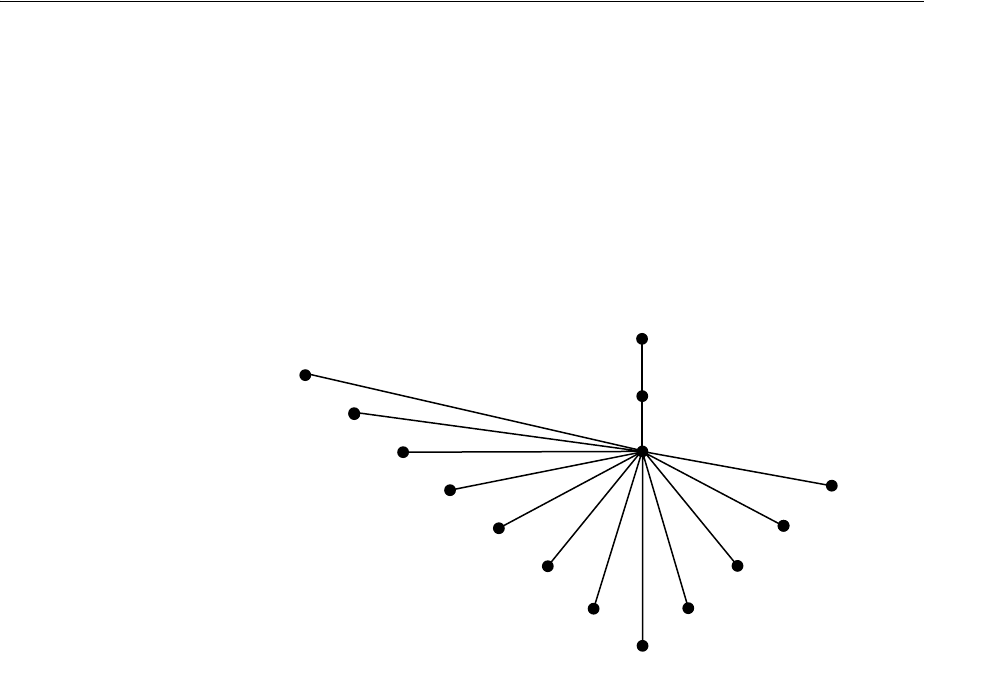
Introduction to Managing Garbage Collection
Managing Garbage Collection 35-5
The Oracle Internet Directory statistics collector entry, with its attributes, is also
located in the entry cn=purgeconfig, immediately below the entry
cn=subconfigsubentry.
Figure 35–2 shows the location of these entries.
Figure 35–2 Garbage Collection Entries in the DIT
35.1.4 Change Log Purging
Both replication and Oracle Directory Integration Platform use change logs to
propagate information from a supplier directory to a consumer directory. All change
logs are stored in the table ods_chg_log. In addition, replication change logs are
stored in asr_chg_log. When the change log garbage collector runs, it purges
change logs that are no longer needed by any change log consumers. This prevents the
change log store in the Oracle Internet Directory database from becoming too large.
The change log garbage collector uses the following two methods to determine which
change logs to purge:
■Change number-based purging
Change number-based purging respects the change status of all change log
consumers. That is, it does not purge change logs unless they have been consumed
by all consumers. When the change log garbage collector runs, it purges all change
logs that have been consumed by replication, Oracle Directory Integration
Platform, and other consumers.
■Time-based purging
Time-based purging is a fall-back method designed to purge change logs of a
certain age. It ensures that old change logs are purged even if they have not been
consumed by all change log subscribers. Time-based purging respects the change
status of replication, but not the change status of other consumers. The change log
garbage collector purges all change logs that are not needed by replication and
that are at least orclpurgetargetage hours old. If orclpurgetargetage is
zero, the change log garbage collector does this immediately. If
orclpurgetargetage is an invalid number or not defined, the default value is
See Also: "Oracle Internet Directory Configuration Schema
Elements" in Oracle Fusion Middleware Reference for Oracle Identity
Management for a description of each garbage collector attribute
cn=purgeConfig
cn=subconfigSubentry
Root
cn=
healthStats PurgeConfig
cn=
secRefresh Events PurgeConfig
cn=
sysResource Events PurgeConfig
cn=
tombstone PurgeConfig
cn=
auditlog PurgeConfig
cn=
oidstats_config
cn=
changelog PurgeConfig
cn=
generalStats PurgeConfig
cn=
comparefailure stats PurgeConfig
cn=
comparesec stats PurgeConfig
cn=
bindsec stats PurgeConfig
cn=
perf stats PurgeConfig

Set Oracle Database Time Zone for Garbage Collection
35-6 Oracle Fusion Middleware Administrator's Guide for Oracle Internet Directory
240 hours (10 days). Change logs needed by replication are not purged until they
have been consumed by replication.
If you have deployed Oracle Directory Integration Platform, and you want to
enable time-based purging, be sure to set orclpurgetargetage to a large
enough value to allow change logs to be processed by Oracle Directory Integration
Platform before they are purged. A value of 240 allows 10 days before change logs
are purged.
See Section 35.5, "Configuring Time-Based Change Log Purging."
35.2 Set Oracle Database Time Zone for Garbage Collection
To ensure that the Oracle Internet Directory garbage collection logic works correctly,
you must set the Oracle Database dbtimezone parameter to the appropriate
displacement from Coordinated Universal Time (UTC). Proceed as follows:
1. Invoke PL/SQL:
$ sqlplus /nolog
SQL> connect / as sysdba
2. Perform a query to get the value of dbtimezone:
SQL> select dbtimezone from dual;
3. Perform a query to get the displacement from Coordinated Universal Time (UTC):
SQL> select systimestamp from dual;
The output will look similar to this:
SYSTIMESTAMP
---------------------------------------
31-JAN-09 01.04.42.281000 PM -05:00
Get the last column of the systimestamp output. In the example, it is -05:00.
4. If the dbtimezone parameter is equal to last column value of the systimestamp
output, you do not need to perform the remaining steps. Otherwise, proceed to
Step 5.
5. Stop all instances of Oracle Internet Directory that are using the Oracle Database,
as described in Chapter 8, "Managing Oracle Internet Directory Instances."
6. Set the dbtimezone parameter, using the value you got from the last column the
systimestamp query:
SQL> ALTER DATABASE SET TIME_ZONE = '-05:00';
7. Shut down the Oracle Database:
SQL> shutdown immediate
8. Restart the Oracle Database:
SQL> startup
9. Restart Oracle Internet Directory as described in Chapter 8, "Managing Oracle
Internet Directory Instances."

Modifying Oracle Internet Directory Garbage Collectors
Managing Garbage Collection 35-7
35.3 Modifying Oracle Internet Directory Garbage Collectors
This section contains these topics:
■Section 35.3.1, "Modifying a Garbage Collector by Using Oracle Directory Services
Manager"
■Section 35.3.2, "Modifying a Garbage Collector by Using Command-Line Tools"
■Section 35.3.3, "Modifying the Oracle Internet Directory Statistics Collector"
35.3.1 Modifying a Garbage Collector by Using Oracle Directory Services Manager
To modify a garbage collector:
1. Invoke Oracle Directory Services Manager and connect to the Oracle Internet
Directory server as described in Section 7.4.5, "Invoking Oracle Directory Services
Manager."
2. From the task selection bar, select Advanced.
3. Expand Garbage Collection in the left pane, then select the garbage collector you
want to modify. The Garbage Collector Window appears in the right pane.
4. In the Garbage Collector window, enter the changes you want to make for this
garbage collector.
5. Choose Apply.
35.3.2 Modifying a Garbage Collector by Using Command-Line Tools
This section provides examples of how to modify garbage collectors by using
command-line tools. The garbage collection attributes that you can modify are listed in
"Oracle Internet Directory Configuration Schema Elements" in Oracle Fusion
Middleware Reference for Oracle Identity Management.
35.3.2.1 Example 1: Modifying a Garbage Collector
Suppose that you want the tombstone garbage collector to run immediately. The LDIF
would look like this:
dn: cn=tombstone purgeconfig, cn=purge config, cn=subconfigsubentry
changetype:modify
replace: orclpurgenow
orclpurgenow: 1
Load this entry with ldapmodify.
ldapmodify -D "cn=orcladmin" -q -h hostname -p port \
-D username -f file_name_of_defined_entry
35.3.2.2 Example 2: Disabling a Garbage Collector Change Log
Suppose that you want to disable changelog garbage collector.
dn: cn=changelog purgeconfig, cn=purgeconfig, cn=subconfigsubentry
changetype: modify
replace: orclpurgeenable
See Also: Oracle OLAP DML Reference for more information about
the dbtimezone parameter.

Managing Logging for Oracle Internet Directory Garbage Collectors
35-8 Oracle Fusion Middleware Administrator's Guide for Oracle Internet Directory
orclpurgeenable: 0
Load this entry with ldapmodify.
ldapmodify -D "cn=orcladmin" -q -h hostname -p port \
-D username -f file_name_of_defined_entry
35.3.3 Modifying the Oracle Internet Directory Statistics Collector
You modify the Oracle Internet Directory statistics collector in the same way as the
garbage collectors, but there are only three modifiable fields.
35.4 Managing Logging for Oracle Internet Directory Garbage Collectors
This section contains these topics:
■Section 35.4.1, "Enabling Logging for Oracle Internet Directory Garbage
Collectors"
■Section 35.4.2, "Disabling Logging for Oracle Internet Directory Garbage
Collectors"
■Section 35.4.3, "Monitoring Garbage Collection Logging"
35.4.1 Enabling Logging for Oracle Internet Directory Garbage Collectors
If you enable logging for garbage collectors, then the directory server writes the
information into a file in the file system. This information includes:
■The job identifier
■A job description of the garbage collector
■The number of entries purged
■The operation status
■The time stamp
■Any errors caught
To enable logging of garbage collection information:
1. Set the orclpurgedebug attribute to 1if needed. When orclpurgedebug is set to
1, extra debugging detail information is logged. This is useful for troubleshooting
garbage collection problems.
2. Set the orclpurgefilename attribute to a valid file name for the log file, for
example: oidgc001.log.
3. Set the orclpurgefileloc attribute to the path name of the directory in which
the log file is located, for example: /private/qzhou/oracle/ldap/log.
4. Enable PL/SQL I/O access to the directory specified in step 3. To do this, include
the following in the database:
UTL_FILE_DIR=PATH_NAME
where PATH_NAME is the path you specified in Step 3.
See Also: The section on the UTL_FILE_DIR parameter type in
the Oracle Database Reference

Configuring Time-Based Change Log Purging
Managing Garbage Collection 35-9
5. Shut down the replication server, then the Oracle Internet Directory server.
6. Restart the database.
7. Start the Oracle Internet Directory server, then the replication server.
35.4.2 Disabling Logging for Oracle Internet Directory Garbage Collectors
To disable logging of garbage collection information, set the orclpurgedebug
attribute to 0.
35.4.3 Monitoring Garbage Collection Logging
The information in the garbage collection log can be useful for monitoring and
troubleshooting garbage collection. You determine the location of the log by setting
attributes when enabling logging. For example, if you configured:
orclpurgefilename = oidgc001.log
orclpurgefileloc = /private/qzhou/oracle/ldap/log
when you enabled logging, then you can monitor change log garbage collection
activities by reading the file
/private/qzhou/oracle/ldap/log/oidgc001.log.
The following is an example of the information logged when an administrator
modified the orclpurgenow attribute of the change log garbage collection
configuration entry:
Running Garbage Collector: cn=changelog purgeconfig
Starting time: 2005/03/24 11:03:23
PurgeConfig object located, Eid= 936
purge_ODSChglog: Nothing to be purged(no_work_to_do)
purge_ODSChglog: 107 chglogs successfully purged
purge_ASRChglog: Nothing to be purged(no_work_to_do)
purge_ASRChglog: 0 chglogs successfully purged
purge_ASRChglog: 0 chglogs successfully purged
Modifying Garbage Collector for at "2005/03/24 11:03:23
Garbage Collector DN recognized, rdn=cn=changelog purgeconfig
orclPurgeNow successfully retrieved.
Garbage Collector job found: jobno=21
Garbage Collector has been run
Garbage collector is updated successfully!
Modifying orclpurgenow forces the change log garbage collector to run
immediately. As shown in the first paragraph, 107 change logs were purged from the
ods_chg_log table and 0 change logs were purged from the asr_chg_log table.
Also, the information in the second paragraph indicates successful modification of
orclpurgenow attribute.
35.5 Configuring Time-Based Change Log Purging
Change log purging was described in Section 35.1.4, "Change Log Purging." You
configure time-based purging by modifying the orclpurgetargetage attribute of
Note: Even when orclpurgedebug is set to 0, minimal information
about garbage collector operation is still logged to indicate the
garbage collector's acitivites.

Configuring Time-Based Change Log Purging
35-10 Oracle Fusion Middleware Administrator's Guide for Oracle Internet Directory
the changelog purging configuration entry. This example configures time-based
purging for 120 hours (5 days). Use an LDIF file similar to this:
dn: cn=changelog purgeconfig,cn=purgeconfig,cn=subconfigsubentry
changetype:modify
replace: orclpurgetargetage
orclpurgetargetage: 120
To apply the ldif file mod.ldif, type:
ldapmodify -D "cn=orcladmin" -q -p port -h host -D dn -q -f mod.ldif
Note: The container for the change log garbage collector is
cn=changelog purgeconfig,
cn=purgeconfig,cn=subconfigsubentry.
See Also: "Oracle Internet Directory Configuration Schema
Elements" in Oracle Fusion Middleware Reference for Oracle Identity
Management

36
Migrating Data from Other Data Repositories 36-1
36Migrating Data from Other Data Repositories
This chapter explains how to migrate data from both LDAP Version 3-compatible
directories and application-specific data repositories into Oracle Internet Directory.
This chapter contains these topics:
■Section 36.1, "Introduction to Migrating Data from Other Data Repositories"
■Section 36.2, "Migrating Data from LDAP-Compliant Directories"
■Section 36.3, "Migrating User Data from Application-Specific Repositories"
36.1 Introduction to Migrating Data from Other Data Repositories
During an Oracle Internet Directory installation, Oracle Identity Management 11g
Installer creates a default schema and directory information tree (DIT). Chapter 3,
"Understanding Oracle Internet Directory Concepts and Architecture," and Chapter 33,
"Planning, Deploying and Managing Realms," describe this default DIT framework.
The framework is flexible and you can modify it to suit the needs of your deployment.
In Oracle Internet Directory, the following directory elements are created by default:
■Root Oracle Context (cn=OracleContext): This is the container where Oracle
products store enterprise-wide configuration data.
■Default identity management realm (dc=dns_domain_of_host,dc=com): This
is the container under which Oracle products expect to find enterprise users and
groups. It approximates the enterprise DIT structure. For example, if Oracle
Internet Directory is installed on a computer whose host name is: my_
computer.us.my_company.com, then the default identity management realm
created at installation of Oracle Internet Directory would be dc=us,dc=my_
company,dc=com. Oracle products expect to find all users under the container
cn=users,dc=us,dc=my_company,dc=com and all groups under
cn=groups,dc=us,dc=my_company,dc=com. In addition to creating the
default identity management realm entry, the Oracle Internet Directory
Configuration Assistant stores a pointer to it in the Root Oracle Context so that
other Oracle Internet Directory-enabled components can bootstrap themselves.
You can change this default identity management realm to suit your deployment
requirements.
36.2 Migrating Data from LDAP-Compliant Directories
This section provides practical information for migrating data from an
LDAP-compliant, third-party directory to Oracle Internet Directory. If you have a
directory with an already-established structure, and you want to migrate the data
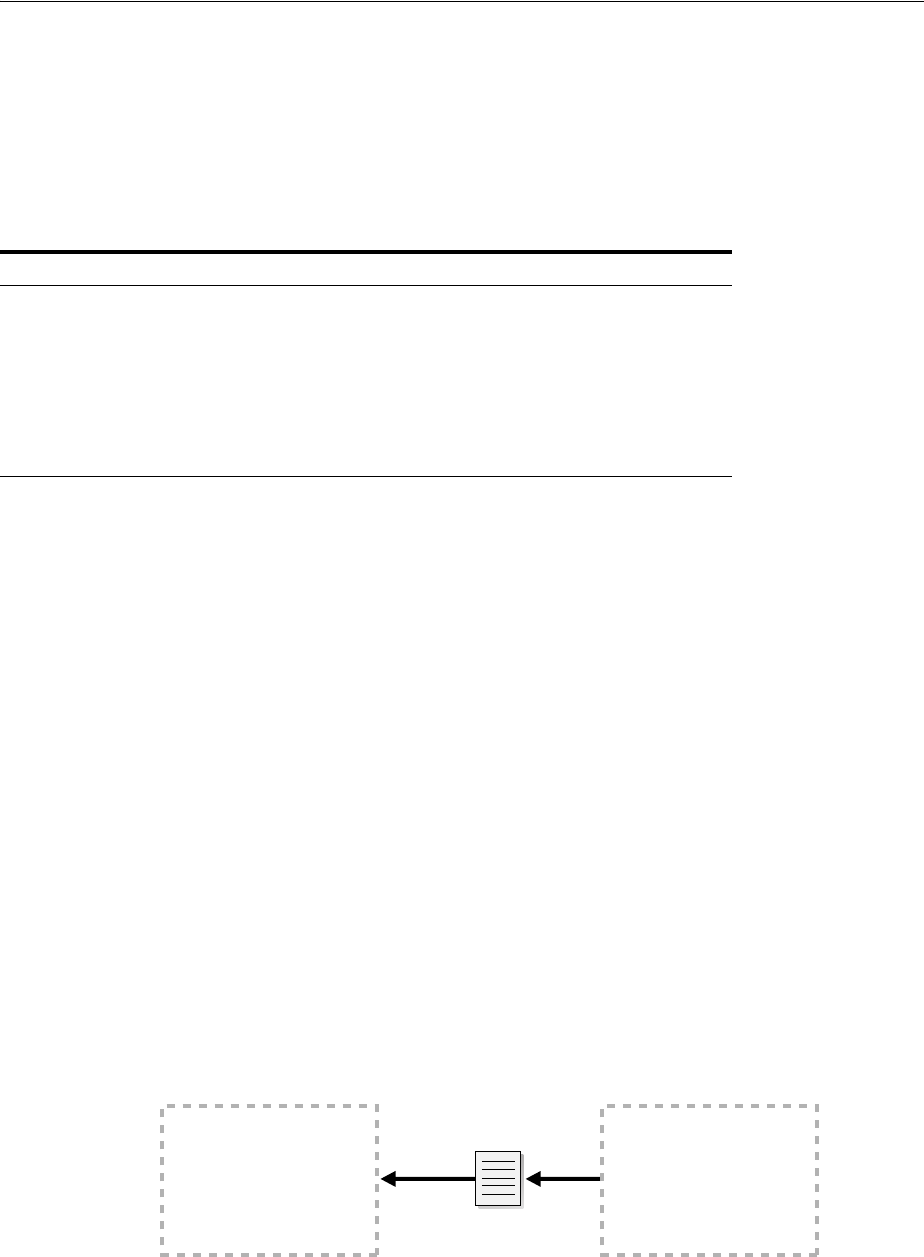
Migrating Data from LDAP-Compliant Directories
36-2 Oracle Fusion Middleware Administrator's Guide for Oracle Internet Directory
from that directory into the default directory structure environment, then follow the
instructions in this section.
Two tools that are commonly used for migrating data are bulkload and
syncProfileBootstrap. Table 36–1, " Features of bulkload and
syncProfileBootstrap" lists the features of bulkload, as compared with
syncProfileBootstrap.
36.2.1 Migrating LDAP Data by Using an LDIF File and bulkload
The bulk loader, bulkload, is a command-line tool for loading a large number of
entries into a directory server. It uses Oracle SQL*Loader to load the directory entries.
The bulkload tool expects the input file to be in LDAP Data Interchange Format
(LDIF). The bulkload tool can validate LDIF input for referential integrity, but it
cannot perform any mapping or other transformation on the data.
When no translation is required and data is very large (500,000 or more), bulkload is
the best choice for migrating data from a third-party directory to Oracle Internet
Directory. It is fast and it can validate LDIF input.
To use this method, you must first export data from the third-party directory to an
LDIF file, as shown in Figure 36–1, "Using an LDIF File and bulkload".
Figure 36–1 Using an LDIF File and bulkload
LDIF is the IETF-sanctioned ASCII interchange format for representing
LDAP-compliant directory data as a file. All LDAP-compliant directories should have
tools to export their contents into one or more LDIF files representing the DIT at the
time of export.
Table 36–1 Features of bulkload and syncProfileBootstrap
Feature bulkload syncProfileBootstrap
Speed Fast Slow
Data transfer method SQL LDAP
Input types accepted LDIF file only LDIF file, LDAP directory,
tagged file, CSV file
Transforms data No Yes
Validates LDIF input Yes No
See Also:
■"Oracle Internet Directory Data Management Tools" in Oracle
Fusion Middleware Reference for Oracle Identity Management for
bulkload syntax information and examples,
■Oracle Fusion Middleware Administrator's Guide for Oracle Directory
Integration Platform for more information about
syncProfileBootstrap.
Oracle Internet Directory Third-Party Directory
bulkload
LDIF
File

Migrating Data from LDAP-Compliant Directories
Migrating Data from Other Data Repositories 36-3
When using an LDIF file and bulkload to migrate data to Oracle Internet Directory,
you must perform the following tasks.
Task 1: Export Data from the Non-Oracle Internet Directory Server into LDIF File
Format
See the vendor-supplied documentation for instructions. If flags or options exist for
exporting data from the foreign directory, be sure to select the method that:
■Produces LDIF output with the least amount of proprietary information included
■Provides maximum conformance to the IETF Request for Comments 2849 of the
IETF, available for download at: http://www.ietf.org
Task 2: Analyze the LDIF User Data for Any Required Schema Additions
Referenced in the LDIF Data
Any attributes not found in the Oracle Internet Directory base schema require
extension of the Oracle Internet Directory base schema before the importation of the
LDIF file. Some directories may support the use of configuration files for defining
extensions to their base schema (Oracle Internet Directory does not). If you have a
configuration file you can use it as a guideline for extending the base schema in Oracle
Internet Directory in "Task 3: Extend the Schema in Oracle Internet Directory".
Task 3: Extend the Schema in Oracle Internet Directory
See Chapter 20, "Managing Directory Schema" for tips on how to extend the directory
schema in Oracle Internet Directory. You can do this by using either Oracle Directory
Services Manager or the SchemaSynch tool, which is documented in Oracle Fusion
Middleware Reference for Oracle Identity Management.
If you have users who are using other Oracle products, you must create users with
object class orclUserV2 and its required attributes. If you are integrating with Active
Directory, you must create users with object class orclADUser and its required
attributes. These object classes and their attributes are documented inOracle Fusion
Middleware Reference for Oracle Identity Management.
Task 4: Remove Any Proprietary Directory Data from the LDIF File
Certain elements of the LDAP v3 standard have not yet been formalized, such as ACI
attributes. As a result, various directory vendors implement ACI policy objects in
ways that do not translate well across vendor installations.
After the basic entry data has been imported from the cleaned up LDIF file to Oracle
Internet Directory, you must explicitly reapply security policies in the Oracle Internet
Directory environment. You can do this by using either Oracle Directory Services
Manager, or command-line tools and LDIF files containing the desired ACP
information.
There may be other proprietary metadata unrelated to access control. You should
remove this as well. Understanding the various IETF RFCs can help you determine
which directory metadata is proprietary to a given vendor and which complies with
the LDAP standards, and is thus portable by way of an LDIF file.
Task 5: Remove Operational Attributes from the LDIF File
Four of the standard LDAP v3 operational attributes, namely, creatorsName,
createTimestamp, modifiersName, and modifyTimestamp are automatically
See Also: RFC 2849 of the IETF, available for download at:
http://www.ietf.org

Migrating Data from LDAP-Compliant Directories
36-4 Oracle Fusion Middleware Administrator's Guide for Oracle Internet Directory
generated by Oracle Internet Directory whenever entries are created or imported. It is
not possible to instantiate these values from existing directory data, for example by
using LDIF file importation. Therefore you should remove these attributes from the
file before attempting to import.
Task 6: Remove Incompatible userPassword Attribute Values from the LDIF File
The userPassword attribute hash algorithms supported by Oracle Internet Directory
are listed in the orclcryptoscheme entry in Section 9.1.5, "Attributes of the DSE."
The userPassword attribute hash values used by some vendor products are not
compatible with Oracle Internet Directory. As a result, you must remove all lines
corresponding to the userPassword attribute and value from the LDIF data file
unless they are represented in plain text or contain no value. After importation of the
LDIF data, you must manually reenter or upload hashed userPassword information
separately into the directory. Be sure that the passwords comply with the Oracle
Internet Directory password policies and are in clear text.
Task 7: Run the bulkload check =TRUE" Mode and Determine Any Remaining
Schema Violations or Duplication Errors
Before generating and loading an LDIF file, always perform a check on it by using the
bulkload utility check mode. The bulkload output reports any inconsistencies in the
data.
36.2.2 Migrating LDAP Data by Using syncProfileBootstrap Directly
The Directory Integration Assistant, syncProfileBootstrap, is a command-line
tool for administering the synchronization profiles scheduled by the Oracle directory
integration server. An administrator can use the syncProfileBootstrap operation
to perform the initial migration of data between a connected directory and Oracle
Internet Directory when configuring the Oracle directory integration server to perform
ongoing synchronization. You also use it for a one-time data migration, without
ongoing synchronization.
The syncProfileBootstrap operation can take data either directly from a
third-party LDAP-compliant directory or from an LDIF file, tagged file, or CSV file.
You must provide mapping rules, either as a synchronization profile or in a
configuration file.
For syncProfileBootstrap syntax information, configuration file properties,
information about input file types, and examples, see "Oracle Directory Integration
PlatformTools" in Oracle Fusion Middleware Reference for Oracle Identity Management and
Oracle Fusion Middleware Administrator's Guide for Oracle Directory Integration Platform.
If you must perform mapping when migrating the data from the third-party directory
to Oracle Internet Directory, and if the data is small in size, you can use
syncProfileBootstrap. As shown in Figure 36–2, "Using syncProfileBootstrap
Directly", you can use the third-party directory itself as input to
syncProfileBootstrap.
See Also: The bulkload command-line tool reference in Oracle
Fusion Middleware Reference for Oracle Identity Management for
instructions on how to use the bulkload check mode

Migrating Data from LDAP-Compliant Directories
Migrating Data from Other Data Repositories 36-5
Figure 36–2 Using syncProfileBootstrap Directly
36.2.3 Migrating LDAP Data by Using an LDIF File and syncProfileBootstrap
Scenario 3 is a variation on Scenario 2. If you do not have direct access to the
third-party directory, you can have the administrator export the data to an LDIF file.
As shown in Figure 36–3, "Using an LDIF File and syncProfileBootstrap",
syncProfileBootstrap can take its input from an LDIF file. You could also use
Oracle directory integration server to migrate the data.
Figure 36–3 Using an LDIF File and syncProfileBootstrap
Whenever you use an LDIF file and bulkload to migrate data to Oracle Internet
Directory, you must perform certain tasks. In this scenario, you are using a mapping
file with syncProfileBootstrap or Oracle Directory Integration Platform, so do
not have to perform all the tasks listed in "Migrating LDAP Data by Using an LDIF
File and bulkload". You only have to perform the following tasks:
■Task 1: Export Data from the Non-Oracle Internet Directory Server into LDIF File
Format
■Task 2: Analyze the LDIF User Data for Any Required Schema Additions
Referenced in the LDIF Data
■Task 3: Extend the Schema in Oracle Internet Directory
36.2.4 Migrating LDAP Data by Using syncProfileBootstrap, bulkload, and LDIF Files
If you have a large amount of data and you must perform mapping on the data, you
can use a combination of tools. As shown in Figure 36–4, "Using syncProfileBootstrap,
bulkload, and LDIF Files", you can export the data from the third-party directory to an
LDIF file, then use syncProfileBootstrap to perform the mapping into another
LDIF file, which you then load with bulkload.
Oracle Internet Directory
syncProfileBootstrap
Third-Party Directory
Mapping
Rules
Oracle Internet Directory
syncProfileBootstrap
Third-Party Directory
Mapping
Rules
LDIF
File
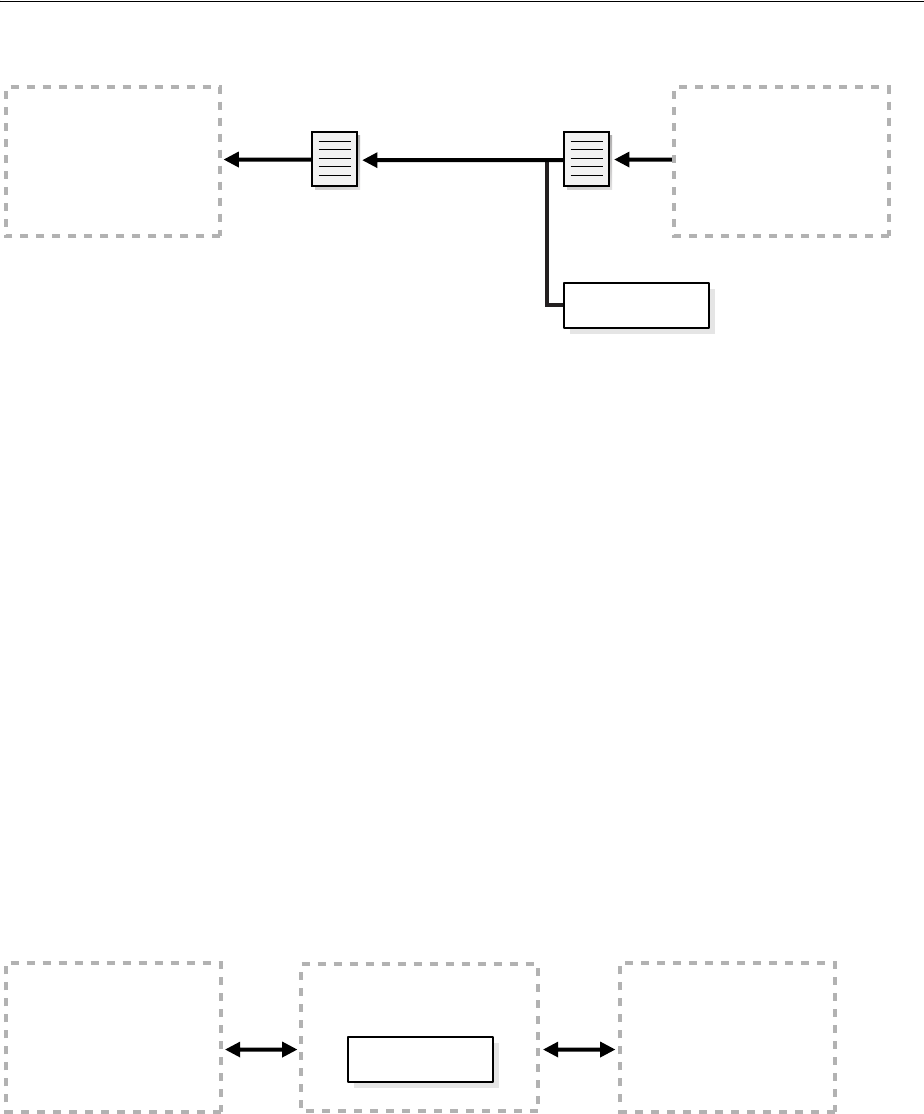
Migrating User Data from Application-Specific Repositories
36-6 Oracle Fusion Middleware Administrator's Guide for Oracle Internet Directory
Figure 36–4 Using syncProfileBootstrap, bulkload, and LDIF Files
As in Section 36.2.3, "Migrating LDAP Data by Using an LDIF File and
syncProfileBootstrap," you only have to perform these tasks:
■Task 1: Export Data from the Non-Oracle Internet Directory Server into LDIF File
Format
■Task 2: Analyze the LDIF User Data for Any Required Schema Additions
Referenced in the LDIF Data
■Task 3: Extend the Schema in Oracle Internet Directory
36.2.5 Migrating LDAP Data by Using the Oracle Directory Integration Platform Server
Under some circumstances, an administrator might choose not to use
syncProfileBootstrap when configuring the Oracle directory integration server.
After it is configured, the Oracle directory integration server itself can migrate data
from a connected directory to Oracle Internet Directory. You can also use the Oracle
directory integration server for a one-time data migration. For more information, see
Oracle Fusion Middleware Administrator's Guide for Oracle Directory Integration Platform.
The Oracle directory integration server enables you to configure bidirectional, ongoing
integration between Oracle Internet Directory and a Third-party directory, as shown in
Figure 36–5, "Using the Oracle Directory Integration Server". For more information, see
Oracle Fusion Middleware Administrator's Guide for Oracle Directory Integration Platform.
Figure 36–5 Using the Oracle Directory Integration Server
36.3 Migrating User Data from Application-Specific Repositories
Migrating user data from an application-specific repository requires:
■Collecting the user data from the application-specific repository and formatting it
in a way that the directory can read it
■Making that data available to the directory administrator who must then:
–Specify where to place it in the directory
Oracle Internet Directory
syncProfileBootstrapbulkload
Third-Party Directory
LDIF
File
LDIF
File
Mapping
Rules
Oracle Internet Directory Third-Party Directory
Oracle Directory
Integration Platform
Sync Sync
Mapping
Rules

Migrating User Data from Application-Specific Repositories
Migrating Data from Other Data Repositories 36-7
–Import it into the directory
36.3.1 The Intermediate Template File
To enable this migration to happen, the Oracle Directory Provisioning Integration
Service requires the application-specific repository to export its data to an
intermediate template file. Records in this template file are not in pure LDIF; they
contain substitution variables that have to do with, for example, the location in the
directory where the information is finally to reside. The application leaves these
variables undefined, so that you, the directory administrator can define them later on.
To convert the user data from this intermediate template file into proper LDIF, you
use the OID Migration Tool (ldifmigrator). After the data is converted to LDIF, you
can load it into the directory.
To summarize: Migrating data from application-specific repositories involves these
general steps:
1. Exporting the application-specific data as an intermediate template file
2. You, the directory administrator, using the OID Migration Tool (ldifmigrator) to
read these partial LDIF entries and convert them to pure LDIF entries based on the
deployment choices
3. You, the directory administrator, loading the data, now in pure LDIF, into Oracle
Internet Directory
4. The application completing the migration process according to its own
specifications
36.3.2 Reconciling Data in Application Repository with Data Already in the Directory
The data you are migrating from an application-specific repository may already reside
in Oracle Internet Directory. If this is the case, then you can reconcile differences
between the two directories by using the reconciliation feature of the OID Migration
Tool (ldifmigrator).
36.3.3 Tasks For Migrating Data from Application-Specific Repositories
To migrate data from application-specific repositories, you create an intermediate
template file, then run the OID Migration Tool.
36.3.3.1 Task 1: Create an Intermediate Template File
Applications generating data in national languages must store that data in AL32UTF8
in the intermediate template file as specified in the IETF RFC 2849, "The LDAP Data
Interchange Format (LDIF) - Technical Specification" available at
http://www.ietf.org.
When generating the intermediate template file, migrating applications must list all
user records sequentially with a record separator as defined in RFC 2849. The OID
Migration Tool (ldifmigrator) assigns all of these users to the default identity
management realm, which corresponds to the enterprise itself.
See Also: The ldifmigrator command-line tool reference in
Oracle Fusion Middleware Reference for Oracle Identity Management for
information about the reconciliation feature of the OID Migration
Tool
Migrating User Data from Application-Specific Repositories
36-8 Oracle Fusion Middleware Administrator's Guide for Oracle Internet Directory
Figure 36–6 shows the overall structure of the intermediate template file containing
user entries.
Figure 36–6 Structure of the Intermediate User File
The intermediate template file uses the following format to generate a valid user entry.
All of the strings in bold text are supplied from the application-specific repository.
dn: cn=UserID, %s_UserContainerDN%
sn: Last_Name
orclGlobalID: GUID_for_User
%s_UserNicknameAttribute%: UserID
objectClass: inetOrgPerson
objectClass: orclUserV2
In this template, the strings %s_UserContainerDN% and %s_
UserNicknameAttribute% are substitution variables for which the OID Migration Tool
provides values. The OID Migration Tool determines these values according to
deployment-specific considerations. Either the application passes the arguments to the
OID Migration Tool, or the tool retrieves them from the directory.
36.3.3.1.1 Example: User Entries in an Intermediate Template File The following
intermediate template file includes user entries generated by the application-specific
migration logic. In this example, all of the data listed in bold text is from the
application-specific user repository.
dn: cn=jdoe, %s_UserContainerDN%
sn: Doe
%s_UserNicknameAttribute%: jdoe
objectClass: inetOrgPerson
objectClass: orclUserV2
title: Member of Technical Staff
homePhone: 415-584-5670
homePostalAddress: 234 Lez Drive$ Redwood City$ CA$ 94402
dn: cn=jsmith, %s_UserContainerDN%
sn: Smith
%s_UserNicknameAttribute%: jsmith
objectClass: inetOrgPerson
objectClass: orclUserV2
title: Member of Technical Staff
homePhone: 650-584-5670
homePostalAddress: 232 Gonzalez Drive$ San Francisco$ CA$ 94404
dn: cn=lrider, %s_UserContainerDN%
sn: Rider
%s_UserNicknameAttribute%: lrider
objectClass: inetOrgPerson
User Entry 1
User Entry 2
User Entry 3
User Entry N

Migrating User Data from Application-Specific Repositories
Migrating Data from Other Data Repositories 36-9
objectClass: orclUserV2
title: Senior Member of Technical Staff
homePhone: 650-584-5670
After all of the user data is converted to the intermediate file format, the OID
Migration Tool further converts it into a proper LDIF file that can be loaded into
Oracle Internet Directory.
You can find examples of intermediate template files in $ORACLE_
HOME/ldap/schema/oid.
36.3.3.1.2 Attributes in User Entries Each user entry has mandatory and optional
attributes.
Table 36–2 lists and describes the mandatory attributes in a user entry.
36.3.3.2 Task 2: Run the OID Migration Tool
After you set up the intermediate template file, the OID Migration Tool enables you to
bring all pertinent data from the application-specific repository into Oracle Internet
Directory. After you have migrated the data, you can update whatever portion of it is
relevant to the application by synchronizing that application with Oracle Internet
Directory. You synchronize by using the Oracle Directory Synchronization Service.
Table 36–2 Mandatory Attributes in a User Entry
Attribute Description
dn Distinguished name of the user entry with appropriate substitution
variables. The relative distinguished name of the entry MUST contain the
cn attribute.
sn Surname—that is, the last name—of the user
objectclass Object classes the entry should minimally belong to: inetOrgPerson and
orclUserV2
See Also:
■IETF Request for Comments 2798: "Definition of the
inetOrgPerson LDAP Object Class," available at
http://www.ietf.org, for a description of each attribute in
the inetOrgPerson object class
■"Object Class Reference for Oracle Identity Management" in
Oracle Fusion Middleware Reference for Oracle Identity
Management for information about optional attributes of the
orclUserV2 object class
See Also: The ldifmigrator command-line tool reference in
Oracle Fusion Middleware Reference for Oracle Identity Management for
instructions about using the OID Migration Tool

Migrating User Data from Application-Specific Repositories
36-10 Oracle Fusion Middleware Administrator's Guide for Oracle Internet Directory

37
Configuring Server Chaining 37-1
37Configuring Server Chaining
Directory server chaining is a new feature of Oracle Internet Directory, introduced at
10g (10.1.4.0.1). It was implemented using the new Java Plug-in framework.
This chapter contains the following topics:
■Section 37.1, "Introduction to Configuring Server Chaining"
■Section 37.2, "Configuring Server Chaining"
■Section 37.3, "Creating Server Chaining Configuration Entries"
■Section 37.4, "Debugging Server Chaining"
■Section 37.5, "Configuring an Active Directory Plug-in for Password Change
Notification"
37.1 Introduction to Configuring Server Chaining
Server chaining enables you to map entries that reside in third party LDAP directories
to part of the directory tree and access them through Oracle Internet Directory,
without synchronization or data migration. With server chaining, you can use Oracle
Internet Directory's authorization framework when identity data resides outside of
Oracle Internet Directory. Server chaining is certified only with Enterprise User
Security. No other Oracle applications can be used with server chaining.
Server chaining does not replace Oracle Directory Integration Platform. Rather, it
offers complementary functionality to Oracle Directory Integration Platform.
Server chaining is different from a virtual directory. A virtual directory, such as Oracle
Virtual Directory, is a flexible virtualization layer between multiple identity
repositories and applications. It offers complementary services to identity
synchronization and directory servers. With a virtual directory, organizations can
create consolidated, logical or virtual views of data that may span multiple directories
and databases.
Server chaining is a simpler, more flexible solution, embedded in Oracle Internet
Directory server, and particular suited to Enterprise User Security customers. It is easy
to administer and upgrade. It also provides Oracle Internet Directory's authorization
framework without extra configuration steps.
As of 11g Release 1 (11.1.1), you can configure server chaining to use SSL.
Note: All references to Oracle Single Sign-On in this chapter refer to
Oracle Single Sign-On 10g (10.1.4.3.0) or later.

Introduction to Configuring Server Chaining
37-2 Oracle Fusion Middleware Administrator's Guide for Oracle Internet Directory
37.1.1 Supported External Servers
Oracle Internet Directory server chaining supports the following external servers:
■Microsoft Active Directory
■Sun Java System Directory Server, formerly known as SunONE iPlanet
■Oracle Directory Server Enterprise Edition
■Novell eDirectory
An implementation of Oracle Internet Directory can connect with one Active Directory
server, one Sun Java System Directory Server, one Novell eDirectory, or with all three.
37.1.2 Integrated Oracle Products
The following products have been integrated with Oracle Internet Directory server
chaining:
■Oracle Single Sign-On 10g (10.1.4.3.0) or later
■Enterprise User Security
37.1.2.1 Oracle Single Sign-On
When server chaining is enabled, a user from the external directory can log in through
Oracle Single Sign-On as if authenticated locally within Oracle Internet Directory,
rather than the external repository.
37.1.2.2 Enterprise User Security
Oracle Internet Directory server chaining enables you to implement Enterprise User
Security without synchronizing identity data with Oracle Internet Directory through
Oracle Directory Integration Platform. Your identity data remains in the external
repository and the Oracle Internet Directory data store contains only Enterprise User
Security-related metadata.
With Sun Java System Directory Server as the external directory, server chaining
supports password-based authentication with Enterprise User Security. For further
details, see Note 802927.1 on My Oracle Support (formerly MetaLink),
http://metalink.oracle.com.
With Active Directory as the external directory, server chaining supports Kerberos-
based authentication and password-based authentication with Enterprise User
Security. The external users can log in to Oracle Database after the Enterprise User
Security authentication setup is completed. For further details, see Section 37.5,
"Configuring an Active Directory Plug-in for Password Change Notification," which is
based on Note 452385.1 on My Oracle Support (formerly MetaLink),
http://metalink.oracle.com.
Note: Oracle Internet Directory server chaining does not support
Active Directory Lightweight Directory Service (AD LDS), formerly
known as ADAM.
See Also: Oracle Database Enterprise User Security Administrator's
Guide for more information on configuring Enterprise User Security
for password authentication and Kerberos authentication.

Configuring Server Chaining
Configuring Server Chaining 37-3
37.1.3 Supported Operations
Server chaining supports the following operations:
■Bind
■Compare
■Modify
■Search
The compare, modify, and search operations can be enabled or disabled by setting
configuration parameters.
When an Oracle Internet Directory client application issues an LDAP search request,
Oracle Internet Directory integrates the search results from its own data and the
external directories.
When an Oracle Internet Directory client application issues an LDAP bind, compare,
or modify request, Oracle Internet Directory redirects the request to the external
directory.
In 10g (10.1.4.0.1) and later, the compare operation is only supported for the
userpassword attribute.
In 10g (10.1.4.0.1) and later, attribute modification is supported in two cases:
■The external attribute has the same name as the Oracle Internet Directory
attribute. This is true for most standard LDAP attributes.
■The external attribute is mapped to an Oracle Internet Directory attribute, and
neither the external nor the Oracle Internet Directory attribute is an operational
attribute.
37.1.4 Server Chaining with Replication
If you use server chaining in a replication environment, set it up on all nodes so that
the entries remain consistent across nodes. Configure server chaining so that the
mapped external directories are the same for all the replicated nodes.
37.2 Configuring Server Chaining
Oracle Internet Directory is shipped with disabled sample server chaining entries.
For Active Directory, the DN for the server chaining entry is
cn=oidscad,cn=OID Server Chaining,cn=subconfigsubentry
For Oracle Directory Server Enterprise Edition and Sun Java System Directory Server,
the entry DN is
cn=oidsciplanet,cn=OID Server Chaining,cn=subconfigsubentry
Novell eDirectory, the entry DN is
cn=oidscedir,cn=OID Server Chaining,cn=subconfigsubentry
Note: You cannot modify an Active Directory user password from
Oracle Internet Directory through server chaining.

Configuring Server Chaining
37-4 Oracle Fusion Middleware Administrator's Guide for Oracle Internet Directory
You configure server chaining by customizing these entries for your environment and
enabling them. You can do this either from the command line or by using Oracle
Directory Services Manager.
This section contains the following topics:
■Section 37.2.1, "Configuring Server Chaining by Using Oracle Directory Services
Manager"
■Section 37.2.2, "Configuring Server Chaining from the Command Line"
37.2.1 Configuring Server Chaining by Using Oracle Directory Services Manager
Oracle Directory Services Manager provides a convenient interface for modifying the
Oracle Internet Directory server chaining configuration entries. To configure server
chaining by using Oracle Directory Services Manager, perform the following steps:
1. Invoke Oracle Directory Services Manager and connect to the Oracle Internet
Directory server as described in Section 7.4.5, "Invoking Oracle Directory Services
Manager."
2. From the task selection bar, select Advanced.
3. Expand Server Chaining. Server Chaining entries appear in the left panel. Current
entries include iPlanet (Oracle Directory Server Enterprise Edition and Sun Java
System Directory Server) and Active Directory.
4. To modify a server chaining configuration entry, select it. The Server Chaining
Management tab appears in the right pane.
5. Modify External Host Name, External Port Number, Login User DN, and Login
User Password as necessary.
6. To enable server chaining authentication, modification, or search, select the
corresponding checkbox.
7. Modify the other fields as necessary.
8. After modifying an external user container, group container, or login credential,
verify the value by clicking Verify User Container, Verify Group Container, or
Verify Login Credential, respectively.
If the verification fails, examine the values you entered for errors. If the problem
persists, consult the external directory administrator to verify the accuracy of the
values you entered.
9. If you want to add an attribute mapping, click the Add attribute mappings to list
icon under Attribute Mapping. To edit an existing mapping, select the mapping
and click the Edit Attribute Mapping icon under Attribute Mapping. The New
Attribute Mapping window appears. Enter the External Directory Attribute and
the OID Attribute. To locate Oracle Internet Directory attribute by browsing, click
Select then select the attribute in the Attribute Selection window.
10. Click OK to create the mapping or click Cancel to abandon it.
11. To delete a mapping, select the mapping and click the Delete selected attribute
mapping icon. When the Delete Confirm dialog appears, click Delete to delete the
mapping or Cancel to abandon deletion.
12. Click OK to enable the configuration changes or click Cancel to abandon the
changes.

Creating Server Chaining Configuration Entries
Configuring Server Chaining 37-5
37.2.2 Configuring Server Chaining from the Command Line
Perform the following steps to configure server chaining from the command line:
1. Create an LDIF file to manually add the user and group containers. To determine
the DNs for these containers, see Section 37.3.2, "Requirements for User and Group
Containers." For example, if your user search base is
cn=users,dc=us,dc=oracle,dc=com, and the group search base is
cn=groups,dc=us,dc=oracle,dc=com, then you would use the following
entries in your LDIF file:
dn: cn=AD,cn=users,dc=us,dc=oracle,dc=com
cn: AD
objectclass: orclcontainer
objectclass: top
dn: cn=iPlanet,cn=users,dc=us,dc=oracle,dc=com
cn: iPlanet
objectclass: orclcontainer
objectclass: top
dn: cn=AD,cn=groups,dc=us,dc=oracle,dc=com
cn: AD
objectclass: orclcontainer
objectclass: top
dn: cn=iPlanet,cn=groups,dc=us,dc=oracle,dc=com
cn: iPlanet
objectclass: orclcontainer
objectclass: top
2. Use ldapadd and the LDIF file you just created to add the entries.
ldapadd -p port -h host -D "binddn" -q -v -f container_ldif_file_name
3. Create another LDIF file to modify and enable the server chaining configuration
entries. For example LDIF files, see Section 37.3.4, "Active Directory Example" and
Section 37.3.7, "Oracle Directory Server Enterprise Edition and Sun Java System
Directory Server (iPlanet) Example." A table of attributes is provided in
Section 37.3, "Creating Server Chaining Configuration Entries" Attribute mapping
is explained in Section 37.3.3, "Attribute Mapping."
4. Modify the server chaining configuration entries using the ldapmodify
command and the LDIF file you just created. Use a command line of the form:
ldapmodify -D "cn=orcladmin" -q -p port -h host -D "binddn" \
-v -f entry_ldif_file_name
37.3 Creating Server Chaining Configuration Entries
This section contains the following topics:
■Section 37.3.1, "Configuration Entry Attributes"
■Section 37.3.2, "Requirements for User and Group Containers"
■Section 37.3.3, "Attribute Mapping"
■Section 37.3.4, "Active Directory Example"
■Section 37.3.5, "Active Directory with SSL Example"

Creating Server Chaining Configuration Entries
37-6 Oracle Fusion Middleware Administrator's Guide for Oracle Internet Directory
■Section 37.3.7, "Oracle Directory Server Enterprise Edition and Sun Java System
Directory Server (iPlanet) Example"
■Section 37.3.8, "Oracle Directory Server Enterprise Edition and Sun Java System
Directory Server (iPlanet) with SSL Example"
■Section 37.3.9, "eDirectory Example"
■Section 37.3.10, "eDirectory with SSL Example"
37.3.1 Configuration Entry Attributes
Table 37–1 lists the configuration entry attributes for server chaining.
Table 37–1 Configuration Entry Attributes for Server Chaining
Attribute Required Description
orclOIDSCExtHost Yes The host name of the external directory host.
This is a single value attribute.
orclOIDSCExtPort Yes The port number of the external directory
host. This is a single value attribute. The
default value is 3060.
orclOIDSCExtDN Yes The DN in the external directory. Server
chaining binds against the external directory
using this identity to perform search and
modify operations. This identity must have
sufficient privilege to perform the operation.
This is a single value attribute.
orclOIDSCExtPassword Yes The password for the DN of the external
directory. This is a single value attribute. Be
sure to enable privacy mode to ensure that
users cannot retrieve this attribute in clear
text. See Section 27.7, "Configuring Privacy
of Retrieved Sensitive Attributes."
orclOIDSCExtUserContainer Yes The user container in the external directory
from which to perform the user search
operation. This is a single value attribute.
orclOIDSCExtGroupContainer Yes The group container in the external directory
from which to perform the group search
operation. This is a single value attribute.
This attribute is optional if the external user
container and the external group container
are the same. In this case the group search
operations are performed on the external
user container.
orclOIDSCTargetUserContainer Yes The user container in Oracle Internet
Directory in which the external users reside.
For more information, see Section 37.3.2,
"Requirements for User and Group
Containers."
orclOIDSCTargetGroupContainer Yes The group container in Oracle Internet
Directory in which the external groups
reside. For more information, see
Section 37.3.2, "Requirements for User and
Group Containers."

Creating Server Chaining Configuration Entries
Configuring Server Chaining 37-7
orclOIDSCAttrMapping No Specifies each attribute mapping between the
external directory and Oracle Internet
Directory. For example, to map the eMail
attribute from Active Directory to the mail
attribute in Oracle Internet Directory, set this
attribute to:
orclOIDSCAttrMapping;mail:eMail
For more information, see Section 37.3.3,
"Attribute Mapping."
orclOIDSCExtSearchEnabled Yes External search capability. 0 = disabled
(default), 1 = enabled. This is a single value
attribute.
orclOIDSCExtModifyEnabled Yes External modify capability. 0 = disabled
(default), 1 = enabled. This is a single value
attribute.
orclOIDSCExtAuthEnabled Yes External authentication capability. 0 =
disabled (default), 1 = enabled. This is a
single value attribute.
orclOIDSCSSLEnabled No SSL connection to the external directory. 0 =
disabled (default), 1 = enabled. This is a
single value attribute. Required if SSL is
enabled.
orclOIDSCExtSSLPort No The SSL port number of the external
directory host. This is a single value
attribute.
OrclOIDSCWalletLocation No The filename and path of the wallet that
contains the server certificate of the external
directory. This is a single value attribute.
Required if SSL is enabled
orclOIDSCWalletPassword No The wallet password. This is a single value
attribute. Required if SSL is enabled
mapUIDtoADAttribute No Specifies the mapping of OID attribute "uid"
to an attribute in Active Directory. You can
map "uid" to any non-binary attributes
defined in Active Directory. The default
value is "name". This is a single value
attribute.
showExternalGroupEntries No In a search against the group container:
"base" - show entries with objectclass group
(default), "sub" - show entries without
objectclass "user" and "computer". This is a
single value attribute. Applicable with Active
Directory only.
showExternalUserEntries No In a one level search with an entry one level
below the user container as the base: "base" -
do not show any entry (default), "sub" - show
entries in the subtree below the base of the
search. This is a single value attribute.
Applicable with Active Directory only.
addOrcluserv2ToADUsers No Add "orcluserv2" objectclass to entries that
have objectclass user. 0 = disabled (default),
1 = enabled. This is a single value attribute.
Applicable with Active Directory only.
Table 37–1 (Cont.) Configuration Entry Attributes for Server Chaining
Attribute Required Description

Creating Server Chaining Configuration Entries
37-8 Oracle Fusion Middleware Administrator's Guide for Oracle Internet Directory
37.3.2 Requirements for User and Group Containers
The target user and group containers must be under the Oracle Internet Directory
search base in order to work with Oracle Single Sign-On. Use the container names
cn=AD for Active Directory and cn=iPlanet for Oracle Directory Server Enterprise
Edition or Sun Java System Directory Server (iPlanet). For example, if your user search
base is:
cn=users,dc=us,dc=oracle,dc=com
you would use
cn=AD,cn=users,dc=us,dc=oracle,dc=com
as the target user container for the Active Directory users or
cn=iPlanet,cn=users,dc=us,dc=oracle,dc=com
as the target user container for the Sun Java System Directory Server users. Similarly, if
your group search base is:
cn=groups,dc=us,dc=oracle,dc=com
you would use
cn=AD,cn=groups,dc=us,dc=oracle,dc=com
as the target container for the Active Directory s or
cn=iPlanet,cn=groups,dc=us,dc=oracle,dc=com
as the target container for the Oracle Directory Server Enterprise Edition or Sun Java
System Directory Server groups.
The target user and group containers exist only for the external directories. All the
users and groups that appear under these nodes are populated by the external
directories. Do not add entries under these containers directly from Oracle Internet
Directory.
37.3.3 Attribute Mapping
If an attribute in an external directory and an Oracle Internet Directory attribute are
the same, then no mapping is required. Server chaining performs some attribute
mapping by default. The default mapping list is as follows:
For Active Directory server chaining, you can use the mapUIDtoADAttribute attribute
to map uid to any non-binary attributes defined in Active Directory.
Table 37–2 Default Attribute Mapping to Active Directory
Oracle Internet Directory
Attribute Active Directory Attribute
orclguid objectGUID
uid name
orclsamaccountname samaccountname
krbprincipalname userprincipalname

Creating Server Chaining Configuration Entries
Configuring Server Chaining 37-9
The following objects cannot be mapped:
■Operational attributes
■Object classes
■Oracle Internet Directory- specific attributes. These attributes typically have names
starting with orcl.
37.3.4 Active Directory Example
The following example shows server chaining configured to use the Active Directory
server dlin-pc9.us.example.com, port 3060, as its external directory store. The
SSL capability has been enabled. All the attributes are explained in Table 37–1 on
page 37-6.
cn=oidscad,cn=OID Server Chaining,cn= subconfigsubentry
orclOIDSCExtHost: dlin-pc9.us.example.com
orclOIDSCExtPort: 3060
orclOIDSCExtDN: cn=administrator,cn=users,dc=oidvd,dc=com
orclOIDSCExtPassword: *******
orclOIDSCExtUserContainer: cn=users,dc=oidvd,dc=com
orclOIDSCTargetUserContainer: cn=AD,cn=users,dc=us,dc=oracle,dc=com
orclOIDSCTargetGroupContainer: cn=AD,cn=groups,dc=us,dc=oracle,dc=com
orclOIDSCExtSearchEnabled: 1
orclOIDSCExtModifyEnabled: 1
orclOIDSCExtAuthEnabled: 1
orclOIDSCAttrMapping;description: title
orcloidscsslenabled: 0
The following example is the LDIF file used to modify the configuration entry:
dn: cn=oidscad,cn=oid server chaining,cn=subconfigsubentry
changetype: modify
replace: orcloidscextdn
orcloidscextdn: cn=administrator,cn=users,dc=oidvd,dc=com
-
replace: orcloidscextpassword
orcloidscextpassword: password
-
replace: orcloidscexthost
Table 37–3 Default Attribute Mapping to Sun Java System Directory Server
Oracle Internet Directory
Attribute Sun Java System Directory Server Attribute
orclguid nsuniqueid
authpassword userpassword
krbprincipalname mail
Table 37–4 Default Attribute Mapping to Novell eDirectory
Oracle Internet Directory
Attribute Novell eDirectory Attribute
orclguid guid
orclsamaccountname uid
krbprincipalname mail

Creating Server Chaining Configuration Entries
37-10 Oracle Fusion Middleware Administrator's Guide for Oracle Internet Directory
orcloidscexthost: dlin-pc9.us.example.com
-
replace: orcloidscextport
orcloidscextport: 3060
-
replace: orcloidsctargetusercontainer
orcloidsctargetusercontainer: cn=AD,cn=users,dc=us,dc=oracle,dc=com
-
replace: orcloidsctargetgroupcontainer
orcloidsctargetgroupcontainer: cn=AD,cn=groups,dc=us,dc=oracle,dc=com
-
replace: orcloidscextusercontainer
orcloidscextusercontainer: cn=users,dc=dlin,dc=net
-
replace: orcloidscextgroupcontainer
orcloidscextgroupcontainer: cn=users,dc=dlin,dc=net
-
replace: orcloidscextsearchenabled
orcloidscextsearchenabled: 1
-
replace: orcloidscextmodifyenabled
orcloidscextmodifyenabled: 1
-
replace: orcloidscextauthenabled
orcloidscextauthenabled: 1
-
replace: orcloidscsslenabled
orcloidscsslenabled:1
37.3.5 Active Directory with SSL Example
The following example shows server chaining configured to use the Active Directory
server ad.example.com, SSL port 3133, and the wallet located at
/adwallet/ewallet.p12.
cn=oidscad,cn=OID Server Chaining,cn= subconfigsubentry
orclOIDSCExtHost: ad.example.com
orclOIDSCExtPort: 3060
orclOIDSCExtDN: cn=administrator,cn=users,dc=oidvd,dc=com
orclOIDSCExtPassword: *******
orclOIDSCExtUserContainer: cn=users,dc=oidvd,dc=com
orclOIDSCTargetUserContainer: cn=AD,cn=users,dc=oracle,dc=com
orclOIDSCTargetGroupContainer: cn=AD,cn=groups,dc=oracle,dc=com
orclOIDSCExtSearchEnabled: 1
orclOIDSCExtModifyEnabled: 1
orclOIDSCExtAuthEnabled: 1
orclOIDSCSSLEnabled: 1
orclOIDSCExtSSLPort: 3133
orclOIDSCWalletLocation: /adwallet/ewallet.p12
orclOIDSCWalletPassword: ********
Perform the following steps to configure server chaining with SSL from the command
line:
1. Configure Active Directory server chaining without SSL, as described in the
previous section.
2. Create an LDIF file like the following to enable SSL connection to the external
directory. Replace the values of orcloidscextsslport,

Creating Server Chaining Configuration Entries
Configuring Server Chaining 37-11
orcloidscwalletlocation and orcloidscwalletpassword with values
that match the actual Active Directory server:
dn: cn=oidscad,cn=oid server chaining,cn=subconfigsubentry
changetype: modify
replace: orcloidscsslenabled
orcloidscsslenabled:1
-
replace: orcloidscextsslport
orcloidscextsslport: 3133
-
replace: orcloidscwalletlocation
orcloidscwalletlocation: /adwallet/ewallet.p12
-
replace: orcloidscwalletpassword
orcloidscwalletpassword: passw0rd
3. To apply the changes, use a command line such as
ldapmodify -p OID_port -h OID_host -D "cn=orcladmin" -q -v -f ldif_file_name
37.3.6 Active Directory with New Attributes Example
The attributes mapUIDtoADAttribute, showExternalGroupEntries,
showExternalUserEntries, and addOrcluserv2ToADUsers have been added
since Oracle Internet Directory 10g (10.1.4.0.1). To add these attributes to an existing
Active Directory server chaining entry, modify the following LDIF file with the
appropriate values:
dn: cn=oidscad,cn=oid server chaining,cn=subconfigsubentry
changetype: modify
replace: mapUIDtoADAttribute
mapUIDtoADAttribute: name
-
replace: showExternalGroupEntries
showExternalGroupEntries: base
-
replace: showExternalUserEntries
showExternalUserEntries: base
-
replace: addOrcluserv2ToADUsers
addOrcluserv2ToADUsers: 0
Use a command line such as
ldapmodify -p OID_port -h OID_host -D "cn=orcladmin" -q -v -f ldif_file_name
to modify the configuration entry.
37.3.7 Oracle Directory Server Enterprise Edition and Sun Java System Directory
Server (iPlanet) Example
The following example shows server chaining configured to use the Sun Java System
Directory Server dlin-pc10.us.example.com, port 103060, as its external
directory store. All the attributes are explained in Table 37–1 on page 37-6.
cn=oidsciplanet,cn=OID Server Chaining,cn=subconfigsubentry
orclOIDSCExtHost: dlin-pc10.us.example.com
orclOIDSCExtPort: 10389
orclOIDSCExtDN: cn=directory manager

Creating Server Chaining Configuration Entries
37-12 Oracle Fusion Middleware Administrator's Guide for Oracle Internet Directory
orclOIDSCExtPassword: ********
orclOIDSCExtUserContainer: ou=people,dc=example,dc=com
orclOIDSCExtGroupContainer: ou=groups,dc=example,dc=com
orclOIDSCTargetUserContainer: cn=iPlanet,cn=users,dc=us,dc=oracle,dc=com
orclOIDSCTargetGroupContainer: cn=iPlanet,cn=groups,dc=us,dc=oracle,dc=com
orclOIDSCExtSearchEnabled: 1
orclOIDSCExtModifyEnabled: 1
orclOIDSCExtAuthEnabled: 1
orclOIDSCSSLEnabled:0
The following example is the LDIF file used to modify the configuration entry:
dn: cn=oidsciplanet,cn=oid server chaining,cn=subconfigsubentry
changetype: modify
replace: orcloidscextdn
orcloidscextdn: cn=directory manager
-
replace: orcloidscextpassword
orcloidscextpassword: password
-
replace: orcloidscexthost
orcloidscexthost: dlin-pc10.us.example.com
-
replace: orcloidscextport
orcloidscextport: 10389
-
replace: orcloidsctargetusercontainer
orcloidsctargetusercontainer: cn=iplanet,cn=users,dc=us,dc=oracle,dc=com
-
replace: orcloidsctargetgroupcontainer
orcloidsctargetgroupcontainer: cn=iplanet,cn=groups,dc=us,dc=oracle,dc=com
-
replace: orcloidscextusercontainer
orcloidscextusercontainer: ou=people,dc=example,dc=com
-
replace: orcloidscextgroupcontainer
orcloidscextgroupcontainer: ou=groups,dc=example,dc=com
-
replace: orcloidscextsearchenabled
orcloidscextsearchenabled: 1
-
replace: orcloidscextmodifyenabled
orcloidscextmodifyenabled: 1
-
replace: orcloidscextauthenabled
orcloidscextauthenabled: 1
37.3.8 Oracle Directory Server Enterprise Edition and Sun Java System Directory
Server (iPlanet) with SSL Example
The following example shows server chaining configured to use the Sun Java System
Directory Server sunone.example.com, SSL port 10636, and the wallet located at
/ipwallet/ewallet.p12
cn=oidsciplanet,cn=OID Server Chaining,cn=subconfigsubentry
orclOIDSCExtHost: sunone.example.com
orclOIDSCExtPort: 10389
orclOIDSCExtDN: cn=directory manager
orclOIDSCExtPassword: ********
orclOIDSCExtUserContainer: ou=people,dc=example,dc=com

Creating Server Chaining Configuration Entries
Configuring Server Chaining 37-13
orclOIDSCExtGroupContainer: ou=groups,dc=example,dc=com
orclOIDSCTargetUserContainer: cn=iPlanet,cn=users,dc=oracle,dc=com
orclOIDSCTargetGroupContainer: cn=iPlanet,cn=groups,dc=oracle,dc=com
orclOIDSCExtSearchEnabled: 1
orclOIDSCExtModifyEnabled: 1
orclOIDSCExtAuthEnabled: 1
orclOIDSCSSLEnabled: 1
orclOIDSCExtSSLPort: 10636
orclOIDSCWalletLocation: /ipwallet/ewallet.p12
orclOIDSCWalletPassword: ********
Perform the following steps to configure server chaining with SSL from the command
line:
1. Configure server chaining without SSL, as described in the previous section.
2. Create the following LDIF file to enable SSL connection to the external directory.
Replace the values of orcloidscextsslport, orcloidscwalletlocation
and orcloidscwalletpassword with values that match the actual Oracle
Directory Server Enterprise Edition/Sun Java System Directory Server.
dn: cn=oidsciplanet,cn=oid server chaining,cn=subconfigsubentry
changetype: modify
replace: orcloidscsslenabled
orcloidscsslenabled:1
-
replace: orcloidscextsslport
orcloidscextsslport: 10636
-
replace: orcloidscwalletlocation
orcloidscwalletlocation: /ipwallet/ewallet.p12
-
replace: orcloidscwalletpassword
orcloidscwalletpassword: passw0rd
3. Execute a command such as
ldapmodify -p OID_port -h OID_host -D "cn=orcladmin" -q -v -f ldif_file_name
to modify the configuration entry.
37.3.9 eDirectory Example
A sample eDirectory configuration looks like this:
cn=oidscedir,cn=OID Server Chaining,cn=subconfigsubentry
orclOIDSCExtHost: edirhost.domain.com
orclOIDSCExtPort: 3060
orclOIDSCExtDN: cn=admin,o=domain
orclOIDSCExtPassword: ********
orclOIDSCExtUserContainer: ou=users,o=domain
orclOIDSCExtGroupContainer: ou=groups,o=domain
orclOIDSCTargetUserContainer: cn=edir,cn=users,dc=us,dc=oracle,dc=com
orclOIDSCTargetGroupContainer: cn=edir,cn=groups,dc=us,dc=oracle,dc=com
orclOIDSCExtSearchEnabled: 1
orclOIDSCExtModifyEnabled: 1
orclOIDSCExtAuthEnabled: 1
orclOIDSCSSLEnabled:0

Debugging Server Chaining
37-14 Oracle Fusion Middleware Administrator's Guide for Oracle Internet Directory
37.3.10 eDirectory with SSL Example
A sample edirectory configuration with SSL looks like this:
cn=oidscedir,cn=OID Server Chaining,cn=subconfigsubentry
orclOIDSCExtHost: edirhost.domain.com
orclOIDSCExtPort: 3060
orclOIDSCExtDN: cn=admin,o=domain
orclOIDSCExtPassword: ********
orclOIDSCExtUserContainer: ou=users,o=domain
orclOIDSCExtGroupContainer: ou=groups,o=domain
orclOIDSCTargetUserContainer: cn=edir,cn=users,dc=us,dc=oracle,dc=com
orclOIDSCTargetGroupContainer: cn=edir,cn=groups,dc=us,dc=oracle,dc=com
orclOIDSCExtSearchEnabled: 1
orclOIDSCExtModifyEnabled: 1
orclOIDSCExtAuthEnabled: 1
orclOIDSCSSLEnabled: 1
orclOIDSCExtSSLPort: 3133
orclOIDSCWalletLocation: /edir/ewallet.p12
orclOIDSCWalletPassword: ********
37.4 Debugging Server Chaining
To debug server chaining, perform the following steps:
1. Set the Oracle Internet Directory server debug logging level, as described in
Section 23.2, "Managing Logging by Using Fusion Middleware Control" or
Section 23.3, "Managing Logging from the Command Line." Use the logging level
value 402653184. This value enables logging of all messages related to the Java
plug-in framework.
2. Modify the Oracle Internet Directory server chaining debugging settings. For both
cn=oidscad,cn=oid server chaining,cn=subconfigsubentry and
cn=oidsciplanet,cn=oid server chaining, cn=subconfigsubentry.
set the attribute orcloidscDebugEnabled to 1.
For example, to set orcloidscDebugEnabled to 1 in cn=oidscad,cn=oid
server chaining,cn=subconfigsubentry, you would type:
$ORACLE_HOME/bin/ldapmodify -h host -p port -D cn=orcladmin -q -f file
where file contains:
dn: cn=oidscad,cn=oid server chaining,cn=subconfigsubentry
changetype: modify
replace: orcloidscDebugEnabled
orcloidscDebugEnabled: 1
37.5 Configuring an Active Directory Plug-in for Password Change
Notification
When you use Enterprise User Security (EUS) with Server Chaining, a hash password
is required in order to authenticate users. This section describes how to install a
plug-in in the Microsoft Active Directory (AD) server so that this hash password is
available to users accessed through Oracle Internet Directory. Customers planning to
See Also: The Java Plug-in Debugging and Logging section in Oracle
Fusion Middleware Application Developer's Guide for Oracle Identity
Management.

Configuring an Active Directory Plug-in for Password Change Notification
Configuring Server Chaining 37-15
configure Enterprise User Security (EUS) to work with users accessed through Server
Chaining must configure this feature.
The steps are as follows
1. In Active Directory, create an attribute called orclCommonAttribute to store
the hash password. Use a command line such as:
ldapadd –p AD_Port –h AD_host -D "AD_administrator_DN" –w AD_administrator_
password -v –f orclca.ldif
Use an orclca.ldif file similar to the following example. Replace DC=bill,DC=com
with the actual Active Directory domain name and choose an appropriate
attributeID.
dn: cn=orclcommonattribute,CN=Schema,CN=Configuration,DC=bill,DC=com
objectClass: top
objectClass: attributeSchemacn: orclcommonattribute
distinguishedName:
CN=orclcommonattribute,CN=Schema,CN=Configuration,DC=bill,DC=com
instanceType: 4
uSNCreated: 16632
attributeID: 1.9.9.9.9.9.9.9.9
attributeSyntax: 2.5.5.3
isSingleValued: TRUE
uSNChanged: 16632
showInAdvancedViewOnly: TRUE
adminDisplayName: orclCommonAttribute
oMSyntax: 27
lDAPDisplayName: orclCommonAttribute
name: orclcommonattribute
objectCategory: CN=Attribute-Schema,CN=Schema,CN=Configuration,DC=bill,DC=com
2. Associate the attribute with the user objectclass. Use a command line such as:
ldapadd –p AD_Port –h AD_host -D "AD_administrator_DN" –w AD_administrator_
password -v –f user.ldif
In the following file, user.ldif, replace DC=bill,DC=com with the actual Active
Directory domain name.
dn: CN=User,CN=Schema,CN=Configuration,DC=bill,DC=com
changetype: modify
add: mayConatin
mayContain: orclCommonAttribute
It might take Active Directory a few minutes to refresh the schema.
3. Install the password change notification plug-in, as follows:
a. Copy %ORACLE_HOME%\ldap\admin\oidpwdcn.dll to the Active
Directory WINDOWS\system32 folder.
b. Use regedt32 to modify the registry. In the line:HKEY_LOCAL_
MACHINE\SYSTEM\CurrentControlSet\Control\Lsa\Notification
Packages, add oidpwdcn to the end. It should look like the following:
RASSFM
KDCSVC
WDIGEST
scecli
oidpwdcn

Configuring an Active Directory Plug-in for Password Change Notification
37-16 Oracle Fusion Middleware Administrator's Guide for Oracle Internet Directory
c. Restart Active Directory.
d. Verify that the plug-in is installed properly by resetting the password of a
user. The orclCommonAttribute should contain the hash password value.
4. Reset the password for all the Active Directory users so that the password verifier
is present for all the users.

38
Managing DIT Masking 38-1
38
Managing DIT Masking
DIT masking is the restriction of the DIT content that is exposed in an Oracle Internet
Directory server instance. Masking restricts access by all users except the super user,
cn=orcladmin
. Typically, you use masking to prevent some users from seeing certain
portions of the DIT, based on which instance of the Oracle Internet Directory server
they connect to. Typical use cases for presenting different views of the DIT include test
vs. production and internal vs. external users.
You could also restrict a user's view of the DIT by using Oracle Virtual Directory, but
DIT masking has far less performance and administrative overhead.
38.1 Configuring Masking
By default, no masking is configured. You use the following configuration attributes of
the instance-specific configuration entry to configure masking.
You modify these attributes in the same way as other attributes of the instance-specific
configuration entry. See Section 9.4.1, "Setting System Configuration Attributes by
Using ldapmodify."
38.2 Masking Examples
Masking is useful in scenarios where the administrator wants to selectively expose the
entries present in the directory. The following examples illustrate this use case.
38.2.1 Restricting Access by Container Name
Consider a DIT setup with the following hierarchy:
cn=internal,o=oracle
cn=external,o=oracle
cn=public,o=oracle
Table 38–1 Masking Configuration Attributes
Attribute Description
orclMaskRealm
Contains the DIT subtrees that are exposed in an instance. The
DN configured and its children are visible in the instance. Other
entries in the DIT are masked (hidden) for all LDAP operations.
orclMaskFilter
Filters the entries exposed in the instance. Entries matching the
filter criteria are exposed. Other entries are hidden for all LDAP
operations.

Masking Examples
38-2 Oracle Fusion Middleware Administrator's Guide for Oracle Internet Directory
The internal container contains entries internal to the organization and should have
limited access. The
external
and
public
container contains data about external users
and some public information that is accessible to all. An administrator wants to ensure
that only the
external
and
public
data is available outside of the organization
firewall. This can be achieved through masking. Create an Oracle Internet Directory
instance, such as
oid2
, that runs on a port exposed through the firewall. To ensure
applications and users connecting to this port see only publicly accessible content,
create masking realms in
cn=oid2
with
ldapmodify
, using the following LDIF file:
dn: cn=oid2,cn=osdldapd,cn=subconfigsubentry
changetype: modify
add: orclmaskrealm
orclmaskrealm: cn=external,o=oracle
orclmaskrealm: cn=public,o=oracle
This ensures that only the entries in the configured containers public and external are
seen through this instance. Applications and users connecting to this instance cannot
see the Internal container and its entries.
38.2.2 Restricting Access by Entry Data
Another use case is restricting entries based on the data stored in them. An
organization might have data about employees, contract workers and temp workers. A
user lookup application such as an email client looks up data on the directory server to
find out email addresses. An administrator wants to hide temp workers' information
and only expose employees and contractor workers in the instance, say
cn=oid2
, that
is accessed by the email client. This can be done by configuring masking filters with
ldapmodify
, using the following LDIF file:
dn: cn=oid2,cn=osdldapd,cn=subconfigsubentry
changetype: modify
add: orclmaskfilter
orclmaskfilter: (usertype=employee)
orclmaskfilter: (usertype=contract)
This ensures that entries with
usertype=employee
or
usertype=contract
are exposed
and others are not exposed.

Part V
Part V Advanced Administration: Directory
Replication
This part provides detailed discussions of replication and high availability and how to
plan and manage them. It contains these chapters:
■Chapter 39, "Setting Up Replication"
■Chapter 40, "Setting Up Replication Failover"
■Chapter 41, "Managing Replication Configuration Attributes"
■Chapter 42, "Managing and Monitoring Replication"

39
Setting Up Replication 39-1
39Setting Up Replication
Replication is the process of copying and maintaining the same naming contexts on
multiple directory servers. It can improve performance by providing more servers to
handle queries and by bringing the data closer to the client. It improves reliability by
eliminating risks associated with a single point of failure.
Before reading this chapter, please see Chapter 6, "Understanding Oracle Internet
Directory Replication" for an introduction to basic replication concepts.
This chapter presents some information that is common to both Advance
Replication-based replication and LDAP-based replication. The procedural sections of
the chapter describe how to set up LDAP-based replication and multimaster
replication with fan-out. For information and procedures specific to Oracle Database
Advanced Replication-based replication, please see Appendix C, "Setting Up Oracle
Database Advanced Replication-Based Replication."
This chapter contains the following topics:
■Section 39.1, "Introduction to Setting Up Replication"
■Section 39.2, "Converting an Advanced Replication-Based Agreement to an
LDAP-Based Agreement"
■Section 39.3, "Setting Up an LDAP-Based Replication Agreement by Using the
Replication Wizard"
■Section 39.4, "Testing Replication by Using Oracle Directory Services Manager"
■Section 39.5, "Setting Up an LDAP-Based Replication by Using the Command
Line"
■Section 39.6, "Setting Up a Multimaster Replication Group with Fan-Out"
See Also: Section 6.2.3, "Transport Mechanism: LDAP or Oracle
Database Advanced Replication."
See Also: Oracle Fusion Middleware High Availability Guide for
information on setting up replication in high availability
configurations.
Note: All references to Oracle Single Sign-On or Oracle Delegated
Administration Services in this chapter refer to Oracle Single Sign-On
10g (10.1.4.3.0) or later and Oracle Delegated Administration Services
10g (10.1.4.3.0) or later.

Introduction to Setting Up Replication
39-2 Oracle Fusion Middleware Administrator's Guide for Oracle Internet Directory
39.1 Introduction to Setting Up Replication
If you are unfamiliar with basic replication concepts, please see Chapter 6,
"Understanding Oracle Internet Directory Replication" before reading this
introduction.
This introduction contains the following topics:
■Section 39.1.1, "Replication Transport Mechanisms"
■Section 39.1.2, "Replication Setup Methods"
■Section 39.1.3, "Bootstrap Rules"
■Section 39.1.4, "The Replication Agreement"
■Section 39.1.5, "Other Replication Configuration Attributes"
■Section 39.1.6, "Replication Process and Architecture"
■Section 39.1.7, "Rules for Configuring LDAP-Based Replication"
■Section 39.1.8, "Replication Security"
■Section 39.1.9, "LDAP Replication Filtering for Partial Replication"
39.1.1 Replication Transport Mechanisms
Oracle Internet Directory supports two replication transport mechanisms.
■LDAP-based replication uses the industry-standard Lightweight Directory Access
Protocol Version 3. You can set up LDAP-based replication in one-way, two-way,
and multimaster configurations. This is the recommended protocol for most
environments.
■Oracle Database Advanced Replication-based replication uses the replication
capability of Oracle Database. Only multimaster configurations are supported.
(You can create a single master DRG by switching all nodes in a group but one to
read-only mode.)
If you must replicate Oracle Single Sign-On data, you must use Oracle Database
Advanced Replication-based replication. For information and procedures specific
to Advanced Replication-based replication, please see Appendix C, "Setting Up
Oracle Database Advanced Replication-Based Replication."
You can convert an existing Oracle Database Advanced Replication-based multimaster
agreement to an LDAP-based multimaster agreement. by using remtool
-asr2ldap. See Section 39.2, "Converting an Advanced Replication-Based Agreement
to an LDAP-Based Agreement."
39.1.2 Replication Setup Methods
The following methods are available for setting up Oracle Internet Directory
replication.
39.1.2.1 Replication Wizard
The recommended method for setting up LDAP-based replication is to use the
replication wizard in Oracle Enterprise Manager Fusion Middleware Control. The
See ALso: The remtool command-line tool reference in Oracle
Fusion Middleware Reference for Oracle Identity Management for more
information about the Replication Environment Management Tool

Introduction to Setting Up Replication
Setting Up Replication 39-3
procedure is described in Section 39.3, "Setting Up an LDAP-Based Replication
Agreement by Using the Replication Wizard." You can also use the wizard for
modifying an existing replication agreement, as described in Section 42.2.4, "Viewing
or Modifying a Replication Setup by Using the Replication Wizard" and Section 42.2.5,
"Deleting an LDAP-Based Replication Agreement by Using the Replication Wizard."
39.1.2.2 Command Line Tools
You must use command line tools to set up Advanced Replication-based replication.
You can also use command line tools to set up LDAP-based replication.
Command-line setup of LDAP-based replication is described in Section 39.5, "Setting
Up an LDAP-Based Replication by Using the Command Line." Command-line setup of
Advanced Replication-based replication is described in Appendix C, "Setting Up
Oracle Database Advanced Replication-Based Replication."
When setting up replication from the command line, you use the oidctl command
for stopping and starting the replication server. You use bulk tools for backing up data
and loading it to other nodes. You use LDAP tools for a few operations.
Optionally, you can use the bootstrap capability of the replication server for the initial
data migration.
You use the Replication Environment Management Tool, remtool, to perform
various replication-related tasks, including:
■Setting up a replication group
■Converting an existing Oracle Database Advanced Replication-based agreement to
an LDAP multimaster agreement.
■Adding and deleting replicas
■Managing the directory replication group
■Modifying or resetting the replication Bind DN password
■Modifying the database replication user REPADMIN password
■Displaying various errors and status information for change log propagation
■Tracking replication progress in a directory replication group.
39.1.2.3 Database Copy Procedure
It is possible to set up replication on a new host by copying the Oracle Database from
an existing host. This is a complex procedure that is not recommended for most
environments. The procedure is described in Appendix L, "Adding a Directory Node
by Using the Database Copy Procedure."
39.1.3 Bootstrap Rules
Whether you are using the replication wizard in Fusion Middleware Control or the
command line, you can use the bootstrap capability of the replication server for the
initial data migration.
You set the bootstrap flag by setting the attribute orclreplicastate to 0 under the
replicadn.
See Also: The remtool command-line tool reference in Oracle
Fusion Middleware Reference for Oracle Identity Management for more
information about the Replication Environment Management Tool

Introduction to Setting Up Replication
39-4 Oracle Fusion Middleware Administrator's Guide for Oracle Internet Directory
When a replica is in bootstrap mode, the supplier node must be in on line mode
(orclreplicastate=1). Do not set the supplier and consumer to bootstrap at same
time.
Bootstrap cannot be used for initial data migration on a node that has more than one
supplier. Therefore, bootstrap is limited to the following types of replica:
■A leaf replica, that is, one that has no consumer replicas.
■A primary replica in a two-node LDAP-based multi-master replication agreement,
provided it has no two-way fanout replicas.
■A non-primary replica in an LDAP-based multimaster replication agreement with
two or more nodes, provided it has no two-way fanout replicas.
■A fanout replica with only one supplier
If you set the bootstrap flag (orclreplicastate=0 under replicadn) of any other
replica, the replication server throws one of these messages:
bootstrapping against non-leaf replica is not allowed
bootstrap against master replica is not allowed
39.1.4 The Replication Agreement
When you set up replication, you create a container called a replication agreement in
the DIT on each of the participating hosts. The attributes of the replication agreement
entry are described in Section 41.1.3, "The Replication Agreement Entry."
If you use the replication wizard in Oracle Enterprise Manager Fusion Middleware
Control, your selections on the Settings page of the wizard specify the replication
agreement attributes that control connection and scheduling.
Your choices on that page include:
■Whether the replication server should use same connection for performing
multiple LDAP operations (Keep Alive) or open a new connection for each LDAP
operation (Always Use New Connection).
■The frequency at which replication should occur (Replication Frequency).
■The interval at which the replication server should repeat the change application
process (Human Intervention Queue Schedule). See Section D.5.1, "How the
Multimaster Replication Process Adds a New Entry to a Consumer" for more
information about the change application process and the human intervention
queue.
See Also:
■Section 39.5.2.1, "Setting Up an LDAP-Based Replica by Using
Automatic Bootstrapping"
■Section D.4, "LDAP Replica States"
Notes:
■Bootstrap is not allowed for Oracle Database Advanced
Replication replicas.
■Disable referential integrity during the replication bootstrapping
process. If referential integrity is enabled, bootstrapping fails.

Introduction to Setting Up Replication
Setting Up Replication 39-5
The replication agreement also contains the replication contexts. These are discussed
in more detail in Section 39.1.9, "LDAP Replication Filtering for Partial Replication."
The attributes are described in Section 41.1.3, "The Replication Agreement Entry."
39.1.5 Other Replication Configuration Attributes
In addition to the replication agreement entry, the DIT includes several other entries
that contain attributes that control replication. The entries and their attributes are
described in Chapter 41, "Managing Replication Configuration Attributes." Once you
have set up replication, you can manage these attributes.
Oracle Enterprise Manager Fusion Middleware Control has a Replication page,
separate from the replication wizard, that enables you to configure replication
attributes. You can also modify replication attributes by using LDAP tools. These
methods are described in Chapter 42, "Managing and Monitoring Replication."
39.1.6 Replication Process and Architecture
See Appendix D, "How Replication Works" for detailed information about replication
architecture and the replication process.
39.1.7 Rules for Configuring LDAP-Based Replication
The following rules apply to LDAP-based replication:
1. If you have multiple Oracle Internet Directory instances that use the same Oracle
Database, only one of the instances can be set up for replication.
2. LDAP Multimaster replication is not backward compatible. It is only supported
between replicas that are running 11g Release 1 (11.1.1).
3. For either multimaster replication or two-way fan-out replication, all nodes must
be running the same release of Oracle Internet Directory. Therefore, you must turn
off replication while performing rolling upgrades.
4. You can add a one-way fan-out replica that is running a newer release than its
supplier. For example, in Figure 6–5, "Example of Fan-Out Replication", Node F
can be running a newer release than the other nodes.
5. In general, do not replicate changes generated on a newer version of Oracle
Internet Directory to a node that has not yet upgraded to that version. If you do,
the changes can contain information that the earlier version cannot properly
interpret.
6. More specifically, if you add a new Oracle Internet Directory 11g Release 1
(11.1.1.6) node to an existing DRG as a one-way fan-out replica, there is no need to
upgrade other nodes of DRG. For all other types of replication, first upgrade the
nodes in the DRG before adding the new node. This is true whether the existing
nodes are running a 10g release or a previous 11g release. For example, in
Figure 6–5, "Example of Fan-Out Replication", before adding an Oracle Internet
Directory 11g Release 1 (11.1.1.6) node as Node E, you must first update Nodes A,
B, C and G to 11g Release 1 (11.1.1.6).
7. In LDAP-based replication, only the naming contexts listed in the
namingcontexts attribute of the root DSE can be replicated to the consumer.

Introduction to Setting Up Replication
39-6 Oracle Fusion Middleware Administrator's Guide for Oracle Internet Directory
8. The supplier of an LDAP-based replica can be a master node that is not a member
of any replication group, a member of a multimaster replication group, or another
LDAP-based replica.
9. An LDAP-based replica can be a consumer for another LDAP-based replica. That
consumer is then called a fan-out replica.
10. The new consumer node must be empty. That is, Oracle Internet Directory must be
newly installed.
39.1.8 Replication Security
This section contains these topics:
■Section 39.1.8.1, "Authentication and the Directory Replication Server"
■Section 39.1.8.2, "Secure Sockets Layer (SSL) and Oracle Internet Directory
Replication"
39.1.8.1 Authentication and the Directory Replication Server
Authentication is the process by which the Oracle directory replication server
establishes the true identity of itself when connecting to the directory server. It occurs
when an LDAP session is established by means of an ldapbind operation.
It is important that the directory replication server be properly authenticated before it
is allowed access to the directory.
The directory replication server uses a unique identity and a password to authenticate
with the directory server. The identity of the directory replication server is of the form
cn=replication dn,orclreplicaid=unique_identifier_of_
node,cn=replication configuration.
When it starts, the directory replication server reads its identity and password from an
Oracle Internet Directory secure wallet, and uses these credentials for authentication.
If you want to change the password for the replication bind DN, then you must use
the -chgpwd, -presetpwd, or -pchgwalpwd option of the Replication Environment
Management Tool. The wallet for replication identity is located at ORACLE_
INSTANCE/OID/admin/oidpwdrOracle_SID.
See Also: The discussion of namingcontexts in:
■Section 39.1.9.1, "Included and Excluded Naming Contexts in
LDAP Replication Filtering"
■Section 42.1.1, "Modifying What Is to Be Replicated in
LDAP-Based Partial Replication"
See Also: Oracle Fusion Middleware Installation Guide for Oracle
Identity Management for instructions on installing Oracle Internet
Directory.
Note: Make sure the schemas are synchronized. Otherwise, the
replication server might not be able to apply changes to the consumer
replica.
See Also: The remtool command-line tool reference in Oracle
Fusion Middleware Reference for Oracle Identity Management.

Introduction to Setting Up Replication
Setting Up Replication 39-7
39.1.8.2 Secure Sockets Layer (SSL) and Oracle Internet Directory Replication
You can deploy Oracle Internet Directory replication with or without SSL. The
replication server automatically detects if it is binding to the SSL port of an Oracle
Internet Directory instance. If so, it automatically works on top of the Secure Sockets
Layer.
To configure LDAP-based replication to use SSL encryption, specify the port number
of the SSL port in the orclReplicaURI attribute, which contains the supplier contact
information.
To configure Oracle Database Advanced Replication to use SSL encryption, use Oracle
Database Advanced Security. See the Secure Sockets Layer chapter in the Oracle
Database Advanced Security Administrator's Guide.
39.1.9 LDAP Replication Filtering for Partial Replication
This section describes rules and best practices to follow when specifying naming
contexts in LDAP partial replication. It contains the following topics:
■Section 39.1.9.1, "Included and Excluded Naming Contexts in LDAP Replication
Filtering"
■Section 39.1.9.2, "Attributes that Control Naming Contexts"
■Section 39.1.9.3, "Rules for LDAP Replication Filtering"
■Section 39.1.9.4, "Examples of LDAP Replication Filtering"
■Section 39.1.9.5, "Rules for Managing Naming Contexts and Attributes"
■Section 39.1.9.6, "Optimization of Partial Replication Naming Context for Better
Performance"
39.1.9.1 Included and Excluded Naming Contexts in LDAP Replication Filtering
In LDAP-based replication, you can include a given naming context for replication and
exclude one or more of the subtrees within that naming context from replication. You
can also exclude from replication one or more of the attributes in that naming context.
In LDAP-based replication, only naming contexts explicitly specified as included are
replicated. In Oracle Database Advanced Replication, however, all naming contexts
are included by default.
Note: In earlier releases, the replication server required the directory
server to allow anonymous bind. The replication server no longer
requires that.
Note: The replication server cannot communicate over an SSL port
that is configured for one-way authentication or two-way
authentication. The replication server startup will fail and hang. You
must configure the replication server to use either the non-SSL port or
an SSL port configured for no authentication. You can use a separate
Oracle Internet Directory server instance just for replication.
See Also: Chapter 26, "Configuring Secure Sockets Layer (SSL)".
See Also: Section 6.2.1, "Content to be Replicated: Full or Partial".

Introduction to Setting Up Replication
39-8 Oracle Fusion Middleware Administrator's Guide for Oracle Internet Directory
39.1.9.2 Attributes that Control Naming Contexts
The attributes that control naming contexts are described in Section 41.1.5, "The
Replication Naming Context Object Entry." If you use the Replication Wizard in Oracle
Enterprise Manager Fusion Middleware Control to set up replication, you set these
attributes on the Scope page.
39.1.9.3 Rules for LDAP Replication Filtering
When two or more naming context objects are configured for replication, the filtering
rules are as follows:
1. The overall included naming context is the union of all included naming contexts
defined in each naming context object.
2. The overall excluded naming contexts is the union of all excluded naming contexts
defined in each naming context object.
3. The attribute exclusions in a naming context object are specific only to that naming
context object.
4. If there is a conflict between an included naming context and an excluded naming
context, the excluded naming context overrules the included naming context. For
example, if an included naming context in naming context object A is a subtree of
an excluded naming context specified in another naming context object, B, the
subtrees specified in orclexcludednamingcontexts of naming context object
B are not replicated. That is, replication filtering in naming context object A is
ignored.
5. If you configure partial replication between two different versions of Oracle
Internet Directory (for example 10g (10.1.4.0.1) and 11g Release 1 (11.1.1)), then
you cannot exclude a naming context. Instead, you must explicitly specify the
naming contexts to be replicated as included naming contexts.
39.1.9.4 Examples of LDAP Replication Filtering
The discussion in this section relies on the sample naming context illustrated in
Figure 39–1. A partial list of user attributes is shown under cn=user1, cn=user2,
and cn=user1000.
Figure 39–1 A Sample Naming Context
The following examples show how these rules work:
See Also: "Replication Schema Elements" in Oracle Fusion Middleware
Reference for Oracle Identity Management for descriptions of the
attributes in the replication naming context entry
c=europe
cn=client
cn=myCompany
c=us
cn=hr cn=sales cn=server
cn=user1 cn=user2
· commonName
· surname
· uid
· userPassword
cn=user1000
· commonName
· surname
· uid
· userPassword
· commonName
· surname
· uid
· userPassword
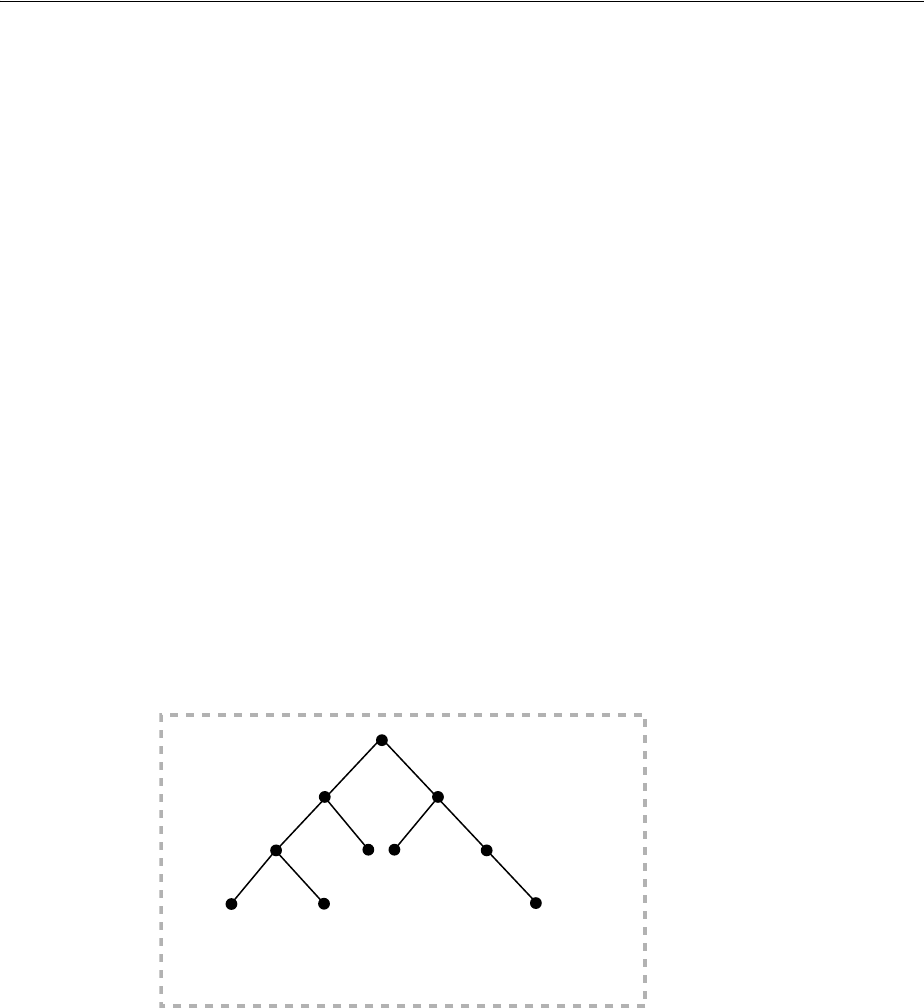
Introduction to Setting Up Replication
Setting Up Replication 39-9
■Scenario A: The Included Naming Context in One Naming Context Object Is a
Subtree of the Included Naming Context in Another Naming Context Object
■Scenario B: The Included Naming Context in One Naming Context Object Is a
Subtree of An Excluded Naming Context in Another Naming Context Object
■Rules for Managing Naming Contexts and Attributes
■Optimization of Partial Replication Naming Context for Better Performance
Scenario A: The Included Naming Context in One Naming Context Object
Is a Subtree of the Included Naming Context in Another Naming Context
Object
In this scenario, the included naming context in naming context object #2 is a subtree
of the included naming context in object #1.
Naming Context Object #1
dn:cn=namectx001,
cn=replication namecontext,
orclagreementid=unique_identifier_of_the_replication_agreement,
orclreplicaid=unique_identifier_of_the_supplier,
cn=replication configuration
orclincludednamingcontexts: cn=mycompany
Naming context object #1 includes the entire DIT under cn=myCompany, as shown in
Figure 39–2.
Figure 39–2 Naming Context Object #1
Naming Context Object #2
dn:cn=namectx002,
cn=replication namecontext,
orclagreementid=unique_identifier_of_the_replication_agreement,
orclreplicaid=unique_identifier_of_the_supplier,
cn=replication configuration
orclincludednamingcontexts: cn=hr,c=us,cn=mycompany
orclexcludednamingcontexts: cn=user1,cn=hr,c=us,cn=mycompany
orclexcludedattributes: userPassword
Naming context object #2 includes the DIT under cn=hr,c=us,cn=mycompany, but
excludes cn=user1 and the attribute userPassword, as shown in Figure 39–3.
c=europe
cn=client
cn=myCompany
c=us
cn=hr cn=sales cn=server
cn=user1 cn=user2
· commonName
· surname
· uid
· userPassword
Included
cn=user1000
· commonName
· surname
· uid
· userPassword
· commonName
· surname
· uid
· userPassword
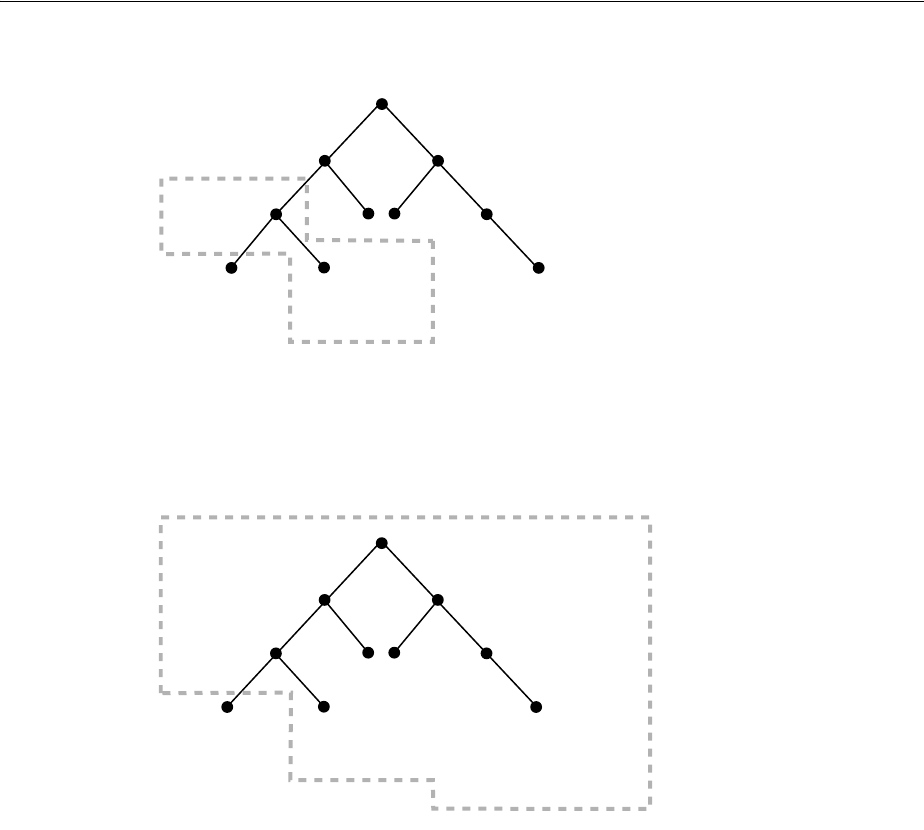
Introduction to Setting Up Replication
39-10 Oracle Fusion Middleware Administrator's Guide for Oracle Internet Directory
Figure 39–3 Naming Context Object #2
The result of combining naming context objects #1 and #2 is shown in Figure 39–4.
Figure 39–4 Result of Combining Naming Context Objects #1 and #2
In this scenario, the naming context that is replicated is the highest one specified in the
orclincludednamingcontexts attribute. Any excluded naming contexts are not
replicated. All changes under the subtree cn=mycompany are replicated, except for
cn=user1,cn=hr,c=us,cn=mycompany and the attribute userPassword under
cn=hr,c=us,cn=mycompany, which are excluded. The attribute userPassword
under the rest of the DIT, however, is not excluded from replication because exclusion
of userPassword was specified only for naming context object #2, which only included
the DIT under cn=hr.
Scenario B: The Included Naming Context in One Naming Context Object
Is a Subtree of An Excluded Naming Context in Another Naming Context
Object
In this scenario, the excluded naming context in naming context object #4 is a subtree
of the excluded naming context defined in naming context object #3.
Naming Context Object #3
dn:cn=namectx001,cn=replication namecontext,
orclagreementid=identifier,orclreplicaid=supplier,cn=replication configuration
orclincludednamingcontexts: cn=mycompany
orclexcludednamingcontexts: c=us,cn=mycompany
c=europe
cn=client
cn=myCompany
c=us
cn=hr cn=sales cn=server
cn=user1 cn=user2
· commonName
· surname
· uid
· userPassword
· commonName
· surname
· uid
· userPassword
Included
Excluded
Excluded
cn=user1000
· commonName
· surname
· uid
· userPassword
c=europe
cn=client
cn=myCompany
c=us
cn=hr cn=sales cn=server
cn=user1 cn=user2
· commonName
· surname
· uid
· userPassword
cn=user1000
· commonName
· surname
· uid
· userPassword
· commonName
· surname
· uid
· userPassword
Included
Excluded
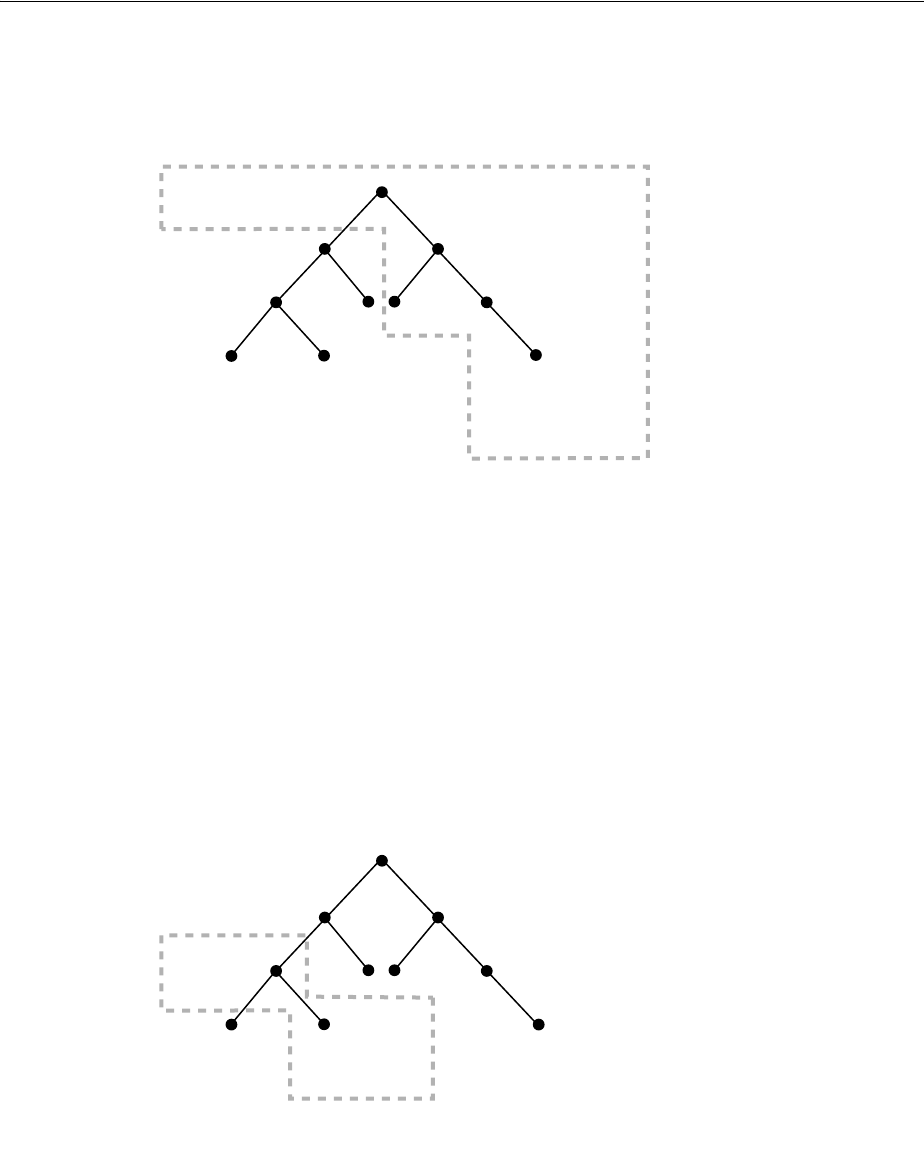
Introduction to Setting Up Replication
Setting Up Replication 39-11
Naming context object #3 excludes everything under c=us,cn=mycompany, as shown
in Figure 39–5.
Figure 39–5 Naming Context Object #3
Naming Context Object #4
dn:cn=namectx002,cn=replication
namecontext,orclagreementid=identifier,orclreplicaid=supplier,
cn=replication configuration
orclincludednamingcontexts: cn=hr, c=us,cn=mycompany
orclexcludednamingcontexts: cn=user1,cn=hr,c=us,cn=mycompany
orclexcludedattributes: userPassword
Naming context object #4 includes the DIT under cn=hr,c=us,cn=mycompany but
excludes user1, and the userPassword attribute for all users, as shown in
Figure 39–6.
Figure 39–6 Naming Context Object #4
The result of combining naming context objects #3 and #4 is shown in Figure 39–7.
c=europe
cn=client
cn=myCompany
c=us
cn=hr cn=sales cn=server
cn=user1 cn=user2
· commonName
· surname
· uid
· userPassword
Included
Excluded
cn=user1000
· commonName
· surname
· uid
· userPassword
· commonName
· surname
· uid
· userPassword
c=europe
cn=client
cn=myCompany
c=us
cn=hr cn=sales cn=server
cn=user1 cn=user2
· commonName
· surname
· uid
· userPassword
· commonName
· surname
· uid
· userPassword
Included
Excluded
Excluded
cn=user1000
· commonName
· surname
· uid
· userPassword
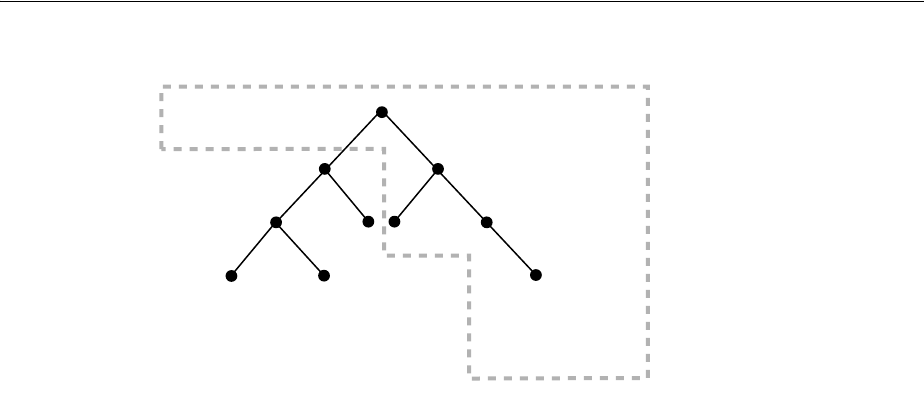
Introduction to Setting Up Replication
39-12 Oracle Fusion Middleware Administrator's Guide for Oracle Internet Directory
Figure 39–7 Result of Combining Naming Context Objects #3 and #4
In this scenario, the included naming context specified in naming context object #4 is
not replicated. That naming context is a subtree of a specified excluded naming
context in naming context object #3. In this case, naming context object #4 is ignored,
and no changes under cn=hr,c=us,cn=mycompany are replicated.
39.1.9.5 Rules for Managing Naming Contexts and Attributes
The following naming contexts cannot be replicated:
■DSE root-specific entry
■orclagreementid=000001,cn=replication configuration
■cn=subconfigsubentry
■cn=Oracle Internet Directory
■cn=subregistrysubentry
The following naming contexts cannot be excluded from replication:
■cn=catalogs
■cn=subschemasubentry
■cn=oracleschemaversion
■cn=replication configuration
The following attributes cannot be excluded from replication whether they are
mandatory or optional. Even if you specify attributes in this list for exclusion from
replication, they are always replicated.
■orclguid
■creatorsname
■createtimestamp
■cn
■dn
■attributetypes
■objectclasses
■objectclass
■orclindexedattribute
c=europe
cn=client
cn=myCompany
c=us
cn=hr cn=sales cn=server
cn=user1 cn=user2
· commonName
· surname
· uid
· userPassword
Included
Excluded
cn=user1000
· commonName
· surname
· uid
· userPassword
· commonName
· surname
· uid
· userPassword

Introduction to Setting Up Replication
Setting Up Replication 39-13
■orclproductversion
You cannot exclude mandatory attributes from replication. For example, suppose that
you have an object class named my_object_class, which includes the following
attributes: mandatory_attribute_1, optional_attribute_1, and optional_
attribute_2. In this case, you cannot exclude from replication mandatory_
attribute_1.
If you attempt to exclude from replication an attribute that is a mandatory attribute for
an entry, replication server still replicates that attribute.
In partial replication, when a naming context is changed from included to excluded
using the moddn operation, the replication server deletes the naming context at the
consumer. Similarly, if the naming context is changed from excluded to included by
using modn at the supplier, then the replication server synchronizes the entire naming
context from supplier to consumer.
39.1.9.6 Optimization of Partial Replication Naming Context for Better Performance
You must plan partial replication carefully to avoid degrading the performance of the
replication process. For best performance, use as few naming context objects as
possible. For example, the combined use of naming context objects #5 and #6 fulfills
the same requirement as the use of naming context object #7, but using naming context
object #7 provides better performance.
This section contains these examples:
■Naming Context Object #5
■Naming Context Object #6
■Naming Context Object #7
Naming Context Object #5
cn=namectx001,cn=replication
namecontext,orclagreementid=identifier,orclreplicaid=supplier,cn=replication
configuration
orclincludednamingcontexts: cn=mycompany
orclexcludednamingcontexts: c=europe,cn=mycompany
orclexcludedattributes: userPassword
Naming context object #5 is shown it Figure 39–8. It includes the DIT under
cn=mycompany, but excludes everything under c=europe. It also excludes the
attribute userPassword.
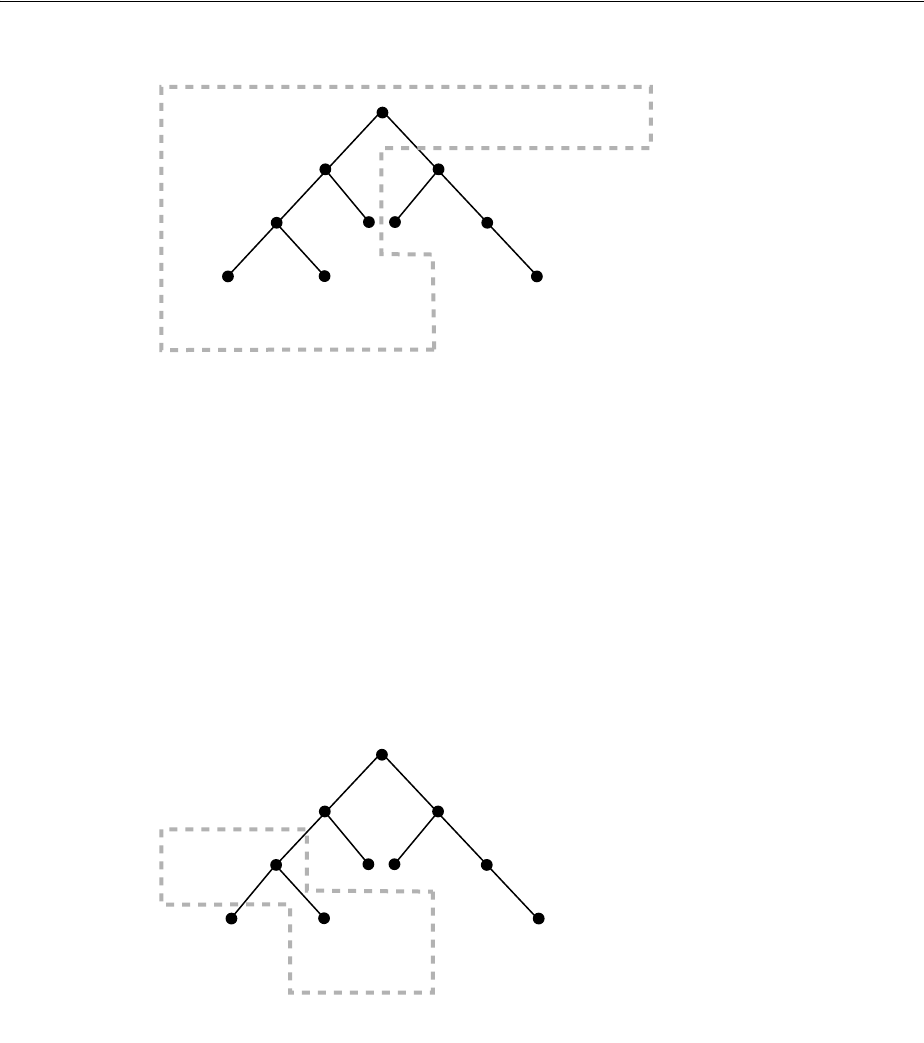
Introduction to Setting Up Replication
39-14 Oracle Fusion Middleware Administrator's Guide for Oracle Internet Directory
Figure 39–8 Naming Context Object #5
Naming Context Object #6
cn=namectx002,cn=replication
namecontext,orclagreementid=<id>,orclreplicaid=<supplier>,cn=replication
configuration
orclincludednamingcontexts: cn=hr, c=us,cn=mycompany
orclexcludednamingcontexts: cn=user1,cn=hr, c=us,cn=mycompany
orclexcludedattributes: userPassword
Naming context object #6 is shown in Figure 39–9. It includes the DIT under cn=hr,
c=us, cn=mycompany but excludes user1 and the attribute userPassword.
Figure 39–9 Naming Context Object #6
If naming context objects #5 and #6 are combined, then all changes under
cn=mycompany are replicated, except for c=europe,c=mycompany,
cn=user1,cn=hr,c=us,cn=mycompany, and the attribute userPassword.
You could fulfill the same requirement, however, by using naming context object #7.
Using a single naming context object provides better partial replication performance.
Naming Context Object #7
cn=namectx001,cn=replication
namecontext,orclagreementid=identifier,orclreplicaid=supplier,cn=replication
configuration
orclincludednamingcontexts: cn=mycompany
orclexcludednamingcontexts: c=europe,cn=mycompany
c=europe
cn=client
cn=myCompany
c=us
cn=hr cn=sales cn=server
cn=user1 cn=user2
· commonName
· surname
· uid
· userPassword
cn=user1000
· commonName
· surname
· uid
· userPassword
· commonName
· surname
· uid
· userPassword
Included
Excluded
Excluded
c=europe
cn=client
cn=myCompany
c=us
cn=hr cn=sales cn=server
cn=user1 cn=user2
· commonName
· surname
· uid
· userPassword
· commonName
· surname
· uid
· userPassword
Included
Excluded
Excluded
cn=user1000
· commonName
· surname
· uid
· userPassword
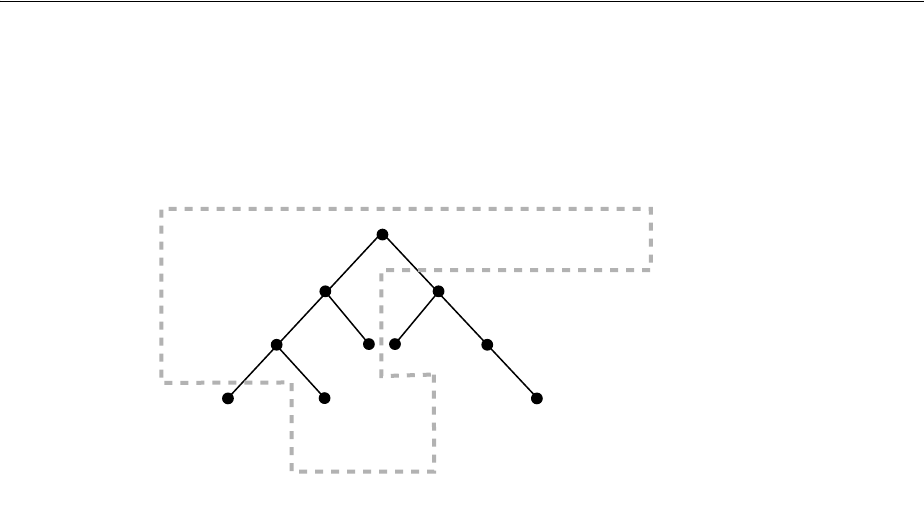
Converting an Advanced Replication-Based Agreement to an LDAP-Based Agreement
Setting Up Replication 39-15
orclexcludednamingcontexts: cn=user1,cn=hr, c=us,cn=mycompany
orclexcludedattributes: userPassword
Naming context object #7 is shown in Figure 39–10.
Figure 39–10 Naming Context Object #7
39.2 Converting an Advanced Replication-Based Agreement to an
LDAP-Based Agreement
You can convert an existing Oracle Database Advanced Replication-based agreement
between two or more nodes to an LDAP multimaster agreement by using remtool
-asr2ldap. The tool prompts you for information. For example:
remtool -asr2ldap
Enter replication administrator's name : repadmin
Enter replication administrator's password :
Enter global name of MDS : inst1.regress.rdbms.dev.example.com
Directory Replication Group (DRG) details :
-------- ------------- ----------------------- ------------- ------------- ----
Instance Host Name Global Name Version Replicaid Site
Name Type
-------- ------------- ----------------------- ------------- ------------- ----
tst1 stacu14 INST1.REGRESS.RDBMS.DEV OID 11.1.1.0. stacu14_tst1 MDS
tst12 stacu14 INST2.REGRESS.RDBMS.DEV OID 11.1.1.0. stacu14_tst12 RMS
-------- ------------- ----------------------- ------------- ------------- ----
Do you want to continue? [y/n] : y
------------------------------------------------------------------------------
Migrating ASR agreement to LDAP MM agreement...
Enter "SYSTEM" user password for "INST2.REGRESS.RDBMS.DEV.EXAMPLE.COM" database at
"stacu14" host :
Enter "SYSTEM" user password for "INST1.REGRESS.RDBMS.DEV.example.com" database at
"stacu14" host :
------------------------------------------------------------------------------
ASR setup has been cleaned
up.------------------------------------------------------------------------------
c=europe
cn=client
cn=myCompany
c=us
cn=hr cn=sales cn=server
cn=user1 cn=user2
· commonName
· surname
· uid
· userPassword
cn=user1000
· commonName
· surname
· uid
· userPassword
· commonName
· surname
· uid
· userPassword
Included
Excluded
Excluded

Setting Up an LDAP-Based Replication Agreement by Using the Replication Wizard
39-16 Oracle Fusion Middleware Administrator's Guide for Oracle Internet Directory
39.3 Setting Up an LDAP-Based Replication Agreement by Using the
Replication Wizard
You configure a one-way, two-way, or multimaster LDAP replica by using the
Replication Wizard in Oracle Enterprise Manager Fusion Middleware Control.
You configure an LDAP replication agreement as follows.
1. From the Oracle Internet Directory menu on the home page, select
Administration, then Replication Management.
2. You are prompted to log into the replication DN account. Provide the host, port,
replication DN, and replication DN password. If anonymous binds are enabled on
this OID component, the replication DN, host, and port fields fill in automatically
and are greyed out. You only need to enter the password.
3. Click the Create icon.
4. On the Type screen, select the replication type: One Way Replication, Two Way
Replication, or Multimaster Replication.
5. Click Next. The Replicas screen displays the replication type you selected.
6. Provide an agreement name. This must be unique across all the nodes.
7. For one way or two way replication, enter the host, port, user name (replication
DN), and replication password for the consumer node. Fields for the supplier
node are populated and greyed out.
For multimaster replication, enter the host, port, user name (replication DN), and
replication password for the secondary nodes. Fields for the primary node are
populated and greyed out.
8. Click Next to go the Settings page.
9. In the LDAP Connection field, select Keep Alive if you want the replication server
to use same connection for performing multiple LDAP operations. Select Always
Use New Connection if you want the server to open a new connection for each
LDAP operation.
10. Enter the Replication Frequency.
11. Enter the Human Intervention Queue Schedule. This is the interval, in seconds,
at which the directory replication server repeats the change application process.
12. If you have specified Two Way Replication or Multimaster Replication as the
agreement type, the settings page contains a section called Replication Server Start
Details. You can select Start Server to start the server instance and you can enable
bootstrap by selecting Enable Bootstrap. First select the host, then select Instance
Name and Component Name for that host. Then you can select Start Server or
Enable Bootstrap or both.
See Also: Section 6.2.2, "Direction: One-Way, Two-Way, or Peer to
Peer"
Note: You cannot use the Replication Wizard in Oracle Enterprise
Manager Fusion Middleware Control to configure an Oracle Database
Advanced Replication-based replication agreement. You must do that
from the command line.

Setting Up an LDAP-Based Replication by Using the Command Line
Setting Up Replication 39-17
13. Click Next to go to the Scope page. The default primary naming context is filled
in.
14. To exclude a secondary naming context within the default primary naming
context, select the primary naming context and click the Create button. Then
proceed to Step 16.
15. To create another primary naming context, click the Create Primary Naming
Context button. This invokes the Primary Naming Context dialog.
To specify a primary naming context, either enter the DN manually in the Primary
Naming Context field or click Select and browse to the DN you want to use as
your primary naming context. Select the container and click OK.
16. To exclude a secondary naming context, click the Add icon below the Excluded
Secondary Naming Contexts field. This invokes the Select Secondary Naming
Context to be Excluded dialog. Select the naming context and click OK. The
naming context appears in the Excluded Secondary Naming Contexts field.
17. To exclude an attribute, click the Add icon below the ExcludedAttributes field.
This invokes the Select Excluded Attributes screen. Select the attributes you want
to exclude and click OK. The attribute now appears in the Excluded Attributes
field.
18. Click OK. The primary naming context is now listed on the Scope page.
19. Click Next. The Summary page displays a summary of the replication agreement
you are about to create.
20. Click Finish to create the replication agreement.
39.4 Testing Replication by Using Oracle Directory Services Manager
Use Oracle Directory Services Manager to test directory replication by doing the
following:
1. Invoke Oracle Directory Services Manager and connect to the Oracle Internet
Directory server as described in Section 7.4.5, "Invoking Oracle Directory Services
Manager."
2. From the task selection bar, select Data Browser.
3. Create a single entry on the MDS node, as described in Section 13.2.6, "Adding a
New Entry by Using Oracle Directory Services Manager."
The identical entry appears in approximately 1 to 10 minutes on the RMS. You can
adjust the timing in the replication server configuration set entry. If entries are
modified on any nodes in the DRG, then the changes are replicated.
39.5 Setting Up an LDAP-Based Replication by Using the Command Line
This section contains these topics:
■Section 39.5.1, "Copying Your LDAP Data by Using ldifwrite and bulkload"
■Section 39.5.2, "Setting Up an LDAP-Based Replica with Customized Settings"
■Section 39.5.3, "Password Policy and Fan-out Replication"
■Section 39.5.4, "Deleting an LDAP-Based Replica"
See Also: Section 6.2.2, "Direction: One-Way, Two-Way, or Peer to
Peer"

Setting Up an LDAP-Based Replication by Using the Command Line
39-18 Oracle Fusion Middleware Administrator's Guide for Oracle Internet Directory
39.5.1 Copying Your LDAP Data by Using ldifwrite and bulkload
You can use ldifwrite and bulkload to copy LDAP data from one host to another.
Use the ldifwrite utility to back up LDAP data with operational attributes
preserved. After this is done, use the bulkload utility to load data to all replicas in a
group.
Use bulkload with the check="TRUE", generate="TRUE", and
restore="TRUE" arguments, and then with the load="TRUE" argument. Preserve
the operational attributes by using the same intermediate files (generated by using the
generate="TRUE" argument) for all replicas. You can load multiple replicas in the
same invocation of the bulkload command by using connect="connect_
string" with the appropriate connect string for each replica.
Using this method can take a long time for a directory with one million entries.
39.5.2 Setting Up an LDAP-Based Replica with Customized Settings
To establish customized settings, you must first install the new node. To do so, follow
the instructions in Oracle Fusion Middleware Installation Guide for Oracle Identity
Management.
After configuring LDAP-based replication with remtool, you can customize the
namingcontext defining what is replicated for that LDAP-based node.
There are two ways to set up an LDAP-based replica with customized setting, based
on how you will migrate the data from the directory:
■Use the command-line tools. Use ldifwrite to backup the data from the
supplier replica, then use bulkload to restore the data to the consumer replica
■Use automatic bootstrapping. This is a replication server feature that automatically
bootstrap the data from the supplier replica to the consumer replica, based upon
replication configuration.
Table 39–1 compares these two methods.
If automatic bootstrapping is your chosen data migration method, customize your
LDAP-based replica using Section 39.5.2.1, "Setting Up an LDAP-Based Replica by
Using Automatic Bootstrapping."
See Also:
■Chapter 15, "Performing Bulk Operations"
■Chapter 25, "Backing Up and Restoring Oracle Internet Directory"
■"Oracle Identity Management Command-line Tool Reference" in
Oracle Fusion Middleware Reference for Oracle Identity Management
See Also: The discussion of naming contexts in Section 42.1.1,
"Modifying What Is to Be Replicated in LDAP-Based Partial
Replication."
Table 39–1 Data Migration Using ldifwrite/bulkload versus Automatic Bootstrapping
Migration Using ldifwrite/bulkload Migration Using Automatic Bootstrapping
Manual procedure
Faster performance
Good for a large amount of data
Automatic procedure
Uses the filtering capability of partial replication
Good for a smaller number of entries

Setting Up an LDAP-Based Replication by Using the Command Line
Setting Up Replication 39-19
If ldifwrite/bulkload is your chosen data migration method, configure your
LDAP-based replica using Section 39.5.2.2, "Setting Up an LDAP-Based Replica by
Using the ldifwrite Tool."
39.5.2.1 Setting Up an LDAP-Based Replica by Using Automatic Bootstrapping
The following eight tasks enable you to configure an LDAP-based replica by using
automatic bootstrapping. They are explained in the paragraphs that follow this list.
■Task 1: Identify and Start the Directory Server on the Supplier Node
■Task 2: Create the New Consumer Node by Installing Oracle Internet Directory
■Task 3: Back Up the Metadata from the New Consumer Node
■Task 4: Add an LDAP-Based Replica by Using the Replication Environment
Management Tool
■Task 5: On the Consumer, Configure the Consumer Replica for Automatic
Bootstrapping
■Task 6: Optional: Change Default Replication Parameters
■Task 7: Ensure the Directory Replication Servers are Started
■Task 8: If Oracle Delegated Administration Services or Oracle Single Sign-On Are
Installed on the New Node, Restore Their Entries in the New Node's Directory
39.5.2.1.1 Task 1: Identify and Start the Directory Server on the Supplier Node Identify the
supplier for an LDAP-based replica. The supplier can be
■A directory that is not a member of any replication group
■A node of a multimaster replication group
■Another LDAP-based replica
Make sure the Oracle Internet Directory server is started on the Supplier node. To start
the directory server, type the following command:
opmnctl startproc ias_component=oid1
39.5.2.1.2 Task 2: Create the New Consumer Node by Installing Oracle Internet Directory Install
a new Oracle Internet Directory on the replica, as documented in Oracle Fusion
Middleware Installation Guide for Oracle Identity Management.
39.5.2.1.3 Task 3: Back Up the Metadata from the New Consumer Node Before configuring
the new node as an LDAP-based replica with customized settings, you must first
migrate its metadata to the supplier node, as follows:
■Make sure the Oracle Internet Directory server is up and running on both the
supplier node and the new node created in Task 2, so that the backup process
(remtool –backupmetadata) can succeed.
■From the newly created node, run the following command:
remtool –backupmetadata \
–replica "new_node_host:new_node_port" \
–master "master_host:master_port"
where master_host:master_port are the hostname and port number for the desired
replica's supplier. you are prompted for replication DN password.

Setting Up an LDAP-Based Replication by Using the Command Line
39-20 Oracle Fusion Middleware Administrator's Guide for Oracle Internet Directory
■Apart from loading the metadata into master replica, this command creates a file
named ocbkup.new_replica_id.TO.master_
replicaid.timestamp.ldif containing the metadata as back up. This file is
created under the ORACLE_INSTANCE /diagnostics/logs/OID/tools
directory. This file contains the changes made to master replica in LDIF format, a
copy of the SSO container entry [orclApplicationCommonName=ORASSO_
SSOSERVER, cn=SSO, cn=Products, cn=OracleContext] and DAS URL container
entry [cn=OperationURLs, cn=DAS, cn=Products, cn=OracleContext].
■If the metadata backup succeeds, it shows the following message in the terminal:
Backup of metadata will be stored in ORACLE_INSTANCE/diagnostics
/logs/OID/tools/ocbkup.replicaid_pilot.TO.replcicaid_master.timestamp.ldif.
Metadata copied successfully.
The message contains the path of your ORACLE_INSTANCE and filename.
■If the metadata backup is unsuccessful, the ORACLE_
INSTANCE/diagnostics/logs/OID/tools/remtool.log file contains error
messages. If you invoked remtool from a terminal, error messages appear on that
terminal.
39.5.2.1.4 Task 4: Add an LDAP-Based Replica by Using the Replication Environment
Management Tool To add a replica, enter the following on the consumer replica:
remtool -paddnode [-v] [-bind supplier_host_name:port]
you are prompted for the replication_dn_password.
The remtool utility prompts for agreement type. Select One-Way, Two-Way, or
Multimaster LDAP, depending on which type of replica you are adding.
you are prompted for the replica ID of the supplier. This is the value of the attribute
orclreplicaid in the root DSE entry. To find the value to supply, type:
ldapsearch -D cn=orcladmin -q -p port -b "" -s base "objectclass=*" orclreplicaid
you are prompted for the list of available naming contexts in the supplier replica. If
you are planning to set up partial replication between server instances running
different versions of Oracle Internet Directory, enter e.
Note: If Oracle Delegated Administration Services is not configured,
you might see an error message similar to this when you run
remtool with the -backupmetadata option:
Failed to add "orclApplicationCommonName=ias.example.com,
cn=IAS Instances, cn=IAS, cn=Products, cn=OracleContext"
as "uniquemember" to entry "cn=Associated Mid-tiers,
orclapplicationcommonname=DASApp, cn=DAS,cn=products,
cn=OracleContext at replica ldap://myhost:3060
Please ignore this error message.
See Also: The remtool command-line tool reference in Oracle
Fusion Middleware Reference for Oracle Identity Management for more
information about remtool options, including -backupmetadata.

Setting Up an LDAP-Based Replication by Using the Command Line
Setting Up Replication 39-21
After remtool has completed successfully, add a separate naming context for each
subtree to be replicated, as follows:
1. Determine the replica ID of the supplier and consumer replica nodes by executing
the following search command on both nodes:
ldapsearch -h host -p port -D cn=orcladmin -q -b "" \
-s base "objectclass=*" orclreplicaid
2. Determine the replication agreement entry, which is of the form:
"orclagreementid=unique_identifier_of_the_replication_
agreeement,orclreplicaid=supplier_replica_id,cn=replication configuration"
To find it, type:
ldapsearch -D cn=orcladmin -q -h supplier_host -p supplier_port \
-b "orclreplicaid=supplier_replica_id,cn=replication configuration" \
-s sub "(&(orclreplicadn=*consumer_replica_
id*)(objectclass=orclreplagreemententry))" dn
3. For each naming context that you plan to include in replication, add an entry like
the following on both the consumer and supplier replica nodes. The following
LDIF file specifies a naming context (subtree) to be included in replication and a
some attributes to exclude from replication.
dn: cn=includednamingcontext000002,
cn=replication namecontext,orclagreementid=000003,
orclreplicaid=stajv18_oid10143,cn=replication configuration
objectclass: top
objectclass: orclreplnamectxconfig
orclincludednamingcontexts: cn=users,dc=small,dc=com
orclexcludedattributes: userpassword
orclexcludedattributes: telephonenumber
cn: includednamingcontext000002
Add the LDIF file to Oracle Internet Directory on the consumer and supplier
replica using the following LDAP add command:
ldapadd -D cn=orcladmin -q -h host -p port -v -f ldif_file
4. Repeat Step3 for each naming context (subtree) to be configured in partial
replication.
39.5.2.1.5 Task 5: On the Consumer, Configure the Consumer Replica for Automatic
Bootstrapping To use the automatic bootstrap capability, on the consumer, set the
orclReplicaState attribute of the consumer replica subentry to 0 as follows:
1. Edit the sample file mod.ldif as follows:
Dn: orclreplicaid=unique_replicaID_of_consumer, cn=replication configuration
Changetype:modify
See Also:
■The remtool command-line tool reference in Oracle Fusion
Middleware Reference for Oracle Identity Management for more
information about the Replication Environment Management
Tool
■Section 39.1.9, "LDAP Replication Filtering for Partial
Replication"

Setting Up an LDAP-Based Replication by Using the Command Line
39-22 Oracle Fusion Middleware Administrator's Guide for Oracle Internet Directory
replace:orclReplicaState
OrclReplicaState: 0
2. Use ldapmodify at the consumer to update the consumer replica's subentry
orclreplicastate attribute.
ldapmodify –D "cn=orcladmin" -q -h consumer_host -p port -f mod.ldif
39.5.2.1.6 Task 6: Optional: Change Default Replication Parameters You can change the
default parameters for replication agreements and for the replica subentry.
39.5.2.1.7 Task 7: Ensure the Directory Replication Servers are Started The exact procedure
for starting the replication servers depends on whether this is a one-way or a two-way
replica or multimaster replica.
■For one-way LDAP replication, you must start the replication server at the
consumer. For example, to start the replication server at oid1, type:
oidctl connect=connStr server=oidrepld instance=1 \
name=asinst_1component name=oid1 \
flags="-h consumer_host -p consumer_port" start
■For two-way or multimaster LDAP replication, you must start the Oracle Internet
Directory replication server at each node, as follows:
oidctl connect=connStr server=oidrepld instance=1 \
name=instance_name componentname=component_name flags="-h \
LdapHost -p LdapPort" start
Note: On Windows systems, ensure that the replication server is not
running before you enable bootstrapping by changing the value of
orclReplicaState to 0.
See Also: Chapter 42, "Managing and Monitoring Replication" for
more information about the bootstrap capability of the LDAP-based
replication
See Also:
■Chapter 41, "Managing Replication Configuration Attributes"
■Section 42.1.1, "Modifying What Is to Be Replicated in
LDAP-Based Partial Replication"
Note: If you are deploying a single master with read-only replica
consumers, you can reduce performance overhead by turning off
conflict resolution. To do so, change the value of
orclconflresolution to 0 by using the following ldif file with
ldapmodify:
dn: cn=configset0,cn=osdrepld,cn=subconfigsubentry
changetype: modify
replace: orclconflresolution
orclconflresolution: 0

Setting Up an LDAP-Based Replication by Using the Command Line
Setting Up Replication 39-23
When the replication server is started, it starts to bootstrap the data from the supplier
to the consumer. After the bootstrap has completed successfully, the replication server
automatically change to ONLINE mode (orclreplicastate=1) to process changes
from the supplier to the consumer. You can monitor the value of orclreplicastate
by using the following command line:
ldapsearch -p port-h host -D cn=orcladmin -q \
-b "orclreplicaid=unique_replicaID_of_consumer, cn=replication configuration" \
-s base "objectclass=*" orclreplicastate
39.5.2.1.8 Task 8: If Oracle Delegated Administration Services or Oracle Single Sign-On Are
Installed on the New Node, Restore Their Entries in the New Node's Directory The entries for
Oracle Delegated Administration Services and Oracle Single Sign-On must refer to the
local instances of these services. However, the initial replication download from the
supplier to the consumer creates these entries with values replicated from the supplier.
If these services are in fact configured on the consumer node, then these values need to
be replaced by the correct information appropriate to the consumer node.
■If the Delegated Administration Service (DAS) is configured on the consumer
node, it must be restored using the following steps:
1. In the ocbkup.new_replicaid.TO.master_
replicaid.timestamp.ldif file created by Task 3, locate and copy the
DAS URL. The DN of the DAS URL container entry is "cn=OperationURLs,
cn=DAS, cn=Products, cn=OracleContext". It is usually the next-to-last entry
in the file.
2. Create an LDIF file called change_das_url.ldif with the following
contents:
dn: cn=OperationURLs,cn=DAS,cn=Products,cn=OracleContext
changetype: modify
replace: orcldasurlbase
orcldasurlbase: copy_paste_the_URL_from_backup_file
3. Execute the following command to change the DAS URL:
ldapmodify –p consumer_port -h consumer_host -D super_user_DN \
-q -f change_das_URL.ldif
■Similarly, if Single Sign-on (SSO) is configured on the consumer node, it must be
restored using the following steps:
1. In the ocbkup.timestamp.dat file created by Task 3, locate and copy the
SSO container entry. Copy only the attributes shown in step 2. The DN of the
SSO container entry is "orclApplicationCommonName=ORASSO_
SSOSERVER, cn=SSO, cn=Products, cn=OracleContext". It is usually the last
entry in the file.
2. Create an LDIF file add_SSO_container.ldif with the following contents:
dn: orclApplicationCommonName=ORASSO_SSOSERVER,
cn=SSO,cn=Products,cn=OracleContext
See Also: Oracle Identity Management Guide to Delegated
Administration and Oracle Application Server Single Sign-On
Administrator's Guide in the 10g (10.1.4.0.1) library.
See Also: Oracle Application Server Single Sign-On Administrator's
Guide in the 10g (10.1.4.0.1) library.

Setting Up an LDAP-Based Replication by Using the Command Line
39-24 Oracle Fusion Middleware Administrator's Guide for Oracle Internet Directory
orclapplicationcommonname: ORASSO_SSOSERVER
orclappfullname: ORASSO_SSOSERVER
orclversion: 10.1.2.0.0
objectclass: orclApplicationEntity
objectclass: top
userpassword: userpassword_copied_from_backup_file
3. Execute the following command to add the SSO container entry:
ldapadd –p consumer_port -h consumer_host -D super_user_DN \
-q -f add_SSO_container.ldif
4. Create an LDIF file mod.ldif with the following contents:
dn: cn=OracleUserSecurityAdmins,cn=Groups,cn=OracleContext
changetype:modify
add: uniquemember
uniquemember: orclApplicationCommonName=ORASSO_SSOSERVER,
cn=SSO,cn=Products,cn=OracleContext
dn: cn=verifierServices, cn=Groups,cn=OracleContext
changetype:modify
add: uniquemember
uniquemember: orclApplicationCommonName=ORASSO_SSOSERVER,
cn=SSO,cn=Products,cn=OracleContext
5. Execute the following command to apply mod.ldif:
ldapmodify -p consumer_port -h consumer_host -D super_user_DN \
-q -f mod.ldif
6. Using a browser, test the Oracle Delegated Administration Services and
Oracle Single Sign-On pages.
To test Oracle Delegated Administration Services, try to log in as the admin
user "orcladmin" on the Oracle Delegated Administration Services page,
http(s)://new_node_hostname:new_node_http_port/oiddas/. If
you cannot log in, see the troubleshooting appendix in Oracle Identity
Management Guide to Delegated Administration. in the 10g (10.1.4.0.1) library.
To test Oracle Single Sign-On, try to log in as the super admin user
"orcladmin" on the Oracle Single Sign-On page, http(s)://new_node_
hostname:new_node_http_port/pls/orasso/. If you cannot log in, see
the troubleshooting appendix in Oracle Application Server Single Sign-On
Administrator's Guide. in the 10g (10.1.4.0.1) library.
39.5.2.2 Setting Up an LDAP-Based Replica by Using the ldifwrite Tool
This section discuss the general tasks you perform when configuring an LDAP-based
replica by using the ldifwrite tool. It contains these topics:
■Task 1: Start the Directory Server on Both the Supplier and the Consumer Nodes
■Task 2: Back Up the Metadata from the New Consumer Node
Note: Do not copy the authpassword;oid, createtimestamp,
creatorsname, modifiersname, modifytimestamp, or
orclguid attributes.

Setting Up an LDAP-Based Replication by Using the Command Line
Setting Up Replication 39-25
■Task 3: Change the Directory Server at the Supplier to Read-Only Mode
■Task 4: Add an LDAP-Based Replica by Using the Replication Environment
Management Tool
■Task 5: Back Up the Naming Contexts to Be Replicated
■Task 6: Change the Directory Server at the Supplier to Read/Write Mode
■Task 7: Load the Data on the New Consumer
■Task 8: If Oracle Delegated Administration Services or Oracle Single Sign-On Are
Installed on the New Node, Restore Their Entries in the New Node's Directory
■Task 9: Optional: Change Default Replication Parameters
■Task 10: Ensure the Directory Replication Servers are Started
39.5.2.2.1 Task 1: Start the Directory Server on Both the Supplier and the Consumer Nodes
1. Identify the supplier for an LDAP-based replica. The supplier can be:
■A directory that is not a member of any replication group
■A node of a multi-master replication group
■Another LDAP-based replica
Make sure the Oracle Internet Directory server is started on the Supplier node. To
start the directory server, type the following command:
opmnctl startproc ias_component=oid1
2. Identify the consumer node, which must be a new Oracle Internet Directory
install. To install a new Oracle Internet Directory as a Master, follow the directions
in Oracle Fusion Middleware Installation Guide for Oracle Identity Management Make
sure the Oracle Internet Directory server is started on the new consumer node. To
start the directory server, type the following command:
opmnctl startproc ias-component=oid1
39.5.2.2.2 Task 2: Back Up the Metadata from the New Consumer Node Before configuring
the consumer as an LDAP-based replica with customized settings, you must first
migrate its metadata to the supplier node, as follows:
■Make sure the Oracle Internet Directory server is up and running on both the
supplier node and the new node created in Task 2, so that the backup process
(remtool –backupmetadata) can succeed.
■From the consumer node, run the following command:
remtool –backupmetadata \
–replica "consumer_host:consumer_port" \
–master "supplier_host:supplier_port"
you are prompted for the passwords.
■Apart from loading the metadata into master replica, this tool creates a file named
ocbkup.consumer_replica_id.TO.supplier_replica_
id.timestamp.dat containing the metadata as back up. This file is created in
the ORACLE_INSTANCE/diagnostics/logs/OID/tools directory. This file
contains the changes made to the master replica in LDIF format, a copy of SSO
container entry [orclApplicationCommonName=ORASSO_SSOSERVER, cn=SSO,

Setting Up an LDAP-Based Replication by Using the Command Line
39-26 Oracle Fusion Middleware Administrator's Guide for Oracle Internet Directory
cn=Products, cn=OracleContext] and DAS URL container entry
[cn=OperationURLs, cn=DAS, cn=Products, cn=OracleContext].
■If the metadata backup succeeded, remtool displays the following message in the
terminal:
Backup of metadata will be stored in ORACLE_INSTANCE/diagnostics
/logs/OID/tools/ocbkup.replicaid_pilot.TO.replcicaid_master.timestamp.ldif.
Metadata copied successfully.
The message contains the path of your ORACLE_INSTANCE.
The message contains the actual path of your ORACLE_INSTANCE and filename.
If the metadata backup is unsuccessful, the ORACLE_
INSTANCE/diagnostics/logs/OID/tools/remtool.log file contains error
messages. If you invoked remtool from a terminal, error messages appear on that
terminal.
39.5.2.2.3 Task 3: Change the Directory Server at the Supplier to Read-Only Mode To ensure
data consistency, change the directory server on the supplier node to read-only. To
switch the server from read/write to read-only mode, use one of the procedures in
Section 15.2, "Changing Server Mode."
39.5.2.2.4 Task 4: Add an LDAP-Based Replica by Using the Replication Environment
Management Tool To add a replica, enter the following on the consumer replica:
remtool -paddnode [-v] [-bind supplier_host_name:port]
you are prompted for the replication_dn_password. The remtool utility prompts
for agreement type. Select One-Way or Two-Way LDAP, depending on which type of
replica you are adding.
39.5.2.2.5 Task 5: Back Up the Naming Contexts to Be Replicated If there is a large number
of entries in the naming contexts that you want to replicate to the LDAP-based replica,
then Oracle recommends that you back up these naming contexts at the supplier node
and then load them to the LDAP-based replica.
To back up the naming contexts:
1. Identify the replication agreement DN created in "Task 4: Add an LDAP-Based
Replica by Using the Replication Environment Management Tool".
ldapsearch -h supplier_host -p port \
-b "orclreplicaid=supplier_replicaID,cn=replication configuration" \
-s sub "(orclreplicadn= orclreplicaid=consumer_replica_ID, \
cn=replication configuration)" dn
2. On the supplier, ensure that ORACLE_INSTANCE is set, the use the following
command to get the data from the supplier. Data loaded into the file will be based
on the agreement configured:
ldifwrite connect="connect_string_of_sponsor_node" \
baseDN="replication_agreement_dn_retrieved_in_step_1" \
file="name_of_output_LDIF_file"
See Also: The remtool command-line tool reference in Oracle
Fusion Middleware Reference for Oracle Identity Management for more
information about the Replication Environment Management Tool

Setting Up an LDAP-Based Replication by Using the Command Line
Setting Up Replication 39-27
39.5.2.2.6 Task 6: Change the Directory Server at the Supplier to Read/Write Mode If you
performed "Task 3: Change the Directory Server at the Supplier to Read-Only Mode",
then change the directory server on the supplier back to read/write mode. Use one of
the procedures in Section 15.2, "Changing Server Mode."
39.5.2.2.7 Task 7: Load the Data on the New Consumer To do this:
1. If there are multiple files, then combine them into one file—for example, backup_
data.ldif.
2. If naming contexts exist on the LDAP-based consumer replica, then remove them
by using bulkdelete. Ensure ORACLE_INSTANCE is set, then enter the following:
bulkdelete connect="connect_string_of_replica" baseDN="naming_context"
Perform this step for each naming context that was backed up in "Task 5: Back Up the
Naming Contexts to Be Replicated" on page 39-26.
On the consumer, load the data to the replica by using bulkload in the append mode.
Ensure ORACLE_INSTANCE is set, then enter the following:
bulkload connect="connect_string_of_replica" append="TRUE" check="TRUE" \
generate="TRUE" restore="TRUE" file="backup_data.ldif"
bulkload connect="connect_string_of_replica" load="TRUE"
39.5.2.2.8 Task 8: If Oracle Delegated Administration Services or Oracle Single Sign-On Are
Installed on the New Node, Restore Their Entries in the New Node's Directory Follow the
procedure described in "Task 8: If Oracle Delegated Administration Services or Oracle
Single Sign-On Are Installed on the New Node, Restore Their Entries in the New
Node's Directory".
See Also:
■Section 42.1.1, "Modifying What Is to Be Replicated in
LDAP-Based Partial Replication"
■The ldifwrite command-line tool reference in Oracle Fusion
Middleware Reference for Oracle Identity Management for more
instructions on using ldifwrite to back up part of the naming
context
Note: If you load data from an earlier version of Oracle Internet
Directory, such as 10g Release 2 (10.1.2.0.2) onto a node running 11g
Release 1 (11.1.1), you must update the password policy entries as
described in Section 39.5.3, "Password Policy and Fan-out
Replication."
See Also:
■The bulkload command-line tool reference in Oracle Fusion
Middleware Reference for Oracle Identity Management for
instructions on using bulkload in either the default mode or the
append mode
■The bulkdelete command-line tool reference in Oracle Fusion
Middleware Reference for Oracle Identity Management

Setting Up an LDAP-Based Replication by Using the Command Line
39-28 Oracle Fusion Middleware Administrator's Guide for Oracle Internet Directory
39.5.2.2.9 Task 9: Optional: Change Default Replication Parameters You can change the
default parameters for replication agreements, for the replica subentry, and for the
replication naming context configuration objects.
39.5.2.2.10 Task 10: Ensure the Directory Replication Servers are Started The exact
procedure for starting the replication servers depends on whether this is a one-way or
a two-way replica.
■For one-way LDAP replication, you must start the replication server at the
consumer. Type:
oidctl connect=connStr server=oidrepld instance=1 \
name=instance_name componentname=oidComponentName \
flags="-h LdapHost -p LdapPort" start
■For two-way LDAP replication, you must start the Oracle Internet Directory
replication servers at both the sponsor replica and the new replica, as follows:
1. Start or restart the replication server at the sponsor replica. Type:
oidctl connect=connStr server=oidrepld instance=1 \
name=instance_name componentname=component_name \
flags="-h LdapHost -p LdapPort" start
2. Start the replication server at the new replica. Type:
oidctl connect=connStr server=oidrepld instance=1 \
name=instance_name componentname=oidComponentName \
flags="-h LdapHost -p LdapPort" start
39.5.3 Password Policy and Fan-out Replication
Oracle Internet Directory 11g Release 1 (11.1.1) supports more fine-grained password
policies than in releases prior to 10g Release 2 (10.1.2.0.2). This can cause problems
when a master node is an earlier version, such as 10g Release 2 (10.1.2.0.2), and the
new fan-out node is 11g Release 1 (11.1.1). The password policy entries from the
master node might not behave as expected when bootstrapped or migrated to the
fan-out node. To correct this problem, as part of the fan-out node setup, after the data
from the master is bootstrapped or migrated, you must update the password policy
See Also:
■Chapter 41, "Managing Replication Configuration Attributes"
■Section 42.1.1, "Modifying What Is to Be Replicated in
LDAP-Based Partial Replication"
Note: If you are deploying a single master with read-only replica
consumers, you can reduce performance overhead by turning off
conflict resolution. To do so, change the value of
orclconflresolution to 0 by using the following ldif file with
ldapmodify:
dn: cn=configset0,cn=osdrepld,cn=subconfigsubentry
changetype: modify
replace: orclconflresolution
orclconflresolution: 0

Setting Up an LDAP-Based Replication by Using the Command Line
Setting Up Replication 39-29
entries by invoking the Java class
oracle.ldap.oidinstall.backend.OIDUpgradePasswordPolicies. The
command-line syntax is as follows:
java –cp ORACLE_HOME/ldap/lib/oidca.jar:ORACLE_HOME/ldap/jlib/ldapjclnt10.jar \
oracle.ldap.oidinstall.backend.OIDUpgradePasswordPolicies host port bindDN \
bindPassword ORACLE_HOME[protocol]
Table 39–2 describes the command-line parameters.
All actions performed by the tool are logged to ppUpgrade.log in the ORACLE_
HOME\ldap\log directory.
39.5.4 Deleting an LDAP-Based Replica
This section explains how to delete an LDAP-based replica. It contains these topics:
■Task 1: Stop the Directory Replication Server on the Node to be Deleted
■Task 2: Delete the Replica from the Replication Group
39.5.4.1 Task 1: Stop the Directory Replication Server on the Node to be Deleted
Stop the Oracle directory replication server by typing:
Table 39–2 Command-line Parameters to OIDUpgradePasswordPolicies
Parameter Description
host The host on which the 11g Release 1 (11.1.1) directory server is
running
port The port on which the 11g Release 1 (11.1.1) directory server is
listening. If the protocol is ssl, port must be an SSL port.
bindDN The privileged administrative user, usually cn=orcladmin
bindPwd The user password associated with the bindDN
ORACLE_HOME The Oracle home for this instance of Oracle Internet Directory
protocol An optional parameter. It should be ssl in an SSL environment
Note: Before running the tool, ensure that the appropriate
environment variable is set correctly:
■On Linux or Solaris, the LD_LIBRARY_PATH variable must
include ORACLE_HOME/lib and ORACLE_HOME/network/lib.
■On 64-bit Solaris, the LD_LIBRARY_PATH variable must include
ORACLE_HOME/lib32 and ORACLE_HOME/network/lib32.
■On Windows, the PATH variable must include ORACLE_
HOME\bin and ORACLE_HOME\network\bin.
See Also: Chapter 28, "Managing Password Policies"
Note: You cannot delete a replica if it is a supplier for another
replica. To delete such a replica, you must first delete all its consumers
from the replication group.

Setting Up a Multimaster Replication Group with Fan-Out
39-30 Oracle Fusion Middleware Administrator's Guide for Oracle Internet Directory
oidctl connect=connStr server=oidrepld instance=1 componentname=oidComponentName \
flags="-h LdapHost -p LdapPort" stop
39.5.4.2 Task 2: Delete the Replica from the Replication Group
Do this by using the Replication Environment Management Tool. Enter:
remtool -pdelnode [-v] [-bind hostname:port_number]
you are prompted for the replication_dn_password.
39.6 Setting Up a Multimaster Replication Group with Fan-Out
To help you set up a multimaster replication group with fan-out, this section offers an
example with four systems as described in Table 39–3.
In this example, the user has set up the following requirements:
■Requirement 1: Node1 and Node2 must be synchronized so that changes made on
either node are replicated to the other— but the naming context cn=private
users, cn=mycompany is to be excluded from this replication.
■Requirement 2: The naming context ou=Americas,cn=mycompany on node3 is
to be partially synchronized from Node2 so that only changes made under
ou=Americas, cn=mycompany on Node2 are replicated to Node3. The
following are to be excluded from this replication:
–Changes made under cn=customer profile, ou=Americas,
cn=mycompany
–Changes in the attribute userpassword.
■Requirement 3: Node4 is to be configured as a full replica of node 2, that is,
changes to all naming contexts in Node2 are replicated (one-way) to Node4.
■Requirement 4: Node5 is to be configured as a two-way (updatable) full replica of
Node1.
See Also: The remtool command-line tool reference in Oracle
Fusion Middleware Reference for Oracle Identity Management
Table 39–3 Nodes in Example of Partial Replication Deployment
Node Host Name Port
Node1 mycompany1.com 3000
Node2 mycompany2.com 4000
Node3 mycompany3.com 5000
Node4 mycompany4.com 6000
Node5 mycompany5.com 7000
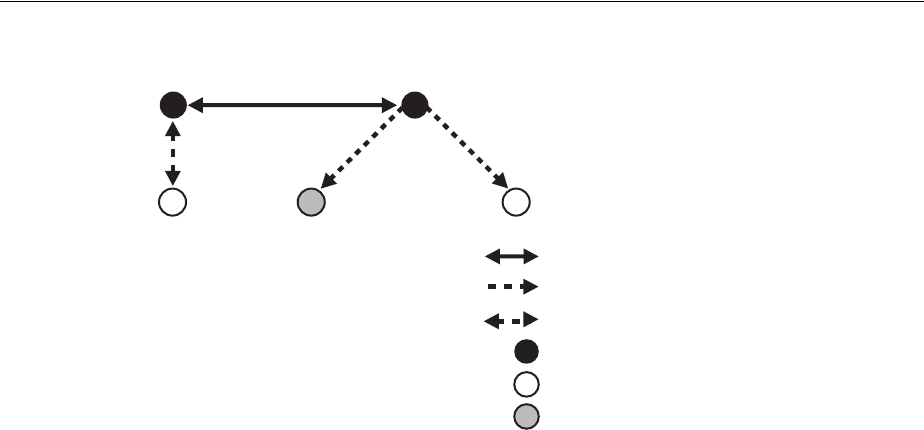
Setting Up a Multimaster Replication Group with Fan-Out
Setting Up Replication 39-31
Figure 39–11 Example of Fan-Out Replication
To meet the first requirement in this example, we set up a multimaster replication
group for Node1 and Node2. To meet the second, we set up a partial replica for Node2
and Node3, and for the third, full LDAP replication from Node2 to Node4.
This section contains these topics:
■Task 1: Set up the Multimaster Replication Group for Node1 and Node2
■Task 2: Configure the Replication Agreement
■Task 3: Start the Replication Servers on Node1 and Node2
■Task 4: Test the Directory Replication Between Node1 and Node2.
■Task 5: Install and Configure Node3 as a Partial Replica of Node2
■Task 6: Customize the Partial Replication Agreement
■Task 7: Start the Replication Servers on All Nodes in the DRG
■Task 8: Install and Configure Node4 as a Full Replica of Node2
■Task 9: Test the Replication from Node2 to Node4
■Task 10: Install and Configure Node5 as a Two-Way Replica of Node1
■Task 11: Test the Two-Way Replication Between Node1 and Node5
Task 1: Set up the Multimaster Replication Group for Node1 and Node2
To set up an LDAP-based multimaster replication group for Node1 and Node2, follow
the instructions in Section 39.5.2, "Setting Up an LDAP-Based Replica with
Customized Settings."
If you prefer to use Advanced Replication-based replication for your multimaster
replication group, follow Tasks 1 through 5 in Section C.2.2, "Setting Up an Advanced
Replication-Based Multimaster Replication Group."
Task 2: Configure the Replication Agreement
In the replication agreement between Node1 and Node2, specify the value for the
orclExcludedNamingcontexts attribute as cn=private
users,cn=mycompany. To do this:
1. Edit the example file mod.ldif as follows:
dn: orclAgreementID=000001,cn=replication configuration
LDAPLDAP
N2
N4
N4
N4
N3
N3
N5
N5
N1 Multimaster Replication
Multimaster Replication Group
Full Replica
Partial Replica
LDAP
Multimaster Replication
LDAP

Setting Up a Multimaster Replication Group with Fan-Out
39-32 Oracle Fusion Middleware Administrator's Guide for Oracle Internet Directory
Changetype:modify
Replace: orclExcludedNamingcontexts
orclExcludedNamingcontexts: cn=private users,cn=mycompany
2. Use ldapmodify to update the replication agreement
orclExcludedNamingcontexts attribute at both Node1 and Node2. To do this,
enter:
ldapmodify -D "cn=orcladmin" -q -h mycompany1.com -p 3000 -f mod.ldif
ldapmodify -D "cn=orcladmin" -q -h mycompany2.com -p 4000 -f mod.ldif
Task 3: Start the Replication Servers on Node1 and Node2
To do this, if you are using LDAP-based replication, follow the instructions on
If you are using Advanced replication, follow the instructions in "Task 6: Start the
Replication Servers on All Nodes in the DRG" in Appendix C, "Setting Up Oracle
Database Advanced Replication-Based Replication."
Task 4: Test the Directory Replication Between Node1 and Node2.
To do this, follow the instructions in Section 39.4, "Testing Replication by Using Oracle
Directory Services Manager."
Task 5: Install and Configure Node3 as a Partial Replica of Node2
If you want to use the bootstrap capability of partial replication, then follow Tasks 1
through 5 in Section 39.5.2.1, "Setting Up an LDAP-Based Replica by Using Automatic
Bootstrapping."
If you want to configure the replica by using the ldifwrite tool, then follow Tasks 1
through 9 in Section 39.5.2.2, "Setting Up an LDAP-Based Replica by Using the
ldifwrite Tool."
Identify Node2 as the supplier and Node3 as the consumer.
Task 6: Customize the Partial Replication Agreement
To do this:
■To achieve Requirement 2 in this example, the default replication between Node2
and Node3 must be configured first:
In partial replication, the cn=oraclecontext naming context is replicated by
default. You can choose not to replicate it by deleting it at both the supplier
(Node2, mycompany2.com) and the consumer (Node3, mycompany3.com).
ldapdelete -D "cn=orcladmin" -q -h mycompany2.com \
-p 4000 "cn=includednamingcontext000001, \
cn=replication namecontext,orclagreementid=000002, \
orclreplicaid==node2_replica_id, \
cn=replication configuration"
ldapdelete -D "cn=orcladmin" -q -h mycompany3.com \
-p 5000 "cn=includednamingcontext000001, \
cn=replication namecontext,orclagreementid=000002, \
orclreplicaid==node2_replica_id, \
cn=replication configuration"
■To replicate the naming context ou=Americas,cn=mycompany, and to exclude
from replication the naming context cn=customer profile, ou=Americas,
cn=mycompany and the attribute userpassword, create a naming context object
as follows:

Setting Up a Multimaster Replication Group with Fan-Out
Setting Up Replication 39-33
a. Edit the example file mod.ldif as follows:
dn: cn=includednamingcontext000002,cn=replication namecontext,
orclagreementid=000002,orclreplicaid=node2_replica_id,
cn=replication configuration
orclincludednamingcontexts: ou=Americas,cn=mycompany
orclexcludednamingcontexts: cn=customer profile, ou=Americas, cn=mycompany
orclexcludedattributes: userpassword
objectclass: top
objectclass: orclreplnamectxconfig
b. Use ldapadd to add the partial replication naming context object at both
Node2 and Node3.
ldapadd -D "cn=orcladmin" -q -h mycompany2.com -p 4000 -f mod.ldif
ldapadd -D "cn=orcladmin" -q -h mycompany3.com -p 5000 -f mod.ldif
■If you decide to use the automatic bootstrap capability of partial replication, then
edit the example file mod.ldif and use ldapmodify to modify the partial replica
orclreplicastate attribute at both Node2 and Node3, as described in "Task 5:
On the Consumer, Configure the Consumer Replica for Automatic Bootstrapping".
Task 7: Start the Replication Servers on All Nodes in the DRG
To do this, start the replication server at each node.
Type:
oidctl connect=connStr server=oidrepld instance=1 \
componentname=oidComponentName flags="-h LdapHost -p LdapPort" start
Task 8: Install and Configure Node4 as a Full Replica of Node2
Since full replica replication is the default configuration when the new node is
installed as an LDAP replica, use the instructions in Section 39.5, "Setting Up an
LDAP-Based Replication by Using the Command Line." When the installer prompts
for the supplier information, provide the supplier hostname, mycompany2.com, the
supplier port, 4000, and the superuser password.
Task 9: Test the Replication from Node2 to Node4
Test this replication using the instructions in the section entitled
If you are using Advanced replication, use the instructions in the section "Task 7: Test
Directory Replication" in Appendix C, "Setting Up Oracle Database Advanced
Replication-Based Replication."
Task 10: Install and Configure Node5 as a Two-Way Replica of Node1
Follow the instructions in Section 39.3, "Setting Up an LDAP-Based Replication
Agreement by Using the Replication Wizard" or in Section 39.5, "Setting Up an
LDAP-Based Replication by Using the Command Line." Provide the supplier
hostname, mycompany1.com, the supplier port, 3000, and the superuser password.
Task 11: Test the Two-Way Replication Between Node1 and Node5
Create an entry at Node1 using either Oracle Enterprise Manager or the ldapadd
command-line tool. Wait for the entry to be replicated at Node5. After the entry is
replicated to Node5, apply a change to that entry at Node5 using either the
ldapmodify command-line tool or Oracle Enterprise Manager. The change is
replicated to Node1.

Setting Up a Multimaster Replication Group with Fan-Out
39-34 Oracle Fusion Middleware Administrator's Guide for Oracle Internet Directory

40
Setting Up Replication Failover 40-1
40Setting Up Replication Failover
This Chapter contains the following topics:
■Section 40.1, "Introduction to Replication Failover"
■Section 40.2, "Performing a Stateless Replication Failover"
■Section 40.3, "Performing a Time-Based Replication Failover"
40.1 Introduction to Replication Failover
Since 10g (10.1.4.0.1), Oracle Internet Directory has supported failover of LDAP
replicas from one supplier to another. Administrator intervention is required.
Figure 40–1 shows a typical failover scenario.
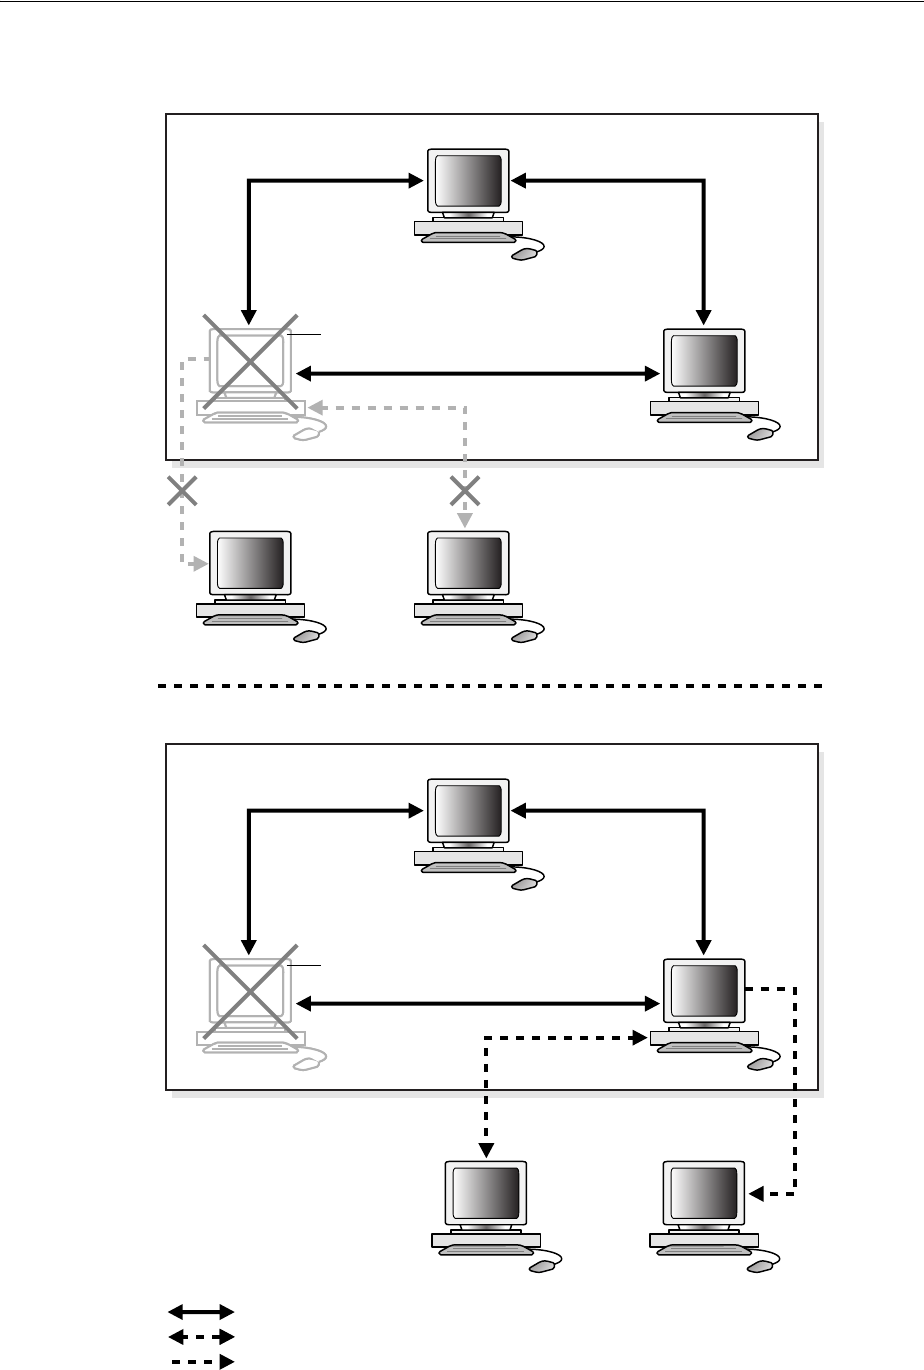
Introduction to Replication Failover
40-2 Oracle Fusion Middleware Administrator's Guide for Oracle Internet Directory
Figure 40–1 Replication Failover Scenario
Server
Down
Banana Candy
Damson
Apple
Eggplant
Multimaster Replication DRG
Before Fail-Over
Server
Down
Banana Candy
Eggplant
Apple
Damson
Multimaster Replication DRG
After Fail-Over
One-Way LDAP
Two-Way LDAP
Multimaster Replication
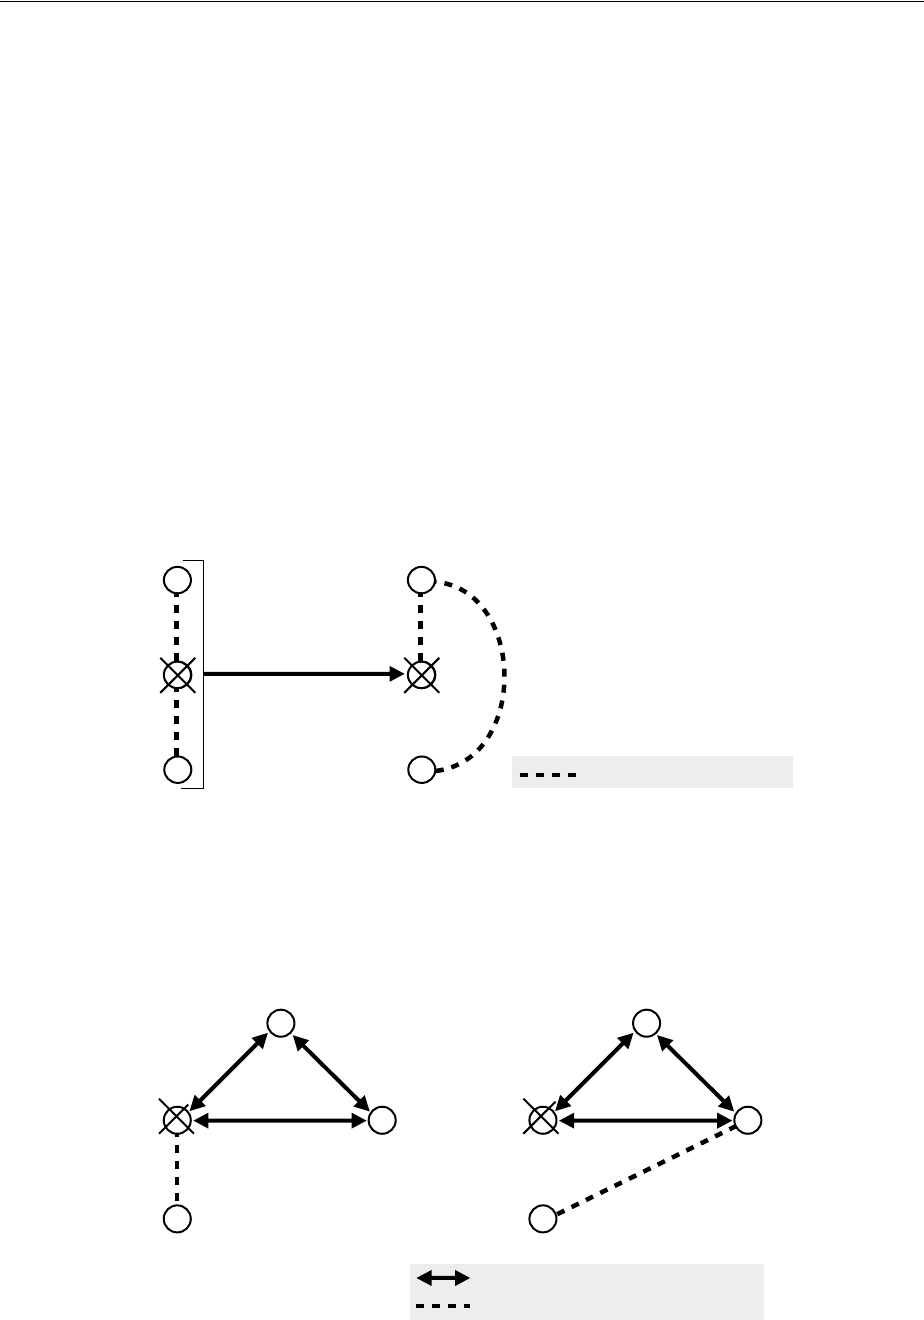
Introduction to Replication Failover
Setting Up Replication Failover 40-3
This scenario has the following features:
■Apple, Banana and Candy are multimaster replicas in the same DRG.
■Damson is a read-only fan-out replica of Banana. That is, it is a partial replica
using one-way LDAP replication.
■Eggplant is an updatable fan-out replica of Banana. That is, it is a partial replica
using two-way LDAP replication.
■If Banana goes down, replication between the multimaster DRG and its fan-out
replicas is broken.
An administrator can switch Eggplant and Damson to a new supplier, Candy.
Only two failover topology types are supported:
■The consumer and new supplier are both connected to the old supplier with
LDAP-based replication agreements. This is shown in Figure 40–2. Node 1 and
Node 3 both have LDAP replication agreements with Node 2. Node 2 is the
original supplier for Node 1. When Node 2 fails, you can fail over Node 1 to a new
supplier, Node 3.
Figure 40–2 Consumer and New Supplier Connected to Old Supplier by LDAP
■The consumer is connected to the old supplier with an LDAP-based agreement
and the old supplier is in the same Advanced Replication group as the new
supplier. This is shown in Figure 40–3. Node 2 and Node 3 are in the same
Advanced Replication DRG. Node 2 is the original supplier for Node 4. When
Node 4 fails, you can fail over Node 4 to a new supplier, Node 3.
Figure 40–3 Old and New Suppliers in the Same Advanced Replication Group
3
2
2
1
failover 2
2
3
1
LDAP (one-way or two-way)
1
N4
N4
2
4
3
1
N4
N4
2
4
3
One way or two way
Multimaster Replication
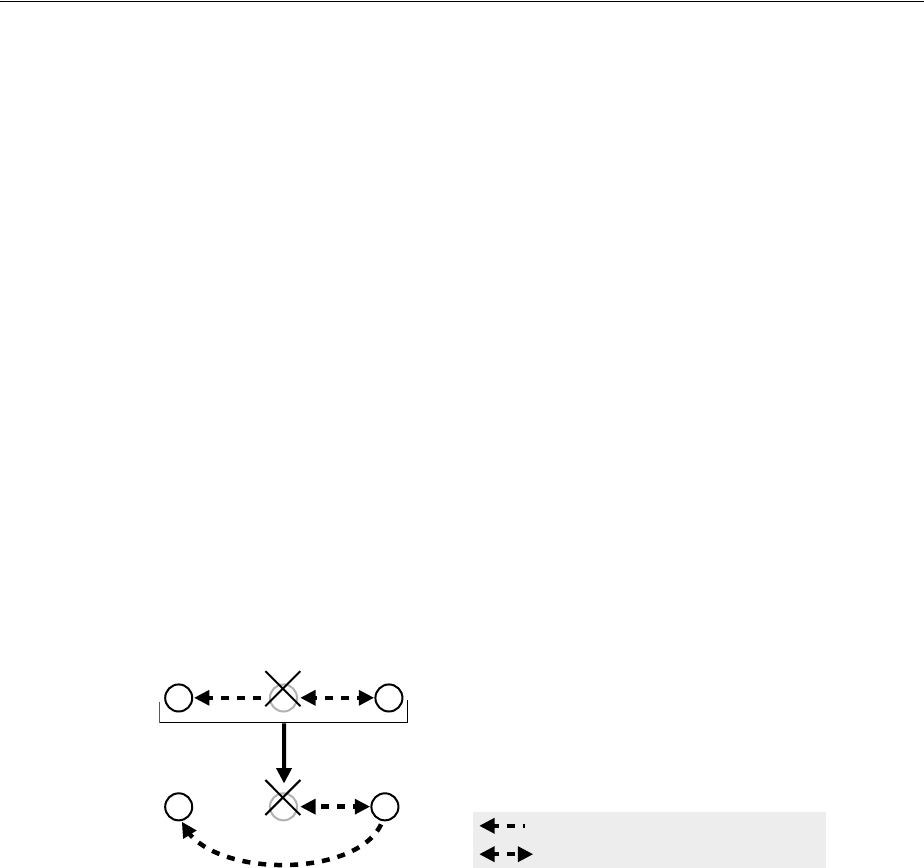
Introduction to Replication Failover
40-4 Oracle Fusion Middleware Administrator's Guide for Oracle Internet Directory
40.1.1 Limitations and Warnings for Replication Failover
This section describes limitations and warnings related to the use of replication
failover.
■As of Oracle Internet Directory 11g Release 1 (11.1.1), replication failover requires
administrator intervention.
■Following failover, you must compare and reconcile the consumer with the new
supplier.
■The new agreement must be of the same type and direction as the old agreement.
■Only two topology types are supported.
■When a supplier fails, its directly connected replica can only fail over to another
directly connected replica of the failed supplier.
■The replication filtering policy for the agreement between the new supplier and
old supplier must match that between the old supplier and consumer.
■In most cases, you should fail over the replica in a way that preserves the original
replica type. In the case shown in Figure 40–4, node 2 is the old supplier for both
node 1 and 3, and node 1 is read-only. When node 2 fails, you could, in theory, set
up either node 1 or 3 as the new supplier node. Best practice, however, is to fail
over node 1 so that node 3 is the supplier. This preserves node 1's original,
read-only replica type.
Figure 40–4 Failover Preserving Replica Type
■If the new agreement is a two-way agreement, after you compare and reconcile the
consumer with its new supplier, you must also compare and reconcile all other
replicas that are connected to the new supplier with the new supplier. For
example, in Figure 40–5, Node 2 has a two-way agreement with Node 3. Node 3 is
connected to another replica, Node 4. When Node 2 fails, you set up a two-way
agreement between node 3 and node 1. After comparing and reconciling node 3
with node 1, you must also compare and reconcile Node 4 with node 3 to ensure
that the replicas are synchronized.
21 3
Two-way LDAP
One-way LDAP
21 3
failover
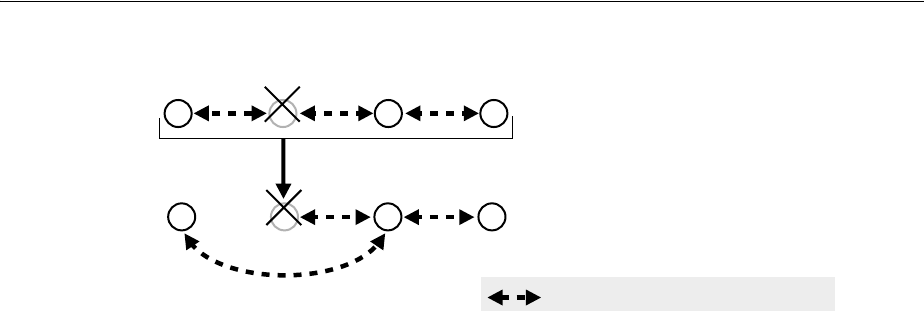
Performing a Stateless Replication Failover
Setting Up Replication Failover 40-5
Figure 40–5 Compare and Reconcile All Connected Replicas
40.1.2 Determining Which Type of Replication Failover to Use
There are two types of replication failover. They are:
■Stateless
■Time-based
Use stateless failover when you are unable to plan for the failover in advance. Stateless
replication failover makes no assumptions about the state of the replicas. You can fail
over to a new supplier at any time. Stateless failover requires more work after failover
to synchronize the nodes.
Use time-based failover for planned failover. Time-based failover results in less work
after failover. However, it requires some setup ahead of time to ensure that the
following assumptions are true at the time of failover:
■The nodes are mostly synchronized
■The new supplier has preserved its change logs so that complete synchronization
can be achieved quickly.
40.2 Performing a Stateless Replication Failover
This section explains how to perform a stateless replication failover. It consists of the
following tasks:
■Task 1: Stop all Directory Replication Server on related Nodes
■Task 2: Break Old Replication Agreement and Set up New Agreement
■Task 3: Save Last Change Number
■Task 4: Compare and Reconcile New Supplier and Consumer
■Task 5: Update Last Applied Change Number of New Agreement
■Task 6: Clean Up Old Agreement on Old Supplier
■Task 7: Start All Directory Replication Server on related Nodes
40.2.1 Task 1: Stop all Directory Replication Server on related Nodes
Stop the Oracle directory replication servers on the new supplier, old supplier and
consumer, by typing:
oidctl connect=connStr server=oidrepld instance=1 componentname=oidComponentName \
flags="-h LdapHost -p LdapPort" stop
2
Two-Way LDAP
New LDAP
Agreement
1 3 4
21 3 4
failover

Performing a Stateless Replication Failover
40-6 Oracle Fusion Middleware Administrator's Guide for Oracle Internet Directory
40.2.2 Task 2: Break Old Replication Agreement and Set up New Agreement
Break the old replication agreement between the old supplier and consumer and set
up a new agreement between the new supplier and consumer. Do this by using the
Replication Environment Management Tool. Type:
remtool -pchgmaster [-v] [-bind consumer_host::port_number]
you are prompted for the replication_dn_password.
40.2.3 Task 3: Save Last Change Number
Obtain the last change number from the new supplier.
For a one-way agreement, use the following command:
ldapsearch -h new_supplier_host -p port_number -b "" \
-s base "objectclass=*" lastchangenumber
For a two-way agreement, use the following command:
ldapsearch -h consumer_host -p port_number -b "" \
-s base "objectclass=*" lastchangenumber
Save this number!
40.2.4 Task 4: Compare and Reconcile New Supplier and Consumer
Use the Oracle Internet Directory Comparison and Reconciliation Tool to compare and
reconcile the new supplier and consumer. For a one-way agreement, type:
oidcmprec operation=reconcile \
source=new_supplier_host:port \
destination=consumer_host:port \
base='""' scope=sub
For a two-way agreement, type:
oidcmprec operation=merge \
source=new_supplier_host:port\
destination=consumer_host:port/ \
base='""' scope=sub
you are prompted for the source and destination replication dn passwords.
This example assumes that the entire directory is replicated and, therefore, that base
is set to " ". If you are using partial replication, use the base and dns2exclude
arguments to the oidcmprec tool to include the desired DIT.
40.2.5 Task 5: Update Last Applied Change Number of New Agreement
Modify the new agreement with the retrieved last applied number at the new supplier.
To do this:
1. Create an LDIF file with the last change number you retrieved in "Task 3: Save Last
Change Number".
See Also: The remtool command-line tool reference in Oracle
Fusion Middleware Reference for Oracle Identity Management
See Also: The oidcmprec command-line tool reference in Oracle
Fusion Middleware Reference for Oracle Identity Management

Performing a Stateless Replication Failover
Setting Up Replication Failover 40-7
For a one-way agreement, it should look similar to this:
dn: agreement_dn
changetype: modify
replace: orclLastAppliedChangeNumber;apply$new_supplier_host$consumer_host
orclLastAppliedChangeNumber;apply$new_supplier_host$consumer_host:
last_change_number_retrieved.
-
replace: orclLastAppliedChangeNumber;transport$new_supplier_host$consumer_host
orclLastAppliedChangeNumber;transport$new_supplier_host$consumer_host:
last_change_number_retrieved_from_new_supplier
For a two-way agreement, it should look similar to this:
dn: agreement_dn
changetype: modify
replace: orclLastAppliedChangeNumber;apply$new_supplier_host$consumer_host
orclLastAppliedChangeNumber;apply$new_supplier_host$consumer_host:
last_change_number_retrieved_from_new_supplier
-
replace: orclLastAppliedChangeNumber;transport$new_supplier$consumer
orclLastAppliedChangeNumber;transport$new_supplier$consumer:
last_change_number_retrieved_from_new_supplier
-
replace: orclLastAppliedChangeNumber;apply$consumer_host$new_supplier_host
orclLastAppliedChangeNumber;apply$consumer_host$new_supplier_host:
last_change_number_retrieved_from_consumer
-
replace: orclLastAppliedChangeNumber;transport$consumer_host$new_supplier_host
orclLastAppliedChangeNumber;transport$consumer_host$new_supplier_host:
last_change_number_retrieved_from_consumer
2. Modify the agreement by using ldapmodify, as follows:
ldapmodify -D "cn=orcladmin" -q -h host_name -p port_number -f LDIF_file
40.2.6 Task 6: Clean Up Old Agreement on Old Supplier
If the old supplier was down when you performed "Task 2: Break Old Replication
Agreement and Set up New Agreement", the old agreement on the old supplier was
not cleaned up. Clean it up now by using the Replication Environment Management
Tool. Type:
remtool -pcleanup -agrmt [-v] [-bind consumer_host::port_number]
you are prompted for the replication_dn_password.
40.2.7 Task 7: Start All Directory Replication Server on related Nodes
Start the Oracle directory replication servers on the new supplier, the old supplier and
the consumer, by typing:
oidctl connect=connStr server=oidrepld instance=1 \
name=instance_name componentname=component_name \
flags="-h LdapHost -p LdapPort" start
See Also: The remtool command-line tool reference in Oracle
Fusion Middleware Reference for Oracle Identity Management

Performing a Time-Based Replication Failover
40-8 Oracle Fusion Middleware Administrator's Guide for Oracle Internet Directory
40.3 Performing a Time-Based Replication Failover
This section explains how to perform a time-based replication failover. It contains
these topics:
■Task 1: Configure Change Log Garbage Collection Object on New Supplier
■Task 2: Save Last Change Number from New Supplier
■Task 3: Enable Change Log Regeneration on New Supplier
■Task 4: Wait for the Desired Time Period to Elapse
■Task 5: Stop all Directory Replication Servers on Related Nodes
■Task 6: Break Old Replication Agreement and Set Up New Agreement
■Task 7: Update Last Applied Change Number of New Agreement
■Task 8: Clean Up Old Agreement on Old Supplier
■Task 9: Start All Directory Replication Servers on Related Nodes
40.3.1 Task 1: Configure Change Log Garbage Collection Object on New Supplier
Configure the changelog purging configuration entry on the new supplier so that it
preserves change logs for the desired period, for example, 24 hours, as follows:
1. Create an LDIF file similar to this:
dn: cn=changelog purgeconfig,cn=purgeconfig,cn=subconfigsubentry
changetype:modify
replace: orclpurgetargetage
orclpurgetargetage: 24
2. Apply the LDIF file by typing:
ldapmodify -D "cn=orcladmin" -q -p port -h host -D dn -f LDIF_file
40.3.2 Task 2: Save Last Change Number from New Supplier
Obtain the last change number from the new supplier, as follows:
ldapsearch -h new_supplier_host -p port_number -D cn=orcladmin -q \
-b "" -s base "objectclass=*" lastchangenumber
Save this number!
40.3.3 Task 3: Enable Change Log Regeneration on New Supplier
Enable change log regeneration at the new supplier, as follows:
1. Create an LDIF file like this:
dn:
changetype: modify
replace: orcldiprepository
orcldiprepository: TRUE
See Also: Chapter 4, "Understanding Process Control of Oracle
Internet Directory Components"
See Also: Chapter 35, "Managing Garbage Collection"

Performing a Time-Based Replication Failover
Setting Up Replication Failover 40-9
2. Apply the LDIF file by typing:
ldapmodify -D "cn=orcladmin" -q -h host_name -p port_number -f LDIF_file
40.3.4 Task 4: Wait for the Desired Time Period to Elapse
Wait for a period no greater than the value of orclpurgetargetage in the
changelog purging configuration entry.
40.3.5 Task 5: Stop all Directory Replication Servers on Related Nodes
Stop the Oracle directory replication servers on the new supplier, old supplier and
consumer, by typing:
oidctl connect=connStr server=oidrepld instance=1 \
componentname=oidComponentName \
flags="-h LdapHost -p LdapPort" stop
40.3.6 Task 6: Break Old Replication Agreement and Set Up New Agreement
Break the old replication agreement between the old supplier and the consumer, then
set up a new agreement between the new supplier and the consumer. Do this by using
the Replication Environment Management Tool, as follows:
remtool -pchgmaster [-v] [-bind hostname:port_number]
you are prompted for the replication_dn_password.
40.3.7 Task 7: Update Last Applied Change Number of New Agreement
Modify the new agreement at the new supplier so that its last applied change number
has the value you retrieved in "Task 2: Save Last Change Number from New Supplier",
as follows:
1. Create an LDIF file with the retrieved last applied change number, similar to this:
dn: agreement_dn
changetype: modify
replace: orclLastAppliedChangeNumber
orclLastAppliedChangeNumber: last_change_number_retrieved
2. Apply the LDIF file to the agreement by using ldapmodify:
ldapmodify -D "cn=orcladmin" -q -h host_name -p port_number -f LDIF_file
40.3.8 Task 8: Clean Up Old Agreement on Old Supplier
If the old supplier was down when you performed "Task 6: Break Old Replication
Agreement and Set Up New Agreement", the old agreement on the old supplier was
not cleaned up. Clean it up now by using the Replication Environment Management
Tool. Type:
See Also: Chapter 4, "Understanding Process Control of Oracle
Internet Directory Components"
See Also: The remtool command-line tool reference in Oracle
Fusion Middleware Reference for Oracle Identity Management

Performing a Time-Based Replication Failover
40-10 Oracle Fusion Middleware Administrator's Guide for Oracle Internet Directory
remtool -pcleanup -agrmt [-v] [-bind hostname:port_number]
you are prompted for the replication_dn_password.
40.3.9 Task 9: Start All Directory Replication Servers on Related Nodes
Start the Oracle directory replication servers on the new supplier, the old supplier and
the consumer, by typing:
oidctl connect=connStr server=oidrepld instance=1 \
componentname=oidComponentName \
flags="-h LdapHost -p LdapPort" start
See Also: The remtool command-line tool reference in Oracle
Fusion Middleware Reference for Oracle Identity Management
See Also:
■Chapter 4, "Understanding Process Control of Oracle Internet
Directory Components"
■The oidctl command-line tool reference in Oracle Fusion
Middleware Reference for Oracle Identity Management.

41
Managing Replication Configuration Attributes 41-1
41Managing Replication Configuration
Attributes
This chapter describes configuration attributes that control the Oracle Internet
Directory replication server. The attributes reside in specific containers in the DIT.
See Chapter 42, "Managing and Monitoring Replication" for specific replication
management tasks.
This chapter contains the following sections:
■Section 41.1, "Introduction to Replication Configuration Attributes"
■Section 41.2, "Configuring Replication Configuration Attributes by Using Fusion
Middleware Control"
■Section 41.3, "Managing Replication Configuration Attributes From the Command
Line"
41.1 Introduction to Replication Configuration Attributes
This introduction contains the following topics:
■Section 41.1.1, "The Replication Configuration Container"
■Section 41.1.2, "The Replica Subentry"
■Section 41.1.3, "The Replication Agreement Entry"
■Section 41.1.4, "The Replication Naming Context Container Entry"
■Section 41.1.5, "The Replication Naming Context Object Entry"
■Section 41.1.6, "The Replication Configuration Set"
■Section 41.1.7, "Examples of Replication Configuration Objects in the Directory"
41.1.1 The Replication Configuration Container
All replication information for a node resides in the container cn=replication
configuration located at the root DSE. This entry resides on each node in a DRG.
The following is a sample replication configuration container entry:
dn: cn=replication configuration
orclaci: access to entry by * (browse)
orclaci: access to attr=(*) by * (search,read)
orclnormdn: cn=replication configuration
cn: replication configuration
description: Replication agreement Container object
objectclass: top

Introduction to Replication Configuration Attributes
41-2 Oracle Fusion Middleware Administrator's Guide for Oracle Internet Directory
objectclass: orclcontainerOC
41.1.2 The Replica Subentry
The Replica subentry has the DN
orclreplicaid=Replica_ID,cn=replication configuration
This subentry is created at installation under the replication configuration container. It
contains attributes that identify and define the characteristics of the node it represents.
Table 41–1 describes the attributes of the replica subentry. Under Update Mechanism,
EM indicates that you can manage this attribute with Oracle Enterprise Manager
Fusion Middleware Control. LDAP indicates that you can manage this attribute by
using LDAP tools.
In Figure 41–3 on page 41-12, a replica subentry is represented by
orclReplicaID=UID_of_node_D,cn=replication configuration.
The following is a sample replica subentry:
dn: orclreplicaid=myhost1_repl1,cn=replication configuration
objectclass: top
Table 41–1 Attributes of the Replica Subentry
Attribute Description
Update
Mechanism Default Possible Values
orclreplicaid Unique identifier for directory
database. Initialized at
installation. Matches orclreplicaid
at the root DSE.
Read-only hostname_
ORACLESID
Integer
orclreplicauri Address used to open a
connection to this replica.
EM, LDAP Valid ldapURI
format
orclreplicaseconda
ryuri
Addresses used if
orclReplicaURI cannot be
used.
EM, LDAP Valid ldapURI
format
orclreplicatype Defines the type of replica such as
read-only or read/write.
EM, LDAP 0
(Read/Write
)
0: Read/Write
1: Read-Only
2: Pilot
orclpilotmode Defines whether replica is in pilot
(testing) mode.
remtool
-pilotreplica
00: False
1: True
orclreplicastate Defines state of the replica. EM, LDAP You can set 0, 1,
2, 6, or 8. Server
sets other
values. See
Table D–1 on
page D-6.
pilotstarttime Time when replica entered pilot
(testing) mode.
Read-only Time
Note: On Windows systems, ensure that the replication server is not
running before you enable bootstrapping by changing the value of
orclReplicaState to 0.

Introduction to Replication Configuration Attributes
Managing Replication Configuration Attributes 41-3
objectclass: orclreplicasubentry
orclreplicaid: myhost1_repl1
orclreplicauri: ldap://myhost1:3060/
orclreplicasecondaryuri: ldap://myhost1.mycompany.com:3060/
orclreplicastate: 1
41.1.3 The Replication Agreement Entry
The DN of the Replication Agreement Entry is:
orclagreementid=Agreement_ID,orclreplicaid=Replica_ID,cn=replication configuration
This entry contains attributes that define the replication agreement between the two or
more nodes and is associated with the orclReplAgreementEntry objectclass. There
are two kinds of agreement:
1. Oracle Database Advanced Replication-based replication agreement. The
replication agreement for Advanced Replication nodes resides under the
replication configuration set. For example: In Figure 41–2, an Oracle Database
Advanced Replication-based replication agreement entry is represented by
orclagreementID=000001,cn=replication configuration.
2. LDAP-based replication agreement. The replication agreement for LDAP nodes
resides under the supplier's replica subentry. For example, in Figure 41–3, an
LDAP-based replication agreement entry is represented by
orclagreementID=000003, orclReplicaID=UID_of_node_
D,cn=replication configuration.
41.1.3.1 Replication Agreement Entry Attributes
Table 41–2 shows the attributes in the replication agreement. Under Update
Mechanism, EM indicates that you can manage this attribute with Oracle Enterprise
Manager Fusion Middleware Control. LDAP indicates that you can manage this
attribute by using LDAP tools.
See Also: ""Replication Schema Elements" in Oracle Fusion
Middleware Reference for Oracle Identity Management for descriptions
of the attributes of the replica subentry.
Table 41–2 Attributes of the Replication Agreement Entry
Attribute Description
Update
Mechanis
m Default Possible Values
orclagreement
id
Name of replication agreement entry. Read-only
orclreplicadn LDAP-based replication only. DN of the replica to
identify a consumer in the replication agreement.
Read-only DN
orclreplicati
onprotocol
Replication protocol for change propagation to
replica. Values:
Read-only ODS_ASR_1.0:
Oracle Database
Advanced
Replication-based
ODS_LDAP_1.0:
LDAP-based
orcldirreplgr
oupdsas
For Oracle Database Advanced Replication-based
groups only. Orclreplicaid values of all the nodes in
this replication group. This list must be identical on
all nodes in the group. You can modify this attribute.
LDAP

Introduction to Replication Configuration Attributes
41-4 Oracle Fusion Middleware Administrator's Guide for Oracle Internet Directory
orclupdatesch
edule
Update interval for new changes and those being
retried.
EM, LDAP 60 (seconds) Greater than or = 0
orclhiqschedu
le
Interval at which the directory replication server
repeats the change application process.
EM, LDAP 600
(seconds)
Greater than or = 60
(seconds)
orclldapconnk
eepalive
Whether the connections from replication server to
the directory server are kept active or established
every time the changelog processing is done.
EM, LDAP 1 0: false
1: true
orcllastappli
edchangenumbe
r
Last change number transported or applied at the
consumer replica. For LDAP-based agreements, this
attribute contains subtypes. The format is:
orcllastappliedchangenumber; status_type$supplier_
replicaID$consumer_replicaID: Number
where status_type is: transport or apply, supplier_
replicaID and consumer_replicaID indicate the direction
of LDAP data flow, and Number is the last applied
change number.
It indicates that changelogs from supplier_replicaID to
consumer_replicaID with change number less than
Number have been transported/applied at node
consumer_replicaID.
For Oracle Database Advanced Replication-based
agreements, only the base type is used.
Read-only
orclexcludedn
amingcontexts
Subtrees to be excluded from replication.
Applicable only to Oracle Database Advanced
Replication-based agreements. LDAP replication uses
the Replication Naming Context Entry, described, in
Table 41–3.
Read-only
orclreplicati
onid
Unique identifier of a one-way, two-way, or
peer-to-peer replication group
Read-only
orclagreement
type
Replication agreement type. Read-only 0:
one-way/read-only
fan-out replication
agreement
1:
two-way/updatable
fan-out replication
agreement
2: LDAP-based
multimaster
replication
agreement
3: Oracle Database
Advanced
Replication-based
multimaster
replication
agreement
Table 41–2 (Cont.) Attributes of the Replication Agreement Entry
Attribute Description
Update
Mechanis
m Default Possible Values

Introduction to Replication Configuration Attributes
Managing Replication Configuration Attributes 41-5
41.1.3.2 Oracle Database Advanced Replication-Based Replication Agreements
For Advanced Replication, the replication agreement on each node lists all of the
nodes in the group. It is identical on each node except for local options such as
partitioned naming contexts on the local directory server.
The entry for this kind of replication agreement resides immediately below the
cn=replication configuration container entry. For example, the DN of such an
agreement can look like this: orclagreementID=000001,cn=replication
configuration.
41.1.3.3 LDAP Replication Agreements
For LDAP-based replication, there are separate replication agreements for each
supplier-consumer relationship. For one-way replication, there is a single, one-way
replication agreement.
The entry for an LDAP-based replication agreement resides immediately below the
replica subentry of the node that serves as the supplier. Thus, the DN of the replication
agreement as found on a supplier node is:
orclagreementID=unique_identifier_of_the_replication_agreement,
orclReplicaID=unique_identifier_of_supplier_node, cn=replication
configuration
Similarly, the DN of the replication agreement as found on a consumer node is:
orclagreementID=unique_identifier_of_the_replication_agreeement,
orclReplicaID=unique_identifier_of_supplier_node, cn=replication
configuration
In a fan-out replication agreement, you can tell which node the agreement entry is
associated with by looking at its parent. For example, look at the following replication
agreement entry.
orclagreementID=000002,orclReplicaID=node_A,cn=replication
configuration
In this example, you can determine that the replication agreement represented by
orclagreementID=000002 is associated with node A. This is because the parent of
orclagreementID=000002 is orclReplicaID=node_A.
41.1.3.4 Two-Way LDAP Replication Agreements
For two-way replication, there can be either a single, two-way replication agreement
or two one-way agreements for each supplier-consumer relationship. The following is
a sample two-way replication agreement entry:
dn: orclagreementid=000002, orclreplicaid=stadd58_repl, cn=replication
configuration
Notes:
■The container entry cn=replication configuration is
replicated on all nodes, but may not be identical on all nodes.
■The orclreplicadn attribute of an LDAP-based replication
agreement specifies the associated consumer node.
■The agreementtype indicates the replication agreement type.
See Table 41–2, " Attributes of the Replication Agreement
Entry" for values of orclagreementtype.

Introduction to Replication Configuration Attributes
41-6 Oracle Fusion Middleware Administrator's Guide for Oracle Internet Directory
orclagreementid: 000002
orclreplicationprotocol: ODS_LDAP_1.0
orclreplicadn: orclreplicaid=stadd57_repl,cn=replication configuration
orclldapconnkeepalive: 1
orclagreementtype: 1
orclreplicationid: 000002
orcllastappliedchangenumber;transport$stadd57$stadd58: 106
orcllastappliedchangenumber;transport$stadd58$stadd57: 2421
orcllastappliedchangenumber;apply$stadd57$stadd58: 106
orcllastappliedchangenumber;apply$stadd58$stadd57: 2421
orclupdateschedule: 0
orclhiqschedule: 60
objectclass: orclReplAgreementEntry
objectclass: top
41.1.4 The Replication Naming Context Container Entry
This entry contains all the LDAP naming context objects.
This entry has the RDN cn=replication namecontext, and it is created below the
orclagreementID entry during replication configuration. The following is a sample
replication naming context container entry:
dn: cn=replication namecontext,orclagreementid=000002,
orclreplicaid=myhost1_repl1,cn=replication configuration
objectclass: top
objectclass: orclcontainerOC
cn: replication namecontext
41.1.5 The Replication Naming Context Object Entry
This entry contains all the LDAP naming context objects. These objects specify the
replication filtering policy, that is, what to include in or exclude from replication to an
LDAP-based partial replica.
This entry is created below the naming context container entry during replication
configuration. It is configurable. For example, in Figure 41–3 on page 41-12, the
replication naming context object is:
cn=includednamingcontext000001,cn=replication
Note: The value of orclagreementtype is 1 because this is a
two-way replication agreement. See Table 41–2, " Attributes of the
Replication Agreement Entry" for values of orclagreementtype for
other replication agreement types.
See Also: "Replication Schema Elements" in Oracle Fusion
Middleware Reference for Oracle Identity Management for descriptions
of the attributes of the replication agreement entry
Note: You cannot include naming contexts or exclude attributes in
Oracle Database Advanced Replication-based agreements. Advanced
Replication agreements use the base attribute
orclexcludednamingcontexts described in Table 41–2.

Introduction to Replication Configuration Attributes
Managing Replication Configuration Attributes 41-7
namecontext,orclagreementID=000003,orclReplicaID=UID_of_node_
D,cn=replication configuration.
Table 41–3 describes the attributes of the replication naming context entry. If you use
the Replication Wizard in Oracle Enterprise Manager Fusion Middleware Control to
set up replication, you set these on the Scope page.
The following is a sample replication naming context object entry:
dn:cn=namectx001,
cn=replication namecontext,
orclagreementid=unique_identifier_of_the_replication_agreement,
orclreplicaid=replica_id_of_node_A,
cn=replication configuration
orclincludednamingcontexts: cn=mycompany
orclexcludednamingcontexts; replica_id_of_node_A$ replica_id_of_node_B :
c=us,cn=mycompany
orclexcludedattributes; replica_id_of_node_B$ replica_id_of_node_A : userPassword
Table 41–3 Attributes of the Replication Naming Context Entry
Attribute Description
orclincludednamingc
ontexts
The root of the naming context to be replicated. If
orclincludednamingcontexts is set to "*", all the naming
contexts are replicated. This attribute has subtypes that specify
the replication direction in which the naming context should be
included. The format is:
orclincludednamingcontexts ; supplier_
replicaID$consumer_replicaiD: DN
This is a single valued attribute. For each naming context object,
you can specify only one unique subtree in each direction.
In partial replication, except for subtrees listed in the
orclexcluednamingcontexts attribute, all subtrees in the specified
included naming context are replicated.
You can modify this attribute.
orclexcludednamingc
ontexts
The root of a subtree, located within the included naming
context, to be excluded from replication.This attribute has
subtypes that specify the replication direction in which the
naming context should be excluded. The format is:
orclexcludednamingcontexts; supplier_
replicaID$consumer_replicaiD : DN
This is a multivalued attribute. From within the naming context
specified in the orclincludednamingcontexts attribute, you can
specify one or more subtrees to be excluded from the partial
replication in each direction.
You can modify this attribute.
orclexcludedattribu
tes
An attribute, located within the included naming context, to be
excluded from replication. Orclexcludedattributes has
subtypes that specify the replication direction in which the
specified attribute should be excluded. The format is:
orclexcludedattributes; supplier_replicaID$consumer_
replicaiD: attribute_name
This is a multivalued attribute.
You can modify this attribute

Introduction to Replication Configuration Attributes
41-8 Oracle Fusion Middleware Administrator's Guide for Oracle Internet Directory
The example specifies the following replication filtering:
■The naming context cn=mycompany is included for replication in both directions
for node A and node B.
■The naming context c=us,cn=mycompany is excluded for replication from node
A to node B only.
■The userPassword attribute is excluded for replication from node B to node A
41.1.6 The Replication Configuration Set
The replication configuration set has the DN:
cn=configset0,cn=osdrepld,cn=subconfigsubentry
Table 41–4 lists and describes the attributes of the replication configuration set, which
has the following DN:
cn=configset0,cn=osdrepld,cn=subconfigsubentry
You must restart the replication server in order for any attribute changes under this
DN to take effect, except for the attribute orcldebuglevel. Under Update
Mechanism, EM indicates that you can manage this attribute with Oracle Enterprise
Manager Fusion Middleware Control. LDAP indicates that you can manage this
attribute by using LDAP tools.
See Also:
■Section 39.1.9.4, "Examples of LDAP Replication Filtering"
■"Replication Schema Elements" in Oracle Fusion Middleware
Reference for Oracle Identity Management
Table 41–4 Replication Configuration Set Attributes
Attribute Description
Update
Mechanism Default Possible Values
modifyTimestamp Time of entry creation or modification. Read-only
modifiersName Name of person creating or modifying
the entry
Read-only
orclChangeRetryCo
unt
Number of processing retry attempts
for a change-entry before being moved
to the human intervention queue.
EM, LDAP 10 Greater than or equal
to 1.
orclThreadsPerSup
plier;transport
Number of worker threads spawned at
each supplier for transporting change
logs.
EM, LDAP 1 1-100
orclThreadsPerSup
plier;apply
Number of worker threads spawned at
each supplier for applying change
logs.
EM, LDAP 5 1-100
orclreplautotune Dynamically vary the number of
threads assigned to transport and
apply tasks based on load. If you set
the server to auto tune, you must
specify the number of maximum
number of threads to be shared
between these tasks. Restart server
after changing.
EM, LDAP 1 0: Off
1: On

Introduction to Replication Configuration Attributes
Managing Replication Configuration Attributes 41-9
41.1.7 Examples of Replication Configuration Objects in the Directory
The examples of replication objects in this section rely on the replication environment
shown in Figure 41–1.
orclreplmaxworker
s
Maximum number of worker threads.
Required if orclreplautotune is
set.
EM, LDAP 20 1-100
orclsdumpflag Generate stack dump.
(Restart after changing.)
EM, LDAP 0 0: False
1: True
orclmaxlogfilesiz
e
Maximum log file size (MB) EM, LDAP 1 MB > or = 1
orclmaxlogfiles Maximum number of log files to keep
in rotation
EM, LDAP 100 > or = 1
orclsizelimit Maximum number of entries to
process per replication cycle
EM, LDAP 1000 1-10000
orclconflresoluti
on
Automatically resolve replication
conflicts
EM, LDAP 1 0: False
1: True
orclreplusesasl;d
igest-md5
Use SASL for replication binds. EM, LDAP Attribute does
not exist by
default.
auth, auth-int,
auth-conf
orclActivateRepli
cation
Specifies that replication be activated
on the replication server designated by
orclOidInstanceName and
orclOidComponentName.
EM, LDAP 0 0: False
1: True
orclReplicationSt
ate
Activation state of the replication
server
Read-only,
using EM,
LDAP
0 0 or nonexistant: Not
running False
1: Running
orcldebuglevel Debug level of replication server EM, LDAP 0 Values are additive:
0: No Debug Log
2097152: Replication
Performance Log
4194304: Replication
Debug Log
8388608: Function
Call Trace
16777216: Heavy
Trace Log
orclOidComponentN
ame
Name of OID component where
replication is or will be activated
Read-only Set during
replication
setup
String
orclOidInstanceNa
me
Instance number of instance where
replication is or will be activated
Read-only Set during
replication
setup
Integer
orclReplAttrConfl
ict
Specifies whether timestamp or
attribute version should be honored
first during attribute level conflict
resolution.
EM, LDAP 0 0: Timestamp first.
1: Version number
first
Table 41–4 (Cont.) Replication Configuration Set Attributes
Attribute Description
Update
Mechanism Default Possible Values
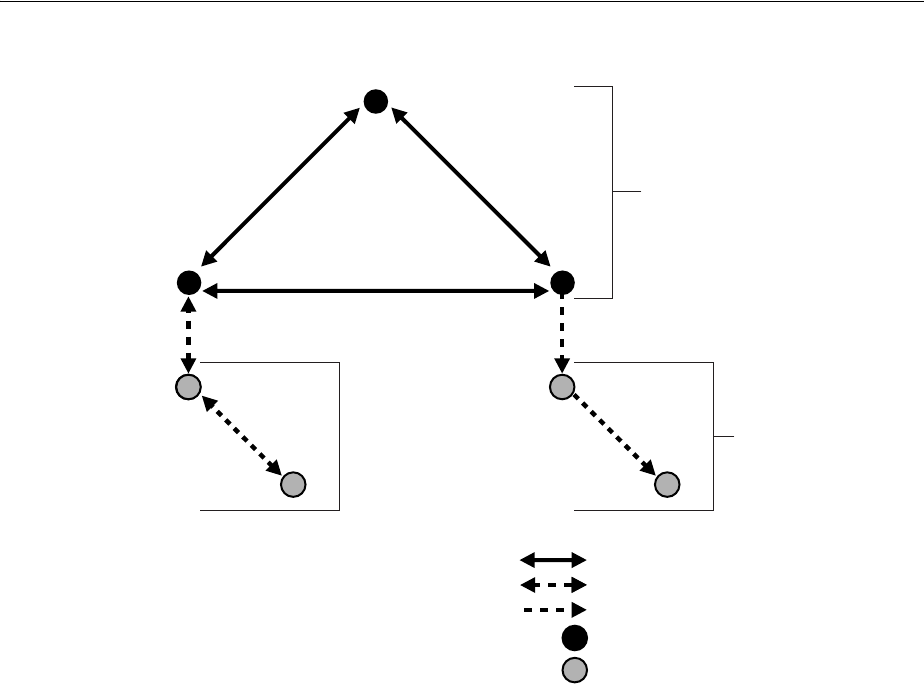
Introduction to Replication Configuration Attributes
41-10 Oracle Fusion Middleware Administrator's Guide for Oracle Internet Directory
Figure 41–1 Example: Multimaster Replication and Fan-Out Replication
In Figure 41–1, nodes A, B, and C form a multimaster replication group. Node C
replicates to a fourth node, D, which, in turn, fans out to Node E.
The replication agreements in this environment are as follows:
■Node A has one replication agreement representing its multimaster relationship
with nodes B and C.
■Node B has two replication agreements, the first representing its multimaster
relationship with nodes A and C, the second representing its relationship to node
F. The replication agreement between B and F is two-way.
■Node C has two replication agreements, the first representing its multimaster
relationship with nodes A and B, the second representing its relationship to node
D. This is a one-way replication agreement in which C serves as the supplier and
node D is the consumer.
■Node D has two replication agreements. Both of its replication agreements are
one-way. One represents its relationship to the supplier node C, from which it
consumes changes, the other represents its relationship to consumer node E for
which it is the supplier.
■Node E has a one-way replication agreement with Node D. Node E is the
consumer.
■Node F has two replication agreements, one representing its relationship to the
node B, the other representing its relationship to node G.Both are two-way
replication agreements.
■Node G has a one-way replication agreement with Node F. Node G is the
consumer.
A
CB
DF
E
Multimaster
Replication
G
Fan-Out
Replication
Multimaster Replication-based Replica
Partial Replica
One-Way Replication
Two-Way Replication
Multimaster Replication

Introduction to Replication Configuration Attributes
Managing Replication Configuration Attributes 41-11
Figure 41–2 shows the replication objects in the DIT that pertain to node C in
Figure 41–1 on page 41-10.
Figure 41–2 Example: Replication Configuration Entries for Node C
For node C, the entry cn=replication configuration at the root DSE contains
these RDNs:
■orclagreementID=000001: The multimaster replication agreement in which
node C participates with nodes A and B.
■orclReplicaID=UID_of_node_C: Unique identifier of node C that contains
information about it.
■orclagreementID=000002: Unique identifier of the relationship between
supplier node C and consumer node D. You know that, in this case,
orclagreementID=000002 is the replication agreement of the supplier node C
because node C is its parent.
This entry contains the attribute orclreplicaDN. Its value is the replica entry
DN of consumer node D, with which node C has the replication agreement.
■cn=replication DN: The bind DN that the directory replication server on node
C uses to bind to the directory server.
■cn=replication namecontext: Container of information about naming
contexts that are included in replication.
■cn=includednamingcontext000001 and cn=namingcontext002: The
actual objects that are included in or excluded from replication. In the naming
context included for replication, you can specify one or more subtrees to be
excluded from replication. In that same included naming context, you can specify
particular attributes to be excluded from replication.
Figure 41–3 shows the replication agreement entry in the DIT that pertains to node D
in Figure 41–1 on page 41-10.
orclReplicaID=
UID_of_Node_C
cn=replication DN
cn=replication configuration
Root DSE
orclagreementID=000002
orclagreementID=000001
cn=replication namecontext
cn=namingcontext001 cn=namingcontext002

Configuring Replication Configuration Attributes by Using Fusion Middleware Control
41-12 Oracle Fusion Middleware Administrator's Guide for Oracle Internet Directory
Figure 41–3 Example: Replication Configuration Entries for Node D
For node D, the entry cn=replication configuration at the root DSE contains
these RDNs:
■orclReplicaID=UID_of_node_D: Unique identifier of node D and contains
information about it.
■orclagreementID=000003: Unique identifier of the relationship between
supplier node D and consumer node E. You know that, in this case,
orclagreementID=000003 is the replication agreement of the supplier node D
because node D is its parent.
This entry contains the attribute orclreplicaDN, the value of which is the DN of
consumer node E with which node D has the replication agreement.
■cn=replication DN: Bind DN that the directory replication server on node D
uses to bind to the directory server.
■cn=replication namecontext: Container of information about naming
contexts that are included in replication.
■cn=namingcontext001 and cn=namingcontext002: Objects specifying
naming contexts to be included in replication. In the naming context included in
replication, you can specify one or more subtrees or particular attributes to be
excluded from replication.
41.2 Configuring Replication Configuration Attributes by Using Fusion
Middleware Control
This section provides a summary of the replication configuration attributes that
correspond with fields you can configure by using Oracle Enterprise Manager Fusion
Middleware Control. For more specific procedures, see Chapter 42, "Managing and
Monitoring Replication."
41.2.1 Configuring Attributes on the Shared Properties, Replication Tab
You can configure some of the replication attributes by using the Oracle Internet
Directory Shared Properties page of Fusion Middleware Control. Select
Administration, then Shared Properties, then select Replication from the Oracle
Internet Directory menu. After changing the configuration, choose Apply. The
correspondence is as follows:
orclReplicaID=
UID_of_Node_D
cn=replication DN
cn=replication configuration
Root
orclagreementID=000003
cn=replication namecontext
cn=includednamingcontext000001 cn=namingcontext002

Configuring Replication Configuration Attributes by Using Fusion Middleware Control
Managing Replication Configuration Attributes 41-13
41.2.2 Configuring Replication Wizard Parameters
Some of the values you select or enter in the Oracle Enterprise Manager Fusion
Middleware Control replication wizard control specific configuration attributes. For
example, your selections on the Schedule page of the replication wizard control the
attributes listed in Table 41–6, " Replication Schedule Attributes".
The wizard sets other attributes appropriately when you configure replication. For
example, the attribute orclreplicauri is formed by concatenation of the fields on
the Replicas page of the wizard.
Table 41–5 Configuration Attributes on Shared Properties, Replication Tab
Field or Heading Configuration Attribute
Change Retry Count orclchangeretrycount
Maximum Number of Workers orclreplmaxworkers
Autotune Replication orclreplautotune
Number of Apply Threads Per Supplier orclthreadspersupplier;apply
Number of Transport Threads per Supplier orclthreadspersupplier;transport
Maximum Number of Entries to Process per
Replication Cycle
orclsizelimit
Automatically Resolve Replication Conflicts orclconflresolution
Generate Stack Dump orclsdumpflag
SASL for Replication Bind orclreplusesasl;digest-md5
Maximum Log File Size (MB) orclmaxlogfilesize
Maximum number of log files to keep in rotation orclmaxlogfiles
Conflict resolution for modify operations orclreplattrconflict
DebugLevel orcldebuglevel
Replication Status orclreplicationstate
Activate/Inactivate orclactivatereplication
Replica ID orclreplicaid
Replica Primary URI orclreplicauri
Replica Secondary URI orclreplicasecondaryuri
Replica State orclreplicastate
Replica Type orclreplicatype
Table 41–6 Replication Schedule Attributes
Field or Heading Configuration Attribute
LDAP Connection orclldapconnkeepalive
Replication Frequency orclupdateschedule
HIQ Schedule orclhiqshecule

Managing Replication Configuration Attributes From the Command Line
41-14 Oracle Fusion Middleware Administrator's Guide for Oracle Internet Directory
41.3 Managing Replication Configuration Attributes From the Command
Line
You can modify most attributes from the command line by using ldapmodify. The
command line syntax is:
ldapmodify -D cn=orcladmin -q -p portNum -h hostname -f ldifFile
The contents of the LDIF file depends on the DN and the operation being performed.
For examples of LDIF files for changing replication configuration attributes, see
Section 42.3, "Managing and Monitoring Replication by Using the Command Line."

42
Managing and Monitoring Replication 42-1
42Managing and Monitoring Replication
This chapter tells you how to monitor and manage replication in Oracle Internet
Directory. For more information about replication configuration attributes, see
Chapter 41, "Managing Replication Configuration Attributes."
This chapter contains the following sections:
■Section 42.1, "Introduction to Managing and Monitoring Replication"
■Section 42.2, "Managing and Monitoring Replication by Using ODSM and Fusion
Middleware Control"
■Section 42.3, "Managing and Monitoring Replication by Using the Command Line"
■Section 42.4, "Comparing and Reconciling Inconsistent Data by Using oidcmprec"
42.1 Introduction to Managing and Monitoring Replication
After you have installed and configured replication, you can view or modify the
default values for replication-related attributes. The attributes and their containers are
described in Chapter 41, "Managing Replication Configuration Attributes."
This introduction includes the following topics:
■Section 42.1.2, "Managing Worker Threads"
■Section 42.1.3, "Change Logs in Directory Replication"
■Section 42.1.4, "The Human Intervention Queue"
■Section 42.1.5, "Pilot Mode"
■Section 42.1.6, "Conflict Resolution in Oracle Replication"
Note: Some changes do not take effect until the replication server
is restarted.
See Also:
■Chapter 6, "Understanding Oracle Internet Directory Replication"
■Chapter 39, "Setting Up Replication"
■Appendix C, "Setting Up Oracle Database Advanced
Replication-Based Replication"
■Appendix D, "How Replication Works"

Introduction to Managing and Monitoring Replication
42-2 Oracle Fusion Middleware Administrator's Guide for Oracle Internet Directory
42.1.1 Modifying What Is to Be Replicated in LDAP-Based Partial Replication
In LDAP-based partial replication, you can change what is or is not replicated by
modifying replica naming context objects. The parameters for these objects are stored
in entries that have this DN:
cn=namingcontext_ID,cn=replication namecontext,
orclAgreementID=numeric_identifier_of_replication_agreement,
orclReplicaId=unique_identifier_of_replica, cn=replication configuration
See Section 42.2.3, "Viewing and Modifying Replica Naming Context Objects" and
Section 42.3.6, "Modifying Replica Naming Context Object Parameters by Using
ldapmodify."
42.1.2 Managing Worker Threads
The replication server is a multithreaded process. You can control the number of
worker threads per supplier that are dedicated to:
■Transporting the changelogs from supplier to consumer
■Applying the transported changelogs at consumer
You can set the number of transport threads and the number of apply threads per
supplier. Alternatively, you can configure the replication server to auto tune, that is, to
dynamically vary the number of threads assigned to these two tasks based on load. If
you set the server to auto tune, you must specify the number of maximum number of
threads to be shared between these tasks.
Table 42–1 shows the Oracle Enterprise Manager Fusion Middleware Control
parameters and configuration attributes that control worker threads. These are
attributes of the replication configuration set.
You must tune these numbers based on load. In Oracle Enterprise Manager Fusion
Middleware Control, you configure threads by using the Shared Properties page,
Replication tab. From the command line, you use ldapmodify.
Note: Because the directory replication server reads replica
naming context objects from the agreement located at the supplier,
you must apply all modifications against naming context objects at
the supplier and, optionally, at the consumer.
Table 42–1 Configuration Attributes Controlling Worker Threads
Fusion Middleware Control Parameter Configuration Attribute
Maximum Number of Workers orclreplmaxworkers
Autotune Replication orclreplautotune
Number of Apply Threads Per Supplier orclthreadspersupplier;apply
Number of Transport Threads per Supplier orclthreadspersupplier;transport

Introduction to Managing and Monitoring Replication
Managing and Monitoring Replication 42-3
42.1.3 Change Logs in Directory Replication
Oracle Internet Directory records each change as an entry in the change log store. Each
entry has a unique change number. The consumer keeps track of the change number
of the last change it applied, and it retrieves from the supplier only those changes with
numbers greater than that of the last change it applied.
■In an LDAP-based replication agreement, change log processing consists of two
phases, transporting the change log and applying the change log. For each
LDAP-based agreement, there are two change log processing statuses, one for the
each phase. The directory replication server stores the last change number it
transported in the transport subtype of the
orlcllastappliedchangenumber attribute of the replication agreement entry.
The directory replication server stores the last change number it applied in the
apply subtype of the orllclastappliedchangenumber attribute of the
replication agreement entry. The format of the
orlcllastappliedchangenumber attribute is shown in Section 41–2,
" Attributes of the Replication Agreement Entry."
■In a replication agreement based on Oracle Database Advanced Replication, the
directory replication server stores the last change number it transported in the
changenumber attribute of the changestatus entry. The changenumber
attribute looks like this:
changenumber=last_applied_change_number, supplier=supplier_node,
consumer=consumer_node
For example, if the last change a consumer applied had a number of 250, then
subsequent changes it retrieves from that supplier would need to have numbers
greater than 250.
Change logs are purged by the garbage collector after they have been consumed by the
replication server.
42.1.4 The Human Intervention Queue
Section D.5, "The Replication Process" describes the roles of the human intervention
queue, the purge queue, and the retry queue in replication. Section 42.1.6, "Conflict
Resolution in Oracle Replication" provides information about the role of these queues
in conflict resolution.
42.1.4.1 Managing the Queues
The human intervention queue tools, ManageHiq.retry and ManageHiq.purge,
enable you to move changes from the human intervention queue to the retry queue or
the purge queue, respectively. See Section 42.3.9, "Managing the Human Intervention
Queue."
See Also:
■Section 42.2.6, "Configure Replication Attributes by Using Fusion
Middleware Control"
■Section 42.3.7, "Configuring Attributes of the Replication
Configuration Set by Using ldapmodify"
■Section 41–4, " Replication Configuration Set Attributes"

Introduction to Managing and Monitoring Replication
42-4 Oracle Fusion Middleware Administrator's Guide for Oracle Internet Directory
42.1.4.2 Queue Statistics
You can view queue statistics by using the replication wizard in Oracle Enterprise
Manager Fusion Middleware Control or the command line. See Section 42.2.10,
"Viewing Queue Statistics by Using Fusion Middleware Control"and Section 42.3.2,
"Viewing Change Logs by Using ldapsearch."
42.1.4.3 The Number of Entries the Human Intervention Queue Tools Can Process
If the number of entries in the Human Intervention Queue is greater than the
maximum number of changelogs the replication server can process at a time, some
entries are never processed.
The maximum number of changelogs the replication server can process at a time is the
minimum of two configuration attributes:
■orclsizelimit in the replication configuration set
■orclsizelimit in the instance-specific configuration entry of the OID
component where replication is active
The default value of orclsizelimit in the replication configuration set is 1000. If
you set it to 0, it takes the default value of 1000.
The orclsizelimit attribute in the Oracle Internet Directory instance-specific entry
specifies the maximum number of entries to be returned by a search. (Its default value
is 10000.
To increase the number of changelogs processed at a time, you must set both attributes
to the same value, a value greater than 1000.
Setting the Oracle Internet Directory server instance attribute orclsizelimit very
high impacts server performance, because orclsizelimit in the Oracle Internet
Directory server instance also controls the maximum number of entries to be returned
by a search.
42.1.5 Pilot Mode
Pilot mode is used to test an application before deploying it in production. Typically,
you set pilot mode on the local node, with one-way replication from the production
node. While the replica is in pilot mode, all the LDAP changes occurring at the local
node are tracked. When you end pilot mode, those changes are written to an LDIF file.
When the application is deployed in production, all the entries added or modified in
the pilot replica can be added to the production node using the ldif file.
42.1.6 Conflict Resolution in Oracle Replication
Oracle Database Advanced Replication-based replication and two-way and
multimaster LDAP-based replication enable updates to multiple directory servers.
Conflicts occur whenever the directory replication server attempts to apply remote
changes from a supplier to a consumer and, for some reason, fails.
See Also:
■Section 42.3.12, "Managing the Number of Entries the Human
Intervention Queue Tools Can Process"
■Table 41–4, " Replication Configuration Set Attributes"
See Also: Section 42.3.4, "Specifying Pilot Mode for a Replica by
Using remtool"

Introduction to Managing and Monitoring Replication
Managing and Monitoring Replication 42-5
Conflicts usually stem from differences in the timing of changes arising from the
occasional slowness or transmission failure over wide area networks. Also, an earlier
inconsistency might continue to cause conflicts if it is not resolved in a timely manner.
In partial replication, when a naming context is changed from included to excluded,
the replication server deletes the naming context at the consumer. Similarly, if the
naming context is changed from excluded to included, the replication server
synchronizes the entire naming context from supplier to consumer.
LDAP operations that can lead to conflicts include:
■Addition
■Deletion
■Modification
■Modification of either an RDN or a DN
42.1.6.1 Levels at Which Replication Conflicts Occur
There are two types of conflicts:
■Entry-level conflicts
■Attribute-level conflicts
Table 42–2 Types of Replication Conflict
Level of Replication Conflict Description
Entry-level conflicts Caused when the directory replication server attempts to
apply a change to the consumer. One of the following types
of changes to the consumer could occur:
■Adding an entry that already exists
■Deleting an entry that does not exist
■Modifying an entry that does not exist
■Applying a modifyrdn operation when the DN does not
exist
These conflicts can be difficult to resolve. For instance, it may
be impossible to resolve a conflict because:
■The entry has been moved to a different location
■The entry has not yet arrived from a supplier
■The entry has been deleted
■The entry never existed on the consumer
If an entry exists and it should not, then it may be because it
was added earlier, or that it recently underwent a modifydn
operation.
Attribute-level conflicts Caused when two directories are updating the same attribute
with different values at different times. If the attribute is
single-valued, then the replication process resolves the
conflict by examining the timestamps of the changes involved
in the conflict and the attribute version number. The attribute
orclReplAttrConfl in the replication configuration set
entry determines which is honored first. If
orclReplAttrConfl is 0 (the default) timestamp is
honored first. If it is 1, attribute version is honored first.

Introduction to Managing and Monitoring Replication
42-6 Oracle Fusion Middleware Administrator's Guide for Oracle Internet Directory
42.1.6.2 Automatic Conflict Resolution
In 11g Release 1 (11.1.1), you can enable automatic conflict resolution. When this
feature is enabled, conflicts in the Human Intervention Queue are automatically
moved to the purge queue if the supplier's schema and consumer's schema match.
You can use either Oracle Enterprise Manager Fusion Middleware Control or the
ldapmodify command to enable or disable automatic conflict resolution. To use
Oracle Enterprise Manager Fusion Middleware Control, change the replication
configuration parameter Automatically Resolve Replication Conflicts. on the
Replication tab of the Shared Properties page. To use the command line, change the
value of orclconflresolution in the replication configuration set.
42.1.6.3 How Automated Conflict Resolution Works
The directory replication server attempts to resolve all conflicts that it encounters by
following this process:
1. The conflict is detected when a change is applied.
2. The replication process attempts to reapply the change a specific number of times
or repetitively for a specific amount of time after a specific waiting period.
3. If the replication process reaches the retry limit without successfully applying the
change, it flags the change as a conflict, which it then tries to resolve. If the conflict
cannot be resolved according to the resolution rules (described in the next section),
the change is moved to a low-priority, human intervention queue. Changes are
then applied according to the time unit specified in the orclHIQSchedule
parameter in the replication agreement. Before it moves the change, the directory
replication server writes the conflict into a log file for the system administrator.
See Also:
■Section 41–4, " Replication Configuration Set Attributes"
■Section 42.2.6, "Configure Replication Attributes by Using Fusion
Middleware Control"
■Section 42.3.7, "Configuring Attributes of the Replication
Configuration Set by Using ldapmodify"
Note: There is no conflict resolution of schema, catalog, and group
entries during replication. This is because attempting resolution of
such large multivalued attributes would have a significant negative
impact on performance. Be careful to avoid updating such entries
from more than one master at a time.

Managing and Monitoring Replication by Using ODSM and Fusion Middleware Control
Managing and Monitoring Replication 42-7
42.2 Managing and Monitoring Replication by Using ODSM and Fusion
Middleware Control
You can manage and monitor replication by using Oracle Enterprise Manager Fusion
Middleware Control. This section contains the following topics:
■Section 42.2.1, "Enabling or Disabling Change Log Generation by Using Fusion
Middleware Control"
■Section 42.2.2, "Viewing the Local Change Logs by Using Oracle Directory Services
Manager"
■Section 42.2.3, "Viewing and Modifying Replica Naming Context Objects"
■Section 42.2.4, "Viewing or Modifying a Replication Setup by Using the Replication
Wizard"
■Section 42.2.5, "Deleting an LDAP-Based Replication Agreement by Using the
Replication Wizard"
■Section 42.2.6, "Configure Replication Attributes by Using Fusion Middleware
Control"
■Section 42.2.7, "Activating or Inactivating a Replication Server by Using Fusion
Middleware Control"
■Section 42.2.8, "Configuring the Replication Debug Level by Using Fusion
Middleware Control"
■Section 42.2.9, "Configuring Replica Details by Using Fusion Middleware Control"
■Section 42.2.10, "Viewing Queue Statistics by Using Fusion Middleware Control"
■Section 42.2.11, "Managing Changelog Processing by Using Fusion Middleware
Control"
■Section 42.2.12, "Monitoring Conflict Resolution Messages by Using Fusion
Middleware Control"
42.2.1 Enabling or Disabling Change Log Generation by Using Fusion Middleware
Control
You can enable and disable change log generation by using Oracle Enterprise Manager
Fusion Middleware Control, as follows:
See Also:
■Appendix D, "How Replication Works"for descriptions of how the
multimaster replication process adds, deletes, and modifies
entries, and how it modifies DNs and RDNs.
■"Oracle Identity Management LDAP Schema Reference" in Oracle
Fusion Middleware Reference for Oracle Identity Management for
schema questions
■The catalog command-line tool reference in Oracle Fusion
Middleware Reference for Oracle Identity Management for catalog
questions
■The section on managing group entries in Oracle Identity
Management Guide to Delegated Administration in the 10g (10.1.4.0.1)
library for group entry questions

Managing and Monitoring Replication by Using ODSM and Fusion Middleware Control
42-8 Oracle Fusion Middleware Administrator's Guide for Oracle Internet Directory
1. Choose Administration, then Server Properties from the Oracle Internet
Directory menu.
2. Choose the Performance tab.
3. Select or deselect Enable Change Log Generation.
4. After changing the configuration, choose Apply.
42.2.2 Viewing the Local Change Logs by Using Oracle Directory Services Manager
Oracle Directory Services Manager enables you to view the last 500 changes you
performed, listing them by change log number, the type of operation—namely, add,
modify, or delete—in which each occurred, and the entry on which each was made. It
allows you select a particular change to see more specific details about it.
You can view change logs by using Oracle Directory Services Manager, as follows:
1. From the task selection bar, select Advanced.
2. Expand Change Log if it is not already expanded. The left panel lists the last 500
changes, beginning with the most recent.
3. Select a change to view its properties.
Table 42–3 lists the properties shown on the Change Log page and the corresponding
attributes of the change log entry.
42.2.3 Viewing and Modifying Replica Naming Context Objects
To add, delete, view, and modify parameters for replica naming context objects, use
the Replication Wizard in Oracle Enterprise Manager Fusion Middleware Control:
1. From the Oracle Internet Directory menu on the home page, select
Administration, then Replication Management.
2. You are prompted to log into the replication DN account. Provide the host, port,
replication DN, and replication DN password.
3. The Replication Agreements page lists information about each replication
agreement: name, type, supplier, consumer, and status. Select the name of the
replication agreement you want to edit and click the Edit icon. Three tabs appear
at the bottom of the screen.
Table 42–3 Properties on the Change Log Page
Property Change Log Attribute
Change Number changenumber
Operation changetype
TargetDN targetdn
Changes changes
Global Unique Identifier (GUID) orclguid
Parent GUID orclparentguid
Change Retry Count orclchangeretrycount
Modifier's Name modifiersname
Operation Time operationtime
Server Name servername

Managing and Monitoring Replication by Using ODSM and Fusion Middleware Control
Managing and Monitoring Replication 42-9
4. On the Scope tab, you can change the scope settings.
To add a primary naming context, click the Create button above the Primary
Naming Context field.
To change the primary naming context, click the Edit button above the Primary
Naming Context field and select a different container.
5. To exclude a secondary naming context, select it in the Secondary Naming
Contexts field and click Exclude to move it to the Excluded Secondary Naming
Contexts field.
To include a secondary naming context, select it in the Excluded Secondary
Naming Contexts field and click Include to move it to the Secondary Naming
Contexts field.
6. To exclude an attribute, select it in the Attributes field and click Exclude to move
it to the Excluded Attributes field.
To include an attribute, select it in the Excluded Attributes field and click Include
to move it to the Attributes field.
7. To apply your changes, click Apply.
8. To effect the changes you have made, you must start or restart the replication
server. For one-way replication, you must restart it on the consumer. For a
two-way or multimaster replication agreement, you must restart the replication
server on each of the nodes in the replication agreement. To do this, select the
Oracle Internet Directory node in the navigation tree and select Control from the
Oracle Internet Directory menu.
42.2.4 Viewing or Modifying a Replication Setup by Using the Replication Wizard
When you set up replication, you create a replication agreement and replica subentry.
You can view or modify the setup by using the Replication Wizard in Oracle
Enterprise Manager Fusion Middleware Control, as follows.
1. From the Oracle Internet Directory menu on the home page, select
Administration, then Replication Management.
2. You are prompted to log into the replication DN account. Provide the host, port,
replication DN, and replication DN password.
3. To view queue statistics for a replication agreement, select the replication
agreement, select Queue Statistics and proceed as described in Section 42.2.10,
"Viewing Queue Statistics by Using Fusion Middleware Control."
4. To view or edit a replication agreement, select the name of the replication
agreement you want to edit and click the Edit icon. At the bottom of the screen,
three tabs appear.
5. To view or edit the replication configuration, select the Replication Configuration
tab.
a. In the LDAP Connection field, select Keep Alive if you want the replication
server to use same connection for performing multiple LDAP operations.
Note: Always inactivate replication before you delete or modify a
replication agreement. See Section 42.2.7, "Activating or Inactivating a
Replication Server by Using Fusion Middleware Control."

Managing and Monitoring Replication by Using ODSM and Fusion Middleware Control
42-10 Oracle Fusion Middleware Administrator's Guide for Oracle Internet Directory
Select Always Use New Connection if you want the server to open a new
connection for each LDAP operation.
b. Enter the Replication Frequency.
c. Enter the Human Intervention Queue Schedule. This is the interval, in
seconds, at which the directory replication server repeats the change
application process.
d. Click Apply to apply your changes, or click Cancel to discard your changes.
6. To view or change the Scope settings, click the Scope tab. Proceed as described in
Section 42.2.3, "Viewing and Modifying Replica Naming Context Objects."
7. To view the type, host, port, and user name for each node, click the Replicas tab of
the Edit Replication Definition page.
8. To view or edit Replica Primary URI, Replica Secondary URI, or Replica State for a
node:
a. Select the Replicas tab and click the "+" next to the supplier or consumer.
b. Make desired changes to the Replica Primary URI or Replica Secondary URI
fields.
c. Select a Replica State from the list.
d. Click Apply to apply your changes, or click Cancel to discard your changes.
9. To make a node the primary node in a multimaster replication group:
1. Click the Replicas tab, select the node, and
2. Click the Make Primary Node icon.
3. Click Apply to add the node to the existing directory replication group or click
Cancel to discard your changes.
10. To add a node to a multimaster replication group:
a. Select the Replicas tab.
b. Click the Create icon.
c. In the popup window, provide the host, port and replication DN password
details for the new node. Click Add.
d. Click Apply to add the node to the existing directory replication group or click
Cancel to discard your changes.
11. To delete a node from a multimaster replication group containing three or more
nodes:
a. Select the Replicas tab.
b. Click the replica you want to delete from the multimaster replication
deployment. The Delete icon becomes enabled.
c. Click Delete.
d. Click Apply to delete the node from the directory replication group (DRG)
42.2.5 Deleting an LDAP-Based Replication Agreement by Using the Replication
Wizard
You delete a one-way, two-way, or multimaster LDAP replica by using the Replication
Wizard in Oracle Enterprise Manager Fusion Middleware Control.

Managing and Monitoring Replication by Using ODSM and Fusion Middleware Control
Managing and Monitoring Replication 42-11
1. From the Oracle Internet Directory menu on the home page, select
Administration, then Replication Management. The Replication Agreements
page lists information about each replication agreement: name, type, supplier,
consumer, and status.
2. You are prompted to log into the replication DN account. Provide the host, port,
replication DN, and replication DN password.
3. To delete a replication agreement, select the agreement and click the Delete icon.
When the Delete Popup appears, click Delete.
42.2.6 Configure Replication Attributes by Using Fusion Middleware Control
You can configure most replication configuration set attributes by using the
Replication tab of the Shared Properties page of Fusion Middleware Control. Select
Administration, then Shared Properties from the Oracle Internet Directory menu,
then select Replication. After changing the configuration, choose Apply. Table 42–4
shows the correspondence between the fields on the Replication Configset section of
the Shared Properties page. See Table 41–5 on page 41-13 for detailed information
about these attributes.
Restart the server after changing Autotune Replication or Generate Stack Dump.
Note: Always inactivate replication before you delete or modify a
replication agreement. See Section 42.2.7, "Activating or Inactivating a
Replication Server by Using Fusion Middleware Control."
Table 42–4 Replication Configset Attributes on Shared Properties, Replication Tab
Field or Heading Configuration Attribute
Change Retry Count orclchangeretrycount
Maximum Number of Workers orclreplmaxworkers
Autotune Replication orclreplautotune
Number of Apply Threads Per Supplier orclthreadspersupplier;apply
Number of Transport Threads per Supplier orclthreadspersupplier;transport
Entries to Process per Replication Cycle orclsizelimit
Automatically Resolve Replication Conflicts orclconflresolution
Generate Stack Dump orclsdumpflag
SASL for Replication Bind orclreplusesasl;digest-md5
Maximum Log File Size (MB) orclmaxlogfilesize
Maximum number of log files to keep in rotation orclmaxlogfiles
DebugLevel orcldebuglevel
See Also:
■Table 41–4, " Replication Configuration Set Attributes" on
page 41-8 for a description of the attributes.
■Section 42.2.8, "Configuring the Replication Debug Level by Using
Fusion Middleware Control" for more information on setting
Debug Level.

Managing and Monitoring Replication by Using ODSM and Fusion Middleware Control
42-12 Oracle Fusion Middleware Administrator's Guide for Oracle Internet Directory
42.2.7 Activating or Inactivating a Replication Server by Using Fusion Middleware
Control
When you set up replication using the Replication Wizard, the replication server is
automatically activated on the Oracle Internet Directory instances where you
configured it. If necessary, you can inactivate replication and activate it again without
changing your configuration. You can also inactivate replication on one instance and
activate it on another Oracle Internet Directory instance that is sharing the same
database. To disable or enable replication by using Oracle Enterprise Manager Fusion
Middleware Control, use the Replication Server Status section of the Replication tab of
the Shared Properties page of Fusion Middleware Control
Configure the attributes as follows:
1. Select Administration, then Shared Properties from the Oracle Internet Directory
menu, then select Replication.
2. In the Replication Server Status section of the page, select the Oracle Internet
Directory component that you want to activate or inactivate from the Activate
Replication on list. This list displays all the Oracle Internet Directory components
in a WebLogic Server domain that share the same database.
3. If the replication status of the selected Oracle Internet Directory component is
inactive, you can click Activate to activate it. If the replication status is active, you
can click Inactivate to activate it. You do not need to click anything else.
Activating replication on one instance automatically inactivates it on the instance
where it was previously active.
Table 42–5 shows the correspondence between the fields in the Replication Server
Status section of the page and the configuration attributes. See Section 41–4,
" Replication Configuration Set Attributes" for more information about these
attributes.
42.2.8 Configuring the Replication Debug Level by Using Fusion Middleware Control
You can configure the replication debug level by using the Debug Level section of the
Replication tab of the Shared Properties page of Fusion Middleware Control.
See Table 41–4, " Replication Configuration Set Attributes" on page 41-8 for
information about the orcldebuglevel attribute.
Configure the debug level as follows:
1. Select Administration, then Shared Properties from the Oracle Internet Directory
menu, then select Replication.
2. Select any combination of Replication Process, Trace Function Calls, Replication
Performance Log, and Heavy Trace Debugging.
Note: The Revert and Apply buttons at the top of the page have no
effect upon the replication server status.
Table 42–5 Replication Server Status Attributes on Shared Properties, Replication Tab
Field or Heading Configuration Attribute
Replication Status orclreplicationstate
Activate Replication on orclactivatereplication

Managing and Monitoring Replication by Using ODSM and Fusion Middleware Control
Managing and Monitoring Replication 42-13
3. Choose Apply.
42.2.9 Configuring Replica Details by Using Fusion Middleware Control
You can change replica details by using the Replica Details section of the Replication
tab of the Shared Properties page of Fusion Middleware Control.
Table 42–6 shows the correspondence between the fields in the Replica Details section
and the attributes of the replica subentry. See Table 41–1, " Attributes of the Replica
Subentry" on page 41-2 for more information about these attributes.
See Section D.4, "LDAP Replica States" for information about the values of
orclreplicastate.
To configure the replica details, select Administration, then Shared Properties from
the Oracle Internet Directory menu, then select Replication. After changing the
configuration, choose Apply.
The choices for Replica State are Bootstrap, Online and DB Copy AddNode.
The choices for Replica Type are ReadWrite, Read Only, and Pilot.
42.2.10 Viewing Queue Statistics by Using Fusion Middleware Control
You view statistics for an LDAP replica by using the Oracle Enterprise Manager
Fusion Middleware Control replication wizard, as follows.
1. From the Oracle Internet Directory menu on the home page, select
Administration, then Replication Management.
2. You are prompted to log into the replication DN account. Provide the host, port,
replication DN, and replication DN password.
3. The Replication Agreements page lists information about each replication
agreement. Click the name of the replication agreement for which you want to
view the queue statistics, then click the Queue Statistics icon.
4. The bottom of the page lists the following statistics:
■New Changes
■Retry Changes
■Purge Changes
■HIQ Changes
■Last Applied Change
■Last Transported Change
Table 42–6 Replica Details on Shared Properties, Replication Tab
Field or Heading Configuration Attribute in the Replica Subentry
Replica ID orclreplicaid
Replica Primary URI orclreplicauri
Replica Secondary URI orclreplicasecondaryuri
Replica State orclreplicastate
Replica Type orclreplicatype

Managing and Monitoring Replication by Using the Command Line
42-14 Oracle Fusion Middleware Administrator's Guide for Oracle Internet Directory
42.2.11 Managing Changelog Processing by Using Fusion Middleware Control
To increase the number of changelogs processed at a time, you must set
orclsizelimit in the replication configuration set and orclsizelimit in the
server instance where replication is running to the same value, a value greater than
1000.
To change orclsizelimit in the replication configuration set by using Fusion
Middleware Control:
1. Select Administration, then Shared Properties from the Oracle Internet Directory
menu
2. Select Replication.
3. Change the parameter Maximum Number of Entries to Process per Replication
Cycle.
4. Choose Apply.
To change orclsizelimit in a server instance by using Oracle Enterprise Manager
Fusion Middleware Control:
1. Select Administration, then Server Properties from the Oracle Internet Directory
menu.
2. Select General.
3. Change the value of Maximum number of entries to be returned by a search.
4. Choose Apply.
Setting the Oracle Internet Directory server instance parameter orclsizelimit very
high impacts server performance, because orclsizelimit also controls the
maximum number of entries to be returned by a search.
42.2.12 Monitoring Conflict Resolution Messages by Using Fusion Middleware Control
You can view conflict resolution messages in the Replication Log by using Oracle
Enterprise Manager Fusion Middleware Control, as follows:
1. From the Oracle Internet Directory menu, select Monitoring, then Logs. The Log
Messages page appears.
2. Click Log Files. The Log Files page appears.
3. Select Replication Log.
42.3 Managing and Monitoring Replication by Using the Command Line
This section contains the following topics
See Also: Table 41–4, " Replication Configuration Set Attributes" on
page 41-8.
See Also:
■Section 23.2.1, "Viewing Log Files by Using Fusion Middleware
Control"for detailed information about viewing log files in Oracle
Enterprise Manager Fusion Middleware Control.
■Section 42.3.8, "Monitoring Conflict Resolution Messages by Using
the Command Line" for detailed infomation about conflict
resolution messages.

Managing and Monitoring Replication by Using the Command Line
Managing and Monitoring Replication 42-15
■Section 42.3.1, "Enabling and Disabling Change Log Generation by Using the
Command Line"
■Section 42.3.2, "Viewing Change Logs by Using ldapsearch"
■Section 42.3.3, "Configuring Attributes of the Replica Subentry by Using
ldapmodify"
■Section 42.3.4, "Specifying Pilot Mode for a Replica by Using remtool"
■Section 42.3.5, "Configuring Replication Agreement Attributes by Using
ldapmodify"
■Section 42.3.6, "Modifying Replica Naming Context Object Parameters by Using
ldapmodify"
■Section 42.3.7, "Configuring Attributes of the Replication Configuration Set by
Using ldapmodify"
■Section 42.3.8, "Monitoring Conflict Resolution Messages by Using the Command
Line"
■Section 42.3.9, "Managing the Human Intervention Queue"
■Section 42.3.10, "Monitoring Replication Progress in a Directory Replication Group
by Using remtool -pthput"
■Section 42.3.11, "Viewing Queue Statistics and Verifying Replication by Using
remtool"
■Section 42.3.12, "Managing the Number of Entries the Human Intervention Queue
Tools Can Process"
■Section 42.3.13, "Changing the Replication Administrator's Password for
Advanced Replication"
42.3.1 Enabling and Disabling Change Log Generation by Using the Command Line
You can enable and disable change log generation by using ldapmodify to change
the value of orclgeneratechangelog, which is an instance-specific attribute. You
enable change log generation by setting the value to 1 and disable it by setting the
value to 0. The command is:
ldapmodify -D cn=orcladmin -q -p portNum -h hostname -f ldifFile
The LDIF file for changing the value of the orclgeneratechangelog attribute in
the instance-specific entry to 1 looks like this:
dn: cn=componentname,cn=osdldapd,cn=subconfigsubentry
changetype: modify
replace: orclgeneratechangelog
orclgeneratechangelog: 1
42.3.2 Viewing Change Logs by Using ldapsearch
To view change logs from the command line, you use ldapsearch. Specify in the
search filter the change number or range of change numbers of the change logs you
want to view. If you want to view change logs that have been transported from a
supplier to the local host, also specify the replica ID of the supplier in the search filter.
For example, to view a range of change logs that have been transported from the
supplier to the local node, type:

Managing and Monitoring Replication by Using the Command Line
42-16 Oracle Fusion Middleware Administrator's Guide for Oracle Internet Directory
ldapsearch -D cn=orcladmin -p port -q -b "cn=changelogs" -s one \
"(&(objectclass=changeLogEntry)(servername=SUPPLIER_REPLICAID)\
(changeNumber>=FROMCHGNO)(changeNumber<=TOCHGNO))"
To view a single change log that has been transported from the supplier to the local
node, type:
ldapsearch -D cn=orcladmin -p port -q -b "cn=changelogs" -s one \
"(&(objectclass=changeLogEntry)(servername=SUPPLIER_REPLICAID)\
(changeNumber=CHGNO))"
To view a range change logs that have been generated at the local node, type:
ldapsearch -D cn=orcladmin -p port -q -b "cn=changelogs" -s one \
"(&(objectclass=changeLogEntry)(changeNumber>=FROMCHGNO)(changeNumber<=TOCHGNO))"
To view a single change log that has been generated at the local node, type:
ldapsearch -D cn=orcladmin -p port -q -b "cn=changelogs" -s one \
"(&(objectclass=changeLogEntry)(changeNumber=CHGNO))"
Some lines in the output might contain the string <@! !@> as a separator.
Table 42–7 lists the important attributes in the change log.
42.3.3 Configuring Attributes of the Replica Subentry by Using ldapmodify
The replica subentry has the DN
orclreplicaid=Replica _ID,cn=replication configuration
Table 42–8 lists the attributes of the replica subentry that you can modify with
ldapmodify. The command line syntax is:
ldapmodify -D cn=orcladmin -q -p portNum -h hostname -f ldifFile
Table 42–7 Important Attributes in the Change Log
Attribute Description
changenumber Change Number
changetype Operation
targetdn Target DN
changes Changes
orclguid Global Unique Identifier (GUID)
orclparentguid Parent GUID
orclchangeretrycount Change Retry Count
modifiersname Modifier's Name
operationtime Operation Time
servername Server Name
Table 42–8 Replica Subentry Attributes
Description Configuration Attribute
Replica ID orclreplicaid
Replica Primary URI orclreplicauri

Managing and Monitoring Replication by Using the Command Line
Managing and Monitoring Replication 42-17
Table D–1, " LDAP Replica States" describes the values of orclreplicastate in
detail. You can set 0, 1 the values, 2, 6, or 8. The other orclreplicastate values
listed in Table D–1 are read-only values set by the replication server during bootstrap.
To set orclreplicastate to zero, you would use the following LDIF file:
dn: orcclreplicaid=Replica _ID,cn=replication configuration
changetype: modify
replace: orclreplicastate
orclreplicastate: 0
42.3.4 Specifying Pilot Mode for a Replica by Using remtool
Before you deploy a replica as part of your enterprise, you might want to test it in pilot
mode. You use the remtool command to begin and end pilot mode. The syntax is:
remtool -pilotreplica begin -bind hostname:ldap_port
remtool -pilotreplica end -bind hostname:ldap_port [-bkup file_name]
When you run remtool -pilotreplica begin:
■orclreplicatype is set to 2 (pilot)
■orclpilotmode is set to 1
■pilotstarttime is set to current time.
When you run remtool -pilotreplica end
■orclpilotmode is set to 0
Do not attempt to modify these attributes directly with ldapmodify.
42.3.5 Configuring Replication Agreement Attributes by Using ldapmodify
The replication agreement has the DN:
orclagreementid=Agreement_ID,orclreplicaid=Replica_ID,cn=replication configuration
Table 42–9 lists the replication agreement attributes that you can modify by using
ldapmodify. See Table 41–2, " Attributes of the Replication Agreement Entry" on
page 42-5 for more information.
Replica Secondary URI orclreplicasecondaryuri
Replica State orclreplicastate
Replica Type orclreplicatype
See Also:
■Table 41–1, " Attributes of the Replica Subentry" on page 41-2
■Section D.4, "LDAP Replica States"
See Also: The remtool command reference in Oracle Fusion
Middleware Reference for Oracle Identity Management for more
information about the -pilotreplica option to remtool.
Table 42–8 (Cont.) Replica Subentry Attributes
Description Configuration Attribute

Managing and Monitoring Replication by Using the Command Line
42-18 Oracle Fusion Middleware Administrator's Guide for Oracle Internet Directory
The following LDIF file changes the human intervention queue schedule by changing
the value of the orclHIQSchedule attribute in the replication agreement to 900
minutes:
dn: orclagreementid=Agreement_ID,orclreplicaid=Replica_ID,cn=replication
configuration
changetype: modify
replace: orclhiqschedule
orclhiqschedule: 900
42.3.6 Modifying Replica Naming Context Object Parameters by Using ldapmodify
It is possible to change the replication scope from the command line. To do so, you
must create or modify the naming context object entries under the replication naming
context container entry. See
To change the replication scope, you would use a command line such as:
ldapadd -p port_number -h host -f file.ldif
with an LDIF file to set the scope for an agreement.
For example, you would use the following LDIF file to set the replication scope to
cn=oraclecontext:
dn: cn=includednamingcontext000001,cn=replication
namecontext,orclagreementid=agreementid,orclreplicaid=replicaid,cn=replication
configurationobjectclass: orclreplnamectxconfig
orclincludednamingcontexts: cn=oraclecontext
cn: includednamingcontext000001
Note: Always inactivate replication before you delete or modify a
replication agreement. See Section 42.2.7, "Activating or Inactivating a
Replication Server by Using Fusion Middleware Control."
Table 42–9 Replication Agreement Options
Description Configuration Attribute Default Value
Replication frequency orclupdateschedule 60 (seconds)
HIQ Schedule orclhiqschedule 600 (seconds)
Whether the connections from the
directory replication server to the
directory server are kept active or
established every time changelog
processing is done
orclldapconnkeepaliv
e
1
See Also: Table 41–2, " Attributes of the Replication Agreement
Entry".
See Also:
■Table 41–2, " Attributes of the Replication Agreement Entry" on
page 41-3
■Section 41.1.4, "The Replication Naming Context Container Entry"
■Section 41.1.5, "The Replication Naming Context Object Entry"

Managing and Monitoring Replication by Using the Command Line
Managing and Monitoring Replication 42-19
You would use the following file to exclude EMEA and APAC groups and exclude the
attributes userpassword and authpassword from the replication scope
dn: cn=includednamingcontext000002,cn=replication
namecontext,orclagreementid=agreementid,orclreplicaid=replicaid,cn=replication
configuration
objectclass=orclreplnamectxconfig
orclincludednamingcontexts: dc=com
orclexcludednamingcontexts: cn=groups,l=emea,dc=xyz,dc=com
orclexcludednamingcontexts: cn=groups,l=apac,dc=xyz,dc=com
orclExcludedAttributes: userpassword
orclExcludedAttributes: authpassword
cn: includednamingcontext000002
Replica naming context object parameters are listed and described under Replication
Schema Elements in Oracle Fusion Middleware Reference for Oracle Identity Management.
Example 42–1 Adding a Naming Context Object for an LDAP-Based Replica
This example creates a naming context object that does the following:
■Replicates the naming context ou=Americas,cn=mycompany
■Excludes from replication the naming context cn=customer profile,
ou=Americas,cn=mycompany
■Excludes from replication the attribute userpassword
The steps are:
1. Edit the example file mod.ldif as follows:
dn: cn=naming_context_identifier, cn=replication namecontext,
orclagreementid=replication_agreement_identifier,
orclreplicaid=supplier_replica_identifier,cn=replication configuration
orclincludednamingcontexts: ou=Americas,cn=mycompany
orclexcludednamingcontexts: cn=customer profile, ou=Americas, cn=mycompany
orclexcludedattributes: userpassword
objectclass: top
objectclass: orclreplnamectxconfig
2. Use ldapadd to add the partial replication naming context object to the supplier.
ldapadd -D "cn=orcladmin" -q -h supplier_host \
-p port_number -f mod.ldif
Example 42–2 Deleting a Naming Context Object
To delete the naming context object created in Example 42–1, type:
ldapdelete -D "cn=orcladmin" -q \
-h supplier_host -p supplier_host_port_number \
"cn=naming_context_identifier, cn=replication namecontext, \
orclagreementid=replication_agreement_identifier, \
orclreplicaid=supplier_replica_identifier, \
cn=replication configuration"
Note: The replication server reads naming context objects from the
supplier replica.

Managing and Monitoring Replication by Using the Command Line
42-20 Oracle Fusion Middleware Administrator's Guide for Oracle Internet Directory
Example 42–3 Modifying the orclIncludedNamingContexts Attribute for a Replica
Naming Context Object
The directory replication server uses the orclIncludedNamingcontexts attribute
value of the replica naming context object to specify the top-level subtree included in
partial replication.
In this example, the included naming context is set to c=us, which means that c=us is
to be included in partial replication.
1. Edit the example file mod.ldif as follows:
DN:cn=naming_context_identifier,cn=replication namecontext,
orclagreementid=replication_agreement_identifier,
orclreplicaid=supplier_replica_identifier,cn=replication configuration
Changetype:modify
Replace: orclIncludedNamingcontexts
orclIncludedNamingcontexts: c=us
2. Use ldapmodify to update the replication agreement orclupdateschedule attribute.
ldapmodify -D "cn=orcladmin" -q -h supplier_host -p port -f mod.ldif
3. Restart the directory replication server.
Example 42–4 Modifying the orclExcludedNamingContexts Attribute for a Replica
Naming Context Object
The directory replication server uses the orclExcludedNamingcontexts attribute
value of the replica naming context object to specify the top-level subtrees excluded
from partial replication.
In this example, the excluded naming contexts are set to ou=Europe,c=us and
ou=Americas,c=us, which means that these two naming contexts are to be excluded
from partial replication.
1. Edit the example file mod.ldif as follows:
DN:cn=naming_context_identifier,
cn=replication namecontext,
orclagreementid=replication_agreement_identifier,
orclreplicaid=supplier_replica_identifier,cn=replication configuration
Changetype:modify
Replace: orclExcludedNamingcontexts
orclExcludedNamingcontexts: ou=Europe, c=us
orclExcludedNamingcontexts: ou=Americas, c=us
2. Use ldapmodify to update the replication agreement orclupdateschedule attribute.
ldapmodify -D "cn=orcladmin" -q -h supplier_host -p port -f mod.ldif
3. Restart the directory replication server.
Note: A subtree specified in the
orclexcludednamingcontexts attribute must also be a subtree
of the specified includednamingcontext of the same replica
naming context object.

Managing and Monitoring Replication by Using the Command Line
Managing and Monitoring Replication 42-21
Example 42–5 Modifying the orclExcludedAttributes Attribute for a Replica Naming
Context Object
You can specify that certain changes made to the included naming context be
excluded, at attribute level, from partial replication. To determine which attributes are
to be excluded, the directory replication server uses the value of the
orclExcludedAttributes attribute of the replica naming context object.
In this example, the telephonenumber and title attributes of the naming context
specified in the orclincludednamingcontexts attribute are excluded from replication.
1. Edit the example file mod.ldif as follows:
DN:cn=naming_context_identifier,
cn=replication namecontext,
orclagreementid=replication_agreement_identifier,
orclreplicaid=supplier_replica_identifier,cn=replication configuration
Changetype:modify
Replace: orclExcludedAttributes
orclExcludedAttributes: telephonenumber
orclExcludedAttributes: title
2. Use ldapmodify to update the replication agreement orclupdateschedule attribute.
ldapmodify -D "cn=orcladmin" -q -h my_host -p port -f mod.ldif
3. Restart the directory replication server.
42.3.7 Configuring Attributes of the Replication Configuration Set by Using ldapmodify
The replication configuration set has the DN:
cn=configset0,cn=osdrepld,cn=subconfigsubentry
Table 42–10 lists the replication configuration set attributes that you can modify with
ldapmodify.
Table 42–10 Replication Configuration Attributes
Description Configuration Attribute Default Value
Change Retry Count orclchangeretrycount 10
Maximum Number of Workers orclreplmaxworkers 20
Autotune Replication
(Restart server after changing.)
orclreplautotune 1
Number of Apply Threads Per Supplier orclthreadspersupplier;
applly
5
Number of Transport Threads per
Supplier
orclthreadspersupplier;
transport
1
Maximum Number of Entries to
Process per Replication Cycle
orclsizelimit 1000
Automatically Resolve Replication
Conflicts
orclconflresolution 1
Generate Stack Dump
(Restart server after changing.)
orclsdumpflag
SASL for Replication Bind orclreplusesasl;digest-m
d5
none

Managing and Monitoring Replication by Using the Command Line
42-22 Oracle Fusion Middleware Administrator's Guide for Oracle Internet Directory
For example, the following LDIF file enables SASL for replication binds by adding and
setting the orclreplusesasl;digest-md5 attribute in the replication
configuration set:
dn: cn=configset0,cn=osdrepld,cn=subconfigsubentry
changetype: modify
add: orclreplusesasl;digest-md5
orclreplusesasl;digest-md5: 1
See Section 42.3.12, "Managing the Number of Entries the Human Intervention Queue
Tools Can Process" for information about changing orclsizelimit.
The attribute orcldebuglevel can be set to any combination of the values shown in
Table 42–11. The values are additive. No restart is required.
42.3.8 Monitoring Conflict Resolution Messages by Using the Command Line
If a conflict has been written into the log, then it means that the system is not able to
resolve it by following its resolution procedure. To avoid further replication change
conflicts arising from earlier unapplied changes, it is important to monitor the logs
regularly.
To monitor replication change conflicts, examine the contents of the replication log.
You can distinguish between messages by their respective timestamps.
Conflict resolution messages are logged in the file ORACLE_
INSTANCE/diagnostics/logs/OID/componentName/oidrepld00-XXXX.log
where XXXX is a number from 0000 to orclmaxlogfiles configured.
Each message includes the conflict reason, change number, supplier node, change
type, target DN, and result. Here are some examples:
This is a conflict resolution message where the conflict was automatically resolved by
replication server:
Maximum Log File Size (MB) orclmaxlogfilesize 1
Maximum number of log files to keep
in rotation
orclmaxlogfiles 100
DebugLevel orcldebuglevel 0
Replication Status orclreplicationstate
Activate/Inactivate orclactivatereplication 0
Table 42–11 Replication Debug Levels
Debug Level Value of orcldebuglevel
Replication Process Trace 4194304
Replication Performance
Log
2097152
Trace Function Calls 8388608
Heavy Trace Debugging 16777216
See Also: Table 41–4, " Replication Configuration Set Attributes" on
page 41-8.
Table 42–10 (Cont.) Replication Configuration Attributes
Description Configuration Attribute Default Value

Managing and Monitoring Replication by Using the Command Line
Managing and Monitoring Replication 42-23
[2008-10-09T09:57:31-07:00] [OID] [NOTIFICATION:16] [] [OIDREPLD] [host: stacu14]
[pid: 4280] [tid: 3] Worker(Transport)::[[************ Conflict Resolution
Message ************
Conflict reason: Attempted to add an existing entry.
Change number: 3696.
Supplier: stacu14_lm5.
Change type: Add.
Target DN: dc=org.
Result: Dropped a newer change entry.
]]
This is an unresolved conflict which was moved to Human intervention queue:
[2008-10-09T10:03:28-07:00] [OID] [NOTIFICATION:16] [] [OIDREPLD] [host: stacu14]
[pid: 4653] [tid: 13] Worker(Transport)::[[************ Conflict Resolution
Message ************
Conflict reason: Attempted to delete a non-existent entry.
Change number: 3698.
Supplier: stacu14_lm5.
Change type: Delete.
Target DN: dc=imc,dc=org.
Result: Change moved to low priority queue after failing on 10th retry.
]]
Conflict reasons, change types, and results include:
Table 42–12 Conflict Resolution Messages
Conflict Reason Change Type Result
Attempted to add an
existing entry
Add Dropped a newer change entry.
Change moved to low priority queue after failing on Nth retry
Deleted duplicated target entry which was created later than the
change entry. Apply the change entry again
Dropped a newer change entry
Dropped change entry since its guid is greater than target entry
guid
Dropped change entry since its guid is same as target entry i.e
change and target entry are identical
Deleted duplicated target entry which has greater guid than the
change entry
Parent entry does not
exist
Add Change moved to low priority queue after failing on Nth retry
Internal Error occurred Add
Delete
Modify
moddn
Change moved to low priority queue after failing on Nth retry
Attempted to modify a
non-existent entry
Modify Change moved to low priority queue after failing on Nth retry
Attempted to delete a
non-existent entry
Delete Change moved to low priority queue after failing on Nth retry

Managing and Monitoring Replication by Using the Command Line
42-24 Oracle Fusion Middleware Administrator's Guide for Oracle Internet Directory
42.3.9 Managing the Human Intervention Queue
When a replication conflict arises, the Oracle Internet Directory replication server
places the change in the retry queue and tries to apply it from there for a specified
number of times. If it fails after the specified number of retries, the replication server
puts the change in the human intervention queue. From there, the replication server
repeats the change application process at less frequent intervals while awaiting your
action.
The human intervention queue tools, ManageHiq.retry and ManageHiq.purge,
enable you to move changes from the human intervention queue to the retry queue or
the purge queue, respectively. After you move the change to the purge queue, there
are no further attempts to re-apply the changelog entry. To address changes in the
human intervention queue, follow these general steps:
1. Examine the change in the human intervention queue.
2. Reconcile the conflicting changes using the Compare and Reconcile Tool (see
Section 42.4, "Comparing and Reconciling Inconsistent Data by Using oidcmprec."
Attempted to delete a
non leaf entry
Delete Change moved to low priority queue after failing on Nth retry
Attempted to move a
non-existent entry
moddn Change moved to low priority queue after failing on Nth retry
Attempted to move to
an existent entry
moddn Change moved to low priority queue after failing on Nth retry
Synchronization of
moddn for another
non-existent entry is
going on
moddn Deleted existent entry which was created later than the entry
trying to move. Move of entry is tried again
Attempted to move to
an existent entry
which is newer than
the source entry
moddn Move of entry is tried again
Attempted to move to
an existent entry
which is older than the
entry trying to move
moddn Deleted Source entry and dropped the change
Attempted to move to
an existing entry
which was created at
the same time and had
the same guid
moddn Deleted Source entry and dropped the change
Attempted to move to
an existing entry
which has greater guid
than the entry trying
to move
moddn Deleted duplicated target entry and re-applied the change
Attempted to move to
an existing entry
which has lower guid
then entry trying to
move
moddn Deleted Source entry and dropped the change
Table 42–12 (Cont.) Conflict Resolution Messages
Conflict Reason Change Type Result

Managing and Monitoring Replication by Using the Command Line
Managing and Monitoring Replication 42-25
3. Either place the change back into the retry queue using ManageHiq.retry or
into the purge queue using ManageHiq.purge.
42.3.10 Monitoring Replication Progress in a Directory Replication Group by Using
remtool -pthput
The Replication Environment Management Tool, remtool, enables you to monitor
replication progress in a directory replication group. When you invoke remtool with
the -pthput option, the tool binds to the specified node and collects information
about all the nodes in the directory replication group. It displays this information at
intervals of specified duration.
The syntax is:
remtool -pthput [-bind hostname:port] -interval time_in_seconds
[-file filename]
The bind argument is optional. If you do not provide it, remtool prompt you for
hostname, port. You are prompted for the replication dn password.
The interval parameter is an optional parameter. Provide its value in seconds. Its
default value is 60 seconds. After each interval the tool displays the following
information for every supplier and consumer node in the directory replication group:
■The changes that were queued in the last interval, q_chgs
■Last applied change number, LA_Chg#
■Changes applied in the last interval, Appl_chgs
■Average throughput for the latest three intervals, Avg_thput
If you specify a file parameter, the output shown on the command line is logged to
that file. Otherwise, the output is logged to a file name based on the timestamp.
Example Output
------------------------------------------------------------------------------
Directory Replication Group (DRG) details :
--- ------------------ ----------------------- ----------------------- -----
Sl Replicaid Directory Information Supplier Information Repl. No.
Type
--- ------------------ ----------------------- ----------------------- -----
001 adc2101322_nldap32 adc2101322.us.oracle.com:3070 adc2101322_nldap3 RW
002 adc2101322_nldap3 adc2101322.us.oracle.com:3061 adc2101322_nldap32 RW
--- ------------------ ----------------------- ----------------------- -----
Queue Statistics :
------------ ------------- ----- ------- ------ ------ ------ --------- ---------
--------------------------------
Supplier Consumer Queued Last Applied Applied
Average
Changes Change Number Changes
Throughput
Of 3 intervals
------------- ------------- ----- ------- ------ ------ ------ --------- ---------
-----------------------------
adc2101322_nldap3 adc2101322_nldap32 0 134369 0
See Also: The Replication Tools chapter in Oracle Fusion Middleware
Reference for Oracle Identity Management for instructions on how to use
the Human Intervention Queue tools

Managing and Monitoring Replication by Using the Command Line
42-26 Oracle Fusion Middleware Administrator's Guide for Oracle Internet Directory
0
adc2101322_nldap32 adc2101322_nldap3 0 47342 0
0
------------- ------------- ----- ------- ------ ------ ------ --------- ---------
--------------------------
adc2101322_nldap3 adc2101322_nldap32 2286 136214 1845
615
adc2101322_nldap32 adc2101322_nldap3 0 47342 0
0
------------- ------------- ----- ------- ------ ------ ------ --------- ---------
-----------------------
adc2101322_nldap3 adc2101322_nldap32 1608 137886 1672
1172
adc2101322_nldap32 adc2101322_nldap3 0 47342 0
0
------------- ------------- ----- ------- ------ ------ ------ --------- ---------
------------------------
adc2101322_nldap3 adc2101322_nldap32 189 140302 2416
1977
adc2101322_nldap32 adc2101322_nldap3 0 47342 0
0
------------- ------------- ----- ------- ------ ------ ------ --------- ---------
-----------------------
42.3.11 Viewing Queue Statistics and Verifying Replication by Using remtool
The Replication Environment Management Tool, remtool, enables you to monitor the
health of the replication process. You can run remtool periodically to ensure that
your replication processes are performing properly. The remtool command has
options that display queue statistics and verify replication.
The remtool options for monitoring an LDAP-based replication agreement are
-pdipqstat and -pverify. Their syntax is as follows:
remtool -pdispqstat [-v] [-bind hostname:port_number]
remtool -pverify [-v] [-bind hostname:port_number] [-hiqmax hiqmax] [-tbtmax
tbtmax]
For an Oracle Database Advanced Replication-based replication agreement, the
remtool options are -dipqstat and -asrverify.
Their syntax is as follows:
remtool -dispqstat [-connect repl_admin_name@net_service_name] [-v]
remtool -asrverify [-connect repl_admin_name@net_service_name] [-v]
All of these commands prompt for the replication_dn_password.
First run remtool with the -pdispqstat or -dispqstat option, depending on the
replication type. It shows the queue statistics of the DRG. Check to see if the number
of Human Intervention Queue (HIQ) entries and change logs to be transported (Logs
TBP) are higher than usual. If so, that means replication is running more slowly than it
should. Run remtool with the -pverify or -asrverify option, depending on the
replication type, to verify your replication configurations.

Managing and Monitoring Replication by Using the Command Line
Managing and Monitoring Replication 42-27
If remtool with the -pverify or -asrverify option reports test failure, check the
report that it generates and follow the suggestion in the report to fix the specific
failures.
42.3.12 Managing the Number of Entries the Human Intervention Queue Tools Can
Process
To increase the number of changelogs processed at a time, you must set
orclsizelimit in the replication configuration set and orclsizelimit in the
server instance where replication is running to the same value, a value greater than
1000. You use ldapmodify to change both of them. In each case, you would type:
ldapmodify -D cn=orcladmin -q -p portNum -h hostname -f ldifFile
To set orclsizelimit in the replication configuration set to 5000, you would use an
LDIF file such as:
dn: cn=configset0,cn=osdrepld,cn=subconfigsubentry
changetype: modify
replace: orclsizelimit
orclsizelimit: 5000
To set orclsizelimit in the server instance to 5000, you would use an LDIF file
such as:
dn: cn=componentname,cn=osdldapd,cn=subconfigsubentry
changetype: modify
replace: orclsizelimit
orclsizelimit: 5000
Setting the Oracle Internet Directory server instance parameter orclsizelimit very
high impacts server performance, because orclsizelimit also controls the
maximum number of entries to be returned by a search.
42.3.13 Changing the Replication Administrator's Password for Advanced Replication
You can change the password for the replication administrator database account on all
nodes of a DRG using Oracle Database Advanced Replication-based replication by
using the -chgpwd argument to the Replication Environment Management Tool,
remtool. To use this argument, enter:
remtool -chgpwd
The remtool utility then prompts you for the MDS Global Name—that is, the name
of the Master Definition Site—the current password, and the new password. It then
asks you to confirm the new password. If you enter an incorrect current password,
then you must run the Replication Environment Management Tool again.
See Also: The remtool command reference in Oracle Fusion
Middleware Reference for Oracle Identity Management
See Also:
■Section 9.1.3, "Attributes of the Instance-Specific Configuration
Entry"
■Section 41.1.6, "The Replication Configuration Set"
■Section 42.3.7, "Configuring Attributes of the Replication
Configuration Set by Using ldapmodify"

Comparing and Reconciling Inconsistent Data by Using oidcmprec
42-28 Oracle Fusion Middleware Administrator's Guide for Oracle Internet Directory
You can also use the -pchgpwd argument to remtool to change the password of the
replication DN of a replica.
To change the password only in the replication wallet, $ORACLE_
INSTANCE/OID/admin/oidpwdrORACLE_SID, use the -pchgwalpwd argument to
remtool. To use this argument, enter:
remtool -pchgwalpwd
42.4 Comparing and Reconciling Inconsistent Data by Using oidcmprec
When the directory replication server encounters inconsistent data, you can use the
Oracle Internet Directory Comparison and Reconciliation Tool to synchronize the
entries on the consumer with those on the supplier. When you do this, perform the
following general steps:
1. Set the supplier and the consumer to read-only mode. Use one of the procedures
in"Changing Server Mode" on page 15-3.
2. Ensure that the supplier and the consumer are in a tranquil state—that is, that
neither is supplying or applying changes. If they are not in a tranquil state, then
wait until they have finished updating.
3. Identify the inconsistent entries or subtree on the consumer.
4. Use the Oracle Internet Directory Comparison and Reconciliation Tool to fix the
inconsistent entries or subtree on the consumer.
5. Set the participating supplier and consumer back to read/write mode.
The compare and reconcile tool oidcmprec enables you to compare two directories. It
detects and resolves conflicts. Of the two directories, one directory is considered to be
the source directory or "source of truth." The other directory is the destination
directory that must be synchronized with the source directory. The directories to be
compared can be directories that are not part of any replication group, part of the same
replication group, or part of different replication groups.
This section provides an introduction to the oidcmprec tool and some examples of
oidcmprec usage. It includes the following topics:
■Section 42.4.1, "Conflict Scenarios"
■Section 42.4.2, "Operations Supported by oidcmprec"
■Section 42.4.3, "Output from oidcmprec"
■Section 42.4.4, "How oidcmprec Works"
■Section 42.4.5, "Setting the Source and Destination Directories"
■Section 42.4.6, "Selecting the DIT for the Operation"
■Section 42.4.7, "Selecting the Attributes for the Operation"
See Also: The remtool command-line tool reference in Oracle
Fusion Middleware Reference for Oracle Identity Management for more
information about using this tool
See Also: The oidcmprec command-line tool reference in Oracle
Fusion Middleware Reference for Oracle Identity Management for syntax
and an explanation of how Oracle Internet Directory Comparison and
Reconciliation Tool works.

Comparing and Reconciling Inconsistent Data by Using oidcmprec
Managing and Monitoring Replication 42-29
■Section 42.4.8, "Controlling Change Log Generation"
■Section 42.4.9, "Using a Text or XML Parameter File"
■Section 42.4.10, "Including Directory Schema"
■Section 42.4.11, "Overriding Predefined Conflict Resolution Rules"
■Section 42.4.12, "Using the User-Defined Compare and Reconcile Operation"
■Section 42.4.13, "Known Limitations of the oidcmprec Tool"
42.4.1 Conflict Scenarios
The oidcmprec tool can detect and resolve the following conflict scenarios:
■Entry only in source directory (entos)
■Entry only in destination directory (entod)
■Attribute only in source directory (atros)
■Attribute only in destination directory (atrod)
■Single-valued attribute differs (svatrdif)
■Multi-valued attribute differs (mvatrdif)
■Entry DN differs (dndif)
The dndif scenario can occur in a replication environment when a modrdn or
moddn operation performed in one node is not replicated to another node. As a
result, the entry has the same orclguid but different DNs on the two nodes. The
tool uses the orclguid attribute to detect this conflict.
The oidcmprec tool can also detect and resolve the following schema conflict
scenarios:
■Object class definition exists only in source directory (odefos)
■Object class definition exists only in destination directory (odefod)
■Object class definition different in source and destination directory (odefdif)
■Attribute definition exists only in source directory (adefos)
■Attribute definition exists only in destination directory (adefod)
■Attribute definition different in source and destination directory (adefdif)
42.4.2 Operations Supported by oidcmprec
The tool supports five operation. Each operation compares entries, detects conflicts,
and optionally resolves them. The operations differ regarding how they resolve
conflicts. The operations are as follows:
■Compare operation: compares two directories and stores the changes as LDIF
records in a file. The LDIF file can be applied to the destination directory to make
it identical to the source directory. Only the data in the source directory is
considered valid.
See Also: The "oidcmprec" command reference inOracle Fusion
Middleware Reference for Oracle Identity Management for the complete
syntax for oidcmprec, including operations, conflict scenarios, and
conflict resolution rules.

Comparing and Reconciling Inconsistent Data by Using oidcmprec
42-30 Oracle Fusion Middleware Administrator's Guide for Oracle Internet Directory
■Reconcile operation: compares two directories and applies necessary changes at
the destination directory to make it identical to the source directory. All the
changes made to the directory are stored as LDIF records in a file. Only the data in
the source directory is considered valid.
■Merge or two-way reconcile operation: compares two directories and applies
necessary changes at the source or destination directory to make them identical.
The data in both directories is considered valid. For example, when the tool
detects that an entry exists only in the destination directory, the tool adds it to the
source. This operation also records all the changes applied to the directory as LDIF
records in a file.
■Merge dry run operation: compares two directories, similar to the merge
operation, but does not apply the changes in the directory. Instead, it stores the
changes as LDIF records in a file. The changes to be applied to the source directory
and to destination directory are stored in two different files.
■User defined compare and reconcile operation: uses conflict resolution rules that
you choose for each conflict scenario. See Oracle Fusion Middleware Reference for
Oracle Identity Management for a list of conflict resolution rules you can use for
each conflict scenario.
42.4.3 Output from oidcmprec
The oidcmprec tool normally generates several output files. You can use options to
oidcmprec to suppress generation of any of the files. The files and their
corresponding options are:
■filename.rpt: contains the DNs of all entries compared and the compare result.
Use logrpt=false to suppress generation of this file.
■filename.s2d.ldif: contains all changes applied to the destination directory or
stored for later application to the destination directory. The name is an
abbreviation for source directory to destination directory. Use logs2d=false to
suppress generation of this file.
■filename.d2s.ldif: contains all changes applied to the source directory or
stored for later application to the source directory. The name is an abbreviation for
destination directory to source directory. Use logd2s=false to suppress
generation of this file.
■filename.eos.rpt: lists DNs of entries that exist only in the source directory. It
also lists name of attributes and object classes that are defined only in the source
directory, if the schema is included for the operation.The name is an abbreviation
for entries available only in source directory. Use logeos=false to suppress
generation of this file.
■filename.eod.rpt: lists DNs of entries that exist only in the destination
directory. It also lists name of attributes and object classes that are defined only in
the destination directory, if the schema is included for the operation. The name is
an abbreviation for entries available only in destination directory. Use
logeod=false to suppress generation of this file.
■filename.dif.rpt: lists DNs of all entire that differ along with names of
attribute that differ. It also lists name of attributes and object classes whose
definitions differ, if the schema is included for the operation. This file is known as
the dif file. Use logdif=false to suppress generation of this file.
■filename.err: contains all error messages. This file is known as the err file. Use
logerr=false to suppress generation of this file.

Comparing and Reconciling Inconsistent Data by Using oidcmprec
Managing and Monitoring Replication 42-31
The tool can dump the total number of entries loaded by the tool in memory and the
number of entries in each of oidcmprec's various queues. The entry counts are
logged in the file oidcmprec.log. Use the qlogfreq=frequency argument to
specify how frequently oidcmprec logs this information. Possible frequency values
are from 1 to 5000. The lower the value, the shorter the interval. For frequent entry
counts, use a value between 5 and 10.
42.4.4 How oidcmprec Works
Using the replication DN and replication DN password as credentials, the tool
performs three tasks. First it loads schema information into memory. Next, it collects
the entries to be compared and it compares them, attribute by attribute. The tool uses
schema information to determine the compare rule to be used for each attribute. Then,
based on the compare result, the tool takes the necessary actions. These operations are
performed by different threads:
■The DN thread is responsible for collecting entries to be compared. While
collecting entries, it does not fetch the entire tree at once. It first fetches the base
entry and processes it. Then it fetches the immediate children of the base entry and
processes them, and then their immediate children, and so on. The collected
entries are passed on to worker threads. You can control the number of DN
threads using the dnthreads argument.
■The worker thread is responsible for comparing entries attribute by attribute and
applying conflict resolution rules. The worker thread then passes on the entry to
the log writer thread. You can control the number of worker threads by using the
threads argument. The total number of worker threads and DN threads cannot
exceed a maximum value equal to 6 * (Number of CPUs) - 2. If you specify more
than that, the tool adjusts the number of worker and DN threads so as not to
exceed the maximum.
■The log writer thread is responsible for writing the contents to all seven output
files listed in Section 42.4.3, "Output from oidcmprec." There is only one log writer
thread. You cannot increase the number.
These threads are spawned, monitored and terminated by the main thread. The main
thread processes command line arguments and parameter files and spawns the other
threads. As soon as the main thread detects that all operations are complete, it
terminates all threads and cleans up all connections.
Each thread establishes an LDAP connection to the source directory and to the
destination directory. These connections remain open until all operations are
completed by the thread. If a connection is closed for any reason, the tool tries to
reestablish connection if the continueOnError argument is set to TRUE. If the tool
can reestablish the connection, it continues operation.
42.4.5 Setting the Source and Destination Directories
You use the source and destination options to set the source and destination
directories.
oidcmprec source=staqj13:3060 destination=staqj:3070 base="''" \
scope=subtree file=temp operation=compare
Note: Use the continueOnError argument to specify whether the
tool should continue processing on error. This argument can be set to
TRUE or FALSE. By default it is set to TRUE.

Comparing and Reconciling Inconsistent Data by Using oidcmprec
42-32 Oracle Fusion Middleware Administrator's Guide for Oracle Internet Directory
The tool prompts for passwords if they are not provided on the command line:
Enter replication DN password of the source directory :
Enter replication DN password of the destination directory :
42.4.6 Selecting the DIT for the Operation
Use the base, dns2Exclude, and scope options to choose the area to be compared
and reconciled.
This example compares the entire directory except c=us,dc=mycom,dc=com and
c=uk,dc=mycom,dc=com:
oidcmprec base="''" \
dns2exclude="'c=us,dc=mycom,dc=com' 'c=uk,dc=mycom,dc=com'" \
operation=compare scope=subtree \
source=myhost1.mycom.com:3060 \
destination=myhost2.mycom.com:3060 \
threads=5 dnthreads=2 file=cmpres
This example compares the naming contexts dc=com and dc=org except for the trees
c=us,dc=mycom,dc=com and c=uk,dc=myorg,dc=org.
oidcmprec base="'dc=com' 'dc=org'" \
dns2exclude="'c=us,dc=mycom,dc=com' 'c=uk,dc=myorg,dc=org'" \
operation=compare scope=subtree \
source=myhost1.mycom.com:3060 \
destination=myhost2.mycom.com:3060 \
threads=5 dnthreads=2 file=cmpres
42.4.7 Selecting the Attributes for the Operation
By default, oidcmprec compares all attributes except for the operational attributes
creatorsname, createtimestamp, modifiersname, modifytimestamp,
orclentrydn, and orclnormdn. You can control the attributes to be included or
excluded for the chosen operation using excludedAttributes or
incudedAttributes, respectively. The excludedAttributes and
incudedAttributes arguments allow limited pattern matching. You can use
attributename* to match all attributes starting with attributename. You can also
use attributename;* to match all subtypes of attributename.
This example excludes the authpassword attribute with and without subtype, plus
the attributes userpassword and category, in addition to the standard excluded
attributes.
oidcmprec operation=compare scope=subtree base="'dc=com' 'dc=org'" \
source=myhost1.mycom.com:3060\
destination=myhost2.mycom.com:3060 \
exclattr="authpassword authpassword;* userpassword category" \
threads=5 dnthreads=2 file=compare
This example includes only the attributes uid, cn, sn, givenname, and mail in the
compare operation.
oidcmprec operation=compare scope=subtree base="'dc=com'" \
source=myhost1.mycom.com:3060 \
destination=myhost2.mycom.com:3060 \
inclattr="uid cn sn givenname mail" \
file=compare

Comparing and Reconciling Inconsistent Data by Using oidcmprec
Managing and Monitoring Replication 42-33
This example includes all attributes for the compare operation except orclguid,
creatorsname, and modifiersname. This example also asks the tool to stop when
it encounters any error by setting continueOnError=false.
oidcmprec operation=compare scope=subtree base="'dc=com'" \
source=myhost1.mycom.com:3060 \
destination=myhost2.mycom.com:3060 \
inclattr="*" exclattr="orclguid creatorsname modifiersname" \
file=compare contonerr=false
42.4.8 Controlling Change Log Generation
Change log generation for the changes made by oidcmprec depends on the value of
the orcldiprepository attribute of the root DSE. Change log generation behavior,
however, can be controlled by using the generateChangeLog argument. The
generateChangeLog argument can have the following values:
■default: The directory server settings determine whether a change log is
generated or not. Change logs are generated if the root entry's
orcldiprepository attribute is set to true. They are not generated if
orcldiprepository is set to false. The same rule applies for both the source
and destination directories. default is the default value for gechglog.
■true: Change logs are always generated, irrespective of the settings on the source
and destination directories.
■false: Change logs are never generated, irrespective of the settings on the source
and destination directories.
In the following example, generateChangeLog false turns off change log
generation:
oidcmprec operation=merge scope=subtree base="'dc=com'" \
source=myhost1.mycom.com:3060 \
destination=myhost2.mycom.com:3060 \
inclattr="*" exclattr="orclguid creatorsname modifiersname" \
file=merge genchglog=false
42.4.9 Using a Text or XML Parameter File
All the arguments that can be given on the oidcmprec command line can also be
stored in a parameter file. You specify a text parameter file using the parameterFile
option. You specify an xml parameter file using the xmlparameterFile option. If
you specify an argument both on the command line and in the parameter file, the
argument specified on the command line takes precedence over the one specified in
the parameter file. For example:
oidcmprec paramfile=comp_param threads=4
This example uses the following sample text parameter file:
#############################################
#Parameter file for compare and reconcile tool
#Creator : John
#Date : 21-Mar-2006
#File Name : comp_param
#############################################
operation=compare
source=staqj13:3060/ods
destination=staqj13:3070/ods
base='("cn=oraclecontext" "c=uk,dc=mycom,dc=com" "c=us,dc=mycom,dc=com")'

Comparing and Reconciling Inconsistent Data by Using oidcmprec
42-34 Oracle Fusion Middleware Administrator's Guide for Oracle Internet Directory
verbose=false
force=true
threads=6
dnthreads=2
excludedAttributes=orclguid userpassword authpassword authpassword;*
filename=cmp2006Feb01
In this example, the tool spawns four worker threads. It gives precedence to command
line arguments.
Here is an XML parameter file equivalent to the sample text parameter file:
<?xml version="1.0" standalone="yes" ?>
- <input>
<operation>compare</operation>
- <source>
<host>staqj13</host>
<port>3070</port>
</source>
- <destination>
<host>staqj13</host>
<port>3070</port>
</destination>
<base> <dn>cn=oraclecontext</dn> <dn>c=uk,dc=mycom,dc=com</dn>
<dn>c=us,dc=mycom,dc=com</dn> </base>
<threads>6</threads>
<dnthreads>2</dnthreads>
<exclattr> <attribute>orclguid</attribute>
<attribute>userpassword</attribute> <attribute>authpassword</attribute>
<exclattr/>
<force>true</force>
<verbose>false</verbose>
<filename>cmp2006Feb01</filename>
</input>
42.4.10 Including Directory Schema
You can include the schema in an oidcmprec operation by including
cn=subschemasubentry in the base argument. For example:
oidcmprec operation=merge scope=subtree \
base="'dc=com' 'cn=subschemasubentry'" \
source=myhost1.mycom.com:3060 \
destination=myhost2.mycom.com:3060 \
inclattr="*" exclattr="orclguid creatorsname modifiersname" \
file=merge genchglog=false
If you include other DNs in addition to the schema, oidcmprec performs the
operation on the schema first.
42.4.11 Overriding Predefined Conflict Resolution Rules
Conflict scenarios and conflict resolution rules for each operation are described in the
"oidcmprec" command reference in Oracle Fusion Middleware Reference for Oracle
Identity Management.
You can override the predefined conflict resolution rules by specifying the conflict
name and the rule to use in the command line or parameter file. The following

Comparing and Reconciling Inconsistent Data by Using oidcmprec
Managing and Monitoring Replication 42-35
example changes the conflict resolution rule used for the conflicts dndif and
mvatrdif to ignore for the compare operation:
oidcmprec operation=compare source=host1:3060 destination=host2:3070 \
base="''" scope=subtree file=temp operation=compare \
dndif=ignore mvatrdif=ignore
42.4.12 Using the User-Defined Compare and Reconcile Operation
In addition to the predefined operations compare, reconcile, merge, and merge
dry run, oidcmprec has a user-defined compare and reconcile operation,
userdefinedcr, that enables you to specifying conflict resolution rule arguments.
Any conflict resolution rule you do not specify with -userdefinedcr defaults to
ignore. The following command line uses the userdefinedcr operation:
oidcmprec operation=userdefinedcr scope=subtree \
base="'dc=com' 'dc=org'" \
source=myhost1.mycom.com:3060 \
destination=myhost2.mycom.com:3060 \
entos=add entod=ignore atros=add atrod=ignore \
svatrdif=usesrc mvatrdif=usesrc dndif=ignore \
threads=5 dnthreads=2 file=myreconcile
Conflict scenarios and conflict resolution rules are described in the "oidcmprec"
command reference in Oracle Fusion Middleware Reference for Oracle Identity
Management.
42.4.13 Known Limitations of the oidcmprec Tool
The oidcmprec tool has the following limitations:
■When the tool logs changes to LDIF records in the filename.s2d.ldif or
filename.d2s.ldif file for deletion of a tree, it logs the parent record first,
followed by its children. If you attempt to apply this change using the
ldapmodify command-line tool, it fails, as the directory server does not allow
deletion of non-leaf entry. To prevent ldapmodify from failing, edit the file to
reorder the records before running ldapmodify.
■When the tool performs a delete operation on a entry, it deletes that entry and its
children. The tool records that the entry was deleted, but does not log that its
children were also deleted.
■The tool has limitations with respect to compound RDNs. These are RDNs that
contain two or more attribute=attrvalue pairs, separated by a +, for
example:
uid=jpaul + cn=john paul + mail=john.paul@example.com,dc=oracle,dc=com
If one of the directories you are comparing contains a compound RDN, when the
tool suggests modrdn/moddn changes in the filename.s2d.ldif or
filename.d2s.ldif file, the deleteoldrdn value might be incorrect.
■If you have provided a filter to oidcmprec, and you plan to use the output as
input to ldapmodify, first edit the output to ensure that entries are in the correct
order. In particular, if you are migrating a whole tree, ensure that the root of the
tree is the first entry.

Comparing and Reconciling Inconsistent Data by Using oidcmprec
42-36 Oracle Fusion Middleware Administrator's Guide for Oracle Internet Directory

Part VI
Part VI Advanced Administration: Directory
Plug-ins
This part contains these chapters:
■Chapter 44, "Developing Plug-ins for the Oracle Internet Directory Server"
■Chapter 43, "Configuring a Customized Password Policy Plug-In"
■Chapter 45, "Configuring a Customized External Authentication Plug-in"

43
Configuring a Customized Password Policy Plug-In 43-1
43 Configuring a Customized Password Policy
Plug-In
Oracle Internet Directory uses plug-ins to add password value checking to its other
password policy management capabilities. These plug-ins enable you to verify that, for
example, a new or modified password has the specified minimum length. You can
customize password value checking to meet your own requirements.
This chapter contains these topics:
■Section 43.1, "Introduction to Configuring a Customized Password Policy Plug-in"
■Section 43.2, "Installing, Configuring, and Enabling a Customized Password Policy
Plug-in"
43.1 Introduction to Configuring a Customized Password Policy Plug-in
When a user wants to add or modify a password, customized password value
checking takes place as follows:
1. The client sends the directory server either an ldapadd or ldapmodify request.
2. Before the directory server makes the addition or modification, it passes the
password value to the plug-in.
3. The plug-in
a. Parses the entry
b. Captures the userpassword attribute value in clear text
c. Implements whatever password value checking you have specified
4. If the password meets the specification, then the plug-in notifies the directory
server accordingly, and the directory server makes the addition or modification.
Otherwise, the plug-in sends one of the following error messages to the directory
server, which, in turn, passes it to the client.
ldap_add: UnKnown Error Encountered
ldap_add: additional info: PASSWORD POLICY VIOLATION:0000X, less than 8 chars
ldap_add: UnKnown Error Encountered
ldap_add: additional info: PASSWORD POLICY VIOLATION:0000X, contains dictionary
word
The same logic applies to the PRE ldapmodify plug-in.
The various kinds of value checks that a password policy plug-in could perform
include:

Installing, Configuring, and Enabling a Customized Password Policy Plug-in
43-2 Oracle Fusion Middleware Administrator's Guide for Oracle Internet Directory
■Minimum and maximum number of alphabetic characters
■Maximum number of numeric characters
■Minimum and maximum number of punctuation characters
■Maximum number of consecutive characters
■Maximum number of instances of any character
■Whether it is a dictionary word
43.2 Installing, Configuring, and Enabling a Customized Password Policy
Plug-in
This example uses the PL/SQL program, pluginpkg.sql. Section 43.2.4, "Contents
of Sample PL/SQL Package pluginpkg.sql" describes this program. In general, this
package contains:
■Two plug-in modules: pre_add and pre_modify
■One value checking function, isGoodPwd, which verifies that a password meets
the minimum length requirement of eight characters and that it does not contain a
dictionary word that is longer than four characters
Thus, in this example, if you try to add a user with the userpassword value less than
eight characters, then the request is rejected. Similarly, if you try to modify a user
password, and the new password value is less than eight characters, then the request
is rejected. Also, if you try to add or modify a user with the userpassword
supersunday, the password is rejected because super and sunday are dictionary
words.
The dictionary is a list of words longer than four characters, initially stored in a file
called words.txt. Before we implement the plug-in, we set up a database table and
store the words into the table. To set up the table we use create.sql, which has the
following contents:
drop table mydic;
create table mydic (word varchar2(1024));
commit;
exit;
Then we load the words into the table using the sqlldr command:
sqlldr control=words.txt userid=ods/ods_password
This section contains these topics:
■Section 43.2.1, "Loading and Registering the PL/SQL Program"
■Section 43.2.2, "Coding the Password Policy Plug-in"
■Section 43.2.3, "Debugging the Password Policy Plug-in"
■Section 43.2.4, "Contents of Sample PL/SQL Package pluginpkg.sql"
43.2.1 Loading and Registering the PL/SQL Program
After you implement the standalone value checking PL/SQL program, do the
following:.
1. Load the plug-in package into the database. In this example, we enter:
sqlplus ods @pluginpkg.sql

Installing, Configuring, and Enabling a Customized Password Policy Plug-in
Configuring a Customized Password Policy Plug-In 43-3
2. Register the plug-in. This example uses a file named pluginreg.dat, which
contains the following:
### add plugin ###
dn: cn=pre_add_plugin,cn=plugin,cn=subconfigsubentry
objectclass:orclPluginConfig
objectclass:top
orclpluginname:pwd_plugin
orclplugintype:operational
orclplugintiming:pre
orclpluginldapoperation:ldapadd
orclpluginenable:1
orclpluginversion:1.0.1
cn:pre_add_plugin
orclpluginsubscriberdnlist:dc=com;o=IMC ,c=US
### modify plugin ###
dn: cn=pre_mod_plugin,cn=plugin,cn=subconfigsubentry
objectclass:orclPluginConfig
objectclass:top
orclpluginname:pwd_plugin
orclplugintype:operational
orclplugintiming:pre
orclpluginldapoperation:ldapmodify
orclpluginenable:1
orclpluginversion:1.0.1
cn:pre_mod_plugin
orclpluginsubscriberdnlist:dc=com;o=IMC ,c=US
orclpluginattributelist:userpassword
Note that, in this plug-in, we let the directory server know that there are two
plug-in modules to invoke when it receives ldapadd or ldapmodify requests. We
use orclpluginsubscriberdnlist:dc=com;o=IMC,c=US so that the plug-in
is invoked ONLY if the target entry is under dc=com or o=IMC,c=US.
To add this file to the directory, enter the following:
ldapadd -p portnum -h hostname -D cn=orcladmin -q -v -f pluginreg.dat
43.2.2 Coding the Password Policy Plug-in
You can use standard PL/SQL character functions to process the password value.
Download any PL/SQL program that can do regular expression. The important thing
is to integrate the value checking functions with your plug-in modules.
43.2.3 Debugging the Password Policy Plug-in
Turn on the directory server plug-in to help you examine the process and content of
plug-ins.
To setup the directory server plug-in debugging, execute the following command:
sqlplus ods @$ORACLE_HOME/ldap/admin/oidspdsu.pls
To enable directory server plug-in debugging, execute the following command:
sqlplus ods @$ORACLE_HOME/ldap/admin/oidspdon.pls
To disable directory server plug-in debugging, execute the following command:

Installing, Configuring, and Enabling a Customized Password Policy Plug-in
43-4 Oracle Fusion Middleware Administrator's Guide for Oracle Internet Directory
sqlplus ods @$ORACLE_HOME/ldap/admin/oidspdof.pls
To show directory server plug-in debugging messages, execute the following
command:
sqlplus ods @$ORACLE_HOME/ldap/admin/oidspdsh.pls
To delete directory server plug-in debugging messages, execute the following
command:
sqlplus ods @$ORACLE_HOME/ldap/admin/oidspdde.pls
43.2.4 Contents of Sample PL/SQL Package pluginpkg.sql
The script pluginpkg.sql, as used in this example, contains the following:
CREATE OR REPLACE PACKAGE pwd_plugin AS
PROCEDURE pre_add (ldapplugincontext IN ODS.plugincontext,
dn IN VARCHAR2,
entry IN ODS.entryobj,
rc OUT INTEGER,
errormsg OUT VARCHAR2
);
PROCEDURE pre_modify (ldapplugincontext IN ODS.plugincontext,
dn IN VARCHAR2,
mods IN ODS.modlist,
rc OUT INTEGER,
errormsg OUT VARCHAR2
);
-- Function: isGoodPwd
-- Parameter: inpwd
-- Purpose: 1. check if the password is at least
-- 8 characters long
-- 2. check if the password contains a
-- dictionary word (longer than 4 characters)
FUNCTION isGoodPwd(inpwd IN VARCHAR2)
RETURN INTEGER;
END pwd_plugin;
/
show error
CREATE OR REPLACE PACKAGE BODY pwd_plugin AS
FUNCTION isGoodPwd(inpwd IN VARCHAR2)
RETURN INTEGER
IS
i NUMBER;
ret NUMBER DEFAULT 1;
minpwdlen NUMBER DEFAULT 8;
len NUMBER DEFAULT 0;
lcount NUMBER DEFAULT 0;
matched VARCHAR2(1024) DEFAULT NULL;

Installing, Configuring, and Enabling a Customized Password Policy Plug-in
Configuring a Customized Password Policy Plug-In 43-5
CURSOR c1 IS
SELECT word FROM mydic WHERE length(word) > 4
AND instr(lower(inpwd), lower(word), 1, 1) > 0;
BEGIN
plg_debug( '=== begin of ISGOODPWD ===');
plg_debug( 'password = ' || inpwd);
len := LENGTH(inpwd);
plg_debug( 'password length = ' || len);
IF len < minpwdlen THEN
RETURN 0;
ELSE
OPEN c1;
LOOP
FETCH c1 INTO matched;
EXIT WHEN c1%NOTFOUND;
lcount := lcount + 1;
END LOOP;
plg_debug( 'count = ' || lcount);
IF lcount > 0 THEN
RETURN 2;
ELSE
RETURN ret;
END IF;
END IF;
plg_debug( '=== end of ISGOODPWD ===');
EXCEPTION
WHEN OTHERS THEN
plg_debug( 'Exception in isGoodPwd(). Error code is ' || TO_CHAR(SQLCODE));
plg_debug( ' ' || Sqlerrm);
RETURN 0;
END;
PROCEDURE pre_add (ldapplugincontext IN ODS.plugincontext,
dn IN VARCHAR2,
entry IN ODS.entryobj,
rc OUT INTEGER,
errormsg OUT VARCHAR2
)
IS
inpwd VARCHAR2(256) DEFAULT NULL;
ret NUMBER DEFAULT 1;
BEGIN
plg_debug( '=== begin of PRE_ADD_PLUGIN ===');
plg_debug( 'dn = ' || dn);
plg_debug( 'entry obj ' || ':entryname = ' || entry.entryname);
FOR l_counter1 IN 1..entry.attr.COUNT LOOP
plg_debug( 'attrname[' || l_counter1 || '] = ' ||
entry.attr(l_counter1).attrname);
FOR l_counter2 IN 1..entry.attr(l_counter1).attrval.COUNT LOOP
plg_debug( entry.attr(l_counter1).attrname ||
'[' || l_counter1 || ']' ||
'.val[' || l_counter2 || '] = ' ||
entry.attr(l_counter1).attrval(l_counter2));

Installing, Configuring, and Enabling a Customized Password Policy Plug-in
43-6 Oracle Fusion Middleware Administrator's Guide for Oracle Internet Directory
END LOOP;
IF entry.attr(l_counter1).attrname = 'userpassword' THEN
inpwd := entry.attr(l_counter1).attrval(1);
-- assuming only one attr val for userpassword
END IF;
END LOOP;
IF (inpwd IS NOT NULL) THEN
ret := isGoodPwd(inpwd);
END IF;
IF (inpwd IS NULL OR ret = 0) THEN
rc := 1;
errormsg := 'PASSWORD POLICY VIOLATION:0000X, less than 8 chars';
plg_debug( ' we got an invalid password, too short ');
ELSIF (ret = 2) THEN
rc := 1;
errormsg := 'PASSWORD POLICY VIOLATION:0000X, contains dictionary word';
plg_debug( ' we got an invalid password, dictionary word ');
ELSE
plg_debug( ' we got a good password ');
rc := 0;
errormsg := 'no pre_mod plguin error msg';
END IF;
plg_debug( '=== end of PRE_ADD_PLUGIN ===');
EXCEPTION
WHEN OTHERS THEN
plg_debug( 'Exception in PRE_ADD plugin. Error code is ' || TO_
CHAR(SQLCODE));
plg_debug( ' ' || Sqlerrm);
rc := 1;
errormsg := 'exception: pre_add plguin';
END;
PROCEDURE pre_modify (ldapplugincontext IN ODS.plugincontext,
dn IN VARCHAR2,
mods IN ODS.modlist,
rc OUT INTEGER,
errormsg OUT VARCHAR2
)
IS
old_passwd VARCHAR2(256) DEFAULT NULL;
new_passwd VARCHAR2(256) DEFAULT NULL;
ret NUMBER DEFAULT 1;
BEGIN
plg_debug( '=== begin of PRE_MOD_PLUGIN ===');
plg_debug( dn);
FOR l_counter1 IN 1..mods.COUNT LOOP
IF (mods(l_counter1).operation = 2) AND
(mods(l_counter1).type = 'userpassword') THEN
FOR l_counter2 IN 1..mods(l_counter1).vals.COUNT LOOP
new_passwd := mods(l_counter1).vals(l_counter2).val;
END LOOP;

Installing, Configuring, and Enabling a Customized Password Policy Plug-in
Configuring a Customized Password Policy Plug-In 43-7
END IF;
IF (mods(l_counter1).operation = 0) AND
(mods(l_counter1).type = 'userpassword') THEN
FOR l_counter2 IN 1..mods(l_counter1).vals.COUNT LOOP
new_passwd := mods(l_counter1).vals(l_counter2).val;
END LOOP;
END IF;
IF (mods(l_counter1).operation = 1) AND
(mods(l_counter1).type = 'userpassword') THEN
FOR l_counter2 IN 1..mods(l_counter1).vals.COUNT LOOP
old_passwd := mods(l_counter1).vals(l_counter2).val;
END LOOP;
END IF;
END LOOP;
plg_debug(' new password: ' || new_passwd);
plg_debug(' old password: ' || old_passwd);
IF (new_passwd IS NOT NULL) THEN
ret := isGoodPwd(new_passwd);
END IF;
IF (new_passwd IS NULL OR ret = 0) THEN
rc := 1;
errormsg := 'PASSWORD POLICY VIOLATION:0000X, less than 8 chars';
plg_debug( ' we got an invalid password, too short ');
ELSIF (ret = 2) THEN
rc := 1;
errormsg := 'PASSWORD POLICY VIOLATION:0000X, contains dictionary word';
plg_debug( ' we got an invalid password, dictionary word ');
ELSE
plg_debug( ' we got a good password ');
rc := 0;
errormsg := 'no pre_mod plguin error msg';
END IF;
plg_debug( '=== end of PRE_MOD_PLUGIN ===');
EXCEPTION
WHEN OTHERS THEN
plg_debug( 'Exception in PRE_MODIFY plugin. Error code is ' || TO_
CHAR(SQLCODE));
plg_debug( ' ' || Sqlerrm);
rc := 1;
errormsg := 'exception: pre_mod plguin';
END;
END pwd_plugin;
/
show error
EXIT;

Installing, Configuring, and Enabling a Customized Password Policy Plug-in
43-8 Oracle Fusion Middleware Administrator's Guide for Oracle Internet Directory

44
Developing Plug-ins for the Oracle Internet Directory Server 44-1
44Developing Plug-ins for the Oracle Internet
Directory Server
This chapter introduces Oracle Internet Directory server plug-ins and presents an
overview of the plug-in framework for Oracle Internet Directory.
This chapter contains these topics:
■Section 44.1, "Introduction to Developing Plug-ins for the Oracle Internet Directory
Server"
■Section 44.2, "Creating a Plug-in"
■Section 44.3, "Registering a Plug-in From the Command Line"
■Section 44.4, "Managing Plug-ins by Using Oracle Directory Services Manager and
Oracle Enterprise Manager Fusion Middleware Control"
44.1 Introduction to Developing Plug-ins for the Oracle Internet Directory
Server
A server plug-in is a customized program that can be used to extend the capabilities of
the Oracle Internet Directory server. A server plug-in can be a PL/SQL package, Java
program or package, shared object or library, or a dynamic link library on Windows.
Each plug-in has a configuration entry in the Oracle Internet Directory Server. The
configuration entry specifies the conditions for invoking the plug-in. The conditions
for invoking a plugin include:
■An LDAP operation, such as ldapbind or ldapmodify
■A timing, relative to the LDAP operation, such as pre_bind or post_modify
Directory server plug-ins can provide the directory server with the following kinds of
added functionality, to mention just a few:
■Validate data before the directory server performs an operation on it
■Perform specified actions after the server performs an operation
■Define password policies
■Authenticate users through external credential stores
On startup, the directory server loads your plug-in configuration and library. Then,
when it processes requests, it calls your plug-in functions whenever the specified
event takes place.
In Figure 44–1, LDAP clients, each using a separate application, send information to
and receive it from the Oracle directory server. Plug-in configuration tools likewise
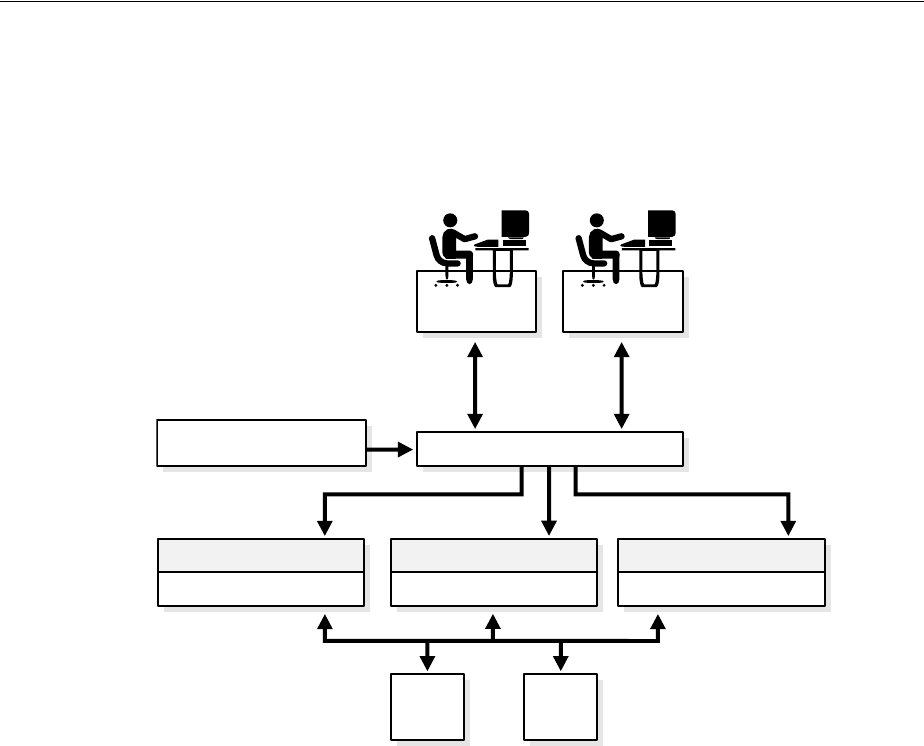
Introduction to Developing Plug-ins for the Oracle Internet Directory Server
44-2 Oracle Fusion Middleware Administrator's Guide for Oracle Internet Directory
send information to the directory server. The directory server sends data to Plug-in
Module 1, Plug-in Module 2, and Plug-in Module 3. Each plug-in module has both a
plug-in module interface and plug-in logic. Each plug-in module sends information to
and receives it from the LDAP API and the Plug-in LDAP.
Figure 44–1 Oracle Internet Directory Plug-in Framework
The work that plug-ins perform depends on whether they execute before, after, or in
addition to normal directory server operations. The next section explains the various
kinds of operation-based plug-ins.
44.1.1 Passing Options to the JVM
The Java server plug-ins run in a Java Virtual Machine (JVM ) within the oidldapd
server itself. The JVM is implemented using the Java Native Interface (JNI). The
oidldapd server passes options to the JVM when it invokes it. These JVM options are
contained in the orcljvmoptions attribute of the DSA configuration entry. By
default, the value of this attribute is -Xmx64M, which specifies a heap size of 64 MB.
You can modify the options by changing the value of orcljvmoptions. Normally,
you only need to do this if you add a plug-in that requires a greater heap size than the
default of 64 M.
You can modify this attribute in the same way as other attributes of the DSA
configuration entry, or by using Oracle Enterprise Manager Fusion Middleware
Control. For more information, see Section 9.4, "Managing System Configuration
Attributes by Using LDAP Tools" and Section 44.4.5, "Managing JVM Options by
Using Oracle Enterprise Manager Fusion Middleware Control."
44.1.2 Supported Languages for Server Plug-ins
As of 10g (10.1.4.0.1), Oracle Internet Directory supports plug-ins in Java and in
PL/SQL. This chapter provides information common to Java and PL/SQL plug-ins.
LDAP Client
Application 1
LDAP Client
Application 2
Plug-in Module Interface
Plug-in Module 2
Plug-in Logic
PL/SQL
LDAP
API
Plug-in
LDAP
Plug-in Module Interface
Plug-in Module 3
Plug-in Logic
Plug-in Module Interface
Plug-in Module 1
Plug-in Logic
Plug-in Configuration
Tools Oracle Directory Server

Introduction to Developing Plug-ins for the Oracle Internet Directory Server
Developing Plug-ins for the Oracle Internet Directory Server 44-3
Appendix F provides additional information specific to PL/SQL plug-ins and
Appendix E provides additional information specific to Java plug-ins.
44.1.3 Server Plug-in Prerequisites
To develop Oracle Internet Directory plug-ins, you should be familiar with the
following topics:
■Generic LDAP concepts
■Oracle Internet Directory
■Oracle Internet Directory integration with Oracle Application Server
You should have programming skills in one of the following areas:
■SQL, PL/SQL, and database RPCs
■Java
44.1.4 Server Plug-in Benefits
Some of the ways you can extend LDAP operations by using plug-ins include the
following:
■You can validate data before the server performs an LDAP operation on the data.
■You can perform actions that you define after the server successfully completes an
LDAP operation.
■You can define extended operations.
■You can authenticate users through external credential stores.
■You can replace an existing server module with your own server module
On startup, the directory server loads your plug-in configuration and library. It calls
your plug-in functions while processing various LDAP requests.
44.1.5 Guidelines for Designing Plug-ins
Use the following guidelines when designing plug-ins:
■Use plug-ins to guarantee that when a specific LDAP operation is performed,
related actions are also performed.
■Use plug-ins only for centralized, global operations that should be invoked for the
program body statement, regardless of which user or LDAP application issues the
statement.
■Do not create recursive plug-ins. For example, creating a pre_ldap_bind plug-in
that itself issues an ldapbind statement would cause the plug-in to execute
recursively until it has run out of resources.
Use plug-ins judiciously. They are executed every time the associated LDAP
operation occurs.
See Also: The chapter about the password policy plug-in in Oracle
Fusion Middleware Administrator's Guide for Oracle Internet Directory.
The chapter contains an example of how to implement your own
password value checking and place it into the Oracle Internet
Directory server.

Introduction to Developing Plug-ins for the Oracle Internet Directory Server
44-4 Oracle Fusion Middleware Administrator's Guide for Oracle Internet Directory
44.1.6 The Server Plug-in Framework
The plug-in framework is the environment in which you develop, configure, and
apply the plug-ins. Each individual plug-in instance is called a plug-in module.
The plug-in framework includes the following:
■Plug-in configuration tools
■Plug-in module interface
■Plug-in LDAP APIs:
–PL/SQL package ODS.LDAP_PLUGIN
–Java package oracle.ldap.ospf
For both languages, you follow these general steps to use the server plug-in
framework:
1. Write a user-defined plug-in procedure in PL/SQL or Java.
2. Compile the plug-in module.
3. Register the plug-in module through the configuration entry interface by using
either the command line or Oracle Directory Services Manager.
44.1.7 LDAP Operations and Timings Supported by the Directory
The Oracle Internet Directory server supports plug-ins for the following LDAP
operations:
■ldapadd
■ldapbind
■ldapcompare
■ldapdelete
■ldapmoddn (Java only)
■ldapmodify
■ldapsearch
Oracle Internet Directory supports four operation timings for plug-ins:
■pre
■post
■when
■when_replace
These are explained in the next four sections.
44.1.7.1 Pre-Operation Server Plug-ins
The server calls pre-operation plug-in modules before performing the LDAP
operation. The main purpose of this type of plug-in is to validate data before the data
is used in the LDAP operation.
When an exception occurs in the pre-operation plug-in, one of the following occurs:
■When the return error code indicates warning status, the associated LDAP request
proceeds.

Introduction to Developing Plug-ins for the Oracle Internet Directory Server
Developing Plug-ins for the Oracle Internet Directory Server 44-5
■When the return code indicates failure status, the request does not proceed.
If the associated LDAP request fails later on, the directory does not roll back the
committed code in the plug-in modules.
44.1.7.2 Post-Operation Server Plug-ins
The Oracle Internet Directory server calls post-operation plug-in modules after
performing an LDAP operation. The main purpose of this type of plug-in is to invoke
a function after a particular LDAP operation is executed. For example, logging and
notification are post-operation plug-in functions.
When an exception occurs in the post-operation plug-in, the associated LDAP
operation is not rolled back.
If the associated LDAP request fails, the post plug-in is still executed.
44.1.7.3 When-Operation Server Plug-ins
The directory calls when-operation plug-in modules while performing standard LDAP
operations. A when-operation plug-in executes immediately before the server's own
code for the operation. The main purpose of this type of plug-in is to augment existing
operations within the same LDAP transaction. If the when-operation plug-in fails, the
standard LDAP operation does not execute. If the when-operation plug-in completes
successfully, but the standard LDAP operation fails, then the changes made in the
plug-in are not rolled back.
You can, for example, use a when-operation plug-in with the ldapcompare operation.
The directory executes its server compare code and executes the plug-in module
defined by the plug-in developer.
PL/SQL when-operation plug-ins are supported in ldapadd, ldapdelete, and
ldapmodify. Java when_operation plug-ins are supported in ldapadd,
ldapdelete, ldapmoddn, ldapmodify, and ldapsearch.
44.1.7.4 When_Replace-Operation Server Plug-ins
A when_replace-operation plug-in executes instead of the server's code for the
operation. You can, for example, use a when_replace plug-in with the ldapcompare
operation. The directory does not execute its compare code. Instead it relies on the
plug-in module to perform the comparison.
PL/SQL when_replace-operation plug-ins are supported only in ldapadd,
ldapcompare, ldapdelete, ldapmodify, and ldapbind.
Java when_replace-operation plug-ins are supported in ldapadd, ldapbind,
ldapcompare, ldapdelete, ldapmoddn, ldapmodify and ldapsearch.
44.1.8 Using Plug-ins in a Replication Environment
Use caution when deploying plug-ins in a replication environment. The following bad
practices can result in an inconsistent state:
■Plug-in metadata replicated to other nodes
■Plug-in installation on some, but not all, of the participating nodes
■Implementation in the plug-in of extra checking that depends on the directory
data
■Changes to directory entries by plug-in programs or other LDAP operations

Creating a Plug-in
44-6 Oracle Fusion Middleware Administrator's Guide for Oracle Internet Directory
You can use plug-ins that change directory entries in a replication environment if you
deploy the plug-in on all nodes and configure the plug-in so that changes caused by
replication do not invoke the plug-in. You do that as follows:
■Add the replica IDs of all the nodes to a group.
■Include the group as a value in the plug-in attribute
orclpluginrequestneggroup. For example:
orclpluginrequestneggroup: cn=pluginNegate,cn=groups,cn=oraclecontext.
Whenever a plug-in detects that a change request has come from a member of the
group cn=pluginNegate, the plug-in is not invoked.
44.2 Creating a Plug-in
Follow these general steps to use the server plug-in framework:
1. Write a user-defined plug-in procedure in PL/SQL or Java.
2. Compile the plug-in module.
3. Register the plug-in module through the configuration entry interface by using
either the command line or Oracle Directory Services Manager.
44.3 Registering a Plug-in From the Command Line
To enable the directory server to call a plug-in at the right time, you must register the
plug-in with the directory server. You do this by creating an entry for the plug-in in
the directory schema under cn=plugin,cn=subconfigsubentry.
44.3.1 Creating a Plug-in Configuration Entry
Table 44–1 lists and describes the object classes and attributes you can specify in a
plug-in configuration.
Table 44–1 Plug-in Configuration Objects and Attributes
Name Value Mandatory?
objectclass orclPluginConfig Yes
objectclass top No
dn Plug-in entry DN Yes
cn Plug-in entry name Yes
orclPluginAttributeList A semicolon-separated list of attribute names
that controls whether the plug-in takes effect. If
the target attribute is included in the list, then
the plug-in is invoked. Only for ldapcompare
and ldapmodify plug-ins.
No
orclPluginEnable 0 = disable (default)
1 = enable
No
orclPluginEntryProperti
es
An ldapsearch filter type value. For example,
if we specify
orclPluginEntryProperties:
(&(objectclass=inetorgperson)(sn=Ce
zanne)), the plug-in is not invoked if the
target entry has objectclass equal to
inetorgperson and sn equal to Cezanne.
No

Registering a Plug-in From the Command Line
Developing Plug-ins for the Oracle Internet Directory Server 44-7
orclPluginIsReplace 0 = disable (default)
1 = enable
For when_replace timing, enable this and set
orclPluginTiming to when.
No
orclPluginKind PL/SQL or Java (Default is PL/SQL) No
orclPluginLDAPOperation One of the following values:
ldapcompare
ldapmodify
ldapbind
ldapadd
ldapdelete
ldapsearch
ldapmoddn (Java Only)
Yes
orclPluginName Plug-in name Yes
orclPluginFlexfield Custom text information (Java only). To
indicate a subtype, specify
orclPluginFlexfield;subtypename, for
example,
orclPluginFlexfield;minPwdLength: 8
No
orclPluginBinaryFlexfie
ld
Custom binary information (Java only). No
orclPluginSecuredFlexfi
eld
Custom text information that must never be
displayed in clear text (Java only). To indicate a
subtype, specify
orclPluginSecuredFlexfield;subtypen
ame, for example
orclPluginSecuredFlexfield;telephon
enumber1: 650.123.456. The value is
stored and displayed in encrypted form. In a
search result, it might appear as something like
this:
orclPluginSecuredFlexfield;telephon
enumber1: 1291zjs8134.
Be sure that Oracle Internet Directory has
privacy mode enabled to ensure that users
cannot retrieve this attribute in clear text. See
"Privacy of Retrieved Sensitive Attributes" in
Oracle Fusion Middleware Administrator's Guide
for Oracle Internet Directory.
No
orclPluginRequestGroup A semicolon-separated group list that controls if
the plug-in takes effect. You can use this group
to specify who can actually invoke the plug-in.
For example, if you specify
orclpluginrequestgroup:cn=security,
cn=groups,dc=oracle,dc=com when you
register the plug-in, the plug-in is not invoked
unless the ldap request comes from the person
who belongs to the group
cn=security,cn=groups,dc=oracle,dc=
com.
No
Table 44–1 (Cont.) Plug-in Configuration Objects and Attributes
Name Value Mandatory?

Registering a Plug-in From the Command Line
44-8 Oracle Fusion Middleware Administrator's Guide for Oracle Internet Directory
44.3.2 Adding a Plug-in Configuration Entry by Using Command-Line Tools
To add a plug-in configuration entry from the command line, create an LDIF file
containing the plug-in configuration. Specify a DN under
cn=plugin,cn=subconfigsubentry.
orclPluginRequestNegGro
up
A semicolon-separated group list that controls if
the plug-in takes effect. You can use this group
to specify who cannot invoke the plug-in. For
example, if you specify
orclpluginrequestgroup:
cn=security,cn=groups,dc=oracle,dc=
com, when you register the plug-in, the plug-in
is not invoked if the LDAP request comes from
the person who belongs to the group
cn=security,cn=groups,dc=oracle,
dc=com.
No
orclPluginResultCode An integer value to specify the ldap result code.
If this value is specified, then plug-in is invoked
only if the LDAP operation is in that result code
scenario.
This is only for the post plug-in type.
No
orclPluginShareLibLocat
ion
File location of the dynamic linking library. If
this value is not present, then Oracle Internet
Directory server assumes the plug-in language
is PL/SQL.
No
orclPluginSubscriberDNL
ist
A semicolon separated DN list that controls if
the plug-in takes effect. If the target DN of an
LDAP operation is included in the list, then the
plug-in is invoked.
No
orclPluginTiming One of the following values:
pre
when
post
For when_replace timing, specify when and
enable orclPluginIsReplace.
No
orclPluginType One of the following values:
configuration
attribute
password_policy
syntax
matchingrule
See Also: "LDAP Operations and Timings
Supported by the Directory" on page 44-4.
Yes
orclPluginVersion Supported plug-in version number No
orclPluginClassReloadEn
abled
If this value is 1, the server reloads the plug-in
class every time it invokes the plug-in. If the
value is 0, the server loads the class only the
first time it invokes the plug-in.
Table 44–1 (Cont.) Plug-in Configuration Objects and Attributes
Name Value Mandatory?

Managing Plug-ins by Using Oracle Directory Services Manager and Oracle Enterprise Manager Fusion Middleware Control
Developing Plug-ins for the Oracle Internet Directory Server 44-9
The following two-part LDIF file, my_ldif_file.ldif, creates an entry for an
operation-based plug-in called my_plugin1:
dn: cn=when_comp,cn=plugin,cn=subconfigsubentry
objectclass: orclPluginConfig
objectclass: top
orclPluginName: my_plugin1
orclPluginType: configuration
orclPluginTiming: when
orclPluginLDAPOperation: ldapcompare
orclPluginEnable: 1
orclPluginVersion: 1.0.1
orclPluginIsReplace: 1
cn: when_comp
orclPluginKind: PLSQL
orclPluginSubscriberDNList: dc=COM,c=us;dc=us,dc=oracle,dc=com;dc=org,dc=us;
o=IMC,c=US
orclPluginAttributeList: userpassword
dn: cn=post_mod_plugin, cn=plugin,cn=subconfigsubentry
objectclass: orclPluginConfig
objectclass: top
orclPluginName: my_plugin1
orclPluginType: configuration
orclPluginTiming: post
orclPluginLDAPOperation: ldapmodify
orclPluginEnable: 1
orclPluginVersion: 1.0.1
cn: post_mod_plugin
orclPluginKind: PLSQL
Add this file to the directory with a command similar to this:
ldapadd -p 3060 -h myhost -D binddn -q -f my_ldif_file.ldif
44.4 Managing Plug-ins by Using Oracle Directory Services Manager and
Oracle Enterprise Manager Fusion Middleware Control
You can register, edit, and delete plug-ins by using Oracle Directory Services Manager.
This section contains the following topics:
1. Section 44.4.1, "Creating a New Plug-in by Using Oracle Directory Services
Manager"
2. Section 44.4.2, "Registering a Plug-in by Using Oracle Directory Services Manager"
3. Section 44.4.3, "Editing a Plug-in by Using Oracle Directory Services Manager"
4. Section 44.4.4, "Deleting a Plug-in by Using Oracle Directory Services Manager"
5. Section 44.4.5, "Managing JVM Options by Using Oracle Enterprise Manager
Fusion Middleware Control"
44.4.1 Creating a New Plug-in by Using Oracle Directory Services Manager
To create a new plug-in:
Note: The plug-in configuration entry is not replicated. Replicating it
would create an inconsistent state.

Managing Plug-ins by Using Oracle Directory Services Manager and Oracle Enterprise Manager Fusion Middleware Control
44-10 Oracle Fusion Middleware Administrator's Guide for Oracle Internet Directory
1. Invoke Oracle Directory Services Manager and connect to the Oracle Internet
Directory server as described in Section 7.4.5, "Invoking Oracle Directory Services
Manager."
2. From the task selection bar, select Advanced.
3. Expand Plug-in. Entries appear in the left panel.
4. To enable a plug-in management configuration entry, select it.
5. Click the Create icon.The New Plug-in window appears in the right pane.
6. Select Plug-in Enable if you want to enable the plug-in now.
7. Enter the Plug-in Name.
8. Select values for the other mandatory properties.
9. When you have finished entering the values, select OK. The plug-in you just
created is now listed on the left side of the page.
44.4.2 Registering a Plug-in by Using Oracle Directory Services Manager
To register a plug-in:
1. Invoke Oracle Directory Services Manager and connect to the Oracle Internet
Directory server as described in Section 7.4.5, "Invoking Oracle Directory Services
Manager."
2. From the task selection bar, select Advanced.
3. Expand Plug-in. Entries appear in the left panel.
4. To enable a plug-in management configuration entry, select it. The Plug-in
Management tab appears in the right pane.
5. Select Plug-in Enable.
6. Click Apply.
7. When you have finished entering the values, select OK. The plug-in you just
created is now listed on the left side of the page.
44.4.3 Editing a Plug-in by Using Oracle Directory Services Manager
To edit a plug-in entry:
1. From the task selection bar, select Advanced.
2. Expand Plug-in. Entries appear in the left panel.
3. To modify a plug-in management configuration entry, select it.
4. Enter changes to Mandatory Properties and Optional Properties on the right side
of the page.
5. Click Apply.
44.4.4 Deleting a Plug-in by Using Oracle Directory Services Manager
To delete a plug-in:
1. From the task selection bar, select Advanced.
2. Expand Plug-in. Entries appear in the left panel.
3. Select the plug-in entry you want to delete.

Managing Plug-ins by Using Oracle Directory Services Manager and Oracle Enterprise Manager Fusion Middleware Control
Developing Plug-ins for the Oracle Internet Directory Server 44-11
4. Click the Delete icon. The plug-in entry you deleted no longer appears in the list.
44.4.5 Managing JVM Options by Using Oracle Enterprise Manager Fusion Middleware
Control
JVM options are contained in the orcljvmoptions attribute of the DSA configuration
entry. The default value is is -Xmx64M, which sets the heap size to 64M. If you need to
allocate more heap, update this attribute.
To modify this attribute by using Oracle Enterprise Manager Fusion Middleware
Control, see Section 9.2.2, "Configuring Shared Properties." To modify it from the
command line, seeSection 13.3, "Managing Entries by Using LDAP Command-Line
Tools."

Managing Plug-ins by Using Oracle Directory Services Manager and Oracle Enterprise Manager Fusion Middleware Control
44-12 Oracle Fusion Middleware Administrator's Guide for Oracle Internet Directory

45
Configuring a Customized External Authentication Plug-in 45-1
45Configuring a Customized External
Authentication Plug-in
You can store user security credentials in a repository other than Oracle Internet
Directory—for example, a database or another LDAP directory—and use these
credentials for user authentication to Oracle components. You do not need to store the
credentials in Oracle Internet Directory and then worry about keeping them
synchronized. Authenticating a user by way of credentials stored in an external
repository is called external authentication.
This chapter contains these topics:
■Section 45.1, "Introduction to Configuring a Customized External Authentication
Plug-in"
■Section 45.2, "Installing, Configuring, and Enabling the External Authentication
Plug-in"
■Section 45.3, "Debugging the External Authentication Plug-in"
■Section 45.4, "Creating the PL/SQL Package oidexaup.sql"
45.1 Introduction to Configuring a Customized External Authentication
Plug-in
Authentication that relies on security credentials stored in Oracle Internet Directory is
called native authentication. When a user enters her security credentials, the directory
server compares them with the credentials stored in Oracle Internet Directory. If the
credentials match, then the directory server authenticates the user.
By contrast, authentication that relies on security credentials stored in a directory
other than Oracle Internet Directory is called external authentication. When a user
enters her security credentials, the directory server compares them with the
credentials stored in the other directory. This is done by using:
■A PL/SQL program that does the external authentication work
■An external authentication plug-in that invokes this PL/SQL program
Note: All references to Oracle Single Sign-On in this chapter refer to
Oracle Single Sign-On 10g (10.1.4.3.0) or later.

Installing, Configuring, and Enabling the External Authentication Plug-in
45-2 Oracle Fusion Middleware Administrator's Guide for Oracle Internet Directory
45.2 Installing, Configuring, and Enabling the External Authentication
Plug-in
This example uses the PL/SQL program, oidexaup.sql. Section 45.4, "Creating the
PL/SQL Package oidexaup.sql" describes this program. This package is used for
installing the external authentication plug-in PL/SQL package. It contains:
■Two plug-ins: namely, when_compare_replace and when_modify_replace
■One utility function: namely, get_nickname
The integrated package is the plug-in package, OIDEXTAUTH. It can also serve as a
template to modify according to the requirements of your deployment.
To install, configure, and enable the external authentication plug-in, follow these steps:
1. Implement your standalone external authentication PL/SQL program. For
example, if you want to authenticate users by using user names and passwords,
then you should have a PL/SQL program which takes these two parameters.
In our sample code, oidexaup.sql, auth_external is the program package
name, and authenticate_user is the function that does the authentication. you
must make sure that this standalone program is working properly before you
move on to next steps.
2. Integrate this standalone program into the plug-in modules.
3. Load the plug-in package into database. In this example, we enter:
sqlplus ods/odspwd @oidexaup.sql
4. Register the plug-ins. Do this by creating and uploading an LDIF file that provides
the directory server with the necessary information to invoke the plug-in.
5. This example uses a file named oidexauth.ldif, which contains the following:
dn: cn=whencompare,cn=plugin,cn=subconfigsubentry
objectclass:orclPluginConfig
objectclass:top
orclpluginname:oidextauth
orclplugintype:configuration
orclplugintiming:when
orclpluginldapoperation:ldapcompare
orclpluginenable:1
orclpluginversion:1.0.1
orclPluginIsReplace:1
cn:whencompare
orclpluginsubscriberdnlist:dc=com;o=IMC,c=US
orclpluginattributelist:userpassword
orclpluginrequestgroup:$prgdn
dn: cn=whenmodify,cn=plugin,cn=subconfigsubentry
objectclass:orclPluginConfig
objectclass:top
orclpluginname:oidextauth
orclplugintype:configuration
orclplugintiming:when
orclpluginldapoperation:ldapmodify
orclpluginenable:1
orclpluginversion:1.0.1
orclPluginIsReplace:1
cn:whenmodify
orclpluginsubscriberdnlist:dc=com;o=IMC,c=US

Debugging the External Authentication Plug-in
Configuring a Customized External Authentication Plug-in 45-3
orclpluginattributelist:userpassword
orclpluginrequestgroup:$prgdn
In this file, we notify the directory server that, whenever there is an ldapcompare
or ldapmodify request, there are two plug-ins to be invoked.
We use orclpluginsubscriberdnlist:dc=com;o=IMC,c=US so that
plug-ins are ONLY invoked if the target entry is under dc=com or o=IMC,c=US.
Replace $prgdn with the plug-in request group DN. This is an optional,
recommended security feature. For integrating with Oracle Single Sign-On, this
value is a required field. Only members of the group entered can invoke the
plug-ins. You may enter multiple groups. Use a semicolon to separate entries.
The recommended defaults are:
cn=OracleUserSecurityAdmins,cn=Groups,cn=OracleContext and
cn=OracleDASAdminGroup,cn=Groups,cn=OracleContext,o=default_
subscriber,dc=com. Note that the Oracle Single Sign-On server is a member of
the first group. Also, be sure to replace o=default_subscriber with the correct
value for your deployment environment.
To add this file to the directory, enter the following:
ldapadd -p portnum -h hostname -D cn=orcladmin -q -v \
-f oidexauth.ldif
Now, everything should be ready. Use the ldapcompare command-line tool to verify
that the plug-in and authentication program are working properly before you try to
authenticate the user from Oracle Single Sign-On.
In our example, we also provide the plug-in code for externally modifying user
password.
45.3 Debugging the External Authentication Plug-in
Turn on directory server plug-in to help you to examine the process and content of
plug-ins.
To setup directory server plug-in debugging, execute the following command:
sqlplus ods @$ORACLE_HOME/ldap/admin/oidspdsu.sql
To enable directory server plug-in debugging, execute the following command:
sqlplus ods @$ORACLE_HOME/ldap/admin/oidspdon.sql
To disable directory server plug-in debugging, execute the following command:
sqlplus ods @$ORACLE_HOME/ldap/admin/oidspdof.sql
To show directory server plug-in debugging messages, execute the following
command:
sqlplus ods @$ORACLE_HOME/ldap/admin/oidspdsh.sql
To delete directory server plug-in debugging messages, please execute the following
command:
sqlplus ods @$ORACLE_HOME/ldap/admin/oidspdde.sql

Creating the PL/SQL Package oidexaup.sql
45-4 Oracle Fusion Middleware Administrator's Guide for Oracle Internet Directory
45.4 Creating the PL/SQL Package oidexaup.sql
The script oidexaup.sql, as used in this example, contains the following:
CREATE OR REPLACE PACKAGE OIDEXTAUTH AS
PROCEDURE when_compare_replace (ldapplugincontext IN ODS.plugincontext,
result OUT INTEGER,
dn IN VARCHAR2,
attrname IN VARCHAR2,
attrval IN VARCHAR2,
rc OUT INTEGER,
errormsg OUT VARCHAR2
);
PROCEDURE when_modify_replace (ldapplugincontext IN ODS.plugincontext,
dn IN VARCHAR2,
mods IN ODS.modlist,
rc OUT INTEGER,
errormsg OUT VARCHAR2
);
FUNCTION get_nickname (dn IN VARCHAR2,
my_session IN DBMS_LDAP.session)
RETURN VARCHAR2;
END OIDEXTAUTH;
/
SHOW ERROR
CREATE OR REPLACE PACKAGE BODY OIDEXTAUTH AS
-- We use this function to convert the dn to nickname.
-- When OID server receives the ldapcompare request, it
-- only has the dn information. We need to use DBMS_LDAP_UTL
-- package to find out the nickname attribute value of
-- the entry.
FUNCTION get_nickname (dn IN VARCHAR2,
my_session IN DBMS_LDAP.session)
RETURN VARCHAR2
IS
my_pset_coll DBMS_LDAP_UTL.PROPERTY_SET_COLLECTION;
my_property_names DBMS_LDAP.STRING_COLLECTION;
my_property_values DBMS_LDAP.STRING_COLLECTION;
user_handle DBMS_LDAP_UTL.HANDLE;
user_id VARCHAR2(2000);
user_type PLS_INTEGER;
user_nickname VARCHAR2(256) DEFAULT NULL;
my_attrs DBMS_LDAP.STRING_COLLECTION;
retval PLS_INTEGER;
BEGIN
plg_debug( '=== Beginning of get_nickname() === ');
user_type := DBMS_LDAP_UTL.TYPE_DN;
user_id := dn;
retval := DBMS_LDAP_UTL.create_user_handle(user_handle, user_type, user_id);

Creating the PL/SQL Package oidexaup.sql
Configuring a Customized External Authentication Plug-in 45-5
plg_debug('create_user_handle() Returns ' || To_char(retval));
retval := DBMS_LDAP_UTL.get_user_properties(my_session,
user_handle,
my_attrs,
DBMS_LDAP_UTL.NICKNAME_PROPERTY,
my_pset_coll);
plg_debug( 'get_user_properties() Returns ' || To_char(retval));
IF my_pset_coll.COUNT > 0 THEN
FOR i IN my_pset_coll.first .. my_pset_coll.last LOOP
retval := DBMS_LDAP_UTL.get_property_names(my_pset_coll(i),
my_property_names);
IF my_property_names.COUNT > 0 THEN
FOR j IN my_property_names.first .. my_property_names.last LOOP
retval := DBMS_LDAP_UTL.get_property_values(my_pset_coll(i),
my_property_names(j),
my_property_values);
IF my_property_values.COUNT > 0 THEN
FOR k IN my_property_values.FIRST..my_property_values.LAST
LOOP
user_nickname := my_property_values(k);
plg_debug( 'user nickname = ' || user_nickname);
END LOOP;
END IF;
END LOOP;
END IF; -- IF my_property_names.count > 0
END LOOP;
END IF; -- If my_pset_coll.count > 0
plg_debug( 'got user_nickname: ' || user_nickname);
-- Free my_properties
IF my_pset_coll.count > 0 then
DBMS_LDAP_UTL.free_propertyset_collection(my_pset_coll);
END IF;
DBMS_LDAP_UTL.free_handle(user_handle);
RETURN user_nickname;
EXCEPTION
WHEN OTHERS THEN
plg_debug('Exception in get_nickname. Error code is ' || to_
char(sqlcode));
plg_debug(' ' || Sqlerrm);
RETURN NULL;
END;
PROCEDURE when_compare_replace (ldapplugincontext IN ODS.plugincontext,
result OUT INTEGER,
dn IN VARCHAR2,
attrname IN VARCHAR2,
attrval IN VARCHAR2,
rc OUT INTEGER,
errormsg OUT VARCHAR2
)

Creating the PL/SQL Package oidexaup.sql
45-6 Oracle Fusion Middleware Administrator's Guide for Oracle Internet Directory
IS
retval pls_integer;
lresult BOOLEAN;
my_session DBMS_LDAP.session;
my_property_names DBMS_LDAP.STRING_COLLECTION;
my_property_values DBMS_LDAP.STRING_COLLECTION;
my_attrs DBMS_LDAP.STRING_COLLECTION;
my_pset_coll DBMS_LDAP_UTL.PROPERTY_SET_COLLECTION;
user_handle DBMS_LDAP_UTL.HANDLE;
user_id VARCHAR2(2000);
user_type PLS_INTEGER;
user_nickname VARCHAR2(60);
remote_dn VARCHAR2(256);
i PLS_INTEGER;
j PLS_INTEGER;
k PLS_INTEGER;
BEGIN
plg_debug( '=== Begin of WHEN-COMPARE-REPLACE plug-in');
plg_debug( 'DN = ' || dn);
plg_debug( 'Attr = ' || attrname);
--plg_debug( 'Attrval = ' || attrval);
DBMS_LDAP.USE_EXCEPTION := FALSE;
errormsg := 'No error msg';
rc := 0;
-- converting dn to nickname
my_session := LDAP_PLUGIN.init(ldapplugincontext);
plg_debug( 'ldap_session =' || RAWTOHEX(SUBSTR(my_session,1,8)));
retval := LDAP_PLUGIN.simple_bind_s(ldapplugincontext, my_session);
plg_debug( 'simple_bind_res =' || TO_CHAR(retval));
user_nickname := get_nickname(dn, my_session);
plg_debug( 'user_nickname =' || user_nickname);
-- unbind from the directory
retval := DBMS_LDAP.unbind_s(my_session);
plg_debug( 'unbind_res Returns ' || To_char(retval));
IF (user_nickname IS NULL) THEN
result := 32;
errormsg := 'Can''t find the nickname';
plg_debug( 'Can''t find the nickname');
RETURN;
END IF;
plg_debug( '=== Now go to extauth ');
BEGIN
retval := auth_external.authenticate_user(user_nickname, attrval);
plg_debug( 'auth_external.authenticate_user() returns = ' || 'True');
result := 6; -- compare result is TRUE
EXCEPTION
WHEN OTHERS THEN
result := 5; -- compare result is FALSE

Creating the PL/SQL Package oidexaup.sql
Configuring a Customized External Authentication Plug-in 45-7
plg_debug( 'auth_external.authenticate_user() returns = ' || 'False');
RETURN;
END;
plg_debug( '=== End of WHEN-COMPARE-REPLACE plug-in');
EXCEPTION
WHEN OTHERS THEN
rc := 1;
errormsg := 'Exception: when_compare_replace plugin';
plg_debug( 'EXCEPTION: ' || retval);
plg_debug('Exception in when_compare. Error code is ' || to_
char(sqlcode));
plg_debug(' ' || Sqlerrm);
END;
PROCEDURE when_modify_replace (ldapplugincontext IN ODS.plugincontext,
dn IN VARCHAR2,
mods IN ODS.modlist,
rc OUT INTEGER,
errormsg OUT VARCHAR2
)
IS
retval pls_integer;
lresult BOOLEAN;
my_session DBMS_LDAP.SESSION;
my_property_names DBMS_LDAP.STRING_COLLECTION;
my_property_values DBMS_LDAP.STRING_COLLECTION;
my_attrs DBMS_LDAP.STRING_COLLECTION;
my_modval DBMS_LDAP.BERVAL_COLLECTION;
my_pset_coll DBMS_LDAP_UTL.PROPERTY_SET_COLLECTION;
user_handle DBMS_LDAP_UTL.HANDLE;
l_mod_array RAW(32);
user_id VARCHAR2(2000);
user_type PLS_INTEGER;
user_nickname VARCHAR2(2000);
old_passwd VARCHAR2(60) DEFAULT NULL;
new_passwd VARCHAR2(60) DEFAULT NULL;
remote_dn VARCHAR2(256);
i PLS_INTEGER;
j PLS_INTEGER;
k PLS_INTEGER;
BEGIN
plg_debug( '=== Begin of WHEN-MODIFY-REPLACE plug-in');
DBMS_LDAP.USE_EXCEPTION := FALSE;
user_type := DBMS_LDAP_UTL.TYPE_DN;
user_id := dn;
-- converting dn to nickname
my_session := LDAP_PLUGIN.init(ldapplugincontext);
plg_debug( 'ldap_session =' || RAWTOHEX(SUBSTR(my_session,1,8)));
retval := LDAP_PLUGIN.simple_bind_s(ldapplugincontext, my_session);
plg_debug( 'simple_bind_res =' || TO_CHAR(retval));
user_nickname := get_nickname(dn, my_session);

Creating the PL/SQL Package oidexaup.sql
45-8 Oracle Fusion Middleware Administrator's Guide for Oracle Internet Directory
plg_debug( 'user_nickname =' || user_nickname);
-- unbind from the directory
retval := DBMS_LDAP.unbind_s(my_session);
FOR l_counter1 IN 1..mods.COUNT LOOP
IF (mods(l_counter1).operation = 2) AND
(mods(l_counter1).type = 'userpassword') THEN
FOR l_counter2 IN 1..mods(l_counter1).vals.COUNT LOOP
new_passwd := mods(l_counter1).vals(l_counter2).val;
END LOOP;
END IF;
IF (mods(l_counter1).operation = 0) AND
(mods(l_counter1).type = 'userpassword') THEN
FOR l_counter2 IN 1..mods(l_counter1).vals.COUNT LOOP
new_passwd := mods(l_counter1).vals(l_counter2).val;
END LOOP;
END IF;
IF (mods(l_counter1).operation = 1) AND
(mods(l_counter1).type = 'userpassword') THEN
FOR l_counter2 IN 1..mods(l_counter1).vals.COUNT LOOP
old_passwd := mods(l_counter1).vals(l_counter2).val;
END LOOP;
END IF;
END LOOP;
IF new_passwd IS NOT NULL AND old_passwd IS NOT NULL THEN
BEGIN
auth_external.change_passwd(user_nickname, old_passwd, new_passwd);
EXCEPTION
WHEN OTHERS THEN
rc := 1;
plg_debug( 'auth_external.change_passwd() raised exception.');
errormsg := 'auth_external.change_passwd() raised exception.';
RETURN;
END;
ELSIF new_passwd IS NOT NULL AND old_passwd IS NULL THEN
BEGIN
auth_external.reset_passwd(user_nickname, new_passwd);
EXCEPTION
WHEN OTHERS THEN
plg_debug( 'auth_external.reset_passwd() raised exception.');
rc := 1;
errormsg := 'auth_external.reset_passwd() raised exception.';
RETURN;
END;
ELSE
rc := 1;
errormsg := 'PLG_Exception. Not enough info to change passwd.';
END IF;
plg_debug( 'external change password succeed');
rc := 0;
errormsg := 'No when_mod_replace plguin error msg';

Creating the PL/SQL Package oidexaup.sql
Configuring a Customized External Authentication Plug-in 45-9
retval := DBMS_LDAP.unbind_s(my_session);
plg_debug( 'End of WHEN-MODIFY-REPLACE');
--COMMIT;
EXCEPTION
WHEN others THEN
rc := 1;
errormsg := 'PLG_Exception: when_modify_replace plguin';
plg_debug('Exception in when_modify. Error code is ' || to_char(sqlcode));
plg_debug(' ' || Sqlerrm);
END;
END OIDEXTAUTH;
/
SHOW ERRORS
--list
EXIT;

Creating the PL/SQL Package oidexaup.sql
45-10 Oracle Fusion Middleware Administrator's Guide for Oracle Internet Directory

Part VII
Part VII Appendixes
This part contains these appendixes:
■Appendix A, "Differences Between 10g and 11g"
■Appendix B, "Managing Oracle Internet Directory Instances by Using OIDCTL"
■Appendix C, "Setting Up Oracle Database Advanced Replication-Based
Replication"
■Appendix D, "How Replication Works"
■Appendix E, "Java Server Plug-in Developer's Reference"
■Appendix F, "PL/SQL Server Plug-in Developer's Reference"
■Appendix G, "The LDAP Filter Definition"
■Appendix H, "The Access Control Directive Format"
■Appendix I, "Globalization Support in the Directory"
■Appendix J, "Setting up Access Controls for Creation and Search Bases for Users
and Groups"
■Appendix K, "Searching the Directory for User Certificates"
■Appendix L, "Adding a Directory Node by Using the Database Copy Procedure"
■Appendix M, "Oracle Authentication Services for Operating Systems"
■Appendix N, "RFCs Supported by Oracle Internet Directory"
■Appendix O, "Managing Oracle Directory Services Manager's Java Key Store"
■Appendix P, "Starting and Stopping the Oracle Stack"
■Appendix Q, "Performing a Rolling Upgrade"
■Appendix R, "Using the Oracle Internet Directory VM Template"
■Appendix S, "Troubleshooting Oracle Internet Directory"

A
Differences Between 10g and 11g A-1
ADifferences Between 10g and 11g
This appendix lists the major differences between Oracle Internet Directory Release
10g (10.1.4.0.1) and 11g Release 1. It contains the following topics:
■Section A.1, "Instance Creation and Process Management"
■Section A.2, "Locations of Configuration Attributes"
■Section A.4, "Enabling Server Debugging"
■Section A.5, "Command Line Tools"
■Section A.6, "Path Names"
■Section A.7, "Graphical User Interfaces"
■Section A.8, "Audit"
■Section A.9, "Referential Integrity"
■Section A.10, "Server Chaining"
■Section A.11, "Replication"
■Section A.12, "Oracle Directory Integration Platform"
■Section A.13, "Oracle Single Sign-On and Oracle Delegated Administration
Services"
■Section A.14, "Java Containers"
A.1 Instance Creation and Process Management
10g Oracle Internet Directory Instance Creation
In 10g (10.1.4.0.1) and earlier releases, configuration information for an instance of
Oracle Internet Directory was stored in a configuration set, which had a DN of the
form:
cn=configsetN,cn=osdldapd,cn=subconfigsubentry
where N is an integer. You created a new Oracle Internet Directory instance by creating
a new configsetN entry and then executing:
oidctl connect=connStr config=N inst=InstNum flags="...." start
to start the instance.

Instance Creation and Process Management
A-2 Oracle Fusion Middleware Administrator's Guide for Oracle Internet Directory
11g Oracle Internet Directory Instance Creation
In 11g Release 1, the procedure for creating an instance has changed. Configuration
information for an Oracle Internet Directory instance now resides in an
instance-specific configuration entry, which has a DN of the form
cn=componentname,cn=osdldapd,cn=subconfigsubentry
where componentname is the name of a Oracle Fusion Middleware system
component of Type=OID, for example, oid1. You do not manually create an
instance-specific configuration entry. Instead, you create a Oracle Fusion Middleware
component of Type=OID. Creating the Oracle Internet Directory component
automatically generates an instance-specific configuration entry.
The first Oracle Internet Directory system component is created during installation.
The first Oracle Internet Directory system component, oid1 by default, is created
during installation with the Oracle instance name asinst_1 by default. The
corresponding configuration entry for this component is
cn=oid1,cn=osdldapd,cn=subconfigsubentry. There are two ways to create
an additional Oracle Internet Directory instance:
■Adding another component of Type=OID by using opmnctl
createcomponent. For example:
opmnctl createcomponent -componentType OID \
-componentName componentName -Db_info "DBHostName:Port:DBSvcName" \
-Namespace "dc=domain"
See Section 8.3.1, "Creating an Oracle Internet Directory Component by Using
opmnctl" for more information.
■Adding an Oracle Internet Directory instance within an existing component of
Type=OID by using oidctl add. See Section B.2, "Creating and Starting an
Oracle Internet Directory Server Instance by Using OIDCTL" for more
information.
The recommended method is to use opmnctl to add a system component. If you
create an instance by adding a component with opmnctl, you must use opmnctl or
Oracle Enterprise Manager Fusion Middleware Control, not oidctl, to stop and start
the instance. See Section 8.3.7, "Starting the Oracle Internet Directory Server by Using
opmnctl" and Section 8.2.2, "Starting the Oracle Internet Directory Server by Using
Fusion Middleware Control."
You can update the configuration attributes of the instance by using Fusion
Middleware Control, LDAP tools, or Oracle Directory Services Manager. See
Chapter 9, "Managing System Configuration Attributes."
If you use opmnctl to add a system component with oid2 as the component name,
then an additional instance with componentname=oid2 is configured within the
given Oracle instance, which is asinst_1 by default. This instance of Oracle Internet
Directory can be started and stopped by using the opmnctl command with
ias-component=oid2 or by using Fusion Middleware Control. The instance-specific
configuration entry for this instance is
cn=oid2,cn=osdldapd,cn=subconfigsubentry and the configuration attributes
in that entry can be updated to customize the instance. For more information about
Note: The entry in configset0 still exists in 11g, but it is read-only
and used to store default attribute values for seeding new
instance-specific configuration entries.

Locations of Configuration Attributes
Differences Between 10g and 11g A-3
instance-specific configuration attributes, see Section 9.1.3, "Attributes of the
Instance-Specific Configuration Entry."
11g Replication Server
Use oidctl or Oracle Enterprise Manager Fusion Middleware Control to start
replication on an instance the first time. After that, opmnctl stops and starts
replication when it stops and starts the component. If you must stop and start the
Oracle Internet Directory Replication Server for administration purposes, use oidctl
or Oracle Enterprise Manager Fusion Middleware Control.
11g OIDMON
In 11g Release 1, OIDMON monitors and reports the status of all Oracle Internet
Directory processes (dispatcher, directory server, and replication server) to OPMN.
This monitoring by OIDMON enables Fusion Middleware Control to report Oracle
Internet Directory status accurately.
A.2 Locations of Configuration Attributes
Oracle Internet Directory configuration information is stored in configuration
attributes in the DIT. For a complete listing of configuration attributes, their locations,
and procedures for managing them, see Chapter 9, "Managing System Configuration
Attributes."
In 10g (10.1.4.0.1), many configurable Oracle Internet Directory attributes resided in
the DSE Root and in the configset entry, for example,
cn=configset0,cn=osdldapd,cn=subconfigsubentry. In 11g Release 1, most
of these have been moved to the instance-specific configuration entry or the DSA
configuration entry.
Most attributes that resided in the instance-specific configuration set at 10g (10.1.4.0.1)
are now stored in the instance-specific configuration entry in 11g Release 1. In
addition, some attributes that resided in the DSA configuration entry are now
instance-specific and have been moved to the instance-specific configuration entry.
Note: You can use oidctl to create an instance if you are running
Oracle Internet Directory as a standalone server, not part of a
WebLogic domain. When you create an instance with oidctl, you
must use oidmon and oidctl to stop and start the instance. An
Oracle Internet Directory instance created with oidctl cannot be
registered with a WebLogic server, so you cannot use Oracle
Enterprise Manager Fusion Middleware Control to manage the
instance. See Appendix B, "Managing Oracle Internet Directory
Instances by Using OIDCTL."
See Also:
■Chapter 4, "Understanding Process Control of Oracle Internet
Directory Components"
■Chapter 8, "Managing Oracle Internet Directory Instances."

Locations of Configuration Attributes
A-4 Oracle Fusion Middleware Administrator's Guide for Oracle Internet Directory
Table A–1 lists 10g attributes, their locations in 10g and in 11g, and their default values
in 11g. In the following table, "Instance Specific" implies that the attribute is located in
the instance-specific configuration entry, for example
cn=oid1,cn=osdldapd,cn=subconfigsubentry and DSA Config is
cn=dsaconfig,cn=configsets,cn=oracle internet directory. Attributes
in the DSA Config entry are shared by all Oracle Internet Directory instances and
components.
Notes:
■During an upgrade to 11g, attributes are created in their new
locations with default values. An attribute's value prior to the
upgrade is not preserved unless the attribute is in the same
location in 11g.
■If you manage attributes from the command line, ensure that the
DNs specified on the command line or in LDIF files reflect the 11g
locations of the attributes.
Table A–1 New Locations of 10g Attributes
Attribute 10g Location 11g Location
11g Default
Value
orclanonymousbindsfl
ag
Root DSE Instance Specific 1
orcldataprivacymode DSA Config DSA Config 0
orcldebugflag Root DSE Instance Specific 0
orcldebugforceflush DSA Config Instance Specific 0
orcldebugop Root DSE Instance Specific 511
orclecacheenabled Root DSE DSA Config 1
orclecachemaxentries Root DSE DSA Config 100000
orclecachemaxentsize DSA Config DSA Config 1000000
orclecachemaxsize Root DSE DSA Config 200000000
orclenablegroupcache Root DSE Instance Specific 1
orcleventlevel Root DSE Instance Specific 0
orclldapconntimeout DSA Config Instance Specific 0
orclmatchdnenabled Root DSE DSA Config 1
orclmaxcc Configset Instance Specific 2
orclmaxconnincache DSA Config Instance Specific 100000
orclnwrwtimeout DSA Config Instance Specific 30
orcloptcontainsquery Root DSE DSA Config 0
orcloptracklevel DSA Config Instance Specific 0
orcloptrackmaxtotals
ize
DSA Config Instance Specific 100000000
orclpkimatchingrule DSA Config DSA Config 2
orclrefreshdgrmems DSA Config DSA Config 0

Default Ports
Differences Between 10g and 11g A-5
A.3 Default Ports
During installation of Oracle Internet Directory, Oracle Identity Management 11g
Installer follows specific steps in assigning the SSL and non-SSL port. First, it attempts
to use 3060 as the non-SSL port. If that port is unavailable, it tries ports in the range
3061 to 3070, then 13060 to 13070. Similarly, it attempts to use 3131 as its SSL port, then
ports in the range 3132 to 3141, then 13131 to 13141.
If you want Oracle Internet Directory to use privileged ports, you can override the
defaults during installation by using staticports.ini. (See Oracle Fusion
Middleware Installation Guide for Oracle Identity Management.) You can also reset the port
numbers after installation. See Section 7.2.8, "Enabling Oracle Internet Directory to run
on Privileged Ports."
orclsaslauthenticati
onmode
Configset Instance Specific auth-conf
orclsaslcipherchoice Configset Instance Specific Rc4-56, des, 3des,
rc4, rc4-40
orclsaslmechanism Configset Instance Specific DIGEST MD5,
EXTERNAL
orclsdumpflag DSA Config Instance Specific 0
orclservermode Root DSE Instance Specific rw
orclserverprocs Configset Instance Specific 1
orclsizelimit Root DSE Instance Specific 10000
orclskewedattribute DSA Config DSA Config objectclass
orclskiprefinsql DSA Config DSA Config 0
orclsslauthenticatio
n
Configset Instance Specific 1
orclsslenable Configset Instance Specific 0
orclsslversion Configset Instance Specific 3
orclsslwalleturl Configset Instance Specific File:
orclstatsdn DSA Config DSA Config
orclstatsflag Root DSE Instance Specific 1
orclstatslevel Root DSE Instance Specific 0
orclstatsperiodicity DSA Config Instance Specific 30
orcltimelimit Root DSE Instance Specific 3600
orcltlimitmode DSA Config DSA Config 1
See Also: Chapter 9, "Managing System Configuration Attributes".
Note: If you perform an upgrade from an earlier version of Oracle
Internet Directory to 11g Release 1, your port numbers from the
earlier version are retained.
Table A–1 (Cont.) New Locations of 10g Attributes
Attribute 10g Location 11g Location
11g Default
Value

Enabling Server Debugging
A-6 Oracle Fusion Middleware Administrator's Guide for Oracle Internet Directory
A.4 Enabling Server Debugging
In 10g, you could enable debugging either by using a debug option when you invoked
the server or by setting orcldebugflag, which was in the root DSE.
In 11g, you cannot enable debugging by using debug options when you invoke the
server. You enable debugging of the directory server by changing the attribute
orcldebugflag, which is now in the instance-specific configuration entry, which has
a DN of the form:
cn=componentname,cn=osdldapd,cn=subconfigsubentry
You can change orcldebugflag either by using the Server Properties page, Logging
tab, in Fusion Middleware Control or by using ldapmodify. For example, you could
use the following LDIF file to configure the Oracle Internet Directory instance in
system component oid1 for heavy trace debugging.
dn: cn=oid1,cn=osdldapd,cn=subconfigsubentry
changetype: modify
replace: orcldebugflag
orcldebugflag: 1
See Chapter 23, "Managing Logging" for more information.
You enable debugging of the replication server by changing the attribute
orcldebuglevel in the replication configuration set
Table 41–4, " Replication Configuration Set Attributes" lists and describes the attributes
of the replication configuration set, which has the following DN:
cn=configset0,cn=osdrepld,cn=subconfigsubentry
You can use either ldapmodify or the Shared Properties, Replication tab, in Fusion
Middleware Control to change orcldebuglevel. See Chapter 41, "Managing
Replication Configuration Attributes" for more information.
A.5 Command Line Tools
Most commands now require that the environment variable ORACLE_INSTANCE be
set.
New options have been added to opmnctl and oidctl.
Several Oracle Internet Directory administration tools and bulk tools take a
connect argument that specifies the Oracle Database to connect to. In 10g, if you
did not include a connect argument on the command line, the command would take
the value of the environment variable ORACLE_SID by default. In 11g Release 1, you
must use the connect argument to specify the database. Oracle Internet Directory
and Oracle Database are not installed in the same ORACLE_HOME, so ORACLE_SID is
irrelevant. Therefore, you must use the connect argument to specify the database, for
example connect=oiddb.
See Also:
■Chapter 8, "Managing Oracle Internet Directory Instances"
■Chapter 15, "Performing Bulk Operations"

Audit
Differences Between 10g and 11g A-7
A.6 Path Names
In Oracle Fusion Middleware 11g Release 1, files that are updatable are installed under
ORACLE_INSTANCE and most product binaries are stored under ORACLE_HOME. As a
result, the path names of most configuration files and log files are different than in 10g
(10.1.4.0.1). Table A–2 lists some examples:
A.7 Graphical User Interfaces
Oracle Directory Manager and Oracle Internet Directory Grid Control Plug-in no
longer exist in 11g Release 1. They have been replaced by Oracle Directory Services
Manager and Oracle Enterprise Manager Fusion Middleware Control.
See the following sections for more information:
■Section 7.4, "Using Oracle Directory Services Manager"
■Section 7.3, "Using Fusion Middleware Control to Manage Oracle Internet
Directory"
A.8 Audit
As of release 11g Release 1, Oracle Internet Directory uses an audit framework that is
integrated with Oracle Fusion Middleware.
You can configure auditing by using Oracle Enterprise Manager Fusion Middleware
Control or the WebLogic Scripting Tool, wlst.
The attribute orclAudFilterPreset has replaced the audit levels used in 10g
(10.1.4.0.1). You can set it to None, Low, Medium, All, or Custom.
There is no longer any need for an Oracle Internet Directory garbage collector.
Table A–2 Some Path Names that Changed
Filename 10g (10.1.4.0.1) Location 11g Release 1 Location
Orclpwdlldap
1
OidpwdrSID
ORACLE_HOME/ldap/admin ORACLE_INSTANCE/OID/admin
Tnsnames.ora ORACLE_HOME/network/admin ORACLE_HOME/config
Oidldapd*.lo
g
oidmon*.log
ORACLE_HOME/ldap/log ORACLE_
HOME/diagnostics/logs/OID/componentN
ame
bulkload.log
bulkdelte.lo
g
catalog.log
ORACLE_HOME/ldap/log ORACLE_
HOME/diagnostics/logs/OID/tools
Bulkload
intermediate
files
ORACLE_HOME/ldap/load ORACLE_HOME/OID/load
opmnctl ORACLE_HOME/opmn/bin ORACLE_INSTANCE/bin
opmn.xmllORACLE_HOME/opmn/conf ORACLE_INSTANCE/config/OPMN/opmn
See Also: Chapter 2, "Understanding Oracle Internet Directory in
Oracle Fusion Middleware"

Referential Integrity
A-8 Oracle Fusion Middleware Administrator's Guide for Oracle Internet Directory
A.9 Referential Integrity
Referential Integrity has been completely reimplemented. You can configure it from
the command line or by using Oracle Enterprise Manager Fusion Middleware Control.
A.10 Server Chaining
Server chaining now supports Novell eDirectory, as well as Microsoft Active Directory
and Sun Java System Directory Server, formerly known as SunONE iPlanet. The
attributes mapUIDtoADAttribute, showExternalGroupEntries,
showExternalUserEntries, and addOrcluserv2ToADUsers have been added
since Oracle Internet Directory 10g (10.1.4.0.1).
A.11 Replication
You can set up and manage LDAP-based replication by using the replication wizard in
Oracle Enterprise Manager Fusion Middleware Control. A separate Replication page
enables you to adjust attributes that control the replication server.
You can now use LDAP-based replication for multimaster directory replication
groups. You no longer need Oracle Database Advanced Replication-based replication
for this purpose. If you want to replicate Oracle Single Sign-On, however, you still
must use Oracle Database Advanced Replication-based replication.
A.12 Oracle Directory Integration Platform
In 10g (10.1.4.0.1), the Oracle Directory Integration Platform server was under the
control of OIDMON, like the LDAP and replication servers. For 11g Release 1, Oracle
Directory Integration Platform has been reimplemented as a J2EE application, and is
started and stopped separately from Oracle Internet Directory servers.
A.13 Oracle Single Sign-On and Oracle Delegated Administration
Services
Oracle Fusion Middleware 11g Release 1 does not include Oracle Single Sign-On or
Oracle Delegated Administration Services. Oracle Internet Directory 11g Release 1
however, is compatible with Oracle Single Sign-On 10g (10.1.4.3.0) or later and Oracle
Delegated Administration Services 10g (10.1.4.3.0) or later.
See Also: Chapter 22, "Managing Auditing."
See Also: Chapter 21, "Configuring Referential Integrity"
See Also:
■Chapter 6, "Understanding Oracle Internet Directory Replication"
■Part V, "Advanced Administration: Directory Replication"
■Appendix C, "Setting Up Oracle Database Advanced
Replication-Based Replication"
See Also: Oracle Fusion Middleware Administrator's Guide for Oracle
Directory Integration Platform

Java Containers
Differences Between 10g and 11g A-9
A.14 Java Containers
In Oracle Application Server 10g, Java applications ran in instances of Oracle
Containers for Java. In the current release, they run in instances of WebLogic. Oracle
Directory Services Manager and Oracle Directory Integration Platform are Java
components that run in WebLogic managed servers.
The Oracle Internet Directory LDAP and replication servers, as C programs, are
system components and are not affected by this change. The Java server plug-ins run
in a JVM within the oidldapd server itself. This is implemented using the Java Native
Interface (JNI).
See Also:
■Oracle Fusion Middleware Introduction to Oracle WebLogic Server
■Chapter 44, "Developing Plug-ins for the Oracle Internet Directory
Server"

Java Containers
A-10 Oracle Fusion Middleware Administrator's Guide for Oracle Internet Directory

B
Managing Oracle Internet Directory Instances by Using OIDCTL B-1
BManaging Oracle Internet Directory
Instances by Using OIDCTL
This appendix contains the following sections:
■Section B.1, "Introduction to Managing Oracle Internet Directory by Using
OIDCTL"
■Section B.2, "Creating and Starting an Oracle Internet Directory Server Instance by
Using OIDCTL"
■Section B.3, "Stopping an Oracle Internet Directory Server Instance by Using
OIDCTL"
■Section B.4, "Starting an Oracle Internet Directory Server Instance by Using
OIDCTL"
■Section B.5, "Viewing Status Information by Using OIDCTL"
■Section B.6, "Deleting an Oracle Internet Directory Server Instance by Using
OIDCTL"
B.1 Introduction to Managing Oracle Internet Directory by Using OIDCTL
Some customers need to run Oracle Internet Directory in standalone mode, without a
WebLogic domain or Oracle Enterprise Manager Fusion Middleware Control. If you
are running Oracle Internet Directory in standalone mode, you can use oidctl add to
create additional instances of Oracle Internet Directory within an existing Oracle
Internet Directory component. If you create an Oracle Internet Directory instance by
using oidctl, your new instance is not visible to a WebLogic server and you are not
able to manage the instance by using Oracle Enterprise Manager Fusion Middleware
Control.
The inst argument to oidctl is an integer. That is, the first server instance is 1
(inst=1) and the second is 2, and so forth.
Figure B–1 shows a single Oracle Internet Directory component with two Oracle
Internet Directory instances. Each instance has its own dispatcher with a non-SSL and
an SSL port. Both dispatchers are controlled by the same OIDMON.
See Also: Section 8.4, "Starting an Instance of the Replication Server
by Using OIDCTL".
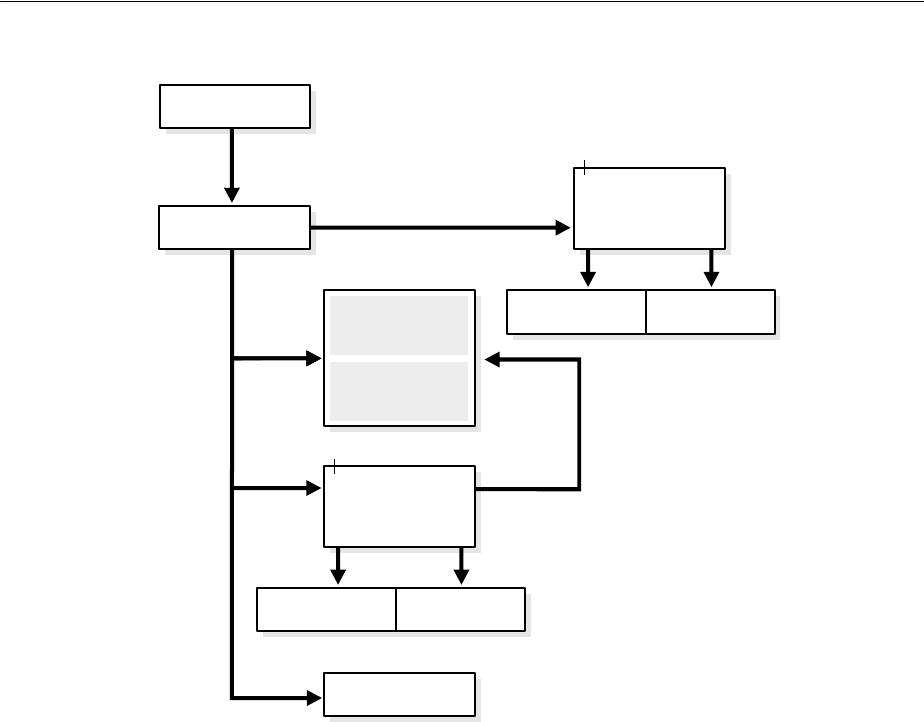
Introduction to Managing Oracle Internet Directory by Using OIDCTL
B-2 Oracle Fusion Middleware Administrator's Guide for Oracle Internet Directory
Figure B–1 A Component with Two Instances
Creating a new instance in this manner also creates a new instance-specific
configuration entry with the new instance number appended to the component name.
For example, if the first instance-specific configuration entry was:
cn=oid1,cn=osdldapd,cn=subconfigsubentry
then the second instance-specific configuration entry is:
cn=oid1_2,cn=osdldapd,cn=subconfigsubentry
You can manage the two instances independently by using LDAP tools or Oracle
Directory Services Manager. The new instance cannot be registered with a WebLogic
domain, so you cannot use Oracle Enterprise Manager Fusion Middleware Control or
WLST to manage it.
Creating an Oracle Internet Directory instance in this manner does not generate any
new pathnames in the file system. Instances that are part of the same Oracle Internet
Directory component read from the same configuration files and write log files to the
same log directory.
For backward compatibility, Oracle Internet Directory 11g Release 1 also allows you to
create an instance with default attribute values by using oidctl add.
OIDLDAPD
Server2
OIDLDAPD
Server1
OIDREPLD
OIDMON
ias_component=oid1
OIDLDAPD
Dispatcher
non-SSL Port = 3060
SSL Port = 3131
OPMN
Oracle Database
Shared Memory
inst = 1
OIDLDAPD
Server2
OIDLDAPD
Server1
OIDLDAPD
Dispatcher
non-SSL Port = 3061
SSL Port = 3132
inst = 2

Stopping an Oracle Internet Directory Server Instance by Using OIDCTL
Managing Oracle Internet Directory Instances by Using OIDCTL B-3
B.2 Creating and Starting an Oracle Internet Directory Server Instance by
Using OIDCTL
You can create another Oracle Internet Directory server instance within an existing
component and start the server by using oidctl add. This command starts the server
as well.
To create and start the server by using oidctl add, type:
oidctl connect=connect_string server=oidldapd inst=new_instance_number \
name=instanceName componentname=componentName \
flags="port=non_ssl_port sport=ssl_port" add
oidctl add creates the new configuration entry:
cn=componentName_new_instance_number,cn=osdldapd,cn=subconfigsubentry
Typically, the inst value of the original instance is 1, the second instance you create
is 2, and so forth. For example:
oidctl connect=oiddb server=oidldapd inst=2 flags="port=3322 sport=3323" add
B.3 Stopping an Oracle Internet Directory Server Instance by Using
OIDCTL
If you have an Oracle Internet Directory server instance within a component that was
created by using oidctl, and the instance has been started, you can stop it by typing:
oidctl connect=connect_string server=oidldapd inst=new_instance_number stop
For example:
oidctl connect=oiddb server=oidldapd inst=2 stop
Notes:
■You must set the environment variables ORACLE_INSTANCE and
ORACLE_HOME before you run the oidctl command.
■If you do not specify the Oracle Internet Directory instance name
and component name to oidctl, the command uses the default
value inst1 or oid1 respectively. If you must specify different
values, you can either set the environment variables INSTANCE_
NAME and COMPONENT_NAME, or pass the instance name and
component name in the command line as name=instanceName,
componentname=componentName, respectively.
■Best practice is to create new Oracle Internet Directory instances
by creating new Oracle Internet Directory components, as
described in Chapter 8, "Managing Oracle Internet Directory
Instances." You should only use oidctl to create an instance if
you plan to run Oracle Internet Directory in standalone mode and
never use Oracle Enterprise Manager Fusion Middleware Control.

Starting an Oracle Internet Directory Server Instance by Using OIDCTL
B-4 Oracle Fusion Middleware Administrator's Guide for Oracle Internet Directory
B.4 Starting an Oracle Internet Directory Server Instance by Using
OIDCTL
If you have an Oracle Internet Directory server instance within a component that was
created by using oidctl, and the instance has been stopped, you can start it by
typing:
oidctl connect=connect_string server=oidldapd inst=new_instance_number start
For example:
oidctl connect=oiddb server=oidldapd inst=2 start
The server is started with the port and sport flags that were specified when the
instance was created.
B.5 Viewing Status Information by Using OIDCTL
You can use oidctl to view status. Type:
oidctl connect=connect_string status
The command oidctl status displays the status of all the Oracle Internet Directory
instances that are running on the host, even though they might be on different Oracle
instances.
B.6 Deleting an Oracle Internet Directory Server Instance by Using
OIDCTL
To stop and permanently delete one Oracle Internet Directory server instance within a
component, type
oidctl connect=connect_string server=oidldapd inst=new_instance_number \
name=instanceName componentname=componentName delete
Only the connect, server, and inst arguments are required. oidctl delete
deletes the configuration entry:
cn=componentName_new_instance_number,cn=osdldapd,cn=subconfigsubentry
Typically, the inst value of the original instance is 1, the second instance you create
is 2, and so forth. For example:
oidctl connect=oiddb server=oidldapd inst=2 delete

C
Setting Up Oracle Database Advanced Replication-Based Replication C-1
CSetting Up Oracle Database Advanced
Replication-Based Replication
As of 11g Release 1 (11.1.1), LDAP-based replication can be used for multimaster
replication as well as one-way and two-way replication. As a result, Oracle Database
Advanced Replication-based replication is less important than it was in 10g
(10.1.4.0.1). The only time you must use Advanced Replication in 11g Release 1 is
when you have Oracle Single Sign-On configured on the same machine and you want
to replicate Oracle Single Sign-On data as well as Oracle Internet Directory data.
This appendix contains the following sections:
■Section C.1, "Introduction to Setting up Oracle Database Advanced
Replication-Based Replication"
■Section C.2, "Setting Up Advanced Replication-Based Replication"
C.1 Introduction to Setting up Oracle Database Advanced
Replication-Based Replication
In 11g Release 1, you must use the command line to set up Advanced Replication. You
can use the Replication Wizard in Oracle Enterprise Manager Fusion Middleware
Control only for setting up LDAP-based replication.
C.1.1 Database Version Compatibility
If you are using Oracle Database Advanced Replication-based replication, all nodes in
a directory replication group must be running the same version of Oracle Database.
C.1.2 Advanced Replication Filtering for Partial Replication
This section describes rules and best practices to follow when setting up Advanced
Replication for partial replication. It contains the following topics:
C.1.2.1 Excluded Naming Contexts
In Advanced Replication, you can only exclude naming contexts.
Note: All references to Oracle Single Sign-On and Oracle Delegated
Administration Services in this appendix refer to Oracle Single
Sign-On 10g (10.1.4.3.0) or later and Oracle Delegated Administration
Services 10g (10.1.4.3.0) or later.
See Also: Section 6.2.1, "Content to be Replicated: Full or Partial".
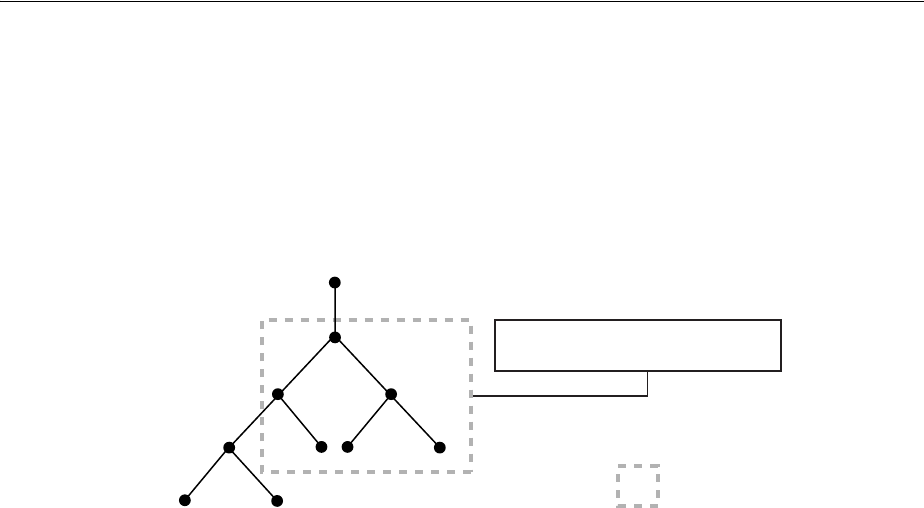
Setting Up Advanced Replication-Based Replication
C-2 Oracle Fusion Middleware Administrator's Guide for Oracle Internet Directory
To exclude a naming context from replication in Oracle Database Advanced
Replication-based replication, specify it using the orclexcludednamingcontext
attribute of the Oracle Database Advanced Replicationn-based replication agreement
entry orclagreementid=000001.
Figure C–1 and the accompanying text further exemplify the use of the naming context
container and its objects.
Figure C–1 Example of a Naming Context Container and Its Objects
In Figure C–1, the naming context included for replication is c=us. Within that
naming context, one subtree, namely cn=users,cn=hr, c=us is excluded from
replication. Moreover, two of the attributes of the c=us naming context are excluded
from replication—namely, userPassword and telephonenumber.
C.1.2.2 Rules for Advanced Replication Filtering.
This section describes the rules for Advanced Replication filtering.
The following naming contexts cannot be replicated:
■DSE root-specific entry
■orclagreementid=000001,cn=replication configuration
■cn=subconfigsubentry
■cn=Oracle Internet Directory
■cn=subregistrysubentry
The following naming contexts cannot be excluded from replication:
■cn=catalogs
■cn=subschemasubentry
■cn=oracleschemaversion
■cn=replication configuration
C.2 Setting Up Advanced Replication-Based Replication
This section tells you how to configure multimaster replication groups, and how to
resolve conflicts manually in them. It contains these topics:
■Section C.2.1, "Rules for Setting Up Advanced Replication"
See Also: Section 41.1.5, "The Replication Naming Context Object
Entry"
cn=sales
c=us
Root DSE
cn=hr
cn=users dc=com Included Naming
Context
orclexcludedattributes=userpasswd
orclexcludedattributes=telephonenumber

Setting Up Advanced Replication-Based Replication
Setting Up Oracle Database Advanced Replication-Based Replication C-3
■Section C.2.2, "Setting Up an Advanced Replication-Based Multimaster Replication
Group"
■Section C.2.3, "Adding a Node for Advanced Replication-Based Multimaster
Replication"
■Section C.2.4, "Deleting a Node from a Multimaster Replication Group"
C.2.1 Rules for Setting Up Advanced Replication
The following nine rules apply to replication based on Advanced Replication
(sometimes referred to as ASR):
1. In this type of Directory Replication Group (DRG), there must be one node
identified as the Master Definition Site (MDS): this is the group master. All other
nodes taking part in the replication are replicas, which in database replication are
termed "Remote Master Sites" (RMS).
2. When you configure Multimaster replication, the master node for a Directory
Replication Group (DRG) and each node that is to become an Oracle Database
Advanced Replication-based replica must be initially empty, that is, a new Oracle
Internet Directory installation.
3. When you add an Oracle Database Advanced Replication-based replica, the new
replica must be empty. That is, Oracle Internet Directory must be newly installed.
4. The sponsor node for each Oracle Database Advanced Replication-based replica
can be any of the following:
■A master node
■An Oracle Database Advanced Replication-based replica of an existing
multi-master DRG
■A supplier of an LDAP replica that is not a consumer LDAP replica of any
other LDAP replica
See Also: The chapters on Multimaster Replication in Oracle Fusion
Middleware High Availability Guide
Note: Even though it is not the central master, an Oracle Database
Advanced Replication-based replica is sometimes called a remote
master site (RMS), due to two facts. The first is that in Advanced
Replication, when information is moved from one site to another, the
recipient of the transferred information is called a "remote master
site." The second fact is that independent changes made directly to an
Oracle Database Advanced Replication-based replica are also
replicated to all members of its group, making it a "master" during
that interaction. Such a group, in which changes to any member are
replicated to all other members, is called a multimaster replication
group.
Note: If the Master node is not a new installation, use the procedure
described in Section C.2.3, "Adding a Node for Advanced
Replication-Based Multimaster Replication" to add replicas. That
procedure also initializes the replication group.

Setting Up Advanced Replication-Based Replication
C-4 Oracle Fusion Middleware Administrator's Guide for Oracle Internet Directory
5. An Oracle Database Advanced Replication-based replica cannot be a consumer of
an LDAP replica.
6. In Oracle Internet Directory 11g Release 1, a node cannot be part of more than one
multimaster replication group.
7. The data replicated between servers in a directory replication group does not
include DSE root-specific data, server configuration data, and replication
agreement data.
8. When an multimaster replication group is configured, the Oracle Single Sign-On
database schema is automatically configured in replication.
9. When you add a node to a DRG, it must be running the same version of Oracle
Internet Directory as the other nodes in the DRG. If you want to add a new 10g
(10.1.4.0.1) node to a DRG containing nodes at an earlier release, first upgrade all
existing nodes to 10g (10.1.4.0.1).
C.2.2 Setting Up an Advanced Replication-Based Multimaster Replication Group
This section discusses the general tasks you perform when installing and setting up a
multimaster replication group. It contains these topics:
■Task 1: Install Oracle Internet Directory on the Master Definition Site (MDS)
■Task 2: Install the Oracle Internet Directory on the Remote Master Sites (RMS)
■Task 3: Set Up Advanced Replication for a Directory Replication Group
■Task 4 (Optional): Load Data into the Directory
■Task 5: Ensure that Oracle Directory Server Instances are Started on All the Nodes
■Task 6: Start the Replication Servers on All Nodes in the DRG
■Task 7: Test Directory Replication
C.2.2.1 Task 1: Install Oracle Internet Directory on the Master Definition Site (MDS)
Install Oracle Internet Directory on the master definition site, as described in Oracle
Fusion Middleware Installation Guide for Oracle Identity Management.
You must be able to use Oracle Net Services to connect to the master definition site
database and all other nodes in the DRG.
See Also: Section C.1.2, "Advanced Replication Filtering for Partial
Replication"
Notes:
■The instructions in this section apply to setting up replication
in a group of empty nodes. They assume that there is no
pre-existing directory data on any of the nodes in the DRG. For
instructions on adding a node to an existing DRG, see
Section C.2.3, "Adding a Node for Advanced Replication-Based
Multimaster Replication."
■During entry replication, the directory replication server does
not always preserve the spaces between RDN components in
the DN. In some rare cases, it may not preserve the case of the
letters in the DN.

Setting Up Advanced Replication-Based Replication
Setting Up Oracle Database Advanced Replication-Based Replication C-5
C.2.2.2 Task 2: Install the Oracle Internet Directory on the Remote Master Sites
(RMS)
Install Oracle Internet Directory on the remote master sites, as described in Oracle
Fusion Middleware Installation Guide for Oracle Identity Management
C.2.2.2.1 If an Existing Master is Used as a Remote Master Site Although Oracle
recommends starting with empty replicas, you can set up replication using machines
initially configured as masters rather than replicas. To use a machine initially
configured as a master as an RMS, you must first migrate its metadata to the MDS, as
follows:
■Make sure the Oracle Internet Directory server is up and running on both the MDS
and each such desired replica so that the process (remtool –backupmetadata) can
succeed.
■From the newly created node, run the following command:
remtool –backupmetadata \
–replica "new_node_host:new_node_port" \
–master "master_host:master_port"
where master_host:master_port are the hostname and port number for the desired
replica's supplier. you are prompted for the replication DN password.
■Apart from loading the metadata into master replica, this tool creates a file named
ocbkup.new_replica_id.TO.master_replicaid.timestamp.dat
containing the metadata as backup. This file is created under the ORACLE_
INSTANCE /diagnostics/logs/OID/tools directory. This file contains the
changes made to master replica in LDIF format, a copy of SSO container entry
[orclApplicationCommonName=ORASSO_SSOSERVER, cn=SSO, cn=Products,
cn=OracleContext] and DAS URL container entry [cn=OperationURLs, cn=DAS,
cn=Products, cn=OracleContext].
■If the metadata backup succeeds, it displays a message in the terminal:
Backup of metadata will be stored in
ORACLE_INSTANCE/diagnostics/logs/OID/tools/ocbkup.replicaid_
pilot.TO.replcicaid_master.timestamp.ldif.
Metadata copied successfully.
Note: During installation, make sure that each Oracle Internet
Directory database instance name is unique on each machine.
Note: If Oracle Delegated Administration Services is not configured,
you might see an error message similar to this when you run
remtool with the -backupmetadata option:
Failed to add "orclApplicationCommonName=ias.example.com,
cn=IAS Instances, cn=IAS, cn=Products, cn=OracleContext"
as "uniquemember" to entry "cn=Associated Mid-tiers,
orclapplicationcommonname=DASApp, cn=DAS,cn=products,
cn=OracleContext at replica ldap://myhost:3060
Please ignore this error message.

Setting Up Advanced Replication-Based Replication
C-6 Oracle Fusion Middleware Administrator's Guide for Oracle Internet Directory
The message contains the actual path of ORACLE_INSTANCE and the filename.
■If an error occurs during this operation, remtool reports the error in the terminal
from which it was invoked. The error messages are also logged in ORACLE_
INSTANCE/diagnostics/logs/OID/tools/remtool.log file.
After successfully migrating the master's metadata to the MDS, you can now safely
continue with "Task 3: Set Up Advanced Replication for a Directory Replication
Group" on page C-6.
C.2.2.3 Task 3: Set Up Advanced Replication for a Directory Replication Group
The following sections lead you through installing and setting up Advanced
Replication by using the Replication Management Tool.
To establish a directory replication group (DRG), you must configure the Advanced
Replication environment by performing the tasks discussed in these topics:
■Section C.2.2.3.1, "On All Nodes, Prepare the Oracle Net Services Environment for
Replication"
■Section C.2.2.3.2, "From the MDS, Configure Advanced Replication For Directory
Replication"
C.2.2.3.1 On All Nodes, Prepare the Oracle Net Services Environment for Replication For each
node in the directory replication group, perform the steps listed here. (Each step is
described more fully in the subsections that directly follow this list.)
1. Configure sqlnet.ora.
2. Configure tnsnames.ora in each Oracle Internet Directory ORACLE_
INSTANCE and Oracle Database ORACLE_INSTANCE.
3. Stop and restart the listener, both in the Oracle Internet Directory ORACLE_
HOME and in the Oracle Database ORACLE_HOME.
4. Test Oracle Net connections to all nodes from each node in the DRG.
To prepare the Oracle Net Services environment for replication:
1. Configure sqlnet.ora.
The sqlnet.ora file should contain the following parameters at minimum:
names.directory_path = (TNSNAMES)
names.default_domain = global_database_domain
On UNIX, the sqlnet.ora file is in ORACLE_INSTANCE/network/admin.
On Microsoft Windows, the sqlnet.ora file is in %ORACLE_
HOME%\network\admin.
2. Configure tnsnames.ora in each Oracle Internet Directory ORACLE_
INSTANCE and Oracle Database ORACLE_INSTANCE.
On each node in the DRG, define all Oracle Internet Directory database instances
in the DRG. Each tnsnames.ora file, in the Oracle Internet Directory ORACLE_
INSTANCE and in the Oracle Database ORACLE_HOME, must contain connect
See Also: Oracle Database Advanced Replication in the Oracle
Database Documentation Library, and the online Help for the
Replication Management Tool, for information on setting up Oracle
Database Advanced Replication-based replication.

Setting Up Advanced Replication-Based Replication
Setting Up Oracle Database Advanced Replication-Based Replication C-7
descriptor information in the following format for each Oracle Internet Directory
database:
net_service_name =
(DESCRIPTION =
(ADDRESS =
(PROTOCOL = TCP)
(HOST = HOST_NAME_OR_IP_ADDRESS)
(PORT = port_no_of_listener))
(CONNECT_DATA =(service_name = service_name_of_database)))
where net_service_name is the global name of the database. For example, if the
database global name is mds.sales.com, then your net_service_name must be
mds.sales.com. Ensure that your database global name and your net_
service_name are domain-qualified. In this example, the global name and net_
service_name are domain-qualified with sales.com.
On UNIX, the tnsnames.ora file is in ORACLE_INSTANCE/config.
On Microsoft Windows, the tnsnames.ora file is in %ORACLE_
INSTANCE%\config.
3. Stop and restart the listener, both in the Oracle Internet Directory ORACLE_
HOME and in the Oracle Database ORACLE_HOME.
To stop the listener for the Oracle Internet Directory database, use the listener
control utility, $ORACLE_HOME/bin/lsnrctl in the Oracle Database Oracle
home. Type the following command at the lsnrctl command prompt:
SET PASSWORD
STOP [listener_name]
SET PASSWORD is required only if the password is set in the listener.ora file.
you are prompted for the password to set. The default listener name is LISTENER.
To restart the listener for the Oracle Internet Directory database, type the
following command at the lsnrctl command prompt:
START [listener_name]
Notes:
■The database global name is composed of the DB_NAME and DB_
DOMAIN initialization parameters of your database. For example,
if your database's DB_NAME is mds and DB_DOMAIN is
sales.com, your database global name is mds.sales.com. The
global name is not domain qualified if the DB_DOMAIN
initialization parameter is not defined.
■The value of the NAMES.DEFAULT_DOMAIN parameter in the
sqlnet.ora file must match the value of the DB_DOMAIN
initialization parameter of the database.
■You must domain-qualify the net service name (for example,
sales.com), but be sure that the domain component matches the
one specified in the NAMES.DEFAULT_DOMAIN parameter in
the sqlnet.ora file.
See Also: Oracle Database Net Services Reference for more information
on tnsnames.ora syntax.

Setting Up Advanced Replication-Based Replication
C-8 Oracle Fusion Middleware Administrator's Guide for Oracle Internet Directory
quit
4. Test Oracle Net connections to all nodes from each node in the DRG.
IMPORTANT: Try to connect using both of these commands:
sqlplus ods@net_service_name_without_domain_name
sqlplus ods@net_service_name_with_domain_name
you are prompted for the ods_password. If you cannot connect, then replication
will not work.
C.2.2.3.2 From the MDS, Configure Advanced Replication For Directory Replication To do this:
1. From the MDS console, connect as the system user on all nodes, including the
MDS. Ensure the following on all nodes:
■The Oracle Internet Directory database is running
■The Oracle Internet Directory listener is running
■The connect string is correct
■The system password is correct
2. Ensure the following wallets exist on the remote sites:
■A wallet for storing the password to the database designated for Oracle
Internet Directory. This wallet is named oidpwdlldap1 and is located in the
directory ORACLE_INSTANCE/OID/admin.
■A wallet for storing the password of the replication administrator. This wallet
is named oidpwdroracle_sid, and is located in the directory ORACLE_
INSTANCE/OID/admin. (The oracle_sid is obtained from the connected
database.)
If the wallets do not exist on a specific site, create them by typing the following
command on the remote node:
oidpasswd connect=connect_string create_wallet=true
3. Check the prerequisites in the attached Note. Then, at a command prompt in the
MDS, use remtool (the Replication Environment Management Tool) to configure
Advanced Replication by running the following command:
$ORACLE_HOME/ldap/bin/remtool -asrsetup
See Also:
■The remtool command-line tool reference in Oracle Fusion
Middleware Reference for Oracle Identity Management for information
about using the -asrsetup option of the Replication
Environment Management Tool (remtool).
■Oracle Database Administrator's Guide in the Oracle Database
Documentation Library for instructions on ensuring that the
database and listener are running
■Oracle Database Net Services Administrator's Guide in the Oracle
Database Documentation Library for instructions on ensuring that
the connect string is correct

Setting Up Advanced Replication-Based Replication
Setting Up Oracle Database Advanced Replication-Based Replication C-9
C.2.2.4 Task 4 (Optional): Load Data into the Directory
You can choose either of two ways to load data into the directory:
■To add just a small number of entries to the DRG, you can wait until you have
completely configured the DRG. Then use ldapadd to load the data to one of the
nodes. The entries are then be replicated to the other nodes at the specified time.
■To add a large amount of data to load into the DRG, use the bulkload utility:
a. Stop the LDAP server at all nodes of the DRG by typing:
opmnctl stopproc process-type=OID
b. On the node that is part of the DRG and where you have the ldif file to be
loaded onto the directories, ensure that ORACLE_INSANCE is set, then enter:
bulkload connect="connect_string" check="TRUE" \
generate="TRUE" file="file_with_absolute_path_name"
c. On the same node, ensure ORACLE_INSTANCE is set, then enter:
bulkload connect="connect_string_1" load="TRUE"
Repeat step c on the same node, each time replacing connect_string_1 with
the connect string of another node in the DRG, until you have loaded the data
onto all the nodes in the DRG. For example, enter:
bulkload connect="connect_string_2" load="TRUE"
then enter
bulkload connect="connect_string_3" load="TRUE"
and so on, until you loaded the data onto all the nodes in the DRG.
Notes:
■If you encounter errors, then clean up the environment by using
the -asrcleanup option of the Replication Environment
Management Tool. Then repeat Step 3.
■As part of "Task 3: Set Up Advanced Replication for a Directory
Replication Group", the Replication Environment Management
Tool (remtool) sets default values for the replication
configuration parameters, which enables you to simply start the
replication servers. If you want to change the replication
configuration parameters, see. Chapter 42, "Managing and
Monitoring Replication."
Note: If data is extracted from Oracle Internet Directory using
ldifwrite, then, in addition to other options, use the
restore="TRUE" option to restore the operational attributes.

Setting Up Advanced Replication-Based Replication
C-10 Oracle Fusion Middleware Administrator's Guide for Oracle Internet Directory
C.2.2.5 Task 5: Ensure that Oracle Directory Server Instances are Started on All the
Nodes
The out-of-box configuration has Oracle Internet Directory LDAP Server instance #1
configured with change logging set to TRUE. This default instance of Oracle Internet
Directory LDAP Server can be started as follows:
opmnctl startproc process-type=OID
C.2.2.6 Task 6: Start the Replication Servers on All Nodes in the DRG
To start replication servers on all nodes, type the following command on each node:
oidctl connect=connStr server=oidrepld instance=1 componentname=oidComponentName \
flags="-h LdapHost -p LdapPort" start
Note that the instance number need not be unique across the entire DRG.
C.2.2.7 Task 7: Test Directory Replication
Test replication as described in
Notes:
■connect_string is the connect string of the local Oracle Internet
Directory database.
■For successful replication, an entry must have the same
orclguid (global identifier) at all replicated nodes. This is
accomplished by performing Step b once and repeating Step c for
all nodes in the DRG.
See Also: The bulkload command-line tool reference in Oracle
Fusion Middleware Reference for Oracle Identity Management for syntax
and usage notes
Note: If you are deploying a single master with read-only replica
consumers, you can reduce performance overhead by turning off
conflict resolution. To do so, change the value of
orclconflresolution to 0 by using the following ldif file with
ldapmodify:
dn: cn=configset0,cn=osdrepld,cn=subconfigsubentry
changetype: modify
replace: orclconflresolution
orclconflresolution: 0
See Also:
Chapter 4, "Understanding Process Control of Oracle Internet
Directory Components" for information on Oracle Internet
Directory process control.

Setting Up Advanced Replication-Based Replication
Setting Up Oracle Database Advanced Replication-Based Replication C-11
C.2.3 Adding a Node for Advanced Replication-Based Multimaster Replication
You can add a node to a master node, or to an LDAP-based supplier replica that is not
a consumer of any other LDAP based replicas, to form a multimaster DRG. When you
do so, the steps in this section automatically perform an initial install and
configuration of Advanced Replication.
To add a new replication node to a live, functioning replication group or to a master
node of any significant size, perform the following steps:
■Prepare the Oracle Net Services Environment
■Task 1: Stop the Directory Replication Server on All Nodes
■Task 2: Identify a Sponsor Node and Install Oracle Internet Directory
■Task 3: Switch the Sponsor Node to Read-Only Mode
■Task 4: Back up the Sponsor Node by Using ldifwrite
■Task 5: Perform Advanced Replication Add Node Setup
■Task 6: Switch the Sponsor Node to Updatable Mode
■Task 7: Start the Directory Replication Server on All Nodes Except the New Node
■Task 8: Load Data into the New Node by Using bulkload
■Task 9: Start the Directory Server on the New Node
■Task 10: Start the Directory Replication Server on the New Node
C.2.3.1 Prepare the Oracle Net Services Environment
Section C.2.2.3.1, "On All Nodes, Prepare the Oracle Net Services Environment for
Replication" describes the process that prepares this environment.
Note: If you want to configure replication for Oracle Single
Sign-On, then follow the postinstallation steps specific to Oracle
Single Sign-On. These are found in the replication installation
section of the Oracle Application Server Single Sign-On
Administrator's Guide. in the 10g (10.1.4.0.1) library.
Note: A new node that you add to an existing multimaster
replication group must have Oracle Internet Directory installed on
it. For more information, see Task 2: Install the Oracle Internet
Directory on the Remote Master Sites (RMS).
Note: Commands shown in the following tasks require the
following types of items to be stored as follows:
■Binaries: $ORACLE_HOME/bin
■SQL scripts: $ORACLE_HOME/ldap/admin
■UNIX scripts: $ORACLE_HOME/ldap/bin
Before beginning "Task 2: Identify a Sponsor Node and Install
Oracle Internet Directory", be sure that all three of these types of
items are in the path.

Setting Up Advanced Replication-Based Replication
C-12 Oracle Fusion Middleware Administrator's Guide for Oracle Internet Directory
C.2.3.2 Task 1: Stop the Directory Replication Server on All Nodes
To stop the directory replication server, run the following command on each node in
the LDAP replication group:
oidctl connect=connStr server=oidrepld instance=1 componentname=oidComponentName\
flags="-h LdapHost -p LdapPort" stop
C.2.3.3 Task 2: Identify a Sponsor Node and Install Oracle Internet Directory
You must identify a sponsor node for this Task. It is the node that supplies the data to
the new node.
For the RMS, Oracle recommends that you install the new instance of Oracle Internet
Directory as an Advanced Replication replica. (You could use an existing master node
as the RMS, but extra manual steps are required.)
Install a new Oracle Internet Directory on the remote site.
If an existing master is used as RMS, you must follow the instructions in
Section C.2.2.2.1, "If an Existing Master is Used as a Remote Master Site" to migrate the
master's metadata to the sponsor node. After successfully migrating the master's
metadata to the MDS, you can now safely continue with "Task 3: Switch the Sponsor
Node to Read-Only Mode".
C.2.3.4 Task 3: Switch the Sponsor Node to Read-Only Mode
A sponsor node is the node that supplies the data to the new node. To switch the
sponsor node from read/write to read-only mode, use one of the procedures in
Section 15.2, "Changing Server Mode."
C.2.3.5 Task 4: Back up the Sponsor Node by Using ldifwrite
Because this may take a long time, you may start "Task 5: Perform Advanced
Replication Add Node Setup" while backup is in process.
On the sponsor node, verify that ORACLE_INSTANCE is set, then enter the following
command:
ldifwrite connect="connect_string" \
baseDN="orclAgreementID=000001,cn=replication configuration" \
file="output_ldif_file"
This backs up the directory of the sponsor node.
C.2.3.6 Task 5: Perform Advanced Replication Add Node Setup
Note: While the sponsor node is in read-only mode, you may not
make any updates to it. You may, however, update any of the other
nodes, but those updates are not replicated immediately.
Also, the sponsor node and the MDS may be the same node.
Note: Oracle Net Service must be configured properly on all nodes
for replication. See: "On All Nodes, Prepare the Oracle Net Services
Environment for Replication" on page C-6.

Setting Up Advanced Replication-Based Replication
Setting Up Oracle Database Advanced Replication-Based Replication C-13
You can perform the Advanced Replication add node setup at the same time that you
perform "Task 4: Back up the Sponsor Node by Using ldifwrite" on page C-12.
On the sponsor node, enter this command:
remtool -addnode
The Replication Environment Management Tool adds the node to the DRG.
C.2.3.7 Task 6: Switch the Sponsor Node to Updatable Mode
To switch the sponsor node to updatable mode, use one of the procedures in
Section 15.7, "Creating and Dropping Indexes from Existing Attributes by Using
catalog."
C.2.3.8 Task 7: Start the Directory Replication Server on All Nodes Except the New
Node
To start the directory replication server, type the following command on all nodes
except the new node:
oidctl connect=connStr server=oidrepld instance=1 componentname=oidComponentName \
flags="-h LdapHost -p LdapPort" start
To ensure that no directory or replication processes are running on the new node,
type:
opmnctl stopproc process-type=OID
Note:
When you run remtool -addnode to add the first Advanced
Replication replica of a replication group, the tool does the initial
replication setup for you, as if you had used remtool -asrsetup.
You must specify the sponsor node's connect identifier when you use
remtool -addnode.
When you use remtool -addnode, the operation might take a long
time to complete, depending on the number of rows available in
replicated tables and the network latency between the nodes. Use the
-v option to view the progress of this operation.
If you encounter errors, then use the -asrverify option first. If it
reports errors, then rectify them by using the -asrrectify option.
Both -asrverify and -asrrectify list all nodes in the DRG. If the
new node is in the list, remove the new node by running the
Replication Environment Management tool with -delnode option.
Then add the new node again using the -addnode option.
See Also: The remtool command-line reference in Oracle Fusion
Middleware Reference for Oracle Identity Management for instructions
on using the -addnode option of the Replication Environment
Management Tool
Note: Task 6 is very similar to Task 3. The only difference is that
the orclservermode parameter is being set back to Read/Write
in this step.

Setting Up Advanced Replication-Based Replication
C-14 Oracle Fusion Middleware Administrator's Guide for Oracle Internet Directory
C.2.3.9 Task 8: Load Data into the New Node by Using bulkload
To load data, ensure that ORACLE_INSTANCE is set, then type the following command
on the new node:
bulkload connect="db_connect_string_of_new_node" check="TRUE" generate="TRUE" \
load="TRUE" restore="TRUE" \
file="absolute_path_to_the_ldif_file_generated_by_ldifwrite"
C.2.3.10 Task 9: Start the Directory Server on the New Node
To start the directory server, type the following command on the new node:
opmnctl startproc process-type=OID
C.2.3.11 Task 10: Start the Directory Replication Server on the New Node
To start the directory replication server, type the following command on the new
node:
oidctl connect=connStr server=oidrepld instance=1 componentname=oidComponentName \
flags="-h LdapHost -p LdapPort" start
C.2.4 Deleting a Node from a Multimaster Replication Group
At times, you may want to delete a node from a DRG (for example, if the addition of a
new node did not fully succeed as a result of system errors).
To delete a replication node, perform the tasks described in these topics:
■Task 1: Stop the Directory Replication Server on All Nodes
■Task 2: Stop All Oracle Internet Directory Processes in the Node to be Deleted
■Task 3: Delete the Node from the Master Definition Site
■Task 4: Start the Directory Replication Server on All Nodes
Note: If you load data from an earlier version of Oracle Internet
Directory, such as 10g Release 2 (10.1.2.0.2) onto a node running 10g
(10.1.4.0.1), you must update the password policy entries as described
in Section 39.5.3, "Password Policy and Fan-out Replication."
Note: If you must change configuration or agreement parameters,
see Chapter 42, "Managing and Monitoring Replication".
Notes:
■If a directory server instance is participating in a replication
agreement, do not use the bulkload tool to add data into the
node. Instead, use ldapadd.
■If Oracle Single Sign-On is desired in replication, then follow
the postinstallation steps in the replication installation section
of the Oracle Application Server Single Sign-On Administrator's
Guide in the 10g (10.1.4.0.1) library.

Setting Up Advanced Replication-Based Replication
Setting Up Oracle Database Advanced Replication-Based Replication C-15
C.2.4.1 Task 1: Stop the Directory Replication Server on All Nodes
To stop the directory replication server, run the following command on each node in
the DRG:
oidctl connect=connStr server=oidrepld instance=1 componentname=oidComponentName \
flags="-h LdapHost -p LdapPort" stop
C.2.4.2 Task 2: Stop All Oracle Internet Directory Processes in the Node to be
Deleted
On the node to be deleted, shut down Oracle Internet Directory.
opmnctl stopproc process-type=OID
C.2.4.3 Task 3: Delete the Node from the Master Definition Site
From the MDS, run the following script:
remtool -delnode
The Replication Environment Management Tool deletes the node from the replication
group.
This process can take a long time, depending on your system resources and the size of
your DRG. If you use the -v option, the tool keeps you informed of its progress.
C.2.4.4 Task 4: Start the Directory Replication Server on All Nodes
To start the directory replication server, type the following command on each of the
remaining nodes of the DRG:
oidctl connect=connStr server=oidrepld instance=1 componentname=oidComponentName \
flags="-h LdapHost -p LdapPort" start
See Also: The opmn command-line tool reference in Oracle Fusion
Middleware Reference for Oracle Identity Management for more
information about shutting down Oracle Internet Directory.
See Also: The remtool command-line tool reference in Oracle
Fusion Middleware Reference for Oracle Identity Management for
instructions on using the -delnode option of the Replication
Environment Management Tool
Note: If you encounter errors, then use the -asrverify option first.
If it reports errors, then rectify them by using the -asrrectify
option. Both -asrverify and -asrrectify list all nodes in the
DRG. If the node to be deleted is in the list, then delete it by running
the Replication Environment Management tool again, using the
-delnode option.
See Also: The opmn command-line tool reference in Oracle Fusion
Middleware Reference for Oracle Identity Management

Setting Up Advanced Replication-Based Replication
C-16 Oracle Fusion Middleware Administrator's Guide for Oracle Internet Directory

D
How Replication Works D-1
DHow Replication Works
This appendix contains advanced information about replication. It contains the
following topics:
■Section D.1, "Features of Oracle Database Advanced Replication-Based
Replication"
■Section D.2, "Architecture for Oracle Database Advanced Replication-Based
Replication"
■Section D.3, "Architecture of LDAP-Based Replication"
■Section D.4, "LDAP Replica States"
■Section D.5, "The Replication Process"
D.1 Features of Oracle Database Advanced Replication-Based
Replication
In Oracle Database Advanced Replication-based replication, the transport of update
information between Oracle Internet Directory nodes in a replication agreement is
managed by Oracle Database Advanced Replication, a store-and-forward transport
feature. Advanced Replication enables you to synchronize database tables across two
Oracle databases.
Oracle Database Advanced Replication:
■Stores local changes and periodically propagates them in batches to consumers.
The consumer replication servers apply the remote changes to their own local
directory servers, and then purge the applied remote changes from their local
stores.
■Enables read and update access to directory tables anywhere in the Oracle
replication group. Typical Advanced Replication configurations use row-level
replication.
■Provides proven network tolerance. Data transfer can be controlled and monitored
by. Such manageability allows a high degree of flexibility in how the data transfer
is scheduled.
Note: All references to Oracle Single Sign-On in this appendix refer
to Oracle Single Sign-On 10g (10.1.4.3.0) or later.
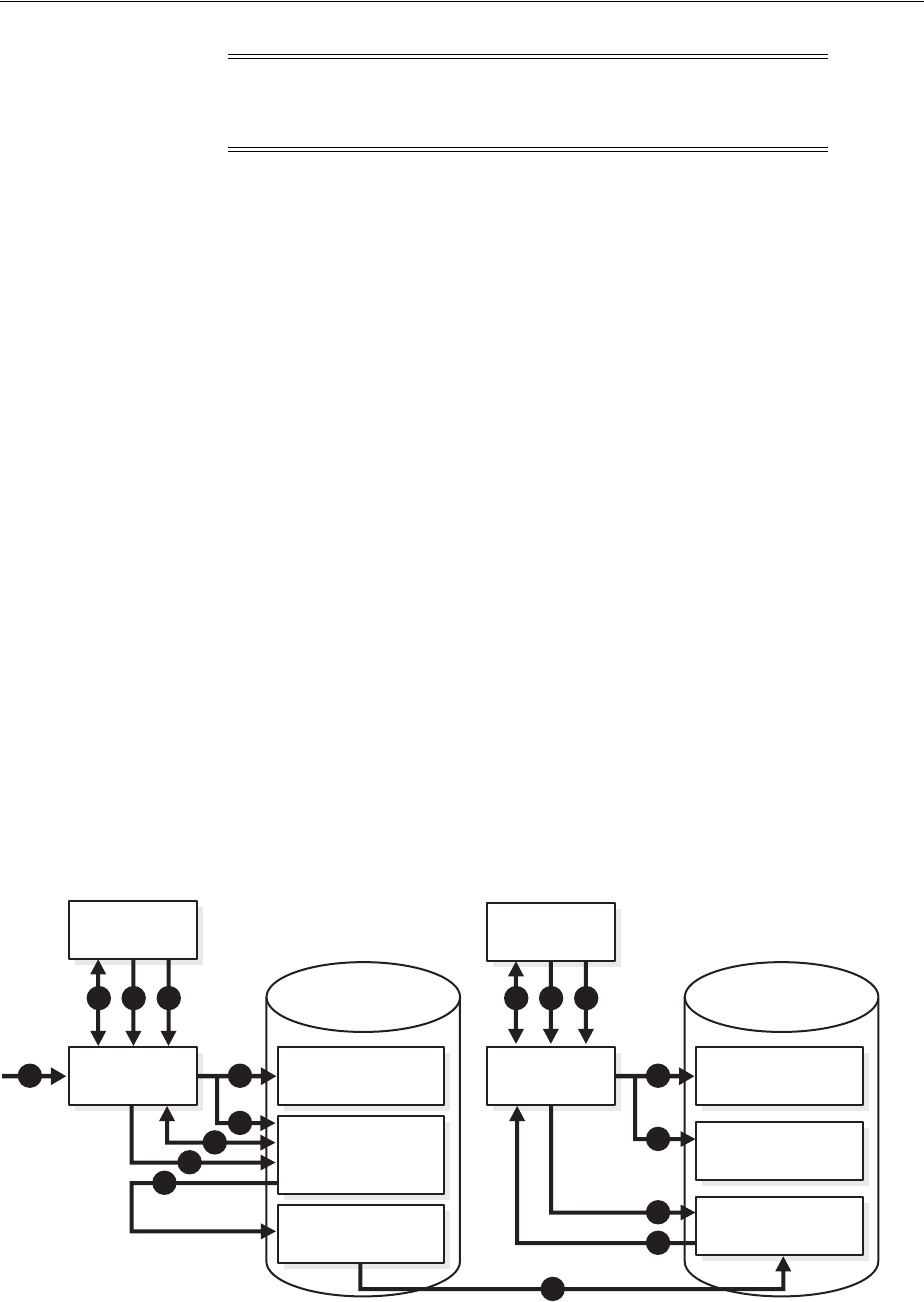
Architecture for Oracle Database Advanced Replication-Based Replication
D-2 Oracle Fusion Middleware Administrator's Guide for Oracle Internet Directory
D.2 Architecture for Oracle Database Advanced Replication-Based
Replication
Typical Oracle Database Advanced Replication configurations use asynchronous data
propagation—that is, suppliers write their changes to change logs, and then regularly
send batched changes to other consumers. Consumers receive the change log data,
then reproduce the changes locally.
When you configure replication, you specify which nodes in a replication group share
changes. Regardless of the number of nodes you introduce into the replication
environment, the basic architecture for replication remains the same. Local changes are
distributed to a remote master site where the replication server, acting as a client,
sends commands to the Oracle Internet Directory server that implements them.
Figure D–1 and its accompanying text provides an overview of the Oracle Database
Advanced Replication process.
Figure D–1 Advanced Replication Process
The events are as follows:
Note: The Oracle Single Sign-On database schema that resides in
the same database as Oracle Internet Directory is also replicated by
Advanced Replication.
See Also:
■The section "Configuring Oracle Single Sign-On for
Replication" in the chapter on high availability in the Oracle
Application Server Single Sign-On Administrator's Guide in the
10g (10.1.4.0.1) library.
■ Oracle Database Advanced Replication in the Oracle Database
Documentation Library for information about Advanced
Replication
Oracle Internet
Directory
Database Storage
ods_chg_log
Oracle Internet
Directory
Database Storage
ods_chg_log
21
2'
3'
Oracle Internet
Directory
Server
Replication
Server
9
9'
10'
7'
5'
4'
81074 53
Oracle Internet
Directory
Server
asr_chg_log
Replication
Server
Replica A Replica B
asr_chg_log
6

Architecture for Oracle Database Advanced Replication-Based Replication
How Replication Works D-3
1. A change request is made on the Oracle Internet Directory server of Replica A.
2. The change is accepted and committed to storage in the Oracle Internet Directory
Database.
2' A new change log is generated for the operation, and stored in the ods_chg_
log table, where server = Replica A.
3. The replication server on Replica A queries for new outbound change logs from
the local ods_chg_log table. The filter used for the query is:
(& (objectclass=changeLogEntry) (servername=ReplicaID_of_A)
(changeNumber>= Last_Applied_ChgNum_From_A_TO_A) )
A control is also passed along with this search operation with the value of
orclreplicationid specified in the processing agreement. The value 1 is
reserved for Advanced Replication agreements.
Last_Applied_ChgNum_From_A_TO_A is the outbound change log processing
status.
3' The directory server internally queries ods_chg_log for new change logs and
returns fetched change logs.
4. The new change log retrieved from ods_chg_log is copied to local asr_chg_
log.
4' The replication server copies retrieved change logs to the local asr_chg_log.
5. The replication server requests Oracle Internet Directory server to update the
Change log retry_cnt status properly.
5' Oracle Internet Directory server updates the retry_cnt of the change log in
the ods_chg_log table.
6. The new change log is pushed From Replica A to Replica B through Oracle
Database Advanced Replication.
7. If the last transported number is greater than last applied change number on
Replica B, it indicates that there are new changes in local change log store asr_
chg_log. In that case, the replication server on Replica B queries for new inbound
change logs from its local asr_chg_log table. The filter used is:
(& (objectclass=changeLogEntry) (servername=ReplicaID_of_A)
(changeNumber>= Last_Applied_ChgNum_From_A_TO_B))
7' The directory server queries asr_chg_log for new change logs.
8. The replication server applies the new change at Replica B.
9. Oracle Internet Directory server at Replica B accepts and commits the change to
storage in the Oracle Database.
9' If the local replica has any LDAP-based consumer replicas, a change log is
regenerated in the ods_chg_log table at Replica B, with the following
regenerating rules:
server = server of local replica,
ReplicaB orclreplicationid/chg_rid = 1
Modifiersname = Replbind_DN_of_A
orclreplicatid/chg_rid is set to the value of orclreplicationid of the
processing agreement. In this case, because the change is replicated and processed
through Advanced Replication, it is set to 1 because 1 is reserved for Advanced
Replication.

Architecture of LDAP-Based Replication
D-4 Oracle Fusion Middleware Administrator's Guide for Oracle Internet Directory
10. The replication server request Oracle Internet Directory server to update the
shadow change log retry_cnt status properly.
10' Oracle Internet Directory server updates the retry_cnt of the shadow change
log in the database.
Purging occurs regularly, removing entries that are already applied and those that are
dropped as candidate changes. Remote change records in the local change log table are
purged by the garbage collection thread if they have been applied locally. Local
change records in the local change log table are purged by the garbage collection
thread if they have been distributed to all the consumers.
D.3 Architecture of LDAP-Based Replication
This section gives a more detailed look at LDAP replication. Data flow in LDAP
replication consists of two phases, transport and apply.
Figure D–2 and its accompanying text explain the fan-out replication process.
Figure D–2 LDAP Replication Process
1. An LDAP change request is made on the Oracle Internet Directory server of
Replica A.
2. The change is accepted and committed to Oracle Internet Directory database
storage.
2'. A new change log is generated for the operation and stored in the ods_chg_
log table, where:
server = Replica A
orclreplicationid/chg_rid = 0 (The value 0 is for user operations)
Modifiersname = user DN of the Modifier (by default)
3. The replication server on Replica B queries for new inbound change logs from the
supplier replica, Replica A's ods_chg_log table]. The filter used for the query is:
See Also: Chapter 42, "Managing and Monitoring Replication" for
information on configuring replication
Oracle Internet
Directory
Database Storage
ods_chg_log
asr_chg_log
Oracle Internet
Directory
Database Storage
ods_chg_log
2
3
1
2'
3'
Replication
Server
7
7'
8
4'
5 64
Oracle Internet
Directory
Server
asr_chg_log
Replication
Server
Replica A Replica B
Oracle Internet
Directory
Server

LDAP Replica States
How Replication Works D-5
(& (objectclass=changelogentry)
(changeNumber>=Last_Transported_ChgNum_From_A_TO_B)
(! (modifiersname=ReplicaID_of_B))
(! (orclreplicatonid =
Orclreplicationid_Attribute_Value_of_Processing_Agreement))
(!(targetdn=*,excluded_naming_ctx_dn ) (….) (….) ….)
(targetdn=cn=catalogs) (targetdn=cn=subschemasubentry)
(targetdn=cn=oracleschemaversion) (targetdn=*,included_naming_ctx_dn)
(targetdn=….)
…)
A control is also passed along with this search operation with the value of
orclreplicationid specified in the processing agreement.
4. The replication Server at B requests that the Oracle Internet Directory at Replica B
store the new change log as a shadow change log.
4'. The Oracle Internet Directory server at Replica B stores the shadow change log
in the asr_chg_log table at Replica B.
Steps 3, 3', and 4 correspond with the transport part of LDAP-based change log
processing
5. The replication server at Replica B checks whether the last transported number is
greater than the last applied change number on Replica B. If so, it indicates that
there are new changes in the local change log store asr_chg_log. In that case,
the replication server at Replica B queries the local store asr_chg_log for new
change logs from A. The filter for the query is:
(& (objectclass=changeLogEntry) (servername=ReplicaID_of_A)
(changeNumber>= Last_Applied_ChgNum_From_A_TO_B))
6. The replication server at Replica B request that the Oracle Internet Directory server
at Replica B apply the retrieved change to storage.
7. Oracle Internet Directory server at Replica B accepts and commits the change to
Oracle Internet Directory database storage.
7' If the local replica is the source of any other replicas, a change log is regenerated
in ods_chg_log table at Replica B, which follows the following changelog
regeneration rules:
server = server of local replica, ReplicaB
orclreplicationid/chg_rid = N
Modifiersname = Replbind_DN_of_A
orclreplicatid/chg_rid is set to the orclreplicationid value of the processing
agreement.
8. The replication server requests that the server update the shadow change log
retry_cnt status properly.
D.4 LDAP Replica States
This section describes the replica states for LDAP-based replication.LDAP replica
states have no effect upon Advanced Replication.
When LDAP based replication is configured, and the replication server is started, the
server reads the replica state orclreplicastate from the local replica,
"orclreplicaid=local_Replica_ID, cn=replication configuration".
The replication server behaves differently, based upon the local replica state, as shown

LDAP Replica States
D-6 Oracle Fusion Middleware Administrator's Guide for Oracle Internet Directory
in Table D–1. The replication server reads the local replica state from the local
(consumer) node.
Note: On Windows systems, ensure that the replication server is not
running before you enable bootstrapping by changing the value of
orclReplicaState to 0.
Table D–1 LDAP Replica States
Value Meaning Server Behavior
0 Bootstrap Starts replication bootstrap processing to synchronize the consumer
directory from the supplier, based on the replication naming context
configuration. Updates the replica state to correspond with bootstrap
progress.
■Sets the replica state to 3 (Bootstrap in progress) immediately
when it starts to bootstrap.
■Sets the replica state to 4 (Bootstrap in progress,
cn=oraclecontext bootstrap has completed) after it
completes bootstrapping of "cn=oraclecontext"
successfully
■Sets the replica state to 5 (Bootstrap Error occurred) after
bootstrap is completed but failure(s) detected during the
bootstrap. Then it waits until the replica state is re-set.
Note: Human intervention is required; See Section S.1.12,
"Troubleshooting Oracle Internet Directory Replication" for
details.
■Sets the replica state to 1 (On-line) after bootstrap has completed
successfully. Then replication automatically starts to perform
normal replication processing.
1 On line Starts normal replication processing to replicate changes from the
supplier to the consumer.
2 Off line Logs an error message in oidrepld.log similar to this:
2004/09/24:17:41:44 * Replica(dlsun1418_replica2) is in
OFFLINE mode, Please update the replica state and restart
OIDREPLD...
The administrator must set the replica state properly and restart the
replication server.
3 Bootstrap in
progress
Sets the replica state back to 0 (Bootstrap), then starts to bootstrap
again as if the replica state were 0.
4 Bootstrap in
progress,
cn=oracleco
ntext
bootstrap has
completed.
Sets the replica state back to 0 (Bootstrap), then starts to bootstrap
again as if the replica state were 0.
5 Bootstrap
completed;
failure detected
for one or more
naming
contexts.
Logs an error message in oidrepld.log similar to this:
2004/09/24:17:13:30 * Replication BOOTSTRAP_ERROR mode
detected for replica(dlsun1418_replica2)
Then it waits until the replica state is reset properly.
6 Database
copy-Based
addnode;
This mode indicates that the replica is a database copy-based
addnode.

LDAP Replica States
How Replication Works D-7
Oracle Internet Directory replication server logs the bootstrapping process in the
Oracle Internet Directory replication server log, $ORACLE_
INSTANCE/diagnostics/logs/OID/componentName/oidrepld00.log.
If bootstrap completes successfully, the log looks similar to the following example, and
the replication server automatically starts to perform normal replication processing.
2004/10/06:17:13:25 * Starting OIDREPLD against isunnad03:5555...
2004/10/06:17:13:26 * Starting scheduler...
2004/10/06:17:13:27 * Start to BootStrap from supplier=isunnad03_purify to
consumer=isunnad03_purify3
2004/10/06:17:13:28 * gslrbssSyncDIT:Replicating namingcontext=cn=oraclecontext
......
2004/10/06:17:14:21 * gslrbssSyncDIT:Sync done successfully for namingctx:
cn=oraclecontext, 222 entries matched
2004/10/06:17:14:21 * gslrbssSyncDIT:Replicating namingcontext=c=india ......
2004/10/06:17:14:21 * gslrbssSyncDIT:Sync done successfully for namingctx:
c=india, 0 entries matched
2004/10/06:17:14:21 * gslrbssSyncDIT:Replicating namingcontext=c=uk ......
2004/10/06:17:19:57 * gslrbssSyncDIT:Sync done successfully for namingctx: c=uk,
1087 entries matched
2004/10/06:17:19:57 * gslrbssSyncDIT:Replicating
namingcontext=cn=oracleschemaversion ......
2004/10/06:17:19:59 * gslrbssSyncDIT:Sync done successfully for namingctx:
cn=oracleschemaversion, 10 entries matched
2004/10/06:17:20:01 * gslrbsbBootStrap: BOOTSTRAP DONE SUCCESSFULL
If failures are detected, the log looks similar to the following example:
2004/09/14:12:57:23 * Starting OIDREPLD against dlsun1418:4444...
2004/09/14:12:57:25 * Starting scheduler...
2004/09/14:12:57:26 * Start to BootStrap from supplier=dlsun1418_replica to
consumer=dlsun1418_replica2
2004/09/14:12:57:27 * gslrbssSyncDIT:Replicating namingcontext=cn=oraclecontext
......
2004/09/14:12:58:21 * gslrbssSyncDIT:Sync done successfully for namingctx:
cn=oraclecontext, 222 entries matched
2004/09/14:12:58:21 * gslrbssSyncDIT:Replicating namingcontext=cn=quan zhou ......
2004/09/14:12:58:23 * BootStrap failure when adding DN=cn=Quan
Zhou,server=dlsun1418_replica2,err=Constraint violation.
2004/09/14:12:58:23 * gslrbssSyncDIT:Sync failed for namingctx: cn=quan zhou, only
1 entries retrieved
2004/09/14:12:58:23 * gslrbssSyncDIT:Replicating
namingcontext=cn=oracleschemaversion ......
2004/09/14:12:58:25 * gslrbssSyncDIT:Sync done successfully for namingctx:
cn=oracleschemaversion, 10 entries matched
2004/09/14:12:58:51 * gslrbsbBootStrap: Failure occurred when bootstrapping 1 out
of 3 namingcontext(s) from the supplier
7 Sync schema Sync schema, but not data, from supplier to consumer.
8 Boot strap
without schema
sync
If schema sync was previously performed, but bootstrapping failed
at a subsequent step, bootstrapping is started again without
performing another schema sync.
Table D–1 (Cont.) LDAP Replica States
Value Meaning Server Behavior

The Replication Process
D-8 Oracle Fusion Middleware Administrator's Guide for Oracle Internet Directory
D.5 The Replication Process
This section describes how the multimaster replication process adds, deletes, and
modifies entries, and how it modifies DNs and RDNs. It contains these topics:
■How the Multimaster Replication Process Adds a New Entry to a Consumer
■How the Multimaster Replication Process Deletes an Entry
■How the Multimaster Replication Process Modifies an Entry
■How the Multimaster Replication Process Modifies a Relative Distinguished Name
■How the Multimaster Replication Process Modifies a Distinguished Name
D.5.1 How the Multimaster Replication Process Adds a New Entry to a Consumer
When the directory replication server adds a new entry to a consumer, it follows this
change application process:
1. The directory replication server looks in the consumer for the DN of the parent of
the target entry. Specifically, it does this by looking for a global unique identifier
(GUID) assigned to the DN of the parent.
2. If the parent entry exists, then the directory replication server composes a DN for
the new entry and places the new entry under its parent in the consumer. It then
places the change entry in the purge queue.
If the change entry is not successfully applied on the first try, then:
The directory replication server places the new change entry in the retry queue, sets
the number of retries to the configured maximum, and repeats the change application
process.
If the change entry is not successfully applied on all but the last retry, then:
The directory replication server keeps the change entry in the retry queue, decrements
the number of retries, and repeats the change application process.
If the change entry is not successfully applied on the last retry, then:
The directory replication server checks to see if the new entry is a duplicate of an
existing entry.
If the change entry is a duplicate entry, then:
The directory replication server applies the following conflict resolution rules:
■The entry with the older creation time stamp is used.
Tip: You have two options for troubleshooting bootstrap failure.
■Option 1: Identify the cause of the bootstrap failure and fix the
cause, then restart bootstrapping by setting the consumer replica's
orclreplicastate to Bootstrap mode.
■Option 2: Identify the naming contexts that failed to be
bootstrapped and use oidcmprec to reconcile them. Then resume
replication by setting the consumer replica's orclreplicastate
to Online mode.
Note: Oidrepld is now in Bootstrap_error mode, so you do need to
reset the consumer replica's replica state (orclreplicastate).

The Replication Process
How Replication Works D-9
■If both entries have the same creation time stamp, then the entry with the smaller
GUID is used.
If the change entry is used, then the target entry is removed, the change is applied, and
the change entry is placed in the purge queue.
If the target entry is used, then the change entry is placed in the purge queue.
If the change entry is not a duplicate entry, then:
The directory replication server places the change entry in the human intervention
queue, and repeats the change application process at the interval you specified in the
orclHIQSchedule parameter.
If the change entry is not successfully applied after it has been placed in the human
intervention queue:
The directory replication server keeps the change in this queue, and repeats the change
application process at specified intervals while awaiting action by the administrator.
The administrator can use the Oracle Internet Directory Comparison and
Reconciliation Tool and the human intervention queue manipulation tool to resolve
the conflict.
D.5.2 How the Multimaster Replication Process Deletes an Entry
When the directory replication server deletes an entry from a consumer, it follows this
change application process:
1. The directory replication server looks in the consumer for an entry with a GUID
matching the one in the change entry.
2. If the matching entry exists in the consumer, then the directory replication server
deletes it. It then places the change entry in the purge queue.
If the change entry is not successfully applied on the first try, then:
The directory replication server places the change entry in the retry queue, sets the
number of retries to the configured maximum, and repeats the change application
process.
If the change entry is not successfully applied on all but the last retry, then:
The directory replication server keeps the change entry in the retry queue, decrements
the number of retries, and repeats the change application process.
If the change entry is not successfully applied on the last retry, then:
The directory replication server places the change entry in the human intervention
queue and repeats the change application process at specified intervals.
If the change entry is not successfully applied after it has been placed in the human
intervention queue:
The directory replication server keeps the change entry in this queue, and repeats the
change application process at specified intervals while awaiting action by the
administrator. The administrator can use the Oracle Internet Directory Comparison
and Reconciliation Tool and the human intervention queue manipulation tool to
resolve the conflict.
D.5.3 How the Multimaster Replication Process Modifies an Entry
When the directory replication server modifies an entry in a consumer, it follows this
change application process:

The Replication Process
D-10 Oracle Fusion Middleware Administrator's Guide for Oracle Internet Directory
1. The directory replication server looks in the consumer for an entry with a GUID
matching the one in the change entry.
2. If the matching entry exists in the consumer, then the directory replication server
compares each attribute in the change entry with each attribute in the target entry.
3. The directory replication server then applies the following conflict resolution
rules:
a. The attribute with the most recent modify time is used.
b. The attribute with the most recent version of the attribute is used—for
example, version 1, 2, or 3.
c. The modified attribute on the host whose name is closest to the beginning of
the alphabet is used.
4. The directory replication server applies the filtered modification, and places the
change entry in the purge queue.
If the change entry is not successfully applied on the first try, then:
The directory replication server places the change entry in the retry queue, sets the
number of retries to the configured maximum, and repeats the change application
process.
If the change entry is not successfully applied on all but the last retry, then:
The directory replication server keeps the change entry in the retry queue, decrements
the number of retries, and repeats the change application process.
If the change entry is not successfully applied by the last retry, then:
The directory replication server places the change entry in the human intervention
queue and repeats the change application process at specified intervals.
If the change entry is not successfully applied after it has been placed in the human
intervention queue:
The directory replication server keeps the change entry in this queue, and repeats the
change application process at specified intervals while awaiting action by the
administrator. You can use the Oracle Internet Directory Comparison and
Reconciliation Tool and the Human Intervention Queue Manipulation Tool to resolve
the conflict.
D.5.4 How the Multimaster Replication Process Modifies a Relative Distinguished
Name
When the directory replication server modifies the RDN of an entry in a consumer, it
follows this change application process:
1. The directory replication server looks in the consumer for the DN with a GUID
that matches the GUID in the change entry.
2. If the matching entry exists in the consumer, then the directory replication server
modifies the RDN of that entry and places the change entry in the purge queue.
If the change entry is not successfully applied on the first try, then:
The directory replication server places the change entry in the retry queue, sets the
number of retries to the configured maximum, and repeats the change application
process.
If the change entry is not successfully applied on all but the last retry, then:

The Replication Process
How Replication Works D-11
The directory replication server keeps the change entry in the retry queue, decrements
the number of retries, and repeats the change application process.
If the change entry is not successfully applied on the last retry, then:
The directory replication server places the change entry in the human intervention
queue and checks to see if it is a duplicate of the target entry.
If the change entry is a duplicate entry, then:
The directory replication server applies the following conflict resolution rules:
■The entry with the older creation time stamp is used.
■If both entries have the same creation time stamp, then the entry with the smaller
GUID is used.
If the change entry is used, then the target entry is removed, the change entry is
applied, and then placed in the purge queue.
If the target entry is used, then the change entry is placed in the purge queue.
If the change entry is not a duplicate entry, then:
The directory replication server places the change entry in the human intervention
queue, and repeats the change application process at specified intervals.
If the change entry is not successfully applied after it has been placed in the human
intervention queue:
The directory replication server keeps the change entry in this queue, and repeats the
change application process at specified intervals while awaiting action by the
administrator. The administrator can use the Oracle Internet Directory Comparison
and Reconciliation Tool and the Human Intervention Queue Manipulation Tool to
resolve the conflict.
D.5.5 How the Multimaster Replication Process Modifies a Distinguished Name
When the directory replication server modifies the DN of an entry in a consumer, it
follows this change application process:
1. The directory replication server looks in the consumer for the DN with a GUID
that matches the GUID in the change entry.
The directory replication server also looks in the consumer for the parent DN with
a GUID that matches the GUID of the new parent specified in the change entry.
2. If both the DN and the parent DN of the target entry exist in the consumer, then
the directory replication server modifies the DN of that entry and places the
change entry in the purge queue.
If the change entry is not successfully applied on the first try, then:
The directory replication server places the change entry in the retry queue, sets the
number of retries to the configured maximum, and repeats the change application
process.
If the change entry is not successfully applied on all but the last retry, then:
The directory replication server keeps the change entry in the retry queue, decrements
the number of retries, and repeats the change application process.
If the change entry is not successfully applied by the last retry, then:
The directory replication server places the change entry in the human intervention
queue and checks to see if it is a duplicate of the target entry.

The Replication Process
D-12 Oracle Fusion Middleware Administrator's Guide for Oracle Internet Directory
If the change entry is a duplicate entry, then:
The directory replication server applies the following conflict resolution rules:
■The entry with the older creation time stamp is used.
■If both entries have the same creation time stamp, then the entry with the smaller
GUID is used.
If the change entry is used, then the target entry is removed, the change entry is
applied, and then placed in the purge queue.
If the target entry is used, then the change entry is placed in the purge queue.
If the change entry is not a duplicate entry, then:
The directory replication server places the change entry in the human intervention
queue, and repeats the change application process at specified intervals.
If the change entry is not successfully applied after it has been placed in the human
intervention queue:
The directory replication server keeps the change entry in this queue, and repeats the
change application process at specified intervals while awaiting action by the
administrator. The administrator can use the Oracle Internet Directory Comparison
and Reconciliation Tool and the Human Intervention Queue Manipulation Tool to
resolve the conflict.

E
Java Server Plug-in Developer's Reference E-1
E Java Server Plug-in Developer's Reference
In response to both customer and internal requests, Oracle has added a Java API to the
server plug-in framework for Oracle Internet Directory. Some of the new Oracle
Internet Directory features, such as server chaining, were developed using the Java
plug-in API.
This chapter contains the following sections:
■Section E.1, "Advantages of Java Plug-ins"
■Section E.2, "Setting Up a Java Plug-in"
■Section E.3, "Java Plug-in API"
■Section E.4, "Java Plug-in Error and Exception Handling"
■Section E.5, "Java Plug-in Debugging and Logging"
■Section E.6, "Java Plug-in Examples"
E.1 Advantages of Java Plug-ins
In addition to the advantages of the Java language itself, Java server plug-ins offer the
following advantages over PL/SQL plug-ins:
■Bidirectional communication between the server and the plug-in
■The ability of the plug-in to return a search result
■Support for the moddn operation
■Better performance
■No knowledge of database required
■Enhanced security
■Enhanced debugging capability
E.2 Setting Up a Java Plug-in
Set up a Java plug-in as follows:
1. Create the standalone Java program using the pre-defined class definition and
methods. You can implement the plug-in as a jar file or as a package.
2. Compile the plug-in file or package. Before compiling, ensure that your
CLASSPATH is set to $ORACLE_HOME/ldap/jlib/ospf.jar. Make sure the
compilation completes without error.

Java Plug-in API
E-2 Oracle Fusion Middleware Administrator's Guide for Oracle Internet Directory
3. Place the class file, jar, or package in the pre-defined class location $ORACLE_
HOME/ldap/server/plugin.
4. Register the Java plug-in by adding the plug-in configuration entry.
You can add the entry by using the command line or by using Oracle Directory
Services Manager. For details, see Section 44.3, "Registering a Plug-in From the
Command Line" and Section 44.4, "Managing Plug-ins by Using Oracle Directory
Services Manager and Oracle Enterprise Manager Fusion Middleware Control."
The jar file can have any name. The manifest file must contain the attribute
Main-Class, followed by the name of the Java plug-in. For example:
Main-Class: myjavaplugin
The value of the orclPluginName attribute in the plug-in configuration entry must
correspond with one of the following:
■The name of a class in a class file
■The fully qualified name of a class in a package
■A jar file name.
The value of the orclPluginName attribute determines where the server expects to
find the class or jar file. Table E–1 shows some examples.
After you perform these steps, the server invokes the plug-in whenever the invocation
criteria are met.
The classes included in the jar file must not occur in the environment. If they do,
unexpected errors might occur. To correct this problem, remove the classes from the
environment and restart the Oracle Internet Directory server. If the JAR or class file
depends on other JAR files or class files, then append the dependent JAR files or paths
of the class files to the CLASSPATH and restart the Oracle Internet Directory server.
You can control whether the server reloads the Java plug-in class every time the
plug-in executes. If the value of the attribute orclPluginClassReloadEnabled is
1, the server reloads the plug-in class every time. If it is 0, the server loads the class
only the first time the plug-in executes.
The path of the Oracle Internet Directory Server Plug-in Framework jar file is
$ORACLE_HOME/ldap/jlib/ospf.jar.
E.3 Java Plug-in API
This section presents a high-level overview of the API and explains the role of the
main classes and interfaces. For detailed information about all the Java server plug-in
classes and interfaces, please see the Javadoc Oracle Fusion Middleware Java API
Reference for Oracle Internet Directory.
Table E–1 Plug-in Names and Corresponding Paths
orclPluginName Path
myjavaplugin ORACLE_
HOME/ldap/server/plugin/myjavaplugin.class
myjavaplugin.jar ORACLE_HOME/ldap/server/plugin/myjavaplugin.jar
my.package.myjavaplug
in
ORACLE_
HOME/ldap/server/plugin/my/package/myjavaplugin

Java Plug-in API
Java Server Plug-in Developer's Reference E-3
This sections contains the following topics:
■Section E.3.1, "Communication Between the Server and Plug-in"
■Section E.3.2, "Java Plug-in Structure"
■Section E.3.3, "PluginDetail"
■Section E.3.4, "PluginResult"
■Section E.3.5, "ServerPlugin Interface"
E.3.1 Communication Between the Server and Plug-in
All Java plug-ins use the ServerPlugin interface for communication between the
plug-in and the Oracle Internet Directory server. When the server invokes a Java
plug-in, it constructs a PluginDetail object and passes information to the plug-in in
that object. The plug-in constructs a PluginResult object. After it completes its task,
the plug-in passes the PluginResult object back to the server. In some cases, the
plug-in changes or adds to the information it received in the PluginDetail and
passes the information back to the server in the PluginResult object. Figure E–1
shows the communication between the Oracle Internet Directory server and the Java
Plug-ins.
Figure E–1 Communication Between the Server and the Java Plug-in
The Java plug-in can also use a ServerLog class to log messages in a log file.
E.3.2 Java Plug-in Structure
The general structure for a Java plug-in is:
public class Java_Plug-in_Class_Name {extends ServerPluginAdapter} {
public PluginResult
Name_of_ServerPlugin_Method(PluginDetail plgObj)
throws Exception {
// Plug-in Code
}
}
or
public class Java_Plug-in_Class_Name {implements ServerPlugin} {
public PluginResult
Name_of_ServerPlugin_Method(PluginDetail plgObj)
throws Exception {
// Plug-in Code
}
Note: Do not use System.exit() in a Java plug-in. Doing so might lead
to unpredictable behavior by the Oracle directory server.
Plug-in
Framework
Java
Plug-in
OID
Server
PluginDetail
PluginResult

Java Plug-in API
E-4 Oracle Fusion Middleware Administrator's Guide for Oracle Internet Directory
}
E.3.3 PluginDetail
The PluginDetail contains the information described in the following sections:
■Section E.3.3.1, "Server"
■Section E.3.3.2, "LdapBaseEntry"
■Section E.3.3.3, "LdapOperation"
■Section E.3.3.4, "PluginFlexfield"
E.3.3.1 Server
This object contains metadata information about the Oracle Internet Directory Server
where the plug-in is being executed. It contains the following information:
■Hostname
■Port
■LdapContext
The Hostname and the Port indicate the host and port on which the server is running.
The LdapContext object allows the plug-in to connect back to the server and inform
it that the connection is being acquired from the plug-in. This is necessary, for
example, in an ldapbind plug-in that performs an ldapbind itself. By connecting back
to the server using this LdapContext object, the plug-in prevents the server from
invoking the same plug-in, resulting in an infinite loop.
The following code fragment shows how the plug-in retrieves the Server object from
the PluginDetail and connects back to the server:
// An LDAP Bind Plug-in
public class MyBindPlugin extends ServerPluginAdapter
{
…..
// Retrieve the Server Object from the PluginDetail
Server srvObj = plgObj.getServer();
……
// This bind will not result in the LDAP Bind Plug-in being called
// in an infinite loop
InitialLdapContext myConn =
(InitialLdapContext)srvObj.getLdapContextFromServerPlugin();
myConn.bind(…);
….
}
See the Javadoc Oracle Fusion Middleware Java API Reference for Oracle Internet Directory
for information about the methods used in the example.
E.3.3.2 LdapBaseEntry
The LdapBaseEntry contains the following information:
■DN
■Attributes
The server must send DN information for all of the operations, except ldapadd. The
meaning of the DN for each operation is shown in Table E–2.

Java Plug-in API
Java Server Plug-in Developer's Reference E-5
The Attributes are JNDI attributes.
The LdapBaseEntry has methods for accessing the DN and Attributes. For
performance reasons, if the LdapBaseEntry is a group entry, and the entry cache
capability is disabled, the attributes uniquemember and member are not accessible.
E.3.3.3 LdapOperation
Every plug-in is associated with one of the seven basic LDAP operations: add, bind,
compare, delete, moddn, modify, or search. The LdapOperation object contains the
following information, which is passed to all seven operations:
■Bind DN
■Server Controls
■Operation Result Code
The Bind DN is the DN of the identity that is requesting the LDAP operation. Server
Controls is a vector that contains control information. If any server controls are passed
to the server during an operation, then the control information is passed to the Java
plug-in in the Server Controls. The meaning of the Operation Result Code depends on
the timing of the operation, as shown in Table E–2. Note that in the case of a when_
replace operation, the plug-in can change the information in the Operation Result
Code and pass it to the server in the PluginResult.
Table E–2 The Meaning of the DN Information for Each LDAP Operation
Operation Meaning of DN
ldapadd No DN sent
ldapbind The entry to which the directory server is attempting to bind
ldapcompare The base entry on which to perform the compare
ldapdelete For Pre and When timings, the entry which is to be deleted
For Post timing, no DN sent
ldapmoddn The base entry to be moved
ldapmodify For Pre and When timings, the entry on which the modification
is being performed
For Post timing, the modified entry
ldapsearch The base entry for the search
See Also: The Oracle Internet Directory chapter in Oracle Fusion
Middleware Performance and Tuning Guide for information about
performance tuning.
Table E–3 Behavior of Operation Result Code
Plug-in Timing Meaning and Behavior of Operation Result Code
Pre
When
Not used
When_replace Error status of the LDAP operation performed by the plug-in.
Output from the plug-in to the server.
Post Error status of LDAP operation performed by the server. Input
to the plug-in from the server.

Java Plug-in API
E-6 Oracle Fusion Middleware Administrator's Guide for Oracle Internet Directory
LdapOperation also has methods for retrieving and modifying its contents.
Seven different classes representing the seven LDAP operations extend the
LdapOperation class. Each of the subclasses includes class-specific information, in
addition to the LdapOperation information. The classes and class-specific
information are shown in Table E–4. Each class name in Table E–4 is a link to the
section describing the details of that class:
Each class has methods for creating, modifying, and retrieving its information. The
class-specific information represents either input to the plug-in, output from the
plug-in to the server, or both.
The rest of this section discusses the operation-specific classes in detail.
E.3.3.3.1 AddLdapOperation When invoking an ldapadd plug-in, the server constructs
an AddLdapOperation object containing a LdapEntry object to pass information
about the entry that is being added. The LdapEntry Object contains the following
information:
■DN
■Attributes
The DN represents the DN of the entry to be added. The Attributes are the entry's
JNDI Attributes. As Table E–5 shows, for all operations except the post-operation, the
plug-in can modify the information in the LdapEntry and return it to the server.
Table E–4 Subclasses of LdapOperation and Class-specific information.
Class Class-Specific information
AddLdapOperation LdapEntry
BindLdapOperation Bind Password
CompareLdapOperation Attribute Name
Attribute Value
DeleteLdapOperation Delete DN
ModdnLdapOperation New Parent DN
New Relative DN
Delete Old RDN
New DN
ModifyLdapOperation LdapModification
SearchLdapOperation Filter
Required Attributes
Scope
SearchResultSet (Not sent by server; created by plug-in to
return data)
Table E–5 Behavior of LdapEntry Information for Each Plug-in Timing
Plug-in Timing Behavior of LdapEntry Information
Pre
When
When_replace
Both input and output. The plug-in can modify the information
and return it to the server.

Java Plug-in API
Java Server Plug-in Developer's Reference E-7
E.3.3.3.2 BindLdapOperation The server passes the following information to an
ldapbind plug-in:
■Bind Password
■Proxy Requester DN
Bind Password is the password for the bind. Proxy Requester DN is the DN of the
identity requesting a Proxy Switch.
E.3.3.3.3 CompareLdapOperation The server passes the following information to an
ldapcompare plug-in:
■Attribute Name
■Attribute Value
The Attribute Name is the name to be compared during the ldapcompare operation.
As Table E–6 shows, for all operations except the post-operation, the plug-in can
modify the information in the Attribute Name and return it to the server.
The Attribute Value is the value to be compared during the ldapcompare operation.
As Table E–7 shows, for all operations except the post-operation, the plug-in can
modify the information in the Attribute Value and return it to the server.
E.3.3.3.4 DeleteLdapOperation The server passes the Delete DN object to an ldapdelete
plug-in. This is the DN to be deleted. As Table E–8 shows, for all operations except the
post-operation, the plug-in can modify the information in the Delete DN and return it
to the server.
Post Input only.
Table E–6 Behavior of the AttributeName for Each Plug-in Timing
Plug-in Timing Behavior of the Attribute Name Information
Pre
When
When_replace
Both input and output. The plug-in can modify the information
and return it to the server.
Post Input only.
Table E–7 Behavior of the Attribute Value for Each Plug-in Timing
Plug-in Timing Behavior of the Attribute Value Information
Pre
When
When_replace
Both input and output. The plug-in can modify the information
and return it to the server.
Post Input only.
Table E–5 (Cont.) Behavior of LdapEntry Information for Each Plug-in Timing
Plug-in Timing Behavior of LdapEntry Information

Java Plug-in API
E-8 Oracle Fusion Middleware Administrator's Guide for Oracle Internet Directory
E.3.3.3.5 ModdnLdapOperation The server passes the following information to
ldapmoddn plug-ins:
■New Parent DN
■New Relative DN
■Delete Old RDN
■New DN
The New Parent DN contains the new parent of the RDN that was specified in the
LdapBaseEntry of the PluginDetail. As Table E–9 shows, for all operations except
the post-operation, the plug-in can modify the information in the New Parent DN and
return it to the server.
The New Relative DN is the new RDN that is to replace the RDN that was specified in
the LdapBaseEntry of the PluginDetail. As Table E–10 shows, for all operations
except the post-operation, the plug-in can modify the information in the New Relative
DN and return it to the server.
The Delete Old RDN value specifies whether the old RDN specified in the
LdapBaseEntry of the PluginDetail is to be retained after it is replaced by the
new relative DN. As Table E–11 shows, for all operations except the post-operation, the
plug-in can modify the value in Delete Old RDN and return it to the server.
Table E–8 Behavior of the Delete DN for Each Plug-in Timing
Plug-in Timing Behavior of the DeleteDN Information
Pre
When
When_replace
Both input and output. The plug-in can modify the information
and return it to the server.
Post Input only.
Table E–9 Behavior of New Parent DN Information for Each Plug-in Timing
Plug-in Timing Behavior of the New Parent DN Information
Pre
When
When_replace
Both input and output. The plug-in can modify the information
and return it to the server.
Post Input only.
Table E–10 Behavior of New Relative Dn Information for Each Plug-in Timing
Plug-in Timing Behavior of the New Relative Dn Information
Pre
When
When_replace
Both input and output. The plug-in can modify the information
and return it to the server.
Post Input only.

Java Plug-in API
Java Server Plug-in Developer's Reference E-9
The New DN specifies the target DN in of the ldapmoddn operation. This information
is only an input from the server to the plug-in. The plug-in cannot modify this
information and return it to the server.
E.3.3.3.6 ModifyLdapOperation The server passes an LdapModification object to
ldapmodify plug-ins. The LdapModification object contains Modification Items,
which are JNDI modification items. As Table E–12 shows, for all operations except the
post-operation, the plug-in can modify the information in the LdapModification
and return it to the server.
E.3.3.3.7 SearchLdapOperation
The SearchLdapOperation object contains the following information:
■Filter
■Required Attributes
■Scope
■SearchResultSet
The Filter, Required Attributes, and Scope are passed by the server.
The Filter contains the LDAP search filter specified for the ldapsearch operation. This
is only an input to the plug-in. The plug-in cannot modify this information and return
it to the server.
The Required Attributes contains the required attributes specified for the ldapsearch
operation. As Table E–13 shows, for all operations except the post-operation, the
plug-in can modify the information in the Required Attributes and return it to the
server.
Table E–11 Behavior of Delete Old RDN Information for Each Plug-in Timing
Plug-in Timing Behavior of the Delete Old RDN Information
Pre
When
When_replace
Both input and output. The plug-in can modify the information
and return it to the server.
Post Input only.
Table E–12 Behavior of LdapModification Information for Each Plug-in Timing
Plug-in Timing Behavior of the LdapModification Information
Pre
When
When_replace
Both input and output. The plug-in can modify the information
and return it to the server.
Post Input only.
Table E–13 Behavior of the Required Attributes for Each Plug-in Timing
Plug-in Timing Behavior of the Required Attributes Information
Pre
When
When_replace
Both input and output. The plug-in can modify the information
and return it to the server.
Post Input only.

Java Plug-in API
E-10 Oracle Fusion Middleware Administrator's Guide for Oracle Internet Directory
The Scope contains the scope of the search to be performed by the ldapsearch
operation. As Table E–14 shows, for all operations except the post-operation, the
plug-in can modify the information in the Scope and return it to the server.
The SearchResultSet defines search results returned from the Java plug-in to the
server. A plug-in performing an ldapsearch operation can construct this object. As
Table E–15 shows, only the when and when_replace plug-ins can return a SearchResult
Set to the server.
E.3.3.4 PluginFlexfield
When you register a plug-in, you can store custom information in the plug-in
configuration entry. When the server invokes the plug-in, it passes this information to
the plug-in in the PluginFlexfield.
There are three schema attributes for storing custom information in the configuration
entry. You can store text information in the orclPluginFlexfield attribute. You
can use sub-types to provide more meaning to the kind of custom information being
stored. For example, you could use the subtype orclPluginFlexfield;ad-host
to store the host name of an Active Directory server that the plug-in must connect to.
You can store a binary value in the orclPluginBinaryFlexfield attribute. You
can only store one value in orclPluginBinaryFlexfield for a plug-in because the
server does not support attribute subtypes for binary attributes.
You can use orclPluginSecuredFlexfield to store custom text information that
must never be displayed in clear text. The value is stored and displayed in encrypted
form. Be sure that Oracle Internet Directory has privacy mode enabled to ensure that
users cannot retrieve this attribute in clear text. See Section 27.7, "Configuring Privacy
of Retrieved Sensitive Attributes." You can use sub-types to provide more meaning to
the kind of custom information being stored. Use the same subtype format as for
orclPluginFlexfield.
When the server invokes the plug-in, it passes the information from the
orclPluginFlexfield, orclPluginBinaryFlexfield, and
orclPluginSecuredFlexfield to the plug-in in the PluginFlexfield object.
The plug-in can interpret the information and use it. It cannot return the
PluginFlexfield to the server.
Table E–14 Behavior of the Scope for Each Plug-in Timing
Plug-in Timing Behavior of the Scope Information
Pre
When
When_replace
Both input and output. The plug-in can modify the information
and return it to the server.
Post Input only.
Table E–15 Behavior of the SearchResultSet for Each Plug-in Timing
Plug-in Timing Behavior of the SearchResultSet Information
Pre The plug-in cannot return the object.
When
When_replace
The plug-in can return this object to the server.
Post The plug-in cannot return the object.

Java Plug-in API
Java Server Plug-in Developer's Reference E-11
In the following configuration entry example, subtypes of orclPluginFlexfield
specify that the minimum password length is 8 characters, that the password must
contain a digit, and that the password cannot contain repeated characters:
dn: cn=pre_add replace,cn=plugin,cn=subconfigsubentry
orclPluginFlexfield;minPwdLength: 8
orclPluginFlexfield;isDigitPwd: 1
orclPluginFlexfield;isRepeatCharsPwd: 0
objectclass: orclPluginConfig
objectclass: top
orclpluginname: MyJavaPwdCheckPlugin
orclplugintype: configuration
orclplugintiming: pre
orclpluginldapoperation: ldapadd
orclpluginenable: 1
orclpluginsubscriberdnlist: cn=users,dc=us,dc=oracle,dc=com
orclpluginattributelist: userpassword
orclPluginKind: Java
E.3.4 PluginResult
To return the results of its execution to the server, a Java plug-in constructs a
PluginResult object and passes it back to the server. The PluginResult contains
one object: an LdapOperation or one of its operation-specific subclasses. These
objects were described in Section E.3.3.3, "LdapOperation" As explained in that
section, for some operations and timings, the plug-in can modify the information in
the "LdapOperation" subclass object it received in the PluginDetail and send that
object back to the server in the PluginResult.
E.3.5 ServerPlugin Interface
All Java plug-ins use the ServerPlugin interface. The interface has pre-defined
methods to communicate with the server. It has one method for each LDAP operation
and timing. Each method takes a PluginDetail object as input and returns a
PluginResult object back to the Oracle Internet Directory Server.
The ServerPluginAdapter class implements the ServerPlugin interface. The
ServerPluginAdapter class has default (NULL) implementations of the
ServerPlugin methods. This class enables you to code a Java plug-in without
having to implement every method.
The rest of this section lists the ServerPlugin methods for each LDAP operation. It
includes:
■Section E.3.5.1, "ServerPlugin Methods for Ldapbind"
■Section E.3.5.2, "ServerPlugin Methods for Ldapcompare"
■Section E.3.5.3, "ServerPlugin Methods for Ldapadd"
■Section E.3.5.4, "ServerPlugin Methods for Ldapmodify"
■Section E.3.5.5, "ServerPlugin Methods for Ldapmoddn"
■Section E.3.5.6, "ServerPlugin Methods for Ldapsearch"
■Section E.3.5.7, "ServerPlugin Methods for Ldapdelete"
E.3.5.1 ServerPlugin Methods for Ldapbind
public PluginResult pre_bind(PluginDetail pc) throws Exception;

Java Plug-in Error and Exception Handling
E-12 Oracle Fusion Middleware Administrator's Guide for Oracle Internet Directory
public PluginResult when_bind_replace(PluginDetail pc) throws Exception;
public PluginResult post_bind(PluginDetail pc) throws Exception;
E.3.5.2 ServerPlugin Methods for Ldapcompare
public PluginResult pre_compare(PluginDetail pc) throws Exception;
public PluginResult when_compare_replace(PluginDetail pc) throws Exception;
public PluginResult post_compare(PluginDetail pc) throws Exception;
E.3.5.3 ServerPlugin Methods for Ldapadd
public PluginResult pre_add(PluginDetail pc) throws Exception;
public PluginResult when_add(PluginDetail pc) throws Exception;
public PluginResult when_add_replace(PluginDetail pc) throws Exception;
public PluginResult post_add(PluginDetail pc) throws Exception;
E.3.5.4 ServerPlugin Methods for Ldapmodify
public PluginResult pre_modify(PluginDetail pc) throws Exception;
public PluginResult when_modify(PluginDetail pc) throws Exception;
public PluginResult when_modify_replace(PluginDetail pc) throws Exception;
public PluginResult post_modify(PluginDetail pc) throws Exception;
E.3.5.5 ServerPlugin Methods for Ldapmoddn
public PluginResult pre_moddn(PluginDetail pc) throws Exception;
public PluginResult when_moddn(PluginDetail pc) throws Exception;
public PluginResult when_moddn_replace(PluginDetail pc) throws Exception;
public PluginResult post_moddn(PluginDetail pc) throws Exception;
E.3.5.6 ServerPlugin Methods for Ldapsearch
public PluginResult pre_search(PluginDetail pc) throws Exception;
public PluginResult when_search(PluginDetail pc) throws Exception;
public PluginResult when_search_replace(PluginDetail pc) throws Exception;
public PluginResult post_search(PluginDetail pc) throws Exception;
E.3.5.7 ServerPlugin Methods for Ldapdelete
public PluginResult pre_delete(PluginDetail pc) throws Exception;
public PluginResult when_delete(PluginDetail pc) throws Exception;
public PluginResult when_delete_replace(PluginDetail pc) throws Exception;
public PluginResult post_delete(PluginDetail pc) throws Exception;Java plug-in API
E.4 Java Plug-in Error and Exception Handling
The Oracle Internet Directory server catches all unhandled exceptions during the
execution of the plug-in. The exception stack trace and message for each exception is
logged in the server log file. These exceptions fall into three categories:
■Run-time errors and exceptions occur due to faulty plug-in code or logic. The
server catches all run-time errors and exceptions, including
NullPointerExceptions, raised during the execution of the Java plug-in. These
errors and exceptions are logged in the server log file.
■Expected exceptions thrown by the plug-in are logged in the Oracle Internet
Directory server log file. In addition, a plug-in can catch an exception and throw it
back to the server to log it in the server log file.
■A plug-in can use the PluginException class to raise an error. The error
message passed to the server with the PluginException object or its subclasses

Java Plug-in Debugging and Logging
Java Server Plug-in Developer's Reference E-13
is passed on to the LDAP client. The server also logs this message in the server log
file along with the exception stack trace and message.
This section includes three examples. They are:
■Section E.4.1, "Run-time Exception Example"
■Section E.4.2, "Run-time Error Example"
■Section E.4.3, "PluginException Example"
E.4.1 Run-time Exception Example
The log entry for a typical exception raised during execution of a plug-in looks like
this:
….
06:17:03 *
ERROR * gslpg_exceptionHndlr * Exception Message : Error
ERROR * gslpg_exceptionHndlr * Exception Stack Trace :
MyCompareJavaPlugin.post_compare(Prog2.java:75)
END
BEGIN
2004/10/19:01:52:13 *
ServerWorker (REG):4 * ConnID:0 * OpID:1 * OpName:compare
ERROR * gslpg_exceptionHndlr * Exception Stack Trace :
java.lang.NullPointerException
java.util.Hashtable.put(Hashtable.java:393)
oracle.ldap.ospf.PluginDetail.put(PluginDetail.java:41)
END
E.4.2 Run-time Error Example
The error occurred because the plug-in MyJavaPlugin did not exist in the $ORACLE_
HOME/ldap/server/plugin directory. The log file entry looks like this:
BEGIN
2004/10/19:01:52:13 *
ServerWorker (REG):4 * ConnID:0 * OpID:1 * OpName:compare
ERROR * gslpg_exceptionHndlr * Exception Stack Trace :
java.lang.NoClassDefFoundError: MyJavaPlugin
END
E.4.3 PluginException Example
The Oracle Internet Directory server returns the standard plug-in error message to the
LDAP client along with the additional error message if a PluginException object is
thrown back to the server. The error displayed by the LDAP client looks something
like this:
ldap_compare: UnKnown Error Encountered
ldap_compare: additional info: Error Message returned by the Java Plug-in
E.5 Java Plug-in Debugging and Logging
A plug-in can maintain its own log file and log to it in real time. In addition, a plug-in
can log debug messages in the Oracle Internet Directory server log file during

Java Plug-in Examples
E-14 Oracle Fusion Middleware Administrator's Guide for Oracle Internet Directory
execution by using the ServerLog class. The method for logging messages in the
ServerLog class is:
public static void log(String message);
Messages logged by the ServerLog.log() method are preceded by the string:
* Server Java Plug-in *
For example:
2006/05/11:01:11:28 * ServerWorker (REG):7
ConnID:241 * mesgID:2 * OpID:1 * OpName:bind
01:11:28 * Server Java Plug-in * MESSAGE FROM PLUGIN
01:11:28 * Server Java Plug-in * Bind DN :
cn=ad_user,cn=oiddvusers,cn=oraclecontext,dc=us,dc=oracle,dc=com
To log plug-in debug messages to the server log, you must start the Oracle Internet
Directory server using one of the following debug levels:
The ServerLog.log() method is thread safe. Execution of this method can degrade
performance.
E.6 Java Plug-in Examples
This sections includes two examples. They are:
■Example 1: Password Validation Plug-in
■Example 2: External Authentication Plug-in for Active Directory
E.6.1 Example 1: Password Validation Plug-in
This example illustrates a Java plug-in that validates a userPassword before the
ldapmodify operation. A pre Java plug-in is registered with the Oracle Internet
Directory server. The plug-in configuration includes the minimum password length to
be checked for in the plug-in. This information is registered in the plug-in
configuration entry using an orclPluginFlexfield attribute. The subtype
minPwdLength specifies the minimum length. This information is passed to the
plug-in using the PluginFlexfield. The orclPluginName specifies the name of
the Java Plug-in to be invoked by the Oracle Internet Directory server.
The input to the plug-in is a PluginDetail and the output from the plug-in is a
PluginResult.
Table E–16 Debug Levels for Java Plug-in Logging
Oracle Internet Directory
Server Debug Level Debug Level Meaning
134217728 All Java plug-in debug messages and internal server messages
related to the Java plug-in framework
268435456 All messages passed by a Java plug-in using the ServerLog
object.
402653184 Both of the above
Note: Do not use System.exit() in a Java plug-in. Doing so might lead
to unpredictable behavior by the Oracle directory server.

Java Plug-in Examples
Java Server Plug-in Developer's Reference E-15
E.6.1.1 Password Validation Plug-in Configuration Entry
dn: cn=checkuserpassword,cn=plugin,cn=subconfigsubentry
orclPluginFlexfield;minPwdLength: 8
objectclass: orclPluginConfig
objectclass: top
orclpluginname: CheckPassword
orclplugintype: configuration
orclplugintiming: pre
orclpluginldapoperation: ldapmodify
orclpluginenable: 1
orclpluginsubscriberdnlist: cn=users,dc=us,dc=oracle,dc=com
orclpluginattributelist: userPassword
orclPluginKind: Java
E.6.1.2 Password Validation Plug-in Code Example
import java.io.*;
import java.lang.*;
import java.util.*;
import javax.naming.*;
import javax.naming.directory.*;
import oracle.ldap.ospf.*;
/**
* This PRE modify plug-in will check whether the "userPassword"
* is greater than 8 characters in length
*/
public class CheckPassword extends ServerPluginAdapter {
// This PRE modify plug-in takes in a PluginDetail Object
// and returns a PluginResult Object
public PluginResult pre_modify(PluginDetail plgObj)
throws Exception
{
try {
// Retrieve the LdapOperation Object from the PluginDetail
ModifyLdapOperation opObj = (ModifyLdapOperation)
plgObj.getLdapOperation();
// Retrieve the LdapModification Object from the LdapOperation
LdapModification modObj = opObj.getLdapModification();
// Retrieve the PluginFlexfield Object from the PluginDetail
PluginFlexfield flxFldObj = plgObj.getPluginFlexfield();
// Retrieve the custom information from the PluginFlexfield
// Get the minimum password length
String passwdlength =
flxFldObj.getFlexfield("minPwdLength");
// Create a Result Object to return to the OID server
PluginResult plgResObj = new PluginResult();
// Check if the LdapModification Object is a NULL
// set the appropriate error and error message
if (modObj==null)
{
throw new PluginException("CheckPassword Plug-in Execution

Java Plug-in Examples
E-16 Oracle Fusion Middleware Administrator's Guide for Oracle Internet Directory
Error");
}
// Retrieve the "userPassword" Attribute Value
ModificationItem modItem = modObj.getModificationItemAt(0);
BasicAttribute attr = (BasicAttribute)modItem.getAttribute();
String attrval = null;
if ((attr.getID()).equals("userpassword"))
attrval = attr.get(0);
// Check for the password length and set appropriate error
// and error message
if (attrval.length() < Integer.parseInt(passwdlength))
{
throw new PluginException("userPassword is less than 8
characters");
}
// Return the PluginResult Object to the OID Server
return plgResObj;
}
// Catch any unexpected exception which may occur and throw
// it back to the OID server to log it
catch (Exception e)
{
throw e;
}
}
}
E.6.2 Example 2: External Authentication Plug-in for Active Directory
This example illustrates an external authentication plug-in for Active Directory. When
a client requests an ldapcompare operation for userPassword, the server invokes
this Java plug-in to authenticate the user against Active Directory.
E.6.2.1 External Authentication Plug-in Configuration Entry
dn: cn=when_rep_comp,cn=plugin,cn=subconfigsubentry
orclpluginsubscriberdnlist: cn=users,dc=us,dc=oracle,dc=com;
orclpluginflexfield;ad-host: dlin-pc2.us.example.com
orclpluginflexfield;ad-port: 3060
orclpluginflexfield;ad-su-dn: administrator@dlin.net
orclpluginflexfield;ad-su-passwd: password1
objectclass: orclPluginConfig
objectclass: top
orclpluginname: ExtAuthAD
orclplugintype: configuration
orclplugintiming: when
orclpluginisreplace: 1
orclpluginldapoperation: ldapcompare
orclpluginversion: 1.0.1
cn: when_rep_comp
orclpluginkind: Java
orclpluginenable: 1
E.6.2.2 External Authentication Plug-in Code
public class ExtAuthAD extends ServerPluginAdapter {

Java Plug-in Examples
Java Server Plug-in Developer's Reference E-17
public PluginResult when_compare_replace(PluginDetail plgObj)
throws Exception {
try {
// Retrieve the LdapOperation from the PluginDetail
CompareLdapOperation opObj =
(CompareLdapOperation) plgObj.getLdapOperation(); String baseDn =
plgObj.getLdapBaseEntry().getDN();
// Retrieve the Base DN, Attribute and Attribute Value
String bdn = baseDn.substring(0,
baseDn.lastIndexOf("cn=users,dc=us,dc=oracle,dc=com")-1)
+",cn=users,dc=dlin,dc=net";
String ban = opObj.getAttributeName(); String bav =
opObj.getAttributeValue().toString();
// Retrieve the AD Information from the PluginFlexfield
PluginFlexfield flxObj = plgObj.getPluginFlexfield();
String adhost = flxObj.getFlexfield("ad-host");
String adport = flxObj.getFlexfield("ad-port");
String adsudn = flxObj.getFlexfield("ad-su-dn");
String adsupasswd = flxObj.getFlexfield("ad-su-passwd");
// Create a PluginResult Object to return to the OID server
PluginResult plgResObj = new PluginResult();
// Create a Hashtable with values required to connect to AD
Hashtable env = new Hashtable();
env.put(Context.INITIAL_CONTEXT_FACTORY,
"com.sun.jndi.ldap.LdapCtxFactory");
env.put(Context.PROVIDER_URL, "ldap://"+adhost+":"+adport);
env.put(Context.SECURITY_AUTHENTICATION, "simple");
env.put(Context.SECURITY_PRINCIPAL, bdn);
env.put(Context.SECURITY_CREDENTIALS, bav);
// Try to connect to AD
DirContext dirContext = null;
try {
dirContext = new InitialDirContext(env);
if (dirContext != null) {
// User has been successfully authenticated, add the appropriate
// result code to the LdapOperation
opObj.setOperationResultCode(6);
}
}
catch(NamingException ne) {
// Unable to connect to the AD directory server with the given
// credentials, add the appropriate result code to the LdapOperation
opObj.setOperationResultCode(5);
}
// Add the LdapOperation to the PluginResult
plgResObj.setLdapOperation(opObj);
// Return the PluginResult
return plgResObj;
} catch(Exception e) {

Java Plug-in Examples
E-18 Oracle Fusion Middleware Administrator's Guide for Oracle Internet Directory
// In case of any unexpected errors in the plug-in, throw the Exception
// back to the OID server to log it throw e;
}
}
}

F
PL/SQL Server Plug-in Developer's Reference F-1
FPL/SQL Server Plug-in Developer's
Reference
This appendix explains how to use the plug-in framework in PL/SQL.
This appendix contains these topics:
■Section F.1, "Designing, Creating, and Using PL/SQL Server Plug-ins"
■Section F.2, "Examples of PL/SQL Plug-ins"
■Section F.3, "Binary Support in the PL/SQLPlug-in Framework"
■Section F.4, "Database Object Types Defined"
■Section F.5, "Specifications for PL/SQL Plug-in Procedures"
F.1 Designing, Creating, and Using PL/SQL Server Plug-ins
This section contains these topics:
■Section F.1.1, "PL/SQLPlug-in Caveats"
■Section F.1.2, "Creating PL/SQLPlug-ins"
■Section F.1.3, "Compiling PL/SQLPlug-ins"
■Section F.1.4, "Managing PL/SQL Plug-ins"
■Section F.1.5, "Enabling and Disabling PL/SQL Plug-ins"
■Section F.1.6, "Exception Handling in a PL/SQL Plug-in"
■Section F.1.7, "PL/SQL Plug-in LDAP API"
■Section F.1.8, "PL/SQL Plug-in and Database Tools"
■Section F.1.9, "PL/SQL Plug-in Security"
■Section F.1.10, "PL/SQL Plug-in Debugging"
■Section F.1.11, "PL/SQL Plug-in LDAP API Specifications"
■Section F.1.12, "Database Limitations"
F.1.1 PL/SQLPlug-in Caveats
The following caveats apply to PL/SQL plug-ins:

Designing, Creating, and Using PL/SQL Server Plug-ins
F-2 Oracle Fusion Middleware Administrator's Guide for Oracle Internet Directory
F.1.1.1 Types of PL/SQL Plug-in Operations
A PL/SQL plug-in can only be associated with ldapbind, ldapadd, ldapmodify,
ldapcompare, ldapsearch, and ldapdelete operations. You cannot associate a
PL/SQL plug-in with moddn. If you must associate a plug-in with moddn, you must
use a Java plug-in.
F.1.1.2 Naming PL/SQL Plug-ins
Plug-in names (PL/SQL package names) must be unique if they share the same
database schema with other plug-ins or stored procedures. But plug-ins can share
names with other database schema objects such as tables and views. This kind of
sharing is not, however, recommended.
F.1.2 Creating PL/SQLPlug-ins
Creating a PL/SQL plug-in module is like creating a PL/SQL package. Both have a
specification part and a body part. The directory, not the plug-in, defines the plug-in
specification because the specification serves as the interface between Oracle Internet
Directory and the custom plug-in.
For security reasons and for the integrity of the LDAP server, you can compile
PL/SQL plug-ins only in the ODS database schema. You must compile them in the
database that serves as the back end database of Oracle Internet Directory.
F.1.2.1 Package Specifications for Plug-in Module Interfaces
Different plug-ins have different package specifications. As Table F–1 shows, you can
name the plug-in package. You must, however, follow the signatures defined for each
type of plug-in procedure. See Section F.5, "Specifications for PL/SQL Plug-in
Procedures" for details.
Table F–2 names the different plug-in procedures. In addition, it lists and describes the
parameters that these procedures use.
Table F–1 Plug-in Module Interface
Plug-in Item User Defined
Oracle Internet
Directory-Defined
Plug-in Package Name X
Plug-in Procedure Name X
Plug-in Procedure Signature X
Table F–2 Operation-Based and Attribute-Based Plug-in Procedure Signatures
Invocation Context Procedure Name IN Parameters OUT Parameters
Before ldapbind
PRE_BIND
ldapcontext, Bind DN,
Password
return code, error
message
With ldapbind but
replacing the default
server behavior
WHEN_BIND_REPLACE
ldapcontext, bind
result, DN,
userpassword
bind result,
return code, error
message
After ldapbind
POST_BIND
ldapcontext, Bind
result, Bind DN,
Password
return code, error
message
Before ldapmodify
PRE_MODIFY
ldapcontext, DN, Mod
structure
return code, error
message

Designing, Creating, and Using PL/SQL Server Plug-ins
PL/SQL Server Plug-in Developer's Reference F-3
With ldapmodify
WHEN_MODIFY
ldapcontext, DN, Mod
structure
return code, error
message
With ldapmodify but
replacing the default
server behavior
WHEN_MODIFY_REPLACE
ldapcontext, DN, Mod
structure
return code, error
message
After ldapmodify
POST_MODIFY
ldapcontext, Modify
result, DN, Mod
structure
return code, error
message
Before ldapcompare
PRE_COMPARE
ldapcontext, DN,
attribute, value
return code, error
message
With ldapcompare
but replacing the
default server behavior
WHEN_COMPARE_
REPLACE
ldapcontext, Compare
result, DN, attribute,
value
compare result,
return code, error
message
After ldapcompare
POST_COMPARE
ldapcontext, Compare
result, DN, attribute,
value
return code, error
message
Before ldapadd
PRE_ADD
ldapcontext, DN,
Entry
return code, error
message
With ldapadd
WHEN_ADD
ldapcontext, DN,
Entry
return code, error
message
With ldapadd but
replacing the default
server behavior
WHEN_ADD_REPLACE
ldapcontext, DN,
Entry
return code, error
message
After ldapadd
POST_ADD
ldapcontext, Add
result, DN, Entry
return code, error
message
Before ldapdelete
PRE_DELETE
ldapcontext, DN return code, error
message
With ldapdelete
WHEN_DELETE
ldapcontext, DN return code, error
message
With ldapdelete but
replacing the default
server behavior
WHEN_DELETE
ldapcontext, DN return code, error
message
After ldapdelete
POST_DELETE
ldapcontext, Delete
result, DN
return code, error
message
Before ldapsearch
PRE_SEARCH
ldapcontext, Base DN,
scope, filter
return code, error
message
After ldapsearch
POST_SEARCH
Ldap context, Search
result, Base DN,
scope, filter
return code, error
message
See Also:
■Section F.1.6.1, "Error Handling" for valid values for the return
code and error message.
■Section F.5, "Specifications for PL/SQL Plug-in Procedures" for
complete supported procedure signatures.
Table F–2 (Cont.) Operation-Based and Attribute-Based Plug-in Procedure Signatures
Invocation Context Procedure Name IN Parameters OUT Parameters

Designing, Creating, and Using PL/SQL Server Plug-ins
F-4 Oracle Fusion Middleware Administrator's Guide for Oracle Internet Directory
F.1.3 Compiling PL/SQLPlug-ins
You must compile the plug-in module against the same database that serves as the
Oracle Internet Directory back end database. Plug-ins are the same as PL/SQL stored
procedures. A PL/SQL anonymous block is compiled each time it is loaded into
memory. Compilation consists of these stages:
1. Syntax checking: PL/SQL syntax is checked, and a parse tree is generated.
2. Semantic checking: Type checking and further processing on the parse tree.
3. Code generation: The pcode is generated.
If errors occur during the compilation of a plug-in, the plug-in is not created. You can
use the SHOW ERRORS statement in SQL*Plus or Enterprise Manager to see any
compilation errors when you create a plug-in, or you can SELECT the errors from the
USER_ERRORS view.
All plug-in modules must be compiled in the ODS database schema.
F.1.3.1 Dependencies
Compiled plug-ins have dependencies. They become invalid if an object depended
upon, such as a stored procedure or function called from the plug-in body, is
modified. Plug-ins that are invalidated for dependency reasons must be recompiled
before the next invocation.
F.1.3.2 Recompiling Plug-ins
Use the ALTER PACKAGE statement to manually recompile a plug-in. For example, the
following statement recompiles the my_plugin plug-in:
ALTER PACKAGE my_plugin COMPILE PACKAGE;
F.1.4 Managing PL/SQL Plug-ins
This section explains how to modify and debug plug-ins.
F.1.4.1 Modifying Plug-ins
Like a stored procedure, a plug-in cannot be explicitly altered. It must be replaced
with a new definition.
When replacing a plug-in, you must include the OR REPLACE option in the CREATE
PACKAGE statement. The OR REPLACE option enables a new version of an existing
plug-in to replace an older version without having an effect on grants made for the
original version of the plug-in.
Alternatively, the plug-in can be dropped using the DROP PACKAGE statement, and
you can rerun the CREATE PACKAGE statement.
If the plug-in name (the package name) is changed, you must register the new plug-in
again.
F.1.4.2 Debugging Plug-ins
You can debug a plug-in using the same facilities available for PL/SQL stored
procedures.

Designing, Creating, and Using PL/SQL Server Plug-ins
PL/SQL Server Plug-in Developer's Reference F-5
F.1.5 Enabling and Disabling PL/SQL Plug-ins
To turn the plug-in on or off, modify the value of orclPluginEnable in the plug-in
configuration object. For example, modify the value of orclPluginEnable in
cn=post_mod_plugin,cn=plugins,cn=subconfigsubentry to be 1 or 0.
F.1.6 Exception Handling in a PL/SQL Plug-in
Each of the procedures in a PL/SQL plug-in must have an exception handling block
that handles errors intelligently and, if possible, recovers from them.
F.1.6.1 Error Handling
Oracle Internet Directory requires that the return code (rc) and error message
(errmsg) be set correctly in the plug-in procedures.
Table F–3 provides the values that are valid for the return code.
The errmsg parameter is a string value that can pass a user's custom error message
back to Oracle Internet Directory server. The size limit for errmsg is 1024 bytes. Each
time Oracle Internet Directory runs the plug-in program, it examines the return code
to determine if it must display the error message.
If, for example, the value for the return code is 0, the error message value is ignored. If
the value of the return code is -1 or greater than zero, the following message is either
logged in the log file or displayed in standard output if the request came from LDAP
command-line tools:
ldap addition info: customized error
F.1.6.2 Program Control Handling between Oracle Internet Directory and Plug-ins
Table F–4 shows where plug-in exceptions occur and how the directory handles them.
Table F–3 Valid Values for the plug-in Return Code
Error Code Description
0
Success
Any number greater
than zero
Failure
-1
Warning
Table F–4 Program Control Handling when a Plug-in Exception Occurs
Plug-in Exception
Occurred in Oracle Internet Directory Server Handling
PRE_BIND, PRE_MODIFY,
PRE_ADD, PRE_SEARCH,
PRE_COMPARE, PRE_
DELETE
Depends on return code. If the return code is:
■Greater than zero (error), then no LDAP operation is
performed
■-1 (warning), then proceed with the LDAP operation
POST_BIND, POST_
MODIFY, POST_ADD,
POST_SEARCH, WHEN_
DELETE
LDAP operation is completed. There is no rollback.
WHEN_MODIFY, WHEN_
ADD, WHEN_DELETE
Rollback the LDAP operation

Designing, Creating, and Using PL/SQL Server Plug-ins
F-6 Oracle Fusion Middleware Administrator's Guide for Oracle Internet Directory
Table F–5 shows how the directory responds when an LDAP operation fails.
F.1.7 PL/SQL Plug-in LDAP API
There are different methods for providing API access:
■Enable a user to utilize the standard LDAP PL/SQL APIs. Note though that, if
program logic is not carefully planned, an infinite loop in plug-in execution can
result.
■Oracle Internet Directory provides the Plug-in LDAP API. This plug-in does not
cause a series of plug-in actions in the directory server if there are plug-ins
configured and associated with the LDAP request.
In the Plug-in LDAP API, the directory provides APIs for connecting back to the
directory server designated in the plug-in module. You must use this API if you want
to connect to the server that is executing the plug-in. If you want to connect to an
external server, you can use the DBMS_LDAP API.
Within each plug-in module, an ldapcontext is passed from the Oracle directory
server. When the Plug-in LDAP API is called, ldapcontext is passed for security
and binding purposes. When binding with this ldapcontext, Oracle Internet
Directory recognizes that the LDAP request is coming from a plug-in module. For this
type of plug-in bind, the directory does not trigger any subsequent plug-ins. It handles
the plug-in bind as a super-user bind. Use this plug-in bind with discretion.
F.1.8 PL/SQL Plug-in and Database Tools
Bulk tools do not support server plug-ins.
F.1.9 PL/SQL Plug-in Security
Some Oracle Internet Directory server plug-ins require that you supply the code that
preserves tight security. For example, if you replace the directory's ldapcompare or
ldapbind operation with your own plug-in module, you must ensure that your
implementation of this operation does not omit any functionality on which security
relies.
To ensure tight security, the following must be done:
■Create the plug-in packages
■Only the LDAP administrator can restrict the database user
Table F–5 Program Control Handling when an LDAP Operation Fails
LDAP Operation Fails in Oracle Internet Directory Server Handling
PRE_BIND, PRE_MODIFY,
PRE_ADD, PRE_SEARCH,
WHEN_DELETE
Pre-operation plug-in is completed. There is no rollback.
POST_BIND, POST_
MODIFY, POST_ADD,
POST_SEARCH, WHEN_
DELETE
Proceed with post-operation plug-in. The LDAP operation
result is one of the IN parameters.
WHEN_MODIFY, WHEN_
ADD, WHEN_DELETE
When types of plug-in changes are rolled back.
WHEN Changes made in the plug-in program body are rolled back.
See Also: Section F.1.11, "PL/SQL Plug-in LDAP API Specifications".

Designing, Creating, and Using PL/SQL Server Plug-ins
PL/SQL Server Plug-in Developer's Reference F-7
■Use the access control list (ACL) to set the plug-in configuration entries to be
accessed only by the LDAP administrator
■Be aware of the program relationship between different plug-ins
F.1.10 PL/SQL Plug-in Debugging
Use the plug-in debugging mechanism for Oracle Internet Directory to examine the
process and content of plug-ins.The following commands control the operation of the
server debugging process.
■To set up plug-in debugging, run this command:
% sqlplus ods @$ORACLE/ldap/admin/oidspdsu.pls
■To enable plug-in debugging, run this command:
% sqlplus ods @$ORACLE/ldap/admin/oidspdon.pls
■After enabling plug-in debugging, you can use this command in the plug-in
module code:
plg_debug('debuggingmessage');
The resulting debug message is stored in the plug-in debugging table.
■To disable debugging, run this command:
% sqlplus ods @$ORACLE/ldap/admin/oidspdof.pls
■To display the debug messages that you put in the plug-in module, run this
command:
% sqlplus ods @$ORACLE/ldap/admin/oidspdsh.pls
■To delete all of the debug messages from the debug table, run this command:
% sqlplus ods @$ORACLE/ldap/admin/oidspdde.pls
F.1.11 PL/SQL Plug-in LDAP API Specifications
Here is the package specification that Oracle Internet Directory provides for the
PL/SQL Plug-in LDAP API:
CREATE OR REPLACE PACKAGE LDAP_PLUGIN AS
SUBTYPE SESSION IS RAW(32);
-- Initializes the LDAP library and return a session handler
-- for use in subsequent calls.
FUNCTION init (ldappluginctx IN ODS.plugincontext)
RETURN SESSION;
-- Synchronously authenticates to the directory server using
-- a Distinguished Name and password.
FUNCTION simple_bind_s (ldappluginctx IN ODS.plugincontext,
ld IN SESSION)
RETURN PLS_INTEGER;
-- Get requester info from the plug-in context
FUNCTION get_requester (ldappluginctx IN ODS.plugincontext)
RETURN VARCHAR2;
END LDAP_PLUGIN;

Examples of PL/SQL Plug-ins
F-8 Oracle Fusion Middleware Administrator's Guide for Oracle Internet Directory
F.1.12 Database Limitations
Oracle Internet Directory can use several different versions of the Oracle Database for
storing directory data. These include Oracle Database Release 2, v9.2.0.6 or later and
Oracle Database 10g, v10.1.0.4 or later.
The following plug-in features are not supported in the directory server running
against Oracle Database Release 2:
■Windows Domain external authentication plug-in.
■The simple_bind_s() function of the LDAP_PLUGIN package provided as the
Oracle Internet Directory PL/SQL PLUGIN API for connecting back to the
directory server as part of plug-in definitions.
F.2 Examples of PL/SQL Plug-ins
This section presents two sample plug-ins. One logs all ldapsearch commands. The
other synchronizes two directory information trees (DITs).
F.2.1 Example 1: Search Query Logging
Situation: A user wants to know if it is possible to log all of the ldapsearch
commands.
Solution: Yes. The user can use the post ldapsearch configuration plug-in for this
purpose. They can either log all of the requests or only those that occur under the DNs
being searched.
To log all the ldapsearch commands:
1. Log all of the ldapsearch results into a database table. This log table has these
columns:
■timestamp
■baseDN
■search scope
■search filter
■required attribute
■search result
Use this SQL script to create the table:
drop table search_log;
create table search_log
(timestamp varchar2(50),
basedn varchar2(256),
searchscope number(1);
searchfilter varchar2(256);
searchresult number(1));
drop table simple_tab;
create table simple_tab (id NUMBER(7), dump varchar2(256));
DROP sequence seq;
CREATE sequence seq START WITH 10000;
commit;
2. Create the plug-in package specification.
CREATE OR REPLACE PACKAGE LDAP_PLUGIN_EXAMPLE1 AS

Examples of PL/SQL Plug-ins
PL/SQL Server Plug-in Developer's Reference F-9
PROCEDURE post_search
(ldapplugincontext IN ODS.plugincontext,
result IN INTEGER,
baseDN IN VARCHAR2,
scope IN INTEGER,
filterStr IN VARCHAR2,
requiredAttr IN ODS.strCollection,
rc OUT INTEGER,
errormsg OUT VARCHAR2
);
END LDAP_PLUGIN_EXAMPLE1;
/
3. Create the plug-in package body.
CREATE OR REPLACE PACKAGE BODY LDAP_PLUGIN_EXAMPLE1 AS
PROCEDURE post_search
(ldapplugincontext IN ODS.plugincontext,
result IN INTEGER,
baseDN IN VARCHAR2,
scope IN INTEGER,
filterStr IN VARCHAR2,
requiredAttr IN ODS.strCollection,
rc OUT INTEGER,
errormsg OUT VARCHAR2
)
IS
BEGIN
INSERT INTO simple_tab VALUES
(to_char(sysdate, 'Month DD, YYYY HH24:MI:SS'), baseDN, scope, filterStr,
result);
-- The following code segment demonstrate how to iterate
-- the ODS.strCollection
FOR l_counter1 IN 1..requiredAttr.COUNT LOOP
INSERT INTO simple_tab
values (seq.NEXTVAL, 'req attr ' || l_counter1 || ' = ' ||
requiredAttr(l_counter1));
END LOOP;
rc := 0;
errormsg := 'no post_search plug-in error msg';
COMMIT;
EXCEPTION
WHEN others THEN
rc := 1;
errormsg := 'exception: post_search plug-in';
END;
END LDAP_PLUGIN_EXAMPLE1;
/
4. Register the plug-in entry in Oracle Internet Directory.
dn: cn=post_search,cn=plugin,cn=subconfigsubentry
objectclass: orclPluginConfig
objectclass: top
orclPluginName: ldap_plugin_example1
orclPluginType: configuration
orclPluginTiming: post
orclPluginLDAPOperation: ldapsearch
orclPluginEnable: 1
orclPluginVersion: 1.0.1
cn: post_search

Examples of PL/SQL Plug-ins
F-10 Oracle Fusion Middleware Administrator's Guide for Oracle Internet Directory
orclPluginKind: PLSQL
Using the ldapadd command-line tool to add this entry:
% ldapadd –p port_number –h host_name –D bind_dn –q –v \
–f register_post_search.ldif
F.2.2 Example 2: Synchronizing Two DITs
Situation: There are two interdependent products under cn=Products,
cn=oraclecontext. This interdependency extends down to the users in these
products' containers. If a user in the first DIT (product 1) is deleted, the corresponding
user in the other DIT (product 2) must be deleted.
Is it possible to set a trigger that, when the user in the first DIT is deleted, calls or
passes a trigger to delete the user in the second DIT?
Solution: Yes, we can use the post ldapdelete operation plug-in to handle the
second deletion occurring in the second DIT.
If the first DIT has the naming context of
cn=DIT1,cn=products,cn=oraclecontext and the second DIT has the naming
context of cn=DIT2,cn=products,cn=oraclecontext, the two users share the
same ID attribute. Inside of the post ldapdelete plug-in module, we can use LDAP_
PLUGIN and DBMS_LDAP APIs to delete the user in the second DIT.
We must set orclPluginSubscriberDNList to
cn=DIT1,cn=products,cn=oraclecontext, so that whenever we delete entries
under cn=DIT1,cn=products,cn=oraclecontext, the plug-in module is
invoked.
1. Assume that the entries under both DITs have been added to the directory. For
example, the entry id=12345,cn=DIT1,cn=products,cn=oraclecontext is
in DIT1, and id=12345,cn=DIT2,cn=products,cn=oraclecontext is in
DIT2.
2. Create the plug-in package specification.
CREATE OR REPLACE PACKAGE LDAP_PLUGIN_EXAMPLE2 AS
PROCEDURE post_delete
(ldapplugincontext IN ODS.plugincontext,
result IN INTEGER,
dn IN VARCHAR2,
Note: When you use a post ldapmodify plug-in to synchronize
changes between two Oracle Internet Directory nodes, you cannot
push all the attributes from one node to the other. This is because the
changes (mod structure) captured in the plug-in module include
operational attributes. These operational attributes are generated on
each node and cannot be modified by using the standard LDAP
methods.
When writing your plug-in program, exclude the following
operational attributes from synchronization: authPassword,
creatorsname, createtimestamp, modifiersname,
modifytimestamp, orcllastlogintime, pwdchangedtime,
pwdfailuretime, pwdaccountlockedtime,
pwdexpirationwarned, pwdreset, pwdhistory,
pwdgraceusetime.

Examples of PL/SQL Plug-ins
PL/SQL Server Plug-in Developer's Reference F-11
rc OUT INTEGER,
errormsg OUT VARCHAR2
);
END LDAP_PLUGIN_EXAMPLE2;
/
3. Create the plug-in package body.
CREATE OR REPLACE PACKAGE BODY LDAP_PLUGIN_EXAMPLE2 AS
PROCEDURE post_delete
(ldapplugincontext IN ODS.plugincontext,
result IN INTEGER,
dn IN VARCHAR2,
rc OUT INTEGER,
errormsg OUT VARCHAR2
)
IS
retval PLS_INTEGER;
my_session DBMS_LDAP.session;
newDN VARCHAR2(256);
BEGIN
retval := -1;
my_session := LDAP_PLUGIN.init(ldapplugincontext);
-- bind to the directory
retval := LDAP_PLUGIN.simple_bind_s(ldapplugincontext, my_session);
-- if retval is not 0, then raise exception
newDN := REPLACE(dn,'DIT1','DIT2');
retval := DBMS_LDAP.delete_s(my_session, newDN);
-- if retval is not 0, then raise exception
rc := 0;
errormsg := 'no post_delete plug-in error msg';
EXCEPTION
WHEN others THEN
rc := 1;
errormsg := 'exception: post_delete plug-in';
END;
END LDAP_PLUGIN_EXAMPLE2;
/
(ldapplugincontext IN ODS.plugincontext,
result IN INTEGER,
dn IN VARCHAR2,
rc OUT INTEGER,
errormsg OUT VARCHAR2
)
IS
retval PLS_INTEGER;
my_session DBMS_LDAP.session;
newDN VARCHAR2(256);
BEGIN
retval := -1;
my_session := LDAP_PLUGIN.init(ldapplugincontext);
-- bind to the directory
retval := LDAP_PLUGIN.simple_bind_s(ldapplugincontext, my_session);
-- if retval is not 0, then raise exception
newDN := REPLACE(dn,'DIT1','DIT2');
retval := DBMS_LDAP.delete_s(my_session, newDN);
-- if retval is not 0, then raise exception
rc := 0;
errormsg := 'no post_delete plug-in error msg';
EXCEPTION
WHEN others THEN

Binary Support in the PL/SQLPlug-in Framework
F-12 Oracle Fusion Middleware Administrator's Guide for Oracle Internet Directory
rc := 1;
errormsg := 'exception: post_delete plug-in';
END;
END LDAP_PLUGIN_EXAMPLE2;
/
4. Register the plug-in entry with Oracle Internet Directory.
Construct the LDIF file register_post_delete.ldif:
dn: cn=post_delete,cn=plugin,cn=subconfigsubentry
objectclass: orclPluginConfig
objectclass: top
orclPluginName: ldap_plugin_example2
orclPluginType: configuration
orclPluginTiming: post
orclPluginLDAPOperation: ldapdelete
orclPluginEnable: 1
orclPluginSubscriberDNList: cn=DIT1,cn=oraclecontext,cn=products
orclPluginVersion: 1.0.1
cn: post_delete
orclPluginKind: PLSQL
Use the ldapadd command-line tool to add this entry:
% ldapadd –p port_number –h host_name –D bind_dn –q –v –f register_
post_delete.ldif
F.3 Binary Support in the PL/SQLPlug-in Framework
Starting with release 10.1.2, object definitions in the Plug-in LDAP API enable
ldapmodify, ldapadd, and ldapcompare plug-ins to access binary attributes in the
directory database. Formerly, only attributes of type VARCHAR2 could be accessed.
These object definitions do not invalidate plug-in code that precedes release 10.1.2. No
change to this code is required. The new definitions appear in Section F.4, "Database
Object Types Defined."
The section that you are reading now examines binary operations involving the three
types of plug-ins. It includes examples of these plug-ins. The new object definitions
apply to pre, post, and when versions of all three.
Note that the three examples use RAW functions and variables in place of LOBs.
F.3.1 Binary Operations with ldapmodify
The modobj object that the plug-in framework passes to an ldapmodify plug-in now
holds the values of binary attributes as binvals. This variable is a table of
binvalobj objects.
The plug-in determines whether a binary operation is being performed by examining
the operation field of modobj. It checks whether any of the values DBMS_
LDAP.MOD_ADD, DBMS_LDAP.MOD_DELETE, and DBMS_LDAP.MOD_REPLACE are
paired with DBMS_LDAP.MOD_BVALUES. The pairing DBMS_LDAP.MOD_ADD+DBMS_
LDAP.MOD_BVALUES, for example, signifies a binary add in the modify operation.
The example that follows shows a post ldapmodify plug-in modifying an entry in
another directory. The plug-in is invoked after ldapmodify applies the same change
to the same entry in the plug-in directory. The entry in the other directory appears
under the DIT cn=users,dc=us,dc=example,dc=com.
create or replace package moduser as

Binary Support in the PL/SQLPlug-in Framework
PL/SQL Server Plug-in Developer's Reference F-13
procedure post_modify(ldapplugincontext IN ODS.plugincontext,
result IN integer,
dn IN varchar2,
mods IN ODS.modlist,
rc OUT integer,
errormsg OUT varchar2);
end moduser;
/
show error
CREATE OR REPLACE PACKAGE BODY moduser AS
procedure post_modify(ldapplugincontext IN ODS.plugincontext,
result IN integer,
dn IN varchar2,
mods IN ODS.modlist,
rc OUT integer,
errormsg OUT varchar2)
is
counter1 pls_integer;
counter2 pls_integer;
retval pls_integer := -1;
user_session DBMS_LDAP.session;
user_dn varchar(256);
user_array DBMS_LDAP.mod_array;
user_vals DBMS_LDAP.string_collection;
user_binvals DBMS_LDAP.blob_collection;
ldap_host varchar(256);
ldap_port varchar(256);
ldap_user varchar(256);
ldap_passwd varchar(256);
begin
ldap_host :='backup.us.example.com';
ldap_port :='4000';
ldap_user :='cn=orcladmin';
ldap_passwd :='password';
plg_debug('START MODIFYING THE ENTRY');
-- Get a session
user_session := dbms_ldap.init(ldap_host, ldap_port);
-- Bind to the directory
retval := dbms_ldap.simple_bind_s(user_session, ldap_user,
ldap_passwd);
-- Create a mod_array
user_array := dbms_ldap.create_mod_array(mods.count);
-- Create a user_dn
user_dn := substr(dn,1,instr(dn,',',1,1))||'cn=users,dc=us,dc=example,
dc=com';
plg_debug('THE CREATED DN IS'||user_dn);
-- Iterate through the modlist
for counter1 in 1..mods.count loop
-- Log the attribute name and operation
if (mods(counter1).operation > DBMS_LDAP.MOD_BVALUES) then
plg_debug('THE NAME OF THE BINARY ATTR. IS'||mods(counter1).type);

Binary Support in the PL/SQLPlug-in Framework
F-14 Oracle Fusion Middleware Administrator's Guide for Oracle Internet Directory
else
plg_debug('THE NAME OF THE NORMAL ATTR. IS'||mods(counter1).type);
end if;
plg_debug('THE OPERATION IS'||mods(counter1).operation);
-- Add the attribute values to the collection
for counter2 in 1..mods(counter1).vals.count loop
user_vals(counter2) := mods(counter1).vals(counter2).val;
end loop;
-- Add the attribute values to the collection
for counter2 in 1..mods(counter1).binvals.count loop
plg_debug('THE NO. OF BYTES OF THE BINARY ATTR. VALUE IS'
||mods(counter1).binvals(counter2).length);
user_binvals(counter2) := mods(counter1).binvals(counter2).binval;
end loop;
-- Populate the mod_array accordingly with binary/normal attributes
if (mods(counter1).operation >= DBMS_LDAP.MOD_BVALUES) then
dbms_ldap.populate_mod_array(user_array,mods(counter1).operation -
DBMS_LDAP.MOD_BVALUES,mods(counter1).type,user_binvals);
user_binvals.delete;
else
dbms_ldap.populate_mod_array(user_array,mods(counter1).operation,
mods(counter1).type,user_vals);
user_vals.delete;
end if;
end loop;
-- Modify the entry
retval := dbms_ldap.modify_s(user_session,user_dn,user_array);
if retval = 0 then
rc := 0;
errormsg:='No error occurred while modifying the entry';
else
rc := retval;
errormsg :='Error code'||rc||' while modifying the entry';
end if;
-- Free the mod_array
dbms_ldap.free_mod_array(user_array);
plg_debug('FINISHED MODIFYING THE ENTRY');
exception
WHEN others THEN
plg_debug (SQLERRM);
end;
end moduser;
/
show error
exit;
F.3.2 Binary Operations with ldapadd
The entryobj object that the plug-in framework passes to an ldapadd plug-in now
holds binary attributes as binattr. This variable is a table of binattrobj objects.
The example that follows shows a post-add plug-in propagating a change (an added

Binary Support in the PL/SQLPlug-in Framework
PL/SQL Server Plug-in Developer's Reference F-15
user) in the plug-in directory to another directory. In the latter directory, the entry
appears under the DIT cn=users,dc=us,dc=example,dc=com.
create or replace package adduser as
procedure post_add(ldapplugincontext IN ODS.plugincontext,
result IN integer,
dn IN varchar2,
entry IN ODS.entryobj,
rc OUT integer,
errormsg OUT varchar2);
end adduser;
/
show error
CREATE OR REPLACE PACKAGE BODY adduser AS
procedure post_add(ldapplugincontext IN ODS.plugincontext,
result IN integer,
dn IN varchar2,
entry IN ODS.entryobj,
rc OUT integer,
errormsg OUT varchar2)
is
counter1 pls_integer;
counter2 pls_integer;
retval pls_integer := -1;
s integer;
user_session DBMS_LDAP.session;
user_dn varchar(256);
user_array DBMS_LDAP.mod_array;
user_vals DBMS_LDAP.string_collection;
user_binvals DBMS_LDAP.blob_collection;
ldap_host varchar(256);
ldap_port varchar(256);
ldap_user varchar(256);
ldap_passwd varchar(256);
begin
ldap_host :='backup.us.example.com';
ldap_port :='4000';
ldap_user :='cn=orcladmin';
ldap_passwd :='password';
plg_debug('START ADDING THE ENTRY');
-- Get a session
user_session := dbms_ldap.init(ldap_host, ldap_port);
-- Bind to the directory
retval := dbms_ldap.simple_bind_s(user_session, ldap_user, ldap_passwd);
-- Create a mod_array
user_array := dbms_ldap.create_mod_array(entry.binattr.count +
entry.attr.count);
-- Create a user_dn
user_dn := substr(dn,1,instr(dn,',',1,1))||'cn=users,dc=us,dc=example,
dc=com';
plg_debug('THE CREATED DN IS'||user_dn);
-- Populate the mod_array with binary attributes
for counter1 in 1..entry.binattr.count loop
for counter2 in 1..entry.binattr(counter1).binattrval.count loop

Binary Support in the PL/SQLPlug-in Framework
F-16 Oracle Fusion Middleware Administrator's Guide for Oracle Internet Directory
plg_debug('THE NAME OF THE BINARY ATTR. IS'||
entry.binattr(counter1).binattrname);
s := dbms_lob.getlength(entry.binattr(counter1).
binattrval(counter2));
plg_debug('THE NO. OF BYTES OF THE BINARY ATTR. VALUE IS'||s);
user_binvals(counter2) := entry.binattr(counter1).
binattrval(counter2);
end loop;
dbms_ldap.populate_mod_array(user_array,DBMS_LDAP.MOD_ADD,
entry.binattr(counter1).binattrname,user_binvals);
user_binvals.delete;
end loop;
-- Populate the mod_array with attributes
for counter1 in 1..entry.attr.count loop
for counter2 in 1..entry.attr(counter1).attrval.count loop
plg_debug('THE NORMAL ATTRIBUTE'||entry.attr(counter1).attrname||'
HAS THE VALUE'||entry.attr(counter1).attrval(counter2));
user_vals(counter2) := entry.attr(counter1).attrval(counter2);
end loop;
dbms_ldap.populate_mod_array(user_array,DBMS_LDAP.MOD_ADD,
entry.attr(counter1).attrname,user_vals);
user_vals.delete;
end loop;
-- Add the entry
retval := dbms_ldap.add_s(user_session,user_dn,user_array);
plg_debug('THE RETURN VALUE IS'||retval);
if retval = 0 then
rc := 0;
errormsg:='No error occurred while adding the entry';
else
rc := retval;
errormsg :='Error code'||rc||' while adding the entry';
end if;
-- Free the mod_array
dbms_ldap.free_mod_array(user_array);
retval := dbms_ldap.unbind_s(user_session);
plg_debug('FINISHED ADDING THE ENTRY');
exception
WHEN others THEN
plg_debug (SQLERRM);
end;
end adduser;
/
show error
exit;
F.3.3 Binary Operations with ldapcompare
The ldapcompare plug-in can use three new overloaded module interfaces to
compare binary attributes. If you want to use these interfaces to develop a plug-in
package that handles both binary and nonbinary attributes, you must include two
separate procedures in the package. The package name for both procedures is the
same because only one orclPluginName can be registered in the plug-in entry.

Binary Support in the PL/SQLPlug-in Framework
PL/SQL Server Plug-in Developer's Reference F-17
After updating an existing plug-in package to include a procedure that compares
binary attributes, reinstall the package. Recompile packages that depend on the
plug-in package.
The three new interfaces look like this:
PROCEDURE pre_compare (ldapplugincontext IN ODS.plugincontext,
dn IN VARCHAR2,
attrname IN VARCHAR2,
attrval IN BLOB,
rc OUT INTEGER,
errormsg OUT VARCHAR2 );
PROCEDURE when_compare_replace (ldapplugincontext IN ODS.plugincontext,
result OUT INTEGER,
dn IN VARCHAR2,
attrname IN VARCHAR2,
attrval IN BLOB,
rc OUT INTEGER,
errormsg OUT VARCHAR2 );
PROCEDURE post_compare (ldapplugincontext IN ODS.plugincontext,
result IN INTEGER,
dn IN VARCHAR2,
attrname IN VARCHAR2,
attrval IN BLOB,
rc OUT INTEGER,
errormsg OUT VARCHAR2 );
The example that follows compares a binary attribute of an entry in the plug-in
directory with a binary attribute of an entry in another directory. This package
replaces the compare code of the server with the compare code of the plug-in. The
package handles both binary and nonbinary attributes. As such it contains two
separate procedures.
create or replace package compareattr as
procedure when_compare_replace(ldapplugincontext IN ODS.plugincontext,
result OUT integer,
dn IN varchar2,
attrname IN VARCHAR2,
attrval IN BLOB,
rc OUT integer,
errormsg OUT varchar2);
procedure when_compare_replace(ldapplugincontext IN ODS.plugincontext,
result OUT integer,
dn IN varchar2,
attrname IN VARCHAR2,
attrval IN varchar2,
rc OUT integer,
errormsg OUT varchar2);
end compareattr;
/
show error
CREATE OR REPLACE PACKAGE BODY compareattr AS
procedure when_compare_replace(ldapplugincontext IN ODS.plugincontext,
result OUT integer,
dn IN varchar2,
attrname IN VARCHAR2,
attrval IN varchar2,
rc OUT integer,

Binary Support in the PL/SQLPlug-in Framework
F-18 Oracle Fusion Middleware Administrator's Guide for Oracle Internet Directory
errormsg OUT varchar2)
is
pos INTEGER := 2147483647;
begin
plg_debug('START');
plg_debug('THE ATTRNAME IS'||attrname||' AND THE VALUE IS'||attrval);
plg_debug('END');
rc := 0;
errormsg :='No error!!!';
exception
WHEN others THEN
plg_debug ('Unknown UTL_FILE Error');
end;
procedure when_compare_replace(ldapplugincontext IN ODS.plugincontext,
result OUT integer,
dn IN varchar2,
attrname IN VARCHAR2,
attrval IN BLOB,
rc OUT integer,
errormsg OUT varchar2)
is
counter pls_integer;
retval pls_integer := -1;
cmp_result integer;
s integer;
user_session DBMS_LDAP.session;
user_entry DBMS_LDAP.message;
user_message DBMS_LDAP.message;
user_dn varchar(256);
user_attrs DBMS_LDAP.string_collection;
user_attr_name VARCHAR2(256);
user_ber_elmt DBMS_LDAP.ber_element;
user_vals DBMS_LDAP.blob_collection;
ldap_host varchar(256);
ldap_port varchar(256);
ldap_user varchar(256);
ldap_passwd varchar(256);
ldap_base varchar(256);
begin
ldap_host :='backup.us.example.com';
ldap_port :='4000';
ldap_user :='cn=orcladmin';
ldap_passwd :='password';
ldap_base := dn;
plg_debug('STARTING COMPARISON IN WHEN REPLACE PLUG-IN');
s := dbms_lob.getlength(attrval);
plg_debug('THE NUMBER OF BYTES OF ATTRVAL'||s);
-- Get a session
user_session := dbms_ldap.init(ldap_host, ldap_port);
-- Bind to the directory
retval := dbms_ldap.simple_bind_s(user_session, ldap_user, ldap_passwd);
-- issue the search
user_attrs(1) := attrname;
retval := DBMS_LDAP.search_s(user_session, ldap_base,

Binary Support in the PL/SQLPlug-in Framework
PL/SQL Server Plug-in Developer's Reference F-19
DBMS_LDAP.SCOPE_BASE,
'objectclass=*',
user_attrs,
0,
user_message);
-- Get the entry in the other OID server
user_entry := DBMS_LDAP.first_entry(user_session, user_message);
-- Log the DN and the Attribute name
user_dn := DBMS_LDAP.get_dn(user_session, user_entry);
plg_debug('THE DN IS'||user_dn);
user_attr_name := DBMS_LDAP.first_attribute(user_session,user_entry,
user_ber_elmt);
-- Get the values of the attribute
user_vals := DBMS_LDAP.get_values_blob(user_session, user_entry,
user_attr_name);
-- Start the binary comparison between the ATTRVAL and the attribute
-- values
if user_vals.count > 0 then
for counter in user_vals.first..user_vals.last loop
cmp_result := dbms_lob.compare(user_vals(counter),attrval,
dbms_lob.getlength(user_vals(counter)),1,1);
if cmp_result = 0 then
rc := 0;
-- Return LDAP_COMPARE_TRUE
result := 6;
plg_debug('THE LENGTH OF THE ATTR.'||user_attr_name||' IN THE
ENTRY IS'||dbms_lob.getlength(user_vals(counter)));
errormsg :='NO ERROR. THE COMPARISON HAS SUCCEEDED.';
plg_debug(errormsg);
plg_debug('FINISHED COMPARISON');
return;
end if;
end loop;
end if;
rc := 1;
-- Return LDAP_COMPARE_FALSE
result := 5;
errormsg :='ERROR. THE COMPARISON HAS FAILED.';
plg_debug('THE LENGTH OF THE ATTR.'||user_attr_name||' IN THE ENTRY IS'
||dbms_lob.getlength(user_vals(user_vals.last)));
plg_debug(errormsg);
plg_debug('FINISHED COMPARISON');
-- Free user_vals
dbms_ldap.value_free_blob(user_vals);
exception
WHEN others THEN
plg_debug (SQLERRM);
end;
end compareattr;
/
show error
exit;

Database Object Types Defined
F-20 Oracle Fusion Middleware Administrator's Guide for Oracle Internet Directory
F.4 Database Object Types Defined
This section defines the object types introduced in the Plug-in LDAP API. All of these
definitions are in Oracle Directory Server database schema. Note that the API includes
object types that enable plug-ins to extract binary data from the database.
create or replace type strCollection as TABLE of VARCHAR2(512);
/
create or replace type pluginContext as TABLE of VARCHAR2(512);
/
create or replace type attrvalType as TABLE OF VARCHAR2(4000);
/
create or replace type attrobj as object (
attrname varchar2(2000),
attrval attrvalType
);
/
create or replace type attrlist as table of attrobj;
/
create or replace type binattrvalType as TABLE OF BLOB;
/
create or replace type binattrobj as object (
binattrname varchar2(2000),
binattrval binattrvalType
);
/
create or replace type binattrlist as table of binattrobj;
/
create or replace type entryobj as object (
entryname varchar2(2000),
attr attrlist,
binattr binattrlist
);
/
create or replace type entrylist as table of entryobj;
/
create or replace type bvalobj as object (
length integer,
val varchar2(4000)
);
/
create or replace type bvallist as table of bvalobj;
/
create or replace type binvalobj as object (
length integer,
binval blob
);
/
create or replace type binvallist as table of binvalobj;
/
create or replace type modobj as object (
operation integer,
type varchar2(256),
vals bvallist,
binvals binvallist
);
/
create or replace type modlist as table of modobj;

Specifications for PL/SQL Plug-in Procedures
PL/SQL Server Plug-in Developer's Reference F-21
F.5 Specifications for PL/SQL Plug-in Procedures
When you use the plug-ins, you must adhere to the signature defined for each of them.
Each signature is provided here.
PROCEDURE pre_add (ldapplugincontext IN ODS.plugincontext,
dn IN VARCHAR2,
entry IN ODS.entryobj,
rc OUT INTEGER,
errormsg OUT VARCHAR2);
PROCEDURE when_add (ldapplugincontext IN ODS.plugincontext,
dn IN VARCHAR2,
entry IN ODS.entryobj,
rc OUT INTEGER,
errormsg OUT VARCHAR2);
PROCEDURE when_add_replace (ldapplugincontext IN ODS.plugincontext,
dn IN VARCHAR2,
entry IN ODS.entryobj,
rc OUT INTEGER,
errormsg OUT VARCHAR2);
PROCEDURE post_add (ldapplugincontext IN ODS.plugincontext,
result IN INTEGER,
dn IN VARCHAR2,
entry IN ODS.entryobj,
rc OUT INTEGER,
errormsg OUT VARCHAR2);
PROCEDURE pre_modify (ldapplugincontext IN ODS.plugincontext,
dn IN VARCHAR2,
mods IN ODS.modlist,
rc OUT INTEGER,
errormsg OUT VARCHAR2);
PROCEDURE when_modify (ldapplugincontext IN ODS.plugincontext,
dn IN VARCHAR2,
mods IN ODS.modlist,
rc OUT INTEGER,
errormsg OUT VARCHAR2);
PROCEDURE when_modify_replace (ldapplugincontext IN ODS.plugincontext,
dn IN VARCHAR2,
mods IN ODS.modlist,
rc OUT INTEGER,
errormsg OUT VARCHAR2);
PROCEDURE post_modify (ldapplugincontext IN ODS.plugincontext,
result IN INTEGER,
dn IN VARCHAR2,
mods IN ODS.modlist,
rc OUT INTEGER,
errormsg OUT VARCHAR2);

Specifications for PL/SQL Plug-in Procedures
F-22 Oracle Fusion Middleware Administrator's Guide for Oracle Internet Directory
PROCEDURE pre_compare (ldapplugincontext IN ODS.plugincontext,
dn IN VARCHAR2,
attrname IN VARCHAR2,
attrval IN VARCHAR2,
rc OUT INTEGER,
errormsg OUT VARCHAR2
);
PROCEDURE pre_compare (ldapplugincontext IN ODS.plugincontext,
dn IN VARCHAR2,
attrname IN VARCHAR2,
attrval IN BLOB,
rc OUT INTEGER,
errormsg OUT VARCHAR2 );
PROCEDURE when_compare_replace (ldapplugincontext IN ODS.plugincontext,
result OUT INTEGER,
dn IN VARCHAR2,
attrname IN VARCHAR2,
attrval IN VARCHAR2,
rc OUT INTEGER,
errormsg OUT VARCHAR2
);
PROCEDURE when_compare_replace (ldapplugincontext IN ODS.plugincontext,
result OUT INTEGER,
dn IN VARCHAR2,
attrname IN VARCHAR2,
attrval IN BLOB,
rc OUT INTEGER,
errormsg OUT VARCHAR2 );
PROCEDURE post_compare (ldapplugincontext IN ODS.plugincontext,
result IN INTEGER,
dn IN VARCHAR2,
attrname IN VARCHAR2,
attrval IN VARCHAR2,
rc OUT INTEGER,
errormsg OUT VARCHAR2
);
PROCEDURE post_compare (ldapplugincontext IN ODS.plugincontext,
result IN INTEGER,
dn IN VARCHAR2,
attrname IN VARCHAR2,
attrval IN BLOB,
rc OUT INTEGER,
errormsg OUT VARCHAR2 );
PROCEDURE pre_delete (ldapplugincontext IN ODS.plugincontext,
dn IN VARCHAR2,
rc OUT INTEGER,
errormsg OUT VARCHAR2
);
PROCEDURE when_delete (ldapplugincontext IN ODS.plugincontext,
dn IN VARCHAR2,
rc OUT INTEGER,
errormsg OUT VARCHAR2

Specifications for PL/SQL Plug-in Procedures
PL/SQL Server Plug-in Developer's Reference F-23
);
PROCEDURE when_delete_replace (ldapplugincontext IN ODS.plugincontext,
dn IN VARCHAR2,
rc OUT INTEGER,
errormsg OUT VARCHAR2
);
PROCEDURE post_delete (ldapplugincontext IN ODS.plugincontext,
result IN INTEGER,
dn IN VARCHAR2,
rc OUT INTEGER,
errormsg OUT VARCHAR2
);
PROCEDURE pre_search (ldapplugincontext IN ODS.plugincontext,
baseDN IN VARCHAR2,
scope IN INTEGER,
filterStr IN VARCHAR2,
requiredAttr IN ODS.strCollection,
rc OUT INTEGER,
errormsg OUT VARCHAR2
);
PROCEDURE post_search (ldapplugincontext IN ODS.plugincontext,
result IN INTEGER,
baseDN IN VARCHAR2,
scope IN INTEGER,
filterStr IN VARCHAR2,
requiredAttr IN ODS.strCollection,
rc OUT INTEGER,
errormsg OUT VARCHAR2
);
PROCEDURE pre_bind (ldapplugincontext IN ODS.plugincontext,
dn IN VARCHAR2,
passwd IN VARCHAR2,
rc OUT INTEGER,
errormsg OUT VARCHAR2
);
PROCEDURE when_bind_replace (ldapplugincontext IN ODS.plugincontext,
result OUT INTEGER,
dn IN VARCHAR2,
passwd IN VARCHAR2,
rc OUT INTEGER,
errormsg OUT VARCHAR2
);
PROCEDURE post_bind (ldapplugincontext IN ODS.plugincontext,
result IN INTEGER,
dn IN VARCHAR2,
passwd IN VARCHAR2,
rc OUT INTEGER,
errormsg OUT VARCHAR2
);

Specifications for PL/SQL Plug-in Procedures
F-24 Oracle Fusion Middleware Administrator's Guide for Oracle Internet Directory

G
The LDAP Filter Definition G-1
GThe LDAP Filter Definition
The paper contained in this appendix is copied with permission from RFC 2254 of the
Internet Engineering Task Force. This document is located at:
http://www.ietf.org
The contents of this paper may have been superseded by later papers or other
information. Check the above Web site and related sites for additional or
supplementary information.
Network Working Group T. Howes Request for Comments: 2254 Netscape
Communications Corp. Category: Standards Track December 1997
The String Representation of LDAP Search Filters
1. Status of this Memo
This document specifies an Internet standards track protocol for the Internet
community, and requests discussion and suggestions for improvements. Please refer
to the current edition of the "Internet Official Protocol Standards" (STD 1) for the
standardization state and status of this protocol. Distribution of this memo is
unlimited.
Copyright Notice
Copyright (C) The Internet Society (1997). All Rights Reserved.
IESG Note
This document describes a directory access protocol that provides both read and
update access. Update access requires secure authentication, but this document does
not mandate implementation of any satisfactory authentication mechanisms.
In accordance with RFC 2026, section 4.4.1, this specification is being approved by
IESG as a Proposed Standard despite this limitation, for the following reasons:
a. to encourage implementation and interoperability testing of these protocols (with or
without update access) before they are deployed, and
NOTE: ORACLE DISCLAIMS ALL WARRANTIES, EXPRESSED
OR IMPLIED, INCLUDING BUT NOT LIMITED TO ANY
WARRANTY THAT THE USE OF THE INFORMATION HEREIN
WILL NOT INFRINGE ANY RIGHTS OR ANY IMPLIED
WARRANTIES OF MERCHANTABILITY OR FITNESS FOR A
PARTICULAR PURPOSE.

G-2 Oracle Fusion Middleware Administrator's Guide for Oracle Internet Directory
b. to encourage deployment and use of these protocols in read-only applications. (e.g.
applications where LDAPv3 is used as a query language for directories which are
updated by some secure mechanism other than LDAP), and
c. to avoid delaying the advancement and deployment of other Internet
standards-track protocols which require the ability to query, but not update, LDAPv3
directory servers.
Readers are hereby warned that until mandatory authentication mechanisms are
standardized, clients and servers written according to this specification which make
use of update functionality are UNLIKELY TO INTEROPERATE, or MAY
INTEROPERATE ONLY IF AUTHENTICATION IS REDUCED TO AN
UNACCEPTABLY WEAK LEVEL.
Implementors are hereby discouraged from deploying LDAPv3 clients or servers
which implement the update functionality, until a Proposed Standard for mandatory
authentication in LDAPv3 has been approved and published as an RFC.
2. Abstract
The Lightweight Directory Access Protocol (LDAP) [1] defines a network
representation of a search filter transmitted to an LDAP server. Some applications may
find it useful to have a common way of representing these search filters in a
human-readable form. This document defines a human-readable string format for
representing LDAP search filters.
This document replaces RFC 1960, extending the string LDAP filter definition to
include support for LDAP version 3 extended match filters, and including support for
representing the full range of possible LDAP search filters.
3. LDAP Search Filter Definition
An LDAPv3 search filter is defined in Section 4.5.1 of [1] as follows:
Filter ::= CHOICE {
and [0] SET OF Filter,
or [1] SET OF Filter,
not [2] Filter,
equalityMatch [3] AttributeValueAssertion,
substrings [4] SubstringFilter,
greaterOrEqual [5] AttributeValueAssertion,
lessOrEqual [6] AttributeValueAssertion,
present [7] AttributeDescription,
approxMatch [8] AttributeValueAssertion,
extensibleMatch [9] MatchingRuleAssertion
}
SubstringFilter ::= SEQUENCE {
type AttributeDescription,
SEQUENCE OF CHOICE {
initial [0] LDAPString,

The LDAP Filter Definition G-3
any [1] LDAPString,
final [2] LDAPString
}
}
AttributeValueAssertion ::= SEQUENCE {
attributeDesc AttributeDescription,
attributeValue AttributeValue
}
MatchingRuleAssertion ::= SEQUENCE {
matchingRule [1] MatchingRuleID OPTIONAL,
type [2] AttributeDescription OPTIONAL,
matchValue [3] AssertionValue,
dnAttributes [4] BOOLEAN DEFAULT FALSE
}
AttributeDescription ::= LDAPString
AttributeValue ::= OCTET STRING
MatchingRuleID ::= LDAPString
AssertionValue ::= OCTET STRING
LDAPString ::= OCTET STRING
where the LDAPString above is limited to the UTF-8 encoding of the ISO 10646
character set [4]. The AttributeDescription is a string representation of the attribute
description and is defined in [1].
The AttributeValue and AssertionValue OCTET STRING have the form defined in [2].
The Filter is encoded for transmission over a network using the Basic Encoding Rules
defined in [3], with simplifications described in [1].
4. String Search Filter Definition
The string representation of an LDAP search filter is defined by the following
grammar, following the ABNF notation defined in [5]. The filter format uses a prefix
notation.
filter = "(" filtercomp ")"
filtercomp = and / or / not / item
and = "&" filterlist
or = "|" filterlist
not = "!" filter
filterlist = 1*filter
item = simple / present / substring / extensible
simple = attr filtertype value
filtertype = equal / approx / greater / less
equal = "="

G-4 Oracle Fusion Middleware Administrator's Guide for Oracle Internet Directory
approx = "~="
greater = ">="
less = "<="
extensible = attr [":dn"] [":" matchingrule] ":=" value
/ [":dn"] ":" matchingrule ":=" value
present = attr "=*"
substring = attr "=" [initial] any [final]
initial = value
any = "*" *(value "*")
final = value
attr = AttributeDescription from Section 4.1.5 of [1]
matchingrule = MatchingRuleId from Section 4.1.9 of [1]
value = AttributeValue from Section 4.1.6 of [1]
The attr, matchingrule, and value constructs are as described in the corresponding
section of [1] given above.
If a value should contain any of the following characters
Character ASCII value ---------------------------
* 0x2a
( 0x28
) 0x29
\ 0x5c
NUL 0x00
then the character must be encoded as the backslash '\' character (ASCII 0x5c)
followed by the two hexadecimal digits representing the ASCII value of the encoded
character. The case of the two hexadecimal digits is not significant.
This simple escaping mechanism eliminates filter-parsing ambiguities and allows any
filter that can be represented in LDAP to be represented as a NUL-terminated string.
Other characters besides the ones listed above may be escaped using this mechanism,
for example, non-printing characters.
For example, the filter checking whether the "cn" attribute contained a value with the
character "*" anywhere in it would be represented as
"(cn=*\2a*)".
Note that although both the substring and present productions in the grammar above
can produce the "attr=*" construct, this construct is used only to denote a presence
filter.
5. Examples
This section gives a few examples of search filters written using this notation.
(cn=Babs Jensen)
(!(cn=Tim Howes))
(&(objectClass=Person)(|(sn=Jensen)(cn=Babs J*)))

The LDAP Filter Definition G-5
(o=univ*of*mich*)
The following examples illustrate the use of extensible matching.
(cn:1.2.3.4.5:=Fred Flintstone)
(sn:dn:2.4.6.8.10:=Barney Rubble)
(o:dn:=Ace Industry)
(:dn:2.4.6.8.10:=Dino)
The second example illustrates the use of the ":dn" notation to indicate that matching
rule "2.4.6.8.10" should be used when making comparisons, and that the attributes of
an entry's distinguished name should be considered part of the entry when evaluating
the match.
The third example denotes an equality match, except that DN components should be
considered part of the entry when doing the match.
The fourth example is a filter that should be applied to any attribute supporting the
matching rule given (since the attr has been left off). Attributes supporting the
matching rule contained in the DN should also be considered.
The following examples illustrate the use of the escaping mechanism.
(o=Parens R Us \28for all your parenthetical needs\29)
(cn=*\2A*)
(filename=C:\5cMyFile)
(bin=\00\00\00\04)
(sn=Lu\c4\8di\c4\87)
The first example shows the use of the escaping mechanism to represent parenthesis
characters. The second shows how to represent a "*" in a value, preventing it from
being interpreted as a substring indicator. The third illustrates the escaping of the
backslash character.
The fourth example shows a filter searching for the four-byte value 0x00000004,
illustrating the use of the escaping mechanism to represent arbitrary data, including
NUL characters.
The final example illustrates the use of the escaping mechanism to represent various
non-ASCII UTF-8 characters.
6. Security Considerations
This memo describes a string representation of LDAP search filters. While the
representation itself has no known security implications, LDAP search filters do. They
are interpreted by LDAP servers to select entries from which data is retrieved. LDAP
servers should take care to protect the data they maintain from unauthorized access.
7. References
[1] Wahl, M., Howes, T., and S. Kille, "Lightweight Directory Access
Protocol (v3)", RFC 2251, December 1997.
[2] Wahl, M., Coulbeck, A., Howes, T., and S. Kille, "Lightweight
Directory Access Protocol (v3): Attribute Syntax Definitions", RFC
2252, December 1997.
[3] Specification of ASN.1 encoding rules: Basic, Canonical, and

G-6 Oracle Fusion Middleware Administrator's Guide for Oracle Internet Directory
Distinguished Encoding Rules, ITU-T Recommendation X.690, 1994.
[4] Yergeau, F., "UTF-8, a transformation format of Unicode and ISO
10646", RFC 2044, October 1996.
[5] Crocker, D., "Standard for the Format of ARPA Internet Text
Messages", STD 11, RFC 822, August 1982.
8. Author's Address
Tim Howes Netscape Communications Corp. 501 E. Middlefield Road Mountain
View, CA 94043 USA Phone: +1 415 937-3419 EMail: howes@netscape.com
9. Full Copyright Statement
Copyright (C) The Internet Society (1997). All Rights Reserved.
This document and translations of it may be copied and furnished to others, and
derivative works that comment on or otherwise explain it or assist in its
implementation may be prepared, copied, published and distributed, in whole or in
part, without restriction of any kind, provided that the above copyright notice and this
paragraph are included on all such copies and derivative works. However, this
document itself may not be modified in any way, such as by removing the copyright
notice or references to the Internet Society or other
Internet organizations, except as needed for the purpose of developing Internet
standards in which case the procedures for copyrights defined in the Internet
Standards process must be followed, or as required to translate it into languages other
than English.
The limited permissions granted above are perpetual and will not be revoked by the
Internet Society or its successors or assigns.
This document and the information contained herein is provided on an "AS IS" basis
and THE INTERNET SOCIETY AND THE INTERNET ENGINEERING TASK FORCE
DISCLAIMS ALL WARRANTIES, EXPRESS OR IMPLIED, INCLUDING BUT NOT
LIMITED TO ANY WARRANTY THAT THE USE OF THE INFORMATION HEREIN
WILL NOT INFRINGE ANY RIGHTS OR ANY IMPLIED WARRANTIES OF
MERCHANTABILITY OR FITNESS FOR A PARTICULAR PURPOSE.

H
The Access Control Directive Format H-1
HThe Access Control Directive Format
This appendix describes the format (syntax) of any access control item (ACI). It
contains these topics:
■Section H.1, "Schema for orclACI"
■Section H.2, "Schema for orclEntryLevelACI"
H.1 Schema for orclACI
The access control directive defined by the user attribute orclACI has the following
schema:
OrclACI:{ object_identifier NAME 'orclACI' DESC 'Stores an inheritable ACI'
EQUALITY
accessDirectiveMatch SYNTAX 'accessDirectiveDescription' USAGE
'directoryOperation'}
accessDirectiveDescription has the following BNF:
<accessDirectiveDescription>
::= access to <object> [by <subject> ( <accessList> )]+
<object> ::= [attr <EQ-OR-NEQ> ( * | (<attrList>) ) | entry]
[filter=(<ldapFilter>)] [DenyGroupOverride] [AppendToAll]
<subject> ::= <entity> [<BindMode>] [<BindIPFilter>] [Added_object_
constraint=(<ldapFilter>)]
<entity> ::= * | self | dn="<regex>" | dnAttr=(<dn_attribute>) | group="<dn>" |
guidattr=(<guid_attribute>) | groupattr=(<group_attribute>) | [SuperUser]
BindMode=(LDAP_authentication_choice)|LDAP_security_choice)
LDAP_authentication_choice::= proxy | simple | MD5Digest | PKCS12
LDAP_security_choice::= SSLNoAuth | SSLOneWay | SASL
BindIPFilter=(<ldapFilter for orclipaddress>)
ex: (|(orclipaddress=1.2.3.*)(orclipaddress=1.2.4.*)),
(&(orclipaddress!=1.2.*)(orclipaddress!=3.4.*))
<accessList> ::= <access> | <access>, <accessList>
<access> ::= none | compare | search | browse | proxy | read | selfwrite | write |
add | delete | nocompare | nosearch | nobrowse | noproxy |noread | noselfwrite |
nowrite | noadd | nodelete
<attrList> ::= <attribute name> | <attribute name>,<attrList>
<EQ-OR-NEQ> ::= = | !=

Schema for orclEntryLevelACI
H-2 Oracle Fusion Middleware Administrator's Guide for Oracle Internet Directory
<regex> ::= <dn> | *,<dn_of_any_subtree_root>
H.2 Schema for orclEntryLevelACI
The BER format for orclEntryLevelACI is the same as the format for orclACI.
The entry level access control directive defined by the user attribute
orclEntryLevelACI has the following schema:
"orclEntryLevelACI":
{ object_identifier NAME 'orclEntryLevelACI' DESC 'Stores entry level ACL
Directive'
EQUALITY accessDirectiveMatch SYNTAX 'orclEntryLevelACIDescription'
USAGE 'directoryOperation' }
<orclEntryLevelACIDescription>
::= access to <object> [by <subject> ( <accessList> )]+
Note: The regular expression defined earlier is not meant to
match any arbitrary expression. The syntax only allows expressions
where the wildcard is followed by a comma and a valid DN. The
latter DN denoted by <dn_of_any_subtree_root> is intended to
specify the root of some subtree.

I
Globalization Support in the Directory I-1
I Globalization Support in the Directory
Oracle Internet Directory uses Globalization Support to store, process and retrieve
data in native languages. It ensures that Oracle Internet Directory utilities and error
messages automatically adapt to the native language and locale.
This chapter discusses Globalization Support as used by Oracle Internet Directory and
tells you the required NLS_LANG environment variables for the various components
and tools in an Oracle Internet Directory environment.
This chapter contains these topics:
■Section I.1, "About Character Sets and the Directory"
■Section I.2, "The NLS_LANG Environment Variable"
■Section I.3, "Using Non-AL32UTF8 Databases"
■Section I.4, "Using Globalization Support with LDIF Files"
■Section I.5, "Using Globalization Support with Command-Line LDAP Tools"
■Section I.6, "Setting NLS_LANG in the Client Environment"
■Section I.7, "Using Globalization Support with Bulk Tools"
I.1 About Character Sets and the Directory
When computer systems process characters, they use numeric codes instead of the
graphical representation of the character. For example, when the database stores the
letter A, it actually stores a numeric code that is interpreted by software as the letter.
A group of characters (for example, alphabetic characters, ideographs, symbols,
punctuation marks, and control characters) can be encoded as a character set. Each
encoded character set assigns a unique code to each character in the set. For example,
in the ASCII encoding scheme, the character code of the first character of the English
upper-case alphabet is Ox4; in the EBCDIC encoding scheme, it is Oxc1.
The computer industry uses many encoded character sets. These character sets can
differ in the number and types of characters available and in many other ways as well.
When you create a database, you specify an encoded character set. Choosing a
character set determines, among other things, what languages can be represented in
the database.
See Also: Section 3.8, "Globalization Support" before configuring
Globalization Support.

About Character Sets and the Directory
I-2 Oracle Fusion Middleware Administrator's Guide for Oracle Internet Directory
Oracle supports most national, international, and vendor-specific encoded character
set standards.
This section contains the following topics:
■Section I.1.1, "About Unicode"
■Section I.1.2, "About Oracle and UTF-8"
■Section I.1.3, "Migration from UTF8 to AL32UTF8 when Upgrading Oracle
Internet Directory"
I.1.1 About Unicode
No single character set contains enough characters to meet the requirements of
day-to-day e-business requirements. For example, no one national character set can
represent all the languages in the European Union. Moreover, there are potential
conflicts between character sets because the same character can be represented by
different codes in different character sets.
To overcome these obstacles, a global character set, called Unicode, was developed. It
is a universal encoded character set that can store information from any language
including punctuation marks, diacritics, mathematical symbols, technical symbols,
musical symbols, and so forth. As of version 3.2, the Unicode Standard supports over
95,000 characters from the world's alphabets, ideograph sets, and symbol collections. It
includes 45,000 supplementary characters, most of which are Chinese, Japanese, and
Korean characters that are rarely used but nevertheless need representation in
electronic documentation.
Unicode has more than one implementation standard, and these are described in
Table I–1.
I.1.2 About Oracle and UTF-8
Oracle began supporting Unicode as a database character set beginning with Oracle
database version 7. With Oracle9i, Oracle added a new UTF-8 character set called
AL32UTF8. This database character set supports the latest version of Unicode (3.2),
including the latest supplementary characters. Oracle intends to enhance AL32UTF8 as
necessary to support future versions of the Unicode standard.
Table I–1 Unicode Implementations
Implementation Description
UTF-8 A variable-width 8-bit encoding of Unicode. One Unicode
character can be one, two, three, or four bytes. Characters from
European scripts are represented in one or two bytes. Those
from Asian scripts are represented in three bytes, and
supplementary characters are represented in four.
UCS-2 A fixed-width 16-bit encoding of Unicode in which each
character, regardless of the script, is two bytes.
UTF-16 The 16-bit encoding of Unicode. It is an extension of UCS-2 that
supports the supplementary characters added in Unicode 3.1.
One character can be two or four bytes. Characters from
European and Asian scripts are represented in two bytes, and
supplementary characters are represented in four.

The NLS_LANG Environment Variable
Globalization Support in the Directory I-3
I.1.3 Migration from UTF8 to AL32UTF8 when Upgrading Oracle Internet Directory
Oracle Internet Directorynow supports AL32UTF8. If you have upgraded Oracle
Internet Directory from a version before 10g (10.1.4.0.1), then, for better performance,
Oracle recommends that you change the character set for the directory database from
UTF8 to AL32UTF8. To do this:
1. Run the character set scanner (CSSCAN) to ensure that there are no invalid UTF8
characters inside your current database.
2. Run the CSALTER script to update the database to AL32UTF8.
I.2 The NLS_LANG Environment Variable
The NLS_LANG parameter has three components—language, territory, and
charset—in the form:
NLS_LANG = language_territory.charset
Each component controls the operation of a subset of Globalization Support features.
Components of the NLS_LANG parameter are shown in Table I–2.
You can set NLS_LANG as an environment variable at the command line. The following
are examples of legal values for NLS_LANG:
■AMERICAN_AMERICA.AL32UTF8
See Also: The chapter on character set migration in the Oracle
Database Globalization Support Guide in the Oracle Database
Documentation Library
Table I–2 Components of the NLS_LANG Parameter
Component Description
language Specifies conventions such as the language used for Oracle
messages, day names, and month names. Each supported
language has a unique name—for example, American English,
French, or German.
If language is not specified, the value defaults to American
English.
See Also: Oracle Database Globalization Support Guide in the
Oracle Database Documentation Library for a complete list of
languages
territory Specifies conventions such as the default calendar, collation,
date, monetary, and numeric formats. Each supported territory
has a unique name; for example, America, France, or Canada.
If territory is not specified, the value defaults to America.
See Also: Oracle Database Globalization Support Guide in the
Oracle Database Documentation Library for a complete list of
terrotories
charset Specifies the character set used by the client application
(normally that of the user's terminal). Each supported character
set has a unique acronym, for example, WE8MSWIN1252,
JA16SJIS, or AL32UTF8.
See Also: Oracle Database Globalization Support Guide in the
Oracle Database Documentation Library for a complete list of
character sets

Using Non-AL32UTF8 Databases
I-4 Oracle Fusion Middleware Administrator's Guide for Oracle Internet Directory
■JAPANESE_JAPAN.AL32UTF8
I.3 Using Non-AL32UTF8 Databases
You can run the Oracle directory server and database tools on a non-AL32UTF8
database, but be sure that all characters in the client character set are included in the
database character set (with the same or different codes). Otherwise, you can lose data
during ldapadd, ldapdelete, ldapmodify, or ldapmodifydn operations. For example,
suppose that you perform an ldapadd operation using a multibyte character set on an
underlying database that uses only single-byte characters. You will lose data because
not all of the bytes you enter are accepted by the database.
I.4 Using Globalization Support with LDIF Files
Attribute type names are always ASCII strings that cannot contain multibyte
characters. Oracle Internet Directory does not support multibyte characters in attribute
type names. However, Oracle Internet Directory does support attribute values
containing multibyte characters such as those in the simplified Chinese (ZHS16GBK)
character set.
Attribute values can be encoded in different ways to allow Oracle Internet Directory
tools to interpret them properly. There are two scenarios, described the following
sections:
■Section I.4.1, "An LDIF file Containing Only ASCII Strings"
■Section I.4.2, "An LDIF file Containing UTF-8 Encoded Strings"
I.4.1 An LDIF file Containing Only ASCII Strings
In this scenario, character strings for attribute values are also in ASCII.
Because all tools use the UTF-8 character set by default, and ASCII is a proper subset
of UTF-8, all tools can interpret these files. The same is true of keyboard input of
values that are simply ASCII strings.
I.4.2 An LDIF file Containing UTF-8 Encoded Strings
In this scenario, character strings for attribute values are also in UTF-8.
Because, by default, all tools use the UTF-8 character set, all tools can interpret these
files. The same is true of keyboard input of values that are UTF-8 strings.
In such a file, some characters may be multibyte. Multibyte characters strings can be
present in the LDIF files as attribute values or given as keyboard input. They can be
encoded in their native character set or in UTF-8. They can also be BASE64 encoded
representations of either the native or the UTF-8 string.
Consider the following cases:
■CASE 1: Native Strings (Non-UTF-8)
■CASE 2: UTF-8 Strings
■CASE 3: BASE64 Encoded UTF-8 Strings
■CASE 4: BASE64 Encoded Native Strings
See Also: "LDIF file formatting rules and examples" in Oracle
Fusion Middleware Reference for Oracle Identity Management

Using Globalization Support with Command-Line LDAP Tools
Globalization Support in the Directory I-5
Because the directory server understands and expects only UTF-8 encoded strings,
cases 1, 3, and 4 need to undergo conversion to UTF-8 strings before they can be sent
to the LDAP server.
I.4.2.1 CASE 1: Native Strings (Non-UTF-8)
If NLS_LANG is not set, use the -E character_set argument with the command-line
LDAP tools ldapadd, ldapaddmt, ldapbind, ldapcompare, ldapmoddn,
ldapmod, ldapdelete, and ldapsearch. You do not need to use the -E
character_set argument if NLS_LANG is set.
This example converts simplified Chinese native strings to UTF-8. The baseDN can be
a simplified Chinese string:
ldapsearch -h my_host -D "cn=orcladmin" -q -p 3060 -E ".ZHS16GBK" -b base_DN \
-s base "objectclass=*"
Use the encode="character_set" argument with the command-line bulk tools
bulkload, bulkmodify, bulkdelete, and ldifwrite, where character_set is
the character set used in the LDIF file. Set NLS_LANG to the character set used by the
directory's database.
I.4.2.2 CASE 2: UTF-8 Strings
No conversion is required.
I.4.2.3 CASE 3: BASE64 Encoded UTF-8 Strings
You do not need to use the -E character_set argument with the LDAP tools, even
if NLS_LANG is not set.
You do not need to use the encode=character_set argument with the
command-line tools. Oracle Internet Directory tools automatically decode BASE64
encoded UTF-8 strings to UTF-8 strings.
I.4.2.4 CASE 4: BASE64 Encoded Native Strings
If NLS_LANG is not set, use the -E character_set argument with the command-line
LDAP tools ldapadd, ldapaddmt, ldapbind, ldapcompare, ldapmoddn,
ldapmod, ldapdelete, and ldapsearch. You do not need to use the -E
character_set argument if NLS_LANG is set.
Use the encode="character_set" argument with the command-line bulk tools
bulkload, bulkmodify, bulkdelete, and ldifwrite, where character_set is
the character set used in the LDIF file. Set NLS_LANG to the character set used by the
directory's database.
Oracle Internet Directory tools automatically decode BASE64 encoded native strings to
simple native strings. The native strings are then converted to the equivalent UTF-8
strings.
I.5 Using Globalization Support with Command-Line LDAP Tools
The Oracle Internet Directory command-line tools read keyboard input or LDIF file
input in the following ways:
■ASCII characters only
Note: In any given input file, only one character set may be used.

Using Globalization Support with Command-Line LDAP Tools
I-6 Oracle Fusion Middleware Administrator's Guide for Oracle Internet Directory
■Non-ASCII input (native language character set)
■BASE64 encoded values of UTF-8 or native strings (from LDIF file only)
If the character set being given as input from an LDIF file or keyboard is not UTF-8,
then the command-line tools need to convert the input into UTF-8 format before
sending it to the LDAP server.
You enable the command-line tools to convert the input into UTF-8 by specifying the
-E character_set argument with any of the command-line LDAP tools. Use the
encode="character_set" argument with bulkload, bulkmodify, bulkdelete, and
ldifwrite.
This section contains these topics:
■Section I.5.1, "Specifying the -E Argument When Using Each Tool"
■Section I.5.2, "Examples: Using the -E Argument with Command-Line LDAP
Tools"
I.5.1 Specifying the -E Argument When Using Each Tool
The client tools always assume UTF-8 (the Oracle character set name is AL32UTF8) to
be the character set unless otherwise specified by the -E argument. The
BASE64-encoded values are decoded, and then the decoded buffer is converted to
UTF-8 if the -E argument is specified. For example, if you specify -E ".ZHS16GBK",
then the decoded buffer is converted from simplified Chinese GBK to Unicode UTF-8
before being sent to the directory server.
Specifying the -E argument ensures that proper character set conversion can occur
from the character set you specify for the -E argument (-E ".character_set") to the
AL32UTF8 character set.
The command-line tools use the -E argument to process the input in the character set
specified for the -E argument. They display their output in the character set specified
in the NLS_LANG environment variable.
For example, to add entries from an LDIF file encoded in the simplified Chinese
character set (ZHS16GBK) by using ldapadd, type:
ldapadd -h myhost -p 3060 -E ".ZHS16GBK" -D cn=orcladmin -q -f my_ldif_file
In this example, the ldapadd tool converts the characters from ".ZHS16GBK"
(simplified Chinese character set) to ".AL32UTF8" before they are sent across the wire
to the directory server.
I.5.2 Examples: Using the -E Argument with Command-Line LDAP Tools
Table I–3 provides additional examples of how to use the -E argument correctly for
each command-line tool. In each example, the command converts data from simplified
Chinese, as specified by the value ".ZHS16GBK", to AL32UTF8. For example, in each
command, the value for the -D option and the password typed at the prompt when -q
is specified are in GBK. Specifying the -E argument converts them to UTF-8.
Note that, in the examples in Table I–3, we do not show any actual characters
belonging to the .ZHS16GBK character set. These examples would, therefore, work
without the -E argument. However, if the argument values contained actual
characters in the .ZHS16GBK character set, then we would need to use the -E
argument.

Setting NLS_LANG in the Client Environment
Globalization Support in the Directory I-7
I.6 Setting NLS_LANG in the Client Environment
If the output required by the client is UTF-8, then you do not need to set the NLS_
LANG environment variable. In this case, the character set component of the NLS_LANG
environment variable defaults to AL32UTF8, and both the input path from client to
server, and the output path from server to client, do not require any character set
conversion.
If the output required by the client is not UTF-8, then you must set the NLS_LANG
environment variable. This ensures that proper character set conversion can occur
from the AL32UTF8 character set to the character set required by the client.
For example, if the NLS_LANG environment variable is set to the simplified Chinese
character set, then the command-line tool displays output in that character set.
Otherwise the output defaults to the AL32UTF8 character set.
See Also: "Oracle Internet Directory Administration Tools" in
Oracle Fusion Middleware Reference for Oracle Identity Management for
syntax and usage notes for each of the command-line tools
Table I–3 Examples: Using the -E Argument with Command-Line Tools
Tool Example
ldapbind
ldapbind -h my_host -p 3060 -E ".ZHS16GBK" -D "o=example,c=us" -q
ldapsearch
ldapsearch -h my_host -p 3060 -E ".ZHS16GBK" -D "o=example,c=us" -q
ldapadd
ldapadd -h my_host -p 3060 -E ".ZHS16GBK" -D "o=example,c=us" -q
ldapaddmt
ldapaddmt -h my_host -p 3060 -E ".ZHS16GBK" -D "o=example,c=us" -q
ldapmodify
ldapmodify -h my_host -p 3060 -E ".ZHS16GBK" -D "o=example,c=us" -q
ldapmodifym
t
ldapmodifymt -h my_host -p 3060 -E ".ZHS16GBK" -D "o=example,c=us" -q
ldapdelete
ldapdelete -h my_host -p 3060 -E ".ZHS16GBK" -D "o=example,c=us" -q
ldapcompare
ldapcompare -h my_host -p 3060 -E ".ZHS16GBK" -D "o=example,c=us" \
-b "ou=Construction,ou=Manufacturing,o=example,c=us" \
-a title -v manager -q
ldapmoddn
ldapmoddn -h my_host -p 3060 -E ".ZHS16GBK" -D "o=example,c=us" \
-b "cn=Frank Smith,ou=Construction,ou=Manufacturing,c=us,
o=example"\
-N "ou=Contracting,ou=Manufacturing,o=example,c=us" -r -q

Using Globalization Support with Bulk Tools
I-8 Oracle Fusion Middleware Administrator's Guide for Oracle Internet Directory
I.7 Using Globalization Support with Bulk Tools
Oracle Internet Directory ensures that the reading and writing of text data from and to
LDIF files are done in UTF-8 encoding as specified by the LDAP standard.
This section provides examples of the argument you use for each of the bulk tools. It
contains the following sections:
■Section I.7.1, "Using Globalization Support with bulkload"
■Section I.7.2, "Using Globalization Support with ldifwrite"
■Section I.7.3, "Using Globalization Support with bulkdelete"
■Section I.7.4, "Using Globalization Support with bulkmodify"
I.7.1 Using Globalization Support with bulkload
Add to the command the argument encode="character_set" where the input LDIF file
is encoded in "character_set".
For example, ensure that ORACLE_INSTANCE is set, then type:
bulkload connect="connect_string" \
encode=".ZHS16GBK" check="TRUE" generate="TRUE" file="my_ldif_file"
I.7.2 Using Globalization Support with ldifwrite
The ldifwrite utility always writes BASE64 encoded values for multibyte strings.
The BASE64 encoding could be of the UTF-8 strings as they are stored in the directory
server, or of native strings as specified by the NLS_LANG environment variable setting
when running ldifwrite.
For example:
ldifwrite connect="connect_string" baseDN="baseDN" ldiffile="output_file"
Note: If you are using Microsoft Windows, then, to use the
command-line tools after server startup, you must reset NLS_LANG
in an MS-DOS window. Set it to the character set that matches the
code page of your MS-DOS session. AL32UTF8 cannot be used. See
the Oracle Database Installation Guide for Microsoft Windows for more
information on which character set to use for command-line tools in
an MS-DOS session.
If you are using a pre-installed Oracle Database with Oracle
Internet Directory, then you must also set the database character set
to AL32UTF8.
See Also: Oracle Database Globalization Support Guide in the Oracle
Database Documentation Library and Oracle Database Installation
Guide for Microsoft Windows
Be careful not to change the NLS_LANG parameter value in the
registry.
See Also: "Oracle Internet Directory Administration Tools" in
Oracle Fusion Middleware Reference for Oracle Identity Management for
a list of arguments for each bulk tool

Using Globalization Support with Bulk Tools
Globalization Support in the Directory I-9
In this example, if the NLS_LANG environment variable is not set, or is set to
language_territory.AL32UTF8, then the output LDIF file will contain
BASE64-encoded UTF-8 strings for any multibyte characters.
For information about loading this LDIF file into a directory, see "CASE 3: BASE64
Encoded UTF-8 Strings" on page I-5.
If the NLS_LANG environment variable is set to a character set other than
AL32UTF8—for example, ".ZHS16GBK"—then the output LDIF file will contain a
BASE64 encoded value of simplified Chinese GBK strings.
For information about loading this LDIF file into the directory, see "CASE 4: BASE64
Encoded Native Strings" on page I-5.
I.7.3 Using Globalization Support with bulkdelete
Add encode="character_set" to the command.
For example:
bulkdelete connect="connect_string" encode=".ZHS16GBK" \
baseDN="ou=manufacturing,o=example,c=us"
In this case the value for the -base option could be in the ZHS16GBK native character
set, that is, simplified Chinese.
I.7.4 Using Globalization Support with bulkmodify
Add encode="character_set" to the command the argument.
For example:
bulkmodify connect="my_service_name" \
encode=".ZHS16GBK" baseDN="ou=manufacturing,o=example,c=us" \
replace=TRUE" value=Foreman filter="objectclass=*"
In this example, values for the basedn, value, and filter arguments can be
specified using the simplified Chinese GBK character set.

Using Globalization Support with Bulk Tools
I-10 Oracle Fusion Middleware Administrator's Guide for Oracle Internet Directory

J
Setting up Access Controls for Creation and Search Bases for Users and Groups J-1
JSetting up Access Controls for Creation and
Search Bases for Users and Groups
If you modify the User Search Base, the User Creation Base, the Group Search Base, or
the Group Creation Base, then access controls for the new container need to be set up
properly. This appendix contains these topics:
■Section J.1, "Setting up Access Controls for the User Search Base and the User
Creation Base"
■Section J.2, "Setting up Access Controls for the Group Search Base and the Group
Creation Base"
J.1 Setting up Access Controls for the User Search Base and the User
Creation Base
To set up access controls for the User Search Base and the User Creation Base:
1. Create an LDIF (user_aci.ldif) file with the following entry:
--- BEGIN LDIF file contents---
dn: %usersearch_or_createbase_dn%
changetype: modify
add: orclaci
orclaci: access to entry by group="cn=oracledascreateuser,
cn=groups,cn=OracleContext,%subscriberdn%"
added_object_constraint=(objectclass=orcluser*) (browse,add) by
group="cn=Common User Attributes, cn=Groups,
cn=OracleContext,%subscriberdn%" (browse) by
group="cn=PKIAdmins, cn=groups, cn=OracleContext,%subscriberdn%" (browse)
orclaci: access to entry filter=(objectclass=inetorgperson) by
group="cn=oracledascreateuser, cn=groups,cn=OracleContext,%subscriberdn%"
added_object_constraint=(objectclass=orcluser*) (browse,add) by
group="cn=oracledasdeleteuser, cn=groups,cn=OracleContext,%subscriberdn%"
(browse,delete) by group="cn=oracledasedituser,
cn=groups,cn=OracleContext,%subscriberdn%" (browse) by
group="cn=UserProxyPrivilege, cn=Groups,cn=OracleContext,%subscriberdn%"
(browse,
proxy) by dn="orclApplicationCommonName=DASApp, cn=DAS,
cn=Products,cn=oraclecontext" (browse,proxy) by self (browse, nodelete, noadd)
by
group="cn=Common User Attributes, cn=Groups,cn=OracleContext,%subscriberdn%"
(browse) by * (browse, noadd, nodelete)
orclaci: access to attr=(*) filter=(objectclass=inetorgperson) by
group="cn=oracledasedituser, cn=groups,cn=OracleContext,
%subscriberdn%" (read,search,write,compare) by self (

Setting up Access Controls for the User Search Base and the User Creation Base
J-2 Oracle Fusion Middleware Administrator's Guide for Oracle Internet Directory
read,search,write,selfwrite,compare) by *
(read, nowrite, nocompare)
orclaci: access to attr=(userPassword)
filter=(objectclass=inetorgperson) by
group="cn=OracleUserSecurityAdmins,cn=Groups,
cn=OracleContext, %subscriberdn%"
(read,search,write,compare) by group="cn=oracledasedituser,
cn=groups,cn=OracleContext,%subscriberdn%"
(read,search,write,compare) by self
(read,search,write,selfwrite,compare) by group="cn=authenticationServices,
cn=Groups,cn=OracleContext,%subscriberdn%" (compare) by * (none)
orclaci: access to attr=(authpassword, orclpasswordverifier, orclpassword) by
group="cn=oracledasedituser,cn=groups,cn=OracleContext,%subscriberdn%"
(read,search,write,compare) by
group="cn=verifierServices,cn=Groups,cn=OracleContext,%subscriberdn%"
(search, read, compare) by self (search,read,write,compare) by * (none)
orclaci: access to attr=(orclpwdaccountunlock) by
group="cn=oracledasedituser,cn=groups,cn=OracleContext,%subscriberdn%" (
write) by * (none)
orclaci: access to attr=(usercertificate, usersmimecertificate) by
group="cn=PKIAdmins,cn=Groups,cn=OracleContext,%subscriberdn%"
(read, search, write, compare) by self (read, search, compare) by *
(read, search, compare)
orclaci: access to attr=(mail) by
group="cn=EmailAdminsGroup,cn=EmailServerContainer,cn=Products,
cn=OracleContext" (write) by group="cn=oracledasedituser,
cn=groups,cn=OracleContext,%subscriberdn%" (read,search,write,compare)
orclaci: access to attr=(orclguid, orclisenabled, modifytimestamp,mail)
by group="cn=Common User Attributes,
cn=Groups,cn=OracleContext,%subscriberdn%"
(read, search, compare) by group="cn=oracledasedituser,
cn=groups,cn=OracleContext,%subscriberdn%" (read,search,write,compare)
by * (read, nowrite, nocompare)
orclaci: access to attr=(orclpasswordhintanswer) by
group="cn=Common User Attributes,
cn=Groups,cn=OracleContext,%subscriberdn%" (read, search, compare) by self
(read,search,write,selfwrite,compare) by * (noread, nowrite, nocompare)
orclaci: access to attr=(orclpasswordhint) by
group="cn=Common User Attributes,
cn=Groups,cn=OracleContext,%subscriberdn%" (read, search, compare) by self
(read,search,write,selfwrite,compare) by
group="cn=OracleUserSecurityAdmins,cn=Groups,cn=OracleContext,
%subscriberdn%" (read,search,write,compare) by *
(noread, nowrite, nocompare)
orclaci: access to attr=(displayName, preferredlanguage,
orcltimezone,orcldateofbirth,orclgender,orclwirelessaccountnumber,cn,
uid,homephone,telephonenumber) by group="cn=Common User Attributes,
cn=Groups,cn=OracleContext,%subscriberdn%"
(read, search, compare) by group="cn=oracledasedituser,
cn=groups,cn=OracleContext,%subscriberdn%" (read,search,write,compare)
by self (read,search,write,selfwrite,compare) by *
(read, nowrite, nocompare)
-
add: orclentrylevelaci
orclentrylevelaci: access to entry by group="cn=oracledascreateuser,
cn=groups,cn=OracleContext,%subscriberdn%" added_object_constraint=
(objectclass=orcluser*) (browse, add) by * (browse)
---END LDIF file contents------

Setting up Access Controls for the Group Search Base and the Group Creation Base
Setting up Access Controls for Creation and Search Bases for Users and Groups J-3
2. Replace %subscriberdn% with the dn of the subscriber and %usersearch_or_
createbase_dn% with the new value of the container DN where the new user
search/create base points to.
3. Run the ldapmodify command as follows:
ldapmodify -p oidport -h oidhost -D cn=orcladmin -q -v \
-f user_aci.ldif
J.2 Setting up Access Controls for the Group Search Base and the Group
Creation Base
To set up access controls for the Group Search Base and the Group Creation Base:
1. Create an ldif (group_aci.ldif) file with the following entry:
--- BEGIN LDIF file contents---
dn: %groupsearch_or_createbase_dn%
changetype: modify
add: orclaci
orclaci: access to entry by group="cn=IASAdmins,
cn=groups,cn=OracleContext,%subscriberdn%"
added_object_constraint=(objectclass=orclcontainer) (browse,add)
orclaci: access to entry by group="cn=oracledascreategroup,
cn=groups,cn=OracleContext,%subscriberdn%"
added_object_constraint=(objectclass=orclgroup*) (browse,add) by
group="cn=Common
Group Attributes, cn=Groups,cn=OracleContext,%subscriberdn%" (browse)
orclaci: access to entry filter=(&(objectclass=orclgroup)(orclisvisible=false))
by
groupattr=(owner) (browse, add, delete) by dnattr=(owner)
(browse, add, delete) by
group="cn=Common Group Attributes, cn=Groups,cn=OracleContext,%subscriberdn%"
(browse) by * (none)
orclaci: access to entry
filter=(&(objectclass=orclgroup)(!(orclisvisible=false))) by
group="cn=oracledascreategroup, cn=groups,cn=OracleContext,%subscriberdn%"
added_object_constraint=(objectclass=orclgroup) (browse,add) by
group="cn=oracledasdeletegroup, cn=groups,cn=OracleContext,%subscriberdn%"
(browse,delete) by group="cn=oracledaseditgroup,
cn=Groups,cn=OracleContext,%subscriberdn%" (browse) by groupattr=(owner) (
browse,
add, delete) by dnattr=(owner) (browse, add, delete) by group="cn=Common Group
Attributes, cn=Groups,cn=OracleContext,%subscriberdn%" (browse)
orclaci: access to attr=(*)
filter=(&(objectclass=orclgroup)(orclisvisible=false)) by
groupattr=(owner) (read,search,write,compare) by dnattr=(owner)
(read,search,write,compare) by * (none) by group="cn=Common Group Attributes,
cn=Groups,cn=OracleContext,%subscriberdn%" (read, search, compare)
orclaci: access to attr=(*)
filter=(&(objectclass=orclgroup)(!(orclisvisible=false))) by
groupattr=(owner) (read,search,write,compare) by dnattr=(owner)
(read,search,write,compare) by group="cn=oracledaseditgroup,
cn=groups,cn=OracleContext,%subscriberdn%" (read,search,write,compare) by
group="cn=Common Group Attributes, cn=Groups,cn=OracleContext,%subscriberdn%"
(read, search, compare)
-
add: orclentrylevelaci
orclentrylevelaci: access to entry by group="cn=oracledascreategroup,
cn=groups,cn=OracleContext,%subscriberdn%"

Setting up Access Controls for the Group Search Base and the Group Creation Base
J-4 Oracle Fusion Middleware Administrator's Guide for Oracle Internet Directory
added_object_constraint=(objectclass=orclgroup) (browse, add) by
group="cn=IASAdmins, cn=groups,cn=OracleContext,%subscriberdn%"
added_object_constraint=(objectclass=orclcontainer) (browse,add) by * (browse)
---END LDIF file contents------
2. Replace %subscriberdn% with the DN of the subscriber and %groupsearch_
or_createbase_dn% with the new value of the container DN where the new
group search base or group create base points to.
3. Run the ldapmodify command as follows:
ldapmodify -p oidport -h oidhost -D cn=orcladmin -q -v -f group_aci.ldif

K
Searching the Directory for User Certificates K-1
K Searching the Directory for User Certificates
Starting with 10g (10.1.4.0.1), you can perform a command-line search of the binary
attribute usercertificate.
Before 10g Release 2 (10.1.2.0.2), the only way to identify a user from the certificate
was through the DN specified in the certificate. This is known as certificate matching.
Starting with 10g Release 2 (10.1.2.0.2), Oracle Internet Directory supports certificate
mapping, in addition to certificate matching. Certificate matching requires that a user
certificate be provisioned in the directory. Certificate mapping does not require
provisioning of a user certificate.
This chapter includes the following topics:
■Section K.1, "Certificate Mapping"
■Section K.2, "Search Types"
K.1 Certificate Mapping
Certificate mapping allows a customer to define rules for mapping the certificate to the
user's DN. A certificate mapping rule is a set of rules for parsing the certificate and for
querying the directory for the user's identity. Only custom extensions of certificates
can be used in mapping rules.
The following examples show how to add, delete, and modify a certificate mapping
rule.
Adding a Certificate Mapping Rule
Add a mapping rule using ldapmodify, as follows:
ldapmodify -D "cn=orcladmin" -q -h hostName -p port_number -f certMapRuleAdd.ldif
The file certMapRuleAdd.ldif should look something like this:
dn: cn=maprule1,cn=SASL-EXTERNAL,cn=Identity Mapping Configurations,cn=Server
Configurations
cn: maprule1
objectclass: orclidmapping
objectclass: orclcertidmapping
orclSearchScope: subtree
orclSearchFilter: (cn=$(2.16.750.5.14.2.81.2.5.1))
orclcertExtensionOID: 2.16.750.5.14.2.81.2.5
orclcertExtensionAttribute: 2.16.750.5.14.2.81.2.5.1

Search Types
K-2 Oracle Fusion Middleware Administrator's Guide for Oracle Internet Directory
Deleting a Certificate Mapping Rule
Delete a mapping rule using ldapdelete, as follows:
ldapdelete hostName -D "cn=orcladmin" -q -p port_number \
"cn=maprule1,cn=SASL-EXTERNAL,cn=Identity Mapping Configurations,cn=Server \
Configurations"
Modifying a Certificate Mapping Rule
Modify a mapping rule using ldapmodify, as follows:
ldapmodify -D "cn=orcladmin" -q -h hostName -p port_number -f certMapRuleMod.ldif
The file certMapRuleMod.ldif should look something like this:
dn: cn=maprule1,cn=SASL-EXTERNAL,cn=Identity Mapping Configurations,cn=Server
Configurations
changetype:modify
replace: attrName
attrName: attrValue
K.2 Search Types
You can use two kinds of certificate search filters:
■A filter of the form "usercertificate=certificate_serial_
number$certificate_issuer_DN". A combination of the certificate serial
number and the certificate issuer's DN is used to locate the certificate. This
combination is called the certificate match value.
■A filter of the form"usercertificate;binary=base_64_encoded_value_
of_certificate". Using this filter, one of six types of searches is possible,
depending upon two things:
–The value of the DSA configuration set attribute (DN:
"cn=dsaconfig,cn=configsets,cn=oracle internet directory"),
orclpkimatchingrule.
–The presence or absence of the LDAP control GSL_CERTIFICATE_CONTROL,
2.16.840.1.113894.1.8.23
The six types of searches possible with a filter of the form
"usercertificate;binary=base_64_encoded_value_of_certificate"
are:
Presence of LDAP
control
Value of
orclpkimatchingrule Search Behavior
Absent Not used The hashed value of the client certificate is
used to locate usercertificate.
Present 0 An exact-match search is performed. The
subject DN of the client certificate is the
search base. This DN is compared with the
user DN in the directory. The search scope is
Base. The filter is "objectclass=*".
Present 1 The hashed value of the client certificate is
used to locate usercertificate.

Search Types
Searching the Directory for User Certificates K-3
For information on using LDAP controls, see "Extensions to the LDAP Protocol" in
Oracle Fusion Middleware Application Developer's Guide for Oracle Identity
Management.
Present 2 (Default) The hashed value of the client certificate is
used to locate usercertificate. If this
search yields nothing, An exact-match search
is performed.
Present 3 The mapping rule is used.
Present 4 First, the mapping rule is used. If that search
yields nothing, then the search proceeds as if
the value were 2.
Notes:
■The usercertificate attribute cannot be searched using a
substring filter.
■In an exact-match search, the search filter can contain only one
attribute value assertion.
■Only one-level and subtree searches are supported.
■The catalog tool does not support catalogs for user
certificates—namely ct_orclcertificatehash and ct_
orclcertificatematch
■The introduction in 10g (10.1.4.0.1) of certificate hash values
requires that certificates be upgraded from earlier releases. See the
upgradecert.pl command-line tool reference in Oracle Fusion
Middleware Reference for Oracle Identity Management.
See Also: "Direct Authentication" on page 32-1
Presence of LDAP
control
Value of
orclpkimatchingrule Search Behavior

Search Types
K-4 Oracle Fusion Middleware Administrator's Guide for Oracle Internet Directory

L
Adding a Directory Node by Using the Database Copy Procedure L-1
LAdding a Directory Node by Using the
Database Copy Procedure
This appendix explains how to add a new node to an existing replicating system by
using the database copy procedure, also known as cold backup. This procedure works
only for Oracle Internet Directory. Do not employ this procedure if other Oracle
Identity Management components, such as Oracle Single Sign-On, are installed. You
can use the database copy procedure to create a new directory replication group
(DRG) if you have a standalone Oracle Internet Directory node. This procedure is
applicable for an Oracle Database Advanced Replication-based replica and for a full
LDAP-based replica.
This appendix contains the following sections:
■Section L.1, "Definitions"
■Section L.2, "Prerequisites"
■Section L.3, "Sponsor Directory Site Environment"
■Section L.4, "New Directory Site Environment"
■Section L.5, "Addition of a Directory Node"
L.1 Definitions
The sponsor site refers to the site or host or node where Oracle Internet Directory and
its repository, the Oracle database, are installed. The sponsor site is also referred to as
sponsor node.
The new site refers to the site or host or node to which you are copying the Oracle
Internet Directory repository. The new site is also referred to as the new node.
L.2 Prerequisites
Your computing environment must meet the following prerequisites before you start
this procedure:
1. The operating system, version, and patch level of the new directory site must be
the same as that of the sponsor directory site. This procedure might not work if the
patch levels of the operating systems differ.
2. Oracle strongly recommends that you back up the sponsor directory's repository
before you employ this procedure.
3. Because this procedure involves copying Oracle data files, performance depends
on the underlying network. If the underlying network is slow, consider using one

Sponsor Directory Site Environment
L-2 Oracle Fusion Middleware Administrator's Guide for Oracle Internet Directory
of the methods described in Chapter 39, "Setting Up Replication" or Appendix C,
"Setting Up Oracle Database Advanced Replication-Based Replication" to set up a
replication group. Alternatively, you could physically transfer compressed Oracle
data files on removable media. Consult your local system or network
administrator for information about the network.
4. Only a person familiar with the Oracle database should perform this procedure.
5. If the sponsor site is already a part of an Advanced Replication group, the sponsor
node must be the Master definition site (MDS).
L.3 Sponsor Directory Site Environment
In the example shown throughout this chapter, the sponsor directory site's
environment is as follows:
Hostname = rst-sun
Domain name = example.com
ORACLE_BASE = /private/oracle/app/oracle
ORACLE_HOME = /private/oracle/app/oracle/product/OraHome_1
ORACLE_SID = LDAP
LD_LIBRARY_PATH = $ORACLE_HOME/lib
NLS_LANG = AMERICAN_AMERICA.AL32UTF8
datafile location = /private/oracle/oradata/LDAP
Dump destination = /private/oracle/app/oracle/admin/LDAP/pfile,
/private/oracle/app/oracle/admin/LDAP/bdump,
/private/oracle/app/oracle/admin/LDAP/cdump,
/private/oracle/app/oracle/admin/LDAP/udump,
/private/oracle/app/oracle/admin/LDAP/create
L.4 New Directory Site Environment
In the example shown throughout this chapter, the new directory site's environment is
as follows:
Hostname = dsm-sun
Domain name = example.com
ORACLE_BASE = /private1/oracle/app/oracle
ORACLE_HOME = /private1/oracle/app/oracle/product/OraHome_1
ORACLE_SID = NLDAP
LD_LIBRARY_PATH = $ORACLE_HOME/lib
NLS_LANG = AMERICAN_AMERICA.AL32UTF8
datafile location = /private1/oracle/oradata/NLDAP
Dump destination = /private1/oracle/app/oracle/admin/NLDAP/pfile,
/private1/oracle/app/oracle/admin/NLDAP/bdump,
/private1/oracle/app/oracle/admin/NLDAP/cdump,
/private1/oracle/app/oracle/admin/NLDAP/udump,
/private1/oracle/app/oracle/admin/NLDAP/create
Everything except the hostname and domain name is created during installation of the
Oracle Database in Step 10.
L.5 Addition of a Directory Node
1. Install the node and check its status, as follows:
a. Install Identity Management with the Oracle Internet Directory component on
the sponsor node. See Oracle Fusion Middleware Installation Guide for Oracle
Identity Management

Addition of a Directory Node
Adding a Directory Node by Using the Database Copy Procedure L-3
b. To check the status of Oracle Internet Directory, type:
$ cd ORACLE_INSTANCE/bin
$ ./opmnctl status
The status should be Alive.
2. Shut down Oracle Internet Directory and all other opmn processes on the sponsor
node, as follows:
$ cd ORACLE_INSTANCE/bin
$ opmnctl stopall
3. Perform the following steps on the sponsor node.
a. At the command line prompt execute the following SQL*Plus commands:
$ sqlplus /nolog
SQL> connect / as sysdba
SQL> ALTER DATABASE BACKUP CONTROLFILE TO TRACE RESETLOGS;
This command sequence creates a trace file under the user dump destination
directory.
To determined the location of the user dump destination directory, execute
following command:
SQL> show parameter user_dump_dest;
The name of the newly-created trace file is of the form:
ORACLE_SID_ora_processid.trc
b. Shut down the database and Oracle Net Services listener on the sponsor node.
By default, the listener name is LISTENER. Type:
$ lsnrctl stop
$ sqlplus /nolog
SQL> connect / as sysdba
SQL> shutdown
SQL> exit
c. If the copied node is part of an Advanced Replication-based DRG, perform the
following steps:
–On other nodes of the DRG, shut down the LDAP replication server only.
$ oidctl connect=connect_string server=oidrepld \
instance=instance_number stop
Repeat this procedure on all nodes except the sponsor node. Specify
appropriate net service names for the corresponding nodes.
See Also:
■Oracle Database Installation Guide for your operating system
■Oracle Fusion Middleware Getting Started With Installation for Oracle
WebLogic Server
■Oracle Fusion Middleware Installation Planning Guide

Addition of a Directory Node
L-4 Oracle Fusion Middleware Administrator's Guide for Oracle Internet Directory
–If you are adding a node to an existing DRG, quiesce Oracle Database
Advanced Replication by using SQL*Plus. Execute the following
commands at the master definition site (MDS) only:
$ cd ORACLE_HOME/ldap/admin
$ sqlplus /nolog SQL> connect repadmin/repadmin_password;
SQL> @oidrsusp.sql
Now that you have stopped replication, you can safely modify other nodes.
d. Rename the trace file created in Step 3a to newdb.sql, under the same
directory.
$ cp ORACLE_SID_ora_processid.trc newdb.sql
4. On the sponsor node, open newdb.sql in a text editor and delete all the lines
except the STARTUP NOMOUNT and CREATE CONTROLFILE statements. After
deleting those lines, newdb.sql should look like this:
STARTUP NOMOUNT
CREATE CONTROLFILE REUSE SET DATABASE "LDAP" RESETLOGS NOARCHIVELOG
MAXLOGFILES 16
MAXLOGMEMBERS 3
MAXDATAFILES 100 MAXINSTANCES 8
MAXLOGHISTORY 454
LOGFILE
GROUP 1 '/private/oracle/oradata/LDAP/redo01.log' SIZE 10M,
GROUP 2 '/private/oracle/oradata/LDAP/redo02.log' SIZE 10M,
GROUP 3 '/private/oracle/oradata/LDAP/redo03.log' SIZE 10M
-- STANDBY LOGFILE
DATAFILE
'/private/oracle/oradata/LDAP/system01.dbf',
'/private/oracle/oradata/LDAP/sysaux01.dbf',
'/private/oracle/oradata/LDAP/users01.dbf',
'/private/oracle/oradata/LDAP/dcm.dbf',
'/private/oracle/oradata/LDAP/portal.dbf',
'/private/oracle/oradata/LDAP/ptldoc.dbf',
'/private/oracle/oradata/LDAP/ptlidx.dbf',
'/private/oracle/oradata/LDAP/ptllog.dbf',
'/private/oracle/oradata/LDAP/oca.dbf',
'/private/oracle/oradata/LDAP/discopltc1.dbf',
'/private/oracle/oradata/LDAP/discopltm1.dbf',
'/private/oracle/oradata/LDAP/oss_sys01.dbf',
'/private/oracle/oradata/LDAP/wcrsys01.dbf',
'/private/oracle/oradata/LDAP/uddisys01.dbf',
'/private/oracle/oradata/LDAP/b2b_dt.dbf',
'/private/oracle/oradata/LDAP/b2b_rt.dbf',
'/private/oracle/oradata/LDAP/b2b_idx.dbf',
'/private/oracle/oradata/LDAP/b2b_lob.dbf',
'/private/oracle/oradata/LDAP/bam.dbf',
'/private/oracle/oradata/LDAP/orabpel.dbf',
'/private/oracle/oradata/LDAP/attrs1_oid.dbf',
'/private/oracle/oradata/LDAP/battrs1_oid.dbf',
'/private/oracle/oradata/LDAP/gcats1_oid.dbf',
'/private/oracle/oradata/LDAP/gdefault1_oid.dbf',
'/private/oracle/oradata/LDAP/svrmg1_oid.dbf',
Note: Perform this SQL*Plus procedure only on the master
definition site.

Addition of a Directory Node
Adding a Directory Node by Using the Database Copy Procedure L-5
'/private/oracle/oradata/LDAP/ias_meta01.dbf',
'/private/oracle/oradata/LDAP/undotbs.dbf'
CHARACTER SET AL32UTF8
;
5. Continue editing the file newdb.sql on the sponsor node, as follows:
a. Change the line:
CREATE CONTROLFILE REUSE DATABASE "LDAP" RESETLOGS NOARCHIVELOG
to:
CREATE CONTROLFILE REUSE SET DATABASE "NLDAP" RESETLOGS NOARCHIVELOG
b. Modify the UNIX directory location of the database and logfiles to point to the
new node site's directory.
In our example, after these modifications, newdb.sql should look like this:
STARTUP NOMOUNT
CREATE CONTROLFILE REUSE SET DATABASE "NLDAP" RESETLOGS NOARCHIVELOG
MAXLOGFILES 16
MAXLOGMEMBERS 3
MAXDATAFILES 100
MAXINSTANCES 8
MAXLOGHISTORY 454
LOGFILE
GROUP 1 '/private1/oracle/oradata/NLDAP/redo01.log' SIZE 10M,
GROUP 2 '/private1/oracle/oradata/NLDAP/redo02.log' SIZE 10M,
GROUP 3 '/private1/oracle/oradata/NLDAP/redo03.log' SIZE 10M
-- STANDBY LOGFILE
DATAFILE
'/private1/oracle/oradata/NLDAP/system01.dbf',
'/private1/oracle/oradata/NLDAP/sysaux01.dbf',
'/private1/oracle/oradata/NLDAP/users01.dbf',
'/private1/oracle/oradata/NLDAP/dcm.dbf',
'/private1/oracle/oradata/NLDAP/portal.dbf',
'/private1/oracle/oradata/NLDAP/ptldoc.dbf',
'/private1/oracle/oradata/NLDAP/ptlidx.dbf',
'/private1/oracle/oradata/NLDAP/ptllog.dbf',
'/private1/oracle/oradata/NLDAP/oca.dbf',
'/private1/oracle/oradata/NLDAP/discopltc1.dbf',
'/private1/oracle/oradata/NLDAP/discopltm1.dbf',
'/private1/oracle/oradata/NLDAP/oss_sys01.dbf',
'/private1/oracle/oradata/NLDAP/wcrsys01.dbf',
'/private1/oracle/oradata/NLDAP/uddisys01.dbf',
'/private1/oracle/oradata/NLDAP/b2b_dt.dbf',
'/private1/oracle/oradata/NLDAP/b2b_rt.dbf',
'/private1/oracle/oradata/NLDAP/b2b_idx.dbf',
'/private1/oracle/oradata/NLDAP/b2b_lob.dbf',
'/private1/oracle/oradata/NLDAP/bam.dbf',
'/private1/oracle/oradata/NLDAP/orabpel.dbf',
'/private1/oracle/oradata/NLDAP/attrs1_oid.dbf',
'/private1/oracle/oradata/NLDAP/battrs1_oid.dbf',
'/private1/oracle/oradata/NLDAP/gcats1_oid.dbf',
'/private1/oracle/oradata/NLDAP/gdefault1_oid.dbf',
'/private1/oracle/oradata/NLDAP/svrmg1_oid.dbf',
'/private1/oracle/oradata/NLDAP/ias_meta01.dbf',
'/private1/oracle/oradata/NLDAP/undotbs.dbf'
CHARACTER SET AL32UTF8
;

Addition of a Directory Node
L-6 Oracle Fusion Middleware Administrator's Guide for Oracle Internet Directory
6. Copy the initialization parameter file init$ORACLE_SID.ora from the sponsor
directory's database to init$ORACLE_SID_NEW_DIR_DB.ora. The default
location of the initialization parameter file is $ORACLE_HOME/dbs on UNIX or
Linux and %ORACLE_HOME%\database on Windows. In our example, copy
/private/oracle/app/oracle/product/OraHome_1/dbs/initLDAP.ora
to /private/oracle/app/oracle/product/OraHome_
1/dbs/initNLDAP.ora as shown here:
$ cd ORACLE_HOME/dbs
$ cp initLDAP.ora initNLDAP.ora
If you are using the server parameter file spfile$ORACLE_SID.ora or
spfile.ora instead of an initialization parameter file, create an initialization
parameter file from the server parameter file. For example, if spfile$ORACLE_
SID.ora is located in the default location $ORACLE_HOME/dbs you would type:
$ sqlplus /nolog
SQL> connect / as sysdba
SQL> create pfile from spfile
SQL> shutdown immediate
This sequence of commands creates an initLDAP.ora file at
/private/oracle/app/oracle/product/OraHome_1 from
spfileLDAP.ora. If the server parameter file is not located in the default
location, you must include the complete path, as shown in the following example:
SQL> connect / as sysdba
SQL> create pfile='/private/oracle/initLDAP.ora' from
spfile=/private/oracle/initLDAP.ora
SQL> shutdown immediate
After you create the initialization file parameter file, create a copy of it as
explained at the beginning of this step.
7. In the new initialization parameter file on the sponsor, make the following
changes:
a. Comment out the parameter JOB_QUEUE_PROCESSES, if it exists.
b. Change the parameter dbname from LDAP to NLDAP.
c. If the new site's domain name is different from the sponsor directory's domain
name, alter the parameter db_domain also.
d. Alter the location of the following parameters to point to the location of the
new site.
background_dump_dest
core_dump_dest
user_dump_dest
control_files
db_recovery_file_dest
e. In addition to the parameters listed in Step 7d, if your initialization parameter
file has any parameters that are node specific, such as DB_RECOVERY_FILE_
DEST and DB_CREATE_FILE_DEST, alter those parameters as well.
In our example, the initialization parameter file initNLDAP.ora looks like this
after these modifications:
*.aq_tm_processes=1
*.background_dump_dest='/private1/oracle/app/oracle/admin/NLDAP/bdump'

Addition of a Directory Node
Adding a Directory Node by Using the Database Copy Procedure L-7
*.compatible='10.1.0.2.0'
*.control_files='/private1/oracle/app/oracle/admin/NLDAP/control01.ctl',
'/private1/oracle/app/oracle/admin/NLDAP/control02.ctl',
'/private1/oracle/app/oracle/admin/NLDAP/control03.ctl'
*.core_dump_dest='/private1/oracle/app/oracle/admin/NLDAP/cdump'
*.db_block_size=8192*.db_cache_size=50331648
*.db_domain='example.com'
*.db_file_multiblock_read_count=16
*.db_name='NLDAP'*.db_recovery_file_dest='/private/oracle1/app/oracle/flash_
recovery_area'
*.db_recovery_file_dest_size=2147483648
*.dispatchers='(PROTOCOL=TCP)(PRE=oracle.aurora.server.GiopServer)',
'(PROTOCOL=TCP)(PRE=oracle.aurora.server.SGiopServer)'
*.java_pool_size=67108864#*.job_queue_processes=5
*.large_pool_size=8388608
*.max_commit_propagation_delay=0
*.open_cursors=300
*.pga_aggregate_target=33554432*.processes=150
*.remote_login_passwordfile='EXCLUSIVE'
*.sessions=400
*.shared_pool_size=150994944
*.undo_management='AUTO'
*.undo_tablespace='UNDOTBS'
*.user_dump_dest='/private1/oracle/app/oracle/admin/NLDAP/udump'
8. Edit the tnsnames.ora file to include connection details for the new node. Refer
to the following sample file:
LDAP.ACME.COM =
(DESCRIPTION =
(ADDRESS = (PROTOCOL = TCP)(HOST = rst-sun)(PORT = 1521))
(CONNECT_DATA =
(SERVER = DEDICATED)
(SERVICE_NAME = ldap.acme.com)
)
)
NLDAP.ACME.COM =
(DESCRIPTION =
(ADDRESS = (PROTOCOL = TCP)(HOST = dsm-sun)(PORT = 1521))
(CONNECT_DATA =
(SERVER = DEDICATED)
(SERVICE_NAME = nldap.acme.com) )
)
9. Create an archive of all the data files and compress the archived file. Be sure to
include all the files listed under DATAFILE in newdb.sql.
As an example, you could use the following commands to go to the database file
location and generate a compressed archive called OID_DB.tar.Z:
$ cd $ORACLE_BASE/oradata/$ORACLE_SID
$ tar -cvf OID_db.tar *.dbf
$ compress OID_db.tar
10. Install Oracle Database on the new node using the software only option. See the
Oracle Database Installation Guide for your platform and Oracle Fusion Middleware
Installation Guide for Oracle Identity Management.
11. When the software-0nly install on the new node has completed, the following
directory exists:

Addition of a Directory Node
L-8 Oracle Fusion Middleware Administrator's Guide for Oracle Internet Directory
/private1/oracle/app/oracle/product/OraHome_1/diag/rdbms
Create the following directories on the new node:
■Datafile location: /private1/oracle/app/oracle/oradata/NLDAP
■Dump destinations:
/private1/oracle/app/oracle/admin/NLDAP/adump
/private1/oracle/app/oracle/admin/NLDAP/udump
/private1/oracle/app/oracle/flash_recovery_area
■Trace file location: /private1/oracle/app/oracle/product/OraHome_
1/diag/rdbms/nldap/nldap/trace
12. Copy the archived file created on the sponsor node in Step 9 to the new node,
using FTP or another appropriate tool. Change directory to the database file
location on the new node, then use FTP to copy the archived file from rst-sun.
$ cd /private1/oracle/app/oracle/oradata/NLDAP
$ ftp
ftp> open rst-sun
Connected to rst-sun.us.example.com.
220 rst-sun FTP server (UNIX(r) System V Release 4.0) ready.
Name (rst-sun:oracle):
331 Password required for oracle.
Password:
230 User oracle logged in.
ftp> cd /private/oracle/oradata/LDAP
250 CWD command successful.
ftp> binary
200 Type set to I.
ftp> mget oradb.tar.Z
If the data files are very large (several gigabytes or terabytes) and the network
bandwidth is low, consider using media, such as tape or disk, to move the
compressed file from the sponsor to the new node.
Extract the archived file on the new node. For example:
$ uncompress oradb.tar.Z
$ tar xvf oradb.tar
Ensure that the data files are extracted to the correct directory. In our example, it is
/private1/oracle/oradata/NLDAP
13. If the sponsor node is part of an Advanced replication group, then perform the
following steps:
a. Copy the initialization parameter file initLDAP.ora from the sponsor node
(rst-sun) to the new node under the UNIX directory $ORACLE_HOME/dbs
using a tool such as FTP. Rename the file to initNLDAP.ora.
Ensure that the contents of the copied file initLDAP.ora are valid after
copying.
Edit the file initLDAP.ora. Change:
.db_name='NLDAP'
to
.db_name='LDAP'

Addition of a Directory Node
Adding a Directory Node by Using the Database Copy Procedure L-9
b. Using a tool such as FTP, copy the file newdb.sql you created on the sponsor
node in Step 5 to the new node. Rename newdb.sql to olddb.sql.
Edit olddb.sql. Change:
CREATE CONTROLFILE REUSE SET DATABASE "NLDAP" RESETLOGS NOARCHIVELOG
to:
CREATE CONTROLFILE REUSE SET DATABASE "LDAP" RESETLOGS NOARCHIVELOG
c. Make a copy of tnsnames.ora called tnsnames.ora.bk.
Edit tnsnames.ora. Change:
LDAP.ACME.COM =
(DESCRIPTION =
(ADDRESS = (PROTOCOL = TCP)(HOST = rst-sun)(PORT = 1521))
(CONNECT_DATA =
(SERVER = DEDICATED)
(SERVICE_NAME = ldap.acme.com)
)
)
NLDAP.ACME.COM =
(DESCRIPTION =
(ADDRESS = (PROTOCOL = TCP)(HOST = dsm-sun)(PORT = 1521))
(CONNECT_DATA =
(SERVER = DEDICATED)
(SERVICE_NAME = nldap.acme.com) )
)
to:
LDAP.ACME.COM =
(DESCRIPTION =
(ADDRESS = (PROTOCOL = TCP)(HOST = dsm-sun)(PORT = 1521))
(CONNECT_DATA =
(SERVER = DEDICATED)
(SERVICE_NAME = ldap.acme.com) )
)
d. At the shell prompt on the new node, set the ORACLE_BASE, ORACLE_HOME,
and ORACLE_SID environment variables. For example (using the C shell):
$ setenv ORACLE_BASE /private1/oracle/app/oracle
$ setenv ORACLE_HOME /private1/oracle/app/oracle/product/OraHome_1
$ setenv ORACLE_SID LDAP
e. In the same shell, execute olddb.sql using SQL*Plus as shown in the
following example:
cd /private1/oracle/app/oracle/admin/NLDAP/udump
$ sqlplus /nolog
SQL> connect / as sysdba
SQL> @olddb.sql
SQL> shutdown normal
SQL>exit
f. Start up the database and listener as follows:
$ sqlplus /nolog
SQL> connect / as sysdba
SQL> startup mount

Addition of a Directory Node
L-10 Oracle Fusion Middleware Administrator's Guide for Oracle Internet Directory
SQL> alter database open resetlogs
SQL> exit
$ lsnrctl start
g. If you have performed a database copy from a node that has Advanced
replication configured with another node, you must delete the LDAP_REP
replication group in the new node. To do so, execute the following commands:
sqlplus / as sydba
SQL> dbms_defer_sys.delete_tran(null,null);
SQL> dbms_defer_sys.delete_error(null,null);
SQL> dbms_repcat.purge_master_log(null,null,null);
SQL> exit
sqlplus rep_admin_db_account_name/password
SQL> exec dbms_repcat.drop_master_repgroup( gname => 'LDAP_REP' )
SQL> shutdown immediate
14. Copy the initialization parameter file initLDAP.ora from the sponsor node
(rst-sun) to the new node under the UNIX directory $ORACLE_HOME/dbs using
FTP or another appropriate tool. Ensure that the contents of the copied file
initLDAP.ora are valid after copying.
In addition, also copy the database password file orclpwORACLE_SID from the
sponsor node to the new node.
15. On the new node, ensure that the following files do not exist in the directory
$ORACLE_HOME/dbs on UNIX or ORACLE_HOME\database in Windows:
■spfileNLDAP.ora
■spfile.ora
If either of these files exists, the Oracle database uses that file instead of the
initNLDAP.ora file you copied from the sponsor node.
16. Using FTP or another appropriate tool, copy the file newdb.sql you created on
the sponsor node in Step 5 to the new node. For example:
$ cd /private1/oracle/app/oracle/admin/NLDAP/udump
$ ftp
ftp> open rst-sun
ftp> cd /private1/oracle/app/oracle/admin/LDAP/udump
ftp> mget newdb.sql
17. At the UNIX shell prompt on the new node, set ORACLE_BASE, ORACLE_
HOME and ORACLE_SID environment variables. For example (using the C shell):
$ setenv ORACLE_BASE /private1/oracle/app/oracle
$ setenv ORACLE_HOME /private1/oracle/app/oracle/product/OraHome_1
$ setenv ORACLE_SID NLDAP
18. In the same UNIX shell, execute newdb.sql using SQL*Plus as shown in the
following example:
$ sqlplus /nolog
SQL> connect / as sysdba
SQL> @newdb.sql
SQL> shutdown normal
SQL>exit
19. Complete the changes on the new node.

Addition of a Directory Node
Adding a Directory Node by Using the Database Copy Procedure L-11
a. Start up the database and listener as follows:
$ sqlplus /nolog
SQL> connect / as sysdba
SQL> startup mount
SQL> alter database open resetlogs
SQL> exit
$ lsnrctl start
b. Change the global database name of the new node.
SQL> connect / as sysdba
SQL> alter database rename global_name to NLDAP;
SQL> exit
Note that the new node ORACLE_SID IS NLDAP.
c. Add a temporary file to the tablespace using the following command:
SQL> connect / as sysdba
SQL> ALTER TABLESPACE TEMP ADD TEMPFILE 'temp01.dbf' size 2000k;
SQL> exit
The value 2000K is just an example. Determine your own value based on the
requirements of your environment.
20. Configure Oracle Internet Directory on the new node
a. Install WebLogic Server. See Oracle Fusion Middleware Installation Guide for
Oracle WebLogic Server.
b. Install Oracle Internet Directory. See Oracle Fusion Middleware Installation Guide
for Oracle Identity Management.
c. Stop Oracle Internet Directory by using opmnctl.
21. On the new node, delete the wallet files oidpwdlldap1 and oidpwdr* at the
new node and reset the ODS password
$ cd $ORACLE_HOME/OID/admin
$ rm oidpwdlldap1 oidpwdr*
22. On the new node, reset the password and start the Oracle Internet Directory
processes.
oidpasswd connect=nldap create_wallet=true
you are prompted to provide the current database password, enter a new database
password, and confirm the new password.
Start Oracle Internet Directory on the new node by using the opmnctl command.
$opmnctl startproc ias-component=oid1
23. At this point, Oracle Internet Directory on the new node is up and running. The
replicaid value in new Oracle Internet Directory node, however, still has the
replica id of the sponsor's node. Therefore, you must reset new node's replicaid.
The new value of replicaid must be of the form hostname_sid where:
Note: When you configure Oracle Internet Directory on the new
node, you must specify the information for the new node database
(created in Step 10).

Addition of a Directory Node
L-12 Oracle Fusion Middleware Administrator's Guide for Oracle Internet Directory
■hostname is the host name of the new node, without the domain name
■sid is the ORACLE_SID of the new node database
Ensure that all letters of the replicaid are in lower case.
a. Create a file, chgrid.ldif, with the following contents:
dn:
changetype: modify
replace: orclreplicaid
orclreplicaid: new_replicaid
b. Using the ldapmodify tool, change the replicaid:
$ORACLE_HOME/bin/ldapmodify -h new_node_host -p port_ldap_server -f
chgrid.ldif
24. Because the replica id of the new node was changed in Step 23, you must re-create
the relative replica entries for the new node, as follows:
$ remtool -pcleanup -bind "new_node_host:new_node_port/new_node_repl_pswd"
The remtool command does report an error and prompt for input because there
are no replica entries that correspond with the new replica id yet. The remtool
command uses your responses to rectify the error. Here is an example, with user
input shown in boldface:
remtool -pcleanup -bind "new_node_host:new_node_port/new_node_repl_pswd"
Error occurred while getting replication configuration information.
This tool will try to rectify the problem if super user DN and password are
provided.
Do you want to continue? [y/n] : y
Enter superuser DN : cn=orcladmin
Enter superuser password :
Enter new password of replication DN :
Reenter new password of replication DN :
DRG identified by replica ldap://new_node_host:new_node_port (new_replicaid)
will be cleaned up.
Do you want to continue? [y/n] : y
------------------------------------------------------------------------------
------------------------------------------------------------------------------
Replica replica ldap://new_node_host:new_node_port (new_replicaid) has been
cleaned up.
25. ) In addition to renaming the replica subentry, you must change the
orclreplicauri, orclreplicasecondaryuri and orclreplicastate
attributes of the replica subentry. You must modify the orclreplicauri and
orclreplicasecondaryuri attributes to contain the URI of the new node's
LDAP server. You must set the orclreplicastate attribute must be set to 6,
which specifies to remtool that this a database copy-based addnode. To change
the values, proceed as follows.
a. Create an LDIF file, modsubentry.ldif, with the following contents:
dn: orclreplicaid=new_replicaid,cn=replication configuration
changetype: modify
replace: orclreplicauri
# Use your host name and port number
# where ldap server is listening
orclreplicauri: ldap://new_node_host:new_node_port/ ---
replace:orclreplicasecondaryuri
# Use your fully qualified host name and

Addition of a Directory Node
Adding a Directory Node by Using the Database Copy Procedure L-13
# the port number where ldap server is listening orclreplicasecondaryuri:
ldap://new_node_host_with_domain_name:new_node_port/ ----
replace:orclreplicastate
orclreplicastate: 6
b. Using the ldapmodify tool, apply the changes to the directory:
$ ldapmodify -h new_node_host -p port_of_ldap_server -f modsubentry.ldif
26. Stop Oracle Internet Directory processes.
$opmnctl stopproc ias-component=oid1
27. Clean up the changelog tables at the new node.
$ sqlplus /nolog
SQL> connect ods/ods_password;
SQL> truncate table ods.ods_chg_log;
SQL> truncate table ods.ods_chg_stat;
SQL> truncate table ods.asr_chg_log;
28. If the new node is part of an Advanced Replication-based DRG, proceed as
follows.
a. To configure Oracle Database Advanced Replication, if you are adding new
node to an existing DRG, at the shell prompt, execute the following command:
$ remtool -addnode
To configureOracle Database Advanced Replication, if you are creating a new
DRG consisting of sponsor node and new node, at the shell prompt, execute
the following command:
$ remtool -asrsetup
b. Start up Oracle Internet Directory and the replication server on all the nodes,
including the new node and the sponsor node.
Use the following command to start replication server:
oidctl connect=nldap server=OIDREPLD instance=1 \
flags="-p new_node_port -h new_node_host" start
Then execute resumeasr or oidrrsme.sql.
29. If the new node is a full LDAP-based replication replica, configure LDAP-based
Replication and add the full replica as fan-out, as follows:
a. Make sure that the database and Oracle Internet Directory server is running at
the sponsor node.
On the sponsor node, type:
$ sqlplus /nolog
SQL> connect / as sysdba
SQL> startup
SQL> exit
$ lsnrctl start
Start OID
$opmnctl startproc ias-component=oid1
Check the status of Oracle Internet Directory by typing:
$opmnctl status

Addition of a Directory Node
L-14 Oracle Fusion Middleware Administrator's Guide for Oracle Internet Directory
b. Configure LDAP-based replication using remtool, as follows:
remtool -paddnode
c. Initialize the replication change status of the new replication agreement.
–Get the maximum used change number from the sponsor node:
$ ldapsearch -h sponsor_node_host -p sponor_node_port -b " " \
-s base "objectclass=*" lastchangenumber
–Create an LDIF file chgstatus.ldif, with the following contents:
dn: orclagreementid=new_agreement_id,orclreplicaid=new_
replicaid,cn=replication configuration
changetype: modify
replace: orcllastappliedchangenumber;transport$sponsor_replicaid$new_
replicaid
orcllastappliedchangenumber;transport$sponsor_replicaid$new_replicaid:
Number_from_ldapsearch
-
replace: orcllastappliedchangenumber;apply$sponsor_replicaid$new_
replicaid
orcllastappliedchangenumber;apply$sponsor_replicaid$new_replicaid:
Number_from_ldapsearch
where Number_from_ldapsearch refers to the maximum change num-
ber from the sponsor node that you obtained using the ldapsearch com-
mand.
–Using ldapmodify, apply the change to both the sponsor node and the
new node:
ldapmodify -p sponsor_node_port -h sponsor_node_host -v \
-f chgstatus.ldif
ldapmodify -p new_node_port -h new_node_host -v -f chgstatus.ldif
d. Start up Oracle Internet Directory and the replication server on all the nodes.
For one-way replication, you only need to start the replication server on the
consumer node.

M
Oracle Authentication Services for Operating Systems M-1
MOracle Authentication Services for
Operating Systems
Oracle Authentication Services for Operating Systems was introduced in Oracle
Internet Directory 10g (10.1.4.0.1). It has been updated for 11g Release 1 (11.1.1). Oracle
Authentication Services for Operating Systems enables you to centralize storage,
authentication, and management of user identities using Oracle Internet Directory. See
Oracle Fusion Middleware Administrator's Guide for Oracle Authentication Services for
Operating Systems for more information.

M-2 Oracle Fusion Middleware Administrator's Guide for Oracle Internet Directory

N
RFCs Supported by Oracle Internet Directory N-1
N RFCs Supported by Oracle Internet
Directory
Table N–1 contains a list of the RFCs currently supported by Oracle Internet
Directory. Some of these have been obsoleted or updated by newer RFCs. Oracle
Internet Directory is continuously being updated to ensure that it conforms to the
newer documents.
Table N–1 Supported RFCs
Number Title
RFC 1274 The COSINE and Internet X.500 Schema
RFC 1488 The X.500 String Representation of Standard Attribute Syntaxes
RFC 1777 Lightweight Directory Access Protocol
RFC 1778 The String Representation of Standard Attribute Syntaxes
RFC 1779 A String Representation of Distinguished Names
RFC 1960 A String Representation of LDAP Search Filters
RFC 2079 Definition of an X.500 Attribute Type and an Object Class to
Hold Uniform Resource Identifiers (URIs)
RFC 2247 Using Domains in LDAP/X.500 Distinguished Names
RFC 2251 Lightweight Directory Access Protocol (v3)
RFC 2252 Lightweight Directory Access Protocol (v3) Attribute Syntax
Definitions
RFC 2253 Lightweight Directory Access Protocol (v3) UTF-8 String
Representation of Distinguished Names
RFC 2254 The String Representation of LDAP Search Filters
RFC 2255 The LDAP URL Format
RFC 2256 A summary of the X500 (96) User Schema for use with LDAPv3
RFC 2307 An Approach for Using LDAP as a Network Information Service
RFC 2377 Naming Plan for Internet Directory-Enabled Applications
RFC 2396 Uniform Resource Identifiers (URI): Generic Syntax
RFC 2596 Use of Language Codes in LDAP
RFC 2696 LDAP Control Extension for Simple Paged Results Manipulation
RFC 2713 Schema for Representing Java(tm) Objects in an LDAP Directory
RFC 2798 Definition of the inetOrgPerson LDAP Object Class

N-2 Oracle Fusion Middleware Administrator's Guide for Oracle Internet Directory
Oracle Internet Directory's base schema is continually revised to comply with new
RFC revisions.
RFC 2829 Authentication Methods for LDAP
RFC 2830 Lightweight Directory Access Protocol (v3): Extension for
Transport Layer Security
RFC 2849 The LDAP Data Interchange Format (LDIF) - Technical
Specification
RFC 2891 LDAP Control Extension for Server Side Sorting of Search
Results
RFC 3112 LDAP Authentication Password Schema
RFC 3296 Named Subordinate References in Lightweight Directory Access
Protocol (LDAP) Directories
RFC 3377 Core LDAP Requirements
RFC 3671 Collective Attributes in the Lightweight Directory Access
Protocol (LDAP)
RFC 3673 Search results returning all operational attributes
RFC 4122 Universally Unique IDentifier (UUID) URN Namespace
RFC 4514 String Representation of Distinguished Names
RFC 5805 Lightweight Directory Access Protocol (LDAP) Transactions
See Also: The Internet Engineering Task Force home page at
http://www.ietf.org/.
Table N–1 (Cont.) Supported RFCs
Number Title

O
Managing Oracle Directory Services Manager's Java Key Store O-1
OManaging Oracle Directory Services
Manager's Java Key Store
ODSM stores its private key, certificate and trusted certificates in a Java Key Store
(JKS). As administrator, you are responsible for managing ODSM's JKS. One
important task you must perform is to remove ODSM's certificates from the JKS when
they have expired. This appendix explains how.
This appendix contains the following topics:
■Section O.1, "Introduction to Managing ODSM's Java Key Store"
■Section O.2, "Retrieving ODSM's Java Key Store Password"
■Section O.3, "Listing the Contents of odsm.cer Java Key Store"
■Section O.4, "Deleting Expired Certificates"
O.1 Introduction to Managing ODSM's Java Key Store
The first time ODSM is invoked, it generates a random password and assigns the
password to its JKS. The JKS file has the name odsm.cer. The file resides in a
directory with a name of the form:
DOMAIN_HOME/config/fmwconfig/servers/AdminServer/applications/odsm/conf
ODSM stores the password to its JDK in Credential Store Framework (CSF), a secure
storage framework provided by Oracle. The WebLogic server administrator can
retrieve the JDK password stored in CSF.
ODSM also generates a self-signed certificate for itself and stores it in its JKS. This
self-signed certificate is valid for 15000 days from the date of generation. This
self-signed certificate is intended for testing purposes only. Oracle recommends
replacing this self-signed certificate with a certificate signed by a Certificate Authority
(CA) for production purposes.
There is no web-based tool for managing a JKS. To manage ODSM's JKS, you use
keytool, a command-line tool shipped with the Sun JRE/JDK. To get the JKS
password from CSF, you use the wlst listCred command.

Retrieving ODSM's Java Key Store Password
O-2 Oracle Fusion Middleware Administrator's Guide for Oracle Internet Directory
O.2 Retrieving ODSM's Java Key Store Password
To manage ODSM's JKS, you must first retrieve ODSM's JKS password from CFS. The
WebLogic administrator can retrieve it using the wlst command, as follows:
$ORACLE_HOME/common/bin/wlst.sh
Initializing WebLogic Scripting Tool (WLST) ...
Welcome to WebLogic Server Administration Scripting Shell
Type help() for help on available commands
wls:/offline> connect()
Please enter your username [weblogic] :weblogic
@ Please enter your password [weblogic] :
Please enter your server URL [t3://localhost:7001] :t3://stadd54:7001
Connecting to t3://stadd54:7001 with userid weblogic ...
Successfully connected to Admin Server 'AdminServer' that belongs to domain 'base_
domain'.
Warning: An insecure protocol was used to connect to the
server. To ensure on-the-wire security, the SSL port or
Admin port should be used instead.
wls:/base_domain/serverConfig> listCred( map="ODSMMap", key="ODSMKey.Wallet" )
{map=ODSMMap, key=ODSMKey.Wallet}
Location changed to domainRuntime tree. This is a read-only tree with
DomainMBean as the root.
For more help, use help(domainRuntime)
[Name : ODSM, Description : null, expiry Date : null] @ PASSWORD:_AQ-\<x<92
O.3 Listing the Contents of odsm.cer Java Key Store
After you retrieve the JKS password, you can manage the JKS by using keytool.
To list the contents of odsm.cer, use the keytool command, as follows:
cd directory_where_odsm.cer_resides
JAVA_HOME/bin/keytool -list -keystore odsm.cer \
-storepass password_obtained_from_CSF
For example:
See Also:
■The chapter on configuring the credential store in Oracle Fusion
Middleware Application Security Guide for more information about
CSF.
■JavaTM Cryptography Architecture API Specification &
Reference, at http://java.sun.com
■keytool - Key and Certificate Management Tool, at
http://java.sun.com
See Also: "Managing the Credential Store" in Oracle Fusion
Middleware Application Security Guide for more information about
managing credentials with wlst commands.

Deleting Expired Certificates
Managing Oracle Directory Services Manager's Java Key Store O-3
$ cd DOMAIN_HOME/config/fmwconfig/servers/AdminServer/applications/odsm/conf
$ JAVA_HOME/bin/keytool -list -keystore odsm.cer -storepass "&M)S86)/RB" -v
Keystore type: JKS
Keystore provider: SUN
Your keystore contains 2 entries
Alias name: serverselfsigned
Creation date: Dec 26, 2008
Entry type: PrivateKeyEntry
Certificate chain length: 1
Certificate[1]:
Owner: CN=OVD, OU=Development, O=Oracle, L=Redwood Shores, ST=California, C=US
Issuer: CN=OVD, OU=Development, O=Oracle, L=Redwood Shores, ST=California, C=US
Serial number: 495586b6
Valid from: Fri Dec 26 17:36:54 PST 2008 until: Wed Jun 24 18:36:54 PDT 2009
Certificate fingerprints:
MD5: 6C:11:16:F3:88:8D:18:67:35:1E:16:5B:3E:03:8A:93
SHA1: F4:91:39:AE:8B:AC:46:B8:5D:CB:D9:A4:65:BE:D2:75:08:17:DF:D0
Signature algorithm name: SHA1withRSA Version: 3
*******************************************
*******************************************
Alias name: cn=rootca, o=oracle, c=us (0)
Creation date: Dec 31, 2008
Entry type: trustedCertEntry
Owner: CN=RootCA, O=Oracle, C=US
Issuer: CN=RootCA, O=Oracle, C=US
Serial number: 0
Valid from: Tue Dec 30 02:33:11 PST 2008 until: Mon Jan 24 02:33:11 PST 2050
Certificate fingerprints:
MD5: 72:31:7B:24:C9:72:E3:90:37:38:68:40:79:D1:0B:4B
SHA1: D2:17:84:1E:19:23:02:05:61:42:A9:F4:16:C8:93:84:E8:20:02:FF
Signature algorithm name: MD5withRSA
Version: 1
*******************************************
*******************************************
O.4 Deleting Expired Certificates
There is no automatic mechanism for removing certificates from the JDK when they
expire. As administrator, you must determine when a certificate has expired and
remove it.
This section contains the following topics:
■Section O.4.1, "Determining the Expiration Date of a Certificate"
■Section O.4.2, "Deleting a Certificate"

Deleting Expired Certificates
O-4 Oracle Fusion Middleware Administrator's Guide for Oracle Internet Directory
O.4.1 Determining the Expiration Date of a Certificate
As explained in Section O.3, "Listing the Contents of odsm.cer Java Key Store", you list
all certificates in odsm.cer by using keytool. The listing contains the valid dates for
each certificate. For example, the following certificate is valid until Sat Oct 31 09:41:23
PDT 2008:
Alias name: cn=ovd, ou=development, o=MyCompany, l=redwood shores,
st=california, c=us (1241455283)
Creation date: May 5, 2008
Entry type: trustedCertEntry
Owner: CN=OVD, OU=Development, O=MyCompany, L=Redwood Shores, ST=California, C=US
Issuer: CN=OVD, OU=Development, O=Oracle, L=Redwood Shores, ST=California, C=US
Serial number: 49ff1ab3
Valid from: Mon May 04 09:41:23 PDT 2008 until: Sat Oct 31 09:41:23 PDT 2008
Certificate fingerprints:
MD5: 93:0E:41:5E:95:88:71:BD:8A:49:ED:A9:29:3B:0A:1E
SHA1: 84:C6:75:60:D9:BE:7B:CA:D6:8B:B5:4B:97:E4:20:39:44:82:FE:93
Signature algorithm name: SHA1withRSA
Version: 3
If certificate's validity period has expired, delete it using keytool as explained in the
next section.
O.4.2 Deleting a Certificate
To delete a certificate in odsm.cer, use keytool, as follows:
cd directory_where_odsm.cer_is_present
JAVA_HOME/bin/keytool -delete -keystore odsm.cer
-storepass password_obtained_from_CSF -alias "cn=rootca, o=oracle, c=us (0)"
For example
$> JAVA_HOME/bin/keytool -delete -keystore odsm.cer \
-storepass "&M)S86)/RB" -alias "cn=rootca, o=oracle, c=us (0)"
[Storing odsm.cer]

P
Starting and Stopping the Oracle Stack P-1
PStarting and Stopping the Oracle Stack
You must start and stop the components of the Oracle stack in a specific order, which
is described in this appendix.
This appendix contains the following sections:
■Section P.1, "Starting the Stack"
■Section P.2, "Stopping the Stack"
P.1 Starting the Stack
Start the stack components in the following order.
1. Start the Oracle Database
a. In the Database ORACLE_HOME, set the ORACLE_SID, ORACLE_HOME and
PATH environment variables to the appropriate values.
b. Start the listener.
ORACLE_HOME/bin/lsnrctl start
c. Start the database.
ORACLE_HOME/bin/sqlplus "/as sysdba"
startup
2. Start the Oracle WebLogic Administration Server.
MW_HOME/user_projects/domains/DOMAIN_NAME/bin/startManagedWebLogic.sh \
SERVER_NAME {ADMIN_URL}
When executing these scripts:
Note: If you start the Oracle WebLogic Administration Server from
the command line as shown, it runs in the foreground and prints
output to the screen. You can, however, run the server in the
background by using nohup at the beginning of the command line.
This sends all output to the file nohup.out and prevents the script
from prompting you for USER_NAME and PASSWORD. To pass
parameters to StartWebLogic.sh when using nohup, you can use a
boot identity file, as described in the "Starting and Stopping Servers"
chapter of Oracle Fusion Middleware Managing Server Startup and
Shutdown for Oracle WebLogic Server.

Stopping the Stack
P-2 Oracle Fusion Middleware Administrator's Guide for Oracle Internet Directory
■The default value for DOMAIN_NAME is IDMDomain
■SERVER_NAME represents the name of the Oracle WebLogic Managed Server.
Its default value is wls_ods1.
■You will be prompted for values for USER_NAME and PASSWORD if you do not
provide them as options when you execute the script.
■The value for ADMIN_URL will be inherited if you do not provide it as an
option when you execute the script.
3. Ensure that the Node Manager is running. Normally, the Oracle WebLogic
Administration Server starts the Node Manager. If, for some reason, the Node
Manager is not running, start it.
MW_HOME/user_projects/domains/DOMAIN_NAME/bin/startNodeManager.sh
4. Start system components, such as Oracle Internet Directory and Oracle Virtual
Directory.
ORACLE_INSTANCE/bin/opmnctl startall
You can verify that the system components have started by executing:
ORACLE_INSTANCE/bin/opmnctl status -l
5. Start WebLogic managed components, such as Oracle Directory Integration
Platform and Oracle Directory Services Manager.
MW_HOME/user_projects/domains/DOMAIN_NAME/bin/startManagedWebLogic.sh \
SERVER_NAME {ADMIN_URL}
To start managed components in the background, you can use the Oracle
WebLogic Administration Console. See Oracle Fusion Middleware Introduction to
Oracle WebLogic Server for more information.
You can view the status of WebLogic managed components with Oracle
Enterprise Manager Fusion Middleware Control. See Section 7.3, "Using Fusion
Middleware Control to Manage Oracle Internet Directory."
P.2 Stopping the Stack
You can stop the Administration Server and all the managed servers by using Oracle
WebLogic Administration Console. See Oracle Fusion Middleware Introduction to Oracle
WebLogic Server for more information.
To stop the stack components from the command line, issue the commands in the
following order.
1. Stop WebLogic managed components, such as Oracle Directory Integration
Platform and Oracle Directory Services Manager.
MW_HOME/user_projects/domains/DOMAIN_NAME/bin/stopManagedWebLogic.sh \
{SERVER_NAME} {ADMIN_URL} {USER_NAME} {PASSWORD}
2. Stop system components, such as Oracle Internet Directory and Oracle Virtual
Directory.
ORACLE_INSTANCE/bin/opmnctl stopall
3. Stop the WebLogic Administration Server.
MW_HOME/user_projects/domains/DOMAIN_NAME/bin/stopWebLogic.sh

Stopping the Stack
Starting and Stopping the Oracle Stack P-3
4. If you want to stop the Node Manager, you can use the kill command.
kill -9 pid
5. Stop the Oracle Database.
a. In the Database ORACLE_HOME, set the ORACLE_SID, ORACLE_HOME, and
PATH environment variables to the appropriate values.
b. Stop the database.
ORACLE_HOME/bin/sqlplus "/as sysdba"
shutdown immediate
c. Stop the listener.
ORACLE_HOME/bin/lsnrctl stop

Stopping the Stack
P-4 Oracle Fusion Middleware Administrator's Guide for Oracle Internet Directory

Q
Performing a Rolling Upgrade Q-1
QPerforming a Rolling Upgrade
If replication is configured in your Oracle Internet Directory environment, follow the
procedure in this appendix to perform a rolling upgrade. This appendix contains
references to Oracle Fusion Middleware Patching Guide.
In order to upgrade your Oracle home directories in a Directory Replication Group
(DRG), you must shut down all the replication servers in the DRG and upgrade each
Oracle home to the latest version individually. If you do not shut down the replication
servers, you might encounter issues when upgrading the Middleware Oracle home
directories. To avoid the downtime and loss of service associated with this process,
Oracle recommends following a rolling upgrade procedure, where each Oracle home
directory is upgraded individually while the other Oracle Internet Directory nodes
and the corresponding replication servers in the DRG remain up and running.
This appendix contains the following topics:
■Section Q.1, "Prerequisites for Rolling Upgrade."
■Section Q.2, "Rolling Upgrade Instructions."
■Section Q.3, "Rolling Upgrade Example."
Q.1 Prerequisites for Rolling Upgrade
Depending on your DRG version, you must apply the following one-off patches to
each Oracle home in the DRG before starting the rolling upgrade procedure to
upgrade the remtool and oidrepld binaries:
■If you have Oracle Internet Directory Version 11.1.1.2.0, apply the fix for bug
number 10033740 on each Middleware Oracle home.
■If you have Oracle Internet Directory Version 11.1.1.3.0, apply the fix for bug
number 10033746 on each Middleware Oracle home.
Q.2 Rolling Upgrade Instructions
Follow the instructions in this section to upgrade an Oracle Internet Directory DRG:
1. Stop the replication server on the first node you want to upgrade.
2. Suspend the replication from the first node to each of the other nodes:
remtool -psuspendrepl -fromnode first_node_host:first_node_port
This command lists out the replica IDs of all the Oracle Internet Directory nodes
along with their respective directory version numbers. You must either specify the

Rolling Upgrade Instructions
Q-2 Oracle Fusion Middleware Administrator's Guide for Oracle Internet Directory
replica ID of each of the other nodes as prompted or enter all which suspends
replication to all the other nodes..
See "remtool" in Oracle Fusion Middleware Reference for Oracle Identity Management
for more information.
3. Validate that replication has been suspended from the first node to all the other
nodes in the DRG by running the following ldapsearch command:
ldapsearch -h first_node_host -p OID_port -b "" -s base
"(objectclass=orclReplAgreementEntry)" orcllastappliedchangenumber
Look for orcllastappliedchangenumber from the first node to the other
nodes with subtype status.It should have value 0. It will be of the form:
orcllastappliedchangenumber;status$replica_id_of_first_node$replica_id_of_
other_node;transport
and
orcllastappliedchangenumber;apply;status$replica_id_of_first_node$replica_id_
of_other_node
If there are any discrepancies, you should repeat Step 2.
4. Stop Oracle Internet Directory on the node you are about to upgrade.
5. Patch the node to Release 11.1.1.4.0. Refer to the instructions in the Oracle Fusion
Middleware Patching Guide:
6. Start Oracle Internet Directory on the node you have just upgraded.
7. Because no other nodes have been upgraded yet, do not resume replication
between the first node and any other node.
8. Stop the replication server on the second node you want to upgrade.
9. Suspend replication from the second node to each of the nodes that have not been
upgraded.
remtool -psuspendrepl -fromnode second_node_host:second_node_port
This command lists out the replica IDs of all the Oracle Internet Directory nodes
along with their respective directory version numbers. You must specify the
replica ID of each of the other nodes that have not been upgraded.
10. Validate that replication has been suspended from the node you are about to
upgrade to each node that has not been upgraded, using the same command as in
Step 3 against the second node.
11. Stop Oracle Internet Directory on the node you are about to upgrade.
12. Patch the node to Release 11.1.1.4.0 as in Step 5.
13. Start Oracle Internet Directory on the node you have just upgraded.
14. Now two nodes have been upgraded, so resume replication from the first node
you upgraded to the second node you upgraded.
remtool -presumerepl -fromnode first_upgraded_replica_host:port -tonode
second_upgraded_replica_host:port
15. Validate that replication has been resumed from first upgraded node to the second
upgraded nodes in DRG by running the following ldapsearch command:
ldapsearch -p OID_port -h first_upgraded_OID_host -b "" -s base "(objectclass=

Rolling Upgrade Example
Performing a Rolling Upgrade Q-3
orclReplAgreementEntry)" orcllastappliedchangenumber
Look for orcllastappliedchangenumber from the first upgraded Oracle
Internet Directory node to the second upgraded node with subtype status; it
should have a value of 1.
Repeat this ldapsearch command against all other earlier upgraded nodes. If
there are any discrepancies, repeat Step 14.
16. Start replication server on the second upgraded replica.
17. Shut down the replication server on the third node you want to upgrade.
18. Suspend replication from the third node to each node that has not yet been
upgraded, if any.
19. Validate that replication has been suspended from the third node to each node
that has not been upgraded.
20. Stop Oracle Internet Directory and other processes on the third node to be
upgraded.
21. Patch the node to Release 11.1.1.4.0 as in Step 5.
22. Start Oracle Internet Directory on the third node.
23. Resume replication from each node that has already been upgraded to the third
node.
24. Validate that replication has been resumed from each upgraded node to the third
node.
25. Start replication on the third node
Repeat this procedure for all the nodes. Before upgrading a node, suspend replication
from that node to each of the nodes that has not yet been upgraded and validate that it
is suspended. Stop Oracle Internet Directory on the node you are about to upgrade.
Upgrade the node. Start Oracle Internet Directory on the node you just upgraded.
Resume replication from nodes that are already upgraded to the node you just
upgraded. Start replication on the node you just upgraded.
Q.3 Rolling Upgrade Example
In this example, there are three Oracle Internet Directory nodes, A, B, and C, in a
mulimaster DRG. All of them of are running 11g Release 1 (11.1.1.3.0). They need to be
upgraded to 11g Release 1 (11.1.1.4.0) by using the rolling upgrade procedure.
We will upgrade Node A first, followed by B and C.
Before starting the rolling upgrade procedure, apply the patch for 11g Release 1
(11.1.1.3.0) on all nodes to patch the oidrepld and remtool binaries. See Section Q.1,
"Prerequisites for Rolling Upgrade."
Follow these steps to upgrade the nodes:
1. Stop the replication server on Node A.
2. Suspend the replication from:
■Node A to OID Node B
■Node A to OID Node C
remtool -psuspendrepl -fromnode HostA:PortA

Rolling Upgrade Example
Q-4 Oracle Fusion Middleware Administrator's Guide for Oracle Internet Directory
This command displays the replica IDs of all three Oracle Internet Directory
nodes. Provide the replica IDs of Node B and Node C as input to remtool.
Alternatively, you can enter all, which causes remtool to automatically select
the replica IDs of B and C.
3. Validate that replication has been suspended from Node A to Node B by running
the following ldapsearch command:
ldapsearch -p PortA -h hostA -b "" -s base
"(objectclass=orclReplAgreementEntry)" orcllastappliedchangenumber
Look for orcllastappliedchangenumber with subtype status. It has value 0
and is of the form:
orcllastappliedchangenumber;apply;status$replica_id_of_node A$replica_id_of_
node_B
orcllastappliedchangenumber:status$replicaid_of_node_A$replicaid_of_
nodeB;transport
If there is any discrepancy in the status value, repeat Step2.
Similarly, validate that replication has been suspended from Node A to Node C.
4. Stop Oracle Internet Directory and other processes on Node A.
5. Run the PSA on Node A to upgrade it to 11g Release 1 (11.1.1.4.0).
6. Bring up Oracle Internet Directory and the replication server on Node A. Note that
there is no node with which Node A should resume replication.
7. Stop the replication server on Node B.
8. Suspend replication from Node B to Node C by executing the following command:
remtool -psuspendrepl -fromnode HostB:PortB -tonode HostC:PortC
9. Validate that replication has been suspended from Node B to Node C by running
the following ldapsearch command:
ldapsearch -p PortB -h hostB -b "" -s base
"(objectclass=orclReplAgreementEntry)" orcllastappliedchangenumber
Look for orcllastappliedchangenumber with subtype status. It has value 0
and is of the form:
orcllastappliedchangenumber;apply;status$replica_id_of_node_B$replica_id_of_
node_C
orcllastappliedchangenumber:status$replicaid_of_node_B$replicaid_of_node_
C;transport
If there is any discrepancy in the status value, repeat Step 8.
10. Stop Oracle Internet Directory and other processes on Node B.
11. Run the PSA on Node B to upgrade it to 11g Release 1 (11.1.1.4.0).
12. Bring up Oracle Internet Directory on Node B.
Resume replication from Node A to Node B
remtool -presumerepl -fromnode HostA:PortA -tonode HostB:PortB
13. Validate that replication has been resumed from Node A to Node B by running the
following ldapsearch command:
ldapsearch -p OID_port -h hostA -b "" -s base "(objectclass=

Rolling Upgrade Example
Performing a Rolling Upgrade Q-5
orclReplAgreementEntry)" orcllastappliedchangenumber
Look for orcllastappliedchangenumber from the upgraded Node A to Node
B with subtype status. It should have value 1.
If there is any discrepancy in the status value, repeat Step12.
14. Bring up the replication server on Node B.
15. Shut down the replication server on Node C.
16. There is no other node to be upgraded so there is no need to suspend replication.
Stop Oracle Internet Directory and other processes on Node C.
17. Run PSA on Node C to upgrade it to 11g Release 1 (11.1.1.4.0).
18. Bring up Oracle Internet Directory on Node C.
Resume replication from Node A to Node C.
remtool -presumerepl -fromnode HostA:PortA -tonode HostC:PortC
Resume replication from Node B to Node C.
remtool -presumerepl -fromnode HostB:PortB -tonode HostC:PortC
19. Validate that replication has been resumed successfully by performing an
ldapsearch on Node A and Node B similar to Step 13. Validate replication:
■From Node A to Node C
■From Node B to Node C
20. Bring up the replication server on Node C.

Rolling Upgrade Example
Q-6 Oracle Fusion Middleware Administrator's Guide for Oracle Internet Directory

R
Using the Oracle Internet Directory VM Template R-1
RUsing the Oracle Internet Directory VM
Template
The Oracle Internet Directory 11.1.1.6.0 VM Template is a ready-to-go environment
that you can run on Oracle VM Server. It consists of Oracle Database 11.1.0.7 and
Oracle Internet Directory 11.1.1.6. You download the template, perform a few
configuration steps and, within a short time, Oracle Database and Oracle Internet
Directory are installed, running, and ready to use. You can also use the template to
quickly install Oracle Internet Directory in a non-VM environment.
The template provides default values that might not be appropriate in all
environments.
R.1 Installing Operating System, Oracle Database, and Oracle Internet
Directory
Follow these steps to install the operating system, Oracle Database, and Oracle
Internet Directory 11.1.1.5.0 into an Oracle VM environment.
1. Install the Oracle VM server as described in Oracle VM Server Installation Guide.
2. Download the VM template files for Oracle Internet Directory,
oidhome.tgz
and
OVM_EL5U2_X86_64_ORACLE11G_PVM_1.tgz
, from
http://edelivery.oracle.com
.
3. Copy the template files to dom0
/OVS/seed_pool
.
4. Change to that directory and extract the files, as follows:
cd /OVS/seed_pool
tar xzf OVM_EL5U2_X86_64_ORACLE11G_PVM_1.tgz
tar xzf oidhome.tgz
5. Change to the directory containing the configuration file
vm.cfg
.
cd OVM_EL5U2_X86_64_ORACLE11G_PVM
6. Edit
vm.cfg
, setting VCPU, Memory, and network (VIF) values appropriately for
this VM. Recommendations for sizing and tuning Oracle Internet Directory are
documented in the Oracle Internet Directory chapter in the Oracle Fusion
Middleware Performance and Tuning Guide.
7. Start Oracle VM by typing:
xm create vm.cfg
8. By default, Oracle VM starts a VNC server on port 5900. From another window,
using a VNC client, connect to the host where Oracle VM is running, at port 5900.

Installing Oracle Internet Directory Template with an Existing Oracle VM that has Oracle Database
R-2 Oracle Fusion Middleware Administrator's Guide for Oracle Internet Directory
9. You are prompted for installation and configuration information. Provide the
information to set up the Oracle 11g database.
10. Log into the host as user
root
, password
ovsroot
. Changing the password is
recommended.
11. Oracle Internet Directory is now installed in the home directory
/oidhome/app/mwhome
.
R.2 Installing Oracle Internet Directory Template with an Existing Oracle
VM that has Oracle Database
Perform the following steps to install the Oracle Internet Directory template with an
existing VM that already has the Oracle Database template with Real Application
Clusters.
1. Download the VM template file
oidhome.tgz
from
http://edelivery.oracle.com
.
2. Copy the file to dom0
/OVS/seed_pool
.
3. Change to that directory and extract the file, as follows:
cd /OVS/seed_pool
tar xzf oidhome.tgz
This extracts the
oidhome.img
file under:
/OVS/seed_pool/OVM_EL5U2_X86_64_
ORACLE11G_PVM
4. Change to the directory containing the configuration file
vm.cfg
. For example:
cd OVM_EL5U2_X86_64_ORACLE11G_PVM
5. Edit
vm.cfg
, adding
oidhome.img
as a disk, as shown in bold:
disk = ['file:/OVS/seed_pool/OVM_EL5U2_X86_64_ORACLE11G_
PVM/System.img,xvda,w','file:/OVS/seed_pool/OVM_EL5U2_X86_64_ORACLE11G_
PVM/oracle11g_x86_64_asm.img,xvdb,w', 'file:/OVS/seed_pool/OVM_EL5U2_X86_64_
ORACLE11G_PVM/oidhome.img,xvdc,w'
]
6. Restart the guest OS by typing:
xm shutdown OVM_EL5U2_X86_64_ORACLE11G_PVM
xm create vm.cfg
7. Create the
/oidhome
directory:
mkdir /oidhome
8. Mount the Oracle Internet Directory image:
mount -t ext3 /dev/xvdc /oidhome
Note: If you need to mount to a directory other than
/oidhome
, you
must relink the Oracle Internet Directory binary by typing:
cd /mntPoint/app/mwhome/ldap/lib
make -f ins_ldap.mk install

Using the Oracle Internet Directory OVM image in a Non-OVM Environment
Using the Oracle Internet Directory VM Template R-3
9. Set the owner and group for the /mntPoint/app directory tree:
chown -R oracle /
mntPoint
/app
chgrp -R dba /
mntPoint
/app
10. Run
oidRoot.sh
:
/
mntPoint
/app/mwhome/Oracle_Idm1/oidRoot.sh
11. Switch to the user
oracle
:
su oracle
12. Set the
DISPLAY
environment variable.
13. Set the
ORACLE_HOME
environment variable to:
/mntPoint/app/mwhome/Oracle_
IDM1
14. Change to the directory containing
config.sh
and execute it:
cd /mntPoint/app/mwhome/Oracle_IDM1/bin
./config.sh
15. You are prompted for information. Provide the information to configure the
environment.
R.3 Registering Oracle Internet Directory for Oracle Enterprise Manager
Fusion Middleware Control and ODSM Management
Download the Oracle WebLogic Server template from
http://edelivery.oracle.com
and install it as a separate VM. From the Oracle Internet Directory VM, execute the
command:
/mountpoint/app/mwhome/asinst_1/bin/opmnctl registerinstance
R.4 Using the Oracle Internet Directory OVM image in a Non-OVM
Environment
1. Download the VM template file
oidhome.tgz
from
http://edelivery.oracle.com
.
2. Extract the file, as follows:
tar xzf oidhome.tgz
This extracts the
oidhome.img
file under:
./OVM_EL5U2_X86_64_ORACLE11G_PVM
3. Copy
oidhome.img
to a directory. For example:
cp oidhome.img /u01
4. Switch to
root
user
5. Create
/oidhome
.
mkdir /oidhome
6. Mount the image. For example:
mount -t ext3 -o loop /u01/oidhome.img /oidhome

Default Values
R-4 Oracle Fusion Middleware Administrator's Guide for Oracle Internet Directory
7. Change to the directory
/oidhome
and set the owner and group for the
/oidhome/app
tree:
cd /oidhome
chown -R oracle ./app
chgrp -R dba //app
8. Run
oidRoot.sh
:
/oidhome/app/mwhome/Oracle_Idm1/oidRoot.sh
9. Set the
DISPLAY
environment variable.
10. Set the
ORACLE_HOME
environment variable to:
/oidhome/app/mwhome/Oracle_IDM1
11. Install the Oracle database, as described in the Oracle Database Installation Guide
for your platform.
12. Run
/oidhome/app/mwhome/Oracle_IDM1/bin/config.sh
to configure Oracle
Internet Directory.
R.5 Default Values
The template provides the following default values:
Entity Value
Root password
ovsroot
Oracle Database home
/u01/app/oracle/11.1.0/db_1
Oracle Internet Directory home
/oidhome/app/mwhome/Oracle_IDM1
Oracle SID
orcl

S
Troubleshooting Oracle Internet Directory S-1
STroubleshooting Oracle Internet Directory
This appendix explains typical problems that you could encounter while running or
installing Oracle Internet Directory. It contains these sections:
■Section S.1, "Problems and Solutions"
■Section S.2, "Need More Help?"
S.1 Problems and Solutions
This section describes common Oracle Internet Directory error messages, problems
and solutions. It contains the following topics:
■Section S.1.1, "Installation Errors"
■Section S.1.2, "Oracle Database Server Errors"
■Section S.1.3, "Directory Server Error Messages and Causes"
■Section S.1.4, "Getting a Core Dump and Stack Trace When Oracle Internet
Directory Crashes"
■Section S.1.5, "TCP/IP Problems"
■Section S.1.6, "Troubleshooting Password Policies"
■Section S.1.7, "Troubleshooting Directory Performance"
■Section S.1.8, "Troubleshooting Port Configuration"
■Section S.1.9, "Troubleshooting Creating Oracle Internet Directory Component
with opmnctl"
■Section S.1.10, "Troubleshooting Starting Oracle Internet Directory"
■Section S.1.11, "Troubleshooting Starting, Stopping, and Restarting of the Directory
Server"
■Section S.1.12, "Troubleshooting Oracle Internet Directory Replication"
■Section S.1.13, "Troubleshooting Change Log Garbage Collection"
■Section S.1.14, "Troubleshooting Dynamic Password Verifiers"
■Section S.1.15, "Troubleshooting Oracle Internet Directory Password Wallets"
Note: All references to Oracle Single Sign-On and Oracle Delegated
Administration Services in this appendix refer to Oracle Single
Sign-On 10g (10.1.4.3.0) or later and Oracle Delegated Administration
Services 10g (10.1.4.3.0) or later.

Problems and Solutions
S-2 Oracle Fusion Middleware Administrator's Guide for Oracle Internet Directory
■Section S.1.16, "Troubleshooting bulkload"
■Section S.1.17, "Troubleshooting bulkdelete, bulkmodify, and ldifwrite"
■Section S.1.18, "Troubleshooting catalog"
■Section S.1.19, "Troubleshooting remtool"
■Section S.1.20, "Troubleshooting Server Chaining"
■Section S.1.21, "Viewing Version Information"
■Section S.1.22, "Troubleshooting Fusion Middleware Control and WLST"
■Section S.1.23, "Troubleshooting Oracle Directory Services Manager"
S.1.1 Installation Errors
During installation and configuration of the Oracle Database, Oracle recommends that
you select the character set AL32UTF8 to avoid possible problems with multibyte
characters.
S.1.2 Oracle Database Server Errors
Because Oracle Internet Directory relies on Oracle Database, database errors can cause
directory server problems. This section lists some database errors you might see in the
Oracle Internet Directory logs.
S.1.2.1 Oracle Database Server Connection is Down
Oracle Internet Directory shuts down. You see error ORA-3113 or ORA-3114 in the log
file.
Problem
Oracle Internet Directory has lost its connection to Oracle Database.
Solution
Check database and listener status, either directly on the host where they are running,
or through. Restart them if necessary. OIDMON automatically detects that the
database is up and restarts OIDLDAPD servers.
S.1.2.2 Oracle Database Server Error Due to Interrupted Client Connection
You get error sgslunrRead or 30SendPort
Problem
These errors indicates that an LDAP client has disconnected abruptly.
Possible reasons include:
■The client program terminated the connection without performing an unbind or
abandon.
The client machine shut down.
■A network component, such as a load balancer or firewall, broke the connection
due to a configured timeout setting.
■The network is down.
See Also: Section S.1.7.3, "Poor Oracle Database Server
Performance".

Problems and Solutions
Troubleshooting Oracle Internet Directory S-3
Solution
These errors are due to conditions external to the server. If necessary, inform the
network administrator.
S.1.2.3 Oracle Database Server Error Due to Schema Modifications
You get error ORA-1562.
Problem
If you attempt to add more schema components than can fit in the rollback segment
space, you encounter this error and the modifications do not commit.
Solution
To solve this, increase the size of the rollback segments in the database server.
S.1.3 Directory Server Error Messages and Causes
This section contains a list of Oracle directory server error messages that you might
encounter. Each message is followed by its most probable causes. Also see Oracle
Fusion Middleware Error Messages Reference.
S.1.3.1 Inappropriate Authentication Error
You see the following error message on the command line when attempting an
anonymous bind to the server:
ldap_bind: Inappropriate authentication
ldap_bind: additional info: Server is Configured to Deny Anonymous Binds
Problem
Anonymous binds are disabled. In most environments, some clients require
anonymous access.
Solution
Enable anonymous binds.
S.1.3.2 Constraint Violation Error Due to Editing a User or Group or Creating a Realm
You get the following error in oidldap*.log:
ORA-01483: invalid length for DATE or NUMBER bind variable.
You may also see the following error on your screen:
LDAP: error code 19 - Constraint Violation
These errors might only occur intermittently.
Problem
If you loaded the OracleAS Metadata Repository into an Oracle 10g Database that uses
the AL32UTF8 character set, you may encounter some errors when you try to edit a
user or Group, or Create Identity Management Realms in Oracle Internet Directory.
Editing a user includes editing attributes for an existing user.
See Also: Section 32.7, "Managing Anonymous Binds" for more
information.

Problems and Solutions
S-4 Oracle Fusion Middleware Administrator's Guide for Oracle Internet Directory
Solution
As a workaround, you can wait a bit and try editing the user again.
S.1.3.3 Standard Error Messages Returned from Oracle Directory Server
Table S–1 lists standard error messages and their causes. Oracle Internet Directory also
returns other messages listed and described in Section S.1.3.4, "Additional Directory
Server Error Messages."
Table S–1 Standard Error Messages
Error Cause
00: LDAP_SUCCESS The operation was successful.
01: LDAP_OPERATIONS_
ERROR
General errors encountered by the server when processing the
request.
02: LDAP_PROTOCOL_
ERROR
The client request did not meet the LDAP protocol requirements,
such as format or syntax. This can occur in the following
situations: Server encounters a decoding error while parsing the
incoming request. The request is an add or modify request that
specifies the addition of an attribute type to an entry but no
values specified. Error reading SSL credentials. An unknown
type of modify operation is specified (other than LDAP_MOD_
ADD, LDAP_MOD_DELETE, and LDAP_MOD_REPLACE)
Unknown search scope
03: LDAP_TIMELIMIT_
EXCEEDED
Search took longer than the time limit specified. If you have not
specified a time limit for the search, Oracle Internet Directory
uses a default time limit of one hour.
04: LDAP_SIZELIMIT_
EXCEEDED
More entries match the search query than the size limit specified.
If you have not specified a size limit for the search, Oracle
Internet Directory uses a default size limit of 1000.
05: LDAP_COMPARE_
FALSE
Presented value is not the same as the one in the entry.
06: LDAP_COMPARE_
TRUE
Presented value is same as the one in the entry.
07: LDAP_STRONG_
AUTH_NOT_SUPPORTED
The requested bind method is not supported by the server. For
example, SASL clients requesting Kerberos authentication from
Oracle Internet Directory receive this error in response.
09: LDAP_PARTIAL_
RESULTS
Server returned a referral.
10: LDAP_REFERRAL Server returned a referral.
12: LDAP_
UNAVAILABLE_
CRITICALEXTENSION
Specified request is not supported
16: LDAP_NO_SUCH_
ATTRIBUTE
Attribute does not exist in the entry specified in the request.
17: LDAP_UNDEFINED_
TYPE
Specified attribute type is undefined in the schema.
19: LDAP_CONSTRAINT_
VIOLATION
The value in the request violated certain constraints.
20: LDAP_TYPE_OR_
VALUE_EXISTS
Duplicate values specified for the attribute.
21: LDAP_INVALID_
SYNTAX
Specified attribute syntax is invalid. In a search, the filter syntax is
invalid.

Problems and Solutions
Troubleshooting Oracle Internet Directory S-5
S.1.3.4 Additional Directory Server Error Messages
Table S–2 lists additional directory server error messages and their causes. These
messages do not display error codes.
The Oracle Internet Directory application replaces the parameter tag seen in some of
the following messages with the appropriate run-time value.
32: LDAP_NO_SUCH_
OBJECT
The base specified for the operation does not exist.
34: LDAP_INVALID_DN_
SYNTAX
Error in the DN syntax.
49: LDAP_INVALID_
CREDENTIALS
Bind failed because the credentials are not correct.
50: LDAP_INSUFFICIENT_
ACCESS
The client does not have access to perform this operation.
53: LDAP_UNWILLING_
TO_PERFORM
General error, or server is in read-only mode.
65: LDAP_OBJECT_
CLASS_VIOLATION
A change to the entry violates the object class definition.
66: LDAP_NOT_
ALLOWED_ON_
NONLEAF
The entry to be deleted has children.
67: LDAP_NOT_
ALLOWED_ON_RDN
Cannot perform the operation on RDN attributes—for example,
you cannot delete the RDN attribute of the entry.
68: LDAP_ALREADY_
EXISTS
Duplicate ADD condition.
81: LDAP_SERVER_DOWN Cannot contact the directory server. This message is returned
from the SDK.
82: LDAP_LOCAL_ERROR The client encountered an internal error. This message is
returned from the client SDK.
83: LDAP_ENCODING_
ERROR
The client encountered an error in encoding the request. This
message is returned from the SDK.
84: LDAP_DECODING_
ERROR
The client encountered an error in decoding the request. This
message is returned from the SDK.
85: LDAP_TIMEOUT Client encountered the time out specified for the operation. This
message is returned from the SDK.
86: LDAP_AUTH_
UNKNOWN
Authentication method is unknown to the client SDK.
87: LDAP_FILTER_ERROR Bad search filter
88: LDAP_USER_
CANCELLED
User cancelled operation
89: LDAP_PARAM_ERROR Bad parameter to an LDAP routine
90: LDAP_NO_MEMORY Out of memory
Table S–1 (Cont.) Standard Error Messages
Error Cause

Problems and Solutions
S-6 Oracle Fusion Middleware Administrator's Guide for Oracle Internet Directory
Table S–2 Additional Error Messages
Error Cause
%s attribute not found The particular attribute type is not defined in the schema.
parameter not found for
attribute parameter
Value not found in the attribute. (ldapmodify)
Admin domain does not
contain schema information
for objectclass parameter
The object class specified in the request is not present in the
schema.
Attempted to add a Class
with oid parameter taken by
other class
Duplicate object identifier specified. (schema modification)
Attribute parameter already
in use
Duplicate attribute name. (schema modification)
Attribute parameter has
syntax error.
Syntax error in the attribute name definition. (schema
modification)
Attribute parameter is not
supported in the schema.
Attribute not defined. (all operations)
Attribute parameter is single
valued.
Attribute is single-valued. (ldapadd and ldapmodify)
Attribute parameter not
present in the entry.
This attribute does not exist in the entry. (ldapmodify)
Bad attribute definition. Syntax error in attribute definition. (schema modification)
Currently Not Supported The version of LDAP request is not supported by this server.
Entry to be deleted not
found.
DN specified in the delete operation not found.
Entry to be modified not
found
The entry specified in the request is not found.
Error encountered while
adding parameter to the
entry
Returned when modify add operation is invoked. A possible
cause is that the system resource is unavailable.
Error encountered while
encrypting an attribute
value.
Error in encrypting user password. (all operations)
Error in DN Normalization. DN specified is invalid. Syntax error encountered in parsing the
DN. (all operations)
Error in hashing parameter
attribute.
Error in creating hash entry for the attribute. (schema
modification)
Error in hashing parameter
objectclass.
Error in creating hash entry for the objectclass. (schema
modification)
Error in Schema hash
creation.
Error while creating hash table for schema. (schema
modification)
Error replacing parameter. Error in replacing this attribute. (ldapmodify)
Error while normalizing
value for attribute parameter.
Error in normalizing value for the attribute. (all operations)
Failed to find parameter in
mandatory or optional
attribute list.
Attribute specified does not exist in either the mandatory or
optional attribute list as required by the object class(es).
Function Not Implemented The feature/request is currently not supported. (Specifying a
non-indexed attribute in a search can generate this error.)

Problems and Solutions
Troubleshooting Oracle Internet Directory S-7
INVALID ACI is parameter The particular ACI you specified in a request is invalid.
Mandatory attribute
parameter is not defined in
Admin Domain parameter.
MUST refers to attribute not defined. (schema modification)
Mandatory Attribute
missing.
The mandatory attribute for the particular entry is missing, as
required by the particular object class.
Matching rule, parameter,
not defined.
Matching rule not defined in the server. (schema modification)
MaxConn Reached The maximum number of concurrent connections to the LDAP
server has been reached.
Modifying the Naming
attribute for the entry
without modifying the DN.
Cannot modify the naming attributes using ldapmodify. A
naming attribute, such as cn is an element in the DN.
New Parent not found. New parent specified in modifydn operation does not
exist.(ldapmodifydn)
Object already exists. Duplicate entry. (ldapadd and ldapmodifydn)
Object ID parameter already
in use.
Duplicate object identifier specified. (schema modification)
Objectclass parameter
already in use.
Duplicate Objectclass name. (schema modification)
Objectclass attribute
missing.
The objectclass attribute is missing for this particular entry.
OID parameter has syntax
error.
syntax error in the object identifier definition. (schema
modification)
One of the attributes in the
entry has duplicate value.
You entered two values for the same attribute in the entry you
are creating.
Operation not allowed on
the parameter.
Operation not allowed on this entry. (modify, add, and delete)
Operation not allowed on
the DSE Entry.
Can't do this operation on DSE entry. (delete)
Optional attribute parameter
is not defined in Admin
Domain parameter.
MAY refers to attribute not defined. (schema modification)
Parent entry not found in
the directory.
Parent entry does not exist. (ldapadd and perhaps
ldapmodifydn)
Super object parameter is not
defined in Admin Domain
parameter.
SUP types refer to non-existing class. (schema modification)
Super type undefined. SUP type does not exist. (schema modification)
Superuser addition not
permitted.
Cannot create superuser entry. (ldapadd)
Syntax, parameter, not
defined.
Syntax not defined in the server. (schema modification)
The attribute or the value
specified in the RDN does
not exist in the entry.
AVA specified as the RDN does not exist in the entry. (ldapadd)
Table S–2 (Cont.) Additional Error Messages
Error Cause

Problems and Solutions
S-8 Oracle Fusion Middleware Administrator's Guide for Oracle Internet Directory
S.1.4 Getting a Core Dump and Stack Trace When Oracle Internet Directory Crashes
You can control the type of information Oracle Internet Directory provides when it
crashes by changing the value of the orclsdumpflag attribute in the instance-specific
configuration entry.
If the server crashes, it leaves a core file under the directory
ORACLE_INSTANCE/diagnostics/logs/OID
If orclsdumpflag is set to 0, and the server crashes, in addition to the core dump,
the server also attempts to leave a stack trace. The location for the stack trace is:
ORACLE_INSTANCE/diagnostics/logs/OID/compName/oidldapd_stack00_pid.dmp
Some operating system-specific settings can affect the generation of a core dump or
stack trace. Consult your operating system documentation to determine whether the
following settings are required:
■The coredump parameter must be set to allow core dumps.
■The file size limit, as specified with the ulimit command, must be sufficient to
allow core dumps.
■The file permissions on the ORACLE_HOME/bin/oidldapd binary file must allow
read by group. You can ensure that group has read permission by typing:
chmod g+r $ORACLE_HOME/bin/oidldapd
as the root user.
S.1.5 TCP/IP Problems
TCP/IP bugs in the operating system can interfere with Oracle Internet Directory
service.
Unknown search scope The search scope specified in the LDAP request is not
recognized.
Version Not Supported The version of the LDAP request is not supported by this server.
Alias Problem Either of the following have occurred:
■An alias was dereferenced, but it did not point to an entry
in the DIT.
■The user tries to add an alias entry whose parent is an alias.
Alias Dereferencing
Problem
The user cannot dereference an alias because of access control
issues.
No Such Object The server cannot find the base DN specified in the search
request.
Invalid DN Syntax When adding or modifying an alias entry, if the value specified
for aliasedObjectName has invalid DN syntax, then the
directory server returns this error message to the client.
Insufficient Access Rights The user does not have access to the dereferenced entry.
Table S–2 (Cont.) Additional Error Messages
Error Cause

Problems and Solutions
Troubleshooting Oracle Internet Directory S-9
S.1.5.1 Do Not Use TCP-Based Monitoring of Server Availability on Windows 2003
Server
If you use the F5 load balancer for monitoring Oracle Internet Directory server
availability, configure the load balancer to use LDAP- or HTTP-based monitoring, as
described in the Oracle Fusion Middleware High Availability Guide section "Configuring
A Load Balancer For OracleAS Cluster (Identity Management)." Using TCP-based
monitoring might cause the service to become unavailable, due to an operating system
bug on Microsoft Windows 2003 Server.
S.1.5.2 Do Not Install DaimondCS Port Explorer
Oracle Internet Directory does not work if DaimondCS Port Explorer is installed on
the system.
S.1.6 Troubleshooting Password Policies
This section describes error messages and problems related to password policies.
S.1.6.1 Password Policy is Not Enforced
The password policy is not being enforced for a given user or set of users. For
example, users can reset their password using a syntax that is disallowed by the
defined password policy.
Problem
Just creating a password policy is not sufficient. You must also specify the subtree to
be governed by the policy.
Solution
Add and populate a pwdPolicysubentry attribute with the policy's DN, at the root
of that subtree.
S.1.6.2 Password Policy Error Messages
Table S–3 contains the error messages sent to the client as a result of password policy
violations. The error codes are not standard LDAP error codes. They are messages sent
as a part of additional information in the LDAP result.
See Also: Section 28.1.2, "Steps Required to Create and Apply a
Password Policy" for more information.
Table S–3 Password Policy Violation Error Messages
Error
Number Exception Comment or Resolution
9000 GSL_PWDEXPIRED_EXCP User's password has expired.
9001 GSL_ACCOUNTLOCKED_EXCP User account is locked.
9002 GSL_EXPIREWARNING_EXCP User password will expire in pwdexpirewarning seconds.
Please change your password now.
9003 GSL_PWDMINLENGTH_EXCP User password is not the required number of characters long.
9004 GSL_PWDNUMERIC_EXCP User password does not contain required numeric characters.
9005 GSL_PWDNULL_EXCP User password is a null password, which is disallowed.

Problems and Solutions
S-10 Oracle Fusion Middleware Administrator's Guide for Oracle Internet Directory
S.1.7 Troubleshooting Directory Performance
This section gives some quick pointers for common performance-related problems.
S.1.7.1 Poor LDAP Search Performance
LDAP search performance is poor.
9006 GSL_PWDINHISTORY_EXCP User's new password is the same as an old one saved in
history, which is disallowed.(The pwdinhistory attribute
controls the number of passwords saved in history.)
9007 GSL_PWDILLEGALVALUE_EXCP The user password supplied is an illegal value defined in
orclpwdillegalvalues, and therefore cannot be used.
9008 GSL_GRACELOGIN_EXCP User password has expired. User has pwdgraceloginlimit
grace logins left or orclpwdgracelogintimelimit seconds
in which grace logins are allowed.
9012 GSL_PWDALPHA_EXCP Your Password must contain at least
orclpwdminalphachars alphabetic characters.
9013 GSL_PWDSPECIAL_EXCP Your Password must contain at least
orclpwdminspecialchars special characters.
9014 GSL_PWDUPPER_EXCP Your Password must contain at least orclpwdminuppercase
upper case characters
9015 GSL_PWDMAXCHAR_EXCP Your Password can only contain orclpwdmaxrptchars
repeated characters
9016 GSL_PWDLOWER_EXCP Your Password must contain at least orclpwdminlowercase
lowercase characters.
9017 GSL_EC_PWDPOLSUBENTINV The pwdPolicysubentry provided is invalid. (The DN is not
that of a valid password policy present in the directory.)
9018 GSL_EC_PWDPOLINUSE The pwdPolicy entry you are deleting is currently in use. (You
must remove the references to the password policy before the
policy itself can be removed.)
9019 GSL_EC_PWDPOLOBJ The DN of a pwdPolicy entry may not be modified.
9020 GSL_PWDMINAGE_EXCP Your Password has to be at least pwdminage seconds old
before it can be changed.
9032 GSL_EC_GRACE_CONST orclgracelogintimelimit and pwdgraceloginlimit
are mutually exclusive. Both cannot be nonzero.
9033 GSL_EC_NOROOTDSEPWDPOL The pwdpolicysubentry attribute in the root DSEcannot be
deleted. (This is not allowed because it would leave the
directory without an applicable password policy.)
9034 GSL_EC_NOTROCPWDPOL Only password policies defined in the Root Oracle Context are
applicable in the Root DSE. (This ensures that only a policy
specified by an admin who has directory-wide privileges can
be applied to the entire directory.)
9050 GSL_ACCTDISABLED_EXCP User account has been disabled.
See Also: Chapter 12, "Managing Accounts and Passwords".
Table S–3 (Cont.) Password Policy Violation Error Messages
Error
Number Exception Comment or Resolution

Problems and Solutions
Troubleshooting Oracle Internet Directory S-11
Problem
Various problems.
Solution
Make sure that:
■Schema associated with the ODS user is ANALYZED
■For searches involving multiple filter operands, make sure that the order in which
they are given goes from the most specific to the least specific. For example,
&(uid=john.doe)(objectclass=person) is better than
&(objectclass=person)(uid=john.doe).
Also see Section S.1.7.3, "Poor Oracle Database Server Performance."
S.1.7.2 Poor LDAP Add or Modify Performance
LDAP add or modify performance is poor.
Problem
Various problems
Solution
Make sure that:
■There are enough redo log files in the database
■The undo tablespace in the database is large enough
■The schema associated with the ODS user is ANALYZED
When estimating the statistics, you can use the OID Database Statistics Collection tool
to analyze the various database ODS schema objects.
Both the tracing functionality described in Chapter 23, "Managing Logging" and the
database tracing event 10046 can assist you in diagnosing performance issues.
S.1.7.3 Poor Oracle Database Server Performance
Problem
Oracle database server is consuming lot of processor resources during LDAP search
operations.
Solution
Proceed as follows:
1. Identify the LDAP operations that are processor-intensive by running:
See Also: The oidstats.sql command-line tool reference in
Oracle Fusion Middleware Reference for Oracle Identity Management for
instructions on using the OID Database Statistics Collection tool
The Oracle Internet Directory chapter in Oracle Fusion Middleware
Performance and Tuning Guide for instructions on optimizing
searches
Note 243006.1 on My Oracle Support (formerly MetaLink),
http://metalink.oracle.com, for information on
performance issues with group entries

Problems and Solutions
S-12 Oracle Fusion Middleware Administrator's Guide for Oracle Internet Directory
oidctl connect=connstr status -diag
This command displays the LDAP operation and associated SQL that is being
executed.
2. Tune the database appropriately for this kind of query. See the Oracle Internet
Directory chapter in Oracle Fusion Middleware Performance and Tuning Guide.
3. If possible, change the applications's search signature. If that is not possible, tune
the Oracle Internet Directory attribute orclinmemfiltprocess. See the Oracle
Internet Directory chapter in Oracle Fusion Middleware Performance and Tuning
Guide.
S.1.8 Troubleshooting Port Configuration
You can find out which ports the Oracle Internet Directory dispatcher is using for SSL
and non-SSL connections in the following ways:
■In Oracle Enterprise Manager Fusion Middleware Control, select Port Usage from
the OID menu.
■From the command line, execute:
ORACLE_INSTANCE/bin/opmnctl status -l
■From the command line, execute:
oidctl connect=oiddb status
S.1.9 Troubleshooting Creating Oracle Internet Directory Component with opmnctl
Problem
The command opmnctl createcomponent fails and the following error appears in
the file ORACLE_INSTANCE/diagnostics/logs/OPMN/opmn/provision.log:
INFO: $ORACLE_INSTANCE/config/tnsnames_copy.ora file does not exist
Solution
Ensure that the following are true:
■The file ORACLE_INSTANCE/config/tnsnames_copy.ora exists
■The OIDDB connectString is present in ORACLE_
INSTANCE/config/tnsnames.ora
■The connectString in the OID Snippet in ORACLE_
INSTANCE/config/OPMN/opmn/opmn.xml is the same as in ORACLE_
INSTANCE/config/tnsnames.ora. OIDDB is the default.
Then retry opmnctl createcomponent.
S.1.10 Troubleshooting Starting Oracle Internet Directory
This section describes problems you might encounter when starting Oracle Internet
Directory.

Problems and Solutions
Troubleshooting Oracle Internet Directory S-13
S.1.10.1 Oracle Internet Directory is Down
Problem
Oracle Enterprise Manager Fusion Middleware Control shows Oracle Internet
Directory down. The command:
opmnctl status
shows that oidmon is down, as well as all the oidldapd processes.
Solution
Consult the OPMN log, ORACLE_HOME/opmn/logs/opmn.log to determine why
oidmon is not starting.
Problem
Oracle Enterprise Manager Fusion Middleware Control shows Oracle Internet
Directory down. The command:
opmnctl status
shows that oidmon is up, but the oidldapd processes are down.
Solution
Check the following logs in the order shown:
1. The oidmon log, ORACLE_
INSTANCE/diagnostics/logs/OID/componentName/oidmon-0000.log
contains details as to why oidmon cannot start the oidldapd process. The most
common issues are
■Unable to connect to Oracle Database: Ensure that the Oracle database and
listener are up and running.
■Time difference between the two nodes is more than 250 seconds: Adjust the
system time.
■Oidmon keeps trying to start oidldapd processes, but they fail to run. To
debug, see Step 2.
2. The Oracle Internet Directory dispatcher log, ORACLE_
INSTANCE/diagnostics/logs/OID/componentName/oidldapd01-0000.l
og contains information about why oidldapd server processes fail to start. The
most common reasons are:
■Configured PORT for Oracle Internet Directory is not free: Execute
netstat -an | grep oidPort
to see if it the port is free.
■Oracle Internet Directory is configured to listen on a port number less than
1024 on a UNIX or Linux system and the executable binary file ORACLE_
HOME/bin/oidldapd is either not owned by root or does not have the
setuid bit set.
■The oidldapd dispatcher keeps spawning oidldapd server processes, but
they fail to run. In this case, you might see a single oidldapd dispatcher
process running if you use ps on UNIX or Linux or Task Manager on
Windows. To debug, see Step 3.

Problems and Solutions
S-14 Oracle Fusion Middleware Administrator's Guide for Oracle Internet Directory
3. The Oracle Internet Directory server log, ORACLE_
INSTANCE/diagnostics/logs/OID/componentName/oidldapd01sPID-00
00.log contains information about why the server processes fail to run. Common
issues include:
■Unable to create Oracle Database connection pool: Check the Oracle Database
PROCESSES parameter and increase if necessary.
■Oracle Internet Directory is configured to use an SSL wallet file, and that file is
inaccessible.
S.1.10.2 Oracle Internet Directory is Read-Only
Problem
The Oracle Internet Directory server starts in read-only mode.
Solution
This usually indicates that the Oracle Internet Directory server has been started
against the wrong schema. To verify, type these two commands:
oidldapd -v
ldapsearch -p oidPort -D cn=orcladmin -q -b "" -s base "objectclass=*"
Orcldirectoryversion
If these commands show different versions, the server starts in read-only mode.
S.1.11 Troubleshooting Starting, Stopping, and Restarting of the Directory Server
To troubleshoot starting and stopping the directory server, you must know the
purpose of each tool involved, how all the tools work together, and the overall process
for starting and stopping the server.
S.1.11.1 About the Tools for Starting, Stopping, and Restarting the Directory Server
Instance
You start the directory server instance by typing:
opmnctl startproc process-type=OID
opmnctl stopproc process-type=OID
OIDCTL When OIDCTL is executed, it connects to the database as user ODS.
Depending on the options used in the command, it either inserts or updates rows into
a table named ODS.ODS_PROCESS_STATUS_STATUS. If the START option is used,
then a row is inserted. If either the STOP or RESTART option is used, then a row is
updated.
The ODS.ODS_PROCESS_STATUS table includes the following information:
■instance: The unique number of the instance, any value between 0 and 1000
■pid: Process identifier, which is updated by OIDMON when the process is started
■state: The type of operation requested
The possible values for state are:
See Also: The Oracle Internet Directory chapter in Oracle Fusion
Middleware Performance and Tuning Guide.

Problems and Solutions
Troubleshooting Oracle Internet Directory S-15
–0=stop
–1=start
–2=running
–3=restart
–4=shutdown
–5=failedover
OIDMON To start, stop, or restart a directory server instance, OIDMON must be
running. At specified intervals, this daemon checks the value of the state column in
the ODS.ODS_PROCESS_STATUS table.
If it finds a row with state=0, then it reads the pid and stops the process.
If it finds one with state=1 or state=4, then it starts a new process and updates
the pid column with a new process identifier.
If it finds one with state=2, then it reads the pid and verifies that the process
with that pid is running. If it is not running, then OIDMON starts a new process
and updates the pid column with a new process identifier.
If it finds a row with state=3, then OIDMON reads the pid, stops the process,
starts a new one, and updates the pid accordingly.
If it is unsuccessful, it pushes the request to another node.
In short, OIDCTL inserts and updates state information in the rows in the ODS.ODS_
PROCESS_STATUS table. OIDMON then reads that information and performs the
specified task.
About the Processes Involved in Starting, Stopping, and Restarting the Directory
Server
Starting, stopping and restarting the directory server involves processes. OIDMON is
one process. On UNIX, it is called oidmon. In a Microsoft Windows environment, it is
called oidmon.exe.
To start an instance, OIDMON checks the unique number in the instance column
mentioned in the previous section. It then starts another process, namely, the
listener/dispatcher, which is different from the Oracle Net Services listener process. It
stores the process identifier for that new process in the pid column.
The listener/dispatcher, in turn, starts a number of server processes as defined in the
configuration set entry. Note that these server processes are controlled by the
listener/dispatcher and not by OIDMON. If one of these processes fails, then it is
automatically restarted by the listener/dispatcher.
Together, the listener/dispatcher and the server processes constitute a directory server
instance. On UNIX, this directory server instance is called oidldapd. On Microsoft
Windows, they are called oidldapd.exe.
Note: When OPMN stops the directory server, the value for state is
initially 4, that is, shutdown. However, when OPMN starts the
directory server again, the state value becomes 2, that is, running.

Problems and Solutions
S-16 Oracle Fusion Middleware Administrator's Guide for Oracle Internet Directory
In short, there are at least three processes: one for OIDMON and at least two for the
directory server itself. When all processes are running, you should see something like
the following on UNIX computers:
% ps -ef|grep oid
root 12387 12381 0 Mar 28 ? 0:05 oidldapd -i 1 -conf 0 key=811436710
root 12381 1 0 Mar 28 ? 0:10 oidmon start
root 13297 1 0 Mar 28 ? 0:14 oidldapd
Another way to obtain server information is by running:
oidctl connect=oiddb status.
S.1.11.2 Problems Starting, Stopping, and Restarting the Directory Server
This section describes some problems you might have when starting, stopping, or
restarting the directory server.
S.1.11.2.1 OIDCTL or OIDMON fails Either OIDCTL or OIDMON can fail for reasons.
Problem
Incorrect syntax
Solution
Verify that you are using the correct syntax as described in "Oracle Internet Directory
Administration Tools" in Oracle Fusion Middleware Reference for Oracle Identity
Management. Note that the correct value of the connect option when using OIDCTL is
the TNS alias—that is, the connect string—and not a host name or other value. See
Note 155790.1, on My Oracle Support (formerly MetaLink),
http://metalink.oracle.com.
Problem
The Oracle Internet Directory-designated database is not running.
The Oracle Net Services configurations are incorrect.
Solution
Verify that the Oracle Internet Directory-designated database and the Oracle Net
Services components are correctly configured and running. To do this, see if you can
connect to the database by using SQL*Plus that is installed in the same ORACLE_HOME
as OIDCTL. Log in as ODS/ods_password@tns_alias where tns_alias is the
same as that used in the connect option with OIDCTL. See Note 155790.1, on My
Oracle Support (formerly MetaLink), http://metalink.oracle.com.
Problem
Missing oidldapd file.
Solution
See $ORACLE_
INSTANCE/diagnostics/logs/OID/componentName/oidmon-XXXX.log. Look
for the message: No such file or directory. To correct the problem, replace the
executable file.

Problems and Solutions
Troubleshooting Oracle Internet Directory S-17
Problem
Wrong permissions on oidldapd executable file.
Solution
Look for the message Exec of OIDLDAPD failed with error 13. On UNIX,
the $ORACLE_HOME/bin/oidldapd file must have the following permissions:
-rws--x--- 1 root dba 1691802 Jan 20 10:30 oidldapd
If the permissions are not correct, type the following, as root:
cd $ORACLE_HOME/bin
chown root:dba oidldapd
chmod 0710 oidldapd
chmod u+s oidldapd
Problem
You are running as a user with insufficient privilege
Solution
To confirm that this is the problem, see ORACLE_INSTANCE/diagnostics/logs/
OID/componentName/oidmon-XXXXX.log.
Look for the message: Permission denied or Open Wallet failed. This
happens if you are not running either as root or as the user who is in the dba group.
To correct the problem, try again as the correct user.
Problem
A port is in use.
Solution
See
ORACLE_INSTANCE/diagnostics/logs/
OID/componentName/oidldapd00sPID-XXXX.log.
Look for the message: Bind failed on... This indicates that the port that
oidldapd is configured to listen on is in use by some other process. To determine
which process is using the port, type:
netstat -a | grep portNum
If necessary, reconfigure the other process to use a different port or configure
oidladapd to listen on another port by adding a configset. Remember that, by
default, oidladapd listens on two ports, an SSL and non-SSL port.
Problem
On a cluster or Oracle Application Server Cluster (Identity Management)
configuration, OIDMON pushes the server to another node in a cluster when it cannot
start the server on the local node.
Solution
See oidmon.log. Look for the message: gslsgfrPushServer: Could not
start serveron NodeA, trying to start on nodeNodeB. To correct this

Problems and Solutions
S-18 Oracle Fusion Middleware Administrator's Guide for Oracle Internet Directory
problem, you must first determine why OIDMON cannot start the server on the local
node.
Problem
A possible problem with Oracle Net Services or with the database itself.
Solution
See oidmon.log, oidldapdxx.log, where xx is the server instance number.
A Row is Missing from ODS.ODS_PROCESS_STATUS
Problem
In a cluster or Oracle Application Server Cluster (Identity Management) configuration,
OIDMON successfully starts oidldapd on both nodes, but then initiates failover due
to a time stamp difference.
Solution
See the trace files oidldapdxx.log where xx is the instance number, and
oidldapdxxsyy.log where xx is the instance number and yy is the process
identifier. If the trace files do not give useful information or pointers to My Oracle
Support (formerly MetaLink) documents, then do the following: (1) Stop the directory
server processes; (2) Remove or rename old trace files; (3) Start OIDMON and a
directory server with maximum debug level, namely, 11744051. Note that, to get the
trace files, you must first stop, then start, the server; you cannot simply restart it.
Investigate the new trace files, and, if needed, log an iTAR with Oracle Support
Services and upload the trace files to the iTAR. See Note 155790.1, on My Oracle
Support (formerly MetaLink), http://metalink.oracle.com.
S.1.12 Troubleshooting Oracle Internet Directory Replication
This section discusses directory replication problems.
Whenever you investigate a replication problem, be sure to consult the log files for
information. The log files are ORACLE_
INSTANCE/diagnostics/logs/OID/componentName/oidrepld-XXXX.log,
oidldapd00-XXXX.log and ORACLE_
INSTANCE/diagnostics/logs/OID/componentName/oidldapd00sPID-XXXX.
log where PID is the server process identifier and XXXX is a number from 0000 to
orclmaxlogfiles configured.
The replication server supports multiple debugging levels. To turn on replication
debugging, use either ldapmodify or the Shared Properties, Replication tab, in
Fusion Middleware Control to change orcldebuglevel in the replication
configuration set.
See Also: The oidctl command-line tool reference in Oracle
Fusion Middleware Reference for Oracle Identity Management for more
information on failover.
Note: Turning on debugging affects replication performance.
See Also: Chapter 41, "Managing Replication Configuration
Attributes" for more information.

Problems and Solutions
Troubleshooting Oracle Internet Directory S-19
Bootstrapping Fails
Disable referential integrity during the replication bootstrapping process. If referential
integrity is enabled, bootstrapping fails.
S.1.12.1 Replication Server Does Not Start
There are several problems that can prevent the replication server from starting.
Problem
Invalid oidctl syntax
Solution
Use the following syntax to start the replication server.:
oidctl server=oidrepld connect=connect string instance=instance_number \
flags="-h host -p port"
Problem
Oracle Internet Directory is not running at the host and port you specified on the
command line when you attempted to start the replication server. This caused the
anonymous bind to the target Oracle Internet Directory to fail.
Solution
Make sure the target Oracle Internet Directory is up and running at the specified host
and port.
Problem
The replication server is attempting to bind to the host and port specified in either the
orclreplicaprimaryurl or the orclreplicasecondaryurl attribute of the
Replica entry, but Oracle Internet Directory is running at a different host or port.
Solution
If you decide to run Oracle Internet Directory at a different host or port, add the new
information to the orclreplicasecondaryurl attribute of the replica entry, as
follows:
1. Prepare a modification file, mod.ldif. For example, to change to host
my.us.example.com and port 4444, you would specify:
dn: orclreplicaid=replica_ID, cn=replication configuration
changetype: modify
add: orclreplicasecondaryurl
orclreplicasecondaryurl: ldap://my.us.example.com:4444/
2. Run:
ldapmodify -h host -p port -f mod.ldif
Problem
The ReplBind credential in the replication wallet ORACLE_
INSTANCE/OID/admin/oidpwdrORACLE_SID is corrupt or invalid. That is, the
password stored in the wallet is not the same as the password that is stored in the
directory, or the wallet does not exist. This causes the replication bind to fail and the
replication server to exit with an error.

Problems and Solutions
S-20 Oracle Fusion Middleware Administrator's Guide for Oracle Internet Directory
You might see messages similar to this example in the file oidrepldXX.log:
2005/07/21:11:13:28 * gslrcfdReadReplDnPswd:Error reading repl passwd
2005/07/21:11:13:28 * gslrcfcReadReplConfig:Error found.
2005/07/21:11:13:28 * Failed to read replication configuration information.
Solution
Use remtool to fix the replication bind credential in the replication wallet or to
synchronize between Oracle Internet Directory and the replication wallet.
■remtool -pchgpwd changes the password of the replication dn of a replica. Use
this option if you know the current replication DN password stored in the
directory and you want to change it both in the directory and in the wallet.
■remtool -presetpwd resets the password or the replication dn of a replica. Use
this option if you know the current replication DN password stored in the
directory and you want to change it both in the directory and in the wallet.
■remtool -pchgwalpwd changes password of replication dn of a replica only in
the wallet. Use this option if you know the replication DN password stored in the
directory but you are not sure whether the wallet has the correct password or you
want to create the wallet file.
All of these options create a wallet if one does not already exist.
Problem
The replication server is attempting to bind to an SSL port that is configured for
one-way or two-way authentication.
Solution
Configure the replication server to use either the non-SSL port or an SSL port
configured for no authentication. You can use a separate Oracle Internet Directory
server instance just for replication.
S.1.12.2 Repository Creation Assistant Error
Problem
When you use the Oracle Application Server tool RepCA to load Oracle Internet
Directory schema into an existing Oracle 10.1.0.3 Database, you might see the
following error message in the ORACLE_
INSTANCE/diagnostics/logs/OID/tools/repca*log file:
SP2-0332: Cannot create spool file.
See Also:
■The remtool command-line tool reference in Oracle Fusion
Middleware Reference for Oracle Identity Management for more
information about using remtool
■The oidpasswd command-line tool reference in Oracle Fusion
Middleware Reference for Oracle Identity Management for more
information about using oidpasswd
See Also: Section 39.1.8.2, "Secure Sockets Layer (SSL) and Oracle
Internet Directory Replication"

Problems and Solutions
Troubleshooting Oracle Internet Directory S-21
Solution
This error message can be ignored.
S.1.12.3 Errors in Replication Bootstrap
errors can occur in replication bootstrap.
Problem
Some of the naming contexts failed to be bootstrapped.
Solution
Identify the naming contexts that failed to be bootstrapped, and use the oidcmprec
tool to reconcile them.Then resume replication by setting the consumer's replica state
to ONLINE mode
Problem
Various causes.
Solution
Identify the cause of the bootstrap failure and fix the cause, then restart bootstrapping
by setting consumer's replica state to BOOTSTRAP mode.
Solution
To determine the exact cause of the error, examine the log file oidldapdxx.log.
Look for error messages like those in the following example:
2004/09/14:12:57:23 * Starting OIDREPLD against dlsun1418:4444...
2004/09/14:12:57:25 * Starting scheduler...
2004/09/14:12:57:26 * Start to BootStrap from supplier=dlsun1418_replica to
consumer=dlsun1418_replica2
2004/09/14:12:57:27 * gslrbssSyncDIT:Replicating namingcontext=cn=oraclecontext
......
2004/09/14:12:58:21 * gslrbssSyncDIT:Sync done successfully for namingctx:
cn=oraclecontext, 222 entries matched
2004/09/14:12:58:21 * gslrbssSyncDIT:Replicating namingcontext=cn=joe smith ......
2004/09/14:12:58:23 * BootStrap failure when adding DN=cn=Joe Smith,
server=dlsun1418_replica2,err=Constraint violation.
2004/09/14:12:58:23 * gslrbssSyncDIT:Sync failed for namingctx: cn=joe smith, only
1 entries retrieved
2004/09/14:12:58:23 * gslrbssSyncDIT:Replicating
namingcontext=cn=oracleschemaversion ......
2004/09/14:12:58:25 * gslrbssSyncDIT:Sync done successfully for namingctx:
cn=oracleschemaversion, 10 entries matched
2004/09/14:12:58:51 * gslrbsbBootStrap: Failure occurred when bootstrapping 1 out
of 3 namingcontext(s) from the supplier
Identify the cause of the bootstrap failure and fix it. You can identify the naming
contexts that caused the problem, then use oidcmprec to compare and reconcile the
naming contexts. After you resolve the problem, start bootstrapping again by starting
the Oracle Internet Directory replication server.
Problem
The Oracle Internet Directory server was shut down during the bootstrapping

Problems and Solutions
S-22 Oracle Fusion Middleware Administrator's Guide for Oracle Internet Directory
Solution
Make sure both the supplier Oracle Internet Directory and the consumer Oracle
Internet Directory servers are up and running during replication bootstrapping.
Problem
Some of the entries being bootstrapped cannot be applied at the consumer due to a
constraint violation.
Solution
Make sure the Oracle Internet Directory schema of the consumer are synchronized
with those of the supplier before starting replication bootstrap. When you add an
LDAP replica, remtool ensures that the Oracle Internet Directory schema on the
consumer replica are synchronized with those on the supplier replica.
Problem
Improper replication filtering during bootstrapping. Replication supports excluding
one or more attributes during bootstrapping. However, if a mandatory attribute of an
entry is configured to be excluded, that entry cannot be applied at the consumer due
to an objectclass violation.
Solution
Follow the replication naming context configuration rules in Chapter 39, "Setting Up
Replication" to configure replication filtering properly.
If you are debugging LDAP replication, you should become familiar with the LDAP
replica states. If LDAP-based replication is configured, when the replication server
starts, it reads the replica state from the local replica. The replication server behaves
differently, depending upon the local replica state. LDAP replication errors appear in
oidldapdxx.log
Problem
When you restart the replication server after the replication server failed to bootstrap a
naming context having more than 5000 entries, you may see error messages similar to
this in the log file oidrepld00.log:
2005/04/05:13:21:55 * gslrbssSyncDIT:Replicating namingcontext=dc=com ......
2005/04/05:15:36:09 * gslrbssSyncDIT:Subtree delete on dc=com failed.
Error=DSA is unwilling to perform
2005/04/05:15:36:09 * gslrbssSyncDIT:Sync failed for namingctx: dc=com, only
0 entries retrieved
The replication server performs two steps during bootstrap operation. First, in the
consumer, it deletes the naming contexts that it has to bootstrap. Second, it copies
entries belonging to those naming contexts from supplier to consumer. Deletion by the
replication server of a naming context having several thousands of entries results in a
big transaction. The undo tablespace must have sufficient space to accommodate a big
transaction. If the database's undo tablespace does not have sufficient space, it results
in an ORA-30036 error.
Solution
Either have the database administrator add more space to the undo tablespace, or use
the bulkdelete tool to delete the required naming context before you start the
replication server.
See Also: Section D.4, "LDAP Replica States"

Problems and Solutions
Troubleshooting Oracle Internet Directory S-23
S.1.12.4 Changes Are Not Replicated
Changes are not replicated from one node to another.
Problem
The replication server has run out of table space
Solution
Look for the following message in the server log:
OCI Error ORA-1653 : ORA-01653: unable to extend table ODS.ASR_CHG_LOG by 8192 in
tablespace OLTS_DEFAULT
Extend the table space and investigate why the table space keeps growing.
Problem
The target Oracle Internet Directory server is down.
Solution
Restart the target Oracle Internet Directory server.
Problem
Various causes
Solution
Make sure the replication server is started on all nodes, in multi-master replication,
and at the consumer node in single-master or fan-out replication.
For Oracle Database Advanced Replication-based multimaster replication, use
remtool to diagnostic and fix problems.
■remtool -asrverify verifies the correctness of a DRG setup and reports
problems.
■remtool -asrrectify verifies the correctness of a DRG setup, reports
problems, and attempts to rectify the problems.
Check the replication log and LDAP log for error messages and fix the cause of the
error after investigation.
S.1.12.5 Replication Stops Working
Problem
Data is not replicated between the replicas. In some cases, a working replication setup
stops working after OID Human Intervention Queue entries are applied to one of the
nodes. In other cases, adding or deleting a new replica causes problems or failures.
Problem
Various causes
See Also: The remtool command-line tool reference in Oracle
Fusion Middleware Reference for Oracle Identity Management for more
information about using remtool.

Problems and Solutions
S-24 Oracle Fusion Middleware Administrator's Guide for Oracle Internet Directory
Solution
See the following Notes on My Oracle Support (formerly MetaLink),
http://metalink.oracle.com:
Note 171693.1, "Resolving Conflicts"
Note 122039.1, "Troubleshooting Basics for Advanced Replication"
Note 213910.1, "Debugging OID Replication when ASR_CHG_LOG Never Gets
Populated."
You can search for Notes by entering a term such as "replication" into the search box.
S.1.13 Troubleshooting Change Log Garbage Collection
Both replication and Oracle Directory Integration Platform use change logs to
propagate information from a supplier directory to a consumer directory. All change
logs are stored in the table ods_chg_log. In addition, replication change logs are
stored in asr_chg_log.
This section discusses possible problems you might encounter with change log
garbage collection.
Problem
Garbage collection is not working and Oracle Internet Directory is using Oracle
Database 11.2.0.1.
Solution
Apply 11.2.0.1.3 PSU to the database.
Problem
Change logs are not being purged due to a replication issue. For example, if a
replication server has been down for a few days, replication change logs are not
purged because they are needed for replication recovery.
Solution
Resolve the replication issue. See "Troubleshooting Oracle Internet Directory
Replication" on page S-18".
Problem
The attribute orclpurgetargetage is set too high and there are one or more
enabled but inactive change log subscribers that do not update
orclLastAppliedChangeNumber in their subscriber profiles. Change
number-based purging won't purge change logs that are not yet consumed and
time-based purging won't purge them because they're not old enough.
Solution
Set the attribute orclpurgetargetageto a smaller value so that change logs are
purged sooner.
Solution
Disable inactive changelog subscribers so that change logs are purged by change log
number-based purging. Locate such enabled but inactive subscriber profiles by
examining the orclLastAppliedChangeNumber in all subscriber profiles by typing:
ldapsearch -v -p port -h host -D cn=orcladmin -q \

Problems and Solutions
Troubleshooting Oracle Internet Directory S-25
-b "cn=changelog subscriber,cn=oracle internet directory" \
-s sub "objectclass=orclchangesubscriber" \
orcllastappliedchangenumber orclsubscriberdisable
Look for an entry that has orclSubscriberDisabled equal to zero and an
orclLastAppliedChangeNumber value that never changes. If such an entry exists,
and the change log garbage collector's orclpurgetargetage is zero or greater,
delete the value of orclpurgetargetage. When orclpurgetargetage is not
defined or less than zero, the garbage collector purges changes applied by the
replication server, even if another subscriber has not updated its
orclLastAppliedChangeNumber.
S.1.14 Troubleshooting Dynamic Password Verifiers
Table S–4 lists and describes the error messages for dynamic password verifiers.
If the directory is able to compare verifiers, and the comparison evaluates as false, the
directory sends the standard error LDAP_COMPARE_FALSE to the client. Similarly, if
the user being authenticated lacks a directory entry, the directory sends the standard
error LDAP_NO_SUCH_OBJECT.
S.1.15 Troubleshooting Oracle Internet Directory Password Wallets
The Oracle Internet Directory Server has two password wallets: oidpwdlldap1 and
oidpwdrSID.
The oidpwdlldap1 file contains the DN and password of an ODS user in encrypted
format. The Oracle Internet Directory server uses the credential to connect to the back
end database at startup time.
S.1.15.1 Oracle Internet Directory Server Does Not Start
Either oidctl or opmn fails to start an Oracle Internet Directory server instance.
Problem
The password stored in the oidpwdlldap1 wallet is not synchronized with the ODS
password in the back end database.
Solution
Try to connect to the database again using the sqlplus command:
sqlplus ods /ods_password@connect_string
See Also: "Change Log Purging" on page 35-5.
Table S–4 Error Messages for Dynamic Password Verifiers
Error Code Description
9022 A reversible encrypted password is missing from the user entry.
9023 The crypto type specified in the LDAP request control is not
supported.
9024 The username parameter is missing from the LDAP request
control.
See Also: "Password Verifier Schema Elements" in Oracle Fusion
Middleware Reference for Oracle Identity Management

Problems and Solutions
S-26 Oracle Fusion Middleware Administrator's Guide for Oracle Internet Directory
If the connection succeeds, try to synchronize the password in the wallet with the ODS
password by using the oidpasswd tool to create a new wallet with the correct
password. For example, ensure that ORACLE_INSTANCE is set, then type:
>> oidpasswd connect=connect_string create_wallet=true
If the connection attempt fails, you must login into the back end database as a
database administrator and change the ODS password by using the sql command:
>> alter user ods identified by some_new_password
Then try to create a new oidpwdlldap1 to store the new password.
Solution
Try to start the Oracle Internet Directory server again.
The oidpwdrSID file contains the DN and password of a replica DN in an encrypted
format. The Oracle Internet Directory replication server uses the credential to connect
to the Oracle Internet Directory server at startup time.
This is an example of a replication password wallet, oidpwdrSID:
/------BEGIN REPL CREDENTIAL:cn=replication dn,orclreplicaid=qdinh-sun_
adeldap,cn=replication configuration-----
ezNkZXMtY2JjLXBrY3M1cGFkfQUnaz0TsfzcP0nM1HcHAXchf5mJw+sb4y0bLvvw3RvSg7H
S7/WsKJB02fdSGRlmfWAV+6llkRQ26g==
-----END REPL CREDENTIAL:cn=replication dn,orclreplicaid=qdinh-sun_
adeldap,cn=replication configuration-----/
S.1.15.2 Password Not Synchronized
Either oidctl or opmn fails to start an Oracle Internet Directory server instance and
the replication server log file oidrepld00.log reports that it is not able to bind.
Problem
The replica DN password stored in the oidpwdrSID is not synchronized with the
replica DN password in the Oracle Internet Directory server.
Solution
Try to connect to the Oracle Internet Directory server instance using the ldapbind
command. Specify the replica DN stored in oidpwdrSID and the replica DN
password. For example:
>> ldapbind -h host -p port -D "cn=replication dn,orclreplicaid=qdinh-sun_adeldap,
cn=replication configuration" -q
If the connection succeeds, then you can reset the password in the oidpwdrSID wallet
using remtool with the option -pchgwalpwd, which changes the password of the
replication DN of a replica only in the wallet. If you do not remember the replication
dn password, then you can reset it using remtool with the option -prestpwd, which
resets the password of the replication dn of a replica.
After resetting the replication password wallet, restart the replication server instance
again a using opmnctl.

Problems and Solutions
Troubleshooting Oracle Internet Directory S-27
S.1.16 Troubleshooting bulkload
Oracle highly recommends that you investigate and correct all errors thrown by
bulkload before proceeding with the next step. If you ignore an bulkload error,
you are likely to run into serious problems later.
To get more information about the reason for error, run the command with debug
enabled (debug=t). Debug information is available in ORACLE_
INSTANCE/diagnostics/logs/OID/tools/bulkload.log and in the database
ods.ds_ldap_log table.
Most bulkload errors occur during data load or during index creation.
Problem
The bulkload command-line tool fails during data load.
Solution
Restore the directory to the state it was in before the data load by using one of these
methods:
■Use the bulkload recover option
■Restore the database from a backup taken before you invoked bulkload.
Problem
The bulkload command-line tool fails during index creation.
Solution
Examine bulkload.log. Find and fix the specific issue that caused index creation
failure. Run bulkload with the index option again.
Failure to correct index errors can cause duplicate entries or duplicate rows in the
Oracle Internet Directory's tables.
Problem
The bulkload command-line tool fails because of a broken connection to the
database. This can occur, for example, due to a host crash or in to a failover in Real
Application Clusters.
Solution
Follow the following procedure:
1. Ensure that the database is restarted properly.
2. If the bulkload invocation employed only the check="TRUE" or
generate="TRUE" options, but not the load="TRUE" option, go to step 3.
If it was the bulkload load="TRUE" option that failed, you must restore the
database to its state before the failure. How you do that depends on whether you
have a backup of the database before you issued the bulkload load="TRUE"
command.
■If you have a backup, use it to restore the database to its original state before
you issued the bulkload command.
■If you do not have a backup, use the bulkload recover command to return
the database to its state before the bulkload load="TRUE" command.
3. Re-issue the bulkload command that failed.

Problems and Solutions
S-28 Oracle Fusion Middleware Administrator's Guide for Oracle Internet Directory
S.1.17 Troubleshooting bulkdelete, bulkmodify, and ldifwrite
Oracle highly recommends that you investigate and correct all errors thrown by the
bulk tools before proceeding with the next step. To get more information about the
reason for error, run the command with debug enabled (debug=t).Debug information
is available in the corresponding log file, bulkdelete.log, bulkmodify.log, or
ldifwrite.log, under ORACLE_INSTANCE/diagnostics/logs/OID/tools/.
In the database, debug information is available in the ods.ds_ldap_log table.
Problem
The bulkdelete or bulkmodify command-line tool fails because of a broken
connection to the database. This can occur, for example, due to a host crash or in to a
failover in Real Application Clusters.
Solution
Ensure that the database is restarted properly. Then retry the bulkdelete or
bulkmodify command that failed.
S.1.18 Troubleshooting catalog
Oracle highly recommends that you investigate and correct all errors thrown by the
bulk tools before proceeding with the next step. To get more information about the
reason for error, run the command with debug enabled (debug=t).Debug information
is available in ORACLE_
INSTANCE/diagnostics/logs/OID/tools/catalog.log and in database
ods.ds_ldap_log table.
Problem
The catalog command-line tool fails because of a broken connection to the database.
This can occur, for example, due to a host crash or in to a failover in Real Application
Clusters.
Solution
Ensure that the database is restarted properly. Retry the catalog command that
failed. If the original invocation employed the add="TRUE" option, the retry might
fail because the first command partially completed. If the retry fails, use catalog
delete="TRUE" to delete the attribute index, then retry the command again.
Problem
The catalog command throws an error because more than 1000 attributes are present
in the file.
Solution
If you need to index more than 1000 attributes, use multiple files.
S.1.19 Troubleshooting remtool
Problem
A remtool query such as
remtool -pdispqstat -v -bind host:port
hangs. During the hang, attempts to bind to the server with other tools might fail.

Problems and Solutions
Troubleshooting Oracle Internet Directory S-29
Solution
If there is a large backlog of changelogs waiting to be purged, the remtool search
query runs for a long time. Ensure that changelog purging is configured appropriately
for your environment. See "Change Log Purging" on page 35-5.
You can also increase the number of worker threads so that other tools can bind while
remtool is running the query. See "Attributes of the Instance-Specific Configuration
Entry" on page 9-2 and the Oracle Internet Directory chapter in Oracle Fusion
Middleware Performance and Tuning Guide.
S.1.20 Troubleshooting Server Chaining
Problem
The log contains the error message Server Chaining error followed by
javax.naming.AuthenticationException.
Solution
In ODSM, go to the Advanced tab and expand Server Chaining. In each enabled
entry, click Verify Login Credential, Verify User Container, and Verify Group
Container.
If the verification fails, examine the values you entered for errors. If the problem
persists, consult the external directory administrator to verify the accuracy of the
values you entered.
S.1.21 Viewing Version Information
On the Oracle Directory Services Manager home page for Oracle Internet Directory,
you can view version information about Oracle Directory Services Manager, Oracle
Internet Directory, and the associated Oracle Database. For information about using
Oracle Directory Services Manager, see "Using Oracle Directory Services Manager" on
page 7-5.
S.1.22 Troubleshooting Fusion Middleware Control and WLST
Problem
Oracle Enterprise Manager Fusion Middleware Control and WLST do not work after
the system is patched to 11g Release 1 (11.1.1.4.0).
Solution
This problem occurs if you had SSL server authentication enabled and cipher suites
configured prior to patching. To fix this problem after patching, remove the
orclsslciphersuite attribute from the instance-specific configuration entry by
using ldapmodify. The LDIF file for deleting the orclsslciphersuite attribute in
the instance-specific entry is:
dn: cn=componentname,cn=osdldapd,cn=subconfigsubentry
changetype: modify
delete: orclsslciphersuite
The command is:
ldapmodify -D cn=orcladmin -q -p portNum -h hostname -f ldifFile

Problems and Solutions
S-30 Oracle Fusion Middleware Administrator's Guide for Oracle Internet Directory
Restart Oracle Internet Directory as described in "Restarting the Oracle Internet
Directory Server by Using opmnctl" on page 8-10.
Problem
Oracle Internet Directory is up and running, but you cannot change Oracle Internet
Directory parameters by using Oracle Enterprise Manager Fusion Middleware Control
or WLST. You might see the error message: Unable to connect backend OID.
Solution
This can occur if the Oracle Internet Directory port number was changed and the
server was not restarted or the Oracle Internet Directory component registration was
not updated. Restart the server and run opmnctl
updatecomponentregistration, as described in "Updating the Component
Registration of an Oracle Instance by Using opmnctl" on page 8-8.
Solution
This occurs if you specify an SSL port configured for server authentication or mutual
authentication when using the replication wizard. The replication wizard can only
connect to SSL ports that are configured for no authentication. Always specify a
non-SSL port or an SSL port configured for no authentication when prompted to log in
or when specifying a node.
Solution
This occurs if Oracle Internet Directory's SSL port is configured for mutual
authentication. Oracle Enterprise Manager Fusion Middleware Control and WLST
manage Oracle Internet Directory through the SSL port, and the port must be
configured for no authentication or server authentication.
S.1.23 Troubleshooting Oracle Directory Services Manager
This section lists issues related to Oracle Directory Services Manager.
S.1.23.1 Cannot Invoke ODSM from Fusion Middleware Control
Problem
You attempt to invoke Oracle Directory Services Manager from Oracle Enterprise
Manager Fusion Middleware Control by selecting Directory Services Manager from
the Oracle Internet Directory menu in the Oracle Internet Directory target, then Data
Browser, Schema, Security, or Advanced.
ODSM does not open. You might see an error message.
Solution
This is probably an installation problem. See Oracle Fusion Middleware Installation Guide
for Oracle Identity Management.
See Also: "SSL Authentication Modes" on page 26-3.

Problems and Solutions
Troubleshooting Oracle Internet Directory S-31
S.1.23.2 Cannot Invoke ODSM from Fusion Middleware Control in Multiple NIC and
DHCP Enabled Environment
Problem
The WebLogic Managed Server where Oracle Directory Services Manager is deployed
has multiple Network Interface Cards (NIC) or is DHCP enabled. Attempts to invoke
Oracle Directory Services Manager from Oracle Enterprise Manager Fusion
Middleware Control fail and return 404 errors.
Solution
Use the WebLogic Server Administration Console to change the listen address of the
Managed WebLogic Server so that the IP address or hostname in the URL for Oracle
Directory Services Manager is accessible.
Perform the following steps:
1. Using a web browser, access the WebLogic Server Administration Console.
2. In the left pane of the WebLogic Server Administration Console, click Lock & Edit
to edit the server configuration.
3. In the left pane of the WebLogic Server Administration Console, expand
Environment and select Servers.
4. On the Summary of Servers page, click the link for the WebLogic Managed Server
where Oracle Directory Services Manager is deployed.
5. On the Settings page for the WebLogic Managed Server, update the Listen
Address to the host name of the server where Oracle Directory Services Manager
is deployed.
6. Click Save to save the configuration.
7. Click Activate Changes to update the server configuration.
S.1.23.3 Various Failover Issues
Problem
When you perform an Oracle Directory Services Manager failover using Oracle HTTP
Server, the failover is not transparent. You see this behavior when you perform the
following steps:
1. Oracle Directory Services Manager is deployed in a High Availability active-active
configuration using Oracle HTTP Server.
2. Display an Oracle Directory Services Manager page using the Oracle HTTP Server
name and port number.
3. Make a connection to an Oracle Internet Directory server.
4. Work with the Oracle Internet Directory server using the current Oracle Directory
Services Manager Oracle HTTP Server host and port.
5. Shut down one managed server at a time using the WebLogic Server
Administration Console.
6. Go back to the Oracle Directory Services Manager page and port, and the
connection which was established earlier with Oracle Internet Directory. When
you do, a message is displayed advising you to re-establish a new connection to
the Oracle Directory Services Manager page.

Problems and Solutions
S-32 Oracle Fusion Middleware Administrator's Guide for Oracle Internet Directory
Solution
If you encounter this problem, perform the following steps:
1. In your web browser, exit the current Oracle Directory Services Manager page.
2. Launch a new web browser page and specify the same Oracle Directory Services
Manager Oracle HTTP Server name and port.
3. Re-establish a new connection to the Oracle Internet Directory server you were
working with earlier.
Problem
ODSM temporarily loses its connection to Oracle Internet Directory and displays the
message LDAP Server is down.
Solution
In a High Availability configuration where ODSM is connected to Oracle Internet
Directory through a load balancer, ODSM reports that the server is down during
failover from one instance of Oracle Internet Directory to another. In other
configurations, this message might indicate that Oracle Internet Directory has been
shut down and restarted. In either case, the connection is reestablished in less than a
minute, and you are able to continue without logging in again.
Problem
ODSM temporarily loses its connection to an Oracle Internet Directory instance that is
using an Oracle RAC database. ODSM might display the message Failure
accessing Oracle database (oracle errcode=errcode), where errcode
is one of the following values: 3113, 3114, 1092, 28, 1041, or 1012.
Solution
This error can occur during failover of the Oracle Database that the Oracle Internet
Directory instance is using. The connection is reestablished in less than a minute, and
you are able to continue without logging in again.
S.1.23.4 ODSM Displays an Error Message
Problem
ODSM displays the error message: Error :Posn: -1, Size: 0
Solution
This error can be ignored. It usually indicates that Oracle Internet Directory has
detected an error in an ODSM operation. JNDI, which ODSM uses to connect to Oracle
Internet Directory, sometimes returns this error code instead of the actual error code.
Oracle Internet Directory server log files show a more meaningful error message.
See Also:
■The Oracle Fusion Middleware High Availability Guide for more
information about Oracle Directory Services Manager in High
Availability configurations.
■"Configuring Oracle HTTP Server to Support Oracle Directory
Services Manager in an Oracle WebLogic Server Cluster" on
page 7-13

Need More Help?
Troubleshooting Oracle Internet Directory S-33
S.1.23.5 Cursor Loses Focus
Problem
When you access ODSM in accessibility mode, using only the keyboard, in Internet
Explorer 7, the cursor loses focus. This behavior has been observed under the
following circumstances:
■You access the directory in SSL-enabled mode and the server certificate appears.
■You type an invalid password and the error dialog appears.
Solution
Press the Tab key nine times, then press the Enter key.
S.2 Need More Help?
You can find more solutions on My Oracle Support (formerly MetaLink),
http://metalink.oracle.com. If you do not find a solution for your problem, log
a service request.
See Also: Oracle Fusion Middleware Release Notes for Microsoft
Windows (32-Bit), available on the Oracle Technology Network:
http://www.oracle.com/technology/documentation/index
.html

Need More Help?
S-34 Oracle Fusion Middleware Administrator's Guide for Oracle Internet Directory

Index-1
Index
Symbols
+ in search request, 13-11
Numerics
3DES value of orclpwdverifierparams
generating dynamic verifiers, 30-11
A
abstract object classes, 3-13
superclasses of, 20-4
top, 3-13
access
exclusionary, 29-14
granting
by using ODSM, 29-15
entry-level, by using ODSM data
browser, 29-21
kinds, 29-10
level requirements for LDAP operations, 29-11
operations, 29-10
read-only
granting by using ldapmodify
command, 29-25
rights, setting by using ODSM access
control, 29-17, 29-19
selecting, by DN
by using ldapmodify command, 29-24
subject, 29-8
unspecified, 29-11
access control, 29-1 to 29-26
and authorization, 3-15
bind IP filter, 29-8
conceptual discussion, 29-1
default, 31-3
defined, 3-15
directive format. See ACI directive format
information, described, 29-1
information, format and syntax, H-1
management constructs, 29-2
managing, 29-1
by using command-line tools, 29-21
by using ODSM, 29-15
policies
conflicting, 29-3
inheriting, 29-3
policy administration, introduction, 29-1
prescriptive, 29-3
setting by using wildcards, 29-23
access control lists, 3-7
See also ACLs
access control policy points
defined, 3-5
groups, 29-4
See also ACPs
account lockout
enforced by password policies, 28-4
accounts
disabling, 12-2
enabling and disabling
by using command-line tools, 12-2
by using Oracle Internet Directory Self-Service
Console, 12-4
managing, 12-1
privileged, 12-2
unlocking
by using command-line tools, 12-3
by using Oracle Internet Directory Self-Service
Console, 12-4
realm administrator, 33-7
superuser, 28-4
ACIs
components, 29-7
content, 29-1
defined, 29-1
entry level
setting up by using ldapmodify
command, 29-23
more than one for the same subject, 29-13
object of directives, 29-7
representation, 29-2
restricting kinds users can add, 29-22
See access control items
subject of directives, 29-8
ACL evaluation
how it works, 29-11
ACLs
directives, within entries, 29-3
for groups, 29-15
precedence rules, 29-12
Index-2
See access control lists
within subtrees, 29-3
ACPs
adding
by using ldapmodify command, 29-23
by using ODSM access control, 29-16
by using ODSM Data Browser, 29-21
defined, 29-2
groups, 29-4
modifying
by using ODSM access control, 29-19
by using ODSM Data Browser, 29-21
multiple, 29-3
See also access control policy points
viewing
by using ODSM access control, 29-15
activate replication, 41-13, 42-12, 42-22
active server instances
viewing, 8-5
by usingopmnctl command, 8-9
added_object_constraint filter, 29-22
added-object-constraint, in access control, 29-10
adding attributes
by using ldapmodify command, 20-21
adding attributes to object classes by using
ldapmodify command, 20-20
adding indexes by using ODSM, 20-17
adding object classes
by using ODSM, 20-13
adding object classes by using ldapmodify
command, 20-20
addresses
IP, 10-1
Advanced Replication
adding a new node for, C-11
architecture, D-2
change logs, D-4
configuring
by using Replication Management Tool, C-6
sqlnet.ora, C-6
tnsnames.ora, C-6
deleting a node, C-14
Directory Replication Group, C-3
DRG, C-3
filtering, C-1
installing and configuring, C-2, C-4
nodes
adding, C-11
deleting, C-14
preparing the Oracle Net Services environment
for, C-6
replication groups (DRGs), C-4
configuring, C-4
Advanced Replication groups
setting up, C-4
AL32UTF8 character set, S-2, S-3
alias entries, 17-1 to 17-6
adding by using ldapadd command, 17-2
defined, 17-1
dereferencing, 17-1
messages, 17-6
modifying by using ldapmodify command, 17-6
searching directory with, 17-3
aliases
attributes with
adding by using ldapmodify command, 20-23
alphabetic characters
password policy attribute, 28-6
anonymous authentication, 32-1
anonymous binds, 9-13
default behavior, 32-8
limited operations on root DSE, 32-8
managing
by using Fusion Middleware Control, 32-8
by using ldapmodify command, 32-8
application-specific repositories
migrating data from, 36-6
apply attribute, 42-2
apply threads per supplier, 41-13
architecture
Oracle Internet Directory, 1-4, 3-1
Oracle Internet Directory Server Manageability
framework, 24-2
attribute aliases, 20-11
delete by using ldapmodify command, 20-24
using with ldapadd, 20-25
using with ldapdelete, 20-26
using with ldapmoddn, 20-26
using with ldapmodify, 20-26
using with ldappadd, 20-25
using with ldapsearch, 20-25
attribute mapping
in server chaining, 37-8
attribute name in search request
case, 9-13
attribute options, 3-12
adding
by using ldapmodify, 13-13
conceptual discussion, 3-12
deleting by using ODSM, 13-13
language codes, 3-12
searching for by using ldapsearch, 13-13
attribute selectors, 29-24
attribute uniqueness
defined, 18-1
rules for creating, 18-3
attribute uniqueness constraint
example, 18-8
attribute uniqueness constraint entries, 18-1 to 18-10
DN, 18-2
attribute uniqueness constraints
creating by using ldapadd, 18-9
deleting by using ldapdelete, 18-9
modifying by using ldapmodify, 18-9
attribute values not preserved on upgrade to
11g, A-4
attributes
adding, 20-5
by using ldapmodify command, 20-21, 20-23
adding index by using ldapmodify
Index-3
command, 20-22
as metadata in schema, 20-2
attribute options, 13-13
adding by using ldapmodify, 13-13
conceptual discussion, 3-12
deleting by using ODSM, 13-13
base schema
deleting, 20-5
modifying, 20-5
change logs, 42-16
collective, 16-1
commonName, 3-10
configuration
automatically created, 3-10
defined, 9-1
managing by using WLST, 9-15
content rules, 20-10
defined, 3-9
deleting, 20-5
by using ODSM, 20-16
determined by object classes, 20-2
ditcontentrule, 20-9
dropping indexes, 20-17
extending number of
by using auxiliary object classes, 20-8
by using content rules, 20-9
for existing entries, 20-8
prior to creating entries, 20-8
for a specific entry
viewing by using ODSM, 13-5
hashed, 9-14
in base schema, 20-5
in Fusion Middleware Control replication
wizard, 41-13
in top object class, 3-13
indexed, 3-6
indexes, created by bulkload, 15-7
indexing, 20-22, 20-23
by using catalog command, 20-7
information, kinds of, 3-9
inheritance of, 20-3
instance-specific
managing by using Fusion Middleware
Control, 9-12
jpegPhotos, 3-10, 13-12
kinds of information in, 3-9
labeledURI, 14-4, 14-6, 14-15, 14-16
listing
by using ldapsearch, 13-11
managing
by using Fusion Middleware Control, 9-12
mandatory, 3-12, 20-3, 20-13
in a user entry, 36-9
matching rules, 3-11
modifying
by using ldapmodify, 20-21
by using ODSM, 20-15
rules for, 20-5
using ldapmodify command, 20-23
multivalued
converting to single-valued, 20-5
null values in, 20-3
objects associated with an ACI, 29-7
of the DSA configuration entry, 9-9
of the DSE, 9-11
of the instance-specific configuration entry, 9-2
optional, 3-12, 20-3
options, 3-12
language codes., 3-12
organization, 3-10
organizationalUnitName, 3-10
redefining mandatory, 20-4
ref, 19-1
removing from object classes, 20-4
replication configuration container, 41-1
searchable, 15-13
searching
by using ODSM, 20-16
single-valued, 3-10
converting to multivalued, 20-5
skewed, 9-14
specifying as mandatory or optional, 20-3
storing password verifiers
for authenticating to Oracle components, 30-5
syntax, 3-11
modifying, 20-5
syntax type
selecting, 20-19
syntaxes
cannot modify, 20-5
selecting, 20-19
system operational, 9-1
types, 3-9
user entry, 12-3
usercertificate, K-1
values, 3-9
viewing, 13-5
with aliases
adding by using ldapmodify command, 20-23
audit
attributes, 22-2
events and categories, 22-2
users to always, 22-4
audit configuration
viewing
by using ldapsearch command, 22-5
audit framework
advantages, 22-2
features, 22-1
audit policy, 22-4
audit policy page
in Fusion Middleware Control, 22-4
audit presets, 22-2
audit record pathname, 22-3
audit record storage, 22-3
audit records, 22-3
audit, 10g versus 11g, A-7
auditing, 22-1 to 22-6
administrator, 22-2
defined, 22-1

Index-4
managing
by using Fusion Middleware Control, 22-4
by using ldapmodify command, 22-6
managing by using WLST, 22-5
auditing Oracle Directory Integration Platform, 22-3
auditing replication, 22-3
authentication, 32-1 to 32-9
anonymous, 32-1
at ldapbind, 32-1
certificate, 32-2
conceptual discussion, 32-1
defined, 3-15
direct
options, 32-1
external, 32-4, 45-1
SASL, 32-2
in a typical directory operation, 3-7
indirect, 32-3
through a RADIUS server, 32-3
modes, SSL
testing, 26-12
native, 45-1
Oracle directory replication server, 39-6
password-based, 32-1
PKI, 26-2
SASL, 32-1
SASL mechanism
external authentication, 32-2
MD5 Digest, 32-2
simple, 32-1
Simple Authentication and Security Layer
(SASL), 32-1
SSL
defined, 32-1
three levels, 1-6
through a middle tier, 32-3
authentication of replication server, 39-6
Authentication Services Group, 31-12
authorization, 3-15
defined, 29-1
automated resolution of conflicts, 42-6
autotune replication, 41-13, 42-2, 42-11, 42-21
auxiliary object classes, 3-13, 20-4
extending number of attributes by using, 20-8
B
backing up data
before setting up replication, 39-18
backup and restore, 25-1
base schema
attributes, 20-5
deleting, 20-5
modifying, 20-5
object classes
modifying, 20-4
base search, 13-4
basic management tasks, 7-15
binary values
printing by using ldapsearch command, 13-14
bind IP filter, 29-8, 29-9
bind mode, 29-9
bind operation
when authentication occurs, 32-1
bind performance monitoring garbage
collectors, 35-3
binding, 3-7
binds
anonymous, 9-13
bootstrap
setting up by using command line, 39-19
setting up by using replication wizard, 39-3
troubleshooting, S-21
bootstrap capability of the replication server, 39-3
bootstrap rules, 39-3
bulk tools, 15-1 to 15-13
environment variables required, 15-1
troubleshooting, S-28
bulkdelete command, 15-10
deleting naming contexts
replication setup, 39-27
Globalization Support, I-9
log file location, 23-1
log file name, 23-1
replication setup
deleting naming contexts, 39-27
syntax, 15-10
bulkload
load command
option, 15-7
bulkload command, 15-6, 15-7
check mode, performing on LDIF files, 36-4
creating indexes, 15-7
Globalization Support, I-8
loading data
replication setup, 39-27
loading data into schema, 15-3
log file location, 23-1
log file name, 23-1
migrating third party LDAP data, 36-5
replication setup
loading data, 39-27
syntax, 15-5
troubleshooting, S-27
bulkmodify command, 15-8
Globalization Support, I-9
log file location, 23-1
log file name, 23-1
syntax, 15-9
by, 29-15
C
cache
metadata, 3-4
cached and uncached groups, 14-2
caches
entry
tuning, 9-14
privilege group membership
Index-5
tuning, 9-14
case of attribute name in search request, 9-13
catalog
limit on number of attributes, S-28
catalog command, 20-23
creating indexes, 15-12
log file location, 23-1
log file name, 23-1
referential integrity
enabling, 21-3
syntax, 15-12
troubleshooting, S-28
catalog entry, 3-6
Catalog Management Tool
See catalog command
certificate authentication, 32-2
certificates
in wallet, 26-4
change log entries
on ODSM home page, 24-7
change logs
and directory replication, 42-3
attributes, 42-16
change number-based purging, 35-5
DNs, 35-5
enable or disable generation
tuning, 9-13
garbage collection
troubleshooting, S-24
garbage collector, 35-2
in Advanced Replication, D-4
in replication, 42-3
managing generation, 42-15
managing generation by using Fusion Middleware
Control, 42-7
purging, 35-5
configuring by using ldapmodify
command, 35-9
methods, 35-5
purging, in multimaster replication, 35-5
time-based purging, 35-5
viewing by using ldapsearch command, 42-15
viewing by using ODSM, 42-8
change number-based purging, 35-5
change retry count, 42-21
replication, 41-13
change retry counts, 42-11
cipher suites
SSL, 26-2
SSL, supported, 26-2
supported in SSL, 26-2
cn entry attribute, 3-10
adding, 13-12
cn=oraclecontext naming context
replication setup, 39-32
cn=pwdpolicies container in realm, 28-2
cn=replication namecontext, 41-6
cold failover cluster
configuring IP address, 10-1
cold failover clusters
IP addresses, 10-1
collective attribute
managing, 16-4
overriding, 16-4
collective attributes, 16-1
command-line tools, 7-13 to 7-14
10g versus 11g, A-6
Catalog Management Tool, 20-7
indexing, 20-7, 20-23
managing entries, 13-11
overview, 7-13
setting Globalization Support, I-5
common entry, defined, 3-6
Common Group Attributes Group, 31-14
Common User Attributes Group, 31-13
commonName attribute, 3-10
compare failure performance monitoring garbage
collectors, 35-3
components
of a directory server, 3-2
of Oracle Internet Directory, 1-5
compound RDNs
oidcmprec limitations, 42-35
configuration attributes, 9-1 to 9-19
10g versus 11g, A-3
automatically created, 3-10
defined, 9-1
listing by using ldapsearch command, 9-18
managing
by using ODSM, 9-19
by using WLST, 9-15
setting by using ldapmodify command, 9-17
configuration files, 10g versus 11g, A-7
configuration information, 10g versus 11g, A-3
conflict resolution
automatic, 42-6
in replication, 42-4
messages, 42-23
command-line monitoring, 42-22
monitoring by using Fusion Middleware
Control, 42-14
conflicting access control policies, 29-3
precedence, rules for resolving, 29-3
conflicts, replication
automated resolution of, 42-6
manual resolution of, 42-24
resolution, 29-12, 42-4
resolving manually, 42-24
typical causes of, 42-5
CONNECT_BY assertions and dynamic
groups, 14-4, 14-5
connecting
to a directory server, 3-6
connection timeout
tuning, 9-13
connection to Oracle Database down, S-2
connections
on ODSM home page, 24-7
connections to database
tuning, 9-13

Index-6
connections, pooling, 1-6
constraints, object classes, 3-13
consumers, defined, 6-4
containment
of groups, planning, 5-3
of users, planning, 5-3
content rules
adding
by usingldapmodify command, 20-27
defined, 20-9
defined as values of ditcontentrule attribute, 20-9
extending number of attributes by using, 20-9
format, 20-27
managing
by using command-line tools, 20-27
modifying
by using ODSM, 20-18
parameters, 20-27
rules for creating and modifying, 20-9
schema enforcement when using, 20-10
controls
definition, 1-3
converting
auxiliary object classes, 20-4
structural object classes, 20-4
createTimestamp attribute, 3-10, 36-3
optional in top, 3-14
creating an instance, 10g versus 11g, A-1
creating content rules
by using ODSM, 20-17
creating content rules by using ODSM, 20-17
creating dynamic groups
by using ODSM, 14-11
creating static groups
by using ODSM, 14-9
creatorsName attribute, 3-10, 36-3
optional attribute in top, 3-14
critical events
in Oracle Internet Directory Server Manageability
framework, 24-9
levels, 24-9
customized settings
LDAP replication setup, 39-18
D
data migration from other repositories, 36-1 to 36-9
data migration process, 36-1
data privacy, 3-15, 27-1 to ??, 27-7, ?? to 27-7,
?? to 27-8
database
connections
pooling, 1-6
tuning, 9-13
dedicated for directory, 3-3
errors, S-2
password, changing, 12-6
server, 1-4
server error, S-2, S-3
server performance
troubleshooting, S-11
database account ODSSM
accessing server manageability information, 24-4
Database Vault
best practices, 27-5
configuration for Oracle Internet Directory, 27-5
deleting policies, 27-5
disabling, 27-5
policies for protecting Oracle Internet
Directory, 27-4
databases used by Oracle Internet Directory
tablespace encryption
enabling or disabling, 27-1
dc attribute, 3-10
debug
on ODSM home page, 24-7
debug logging levels, 23-5
about, 23-2
replication server, 41-13, 42-11, 42-22
configuring by using Fusion Middleware
Control, 42-12
setting by using ODSM, 23-5
setting by using OID Control Utility, 23-6
setting by using the command line, 23-6
debug operations, 23-7
enabled, 23-5
setting
by using ldapmodify command, 23-8
debug, enabling, 10g versus 11g, A-6
debugging LDAP operations, 23-7
debugging the external authentication plug-in, 45-3
debugging, limiting to specific operations, 23-7
default configuration
access controls, 31-3
default identity management realm, 3-23, 33-6
default knowledge references (referrals)
configuring, 19-3
default password policy, 28-4
default ports, 3-4
10g versus 11g, A-5
default URLs and ports
list of commonly-used, 7-2
Delegated Administration Services
defined, 3-19
self-service console, 12-4
delegating privileges, 31-1 to 31-14
delegating privileges for user and group
management, 31-3
deleting a replica
command-line, 39-29
deleting attributes by using ODSM, 20-16
deleting object classes by using ODSM, 20-14
dereferencing alias entries, 17-1
differences between 10g and 11g, A-1 to A-9
Digest, MD5, 32-2
digest-md5 attribute, 41-9, 41-13, 42-11, 42-21
directories
application, migrating data from, 36-6
backup and restore, 25-1
contrasted to relational databases, 1-2

Index-7
database listener, C-7
defined, 1-1
distributed, 3-16
existing, default directory structure, 36-1
expanding role of, 1-1
location-independent, 1-2
online
expanding role of, 1-1
partitioned, 3-17
planning structure of, 5-2
schema
managing, 20-1
overview, 20-1
special purpose, 1-2
under the Oracle instance, 2-4
directory attributes
view all by using ODSM, 20-16
directory concepts and architecture, 3-1 to 3-26
directory entries, managing, 13-1 to 13-14
directory information tree (DIT), 3-7
default, 33-6
defined, 3-7
planning, 5-1
planning for identity management, 5-1
directory metadata
defined, 3-4
directory organization, 5-1 to 5-5
directory replication group (DRG) type, 6-4
directory replication server, 1-5, 3-3
authentication, 39-6
log file location, 23-1
directory schema, 20-2
defined, 3-5
managing, 20-1
directory servers, 1-5, 3-3
connecting to, 3-6
log file location, 23-2
managing instances, 8-1
processes
multiple, 3-4
shared server, 1-6
supported by server chaining, 37-2
viewing information, 8-5, 8-9
disabling accounts, 12-2
disallowed password values
password policy attribute, 28-6
dispatcher
maximum server response time, 9-13
dispatcher process, 3-3, 8-3
dispatcher threads
number
tuning, 9-13
displaying entries
by using ODSM, 13-2
distinguished names, 3-7
components of, 3-8
defined, 3-7
format, 3-8
distributed directories, 3-16, 3-17
partitioned, 3-16
replicated, 3-16
ditcontentrule attribute, 20-9
DITContentRule subschemasubentry attribute, 20-9
DN
match, 9-14
See also distinguished names
user, 9-14
DSA configuration entry
attributes, 9-9, 9-11
defined, 9-11
DN, 9-9
navigating to in ODSM, 9-19
DSE root
navigating to in ODSM, 9-19
dual mode
SSL, 26-4
dumping entries by using ldifwrite, 15-11
duration of a search, specifying, 13-4
dynamic groups, 14-2
cached and uncached, 14-2
creating
by using ldapadd, 14-15
by using ODSM, 14-11
modifying
by using ldapmodify command, 14-17
by using ODSM, 14-13
refreshing, 14-3
schema elements for creating, 14-4
dynamic password verifiers
described, 30-11
generating, 30-11
troubleshooting, S-25
E
-E argument in Globalization Support, I-6
EM
See Fusion Middleware Control
EMD administrator account
password
changing by using WLST, 12-7
enabling debug, 10g versus 11g, A-6
encryption
of sensitive attributes, 27-6
passwords
UNIX crypt, 30-3, 30-4
Enterprise Manager
See Fusion Middleware Control
Enterprise User Security
server chaining
plug-in for password change
notification, 37-14
SSL needs, 26-4
with server chaining, 37-1
entity component, in access control, 29-8
entries
adding
by copying an existing entry, 13-8
by using ODSM, 13-6
requires write access to parents, 13-6

Index-8
adding by using ldapmodify, 13-13
attributes, viewing, 13-5
catalog, defined, 3-6
common, defined, 3-6
conceptual discussion, 3-7
displaying
by using ODSM, 13-2
distinguished names of, 3-7
garbage collector, 35-4
inheriting attributes, 20-3
loading, 20-3
locating by using distinguished names, 3-8
managing
by using bulk tools, 15-1
by using command line tools, 13-11
by using command-line tools, 13-11
by using ODSM, 13-1
modifying
by using ODSM, 13-9
naming, 3-7
objects associated with an ACI, 29-7
parent, 20-3
password policy, defined, 3-6
password verifier, defined, 3-6
plug-in, defined, 3-6
replication naming context container, 41-6
restricting the kinds users can add, 29-17, 29-22
returned by a search
maximum number, 9-13
searching
base level, 13-4
by using ODSM, 13-3
one-level, 13-4
specifying search depth, 13-4
subtree level, 13-4
selecting by DN
by using ldapmodify command, 29-24
static group
modifying, by using ldapmodify
command, 14-15
statistics collector, 35-5
user
adding, by using ldapadd, 13-12
modifying, 13-13
modifying, by using ldapmodify, 13-13
with attribute options
deleting by using ODSM, 13-13
searching for by using ldapsearch, 13-13
entry cache
defined, 3-8
tuning, 9-14
entry-level access
granting
by using ODSM, 29-21
modifying
by using ODSM data browser, 29-21
setting
by using ODSM data browser, 29-21
environment variables
required for bulk tools, 15-1
when using command-line tools, 7-13
environment variables, NLS_LANG, I-3
error messages, S-5
30SendPort, S-2
additional, S-5
administration, S-3
alias entries, 17-6
constraint violation, S-3
database server, S-2, S-3
directory server, due to interrupted client
connection, S-2
directory server, due to schema
modifications, S-3
installation, S-2
ORA-01483, S-3
ORA-1562, S-3
ORA-3113, S-2
ORA-3114, S-2
password policies, S-9
returned from Oracle directory server, S-4
sgslunrRead, S-2
standard, S-4
event tracking
security
configuring by using ldapmodify
command, 24-8
exclusionary access to objects, granting, 29-14
existing ACPs and their ACI directives, modifying
by using ODSM access control, 29-19
existing attributes
modifying aliases in
by using ldapmodify, 20-23
expiration warning messages
password policy attribute, 28-6
expiry warning
password policies, 28-4
explicit hierarchies, 14-7
extensibility, in LDAP Version 3, 1-3
extensibleObject object class, 19-1
external authentication, 32-4
contrasted with native authentication, 45-1
defined, 45-1
plug-in, 45-1
debugging, 45-3
installing, 45-2, 45-4
installing, configuring, and enabling, 45-2
SASL authentication mechanism, 32-2
external repository, storing security credentials
in, 45-1
F
failed login attempts
operational attribute, 28-7
failover, 1-6
failure tolerance, and replication, 6-2
fan-out replication, 6-5
described, 39-6
example of configuration objects, 41-9
groups, 6-5

Index-9
with multimaster replication groups, 6-7
LDAP-based, 3-16
setup, 39-30
features, new
release 11g (11.1.1), xlv
release 11g (11.1.1.4.0), xliv
release 11g (11.1.1.6.0), xliii
file names
log files, 23-1
filters
in searches, 3-6
maximum size, 9-14
search processed in memory, 9-14
force flushing trace information, 23-8
framework
server manageability, 24-1
full replication, 6-3
function calls, tracing, 23-7
Fusion Middleware Control
activating replication, 42-12
as a component of Oracle Internet Directory server
manageability, 24-4
changing superuser password, 12-5
configuring a user for statistics collection, 24-5
configuring certificate authentication
method, 32-6
configuring logging, 23-5
configuring replica details, 42-13
configuring replication attributes, 41-12, 42-11
configuring replication debug level, 42-12
configuring SASL authentication, 32-6
configuring server statistics collection, 24-4
configuring SSL, 26-5
configuring SSL parameters, 26-7
connecting, 7-4
creating a wallet, 26-6
deactivating replication, 42-12
default port, 7-2
defined, 2-4
deleting replication agreements, 42-10
described, 2-4
enabling or disabling change log generation, 42-7
enabling referential integrity, 21-2
General tab of Server Properties page, 9-14
home page
statistics information, 24-6
human intervention queue, 42-14
invoking ODSM from, 7-9
log files
viewing, 23-5
logging
configuring, 23-5
managing and monitoring replication, 42-7
managing anonymous binds, 32-8
managing auditing, 22-4
managing configuration attributes, 9-12
managing logging, 23-4
managing Oracle Internet Directory, 7-4
managing Oracle Internet Directory
components, 8-4
managing replica naming context objects, 42-8
managing Server Properties, 9-12
managing worker threads, 42-2
menus, 7-5
metrics, 24-6
monitoring conflict resolution, 42-14
oidmon interprets, 3-3
performance summary, 24-6
process status available to, 4-5
replication configuration, 41-12
replication wizard
bootstrap capability, 39-3
restarting the directory server, 8-5
server properties page, 9-12
setting server mode, 15-3
setting SSL parameters, 26-8
setting up statistics collection, 24-4
shared properties page, replication tab, 42-11
shared properties, replication tab, 41-12
starting the directory server, 8-5
statistics on Oracle Internet Directory home
page, 24-6
troubleshooting, S-29
URL, 7-4
viewing active server information, 8-5
viewing log files, 23-5
viewing or modifying replication setup, 42-9
viewing queue statistics, 42-13
viewing statistics information, 24-6
Fusion Middleware Control replication wizard
configuration attributes, 41-13
replication setup, 39-16
setup, 39-16 to 39-17
Fusion Middleware Control, introduction, 7-4 to 7-5
Fusion Middleware Home
defined, 2-3
G
garbage collection, 35-1 to 35-10
database patch needed, S-24
framework
about, 35-1
components of, 35-1
how it works, 35-3
in replication, 35-5
plug-in, 35-1
garbage collection log
monitoring, 35-9
garbage collectors
bind performance monitoring, 35-3
change log, 35-2
definition, 35-2
DN, 35-4
entries for, 35-4
general statistics, 35-2
health statistics, 35-2
LDAP compare performance monitoring, 35-3
LDAP performance monitoring, 35-3
managing, 35-7

Index-10
modifying
by using ldapmodify command, 35-7
by using ODSM, 35-7
predefined, 35-2
security and refresh events, 35-2
system resource events, 35-2
tombstone, 35-3
general statistics garbage collector, 35-2
generate stack dump, 42-21
Globalization Support, 3-15, 3-16, I-1 to ??
Bulk Tools, I-8
bulkdelete command, I-9
bulkload command, I-8
bulkmodify command, I-9
command-line tools, I-5
ldapadd command, I-7
ldapaddmt command, I-7
ldapbind, I-7
ldapcompare command, I-7
ldapdelete command, I-7
ldapmoddn command, I-7
ldapmodify command, I-7
ldapmodifymt command, I-7
ldapsearch command, I-7
LDIF Files, I-4
ldifwrite command, I-8
managing, I-1
settings for Oracle Internet Directory, I-3
grace logins
enforced by password policies, 28-4
password policy attribute, 28-6
grace period
operational attribute, 28-7
graphical user interfaces, 10g versus 11g, A-7
group entries
creating
by using ODSM, 14-9, 14-11
groupOfNames object class, 14-2, 14-9, 14-10, 14-11,
14-12
groupOfUniqueNames object class, 14-2, 14-9, 14-11
groups, 14-1 to 14-17
ACL evaluation for, 29-15
ACPs, 29-4
creating
by using ODSM, 14-11
dynamic, 14-2
creating by using ldapadd, 14-15
refresh, 14-3
schema elements for creating, 14-4
dynamic and static, administration of, 14-1
granting access rights to, 29-5
granting selfwrite access
by using ldapmodify command, 29-25
hierarchical, 14-7
membership
how directory server computes, 29-5
modifying by using ldapmodify, 14-17
names and containment, planning, 5-3
privilege, 29-4
defined, 3-5
static, 14-2
modifying by using ldapmodify
command, 14-14
schema elements for creating, 14-2
when to use static or dynamic, 14-8
guidelines
for deleting object classes, 20-4
H
hashed attributes, 9-14
hashed password comparisons
password policy attribute, 28-7
hashing
passwords to the directory, 30-1
protection
MD4, 30-3
hashing algorithms
default, 30-2
password verifiers
for authenticating to Oracle components, 30-4
userpassword, 30-2
hashing schemes
for protecting user passwords, 30-3
retained on upgrade, 30-2
health statistics garbage collector, 35-2
hierarchical groups, 14-7
hierarchies
explicit, 14-7
implicit, 14-7
high availability, 1-6
home page
ODSM
statistics information, 24-7
human intervention queue, 42-3
managing, 42-24
managing processing by using ldapmodify
command, 42-27
number of entries
managing by using Fusion Middleware
Control, 42-14
processing, 42-4
schedule, 39-16, 41-13, 42-18
tools, 42-24
I
identity management, 33-6
defined, 3-21
planning DIT for, 5-1
policies, 3-24
realms, 3-23, 33-3
creating additional, 33-13
customizing, 33-8
default, 3-23
defined, 3-23
entry in default DIT, 33-5
implementation in Oracle Internet
Directory, 33-5
in enterprise deployments, 33-3

Index-11
in hosted deployments, 33-4
multiple, 33-4
multiple in enterprise deployments, 33-4
planning, 33-1
single, 33-3
single in enterprise deployments, 33-3
realm-specific Oracle Context, 33-6
idle connection timeout
tuning, 9-13
IETF
LDAP approval, 1-3
implicit hierarchies, 14-7
inactivate replication, 41-13, 42-22
indexed attributes, 3-6
indexes
adding
by using ldapmodify, 20-22
by using ODSM, 20-17
created by bulkload, 15-7
creating by using catalog command, 15-12
dropping
by using catalog command, 15-13
dropping from attributes, 20-17
by using ldapmodify command, 20-22
by using ODSM, 20-17
inheritable ACP
setting up
by using ldapmodify command, 29-23
inheritance, 3-12
and access control policies, 29-3
class, 3-12
from superclasses, 20-3
installation errors, S-2
instance configuration information, 10g versus
11g, A-1
instance creation, 10g versus 11g, A-1
instances
adding, 8-3
Oracle Internet Directory
adding, 8-3
creating the first, 8-2
managing, 8-1
registering
by using opmnctl command, 8-7
instances, managing server, 8-1 to 8-11
instance-specific configuration entry
attributes, 9-2
DN, 8-1, 9-2
navigating to in ODSM, 9-19
integration, Oracle Directory Services
Manager-SSO, 7-6
intermediate template file
in migration from application-specific
repositories, 36-7
internationalization, and LDAP, I-1
Internet Engineering Task Force (IETF). See IETF.
Internet Protocol version 6
configuring address, 10-1
interoperability mode
SSL, 26-5
interoperability mode, SSL
setting by using ldapmodify command, 26-13
introduction to directory services, 1-1 to ??
invalid login attempts, lockout after
password policy attribute, 28-5
IP addresses
cold failover clusters, 10-1
managing, 10-1
virtual, 10-1
IPV4 addresses, 10-1
IPV6 addresses, 10-1
J
Java containers, 10g versus 11g, A-9
Java plug-ins
API, E-2 to E-9
setting up, E-1
jpegPhoto attribute, 3-10, 13-12
K
keep alive
LDAP connection, 41-13
replication server connection, 39-16
knowledge references, 3-17, 3-18, 19-1 to 19-4
configuring, 19-1
default
configuring, 19-3
defined, 3-18
managing, 19-1
overview, 3-17
restricting permissions for managing, 3-19
smart
configuring, 19-3
superior, 3-18
L
labeleduri, 14-2
labeledURI attribute, 14-4, 14-6, 14-15, 14-16
language codes, as attribute options, 3-12
last login attempt, 28-7
last password change
operational attribute, 28-7
last successful login
operational attribute, 28-7
latency, operation
on ODSM home page, 24-7
LDAP
add or modify performance, S-11
and internationalization, 3-15
and simplified directory management, 1-3
attributes, common, 3-10
communication between replication server and
directory, 3-3
compare performance, 35-3
extensibility, 1-3
IETF approval, 1-3
search performance, S-10
security, 1-3
Index-12
server instances, 3-3
servers, 3-3
multithreaded, 1-6
Version 3, 1-3
LDAP filter definition, G-1 to G-6
LDAP multimaster agreement
converting an Advanced Replication-based
agreement to, 39-15
LDAP operations
causing replication conflicts, 42-5
debugging, 23-7
tracing, 23-7
LDAP Utilities, 7-14
ldapadd command, 7-14
adding alias entries, 17-2
adding entries, 13-12
adding partial replication context, 39-33
attribute aliases
using with, 20-25
configuring server chaining, 37-5
creating attribute uniqueness constraints, 18-9
creating dynamic groups, 14-15
entries
adding, 13-12
Globalization Support, I-7
password policy
creating, 28-11
replication setup, 39-21
ldapaddmt command, 7-14
Globalization Support, I-7
LDAP-based partial replication
determining what is to be replicated, 42-2
LDAP-based replica
deleting, 39-29
setting up, 39-18
LDAP-based replication
configuring, 39-5
process, D-4
rules, 39-5
setup, 39-1 to 39-33
LDAP-based replication architecture, D-4
ldapbind command, 7-14
and Globalization Support, I-7
SSL
testing, 26-11
SSL configuration
testing, 26-12
ldapcompare command, 7-14
Globalization Support, I-7
LDAP-compliant directories, migrating data
from, 36-1
ldapdelete command, 7-14
attribute aliases
using with, 20-26
deleting attribute uniqueness constraints, 18-9
deleting replication context, 39-32
Globalization Support, I-7
ldapmoddn command, 7-14
attribute aliases
using with, 20-26
Globalization Support, I-7
ldapmodify command, 7-14
adding ACPs, 29-23
adding attribute options, 13-13
adding attributes, 20-21, 20-23
adding attributes to object classes, 20-20
adding attributes with aliases, 20-23
adding object classes, 20-20, 20-21
adding plug-in configuration entries, 44-8
attribute aliases
using with, 20-26
attribute aliases in existing attributes
modifying, 20-23
attribute options
adding, 13-13
deleting, 13-13
attributes, 20-21
auditing
enabling for replication and Oracle Directory
Integration Platform, 22-6
managing, 22-6
configuring attributes of replication configuration
set, 42-21
configuring change log purging, 35-9
configuring knowledge references, 19-3
configuring replica subentry attributes, 42-16
configuring replication agreement
attributes, 42-17
configuring server chaining, 37-5
configuring SSL, 26-10
configuring SSL authentication, 26-11
configuring SSL cipher suite, 26-11
configuring SSL interoperability mode, 26-11
configuring SSL version, 26-11
configuring SSL wallet URL, 26-11
configuring user statistics
configuring statistics collection, 24-10
content rules
adding, 20-27
debug operations
setting, 23-8
delete attribute aliases, 20-24
deleting attribute options, 13-13
disabling accounts by using, 12-3
enabling force flushing to log file, 23-8
enabling SSL, 26-11
entries
modifying, 13-13
selecting by DN, 29-24
entry level ACLs
setting up, 29-23
Globalization Support, I-7
granting selfwrite access to group entries, 29-25
indexes
adding, 20-22
dropping from attributes, 20-22
managing anonymous binds, 32-8
managing change log generation, 42-15
managing human intervention queue, 42-27
managing password verifier profiles for Oracle
Index-13
components, 30-10
managing replication configuration
attributes, 41-14
managing superuser, 12-6
modifying alias entries, 17-6
modifying attribute uniqueness constraints, 18-9
modifying attributes, 13-13, 20-21, 20-23
modifying dynamic groups, 14-17
modifying garbage collectors, 35-7
modifying replica naming context object
parameters, 42-18
modifying static groups, 14-14, 14-15
object classes
adding, 20-21
password hashing schemes
managing, 30-3
password hashing schemes for creating password
verifiers
managing, 30-3
password policies
setting, 28-12
password policy
applying to subtree, 28-11
privacy mode
enabling, 27-7
read-only access
granting, 29-25
referential integrity
disabling, 21-3
enabling, 21-2
replication setup, 39-22
searching for published naming contexts, 11-2
security event tracking
configuring, 24-8
server mode
setting, 15-3
setting logging levels, 23-6
setting server mode, 15-3
setting system configuration attributes by
using, 9-17
setting value of orclpwdverifierparams, 30-12
SSL interoperability mode
setting, 26-13
statistics collection
configuring, 24-8
unlocking user accounts by using, 12-3
user statistics
configuring, 24-9
using attribute selectors
granting access, 29-24
ldapmodifymt command, 7-14
Globalization Support, I-7
ldapsearch
listing operational attributes, 13-11
ldapsearch command
alias entries, 17-3
attribute aliases
using with, 20-25
attributes
listing, 13-11
audit configuration
viewing, 22-5
checking value of
orclpwdencryptionenable, 30-11
determining replica IDs, 39-21
determining replication agreement
replication, 39-21
finding orclreplicaid value
replication setup, 39-20
Globalization Support, I-7
identifying naming contexts
replication setup, 39-26
listing configuration attributes, 9-18
password policies
viewing, 28-11
printing binary values, 13-14
privacy mode
determining, 27-7
replication, 39-21
determining replication agreement, 39-21
replication setup
finding orclreplicaid value, 39-20
identifying naming contexts, 39-26
searching
entries with attribute options, 13-13
searching for published naming contexts, 11-1
searching password verifier profiles for Oracle
components, 30-10
SSL attributes
listing, 26-11
statistics
viewing configuration, 24-8
syntaxes
viewing, 20-28
viewing change logs, 42-15
viewing matching rules, 20-28
viewing schema, 20-19
viewing syntaxes, 20-28
LDIF file
using with ODSM, 13-5
LDIF files, 9-17, S-29
importing by using bulkload, 15-6
importing, by using bulkload, 15-6
removing proprietary data from in
migration, 36-3
ldifwrite command, 15-11
dumping entries by using, 15-11
getting supplier data
replication setup, 39-26
Globalization Support, I-8
log file location, 23-1
replication setup
getting supplier data, 39-26
setting up replication by using, 39-24
syntax, 15-11
list of sensitive attributes, 27-6
listener, for directory database, 3-3, 3-4
restarting, C-7
stopping, C-7
listener.ora, C-7

Index-14
load balancing
and replication, 6-2
-load option, in bulkload, 15-7
location-independence, of directories, 1-2
locked accounts
unlocking with ODSM, 12-5
lockout after invalid login attempts
password policy attribute, 28-5
log files, 23-1
10g versus 11g, A-7
force flushing trace information, 23-8
garbage collection, 35-9
maximum in rotation, 42-11
maximum number in rotation, 23-5, 41-13
maximum size, 23-5, 41-13, 42-11, 42-22
rotation, 23-5
size, 42-22
trace messages, 23-3
viewing
by using Fusion Middleware Control, 23-5
log messages
for specific operations, 23-3
interpreting, 23-2
stored as trace objects, 23-3
logging, 23-1 to 23-8
configuring
by using Fusion Middleware Control, 23-5
features, 23-2
for garbage collectors, enabling and
disabling, 35-8
format, 23-1
levels
setting by using ldapmodify command, 23-6
logging tab
server properties page
Fusion Middleware Control, 23-5
login attempts, 28-7
loose consistency model of replication, 6-6
lowercase character
password policy attribute, 28-6
LSNRCTL utility, C-7
M
ManageHiq.purge command, 42-3, 42-24
ManageHiq.retry command, 42-3, 42-24
managing directory schema, 20-1
mandatory attributes, 3-12, 20-3
adding to existing object classes, 20-4
adding to object classes in use, 20-13
in a user entry, 36-9
redefining, 20-4
manual resolution of conflicts, 42-24
match DN, 9-14
matching rules
as metadata in schema, 20-2
attribute, 3-11
cannot add to subSchemaSubentry, 20-2
PKI, 9-14
stored in schema, 20-2
viewing
by using ldapsearch command, 20-28
by using ODSM, 20-18
maximum entry cache size
tuning, 9-14
maximum log file size, 23-5
maximum number of worker threads, 42-2
maximum valid time of password
password policy attribute, 28-5
MBeans
defined, 2-4
related to Oracle Internet Directory
configuration, 9-16
MD5
for password encryption, 30-3, 30-4
MD5 Digest, SASL authentication mechanism, 32-2
member attribute, 14-9, 14-11
messages, log
interpreting, 23-2
metadata
cache, 3-4
directory, defined, 3-4
stored in schema, 20-2
metrics
performance page
Fusion Middleware Control, 24-6
Microsoft Active Directory
with server chaining, 37-2
middle tier
using proxy user with, 32-3
migrating data
from other LDAP-compliant directories, 36-1
migrating third-party LDAP data
by using Directory Integration Platform
server, 36-6
by using LDIF files and syncprofilebootstrap
command, 36-5
by using syncprofile bootstrap, bulkload, and LDIF
files, 36-5
by using syncprofilebootstrap command, 36-4
migration
from application-specific repositories
intermediate template file, 36-7
minimum password length
enforced by password policies, 28-4
password policy attribute, 28-6
modifiersName attribute, 3-10, 36-3, 41-8
optional in top, 3-14
modifying attribute aliases in existing attributes
by using ldapmodify, 20-23
modifying attributes by using ODSM, 20-15
modifying content rules
by using ODSM, 20-18
modifying dynamic groups
by using ODSM, 14-13
modifying object classes
by using ODSM, 20-13
modifying static groups, 14-10
by using ldapmodify command, 14-14
by using ODSM, 14-10

Index-15
modifyTimestamp attribute, 3-10, 36-3, 41-8
optional in top, 3-14
monitoring Oracle Internet Directory, 24-1 to 24-11
monitoring servers, 24-2
multimaster flag
toggling, 39-22, 39-28, C-10
multimaster replication, 6-4, 6-6
multimaster replication groups
with fan-out, 39-30
with fan-out replication groups, 6-7
multiple directory server instances
SSL
configuration, 26-4
multiple server processes, 3-4
multithreaded LDAP servers, 1-6
multivalued attributes, 3-10
converting to single-valued, 20-5
member, 14-9, 14-11
orclEntryLevelACI, 29-3
N
names
of groups, planning, 5-3
of users, planning, 5-3
naming contexts, 3-14
defined, 11-1
definition, 3-14
discovering, 3-14
in partitioned directories, 3-17
in replication filtering, 39-7
managing, 11-1
optimization of partial replication, 39-13
publishing, 3-14, 11-1
searching for published, 11-1
subordinate, 3-18
that cannot be excluded from replicatio, 39-12
that cannot be replicated, 39-12
namingcontexts attribute, 9-12, 11-1, 11-2
multivalued, 11-2
native authentication
contrasted with external authentication, 45-1
defined, 45-1
network retry timeout
tuning, 9-13
new features
release 11g (11.1.1), xlv
release 11g (11.1.1.4.0), xliv
release 11g (11.1.1.6.0), xliii
new syntaxes, adding, 3-11
NLS_LANG environment variable, 7-13, I-3
required by bulk tools, 15-1
setting
in the client environment, I-7
settings, I-3
nodes, Oracle Internet Directory, 3-2
non-alphanumeric characters
password policy attribute, 28-6
non-Oracle clients
SSL needs, 26-5
non-SSL port, 3-4, 9-13
Novell eDirectory
with server chaining, 37-2
null values, in attributes, 20-3
number of entries
on ODSM home page, 24-7
number of seconds between modifications
password policy attribute, 28-5
number of workers
maximum, 41-13, 42-11
numeric characters
password policy attribute, 28-6
O
O3LOGON algorithm, 30-4
object classes, 3-12
adding, 20-1
by using ldapmodify command, 20-20, 20-21
by using ODSM, 20-13
adding attributes
by using ldapmodify command, 20-20
as metadata in schema, 20-2
assigning to entries, 20-2
auxiliary, 3-13
converting auxiliary, 20-4
defining, 20-8
deleting
by using ODSM, 20-14
from base schema, 20-9
not in base schema, 20-4
extensibleObject, 19-1
groupOfNames, 14-9, 14-10, 14-11, 14-12
guidelines
for deleting, 20-9
in the base schema, modifying, 20-4
modifying
by using ldapmodify command, 20-21
by using ODSM, 20-13
orclprivilegegroup, 3-5
and dynamic groups, 14-4
redefining mandatory attributes in, 20-4
referral, 19-1
removing attributes from, 20-4
removing superclasses from, 20-4
rules, 3-13
searching
by using ODSM, 20-12
structural, 3-13
structural, converting, 20-4
subclasses, 3-12
defining, 20-8
superclasses, 3-12
top, 3-13
types, 3-13
abstract, 3-13
auxiliary, 3-13
structural, 3-13
unique name of, 20-3
unique object identifier, 20-3
Index-16
viewing properties by using ODSM, 20-14
object identifier as attribute alias, 20-11
objectclasses
orclacpgroup, 29-4
OCI. See Oracle Call Interface.
ODS_PROCESS_STATUS Table, 4-2
ODS_PROCESS_STATUS table, 4-2
ODSM, 7-6 to 7-13
adding
entries, 13-6
adding ACPs, 29-16
from data browser, 29-21
adding indexes to attributes, 20-17
adding new attributes, 20-14
adding new entries, 13-6
adding object classes, 20-13
assigning password polices to subtrees, 28-10
attributes, searching for, 20-16
cataloging attributes, 20-17
configuring HTTP server, 7-13
configuring server chaining, 37-4
configuring session timeout, 7-12
configuring single sign-on integration, 7-7
connecting, 7-6
connecting as an SSO-authenticated user, 7-12
connecting to server, 7-10
copying existing entries, 13-8
creating attribute uniqueness constraints, 18-6
creating content rules, 20-17
creating dynamic groups, 14-11
creating password policies, 28-10
creating plug-ins, 44-9
creating static groups, 14-9
data browser icons, 13-3
default port, 7-2
deleting a subtree, 13-8
deleting attribute uniqueness constraints, 18-7
deleting attributes, 20-16
deleting object classes, 20-14
deleting plug-ins, 44-10
displaying directory entries, 13-2
dropping indexes from attributes, 20-17
editiing plug-ins, 44-10
exporting entries, 13-5
home page, 24-7
icons
data browser, 13-3
importing entries, 13-5
introduction, 7-6
invoking, 7-9
JAWS screen reader, 7-6
listing and locking a locked account, 12-5
logging into server, 7-10
managing configuration attributes, 9-19
managing directory schema, 20-12
managing password verifier profiles for Oracle
components, 30-10
managing plug-ins, 44-9
managing system configuration attributes, 9-19
modifying ACPs, 29-19
modifying attribute uniqueness constraints, 18-7
modifying attributes, 20-15
modifying content rules, 20-18
modifying dynamic groups, 14-13
modifying entries, 13-9
modifying entry-level access
from data browser, 29-21
modifying garbage collectors, 35-7
modifying object classes, 20-13
modifying password policies, 28-9
navigating to from Fusion Middleware
Control, 7-5
non-super user access, 7-6
registering plug-ins, 44-10
searching for attributes, 20-16
searching for entries, 13-3
searching for object classes, 20-12
selecting attribute syntax type, 20-19
setting entry-level access
from data browser, 29-21
single sign-on integration
configuring HTTP server, 7-9
configuring OAM, 7-8
supported browsers, 7-9
testing replication, 39-17
troubleshooting, S-30
URL, 7-9
using SSL, 7-11
viewing ACPs, 29-15
viewing all directory attributes, 20-16
viewing attributes, 13-5
viewing attributes for specific entries, 13-5
viewing local change logs, 42-8
viewing matching rules, 20-18
viewing password policies, 28-9
viewing properties of object classes, 20-14
viewing statistics information, 24-7
viewing syntaxes, 20-19
viewing version information, S-29
ODSSM account, 24-4
ODSSMadministrator account
password
changing by using WLST, 12-8
OID Compare and Reconcile Tool, 42-28
OID Control Utility
See oidctl command
OID Monitor
See OIDMON
oidcmprec command, 42-28 to 42-35
change log generation for changes, 42-33
comparing and reconciling inconsistent
data, 42-28
conflict scenarios, 42-29
how it works, 42-31
including directory schema, 42-34
limitations, 42-35
operations supported, 42-29
output, 42-30
overriding predefined conflict resolution
rules, 42-34
Index-17
selecting attributes, 42-32
selecting DIT, 42-32
source and destination directories, 42-31
user-defined operations, 42-35
using parameter file, 42-33
oidctl command
in Oracle Internet Directory node, 3-3
in standalone mode, B-1
starting replication server, 8-10, 39-22
troubleshooting database server, S-11
oiddiag command
detecting referential integrity violations, 21-3
viewing statistics, 24-10
oidexaup.sql
contents of, 45-4
for installing external authentication plug-in, 45-2
OIDEXTAUTH PL/SQL package for external
authentication, 45-2
oidldapd dispatcher
in instance, 8-3
log file location, 23-2
log file name, 23-2
oidldapd server
in an instance, 8-3
log file location, 23-2
OIDMON, 4-1, 4-2
in Oracle Internet Directory node, 3-3
OIDMON log file name, 23-2
OIDMON process
in instace, 8-3
oidpasswd command
changing database password, 12-6
resetting superuser password, 12-7
oidrepld command
log file name, 23-1
OIDUpgradePasswordPolicies command
replication setup, 39-29
one-level search, 13-4
one-way hashed values
userpassword verifiers, 30-2
online directories, 1-1
OpenLDAP Community, xl
operation debug, 23-7
operation latency
on ODSM home page, 24-7
operational attributes, 9-1
described, 9-2
listing with ldapsearch, 13-11
operations enabled for debug, 23-5
operations, limiting debugging to specific, 23-7
OPMN
See Oracle Process Manager and Notification
Server
opmnctl command, 4-1
creating a component, 8-3
creating a system component, 8-6
registering an instance, 8-7
replication setup
starting replication server, 39-25
restarting server, 8-10
starting replication server
replication setup, 39-25
starting server, 8-9
stopping server, 8-10
viewing server instances, 8-9
viewing status, 8-9
opmn.xml
changing database information, 8-10
snippet, 4-3
optional attributes, 3-12, 20-3
adding to pre-defined object classes, 20-8
options, attribute, 3-12
ORA-1562 error, S-3
ORA-3113 error, S-2
ORA-3114 error, S-2
Oracle Advanced Security, use of Oracle Internet
Directory, 1-7
Oracle Application Server Administrators
Group, 31-9
Oracle Call Interface
Oracle components
privileges for administering, 31-3
Oracle components, use of Oracle Internet
Directory, 1-6
Oracle Context
root, 33-5
Oracle Context Administrators Group, 31-13
Oracle data servers
changing password to, 12-6
error messages, S-2, S-3
Oracle Database Advanced Replication, C-8
configuring, C-6, C-8
by using Replication Management Tool, C-6
for directory replication, C-8
features, D-1
installing, C-6
See also Advanced Replication
setting up, C-6
Oracle Database Advanced Replication-based
replication, 6-4, C-1 to C-15
See also Advanced Replication
Oracle Database Server, 3-3
Oracle Database Transparent Data Encryption
(TDE), 27-1
Oracle Database Vault, 27-3
Oracle Delegated Administration Services, 10g versus
11g, A-8
Oracle Diagnostic Logging (ODL) format, 23-1
Oracle Directory Integration Platform
defined, 3-20
description, 1-8
enabling auditing, 22-6
Oracle Directory Integration Platform auditing, 22-3
Oracle Directory Integration Platform, 10g versus
11g, A-8
Oracle directory replication server
authentication, 39-6
component of Oracle Internet Directory, 1-5
component of Oracle Internet Directory node, 3-3
starting in Advanced Replication, C-10
Index-18
Oracle Directory Server Enterprise Edition, 37-2
Oracle directory server instances, 1-5, 3-3
starting in Advanced Replication, C-10
Oracle Directory Services Manager
See ODSM
SSO integration, 7-6
Oracle Fusion Middleware, 2-1 to 2-5
Oracle Globalization Support, 3-15
Oracle home, 2-3
Oracle Identity and Access Management
delegation in, 31-1
Oracle Identity Management, 3-22
components, 3-22
group information, 5-4
management policies, 3-24
objects, 33-5
planning, 5-2
products, 3-22
realms, planning, 33-1
user information, 5-3, 33-7
what it does, 3-21
Oracle instance, 2-3
directories under, 8-2
Oracle Internet Director Server Manageability
architecture, 24-1
components, 24-1
Oracle Internet Directory
advantages of, 1-5
architecture, 1-4, 3-1
components, 1-5
how Oracle components use it, 1-6
nodes, 3-2
super user password, resetting, 12-7
used by Oracle Advanced Security, 1-7
Oracle Internet Directory database password
changing
by using oidpasswd, 12-6
Oracle Internet Directory Deployment Options, 2-2
Oracle Internet Directory ports, 3-4
Oracle Internet Directory Self-Service Console
in indirect authentication of end users, 32-3
Self-Service Console, 3-20
Oracle Internet Directory Server Manageability
architecture and components, 24-2
capabilties, 24-1
configuring, 24-4
framework, 24-1
configuring critical events, 24-9
Oracle Net Services, 3-3, 3-7
preparing for Advanced Replication, C-6
use of Oracle Internet Directory, 1-7
Oracle Platform Security Services
use of Oracle Internet Directory, 1-7
Oracle Process Manager and Notification Server
(OPMN), 3-3, 4-1
Oracle Single Sign-On, 10g versus 11g, A-8
Oracle Virtual Directory
description, 1-8
Oracle Webcenter Suite
use of Oracle Internet Directory, 1-7
ORACLE_HOME environment variable, 7-13
required by bulk tools, 15-1
ORACLE_INSTANCE environment variable, 2-3,
7-13, A-6
required by bulk tools, 15-1
ORACLE_SID environment variable, A-6
orclACI, 29-3
access to, 29-3
orclaci attribute, 9-12, 29-3
optional in top, 3-14
orclacpgroup object class, 14-4, 29-4
orclactivatereplication attribute, 41-9, 41-13, 42-12,
42-22
orclactiveenddate user entry attribute, 12-3
orclactivestartdate user entry attribute, 12-3
orclagreementid attribute, 41-3
orclagreementid entry, 41-6
orclagreementtype attribute, 41-4
orclanonymousbindsflag
values, 32-8
orclanonymousbindsflag attribute, 9-6, 32-8
new location in 11g, A-4
orclaudcustevents attribute, 9-4, 22-3, 22-4
orclaudfilterpreset attribute, 9-4, 22-2, 22-4
orclaudsplusers attribute, 9-4, 22-3, 22-4
orclchangeretrycount attribute, 41-8, 41-13, 42-11,
42-21
orclcommonusernickname attribute
uniqueness constraints, 18-8
orclcommonusersearchbase attribute in realm-specific
Oracle context, 30-5
orclconflresolution attribute, 41-9, 41-13, 42-11, 42-21
orclConnectByAttribute group attribute, 14-5
orclConnectByStartingValue group attribute, 14-5
orclcryptoscheme attribute, 9-12
orcldataprivacymode attribute, 9-10, 27-6
new location in 11g, A-4
orcldebugflag, 23-7
orcldebugflag attribute, 9-4, 23-5, 23-6, 23-7
new location in 11g, A-4
orcldebugforceflush attribute, 9-4, 23-8
new location in 11g, A-4
orcldebuglevel attribute, 41-9, 41-13, 42-11, 42-22
debug levels, 42-22
orcldebugop attribute, 9-4, 23-5
new location in 11g, A-4
orcldirreplgroupdsas attribute, 41-3
orcldispthreads attribute, 9-6, 9-13
orclDynamicGroup, 14-2
orclDynamicList object class, 14-3
orclecacheenabled attribute, 9-11, 9-14
new location in 11g, A-4
orclecachemaxentries attribute, 9-11, 9-14
new location in 11g, A-4
orclecachemaxentsize attribute
new location in 11g, A-4
orclecachemaxsize attribute, 9-11, 9-14
new location in 11g, A-4
orclenablegroupcache attribute, 9-11
new location in 11g, A-4
Index-19
orclencryptedattributes attribute, 9-10, 27-6
orclEntryLevelACI attribute, 29-3
optional in top, 3-14
orclepwdpolicynable attribute of password
policies, 28-2
orcleventlevel attribute, 9-5, 24-9
new location in 11g, A-4
orclexcludedattributes attribute, 41-7
orclexcludednamingcontexts attribute, 39-31, 41-4,
41-7
orclextconfflag attribute, 22-3
orclgeneratechangelog attribute, 9-10, 9-13, 42-15
orclGuid
optional attribute in top, 3-13
orclhashedattributes attribute, 9-14
orclhiqschedule attribute, 41-4, 41-13, 42-18
orclhostname attribute, 9-3
configuring, 10-1
orclincludednamingcontexts attribute, 41-7
orclinmemfiltprocess attribute, 9-10, 9-14
orclisenabled attribute, 12-2
orcllastappliedchangenumber attribute, 41-4
orcllastlogintime operational attribute, 28-7
orclldapconnkeepalive attribute, 41-4, 41-13, 42-18
orclldapconntimeout attribute, 9-6, 9-13
new location in 11g, A-4
ORCLLM algorithm, 30-4
orclmatchdnenabled attribute, 9-10, 9-14
new location in 11g, A-4
orclmaxcc attribute, 9-7, 9-13
new location in 11g, A-4
orclmaxconnincache attribute, 9-7, 9-14
new location in 11g, A-4
orclmaxfiltsize attribute, 9-9, 9-14
orclmaxldapconns attribute, 9-7, 9-13
orclmaxlogfiles attribute, 9-4, 23-5, 41-9, 41-13, 42-11,
42-22
orclmaxlogfilesize attribute, 9-5, 23-5, 41-9, 41-13,
42-11, 42-22
orclmaxserverresptime attribute, 9-7, 9-13
orclMemberOf attribute, 14-7
orclnonsslport attribute, 9-3
ORCLNT algorithm, 30-4
orclnwrwtimeout attribute, 9-7, 9-13
new location in 11g, A-4
orclOidComponentName attribute, 41-9
orclOidInstanceName attribute, 41-9
orcloptcontainsquery attribute
new location in 11g, A-4
orcloptracklevel attribute, 9-5, 24-8
new location in 11g, A-4
orcloptrackmaxtotalsize attribute, 9-8, 24-9
new location in 11g, A-4
orcloptracknumelemcontainers attribute, 9-8, 24-9
orclpilotmode attribute, 41-2
in pilot mode, 42-17
orclpkimatchingrule attribute, 9-10, 9-14, 32-2
new location in 11g, A-4
orclpluginworkers attribute, 9-8, 9-13
orclprivilegegroup object class, 3-5, 14-4, 29-4
and dynamic groups, 14-4
orclpwdaccountunlock user attribute, 12-3
orclpwdAllowHashCompare password policy
attribute, 28-7
orclpwdAlphaNumeric password policy
attribute, 28-6
orclpwdencryptionenable
checking value
by using ldapsearch command, 30-11
orclpwdEncryptionEnable password policy
attribute, 28-7
orclpwdencryptionenable realm attribute
when provisioning users, 30-11
orclpwdGraceLoginTimeLimit password policy
attribute, 28-6
orclpwdIllegalValues password policy
attribute, 28-6
orclpwdipaccountlockedtime operational
attribute, 28-7
orclpwdipfailuretime operational attribute, 28-7
orclpwdIPLockout password policy attribute, 28-5
orclpwdIPLockoutDuration password policy
attribute, 28-6
orclpwdIPMaxFailure password policy
attribute, 28-6
orclPwdMaxInactivity, 28-7
orclpwdMaxRptChars password policy
attribute, 28-6
orclpwdMinAlphaChars password policy
attribute, 28-6
orclpwdMinLowercase password policy
attribute, 28-6
orclpwdMinSpecialChars password policy
attribute, 28-6
orclpwdMinUppercase password policy
attribute, 28-6
orclpwdPolicyEnable password policy
attribute, 28-7
orclPwdTrackLogin
password policy attribute, 28-7
orclpwdverifierparams
default DN, 30-11
orclrefreshdgrmems attribute, 9-9, 14-3
new location in 11g, A-4
orclReplAgreementEntry objectclass, 41-3
orclreplautotune attribute, 41-8, 42-2, 42-11, 42-21
orclreplicadn attribute, 41-3
orclreplicaid attribute, 41-2, 41-13, 42-13, 42-16
orclreplicasecondaryuri attribute, 41-2, 41-13, 42-13,
42-17
orclreplicastate attribute, 39-3, 41-2, 41-13, 42-13,
42-17
monitoring value, 39-23
orclreplicationid attribute, 41-4
orclreplicationprotocol attribute, 41-3
orclreplicationstate attribute, 41-9, 41-13, 42-12,
42-22
orclreplicatype attribute, 41-2, 41-13, 42-13, 42-17
in pilot mode, 42-17
orclreplicauri attribute, 41-2, 41-13, 42-13, 42-16

Index-20
orclreplmaxworkers attribute, 41-9, 41-13, 42-2,
42-11, 42-21
orclreplusesasl, 41-9, 41-13, 42-11, 42-21
orclreqattrcase attribute, 9-3, 9-13
orclrevpwd attribute, 30-2, 30-11
orclRIattr attribute, 21-1
orclrienabled attribute, 9-9, 9-14, 21-1
orclsaslauthenticationmode attribute, 9-6, 32-6, 32-7
new location in 11g, A-5
orclsaslcipherchoice attribute, 9-6, 32-6, 32-7
new location in 11g, A-5
orclsaslmechanism attribute, 9-6, 32-6, 32-7
new location in 11g, A-5
orclsdumpflag attribute, 9-9, 41-9, 41-13, 42-11, 42-21
new location in 11g, A-5
orclservermode attribute, 9-4
new location in 11g, A-5
setting by using ldapmodify command, 15-3
orclserverprocs attribute, 9-3, 9-13
new location in 11g, A-5
orclsizelimit attribute, 9-9, 41-9, 41-13, 42-4, 42-11,
42-21
managing by using ldapmodify, 42-27
new location in 11g, A-5
orclskewedattribute attribute, 9-10, 9-14
new location in 11g, A-5
orclskiprefinsql attribute, 9-11, 9-14
new location in 11g, A-5
orclsslauthentication attribute, 9-5, 26-3, 26-8, 26-11
new location in 11g, A-5
orclsslciphersuite attribute, 9-5, 26-2, 26-8, 26-11
orclsslenable attribute, 9-5, 26-4, 26-8, 26-11
new location in 11g, A-5
orclsslinteropmode attribute, 9-5, 26-5, 26-10, 26-11
orclsslport attribute, 9-3
orclsslversion attribute, 9-5, 26-8, 26-11
new location in 11g, A-5
orclsslwalleturl attribute, 9-6, 26-4, 26-8, 26-11
new location in 11g, A-5
orclstatsdn attribute, 9-9, 9-14
new location in 11g, A-5
orclstatsflag attribute, 9-5, 24-8, 24-9
new location in 11g, A-5
orclstatslevel attribute, 9-5, 24-9
new location in 11g, A-5
orclstatsperiodicity attribute, 9-5, 24-8
new location in 11g, A-5
orclsuname attribute, 12-6
orclsupassword attribute, 12-6
orclthreadspersupplier, 42-2
orclthreadspersupplier attribute, 41-8, 41-13, 42-2,
42-11, 42-21
orcltimelimit attribute, 9-9
new location in 11g, A-5
orcltlimitmode attribute, 9-11
new location in 11g, A-5
orcluniqueattrname attribute in attribute uniqueness
constraint entries, 18-2
orcluniqueenable attribute in attribute uniqueness
constraint entries, 18-2, 18-10
orcluniqueobjectclass attribute in attribute uniqueness
constraint entries, 18-2
orcluniquescope attribute in attribute uniqueness
constraint entries, 18-2
orcluniquesubtree attribute in attribute uniqueness
constraint entries, 18-2
orclupdateschedule attribute, 41-4, 41-13, 42-18
orclUserV2 attribute, 36-9
ORCLWEBDAV algorithm, 30-4
organization attribute, 3-10
organizationalUnitName, 3-10
ou attribute, 3-10
P
parameters
for an active instance, modifying, 26-7
partial replication, 6-3
filtering, 39-7
partitioning, 3-16, 3-17
password
EMD administrator
changingby using WLST, 12-7
ODSSM administrator
changing by using WLST, 12-8
replication administrator
changing by using remtool command, 42-27
superuser
changing by using Fusion Middleware
control, 12-5
password encryption
password policy attribute, 28-7
password expiration
enforced by password policies, 28-4
operational attribute, 28-7
password expiry warning
enforced by password policies, 28-4
password length
enforced by password policies, 28-4
password policies, 28-1 to 28-12
about, 28-1
applicable operations on userpassword
attribute, 28-5
applied to subtrees, 28-2
applied to superuser, 28-4
applying to subtree
by using ldapmodify command, 28-11
assigning to subtree
by using ODSM, 28-10
attributes, 28-5
creating
by using ldapadd command, 28-11
by using ODSM, 28-10
creating by using ODSM, 28-10
default, 28-4
defined, 28-1
definition, 28-1
disabling, 28-4
DN, 28-2
enabling, 28-2
Index-21
enforced by Oracle Internet Directory, 28-1
entry
defined, 3-6
error messages, S-9
fine-grained, 28-2
granularity, 28-2
management, 3-15
managing by using command-line tools, 28-11
modifying
by using ODSM, 28-9
modifying by using ODSM, 28-9
plug-in, 43-1
how it works, 43-1
rules, 28-1
runtime resolution by directory server, 28-3
setting
by using command-line tools, 28-11, 28-12
by using ldapmodify command, 28-12
steps to establish, 28-2
troubleshooting, S-9
verification by directory server, 28-7
verification of, 28-7
viewing
by using ldapsearch command, 28-11
by using ODSM, 28-9
password policy entries
location, 28-3
master node version, 39-28
replication, 39-28
password reset
password policy attribute, 28-6
password syntax check
password policy attribute, 28-6
password verifier entry, defined, 3-6
password verifier profile entries
for application, 30-4
location, 30-5
password verifier profiles
for Oracle components
managing by using ldapmodify
command, 30-10
searching by using ldapsearch
command, 30-10
password verifier profiles for Oracle components
managing
by using ODSM, 30-9
password verifiers, 30-1 to 30-12
authenticating to Oracle components
managing, 30-4
default for Oracle components, 30-7
dynamic
generating, 30-11
for authenticing to the directory, 30-1
password wallets
troubleshooting, S-25
password-based authentication, 32-1
passwords
command-line prompt, 7-14
database, 12-6
for guest users, 12-2
for proxy users, 12-2
for super users, 12-2
for superuser, 12-2
forcing changes by using command-line
tools, 12-3
integrity
MD4, 30-3
managing, 12-1
policies
setting by using command-line tools, 28-11
protection, 3-15
changing by using ldapmodify
command, 30-3
changing scheme, 30-1
default verifiers for Oracle components, 30-7
managing by using ldapmodify
command, 30-3
MD5, 30-3, 30-4
O3LOGON, 30-4
ORCLLM, 30-4
ORCLNT, 30-4
ORCLWEBDAV, 30-4
SASL/MD5, 30-4
SHA-1, 30-3, 30-4
SMD5, 30-3
SSHA, 30-3
UNIX Crypt, 30-3, 30-4
to Oracle components
storing, 30-5
to Oracle data servers, changing, 12-6
passwords and accounts, managing, 12-1 to ??
PATH environment variable, 7-13
required by bulk tools, 15-1
path names, 10g versus 11g, A-7
peer-to-peer replication, 6-4
performance
add or modify, S-11
by using orclEntryLevelACI, 29-3
replication and, 6-2
search, S-10
troubleshooting, S-10
performance page metrics
Fusion Middleware Control, 24-6
perfromance monitoring garbage collector, 35-3
permissions, 3-15, 29-1
granting
by using ODSM, 29-15
pilot mode, 42-4
specifying by using remtool command, 42-17
pilotstarttime attribute, 41-2
in pilot mode, 42-17
PKE matching rules, 9-14
PKI authentication, 26-2
PL/SQL plug-in developer's reference, F-1 to F-23
plug-in configuration entries
adding by using ldapmodify command, 44-8
plug-in framework, 44-4
plug-in threads
per server process
tuning, 9-13
Index-22
plug-ins
benefits, 44-3
configuration entries, 44-6
creating, 44-6
creating by using ODSM, 44-9
deleting by using ODSM, 44-10
editing by using ODSM, 44-10
entry, 3-6
external authentication, 45-1
for password policies, 43-1
garbage collection, 35-1
guidelines, 44-3
in replication environment, 44-5
languages supported, 44-2
managing by using ODSM, 44-9
password policy
how it works, 43-1
registering by using ODSM, 44-10
registering from command line, 44-6
supported operations, 44-4
point-to-point replication, 6-5
policies
identity management, 3-24
pooling, connection, 1-6
port configuration
troubleshooting, S-12
ports
assignment, 3-4
default
Oracle Internet Directory, 3-4
default, 10g versus 11g, A-5
non-SSL, 9-13
privileged, 7-3
SSL, 9-13
postinstallation tasks, 7-1, 7-1 to 7-3
precedence
at the attribute level, 29-13
at the entry level, 29-13
rules
ACL evaluation, 29-12
in conflicting access policies, 29-3
prescriptive access control, 29-3
Preserving case of required attribute name in search
request, 9-13
previously used passwords
operational attribute, 28-7
privacy mode, 27-6
determining
by using ldapsearch, 27-7
enabling
by using ldapmodify command, 27-7
privacy, data, 3-15, 27-7
privilege groups, 29-4
associated with orclprivilegegroup object
class, 29-4
defined, 3-5
privileged accounts, 12-2
privileged ports, 7-3
privileged user
access to data
prevented with Database Vault, 27-3
types, 28-5
privileges, 3-15, 29-1
privileges for user and group management
delegation of, 31-3
process control, 4-1 to 4-6
architecture, 4-1
best practices, 4-5
process management, 10g versus 11g, A-1
process monitoring, 4-5
processes
on ODSM home page, 24-7
properties
server
managing by using Fusion Middleware
Control, 9-12
shared
managing by using Fusion Middleware
Control, 9-14
proxy users, 32-3
managing
by using ldapmodify, 12-6
by using ODSM, 12-5
public key infrastructure, 26-2
public-key encryption
described, 26-2
purge queue, 42-3
purging change logs, 35-5
pwdaccountlockedtime operational attribute, 28-7
pwdAllowUserChange password policy
attribute, 28-7
pwdchangedtime operational attribute, 28-7
pwdCheckSyntax password policy attribute, 28-6
pwdexpirationwarned operational attribute, 28-7
pwdExpireWarning password policy attribute, 28-6
pwdFailureCountInterval password policy
attribute, 28-6
pwdfailuretime operational attribute, 28-7
pwdGraceLoginLimit password policy
attribute, 28-6
pwdgraceusetime operational attribute, 28-7
pwdhistory operational attribute, 28-7
pwdInHistory password policy attribute, 28-6
pwdLockout password policy attribute, 28-5
pwdLockoutDuration password policy
attribute, 28-5
pwdMaxAge password policy attribute, 28-5
pwdMaxFailure password policy attribute, 28-6
pwdMinAge password policy attribute, 28-5
pwdMinLength password policy attribute, 28-6
pwdMustChange password policy attribute, 12-3,
28-6
pwdpolicy entry, 12-3
pwdpolicy object class, 28-2
creating values
step in estabishing policies, 28-2
pwdpolicysubentry attribute in subtree, 28-2
pwdreset operational attribute, 28-7

Index-23
Q
queue statistics
viewing
by using Fusion Middleware Control, 42-13
R
RDNs. See relative distinguished names (RDNs)
read-only access
granting
by using ldapmodify command, 29-25
realms, 33-1 to ??, 33-3, ?? to 33-14
identity management
customizing, 33-8
default, 3-23, 33-6
defined, 3-23
implementation in Oracle Internet
Directory, 33-5
in enterprise deployments, 33-3
in hosted deployments, 33-4
multiple in enterprise deployments, 33-4
planning, 33-1
single in enterprise, 33-3
realm-specific
Oracle Context, 33-6
password policy, 28-2
privileged user, 28-5
recovery features, in Oracle, 1-6
redefining mandatory attributes, 20-4
ref attribute, 9-12, 19-1
referential integrity, 9-14, 21-1 to 21-4
10g versus 11g, A-8
configuring specific attributes
by using catalog command, 21-3
defined, 21-1
disabling
by using ldapmodify command, 21-3
disabling by using Fusion Middleware
Control, 21-2
enabling
by using Fusion Middleware Control, 21-2
by using ldapmodify command, 21-2
violations
detecting by using oiddiag command, 21-3
referral object class, 19-1
referrals, 3-17
client-side referral caching, 19-1
defined, 3-18
kinds, 3-19
refresh dynamic group membership, 14-3
registering with WebLogic server, 8-2, 8-4
relational databases contrasted to directories, 1-2
relative distinguished names (RDNs), 3-8
remtool
performing a rolling upgrade, Q-1
remtool command
adding an LDAP-based replica, 39-20
adding replica
replication setup, 39-26
Advanced Replication, C-8
backing up data
replication setup, 39-25
changing replication administrator's
password, 42-27
replication setup, 39-3
adding replica, 39-26
backing up data, 39-25
specifying pilot mode, 42-17
troubleshooting, S-28
verifying replication, 42-26
viewing queue statistics, 42-26
repeated characters
password policy attribute, 28-6
replica details
configuring by using Fusion Middleware
Control, 42-13
replica ID, 41-13, 42-13, 42-16
replica naming context object
parameters, 42-18 to 42-21
replica naming context objects
viewing and modifying
by using Fusion Middleware Control, 42-8
replica primary URI, 41-13, 42-13, 42-16
replica secondary URI, 41-13, 42-13, 42-17
replica state, 42-13, 42-17
replica status, 41-13
replica subentry
configuring attributes by using ldapmodify
command, 42-16
DN, 41-2, 42-16
example, 41-2
modifying by using Fusion Middleware
Control, 42-9
replica type, 41-13, 42-13, 42-17
replicas
defined, 6-4
replicated directories, conceptual discussion, 3-16
replication, 3-16
activate and inactivate, 41-13, 42-22
adding a new entry to a consumer, D-8
Advanced Database, 3-16
Advanced replication-based and
LDAP-based, 6-4
agreement entry, 41-3
agreements, 6-4
example of, 41-9
and high availability, 6-9
and load balancing, 6-9
and local availability, 6-8
and performance, 6-2
and SSL, 39-7
authentication, 39-6
change logs in, 42-3
command-line setup
LDAP-based, 39-17
command-line tools, 39-3
comparing and reconciling inconsistent
data, 42-28
configuring
Oracle Database Advanced Replication, C-8
Index-24
conflicts
automatically resolve, 41-13, 42-11
levels of occurrence, 42-5
monitoring, 42-22
resolving manually, 42-24
typical causes of, 42-5
converting Advanced Replication-based agreement
to LDAP-based agreement, 39-15
deleting an entry, D-9
directory replication group (DRG), 6-4
enabling auditing, 22-6
failure tolerance, 6-2
fan-out, 6-5
filtering, 39-7
full, 6-3
groups
multimaster, 3-16
LDAP
filtering, 39-8
LDAP-based, 39-2
configuring, 39-5
deleting, 39-29
determining what is to be replicated, 42-2
installing and configuring, 39-17
process, D-4
setting up, 39-16, 39-18
LDAP-based replication agreement
deleting, 42-10
load balancing, 6-2
loose consistency model, 6-6
managing and monitoring, 42-1 to 42-35
managing naming contexts and attributes, 39-12
modifying a DN, D-11
modifying an RDN, D-10
multimaster, 6-4
multimaster with fan-out, 6-7
naming context container entry, 41-6
naming contexts
included and excluded, 39-7
partial, 6-3
optimization, 39-13
peer-to-peer, 6-4
point-to-point, 6-5
process, D-8, D-9, D-10, D-11
reasons for using, 6-1
security, 39-6
See also Advanced Replication, Oracle Database
Advanced Replication-based Replication,
LDAP-based replication
server
log file location, 23-1
setting up by using replication wizard in Fusion
Middleware Control, 39-16
single master, 3-16
defined, 6-4
SSL mode, 39-7
transport mechanisms, 39-2
troubleshooting, S-18, S-23
with server chaining, 37-3
replication administrator password
changing by using remtool command, 42-27
replication agreement entry
DN, 41-3
replication agreements
attributes, 39-4
examples, 41-5
modifying by using Fusion Middleware
Control, 42-9
on ODSM home page, 24-7
viewing by using Fusion Middleware
Control, 42-9
replication and SSL, 39-7
replication architecture
LDAP-based, D-4
replication attributes
configuring, 41-12
replication auditing, 22-3
replication authentication, 39-6
replication bind DN password, 39-6
replication binds
SASL, 41-13, 42-21
replication bootstrap
troubleshooting, S-21
replication concepts, 6-1
replication configuration attributes, 41-1 to 41-14
command line, 41-14
replication configuration container attributes, 41-1
replication configuration container entry
example, 41-1
replication configuration set
DN, 41-8
replication configuration set DN, 42-21
replication conflicts
automatically resolve, 42-21
types, 42-5
replication cycle
entries to process, 42-11
maximum number of entries to process, 42-21
number of entries to process, 41-13
Replication Environment Management Tool
See remtool
replication failover, 40-1 to 40-10
described, 40-1
limitations and warnings, 40-4
stateless, 40-5
time-based, 40-8
types, 40-5
replication filtering, 39-7
examples, 39-8
rules, 39-8
replication filtering examples, 39-8 to 39-12
replication frequency, 41-13, 42-18
Replication Management Tool, C-6
replication naming context container entry, 41-6
replication naming context object entry, 41-6
DN, 41-6
example, 41-7
replication objects
examples, 41-9
replication server

Index-25
credentials, 39-6
in Oracle Internet Directory node, 3-3
starting
by using oidctl command, 8-10
with SSL-enabled directory server, 26-4
replication server connection, 42-18
keep alive, 39-16
replication server debug level, 42-11, 42-22
replication setup
customized settings, 39-18
human intervention queue schedule, 39-16
modifying by using Fusion Middleware
Control, 42-9
restoring entries from other components, 39-23
tasks performed by remtool command, 39-3
viewing by using Fusion Middleware
Control, 42-9
replication status, 41-13, 42-12, 42-22
replication type
choosing
by using Fusion Middleware Control, 39-16
replication wizard
See Fusion Middleware Control replication wizard
replication, 10g versus 11g, A-8
replication, basics, 6-1 to 6-9
Repository Creation Assistant (repca)
troubleshooting, S-20
resetting your password
by using self-service console, 12-4
resource access information, 3-24
resource information, 3-24
location in DIT, 3-24
resource type information, 3-24
restarting server
by using Fusion Middleware Control, 8-5
by using opmnctl command, 8-10
restricting ACIs users can add, 29-22
retry queue, 42-3
retry timeout
tuning, 9-13
rolling upgrade, Q-1
Root DSE entry
defined, 3-5
root Oracle Context, 33-5
rotation
log files, 23-5
S
SASL
clients enabled with
Digest-MD5 authentication to directory
server, 32-5
external authentication, 32-5
SASL for replication binds, 41-13, 42-11, 42-21
SASL/MD5, for generating password verifier, 30-4
scalability, of Oracle Internet Directory, 1-6
schema, 20-1 to 20-28
administration, 20-1
definitions in subSchemaSubentry, 20-2
directory, defined, 3-5
for orclACI, H-1
for orclEntryLevelACI, H-2
search
and compare operations, 3-11
configuring, 8-5
depth, specifying, 13-4
filters
maximum size, 9-14
processing in memory, 9-14
for attributes by using ODSM, 20-16
for object classes
by using ODSM, 20-12
maximum entries returned, 9-13
maximum time to complete, 9-13
processing, 3-6
results, specifying maximum number of entries
returned, 13-4
skip referral for, 9-14
specifying maximum number of entries
returned, 13-4
search request
preserving case of attribute name, 9-13
Section, 29-15
secure
port 3133, 26-3
secure mode
running server instances in, 26-3
Secure Sockets Layer
See SSL
security, 1-6
credentials, stored in an external repository, 45-1
for different clients, 26-4
in LDAP Version 3, 1-3
in replication, 39-6
SSL parameters for different clients, 26-4
Security Administrators Group, 31-12
security and refresh events garbage collector, 35-2
security event tracking
configuring
by using ldapmodify command, 24-8
security in Oracle Internet Directory, 3-15
self-service console
of Delegated Administration Services, 12-4
resetting your password, 12-4
unlocking accounts by using, 12-4
self-signed wallet for SSL configuration
creating
by using Fusion Middlware Control, 26-6
selfwrite access
to groups
granting by using ldapmodify
command, 29-25
sensitive attributes
list, 27-6
stored in encrypted format, 27-6
server
instances
running in secure mode, 26-3
restarting
Index-26
by using Fusion Middleware Control, 8-5
by usingopmnctl command, 8-10
starting
by using Fusion Middleware Control, 8-5
by using opmnctl command, 8-9
stopping
by using Fusion Middleware Control, 8-5
by usingopmnctl command, 8-10
server chaining, 37-1 to 37-16
10g versus 11g, A-8
attribute mapping, 37-8
configuration entry attributes, 37-6
configuring
by using ldapadd and ldapmodify
commands, 37-5
by using ODSM, 37-4
debugging, 37-14
described, 37-1
entries
DNs, 37-3
examples, 37-9 to 37-14
Microsoft Active Directory plug-in for password
change notification, 37-14
plug-in for password change notification
Enterprise User Security, 37-14
supported directory servers, 37-2
supported operations, 37-3
troubleshooting, S-29
user and group containers, 37-8
with replication, 37-3
with SSL, 37-1
server instances
in standalone mode, B-1
server manageability
See Oracle Internet Director Server Manageability
server mode, 9-12
server plug-ins, 44-1 to 44-11
defined, 44-1
languages supported, 44-2
See also plug-ins
server processes, 4-1
number
tuning, 9-13
server properties
managing
by using Fusion Middleware Control, 9-12
server properties page
Fusion Middleware Control, 9-12
logging tab
Fusion Middleware Control, 23-5
server response time
maximum
tuning, 9-13
server response to dispatcher
tuning, 9-13
server startup
troubleshooting, S-12
server statistics
monitored by server manageability
framework, 24-1
servers
monitoring, 24-2
servers. See also directory servers, directory
replication servers, or directory integration
platform servers
Service Registry, 3-20
Service to Service Authentication, 3-20
Setting, C-4
SHA-1
for password encryption, 30-3, 30-4
SHA-2 algorithm, 30-2
SHA256, 30-3, 30-4
SHA384, 30-3, 30-4
SHA512, 30-3, 30-4
shared properties
managing
by using Fusion Middleware Control, 9-14
simple authentication, 32-1
Simple Authentication and Security Layer (SASL)
authentication, 32-1
clients enabled with
Digest-MD5 authentication to directory, 32-5
external authentication, 32-5
how it works, 32-5
in LDAP Version 3, 1-3
Single Sign-On
understanding integration with Oracle Directory
Services Manager, 7-6
single-master replication
defined, 6-4
single-valued attributes, 3-10
converting to multivalued, 20-5
skewed attributes, 9-14
skip referral for search, 9-14
smart knowledge references (referrals)
configuring, 19-3
SMD5, 30-4
for password encryption, 30-3
sn entry attribute
adding, 13-12
special purpose directories, 1-2
sponsor node
Advanced Replication, C-12
sqlnet.ora, configuring for Advanced
Replication, C-6
SSHA, 30-4
for password encryption, 30-3
SSHA256, 30-3, 30-4
SSHA384, 30-3, 30-4
SSHA512, 30-3, 30-4
SSL, 26-1 to ??, 26-10, ?? to 26-13
and replication, 39-7
attributes
listing by using ldapsearch command, 26-11
authentication
configuring by using ldapmodify
command, 26-11
authentication modes, 26-3
setting by using Fusion Middleware
Control, 26-8
Index-27
testing, 26-12
cipher suites, 26-2
configuring by using ldapmodify
command, 26-11
supported in Oracle Internet Directory, 26-2
client scenarios, 26-3
configuration
testing by using ldapbind command, 26-12
configuration parameters, 26-3
configuration service, 26-4
configuring, 26-7
by using ldapmodify command, 26-10
by using WLST, 26-8
connection failures
interoperability mode, 26-5
described, 26-1
enabling
by using Fusion Middleware Control, 26-8
by using ldapmodify command, 26-11
handshake, 26-2
interoperability mode, 26-5
configuring by using ldapmodify
command, 26-11
setting by using ldapmodify command, 26-13
managing, 26-1
mode
replication, 39-7
on a non-SSL port, 26-5
parameters, 26-3, 26-8
configuring by using command-line
tools, 26-10
configuring by using Fusion Middleware
Control, 26-7
configuring by using Oracle Enterprise
Manager, 26-7
different directory server instances, 26-4
replication and, 39-7
replication issues, 26-4
server cipher suite
setting by using Fusion Middleware
control, 26-8
strong authentication, 26-2
testing
by using ldapbind command, 26-11
by using ODSM, 26-11
version
configuring by using ldapmodify
command, 26-11
setting by using Fusion Middleware
Control, 26-8
with server chaining, 37-1
SSL port, 3-4, 9-13
SSL wallet URL
setting
by using Fusion Middleware Control, 26-8
by using ldapmodify command, 26-11
stack dumps
generate, 42-11, 42-21
generating, 41-13
standalone mode, B-1 to B-4
starting and stopping the Oracle stack, P-1 to P-3
starting Oracle Internet Directory
concepts, 4-4
starting replication server
by using oidctl command, 8-10
starting server
by using Fusion Middleware Control, 8-5
by using opmnctl command, 8-9
starting the Oracle stack, P-1
startTLS, 26-5
static groups, 14-2
creating
by using ODSM, 14-9
modifying
by using ODSM, 14-10
modifying by using ldapmodify command, 14-15
schema elements for creating, 14-2
statistics collection
configuring
by using Fusion Middleware Control, 24-5
by using ldapmodify command, 24-8
configuring by using Fusion Middleware
Control, 24-4
configuring user
by using ldapmodify command, 24-10
users
configuring by using ldapmodify
command, 24-9
statistics collector
DN, 35-4
entry for, 35-5
managing behavior, 35-3
statistics configuration
viewing
by using ldapsearch command, 24-8
statistics information
home page
Fusion Middleware Control, 24-6
ODSM, 24-7
home page, ODSM, 24-7
viewing
by using Fusion Middleware Control, 24-6
statistics reports
viewing
by using oiddiag command, 24-10
status
viewing
by using opmnctl command, 8-9
viewing by using Fusion Middleware
Control, 8-4
stopping server, 4-4
by using Fusion Middleware Control, 8-5
by usingopmnctl command, 8-10
stopping the Oracle stack, P-2
store-and-forward transport, in Oracle Database
Advanced Replicaton, D-1
strong authentication, 32-1
structural object class type, 3-13
structural object classes, 3-13
converting, 20-4

Index-28
type, 3-13
structure rules, not enforced by Oracle Internet
Directory, 3-13
subclasses, 3-12
subentries, definition, 20-2
subentry attribute, 9-12
subject selectors, 29-24
subordinate naming contexts, 3-18
subSchemaSubentry
holding schema definitions, 20-2
subtree level search, 13-4
Sun Java System Directory Server
with server chaining, 37-2
super user password, resetting, 12-7
super users
managing
by using ldapmodify command, 12-6
superclasses, 3-12
and inheritance, 20-3
superior knowledge references (referrals), 3-18
superuser
account lockout, 28-4
definition, 12-2
managing by using ldapmodify, 12-6
password
changing by using Fusion Middleware
Control, 12-5
resetting by using oidpasswd, 12-7
subject to password policies, 28-4
suppliers
defined, 6-4
syncprofilebootstrap command
migrating third-party LDAP data, 36-4
syntax
attribute, 3-11
stored in schema, 20-2
syntaxes
cannot add to subSchemaSubentry, 20-2
new, adding, 3-11
viewing
by using by using ldapsearch command, 20-28
by using ldapsearch command, 20-28
by using ODSM, 20-19
system components
creating by using opmnctl command, 8-6
creating Oracle Internet Directory, 8-2
defined, 2-2
system operational attributes
setting, 9-1
by using ldapmodify, 9-17
by using ODSM, 9-12
viewing, 9-1
system resource events garbage collector, 35-2
T
table space encryption
described, 27-1
enabling or disabling
on databases used by Oracle Internet
directory, 27-1
TCP/IP Problems, S-8
telephoneNumber attribute, 3-11
testing SSL configuration
by using ldapbind command, 26-12
by using ODSM, 26-11
threads
in logging, 23-3
plug-in
tuning, 9-13
threads per supplier
apply, 41-13, 42-11, 42-21
transport, 41-13, 42-11, 42-21
time when account locked
operational attribute, 28-7
time-based change log purging, 35-5
timeout
connection
tuning, 9-13
TLS and SSL protocols, 26-2
TNS_ADMIN environment variable, 7-13
tnsnames.ora
configuring for Advanced Replication, C-6
tombstone garbage collector, 35-3
top object class, 3-13
optional attributes in, 3-13
trace information
force flushing
to log file, 23-8
trace messages
in log files, 23-3
trace objects
log messages
storage as, 23-3
tracing function calls, 23-7
tracing LDAP operations, 23-7
tracking of user's last login time
password policy attribute, 28-7
transport threads per supplier, 41-13
tree view
browsing, 13-4
selecting root of search, 13-4
troubleeshooting
replication, S-23
troubleshooting, S-1 to S-33
bulk tools, S-28
bulkload command, S-27
catalog command, S-28
change log garbage collection, S-24
database server performance, S-11
directory server instance startup, S-12, S-14
dynamic password verifiers, S-25
Fusion Middleware Control, S-29
getting a core dump, S-8
getting a stack trace, S-8
ODSM, S-30
password policies, S-9
password wallets, S-25
performance, S-10
port configuration, S-12

Index-29
remtool command, S-28
replication, S-18, S-23
replication bootstrap, S-21
Repository Creation Assistant (repca), S-20
server chaining, S-29
typical problems in Oracle Internet Directory, S-1
Trusted Application Administrators Group, 31-10
tuning, 34-1 to ??
database connections, 9-13
dispatcher threads, 9-13
enable or disable change log generation, 9-13
enable or disable entry cache, 9-14
idle connection timeout, 9-13
maximum entries in entry cache, 9-14
maximum plug-in threads per server
process, 9-13
network retry timeout, 9-13
privilege group membership cache
tuning, 9-14
server processes, 9-13
server response time
maximim, 9-13
types
of attributes, 3-9
U
Unicode Transformation Format 8-bit (UTF-8)
uniqueness constraints
orclcommonusernickname attribute, 18-8
UNIX crypt
for password encryption, 30-3, 30-4
unlocking accounts, 12-3
by using self-service console, 12-4
unspecified access, 29-11
uppercase characters
password policy attribute, 28-6
Uptime
on ODSM home page, 24-7
used passwords
password policy attribute, 28-6
user
names and passwords, managing
by using ldapmodify, 12-6
user account
unlocking, 12-3
user and group containers
server chaining, 37-8
user certificates
searching for, K-1 to K-3
user DN, 9-14
user entry attributes, 12-3
User Management Application Administrators
Group, 31-10
user must reset password
operational attribute, 28-7
User Proxy Privilege Group, 31-13
user statistics collection
configuring
by using ldapmodify command, 24-9, 24-10
usercertificate attribute, K-1
userpassword attribute
adding, 13-12
applicable operations
in password policies, 28-5
hash values, 36-4
of entry, 30-2
userpassword hashing algorithhm, 30-2
userpassword parameter, 30-11
users
entries
adding by using ldapadd, 13-12
modifying by using ldapmodify, 13-13
names and containment, planning, 5-3
proxy, 32-3
users to always audit, 22-4
UTF-8. See Unicode Transformation Format 8-bit
V
Verifier Services Group, 31-12
verifying replication
by using remtool, 42-26
version information
viewing by using ODSM, S-29
viewing all directory attributes by using
ODSM, 20-16
viewing properties of object classes by
usingODSM, 20-14
viewing queue statistics
by using remtool, 42-26
viewing schema
by using ldapsearch command, 20-19
viewing syntaxes
by using ldapsearch command, 20-28
virtual IP addresses, 10-1
W
wallets
creating by using Fusion Middlware
Control, 26-6
creating with WLST, 26-8
for replication identity
pathname, 39-6
self-signed
creating by using Fusion Middleware
Control, 26-6
with SSL, 26-4
WebLogic domain
registration with, 8-2
WebLogic Scripting Tool See WLST
WebLogic Server Administrative Console
default port, 7-2
WebLogic Server Domain
defined, 2-1
WebLogic Server Home
defined, 2-3
wildcards, in setting access control policies, 29-23
wizards

Index-30
replication, 41-13
WLST
changing EMD administrator password, 12-7
changing ODSSM administrator password, 12-8
configuring SSL, 26-8
defined, 2-4, 7-14
managing auditing, 22-5
managing configuration attributes by using, 9-15
worker threads
managing, 42-2
maximim number, 41-13
maximum number, 42-21
replication, 42-2
X
X509 certificates
in wallets, 26-4
