Aiaag Oracle Fusion Middleware Administrator Guide For Access Management
User Manual:
Open the PDF directly: View PDF ![]() .
.
Page Count: 1580 [warning: Documents this large are best viewed by clicking the View PDF Link!]
- Content
- List of Figures
- List of Tables
- List of Examples
- Preface
- What's New in This Guide?
- Part I Introduction to Oracle Access Management
- 1 Introducing Oracle Access Management
- 2 Getting Started with Oracle Access Management
- 2.1 Starting and Stopping Servers in Your Deployment
- 2.2 Specifying the Oracle Access Management Console Administrator
- 2.3 Using the New Oracle Access Management Console
- 2.4 Configuring with the Command-Line Tools
- 2.5 Logging, Auditing, Reporting and Monitoring Performance
- 2.6 Configuring Oracle Access Management Login Options
- Part II Managing Common and System Configurations
- 3 Managing Common Services and Certificate Validation
- 3.1 Configuring Oracle Access Management
- 3.2 Enabling or Disabling Available Services
- 3.3 Managing Common Settings
- 3.4 Managing Certificate Validation and Revocation
- 4 Delegating Administration
- 4.1 Understanding Delegated Administration
- 4.2 Defining the Administrator Roles
- 4.3 Delegating the Identity Store
- 4.4 Assigning Roles Using the Administration Console
- 4.5 Default Administrators, Roles and Groups
- 4.6 Using the Container Security Framework and MBeans
- 4.7 Using the Remote Registration Utility
- 4.8 Auditing Reports
- 5 Managing Data Sources
- 5.1 Introducing the Data Sources
- 5.2 Managing OAM Identity Stores
- 5.3 Managing the Identity Directory Service User Identity Stores
- 5.3.1 Using Identity Directory Services
- 5.3.2 Creating an Identity Directory Service Profile
- 5.3.3 Editing or Deleting an Identity Directory Service Profile
- 5.3.4 Creating a Form-fill Application Identity Directory Service Profile
- 5.3.5 Understanding the Pre-Configured Identity Directory Service Profile
- 5.3.6 Creating an Identity Directory Service Repository
- 5.4 Setting the Default Store and System Store
- 5.5 Managing the Administrators Role
- 5.6 Managing the Policy and Session Database
- 5.7 Introduction to Oracle Access Management Keystores
- 5.8 Integrating a Supported LDAP Directory with Oracle Access Manager
- 6 Managing Server Registration
- 7 Using Multi-Data Centers
- 7.1 Introducing Multi-Data Center
- 7.2 Understanding Multi-Data Center Deployments
- 7.2.1 Session Adoption Without Re-authentication, Session Invalidation or Session Data Retrieval
- 7.2.2 Session Adoption Without Re-authentication But With Session Invalidation & Session Data Retrieval
- 7.2.3 Session Adoption Without Re-authentication & Session Invalidation But With On-demand Session Data Retrieval
- 7.2.4 Authentication & Authorization Requests Served By Different Data Centers
- 7.2.5 Logout and Session Invalidation
- 7.3 Before Deploying Multi-Data Centers
- 7.4 Deploying Multi-Data Centers
- 7.5 Load Balancing Between Access Management Components
- 7.6 Setting Up A Multi-Data Center
- 7.7 Syncing Multi-Data Centers
- 7.8 Understanding Time Outs and Session Syncs
- 7.9 WLST Commands for Multi-Data Centers
- 7.10 Replicating Domains with Multi-Data Centers and Identity Manager
- 7.11 Multi-Data Center Recommendations
- 7.12 Cloning with T2P
- Part III Logging, Auditing, Reporting and Monitoring Performance
- 8 Logging Component Event Messages
- 9 Auditing Administrative and Run-time Events
- 9.1 Understanding Oracle Fusion Middleware Auditing
- 9.2 Introduction to Oracle Access Management Auditing
- 9.3 Access Manager Events You Can Audit
- 9.4 Mobile and Social Events You Can Audit
- 9.5 Identity Federation Events You Can Audit
- 9.6 Security Token Service Events You Can Audit
- 9.7 Setting Up Auditing for Oracle Access Management
- 9.8 Validating Auditing and Reports
- 10 Logging WebGate Event Messages
- 10.1 About Logging, Log Levels, and Log Output
- 10.2 About Log Configuration File Paths and Contents
- 10.3 About Directing Log Output to a File or the System File
- 10.4 Structure and Parameters of the Log Configuration File
- 10.5 About Activating and Suppressing Logging Levels
- 10.6 Mandatory Log-Handler Configuration Parameters
- 10.7 Configuring Different Threshold Levels for Different Types of Data
- 10.8 Filtering Sensitive Attributes
- 11 Reporting
- 12 Monitoring Performance and Health
- 13 Monitoring Performance and Logs with Fusion Middleware Control
- 13.1 Prerequisites
- 13.2 Introduction to Fusion Middleware Control
- 13.3 Logging In to and Out of Fusion Middleware Control
- 13.4 Displaying Menus and Pages in Fusion Middleware Control
- 13.5 Viewing Performance in Fusion Middleware Control
- 13.6 Managing Log Level Changes in Fusion Middleware Control
- 13.7 Managing Log File Configuration from Fusion Middleware Control
- 13.8 Viewing Log Messages in Fusion Middleware Control
- 13.9 Displaying MBeans in Fusion Middleware Control
- 13.10 Displaying Farm Routing Topology in Fusion Middleware Control
- Part IV Managing Access Manager Settings and Agents
- 14 Configuring Access Manager Settings
- 15 Introduction to Agents and Registration
- 16 Registering and Managing OAM 11g Agents
- 16.1 Prerequisites
- 16.2 Understanding OAM Agent Registration Parameters in the Console
- 16.3 Registering an OAM Agent Using the Console
- 16.4 Configuring and Managing Registered OAM Agents Using the Console
- 16.5 Understanding the Remote Registration Tool, Modes, and Process
- 16.6 Understanding Remote Registration Templates: OAM Agents
- 16.7 Performing Remote Registration for OAM Agents
- 16.8 Introduction to Updating Agents Remotely
- 16.9 Updating Agents Remotely
- 16.10 Validating Remote Registration and Resource Protection
- 16.11 Replacing the IAMSuiteAgent with an 11g WebGate
- 16.11.1 Registering a Replacement 11g WebGate for IAMSuiteAgent
- 16.11.2 Installing the Replacement 11g WebGate for IAMSuiteAgent
- 16.11.3 Updating the WebLogic Server Plug-in
- 16.11.4 Confirming the AutoLogin Host Identifier for an OAM / OIM Integration
- 16.11.5 Configuring OAM Security Providers for WebLogic
- 16.11.6 Disabling IAMSuiteAgent
- 16.11.7 Verification
- 16.12 Managing the Preferred Host in 10g WebGates
- 17 Maintaining Access Manager Sessions
- 17.1 Introducing Access Manager Session Management
- 17.2 Understanding Server-Side Session Management
- 17.2.1 Securing Access Manager Sessions
- 17.2.2 Understanding the Access Manager Session Lifecycle, States, and Enforcement
- 17.2.2.1 About Global Session Enforcement Checks
- 17.2.2.2 About Session Removal
- 17.2.2.3 About Step-Up and Step-Down Authentication and Credentials
- 17.2.2.4 About Optional Application-Specific Session Enforcement
- 17.2.2.5 About Timeout with Multiple-Agent Types: OSSO and OAM Agents
- 17.2.2.6 About OpenSSO Agents
- 17.2.3 Access Manager Sessions and the Role of Oracle Coherence
- 17.3 Server-Side Session Enforcement Examples
- 17.4 Configuring the Server-Side Session Lifecycle
- 17.5 Managing Active Server-Side Sessions
- 17.6 Verifying Server-Side Session Operations
- 17.7 Understanding Client-Side Session Management
- 17.8 Using WLST To Configure Session Management
- Part V Managing Access Manager SSO, Policies, and Testing
- 18 Understanding Single Sign-On with Access Manager
- 18.1 Introducing Access Manager Single Sign-On
- 18.2 Understanding the Access Manager Policy Model
- 18.3 Anatomy of an Application Domain and Policies
- 18.4 Introduction to Policy Conditions and Rules
- 18.5 Introducing Access Manager Credential Collection and Login
- 18.6 Understanding SSO Cookies
- 18.7 Introduction to Configuration Tasks for Single Sign-On
- 19 Managing Authentication and Shared Policy Components
- 19.1 Prerequisites
- 19.2 Understanding Authentication and Shared Policy Component Tasks
- 19.3 Managing Resource Types
- 19.4 Managing Host Identifiers
- 19.5 Understanding Authentication Methods and Credential Collectors
- 19.6 Managing Native Authentication Modules
- 19.7 Orchestrating Multi-Step Authentication with Plug-in Based Modules
- 19.7.1 Comparing Simple Form and Multi-Factor (Multi-Step) Authentication
- 19.7.2 About Plug-ins for Multi-Step Authentication Modules
- 19.7.3 About Plug-in Based Modules for Multi-Step Authentication
- 19.7.4 Example: Leveraging SubjectAltName Extension Data and Integrating with Multiple OCSP Endpoints
- 19.7.5 Creating and Orchestrating Plug-in Based Multi-Step Authentication Modules
- 19.7.6 Creating and Managing Step-Up Authentication
- 19.7.7 Configuring an HTTPToken Extractor Plug-in
- 19.7.8 Configuring a JSON Web Token Plug-in
- 19.8 Deploying and Managing Individual Plug-ins for Authentication
- 19.9 Managing Authentication Schemes
- 19.10 Extending Authentication Schemes with Advanced Rules
- 19.11 Configuring Challenge Parameters for Encrypted Cookies
- 19.12 Understanding Password Policy
- 19.13 Managing Global Password Policy
- 19.14 Configuring Password Policy Authentication
- 19.15 Configuring 11g WebGates and Authentication Policy for DCC
- 19.16 Completing Password Policy Configuration
- 19.17 Configuring Authentication POST Data Handling
- 19.18 Long URL Handling During Authentication
- 19.19 Using Application Initiated Authentication
- 19.20 Using the Adaptive Authentication Service
- 19.20.1 Understanding the Adaptive Authentication Service
- 19.20.2 Configuring Access Manager for Two-Factor Authentication
- 19.20.3 Configuring the Oracle Mobile Authenticator App
- 19.20.3.1 Understanding Oracle Mobile Authenticator Configuration
- 19.20.3.2 Configuring the Oracle Mobile Authenticator App on iOS
- 19.20.3.2.1 Configuring OMA on iOS Using the Online Option
- 19.20.3.2.2 Configuring OMA on iOS Using the Offline Option
- 19.20.3.2.3 Copying a One-Time Password from the Oracle Mobile Authenticator
- 19.20.3.2.4 Editing an Account on the Oracle Mobile Authenticator
- 19.20.3.2.5 Deleting an Account on the Oracle Mobile Authenticator
- 19.20.3.3 Configuring the Oracle Mobile Authenticator App on Android
- 19.20.3.3.1 Configuring OMA on Android Using the Online Option
- 19.20.3.3.2 Configuring OMA on Android Using the Offline Option
- 19.20.3.3.3 Copying a One-Time Password from the Oracle Mobile Authenticator
- 19.20.3.3.4 Editing an Account on the Oracle Mobile Authenticator
- 19.20.3.3.5 Deleting an Account on the Oracle Mobile Authenticator
- 19.20.4 Configuring the Google Authenticator App
- 20 Managing Policies to Protect Resources and Enable SSO
- 20.1 Prerequisites
- 20.2 Introduction to Application Domain and Policy Creation
- 20.3 Understanding Application Domain and Policy Management
- 20.4 Managing Application Domains and Policies Using the Console
- 20.5 Configuring Policy Ordering
- 20.6 Adding and Managing Policy Resource Definitions
- 20.6.1 Defining Resources in an Application Domain
- 20.6.1.1 About the Resource Type in a Resource Definition
- 20.6.1.2 About the Host Identifier in a Resource Definition
- 20.6.1.3 About the Resource URL, Prefixes, and Patterns
- 20.6.1.4 About Query String Name and Value Parameters for Resource Definitions
- 20.6.1.5 About Literal Query Strings in Resource Definitions
- 20.6.1.6 About Run Time Resource Evaluation
- 20.6.2 Defining Resources in an Application Domain
- 20.6.3 Searching for a Resource Definition
- 20.6.4 Viewing, Editing, or Deleting a Resource Definition
- 20.6.1 Defining Resources in an Application Domain
- 20.7 Defining Authentication Policies for Specific Resources
- 20.8 Defining Authorization Policies for Specific Resources
- 20.9 Introduction to Policy Responses for SSO
- 20.9.1 About Authentication and Authorization Policy Responses for SSO
- 20.9.2 About the Policy Response Language
- 20.9.3 About the Namespace and Variable Names for Policy Responses
- 20.9.4 About Constructing a Policy Response for SSO
- 20.9.5 About Policy Response Processing
- 20.9.6 About Assertion Claims and Processing
- 20.10 Adding and Managing Policy Responses for SSO
- 20.11 Introduction to Authorization Policy Rules and Conditions
- 20.12 Defining Authorization Policy Conditions
- 20.13 Defining Authorization Policy Rules
- 20.14 Validating Authentication and Authorization in an Application Domain
- 20.15 Understanding Remote Policy and Application Domain Management
- 20.16 Managing Policies and Application Domains Remotely
- 20.17 Defining an Application
- 21 Validating Connectivity and Policies Using the Access Tester
- 21.1 Prerequisites
- 21.2 Introduction to the Access Tester for Access Manager 11g
- 21.3 Installing and Starting the Access Tester
- 21.4 Introduction to the Access Tester Console and Navigation
- 21.5 Testing Connectivity and Policies from the Access Tester Console
- 21.5.1 Establishing a Connection Between the Access Tester and the OAM Server
- 21.5.2 Validating Resource Protection from the Access Tester Console
- 21.5.3 Testing User Authentication from the Access Tester Console
- 21.5.4 Testing User Authorization from the Access Tester Console
- 21.5.5 Observing Request Latency
- 21.6 Creating and Managing Test Cases and Scripts
- 21.7 Evaluating Scripts, Log File, and Statistics
- 22 Configuring Centralized Logout for Sessions Involving 11g WebGates
- Part VI Registering and Using Agents with Access Manager
- 23 Registering and Managing Legacy OpenSSO Agents
- 23.1 Introduction to OpenSSO, Agents, Migration and Co-existence
- 23.2 Runtime Processing Between OpenSSO Agents and Access Manager
- 23.3 Understanding OpenSSO Agent Registration Parameters
- 23.4 Registering and Managing OpenSSO Agents Using the Console
- 23.5 Performing Remote Registration for OpenSSO Agents
- 23.6 Updating Registered OpenSSO Agents Remotely
- 23.7 Locating Other OpenSSO Agent Information
- 24 Registering and Managing Legacy OSSO Agents
- 24.1 Understanding OSSO Agents with Access Manager
- 24.2 Registering OSSO Agents Using Oracle Access Management Console
- 24.3 Configuring and Managing Registered OSSO Agents Using the Console
- 24.4 Performing Remote Registration for OSSO Agents
- 24.5 Updating Registered OSSO Agents Remotely
- 24.6 Configuring Logout for OSSO Agents with Access Manager 11.1.2
- 24.7 Locating Other OSSO Agent Information
- 25 Registering and Managing 10g WebGates with Access Manager 11g
- 25.1 Prerequisites
- 25.2 Introduction to 10g OAM Agents for Access Manager 11g
- 25.2.1 About IAMSuiteAgent: A Pre-Configured 10g WebGate Registered with Access Manager
- 25.2.2 About Legacy Oracle Access Manager 10g Deployments and WebGates
- 25.2.3 About Installing Fresh 10g WebGates to Use With Access Manager 11.1.2
- 25.2.4 About Centralized Logout with 10g OAM Agents and 11g OAM Servers
- 25.3 Comparing Access Manager 11.1.2 and 10g
- 25.4 Configuring Centralized Logout for IAMSuiteAgent
- 25.5 Registering a 10g WebGate with Access Manager 11g Remotely
- 25.6 Managing 10g OAM Agents Remotely
- 25.7 Locating and Installing the Latest 10g WebGate for Access Manager 11g
- 25.7.1 Preparing for a Fresh 10g WebGate Installation with Access Manager 11g
- 25.7.2 Locating and Downloading 10g WebGates for Use with Access Manager 11g
- 25.7.3 Starting WebGate 10g Installation
- 25.7.4 Specifying a Transport Security Mode
- 25.7.5 Requesting or Installing Certificates for Secure Communications
- 25.7.6 Specifying WebGate Configuration Details
- 25.7.7 Updating the WebGate Web Server Configuration
- 25.7.8 Finishing WebGate Installation
- 25.7.9 Installing Artifacts and Certificates
- 25.7.10 Confirming WebGate Installation
- 25.8 Configuring Centralized Logout for 10g WebGate with 11g OAM Servers
- 25.9 Removing a 10g WebGate from the Access Manager 11g Deployment
- 26 Configuring Apache, OHS, IHS for 10g WebGates
- 26.1 Prerequisites
- 26.2 About Oracle HTTP Server and Access Manager
- 26.3 About Access Manager with Apache and IHS v2 Webgates
- 26.4 About Apache v2 Architecture and Access Manager
- 26.5 Requirements for Oracle HTTP Server, IHS, Apache v2 Web Servers
- 26.6 Preparing Your Web Server
- 26.6.1 Preparing the IHS v2 Web Server
- 26.6.2 Preparing Apache and Oracle HTTP Server Web Servers on Linux
- 26.6.3 Preparing Oracle HTTP Server Web Servers on Linux and Windows Platforms
- 26.6.4 Setting Oracle HTTP Server Client Certificates
- 26.6.5 Preparing the Apache v2 Web Server on UNIX
- 26.6.6 Preparing the Apache v2 SSL Web Server on AIX
- 26.6.7 Preparing the Apache v2 Web Server on Windows
- 26.7 Activating Reverse Proxy for Apache v2 and IHS v2
- 26.8 Verifying httpd.conf Updates for Webgates
- 26.9 Tuning Oracle HTTP Server Webgates for Access Manager
- 26.10 Tuning OHS /Apache Prefork and Worker MPM Modules for OAM
- 26.11 Starting and Stopping Oracle HTTP Server Web Servers
- 26.12 Tuning Apache/IHS v2 Webgates for Access Manager
- 26.13 Removing Web Server Configuration Changes After Uninstall
- 26.14 Helpful Information
- 27 Configuring the ISA Server for 10g WebGates
- 27.1 Prerequisites
- 27.2 About Access Manager and the ISA Server
- 27.3 Compatibility and Platform Support
- 27.4 Installing and Configuring Webgate for the ISA Server
- 27.5 Configuring the ISA Server for the ISAPI Webgate
- 27.6 Starting, Stopping, and Restarting the ISA Server
- 27.7 Removing Access Manager Filters Before Webgate Uninstall on ISA Server
- 28 Configuring the IIS Web Server for 10g WebGates
- 28.1 Prerequisites
- 28.2 Webgate Guidelines for IIS Web Servers
- 28.3 Prerequisite for Installing Webgate for IIS 7
- 28.4 Updating IIS 7 Web Server Configuration on Windows 2008
- 28.5 Completing Webgate Installation with IIS
- 28.5.1 Enabling Client Certificate Authentication on the IIS Web Server
- 28.5.2 Ordering the ISAPI Filters
- 28.5.3 Enabling Pass-Through Functionality for POST Data
- 28.5.4 Protecting a Web Site When the Default Site is Not Setup
- 28.6 Installing and Configuring Multiple 10g Webgates for a Single IIS 7 Instance
- 28.6.1 Installing Each IIS 7 Webgate in a Multiple Webgate Scenario
- 28.6.2 Setting the Impersonation DLL for Multiple IIS 7 Webgates
- 28.6.3 Enabling Client Certification for Multiple IIS 7 Webgates
- 28.6.4 Configuring IIS 7 Webgates for Pass Through Functionality
- 28.6.5 Confirming IIS 7 Webgate Installation
- 28.7 Installing and Configuring Multiple Webgates for a Single IIS 6 Instance
- 28.8 Finishing 64-bit Webgate Installation
- 28.9 Confirming Webgate Installation on IIS
- 28.10 Starting, Stopping, and Restarting the IIS Web Server
- 28.11 Removing Web Server Configuration Changes Before Uninstall
- 29 Configuring Lotus Domino Web Servers for 10g WebGates
- Part VII Managing Oracle Access Management Identity Federation
- 30 Introducing Identity Federation in Oracle Access Management
- 30.1 Understanding Identity Federation Concepts
- 30.2 Integrating Identity Federation with Access Manager
- 30.3 Deploying Identity Federation with Oracle Access Management
- 30.4 Exchanging Identity Federation Data
- 30.5 Understanding How Identity Federation Works
- 30.6 Using Identity Federation
- 30.7 Administrating Identity Federation
- 30.8 Enabling Identity Federation
- 31 Managing Identity Federation Partners
- 31.1 Understanding Federation And Partners
- 31.2 Managing Federation Partners
- 31.3 Administering Identity Federation As A Service Provider
- 31.4 Administering Identity Federation As An Identity Provider
- 31.5 Using Attribute Mapping Profiles
- 31.6 Mapping Federation Authentication Methods to Access Manager Authentication Schemes
- 31.7 Using the Attribute Sharing Plug-in for the Attribute Query Service
- 31.8 Using the Federation Proxy
- 31.9 Using WLST for Identity Federation Administration
- 32 Managing Settings for Identity Federation
- 32.1 Prerequisites
- 32.2 Introduction to Federation Settings
- 32.3 Managing General Federation Settings
- 32.4 Managing Proxy Settings for Federation
- 32.5 Defining Keystore Settings for Federation
- 32.6 Exporting Metadata
- 33 Managing Federation-related Schemes and Policies
- 33.1 Prerequisites
- 33.2 Using Identity Federation and Access Manager in Concert Together
- 33.3 Using Authentication Schemes and Modules for Identity Federation 11g Release 2 (11.1.2.2)
- 33.4 Using Authentication Schemes and Modules for Oracle Identity Federation 11g Release 1
- 33.5 Managing Access Manager Policies for Use with Identity Federation
- 33.6 Testing Identity Federation Configuration
- 33.7 Using the Default Identity Provisioning Plug-in
- 33.8 Configuring the Identity Provider Discovery Service
- 33.9 Configuring the Federation User Self-Registration Module
- Part VIII Managing Oracle Access Management Security Token Service
- 34 Introducing the Oracle Access Management Security Token Service
- 34.1 Understanding the Security Token Service
- 34.2 Using the Security Token Service
- 34.3 Security Token Service Key Terms and Concepts
- 34.4 Integrating the Oracle Web Services Manager
- 34.5 Architecting the Security Token Service
- 34.6 Security Token Service Supported Token Matrix
- 34.7 Deploying Security Token Service
- 34.8 Installing Security Token Service
- 34.8.1 Security Token Service Cluster in Single WLS Domain
- 34.8.2 Endpoint Exposure through a Web Server Proxy
- 34.8.3 Interoperability of Requester and Relying Party with Other Oracle WS-Trust based Clients
- 34.8.4 Security Token Service Installation Overview
- 34.8.5 Post-Installation Tasks: Security Token Service
- 34.9 Administrating the Security Token Service
- 35 Security Token Service Implementation Scenarios
- 36 Configuring Security Token Service Settings
- 36.1 Prerequisites
- 36.2 Introduction to Security Token Service Configuration
- 36.3 Enabling and Disabling Security Token Service
- 36.4 Defining Security Token Service Settings
- 36.5 Using and Managing WSS Policies for Oracle WSM Agents
- 36.6 Configuring OWSM for WSS Protocol Communication
- 36.6.1 About Oracle WSM Agent WS-Security Policies for Security Token Service
- 36.6.2 Retrieving the Oracle WSM Keystore Password
- 36.6.3 Extracting the Oracle STS/Oracle WSM Signing and Encryption Certificate
- 36.6.4 Adding Trusted Certificates to the Oracle WSM Keystore
- 36.6.5 Validating Trusted Certificates in the Oracle WSM Keystore
- 36.6.6 Configuring Oracle WSM Agent for WSS Kerberos Policies
- 36.7 Managing and Migrating Security Token Service Policies
- 36.8 Logging Security Token Service Messages
- 36.9 Auditing the Security Token Service
- 37 Managing Security Token Service Certificates and Keys
- 37.1 Prerequisites
- 37.2 Introducing the Security Token Service Certificates and Keys
- 37.3 Managing Security Token Service Encryption/Signing Keys
- 37.4 Managing Partner Keys for WS-Trust Communications
- 37.5 Managing Certificate Validation
- 38 Managing Templates, Endpoints, and Policies
- 38.1 Introduction
- 38.2 Searching for an Existing Template
- 38.3 Managing Token Issuance Templates
- 38.4 Managing Token Validation Templates
- 38.5 Managing Security Token Service Endpoints
- 38.6 Managing Token Issuance Policies, Conditions, and Rules
- 38.7 Managing TokenServiceRP Type Resources
- 38.8 Making Custom Classes Available
- 38.9 Managing a Custom Security Token Service Configuration
- 39 Managing Token Service Partners and Partner Profiles
- 40 Troubleshooting Security Token Service
- Part IX Managing Oracle Access Management Mobile and Social
- 41 Understanding Mobile and Social
- 42 Configuring Mobile Services
- 42.1 Opening the Mobile Services Configuration Page
- 42.2 Understanding Mobile Services Configuration
- 42.3 Defining Service Providers
- 42.3.1 Defining, Modifying or Deleting an Authentication Service Provider
- 42.3.1.1 Understanding the Pre-Configured Authentication Service Providers
- 42.3.1.2 Understanding the JWT-OAM Token Authentication Service Provider
- 42.3.1.3 Creating an Authentication Service Provider
- 42.3.1.4 Editing or Deleting an Authentication Service Provider
- 42.3.1.5 Requiring User Credentials to Exchange a JWT Token for an OAM Token
- 42.3.1.6 Configuring OAM to use the JWT-OAM + PIN Token Service Provider
- 42.3.2 Defining, Modifying or Deleting an Authorization Service Provider
- 42.3.3 Defining, Modifying or Deleting a User Profile Service Provider
- 42.3.1 Defining, Modifying or Deleting an Authentication Service Provider
- 42.4 Defining Service Profiles
- 42.5 Defining Security Handler Plug-ins
- 42.6 Defining Application Profiles
- 42.7 Defining Service Domains
- 42.8 Using the Jail Breaking Detection Policy
- 42.9 Configuring Mobile Services with Other Oracle Products
- 42.9.1 Configuring Mobile Services for Access Manager
- 42.9.1.1 Configuring Mobile Services to Work With Access Manager in Simple and Certificate Mode
- 42.9.1.2 Configuring an Authentication Service Provider for Remote Oracle Access Manager Server 10g
- 42.9.1.3 Configuring an Authentication Service Provider for Remote Access Manager 11gR2 or Oracle Access Manager 11gR1 PS1
- 42.9.2 Configuring Mobile Services for Oracle Adaptive Access Manager
- 42.9.2.1 Understanding OAAM Support in Mobile and Social
- 42.9.2.2 Configuring the WebLogic Administration Domain
- 42.9.2.3 Configuring OAAM if Social Identity Authentication is Enabled in Mobile Services
- 42.9.2.4 Setting up a Lost or Stolen Device Rule
- 42.9.2.5 Configuring Blacklisted Devices and Applications
- 42.9.2.6 Understanding the OAAM Sessions for Mobile Applications
- 42.9.2.7 Registering Users for OAAM Authentication
- 42.9.1 Configuring Mobile Services for Access Manager
- 43 Configuring Social Identity
- 43.1 Opening the Social Identity Configuration Page
- 43.2 Understanding Social Identity Configuration
- 43.3 Defining Social Identity Providers
- 43.3.1 Creating a Social Identity Provider
- 43.3.2 Editing or Deleting a Social Identity Provider
- 43.3.3 Generating the Consumer Key and Consumer Secret for OAuth Providers
- 43.3.3.1 Generating a Consumer Key and Consumer Secret for Facebook
- 43.3.3.2 Generating a Consumer Key and Consumer Secret for Twitter
- 43.3.3.3 Generating a Consumer Key and Consumer Secret for LinkedIn
- 43.3.3.4 Generating a Consumer Key and Consumer Secret for Foursquare
- 43.3.3.5 Generating a Consumer Key and Consumer Secret for Windows Live
- 43.3.3.6 Generating a Consumer Key and Consumer Secret for Google
- 43.3.4 Troubleshooting Facebook Social Identity Providers
- 43.4 Defining Service Provider Interfaces
- 43.5 Defining Application Profiles
- 43.6 Integrating Social Identity With Mobile Applications
- 43.7 Linking Social Identity Provider Accounts
- 44 Configuring Mobile and Social System Settings
- 44.1 Accessing the Mobile and Social Settings Interface
- 44.2 Logging and Auditing
- 44.3 Deploying Mobile and Social With Oracle Access Manager
- 44.4 Configuring Mobile and Social After Running Test-to-Production Scripts
- 44.5 Configuring Mobile and Social for High Availability (HA)
- 44.6 Enabling the REST Client to Specify the Tenant Name
- Part X Managing the Oracle Access Management OAuth Service
- 45 Understanding the OAuth Service
- 45.1 Introducing the OAuth Service
- 45.2 Understanding the OAuth Service
- 45.2.1 Understanding OAuth 2.0 Roles
- 45.2.2 Understanding the OAuth Service Components
- 45.2.3 Understanding the OAuth Service Supported Features
- 45.2.4 The Mobile OAuth Authorization Flow
- 45.2.5 Understanding the OAuth Service Authorization and Authentication Endpoints
- 45.2.6 Understanding Refresh Tokens
- 45.2.7 Understanding the Mobile OAuth Client UI Form Factor Options
- 45.2.8 Understanding Mobile OAuth Single Sign-on (SSO)
- 45.3 Understanding the OAuth Service Processes
- 46 Configuring OAuth Services
- 46.1 Enabling OAuth Services
- 46.2 Opening the OAuth Services Configuration Page
- 46.3 Understanding OAuth Services Configuration
- 46.3.1 Understanding OAuth Identity Domains Configuration
- 46.3.2 Understanding OAuth Service Provider Configuration
- 46.3.3 Understanding OAuth Service Profiles Configuration
- 46.3.4 Understanding OAuth Resource Servers Configuration
- 46.3.5 Understanding OAuth Client Profiles Configuration
- 46.3.6 Understanding OAuth Consent Management Service Configuration
- 46.3.7 Understanding OAuth Access Token Custom Attributes
- 46.3.8 Understanding OAuth Services Security
- 46.4 Configuring OAuth Services Settings
- 46.4.1 Configuring OAuth Identity Domains
- 46.4.2 Configuring OAuth Service Profiles
- 46.4.3 Configuring OAuth Clients
- 46.4.4 Configuring the OAuth Service Provider
- 46.4.5 Configuring OAuth Resource Servers
- 46.4.6 Configuring User Profile Services
- 46.4.7 Configuring OAuth Consent Management Services
- 46.4.8 Configuring OAuth Plug-Ins
- 46.4.9 Configuring OAuth Server Settings
- 46.4.10 Configuring the OAuth Services Jail Breaking Detection Policy
- 46.4.11 Configuring Token Life Cycle Management
- 46.5 Configuring OAuth to Accept Third-Party JWT Bearer Assertions
- 46.6 Configuring a WebGate to Support the OAuth Service
- Part XI Managing Oracle Access Management Oracle Access Portal
- 47 Configuring the Access Portal Service
- 47.1 Prerequisites for Deploying the Access Portal Service
- 47.2 Overview of the Access Portal Service Deployment Process
- 47.3 Deploying the Access Portal Service
- 47.3.1 Deploying the Java Cryptography Extension Policy Files
- 47.3.2 Creating the Identity Store Configuration File
- 47.3.3 Creating the Oracle Access Manager Configuration File
- 47.3.4 Understanding the Access Portal Service Repository Objects
- 47.3.5 Preparing and Enabling the Access Portal Service on an Oracle Repository
- 47.3.6 Preparing and Enabling the Access Portal Service on Microsoft Active Directory
- 47.3.7 (Active Directory Only) Deploying the OAMAgent Web Application
- 47.3.8 Setting the Policy Cache Refresh Interval
- 47.3.9 Integrating with Oracle Privilege Account Manager
- 47.3.10 Deploying the Oracle Traffic Director Administration Server
- 47.3.11 Deploying the Webgate Binaries and Secure Trust Artifacts
- 47.3.12 (Optional) Configuring the ESSOProvisioning Plugin
- 47.3.13 Creating an Oracle Traffic Director Configuration
- 47.3.14 Protecting the Oracle Traffic Director Instance with the Webgate and Access Proxy Plugins
- 47.3.15 (Optional) Enabling the Detached Credential Collector for the Target Webgate
- 47.3.16 Configuring Logon Manager for Compatibility with the Access Portal Service
- 47.4 Enabling Form-Fill Single Sign-On for an Application
- 47.5 Adding a Federated Partner Provider Application
- 47.6 Adding an Oracle SSO Agent Application
- 47.7 Common Interface Controls
- 47.8 Managing Password Generation Policies
- 47.9 Managing Credential Sharing Groups
- 47.10 Managing Global Agent Settings
- Part XII Using Identity Context
- 48 Using Identity Context
- 48.1 Introducing Identity Context
- 48.2 Understanding Identity Context
- 48.3 Working With the Identity Context Service
- 48.4 Using the Identity Context API
- 48.5 Configuring the Identity Context Service Components
- 48.5.1 Configuring Oracle Fusion Middleware
- 48.5.2 Configuring Access Manager
- 48.5.3 Configuring Oracle Adaptive Access Manager
- 48.5.4 Configuring Web Service Security Manager
- 48.5.5 Configuring Oracle Entitlements Server
- 48.5.6 Configuring Oracle Enterprise Single Sign On
- 48.5.7 Configuring Oracle Access Management Mobile and Social
- 48.6 Validating Identity Context
- Part XIII Integrating Access Manager with Other Products
- 49 Integrating RSA SecurID Authentication with Access Manager
- 50 Configuring Access Manager for Windows Native Authentication
- 50.1 Introducing Access Manager with Windows Native Authentication
- 50.2 Preparing Your Active Directory/Kerberos Topology
- 50.3 Performing Oracle-Specific Prerequisite Tasks
- 50.4 Enabling the Browser to Return Kerberos Tokens
- 50.5 Integrating KerberosPlugin with Oracle Virtual Directory
- 50.6 Integrating Access Manager KerberosPlugin with Search Failover
- 50.7 Configuring Access Manager for Windows Native Authentication
- 50.8 Validating WNA with Access Manager-Protected Resources
- 50.9 Configuring WNA For Use With DCC
- 50.10 Configuring Access for Multiple Untrusted Active Directory Forests
- 50.10.1 Create Service Principal Accounts
- 50.10.2 Generating a Master Keytab File
- 50.10.3 Configuring the krb5.conf File
- 50.10.4 Validating Access to the KDC Servers Using the Keytabs
- 50.10.5 Creating the Active Directory or Oracle Virtual Directory User Stores
- 50.10.6 Creating the Custom Kerberos Authentication Module
- 50.10.7 Configuring Integrated Windows Authentication
- 50.10.8 Testing the Configurations
- 50.10.9 Troubleshooting the Configurations
- 50.11 Troubleshooting WNA Configuration
- 51 Integrating JBoss with Access Manager
- 51.1 Introduction to JBoss with Access Manager
- 51.2 Integration Topology
- 51.3 Preparing Your Environment for JBoss Integration
- 51.4 Protecting JBoss-Specific Resources
- 51.5 Protecting Web Applications with the JBoss Agent
- 51.6 Configuring JBoss Server to Access a Host Name (not localhost)
- 51.7 Configuring the Login Module to Secure EJBs
- 51.8 Configuring the Login Module to Secure Web Service Access
- 51.9 Configuring Logging for the JBoss Agent and Login Module
- 51.10 Validating Your Configuration
- 52 Integrating Microsoft SharePoint Server with Access Manager
- 52.1 What is Supported in This Release?
- 52.2 Introduction to Integrating With the SharePoint Server
- 52.3 Integration Requirements
- 52.4 Preparing for Integration With SharePoint Server
- 52.5 Integrating With Microsoft SharePoint Server
- 52.6 Setting Up Microsoft Windows Impersonation
- 52.7 Completing the SharePoint Server Integration
- 52.8 Integrating With Microsoft SharePoint Server Configured With LDAP Membership Provider
- 52.8.1 About Integrating With Microsoft SharePoint Server Configured With LDAP Membership Provider
- 52.8.2 Installing Access Manager for Microsoft SharePoint Server Configured With LDAP Membership Provider
- 52.8.3 Configuring an Authentication Scheme for Use With LDAP Membership Provider
- 52.8.4 Updating the Application Domain Protecting the SharePoint Web Site
- 52.8.5 Creating an Authorization Response for Header Variable SP_SSO_UID
- 52.8.6 Creating an Authorization Response for the OAMAuthCookie
- 52.8.7 Configuring and Deploying OAMCustomMembershipProvider
- 52.8.8 Enabling Logging for CustomMemberShipProvider
- 52.8.9 Ensuring Directory Servers are Synchronized
- 52.8.10 Testing the Integration
- 52.9 Configuring Single Sign-On for Office Documents
- 52.10 Configuring Single Sign-off for Microsoft SharePoint Server
- 52.11 Setting Up Access Manager and Windows Native Authentication
- 52.12 Synchronizing User Profiles Between Directories
- 52.13 Testing Your Integration
- 52.14 Troubleshooting
- 53 Integrating Access Manager with Outlook Web Application
- 53.1 What is New in This Release?
- 53.2 Introduction to Integration with Outlook Web Application
- 53.3 Enabling Impersonation With a Header Variable
- 53.3.1 Requirements for Impersonation with a Header Variable
- 53.3.2 Creating an Impersonator as a Trusted User
- 53.3.3 Assigning Rights to the Trusted User
- 53.3.4 Binding the Trusted User to Your Webgate
- 53.3.5 Adding an Impersonation Response to An Application Domain
- 53.3.6 Adding an Impersonation DLL to IIS
- 53.3.7 Testing Impersonation
- 53.4 Setting Up Impersonation for Outlook Web Application (OWA)
- 53.4.1 Prerequisites to Setting Impersonation for Outlook Web Application
- 53.4.2 Creating a Trusted User Account for Outlook Web Application
- 53.4.3 Assigning Rights to the Outlook Web Application Trusted User
- 53.4.4 Binding the Trusted Outlook Web Application User to Your Webgate
- 53.4.5 Adding an Impersonation Action to an Application Domain for Outlook Web Application
- 53.4.6 Adding an Impersonation dll to IIS
- 53.4.7 Configuring IIS Security
- 53.4.8 Testing Impersonation for Outlook Web Application
- 53.5 Setting Up Access Manager WNA for Outlook Web Application
- 54 Integrating Microsoft Forefront Threat Management Gateway 2010 with Access Manager
- 54.1 What is New in This Release?
- 54.2 Introduction to Integration with TMG Server 2010
- 54.3 Creating a Forefront TMG Policy and Rules
- 54.4 Installing and Configuring 10g Webgate for Forefront TMG Server
- 54.5 Configuring the TMG 2010 Server for the ISAPI 10g Webgate
- 54.6 Starting, Stopping, and Restarting the TMG Server
- 54.7 Removing Access Manager Filters Before WebGate Uninstall on TMG Server
- 54.8 Troubleshooting
- 55 Integrating Access Manager 11.1.2 with SAP NetWeaver Enterprise Portal
- 55.1 What is Supported in This Release?
- 55.2 Supported Versions and Platforms
- 55.3 Integration Architecture
- 55.4 Configuring Oracle Access Management and NetWeaver Enterprise Portal 7.0.x
- 55.5 Configuring Oracle Access Management and NetWeaver Enterprise Portal 7.4.x
- 55.6 Testing the Integration
- 55.7 Troubleshooting the Integration
- 56 Integrating Oracle Access Manager 11.1.2 with SAP NetWeaver Enterprise Portal Using OpenSSO Policy Agent 2.2
- 56.1 What is Supported in This Release?
- 56.2 Registering the OpenSSO Agent
- 56.3 Installing the OpenSSO Policy Agent 2.2 on SAP Enterprise Portal
- 56.4 Deploying the Agent Software Delivery Archive
- 56.5 Making a Class Loader Reference to the Login Module
- 56.6 Modifying the SAP Enterprise Portal 7.0 / Web Application Server 7.0 Class Path
- 56.7 Deploying and Starting the Agentapp.war File
- 56.8 Using Telnet to Create a Reference Between agentapp and Library AmSAPAgent2.2
- 56.9 Adding the Login Module to the Stack
- 56.10 Modifying the Login Module Stack
- 56.11 Updating the ume.logoff.redirect.uri
- 56.12 Configuring the AMAgent.properties File
- 56.13 Testing the Integration
- Part XIV Appendixes
- A.1 Introducing Oracle Platform Security Services and Oracle Application Developer Framework
- A.2 Integrating Access Manager With Web Applications Using Oracle ADF Security and the OPSS SSO Framework
- A.3 Configuring Centralized Logout for Oracle ADF-Coded Applications
- A.4 Confirming Application-Driven Authentication During Runtime
- B.1 Introduction to Internationalization and Multibyte Data Support
- C.1 Prerequisites
- C.2 Securing Communication Between OAM Servers and WebGates
- C.3 Generating Client Keystores for OAM Tester in Cert Mode
- C.4 Configuring Cert Mode Communication for Access Manager
- C.4.1 About Cert Mode Encryption and Files
- C.4.2 Generating a Certificate Request and Private Key for OAM Server
- C.4.3 Retrieving the OAM Keystore Alias and Password
- C.4.4 Importing the Trusted, Signed Certificate Chain Into the Keystore
- C.4.5 Adding Certificate Details to Access Manager Settings
- C.4.6 Generating a Private Key and Certificate Request for WebGates
- C.4.7 Updating WebGate to Use Certificates
- C.5 Configuring Simple Mode Communication with Access Manager
- D.1 Bundled 10g IAMSuiteAgent Artifacts
- D.2 Generated Artifacts: OpenSSO
- D.2.1 Generated OpenSSOAgentAuthPlugin
- D.2.2 Generated Host Identifier: OpenSSOAgent
- D.2.3 Generated Application Domain: OpenSSOAgent
- D.2.4 Generated Resources: OpenSSOAgent
- D.2.5 Generated Authentication Policy: OpenSSOAgent Application Domain
- D.2.6 Generated Authorization Policy: OpenSSOAgent Application Domain
- D.3 Migrated Artifacts: OpenSSO
- D.3.1 Migrated User Identity Store: OpenSSO
- D.3.2 Migrated Agents: OpenSSO
- D.3.3 Migrated Authentication Module: OpenSSO
- D.3.4 Migrated Host Identifier: OpenSSO
- D.3.5 Migrated Application Domain: OpenSSO
- D.3.6 Migrated Resources: OpenSSO
- D.3.7 Migrated Authentication Policy: OpenSSO
- D.3.8 Migrated Authorization Policy: OpenSSO
- E.1 Introduction to Oracle Access Management Troubleshooting
- E.1.1 About System Analysis and Problem Scenarios
- E.1.2 About LDAP Server or Identity Store Issues
- E.1.3 About OAM Server or Host Issues
- E.1.4 About Agent-Side Configuration and Load Issues
- E.1.5 About Runtime Database (Audit or Session Data) Issues
- E.1.6 About Change Propagation or Activation Issues
- E.1.7 About Policy Store Database Issues
- E.2 Using My Oracle Support for Additional Troubleshooting Information
- E.3 Administrator Lockout
- E.4 Oracle Access Management Console Inconsistent State
- E.5 AdminServer Won't Start if the Wrong Java Path Given with WebLogic Server Installation
- E.6 Agent Naming Not Unique
- E.7 Application URL Requirements
- E.8 Authentication Issues
- E.9 Authorization Issues
- E.10 Cannot Access Authentication LDAP or Database
- E.11 Cannot Find Configuration
- E.12 Co-existence Between OSSO and Access Manager
- E.13 Could Not Find Partial Trigger
- E.14 Denial of Service Attacks
- E.15 Deployments with Freshly Installed 10g Webgates
- E.16 Diagnosing Initialization and Performance Issues
- E.17 Disabling Windows Challenge/Response Authentication on IIS Web Servers
- E.18 Changing UserIdentityStore1 Type Can Lock Out Administrators
- E.19 IIS Web Server Issues
- E.20 Import and File Upload Limits
- E.21 jps Logger Class Instantiation Warning is Logged on Authentication
- E.22 Internationalization, Languages, and Translation
- E.23 Login Failure for a Protected Page
- E.24 OAM Metric Persistence Timer IllegalStateException: SafeCluster
- E.25 Partial Cluster Failure and Intermittent Login and Logout Failures
- E.26 RSA SecurID Issues and Logs
- E.27 Registration Issues
- E.28 Rowkey does not have any primary key attributes Error
- E.29 SELinux Issues
- E.30 Session Issues
- E.31 SSL versus Open Communication
- E.32 Start Up Issues
- E.33 Synchronizing OAM Server Clocks
- E.34 Using Coherence
- E.35 Validation Errors
- E.36 Web Server Issues
- E.36.1 Server Fails on an Apache Web Server
- E.36.2 Apache v2 on HP-UX
- E.36.3 Apache v2 Bundled with Red Hat Enterprise Linux 4
- E.36.4 Apache v2 Bundled with Security-Enhanced Linux
- E.36.5 Apache v2 on UNIX with the mpm_worker_module for Webgate
- E.36.6 Domino Web Server Issues
- E.36.7 Errors, Loss of Access, and Unpredictable Behavior
- E.36.8 Known Issues for ISA Web Server
- E.36.9 Oracle HTTP Server Fails to Start with LinuxThreads
- E.36.10 Oracle HTTP Server Webgate Fails to Initialize On Linux Red Hat 4
- E.36.11 Oracle HTTP Server Web Server Configuration File Issue
- E.36.12 Issues with IIS v6 Web Servers
- E.36.13 PCLOSE Error When Starting Sun Web Server
- E.36.14 Removing and Reinstalling IIS DLLs
- E.37 Windows Native Authentication

[1]
Oracle® Fusion Middleware
Administrator's Guide for Oracle Access Management
11g Release 2 (11.1.2.2) for All Platforms
E27239-22
June 2015
Oracle Fusion Middleware Administrator's Guide for Oracle Access Management, 11g Release 2 (11.1.2.2) for
All Platforms
E27239-22
Copyright © 2000, 2015 Oracle and/or its affiliates. All rights reserved.
Primary Author: Michael Teger
Contributing Author: Vinaye Misra, Kevin Kessler, Cathy Tenga, Serge Pomorski
Contributor: Vadim Lander, Vamsi Motokuru, Damien Carru, Peter Povinec, Weifang Xie, Satish
Madawand, Neelima Jadhav, Charles Wesley, Harshal X Shaw, Jeremy Banford, Rey Ong, Ramana Turlapati,
Deepak Ramakrishnan, David Goldsmith, Vishal Parashar, Carlos Subi, Patricia Fuzesy
This software and related documentation are provided under a license agreement containing restrictions on
use and disclosure and are protected by intellectual property laws. Except as expressly permitted in your
license agreement or allowed by law, you may not use, copy, reproduce, translate, broadcast, modify, license,
transmit, distribute, exhibit, perform, publish, or display any part, in any form, or by any means. Reverse
engineering, disassembly, or decompilation of this software, unless required by law for interoperability, is
prohibited.
The information contained herein is subject to change without notice and is not warranted to be error-free. If
you find any errors, please report them to us in writing.
If this is software or related documentation that is delivered to the U.S. Government or anyone licensing it
on behalf of the U.S. Government, then the following notice is applicable:
U.S. GOVERNMENT END USERS: Oracle programs, including any operating system, integrated software,
any programs installed on the hardware, and/or documentation, delivered to U.S. Government end users
are "commercial computer software" pursuant to the applicable Federal Acquisition Regulation and
agency-specific supplemental regulations. As such, use, duplication, disclosure, modification, and
adaptation of the programs, including any operating system, integrated software, any programs installed on
the hardware, and/or documentation, shall be subject to license terms and license restrictions applicable to
the programs. No other rights are granted to the U.S. Government.
This software or hardware is developed for general use in a variety of information management
applications. It is not developed or intended for use in any inherently dangerous applications, including
applications that may create a risk of personal injury. If you use this software or hardware in dangerous
applications, then you shall be responsible to take all appropriate fail-safe, backup, redundancy, and other
measures to ensure its safe use. Oracle Corporation and its affiliates disclaim any liability for any damages
caused by use of this software or hardware in dangerous applications.
Oracle and Java are registered trademarks of Oracle and/or its affiliates. Other names may be trademarks of
their respective owners.
Intel and Intel Xeon are trademarks or registered trademarks of Intel Corporation. All SPARC trademarks
are used under license and are trademarks or registered trademarks of SPARC International, Inc. AMD,
Opteron, the AMD logo, and the AMD Opteron logo are trademarks or registered trademarks of Advanced
Micro Devices. UNIX is a registered trademark of The Open Group.
This software or hardware and documentation may provide access to or information about content,
products, and services from third parties. Oracle Corporation and its affiliates are not responsible for and
expressly disclaim all warranties of any kind with respect to third-party content, products, and services
unless otherwise set forth in an applicable agreement between you and Oracle. Oracle Corporation and its
affiliates will not be responsible for any loss, costs, or damages incurred due to your access to or use of
third-party content, products, or services, except as set forth in an applicable agreement between you and
Oracle.

iii
Content
Preface ................................................................................................................................................................. lv
What's New in This Guide?................................................................................................................... lvii
Part I Introduction to Oracle Access Management
1 Introducing Oracle Access Management
1.1 Understanding Oracle Access Management Services ........................................................... 1-1
1.2 Using Oracle Access Management Access Manager ............................................................. 1-3
1.2.1 Architecting Access Manager ............................................................................................ 1-4
1.2.2 Deploying Access Manager................................................................................................ 1-5
1.3 Features of Access Manager 11.1.2 ........................................................................................... 1-6
1.3.1 Features In Access Manager 11.1.2.................................................................................... 1-6
1.3.2 Features Not In Access Manager 11.1.2............................................................................ 1-9
1.4 System Requirements and Certification .................................................................................. 1-9
1.5 Installing Oracle Access Management.................................................................................. 1-10
1.5.1 About Oracle Access Management Installation .......................................................... 1-10
1.5.2 About Oracle Access Management Post-Installation Tasks ....................................... 1-10
2 Getting Started with Oracle Access Management
2.1 Starting and Stopping Servers in Your Deployment ............................................................. 2-1
2.1.1 Starting Node Manager....................................................................................................... 2-1
2.1.2 Starting and Stopping WebLogic AdminServer.............................................................. 2-2
2.1.3 Starting and Stopping Managed WebLogic Servers and Access Manager Servers ... 2-2
2.2 Specifying the Oracle Access Management Console Administrator................................... 2-3
2.3 Using the New Oracle Access Management Console............................................................ 2-4
2.3.1 Logging In............................................................................................................................. 2-4
2.3.2 Signing Out........................................................................................................................... 2-6
2.3.3 Understanding the Controls............................................................................................... 2-6
2.3.4 Accessing Online Help..................................................................................................... 2-10
2.3.5 Conducting A Search ....................................................................................................... 2-11
2.4 Configuring with the Command-Line Tools ....................................................................... 2-11
2.5 Logging, Auditing, Reporting and Monitoring Performance ........................................... 2-12
2.6 Configuring Oracle Access Management Login Options .................................................. 2-12
2.6.1 Choosing a User Login Language .................................................................................. 2-12
iv
2.6.2 Configuring Persistent Login.......................................................................................... 2-15
Part II Managing Common and System Configurations
3 Managing Common Services and Certificate Validation
3.1 Configuring Oracle Access Management................................................................................ 3-1
3.2 Enabling or Disabling Available Services ............................................................................... 3-2
3.3 Managing Common Settings..................................................................................................... 3-4
3.3.1 About Common Settings Pages ......................................................................................... 3-4
3.3.2 Managing Common Settings ............................................................................................. 3-5
3.3.3 Viewing Common Coherence Settings............................................................................. 3-6
3.4 Managing Certificate Validation and Revocation.................................................................. 3-7
3.4.1 Managing Certificate Revocation Lists............................................................................. 3-7
3.4.2 Enabling OCSP Certificate Validation ............................................................................. 3-8
3.4.3 Enabling CRL Distribution Point Extensions .................................................................. 3-9
3.4.4 Additional OCSP Configurations...................................................................................... 3-9
3.4.5 Using the configureOAMOSCSPCertValidation WLST Command.......................... 3-12
4 Delegating Administration
4.1 Understanding Delegated Administration ............................................................................. 4-1
4.2 Defining the Administrator Roles ............................................................................................ 4-1
4.3 Delegating the Identity Store .................................................................................................... 4-2
4.4 Assigning Roles Using the Administration Console ............................................................. 4-2
4.5 Default Administrators, Roles and Groups ............................................................................ 4-3
4.6 Using the Container Security Framework and MBeans........................................................ 4-4
4.7 Using the Remote Registration Utility..................................................................................... 4-4
4.8 Auditing Reports......................................................................................................................... 4-5
5 Managing Data Sources
5.1 Introducing the Data Sources ................................................................................................... 5-1
5.1.1 About the oam-config.xml Configuration Data File....................................................... 5-3
5.1.2 About the Default LDAP Group........................................................................................ 5-4
5.2 Managing OAM Identity Stores ............................................................................................... 5-4
5.2.1 About User Identity Stores................................................................................................. 5-4
5.2.2 Using Multiple Identity Stores........................................................................................... 5-5
5.2.3 About the User Identity Store Registration Page............................................................ 5-7
5.2.4 Registering a New User Identity Store .......................................................................... 5-10
5.2.5 Viewing or Editing a User Identity Store Registration ............................................... 5-11
5.2.6 Deleting a User Identity Store Registration .................................................................. 5-12
5.3 Managing the Identity Directory Service User Identity Stores ......................................... 5-12
5.3.1 Using Identity Directory Services .................................................................................. 5-13
5.3.2 Creating an Identity Directory Service Profile ............................................................. 5-14
5.3.3 Editing or Deleting an Identity Directory Service Profile........................................... 5-17
5.3.4 Creating a Form-fill Application Identity Directory Service Profile......................... 5-20
5.3.5 Understanding the Pre-Configured Identity Directory Service Profile.................... 5-20
5.3.6 Creating an Identity Directory Service Repository...................................................... 5-20
v
5.4 Setting the Default Store and System Store.......................................................................... 5-21
5.5 Managing the Administrators Role....................................................................................... 5-22
5.5.1 About Managing the Administrator Role ..................................................................... 5-22
5.5.2 Managing Administrator Roles ...................................................................................... 5-23
5.6 Managing the Policy and Session Database ........................................................................ 5-25
5.6.1 About the Database Store for Policy, Password Management, and Sessions.......... 5-25
5.6.2 About Database Deployment.......................................................................................... 5-25
5.6.3 Configuring a Separate Database for Access Manager Sessions ............................... 5-26
5.7 Introduction to Oracle Access Management Keystores ..................................................... 5-27
5.7.1 About Access Manager Security Keys and the Embedded Java Keystore ............... 5-27
5.7.2 About Access Manager Keystores.................................................................................. 5-28
5.7.3 About Identity Federation Keystore .............................................................................. 5-30
5.8 Integrating a Supported LDAP Directory with Oracle Access Manager ........................ 5-30
6 Managing Server Registration
6.1 Prerequisites ................................................................................................................................ 6-1
6.2 Introduction to OAM Servers, Registration, and Management........................................... 6-1
6.2.1 About Individual OAM Server Registrations ................................................................. 6-2
6.2.2 About the Embedded Proxy Server and Backward Compatibility .............................. 6-3
6.2.3 About 11g SSO, Legacy 10g SSO in Combination with OSSO 10g............................... 6-3
6.2.4 About Communication Between OAM Servers and Webgates.................................... 6-4
6.2.5 About Restarting Servers After Configuration Changes ............................................... 6-4
6.3 Managing Individual OAM Server Registrations ................................................................. 6-5
6.3.1 About the OAM Server Registration Page ...................................................................... 6-5
6.3.2 Registering a Fresh OAM Server Instance ....................................................................... 6-8
6.3.3 Viewing or Editing Individual OAM Server and Proxy Settings ................................ 6-9
6.3.4 Deleting an Individual Server Registration .................................................................. 6-10
7 Using Multi-Data Centers
7.1 Introducing Multi-Data Center................................................................................................. 7-1
7.1.1 Providing a Multi-Data Center Solution .......................................................................... 7-3
7.1.2 Supported Multi-Data Center Topologies........................................................................ 7-5
7.1.3 Understanding Access Manager Security Modes for Multi-Data Center.................... 7-7
7.2 Understanding Multi-Data Center Deployments ............................................................... 7-10
7.2.1 Session Adoption Without Re-authentication, Session Invalidation or Session Data
Retrieval 7-11
7.2.2 Session Adoption Without Re-authentication But With Session Invalidation & Session
Data Retrieval 7-12
7.2.3 Session Adoption Without Re-authentication & Session Invalidation But With
On-demand Session Data Retrieval 7-13
7.2.4 Authentication & Authorization Requests Served By Different Data Centers........ 7-13
7.2.5 Logout and Session Invalidation.................................................................................... 7-14
7.3 Before Deploying Multi-Data Centers .................................................................................. 7-15
7.4 Deploying Multi-Data Centers............................................................................................... 7-16
7.5 Load Balancing Between Access Management Components............................................ 7-18
7.6 Setting Up A Multi-Data Center ............................................................................................ 7-20
7.7 Syncing Multi-Data Centers ................................................................................................... 7-24
vi
7.7.1 How Automated Policy Synchronizaton Works.......................................................... 7-24
7.7.2 Understanding the Replication Agreement ................................................................. 7-25
7.7.3 Enabling the Replication Service .................................................................................... 7-26
7.8 Understanding Time Outs and Session Syncs..................................................................... 7-29
7.8.1 Ensuring Maximum Session Constraints ...................................................................... 7-29
7.8.2 Configuring Policies for Idle Timeout ........................................................................... 7-29
7.8.3 Expiring Multi-Data Center Sessions............................................................................. 7-30
7.8.4 Synchronizing Sessions and Multi-Data Center Fail Over ......................................... 7-30
7.9 WLST Commands for Multi-Data Centers........................................................................... 7-33
7.9.1 enableMultiDataCentreMode ......................................................................................... 7-33
7.9.2 disableMultiDataCentreMode ........................................................................................ 7-34
7.9.3 addPartnerForMultiDataCentre ..................................................................................... 7-35
7.9.4 removePartnerForMultiDataCentre............................................................................... 7-36
7.9.5 setMultiDataCenterType ................................................................................................. 7-37
7.9.6 setMultiDataCenterWrite ................................................................................................ 7-37
7.9.7 setMultiDataCentreClusterName .................................................................................. 7-38
7.9.8 validateMDCConfig ......................................................................................................... 7-38
7.10 Replicating Domains with Multi-Data Centers and Identity Manager ........................... 7-38
7.11 Multi-Data Center Recommendations .................................................................................. 7-39
7.11.1 Using a Common Domain............................................................................................... 7-39
7.11.2 Using an External Load Balancer ................................................................................... 7-40
7.11.3 Honoring Maximum Sessions......................................................................................... 7-40
7.12 Cloning with T2P ..................................................................................................................... 7-40
7.12.1 Move OPSS Data............................................................................................................... 7-40
Part III Logging, Auditing, Reporting and Monitoring Performance
8 Logging Component Event Messages
8.1 Prerequisites ................................................................................................................................ 8-1
8.2 Introduction to Logging Component Event Messages.......................................................... 8-1
8.2.1 About Component Loggers................................................................................................ 8-3
8.2.2 Sample Logger and Log Handler Definition ................................................................... 8-4
8.2.3 About Logging Levels......................................................................................................... 8-5
8.3 Configuring Logging for Access Manager ............................................................................. 8-5
8.3.1 Modifying the Logger Level for Access Manager........................................................... 8-6
8.3.2 Adding an Access Manager-Specific Logger and Log Handler.................................... 8-7
8.4 Configuring Logging for Security Token Service and Identity Federation........................ 8-8
8.4.1 Configuring Logging for Security Token Service or Identity Federation ................... 8-9
8.4.2 Defining Log Level and Log Details for Security Token Service or Identity Federation..
8-10
8.5 Validating Run-time Event Logging Configuration ........................................................... 8-11
9 Auditing Administrative and Run-time Events
9.1 Understanding Oracle Fusion Middleware Auditing ........................................................... 9-1
9.2 Introduction to Oracle Access Management Auditing ......................................................... 9-2
9.2.1 About Oracle Access Management Auditing Configuration ....................................... 9-2
9.2.2 About Audit Record Storage.............................................................................................. 9-3
vii
9.2.3 About Audit Reports and Oracle Business Intelligence Publisher............................... 9-4
9.2.4 About the Audit Log and Data .......................................................................................... 9-6
9.3 Access Manager Events You Can Audit.................................................................................. 9-6
9.3.1 Access Manager Administrative Events You Can Audit............................................... 9-6
9.3.2 Access Manager Run-time Events You Can Audit ......................................................... 9-9
9.3.3 Auditing Authentication Events..................................................................................... 9-11
9.4 Mobile and Social Events You Can Audit............................................................................ 9-11
9.4.1 REST Run-Time Audit Events ........................................................................................ 9-12
9.4.2 Mobile and Social Audit Events ..................................................................................... 9-12
9.5 Identity Federation Events You Can Audit.......................................................................... 9-14
9.5.1 Session Management Events for Identity Federation.................................................. 9-14
9.5.2 Protocol Flow Events for Identity Federation .............................................................. 9-15
9.5.3 Server Configuration Events for Identity Federation.................................................. 9-15
9.5.4 Security Events for Identity Federation......................................................................... 9-16
9.6 Security Token Service Events You Can Audit ................................................................... 9-16
9.6.1 About Audit Record Content Common to All Events ................................................ 9-17
9.6.2 Security Token Service Administrative Events You Can Audit ................................ 9-17
9.6.3 Security Token Service Run-time Events You Can Audit .......................................... 9-19
9.7 Setting Up Auditing for Oracle Access Management ........................................................ 9-20
9.7.1 Setting Up the Audit Database Store ............................................................................. 9-21
9.7.2 Preparing Oracle Business Intelligence Publisher EE ................................................. 9-21
9.7.3 Using the Oracle Access Management Console for Audit Configuration .............. 9-22
9.7.4 Adding, Viewing, or Editing Audit Settings ............................................................... 9-24
9.8 Validating Auditing and Reports ......................................................................................... 9-25
10 Logging WebGate Event Messages
10.1 About Logging, Log Levels, and Log Output...................................................................... 10-1
10.1.1 About Log Levels.............................................................................................................. 10-2
10.1.2 About Log Output ............................................................................................................ 10-3
10.2 About Log Configuration File Paths and Contents ............................................................ 10-4
10.2.1 Log Configuration File Paths and Names..................................................................... 10-4
10.2.2 Log Configuration File Contents .................................................................................... 10-5
10.3 About Directing Log Output to a File or the System File .................................................. 10-9
10.4 Structure and Parameters of the Log Configuration File................................................. 10-10
10.4.1 The Log Configuration File Header............................................................................. 10-11
10.4.2 The Initial Compound List ............................................................................................ 10-11
10.4.3 The Simple List and Logging Threshold..................................................................... 10-11
10.4.4 The Second Compound List and Log Handlers......................................................... 10-13
10.4.5 The List for Per-Module Logging................................................................................. 10-14
10.4.6 The Filter List................................................................................................................... 10-14
10.4.7 About XML Element Order........................................................................................... 10-15
10.5 About Activating and Suppressing Logging Levels......................................................... 10-16
10.5.1 About Log Handler Precedence ................................................................................... 10-16
10.6 Mandatory Log-Handler Configuration Parameters........................................................ 10-17
10.6.1 Settings in the Default Log Configuration File .......................................................... 10-18
10.7 Configuring Different Threshold Levels for Different Types of Data............................ 10-21
10.7.1 About the MODULE_CONFIG Section....................................................................... 10-22
viii
10.7.2 Configuring a Log Level Threshold for a Function or Module ............................... 10-24
10.8 Filtering Sensitive Attributes................................................................................................ 10-26
11 Reporting
11.1 Using the Reports..................................................................................................................... 11-1
11.2 Accessing Oracle Access Management Reports .................................................................. 11-2
11.3 Supported Output Formats .................................................................................................... 11-2
11.4 Reports for Access Manager................................................................................................... 11-3
11.4.1 Account Management Reports ....................................................................................... 11-3
11.4.2 Authentication Reports.................................................................................................... 11-3
11.4.3 Errors and Exceptions ...................................................................................................... 11-4
11.5 Creating Reports Using Third-Party Software .................................................................... 11-6
12 Monitoring Performance and Health
12.1 Introduction to Performance Monitoring............................................................................. 12-1
12.2 Reviewing DMS Metric Tables .............................................................................................. 12-2
12.3 Monitoring Server Metrics...................................................................................................... 12-2
12.3.1 Monitoring Server Instance Performance ..................................................................... 12-2
12.3.2 Reviewing Server Metrics Using Oracle Access Management Console................... 12-3
12.4 Monitoring SSO Agent Metrics.............................................................................................. 12-6
12.4.1 Monitoring Agent Metrics Using Oracle Access Management Console .................. 12-6
12.4.2 Reviewing OAM Agent Metrics .................................................................................... 12-6
12.4.3 Reviewing OSSO Agent Metrics..................................................................................... 12-8
12.5 Introduction to OAM Proxy Metrics and Tuning ............................................................... 12-9
12.5.1 About OAM Proxy Metrics ........................................................................................... 12-10
12.5.2 OAM Proxy Server Tuning Parameters....................................................................... 12-10
12.6 Reviewing OpenSSO Metrics in the DMS Console........................................................... 12-11
12.6.1 OpenSSO Proxy Events and Metrics: Server ............................................................. 12-11
12.6.2 OpenSSO Proxy Metrics: Agent ................................................................................... 12-12
12.6.3 Reviewing OpenSSO Metrics Using the DMS Console............................................. 12-12
12.7 Monitoring the Health of an Access Manager Server....................................................... 12-13
12.7.1 Understanding WebGate and Access Manager Communications .......................... 12-13
12.7.2 Monitoring Access Manager Server Health................................................................ 12-13
13 Monitoring Performance and Logs with Fusion Middleware Control
13.1 Prerequisites ............................................................................................................................. 13-1
13.2 Introduction to Fusion Middleware Control ...................................................................... 13-1
13.3 Logging In to and Out of Fusion Middleware Control ...................................................... 13-2
13.3.1 About the Login Page for Fusion Middleware Control .............................................. 13-3
13.3.2 Logging In To Fusion Middleware Control.................................................................. 13-3
13.3.3 Logging Out of Fusion Middleware Control................................................................ 13-3
13.4 Displaying Menus and Pages in Fusion Middleware Control ......................................... 13-3
13.4.1 About the Farm Page in Fusion Middleware Control................................................. 13-4
13.4.2 About Context Menus and Pages in Fusion Middleware Control ............................ 13-5
13.4.3 Displaying Context Menus and Target Details in Fusion Middleware Control ..... 13-7
13.5 Viewing Performance in Fusion Middleware Control ....................................................... 13-8
ix
13.5.1 About Performance Overview Pages in Fusion Middleware Control ..................... 13-9
13.5.2 About the Metrics Palette and the Performance Summary Page ............................ 13-15
13.5.3 Displaying Performance Metrics in Fusion Middleware Control ........................... 13-17
13.5.4 Displaying Component-Specific Performance Details.............................................. 13-19
13.6 Managing Log Level Changes in Fusion Middleware Control....................................... 13-19
13.6.1 About Dynamic Log Level Changes ............................................................................ 13-20
13.6.2 Setting Log Levels Dynamically Using Fusion Middleware Control ..................... 13-24
13.7 Managing Log File Configuration from Fusion Middleware Control ........................... 13-24
13.7.1 About Log File Configuration....................................................................................... 13-24
13.7.2 Managing Log File Configuration by Using Fusion Middleware Control............. 13-27
13.8 Viewing Log Messages in Fusion Middleware Control................................................... 13-28
13.8.1 About Finding, Viewing, and Exporting Log Messages........................................... 13-28
13.8.2 Viewing Logged Messages With Fusion Middleware Control................................ 13-32
13.9 Displaying MBeans in Fusion Middleware Control......................................................... 13-33
13.9.1 About the System MBean Browser............................................................................... 13-34
13.9.2 Managing Mbeans .......................................................................................................... 13-36
13.10 Displaying Farm Routing Topology in Fusion Middleware Control............................. 13-37
13.10.1 About the Routing Topology ........................................................................................ 13-37
13.10.2 Viewing the Routing Topology using Fusion Middleware Control ...................... 13-39
Part IV Managing Access Manager Settings and Agents
14 Configuring Access Manager Settings
14.1 Prerequisites ............................................................................................................................. 14-1
14.2 Managing Load Balancing ..................................................................................................... 14-1
14.2.1 About Common Load Balancing Settings .................................................................... 14-1
14.2.2 Managing OAM Server Load Balancing ...................................................................... 14-2
14.3 Managing Secure Error Modes ............................................................................................. 14-3
14.3.1 About OAM Server Error Modes ................................................................................... 14-3
14.3.2 Managing OAM Server Secure Error Modes................................................................ 14-5
14.4 Managing SSO Tokens and IP Validation ............................................................................ 14-5
14.4.1 About Access Manager SSO Tokens and IP Validation Settings............................... 14-5
14.4.2 Managing SSO Tokens and IP Validation..................................................................... 14-6
14.5 Managing the Access Protocol for OAM Proxy Simple and Cert Mode Security.......... 14-6
14.5.1 About Simple and Cert Mode Transport Security....................................................... 14-7
14.5.2 About the Common OAM Proxy Page for Secure Server Communications ........... 14-8
14.5.3 Viewing or Editing Simple or Cert Settings for OAM Proxy .................................... 14-8
14.5.4 Configuring 64-bit WebGate in Cert Mode................................................................... 14-9
14.5.5 Tuning the Simple Mode WebGate................................................................................ 14-9
14.6 Managing Run Time Policy Evaluation Caches .................................................................. 14-9
14.6.1 About Run Time Policy Evaluation Caches.................................................................. 14-9
14.6.2 Managing Run Time Policy Evaluation Caches......................................................... 14-10
15 Introduction to Agents and Registration
15.1 Introduction to Policy Enforcement Agents ........................................................................ 15-1
15.1.1 About Agent Types and Runtime Processing ........................................................... 15-1
x
15.1.2 About 11g Webgate Configured as a Detached Credential Collector....................... 15-4
15.1.3 About 11g Webgate Functionality for Mobile and Social .......................................... 15-5
15.1.4 About the Pre-Registered 10g Webgate IAMSuiteAgent ........................................... 15-5
15.2 Introduction to Agent Registration ....................................................................................... 15-5
15.2.1 About Agent Registration, Keys, and Policies ............................................................. 15-6
15.2.2 About File System Changes and Artifacts for Registered Agents............................. 15-7
15.3 Introduction to Remote Registration..................................................................................... 15-8
15.3.1 About Performing In-Band Remote Registration ........................................................ 15-8
15.3.2 About Performing Out-of-Band Remote Registration ............................................... 15-9
15.3.3 About Updated Agent Configuration Files ................................................................ 15-10
16 Registering and Managing OAM 11g Agents
16.1 Prerequisites ............................................................................................................................. 16-1
16.2 Understanding OAM Agent Registration Parameters in the Console............................. 16-2
16.2.1 About Create OAM WebGate Page and Parameters................................................... 16-2
16.2.2 About User-Defined WebGate Parameters................................................................... 16-5
16.2.3 About IP Address Validation for WebGates............................................................... 16-10
16.3 Registering an OAM Agent Using the Console................................................................. 16-12
16.4 Configuring and Managing Registered OAM Agents Using the Console .................... 16-14
16.4.1 Understanding Registered OAM Agent Configuration Parameters in the Console .........
16-14
16.4.2 Searching for an OAM Agent Registration................................................................. 16-20
16.4.3 Viewing or Editing an OAM Agent Registration Page in the Console................... 16-22
16.4.4 Deleting OAM Agent Registration Using the Console ............................................. 16-23
16.5 Understanding the Remote Registration Tool, Modes, and Process.............................. 16-24
16.5.1 About Remote Registration Command Arguments and Modes ............................. 16-24
16.5.2 Common Elements within Remote Registration Request Templates ..................... 16-25
16.5.3 About Key Use, Generation, Provisioning, and Storage........................................... 16-26
16.6 Understanding Remote Registration Templates: OAM Agents...................................... 16-28
16.6.1 OAM Agent Parameters for Remote Registration ..................................................... 16-28
16.7 Performing Remote Registration for OAM Agents .......................................................... 16-31
16.7.1 Acquiring and Setting Up the Remote Registration Tool ........................................ 16-32
16.7.2 Creating Your Remote Registration Request.............................................................. 16-33
16.7.3 Performing In-Band Remote Registration .................................................................. 16-33
16.7.4 Performing Out-of-Band Remote Registration .......................................................... 16-34
16.8 Introduction to Updating Agents Remotely ...................................................................... 16-36
16.8.1 About Remote Agent Update Modes ......................................................................... 16-36
16.8.2 About Remote 11g OAM Agent Updates Template.................................................. 16-36
16.9 Updating Agents Remotely ................................................................................................. 16-37
16.9.1 Updating Agents Remotely........................................................................................... 16-37
16.9.2 Performing Remote Agent Validation......................................................................... 16-38
16.9.3 Performing Remote Agent Removal............................................................................ 16-38
16.10 Validating Remote Registration and Resource Protection............................................... 16-38
16.10.1 Validating Agent Registration using the Oracle Access Management Console.... 16-39
16.10.2 Validating Authentication and Access After Remote Registration ........................ 16-39
16.11 Replacing the IAMSuiteAgent with an 11g WebGate ...................................................... 16-41
16.11.1 Registering a Replacement 11g WebGate for IAMSuiteAgent ................................ 16-42
xi
16.11.2 Installing the Replacement 11g WebGate for IAMSuiteAgent ................................ 16-44
16.11.3 Updating the WebLogic Server Plug-in ..................................................................... 16-44
16.11.4 Confirming the AutoLogin Host Identifier for an OAM / OIM Integration......... 16-45
16.11.5 Configuring OAM Security Providers for WebLogic................................................ 16-46
16.11.6 Disabling IAMSuiteAgent ............................................................................................. 16-49
16.11.7 Verification ...................................................................................................................... 16-50
16.12 Managing the Preferred Host in 10g WebGates................................................................ 16-50
16.12.1 setAllowEmptyHostIdentifier ...................................................................................... 16-51
17 Maintaining Access Manager Sessions
17.1 Introducing Access Manager Session Management ........................................................... 17-1
17.2 Understanding Server-Side Session Management.............................................................. 17-2
17.2.1 Securing Access Manager Sessions ................................................................................ 17-2
17.2.2 Understanding the Access Manager Session Lifecycle, States, and Enforcement... 17-3
17.2.3 Access Manager Sessions and the Role of Oracle Coherence..................................... 17-6
17.3 Server-Side Session Enforcement Examples ........................................................................ 17-7
17.3.1 Example 1: Single Authentication Scheme.................................................................... 17-8
17.3.2 Example 2: Multiple Authentication Schemes.............................................................. 17-8
17.4 Configuring the Server-Side Session Lifecycle ................................................................... 17-9
17.4.1 About Global Session Lifecycle Settings ....................................................................... 17-9
17.4.2 About Application-Specific Session Overrides .......................................................... 17-11
17.4.3 Viewing or Modifying Global Session Settings.......................................................... 17-11
17.4.4 Viewing or Modifying Optional Application-Specific Session Overrides ............. 17-12
17.5 Managing Active Server-Side Sessions............................................................................... 17-12
17.5.1 About the Session Management Pages........................................................................ 17-13
17.5.2 Managing Active Sessions............................................................................................. 17-16
17.6 Verifying Server-Side Session Operations.......................................................................... 17-17
17.7 Understanding Client-Side Session Management............................................................. 17-18
17.8 Using WLST To Configure Session Management............................................................. 17-18
17.8.1 displaySSOSessionType................................................................................................. 17-18
17.8.2 configSSOSessionType................................................................................................... 17-19
Part V Managing Access Manager SSO, Policies, and Testing
18 Understanding Single Sign-On with Access Manager
18.1 Introducing Access Manager Single Sign-On ..................................................................... 18-1
18.1.1 About Multiple Network Domain SSO ......................................................................... 18-4
18.1.2 About Application SSO and Access Manager .............................................................. 18-4
18.1.3 About Multiple WebLogic Server Domain SSO........................................................... 18-5
18.1.4 About Reverse-Proxy SSO............................................................................................... 18-6
18.2 Understanding the Access Manager Policy Model............................................................. 18-7
18.3 Anatomy of an Application Domain and Policies ............................................................ 18-10
18.3.1 About Resource Definitions for Policies...................................................................... 18-11
18.3.2 About Authentication Policies ..................................................................................... 18-11
18.3.3 About Authorization Policies ....................................................................................... 18-12
18.3.4 About Token Issuance Policies ..................................................................................... 18-13
xii
18.4 Introduction to Policy Conditions and Rules .................................................................... 18-13
18.5 Introducing Access Manager Credential Collection and Login ..................................... 18-14
18.5.1 About Access Manager Credential Collection............................................................ 18-14
18.5.2 About SSO Login Processing with OAM Agents and ECC...................................... 18-16
18.5.3 About Login Processing with OAM Agents and DCC ............................................ 18-18
18.5.4 About SSO Login Processing with OSSO Agents (mod_osso) and ECC................ 18-21
18.6 Understanding SSO Cookies ................................................................................................ 18-23
18.6.1 About Single Sign-On Cookies During User Login................................................... 18-23
18.6.2 About Single Sign-On Server and Agent Cookies ..................................................... 18-24
18.7 Introduction to Configuration Tasks for Single Sign-On................................................. 18-28
19 Managing Authentication and Shared Policy Components
19.1 Prerequisites ............................................................................................................................. 19-1
19.2 Understanding Authentication and Shared Policy Component Tasks ........................... 19-2
19.3 Managing Resource Types...................................................................................................... 19-2
19.3.1 About Resource Types and Their Use ........................................................................... 19-3
19.3.2 About the Resource Type Page....................................................................................... 19-4
19.3.3 Searching for a Specific Resource Type......................................................................... 19-6
19.3.4 Creating a Custom Resource Type................................................................................. 19-7
19.4 Managing Host Identifiers...................................................................................................... 19-7
19.4.1 About Host Identifiers ..................................................................................................... 19-8
19.4.2 About Virtual Web Hosting ......................................................................................... 19-10
19.4.3 About the Host Identifier Page..................................................................................... 19-14
19.4.4 Creating a Host Identifier.............................................................................................. 19-15
19.4.5 Searching for a Host Identifier Definition................................................................... 19-16
19.4.6 Viewing or Editing a Host Identifier Definition ........................................................ 19-16
19.4.7 Deleting a Host Identifier Definition ........................................................................... 19-17
19.5 Understanding Authentication Methods and Credential Collectors ............................. 19-17
19.5.1 About Different Authentication Methods................................................................... 19-18
19.5.2 Comparing Embedded Credential Collector with Detached Credential Collector ...........
19-19
19.5.3 Authentication Event Logging and Auditing ............................................................ 19-22
19.6 Managing Native Authentication Modules ....................................................................... 19-23
19.6.1 About Native Access Manager Authentication Modules ........................................ 19-23
19.6.2 Viewing or Editing Native Authentication Modules ................................................ 19-27
19.6.3 Deleting a Native Authentication Module.................................................................. 19-28
19.7 Orchestrating Multi-Step Authentication with Plug-in Based Modules ...................... 19-28
19.7.1 Comparing Simple Form and Multi-Factor (Multi-Step) Authentication .............. 19-29
19.7.2 About Plug-ins for Multi-Step Authentication Modules ......................................... 19-30
19.7.3 About Plug-in Based Modules for Multi-Step Authentication ................................ 19-38
19.7.4 Example: Leveraging SubjectAltName Extension Data and Integrating with Multiple
OCSP Endpoints 19-44
19.7.5 Creating and Orchestrating Plug-in Based Multi-Step Authentication Modules . 19-46
19.7.6 Creating and Managing Step-Up Authentication ..................................................... 19-48
19.7.7 Configuring an HTTPToken Extractor Plug-in .......................................................... 19-53
19.7.8 Configuring a JSON Web Token Plug-in .................................................................... 19-54
19.8 Deploying and Managing Individual Plug-ins for Authentication................................ 19-55
xiii
19.8.1 About Managing Your Own Authentication Plug-ins .............................................. 19-56
19.8.2 Making Custom Authentication Plug-ins Available for Use ................................... 19-61
19.8.3 Checking an Authentication Plug-in's Activation Status.......................................... 19-63
19.8.4 Deleting Your Custom Authentication Plug-ins........................................................ 19-63
19.9 Managing Authentication Schemes..................................................................................... 19-64
19.9.1 About Authentication Schemes and Pages ................................................................. 19-65
19.9.2 Understanding Multi-Level and Step-Up Authentication........................................ 19-79
19.9.3 Creating an Authentication Scheme ............................................................................ 19-82
19.9.4 Searching for an Authentication Scheme .................................................................... 19-83
19.9.5 Viewing, Editing, or Deleting an Authentication Scheme........................................ 19-83
19.10 Extending Authentication Schemes with Advanced Rules ............................................. 19-84
19.10.1 Using Pre-Authentication Advanced Rules................................................................ 19-85
19.10.2 Understanding Sample Advanced Rules .................................................................... 19-86
19.11 Configuring Challenge Parameters for Encrypted Cookies ............................................ 19-87
19.11.1 About Challenge Parameters for Encrypted Cookies................................................ 19-87
19.11.2 Configuring Challenge Parameters for Security of Encrypted Cookies................. 19-88
19.11.3 Setting Challenge Parameters for Persistence of Encrypted Cookies ..................... 19-89
19.12 Understanding Password Policy ......................................................................................... 19-89
19.12.1 Previewing Oracle-Provided Password Forms and Functionality.......................... 19-89
19.12.2 Previewing the Password Policy Page in Oracle Access Management Console... 19-91
19.12.3 About Credential Collectors and Password Policy Validation................................ 19-93
19.13 Managing Global Password Policy ..................................................................................... 19-97
19.13.1 Defining Your Global Password Policy....................................................................... 19-98
19.13.2 Designating the Default Store for Your Password Policy......................................... 19-98
19.13.3 Adding Key Password Attributes to the Default Store............................................. 19-99
19.13.4 Adding an Administrator to Change User Attributes After a Password Change .............
19-101
19.14 Configuring Password Policy Authentication ................................................................ 19-103
19.14.1 Configuring the Password Policy Validation Authentication Module ................ 19-103
19.14.2 Configuring the PasswordPolicyValidationScheme .............................................. 19-106
19.14.3 Adding Your PasswordPolicyValidationScheme to ECC Authentication Policy 19-108
19.15 Configuring 11g WebGates and Authentication Policy for DCC ................................. 19-109
19.15.1 Enabling DCC Credential Operations ....................................................................... 19-109
19.15.2 Locating and Updating DCC Forms for Password Policy ..................................... 19-110
19.15.3 Adding PasswordPolicyValidationScheme to Authentication Policy for DCC .. 19-111
19.15.4 Supporting Federation Flows With DCC.................................................................. 19-112
19.16 Completing Password Policy Configuration ................................................................... 19-113
19.16.1 Setting the Error Message Mode for Password Policy Messages .......................... 19-113
19.16.2 Overriding Native LDAP Password Policy Validation........................................... 19-113
19.16.3 Disabling ECC Operation and Using DCC Exclusively.......................................... 19-114
19.16.4 Testing Your Multi-Step Authentication................................................................... 19-115
19.17 Configuring Authentication POST Data Handling......................................................... 19-116
19.17.1 About Authentication Post Data Preservation and Restoration............................ 19-116
19.17.2 About Configuring Authentication POST Data Handling ..................................... 19-118
19.17.3 About Post Data Size Limits........................................................................................ 19-120
19.17.4 Configuring Authentication POST Data Handling ................................................. 19-120
19.17.5 Testing POST Data Handling Configuration............................................................ 19-121
xiv
19.18 Long URL Handling During Authentication................................................................... 19-122
19.18.1 About Long URLs and Authentication Handling.................................................... 19-122
19.18.2 About Configuring Long URL Handling.................................................................. 19-122
19.19 Using Application Initiated Authentication .................................................................... 19-124
19.20 Using the Adaptive Authentication Service .................................................................... 19-124
19.20.1 Understanding the Adaptive Authentication Service............................................. 19-125
19.20.2 Configuring Access Manager for Two-Factor Authentication............................... 19-126
19.20.3 Configuring the Oracle Mobile Authenticator App ................................................ 19-130
19.20.4 Configuring the Google Authenticator App............................................................. 19-134
20 Managing Policies to Protect Resources and Enable SSO
20.1 Prerequisites ............................................................................................................................. 20-1
20.2 Introduction to Application Domain and Policy Creation ................................................ 20-2
20.2.1 Generating Application Domains and Policies Automatically.................................. 20-3
20.2.2 Managing Application Domains and Policies Remotely ............................................ 20-3
20.2.3 Creating or Managing an Application Domain and Policies ..................................... 20-3
20.3 Understanding Application Domain and Policy Management ........................................ 20-4
20.3.1 About Application Domain Pages and Navigation .................................................... 20-5
20.3.2 About the Application Domain Summary Page .......................................................... 20-5
20.3.3 About the Resource Container in an Application Domain......................................... 20-6
20.3.4 About Authentication Policy Pages ............................................................................... 20-7
20.3.5 About Authorization Policy Pages................................................................................. 20-8
20.3.6 About Token Issuance Policy Pages............................................................................. 20-10
20.4 Managing Application Domains and Policies Using the Console.................................. 20-10
20.4.1 About Application Domains Summary Page ............................................................. 20-10
20.4.2 Creating a Fresh Application Domain......................................................................... 20-11
20.4.3 Searching for an Existing Application Domain.......................................................... 20-12
20.4.4 Viewing or Editing an Application Domain............................................................... 20-12
20.4.5 Deleting an Application Domain and Its Contents.................................................... 20-13
20.5 Configuring Policy Ordering ............................................................................................... 20-13
20.6 Adding and Managing Policy Resource Definitions ........................................................ 20-14
20.6.1 Defining Resources in an Application Domain.......................................................... 20-15
20.6.2 Defining Resources in an Application Domain.......................................................... 20-28
20.6.3 Searching for a Resource Definition............................................................................. 20-29
20.6.4 Viewing, Editing, or Deleting a Resource Definition ............................................... 20-31
20.7 Defining Authentication Policies for Specific Resources ................................................. 20-32
20.7.1 About the Authentication Policy Page ........................................................................ 20-33
20.7.2 Creating an Authentication Policy for Specific Resources ....................................... 20-34
20.7.3 Searching for an Authentication Policy....................................................................... 20-35
20.7.4 Viewing or Editing an Authentication Policy............................................................. 20-36
20.7.5 Deleting an Authentication Policy ............................................................................... 20-36
20.8 Defining Authorization Policies for Specific Resources................................................... 20-37
20.8.1 About Authorization Policies for Specific Resources................................................ 20-37
20.8.2 Creating an Authorization Policy and Specific Resources ....................................... 20-38
20.8.3 Searching for an Authorization Policy ....................................................................... 20-39
20.8.4 Viewing or Editing an Authorization Policy and Resources ................................... 20-40
20.8.5 Deleting an Entire Authorization Policy .................................................................... 20-40
xv
20.9 Introduction to Policy Responses for SSO.......................................................................... 20-41
20.9.1 About Authentication and Authorization Policy Responses for SSO..................... 20-41
20.9.2 About the Policy Response Language ......................................................................... 20-43
20.9.3 About the Namespace and Variable Names for Policy Responses ......................... 20-43
20.9.4 About Constructing a Policy Response for SSO......................................................... 20-44
20.9.5 About Policy Response Processing .............................................................................. 20-46
20.9.6 About Assertion Claims and Processing..................................................................... 20-47
20.10 Adding and Managing Policy Responses for SSO ............................................................ 20-47
20.10.1 Adding a Policy Response for SSO .............................................................................. 20-48
20.10.2 Viewing, Editing, or Deleting a Policy Response for SSO ........................................ 20-48
20.11 Introduction to Authorization Policy Rules and Conditions .......................................... 20-49
20.11.1 About Allow or Deny Rules.......................................................................................... 20-50
20.11.2 About Authorization Policy Conditions .................................................................... 20-50
20.11.3 About Classifying Users and Groups for Conditions ............................................... 20-51
20.11.4 Guidelines for Authorization Responses Based on Conditions............................... 20-52
20.12 Defining Authorization Policy Conditions ........................................................................ 20-52
20.12.1 Choosing a Condition Type .......................................................................................... 20-53
20.12.2 Defining Identity Conditions........................................................................................ 20-55
20.12.3 Defining IP4 Range Conditions .................................................................................... 20-61
20.12.4 Defining Temporal Conditions..................................................................................... 20-63
20.12.5 Defining Attribute Conditions...................................................................................... 20-65
20.12.6 Viewing, Editing, or Deleting Authorization Policy Conditions............................. 20-69
20.13 Defining Authorization Policy Rules.................................................................................. 20-69
20.13.1 About Defining Rules in an Authorization Policy..................................................... 20-70
20.13.2 About Expressions and Expression-Based Policy Evaluation.................................. 20-72
20.13.3 Defining Rules in an Authorization Policy................................................................. 20-75
20.14 Validating Authentication and Authorization in an Application Domain ................... 20-76
20.15 Understanding Remote Policy and Application Domain Management........................ 20-76
20.15.1 About Managing Policies Remotely............................................................................. 20-77
20.15.2 About the Create Policy Request Template ................................................................ 20-78
20.15.3 About the Update Policy Request Template............................................................... 20-79
20.15.4 About Remote Policy Management and Templates .................................................. 20-79
20.16 Managing Policies and Application Domains Remotely ................................................. 20-81
20.17 Defining an Application........................................................................................................ 20-81
21 Validating Connectivity and Policies Using the Access Tester
21.1 Prerequisites ............................................................................................................................. 21-1
21.2 Introduction to the Access Tester for Access Manager 11g .............................................. 21-1
21.2.1 About OAM Agent and Server Interoperability .......................................................... 21-3
21.2.2 About Access Tester Security and Processing .............................................................. 21-5
21.2.3 About Access Tester Modes and Administrator Interactions ................................... 21-6
21.3 Installing and Starting the Access Tester.............................................................................. 21-8
21.3.1 Installing the Access Tester ............................................................................................. 21-8
21.3.2 About Access Tester Supported System Properties..................................................... 21-9
21.3.3 Starting the Tester Without System Properties For Use in Tester Console Mode. 21-10
21.3.4 Starting the Access Tester with System Properties For Use in Command Line Mode......
21-11
xvi
21.4 Introduction to the Access Tester Console and Navigation ............................................ 21-12
21.4.1 Access Tester Menus and Command Buttons............................................................ 21-14
21.5 Testing Connectivity and Policies from the Access Tester Console ............................... 21-15
21.5.1 Establishing a Connection Between the Access Tester and the OAM Server........ 21-16
21.5.2 Validating Resource Protection from the Access Tester Console............................ 21-19
21.5.3 Testing User Authentication from the Access Tester Console................................. 21-21
21.5.4 Testing User Authorization from the Access Tester Console .................................. 21-23
21.5.5 Observing Request Latency........................................................................................... 21-24
21.6 Creating and Managing Test Cases and Scripts................................................................ 21-25
21.6.1 About Test Cases and Test Scripts ............................................................................... 21-25
21.6.2 Capturing Test Cases...................................................................................................... 21-26
21.6.3 Generating an Input Test Script.................................................................................... 21-27
21.6.4 Personalizing an Input Test Script ............................................................................... 21-28
21.6.5 Executing a Test Script .................................................................................................. 21-29
21.7 Evaluating Scripts, Log File, and Statistics ........................................................................ 21-32
21.7.1 About Evaluating Test Results...................................................................................... 21-32
21.7.2 About the Saved Connection Configuration File....................................................... 21-33
21.7.3 About the Generated Input Test Script ....................................................................... 21-33
21.7.4 About the Target Output File Containing Test Run Results .................................... 21-35
21.7.5 About the Statistics Document ..................................................................................... 21-37
21.7.6 About the Execution Log ............................................................................................... 21-39
22 Configuring Centralized Logout for Sessions Involving 11g WebGates
22.1 Prerequisites ............................................................................................................................. 22-1
22.2 Introduction to Centralized Logout for Access Manager 11g ........................................... 22-1
22.2.1 About Centralized Logout for 11g Webgates .............................................................. 22-2
22.2.2 About Logout Parameters for 11g Webgates................................................................ 22-2
22.3 Configuring Centralized Logout for 11g Webgates............................................................ 22-4
22.3.1 Configuring Centralized Logout for 11g Webgates When the ECC is Used ........... 22-5
22.3.2 Configuring Logout When Using Detached Credential Collector-Enabled Webgate.......
22-6
22.4 Validating Global Sign-On and Centralized Logout ......................................................... 22-6
22.4.1 Confirming Global Sign-On ............................................................................................ 22-6
22.4.2 Validating Global Sign-On with Mixed Agent Types ................................................. 22-7
22.4.3 Observing Centralized Logout ....................................................................................... 22-8
Part VI Registering and Using Agents with Access Manager
23 Registering and Managing Legacy OpenSSO Agents
23.1 Introduction to OpenSSO, Agents, Migration and Co-existence ...................................... 23-1
23.1.1 About Migration and Co-existence Between OpenSSO and Access Manager ..... 23-2
23.1.2 About OpenSSO Agent Reliance on Access Manager................................................. 23-4
23.2 Runtime Processing Between OpenSSO Agents and Access Manager............................ 23-6
23.3 Understanding OpenSSO Agent Registration Parameters .............................................. 23-10
23.3.1 About OpenSSO Agent Registration Parameters....................................................... 23-10
23.3.2 About the Expanded OpenSSO Agent Page and Parameters .................................. 23-12
23.4 Registering and Managing OpenSSO Agents Using the Console ................................. 23-20
xvii
23.4.1 Registering an OpenSSO Agent using the Oracle Access Management Console . 23-21
23.4.2 Configuring and Managing Registered OpenSSO Agents Using the Console...... 23-22
23.5 Performing Remote Registration for OpenSSO Agents ................................................... 23-23
23.5.1 Understanding Request Templates for OpenSSO Agent Remote Registration..... 23-23
23.5.2 Reviewing OpenSSO Bootstrap Configuration Mappings....................................... 23-25
23.5.3 Performing In-Band Remote Registration with OpenSSO Agents.......................... 23-26
23.5.4 Performing Out-of-Band Remote Registration with OpenSSO Agents.................. 23-27
23.6 Updating Registered OpenSSO Agents Remotely ............................................................ 23-28
23.6.1 Updating OpenSSO Agents Remotely......................................................................... 23-29
23.7 Locating Other OpenSSO Agent Information ................................................................... 23-29
24 Registering and Managing Legacy OSSO Agents
24.1 Understanding OSSO Agents with Access Manager.......................................................... 24-1
24.1.1 About OSSO Agents with Access Manager .................................................................. 24-1
24.1.2 Comparing Access Manager 11g SSO versus OSSO 10g ............................................ 24-2
24.2 Registering OSSO Agents Using Oracle Access Management Console .......................... 24-6
24.2.1 Understanding the Create OSSO Agent Registration Page and Parameters ........... 24-6
24.2.2 Registering an OSSO Agent (mod_osso) Using the Console ..................................... 24-8
24.3 Configuring and Managing Registered OSSO Agents Using the Console...................... 24-9
24.3.1 Understanding the Expanded OSSO Agent Page in the Console.............................. 24-9
24.3.2 Searching for an OSSO Agent (mod_osso) Registration .......................................... 24-10
24.3.3 Viewing or Editing OSSO Agent (mod_osso) Registration...................................... 24-11
24.3.4 Deleting an OSSO Agent (mod_osso) Registration ................................................... 24-11
24.4 Performing Remote Registration for OSSO Agents.......................................................... 24-12
24.4.1 Understanding Request Templates for OSSO Remote Registration ....................... 24-12
24.4.2 Performing In-Band Remote Registration of OSSO Agents ..................................... 24-13
24.4.3 Performing Out-of-Band Remote Registration for OSSO Agents............................ 24-14
24.5 Updating Registered OSSO Agents Remotely................................................................... 24-15
24.6 Configuring Logout for OSSO Agents with Access Manager 11.1.2.............................. 24-16
24.6.1 About Centralized Logout with OSSO Agents (mod_OSSO) and Access Manager..........
24-17
24.6.2 Removing Custom mod_osso Cookies on Logout..................................................... 24-17
24.7 Locating Other OSSO Agent Information .......................................................................... 24-18
25 Registering and Managing 10g WebGates with Access Manager 11g
25.1 Prerequisites ............................................................................................................................. 25-1
25.2 Introduction to 10g OAM Agents for Access Manager 11g............................................... 25-2
25.2.1 About IAMSuiteAgent: A Pre-Configured 10g WebGate Registered with Access
Manager 25-2
25.2.2 About Legacy Oracle Access Manager 10g Deployments and WebGates ............... 25-2
25.2.3 About Installing Fresh 10g WebGates to Use With Access Manager 11.1.2 ............ 25-3
25.2.4 About Centralized Logout with 10g OAM Agents and 11g OAM Servers.............. 25-4
25.3 Comparing Access Manager 11.1.2 and 10g ........................................................................ 25-5
25.3.1 Comparing Access Manager 11g versus 10g ................................................................ 25-5
25.3.2 Comparing Access Manager 11g versus 10g Policy Model........................................ 25-7
25.4 Configuring Centralized Logout for IAMSuiteAgent ...................................................... 25-10
xviii
25.5 Registering a 10g WebGate with Access Manager 11g Remotely................................... 25-11
25.6 Managing 10g OAM Agents Remotely............................................................................... 25-13
25.7 Locating and Installing the Latest 10g WebGate for Access Manager 11g.................... 25-14
25.7.1 Preparing for a Fresh 10g WebGate Installation with Access Manager 11g.......... 25-14
25.7.2 Locating and Downloading 10g WebGates for Use with Access Manager 11g .... 25-16
25.7.3 Starting WebGate 10g Installation................................................................................ 25-17
25.7.4 Specifying a Transport Security Mode ........................................................................ 25-18
25.7.5 Requesting or Installing Certificates for Secure Communications.......................... 25-18
25.7.6 Specifying WebGate Configuration Details................................................................ 25-19
25.7.7 Updating the WebGate Web Server Configuration................................................... 25-19
25.7.8 Finishing WebGate Installation .................................................................................... 25-21
25.7.9 Installing Artifacts and Certificates ............................................................................. 25-21
25.7.10 Confirming WebGate Installation ................................................................................ 25-22
25.8 Configuring Centralized Logout for 10g WebGate with 11g OAM Servers ................. 25-22
25.8.1 About Centralized Logout Processing for 10g WebGate with 11g OAM Server .. 25-23
25.8.2 About the Centralized Logout Script for 10g WebGates with 11g OAM Servers. 25-24
25.8.3 Configuring Centralized Logout for 10g WebGates with Access Manager........... 25-26
25.9 Removing a 10g WebGate from the Access Manager 11g Deployment ........................ 25-27
26 Configuring Apache, OHS, IHS for 10g WebGates
26.1 Prerequisites ............................................................................................................................. 26-1
26.2 About Oracle HTTP Server and Access Manager............................................................... 26-1
26.3 About Access Manager with Apache and IHS v2 Webgates............................................. 26-2
26.3.1 About the Apache HTTP Server..................................................................................... 26-3
26.3.2 About the IBM HTTP Server........................................................................................... 26-3
26.3.3 About the Apache and IBM HTTP Reverse Proxy Server .......................................... 26-3
26.4 About Apache v2 Architecture and Access Manager......................................................... 26-4
26.5 Requirements for Oracle HTTP Server, IHS, Apache v2 Web Servers ............................ 26-5
26.5.1 Requirements for IHS2 Web Servers.............................................................................. 26-6
26.5.2 Requirements for Apache and IHS v2 Reverse Proxy Servers................................... 26-6
26.5.3 Requirements for Apache v2 Web Servers.................................................................... 26-6
26.6 Preparing Your Web Server.................................................................................................... 26-7
26.6.1 Preparing the IHS v2 Web Server .................................................................................. 26-8
26.6.2 Preparing Apache and Oracle HTTP Server Web Servers on Linux....................... 26-11
26.6.3 Preparing Oracle HTTP Server Web Servers on Linux and Windows Platforms. 26-11
26.6.4 Setting Oracle HTTP Server Client Certificates.......................................................... 26-12
26.6.5 Preparing the Apache v2 Web Server on UNIX......................................................... 26-12
26.6.6 Preparing the Apache v2 SSL Web Server on AIX..................................................... 26-16
26.6.7 Preparing the Apache v2 Web Server on Windows ................................................. 26-17
26.7 Activating Reverse Proxy for Apache v2 and IHS v2....................................................... 26-19
26.7.1 Activating Reverse Proxy For Apache v2 Web Servers ............................................ 26-19
26.7.2 Activating Reverse Proxy For IHS v2 Web Servers................................................... 26-20
26.8 Verifying httpd.conf Updates for Webgates...................................................................... 26-22
26.8.1 Verifying Webgate Details............................................................................................. 26-22
26.8.2 Verifying Language Encoding ...................................................................................... 26-24
26.9 Tuning Oracle HTTP Server Webgates for Access Manager........................................... 26-25
26.10 Tuning OHS /Apache Prefork and Worker MPM Modules for OAM.......................... 26-25
xix
26.10.1 Tuning Oracle HTTP Server /Apache Prefork MPM Module................................. 26-26
26.10.2 Tuning Oracle HTTP Server /Apache Worker MPM Module ................................ 26-26
26.10.3 Tuning Kernel Parameters............................................................................................. 26-27
26.11 Starting and Stopping Oracle HTTP Server Web Servers................................................ 26-27
26.12 Tuning Apache/IHS v2 Webgates for Access Manager ................................................. 26-27
26.13 Removing Web Server Configuration Changes After Uninstall..................................... 26-30
26.14 Helpful Information ............................................................................................................. 26-30
27 Configuring the ISA Server for 10g WebGates
27.1 Prerequisites ............................................................................................................................. 27-1
27.2 About Access Manager and the ISA Server ........................................................................ 27-1
27.3 Compatibility and Platform Support ................................................................................... 27-2
27.4 Installing and Configuring Webgate for the ISA Server .................................................... 27-2
27.4.1 Installing Webgate with ISA Server............................................................................... 27-2
27.4.2 Changing /access Directory Permissions .................................................................... 27-3
27.5 Configuring the ISA Server for the ISAPI Webgate............................................................ 27-3
27.5.1 Registering Access Manager Plug-ins as ISA Server Web Filters.............................. 27-3
27.5.2 Configuring ISA Firewall Policies for ISA Web Filters ............................................... 27-4
27.5.3 Ordering the ISAPI Filters............................................................................................... 27-6
27.6 Starting, Stopping, and Restarting the ISA Server ............................................................. 27-7
27.7 Removing Access Manager Filters Before Webgate Uninstall on ISA Server................. 27-7
28 Configuring the IIS Web Server for 10g WebGates
28.1 Prerequisites ............................................................................................................................. 28-1
28.2 Webgate Guidelines for IIS Web Servers ............................................................................. 28-1
28.2.1 Guidelines for ISAPI Webgates ..................................................................................... 28-2
28.3 Prerequisite for Installing Webgate for IIS 7........................................................................ 28-5
28.3.1 Prerequisite for Installing Any 10g Webgate for IIS 7................................................. 28-5
28.3.2 Prerequisite for Installing a 32-bit Webgate for IIS 7................................................... 28-6
28.4 Updating IIS 7 Web Server Configuration on Windows 2008........................................... 28-6
28.5 Completing Webgate Installation with IIS........................................................................... 28-7
28.5.1 Enabling Client Certificate Authentication on the IIS Web Server ........................... 28-7
28.5.2 Ordering the ISAPI Filters............................................................................................... 28-8
28.5.3 Enabling Pass-Through Functionality for POST Data................................................. 28-9
28.5.4 Protecting a Web Site When the Default Site is Not Setup....................................... 28-13
28.6 Installing and Configuring Multiple 10g Webgates for a Single IIS 7 Instance............ 28-14
28.6.1 Installing Each IIS 7 Webgate in a Multiple Webgate Scenario ............................... 28-14
28.6.2 Setting the Impersonation DLL for Multiple IIS 7 Webgates................................... 28-16
28.6.3 Enabling Client Certification for Multiple IIS 7 Webgates ....................................... 28-17
28.6.4 Configuring IIS 7 Webgates for Pass Through Functionality .................................. 28-18
28.6.5 Confirming IIS 7 Webgate Installation ........................................................................ 28-19
28.7 Installing and Configuring Multiple Webgates for a Single IIS 6 Instance ................... 28-19
28.7.1 Installing Each Webgate in a Multiple Webgate Scenario........................................ 28-20
28.7.2 Setting the Impersonation DLL for Multiple Webgates............................................ 28-22
28.7.3 Enabling SSL and Client Certification for Multiple Webgates................................. 28-23
28.7.4 Confirming Multiple Webgate Installation................................................................. 28-24
xx
28.8 Finishing 64-bit Webgate Installation ................................................................................ 28-24
28.8.1 Setting Access Permissions, ISAPI filters, and Directory Security Authentication ...........
28-25
28.8.2 Setting Client Certificate Authentication .................................................................... 28-26
28.9 Confirming Webgate Installation on IIS............................................................................. 28-26
28.10 Starting, Stopping, and Restarting the IIS Web Server..................................................... 28-27
28.11 Removing Web Server Configuration Changes Before Uninstall................................... 28-27
29 Configuring Lotus Domino Web Servers for 10g WebGates
29.1 Prerequisites ............................................................................................................................. 29-1
29.2 Installing the Domino Web Server ........................................................................................ 29-1
29.3 Setting Up the First Domino Web Server ............................................................................. 29-2
29.4 Starting the Domino Web Server........................................................................................... 29-3
29.5 Enabling SSL (Optional).......................................................................................................... 29-3
29.6 Installing a Domino Security (DSAPI) Filter ....................................................................... 29-4
29.6.1 Completing the WebGate Installation .......................................................................... 29-5
Part VII Managing Oracle Access Management Identity Federation
30 Introducing Identity Federation in Oracle Access Management
30.1 Understanding Identity Federation Concepts ..................................................................... 30-1
30.2 Integrating Identity Federation with Access Manager....................................................... 30-1
30.3 Deploying Identity Federation with Oracle Access Management.................................... 30-2
30.4 Exchanging Identity Federation Data ................................................................................... 30-3
30.4.1 Using SAML 2.0 ................................................................................................................ 30-3
30.4.2 Using SAML 1.1 ................................................................................................................ 30-6
30.4.3 Using OpenID 2.0.............................................................................................................. 30-8
30.4.4 Initiating Federation SSO............................................................................................... 30-10
30.5 Understanding How Identity Federation Works.............................................................. 30-11
30.6 Using Identity Federation..................................................................................................... 30-12
30.6.1 Achieving SSO................................................................................................................. 30-12
30.6.2 Logging Out..................................................................................................................... 30-12
30.6.3 Authorizing ..................................................................................................................... 30-13
30.6.4 Forcing Authentication .................................................................................................. 30-13
30.6.5 Indicating a Passive Identity Provider ........................................................................ 30-13
30.6.6 User and Assertion Mapping ....................................................................................... 30-13
30.6.7 Platform Dependencies.................................................................................................. 30-14
30.7 Administrating Identity Federation .................................................................................... 30-14
30.8 Enabling Identity Federation................................................................................................ 30-15
31 Managing Identity Federation Partners
31.1 Understanding Federation And Partners............................................................................. 31-1
31.2 Managing Federation Partners .............................................................................................. 31-1
31.3 Administering Identity Federation As A Service Provider ............................................... 31-2
31.3.1 Creating Remote Identity Provider Partners................................................................ 31-2
31.3.2 Managing the Remote Identity Provider Partners....................................................... 31-8
xxi
31.4 Administering Identity Federation As An Identity Provider............................................ 31-9
31.4.1 Creating Remote Service Provider Partners ................................................................. 31-9
31.4.2 Managing the Remote Service Provider Partners...................................................... 31-11
31.5 Using Attribute Mapping Profiles....................................................................................... 31-11
31.5.1 Using the SP Attribute Mapping Profile ..................................................................... 31-12
31.5.2 Using the IdP Attribute Mapping Profile.................................................................... 31-14
31.6 Mapping Federation Authentication Methods to Access Manager Authentication Schemes.
31-15
31.6.1 Understanding Federation SSO As An IdP................................................................. 31-16
31.6.2 Understanding Federation SSO As An SP .................................................................. 31-17
31.6.3 Configuring an Alternate Authentication Scheme .................................................... 31-17
31.6.4 Using WLST For Mapping Administration ................................................................ 31-17
31.7 Using the Attribute Sharing Plug-in for the Attribute Query Service ........................... 31-18
31.7.1 Understanding the Plug-in and Query Service Design............................................. 31-18
31.7.2 Configuring for Attribute Sharing ............................................................................... 31-21
31.8 Using the Federation Proxy.................................................................................................. 31-24
31.9 Using WLST for Identity Federation Administration ...................................................... 31-25
32 Managing Settings for Identity Federation
32.1 Prerequisites ............................................................................................................................. 32-1
32.2 Introduction to Federation Settings....................................................................................... 32-1
32.3 Managing General Federation Settings ................................................................................ 32-2
32.3.1 About Managing General Federation Settings ............................................................. 32-2
32.3.2 Managing General Federation Settings ......................................................................... 32-3
32.4 Managing Proxy Settings for Federation.............................................................................. 32-3
32.4.1 About Proxy Settings for Federation ............................................................................ 32-4
32.4.2 Managing Proxy Settings for Identity Federation........................................................ 32-4
32.5 Defining Keystore Settings for Federation ........................................................................... 32-5
32.5.1 About Managing Keytore Settings for Identity Federation ....................................... 32-5
32.5.2 Managing Identity Federation Encryption/Signing Keys.......................................... 32-5
32.6 Exporting Metadata ................................................................................................................. 32-7
33 Managing Federation-related Schemes and Policies
33.1 Prerequisites ............................................................................................................................. 33-1
33.2 Using Identity Federation and Access Manager in Concert Together............................. 33-1
33.3 Using Authentication Schemes and Modules for Identity Federation 11g Release 2
(11.1.2.2) 33-2
33.3.1 About the FederationScheme Authentication Scheme................................................ 33-2
33.3.2 About the FederationPlugin Authentication Module ................................................. 33-3
33.3.3 Managing Authentication with Identity Federation in 11g Release 2 ...................... 33-4
33.4 Using Authentication Schemes and Modules for Oracle Identity Federation 11g Release 1 .
33-5
33.4.1 About Scheme OIFScheme ............................................................................................. 33-6
33.4.2 About Module OIFMTLDAPPlugin .............................................................................. 33-7
33.4.3 Managing Authentication with Oracle Identity Federation Release 11gR1............. 33-7
33.5 Managing Access Manager Policies for Use with Identity Federation ............................ 33-8
33.5.1 About Policy Responses with Assertion Attributes for Identity Federation ........... 33-8
xxii
33.5.2 Defining Policy Responses with Assertion Attributes for Identity Federation....... 33-9
33.6 Testing Identity Federation Configuration ........................................................................ 33-10
33.7 Using the Default Identity Provisioning Plug-in .............................................................. 33-11
33.7.1 Why Use a Provisioning Plug-in? ................................................................................ 33-12
33.7.2 About the Default Provisioning Plug-in...................................................................... 33-12
33.7.3 Using the Default Provisioning Plug-in ...................................................................... 33-12
33.7.4 Switching to a Custom Provisioning Plug-in ............................................................. 33-12
33.8 Configuring the Identity Provider Discovery Service...................................................... 33-13
33.8.1 Using the Bundled IdP Discovery Service .................................................................. 33-13
33.8.2 Creating a custom IdP Discovery Service ................................................................... 33-13
33.8.3 Disabling the use of an IdP Discovery Service........................................................... 33-15
33.9 Configuring the Federation User Self-Registration Module............................................ 33-16
Part VIII Managing Oracle Access Management Security Token Service
34 Introducing the Oracle Access Management Security Token Service
34.1 Understanding the Security Token Service.......................................................................... 34-1
34.2 Using the Security Token Service ......................................................................................... 34-2
34.3 Security Token Service Key Terms and Concepts............................................................... 34-3
34.4 Integrating the Oracle Web Services Manager .................................................................... 34-6
34.5 Architecting the Security Token Service............................................................................... 34-8
34.6 Security Token Service Supported Token Matrix ............................................................... 34-8
34.7 Deploying Security Token Service ........................................................................................ 34-9
34.7.1 Centralized Token Authority Deployment................................................................... 34-9
34.7.2 Tokens Behind a Firewall Deployment ......................................................................... 34-9
34.7.3 Web Services SSO Deployment .................................................................................... 34-10
34.8 Installing Security Token Service ........................................................................................ 34-11
34.8.1 Security Token Service Cluster in Single WLS Domain............................................ 34-11
34.8.2 Endpoint Exposure through a Web Server Proxy...................................................... 34-11
34.8.3 Interoperability of Requester and Relying Party with Other Oracle WS-Trust based
Clients 34-12
34.8.4 Security Token Service Installation Overview ........................................................... 34-12
34.8.5 Post-Installation Tasks: Security Token Service ........................................................ 34-12
34.9 Administrating the Security Token Service ....................................................................... 34-12
35 Security Token Service Implementation Scenarios
35.1 Prerequisites ............................................................................................................................. 35-1
35.2 Typical Token Ecosystem ....................................................................................................... 35-1
35.3 Scenario: Identity Propagation with the Access Manager Token..................................... 35-2
35.3.1 Component Processing: Identity Propagation with the OAM Token....................... 35-4
35.3.2 Request Security Token Attributes and Run Time Processing .................................. 35-5
35.3.3 Configuration Requirements: Identity Propagation with the OAM Token............. 35-7
35.3.4 Testing Your Implementation....................................................................................... 35-15
35.4 Scenario: Web Service Security With On Behalf Of Username Token .......................... 35-16
35.4.1 Component interactions for Identity Propagation with Username Token ............ 35-16
35.4.2 RST Attributes and Processing for Identity Propagation with a Username Token ...........
35-16
xxiii
35.4.3 Configuration Requirements: Identity Propagation with the Username Token... 35-18
36 Configuring Security Token Service Settings
36.1 Prerequisites ............................................................................................................................ 36-1
36.2 Introduction to Security Token Service Configuration ...................................................... 36-1
36.2.1 Post-Installation Configuration ...................................................................................... 36-2
36.2.2 About OAM Servers and Security Token Service........................................................ 36-3
36.2.3 About Security Token Service Clients ........................................................................... 36-4
36.2.4 About Agents and Security Token Service ................................................................... 36-4
36.2.5 About Security Token Service End Points and Policies .............................................. 36-5
36.3 Enabling and Disabling Security Token Service ................................................................. 36-7
36.3.1 About Security Token Service and the Oracle Access Management Console ......... 36-7
36.3.2 About Enabling Services for Security Token Service ................................................. 36-9
36.3.3 Enabling and Disabling Services for Security Token Service..................................... 36-9
36.4 Defining Security Token Service Settings........................................................................... 36-10
36.4.1 About Security Token Service Settings........................................................................ 36-10
36.4.2 Managing Security Token Service Settings................................................................. 36-12
36.5 Using and Managing WSS Policies for Oracle WSM Agents .......................................... 36-13
36.5.1 Using and Modifying Oracle Workspace Studio Policies......................................... 36-13
36.5.2 Managing WSS Policies for Security Token Service: Classpath............................... 36-13
36.5.3 Managing WSS Policies for Security Token Service: Oracle WSM Policy Manager..........
36-14
36.6 Configuring OWSM for WSS Protocol Communication.................................................. 36-15
36.6.1 About Oracle WSM Agent WS-Security Policies for Security Token Service........ 36-16
36.6.2 Retrieving the Oracle WSM Keystore Password........................................................ 36-16
36.6.3 Extracting the Oracle STS/Oracle WSM Signing and Encryption Certificate ....... 36-16
36.6.4 Adding Trusted Certificates to the Oracle WSM Keystore....................................... 36-17
36.6.5 Validating Trusted Certificates in the Oracle WSM Keystore.................................. 36-18
36.6.6 Configuring Oracle WSM Agent for WSS Kerberos Policies ................................... 36-18
36.7 Managing and Migrating Security Token Service Policies .............................................. 36-19
36.7.1 About Managing and Migrating Security Token Service Policies........................... 36-19
36.7.2 Managing Security Token Service Policies ................................................................. 36-20
36.7.3 Migrating Security Token Service Policies.................................................................. 36-20
36.8 Logging Security Token Service Messages ........................................................................ 36-20
36.9 Auditing the Security Token Service ................................................................................. 36-21
36.9.1 About Security Token Service Audit Record Storage ............................................... 36-22
36.9.2 About Audit Reports and Oracle Business Intelligence Publisher.......................... 36-22
36.9.3 About the Audit Log ...................................................................................................... 36-22
36.9.4 About Auditing Security Token Service Events......................................................... 36-23
37 Managing Security Token Service Certificates and Keys
37.1 Prerequisites ............................................................................................................................. 37-1
37.2 Introducing the Security Token Service Certificates and Keys......................................... 37-1
37.2.1 About Keystores and Security Token Service............................................................... 37-2
37.2.2 About the Oracle Web Services Manager Keystore (default-keystore.jks) .............. 37-3
37.2.3 About Using the OPSS Keystore for Requester Certificates....................................... 37-3
xxiv
37.3 Managing Security Token Service Encryption/Signing Keys........................................... 37-4
37.3.1 Resetting System Keystore (.oamkeystore) and Trust Keystore (amtruststore)
Password 37-4
37.3.2 Adding a New Key Entry to the System Keystore (.oamkeystore) ........................... 37-5
37.3.3 Extracting an Security Token Service Certificate ......................................................... 37-6
37.4 Managing Partner Keys for WS-Trust Communications ................................................... 37-7
37.4.1 About Partner Certificates............................................................................................... 37-7
37.4.2 About Downloading the Relying Party's Certificate at Run Time ............................ 37-8
37.4.3 Setting the Partner's Signing or Encryption Certificate .............................................. 37-8
37.5 Managing Certificate Validation ........................................................................................... 37-9
37.5.1 Managing the Trust Anchors Store (amtruststore)...................................................... 37-9
37.5.2 Managing Certificate Revocation Lists........................................................................ 37-10
37.5.3 Using a Custom Trust Anchor Store for Security Token Service............................. 37-10
38 Managing Templates, Endpoints, and Policies
38.1 Introduction .............................................................................................................................. 38-1
38.2 Searching for an Existing Template....................................................................................... 38-2
38.2.1 About Template Search Controls .................................................................................. 38-3
38.2.2 Searching For a Template ................................................................................................ 38-6
38.3 Managing Token Issuance Templates................................................................................... 38-6
38.3.1 About Managing Token Issuance Templates ............................................................... 38-6
38.3.2 Managing a Token Issuance Template ........................................................................ 38-13
38.4 Managing Token Validation Templates ............................................................................. 38-14
38.4.1 About Managing Token Validation Templates.......................................................... 38-14
38.4.2 Managing Token Validation Templates ...................................................................... 38-23
38.5 Managing Security Token Service Endpoints.................................................................... 38-25
38.5.1 About Managing Endpoints.......................................................................................... 38-25
38.5.2 Managing EndPoints...................................................................................................... 38-26
38.6 Managing Token Issuance Policies, Conditions, and Rules ............................................ 38-27
38.6.1 About Token Issuance Policies ..................................................................................... 38-27
38.6.2 About Managing Token Issuance Conditions and Rules ......................................... 38-27
38.6.3 Managing Token Issuance Policies and Conditions .................................................. 38-29
38.7 Managing TokenServiceRP Type Resources ..................................................................... 38-30
38.7.1 About Managing TokenServiceRP Type Resources in Access Manager................ 38-31
38.7.2 Managing TokenServiceRP Type Resources in Application Domains................... 38-32
38.8 Making Custom Classes Available...................................................................................... 38-33
38.8.1 About Making Classes Available ................................................................................. 38-33
38.8.2 About Narrowing a Search for Custom Tokens......................................................... 38-36
38.8.3 Managing Custom Tokens ........................................................................................... 38-37
38.9 Managing a Custom Security Token Service Configuration ........................................... 38-39
38.9.1 Creating the Validation Template ................................................................................ 38-39
38.9.2 Creating the Issuance Template for a Custom Token ............................................... 38-41
38.9.3 Adding the Custom Token to a Requester Profile..................................................... 38-43
38.9.4 Adding the Custom Token to the Relying Party Profile........................................... 38-43
38.9.5 Mapping the Token to a Requestor.............................................................................. 38-44
38.9.6 Creating an /wssuser EndPoint ................................................................................... 38-45
xxv
39 Managing Token Service Partners and Partner Profiles
39.1 Prerequisites ............................................................................................................................. 39-1
39.2 Introduction Token Service Partners and Partner Profiles ................................................ 39-1
39.2.1 About Token Service Partners ........................................................................................ 39-1
39.2.2 About Partner Profiles ..................................................................................................... 39-2
39.3 Managing Token Service Partners......................................................................................... 39-3
39.3.1 About Managing Token Service Partners ..................................................................... 39-3
39.3.2 Managing a Token Service Partner ................................................................................ 39-6
39.3.3 Refining Partner Searches ............................................................................................... 39-7
39.4 Managing Token Service Partner Profiles ............................................................................ 39-7
39.4.1 About Managing Partner Profiles .................................................................................. 39-7
39.4.2 Managing a Token Service Partner Profile.................................................................. 39-18
39.4.3 Refining a Profile Search................................................................................................ 39-19
40 Troubleshooting Security Token Service
40.1 Authorization Issues................................................................................................................ 40-1
40.2 Endpoint Issues ........................................................................................................................ 40-2
40.3 Mapping Operation Issues ..................................................................................................... 40-2
Part IX Managing Oracle Access Management Mobile and Social
41 Understanding Mobile and Social
41.1 Introducing Mobile and Social............................................................................................... 41-1
41.1.1 Installing Mobile and Social............................................................................................ 41-3
41.1.2 Deploying Mobile and Social .......................................................................................... 41-3
41.1.3 Enabling Mobile and Social............................................................................................. 41-4
41.2 Understanding Mobile Services............................................................................................. 41-4
41.2.1 Introducing Authentication Services and Authorization Services............................ 41-5
41.2.2 Understanding the Mobile Services Authorization Flow........................................... 41-7
41.2.3 Understanding Single Sign-on (SSO) for Mobile Services.......................................... 41-7
41.2.4 Introducing the Mobile and Social Mobile Services Client SDK .............................. 41-8
41.2.5 Introducing User Profile Services................................................................................... 41-9
41.3 Understanding the Mobile Services Processes .................................................................... 41-9
41.3.1 Registering a Mobile Device With User Authentication........................................... 41-10
41.3.2 Authenticating a User With a Registered Device....................................................... 41-13
41.3.3 Using REST Calls for User Authentication ................................................................. 41-15
41.3.4 Authenticating the User With a Mobile Browser-Based Web App......................... 41-16
41.3.5 Authorization Using the Mobile OAuth Authorization Flow ................................. 41-17
41.4 Using Mobile Services ........................................................................................................... 41-19
41.4.1 Protecting the Mobile Client Registration Endpoint ................................................. 41-19
41.4.2 Exchanging Credentials ................................................................................................. 41-20
41.4.3 Protecting User Profile Services And Authorization Services ................................. 41-21
41.4.4 Using Mobile Services with Oracle Access Manager ................................................ 41-21
41.4.5 Using Mobile Services with Oracle Adaptive Access Manager Services ............... 41-22
41.5 Understanding Social Identity ............................................................................................. 41-22
41.6 Understanding Social Identity Processes ........................................................................... 41-23
xxvi
41.6.1 Authenticating a Returning User With a Local Account .......................................... 41-24
41.6.2 Authenticating a New User With No Local Account................................................ 41-25
41.6.3 Using OAuth For Access Token Retrieval .................................................................. 41-27
41.6.4 Authenticating a User With Access Manager and Social Identity........................... 41-29
41.6.5 Authenticating a User Locally ...................................................................................... 41-31
41.7 Using Social Identity.............................................................................................................. 41-32
41.7.1 Using Social Identity With Oracle Access Manager .................................................. 41-32
41.7.2 Using Social Identity With Mobile Services................................................................ 41-32
41.7.3 Using the Social Identity SDK....................................................................................... 41-33
42 Configuring Mobile Services
42.1 Opening the Mobile Services Configuration Page.............................................................. 42-1
42.2 Understanding Mobile Services Configuration................................................................... 42-1
42.2.1 Understanding Service Providers .................................................................................. 42-2
42.2.2 Understanding Service Profiles ...................................................................................... 42-3
42.2.3 Understanding Security Handler Plug-ins ................................................................... 42-3
42.2.4 Understanding Application Profiles.............................................................................. 42-3
42.2.5 Understanding Service Domains.................................................................................... 42-4
42.3 Defining Service Providers..................................................................................................... 42-4
42.3.1 Defining, Modifying or Deleting an Authentication Service Provider..................... 42-5
42.3.2 Defining, Modifying or Deleting an Authorization Service Provider .................... 42-15
42.3.3 Defining, Modifying or Deleting a User Profile Service Provider........................... 42-17
42.4 Defining Service Profiles....................................................................................................... 42-20
42.4.1 Defining, Modifying and Deleting an Authentication Service Profile.................... 42-21
42.4.2 Defining, Modifying and Deleting an Authorization Service Profile ..................... 42-22
42.4.3 Defining, Modifying and Deleting a User Profile Service Profile ........................... 42-23
42.5 Defining Security Handler Plug-ins.................................................................................... 42-24
42.5.1 Creating a Security Handler Plug-in............................................................................ 42-25
42.5.2 Editing or Deleting a Security Handler Plug-in ......................................................... 42-26
42.5.3 Device Fingerprinting and Device Profile Attributes................................................ 42-26
42.6 Defining Application Profiles .............................................................................................. 42-26
42.6.1 Creating an Application Profile.................................................................................... 42-26
42.6.2 Editing or Deleting an Application Profile ................................................................. 42-27
42.7 Defining Service Domains .................................................................................................... 42-28
42.7.1 Creating a Service Domain............................................................................................ 42-29
42.7.2 Editing or Deleting a Service Domain ......................................................................... 42-32
42.8 Using the Jail Breaking Detection Policy............................................................................ 42-32
42.8.1 Adding a New Jail Breaking Detection Policy............................................................ 42-32
42.8.2 Editing the Jail Breaking Detection Policy .................................................................. 42-33
42.9 Configuring Mobile Services with Other Oracle Products .............................................. 42-34
42.9.1 Configuring Mobile Services for Access Manager..................................................... 42-34
42.9.2 Configuring Mobile Services for Oracle Adaptive Access Manager....................... 42-39
43 Configuring Social Identity
43.1 Opening the Social Identity Configuration Page ................................................................ 43-1
43.2 Understanding Social Identity Configuration ..................................................................... 43-1
43.2.1 Understanding Social Identity Providers...................................................................... 43-2
xxvii
43.2.2 Understanding Service Provider Interfaces.................................................................. 43-2
43.2.3 Understanding Application Profiles.............................................................................. 43-2
43.3 Defining Social Identity Providers ....................................................................................... 43-3
43.3.1 Creating a Social Identity Provider................................................................................ 43-3
43.3.2 Editing or Deleting a Social Identity Provider ............................................................. 43-7
43.3.3 Generating the Consumer Key and Consumer Secret for OAuth Providers........... 43-8
43.3.4 Troubleshooting Facebook Social Identity Providers................................................ 43-10
43.4 Defining Service Provider Interfaces .................................................................................. 43-11
43.4.1 Creating a Service Provider Interface .......................................................................... 43-12
43.4.2 Editing or Deleting an Service Provider Interface ..................................................... 43-12
43.4.3 Adding a Custom Service Provider Interface Implementation ............................... 43-12
43.5 Defining Application Profiles .............................................................................................. 43-13
43.5.1 Creating an Application Profile.................................................................................... 43-13
43.5.2 Editing or Deleting an Application Profile ................................................................. 43-16
43.6 Integrating Social Identity With Mobile Applications ..................................................... 43-16
43.7 Linking Social Identity Provider Accounts........................................................................ 43-17
43.7.1 Using Social Identity Provider Account Linking ....................................................... 43-18
43.7.2 Configuring Social Identity Provider Account Linking............................................ 43-19
44 Configuring Mobile and Social System Settings
44.1 Accessing the Mobile and Social Settings Interface ............................................................ 44-1
44.1.1 Understanding the Mobile and Social Settings Page .................................................. 44-1
44.2 Logging and Auditing............................................................................................................. 44-2
44.3 Deploying Mobile and Social With Oracle Access Manager ............................................. 44-2
44.4 Configuring Mobile and Social After Running Test-to-Production Scripts .................... 44-4
44.5 Configuring Mobile and Social for High Availability (HA).............................................. 44-4
44.6 Enabling the REST Client to Specify the Tenant Name...................................................... 44-4
Part X Managing the Oracle Access Management OAuth Service
45 Understanding the OAuth Service
45.1 Introducing the OAuth Service.............................................................................................. 45-1
45.2 Understanding the OAuth Service........................................................................................ 45-1
45.2.1 Understanding OAuth 2.0 Roles .................................................................................... 45-2
45.2.2 Understanding the OAuth Service Components ......................................................... 45-2
45.2.3 Understanding the OAuth Service Supported Features............................................. 45-2
45.2.4 The Mobile OAuth Authorization Flow........................................................................ 45-3
45.2.5 Understanding the OAuth Service Authorization and Authentication Endpoints 45-4
45.2.6 Understanding Refresh Tokens ...................................................................................... 45-4
45.2.7 Understanding the Mobile OAuth Client UI Form Factor Options ......................... 45-5
45.2.8 Understanding Mobile OAuth Single Sign-on (SSO) .................................................. 45-5
45.3 Understanding the OAuth Service Processes ...................................................................... 45-6
45.3.1 Understanding OAuth 3-Legged Authorization.......................................................... 45-6
45.3.2 Understanding OAuth 2-Legged Authorization.......................................................... 45-7
45.3.3 Understanding Mobile OAuth Authorization.............................................................. 45-8
xxviii
46 Configuring OAuth Services
46.1 Enabling OAuth Services........................................................................................................ 46-1
46.2 Opening the OAuth Services Configuration Page .............................................................. 46-1
46.3 Understanding OAuth Services Configuration................................................................... 46-2
46.3.1 Understanding OAuth Identity Domains Configuration ........................................... 46-2
46.3.2 Understanding OAuth Service Provider Configuration............................................. 46-2
46.3.3 Understanding OAuth Service Profiles Configuration............................................... 46-2
46.3.4 Understanding OAuth Resource Servers Configuration............................................ 46-3
46.3.5 Understanding OAuth Client Profiles Configuration................................................. 46-5
46.3.6 Understanding OAuth Consent Management Service Configuration ..................... 46-6
46.3.7 Understanding OAuth Access Token Custom Attributes ......................................... 46-6
46.3.8 Understanding OAuth Services Security ...................................................................... 46-7
46.4 Configuring OAuth Services Settings................................................................................... 46-8
46.4.1 Configuring OAuth Identity Domains ......................................................................... 46-8
46.4.2 Configuring OAuth Service Profiles ........................................................................... 46-10
46.4.3 Configuring OAuth Clients........................................................................................... 46-15
46.4.4 Configuring the OAuth Service Provider ................................................................... 46-20
46.4.5 Configuring OAuth Resource Servers......................................................................... 46-21
46.4.6 Configuring User Profile Services ............................................................................... 46-23
46.4.7 Configuring OAuth Consent Management Services................................................. 46-26
46.4.8 Configuring OAuth Plug-Ins ........................................................................................ 46-28
46.4.9 Configuring OAuth Server Settings............................................................................. 46-29
46.4.10 Configuring the OAuth Services Jail Breaking Detection Policy............................. 46-30
46.4.11 Configuring Token Life Cycle Management .............................................................. 46-31
46.5 Configuring OAuth to Accept Third-Party JWT Bearer Assertions............................... 46-32
46.5.1 Understanding the default OAuth Service Profile Keystore.................................... 46-32
46.5.2 Creating a Non-Default Keystore for an OAuth Service Profile.............................. 46-32
46.5.3 Configuring an OAuth Service Profile for Third-Party JWT Assertion Validation ...........
46-36
46.6 Configuring a WebGate to Support the OAuth Service................................................... 46-37
Part XI Managing Oracle Access Management Oracle Access Portal
47 Configuring the
Access Portal Service
47.1 Prerequisites for Deploying the Access Portal Service....................................................... 47-1
47.2 Overview of the Access Portal Service Deployment Process ............................................ 47-2
47.3 Deploying the Access Portal Service..................................................................................... 47-4
47.3.1 Deploying the Java Cryptography Extension Policy Files.......................................... 47-4
47.3.2 Creating the Identity Store Configuration File............................................................. 47-4
47.3.3 Creating the Oracle Access Manager Configuration File ........................................... 47-7
47.3.4 Understanding the Access Portal Service Repository Objects ................................. 47-10
47.3.5 Preparing and Enabling the Access Portal Service on an Oracle Repository ........ 47-11
47.3.6 Preparing and Enabling the Access Portal Service on Microsoft Active Directory ..........
47-13
47.3.7 (Active Directory Only) Deploying the OAMAgent Web Application .................. 47-17
47.3.8 Setting the Policy Cache Refresh Interval ................................................................... 47-19
xxix
47.3.9 Integrating with Oracle Privilege Account Manager ................................................ 47-19
47.3.10 Deploying the Oracle Traffic Director Administration Server................................. 47-22
47.3.11 Deploying the Webgate Binaries and Secure Trust Artifacts................................... 47-23
47.3.12 (Optional) Configuring the ESSOProvisioning Plugin ............................................. 47-24
47.3.13 Creating an Oracle Traffic Director Configuration.................................................... 47-25
47.3.14 Protecting the Oracle Traffic Director Instance with the Webgate and Access Proxy
Plugins 47-25
47.3.15 (Optional) Enabling the Detached Credential Collector for the Target Webgate . 47-26
47.3.16 Configuring Logon Manager for Compatibility with the Access Portal Service... 47-28
47.4 Enabling Form-Fill Single Sign-On for an Application .................................................... 47-29
47.4.1 Configuring a Form-Fill Application Policy ............................................................... 47-29
47.4.2 Guidelines for Configuring Proxy Rules in Oracle Traffic Director ....................... 47-32
47.4.3 Configuring the Access Proxy Request Filtering ....................................................... 47-35
47.5 Adding a Federated Partner Provider Application .......................................................... 47-39
47.6 Adding an Oracle SSO Agent Application......................................................................... 47-40
47.7 Common Interface Controls ................................................................................................. 47-41
47.8 Managing Password Generation Policies........................................................................... 47-42
47.8.1 Searching for Password Generation Policies .............................................................. 47-43
47.8.2 Creating Password Generation Policies ...................................................................... 47-44
47.8.3 Managing Policy Subscribers........................................................................................ 47-46
47.9 Managing Credential Sharing Groups................................................................................ 47-48
47.9.1 Searching for Credential Sharing Groups ................................................................... 47-49
47.9.2 Creating Credential Sharing Groups ........................................................................... 47-49
47.9.3 Managing Applications in Credential Sharing Groups ............................................ 47-51
47.10 Managing Global Agent Settings......................................................................................... 47-53
47.10.1 Searching for Sets of Global Agent Settings................................................................ 47-53
47.10.2 Importing an INI File with a Global Agent Settings Configuration........................ 47-54
47.10.3 Creating a Set of Global Agent Settings ...................................................................... 47-54
Part XII Using Identity Context
48 Using Identity Context
48.1 Introducing Identity Context ................................................................................................. 48-1
48.2 Understanding Identity Context............................................................................................ 48-3
48.3 Working With the Identity Context Service......................................................................... 48-4
48.3.1 Using the Identity Context Dictionary .......................................................................... 48-4
48.3.2 Understanding Identity Context Runtime .................................................................... 48-7
48.4 Using the Identity Context API.............................................................................................. 48-9
48.5 Configuring the Identity Context Service Components................................................... 48-11
48.5.1 Configuring Oracle Fusion Middleware ..................................................................... 48-11
48.5.2 Configuring Access Manager........................................................................................ 48-12
48.5.3 Configuring Oracle Adaptive Access Manager ......................................................... 48-13
48.5.4 Configuring Web Service Security Manager .............................................................. 48-15
48.5.5 Configuring Oracle Entitlements Server ..................................................................... 48-15
48.5.6 Configuring Oracle Enterprise Single Sign On .......................................................... 48-16
48.5.7 Configuring Oracle Access Management Mobile and Social................................... 48-17
48.6 Validating Identity Context.................................................................................................. 48-18
xxx
Part XIII Integrating Access Manager with Other Products
49 Integrating RSA SecurID Authentication with Access Manager
49.1 Introduction to Access Manager and RSA SecurID Authentication ................................ 49-1
49.2 Components Required for SecurID Authentication ........................................................... 49-3
49.2.1 Supported Versions and Platforms ................................................................................ 49-3
49.2.2 Required RSA Components ............................................................................................ 49-3
49.2.3 Installation and Configuration Requirements.............................................................. 49-4
49.3 SecurID Authentication Modes.............................................................................................. 49-5
49.3.1 Standard SecurID Authentication .................................................................................. 49-5
49.3.2 SecurID Next Tokencode Authentication ..................................................................... 49-6
49.3.3 SecurID New PIN Authentication.................................................................................. 49-6
49.4 Configuring Access Manager for RSA SecurID Authentication ....................................... 49-7
49.5 Running a Custom RSA Plug-in .......................................................................................... 49-10
50 Configuring Access Manager for Windows Native Authentication
50.1 Introducing Access Manager with Windows Native Authentication.............................. 50-1
50.1.1 Access Manager WNA Login and Fall Back Authentication ..................................... 50-2
50.1.2 Supported Integration Approaches ............................................................................... 50-4
50.2 Preparing Your Active Directory/Kerberos Topology ...................................................... 50-4
50.3 Performing Oracle-Specific Prerequisite Tasks ................................................................... 50-9
50.3.1 Confirming Access Manager Operation........................................................................ 50-9
50.4 Enabling the Browser to Return Kerberos Tokens ........................................................... 50-10
50.5 Integrating KerberosPlugin with Oracle Virtual Directory............................................. 50-11
50.5.1 Preparing Oracle Virtual Directory for Integration................................................... 50-11
50.5.2 Registering Oracle Virtual Directory as the Default Store for WNA ...................... 50-12
50.5.3 Setting Up Authentication with Access Manager KerberosPlugin and OVD ....... 50-13
50.6 Integrating Access Manager KerberosPlugin with Search Failover............................... 50-14
50.6.1 Registering Microsoft Active Directory Instances with Access Manager .............. 50-15
50.6.2 Setting Up Access Manager KerberosPlugin for ADGCs......................................... 50-16
50.7 Configuring Access Manager for Windows Native Authentication .............................. 50-18
50.7.1 Creating the Authentication Scheme for Windows Native Authentication .......... 50-18
50.7.2 Configuring Access Manager Policies for Windows Native Authentication ........ 50-19
50.7.3 Configuring WNA for NTLM Fallback ....................................................................... 50-19
50.7.4 Verifying the Access Manager Configuration File..................................................... 50-20
50.8 Validating WNA with Access Manager-Protected Resources ....................................... 50-20
50.9 Configuring WNA For Use With DCC............................................................................... 50-21
50.9.1 Initializing the Kerberos Protocol................................................................................. 50-21
50.9.2 Configuring Access Manager........................................................................................ 50-23
50.10 Configuring Access for Multiple Untrusted Active Directory Forests .......................... 50-23
50.10.1 Create Service Principal Accounts ............................................................................... 50-24
50.10.2 Generating a Master Keytab File .................................................................................. 50-24
50.10.3 Configuring the krb5.conf File...................................................................................... 50-27
50.10.4 Validating Access to the KDC Servers Using the Keytabs ....................................... 50-28
50.10.5 Creating the Active Directory or Oracle Virtual Directory User Stores ................. 50-28
50.10.6 Creating the Custom Kerberos Authentication Module........................................... 50-29
xxxi
50.10.7 Configuring Integrated Windows Authentication .................................................... 50-32
50.10.8 Testing the Configurations............................................................................................ 50-33
50.10.9 Troubleshooting the Configurations............................................................................ 50-34
50.11 Troubleshooting WNA Configuration................................................................................ 50-36
50.11.1 Keytab Format Results in Authentication Error When Using IBM JDK................. 50-36
50.11.2 Kinit Fails ......................................................................................................................... 50-36
50.11.3 Unable To Access a Protected Resource Using WNA Authentication Scheme .... 50-36
50.11.4 User Identity Store is Not Active Directory................................................................ 50-37
51 Integrating JBoss with Access Manager
51.1 Introduction to JBoss with Access Manager ........................................................................ 51-1
51.1.1 About Configuration and Processing by Access Manager JBoss Agent................... 51-2
51.1.2 About Configuration and Processing by Access Manager Login Module............... 51-3
51.2 Integration Topology .............................................................................................................. 51-5
51.2.1 Access Manager JBoss Agent Functionality ................................................................. 51-5
51.2.2 Topology: Access Manager with JBoss Agent ............................................................. 51-5
51.2.3 Topology: JBoss Agent Behind Web Server Configured with Webgate................... 51-6
51.2.4 Sample Integration Topology ......................................................................................... 51-6
51.3 Preparing Your Environment for JBoss Integration............................................................ 51-7
51.4 Protecting JBoss-Specific Resources ...................................................................................... 51-8
51.4.1 Registering the JBoss Agent with Automatic Policy Creation ................................... 51-9
51.4.2 Creating a Custom Policy for JBoss Resource Protection ......................................... 51-10
51.5 Protecting Web Applications with the JBoss Agent.......................................................... 51-11
51.5.1 Creating Configuration Properties for the JBoss Agent............................................ 51-11
51.5.2 Configuring the Authentication Valve ........................................................................ 51-12
51.5.3 Mapping the Filter in the Application's web.xml File............................................... 51-13
51.5.4 Configuring the JBoss Login Module to Use Access Manager Policies.................. 51-14
51.6 Configuring JBoss Server to Access a Host Name (not localhost).................................. 51-14
51.7 Configuring the Login Module to Secure EJBs.................................................................. 51-15
51.7.1 Configuring the Server to Secure EJBs ........................................................................ 51-15
51.7.2 Configuring the Client Side to Secure EJBs ................................................................ 51-16
51.8 Configuring the Login Module to Secure Web Service Access....................................... 51-17
51.8.1 Configuring the Server to Secure Web Services Access............................................ 51-18
51.8.2 Configuring the Client to Secure Web Services Access............................................. 51-19
51.9 Configuring Logging for the JBoss Agent and Login Module........................................ 51-19
51.10 Validating Your Configuration............................................................................................ 51-20
52 Integrating Microsoft SharePoint Server with Access Manager
52.1 What is Supported in This Release?...................................................................................... 52-1
52.2 Introduction to Integrating With the SharePoint Server ................................................... 52-2
52.2.1 About Windows Impersonation..................................................................................... 52-3
52.2.2 About Form Based Authentication With This Integration ......................................... 52-3
52.2.3 About Authentication With Windows Impersonation and SharePoint Server
Integration 52-4
52.2.4 About Access Manager and Windows Native Authentication.................................. 52-5
52.3 Integration Requirements ....................................................................................................... 52-6
xxxii
52.3.1 Confirming Requirements............................................................................................... 52-6
52.3.2 Required Access Manager Components ....................................................................... 52-6
52.3.3 Required Microsoft Components ................................................................................... 52-7
52.4 Preparing for Integration With SharePoint Server.............................................................. 52-8
52.5 Integrating With Microsoft SharePoint Server .................................................................. 52-10
52.5.1 Creating a New Web Application in Microsoft SharePoint Server ......................... 52-11
52.5.2 Creating a New Site Collection for Microsoft SharePoint Server ............................ 52-13
52.6 Setting Up Microsoft Windows Impersonation ............................................................... 52-14
52.6.1 Creating Trusted User Accounts .................................................................................. 52-15
52.6.2 Assigning Rights to the Trusted User.......................................................................... 52-15
52.6.3 Binding the Trusted User to Your WebGate............................................................... 52-16
52.6.4 Adding an Impersonation Response to an Authorization Policy............................ 52-17
52.6.5 Adding an Impersonation DLL to IIS.......................................................................... 52-18
52.6.6 Testing Impersonation ................................................................................................... 52-20
52.7 Completing the SharePoint Server Integration.................................................................. 52-22
52.7.1 Configuring IIS Security ................................................................................................ 52-23
52.8 Integrating With Microsoft SharePoint Server Configured With LDAP Membership
Provider 52-23
52.8.1 About Integrating With Microsoft SharePoint Server Configured With LDAP
Membership Provider 52-24
52.8.2 Installing Access Manager for Microsoft SharePoint Server Configured With LDAP
Membership Provider 52-25
52.8.3 Configuring an Authentication Scheme for Use With LDAP Membership Provider .......
52-26
52.8.4 Updating the Application Domain Protecting the SharePoint Web Site................ 52-27
52.8.5 Creating an Authorization Response for Header Variable SP_SSO_UID ............. 52-29
52.8.6 Creating an Authorization Response for the OAMAuthCookie ............................. 52-29
52.8.7 Configuring and Deploying OAMCustomMembershipProvider........................... 52-30
52.8.8 Enabling Logging for CustomMemberShipProvider ................................................ 52-32
52.8.9 Ensuring Directory Servers are Synchronized ........................................................... 52-33
52.8.10 Testing the Integration................................................................................................... 52-33
52.9 Configuring Single Sign-On for Office Documents .......................................................... 52-33
52.10 Configuring Single Sign-off for Microsoft SharePoint Server ......................................... 52-33
52.10.1 Configuring a Custom Logout URL in SharePoint Server ....................................... 52-34
52.10.2 Configuring Logout in SharePoint Server With Impersonation.............................. 52-34
52.11 Setting Up Access Manager and Windows Native Authentication ............................... 52-35
52.11.1 Setting Up Access Manager WNA ............................................................................... 52-35
52.11.2 Setting Up WNA With SharePoint Server................................................................... 52-35
52.11.3 Installing Access Manager for WNA and SharePoint Server................................... 52-36
52.11.4 Testing Your WNA Implementation ........................................................................... 52-37
52.12 Synchronizing User Profiles Between Directories ............................................................ 52-38
52.13 Testing Your Integration....................................................................................................... 52-38
52.13.1 Testing the SharePoint Server Integration .................................................................. 52-38
52.13.2 Testing Single Sign-On for the SharePoint Server Integration................................. 52-38
52.14 Troubleshooting ..................................................................................................................... 52-39
52.14.1 Internet Explorer File Downloads Over SSL Might Not Work................................ 52-39
xxxiii
53 Integrating Access Manager with Outlook Web Application
53.1 What is New in This Release? ................................................................................................ 53-1
53.2 Introduction to Integration with Outlook Web Application ............................................. 53-1
53.2.1 About Impersonation Provided by Microsoft Windows............................................ 53-2
53.2.2 About Access Manager 11g Support for Windows Impersonation .......................... 53-2
53.2.3 About Single Sign-On for Authenticated Access Manager Users into Exchange ... 53-2
53.2.4 About Confirming Requirements................................................................................... 53-3
53.3 Enabling Impersonation With a Header Variable............................................................... 53-3
53.3.1 Requirements for Impersonation with a Header Variable ......................................... 53-3
53.3.2 Creating an Impersonator as a Trusted User................................................................ 53-4
53.3.3 Assigning Rights to the Trusted User............................................................................ 53-5
53.3.4 Binding the Trusted User to Your Webgate.................................................................. 53-6
53.3.5 Adding an Impersonation Response to An Application Domain ............................. 53-7
53.3.6 Adding an Impersonation DLL to IIS............................................................................ 53-8
53.3.7 Testing Impersonation ..................................................................................................... 53-9
53.4 Setting Up Impersonation for Outlook Web Application (OWA).................................. 53-11
53.4.1 Prerequisites to Setting Impersonation for Outlook Web Application................... 53-12
53.4.2 Creating a Trusted User Account for Outlook Web Application ............................ 53-12
53.4.3 Assigning Rights to the Outlook Web Application Trusted User ........................... 53-12
53.4.4 Binding the Trusted Outlook Web Application User to Your Webgate................. 53-13
53.4.5 Adding an Impersonation Action to an Application Domain for Outlook Web
Application 53-14
53.4.6 Adding an Impersonation dll to IIS ............................................................................. 53-15
53.4.7 Configuring IIS Security ................................................................................................ 53-15
53.4.8 Testing Impersonation for Outlook Web Application .............................................. 53-16
53.5 Setting Up Access Manager WNA for Outlook Web Application ................................. 53-18
54 Integrating Microsoft Forefront Threat Management Gateway 2010 with
Access Manager
54.1 What is New in This Release? ................................................................................................ 54-1
54.2 Introduction to Integration with TMG Server 2010 ............................................................ 54-1
54.2.1 About This Integration..................................................................................................... 54-1
54.2.2 About Confirming Certification Requirements............................................................ 54-2
54.3 Creating a Forefront TMG Policy and Rules........................................................................ 54-2
54.3.1 Creating a Custom Policy for Forefront TMG .............................................................. 54-2
54.3.2 Creating a Forefront TMG Firewall Policy Rule .......................................................... 54-3
54.3.3 Verifying Forefront TMG Proxy Configuration........................................................... 54-5
54.4 Installing and Configuring 10g Webgate for Forefront TMG Server .............................. 54-6
54.4.1 Installing 10g WebGate with TMG Server .................................................................... 54-6
54.4.2 Changing /access Directory Permissions .................................................................... 54-6
54.5 Configuring the TMG 2010 Server for the ISAPI 10g Webgate......................................... 54-7
54.5.1 Registering Access Manager Plug-ins as TMG Server Web Filters ........................... 54-7
54.5.2 Ordering the ISAPI Filters............................................................................................... 54-7
54.5.3 Verifying Form-based Authentication........................................................................... 54-8
54.6 Starting, Stopping, and Restarting the TMG Server .......................................................... 54-8
54.7 Removing Access Manager Filters Before WebGate Uninstall on TMG Server ............. 54-9
xxxiv
54.8 Troubleshooting ....................................................................................................................... 54-9
55 Integrating Access Manager 11.1.2 with SAP NetWeaver Enterprise Portal
55.1 What is Supported in This Release?...................................................................................... 55-1
55.2 Supported Versions and Platforms ....................................................................................... 55-1
55.3 Integration Architecture.......................................................................................................... 55-2
55.3.1 Process Overview: Integration with SAP NetWeaver Enterprise Portal.................. 55-2
55.4 Configuring Oracle Access Management and NetWeaver Enterprise Portal 7.0.x........ 55-3
55.4.1 Before You Begin............................................................................................................... 55-3
55.4.2 Configuring the Apache HTTP Server as a Proxy ...................................................... 55-4
55.4.3 Configuring SAP NetWeaver Enterprise Portal for External Authentication ......... 55-5
55.4.4 Adjusting the Login Module Stacks for using Header Variables .............................. 55-6
55.4.5 Configuring Access Manager 11.1.2 for SAP Enterprise Portal ................................ 55-7
55.5 Configuring Oracle Access Management and NetWeaver Enterprise Portal 7.4.x........ 55-7
55.5.1 Before You Begin............................................................................................................... 55-8
55.5.2 Configuring Access Manager for SAP NetWeaver Enterprise Portal 7.4.x.............. 55-8
55.5.3 Configuring Apache Web Server 2.0.x or 2.2.x........................................................... 55-10
55.5.4 Configuring SAP Enterprise Portal 7.4 for External Authentication ...................... 55-11
55.5.5 Adjusting the Login Module Stacks for Using Header Variables ........................... 55-13
55.6 Testing the Integration .......................................................................................................... 55-13
55.7 Troubleshooting the Integration.......................................................................................... 55-14
56 Integrating Oracle Access Manager 11.1.2 with SAP NetWeaver Enterprise
Portal Using OpenSSO Policy Agent 2.2
56.1 What is Supported in This Release?...................................................................................... 56-1
56.2 Registering the OpenSSO Agent............................................................................................ 56-2
56.3 Installing the OpenSSO Policy Agent 2.2 on SAP Enterprise Portal ................................ 56-3
56.3.1 Post-Installation Steps...................................................................................................... 56-3
56.4 Deploying the Agent Software Delivery Archive ............................................................... 56-4
56.5 Making a Class Loader Reference to the Login Module .................................................... 56-4
56.6 Modifying the SAP Enterprise Portal 7.0 / Web Application Server 7.0 Class Path ..... 56-5
56.7 Deploying and Starting the Agentapp.war File .................................................................. 56-5
56.8 Using Telnet to Create a Reference Between agentapp and Library AmSAPAgent2.2. 56-5
56.9 Adding the Login Module to the Stack................................................................................. 56-6
56.10 Modifying the Login Module Stack ...................................................................................... 56-6
56.11 Updating the ume.logoff.redirect.uri.................................................................................... 56-6
56.12 Configuring the AMAgent.properties File........................................................................... 56-7
56.13 Testing the Integration ........................................................................................................... 56-7
Part XIV Appendixes
A Integrating Oracle ADF Applications with Access Manager SSO
A.1 Introducing Oracle Platform Security Services and Oracle Application Developer
Framework A-1
A.1.1 Oracle Platform Security Services Single Sign-on Framework .................................... A-1
A.1.2 Oracle Application Developer Framework..................................................................... A-2
xxxv
A.2 Integrating Access Manager With Web Applications Using Oracle ADF Security and the
OPSS SSO Framework A-3
A.2.1 Sample SSO Configuration for Access Manager............................................................ A-4
A.2.2 SSO Provider Configuration Details ................................................................................ A-6
A.3 Configuring Centralized Logout for Oracle ADF-Coded Applications ............................ A-7
A.3.1 About Centralized Logout Processing for Applications Coded to Oracle ADF
Standards A-7
A.3.2 Configuring Centralized Logout for ADF-Coded Applications with Access Manager....
A-8
A.4 Confirming Application-Driven Authentication During Runtime .................................. A-10
B Internationalization and Multibyte Data Support for 10g WebGates
B.1 Introduction to Internationalization and Multibyte Data Support .................................... B-1
B.1.1 Languages For Localized Messages ................................................................................ B-1
B.1.2 Bi-directional Language Support ..................................................................................... B-3
B.1.3 UTF-8 Encoding .................................................................................................................. B-3
C Securing Communication
C.1 Prerequisites ............................................................................................................................... C-1
C.2 Securing Communication Between OAM Servers and WebGates ..................................... C-1
C.2.1 About Certificates, Authorities, and Encryption Keys.................................................. C-3
C.2.2 About Security Modes and X509Scheme Authentication ............................................ C-4
C.2.3 About the Importcert Tool................................................................................................. C-4
C.3 Generating Client Keystores for OAM Tester in Cert Mode ............................................... C-5
C.4 Configuring Cert Mode Communication for Access Manager ........................................... C-6
C.4.1 About Cert Mode Encryption and Files .......................................................................... C-6
C.4.2 Generating a Certificate Request and Private Key for OAM Server ........................... C-7
C.4.3 Retrieving the OAM Keystore Alias and Password ..................................................... C-7
C.4.4 Importing the Trusted, Signed Certificate Chain Into the Keystore ........................... C-8
C.4.5 Adding Certificate Details to Access Manager Settings.............................................. C-10
C.4.6 Generating a Private Key and Certificate Request for WebGates ............................. C-11
C.4.7 Updating WebGate to Use Certificates.......................................................................... C-11
C.5 Configuring Simple Mode Communication with Access Manager ................................. C-13
C.5.1 About Simple Mode, Encryption, and Keys ................................................................. C-13
C.5.2 Retrieving the Global Passphrase for Simple Mode.................................................... C-14
C.5.3 Updating WebGate Registration for Simple Mode...................................................... C-14
C.5.4 Verifying Simple Mode Configuration.......................................................................... C-15
D Reviewing Bundled, Generated, and Migrated Artifacts
D.1 Bundled 10g IAMSuiteAgent Artifacts................................................................................... D-1
D.1.1 Pre-Registered 10g IAMSuiteAgent ................................................................................ D-1
D.1.2 IAMSuiteAgent Security Provider Settings, WebLogic Administration Console..... D-2
D.1.3 IAMSuiteAgent Registration............................................................................................. D-3
D.1.4 Resources Protected by IAMSuiteAgent ......................................................................... D-5
D.1.5 Pre-seeded IAM Suite Application Domain and Policies............................................. D-5
D.2 Generated Artifacts: OpenSSO................................................................................................. D-8
xxxvi
D.2.1 Generated OpenSSOAgentAuthPlugin........................................................................... D-9
D.2.2 Generated Host Identifier: OpenSSOAgent.................................................................. D-10
D.2.3 Generated Application Domain: OpenSSOAgent ....................................................... D-10
D.2.4 Generated Resources: OpenSSOAgent.......................................................................... D-11
D.2.5 Generated Authentication Policy: OpenSSOAgent Application Domain................ D-11
D.2.6 Generated Authorization Policy: OpenSSOAgent Application Domain ................. D-12
D.3 Migrated Artifacts: OpenSSO................................................................................................. D-12
D.3.1 Migrated User Identity Store: OpenSSO ....................................................................... D-13
D.3.2 Migrated Agents: OpenSSO ............................................................................................ D-13
D.3.3 Migrated Authentication Module: OpenSSO ............................................................... D-14
D.3.4 Migrated Host Identifier: OpenSSO............................................................................... D-14
D.3.5 Migrated Application Domain: OpenSSO .................................................................... D-15
D.3.6 Migrated Resources: OpenSSO....................................................................................... D-15
D.3.7 Migrated Authentication Policy: OpenSSO .................................................................. D-16
D.3.8 Migrated Authorization Policy: OpenSSO.................................................................... D-16
E Troubleshooting
E.1 Introduction to Oracle Access Management Troubleshooting ........................................... E-2
E.1.1 About System Analysis and Problem Scenarios ............................................................ E-2
E.1.2 About LDAP Server or Identity Store Issues .................................................................. E-3
E.1.3 About OAM Server or Host Issues................................................................................... E-4
E.1.4 About Agent-Side Configuration and Load Issues........................................................ E-4
E.1.5 About Runtime Database (Audit or Session Data) Issues ............................................ E-5
E.1.6 About Change Propagation or Activation Issues........................................................... E-5
E.1.7 About Policy Store Database Issues................................................................................. E-6
E.2 Using My Oracle Support for Additional Troubleshooting Information.......................... E-6
E.3 Administrator Lockout.............................................................................................................. E-6
E.4 Oracle Access Management Console Inconsistent State ...................................................... E-7
E.5 AdminServer Won't Start if the Wrong Java Path Given with WebLogic Server Installation
E-7
E.6 Agent Naming Not Unique ...................................................................................................... E-8
E.7 Application URL Requirements............................................................................................... E-8
E.8 Authentication Issues ................................................................................................................ E-8
E.8.1 Anonymous Authentication Issues.................................................................................. E-8
E.8.2 X.509Scheme and SSL Handshake Issues........................................................................ E-9
E.8.3 X.509 Protected Resource and Single Sign Off ............................................................. E-10
E.8.4 X509CredentialExtractor Certificate Validation Error ................................................ E-10
E.9 Authorization Issues................................................................................................................ E-10
E.9.1 Authorization Condition Error....................................................................................... E-11
E.9.2 LDAP Search Filter Test Results..................................................................................... E-11
E.9.3 Authorization Header Response Names....................................................................... E-11
E.10 Cannot Access Authentication LDAP or Database............................................................. E-11
E.11 Cannot Find Configuration .................................................................................................... E-12
E.11.1 Configuration Does Not Exist ........................................................................................ E-12
E.12 Co-existence Between OSSO and Access Manager............................................................. E-12
E.13 Could Not Find Partial Trigger.............................................................................................. E-12
E.14 Denial of Service Attacks ........................................................................................................ E-13
xxxvii
E.14.1 Protecting the OAM Server from Crashing Under Load............................................ E-13
E.14.2 Compensating for Network Latency ............................................................................ E-14
E.14.3 Protecting OAM Servers from a Flood of HTTP Requests ......................................... E-14
E.15 Deployments with Freshly Installed 10g Webgates............................................................ E-15
E.15.1 Authentication Issues with 10g Webgates .................................................................... E-15
E.15.2 Logout Issues with 10g Webgates .................................................................................. E-15
E.16 Diagnosing Initialization and Performance Issues ............................................................. E-16
E.16.1 Diagnosing an Initialization Issue.................................................................................. E-16
E.16.2 Diagnosing a Performance Issue .................................................................................... E-16
E.16.3 Diagnosing Out-of-Memory Issues With a Heap Dump............................................ E-16
E.17 Disabling Windows Challenge/Response Authentication on IIS Web Servers ............. E-17
E.18 Changing UserIdentityStore1 Type Can Lock Out Administrators................................. E-17
E.19 IIS Web Server Issues .............................................................................................................. E-18
E.19.1 Form Authentication or Pass-Through Not Working ................................................. E-18
E.19.2 IIS and General Web Component Guidelines .............................................................. E-18
E.19.3 Issues with IIS v6 Web Servers ....................................................................................... E-19
E.19.4 Page Cannot Be Displayed Error.................................................................................... E-19
E.19.5 Removing and Reinstalling IIS DLLs............................................................................. E-20
E.20 Import and File Upload Limits .............................................................................................. E-20
E.21 jps Logger Class Instantiation Warning is Logged on Authentication............................ E-21
E.22 Internationalization, Languages, and Translation .............................................................. E-21
E.22.1 Automatically Generated Descriptions Are Not Translated...................................... E-21
E.22.2 Console Looks Messy ...................................................................................................... E-21
E.22.3 Authentication Fails: Users with Non-ASCII Characters ........................................... E-21
E.22.4 Access Tester Does Not Work with Non-ASCII Agent Names ................................. E-22
E.22.5 Locales, Languages, and Oracle Access Management Console Login Page............ E-22
E.23 Login Failure for a Protected Page ........................................................................................ E-22
E.24 OAM Metric Persistence Timer IllegalStateException: SafeCluster ................................ E-22
E.25 Partial Cluster Failure and Intermittent Login and Logout Failures ............................... E-23
E.26 RSA SecurID Issues and Logs ................................................................................................ E-23
E.27 Registration Issues ................................................................................................................... E-24
E.28 Rowkey does not have any primary key attributes Error.................................................. E-24
E.29 SELinux Issues.......................................................................................................................... E-24
E.30 Session Issues............................................................................................................................ E-25
E.30.1 Session Impersonation Not Enabled by Default .......................................................... E-25
E.30.2 Sessions with Oracle Access Manager 11.1.1 Integrated with Oracle Identity Federation
11.1.1 E-26
E.31 SSL versus Open Communication......................................................................................... E-26
E.32 Start Up Issues.......................................................................................................................... E-26
E.33 Synchronizing OAM Server Clocks ...................................................................................... E-27
E.34 Using Coherence ..................................................................................................................... E-28
E.35 Validation Errors...................................................................................................................... E-29
E.36 Web Server Issues .................................................................................................................... E-29
E.36.1 Server Fails on an Apache Web Server.......................................................................... E-30
E.36.2 Apache v2 on HP-UX ....................................................................................................... E-30
E.36.3 Apache v2 Bundled with Red Hat Enterprise Linux 4................................................ E-30
E.36.4 Apache v2 Bundled with Security-Enhanced Linux ................................................... E-31
xxxviii
E.36.5 Apache v2 on UNIX with the mpm_worker_module for Webgate .......................... E-31
E.36.6 Domino Web Server Issues.............................................................................................. E-32
E.36.7 Errors, Loss of Access, and Unpredictable Behavior................................................... E-32
E.36.8 Known Issues for ISA Web Server ................................................................................. E-33
E.36.9 Oracle HTTP Server Fails to Start with LinuxThreads................................................ E-33
E.36.10 Oracle HTTP Server Webgate Fails to Initialize On Linux Red Hat 4 ...................... E-34
E.36.11 Oracle HTTP Server Web Server Configuration File Issue......................................... E-34
E.36.12 Issues with IIS v6 Web Servers ....................................................................................... E-34
E.36.13 PCLOSE Error When Starting Sun Web Server............................................................ E-35
E.36.14 Removing and Reinstalling IIS DLLs............................................................................. E-35
E.37 Windows Native Authentication........................................................................................... E-36
xxxix
List of Figures
1–1 Oracle Access Management Overview.................................................................................... 1-2
1–2 Access Manager 11g Components and Services..................................................................... 1-4
1–3 Access Manager 11g Component Distribution....................................................................... 1-5
2–1 Default Oracle Access Management Console Log In Page................................................... 2-5
2–2 Signing Out of the Oracle Access Management Console...................................................... 2-6
2–3 Oracle Access Management Console Launch Pad ................................................................. 2-7
2–4 Tabs of Open Content Pages ..................................................................................................... 2-8
2–5 SSO Agent Search Page........................................................................................................... 2-11
3–1 Oracle Access Management Configuration Options ............................................................. 3-1
3–2 Available Services ....................................................................................................................... 3-3
3–3 Common Settings Page (Collapsed View)............................................................................... 3-4
3–4 Common Coherence Settings .................................................................................................... 3-6
3–5 Certificate Revocation List Dialog Box .................................................................................... 3-8
3–6 OCSP/CDP Settings ................................................................................................................... 3-9
5–1 Creating User Identity Store Registration .............................................................................. 5-8
5–2 System Store Registration ...................................................................................................... 5-10
5–3 Identity Directory Service Console Page .............................................................................. 5-14
5–4 Create IDS Profile Page ........................................................................................................... 5-15
5–5 Create IDS Repository Page ................................................................................................... 5-21
5–6 Common Settings: Default and System Identity Stores ..................................................... 5-22
5–7 System Store Registration with Access System Administrators Section ......................... 5-23
5–8 Add System Administrator Roles.......................................................................................... 5-23
6–1 OAM Server Registration Page with Proxy Tab Displayed ................................................. 6-5
6–2 Coherence Page and Values for an Individual OAM Server ............................................... 6-8
7–1 Multi-Data Center System Architecture .................................................................................. 7-2
7–2 Active-Active Deployment Mode............................................................................................. 7-6
7–3 Active-Active Mode Failover .................................................................................................... 7-7
7–4 Multi-Data Center Deployment............................................................................................. 7-11
7–5 Requests Served By Different Data Centers......................................................................... 7-14
7–6 Logout and Session Invalidation ........................................................................................... 7-15
7–7 Active-Active Topology .......................................................................................................... 7-17
7–8 Active-Active Topology Across Multiple Data Centers..................................................... 7-18
7–9 Load Balancing Access Manager Components ................................................................... 7-19
7–10 Global Load Balancer Front Ends Local Load Balancer..................................................... 7-20
7–11 Automated Policy Synchronization Flow ............................................................................ 7-25
9–1 Audit to Database Architecture ................................................................................................ 9-4
9–2 Common Settings: Auditing Configuration......................................................................... 9-23
10–1 Log-Level Activation in the Default Log Configuration File .......................................... 10-21
12–1 Server Processes Overview Page ........................................................................................... 12-3
12–2 OAM Server Metrics: Session Operations Monitoring Page ............................................. 12-4
12–3 OAM Server Metrics: Server Operations Tab ...................................................................... 12-5
12–4 OAM Server Metrics: OAM Agents Tab............................................................................... 12-5
12–5 OAM Agent Metrics: Monitoring Characteristics............................................................... 12-7
12–6 OAM Agent Metrics: Detached Connectivity Table .......................................................... 12-7
12–7 OAM Agent Metrics: Detached Operations Overview Table ........................................... 12-7
12–8 OAM Agent Metrics: Detached Operations Detail Table ................................................. 12-7
12–9 OAM Agent Metrics: Detached Information Table ............................................................ 12-8
12–10 OSSO Agent Monitoring Page with Operation Details...................................................... 12-8
12–11 OSSO Agent Monitoring Process Overview Table ............................................................ 12-9
12–12 OSSO Agent Information Table ............................................................................................ 12-9
13–1 Fusion Middleware Control (AS-Control) Deployment Architecture ............................ 13-2
13–2 OAM Farm Page in Fusion Middleware Control................................................................ 13-4
13–3 Farm Navigation Tree in Fusion Middleware Control ...................................................... 13-5
13–4 Node Information Page in Fusion Middleware Control.................................................... 13-5
xl
13–5 Application Deployment Summary for the Selected Internal Application..................... 13-6
13–6 Application Deployment Menu............................................................................................. 13-6
13–7 WebLogic Server Domain Summary with Context Menu Exposed................................. 13-7
13–8 Cluster Page ............................................................................................................................. 13-9
13–9 Key Metrics for Server Pages ............................................................................................... 13-10
13–10 Aggregated Access Manager Component Metrics for the Cluster................................. 13-12
13–11 Access Manager Component Metrics for a Single OAM Server Instance ..................... 13-12
13–12 Aggregated STS Component Metrics for the Cluster ....................................................... 13-14
13–13 STS Component Metrics for an Individual OAM Server Instance ................................. 13-14
13–14 Performance Summary Command...................................................................................... 13-15
13–15 Performance Summary Page with Metric Palette ............................................................ 13-15
13–16 Access Manager Log Levels on the Log Configuration Tab............................................ 13-21
13–17 Log Levels for Security Token Service ............................................................................... 13-22
13–18 Log Files Configuration Page............................................................................................... 13-25
13–19 Typical Log Messages Page in Fusion Middleware Control ........................................... 13-29
13–20 System MBean Browser and Attributes Tab...................................................................... 13-35
13–21 Routing Topology with Context Menu............................................................................... 13-38
14–1 Access Manager Settings: Load Balancer ............................................................................. 14-2
14–2 Access Manager Settings: Server Error Mode...................................................................... 14-3
14–3 Access Manager Settings: SSO ............................................................................................... 14-6
14–4 Common Policy Evaluation Caches .................................................................................... 14-10
16–1 Create OAM 11g WebGate Page............................................................................................ 16-2
16–2 Load Balanced Deployment ................................................................................................. 16-12
16–3 Confirmation Window and Expanded 11g WebGate Page with Defaults ................... 16-15
16–4 WebGate Search Controls and Create ... Buttons .............................................................. 16-20
16–5 Key Generation....................................................................................................................... 16-27
17–1 Session Data and the Role of Oracle Coherence.................................................................. 17-7
17–2 Global Session Details: Common Settings Page ................................................................ 17-10
17–3 Common Configuration: Session Management Page....................................................... 17-13
18–1 Access Manager 11g Policy Model ...................................................................................... 18-7
18–2 Access Manager Shared Policy Components....................................................................... 18-7
18–3 Anatomy of Access Manager Policies................................................................................. 18-11
18–4 SSO Log-in with Embedded Credential Collector and OAM Agents............................ 18-17
18–5 Example: Separate Resource Webgate and DCC Webgate Deployment ...................... 18-19
18–6 Combined DCC and Webgate Configuration.................................................................... 18-20
18–7 SSO Login Processing with OSSO Agents and ECC......................................................... 18-22
19–1 Default HTTP Resource Type Definition ............................................................................. 19-4
19–2 Default Resource Type wl_authen ........................................................................................ 19-5
19–3 Default Resource Type TokenServiceRP Resource Type ................................................... 19-5
19–4 Host Identifier Page............................................................................................................... 19-14
19–5 Native Kerberos Authentication Module........................................................................... 19-24
19–6 Native LDAP Authentication Module................................................................................ 19-25
19–7 Native X509 Authentication Module .................................................................................. 19-26
19–8 Access Manager Plug-ins for Customized Authentication Modules ............................. 19-31
19–9 Creating Custom Authentication Modules: General ....................................................... 19-32
19–10 Adding a Step and Associating a Plug-in........................................................................... 19-32
19–11 Plug-in Based Authentication Module Steps and Details................................................ 19-37
19–12 Steps Orchestration for Plug-in Based Authentication Modules.................................... 19-38
19–13 Oracle-provided Plug-in Based Authentication Modules ............................................... 19-39
19–14 KerberosPlugin....................................................................................................................... 19-40
19–15 Default KerberosPlugin Steps and Details......................................................................... 19-40
19–16 Default KerberosPlugin Steps and Orchestration............................................................. 19-40
19–17 LDAPPlugin............................................................................................................................ 19-41
19–18 Default LDAPPlugin Steps and Details.............................................................................. 19-41
19–19 Default Orchestration of Steps for LDAPplugin ............................................................... 19-41
xli
19–20 X509Plugin .............................................................................................................................. 19-42
19–21 X509Plugin Default Steps and Details ................................................................................ 19-42
19–22 Default Orchestration for X509Plugin Steps ...................................................................... 19-43
19–23 Password Policy Validation Module Plug-ins................................................................... 19-44
19–24 Steps Orchestration: Password Policy Validation Plug-ins ............................................. 19-44
19–25 StandardLevelCheck-2 and SensitiveLevelCheck-6 Modules......................................... 19-48
19–26 Plug-ins Page .......................................................................................................................... 19-56
19–27 Plugin Details: Activation Status of Selected Plug-in....................................................... 19-59
19–28 Default LDAPScheme Page.................................................................................................. 19-65
19–29 Password Policy Configuration Page.................................................................................. 19-92
19–30 Default Store with New Administrator Designated....................................................... 19-102
19–31 Password Policy Validation Authentication Module with Orchestrated Plug-ins .... 19-103
19–32 Step Orchestration for Password Policy Validation Module......................................... 19-104
19–33 Sample ECC PasswordPolicyValidationScheme ............................................................ 19-106
19–34 Sample DCC PasswordPolicyValidationScheme ............................................................ 19-107
19–35 Server Error Mode for Password Management............................................................... 19-113
19–36 Creating an OAuth Web Client.......................................................................................... 19-127
20–1 Application Domains Search Page ........................................................................................ 20-5
20–2 Application Domain Page for Acme Application ............................................................... 20-6
20–3 Search Results for Resources in an Application Domain................................................... 20-6
20–4 Authentication Policies Tab.................................................................................................... 20-7
20–5 Authentication Policy Page: Resources and Responses .................................................... 20-8
20–6 Authorization Policies Page ................................................................................................... 20-9
20–7 Individual Authorization Policy Page .................................................................................. 20-9
20–8 Individual Authorization Policy Resources tab .................................................................. 20-9
20–9 Token Issuance Policies Page ............................................................................................... 20-10
20–10 Create Application Domain.................................................................................................. 20-11
20–11 Adding a Resource Prefix for Policy Ordering.................................................................. 20-14
20–12 Fresh Resources (Definition) Page in the Application Domain ...................................... 20-16
20–13 HTTP Resources, Query String Resource URL Controls ................................................. 20-26
20–14 Sample Resource Definitions Search within an Application Domain............................ 20-30
20–15 Sample Search Results for Resource Definitions in an Application Domain................ 20-31
20–16 Sample Authentication Policies Page in the Application Domain ................................. 20-33
20–17 Sample Individual Authentication Policy Page ................................................................ 20-34
20–18 Sample Individual Authorization Policy Page .................................................................. 20-38
20–19 Authorization Policies Page ................................................................................................. 20-39
20–20 Authorization Policy Response in the Console ................................................................. 20-42
20–21 Simple Response Samples..................................................................................................... 20-45
20–22 Complex Response Sample ................................................................................................. 20-46
20–23 Individual Authorization Policy Conditions Tab ............................................................. 20-51
20–24 Add Condition Window ...................................................................................................... 20-53
20–25 Condition Containers on the Authorization Policy Page................................................. 20-54
20–26 Add Identities Window ....................................................................................................... 20-56
20–27 Identity Condition and Details ............................................................................................ 20-57
20–28 Add Search Filter Controls ................................................................................................... 20-58
20–29 Identity Conditions: Details ................................................................................................. 20-59
20–30 IP4 Range Conditions............................................................................................................ 20-62
20–31 Temporal Condition Type Details Page ............................................................................. 20-64
20–32 Attribute Conditions Page.................................................................................................... 20-66
20–33 Add Attributes Dialog .......................................................................................................... 20-66
20–34 Authorization Policy Rules Tab: Simple Mode ................................................................. 20-71
20–35 Rules Tab: Expression Rule Mode....................................................................................... 20-73
21–1 OAM Agent (PEP) and OAM Server (PDP) Inter-operability........................................... 21-4
21–2 User Interactions with the Access Tester.............................................................................. 21-7
21–3 Access Tester Console ........................................................................................................... 21-13
xlii
21–4 Server Connection Panel in the Access Tester ................................................................... 21-17
21–5 Protected Resource URI Panel in the Access Tester.......................................................... 21-19
21–6 Access Tester User Identity Panel ....................................................................................... 21-21
21–7 Test Case Workflow............................................................................................................... 21-25
23–1 Typical Deployment with OpenSSO and Access Manager ............................................... 23-7
23–2 New OpenSSO Agent Page .................................................................................................. 23-11
23–3 Expanded OpenSSO Web Agent Registration Page ......................................................... 23-13
23–4 Expanded OpenSSO J2EE Agent Registration Page ......................................................... 23-14
24–1 Create OSSO Agent Page........................................................................................................ 24-7
24–2 OSSO Agent Page and Confirmation Window ................................................................... 24-9
30–1 Available Services Page......................................................................................................... 30-15
31–1 New Identity Provider Page, Service Details Loaded from Metadata............................. 31-3
31–2 New Identity Provider Page, Service Details entered Manually ...................................... 31-3
31–3 Searching for Identity Providers............................................................................................ 31-8
31–4 Updating an Identity Provider............................................................................................... 31-9
31–5 Attribute Sharing Plug-in Design........................................................................................ 31-18
32–1 Identity Federation Service Settings Page ............................................................................ 32-2
32–2 General Section of Federation Settings Page........................................................................ 32-3
32–3 Federation Proxy Settings....................................................................................................... 32-4
32–4 Keystore Settings...................................................................................................................... 32-5
33–1 FederationScheme.................................................................................................................... 33-2
33–2 FederationPlugin...................................................................................................................... 33-3
33–3 FederationPlugin Orchestration ............................................................................................ 33-3
33–4 Setting Up the Authentication Policy with FederationScheme......................................... 33-5
33–5 OIFScheme ................................................................................................................................ 33-6
33–6 OIFMTLDAPPlugin................................................................................................................. 33-7
33–7 Authorization Policy Response Tab...................................................................................... 33-8
33–8 Adding a Federation Response Attribute to an AuthZ Policy........................................ 33-10
34–1 Security Token Service Architecture..................................................................................... 34-8
34–2 Security Token Service Token Support................................................................................. 34-8
34–3 Token Translation at a Centralized Authority..................................................................... 34-9
34–4 Translating Tokens Behind a Firewall ................................................................................ 34-10
34–5 Web Services SSO................................................................................................................... 34-11
35–1 Typical Token Ecosystem ....................................................................................................... 35-2
35–2 Identity Propagation with the OAM Token......................................................................... 35-3
35–3 Process Flow During Identity Propagation.......................................................................... 35-3
35–4 Identity Propagation Deployment......................................................................................... 35-4
35–5 Identity Propagation Processing ........................................................................................... 35-4
35–6 Required v1.0 WebLogic Server Identity Assertion Providers ......................................... 35-9
35–7 IAP-Security Token Service Details..................................................................................... 35-10
35–8 LDAP Provider: IAP-DSEE .................................................................................................. 35-11
35–9 Default Identity Store Defined in Access Manager........................................................... 35-12
35–10 Token Issuance Policy for Identity Propagation .............................................................. 35-12
35–11 /wssuser Endpoint for Identity Assertion......................................................................... 35-13
35–12 Default Identity Store Defined for Access Manager ......................................................... 35-19
35–13 Token Issuance Policy for Identity Propagation ............................................................... 35-20
35–14 /wss11user Endpoint for Identity Assertion..................................................................... 35-20
36–1 Default Endpoints, Policies, and Validation Templates..................................................... 36-5
36–2 WS-Security 1.0 and 1.1 Policies ............................................................................................ 36-7
36–3 Available Services Panel ......................................................................................................... 36-9
36–4 Security Token Service Page................................................................................................. 36-10
38–1 Validation Templates Search Controls ................................................................................. 38-3
38–2 Issuance Template Search Controls....................................................................................... 38-3
38–3 Issuance Template: General Details and Defaults............................................................... 38-7
38–4 Issuance Properties: Username Token Type........................................................................ 38-7
xliii
38–5 Issuance Properties: SAML Token Types............................................................................. 38-8
38–6 Security Details: SAML Tokens ........................................................................................... 38-10
38–7 New Validation Template page: General Page Defaults.................................................. 38-15
38–8 New Validation Template: General Authentication Details............................................ 38-17
38–9 Token Mapping: SAML2 WS-Security Validation Template .......................................... 38-19
38–10 Token Mapping, username-wstrust-validation-template................................................ 38-19
38–11 Token Mapping: x509-wss-validation-template................................................................ 38-20
38–12 Endpoints Page....................................................................................................................... 38-25
38–13 Token Issuance Policies and Conditions ............................................................................ 38-28
38–14 Pre-defined Resource Type: TokenServiceRP ................................................................... 38-31
38–15 Search: Resource Type TokenServiceRP in Application Domain................................... 38-32
38–16 New Custom Token Page ..................................................................................................... 38-34
38–17 Custom Token Definition: email.......................................................................................... 38-34
38–18 Custom Tokens Search Page and Controls ........................................................................ 38-36
38–19 General Details: email-wstrust-valid-temp........................................................................ 38-40
38–20 Token Mapping: email-wstrust-valid-temp....................................................................... 38-40
38–21 General Details: email-issuance-temp ................................................................................ 38-41
38–22 Issuance Properties: email-issuance-temp ......................................................................... 38-42
39–1 New Requester Partner Page.................................................................................................. 39-3
39–2 New Relying Party Partners Page ......................................................................................... 39-4
39–3 Defined Requester Partner .................................................................................................... 39-5
39–4 Partner Search Controls .......................................................................................................... 39-7
39–5 Requester Profile: General ...................................................................................................... 39-7
39–6 Requester Profile: Token and Attributes .............................................................................. 39-9
39–7 Relying Party Profile Token and Attributes....................................................................... 39-10
39–8 Token and Attributes: Issuing Authority .......................................................................... 39-14
39–9 Issuing Authority Profile: Token Mapping Tab ................................................................ 39-16
39–10 Search Profiles Page: Requester ........................................................................................... 39-19
41–1 First Time Device/Application Registration and Authentication Process.................... 41-12
41–2 Mobile SSO Agent Requests Access Token from Access Manager ................................ 41-13
41–3 Mobile SSO Agent Has Valid Access Token in Credential Store.................................... 41-14
41–4 Mobile SSO Agent Does Not Have Valid Access Token in Credential Store................ 41-15
41–5 User Authentication Using REST ........................................................................................ 41-16
41–6 Authenticating User From Browser-based Web App on Registered Mobile Device... 41-17
41–7 .................................................................................................................................................. 41-19
41–8 Authenticating a Returning User with a Local Account.................................................. 41-25
41–9 Authenticating a New User with No Local Account........................................................ 41-27
41–10 Authenticating a User With an OAuth Identity Provider ............................................... 41-29
41–11 Authenticating a User with Access Manager..................................................................... 41-31
41–12 Authenticating a User Locally.............................................................................................. 41-32
42–1 Using ODSM to create the PIN attribute in OUD ............................................................. 42-12
42–2 Using ODSM to create the pinperson object class............................................................. 42-13
42–3 Using the OAM Console to create an IdentityStore.......................................................... 42-14
43–1 Social Identity Account Linking .......................................................................................... 43-18
45–1 OAuth 3-Legged Flow Diagram ............................................................................................ 45-7
45–2 Using a Split Request to get a Client Verification Code..................................................... 45-9
45–3 The Complete Mobile App Authorization Request Flow................................................ 45-11
47–1 Password Generation Policies Search/Create Tab............................................................ 47-43
47–2 Password Generation Policies Search Results ................................................................... 47-44
47–3 New Password Generation Policy Summary Tab............................................................. 47-44
47–4 Password Constraints Tab of a Password Generation Policy ......................................... 47-46
47–5 Add Applications Dialog...................................................................................................... 47-47
47–6 Add Applications Dialog Search Results ........................................................................... 47-48
47–7 Credential Sharing Groups Search Results ........................................................................ 47-49
47–8 New Credential Sharing Group Page ................................................................................. 47-51
xliv
47–9 Add Applications Dialog...................................................................................................... 47-52
47–10 Add Applications Dialog Search Results ........................................................................... 47-53
47–11 Global Agent Settings Search Results ................................................................................. 47-54
47–12 Import Global Agent Settings Dialog.................................................................................. 47-54
47–13 New Global Agent Settings Page......................................................................................... 47-55
48–1 End to End Identity Context Process .................................................................................... 48-3
48–2 End To End Identity Context Process Components ........................................................... 48-3
48–3 Identity Context Process Flow ............................................................................................... 48-8
48–4 OAM Authentication Provider Configuration .................................................................. 48-18
50–1 Steps After Creation .............................................................................................................. 50-30
50–2 Steps After Orchestration...................................................................................................... 50-30
51–1 Various Clients Deployed on JBoss Application Server..................................................... 51-6
51–2 JBoss Agent Deployed with an Oracle HTTP Server Webgate ......................................... 51-6
51–3 Sample Integration Topology................................................................................................. 51-6
52–1 Setting up a Trusted User Account for Windows Impersonation .................................. 52-15
52–2 Configuring Rights for the Trusted User in Windows Impersonation.......................... 52-16
52–3 Registering the Impersonation Module.............................................................................. 52-19
52–4 Verifying Event Viewer Settings.......................................................................................... 52-21
52–5 Impersonation Authentication............................................................................................. 52-23
53–1 Setting up a Trusted User Account for Windows Impersonation .................................... 53-5
53–2 Configuring Rights for the Trusted User in Windows Impersonation............................ 53-6
53–3 Sample Webgate Registration Page....................................................................................... 53-6
53–4 Impersonation Response in An Application Domain ........................................................ 53-7
53–5 Verifying Event Viewer Settings.......................................................................................... 53-10
53–6 Webgate Registration Page................................................................................................... 53-13
53–7 Impersonation Authentication............................................................................................. 53-16
C–1 Communication Channels for OAM Servers and WebGates.............................................. C-2
D–1 IAMSuiteAgent Settings in the WebLogic Administration Console.................................. D-3
D–2 IAMSuiteAgent Registration.................................................................................................... D-4
D–3 Resources Protected by the IAMSuiteAgent.......................................................................... D-5
D–4 IAMSuite Authentication Policy: OAM Admin Console Policy......................................... D-6
D–5 Protected HigherLevel Policy: Authentication, LDAP Scheme .......................................... D-6
D–6 Protected LowerLevel Policy: Authentication, OIMScheme .............................................. D-7
D–7 Public Policy: Authentication, AnonymousSheme ............................................................... D-7
D–8 IAM Suite Authorization Policy .............................................................................................. D-8
D–9 IAM Suite Token Issuance Policy and Resource URLs ........................................................ D-8
D–10 Generated Authentication Module: OpenSSOAgentAuthPlugin....................................... D-9
D–11 Generated Host Identifier: OpenSSOAgent......................................................................... D-10
D–12 Generated Application Domain: OpenSSOAgent............................................................... D-10
D–13 Application Domain Resources: OpenSSOAgent ............................................................... D-11
D–14 Generated Authentication Policy: OpenSSOAgent Application Domain ....................... D-11
D–15 Generated Authorization Policy: OpenSSOAgent Application Domain......................... D-12
D–16 Migrated User Identity Store: OpenSSO............................................................................... D-13
D–17 Migrated Agent: OpenSSO..................................................................................................... D-13
D–18 Migrated Authentication Module: OpenSSO ...................................................................... D-14
D–19 Migrated Host Identifier: OpenSSO...................................................................................... D-14
D–20 Migrated Application Domain: OpenSSO............................................................................ D-15
D–21 Migrated Resources: OpenSSO .............................................................................................. D-15
D–22 Migrated Authentication Policy: OpenSSO ......................................................................... D-16
D–23 Migrated Authorization Policy2 Condition: OpenSSO...................................................... D-16
D–24 Migrated Authorization Policy2: IP Condition Details ...................................................... D-17
xlv
xlvi
List of Tables
1–1 Access Manager Deployment Types....................................................................................... 1-5
1–2 Features in Access Manager 11.1.2 .......................................................................................... 1-7
1–3 Features Not Available In Access Manager 11.1.2 ................................................................ 1-9
1–4 Oracle Access Management Post-Installation Tasks.......................................................... 1-11
2–1 Welcome Page Sections and Shortcuts.................................................................................... 2-7
2–2 Controls for Closing Pages ....................................................................................................... 2-8
2–3 Page Elements and Descriptions.............................................................................................. 2-8
2–4 Selection Tasks and Controls.................................................................................................... 2-9
2–5 Language Codes For Login Pages ........................................................................................ 2-12
2–6 Oracle Access Management Language Selection Methods............................................... 2-14
2–7 OAM_LANG_PREF Cookie .................................................................................................. 2-14
2–8 Application Integration for Language Preference ............................................................. 2-15
3–1 Configuration Options .............................................................................................................. 3-1
3–2 Common Services ...................................................................................................................... 3-3
3–3 Common Settings....................................................................................................................... 3-4
3–4 Common Coherence Settings ................................................................................................... 3-6
3–5 .................................................................................................................................................... 3-11
4–1 Roles for Delegating Adminisration ....................................................................................... 4-2
5–1 Data Sources for Oracle Access Management ....................................................................... 5-1
5–2 Data Sources for Oracle Access Management Services........................................................ 5-2
5–3 User Identity Store Elements.................................................................................................... 5-8
5–4 Access Manager Keys and Storage....................................................................................... 5-28
5–5 Keystores for Access Manager and Security Token Service............................................. 5-28
6–1 Conditions Requiring Server Restart ...................................................................................... 6-4
6–2 OAM Server Instance Settings ................................................................................................. 6-5
6–3 OAM Proxy Settings for an Individual OAM Server ........................................................... 6-6
6–4 Default Coherence Settings for Individual OAM Servers.................................................... 6-8
7–1 Automated Policy Synchronization - States of Replica ..................................................... 7-25
7–2 Multi-Data Center Policy Configurations for Idle Timeout ............................................. 7-29
7–3 Session Synchronization and Failover Scenarios ............................................................... 7-31
7–4 oamMDC.properties Properties............................................................................................ 7-33
7–5 partnerInfo.properties Properties......................................................................................... 7-35
8–1 Logging Files............................................................................................................................... 8-2
8–2 Logging Defaults........................................................................................................................ 8-2
8–3 Oracle Access Management Server-Side Component Loggers........................................... 8-3
8–4 Oracle Access Management Shared-Service Engine Component Loggers ....................... 8-4
8–5 Oracle Access Management Foundation API Component Loggers................................... 8-4
8–6 Mapping of ODL to Java Levels .............................................................................................. 8-5
8–7 Oracle Security Token Service and Identity Federation Loggers ....................................... 8-9
9–1 Oracle Business Intelligence Enterprise Edition Reports for OAM.................................... 9-5
9–2 Access Manager Administrative Audit Events ..................................................................... 9-6
9–3 Access Manager Run-time Audit Events................................................................................ 9-9
9–4 REST Run-Time Audit Events............................................................................................... 9-12
9–5 Mobile and Social Run-Time Audit Events......................................................................... 9-12
9–6 Categories of Audit Events for Identity Federation........................................................... 9-14
9–7 Identity Federation Session Management Events.............................................................. 9-14
9–8 Protocol Flow Events for Identity Federation..................................................................... 9-15
9–9 Server Configuration Identity Federation........................................................................... 9-15
9–10 Security Events for Identity Federation............................................................................... 9-16
9–11 Security Token Service Configuration Management Operations .................................... 9-17
9–12 Security Token Service-specific Run-time Events.............................................................. 9-19
9–13 Audit Configuration Elements.............................................................................................. 9-23
10–1 Logging Levels ........................................................................................................................ 10-2
xlvii
10–2 Log Configuration File Names for Components................................................................ 10-5
10–3 Log Writers ............................................................................................................................ 10-10
10–4 Global Parameters in the First Compound List................................................................ 10-11
10–5 Factors that Determine Whether Logging Is Active ........................................................ 10-16
10–6 Mandatory Log Configuration File Parameters ............................................................... 10-17
10–7 Log Data File Configuration Parameters........................................................................... 10-18
10–8 ParamName Values You Can Configure for Per-Module Logging Threshold............ 10-23
11–1 Accounts_Locked_Out Report Fields .................................................................................. 11-3
11–2 Authentication_statistics Report Fields ............................................................................... 11-3
11–3 AuthenticationFromIPByUser Report Fields...................................................................... 11-4
11–4 AuthenticationPerIP Report Fields ...................................................................................... 11-4
11–5 AuthenticationStatisticsPerServer Report Fields ............................................................... 11-4
11–6 All Errors and Exceptions Report Fields ............................................................................. 11-5
11–7 Authentication Failures Report Fields................................................................................. 11-5
11–8 Authentication History Report Fields.................................................................................. 11-5
11–9 Authorization History Report Fields ................................................................................... 11-6
11–10 Multiple Logins From Same IP Report Fields..................................................................... 11-6
12–1 OAM Server Metrics: Server Processes Overview Tab ..................................................... 12-3
12–2 OAM Server Metrics: Session Operations ........................................................................... 12-4
12–3 OAM Server Metrics: Server Operations Tab ..................................................................... 12-5
12–4 OAM Proxy Metrics.............................................................................................................. 12-10
12–5 OAM Proxy Tuning Parameters ......................................................................................... 12-10
12–6 OpenSSO Proxy Server Events............................................................................................ 12-11
12–7 OpenSSO Proxy Metrics: Server ......................................................................................... 12-11
12–8 OpenSSO Proxy Metrics: Agent.......................................................................................... 12-12
13–1 Farm Page Sections ................................................................................................................. 13-4
13–2 Resulting Pages for Selected Nodes and Targets ............................................................... 13-8
13–3 Summary of Performance Overviews in Fusion Middleware Control......................... 13-10
13–4 Access Manager Component Metrics ................................................................................ 13-13
13–5 STS Component-Specific Metrics........................................................................................ 13-14
13–6 Status and Controls on Performance Summary Pages.................................................... 13-15
13–7 OAM Log Availability and Functions in Fusion Middleware Control......................... 13-20
13–8 Log Levels Tab on Log Configuration Page...................................................................... 13-22
13–9 Log Files Elements ................................................................................................................ 13-26
13–10 OAM Log Message Search Controls in Fusion Middleware Control............................ 13-29
13–11 System MBean Browser ....................................................................................................... 13-34
13–12 MBeans that Access Manager and Security Token Service Deploy............................ 13-34
13–13 System MBean Browser ....................................................................................................... 13-36
13–14 Farm Topology ...................................................................................................................... 13-38
14–1 Access Manager Settings: Load Balancer ............................................................................ 14-2
14–2 Server Error Mode .................................................................................................................. 14-3
14–3 Error Trigger Condition, Modes, and Message Codes...................................................... 14-4
14–4 External Error Codes, Trigger Conditions, and Recommended Messages.................... 14-4
14–5 Access Manager Settings: SSO .............................................................................................. 14-6
14–6 Summary: Simple and Cert Mode........................................................................................ 14-7
14–7 Server Common OAM Proxy Secure Communication Settings....................................... 14-8
14–8 Policy Evaluation Caches..................................................................................................... 14-10
15–1 Agent Types............................................................................................................................. 15-2
15–2 Agent Registration and SSO Support................................................................................... 15-3
15–3 Run Time Processing Overview for Access Manager........................................................ 15-4
15–4 Keys and Policies Generated During Agent Registration................................................. 15-6
15–5 Artifacts Associated with Agent Registration .................................................................... 15-7
15–6 Copying Generated Artifacts ................................................................................................ 15-7
15–7 Remote Registration Methods............................................................................................... 15-8
15–8 Remote Registration Does Not Support .............................................................................. 15-8
xlviii
15–9 Agent Registration and Configuration Update Artifacts................................................ 15-10
16–1 Elements on Create Pages for 11g and 10g OAM Agents................................................. 16-3
16–2 User-Defined WebGate Parameters ..................................................................................... 16-6
16–3 Elements on Expanded 11g and 10g WebGate/Access Client Registration Pages ..... 16-16
16–4 OAM Agent Search Controls............................................................................................... 16-21
16–5 Environment Variables to Set within oamreg................................................................... 16-24
16–6 Remote Registration Command Arguments: mode ........................................................ 16-24
16–7 Remote Registration Command Samples.......................................................................... 16-25
16–8 Common Elements in Remote Registration Requests ..................................................... 16-25
16–9 Remote Registration Request Templates for OAM Agents ............................................ 16-28
16–10 Elements in Extended OAM Agent Remote Registration Requests.............................. 16-29
16–11 Variables Required for Remote Registration .................................................................... 16-32
16–12 Files Returned by in-band Administrator to out-of-band Administrator .................... 16-34
16–13 Remote Agent Update Modes and Input Files ................................................................. 16-36
16–14 Delta: OAM Agent Update versus Registration Request................................................ 16-36
17–1 Session Lifecycle States .......................................................................................................... 17-3
17–2 Session Checks for State Changes......................................................................................... 17-4
17–3 Session Removal...................................................................................................................... 17-4
17–4 Application Domain-Specific Overrides.............................................................................. 17-5
17–5 Session Content: Single Authentication Scheme................................................................ 17-8
17–6 Session Outcomes: Multiple Authentication Schemes ...................................................... 17-9
17–7 Global Session Settings......................................................................................................... 17-10
17–8 Application-Specific Session Timing Overrides............................................................... 17-11
17–9 Session Management Controls and the Results Table..................................................... 17-13
18–1 Summary: SSO Components ................................................................................................. 18-2
18–2 Introduction to SSO Implementations ................................................................................. 18-3
18–3 Access Manager Global, Shared Policy Components........................................................ 18-8
18–4 Access Manager Policy Components................................................................................... 18-9
18–5 Condition Types.................................................................................................................... 18-13
18–6 Login Processing with Access Manager-Protected Resources ....................................... 18-15
18–7 DCC Deployment Support .................................................................................................. 18-18
18–8 SSO Cookies........................................................................................................................... 18-23
19–1 Comparison: Resource Types for Access Manager versus 10g........................................ 19-3
19–2 Resource Type Definition ...................................................................................................... 19-5
19–3 Host Identifiers Examples...................................................................................................... 19-8
19–4 Host Identifier Definition .................................................................................................... 19-15
19–5 Comparing the DCC and ECC............................................................................................ 19-20
19–6 Native Authentication Modules ......................................................................................... 19-23
19–7 Native Kerberos Authentication Module Definition....................................................... 19-24
19–8 Native LDAP Authentication Modules Definition .......................................................... 19-25
19–9 X509 Authentication Module Definition ........................................................................... 19-27
19–10 Simple Form versus Multi-Step Authentication............................................................... 19-30
19–11 General tab............................................................................................................................. 19-32
19–12 Add New Step Entries, Steps Results Table, and Details Section.................................. 19-33
19–13 Parameter Details for Various Plug-ins ............................................................................. 19-34
19–14 Steps Orchestration Subtab.................................................................................................. 19-38
19–15 X509 Step Details (KEY_CERTIFICATE_ATTRIBUTE_TO_EXTRACT) ...................... 19-43
19–16 Steps and Plug-ins in a Customized Step-up Authentication Module ......................... 19-49
19–17 Managing Custom Plug-ins Actions .................................................................................. 19-57
19–18 Plugins Status Table.............................................................................................................. 19-58
19–19 Example of Plugin Details Extracted from XML Metadata File..................................... 19-60
19–20 Authentication Scheme Definition ..................................................................................... 19-65
19–21 Pre-configured Authentication Schemes........................................................................... 19-68
19–22 Challenge Parameters in Pre-configured Schemes .......................................................... 19-75
19–23 User-Defined Challenge Parameters for Authentication Schemes................................ 19-76
xlix
19–24 Advanced Rules Attributes ................................................................................................. 19-84
19–25 Request Context Data........................................................................................................... 19-85
19–26 Location Context Data.......................................................................................................... 19-86
19–27 Session Context Data............................................................................................................ 19-86
19–28 User Context Data................................................................................................................. 19-86
19–29 Sample Advanced Rules ...................................................................................................... 19-86
19–30 Challenge Parameters for 10g/11g Encrypted Cookies .................................................. 19-88
19–31 Credential Collector Password Pages ................................................................................ 19-89
19–32 Password Management Forms and Functions ................................................................. 19-90
19–33 Password Policy Elements................................................................................................... 19-92
19–34 Specifying Credential Collectors and Related Forms for Authentication .................... 19-94
19–35 Location of Oracle-provided LDIFs for LDAP Providers............................................. 19-100
19–36 Key Password Attributes in a Password Policy ............................................................. 19-100
19–37 User Password Step Details............................................................................................... 19-104
19–38 Resource Webgate Support of POST Data Preservation and Restoration.................. 19-117
19–39 Credential Collector Support for POST Data Handling................................................ 19-117
19–40 Authentication Schemes Supporting POST Data Handling......................................... 19-118
19–41 Parameters Required for Authentication POST Data Handling.................................. 19-118
19–42 ECC and DCC: Long URL Handling ............................................................................... 19-122
19–43 Authentication Schemes Supporting Long URL Handling .......................................... 19-123
19–44 Parameters Required for Long URL Handling............................................................... 19-123
20–1 Resource Definition Elements............................................................................................. 20-16
20–2 HTTP Resources Sample URL Values................................................................................ 20-19
20–3 Supported Wildcards in Resource URL Patterns (Precedence Order).......................... 20-20
20–4 Sample Resource URLs ........................................................................................................ 20-22
20–5 Pattern Matching for Requested URLs .............................................................................. 20-23
20–6 Query String Matching: Examples ..................................................................................... 20-24
20–7 Resource Evaluation Outcomes.......................................................................................... 20-27
20–8 Search Elements for a Resource in an Application Domain ........................................... 20-30
20–9 Authentication Policy Elements and Descriptions........................................................... 20-34
20–10 Authorization Policy Elements and Descriptions ............................................................ 20-38
20–11 Response Elements ............................................................................................................... 20-42
20–12 Namespace Request Variables for Single Sign-On........................................................... 20-43
20–13 Namespace Session Variables for Single Sign-On............................................................ 20-44
20–14 Namespace User Variables.................................................................................................. 20-44
20–15 Simple Responses and Descriptions................................................................................... 20-45
20–16 Complex Responses.............................................................................................................. 20-46
20–17 Fresh OSSO Installation: Protected Policy Response (Header)...................................... 20-48
20–18 Authorization Policy Condition Tab.................................................................................. 20-51
20–19 Add Condition Window Elements..................................................................................... 20-53
20–20 Add identities Elements....................................................................................................... 20-56
20–21 Add Search Filter Elements................................................................................................. 20-58
20–22 LDAP Search Filter Examples for Access Manager ......................................................... 20-59
20–23 Temporal Condition Details................................................................................................ 20-64
20–24 Access Conditions that Require Attribute-Type Conditions.......................................... 20-65
20–25 Attribute Condition Elements............................................................................................. 20-67
20–26 Attribute Names for Request Built-ins .............................................................................. 20-67
20–27 Attribute Names for Session Built-ins................................................................................ 20-67
20–28 Attribute Condition Data (Aggregation of Conditions).................................................. 20-68
20–29 Authorization Policy Rules Elements ................................................................................ 20-71
20–30 Rule Tab in Expression Mode ............................................................................................. 20-73
20–31 Operators for Expressions in Authorization Rules.......................................................... 20-73
20–32 Remote Policy Management Modes, Templates, and Flags ........................................... 20-77
20–33 Remote Management Template Elements......................................................................... 20-80
21–1 User Interactions: Tester Console Mode versus Command Line Mode Operations .... 21-7
l
21–2 Access Tester Supported System Properties....................................................................... 21-9
21–3 Access Tester Console Panels.............................................................................................. 21-13
21–4 Command Buttons in Access Tester Panels...................................................................... 21-14
21–5 Additional Access Tester Buttons....................................................................................... 21-14
21–6 Access Tester Menus............................................................................................................. 21-15
21–7 Connection Panel Information............................................................................................ 21-17
21–8 Protected Resource URI Panel Fields and Controls......................................................... 21-19
21–9 Access Tester User Identity Panel Fields and Controls................................................... 21-21
21–10 Access Tester Capture Request Options............................................................................ 21-26
21–11 Generate Script Command .................................................................................................. 21-27
21–12 Test Script Control Parameters ........................................................................................... 21-28
21–13 Run Test Script Commands................................................................................................. 21-30
21–14 Mismatched Results Reasons in the Statistics Document ............................................... 21-33
22–1 Centralized Logout Circumstances...................................................................................... 22-2
22–2 Logout Details After Registration (ObAccessClient.xml) ................................................. 22-3
23–1 Features: OpenSSO Agents with Access Manager............................................................. 23-2
23–2 OpenSSO Policy Migration.................................................................................................... 23-3
23–3 OpenSSO Reliance on Access Manager ............................................................................... 23-5
23–4 Access Manager Processing with OpenSSO ....................................................................... 23-8
23–5 Elements on the New OpenSSO Agent Page.................................................................... 23-11
23–6 Relocating OpenSSO Artifacts ............................................................................................ 23-12
23–7 Expanded OpenSSO Agent Registration Elements.......................................................... 23-15
23–8 OpenSSO Request Files for Remote Registration............................................................. 23-23
23–9 OpenSSO Agent Remote Registration Request ................................................................ 23-24
23–10 J2EE Request File Mappings to the Properties File.......................................................... 23-25
23–11 Mapping the Web Request File to the Properties File ..................................................... 23-26
23–12 Delta: OpenSSO Remote Registration versus Remote Updates..................................... 23-28
23–13 Other OpenSSO Information in this Guide....................................................................... 23-30
24–1 OSSO Agents with Access Manager .................................................................................... 24-2
24–2 11g Access Manager SSO versus OSSO 10g Component Summary ............................... 24-3
24–3 Create OSSO Agent Page Elements...................................................................................... 24-7
24–4 Relocating OSSO Artifacts..................................................................................................... 24-8
24–5 Expanded OSSO Agent Elements......................................................................................... 24-9
24–6 OpenSSO Request Files for Remote Registration............................................................. 24-12
24–7 OSSO-Specific Elements in a Remote Registration Request........................................... 24-13
24–8 Delta: OSSO Remote Registration versus Remote Updates ........................................... 24-15
24–9 Other OSSO Information in this Guide ............................................................................. 24-18
25–1 Installation Comparison with 10g WebGates ..................................................................... 25-4
25–2 Comparison: Access Manager 11g versus 10g.................................................................... 25-6
25–3 Comparing Access Manager 11g Policy Model versus 10g.............................................. 25-8
25–4 Preparing for 10g WebGate Installation with Access Manager 11g.............................. 25-15
25–5 Sample end_url Parameter Specifications......................................................................... 25-26
28–1 IIS 7 Webgate Windows Server 2008.................................................................................... 28-6
30–1 Supported SAML 2.0 NameID Formats............................................................................... 30-4
30–2 SAML 2.0 URLs for Identity Federation Acting As Identity Provider............................ 30-5
30–3 SAML 2.0 URLs for Identity Federation Acting as Service Provider.............................. 30-6
30–4 Supported SAML 1.1 NameID Formats............................................................................... 30-7
30–5 SAML 1.1 URLs for Identity Federation Acting As Identity Provider............................ 30-8
30–6 SAML 1.1 URL for Identity Federation Acting as Service Provider................................ 30-8
30–7 OpenID 2.0 URLs for Identity Federation Acting As Identity Provider....................... 30-10
30–8 OpenID 2.0 URLs for Identity Federation Acting as Service Provider ......................... 30-10
30–9 Configuring Identity Federation Settings.......................................................................... 30-14
30–10 Implementing Identity Federation .................................................................................... 30-15
31–1 Default Partner Profiles.......................................................................................................... 31-2
31–2 Identity Provider Partner Settings........................................................................................ 31-3
li
31–3 Attributes for Google OpenID Partner ............................................................................... 31-6
31–4 Attributes for Yahoo OpenID Partner................................................................................. 31-7
31–5 Elements Used for IdP Provider Search ............................................................................. 31-8
31–6 Service Provider Partner Settings....................................................................................... 31-10
31–7 Sample SP Attribute Mappings........................................................................................... 31-12
31–8 Attribute Mapping Value Expressions .............................................................................. 31-13
31–9 Sample IdP Attribute Mappings......................................................................................... 31-14
31–10 Default Federation Authentication Method and Access Manager Authentication Scheme
Mappings 31-15
31–11 Configuration Parameters for Attribute Sharing Plug-in ............................................... 31-21
31–12 Session Attributes Accessible To Attribute Sharing Plug-in .......................................... 31-22
32–1 Federation Settings in the Console ....................................................................................... 32-2
32–2 General Federation Settings .................................................................................................. 32-3
32–3 Federation Proxy Settings...................................................................................................... 32-4
32–4 Keystore Settings for Federation........................................................................................... 32-5
33–1 FederationScheme Element Definitions............................................................................... 33-2
33–2 FederationPlugin Steps .......................................................................................................... 33-3
33–3 Orchestration of FederationPlugin...................................................................................... 33-4
33–4 OIFScheme Definition ............................................................................................................ 33-6
33–5 OIFMTLDAPPlugin Steps ..................................................................................................... 33-7
33–6 Policy Response Elements ..................................................................................................... 33-9
34–1 Security Token Service 11g Infrastructure .......................................................................... 34-3
34–2 Security Token Service Terms............................................................................................... 34-4
34–3 Integrated Oracle Web Services Manager ........................................................................... 34-7
36–1 Security Token Service Settings .......................................................................................... 36-11
36–2 Configuring a Non-Oracle WSM Client for WSS Kerberos Policies.............................. 36-18
37–1 Security Token Service Public Keys Used at Run Time .................................................... 37-2
37–2 Keystore Mbeans..................................................................................................................... 37-2
37–3 Partner Keys for WS-Trust Communications ..................................................................... 37-7
37–4 Conditions for Security Token Service Certificate Validation.......................................... 37-9
37–5 Successful Certificate Validation Requirements................................................................. 37-9
38–1 Search Validation Template .................................................................................................. 38-4
38–2 Issuance Template Requirements......................................................................................... 38-6
38–3 Issuance Template: General Details ..................................................................................... 38-7
38–4 Issuance Properties: Username Token Type....................................................................... 38-8
38–5 Issuance Properties: SAML Token Types............................................................................ 38-9
38–6 Security Details: SAML Tokens .......................................................................................... 38-10
38–7 Issuance Template: Attribute Mapping, SAML Token ................................................... 38-11
38–8 Validation Template Protocols............................................................................................ 38-15
38–9 New Validation Template: General Details ...................................................................... 38-16
38–10 New Validation Template: Authentication Details.......................................................... 38-17
38–11 New Validation Template: Token Mapping ..................................................................... 38-20
38–12 Endpoints Page...................................................................................................................... 38-26
38–13 Conditions tab: Token Issuance Policy .............................................................................. 38-28
38–14 New Custom Token Elements............................................................................................. 38-35
38–15 Custom Tokens Search Elements and Controls................................................................ 38-36
39–1 Security Token Service Partners ........................................................................................... 39-1
39–2 Security Token Service Clients.............................................................................................. 39-2
39–3 Security Token Service Partner Entry .................................................................................. 39-2
39–4 Security Token Service Partner Profile Data....................................................................... 39-2
39–5 Partner Elements for Partner Types ..................................................................................... 39-3
39–6 Elements for Security Token Service Partners.................................................................... 39-4
39–7 Profile: General........................................................................................................................ 39-8
39–8 Requester Profile: Token and Attributes ............................................................................. 39-9
39–9 Relying Party Profile Requirements................................................................................... 39-10
lii
39–10 Token and Attributes Elements: Issuing Authority......................................................... 39-15
39–11 Issuing Authority Token Mapping Elements ................................................................... 39-16
41–1 Features in Mobile and Social Based on the Companion Services Installed .................. 41-3
41–2 Mobile and Non-Mobile Authentication Service Providers in Mobile Services............ 41-6
41–3 Android, iOS, and Java Features of Mobile and Social Mobile Services Client SDK.... 41-8
41–4 Token Requirements for the Mobile and Social Server ................................................... 41-20
41–5 Identity Providers That Mobile and Social Natively Supports...................................... 41-23
42–1 Pre-configured Authentication Service Providers ............................................................. 42-6
42–2 Access Manager Authentication Service Provider Default Attributes............................ 42-8
42–3 WebGate Agent for Authentication Service Provider Default Attributes ...................... 42-9
42–4 JWT Authentication Service Provider Default Attributes................................................. 42-9
42–5 JWT-OAM Authentication Service Provider Default Attributes ................................... 42-10
42–6 Access Manager Authorization Service Provider Default Attributes ........................... 42-16
42–7 WebGate Agent for Authorization Service Provider Default Attributes...................... 42-16
42–8 User Profile Service Provider Default Attribute Names and Values ............................ 42-18
42–9 User Profile Service Provider Default Attribute Names and Values ............................ 42-19
42–10 Authentication Service Profile Default General Properties............................................ 42-21
42–11 Token Support and URI Category Information Default Properties .............................. 42-22
42–12 Authorization Service Profile Default General Properties.............................................. 42-23
42–13 User Profile Service Profile Default General Properties.................................................. 42-24
42–14 Security Handler Plug-in General Properties ................................................................... 42-25
42–15 Application Profile General Properties.............................................................................. 42-26
42–16 Service Domain General Properties ................................................................................... 42-29
42–17 Application Profile Selection Properties............................................................................ 42-30
42–18 Service Profile Selection Properties.................................................................................... 42-31
42–19 User Profile Service Protection Properties ........................................................................ 42-31
42–20 Authorization Service Protection Properties .................................................................... 42-31
42–21 OAAM Policies Supported By Mobile and Social............................................................ 42-40
42–22 Mapping Terms Between OAAM and Mobile and Social .............................................. 42-40
43–1 OpenID Protocol Attributes .................................................................................................. 43-4
43–2 OAuth Protocol Attributes .................................................................................................... 43-5
43–3 User Attributes Returned By Google ................................................................................... 43-6
43–4 User Attributes Returned By Yahoo..................................................................................... 43-6
43–5 User Profile Attributes Returned By Foursquare............................................................... 43-7
43–6 User Profile Attributes Returned By Windows Live ......................................................... 43-7
43–7 Service Provider Interface Information Properties .......................................................... 43-12
43–8 Account Linking Properties................................................................................................. 43-19
44–1 Attribute Settings for an Oracle Access Manager 11gR1 PS1 Authentication Service
Provider 44-2
46–1 User Profile Resource Server - Resource Categories.......................................................... 46-4
46–2 User Profile Resource Server - Scope Settings .................................................................... 46-4
46–3 OAuth Service Profile Configuration Attributes.............................................................. 46-12
46–4 Mobile Client Attributes Names and Values.................................................................... 46-14
46–5 Web Client Attributes Names and Values ........................................................................ 46-17
46–6 OAuth Service Provider Attributes for Access Manager................................................ 46-20
46–7 User Profile Service Attributes............................................................................................ 46-25
46–8 OAuth Server Settings Attributes....................................................................................... 46-30
46–9 Default OAuth JKS Keystore File and Settings File ......................................................... 46-32
48–1 Identity Context Schema Attributes..................................................................................... 48-4
48–2 Mapping Identity Context Operations ................................................................................ 48-9
49–1 Access Manager Support for RSA Features ........................................................................ 49-2
49–2 RSA Features Not Supported................................................................................................ 49-2
49–3 Installation and Configuration Guidelines ......................................................................... 49-4
50–1 Sample Naming....................................................................................................................... 50-6
50–2 ktpass Keytab Generation Parameter Descriptions ......................................................... 50-25
liii
50–3 Values for Kerberos Authentication Module Steps ......................................................... 50-29
50–4 Steps Orchestration Order ................................................................................................... 50-30
50–5 Steps Parameter Values........................................................................................................ 50-31
50–6 Kerberos Authentication Scheme Parameter Values....................................................... 50-32
50–7 Firefox Preferences for IWA................................................................................................ 50-33
51–1 JBoss Agent Composition ...................................................................................................... 51-5
52–1 Access Manager Component Requirements....................................................................... 52-6
52–2 Microsoft Requirements for this Integration....................................................................... 52-7
52–3 Create Web Application Options for Microsoft SharePoint Server............................... 52-11
52–4 Create a Web Application to Host a Site Collection for SharePoint Server.................. 52-13
53–1 Requirements for Impersonation with a Header Variable ............................................... 53-3
55–1 Login Module Stacks for using Header Variables ............................................................. 55-6
55–2 Login Module Stacks for using Header Variables ........................................................... 55-13
56–1 .................................................................................................................................................... 56-3
56–2 .................................................................................................................................................... 56-4
56–3 Login Module Flags................................................................................................................ 56-6
A–1 addOAMSSOProvider Command-line Arguments............................................................. A-4
B–1 Languages for Localized Messages ........................................................................................ B-2
C–1 importcert Command Syntax.................................................................................................. C-4
D–1 Comparing IAMSuiteAgent with 11g and 10g Webgates................................................... D-4
liv
List of Examples
3–1 Certificate Validation Module Configuration......................................................................... 3-9
3–2 Multiple OCSP Responder Configuration ........................................................................... 3-10
7–1 Sample oamMDCProperty.properties File........................................................................... 7-34
8–1 Configuring Access Manager Loggers and Log Handlers.................................................... 8-4
10–1 The Default Log Configuration File with Comments ........................................................ 10-6
10–2 Simple Lists with Global Settings (First Compound List in oblog_config_wg.xml).... 10-12
10–3 FILTER_LIST Masks Sensitive Attributes in Log Files..................................................... 10-15
10–4 Valid Name/Value List......................................................................................................... 10-15
10–5 Another Valid Name/Value List......................................................................................... 10-16
10–6 Opening tag for a Name/Value List ................................................................................... 10-16
10–7 Opening tag for a Name/Value List ................................................................................... 10-16
10–8 A Default Log Configuration File Without Embedded Comments .............................. 10-19
16–1 Updates for the 11g WebGate in mod_wl_ohs.conf ......................................................... 16-44
21–1 Connection Configuration File............................................................................................. 21-33
21–2 Generated Input Test Script.................................................................................................. 21-34
21–3 Output File Generated During a Test Run......................................................................... 21-35
21–4 Sample Statistics Document ................................................................................................. 21-37
21–5 Execution Log......................................................................................................................... 21-39
25–1 logout.html Script .................................................................................................................. 25-24
31–1 Sample SOAP Attribute Request ......................................................................................... 31-20
31–2 Sample SOAP Attribute Response ...................................................................................... 31-20
35–1 Sample exchange: Request Security Token Sent By the Client ....................................... 35-21
35–2 Request Security Token Response sent by the Security Token Service ......................... 35-22
42–1 Sample merge-creds.xml....................................................................................................... 42-38
46–1 Creating the Keystore............................................................................................................ 46-33
46–2 Loading the Certificates ........................................................................................................ 46-33
46–3 Update jps-config.xml ........................................................................................................... 46-34
46–4 Adding the new Service Instance ........................................................................................ 46-34
46–5 Creating Credential Store Entries........................................................................................ 46-35
48–1 Working with Identity Context Dictionary.......................................................................... 48-9
48–2 Using WLST To Grant Attribute Service Access To Application ................................... 48-10
48–3 Working with Identity Context Runtime ........................................................................... 48-10
48–4 Custom Function Creating Identity Context ..................................................................... 48-15
52–1 Sample .ASP Page Code........................................................................................................ 52-22
A–1 Sample SSO Configuration for Access Manager ................................................................... A-5

lv
Preface
This guide provides information on daily administration and policy configuration
tasks using Oracle Access Management.
Audience
This document is intended for Administrators who are familiar with the following
concepts:
■Oracle WebLogic Server concepts and administration
■LDAP server concepts and administration
■Database concepts and administration (for policy and session management data)
■Web server concepts and administration
■WebGate and mod_osso agents
■Auditing, logging, and monitoring concepts
■Security token concepts
■Integration of the Policy store, Identity store, and familiarity with Oracle Identity
Management and OIS might be required
Documentation Accessibility
For information about Oracle's commitment to accessibility, visit the Oracle
Accessibility Program website at
http://www.oracle.com/pls/topic/lookup?ctx=acc&id=docacc
.
Access to Oracle Support
Oracle customers that have purchased support have access to electronic support
through My Oracle Support. For information, visit
http://www.oracle.com/pls/topic/lookup?ctx=acc&id=info
or visit
http://www.oracle.com/pls/topic/lookup?ctx=acc&id=trs
if you are hearing
impaired.
Related Documents
For more information, see the following documents in the Oracle Fusion Middleware
11g Release 2 (11.1.2.2) documentation set:
■Oracle Access Management 11g Release 2 (11.1.2.2) Release Notes

lvi
■Oracle Fusion Middleware Installation Guide for Oracle Identity and Access
Management—Explains how to use the Oracle Universal Installer and the
WebLogic Configuration Wizard for initial Access Manager 11g deployment.
Installing 11g WebGates for Access Manager is also covered.
■Oracle Fusion Middleware Administrator's Guide for Oracle Access
Management—Explains how to manage configuration and policies for Access
Manager, Security Token Service, Identity Federation, Mobile and Social, and
Identity Context.
■Oracle Fusion Middleware Developer's Guide for Oracle Access
Management—Explains how to write custom applications and plug-ins to
functions programmatically, to create custom Access Clients that protect
non-Web-based resources.
■Oracle Fusion Middleware Upgrade Guide for Java EE—For information about the
types of Java EE environments available in 10g and instructions for upgrading
those environments to Oracle Fusion Middleware 11g.
■Oracle Fusion Middleware Upgrade Guide for Oracle Identity and Access
Management
■Oracle Fusion Middleware Performance and Tuning Guide
■Oracle Fusion Middleware Administrator's Guide—Describes how to manage a
secure Oracle Fusion Middleware environment, including how to change ports,
deploy applications, and how to back up and recover Oracle Fusion Middleware.
This guide also explains how to move data from a test to a production
environment.
■Oracle Fusion Middleware Enterprise Deployment Guide for Oracle Identity
Management—For a step-by-step guide to deployment.
■Oracle Fusion Middleware High Availability Guide—For high availability
conceptual information as well as administration and configuration procedures for
Administrators, developers, and others whose role is to deploy and manage
Oracle Fusion Middleware with high availability requirements.
■Oracle Fusion Middleware WebLogic Scripting Tool Command
Reference—Provides a section on customized Oracle Access Management
commands in the chapter "Infrastructure Security Custom WLST Commands".
■Oracle Fusion Middleware Security and Administrator's Guide for Web
Services—Describes how to administer and secure Web services.
Conventions
The following text conventions are used in this document:
Convention Meaning
boldface Boldface type indicates graphical user interface elements associated
with an action, or terms defined in text or the glossary.
italic Italic type indicates book titles, emphasis, or placeholder variables for
which you supply particular values.
monospace
Monospace type indicates commands within a paragraph, URLs, code
in examples, text that appears on the screen, or text that you enter.

lvii
What's New in This Guide?
This chapter describes changes and updates to this book. See the following sections for
details.
■Product Enhancements for Oracle Access Management 11.1.2.2.0
■Product Enhancements for Oracle Access Management 11.1.2.1.0
■Product Enhancements in Oracle Access Management 11.1.2.0.0
■Product and Component Name Changes with 11.1.2
Product Enhancements for Oracle Access Management 11.1.2.2.0
This list of enhancements has been developed for this Oracle Access Management
11.1.2.2.0 release. Where applicable, links to the documentation are included.
■Using Multi-Data Centers and How Automated Policy Synchronizaton Works
■Delegating Administration
■OAuth Service
The Oracle Access Manager OAuth 2.0 Service provides a standards compliant
OAuth 2.0 authorization server with support for both 3-legged and 2-legged
OAuth flows and enables the OAuth 2.0 Client and the OAuth 2.0 Resource Server
roles. It also provides support for mobile OAuth 2.0 clients (such as native
applications on mobile devices) and includes built-in support for mobile
application registration and device identification during the OAM OAuth 2.0
mobile flow ensuring trusted access from mobile devices and built-in server side
single sign-on. It is ideally suited for enterprise scenarios that may require higher
levels of security during an OAuth flow and would benefit from built-in OAM
integrations provided by the OAM OAuth 2.0 service.
■Introduction to Application Domain and Policy Creation
■Administering Identity Federation As An Identity Provider
■Managing Oracle Access Management Oracle Access Portal
■Using the New Oracle Access Management Console
Policy Management Enhancements include:
–Right click menu items available for all search result tables
–Duplicate Resources, Authentication Policies, Authorization Policies and
Token Issuance Policies and create new objects using the duplicate (Copy of)
–Search for the Host Identifier from the Resource page
lviii
–New Administrator tab in the Application Domain edit screen
–New Advance Rules tab (with Pre-Authentication and Post-Authentication
sub tabs) in Authentication Policy
■For Granular Timeout and cookie-based session management, see Maintaining
Access Manager Sessions
■SHA2 encryption for all WebGate servers
■Configuring Policy Ordering
■Using Application Initiated Authentication
■Configuring Persistent Login (Remember Me)
■Coexistence enhancements
■Support added for Internet Protocol version 6 (IPv6)
Product Enhancements for Oracle Access Management 11.1.2.1.0
The following list outlines the enhancements available with Oracle Access
Management 11.1.2.1.0.
■Newly certified integrations described in:
–Chapter 53: Outlook Web Application (OWA) 2010
–Chapter 54: Microsoft Forefront Threat Management Gateway (TMG) 2010
–Chapter 55: SAP Enterprise Portal v6.0 and v7.0
–Oracle Fusion Middleware Third-Party Application Server Guide for Oracle
Identity and Access Management (WebSphere Portal)
■Authentication POST Data preservation and restoration is explained in:
"Configuring Authentication POST Data Handling" on page 19-116.
■Long URL handling is explained in "Long URL Handling During Authentication"
on page 19-122.
■Step up authentication is described in "Creating and Managing Step-Up
Authentication" on page 19-48.
■Language selection on Login page is described in "Choosing a User Login
Language" on page 2-12.
■Configurable Webgate Request Context Cookie Expiry Time is explained in:
–Table 16–2, " User-Defined WebGate Parameters"
–"OAMRequestContext" on page 18-26
Product Enhancements in Oracle Access Management 11.1.2.0.0
Oracle Access Management 11.1.2.0.0 provides new functions and enhancements
outlined in following topics.
■November 2012 Book Refresh
■August 2012 Book Refresh
■Access Management Services
■Access Tester
lix
■Attribute Type Authorization Condition
■Deprecation
■Detached Credential Collection
■Dynamic Multi-Factor/Multi-Step Authentication
■Identity Context
■Integration with Third Party Products
■LDAP Search Filters in Identity Conditions
■Leverage SubjectAltName Extension Data/Integrate with Multiple OCSP
Endpoints
■Mobile and Social
■Multiple Identity Store Support
■OpenSSO Support
■Password Policy Management
■Query String Name and Value Parameters in a Resource Definition Pattern
■Resource Type TokenServiceRP for Non-Browser Client-enabled Webgate
■RESTful Services
■Shared Secret Key: Access Client and Software Developer Kit Enhancement
■Token Issuance Policy for Mobile and Social
■Tuning Performance
■User-Defined Parameters: 11g Webgate
November 2012 Book Refresh
The following information has been added or updated:
■Chapter 1: Added "System Requirements and Certification".
■Chapter 2: Removal (redundant) has altered chapter numbers.
■Chapter 3: Moved password policy, refocused for ECC, into Chapter 16 with other
authentication details.
■Chapter 6: Added descriptions of loggers to:
–Table 8–3, " Oracle Access Management Server-Side Component Loggers"
–Table 8–4, " Oracle Access Management Shared-Service Engine Component
Loggers"
–Table 8–5, " Oracle Access Management Foundation API Component Loggers"
■Chapter 12: Re-focused for 11g OAM Agents (Webgates and Access Clients).
■Chapter 13:
–Combined console and remote registration for 11g OAM Agents.
–Moved "Configuring 11g WebGates and Authentication Policy for DCC" to
chapter 16.
■Chapter 15:
–Added "Introducing Access Manager Credential Collection and Login".
lx
■Chapter 16: Relocated authentication details with other shared policy components:
–Combined console and remote registration for 11g OAM Agents.
–Added "Introducing Access Manager Credential Collection and Login"
–Refocused and moved from chapter 3: "Managing Global Password Policy"
–Moved "Configuring 11g WebGates and Authentication Policy for DCC" from
chapter 3.
■Chapter 17:
–Added "Understanding Remote Policy and Application Domain
Management".
–Added "Managing Policies and Application Domains Remotely".
■Chapter 20: Relocated OpenSSO Agent registration and management details here.
■Chapter 20: Relocated OSSO Agent registration and management details here.
■Chapter 22: Expanded 10g OAM Agent details to include console and remote
registration updates, and logout with Access Manager.
■Appendix A: Relocated to relevant logout configuration details.
August 2012 Book Refresh
This book has been updated to address reported issues. Global updates include
cosmetic changes and updated screens.
Access Management Services
Several previously separate access products of the Oracle Identity Management
portfolio are combined into one product: Oracle Access Management.
Access Tester
The Access Tester can validate the connections in the pool and make cache flush
(SYNC_INFO) requests to be sent over a connection that is already established; instead
of using out-of-band connection for cache flush requests.
See Also: The following topics are new or updated in this release.
■Table 20–17, " Fresh OSSO Installation: Protected Policy Response
(Header)" for details about obtaining subscriber DN information
from Oracle Internet Directory.
■Table 19–13, " Parameter Details for Various Plug-ins"
■Section 31.3.1, "Creating Remote Identity Provider Partners" for
details about defining OpenID 2.0 IdP partners for federation.
See Also:
■Chapter 1, "Introducing Oracle Access Management"
■Part IV, "Managing Access Manager Settings and Agents"
■Part VII, "Managing Oracle Access Management Identity
Federation"
■Part IX, "Managing Oracle Access Management Mobile and
Social"
■Part XII, "Using Identity Context"
lxi
Attribute Type Authorization Condition
Authorization conditions enable you to implement dynamic security policies and
resulted in changes to the Policy Configuration interface in the Oracle Access
Management Console:
■Authorization Conditions: The earlier constraint class is renamed as a Condition
Type. Conditions contain no Allow or Deny specification; however, new Rules
specify Allow or Deny access options.
■A new condition type: Attribute.
■Use of Implied Constraints option in policies is replace, allowing you to create
particular condition types by instantiating those and selecting rules.
Deprecation
Standard Authentication Modules (LDAP, Kerberos, and X509) are targeted for
deprecation in future releases. Oracle strongly recommends using native or custom
Plug-ins rather than standard Authentication Modules.
Detached Credential Collection
Detached credential collection is an additional capability of the 11g Webgate (OAM
Agent). This is required for secure dynamic multi-factor/multi-step authentication.
You can easily enable the 11g Webgate to use as a DCC; or continue using the
embedded credential collector (ECC) in the OAM Server.
Dynamic Multi-Factor/Multi-Step Authentication
Multi-factor authentication requires a custom authentication plug-in to transmit
information to the back-end authentication scheme several times during the login
process. All information collected by the plug-in and saved in the context will be
available to the plug-in through the authentication process. Context data can also be
used to set cookies or headers in the user's login page.
See Also: Chapter 21, "Validating Connectivity and Policies Using
the Access Tester"
See Also: "Introduction to Authorization Policy Rules and
Conditions" on page 20-49
See Also: "About Attribute Conditions" on page 20-65
See Also: "Introduction to Authorization Policy Rules and
Conditions" on page 20-49
See Also:
■Table 19.7, "Orchestrating Multi-Step Authentication with Plug-in
Based Modules" on page 19-28
■Oracle Fusion Middleware Developer's Guide for Oracle Access
Management if you want to create custom authentication plug-ins.
See Also: "Configuring 11g WebGates and Authentication Policy for
DCC" on page 19-109
lxii
Identity Context
Identity Context leverages the context-aware policy management and authorization
capabilities built into the Oracle Access Management platform. Identity Context
secures access to resources using traditional security controls (roles and groups) as and
dynamic data established during authentication and authorization (strength, risk
levels, device trust, and so on).
Integration with Third Party Products
Details of integrating Access Manager with third-party products have moved from the
earlier Oracle Fusion Middleware Integration Guide for Oracle Access Manager to this
book. The following integrations are supported:
LDAP Search Filters in Identity Conditions
Access Manager authorization conditions accept a list of users, groups, and LDAP
search filters as part of allowed or denied identities. LDAP search filters provide a
simple way of specifying a target identity population without having to reorganize or
create new groups in the identity store (directory server). This brings to Access
Manager 11g, parity with Oracle Access Manager 10g.
Leverage SubjectAltName Extension Data/Integrate with Multiple OCSP
Endpoints
Access Manager support for personal identity verification (PIV) cards (a United States
Federal smart card), is to use FASC-N and EDIPI attributes from the SubjectaltName
extension to map the user during X.509 authentication. While multiple OCSP
providers are not supported, you can use an OCSP Gateway or write a custom
authentication plug-in that uses the OSDT OCSP APIs to validate against multiple
OCSP providers.
See Also:
■Oracle Fusion Middleware Developer's Guide for Oracle Access
Management
See Also: Chapter 48, "Using Identity Context"
See Also: Part XIII, "Integrating Access Manager with Other
Products"
■Chapter 49, "Integrating RSA SecurID Authentication with Access
Manager"
■Chapter 50, "Configuring Access Manager for Windows Native
Authentication"
■Chapter 51, "Integrating JBoss with Access Manager"
■Chapter 52, "Integrating Microsoft SharePoint Server with Access
Manager"
See Also: "About LDAP Search Filter Support in Identity
Conditions" on page 20-57
See Also:
■"Example: Leveraging SubjectAltName Extension Data and
Integrating with Multiple OCSP Endpoints" on page 19-44
lxiii
Mobile and Social
Mobile and Social serves as an intermediary between a user seeking to access
protected resources, and the back-end Oracle Access Management and Oracle Identity
Management services that protect those resources. Mobile and Social services'
pluggable architecture enables Administrators to add, modify, and remove Identity
and Access Management services without having to update user installed software.
Multiple Identity Store Support
Administrators can install multiple user identity stores for Access Manager. Each
identity store can rely on a different LDAP provider. Each authentication module (or
plug-in within an authentication step) can be configured to use a specific user identity
store.
OpenSSO Support
Access Manager supports Web and Java Agents deployed on Web or J2EE containers.
Each OpenSSO Agent is a filter that is plugged into the container (Oracle WebLogic
Server, JBoss, Apache, and so on) that hosts applications.
Access Manager provides an OpenSSO Proxy to handle requests for resources
protected by OpenSSO Agents. The Oracle-provided OpenSSO Proxy facilitates single
sign-on to OpenSSO Agent-protected applications by enabling communication
between the agent and the OAM Server.
Password Policy Management
Access Manager enables password policy management through the Oracle Access
Management Console. The global password policy applies to Access Manager users
when the Password Policy Validation Module is implemented. The password policy is
stored within the policy store and applies to all resources protected by Access
Manager.
Query String Name and Value Parameters in a Resource Definition Pattern
The Policy Model supports Query String Name and Value Parameters in a Resource
Pattern Definition:
See Also: Part IX, "Managing Oracle Access Management Mobile
and Social"
See Also:
■"Using Multiple Identity Stores" on page 5-5
■"Orchestrating Multi-Step Authentication with Plug-in Based
Modules" on page 19-28
See Also:
■Chapter 23, "Registering and Managing Legacy OpenSSO Agents"
■Oracle Fusion Middleware Upgrade Guide for Oracle Identity and
Access Management
See Also:
■"Managing Global Password Policy" on page 19-97
■"Configuring 11g WebGates and Authentication Policy for DCC"
on page 19-109

lxiv
Resource Type TokenServiceRP for Non-Browser Client-enabled Webgate
A TokenServiceRP type resource represents resources for, and is based on, the Token
Service Relying Party (required for non-browser clients such as Identity Connect).
RESTful Services
Oracle Access Management supports programmatic RESTful services.
Shared Secret Key: Access Client and Software Developer Kit
Enhancement
Custom Access Clients developed using the Access Manager 11g Access Software
Developer Kit support the 11g Shared Secret Key Per Agent (Webgate or Access Client)
security feature. Each agent has its own secret key that is shared between the Access
Client and the OAM Server to encrypt or decrypt the host-based Access-Client-specific
OAMAuthnCookie. Even if one Access Client is compromised, the impact is limited to
that particular Access Client; no other Access Clients are affected.
Access Manager 11g Pure Java ASDK provides both Oracle Java APIs (in
oracle.security.am.asdk packages) and Oblix Java APIs (in com.oblix.access packages).
Access Manager 11g Pure Java Access Clients:
■Communicate with OAM Servers using Oracle Java APIs and either Oracle Access
Protocol version 3 (or version 4 which supports Shared Secret Key Per Webgate
security feature)
■Communicate with 10g Servers using Oblix Java APIs and Oracle Access Protocol
version 3 only (with no support for SSKPA)
Token Issuance Policy for Mobile and Social
A Token Issuance Policy is required for clients for Mobile and Social performing
authentication and authorization.
See Also:
■"About Query String Name and Value Parameters for Resource
Definitions" on page 20-22
See Also: "Managing TokenServiceRP Type Resources in
Application Domains" on page 38-32
See Also: Oracle Fusion Middleware Developer's Guide for Oracle
Access Management
Note: There is no impact to existing 10g ASDK users. Oblix class
wrappers can be modified to create Access Client instances with 10g
mode transparently. However, to operate in 11g compatible mode,
Oracle java APIs should be used.
See Also: Oracle Fusion Middleware Developer's Guide for Oracle
Access Management
See Also: Part IX, "Managing Oracle Access Management Mobile
and Social" for details about Mobile and Social Authentication Service

lxv
Tuning Performance
A survey of topics is provided to help tune a deployed Oracle Access Management
environment to ensure optimal performance and stability.
User-Defined Parameters: 11g Webgate
11g Webgate works with browser clients. However, there are cases where a
non-browser (Representational State Transfer (REST) client needs to access HTTP
resources and perform authentication and authorization.
Product and Component Name Changes with 11.1.2
Oracle Access Management provided some product and component name changes, as
shown in the following table.
See Also: Oracle Fusion Middleware Performance and Tuning
Guide
See Also:
■"About 11g Webgate Functionality for Mobile and Social" on
page 15-5
■Part IX, "Managing Oracle Access Management Mobile and
Social"
■Oracle Fusion Middleware Developer's Guide for Oracle Access
Management
Item In Oracle Access Management 11.1.2 In Oracle Access Management 11.1.1
Services Access Manager
Identity Federation
Security Token Service
Mobile and Social
Identity Context (always enabled)
Access Manager
N/A
Security Token Service
N/A
Agents Webgate (OAM Agent)
Access Client (OAM Agent)
OSSO Agent
OpenSSO Agent
Webgate (OAM Agent)
Access Client (OAM Agent)
OSSO Agent
N/A
Console Names Oracle Access Management Console Oracle Access Manager Console
Administrators Administrator or Oracle Access Management
Administrator
Oracle Access Manager Administrator
Agent and Application
Domain Registration
Policy Creation
Oracle Access Management Console
Remote registration tool for automated Agent
registration, Application Domain creation with
default security policies.
Oracle Access Manager Console
Remote registration tool
Authorization Conditions and Rules Constraints
lxvi

Part I
Part I
Introduction to Oracle Access Management
Part I of this book provides an introduction to Oracle Access Management. It contains
information on the available services as well as instructions on how to start using the
Oracle Access Management Console. This part contains the following chapters.
■Chapter 1, "Introducing Oracle Access Management"
■Chapter 2, "Getting Started with Oracle Access Management"

1
Introducing Oracle Access Management 1-1
1
Introducing Oracle Access Management
[2]
This book provides information on Oracle Access Management, the enterprise-level
security platform, and how to administer and configure it. Oracle Access Management
includes Oracle Access Management Access Manager (Access Manager) and its
incorporated services: Identity Federation, Mobile and Social, Security Token Service,
Identity Context and Access Portal.
This chapter provides a high-level overview of the Oracle Access Management
architecture and these services.
■Understanding Oracle Access Management Services
■Using Oracle Access Management Access Manager
■Features of Access Manager 11.1.2
■System Requirements and Certification
■Installing Oracle Access Management
1.1 Understanding Oracle Access Management Services
Oracle Access Management is a Java, Enterprise Edition (Java EE)-based
enterprise-level security application that provides a full range of Web-perimeter
security functions and Web single sign-on services including identity context,
authentication and authorization; policy administration; testing; logging; auditing; and
more. It leverages shared platform services including session management, Identity
Context, risk analytics, and auditing, and provides restricted access to confidential
information. Many existing access technologies in the Oracle Identity Management
stack converge in the Oracle Access Management stack as illustrated in Figure 1–1.
Understanding Oracle Access Management Services
1-2 Administrator's Guide for Oracle Access Management
Figure 1–1 Oracle Access Management Overview
Overview of Oracle Access Management software
***********************************************************************************************
Starting with release 11.1.2, Oracle Access Management includes these services.
■Oracle Access Management Access Manager (Access Manager) is described in
"Using Oracle Access Management Access Manager" on page 1-3 and the
following parts of this guide.
–Part II, "Managing Common and System Configurations"
–Part III, "Logging, Auditing, Reporting and Monitoring Performance"
–Part IV, "Managing Access Manager Settings and Agents"
–Part V, "Managing Access Manager SSO, Policies, and Testing"
–Part VI, "Registering and Using Agents with Access Manager"
–Part XIII, "Integrating Access Manager with Other Products"
■Oracle Access Management Identity Federation (Identity Federation) provides
cross-domain single sign-on support using open federation protocol standards
such as SAML and OpenID. Beginning with release 11.1.2, Identity Federation is
tightly integrated with Oracle Access Management out of the box. This new Oracle
Access Management service includes a streamlined user interface and
administration experience. For more information, see the chapters listed in
Part VII, "Managing Oracle Access Management Identity Federation."
■Oracle Access Management Security Token Service (Security Token Service)
provides token validation and generation to facilitate access to services across
security domains and beyond organizational boundaries. Essentially the service
acts as a trust-broker that receives and validates client requests and generates
appropriate tokens for a requested resource. For more information, see the
chapters listed in Part VIII, "Managing Oracle Access Management Security Token
Service."
■Oracle Access Management Mobile and Social (Mobile and Social) acts as an
intermediary between a user seeking access to protected resources, and the
back-end Identity and Access Management services that protect the resources.

Using Oracle Access Management Access Manager
Introducing Oracle Access Management 1-3
Mobile and Social extends security and compliance to mobile platforms and
simplifies integration with Social Identity services including Facebook and
Google. Mobile and Social RESTful enables Identity and Access Management
infrastructure and includes platform-specific developer kits for leading mobile
platforms that enables developers to easily access security services and enable
single sign-on across native and mobile browser-based applications. For more
information, see the chapters listed in Part IX, "Managing Oracle Access
Management Mobile and Social."
■Identity Context provides context-aware security policy management that enables
Administrators to control the level of security imposed in an application delivery
environment through security frameworks provided by Oracle Identity
Management. For more information, see the chapters listed in Part XII, "Using
Identity Context".
OpenSSO 8.0 and Sun Access Manager 7.1 have also converged into Oracle Access
Management 11.1.2. For more information, see:
■Chapter 23, "Registering and Managing Legacy OpenSSO Agents"
■Oracle Fusion Middleware Upgrade Guide for Oracle Identity and Access
Management
With the 11.1.2.2 release, Oracle Access Management has integrated Oracle Access
Portal, a hosted single sign-on proxy service that enables Web applications with
Oracle's form-fill single sign-on technology. For more information, see Part XI,
"Managing Oracle Access Management Oracle Access Portal."
1.2 Using Oracle Access Management Access Manager
Oracle Access Management Access Manager (Access Manager) is the former
(standalone) product named Oracle Access Manager. Access Manager provides the
Oracle Fusion Middleware 11g single sign-on (SSO) solution. It operates
independently (as described in this book) but can also operate with the Access
Manager Authentication Provider as described in the Oracle Fusion Middleware
Application Security Guide.
Access Manager SSO allows users and groups to access multiple applications after
authentication, eliminating the need for multiple sign-on requests. To enable SSO, a
Web server, Application Server, or any third-party application must be protected by a
WebGate (or mod_osso instance) that is registered as an agent with Access Manager.
Administrators then define authentication and authorization policies to protect the
resource. To enforce these authentication policies, the agent acts as a filter for HTTP
requests.
Note: For information on the differences between Access Manager
11g, 10g and other software, see:
■"Comparing Access Manager 11.1.2 and 10g" on page 25-5
■"Comparing Access Manager 11g SSO versus OSSO 10g" on
page 24-2
■"Introduction to OpenSSO, Agents, Migration and Co-existence"
on page 23-1
Using Oracle Access Management Access Manager
1-4 Administrator's Guide for Oracle Access Management
You can also integrate any Web applications currently using Oracle ADF Security and
the OPSS SSO Framework with Access Manager. (See Appendix A, "Integrating Oracle
ADF Applications with Access Manager SSO.") The following sections contain more
details on Access Manager.
■Architecting Access Manager
■Deploying Access Manager
1.2.1 Architecting Access Manager
Access Manager 11g sits on an instance of Oracle WebLogic Server and is part of the
Oracle Fusion Middleware Access Management architecture. While providing
backward compatibility and co-existence with existing solutions, Access Manager 11g
replaces and converges the earlier technologies Access Manager 10g and Oracle
Application Server SSO (OSSO) 10g. Figure 1–2 illustrates the primary Access
Manager 11g components and services. The Protocol Compatibility Framework
interfaces with OAM WebGates, mod_osso agents, and custom Access Clients created
using the Access Manager Software Developer Kit (SDK).
Figure 1–2 Access Manager 11g Components and Services
Access Manager 11g Components
***********************************************************************************************
Figure 1–3 illustrates the distribution of Access Manager components.
Note: WebGates are agents provided for various Web servers by
Oracle as part of the product. Custom access clients, created using the
Access Manager SDK, can be used with non-Web applications. Unless
explicitly stated, information in this book applies equally to both.
Using Oracle Access Management Access Manager
Introducing Oracle Access Management 1-5
Figure 1–3 Access Manager 11g Component Distribution
Access Manager 11g component distribution
***********************************************************************************************
The Oracle Access Management Console resides on the Oracle WebLogic
Administration Server (referred to as AdminServer). WebLogic Managed Servers
hosting OAM runtime instances are known as OAM Servers. Information shared
between the two includes:
■Agent and server configuration data
■Access Manager policies
■Session data (shared among all OAM Servers)
1.2.2 Deploying Access Manager
Table 1–1 describes the types of deployments in which Access Manager might be
installed by your enterprise.
During initial installation and configuration of Access Manager in your deployment,
you create a new WebLogic Server domain (or extend an existing domain). Regardless
of the deployment size or type, in a new WebLogic Server domain, the following
components are installed using the Oracle Fusion Middleware Configuration Wizard.
■WebLogic Administration Server
■Oracle Access Management Console deployed on the WebLogic Administration
Server
■A WebLogic Managed Server for Oracle Access Management services
Table 1–1 Access Manager Deployment Types
Deployment Type Description
Development Deployment Ideally a sandbox-type setting where the dependency on the
overall deployment is minimal
QA Deployment Typically a smaller shared deployment used for testing
Pre-production Deployment Typically a shared deployment used for testing with a wider
audience
Production Deployment Fully shared and available within the enterprise on a daily basis
Note: In an existing WebLogic Server domain, the WebLogic
Administration Server is already installed and operational.

Features of Access Manager 11.1.2
1-6 Administrator's Guide for Oracle Access Management
■Application deployed on the Managed Server
Once the domain is configured, additional details are defined for OAM Servers,
Database Schemas, (optional) WebLogic Managed Servers and clusters, and the
following store types:
■Policy Store: The default policy store is file-based for development and
demonstration purposes, and is not supported in production environments. All
policy operations and configurations are performed directly on the database
configured as the policy store in production environments.
■Identity Store: The default Embedded LDAP data store is set as the primary user
identity store for Access Manager.
■Keystore: A Java keystore is configured for certificates for Simple or
Certificate-based communication between OAM Servers and WebGates during
authorization. The keystore bootstrap also occurs on the initial AdminServer
startup after running the Configuration Wizard.
1.3 Features of Access Manager 11.1.2
The following sections provide details on the features available (and not available) in
Access Manager 11.1.2.
■Features In Access Manager 11.1.2
■Features Not In Access Manager 11.1.2
1.3.1 Features In Access Manager 11.1.2
Table 1–2 provides an overview of Access Manager 11.1.2. For a list of names that have
changed with 11.1.2, see "Product and Component Name Changes with 11.1.2" on
page lxv.
See Also: "Understanding Oracle WebLogic Server Domains" in the
Oracle Fusion Middleware Understanding Domain Configuration for Oracle
WebLogic Server guide provides information about Oracle WebLogic
Server administration domains.
See Also: "Managing the Policy and Session Database" on page 5-25
See Also: "Managing OAM Identity Stores" on page 5-4
See Also: "Managing the Policy and Session Database" on page 5-25

Features of Access Manager 11.1.2
Introducing Oracle Access Management 1-7
Table 1–2 Features in Access Manager 11.1.2
Access Manager 11g Description
Oracle Identity
Management Infrastructure
Enables secure, central management of enterprise identities.
Policy Enforcement Agents Resides with the relying parties and delegate authentication and authorization tasks to OAM
Servers.
■11g OAM Agents, Chapter 16
■10g OAM Agents and the Pre-configured IAMSuiteAgent (10g OAM Agent), Chapter 25
■OpenSSO Agents, Chapter 23
■10g OSSO Agents (mod_osso), Chapter 24
Notes:
Nine Administrator languages are supported.
Unless explicitly stated, the term "Webgate" refers to both an out of the box Webgate or a custom
Access Client.
See Chapter 15 for an introduction to agents.
Server-side components ■OAM Server (installed on a WebLogic Managed Sever),
Console Oracle Access Management Console provides access to all services and configuration details.
See Chapter 2.
Protocols for information
exchange on the Internet
Front channel protocols exchanged between Agent and Server: HTTP/HTTPS.
Back channel protocols: Authenticated clients can perform session operations using enhancements
in the Oracle Access Protocol (OAP).
Proxy Provides support for legacy systems
■OAM Proxy supports legacy Access Manager implementations by acting as a legacy Access
Server.
"Managing the Access Protocol for OAM Proxy Simple and Cert Mode Security" on page 14-6
"Introduction to OAM Proxy Metrics and Tuning" on page 12-9
■OSSO Proxy supports OSSO Agents by acting as the legacy OSSO Server. See Chapter 24.
■Oracle-provided OpenSSO Proxy handles requests for resources protected by OpenSSO
Agents. See Chapter 23.
See Also: About the Embedded Proxy Server and Backward Compatibility and the new Part XI,
"Managing Oracle Access Management Oracle Access Portal."
Cryptographic keys Note: One key is generated and used per registered mod_osso or 11g Webgate. However, one
single key is generated for all 10g Webgates.
■During 11g agent registration, one per-agent secret key shared is generated for encrypting and
decrypting SSO cookies between 11g Webgate and OAM Server. See Chapter 16.
■During 10g agent registration, a global shared secret key is generated across all of Access
Manager 11g (all Agents and OAM Servers). See Chapter 25.
■During OSSO agent registration, One key per partner shared between mod_osso and OSSO
server. See Chapter 24.
■OpenSSO Agent Host- or Domain-based key stored locally in Agent bootstrap file on the
Agent host. See Chapter 23.
■During OAM Server registration, one server key is generated.
Keys storage ■Agent side: A per-agent key is stored locally in the Oracle Secret Store in a wallet file
■OAM Server side: Per- agent keys, and server keys, are stored in the credential store on the
server side

Features of Access Manager 11.1.2
1-8 Administrator's Guide for Oracle Access Management
Encryption / Decryption
(The process of converting
encrypted data back into its
original form)
Introduces client-side cryptography and ensures that cryptography is performed at both the agent
and server ends:
1. Webgate encrypts obrareq.cgi using the agent key.
Note: obrareq.cgi is the authentication request in the form of a query string redirected from
Webgate to OAM Server.
2. OAM Server decrypts the request, authenticates, creates the session, and sets the server
cookie.
3. OAM Server also generates the authentication token for the agent (encrypted using the agent
key), packs it in obrar.cgi with a session token (if using cookie-based session management),
authentication token and other parameters, then encrypts obrar.cgi using the agent key.
Note: obrar.cgi is the authentication response string redirected from the OAM Server to
Webgate.
4. Webgate decrypts obrar.cgi, extracts the authentication token, and sets a host-based cookie.
Policy Store Database in production environments; file-based in demonstration and development
environments, as described in "Managing the Policy and Session Database" on page 5-25.
Applications An application that delegates authentication and authorization to Access Manager and accepts
headers from a registered Agent.
Note: External applications do not delegate authentication. Instead, these display HTML login
forms that ask for application user names and passwords. For example, Yahoo! Mail is an external
application that uses HTML login forms.
SSO Engine Manages the session lifecycle, facilitates global logout across all relying parties in the valid session,
and provides consistent service across multiple protocols. Uses Agents registered with Access
Manager 11g:
■Authentication with the default embedded credential collector occurs across the HTTP
(HTTPS) channel
■Authentication with the optional detached credential collector occurs across the Oracle Access
Protocol (OAP) channel
■Authorization occurs across the Oracle Access Protocol (OAP) channel
See: Chapter 18
Session Management ■Global session specifications are enabled for all Application Domains and resources. In
addition, Application Domain-specific session overrides can be configured.
See Chapter 17.
Policies Registered agents rely on Access Manager authentication, authorization, and token issuance
policies to determine who gets access to protected applications (defined resources).
See: Chapter 20
Client IP ■Maintains this client's age, and includes it in the host-based cookie: OAMAuthnCookie for 11g
Webgate (or ObSSOCookie for 10g Webgate)
Response token replay
prevention
■Include
RequestTime
(the timestamp just before redirect) in obrareq.cgi and copy it to
obrar.cgi (the authentication response string redirected from the OAM Server to Webgate) to
prevent response token replay.
Table 1–2 (Cont.) Features in Access Manager 11.1.2
Access Manager 11g Description

System Requirements and Certification
Introducing Oracle Access Management 1-9
1.3.2 Features Not In Access Manager 11.1.2
Table 1–3 lists several features provided in Access Manager 10g but not included in
Access Manager 11.1.2.
1.4 System Requirements and Certification
Refer to the system requirements and certification documentation on Oracle
Technology Network (OTN) for information about hardware and software
requirements, platforms, databases, and other information.
The system requirements document covers information such as hardware and
software requirements, minimum disk space and memory requirements, and required
system libraries, packages, or patches:
http://www.oracle.com/technetwork/middleware/ias/downloads/fusion-requirem
ents-100147.html
The certification document covers supported installation types, platforms, operating
systems, databases, JDKs, and third-party products:
http://www.oracle.com/technetwork/middleware/ias/downloads/fusion-certific
ation-100350.html
Multiple network domain
support
Access Manager 11g supports cross-network-domain single sign-on out of the box.
Oracle recommends you use Oracle Federation for this situation.
Cookies Host-based authentication cookie:
■11g Webgate, One per agent: OAMAuthnCookie_host:port_random_number set by Webgate
using the authentication token received from the OAM Server after successful authentication.
Note: A valid OAMAuthnCookie is required for a session.
■11g Webgate, Transient: OAM_REQ is scoped to the OAM Server. OAM_REQ is set or cleared
by the OAM Server if the Authentication request context cookie is enabled. Protected with
keys known to the OAM Server only. This cookie is configured as a high availability option to
store the state about the user's original request to a protected resource while his credentials
are collected and authentication is performed.
■10g Webgate, One ObSSOCookie for all 10g Webgates.
■One for the OAM Server: OAM_ID, which is scoped to the OAM Server. OAM_ID is
generated by the OAM Server when the user is challenged for credentials and submitted to
the server on every redirect to the server.
See Chapter 18.
Centralized log-out ■The
logOutUrls
(10g Webgate configuration parameter) is preserved. 10g logout.html
requires specific details for Access Manager 11g. See Chapter 25.
■11g Webgate parameters are new:
Logout Redirect URL
Logout Callback URL
Logout Target URL
See Chapter 22.
Table 1–3 Features Not Available In Access Manager 11.1.2
Unavailable or Unsupported Feature
Extensibility framework required for building custom authorization plug-ins.
Authorization for mod_osso-protected resources
Table 1–2 (Cont.) Features in Access Manager 11.1.2
Access Manager 11g Description

Installing Oracle Access Management
1-10 Administrator's Guide for Oracle Access Management
1.5 Installing Oracle Access Management
The following sections contain information and links regarding Access Manager
installation and post-installation tasks.
■About Oracle Access Management Installation
■About Oracle Access Management Post-Installation Tasks
1.5.1 About Oracle Access Management Installation
The Oracle Fusion Middleware Supported System Configurations document provides
certification information on supported installation types, platforms, operating systems,
databases, JDKs, and third-party products related to Oracle Identity Management 11g.
You can access the Oracle Fusion Middleware Supported System Configurations document
by searching the Oracle Technology Network (OTN) Web site:
http://www.oracle.com/technology/software/products/ias/files/fusion_
certification.html
Using the Oracle Fusion Middleware Configuration Wizard, the following components
are deployed for a new domain:
■WebLogic Administration Server
■Oracle Access Management Console deployed on the WebLogic Administration
Server (sometimes referred to as the OAM Administration Server, or simply
AdminServer)
■A Managed Server for Oracle Access Management
■An application deployed on the Managed Server
OracleAS 10g SSO deployments can be upgraded to use Oracle Access Management
11g SSO. After upgrading and registering OSSO Agents, authentication is based on
Access Manager 11g Authentication Policies. However, only OAM Agents
(Webgates/Access Clients) use Access Manager 11g Authorization Policies. Over time,
all mod_osso agents in the upgraded environment should be replaced with Webgates
to enable use of 11g Authorization policies.
For details about co-existence after the upgrade, see Oracle Fusion Middleware Upgrade
Guide for Oracle Identity and Access Management:
1.5.2 About Oracle Access Management Post-Installation Tasks
Each WebLogic Server domain is a logically related group of Oracle WebLogic Server
resources. WebLogic administration domains include a special Oracle WebLogic Server
instance called the Administration Server. Usually, the domain includes additional
Oracle WebLogic Server instances called Managed Servers, where Web applications
and Web Services are deployed.
During initial deployment, the WebLogic Administrator userID and password are set
for use when signing in to both the Oracle Access Management and WebLogic Server
Administration Console. A different Administrator can be assigned for Oracle Access
Management, as described in "Specifying the Oracle Access Management Console
Administrator" on page 2-3. Administrators can log in and use the Oracle Access
See Also:
■Oracle Fusion Middleware Installation Guide for Oracle Identity
and Access Management

Installing Oracle Access Management
Introducing Oracle Access Management 1-11
Management Console for the post-installation tasks documented in Table 1–4.
Table 1–4 Oracle Access Management Post-Installation Tasks
Service Requirements
Access Manager Enable Access Manager Service.
Register:
■Data Sources
■OAM Server instances
■Agents for Access Manager
■Application domains and policies that protect resources
Configure:
■Common Settings, including Session-timing
■Certificate Validation
■Common Password Policy
Configure Access Manager Settings.
Identity Federation Enable Identity Federation Service
Configure Federation Settings
Register Identity Provider and Service Provider partners
Security Token Service Enable Security Token Service Service.
Configure Security Token Service Settings.
Register Endpoints
Create Token Issuance and Validation Templates
Register Partner Profiles and Partners
Mobile and Social Enable Mobile and Social Service
Configure Mobile and Social

Installing Oracle Access Management
1-12 Administrator's Guide for Oracle Access Management

2
Getting Started with Oracle Access Management 2-1
2
Getting Started with Oracle Access
Management
[3]
This chapter describes the initial steps needed to start your servers and log in to the
Oracle Access Management Console. All tasks presume that Oracle Access
Management 11.1.2 is deployed as described in the Oracle Fusion Middleware Installation
Guide for Oracle Identity and Access Management.
This information is organized in the following sections.
■Starting and Stopping Servers in Your Deployment
■Specifying the Oracle Access Management Console Administrator
■Using the New Oracle Access Management Console
■Configuring with the Command-Line Tools
■Logging, Auditing, Reporting and Monitoring Performance
■Configuring Oracle Access Management Login Options
2.1 Starting and Stopping Servers in Your Deployment
The Oracle Access Management Console is deployed on the WebLogic Administration
Server (AdminServer) thus, Oracle Access Management Administrators can access it
only when the AdminServer is running. If the Oracle Access Management Console is
protected by a WebGate, the OAM Server must also be running. And the Node
Manager must be started before the other servers. The following sections have more
details.
■Starting Node Manager
■Starting and Stopping WebLogic AdminServer
■Starting and Stopping Managed WebLogic Servers and Access Manager Servers
2.1.1 Starting Node Manager
Node Manager is a Java utility that allows you to perform common operations tasks
for a Managed Server, regardless of its location with respect to its Administration
Server. Node Manager must be running before you can start and stop the WebLogic
AdminServer, or WebLogic managed servers hosting OAM Servers.
After installing and configuring Oracle Identity Manager, configure the Node
Manager for use with the WebLogic Administration Console (AdminServer) or Oracle
Enterprise Manager Fusion Middleware Control. This configuration is done only once,

Starting and Stopping Servers in Your Deployment
2-2 Administrator's Guide for Oracle Access Management
as described in "Configuring the Node Manager" in Oracle Fusion Middleware
Administrator's Guide for Oracle Identity Manager.
Following this configuration, ensure that the Node Manager is up by running the
startNodeManager.sh
script. Oracle WebLogic Administration Server does not do this
automatically.
$WLS_HOME/server/bin/startNodeManager.sh
To start or stop Node Manager
1. Change to your $WLS_HOME/server/bin directory.
2. Enable Start Scripts: Run
setNMProps
to start the stack and instruct Node
Manager to enable the use of start scripts (
StartScriptEnabled=true
):
./setNMProps.sh
3. Start Node Manager:
./startNodeManager.sh
2.1.2 Starting and Stopping WebLogic AdminServer
Starting the WebLogic AdminServer the first time can take 12-15 minutes or more. This
process must not be interrupted or terminated as policy data might be corrupted. The
following procedure describes starting and stopping the WebLogic AdminServer using
the scripts located in your
$DOMAIN_HOME/bin
directory.
■Unix:
startWebLogic.sh
or
stopWebLogic.sh
■Windows:
startWebLogic.cmd
or
stopWebLogic.cmd
To start or stop AdminServer
1. Navigate to your
$DOMAIN_HOME/bin
.
2. Start AdminServer:
■Unix:
./startWebLogic.sh
■Windows:
run startWebLogic.cmd
3. Stop AdminServer:
■Unix:
./stopWebLogic.sh
■Windows:
run stopWebLogic.
cmd
2.1.3 Starting and Stopping Managed WebLogic Servers and Access Manager Servers
You can perform all start and stop operations for managed WebLogic Servers hosting
Oracle Access Management Servers (OAM Servers) from either a command prompt,
the Oracle WebLogic Server Administration Console or the Oracle Enterprise Manager
See Also: Oracle WebLogic Server Administrator Guide for details.
WARNING: If startWebLogic.cmd (Windows) or startWebLogic.sh
(Linux) is stopped for any reason (whether accidently or because of
a system crash or reboot), policy data might be corrupted. This
would require removal and recreation of the domain and running
the RCU again to recreate the OAM schema.

Specifying the Oracle Access Management Console Administrator
Getting Started with Oracle Access Management 2-3
Fusion Middleware Control. The following procedure describes starting and stopping
the OAM Server using the scripts located in the
$DOMAIN_HOME/bin
directory (.sh
scripts for Unix systems; .cmd scripts for Windows Systems).
■Unix:
startManagedWebLogic.sh
or
stopManagedWebLogic.sh
■Windows:
startManagedWebLogic.cmd
or
stopManagedWebLogic.cmd
Both the Managed Server name and the AdminServer URL are required for these
operations. For example, if the managed server is named oam_server1 and the
AdminServer URL is http://examplewlsadminhost.example.com:7001, the start and stop
commands run on a Unix system would look like these:
startManagedWebLogic.sh oam_server1 http://examplewlsadminhost.example.com:7001
stopManagedWebLogic.sh oam_server1 http://examplewlsadminhost.example.com:7001
To start or stop OAM Servers
1. Navigate to
$DOMAIN_HOME/bin
.
2. Start OAM Server.
■Unix: ./
startManagedWebLogic.sh
MANAGED_SERVER_NAME
ADMIN_SERVER_URL
■Windows: run
startManagedWebLogic.cmd
MANAGED_SERVER_NAME
ADMIN_
SERVER_URL
3. Stop OAM Server.
■Unix: ./
stopManagedWebLogic.sh
MANAGED_SERVER_NAME
ADMIN_SERVER_URL
■Windows: run stopManagedWebLogic.cmd
MANAGED_SERVER_NAME
ADMIN_
SERVER_URL
2.2 Specifying the Oracle Access Management Console Administrator
A single default LDAP group, the WebLogic Server
Administrators
group, is set in
the Default User Identity Store (Embedded LDAP) designated as the System Store. The
LDAP group, when assigned to a specified user, grants full system and policy
configuration privileges. Specifying a different LDAP group prohibits WebLogic
Administrators from logging in to Oracle Access Management Console or from using
administrative command-line tools.
During initial deployment with the Oracle Fusion Middleware Configuration Wizard,
the Administrator userID and password are set. These credentials grant access to the:
■Oracle Access Management Console to register and manage system
configurations, security elements, and policies.
■WebLogic Server Administration Console to view the Summary of Server
Configuration (Cluster, Machine, State, Health, and Listening Port) of deployed
OAM Servers within the WebLogic Server domain, and also to Start, Resume,
Suspend, Shutdown, or Restart SSL on these servers. See the WebLogic Server
Administration Console, see Oracle Fusion Middleware Administrator's Guide for
more information.
Note: Unless explicitly stated, the term Administrator in this guide
refers to the Oracle Access Management Administrator.

Using the New Oracle Access Management Console
2-4 Administrator's Guide for Oracle Access Management
■Custom Administrative command-line tools (including the WebLogic Scripting
Tool and Remote Registration Tool) provide an alternative to the Oracle Access
Management Console for a specific set of functions. See Section 2.4, "Configuring
with the Command-Line Tools" for more information.
Initially, administrative users must log in to the Oracle Access Management Console
using the WebLogic Administrator credentials set during initial configuration.
However, your enterprise might require independent sets of Administrators: one set of
users responsible for Oracle Access Management administration and a different set for
WebLogic administration. For information on this, see "Managing the Administrators
Role" on page 5-22.
2.3 Using the New Oracle Access Management Console
The newly-designed Oracle Access Management Console provides administrative
access to Oracle Access Management services and configuration. The following
sections describe features of the Oracle Access Management Console.
■Logging In
■Signing Out
■Understanding the Controls
■Accessing Online Help
■Conducting A Search
2.3.1 Logging In
When accessing the Oracle Access Management Console, the WebLogic Server
(AdminServer) host and port must be specified in the URL. Let's assume the following
sample URL, https://examplewlsadminhost.example.com:7001/oamconsole. In this URL,
the following is true.
■HTTPS represents the Hypertext Transfer Protocol (HTTP) with the Secure Socket
Layer (SSL) enabled to encrypt and decrypt user page requests and the pages
returned by the Web server
■examplewlsadminhost.example.com refers to fully-qualified domain name of the
computer hosting the Oracle Access Management Console (AdminServer)
■7001 refers to the designated bind port for the Oracle Access Management
Console, which is the same as the bind port used for AdminServer (the WebLogic
Server Administration Console)
■/oamconsole/ refers to the Oracle Access Management Console Log In page
Note: Concurrent configuration updates are not supported. Only one
Administrator is allowed to modify the system configuration at any
given time. Administrators performing updates concurrently will
result in an inconsistent state within the Oracle Access Management
Console's system configuration.
Note: If you have Oracle Identity Navigator installed to access
multiple consoles from one URL, see the Oracle Fusion Middleware
Administrator's Guide for Oracle Identity Navigator.
Using the New Oracle Access Management Console
Getting Started with Oracle Access Management 2-5
When navigating to the oamconsole URL, the default Oracle Access Management
Console Log In page is displayed - as in Figure 2–1.
Figure 2–1 Default Oracle Access Management Console Log In Page
To log in to Oracle Access Management Console
1. In a browser window, enter the URL to the Oracle Access Management Console
using the appropriate protocol (HTTP or HTTPS). For example:
https://hostname:port/oamconsole/
2. On the Log In page, enter the Oracle Access Management Console Administrator
credentials. For example:
Username: Admin_login_id
Password: Admin_password
Language: English (see "Choosing a User Login Language")
3. Click the Login button.
■Successful: The Oracle Access Management Console Welcome page is
displayed.
■Not Successful: See "Administrator Lockout" on page E-6.
Note: If you specify an OAM Server host and port (as you would to
access the ODSM console), the AdminServer redirects to the managed
server which produces a 404 Not Found error.
Note: Ensure that you use the correct administrative credential to log
in. Initially, the LDAP group for the Oracle Access Management
Console Administrator is the same as the LDAP group defined for the
WebLogic Server Administration Console (
Administrators
) and the
common Default System User Identity Store store is the WebLogic
Embedded LDAP.
See Also: "Specifying the Oracle Access Management Console
Administrator" on page 2-3
Using the New Oracle Access Management Console
2-6 Administrator's Guide for Oracle Access Management
2.3.2 Signing Out
The Sign Out link appears in the upper-right corner of the Oracle Access Management
Console, as shown in Figure 2–2. You click the Sign Out link to conclude your session.
Oracle recommends that you also close the browser window after signing out.
Figure 2–2 Signing Out of the Oracle Access Management Console
To sign out of Oracle Access Management Console
1. Click the Sign Out link in the upper-right corner of the console.
2. Close your browser window.
2.3.3 Understanding the Controls
The Oracle Access Management Console is a Web-based program that provides
function controls for system and policy configuration as well as page-level tabs and
controls.
This section provides a quick introduction to orient you to the Oracle Access
Management Console.
■Using Tabs and the Launch Pad
■Understanding the Elements on a Page
■Selecting Controls in the Oracle Access Management Console
2.3.3.1 Using Tabs and the Launch Pad
The new Oracle Access Management Console Launch Pad provides quick access to the
configuration and service pages. When a Launch Pad link is clicked, a new tab opens
(in line with the default Launch Pad tab) that includes the fields applicable to the link's
function. Figure 2–3 provides a look at the Oracle Access Management Console
Launch Pad as it appears immediately after successfully logging in.
Note: Concurrent configuration updates are not supported. Only one
Administrator should be allowed to modify the system configuration
at any given time. Administrators performing updates concurrently
will result in an inconsistent state within the system configuration.
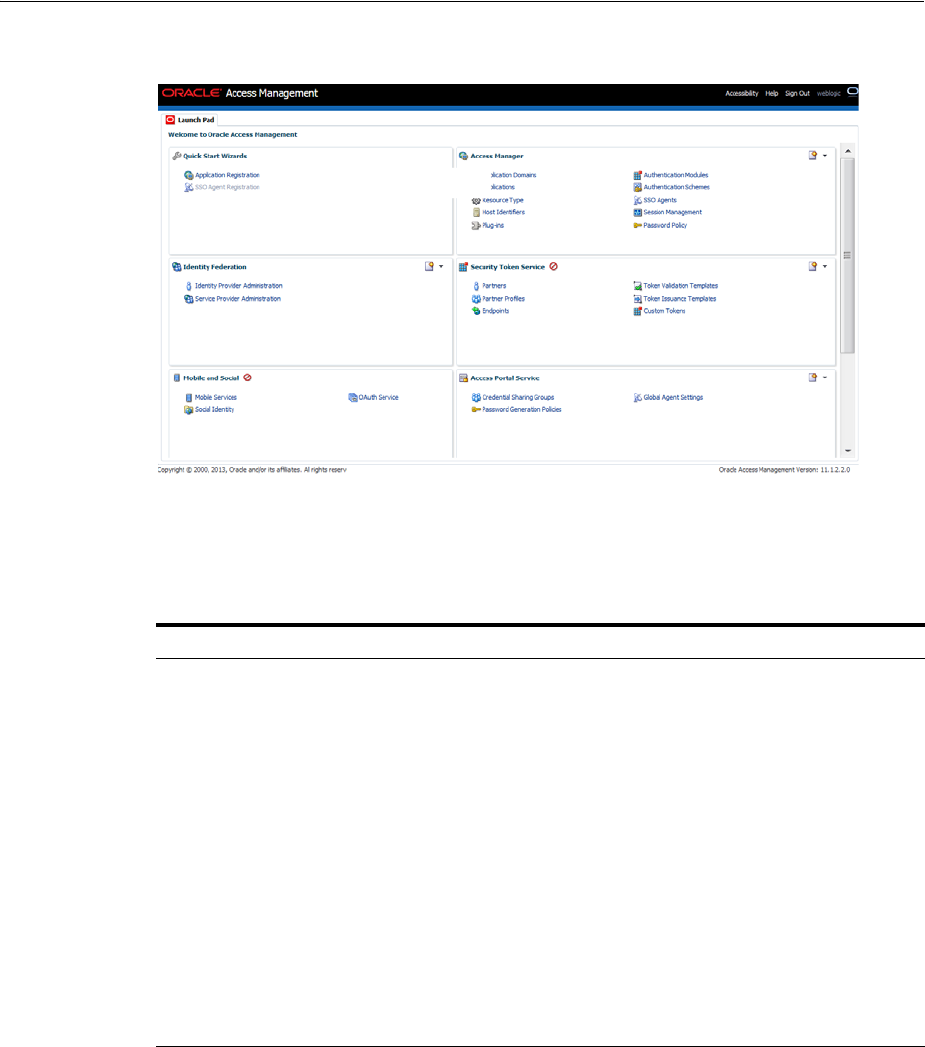
Using the New Oracle Access Management Console
Getting Started with Oracle Access Management 2-7
Figure 2–3 Oracle Access Management Console Launch Pad
The Launch Pad is divided into panels that include one or more links that you can
click to initiate certain tasks. Table 2–1 contains links to the sections of this guide that
contain information on these shortcuts.
Like the Launch Pad, any clicked shortcut appears as a named tab under the Oracle
Access Management banner. The tab of the active page is white. Only the active page
is visible and generally provides a work space where you can add, view, or modify
related settings. Up to ten pages (tabs) can be open simultaneously. Figure 2–4
illustrates multiple pages open at the same time. You can see named tabs for each page
and controls to access pages that are concealed (or to close the active page or close
multiple pages). The controls that you can use to close the open pages are described in
Table 2–2.
Table 2–1 Welcome Page Sections and Shortcuts
Section Shortcuts
Quick Start Wizards ■Application Registration is a configuration wizard for an
application that will be protected by Access Manager. See
Managing Access Manager SSO, Policies, and Testing.
■SSO Agent Registration is a configuration wizard for an entity
that acts as access client, enabling SSO across protected
resources. See Registering and Using Agents with Access
Manager.
Access Manager See Managing Access Manager SSO, Policies, and Testing.
Identity Federation See Managing Oracle Access Management Identity Federation.
Security Token Service See Managing Oracle Access Management Security Token Service.
Mobile and Social See Managing Oracle Access Management Mobile and Social.
Access Portal See Managing Oracle Access Management Oracle Access Portal.
Configuration See Managing Access Manager Settings and Agents and Managing
Access Manager SSO, Policies, and Testing.
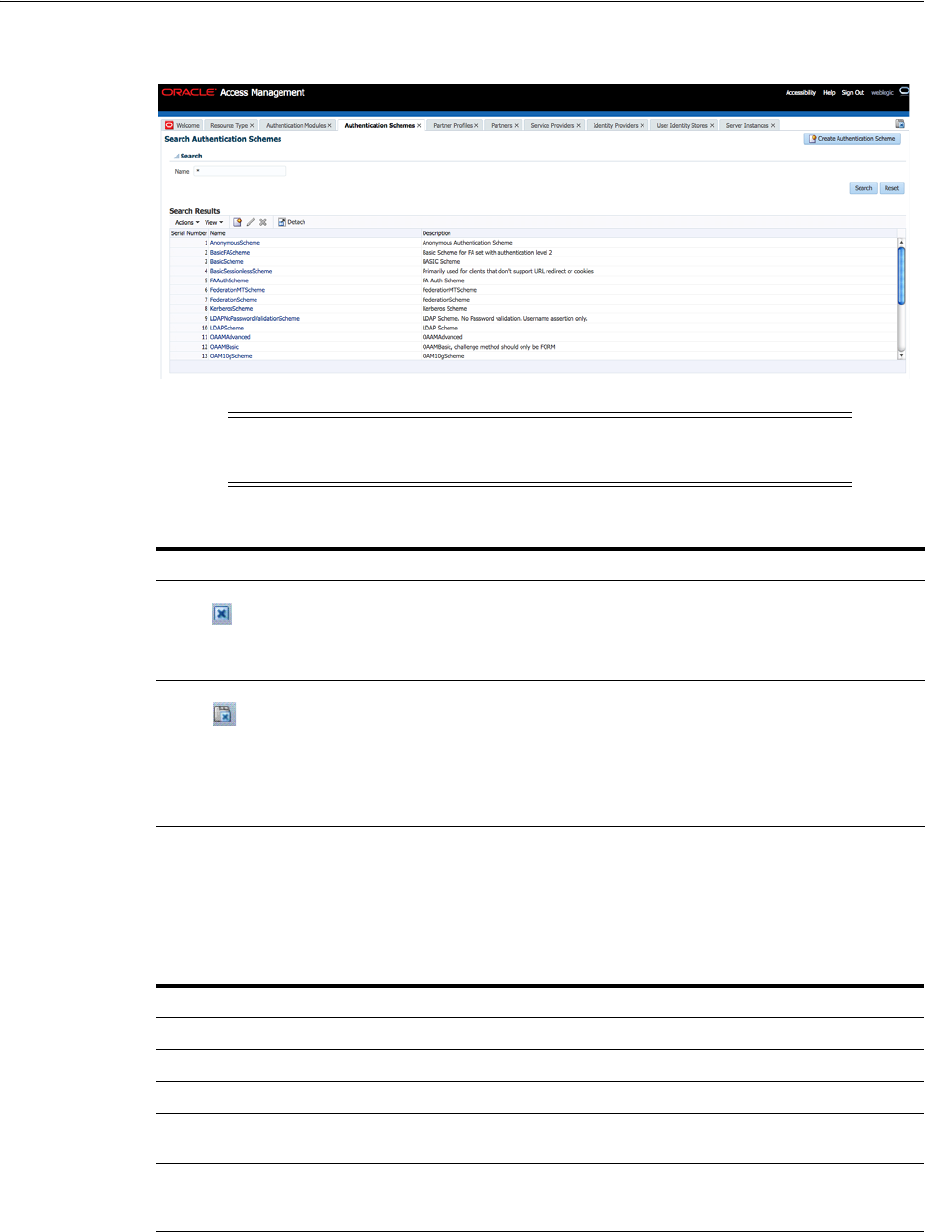
Using the New Oracle Access Management Console
2-8 Administrator's Guide for Oracle Access Management
Figure 2–4 Tabs of Open Content Pages
2.3.3.2 Understanding the Elements on a Page
Pages in the console contain one or more graphical user interface elements as
described in Table 2–3.
Note: Each page is displayed only once. No warning is issued if you
attempt to open the same page multiple times.
Table 2–2 Controls for Closing Pages
Page Control Definition Description
Close Active Page Click this button to close the active page.
Note: Closing a page before clicking Apply might discard any
changes or additions without warning.
Close Multiple Pages ■Click this button to initiate closing multiple open pages.
■In the dialog box that appears, click the box beside the
name of each page you want to close.
■Click OK to complete the action.
Note: Closing a page before clicking Apply might discard any
changes or additions without warning.
Table 2–3 Page Elements and Descriptions
Page Element Description
Named tab Identifies each open page in the console. See Figure 2–1.
Page controls Enables you to close one or more pages. See Table 2–2.
Apply button Submits changes or additions made to the page.
Named text box Enables you to enter relevant details in the named field using the
keyboard.
Checkbox Enables you to choose one of several options. For example, you can tick
a checkbox to define a state (Enabled vs. Disabled) or a security mode
(Open vs. Simple vs. Cert).
Tables Displays current specifications or space for new specifications. Tables
have independent command buttons independent from page-level and
option buttons.

Using the New Oracle Access Management Console
Getting Started with Oracle Access Management 2-9
2.3.3.3 Selecting Controls in the Oracle Access Management Console
Table 2–4 describes how to select the desired node or instance and other commands
and page controls in the Oracle Access Management Console. The usual selection
guidelines apply.
Command buttons for tables Enables you to:
Add a fresh row or definition to the table.
Remove the selected row or definition from the table.
Drop down lists (list) Found on certain pages to provide a menu of choices from which to
choose when supplying information.
Table 2–4 Selection Tasks and Controls
Task Control Description
Activate Click mouse
button
Click to activate the desired:
■Function tab: System Configuration, Policy Configuration,
Browse, Search
■Named tab on a page to reveal related lower-level settings to view
or modify: Resources and Responses, for instance.
■Named Page tab to reveal (activate) the page
■Text field to enter information on a page
■Page Control (close or close all buttons as described in Table 2–2)
Open Click Item, Select
Open command
button
Click the item, click the Open command button:
■Resource Type name
■Host Identifier definition name
■Authentication scheme name
■Resource name in an Application Domain
■Authentication policy name in an Application Domain
■Authorization policy name in an Application Domain
■Agent instance name
■Server instance name
■User identity store instance name
■Database instance name
■Authentication module name
■System utility name
Highlight Drag cursor Drag the cursor across text in a box to highlight its content.
Table 2–3 (Cont.) Page Elements and Descriptions
Page Element Description

Using the New Oracle Access Management Console
2-10 Administrator's Guide for Oracle Access Management
2.3.4 Accessing Online Help
At any time while using the Oracle Access Management Console, you can click the
Help link at the top of the page to get more information. Online Help topics link to
information in an online version of this book.
Generally speaking, topics that are displayed by selecting Help in the Oracle Access
Management Console appear in only English and Japanese languages. Online Help is
not translated into the ADMIN languages.
You can click the Welcome tab to display a list of topics that describe actions you can
take. For specific help topics, use the following procedure.
To locate a specific help topic
1. From the Oracle Access Management Console, click a tab.
2. Click Help in the upper-right corner of the console.
3. Review the page that appears in a new window and select one of the following
links to:
–More—Click this link to view more information.
–How?—Click this link to see steps to perform a task related to your help
search.
–Contents—In the left Help pane, expand Contents to see all help topics as well
as all topics in the online manual.
– Search—Displays a search window where you can enter your help search
criteria.
4. Click the following buttons, as needed:
–View—Displays a set of viewing options.
– Arrows—Return to the previous page or go forward to the next page.
Select Click mouse
button
Click the desired item on which to operate. For example, click the
desired:
■Icon, node, or instance name in the navigation tree (Shared
Components is one example)
■Search Button: Initiates a search based on specified criteria
■Menu name and command to take action on the selected item in
the navigation tree
■Command button to take immediate action:
Menu and tool bar buttons
Close page buttons (Table 2–2)
■Command Button on a Page or Table:
Apply: Submits additions and changes on the active page.
Table or section buttons (Table 2–3)
Add a new row.
Remove the selected row.
■Links: Help, and Sign Out are examples
Table 2–4 (Cont.) Selection Tasks and Controls
Task Control Description
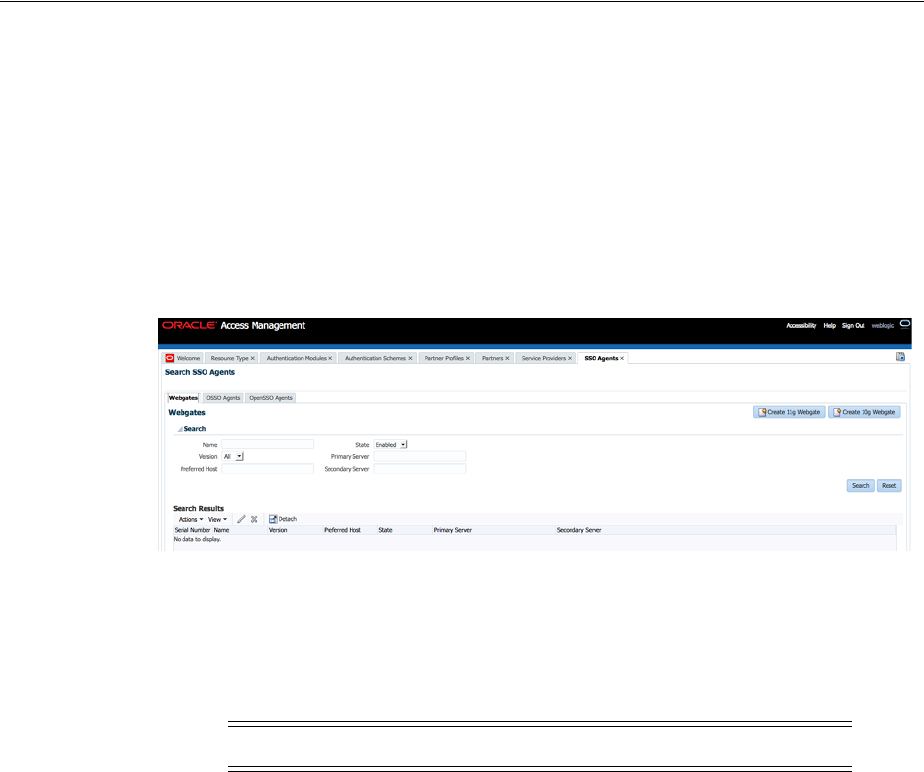
Configuring with the Command-Line Tools
Getting Started with Oracle Access Management 2-11
–Printer Icon—Prints the page.
–Envelope Icon—Emails the page.
2.3.5 Conducting A Search
The Oracle Access Management Console provides search controls for specific elements
such as Agents, Application Domains, and Resources. Figure 2–5 is a screen shot of a
Search page used for SSO Agent searches.
Figure 2–5 SSO Agent Search Page
Search pages differ depending on the entity you are trying to find. In all searches, you
can leave a field blank to display everything or use a wildcard (*) character if you do
not know the exact name you seek. Some search controls include the ability to save
your search criteria. From the search results table, you can choose an item to open for
viewing or editing.
2.4 Configuring with the Command-Line Tools
Several command-line tools are available to perform various tasks using the keyboard
rather than the Oracle Access Management Console. After using these commands, the
configurations will be available in the console.
■Remote registration tool,
oamreg
, enables remote registration of Agents, and
creation of default Application Domains.
■Upgrade Assistant (UA) enables you to transfer OSSO 10g configuration to Oracle
Access Management
■Oracle WebLogic Scripting Tool (WLST) provides a number of custom OAM
command-line alternatives for tasks you can perform in the Oracle Access
Management Console.
Note: The search tool is case insensitive.
See Also: Chapter 16, "Registering and Managing OAM 11g Agents"
See Also:
■Oracle Fusion Middleware Upgrade Guide for Oracle Identity and
Access Management
See Also: Oracle Fusion Middleware WebLogic Scripting Tool
Command Reference

Logging, Auditing, Reporting and Monitoring Performance
2-12 Administrator's Guide for Oracle Access Management
2.5 Logging, Auditing, Reporting and Monitoring Performance
Logging is the mechanism by which components write messages to a file. These
messages can be logged at different levels of granularity. Oracle Access Management
components use the same logging infrastructure and guidelines as any other
component in Oracle Fusion Middleware 11g. Administrators can monitor
performance and log messages for Access Manager and Security Token Service using
Oracle Fusion Middleware Control.
In Oracle Fusion Middleware, auditing provides a measure of accountability and
answers to the "who has done what and when" types of questions. Oracle Access
Management uses the Oracle Fusion Middleware Common Audit Framework to
support auditing for a large number of user authentication and authorization run-time
events, and administrative events (changes to the system). The Oracle Fusion
Middleware Common Audit Framework provides uniform logging and exception
handling and diagnostics for all audit events. For more information, see Part III,
"Logging, Auditing, Reporting and Monitoring Performance".
2.6 Configuring Oracle Access Management Login Options
The following sections contain information on configuring user login options.
■Choosing a User Login Language
■Configuring Persistent Login
2.6.1 Choosing a User Login Language
Oracle Access Management supports language selection through a drop down list of
languages on the login form combined with use of the OAM_LANG_PREF language
preference cookie. Table 2–5 lists the supported languages and applicable language
codes.
See Also: Oracle Fusion Middleware Performance and Tuning
Guide
Table 2–5 Language Codes For Login Pages
Language Code Language Administrators
ar Arabic
cs Czech
da Danish
de German German
el Greek
en English English
es Spanish Spanish
fi Finnish
fr French French
fr-CA Canadian French
he Hebrew
hr Croatian
hu Hungarian

Configuring Oracle Access Management Login Options
Getting Started with Oracle Access Management 2-13
To accomplish a very specific login experience, implement a custom login page using
the customization facilities in Oracle Access Management as described in Oracle Fusion
Middleware Developer's Guide for Oracle Access Management.
This section provides the following topics:
■Selecting A Language for Oracle Access Management Login
■Understanding the Language Preference Cookie
■Propagating Language Preference and Application Integration
■Configuring Your Language Preference
2.6.1.1 Selecting A Language for Oracle Access Management Login
Oracle Access Management provides the language selection methods described in
Table 2–6. The order of these items in the table illustrate the preference order. The
preference order can be configured using WLST. See Configuring Your Language
Preference for details.
it Italian Italian
ja Japanese Japanese
ko Korean Korean
nl Dutch
no Norwegian
pl Polish
pt-BR Brazilian Portuguese Brazilian Portuguese
pt Portuguese
ro Romanian
ru Russian
sk Slovak
sv Swedish
th Thai
tr Turkish
zh-CN Simplified Chinese Simplified Chinese
zh-TW Traditional Chinese Traditional Chinese
Note: Prior to the release of 11.1.2.1, Oracle Access Manager relied
on the Browser Language preference (Accept-Language HTTP
Header) to determine the language in which the login page was
rendered. The default, if the language could not determined, was
English (en-us). This behavior is supported going forward until
existing applications have migrated to the 11.1.2.1 model.
Table 2–5 (Cont.) Language Codes For Login Pages
Language Code Language Administrators

Configuring Oracle Access Management Login Options
2-14 Administrator's Guide for Oracle Access Management
Language preferences are disabled until explicitly enabled. By default, the login form
does not include the list of language values until the application locales are specified.
2.6.1.2 Understanding the Language Preference Cookie
The language preference cookie, OAM_LANG_PREF is a domain scoped cookie as
described in Table 2–7.
Table 2–6 Oracle Access Management Language Selection Methods
Method Description
Server Override Allows the OAM Server to determine the language. It is
intended to support scenarios where the User Agent cannot
reliably indicate its language preference(s) or where the
administrator needs to override other selection mechanisms for
operational reasons.
Preference Cookie A domain cookie (similar to ORA_FUSION_PREFS) that
contains the user's language preferences. It is intended to allow
lang preferences maintained by an application(s) personalization
facilities to be used.
Note: Multiple DNS domain support for the Preference Cookie
is a limitation today. The solution will include Resource
Webgates using the OAM Front-Channel protocol in
combination with local resource cookie enhancements to
manage preference cookie semantics across DNS domains.
See Also: "Understanding the Language Preference Cookie"
Browser Language Allows User Agents (Browsers, REST Clients, HTTP Clients) to
specify the user's language preference via an HTTP
Accept-Language header.
Default Language Used if Oracle Access Management cannot determine the user's
language preference based on the specified selection
mechanisms.
Note: Language Selection is only available in the ECC login page; it
is not currently available in the DCC login page.
Table 2–7 OAM_LANG_PREF Cookie
Parameters Description
Name OAM_LANG_PREF
Domain Domain-scoped cookie
Path /
Value [Cookie version] [separator] [UTF-8 BASE64(name-value pairs)]
For example:
v1.0~kqhkiG9w0BAQQFADCB0TELM
ExpirationTime Persistent | Session (default) – Specified in OAM configuration
Secure Flag No
preferredLanguage BCP47/RFC4647. Specifically, the value space should conform to what is
formally called the "language priority list".
defaultLanguageMarker true (reconcile cookie with application maintained preferences) |false
(read from cookie).
Cookie Lifecycle Oracle Access Management and other applications can perform create,
read, update, and delete operations.

Configuring Oracle Access Management Login Options
Getting Started with Oracle Access Management 2-15
2.6.1.3 Propagating Language Preference and Application Integration
Oracle Access Management will propagate the language selected by the user to
applications as described in Table 2–8.
2.6.1.4 Configuring Your Language Preference
Use the
configOAMLoginPagePref
WebLogic Scripting Tool command to configure the
login page language preferences. Information regarding this WLST command can be
found in the Oracle Fusion Middleware WebLogic Scripting Tool Command Reference.
2.6.2 Configuring Persistent Login
With Access Manager, a user needs to re-authenticate after a period of session
inactivity defined by the Idle Timeout parameter (default is 15 minutes) and once the
session expires, due to the value of the Session Lifetime parameter (default is 8 hours).
New with this release, the Persistent Login functionality offers administrators the
option to skip user re-authentication for a considerably longer period of time should
the user opt in - allowing a user two weeks or a month significantly improves
convenience. Persistent Login (sometimes referred to as Remember Me or Keep Me
Signed In) can be enabled or disabled with the period of time being configurable. It is
disabled by default.
Persistent Login is enabled in the
oam-config.xml
global configuration file. The
appropriate Application Domain must also explicitly allow Persistent Login. When
enabled globally, the user login page will have a Keep Me Signed In checkbox and,
when checked, the user receives an RMToken. Once the user's session expires or times
out, a user with an RMToken will not be challenged if the resource is in the
Application Domain that allows Persistent Login and if its authentication level is
adequate. If the user tries to access a resource in an Application Domain that has not
Table 2–8 Application Integration for Language Preference
Method Description
HTTP Accept-Language Header This enables application to integration without code change. This is a
major advantage over the other options. We can expect this to be good
for most applications that respond to the browser locale setting. This
is the standard practice in internationalizing a Web application. We
expect this to be able to become the standard option for all ADF based
products, as well as any application that responds to browser locale.
Note: OAM Agents ensure that the Accept-Language reflects the
language selected. Also, ServletFilters could be used to make this
happen.
Access Manager Policy Response Access Manager stores the language selection in the attribute langPref
in the session namespace. For instance:
$session.langPref
.
This attribute can be passed to downstream applications using an
HTTP Header and/or Cookie through the Access Manager Policy
Response. The name of the Header and/or Cookie is a deployment
time assignment.
Preference Cookie When the language selected during login differs from the value stored
in the Preference Cookie, Oracle Access Management will update the
"
preferredLanaguage
" parameter in the Preference Cookie with the
newly selected language and set the defaultLanguageMarker"
parameter to "
false
".
IdentityContext The language preference can be propagated as a custom claim in the
IdentityContext. Select "oracle:idm:claims:session:attributes" as the
claim name and then specify the session attribute using the following
notation: "
preferredLanguage=$session.langPref
.
The claim will be created with the name of
"
oracle:idm:claims:session:attributes:preferredLanguage
" and
value equal to the session's
langPref
attribute.

Configuring Oracle Access Management Login Options
2-16 Administrator's Guide for Oracle Access Management
opted in, the user will be challenged for credentials even if the authentication level is
adequate. (If the user does not opt in when logging in, reauthentication will be
prompted after a session expiration or inactive timeout.)
The following behaviors are pertinent to the Persistent Login functionality.
■If enabled for the user logged in to Access Manager from a device browser, closing
and reopening the browser does not require reauthentication within the defined
Persistent Login time period
■Session activities will be reflected in the Audit data.
■When the time period expires, the end user is asked to authenticate again.
■When attempting to access applications from a different device (or even a different
process/browser in the same device), the end user will be asked to authenticate
again.
■When the user clicks log out, the OAM_RM token is deleted and they user must
log in again. Session termination by an administrator will have the same effect.
■As the OAM_RM token is based on credentials entered at the time of token
creation, any event that changes the password status will invalidate the token and
force the user to re-authenticate. This includes:
–Password expiration
–Password reset by administrator
–Password changed by the user on a different device
–User deleted or locked by the administrator
■To address a stolen device scenario, the administrator can terminate all sessions for
all devices/browsers of a user. The user will need to re-authenticate but has the
option to enable Persistent Login on the login page
■Application triggered re-authentication forces the user to re-authenticate even if
Persistent Login is enabled as the application is intentionally challenging the user
before doing a sensitive operation.
■When a user navigates from an application which allows Persistent Login to one
that does not, although the user is logged in automatically, the application which
does not allow Persistent Login will challenge the user to enter credentials.
■Persistent Login is not available in application triggered login pages.
The following sections have additional details.
■Enabling Persistent Login
■Troubleshooting Persistent Login
2.6.2.1 Enabling Persistent Login
Follow this procedure to enable Persistent Login. The feature is not enabled by default.
1. Enable Persistent Login globally by running one the following WLST command.
Note: If the Application Domain 'Session Idle Timeout' is specified,
Persistent Login cannot be enabled.

Configuring Oracle Access Management Login Options
Getting Started with Oracle Access Management 2-17
■For WebLogic Server, run Oracle_IDM1/common/bin/wlst.sh using
configurePersistentLogin(enable="true", validityInDays="30",
maxAuthnLevel="2", userAttribute="obPSFTID")
■For WebSphere Application Server, go to $IDM_
HOME/common/bin/wsadmin -connType SOAP -port SOAP_PORT -user
WAS_ADMIN -password WAS_ADMIN_PASSWORD and run
Oam.configurePersistentLogin(enable="true", validityInDays="30",
maxAuthnLevel="2", userAttribute="obPSFID")
2. Create a new Authentication Scheme for Persistent Login using the values in the
following table.
Details can be found in Section 19.9, "Managing Authentication Schemes." The
'Keep me signed in' check box will be displayed only when accessing a resource
protected by this scheme.
3. Click the Application Domains link in the Launch Pad.
4. Click the Application Domain for which you will use this PersistentLoginScheme
and change its Authentication Scheme as documented in this sub procedure.
Details are in Section 20.7, "Defining Authentication Policies for Specific
Resources."
a. Click the Authentication Policies tab in the appropriate Application Domain.
b. Change the Authentication Scheme for the Protected Resource Policy to
PersistentLoginScheme. This allows persistent login for this policy.
5. Click the Application Domain under which you will create a Response for all
configured Authorization Policies as documented in this sub procedure.
There may be multiple authorization policies and this needs to be done for all.
Details are in Section 20.9.4, "About Constructing a Policy Response for SSO."
a. Click the Authorization Policies tab in the appropriate Application Domain.
b. One at a time, click an Authorization Policy in this Application Domain to
open its configuration tab.
Attribute Value
Name PersistentLoginScheme (or any name)
Description any description
Authentication Level 2
Challenge Method FORM
Challenge Redirect URL /oam/server/
Authentication Module LDAPPlugin
Challenge URL /pages/login.jsp
Context Type default
Context Value /oam
Challenge Parameters enablePersistentLogin=true
Note: The Public Resource Policy should not be modified.

Configuring Oracle Access Management Login Options
2-18 Administrator's Guide for Oracle Access Management
c. Click Responses.
d. Click Add to create an Authorization Response in the Application Domain.
e. Enter the following values in the displayed Add Response pop-up and click
Add.
Perform this procedure for all Authorization Policies before moving on to the
next step.
6. Access a resource protected by this scheme.
The 'Keep me signed in' checkbox is displayed on the login page.
7. Provide valid credentials and select 'Keep me signed in'.
8. Close and re-open the browser.
9. Access the same resource.
You will be logged in automatically without asking for credentials.
2.6.2.2 Troubleshooting Persistent Login
When enabling Persistent Login using WLST, an LDAP attribute named
obpsftid
is
defined to store the Persistent Login properties. When the user is locked, this attribute
needs to be updated but the
oamSoftwareUser
does not have sufficient LDAP rights
over it. Use the following procedure to give oamSoftwareUser permission.
1. Copy the LDIF data below and paste it into a file that you will save as
oam_user_
write_acl_users_obpsftid_template.ldif
.
##############################################################################
# Copyright (c) 2010, 2011, Oracle and/or its affiliates. All rights reserved.
#
# NAME: idm_idstore_groups_acl_template.ldif
#
#
# DESCRIPTION:
#
# This file provides appropriate ACLs to user and group containers.
#
#
# SUBSTITUTION VARIABLES:
#
# %s_UsersContainerDN% : The container in which users reside
# %s_GroupsContainerDN% : The container in which groups reside
#
##############################################################################
dn: %s_UsersContainerDN%
Attribute Value
Type Session
Name allowPersistentLogin
Value true
Note: Persistent Login can also be enabled and disabled using WLST.
See the Oracle Fusion Middleware WebLogic Scripting Tool Command
Reference for details on the
configurePersistentLogin
command.

Configuring Oracle Access Management Login Options
Getting Started with Oracle Access Management 2-19
changetype: modify
delete: orclaci
orclaci: access to attr=(obUserAccountControl, obLoginTryCount, obLockoutTime,
oblastsuccessfullogin, oblastfailedlogin, obpasswordexpirydate, obver,
obLastLoginAttemptDate, oblockedon) by
group="cn=orclFAOAMUserWritePrivilegeGroup,%s_GroupsContainerDN%"
(search,read,compare,write) by group="cn=orclFAUserReadPrivilegeGroup,%s_
GroupsContainerDN%" (search,read,compare) by
group="cn=orclFAUserWritePrivilegeGroup,%s_GroupsContainerDN%"
(search,read,compare,write)
-
add: orclaci
orclaci: access to attr=(obUserAccountControl, obLoginTryCount, obLockoutTime,
oblastsuccessfullogin, oblastfailedlogin, obpasswordexpirydate, obver,
obLastLoginAttemptDate, oblockedon, obpsftid) by
group="cn=orclFAOAMUserWritePrivilegeGroup,%s_GroupsContainerDN%"
(search,read,compare,write) by group="cn=orclFAUserReadPrivilegeGroup,%s_
GroupsContainerDN%" (search,read,compare) by
group="cn=orclFAUserWritePrivilegeGroup,%s_GroupsContainerDN%"
(search,read,compare,write)
2. Do the following in the created
oam_user_write_acl_users_obpsftid_
template.ldif
.
■Replace %s_UsersContainerDN% with User Search Base.
■Replace %s_GroupsContainerDN% with Group Search Base.
3. Change to the OID directory and run ldapmodify.
$ setenv ORACLE_HOME <OID_INSTALL_LOCATION>
$ cd $ORACLE_HOME/bin
$ ./ldapmodify -h <LDAP server> -p <LDAP port> -D <bind DN> -w <bindpassword>
-v -f oam_user_write_acl_users_obpsftid_template.ldif

Configuring Oracle Access Management Login Options
2-20 Administrator's Guide for Oracle Access Management

Part II
Par t II
Managing Common and System
Configurations
Part II provides information about managing common system configuration details for
Oracle Access Management. It contains the following chapters.
■Chapter 3, "Managing Common Services and Certificate Validation"
■Chapter 4, "Delegating Administration"
■Chapter 5, "Managing Data Sources"
■Chapter 6, "Managing Server Registration"
■Chapter 7, "Using Multi-Data Centers"
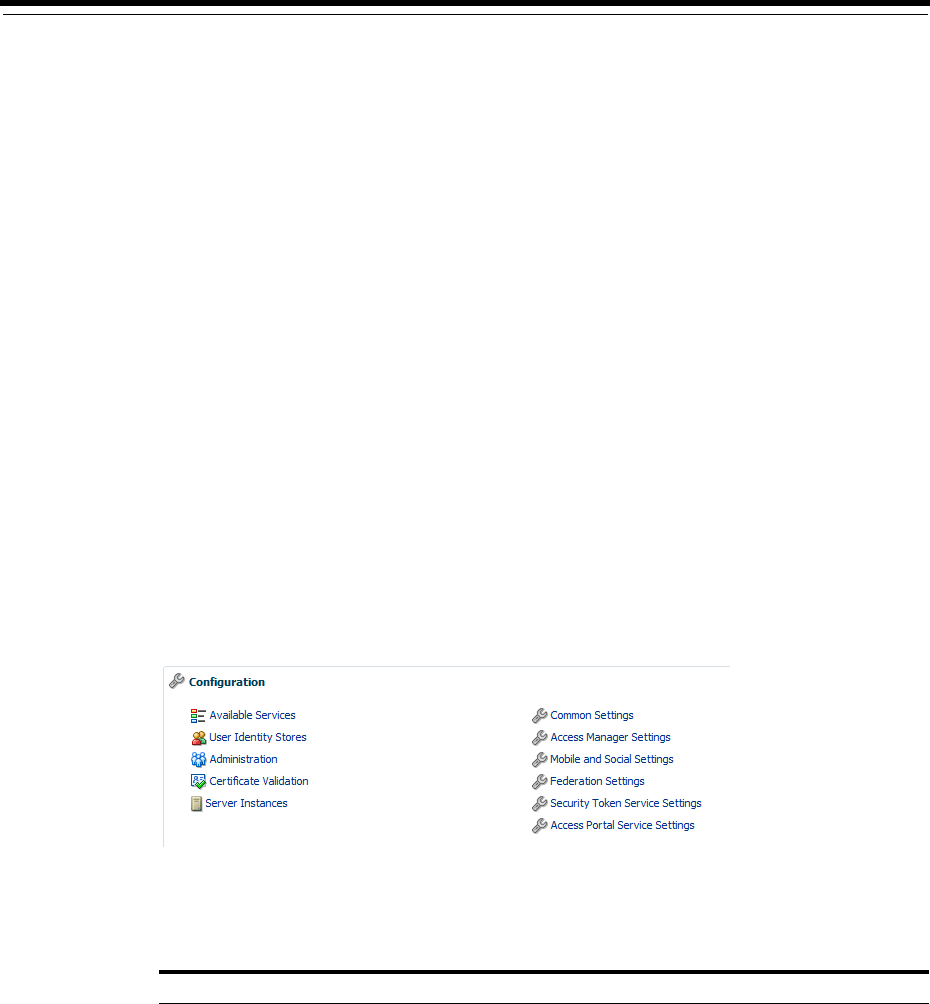
3
Managing Common Services and Certificate Validation 3-1
3
Managing Common Services and Certificate
Validation
[4]
This chapter explains how to configure properties that are used in common by the
services integrated into Oracle Access Management.
This chapter contains the following sections:
■Configuring Oracle Access Management
■Enabling or Disabling Available Services
■Managing Common Settings
■Managing Certificate Validation and Revocation
3.1 Configuring Oracle Access Management
This section introduces the Oracle Access Management options and settings
collectively called Configuration. Unless explicitly stated, these Configuration options
are shared by all Access Manager servers and services in the domain. Figure 3–1 shows
the Configuration options defined in the new Oracle Access Management Console.
Figure 3–1 Oracle Access Management Configuration Options
Table 3–1 describes the Configuration options. The items listed apply to all services in
the suite.
Table 3–1 Configuration Options
Node Description
Available Services See "Enabling or Disabling Available Services" on page 3-2.
User Identity Stores See "Managing OAM Identity Stores" in Chapter 5, "Managing Data
Sources."
Administration See Chapter 4, "Delegating Administration."

Enabling or Disabling Available Services
3-2 Administrator's Guide for Oracle Access Management
3.2 Enabling or Disabling Available Services
Figure 3–2 shows the Available Services page of the Common Configuration section,
which provides the status of services, and controls to enable or disable a service.
Initially, only Access Manager services are enabled. Oracle Access Management
Administrators must enable a service in the Oracle Access Management Console to use
the related functionality. The exception to this is Identity Context, which is enabled by
default and does not have any controls to disable it.
Certificate Validation Provides access to the certificate revocation list and OCSP/CDP
settings.
See: "Managing Certificate Validation and Revocation" on page 3-7.
Server Instances Provides access to all registered OAM Server instances.
See: Chapter 6, "Managing Server Registration"
Common Settings Provides configurations that apply to all Oracle Access
Management services including Session properties, Oracle
Coherence, Auditing, and Default and System Identity Stores.
See: "Managing Common Settings" on page 3-4.
Access Manager Settings Provides access to Access Manager operation configurations.
See "Managing Common and System Configurations"
Mobile and Social
Settings
Provides access to configurations for Oracle Access Management
Mobile and Social.
See "Managing Oracle Access Management Mobile and Social"
Federation Settings Provides access to configurations for Oracle Access Management
Identity Federation.
See Chapter 5, "Managing Data Sources"
Security Token Service
Settings
Provides access to configurations for Oracle Access Management
Security Token Service.
See "Managing Oracle Access Management Security Token Service"
Access Portal Settings Provides access to configurations for Oracle Access Portal.
See "Managing Oracle Access Management Oracle Access Portal"
Table 3–1 (Cont.) Configuration Options
Node Description
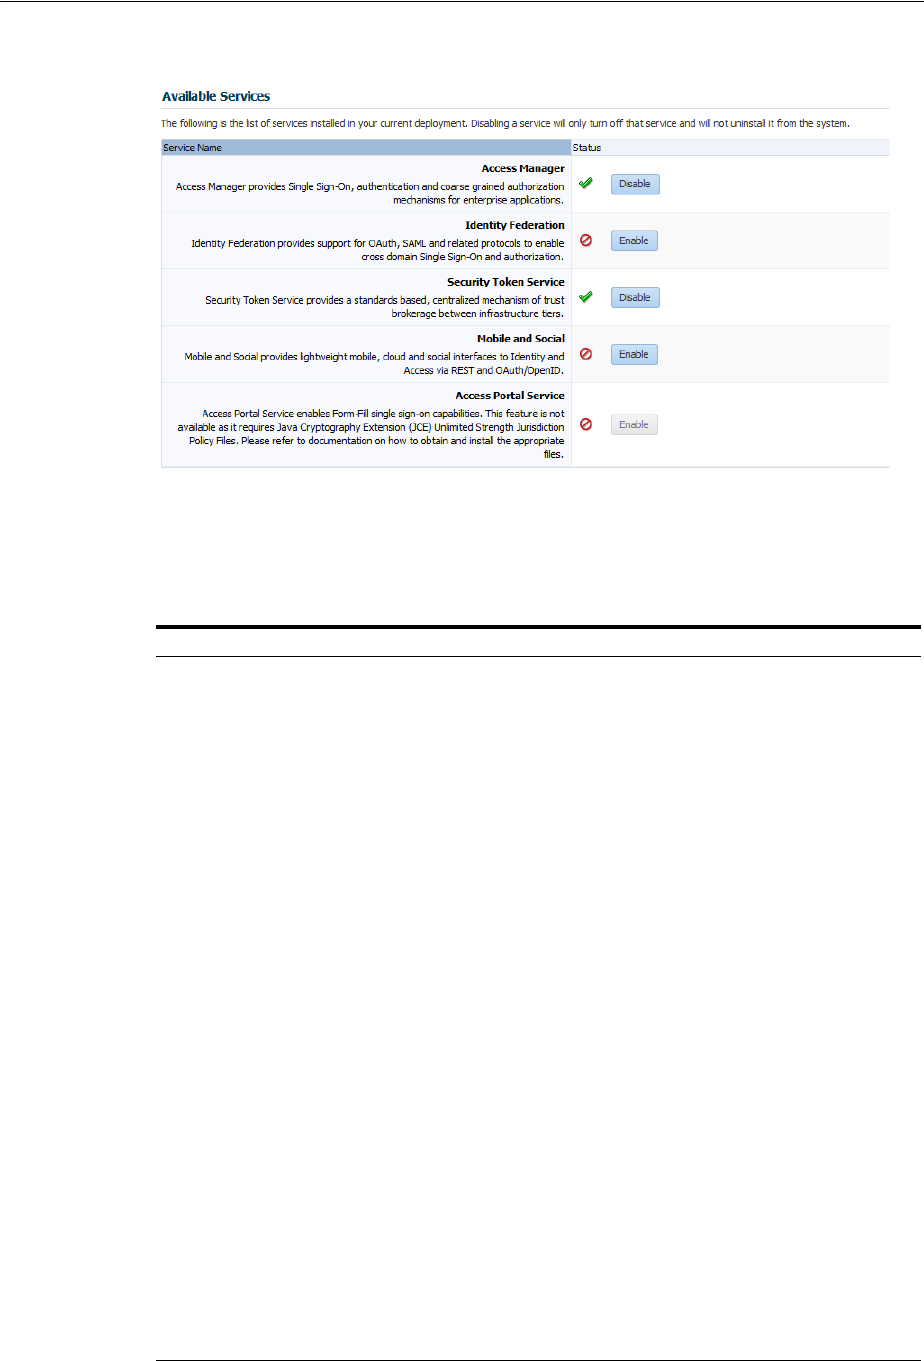
Enabling or Disabling Available Services
Managing Common Services and Certificate Validation 3-3
Figure 3–2 Available Services
A green check mark in the Status field beside the service name indicates the service is
enabled. A red circle with a line through it indicates that the corresponding service is
disabled.
Table 3–2 Common Services
Service Description
Access Manager Access Manager functionality is enabled by default. Access Manager
Service is required to set SSO policies, configure Access Manager, as
well as Common Configuration, and when REST Services are enabled.
Default: Enabled
No other services are required for Access Manager and Common
Configuration.
Identity Federation Must be enabled to manage the federation partners.
Default: Disabled
Note: The Access Manager service must also be enabled because
Identity Federation is another authentication module.
See Also: Part VII, "Managing Oracle Access Management Identity
Federation".
Security Token Service Enable this service to use Security Token Service functionality.
Default: Disabled
Access Manager service is not required.
See Also: Part VIII, "Managing Oracle Access Management Security
Token Service".
Mobile and Social Mobile and Social Services can be deployed in either of two ways:
■As part of Oracle Access Management, where Access Manager is
enabled by default and Mobile and Social must be enabled
manually to operate together with Access Manager.
■Oracle Access Management and Mobile and Social only. Here
only Mobile and Social is enabled by default to work on its own
(or use a remote Access Manager).
See Also: Part IX, "Managing Oracle Access Management Mobile and
Social"
Access Portal Must be enabled to manage Access Portal.
Default: Disabled
See Part XI, "Managing Oracle Access Management Oracle Access
Portal"
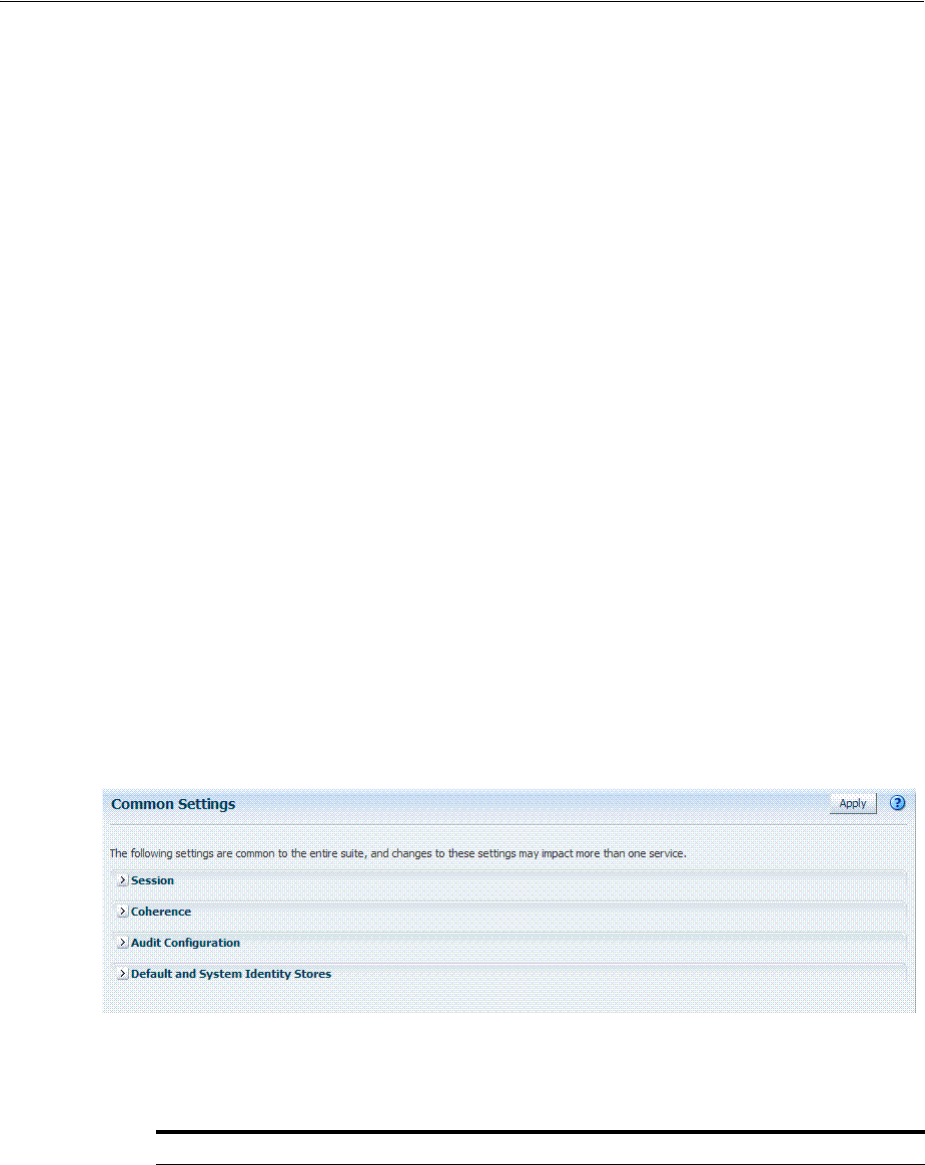
Managing Common Settings
3-4 Administrator's Guide for Oracle Access Management
Prerequisites
WebLogic AdminServer must be running.
See Using the New Oracle Access Management Console.
To enable or disable a service
From the Oracle Access Management Console Launch Pad, click Available Services
under Configuration.
1. Click Enable beside the desired service name (or confirm that the Status check
mark is green).
2. Click Disable beside the desired service name (or confirm that the Status check
mark is red).
3.3 Managing Common Settings
The Common Settings apply to all OAM Server instances and services. This section
provides the following topics:
■About Common Settings Pages
■Managing Common Settings
3.3.1 About Common Settings Pages
Common Settings apply to all services within the suite. Figure 3–3 shows the named
sections on the Common Settings page, which can be expanded to reveal related
elements and values.
Figure 3–3 Common Settings Page (Collapsed View)
Oracle Access Management Administrators can control and specify parameters used
by the entire suite, not just a single service, as introduced in Table 3–3.
Table 3–3 Common Settings
Tab Name Description
Session Session configuration refers to the process of managing the lifecycle requirements of
a session, and notification of events to enable global logout. Global logout is
required for OSSO Agents (mod_osso) to ensure that logging out of a session on any
entity propagates the logout to all entities.
See Also: "Managing Common Settings" on page 3-5.

Managing Common Settings
Managing Common Services and Certificate Validation 3-5
3.3.2 Managing Common Settings
Users with valid Oracle Access Management Administrator credentials can perform
the following task to display the Common Settings page and perform changes.
Included in each main step is a reference to more information elsewhere in this book.
Prerequisites
The OAM Server must be running.
To manage common settings
1. From the Launch Pad, click Common Settings.
2. Session:
a. On the Common Settings page, expand the Session section.
b. Click the arrow keys beside each list to increase or decrease session lifecycle
settings as needed:
Session Lifetime (minutes)
Idle Timeout (minutes)
Maximum Number of Sessions per User
c. Database Persistence: Check the box to enable Database Persistence for Active
Sessions (or clear it to disable Database Persistence).
d. Click Apply to submit your changes.
e. See Also: Chapter 17, "Maintaining Access Manager Sessions".
3. Coherence: See "Viewing Common Coherence Settings" on page 3-6.
4. Audit Configuration:
a. Open the Audit Configuration section.
Coherence Common Oracle Coherence settings shared by all OAM Servers differ from those
for individual OAM Servers. However, in both cases Oracle recommends that you
make no adjustments to these settings unless instructed to do so by an Oracle
Support Representative.
See Also: "Managing Common Settings" on page 3-5.
Audit Configuration Oracle Access Management supports auditing for a large number of administrative
and run-time events, uniform logging and exception handling, and the diagnostics
of all audit events. Oracle Access Management auditing configuration is recorded in
oam-config.xml
.
See Also: "Managing Common Settings" on page 3-5 and "Using the Oracle Access
Management Console for Audit Configuration" on page 9-22.
Default and System
Identity Stores
This section identifies the default identity and system stores, which can be one in
the same (or different).
See Also: "Managing Common Settings" on page 3-5.
See Also: Details for other operations common to all OAM
components:
■Chapter 8, "Logging Component Event Messages"
■Chapter 12, "Monitoring Performance and Health"
Table 3–3 (Cont.) Common Settings
Tab Name Description
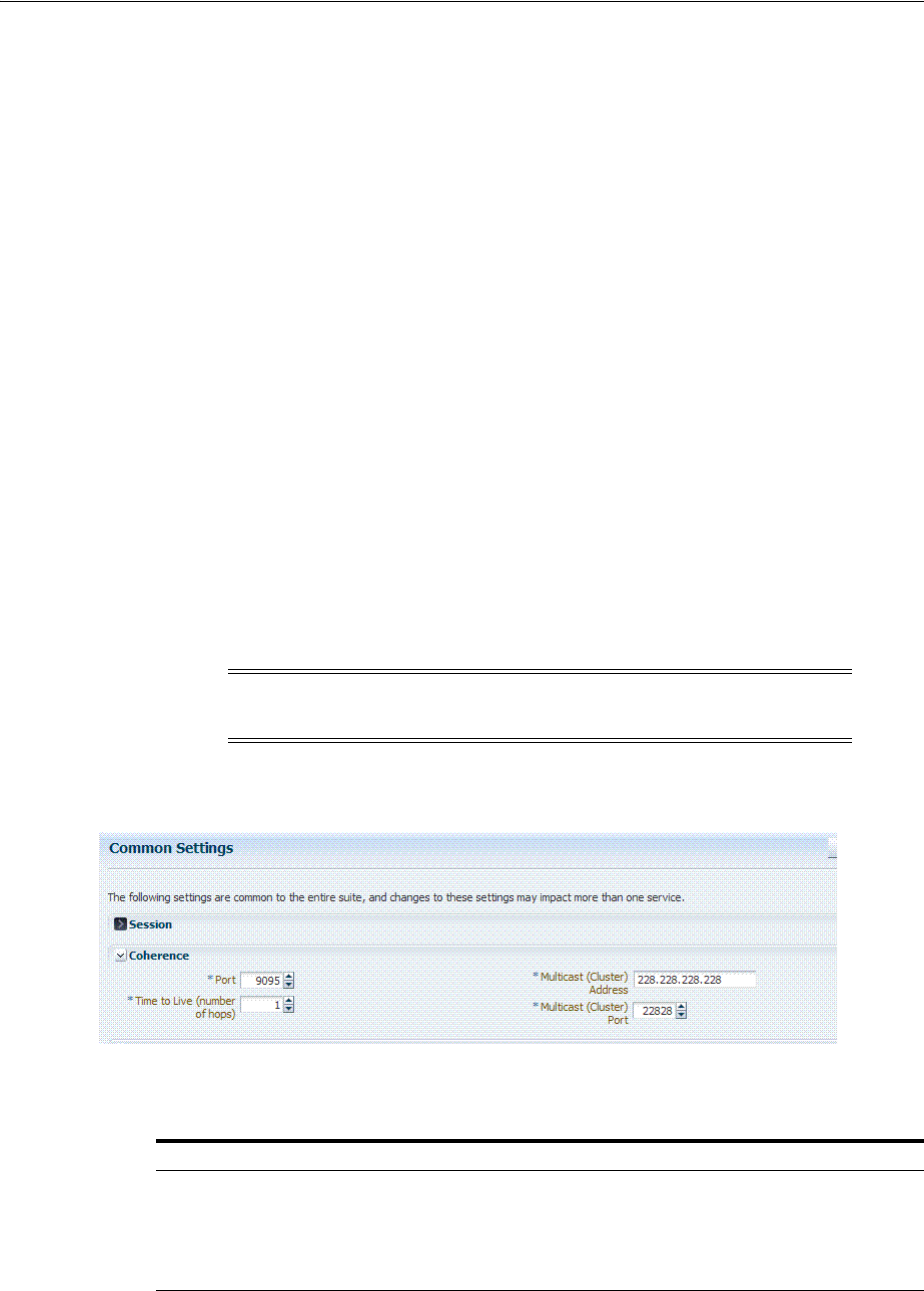
Managing Common Settings
3-6 Administrator's Guide for Oracle Access Management
b. In the Audit Configuration section, enter appropriate details for your
environment:
Maximum (Log) Directory Size
Maximum (Log) File Size
Filter Enabled
Filter preset (select from the list to define verbosity of audit data)
Audit Configuration Table: Use Add (+) or Delete (x) buttons to specify users.
c. Click Apply to submit the Audit Configuration (or close the page without
applying changes).
d. See Also: Chapter 9, "Auditing Administrative and Run-time Events".
5. Default Store and System Stores:
a. Expand the Default and System Identity Stores section.
b. Click the name of the System Store (or Default Store) to display the
configuration page.
c. See "Setting the Default Store and System Store" on page 5-21 for more
information.
3.3.3 Viewing Common Coherence Settings
Figure 3–4 shows the Common Settings page with the coherence section expanded.
Figure 3–4 Common Coherence Settings
Table 3–4 describes these settings.
Note: Oracle strongly recommends that you do not alter these
settings without the assistance of Oracle Support.
Table 3–4 Common Coherence Settings
Element Description
Port Value between 1 and 65535 is supported.
Cluster Address Value between 224.1.255.0 to 239.255.255.255 is allowed.
Time to Live Value between 0 and 255 is supported.
Cluster Port Value between 1 and 65535 is supported.

Managing Certificate Validation and Revocation
Managing Common Services and Certificate Validation 3-7
To view Common Coherence settings
1. From the System Configuration tab, expand the Common Configurations section,
and double-click Common Settings.
2. On the Common Settings page, expand the Coherence section.
3. Close the page when you finish; do not make any changes.
3.4 Managing Certificate Validation and Revocation
The Certificate Validation module is used by the Security Token Service to validate
X.509 tokens and to verify whether or not the certificates have been revoked. It
supports the following options.
■A Certificate Revocation List (CRL) is a list of certificates (identified by serial
numbers) that have been revoked. Revoked certificates are listed with a reason, an
issue date, and the issuing entity. (In addition, each list contains a proposed date
for the next release.) Entities presenting these (revoked) certificates should no
longer be trusted. When a potential user attempts to access a server, the server
allows or denies access based on the CRL entry for the particular user. For more
information, see Section 3.4.1, "Managing Certificate Revocation Lists."
■The Online Certificate Status Protocol (OCSP) was developed as an alternative to
CRLs. OCSP specifies how the client application that requests information on a
certificate's status will obtain it from the server that responds to the request. An
OCSP responder can return a signed response signifying that the certificate
specified in the request is either good, revoked or unknown. If the OCSP cannot
process the request, it returns an error code. For more information, see
Section 3.4.2, "Enabling OCSP Certificate Validation."
■A CRL Distribution Point extension (CDP extensions) contains information
regarding the location of Certificate Revocation Lists (CRLs) and OCSP servers.
You can use the Administration Console to define these points. For more
information, see Section 3.4.3, "Enabling CRL Distribution Point Extensions."
The following sections provide more information.
■Additional OCSP Configurations
■Using the configureOAMOSCSPCertValidation WLST Command
3.4.1 Managing Certificate Revocation Lists
Users with Oracle Access Management Administrator credentials can use the
following procedure to enable the CRL functionality and import a current Certificate
Authority Certificate Revocation List (CA CRL).
Prerequisites
Have your CA CRL ready to import.
To import Certificate Revocation Lists
1. Under the Configuration section of the Oracle Access Management Console, click
Certificate Validation.
The Certificate Revocation List tab is displayed.
2. Confirm that the Enabled box is checked.
3. Add or remove a CRL.
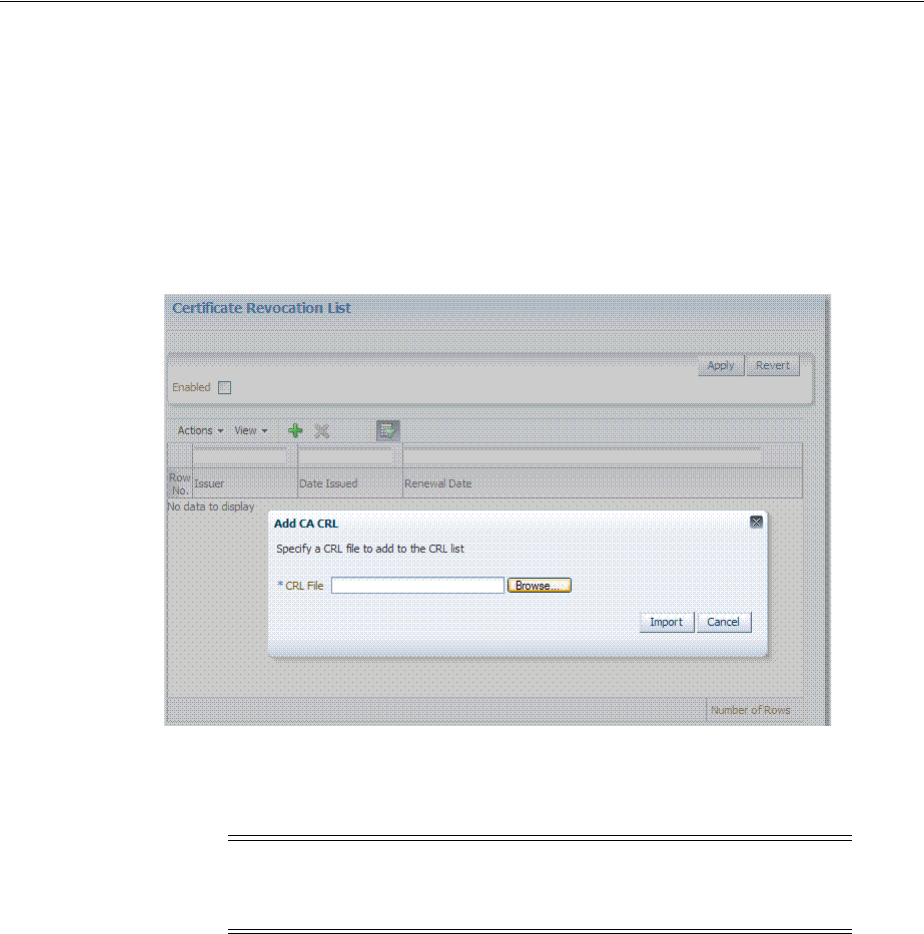
Managing Certificate Validation and Revocation
3-8 Administrator's Guide for Oracle Access Management
■Add: Click the Add (green plus sign) button, browse for the CRL file, select it,
and click Import.
■Remove: Click the name of the list in the table, click the Delete (x) button, and
confirm when asked.
Figure 3–5 is a screenshot of the pop-up window used to add a CA CRL to the
CRL List using the Administration Console.
Figure 3–5 Certificate Revocation List Dialog Box
4. Click Apply to save the configuration.
5. Proceed to "Enabling OCSP Certificate Validation".
3.4.2 Enabling OCSP Certificate Validation
Users with Oracle Access Management Administrator credentials can use the
following procedure to enable the OCSP.
Prerequisites
Have the URL of the OCSP service ready to import.
To enable OCSP certificate validation
1. Under the Configuration section of the Oracle Access Management Console, click
Certificate Validation.
The Certificate Revocation List page is displayed. Confirm that the Enabled box is
checked.
2. Click the OCSP/CDP tab.
a. Enable OCSP.
Note: To search for CRLs in the table, enable Query by Example from
the View drop-down. Enter filter strings in the header fields displayed
and hit Enter.
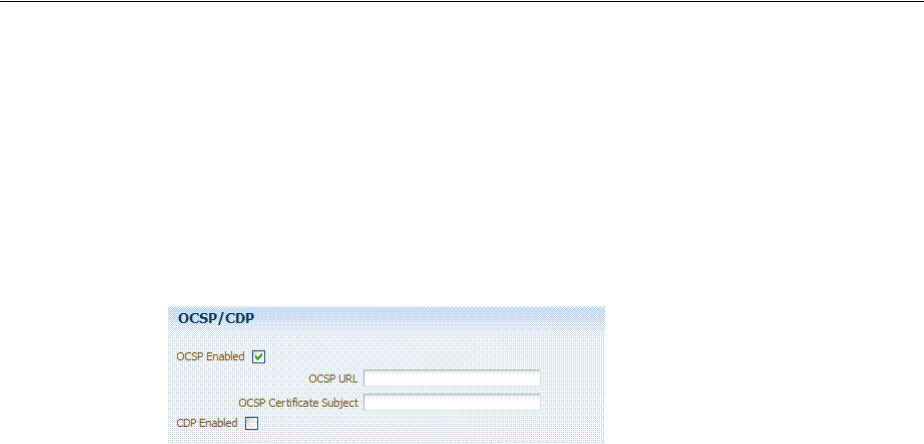
Managing Certificate Validation and Revocation
Managing Common Services and Certificate Validation 3-9
b. Enter the URL of the OCSP Service.
c. Enter the Subject DN of the OCSP Service.
d. Save this configuration.
Figure 3–6 illustrates how to add an OCSP URL using the Administration Console.
See "Using the configureOAMOSCSPCertValidation WLST Command" on
page 3-12 for details on how to do this using the WLST command.
Figure 3–6 OCSP/CDP Settings
3. Proceed to "Enabling CRL Distribution Point Extensions".
3.4.3 Enabling CRL Distribution Point Extensions
Users with Oracle Access Management Administrator credentials can use the
following procedure to add CRL distribution points in issued certificates.
To enable CDP
1. Under the Configuration section of the Oracle Access Management Console, click
Certificate Validation.
The Certificate Revocation List page is displayed. Confirm that the Enabled box is
checked.
2. Open the OCSP/CDP tab.
a. Enable CDP.
b. Save this configuration.
Figure 3–6 illustrates this.
3.4.4 Additional OCSP Configurations
Support for HTTP Proxy and multiple OCSP Responder configurations have been
added for this 11g Release 2 (11.1.2.2) version of Oracle Access Manager. Example 3–1
illustrates the current Certificate Validation Module configuration.
Example 3–1 Certificate Validation Module Configuration
<Setting Name="CertValidationModule" Type="htf:map">
<Setting Name="certpathvalidationocspcertsubject"
Type="xsd:string"></Setting>
<Setting Name="certpathvalidationocspurl" Type="xsd:string"></Setting>
<Setting Name="certvalidationcrlstorelocation"
Type="xsd:string">/scratch/maymaria/installed/wlsHome/user_projects/
domains/base_domain/config/fmwconfig/amcrl.jar</Setting>
<Setting Name="defaulttrustcastorelocation"
Type="xsd:string">/scratch/maymaria/installed/wlsHome/user_projects/
domains/base_domain/config/fmwconfig/amtruststore</Setting>
<Setting Name="defaulttrustcastoretype" Type="xsd:string">jks</Setting>

Managing Certificate Validation and Revocation
3-10 Administrator's Guide for Oracle Access Management
<Setting Name="certpathvalidationcdpenabled"
Type="xsd:boolean">false</Setting>
<Setting Name="certpathvalidationcrlenabled"
Type="xsd:boolean">false</Setting>
<Setting Name="certpathvalidationocspenabled"
Type="xsd:boolean">false</Setting>
</Setting>
The following sections contain configuration information for these new features.
■Using WLST to Configure HTTP Proxy
■Configuring Multiple OCSP Responders
3.4.4.1 Using WLST to Configure HTTP Proxy
The Oracle Access Manager OCSP checker can perform authentication against OCSP
responders that are outside an enterprise's intranet via HTTP Proxy.
Use the
updateHTTPProxyConfig
WLST command to configure the proxy.
3.4.4.1.1 Using the updateHTTPProxyConfig WLST Command Online command that
configures the OAM OCSP checker to use HTTP proxy.
3.4.4.1.2 Description Adds or updates proxy information.
3.4.4.1.3 Syntax
updateHTTPProxyConfig(proxyHost, proxyPort, conTimeOut)
3.4.4.1.4 Example
updateHTTPProxyConfig(proxyHost="hostname.example.com", proxyPort="8888",
conTimeOut="600")
3.4.4.2 Configuring Multiple OCSP Responders
Certificate authentication currently supports authentication against a single OCSP
responder as documented in "Enabling OCSP Certificate Validation" on page 3-8.
Support for multiple OCSP responders has been added since the responder URL is
now part of the certificate's Authority Information Access Extension. To support
multiple OCSP Responders, the three lines of configuration in Example 3–2, "Multiple
OCSP Responder Configuration" must be added to the top of the Certificate Validation
Module configuration section (illustrated in Example 3–1).
Example 3–2 Multiple OCSP Responder Configuration
<Setting Name="CertValidationModule" Type="htf:map">
<Setting Name="certpathvalidationocspurltocamap" Type="htf:map">
<Setting Name="<url_value>" Type="xsd:string">
<ocsp_responder_subject></Setting>
</Setting>
<Setting Name="useJDKOCSP" Type="xsd:string">false</Setting>
...
Argument Definition
proxyHost
Mandatory. The host name of the proxy.
proxyPort
Mandatory. The port number of the proxy.
conTimeOut
Mandatory. The connection timeout in milliseconds.

Managing Certificate Validation and Revocation
Managing Common Services and Certificate Validation 3-11
</Setting>
Configure the first and second lines to enable multiple OCSP responders.
■Set
certpathvalidationocspenabled
to true.
■Update the
certpathvalidationocspurltocamap
configuration. It is of type Map,
the key is the OCSP Responder URL (URL Encoded) and the value is the OCSP
Responder's Certificate subject.
<Setting Name="certpathvalidationocspurltocamap" Type="htf:map">
<Setting Name=" http%3A%2F%2Flocalhost%3A9797" Type="xsd:string">
emailAddress=sagar@pspl.com,CN=ps2436,OU=OBLIX-QA,O=PSPL,
L=PUNE,ST=MAHA,C=MY</Setting>
</Setting>
■(Optionally) set values for
certpathvalidationocspcertsubject
and
certpathvalidationocspurl
.
The Responder URLs will be fetched first from the AuthorityInformationAccess
extension of the user's X.509 certificate and second from Modules/Plugin
(CertValidation). The Responder Subjects will be fetched first from the defined
configuration map and second from the Module/Plugin (CertValidation)
configuration. In cases where these configurations are not found, the OCSP validation
will fail.
Configure the third line to provide backward compatibility for those who want to use
JDK OCSP validation rather than the new OAM OCSP Checker. By default, the JDK
OCSP Checker is enabled. When configuring the OAM OCSP Checker using the WLST
command, the flag is set to false. For more information on the WLST command, see
Section 3.4.5, "Using the configureOAMOSCSPCertValidation WLST Command."
Depending on the Certificate Validation Module configuration there are three different
options as documented in Table 3–5.
Table 3–5
Configuration
OCSP
Configuration
(certpathvalidationo
cspenabled)
CRL Configuration
(certpathvalidation
crlenabled)
JDK/OAM OCSP
Configuration
(useJDKOCSP)
No OCSP Checking
Simple certificate validation
is performed during OAM
X-509 authentication
False False False
OAM OCSP
X-509 authentication
performs certificate
validation with OCSP
checking using the new
OAM OCSP Checker.
True True/False
(does not matter)
False
JDK OCSP
X-509 authentication
performs certificate
validation with OCSP
checking using the JDK
OCSP Checker.
True True True

Managing Certificate Validation and Revocation
3-12 Administrator's Guide for Oracle Access Management
To enable OCSP validation to be done using one configured responder URL, set the
certpathvalidationcrlenabled
and
certpathvalidationocspenabled
properties to
true and set values for the
certpathvalidationocspcertsubject
and
certpathvalidationocspurl
properties. If these properties are not set, OCSP
validation will be done using the responder URL defined within the user certificate's
AIA Extension. If no URL is defined, OCSP validation will fail.
3.4.5 Using the configureOAMOSCSPCertValidation WLST Command
Online command that updates the OAM OCSP configuration including:
■Updates or adds an OCSP responder URL and subject details to the
"certpathvalidationocspurltocamap"
■Clear the newly added configuration; for example,
"certpathvalidationocspurltocamap"
■Set or unset the "useJDKOCSP" flag to enable or disable JDK OCSP
3.4.5.1 Description
Updates the OAM OCSP configuration by adding/modifying the OCSP responder
URL and subject details in the certpathvalidationocspurltocamap property and
enabling/disabling the use of the JDK OCSP Checker.
3.4.5.2 Syntax
configureOAMOCSPCertValidation(url, subject, clear (optional),
display (optional), useJDKOCSP (optional))
3.4.5.3 Examples
The following example enables the OAM OCSP and sets the Responder URL and
subject.
configureOAMOCSPCertValidation(url="http://sample:9898",
subject="cert-subject-detail")
The following example enables the OAM OCSP and updates the Responder URL and
subject.
configureOAMOCSPCertValidation(url="http://sample:9898",
subject="details changed/updated")
The following example disables and clears the OAM OCSP.
configureOAMOCSPCertValidation(url="http://sample:9898", subject="subject-detail",
clear="true")
The following example enables/disables the JDK OCSP.
Argument Definition
url
Mandatory. Takes as a value the valid URL.
subject
Mandatory. Takes the details being modified.
clear
Optional. Takes a value of true or false.
display
Optional. Takes a value of true or false.
useJDKOCSP
Optional. Takes a value of true or false.

Managing Certificate Validation and Revocation
Managing Common Services and Certificate Validation 3-13
configureOAMOCSPCertValidation(url="http://sample:9898",
subject="details changed/updated", useJDKOCSP="true")

Managing Certificate Validation and Revocation
3-14 Administrator's Guide for Oracle Access Management

4
Delegating Administration 4-1
4
Delegating Administration
[5]
With this release of Oracle Access Manager, a System Administrator has the capability
to delegate administration of Application Domains to other administrators. An
Application Domain Administrator role has been developed towards this end.
This chapter contains details about delegating administration in the following sections.
■Understanding Delegated Administration
■Defining the Administrator Roles
■Delegating the Identity Store
■Assigning Roles Using the Administration Console
■Default Administrators, Roles and Groups
■Using the Container Security Framework and MBeans
■Using the Remote Registration Utility
■Auditing Reports
4.1 Understanding Delegated Administration
Delegating administration allows a high-level administrator to grant responsibilities to
other, more local administrators. This is useful in large organizations where it may be
necessary to administer thousands or millions of users. When you delegate
administration, you determine what rights you want to grant to another user.
A Super/System Administrator can grant the rights to administer an Application
Domain to an Application Domain Adminstrator. An Application Domain
Adminstrator can further delegate the rights to administer one or more of their
Application Domains to other Application Domain Administrators. An Application
Domain Administrator can create and edit Resources, Authentication Policies and
Authorization Policies. These rights are scoped to one or more Application Domains.
4.2 Defining the Administrator Roles
Pre-defined, default roles are available after installing Access Manager. These
administrative roles are hierarchical in nature with the parent (super) role having a
super-set of privileges that can be assigned to child roles. The Access Manager System
Administrator can administer the following:
■All Application and component policy objects (including Resources,
Authentication Policies, Authorization Policies, and Token Issuance Policies)

Delegating the Identity Store
4-2 Administrator's Guide for Oracle Access Management
■Shared components (including Authentication Schemes, Host Identifiers, and
Resource Types)
■System configuration (including Common Configuration, Access Manager settings
and Authentication Modules, Security Token Service Settings, Custom Tokens,
Endpoints, Templates and Profiles, and Access Manager Agents and Security
Token Service Partners)
■Agents and partners
System Administrators can delegate rights to administer one or more Application
Domains to an Application Domain Adminstrator. An Application Domain
Adminstrator can further delegate the rights to administer one or more of their
Application Domains to other Application Domain Administrators.
Table 4–1 documents the default administrator roles.
4.3 Delegating the Identity Store
The Access Manager System Identity Store is used to enforce authentication and
authorization during the execution of administrative operations. The LDAP Directory
defined as the System Identity Store will contain all the administrators having access
to the Administration Console. An administrator can define a new User Identity Store
and select one of the existing profiles as the System Identity Store but only the System
Administrator can modify the current System Identity Store or switch to a new one.
When migrating to a new Identity Store, if users from the new store are assigned
Access Manager roles, those privileges become active and are enforced by Access
Manager. The administrator will be responsible for removing any delegated
administration privileges for the new Identity Store and the Access Manager
Administrator group will be mapped to the Administrator role of the new identity
store.
4.4 Assigning Roles Using the Administration Console
The System Administrator can use the Oracle Access Management Console to assign
roles to users or groups that cover specific Application Domains. Users can be
assigned multiple roles as long as the functionality doesn't overlap. For example, if
Note: Only a Super or Global System Administrator can assign roles
to users; users cannot further delegate that role to others.
Table 4–1 Roles for Delegating Adminisration
Role Name Description
Super/System
Administrator
Access to entire Oracle Access Management Console including
policy creation and system configuration
Application Domain
Administrator
Access to policy creation and resources in the specified
Application Domain.
Note: If the user currently logged in does not have the necessary
administrator roles in the new system store, the Administration
Console will log out or refresh so that it is compliant with the roles
assigned to the current administrator.

Default Administrators, Roles and Groups
Delegating Administration 4-3
user X is assigned Global Policy Administrator, the user cannot be granted Policy
Administrator for the HR domain because the latter is a child of the former.
From a high level:
1. When delegating administration for a specific policy object or a set of policy
objects, the delegator selects the item(s) and assigns the user(s), group(s), LDAP
Search Filter(s) or Domain System role(s) to it.
2. When delegating administration for all objects of a specific type, the delegator will
select the user(s), group(s), LDAP Search Filter(s) or Domain System role(s) and
grant the rights to administer the objects of that type to the selected. In this case,
the administrator can't select objects for which administration is being delegated;
the administrator will select a role that is granted to the appropriate delegatee
with a specific right.
4.5 Default Administrators, Roles and Groups
A virtual Access Manager Administrator group is defined and mapped to the Domain
Administrator role. The Access Manager Administrator group will be assigned the
Access Manager roles in the following list.
■System Administrator encompasses the privileges to manage all system
configurations and policy objects.
■System Administrator encompasses the privileges to manage System
Configuration, Common Configuration, Access Manager Settings, Agents,
Authentication Modules, Authentication Schemes, Host Identifiers, Resource
Types, Federation Partners and Enterprise Single Sign-on policies. Additionally,
Security Token Service Settings, Partners, Custom Tokens, Endpoints, Templates
and Profiles can be managed.
■Application Domain Administrator encompasses the privileges to manage objects
in an Application Domain.
The IDM Suite Navigator will define administrator roles that allow an administrator
assigned with that role to perform similar administrative tasks in the different
components of the IDM suite. For example, if the IDM Suite Navigator defines the
IDM Suite Administrator role, an administrator assigned with that role would be
granted with the following:
■OAM System Administrator Role
■OAAM Administrator Role
■OIF Administrator Role
Note: Roles can be assigned only to users or groups from the
system/default store.
Note: Customers using Oracle Identity Manager (or Oracle Identity
Manager XE) may want to define Enterprise Roles that are common to
all of IDM and use OIM to assign users and groups to these Enterprise
Roles. The Administration Console allows for this.

Using the Container Security Framework and MBeans
4-4 Administrator's Guide for Oracle Access Management
4.6 Using the Container Security Framework and MBeans
MBeans that enforce authentication and authorization using the container security
framework are published using the Portable JMX Framework.
■The Configuration Service MBeans are used for configuring the Certificate
Validation Module, the STS Endpoints, Templates & Profiles, and the STS Settings
& Custom Tokens.
■The Partner and Trust Store Service MBeans are used for managing the STS
Partners.
At runtime, the JMX Framework will authenticate the client during the connection
operation and ensure that the client belongs to the role specified in the MBean security
annotations. Because of this, the Access Manager System Identity Store needs to be
configured as an Authentication Provider in the security realm of the domain.
Additionally, users accessing the MBeans will need to be assigned the following role
depending on the container:
■WebLogic: Admin
■WebSphere: Admin or Configurator
4.7 Using the Remote Registration Utility
The Remote Registration Utility (RREG) is also governed by the roles assigned to the
user invoking them. When using RREG to remotely register agents, the administrator
provides credentials that allows the RREG client to successfully connect and
authenticate to the RREG Access Manager Server; this, in turn, propagates the client's
identity to the Access Manager components that will enforce the appropriate
administration roles. The following might occur when running the RREG based on the
administrator's role:
■In a creation operation:
a. A new agent entry can be provisioned.
b. A HostID for that Agent can be created.
c. An Application for that agent might be created.
d. Resources might be added to the new Application using the newly created
HostID.
■In an update operation:
a. Agent settings can be changed.
b. A HostID for that agent can be changed.
c. An Application for that agent can be created if it does not exist.
d. Resources can be added to the Application.
The RREG administrator must be assigned roles to ensure successful completion of the
administrative operations.
■The System Administrator role to create/update an Agent.
■The OAM Shared Component Administrator / System Administrator role to
create/update an HostID entry.
■The OAM Domain Administrator role / System Administrator to create/update
an Application and create/configure Resources.

Auditing Reports
Delegating Administration 4-5
After executing the RREG command, the administrator will be set as the delegated
administrator for the created Application, Agent and HostID.
4.8 Auditing Reports
Auditing becomes even more critical when administration has been delegated to
several users. All policy object and system configuration operations performed by
administrators through the Administration Console or programmatically are logged
and informational reports can be generated. For more information, see Chapter 9,
"Auditing Administrative and Run-time Events."

Auditing Reports
4-6 Administrator's Guide for Oracle Access Management

5
Managing Data Sources 5-1
5
Managing Data Sources
This chapter provides the steps to register and administer data sources using the
Oracle Access Management Console. The information is common to all services
available through the Oracle Access Management Console.
This chapter includes the following sections:
■Introducing the Data Sources
■Managing OAM Identity Stores
■Managing the Identity Directory Service User Identity Stores
■Setting the Default Store and System Store
■Managing the Administrators Role
■Managing the Policy and Session Database
■Introduction to Oracle Access Management Keystores
■Integrating a Supported LDAP Directory with Oracle Access Manager
5.1 Introducing the Data Sources
The term data source is a Java Database Connectivity (JDBC) term used within Oracle
Access Management to refer to a collection of user identity stores or a database for
policies. Oracle Access Management supports several types of data sources that are
typically installed for the enterprise. Each data source is a storage container for the
various types of information documented in Table 5–1.
Table 5–1 Data Sources for Oracle Access Management
Data Source Description
Database A collection of information that is organized and stored so that its content
can be easily accessed, managed, and updated.
■Access Manager policy data, including password management data,
must be stored in a database that is extended with the Access
Manager-specific schema and registered with Access Manager. See
"Managing the Policy and Session Database" on page 5-25.
■Session Store: By default, Access Manager session data is stored
within in-memory caches that is migrated to the policy store. In
production environments, you can have an independent database for
policy data and another for session data. For details about sessions
and session data, see Chapter 17.
■Audit Store: Audit data can be stored either in a file or in a separate
database (not the policy store database). For information on auditing
administrative and run time events, see Chapter 9.

Introducing the Data Sources
5-2 Administrator's Guide for Oracle Access Management
Table 5–2 contains the Oracle Access Management services and links to information
about the data sources used for each.
User Identity Store Central LDAP storage in which an aggregation of user-oriented data is
kept and maintained in an organized way. (Access Manager does not
include identity services; there is no native user, group, or role store.) The
identity store must be installed and registered with Access Manager to
enable authentication when a user attempts to access a protected resource
(and during authorization, to ensure that only authorized users can access
a resource). During the initial deployment process, described in the Oracle
Fusion Middleware Installation Guide for Oracle Identity and Access
Management, the embedded LDAP store is used as the User Identity
Store.
Oracle recommends that you use only the Oracle Access Management
Console or WebLogic Scripting Tool (WLST) commands for changes; do
not edit oam-config.xml.
By default, Access Manager uses the Embedded LDAP in the WebLogic
Server domain as the user identity store. However, a number of other
external LDAP repositories can also be registered as user identity stores. In
this case, one store must be designated as the System Store that contains
Administrator roles and users.
Oracle Access Management
configuration data file:
oam-config.xml
During the initial deployment process, described in the Oracle Fusion
Middleware Installation Guide for Oracle Identity and Access
Management, Oracle Access Management configuration data is stored in
an XML file: oam-config.xml.
See "About the oam-config.xml Configuration Data File" on page 5-3.
Keystores Several keystores are associated with Oracle Access Management services
as described in "Introduction to Oracle Access Management Keystores" on
page 5-27.
■Embedded Java Keystore: Used for certificates for Simple or
Certificate-based communication between OAM Servers and
Webgates. The keystore bootstrap occurs upon initial AdminServer
startup after running the Configuration Wizard.
See: "About Access Manager Security Keys and the Embedded Java
Keystore" on page 5-27
■Security Token Service Keystores: Access Manager and Security
Token Service keystore should always be different. For more
information, see "About Access Manager Keystores" on page 5-28.
■Identity Federation Keystores: Keystore settings enable you to create
aliases (a short hand notation) for keys in the keystore.
See: "About Identity Federation Keystore" on page 5-30
Table 5–2 Data Sources for Oracle Access Management Services
Service Description
Access Manager Access Manager supports multiple Identity Stores and provides SSO
authentication using data sources:
■"Managing OAM Identity Stores"
■"Managing the Policy and Session Database"
■"About the oam-config.xml Configuration Data File"
■"About Access Manager Security Keys and the Embedded Java Keystore"
Identity Federation Identity Federation supports multiple Identity Stores which can be assigned on a
per Identity Partner basis. Each Identity Store must be registered with Access
Manager. If no Identity Store is defined in the Identity Partner, the designated
Default Store is used.
■"Using Multiple Identity Stores"
■"About Identity Federation Keystore"
■"Administering Identity Federation As A Service Provider"
Table 5–1 (Cont.) Data Sources for Oracle Access Management
Data Source Description

Introducing the Data Sources
Managing Data Sources 5-3
The following sections contain additional details.
■About the oam-config.xml Configuration Data File
■About the Default LDAP Group
5.1.1 About the oam-config.xml Configuration Data File
Oracle Access Management provides an XML file (
oam-config.xml
) containing all
Access Manager-related system configuration data. Any changes made to the Access
Manager deployment configuration, including server and agent registration, are stored
in oam-config.xml and are automatically propagated to each Access Manager server.
Each Access Manager server has a local copy of the latest configuration XML file.
Whether you have failover configured in a high-availability environment or not, all
Access Manager servers always have the latest oam-config.xml file.
Oracle recommends not editing oam-config.xml directly. Manual changes to this file
could result in lost data or overwriting of the file during data sync operations.
However, if you must edit oam-config.xml, use the following guidelines:
■Back up oam-config.xml in: $DOMAIN_HOME/config/fmwconfig/ and store the
copy in a different location for use if needed.
■Make your changes on the node running the AdminServer to minimize possible
conflicts that another AdminConsole user might make.
■If Access Manager Servers are running, increment the configuration version
number at the top of the file to associate your change and enable automatic
propagation and dynamic activation across all OAM Servers. For example, see the
next to last line of this example (existing value + 1):
<Setting Name="Version" Type="xsd:integer">
<Setting xmlns="http://www.w3.org/2001/XMLSchema"
Name="NGAMConfiguration" Type="htf:map:>
Security Token Service Security Token Service uses only the designated Default Store for user identities.
■"About Access Manager Keystores"
■"Configuration overview: Identity Propagation with the Username Token".
■Chapter 37, "Managing Security Token Service Certificates and Keys"
Mobile and Social Mobile and Social provides its own Identity Directory Service configuration that
points to directory servers for user authentication and/or user profile services.
There is no dependency on the global data sources upon which Access Manager
and other Oracle Access Management services rely.
■Chapter 42, "Configuring Mobile Services"
See Also:
■"Managing Global Password Policy" on page 19-97 and
"Configuring 11g WebGates and Authentication Policy for DCC"
on page 19-97
■"Setting the Default Store and System Store" on page 5-21
■Chapter 17 for details about sessions stored in-memory using
Oracle Coherence and propagated to Oracle Database
■Chapter 9 for details about Audit data stored within audit files or
a separate Oracle Database
Table 5–2 (Cont.) Data Sources for Oracle Access Management Services
Service Description

Managing OAM Identity Stores
5-4 Administrator's Guide for Oracle Access Management
<Setting Name="ProductRelease" Type="xsd:string">11.1.1.3</Setting>
<Setting Name="Version" Type="xsd:integer">2</Setting>
</Setting>
5.1.2 About the Default LDAP Group
The default LDAP group,
Administrators
, is set during initial deployment using the
Oracle Fusion Middleware Configuration Wizard, as described in "Specifying the
Oracle Access Management Console Administrator" on page 2-3.
5.2 Managing OAM Identity Stores
This section provides the steps you need to manage user identity store registrations
using the Oracle Access Management Console.
■About User Identity Stores
■Using Multiple Identity Stores
■About the User Identity Store Registration Page
■Registering a New User Identity Store
■Viewing or Editing a User Identity Store Registration
■Deleting a User Identity Store Registration
5.2.1 About User Identity Stores
A User Identity Store is a centralized LDAP repository in which an aggregation of
Administrator and user-oriented data is stored and maintained in an organized way.
Oracle Access Management supports multiple LDAP vendors, and multiple LDAP
stores can be registered for use by Oracle Access Management and its services.
Oracle Access Management addresses each user population and LDAP directory store
as an identity domain. Each identity domain maps to a configured LDAP User Identity
Store that must be registered with Oracle Access Management.
During initial WebLogic Server domain configuration using the Oracle Fusion
Middleware Configuration Wizard, the Embedded LDAP is configured as the one and
only user identity store for Oracle Access Management. Within the Embedded LDAP,
the Administrators group is created with
weblogic
seeded as the default
Administrator.
Note: Oracle recommends that you use the Identity Directory Service
Profiles to access identity data stores rather than the legacy OAM ID
Stores function as it will be deprecated in a future release. The Identity
Directory Service is documented in Section 5.3, "Managing the
Identity Directory Service User Identity Stores."
See Also: Oracle Fusion Middleware Securing Oracle WebLogic Server
Note: The Embedded LDAP performs best with fewer than 10,000
users. With more users, consider a separate enterprise LDAP server. In
a highly available configuration, Oracle recommends that an external
LDAP is used as the User Identity Store.

Managing OAM Identity Stores
Managing Data Sources 5-5
When a user attempts to access an Access Manager-protected resource, she can be
authenticated against any store, not simply the designated Default Store. That said,
there are a few considerations:
■System Store: Only one User Identity Store can (and must) be designated as the
System Store. This is used to authenticate Administrators signing in to use the
Oracle Access Management Console, remote registration tools, and custom
administrative commands in WLST.
Administrators using the Oracle Access Management Console or remote
registration utility must have credentials stored in the System Store.
Once you define a remote User Store as the System Store, you must change the
OAMAdminConsoleScheme
to use an LDAP Authentication Module that references
the same remote user store (the System Store).
■Default Store: As the name implies, the LDAP store designated as the Default
Store is the automatic choice for use by LDAP authentication modules unless you
configure use of a different store for the module or plug-in.
Security Token Service: Uses only the designated Default Store. When adding User
Conditions to a Token Issuance Policy, for instance, the identity store from which
the users are to be chosen must be Default Store.
In the Oracle Access Management Console, User Identity Store registrations are
organized under the Data Sources node (System Configuration tab, Common
Configuration section). Administrators can register, view, modify, and delete User
Identity Store registrations using either the Oracle Access Management Console or
custom WLST commands described in Oracle Fusion Middleware WebLogic Scripting
Tool Command Reference.
5.2.2 Using Multiple Identity Stores
Administrators can install and register multiple user identity stores for Oracle Access
Management. Each identity store can rely on a different LDAP provider. When more
than one identity store is registered, an Administrator must define:
■The System Store: Administrator logins occur against the System Store only.
■The Default Store: Comes into play during patching and when using Identity
Federation, and Security Token Service.
–Patching: Oracle recommends that before patching, you designate
UserIdentityStore1 as the Default Store and also update LDAP Authentication
Modules to use UserIdentityStore1(the Embedded LDAP of Weblogic Server).
For more information see, Oracle Fusion Middleware Upgrade Guide for Oracle
Identity and Access Management.
–Identity Federation: Supports multiple identity stores, on a per IdP Partner
basis. The specified identity store must be registered like any other store. If no
identity store is defined in the IdP Partner, the Default Store is used. For
details, see "Administering Identity Federation As A Service Provider" on
page 31-2.
Note: Users attempting to access an Access Manager-protected
resource can be authenticated against any user identity store that is
registered and defined in the authentication scheme. Security Token
Service uses only the Default User Identity Store

Managing OAM Identity Stores
5-6 Administrator's Guide for Oracle Access Management
–Security Token Service: An LDAP server is required for Security Token Service
to map the Username token referencing the user to an LDAP User record, and
thus use that record to populate the outgoing token. Ensure that the desired
LDAP server is registered and configured as the Oracle Access Management
Default Identity Store, as described in "Setting the Default Store and System
Store" on page 5-21. For more information, see "Configuration overview:
Identity Propagation with the Username Token" on page 35-18.
■The specific store to use with each LDAP authentication module or plug-in (and
Form or Basic authentication schemes)
External LDAP repositories can provide user, role, and group membership
information. A user's group memberships, for example, are calculated at login time
and stored for the duration of the session. Information is used as follows:
■When evaluating policies during authentication
■When evaluating identities for authorization conditions in a policy
■When using LDAP to search for identities for conditions in an authorization policy
Registering user identity stores is required to provide connectivity with OAM Servers.
After registering the identity store, Administrators can reference it in one or more
authentication modules that form the basis for authentication schemes.
Oracle Access Management addresses each user population and directory as an
identity domain. Each identity domain simply maps to a configured identity store
name.
In the first Oracle Access Manager 11g release, users were identified using a simple
user name/id field both internally and externally. Support for multiple identity realms
requires cross-realm representation of a user or a group or any entity that resides
within the identity store. This representation, referred to as a canonical identifier,
serves as a unique identifier to various run time and administrative components of
Oracle Access Management:
■External Representation: Qualifies the simple user name with identity domain
information.
For instance, in Oracle Access Management Console a table that lists user names
includes a column that displays the identity domain of the respective user. Identity
domains map to identity store names. All functional components (the console,
Policies, Responses, Logging, Session management, Auditing, and so on) that
display user information will begin to qualify the same with the identity domain
information.
■Internal Representation: To support disambiguation, OAM stores and uses the
fully-qualified name (or uses both fields, as-is, to form a composite key).
For instance, The Session Management Engine does this to eliminate the need to
store composite). In any case, the fully-qualified name is not visible.
Authorization Policy Administration
Authorization policy administration allows authoring of grants to users or groups.
Administrators can search within specific identity stores, selecting certain users or
Note: There is no way to flush a user's group memberships,
information to force Oracle Access Management to recalculate it at a
later date.

Managing OAM Identity Stores
Managing Data Sources 5-7
groups and granting or denying them access. Search results provide canonical
identifiers for users and groups such that those values are stored as principals of the
Identity Condition type of an Access Manager Authorization policy. The console
displays the names and the Identity Store of origin.
Run Time
Authentication and Authorization relies on the Policy run time component.
OAMIdentity
is the runtime representation of the authenticated user and any groups
that the user is a member of (if any). During policy evaluation, information present
within the
OAMIdentity
is matched with what is stored as part of authorization
policy's Identity Constraint. The domain is asserted as a Name Qualifier within the
token.
For OAM Proxy, in addition to the existing OAM_REMOTE_USER header, a second
OAM_IDENTITY_DOMAIN header is set on every request for an authenticated user,
such that a consuming application can disambiguate the user if needed.
Sessions
Session Management searches inform Administrators as to the user Identity Store,
which is listed in the search results table.
Auditing and Logging
The user Identity Store against which the user has been authenticated is accounted for
during auditing and logging.
5.2.3 About the User Identity Store Registration Page
This topic describes the various user identity store settings under the System
Configuration tab.
Figure 5–1 illustrates the Create User Identity Store Page, which provides fields where
you enter details for your store and default settings that you can edit for your
environment. The Store Type drop-down list provides supported choices.
See Also:
■"About the User Identity Store Registration Page"
■"Managing the Administrators Role" on page 5-22
■"Setting the Default Store and System Store" on page 5-21
■Oracle Fusion Middleware WebLogic Scripting Tool Command
Reference
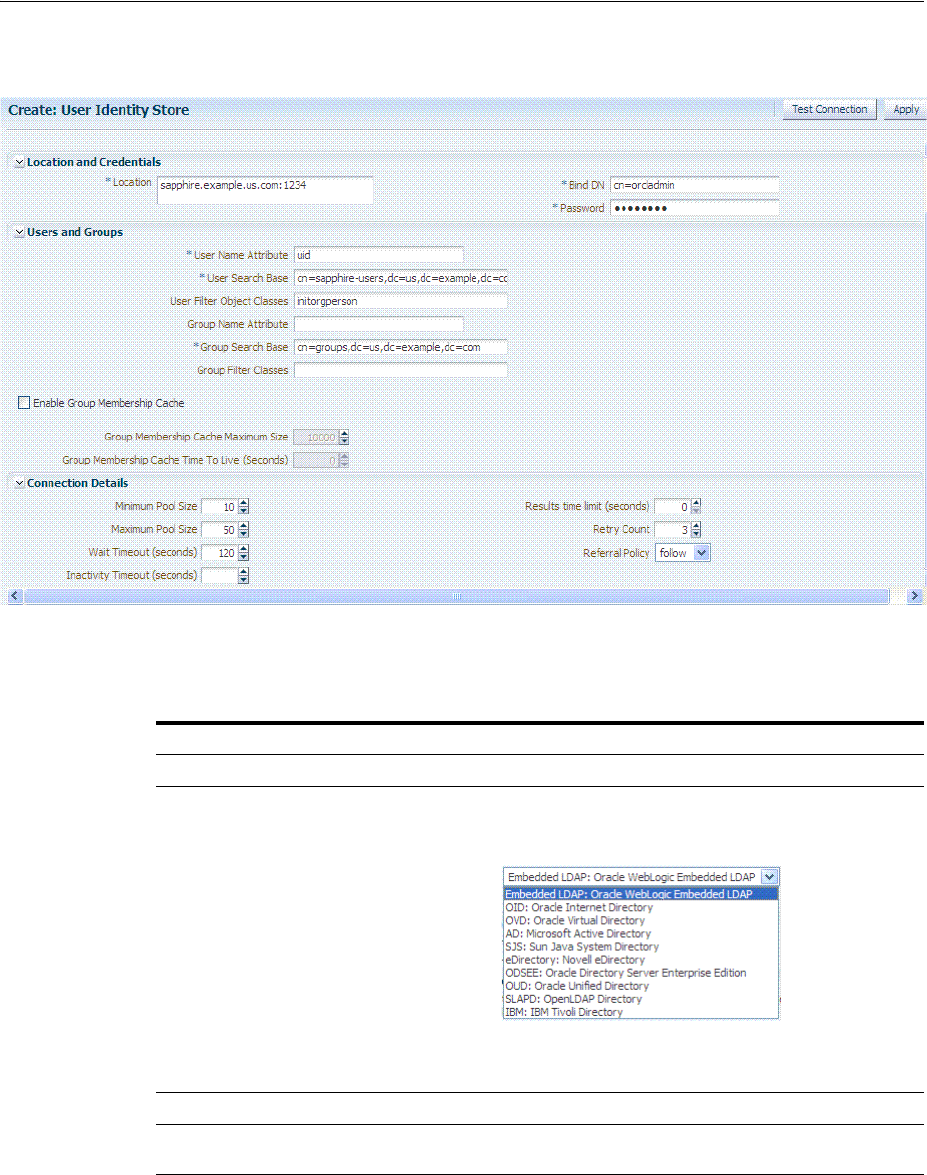
Managing OAM Identity Stores
5-8 Administrator's Guide for Oracle Access Management
Figure 5–1 Creating User Identity Store Registration
Required settings are identified by the asterisk (*) on the page. Table 5–3 describes
each element and is organized by element types.
Table 5–3 User Identity Store Elements
Elements Description
Store Name A unique name for this registration. Use up to 30 characters for the name.
Store Type A list of all supported LDAP providers from which you can choose. You can
have multiple identity stores, as described in "Using Multiple Identity Stores" on
page 5-5.
See Also: Table 19–35, " Location of Oracle-provided LDIFs for LDAP
Providers".
Description Optional.
Enable SSL Click to check this box and indicate that SSL is enabled between the directory
server and OAM Server.
Location and Credentials Description

Managing OAM Identity Stores
Managing Data Sources 5-9
Location The URL for the LDAP host, including the port number. Oracle Access
Management 11g support multiple LDAP URLs with failover capability. The
Identity Assertion Provider fails over to the next LDAP URL based on the order
in which these appear.
Enter one (or more) LDAP URLs in
host:port
format, Multiple URLs must be
separated by a space or new line. There is no need to specify ldap:// or
ldaps://(which supports SSL_NO_AUTH) in the URL value:
localhost:myhost:7001
Note: The number of characters a supported URL can have is based on the
browser version. Ensure that your applications do not use URLs that exceed the
length that Oracle Access Management and the browser can handle.
Bind DN The user DN for the connection pool over which all other BINDs occur. Oracle
recommends a non administrative user with appropriate Read and Search
privileges for the user and group base DNs.
For example:
uid=amldapuser,ou=people,o=org
Password The password of the Principal, which is encrypted for security.
Users and Groups Description
User Name Attribute The attribute that identifies the username.
For example:
uid
User Search Base The node in the directory information tree (DIT) under which user data is
stored, and the highest possible base for all user data searches.
For example:
ou=people,ou=myrealm,dc=base_domain
User Filter Object Class The object classes to be included in search results for users, in a
comma-separated list of user object class names. For example:
user,person
.
Group Name Attribute The attribute that identifies the group name.
Default: cn
Group Search Base Currently only static groups are supported, with the
uniquemember
attribute.
The node in the directory information tree (DIT) under which group data is
stored, and the highest possible base for all group data searches.
For example:
ou=groups,ou=myrealm,dc=base_domain
Group Filter Classes The object classes to be included in the search results for groups, in a
comma-separated list of group object classes. For example:
groups,groupOfNames.
Enable Group Cache
(size)
Boolean value for group cache: true or false.
Default: true
Group Cache Size Integer for the group cache size.
Default: 10000
Group Cache TTL
(seconds)
Integer (in seconds) for Time to Live for group cache elements.
Default: 0
Connection Details Description
Minimum Pool Size The smallest size set for the connection pool.
Default: 10
Maximum Pool Size The greatest size set for the connection pool.
Default: 50
Table 5–3 (Cont.) User Identity Store Elements
Elements Description
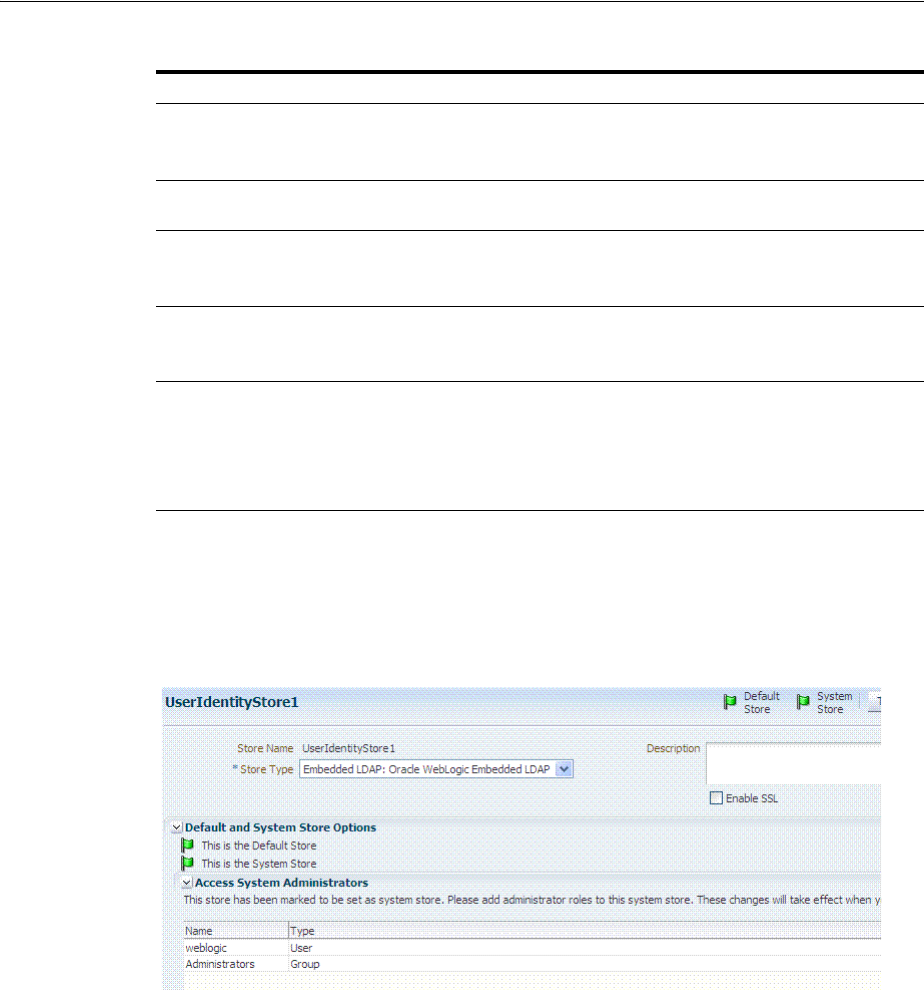
Managing OAM Identity Stores
5-10 Administrator's Guide for Oracle Access Management
Figure 5–2 shows the Default and System Store designations. Notice the Access System
Administrators section. You can add or remove Administrator roles only within the
defined System Store and the store itself.
Figure 5–2 System Store Registration
5.2.4 Registering a New User Identity Store
Users with valid Oracle Access Management Administrator credentials can use this
procedure to register a new user identity store using the Oracle Access Management
Console.
After you register the identity store, you can reference it in one or more authentication
modules that form the basis for authentication schemes. You can also reference a
specific identity store within Identity Conditions in Authorization Policies.
Wait Timeout The number (in seconds) that connection requests can wait before timing out in
the event of a fully utilized pool.
Default: 120
Inactivity Timeout The number (in seconds) that connection requests can be inactive before timing
out in the event of a fully utilized pool.
Results Time Limit
(seconds)
The time limit (in seconds) for LDAP searches and bind operations on the
connection pool.
Default: 0
Retry Count The number of time that the connection is retried when there is a connection
failure.
Default: 3
Referral Policy One of these values:
■follow: Follows referrals during an LDAP search (Default)
■ignore: Ignores referral entries during an LDAP search
■throw: Results in a Referral Exception, which can be caught by the
component user.
See Also: Details about classifying users in Chapter 20, "Managing
Policies to Protect Resources and Enable SSO"
Table 5–3 (Cont.) User Identity Store Elements
Elements Description

Managing OAM Identity Stores
Managing Data Sources 5-11
Prerequisites
■Install the user identity store that you intend to register with Oracle Access
Management.
■Extend the LDAP directory schema for Access Manager, as described in Oracle
Fusion Middleware Installation Guide for Oracle Identity and Access
Management.
■Create Users and Groups in the LDAP directory, as described in your vendor
documentation.
To register a new user identity store definition
1. From the Oracle Access Management Console Launch Pad, click User Identity
Stores.
2. Click Create.
3. Fill in the form with appropriate values for your deployment (Table 5–3), then
click Apply to submit the registration.
4. Tes t C on ne c ti on : Click the Test Connection button to confirm connectivity, then
close the Confirmation window.
5. Close the registration page.
6. Add Administrators: See "Managing the Administrators Role" on page 5-22.
a. In the navigation tree, double-click the store name to open the registration
page.
b. In the Access System Administrators section, click the + above the table.
c. Fill in the Add System Administrator Roles dialog box (...).
d. Click Apply.
7. Set Default Store: See "Setting the Default Store and System Store" on page 5-21.
8. Click Apply to submit the registration and close the page.
9. Configure one or more authentication modules or plug-ins to use this store, as
described in:
■"Native LDAP Authentication Modules" on page 19-25
■"Orchestrating Multi-Step Authentication with Plug-in Based Modules" on
page 19-28
5.2.5 Viewing or Editing a User Identity Store Registration
Users with valid Oracle Access Management Administrator credentials can view or
modify the registration of a user identity store.
Prerequisites
The user identity store that you intend to register must be installed and running.
See Also:
■"About the User Identity Store Registration Page" on page 5-7
■"Using Multiple Identity Stores" on page 5-5
■"Setting the Default Store and System Store" on page 5-21

Managing the Identity Directory Service User Identity Stores
5-12 Administrator's Guide for Oracle Access Management
To view or modify a user identity store registration
1. From the Oracle Access Management Console Launch Pad, click User Identity
Stores.
2. Click and open the desired User Identity Store registration page.
3. Modify values as needed (see Table 5–3).
4. Click Apply to update the registration (or close the page without applying
changes).
5. Test Connection: Click Test Connection button to confirm connectivity, then close
the Confirmation window.
6. Set as System or Default Store: See "Setting the Default Store and System Store".
7. Manage Administrator Roles: See "Managing the Administrators Role".
8. Configure one or more authentication modules or plug-ins to use this store, as
described in:
■"Native LDAP Authentication Modules" on page 19-25
■"Orchestrating Multi-Step Authentication with Plug-in Based Modules" on
page 19-28
9. Close the page when you finish.
5.2.6 Deleting a User Identity Store Registration
Users with valid Oracle Access Management Administrator credentials can use this
procedure to delete a user identity store registration using the Oracle Access
Management Console.
To delete a secondary user identity store registration
1. Edit LDAP Authentication Modules that reference the store to be deleted (to
ensure a valid identity store is referenced within the module).
2. From the Oracle Access Management Console Launch Pad, click User Identity
Stores
3. Click and open the desired User Identity Store registration page to confirm it is the
one to delete (and not a Default), then close the page.
4. Click the desired instance name and click the Delete button in the tool bar.
5. Click the Delete button in the Confirmation window (or click Cancel to dismiss the
window and retain the instance).
6. Confirm that the definition is no longer listed in the navigation tree.
5.3 Managing the Identity Directory Service User Identity Stores
Identity Directory Service (IDS) is a flexible and configurable service used by Access
Manager as the means for accessing multiple identity data stores. The purpose of IDS
is to allow the management of users or groups from identity stores not deployed with
Access Manager itself. The following sections contain the details.
Note: You cannot delete the Default Store or System Store
registration.

Managing the Identity Directory Service User Identity Stores
Managing Data Sources 5-13
■Using Identity Directory Services
■Creating an Identity Directory Service Profile
■Editing or Deleting an Identity Directory Service Profile
■Creating a Form-fill Application Identity Directory Service Profile
■Understanding the Pre-Configured Identity Directory Service Profile
■Creating an Identity Directory Service Repository
5.3.1 Using Identity Directory Services
Identity Directory Service offers a consistent and rationalized technology to access
identity stores that eliminates redundant configurations and simplifies Identity
Management operations. IDS provides the following benefits:
1. Support for different types of user directories including integration with native
user/password state managed by the directory.
2. Consistent administration user interface and a paradigm for working with
different identity stores across Oracle Identity Management components.
3. Built in failover and load balancing capabilities.
4. Logical to physical attribute mapping and entity relationships.
The following list of directory servers are among those supported.
■Microsoft Active Directory
■Novell eDirectory
■Oracle Directory Server Enterprise Edition
■Oracle Internet Directory
■Oracle Unified Directory
■Oracle Virtual Directory
■OpenLDAP
■IBM Tivoli Directory Server
■WebLogic Server Embedded LDAP
Figure 5–3 is a screen capture of the Identity Directory Service console page.
Note: Oracle recommends that you use the Identity Directory Service
Profiles to access identity data stores rather than the legacy OAM ID
Stores function as it will be deprecated in a future release.
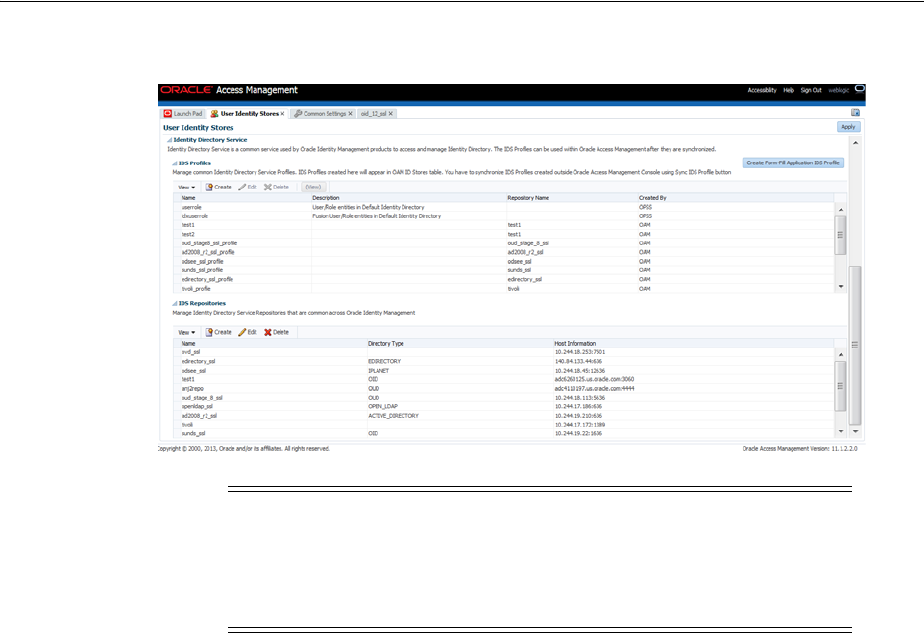
Managing the Identity Directory Service User Identity Stores
5-14 Administrator's Guide for Oracle Access Management
Figure 5–3 Identity Directory Service Console Page
Configuring an Identity Directory Service store involves configuring parameters for an
IDS Profile and an IDS Repository. The IDS Profile specifies the full scope of traits for a
particular type of identity store. It is the logical configuration for the repository and
contains the following data.
■Entity definition
■Entity relationship definition
■Default operational configuration (including the tenant search/create base, the
tenant filter, timeouts and cache configuration)
The IDS Repository configuration defines the actual location of the store. The IDS
Repository is a physical configuration that containing the following data.
■Connection details (including the host machine, port number and credentials)
■Connection pool details
■High-availability/failover configuration
■Entity attribute mapping
5.3.2 Creating an Identity Directory Service Profile
To create an Identity Directory Service profile, proceed as follows.
1. Click User Identity Stores from the Launch Pad.
2. Click Create under IDS Profile.
The Create IDS Profile page is displayed as in Figure 5–4.
Note: Note this page contains the configuration panel for the legacy
OAM ID Stores. Oracle recommends that you use the Identity
Directory Service Profiles to access identity data stores rather than the
legacy OAM ID Stores function as it will be deprecated in a future
release.
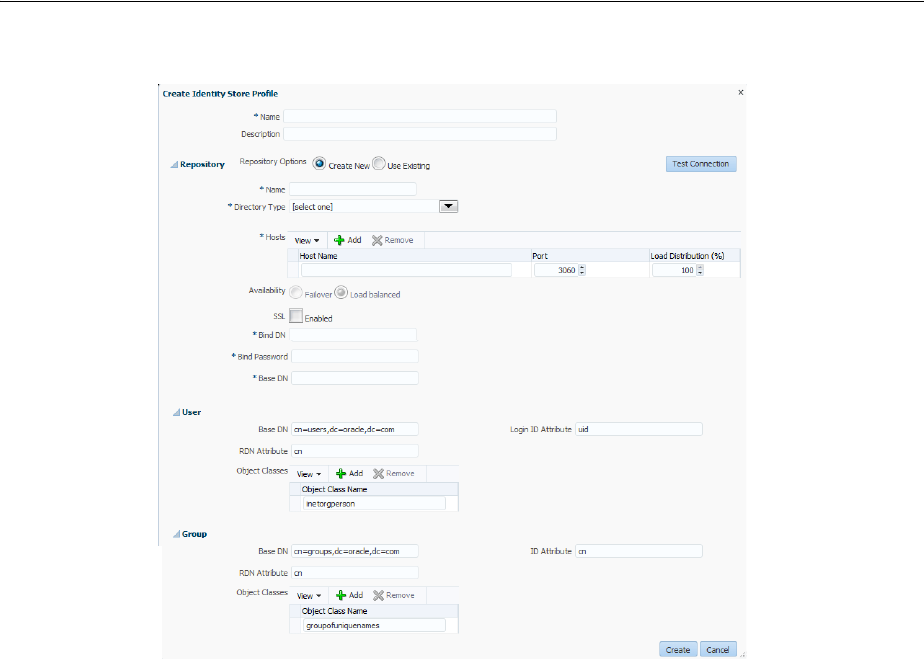
Managing the Identity Directory Service User Identity Stores
Managing Data Sources 5-15
Figure 5–4 Create IDS Profile Page
3. Provide the following values for the new Identity Directory Service profile.
■Name - Type a unique name for this User Profile Service Provider.
■Description - (Optional) Type a short description that will help you or another
Administrator identify this service in the future.
4. Configure the Repository properties by selecting Create New or Use Existing.
Create New defines a new Repository object (that is, a reference to an LDAP
directory server) for the Identity Directory Service connection. Click Tes t
Connection after you have defined the values in the Repository section to verify
they are correct. This option is only available when defining a new Identity
Directory Service connection. Use Existing allows you to choose a previously
defined Repository object by selecting it from the drop down menu.
■(Repository) Name - Enter a new unique name to create, or choose an existing
one from the menu. After entering a new name, configure properties for the
Identity Directory Service connection.
■Directory Type - Select the type of directory server software hosting the
Repository; for example, Microsoft Active Directory or Oracle Internet Directory.
If your directory is not listed, leave this field empty. If you are not defining a
new Identity Directory Service connection or creating a new repository, this
field is read-only.
■Host Information - Contains information about the host computer on which
the Identity Directory Service Repository is located. Add multiple hosts if the
directory server is part of a cluster. Click Add to add a new host to the table. In
the Host Name column type either the IP Address or the name of the
computer (or virtual computer) on which the Directory server is running. In
the Port column, type the port number that the directory server is configured

Managing the Identity Directory Service User Identity Stores
5-16 Administrator's Guide for Oracle Access Management
to use. If the hosts are part of a cluster, in the Load Distribution column type
the load amount as a percentage that should be directed to each host. For
multiple hosts, the amount should add up to 100%. To delete a host, select its
row in the table and click Remove. If you are not defining a new Identity
Directory Service connection or creating a new repository, this field is
read-only.
■Availability - Choose Failover if the cluster is configured for failover
operation, or choose Load balanced if the cluster distributes the load across
multiple hosts. This field is read-only if you are using an existing repository.
■SSL - Select Enabled if the connection is configured for SSL. (See the Oracle
Fusion Middleware Application Security Guide for SSL configuration details.)
■Bind DN - Type the distinguished name (DN) of the LDAP Administrator
used to authenticate to the Directory server.
■Bind Password - Type the Bind DN password used to authenticate to the
Directory server.
■Base DN - Type the base distinguished name (DN) where User and Group
data is located.
5. Configure the User properties to configure the LDAP User object in Mobile and
Social User Profile services.
■Object Classes - Click Add to add a custom object class that represents people
in an organization as defined on your directory server.
■RDN Attribute - Type the relative distinguished name attribute (for example,
cn) designated for the User object on the directory server.
■Base DN - Type the base DN (in LDAP form) for the User object on the
directory server.
■Login ID Attribute - Type the LDAP attribute from which the login ID
specifying the User will be extracted.
6. Configure the Group properties to configure the LDAP group object in Mobile and
Social User Profile services.
■Object Classes - Click Add to add a custom object class that represents a
group of people in an organization as defined on your Directory server.
■RDN Attribute - Type the relative distinguished name attribute (for example,
cn) designated for the Group object on the directory server.
■Base DN - Type the base DN (in LDAP form) for the Group object on the
directory server.
■ID Attribute - Type the LDAP attribute from which the ID designated for the
Group object will be extracted.
7. Click Create.
The profile is displayed in the IDS Profiles table.
Note: These fields are read-only if using an existing Identity
Directory Service connection.

Managing the Identity Directory Service User Identity Stores
Managing Data Sources 5-17
5.3.3 Editing or Deleting an Identity Directory Service Profile
To edit or delete an IDS Profile, select the name in the table and click Edit or Delete on
the tool bar. Editing the profile allows for additional configuration properties for the
Identity Directory Service connection.
■Name - Choose an Identity Directory Service connection to associate with the User
Profile Service Provider from the drop down menu.
–If you choose either of the default Identity Directory Services (either
userrole
or
idxuserrole
) you cannot view or edit the configuration values.
–If you choose an Identity Directory Service connection that you or another
Administrator created, you can view and edit the configuration values as
needed.
■General and Repository - Use the fields under this tab to edit the Directory
Service and Repository configuration values that Mobile and Social uses to
connect to the Directory Service.
– Repository Name - Choose from the menu a repository to associate with the
Identity Directory Service connection. After choosing a repository, configure
its properties using the following form fields.
–Directory Type - Displays the type of Directory server software hosting the
Repository, for example Microsoft Active Directory, Oracle Internet Directory, and
so on. This field is read-only.
– Host Information - Displays information about the host computer where the
Identity Directory Service Repository is located. Add multiple hosts if the
Directory server is part of a cluster. Click Add to add a new host to the table.
In the Host Name column type either the IP Address or the name of the
computer (or virtual computer) that the Directory server is running on. In the
Port column, type the port number that the Directory server is configured to
use. If the hosts are part of a cluster, in the Load Distribution column type the
load amount as a percentage that should be directed to each host. For multiple
hosts, the amount should add up to 100%. To delete a host, select its row in the
table and click Remove. If you are not defining a new Identity Directory
Service connection or creating a new repository, this field is read-only.
– Availability - Choose Failover if the cluster is configured for failover
operation, or choose Load balanced if the cluster distributes the load across
multiple hosts. This field is read-only if you are using an existing repository.
–SSL - Select Enabled if the connection is configured for SSL. Otherwise clear
the option box.
– Bind DN - Type the distinguished name (DN) of the LDAP Administrator
used to authenticate to the Directory server.
– Bind Password - Type the Bind DN password used to authenticate to the
Directory server.
–Base DN - Type the base distinguished name (DN) where User and Group
data is located.
■Entity Attributes - Use the fields under this tab to view or edit the attributes that
Mobile and Social uses to navigate the corporate directory service schema. Click
Add to add an attribute to the table or click Remove to delete an attribute.
– Name - The attribute name.

Managing the Identity Directory Service User Identity Stores
5-18 Administrator's Guide for Oracle Access Management
– Physical Attribute - The name of the corresponding physical attribute type in
the underlying Repository.
–Type - The attribute's data type.
– Description - A brief description of the attribute.
–Sensitive - Select to mark that the attribute contains sensitive information
such as a password.
–Read-only - Select to protect the attribute from modification.
■Entities / User Properties - Use the fields under the User sub head to configure
how Mobile and Social interacts with the User entities on the LDAP server.
–Create Base - Specifies the base DN (the top level of the LDAP directory tree)
at which Users are defined.
– Search Base - Specifies the search base DN for Users. Only entries at or below
the search base DN are considered when processing the search operation.
– Create Object Classes - Specifies the object class under which attributes
associated with a person are stored.
– RDN Attribute - Specifies the relative distinguished name attribute, for
example cn.
– ID Attribute - Specifies the attribute that uniquely identifies the User, such as
the uid attribute or the loginid attribute.
– Filter Object Classes - Specifies the object class by which to filter.
–Attributes Configuration - Specify the User attributes that should be available
to, and searchable by, the User Profile Service Provider.
*Used - Specifies if the attribute is used for Users in the directory service.
* Attribute Name - Specifies the name of the attribute as defined on the
Entity Attributes tab.
*In Results - Select if the specified attribute should be returned in search
results.
* Searchable - Select if the specified attribute should be available for search
operations.
* Search Operator - Select a search operator from the menu to restrict how
the specified attribute is searched.
– Operations Configuration - Select from Create, Update, Delete, and Search to
enable those operations at the User entity level. Clear the option boxes to
disable them.
■Entities / Group Properties - Use the fields under the Group sub head to configure
how Mobile and Social interacts with the Group entities on the LDAP server.
–Create Base - Specifies the base DN (the top level of the LDAP directory tree)
at which Users are defined.
– Search Base - Specifies the search base DN for Groups. Only entries at or
below the search base DN are considered when processing the search
operation.
– Create Object Classes - Specifies the object class under which attributes
associated with a Group are stored.

Managing the Identity Directory Service User Identity Stores
Managing Data Sources 5-19
– RDN Attribute - Specifies the relative distinguished name attribute; for
example, cn.
– ID Attribute - Specifies the LDAP attribute that uniquely identifies the Group.
– Filter Object Classes - Specifies the object class by which to filter.
–Attributes Configuration - Specify the Group attributes that should be
available to, and searchable by, the User Profile Service Provider.
*Used - Specifies if the attribute is used for Users in the directory service.
* Attribute Name - Specifies the name of the attribute as defined on the
Entity Attributes tab.
*In Results - Select if the specified attribute should be returned in search
results.
* Searchable - Select if the specified attribute should be available for search
operations.
* Search Operator - Select a search operator from the menu to restrict how
the specified attribute is searched.
– Operations Configuration - Select from Create, Update, Delete, and Search to
enable those operations at the Group entity level. Clear the option boxes to
disable them.
■Relationships - Use the fields under this tab to configure the relationship between
attributes for this Identity Directory Service.
– Name - The relationship name.
– (From) Entity - Choose User to select from User attributes or choose Group to
select from Group attributes in the (From) Attribute column.
– (From) Attribute - Choose the attribute from which you are mapping.
– Relation - Choose the menu option that describes the relationship between the
specified attribute in the From column and the specified attribute in the To
column.
– (To) Entity - Choose User to select from User attributes or choose Group to
select from Group attributes in the (To) Attribute column.
– (To) Attribute - Choose the attribute to which you are mapping.
–Recursive - Select if the relationship extends down the directory tree to
include nested child entities or up the directory tree to include parent entities.
■Relationship Configuration - Type the URI segment used to access the
corresponding column in the Identity Directory Service. Use Add to add a new
relationship or Remove to remove a configured relationship.
– Access URI - Type a URI segment that will be used to access a corresponding
data column in the Identity Directory service. For example, if
memberOf
is the
Access URI, then:
http://host:port/.../idX/memberOf
would be the URI to access related entities of an entity with ID
idX
.
– Identity Directory Service Relation - Choose the Directory Service
relationship that is to be accessed by the Access URI segment. You can
configure relationships on the Relationships tab in the Identity Directory
Service configuration section provided that the Identity Directory Service is

Managing the Identity Directory Service User Identity Stores
5-20 Administrator's Guide for Oracle Access Management
not the pre-configured UserProfile Identity Provider. (You cannot configure
Identity Directory Service relationships for the UserProfile Service Provider.)
– Entity URI Attribute - Type the JSON attribute name to be used in the URI
response sent from the Mobile and Social server. For example, if person-uri is
the specified entity URI attribute, the URI response would be as follows:
{ {"person-uri":uriY1, ...}, {"person-uri":uriY2, ...}, ... }
where
uriY1
and
uriY2
are the direct URIs to access each of the related
entities.
– Scope for Requesting Recursion - Use Scope attribute values with the scope
query parameter to retrieve a nested level of attributes in a relationship search.
To access related entities recursively, type the value to be used. The Mobile
and Social default configuration uses two scope attribute values:
toTop
and
all
. If the Scope for Requesting Recursion value is the attribute value
all
,
then the following REST URI example is used to make the request:
http://host:port/.../idX/reports?scope=all
In this example, the URI returns the entities related to the entity with ID
idX
,
as well as all further related entities.
5.3.4 Creating a Form-fill Application Identity Directory Service Profile
To create an Identity Directory Service Profile for a Form-fill Application, click the
Create Form-fill Application IDS Profile button on the left of the User Identity Stores
console page. (See Figure 5–3.)
Section 5.3.2, "Creating an Identity Directory Service Profile" and Section 5.3.3, "Editing
or Deleting an Identity Directory Service Profile" contain definitions for most of the
Form-fill attributes. Additional definitions for the Entity Search Bases section specific
to this type of profile are listed below.
■User Search Base - Full DN for the node at which enterprise users are stored in the
directory; for example, cn=Users,realm_DN.
■App Template Search Base - Full DN for the node from which searches for the
Application Templates will begin.
■Top Search Base - Full DN for the node from which searches will begin; for
example, cn=realm_DN.
5.3.5 Understanding the Pre-Configured Identity Directory Service Profile
Mobile and Social provides a pre-configured IDS Profile named UserIdentityStore1.
This profile allows lookup and update tasks to be performed on directory objects using
Mobile and Social.
5.3.6 Creating an Identity Directory Service Repository
To create an Identity Directory Service repository, proceed as follows.
1. Click User Identity Stores from the Launch Pad.
2. Click Create under IDS Repository.
The Create IDS Repository page is displayed as in Figure 5–5.
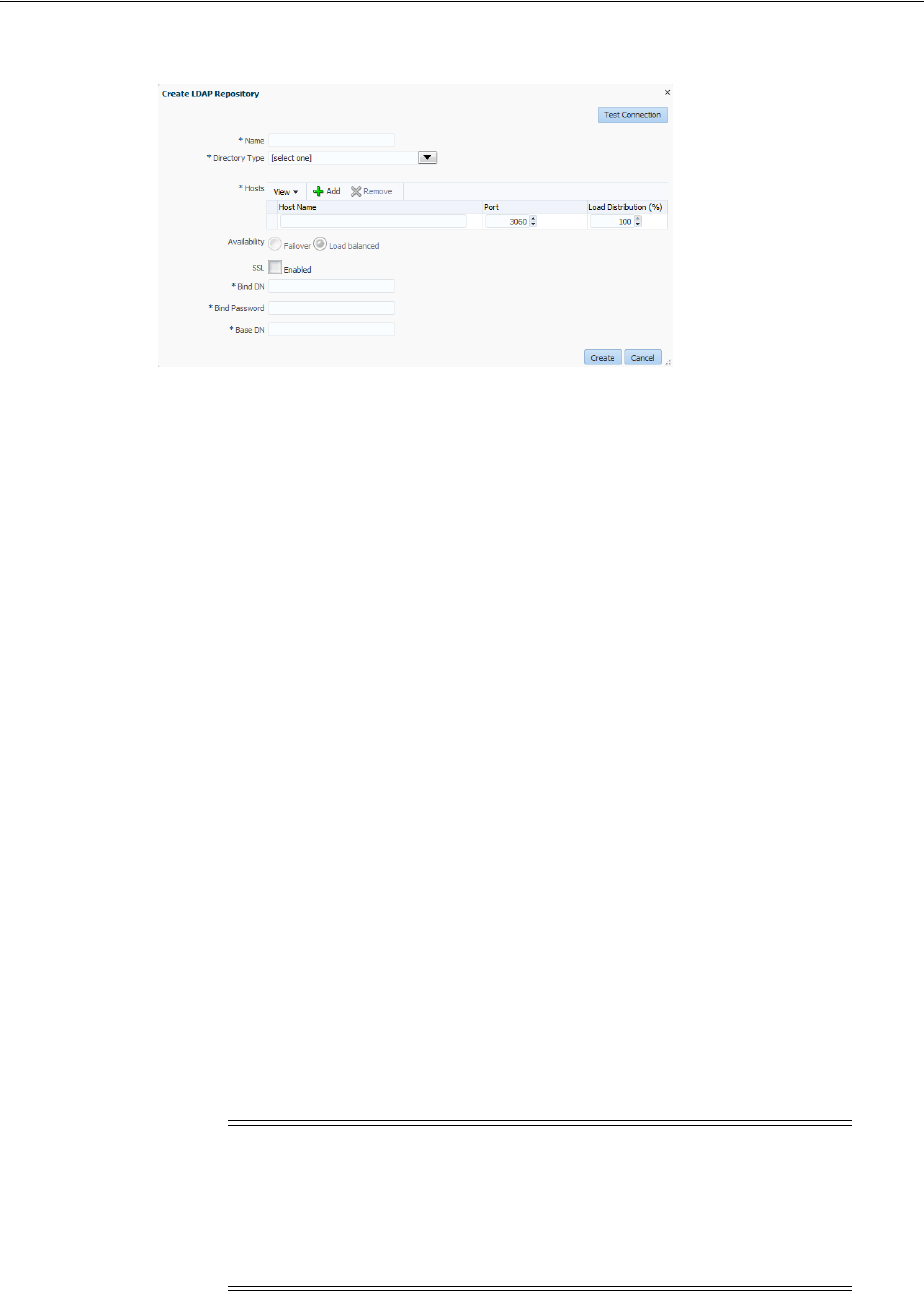
Setting the Default Store and System Store
Managing Data Sources 5-21
Figure 5–5 Create IDS Repository Page
3. Provide the following values for the new Identity Directory Service repository.
■Name: the entry must be a unique.
■Select the Directory Type from the drop down choices.
4. Click Add to configure the physical location of the repository (Host name, Port
number and Load Weightage percentage).
5.
■Availability - select Failover or Load balanced
■SSL - select to enable
■Bind DN
■Bind Password
■Base DN
6. Click Test Connection to confirm the values are correct.
7. Click Create.
The profile is displayed in the IDS Profiles table.
5.4 Setting the Default Store and System Store
Users with valid Oracle Access Management Administrator credentials can designate
a user identity store registration as either the Default Store or the System Store. The
Default Store is required for the Security Token Service and migration when patching.
Administrator roles and credentials must reside in the System Store. You can define
the appropriate store from the drop down menu. UserIdentityStore1 is the embedded
LDAP store.
Note: Changing the System Store impacts the entire identity
management domain. For example, administrator login works only
when the LDAP Authentication Module used by the
OAMAdminConsoleScheme
also uses the System Store. If you set another
store as a remote store, ensure that the
OAMAdminConsoleScheme
is also
modified to avoid a lockout.
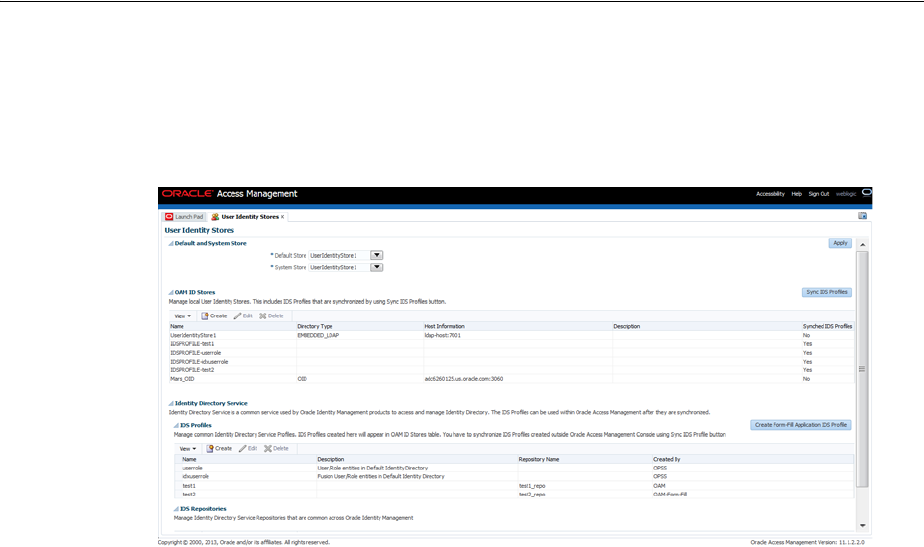
Managing the Administrators Role
5-22 Administrator's Guide for Oracle Access Management
You can modify the Default and System Identity Stores configurations from the User
Identity Stores link on the Launch Pad. Figure 5–6 is a screen capture of the User
Identity Stores page.
Figure 5–6 Common Settings: Default and System Identity Stores
The supported method of configuring the ID Store for a WebSphere installation is
documented in the Oracle Fusion Middleware Third-Party Application Server Guide for
Oracle Identity and Access Management. Additional information regarding store
configurations can be found in the following sections.
■"Using Multiple Identity Stores"
■"Managing OAM Identity Stores"
■"Managing the Administrators Role"
5.5 Managing the Administrators Role
This section provides the following topics:
■About Managing the Administrator Role
■Managing Administrator Roles
5.5.1 About Managing the Administrator Role
Administrator login works only when the Authentication Scheme (and assigned
Authentication Module) used by the IAMSuiteAgent, also uses the System Store.
By default, the Administrators role for Oracle Access Management is the same as the
WebLogic Administrators role (Administrators). You can register another User Identity
Store (Oracle Internet Directory, for example); however, user
weblogic
must be defined
with at least one user in the registered store to authenticate against.
Your enterprise might require independent sets of Administrators: one set of users
responsible for Access Manager and another for Security Token Service. All
Administrator roles, users, and groups must be stored in the System Store. If the
System Store changes, appropriate Administrator roles must be added to the new
System Store. If, when editing an Identity Store registration, you designate a store as
the System Store the Access System Administrator section opens on the page as shown
in Figure 5–7.
Managing the Administrators Role
Managing Data Sources 5-23
Figure 5–7 System Store Registration with Access System Administrators Section
You can add new Administrator roles when adding or editing a User Identity Store
registration. Figure 5–8 shows the page and controls to use.
Figure 5–8 Add System Administrator Roles
5.5.2 Managing Administrator Roles
The following procedure explains how to define or remove Oracle Access
Management Administrator roles which must be stored in the User Identity Store
designated as the System Store. First, define the desired LDAP group to use for
Administrators and then ensure that your Administrators group is available in the
group search base
Prerequisites
Setting the Default Store and System Store

Managing the Administrators Role
5-24 Administrator's Guide for Oracle Access Management
To add or remove an Administrator role from the System Store
1. View System Store Registration: Perform the following steps (or find a different
System Store in the Data Sources node to designate as the System Store).
a. From the Oracle Access Management Console Launch Pad, click
Administration.
The registered System Store can not be changed from this page .
b. Search the System Store to find configured administrators.
2. Add User Roles:
a. Click the Grant (+) button above the Access System Administrators table to
display the Add Users and Groups dialog box.
b. Select User in the Type list and click the Search button.
c. In the results list, click the desired User and then click the Add Selected
button.
d. Repeat as need to add desired Administrator User roles.
e. Click Apply to submit user roles.
3. Add Group Roles:
a. Click the Grant (+) button above the Access System Administrators table to
display the Add Users and Groups dialog box.
b. Select Group in the Type list and click the Search button.
c. In the results list, click the desired Group and then click the Add Selected
button.
d. Repeat as need to add desired Administrator Group roles.
e. Click Apply to submit Group roles.
4. Remove Administrator Roles:
a. In the Access System Administrators table, click the row containing the user or
group to remove.
b. Click the Delete (x) button above the table.
c. Confirm removal when asked.
d. Click Apply to submit the removal.
5. Correct any authentication plug-ins that use the System Store (if this is a new
store).
This procedure is decscribed in "Orchestrating Multi-Step Authentication with
Plug-in Based Modules" on page 19-28
6. Test the New Role: Close the browser window, then re-open it.
a. Sign out of the Oracle Access Management Console and close the browser
window.
b. Start up the Oracle Access Management Console and attempt to log in using
the previous Administrator role to confirm that this attempt fails.
c. Log in using the new Administrator role to confirm that this attempt is
successful.
Login Failure: See "Administrator Lockout" on page E-6.

Managing the Policy and Session Database
Managing Data Sources 5-25
5.6 Managing the Policy and Session Database
This section includes the following topics:
■About the Database Store for Policy, Password Management, and Sessions
■About Database Deployment
■Configuring a Separate Database for Access Manager Sessions
5.6.1 About the Database Store for Policy, Password Management, and Sessions
Oracle Access Management requires a database to store Access Manager policy data,
password management data, and Access Manager sessions in a production
environment.
The following data is maintained in the policy store database by default:
■Policy data, including authentication modules and schemes, Application Domains,
and policies.
■Password Management data, which includes password policy type for each
configured User Identity store as well as the policy that governs password
requirements, expiry, notification,
■Sessions, as a persistent backup to distributed in-memory storage
5.6.2 About Database Deployment
Oracle requires a single database as the policy store in production environments. This
single database can also be used to store session data. Using the database as the
session store provides greater scalability and fault-tolerance (against a power event
taking all servers down).
The policy database must be installed according to vendor instructions. The policy
database is configured for use in a Oracle WebLogic Server domain using Oracle
Fusion Middleware Configuration Wizard and policy store Database configuration
template.
Note: At most, your deployment can have one policy store database
(which serves password management) and one session store. By
default, a single JDBC data source is used for both.
Note: The preferred mode for audit data storage in production
environments is writing audit records to a stand-alone RDBMS
database for audit data only. This is done using a separately
configured audit store. The policy store is not used for audit data.
See Also: "Managing the Policy and Session Database" on page 5-25
Note: You can have up to two databases: one policy database and
one session database. Access Manager is agnostic with respect to the
actual back end repository and does not manage this policy store
configuration directly.

Managing the Policy and Session Database
5-26 Administrator's Guide for Oracle Access Management
During initial deployment with the WebLogic Configuration Wizard, the following
database details are requested:
■Database login ID and password
■Database Service name and location
An Administrator must extend the database with the Access Manager-specific schema
using RCU, as described in Oracle Fusion Middleware Installation Guide for Oracle
Identity and Access Management. Basic schema creation occurs when the RCU is
invoked. The RCU prepares the database to accept Access Manager policy, password
management, and session data.
Using the WebLogic Configuration Wizard you can register and test the connection to
the database.
Actual Access Manager policy elements are created the first time the WebLogic
AdminServer is started with the Oracle Access Management Console deployed.
5.6.3 Configuring a Separate Database for Access Manager Sessions
Access Manager includes a data source named
oamDS
which is configured against the
database instance extended with the Access Manager Schema. The following
pre-defined Java Naming and Directory Interface (JNDI) names are used by the OAM
Server to refer the data source.
jdbc/oamds (used by both the policy layer and session layer to access database)
You can use the following procedure to create a separate database instance for session
data using the WebLogic Administration Console. There is no support for this action in
the Oracle Access Management Console.
To create and use an independent database for session data
1. Install and configure the database for session data and then use RCU with the
Access Manager-specific schema to set up the database as a session data store.
2. Create a new Data Source instance for session data:
a. From the WebLogic Administration Console, Domain Structure panel, expand
the domain name, Services node.
b. Expand JDBC, Data Source.
c. Create a new Data Source with the JNDI name
jdbc/oamsession
.
d. Save the changes.
e. Stop the OAM Servers and the AdminServer to avoid potential loss of data
during the next step.
f. In oam-config.xml, edit the value of the
DataSourceName
attribute to the one
configured in step 1. For example:
domain-home/config/fmwconfig/oam-config.xml
See Also: Oracle Fusion Middleware Installation Guide for Oracle
Identity and Access Management
Note: In this rare instance, Oracle recommends that you carefully
edit oam-config.xml as described in Step 2f.

Introduction to Oracle Access Management Keystores
Managing Data Sources 5-27
From:
<Setting Name="SmeDb" Type="htf:map">
<Setting Name="URL" Type="xsd:string">jdbc:oracle:thin://amdb.example.
com:2001/AM</Setting>
<Setting Name="Principal" Type="xsd:string">amuser</Setting>
<Setting Name="Password" Type="xsd:string">password</Setting>
<Setting Name="DataSourceName" Type="xsd:string">jdbc/oamds</Setting>
</Setting>
To:
<Setting Name="SmeDb" Type="htf:map">
<Setting Name="URL" Type="xsd:string">jdbc:oracle:thin://amdb.example.
com:2001/AM</Setting>
<Setting Name="Principal" Type="xsd:string">amuser</Setting>
<Setting Name="Password" Type="xsd:string">password</Setting>
<Setting Name="DataSourceName"
Type="xsd:string">jdbc/oamsession</Setting>
</Setting>
3. Restart AdminServer and OAM Servers.
5.7 Introduction to Oracle Access Management Keystores
This section provides the following topics:
■About Access Manager Security Keys and the Embedded Java Keystore
■About Access Manager Keystores
■About Identity Federation Keystore
5.7.1 About Access Manager Security Keys and the Embedded Java Keystore
Keystores are created and configured during Access Manager installation. The
password and the key entries password were randomly generated.
The preferred keystore format is JKS (Java keystore). A Java keystore is associated with
Access Manager behind the scenes and is used to store cryptographic security keys
that are generated to encrypt agent traffic and session tokens:
■Every OAM Agent and OSSO Agent has a secret key that other agents cannot
read.
■There is a key to encrypt Oracle Coherence-based session traffic.
■During agent and application registration, a key is generated for encrypting and
decrypting SSO Cookies (for Webgates and mod_osso).
Administrators use the Oracle-provided
importcert
tool for several different
procedures related to keystores, keys, and certificates, as described in Appendix C.
The WLST
resetKeystorePassword
method allows you to set the .oamkeystore
password and any key entries with a password identical to the .oamkeystore password
to a new value. See Oracle Fusion Middleware WebLogic Scripting Tool Command
Reference.
Table 5–4 identifies the generated Access Manager cryptographic keys.

Introduction to Oracle Access Management Keystores
5-28 Administrator's Guide for Oracle Access Management
Keystores are not accessible using the Oracle Access Management Console. You can
manage keystores and certificates as described in Appendix C, "Securing
Communication".
5.7.2 About Access Manager Keystores
Table 5–5 provides a summary of keystores used for Access Manager.
Table 5–4 Access Manager Keys and Storage
Keys and Storage Description
Access Manager
Cryptographic keys
■One per agent secret key shared between 11g Webgate and OAM Server
One global shared secret key used by all your 10g Webgates
■One OAM Server key
Key storage ■Agent side: A per-agent key is stored locally in the Oracle Secret Store in a wallet file. Client
keystore/scratch/clientTrustStore.jks and /scratch/clientKey.jks can be used.
■OAM Server side: .oamkeystore contains a per-agent key, and server key, are stored in the
credential store on the server side.
See Also: "About Identity Federation Keystore" on page 5-30
■"About Communication Between OAM Servers and Webgates" on
page 6-4
■Oracle Fusion Middleware Administrator's Guide for details
about the SSL automation tool and managing ports for WebLogic
Server, Oracle HTTP Server, and Oracle Fusion Middleware
Table 5–5 Keystores for Access Manager and Security Token Service
Keystore Description
System Keystore / Partner
Keystore
.oamkeystore
The container for keys and certificates associated with OAM
Server instances (OAM secret keys and Security Token Service
private keys for signing and encryption).
The container for keys and certificates that are used to
establish trust with partners, clients, and agents. The partner
keys and certificates are stored in.oamkeystore with sensitive
information encrypted.
Only one System Keystore of type JCEKS can be present:
.oamkeystore.
$
DOMAIN_HOME/config/fmwconfig/.oamkeystore
The certificate alias and password can be configured using the
Oracle Access Management Console.
See Also:
■Table 36–1, " Security Token Service Settings"
■Chapter 37, "Managing Security Token Service Certificates
and Keys"

Introduction to Oracle Access Management Keystores
Managing Data Sources 5-29
Trust Keystore
amtrustkeystore
The Trust Keystore is used to validate keys and certificates
presented by clients to establish trust in entities interacting
with OAM Server instances.
$
DOMAIN_HOME/config/fmwconfig/amtruststore
amtruststore is created during installation, and must include at
least one trusted anchor.
The Trust Keystore is managed by using the JRE's keytool
application. Security Token Service can use a custom trust
keystore.
See Also:
■"Managing the Trust Anchors Store (amtruststore)" on
page 37-9
■"Using a Custom Trust Anchor Store for Security Token
Service" on page 37-10
Certificate Revocation Lists
(CRL)
amcrl.jar
Certificate revocation information lists are stored in a ZIP
archive on the filesystem. These are used by OAM Servers
when performing CRL-based certificate revocation checking.
amcrl.jar contains CRL files in the DER format:
$DOMAIN_HOME/config/fmwconfig/amcrl.jar
The OAM Server defines a notification listener for the
Keystores and the CRL Zip file. Any changes to these files
causes Security Token Service to reload the keystore/crl-zip at
runtime, without requiring any restarts.
amcrl.jar is created by installation and can be modified using
the Oracle Access Management Console.
See Also:
■"Managing Certificate Validation and Revocation" on
page 3-7
■"Managing Certificate Revocation Lists" on page 37-10
Oracle WSM Agent Keystore
default-keystore.jks
The Oracle WSM Agent uses this keystore for various
cryptographic operations. For these operations, the Oracle
WSM Agent uses the keystore configured for Oracle WSM
tasks.
Oracle strongly recommends that the Oracle WSM Agent
keystore and the Access Manager and Security Token Service
keystore always be different. Otherwise, keys could be
available to any modules authorized by OPSS to access the
keystore and Access Manager/Security Token Service keys
might be accessed.
See Also:
"About the Oracle Web Services Manager Keystore
(default-keystore.jks)" on page 37-3
OPSS Keystore For special cases where clients use referencing schemes such as
SKI (as opposed to a certificate token being received as part of
the web service request), the requester's certificates need to be
populated in the OPSS Keystore.
This is an uncommon scenario that requires manually
provisioning keys to the OPSS keystore.
See Also:
■"About Agents and Security Token Service" on page 36-4
■Oracle Fusion Middleware Application Security Guide.
Table 5–5 (Cont.) Keystores for Access Manager and Security Token Service
Keystore Description

Integrating a Supported LDAP Directory with Oracle Access Manager
5-30 Administrator's Guide for Oracle Access Management
5.7.3 About Identity Federation Keystore
Identity Federation and Access Manager store key pairs and certificates that are used
for digital signatures and encryption operations. Identity Federation uses keys to:
■Sign outgoing assertions
■Decrypt incoming XML encrypted data contained inside the SAML message
The following keystore is used to store the encryption and signing certificates:
$DOMAIN_HOME/config/fmwconfig/.oamkeystore
Identity Federation uses CSF to securely store keystore passwords, as well as server
credentials such as HTTP Basic Authentication usernames and passwords.
5.8 Integrating a Supported LDAP Directory with Oracle Access Manager
This section describes post-installation enablement of a centralized LDAP store for use
with Oracle Access Manager. Oracle Internet Directory is featured in this discussion.
However, tasks are the same regardless of your chosen LDAP provider.
Oracle Access Manager addresses each user population and LDAP directory store as
an identity domain. Each identity domain maps to a configured LDAP User Identity
Store that is registered with Oracle Access Manager. Multiple LDAP stores can be
used with each one relying on a different supported LDAP provider.
During initial WebLogic Server domain configuration, the Embedded LDAP is
configured as the one and only User Identity Store for Oracle Access Manager. Within
the Embedded LDAP, the Administrators group is created, with
weblogic
seeded as
the default Administrator:
■Only the User Identity Store designated as the System Store is used to authenticate
Administrators signing in to use the Oracle Access Management Console, remote
registration, and custom administrative commands in WLST.
■Users attempting to access an OAM-protected resource can be authenticated
against any store, not necessarily the only one designated as the Default User
Identity Store.
■Security Token Service uses only the Default User Identity Store. When adding
User constraints to a Token Issuance Policy, for instance, the identity store from
which the users are to be chosen must be Default User Identity Store.
After registering a User Identity Store with Access Manager, administrators can
reference the store in one or more authentication modules, which form the basis for
Oracle Access Manager Authentication Schemes and Policies. When you register a
.cohstore.jks This is used to store the SSL Key and Certifcate that is used to
encrypt SSL communication between Coherence nodes. For
information on securing Coherence communications, see the
Oracle Coherence Security Guide.
See Also:
■"About Communication Between OAM Servers and Webgates" on
page 6-4
■"Defining Keystore Settings for Federation" on page 32-5
Table 5–5 (Cont.) Keystores for Access Manager and Security Token Service
Keystore Description

Integrating a Supported LDAP Directory with Oracle Access Manager
Managing Data Sources 5-31
partner (either using the Oracle Access Management Console or the remote
registration tool), an application domain can be created and seeded with a policy that
uses the designated default Authentication Scheme. When a user attempts to access an
Oracle Access Manager-protected resource, she is authenticated against the store
designated by the authentication module.
For more information, see Oracle Fusion Middleware Integration Guide for Oracle
Identity Management Suite.

Integrating a Supported LDAP Directory with Oracle Access Manager
5-32 Administrator's Guide for Oracle Access Management

6
Managing Server Registration 6-1
6
Managing Server Registration
This chapter describes how to register the managed server instances that interact with
Oracle Access Management. In this book, these managed servers are referred to as
OAM Servers. You accomplish this task using the Oracle Access Management Console.
The following topics are included:
■Prerequisites
■Introduction to OAM Servers, Registration, and Management
■Managing Individual OAM Server Registrations
6.1 Prerequisites
Ensure that the following environmental considerations are met:
■A new Managed Server has been added to the domain using either the Oracle
WebLogic Server Administration Console or WLST commands.
■The Oracle JRF Template was applied to the Managed Server (or cluster) if needed.
For details, see Oracle Fusion Middleware Administrator's Guide.
Oracle recommends that you review "Introduction to OAM Servers, Registration, and
Management".
6.2 Introduction to OAM Servers, Registration, and Management
The Oracle Access Management Console is a Java EE application that must be installed
and run on the same computer as the WebLogic Administration Server. Other key
applications that run on the WebLogic Administration Server include the WebLogic
Server Administration Console and Enterprise Manager for Fusion Middleware
Control.
The Oracle Access Management runtime instance deployed on Oracle WebLogic
Managed Servers is referred to as an OAM Server. Each OAM Server must be
registered with Access Manager to enable communication with registered agents
during authentication, authorization, and resource access.
Note: The Oracle Access Management Console might be referred to
as the OAM Administration Server. However, this is not a peer of the
OAM Server deployed on a WebLogic Managed Server.

Introduction to OAM Servers, Registration, and Management
6-2 Administrator's Guide for Oracle Access Management
Administrators can extend the WebLogic Server domain and add more OAM Server
instances whenever needed, using either:
■The WebLogic Server Administration Console, after which you manually register
the OAM Server instance using the Oracle Access Management Console
■The WebLogic Configuration Wizard
■Customized Oracle WebLogic Scripting Tool (WLST) commands as described in
Oracle Fusion Middleware WebLogic Scripting Tool Command Reference
The last two methods automatically register the OAM Server instance, which appears
in the Oracle Access Management Console; no additional steps are required.
This section introduces OAM Server instance registration and management using the
Oracle Access Management Console:
■About Individual OAM Server Registrations
■About the Embedded Proxy Server and Backward Compatibility
■About 11g SSO, Legacy 10g SSO in Combination with OSSO 10g
■About Communication Between OAM Servers and Webgates
6.2.1 About Individual OAM Server Registrations
Administrators can add one or more Managed Servers to the WebLogic Server domain
for Oracle Access Management.
When using the WebLogic Configuration Wizard, the OAM Server is automatically
registered. However, if the configuration wizard was not used, the OAM Server must
be registered manually to open a communication channel.
Alternatively. You can use custom WLST commands for OAM to display, edit, or
delete a server registration Any changes are automatically propagated to the Oracle
Access Management Console and to every OAM Server in the cluster.
Only OAM Servers are registered with Oracle Access Management. The Oracle Access
Management Console (on the WebLogic Administration Server) is not registered with
itself.
Regardless of the method used to register an OAM Server, details for each instance are
located on the System Configuration tab, Common Configuration section in the Oracle
Access Management Console, including:
■Server name, Host, Port
■Proxy: Performs as the legacy Access Server and defines the communication
security mode. For more information, see:
–About the Embedded Proxy Server and Backward Compatibility
–About 11g SSO, Legacy 10g SSO in Combination with OSSO 10g
See Also: Oracle Fusion Middleware Installation Guide for Oracle
Identity and Access Management.
See Also: Table 1–3 for a comparison of Access Manager 11g versus
Oracle Access Manager 10g.
See Also: Oracle Fusion Middleware WebLogic Scripting Tool
Command Reference

Introduction to OAM Servers, Registration, and Management
Managing Server Registration 6-3
–About Communication Between OAM Servers and Webgates
■Oracle Coherence: Provides a distributed cache for various OAM services,
including session data.
Administrators can search for a specific instance registration, register a newly installed
OAM Server, view, modify, or delete server registrations using the Oracle Access
Management Console. For more information, see "About the OAM Server Registration
Page" on page 6-5.
6.2.2 About the Embedded Proxy Server and Backward Compatibility
Oracle Access Management server-side components include Proxy servers to maintain
backward compatibility with Oracle Access Manager 10g policy-enforcement agents
(10g Webgates and Access Clients) and OracleAS SSO 10g mod_osso (known as OSSO
Agents in 11g), as well as OpenSSO Agents.
Legacy 10g SSO: The OAM Proxy can accept requests from multiple Access clients
concurrently and enables all Webgates and AccessGates (known as Access Clients in
11g) to interact with Access Manager. For more information, see "OAM Proxy Page" on
page 6-6.
Legacy OracleAS 10g (OSSO): The integrated OSSO proxy handles token generation
and validation in response to token requests during authentication using OSSO Agents
with Access Manager. The OSSO proxy needs no configuration. Simply register the
OSSO agent as described in Chapter 15 and Chapter 16.
6.2.3 About 11g SSO, Legacy 10g SSO in Combination with OSSO 10g
You can upgrade OracleAS SSO to use Access Manager SSO when you have a legacy
deployment where Oracle Access Manager 10g is integrated and used in combination
with OracleAS (OSSO) 10g.
After upgrading OSSO to use Access Manager 11g, you can have 10g Webgates
operating with Access Manager 11g SSO the same deployment. In this situation, the
OAM Proxy forwards requests to either the 10g Access Server or to Access Manager
11g as needed.
The Oracle Access Manager 10g ObSSOCookie is an encrypted session-based single
sign-on cookie that is generated when a user authenticates successfully. The 10g
ObSSOCookie stores user identity information, which you can cache if needed.
The integrated OAM Proxy supports the AES encryption algorithm of the 10g
ObSSOCookie to enable backward compatibility with release 10g Webgates. The 10g
Access Server can decrypt the cookie created by the OAM Proxy (and vice versa). This
allows Access Manager 11g to perform authentication and Oracle Access Manager 10g
to perform authorization (and vice versa).
For more information, see "OAM Proxy Page" on page 6-6.
See Also: "About 11g SSO, Legacy 10g SSO in Combination with
OSSO 10g"
Note: An Access Manager 11g ObSSOCookie created by OAM Proxy
is compatible with the 10g ObSSOCookie created by Access Server.

Introduction to OAM Servers, Registration, and Management
6-4 Administrator's Guide for Oracle Access Management
6.2.4 About Communication Between OAM Servers and Webgates
Communication modes for the OAP channel include:
■Open: Use this unencrypted mode if communication security is not an issue in
your deployment.
■Simple: Use this Oracle-signed certificate mode if you have some security
concerns, such as not wanting to transmit passwords as plain text, but you do not
manage your own Certificate Authority (CA).
■Cert: Use if you want different certificates on OAM Servers and Webgates and you
have access to a trusted third-party CA.
On each individual OAM Server registration, the security mode is defined on the
Proxy tab, as described in "About the OAM Server Registration Page" on page 6-5.
Simple and Cert modes also require:
■Security passwords that are common to all OAM Servers and Webgates, as
described in "Managing the Access Protocol for OAM Proxy Simple and Cert
Mode Security" on page 14-6.
■Appropriately signed X.509 digital certificates, as described in Appendix C,
"Securing Communication".
At least one OAM Server instance must be running in the same mode as the agent
during agent registration. Otherwise, agent registration fails. After agent registration,
however, you can change the communication mode of the OAM Server.
Communication between the agent and server would continue to work as long as the
Webgate mode is at least at the same level as the OAM Server mode or higher. The
agent mode can be higher but cannot be lower. For example, of OAM Server mode is
Open, agents can communicate in any of the three modes. If OAM Server mode is
Simple, agents can use Simple or Cert mode. If OAM Server mode is Cert, agents must
use Cert mode.
6.2.5 About Restarting Servers After Configuration Changes
Most Oracle Access Management functional services take up changes made through
the Oracle Access Management Console without restarting OAM Server. Table 6–1
identifies conditions that do require a server restart.
See Also: Appendix C, "Securing Communication"
Table 6–1 Conditions Requiring Server Restart
Event Description
Session persistence change A change from database to in-memory (or vice versa) session
persistence requires an OAM Server restart.
Oracle Coherence port
number
A change to the port number requires an OAM Server restart.
Load balancer server
definition
A change requires an OAM Server restart.
Managed Server port number A change requires an OAM Server restart.
New Managed Server Adding a new managed server to the cluster requires
restarting the AdminServer to policy enable uptake.
OAM Servers must be restarted to reinitialize Oracle
Coherence security configuration with the new server
included.
Managing Individual OAM Server Registrations
Managing Server Registration 6-5
6.3 Managing Individual OAM Server Registrations
This section describes how to register and manage OAM Server instances using the
Oracle Access Management Console. Topics here include:
■About the OAM Server Registration Page
■Registering a Fresh OAM Server Instance
■Viewing or Editing Individual OAM Server and Proxy Settings
■Deleting an Individual Server Registration
6.3.1 About the OAM Server Registration Page
Users with valid Administrator credentials can register a freshly installed Managed
Server (OAM Server instance) or modify an existing OAM Server registration using
the Oracle Access Management Console.
Alternatively: You can use custom WLST commands to register and manage OAM
Server instances. Changes are reflected in the Oracle Access Management Console and
are automatically propagated to every OAM Server in the cluster.
Figure 6–1 illustrates a typical OAM Server registration page when viewed within the
Oracle Access Management Console.
Figure 6–1 OAM Server Registration Page with Proxy Tab Displayed
This screen illustrates the Server Registration page. The Proxy and Coherence tabs
provide additional elements to help configure your environment.
***********************************************************************************************
Individual server registration settings are described in Table 6–2.
See Also: Oracle Fusion Middleware WebLogic Scripting Tool
Command Reference
Table 6–2 OAM Server Instance Settings
Element Definition
Server name The identifying name for this server instance, which was defined during initial
deployment in the WebLogic Server domain.
Host The full DNS name (or IP address) of the computer hosting the server instance. For
example: host2.domain.com.

Managing Individual OAM Server Registrations
6-6 Administrator's Guide for Oracle Access Management
6.3.1.1 OAM Proxy Page
An integrated proxy server (OAM Proxy) is installed with each Managed Server for
OAM Server. The OAM Proxy is used as a legacy Access Server to provide backward
compatibility for 10g Agents that are registered with Access Manager 11g. The Agent
can be freshly installed or currently operating within an Oracle Access Manager 10g
SSO deployment.
Each OAM Proxy instance requires a different port. The proxy starts listening when
the application starts. Registered access clients can immediately communicate with the
proxy.
The OAM Proxy handles both configuration and run-time events. Each OAM Proxy
can accept requests from multiple access clients concurrently. Each OAM Proxy
enables access clients to interact with Access Manager 11g. This includes:
■10g (10.1.4.3) Webgates
■10g (10.1.4.2.0) Webgates
■10g (10.1.4.0.1) Webgates
■11g Webgates (needs no proxy)
OAM Proxy settings consist of the details in Table 6–3.
Port The port on which this server communicates (listens and responds).
Default: 5575
Note: If both the SSL and Open ports of the Managed Server are enabled, then the
Managed Server is set to the SSL port by default. If you must use the non-SSL port,
the credential collector URL of the authentication scheme must be set to the absolute
URL which points to
http
as the protocol and non-SSL port.
See Also: Appendix C, "Securing Communication"
Proxy See "OAM Proxy Page" on page 6-6
Coherence See "Coherence Page for Individual Servers" on page 6-7
See Also: "Managing Individual OAM Server Registrations" on
page 6-5
Note: For Access Clients, Access Manager 11g provides
authentication and authorization functionality only. Policy
modification through Access Clients is not supported.
Table 6–3 OAM Proxy Settings for an Individual OAM Server
OAM Proxy
Setting Type Value
Port int (integer) The unique port on which this OAM Proxy instance is listening.
Proxy Server ID The identifier of the computer on which the OAM Proxy (and this
OAM Server instance) resides. DNS hostname is preferred;
however, you can use any valid and relevant string.
Table 6–2 (Cont.) OAM Server Instance Settings
Element Definition
Managing Individual OAM Server Registrations
Managing Server Registration 6-7
OAM Proxy Logging: Oracle Access Management services use the same logging
infrastructure as any other Oracle Fusion Middleware 11g component, as described in
Chapter 9. However, OAM Proxy uses Apache log4j for logging.
6.3.1.2 Coherence Page for Individual Servers
Coherence provides replicated and distributed (partitioned) data management and
caching services on top of a reliable, highly scalable peer-to-peer clustering protocol.
Coherence has no single points of failure; it automatically and transparently fails over
and redistributes its clustered data management services when a server becomes
inoperative or is disconnected from the network.
When a new server is added, or when a failed server is restarted, it automatically joins
the cluster and Coherence fails back services to it, transparently redistributing the
cluster load. Coherence includes network-level fault tolerance features and transparent
soft re-start capability to enable servers to self-heal.
Coherence modules consist of the values, and types for the individual server instance,
as shown in Figure 6–3.
Mode OAM channel transport security for the OAM Proxy can be one
of the following (the agent mode must match during registration
and can be higher after registration):
■Open: No encryption.
■Simple: The data passed between the OAM Agent and OAM
Server is encrypted using OAM self-signed certificates.
Before specifying Simple mode, you must specify the global
passphrase.
■Cert: The data between the OAM Agent and OAM Server is
encrypted using Certificate Authority (CA) signed X.509
certificates.
Note: Before specifying Cert mode, you must acquire signed
certificates from a trusted third party Certificate Authority.
Note: Simple and Cert transport security modes are governed by
information defined on the OAM Server Common Properties
OAM Proxy tab, as described in "Managing the Access Protocol
for OAM Proxy Simple and Cert Mode Security" on page 14-6.
See Also: Appendix C if you are configuring Simple or Cert
transport security modes.
Table 6–3 (Cont.) OAM Proxy Settings for an Individual OAM Server
OAM Proxy
Setting Type Value
Managing Individual OAM Server Registrations
6-8 Administrator's Guide for Oracle Access Management
Figure 6–2 Coherence Page and Values for an Individual OAM Server
Coherence Logging: Appears only in the WebLogic Server log. There is no bridge from
Oracle Coherence logging to Oracle Access Management logging. For Oracle Fusion
Middleware 11g logging infrastructure details, see Chapter 8.
6.3.2 Registering a Fresh OAM Server Instance
Users with valid Administrator credentials can perform the following task to register a
new Managed Server (OAM Server) instance using the Oracle Access Management
Console.
Prerequisites
The new Managed Server instance must be configured in the Oracle WebLogic Server
domain, but not yet started.
WARNING: Oracle recommends that you do not modify Oracle
Coherence settings for an individual server unless you are
requested to do so by an Oracle Support Representative.
Table 6–4 Default Coherence Settings for Individual OAM Servers
Coherence
Module Type of Entry Description and Default Values
LogLevel String The Coherence log level (from 0 to 9) for OAM Server events.
LogPort int (integer) The listening port for Coherence logging on the WebLogic Server.
LogLimit String The Coherence log limit
Note: Each OAM Server must be registered to communicate with
agents.
See Also:
■Oracle Fusion Middleware Installation Guide for Oracle Identity
and Access Management
■"About the OAM Server Registration Page" on page 6-5

Managing Individual OAM Server Registrations
Managing Server Registration 6-9
To register an OAM Server instance
1. Install the new Managed Server instance and configure it in the Oracle WebLogic
Server domain, but do not start this instance.
2. Log in to the Oracle Access Management Console.
3. Click Server Instances and then Create to open a fresh page.
4. On the Create: OAM Server page, enter details for your instance, as described in
Table 6–2:
■Server name
■Host
■Port
5. Proxy: Enter or select details for this OAM Proxy instance, as described in
Table 6–3:
■Port
■Proxy Server ID
■Mode (Open, Simple, or Cert)
6. Coherence: Oracle recommends that you do not modify Oracle Coherence settings
for an individual server instance unless you are requested to do so by an Oracle
Support Representative.
7. Click Apply to submit the configuration, which should appear in the navigation
tree (or close the page without applying changes).
8. Start the newly registered server.
6.3.3 Viewing or Editing Individual OAM Server and Proxy Settings
Users with valid Administrator credentials can perform the following task to view or
modify settings for an individual server instance using the Oracle Access Management
Console. For instance, you might need to change the listening port or the Proxy
communication transport security mode.
Changes are immediately visible in the Oracle Access Management Console and
propagated to all OAM Servers in the cluster.
To view or modify a server instance registration
1. From the Oracle Access Management Console, click Server Instances.
See Also: Appendix C if you are using Simple or Cert mode
See Also: "Using Coherence" on page E-28
See Also:
■"About the OAM Server Registration Page" on page 6-5
■Oracle Fusion Middleware WebLogic Scripting Tool Command
Reference
■Moving Identity Management to a New Production Environment
in the Oracle Fusion Middleware Administrator's Guide

Managing Individual OAM Server Registrations
6-10 Administrator's Guide for Oracle Access Management
2. Double-click the desired instance name to display its configuration, and then
proceed as follows:
■View Only: Close the page when you finish viewing details.
■Modify: Perform remaining steps to edit the configuration.
3. On the OAM Server page, change details for your instance, as described in
Table 6–2.
4. Proxy: Change details for this OAM Proxy instance, as described in Table 6–3.
5. Coherence: Oracle recommends that you do not modify Oracle Coherence settings
for an individual server instance unless you are requested to do so by an Oracle
Support Representative.
6. Click Apply to submit the changes (or close the page without applying change).
6.3.4 Deleting an Individual Server Registration
Users with valid Administrator credentials can perform the following task to delete a
server registration, which disables the OAM Server.
Prerequisites
Registering a Fresh OAM Server Instance
To delete a server registration
1. From the System Configuration tab, Common Configuration section, click to
expand the Server Instances node.
2. Double-click the desired instance name to confirm details, then close the page.
3. Click the desired instance name, click the Delete button in the tool bar, and
confirm removal in the Confirmation window.
4. Confirm that the instance is removed from the navigation tree.
5. Finalize server instance removal by removing the instance from the WebLogic
Server Administration Console.
The Node Manager on Managed Server host handles the rest automatically.
See Also: Appendix C if you are using Simple or Cert mode
See Also: "Using Coherence" on page E-28

7
Using Multi-Data Centers 7-1
7
Using Multi-Data Centers
[6]
Oracle Access Management Access Manager allows for distribution of directory
service data by providing identical copies of said data across more than one data
center. Multiple data centers provide a scalable deployment model to support access
management requirements for millions of users. The Multi-Data Center topology
scales horizontally - within a single data center by clustering multiple nodes or across
multiple data centers. This model provides load balancing as well as failover
capabilities in the case that one of the data centers goes down.
This chapter contains the following sections.
■Introducing Multi-Data Center
■Understanding Multi-Data Center Deployments
■Before Deploying Multi-Data Centers
■Deploying Multi-Data Centers
■Load Balancing Between Access Management Components
■Setting Up A Multi-Data Center
■Syncing Multi-Data Centers
■Understanding Time Outs and Session Syncs
■WLST Commands for Multi-Data Centers
■Replicating Domains with Multi-Data Centers and Identity Manager
■Multi-Data Center Recommendations
7.1 Introducing Multi-Data Center
Large organizations using Access Manager 11g typically deploy their applications in
multi-data centers to distribute load as well as address data recovery. Deploying
multi-data centers configures single sign-on (SSO) between them and allows for the
transfer of user session details transparently. The scope of a data center comprises
protected applications, WebGate agents, Access Manager servers and other
infrastructure entities including identity stores and databases. (Access Manager 11g
supports scenarios where applications are distributed across two or more data
centers.)
The Multi-Data Center approach supported by Access Manager is a Master-Clone
deployment in which the first data center is specified as the Master and clone data
centers mirror it. A Master Data Center is cloned using Test-to-Production (T2P) tools
to create one or more child Data Centers. See Oracle Fusion Middleware Administrator's
Guide for information on T2P. (The T2P utility is also used to replicate Access Manager
Introducing Multi-Data Center
7-2 Administrator's Guide for Oracle Access Management
domains used by data centers.) Figure 7–1 illustrates the Multi-Data Center system
architecture.
Figure 7–1 Multi-Data Center System Architecture
A data center may include applications, data stores, load balancers and the like. Each
data center includes a full Access Manager installation. The WebLogic Server domain
will not span data centers. Global load balancers are configured to route HTTP traffic
to the geographically closest data center. (No load balancers are used to manage Oracle
Access Protocol traffic.) Additionally, they maintain user to data center affinity
although session adoption allows for the creation of a user session based on the
submission of a valid authentication cookie (OAM_ID) indicating that a session for the
user already exists in another data center. (Session adoption may or may not involve
re-authentication of the user.)
All applications are protected by WebGate agents configured against Access Manager
clusters in the respective data centers. Every WebGate has a primary server and one or
more secondary servers; WebGate agents in each data center have Access Manager
server nodes from the same data center in the primary list and nodes from other data
centers in the secondary list. It is still possible for a user request to be routed to a
different data center when:
■The data center goes down.
■There is a load spike causing redistribution of traffic.
■Certain applications are deployed in only one data center.
■WebGates are configured to load balance within one data center but failover across
data centers.
The following sections contain more information on how Multi-Data Center works
and the topologies it supports.
■Providing a Multi-Data Center Solution
■Supported Multi-Data Center Topologies
■Understanding Access Manager Security Modes for Multi-Data Center

Introducing Multi-Data Center
Using Multi-Data Centers 7-3
7.1.1 Providing a Multi-Data Center Solution
The following sections contain information on how the Multi-Data Center solution is
implemented.
■Enhancing Cookies for Multi-Data Center
■Session Adoption During Authorization
■Session Indexing
7.1.1.1 Enhancing Cookies for Multi-Data Center
The following sections contain information on the SSO cookies enhanced and used by
the Multi-Data Center.
■OAM_ID Cookie
■OAMAuthn / ObSSO WebGate Cookies
■OAM_GITO (Global Inactivity Time Out) Cookie
7.1.1.1.1 OAM_ID Cookie The OAM_ID cookie is the SSO cookie for Access Manager
and holds the attributes required to enable the MDC behavior across all Data Centers.
If a subsequent request from a user in the same SSO session is routed to a different
Data Center in the Multi-Data Center topology, session adoption is triggered per the
configured session adoption policies. Session adoption refers to the action of a Data
Center creating a local user session based on the submission of a valid authentication
cookie (OAM_ID) that indicates a session for the user exists in another other Data
Center in the topology. (It may or may not involve re-authentication of the user.) When
a user session is created in a Data Center, the OAM_ID cookie will be
augmented/updated with the
clusterid
of the Data Center, a
sessionid
and the
latest_visited_clusterid
.
In Multi-Data Center deployments, OAM_ID is a host-scoped cookie. Its domain
parameter is set to
login.oracle.com
, a virtual host name which is a singleton across
data centers and is mapped by the global load balancer to the Access Manager servers
in the Access Manager data center based on the load balancer level user traffic routing
rules (for example, based on geographical affinity). The OAM_ID cookie is not
accessible to applications other than the Access Manager servers.
7.1.1.1.2 OAMAuthn / ObSSO WebGate Cookies OAMAuthn is the WebGate cookie for 11g
and ObSSO is the WebGate cookie for 10g. On successful authentication and
authorization, a user will be granted access to a protected resource. At that point, the
browser will have a valid WebGate cookie with the
clusterid:sessionid
of the
servicing Data Center. If authentication followed by authorization spans across
multiple Data Centers, the Data Center authorizing the user request will trigger
session adoption by retrieving the session's originating
clusterid
from the WebGate
cookie. After adopting the session, a new session will be created in the current Data
Center with the synced session details.

Introducing Multi-Data Center
7-4 Administrator's Guide for Oracle Access Management
7.1.1.1.3 OAM_GITO (Global Inactivity Time Out) Cookie OAM_GITO is a domain cookie set
as an authorization response. The session details of the authentication process will be
recorded in the OAM_ID cookie. If the authorization hops to a different Data Center,
session adoption will occur by creating a new session in the Data Center servicing the
authorization request and sets the session index of the new session as the incoming
sessionid
. Since subsequent authentication requests will only be aware of the
clusterid:sessionid mapping available in the OAM_ID cookie, a session hop to a
different Data Center for authorization will go unnoticed during the authentication
request. To address this gap, an OAM_GITO cookie (which also facilitates timeout
tracking across WebGate agents) is introduced.
During authorization, the OAM_GITO cookie is set as a domain cookie. For
subsequent authentication requests, the contents of the OAM_GITO cookie will be
read to determine the latest session information and the inactivity/idle time out
values. The OAM_GITO cookie contains the following data.
■Data Center Identifier
■Session Identifier
■User Identifier
■Last Access Time
■Token Creation Time
7.1.1.2 Session Adoption During Authorization
Multi-Data Center session adoption is supported during the authorization flow. After
successful authentication, the OAMAuthn cookie will be augmented with the cluster
ID details of the Data Center where the authentication has taken place. During
Note: The WebGate cookie cannot be updated during authorization
hence the newly created
sessionid
cannot be persisted for future
authorization references. In this case, the remote sessionid and the
local sessionids are linked through
session indexing
. During a
subsequent authorization call to a Data Center, a new session will be
created when:
■MDC is enabled.
■A session matching the sessionid in the WebGate cookie is not
present in the local Data Center.
■There is no session with a Session Index that matches the
sessionid in the WebGate cookie.
■A valid session exists in the remote Data Center (based on the
MDC SessionSync Policy).
In these instances, a new session is created in the local Data Center
with a Session Index that refers to the sessionid in the WebGate
cookie.
Note: For the OAM_GITO cookie, all WebGates and Access Manager
servers should share a common domain hierarchy. For example, if the
server domain is
.us.example.com
then all WebGates must have (at
least)
.example.com
as a common domain hierarchy; this enables the
OAM_GITO cookie to be set with the
.example.com
domain.

Introducing Multi-Data Center
Using Multi-Data Centers 7-5
authorization, if the request is routed to a different Data Center, the runtime does
adequate checks to determine whether it is a Multi-Data Center scenario and looks for
a valid remote session. If one is located, the Multi-Data Center session adoption
process is triggered per the session adoption policies; a new session will be created in
the Data Center servicing the authorization request.
7.1.1.3 Session Indexing
During an authorization call to a Data Center, a new session will be created in the local
Data Center with a Session Index that refers to the session identifier in the
OAMAuth/ObSSO cookie. This will occur under the following conditions:
■Session matching Session ID in the OAMAuth/ObSSO cookie is not present in the
local Data Center.
■MDC is enabled.
■No session with Session Index matching Session ID in the OAMAuth/ObSSO
cookie.
■Valid Session exists in the remote Data Center based on the MDC SessionSync
Policy.
7.1.2 Supported Multi-Data Center Topologies
Access Manager supports the following Multi-Data Center topologies.
■An Active-Active topology is when Master and Clone data centers are exact
replicas and active at the same time. They cater to different sets of users based on
defined criteria; geography, for example. A load balancer routes traffic to the
appropriate Data Center. See Section 7.1.2.1, "Active-Active Mode."
■An Active Standby-Passive topology is when the primary Data Center is operable
and the clone Data Center is not but can be brought up within a reasonable time in
cases when the primary data center fails. See Section 7.1.2.2, "Active
Standby-Passive Mode."
■Active–Hot Standby is when one of the Data Centers is in hot standby mode. In this
case, the Data Center will not actively be used until the other Data Center goes
down. See Section 7.1.2.3, "Active-Hot Standby."
7.1.2.1 Active-Active Mode
Figure 7–2 illustrates a Multi-Data Center set up in Active-Active mode during normal
operations. The New York Data Center is designated as the Master and all policy and
configuration changes are restricted to it. The London Data Center is designated as a
Clone and uses T2P tooling and utilities to periodically synchronize data with the New
York Data Center. The global load balancer is configured to route users in different
Note: Since OAMAuthn cookie updates are not supported during
authorization, the newly created session's session index will be set to
that of the incoming session ID.
Note: An Active-Active topology with agent failover is when an
agent has Access Manager servers in one Data Center configured as
primary and Access Manager servers in the other Data Centers
configured as secondary to aid failover scenarios.
Introducing Multi-Data Center
7-6 Administrator's Guide for Oracle Access Management
geographical locations (US and Europe) to the appropriate data centers (New York or
Europe) based on proximity to the data center (as opposed to proximity of the
application being accessed). For example, all requests from US-based User 1 will be
routed to the New York Data Center (NYDC) and all requests from Europe-based User
2 will be routed to the London Data Center (LDC).
Figure 7–2 Active-Active Deployment Mode
In this example, if NYDC was overloaded with requests, the global load balancer
would start routing User 1 requests to the clone Access Manager cluster in LDC. The
clone Access Manager cluster can tell (from the user's OAM ID cookie) that there is a
valid session in the master cluster and would therefore create a new session without
prompting for authentication or re-authentication. Further, the session adoption policy
can be configured such that the clone Access Manager cluster would make a back-end
request for session details from the master Access Manager cluster using the Oracle
Access Protocol (OAP). The session adoption policy can also be configured to
invalidate the remote session (the session in NYDC) so the user has a session only in
one data center at a given time.
Figure 7–3 illustrates how a user might be rerouted if the Master cluster is overloaded
or down. If the Master Access Manager cluster were to go completely down, the clone
Access Manager cluster would try to obtain the session details of User 1 but since the
latter would be completely inaccessible, User 1 would be forced to re-authenticate and
establish a new session in the clone Access Manager cluster. In this case, any
information stored in the previous session is lost.
Note: The Access Manager clusters in this figure are independent
and not part of the same Oracle WebLogic domain. WebLogic domains
are not recommended to span across data centers.
Introducing Multi-Data Center
Using Multi-Data Centers 7-7
Figure 7–3 Active-Active Mode Failover
7.1.2.2 Active Standby-Passive Mode
Active-Passive Mode is when one of the data centers is passive and can be brought up
within a reasonable time in case the primary data center fails.
7.1.2.3 Active-Hot Standby
Active-Hot Standby Mode is when one of the data centers is in a hot standby mode. It
will not actively cater to users until the other data center goes down.
7.1.3 Understanding Access Manager Security Modes for Multi-Data Center
The MDC relies on the Oracle Access Protocol (OAP) channel for the inter data center
session management operations and back channel communication. The security mode
of the MDC partner profile should match the security mode defined for the Access
Manager server: OPEN, SIMPLE or CERT.
7.1.3.1 OPEN Security Mode
This is the default mode of the Access Manager deployment. No configuration is
needed. The following is a sample input properties file for use with the
addPartnerForMultiDataCentre WLST command.
remoteDataCentreClusterId=
<CLUSTER ID OF REMOTE DC FOR WHICH THE AGENT IS BEING ADDED>
oamMdcAgentId=
<AGENT ID OF THE REGISTERED PARTNER IN datacenter ABOVE>
PrimaryHostPort=<fully-qualified-host-name:OAM-port>
for example:PrimaryHostPort=adc.example.com:5575
SecondaryHostPort=<fully-qualified-host-name:OAM-port>
for example:SecondaryHostPort=adc.example.com:5577
AccessClientPasswd=<ACCESS CLIENT PASSWORD OF oamMdcAgentId IN datacenter>
oamMdcSecurityMode=OPEN
agentVersion=<WEBGATE AGENT VERSION 10g or 11g>
Note: An MDC partner profile is exposed by each data center and
used by other data centers to communicate with it. Registering an
MDC partner is a two step process. Consider an MDC with three data
centers. In DC1, expose an MDC partner profile by creating a 10g or
11g WebGate (DC1_MDC_Partner). Then, register DC1_MDC_Partner
in DC2 and DC3 using addPartnerForMultiDataCentre. See
Section 7.9.3, "addPartnerForMultiDataCentre" for details.

Introducing Multi-Data Center
7-8 Administrator's Guide for Oracle Access Management
#NA ----> Not Applicable
trustStorePath=NA
keyStorePath=NA
globalPassPhrase=NA
keystorePassword=NA
7.1.3.2 SIMPLE Security Mode
Follow the instructions in Appendix C.5, "Configuring Simple Mode Communication
with Access Manager" to set up the Access Manager servers in SIMPLE mode. In short,
create an MDC partner profile in each of the member data centers in SIMPLE mode,
and add it to each of the other data centers. The following is a sample input properties
file for use with the addPartnerForMultiDataCentre WLST command.
remoteDataCentreClusterId=
<CLUSTER ID OF REMOTE DC FOR WHICH THE AGENT IS BEING ADDED>
oamMdcAgentId=<AGENT ID OF THE REGISTERED PARTNER IN datacenter ABOVE>
PrimaryHostPort=<fully-qualified-host-name:OAM-port>
for example:PrimaryHostPort=adc.example.com:5575
SecondaryHostPort=<fully-qualified-host-name:OAM-port>
for example:SecondaryHostPort=adc.example.com:5577
AccessClientPasswd=<ACCESS CLIENT PASSWORD OF oamMdcAgentId IN datacenter>
oamMdcSecurityMode=SIMPLE
agentVersion=<WEBGATE AGENT VERSION 10g or 11g>
#Copy the oamclient-truststore.jks & oamclient-keystore.jks from
#<DOMAIN_HOME>/output/webgate-ssl/ from 'datacenter with cluster ID
#remoteDataCentreClusterId' above into the local DC say /scratch/MDCArtifacts/ and
#refer them in the below parameters
trustStorePath=</scratch/MDCArtifacts/oamclient-truststore.jks>
keyStorePath=</scratch/MDCArtifacts/oamclient-keystore.jks>
#Use the online WLST command displaySimpleModeGlobalPassphrase() to list
#the global passphrase in SIMPLE mode. Admins can also update this in the UI
#@ System Configuration-->Access Manager-->Access Manager Settings-->
#Access Protocol-->Simple Mode Configuration-->Global Passphrase.
#globalPassPhrase & keystorePassword are the same for SIMPLE mode
globalPassPhrase=<passphrase resulted in using the above steps>
keystorePassword=<same as globalPassPhrase>
7.1.3.3 CERT Security Mode
Follow the instructions in Appendix C.4, "Configuring Cert Mode Communication for
Access Manager" to set up the Access Manager servers in CERT mode. In short, create
an MDC partner in each of the member data centers in CERT mode, and generate the
'clientTrustStore.jks' and 'clientKeyStore.jks' keystores to be used by the MDC partner
using the following procedure.
1. Run the following openssl command from a Linux command prompt to generate
aaa_key.pem & aaa_req.pem.
openssl req -new -keyout aaa_key.pem -out aaa_req.pem -utf8
Use the certreq command to generate the certificate and chain.
2. Create aaa_cert.pem using the following procedure.
a. Open aaa_req.pem in a text editor and copy the contents.

Introducing Multi-Data Center
Using Multi-Data Centers 7-9
Exclude the trailing spaces from your selection.
b. Paste the copied text into Signcsr.
Include [-----BEGIN CERTIFICATE REQUEST----- and -----END CERTIFICATE
REQUEST-----].
c. Copy the output into a text editor and save it as aaa_cert.pem.
3. Create aaa_chain using the following procedure.
a. Open certreq.
b. Click on chain.pem and copy/paste the contents into a text editor and save it
as aaa_chain.pem.
Excluding traiing and leading spaces from your selection.
4. Encrypt the private key (aaa_key.pem) using the following command.
openssl rsa -in aaa_key.pem -passin pass: -out aaa_key.pem -passout
pass:Welcome1 -des
The password used in this command must be defined as the access client
password or agent key password while registering the MDC partner.
5. Copy aaa_key.pem, aaa_cert.pem and aaa_chain.pem to a temporary location.
For example, /tmp/clientCertArtifacts/
6. Convert aaa_cert.pem and aaa_key.pem into DER format using one of the
following commands.
-openssl x509 -in /tmp/clientCertArtifatcs/aaa_cert.pem -inform PEM -out
/tmp/clientCertArtifatcs/aaa_cert.der -outform DER;
-openssl pkcs8 -topk8 -nocrypt -in /tmp/clientCertArtifatcs/aaa_key.pem
-inform PEM -out /tmp/clientCertArtifatcs/aaa_key.der -outform DER;
7. Import the aaa_key.der and aaa_cert.der into clientKeyStore.jks; and the aaa_
chain.pem into clientTrustStore.jks with the below steps
-cd $IDM_HOME/oam/server/tools/importcert/;
-unzip importcert.zip;
-java -cp importcert.jar
oracle.security.am.common.tools.importcerts.CertificateImport -keystore
/tmp/clientCertArtifatcs/clientKeyStore.jks -privatekeyfile
/tmp/clientCertArtifatcs/aaa_key.der -signedcertfile
/tmp/clientCertArtifatcs/aaa_cert.der -storetype jks -genkeystore yes
-keytool -importcert -file /tmp/clientCertArtifatcs/aaa_chain.pem -trustcacerts
-keystore /tmp/clientCertArtifatcs/clientTrustStore.jks -storetype JKS
Enter the keystore passwords when prompted. The password needs to be defined
in the input properties file for the addPartnerForMultiDataCentre WLST
command as well.
8. If not done when creating the certificates for the WebGate, import the aaa_key.der
and aaa_cert.der formatted certificates into the .oamkeystore using the same
Oracle provided importcert.jar used inthe previous step.
-java -cp importcert.jar
oracle.security.am.common.tools.importcerts.CertificateImport

Understanding Multi-Data Center Deployments
7-10 Administrator's Guide for Oracle Access Management
-keystore /scratch/Oracle/Middleware/domains/
base_domain/config/fmwconfig/.oamkeystore -privatekeyfile
/tmp/clientCertArtifacts/aaa_key.der -signedcertfile
/tmp/clientCertArtifacts/aaa_cert.der -alias mycertmode1 -storetype JCEKS
alias is the alias name defined when setting CERT mode in Access Manager.
The following is a sample input properties file for use with the
addPartnerForMultiDataCentre WLST command.
remoteDataCentreClusterId=
<CLUSTER ID OF REMOTE DC FOR WHICH THE AGENT IS BEING ADDED>
oamMdcAgentId=<AGENT ID OF THE REGISTERED PARTNER IN datacenter ABOVE>
PrimaryHostPort=<fully-qualified-host-name:OAM-port>
for example:PrimaryHostPort=adc.example.com:5575
SecondaryHostPort=<fully-qualified-host-name:OAM-port>
for example:SecondaryHostPort=adc.example.com:5577
AccessClientPasswd=<ACCESS CLIENT PASSWORD OF oamMdcAgentId IN datacenter>
oamMdcSecurityMode=CERT
agentVersion=<WEBGATE AGENT VERSION 10g or 11g>
trustStorePath=</tmp/clientCertArtifatcs/clientTrustStore.jks >
keyStorePath=</tmp/clientCertArtifatcs/clientKeyStore.jks >
globalPassPhrase=NA
#use keystore password used for generating keystore in the previous step
keystorePassword=<keystore password given while generating keystore>
7.2 Understanding Multi-Data Center Deployments
In a Multi-Data Center deployment, each data center will include a full Access
Manager installation and WebLogic Server domains will not span the Data Centers.
Global load balancers will maintain user to Data Center affinity although a user
request may be routed to a different Data Center:
■When the data center goes down.
■When a load spike causes redistribution of traffic.
■When each Data Center is not a mirror of the other. For example, certain
applications may only be deployed in a single Data Center.
■WebGates are configured to load balance within the Data Center and failover
across Data Centers.
Figure 7–4 illustrates a basic Multi-Data Center deployment.
Understanding Multi-Data Center Deployments
Using Multi-Data Centers 7-11
Figure 7–4 Multi-Data Center Deployment
The following sections describe several deployment scenarios.
■Session Adoption Without Re-authentication, Session Invalidation or Session Data
Retrieval
■Session Adoption Without Re-authentication But With Session Invalidation &
Session Data Retrieval
■Session Adoption Without Re-authentication & Session Invalidation But With
On-demand Session Data Retrieval
■Authentication & Authorization Requests Served By Different Data Centers
■Logout and Session Invalidation
7.2.1 Session Adoption Without Re-authentication, Session Invalidation or Session
Data Retrieval
The following scenario illustrates the flow when the Session Adoption Policy is
configured without reauthentication, remote session invalidation and remote session
data retrieval. It is assumed the user has affinity with DC1.
1. User is authenticated by DC1.
On successful authentication, the OAM_ID cookie is augmented with a unique
data center identifier referencing DC1 and the user can access applications
protected by Access Manager in DC1.
2. Upon accessing an application deployed in DC2, the user is routed to DC2 by a
global load balancer.
3. Access Manager in DC2 is presented with the augmented OAM_ID cookie issued
by DC1.
On successful validation, Access Manager in DC2 knows that this user has been
routed from the remote DC1.
4. Access Manager in DC2 looks up the Session Adoption Policy.
Note: The OAP connection used for backchannel communication
does not support load balancing or failover so a load balancer needs to
be used.

Understanding Multi-Data Center Deployments
7-12 Administrator's Guide for Oracle Access Management
The Session Adoption Policy is configured without reauthentication, remote
session invalidation or remote session data retrieval.
5. Access Manager in DC2 creates a local user session using the information present
in the DC1 OAM_ID cookie (lifetime, user) and re-initializes the static session
information ($user responses).
6. Access Manager in DC2 updates the OAM_ID cookie with its data center
identifier.
Data center chaining is also recorded in the OAM_ID cookie.
7. User then accesses an application protected by Access Manager in DC1 and is
routed back to DC1 by the global load balancer.
8. Access Manager in DC1 is presented with the OAM_ID cookie issued by itself and
updated by DC2.
On successful validation, Access Manager in DC1 knows that this user has
sessions in both DC1 and DC2.
9. Access Manager in DC1 attempts to locate the session referenced in the OAM_ID
cookie.
■If found, the session in DC1 is updated.
■If not found, Access Manager in DC1 looks up the Session Adoption Policy
(also) configured without reauthentication, remote session invalidation and
remote session data retrieval.
10. Access Manager in DC1 updates the OAM_ID cookie with its data center identifier
and records data center chaining as previously in DC2.
7.2.2 Session Adoption Without Re-authentication But With Session Invalidation &
Session Data Retrieval
The following scenario illustrates the flow when the Session Adoption Policy is
configured without reauthentication but with remote session invalidation and remote
session data retrieval. It is assumed the user has affinity with DC1.
1. User is authenticated by DC1.
On successful authentication, the OAM_ID cookie is augmented with a unique
data center identifier referencing DC1.
2. Upon accessing an application deployed in DC2, the user is routed to DC2 by a
global load balancer.
3. Access Manager in DC2 is presented with the augmented OAM_ID cookie issued
by DC1.
On successful validation, Access Manager in DC2 knows that this user has been
routed from the remote DC1.
4. Access Manager in DC2 looks up the Session Adoption Policy.
The Session Adoption Policy is configured without reauthentication but with
remote session invalidation and remote session data retrieval.
5. Access Manager in DC2 makes a back-channel (OAP) call (containing the session
identifier) to Access Manager in DC1 to retrieve session data.
The session on DC1 is terminated following data retrieval. If this step fails due to a
bad session reference, a local session is created as documented in Section 7.2.1,

Understanding Multi-Data Center Deployments
Using Multi-Data Centers 7-13
"Session Adoption Without Re-authentication, Session Invalidation or Session
Data Retrieval."
6. Access Manager in DC2 creates a local user session using the information present
in the OAM_ID cookie (lifetime, user) and re-initializes the static session
information ($user responses).
7. Access Manager in DC2 rewrites the OAM_ID cookie with its own data center
identifier.
8. The user then accesses an application protected by Access Manager in DC1 and is
routed to DC1 by the global load balancer.
9. Access Manager in DC1 is presented with the OAM_ID cookie issued by DC2.
On successful validation, Access Manager in DC1 knows that this user has
sessions in DC2.
10. Access Manager in DC1 makes a back-channel (OAP) call (containing the session
identifier) to Access Manager in DC2 to retrieve session data.
If the session is found, a session is created using the retrieved data. If it is not
found, the OAM Server in DC1 creates a new session. The session on DC2 is
terminated following data retrieval.
7.2.3 Session Adoption Without Re-authentication & Session Invalidation But With
On-demand Session Data Retrieval
Multi-Data Center supports session adoption without re-authentication except that the
no-local session are not terminated and the local session is created using session data
retrieved from the remote DC. Note that the OAM_ID cookie is updated to include an
attribute that indicates which data center is currently being accessed.
7.2.4 Authentication & Authorization Requests Served By Different Data Centers
Consider a scenario where an authentication request is served by the New York Data
Center (NYDC) but the authorization request is presented to the London Data Center
(LDC) because of user affinity. If Remote Session Termination is enabled, the scenario
requires a combination of the OAM_ID cookie, the OamAuthn/ObSSO authorization
cookie and the GITO cookie to perform the seamless Multi-Data Center operations.
This flow (and Figure 7–5 following it) illustrates this. It is assumed that the user has
affinity with NYDC.
1. Upon accessing APP1, a user is authenticated by NYDC.
On successful authentication, the OAM_ID cookie is augmented with a unique
data center identifier referencing NYDC. The subsequent authorization call will be
served by the primary server for the accessed resource, NYDC. Authorization
generates the authorization cookie with the NYDC identifier (cluster-id) in it and
the user is granted access to the APP1.
2. User attempts to access APP2 in LDC.
3. The Webgate for APP2 finds no valid session in LDC and initiates authentication.
Due to user affinity, the authentication request is routed to NYDC where seamless
authentication occurs. The OamAuthn cookie contents are generated and shared
with the APP2 Webgate.
4. The APP2 Webgate forwards the subsequent authorization request to APP2's
primary server, LDC with the authorization cookie previously generated.
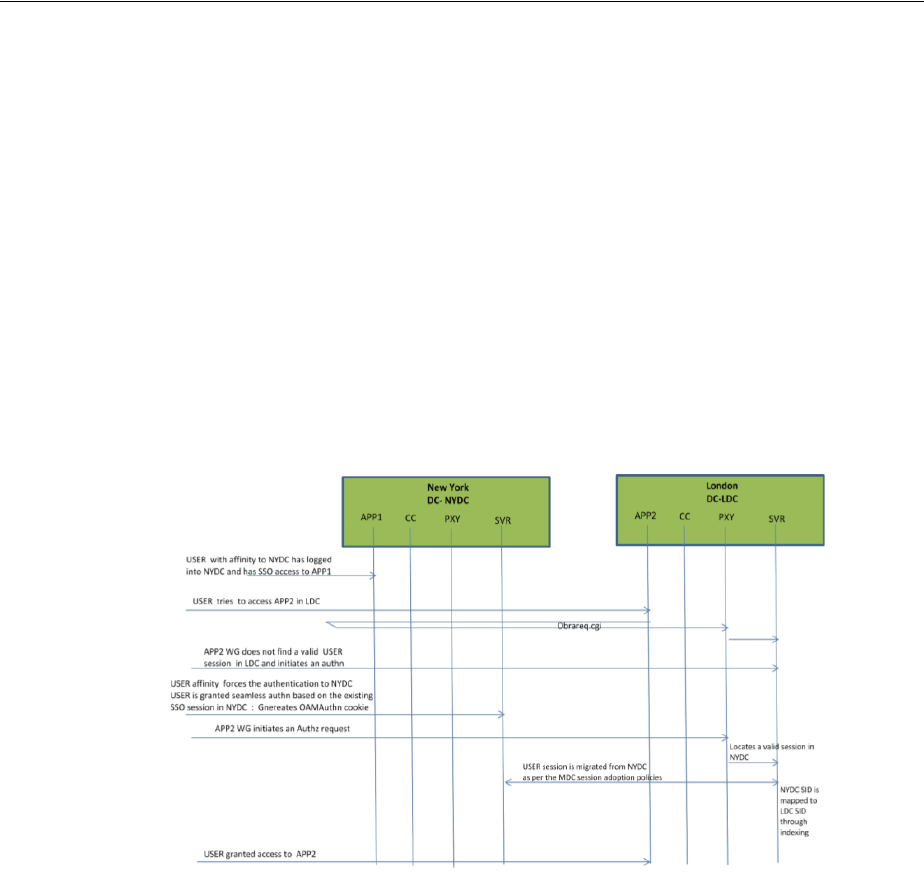
Understanding Multi-Data Center Deployments
7-14 Administrator's Guide for Oracle Access Management
During authorization, LDC will determine that this is a Multi-Data Center scenario
and a valid session is present in NYDC. In this case, authorization is accomplished
by syncing the remote session as per the configured session adoption policies.
5. A new session is created in LDC during authorization and the incoming session id
is set as the new session's index.
Subsequent authorization calls are honored as long as the session search by index
returns a valid session in LDC. Each authorization will update the GITO cookie
with the cluster-id, session-id and access time. The GITO cookie will be re-written
as an authorization response each time.
lf a subsequent authentication request from the same user hits NYDC, it will use
the information in the OAM_ID and GITO cookies to determine which Data
Center has the most current session for the user. The Multi-Data Center flows are
triggered seamlessly based on the configured Session Adoption policies.
Figure 7–5 Requests Served By Different Data Centers
7.2.5 Logout and Session Invalidation
In Multi-Data Center scenarios, logout ensures that all server side sessions across Data
Centers and all authentication cookies are cleared out. For session invalidation,
termination of a session artifact over the back-channel will not remove the session
cookie and state information maintained in the Webgates. However, the lack of a
server session will result in an Authorization failure which will result in
re-authentication. In the case of no session invalidation, the logout clears all server
side sessions that are part of the current SSO session across Data Centers. This flow
(and Figure 7–6 following it) illustrates logout. It is assumed that the user has affinity
with NYDC.
1. User with affinity to NYDC gets access to APP1 after successful authentication
with NYDC.
2. User attempts to access APP2.
At this point there is a user session in NYDC as well as LDC (refer to section 2.4.5)
as part of SSO.
3. User logs out from APP1.
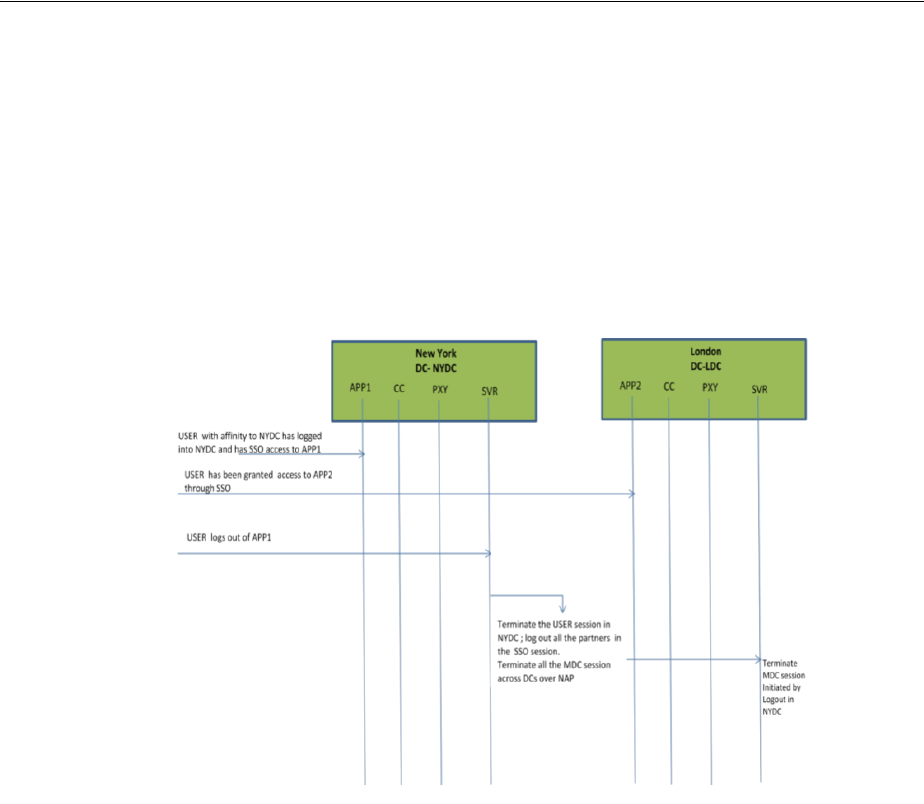
Before Deploying Multi-Data Centers
Using Multi-Data Centers 7-15
Due to affinity, the logout request will reach NYDC.
4. The NYDC server terminates the user's SSO session and logs out from all the SSO
partners.
5. The NYDC server sends an OAP terminate session request to all relevant Data
Centers associated with the SSO session - including LDC.
This results in clearing all user sessions associated with the SSO across Data
Centers.
Figure 7–6 Logout and Session Invalidation
7.3 Before Deploying Multi-Data Centers
The following pre-requisites must be satisfied before deploying Multi-Data Centers.
■All Data Center clusters must be front ended by a single Load Balancer. The load
balancer should send all requests in a user session consistently to the same
backend server (persistence, stickiness) and it should be route traffic
geographically (geo-affinity).
■Clocks on the machines in which Access Manager and agents are deployed must
be in sync. Non-MDC Access Manager clusters require the clocks of WebGate
agents be in sync with Access Manager servers. This requirement applies to the
MDC as well. If the clocks are out of sync, token validations will not be consistent
resulting in deviations from the expected behaviors regarding the token expiry
interval, validity interval, timeouts and the like.
■The identity stores in a Multi-Data Center topology must have the same Name.
■The first Data Center is designated as Master and will be cloned (using T2P tools)
for additional Data Centers.
■All configuration and policy changes are propagated from the Master to the Clone
using the WLST commands provided as part of the T2P Tooling.

Deploying Multi-Data Centers
7-16 Administrator's Guide for Oracle Access Management
■Each Data Center is a separate WebLogic Domain and the install topology is the
same.
■Any firewall between these Data Centers must allow communication over the
OAP channel between the data centers.
■Partners (WebGates or agents) are anchored to a single Data Center. Partner
registration is done at the individual Data Centers.
7.4 Deploying Multi-Data Centers
An Active-Active topology is when Master and Clone Data Centers are exact replicas
of each other (including applications, data stores and the like). They are active at the
same time and cater to different sets of users based on defined criteria - geography, for
example. A load balancer routes traffic to the appropriate Data Center. Identical Access
Manager clusters are deployed in both locales with New York designated as the
Master and London as the Clone.
Figure 7–7 illustrates the topology for a Multi-Data Center deployment in
Active-Active mode. The New York Data Center is designated as the Master and all
policy and configuration changes are restricted to it. The London Data Center is
designated as a Clone and uses T2P tooling and utilities to periodically synchronize
data with the New York Data Center. The global load balancer is configured to route
users in different geographical locations (US and Europe) to the appropriate data
centers (New York or Europe) based on proximity to the data center (as opposed to
proximity of the application being accessed). For example, all requests from US-based
User 1 will be routed to the New York Data Center (NYDC) and all requests from
Europe-based User 2 will be routed to the London Data Center (LDC).
Note: An Active-Active topology with agent failover is when an
agent has Access Manager servers in one Data Center configured as
primary and Access Manager servers in the other Data Centers
configured as secondary to aid failover scenarios.
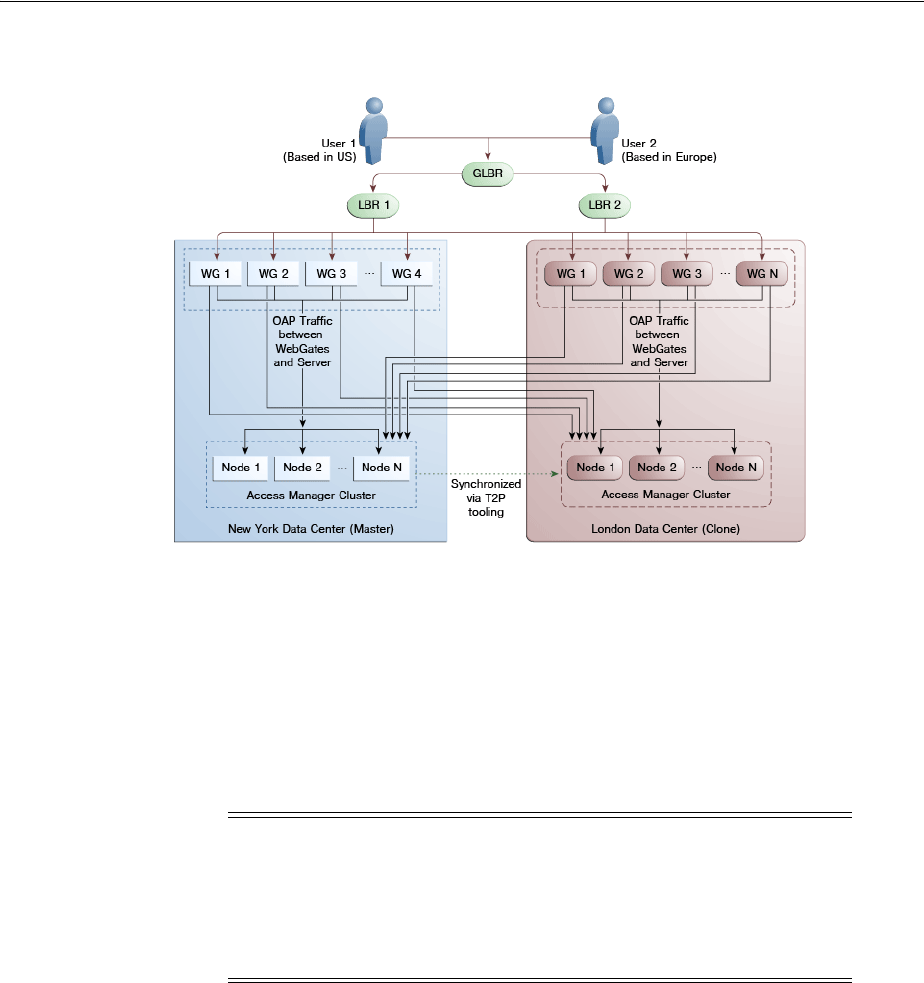
Deploying Multi-Data Centers
Using Multi-Data Centers 7-17
Figure 7–7 Active-Active Topology
The Global Load Balancer is configured for session stickiness so once a user has been
assigned to a particular data center, all subsequent requests from that user would be
routed to the same data center. In this example, User 1 will always be routed to the
New York Data Center and User 2 to the London Data Center.
User requests in the respective data centers are intercepted by different WebGates
depending on the application being accessed. Each WebGate has the various nodes of
the Access Manager cluster within the same data center configured as its primary
servers. In this case, the WebGates load balance and failover the local data center.
Any number of Clone data centers can be configured to distribute the load across the
globe. The only condition is that all Clone data centers are synchronized from a single
Master using T2P. Figure 7–8 below depicts an Active-Active Multi-Data Center
deployment across five data centers.
Note: Administrators have the flexibility to configure the primary
servers for every WebGate in different orders based on load
characteristics. Running monitoring scripts in each data center will
detect if any of the Access Manager components – the WebGates or the
servers – are unresponsive so administrators can reconfigure the load
balancers to direct user traffic to a different data center.
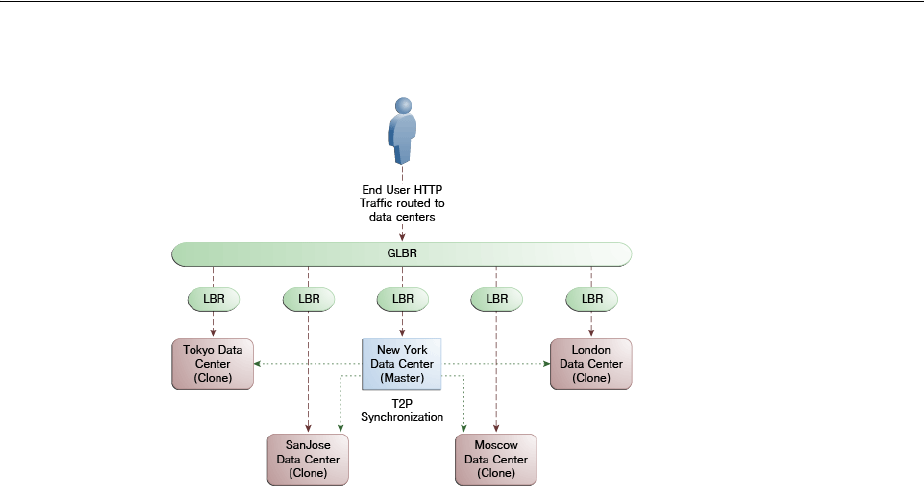
Load Balancing Between Access Management Components
7-18 Administrator's Guide for Oracle Access Management
Figure 7–8 Active-Active Topology Across Multiple Data Centers
7.5 Load Balancing Between Access Management Components
The topology described earlier shows global and local load balancers for routing the
end user HTTP traffic to various data centers. Additionally, customers can choose to
deploy load balancers between the access manager components to simplify the
configuration of the access manager components by using virtual host names. For
example, instead of configuring the primary servers in each WebGate in the NYDC as
ssonode1.ny.acme.com, ssonode2.ny.acme.com and so on, they can all point to a single
virtual hostname like sso.ny.acme.com and the load balancer will resolve the DNS to
direct them to various nodes of the cluster. However, while introducing a load
balancer between Access Manager components, there are a few constraining
requirements to keep in mind.
■OAP connections are persistent and need to be kept open for a configurable
duration even while idle.
■The WebGates need to be configured to recycle their connections proactively prior
to the Load Balancer terminating the connections, unless the Load Balancer is
capable of sending TCP resets to both the Webgate and the server ensuring clean
connection cleanup.
■The Load Balancer should distribute the OAP connection uniformly across the
active Access Manager Servers for each WebGate (distributing the OAP
connections according the source IP), otherwise a load imbalance may occur.
Figure 7–9 illustrates a variation of the deployment topology with local load balancers
(LBR 3 and LBR 4) front ending the clusters in each data center. These local load
balancers can be Oracle HTTP Servers (OHS). The OAP traffic still flows between the
WebGates and the Access Manager clusters within the data center but the load
balancers perform the DNS routing to facilitate the use of virtual host names.

Load Balancing Between Access Management Components
Using Multi-Data Centers 7-19
Figure 7–9 Load Balancing Access Manager Components
Figure 7–10 illustrates a second variation of the deployment topology with the
introduction of a global load balancer (GLBR2) to front end local load balancers (LBR3
and LBR4). In this case, the hostnames can be virtualized not just within the data
center but across the data centers. The WebGates in each data center would be
configured to load balance locally but fail over remotely. One key benefit of this
topology is that it guarantees high availability at all layers of the stack. Even if the
entire Access Manager cluster in a data center were to go down, the WebGates in that
data center would fail over to the Access Manager cluster in the other data center.
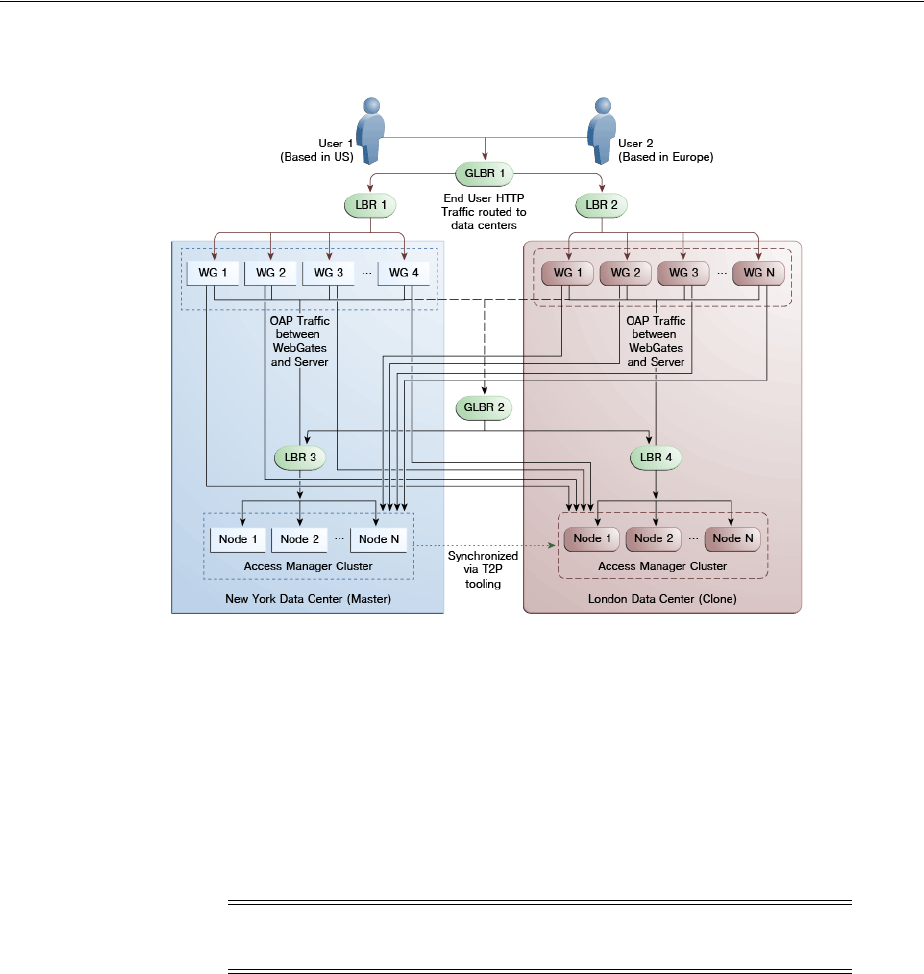
Setting Up A Multi-Data Center
7-20 Administrator's Guide for Oracle Access Management
Figure 7–10 Global Load Balancer Front Ends Local Load Balancer
For information on monitoring Access Manager server health with a load balancer in
use, see Section 12.7, "Monitoring the Health of an Access Manager Server."
7.6 Setting Up A Multi-Data Center
The MDC feature is disabled by default. To deploy an Access Manager MDC, start
with an Access Manager cluster, set all MDC global configurations and designate the
cluster as the Master Data Center. This procedure includes running the commands
documented in Section 7.9, "WLST Commands for Multi-Data Centers."
From the Master, clone the required number of Data Centers using the T2P process
explained in the following documents.
■See Oracle Fusion Middleware Administrator's Guide for information on T2P when
using WebLogic Server.
■See Oracle Fusion Middleware Third-Party Application Server Guide for Oracle Identity
and Access Management for information on T2P when using Websphere Server.
The following procedure contains more details.
1. Set up the primary Access Manager Data Center and designate it as the Master.
This Multi-Data Center can be an existing Access Manager cluster or a vanilla
installation. The Access Manager bootstrap assigns a unique
clusterId
to the
Access Manager cluster. To set a custom clusterId, use the
setMultiDataCentreClusterName
WLST command documented in Section 7.9.7,
"setMultiDataCentreClusterName."
Note: See Oracle Fusion Middleware WebLogic Scripting Tool Command
Reference for information on the WebLogic Scripting Tool.

Setting Up A Multi-Data Center
Using Multi-Data Centers 7-21
a. Perform the basic configurations.
This includes setting up the LDAP store, and configuring the security mode
[SIMPLE/CERT].
b. Enable MDC by running the
enableMultiDataCentreMode
WLST command.
This applies the global configurations.
c. Configure the global load balancer.
d. Validate the MDC configuration by running the
validateMDCConfig()
WLST
command.
e. Restart the Admin server.
f. Designate this Access Manager cluster as the Master Data Center.
enableMultiDataCentreMode sets an Access Manager cluster as Master, by
default. To explicitly set the DC type, use the
setMultiDataCenterType
WLST
command.
g. Deploy any applications and WebGates to the Data Center.
2. Clone the required number of clusters from the Master Data Center using the T2P
process.
a. R2PS1 Step Only: Before you begin cloning an Access Manager R2PS1 data
center, move the OPSS data from the source database to the target. Instructions
for performing this procedure can be found in the Oracle Fusion Middleware
Administrator's Guide.
b. After moving the OPSS data, copy the Access Manager from the source test
machine to the target production server using the following three sets of
commands.
On the Source Test machine, run:
export JAVA_HOME=/scratch/11gR2_Refresh/jRockit;
export MW_HOME=/scratch/R2PS2RC4Refresh/Middleware;
export T2P_HOME=/scratch/R2PS2RC4Refresh/T2P;
Note: This step contains the cloning procedure for R2PS1. If using
R2PS2, do the following:
■Run the rcu to create the schema required for Access Manager on
the target data center database.
■Skip step a.
■Export the Access Manager and OPSS data by running the
copyConfig command (as designated below) with the additional
-opssDataExport true
argument.
./copyConfig.sh -javaHome $JAVA_HOME -archiveLoc
$T2P_HOME/oamt2pConfig.jar
-sourceDomainLoc $WL_DOMAIN_HOME -sourceMWHomeLoc
$MW_HOME -domainHostName name.example.com
-domainPortNum 7001
-domainAdminUserName weblogic
-domainAdminPassword $T2P_HOME/t2p_domain_pass.txt
-silent true -ldl $T2P_HOME/oam_cln_log_config
-opssDataExport true -debug true;

Setting Up A Multi-Data Center
7-22 Administrator's Guide for Oracle Access Management
export WL_DOMAIN_HOME=$MW_HOME/user_projects/domains/base2_domain;
cd $MW_HOME/oracle_common/bin/;
Note : For the copyBinary command the Admin and
managed servers can be running or stopped
./copyBinary.sh -javaHome $JAVA_HOME -archiveLoc $T2P_HOME/oamt2pbin.jar
-sourceMWHomeLoc $MW_HOME -idw true
-ipl $MW_HOME/oracle_common/oraInst.loc
-silent true -ldl $T2P_HOME/oam_cln_log;
Note : For the copyConfig command the Admin and managed servers
should be up and running; see note above when running R2PS2
./copyConfig.sh -javaHome $JAVA_HOME -archiveLoc $T2P_HOME/oamt2pConfig.jar
-sourceDomainLoc $WL_DOMAIN_HOME -sourceMWHomeLoc
$MW_HOME -domainHostName name.example.com -domainPortNum 7001
-domainAdminUserName weblogic
-domainAdminPassword $T2P_HOME/t2p_domain_pass.txt
-silent true -ldl $T2P_HOME/oam_cln_log_config -debug true;
cp $MW_HOME/oracle_common/bin/pasteBinary.sh $T2P_HOME;
cp $MW_HOME/oracle_common/jlib/cloningclient.jar $T2P_HOME;
cp $MW_HOME/oracle_common/oraInst.loc $T2P_HOME;
On the target production server, run:
export JAVA_HOME=/scratch/PSFE_T2P_FINAL/jRockit/jRockit;
export MW_HOME=/scratch/PSFE_T2P_FINAL/Middleware;
export T2P_HOME=/scratch/PSFE_T2P_FINAL/T2P/T2P;
export WL_DOMAIN_HOME=
/scratch/PSFE_T2P_FINAL/Middleware/user_projects/domains/base15_domain;
Make a directory and copy the contents of $T2P_HOME on the source
machine to this directory. Use the appropriate copy command for the target
environment.
mkdir -p $T2P_HOME
cp -r /net/slc02ozn/$T2P_HOME/* $T2P_HOME
cd $T2P_HOME
./pasteBinary.sh -javaHome $JAVA_HOME -al /scratch/T2P_FIX/oamt2pbin.jar
-tmw $MW_HOME -silent true -idw true -esp false
-ipl /scratch/T2P_FIX/oraInst.loc -ldl /scratch/T2P_FIX/oam_cln_log_p
-silent true
cd $MW_HOME/oracle_common/bin
./extractMovePlan.sh -javaHome $JAVA_HOME -al $T2P_HOME/oamt2pConfig.jar
-planDirLoc $T2P_HOME/moveplan/
cp $T2P_HOME/moveplan/moveplan.xml $T2P_HOME/moveplan/moveplan.org
Also on the target production server, before running this pasteConfig
command, the moveplan.xml just extracted must be updated with the host
and port details of the Target Machine as well as the DATA SOURCE
details. Be sure that the moveplan modifications are reviewed carefully and

Setting Up A Multi-Data Center
Using Multi-Data Centers 7-23
the Target machine details are verified before running the following
pasteConfig command.
./pasteConfig.sh -javaHome $JAVA_HOME
-archiveLoc $T2P_HOME/oamt2pConfig.jar -targetMWHomeLoc $MW_HOME
-targetDomainLoc $WL_DOMAIN_HOME
-movePlanLoc $T2P_HOME/moveplan/moveplan.xml
-domainAdminPassword $T2P_HOME/t2p_domain_pass.txt
-ldl $T2P_HOME/oam_cln_log_paste_p -silent true
After these steps, the Access Manager Clone Cluster is set up and the
Admin Server started and running. The managed servers can be started as
needed.
3. Perform the following configurations for the clones created in the previous step.
a. Set a unique
clusterId
for all Clone Data Centers using the
setMultiDataCentreClusterName
WLST command.
setMultiDataCentreClusterName(clusterName="LonCluster")
The T2P process copies the Master
clusterId
to all clones.
b. Use the
addPartnerForMultiDataCentre
WLST command to configure and
register the MDC partners in all of the member Data Centers (Master and
Clones).
c. Open the necessary firewall ports in the Clone Data Centers to allow back
channel communication (required for onDemand session data retrieval).
d. Deploy any applications and WebGates to the Clone Data Centers.
4. Distribute the changes to all the member Data Centers using T2P commands.
5. Mark the member Data Centers as write protected by designating them as Clone
and read-only using the
setMultiDataCenterType
and
setMultiDataCenterWrite
WLST commands.
Note: An MDC partner profile is exposed by each data center and
used by other data centers to communicate with it. Registering an
MDC partner is a two step process. Consider an MDC with three data
centers. In DC1, expose an MDC partner profile by creating a 10g or
11g WebGate (DC1_MDC_Partner). Then, register DC1_MDC_Partner
in DC2 and DC3 using addPartnerForMultiDataCentre. See
Section 7.9.3, "addPartnerForMultiDataCentre" for details.
Note: In cases of load balancing based on the user's affinity, the load
balancer decides the target Data Center against which the
authentication will occur so an authentication request initiated by a
given WebGate can reach any of the member Data Centers. Thus, the
WebGate profiles need to be uniformly present across the member
Data Centers even though the applications are deployed selectively
across Data Centers. To sync this WebGate specific data following T2P,
use the exportPartners/importPartners and
exportPolicy/importPolicy WLST commands.

Syncing Multi-Data Centers
7-24 Administrator's Guide for Oracle Access Management
7.7 Syncing Multi-Data Centers
The Multi-Data Center infrastructure can be configured to keep Access Manager data
synchronized across multiple data centers. Previously, replication was addressed using
T2P tooling to setup the Master and Clones and any further changes are applied using
the WLST commands. In this 11gR2 release introduces Automated Policy
Synchromization (APS), an automated replication mechanism that removes
administrator and manual intervention from the data synchronization process. (The
T2P tooling and WLST command procedure used previous to this release is still
available.
When syncing data centers using APS, the following may occur:
■Establishment of a replication agreement with the registration of one data center as
a replication clone and another in a separate geographical location as its master;
the changes are pulled and applied to the clone.
■Definition of data center specific configurations which may not be replicated
across data centers.
■Tracking of Access Manager configuration changes in each data center and
querying the current replication state in any of the data centers.
■Generation of a changelog which can be applied in the context of a similar setup
running in another data center.
■Trigger of a pull from a master data center if there is a need; for example, if
automated replication fails.
■Replication of Access Manager configuration artifacts in Master-Clone model.
The following sections contain additional details.
■How Automated Policy Synchronizaton Works
■Understanding the Replication Agreement
■Enabling the Replication Service
7.7.1 How Automated Policy Synchronizaton Works
Automated Policy Synchronization works in a master-clone topology. In this topology,
multiple clones pull changes from a single master. One Data Center is defined by the
administrator as the master and one or more other Data Centers work as clones. The
administrator makes changes to the master and the clones replicate them. Only master
to clone replication is supported; changes to clones will not be replicated back to the
master.
To partake in APS, the supplier data center (initiater of the replication) and the clone
data center (receiver of the changes) must have a Replication Agreement stored in the
Access Manager data store. (APS is optional; administrator initiated import and export
based replication is still available.) Table 7–1 documents the states in which APS can be
deployed.
Note: Policy, system configuration and partner metadata will to be
synchronized
Note: Multi-master replication is not supported.
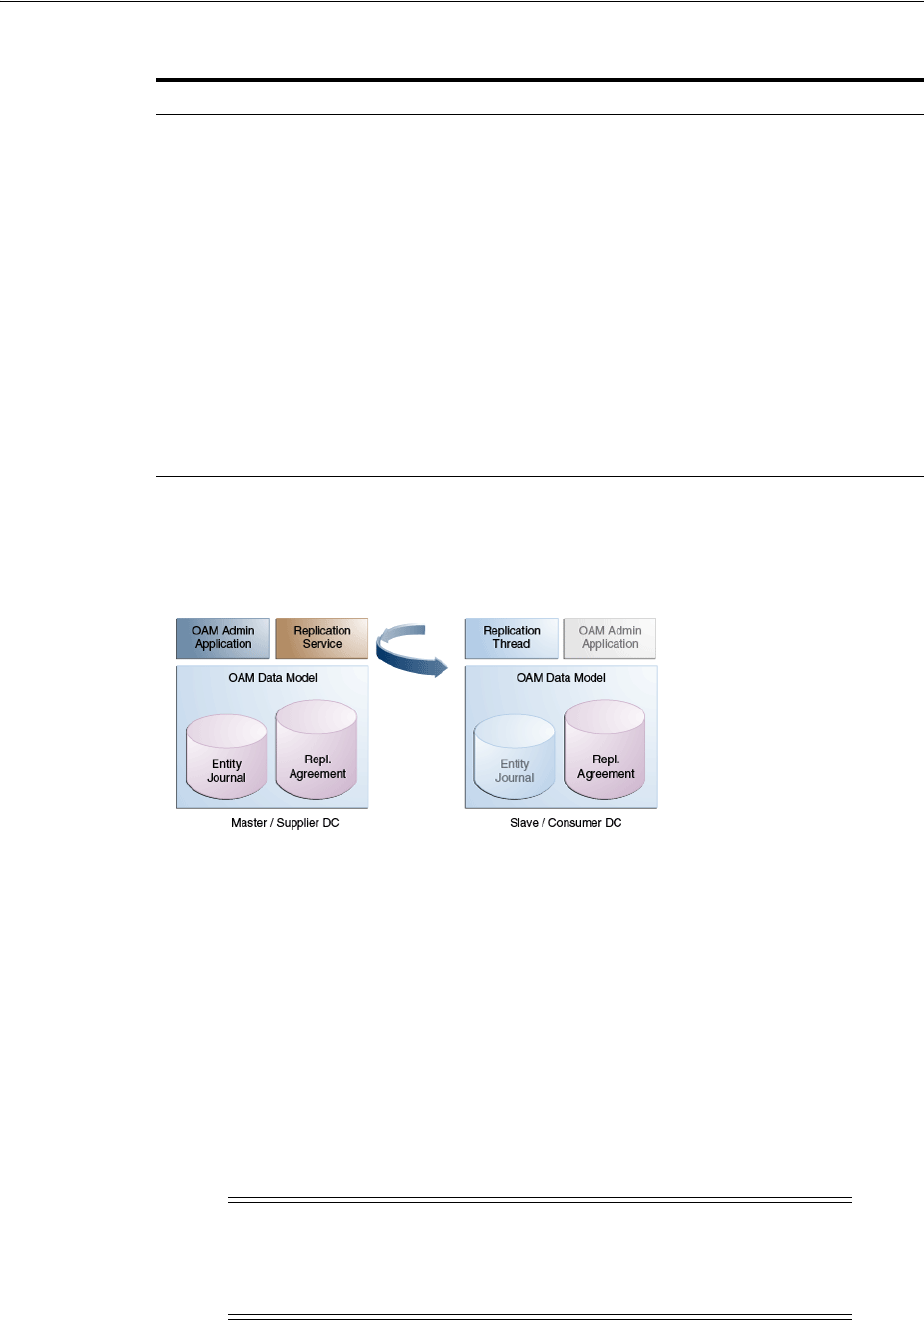
Syncing Multi-Data Centers
Using Multi-Data Centers 7-25
Figure 7–11 illustrates the flow of Automated Policy Synchronization.
Figure 7–11 Automated Policy Synchronization Flow
7.7.2 Understanding the Replication Agreement
APS replicates configuration changes (defined as journals) from a Master node to Clone
nodes. On receiving the journals, each node updates it's configuration to match the
journal and remains in the synchronized state. The nodes, though, need to enter a
replication agreement to receive change journals.
When a new data center is added to an existing MDC topology, it has to bootstrap
itself to be in sync with the existing data centers. This bootstrap operation will get the
current Access Manager policies, system configuration, partner metadata and server
keys for the existing MDC topology. After the bootstrap operation, the new data center
captures the last change sequence number from the topology's master so that during
replication it can be used to determine the current state.
Table 7–1 Automated Policy Synchronization - States of Replica
State Definition
Active An Access Manager domain (inlcuding Admin and managed
servers) is setup to serve access requests. In an active state, the
Access Manager server provides the web access management
functionalities without additional MDC features.
Bootstrapping This state is optional for some Data Centers; for example, the
first one in an MDC topology. A Data Center goes through this
intermediate state when added to an existing MDC topology.
The new DC contacts the master and bootstraps itself to the
same state. The bootstrap includes synchronizing the server
keys, policy artifacts, partners, and system configuration. After
completion of bootstrapping, the DC will be Replication Ready.
Replication Ready In this state, MDC is enabled, the DC is made part of the
topology, and the replication service is enabled. Once enabled, a
clone can be registered with the master via a Replication
Agreement. Once established, clone DCs can query and start
pulling changelogs from the master.
Note: Automated bootstrap is the ideal scenaro but (in R2PS2) you
can execute T2P tooling first to ensure the Master configuration and
Clones are in the same state. Following this, APS can be enabled and
setup for sync. See Enabling the Replication Service for details.

Syncing Multi-Data Centers
7-26 Administrator's Guide for Oracle Access Management
To establish replication, the clone data center must know the supplier's change log
sequence number. If the data center is added to the topology on 'day 0' and the
replication agreement was created on 'day N', there is a need to bootstrap again. To
avoid this and to keep the flow simple, creating a replication agreement should take
care of the bootstrap and actual replication agreement creation. See Enabling the
Replication Service for details.
7.7.3 Enabling the Replication Service
The Replication Service is a set of REST API. The binaries are installed as part of the
Access Manager application and deployed in AdminServer. It is disabled by default
but can be enabled by setting the
oracle.oam.EnableMDCReplication
property to true.
After enabling the service, create a pull model Replication Agreement between the
clone data center and the master. The clone polls for changes from the master as long
as the replication agreement is valid for it. The master will respond to the clone's
request as long as it finds a valid replication agreement. The clone pulls changes from
the master and applies them locally.
The following sections contain details on how to use the REST API provided by Access
Manager. They need to be executed at the master data center's end point.
■Setting Up Replication Using REST
■Querying for Replication Agreement Details
■Modifying an Existing Replication Agreement
■Deleting a Replication Agreement
7.7.3.1 Setting Up Replication Using REST
The example in this section assumes that DC1 is the master located at
oam1.oracle.com. DC2 is cloned from DC1 using the T2P process and is located at
oam2.oracle.com.
Note: To verify that the replication REST services are available,
access the following hello REST end point.
curl -u <user>
'https://oam1.example.com:7002/oam/services/rest/_
replication/hello'

Syncing Multi-Data Centers
Using Multi-Data Centers 7-27
This following REST request will:
■Insert an entry in the Master's replication agreement store that contains details
regarding the clone that wants to pull changes.
■Insert an entry in the Clone's replication agreement store that contains details
regarding the master and values like the poll interval.
POST http://oam1.oracle.com/oam/services/rest/_replication/setup HTTP/1.1
Content-Type: application/json
{"name":"DC12DC2", "source":"DC1","target":"DC2","documentType":"ENTITY"}
In response to this REST request, the Master provides its starting sequence number for
the changelog repository. The starting sequence number is used to update the Clone's
replication agreement to the sequence number from which the replication will occur.
The identifier returned is used for replication related queries.
{"enabled":"true","identifier":"201312040602298762","ok":"true","pollInterval":"60
","startingSequenceNumber":"10","state":"READY"}
In the previous example, all records before the value of the startingSequenceNumber
(10) are not available. It is implicit that the bootstrap happened before creating the
replication agreement and the Clone can start pulling changes from sequence number
10. The Clone also has an entry created in its local replication table which keeps track
of the last sequence number
Note: For replication, the partnerInfo.properties file used for WLST
input should have an additional
RESTEndpoint
property (sample
below). Its value is the HTTP endpoint for invoking replication related
REST services. See addPartnerForMultiDataCentre.
remoteDataCentreClusterId=DC1
oamMdcAgentId=DC1Partner
PrimaryHostPort=dc1.oracle.com:5575
SecondaryHostPort=dc1.oracle.com:5576
AccessClientPasswd=secret
oamMdcSecurityMode=OPEN
trustStorePath=NA
keyStorePath=NA
globalPassPhrase=NA
keystorePassword=NA
agentVersion=11g
RESTEndpoint=https://oam1.oracle.com:443
Note: The REST end point can be an HTTP or HTTPS URL. HTTPS is
preferred.

Syncing Multi-Data Centers
7-28 Administrator's Guide for Oracle Access Management
The replication agreement needs to be done for each Master-Clone pair. Once finished,
Clones may periodically start pulling changes from their Master. See Understanding
the Replication Agreement. After replication is enabled, in both Master and Clone data
centers, execute the addPartnerForMultiDataCentre WLST command for each of
master and clone node to register all as MDC partners.
7.7.3.2 Querying for Replication Agreement Details
A REST request can be executed at the Master data center's endpoint to query the
details of the replication agreement between a Master and a Clone. To query details of
a Master, use the following:
GET http://oam1.oracle.com/oam/services/rest/_replication/201312040602298762
HTTP/1.1
Content-Type: application/json
To query details of a clone, use the following:
GET http://oam1.oracle.com/oam/services/rest/_
replication/201312040602298762?type=clone HTTP/1.1 HTTP/1.1
Content-Type: application/json
7.7.3.3 Modifying an Existing Replication Agreement
Replication Agreement properties (enabled status, poll interval and the like) can be
updated by executing the following REST API at the Master data center's endpoint.
Either the master or clone replication agreement will be updated as specified by the
value of the replicaType parameter. The default value for the pollInterval parameter
for a clone is 900 seconds. The clone will poll for changes, apply them and wait the
specified duration.
PUT http://oam1.oracle.com/oam/services/rest/_replication/201312040602298762
HTTP/1.1
Content-Type: application/json
{"enabled":"false","pollInterval":"60","replicaType":"clone"}
This example will disable the clone replication agreement and change the poll interval
to '60' seconds. If a value for replicaType is not defined (or it is mentioned as
SUPPLIER) the master's replication agreement will be updated.
Note: The Weblogic user and password will be used for
authentication when replication polling happens from the Clone to the
Master. To call a different user for replication, a valid basic
authorization header can be provided for the Clone. In the following
example, 'replicationuser' and 'secret' are user and password
(respectively) and "BASIC cmVwbGljYXRpb251c2VyOnNlY3JldA=="
is the basic header (base64 encrypted with user and password) to be
used for REST calls. User details will be seeded to both the Master and
Clone.
curl -u weblogic:welcome1 -H 'Content-Type: application/json'
-X POST 'http://adc1140321.example.com:7001/oam/services/rest
/_replication/setup' -d
'{"source":"DC1","target":"DC2","documentType":"ENTITY",
"config":{"entry":{"key":"authorization",
"value":"BASIC cmVwbGljYXRpb251c2VyOnNlY3JldA=="}}}'

Understanding Time Outs and Session Syncs
Using Multi-Data Centers 7-29
7.7.3.4 Deleting a Replication Agreement
A replication agreement can be deleted by executing the following REST API at the
master DC's endpoint. Replication Agreements that are currently active and in use
cannot be deleted until the master and clone have been disabled.
DELETE http://oam1.oracle.com/oam/services/rest/_replication/
201312040602298762 HTTP/1.1
7.8 Understanding Time Outs and Session Syncs
The following sections contain information on how the Multi-Data Center deals with
session time outs and syncs.
■Ensuring Maximum Session Constraints
■Configuring Policies for Idle Timeout
■Expiring Multi-Data Center Sessions
■Synchronizing Sessions and Multi-Data Center Fail Over
7.8.1 Ensuring Maximum Session Constraints
Credential Collector user affinity ensures that maximum session constraints per user
are honored. There is no Multi-Data Center session store to validate allowed
maximum sessions per user.
7.8.2 Configuring Policies for Idle Timeout
The OAM_ID and OAM_GITO cookies are used to calculate and enforce idle
(inactivity) timeouts. The OAM_GITO cookie, though, can be set only if there is a
common sub-domain across WebGates. Thus, Multi-Data Center policies should be
configured based on whether or not the OAM_GITO cookie is set. Table 7–2
documents the policy configurations.
Table 7–2 Multi-Data Center Policy Configurations for Idle Timeout
OAM_GITO Set Multi-Data Center Policies
Yes
Idle timeout will be
calculated from the latest
OAM_GITO cookie
SessionMustBeAnchoredToDataCenterServicingUser=<true/false>
SessionDataRetrievalOnDemand=true
Reauthenticate=false
SessionDataRetrievalOnDemandMax_retry_attempts=<number>
SessionDataRetrievalOnDemandMax_conn_wait_
time=<milliseconds>
SessionContinuationOnSyncFailure=<true/false>
MDCGitoCookieDomain=<sub domain>

Understanding Time Outs and Session Syncs
7-30 Administrator's Guide for Oracle Access Management
7.8.3 Expiring Multi-Data Center Sessions
Session expiration will be managed by the Data Center with which the user has
affinity. Users have affinity to a particular Data Center based on the global trffic
manager/load balancer.
7.8.4 Synchronizing Sessions and Multi-Data Center Fail Over
Access Manager server side sessions are created and maintained based on single
sign-on (SSO) credentials. The attributes stored in the session include (but are not
limited to) the user identifier, an identity store reference, subject, custom attributes,
partner data, client IP address and authentication level. SSO will be granted if the
server can locate a valid session corresponding to the user's request.
In a Multi-Data Center scenario, when a user request hops across Data Centers, the
Data Center servicing the request should validate for a legitimate session locally and
across Data Centers. If a valid session for a given request exists in a remote Data
Center, the remote session needs to be migrated to the current Data Center based on
the MDC session synchronization policies. (See Section 7.2, "Understanding
Multi-Data Center Deployments" for details.) During this session synchronization, all
session attributes from the remote session are synced to the newly created session in
the Data Center servicing the current request.
The Multi-Data Center also supports Webgate failover across Data Centers. When a
Webgate fails over from one Data Center to a second, the session data can not be
synchronized because the first Data Center servers are down. Thus, the second Data
Center will decide whether or not to proceed with the session adoption based on the
setting configured for
SessionContinuationOnSyncFailure
. When true, even if the
OAP communication to the remote Data Center fails, the Data Center servicing the
current request can proceed to create a new session locally based on the mandatory
attributes available in the cookie. This provides seamless access to the requested
resource despite the synchronization failure. Table 7–3 summarizes prominent session
synchronization and failover scenarios.
No
Idle time out will be
calculated from the
OAM_ID cookie because
OAM_GITO is not
available
SessionMustBeAnchoredToDataCenterServicingUser=false
SessionDataRetrievalOnDemand=true
Reauthenticate=false
SessionDataRetrievalOnDemandMax_retry_attempts=<number>
SessionDataRetrievalOnDemandMax_conn_wait_
time=<milliseconds>
SessionContinuationOnSyncFailure=<true/false>
#MDCGitoCookieDomain= This setting should be commented or
removed
Table 7–2 (Cont.) Multi-Data Center Policy Configurations for Idle Timeout
OAM_GITO Set Multi-Data Center Policies

Understanding Time Outs and Session Syncs
Using Multi-Data Centers 7-31
Table 7–3 Session Synchronization and Failover Scenarios
MDC
Deployment MDC Policy
Validate
Remote
Session
Session
Synchronized
in DC
Servicing
User From
Remote DC
Terminate
Remote
Session User Challenged
Active-Active SessionMustBeAnchoredToDataCen
terServicingUser=true
SessionDataRetrievalOnDemand=tr
ue
Reauthenticate=false
SessionDataRetrievalOnDemandMa
x_retry_attempts=<number>
SessionDataRetrievalOnDemandMa
x_conn_wait_time=<milliseconds>
SessionContinuationOnSyncFailure
= false
MDCGitoCookieDomain=<sub
domain>
Yes Yes Yes When a valid
session could not
be located in a
remote DC

Understanding Time Outs and Session Syncs
7-32 Administrator's Guide for Oracle Access Management
Active-Active SessionMustBeAnchoredToDataCen
terServicingUser=false
SessionDataRetrievalOnDemand=tr
ue
Reauthenticate=false
SessionDataRetrievalOnDemandMa
x_retry_attempts=<number>
SessionDataRetrievalOnDemandMa
x_conn_wait_time=<millisecon
ds>
SessionContinuationOnSyncFailure
= false
MDCGitoCookieDomain=<sub
domain>
Yes Yes No When a valid
session could not
be located in a
remote DC
Active-Standby SessionMustBeAnchoredToDataCen
terServicingUser=true
SessionDataRetrievalOnDemand=tr
ue
Reauthenticate=false
SessionDataRetrievalOnDemandMa
x_retry_attempts=<number>
SessionDataRetrievalOnDemandMa
x_conn_wait_time=<millisecon
ds>
SessionContinuationOnSyncFailure
= false
MDCGitoCookieDomain=<sub
domain>
Could
not
validate
as the
remote
DC is
down
No, since the
remote DC is
down
Could not
terminate
as the
remote
DC is
down
Yes
Active-Standby SessionMustBeAnchoredToDataCen
terServicingUser=true
SessionDataRetrievalOnDemand=tr
ue
Reauthenticate=false
SessionDataRetrievalOnDemandMa
x_retry_attempts=<number>
SessionDataRetrievalOnDemandMa
x_conn_wait_time=<milliseconds>
SessionContinuationOnSyncFailure
= true
MDCGitoCookieDomain=<sub
domain>
Could
not
validate
as the
remote
DC is
down
No, since the
remote DC is
down
Could not
terminate
as the
remote
DC is
down
No
Provides seamless
access by creating
a local session
from the details
available in the
valid cookie
Table 7–3 (Cont.) Session Synchronization and Failover Scenarios
MDC
Deployment MDC Policy
Validate
Remote
Session
Session
Synchronized
in DC
Servicing
User From
Remote DC
Terminate
Remote
Session User Challenged

WLST Commands for Multi-Data Centers
Using Multi-Data Centers 7-33
7.9 WLST Commands for Multi-Data Centers
The following WebLogic Scripting Tool (WLST) commands are specific to Multi-Data
Center deployment. More information is in the following sections.
■enableMultiDataCentreMode
■disableMultiDataCentreMode
■addPartnerForMultiDataCentre
■removePartnerForMultiDataCentre
■setMultiDataCenterType
■setMultiDataCenterWrite
■setMultiDataCentreClusterName
■validateMDCConfig
7.9.1 enableMultiDataCentreMode
Online command used to enable Multi-Data Center mode.
7.9.1.1 Description
This command enables Multi-Data Center mode. It takes a value equal to the full path
to, and name of, the MDC.properties file.
7.9.1.2 Syntax
enableMultiDataCentreMode(propfile="../MDC_properties/oamMDCProperty.properties")
Note: Setting the SSO Token version to 5 is not supported from the
administration console. To do this, modify the Access Manager
Settings page and run the
enableMultiDataCentreMode
WLST
command to set.
Argument Definition
propfile
Mandatory. Takes a value equal to the full path to, and name of, the
oamMDCProperty.properties
file. Table 7–4 documents the properties
that comprise
the file.
Example 7–1 (following the table) is a
sample oamMDCProperty.properties file.
Table 7–4 oamMDC.properties Properties
Property Definition
SessionMustBeAnchoredToDataCenterServicing
User
Takes a value of True (Invalidate) or False
(No Invalidation).
SessionDataRetrievalOnDemand Takes a value of True (Cross DC retrieval) or
False (No). Data retrieval can be turned off
without disabling MDC. If False, session data
is not transferred but SSO is still performed
as the user moves across DCs.
Reauthenticate Takes a value of True (force reauthentication)
or False (No forced reauthentication).

WLST Commands for Multi-Data Centers
7-34 Administrator's Guide for Oracle Access Management
Example 7–1 Sample oamMDCProperty.properties File
SessionMustBeAnchoredToDataCenterServicingUser=true
SessionDataRetrievalOnDemand=true
Reauthenticate=true
SessionDataRetrievalOnDemandMax_retry_attempts=3
SessionDataRetrievalOnDemandMax_conn_wait_time=80
SessionContinuationOnSyncFailure=true
#MDCGitoCookieDomain=.oracle.com <This setting should be provided only if there is
a common cookie subdomain across the WGs and DCs>
7.9.1.3 Example
The following command enables this data center.
enableMultiDataCentreMode(propfile="../MDC_properties/oamMDCProperty.properties")
7.9.2 disableMultiDataCentreMode
Online command used to disable Multi-Data Center mode.
7.9.2.1 Description
This command disables Multi-Data Center mode.
7.9.2.2 Syntax
disableMultiDataCentreMode()
There are no arguments for this command.
7.9.2.3 Example
The following command disables Multi-Data Center mode.
disableMultiDataCentreMode()
SessionDataRetrievalOnDemandMax_retry_
attempts
Takes a value equal to a binary that
represents the number of times to retry data
retrieval when it fails. Default is 2.
SessionDataRetrievalOnDemandMax_conn_
wait_time
Takes a value equal to a binary that
represents the total amount of time in
seconds to wait for a connection. Default is
1000.
SessionContinuationOnSyncFailure Takes a value of True (Invalidation/Retrieval
must succeed) or False (ignore Failure).
MDCGitoCookieDomain Specifies the domain with which the OAM_
GITO cookie should be set. In MDC
deployments where a common cookie
domain hierarchy cannot be derived, this
setting should be commented or removed as
described in Inactivity time outs scenario.
Table 7–4 (Cont.) oamMDC.properties Properties
Property Definition

WLST Commands for Multi-Data Centers
Using Multi-Data Centers 7-35
7.9.3 addPartnerForMultiDataCentre
In an MDC deployment with
n
number of Data Centers, each Data Center has a
registered partner to communicate with each of the other (n-1) Data Centers. This
makes the total number of partner registrations (n) x (n-1). This online command is
used to add a partner for inter Data Center OAP communication.
7.9.3.1 Description
This command adds a partner to the Data Center. It takes a value equal to the full path
to, and name of, the
partnerInfo.properties
file.
7.9.3.2 Syntax
addPartnerForMultiDataCentre(propfile="../MDC_properties/partnerInfo.properties")
Table 7–5 documents the properties that comprise
partnerInfo.properties
. See
Section 7.1.3, "Understanding Access Manager Security Modes for Multi-Data Center"
for properties file samples.
Note: An MDC partner profile is exposed by each data center and
used by other data centers to communicate with it. Registering an
MDC partner is a two step process. Consider an MDC with three data
centers. In DC1, expose an MDC partner profile by creating a 10g or
11g WebGate (DC1_MDC_Partner). Then, register DC1_MDC_Partner
in DC2 and DC3 using addPartnerForMultiDataCentre. See
Section 7.9.3, "addPartnerForMultiDataCentre" for details.
Argument Definition
propfile
Mandatory. Takes a value equal to the path to, and name of, the
partnerInfo.properties file.
RESTEndpoint
Optional. Takes as a value the HTTP/HTTPS URL from which the
Access Manager REST services can be accessed.
Table 7–5 partnerInfo.properties Properties
Property Definition
remoteDataCentreClusterId Cluster id of the remote Data Center with which the OAP
communication needs to be established.
oamMdcAgentId Partner ID of the registered partner profile in the remote Data
Center. The "allow management operations" flag for this partner
should be set in the remote Data Center.
PrimaryHostPort Takes a fully-qualified-host-name:OAM-port for the primary Access
Manager server corresponding to the remote DC identified by
remoteDataCentreClusterId; for example:
PrimaryHostPort=abc.example.com:5575

WLST Commands for Multi-Data Centers
7-36 Administrator's Guide for Oracle Access Management
7.9.3.3 Example
The following command defines this data center as a Master.
addPartnerForMultiDataCentre(propfile="../MDC_properties/partnerInfo.properties")
7.9.4 removePartnerForMultiDataCentre
Online command used to remove a registered remote partner from the Data Center
configuration.
7.9.4.1 Description
This command removes a registered remote partner from a configured Data Center. It
takes a value equal to a valid remoteDataCentreClusterId.
7.9.4.2 Syntax
removePartnerForMultiDataCentre=("<cluster_ID>")
SecondaryHostPort Takes a fully-qualified-host-name:OAM-port for the secondary
Access Manager server corresponding to the remote DC
identified by remoteDataCentreClusterId; for example:
SecondaryHostPort=abc.example.com:5577
Consider an OAM MDC member Data Center with two
managed servers at abc.example.com with ports as follows:
oam_server1 (5575) and oam_server2 (5577). High
availability/failover of the OAP SDK partner can be achieved by
setting the PrimaryHostPort and SecondaryHostPort as below.
PrimaryHostPort=abc.example.com:5575
SecondaryHostPort=abc.example.com:5577
AccessClientPasswd The access client password of the MDC partner registered in the
remote Data Center.
oamMdcSecurityMode Defines the MDC security mode. Takes a value of
OPEN/SIMPLE/CERT. (CERT Mode is preferred, SIMPLE is
fine but OPEN is discouraged.)
For SIMPLE and CERT modes, the following values should be
supplied appropriately. For OPEN mode, these values are not
applicable.
agentVersion Valid agent version 11g/10g.
trustStorePath Absolute path to the truststore file [SIMPE/CERT].
keyStorePath Absolute path to the keyStore file [SIMPLE/CERT].
globalPassPhrase Global passphrase set during the partner registration
[SIMPLE/CERT].
keystorePassword Key store password set during partner configuration
[SIMPLE/CERT].
Argument Definition
cluster_ID
Mandatory. Takes a string value equal to the cluster ID.
Table 7–5 (Cont.) partnerInfo.properties Properties
Property Definition

WLST Commands for Multi-Data Centers
Using Multi-Data Centers 7-37
7.9.4.3 Example
The following command defines the partner to be removed.
removePartnerForMultiDataCentre("99bf9-adc2120609")
7.9.5 setMultiDataCenterType
Online command used to set the type of data center - either Master or Clone.
7.9.5.1 Description
In an MDC deployment one Data Center is designated as the Master and the others as
a Clone. Essentially all MDC wide global configurations and policy updates should be
applied to the Master and propagated to the Clones using the supported T2P
commands. This command sets the type of the data center. Values are Master or Clone.
7.9.5.2 Syntax
setMultiDataCenterType(DataCenterType="<Master|Clone>")
7.9.5.3 Example
The following command defines this data center as a Master.
setMultiDataCenterType(DataCenterType="Master")
7.9.6 setMultiDataCenterWrite
Online command used to set controls for modifications to system and policy
configurations.
7.9.6.1 Description
Clone Data Centers can be write protected so no updates can be made to the system or
policy configurations. Values are true or false.
7.9.6.2 Syntax
setMultiDataCenterWrite(WriteEnabledFlag="<true|false>")
7.9.6.3 Example
The following command enables modifications to the system and policy
configurations.
setMultiDataCenterWrite(WriteEnabledFlag = "true")
Argument Definition
DataCenterType
Mandatory. Takes a string value of Master or Clone.
Argument Definition
WriteEnabledFlag
Mandatory. Takes a string value of true or false.

Replicating Domains with Multi-Data Centers and Identity Manager
7-38 Administrator's Guide for Oracle Access Management
7.9.7 setMultiDataCentreClusterName
Online command to set the cluster name of the Data Center to the supplied string.
7.9.7.1 Description
This command sets the Multi-Data Center cluster name. Value is a string.
7.9.7.2 Syntax
setMultiDataCentreClusterName(clusterName="<string_value>")
7.9.7.3 Example
The following command enables this data center.
setMultiDataCentreClusterName(clusterName="MyCluster")
7.9.8 validateMDCConfig
Online command used to insure the Multi-Data Center configuration is correct.
7.9.8.1 Description
This command validates that the required entries in the Multi-Data Center
configuration are present in
oam-config.xml
. For the MDC solution, a new Access
Manager event named
mdc_session_update
is required to create or update MDC
sessions during authorization. The Access Manager event model requires a set of
configurations to be present in the
oam-config.xml
configuration file. The required
configurations cannot be added statically so
validateMDCConfig
validates the required
entries for
mdc_session_update
and seeds any configurations not already present.
7.9.8.2 Syntax
validateMDCConfig()
There are no arguments for this command.
7.9.8.3 Example
The following command validates the MDC configuration.
validateMDCConfig()
7.10 Replicating Domains with Multi-Data Centers and Identity Manager
If you have a deployment where Access Manager 11.1.2.1.0 and Oracle Identity
Manager (11.1.2.1.0) are integrated in the same domain, Test-to-Production (T2P)
cannot be used for domain replication because Identity Manager does not support T2P.
In this case, Access Manager and Identity Manager should be installed in different
domains using the following procedure.
1. Install Access Manager.
2. Run
configureSecurityStore (-create)
.
Argument Definition
clusterName
Mandatory. Takes a string equal to the cluster name.

Multi-Data Center Recommendations
Using Multi-Data Centers 7-39
3. Start Access Manager.
Remember to enable TRACE logging with instrumented EAR.
4. Install Identity Manager.
5. Run
configureSecurityStore (-join)
.
6. Update the default passwords for the Access Manager and Identity Manager
domains in
$DOMAIN_HOME/config/fmwconfig/default-keystore.jks
password
using the
keytool
command.
7. Set the same password values in the CSF using the EM console.
a. Navigate to the domain_name of the appropriate Weblogic domain.
b. Right click the domain_name and navigate to Security --> Credentials.
c. Expand the
oracle.wsm.security
Credential map and edit the value of
keystore-csf-key
.
d. Update password and confirm password fields with the password.
This password should be same as the new password for
default-keystore.jks
in both Access Manager and Identity Manager
domains
8. Map oracle.wsm.security with the Key keystore-csf-key.
9. Start Identity Manager.
10. Restart Access Manager and Identity Manager.
7.11 Multi-Data Center Recommendations
This section contains recommendations regarding the Multi-Data Center functionality.
■Using a Common Domain
■Using an External Load Balancer
■Honoring Maximum Sessions
7.11.1 Using a Common Domain
It is recommended that WebGates be domain-scoped in a manner that a common
domain can be inferred across all WebGates and the OAM Server Credential
Collectors. This allows for WebGates to set an encrypted GITO cookie to be shared
with the OAM Server. For example, if WebGates are configured on
applications.abc.com and the OAM Server Credential Collectors on server.abc.com,
abc.com is the common domain used to set the GITO cookie. In scenarios where a
common domain cannot be inferred, setting the GITO cookie is not practical as a given
Data Center may not be aware of the latest user sessions in another Data Center. This
would result in the Data Center computing session idle-timeout based on old session
data and could result in re-authenticating the user even though a more active session
lives elsewhere.
Note: A similar issue occurs during server fail-over when the
SessionContinuationOnSyncFailure property is set. The expectation is
to retrieve the session from contents of the OAM_ID cookie. Since it's
not possible to retrieve the actual inactivity time out value from the
GITO cookie, a re-authentication could result.

Cloning with T2P
7-40 Administrator's Guide for Oracle Access Management
When there is no common cookie domain across WebGates and OAM servers, make
the following configuration changes to address idle time out issues.
■Run the
enableMultiDataCentreMode
WLST command after removing the
MDCGitoCookieDomain property from the input properties file.
■Set the value of the WebGate cookie validity lower than the value of the session
idle time out proeprty. Consider a session idle time out value of 30 minutes and a
WebGate cookie validity value of 15 minutes; in this case, every 15 minutes the
session will be refreshed in the authenticating Data Center.
7.11.2 Using an External Load Balancer
This patch uses the 11g SDK API to retrieve session data but this API does not support
SDK based load-balancing across the configured set of primary servers. Use an
external TCP based load balancer to front-end the NAP endpoints of the Data Center
nodes where high performance is expected.
7.11.3 Honoring Maximum Sessions
A typical Multi-Data Center scenario authenticates users against the Data Center with
which the user geography has an affinity. In the rare scenarios where user
authentication and session creation for a given user spans across member Data Centers
(bypassing geographic affinity and load spike), the maximum sessions the user has in
the whole Multi-Data Center topology would not be honored.
7.12 Cloning with T2P
This document contains steps and prerequisites to cloning an Access Manager R2PS1
data center. There are two procedures involved.
1. Move the OPSS data to the target database.
2. Copy the OAM from source to Target.
7.12.1 Move OPSS Data
Moving the OPSS data tier is not applicable Moving the data tier if applicable [Not
applicable if the T2P is done for OAM alone.]
The procedure to move the OPSS data tier can be found in the Refer to the steps in
http://docs.oracle.com/cd/E27559_01/core.1112/e28516/testprod.htm#autoId5 for
this
Scenario:
The following steps can be used to clone a freshly installed OAM or an existing OAM
set up.
Moving OPSS data to the Clone: (http://docs.oracle.com/cd/E27559_
01/core.1112/e28516/testprod.htm#CHDHAFCE)
Note: Failover between primary and secondary OAM servers are
supported in the current release of 11g SDK APIs.

Part III
Part III
Logging, Auditing, Reporting and Monitoring
Performance
Part III provides information to help you perform logging, auditing, and performance
monitoring for Oracle Access Management services.
Part III contains the following chapters:
■Chapter 8, "Logging Component Event Messages"
■Chapter 10, "Logging WebGate Event Messages"
■Chapter 9, "Auditing Administrative and Run-time Events"
■Chapter 11, "Reporting"
■Chapter 12, "Monitoring Performance and Health"
■Chapter 13, "Monitoring Performance and Logs with Fusion Middleware Control"

8
Logging Component Event Messages 8-1
8
Logging Component Event Messages
Logging is the mechanism by which components and services write messages to a log
file to capture critical component events, process, and state information.
Administrators can configure logging to provide information at various levels of
granularity using the same logging infrastructure and guidelines as any other
component in Oracle Fusion Middleware 11g:
java.util.logging
(standard and
available in all Java environments). The logging system writes output to flat files only.
Logging to an Oracle Database instance is not supported.
Configuring logging and locating log files are the focus of this chapter. Diagnosing
problems using the information in log files is outside the scope of this manual.
This chapter includes the following topics:
■Prerequisites
■Introduction to Logging Component Event Messages
■Configuring Logging for Access Manager
■Configuring Logging for Security Token Service and Identity Federation
■Validating Run-time Event Logging Configuration
8.1 Prerequisites
Before you can perform tasks in this chapter ensure that the Oracle Access
Management Console and a managed OAM Server are running.
Oracle recommends that you review Chapter 6, "Managing Server Registration".
8.2 Introduction to Logging Component Event Messages
The logging infrastructure records messages that can be used for problem diagnosis.
Security Token Service is a J2EE Web application, part of the Access Manager J2EE
Application. Both use OJDL for logging purposes. Security Token Service captures the
interactions between itself and Partners with timestamps.
Note: Unless explicitly stated, information in this chapter is the same
whether you are using Access Manager, Identity Federation, or
Security Token Service. You can also use a custom Oracle WebLogic
Scripting Tool (WLST) command to change logging levels.

Introduction to Logging Component Event Messages
8-2 Administrator's Guide for Oracle Access Management
The Administrator controls the amount of information that is logged in a message by
specifying log levels for each component for which a logger is defined.
Oracle Access Management makes use of the files in Table 8–1.
Oracle Access Management uses the WebLogic container's logging defaults in
Table 8–2.
For more information, see:
■About Component Loggers
■Sample Logger and Log Handler Definition
■About Logging Levels
Note: Generally, you enable logging to produce files that you send to
Oracle Technical Support for problem diagnosis. Documentation for
log messages is not available. In some cases, you might be able to
diagnose problems on your own by reading log files.
Table 8–1 Logging Files
File Type Description
Logging Configuration
File
Provides logging level and other configuration information for logging. This file
is stored in the following path:
$DOMAIN_HOME/config/fmwconfig/servers/SERVER-NAME/logging.xml
Note: By default, Security Token Service and Identity Federation messages are
logged in the OAM Server's log file. However, for convenience, you can edit
logging.xml to direct Security Token Service or Identity Federation information
to a separate log file, as described in "Configuring Logging for Security Token
Service and Identity Federation" on page 8-8.
Log File Logged information is stored in the following location:
$DOMAIN_HOME/servers/SERVER-NAME/logs/
SERVER-NAME-diagnostics.log
Table 8–2 Logging Defaults
Description
Events The following events are logged automatically:
■OAM Server events (managed run-time servers)
■Administrative events (generated for configuration changes made
using the console)
Levels By default, the log level for all Oracle Access Management components
is the Notification level. Logging at the Error level produces a small
amount of output while other log levels can result in voluminous
logging output, which can impact performance. In production
environments, logging is usually either disabled or the log level is set
to a level that results in a small volume of logging output (the error
level, for example).
See Also:
■Chapter 13 for details about how you can configure and view logs
using Fusion Middleware Control
■Logging information in the Oracle Fusion Middleware
Application Security Guide
Introduction to Logging Component Event Messages
Logging Component Event Messages 8-3
8.2.1 About Component Loggers
This section introduces component loggers for Security Token Service and Access
Manager. There are differences.
Security Token Service has only a single logger: oracle.security.fed. For more
information, see "Configuring Logging for Security Token Service and Identity
Federation" on page 8-8.
Each Access Manager component is associated with its own logger name, as listed in
the following tables:
■Table 8–3, " Oracle Access Management Server-Side Component Loggers"
■Table 8–4, " Oracle Access Management Shared-Service Engine Component
Loggers"
■Table 8–5, " Oracle Access Management Foundation API Component Loggers"
Table 8–3 Oracle Access Management Server-Side Component Loggers
Component Name OAM Logger Name Description
Protocol Binding oracle.oam.binding Responsible for marshalling/unmarshalling wire
protocol request and response to a Java Object
representation.
SSO Controller oracle.oam.controller.sso Responsible for managing the user session
lifecycle and orchestrating the SSO and logout
flows.
OAM Proxy oracle.oam.proxy.oam Responsible for interacting with OAM Webgates
by marshalling/unmarshalling OAP protocol
requests and responses and performing the
data/message transformation necessary to help
the OAM Server process OAP
requests/responses.
OSSO Proxy oracle.oam.proxy.osso Responsible for interacting with OSSO Agents by
marshalling/unmarshalling requests and
responses and doing the data/message
transformation necessary to help the OAM Server
process mod_osso requests/responses.
OpenSSO Proxy oracle.oam.proxy.opensso Responsible for interacting with OpenSSO Web
and Java Agents by marshalling/unmarshalling
requests and responses and performing the
data/message transformation necessary to help
the OAM Server process OpenSSO agent
requests/responses.
Credential Collector oracle.oam.credcollector Responsible for interacting with the user to
acquire the necessary information required by the
Authentication Scheme.
Remote Registration of Partners oracle.oam.engine.remotereg Responsible for registering partners with the
OAM Server and managing associated protected
policies.
Oracle Access Management Console oracle.oam.admin.console Console that supports administration and
monitoring of the Access Management
deployment.
Admin-Service Config oracle.oam.admin.service.config Module used by the UI Console to manage the
configuration.
Diagnostics and Monitoring oracle.oam.diag Provides instrumentation used by the OAM
Server components to enable Diagnostic and
Monitoring.

Introduction to Logging Component Event Messages
8-4 Administrator's Guide for Oracle Access Management
8.2.2 Sample Logger and Log Handler Definition
This topic provides a sample for Access Manager only.
Example 8–1 illustrates the configuration of an Access Manager logger and a log
handler in the file
logging.xml
.
Example 8–1 Configuring Access Manager Loggers and Log Handlers
<logging_configuration>
<log_handlers>
<log_handler name='oam-handler' class='oracle.core.ojdl.logging.
ODLHandlerFactory'>
<property name='path' value='oam/diagnostic'/>
<property name='maxFileSize' value='10485760'/>
<property name='maxLogSize' value='104857600'/>
</log_handler>
</log_handlers>
<loggers>
<logger name='oracle.security.am' level='NOTIFICATION:1'>
Table 8–4 Oracle Access Management Shared-Service Engine Component Loggers
Component Name OAM Logger Name Description
Authentication Engine oracle.oam.engine.authn Supports establishing the identity of the user by
validating the credentials and other data as
required by the specified Authentication scheme.
Policy Service Engine oracle.oam.engine.policy Supports management of Authentication,
Authorization and Token Issuance Policies. In
addition, it also provide a policy decision service
to support runtime processing.
Session Management Engine oracle.oam.engine.session Supports managing user session and token
context information with support for
user/administrator-initiated and time-out based
events.
Token Engine oracle.oam.engine.token Supports managing the entire token life cycle
from generation to cancellation.
SSO Engine oracle.oam.engine.sso Supports the single sign-on experience by
managing the lifecycle of the user login
session(s).
PartnerTrustMetadata Engine oracle.oam.engine.ptmetadata Supports management of partner metadata and
trust information.
Authorization Engine oracle.oam.engine.authz Wrapper that provides methods that map
directly to OAP runtime request operations.
Table 8–5 Oracle Access Management Foundation API Component Loggers
Component Name OAM Logger Name Description
Session Access oracle.oam.session.access ** Not useful unless your are decompiling code.
Session Access Implementation oracle.oam.session.accessimpl ** Not useful unless your are decompiling code.
Policy Access oracle.oam.policy.access ** Not useful unless your are decompiling code.
Note: Security Token Service has only one logger and log handler, as
described in "Configuring Logging for Security Token Service and
Identity Federation" on page 8-8.

Configuring Logging for Access Manager
Logging Component Event Messages 8-5
<handler name='oam-handler'/>
...
</logger>
</loggers>
</logging_configuration>
8.2.3 About Logging Levels
This topic applies to Oracle Access Management.
The amount of data output by a logger is controlled by its level; the higher the level,
the more information is logged. The level of a logger is specified with the element
<logger> in the file logging.xml with the following format:
<logger name="loggerName" level="notifLevel"/>
where loggerName is a logger name (see "About Component Loggers"), and notifLevel is
either an ODL message level or a Java message level.
Table 8–6 shows the correspondence between ODL message levels and Java message
levels, in increasing order:
Any other Java level value not listed above (that is, one outside the interval
[SEVERE.intValue()+100 - FINEST] is mapped to the ODL level UNKNOWN.
8.3 Configuring Logging for Access Manager
This section describes tasks for only Access Manager.
See Also: For more information about Java EE application logging,
see Appendix I, section I.1.1, in Oracle Fusion Middleware
Application Security Guide.
Table 8–6 Mapping of ODL to Java Levels
ODL Message Level Java Message Level
INCIDENT_ERROR:1 SEVERE.intValue()+100
ERROR:1 SEVERE (logs exceptions)
WARNING:1 WARNING (logs exceptions)
NOTIFICATION:1 INFO (default)
NOTIFICATION:16 CONFIG
NOTIFICATION:32 INFO and CONFIG
TRACE:1 FINE (occasionally recommended in production environments)
TRACE:16 FINER (not recommended in production environments)
TRACE:32 FINEST (not recommended in production environments)
Note: If you define a filter to log messages at the finest level for the
oracle.security.fed package and sub-package (classes for Security
Token Service), after restarting the server you would see logs for the
OAM Server. For more information, see "Configuring Logging for
Security Token Service and Identity Federation" on page 8-8.

Configuring Logging for Access Manager
8-6 Administrator's Guide for Oracle Access Management
There is no graphical user interface available to change logger levels; only WLST
commands can be used. This section provides the following topics:
■Modifying the Logger Level for Access Manager
■Adding an Access Manager-Specific Logger and Log Handler
8.3.1 Modifying the Logger Level for Access Manager
Administrators can use custom WLST commands for Access Manager to change
logger settings as described in the following procedure. Your deployment and choices
will be different.
To modify the OAM logger level
1. Confirm that the OAM Server is running.
2. Acquire the custom WLST script for Access Manager. For example:
$ORACLE_HOME/common/bin/wlst.sh
3. Connect to the WebLogic Server and log in as the WebLogic Administrator. For
example:
connect([username, password])
4. List available loggers for the OAM Server. For example:
wls:/base_domain/serverConfig> listLoggers(pattern="oracle.oam.*",target="oam_
server1")
Here pattern= represents the oam.controller component and target= represents the
desired OAM Server as it was specified during registration.
5. View the list of Access Manager loggers associated with this OAM Server. For
example:
Logger | Level
--------------------------------------------+-----------------
oracle.oam | <Inherited>
oracle.oam.admin.foundation.configuration | <Inherited>
oracle.oam.agent-default | <Inherited>
oracle.oam.audit | <Inherited>
oracle.oam.binding | <Inherited>
oracle.oam.commonutil | <Inherited>
oracle.oam.config | <Inherited>
oracle.oam.controller | <Inherited>
oracle.oam.default | <Inherited>
oracle.oam.diagnostic | <Inherited>
oracle.oam.engine.authn | <Inherited>
oracle.oam.engine.authz | <Inherited>
See Also: "Configuring Logging for Security Token Service and
Identity Federation"
Note: Use the WLST command
help("fmw diagnostics")
.
See Also: Oracle Fusion Middleware WebLogic Scripting Tool
Command Reference

Configuring Logging for Access Manager
Logging Component Event Messages 8-7
oracle.oam.engine.policy | <Inherited>
oracle.oam.foundation.access | <Inherited>
oracle.oam.idm | <Inherited>
oracle.oam.idm | <Inherited>
oracle.oam.idm | <Inherited>
oracle.oam.user.identity.provider | <Inherited>
6. Modify the log level based on your requirements. For example, this sequence
changes the log level of the oam.controller to TRACE:32 with no persistence:
wls:/base_domain/serverConfig> domainRuntime()
wls:/base_domain/domainRuntime> setLogLevel(logger="oracle.oam.controller",
level="TRACE:32", persist="0", target="oam_server1")
7. Repeat step 4 to list the loggers again and verify the log level change. For example:
wls:/base_domain/serverConfig> listLoggers(pattern="oracle.oam.*",target="oam_
server1")
Logger | Level
--------------------------------------------+-----------------
oracle.oam | <Inherited>
oracle.oam.admin.foundation.configuration | <Inherited>
oracle.oam.agent-default | <Inherited>
oracle.oam.audit | <Inherited>
oracle.oam.binding | <Inherited>
oracle.oam.commonutil | <Inherited>
oracle.oam.config | <Inherited>
oracle.oam.controller | TRACE:32
oracle.oam.default | <Inherited>
oracle.oam.diagnostic | <Inherited>
oracle.oam.engine.authn | <Inherited>
oracle.oam.engine.authz | <Inherited>
oracle.oam.engine.policy | <Inherited>
oracle.oam.foundation.access | <Inherited>
oracle.oam.idm | <Inherited>
oracle.oam.idm | <Inherited>
oracle.oam.idm | <Inherited>
oracle.oam.user.identity.provider | <Inherited>
8. Verify the generated log file to confirm the controller is logged at the TRACE:32
level:
$DOMAIN_HOME/server/SERVER_INSTNCE_NAME/logs/
9. Proceed to "Validating Run-time Event Logging Configuration" on page 8-11.
8.3.2 Adding an Access Manager-Specific Logger and Log Handler
Administrators can use the following procedure to specify a log file path and
necessary attributes.
In the following procedure, you will identify the target OAM Server, rotation and
retention periods, a path to the log file, the handler, and logger. Your deployment and
choices will be different.
Note: Use the WLST command
help("fmw diagnostics")
to get
more information.

Configuring Logging for Security Token Service and Identity Federation
8-8 Administrator's Guide for Oracle Access Management
Skip steps 1 through 3 if the following items are true:
■The OAM Server is running
■You have the WLST script
■You have connected to the server and logged in
To specify the OAM logger, level, and log handler
1. Confirm that the OAM Server is running.
2. Acquire the WLST script. For example:
$ORACLE_HOME/common/bin/wlst.sh
3. Connect to the WebLogic Server and log in as the WebLogic Administrator. For
example:
sh wlst.sh wls:/offline> connect
4. Add an Access Manager logger and level for the OAM Server. For example:
wls:/base_domain/serverConfig> domainRuntime()
wls:/base_domain/domainRuntime> setLogLevel(logger="oracle.oam",
level="WARNING", persist="0", target="oam_server1")
5. Add a custom log handler and associate it with the Access Manager logger. For
example:
wls:/base_domain/domainRuntime> configureLogHandler(name="oam-log-handler",
target="oam_server1", rotationFrequency="daily", retentionPeriod="week",
path="${domain.home}/oamlogs" , maxFileSize ="10485760", maxLogSize =
"104857600", addHandler="true", handlerType="oracle.core.ojdl.logging
.ODLHandlerFactory", addToLogger="oracle.oam")
wls:/base_domain/domainRuntime>configureLogHandler(name="oam-log-handler",
addProperty="true", propertyName="supplementalAttributes", propertyValue=
"OAM.USER, OAM.COMPONENT", target="oam_server1")
6. Verify all the logs in the $DOMAIN_HOME/oamlogs directory:
$DOMAIN_HOME/oamlogs/
8.4 Configuring Logging for Security Token Service and Identity
Federation
By default Security Token Service and Identity Federation messages are logged into
the OAM Server's log files. You can view and configure logs in Fusion Middleware
Control. However, you can also edit logging.xml and direct Security Token Service and
Identity Federation information to a separate log file, as described here.
The files that are involved include:
■Logging Configuration File: Provides logger names and other configuration
information for logging. This file is stored in: $DOMAIN_
HOME/config/fmwconfig/servers/SERVER-NAME/logging.xml.
See Also: Oracle Fusion Middleware WebLogic Scripting Tool
Command Reference

Configuring Logging for Security Token Service and Identity Federation
Logging Component Event Messages 8-9
■Log File: $DOMAIN_HOME/ostslogs/SERVER-NAME-diagnostics.log, for
example.
Security Token Service and Identity Federation do not categorize log handlers as
Access Manager does. Instead, there is only one logger that affects the log levels for
Security Token Service and Identity Federation. Table 8–7 provides details for this
logger, which are required in the WLST command.
For details, see:
■Configuring Logging for Security Token Service or Identity Federation
■Defining Log Level and Log Details for Security Token Service or Identity
Federation
8.4.1 Configuring Logging for Security Token Service or Identity Federation
Administrators can use the following procedure to separate Security Token Service or
Identity Federation log messages from OAM Server message logs.
To configure logging for Security Token Service or Identity Federation
1. Locate and open logging.xml: $DOMAIN_
HOME/config/fmwconfig/servers/SERVER-NAME/logging.xml.
2. Add the following to create the independent message log for Security Token
Service:
<log_handler name='stsfed-handler' class='oracle.core.ojdl.logging.ODLHand
lerFactory'>
<property name='path' value='sts/log'/>
<property name='maxFileSize' value='10485760'/>
<property name='maxLogSize' value='104857600'/>
</log_handler>
<logger name='oracle.security.fed' level='TRACE:32'>
<handler name='stsfed-handler'/>
</logger>
3. Save the file.
4. Proceed with "Defining Log Level and Log Details for Security Token Service or
Identity Federation".
Table 8–7 Oracle Security Token Service and Identity Federation Loggers
Component Name Logger Name Log Handler Name Log Class
Security Token Service or
Identity Federation
oracle.security.fed stsfed-handler class=oracle.core.ojdl.loggi
ng.ODLHandlerFactory
See Also:
■Chapter 13 for details about how you can configure and view logs
using Fusion Middleware Control
■Logging information in the Oracle Fusion Middleware
Application Security Guide

Configuring Logging for Security Token Service and Identity Federation
8-10 Administrator's Guide for Oracle Access Management
8.4.2 Defining Log Level and Log Details for Security Token Service or Identity
Federation
Administrators can use custom WLST commands for Oracle Access Management to
change logger settings for Security Token Service as described here. This specifies an
independent output file for only Security Token Service log messages.
This sample procedure for Security Token Service logging is very similar to the one for
Access Manager. However, there are a few differences. Your deployment choices will
be different.
Skip steps 1 through 3 if the following items are true:
■The OAM Server is running
■You have the WLST script
■You have connected to the server and logged in
To modify the logger level and log file for Security Token Service
1. Confirm that the OAM Server is running.
2. Acquire the custom WLST script for Oracle Access Management:
$ORACLE_HOME/common/bin/wlst.sh
3. Connect to the WebLogic Server and log in as the WebLogic Administrator. For
example:
sh wlst.sh wls:/offline> connect adminID password
4. Modify the log level of
oracle.security.fed
based on your requirements. For
example, this sequence changes the log level to WARNING with no persistence:
wls:/base_domain/serverConfig> domainRuntime()
wls:/base_domain/domainRuntime> setLogLevel(logger="oracle.security.fed",
level="WARNING", persist="0", target="oam_server1")
5. Specify the target OAM Server, as well as rotation and retention periods, path to
the log file, the handler, and logger. For example:
wls:/base_domain/domainRuntime> configureLogHandler(name="osts-log-handler",
target="oam_server1", rotationFrequency="daily", retentionPeriod="week",
path="${domain.home}/ostslogs", maxFileSize ="10485760", maxLogSize
="104857600", addHandler="true",handlerType="oracle.core.ojdl.logging.ODL
HandlerFactory", addToLogger="oracle.security.fed")
6. Verify the generated log file to confirm the controller is logged at the WARNING
level:
$DOMAIN_HOME/ostslogs/SERVER-NAME-diagnostics.log
$DOMAIN_HOME/oiflogs/SERVER-NAME-diagnostics.log
7. Proceed to "Validating Run-time Event Logging Configuration" on page 8-11.
Note: Use the WLST command
help("fmw diagnostics")
.
See Also: Oracle Fusion Middleware WebLogic Scripting Tool
Command Reference

Validating Run-time Event Logging Configuration
Logging Component Event Messages 8-11
8.5 Validating Run-time Event Logging Configuration
You can use the following procedure to test your run-time event logging configuration.
Prerequisites
■Configure logging using WLST commands as described in this chapter.
■Ensure the Agents and Servers are running.
■Configure an Application Domain to protect the resource as described in
Chapter 20, "Managing Policies to Protect Resources and Enable SSO".
To validate run-time event logging
1. In a browser, enter the URL to a protected resource and sign in using an invalid
credential.
2. Sign in again using the proper credential.
3. On the physical server, verify all the logs appear in:
$DOMAIN_HOME/oamlogs/
$DOMAIN_HOME/ostslogs/SERVER-NAME-diagnostics.log
$DOMAIN_HOME/oiflogs/SERVER-NAME-diagnostics.log
4. Open the log file and look for the last entries to confirm authentication failure and
success, respectively.

Validating Run-time Event Logging Configuration
8-12 Administrator's Guide for Oracle Access Management

9
Auditing Administrative and Run-time Events 9-1
9
Auditing Administrative and Run-time Events
[7]
In Oracle Fusion Middleware, auditing refers to the process of collecting for review
specific information related to administrative, authentication, and run-time events.
Auditing can help you evaluate adherence to polices, user access controls, and risk
management procedures. Auditing provides a measure of accountability and answers
to the "who has done what and when" types of questions. Audit data can be used to
create dashboards, compile historical data, and assess risks. Analyzing recorded audit
data allows compliance officers to perform periodic reviews of compliance policies.
(Analyzing and using audit data is outside the scope of this chapter.)
This chapter describes the administrative and run-time events that can be audited for
Oracle Access Management services (Access Manager, Security Token Service, Identity
Federation, and Mobile and Social) as well as information on configuring common
auditing settings and validating your auditing configuration. It includes the following
topics:
■Understanding Oracle Fusion Middleware Auditing
■Introduction to Oracle Access Management Auditing
■Access Manager Events You Can Audit
■Mobile and Social Events You Can Audit
■Identity Federation Events You Can Audit
■Security Token Service Events You Can Audit
■Setting Up Auditing for Oracle Access Management
■Validating Auditing and Reports
9.1 Understanding Oracle Fusion Middleware Auditing
Review the following sections in the Oracle Fusion Middleware Application Security Guide
to gain an understanding of auditing and the Audit Framework in Oracle Fusion
Middleware.
■Introduction to Oracle Fusion Middleware Audit Framework
■Setting up Oracle Business Intelligence Publisher
■Customizing Audit Reports
Note: There is nothing specific or separate related to auditing
OpenSSO Agents or Identity Context. Unless explicitly stated,
information in this chapter is the same for all Oracle Access
Management services.

Introduction to Oracle Access Management Auditing
9-2 Administrator's Guide for Oracle Access Management
■"Auditing the Security Token Service" on page 36-21
■Oracle Fusion Middleware Audit Framework Reference for details about how the
Audit database is laid out
9.2 Introduction to Oracle Access Management Auditing
Many businesses must now be able to audit identity information and user access on
applications and devices. Compliance audits help an enterprise conform with
regulatory requirements—Sarbanes-Oxley or the Health Insurance Portability and
Accountability Act (HIPAA) are two examples.
Oracle Access Management uses the Oracle Fusion Middleware Common Audit
Framework to support auditing for a large number of user authentication and
authorization run-time events, and administrative events (changes to the system). The
Oracle Fusion Middleware Common Audit Framework provides uniform logging and
exception handling and diagnostics for all audit events.
Auditing is based on configuration parameters set using the Oracle Access
Management Console which enables data capture for a user or set of users. While
auditing can be enabled or disabled, it is normally enabled in production
environments. Audit data can be written to either a single, centralized Oracle Database
instance or to flat files known as bus-stop files.
Auditing has minimal performance impact, and the information captured by auditing
can be useful (even mission-critical). The audit log file helps the audit Administrator
track errors and diagnose problems if the audit framework is not working properly.
This section contains the following topics.
■About Oracle Access Management Auditing Configuration
■About Audit Record Storage
■About Audit Reports and Oracle Business Intelligence Publisher
■About the Audit Log and Data
9.2.1 About Oracle Access Management Auditing Configuration
An Administrator controls certain auditing parameters using the Oracle Access
Management Console. This auditing configuration is recorded in the
oam-config.xml
file. Additional auditing configuration is required through the Common Audit
Framework.
Note: The Oracle Fusion Middleware Common Audit Framework
database audit store does not include Access Manager policy or
session-data and is not configured through the Oracle Access
Management Console.
Note: Oracle recommends that you use only the Oracle Access
Management Console or WebLogic Scripting Tool (WLST) commands
for changes; do not edit the
oam-config.xml
file directly.

Introduction to Oracle Access Management Auditing
Auditing Administrative and Run-time Events 9-3
Event configuration (mapping events to levels) occurs in the
component_events.xml
file. An audit record contains a sequence of items that can be configured to meet
particular requirements.
Within the Oracle Access Management Console, you can set the maximum log file and
log directory size. Audit policies (known as Filter Presets declare the types of events to
be captured by the audit framework for particular components.
Audit policies cannot be configured using Fusion Middleware Control, therefore audit
filter settings in the EM Console will not be applied to the audit function within Oracle
Access Management. Oracle Access Management does not use JPS infrastructure to
configure the audit configuration. There are no WebLogic Scripting Tool (WLST)
commands for auditing.
9.2.2 About Audit Record Storage
Audit data can be written to either a single, centralized Oracle Database instance or to
flat files known as bus-stop files. By default, audit data is recorded to the file but
administrators can change the configuration to log audit data to a database. Although
the formats differ, audit data content is identical in both the flat file and the database.
■Audit Bus-stop: Local files containing audit data records before they are pushed to
the audit data store. In the event that no audit data store is configured, audit data
remains in these bus-stop files. The bus-stop files are simple text files that can be
queried easily to look up specific audit events. When an audit data store is in
place, the bus-stop acts as an intermediary between the component and the audit
data store. The local files are periodically uploaded to the audit data store based
on a configurable time interval.
Bus-stop files for Java components are located in:
$DOMAIN_HOME/servers/$SERVER_NAME/logs/auditlogs/OAM/audit.log
Bus-stop files for system components are located in:
$ORACLE_INSTANCE/auditlogs/OAM/oam_server1/audit.log
■Database Logging: Implements the Common Auditing Framework across a range
of Oracle Fusion Middleware products. The benefit is audit-function commonality
at the platform level.
■Database Audit Store: In production environments, Oracle recommends using a
database audit store to provide scalability and high-availability for the Common
Audit Framework. A key advantage of the audit data store is that audit data from
multiple components can be correlated and combined in reports; for example,
authentication failures in all Middleware components and instances. Audit data is
cumulative and grows over time so ideally this is a stand-alone RDBMS database
for audit data only and not used by other applications.
See Also:
■"Access Manager Events You Can Audit" on page 9-6
■"Security Token Service Events You Can Audit" on page 9-16
Note: The preferred mode in production environments is writing
audit records to a stand-alone RDBMS database for audit data only.
Introduction to Oracle Access Management Auditing
9-4 Administrator's Guide for Oracle Access Management
To switch to a database as the permanent store for your audit records, you must
first use the Repository Creation Utility (RCU) to create a database schema for
audit data. The RCU seeds that database store with the schema required to store
audit records in a database. After the schema is created, configuring a database
audit store involves:
■Creating a data source that points to the audit schema you created
■Configuring the audit store to point to the data source
Figure 9–1 provides a simplified view of the audit architecture with a supported
database. As previously documented, the Oracle Fusion Middleware Audit
Framework schema is provided by the RCU.
Figure 9–1 Audit to Database Architecture
An independent audit loader process reads the flat log file and inserts records in
the log table of the Oracle database. The audit store allows Administrators to
expose audit data with Oracle Business Intelligence Publisher using a variety of
out-of-the-box reports.
9.2.3 About Audit Reports and Oracle Business Intelligence Publisher
Oracle Access Management integrates with Oracle Business Intelligence Publisher,
which provides a pre-defined set of compliance reports through which the data in the
database audit store is exposed. These reports allow you to drill down the audit data
based on various criteria, such as user name, time range, application type, and
execution context identifier (ECID). Out-of-the-box, there are several sample audit
reports available with Oracle Access Management and accessible with Oracle Business
Intelligence Publisher. You can also use Oracle Business Intelligence Publisher to create
your own custom audit reports.
See Also:
■"Configuring and Managing Auditing" in the Oracle Fusion
Middleware Application Security Guide
■"Setting Up the Audit Database Store" on page 9-21

Introduction to Oracle Access Management Auditing
Auditing Administrative and Run-time Events 9-5
Oracle BI Enterprise Edition (Oracle BI EE) is a comprehensive set of enterprise
business intelligence tools and infrastructure, including a scalable and efficient query
and analysis server, an ad-hoc query and analysis tool, interactive dashboards,
proactive intelligence and alerts, real-time predictive intelligence, and an enterprise
reporting engine. The components of Oracle BI EE share a common service-oriented
architecture, data access services, analytic and calculation infrastructure, metadata
management services, semantic business model, security model and user preferences,
and administration tools. Oracle BI EE provides scalability and performance with
data-source specific optimized analysis generation, optimized data access, advanced
calculation, intelligent caching services, and clustering.
For an overview of how to prepare Oracle BI EE for use with auditing reports for
Oracle Access Management, see "Preparing Oracle Business Intelligence Publisher EE"
on page 9-21.
Oracle BI EE reports contain enumerated fields, the data fields and labels of which are
self-explanatory. Content of reports is described in Table 9–1 (taken from Knowledge
Base Doc ID 1495333.1 on My Oracle Support.
For more information, see the following topics:
■Access Manager Events You Can Audit
■Identity Federation Events You Can Audit
■Security Token Service Events You Can Audit
See Also: Using Audit Analysis and Reporting in the Oracle Fusion
Middleware Security Guide
Table 9–1 Oracle Business Intelligence Enterprise Edition Reports for OAM
Report Type Description
Account Management User ID | Timestamp | Component/ Application Name | Event Details
Authentication_Statistics Authentication_statistics
Failure | Userid | Number of Events
AuthenticationFromIPByUser
IP Address | Distinct User Count | Total Attempts | Users
AuthenticationPerIP
IP Address | Distinct Users | Total Number of Attempts
AuthenticationStatisticsPerServer
Server Instance Name | Success Count | Failure Count
Errors_and_Exceptions All_Errors_and_Exceptions
User ID | Timestamp | Component/Application Name | Client IP Address |
Message Event | Event Details
Authentication_Failures
User ID | Timestamp | Component/ Application Name | Client IP Address |
Authentication Method | Message Event Details | Authorization_Failures
Users_Activities
Authentication_History
User ID | Timestamp | Component/ Application Name | Client IP Address |
Authentication Method | Message Event Details | Authorization_Failures
Multiple_Logins_From_Same_IP
IP Address | Usernames Used

Access Manager Events You Can Audit
9-6 Administrator's Guide for Oracle Access Management
9.2.4 About the Audit Log and Data
An audit log file helps the audit administrator track errors and diagnose problems
when the audit framework is not working properly. An audit log file records several
fields including (but not limited to) Date, Time, Initiator, EventType, EventStatus,
MessageText, ECID, RID ContextFields, SessionId, TargetComponentType,
ApplicationName, and EventCategory.
9.3 Access Manager Events You Can Audit
This section provides the following topics:
■Access Manager Administrative Events You Can Audit
■Access Manager Run-time Events You Can Audit
■Auditing Authentication Events
9.3.1 Access Manager Administrative Events You Can Audit
Administrative events are those generated when the Oracle Access Management
Console is used. The Access Manager-specific administrative events that can be
audited and the details captured for them are listed in Table 9–2. These event
definitions and configurations are implemented as part of the audit service in Oracle
Platform Security Services.
See Also: The topic on audit logs in the chapter on configuring and
managing auditing in the Oracle Fusion Middleware Security Guide
See Also:
■Identity Federation Events You Can Audit on page 9-14
■Security Token Service Events You Can Audit on page 9-16
Note: The amount and type of information that is logged is
controlled by choosing a filter preset from the Audit Configuration
section. Auditable events for each filter preset are fixed in the
read-only
component_events.xml
file. Editing or customizing this file
is not supported.
Table 9–2 Access Manager Administrative Audit Events
Administrative Event Event Data Include
Oracle Access Management Console Login
success/failure
■User name
■Remote IP
■Roles
Authentication Policy Creation ■Policy name
■Authentication scheme details
■Resource details
■Policy type (authentication or authorization)

Access Manager Events You Can Audit
Auditing Administrative and Run-time Events 9-7
Authentication Policy Modification ■Policy name
■Authentication scheme details
■Resource details
■Policy type (authentication or authorization
■Old Policy name
■Old Authentication scheme details
■Old Resource details
Authentication Policy Removal ■Policy name
■Authentication scheme details
■Resource details
■Policy type (authentication or authorization
Resource Creation ■Resource name
■URI
■Operation
■Resource type
Resource Modification ■Resource name
■URI
■Operation
■Resource type
■Old Resource name
■Old URI
■Old Operation
Resource Removal ■Resource name
■URI
■Operation
■Resource type
Authentication Scheme Creation ■Scheme name
■Authentication modules
■Level
Authentication Scheme Modification ■Scheme name
■Authentication modules
■Level
■Old Scheme name
■Old Authentication modules
■Old Level
Authentication Scheme Removal (Delete) ■Scheme name
■Authentication modules
■Level
Response Creation ■Response name
■Response key
■Data source
■Response Type
Table 9–2 (Cont.) Access Manager Administrative Audit Events
Administrative Event Event Data Include

Access Manager Events You Can Audit
9-8 Administrator's Guide for Oracle Access Management
Response Modification ■Response name
■Response key
■Data source
■Response Type
■Old Response name
■Old Response key
■Old Data source
Response Removal (Delete) ■Response name
■Response key
■Data source
■Response Type
Partner Addition ■Partner name
■Partner ID
■Partner URL
■Logout URL
Partner Modification ■Partner name
■Partner ID
■Partner URL
■Logout URL
■Old Partner name
■Old Partner URL
■Old Logout URL
Partner Removal ■Partner name
■Partner ID
■Partner URL
■Logout URL
Conditions creation ■Condition Name
■Condition type
■Condition data
Conditions Modification ■Condition Name
■Condition type
■Condition data
■Old Condition name
■Old Condition type
■Old Condition data
Conditions Removal ■Condition Name
■Condition type
■Condition data
Server Domain creation ■Domain Name
Server Domain Modification ■Domain Name
■Old Domain Name
Server Domain Removal ■Domain Name
Table 9–2 (Cont.) Access Manager Administrative Audit Events
Administrative Event Event Data Include

Access Manager Events You Can Audit
Auditing Administrative and Run-time Events 9-9
9.3.2 Access Manager Run-time Events You Can Audit
Run-time events are those generated by some of the events the Access Manager
component engines issue when interacting with one another. The run-time events that
can be audited, when they are issued, and the details captured for them are listed in
Table 9–3. These event definitions and configurations are implemented as part of the
audit service in Oracle Platform Security Services.
Server configuration change ■New details
■Old details
■Instance Name
■Application Name
■User Name
■Remote ID
■Roles
■Date and time
Note: The amount and type of information that is logged is
controlled by choosing a filter preset in the Audit Configuration.
Auditable events for each filter preset are fixed in the read-only
component_events.xml
file. Editing or customizing this file is not
supported.
Table 9–3 Access Manager Run-time Audit Events
Run-time Event Issued When Event Details Include
Authentication
Attempt
A user attempts to access a protected
resource and the request arrives at the SSO
server; this event might be followed by the
events credential submit and authentication
success or failure.
■Remote IP
■Resource ID
■Partner ID
■Resource ID
■Authentication scheme ID
■Authentication Policy ID
Authentication
Success
A client submits credentials and credential
validation is successful.
■Remote IP
■User Name
■User DN
■Resource ID
■Authentication scheme ID
■Authentication Policy ID
■Partner ID
Authentication
Failure
A client submits credentials and credential
validation fails.
■Remote IP
■User Name
■User DN
■Resource ID
■Authentication Scheme ID
■Failure Error Code
■Retry count
■Authentication Policy ID
■Partner ID
Table 9–2 (Cont.) Access Manager Administrative Audit Events
Administrative Event Event Data Include

Access Manager Events You Can Audit
9-10 Administrator's Guide for Oracle Access Management
Session Creation Authentication succeeds. ■SSO Session ID
■User Name
■User DN
■Remote IP
■Resource ID
■Authentication scheme ID
■Authentication Policy ID
Session Destroy Authentication succeeds. ■SSO Session ID
■User Name
■User DN
■Partner ID
Login success A client finishes the login procedure and it
is forwarded to the agent.
■Remote IP
■User Name
■User DN
■Authentication level
■Resource ID
■Authentication scheme ID
■Authentication Policy ID
■Partner ID
Login failure A client fails to login; this event is issued
only when all the retry authentication
attempts allowed have failed or when the
account is locked.
■Remote IP
■User Name
■Authentication level
■Resource ID
■Authentication scheme ID
■Authentication Policy ID
■Partner ID
Logout success A client finishes the logout procedure and
is forwarded to the agent.
■Remote IP
■User DN
■Authentication level
■SSO Session ID
■Partner ID
Logout failure A client fails to logout. ■Remote IP
■User DN
■SSO Session ID
■Failure details
■Partner ID
Credential
Collection
A client is redirected to the credential
collection page.
■Remote IP
■Resource Name
■Resource ID
■Authentication scheme ID
■Authentication Policy ID
Credential Submit A client submits credentials. ■Remote IP
■User Name
■Resource ID
■Authentication scheme ID
■Authentication Policy ID
Table 9–3 (Cont.) Access Manager Run-time Audit Events
Run-time Event Issued When Event Details Include

Mobile and Social Events You Can Audit
Auditing Administrative and Run-time Events 9-11
9.3.3 Auditing Authentication Events
Auditing events during authentication can help Administrators scrutinize security
weaknesses in their systems. The events that an Administrator can configure for
auditing during authentication are:
■Authentication success
■Authentication failure
■Create, modify, delete, or view Authentication Policy data
Information related to the user being authenticated may include the following:
■IP address
■Browser type
■User Login ID
■Time of Access
Information about users requesting authentication or brute force attacks can be stored
in the file system or in a back-end database.
9.4 Mobile and Social Events You Can Audit
This section provides the following topics:
■REST Run-Time Audit Events
■Mobile and Social Audit Events
Authorization
Success
A client has been authorized to access a
resource.
■Remote IP
■User DN
■Resource ID
■Authorization Policy ID
Authorization
Failure
A client has not been authorized to access a
resource.
■Remote IP
■User DN
■Resource ID
■Authorization Policy ID
Server Start Up The server starts up. ■Date and time
■Instance Name
■Application Name
■User Name
Server Shut Down The server shuts down. ■Date and time
■Instance Name
■Application Name
■User Name
Note: Oracle recommends that you avoid auditing, logging, or
tracing sensitive user attributes, such as user passwords.
Table 9–3 (Cont.) Access Manager Run-time Audit Events
Run-time Event Issued When Event Details Include

Mobile and Social Events You Can Audit
9-12 Administrator's Guide for Oracle Access Management
9.4.1 REST Run-Time Audit Events
You can audit the run-time events in the following table.
9.4.2 Mobile and Social Audit Events
You can audit the runtime events in the following table.
Table 9–4 REST Run-Time Audit Events
Run-time Event Issued When Event Details Include
Partner Security Validation
Event
Partner credentials are
validated using the
appropriate security
mechanism. The event is
logged for both success and
failure scenarios.
■Partner ID (or any unique
partner var)
■Remote IP
■Security Mechanism
■Service Instance
(Endpoint or name)
■Event Status
(success/fail)
Create Token A token is created. ■Event Status
■Caller Attribute
■Subject Attribute
■Filter Subject Attribute
■Token Attribute
■Opcode Attribute
■Message Text
Terminate Token A token is terminated. ■Event Status
■Caller Attribute
■Subject Attribute
■Filter Subject Attribute
■Token Attribute
■Opcode Attribute
■Message Text
Get Token A token is obtained/read. ■Event Status
■Caller Attribute
■Subject Attribute
■Filter Subject Attribute
■Token Attribute
■Opcode Attribute
■Message Text
Table 9–5 Mobile and Social Run-Time Audit Events
Run-Time Event Issued When Event Details Include
IDP Login A user attempts to log in
using an identity provider
■Event status
■Application ID
■Identity provider name
■Event message

Mobile and Social Events You Can Audit
Auditing Administrative and Run-time Events 9-13
IDP Rest Access The REST service for identity
providers is accessed
■Event status
■Application ID
■Protocol
■Event message
IDP User Profile The user profile related to a
user authenticated by an
identity provider is obtained
■Event status
■Application ID
■User attributes
■Identity provider name
■Event message (optional
attributes)
Local Registration A user registers locally by
providing registration info
■Event status
■User ID
■First name
■Last name
■E-mail
■Location
■Time zone
■Event message
Security Validation The security mechanism on
the Identity Provider REST
Services for Relying Party
(RP) is validated
■Security mechanism
■Client principal
■Remote IP address
■Event message
OpenID Authentication
Request
An OpenID authentication
request is initiated
■Event status
■Request ID
■IDP login URL
■Request attributes
■Message text
OAuth Authentication
Request
An OAuth authentication
request is initiated
■Event status
■Request ID
■Return URL
■IDP attributes
■Message text
OAuth Access Token Request An OAuth access token
request is initiated
■Event status
■Request ID
■Token
■Message text
Local Login User logs in locally ■Event status
■Application ID
■User ID
■Token
■Message text
Table 9–5 (Cont.) Mobile and Social Run-Time Audit Events
Run-Time Event Issued When Event Details Include

Identity Federation Events You Can Audit
9-14 Administrator's Guide for Oracle Access Management
9.5 Identity Federation Events You Can Audit
The Identity Federation service also uses the Fusion Middleware Audit Framework for
auditing. The following data is part of each audit record, regardless of the event or
event type that is audited:
■timestamp - Date and time the audit event occurred
■initiator - the initiator of the audit event (for some events this attribute may be
empty)
■ECID - the execution context ID
The Fusion Middleware Audit Framework supports the following audit levels:
■None
■Low
■Medium
■Custom
Events can be audited in different categories and audit levels. Table 9–6 lists the event
categories and where they are described in this chapter.
The following section contain more information.
■Session Management Events for Identity Federation
■Protocol Flow Events for Identity Federation
■Server Configuration Events for Identity Federation
■Security Events for Identity Federation
9.5.1 Session Management Events for Identity Federation
Session Management events for this Identity Federation release, include a subset of
auditable events for the previous release. For attributes of each event, see "Session
Management Events" in Oracle Fusion Middleware Administrator's Guide for Oracle
Identity Federation.
Table 9–6 Categories of Audit Events for Identity Federation
Category Described in ...
Session Management Session Management Events for Identity Federation
Protocol Flow Protocol Flow Events for Identity Federation
Server Configuration Server Configuration Events for Identity Federation
Security Security Events for Identity Federation
See Also: Oracle Fusion Middleware Administrator's Guide for
Oracle Identity Federation chapter on "Diagnostics and Auditing" for
greater detail
Table 9–7 Identity Federation Session Management Events
Auditable Events Auditing Not Supported in This Release for ...
CreateUserSession –
Creation of a session after a successful login
CreateUserFederation –
Creation of a user federation between two remote servers

Identity Federation Events You Can Audit
Auditing Administrative and Run-time Events 9-15
9.5.2 Protocol Flow Events for Identity Federation
Protocol flow events for this Identity Federation release, include a subset of auditable
events for the previous Identity Federation release. For attributes of each event, see
"Protocol Flow Events" in Oracle Fusion Middleware Administrator's Guide for Oracle
Identity Federation.
9.5.3 Server Configuration Events for Identity Federation
Auditable Server configuration events for this Identity Federation release, include a
subset of auditable events for the previous Identity Federation release. For attributes of
each event, see "Server Configuration Events" in Oracle Fusion Middleware
Administrator's Guide for Oracle Identity Federation.
DeleteUserSession –
Deletion of a session after logout
UpdateUserFederation -
Updating the user federation between two remote servers
CreateActiveUserFederation –
Creation of an active federation after
successful login
DeleteUserFederation –
Deletion of a user federation between two remote servers
CreateActiveUserFederation –
Creation of an active federation after
successful login
DeleteActiveUserFederation -
Deletion of an active federation after logout
LocalAuthentication –
Authentication of a user at OIF
LocalLogout - Logout of a user at Identity
Federation
Table 9–8 Protocol Flow Events for Identity Federation
Auditable Events Auditing Not Supported in This Release for ...
IncomingMessage
Message being received by Identity Federation
AssertionCreation
Creation of an assertion by Identity Federation
(Success only
OutgoingMessage
Message being sent by Identity Federation (Success
only)
AssertionConsumption
Consumption of an assertion by Identity Federation
(Success only)
Table 9–9 Server Configuration Identity Federation
Auditable Events Auditing Not Supported in This Release for ...
CreateConfigProperty
Adding a new configuration property (Success only)
SetDataStoreType
Changing the type of a data store (Success only)
ChangeConfigProperty
Changing the value of an existing configuration
property (Success only)
ChangeDataStore
Setting of the federation data store (Success only)
DeleteConfigProperty
Deleting a configuration property (Success only)
Table 9–7 (Cont.) Identity Federation Session Management Events
Auditable Events Auditing Not Supported in This Release for ...

Security Token Service Events You Can Audit
9-16 Administrator's Guide for Oracle Access Management
9.5.4 Security Events for Identity Federation
Auditable security events for this Identity Federation release, include all auditable
events for the previous Identity Federation release. For attributes of each event, see
"Security Events" in Oracle Fusion Middleware Administrator's Guide for Oracle
Identity Federation.
9.6 Security Token Service Events You Can Audit
Security Token Service provides an independent audit configuration file, named
component_events.xml
, that defines specific event types and events to audit. The
following sections provide more details.
■About Audit Record Content Common to All Events
■Security Token Service Administrative Events You Can Audit
■Security Token Service Run-time Events You Can Audit
CreatePeerProvider
Adding a new provider to the list of trusted
providers (Success only)
UpdatePeerProvider
Updating the information on an existing provider in
the list of trusted providers (Success only)
PeerProviderID
DeletePeerProvider
Deleting a provider from the list of trusted
providers (Success only)
LoadMetadata
Loading of metadata (Success only)
ChangeFederation
Changing of the trusted providers (Success only)
ChangeServerProperty
Changing of a server configuration property
(Success only)
Table 9–10 Security Events for Identity Federation
Auditable Events Auditing Not Supported in This Release for ...
CreateSignature
Creation of a digital signature by Identity
Federation
n/a
Ve ri fy S ig na tu re
Verification of a digital signature by Identity
Federation
EncryptData
Encryption of data by Identity Federation
DecryptData
Decryption of data by Identity Federation
Table 9–9 (Cont.) Server Configuration Identity Federation
Auditable Events Auditing Not Supported in This Release for ...

Security Token Service Events You Can Audit
Auditing Administrative and Run-time Events 9-17
9.6.1 About Audit Record Content Common to All Events
The following data is part of each audit record, regardless of the event or event type
that is audited:
■Date and time of event
■IP address of the client initiating event
■Client identity
■Processing time for the event
9.6.2 Security Token Service Administrative Events You Can Audit
Security Token Service administrative events fall into several configuration
management operations defined in
component_events.xml
. See details in Table 9–11.
See Also: "Setting Up Auditing for Oracle Access Management" on
page 9-20
Table 9–11 Security Token Service Configuration Management Operations
Security Token Service
Configuration Operations Description
Common Attributes ■OldSettings: The string representing the previous settings before
the change was applied.
■NewSettings: The string representing the new settings.
■TemplateID: The ID of the Validation or Issuance Template being
created or updated or deleted.
■ProfileID: The ID of the Partner Profile being created or updated
or deleted.
■PartnerID: The ID of the Partner being created or updated or
deleted.
■SettingsID: The ID of the generic settings being created or
updated or deleted.
Create Validation Template Audit event recorded for the creation of a Validation Template
referenced by CreateValidationTemplate.
Attributes:
■TemplateID
■NewSettings
Update Validation Template Audit event recorded for the update of a Validation Template
referenced by UpdateValidationTemplate.
Attributes:
■TemplateID
■OldSettings
■NewSettings
Delete Validation Template Audit event recorded for the delete event of a Validation Template
referenced by DeleteValidationTemplate.
Attributes:
■TemplateID
■OldSettings
Create Issuance Template Audit event recorded for the creation of an Issuance Template
referenced by CreateIssuanceTemplate.
Attributes:
■TemplateID
■NewSettings

Security Token Service Events You Can Audit
9-18 Administrator's Guide for Oracle Access Management
Update Issuance Template Audit event recorded for the update of an Issuance Template
referenced by UpdateIssuanceTemplate.
Attributes:
■TemplateID
■OldSettings
■NewSettings
Delete Issuance Template Audit event recorded for the delete event of an Issuance Template
referenced by DeleteIssuanceTemplate.
Attributes:
■TemplateID
■OldSettings
Create Partner Profile Audit event recorded for the creation of Partner Profile referenced by
CreatePartnerProfile.
Attributes:
■ProfileID
■NewSettings
Update Partner Profile Audit event recorded for the update of a Partner Profile referenced by
UpdatePartnerProfile.
Attributes:
■ProfileID
■OldSettings
■NewSettings
Delete Partner Profile Audit event recorded for the delete event of Partner Profile referenced
by DeletePartnerProfile.
Attributes:
■ProfileID
■OldSettings
Create Partner Audit event recorded for the creation of Partner Profile referenced by
CreatePartner.
Attributes:
■PartnerID
■NewSettings
Update Partner Audit event recorded for the update of a Partner Profile referenced by
UpdatePartner.
Attributes:
■PartnerID
■OldSettings
■NewSettings
Delete Partner Audit event recorded for the delete event of Partner Profile referenced
by DeletePartner.
Attributes:
■PartnerID
■OldSettings
Generic Admin Creation Audit event recorded for the generic create administrative operation
referenced by GenericAdminCreation.
Attributes:
■SettingsID
■NewSettings
Table 9–11 (Cont.) Security Token Service Configuration Management Operations
Security Token Service
Configuration Operations Description

Security Token Service Events You Can Audit
Auditing Administrative and Run-time Events 9-19
9.6.3 Security Token Service Run-time Events You Can Audit
Security Token Service-specific run-time events for token operations are defined in
component_events.xml
. See details in Table 9–12.
Generic Admin Update Audit event recorded for the update of a generic update
administrative operation referenced by GenericAdminUpdate.
Attributes:
■SettingsID
■OldSettings
■NewSettings
Generic Admin Removal Audit event recorded for generic delete administrative operation
referenced by GenericAdminDeletion.
Attributes:
■SettingsID
■OldSettings
Table 9–12 Security Token Service-specific Run-time Events
Token Operations Description
Common Attributes ■Requester: Who made the request by sending the RST
■RelyingParty: The one for whom the token is created
■UserID: End user identity
■TokenType: Either SAML11, SAML20, Username, X.509,
Kerberos, OAM or Custom
■Token: The XML value of the token
■TokenContext: The Context data passed for token
operations
■Message: The XML representation of the incoming or
outgoing message
Incoming Message Incoming RSTR message received by Security Token Service
referenced by OutgoingMessage.
Attributes populated for this event, if available:
■Requester
■RelyingParty
■Message
Outgoing Message Outgoing RSTR message received by Security Token Service
referenced by IncomingMessage.
Attributes populated for this event, if available:
■Requester
■RelyingParty
■Message
Table 9–11 (Cont.) Security Token Service Configuration Management Operations
Security Token Service
Configuration Operations Description

Setting Up Auditing for Oracle Access Management
9-20 Administrator's Guide for Oracle Access Management
9.7 Setting Up Auditing for Oracle Access Management
The following overview provides a list of the tasks that must be performed before you
can perform auditing for Oracle Access Management.
Task overview: Configuring auditing
1. Set up the audit data store, as described in "Setting Up the Audit Database Store"
on page 9-21.
2. Set up publishing for audit reports, as described in "Preparing Oracle Business
Intelligence Publisher EE" on page 9-21.
3. Edit the Audit Configuration in the Oracle Access Management Console, as
described in:
■Using the Oracle Access Management Console for Audit Configuration
■Adding, Viewing, or Editing Audit Settings
See Section 9.8, "Validating Auditing and Reports" for details testing and validating
the audit configuration.
Token Validation Audit event for token validation in Security Token Service
referenced by TokenValidation. The status attribute indicates
whether or not the validation operation was successful.
Attributes populated for this event, if available:
■Requester
■RelyingParty
■Token
■TokenType
■TokenContext
■Status
Token Generation Audit event for token generation in Security Token Service
referenced by TokenGeneration.
Attributes populated for this event, if available:
■Requester
■RelyingParty
■Token
■TokenType
■TokenContext
■UserID
LDAP User Authentication Audit event for local user authentication with the LDAP
Directory referenced by LDAPUserAuthentication.
Attributes populated for this event, if available:
■UserID
■Status
Generic Runtime Operation Audit event for a generic operation performed by Security
Token Service referenced by GenericRuntimeOperation
Attributes populated for this event, if available:
■OperationType: type of operation
■OperationData: string representing context of the
operation
Table 9–12 (Cont.) Security Token Service-specific Run-time Events
Token Operations Description

Setting Up Auditing for Oracle Access Management
Auditing Administrative and Run-time Events 9-21
9.7.1 Setting Up the Audit Database Store
This topic provides an overview of the tasks required to create the audit database and
extend the schema using the Repository Creation Utility (RCU). This task is required
before you can audit events for Oracle Access Management if you choose a database
store for audit data.
Task overview: Creating the database audit store
1. Create an audit database, version 11.1.0.7 or later, as described in the Oracle Fusion
Middleware Application Security Guide.
2. Run the RCU against the database, as described in "Create the Audit Schema using
RCU" in the Oracle Fusion Middleware Repository Creation Utility User's Guide.
3. Set up audit data sources for the audit loader and configure it for the OAM Server
as described in "Set Up Audit Data Sources" in the Oracle Fusion Middleware
Application Security Guide:
■Use the Java EE audit loader configuration for WebLogic Server.
■Use the JNDI name of the data source jdbc/AuditDB that points to the
database that was set up in step 2 above.
4. In the service instance specified in the domain file
($DOMAIN_
HOME/config/fmwconfig/jps-config.xml
), enable database auditing by changing
the value of the property
audit.loader.repositoryType
to
DB
. For example:
<serviceInstance name="audit.db" provider="audit.provider">
<property name="audit.loader.repositoryType" value="DB"/>
<property name="auditstore.type" value="db"/>
<property name="audit.loader.jndi" value="jdbc/AuditDB"/>
<property name="audit.maxDirSize" value="0"/>
<property name="audit.filterPreset" value="None"/>
<property name="audit.maxFileSize" value="104857600"/>
<property name="audit.loader.interval" value="15"/>
<propertySetRef ref="props.db.1"/>
</serviceInstance>
5. Restart the WebLogic Server.
6. Ensure that the audit loader is configured for the OAM Server and that it points to
the proper database, as described in "Configure a Database Audit Store for Java
Components" in the Oracle Fusion Middleware Application Security Guide.
7. Maintain the bus-stop files, as described in "Tuning the Bus-stop Files" in the
Oracle Fusion Middleware Application Security Guide.
9.7.2 Preparing Oracle Business Intelligence Publisher EE
You must prepare Oracle Business Intelligence Publisher Enterprise Edition (EE) for
use with Oracle Access Management audit reports as outlined in the following
procedure.
See Also:
■Oracle Fusion Middleware Application Security Guide for details on
managing the audit store
■Oracle Fusion Middleware Repository Creation Utility User's
Guide

Setting Up Auditing for Oracle Access Management
9-22 Administrator's Guide for Oracle Access Management
Task overview: Prepare Oracle BI Publisher
1. Install Oracle BI Publisher, as described in the Oracle Business Intelligence Enterprise
Edition Installation and Upgrade Guide.
2. Perform tasks as described in "Set Up Oracle Reports in Oracle Business
Intelligence Publisher" in the Oracle Fusion Middleware Application Security
Guide:
■Unzip the
oam_audit_reports_11_1_2_0_0.zip
into your Reports folder.
This zip file is located in the $ORACLE_HOME/oam/server/reports/
directory.
■Set up the JNDI connection for the audit data source or the JDBC connection
the audit database.
The datasource name must be "Audit".
3. Set up audit report templates, as described in the section "Set Up Audit Report
Templates" of the Oracle Fusion Middleware Application Security Guide.
4. Set up audit report filters, as described in the section "Set Up Audit Report Filters"
of the Oracle Fusion Middleware Application Security Guide.
5. View reports from the following path: Reports/Oracle_Fusion_Middleware_Audit
reports.
9.7.3 Using the Oracle Access Management Console for Audit Configuration
Within Oracle Access Management, certain Audit Configuration settings are accessible
as Common Settings under the System Configuration. These settings are not required
when you audit to a database. Figure 9–2 shows the Audit Configuration section of the
Common Settings page.
See Also:
■Oracle Fusion Middleware Metadata Repository Builder's Guide for
Oracle Business Intelligence Enterprise Edition
■Oracle Fusion Middleware Developer's Guide for Oracle Business
Intelligence Enterprise Edition
■Oracle Fusion Middleware User's Guide for Oracle Business
Intelligence Enterprise Edition
See Also: "Validating Auditing and Reports" on page 9-25
Setting Up Auditing for Oracle Access Management
Auditing Administrative and Run-time Events 9-23
Figure 9–2 Common Settings: Auditing Configuration
The Auditing section provides settings for the Log Directory, Filter Settings, and Audit
Configuration Users.
Table 9–13 describes the elements in the Audit Configuration page.
Note: The actual log directory cannot be configured using the Oracle
Access Management Console. It is the default directory for the
Common Audit Framework audit loader. Changing the directory
impacts the audit loader and is not supported.
Table 9–13 Audit Configuration Elements
Elements Description
Maximum Directory Size The maximum size, in MBs, of the directory that contains audit output files.
For example, assuming that the maximum file size is 10, a value of 100 for
this parameter implies that the directory allows a maximum of 10 files.
Once the maximum directory size is reached, the audit logging stops.
For example, a value of 100 specifies a maximum of 10 files if the file size is
10 MB. If the size exceeds this, the creation of audit logs stops.
This is configured using the
max.DirSize
property described in the
configuration file
jps-config.xml
. This property controls the maximum size
of a bus-stop directory for Java components as described in the Oracle Fusion
Middleware Application Security Guide.
Maximum File Size The maximum size, in MBs, of an audit log file. Once the size of a file
reaches the maxi mum size, a new log file is created. For example,
specifying 10 directs file rotation when the file size reaches 10 MB.
This is configured using the
max.fileSize
property described in the
configuration file
jps-config.xml
. This property controls the maximum size
of a bus-stop file for Java components as described in the Oracle Fusion
Middleware Application Security Guide.
Filter Enabled Check this box to enable event filtering.
Setting Up Auditing for Oracle Access Management
9-24 Administrator's Guide for Oracle Access Management
9.7.4 Adding, Viewing, or Editing Audit Settings
The Administrator controls the amount and type of information that is logged by
choosing a filter preset from the Audit Configuration tab on the OAM Server Common
Properties page.
The following procedure describes how to add, view, or edit OAM Server Common
Audit Configuration settings. Individual audit policies cannot be configured using
Fusion Middleware Control. Oracle Access Management does not use JPS
infrastructure to configure the audit configuration. There are no WebLogic Scripting
Tool (WLST) commands for auditing.
To view or edit auditing configuration in the Oracle Access Management
Console
1. From the Oracle Access Management Console, click Common Settings.
2. In the Audit Configuration section, enter appropriate details for your environment
(Table 9–13):
■Maximum Log directory size
■Maximum Log file size
■Filter Enabled
■Filter Preset (to define verbosity of audit data)
■Users to include specific users from the audit by clicking the Add (+) button
above the Users table and entering a value in the field.
3. Click Apply to submit the Audit Configuration (or close the page without
applying changes).
4. Restart AdminServer and OAM Servers after changes are applied.
Filter Preset Defines the amount and type of information that is logged when the filter is
enabled. The default value is Low.
■All: captures and records all auditable OAM events
■Low: captures and records a specific set of auditable OAM events
■Medium: captures and records events covered by the Low setting plus
a number of other auditable OAM events
■None: no OAM events are captured and recorded
Events for each filter preset are fixed in the read-only component_
events.xml file. Editing or customizing this file is not supported for Oracle
Access Management. Only items that are configured for auditing at the
specified filter preset can be audited.
Users Specifies the list of users whose actions are included only when the filter is
enabled. All actions of the special users are audited regardless of the filter
preset. Administrators can add, remove or edit special users from this table.
Note: Auditable events for each filter preset are fixed in the
read-only
component_events.xml
file. Editing or customizing this file
is not supported.
Table 9–13 (Cont.) Audit Configuration Elements
Elements Description

Validating Auditing and Reports
Auditing Administrative and Run-time Events 9-25
9.8 Validating Auditing and Reports
Use the following procedure to test your run-time event auditing configuration.
Prerequisites
■Configure auditing parameters as described in "Setting Up Auditing for Oracle
Access Management" on page 9-20.
■Ensure the Agents and Servers are running.
■Prepare BI EE Publisher as described in "Preparing Oracle Business Intelligence
Publisher EE" on page 9-21.
To validate your auditing configuration
1. Authentication Event: Audit Console login success/failure as described here or
any administrative event described in Table 9–2, " Access Manager Administrative
Audit Events".
a. Sign out of Oracle Access Management Console.
b. Sign in to Oracle Access Management Console with invalid user (not
Administrator) credentials.
c. Sign in to Oracle Access Management Console using the proper Administrator
credentials.
d. Review Log File: Open the audit.log file and search for the last Administrative
event entries:
$DOMAIN_HOME/servers/$ADMINSERVER_NAME/logs/auditlogs/OAM/audit.log
e. Review Database Log:
a. Perform tasks in "Setting Up the Audit Database Store" on page 9-21.
b. Generate an Authentication event as described in Step 1.
c. Connect to the database and connecting to the database and reviews audit
events under IAU_BASE table.
2. Runtime Event: Audit Authorization success/failure as described here or any
runtime event described in Table 9–3, " Access Manager Run-time Audit Events".
a. In a browser window, enter the URL of a protected resource for which you are
not authorized.
b. Review Log File: Open the audit.log file and search for the last Administrative
event entries:
$DOMAIN_HOME/servers/$ADMINSERVER_NAME/logs/auditlogs/OAM/audit.log
c. Review Database Log:
a. Perform tasks in "Setting Up the Audit Database Store" on page 9-21.
b. Generate and Authentication event as described in Step 1.
c. Connect to the database and connecting to the database and reviews audit
events under IAU_BASE table.
3. Audit Configuration Changes: See Also "Adding, Viewing, or Editing Audit
Settings" on page 9-24.
Validating Auditing and Reports
9-26 Administrator's Guide for Oracle Access Management
a. From the Oracle Access Management Console, System Configuration tab,
Common Configuration, modify Maximum Directory Size (MB) and
Maximum File Size (MB) parameters.
b. Repeat Steps here to confirm auditing is working.
4. View Reports:
a. Sign in to Oracle BI EE. For example:
http://host:port/xmlpserver
Here, host is the computer hosting Oracle BI Publisher; port is the listening port
for BI Publisher; xmlpserver is the login page for BI Publisher.
b. In Oracle BI Publisher Enterprise, locate the desired reports. For example:
Click Shared Folders, the component that contains the report you would like
to view and then select the desired report.
c. Perform any analysis as desired, or edit your auditing configuration as
needed.
$MW_HOME/user_projects/domains/base_domain/servers/oam_server1/logs/
auditlogs/OAM/
5. Archive and manage audit logs according to your company policies.

10
Logging WebGate Event Messages 10-1
10
Logging WebGate Event Messages
Each WebGate instance (both 10g and 11g WebGates) can write information about its
processes and states to a log file. The logs can be configured to provide information at
various levels of granularity. For example, you can record errors, errors plus state
information, or errors, states, and other information to the level of a debug trace. You
can also eliminate sensitive information from the logs.
This chapter provides the following sections:
■About Logging, Log Levels, and Log Output
■About Log Configuration File Paths and Contents
■About Directing Log Output to a File or the System File
■Structure and Parameters of the Log Configuration File
■About Activating and Suppressing Logging Levels
■Mandatory Log-Handler Configuration Parameters
■Configuring Different Threshold Levels for Different Types of Data
■Filtering Sensitive Attributes
10.1 About Logging, Log Levels, and Log Output
The logging feature enables you to analyze system performance and to troubleshoot
issues. You can configure logging for individual WebGate instances of the following
components:
■10g WebGates
■11g WebGates
■Custom Access Clients (Access Manager SDK)
You can configure different logging levels for different functional areas of a component
instance. For example, you can capture debug data for LDAP activity while recording
only error-level data for all other component activity. You can also record the time
taken for each request that a component processes, and you can send different levels of
Note: Unless explicitly stated, all information in this section applies
equally to 10g and 11g Webgates. For instance, the location of the log
configuration, oblog_config_wg.xml, has changed for 11g while the
content of the file and most other specifics have not.

About Logging, Log Levels, and Log Output
10-2 Administrator's Guide for Oracle Access Management
log data to different destinations. For example, you can send error information to a file
and all other log data to the system log.
Securing Sensitive Information: Access Manager handles sensitive information about
users. On some sites, this includes user password, date of birth, a social security
number, security questions and answers for lost password requests. Sensitive data on
your site might include a security number or other information you want to secure. At
certain logging levels, sensitive information might be captured. Today, you can filter
sensitive information out of log files, as described in "Filtering Sensitive Attributes" on
page 10-26.
Configuring Logging: You configure logging by editing a configuration file that is
stored with the Webgate. See "About Log Configuration File Paths and Contents" on
page 10-4.
Logging Levels: You can request logging at various levels. The highest level is Fatal
and the lowest level is Trace. See "About Log Levels" on page 10-2 for details.
Logging Destinations: In the log configuration file, a parameter known as a log writer
determines the destination for log output. See "About Directing Log Output to a File or
the System File" on page 10-9 for details. You create a complete definition for your log
output by identifying a log writer and a log level. This complete definition is known as
a log-handler. See "The Second Compound List and Log Handlers" on page 10-13 for
details.
The rest of this section discusses the following topics:
■About Log Levels
■About Log Output
10.1.1 About Log Levels
A logging level determines the amount of data that is written to the log data file. Each
logging level is cumulative, that is, each level contains all the data generated by the
higher levels. For example, Error logs contain all the data generated by the Fatal logs,
plus the events that are specific to the Error category.
Table 10–5 describes the levels. The default log level is Warning: LOGLEVEL_
WARNING.
Table 10–1 Logging Levels
Level
Number of
Events
Reported Description
LOGLEVEL_
FATAL
> 60 Records critical errors. Generally, these events can
cause the component to exit.
In the event of a system failure, Fatal-level messages are
always flushed to the log file.
LOGLEVEL_
ERROR
> 960 Records events that may require corrective action, for
example, a component is unavailable. Error logs can
also be generated for transient or self-correcting
problems, for example, failure to connect to another
component.
LOGLEVEL_
WARNING
> 1200 Records issues that may lead to an error or require
corrective action in the future.
LOGLEVEL_ INFO
> 400 Records completed actions or the current state of a
component, for example, the component is initializing.

About Logging, Log Levels, and Log Output
Logging WebGate Event Messages 10-3
Compound Lists: You can collect log data from non-adjacent levels and send different
levels of log data to different destinations. For example, you can send the Fatal logs to
the system log, and write Error logs to a file. See "The Second Compound List and Log
Handlers" on page 10-13 for details.
Threshold: You configure a global cutoff, or threshold, for logging on the
LOG_
THRESHOLD_LEVEL
parameter in the log configuration file. By default, if a configured
level for a log-handler exceeds the cutoff, the log data is not collected. Note that logs
can fail to be written despite the configured level because the
LOG_THRESHOLD_LEVEL
parameter takes precedence over the level configured in the log-handler. Only the
MODULE_CONFIG
section of the log configuration file overrides the global threshold. See
"The Simple List and Logging Threshold" on page 10-11 for details.
Overrides: You specify function- or module-specific overrides for the global logging
threshold on the
MODULE_CONFIG
parameter. See "Configuring Different Threshold
Levels for Different Types of Data" on page 10-21 for details.
10.1.2 About Log Output
Each line of the log output file follows a particular structure. A line starts with a date
and time stamp, followed by the thread that is processing the request, the name of the
function or module being logged, and the log level.
The following is a snapshot of the left-most columns of the log output file:
LOGLEVEL_
DEBUG1
> 400 Records debugging information. Typically, the
information at this level is only meaningful to a
developer.
LOGLEVEL_
DEBUG2
> 100 Records advanced debugging information. This level
augments the Debug1 log level. Typically, the
information at this level is only meaningful to a
developer.
LOGLEVEL_
DEBUG3
> 900 Records a large amount of debugging information or
data pertaining to an expensive section of the code.
This level is useful for debugging a tight loop or a
performance-sensitive function. Typically, the
information at this log level is only meaningful to a
developer.
These logs can contain sensitive information.
LOGLEVEL_
TRACE
> 900 Access
Manager API
> 150
third-party API
This log level is used to trace code path execution or to
capture performance metrics. This information is
captured at the entry and exit points for each
component function. Typically, the information at this
log level is only meaningful to a developer.
These logs can contain sensitive information.
LOGLEVEL_ ALL
> 5000 This level includes all the events and states from all
other levels.
Note: The Trace and Debug3 level logs can contain sensitive
information. For more information about sensitive information, see
"Filtering Sensitive Attributes" on page 10-26.
Table 10–1 (Cont.) Logging Levels
Level
Number of
Events
Reported Description

About Log Configuration File Paths and Contents
10-4 Administrator's Guide for Oracle Access Management
2007/06/01@00:50:56.859000 5932 2672 DB_RUNTIME DEBUG3
2007/06/01@00:50:56.859000 5932 2672 DB_RUNTIME TRACE
2007/06/01@00:50:56.859000 5932 2672 LDAP DEBUG1
2007/06/01@00:50:56.859000 5932 2672 LDAP TRACE
2007/06/01@00:50:56.859000 5932 2672 LDAP TRACE
The two columns to the right of the log level are internal code references, and can be
ignored. The following is an example of these columns:
0x00000205 ldap_connection_mngr.cpp:212
To the right of the internal code reference columns, you see the log message that is
associated with this log level, for example, "
Function called
" or "
Function
returned
," followed by the name of the function, as illustrated in the following
example:
"Function called" _CallName^ldap_init
The log message and function name can be followed by additional information, for
example, the duration of the process, the address space where the function is running,
or state information, as illustrated in the following examples:
"Connection health check result" Server^dlsun4072 Port^389 Server Priority^1
Connection available^true
"Function entered" _TraceName^ConnectionWatcherThread::CheckPrimaries
"Function exited" _TraceName^ConnectionWatcherThread::CheckPrimaries
TraceDuration^0.000028
"Connection Pool Status in ValidateConnections() "NumLivePrimaryConnections^1
Maximum Connections^1 UpConnections^1 Failover Threshold^1 Max Session
Time^0 SleepFor^60
To secure sensitive information and ensure that it is not included in the output of the
logging operation, see "Filtering Sensitive Attributes" on page 10-26.
10.2 About Log Configuration File Paths and Contents
The log configuration file, oblog_config_wg.xml, is used to specify configuration
details for Webgate logging (oblogs).
You configure parameters that control Webgate log output in XML-based log files that
you edit with a plain text editor. Changes that you make to these files are effective
immediately.
The rest of this section discusses the following topics:
■Log Configuration File Paths and Names
■Log Configuration File Contents
10.2.1 Log Configuration File Paths and Names
By default, Webgate logging is enabled and oblogs are generated in the Oracle HTTP
Server (OHS) instance diagnostics directory: instance1/diagnostics/logs/OHS/ohs1/.
Each Webgate instance includes a log configuration file (oblog_config_wg.xml) where
you can define what type of data is recorded in the log output. A log configuration file
See Also: "Log Configuration File Contents" on page 10-5

About Log Configuration File Paths and Contents
Logging WebGate Event Messages 10-5
is distinct from the log output file. For details on log output files, see "About Log
Output" on page 10-3.
The oblog_config_wg.xml file is updated when you edit to configure Webgate logging.
For example, by setting a new log threshold level, changing a log file name, or filtering
logs related to some modules and so on.
Log configuration, oblog_config_wg.xml, files reside in the following locations
depending upon your Webgate version:
10g Webgates: Webgate_install_dir\oblix\config
11g Webgates: $WEBGATE_HOME or $ORACLE_HOME/webgate/ohs/config. The
same oblog_config_wg.xml file is copied to the Webgate instance directory
($INSTANCE_HOME/webgate/config) when the Webgate instance is created The later
is to be used when configuring logging.
After installation, oblog_config_wg.xml and oblog_config_wg_original.xml both
contain comments to help guide your editing.
Table 10–2 lists the names of the log configuration files. Do not change the names.
The oblog_config_wg.xml file can be edited using any text editor as long as you ensure
that after the update the file is still valid XML. After updates to the file, changes will
take affect in about 60 seconds.
10.2.2 Log Configuration File Contents
The log configuration file controls items such as the following:
■What is logged for that component
■Where the data is sent
■In certain cases, the size of the write buffer used for the log
■Log file rotation intervals
The configuration file contains XML statements that you can edit in a text editor.
Note: Do not change the path to this file. If you install more than one
instance, a log configuration file is installed for each instance. When
configuring logging, oblog_config_wg.xml under $INSTANCE_HOME
should be updated.
Table 10–2 Log Configuration File Names for Components
Component Log Configuration FIle Name
Webgate oblog_config_wg.xml
Access Manager SDK (custom Access
Client)
oblog_config.xml
Important: Do not change the default path or name for any logging
configuration file.

About Log Configuration File Paths and Contents
10-6 Administrator's Guide for Oracle Access Management
10.2.2.1 When Changes to the File Take Effect
A watcher thread picks up changes to the log configuration file every 60 seconds and
ensures that changes take effect. It is unnecessary to restart the server
10.2.2.2 About Comments in the Log File
Each default log configuration file contains comments that are intended to assist with
editing the file.
The commented default configuration file is shown here:
Comments can span one or multiple lines. Comments look similar to the following:
<!--NetPoint Logging Configuration File -->
<!-- -->
<!--Changes to this file will be automatically taken into effect -->
<!--in one minute. This does not require any server restart. -->
Example 10–1 shows a typical log configuration file with comments. Example 10–8
shows an example of a log file without comments.
Example 10–1 The Default Log Configuration File with Comments
<?xml version="1.0" encoding="ISO-8859-1" ?>
<!--============================================================ -->
<!--============================================================ -->
<!--NetPoint Logging Configuration File -->
<!-- -->
<!--Changes to this file will be automatically taken into effect -->
<!--in one minute. This does not require any server restart. -->
<!-- -->
<!--============================================================ -->
<!--============================================================ -->
<!--Set the Log Threshold -->
<!---->
<!--The log Threshold determines the amount of information to log. -->
<!--Selecting a lower level of logging includes the information -->
<!--logged at the higher levels. For example, LOGLEVEL_ERROR -->
<!--includes the information collected at LOGLEVEL_FATAL. -->
<!---->
<!--Choices are: -->
<!--LOGLEVEL_FATAL - serious error, possibly a program halt. -->
<!--LOGLEVEL_ERROR - a transient or self-correcting problem. -->
<!--LOGLEVEL_WARNING - a problem that does not cause an error. -->
<!--LOGLEVEL_INFO - reports the current state of the component. -->
<!--LOGLEVEL_DEBUG1 - basic debugging information. -->
<!--LOGLEVEL_DEBUG2 - advanced debugging information. -->
<!--LOGLEVEL_DEBUG3 - logs performance-sensitive code. -->
<!--LOGLEVEL_TRACE - used when you need to trace the code path -->
<!--execution or capture metrics. Includes all previous levels. -->
<!-- -->
<!--If you do not specify a threshold, the default is WARNING. -->
<!-- -->
<!--In addition to specifying a threshold, you need to specify -->
<!--if changes that you make to the logging configuration in -->
<!--the NetPoint GUI overwrite the settings in this file. The -->
<!--AutoSync parameter accomplishes this. This parameter takes a -->
<!--value of True or False. If set to True, changes made in the -->
See Also: The log configuration file on your system.

About Log Configuration File Paths and Contents
Logging WebGate Event Messages 10-7
<!--GUI overwrite changes in this config file. If False, changes -->
<!--made in the GUI are only in effect until the server is -->
<!--stopped or restarted, after which the settings in this file -->
<!--overwrite the GUI settings. The default is True. -->
<!-- -->
<!-- -->
<CompoundList xmlns="http://www.oblix.com" ListName="logframework.xml.staging">
<SimpleList>
<NameValPair ParamName="LOG_THRESHOLD_LEVEL" Value="LOGLEVEL_WARNING" />
<NameValPair ParamName="AUTOSYNC" Value="True" />
<!-- SECURE_LOGGING flag can be used to turn on/off Secure Logging -->
<!-- feature. By defalut this feature is tunred on. -->
<NameValPair ParamName="SECURE_LOGGING" Value="On" />
<!-- In addition to specifying a log threshold, you need to -->
<!-- configure log level for which Secure Logging should be -->
<!-- applicable.Choices for this can be used same as that of -->
<!-- LOG_THRESHOLD_LEVEL. Secure log threshold can be set using -->
<!-- LOG_SECURITY_THRESHOLD_LEVEL flag. Default value for Secure -->
<!-- log threshold is TRACE. -->
<NameValPair ParamName="LOG_SECURITY_THRESHOLD_LEVEL"
Value="LOGLEVEL_TRACE" />
<!-- LOG_SECURITY_ESCAPE_CHARS is used to configure escape sequence -->
<!-- characters. This can be used to avoid additional information -->
<!-- getting overwritten due to Secure Logging mechanism. Currently -->
<!-- following characters have been identified as escape sequence. -->
<!-- Configuring inappropriate characters may lead to sensitive -->
<!-- information being unmasked. -->
<NameValPair ParamName="LOG_SECURITY_ESCAPE_CHARS" Value="),]" />
<!-- LOG_SECURITY_MASK_LENGTH is used to specify default masking -->
<!-- length if none is specified in FILTER_LIST. -->
<!-- Default value for LOG_SECURITY_MASK_LENGTH is 300. -->
<NameValPair ParamName="LOG_SECURITY_MASK_LENGTH" Value="300" / >
</SimpleList>
<!-- -->
<!-- -->
<!--============================================================ -->
<!--============================================================ -->
<!--Configure the Log Level -->
<!-- -->
<!-- -->
<!--To configure a log level, you specify a name for the -->
<!--configuration (for instance, MyErrorLog1) and -->
<!--the log level that you are configuring. You can create -->
<!--more than one configuration per log level if you want -->
<!--to output to more than one destination. You can output to -->
<!--the system log or to a file, as specified on -->
<!--the LOG_WRITER parameter. The value for the LOG_WRITER -->
<!--parameter may only be SysLogWriter, FileLogWriter or -->
<!--MPFileLogWriter. The MPFileLogWriter is a multi-process safe -->
<!--FileLogWriter. It should be used to log in webcomponents i.e -->
<!--Webgate loaded on multiprocess -->
<!--webservers like Apache and IPlanet(UNIX) -->
<!-- -->
<!--If you do not specify an output destination, the default is -->
<!--SysLogWriter. -->
<!-- -->
<!--If outputting to a file, you also specify a file name and -->
<!--other parameters. Default parameter values are: -->
<!--FILE_NAME: <installdir>/oblix/log/oblog.log -->
<!--BUFFER_SIZE: 32767 (number of bytes) -->

About Log Configuration File Paths and Contents
10-8 Administrator's Guide for Oracle Access Management
<!--MAX_ROTATION_SIZE: 5242880 (bytes, equivalent to 5MB) -->
<!--MAX_ROTATION_TIME: 86400 (seconds, equivalent to one day) -->
<!-- -->
<!--Configuring the log level does not ensure that the data is -->
<!--actually collected. Data collection for a log is -->
<!--determined by the LOG_THRESHOLD_LEVEL parameter, above, -->
<!--and the LOG_STATUS parameter in the log configuration. -->
<!-- -->
<!--If you do not provide a LOG_STATUS, the default for -->
<!--LOGLEVEL_FATAL, LOGLEVEL_ERROR, and LOGLEVEL_WARNING, -->
<!--is On. -->
<!---->
<!--This file contains several sample configurations that are -->
<!--enclosed in comments. To use them, remove the comments. -->
<!-- -->
<CompoundList xmlns="http://www.oblix.com" ListName="LOG_CONFIG">
<!--Write all FATAL logs to the system logger. -->
<ValNameList xmlns="http://www.oblix.com" ListName="LogFatal2Sys">
<NameValPair ParamName="LOG_LEVEL" Value="LOGLEVEL_FATAL" />
<NameValPair ParamName="LOG_WRITER" Value="SysLogWriter" />
<NameValPair ParamName="LOG_STATUS" Value="On" />
</ValNameList>
<!--Write all logs to the Oracle log file. -->
<ValNameList xmlns="http://www.oblix.com" ListName="LogAll2File">
<NameValPair ParamName="LOG_LEVEL" Value="LOGLEVEL_ALL" />
<NameValPair ParamName="LOG_WRITER" Value="FileLogWriter" />
<NameValPair ParamName="FILE_NAME" Value="oblog.log" />
<!-- Buffer up to 64 KB (expressed in bytes) of log entries before
flushing to the file. -->
<NameValPair ParamName="BUFFER_SIZE" Value="65535" />
<!--Rotate the log file once it exceeds 50 MB (expressed in bytes). -->
<NameValPair ParamName="MAX_ROTATION_SIZE" Value="52428800" />
<!--Rotate the log file after 24 hours (expressed in seconds). -->
<NameValPair ParamName="MAX_ROTATION_TIME" Value="86400" />
<NameValPair ParamName="LOG_STATUS" Value="On" />
</ValNameList>
</CompoundList>
<!-- List of values that can be specified in the module config -->
<!-- -->
<!-- On - Uses loglevel set in the loglevel threshold -->
<!-- Off - No information is logged -->
<!-- LOGLEVEL_FATAL - serious error, possibly a program halt. -->
<!-- LOGLEVEL_ERROR - a transient or self-correcting problem. -->
<!-- LOGLEVEL_WARNING - a problem that does not cause an error. -->
<!-- LOGLEVEL_INFO - reports the current state of the component. -->
<!-- LOGLEVEL_DEBUG1 - basic debugging information. -->
<!-- LOGLEVEL_DEBUG2 - advanced debugging information. -->
<!-- LOGLEVEL_DEBUG3 - logs performance-sensitive code. -->
<!-- LOGLEVEL_TRACE - used when you need to trace the code path -->
<!-- execution or capture metrics. Includes all previous levels. -->
<!-- -->
<!-- List of modules that can be specified in the module config -->
<!-- -->
<!-- ALL_MODULES - Applies to all log modules -->
<!-- Specific module name - Applies to specific module -->
<!-- -->
<!-- -->
<!-- <ValNameList -->
<!-- xmlns="http://www.oblix.com" -->
<!-- ListName="MODULE_CONFIG"> -->

About Directing Log Output to a File or the System File
Logging WebGate Event Messages 10-9
<!-- <NameValPair -->
<!-- ParamName="CONNECTIVITY" -->
<!-- Value="LOGLEVEL_TRACE"></NameValPair> -->
<!-- </ValNameList> --><!--
<!--FILTER_LIST is used to maintain list of attributes which need -->
<!-- to be treated as sensitive and hence will be filtered out from -->
<!-- from logs. FILTER_LIST consist of all attribute names along -->
<!-- with corresponding masking lengths.There should be separate -->
<!-- entry in the list for the display name of the attribute -->
<!-- identified as sensitive. All attributes configured are case -->
<!-- sensitive i.e. if we configured sensitive attribute homePhone -->
<!-- as HomePhone then it will not get filtered out from logs. -->
<!-- By default four attributes (password, Password, response and -->
<!-- Response) are configured as sensitive -->
<!-- A sample configuration is shown below -->
<!-- <ValNameList -->
<!-- xmlns="http://www.oblix.com" -->
<!-- ListName="FILTER_LIST"> -->
<!-- <NameValPair -->
<!-- ParamName="password" -->
<!-- Value="40"></NameValPair> -->
<!-- <NameValPair -->
<!-- ParamName="Password" -->
<!-- Value="40"></NameValPair> -->
<!-- <NameValPair -->
<!-- ParamName="response" -->
<!-- Value="40"></NameValPair> -->
<!-- <NameValPair -->
<!-- ParamName="Response" -->
<!-- Value="40"></NameValPair> -->
<!-- <NameValPair -->
<!-- ParamName="homePhone" -->
<!-- Value="40"></NameValPair> -->
<!-- </ValNameList> -->
<ValNameList xmlns="http://www.oblix.com" ListName="FILTER_LIST">
<NameValPair ParamName="password" Value="40" />
<NameValPair ParamName="Password" Value="40" />
<NameValPair ParamName="passwd" Value="40" />
<NameValPair ParamName="Passwd" Value="40" />
<NameValPair ParamName="response" Value="40" />
<NameValPair ParamName="Response" Value="40" />
</ValNameList>
</CompoundList>
10.3 About Directing Log Output to a File or the System File
To send log output to a destination, you configure a log writer. A log writer can send
log output to one, none, or both of the following:
■A log file.
This file resides under the root installation directory of the component.
■The system file of the host for the component.
If more than one component resides on the same host, all components send data to
the system log file on that host.

Structure and Parameters of the Log Configuration File
10-10 Administrator's Guide for Oracle Access Management
You can send logs of a particular level, or logs of different levels, to more than one type
of log writer. For instance, you can send Fatal data to the system log, and send Trace
data to a file. Or, you can send Fatal data to both the system log and a file.
You define log writers in the log configuration file using the
LOG_WRITER
parameter in
a log-handler definition. See "The Second Compound List and Log Handlers" on
page 10-13 for details.
The log writers are described in Table 10–3.
10.4 Structure and Parameters of the Log Configuration File
The log configuration file conforms to a standard format. You can edit parameters and
add or subtract sections known as log-handler definitions, but do not change the
underlying format of the log configuration file.
See Example 10–1 or Example 10–8 for a listing of the default log configuration file.
The rest of this section discusses the following topics:
■The Log Configuration File Header
■The Initial Compound List
■The Simple List and Logging Threshold
■The Second Compound List and Log Handlers
■The List for Per-Module Logging
Table 10–3 Log Writers
Writer Description
SysLogWriter
Sends data to the system log file for the computer that hosts the
component being logged. Typically, the system log file contains event
information from multiple applications and the host operating system.
For Windows, this is the application log file located at My Computer,
Manage, Event Viewer, Application.
For UNIX platforms, the name and location of the system log file can
vary according to the computer and the preferences of the system
Administrator. Consult the Administrator of the computer for the file
location.
The default log configuration file sends Fatal, Error, and Warning
messages to the system log file.
FileLogWriter
This writer is recommended when you want to save log data for an
OAM Server or other single-process application on a disk file.
The FileLogWriter opens the log file and holds it open for disk writes
until the approximate file size limit or file rotation interval has been
reached. Oracle does not recommend this log writer for situations
where more than one process needs to write to the same log file. For
these situations, use the MPFileLogWriter.
MPFileLogWriter
This writer resembles the FileLogWriter, except that it opens and
closes the log file each time it writes data to the file. This enables
multiple processes to write to the file in turn. However, this practice
can slow performance substantially.
Oracle recommends using MPFileLogWriter only when FileLogWriter
fails to record logging data from some of the processes associated with
a multi-process application, for example, an Access Client installed on
a multi-process Web server (such as Apache) or the Solaris version of
the iPlanet Web server.

Structure and Parameters of the Log Configuration File
Logging WebGate Event Messages 10-11
■The Filter List
■About XML Element Order
10.4.1 The Log Configuration File Header
At the beginning of the log configuration file there is an XML file header:
<?xml version="1.0" encoding="ISO-8859-1" ?>
The header serves the following purposes:
■The header declares the relevant XML version, which is always 1.0.
■It also declares the encoding format, which is always ISO-8559-1.
10.4.2 The Initial Compound List
The header is followed by an initial compound list that is delimited as follows:
<CompoundList xmlns="http://www.oblix.com" ListName="logframework.xml.staging">
. . .
</CompoundList>
The first compound list is structured as follows:
■The compound list start-tag shows the relevant XML name space for the log
configuration file in the
xmlns
parameter.
■The compound list start-tag also provides a name for the compound list in the
ListName
parameter.
■The compound list end-tag occurs near the end of the file.
This compound list delimits all log configuration information.
10.4.3 The Simple List and Logging Threshold
After the start-tag for the first compound list, a simple list sets the global defaults for
logging, as follows:
<SimpleList>
. . .
</SimpleList>
Between the start and end tags of the simple list, you configure the following:
Table 10–4 Global Parameters in the First Compound List
Parameter Description
LOG_LEVEL_THRESHOLD
Sets the default logging threshold.
Default value:
LOGLEVEL_WARNING
Possible Values: Refer to log levels in "About Log Levels" on
page 10-2
The global threshold allows logs of a particular level and more
general levels to be collected, and prevents lower-level logs from
being collected. This threshold can be overridden by a
per-module threshold. See "Configuring Different Threshold
Levels for Different Types of Data" on page 10-21 for details.

Structure and Parameters of the Log Configuration File
10-12 Administrator's Guide for Oracle Access Management
Example 10–2 shows the simple lists containing global settings, which appear in the
first compound list in the oblog_config_wg.xml file.
Example 10–2 Simple Lists with Global Settings (First Compound List in oblog_config_
wg.xml)
<SimpleList>
<NameValPair
ParamName="LOG_THRESHOLD_LEVEL"
Value="LOGLEVEL_WARNING">
</NameValPair>
<NameValPair
ParamName="AUTOSYNC"
Value="True">
</NameValPair>
<NameValPair
ParamName="SECURE_LOGGING"
Value="On">
</NameValPair>
<NameValPair
ParamName="LOG_SECURITY_THRESHOLD_LEVEL"
Value="LOGLEVEL_TRACE">
SECURE_LOGGING
Dynamically enables or disables the secure logging mechanism.
This does not require a server or component restart.
Default value: On
Possible Values: On or Off
LOG_SECURITY_THRESHOLD_
LEVEL
Indicates the log threshold for which secure logging is effective.
Default value:
LOGLEVEL_TRACE
Possible Values: Refer to log levels in "About Log Levels" on
page 10-2
Note: Ensure that
LOG_THRESHOLD_LEVEL
and
LOG_SECURITY_
THRESHOLD_LEVEL
are the same or are consistent with one
another. For example, if
LOG_THRESHOLD_LEVEL
is set to
LOGLEVEL_TRACE
while
LOG_SECURITY_THRESHOLD_LEVEL
is set at
LOGLEVEL_WARNING
, then secure logging applies to
LOGLEVEL_
WARNING
and above but does not apply to
LOGLEVEL_TRACE
.
LOG_SECURITY_ESCAPE_
CHARS
Configure escape sequence characters used to avoid additional
information being overwritten due to the secure logging
mechanism. Use a comma separated list as shown here.
Default value: ),]
Possible Values: Characters only
Note: Default values are recommended. Configuring
inappropriate characters may lead to sensitive information being
unmasked.
LOG_SECURITY_MASK_LENGTH
Specifies the default masking length if none is specified in
FILTER_LIST.
Default value: 300
Possible Values: Positive integer
Note: FILTER_LIST appears after the second compound list (log
handlers). For more information, see "Filtering Sensitive
Attributes" on page 10-26.
Table 10–4 (Cont.) Global Parameters in the First Compound List
Parameter Description

Structure and Parameters of the Log Configuration File
Logging WebGate Event Messages 10-13
</NameValPair>
<NameValPair
ParamName="LOG_SECURITY_ESCAPE_CHARS"
Value="),]">
</NameValPair>
<NameValPair
ParamName="LOG_SECURITY_MASK_LENGTH"
Value="300">
</NameValPair>
</SimpleList>
10.4.4 The Second Compound List and Log Handlers
After the simple list containing global settings, and within the start and end tags for
the initial compound list, you specify an additional compound list. This compound list
contains log-handler definitions. The start and end tags for this list are as follows:
<CompoundList xmlns="http://www.oblix.com" ListName="LOG_CONFIG">
. . .
</CompoundList>
This compound list tag is configured as follows:
■In the start tag for the compound list, the
xmlns
parameter indicates the relevant
XML name space.
■Also in the start tag, you specify the name of the list on the
ListName
parameter.
Typically, the name of this list is
LOG_CONFIG
.
Between the start and end tags for the compound list for the log-handler, you specify
one or more
ValNameList
elements. Each
ValNameList
element contains the definition
for a log-handler. Each instance of this element begins and ends as follows:
<ValNameList xmlns="http://www.oblix.com" ListName="Unique_Name">
. . .
</ValNameList>
The
ValNameList
elements are configured as follows:
■The opening tag sets the relevant XML name space on the
xmlns
parameter.
■The opening tag also sets a name for the log-handler on the
ListName
parameter.
Within the opening and closing
ValNameList
tags, you configure the log-handler. A
log-handler definition contains three mandatory
NameValPair
elements:
■The first mandatory
NameValPair
element defines the logging level for the
log-handler.
This element contains the statement
ParamName="LOG_LEVEL"
, whose value is a
reserved name in Table 10–1, as follows:
<NameValPair ParamName="LOG_LEVEL" Value="LOGLEVEL_FATAL" />
■The second mandatory
NameValPair
element defines the destination for log
output.
This element contains a statement
ParamName="LOG_WRITER"
, whose value is a
reserved name in Table 10–3, as follows:
<NameValPair ParamName="LOG_WRITER" Value="SysLogWriter" />
■The third mandatory
NameValPair
element toggles this log-handler on and off.

Structure and Parameters of the Log Configuration File
10-14 Administrator's Guide for Oracle Access Management
This element contains a statement
ParamName="LOG_STATUS"
, with a value of
On
or
Off
, as follows:
<NameValPair ParamName="LOG_STATUS" Value="On" />
Finally, within the opening and closing
ValNameList
tags, if you specify
FileLogWriter
or
MPFileLogWriter
as the log writer, you can add none, some, or all of
the following. See Table 10–7 for details:
■A destination file name, as follows:
<NameValPair ParamName="FILE_NAME" Value="oblog.log" />
■A buffer size, as follows:
<NameValPair ParamName="BUFFER_SIZE" Value="65535" />
■A a file size that determines when a new log file is generated, as follows:
<NameValPair ParamName="MAX_ROTATION_SIZE" Value="52428800" />
■A time in minutes that determines the interval at which a new log file is generated,
as follows:
<NameValPair ParamName="MAX_ROTATION_TIME" Value="86400" />
10.4.5 The List for Per-Module Logging
After the end tag for the compound list that delimits the log-handlers, and before the
end tag for the initial compound list, you can add per-module logging parameters.
See "Configuring Different Threshold Levels for Different Types of Data" on page 10-21
for details.
10.4.6 The Filter List
After the per-module logging parameters a filter list identifies sensitive information
that you might want to filter out of the log file. For example, passwords and responses
for lost password management are sensitive information that you might want to filter
out of the log file.
Each name value pair associated with the FILTER_LIST parameter provides the name
of a word or phrase to be checked before the log is written and the corresponding
masking length for that word or phrase. During logging, the value of the word or
phrase is masked and omitted from the log file.
Simply put, during logging Access Manager does not recognize whether a value to be
masked is an attribute or its display name or something different (plain text). Secure
Logging works by searching for words or phrases added in the FILTER_LIST and then
masking out any data that is followed by the occurrence of those words or phrases. For
example, in the following statement:
\csabuild\coreid1014\np_common\db\ldap\util\ldap_util3.cpp:3107 "ldap_parse_result
of Simple Bind" ld handle^0x0779FA00 result^0x09FB0088
bind^cn=orcladmin LDAP bind operation status code^0 Additional
error message^ freeit^0 parse_rc^0
After turning Secure Logging ON and adding "
bind
" in the FILTER_LIST (which is
neither an attribute nor a display name), whatever follows the word in the FILTER_
LIST (in this case, "
bind
") is masked. In this case, you would see the following in logs:

Structure and Parameters of the Log Configuration File
Logging WebGate Event Messages 10-15
\csabuild\coreid1014\np_common\db\ldap\util\ldap_util3.cpp:3107 "ldap_parse_result
of Simple Bind" ld handle^0x0779FA00 result^0x09FB0088
bind^cn=orcladmin LDAP bind********** status code^0 Additional
error message^ freeit^0 parse_rc^0
All attributes are case sensitive. For example, if you enter "
password
" instead of
"
Password
" as a display name for an attribute, then "
Password
" is not filtered. By
default, four attributes are always configured in the filter list: password, Password,
response, and Response.
The default masking length,
40
, is specified for each of the four default attributes. The
default mask length can be altered for the default attributes if needed. If you add other
attributes to the filter list, you might need a larger mask length (
300
, for example).
The default filter list is shown in Example 10–3.
Example 10–3 FILTER_LIST Masks Sensitive Attributes in Log Files
<ValNameList>
xmlns="http://www.oblix.com"
ListName="FILTER_LIST">
<NameValPair
ParamName="password"
Value="40"></NameValPair>
<NameValPair
ParamName="Password"
Value="40"></NameValPair>
<NameValPair
ParamName="passwd"
Value="40"></NameValPair>
<NameValPair
ParamName="Passwd"
Value="40"></NameValPair>
<NameValPair
ParamName="response"
Value="40"></NameValPair>
<NameValPair
ParamName="Response"
Value="40"></NameValPair>
</SimpleList>
When you add another attribute to the filter list, you must include the display name as
well as the attribute name in the directory server.
10.4.7 About XML Element Order
When using XML, you can specify parallel elements in a list in any order as long as the
elements remain intact and within the tags that originally bracketed them. For
example, the lists in Example 10–4 and Example 10–5 are equivalent:
Example 10–4 Valid Name/Value List
<ValNameList xmlns="http://www.example.com" ListName="LogError2Sys">
<NameValPair ParamName="LOG_LEVEL" Value="LOGLEVEL_ERROR" />
<NameValPair ParamName="LOG_WRITER" Value="SysLogWriter" />
<NameValPair ParamName="LOG_STATUS" Value="On" />
</ValNameList>

About Activating and Suppressing Logging Levels
10-16 Administrator's Guide for Oracle Access Management
Example 10–5 Another Valid Name/Value List
<ValNameList xmlns="http://www.example.com" ListName="LogError2Sys">
<NameValPair ParamName="LOG_WRITER" Value="SysLogWriter" />
<NameValPair ParamName="LOG_LEVEL" Value="LOGLEVEL_ERROR" />
<NameValPair ParamName="LOG_STATUS" Value="On" />
</ValNameList>
Similarly, within a given tag, the attributes (except for the tag name, which must
always be the first element within the tag brackets) can be reordered, as long as they
remain intact and within the tag elements that originally bracketed them. The opening
tags for a name-value list in Example 10–6 and Example 10–7 are equivalent:
Example 10–6 Opening tag for a Name/Value List
<ValNameList xmlns="http://www.example.com" ListName="LogError2Sys">
Example 10–7 Opening tag for a Name/Value List
<ValNameList ListName="LogError2Sys" xmlns="http://www.example.com">
10.5 About Activating and Suppressing Logging Levels
Several factors determine if logging is active for a particular log-handler. Table 10–5
lists these factors.
10.5.1 About Log Handler Precedence
You can configure up to three log-handler definitions for a single log level in a log
configuration file. Three different log handlers are required to send output for a
particular log level to each of the three log writers described in Table 10–3.
If you specify different
LOG_STATUS
settings in these log handlers, the setting in the
log-handler definition closest to the physical end of the log configuration file sets the
status for the other log-handler definitions of the same log level. For example, you can
set
LOG_STATUS
to
Off
for the first two log handlers for the Error log level, but if
LOG_
Table 10–5 Factors that Determine Whether Logging Is Active
Factor Importance Description
LOG_ THRESHOLD_
LEVEL
Primary This parameter sets a cutoff for logging. Any log level
that is more detailed than the threshold is
suppressed. See Table 10–1 for valid log levels.
You override this parameter for a subset of items that
can be logged using the
MODULE_CONFIG
parameter.
See "Configuring Different Threshold Levels for
Different Types of Data" on page 10-21 for details.
MODULE_CONFIG
Primary This sets a per-module override for the global logging
threshold.
See "Configuring Different Threshold Levels for
Different Types of Data" on page 10-21 for details.
LOG_STATUS
Secondary This parameter toggles logging on or off, as long as it
is not overridden by the logging threshold or a
module-specific override.
The physical
position of a log
handler
Secondary See "About Log Handler Precedence" on page 10-16.

Mandatory Log-Handler Configuration Parameters
Logging WebGate Event Messages 10-17
STATUS
is
On
for the third and final log handler in the configuration file, logging still
occurs for all three handlers.
The
LOG_STATUS
settings are moot if that level is more fine-grained than the current
LOG_THRESHOLD_LEVEL
. In this case, logging cannot be activated at this level unless the
threshold is overridden by a module-specific threshold. See "Configuring Different
Threshold Levels for Different Types of Data" on page 10-21 for details.
10.6 Mandatory Log-Handler Configuration Parameters
At minimum, each log-handler definition contains five parameters listed in Table 10–6.
If you specify
FileLogWriter
or
MPFileLogWriter
as the value for the
LOG_WRITER
parameter, the four parameters in Table 10–7 are relevant.
Table 10–6 Mandatory Log Configuration File Parameters
Parameter Comment
xmlns
This parameter is specified in the opening
ValNameList
tag.
It specifies the relevant XML namespace for the current list and
is identical for all log-handler definitions in a given logging
configuration file. Example:
http://www.example.com
ListName
This parameter is specified in the opening
ValNameList
tag.
Where possible, use the default names.
When creating a new log-handler definition, select a memorable
name that you cannot confuse with other log handlers.
Examples:
WarningsAndAboveToSyslog
sends Fatal, Error, and Warning
messages to the system log file.
WarningsOnlyToFileLog128KBuffer
sends messages from just
the Warning level to a 128KB buffer, and hence to a disk file.
TraceOnlyToMPRotateDaily
sends messages from just the Trace
level to the multi-process file writer, which opens and closes the
file each time it writes to disk. This file is replaced with a fresh
(empty) file every day, regardless of the size of the file at the
time of replacement.
LOG_LEVEL
This specifies a log level. See Table 10–1 for details.
The default logging configuration file activates logging for three
levels: Fatal, Error, and Warning.
LOG_WRITER
This specifies the destination for log output for this log-handler.
See Table 10–3 for details.
The default log configuration file sends output to both the
system log and the log data file for the component doing the
logging.
LOG_STATUS
This parameter turns the log handler
on
or
off
.

Mandatory Log-Handler Configuration Parameters
10-18 Administrator's Guide for Oracle Access Management
10.6.1 Settings in the Default Log Configuration File
As installed with each component, the log configuration file activates only the highest
three levels (Fatal, Error, and Warning) and directs all log output to the system log.
On Windows, you can view the system log for the computer that hosts the component
you are logging by navigating to My Computer, Manage, Event Viewer, Application.
System event entries for the components being logged are interspersed among the
system events for the operating system and applications other than Access Manager.
For Solaris and Linux environments, the location of the system log is recorded in a
system configuration file whose particulars can vary from computer to computer. For
the name and location of this system file or the system log, consult the owner of the
computer that hosts the component whose system log you want to examine.
Table 10–7 Log Data File Configuration Parameters
Parameter Description Default
FILE_ NAME
Mandatory. Used only for the FileLogWriter or
MPFileLogWriter. It is the name and location of the
file where log data is written.
You can prepend an absolute path to the file name
to store it somewhere other than the default
location, which is:
component_install_dir\oblix\logs
Where component_install_dir is the root installation
directory for the component whose system events
you are logging.
When you create more than one log-handler
definition that sends output to FileLogWriter or
MPFileLogWriter, provide unique file names so
that multiple handlers do not write to the same file.
This caution does not apply to log handlers
accessing the SysLogWriter.
oblog.log
BUFFER_SIZE
Optional. This is the size of the buffer, in bytes, for
logged data as it is being written to the log file.
If you set the buffer value to 0 or a negative
number, the default value is used. To write to the
log file immediately, without buffering, set the
value to a small number, for example, 5. Oracle
recommends that you set a small buffer size in
situations where there are system failures.
65535
(64KB)
MAX_ ROTATION_
SIZE
Optional. When the log file reaches this size (in
bytes), a time stamp is appended to the file name,
for example
oblog.log
becomes
oblog.log1081303126
. New data is written to the
file with the original name.
52428800
(512KB)
MAX_ ROTATION_
TIME
Optional. A time interval, in seconds, when the log
file is renamed, whether or not it has reached the
maximum rotation size.
If the rotation time determines when the file is
rotated, the numbers appended to the log files
differ by the number of seconds in the rotation
interval. For example,
oblog.log.1081389526
and
oblog.log.1081303126
differ by 84,600, which is
the number of seconds in 24 hours. This is the
rotation interval set in the log configuration file.
86400
(1 day, in
seconds)

Mandatory Log-Handler Configuration Parameters
Logging WebGate Event Messages 10-19
Example 10–8 shows the default log configuration file with comments removed to
expose the file structure.
Example 10–8 A Default Log Configuration File Without Embedded Comments
<?xml version="1.0" encoding="utf-8"?>
<CompoundList
xmlns="http://www.oblix.com
ListName="oblog_config_wg.xml.staging">
<SimpleList>
<NameValPair
ParamName="LOG_THRESHOLD_LEVEL"
Value="LOGLEVEL_WARNING"></NameValPair>
</SimpleList>
<SimpleList>
<NameValPair
ParamName="AUTOSYNC"
Value="True"></NameValPair>
</SimpleList>
<SimpleList>
<NameValPair
ParamName="SECURE_LOGGING"
Value="On"></NameValPair>
</SimpleList>
<SimpleList>
<NameValPair
ParamName="LOG_SECURITY_THRESHOLD_LEVEL"
Value="LOGLEVEL_TRACE"></NameValPair>
</SimpleList>
<SimpleList>
<NameValPair
ParamName="LOG_SECURITY_ESCAPE_CHARS"
Value="),]"></NameValPair>
</SimpleList>
<SimpleList>
<NameValPair
ParamName="LOG_SECURITY_MASK_LENGTH"
Value="300"></NameValPair>
</SimpleList>
<CompoundList
xmlns="http://www.oblix.com"
ListName="LOG_CONFIG">
<ValNameList
xmlns="http://www.oblix.com"
ListName="LogFatal2Sys">
<NameValPair
ParamName="LOG_LEVEL"
Value="LOGLEVEL_FATAL"></NameValPair>
<NameValPair
ParamName="LOG_WRITER"
Value="SysLogWriter"></NameValPair>
<NameValPair
ParamName="LOG_STATUS"
Value="On"></NameValPair>
</ValNameList>
<ValNameList
xmlns="http://www.oblix.com"
ListName="LogAll2File">
<NameValPair
ParamName="LOG_LEVEL"

Mandatory Log-Handler Configuration Parameters
10-20 Administrator's Guide for Oracle Access Management
Value="LOGLEVEL_ALL"></NameValPair>
<NameValPair
ParamName="LOG_WRITER"
Value="FileLogWriter"></NameValPair>
<NameValPair
ParamName="FILE_NAME"
Value="oblog.log"></NameValPair>
<NameValPair
ParamName="BUFFER_SIZE"
Value="65535"></NameValPair>
<NameValPair
ParamName="MAX_ROTATION_SIZE"
Value="52428800"></NameValPair>
<NameValPair
ParamName="MAX_ROTATION_TIME"
Value="86400"></NameValPair>
<NameValPair
ParamName="LOG_STATUS"
Value="On"></NameValPair>
</ValNameList>
</CompoundList>
<ValNameList
xmlns="http://www.oblix.com"
ListName="FILTER_LIST">
<NameValPair
ParamName="password"
Value="40"></NameValPair>
<NameValPair
ParamName="Password"
Value="40"></NameValPair>
<NameValPair
ParamName="passwd"
Value="40"></NameValPair>
<NameValPair
ParamName="Passwd"
Value="40"></NameValPair>
<NameValPair
ParamName="response"
Value="40"></NameValPair>
<NameValPair
ParamName="Response"
Value="40"></NameValPair>
</ValNameList>
</CompoundList>
10.6.1.1 Description of the Settings in the Default Log Configuration File
The default configuration file sends Fatal, Error, and Warning messages to both the
system log and to a log data file named oblog.log.
The simple list near the top of the file sets the following parameters:
■It sets the
LOG_THRESHOLD_LEVEL
to
Warning
.
The threshold suppresses logging for levels that are more fine-grained than
Warning. You can override this threshold. See "Configuring Different Threshold
Levels for Different Types of Data" on page 10-21 for details.
The nested compound list contains four log-handler definitions:
■The first, named
LogFatal2Sys
, sets the logging level to
Fatal
and sets
LOG_
STATUS
to On.
Configuring Different Threshold Levels for Different Types of Data
Logging WebGate Event Messages 10-21
The threshold level is Warning, which is more fine-grained than Fatal, so this
definition is in effect. The log output is written to the system log, as specified by
the
LOG_WRITER
parameter.
■The
LogError2Sys
log-handler definition sends Error level messages to the system
log.
Error is located before the current threshold level (Warning), so this definition is in
effect.
■The
LogWarning2Sys
definition sends Warning level output to the system log.
Like the two previous log-handler definitions, it is not overridden by the current
LOG_THRESHOLD_LEVEL
parameter.
■
LogAll2File
, the final log-handler definition, appears to send output from all log
levels to a disk file named oblog.log.
The
LOG_THRESHOLD_LEVEL
parameter is set to Warning, so only the output from
the Fatal, Error, and Warning levels are recorded in this log data file. Since output
from
LogAll2File
goes to the
FileLogWriter
, the parameters governing file name,
buffer size, rotation size, and rotation interval all take effect.
Figure 10–1 illustrates log-level activation in the default log confirmation file.
Figure 10–1 Log-Level Activation in the Default Log Configuration File
10.7 Configuring Different Threshold Levels for Different Types of Data
When diagnosing a problem, you may not want detailed logs for every operation that
a component performs. For example, to diagnose slow response times for requests that
an Identity Server submits to its directory, you would want detailed information on
LDAP operations and fewer details about other types of operations.

Configuring Different Threshold Levels for Different Types of Data
10-22 Administrator's Guide for Oracle Access Management
As of release 10.1.4.2, you can configure per-module or per-function threshold levels in
the log configuration file, so that Access Manager generates detailed logs for some
components while generating concise logs, or no logs, for others.
You configure per-module logging thresholds in a
MODULE_CONFIG
section in the oblog_
config_wg.xml file. The
MODULE_CONFIG
section overrides the global default that you
specify on the
LOG_THRESHOLD_LEVEL
in the simple list section of this file.
The rest of this section discusses the following topics:
■About the MODULE_CONFIG Section
■Configuring a Log Level Threshold for a Function or Module
10.7.1 About the MODULE_CONFIG Section
As described in "Structure and Parameters of the Log Configuration File" on
page 10-10, in the log configuration file you configure a global logging threshold. The
following is an example of the global
LOG_THRESHOLD_LEVEL
setting:
<SimpleList>
<NameValPair ParamName="LOG_THRESHOLD_LEVEL" Value="LOGLEVEL_WARNING" />
. . .
</SimpleList>
In addition to the global threshold, the configuration file can contain a
ValNameList
that defines function- or module-specific log thresholds. The name of this list is always
MODULE_CONFIG
. Only one instance of this list is permitted in the log configuration file,
and the information in the list applies to all log writers defined in the file. As of release
10.1.4.2, the default log configuration file contains a commented sample of the
MODULE_
CONFIG
list.
Each item in the
MODULE_CONFIG
list sets a logging level for a module, as shown in the
following example:
<ValNameList xmlns="http://www.oblix.com" ListName="MODULE_CONFIG">
<NameValPair ParamName="LDAP" Value="LOGLEVEL_TRACE"></NameValPair>
<NameValPair ParamName="DB_RUNTIME" Value="LOGLEVEL_TRACE"></NameValPair>
</ValNameList>
The elements in this section are as follows:
■The
ValNameList
tag delimits the list of per-module logging thresholds.
■One
NameValPair
tag delimits each specific per-module logging threshold.
■The
ParamName
parameter sets the name of a module or function.
See Table 10–8 for a list of valid values.
■The
Value
parameter sets the logging threshold for the module that you specify as
a value for the
ParamName
parameter.
Table 10–1 lists the permissible values for the
Value
parameter. In addition to these
values, you can specify the value
ON
to enable logging for the module and a value
of
OFF
to disable logging for the specific module.
10.7.1.1 Location of the Per-Module Logging Section in the Log Configuration File
You add the per-module logging threshold section near the end of the log
configuration file, after the closing tag for the compound list for the log-handlers and
before the closing tag for the first compound list in the file.

Configuring Different Threshold Levels for Different Types of Data
Logging WebGate Event Messages 10-23
This section contains an example of the per-module logging section. See "To configure
a module-specific log threshold" on page 10-24 for details.
10.7.1.2 List of Modules That Can Be Logged
Table 10–8 describes the a partial list of the values that you can specify for the
ParamName
parameter in the
MODULE_CONFIG
list.
Table 10–8 ParamName Values You Can Configure for Per-Module Logging Threshold
ParamName Value Logging Threshold That This Parameter Sets
AAA_ACTIONS
Sets a logging threshold for triggered actions that are configured as
part of a policy in the OAM Server.
<ValNameList xmlns="http://www.oblix.com"
ListName="MODULE_CONFIG">
<NameValPair Paramname="AAA_ACTIONS" Value="OFF">
</NameValPair>
AAA_AMENGINE
Sets a logging threshold for activity performed by the Access
Manager engine.
AAA_ISRESRCOPPROT
Sets a logging threshold for all OAM Server activities related to
determining if a resource operation is protected.
ACCESS_CLIENT
Sets a logging threshold for operations performed by an access
client, that is, an Access Client or Webgate.
ACCESS_GATE
Sets a logging threshold for operations performed by an Access
Client.
ACCESS_SDK
Sets a logging threshold for operations performed by the Access
Manager SDK interface.
See the Oracle Fusion Middleware Developer's Guide for Oracle
Access Management for details.
ACCESS_SERVER
Sets a logging threshold for operations performed in the OAM
Server.
AM_SDK
Sets a logging threshold for the Access Manager SDK.
See the Oracle Fusion Middleware Developer's Guide for Oracle
Access Management for details.
AUDIT
Sets a logging threshold for auditing.
See Chapter 9 for details.
AUTHENTICATION
Sets a logging threshold for user authentication operations.
AUTHN_MGMT
Sets a logging threshold for authentication scheme management.
AUTHN_PLUGIN
Sets a logging threshold for operations performed by an
authentication plug-in.
AUTHORIZATION
Sets a logging threshold for user authorization operations.
AUTHZ_MGMT
Sets a logging threshold for authorization scheme management.
AUTHZ_PLUGIN
Sets a logging threshold for authorization plug-in operations.
CACHE
Sets a logging threshold for cache management and operations on
the caches.
CONN_MGMT
Sets a logging threshold for connection management.
CONN_RUNTIME
Sets a logging threshold for connection run time.
CONNECTIVITY
Sets a logging threshold for client-sever connectivity and
messaging.

Configuring Different Threshold Levels for Different Types of Data
10-24 Administrator's Guide for Oracle Access Management
10.7.2 Configuring a Log Level Threshold for a Function or Module
The following procedure describes how to configure a function- or module-specific log
level threshold.
To configure a module-specific log threshold
1. Open the log configuration file in the following location:
Webgate_install_dir\identity|access\oblix\config
DB_CONFIGURATION
Sets a logging threshold for the data store interface layer
configuration.
DB_RUNTIME
Sets a logging threshold for the data store interface layer run time.
DIAGNOSTIC_FRAMEWORK
Sets a logging threshold for the diagnostic framework.
GROUPDB
Sets the threshold for logging accesses of Group Manager data in
the directory.
GROUP_MGR
Sets the threshold for logging Group Manager operations.
HTTP_REQ
Sets the threshold for logging HTTP request processing.
IDXML
Sets the threshold for logging IDXML operations.
See the Oracle Fusion Middleware Developer's Guide for Oracle
Access Management for details.
LDAP
Sets a logging threshold for LDAP SDK, for example:
<ValNameList xmlns="http://www.oblix.com"
ListName="MODULE_CONFIG">
<NameValPair Paramname="LDAP" Value="LOGLEVEL_TRACE">
</NameValPair>
NET
Sets a logging threshold for network APIs.
OBMYGROUPS
Sets a logging threshold for
ObMyGroups
processing. This refers to
searches of groups where the person who initiated the search is a
member.
OIS_CLIENT
Sets a logging threshold for the Identity client.
POLICY_MGMT
Sets a logging threshold for policy and policy domain management.
PPP
Sets a logging threshold for Identity Event Plug-in API operations.
See the Oracle Fusion Middleware Developer's Guide for Oracle
Access Management for details.
QUERY_BUILDER
Sets a logging threshold for Query Builder operations.
SECURITY
Sets a logging threshold for the security and encryption library.
SELECTOR
Sets a logging threshold for Selector operations.
SERVER
Sets a logging threshold for server infrastructure.
SSOTOKEN
Single sign-on token management.
UTILS
Sets a logging threshold for utility classes.
WEB
Sets a logging threshold for the Web server plug-in interface.
XML
Sets a logging threshold for the XML Infrastructure.
Table 10–8 (Cont.) ParamName Values You Can Configure for Per-Module Logging
ParamName Value Logging Threshold That This Parameter Sets

Configuring Different Threshold Levels for Different Types of Data
Logging WebGate Event Messages 10-25
2. If a
ValNameList
section with a
ListName
of
MODULE_CONFIG
does not already exist
in this file, create one that is similar to the following:
<ValNameList xmlns="http://www.oblix.com" ListName="MODULE_CONFIG">
</ValNameList>
Place this list after the end tag for the compound list that contains the log handler
definitions. If there are comments immediately after this end tag, place the list
after the comments.
3. Between the opening and closing tags of the new
ValNameList
element, configure
one or more
NameValPair
elements.
This element contains a
ParamName
parameter and a
Value
parameter. See
Table 10–8 for the modules that you can supply on the
ParamName
parameter. See
Table 10–1 for values, or you can specify a value of
On
or
Off
. The following is an
example:
<NameValPair ParamName="LDAP" Value="LOGLEVEL_TRACE"></NameValPair>
You can specify multiple
ValNamePair
elements within the
ValNameList
.
A complete per-module logging threshold section is illustrated in bold in the
following example:
<!-- ============================================================ -->
<!-- Configure the Log Level -->
. . .
<CompoundList xmlns="http://www.oblix.com" ListName="LOG_CONFIG">
<!-- Write all FATAL logs to the system logger. -->
<ValNameList xmlns="http://www.oblix.com" ListName="LogFatal2Sys">
<NameValPair ParamName="LOG_LEVEL" Value="LOGLEVEL_FATAL">
</NameValPair>
<NameValPair ParamName="LOG_WRITER" Value="SysLogWriter">
</NameValPair>
<NameValPair ParamName="LOG_STATUS" Value="On">
</NameValPair>
</ValNameList>
. . .
</CompoundList>
<!-- List of values that can be specified in the module config -->
<!-- -->
<!-- On - Uses loglevel set in the loglevel threshold -->
<!-- Off - No information is logged -->
<!-- LOGLEVEL_FATAL - serious error, possibly a program halt. -->
<!-- LOGLEVEL_ERROR - a transient or self-correcting problem. -->
<!-- LOGLEVEL_WARNING - a problem that does not cause an error. -->
<!-- LOGLEVEL_INFO - reports the current state of the component. -->
<!-- LOGLEVEL_DEBUG1 - basic debugging information. -->
<!-- LOGLEVEL_DEBUG2 - advanced debugging information. -->
<!-- LOGLEVEL_DEBUG3 - logs performance-sensitive code. -->
<!-- LOGLEVEL_TRACE - used when you need to trace the code path -->
<!-- execution or capture metrics. Includes all previous levels. -->
<!-- -->
<!-- List of modules that can be specified in the module config -->
<!-- -->
<!-- ALL_MODULES - Applies to all log modules -->
<!-- Specific module name - Applies to specific module -->
<!-- -->
<!-- -->
<!-- <ValNameList -->

Filtering Sensitive Attributes
10-26 Administrator's Guide for Oracle Access Management
<!-- xmlns="http://www.oblix.com" -->
<!-- ListName="MODULE_CONFIG"> -->
<!-- <NameValPair -->
<!-- ParamName="CONNECTIVITY" -->
<!-- Value="LOGLEVEL_TRACE"></NameValPair> -->
<!-- </ValNameList> -->
<ValNameList xmlns="http://www.oblix.com" ListName="MODULE_CONFIG">
<NameValPair ParamName="LDAP" Value="LOGLEVEL_TRACE"></NameValPair>
<NameValPair ParamName="DB_RUNTIME" Value="LOGLEVEL_TRACE">
</NameValPair>
</ValNameList>
</CompoundList>
10.8 Filtering Sensitive Attributes
As described earlier, you can activate secure logging and expand the default filter list
to mask sensitive information from the log file.
When you add another attribute to the filter list, you must include the display name as
well as the attribute name in the directory server. The following procedure describes
how to perform this task. In this example, you are instructed to filter the user's home
phone number: display name Home Phone; attribute name
homePhone
. However, you
can filter the attribute of your choice.
Oracle recommends that you optimize the use of FILTER_LIST to reduce the runtime
cost. For example, rather than adding two ParamName variations (
User Password
and
userPassword
), you could use only one. Using
Password
as the ParamName masks
values for
User Password
,
userPassword
, and other words that end with
Password
.
Also, instead of including both
Home Phone
and
homePhone
in FILTER_LIST, you could
simply use
Phone
.
To add sensitive attributes to the filter list
1. Open the log configuration file in a text editor:
Webgate_install_dir\identity|access\oblix\config\oblog_config_wg.xml
2. In oblog_config_wg.xml:
a. Confirm that secure logging is active. For example:
<SimpleList>
<NameValPair
ParamName="SECURE_LOGGING"
Value="On"></NameValPair>
</SimpleList>
Note: Each value added to FILTER_LIST increases the runtime cost
of using Secure Logging.
See Also:
■"About Logging, Log Levels, and Log Output" on page 10-1
■"The Simple List and Logging Threshold" on page 10-11
■"The Filter List" on page 10-14
■"Settings in the Default Log Configuration File" on page 10-18

Filtering Sensitive Attributes
Logging WebGate Event Messages 10-27
b. Locate the
FILTER_LIST
parameter at the end of the file. For example:
<ValNameList xmlns="http://www.oblix.com" ListName="FILTER_LIST">
<NameValPair ParamName="password" Value="40" />
<NameValPair ParamName="Password" Value="40" />
<NameValPair ParamName="response" Value="40" />
<NameValPair ParamName="Response" Value="40" />
</ValNameList>
c. Add the display name to mask and the value for the mask length, then add the
attribute and the value for the mask length. For example:
<NameValPair ParamName="Home Phone" Value="300" />
<NameValPair ParamName="homePhone" Value="300" />
d. Confirm that
LOG_THRESHOLD_LEVEL
and
LOG_SECURITY_THRESHOLD_LEVEL
are
at the same level or are consistent with each other, as described in Table 10–4
on page 10-11. For example:
<SimpleList>
<NameValPair ParamName="LOG_THRESHOLD_LEVEL" Value="LOGLEVEL_WARNING" />
</SimpleList>
...
<SimpleList>
<NameValPair ParamName="LOG_SECURITY_THRESHOLD_LEVEL" Value="LOGLEVEL_
WARNING" />
</SimpleList>
e. Save the oblog_config_wg.xml file.
3. Filtering User Password: Perform the following steps and see "The Filter List" on
page 10-14:
In the filter list in oblog_config_wg.xml, add the User Password display name and
the corresponding attribute, and set the mask length for each. For example:
<ValNameList xmlns="http://www.oblix.com" ListName="FILTER_LIST">
...
<NameValPair ParamName="User Password" Value="40" />
<NameValPair ParamName="userPassword" Value="40" />
</ValNameList>
4. Test secure logging and filtering of sensitive information as follows:
a. In the oblog_config_wg.xml file, set the
LOG_THRESHOLD_LEVEL
and
LOG_
SECURITY_THRESHOLD_LEVEL
to
TRACE
:
<NameValPair ParamName="LOG_THRESHOLD_LEVEL" Value="LOGLEVEL_TRACE" />
...
<NameValPair ParamName="LOG_SECURITY_THRESHOLD_LEVEL" Value="LOGLEVEL_
TRACE" />
b. Perform a task that involves the component for which you have configured
secure logging. For example:
Access a resource
Note: For testing, set the
LOG_THRESHOLD_LEVEL
and
LOG_SECURITY_
THRESHOLD_LEVEL
to
TRACE
. See Step 6a.

Filtering Sensitive Attributes
10-28 Administrator's Guide for Oracle Access Management
View or modify the value of the attribute in the user's profile:
Home Phone
(if
the filtered attribute is
homePhone
).
c. Check the oblog and confirm that the filtered attribute value is masked by a
string like ***********.
Webgate_install_dir/access/oblix/log/oblog.log
d. In the oblog_config_wg.xml file, reset the
LOG_THRESHOLD_LEVEL
and
LOG_
SECURITY_THRESHOLD_LEVEL
to the desired level for your enterprise.
e. Adjust the mask length of filtered attributes if needed in the oblog_config_
wg.xml file. For example:
<NameValPair ParamName="Home Phone" Value="340" />
<NameValPair ParamName="homePhone" Value="340"/>
5. Repeat Steps 1 through 6 for each component in your deployment with one or
more masked attributes.

11
Reporting 11-1
11
Reporting
[8]
Oracle Access Manager enables you to use Oracle BI Publisher as the reporting
solution for Oracle Access Management services. Access Manager provides a
restricted-use license for Oracle BI Publisher and easy-to-use reporting packages.
This chapter contains the following sections.
■Using the Reports
■Accessing Oracle Access Management Reports
■Supported Output Formats
■Reports for Access Manager
■Creating Reports Using Third-Party Software
11.1 Using the Reports
Oracle Access Management integrates with Oracle Business Intelligence Publisher,
which provides a pre-defined set of compliance reports. The data in the database audit
store is exposed through pre-defined reports in Oracle Business Intelligence Publisher.
These reports allow you to drill down the audit data based on various criteria, such as
user name, time range, application type, and execution context identifier (ECID).
Out-of-the-box, there are several sample audit reports available with Oracle Access
Management and accessible with Oracle Business Intelligence Publisher. You can also
use Oracle Business Intelligence Publisher to create your own custom reports.
Oracle BI Enterprise Edition (Oracle BI EE) is a comprehensive set of enterprise
business intelligence tools and infrastructure, including a scalable and efficient query
and analysis server, an ad-hoc query and analysis tool, interactive dashboards,
proactive intelligence and alerts, real-time predictive intelligence, and an enterprise
reporting engine. Oracle BI EE is designed to bring greater business visibility and
insight to a wide variety of users.
The components of Oracle Business Intelligence Enterprise Edition share a common
service-oriented architecture, data access services, analytic and calculation
infrastructure, metadata management services, semantic business model, security
model and user preferences, and administration tools. Oracle Business Intelligence
Note: For large-scale deployments, it is recommended that you
deploy a dedicated enterprise-class reporting solution. A solution
based on tools such as Oracle Business Intelligence Enterprise Edition
can provide the flexibility, automation, and performance required for
a large-scale organizations.

Accessing Oracle Access Management Reports
11-2 Administrator's Guide for Oracle Access Management
Enterprise Edition provides scalability and performance with data-source specific
optimized analysis generation, optimized data access, advanced calculation, intelligent
caching services, and clustering. The following are Oracle Access Management
reporting features:
■Select and view reports from a predefined list in the BI Publisher.
■Filter report information.
■View reports on-screen in the desired format.
■Provide interactive reports.
11.2 Accessing Oracle Access Management Reports
To access Access Manager Reports, you must start BI Publisher and run them. BI
Publisher cannot be accessed through the Access Manager Console. You must open BI
publisher explicitly to access Access Manager reports.
To start BI Publisher
1. Navigate to Start, Oracle BI Publisher Desktop, Oracle - BIPHome10134 and
click Start BI Publisher.
The Oracle BI Publisher Home page appears.
2. Enter the user name and password.
3. Click Sign In.
To run a report
1. Start Access Manager Reports.
See "Accessing Oracle Access Management Reports" on page 11-2 for more
information.
2. Click the more... link under Shared Folders.
3. Click Access Manager Reports to access the reports.
Alternately, click the more... link under Access Manager Reports. The resulting
page displays the Access Manager Reports classified according to functional area.
4. Select the report to view by clicking its name.
5. Click View.
The Report Input Parameters page displays the input parameters that must be
provided to run a report. The parameters act as filter criteria. In some cases, at
least one or more fields are mandatory while some reports do not require any
input parameters. If you leave the input parameter field blank and click View, all
the information associated with the report is displayed.
6. Enter the required parameters, if any.
7. Click View to run the report.
The report is displayed.
11.3 Supported Output Formats
All BI Publisher reports are generated in a native XML format. This XML can be
transformed into other output formats. The following formats are supported:

Reports for Access Manager
Reporting 11-3
■HTML
■PDF
■RTF
■MHTML
11.4 Reports for Access Manager
Access Manager Reports are classified based on functional area. For example, Access
Policy Reports, Attestation, Request and Approval Reports and Password Policy
Reports are available. (It is no longer named Operational and Historical.) Oracle
Access Manager Reports are classified into the following categories based on their
functional areas:
■Account Management Reports
■Authentication Reports
■Errors and Exceptions
11.4.1 Account Management Reports
The Accounts_Locked_Out Report is the account management report that allows
administrators to view details about accounts that have been locked out.
11.4.2 Authentication Reports
Authentication reports allow administrators to view details regarding user
authentications. They include:
■Authentication Statistics Report
■AuthenticationFromIPByUser
■AuthenticationPerIP
■AuthenticationStatisticsPerServer Report
11.4.2.1 Authentication Statistics Report
This report contains details regarding failed and successful authentications.
Table 11–1 Accounts_Locked_Out Report Fields
Field Description
User ID Identifier of the locked out user
Timestamp Time stamp of the lockout
Component/Application Name Component from which the user has been locked out
Event Details Additional information
Table 11–2 Authentication_statistics Report Fields
Field Description
Failure Failed (yes) or successful (no) authentication
Userid Identifier of the user
Number of Events Number of authentication events

Reports for Access Manager
11-4 Administrator's Guide for Oracle Access Management
11.4.2.2 AuthenticationFromIPByUser
This report contains details regarding failed and successful authentications from a
particular IP address.
11.4.2.3 AuthenticationPerIP
This report contains details regarding failed and successful authentications from this
IP address.
11.4.2.4 AuthenticationStatisticsPerServer Report
This report contains details regarding failed and successful authentications from a
particular server instance.
11.4.3 Errors and Exceptions
Error and exception reports allow administrators to view errors and exceptions logged
during the authentication process. They include:
■All Errors and Exceptions
■Authentication Failures
■User Activities
■Authentication History
■Authorization History
■Multiple Logins From Same IP
11.4.3.1 All Errors and Exceptions
This report contains details regarding errors and exceptions encountered during
runtime.
Table 11–3 AuthenticationFromIPByUser Report Fields
Field Description
IP Address IP address of the client
Distinct User Count Number of distinct users
Total Attempts Number of authentication attempts from this IP address
Users List of users attempting authentication from this IP address
Table 11–4 AuthenticationPerIP Report Fields
Field Description
IP Address IP address of the server
Distinct Users Number of users authenticated
Total Number of Attempts Number of authentication attempts (successful and failed)
Table 11–5 AuthenticationStatisticsPerServer Report Fields
Field Description
Server Instance Name Identifier of the server instance
Success Count Number of successful authentications
Failure Count Number of failed authentications

Reports for Access Manager
Reporting 11-5
11.4.3.2 Authentication Failures
This report contains details regarding failed and successful authentications.
11.4.3.3 User Activities
There are no fields to define in this report.
11.4.3.4 Authentication History
This report contains details regarding failed and successful authentications.
11.4.3.5 Authorization History
This report contains details regarding failed and successful authorizations.
Table 11–6 All Errors and Exceptions Report Fields
Field Description
User ID Identifier of the locked out user
Timestamp Time stamp of the lockout
Component/Application Name Component from which the user has been locked out
Client IP Address IP address of the client
Message Event The error or exception
Event Details Information regarding the error or exception
Table 11–7 Authentication Failures Report Fields
Field Description
User ID Identifier of the locked out user
Timestamp Time stamp of the lockout
Component/Application Name Component from which the user has been locked out
Client IP Address IP address of the client
Authentication Method Authentication method
Message Event Details Message regarding the failed authentication
Authorization_Failures Authorization failure
Table 11–8 Authentication History Report Fields
Field Description
User ID Identifier of the locked out user
Timestamp Time stamp of the lockout
Component/Application Name Component from which the user has been locked out
Client IP Address IP address of the client
Authentication Method Authentication method
Message Event Details Message regarding the failed authentication
Authorization_Failures Authorization failure

Creating Reports Using Third-Party Software
11-6 Administrator's Guide for Oracle Access Management
11.4.3.6 Multiple Logins From Same IP
This report contains details regarding multiple logins from the same IP address.
11.5 Creating Reports Using Third-Party Software
Access Manager supports the creation of reports by using third-party tools such as
Crystal Reports. To learn how to create reports by using third-party software, see the
third-party software documentation. Additional information on the audit schema and
creating custom reports can be found in the Oracle Fusion Middleware Application
Security Guide.
Table 11–9 Authorization History Report Fields
Field Description
User ID Identifier of the locked out user
Timestamp Time stamp of the lockout
Component/Application Name Component from which the user has been locked out
Client IP Address IP address of the client
Authentication Method Authentication method
Message Event Details Message regarding the failed authentication
Authorization_Failures Authorization failure
Table 11–10 Multiple Logins From Same IP Report Fields
Field Description
IP Address IP address
Usernames Used Identifiers of users

12
Monitoring Performance and Health 12-1
12
Monitoring Performance and Health
Monitoring performance refers to observing (viewing) performance metrics to make
yourself aware of the state specific components. Monitoring health allows perimeter
devices to check the health of an Access Manager server instance by hitting the
heartbeat URL of the Managed Server. This chapter provides information on
monitoring Oracle Access Management performance and Access Manager health. It
contains the following sections.
■Introduction to Performance Monitoring
■Reviewing DMS Metric Tables
■Monitoring Server Metrics
■Monitoring SSO Agent Metrics
■Introduction to OAM Proxy Metrics and Tuning
■Reviewing OpenSSO Metrics in the DMS Console
■Monitoring the Health of an Access Manager Server
12.1 Introduction to Performance Monitoring
Component performance metrics can be collected in memory during the completion of
particular events. These metrics are kept only in memory so there are several
mechanisms to extract and display them: EM, dmsSpy, and dmsDump, for example.
See Also:
■Chapter 13 if you are using Oracle Enterprise Manager Fusion
Middleware Control
Note: dmsSpy is a WebLogic Application Server (WAS) tool that
displays raw DMS data specific to the WAS instance. Information is
categorized by Noun Types (OAMS.OAM_ prefix for Oracle Access
Management) and includes metrics pertaining to all DMS
instrumented applications running in the WAS instance. To see the
metrics on a WebLogic instance, go to http://hostname:port/dms/. For
example:
http://samplehost:7001/dms/
Oracle Fusion Middleware Performance and Tuning Guide for details
about instrumenting applications with Oracle Dynamic Monitoring
Systems (DMS).
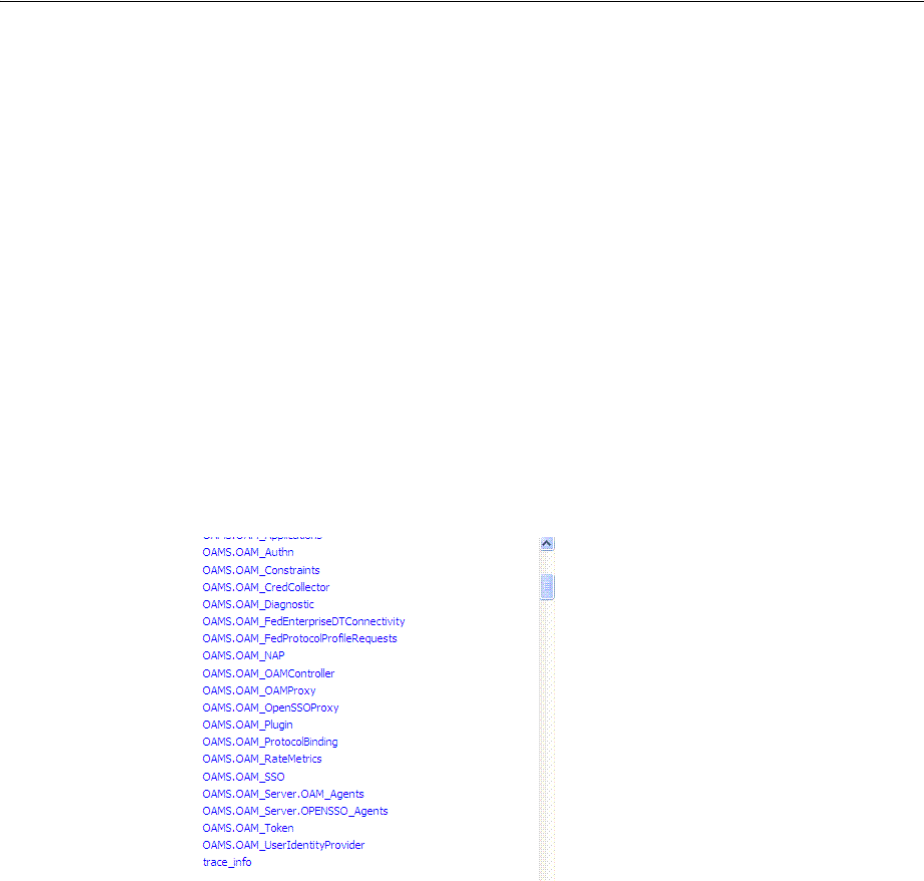
Reviewing DMS Metric Tables
12-2 Administrator's Guide for Oracle Access Management
The metrics can be used to monitor the time spent in a particular area or track
particular occurrences or state changes. Oracle Access Management uses the Oracle
Dynamic Monitoring Systems (DMS) to measure application-specific performance
information for OAM Servers and registered Agents. Administrators can monitor
performance for Access Manager using the Monitoring command on the Actions menu
under the System Configuration tab.
12.2 Reviewing DMS Metric Tables
Use this procedure to access the DMS console.
To access DMS console
1. In a browser window, go to the DMS Console using the following URL:
http:// <example_AdminServer:Port/dms/
2. Log in with your Oracle Access Management Administrator credentials.
3. In the DMS Metric Tables, click the desired metric from those listed to view the
results on the right-side of the console.
12.3 Monitoring Server Metrics
This section provides the following topics:
■Monitoring Server Instance Performance
■Reviewing Server Metrics Using Oracle Access Management Console
12.3.1 Monitoring Server Instance Performance
Users with valid Oracle Access Management Administrator credentials can use the
following procedure to display various performance metrics using the Oracle Access
Management Console.
Prerequisites
The OAM Server must be running.
Monitoring Server Metrics
Monitoring Performance and Health 12-3
To monitor performance using Oracle Access Management Console
1. From the Oracle Access Management Console, click Server Instances and the
desired server instance.
2. Server Instance:
a. From the Actions menu in the navigation tree, click Monitor Menu.
b. On the Monitor page, click the desired subtab to view results for the server
instance:
Server Processes Overview
Session Operations
Server Operations
OAM Agents
c. Proceed to "Reviewing Server Metrics Using Oracle Access Management
Console".
3. See also, "Introduction to OAM Proxy Metrics and Tuning" on page 12-9.
12.3.2 Reviewing Server Metrics Using Oracle Access Management Console
This topic provides a look at the Server metrics available when you have a server
instance selected in the navigation tree and you choose the Monitoring Menu
command on the Actions menu under the System Configuration tab. Figure 12–1
shows the Server Processes page.
Figure 12–1 Server Processes Overview Page
Server Processes Overview provides the following OAM Server events, organized in
individual columns on the tab.
Table 12–1 OAM Server Metrics: Server Processes Overview Tab
Server Metric Columns
Authorization Process
Authorization Requests
Authentication Process Failure
Monitoring Server Metrics
12-4 Administrator's Guide for Oracle Access Management
Figure 12–2 shows the Session Operations Monitoring tab after detaching the table to
display all event metrics in individual columns.
Figure 12–2 OAM Server Metrics: Session Operations Monitoring Page
OAM Server Session Operations metrics include:
Figure 12–3 shows the detached OAM Server Operations Monitoring page.
Authentication Process Success
Pre Authentication Process Failure
Pre Authentication Process Success
Table 12–2 OAM Server Metrics: Session Operations
Session Operations
Check Session Valid
Check Session Valid Failure
Check Session Valid Success
Create Session
Create Session Failure
Create Session Success
Destroy Session
Destroy Session Failure
Destroy Session Success
Delete Client Session
Delete Client Session Failure
Table 12–1 (Cont.) OAM Server Metrics: Server Processes Overview Tab
Server Metric Columns
Monitoring Server Metrics
Monitoring Performance and Health 12-5
Figure 12–3 OAM Server Metrics: Server Operations Tab
OAM Server Operations metrics include those in Table 12–3.
Figure 12–4 shows the OAM Server Metrics: OAM Agents tab with all available
metrics showing.
Figure 12–4 OAM Server Metrics: OAM Agents Tab
OAM Agent performance metrics include:
Table 12–3 OAM Server Metrics: Server Operations Tab
OAM Server: Operations Metrics
Authentication Policy Response Failure
Authentication Policy Response Success
Authentication Scheme Response Failure
Authentication Scheme Response Success
Authentication Failure
Authentication Failure Responses
Authentication Policy Response
Authentication Requests
Authentication Scheme Response
Autorization Failure
Autorization Failure
Autorization Process Failure
Autorization Process Success

Monitoring SSO Agent Metrics
12-6 Administrator's Guide for Oracle Access Management
■Agent Name
■Agent Status
■Vers ion
12.4 Monitoring SSO Agent Metrics
This section describes how to review metrics for various components and how to
determine whether tuning is needed. The following topics are included:
■Monitoring Agent Metrics Using Oracle Access Management Console
■Reviewing OAM Agent Metrics
■Reviewing OSSO Agent Metrics
12.4.1 Monitoring Agent Metrics Using Oracle Access Management Console
Users with valid Oracle Access Management Administrator credentials can use the
following procedure to display various SSO Agent performance metrics using the
Oracle Access Management Console.
Prerequisites
The server and agent must be running.
To monitor SSO Agent performance using Oracle Access Management Console
1. From the Oracle Access Management Console, click SSO Agents.
2. Open the desired agent type node:
■OAM Agents
■OSSO Agents
■OpenSSO Agents: There is no way to monitor this Agent other than OpenSSO
Proxy behavior with respect to Agent Requests. See "Reviewing OpenSSO
Metrics Using the DMS Console" on page 12-12.
3. Search for the desired agent to monitor, as usual.
4. In the Search Results table, highlight the desired agent SerialNumber and from the
Actions menu select Monitor.
5. Proceed as needed.
■Reviewing OAM Agent Metrics
■Reviewing OSSO Agent Metrics
12.4.2 Reviewing OAM Agent Metrics
OAM Agent metrics are organized across the following tabs, as shown in Table 12–5:
■Connectivity
■Operations Overview
■Operations Detail
■Information
Monitoring SSO Agent Metrics
Monitoring Performance and Health 12-7
Figure 12–5 OAM Agent Metrics: Monitoring Characteristics
Following figures illustrate detached tables for one OAM Agent with all possible
metrics displayed for each:
■Figure 12–6, "OAM Agent Metrics: Detached Connectivity Table"
■Figure 12–7, "OAM Agent Metrics: Detached Operations Overview Table"
■Figure 12–8, "OAM Agent Metrics: Detached Operations Detail Table"
■Figure 12–9, "OAM Agent Metrics: Detached Information Table"
Figure 12–6 OAM Agent Metrics: Detached Connectivity Table
Figure 12–7 OAM Agent Metrics: Detached Operations Overview Table
Figure 12–8 OAM Agent Metrics: Detached Operations Detail Table
See Also: Oracle Fusion Middleware Performance and Tuning
Guide
Monitoring SSO Agent Metrics
12-8 Administrator's Guide for Oracle Access Management
Figure 12–9 OAM Agent Metrics: Detached Information Table
12.4.3 Reviewing OSSO Agent Metrics
When you have an OSSO Agent selected OSSO Agents Search Results table and
choose Monitor from the table's Actions menu, the following metrics pages are
available:
■Figure 12–10, "OSSO Agent Monitoring Page with Operation Details"
■Figure 12–11, "OSSO Agent Monitoring Process Overview Table"
■Figure 12–12, "OSSO Agent Information Table"
Figure 12–10 OSSO Agent Monitoring Page with Operation Details
Figure 12–11 illustrates the detached OSSO 10g Agent Monitoring Process Overview
table.
Introduction to OAM Proxy Metrics and Tuning
Monitoring Performance and Health 12-9
Figure 12–11 OSSO Agent Monitoring Process Overview Table
Figure 12–12 illustrates the detached OSSO Agent Information table.
Figure 12–12 OSSO Agent Information Table
12.5 Introduction to OAM Proxy Metrics and Tuning
This section provides the following topics:
■About OAM Proxy Metrics
■OAM Proxy Server Tuning Parameters
See Also:
■"OpenSSO Proxy Events and Metrics: Server" on page 12-11
■Oracle Fusion Middleware Performance and Tuning Guide

Introduction to OAM Proxy Metrics and Tuning
12-10 Administrator's Guide for Oracle Access Management
12.5.1 About OAM Proxy Metrics
Throughput refers to the number of requests processed per second. Latency refers to
the time required to process a particular request. There is less than a 20% latency
increase with the introduction of a proxy between Webgate and OAM Server.
Table 12–4 lists the various OAM Proxy metrics available.
12.5.2 OAM Proxy Server Tuning Parameters
Performance of the OAM Proxy can be tuned by changing its configuration through
the Java EE container Administration Console.
Table 12–5 provides the tuning parameters for the OAM Proxy.
Table 12–4 OAM Proxy Metrics
Metric Description
handshakes.active Number of active threads doing handshake
handshakes.avg Average time spent performing initial handshake
handshakes.completed Number of times an initial handshake has been executed
handshakes.maxTime Maximum time spent performing initial handshake
handshakes.minTime Minimum time spent performing initial handshake
handshakes.time Total time spent performing initial handshake
failedHandshakes.count Count of failed handshakes
peerCompatibilityFailures.c
ount
Count of how many Peer Compatibility Check Failures have
happened
openSecurityMode.count Count of how many Open Security Mode handshakes have
happened
simpleSecurityMode.count Count of how many Simple Security mode handshakes have
happened
SSLSecurityMode.count Count of how many SSL Security Mode handshakes have
happened
negotiateSecurityMode.acti
ve
Number of active threads doing security mode negotiation
Note: Both the Java EE container Administrator and the Oracle
Access Management Administrator can tune performance using the
Java EE container Administration Console, which is outside the scope
of this book.
Table 12–5 OAM Proxy Tuning Parameters
Purpose Parameter Type Value Description
Denial of
Service
Attacks
ConnectionValidationInterval Integer 120 The time interval in seconds for
validating the connections
periodically for denial of service
attacks
BacklogQueue Integer 50 Maximum length of backlog
queue

Reviewing OpenSSO Metrics in the DMS Console
Monitoring Performance and Health 12-11
12.6 Reviewing OpenSSO Metrics in the DMS Console
This section provides the following topics:
■OpenSSO Proxy Events and Metrics: Server
■OpenSSO Proxy Metrics: Agent
■Reviewing OpenSSO Metrics Using the DMS Console
12.6.1 OpenSSO Proxy Events and Metrics: Server
Throughput refers to the number of requests processed per second. Latency refers to
the time required to process a particular request. The Events that can be monitored are
described in Table 12–6.
Table 12–7 lists the various OpenSSO Proxy metrics available for the named server.
MaxNAPHandShakeTime Integer 100 The maximum time in
milliseconds within which the
client should complete the NAP
handshake with client. If NAP
handshake over a connection is
not completed within this time,
the connection will be marked as
malicious
Table 12–6 OpenSSO Proxy Server Events
Event Description
Naming Service Request This request is for naming lookups. One can monitor response time taken by the
OpenSSO Proxy in servicing this request
Agent Authentication Process Agent Authentication has been captured in two phases:
■AgentAuthentication_Login and AgentAuthentication_SubmitRequirements
phase. The second phase refers to the phase after the credentials are
submitted by the OpenSSO Agent for authentication
■The second phase refers to the phase after the credentials are submitted by
the OpenSSO Agent for authentication.
Agent Session Validation Agent Session Validation
User Authentication This event is captured for Client SDK's only. One can monitor response time taken
to authenticate client SDK's through this diagnostic event
User Session Validation Time taken to validate User Session
User Authorization Time taken for authorization as per the configured policy for the given resource
Table 12–7 OpenSSO Proxy Metrics: Server
Metric Description
AgentAuthentication_Login Response time details for Authentication requests during login phase sent by the
Agent to authenticate
AgentAuthentication_LoginFailures Count of how many Agent Authentication requests during login phase have
failed.
AgentAuthentication_SubmitRequirements Response time details for Authentication requests during Submit Requirements
phase send by the Agent to authenticate
AgentAuthentication_
SubmitRequirementsFailures
Count of how many Agent Authentication requests during Submit Requirements
phase have failed
NamingServiceRequest Response time details for Naming Service Request operations
Table 12–5 (Cont.) OAM Proxy Tuning Parameters
Purpose Parameter Type Value Description

Reviewing OpenSSO Metrics in the DMS Console
12-12 Administrator's Guide for Oracle Access Management
12.6.2 OpenSSO Proxy Metrics: Agent
Table 2 lists the various OpenSSO Proxy metrics available for each OpenSSO Agent.
12.6.3 Reviewing OpenSSO Metrics Using the DMS Console
User with valid Oracle Access Management Administrator credentials can use the
procedure here to view OpenSSO Proxy metrics in the DMS console.
Prerequisites
The OAM Server must be running.
To access DMS console
1. In a brower window, go to the DMS Console using the following URL:
http:// <example_AdminServer:Port/dms/Spy
NamingServiceRequestFailures Count of how many Naming Service Request operations have failed
UserAuthentication_SDK Response time details for User Authentication requests
UserAuthentication_SDKFailures Count of how many User authentication Requests have failed
UserAuthorization Response time details for User Authorization operations
UserAuthorizationFailures Count of how many user authorization operations have failed
ValidateAgentSession Response time details for Agent Session Validation operation
ValidateAgentSessionFailures Count of how many agent session validation operations have failed
ValidateUserSession Response time details for User Session Validation operation
ValidateUserSessionFailures Count of how many User session validation operations have failed.
Table 12–8 OpenSSO Proxy Metrics: Agent
Metric Description
AgentAuthentication_
SubmitRequirements
Response time details for Authentication requests during Submit
Requirements phase collected per Agent
AgentCacheMode Specifies the cache mode for the client policy evaluator. Values can be:
subtree or self
AgentFilterMode Specifies how the agent filters requests to protected web applications.
The global value functions as a default, and applies for protected
applications that do not have their own filter settings
AgentHostName The host name of OpenSSO Agent
AgentIPAddress The IP Address of OpenSSO Agent
AgentMappingMode Specifies the mechanism used to determine the user ID
AgentState The state of OpenSSO Agent: enabled or disabled.
UserAttributeName Specifies the data store attribute that contains the user ID
UserAuthorization Response time details for User Authorization operations collected per
Agent
UserIdentity Specifies the session property name for the authenticated user's ID.
Default is 'UserToken'
ValidateAgentSession Response time details for Agent Session Validation operation collected
per Agent
agentType The type of OpenSSO agent: J2EE or Web Agent
Table 12–7 (Cont.) OpenSSO Proxy Metrics: Server
Metric Description

Monitoring the Health of an Access Manager Server
Monitoring Performance and Health 12-13
2. Log in with your Oracle Access Management Administrator credentials.
3. OpenSSO Agent Metrics: In the DMS Metric Tables, click OAMS.OAM_
Server.OPENSSO_Agents.
4. OpenSSO Proxy Metrics: In the DMS Metric Tables, click OAMS.OAM_
OpenSSOProxy and view the results on the right side of the console.
12.7 Monitoring the Health of an Access Manager Server
Access Manager Services are business critical and must always be available to control
user access to an organization’s protected web services and applications. Because
hardware, network connectivity issues and other failures can happen, HeartBeat
monitoring can be leveraged by Load Balancers to ensure user traffic is routed to
healthy OAM Servers. For example, when there is a firewall installed between a User
Agent or WebGate (10 or 11g) and the 10g or 11g Access Manager server, perimeter
devices can check availability of the Access Manager server (its health) by hitting its
HeartBeat URL. The following sections contain details.
■Understanding WebGate and Access Manager Communications
■Monitoring Access Manager Server Health
12.7.1 Understanding WebGate and Access Manager Communications
When deploying a network firewall between a WebGate and Access Manager server,
the WebGate communicates using the OAP protocol by creating a TCP socket
connection with Access Manager to establish a message channel. The WebGate uses
the message channel to send different OAP messages necessary to serve the resource
requests (isprotected, isauthorized, and the like). Now, consider a situation in which
the WebGate/Oracle HTTP Server is idle. In this case, the WebGate has received no
resource request and will not send any messages to Access Manager for authentication
or authorization; there will also not be any read/write activity on the socket
connection.
The firewall determines this connection is idle after 30-40 minutes of inactivity
(depending on its configuration) and terminates the socket connection but does not
inform/notify the WebGate or Access Manager server. In this case, when a request for
a resource arrives at the WebGate and it sends a OAP message to the Access Manager
server, it uses the existing connection and waits for a reply. Because the connection
was dropped by the firewall, the WebGate does not receive any reply; so it waits for
the TCP timeout. Following the TCP timeout, WebGate understands the message
channel is of no use and starts the process to get a new message channel. TCP timeout
is OS specific and may vary from several minutes to hours which makes the WebGate
unable to process user requests.
12.7.2 Monitoring Access Manager Server Health
The OAM monitoring model allows Web Tier components (load balancers) to ping an
OAM Managed Server's HeartBeat endpoint at a scheduled interval over HTTP(S).
This allows Web Tier components to route incoming HTTP traffic away from
unhealthy OAM Managed Server(s). Every OAM Managed Server exposes this
HeartBeat URL:
Note: The
setKeepAlive
WebGate parameter ensures that load
balancers do not drop the OAP connection. See User-Defined
WebGate Parameters for details.

Monitoring the Health of an Access Manager Server
12-14 Administrator's Guide for Oracle Access Management
Scheme://ManagedServerHost:ManagedServerPort/oam/server/HeartBeat
In this URL, the following is true:
■scheme = https | http
■ManagedServerHost = Host name of the Access Manager WLS Managed Server
■ManagedServerPort = Port used by the Access Manager WLS Managed Server
The HeartBeat URL works as follows:
1. The Web Tier components will send an HTTP request to the HeartBeat endpoint of
the Access Manager Managed Server.
2. The Access Manager Managed Server will then do the following:
■Verify Id Store Connectivity
■Verify Policy Store Connectivity
■Verify the Credential Collector URLs are reachable
■Sanity check the working of the Coherence Layer
■Check for NAP connectivity
If the above tests succeed, the Access Manager server is considered to be healthy
and a HTTP 200 response is sent to the Load Balancer. Any other HTTP Status
Code value signifies that the Access Manager Managed Server is not healthy.
3. When multiple Access Manager Managed Servers are present in the deployment,
the Web Tier component will repeat this for each OAM Managed Server.
Note: Neither the health status test results or check results can be
communicated in the body of the HTTP Response.

13
Monitoring Performance and Logs with Fusion Middleware Control 13-1
13
Monitoring Performance and Logs with Fusion
Middleware Control
Live, dynamic performance metrics can be viewed in Fusion Middleware Control. This
chapter describes how to monitor performance and log messages for Access Manager
and Security Token Service using Oracle Fusion Middleware Control. This chapter
focuses on general tasks that Administrators can perform from Fusion Middleware
Control, which does not replace details in the Oracle Fusion Middleware
Administrator's Guide.
This chapter includes the following topics:
■Prerequisites
■Introduction to Fusion Middleware Control
■Logging In to and Out of Fusion Middleware Control
■Displaying Menus and Pages in Fusion Middleware Control
■Viewing Performance in Fusion Middleware Control
■Managing Log Level Changes in Fusion Middleware Control
■Displaying MBeans in Fusion Middleware Control
■Displaying Farm Routing Topology in Fusion Middleware Control
13.1 Prerequisites
Oracle Fusion Middleware Control must be deployed with Oracle Access Management
on the WebLogic Administration Server, as described in the Oracle Fusion Middleware
Installation Guide for Oracle Identity and Access Management.
13.2 Introduction to Fusion Middleware Control
Within Fusion Middleware Control, information is updated dynamically during live
sessions of Access Manager, Security Token Service, and other products.
Fusion Middleware Control organizes a wide variety of performance data and
administrative functions into distinct Web-based pages. This helps Administrators
Note: Unless explicitly stated, information in this chapter is the same
for both services. There are no metrics in Oracle Fusion Middleware
Control for Identity Federation or Mobile and Social.
Logging In to and Out of Fusion Middleware Control
13-2 Administrator's Guide for Oracle Access Management
easily locate the most important monitoring data and the most commonly used
administrative functions from a Web browser.
Oracle Access Management 11g is deployed as a Java EE application in a WebLogic
container. For high availability and failover, Oracle Access Management is typically
deployed in a WebLogic cluster environment.
A WebLogic Server domain can have multiple clusters. To provide monitoring and
performance statistics for all clustered components requires a composite target. This
target provides status and rolled-up load and response performance metrics for
member instances. In addition to the metrics exposed for Access Manager and Security
Token Service, generic performance metrics are also available for Java EE application
and composite Java EE applications.
Fusion Middleware Control must be deployed with Oracle Access Management on the
WebLogic Administration Server, as shown in Figure 13–1.
Figure 13–1 Fusion Middleware Control (AS-Control) Deployment Architecture
Using Fusion Middleware Control for targets is supported through the Oracle
Dynamic Monitoring Systems instrumentation within Oracle Access Management.
This instrumentation is used to provide:
■Performance overview and drill down
■Log message searches and dynamic log level changes
■Routing topology overview
■Mbean browser
■Component- and cluster-level metrics for Access Manager with Security Token
Service
13.3 Logging In to and Out of Fusion Middleware Control
This section provides the following topics:
■About the Farm Page in Fusion Middleware Control
Note: Enterprise Manager Grid Control is an independently licensed
product that provides additional capabilities not found in Fusion
Middleware Control (primarily, the ability to collect and maintain data
for historical purposes and trending).

Displaying Menus and Pages in Fusion Middleware Control
Monitoring Performance and Logs with Fusion Middleware Control 13-3
■Logging In To Fusion Middleware Control
■Logging Out of Fusion Middleware Control
13.3.1 About the Login Page for Fusion Middleware Control
The Fusion Middleware Control Login page provides the usual fields for the User
Name and Password. The bottom of the Fusion Middleware Control Login page
provides topics that you can click for additional information.
13.3.2 Logging In To Fusion Middleware Control
Only Fusion Middleware Control Administrators can perform this task.
To log in to Fusion Middleware Control
1. In a browser window, enter the URL to Fusion Middleware Control. For example:
http://host.example.com:8888/em/
2. Expand a topic at the bottom of the Login page to learn about the enhanced user
experience or new features.
3. Log in as a Fusion Middleware Control Administrator.
4. Choose the farm containing Oracle Access Management, if needed.
5. Help: From the Farm Resource Center on the OAM Farm page, choose topics of
interest (or click Help in the upper-right corner of the page) to get more
information.
6. Proceed to any topic in this chapter for viewing and configuration details.
13.3.3 Logging Out of Fusion Middleware Control
You can use the following procedure to sign out of Fusion Middleware Control.
To log out of Fusion Middleware Control
1. Click the Log Out link in the upper-right corner of Fusion Middleware Control.
2. Close the browser window.
13.4 Displaying Menus and Pages in Fusion Middleware Control
This section provides the following topics for Access Manager and Security Token
Service:
■About the Farm Page in Fusion Middleware Control
■About Context Menus and Pages in Fusion Middleware Control
■Displaying Context Menus and Target Details in Fusion Middleware Control
See Also: Oracle Fusion Middleware Administrator's Guide for details
about getting started using Fusion Middleware Control
See Also: Oracle Fusion Middleware Administrator's Guide for details
about getting started using Fusion Middleware Control
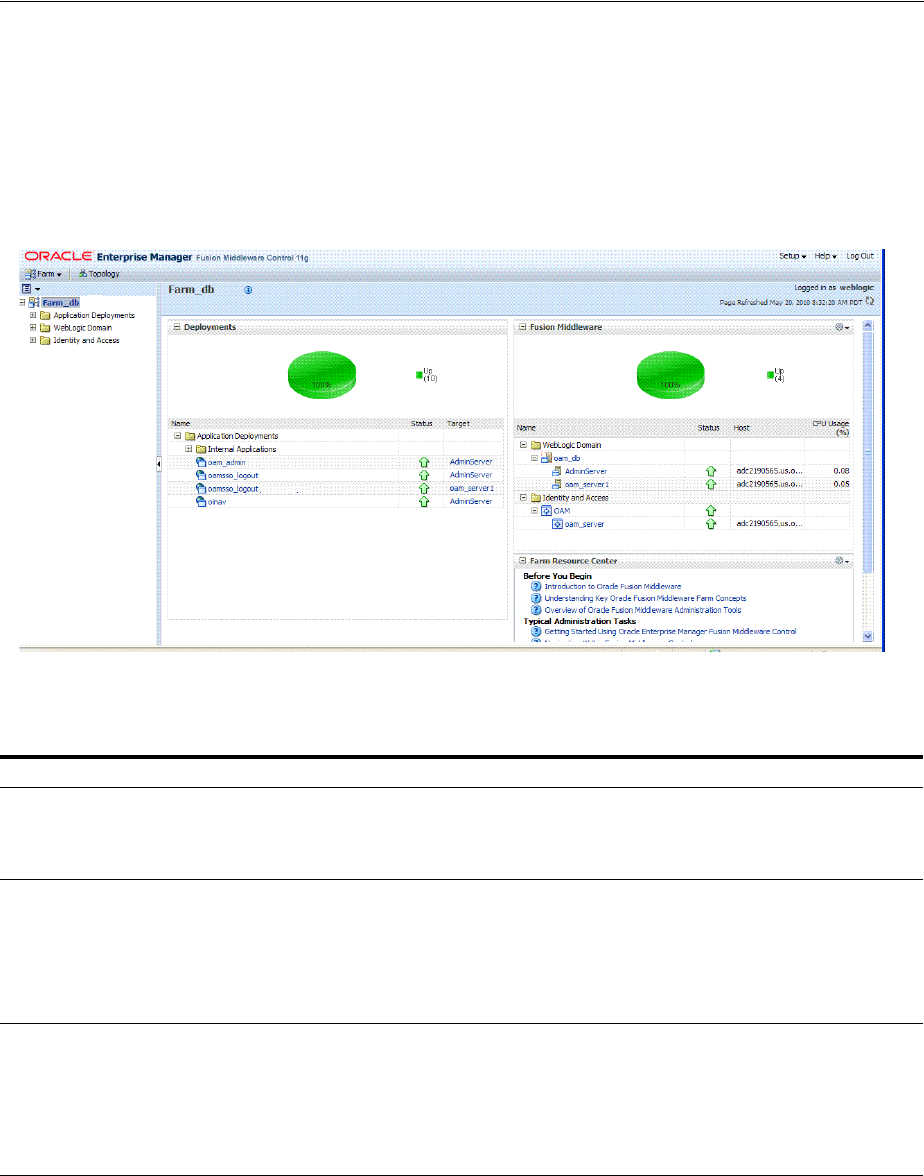
Displaying Menus and Pages in Fusion Middleware Control
13-4 Administrator's Guide for Oracle Access Management
13.4.1 About the Farm Page in Fusion Middleware Control
Figure 13–2 illustrates the OAM Farm page in Fusion Middleware Control. Each Farm
page includes similar information. The Farm Resource Center provides immediate
access to online information.
Figure 13–2 OAM Farm Page in Fusion Middleware Control
Sections on the Farm page are described in Table 13–1.
The navigation tree on the left side of the page, like the one in Figure 13–3, enables you
to choose a specific instance (target) on which to operate regardless of the page you are
currently viewing. Target names in your environment will be different.
Table 13–1 Farm Page Sections
Farm Page Sections Description
Deployments Within the farm, this section displays the Status and Target of each Internal Application
within the Application Deployment.
Clicking any link in the Deployments section (or in the navigation tree) displays a page
containing more information.
Fusion Middleware Within the farm, this section displays the status, host, and CPU usage for server instances
in the:
■WebLogic Server domain
■Identity and Access
Clicking any link on the page (or in the navigation tree) displays a page containing a more
detailed summary.
Farm Resource Center Provides a wealth of online information in the following categories:
■Information that is useful before you begin using Fusion Middleware Control
■Administrator tasks using Fusion Middleware Control
■Other resources
Clicking any link in the resource center displays information on the chosen subject. With a
wealth of information online, these details are not repeated in this book.
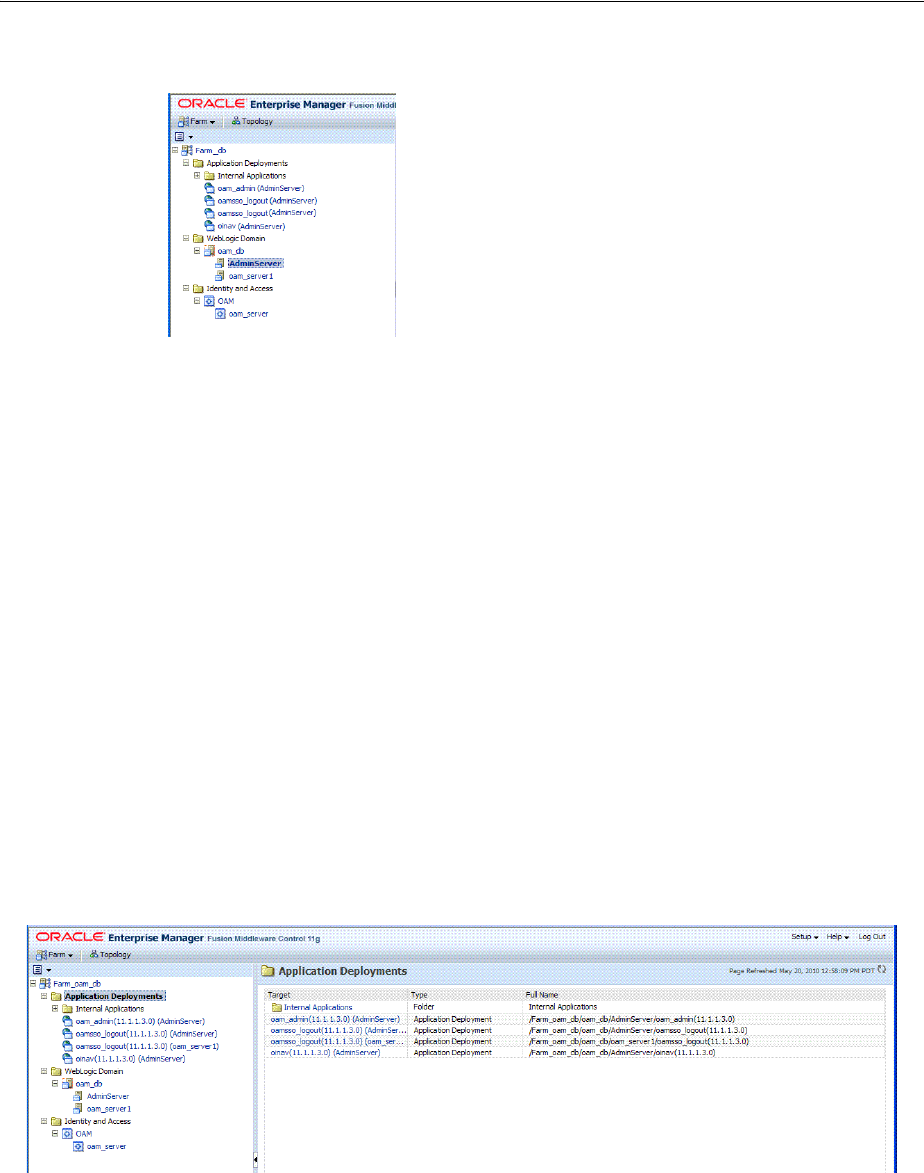
Displaying Menus and Pages in Fusion Middleware Control
Monitoring Performance and Logs with Fusion Middleware Control 13-5
Figure 13–3 Farm Navigation Tree in Fusion Middleware Control
For more information, see "Logging In To Fusion Middleware Control".
13.4.2 About Context Menus and Pages in Fusion Middleware Control
For Oracle Access Management, Farm details in Fusion Middleware Control are
divided into the following nodes within the navigation tree:
■Application Deployments
■Internal Applications (includes logout page and other details for the OAM
AdminServer and OAM Server instances)
■WebLogic Server domains (WebLogic Server details, including the OAM Farm)
■Identity and Access (includes OAN Cluster or individual OAM Server instances)
Clicking a node in the navigation tree displays an information page with individual
links and a description of the Target, Type, and Full Name, as shown in Figure 13–4 for
Application Deployments.
Figure 13–4 Node Information Page in Fusion Middleware Control
Clicking an instance (target) name (from either the navigation tree or a page), displays
a context menu and a more detailed summary page. The Internal Application target is
highlighted in the navigation tree and a page of the same name is displayed on the
right. The context menu is available beneath the target name at the top of the page, as
shown in Figure 13–5.
See Also: "Displaying Menus and Pages in Fusion Middleware
Control" on page 13-3
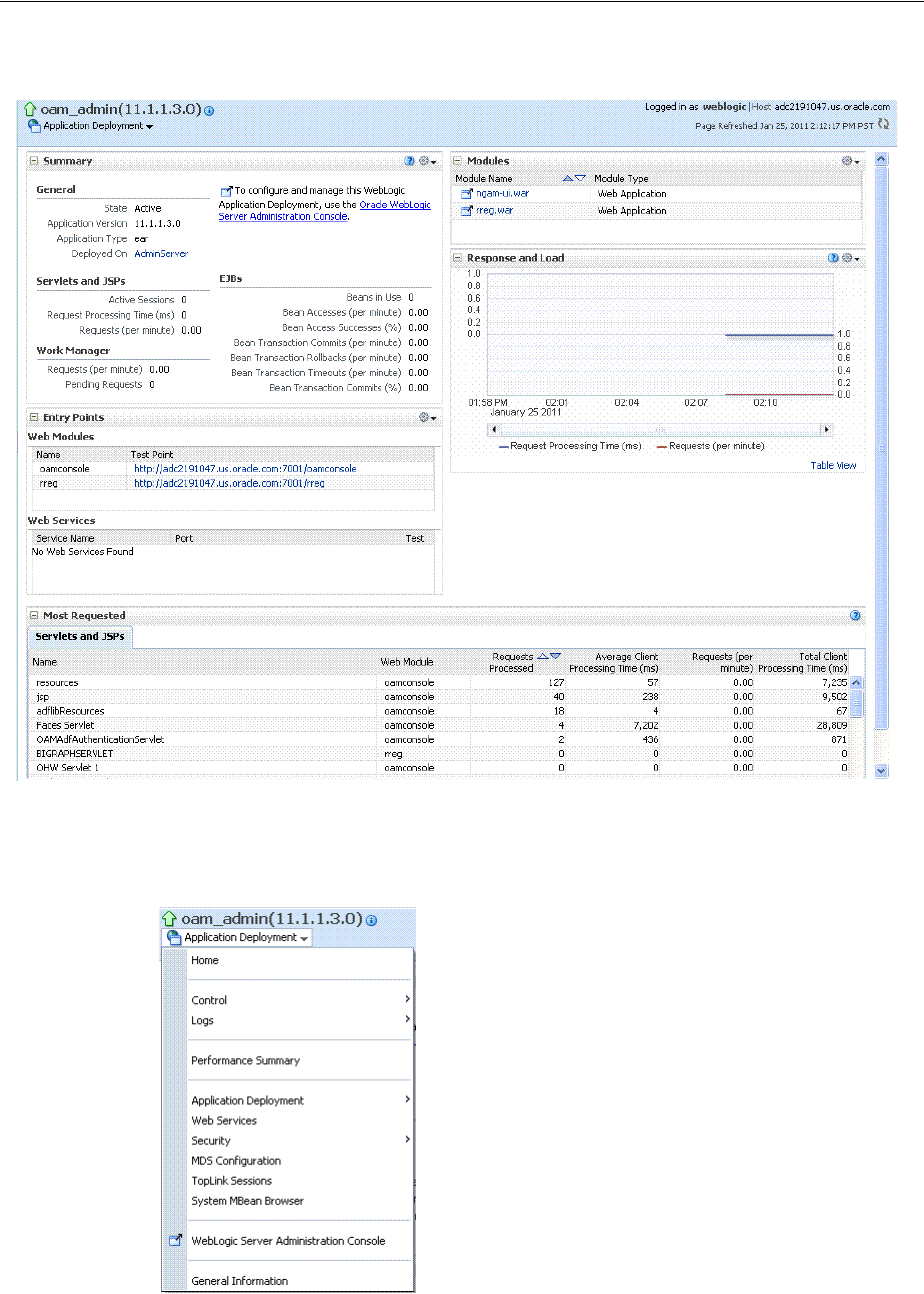
Displaying Menus and Pages in Fusion Middleware Control
13-6 Administrator's Guide for Oracle Access Management
Figure 13–5 Application Deployment Summary for the Selected Internal Application
The Application Deployment menu is shown in Figure 13–6.
Figure 13–6 Application Deployment Menu
WebLogic Server domain: The WebLogic Server domain page is shown in Figure 13–7
with the corresponding menu displayed. The Oracle WebLogic Server domain
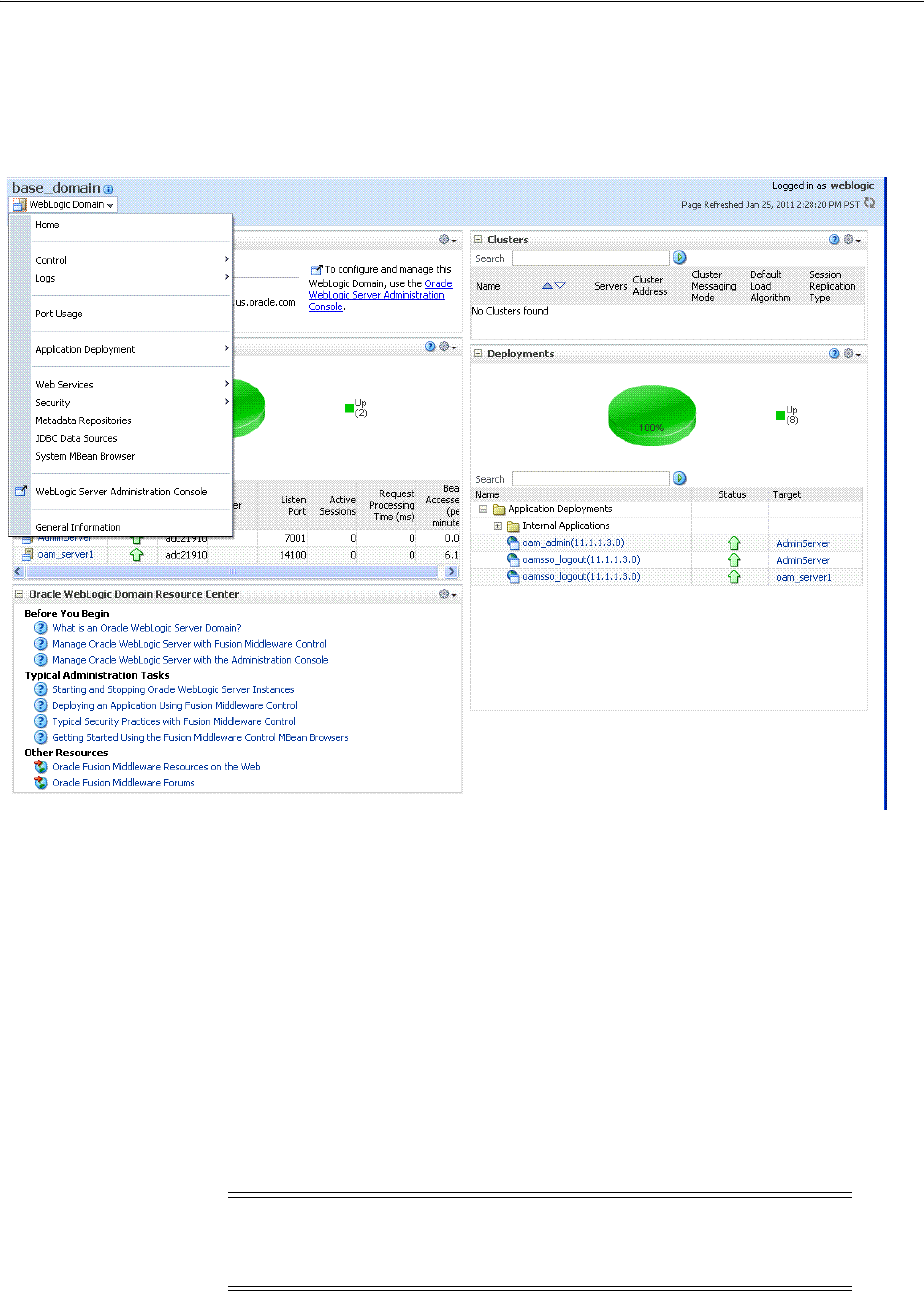
Displaying Menus and Pages in Fusion Middleware Control
Monitoring Performance and Logs with Fusion Middleware Control 13-7
Resource Center, with links to online documentation, is visible in the bottom-left
corner. This page more closely resembles the Farm landing page.
Figure 13–7 WebLogic Server Domain Summary with Context Menu Exposed
Selecting a target name within the WebLogic Server domain node displays a target
summary page that more closely resembles the Application Deployment page in
Figure 13–5.
For more information, see "Displaying Context Menus and Target Details in Fusion
Middleware Control".
13.4.3 Displaying Context Menus and Target Details in Fusion Middleware Control
Fusion Middleware Control Administrators can use the following procedure to view
context menus and target pages.
See Also: "Viewing Performance in Fusion Middleware Control" on
page 13-8 for information about the Identity and Access node and
related pages.
Note: From the Farm Resource Center on the OAM Farm page,
choose topics of interest (or click Help in the upper-right corner of the
page) to get more information.
See Also: "About Context Menus and Pages in Fusion Middleware
Control" on page 13-5

Viewing Performance in Fusion Middleware Control
13-8 Administrator's Guide for Oracle Access Management
To display context menus and target information
1. Log in as described in "Logging In To Fusion Middleware Control" on page 13-3.
2. Expand the Farm containing Oracle Access Management, if needed.
3. Information Pages: From the navigation tree, click one of the following to display
the related information page:
■Application Deployments
■WebLogic Server domain
■Identity and Access
4. Menus and Summary Pages: Click an instance name (in either the navigation tree
or the related page) to display a summary page and menu (Figure 13–5 and
Figure 13–6).
5. Cluster or Server Pages: See "Viewing Performance in Fusion Middleware
Control".
13.5 Viewing Performance in Fusion Middleware Control
Fusion Middleware Control provides Administrators with:
■A cluster-wide view of performance for Access Manager with Security Token
Service
■A per-server drill-down of key performance metrics
■The ability to quickly add or remove performance metrics
Using Fusion Middleware Control, you can view performance metrics for live sessions
in a variety of formats. Table 13–2 summarizes the pages for selected nodes and target
instances.
Table 13–2 Resulting Pages for Selected Nodes and Targets
Node Target
Information
Summary Page
Performance
Overview
Performance
Summary
w/Metrics
Application Deployment
Internal Applications ...AdminServer
oamsso_logout(11.1.1.3.0) AdminServer
oamsso_logout(11.1.1.3.0) oam_server
Yes
Yes
Yes
No
No
No
Yes
Yes
Yes
WebLogic Server domain
oam_bd (Cluster name)
AdminServer
oam_server
Yes
Yes
Yes
No
No
No
No
Yes
Yes
Identity and Access
OAM
(Cluster)
oam_server
(Server)
No
No
Yes
Yes
Yes
Yes
Note: Security Token Service performance is included with relevant
OAM Cluster and Server pages.
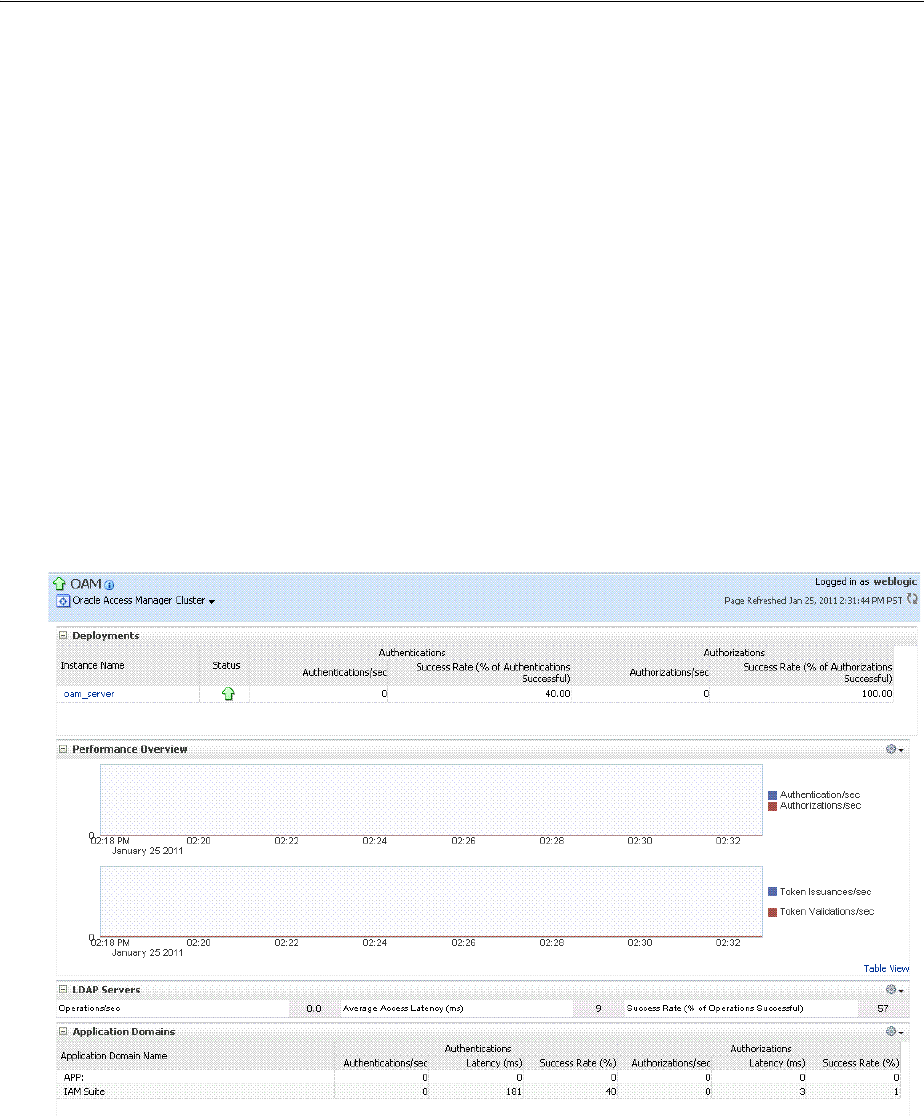
Viewing Performance in Fusion Middleware Control
Monitoring Performance and Logs with Fusion Middleware Control 13-9
This section provides the following topics:
■About Performance Overview Pages in Fusion Middleware Control
■About the Metrics Palette and the Performance Summary Page
■Displaying Performance Metrics in Fusion Middleware Control
■Displaying Component-Specific Performance Details
13.5.1 About Performance Overview Pages in Fusion Middleware Control
The Fusion Middleware Control Performance Overview can be used to reflect
WebLogic cluster information down to specific performance metrics for individual
Cluster and Server targets.
Cluster Page: The top node within Identity and Access leads to a page for the OAM
Cluster Deployment, which includes a Performance Overview. For Figure 13–8, the
Cluster is selected in the navigation tree, beneath the Identity and Access node.
Figure 13–8 illustrates the Cluster Deployments and Performance Overview sections.
This page includes a table for Token Issuance and Token Validations.
Figure 13–8 Cluster Page
OAM Server Pages: Selecting an OAM Server target name from the navigation tree (or
the open page), displays a Performance Overview for the target. At the top of the
OAM Server page, a summary of Key Metrics for the server instances appears instead
of the Cluster Deployment section. Figure 13–9 illustrates the OAM Server instance
Key Metrics, which include Token Issuance and Token Validations per second. The
Token Validation success rate is included.
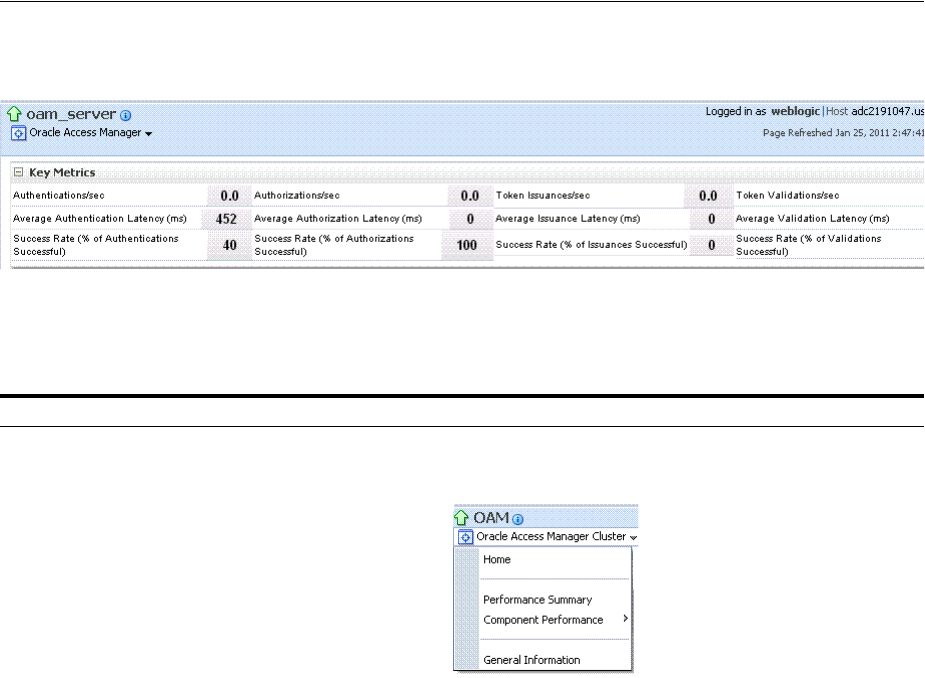
Viewing Performance in Fusion Middleware Control
13-10 Administrator's Guide for Oracle Access Management
Figure 13–9 Key Metrics for Server Pages
Table 13–3 describes the elements of the Performance Overview for Clusters and OAM
Server instances in Fusion Middleware Control. There are only a few differences.
Table 13–3 Summary of Performance Overviews in Fusion Middleware Control
Section or Column Name Description
Cluster Menu Dynamic context menus provide functions related to the selected target (also available
when you right-click a target in the navigation tree). This menu is available for the
selected Cluster.
The Component Performance command enables you to choose between displaying
Access Manager or Security Token Service metrics.
See Also: "Access Manager Component Pages" and "Security Token Service Component
Pages".
Deployments, OAM Cluster pages This section appears only on OAM Cluster pages. It describes the status of each instance
in the cluster. The following information is included:
■Instance Name
■Status
■Authentications
■Authorizations
Instance Name This column includes the name of each OAM Server instance in the cluster. For
example:
OAM_server_name
Status This column identifies the status of each OAM Server instance in the cluster with either
a:
■Green Up Arrow (running)
■Red Down Arrow (not running)
Authentications Authentications columns identify:
■Authentications/sec: The number of authentications per second for each OAM
Server instance in the cluster
■Success Rate (% of Authentications Successful): A numeric value representing the
percentage of successful authentications for each OAM Server instance in the
cluster
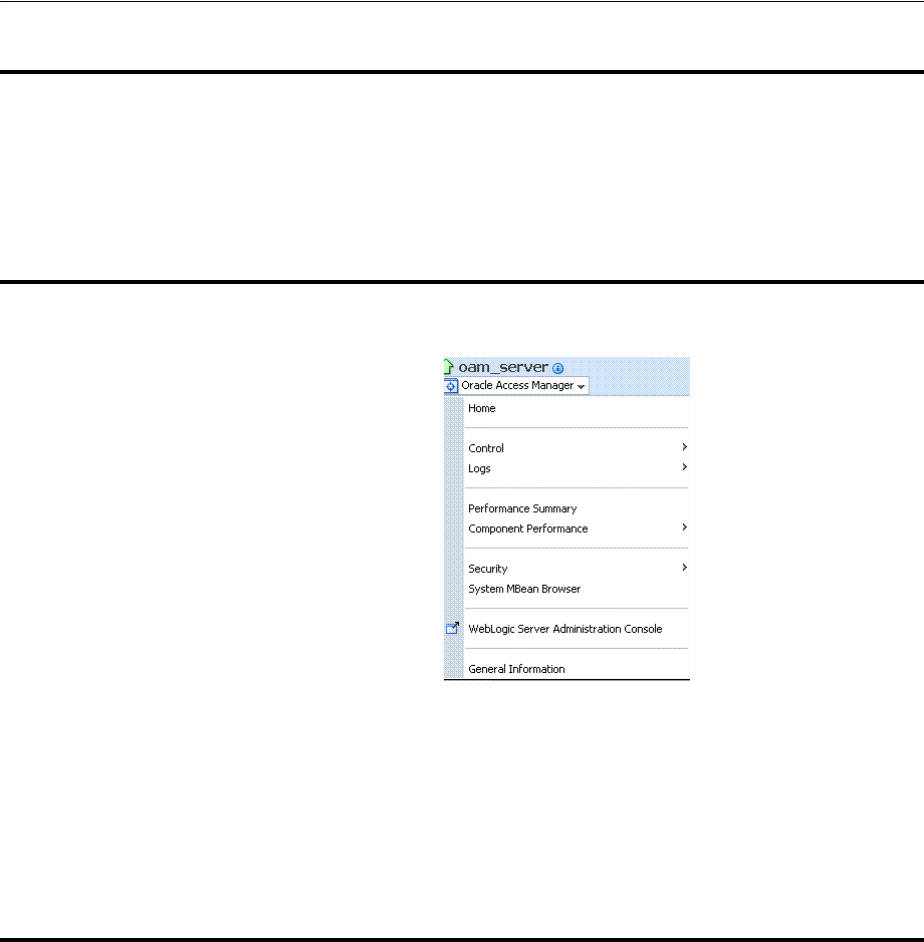
Viewing Performance in Fusion Middleware Control
Monitoring Performance and Logs with Fusion Middleware Control 13-11
Authorizations This column identifies the number of authorizations per second for each OAM Server
instance in the cluster.
Authorizations columns identify:
■Authorizations/sec: The number of authorizations per second for each OAM
Server instance in the cluster
■Success Rate (% of Authorizations Successful): A numeric value representing the
percentage of successful authorizations for each OAM Server instance in the
cluster
Server Instance Menu Dynamic context menus provide functions related to the selected target (also available
when you right-click a target in the navigation tree). This menu is available for the
selected server instance.
The Component Performance command enables you to choose between displaying
specific Access Manager or Security Token Service metrics.
See Also: "Access Manager Component Pages" and "Security Token Service Component
Pages".
Key Metrics, OAM Server Page This table provides a summary of statistics for only the selected OAM Server instance.
Key metrics include details for both Access Manager and Security Token Service:
■Authentications/sec, Average Authentication Latency (ms), and Success ratio
■Authorizations/sec, Average Authorization Latency (ms), and Success ratio
■Token Issuances/sec, Average Issuance Latency (ms), and Success ratio
■Token Validations/sec, Average Validation Latency (ms), and Success ratio
Performance Overview, OAM Cluster
and OAM Server Pages
This section provides a graphic representations of Access Manager authentication and
authorization operations and Security Token Service Token Issuance and Token
Validation operations. Metrics in the Performance Overview are not configurable. The
Metrics Palette is available for only the Performance Summary.
Whether you have an OAM Cluster or OAM Server instance selected, the Performance
Overview includes:
■Authentications/sec and Authorizations/sec
■Token Issuances/sec and Token Validations/sec
Within each table:
■Coordinates along the horizontal axis (the x axis) identify the time period.
■Coordinates along the vertical axis (the y axis) identify the number of named
transactions that occured during the time period.
Table 13–3 (Cont.) Summary of Performance Overviews in Fusion Middleware Control
Section or Column Name Description
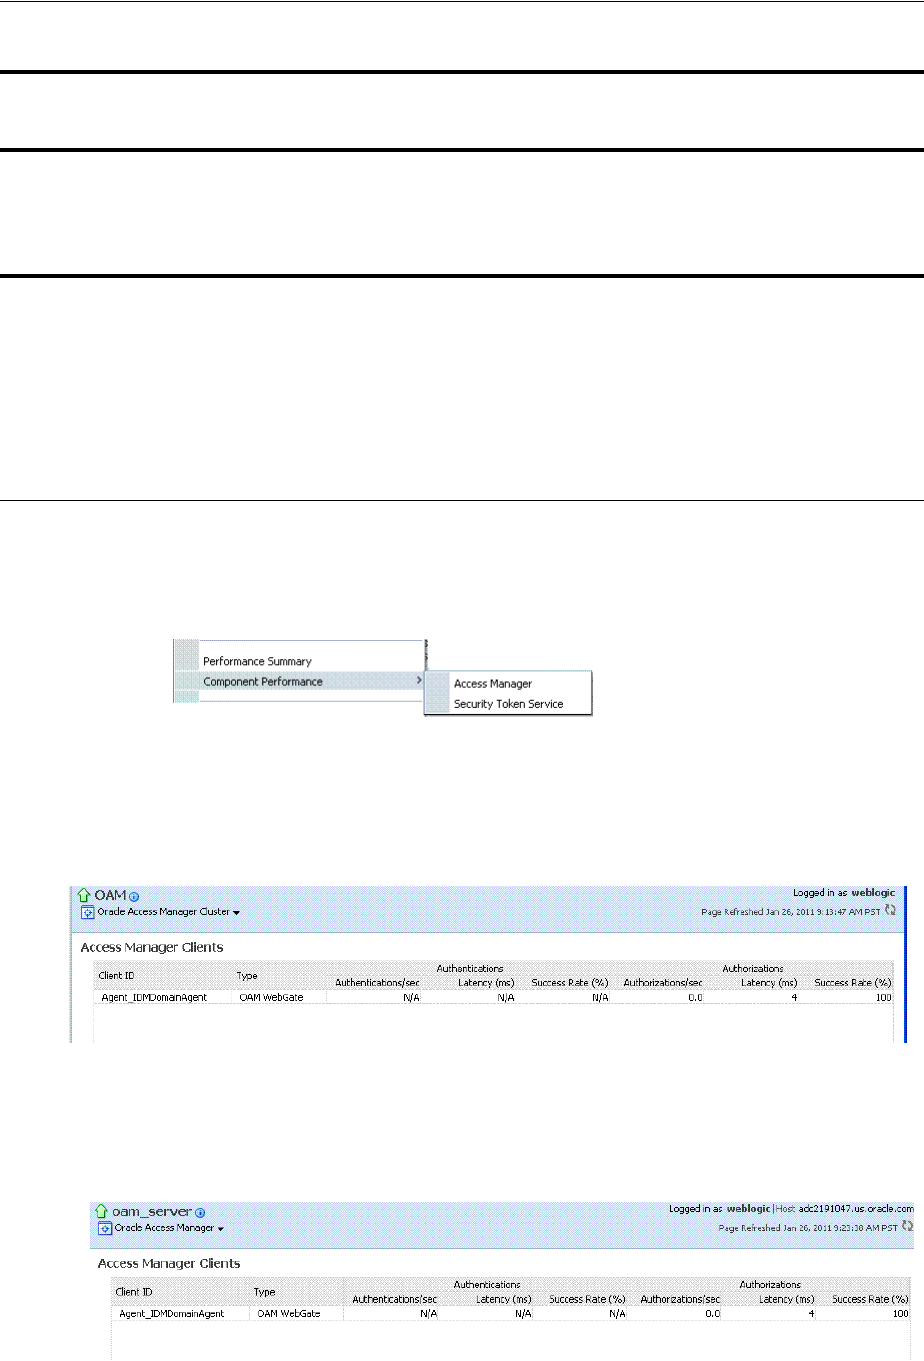
Viewing Performance in Fusion Middleware Control
13-12 Administrator's Guide for Oracle Access Management
13.5.1.1 Access Manager Component Pages
The Component Performance command on both the Cluster and Server instance
menus enables you to display Access Manager-specific metrics.
Cluster component-specific metrics are aggregated across the cluster, illustrated in
Figure 13–10. Details follow in Table 13–4.
Figure 13–10 Aggregated Access Manager Component Metrics for the Cluster
Figure 13–11 illustrates the Access Manager component metrics for a single OAM
Server instance.
Figure 13–11 Access Manager Component Metrics for a Single OAM Server Instance
Table View Click the Table View link on the bottom-right side of the Performance Overview to
display performance information in columns within a pop up window.
LDAP Servers, OAM Cluster and
OAM Server Pages
This section is available when either an OAM Cluster or a single OAM Server instance
is selected. It provides information for the default LDAP user identity store:
■LDAP operations/sec
■LDAP Latency (milliseconds)
■LDAP Success Rate
Application Domains, OAM Cluster
and OAM Server Pages
This section of the OAM Cluster and OAM Server pages provides information for all
Application Domains that were used during authentication and authorization
processing.
Columns in this section provide the:
■Application Domain Name: Each Application Domain that contains the
authentication and authorization policies used for a request.
■Authentications/sec, Authentications Latency (ms), Success Ratio (%) for each
Application Domain
■Authorizations/sec, Authorization Latency (ms), Success Ratio (%) for each
Application Domain
Table 13–3 (Cont.) Summary of Performance Overviews in Fusion Middleware Control
Section or Column Name Description
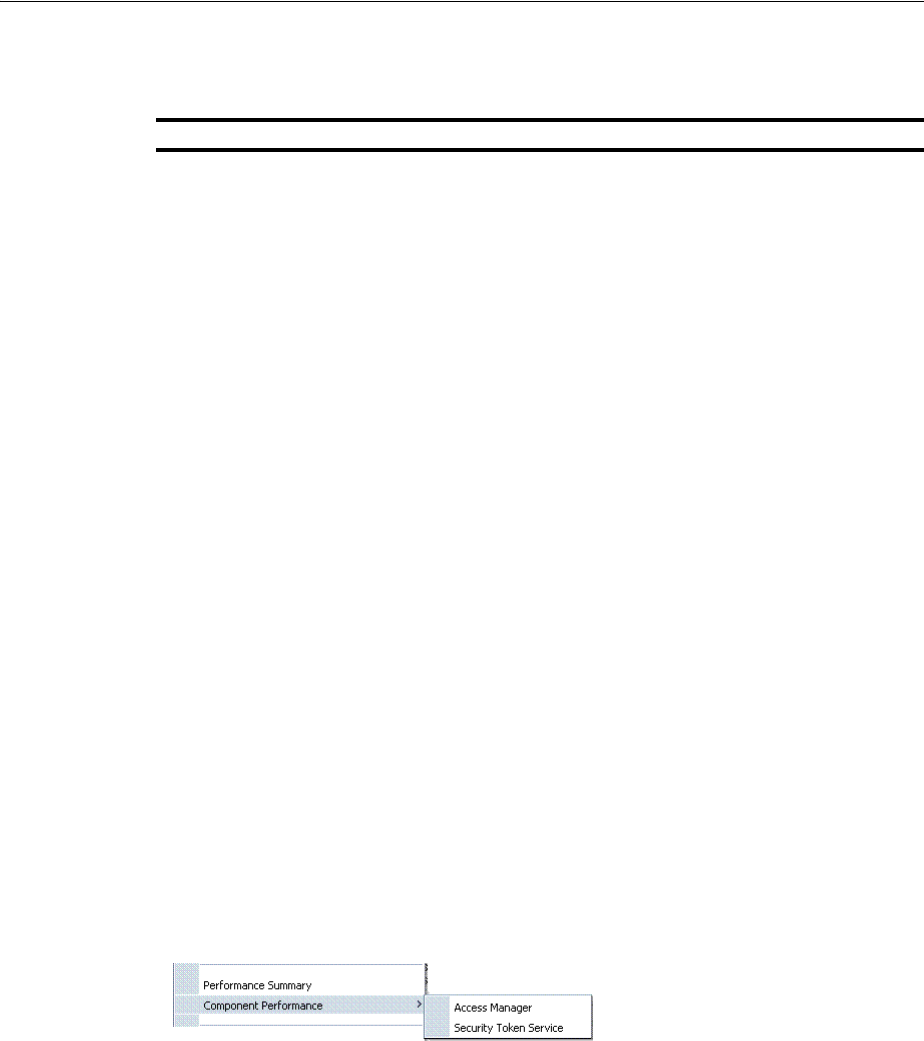
Viewing Performance in Fusion Middleware Control
Monitoring Performance and Logs with Fusion Middleware Control 13-13
Table 13–4 describes the component-specific metrics for Access Manager.
13.5.1.2 Security Token Service Component Pages
The Component Performance command on both the Cluster and Server instance
menus enables you to display Security Token Service component-specific metrics.
Component-specific metrics are aggregated for the Cluster, as illustrated in
Figure 13–10.
Table 13–4 Access Manager Component Metrics
Access Manager Metrics Description
Access Manager Clients Based on your selection (Cluster or Server instance), this page
provides information for all active Access Clients in a cluster (or for
the active Access Clients of an individual OAM Server). Details
include:
■Client ID
■Type
■Authentications
■Authorizations
Client ID Displays the name of the Agent, as defined in the Agent registration in
the Oracle Access Management Console. For example:
IAMSuiteAgent
Type Displays the Agent. type For example:
OAM Webgate
Authentications Authentications columns identify:
■Authentications/sec: The number of authentications per second
for each OAM Server instance in the cluster
■Latency (ms): The number of milliseconds the authentication was
delayed
■Success Rate (% ): A numeric value representing the percentage
of successful authentications for each OAM Server instance in the
cluster
Authorizations Authorizations columns identify:
■Authorizations/sec: The number of authorizations per second for
each OAM Server instance in the cluster
■Latency (ms): The number of milliseconds the authorization was
delayed
■Success Rate (%): A numeric value representing the percentage of
successful authorizations for each OAM Server instance in the
cluster
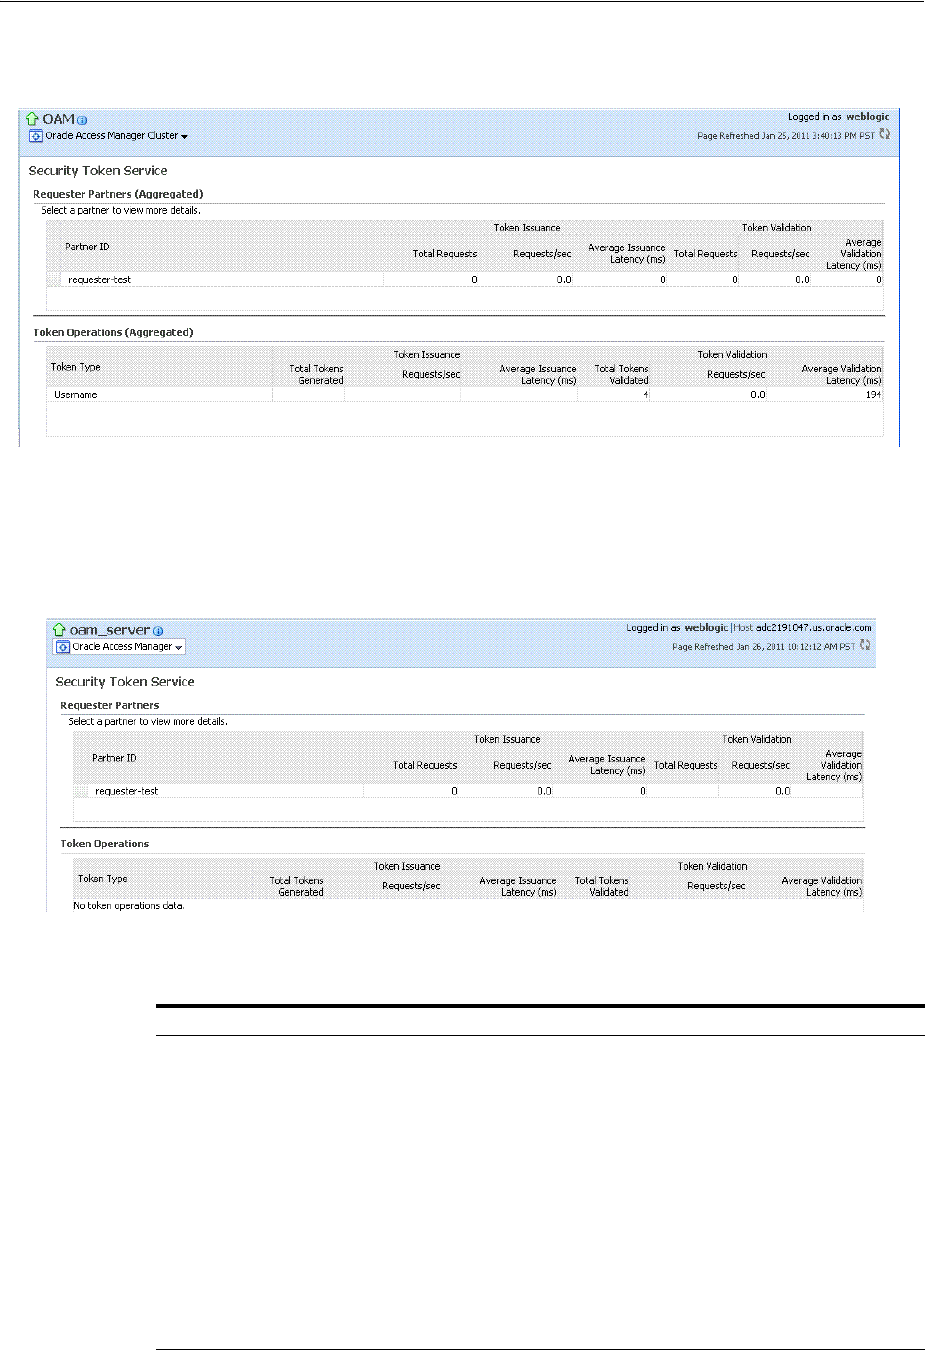
Viewing Performance in Fusion Middleware Control
13-14 Administrator's Guide for Oracle Access Management
Figure 13–12 Aggregated STS Component Metrics for the Cluster
For each individual server instance, STS component-specific metrics are also available,
as illustrated in Figure 13–10.
Figure 13–13 STS Component Metrics for an Individual OAM Server Instance
Table 13–5 introduces the STS component specific metrics.
Table 13–5 STS Component-Specific Metrics
Security Token Service Metrics Description
Requestor Partners Statistics summary for either the selected OAM Server instance (or an
aggregated summary for the Cluster):
■Partner ID
■Token Issuances
■Token Validations
Selecting a Requestor Partner ID reveals Relying Party Details with
specific information for only the named partner.
Token Operations Metrics for STS Token Operations include:
■Token Type
■Token Issuances: Total Requests, Requests per second, Average
Issuance Latency (ms)
■Token Validations: Total Requests, Requests per second, Average
Issuance Latency (ms)
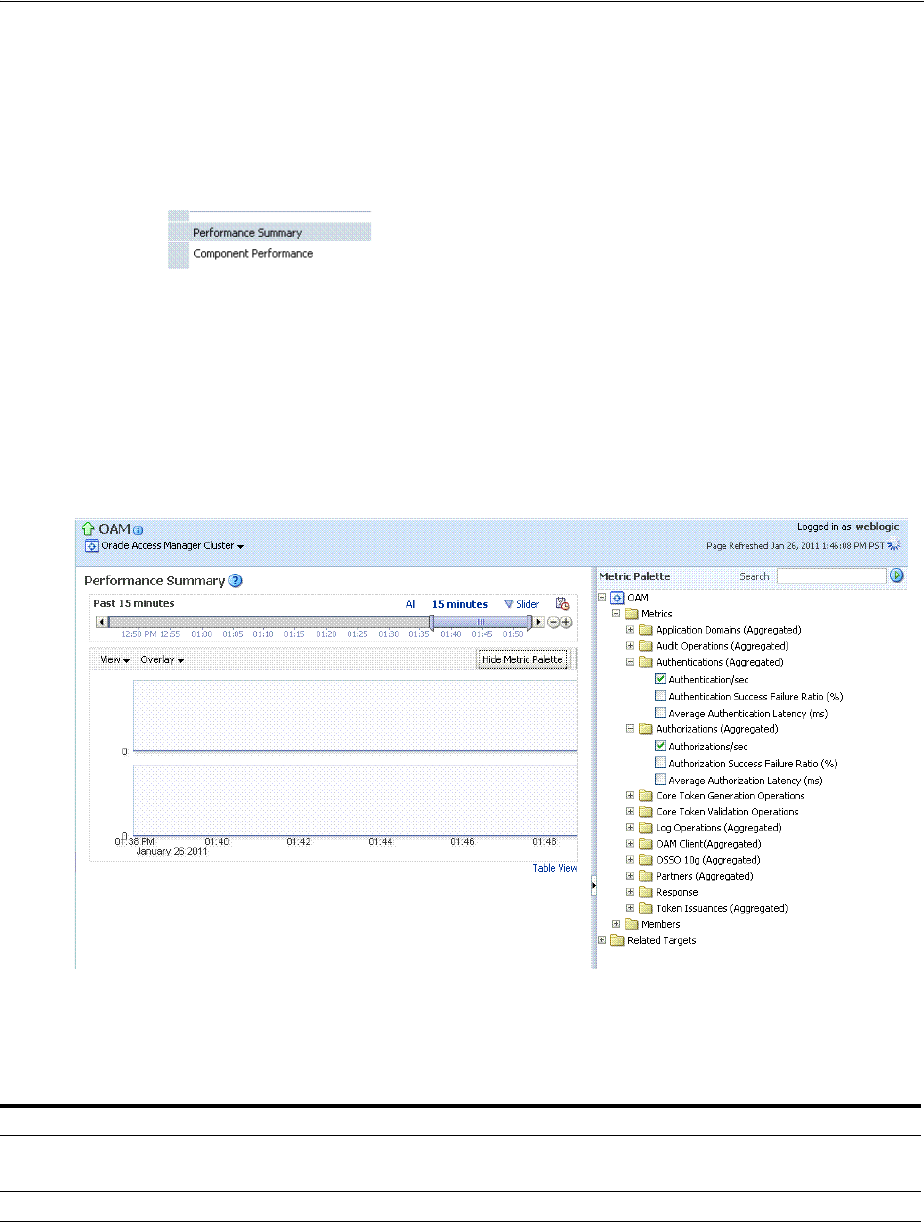
Viewing Performance in Fusion Middleware Control
Monitoring Performance and Logs with Fusion Middleware Control 13-15
13.5.2 About the Metrics Palette and the Performance Summary Page
The Performance Summary command on the Cluster or Server menu displays metrics
charts for the selected target.
Figure 13–14 Performance Summary Command
On the Performance Summary page, a chart is displayed for each selected metric. An
OAM Server Performance Summary page. Figure 13–15 shows the Performance
Summary page with an open Metric Palette from which you can choose metrics to
chart. Stacked charts allow you to easily compare multiple metrics for the same time
frame, change the time frame to go back in time, or zoom in or out.
Figure 13–15 Performance Summary Page with Metric Palette
Table 13–6 describes the status and controls available on the Performance Summary
page.
Table 13–6 Status and Controls on Performance Summary Pages
Status or Control Description
Past n minutes Status is based on the specified time period, which can be adjusted using the slider.
All
n Minutes The specified time period, which can be adjusted using the slider.
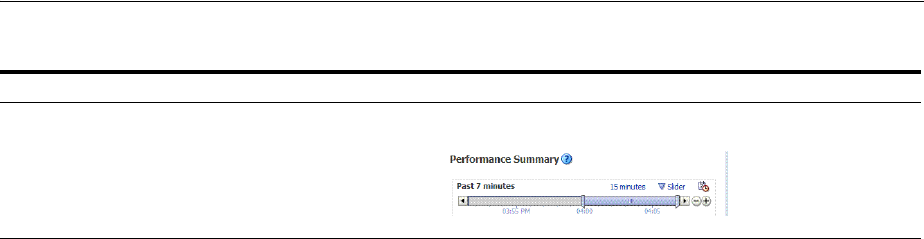
Viewing Performance in Fusion Middleware Control
13-16 Administrator's Guide for Oracle Access Management
Slider The tool you use to adjust the time period.
Chart Set A list from which you can choose the set of saved charts to view.
Table 13–6 (Cont.) Status and Controls on Performance Summary Pages
Status or Control Description
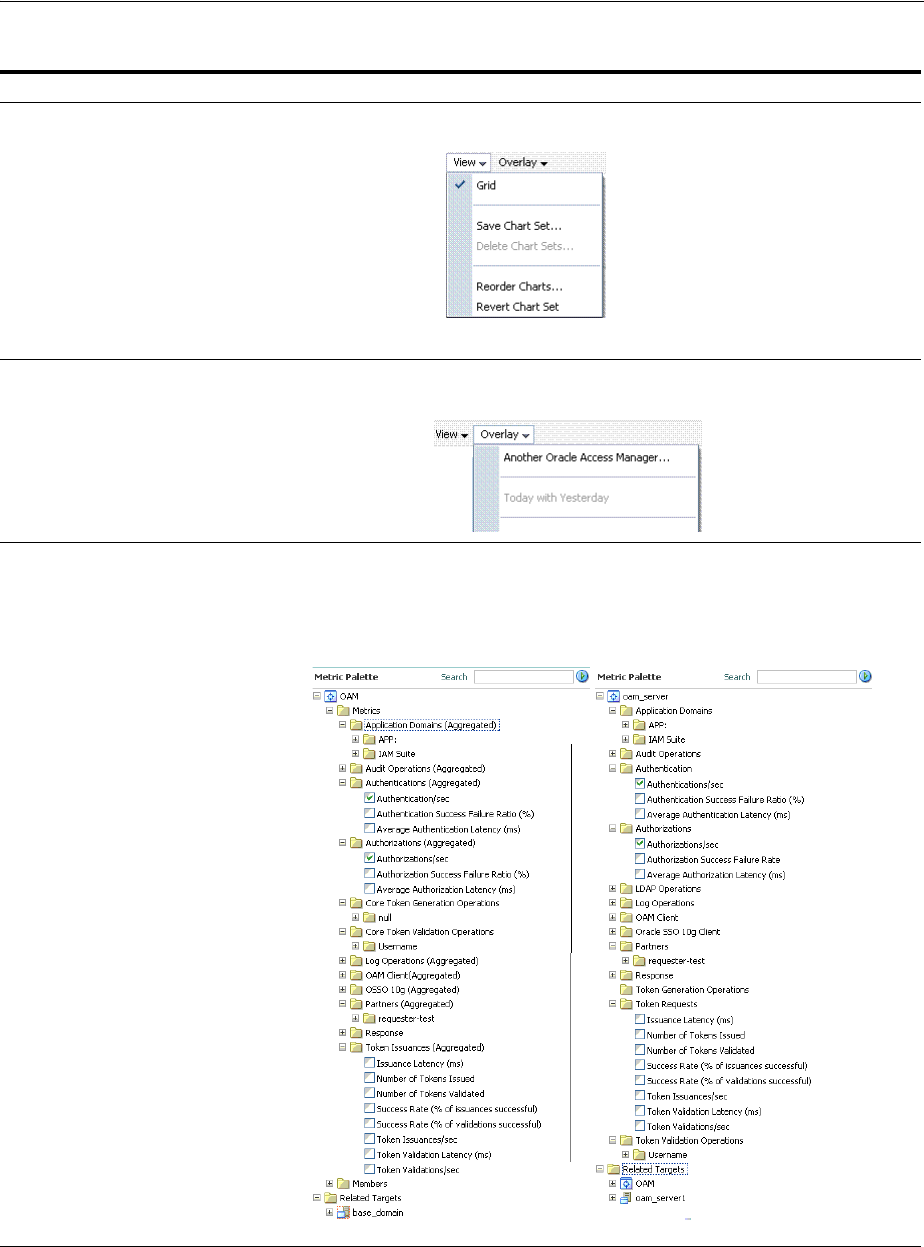
Viewing Performance in Fusion Middleware Control
Monitoring Performance and Logs with Fusion Middleware Control 13-17
13.5.3 Displaying Performance Metrics in Fusion Middleware Control
Fusion Middleware Control Administrators can use the following procedure to add or
change the metrics that are displayed in the Performance Summary.
View A menu that enables you to add a grid, save a chart, and order information on the page.
Overlay A menu that enables you to search for and view another instance of the same type and
compare this against the instance in the summary.
Metric Palette A listing from which you can select performance metrics to chart. Items unique to Access
Manager and Security Token Service are shown here.
Left: Metric Palette for the Cluster
Right: Metric Palette for a Single OAM Server
Table 13–6 (Cont.) Status and Controls on Performance Summary Pages
Status or Control Description

Viewing Performance in Fusion Middleware Control
13-18 Administrator's Guide for Oracle Access Management
To add or change metrics displayed in the Performance Summary
1. Log in as described in "Logging In To Fusion Middleware Control" on page 13-3.
2. Performance Overview:
a. Expand the desired node and select a target. For example: Identity and Access.
Identity and Access
oam_server
b. Review the Performance Overview.
3. Performance Summary:
a. Select a target (Step 1).
b. From the context menu, select Performance Summary.
c. Review the Summary Page.
4. Changing Metrics:
a. From the Performance Summary page (Step 2), click the Show Metrics Palette
button.
b. From the Metrics Palette, expand nodes and check (or clear) boxes to add (or
remove) metrics from the summary.
c. Review the updated the Summary page.
d. Click Hide Metrics Palette when you finish.
5. Saving a Chart Set:
a. From the View menu on the Performance Summary page, click Save Chart
Set.
b. In the dialog box that appears, enter a unique name for this chart set and click
OK when the operation is confirmed.
c. Click Hide Metrics Palette when you finish.
d. Review the updated information on the Summary Page.
6. Adding an Overlay, Access Manager:
a. From the Overlay menu on the Performance Summary page, click Another
Oracle Access Manager.
b. In the Search and Select Targets dialog, enter the target name and host name,
then click Go.
c. In the target results table, click the name of the desired target and then click
Select.
d. When finished viewing the overlay, click Remove Overlay from the Overlay
menu.
7. Adding an Overlay, Today with Yesterday:
See Also:
■"About Performance Overview Pages in Fusion Middleware
Control"
■"About the Metrics Palette and the Performance Summary Page"

Managing Log Level Changes in Fusion Middleware Control
Monitoring Performance and Logs with Fusion Middleware Control 13-19
a. From the Overlay menu on the Performance Summary page, click Today with
Yesterday.
b. When finished viewing the overlay, click Remove Overlay from the Overlay
menu.
8. Tes ti ng :
a. Using the Access Tester, perform several authentication and authorization
tests (see Chapter 21).
b. In Fusion Middleware Control, check performance metrics.
13.5.4 Displaying Component-Specific Performance Details
Fusion Middleware Control Administrators can use the following procedure to view
and compare component-specific performance data.
To display component-specific performance details
1. Log in as described in "Logging In To Fusion Middleware Control" on page 13-3.
2. Expand the desired node and select a target. For example:
Identity and Access
oam_server
3. From the context menu, select Component Performance.
4. Choose Access Manager (or Security Token Service).
5. STS Partner ID: Choose a Partner ID in the Security Token Service results table
for more details, if needed.
6. Component Performance:
a. From the context menu, select Component Performance.
b. Choose either Access Manager (or Security Token Service).
c. Choose an item in the results table to get more details, if available.
7. Tes ti ng :
a. Using the Access Tester, perform several authentication and authorization
tests (see Chapter 21).
b. In Fusion Middleware Control, check performance metrics.
13.6 Managing Log Level Changes in Fusion Middleware Control
Oracle Fusion Middleware components generate log files containing messages that
record all types of events. Administrators can set log levels using Fusion Middleware
Control, as described in this chapter.
See Also:
■"Access Manager Component Pages"
■"Security Token Service Component Pages"
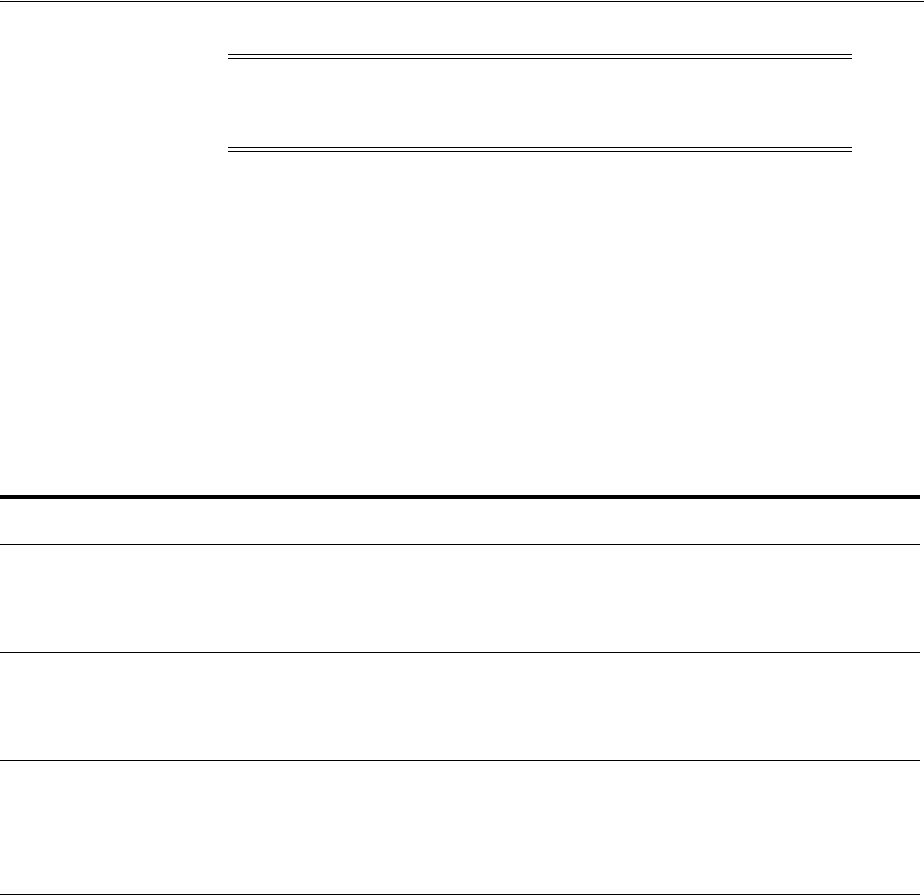
Managing Log Level Changes in Fusion Middleware Control
13-20 Administrator's Guide for Oracle Access Management
Topics in this section include:
■About Dynamic Log Level Changes
■Setting Log Levels Dynamically Using Fusion Middleware Control
13.6.1 About Dynamic Log Level Changes
Using Fusion Middleware Control, Administrators can change log levels dynamically
for Access Manager (or Security Token Service).
Table 13–7 outlines log availability and functions in Fusion Middleware Control.
Figure 13–16 shows the Log Levels configuration page in Fusion Middleware Control.
Notice that Runtime Loggers is the selected View and oracle.oam logger names are
currently displayed. With Security Token Service there is only one logger that affects
the log levels for Security Token Service:
oracle.security.fed
.
Note: Alternatively, Administrators can set OAM logger levels using
custom WebLogic Scripting Tool (WLST) commands, as described in
Chapter 8.
Table 13–7 OAM Log Availability and Functions in Fusion Middleware Control
Node Target
View Log
Messages
Log
Configuration
Application Deployment
Internal Applications ...AdminServer
oamsso_logout(11.1.1.3.0) AdminServer
oamsso_logout(11.1.1.3.0) oam_server
Yes
Yes
Yes
Yes
Yes
Yes
WebLogic Server domain
oam_bd (Cluster name)
AdminServer
oam_server
Yes
Yes
Yes
No
Yes
Yes
Identity and Access
OAM
(Cluster)
oam_server
(Server)
No
Yes
No
Yes
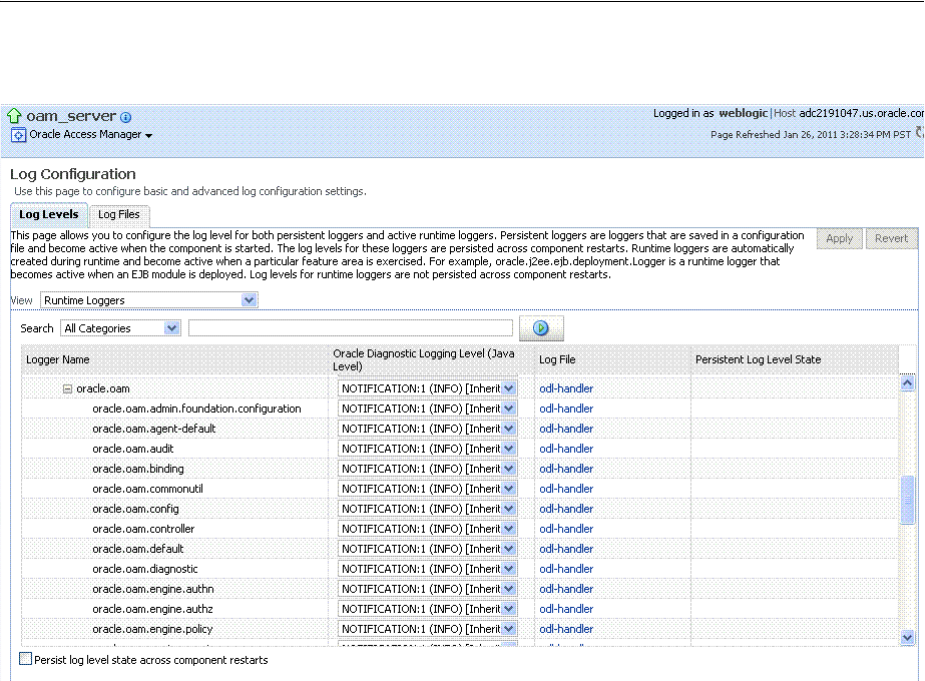
Managing Log Level Changes in Fusion Middleware Control
Monitoring Performance and Logs with Fusion Middleware Control 13-21
Figure 13–16 Access Manager Log Levels on the Log Configuration Tab
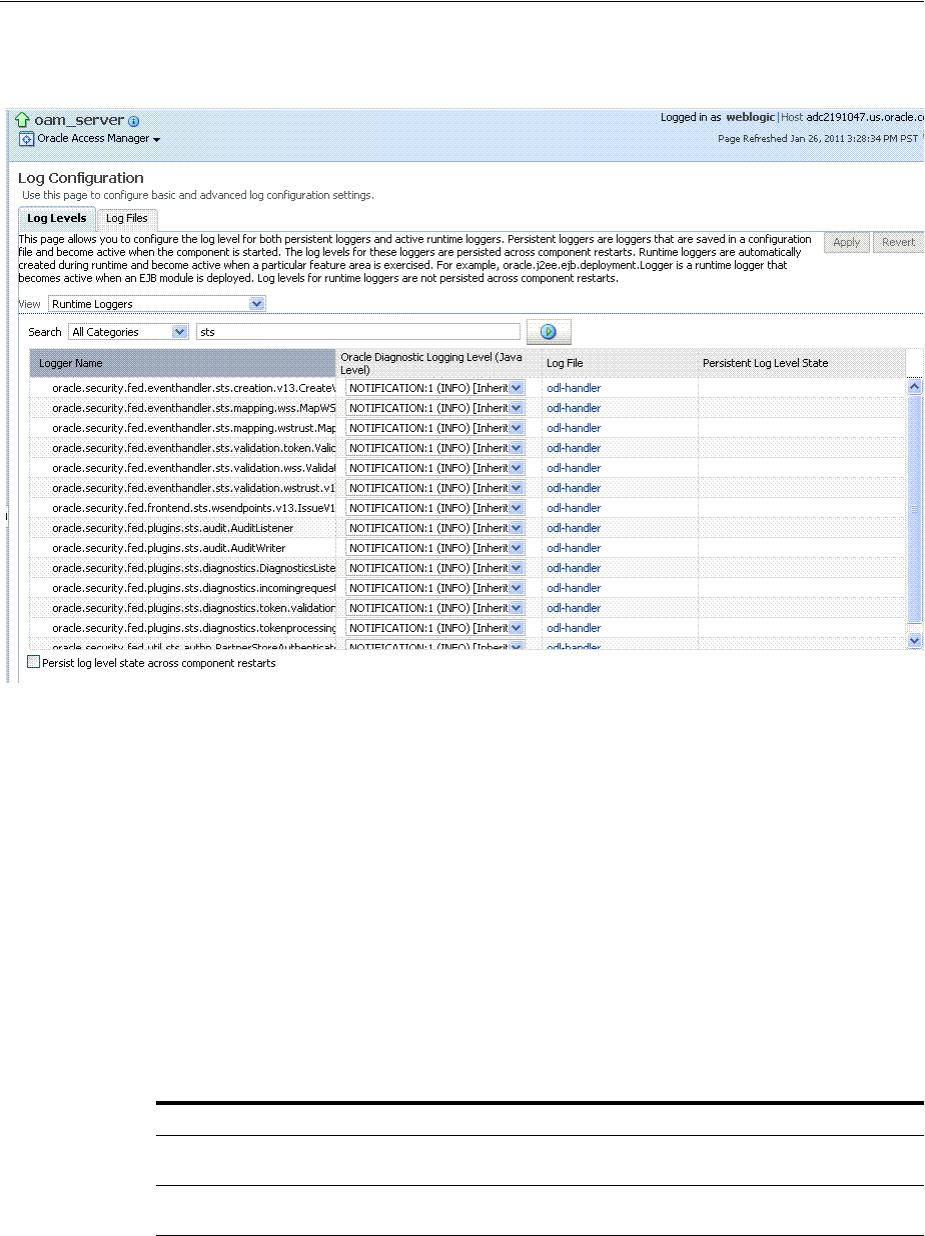
Managing Log Level Changes in Fusion Middleware Control
13-22 Administrator's Guide for Oracle Access Management
Figure 13–17 Log Levels for Security Token Service
The Log Levels tab on the Log Configuration page allows you to configure the log
level for both persistent loggers and active runtime loggers:
■Persistent loggers are saved in a configuration file and become active when the
component is started.
The log levels for these loggers are persisted across component restarts.
■Runtime loggers are automatically created during runtime and become active
when a particular feature area is exercised.
For example, oracle.j2ee.ejb.deployment.Logger is a runtime logger that becomes
active when an EJB module is deployed. Log levels for runtime loggers are not
persisted across component restarts.
Table 13–8 explains the configuration status and options for log levels.
Table 13–8 Log Levels Tab on Log Configuration Page
Element Description
Apply Submits and applies log level configuration changes, which take affect
immediately.
Revert Restores the target's previous log level configuration, which take affect
immediately.
View Use this list to view runtime loggers or loggers with a persistent log
level state.
■Runtime Loggers
■Loggers with Persistent Log Level State
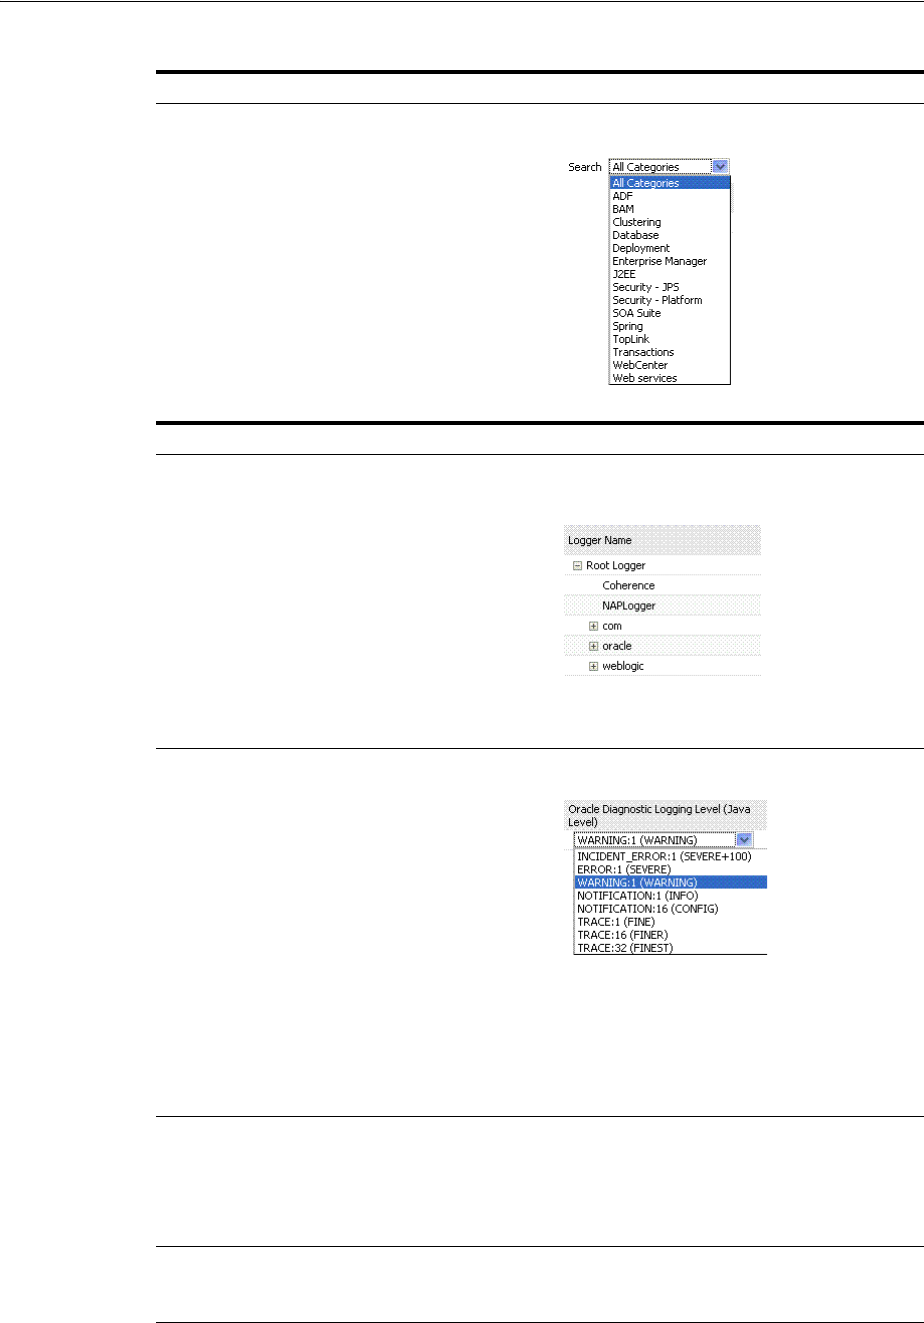
Managing Log Level Changes in Fusion Middleware Control
Monitoring Performance and Logs with Fusion Middleware Control 13-23
Search Use this list to specify the categories you would like to search.
Table
Logger Name The name of the loggers found during the search. You can expand names
in the list to see any loggers beneath the top node.
Oracle Diagnostic Logging
Level (Java Level)
Choose the logging level for the corresponding logger; c.
Click Apply and review confirmation messages displayed in a pop-up
window:
Updating log levels
Updating the log levels of runtime loggers
The log levels of runtime loggers have been updated successfully
The log levels have been updated successfully
Log File Clicking a name in the Log File column displays the Log Files page,
which you can use to create and edit the file where log messages are
logged, the format of the log messages, rotation policies, and other
logging parameters.
See Also: "Managing Log File Configuration from Fusion Middleware
Control" on page 13-24.
Persistent Log Level State Identifies the persistent state for this specific logger, which is set when
you create or edit the value using the Log Files tab.
Table 13–8 (Cont.) Log Levels Tab on Log Configuration Page
Element Description

Managing Log File Configuration from Fusion Middleware Control
13-24 Administrator's Guide for Oracle Access Management
13.6.2 Setting Log Levels Dynamically Using Fusion Middleware Control
Fusion Middleware Control Administrators can use the following procedure to set the
log level dynamically.
To configure logging levels dynamically in Fusion Middleware Control
1. Log in as described in "Logging In To Fusion Middleware Control" on page 13-3.
2. Expand the desired node, and select a target. For example:
Identity and Access
oam_server
3. From the Access Manager context menu, select Logs and then choose Log
Configuration.
4. From the Log Levels tab, View list, choose the loggers to display. For example:
Runtime Loggers.
5. From the Search list, choose a category, enter your search criteria, and click the
search button. For example: All Categories sts.
6. In the results table, expand nodes to reveal information as needed.
7. In the results table, choose log levels for your environment, then click Apply (or
Revert).
8. Proceed to "Managing Log File Configuration from Fusion Middleware Control"
13.7 Managing Log File Configuration from Fusion Middleware Control
This section provides the following information:
■About Log File Configuration
■Managing Log File Configuration by Using Fusion Middleware Control
13.7.1 About Log File Configuration
Figure 13–8 shows the Log Files Configuration. Use this page to create and edit where
the log messages will be logged to, the format of the log messages, the rotation policies
used, as well as other parameters depending on the log file configuration class.
See Also: "About Dynamic Log Level Changes" on page 13-20
Note: Alternatively, Administrators can set logger levels using
custom WebLogic Scripting Tool (WLST) commands, as described in
Chapter 8.
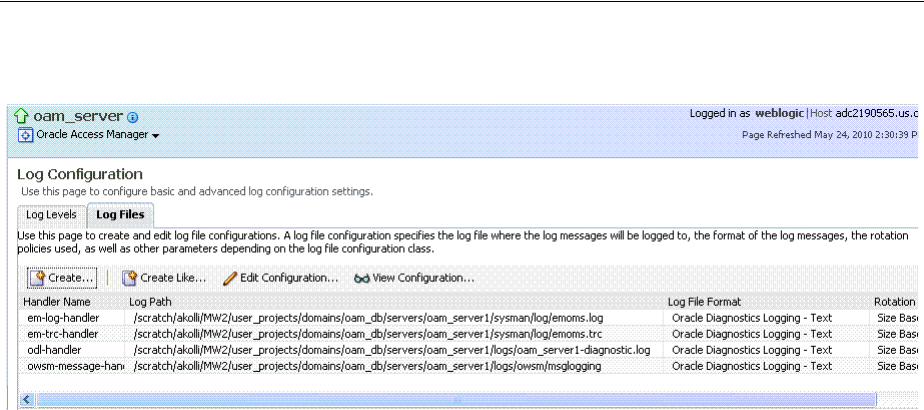
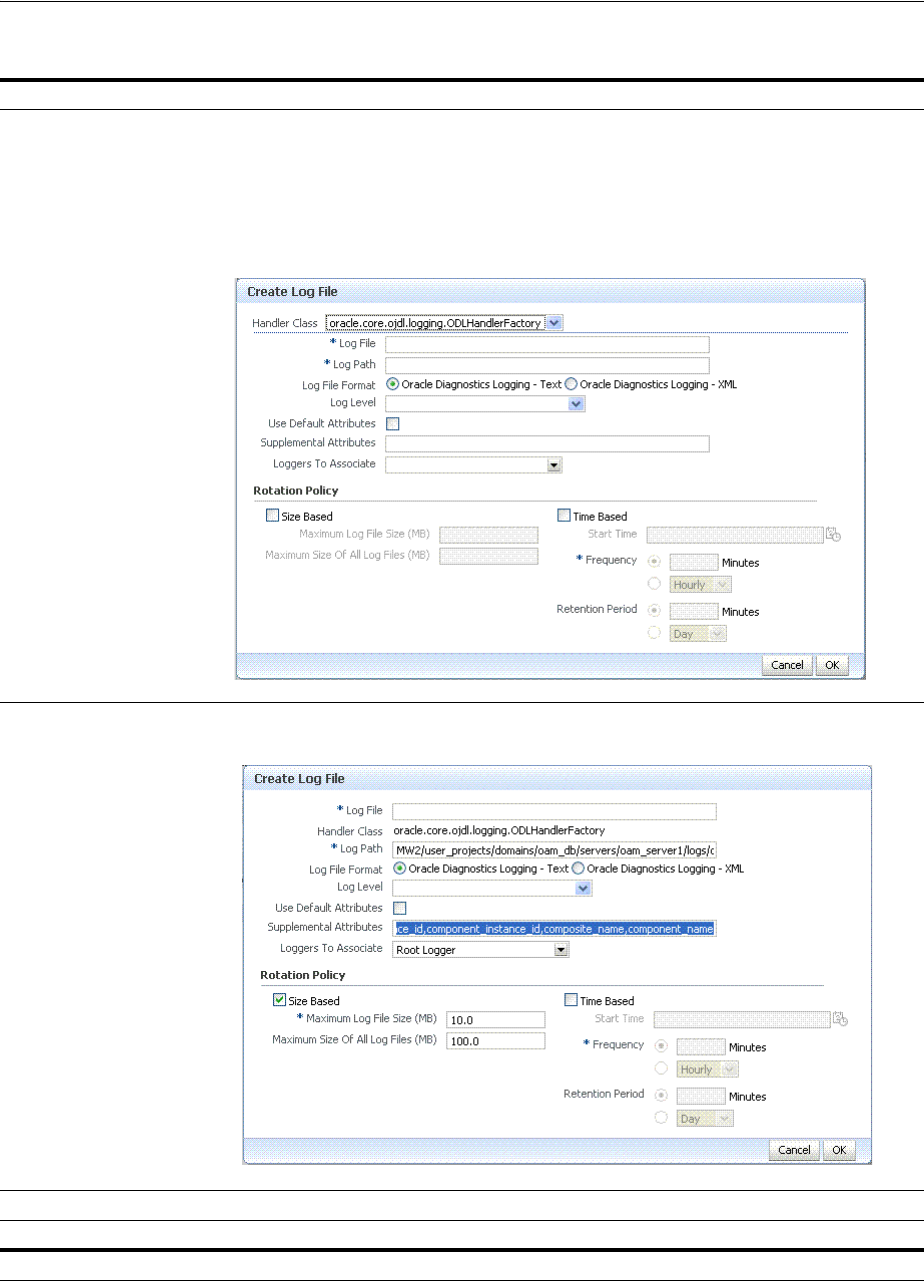
Managing Log File Configuration from Fusion Middleware Control
13-26 Administrator's Guide for Oracle Access Management
Table 13–9 Log Files Elements
Element Description
Create Click this button to display the fresh form to create a new file for logged messages.
Notes:
■Log File is the name of the log handler (odl-handler for OAM)
■Log Path points to the logging output file in your environment, which you can change.
■The output logging file in your environment can have a unique file name.
Create Like Click this button to display a partially filled-in form to create a new file for logged messages.
Edit Configuration Click this button to display and edit the selected log file configuration.
View Configuration Click this button to view a read-only description of the selected log file configuration.
Table The information in this table is based on log file configuration parameters in this table.
Handler Name The Log File name assigned during log file creation.

Managing Log File Configuration from Fusion Middleware Control
Monitoring Performance and Logs with Fusion Middleware Control 13-27
13.7.2 Managing Log File Configuration by Using Fusion Middleware Control
Fusion Middleware Control Administrators can use the following procedure to create
a log file, edit the configuration, or view a read-only version of the log file
configuration.
To manage log files in Fusion Middleware Control
1. Log in as described in "Logging In To Fusion Middleware Control" on page 13-3.
2. Expand the desired node, and select a target. For example:
Identity and Access
oam_server
3. From the Access Manager menu, select Logs and then Log Configuration.
4. Create a Log File: From the Log Files tab (Table 13–9):
a. Click the Create button to display a fresh Create Log File form.
b. Enter a name and file system path for this log file. For example:
Log File
oam-odl-handler
Log Path domains
/oam_db/servers/oam-server1/log/oam.log
c. Click the desired Log File Format. For example: ... Text
d. Set the logging attributes. For example:
Use Default Attributes
X
Supplemental Attributes
e. Associate a Logger. For example: Root Logger
f. Specify the Rotation Policy. For example: Size Based
Maximum Log File Size (MB)
10.0
Maximum Size of All Log File Size (MB)
1000.0
g. Click OK to submit the configuration.
5. Create Like:
a. From the Log Files tab, click the name of an existing log file.
b. Click the Create Like button.
c. On the Create Log File form, enter your own information:
Log File name
Log Level
Attributes
Log Path The file system directory path assigned during log file creation.
Log File Format The Log File format assigned during log file creation.
Rotation Policy The rotation policy selected during log file creation.
See Also: "About Log File Configuration" on page 13-24
Table 13–9 (Cont.) Log Files Elements
Element Description

Viewing Log Messages in Fusion Middleware Control
13-28 Administrator's Guide for Oracle Access Management
d. Edit any other details as needed, then click OK to submit the configuration.
6. Edit Configuration:
a. From the Log Files tab, click the name of an existing log file.
b. Click the Edit Configuration button.
c. Change configuration details as needed.
d. Click OK to submit the changes.
7. View Configuration:
a. From the Log Files tab, click the name of an existing log file.
b. Click the View Configuration button.
c. Review the information, then click OK to dismiss the configuration page.
8. Proceed to "Viewing Log Messages in Fusion Middleware Control".
13.8 Viewing Log Messages in Fusion Middleware Control
This section includes the following topics:
■About Finding, Viewing, and Exporting Log Messages
■Viewing Logged Messages With Fusion Middleware Control
13.8.1 About Finding, Viewing, and Exporting Log Messages
By using the context menu for an OAM Server instance in Fusion Middleware Control,
Administrators can locate, view, and export key log information for:
■Application Deployment targets, including the WebLogic (and OAM)
AdminServer and the OAM SSO logout pages on both AdminServer and OAM
Servers
■WebLogic Server domain targets, including the OAM Farm, AdminServer, and
OAM Servers
■Identity and Access targets, including the OAM Farm, Clusters, and individual
OAM Servers
Using log files to troubleshoot common problems requires that you:
■Get familiar with the Oracle Diagnostic Logging (ODL) format used by Oracle
Fusion Middleware components, as described in the Oracle Fusion Middleware
Application Security Guide
■Configure log files to collect the appropriate level of information
■Search, view and export key log information in the farm
■Correlate messages in log files across components
Figure 13–19 shows the Log Messages page for Access Manager and Security Token
Service in Fusion Middleware Control.
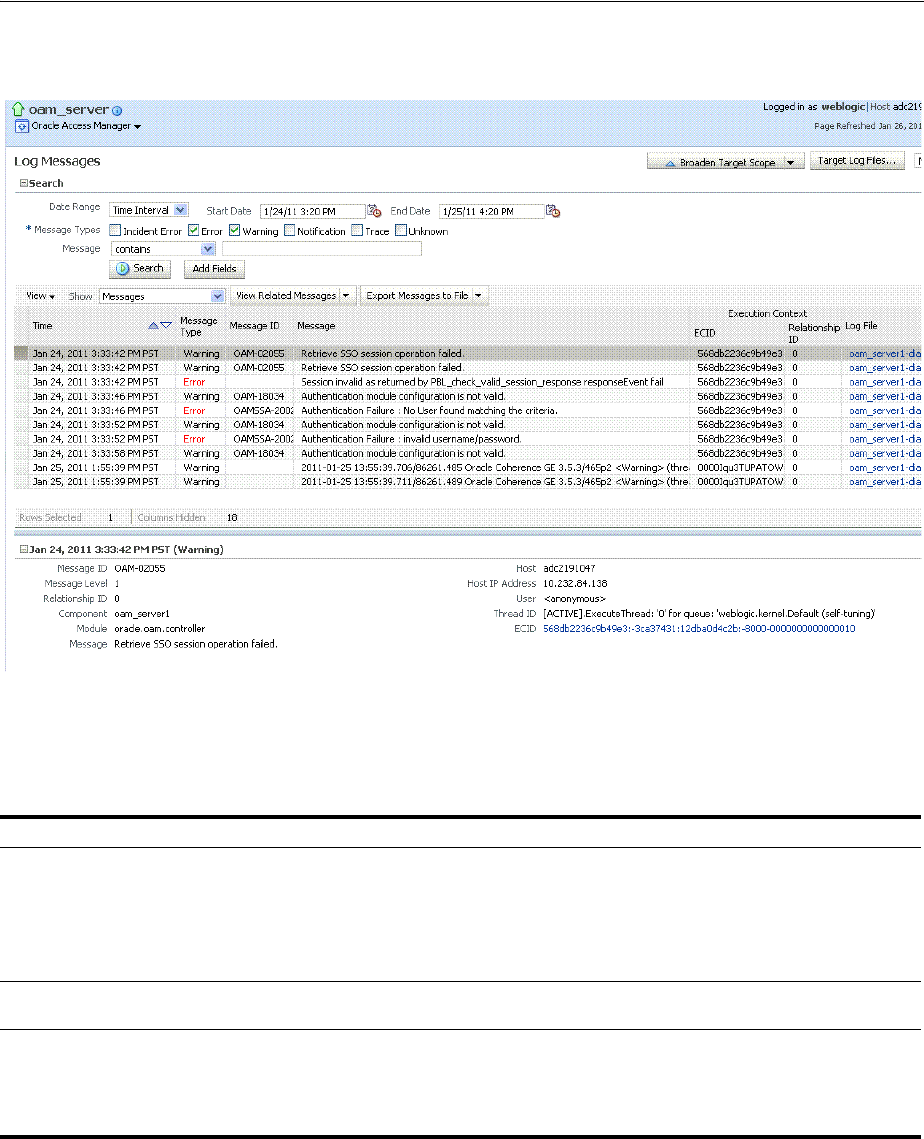
Viewing Log Messages in Fusion Middleware Control
Monitoring Performance and Logs with Fusion Middleware Control 13-29
Figure 13–19 Typical Log Messages Page in Fusion Middleware Control
Table 13–10 describes elements on the Log Messages page in Fusion Middleware
Control, which you can use to locate and view messages.
Table 13–10 OAM Log Message Search Controls in Fusion Middleware Control
Element Description
Broaden Target Scope Select items on this list to expand (or narrow) the targets that are used in this search:
■Oracle WebLogic Server domain
■OAM Cluster
■Oracle WebLogic Server
■Oracle Fusion Middleware Farm
Target Log Files... Displays a list of all log files for the target scope from which you can select a specific log file to view or
download.
Refresh Options Select an item from this list to specify the refresh method:
■Manual Refresh
■30 Second Refresh
■1 Minute Refresh
Search Options
Viewing Log Messages in Fusion Middleware Control
13-30 Administrator's Guide for Oracle Access Management
Date Range The period during which the desired set of messages was logged:
■Most Recent
Minutes
Hours
Days
■Time interval
Date Range
Start Date
End Date
Message Types Check all message types that apply for this search:
■Incident Error
■Error
■Warning
■Notification
■Trace
■Unknown
Message Choose an identifier from this list and add a value in the blank field beside it to refine your search
criteria:
Add Fields Click this button to display a list of additional search criteria you can include.
Search Click this button to initiate a search using the specified criteria.
Viewing Options
Table 13–10 (Cont.) OAM Log Message Search Controls in Fusion Middleware Control
Element Description
Viewing Log Messages in Fusion Middleware Control
Monitoring Performance and Logs with Fusion Middleware Control 13-31
View Choose items from this menu to view or reorder columns in the search results table:
Show Select the entity to view:
View Related Messages This menu is available when at least one message is listed in the search results.
Table 13–10 (Cont.) OAM Log Message Search Controls in Fusion Middleware Control
Element Description
Viewing Log Messages in Fusion Middleware Control
13-32 Administrator's Guide for Oracle Access Management
13.8.2 Viewing Logged Messages With Fusion Middleware Control
Fusion Middleware Control Administrators can use the following procedure to view
and download log messages for the target. This procedure explains how to search for
messages, view messages (or view related messages), view all messages in a single log
file, and export or download messages.
To view OAM Server log messages within Fusion Middleware Control
1. Log in as described in "Logging In To Fusion Middleware Control" on page 13-3.
2. Expand the desired node and select a target. For example:
Identity and Access
oam_server
3. From the OAM context menu, select Logs and then choose View Log Messages.
4. Search (Table 13–10):
a. Specify a Date Range.
b. Check all Message Types to be included in your search.
c. Define Message content options.
d. Add Fields: Enter details to further refine message content.
e. Click Search to display a list of messages that fit your search criteria.
Export Messages to a
File
A menu of viewing commands that are available when at least one message is listed in the search
results. You can choose from the following commands:
Results Table Columns These are based on selections in the View menu on the Log Messages page.
Message Area Displays details for the selected message in the search results table.
See Also: "About Finding, Viewing, and Exporting Log Messages"
on page 13-28
Table 13–10 (Cont.) OAM Log Message Search Controls in Fusion Middleware Control
Element Description

Displaying MBeans in Fusion Middleware Control
Monitoring Performance and Logs with Fusion Middleware Control 13-33
5. View Messages: From the table of search results, click one or more messages to
view on the lower half of the page.
6. View Related: Use one of the following methods to organize the table of search
results.
a. By Time: From the View Related menu, select by Time.
b. By ECID: Click ECID in the message on the screen (or, from the View Related
menu, select by ECID Execution Context ID).
c. From the Scope menu, select a time period.
7. Log File: From the table of search results, click a name in the Log File column to
view all messages in the file.
8. Export Messages
a. Select one or more messages in the search results table.
b. From the Export Messages menu, choose the desired export format. For
example: As Oracle Diagnostic Log (.txt).
c. In the dialog box, click Open with and then choose the desired program.
d. From the open program, save the file to a new path.
9. Download
a. Select one or more messages in the search results table.
b. Click the Download button.
c. In the dialog box, click Open with and then choose the desired program.
d. From the open program, save the file to a new path.
10. Tes ti ng :
a. Using the Access Tester, enter an invalid user name and try to authenticate
(see Chapter 21).
b. In Fusion Middleware Control, go to the log viewer and review the error.
c. Using the Access Tester, enter an invalid password and try to authenticate.
d. In the Fusion Middleware Control log viewer, check the error and then view
all related log messages.
e. Repeat this test using different log levels, as described in "Managing Log Level
Changes in Fusion Middleware Control" on page 13-19.
13.9 Displaying MBeans in Fusion Middleware Control
A Java object is a unit of code that runs the computer. Each object is an instance of a
particular class or subclass that relies on the class's methods or procedures or data
variables. Within the Java programming language, a Java object that represents a
manageable resource (application, service, component, or device) is known as an
MBean (managed bean).
Fusion Middleware Control enables you to:
■View information on key MBean Attributes and Operations
■Invoke methods
This section provides the following topics:

Displaying MBeans in Fusion Middleware Control
13-34 Administrator's Guide for Oracle Access Management
■About the System MBean Browser
■Managing Mbeans
13.9.1 About the System MBean Browser
The Fusion Middleware Control System Mbean Browser can be used to view the items
outlined in Table 13–11.
Table 13–12 describes the MBeans that Access Manager and Security Token Service
deploy on the AdminServer on the domain runtime server (OAM Server).
Figure 13–20 Shows the System MBean Browser and the related Attributes tab
displaying information for the Security Token Service CertRevocationListConfig:
oracle.sts:Location=oam_server1,type=CertRevocationListConfig
.
Table 13–11 System MBean Browser
Node Target System Mbean Browser
Application Deployment
Internal Applications ...AdminServer
oamsso_logout(11.1.1.3.0)
AdminServer
oamsso_logout(11.1.1.3.0) oam_
server
Yes
Yes
Yes
WebLogic Server domain
oam_bd (Cluster name)
AdminServer
oam_server
Yes
Yes
Yes
Identity and Access
OAM
(Cluster)
oam_server
(Server)
No
Yes
Note: Security Token Service MBeans are also available as described
here.
Table 13–12 MBeans that Access Manager and Security Token Service Deploy
MBeans For Description
Configuration Service oracle.oam:type=Config
Partner and Trust Service oracle.oam:type=PATConfig
STS MBeans oracle.sts:type=Config
Certificate Validation Module These are used for CRL management.
oracle.sts:type=CertRevocationListConfig
Displaying MBeans in Fusion Middleware Control
13-36 Administrator's Guide for Oracle Access Management
13.9.2 Managing Mbeans
Fusion Middleware Control Administrators can use the following procedure to view
MBeans for Access Manager and Security Token Service. Additionally, you can apply
values (or revert the change) and invoke MBeans.
To view, edit, or invoke MBeans for Access Manager and Security Token Service
1. Log in as described in "Logging In To Fusion Middleware Control" on page 13-3.
2. Expand the desired node and select a target. For example:
Table 13–13 System MBean Browser
System MBean Browser
System MBean Browser Expand items in this section to display Mbeans for the selected target. Under Application Defined
Beans, find
oracle.oam
and
oracle.sts
.
MBean Information Details for Attributes and Operations related to the MBean for the selected target are displayed on
the right.
Attributes This tab describes MBean attributes for the selected target.
Operations This tab describes MBean operations for the selected target.
Notifications This tab lists any notifications resulting from the invocation of an MBean.
Controls The following controls are available from these pages:
■Name Link: Clicking a name on either tab displays a full description of related MBeans.
■Apply Button: Submits and applies the selected MBean attribute value.
■Revert Button: Restores previous MBean attribute values following a change (and before
clicking Apply.
■Return Button: Returns you to the MBean Information page.
■Invoke Button: Invokes the selected MBean and value

Displaying Farm Routing Topology in Fusion Middleware Control
Monitoring Performance and Logs with Fusion Middleware Control 13-37
Identity and Access
oam_server
3. From the Access Manager context menu, select System MBean Browser.
4. System MBean Browser: Expand classes and select an MBean target to display
related attributes and operations. For example: oracle.sts or oracle.oam.
5. Manage MBean Attributes:
a. Click the Attributes tab.
b. Review the name and description of MBean attributes for the selected target.
c. Edit values for one or more attributes and click Apply to submit changes (or
click Revert to cancel changes).
Alternatively: Click a Name in the Attributes table to display a full description
and the value; change the value and click Apply (or click Revert to cancel the
change).
6. Manage MBean Operations:
a. Click the Operations tab.
b. Review the name, description, number of parameters, and return type for each
MBean operation for the selected target.
c. Click a name in the Operations table to display the parameters and related
name, description, type, and value.
d. Edit values for the operation and click Apply to submit changes (or click
Revert to cancel changes).
e. Click Invoke to invoke the MBean and review the message that appears.
13.10 Displaying Farm Routing Topology in Fusion Middleware Control
Fusion Middleware Control enables you to view a graphical representation of the
Access Manager routing topology.
This section provides the following topics:
■About the Routing Topology
■Viewing the Routing Topology using Fusion Middleware Control
13.10.1 About the Routing Topology
Figure 13–21 shows the Farm routing topology page in Fusion Middleware Control.
Displaying Farm Routing Topology in Fusion Middleware Control
13-38 Administrator's Guide for Oracle Access Management
Figure 13–21 Routing Topology with Context Menu
Table 13–14 describes the status and controls on the Farm topology page.
Table 13–14 Farm Topology
Element Description
Save Image Saves the image.
Print Prints the image.
Scales the image.
Displaying Farm Routing Topology in Fusion Middleware Control
Monitoring Performance and Logs with Fusion Middleware Control 13-39
13.10.2 Viewing the Routing Topology using Fusion Middleware Control
Fusion Middleware Control Administrators can use the following procedure to view
the routing topology of the farm that includes Access Manager 11g.
To view Farm routing topology
1. Log in as described in "Logging In To Fusion Middleware Control" on page 13-3.
2. Select the Farm in the navigation tree.
3. Click Topology above the navigation tree.
4. In the Topology Browser window, click the name of the farm and click OK.
5. Use the scaling tool to shrink or grow the image.
6. Expand instances in the topology to display details about each one.
7. Use the Overlay options to add status and metrics information to the instances.
8. Use the Find option to locate specific information (Table 13–14).
9. Click Print or Save, as needed.
Find Enter a value or simply click Find to display results.
+ Expands the instance on the topographical view to provide more information.
Status Bar Displays the full farm name and targets within the farm., as well as the up and
down status. You can choose to overlay the status and metrics on individual
instances in the topology view.
See Also: "About the Routing Topology"
Table 13–14 (Cont.) Farm Topology
Element Description

Displaying Farm Routing Topology in Fusion Middleware Control
13-40 Administrator's Guide for Oracle Access Management

Part IV
Par t IV
Managing Access Manager Settings and
Agents
Part IV provides information about managing low-level Access Manager
configuration.
Part IV contains the following chapters:
■Chapter 14, "Configuring Access Manager Settings"
■Chapter 15, "Introduction to Agents and Registration"
■Chapter 16, "Registering and Managing OAM 11g Agents"
■Chapter 17, "Maintaining Access Manager Sessions"

14
Configuring Access Manager Settings 14-1
14
Configuring Access Manager Settings
[9]
The Access Manager Settings provide configuration options for a number of specific
Access Manager service operations.
This chapter describes these Access Manager-specific settings.
■Prerequisites
■Managing Load Balancing
■Managing Secure Error Modes
■Managing SSO Tokens and IP Validation
■Managing the Access Protocol for OAM Proxy Simple and Cert Mode Security
■Managing Run Time Policy Evaluation Caches
14.1 Prerequisites
Before you begin these tasks, be sure to review the following topics:
■Chapter 2, "Getting Started with Oracle Access Management"
■Chapter 6, "Managing Server Registration"
14.2 Managing Load Balancing
This section provides the following topics:
■About Common Load Balancing Settings
■Managing OAM Server Load Balancing
14.2.1 About Common Load Balancing Settings
For production environments that require increased application performance,
throughput, or high availability, you can configure two or more Managed Servers to
operate as a cluster. A cluster is a collection of multiple WebLogic Server server
instances running simultaneously and working together to provide increased
scalability and reliability. In a cluster, most resources and services are deployed
identically to each Managed Server (as opposed to a single Managed Server), enabling
failover and load balancing. A single domain can contain multiple WebLogic Server
clusters and multiple Managed Servers that are not configured as clusters. The key
difference between clustered and non-clustered Managed Servers is support for
failover and load balancing. These features are available only in a cluster of Managed
Servers.
Managing Load Balancing
14-2 Administrator's Guide for Oracle Access Management
By default, Access Manager has a single OAM Server to which all login and logout
requests are sent. In a high-availability deployment, you must change this setup so
that login and logout requests are first sent to the load balancer.
Figure 14–1 shows the Load Balancing Settings section of the Access Manager Settings
page. In earlier releases this was part of the SSO Engine settings; the SSO Engine being
the controller for sessions.
Figure 14–1 Access Manager Settings: Load Balancer
Table 14–1 describes each element and how it is used. Settings are global and common
to all OAM Servers in the WebLogic administration domain.
14.2.2 Managing OAM Server Load Balancing
Users with valid Administrator credentials can perform the following task to modify
Access Manager load balancing settings using the Oracle Access Management
Console.
To view or edit common load balancing specifications
1. From the Access Manager Settings, open Load Balancing:
2. Expand the Load Balancing area:
■View Only: Close the page when you finish.
See Also: Oracle Fusion Middleware High Availability Guide,
"Access Manager High Availability Configuration Steps" for high-level
instructions for setting up a high availability deployment for Access
Manager.
Table 14–1 Access Manager Settings: Load Balancer
Element Description
OAM Server Host The virtual host name that represents the OAM Server Cluster, which
might be exposed by a load balancer in front of an OAM Server
Cluster.
OAM Server Port The virtual host port associated with the OAM Server Cluster. Values
between 1 and 65535 are supported.
OAM Server Protocol The protocol, either HTTP or HTTPS, that is used to access the virtual
host that represents the OAM Server Cluster.
See Also: "About Security Modes and X509Scheme Authentication" on
page C-4
See Also: "About Common Load Balancing Settings" on page 14-1

Managing Secure Error Modes
Configuring Access Manager Settings 14-3
■Modify: Edit Load Balancing settings for your deployment (Table 14–1).
3. Click Apply to submit the changes (or close the page without applying changes).
4. Dismiss the Confirmation window.
14.3 Managing Secure Error Modes
A custom error page is packaged as part of the custom login application. An
out-of-the-box custom Web application archive file is provided that you can use as a
starting point to develop customized login and password pages.
Server Error Mode settings are global and common to all OAM Servers in the
WebLogic administration domain. This section provides the following topics:
■About OAM Server Error Modes
■Managing OAM Server Secure Error Modes
14.3.1 About OAM Server Error Modes
Figure 14–1 shows the Server Error Mode function, which appears on the Load
Balancing Settings area of the Access Manager Settings page.
Figure 14–2 Access Manager Settings: Server Error Mode
Table 14–2 describes the options you can choose to configure Server Error Mode for
your deployment.
Table 14–2 Server Error Mode
Element Description
Server Error Mode The setting you choose determines the nature of error messages and error codes
returned by the OAM Server when an operation fails (because of an invalid
username or password, for example, or a server error (connection to the LDAP
Server is down)).
Choose one of the following settings to configure error messages with varying
degrees of security for your custom login pages:
■SECURE: Most secure. Provides generic error messages that barely give any
hint of the internal reason for the error.
■EXTERNAL: Recommended level.
■INTERNAL: Least secure level. Recommended for Password Policy
validation, as described in "Managing Global Password Policy" on
page 19-97.
■OSSO10g: Compatible with OSSO 10g. Might be required in upgraded
environments for consistency.
See Also: "Managing OAM Server Secure Error Modes" on page 14-5.

Managing Secure Error Modes
14-4 Administrator's Guide for Oracle Access Management
Table 14–3 shows the error triggering condition and message codes for each of the
three modes.
Table 14–4 identifies the error codes, trigger conditions, and recommended messages.
Table 14–3 Error Trigger Condition, Modes, and Message Codes
Error Triggering Condition Internal Mode External Mode Secure Mode
Invalid login attempt OAM-1 OAM-2 OAM-8
Processing submitted credentials fails. For example: In
WNA mode, the SPNEGO token is not received.
OAM-3 OAM-3 OAM-8
An authentication exception is raised. OAM-4 OAM-4 OAM-9
User account gets locked based on certain conditions
(exceeded invalid attempts, for instance).
OAM-5 OAM-5 OAM-8
OAM-9 with OIM
integration
User account disabled. OAM-5 OAM-5 OAM-9
User has exceeded the maximum number of allowed
sessions (a configurable attribute).
OAM-6 OAM-6 OAM-9
Default error message, which is displayed when no
other specific messages propagate up. This is not
propagated to the user level. Cause could be multiple
conditions.
OAM-7 OAM-7 OAM-9
Password expired. OAM-10 OAM-10 OAM-9
See Also: Developing Custom Error Pages in the Oracle Fusion
Middleware Developer's Guide for Oracle Access Management
Table 14–4 External Error Codes, Trigger Conditions, and Recommended Messages
External Error
Code Trigger Condition Recommended Display Message
OAM-1 Invalid login attempts less than the allowed count. An incorrect Username or Password was specified
OAM-2 Invalid login attempts less than the allowed count. An incorrect Username or Password was specified
OAM-3 Processing submitted credentials fails for some
reason. For example: in WNA mode, the SPENGO
token is not received.
Internal Error.
OAM-4 An authentication exception is raised for some
reason.
System error. Please contact the System
Administrator.
OAM-5 The user account gets locked because of certain
conditions (exceeded invalid attempts, for instance).
OIM Integration. The Error page appears with
contact details after the password is validated.
The user account is locked or disabled.
Please contact the System Administrator.
OAM-5 The user account gets locked because of certain
conditions (exceeded invalid attempts, for instance).
OID Without OIM Integration: The Error page
appears with contact details after the password is
validated.
The user account is locked or disabled.
Please contact the System Administrator.
OAM-5 The user account is disabled. The user account is locked or disabled.
Please contact the System Administrator.
OAM-6 The user has exceeded the maximum number of
allowed sessions, which is a configurable attribute.
The user has already reached the maximum allowed
number of sessions. Please close one of the existing
sessions before trying to login again.
Managing SSO Tokens and IP Validation
Configuring Access Manager Settings 14-5
14.3.2 Managing OAM Server Secure Error Modes
Users with valid Administrator credentials can perform the following task to modify
Access Manager secure error modes for OAM Servers using the Oracle Access
Management Console.
To view or edit secure error modes for OAM Servers
1. From the Access Manager Settings, click Load Balancing.
2. Server Error Mode:
■Modify: Choose the desired Server Error Mode for your deployment
(Table 14–2 and Table 14–4).
■View Only: Close the page when you finish.
3. Click Apply to submit the changes (or close the page without applying changes).
4. Dismiss the Confirmation window.
5. Proceed to "Managing SSO Tokens and IP Validation".
14.4 Managing SSO Tokens and IP Validation
This section provides the following topics:
■About Access Manager SSO Tokens and IP Validation Settings
■Managing SSO Tokens and IP Validation
14.4.1 About Access Manager SSO Tokens and IP Validation Settings
Figure 14–3 shows the SSO portion of the Access Manager Settings page. Table 14–5
describes each element and how it is used.
OAM-7 Failure could be due to multiple reasons; the exact
reason is not propagated to the user level for security
reasons. For instance:
■The request ID could have been lost
■The certificate is not retrieved correctly
The default error message is displayed when no
other specific messages are propagated up.
System error. Please re-try your action. If you
continue to get this error, please contact the
Administrator.
OAM-8 See Table 14–3 Authentication failed.
OAM-9 System error. Please re-try your action. If you
continue to get this error, please contact the
Administrator.
System error. Please re-try your action. If you
continue to get this error, please contact the
Administrator.
OAM-10 Password expired. The password has expired.
See Also: "About Common Load Balancing Settings" on page 14-1
Table 14–4 (Cont.) External Error Codes, Trigger Conditions, and Recommended Messages
External Error
Code Trigger Condition Recommended Display Message
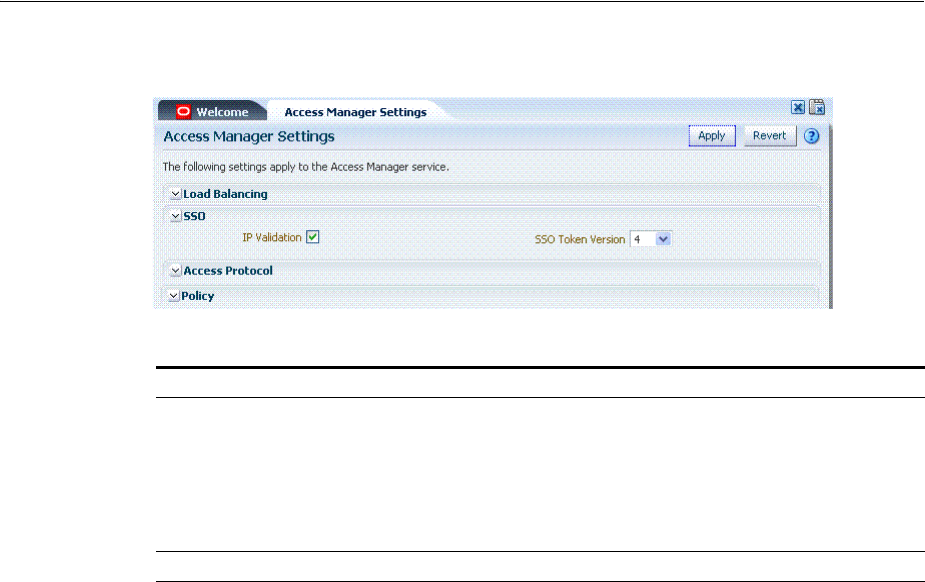
Managing the Access Protocol for OAM Proxy Simple and Cert Mode Security
14-6 Administrator's Guide for Oracle Access Management
Figure 14–3 Access Manager Settings: SSO
14.4.2 Managing SSO Tokens and IP Validation
Users with valid Administrator credentials can perform the following task to modify
Access Manager load balancing settings using the Oracle Access Management
Console.
To view or edit Access Manager SSO specifications
1. From the Oracle Access Management Console, click Access Manager Settings.
2. On the Access Manager Settings page, expand the SSO section:
■View Only: Close the page when you finish.
■Modify: Perform remaining steps to edit the configuration.
3. Edit settings as needed for your deployment, based on details in Table 14–5.
4. Click Apply to submit the changes (or close the page without applying changes).
5. Dismiss the Confirmation window.
6. Proceed to "Managing the Access Protocol for OAM Proxy Simple and Cert Mode
Security".
14.5 Managing the Access Protocol for OAM Proxy Simple and Cert Mode
Security
This section provides the following details:
■About Simple and Cert Mode Transport Security
■About the Common OAM Proxy Page for Secure Server Communications
■Viewing or Editing Simple or Cert Settings for OAM Proxy
Table 14–5 Access Manager Settings: SSO
Element Description
IP Validation Specific to Webgates and is used to determine whether a client's IP
address is the same as the IP address stored in the ObSSOCookie
generated for single sign-on.
Check the box to enable IP Validation.
Clear the box to disable IP Validation if and only if IP Validation is
disabled on all the configured WebGates. See Section 16.2.3, "About IP
Address Validation for WebGates."
SSO Token Version Select your SSO token version from the list.
See Also: "About Common Load Balancing Settings" on page 14-1
Managing the Access Protocol for OAM Proxy Simple and Cert Mode Security
Configuring Access Manager Settings 14-7
■Configuring 64-bit WebGate in Cert Mode
■Tuning the Simple Mode WebGate
14.5.1 About Simple and Cert Mode Transport Security
Table 14–6 outlines the similarities between Simple and Cert modes.
See Also: Appendix C, "Securing Communication"
Table 14–6 Summary: Simple and Cert Mode
Artifact or Process Simple Mode Cert Mode Open Mode
X.509 digital certificates only. X X N/A
Communication between OAM Agents and
OAM Servers is encrypted using Transport
Layer Security, RFC 2246 (TLS v1).
X X N/A
For each public key there is a corresponding
private key that Access Manager stores in a
file:
aaa_key.pem
generated by openSSL
aaa_key.pem
generated by your CA
N/A
Signed certificates in Privacy Enhanced
Mail (PEM) format
aaa_cert.pem generated by
openSSL
aaa_cert.pem generated by
your CA
N/A
During OAM Server configuration, secure
the private key with a Global passphrase or
PEM format details, depending on which
mode you are using. Before an OAM Server
or Webgate can use a private key, it must
have the correct passphrase.
Global passphrase stored in
a nominally encrypted file:
■password.xml
PEM format:
■Keystore Alias
■Key KEYSTOREStore
Alias Password
N/A
During OAM Agent or OAM Server
registration, the communication mode is
propagated to the Oracle Access
Management Console.
Same passphrase for each
Webgate and OAM Server
instance.
Different passphrase for
each Webgate and OAM
Server instance.
N/A
The certificate request for the Webgate
generates the certificate request file, which
you must send to a root CA that is trusted
by the OAM Sever.
The root CA returns the Webgate
certificates, which can then be installed
either during or after Webgate installation.
cacert.pem
The certificate request,
signed by the
Oracle-provided openSSL
Certificate Authority
aaa_req.pem
The certificate request,
signed by the your
Certificate Authority
N/A
Encrypt the private key using the DES
Algorithm. For example:
openssl rsa -in aaa_key.pem -passin
pass: -out aaa_key.pem -passout pass:
passphrase -des
N/A X N/A
Agent Key Password N/A Enter a password during
agent registration in Cert
Security mode (see
Table 16–1, " Elements on
Create Pages for 11g and 10g
OAM Agents").
N/A

Managing the Access Protocol for OAM Proxy Simple and Cert Mode Security
14-8 Administrator's Guide for Oracle Access Management
14.5.2 About the Common OAM Proxy Page for Secure Server Communications
Table 14–7 describes the settings required for Simple or Cert mode configurations.
14.5.3 Viewing or Editing Simple or Cert Settings for OAM Proxy
Administrators can use this procedure to confirm or alter settings for the common
OAM Proxy.
During Agent registration,
ObAccessClient.xml is generated in:
$DOMAIN_HOME/output/$Agent_Name/
ObAccessClient.xml
Copy to:
11g Webgate: $11gWebgate_
instance_
dir/config/OHS/ohs1/web
gate/config
If:
$11gWebgate_instance_
dir=$ORACLE_
HOME/instance/instance1
10g Webgate: $Webgate_
install_dir/oblix/lib
ObAccessClient.xml
Copy to:
11g Webgate: $11gWebgate_
instance_dir/...
10g Webgate: $Webgate_
install_dir/...
ObAccessClient.xml
Copy to:
11g Webgate:
$11gWebgate_
instance_dir/...
10g Webgate:
$Webgate_install_dir/
...
During Agent registration, password.xml is
generated in:
$DOMAIN_HOME/output/$Agent_Name/
See Also: Appendix C
password.xml
Copy to:
11g Webgate: $11gWebgate_
instance_dir/...
10g Webgate: $Webgate_
install_dir/...
password.xml
Copy to:
11g Webgate: $11gWebgate_
instance_dir/...
10g Webgate: $Webgate_
install_dir/...
N/A
During Agent registration, aaa_key.pem is
generated in:
$DOMAIN_HOME/output/$Agent_Name/
See Also: Appendix C
aaa_key.pem
Copy to:
11g Webgate: $11gWebgate_
instance_dir...
10g Webgate: $Webgate_
install_dir...
aaa_key.pem
Copy to:
11g Webgate: $11gWebgate_
instance_dir...
10g Webgate: $Webgate_
install_dir...
N/A
Table 14–7 Server Common OAM Proxy Secure Communication Settings
Mode Description
Simple Mode Configuration The global passphrase for communication using OAM-signed X.509
certificates. This is set during initial OAM Server installation.
Administrators can edit this passphrase and then reconfigure all existing
OAM Agents to use it, as described in"Viewing or Editing Simple or Cert
Settings for OAM Proxy".
Cert Mode Configuration Details required for the Key KEYSTOREStore where the Cert mode X.509
certificates signed by an outside Certificate Authority reside:
■PEM Keystore Alias
■PEM Keystore Alias Password
Note: These are set during initial OAM Server installation. The certificates
can be imported using the import certificate utility or the keytool shipped
with JDK.
Administrators can edit the alias and password and then reconfigure all
existing OAM Agents to use them, as described in"Viewing or Editing
Simple or Cert Settings for OAM Proxy".
Table 14–6 (Cont.) Summary: Simple and Cert Mode
Artifact or Process Simple Mode Cert Mode Open Mode

Managing Run Time Policy Evaluation Caches
Configuring Access Manager Settings 14-9
To view or edit Simple or Cert mode settings for the OAM Proxy
1. From the Oracle Access Management Console, click Access Manager Settings.
2. Expand the Access Protocol section of the page, if needed.
3. Simple Mode: Add or alter a Global Passphrase if you are using OAM-signed
X.509 certificates.
4. Cert Mode Configuration: Specify the following details.
■PEM Keystore Alias
■PEM Keystore Alias Password
5. Click Apply to submit the changes and dismiss the Confirmation window (or close
the page without applying changes).
6. Update Agent registration pages as needed to regenerate artifacts, and then
replace the earlier artifacts as described in Chapter 15 or Chapter 16.
14.5.4 Configuring 64-bit WebGate in Cert Mode
64-bit WebGates now support SHA2 (256,384 & 512 bit) certificates. Run the following
command to configure a 64-bit WebGate in cert mode.
<Oracle Middleware Home>/oracle_common/bin/orapki wallet add
-wallet $DOMAIN_HOME/output/$Agent_Name/cwallet.sso -trusted_cert
-cert <Root CA path .i.e. aaa_chain.pem> -auto_login_only
14.5.5 Tuning the Simple Mode WebGate
If using a simple mode WebGate, you can improve the response time of the OAM login
page by changing the
aaaTimeoutThreshold
time parameter in the WebGate profile
from -1 to 10. For detailed information about the AAA Timeout Threshold
configuration element, see Table 16–3, " Elements on Expanded 11g and 10g
WebGate/Access Client Registration Pages" in the "Registering and Managing OAM
11g Agents" chapter.
14.6 Managing Run Time Policy Evaluation Caches
This section explains:
■About Run Time Policy Evaluation Caches
■Managing Run Time Policy Evaluation Caches
14.6.1 About Run Time Policy Evaluation Caches
Figure 14–4 illustrates the Policy section of the Access Manager Settings page. This
section provides settings for the Resource Matching Cache and the Authorization
Result Cache, which come into play during policy evaluation at run time.
See Also:
■"Registering an OAM Agent Using the Console" on page 16-12
■Appendix C, "Securing Communication"
See Also: "About Run Time Resource Evaluation" on page 20-27
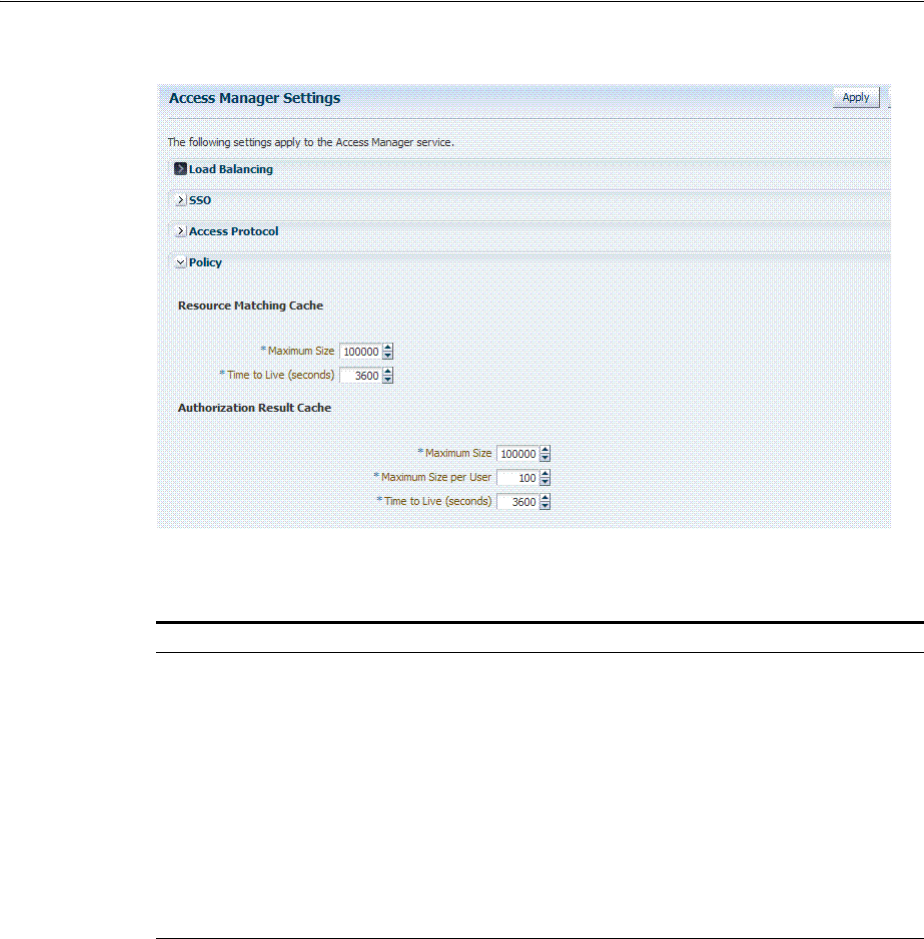
Managing Run Time Policy Evaluation Caches
14-10 Administrator's Guide for Oracle Access Management
Figure 14–4 Common Policy Evaluation Caches
Table 14–8 outlines these global settings that apply to all servers and requests.
14.6.2 Managing Run Time Policy Evaluation Caches
Administrators can use this procedure to manage the Access Manager policy
evaluation caches.
To manage common run time policy evaluation cache settings
1. From the Oracle Access Management Console, click Access Manager Settings.
2. On the Access Manager Settings page, expand the Policy section.
3. Resource Matching Cache: Specify details and click apply (Table 14–8).
4. Authorization Result Cache: Specify details and click apply (Table 14–8).
Table 14–8 Policy Evaluation Caches
Element Description
Resource Matching Cache Caches mappings between the requested URL and the policy holding
the resource pattern that applies to the URL.
Default Values:
■Maximum Size 100000 Zero disables the cache
■Time to Live (seconds) 3600 Zero disables Time to Live
Authorization Result Cache Caches policy decisions for the requested URL and user.
Default Values:
■Maximum Size 100000 Zero disables the cache
■Maximum Size per User 100 Zero disables the cache
■Time to Live (seconds) 3600 Zero disables Time to Live
See Also: Oracle Fusion Middleware Performance and Tuning Guide
See Also: Guide
■Oracle Fusion Middleware High Availability Guide
■Oracle Fusion Middleware Performance and Tuning Guide

Managing Run Time Policy Evaluation Caches
Configuring Access Manager Settings 14-11
5. Click Apply to submit the changes and dismiss the Confirmation window (or close
the page without applying changes).

Managing Run Time Policy Evaluation Caches
14-12 Administrator's Guide for Oracle Access Management

15
Introduction to Agents and Registration 15-1
15
Introduction to Agents and Registration
An agent (also known as a single sign-on agent or policy-enforcement agent) is any
front-ending entity that acts as an access client to enable single sign-on across
enterprise applications. Individual agents must be registered with Access Manager 11g
to set up the required trust mechanism between the agent and OAM Server. Registered
agents delegate authentication tasks to the OAM Server.
This chapter includes the following topics to give you an overview of agents, their
registration and management, processing, and tools. It includes the following topics:
■Introduction to Policy Enforcement Agents
■Introduction to Agent Registration
■Introduction to Remote Registration
15.1 Introduction to Policy Enforcement Agents
An agent is a software plug-in that can be installed on a Web server (such as Oracle
HTTP Server) where the application resides. To secure access to protected resources, a
Web server, Application Server, or third-party application must be associated with an
agent that is registered with Access Manager. To spare users from re-authenticating
when accessing multiple resources, an application must delegate the authentication
function to the single sign-on (SSO) provider: Access Manager.
During agent registration, the application can be automatically registered and basic
policies generated automatically. Alternatively, you can turn off automatic policy
generation during Agent registration and manually create policies.
After registration, the Agent collaborates communication between the OAM Server
and its services and acts as a filter for HTTP/HTTPS requests. The Agent intercepts
requests for resources protected by Access Manager and works with Access Manager
to fulfill access requirements.
This section introduces the types of agents for Access Manager:
■About Agent Types and Runtime Processing
■About 11g Webgate Configured as a Detached Credential Collector
■About 11g Webgate Functionality for Mobile and Social
■About the Pre-Registered 10g Webgate IAMSuiteAgent
15.1.1 About Agent Types and Runtime Processing
With Access Manager 11.1.2, each Agent acts as a filter for requests. Your deployment
can include the agent types described in Table 15–1, in any combination.

Introduction to Policy Enforcement Agents
15-2 Administrator's Guide for Oracle Access Management
Table 15–1 Agent Types
Agent Type Description
OAM Agents
Note: Unless explicitly
stated, the terms Webgate
and Access Client are used
interchangeably.
OAM Agents must be installed independently, following Oracle Access
Management installation. After registering the agent with Access Manager,
the agent communicates directly with registered OAM Servers and Access
Manager services. OAM Agents communicate with Access Manager using
the OAM Proxy to "sanitize" the request and respond identically for all
agents. The following OAM Agents types are available:
■Webgate: An out of an box Web server access client that intercepts
HTTP requests for Web resources and forwards these to the OAM
Server. Webgates for various Web servers are shipped with Access
Manager.
11g Webgates (Chapter 25) provide:
Oracle Universal Installer for platform
Host-based cookie
Individual Webgate OAMAuthnCookie_<host:port>
Resource to Authorization Policy
Authorization Result
Webgate Authorization Caching
Diagnostic page to tune parameters
Capability to act as a detached credential collector
See Also:
"About 11g Webgate Functionality for Mobile and Social"
"About 11g Webgate Configured as a Detached Credential Collector"
Oracle Fusion Middleware Performance and Tuning Guide
10g Webgates provide
InstallShield and One installer per platform
Domain-based cookie
ObSSOCookie (one for all 10g Webgates)
Web server configuration
See Also: 10g Pre-registered IAMSuiteAgent in this table and
Chapter 25
■Custom, Programmatic Access Clients: Access Manager provides a
pure Java software developer kit (SDK). Use this SDK to create custom
Access Clients and extensions for Access Manager authentication and
authorization functionality (and custom tokens). An Access Client
processes requests for Web and non-Web resources (non-HTTP) from
users or applications. See details in the Oracle Fusion Middleware
Developer's Guide for Oracle Access Management.
IAMSuiteAgent
a Pre-registered OAM 10g
Agent
This pre-registered 10g agent provides single sign-on functionality for the
IAM suite of consoles. The IAM Suite Agent includes a companion
Application Domain (IAMSuite) and basic policies that should not be
modified.
See Also: About the Pre-Registered 10g Webgate IAMSuiteAgent on
page 15-5
Legacy OSSO Agents mod_osso is part of the OracleAS 10g single sign-on (OSSO) solution that
authenticates users at a central OSSO Server. The mod_osso module is an
Oracle HTTP Server module that provides authentication to OracleAS
applications.
After registration with Access Manager, OSSO 10g Agents communicate
directly with Access Manager 11g services through an OSSO proxy. The
OSSO proxy supports existing OSSO agents when upgrading to Access
Manager. The OSSO proxy handles requests from OSSO Agents and
translates the OSSO protocol into a protocol for Access Manager 11g
authentication services.
Access Manager gives mod_osso the redirect URL for the user based on the
authentication scheme associated with the OAM policy defined for the
resource
See Also: Chapter 24, "Registering and Managing Legacy OSSO Agents" as
well as the following topics:

Introduction to Policy Enforcement Agents
Introduction to Agents and Registration 15-3
Table 15–2 introduces Access Manager features that support agent registration,
configuration, management, and single-sign on. Links to topics providing more
information are included.
OAM Agent Run Time Processing
Table 15–3 provides run time processing information for OAM Agents.
Legacy OpenSSO Agents Java Agents are deployed J2EE containers to work with the OpenSSO
server. Web Agents can be deployed on any Web or Servlet container. Each
OpenSSO Agent is a filter that is plugged into the container (Oracle
WebLogic Server, JBoss, Apache, and so on) that hosts applications.
Access Manager provides an OpenSSO Proxy to handle requests for
resources protected by OpenSSO Agents:
Scope can be Host- or Domain-based
OpenSSO Agent key stored locally (Agent bootstrap file, Agent host)
See Also: Chapter 23, "Registering and Managing Legacy OpenSSO
Agents".
Table 15–2 Agent Registration and SSO Support
Oracle Provides Description
Oracle Access Management Console Agent Registration, Configuration, Management.
See Also: "Registering an OAM Agent Using the Console" on page 16-12
oamreg tool Remote Agent Registration and Management
See Also: "Acquiring and Setting Up the Remote Registration Tool". on
page 16-32
SSO Implementations Access Manager supports numerous SSO scenarios.
See Also: "Introducing Access Manager Single Sign-On" on page 18-1
Protocols that secure information
exchange on the Internet
This depends on the credential collector you choose.
See Also: Table 19–5, " Comparing the DCC and ECC"
Login and Logout Forms The location of the login and logout forms depends on the credential collector.
See Also: Table 19–5, " Comparing the DCC and ECC" and Chapter 22
Cryptographic keys One key is generated and used per registered mod_osso or 11g Webgate.
However, one single key is generated for all 10g Webgates.
See Also: Table 1–2, " Features in Access Manager 11.1.2"
Keys storage ■Agent side: A per agent key is stored locally in the Oracle Secret Store in a
wallet file.
■OAM Server side: A per agent key, and server key, are stored in the
credential store on the server side.
See Also: "Introducing Access Manager Credential Collection and
Login" on page 18-14
Table 15–1 (Cont.) Agent Types
Agent Type Description

Introduction to Policy Enforcement Agents
15-4 Administrator's Guide for Oracle Access Management
15.1.2 About 11g Webgate Configured as a Detached Credential Collector
With Oracle Access Manager 11.1.1, the Embedded Credential Collector (IECC) is the
default. The ECC was and is integrated with the OAM Server.
Access Manager 11.1.2 also supports the ECC by default. However, Access Manager
11.1.2 also enables you to configure an 11g Webgate to use as a detached credential
collector (DCC).
Table 15–3 Run Time Processing Overview for Access Manager
Agent Type Description
11g Webgates
11g Access Clients
After installation and registration, 11g Webgates communicate with Access Manager
using the OAM Proxy to "sanitize" the request and respond identically for all agents.
Process overview, Authentication Request without OAMAuthnCookie: When a
request for a resource protected by Basic authentication scheme comes without an
authorization header (credentials)
1. Webgate redirects through the front channel to either Embedded or Detached
Credential Collector (depending on scheme configuration) to collect credentials.
2. Credential Collector collects user credentials based on the challenge method
defined for the authentication scheme.
3. User is authenticated; OAM Proxy (Embedded Collector) or Detached Collector
itself (DCC) communicates with the OAM Server through the back channel
protocol for the token and returns a response through the front channel with a
token issued by the OAM Server.
4. Webgate validates the response, extracts the authentication token issued by the
OAM Server, and sets a token in OAMAuthnCookie.
5. Webgate is redirected to the requested resource, with the newly set
OAMAuthnCookie attached.
6. Webgate validates the OAMAuthnCookie, performs authorization through the
back channel, and serves the page when authorization is successful.
Process overview, Basic Authentication: When a request for a resource protected by
Basic authentication scheme comes without an authorization header (credentials)
1. Webgate responds with
WWW-Authenticate
header containing the realm
mentioned in the authentication scheme with status code
401(authorization
required)
.
2. Browser client interprets the
WWW-Authenticate
header and collects credentials
from user.
3. Browser client performs request again with authorization header containing
credentials.
See Also:
"About 11g Webgate Configured as a Detached Credential Collector" on page 15-4
"About 11g Webgate Functionality for Mobile and Social" on page 15-5
10g Webgates
10g Access Clients
After installation and registration, 10g Webgates communicate directly with Access
Manager using the OAM proxy, which acts as a bridge.
See Also:
■IAMSuiteAgent for details about this agent and Application Domain.
■Chapter 25 for details about registering legacy 10g Webgates with Access
Manager.
■Appendix A for details about legacy 10g Webgates currently operating with Web
Applications coded for Oracle ADF Security and the OPSS SSO Framework.
■Oracle Fusion Middleware Application Security Guide for details about legacy 10g
Webgates configured as the Identity Assertion Provider (IAP) for SSO (for
applications using WebLogic container-based security with Access Manager 11g
(or Oracle Access Manager 10g).
OpenSSO Agents See Also: "Runtime Processing Between OpenSSO Agents and Access Manager" on
page 23-6.
OSSO Agent
(mod_osso 10g)
See: "Understanding OSSO Agents with Access Manager" on page 24-1.

Introduction to Agent Registration
Introduction to Agents and Registration 15-5
An 11g Webgate configured to act as a detached credential collector (DCC) is known as
anAuthenticating Webgate. Webgates that protect resources are known as Resource
Webgates.
The DCC is considered more secure compared to the default embedded credential
collector (ECC).
15.1.3 About 11g Webgate Functionality for Mobile and Social
Webgate interacts with the client to perform authentication and authorization, which
involves redirection to collect credentials, set the cookie to hold the session, error
reporting, and so on. Webgate works with browser clients, which usually have all the
support required for this interaction end to end. However, there are cases where a
non-browser/REST client needs to access resources and perform authentication and
authorization.
Mobile and Social support is enabled using two user-defined parameters within the
Webgate agent registration page. Mobile and Social services use a programmatic
non-browser client with Access Manager.
15.1.4 About the Pre-Registered 10g Webgate IAMSuiteAgent
This 10g Webgate and the companion Application Domain provides single sign-on
functionality for the IDM Administration Console. IAMSuiteAgent is installed and
pre-configured as part of the OAM Server installation and configuration.
Oracle strongly recommends that you do not alter IAMSuiteAgent and the companion
Application Domain. However, you can replace the IAMSuiteAgent with a fresh 10g
Webgate.
15.2 Introduction to Agent Registration
You can use either the Oracle Access Management Console or the remote registration
tool for Agent registration and updates. Unless explicitly stated, information in this
section applies to agent registration using either the Oracle Access Management
Console or the remote registration tool.
This section provides the following information:
■About Agent Registration, Keys, and Policies
See Also: "Configuring 11g WebGates and Authentication Policy for
DCC" on page 19-109
See Also:
■Part IX, "Managing Oracle Access Management Mobile and
Social"
■Oracle Fusion Middleware Developer's Guide for Oracle Access
Management
See Also:
■"Replacing the IAMSuiteAgent with an 11g WebGate" on
page 16-41
■"Configuring Centralized Logout for IAMSuiteAgent" on
page 25-10
■"Bundled 10g IAMSuiteAgent Artifacts" on page D-1

Introduction to Agent Registration
15-6 Administrator's Guide for Oracle Access Management
■About File System Changes and Artifacts for Registered Agents
15.2.1 About Agent Registration, Keys, and Policies
Only registered agents can communicate with an OAM Server, and process
information when a user attempts to access a protected resource. During agent
registration, you can create policies to protect the application during agent
registration.
Administrators must register each Agent to operate with Access Manager. The agent is
presumed to reside on the computer hosting the application to be protected. However,
the Agent can reside on a proxy Web server and the application on a different host.
An agent key and partner key are created during registration. If you choose to
automatically create policies during agent registration, a host identifier and
Application Domain are created with basic policies and resource definitions. Later on,
you can view and manage the Application Domain and policies.
Following a successful registration, whether using the console or using remote
registration, the full agent registration appears in the Oracle Access Management
Console and is propagated to all Managed Servers in the cluster. Table 15–4 identifies
the keys and policies generated during agent registration.
Note: You can register multiple Webgates or Access Clients under a
single host identifier, with the same Application Domain and policies,
as follows:
1. When you register a Webgate, allow the process to create a host identifier
(a name of your choice), and enable "Auto Create Policies".
2. Register a second Webgate with the same host identifier as Step 1, and
clear the "Auto Create Policies" box to eliminate policy creation.
Table 15–4 Keys and Policies Generated During Agent Registration
Keys and Policies Accessible to Accessible through
One key per 11g Webgate Agent
One key for all 10g Agents
One key per OpenSSO Agent stored in
local Agent bootstrap file
One key per OSSO Agent
See Also: "About Key Use, Generation,
Provisioning, and Storage" on page 16-26
■OAM Server ■Client-side: Secure local storage
on the client host (a local wallet
file)
■Server side: The Java Keystore
Partner key for the application
(None for OpenSSO Agents)
■11g Webgate Client-side
Application Domain and default Policies
are generated during Agent registration on
demand:
■Named for the Agent
■Populated with default
authentication and authorization
policies (but not Token Issuance
Policies)
■Identified by the same host identifier
that was specified for the Agent
during registration
■Administrators can view, modify, or
remove a registered agent using either
the Oracle Access Management
Console or custom WLST commands
for Access Manager
■All agent types at run time monitor
attempts to access a Web site and use
OAM Servers to provide
authentication and authorization
services before completing the request
Oracle Access Management Console
Policy Configuration
Application Domains
DomainName
Introduction to Agent Registration
Introduction to Agents and Registration 15-7
15.2.2 About File System Changes and Artifacts for Registered Agents
When you register an agent using the Oracle Access Management Console, a new file
system directory is created for the Agent on the Oracle Access Management Console
host (AdminServer).
This new directory includes generated files for the registered agent, as described in
Table 15–5.
Generated or updated artifacts must be copied from the console host (AdminServer)
into the agent's installation directory, as shown in Table 15–6.
Table 15–5 Artifacts Associated with Agent Registration
Registration Artifact Generated for ...
All Webgates or Access Client
ObAccessClient.xml
All Webgates/Access Clients on the console host (AdminServer).
During run time, periodic update checks are made. ObAccessClient is updated
automatically when a change is discovered.
Note: The pre-registered 10g IAMSuiteAgent does not use ObAccessClient.xml for
bootstrap or configuration.
See Also: Properties files generated on the client in this table.
cwallet.sso
11g Webgate only
11g Webgates, regardless of the transport security mode.
Certificate and password files for secure
communication
All Webgates/Access Clients. For example:
■password.xml (nominally encrypted file for Simple Mode Global passphrase)
■aaa_cert.pem (reserved name for Webgate certificate file, which cannot be
changed)
■aaa_key.pem (reserved name for Webgate key file, which cannot be changed)
Cert Mode:
■PEM keystore Alias
■PEM keystore Alias Password
Note: When editing an 11g Webgate registration, password.xml is updated only when
the mode is changed from Open to Cert or Simple to Cert. In Cert mode, once
generated, password.xml cannot be updated. Editing the agent Key Password does not
result in creation of a new password.xml.
See: Chapter 14 for details about Simple and Cert mode transport security)
OpenSSO Properties files See: Chapter 23, "Registering and Managing Legacy OpenSSO Agents"
osso.conf file See: Chapter 24, "Registering and Managing Legacy OSSO Agents"
Table 15–6 Copying Generated Artifacts
Agent Type & Artifacts Copy Generated Artifacts to Agent Installation Directory ...
ObAccessClient.xml
(and 11g Webgate cwallet.sso)
11g Webgate or Access Client
Before agent startup, copy the ObAccessClient file (and cwallet.sso) from the
generated location (AdminServer (Console) host) to the agent installation directory.
See: Chapter 16, "Registering and Managing OAM 11g Agents"
ObAccessClient.xml
10g Webgate or Access Client
Before agent startup, copy ObAccessClient.xml from the generated location to the
agent installation directory. For example, from the AdminServer (Console) host:
Note: The pre-registered IAMSuiteAgent does not use ObAccessClient.xml and
should not be modified.
See: Chapter 25, "Registering and Managing 10g WebGates with Access Manager
11g"
OpenSSO Agent Properties Files See: Chapter 23, "Registering and Managing Legacy OpenSSO Agents"
10g OSSO Agent osso.conf See: Chapter 24, "Registering and Managing Legacy OSSO Agents"

Introduction to Remote Registration
15-8 Administrator's Guide for Oracle Access Management
15.3 Introduction to Remote Registration
As an alternative to using the console for agent registration, you can use the remote
registration utility, oamreg, with Oracle-provided templates. The user of the remote
registration script can be a part of any group that is mapped against the
Administrator's Role in the primary user-identity store for Access Manager
(Chapter 5).
Secure registration and creation of an Application Domain (as well as Symmetric key
generation) is supported using either remote registration mode described in
Table 15–7.
Symmetric key generation per Application: One key is generated and used per
registered mod_osso or 11g Webgate. However, one single key only is generated for all
10g Webgates.
Table 15–8 describes functionality that is not supported:
For more information, see the following topics in Chapter 16:
■About Performing In-Band Remote Registration
■About Performing Out-of-Band Remote Registration
■About Updated Agent Configuration Files
15.3.1 About Performing In-Band Remote Registration
Following is a brief overview of in-band Web server Administrator tasks for
provisioning an application using the remote registration tool. Unless explicitly stated,
tasks are the same regardless of the type of agent you have protecting resources.
In this overview, the term "Administrator" refers to any user within the network who
is part of the LDAP group that is designated for Administrators in the Default System
User Identity Store registered with Oracle Access Management.
Table 15–7 Remote Registration Methods
Method Description
In-band mode For Administrators within the network who manage the Web server that hosts
the agent can use this mode or the Oracle Access Management Console.
Out-of-band mode Administrators outside the network must submit registration requests to an
Administrator within the network. After processing the request, the in-band
Administrator returns the files required by the out-of-band Administrator who
uses the files to configure his environment.
Note: Registration of legacy Agents (10g Webgate, OpenSSO, and
OSSO 10g), is also supported.
Table 15–8 Remote Registration Does Not Support
Not Supported with Remote Registration
Persistence of the Key and Agent Information
Generation of Keys used by internal components
API support for reading Agent information

Introduction to Remote Registration
Introduction to Agents and Registration 15-9
Task overview: In-band Administrators performing remote registration
1. Acquire the registration tool as described in "Acquiring and Setting Up the Remote
Registration Tool" on page 16-32.
2. Update the input file with unique values for the agent and Application Domain as
described in "Creating Your Remote Registration Request" on page 16-33.
3. Run the registration tool to configure the Agent and create a default Application
Domain for the resources, as described in "Performing In-Band Remote
Registration" on page 16-33.
4. Validate the configuration as described in "Validating Remote Registration and
Resource Protection" on page 16-38.
5. Perform access checks to validate that the configuration is working, as described
in "Validating Authentication and Access After Remote Registration" on
page 16-39.
15.3.2 About Performing Out-of-Band Remote Registration
The term out-of-band registration refers to manual registration that involves
coordination and actions by both the in-band Administrator and the out-of-band
Administrator.
Task overview: Out-of-band remote registration (Agent outside the network)
1. Out-of-band Administrator: Creates a starting request input file containing
specific application and agent details and submits it to the in-band Administrator.
■Acquire the registration tool as described in "Acquiring and Setting Up the
Remote Registration Tool" on page 16-32.
■Copy and edit a template to input unique values for the agent and Application
Domain as described in "Creating Your Remote Registration Request" on
page 16-33.
■Submit the starting request input file to the in-band Administrator using a
method you choose (email or file transfer).
2. In-band Administrator:
■Acquire the registration tool as described in "Acquiring and Setting Up the
Remote Registration Tool" on page 16-32.
■Use the out-of-band starting request with the registration tool to provision the
agent and create the following files to return to the out-of-band Administrator.
See "Performing Out-of-Band Remote Registration" on page 16-34 for details:
–agentName_Response.xml is generated for the out of band Administrator
to use in Step 3.
–OAM Agents: A modified ObAccessClient.xml file is created (and the 11g
Webgate cwallet.sso file), which the out-of-band Administrator can use to
bootstrap the Webgate.
11g Webgates: SSO wallet creation.
–OSSO Agents: A modified osso.conf file is created for the out-of-band
Administrator to bootstrap the OSSO module.
–OpenSSO Agents: A modified version of the OpenSSO properties files are
generated.

Introduction to Remote Registration
15-10 Administrator's Guide for Oracle Access Management
3. Out-of-band Administrator: Uses the registration tool with the agentName_
Response.xml file and copies the Agent configuration and any other generated
artifacts to the appropriate file system directory.
4. In-band Administrator: Validates the configuration as described in "Validating
Remote Registration and Resource Protection" on page 16-38.
5. Out-of-band Administrator: Performs several access checks to validate that the
configuration is working, as described in "Validating Authentication and Access
After Remote Registration" on page 16-39.
15.3.3 About Updated Agent Configuration Files
After a successful registration (or update), you must locate the Agent configuration
files on the AdminServer (console) host and copy these to the Agent host, as described
in Table 15–9.
Note: In
outofband
mode, the in-band Administrator uses the
starting request file submitted by the out-of-band Administrator, and
returns a generated agentName_Response.xml file to the out-of-band
Administrator for additional processing. The out-of-band
Administrator runs the remote registration tool with agentName_
Response.xml as input to generate agent configuration files.
See Also:
■"About Updated Agent Configuration Files" on page 15-10
■"Understanding the Remote Registration Tool, Modes, and
Process" on page 16-24
Table 15–9 Agent Registration and Configuration Update Artifacts
Artifacts For ... Description
Simple or Cert mode If Simple or Cert mode is used, certificate artifacts must also be copied to
the Agent host following registration.
See Also: Appendix C, "Securing Communication"
11g OAM Agents
(Webgate/Access Client)
See Also: Chapter 16, "Registering and Managing OAM 11g Agents"
10g OAM Agents
(Webgate/Access Client)
See Also: Chapter 25, "Registering and Managing 10g WebGates with
Access Manager 11g"
OSSO Agent See Also: Chapter 24, "Registering and Managing Legacy OSSO Agents"
OpenSSO Agent See Also: Chapter 23, "Registering and Managing Legacy OpenSSO Agents"

16
Registering and Managing OAM 11g Agents 16-1
16
Registering and Managing OAM 11g Agents
This chapter provides information on registration and management of 11g WebGates
(and the programmatic equivalent, Access Clients) using either the console or the
remote registration command-line utility. During registration, you can identify specific
applications to be protected by Access Manager policies.
This chapter includes the following topics:
■Prerequisites
■Understanding OAM Agent Registration Parameters in the Console
■Registering an OAM Agent Using the Console
■Configuring and Managing Registered OAM Agents Using the Console
■Understanding the Remote Registration Tool, Modes, and Process
■Understanding Remote Registration Templates: OAM Agents
■Performing Remote Registration for OAM Agents
■Introduction to Updating Agents Remotely
■Updating Agents Remotely
■Validating Remote Registration and Resource Protection
■Replacing the IAMSuiteAgent with an 11g WebGate
■Managing the Preferred Host in 10g WebGates
16.1 Prerequisites
Before you can perform tasks in this chapter, ensure that the Oracle Access
Management Console host (AdminServer) and a managed OAM Server are running.
See Also: The following, as needed for your environment.
■Chapter 15, "Introduction to Agents and Registration"
■"Managing Policies and Application Domains Remotely" on
page 20-81
■Chapter 23, "Registering and Managing Legacy OpenSSO Agents"
■Chapter 24, "Registering and Managing Legacy OSSO Agents"
■Chapter 25, "Registering and Managing 10g WebGates with
Access Manager 11g"
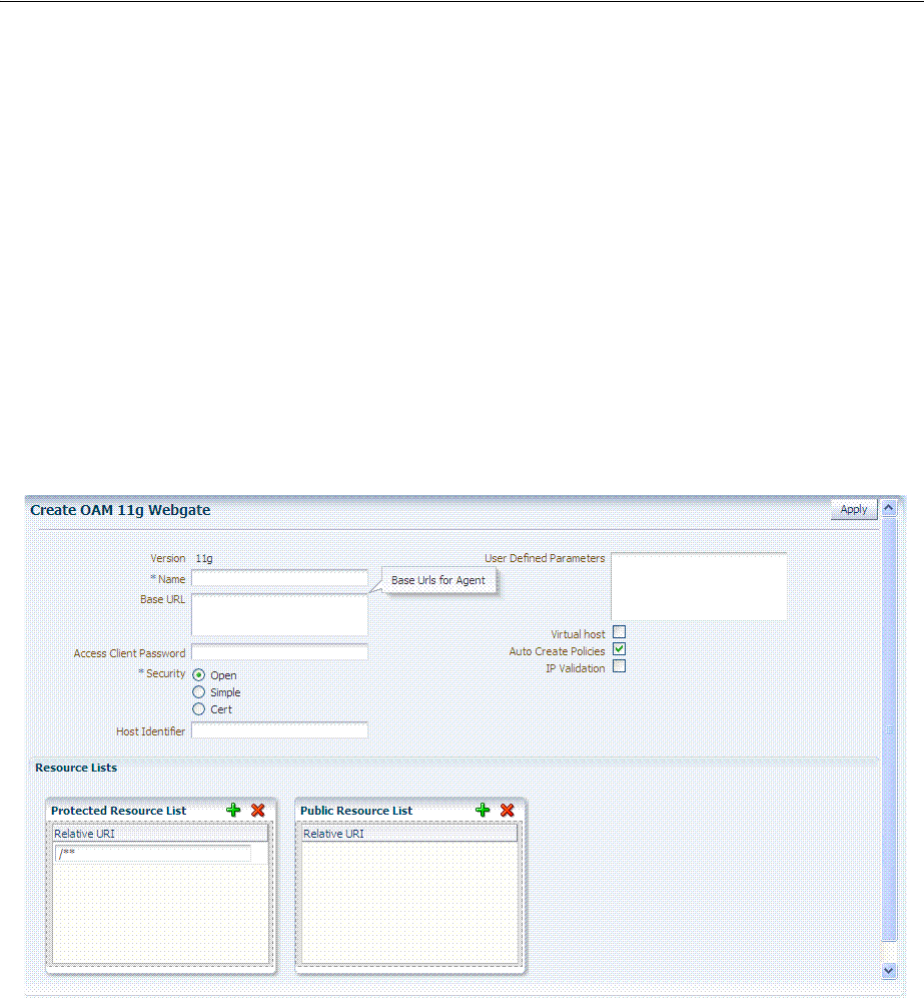
Understanding OAM Agent Registration Parameters in the Console
16-2 Administrator's Guide for Oracle Access Management
16.2 Understanding OAM Agent Registration Parameters in the Console
This section describes OAM Agent registration parameters. Unless explicitly stated,
the information here applies equally to both 11g and 10g WebGates, including
programmatic Access Clients. Topics include:
■About Create OAM WebGate Page and Parameters
■About User-Defined WebGate Parameters
■About IP Address Validation for WebGates
16.2.1 About Create OAM WebGate Page and Parameters
The
Create OAM ... WebGate
page requests minimal information to streamline
registration. Required details are identified by the asterisk (*). Whether you register an
11g WebGate or 10g WebGate, the initial information requested is the same.
Figure 16–1 Create OAM 11g WebGate Page
Table 16–1 describes the Create page for 11g WebGates (or Access Clients). Unless
explicitly noted, all elements apply to both 11g and 10g Agents.

Understanding OAM Agent Registration Parameters in the Console
Registering and Managing OAM 11g Agents 16-3
Table 16–1 Elements on Create Pages for 11g and 10g OAM Agents
OAM WebGate Element Description
Name The unique identifying name for this Agent registration. This is often the name of the computer that
is hosting the Web server used by WebGate.
A unique identifying name for each Agent registration is preferred. However:
■If the Agent Name exists, no error occurs and the registration does not fail. Instead, Access
Manager creates the policies if they are not already in place.
■If the host identifier exists, the unique Agent Base URL is added to the existing host identifier
and registration proceeds.
Base URL
Optional
The host and port of the computer on which the Web server for the WebGate is installed. For
example, http://example_host:port or https://example_host:port. The port number is optional.
Note: A particular Base URL can be registered once only. There is a one-to-one mapping from this
Base URL to the Web server domain on which the WebGate is installed (as specified with the Host
Identifier element). However, one domain can have multiple Base URLs.
Access Client Password
Optional
An optional, unique password for this WebGate, which can be assigned during this registration
process.
When a registered WebGate connects to an OAM Server, the password is used for authentication to
prevent unauthorized WebGates from connecting to OAM Servers and obtaining policy
information.
Security Level of communication transport security between the Agent and the OAM Server (this must
match the level specified for the OAM Server):
■Open--No transport security
■Simple--SSL v3/TLS v1.0 secure transport using dynamically generated session keys
■Cert--SSL v3/TLS v1.0 secure transport using server side x.509 certificates. Choosing this
option displays a field where you can enter the Agent Key Password.
Agent Key Password: The private key file (aaa_key.pem) is encrypted using DES algorithm.
The Agent Key Password is saved in obfuscated format in password.xml and is required by
the server to generate password.xml. However, this password is not retained by the server.
When editing an 11g WebGate registration, password.xml is updated only when the mode is
changed from Open to Cert or Simple to Cert. In Cert mode, once generated, password.xml
cannot be updated. Editing the Agent Key Password does not result in creation of a new
password.xml.
Note: For more information on Simple and Cert modes, and private key encryption, see
Appendix C.
Host Identifier This identifier represents the Web server host. This is automatically seeded with the value in the
agent Name field.
Note: You can register multiple OAM WebGates (or Access Clients) under a single host identifier
with the same Application Domain and policies, as follows:
1. When you register a WebGate, allow the process to create a host identifier (a name of your
choice), and enable "Auto Create Policies".
2. Register a second WebGate with the same host identifier as Step 1, and clear the "Auto Create
Policies" box to eliminate policy creation.
See Also: "About Virtual Web Hosting" on page 19-10.
User-defined Parameters Parameters you can enter to enable specific WebGate behaviors:
See Also: "About User-Defined WebGate Parameters" on page 16-5.
Virtual Host Check the box beside Virtual Host if you installed a WebGate on a Web server that contains
multiple Web site and domain names. The WebGate must reside in a location that enables it to
protect all of the Web sites on that server.
See Also: "About Virtual Web Hosting" on page 19-10.

Understanding OAM Agent Registration Parameters in the Console
16-4 Administrator's Guide for Oracle Access Management
Auto Create Policies During agent registration, you can have authentication and authorization policies created
automatically. This option is checked (enabled) by default.
Default: Enabled
Shared Registration and Policies: Multiple WebGates (or Access Clients) installed on different Web
servers can share a single registration and policies to protect the same resources. This is useful in a
high-availability failover environment. To do this:
1. WebGate1: Register the first WebGate and enable Auto Create Policies to generate a host
identifier (named as you like) and policies.
2. WebGate2: Register the second WebGate, specify the same host identifier as the first WebGate,
and disable Auto Create Policies.
After registering the second agent, both WebGates use the same host identifier and policies.
IP Validation Check the box beside IP Validation to ensure a client's IP address is the same as the IP address
stored in the OAM session. When enabled, the IP address stored in the OAM session must match
the client's IP address. Otherwise, the request is rejected and the user must re-authenticate. In the IP
Validation Exceptions box, enter any IP addresses to exclude from validation using standard
notation for the addresses: for example, 10.20.30.123.
Default: Disabled
See Also: "About IP Address Validation for WebGates" on page 16-10.
Agent Key Password Requested for only Cert mode communication, this passphrase is used to encrypt the private key
used for SSL communication between WebGate and the OAM Server in Simple and Cert modes.
Note: The Agent Key Password has no relationship to the Access Client Password described earlier
within this table.
Simple Mode: In this mode, the agent key password is a global passphrase that must be the same
on both the client and server. Once the OAM Server has this configured, the password can be
retrieved during agent registration. However, the Administrator must copy to the client side, the
password.xml file generated during agent registration.
Cert Mode: In this mode, the agent key can be different on the client and server; it is no longer
global. Administrators must enter the Agent Key Password to enable generation of a password.xml
file during agent registration, which must be copied to the agent side. For certificate generation,
you must encrypt the private key (used for SSL) using this password through
openssl
or other
third-party tools to be placed inside aaa_key.pem. At runtime, WebGate retrieves the key from
password.xml, and uses it to decrypt the key in aaa_key.pem.
■If the key is encrypted, WebGate internally invokes the call back function to obtain the
password.
■If the key is encrypted and password.xml does not exist, WebGate cannot establish
connections with the OAM Server.
■If the key is not encrypted, there is no attempt to read password.xml.
For more information, see Appendix C.
Resource Lists
Table 16–1 (Cont.) Elements on Create Pages for 11g and 10g OAM Agents
OAM WebGate Element Description

Understanding OAM Agent Registration Parameters in the Console
Registering and Managing OAM 11g Agents 16-5
To help streamline WebGate registration, some elements are concealed during the
create operation and default values are applied.
16.2.2 About User-Defined WebGate Parameters
Certain supported parameters can be defined by Administrators entering values
directly on the WebGate registration page or within the OAM Agent remote
registration request template. Table 16–2 describes supported user-defined parameters.
Each parameter can have only one value.
Protected Resource (URI)
List
URIs for the protected application: /
myapp/login
, for example. Each URI for the protected
application should be specified in a new row of the table for the Protected Resource List.
Default: /**
The default matches any sequence of characters within zero or more intermediate levels spanning
multiple directories.
Add Resources: Each URI should be specified in a new row of the table for the Protected Resource
List. Click the + button to add a resource to the Protected Resource List. For instance, if you add
/financial
(and repeat to add
/myfinancial
) the following URLS are seeded into the designated
policies of the Application Domain when Auto Create Policies is selected):
/financial yields Resource URL /financial/**
/myfinancial yields Resource URL /myfinancial/**
/**
See Also: "About the Resource URL, Prefixes, and Patterns" on page 20-19.
Public Resource (URI) List Each public application should be specified in a new row of the table for the Public Resource List.
Add Resources: Each URI should be specified in a new row of the table for the Public Resource
List. Click the + button to add a resource to the Public Resource List. For instance, if you add
/people
the following URLS are included here and in the Application Domain (when Auto Create
Policies is selected):
/people
See Also: "About the Resource URL, Prefixes, and Patterns" on page 20-19.
See Also: Table 16–3, " Elements on Expanded 11g and 10g WebGate/Access Client Registration Pages"
Note: All changes made using the Oracle Access Management
Console are taken up without restarting the application server.
Changes are reflected automatically after the reconfiguration timeout
period.
Table 16–1 (Cont.) Elements on Create Pages for 11g and 10g OAM Agents
OAM WebGate Element Description

Understanding OAM Agent Registration Parameters in the Console
16-6 Administrator's Guide for Oracle Access Management
Table 16–2 User-Defined WebGate Parameters
User-Defined WebGate Parameter Description
ChallengeRedirectMethod Configure this user-defined authentication POST data preservation parameter for both
the embedded credential collector (ECC) and the detached credential collector (DCC).
Value: GET|POST|DYNAMIC
Note: Preference is given first to the Authentication Scheme containing this parameter;
second to the WebGate providing this user defined parameter. Otherwise, default
behavior is Dynamic.
See Also: Table 19–23, " User-Defined Challenge Parameters for Authentication
Schemes"
ChallengeRedirectMaxMessageBytes Configure this user-defined WebGate parameter to limit the size of the message data
received as obrareq.cgi and obrar.cgi. Message data is comprised of query string length,
if present (or POST data length, if POST data is present). If message size exceeds this
limit, the message is not processed and the existing message is shown in the browser.
The event is logged as usual.
Default: 8192 bytes
Notes:
obrareq.cgi is the authentication request in the form of a query string redirected from
WebGate to OAM Server.
obrar.cgi is the authentication response string redirected from the OAM Server to
WebGate.
See Also: "Configuring Authentication POST Data Handling" on page 19-116
Table 16–2, " User-Defined WebGate Parameters"
MaxPostDataBytes Authentication post-data preservation parameter for both the embedded credential
collector (ECC) and the detached credential collector (DCC).
This parameter requires a positive integer value that restricts the maximum number of
bytes of POST data that is submitted as user credentials and sent to the OAM Server.
Default: 8192 bytes
Assigning MaxPostDataBytes to a Resource WebGate gives preference to restricting the
size of the post data received from the application before forwarding the post data to be
preserved.
See Also: "Configuring the PasswordPolicyValidationScheme"
"Configuring Authentication POST Data Handling" on page 19-116
Table 19–23, " User-Defined Challenge Parameters for Authentication Schemes"
MaxPreservedPostDataBytes Configure this user-defined WebGate parameter (or user-defined Authentication Scheme
challenge parameter) for authentication POST-data preservation.
Default: 8192 bytes
Note: Preference is given first to the Authentication Scheme containing this parameter;
second to the WebGate providing this user-defined parameter. Otherwise, default
behavior is 8192 bytes.
This parameter defines the maximum length of POST data that WebGate can preserve. If
the size of inbound raw user POST data (or encrypted post data after processing),
crosses this limit, POST data is dropped and the existing authentication flow continues.
The event is logged as usual.
See Also: "Configuring Authentication POST Data Handling" on page 19-116
Table 19–23, " User-Defined Challenge Parameters for Authentication Schemes"
PostDataRestoration Authentication post-data preservation parameter for both the embedded credential
collector (ECC) and the detached credential collector (DCC). This parameter requires a
value of
true
or
false
.
Default:
false
When set to
true
, WebGate initiates POST data preservation.
See Also: "Configuring Authentication POST Data Handling" on page 19-116

Understanding OAM Agent Registration Parameters in the Console
Registering and Managing OAM 11g Agents 16-7
serverRequestCacheType
ECC Only
Authentication post-data preservation parameter by the embedded credential collector
(ECC).
This OAM Server parameter in oam-config.xml indicates mechanism to be used to
remember the request context. Possible values are FORM, COOKIE, or CACHE.
Default: COOKIE
FORM is the required value for POST data preservation.
See Also:
TempStateMode
in Table 19–23, " User-Defined Challenge Parameters for
Authentication Schemes".
"Configuring Authentication POST Data Handling" on page 19-116
UrlInUTF8Format=true In an environment that uses Oracle HTTP Server 2, this parameter must be set to true to
display latin-1 and other character sets.
ProxySSLHeaderVar=IS_SSL Uses when the WebGate is located behind a reverse proxy, SSL is configured between the
client and the reverse proxy, and non-SSL is configured between the reverse proxy and
the Web server. It ensures that URLs are stored as HTTPS rather than HTTP. The proxy
ensures that URLs are stored in HTTPS format by setting a custom header variable
indicating whether it is servicing an SSL or non-SSL client connection.
The value of the ProxySSLHeaderVar parameter defines the name of the header variable
the proxy must set. The value of the header variable must be "ssl" or "nonssl".
If the header variable is not set, the SSL state is decided by the SSL state of the current
Web server.
Default: IS_SSL
client_request_retry_attempts=1 WebGate-to-OAM Server timeout threshold specifies how long (in seconds) the WebGate
waits for the OAM Server before it considers it unreachable and attempts the request on
a new connection.
If the OAM Server takes longer to service a request than the value of the timeout
threshold, the WebGate abandons the request and retries the request on a new
connection.
Default: 1
Note: The new connection that is returned from the connection pool can be to the same
OAM Server, depending on your connection pool settings. Also, other OAM Servers
may also require more time to process the request than the time specified on the timeout
threshold. In some cases, the WebGate can retry the request until the OAM Servers are
shut down. You can configure a limit on the number of retries that the WebGate
performs for a non-responsive server using the client_request_retry_attempts parameter.
InactiveReconfigPeriod=10 The WebGate update thread reads the shared secret from the OAM Server every 1
minute when WebGate is active. The OAM Server server returns the shared secret in its
own cache (the OAM Server cache).
Default: 10 (minutes)
See Also: Oracle Fusion Middleware Performance and Tuning Guide
fallbackToContainerPolicy=true Used for the IAMSuiteAgent. When set to
false
, user access to the resource is denied
and an HTTP response code, 403 is returned.
When set to 'true' the request goes through to the container and uses whatever policy
(related to J2EE authentication/authorization) is configured on the container to grant or
deny the user access.
Default:
true
logoutRedirectUrl= Default = http://OAMServer_host:14200/oam/server/logout
protectWebXmlSecuredPagesOnly=tr
ue
Used for the IAMSuiteAgent. After the user is authenticated, this parameter is used for
all subsequent requests to determine if the Agent should validate the incoming request.
When set to:
false
: The Agent always validates the incoming request
true
: The default. The Agent determines whether to validate the incoming request based
on the following:
■If the application specifies 'CLIENT-CERT' as part of the construct:
"<auth-method>" in its web.xml, the Agent validates the incoming request.
■If the application does not specify 'CLIENT-CERT' as part of the construct:
"<auth-method>" in its web.xml, the Agent does not validate the incoming request.
Instead, the Agent lets the request go through to the application.
Table 16–2 (Cont.) User-Defined WebGate Parameters
User-Defined WebGate Parameter Description

Understanding OAM Agent Registration Parameters in the Console
16-8 Administrator's Guide for Oracle Access Management
maxAuthorizationResultCacheElems Max Authorization Results Cache Elements—Number of elements maintained in the
Authorization Result Cache. This cache maintains information about authorization
results for associated sessions. For example:
maxAuthorizationResultCacheElems=10000
Default = 100000
See Also: Oracle Fusion Middleware Performance and Tuning Guide
authorizationResultCacheTimeout Authorization Results Cache Timeout—Number of elements maintained in the
Authorization Result Cache. This cache maintains information about authorization
results for associated sessions. For example:
authorizationResultCacheTimeout=60
Default, if no time is specified = 15 (seconds)
Note: Authorization Results Cache Timeout is not set by default.
With the cache enabled, the first request result persists for the cache duration. This
magnifies the effect causing a brief time delay. For example suppose you set an
authentication policy Response and set a custom session attribute exmpl:sample. The
corresponding authorization policy Response returns this as HEADER SESSION_ATTR_
EXMPL=sample. When a user access the URL protected by these policies, the header
comes after a few refreshes. Initially, however, the value might not be found.
A value of 0 disables the cache. With no cache, it takes two requests for the header
response to be filled. The first sets the session variable used, the second uses the session
variable. Oracle recommends that you do not set a Response value in the same
authorization request that triggers it.
See Also: Oracle Fusion Middleware Performance and Tuning Guide.
UniqueCookieNames Controls WebGate cookie name format:
■Legacy format (still the default and backward compatible): <prefix>_
<host>:<port>_<suffix>
■Enabled UniqueCookieNames format (rfc2109-compliant cookie name restriction):
<prefix>_<host>:<port>_<suffix>
■Disabled: Cookie name format is <prefix>_<suffix>. No <host>:<port> and No
<host>_<port> is added to the cookie name.
■Any other value is treated as the default legacy format: <prefix>_<host>:<port>_
<suffix>
11g WebGate only
SetKeepAlive By default, SetKeepAlive is ON. In this case, a first keep-alive message will be sent after
the default idle time of 2 minutes. To change this behavior, set a new value for the
parameter. If SetKeepAlive=Off, the feature is disabled and no keep-alive messages will
be sent. If SetKeepAlive=x (where x is some positive integer value), the keep-alive
message will be sent after the channel is idle for
x
minutes. Any firewall or load balancer
should be configured to forward the TCP/IP keep-alive messages to the actual end
parties (front-ending Access Manager server).
A programmatic way to change the idle time is implemented for Linux64, Linux32, and
Windows32 WebGates. This is not possible on SPARC Solaris platforms; in that case,
SetKeepAlive is enabled and the idle time out for Keep alive must be set manually by
the system administrator.
filterOAMAuthnCookie For 11g WebGate, a user-defined parameter (
filterOAMAuthnCookie
(default
true
)) can
be used to prevent the OAMAuthnCookie from being passed to downstream
applications for security consideration. If you do want to pass the cookie on, then set the
filterOAMAuthnCookie
parameter to
false
.
Table 16–2 (Cont.) User-Defined WebGate Parameters
User-Defined WebGate Parameter Description

Understanding OAM Agent Registration Parameters in the Console
Registering and Managing OAM 11g Agents 16-9
ssoCookie Controls the OAMAuthnCookie cookie.
Default:
ssoCookie=httponly
ssoCookie=Secure
Disable either setting:
ssoCookie=disablehttponly
ssoCookie=disableSecure
Note: These parameters are configured differently depending on your credential
collector configuration.
■For detached credential collector-enabled 11g WebGates, set these parameters
directly in the agent registration page.
■For non-DCC agents (Resource WebGates), these parameters are configured
through user-defined challenge parameters in authentication schemes.
See Also:
Table 19–23, " User-Defined Challenge Parameters for Authentication Schemes"
"Configuring Challenge Parameters for Encrypted Cookies" on page 19-87
"Configuring 11g WebGates and Authentication Policy for DCC" on page 19-109
miscCookies Controls other miscellaneous Access Manager internal cookies. By default, httponly is
enabled for all other (miscellaneous) cookies.
Default:
miscCookies=httponly
miscCookies=Secure
Disable either setting:
miscCookies=disablehttponly
miscCookies=disableSecure
Note: These parameters are configured differently depending on your credential
collector configuration.
■For detached credential collector-enabled WebGates, set these parameters directly
in the agent registration page.
■For non-DCC agents (Resource WebGates), these parameters are configured
through challenge parameters of the same name.
See Also:
Table 19–23, " User-Defined Challenge Parameters for Authentication Schemes"
"Configuring Challenge Parameters for Encrypted Cookies" on page 19-87
"Configuring 11g WebGates and Authentication Policy for DCC" on page 19-109
OAMAuthAuthenticationServiceLoca
tion
11g WebGate non-browser client
functionality
Activates non-browser client functionality and defines the location of the authentication
service.
OAMAuthUserAgentPrefix
=prefix string that acts as the prefix for the "user-agent" HTTP
header value.
For example, to activate this functionality for Identity Connect:
OAMAuthAuthenticationServiceLocation=https://login.example.com/nbc
Non-browser client functionality is deactivated if the parameter is omitted (or is
provided with no value).
See Also: Section IX, "Managing Oracle Access Management Mobile and Social."
Table 16–2 (Cont.) User-Defined WebGate Parameters
User-Defined WebGate Parameter Description
Understanding OAM Agent Registration Parameters in the Console
16-10 Administrator's Guide for Oracle Access Management
16.2.3 About IP Address Validation for WebGates
IP address validation is a function that determines if a client's IP address is the same as
the IP address stored in the OAM session. The
IPValidation
parameter turns IP
address validation on and off; it is a WebGate specific parameter found in the WebGate
profile. If
IPValidation
is
true
, the IP address stored in the session must match the
client's IP address, otherwise, the request (Table 1–2) is rejected and the user must
reauthenticate. By default,
IPValidation
is
false
.
To configure single sign-on between WebGate and an Access Client that does not have
the client IP address at authentication, the IP validation option can be explicitly turned
off (set IP Validation to false). When the IP Validation parameter is set to false, the
browser or client IP address is not used. However, Oracle recommends that you keep
IP validation on whenever possible. Additionally:
■Enabling IP Validation on the WebGate side automatically enables it on the OAM
server side. This can be verified in the Access Manager settings.
■Disabling IP Validation on the WebGate side will not disable it on the OAM server
side.
OAMAuthUserAgentPrefix
11g WebGate non-browser client
functionality
Activates non-browser client functionality and defines the string that acts as a prefix for
the "user-agent" http header value.
OAMAuthAuthenticationServiceLocation
=full URL location of the NBC authentication
service.
For example, to activate this functionality for Identity Connect:
OAMAuthUserAgentPrefix=NBC
Non-browser client functionality is deactivated if this parameter is omitted (or is
provided with no value).
See Also: Section IX, "Managing Oracle Access Management Mobile and Social."
RequestContextCookieExpTime Controls the time (in seconds) to expire OAMRequestContext cookie. Configuring the
cookie lifetime is an optional control for deployments with a critical need to handle
situations where the cookies could proliferate.
Default: not set
In the Resource WebGate registration, add this parameter to expire the
OAMRequestContext cookie in the configured number of seconds using the "Max-Age"
directive on all but IE browsers (default 5 minutes).
Note: For Internet Explorer only, this parameter requires a time sync between the
browser and Web server hosts because IE uses the "Expires" directive to expire the
cookie with an absolute time. However, on IE browsers, when this parameter is not set,
OAMRequestContext cookie is a transient session cookie.
On other (non-IE) browsers, the cookie is persistent and expires based on the time set
using the "Max-Age" directive.
See Also:
OAMRequestContext in Table 18–8, " SSO Cookies"
ProxyTrustedIPList Multi-valued parameter that holds the list of IP addresses of the trusted proxies or load
balancers. See Section 16.2.3.2.1, "Using ProxyTrustedIPList."
ProxyRemoteIPHeaderVar Specifies the name of the HTTP header that contains the list of IP addresses. See
Section 16.2.3.2.2, "Defining ProxyRemoteIPHeaderVar."
Note: Access Manager now supports Internet Protocol version 6
(IPv6) as well as IPv4.
Table 16–2 (Cont.) User-Defined WebGate Parameters
User-Defined WebGate Parameter Description

Understanding OAM Agent Registration Parameters in the Console
Registering and Managing OAM 11g Agents 16-11
side.
■IP Validation on the OAM server side should be disabled manually, if and only if it
is disabled on all the WebGates as well.
■When IP Validation is enabled on the WebGate side, IP Validation on the OAM
server side should never be turned off.
More details are in the following sections.
■For WebGate profile configuration information, see "Viewing or Editing an OAM
Agent Registration Page in the Console."
■Defining The IP Validation Exceptions List
■Enabling IP Validation in Load Balanced Environments
16.2.3.1 Defining The IP Validation Exceptions List
The IP Validation parameter can cause problems with certain Web application
deployments. For example, Web applications managed by a proxy server typically
change the user's IP address, substituting the IP address of the proxy. This prevents
single sign-on from using the cookie. The IP Validation Exceptions parameter lists IP
addresses that are exceptions to this process. When
IPValidation
is
true
, the IP
address is compared to the IP Validation Exceptions List. If the address is found on the
list, it does not need to match the IP address stored in the cookie.
You can add as many IP addresses as needed to the Exceptions list - the actual IP
addresses of the client and not the IP addresses stored in the ObSSOCookie SSO
cookie. If an SSO cookie is from one of the exception IP addresses, the Access System
ignores the address stored in the SSO cookie for validation. (The IP addresses in the IP
Validation Exceptions List can be used when the IP address in the cookie is for a
reverse proxy.)
16.2.3.2 Enabling IP Validation in Load Balanced Environments
In the case of (proxy servers or) a load balancer, Oracle Access Manager can not
enforce true IP validation because an attacker can use the IP address defined in the
exception list. Web applications managed thusly typically change the user's IP address
(substituting the IP address of the proxy or load balancer). This can prevent single
sign-on using the SSO cookie.
A load balancer adds an "X-forwarded-for" header variable to incoming HTTP
requests, containing a comma-space-separated list of the original IP number of the
requester. Consider the following example in which the request passed proxy1, proxy2
and proxy3 (proxy3 appears as the remote address of the request). The last IP address
is always the IP address that connects to the last proxy.
X-Forwarded-For: client1, proxy1, proxy2
The trust list will be referenced to look up each IP address from the header, starting
with the right-most value. The left-most IP address being the farthest downstream
client and each successive proxy that passed the request (adding the IP address from
which it received the request).
Within the specified order, the first IP address that does not match any of those in the
trusted list is treated as an apparent client IP (defined as the IP address of the initiator
of the connection to the furthest node along the communication path that can be
trusted). Additionally:
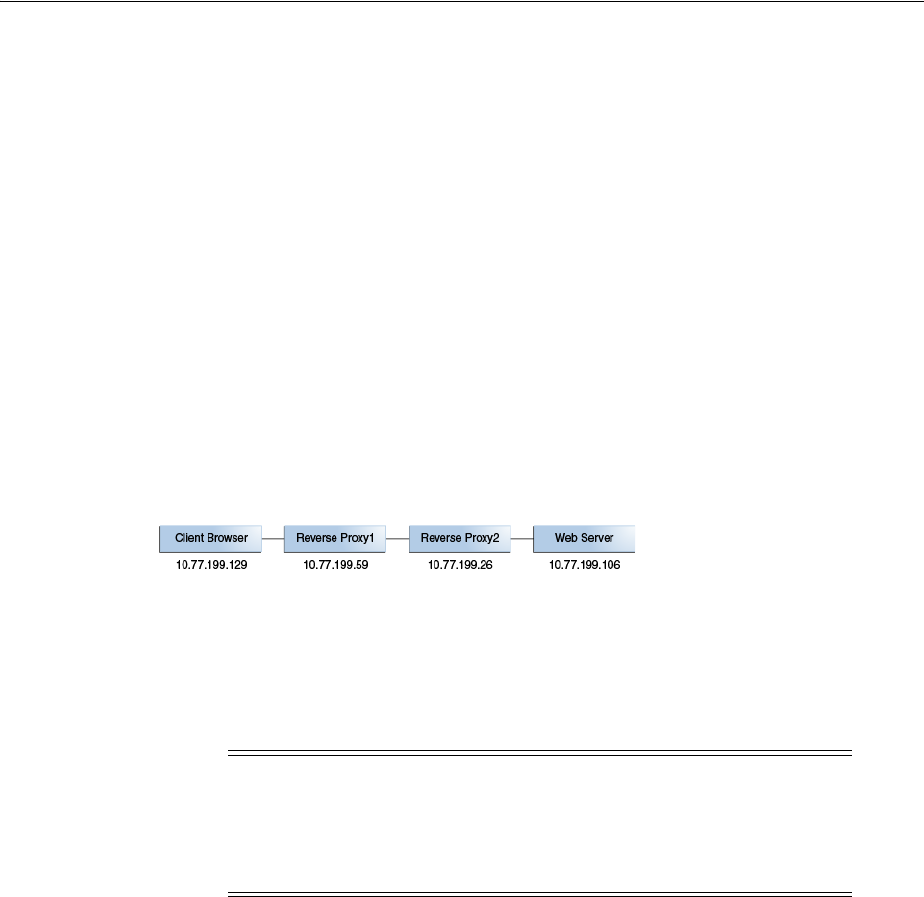
Registering an OAM Agent Using the Console
16-12 Administrator's Guide for Oracle Access Management
■When all IP addresses from the header (starting from the right side) match with
entries in the trusted list, WebGate chooses the end client IP (the left most IP
address in the header).
■When the IP address is determined, WebGate obtains a session token that contains
the apparent client IP address and IP validation is evaluated by comparing the IP
address against the address in the session token.
■When the IP validation feature is enabled within a load balanced deployment,
authentication (session creation) and authorization is done by the WebGate with
this feature; otherwise the authenticated user must re-authenticate. When
WebGate searches for the particular HTTP header, the search is case-insensitive.
For example, "X-Forwarded-For" and "X-FORWARDED-FOR" are treated the same.
16.2.3.2.1 Using ProxyTrustedIPList
ProxyTrustedIPList
is a user defined, multi-valued
WebGate parameter that holds the list of IP addresses for the trusted proxies or load
balancers. The values are space separated. The IP addresses in the IP Validation
Exceptions List can be used when the IP address in the cookie is for a reverse proxy.
Figure 16–2 Load Balanced Deployment
In Figure 16–2, the end user's HTTP request passes through REVERSEPROXY1 and
REVERSEPROXY2 to reach the actual Web server. In this case, the IP addresses of
REVERSEPROXY1 and REVERSEPROXY2 should be added in the ProxyTrustedIPList
list as follows:
ProxyTrustedIPList=10.77.199.59 10.77.199.26
16.2.3.2.2 Defining ProxyRemoteIPHeaderVar The ProxyRemoteIPHeaderVar parameter
specifies the name of the HTTP header that contains the list of IP addresses. If this
parameter is not provided, the default header X-Forwarded-For is used. This
parameter can be configured like any other user-defined parameter in a WebGate
profile. For example, in the deployment described in Using ProxyTrustedIPList,
"X-FORWARDED-FOR" and other headers that come to the Web server take the
following form.
HTTP_X_FORWARDED_FOR="10.77.199.129, 10.77.199.59"
REMOTE_ADDR="10.77.199.26"
16.3 Registering an OAM Agent Using the Console
This procedure is for both a WebGate or programmatic Access Client. Registration
steps are the same. You can register an OAM-type agent before you deploy it. Users
with valid Administrator credentials can perform the following task to register a
WebGate using the Oracle Access Management Console.
Note: In a centralized authentication deployment, if any Resource
WebGate (RWG) or Authentication WebGate (AWG) is behind a proxy,
the IP addresses of all intermediaries must be configured (in the
ProxyTrustedIPList
parameter) in the profile of the WebGate behind
the proxy. Otherwise, IP validation failures can occur.

Registering an OAM Agent Using the Console
Registering and Managing OAM 11g Agents 16-13
After agent registration, you can change the communication mode of the OAM Server
if needed. Communication between the agent and server continues to work as long as
the WebGate mode is at least at the same level as the OAM Server mode or higher. See
Appendix C.
Prerequisites
Confirm that at least one OAM Server is running in the same mode as the agent to be
registered.
To register an OAM Agent
1. From the Oracle Access Management Console Launch Pad, click SSO Agent and
one of the following to open a fresh page:
■New OAM 11g Agent
■New OAM 10g Agent (see also Chapter 25)
2. On the Create OAM ... WebGate page, enter required details (those with an *) to
register this Agent ().
3. Protected Resource List: In this table, enter individual resource URLs to be
protected by this Agent, as shown in Table 16–1.
4. Public Resource List: In this table, enter individual resource URLs to be public
(not protected), as shown in Table 16–1.
5. Auto Create Policies: Check to create a fresh Application Domain and policies (or
clear and use the same host identifier as another WebGate and share policies
(Table 16–1)).
6. Click Apply to submit the registration (or close the page without applying
changes).
7. 10g WebGate: See Chapter 25 and:
a. Proceed as needed for your environment (Chapter 25):
Existing WebGate: Perform Step 8, then go to Chapter 22, "Configuring
Centralized Logout for Sessions Involving 11g WebGates".
New WebGate: Go to "Locating and Installing the Latest 10g WebGate for
Access Manager 11g" on page 25-14.
8. Copy the artifacts as follows (or install WebGate with the same specifications, then
copy artifacts), including any Simple or Cert mode files. For example, Open mode
files include:
See Also:
■Understanding OAM Agent Registration Parameters in the
Console
■Oracle Fusion Middleware Installation Guide for Oracle Identity
and Access Management chapter "Installing and Configuring
Oracle HTTP Server 11g WebGate for OAM"
Agent & Artifacts Artifacts
11g WebGate/Access Client
ObAccessClient.xml and
cwallet.sso
From the AdminServer (Console) host:
$DOMAIN_HOME/output/$Agent_Name/
To the Agent host: $11gWG_install_dir/WebGate/config

Configuring and Managing Registered OAM Agents Using the Console
16-14 Administrator's Guide for Oracle Access Management
9. Verify Registration: These are similar to steps in "Validating Agent Registration
using the Oracle Access Management Console".
a. In the navigation tree, confirm the Agent name is listed; click the Reset button
in the navigation tree toolbar if needed.
b. Confirm the registration page contains the appropriate information.
c. Auto Create Policies: Confirm the Application Domain was generated, the
host identifier was created for the application, and that resources were created
in the Application Domain and associated with the host identifier.
d. Perform further tests, as described in "Validating Authentication and Access
After Remote Registration".
10. Proceed as needed for your deployment:
■"Configuring and Managing Registered OAM Agents Using the Console"
■Part V, "Managing Access Manager SSO, Policies, and Testing"
16.4 Configuring and Managing Registered OAM Agents Using the
Console
This section provides the following topics to help you manage registered WebGates:
■Understanding Registered OAM Agent Configuration Parameters in the Console
■Searching for an OAM Agent Registration
■Viewing or Editing an OAM Agent Registration Page in the Console
■Deleting OAM Agent Registration Using the Console
16.4.1 Understanding Registered OAM Agent Configuration Parameters in the Console
Whether you registered the agent using the Oracle Access Management Console or the
remote registration utility, you can view the full agent configuration page in the
console, as shown in Figure 16–3.
10g WebGate/Access Client
ObAccessClient.xml
Note: Go to Chapter 25 before
completing this task.
From the AdminServer (Console) host:
$DOMAIN_HOME/output/$Agent_Name/
To the Agent host:
$10gWG_install_dir/oblix/lib/
Agent & Artifacts Artifacts
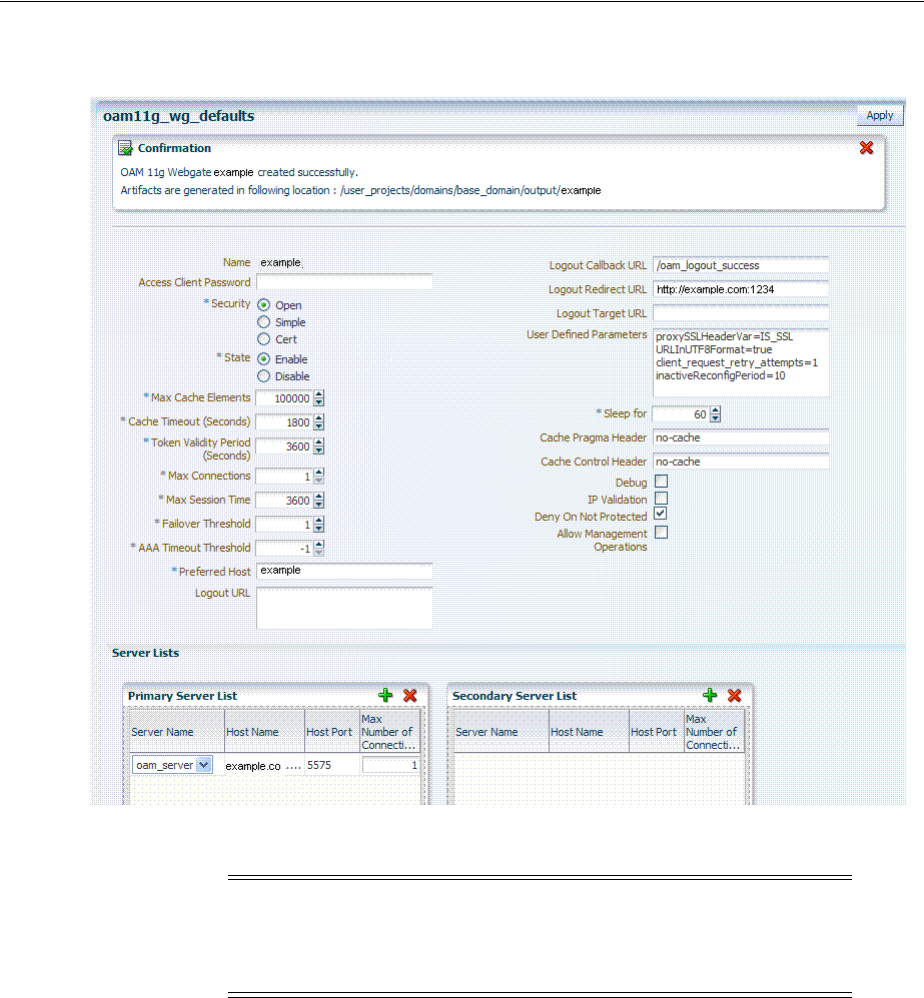
Configuring and Managing Registered OAM Agents Using the Console
Registering and Managing OAM 11g Agents 16-15
Figure 16–3 Confirmation Window and Expanded 11g WebGate Page with Defaults
There are only a few differences between 11g and 10g WebGate registration pages.
Table 16–3 describes elements on an expanded registration. Additional settings
revealed here are used by the OAM Proxy.
Note: Most elements on the agent's page are the same as those you
define when using the remote registration tool with the expanded
OAM template.
ObAccessClient.xml
is populated with values after
agent registration or modification, regardless of the method you use.

Configuring and Managing Registered OAM Agents Using the Console
16-16 Administrator's Guide for Oracle Access Management
Table 16–3 Elements on Expanded 11g and 10g WebGate/Access Client Registration Pages
Element Description
Name
Access Client Password
Security
User-defined Parameters
IP Validation
See: Table 16–1, " Elements on Create Pages for 11g and 10g OAM Agents".
See Also: "About User-Defined WebGate Parameters" on page 16-5
See Also: "About IP Address Validation for WebGates" on page 16-10.
Primary Cookie Domain
10g WebGate only, Chapter 25
This parameter describes the Web server domain on which the Agent is deployed,
for instance,.example.com.
You must configure the cookie domain to enable single sign-on among Web servers.
Specifically, the Web servers for which you configure single sign-on must have the
same Primary Cookie Domain value. WebGate uses this parameter to create the
ObSSOCookie authentication cookie.
This parameter defines which Web servers participate within the cookie domain and
have the ability to receive and update the ObSSOCookie. This cookie domain is not
used to populate the ObSSOCookie; rather it defines which domain the
ObSSOCookie is valid for, and which Web servers have the ability to accept and
change the ObSSOCookie contents.
Default: If the client side domain can be determined during registration, the Primary
Cookie Domain is populated with that value. However, if no domain is found, there
is no value and WebGate uses the host-based cookie.
Note: The more general the domain name, the more inclusive your single sign-on
implementation will be. For example, if you specify b.com as your primary cookie
domain, users will be able to perform single sign-on for resources on b.com and on
a.b.com. However, if you specify a.b.com as your primary cookie domain, users will
have to re-authenticate when they request resources on b.com.
State
Only in the console.
Specifies whether this registration is enabled or disabled.
Default = Enabled
Max Cache Elements Number of elements maintained in the cache. Caches are the following:
■Resource to Authentication Scheme—This cache maintains information about
Resources (URLs), including whether it is protected and, if so, the
authentication scheme used for protection.
■(11g WebGate only) Resource to Authorization Policy—This cache maintains
information about Resources and associated authorization policy—This cache
stores authentication scheme information for a specific authentication scheme
ID.
The value of this setting refers to the maximum consolidated count for elements in
these caches.
Default = 100000
Cache Timeout (seconds) Amount of time cached information remains in the WebGate caches (Resource to
Authentication Scheme, Authentication Schemes, and 11g WebGate only Resource to
Authorization Policy) when the information is neither used nor referenced.
Default = 1800 (seconds)
Token Validity Period (seconds)
11g WebGate only
Maximum valid time period for an agent token (the content of OAMAuthnCookie
for 11g WebGate).
Default = 3600 (seconds)
Note: For 10g WebGates, use Cookie Session Time to set the Token Validity Period.
Max Connections The maximum number of connections that this WebGate can establish with the
OAM Server. This number must be the same as (or greater than) the number of
connections that are actually associated with this agent.
Default = 1
Max Session Time Maximum time to keep network connections from this WebGate to the OAM Server
alive. After elapsed time, all the WebGate to OAM Server network connections will
be shutdown and replaced with new ones.
The unit in which to define this value is based on the maxSessionTimeUnits
user-defined parameter which can be minutes or hours. When
maxSessionTimeUnits is not defined, the unit is defaulted to hours.

Configuring and Managing Registered OAM Agents Using the Console
Registering and Managing OAM 11g Agents 16-17
Failover Threshold Number representing the point when this WebGate opens connections to a
Secondary OAM Server.
Default = 1
For example, if you type 30 in this field and the number of connections to primary
OAM Server falls to 29, this Agent opens connections to secondary OAM Server.
AAA Timeout Threshold Number (in seconds) to wait for a response from the OAM Server. If this parameter
is set, it is used as an application TCP/IP timeout instead of the default TCP/IP
timeout.
Default = -1 (default network TCP/IP timeout is used)
If using a simple mode WebGate, you can improve the response time of the OAM
login page by changing the
aaaTimeoutThreshold
time parameter in the WebGate
profile from -1 to 10.
A typical value for this parameter is between 30 and 60 seconds. If set to a very low
value, the socket connection can be closed before a reply from OAM Server is
received, resulting in an error.
For example, suppose a WebGate is configured to talk to one primary OAM Server
and one secondary OAM Server. If the network wire is pulled from the primary
OAM Server, the WebGate waits for the TCP/IP timeout to learn that there is no
connection to the primary OAM Server. The WebGate tries to reestablish the
connections to available servers starting with the primary OAM Server. Again, the
Agent waits for the TCP/IP timeout to determine if a connection can be established.
If it cannot, the next server in the list is tried. If a connection can be established to
another OAM Server (either a primary or secondary), the requests are re-routed.
However this can take longer than desired.
When finding new connections, WebGate checks the list of available servers in the
order specified in its configuration. If there is only one primary OAM Server and
one secondary OAM Server specified, and the connection to the primary OAM
Server times out, the Agent still tries the primary OAM Server first. As a result, the
Agent cannot send requests to an OAM Server for a period greater than twice the
setting in the OAM Server Timeout Threshold.
If the OAM Server takes longer to service a request than the value of the timeout
threshold, the Agent abandons the request and retries the request on a new
connection. Note that the new connection that is returned from the connection pool
can be to the same OAM Server, depending on your connection pool settings. Also,
other OAM Server may also take longer to process the request than the time
specified on the threshold. In these cases, the Agent can continue to retry the request
until the OAM Server is shut down.
ServerConnectionReadTimeout This parameter can be configured in the ASDK Agent User Defined Parameters
section, for further timeout fine-tuning. This setting can be configured for TCP read
timeout if required. The read timeout is the timeout on waiting to read data.
Specifically, if the server fails to send a byte n seconds after the last byte, a read
timeout error will be raised.
poolTimeOut This parameter can be configured in the ASDK Agent User Defined Parameters
section. poolTimeout is the maximum time a request thread will wait to get a
connection from the connection pool, before throwing an exception. The default is 30
seconds.
Idle Session Timeout
10g WebGate only, Chapter 25
Default: 3600
Release 7.0.4 WebGates enforced their own idle session timeout only.
10.1.4.0.1 WebGates enforced the most restrictive timeout value among all WebGates
the token had visited.
With 10g (10.1.4.3), the 7.0.4 behavior was reinstated as the default with this element.
To set Idle Session Timeout logic:
■The default value of
leastComponentIdleTimeout
instructs the WebGate to use
the most restrictive timeout value for idle session timeout enforcement.
■A value of
currentComponentIdleTimeout
instructs the WebGates to use the
current WebGate timeout value for idle session timeout enforcement.
Table 16–3 (Cont.) Elements on Expanded 11g and 10g WebGate/Access Client Registration Pages
Element Description

Configuring and Managing Registered OAM Agents Using the Console
16-18 Administrator's Guide for Oracle Access Management
Preferred Host Specifies how the hostname appears in all HTTP requests as users attempt to access
the protected Web server. The hostname within the HTTP request is translated into
the value entered into this field regardless of the way it was defined in a user's
HTTP request.
The Preferred Host function prevents security holes that can be inadvertently
created if a host's identifier is not included in the Host Identifiers list. However, it
cannot be used with virtual Web hosting. For virtual hosting, you must use the Host
Identifiers feature.
Defaults to Name (of WebGate registration)
User Defined Parameters See Also: "About User-Defined WebGate Parameters" on page 16-5 and Oracle
Fusion Middleware Performance and Tuning Guide
Logout URL
10g and 11g WebGates
The Logout URL triggers the logout handler, which removes the cookie
(ObSSOCookie for 10g WebGates; OAMAuthnCookie for 11g WebGates) and
requires the user to re-authenticate the next time he accesses a resource protected by
Access Manager.
Default = [] (not set)
Note: This is the standard 10g WebGate configuration parameter used to trigger
initial logout through a customized local logout page as described in "Configuring
Centralized Logout for 10g WebGate with 11g OAM Servers" on page 25-22.
Additional Logout for 11g WebGate Only For 11g WebGate single sign-off behavior, specific logout elements and values
automate the redirect to a central Logout URL, callback URL, and end_URL.
See Also: Table 22–2, " Logout Details After Registration (ObAccessClient.xml)"
Logout Callback URL
11g WebGate only
The URL to
oam_logout_success
, which clears cookies during the call back. This can
be a URI format without host:port (recommended), where the OAM Server calls back
on the host:port of the original resource request. For example:
Default = /oam_logout_success
This can also be a full URL format with a host:port, where OAM Server calls back
directly without reconstructing callback URL.
Note: In the remote registration template this parameter is named
logoutCallbackUrl (Table 16–10).
See Also: Table 22–2, " Logout Details After Registration (ObAccessClient.xml)"
Logout Redirect URL
11g WebGate only
This parameter is automatically populated after agent registration completes.By
default, this is based on the OAM Server host name with a default port of 14200. For
example:
Default = http://OAMServer_host:14200/oam/server/logout
See Also: Table 22–2, " Logout Details After Registration (ObAccessClient.xml)"
Logout Target URL
11g WebGate only
The value is the name for the query parameter that the OPSS applications passes to
WebGate during logout; the query parameter specifies the target URL of the landing
page after logout completes.
Default: end_url
Note: The end_url value is configured using param.logout.targeturl in
jps-config.xml.
See Also: Table 22–2, " Logout Details After Registration (ObAccessClient.xml)"
Sleep for (seconds) The frequency (in seconds) with which the OAM Server checks its connections to the
directory server. For example, if you set a value of 60 seconds, the OAM Server
checks its connections every 60 seconds from the time it comes up.
Default: 60 (seconds)
Table 16–3 (Cont.) Elements on Expanded 11g and 10g WebGate/Access Client Registration Pages
Element Description

Configuring and Managing Registered OAM Agents Using the Console
Registering and Managing OAM 11g Agents 16-19
Cache Pragma Header
Cache Control Header
WebGate only (not Access Clients)
These settings apply only to WebGates and control the browser's cache.
By default, both parameters are set to no-cache. This prevents WebGate from
caching data at the Web server application and the user's browser.
However, this may prevent certain operations such as downloading PDF files or
saving report files when the site is protected by a WebGate.
You can set the Access Manager SDK caches that the WebGate uses to different
levels. See http://www.w3.org/Protocols/rfc2616/rfc2616-sec14.html section 14.9
for details.
All of the cache-response-directives are allowed. For example, you may need to set
both cache values to public to allow PDF files to be downloaded.
Defaults: no-cache
See Also: Oracle Fusion Middleware Performance and Tuning Guide
Debug Debugging can be enabled or not.
Deny on Not Protected
WebGates only (not Access Clients)
Oracle recommends enabling Deny On Not Protected.
When enabled, this element denies access to all resources to which access is not
explicitly allowed by a rule or policy. Enabling this can limit the number of times the
WebGate queries the OAM Server, and can improve performance for large or busy
Application Domains.
■11g WebGate: Always enabled, and cannot be changed
■10g WebGate: Can be disabled.
Important: Deny on Not Protected overrides Host Identifiers and Preferred Host.
Oracle recommends enabling Deny on Not Protected. Otherwise security holes can
occur in large installations with multiple Host Identifiers, virtual hosts, and other
complex configurations.
Allow Management Operations This Agent Privilege function enables the provisioning of session operations per
agent, as follows:
■Terminate session
■Enumerate sessions
■Add or Update attributes for an existing session
■List all attributes for a given session ID or read session
Default: Disabled
Note: Only privileged agents can invoke session management operations. When this
parameter is enabled, session management requests (listed above) are processed by
the OAM Server. If disabled, such requests are rejected for the agent.
11g WebGate only
Allow Credential Collector Operations
11.1.2 and later WebGate only
Activates WebGate detached credential collector functionality for simple-form or
dynamic multi-factor authentication.
Default: Disabled
See Also: "Configuring 11g WebGates and Authentication Policy for DCC" on
page 19-109.
Sharepoint Impersonation User
10g WebGate only, Chapter 25
The trusted user for impersonation, in Active Directory. This user should not be
used for anything other than impersonation. The constraints are the same as any
other user in Active Directory.
Note: SharePoint impersonation is separate and distinct from the Access Manager
user impersonation feature described in the Oracle Fusion Middleware Developer's
Guide for Oracle Access Management.
Table 16–3 (Cont.) Elements on Expanded 11g and 10g WebGate/Access Client Registration Pages
Element Description
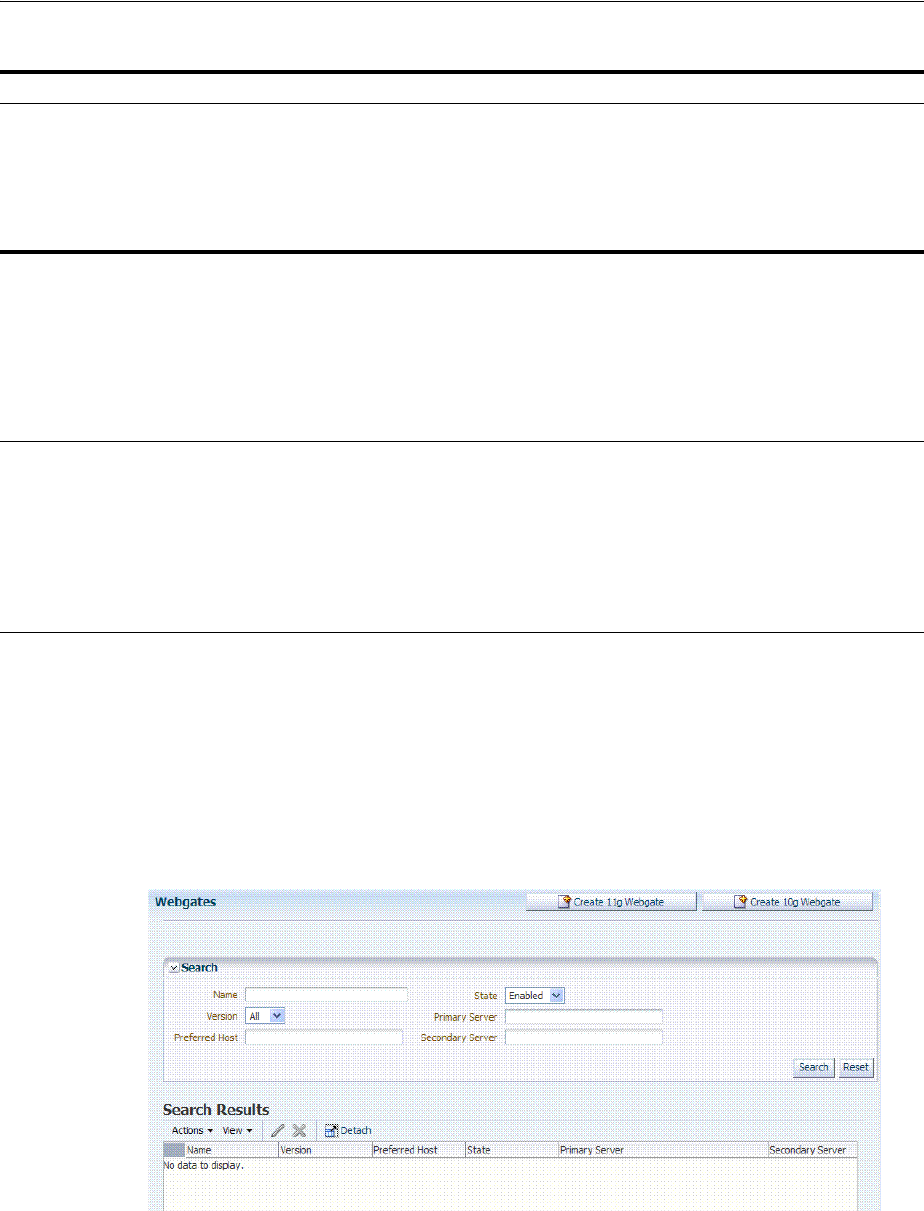
Configuring and Managing Registered OAM Agents Using the Console
16-20 Administrator's Guide for Oracle Access Management
16.4.2 Searching for an OAM Agent Registration
Figure 16–4 shows the WebGates Search controls, defaults, and the empty Search
Results table. From this page you can create a new 11g WebGate or 10g WebGate
registration, or search for a specific WebGate or group of WebGates (all 11g WebGates,
for instance).
Figure 16–4 WebGate Search Controls and Create ... Buttons
If you do not know the exact name, you can use a wild card (*) in the search string.
From the search results table, you can choose an name to open and view or edit the
registration page.
The controls available on this page are described in Table 16–4.
Sharepoint Impersonation Password
10g WebGate only, Chapter 25
This is the trusted user password for impersonation. The constraints are the same as
any other user password in Active Directory.
Oracle recommends that the user choose a very complex password, because the
trusted user is granted powerful permissions. Also, check the box
Password Never
Expires
. The impersonation module should be the only entity that ever sees the
trusted user account. It is extremely difficult for an outside agency to discover that
the password has expired.
Primary Server List Identifies Primary Server details for this Agent. The default is based on the OAM
Server:
■Server Name
■Host Name
■Host Port
■Max Number (maximum connections this WebGate will establish with the
OAM Server (not the maximum total connections the WebGate can establish
with all OAM Servers).)
Secondary Server List Identifies Secondary OAM Server details for this agent, which must be specified
manually:
■Server Name
■Host Name
■Host Port
■Max Number (maximum connections this WebGate will establish with the
OAM Server (not the maximum total connections the WebGate can establish
with all OAM Servers).)
Table 16–3 (Cont.) Elements on Expanded 11g and 10g WebGate/Access Client Registration Pages
Element Description
Configuring and Managing Registered OAM Agents Using the Console
Registering and Managing OAM 11g Agents 16-21
Prerequisites
The OAM Agent must be a registered agent of Access Manager.
To search for a OAM Agent registration
1. From the Oracle Access Management Console, click SSO Agents.
2. Double-click the OAM Agents node.
3. Find:
■All Enabled: Select Version All, State All, and click the Search button.
■An Agent Version: From the Agent version list, choose 10g or 11g and click
the Search button.
■An Agent Name: In the text field, enter the exact name of the instance you
want to find and click the Search button. For example:
my_OAM_Agent
4. Click the Search Results tab to display the results table, then:
■Edit or View: Click the Edit command button in the tool bar to see the
configuration page.
■Delete: Proceed to "Deleting OAM Agent Registration Using the Console" on
page 16-23.
■Detach: Click Detach in the tool bar to expand the table to a full page.
■Reconfigure Table: Select a View menu item to alter the appearance of the
results table.
5. Apply any changes (or dismiss the page) when you finish.
Table 16–4 OAM Agent Search Controls
Control Description
Create 11g WebGate Click to open a fresh 11g WebGate registration page.
Create 10g WebGate Click to open a fresh 10g WebGate registration page and see Chapter 25,
"Registering and Managing 10g WebGates with Access Manager 11g".
Name Enter the name (or partial name and wild card (*)) as defined on the
registration page. For example: entering a* could return Agent_WebGate_
AccessDebugNew in the result table.
Version Choose a WebGate version to narrow the search and results:
■11g
■10g
Preferred Host Enter all (or part of with a wild card (*)) hostname as it appears in HTTP
requests. For example: iam* could return IAMSuiteAgent in the result
stable.
State Choose a WebGate state to narrow the search and results:
■Enabled
■Disabled
Primary Server Enter the entire (or partial with a wild card (*)) Primary Server name.
Secondary Server Enter the entire (or partial with a wild card (*)) Secondary Server name.

Configuring and Managing Registered OAM Agents Using the Console
16-22 Administrator's Guide for Oracle Access Management
16.4.3 Viewing or Editing an OAM Agent Registration Page in the Console
This procedure is the same whether you are editing a WebGate or Access Client
registration. Users with valid Administrator credentials can change any setting for
registered WebGates and programmatic Access Clients using the Oracle Access
Management Console, as described in the following procedure. For example, you
might want to revise the time-out threshold or other settings used by the OAM Proxy.
After changes, updated details are propagated through a runtime configuration
update process. There is usually no need to copy the artifacts over to the WebGate
configuration area. (Artifacts need only be copied to the WebGate directory path if the
agent name, access client password, or security mode is changed.)
Prerequisites
The agent must be registered and available in the Oracle Access Management Console.
To view or modify details for a registered OAM Agent
1. From the Oracle Access Management Console, click SSO Agents.
a. Double-click OAM Agents node to display the Search page.
b. Find the Registration: See "Searching for an OAM Agent Registration".
c. Click the Agent name in the results table to open the page.
2. Modify Agent details, and Primary or Secondary Server details, as needed
(Table 16–1, Table 16–3).
3. User-Defined Parameters: Add or modify these as desired (Table 16–2).
4. Click Apply to submit changes and dismiss the Confirmation window (or close the
page without applying changes).
5. Copy the artifacts as follows (or install WebGate with the same specifications, then
copy artifacts), including any Simple or Cert mode files. For example, Open mode
files include:
6. Proceed as needed for your deployment:
Note: All changes made using the Oracle Access Management
Console are taken up without restarting the application server, and are
reflected automatically after the reconfiguration time-out period.
See Also:
■About Create OAM WebGate Page and Parameters
Agent & Artifacts Artifacts
11g WebGate/Access Client
ObAccessClient.xml and
cwallet.sso
From the AdminServer (Console) host:
$DOMAIN_HOME/output/$Agent_Name/
To the Agent host: $11gWG_install_dir/WebGate/config.
10g WebGate/Access Client
ObAccessClient.xml
Note: Go to Chapter 25 before
completing this task.
From the AdminServer (Console) host:
$DOMAIN_HOME/output/$Agent_Name/
To the Agent host
$10gWG_install_dir/oblix/lib/ObAccessClient.xml

Configuring and Managing Registered OAM Agents Using the Console
Registering and Managing OAM 11g Agents 16-23
Part V, "Managing Access Manager SSO, Policies, and Testing".
16.4.4 Deleting OAM Agent Registration Using the Console
Users with valid Administrator credentials can perform the following procedure to
delete a registered WebGate or Access Client from the Oracle Access Management
Console.
Prerequisites
Evaluate the Application Domain, resources, and policies associated with this agent
and ensure that these are configured to use another agent (or be removed).
To delete a WebGate or Access Client registration
1. From the Oracle Access Management Console, click SSO Agents.
a. Open the OAM Agents node to display the Search page.
b. Find the Registration: See "Searching for an OAM Agent Registration".
c. Select the desired registration from the results table, and open it to confirm it
is the right agent to remove, close the page.
d. Select the name in the results table, click the Delete (X) button, check the
Confirmation dialog and then close the page.
e. Confirm the Agent name is no longer listed in the navigation tree.
2. Remove the 10g Agent Instance: Perform the following steps (see "Removing a
10g WebGate from the Access Manager 11g Deployment" on page 25-27, if
needed).
a. Shut down the Web server.
b. Remove WebGate software using the utility provided in the following
directory path:
$WebGate_install_dir/oui/bin
Windows: setup.exe -d
Unix: runInstaller -d
c. Revert to the httpd.conf version before updates for WebGate. For example:
Copy: httpd.conf.ORIG
To: httpd.conf
d. Restart the Web server.
e. On the agent host, manually remove the WebGate instance directory:
11g WebGate/Access Client: $11gWebGate_instance_dir/WebGate/config.
Note: Deleting an agent registration removes only the registration
(not the associated host identifier, Application Domain, resources, or
the agent itself).
See Also:
■Understanding OAM Agent Registration Parameters in the
Console

Understanding the Remote Registration Tool, Modes, and Process
16-24 Administrator's Guide for Oracle Access Management
10g WebGate/Access Client: $WebGate_install_dir/oblix/lib/
16.5 Understanding the Remote Registration Tool, Modes, and Process
As an alternative to using the console for agent registration, you can use the remote
registration utility, oamreg, with Oracle-provided templates. Administrators using the
Oracle Access Management Console or remote registration utility must have
credentials stored in the System Store (Chapter 5).
This section provides details about remote registration in the following topics:
■About Remote Registration Command Arguments and Modes
■Common Elements within Remote Registration Request Templates
■About Key Use, Generation, Provisioning, and Storage
16.5.1 About Remote Registration Command Arguments and Modes
Before using the remote registration tool, two environment variables within the script
must be set as shown in the samples in Table 16–5, which presume the location of the
tool to be $OAM_REG_HOME on a Linux system. Your environment might be
different.
Additionally, before using the remote registration tool, you must modify several tags
in the request file, as described later (Table 16–9).
Remote Registration Command Arguments
The arguments required to run the remote registration script are listed in Table 16–6.
Remote Registration Sample Commands
Sample commands are shown in Table 16–7, which presume the location of the tool to
be $OAM_REG_HOME on a Linux system.
See Also: "Introduction to Remote Registration" on page 15-8
Table 16–5 Environment Variables to Set within oamreg
Environment Variable Description
OAM_REG_HOME The directory under which RREG.tar was exploded, followed by
/rreg:
$OAM_HOME/oam/server/rreg/client/rreg
JAVA_HOME The location where Java is located on the client computer. For
example: $WLS_HOME/Middleware/jdk160_11.
Note: $JAVA_HOME should point to JDK 1.6.
Table 16–6 Remote Registration Command Arguments: mode
Arguments Description
mode Either:
■
inband
■
outofband
input/
filename.xml
Either the absolute path to the input file (*request.xml or an
agentName_Response.xml), or the path relative to the value of $OAM_
REG_HOME.
The preferred location is $OAM_REG_HOME/input

Understanding the Remote Registration Tool, Modes, and Process
Registering and Managing OAM 11g Agents 16-25
After running the script, messages inform you of success or failure. Following a
successful registration or update, you must copy the artifacts to the Agent host, as
outlined in "About Updated Agent Configuration Files" on page 15-10.
16.5.2 Common Elements within Remote Registration Request Templates
Table 16–8, shows the global elements that are common within all remote registration
request files, regardless of agent type.
Table 16–7 Remote Registration Command Samples
Command Type Sample (on Linux)
In-band Administrator In-band
Request
./bin/oamreg.sh inband input/*Request.xml
In-band Administrator
Submitted Request
./bin/oamreg.sh outofband input/starting_request.xml
Out-of-band Administrator
Returned Response
./bin/oamreg.sh outofband input/agentName_Response.xml
[prompt_flag] value:
[-noprompt]
Optional. When -noprompt is used, oamreg does not wait for prompts
(password, and so on). Instead these values can be piped in, either from
an input file or from the command line itself using an echo command.
Examples from $OAM_REG_HOME location:
(echo username; echo password; echo WebGate_password;) |
./bin/oamreg.sh inband input/Request.xml -noprompt
config.file
(echo username; echo password; echo WebGate_password; echo
httpscert_trust_prompt;) | ./bin/oamreg.sh inband
input/Request.xml -noprompt
(echo username; echo password; echo WebGate_password; echo
cert_password;) | ./bin/oamreg.sh inband input/Request.xml
-noprompt
(echo username; echo password; echo WebGate_password; echo
httpscert_trust_prompt; echo cert_password;) |
./bin/oamreg.sh inband input/Request.xml -noprompt
See Also: "Updating Agents Remotely" on page 16-37
Note: After launching the script, Administrators are prompted for a
username and password (unless -
noprompt
is used as shown in
Table 16–7.)
Note: In Table 16–8, descriptions of each element are omitted; see
Table 16–1.
Table 16–8 Common Elements in Remote Registration Requests
Element Example
<serverAddress>
<serverAddress>http://{oam_admin_ser
ver_host}:{oam_admin_server_port}
</serverAddress>
<agentName>
<agentName>RREG_OAM</agentName>
<hostIdentifier>
<hostIdentifier>RREG_HostId11G
</hostIdentifier>

Understanding the Remote Registration Tool, Modes, and Process
16-26 Administrator's Guide for Oracle Access Management
16.5.3 About Key Use, Generation, Provisioning, and Storage
Each registered agent has a symmetric key, regardless of the registration method
(Oracle Access Management Console versus remote registration).
Each application will have a symmetric key whether it is protected through mod_osso,
or an OAM Agent. This key is generated by the registration tool. Storage of the
application mapping, key, and type of Agent persists in the system configuration for
retrieval as needed.
Key Use
Each 11g WebGate agent has its own secret key that is shared between the agent and
the OAM Server. If one 11g WebGate is compromised, other 11g WebGates are
unaffected. The following presents an overview:
■Encrypt/Decrypt the host-based WebGate-specific OAMAuthnCookie_
<host:port>_<random number>.
■Encrypt/Decrypt the data that is redirected between WebGate and OAM Server.
Key Generation
Figure 16–5 illustrates the process of key generation, which occurs automatically when
the agent is registered, regardless of the method used (Oracle Access Management
Console versus remote registration). There is one symmetric key per agent.
Extended Templates Only
<agentBaseUrl>
<agentBaseUrl>http://{web_server_
host):(web_server_port}
</agentBaseUrl>
<autoCreatePolicy>
<autoCreatePolicy>true
</autoCreatePolicy>
<applicationDomain>
<applicationDomain>RREG_OAM11G
</applicationDomain>
<virtualhost>
<virtualhost>false<virtualhost>
Table 16–8 (Cont.) Common Elements in Remote Registration Requests
Element Example
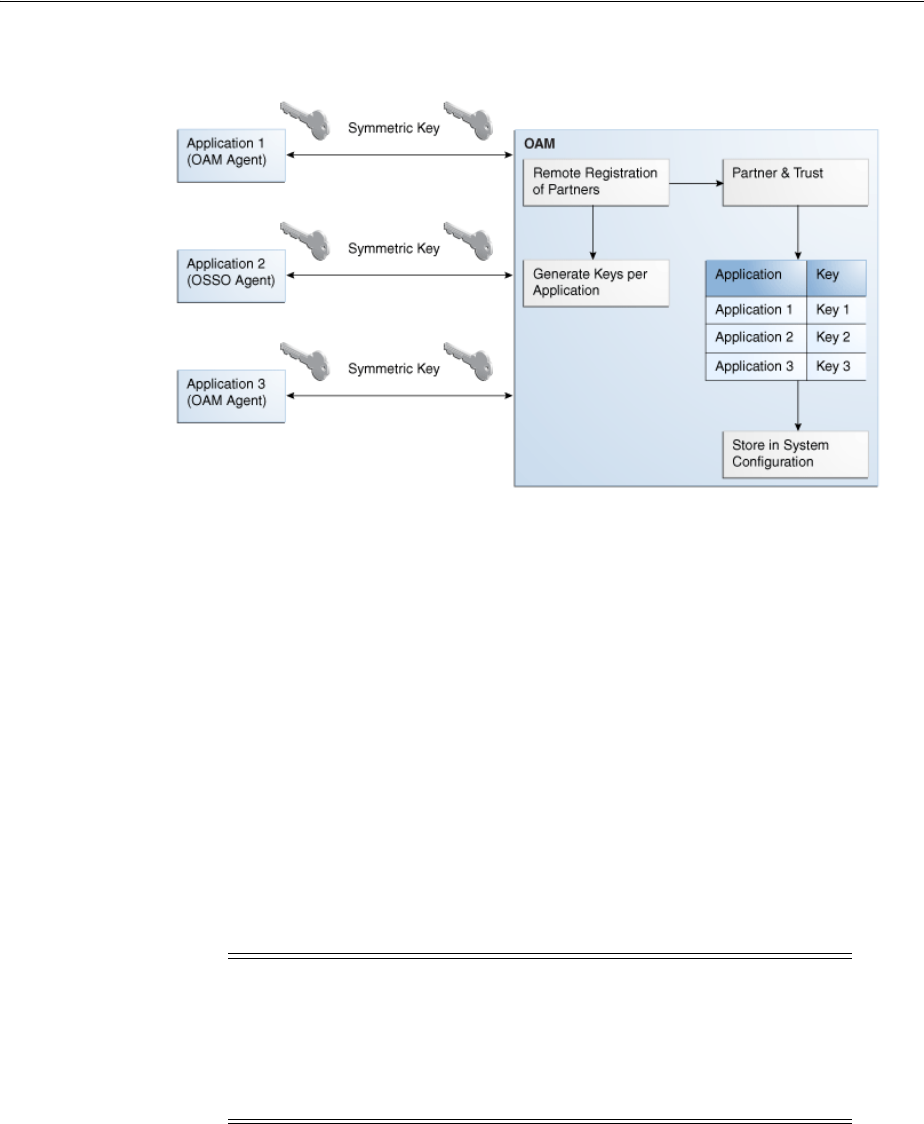
Understanding the Remote Registration Tool, Modes, and Process
Registering and Managing OAM 11g Agents 16-27
Figure 16–5 Key Generation
Key Accessibility and Provisioning
Each Agent specific key must be accessible to the corresponding WebGate through a
secure local storage on the client machine. Cryptographic keys are not stored in the
data store. Instead, an alias to an entry in a Java keystore or CSF repository is stored;
the Partner and Trust Management API obtain the actual key when it is requested. The
agent specific secret key:
■Is provisioned during remote registration (either in-band mode or out-of-band
mode)
■Is unique so that it can uniquely identify each agent.
■Is distributed securely back to the agent (either through the wire during in-band
mode or through a separate secure channel during out-of-band mode).
■ Is saved in the Oracle Secret Store, in the SSO wallet. SSO wallet creation applies
only to 11g WebGates (not to 10g WebGates or other agent types).
■Is saved in the Oracle Secret Store, in an auto-login editable SSO wallet, upon
completion of registration.
Key Storage
The SSO wallet containing the agent key must be located in cwallet.sso, in the
directory with ObAccessClient.xml in WebGate_instance_dir/WebGate/config (for
example, $WebTier_MW_Home/Oracle_WT1/instances).
Note: The Oracle Secret Store is a container that consolidates the
storage of secret keys and other security-related secret information
inside the Oracle Wallet, not in plain-text. The SSO wallet relies on
underlying file system security to protect its data. Opening this wallet
does not require a password. The SSO wallet depends on the
operating system and file permissions for its security.

Understanding Remote Registration Templates: OAM Agents
16-28 Administrator's Guide for Oracle Access Management
The SSO wallet does not require a user password, and should be protected with the
proper file permission (700) or registry on Windows.
16.6 Understanding Remote Registration Templates: OAM Agents
Oracle provides both a short and extended registration request template for use with
the remote agent registration tool: oamreg.sh (Linux) or oamreg.bat (Windows). This
topic focuses on OAM Agent templates (WebGates and Access Clients).
Regardless of the template you choose (short or extended), only a few differences exist
between 11g and 10g OAM Agent templates, listed in Table 16–9 and stored in
$OAM_
REG_HOME/input/
.
16.6.1 OAM Agent Parameters for Remote Registration
Table 16–10 describes elements specific to OAM Agent remote registration requests.
Element names in request templates might differ slightly from counterparts in the
Oracle Access Management Console. Unless explicitly stated, all information applies
equally to requests for both 10g and 11g WebGates/Access Clients. Protected, public,
and excluded resource lists are included in both the short and extended request
templates for OAM Agents.
Table 16–9 Remote Registration Request Templates for OAM Agents
Template Type Template Name in $OAM_REG_HOME/input/
Abbreviated (Short) Form OAM11GRequest_short.xml (11g WebGates)
OAMRequest_short.xml (10g WebGates)
Extended (Full) Form OAM11gRequest.xml (11g WebGates)
OAMRequest.xml (10g WebGates)
Other Templates
Update Agent
Create Policies, Update Policies
Out-of-band Response
For a look at these specialized tasks and templates, see:
■"Updating Agents Remotely" on page 16-37
■"Managing Policies and Application Domains Remotely" on
page 20-81
■"Performing Out-of-Band Remote Registration" on page 16-34
Note: Despite being nearly identical for both 10g and 11g WebGates,
be sure to copy and use the appropriate request for your release.
Note: In Table 16–10, descriptions of each element are omitted
because they are shown in Table 16–3.

Understanding Remote Registration Templates: OAM Agents
Registering and Managing OAM 11g Agents 16-29
Table 16–10 Elements in Extended OAM Agent Remote Registration Requests
Element Example
<serverAddress>
<agentName>
<hostIdentifier>
<agentBaseUrl>
<autoCreatePolicy>
<applicationDomain>
<virtualhost>
See Table 16–8, " Common Elements in Remote Registration Requests".
<hostPortVariationsList>
<hostPortVariationsList>
<host>host1</host>
<port>7777</port>
</hostPortVariations>
<host>host2</host>
<port>7778</port>
</hostPortVariations>
</hostPortVariationsList>
<protectedResourcesList>
<protectedResourcesList>
<resource>/</resource>
</protectedResourcesList>
<publicResourcesList>
<publicResourcesList>
<resource>/public/index.html
</resource>
</publicResourcesList>
<excludedresourcesList>
<excludedresourcesList>
<resource>/excluded/index.html
</resource>
</excludedresourcesList>
<primaryCookieDomain>
10g Request Only
In OAMRequest.xml (10g
WebGates) <hostIdentifier> is
also used as preferred HTTP host
<primaryCookieDomain>{client_domain}
</primaryCookieDomain>
<maxCacheElems>
<maxCacheElems>100000
</maxCacheElems>
<cacheTimeout>
<cacheTimeout>1800</cacheTimeout>
<tokenValidityPeriod>
11g Request Only
<tokenValidityPeriod>3600
</tokenValidityPeriod>
<cookieSessionTime>
10g WebGate only, Chapter 25
<cookieSessionTime>3600
</cookieSessionTime>
<maxConnections>
<maxConnections>1</maxConnections>
<maxSessionTime>
<maxSessionTime>24</maxSessionTime>
<idleSessionTimeout>
10g WebGate only, Chapter 25
<idleSessionTimeout>3600>
</idleSessionTimeout
<failoverThreshold>
<failoverThreshold>1
</failoverThreshold>
<aaaTimeoutThreshold>-
<aaaTimeoutThreshold>-1
</aaaTimeoutThreshold>
<sleepFor>
<sleepFor>60</sleepFor>
<debug>
<debug>false</debug>
<security>
<security>open</security

Understanding Remote Registration Templates: OAM Agents
16-30 Administrator's Guide for Oracle Access Management
<denyOnNotProtected>
<denyOnNotProtected>1
</denyOnNotProtected>
<allowManagementOperations>
<allowManagementOperations>false/<allowManagementOperations>
<cachePragmaHeader>
<cacheControlHeader>
<cachePragmaHeader>no-cache
</cachePragmaHeader>
<cacheControlHeader>no-cache
</cacheControlHeader
<ipValidation>
<ipValidation>0</ipValidation>
<ipValidationExceptions>
<ipValidationExceptions>
<ipAddress>10,11,11,11</ipAddress>
<ipAddress>10,11,11,12</ipAddress>
<ipAddress>10,11,11,13</ipAddress>
</ipValidationExceptions>
<logOutUrls>
<logOutUrls>
<url>/logout1.html</url>
<url>/logout2.html</url>
</logOutUrls>
<logoutCallbackUrl>
11g Request Only
<logoutCallbackUrl>/oam_logout_success
</logoutCallbackUrl>
<logoutTargetUrlParamName>
11g Request Only
<logoutTargetUrlParamName>end_url
</logoutTargetUrlParamName>
User-Defined Parameter Names Examples
<userDefinedParameters>
<userDefinedParam>
<name>...</name>
<value>...</value>
</userDefinedParam>
MaxPostDataLength
<userDefinedParameters>
<userDefinedParam>
<name>MaxPostDataLength</name>
<value>750000</value>
</userDefinedParam>
maxSessionTimeUnits
<userDefinedParameters>
<name>maxSessionTimeUnits</name>
<value>hours</value>
</userDefinedParam>
useIISBuiltinAuthentication
<userDefinedParameters>
<name>useIISBuiltinAuthentication
</name>
<value>false</value>
</userDefinedParam>
idleSessionTimeoutLogic
10g WebGates only
<userDefinedParameters>
<name>idleSessionTimeoutLogic
</name>
<value>leastComponentIdleTimeout
</value>
</userDefinedParam>
URLInUTF8Format
<userDefinedParameters>
<name>URLInUTF8Format</name>
<value>true</value>
</userDefinedParam>
Table 16–10 (Cont.) Elements in Extended OAM Agent Remote Registration Requests
Element Example

Performing Remote Registration for OAM Agents
Registering and Managing OAM 11g Agents 16-31
16.7 Performing Remote Registration for OAM Agents
This section includes the following topics describing how to perform remote
registration, which is similar regardless of the agent type:
■Acquiring and Setting Up the Remote Registration Tool
■Creating Your Remote Registration Request
■Performing In-Band Remote Registration
■Performing Out-of-Band Remote Registration
inactiveReconfigPeriod
Shared secret applies to only 10g
WebGate
Configuration applies to only
11g WebGate.
<userDefinedParameters>
<name>inactiveReconfigPeriod</name>
<value>10</value>
</userDefinedParam>
WaitForFailover
<userDefinedParameters>
<name>WaitForFailover</name>
<value>-1</value>
</userDefinedParam>
proxySSLHeaderVar
<userDefinedParameters>
<name>proxySSLHeaderVar</name>
<value>IS_SSL</value>
</userDefinedParam>
client_request_retry_attempts
<userDefinedParameters>
<name>client_request_retry_attempts </name>
<value>1</value>
</userDefinedParam>
ContentLengthFor401Response
<userDefinedParameters>
<name>ContentLengthFor401Response
</name>
<value>0</value>
</userDefinedParam>
SUN61HttpProtocolVersion
<userDefinedParameters>
<name>SUN61HttpProtocolVersion
</name>
<value>1.0</value>
</userDefinedParam>
impersonationCredentials
<userDefinedParameters>
<name>username:password
</name>
<value>cred</value>
</userDefinedParam>
UseWebGateExtForPassthrough
<userDefinedParameters>
<name>UseWebGateExtForPassthrough
</name>
<value>false</value>
</userDefinedParam>
syncOperationMode
<userDefinedParameters>
<name>syncOperationMode</name>
<value>false</value>
</userDefinedParam>
filterOAMAuthnCookie
11g Request only.
<userDefinedParameters>
<name>filterOAMAuthnCookie</name>
<value>true</value>
</userDefinedParam>
Table 16–10 (Cont.) Elements in Extended OAM Agent Remote Registration Requests
Element Example

Performing Remote Registration for OAM Agents
16-32 Administrator's Guide for Oracle Access Management
16.7.1 Acquiring and Setting Up the Remote Registration Tool
The oamreg client tool can be used anywhere, not just on the OAM Server. If the
oamreg home is already exploded, you can use the following procedure to acquire and
update the oamreg script for your operating system:
Windows: oamreg.bat
Linux: oamreg.sh
For remote registration, two variables are required: JAVA_HOME and OAM_REG_
HOME, as described in Table 16–11.
To acquire the tool and update the script with your environment variables
1. Locate RREG.tar.gz file in the following path:
$ORACLE_HOME/oam/server/rreg/client/RREG.tar.gz
2. Untar RREG.tar.gz file, which creates directories beneath
/client
containing the
required tool and templates.
3. In the oamreg script (...
/rreg/client/rreg/bin
) set environment variables as
follows:
a. Set JAVA_HOME to JDK 1.6 (Table 16–11).
b. Set OAM_REG_HOME to the exploded_dir_for_RREG.tar/rreg based on your
environment (client side or server side Table 16–11).
4. Proceed with "Creating Your Remote Registration Request".
Note: Oracle Recommends using the latest tool and files by applying
the latest bundle patch and untarring RREG.tar.gz again as described
here.
Table 16–11 Variables Required for Remote Registration
Location Variable Description
Client Side JAVA_HOME The JDK 1.6 location on the computer that relies on
$JAVA_HOME already set in the environment.
OAM_REG_HOME The absolute file location for RREG HOME (directory
under which RREG.tar was exploded, followed by /rreg
and one directory above where the scripts reside).
For example:
$OAM_HOME/oam/server/rreg/client/rreg
If $ORACLE_IDM_HOME is $MW_HOME/Oracle_IDM:
export $OAM_REG_HOME=$MW_HOME/Oracle_
IDM/oam/server/rreg
rreg folder location
(not RREG.tar.gz
location)
JAVA_HOME Relies on $JAVA_HOME already set in the environment.
OAM_REG_HOME Is already set in the script during the installation.
See Also: "About Remote Registration Command Arguments and
Modes" on page 16-24

Performing Remote Registration for OAM Agents
Registering and Managing OAM 11g Agents 16-33
16.7.2 Creating Your Remote Registration Request
You can use the following procedure to create an appropriate *Request*.xml file to
provide input for the specific agent you want to register.
Prerequisites
Understanding Remote Registration Templates: OAM Agents
To create the registration request
1. Locate the required *Request*.xml input file for the agent you want to register:
Regardless of the template you choose (short or extended), only a few differences
exist between 11g and 10g agent templates stored in
$OAM_REG_HOME/input/
. For
example:
OAM11GRequest.xml
2. Copy the request file to a new name. For example:
From: OAM11GRequest.xml
To: my11gagent_request.xml
3. In the Request file, modify information to reflect details for your agent and the
resources to protect using details in:
■Table 16–9, " Remote Registration Request Templates for OAM Agents"
■Table 16–10, " Elements in Extended OAM Agent Remote Registration
Requests"
4. Proceed with task needed for your environment:
■Performing In-Band Remote Registration
■Performing Out-of-Band Remote Registration
16.7.3 Performing In-Band Remote Registration
The OAM Administrator within the network performs all tasks. This section provides
the steps to perform in-band remote registration, regardless of agent type. For this
example, an OAM Agent is being registered using the short request on a Linux system.
Your agent type, request template, and output files will be different.
Prerequisites
■Acquiring and Setting Up the Remote Registration Tool
■Creating Your Remote Registration Request
To perform in-band remote registration
1. On the computer hosting the Agent, run the registration command and specify
your own *Request*.xml as the input file. For example:
./bin/oamreg.sh inband input/
myagent_request.xml
2. Provide the registration Administrator user name and password when asked.
3. Read the messages on-screen to confirm:
See Also: Oracle Fusion Middleware Installation Guide for Oracle
Identity and Access Management chapter "Installing and Configuring
Oracle HTTP Server 11g WebGate for OAM"

Performing Remote Registration for OAM Agents
16-34 Administrator's Guide for Oracle Access Management
■Success: On-screen message confirms
In-band registration process completed successfully
!
Native Configuration File Location: "... created in output folder
..."
The output folder is in the same location where RREG.tar.gz was expanded:
/rreg/output/AgentName/
4. Review the native configuration file created for the agent in the
/rreg/output/AgentName/ folder.
5. Finalize Registration: Perform the following steps to replace the earlier agent
configuration file if it is not already replaced:
a. Copy artifacts in /rreg/output/AgentName/ to update the agent
configuration. For example:
From the AdminServer (Console) host
/rreg/output/
Agent_Name/
ObAccessClient.xml
and
cwallet.sso
To the Agent host: $11gWG_install_dir/
WebGate/config
. For example:
$WebTier_MW_Home/Oracle_WT1/instances/instance1
/config/OHS/ohs1/WebGate/config
b. Restart the OAM Server hosting the agent.
6. Proceed with "Validating Remote Registration and Resource Protection".
16.7.4 Performing Out-of-Band Remote Registration
This section provides steps for Administrators outside (and inside) the network as
they work together to register an agent remotely.
During out-of-band remote registration, an administrator outside the network submits
a registration request to an Administrator within the network. After processing the
request, the in-band Administrator returns the following files to the out-of-band
Administrator to configure his environment:
The steps performed by each Administrator are identified:
■In-Band Administrator: Identifies a task performed by the Web server
Administrator within the network.
■Out-of-Band Administrator Identifies a task performed by the Web server
Administrator outside the network
Table 16–12 Files Returned by in-band Administrator to out-of-band Administrator
File Description
agentName_Response.xml Returned to, and used by, the out-of-band Administrator. Oracle
recommends that you do not open or edit agentName_Response.xml.
Native Web server configuration
files
Returned to, and used by, the out-of-band Administrator to update
his Web server.
See Also "About Updated Agent Configuration Files" on page 15-10
See Also: Oracle Fusion Middleware Installation Guide for Oracle
Identity and Access Management chapter "Installing and Configuring
Oracle HTTP Server 11g WebGate for OAM"

Performing Remote Registration for OAM Agents
Registering and Managing OAM 11g Agents 16-35
Steps here illustrate registering an OAM Agent on a Linux system. Your templates and
output files will be different.
Prerequisites
Acquiring and Setting Up the Remote Registration Tool
To perform out-of-band remote registration
1. Out-of-Band Administrator: Create and send your starting_request.xml file to the
in-band Administrator for processing (see "Creating Your Remote Registration
Request" on page 16-33):
$WLS_Home/Middleware/Oracle_
$IDM1/oam/server/rreg/client/rreg/output/AgentName/starting_request.xml
2. In-Band Administrator:
a. Run the registration command and specify the out-of-band Administrator's
starting_request.xml as the input file. For example:
./bin/oamreg.sh outofband input/starting_request.xml
b. Provide the Registration Administrator user name and password when asked.
c. Read messages on-screen to confirm:
Success: "... registration process completed successfully!
Response.xml location: "... created in input folder ..."
The input folder is in the same location where RREG.tar.gz was expanded:
/rreg/input/AgentName/
d. Return the agentName_Response.xml file to the out-of-band Administrator
along with any other artifacts. For example:
agentName_Response.xml
3. Out-of-Band Administrator: Updates the environment, as follows.
a. On the computer hosting the Agent, run the remote registration command and
specify the received agentName_Response.xml as the input file. For example:
./bin/oamreg.sh outofband input/
agentName_
Response.xml
b. Copy artifacts generated in /rreg/output/AgentName/ to update the agent
configuration (), then restart the OAM Server hosting the agent. For example,
ObAccessClient.xml and cwallet.sso:
From the AdminServer (Console) host
/rreg/output/
Agent_
Name/
ObAccessClient.xml
and
cwallet.sso
To the Agent host: $11gWG_install_dir/
WebGate/config
. For example:
$WebTier_MW_Home/Oracle_WT1/instances/instance1
/config/OHS/ohs1/WebGate/config
c. Proceed with "Validating Remote Registration and Resource Protection".
See Also: Part VI, "Registering and Using Agents with Access
Manager", if needed.

Introduction to Updating Agents Remotely
16-36 Administrator's Guide for Oracle Access Management
16.8 Introduction to Updating Agents Remotely
Several remote management modes are provided to help Administrators quickly
update, validate, or delete an existing agent registration. This section provides the
following topics:
■About Remote Agent Update Modes
■About Remote 11g OAM Agent Updates Template
16.8.1 About Remote Agent Update Modes
Table 16–13 presents remote agent management modes. Command parameters include
the mode, input *Request.xml file (a relative path with respect to $OAM_REG_HOME,
the preferred location for the input *Request.xml files):
./oamreg.sh <mode> <input_file> [prompt_flag] [component.oam.config_file] <mode>
value
16.8.2 About Remote 11g OAM Agent Updates Template
You use
OAM11GUpdateAgentRequest.xml
to pass specific Agent-update values to the
remote registration tool, oamreg. The primary differences between the update request
and the original registration request is that the update request.
Table 16–13 Remote Agent Update Modes and Input Files
Mode and Input Files Description and Syntax
agentUpdate mode
OAM11GUpdateAgentRequest.xml
OAMUpdateAgentRequest.xml
Allows Administrators to update existing agent attributes, regardless
of agent type:
./bin/oamreg.sh agentUpdate input/*UpdateAgentRequest.xml
See Also:
OpenSSOUpdateAgentRequest, Chapter 23
OSSOUpdateAgentRequest, Chapter 24
agentValidate mode
No input file needed.
Validates whether the agent is already provisioned in Oracle Access
Manager:
./bin/oamreg.sh agentValidate agentname
agentDelete mode
No input file needed.
Allows Administrators to delete the agent registration:
./bin/oamreg.sh agentDelete agentname
Table 16–14 Delta: OAM Agent Update versus Registration Request
Delta Element
Adds <ipValidation>
Omits <ipValidationExceptions>
<hostidentifier>
<virtualhost>
<hostportVariations>
<authCreatePolicy> and application domain-related elements
<ssoServerVersion>
<idleSessionTimeout>
See Also:
■Table 16–3, " Elements on Expanded 11g and 10g WebGate/Access
Client Registration Pages"

Updating Agents Remotely
Registering and Managing OAM 11g Agents 16-37
16.9 Updating Agents Remotely
This section provides the following topics for agents registered with Access Manager,
regardless of agent type:
■Updating Agents Remotely
■Performing Remote Agent Validation
■Performing Remote Agent Removal
16.9.1 Updating Agents Remotely
This topic provides the steps to update agents registered with Access Manager,
regardless of agent type.
Prerequisites
Review About Remote Agent Update Modes
To remotely update an Agent registration
1. Set up the registration tool as described in, "Acquiring and Setting Up the Remote
Registration Tool" on page 16-32.
2. Create your update request using one of the following templates:
■OAM11GUpdateAgentRequest.xml
■OAMUpdateAgentRequest.xml (10g) Chapter 25
■OSSOUpdateAgentRequest.xml Chapter 24
■OpenSSOUpdateAgentRequest.xml Chapter 23
3. On the computer hosting the Agent, run the following command with
agentUpdate
mode specify your own *Request*.xml as the input file. For example:
./bin/oamreg.sh agentUpdate input/*UpdateAgentRequest.xml
4. Provide the registration Administrator user name and password when asked.
5. Read the messages on-screen to confirm:
■Success: On-screen message confirms
agentUpdate process completed successfully!
Native Configuration File Location: "... created in output folder
..."
The output folder is in the same location where RREG.tar.gz was expanded:
/rreg/output/AgentName/
6. Finalize Agent Registration: Copy the updated ObAccessClient.xml and
cwallet.sso.
From the AdminServer (Console) host: /rreg/output/Agent_Name/
To the Agent host: $11gWG_install_dir/WebGate/config. For example:
See Also:
■Chapter 23, "Registering and Managing Legacy OpenSSO Agents"
■Chapter 24, "Registering and Managing Legacy OSSO Agents"
■"Managing 10g OAM Agents Remotely" on page 25-13

Validating Remote Registration and Resource Protection
16-38 Administrator's Guide for Oracle Access Management
$WebTier_MW_Home/Oracle_WT1/instances/instance1/
config/OHS/ohs1/WebGate/config
7. Restart the OAM Server that is hosting this agent and proceed to "Performing
Remote Agent Validation".
16.9.2 Performing Remote Agent Validation
This topic provides the steps to validate agent registration, regardless of agent type.
Prerequisites
Review About Remote Agent Update Modes
To remotely validate an Agent registration
1. Set up the registration tool as described in, "Acquiring and Setting Up the Remote
Registration Tool" on page 16-32.
2. On the Agent host, run the following command in
agentValidate
mode. For
example:
./bin/oamreg.sh agentValidate agentname
3. Provide the registration Administrator user name and password when asked.
4. Read the messages on-screen to confirm:
■Success: On-screen message confirms
AgentValidation process completed successfully!
16.9.3 Performing Remote Agent Removal
This topic provides the steps to remove a registered agent, regardless of agent type.
Prerequisites
Review About Remote Agent Update Modes
To remotely remove an Agent registration
1. Set up the registration tool as described in, "Acquiring and Setting Up the Remote
Registration Tool" on page 16-32.
2. On the computer hosting the Agent, run the following
agentDelete
command. For
example:
./bin/oamreg.sh agentDelete agentname
3. Provide the registration Administrator user name and password when asked.
4. Read the messages on-screen to confirm:
■Success: On-screen message confirms
AgentDelete process completed successfully
!
16.10 Validating Remote Registration and Resource Protection
You can use the following sections as a guide to validate registration of an agent
regardless of the agent type. You must be an in-band Administrator to perform tasks

Validating Remote Registration and Resource Protection
Registering and Managing OAM 11g Agents 16-39
using the Oracle Access Management Console. Out-of-band Administrators must test
authentication and access remotely.
■Validating Agent Registration using the Oracle Access Management Console
■Validating Authentication and Access After Remote Registration
16.10.1 Validating Agent Registration using the Oracle Access Management Console
Only an in-band Administrator can use the following procedure.
To validate agent and application registration
1. Validate Agent Registration in the Oracle Access Management Console:
a. Confirm Agent details under the System Configuration tab in the Oracle
Access Management Console.
b. Confirm the updated Agent configuration files are in the appropriate location,
as described in "Performing Remote Registration for OAM Agents".
2. Validate Shared Components, Host identifier: Confirm that the host identifier is
defined in the Oracle Access Management Console.
3. Validate Application Domain: Under the Policy Configuration tab, confirm there
is a new Application Domain named after the registered agent. Resources in the
Application Domain should be associated with the host identifier.
4. Proceed with "Validating Authentication and Access After Remote Registration".
16.10.2 Validating Authentication and Access After Remote Registration
After registration, protected resource should be accessible with proper authentication
without restarting the AdminServer or OAM Server. Both in-band and out-of-band
Administrators can use the following procedure to validate proper registration and
policies.
The procedure here provides several methods for confirming that registration,
authentication, and authorization are properly configured and operational. The
procedures is nearly identical for all agent types.
To verify authentication and access after registration
1. Enter the URL for an application protected by the registered OAM Agent to
confirm that the log in page appears (proving that the authentication redirect URL
was specified appropriately). For example:
http://exampleWebserverHost.sample.com:8100/resource1.html
2. On the Log In page, enter a valid username and password when asked, and click
Login.
3. Check the OAM specific cookies are created in the browser session. For example:
ObSSOCookie:
Set-Cookie:
ObSSOCookie=GGVEuvjmrMe%2FhbItbjT24CBmJo1eCIfDIwQ1atdGdnY4mt6kmdSekSFeAAFvFrZZZ
xDfvpkfS3ZLZFbaZU2rAn0YYUM3JUWVYkYFwB%2BBK7V4x%2FeuYHj%2B8gwOyxhNYFna3iSx1MSZBE
y51KTBfsDYOiw6R%2BCxUhOO8uZDTYHI3s0c7AQSyrEiQTuUV3nv1omaFZlk1GuZa4J7ycaGbIUyqwX
See Also: Chapter 20, "Managing Policies to Protect Resources and
Enable SSO"

Validating Remote Registration and Resource Protection
16-40 Administrator's Guide for Oracle Access Management
rM0cKuBJNd6sX1LiRj9HofYQsvUV7ToqeAOpDS7z9qs5LhqU5Vq60bBn12DTX6zNX6Lcc0L5tVwvh7%
2BnOAkz2%2BoDkLs%2BBTkeGcB3ppgC9;httponly; path=/; domain=.example.com;
OAM_ID Cookie:
Set-Cookie:
OAM_ID=v1.0~0~E1EBBC9846E09857060A68E79AEEB608~AA79FC43C695162B6CDE3738F40E94DA
6408D58B879AC3B467EBBD4800743C899843672B3511141FFABCF58B2CDCB700C83CC734A913625
7C4ABDA6913C9EF5A4E05C5D03D3514F2FECACD02F1C1B9314D76B4A68CB7A8BE42AEB09AFB98B8
EB; path=/; HttpOnly
4. Proceed as follows:
■Success: If you authenticated successfully and were granted access to the
resource; the configuration is working properly. Proceed with Steps 5 through
12 for further validations.
■Failure: If you received an error during login or were denied access to the
resource, check the following:
–Login Error: Confirm that you provided a valid user id and password.
– Unavailable Resource: Confirm that the resource is available.
– Wrong Redirect URL: Verify the redirect URL in the Oracle Access
Management Console.
5. User Variations: Perform steps 1 through 4 again with user variations to confirm
appropriate behavior (either success for authorized users or failure for
unauthorized users).
6. Request Cancellation: Perform a partial log in and click Cancel to confirm that the
resource is not accessed.
7. Modified Authentication URL: Enter a nearly identical authentication URL as
you perform Steps 1 through 5 to confirm appropriate response. For example, add
a character to the URL string.
8. Updated Resource: Perform the following steps to ensure the resource is
accessible. For example:
Original Resource: /abc/test.html
Updated Resource: /abc/xyz/test.html
Without restarting the Oracle WebLogic Server:
■Access the updated resource and confirm the user is asked to authenticate and
the resource is accessible.
■Access the original resource and confirm that the resource is accessible and the
user is not asked for authentication.
9. Various URL Patterns: Verify authentication for various URL patterns as you
perform steps 1 through 5.
10. New Authentication Scheme: Perform the following steps to confirm
authentication operations without restarting the WebLogic Server.
■Add a new authentication policy that uses a different Authentication Scheme.
■Protect the resource using the new policy.
■Without restarting the Oracle WebLogic Server, perform steps 1 through 4.

Replacing the IAMSuiteAgent with an 11g WebGate
Registering and Managing OAM 11g Agents 16-41
11. CGI Resource Header Variable and Cookies: Perform the following steps to
confirm authentication operations without having to restart the WebLogic Server.
■Add a new authentication policy to protect a Common Gateway Interface
(CGI) resource and set the Response for "Authentication Successful".
■Protect the resource using the new policy.
■Access the CGI resource.
■Check for the header values configured for the response in a CGI data dump.
12. Agent Disabled: Perform the following steps to validate accessibility and
authentication if WebGate is disabled in ObAccessClient.xml (WebGate should
pick up the enabled value from oam-config.xml).
■Disable the Agent State.
■Start the Web server and OAM Server.
■Access an application protected by the Agent and confirm that you are asked
to authenticate.
16.11 Replacing the IAMSuiteAgent with an 11g WebGate
You can skip this section if you are not replacing the IAMSuiteAgent with an 11g
WebGate.
Access Manager and Oracle Identity Manager are among the Oracle Fusion
Middleware 11g components. During initial configuration with the WebLogic Server
Configuration Wizard, the IAMSuiteAgent is registered with Access Manager 11g
along with the IDM domain host identifier and an Application Domain named for the
agent.
Oracle Fusion Middleware uses Access Manager to protected Oracle Identity
Management consoles out of the box using the IAMSuiteAgent.
To protect applications beyond containers, you can replace the IAMSuiteAgent with a
11g WebGate (to protect the same set of applications using the same Application
Domain and policies as the pre-registered IAMSuiteAgent).
Task overview: Replacing the IAMSuiteAgent with an 11g WebGate
1. Registering a Replacement 11g WebGate for IAMSuiteAgent
2. Installing the Replacement 11g WebGate for IAMSuiteAgent
3. Updating the WebLogic Server Plug-in
4. Optional: Confirming the AutoLogin Host Identifier for an OAM / OIM
Integration
5. Optional: Configuring OAM Security Providers for WebLogic
6. Optional: Disabling IAMSuiteAgent
7. Configuring Centralized Logout for 11g Webgates
8. Veri fic ati on
See Also: Chapter 20, "Managing Policies to Protect Resources and
Enable SSO"

Replacing the IAMSuiteAgent with an 11g WebGate
16-42 Administrator's Guide for Oracle Access Management
16.11.1 Registering a Replacement 11g WebGate for IAMSuiteAgent
The following procedure walks through registering a replacement 11g WebGate using
the remote registration tool, in-band mode.
In this example,
OAMRequest_short.xml
is used as a template to create an agent named
11g4IAM, protecting /.../*, and declaring a public resource,
/public/index.html
. Your
values will be different.
To register an 11g WebGate to replace the IAMSuiteAgent
1. Acquire the Access Manager remote registration tool and set up the script for your
environment. For example:
a. Locate RREG.tar.gz file in the following path:
$ORACLE_HOME/oam/server/rreg/client/RREG.tar.gz
b. Untar RREG.tar.gz file to any suitable location. For example: exploded_dir_
for_RREG.tar/rreg/input/oamreg.
c. In the oamreg script, set the following environment variables based on your
situation (client side or server side) and information in Table 16–5:
OAM_REG_HOME = exploded_dir_for_RREG.tar/rreg
JAVA_HOME = Java_location_on_the_computer
2. Create the registration request and ensure that the
autoCreatePolicy
parameter is
set to false:
a. Locate OAMRequest_short.xml and copy it to a new file. For example:
exploded_dir_for_RREG.tar/rreg/input/oamreg/
Copy: OAM11gRequest_short.xml
To: 11g4IAM.xml
b. Edit 11g4IAM.xml to include details for your environment. For example, if you
are changing from the IAMSuiteAgent to an 11g WebGate Agent your request
might look like the following:
<OAM11gRegRequest>
<serverAddress>http://ruby.uk.example.com:7001</serverAddress>
<hostIdentifier>11g4IAM</hostIdentifier>
<agentName>11g4IAM</agentName>
<autoCreatePolicy>false</autoCreatePolicy>
<logOutUrls><url>/oamsso/logout.html</url></logOutUrls>
...retain defaults for remaining elements...
...
...
</OAM11gRegRequest>
See Also:
■Chapter 16 for more information about the remote registration
tool, processing, and request files
Note: To use IAM Suite policies with the replacement WebGate,
ensure that the WebGate registration is configured to use the
IAMSuiteAgent Host Identifier and Preferred Host.

Replacing the IAMSuiteAgent with an 11g WebGate
Registering and Managing OAM 11g Agents 16-43
3. Register the agent. For example:
a. Locate the remote registration script.
Linux: rreg/bin/oamreg.sh
Windows: rreg\bin\oamreg.bat
b. From the directory containing the script, execute the script using inband
mode. For example:
$ ./bin/oamreg.sh inband input/11g4IAM.xml
Welcome to OAM Remote Registration Tool!
Parameters passed to the registration tool are:
Mode: inband
Filename: ...
c. When prompted, enter the following information using values for your
environment:
Enter your agent username: userame
Username: userame
Enter agent password: ********
Do you want to enter a WebGate password?(y/n)
n
iv.Do you want to import an URIs file?(y/n)
n
d. Review the final message to confirm that this was a successful registration:
Inband registration process completed successfully! Output artifacts are
created in the output folder"
4. Log in to the Oracle Access Management Console and review your new
registration:
a. From the System Configuration tab, Access Manager section, open the OAM
Agents node and locate your agent registration.
b. Double-click the agent's name to display the registration page and review the
details. For example:
c. OAM Proxy Port—From the System Configuration tab, Common
Configuration section, double-click Server Instances and locate the port on
which the OAM Proxy is running.
5. Copy the artifacts as follows (or install WebGate with the same specifications, then
copy artifacts), as described in "Installing the Replacement 11g WebGate for
IAMSuiteAgent".
See Also: "Creating Your Remote Registration Request" on
page 16-33
See Also: "Searching for an OAM Agent Registration" on page 16-20
Note: If you install a fresh WebGate, enter matching details during
installation.

Replacing the IAMSuiteAgent with an 11g WebGate
16-44 Administrator's Guide for Oracle Access Management
6. Proceed to "Updating the WebLogic Server Plug-in".
16.11.2 Installing the Replacement 11g WebGate for IAMSuiteAgent
After provisioning you must install the 11g WebGate to replace the IAMSuiteAgent.
During the installation, you must provide some of the same information for the
WebGate as you did when provisioning it.
Prerequisites
Registering a Replacement 11g WebGate for IAMSuiteAgent
Task overview: Installing the 11g WebGate includes
1. Install the 11g WebGate as described in Oracle Fusion Middleware Installation
Guide for Oracle Identity and Access Management.
2. Replace IAMSuiteAgent Registration as described in "Updating the WebLogic
Server Plug-in".
16.11.3 Updating the WebLogic Server Plug-in
After provisioning and installing the 11g WebGate to replace the IAMSuiteAgent, the
mod_wl_ohs.conf file requires specific entries to instruct the WebGate Web server to
forward requests to the applications on the WebLogic Server.
Example 16–1 illustrates the areas that must be changed using sample entries. Entries
for your environment will be different.
Example 16–1 Updates for the 11g WebGate in mod_wl_ohs.conf
<IfModule weblogic_module>
<Location /oamconsole>
SetHandler weblogic-handler
WebLogicHost ruby.uk.example.com
WebLogicPort 6162
</Location>
<Location apmmconsole>
SetHandler weblogic-handler
WebLogicHost ruby.uk.example.com
WebLogicPort 6162
</Location>
...
</IfModule>
Agent & Artifacts Artifacts
11g WebGate/Access Client
ObAccessClient.xml and
cwallet.sso
From the AdminServer (Console) host:
$DOMAIN_HOME/output/$Agent_Name/
To the Agent host: $11gWG_install_dir/WebGate/config
Note: The generic name of the WebLogic Server plug-in for Apache
is mod_weblogic. For Oracle HTTP Server 11g, the name of this
plug-in is mod_wl_ohs (the actual binary name is mod_wl_ohs.so).
Examples show exact syntax for implementation.

Replacing the IAMSuiteAgent with an 11g WebGate
Registering and Managing OAM 11g Agents 16-45
Prerequisites
Installing the Replacement 11g WebGate for IAMSuiteAgent
To update the mod WebLogic configuration for your environment
1. Locate the mod_wl_ohs.conf file in the following path:
$OHS-INSTANCE_HOME/config/OHS/INSTANCE_NAME/mod_wl_ohs.conf
2. Edit the file to include a Location element for each application URI that was
previously accessed directly on the WebLogic Server (see Example 16–1).
3. Save the file.
4. Restart the Web server.
5. Proceed to the following task, as needed:
■Confirming the AutoLogin Host Identifier for an OAM / OIM Integration
■Configuring OAM Security Providers for WebLogic
16.11.4 Confirming the AutoLogin Host Identifier for an OAM / OIM Integration
This topic describes how to confirm (or configure) Oracle Identity Manager (OIM)
automatic login functionality when you have Access Manager integrated with OIM.
The AutoLogin functionality when Oracle Identity Manager is integrated with Access
Manager 11g requires the 10g WebGate Web server host name and port in the list of
host identifiers for the IAMSuiteAgent.
The agentBaseUrl parameter is used to update a given Host Identifier. However, if
automatic policy creation is set to false, the remote registration utility does not create
the Application Domain and does not honor the agentBaseUrl parameter.
The following procedure shows how to confirm (or configure) the AutoLogin host
identifier for an Access Manager/Oracle Identity Manager integration. Your values
will be different.
Prerequisites
Updating the WebLogic Server Plug-in
Note: You need similar Location entries for each of the URIs for all
the applications that were earlier accessed directly on the WebLogic
Server.
Note: Skip this step if you do not have Access Manager 11g
integrated with Oracle Identity Manager 11g.
Note: If you have a load balancer in front of the 11g WebGate Web
server, you must also include the load balancer's host name and port
during Step 3.

Replacing the IAMSuiteAgent with an 11g WebGate
16-46 Administrator's Guide for Oracle Access Management
To configure the AutoLogin Host Identifier for an OAM / OIM Integration
1. From the Policy Configuration tab, Host Identifiers node, and select
IAMSuiteAgent.
2. In the Operations panel, confirm that all host name and port combinations are
listed for this Host Identifier.
3. Proceed to "Configuring OAM Security Providers for WebLogic".
16.11.5 Configuring OAM Security Providers for WebLogic
This section describes how to configure the WebLogic Security Providers to ensure
Single Sign On using Access Manager 11g and the 10g WebGate.
Refer to following topics for more information on setting up the security providers for
the 11g WebGate.
■About Security Providers
■Setting Up Security Providers for the 11g WebGate
16.11.5.1 About Security Providers
To complete the Access Manager 11g SSO configuration when a 11g WebGate is
replacing the IAMSuiteAgent requires configuring the following security providers in
a WebLogic Server domain:
■OAM Identity Asserter: Uses token-based authentication and asserts the OAM
SSO header and token.
■OID (or OVD) Authenticator: Creates the Subject and populates it with the correct
principals.
Depending on the store where your users are located, you configure either the
Oracle Internet Directory Authenticator or the Oracle Virtual Directory
Authenticator as the primary credential authenticator.
■Default Authenticator: This default WebLogic Authentication provider allows you
to manage users and groups in one place: the embedded WebLogic Server LDAP
server. This Authenticator is used by the Oracle WebLogic Server to login
administrative users:
When you configure multiple Authentication providers, you use the JAAS Control
Flag for each provider to control how the Authentication providers are used in the
login sequence. You can choose the following the JAAS Control Flag settings, among
others:
■REQUIRED—The Authentication provider is always called, and the user must
always pass its authentication test. Regardless of whether authentication succeeds
or fails, authentication still continues down the list of providers. The OAM
Identity Asserter is required.
■SUFFICIENT—The user is not required to pass the authentication test of the
Authentication provider. If authentication succeeds, no subsequent Authentication
See Also: "Searching for a Host Identifier Definition" on page 19-16
Note: Skip this step if you do not have Access Manager 11g
integrated with Oracle Identity Manager 11g.

Replacing the IAMSuiteAgent with an 11g WebGate
Registering and Managing OAM 11g Agents 16-47
providers are executed. If authentication fails, authentication continues down the
list of providers. Both the Oracle Internet Directory (or Oracle Virtual Directory)
and the Default Authenticator are sufficient.
■OPTIONAL—When additional Authentication providers are added to an existing
security realm, the Control Flag is set to OPTIONAL by default. You might need to
change the setting of the Control Flag and the order of providers so that each
Authentication provider works properly in the authentication sequence.
The user is allowed to pass or fail the authentication test of this Authentication
provider. However, if all Authentication providers configured in a security realm
have the JAAS Control Flag set to OPTIONAL, the user must pass the
authentication test of one of the configured providers.
Access Manager JAR are WAR files for authentication providers are available when
you install an Oracle Fusion Middleware product (Oracle Identity Management,
Oracle SOA Suite, or Oracle WebCenter). If you have a Fusion Middleware
application, you already have the files you need.
■oamAuthnProvider.jar: Includes files for both the Access Manager Identity
Asserter for single sign-on and the Authenticator for Oracle WebLogic Server
10.3.1+. A custom Access Manager AccessGate is also provided to process requests
for Web and non-Web resources (non-HTTP) from users or applications.
■oamauthenticationprovider.war: Restricts the list of providers that you see in the
Oracle WebLogic Server Console to only those needed for use with Access
Manager.
When you deploy the extension, the Administration Console creates an
in-memory union of the files and directories in its WAR file with the files and
directories in the extension WAR file. Once the extension is deployed, it is a full
member of the Administration Console: it is secured by the WebLogic Server
security realm, it can navigate to other sections of the Administration Console, and
when the extension modifies WebLogic Server resources, it participates in the
change control process For more information, see Oracle Fusion Middleware
Extending the Administration Console for Oracle WebLogic Server.
16.11.5.2 Setting Up Security Providers for the 11g WebGate
The following procedure requires the WebLogic Server Administration Console. This
example illustrates setting up the Oracle Internet Directory provider with the OAM
Identity Asserter and Default Authenticator. The steps are the same for OVD, should
you need this.
See Also: "Configuring Authentication Providers" in Oracle Fusion
Middleware Securing Oracle WebLogic Server for a complete list of
Authentication providers and details about configuring the Oracle
Internet Directory provider to match the LDAP schema for user and
group attributes.
Note: If you have a Fusion Middleware application, you already
have the files you need and you can skip Step 1 of the following
procedure. With no Fusion Middleware application, however, you
have a stand-alone Oracle WebLogic Server and must obtain the JAR
and WAR files from Oracle Technology Network as described in Step
1.

Replacing the IAMSuiteAgent with an 11g WebGate
16-48 Administrator's Guide for Oracle Access Management
Prerequisites
Updating the WebLogic Server Plug-in
To set up providers in a WebLogic Server domain for 11g WebGate with Access
Manager 11g
1. No Oracle Fusion Middleware Application: Obtain the Access Manager provider:
a. Log in to Oracle Technology Network at:
http://www.oracle.com/technology/software/products/middleware/htdocs/111110
_fmw.html
b. Locate the oamAuthnProvider ZIP file with WebGates:
oamAuthnProvider<version number>.zip
c. Extract and copy oamAuthnProvider.jar to the following path on the computer
hosting Oracle WebLogic Server:
$BEA_HOME/wlserver_10.x/server/lib/mbeantypes/oamAuthnProvider.jar
2. With Oracle Fusion Middleware Application Installed:
a. Locate oamauthenticationprovider.war in the following path:
$ORACLE_HOME/modules/oracle.oamprovider_11.1.2/oamauthenticationprovi
der.war
b. Copy oamauthenticationprovider.war to the following location:
$BEA_HOME/wlserver_10.x/server/lib/console-ext/autodeploy/oamauthentication
provider.war
3. Log in to the WebLogic Server Administration Console and click Security Realms,
Default Realm Name, and click Providers.
4. OAM Identity Asserter: Perform the following steps to add this provider:
a. Click Authentication, click New, and then enter a name and select a type:
Name:
OAM ID Asserter
Type: OAMIdentityAsserter
OK
b. In the Authentication Providers table, click the newly added authenticator.
c. Click the Common tab, set the Control Flag to REQUIRED, and click Save
5. OID Authenticator: Perform the following steps to add this provider.
a. Click Security Realms, Default Realm Name, and click Providers
b. Click New, enter a name, and select a type:
Name:
OID Authenticator
Type: OracleInternetDirectoryAuthenticator
OK
c. In the Authentication Providers table, click the newly added authenticator.
d. On the Settings page, click the Common tab, set the Control Flag to
SUFFICIENT, and then click Save.

Replacing the IAMSuiteAgent with an 11g WebGate
Registering and Managing OAM 11g Agents 16-49
e. Click the Provider Specific tab and specify the following required settings
using values for your own environment:
Host: Your LDAP host. For example:
localhost
Port: Your LDAP host listening port. For example:
6050
Principal: LDAP administrative user. For example:
cn=orcladmin
Credential: LDAP administrative user password.
User Base DN: Same searchbase as in Access Manager.
All Users Filter: For example:
(&(uid=*)(objectclass=person))
User Name Attribute: Set as the default attribute for username in the LDAP
directory. For example:
uid
Group Base DN: The group searchbase (same as User Base DN)
Do not set the All Groups filter as the default works fine as is.
Save.
6. Default Authenticator: Perform the following steps to set up the Default
Authenticator for use with the Identity Asserter:
a. Go to Security Realms, Default Realm Name, and click Providers.
b. Click Authentication, Click DefaultAuthenticator to see its configuration
page.
c. Click the Common tab and set the Control Flag to SUFFICIENT.
d. Save.
7. Reorder Providers:
a. Click Security Realms, Default Realm Name, Providers.
b. On the Summary page where providers are listed, click the Reorder button
c. On the Reorder Authentication Providers page, select a provider name and
use the arrows beside the list to order the providers as follows:
OAM Identity Asserter (REQUIRED)
OID Authenticator (SUFFICIENT)
Default Authenticator (SUFFICIENT)
d. Click OK to save your changes
8. Activate Changes: In the Change Center, click Activate Changes
9. Reboot Oracle WebLogic Server.
10. Proceed as follows:
■Successful: Go to "Disabling IAMSuiteAgent".
■Not Successful: Confirm that all providers have the proper specifications for
your environment, are in the proper order, and that
oamAuthnProvider.jar
is
in the correct location as described in "About Security Providers" on
page 16-46.
16.11.6 Disabling IAMSuiteAgent
This step is optional, not required.

Managing the Preferred Host in 10g WebGates
16-50 Administrator's Guide for Oracle Access Management
IAMSuiteAgent detects when the WebGate has performed the authentication and then
goes silent. However, if the agent must be disabled, then either the WLSAGENT_
DISABLED system property or environment variable must be set to true for each one
of the servers on which the agent should be disabled. This applies to both
AdminServer and OAM Servers.
You can disable the agent in one of two ways:
■Either set the WLSAGENT_DISABLED environment variable to true
■Or pass WLSAGENT_DISABLED as a System Property
Prerequisites
Configuring OAM Security Providers for WebLogic, if needed.
To disable the IAMSuiteAgent
1. On the computer hosting the IAMSuiteAgent, perform one the following tasks:
■Either set the
WLSAGENT_DISABLED
environment variable to true:
setenv WLSAGENT_DISABLED true
■Or or pass
DWLSAGENT_DISABLED=true
as a System Property:
-DWLSAGENT_DISABLED=true
2. Restart the Web server.
3. Proceed with "Configuring Centralized Logout for 11g Webgates" on page 22-4,
then return to "Verification".
16.11.7 Verification
Oracle recommends testing your environment using the 11g WebGate to ensure that all
applications that were previously protected by the IAMSuiteAgent are now protected
after configuring the 10g WebGate.
Prerequisites
"Configuring Centralized Logout for 11g Webgates"
16.12 Managing the Preferred Host in 10g WebGates
In previous 10g releases, the preferred host was a mandatory parameter which could
be made optional through configuration. In the current implementation of Access
Manager, the value of the preferred host parameter in the agent profile is a mandatory
field populated when the profile is created. Thus when migrating agent profiles from
Access Manager 10g, this parameter might have no value. Because of the empty
preferred host value in a migrated agent profile, the Access Manager 11g console does
not allow the administrator to modify the agent profile. Since the current migration
process does not support migration when this parameter is empty, the following
actions have been incorporated into the migration process.
See Also:
■"Validating Authentication and Authorization in an Application
Domain" on page 20-76
■Chapter 21, "Validating Connectivity and Policies Using the
Access Tester"

Managing the Preferred Host in 10g WebGates
Registering and Managing OAM 11g Agents 16-51
■During the migration of agent profiles with no preferred host value, the host
identifier defined as the value of AUTO_UPDATE_HOSTID will be set as the
preferred host. This will work for 11g WebGates as well as 10g WebGates.
■The ALLOWBLANKPREFERREDHOST flag will be added and action taken based
on its value. In cases where it is set to true, the empty string will be sent to the
agent as the preferred host. In cases where it is set to false, the server will send a
fatal error to the agent.
Use the setAllowEmptyHostIdentifier WLST command, described in the following
section, to manage this feature.
16.12.1 setAllowEmptyHostIdentifier
Enables and disables the use of an empty preferred host parameter.
16.12.1.1 Description
Enables or disables the use of an empty preferred host parameter. The following
parameters (added to the oam-config.xml file) will be set to enable or disable an empty
preferred host parameter in the ObAccessClient.xml file.
<Setting Name="AutoUpdateHostIdentifier"
Type="xsd:string">AUTO_UPDATE_HOSTID</Setting>
<Setting Name="AllowEmptyHostIdentifier"
Type="xsd:boolean">true</Setting>
16.12.1.2 Syntax
setAllowEmptyHostIdentifier(enable="true/false")
16.12.1.3 Example
setAllowEmptyHostIdentifier(enable ="true")
Note: In the getClientConfigResponse() method, the AUTO_
UPDATE_HOSTID host identifier will be replaced with an empty
string so that the preferred host will not be set in ObAccessClient.xml.
In these cases, the WebGate will read the host from the HTTP header.
Because the user can modify the HTTP header, this vulnerability is
indicated as follows.
■The 11g Access Manager console displays the agent profile with a
red mark indicating that the value of the preferred host is blank.
■The agent's GetClientConfig() method indicates that the empty
preferred host is null.
Argument Definition
enable
Set to true or false to allow for an empty host identifier or not.

Managing the Preferred Host in 10g WebGates
16-52 Administrator's Guide for Oracle Access Management

17
Maintaining Access Manager Sessions 17-1
17
Maintaining Access Manager Sessions
An Access Manager session is created during authentication and bound to both the
user and the client with which the user has authenticated. Access Manager sessions are
maintained to provide tracking and policy enforcement (performed either manually by
an Administrator or using automated flows) for a given session's lifecycle. The Access
Manager session lifecycle consists of state transitions for session creation, updates,
idleness, and expiration.
This chapter describes concepts and procedures for Access Manager sessions.
■Introducing Access Manager Session Management
■Understanding Server-Side Session Management
■Server-Side Session Enforcement Examples
■Configuring the Server-Side Session Lifecycle
■Managing Active Server-Side Sessions
■Verifying Server-Side Session Operations
■Understanding Client-Side Session Management
■Using WLST To Configure Session Management
17.1 Introducing Access Manager Session Management
With this 11gR2 PS2 release of Oracle Access Management, Access Manager sessions
can be managed from either the server side or the client side.
■Server-side session management (also referred to as Coherence-based session
management) is the default session management option developed for Access
Manager. It allows for advanced session management across nodes via
Coherence-based caching. Offering reliable performance and advanced features
(including impersonation, session sniping, identity context propagation and the
like), server side session management is recommended for most deployments -
especially internal ones where rich session management features are desired. More
details are documented in:
–"Understanding Server-Side Session Management" on page 17-2
–"Server-Side Session Enforcement Examples" on page 17-7
–"Configuring the Server-Side Session Lifecycle" on page 17-9
–"Managing Active Server-Side Sessions" on page 17-12
–"Verifying Server-Side Session Operations" on page 17-17

Understanding Server-Side Session Management
17-2 Administrator's Guide for Oracle Access Management
■Client-side session management (also referred to as cookie-based session
management) manages sessions using browser cookies; it is essentially stateless.
Client side session management offers higher performance with a lightweight
footprint when compared to the Coherence-based option. It stores session details
in the browser cookie with no information saved on the server-side and is most
appropriate for very large deployments where advanced server-side session
management features are not needed. More details are documented in
"Understanding Client-Side Session Management" on page 17-18.
See "Using WLST To Configure Session Management" on page 17-18 for instructions
on how to configure the session management option.
17.2 Understanding Server-Side Session Management
This section provides the following topics:
■Securing Access Manager Sessions
■Understanding the Access Manager Session Lifecycle, States, and Enforcement
■Access Manager Sessions and the Role of Oracle Coherence
17.2.1 Securing Access Manager Sessions
Session security begins with a secure installation. For installation details see the Oracle
Fusion Middleware Installation Guide for Oracle Identity and Access Management.
The HTTPS protocol, Oracle Coherence and database encryption are some of the ways
in which Access Manager supports server-side session security. The following list
describes how this support can work.
■HTTPS Protocol
Access Manager helps prevent session fixation by providing IP address checks by
the Proxy. To further help prevent session fixation, be sure to use the secure
HTTPS protocol for communication between WebGates and OAM Servers.
■Oracle Coherence
Data is not encrypted in-memory; however, data is protected over the wire. Oracle
Coherence communicates between the different Access Manager instances on
various servers, and this communication is secured in the following ways.
–Coherence supports communication only between hosts that have been
previously identified. This is done as a range of IP addresses, or by specific
host names. Access Manager configuration files contain entries for each server
that participates in the communication. During startup, this information is
provided to Coherence ensuring that only authorized servers participate in the
communication.
Note: Cookie-based sessions can be accessed only from a browser
request context and not directly from the server.
See Also: Oracle Fusion Middleware Administrator's Guide for
details about configuring secure communications between Oracle
Fusion Middleware components using SSL.

Understanding Server-Side Session Management
Maintaining Access Manager Sessions 17-3
–Coherence uses mutually-authenticated SSL between all servers in the cluster.
The jceks keystore file, which holds the applicable keys and certificates, is
created during installation.
For more information, see "Access Manager Sessions and the Role of Oracle
Coherence" on page 17-6 as well as the Oracle Coherence documentation.
■Database Encryption
The Session Management Engine does not encrypt data. For security concerns, use
an in-database encryption such as Oracle Advanced Security.
17.2.2 Understanding the Access Manager Session Lifecycle, States, and Enforcement
The session lifecycle refers to a set of states with defined transitions from one state to
another that depend on user activity (or lack thereof), and manual (or automated)
Administrator activity. Administrators can define the following global session lifecycle
settings:
■Session Lifetime
■Idle Timeout
■Maximum number of Sessions
■Database Persistence of Active Sessions
Session lifecycle states include those in Table 17–1.
For more information, see the following topics:
■About Global Session Enforcement Checks
■About Session Removal
■About Step-Up and Step-Down Authentication and Credentials
■About Optional Application-Specific Session Enforcement
Note: Idle Timeout can also be implemented as application-specific
settings, as described later.
Table 17–1 Session Lifecycle States
State Description
Active Newly-created sessions are active. A session is created when the user is
authenticated by Access Manager.
The session remains active until Access Manager determines that the session must
transition into one of the other states in this table.
Note: Administrators can delete only active sessions.
Idle An active session becomes idle when the user does not access Access
Manager-protected content for the period defined by an Administrator.
When an active session becomes idle, the user must re-authenticate to proceed.
When re-authentication is successful, the session returns to the Active state; session
attribute values are preserved through this process.
Expired An active session expires when the duration of the session exceeds the defined
lifetime. An expired session is completely inaccessible and eligible for deletion.
When an active session expires, the user must re-authenticate to proceed.
When re-authentication is successful, a new session is created; however, session
attribute values are not preserved (as they are for Idle states).

Understanding Server-Side Session Management
17-4 Administrator's Guide for Oracle Access Management
■About Timeout with Multiple-Agent Types: OSSO and OAM Agents
■About OpenSSO Agents
17.2.2.1 About Global Session Enforcement Checks
Each Access Manager session holds the following attributes and applicable values.
■Session creation time
■Last access time
The values of these attributes are compared for session enforcement as described in
Table 17–2.
During transitions to the Idle state, underlying session attributes are preserved
because the user previously satisfied authentication criteria and the data is trusted.
However, continued access to protected resources based on that session, and resulting
modification of data within that session, is not allowed until the user re-authenticates,
proving not to be a malicious user with access to an unlocked computer.
17.2.2.2 About Session Removal
A session can be removed by any of the actions described in Table 17–3.
17.2.2.3 About Step-Up and Step-Down Authentication and Credentials
On occasion, multiple forms of authentication are required and performed within a
single session to complete a step-up flow. In a step-up flow, a user authenticates to
access protected content and later in the same session, the user requests other, more
sensitive content and is required to authenticate again to access it at a more stringent
level. In a step-up flow, multiple authentications always occur in order of the
increasing authentication level. Each session holds the Authentication Level attribute
for step-up authentication enforcement.
Table 17–2 Session Checks for State Changes
Session Check Description
Is the Session Idle? Compares the last access time against the configured Idle Timeout value.
Exceeding the configured period triggers a change from the Active to the Idle
state.
Is the Session Expired? Compares the session creation time against the configured Session Lifetime.
Exceeding the configured period triggers a change from the Active to the Expired
state.
Table 17–3 Session Removal
Action Description
Expiration Expired sessions are eligible for removal based on their creation time. Actual
removal is determined by the storage mechanism. The session is removed from the
distributed cache using a background task running on the server; it is removed
from the database using a similar background task, an optionally-enabled job
within the database itself, or both methods in combination.
Once a session has been deleted from storage on all tiers (local and distributed
caches, and from the database if enabled), the session is removed.
User Logout User Logout triggers immediate removal from the distributed cache, subject to
present volume of DB session writes and performance.
Termination Termination is identical to user log out whether the session is interactively
terminated through the Administration Console or in an automated way--as part of
an Oracle Identity Management user lockout or de-provisioning flow.

Understanding Server-Side Session Management
Maintaining Access Manager Sessions 17-5
A re-authentication level might be a step down from the session. If the
re-Authentication Level is less than that previously contained in the session, the user
has completed a step-down process. Upon successful re-authentication, the session is
restored to the Active state with an Authentication Level that is equal to the lower
level of the authentication scheme used. If the user later attempts to access content that
is protected at a higher level, step-up authentication occurs.
17.2.2.4 About Optional Application-Specific Session Enforcement
Access Manager enforces limitations on user access to resources in a more granular
way than is possible with a single set of global session timings, or single set of
authentication schemes in which access depends solely on a single authentication
level. Access to certain data has more stringent requirements, while access to all other
data is configured globally.
Administrators can choose to override global session timeout settings on a per
application basis, defined as part of Application Domain settings. Optional
application-specific session configuration provides:
■The ability to declare session idle timings on a per-application basis, which is
generally more stringent than the global idle timing defined within the
deployment as a whole.
■The ability to require the user to re-authenticate after a per-application session
inactivity timeout.
Table 17–4 describes session enforcement when you have defined Application
Domain-specific overrides to global session settings.
17.2.2.5 About Timeout with Multiple-Agent Types: OSSO and OAM Agents
The idle timeout is applied appropriately even if the session is operating in a
disconnected state. (A disconnected state occurs if mod_osso requests are being made
but not by the WebGate. In this case, the session appears to have idled out to the
server.) To enable global logout for the OSSO Agent, the Session Management Engine
reconciles a period of inactivity with the OAM Agent against a period of activity with
the OSSO Agent.
mod_osso agents support granular timeout only if the Global Inactivity TimeOut
feature is enabled (using the
editGITOValues
WLST command). The GITO cookie is
needed in special cases to support timeout with multiple types of agents (mod_osso
and WebGate) working with OAM Server. If a user leaves an active session (with an
OAM Agent), starts a session with an OSSO Agent, and then returns to the initial
session (with the OAM Agent, now inactive), the Session Management Engine
reconciles the period of inactivity with the OAM Agent against the period of activity
with the OSSO Agent to enable global logout for the OSSO Agent.
Table 17–4 Application Domain-Specific Overrides
Override Description
Is the Session Idle? Compares the last access time against the configured Idle Timeout
value for the defined Application Domain only. Exceeding the
configured period triggers a change from the Active to the Idle state.
Is the Session Expired? Compares the session creation time against the configured Session
Lifetime. Exceeding the configured period triggers a change from the
Active to the Expired state for the defined Application Domain group
only.

Understanding Server-Side Session Management
17-6 Administrator's Guide for Oracle Access Management
17.2.2.6 About OpenSSO Agents
In the context of session management, OpenSSO agents are equivalent to WebGates.
Unlike mod_osso, OpenSSO Agents do not operate in a disconnected state.
17.2.3 Access Manager Sessions and the Role of Oracle Coherence
This section describes how the embedded Oracle Coherence data management and
caching service interacts with the session stores during session management. This
might include the local and distributed (serialized) in-memory caches and an optional
database if one is configured and enabled as the Session Management Engine session
store.
Access Manager uses Coherence to replicate session states within a distributed
installation. Coherence is used to communicate state changes between the OAM
Servers. Coherence relies on User Datagram Protocol (UDP) for cluster discovery and
heartbeat. If a firewall exists between certain components, then the corresponding
UDP ports used by Coherence must be open. Otherwise, Access Manager might not
work correctly.
Oracle Coherence replicates and distributes session data across all Managed Servers in
the cluster. The location of the session is transparent to the client. The Session
Management Engine exposes session objects to other components as needed.
Oracle Coherence also performs failover and reconciliation. For example, if one
Managed Server fails, Oracle Coherence automatically distributes data from the failed
host to the distributed in-memory caches of other Managed Servers.
Although the Oracle Access Management Console resides on the WebLogic
AdminServer, sessions are not stored there. Figure 17–1 illustrates session storage
using an embedded Oracle Coherence.
Note: Generally, both the AdminServer and OAM Servers participate
in the Oracle Coherence cluster. However, AdminServer does not
access session data except when performing searches.
Note: To maintain a consistent shared session state among the OAM
Servers, the Coherence infrastructure requires network connectivity
between cluster members. Oracle recommends the use of redundant
networking infrastructure in deployments requiring OAM session
data consistency in the presence of network component failures.
Note: Oracle Coherence traffic is automatically encrypted.
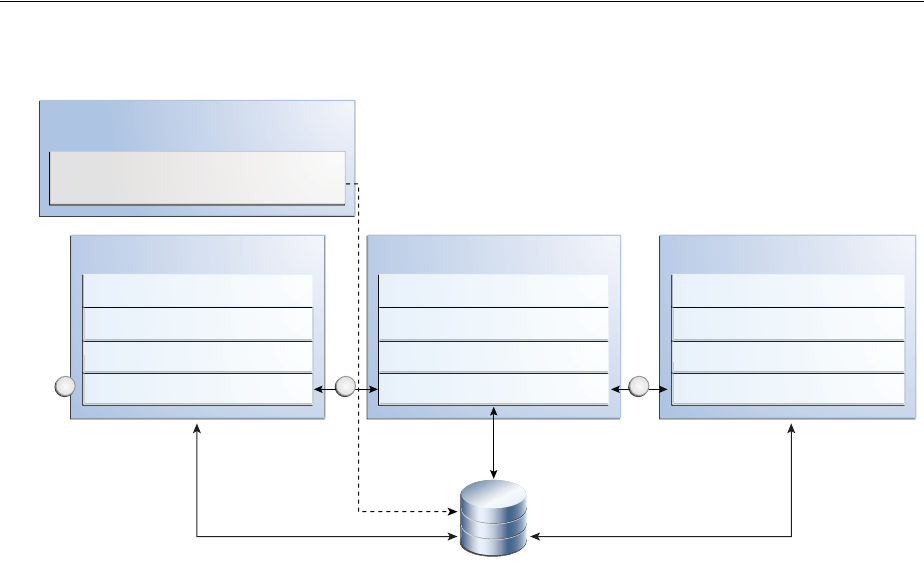
Server-Side Session Enforcement Examples
Maintaining Access Manager Sessions 17-7
Figure 17–1 Session Data and the Role of Oracle Coherence
The session is stored on two hosts. If the distributed cache runs out of allocated
memory space, the oldest sessions are evicted from the cache. If the Session
Management Engine is configured to use just the distributed cache, evicted sessions
are recorded in a flat file to avoid loss. The following list is an overview of how session
data is stored after a successful authentication.
1. The session is created in the distributed in-memory cache. A copy is available in
the local in-memory cache on the computer hosting the resource (Managed Server
1 in this example). If session persistence to database is enabled, the session is also
written to the database.
2. With each session change, Oracle Coherence updates, replicates, and distributes
the session in the distributed cache among OAM Servers (Managed Server 2 in this
example). By default, each change is also written to the database.
3. A new resource request is made and the session is read into the local in-memory
cache on the server hosting the resource (Managed Server 3 in this example).
17.3 Server-Side Session Enforcement Examples
Satisfying the authentication scheme of a given level provides access to all resources
protected at lower levels. Additionally, all authentication schemes of a given level are
viewed as equivalent. This section provides a simple session enforcement example
based on a single authentication scheme used in two application domains as well as a
more complex example based on multiple authentication schemes used in two
application domains.
■Example 1: Single Authentication Scheme
■Example 2: Multiple Authentication Schemes
■Access Manager Sessions and the Role of Oracle Coherence
WebLogic Server
Administration Console
Oracle Access Management Console
Configuration Data
OAM Server 1
Distributed In-Memory Cache
Local In-Memory Cache
Coherence
SME
OAM Server 2
Distributed In-Memory Cache
Local In-Memory Cache
Coherence
SME
Policy and SME Database
1
OAM Server 3
Distributed In-Memory Cache
Local In-Memory Cache
Coherence
SME
32

Server-Side Session Enforcement Examples
17-8 Administrator's Guide for Oracle Access Management
17.3.1 Example 1: Single Authentication Scheme
Consider the following configuration:
■A single authentication scheme (S1) defined using Level 2
■Application domains D1 and D2
■All resources within each domain are protected with a single authentication policy,
which uses S1, and a single authorization policy.
■Global Session Configuration:
–Session Lifetime: 90 minutes
–Idle Session Timeout: 0 (session never idles out)
–Application Domain Timeout: 30 minutes
Now consider the outcomes in Table 17–5.
17.3.2 Example 2: Multiple Authentication Schemes
In previous releases of Access Manager, a session could only have its authentication
level reduced in the context of an Oracle Identity Management integration self-service
flow (such as forced password reset). In this release, step-down authentication occurs
when a session times out as a matter of course--until the user happens to provide new
credentials that satisfy a scheme of the same level as the maximum held by the session
previously. Otherwise, from the authentication perspective, it is as if the session is new
and further step-up is required. Consider this example with two authentication
schemes (for step-up and step-down).
■Authentication schemes S1 (Level 2) and S2 (Level 3)
■Application domains D1 and D2
■All resources within each domain are protected with a single authentication policy,
and a single authorization policy
■D1 uses S1; D2 uses S2
■Global Session Configuration:
–Session Life: 240 mins
–Idle Timeout: 30 mins
–Appdomain 2 (D2) Timeout: 15 mins (appdomain setting)
When accessing resources from D1, timeout will occur after 30 minutes (global timeout
setting); D2 timeout will happen after 15 mins since its timeout value is overridden at
the global level. Table 17–6 shows the resulting outcomes.
Table 17–5 Session Content: Single Authentication Scheme
Time (Delta) Action Access Allowed or Denied Session Content
0 Access to D1 Denied due to no session null
1 Authentication with S1 and
Access to D1
Allowed because Authentication scheme is
satisfied
Level 2, authentication
time 1
21 Access to D2 Allowed Level 2, authentication
time 1
66 Access to D1 Denied due to Application Domain Timeout
(based on the parameters configured)
Level 2, authentication
time 1
67 Authentication with S1 and
Access to D1 and D2
Both Allowed because the Authentication Sceme is
satisfied
Level 2, authentication
time 67

Configuring the Server-Side Session Lifecycle
Maintaining Access Manager Sessions 17-9
The access order does have an impact on the outcome. For instance, the last D1 access
could have been allowed if the user had chosen to first pursue access to the D2
application after credentials had expired. For example:
■Authentication S2 with Access to D2 Allowed: L3 scheme satisfied; resulting level
of the now (again) active session same as before. Session Content: Level 3,
authentication time 51
■Access to D1 Allowed: Level 3 credentials also sufficient for Level 2-protected
access. Session Content: Level 3, authentication time 51.
17.4 Configuring the Server-Side Session Lifecycle
Session Lifecycle settings can be defined using the Oracle Access Management
Console. When you define either global or application-specific session lifecycle
settings, any timing interval set to 0 cancels the corresponding check. For example if
idle timeout is set to 0, sessions never idle out. With a session lifetime of 0, sessions
never expire. In all cases, applicable data is tracked and updated in the session, just as
if it is being checked on a per-request basis.
This section provides the following topics:
■About Global Session Lifecycle Settings
■About Application-Specific Session Overrides
■Viewing or Modifying Global Session Settings
■Viewing or Modifying Optional Application-Specific Session Overrides
17.4.1 About Global Session Lifecycle Settings
Access Manager session lifecycle settings are defined as part of the Common Settings
shared by all OAM Servers. Figure 17–2 shows the lifecycle attributes that you can
configure on the Common Settings page.
Table 17–6 Session Outcomes: Multiple Authentication Schemes
Time (Delta) Action Access Allowed or Denied Session Content
0 Access D1 resource
(RD1)
Access allowed after successful login Timeout for D1 will be set to
0+30=30 (30 is default global timeout
as D1 has not overriden timeout at
the Application Domain level)
1 (implies
after 1
minute)
Access D2 resource
(RD2)
Access allowed post credential challenge (user
will be prompted for credentials since D2 is
protected using a higher authentication
scheme)
Timeout of D2 will be set to 1+15=16
t>16 and t<30
(say t=20)
Access RD1 and RD2 Allowed access to RD1 because timeout of
D1=30. Allowed access to RD2 after providing
credentials since timeout of D2=16
The new timeout of D2 is 16
40 Access RD1 Allowed: D1 resource will be allowed since
timeout is 50
55 Access RD1 and RD2 Allowed to access both resources after user is
successfully challenged for credentials.
Timeout of D1 is now 85 (55+30)
Timeout of D2 is now 70 (55+15)
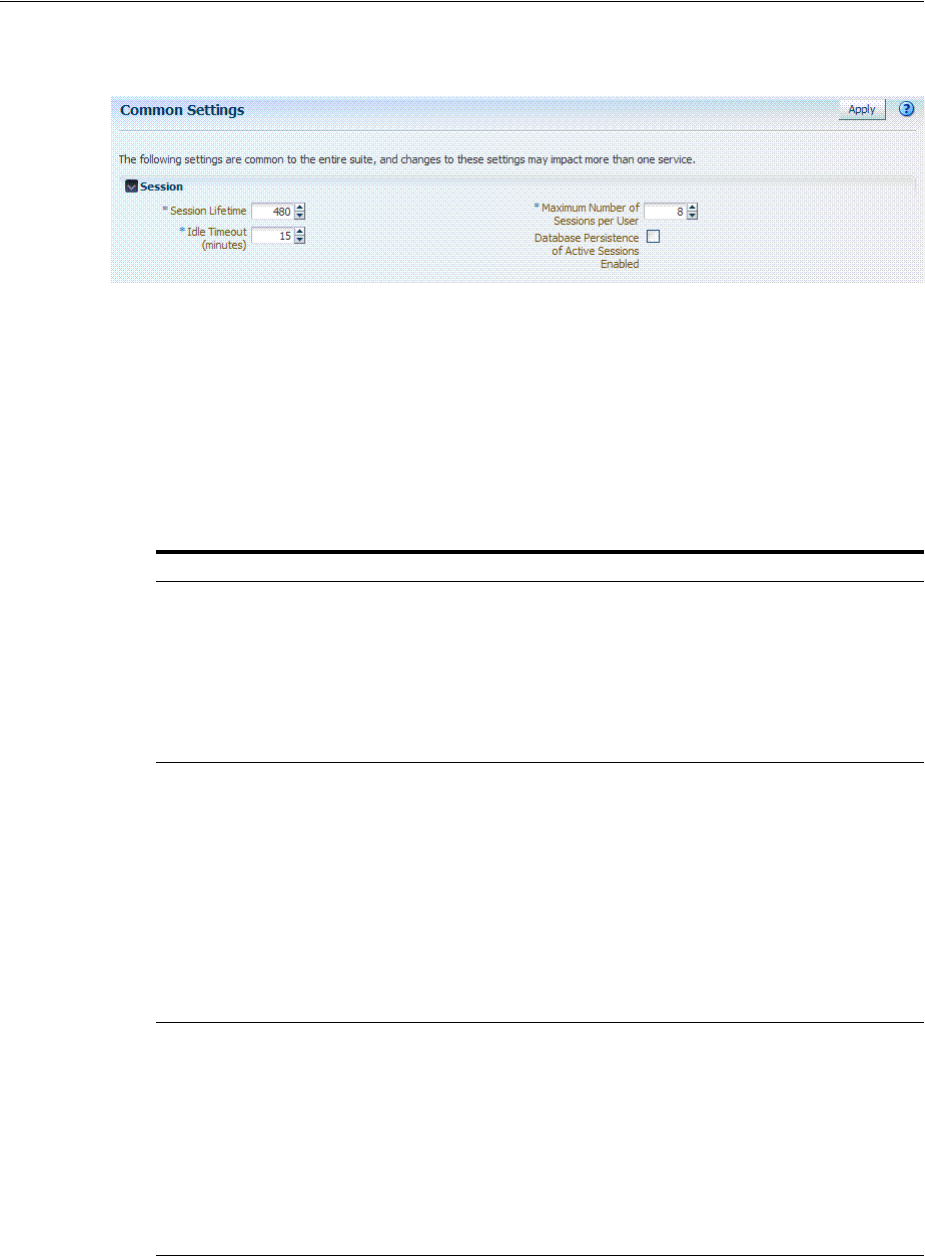
Configuring the Server-Side Session Lifecycle
17-10 Administrator's Guide for Oracle Access Management
Figure 17–2 Global Session Details: Common Settings Page
Table 17–7 describes the global session lifecycle settings and their defaults. Sessions
can operate in a disconnected mode (mod_osso, for example). Therefore, changes to
the configuration establishing your session rules apply only to new sessions. To apply
changes immediately, Oracle recommends that you terminate existing sessions and
force users to create new ones that adhere to your new rules.
See Also: Oracle Fusion Middleware Performance and Tuning
Guide
Table 17–7 Global Session Settings
Setting Description
Session Lifetime (minutes) The amount of time, in minutes, that a user's authentication session
remains active. When the lifetime is reached, the session expires.
Default = 1440 minutes (24 hours specified in an integer representing
minutes)
A value of zero (0) disables this setting. Any value between 0 (zero) and
2147483647 is allowed.
Note: An expired session is automatically deleted from the in-memory
caches (or database).
Idle Timeout (minutes) The amount of time, in minutes, that a user's authentication session
remains active without accessing any Access Manager protected
resources. When the user is idle for a longer period, they are asked to
re-authenticate.
Default = 15 minutes
A value of zero (0) disables this setting. Any value between 0 (zero) and
2147483647 is allowed.
Note: Timed-out sessions are not deleted from the session manager.
Session data could be removed from memory but will still be available in
the persistant store (database). After re-authentication, the same session
will be re-activated.
See Also: "About Application-Specific Session Overrides"
Maximum Number of Sessions
per User
The exact number of sessions each user can have at one time. Use this
setting to configure multiple session restrictions for all users.
Any positive integer is allowed.
Specifying the count as "1", activates a special mode. If a user who
already has a session authenticates using another device (thereby
creating a new session), then their existing session is deleted. No error is
reported and no warning is given.
Note: Too high a number impacts performance and result in a security
risk. Oracle recommends less than 20 as a reasonable limit per user.
Otherwise there can be performance impact. For tuning information, see
Oracle Fusion Middleware Performance and Tuning Guide.

Configuring the Server-Side Session Lifecycle
Maintaining Access Manager Sessions 17-11
17.4.2 About Application-Specific Session Overrides
Application-specific access is tracked from the initial application-access time and is
updated only as further requests are made of that Application Domain. In other
words, the user's authentication and the authentication state are under control of
Access Manager and the Administrator. The current idle time for a given application is
shared between Access Manager and the application. The application provisions its
own run time data for the user on a per-session basis and needs to remove it as soon as
possible to make room for others.
Administrators can add application-specific session overrides on the Summary tab of
an Application Domain. Table 17–8 lists application-specific settings that, when
specified, override global session settings.
For more information, see "Viewing or Modifying Optional Application-Specific
Session Overrides" on page 17-12.
17.4.3 Viewing or Modifying Global Session Settings
Users with valid Administrator credentials can use the following procedure to modify
common session lifecycle settings using the Oracle Access Management Console.
To view or modify global session settings
1. From the Oracle Access Management Console, click Common Settings.
2. On the Common Settings page, expand the Session section.
3. Click the arrow keys beside each list to increase or decrease session lifecycle
settings as needed (Table 17–7):
■Session Lifetime (minutes)
■Idle Timeout (minutes)
■Maximum Number of Sessions per User
Database Persistence for Active
Sessions Enabled
Persists active sessions to the configured database session store, in
addition to the local and distributed caches. Sessions are retained even if
all managed servers die off.
Default = Enabled (checked)
If this is overkill for your environment, or you want to perform
deployment sizing to take into account the database, you can clear the
checkbox and restart all OAM Servers to disable this function.
Table 17–8 Application-Specific Session Timing Overrides
Element Description
Idle timeout Access Manager previously stored the last access time value within the session. To
enforce maximum idle time on a per-application basis, Access Manager includes a
new application-specific last access time field to hold it. This is filled with the last
access time for each subset of domains visited within the course of a session, on
which a per-application idle timeout override has been defined. This is not
needed for domains on which an override has not been defined--no checking is
done against such data.
Default: undefined
See Also: "About Global Session Lifecycle Settings"
Table 17–7 (Cont.) Global Session Settings
Setting Description

Managing Active Server-Side Sessions
17-12 Administrator's Guide for Oracle Access Management
■(Management) Maximum Search Results - denotes the number of sessions
fetched by default for a session query if the result set is large
■Database Persistence of Active Sessions Enabled
4. Check the box to enable Database Persistence for Active Sessions.
5. Click Apply to submit the changes (or close the page without applying changes).
6. Close the page when you finish.
7. Proceed to one of the following topics:
■"Viewing or Modifying Optional Application-Specific Session Overrides"
■"Managing Active Server-Side Sessions"
17.4.4 Viewing or Modifying Optional Application-Specific Session Overrides
Users with valid Administrator credentials can use the following procedure to modify
optional session settings for one or more application domains in a named group.
To view or modify optional application-specific session settings
1. From the Oracle Access Management Console, click Application Domains.
2. Find and open the desired domain.
3. On the Summary tab, enter the following information to create (or add) this
domain to the group that uses session overrides (Table 17–8):
■Idle Timeout
4. Click Apply to submit the changes (or close the page without applying changes).
5. Proceed to "Managing Active Server-Side Sessions".
17.5 Managing Active Server-Side Sessions
The Oracle Access Management Console Session Management page provides Search
controls that enable Administrators to create a query based on filter conditions, save
their Search Criteria for use later, and add fields to the query form to further refine the
search.
In the database store configuration, the session might exist in the database but not in
the cache. Session searches are based on the system time stamp. The database is
queried for sessions updated earlier than the time stamp (minus the write delay). The
cache is queried for sessions updated later than this time stamp. Resulting data found
in the cache and the database is merged. If duplicate results exist, cache data prevails.
Detailed performance metrics are generated for search operations.
This section describes how to locate and delete one or more sessions for a single user,
or for all users. It provides the following information:
■About the Session Management Pages
■Managing Active Sessions
See Also: "About Application-Specific Session Overrides" on
page 17-11
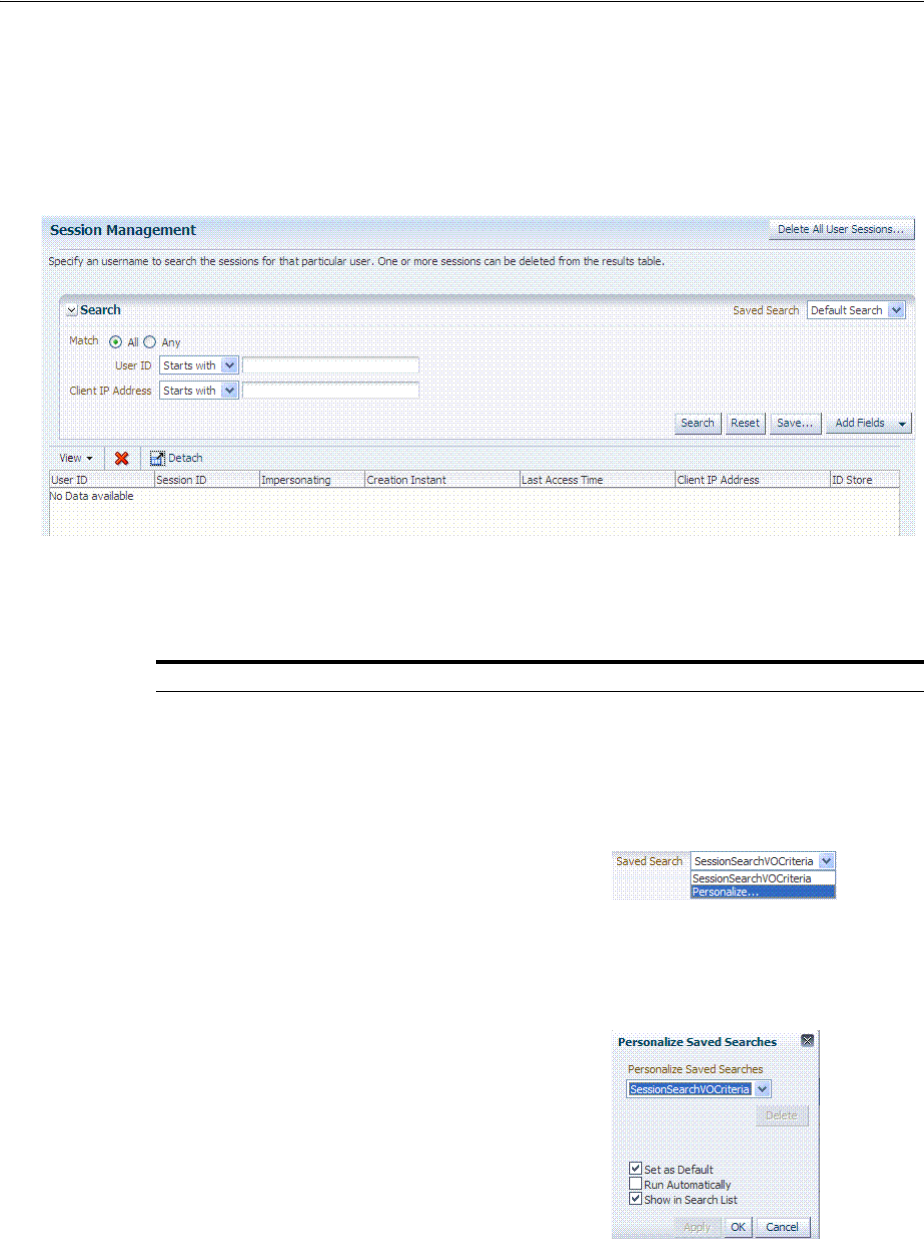
Managing Active Server-Side Sessions
Maintaining Access Manager Sessions 17-13
17.5.1 About the Session Management Pages
Figure 17–3 illustrates the Session Management page, under the System Configuration
tab, Common Configuration section. Additional details follow the figure.
Figure 17–3 Common Configuration: Session Management Page
Table 17–9 describes Session Management page and Search controls that enable you to
create a query that is based on filter conditions.
Table 17–9 Session Management Controls and the Results Table
Name Description
Delete All User Sessions ... Choose this command button to delete the active sessions of all
users.
Note: A Confirmation window appears where you can confirm or
decline the operation.
Saved Search Lists any search criteria saved previously for reuse. A list like the
following is made available whenever you save search criteria.
If you choose Personalize, you can change the behavior of the
saved search criteria by making new choices in the following
window.
Match All Any Enables you to match either any of the criteria you have specified
or match all of the criteria you have specified during the search.
Note: When a resource is protected
byAnonymousScheme
, it is not
displayed in a session search.
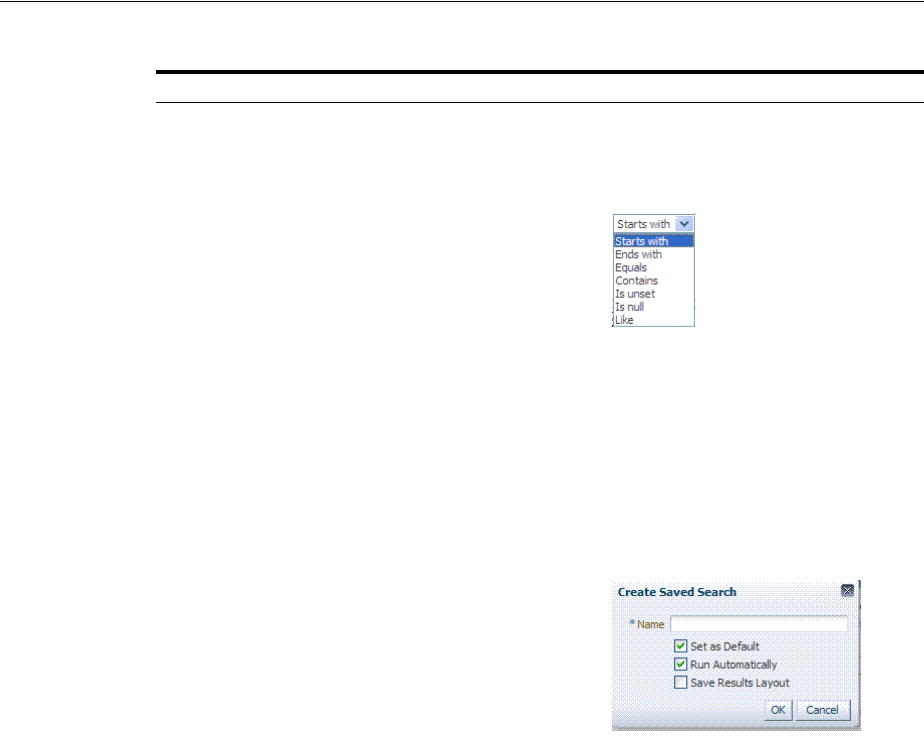
Managing Active Server-Side Sessions
17-14 Administrator's Guide for Oracle Access Management
Userid Enter a specific userID in the field and then click the Search
button to display all active sessions for this user. Incomplete
strings and wild cards are allowed.
The following list is available to assist your search:
Client IP Address Enter a Client IP Address and then click the Search button to
display all active sessions for this user. Incomplete strings and
wild cards are allowed. The same list is available to assist your
Userid search and your Client IP Address.
Search Click this button to initiate a search based on criteria in the form.
Reset Click this button to clear the form of all criteria.
Save Click this button to initiate a save operation that enables reuse of
your search criteria. The following window opens.
1. Enter a name, which will appear in the Saved Search list for
later selection.
2. Set this search as the Default (or clear the check box).
3. Set this search to Run Automatically (or clear the check box).
4. Save the Results Layout (or clear the check box).
5. Click OK.
Table 17–9 (Cont.) Session Management Controls and the Results Table
Name Description
Managing Active Server-Side Sessions
Maintaining Access Manager Sessions 17-15
Add Fields You can add different fields to your search form. The following
list is available to assist.
1. Click the Add Fields button.
2. Click items in the list to add them to the form and click Save.
After adding an item, notice that a list is available to assist with
the search. For example: Employment and time-based selections
provide the following list.
View Choose commands from the View menu above the results table to
configure the table. Commands include:
■Columns: Displays a menu with the following options you
can use to hide or display specific details in the table:
■Detach: Expands the results table to a full-screen view
■Attach: Restores the Session Management page view.
■Reorder Columns: Specifies a new order for columns
containing session data in the results table.
Delete
Choose this command button after selecting items in the results
table to delete.
Note: When session search criteria is generic (using just a wild
card (*), for example), there is a limitation on deleting a session
from a large list of sessions. Oracle recommends that your session
search criteria is fine-grained enough to obtain a relatively small
set of results (ideally 20 or less).
Also: A Confirmation window appears where you can confirm or
decline the operation.
Table 17–9 (Cont.) Session Management Controls and the Results Table
Name Description
Managing Active Server-Side Sessions
17-16 Administrator's Guide for Oracle Access Management
17.5.2 Managing Active Sessions
Users with valid Administrator credentials can use information in the following
procedure to configure the search results table, locate the active sessions of a specific
user, delete one or more sessions for a specific user, or delete all sessions for all users.
When a resource is protected by
AnonymousScheme
, it is not displayed in a session
search.
Skip any steps that do not apply to your requirements.
Prerequisites
OAM Server must be running.
To locate and manage active sessions
1. From the Oracle Access Management Console, click Session Management.
The Session Management Search page appears with the Username field and a
results table.
2. Add Fields: From the Add Fields list, choose the desired field name (Table 17–9).
3. Choose Operators: Open the list of operators for the chosen search field, and
choose the desired function.
4. Find sessions:
a. In the desired query field, enter your criteria (with or without a wild card (*)).
b. Click the Search button to locate sessions that match either any or all your
criteria.
c. Review the results table.
d. Repeat if needed to further refine your search.
Detach
Click to expand the results table to a full-page view.
Note: If the table is already a detached full-page, click Detach to
restore the Session Management page.
Results table (not named) After searching for the active sessions of a specific user, results are
displayed in the table. Details include:
■Session ID: A unique, OAM-generated session Id.
■User ID:
■Impersonating:
■Creation Time: The day and time the session was created.
■Last Accessed: The day and time the session was last
accessed
■Client IP: The IP address of the specified user.
■ID Store
■Impersonator
See Also: "About the Session Management Pages"
Table 17–9 (Cont.) Session Management Controls and the Results Table
Name Description

Verifying Server-Side Session Operations
Maintaining Access Manager Sessions 17-17
5. Configure the Results Table: Use functions on the View menu to create the
desired results table.
6. Delete sessions:
a. In the results table, click one or more sessions to remove.
b. Click the Delete (x) button to delete the selected sessions.
c. Click Yes to confirm deleting selected sessions (or click No to cancel the delete
operation).
d. Notify the user, if needed.
7. Delete sessions for all users:
a. Click the Delete All Sessions button in the upper-right corner.
b. Click Yes when you are asked to confirm.
8. Close the Session Management page when you finish.
9. Proceed to "Verifying Server-Side Session Operations".
17.6 Verifying Server-Side Session Operations
Use the following procedure to verify your configured session lifecycle operations.
To validate session operations
1. Authenticate:
a. Access a resource from a browser using a credential other than your
Administrative credential.
b. Verify that the session exists, as described in "Managing Active Sessions".
2. Multiple Sessions:
a. From a second browser (with cookies removed), access the same resource.
b. Verify that two sessions exist.
3. Delete all sessions, (Step 7 of "Managing Active Sessions") and confirm that the
Active sessions are removed.
4. Re-authentication Verification:
a. From the second browser (Step 2), access a different resource to confirm that
you must re-authenticate.
b. Enter credentials for the resource.
c. Verify that a session was created.
5. Database Verification:
a. Delete all sessions.
b. Connect to the database and run the following query:
SQL> select * from oam_session
c. Confirm that you see the following results:
no row selected
d. From the second browser, access a different resource.

Understanding Client-Side Session Management
17-18 Administrator's Guide for Oracle Access Management
e. Connect to the database and run the following query
SQL> select * from oam_session
f. Confirm that you see one row of data:
1 rows selected
g. Select rows from OAM_SESSION_ATTRIBUTES and confirm that data exists
for the user.
17.7 Understanding Client-Side Session Management
Client-side (or cookie-based) session management is a light weight session
management solution that reduces server-side overhead and provides better
scalability. It uses client-side cookies as the persistent mechanism for SSO sessions,
making the server stateless. Client-Side session management supports the following
features:
■Authentication
■Authorization (excluding session constrains and responses)
■OAM & OIM integration over TAP - excluding session deletion on attribute
change (account lock/disable, etc.)
■Step up authentication
■Inactivity time out with single web domain
17.8 Using WLST To Configure Session Management
The following WLST commands can be used to configure for server-side (default) or
client-side (cookie-based) session management.
■displaySSOSessionType
■configSSOSessionType
17.8.1 displaySSOSessionType
Online and offline command that allows you to view the session management
configuration.
17.8.1.1 Description
Allows you to view the session type configuration.
17.8.1.2 Syntax
displaySSOSessionType(domainHome="<domainHome>")
Argument Definition
domainHome
Specifies the location for the Weblogic Server OR Cell Path for
WebSphere. This parameter is mandatory for WebSphere. When
Offline, a value is mandatory; when online, optional.

Using WLST To Configure Session Management
Maintaining Access Manager Sessions 17-19
17.8.1.3 Example
displaySSOSessionType(domainHome="/oracle/product/OAM/domains/oam_domain")
17.8.2 configSSOSessionType
Online and offline command that allows you to configure session management as
COOKIE-BASED or DEFAULT.
17.8.2.1 Description
Configure session management for Access Manager.
17.8.2.2 Syntax
configSSOSessionType(type="<ssoSessionType>",
cookieDomain="<cookieDomain>",domainHome="<domainHome>")
17.8.2.3 Examples
configSSOSessionType(type="COOKIE_BASED",cookieDomain-".example.com")
configSSOSessionType(type="COOKIE_BASED",cookieDomain-".example.com",
domainHome="domainHome1")
configSSOSessionType(type="Default",cookieDomain=".example.com")
Argument Definition
type
Specifies the type of session store. Accepted values are COOKIE_
BASED or DEFAULT.
cookieDomain
Specifies the value of the SSO Session Timeout cookie domain.
domainHome
Specifies the location for the Weblogic Server OR Cell Path for
WebSphere. This parameter is mandatory for WebSphere. When
Offline, a value is mandatory; when online, optional.

Using WLST To Configure Session Management
17-20 Administrator's Guide for Oracle Access Management

Part V
Par t V
Managing Access Manager SSO, Policies,
and Testing
This part, Part V, provides information to help you understand single-sign on (SSO)
with Access Manager, and help you to configure Access Manager policies and logout.
Testing your single sign-on connection and policies is also described.
Part V contains the following chapters:
■Chapter 18, "Understanding Single Sign-On with Access Manager"
■Chapter 19, "Managing Authentication and Shared Policy Components"
■Chapter 20, "Managing Policies to Protect Resources and Enable SSO"
■Chapter 21, "Validating Connectivity and Policies Using the Access Tester"
■Chapter 22, "Configuring Centralized Logout for Sessions Involving 11g
WebGates"

18
Understanding Single Sign-On with Access Manager 18-1
18
Understanding Single Sign-On with Access
Manager
[10]
This chapter introduces the elements that comprise Access Manager single sign-on. It
provides an administrator with the foundation to begin developing policies.
This chapter includes the following topics:
■Introducing Access Manager Single Sign-On
■Understanding the Access Manager Policy Model
■Anatomy of an Application Domain and Policies
■Introduction to Policy Conditions and Rules
■Introducing Access Manager Credential Collection and Login
■Understanding SSO Cookies
■Introduction to Configuration Tasks for Single Sign-On
18.1 Introducing Access Manager Single Sign-On
Login is the action a user takes to authenticate and gain access to a protected
application. Single sign-on (SSO) is the process that gives users the ability to access
multiple protected resources (Web pages and applications) with a single
authentication. SSO is enabled by Access Manager to eliminate the need for additional
or different logins to access other applications at the same (or lower) authentication
level during the same session.
Access Manager converges several SSO architectures (including Identity Federation for
Partner Networks, and Service Oriented Architecture) and provides SSO through a
common SSO Engine for consistent service across multiple protocols. The Oracle
Identity Management Infrastructure stores user identities in the identity store
referenced in the policy.
Note: Unless explicitly stated, information in this chapter is the same
for all agent types and Access Manager credential collectors.
For details about single log-out, see Chapter 22, "Configuring
Centralized Logout for Sessions Involving 11g WebGates".

Introducing Access Manager Single Sign-On
18-2 Administrator's Guide for Oracle Access Management
Table 18–1 summarizes the components that support or enforce Access Manager
policies, and where to find more information about these, if needed.
Note: Contextual data is the information that is presented to or
collected by Access Manager at various stages of user interaction.
These stages include authentication, authorization, enterprise SSO,
federation, adaptive authentication, token validation, session creation,
and so on. The information itself might comprise a user's device
fingerprints, IP address, antivirus and firewall protection, assertion
and so on. Components that play the role of contextual data providers
and asserters when integrated with Access Manager include
Enterprise Single Sign-on, Identity Federation, Oracle Adaptive
Access Manager.
Note: Default Access Manager behavior is to deny access when a
resource is not protected by a policy that explicitly allows access. To
delegate authentication tasks to Access Manager, agents must reside
with the relying parties and must be registered with Access Manager.
Registering an agent sets up the required trust mechanism between
the agent and Access Manager SSO.
Table 18–1 Summary: SSO Components
Component Description
Applications Applications can delegate authentication and authorization to Access Manager and accepts
headers from a registered Agent.
Note: External applications do not delegate authentication. Instead, these display HTML
login forms that ask for application user names and passwords. For example, Yahoo! Mail
is an external application that uses HTML login forms.
■OAM Server
■Oracle Access Management
Console (installed on
WebLogic AdminServer)
Non-administrative users first gain access by entering the URL of a protected resource,
which returns the SSO login page.
See Also: "Introducing Access Manager Credential Collection and Login" on page 18-14.
Administrative users access the console to author policies by typing the URL:
https://host:port/oamconsole. Although, default policies can be generated automatically
during Agent registration, as described in Chapter 16.
See Also: Chapter 20, "Managing Policies to Protect Resources and Enable SSO".
Policy Enforcement Agents ■OAM Agents (Webgate or Access Client)
■Legacy OSSO Agents
■Legacy OpenSSO Agents
See Also: Chapter 15, "Introduction to Agents and Registration".
Credential Collectors and
Communication Channels
■Authentication with the default embedded credential collector (ECC) occurs across
the HTTP (HTTPS) channel
■Authentication with the optional detached credential collector (DCC) occurs across
the Oracle Access Protocol (OAP) channel
■Authorization occurs across the Oracle Access Protocol (OAP) channel
See Also: Table 19–5, " Comparing the DCC and ECC"
SSO Engine Manages the session lifecycle, facilitates global logout across all relying parties in the valid
session, and provides consistent service across multiple protocols.
See Also: Chapter 17, "Maintaining Access Manager Sessions" and Chapter 22,
"Configuring Centralized Logout for Sessions Involving 11g WebGates"

Introducing Access Manager Single Sign-On
Understanding Single Sign-On with Access Manager 18-3
Single sign-on can be implemented as introduced in Table 18–2, which includes
pointers to additional information.
Proxy support for legacy systems ■OAM Proxy supports legacy Access Manager implementations by acting as a legacy
Access Server. See:
"Managing the Access Protocol for OAM Proxy Simple and Cert Mode Security"
"Introduction to OAM Proxy Metrics and Tuning" on page 12-9
■OSSO Proxy supports OSSO Agents by acting as the legacy OSSO Server. See:
Chapter 24
■Oracle-provided OpenSSO Proxy handles requests for resources protected by
OpenSSO Agents. See: Chapter 23
See Also: About the Embedded Proxy Server and Backward Compatibility
Access Policies Registered agents rely on Access Manager authentication, authorization, and token
issuance policies to determine who gets access to protected applications (defined
resources).
Note: Default Access Manager behavior is to deny access when a resource is not protected
by a policy that explicitly allows access.
See Also: Chapter 20, "Managing Policies to Protect Resources and Enable SSO"
Policy Store Database in production environments (otherwise, oam-config.xml).
See Also: Chapter 5
Cryptographic keys and Key
Storage
One key is generated and used per registered mod_osso or 11g Webgate. However, one
single key is generated for all 10g Webgates.
See Also: Table 1–2, " Features in Access Manager 11.1.2".
Cookies See: "Understanding SSO Cookies" on page 18-23.
Note: Single Sign-on for the Oracle Access Management Console,
and other Oracle Identity Management consoles deployed in a
WebLogic container, is enabled using the pre-registered
IAMSuiteAgent and companion policies. No further configuration is
needed to protect the consoles.
Table 18–2 Introduction to SSO Implementations
SSO Type Description
Single Network Domain SSO You can set up Access Manager single sign-on for resources within a
single network domain (example.com, for example). This includes
protecting resources belonging to multiple WebLogic administration
domains within a single network domain.
Single Network Domain SSO is the subject of this book.
Multiple Network Domain SSO Access Manager 11g supports cross-network-domain single sign-on
out of the box.
See Also:"About Multiple Network Domain SSO" on page 18-4.
Application SSO Application single sign-on allows users who have been authenticated
by Access Manager to access applications without being
re-authenticated.
See Also: "About Application SSO and Access Manager" on page 18-4
Table 18–1 (Cont.) Summary: SSO Components
Component Description

Introducing Access Manager Single Sign-On
18-4 Administrator's Guide for Oracle Access Management
18.1.1 About Multiple Network Domain SSO
With Access Manager, this is a standard feature. When 11g WebGates are used
exclusively all cookies in the system are host-based. However, you must have control
over all the domains. If some domains are controlled by external entities (not part of
the Access Manager deployment), Oracle recommends that you use Identity
Federation.
Access Manager supports cross-network-domain single sign-on out of the box. During
single sign-off with Access Manager:
■The SSO cookie set by OAM Server is a host cookie that works across the network
domains. The WebGate clears its standalone Agent cookie and then redirects to the
OAM Server for session clearing.
■10g WebGates do not have a standalone Agent cookie; logout occurs only on the
server side with no redirection required.
■With 11g WebGates and OSSO agents that support a standalone agent cookie, the
agent Logout Callback URL is called in parallel. The agents accessed in a session
and agents from multiple domains are all called in parallel, depending on the
number of concurrent connections supported in the browser.
18.1.2 About Application SSO and Access Manager
Access Manager enables Administrators to create a web of trust in which a user's
credentials are verified once and are provided to each application the user runs. Using
Multiple WebLogic Server
Domain SSO
The basic administration unit for WebLogic Server instances is known
as a domain. You can define multiple WebLogic administration
domains based on different system Administrators' responsibilities,
application boundaries, or the geographical locations of WebLogic
servers. However, all Managed Servers in a cluster must reside in the
same WebLogic Server domain.
See Also: "About Multiple WebLogic Server Domain SSO" on
page 18-5
Reverse-Proxy SSO This SSO implementation type is supported with a few configuration
differences.
See Also: "About Reverse-Proxy SSO" on page 18-5
SSO with Mixed Release Agents Access Manager seamlessly supports registered 11g and 10g OAM
gents (Webgates and programmatic access clients), as well as legacy
OSSO Agents (mod_osso 10g), and legacy OpenSSO agents). These can
be used in any combination.
Note: Access Manager provides a proprietary multiple network
domain SSO capability that predates Identity Federation 11.1.1. If this
is implemented in your Oracle Access Manager 10g deployment, you
can register 10g Agents with Access Manager 11g to continue this
support.
See Also:
■"Configuring Centralized Logout for 11g Webgates" on page 22-4
■Oracle Fusion Middleware Administrator's Guide for Oracle Identity
Federation, 11.1.1
Table 18–2 (Cont.) Introduction to SSO Implementations
SSO Type Description

Introducing Access Manager Single Sign-On
Understanding Single Sign-On with Access Manager 18-5
these credentials, the application does not need to re-authenticate the user with its
own mechanism.
Application single sign-on allows users who have been authenticated by Access
Manager to access applications without being re-authenticated.
There are two ways to send a user's credentials:
■Using Cookies: A specific value is set on the browser's cookie that the application
must extract to identify a user.
■Using Header Variables: An HTTP header set on the request by the agent and
visible to the application.
Header response values are inserted into a request by an OAM Agent, and can only be
applied on Web servers that are protected by an agent. registered with Access Manager
11g If the policy includes a redirect URL that is hosted by a Web server not protected
by Access Manager, header responses are not applied.
For example, when a user authenticates, she might be redirected to a portal index
page:
http://example.com/authnsuccess.htm
For authentication failure, an authentication action might redirect the user to an error
page or a self-registration script:
http://example.com/authnfail.htm
18.1.3 About Multiple WebLogic Server Domain SSO
Access Manager supports SSO in multiple WebLogic administration domains.
You can define multiple WebLogic administration domains based on different system
Administrators' responsibilities, application boundaries, or the geographical locations
of WebLogic servers. Conversely, you can use a single domain to centralize all
WebLogic Server administration activities.
There are two basic types of WebLogic administration domains:
■Domain with Managed Servers: A simple production environment can consist of
a domain with several Managed Servers that host applications, and an
Administration Server to perform management operations. In this configuration,
applications and resources are deployed to individual Managed Servers; similarly,
clients that access the application connect to an individual Managed Server.
Note: Both forms require Administrators to enter the appropriate
responses within the policy. For more information, see "Introduction
to Policy Responses for SSO" on page 20-41.
Note: All Managed Servers in a cluster must reside in the same
domain; you cannot split a cluster over multiple domains. All
Managed Servers in a domain must run the same version of the Oracle
WebLogic Server software. The Administration Server can run either
the same version as the Managed Servers in the domain, or a later
service pack.

Introducing Access Manager Single Sign-On
18-6 Administrator's Guide for Oracle Access Management
Production environments that require increased application performance,
throughput, or availability may configure two or more of Managed Servers as a
cluster. Clustering allows multiple Managed Servers to operate as a single unit to
host applications and resources. For more information about the difference
between a standalone and clustered Managed Servers, see Managed Servers and
Clustered Managed Servers.
■Standalone WebLogic Server Domain: For development or test environments,
you may want to deploy a single application and server independently from
servers in a production domain. In this case, you can deploy a simple domain
consisting of a single server instance that acts as an Administration Server and
also hosts the applications you are developing. The examples domain that you can
install with WebLogic Server is an example of a standalone WebLogic Server
domain.
All Managed Servers in a cluster must reside in the same domain; you cannot split a
cluster over multiple domains. All Managed Servers in a domain must run the same
version of the Oracle WebLogic Server software. The Administration Server can run
either the same version as the Managed Servers in the domain, or a later service pack.
Each domain's configuration is stored in a separate configuration file (config.xml),
which is stored on the Administration Server along with other files such as logs and
security files. When you use the Administration Server to perform a configuration
task, the changes you make apply only to the domain managed by that Administration
Server. To manage another domain, use the Administration Server for that domain. For
this reason, the servers instances, applications, and resources in one domain should be
treated as being independent of servers, applications, and resources in a different
domain.You cannot perform configuration or deployment tasks in multiple domains at
the same time.
Each domain requires its own Administration Server for performing management
activities. When you use the Oracle Access Management Console to perform
management and monitoring tasks, you can switch back and forth between domains,
but in doing so, you are connecting to different Administration Servers.
If you have created multiple domains, each domain must reference its own database
schema. You cannot share a configured resource or subsystem between domains. For
example, if you create a JDBC data source in one domain, you cannot use it with a
Managed Server or cluster in another domain. Instead, you must create a similar data
source in the second domain. Furthermore, two or more system resources cannot have
the same name.
18.1.4 About Reverse-Proxy SSO
This is a supported configuration with the following caveats.
Caveats
If you are going to use a reverse proxy in a single sign-on configuration, be sure to
perform one of the following tasks. Otherwise, the reverse proxy hides the client's IP
address:
■Either to set the
IPvalidation
parameter to
false
■Or add the proxy IP address to the
IPValidationExceptions
list in the Webgate
registration
In some situations the Reverse Proxy does not pass the 10g Webgate ObSSOCookie to
Oracle WebLogic after a successful authentication. To avoid this issue:
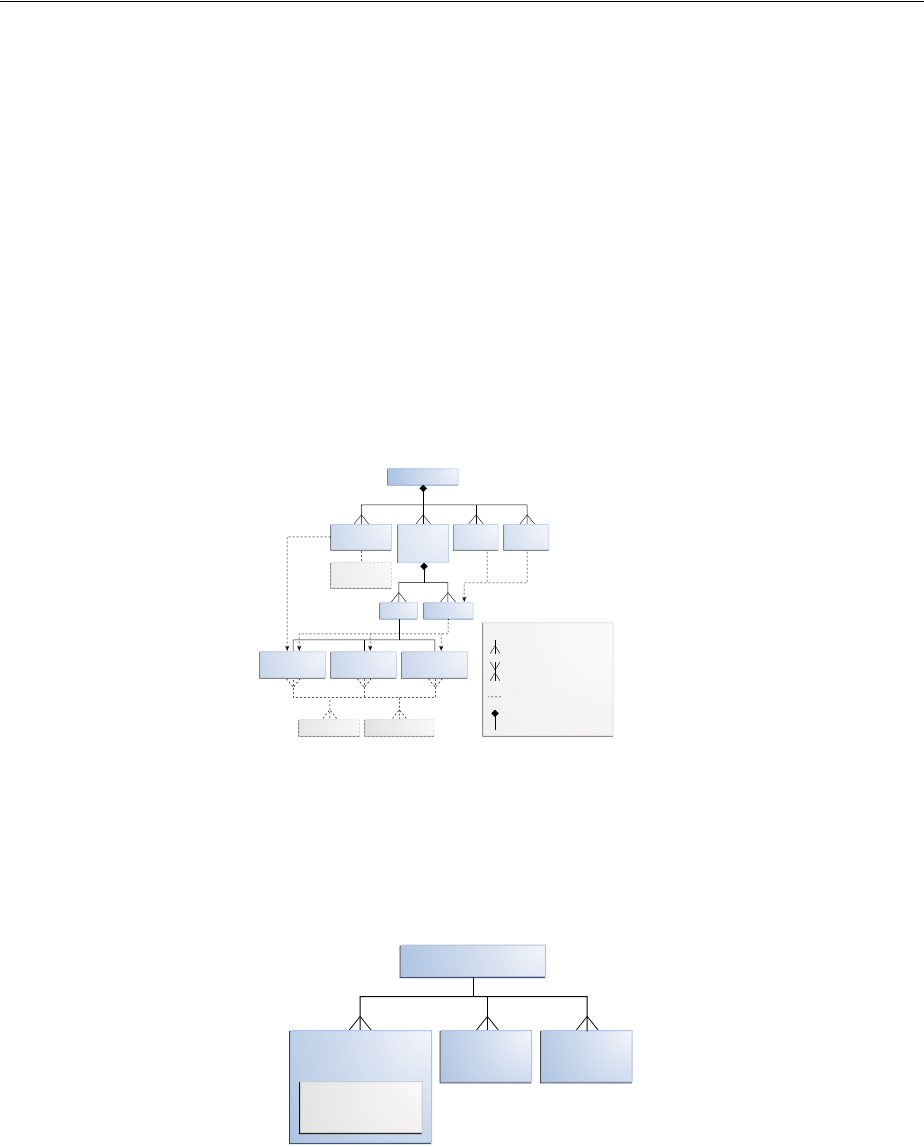
Understanding the Access Manager Policy Model
Understanding Single Sign-On with Access Manager 18-7
■Use Form authentication instead of Basic Over LDAP when using Reverse Proxy
with Oracle WebLogic
■For 11g Webgate, a user-defined parameter (
filterOAMAuthnCookie
(default
true
))
can be used to prevent the OAMAuthnCookie from being passed to downstream
applications for security consideration. If you do want to pass the cookie on, then
set the
filterOAMAuthnCookie
parameter to
false
.
18.2 Understanding the Access Manager Policy Model
Access Manager distills the policy models of Oracle Access Manager and OSSO into a
single Access Manager policy model. Figure 18–1 illustrates the main elements of the
Access Manager 11g policy model including the shared policy components, an
individual Application Domain, and external dependencies.
Figure 18–1 Access Manager 11g Policy Model
Shared Policy Components
Shared policy components are global and can be used in one or more Application
Domains. Figure 18–2 illustrates the shared components for Access Manager policies.
Figure 18–2 Access Manager Shared Policy Components
Table 18–3 describes the global, shared components in an Access Manager policy.
Access Manager
Authentication
Schemes
Authentication
Modules
Application
Domains
Resource
Types
Host
Identifiers
PoliciesResources
Token Issuance
Policies
Authorization
Policies
Authentication
Policies
IdentitiesContextual Data
Legend
External Dependencies
Relationship: Containment
Relationship: One-to-Many
Relationship: Many-to-Many
Access Manager
Resource
Types
Host
Identifiers
Authentication
Schemes
Authentication
Modules

Understanding the Access Manager Policy Model
18-8 Administrator's Guide for Oracle Access Management
Table 18–3 Access Manager Global, Shared Policy Components
Component Description
Resource Types Defines the type of resource to be protected and the associated
operations. The default resource type is HTTP. However,
Administrators can define non-HTTP resource types that can be
applied to specific resources in an Application Domain.
Any number of resources can belong to a specific resource type.
However, each resource that is added to a policy must be defined as a
single type:
■HTTP
■wl_authen
■TokenServiceRP
See Also:
■Chapter 19: Managing Resource Types
■Chapter 38: Managing TokenServiceRP Type Resources
Host Identifiers A host can be known by multiple names. To ensure that OAM
recognizes the URL for a resource, OAM must know the various ways
used to refer to that resource's host computer.
With Access Manager, all possible host variations are stored together.
Administrators enter the canonical name for the host and every other
name by which the host can be addressed by users. A request sent to
any address on the list is mapped to the official host name.
Authentication and authorization policies in an Application Domain
protect resources based on host identifiers. Host identifiers are used to
identify resources or an application at run time and can be used to
formulate policies for application resources at design time.
Host identifiers can be generated automatically during Agent
registration and are used to seed the Resource definition and default
authentication and authorization policies in the new Application
Domain.
Alternatively: Administrators can create a host identifier definition for
use in one or more Application Domains.
Virtual Web Hosting: Enables support of multiple domain names and
IP addresses that each resolve to their unique subdirectories on a
single server. The same host can have multiple sites being served
either based on multiple NIC cards (IP based) or multiple names (for
example, abc.com and def.com) resolving to same IP.
See Also: "About Host Identifiers" on page 19-8.
Authentication Scheme A named component that defines the challenge mechanism, level of
trust, and the underlying authentication module or plug-in required to
authenticate a user. Several default schemes provided with Access
Manager and Administrators can define their own schemes.
Authenticating a user's identity with Access Manager refers to running
a pre-defined set of processes to verify the digital identity of the user.
One authentication scheme can be assigned to multiple authentication
policies. However, each authentication policy can have only one
authentication scheme assigned to it.
Note: Authentication schemes are defined globally to ensure that a
small number of Administrators define them in a consistent, secure
way.
See Also: "Managing Authentication Schemes" on page 19-64

Understanding the Access Manager Policy Model
Understanding Single Sign-On with Access Manager 18-9
Access Manager Policy Components
Access Manager default behavior denies access when a resource is not protected by a
policy that explicitly allows access. Table 18–4 describes policy components you
configure to allow access and where you can find the details.
Authentication Modules and
Plug-ins
The smallest executable unit of an authentication scheme. The
authentication module determines the exact procedure to be followed
and the method for challenging the user for credentials.
Authentication involves determining which credentials a user must
supply when requesting access to a resource, gathering credentials,
and returning a response that is based on the results of credential
validation.
All authentication processing relies on an authentication module to
define the rules governing requirements and transmission of
information to the backend authentication scheme. All information
collected by the plug-in and saved in the context is available to the
plug-in through the authentication process. Context data can also be
used to set cookies or headers in the user's login page
A number of plug-ins and several pre-defined modules are provided.
Oracle strongly recommends using plug-ins, which you can configure
and orchestrate as needed to provide multi-step authentication.
See Also:
■"Managing Native Authentication Modules" on page 19-23
■"Orchestrating Multi-Step Authentication with Plug-in Based
Modules" on page 19-28
See Also: "Anatomy of an Application Domain and Policies" on
page 18-10
Table 18–4 Access Manager Policy Components
Component Description
Application Domain Each Application Domain provides a logical container for resources, and the associated
policies that dictate who can access these resources. An application domain can be
created automatically during Agent registration or manually using the console.
See Also: "Anatomy of an Application Domain and Policies" on page 18-10
Resource Definitions Based on a defined host identifier, Administrators can add specific resources to an
Application Domain and apply policies to protect those resources.
See Also: "Adding and Managing Policy Resource Definitions" on page 20-14.
Authentication Policy Each resource defined in an Application Domain can be protected by only one
authentication policy. Each authentication policy requires one authentication scheme.
One authentication policy can protect many resources. However, each resource can be
protected by only one authentication policy.
See Also: "Defining Authentication Policies for Specific Resources" on page 20-32
Authorization Policies Each resource assigned to an Application Domain can be protected by only one
authorization policy. Each policy can include one or more conditions and a rule.
Authorization policies can also contain success responses.
One authorization policy can protect many resources. However, each resource can be
protected by only one authorization policy.
See Also: "Defining Authorization Policies for Specific Resources" on page 20-37.
Token Issuance Policy By default, only a container for Token Issuance Policies is provided in a generated
Application Domain. No Conditions or Rules are generated automatically. You must add
these manually.
See Also: "About Token Issuance Policy Pages" on page 20-10.
Table 18–3 (Cont.) Access Manager Global, Shared Policy Components
Component Description
Anatomy of an Application Domain and Policies
18-10 Administrator's Guide for Oracle Access Management
18.3 Anatomy of an Application Domain and Policies
Access Manager enables you to control who can access resources based on policies
defined within an Application Domain. Users attempt to access a protected resource
by entering a URL in a browser, by running an application, or by calling some other
external business logic. When a user requests access to a protected resource, the
request is evaluated according to policies that discriminate between authenticated
users who are authorized and those who are not authorized for access to a particular
resource.
Application domains do not have any hierarchical relationship to one another. Each
Application domain can be made to contain policy elements related to an entire
application deployment, a particular tier of the deployment, or a single host.
Within each Application Domain, specific resources are identified for protection by
specific policies that govern access. Authentication and authorization policies include
Administrator-configured responses that are applied upon successful evaluation.
Authorization policies include Administrator-configured conditions and rules that
define how evaluation is performed, and responses to be applied upon successful
evaluation.
The size and number of Application Domains is up to the Administrator. The decision
can be based on individual application resources or any other logical grouping as
needed. An Application Domain is automatically created during Agent registration.
Also, Administrators can protect multiple Application Domains using the same agent
by manually creating the Application Domain and adding the resources and policies.
Figure 18–3 shows an expanded view of policies within an Application Domain, as
well as how the shared elements are used in an Application Domain.
Policy Responses Available for all policy types, Authentication and Authorization success Responses can
be defined within respective policies to be applied after policy evaluation.
See Also: "Introduction to Policy Responses for SSO" on page 20-41.
Rule Available for only Authorization and Token Issuance Policies.
Each Authorization policy includes a rule that defines whether the policy allows or
denies access to resources protected by the policy.
The rule references Authorization conditions, described next.
See Also: "Introduction to Authorization Policy Rules and Conditions" on page 20-49.
Condition Available for only Authorization and Token Issuance Policies.
Each Authorization policy rule references conditions that define to whom the rule
applies, if there is a time Condition, and how evaluation outcomes are to be applied.
Conditions are declared outside of rules and are referenced within a rule.
See Also: "Introduction to Authorization Policy Rules and Conditions" on page 20-49.
Table 18–4 (Cont.) Access Manager Policy Components
Component Description
Anatomy of an Application Domain and Policies
Understanding Single Sign-On with Access Manager 18-11
Figure 18–3 Anatomy of Access Manager Policies
For more information, see the following topics:
■About Resource Definitions for Policies
■About Authentication Policies
■About Authorization Policies
■About Token Issuance Policies
18.3.1 About Resource Definitions for Policies
The term resource represents a document, or entity, or pieces of content stored on an
OAM Server and available for access by a large audience.
Clients communicate with the OAM Server to request a resource using a particular
protocol (HTTP or HTTPS, for example), which corresponds to an existing Resource
Type. Every HTTP Resource Type must be associated with a host identifier. However,
non-HTTP Resource Types are associated with a specific name (not a host identifier).
With Access Manager, each resource must be defined as within the Resources
container in an Application Domain before it can be associated with a specific policy.
For more information, see "Adding and Managing Policy Resource Definitions" on
page 20-14.
18.3.2 About Authentication Policies
Administrators can create an authentication policy to apply to specific resources
within an Application Domain. Each authentication policy:
■Identifies the specific resources covered by this policy, which must be defined on
the Resources tab of this policy and in the Resources container for the Application
Domain
■Specifies the authentication scheme that provides the challenge method to be used
to authenticate the user
■Specifies the Success URL (and the failure URL) that redirects the user based on
the results of this policy evaluation
Note: Only resources defined in the Resources container can be
associated with policies in the Application Domain.
Note: To protect pieces of content on a page, Oracle recommends
using Oracle Entitlements Server.

Anatomy of an Application Domain and Policies
18-12 Administrator's Guide for Oracle Access Management
■Defines optional Responses that identify post-authentication actions to be carried
out by the Agent.
Policy responses provide the ability to insert information into a session and pull it
back out at any later point. This is more robust and flexible than Oracle Access
Manager 10g, which provided data passage to (and between) applications by
redirecting to URLs in a specific sequence.
Policy responses are optional. These must be configured by an Administrator and
are applied to specific resources defined within the Application Domain. For more
information, see "Introduction to Policy Responses for SSO" on page 20-41.
Authentication Policy Evaluation Results
To authenticate a user, Access Manager presents the user's browser with a request for
authentication credentials based on the challenge method defined by the
authentication scheme for this policy.
After policy evaluation, the result is returned and the user is redirected based on that
result:
■Success (allow access) redirects to the requested URL
■Failure, (deny access) redirects to a generic error page
18.3.3 About Authorization Policies
Authorization is the process of determining if a user has a right to access a requested
resource. A user might want to see data or run an application program protected by a
policy, for example.
Administrators can create an authorization policy to specify the conditions under
which a subject or identity has access to a particular resource. The requested resource
must belong to an Application Domain and must be included within a specific
authorization policy.
Each authorization policy:
■Identifies the specific resources covered by this policy, which must be defined on
the Resources tab of this policy and in the Resources container for the Application
Domain
■Specifies the Success URL (and the failure URL) that redirects the user based on
the results of this policy evaluation
■Identifies specific Allow or Deny Rules based on defined conditions for this policy
and resources. See Table 18–5 for an overview of Condition types.
Note: Policy evaluation results can be overridden policy by policy.
See Also:
■"About Authentication Policy Pages" on page 20-7
■"Managing Run Time Policy Evaluation Caches" on page 14-9
Note: OracleAS SSO 10g does not provide authorization; OSSO
Agents do not use Access Manager 11g Authorization Policies.

Introduction to Policy Conditions and Rules
Understanding Single Sign-On with Access Manager 18-13
■Defines optional Responses that identify post-authorization actions to be carried
out by the Agent, as described in "Introduction to Policy Responses for SSO" on
page 20-41.
18.3.4 About Token Issuance Policies
A Token Issuance Policy defines the rules under which a token can be issued for a
resource (Relying Party Partner) based on the client's identity. The client can be either a
Requester Partner or an end user.
Unless explicitly stated, information on Application Domains and authorization
policies applies equally to Token Issuance policies.
For specific information about Token Issuance Policies, see:
■"Managing TokenServiceRP Type Resources" on page 38-30
■"Managing Token Issuance Policies, Conditions, and Rules" on page 38-27
18.4 Introduction to Policy Conditions and Rules
Unless explicitly stated, information on policy Conditions and Rules applies equally
to:
■Authorization policies
■Token Issuance policies
Conditions
Conditions can be specified only within Authorization and Token Issuance policies.
Conditions are used in conjunction with Rules that specify Allow or Deny access,
based on defined Conditions. Table 18–5 identifies available condition types.
Each Authorization and Token Issuance policy can contain one or more condition
objects. There can be more than one instance of a type of condition in a policy (the
previous policy model allowed only one instance of a class in a policy).
See Also: "Introduction to Policy Conditions and Rules"
Note: During automatic policy generation, no Token Issuance
Policies are created; only the container for Token Issuance Policies is
generated automatically.
Table 18–5 Condition Types
Type For more information, see ...
Identity "Introduction to Authorization Policy Rules and Conditions" on page 20-49.
IP4 Range "Defining IP4 Range Conditions" on page 20-61.
Temporal "Defining Temporal Conditions" on page 20-63.
Attribute "Defining Attribute Conditions" on page 20-65.
True Effectively "Allow All". Oracle recommends this be used as the default option in
cases where you need to let in any authenticated use. In this case, you do not
need any particular conditions to be satisfied at authorization time.
This replaces the Use Implied Constraints flag the previous release of Access
Manager, which similarly lets policy evaluation complete with an Allow result
when no specifically-defined constraints were present.

Introducing Access Manager Credential Collection and Login
18-14 Administrator's Guide for Oracle Access Management
Conditions are similar to earlier Access Manager 11g authorization constraints.
However, constraints included Allow or Deny specifications and conditions do not.
Rules
Rules are new constructs in the policy model. Each Rule defines the Allow or Deny
specification that determines the overall effect of the policy. Rules also define how the
outcomes of each Condition evaluation is to be combined. Conditions are referenced in
rules and declared outside of rules.
Within a Rule, evaluation outcomes can be combined as follows:
■Simple Mode: Accepts a list of condition names that are combined based on the
value of a combiner that allows either All conditions to be met or Any one
condition to be met to return "true" for the evaluation. [Previously, ALL allowed
constraints while ANY denied them.]
■Expression mode: Allows the user to specify a Boolean expression to combine
conditions using condition names and special characters (comma, vertical bar,
ampersand and exclamation point: , |& and !.
For more information about Conditions and Rule, see Chapter 20.
18.5 Introducing Access Manager Credential Collection and Login
This section provides the following topics:
■About Access Manager Credential Collection
■About SSO Login Processing with OAM Agents and ECC
■About Login Processing with OAM Agents and DCC
■About SSO Login Processing with OSSO Agents (mod_osso) and ECC
18.5.1 About Access Manager Credential Collection
Access Manager provides two mechanisms for credential collection during
authentication processing:
■The default Embedded Credential Collector (ECC) is installed with the Access
Manager Server and can be used as-is with no additional installation or set up
steps (except the global password policy configuration described in "Managing
Global Password Policy" on page 19-97).
The mechanism that redirects the user from the Policy Enforcement Point to the
Credential Collector is a proprietary front channel protocol over HTTP. This
protocol currently provides a context of the request and the authentication
response on the query string.
■The 11.1.2 (or later) WebGate provides a single switch for the optional Detached
Credential Collector (DCC). The DCC provides network isolation for greater
security in production deployments, and is required for some forms of
authentication.
Unless explicitly stated, instructions in this book presume you are using the ECC.
Note: A policy in which there are one or more conditions that are not
part of either an Allow or Deny Rule is treated as a valid policy.

Introducing Access Manager Credential Collection and Login
Understanding Single Sign-On with Access Manager 18-15
Single Sign On login processing determines whether the user is a valid user and
whether the session state is active or inactive (either a first time user or the user
session has expired). Session management support locates, persists, and cleans up the
session context and user token.
Login with Self-Service Provisioning Applications
Provisioning does not create the session in Access Manager. When a new user uses a
self-service provisioning application to create an account, he is prompted for his
userID and password again when accessing an application.
The protected application is directed to Access Manager 11g, which requests the user's
credentials. For example, if Oracle Identity Manager is protected by Access Manager,
the user request is redirected to Access Manager from which a request to enter
credentials is made.
Success and failure results are the same as described in "Login Processing with Access
Manager-Protected Resources".
Login Processing with Access Manager-Protected Resources
The first time a user attempts to access a protected resource, she is prompted for her
credentials based on the authentication scheme and authentication level for the
resource. Typically a userID and password are needed.
Failure: Authentication fails if the wrong userID or password is entered. The user is
not authenticated and another prompt for credentials appears.
With Oracle Access Manager 11.1.1, only the ECC in the OAM server was available.
Access Manager 11.1.2 supports the ECC by default. However, Access Manager also
enables you to configure an 11g WebGate to use as a detached credential collector
(DCC). A DCC-enabled WebGate can be separate from (or combined with) a Resource
Webgates.
Both the ECC and DCC provide an authentication flow that includes form login, error,
and login retries. They provide SecurID and server affinity as well as password policy
enforcement and a dynamic, multi-step, iterative, and variable (multi-step
authentication) where the credentials are not supplied all at one time. A customizable
authentication flow can include authentication plug-ins with contracts between the
plug-in, OAM Proxy, and Credential Collector; a contract between the plug-in and
login application; and between the Credential Collector and login application.
When deciding whether to use one credential collector or both, consider:
■Co-existence: Allowing both the ECC and DCC to co-exist enables you to use
authentication schemes and policies configured for either the ECC or the DCC.
This enables a fallback mechanism for resources that rely on the ECC (Oracle
Access Management Console, for instance).
■Disabling ECC: Disabling the ECC entirely prohibits access to resources that rely
on the ECC mechanism (Oracle Access Management Console, for instance).
Table 18–6 provides links to more information.
Table 18–6 Login Processing with Access Manager-Protected Resources
Login Processing Topic See
With OAM Agents and ECC "About SSO Login Processing with OAM Agents and ECC" on
page 18-16
With OAM Agents and DCC "About Login Processing with OAM Agents and DCC" on page 18-18

Introducing Access Manager Credential Collection and Login
18-16 Administrator's Guide for Oracle Access Management
18.5.2 About SSO Login Processing with OAM Agents and ECC
This topic is based on using the default Embedded Credential Collector with OAM
Agents (Resource Webgates) protecting resources).
Access Manager authenticates each user with a customer-specified authentication
method to determine the identity and leverages information stored in the user identity
store. Access Manager authentication supports several authentication methods and a
number of authentication levels. Resources with varying degrees of sensitivity can be
protected by requiring higher levels of authentication that correspond to more
stringent authentication methods.
When a user tries to access a protected application, the request is received by Access
Manager which checks for the existence of the SSO cookie.
After authenticating the user and setting up the user context and token, Access
Manager sets the SSO cookie and encrypts the cookie with the SSO Server key (which
can be decrypted only by the SSO Engine).
Depending on the actions (responses in Access Manager 11g) specified for
authentication success and authentication failure, the user may be redirected to a
specific URL, or user information might be passed on to other applications through a
header variable or a cookie value.
Based on the authorization policy and results of the check, the user is allowed or
denied access to the requested content. If the user is denied access, she is redirected to
another URL (specified by the Administrator in Webgate registration).
Figure 18–4 shows the processes involved in evaluating policies, validating a user's
identity, authorizing the user for a protected resource, and serving the protected
resource. This example shows the OAM Agent flow. There are slight variations with
11g Webgates/Access Clients.
With OSSO Agents and ECC "About SSO Login Processing with OSSO Agents (mod_osso) and
ECC" on page 18-21
With Other Agents or Mixed
Agent Types
Mixed agent types are supported. Processing is the same for each
agent type. For other agent types, see:
■Chapter 23, "Registering and Managing Legacy OpenSSO
Agents"
■Chapter 24, "Registering and Managing Legacy OSSO Agents"
■Chapter 25, "Registering and Managing 10g WebGates with
Access Manager 11g"
Login and Auto Login for
Applications Using Oracle ADF
Security
Oracle Platform Security Services (OPSS) comprise Oracle WebLogic
Server's internal security framework. On the Oracle WebLogic Server,
you can run a Web application that uses Oracles Application
Development Framework (Oracle ADF) security, integrates with
Access Manager 11g SSO, and uses OPSS SSO for user authentication.
For more information, see Appendix A, "Integrating Oracle ADF
Applications with Access Manager SSO".
Table 18–6 (Cont.) Login Processing with Access Manager-Protected Resources
Login Processing Topic See
Introducing Access Manager Credential Collection and Login
Understanding Single Sign-On with Access Manager 18-17
Figure 18–4 SSO Log-in with Embedded Credential Collector and OAM Agents
Process overview: SSO Login Processing with Embedded Credential
Collector and OAM Agents
1. The user requests a resource.
2. Webgate forwards the request to Access Manager for policy evaluation.
3. Access Manager:
■Checks for the existence of an SSO cookie.
■Checks policies to determine if the resource protected and if so, how?
4. Access Manager Server logs and returns decisions.
5. Webgate responds as follows:
a. Unprotected Resource: Resource is served to the user.
b. Protected Resource:
Request is redirected to the credential collector.
The login form is served based on the authentication policy.
Authentication processing begins
6. User sends credentials.
7. Access Manager verifies credentials.

Introducing Access Manager Credential Collection and Login
18-18 Administrator's Guide for Oracle Access Management
8. Access Manager starts the session and creates the following host-based cookies:
■One per Agent: OAMAuthnCookie set by 11g Webgates (ObSSOCookie set by
10g Webgate) using the authentication token received from the OAM Server
after successful authentication.
Note: A valid cookie is required for a session.
■One for OAM Server: OAM_ID
9. Access Manager logs Success or Failure.
10. Credential collector redirects to Webgate and authorization processing begins.
11. Webgate prompts Access Manager to look up policies, compare the user's identity,
and determine the user's level of authorization.
12. Access Manager logs policy decision and checks the session cookie.
13. OAM Server evaluates authorization policies and cache the result.
14. OAM Server logs and returns decisions
15. Webgate responds as follows:
■If the authorization policy allows access, the desired content or applications
are served to the user.
■If the authorization policy denies access, the user is redirected to another URL
determined by the Administrator.
18.5.3 About Login Processing with OAM Agents and DCC
The detached credential collector is simply a WebGate configured to use the additional
Credential Collection capability in your deployment. There are two deployment types
depending on whether the DCC WebGate is also protecting the applications or not.
Table 18–7 identifies the DCC-supported deployments.
Table 18–7 DCC Deployment Support
Deployment Type Description
Separate DCC and Resource
Webgate
A distributed deployment where WebGates protecting applications
are managed independently from the centralized DCC. You can have:
■Two or more 11.1.1.5 Resource Webgates that redirect to the 11.1.2
DCC-enabled Webgate for authentication
■10.1.4.3 Resource Webgate that redirects to the 11.1.2
DCC-enabled Webgate for authentication
Enable HTTPS between the user-agent and the DCC (but not with
some or all Resource WebGates).
When credential collection is externalized and centralized in the DCC,
the user-agent connections with other WebGates never carry user
credentials, nor session tokens that could be used to obtain access to
resources protected by any other WebGate. This significantly reduces
exposure caused by lack of SSL on these links and may be an
acceptable tradeoff in some deployments.
■Separate OHS Instances: Install the DCC on a different OHS
instance (on the same or different host) as the Resource Webgate.
■Define the Resource Webgate Authentication Scheme Challenge
Redirect URL to point to the DCC.
■Define the Resource Webgate logoutRedirectUrl to point to the
DCC logout script/page (logout callbacks to Resource Webgate is
invoked during logout).
See Also: Figure 18–5
Introducing Access Manager Credential Collection and Login
Understanding Single Sign-On with Access Manager 18-19
Separate DCC and Resource Webgates: A sample deployment with segregated DCC
is shown in Figure 18–5.
Figure 18–5 Example: Separate Resource Webgate and DCC Webgate Deployment
This topology (Figure 18–5) showcases choices appropriate for scenarios with
maximum security sensitivity. Both centralized and externalized credential collection
are used: Resource WebGates protecting applications are segregated from the DCC
WebGate performing credential collection.
The user accesses the Access Manager-protected resource from the public network. A
WebGate protecting the application is deployed within a DMZ. The DCC Webgate is
also deployed within a DMZ. The protected application and OAM Server instances are
located within the private network and not directly accessible from the public
network.
Combined DCC and Resource
Webgate
A streamlined deployment minimizing configuration and processing
overhead.
A DCC Webgate can function as both a resource Webgate (Policy
Enforcement Point) that protects application resources and a DCC. In
this case, there is no front-channel redirection or processing:
■Install the DCC on a the same OHS instance (on the same host) as
the Resource Webgate.
■Simplified configuration: The Challenge Redirect URL can be
empty.
■No logoutRedirectUrl is needed, no logout callback is needed.
See Also: Figure 18–6
Table 18–7 (Cont.) DCC Deployment Support
Deployment Type Description
Introducing Access Manager Credential Collection and Login
18-20 Administrator's Guide for Oracle Access Management
Using the DCC in the DMZ, only authenticated network connections are allowed to
reach the server itself. The DCC inherits all back-channel communication
characteristics available to 11g WebGates (network connection using the Oracle Access
Protocol). The OAP offers:
■SSL between the client and the server, optionally using 3rd party signed
certificates
■mutual authentication at the application level using client id and password
■request multiplexing and full-duplex communication at the application level
■built-in connection load balancing and failover capability
The DCC receives an authentication request from the Agent and checks for the
presence of the DCC cookie. If the cookie does not exist, credential collection is
initiated; checks are made, and user-supplied credentials are passed for validation.
Figure 18–6 Combined DCC and Webgate Configuration
Process overview: Authentication with the combined DCC and Resource
Webgate
1. The user requests access to a resource which initiates the authentication process.
2. The DCC redirects through the front channel to the login page.
3. The login page is returned to the user.
4. User enters credentials, which are posted to the action URL (a user-defined
parameter in an authentication scheme, Table 19–23).
5. Authentication occurs using the back channel (OAP) and OAM Proxy.
Note: Encryption occurs only from an 11g resource Webgate to the
DCC. The channel is not encrypted for communication between 10g
resource Webgate and 11g DCC; this is in clear text.
Login App with pages:
Login / CredCollection
Logout
Error
Browser
User Agent
OHS
DCC
WebGate
OAM Server
Instance
OAM
Proxy
AUTHN
Plugin
31 4 3
2 9
6
7
5
8
Legend
User-Agent channel: HTTPS
Front channel: HTTPS
Other: SSL

Introducing Access Manager Credential Collection and Login
Understanding Single Sign-On with Access Manager 18-21
6. The Authentication Plug-in is activated.
7. The Plug-in requests redirect to a URL to collect additional credentials.
8. The Plug-in request is returned to the DCC.
9. The DCC redirects to the URL and expects specified credentials.
10. The Browser follows the redirect.
11. Credentials are posted to the Action URL.
18.5.4 About SSO Login Processing with OSSO Agents (mod_osso) and ECC
SSO login processing with registered OSSSO Agents (mod_osso) is similar to login
processing with Webgates. However, mod_osso provides only authentication using
Access Manager 11g authentication policies.
Figure 18–7 illustrates the login processing with mod_osso and Access Manager 11g.
See Also: "Configuring Logout When Using Detached Credential
Collector-Enabled Webgate" on page 22-6
Note: mod_osso does not support authorization either on its own or
using Access Manager 11g policies.
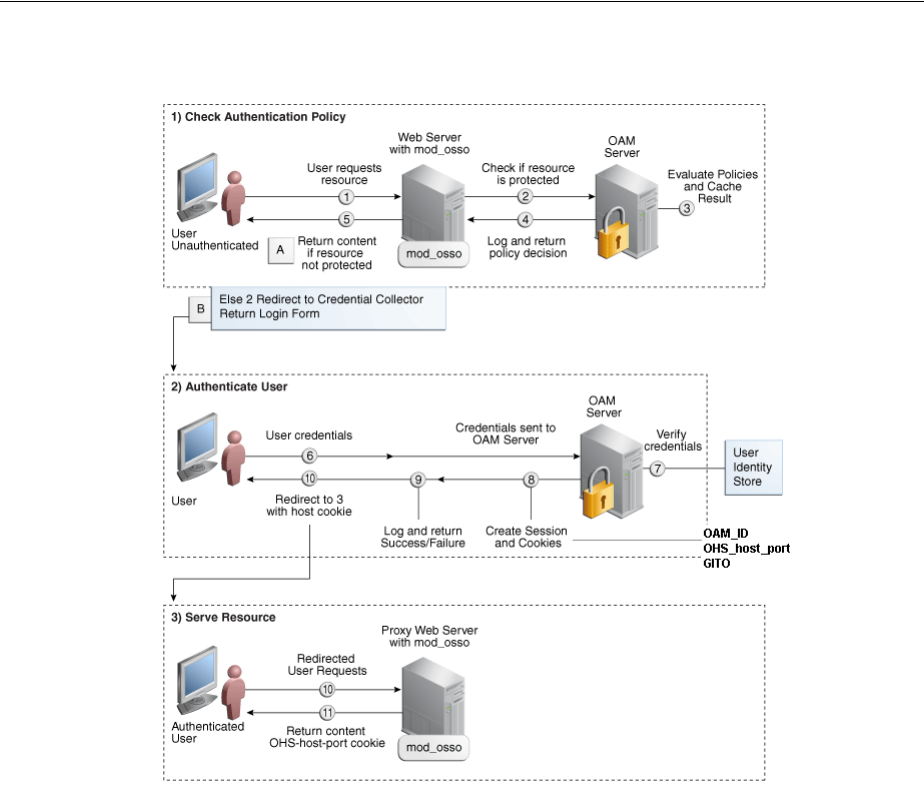
Introducing Access Manager Credential Collection and Login
18-22 Administrator's Guide for Oracle Access Management
Figure 18–7 SSO Login Processing with OSSO Agents and ECC
Process overview: SSO Log-in Processing with OSSO Agents and ECC
1. The user requests a resource.
2. mod_osso forwards the request to Access Manager for policy evaluation.
3. Access Manager:
■Checks for the existence of an SSO cookie.
■Checks policies to determine if the resource protected and if so, how?
4. OAM Server logs and returns decisions.
5. mod_osso responds as follows:
a. Unprotected Resource: Resource is served to the user.
b. Protected Resource:
Request is redirected to the credential collector.
The login form is served based on the authentication policy.
Authentication processing begins
6. User sends credentials.
7. ECC verifies credentials.

Understanding SSO Cookies
Understanding Single Sign-On with Access Manager 18-23
8. Access Manager starts the session, passes an authentication token to the
application, and creates the following cookies:
■One per partner: OHS_host_port
■One for the OAM Server: OAM_ID
■Global Inactivity Out: A domain-level cookie GITO, described in "mod_osso
Cookies" on page 18-27
9. Access Manager logs Success or Failure.
10. Credential collector redirects to mod_osso, which transmits the simple header
values that applications can use to authorize the user.
11. Resource is served upon authentication success and the OHS-host-port cookie is
set.
18.6 Understanding SSO Cookies
This section provides a brief overview of single sign-on with Access Manager 11g. It
includes the following topics:
■About Single Sign-On Cookies During User Login
■About Single Sign-On Server and Agent Cookies
18.6.1 About Single Sign-On Cookies During User Login
Table 18–8 describes the cookies that can be set or cleared during user login.
Table 18–8 SSO Cookies
SSO Cookie Set at
User Login Set By Description
OAM_ID cookie OAM Server
Embedded
Credential
Collector
When a user attempts to access a protected application, the request
comes to the SSO Engine and the controller checks for the existence
of the cookie.
See Also: "OAM_ID cookie" on page 18-24.
OAMAuthnCookie 11g Webgate Set by each 11g Webgate that is contacted. Protected by the key
known to the respective 11g Webgate and the OAM Server. A valid
OAMAuthnCookie is required for a session.
Note: If the user accesses applications protected by different 11g
Webgates, you will have multiple OAMAuthnCookies.
See "OAMAuthnCookie for 11g OAM Webgates" on page 18-25.
ObSSOCookie 10g Webgate A domain-based cookie for 10g Webgates is set only when a 10g
Webgate is contacted. Protected with keys known to the OAM
Server only. One global shared secret key for all Webgates.
Note: This cookie enables backward compatibility and
inter-operability between Access Manager 11g and older agents.
See "ObSSOCookie for 10g Webgates" on page 18-26
OAM_REQ OAM Server
Embedded
Credential
Collector
A transient cookie that is set or cleared by the OAM Server if the
Authentication request context cookie is enabled. Protected with
keys known to the OAM Server only.
Note: This cookie is configured as a high availability option to store
the state about user's original request to a protected resource while
his credentials are collected and authentication performed.
See "OAM_REQ Cookie" on page 18-26.

Understanding SSO Cookies
18-24 Administrator's Guide for Oracle Access Management
For details about configuring authentication and authorization policies, see
Chapter 20, "Managing Policies to Protect Resources and Enable SSO".
18.6.2 About Single Sign-On Server and Agent Cookies
■OAM_ID cookie
■OAMAuthnCookie for 11g OAM Webgates
■ObSSOCookie for 10g Webgates
■OAM_REQ Cookie
■OAMRequestContext
■DCCCtxCookie
■mod_osso Cookies
■OpenSSO Cookie (iPlanetDirectoryPro)
18.6.2.1 OAM_ID cookie
This cookie is scoped to the OAM Server. OAM_ID is generated by the OAM Server
when the user is challenged for credentials, and submitted to the server on every
redirect to the server.
OAMRequestContext 11g Webgate Set or cleared by the 11g Webgate and protected by the key known
to the respective 11g Webgate and the OAM Server.
With Internet Explorer browser:
--When RequestContextCookieExpTime is not set,
OAMRequestContext is a transient cookie.
--When RequestContextCookieExpTime is set, the
OAMRequestContext cookie expires by the time set using the
"
Expires
" directive. This requires a time sync between the client
host and Web server host.
With all other (non-IE) browsers, when
RequestContextCookieExpTime is not set OAMRequestContext
expires in 5 minutes by default or by the time set using the
"
Max-Age
" directive.
See Also: "OAMRequestContext" on page 18-26
Table 16–2, " User-Defined WebGate Parameters"
DCCCtxCookie Detached
Credential
Collector
For detached credential collector (DCC)--similar to OAM_REQ
created by embedded credential collector (ECC).
See "DCCCtxCookie" on page 18-26
OHS-host-port Oracle HTTP
Server
Set only when OSSO Agents (mod_osso) are contacted on Oracle
HTTP Server (OHS). Protected with the key known to the
respective mod_osso agent and the OAM Server.
Note: This cookie enables backward compatibility and
inter-operability between Access Manager 11g and older agents.
See "mod_osso Cookies" on page 18-27.
GITO cookie OAM Server Provides backward compatibility and inter-operability between
OSSO 10g and Access Manager 11g. The cookie is created by the
OAM Server and accessed or modified by the OAM Server or mod_
osso agent.
See "mod_osso Cookies" on page 18-27.
OpenSSO cookie OpenSSO
Proxy
See "OpenSSO Cookie (iPlanetDirectoryPro)" on page 18-28.
Table 18–8 (Cont.) SSO Cookies
SSO Cookie Set at
User Login Set By Description

Understanding SSO Cookies
Understanding Single Sign-On with Access Manager 18-25
OAM_ID is protected by keys known to the OAM Server only.
When a user attempts to access a protected application, the request comes to the SSO
Engine and the controller checks for the existence of the cookie:
■If the cookie does not exist, user authentication begins. After successful
authentication, the user context and token are set by the SSO Engine. The cookie is
set with the global user ID (GUID), creation time, and idle timeout details.
Information in the cookie is encrypted with the SSO Server key and can be
decrypted only by the SSO Engine.
■If the cookie exists, then the cookie is decrypted and the sign in flow completes
with the authenticated user.
18.6.2.2 OAMAuthnCookie for 11g OAM Webgates
There is one OAMAuthnCookie_<host:port>_<random number> set by each 11g
Webgate using the authentication token received from the OAM Server after successful
authentication. A valid OAMAuthnCookie is required for a session.
SSL Connections: Administrators can ensure the ObSSOCookie is only sent over an
SSL connection and prevents the cookie from being sent back to a non-secure Web
server by configuring SSL and then specifying Simple or Cert mode for Agents and
Servers. For details, see "About Communication Between OAM Servers and Webgates"
on page 6-4.
Cookie Expiration: For 11g Webgate and OAMAuthnCookie, expiration is controlled
by the "tokenValidityPeriod" parameter, which controls the valid token (or cookie)
time.
This key is known to both the 11g Webgate and SSO Engine and is used for encrypting
OAMAuthnCookie. The SSO engine key (only known to the SSO Engine) is used for
encrypting the OAM_ID OAM Server cookie.
Similar to ObSSOCookie for 10g Webgates.
18.6.2.3 ObSSOCookie for 10g Webgates
Access Manager 11g sets a key-based cookie ObSSOCookie for each user or application
that accesses a resource protected by a 10g Webgate. The key is set up during agent
registration and is known to both the agent and SSO Engine (shared between them).
This key is different from the OAM Server (or SSO Engine) key.
Removing the ObSSOcookie causes the 10g Webgate to log the user out and requires
the user to re-authenticate the next time he or she requests a resource that is protected
by the Access System.
The Webgate sends the ObSSOCookie to the user's browser upon successful
authentication. This cookie can then act as an authentication mechanism for other
protected resources that require the same or a lower level of authentication. When the
user requests access to a browser or another resource, the request flows to the OAM
Server. The user is logged in, and the ObSSOCookie is set. The OAM Server generates
a session token with a URL that contains the ObSSOCookie. Single sign-on works
when the cookie is used for subsequent authorizations in lieu of prompting the user to
supply authorization credentials.
When the cookie is generated, part of the cookie is used as an encrypted session token.
The single sign-on cookie does not contain user credentials such as user name and
password.
SSL Connections: Administrators can ensure the ObSSOCookie is only sent over an
SSL connection and prevents the cookie from being sent back to a non-secure Web

Understanding SSO Cookies
18-26 Administrator's Guide for Oracle Access Management
server by configuring SSL and then specifying Simple or Cert mode for Agents and
Servers. For details, see "About Communication Between OAM Servers and Webgates"
on page 6-4.
Cookie Expiration: Administrators can specify the desired Cookie Session Time in the
OAM Agent registration. For more information, see "Registering an OAM Agent Using
the Console" on page 16-12.
18.6.2.4 OAM_REQ Cookie
A transient cookie that is set or cleared by the OAM Server if the Authentication
request context cookie is enabled. Protected with keys known to the OAM Server only.
This cookie is configured as a high availability option to store the state about user's
original request to a protected resource while his credentials are collected and
authentication performed.
In high availability configurations, the Request Cache type must be changed from
BASIC to COOKIE using Infrastructure Security custom WLST commands.
18.6.2.5 OAMRequestContext
This cookie is set or cleared by the 11g Resource Webgate and protected by the key
known to the respective 11g Webgate and the OAM Server.
This cookie is configured to store the state about the user's original request to a
protected resource while his credentials are collected and authentication performed.
■With Internet Explorer browser:
–When RequestContextCookieExpTime is not set, OAMRequestContext is a
transient cookie.
–When RequestContextCookieExpTime is set, the OAMRequestContext cookie
expires by the time set using the "
Expires
" directive. This requires a time sync
between the client host and Web server host.
■With all other (non-IE) browsers, when RequestContextCookieExpTime is not set
OAMRequestContext expires in 5 minutes by default or by the time set using the
"
Max-Age
" directive.
18.6.2.6 DCCCtxCookie
This comes into play only with the Detached Credential Collector (DCC).
The DCCCtxCookie is used by DCC to save various context information required
during authentication. It includes information necessary to reconstruct the original
Note: You must invoke the WLST script from the Oracle Common
home. See "Using Custom WLST Commands" in the Oracle Fusion
Middleware Administrator's Guide.
See Also:
■Oracle Fusion Middleware WebLogic Scripting Tool Command
Reference
■Table 18–8, " SSO Cookies"
See Also: RequestContextCookieExpTime in Table 16–2,
" User-Defined WebGate Parameters"

Understanding SSO Cookies
Understanding Single Sign-On with Access Manager 18-27
request upon completion of authentication, to maintain server affinity, and to perform
iterative multi-step authentication.
By default, DCCCtxCookie is set when the DCC is first redirected away to collect
credentials based on the authentication scheme (when the browser is first redirected to
the login form with a form-based authentication scheme).
With the DCC, once authenticated the OAM server issues a DCC master session token
to the DCC in the authenticate response. DCC then sets a host- based DCC cookie
using the token and:
■If DCC cookie Presented During Authentication: DCC decrypts the token using
a DCC key, and performs partial token validation locally (integrity check, token
validity period check). If it passes, DCC performs complete token validation for
timeout aspects over the OAP channel against the OAM Server.
■If no DCC Cookie: This indicates a first time authentication which initiates
credential collection, performs sanity and syntactic checks on the credential and
submits to OAM Server for validation.
18.6.2.7 mod_osso Cookies
The mod_osso module is the Oracle HTTP Server module that provides authentication
to OracleAS applications. This module resides on the Oracle HTTP Server that enables
applications protected by OracleAS Single Sign-On to accept HTTP headers in lieu of a
user name and password once the user has logged into the OracleAS Single Sign-On
server. The values for these headers are stored in a mod_osso cookie.
Located on the application server, mod_osso simplifies the authentication process by
serving as the sole application to the single sign-on server. In this way, mod_osso
renders authentication transparent to OracleAS applications. The Administrator for
these applications is spared the burden of integrating them with an SDK. After
authenticating a user, mod_osso transmits the simple header values that applications
may use to authorize the user.
GITO Cookie
Needed in special cases to support timeout when multiple types of agents (mod_osso
and Webgate) are working with Access Manager 11g. Server side session managers can
check the validity of the cookie for expiry and timeout during session validation.
Global logout is required for OSSO Agents (mod_osso) to ensure that logging out of a
session on any entity propagates the logout to all entities.
When a user is authenticated by OSSO 10g, the OSSO Server sets GITO cookie. Once
the partner cookie (OHS cookie) is set, OHS does not route the request to the server.
Instead, on every access, OHS decrypts the GITO cookie and updates the last activity
timestamp. During request processing, if any partner detects that current time has
surpassed GITO timeout (last activity time + GITO timeout), the request is sent to
OSSO 10g in forced authentication mode. When a request reaches OSSO server in
forced authentication mode, server chooses to ignore SSO_ID cookie and challenges
user for credentials, considering it as a fresh request. After successful authentication,
SSO_ID and GITO cookie are updated.
This is enabled (using the
editGITOValues
WLST command), as described in the
Oracle Fusion Middleware WebLogic Scripting Tool Command Reference.
See Also: "Configuring 11g WebGates and Authentication Policy for
DCC" on page 19-109

Introduction to Configuration Tasks for Single Sign-On
18-28 Administrator's Guide for Oracle Access Management
OssoSecureCookies Directive
Add the OssoSecureCookies directive to set the Secure flag on all cookies. This tells the
browser to only transmit those cookies on connections secured by HTTPS. An example
of this directive in a mod_osso configuration (mod_osso.conf), is as follows:
<IfModule mod_osso.c>
OssoIpCheck off
OssoIdleTimeout off
OssoSecureCookies on
OssoConfigFile osso/osso.conf
<Location /j2ee/webapp>
require valid-user
AuthType Basic
</Location>
</IfModule>
For more information, see Oracle Application Server Single Sign-On Administrator's
Guide.
18.6.2.8 OpenSSO Cookie (iPlanetDirectoryPro)
The agent finds this cookie after the OpenSSO Proxy triggers session validation. The
default name of the OpenSSO cookie is:
iPlanetDirectoryPro
After the OpenSSO agent is authenticated and logged in, the agent verifies whether
the user has an OpenSSO cookie. If not, the user authentication request is initiated
from the OpenSSO Agent. During SSO User Login and Authentication flow OpenSSO
cookie is created, which contains the OpenSSO session identifier, and this cookie is set
in the user's browser.
During End User Session Validation, OpenSSO agent intercepts the request to the
protected application and finds an OpenSSO cookie.
During User Single Logout, the OpenSSO Proxy receives a User logout request and
forwards the user to the OAM Logout URL OpenSSO Proxy decrypts the OpenSSO
cookie, fetches the OpenSSO session identifier and, from that, fetches the OAM session
ID. OpenSSO proxy sends the logout request to controller through the OpenSSO
logout event with the OAM session ID.
■SSO User Login and Authentication flow
■End User Session Validation flow
■User Single Logout flow
18.7 Introduction to Configuration Tasks for Single Sign-On
The following overview outlines the tasks that Administrators must perform to
configure single sign-on with Access Manager 11g,. For each task, a link to additional
information is included.
Task overview: Configuring single sign-on
1. Review all topics in this chapter to get familiar with the Access Manager 11g SSO
policy model.
2. Configure a single sign-on logout URL for each application you want to protect,
using documentation for your specific application.

Introduction to Configuration Tasks for Single Sign-On
Understanding Single Sign-On with Access Manager 18-29
3. Install and register an Agent on each Web server that is hosting an application to
protect using either method. See:
■Chapter 15, "Introduction to Agents and Registration"
■Chapter 16, "Registering and Managing OAM 11g Agents"
4. Proceed to manage resource types, host identifiers, authentication schemes, and
modules:
■Chapter 19, "Managing Authentication and Shared Policy Components"
5. Locate an existing Application Domain (or start a fresh one) and add resources
and policies, as described in:
■Chapter 20, "Managing Policies to Protect Resources and Enable SSO"

Introduction to Configuration Tasks for Single Sign-On
18-30 Administrator's Guide for Oracle Access Management

19
Managing Authentication and Shared Policy Components 19-1
19
Managing Authentication and Shared Policy
Components
This chapter describes how Administrators can manage shared policy components in
the following topics:
■Prerequisites
■Understanding Authentication and Shared Policy Component Tasks
■Managing Resource Types
■Managing Host Identifiers
■Understanding Authentication Methods and Credential Collectors
■Managing Native Authentication Modules
■Orchestrating Multi-Step Authentication with Plug-in Based Modules
■Deploying and Managing Individual Plug-ins for Authentication
■Managing Authentication Schemes
■Extending Authentication Schemes with Advanced Rules
■Configuring Challenge Parameters for Encrypted Cookies
■Understanding Password Policy
■Managing Global Password Policy
■Configuring Password Policy Authentication
■Configuring 11g WebGates and Authentication Policy for DCC
■Completing Password Policy Configuration
■Configuring Authentication POST Data Handling
■Long URL Handling During Authentication
■Using Application Initiated Authentication
■Using the Adaptive Authentication Service
19.1 Prerequisites
Oracle recommends that you review information in Chapter 18, "Understanding Single
Sign-On with Access Manager" before performing activities in this chapter.
Additionally, the Oracle Access Management Console and at least one OAM Server

Understanding Authentication and Shared Policy Component Tasks
19-2 Administrator's Guide for Oracle Access Management
must be installed and running within a WebLogic Server domain, and Access Manager
must be running with at least two registered Agents.
19.2 Understanding Authentication and Shared Policy Component Tasks
This section introduces the tasks that must be performed to configure shared policy
components required for use in Access Manager authentication policies that protect
resources and enable single sign-on.
Task overview: Configuring shared policy components
1. Confirm that the desired resource type is defined, as described in this chapter:
■Managing Resource Types
2. Confirm that a host identifier definition named for the agent was created during
agent registration, (or create one yourself), as described in:
■Managing Host Identifiers
3. Gain comprehension about credential collection with Access Manager:
■Understanding Authentication Methods and Credential Collectors
4. Learn about and use the authentication plug-ins that enable multi-step
authentication:
■Orchestrating Multi-Step Authentication with Plug-in Based Modules
■Deploying and Managing Individual Plug-ins for Authentication
5. Create and manage authentication schemes that you can add to authentication
policies, as described in:
■Managing Authentication Schemes
■Configuring Challenge Parameters for Encrypted Cookies
6. Set up your own global password policy for either the default embedded or
optional detached credential collector (unless specified, tasks apply to both ECC
and DCC, with minor changes noted in the discussion):
■Understanding Password Policy
■Managing Global Password Policy
■Configuring Password Policy Authentication
■DCC: Configuring 11g WebGates and Authentication Policy for DCC
■Completing Password Policy Configuration
7. Proceed to Chapter 20 to set up authentication policies.
19.3 Managing Resource Types
This section includes the following topics:
■About Resource Types and Their Use
■About the Resource Type Page
■Searching for a Specific Resource Type
See Also: Chapter 18, "Understanding Single Sign-On with Access
Manager"

Managing Resource Types
Managing Authentication and Shared Policy Components 19-3
■Creating a Custom Resource Type
19.3.1 About Resource Types and Their Use
When adding a resource to an Application Domain, Administrators must choose from
a list of defined Resource Types. Oracle-provided resource types include:
■HTTP
■wl_authen
■TokenServiceRP
Administrators can configure additional resource types, and define operations on both
Oracle-provided and custom resource types. A particular resource can be defined to
use a subset of the declared operations, or all of them (which includes any new
operators defined on the resource's type subsequently.
Administrators cannot remove custom resource types or operations for which
resources have been created. Oracle-provided resource types and operations are
marked as read-only within the policy store and cannot be removed.
Table 19–1 compares resource types and operations.
Note: Changes to the operation list of a resource type is not allowed
if a resource of that type exists.
Table 19–1 Comparison: Resource Types for Access Manager versus 10g
Access Manager 11g Oracle Access Manager 10g
HTTP: The default resource type used with HTTP and HTTPS protocols.
When adding an HTTP type resource to an Application Domain, Administrators
must choose from a list of existing host identifiers and add the resource URL.
This resource type is read-only. Default operations associated with the HTTP
resource type need not be defined by an Administrator. Instead, policies
developed and applied to the resource apply to all operations:
Operations: Oracle-provided resource types are read-only; associated operations
are pre-defined. Policies developed and applied to HTTP type resources apply to
all operations.
■Get
■Post
■Put
■Head
■Delete
■Trace
■Options
■Connect
■Other
See Also: "About the Resource Type Page" on page 19-4.
HTTP: The HTTP resource type is read-only.
Operations: Oracle-provided resource types
are read-only; associated operations are
pre-defined. Policies developed and applied
to the resource apply to all operations.
■Get
■Post
■Put
■Head
■Delete
■Trace
■Options
■Connect
■Other
wl_authen: Resources for representing WebLogic Authentication schemes is also
read-only (default operations cannot be modified or deleted.)
This non-HTTP resource type is available to use with resources deployed in a
WebLogic container in a domain that does not include Access Manager. The
protected resource is accessed through its URL on the Oracle WebLogic Server.
Type wl_authen resources, require a custom Access Client.
N/A
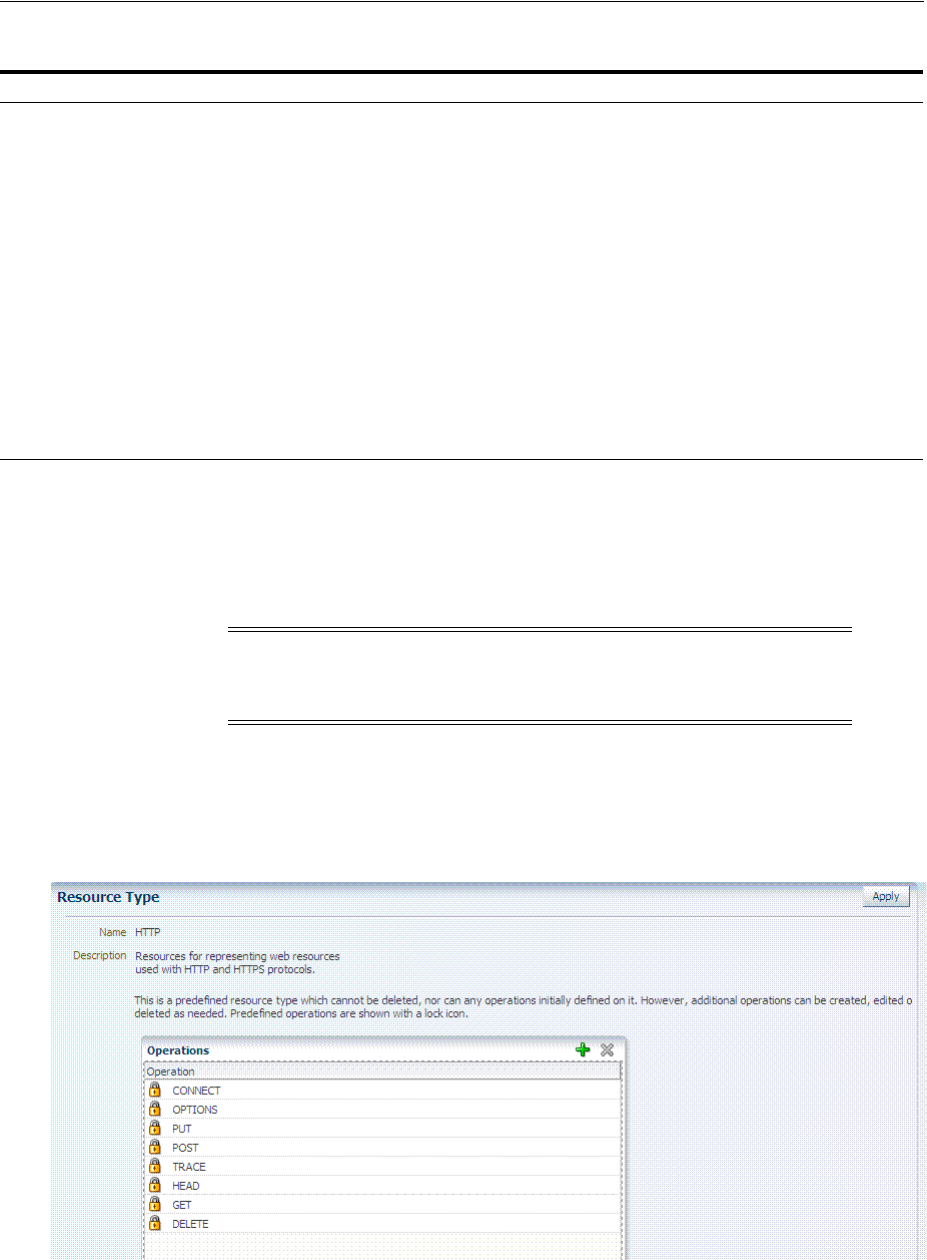
Managing Resource Types
19-4 Administrator's Guide for Oracle Access Management
19.3.2 About the Resource Type Page
In the Oracle Access Management Console, resource types are organized with other
Components under the Policy Configuration tab. The navigation tree shows
Oracle-provided resource types: HTTP, wl_authen, and TokenServiceRP.
The
HTTP
resource type, shown in Figure 19–1, is used for Web applications protected
by Access Manager and accessed using internet protocols (HTTP or HTTPS).
Figure 19–1 Default HTTP Resource Type Definition
The
wl_authen
resource type is shown in Figure 19–2. It is used for Fusion Middleware
applications that use one of the following Access Manager Identity Assertion Provider
configurations described in the Oracle Fusion Middleware Application Security Guide:
TokenServiceRP: Resources for representing Token Service Relying Party. The
Operation for this resource type is Issue.
N/A
Custom Resource Types: Have no associated host identifier.
A custom "EJB" resource type can be created on demand for use in SSO
integrations.
EJB: A custom resource type used in SSO
integrations with WebLogic and WebSphere
for authenticating the user. During
authentication, the user's groups were
fetched and populated in the Subject
Principal as roles. Subsequent authorization
was executed inside the application server
based on user roles.
No authorization calls were made using
resource operations.
Non-HTTP resource types have no associated host identifier.
When adding non-HTTP resources to an Application Domain, Administrators
must enter the Type name into the Resource URL field as a pointer. The name
cannot match any host Identifier (and vice versa). This is not a relative HTTP
URL.
Note: Pre-defined resource types cannot be deleted. Pre-defined
operations are shown with a lock icon and cannot be deleted.
Additional operations can be created, edited, or deleted as needed.
Table 19–1 (Cont.) Comparison: Resource Types for Access Manager versus 10g
Access Manager 11g Oracle Access Manager 10g
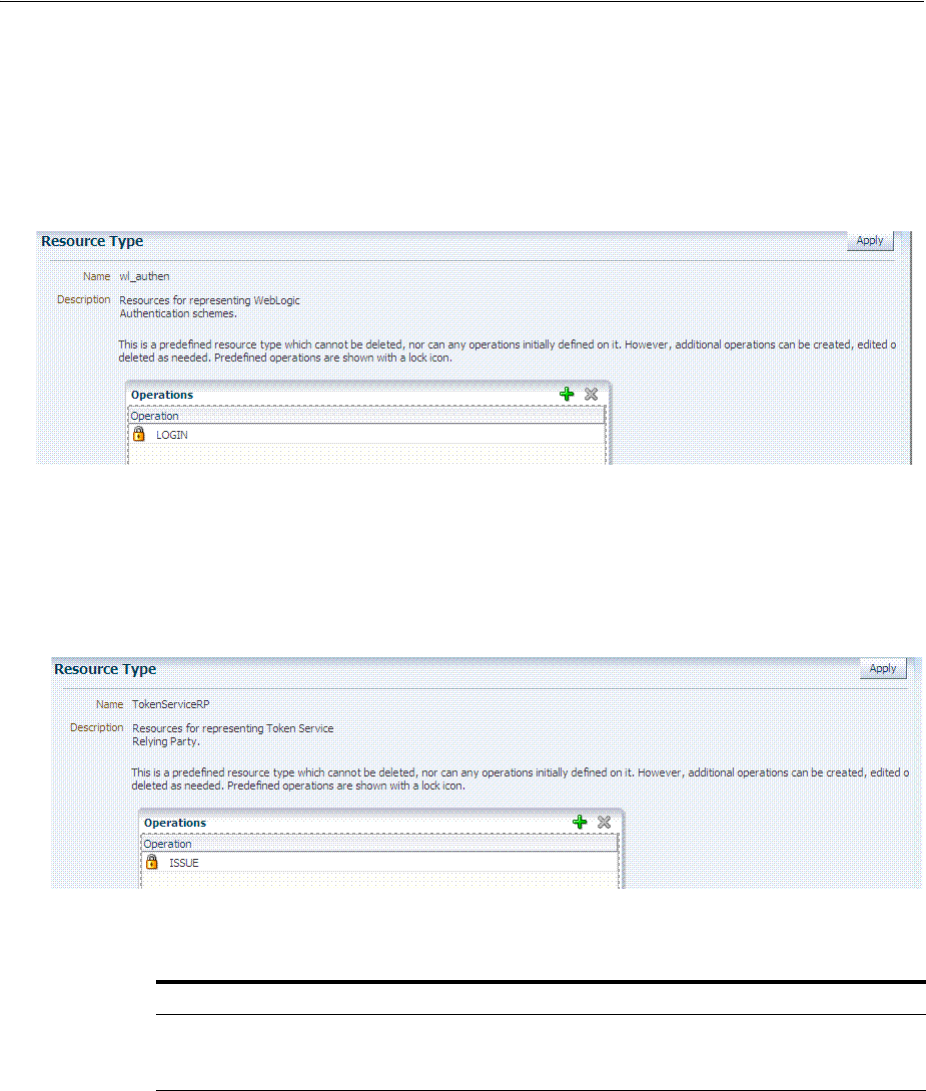
Managing Resource Types
Managing Authentication and Shared Policy Components 19-5
■Identity Asserter
■Identity Asserter with Oracle Web Services Manager
■Authenticator function
Figure 19–2 Default Resource Type wl_authen
The
TokenServiceRP
resource type represents the Token Service Relying Party, as
shown in Figure 19–3. The operation for this resource type is Issue. For more
information, see "Managing TokenServiceRP Type Resources" on page 38-30.
Figure 19–3 Default Resource Type TokenServiceRP Resource Type
Table 19–2 describes the elements in each resource type definition.
Table 19–2 Resource Type Definition
Element Description
Name Required. A unique name of up to 30 alpha or numeric characters.
Note: A non-HTTP Resource Type name cannot match a Host Identifier (and vice
versa).
Description Optional. Use this field to describe the purpose of this resource type using up to 200
alpha or numeric characters.
For example: Resources representing WebLogic Authentication schemes.

Managing Resource Types
19-6 Administrator's Guide for Oracle Access Management
Following topics describe how to create, modify, and delete a resource type.
19.3.3 Searching for a Specific Resource Type
Users with valid Administrator credentials can use the following procedure to locate a
defined resource type.
To search for a resource type
1. From the Oracle Access Management Console, click Resource Types.
2. From the search type list, choose Resource Type, enter the name of the Resource
Type you want to find (with or without a wild card (*)), and click Search. For
example:
h*
Alternatively: Go to the desired Application Domain, open the Resources node to
display controls for that domain, choose a Resource Type from the list, and click
Search.
3. Click the Search Results tab to display the results table, and then:
■Edit or View: Click the Edit button in the tool bar to display the configuration
page.
■Delete: Click the Delete button in the tool bar to remove the instance; confirm
removal in the Confirmation window.
Operations Optional. Policies that govern a particular resource apply to all specified operations
defined for the resource. Add (or remove) operations for this resource type as a
string and the operations will be available when you define a resource of this type
within an Application Domain. There is no limit to the number of operations that
can be added to the resource type.
■Get
■Post
■Put
■Head
■Issue (
TokenServiceRP
)
■Login (
wl_authen
)
■Delete
■Trace
■Options
■Connect
■Other (available with Oracle Access Manager 10 is not supported in 11g).
Remote Registration: During automatic policy creation, specified operations are
supported. During automatic policy creation with no operations specified, then All
operations defined for that type are supported.
Migration: During an upgrade to Access Manager 11.1.2 (from 10g or from 11.1.1.3
or from 11.1.1.5), resource definitions and HTTP default operations are handled
automatically. However, you must create any custom resource types to replace
10g-provided EJB custom resource types which are no longer provided by Oracle.
See
See Also: "About Resource Types and Their Use" on page 19-3 and "Defining
Resources in an Application Domain" on page 20-15.
See Also: "Conducting A Search"
Table 19–2 (Cont.) Resource Type Definition
Element Description

Managing Host Identifiers
Managing Authentication and Shared Policy Components 19-7
■Detach: Click Detach in the tool bar to expand the table to a full page.
■Reorder Columns: Select a View menu item to alter the appearance of the
results table.
4. Click the Browse tab to return to the navigation tree when you finish with the
Search results.
19.3.4 Creating a Custom Resource Type
Users with valid Administrator credentials can use the following procedure to create a
defined resource type. For instance, you can define a custom resource type that applies
to as few as one or two (or more) operations. Any defined custom resource type is
listed with default resource types when adding resources to an authentication or
authorization policy.
To create a custom resource type
1. From the Oracle Access Management Console, click Resource Types.
2. Click the Add + button.
3. Enter the following information:
■Name: A unique name that identifies this resource type.
■Description: Optional.
■Operations: Click + in the Operations table, type the operation name into the
field provided. Repeat as needed to define all operations for this resource type.
■Reconfigure Table: Select a View menu item to alter the appearance of the
results table.
4. Click Apply to submit this custom resource definition.
5. Add this resource definition to an Application Domain as described in "Adding
and Managing Policy Resource Definitions" on page 20-14.
19.4 Managing Host Identifiers
This section describes host identifiers and their use as well as how to create, modify, or
remove a host identifier. Topics here include:
■About Host Identifiers
■About Virtual Web Hosting
■About the Host Identifier Page
■Creating a Host Identifier
■Searching for a Host Identifier Definition
■Viewing or Editing a Host Identifier Definition
■Deleting a Host Identifier Definition
See Also:
■"About Resource Types and Their Use" on page 19-3
■"Defining Resources in an Application Domain" on page 20-28

Managing Host Identifiers
19-8 Administrator's Guide for Oracle Access Management
19.4.1 About Host Identifiers
Access Manager policies protect resources on computer hosts. Within Access Manager,
the computer host is specified independently using a host identifier.
Table 19–3 illustrates the different host names under which a Web server might be
accessible to employees. Creating a single Host Identifier using all of these names
allows you to define a single set of policies to appropriately protect the application,
regardless of how the user accesses it.
Based on a defined host identifier, Administrators can add specific resources to an
Application Domain and apply policies to protect those resources.
Registered Agents protect all requests that match the addressing methods defined for
the host identifier used in a policy. A request sent to any address on the list is mapped
to the official host name and Access Manager can apply the policies that protect the
resource and OAM can apply the policies that protect the resource.
A host identifier is automatically created when an Agent (and application) are
registered using either the Oracle Access Management Console or the remote
registration tool. Administrators can manually add a host identifier if an application
and resources exist on a host that does not have a mapped host identifier. Also, Oracle
Access Management Administrators can modify an existing host identifier to add in
the new host name variations. For instance, adding another proxy Web server with a
different host name requires a new host name variation.
For more information, see:
■Host Identifier Usage
■Host Identifier Guidelines
■Host Identifier Variations
19.4.1.1 Host Identifier Usage
At design time, the host identifier can be used while defining which resources belong
to a specific Application Domain. Resources are scoped using their host identifier
(HTTP) or type (non-HTTP). This combination uniquely identifies them across Access
Manager.
Table 19–3 Host Identifiers Examples
Sample Host Identifier Description
hrportal.intranet.company.com A friendly name employees can remember. This is a load-balanced
proxy, and requests to this could actually utilize one of several servers
hosting the HR application.
hr-sf-02.intranet.company.com A single machine hosting the application, which can be accessed
directly.
hrportal.company.com The same application is also accessible externally to the corporate
firewall, primarily for use by ex-employees to check benefits, 401k
info, and so on. This is also a load-balanced reverse proxy.
Note: Each resource should be unique across all Application
Domains; each resource and host identifier combination must be
unique across all Application Domains.

Managing Host Identifiers
Managing Authentication and Shared Policy Components 19-9
Runtime Usage
At run time, Web server host information in the access query from an OAM Agent is
mapped to a host identifier and associated with the resource that is being accessed by
a user. The OAM Agent obtains the Web server host information in one of two ways:
■If the Preferred Host parameter is configured for virtual Web hosting support
(see"About Virtual Web Hosting" on page 19-10), Web server host information for
the given request is obtained from the Web server.
■If the Preferred Host parameter directly specifies the Web server host information,
it is always used irrespective of the Web server's own host information.
This allows for the Resources to be specified in terms of logical host names in their
Host Identifiers, instead of the host names matching the present deployment of the
Web server.
For instance, a user accessing
aseng-wiki
, would enter:
http://example-wiki.uk.example.com/wikiexample
Here, wikiexample is the resource URL and example-wiki.uk.example.com is the host.
Matching this host and port (port is 80) provides the host identifier.
Preferred Host
Web server host information is generally acquired by setting the Preferred Host string
of the OAM Agent. If the Agent is actively protecting multiple virtual hosts, this string
can be set to
server_name
to ensure that the actual request hostname is correctly
picked up from the Web server's request object. For more information, see "About
Virtual Web Hosting" on page 19-10
Authenticating Hosts and Challenge Redirect in Authentication Schemes
When a user attempts to access a protected resource URL, she is redirected to the
server specified in the Challenge Redirect field of the authentication scheme. If the
authentication challenge is to be processed by another host, the name of that host must
be defined to be available in the Host Identifiers list. For example, if a user is
redirected to an SSL-enabled server for authentication, that server must be defined as a
host identifier.
19.4.1.2 Host Identifier Guidelines
Each host identifier can be defined to represent one or more Web server hosts.
Following are several important guidelines for host identifiers:
■Each host name must be unique.
■Each host name:port pair must be unique.
■Each host name:port pair must belong to only one host identifier.
■Each host name:port pair must match the end user's entry exactly.
■A Host Identifier name cannot match a non-HTTP Resource Type name (and vice
versa).
■Each resource and host identifier combination must be unique across all
Application Domains.
Note: If you enter a host name in the Challenge Redirect field of an
authentication scheme, it must be defined as a Host Identifier.

Managing Host Identifiers
19-10 Administrator's Guide for Oracle Access Management
For more information, see "Host Identifier Variations".
19.4.1.3 Host Identifier Variations
Host identifiers are used to simplify the identification of a Web server host by defining
all possible hostname variations. Host identifiers consist of a list of all URL addressing
methods. A host identifier must be configured for each Web site or virtual Web site
that you want to protect with Access Manager.
You can identify Web server hosts to Access Manager in various ways, for example, by
providing a computer name or an IP address. The following are examples of how the
same host can be addressed:
■example.com
■example.com:80
■www.example.com
■www.example.com:80
■216.200.159.58
■216.200.159.58:80
19.4.2 About Virtual Web Hosting
You can install a Webgate on a Web server that contains multiple Web site and domain
names. The Webgate must reside in a location that enables it to protect all of the Web
sites on that server.
The virtual Web hosting feature of many Web servers enables you to support multiple
domain names and IP addresses that each resolve to their unique subdirectories on a
single virtual server. For example, you can host abc.com and def.com on the same
virtual server, each with its own domain name and unique site content. You can have
name-based or IP-based virtual hosting.
A virtual host referees the situation where the same host has multiple sites being
served either based on multiple NIC cards (IP based) or multiple names (for example,
abc.com and def.com resolving to same IP).
Consider a case where you have two virtual hosts configured on an OHS Server acting
as reverse proxy to OAM Server, as follows:
■One virtual host is configured in two-way SSL mode
■One virtual host configured in non-SSL mode
Suppose there are two resources protected with different authentication schemes and
Application Domains:
■/resource1 is protected by a X509Scheme with a Challenge URL (to define the
credential collection URL) of https://sslvhost:port/
When the user accesses /resource1 he is redirected to the OHS Server on the SSL
port for authentication and is asked for the X.509 Certificate.
■/resource2 is protected by a LDAPScheme on the second virtual host with a
Challenge Redirect of http://host:port/
Note: The information here is the same for both 11g and 10g
Webgates.

Managing Host Identifiers
Managing Authentication and Shared Policy Components 19-11
When user accesses /resource2 he is redirected to second virtual host which is in
non-SSL mode (or in one way SSL mode if required). The Login form for LDAP
authentication is displayed.
19.4.2.1 Placing a Webgate Behind a Reverse Proxy
You can use 10g Webgates with reverse proxies for Access Manager. This topic
discusses benefits and pitfalls of this strategy.
Benefits:
■All Web content can be protected from a single logical component as long as all
requests go through the proxy.
This is true even for platforms that are not supported by Access Manager. If you
have different types of Web servers (for example, iPlanet, Apache, and so on) on
different platforms (for example, Windows XP, Linux, and so on), all content on
these servers can be protected. A reverse proxy can be a workaround for
unsupported Web servers, eliminating the need to write custom Access Clients for
unsupported Web servers and on platforms that do not have Webgate support, for
example, MacOS.
■A reverse proxy offers architecture flexibility.
Reverse proxies can allow deployments to expose an application that is available
on the intranet to the extranet. Or applications that are available on the extranet
can be exposed to the intranet. This can be done without any changes to the
application that is already deployed.
■You only need to install a separate Webgate on the reverse proxy, rather than on
every Web server.
This allows for a single management point and can help with manageability of the
system. You can manage the security of all of the Web servers through the reverse
proxy without establishing a footprint on the other Web Servers.
Pitfalls: The main pitfall of using a proxy is the extra work involved in setup. If you
deploy the Webgate on a Web server that is behind a reverse proxy, the following are
configuration requirements:
■Ensure that any Web server that uses the reverse proxy for authentication only
accepts requests from the reverse proxies.
This will also require that Webgates deployed on this Web server be configured to
not enforce IP validation for requests from the reverse proxy server that front-ends
the Webgate. This is done by configuring the known IP addresses of the reverse
proxy server or servers in the IP Validation list. Note that while you can achieve
the same effect by turning IP validation off for the Webgate, this is not a
recommended approach due to security risks.
Ensuring that the Web server only accepts requests from reverse proxies is
typically done by adding an ACL statement in the server. This prevents users from
bypassing the reverse proxy and directly accessing restricted content.
Note: Your deployment can support X.509 and Form authentication
with 10g mod_osso. However, mod_osso can be configured for only
one SSO Server. In this case, the Agent redirects to Access Manager on
the non-SSL virtual host. The credential collector checks the
Authentication Scheme's Challenge URL parameter for the resource
and redirects back to the HTTPS virtual host for X509 authentication.

Managing Host Identifiers
19-12 Administrator's Guide for Oracle Access Management
■Update the virtual hosts that are configured in the Policy Manager so that the
Access System intercepts requests that are sent to the reverse proxy.
■Prevent people from circumventing the proxy by entering URLs that point directly
to the back-end system.
You can prevent this problem through the use of Web Server Access Control Lists
or firewall filters.
■Since all user requests are processed by the proxy, you must deploy enough proxy
servers to enable the system to handle the load.
■Redirect all existing URLs to the host name and port number of the reverse proxy
server.
This often requires configuring the reverse proxy to perform content inspection
and rewriting to prevent any absolute HTML links, for instance, to prevent broken
link. This is achievable with most reverse proxies, and this is something you can
configure independently of the Access System,.
■It is a best practice that URL links exposed to the front-ended applications rely on
only relative URLs (../../sub-path/resource) rather than absolute URLs
(http://example.com:[port]/path/resource).
Absolute URLs can break links on the end user's browser when deployed behind a
reverse proxy.
19.4.2.2 Configuring Virtual Hosting for Non-Apache Web Servers
Ensure that the Virtual Host box is checked on the 10g Webgate registration page.
On most Web servers, other than Apache-based servers, you must set the Preferred
Host value to HOST_HTTP_HEADER. This ensures that, when user's browser sends a
request, the Webgate sets the value of the Preferred Host to the host value in the
request. For example, suppose a user enters the string example2 in a URL:
http://example2
On the Web server, if one of the Web sites has a host named
example2
, the request is
served by the matching virtual site.
In the Preferred Host field of the expanded 10g Webgate registration page, enter the
following:
HOST_HTTP_HEADER.
IIS Virtual Hosting: From the IIS console, you must configure each virtual Web site to
contain the following fields:
■Host Header Name
■IP address
■Port
19.4.2.3 Associating a Webgate for Apache with Virtual Hosts, Directories, or Files
Ensure that the Virtual Host box is checked on the 10g Webgate registration page.
See Also:
■
http://www.simpledns.com/kb.aspx?kbid=1149
■
http://support.microsoft.com/kb/q190008/

Managing Host Identifiers
Managing Authentication and Shared Policy Components 19-13
On Apache-based Web servers (Apache, Apache 2, IBM HTTP Server, Oracle HTTP
Server, and so on), the Preferred Host value must be set to SERVER_NAME.
When using an Apache-based reverse proxy for single sign-on, in the Web server
configuration file (httpd.config, for example) file you specify the Web sites to run on
the Apache server. The settings can be global across all Web sites or local to a Web site.
You can restrict the Access Manager loading references in the httpd.config file to be
associated with a specified site, with virtual hosts, specific directories or even files.
To associate the Webgate with specific targets, you move the following directives the
the http.conf file:
AuthType Oblix
require valid-user
You can put these directives in a block that tells Apache to use Webgate for every
request. You can also move the directives to a block that limits when the Webgate is
called. The following is an example of putting the
LocationMatch
directive after a
VirtualHost
directive:
DocumentRoot /usr/local/apache/htdocs/myserver
ServerName myserver.example.net
AuthType Oblix
require valid-user
After you move the
LocationMatch
block to the
VirtualHost
directive, the Webgate
will only work for that virtual host. You can add the
LocationMatch
block to as many
virtual hosts as you want. The following examples shows how you could protect one
virtual server:
ServerAdmin webmaster@example.net
DocumentRoot "Z:/Apps/Apache/htdocs/MYsrv"
ServerName apps.example.com
ProxyRequests On
SSLEngine on
SSLCACertificateFile Z:/Apps/sslcert_exampleapps_ptcweb32/intermediateca.cer
SSLCertificateFile Z:/Apps/sslcert_exampleapps_ptcweb32/sslcert_myapps_
ptcweb32.cer
SSLCertificateKeyFile Z:/Apps/sslcert_exampleapps_ptcweb32/sslcert_myapps_
ptcweb32.key
ErrorLog logs/proxysite1_log
CustomLog logs/proxysite1_log common
ProxyPass /https://apps.example.com/
ProxyPassReverse /https://apps.example.com/
ProxyPass /bkcentral https://apps.example.com/bkcentral
ProxyPassReverse /bkcentral https://apps.example.com/bkcentral
ProxyPass /NR https://apps.example.com/NR
ProxyPassReverse /NR https://apps.example.com/NR
Note: The SERVER_NAME value is not supported for any host other
than an Apache-based server. If you set this value for a
non-Apache-based server, users will be unable to access any resources
that are protected by Webgate on that Web server. Users will, instead,
receive an error that the Webgate configuration is incorrect.
The
ServerName
directive must be explicitly set with 7777 along with
the hostName. This is irrespective of the
Listen
directive is set
correctly. The Server sometimes requires this value explicitly to
identify itself, most often it can identify itself automatically.
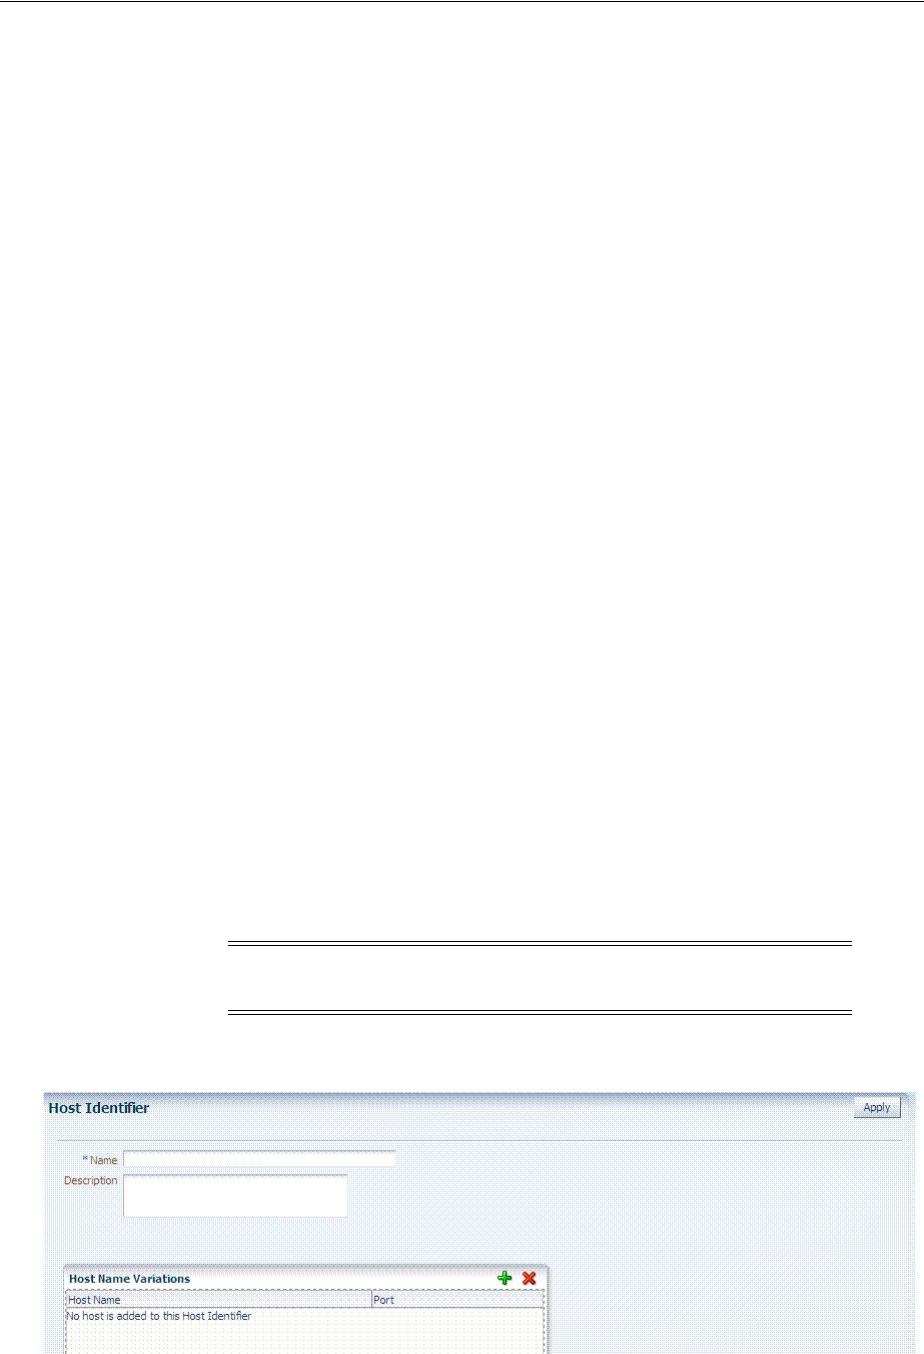
Managing Host Identifiers
19-14 Administrator's Guide for Oracle Access Management
AuthType Oblix
require valid-user
#*** BEGIN Oracle Access Manager Webgate Specific ****
LoadModule obWebgateModule
Z:/apps/Oracle/WebComponent/access/oblix/apps/webgate/bin/webgate.dll
WebgateInstalldir Z:/apps/Oracle/WebComponent/access
WebgateMode PEER
SetHandler obwebgateerr
SSLMutex sem
SSLRandomSeed startup builtin
SSLSessionCache none
SSLLog logs/SSL.log
SSLLogLevel info
# You can later change "info" to "warn" if everything is OK
19.4.3 About the Host Identifier Page
A host identifier is automatically created when an Agent (and application) are
registered using either the Oracle Access Management Console or the remote
registration tool. In the Application Domain that is registered with the Agent, the host
identifier is used automatically.
Administrators can use the console to create and manage host identifiers. Within the
Oracle Access Management Console, host identifiers are organized under Shared
Components, on the Policy Configuration tab navigation tree. Administrators can
manually create a new host identifier definition, modify a definition, delete a
definition, or copy an existing definition to use as a template. The name of the copy is
based on the original definition name. For example, if you copy a definition named
host3, the copy is named copy of host3.
Figure 19–4 illustrates a typical Host Identifier configuration page in the console,
where you enter the canonical name for the host, and every other name by which the
same host can be addressed by users.
Figure 19–4 Host Identifier Page
Note: Each host identifier must be unique. You cannot use the same
host name and port in any other host identifier definition.

Managing Host Identifiers
Managing Authentication and Shared Policy Components 19-15
Table 19–4 describes the host identifier definition.
19.4.4 Creating a Host Identifier
Users with valid Administrator credentials can use the following procedure to create a
host identifier definition manually. This is needed if an application and resources were
manually added to a host that has no mapped host identifier. When you choose Auto
Create Policies when registering an Agent, this is done automatically.
To manually create a Host Identifier
1. From the Oracle Access Management Console, click Host Identifiers.
2. Click the Create Host Identifier button in the upper-right corner of the Search Host
Identifiers page.
Alternatively: Open the Host Identifiers node, click the Create (+) button above
the Search Results table.
3. On the fresh Host Identifier page, fill in the:
a. Name
b. Description
c. Host Name Variations: Add (or remove) host name and port variations in the
Operations list.
Add: Click the Create (+) button, then enter a new host name and port
combination to identify variables that map to the Host Identifier Name.
Remove: Click a host name, then click the Delete button to remove it.
4. Repeat step 3c as needed to identify all variations of this host that users can access.
5. Click Apply to submit the new definition (or close the page without applying
changes).
Table 19–4 Host Identifier Definition
Property Description
Name A unique name for this definition. Use only upper- and lower-case alpha characters.
No punctuation or special characters are allowed.
Description The optional description, up to 200 characters, that explains the use of this
configuration.
Host Name
Variations
■Host Name: A list of the various host names or permutations that users might
use when accessing the application.
See also: "Host Identifier Variations" on page 19-10 and "Host Identifier
Guidelines" on page 19-9.
■Port: The Web server port used by each host or permutation
Note: If you copy an existing definition to use as a template, you
must modify all unique identifiers in the copy.
See Also:
■"About Host Identifiers" on page 19-8
■"About Virtual Web Hosting" on page 19-10

Managing Host Identifiers
19-16 Administrator's Guide for Oracle Access Management
6. Close the Confirmation window, and confirm the new definition is listed in the
navigation tree.
19.4.5 Searching for a Host Identifier Definition
Users with valid Administrator credentials can perform the following task to search
for a specific host identifier.
To find for a host identifier
1. From the Oracle Access Management Console, click Host Identifiers.
2. In the Search Host Identifiers page Name field, enter a name (or a partial name
with wild card (*)), or leave the Name field blank to show all Host Identifiers. For
example:
my_h*
3. Click the Search button to initiate the search and display results in a table, then:
■View or Edit: Double-click the name in the Search Results table to display the
configuration page, then add or edit as usual.
■Delete: Click the Delete button in the tool bar to remove the selected item in
the results table; confirm removal in the Confirmation window.
■Detach: Click Detach in the tool bar to expand the Search Results table to a full
page (or from the View menu, click Detach).
■Reorder Columns: From the View menu, select reorder Columns and use the
arrows provided to reorder the columns.
19.4.6 Viewing or Editing a Host Identifier Definition
Users with valid Administrator credentials can use the following procedure to modify
a host identifier definition. This can include adding, changing, or removing individual
host identifiers from the definition. For instance, when adding another proxy Web
server with a different host name, you might need to modify an existing host identifier
definition to add the new host name variation.
Prerequisite: Inventory Application Domains that refer to the host identifier and
To view or modify a Host Identifier
1. Locate the desired host identifier and view it as described in "Searching for a Host
Identifier Definition" on page 19-16.
Note: During Delete, if the Host Identifier is associated with a
resource, you are prompted with an alert. Without any association, the
Host Identifier is deleted successfully.
See Also: "Conducting A Search"
Note: After viewing settings, you can either close the page or modify
settings as needed.
See Also: "About the Host Identifier Page" on page 19-14

Understanding Authentication Methods and Credential Collectors
Managing Authentication and Shared Policy Components 19-17
2. On the Host Identifier page, modify information as needed (Table 19–4):
a. Name
b. Description
c. Host Name Variations: In the table provided:
Add (+) Host Name Variations: Click the Add (+) button, then enter a new
host name and port combination to identify variables that map to the Host
Identifier Name.
Delete (X) Host Name Variations: Click a host name, then click the Delete
button to remove it.
3. Repeat step 3c as needed to add or remove variations.
4. Click Apply to submit the changes (or close the page without applying changes).
5. Dismiss the Confirmation window, and close the page when you finish.
19.4.7 Deleting a Host Identifier Definition
Users with valid Administrator credentials can use the following procedure to delete
an entire host identifier definition. A validation error occurs if you attempt to delete
the host identifier that is being used in a resource.
Prerequisites
Each resource in an Application Domain is associated with a specific host identifier. If
you intend to delete a host identifier you must first modify any resource definitions in
an Application Domain that uses this host identifier.
To delete a Host Identifier
1. Locate and modify related resource definitions in any application domains that
uses this host identifier. See "Searching for a Resource Definition" on page 20-29.
2. Locate the desired host identifier as described in "Searching for a Host Identifier
Definition" on page 19-16.
3. View: Double-click the name in the results table to display the configuration page,
and confirm this can be removed.
4. Delete: Click the Delete button in the tool bar to remove the selected item in the
results table; confirm removal in the Confirmation window.
19.5 Understanding Authentication Methods and Credential Collectors
With Access Manager, authentication involves redirecting the requester (user) to a
centralized component that performs authentication (known as the Credential
Collector).
This section provides the following topics:
Note: If the Host Identifier is associated with a resource, you are
alerted. Without any association, the Host Identifier is deleted.
See Also: "Viewing or Editing a Host Identifier Definition" on
page 19-16 if you want to remove a single host identifier from an
existing definition.

Understanding Authentication Methods and Credential Collectors
19-18 Administrator's Guide for Oracle Access Management
■About Different Authentication Methods
■Comparing Embedded Credential Collector with Detached Credential Collector
■Authentication Event Logging and Auditing
19.5.1 About Different Authentication Methods
Authentication is the process of proving that a user is who he or she claims to be.
Authenticating a user's identity with Access Manager refers to running a pre-defined
set of processes to verify the digital identity of the user.
Using Access Manager, a resource or group of resources can be protected by a single
authentication process known as an authentication scheme. Authentication schemes
rely on pre-defined authentication modules or plug-ins.
This section describes multi-level authentication and other authentication methods
supported by Access Manager.
Multi-level Authentication
Access Manager enables Administrators to assign different authentication levels to
different authentication schemes, and then choose which scheme protects which
application. Every authentication scheme requires a strength level. The lower this
number, the less stringent the scheme. A higher level number indicates a more secure
authentication mechanism.
SSO capability enables users to access more than one protected resource or application
with a single sign in. A user who is authenticated to access resources at level 2, is
eligible to access resources protected at levels less than or equal to 2. However, if the
user is authenticated to access resources at level 2 and then attempts to access
resources protected by level 3, the user is asked to re-authenticate (this is known as
step-up authentication).
For more information, see "About Multi-Level and Step-Up Authentication" on
page 19-79.
Multi-Step Authentication
Multi-step authentication requires a custom authentication module composed of two
or more authentication plug-ins that transmit information to the backend
authentication scheme several times during the login process. All information
collected by the plug-in and saved in the context will be available to the plug-in
through the authentication process. Context data can also be used to set cookies or
headers in the user's login page.
See "Comparing Simple Form and Multi-Factor (Multi-Step) Authentication" on
page 19-29.
Windows Native Authentication
Integrated Windows Native Authentication is supported for both OSSO and Webgate
protected applications. This form of authentication relies on the Kerberos
authentication module. For more information, see Chapter 50, "Configuring Access
Manager for Windows Native Authentication".
Other Authentication Types
Authentication features required by Oracle Fusion Middleware applications are
supported, including:
See Also: "Multi-Step Authentication"

Understanding Authentication Methods and Credential Collectors
Managing Authentication and Shared Policy Components 19-19
■Weak authentication, typically a user name and password, no certificates
■Auto-login with third-party self-service user provisioning
■HTTP header support for user context information. For instance, host identifiers
are used to create a host context for the resource. This is useful when adding
resources that have the same URL paths on different computers.
If you use different authentication schemes for two WebGates, users can go from a
higher authentication scheme to a lower one without re-authentication, but not from a
lower level to a higher level.
For details about configuring and using authentication schemes with Access Manager,
see "Managing Authentication Schemes" on page 19-64.
19.5.2 Comparing Embedded Credential Collector with Detached Credential Collector
Access Manager 11.1.2 supports the embedded credential collector (ECC) by default
and also enables you to configure the latest Webgate to use as a detached credential
collector (DCC, also known as an Authenticating Webgate).
The DCC is considered more secure than the default embedded credential collector
(ECC). The centralized DCC presents the login page, collects user credentials (userID
and password, for example), and sends these to the OAM Server using the back
channel Oracle Access Protocol (OAP). Additional credentials can be requested using
the DCC.
When OAM Server is configured to use the DCC, the ECC and its HTTP endpoints are
disabled. The only HTTP communication is to the Oracle Access Management Console
hosted by the WebLogic AdminServer in the domain where the OAM Server is
deployed. Connectivity to the AdminServer can be controlled at the network level, for
example, to disallow administration requests from outside the internal network.
■Allowing both the ECC and DCC to co-exist enables you to use authentication
schemes and policies configured for use with either the ECC or the DCC. This
enables a fallback mechanism for resources that rely on the ECC, which includes
the Oracle Access Management Console.
■Disabling (turning off) the ECC entirely prohibits access to resources that rely on
the ECC mechanism, including the Oracle Access Management Console.
While the embedded and detached credential collectors (ECC and DCC, respectively)
are essentially the same, compare the two in Table 19–5.
Note: During single sign-on, users might pass the authentication
tests but might fail authorization tests when attempting to access a
second or third resource. Each resource in the domain might have a
unique authorization policy.
See Also: "Introducing Access Manager Credential Collection and
Login" on page 18-14

Understanding Authentication Methods and Credential Collectors
19-20 Administrator's Guide for Oracle Access Management
Table 19–5 Comparing the DCC and ECC
DCC ECC
Deployment The Detached Credential Collector remains a
logical part of the server and acts as a front
channel communication endpoint of the OAM
Server. However, the DCC also:
■Stands alone (detached from the OAM
Server and does not require an application
server).
■Supports RSA SecurID passcode verification,
get next token, create new pin workflows.
■Is similar to the earlier 10g Authenticating
Webgate with greater flexibility for server
scale-out and attack resilience as well as
credential collection UI construction, flow,
and lifecycle management.
The Embedded Credential Collector is deployed
with, and integral to, the OAM Server and part of
the protocol binding layer.
The ECC supports RSA SecurID passcode
verification, get next token, create new pin
workflows.
DMZ Deployment Yes.
The main benefit of a deployment using DCC in
the DMZ is the termination of the end-user
network connections within the public network,
and the use of Oracle Access Protocol (Oracle's
proprietary application network protocol) over
mutually authenticated connections reaching the
OAM Server. This offers a complete isolation of
the OAM Server from the establishment of any
unauthenticated network connection.
Unauthenticated users cannot send malformed
requests to the OAM Server.
No.
Communication channel DCC consumes HTTP/HTTPS requests from the
user, then communicates with the OAM Server
across the Oracle Access Protocol (back channel),
which can be SSL-enabled.
ECC communicates with both the user and the
OAM Server across HTTP/HTTPS.
DCC login, error, and
password pages
Dynamic pages general login/logout and
password policy with the DCC are excluded
automatically through the OHS
httpd.conf/webgate.conf file--you do not need to
configure a policy to exclude these. See the
Webgate host in $
WEBGATE_
HOME/webgate/ohs/oamsso/*,
$
WEBGATE_
HOME/webgate/ohs/oamsso-bin/*pl
, and
$WEBGATE_
HOME/webgate/ohs
/
oamsso-bin/templates
/*
directory:
■Login page:
/oamsso-bin/login.pl
■Logout:
/oamsso-bin/logout.pl
■RSA SecurID login pages:
/oamsso-bin/
securid.pl
Note: Update the Perl location in the first line of
the login, logout, and securid scripts in
/oamsso-bin
.
See Also: Table 19–31, " Credential Collector
Password Pages".
Chapter 49, "Integrating RSA SecurID
Authentication with Access Manager" for details
about login pages for this implementation.
For details about customizing pages and
messages, see the Oracle Fusion Middleware
Developer's Guide for Oracle Access
Management.
Pages where the user enters her credentials arrive
out of the box on the OAM Server and require no
additional settings or changes.
■Login page: /pages/login.jsp
■Logout page: /pages/logout.jsp
■Error page: /pages/servererror.jsp
■Multi-step: /pages/mfa_login.jsp

Understanding Authentication Methods and Credential Collectors
Managing Authentication and Shared Policy Components 19-21
Perl Scripts for
DCC-based Login and
Logout
Perl Scripts for DCC-based Login and Logout
The path name of the Perl executable must be
updated in Oracle-provided Perl scripts on the
Webgate host
$WEBGATE_
HOME/webgate/ohs/oamsso-bin/*pl
to be
consistent with the actual location.
Unix: The
which
command finds Perl on the
OAM Server. For example:
which perl
/usr/bin/perl
However, Perl scripts themselves point to:
/usr/local/bin/perl
Windows: The default Perl Interpreter specified
in Oracle-provided Perl scripts will not be
available. You must update the Perl Interpreter
path in these scripts to actual path to Perl on your
system.
N/A
Password policy
enforcement
Yes.
See "Locating and Updating DCC Forms for
Password Policy" on page 19-110
Yes
See: "Managing Global Password Policy" on
page 19-97
Authentication scheme
collection methods
DCC supports only Form Based Authentication. ECC supports all challenge methods.
The ECC collects user credentials based on the
challenge method of the Authentication Scheme
and sends it back to OAM Server for validation.
Custom Authentication
Plug-ins and Challenge
Methods
Yes; same as ECC. All challenge methods and multi-step
authentication (Password Policy and other
custom authentication plugins) are supported.
Single Step (Simple
Form) Authentication
Yes; same as ECC. Yes. Both the DCC and ECC handle this, where:
■All credentials are supplied in one simple
form
■Upon credential validation and
authentication, either success or failure
status is returned
■This can be retried upon failure
Multi-Step
Authentication
Yes. Both the DCC and ECC handle complex
multi-factor (multi-step, iterative, and variable)
Authentication processing.
In this case:
■Not all required credentials are supplied at
once
■Depending on the authentication status,
PENDING state, expected credentials and
context data are returned, expecting those
credentials to be supplied in the next round
■Each intermediate step, submit required
credentials and context data to feed
authentication engine, until a success or
failure status returned
■The Authentication plug-in can have
multiple steps configured
See "Understanding Multi-Level and Step-Up
Authentication" on page 19-79
Yes. Both the DCC and ECC handle complex
multi-factor (multi-step, iterative, and variable)
Authentication processing.
Table 19–5 (Cont.) Comparing the DCC and ECC
DCC ECC

Understanding Authentication Methods and Credential Collectors
19-22 Administrator's Guide for Oracle Access Management
19.5.3 Authentication Event Logging and Auditing
Authentication Success and Failure events are audited, in addition to administration
events. Auditing covers creating, modifying, viewing, and deleting authentication
schemes, modules, and policies. Information that is collected about the user who is
authenticating includes:
■IP address
■User Login ID
Authentication
Processing
The DCC does not restrict authentication
functionality of the OAM Server in any way as
compared to the ECC.
The DCC:
1. Handles authentication redirects from both
10g and 11g Webgates.
2. Handles Form-based authentication, which
consists of a challenge to the user for their
credentials (simple form or multi-factor).
3. Decrypts the authentication request message
from the agent using the agent key; performs
basic integrity checks; validates request time;
and extracts all parameters from the request
including request context.
4. Constructs the authentication response
message, including request context
originally retrieved, encrypts obrar using the
agent key.
5. Decrypts the logout redirect request using
the agent key to trigger logout processing.
During authentication:
1. The ECC handles the request coming to the
protocol binding layer (PBL), which converts
it and sends it to the SSO Engine.
2. The SSO Engine checks for a valid session
and, if none, transfers control to the
Authentication Engine.
3. The Authentication Engine checks for
resource protection and fetches the
authentication scheme associated with the
resource.
4. The ECC interacts with the client, accepts the
data, and submits this to the PBL.
Overriding the ECC To deploy the DCC and override the ECC, an
Administrator must perform the following tasks
to specify the relevant DCC URLs and forms.
■OAM Agent registration: Allow Credential
Collector Operations (enable for DCC)
■Authentication Module, Step Orchestration:
Error (if Failure)
■Authentication Scheme: Challenge Redirect
URL (DCC host and port)
■Authentication Scheme: Challenge URL
/
oamsso-bin/login.pl
(DCC login pages)
■Authentication Scheme: Challenge Method
■Password Policy: Password Service URL for
DCC (Default:
/oamsso-bin/login.pl
)
See "Enabling DCC Credential Operations" on
page 19-109
N/A
Logout Configuration See "Configuring Logout When Using Detached
Credential Collector-Enabled Webgate" on
page 22-6
See "Configuring Centralized Logout for 11g
Webgates" on page 22-4
Cookie/Token ■DCCCtxCookie
■11g Webgate: OAMAuthnCookie
■11g Webgate: OAMRequestContext
■10g Resource Webgate: ObSSOCookie
See: "About Single Sign-On Cookies During User
Login" on page 18-23
■11g Webgate: OAMAuthnCookie
■11g Webgate: OAM_REQ
■11g Webgate: OAM_ID
■11g Webgate: OAMRequestContext
■10g Webgate: ObSSOCookie
See: "About Single Sign-On Cookies During User
Login" on page 18-23
Table 19–5 (Cont.) Comparing the DCC and ECC
DCC ECC

Managing Native Authentication Modules
Managing Authentication and Shared Policy Components 19-23
■Time of Access
During logging (or auditing), user information, user sensitive attributes are not
recorded. Secure data (user passwords, for example) are removed to avoid misuse.
19.6 Managing Native Authentication Modules
In Access Manager, each authentication scheme requires an authentication module.
This section provides the following information:
■About Native Access Manager Authentication Modules
■Viewing or Editing Native Authentication Modules
■Deleting a Native Authentication Module
19.6.1 About Native Access Manager Authentication Modules
Table 19–6 lists the Native Access Manager Authentication Modules.
See Also:
■Chapter 8, "Logging Component Event Messages"
■Chapter 9, "Auditing Administrative and Run-time Events."
■Chapter 12, "Monitoring Performance and Health"
Note: Native authentication modules lack the flexibility to
orchestrate two or more plug-ins to meet specialized authentication
needs. Therefore, native authentication modules are targeted for
deprecation in future releases. Oracle strongly recommends using
plug-in based authentication modules as described "Orchestrating
Multi-Step Authentication with Plug-in Based Modules" on
page 19-28.
Table 19–6 Native Authentication Modules
Module Name Description
LDAP Matches the credentials (username and password) of the user who
requests a resource to a user definition stored in an LDAP directory
server. An LDAP module is required for Basic and Form challenge
methods.
See Also: "Native LDAP Authentication Modules" on page 19-25.
LDAPNoPasswordAuthModule Matches the credentials (username and password) of the user who
requests a resource to a user definition stored in an LDAP directory
server. An LDAP module is required for Basic and Form challenge
methods.
See Also: "Native LDAP Authentication Modules" on page 19-25.
Kerberos Identifies the key tab file and krb5.configuration file names and
Principal.
Use this plug-in when configuring Access Manager for Windows
Native Authentication, as described in Chapter 50.
See Also: "Native Kerberos Authentication Module" on page 19-24.
X509 Similar to the LDAPPlugin with additional properties that indicate
which attribute of the client's X.509 certificate should be validated
against the user attribute in LDAP.
See Also: "Native X509 Authentication Module" on page 19-25.
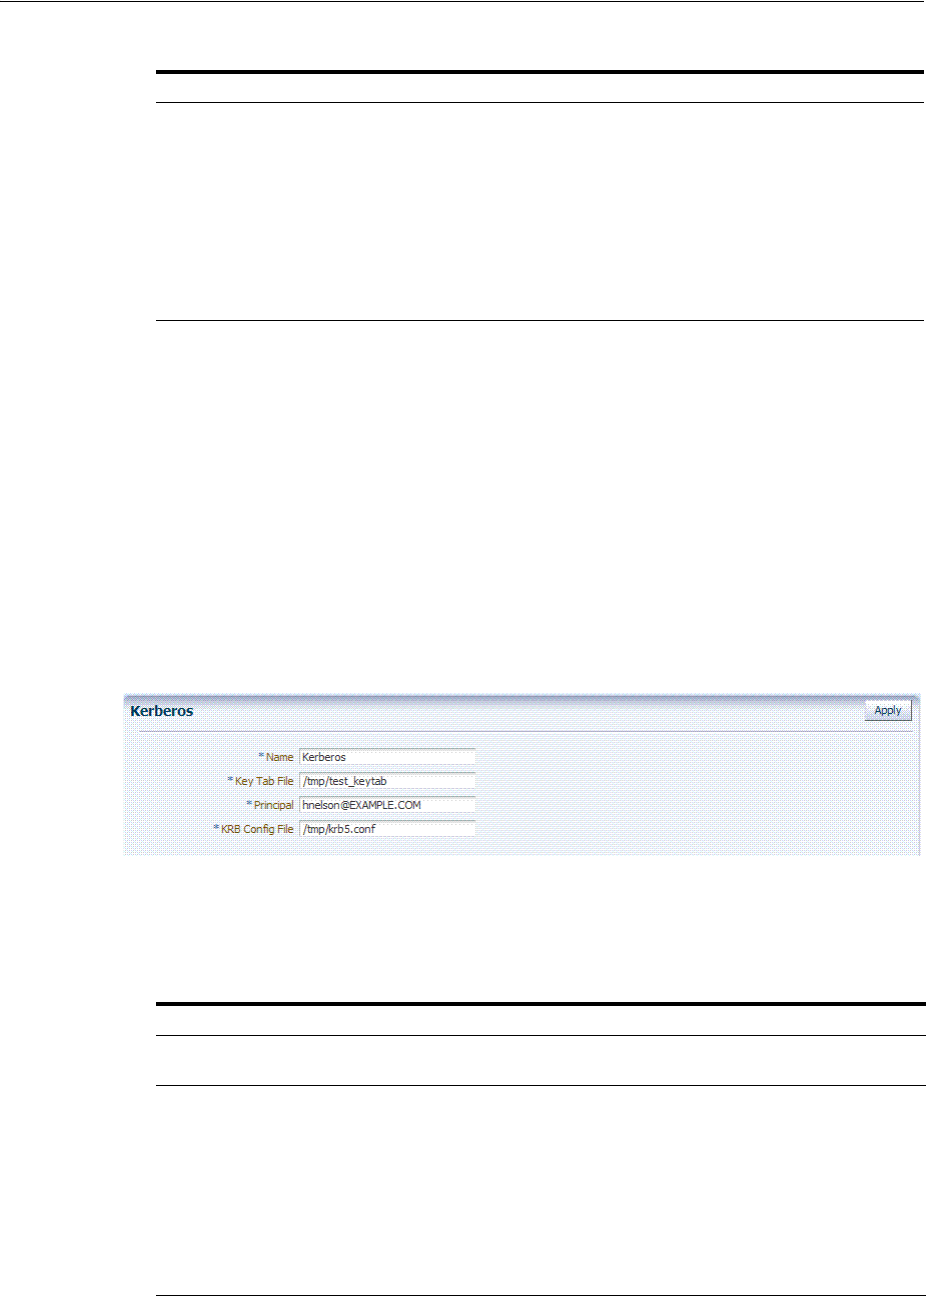
Managing Native Authentication Modules
19-24 Administrator's Guide for Oracle Access Management
19.6.1.1 Native Kerberos Authentication Module
The pre-configured Kerberos authentication module is illustrated in Figure 19–5.
Additional details follow the figure.
Figure 19–5 Native Kerberos Authentication Module
Table 19–7 describes the definition of the native Kerberos authentication module. You
can use the existing, pre-configured Kerberos authentication module or create one of
your own.
Custom Authentication Modules This type of module relies on bundled plug-ins (or those that are
developed using the Access Manager Authentication Extensibility
Java API). This type of module generally uses more than one plug-in
that you can orchestrate to ensure that each one performs a specific
authentication function. Depending on the success or failure action
defined for each plug-in, another authentication plug-in is called.
See Also: "About Plug-in Based Modules for Multi-Step
Authentication" on page 19-38, and Oracle Fusion Middleware
Developer's Guide for Oracle Access Management for details about
developing and deploying plug-ins, custom authentication modules,
and schemes that use custom modules.
See Also:
■"About Challenge Methods" on page 19-71
■Oracle Fusion Middleware Developer's Guide for Oracle Access
Management for details about creating custom authentication
plug-ins
Table 19–7 Native Kerberos Authentication Module Definition
Element Description
Name The unique ID of this module, which can include upper and lower case alpha
characters as well as numbers and spaces.
Key Tab File The path to the encrypted, local, on-disk copy of the host's key, required to authenticate
to the key distribution center (KDC). For example: /etc/krb5.keytab.
The KDC authenticates the requesting user and confirms that the user is authorized for
access to the requested service. If the authenticated user meets all prescribed
conditions, the KDC issues a ticket permitting access based on a server key. The client
receives the ticket and submits it to the appropriate server. The server can verify the
submitted ticket and grant access to the user submitting it.
The key tab file should be readable only by root, and should exist only on the
machine's local disk. It should not be part of any backup, unless access to the backup
data is secured as tightly as access to the machine's root password itself.
Principal Identifies the HTTP host for the principal in the Kerberos database, which enables
generation of a keytab for a host.
Table 19–6 (Cont.) Native Authentication Modules
Module Name Description
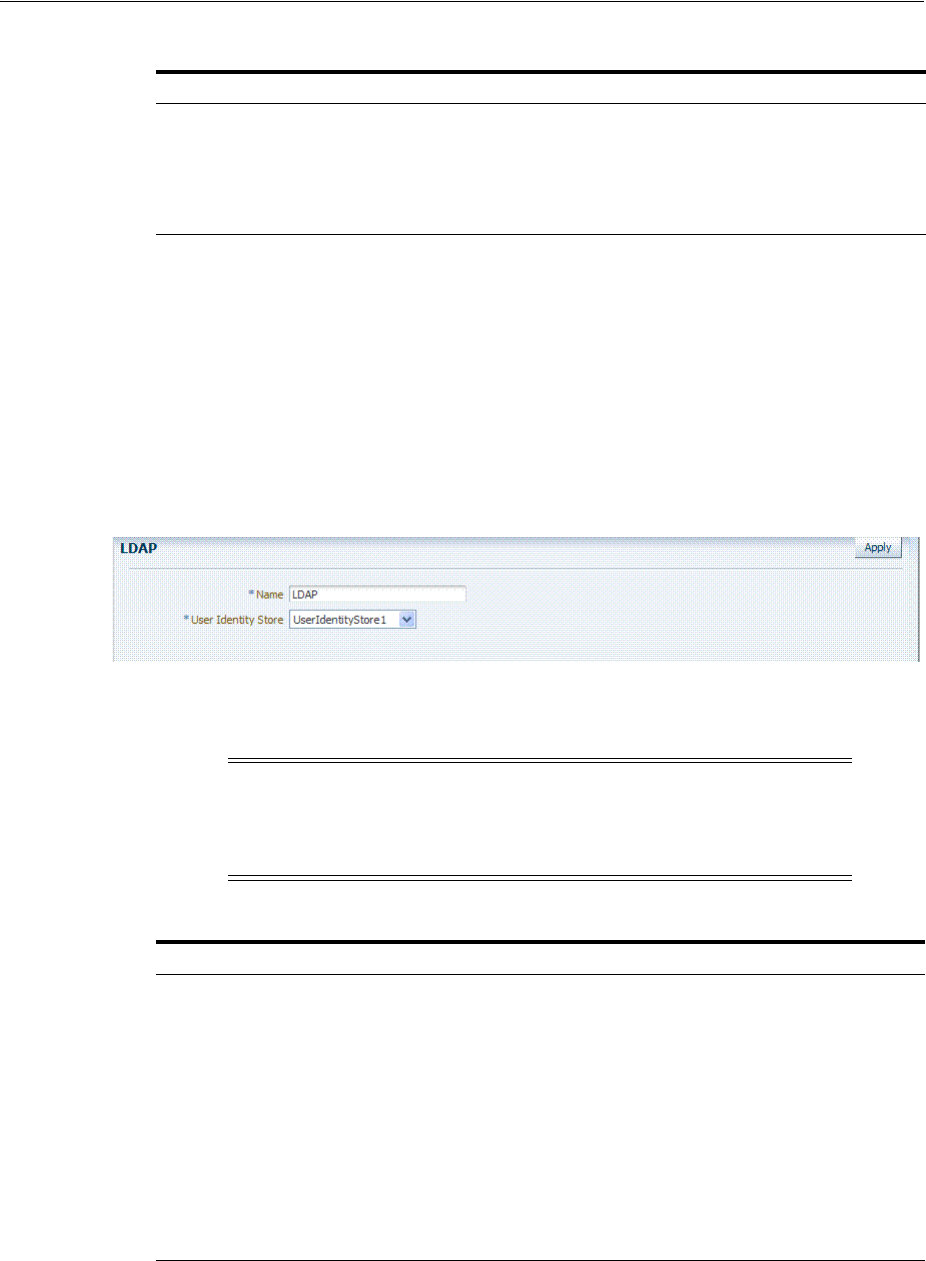
Managing Native Authentication Modules
Managing Authentication and Shared Policy Components 19-25
19.6.1.2 Native LDAP Authentication Modules
Oracle provides two LDAP authentication modules:
■LDAP
■LDAPNoPasswordAuthModule
Both modules have the same requirements (Name and User Identity Store), as
illustrated in Figure 19–6. Additional details follow the figure.
Figure 19–6 Native LDAP Authentication Module
Table 19–8 describes the elements in an LDAP authentication module. The same
elements and values are also used in LDAPNoPasswordAuthnModule.
19.6.1.3 Native X509 Authentication Module
Access Manager provides a pre-configured X509 authentication module as a default.
Administrators can also create new X509 authentication modules. In cryptographic
Krb Config File Identifies the path to the configuration file that controls certain aspects of the Kerberos
installation. A krb5.conf file must exist in the /etc directory on each UNIX node that is
running Kerberos.
krb5.conf contains configuration information required by the Kerberos V5 library (the
default Kerberos realm and the location of the Kerberos key distribution centers for
known realms).
Note: These standard LDAP Authentication Modules are targeted
for deprecation. Future enhancements will not be available in
standard modules. Oracle strongly recommends using plug-in based
modules.
Table 19–8 Native LDAP Authentication Modules Definition
Element Description
Name A unique name for this module.
User Identity Store The designated LDAP user identity store must contain any user credentials
required for authentication by this module. The LDAP store must be registered
with Access Manager.
See Also: "Managing OAM Identity Stores" on page 5-4.
Multiple identity store vendors are supported. Upon installation, there is only
one User Identity Store, which is also the designated System Store. If you add
more identity stores and designate a different store as the System Store, be sure
to change the LDAP module to point to the System Store. The authentication
scheme
OAMAdminConsoleScheme
relies on the LDAP module for Administrator
Roles and credentials.
See Also: "Setting the Default Store and System Store" on page 5-21 and
"Administrator Lockout" on page E-6.
Table 19–7 (Cont.) Native Kerberos Authentication Module Definition
Element Description
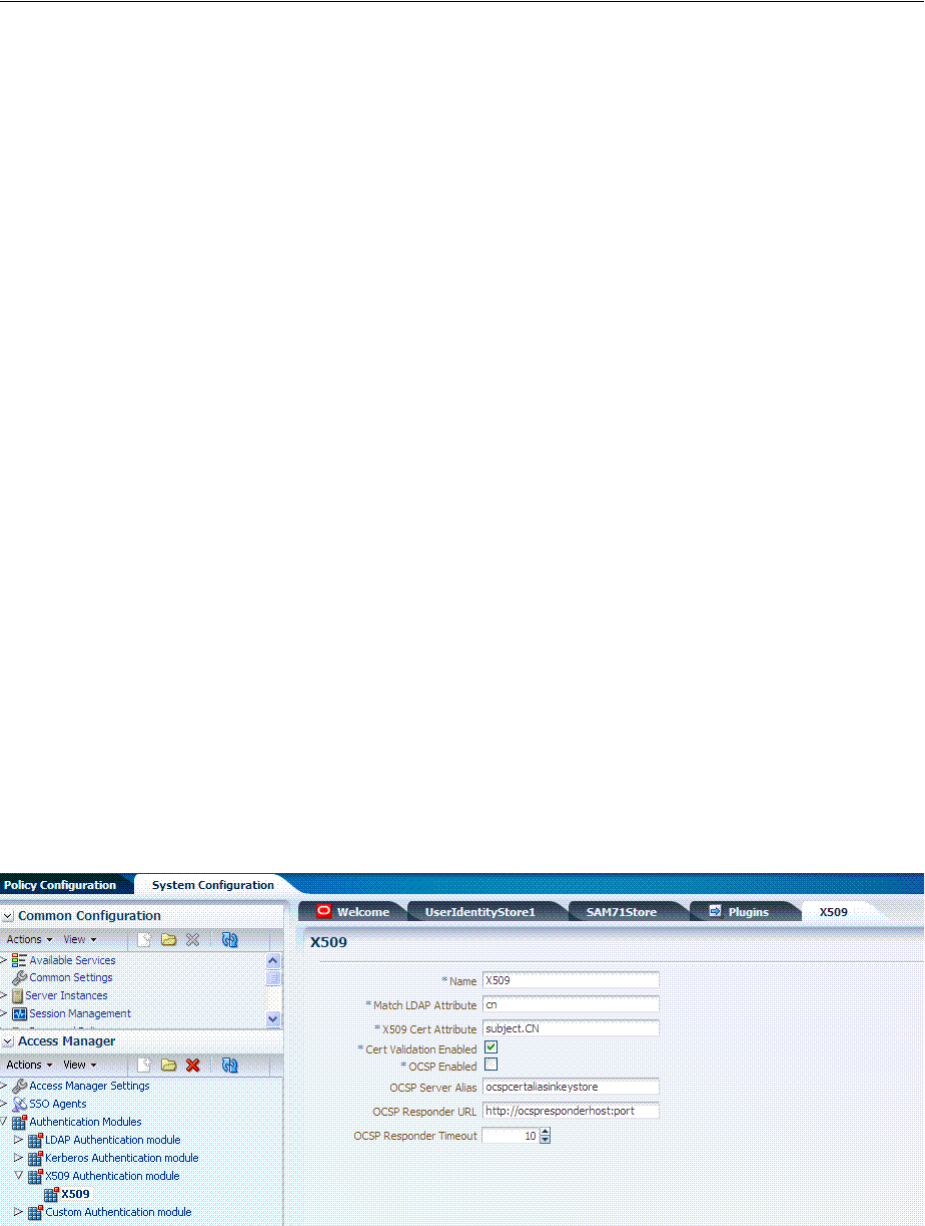
Managing Native Authentication Modules
19-26 Administrator's Guide for Oracle Access Management
terms, X.509 is a standard for digital public key certificates used for single sign-on
(SSO). X.509 specifies standard formats for public key certificates, certificate revocation
lists, and attribute certificates among other things.
With X.509 digital certificates you can assume a strict hierarchical system of certificate
authorities (CAs) issuing the certificates. In the X.509 system, a CA issues a certificate
that binds a public key to a particular Distinguished Name, or to an Alternative Name
such as an e-mail address or a DNS-entry.
The trusted root certificates of an enterprise can be distributed to all employees so that
they can use the company PKI system. Certain Web browsers provide pre-installed
root certificates to ensure that SSL certificates work immediately.
Access Manager uses the Online Certificate Status Protocol (OCSP) Internet protocol to
maintain the security of a server and other network resources. OCSP is used for
obtaining the revocation status of an X.509 digital certificate. OCSP specifies the
communication syntax used between the server containing the certificate status and
the client application that is informed of that status.
When a user attempts to access a server, OCSP sends a request for certificate status
information. OCSP discloses to the requester that a particular network host used a
particular certificate at a particular time. The server returns a response of "
current
",
"
expired
," or "
unknown
." OCSP allows users with expired certificates a configurable
grace period, during which they can access servers for the specified period before
renewing.
OCSP messages are encoded in ASN.1 and are usually transmitted over HTTP. The
request and response characteristic of OCSP has led to the term "OCSP responders"
when referring to OCSP servers. With Access Manager, the computer hosting the
Oracle Access Management Console is the OCSP responder.
An OCSP responder can return a signed response signifying that the certificate
specified in the request is 'good', 'revoked' or 'unknown'. If OCSP cannot process the
request, it can return an error code.
Figure 19–7 Native X509 Authentication Module
Table 19–9 describes the requirements of the native X509 authentication module.

Managing Native Authentication Modules
Managing Authentication and Shared Policy Components 19-27
19.6.2 Viewing or Editing Native Authentication Modules
Users with valid Administrator credentials can use the following procedure to modify
an existing authentication module. This includes changing the name of an existing
module as well as changing other attributes.
Prerequisites
Modify each authentication scheme that references the module you will change, to use
another authentication module if needed.
Note: This standard Authentication Module is targeted for
deprecation. Future enhancements will not be available in standard
modules. Oracle strongly recommends using plug-in based modules.
Table 19–9 X509 Authentication Module Definition
Element Description
Name Identifies this module definition with a unique name.
Match LDAP Attribute Defines the LDAP distinguished name attribute to be searched against given
the X509 Cert Attribute value.
For example, if the certificate subject EMAIL is me@example.com and it
must be matched against the "mail" LDAP Attribute, an LDAP query must
search LDAP against the "mail" attribute with a value "me@example.com
(cn).
Default: cn
X509 Cert Attribute Defines the certificate attribute to be used to bind the public key (attributes
within subject, issuer scope to be extracted from the certificate: subject.DN,
issuer.DN, subject.EMAIL, for example).
See Also. Match LDAP Attribute earlier in this table.
Cert Validation Enabled Enables (or disables if not checked) X.509 Certificate validation.
When enabled, the OAM Server performs the certificate validation (rather
than having the WebLogic server intercept and validate the certificate before
passing it to the OAM Server). Access Manager performs the entire
certificate path validation.
OCSP Enabled Enables (or disables when not checked) the Online Certificate Status
Protocol. Values are either
true
or
false
. For example:
OCSP Enabled: true
Note: OCSP Server Alias, OCSP Responder URL and OCSP Responder
Timeout are required only when OCSP Enabled is selected.
OCSP Server Alias An aliased name for the OSCSP Responder pointing to CA certificates in
.oamkeystore file--a mapping between the aliased name and the actual
instance name or the IP address of the OSCSP Responder instance.
OCSP Responder URL Provides the URL of the Online Certificate Status Protocol responder. For
example, OpenSSL Responder URL:
http://localhost:6060
OCSP Responder Timeout Specifies the grace period for users with expired certificates, which enables
them to access OAM Servers for a limited time before renewing the
certificate.

Orchestrating Multi-Step Authentication with Plug-in Based Modules
19-28 Administrator's Guide for Oracle Access Management
To find, view, or edit an authentication module
1. From the Oracle Access Management Console, click Authentication Modules.
2. Open the desired Authentication Modules page.
3. On the Authentication Modules page, modify information as needed:
■Kerberos Module: See Table 19–7
■LDAP Module: See Table 19–8
■X509 Module: See Table 19–9 and Table 19–15
4. Click Apply to submit the changes and close the Confirmation window (or close
the page without applying changes).
5. Add the updated authentication module to authentication schemes (or change to
another authentication module in each authentication scheme that references this
module), as described in "Managing Authentication Schemes" on page 19-64.
19.6.3 Deleting a Native Authentication Module
Users with valid Administrator credentials can use the following procedure to delete
an authentication module.
The following procedure is the same whether you are deleting a custom authentication
module or a native module.
Prerequisites
In each authentication scheme that references the module to be deleted, specify
another authentication module.
To delete an authentication module
1. From the Oracle Access Management Console, click Authentication Modules.
2. Optional: Open the module to verify this is the module to remove, then close the
page.
3. Click the desired module name, then click the Delete button.
4. Confirm removal (or dismiss the confirmation window to retain the module).
19.7 Orchestrating Multi-Step Authentication with Plug-in Based Modules
Authentication involves determining which credentials a user must supply when
requesting access to a resource, gathering credentials, and returning a response that is
based on the results of credential validation. All authentication processing relies on an
authentication module to define the rules governing requirements and transmission of
information to the backend authentication scheme. All information collected by the
plug-in and saved in the context is available to the plug-in through the authentication
Note: By default, the
LDAP
module is used in the authentication
scheme that protects the Oracle Access Management Console. To
ensure Administrator access, the
LDAP
module must point to the User
Identity Store that is designated as the System Store. If you change the
designated System Store, be sure to change the LDAP Module to
reference the newly designated System Store.

Orchestrating Multi-Step Authentication with Plug-in Based Modules
Managing Authentication and Shared Policy Components 19-29
process. Context data can also be used to set cookies or headers in the user's login
page.
This section provides the following topics:
■Comparing Simple Form and Multi-Factor (Multi-Step) Authentication
■About Plug-ins for Multi-Step Authentication Modules
■About Plug-in Based Modules for Multi-Step Authentication
■Example: Leveraging SubjectAltName Extension Data and Integrating with
Multiple OCSP Endpoints
■Creating and Orchestrating Plug-in Based Multi-Step Authentication Modules
■Creating and Managing Step-Up Authentication
■Configuring an HTTPToken Extractor Plug-in
■Configuring a JSON Web Token Plug-in
19.7.1 Comparing Simple Form and Multi-Factor (Multi-Step) Authentication
Simple form-based authentication relies on the default embedded or optional detached
credential collector and Web forms that process user logins with Access Manager
authentication mechanisms. Simple form-based authentication is the default and does
not require additional configuration unless you want to customize forms. With simple
form-based authentication:
■All credentials are supplied in one simple form.
■Upon credential validation and authentication, either success or failure status is
returned.
■Authentication can be retried upon failure.
For dynamic, multi-step authentication, Access Manager provides a number of
plug-ins with which you can design and orchestrate your own customized
authentication modules. Authentication plug-ins provide processing that meets your
specific needs.
Also, Administrators can install multiple user identity stores for Access Manager. Each
identity store can rely on a different LDAP provider. Each authentication plug-in can
be configured to use a different user identity store.
Both the ECC and DCC handle complex multi-factor (multi-step, iterative, and
variable) Authentication processing, where:
■Not all required credentials are supplied at once.
Note: Oracle strongly recommends using authentication plug-ins to
create custom authentication modules.
See Also: Oracle Fusion Middleware Developer's Guide for Oracle
Access Management if you want to create custom authentication
plug-ins.
See Also: Oracle Fusion Middleware Developer's Guide for Oracle Access
Management for details about customizing login pages and forms

Orchestrating Multi-Step Authentication with Plug-in Based Modules
19-30 Administrator's Guide for Oracle Access Management
■Depending on the authentication status, PENDING state, expected credentials and
context data are returned, expecting those credentials to be supplied in the next
round.
■Each intermediate step, submit required credentials and context data for the
authentication engine, until a success or failure status returned.
■The Authentication plug-in can have multiple steps configured.
Table 19–10 provides more information about these two forms of authentication.
19.7.2 About Plug-ins for Multi-Step Authentication Modules
You can create custom plug-in based authentication modules using existing Access
Manager as described in this chapter. You can also create your own plug-ins, as
described in the Oracle Fusion Middleware Developer's Guide for Oracle Access
Management.
Plug-ins operate with either the default embedded credential collector (ECC) or the
optional detached credential collector (DCC-enabled Webgate). Each authentication
plug-in provides an individual piece of functionality that you can use alone or string
Note: If using multi-factor authentication, the
UserIdentificationPlugin should be invoked in the last pass during the
authentication process.
Table 19–10 Simple Form versus Multi-Step Authentication
Authentication Method Description
Simple form-based
authentication
Simple form-based authentication relies on Credential Collectors (both ECC
and DCC) and Web forms that process user logins using Access Manager
authentication mechanisms. This is the default and does not require
additional configuration unless you want to customize forms.
See Also:
Oracle Fusion Middleware Developer's Guide for Oracle Access Management
for details about customizing login pages and forms
Multi-Step Authentication Multi-step authentication requires a custom authentication module composed
of two or more authentication plug-ins that transmit information to the
backend authentication scheme several times during the login process. All
information collected by the plug-in and saved in the context will be available
to the plug-in through the authentication process. Context data can also be
used to set cookies or headers in the user's login page.
Multi-Step authentication relies on:
■Authentication Chaining: You can chain multiple authentication plug-ins
in a new authentication module, and add the module to an
authentication scheme.
■Challenge Mechanism: Controls the way in which the required
credentials are collected. Currently, this is tied to the authentication
scheme. Both the ECC and DCC use the same challenge mechanisms.
■Credential Collection: Either the ECC or DCC can be used for multi-step
authentication. (DCC provides greater flexibility for interactions with
users or programmatic entities when collecting authentication-related
information that involves several methods to establish the user's
identity).
See Also:
"Adding PasswordPolicyValidationScheme to Authentication Policy for DCC"
on page 19-111
"Creating and Managing Step-Up Authentication" on page 19-48
Oracle Fusion Middleware Developer's Guide for Oracle Access Management
for details about custom authentication plug-ins
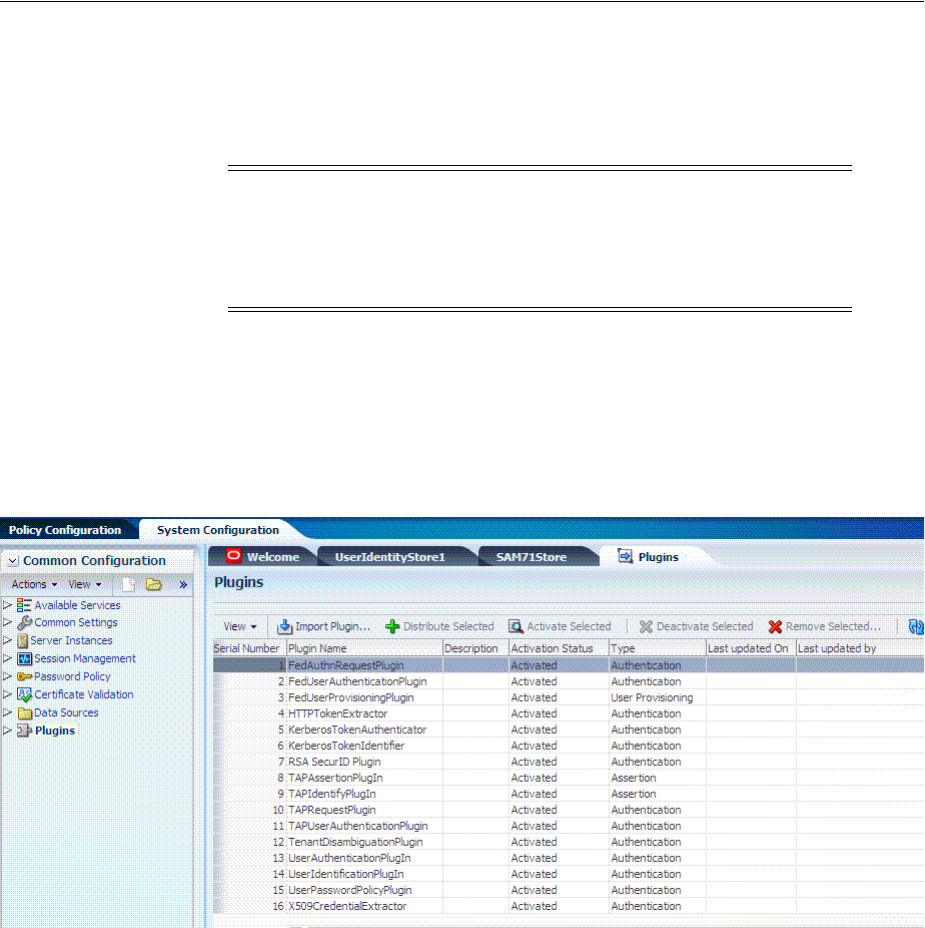
Orchestrating Multi-Step Authentication with Plug-in Based Modules
Managing Authentication and Shared Policy Components 19-31
together into a series of steps. The lifecycle of a plug-in centers around the ability to
add and use the plug-ins to build features and work flows that act as extensions to the
OAM Server. Each plug-in is deployed as a JAR file and each plug-in's configuration
requirements must be given in XML format.
Figure 19–8 shows out of the box plug-ins available from the Common Configuration
section of the System Configuration tab on the Oracle Access Management Console.
These plug-ins, and any that you create using the SDK and import, appear in a list
when you add steps to build a custom authentication module.
Figure 19–8 Access Manager Plug-ins for Customized Authentication Modules
The Name generally defines the component that relies on the plug-in. The Description
is optional. The Type column indicates the purpose of the plug-in. Activation Status
lets you know if this is active and ready to use.
Whether you use an Oracle-provided plug-in or create one of your own, adding a
plug-in when you create a custom authentication module is the same.
Each custom module requires the following types of information:
■General identifies the unique name and optional description for the individual
plug-in.
■Steps identify the specific plug-ins to use, and their execution order, based on the
configuration details of each plug-in (including the user identity store to use).
Note: Standard (native) Authentication Modules are targeted for
deprecation; future enhancements will not be available in the standard
modules. Oracle strongly recommends using plug-in based modules
as described in "Orchestrating Multi-Step Authentication with Plug-in
Based Modules" on page 19-28.
See Also: Oracle Fusion Middleware Developer's Guide for Oracle Access
Management for details about building your own custom plug-ins. You
can import new plug-ins, distribute, activate, deactivate, and remove
custom plug-ins.
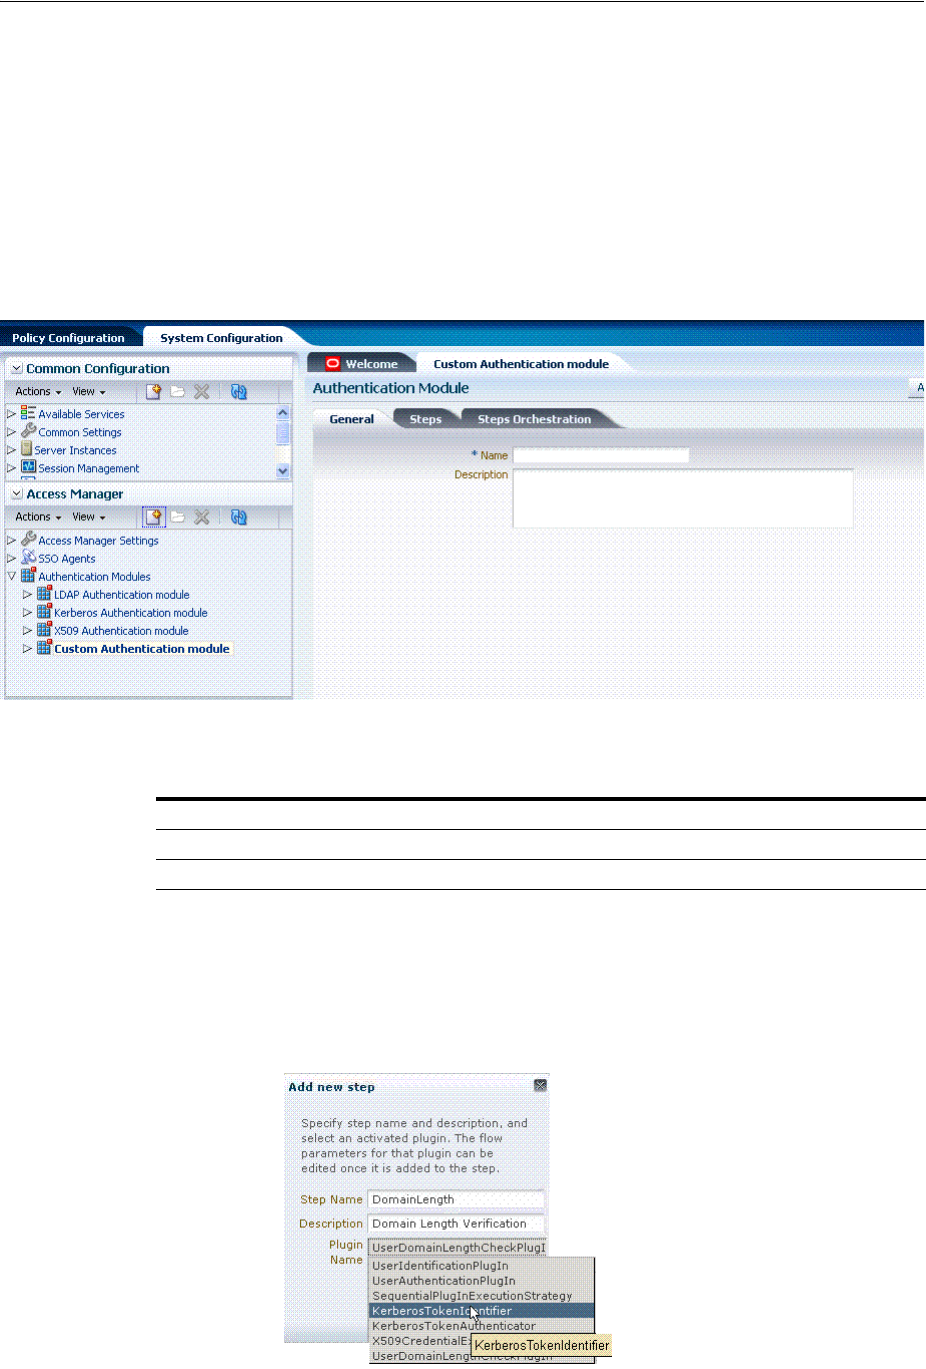
Orchestrating Multi-Step Authentication with Plug-in Based Modules
19-32 Administrator's Guide for Oracle Access Management
■Step Orchestration specifies the action to be taken on success or on failure or on
error.
Additionally, when multi-factor authentication is used, the UserIdentificationPlugin
should be invoked in the last pass during the authentication process.
Figure 19–9 shows a Custom Authentication Module within the Access Manager
section of the System Configuration tree. Each module provides three subtabs where
you enter information for the module.
Figure 19–9 Creating Custom Authentication Modules: General
Table 19–11 describes the content of the General tab.
Clicking the Steps tab opens a fresh page where you can add a new step. When you
add a new Step, the following dialog box appears. Information that you enter is used
to populate the table and Details sections of the page.
Figure 19–10 Adding a Step and Associating a Plug-in
Table 19–11 General tab
Element Description
Name A unique name up to 60 characters.
Description Optional; up to 250 characters.

Orchestrating Multi-Step Authentication with Plug-in Based Modules
Managing Authentication and Shared Policy Components 19-33
Table 19–12 describes the information required when adding a new step. Each step
requires a plug-in and each plug-in requires specific details for proper operation.
Table 19–13 describes the Plug-in Parameter Details required by Oracle-provided
plug-ins. Absent from this table are the plug-in exceptions (those plug-ins with no
initial parameters):
KerberosTokenIdentifier
,
FedAuthnRequestPlugin
, and
FedUserAuthenticationPlugin
.
Table 19–12 Add New Step Entries, Steps Results Table, and Details Section
Element Description
Step Name The unique name you enter to identify this step, up to 60 characters.
Description The optional description for this step, as entered when adding the step (up to 250
characters).
Plugin Name The plug-in that you select for a particular step from the list of imported and activated
plug-ins.
See Also: Oracle Fusion Middleware Developer's Guide for Oracle Access Management
for details about creating custom plug-ins.
Step Details Plug-in configuration details must be specified to ensure proper operation. Details might
differ depending the chosen plug-in and its requirements.
See Also: Table 19–13.

Orchestrating Multi-Step Authentication with Plug-in Based Modules
19-34 Administrator's Guide for Oracle Access Management
Table 19–13 Parameter Details for Various Plug-ins
Plug-in Parameter Display Name Description
KEY_IDENTITY_STORE_REF Identity Store Name Most plug-ins require this attribute to ensure that the
appropriate user identity store is called during
authentication.
The following plug-in uses only this property:
■TAPAssertionPlugIn
For additional Details required by plug-ins that employ
this property, see:
■UserIdentificationPlugIn
■UserAuthenticationPlugIn
■UserPasswordPolicyPlugin
■TAPUserAuthenticationPlugin
■TenantDisambiguationPlugin
CredentialCollectorPlugIn CredentialCollectorPlugIn This plugin allows the administrator to configure which
credentials will be collected for authentication.
Credentials to be collected are configured as step
parameters. The plugin validates these parameters and
renders the UI to collect the credentials. After user
input, the plugin parses the credential parameters and
builds the user context with credential objects.
NOTE: Plugin error responses are set to the context if
the credentials are invalid and the plugin returns failure.
The plugin supports the collection of 4 credentials as
step level parameters.
1. CRED_PARAM_1
2. CRED_PARAM_2
3. CRED_PARAM_3
4. CRED_PARAM_4
The following example illustrates how to collect a
username and password.
CRED_PARAM_1=
{ID=KEY_USERNAME},{DISPLAY_NAME=KEY_
USERNAME},{TYPE=text}
{ID=KEY_PASSWORD},{DISPLAY_NAME=KEY_
PASSWORD},{TYPE=password}
Where ID, DISPLAY_NAME and TYPE are constants.
Actiontype Action Type Indicates if the plugin wants to REDIRECT or
FORWARD to the login page to collect credentials.
loginPageURL Login Page URL The URL to which the user will be forwarded or
redirected for credential collection.
NO_OF_CREDENTIALS The number of credentials provided for the plugin
instance. If the number of instances is more than 4, the
user must update the oam-config file to add additional
CRED_PARAMS as plugin parameters.
UserIdentificationPlugIn UserIdentificationPlugIn This native plug-in maps the user to a specific LDAP
user record.
KEY_LDAP_FILTER LDAP Filter The search filter required to identify the user. Only
standard LDAP attributes can be used when defining an
LDAP search filter.
KEY_SEARCHBASE_URL LDAP Searchbase The search base required for the query. The node in the
directory information tree (DIT)) under which user data
is stored; the highest possible base for all user data
searches.
UserAuthenticationPlugIn UserAuthenticationPlugIn This native plug-in authenticates the supplied
username/password credentials against an LDAP
directory.

Orchestrating Multi-Step Authentication with Plug-in Based Modules
Managing Authentication and Shared Policy Components 19-35
KEY_PROP_AUTHN_
EXCEPTION
Propagate LDAP errors Enables (or disables) propagation of LDAP errors.
UserAuthenticationPlugIn employs this attribute.
UserAuthnLevelCheckPlugin UserAuthnLevelCheckPlugin This native plugin shall determine if the user has been
authenticated to the authentication level X - where the
value of X is provided by the plugin parameter
AUTHN_LEVEL_FOR_PLUGIN. For example, it checks
the current Authentication Level of the user with the
value specified. In addition, the plug-in specifies a list of
parameters to collect depending on whether the
Authentication Level check succeeded or failed.
AUTHN_LEVEL_FOR_PLUGIN AUTHN_LEVEL_FOR_PLUGIN Specify the authentication level as an integer.
Multiple steps can use UserAuthnLevelCheckPlugin.
However, each Step must have a unique name and
AUTHN_LEVEL_FOR_PLUGIN.
See Also: "Creating and Managing Step-Up
Authentication" on page 19-48
UserPasswordPolicyPlugin UserPasswordPolicyPlugin
PLUGIN_EXECUTION_MODE Mode of Operation The execution mode of plug-in
(UserPasswordPolicyPlugin). Depending upon the
configuration, this plug-in can operate either alone or
with other default plug-ins. Values are one of the
following:
■PSWDONLY: Default. The most preferred
configuration where only the password status is
determined. The ID and authentication must be
performed using the UserIdentification and
UserAuthentication Plugins.
■AUTHWITHPSWD: Both authentication and
password are performed using this plug-in.
■AUTHONLY: Only the user identification and
authentication is performed using this plug-in
POLICY_SCHEMA Policy Schema To Use Specifies the schema for the password service (used
with UserPasswordPolicyPlugin). Only OAM10G is
supported.
Default: OAM10G
NEW_USERPSWD_BEHAVIOR Force Password Change on First
Login
Configures retroactive behavior of the new-user
password-policy. Used with
UserPasswordPolicyPlugin.Values are either:
■FORCECHANGEPASSWORD: Forces a password
change.
■NOFORCEPASSWORDCHANGE: The password
policy change does not affect user passwords that
are already set.
Default: FORCECHANGEPASSWORD
DISABLED_STATUS_SUPPORT Disabled Account Status Support Specifies whether the disabled status is to be supported
and acted upon in this password service. Valid values
are either True or False.
Default: TRUE
URL_ACTION Password Management Action
URL
Specifies the URL to which the user is sent for password
management. The type of servlet action needed for
redirecting the user to the specific password page for
expiry and warning pages. Values can be either:
■REDIRECT_POST
■REDIRECT_GET
■FORWARD
Default: REDIRECT_POST
FedUserProvisioningPlugin
Table 19–13 (Cont.) Parameter Details for Various Plug-ins
Plug-in Parameter Display Name Description

Orchestrating Multi-Step Authentication with Plug-in Based Modules
19-36 Administrator's Guide for Oracle Access Management
KEY_USER_RECORD_
ATTRIBUTE_LIST
List of User Attributes For Federation. Comma-separated list of assertion
attributes required to create the user record.
KEY_PROVIDERID_ATTRIBUTE_
NAME
Partner Attribute Name For Federation. The attribute name of the LDAP user
record whose value will be set to the Partner's Identity
Provider ID when provisioning the user. This field is
optional and if empty, the Partner's Identity Provider ID
will not be set in the LDAP user record.
KEY_USERID_ATTRIBUTE_
NAME
User UserID Attribute For Federation. Name of the attribute in the assertion
attributes that is used as the LDAP UserID.
TAPIdentifyPlugIn
KEY_TAP_RETURN_ATTRIBUTE Username Mapping Attribute Name of the attribute used for account linking by
TAPIdentifyPlugIn.
SequentialPlugInExecutionStrate
gy
StrategyName Orchestration Strategy Name of the plugin orchestration strategy required by
SequentialPlugInExecutionStrategy.
KerberosTokenAuthenticator
KEY_KEYTAB_FILE Location of Keytab file Name of the file containing Kerberos principals and
encrypted keys required by
KerberosTokenAuthenticator
KEY_PRINCIPAL OAM Service Principal Your OAM Account SPN, required by
KerberosTokenAuthenticator.
KEY_KRB_CONFIG_FILE Location of Kerberos
Configuration file
Location of the Kerberos configuration properties file,
required by KerberosTokenAuthenticator.
KEY_DOMAIN_DNS2DN_MAP AD Domain DNS Names to DN
Mapping
Comma-separated list of Active Directory DNS
Domains to DN mappings required by
KerberosTokenAuthenticator.
X509CredentialExtractor
KEY_CERTIFICATE_ATTRIBUTE_
TO_EXTRACT
User Mapping Attribute X509 certificate Attribute to be used for user mapping
required by X509CredentialExtractor.
KEY_IS_CERT_VALIDATION_
ENABLED
Certificate Validation Enable or disable X.509 certificate validation, required
by X509CredentialExtractor.
TAPRequestPlugin
TAPS2PVersion Integration Protocol Version Token version for Integration.
TAPPartnerId Integration PartnerId Integration Partner Identifier.
TAPChallengeURL Partner Integration Endpoint
URL
Remote Partner End Point URL.
TAPUserAuthenticationPlugin
KEY_USERNAME_ATTRIBUTE Username Mapping Attribute Name of the attribute used for account linking required
by TAPUserAuthenticationPlugin
KEY_CHECK_TOKEN_EXPIRY Enable Token Expiration
Checking
Enable or disable Integration token expiration.
TenantDisambiguationPlugin
KEY_FEDERATED_TENANTS FederatedTenantNames Optional names of tenants (comma separated) for whom
federated authentication is enabled. Plugin will check
with Federation engine if tenant names are not
mentioned.
RSA SecurID Plugin
username Username Parameter Name of the username plugin parameter required by
RSA SecurID Plugin.
passcode Passcode Parameter Name of the passcode plugin parameter required by
RSA SecurID Plugin.
Table 19–13 (Cont.) Parameter Details for Various Plug-ins
Plug-in Parameter Display Name Description
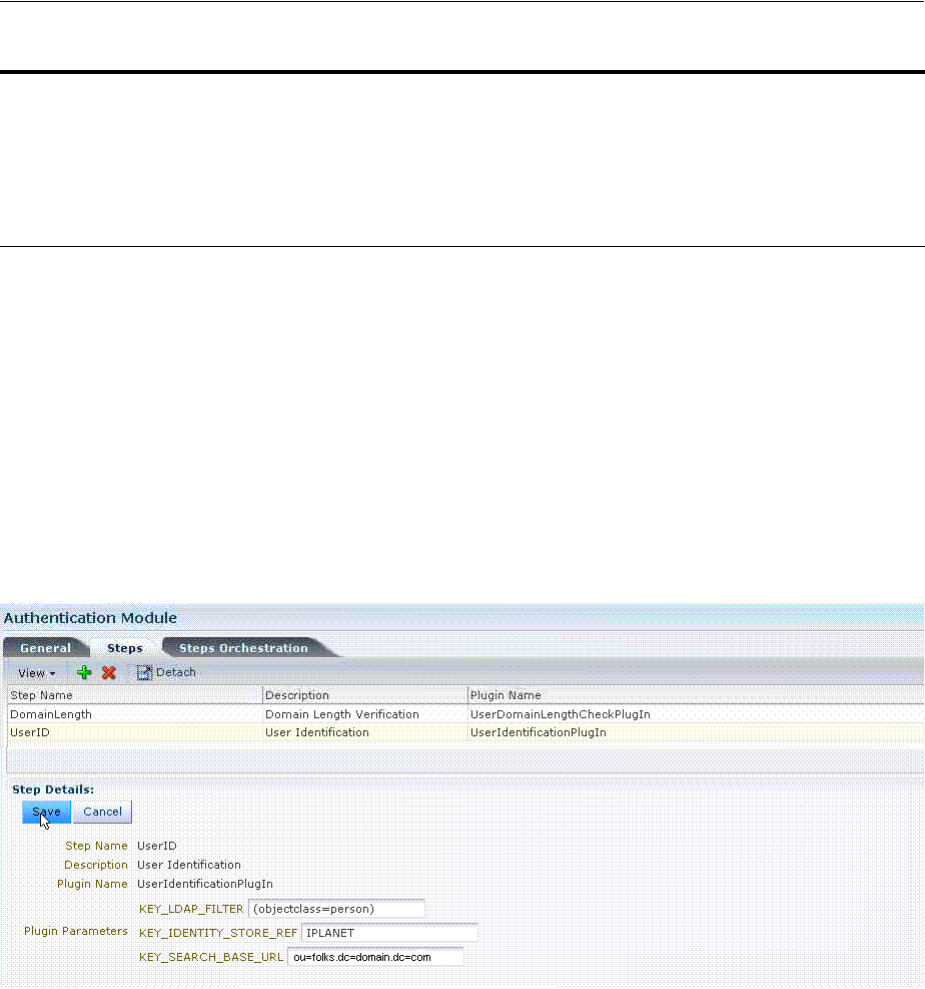
Orchestrating Multi-Step Authentication with Plug-in Based Modules
Managing Authentication and Shared Policy Components 19-37
Figure 19–11 illustrates the Steps subtab and Details section for a custom
authentication module. When adding Steps, there is no data to display in the table.
However, when you add one or more Steps the table the Details sections are
populated.
Figure 19–11 Plug-in Based Authentication Module Steps and Details
Figure 19–12 illustrates the Steps Orchestration subtab of a custom authentication
module, which is populated by information for each defined step (and the action you
choose for each operational condition).
nexttoken Next Token Parameter Name of the next token plugin parameter required by
RSA SecurID Plugin.
newpin New PIN Parameter Name of the new pin plugin parameter required by RSA
SecurID Plugin.
confirmnewpin Confirm New PIN Parameter Name of the confirm new pin plugin parameter
required by RSA SecurID Plugin.
HTTPTokenExtractor
KEY_HEADER_PROPERTY HTTP Header Names Comma separated list of HTTP Headers. See
Section 19.7.7, "Configuring an HTTPToken Extractor
Plug-in."
KEY_COOKIE_PROPERTY HTTP Cookie Names Comma separated list of Cookies. See Section 19.7.7,
"Configuring an HTTPToken Extractor Plug-in."
Table 19–13 (Cont.) Parameter Details for Various Plug-ins
Plug-in Parameter Display Name Description
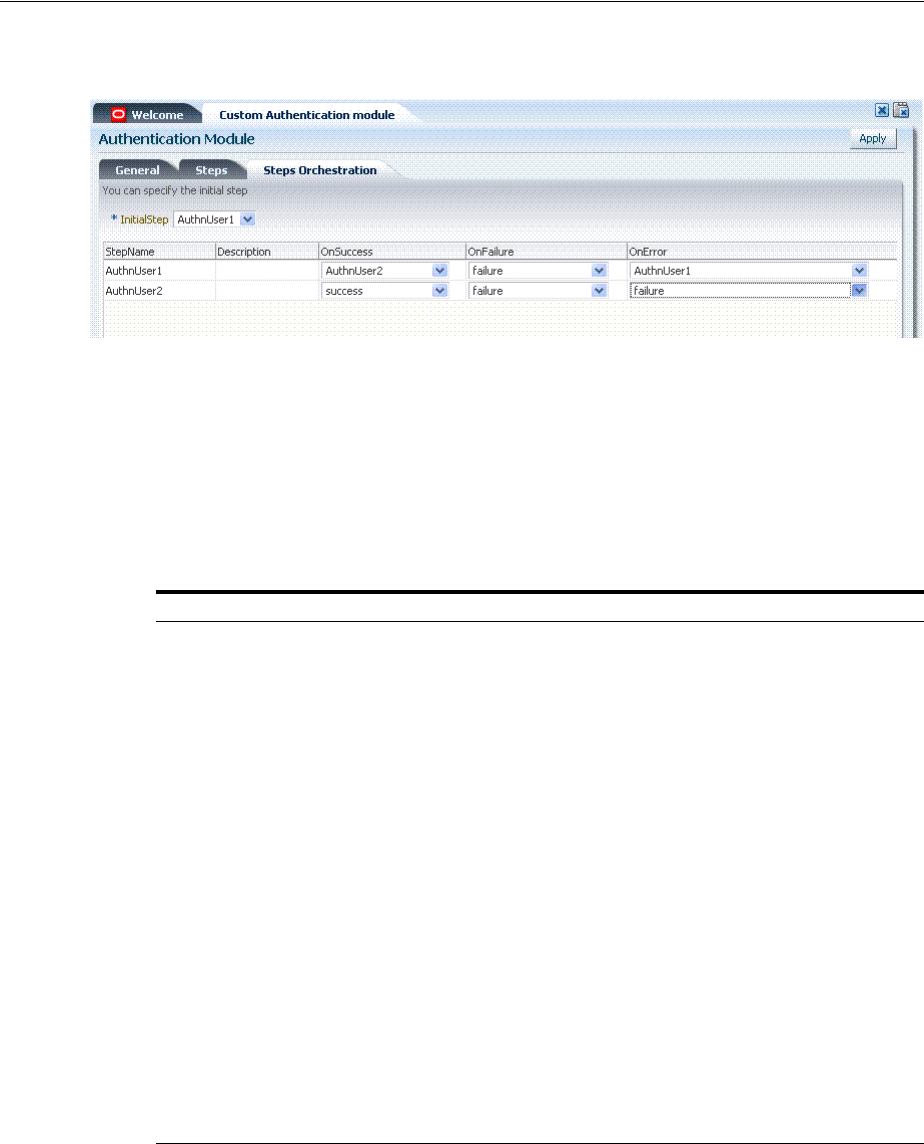
Orchestrating Multi-Step Authentication with Plug-in Based Modules
19-38 Administrator's Guide for Oracle Access Management
Figure 19–12 Steps Orchestration for Plug-in Based Authentication Modules
Table 19–14 describes the elements on the Steps Orchestration subtab. The lists
available for
OnSuccess
,
OnFailure
, and
OnError
include the following choices:
■success
■failure
■StepName (any step in the module can be selected as the action for an operational
condition)
19.7.3 About Plug-in Based Modules for Multi-Step Authentication
Figure 19–13 lists the currently available native plug-in based Authentication modules.
Table 19–14 Steps Orchestration Subtab
Element Description
Initial Step Choose the starting step from those listed. The list includes only those
steps defined for this module.
Name Each step added to this module is listed by the name that was entered
when the step was added.
Description The optional description for this step, entered when this step was
added.
OnSuccess The action selected for successful operation. A list provides actions
you can choose:
■Success
■Failure
■StepName (activates the next step)
OnFailure The action selected for failure of this step. A list provides actions you
can choose:
■Success
■Failure
■StepName (activates the next step)
OnError The action selected for an error when executing this step. A list
provides actions you can choose:
■Success
■Failure
■StepName (activates the next step)
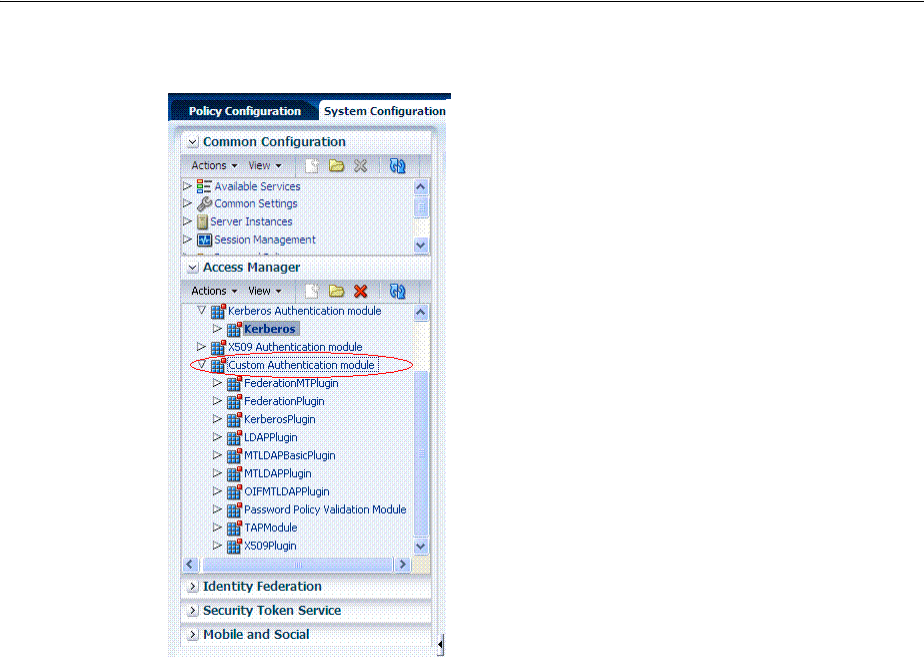
Orchestrating Multi-Step Authentication with Plug-in Based Modules
Managing Authentication and Shared Policy Components 19-39
Figure 19–13 Oracle-provided Plug-in Based Authentication Modules
Following topics describe several of the native Custom modules provided with
pre-populated plug-ins. You can use these to orchestrate your own custom
authentication modules:
■KerberosPlugin
■LDAPPlugin
■X509Plugin
■Password Policy Validation Module and Plug-ins
KerberosPlugin
Use this plug-in when configuring Access Manager for Windows Native
Authentication, as described in Chapter 50.
Figure 19–14 shows the KerberosPlugin module that is bundled with Access Manager
11g. This is a credential mapping module that matches the credentials (username and
password) of the user who requests a resource to the encrypted "kerberos ticket".
See Also:
■Table 19–13, " Parameter Details for Various Plug-ins"
■Example: How to leverage the SubjectAltName extension data
and integrate with multiple OCSP Endpoints on page 19-45
■"Creating and Managing Step-Up Authentication" on page 19-48
Orchestrating Multi-Step Authentication with Plug-in Based Modules
19-40 Administrator's Guide for Oracle Access Management
Figure 19–14 KerberosPlugin
Figure 19–15 shows the default steps and details. Figure 19–16 shows the orchestration
of the steps and conditions.
Figure 19–15 Default KerberosPlugin Steps and Details
Figure 19–16 Default KerberosPlugin Steps and Orchestration
Orchestrating Multi-Step Authentication with Plug-in Based Modules
Managing Authentication and Shared Policy Components 19-41
LDAPPlugin
Figure 19–17 shows the LDAPPlugin module that is bundled with Access Manager. By
default, LDAPPlugin has 2 steps, shown in Figure 19–18. Figure 19–19 shows the
default orchestration of steps for LDAPplugin.
Figure 19–17 LDAPPlugin
Figure 19–18 Default LDAPPlugin Steps and Details
Figure 19–19 Default Orchestration of Steps for LDAPplugin
Orchestrating Multi-Step Authentication with Plug-in Based Modules
19-42 Administrator's Guide for Oracle Access Management
X509Plugin
Figure 19–20 shows the X509Plugin module that is bundled with Access Manager 11g.
The X509Plugin is similar to the LDAPPlugin with additional properties that indicate
which attribute of the client's X.509 certificate should be validated against the user
attribute in LDAP. Figure 19–21 shows default steps and details for this plug-in.
Figure 19–22 shows the default orchestration of steps for the X509Plugin.
Figure 19–20 X509Plugin
Figure 19–21 X509Plugin Default Steps and Details
With this plug-in, the root and sub CA certificates must be added to the $DOMAIN_
HOME/config/fmwconfig/amtruststore because the X509CredentialExtractor plug-in
loads certificates from this location.
Table 19–15 lists the stepX509 values for Subject and Subject Alternative Names. Such
processing is only supported when the X509Plugin is used.
See Also:
■Table 19–13, " Parameter Details for Various Plug-ins"
■Example: How to leverage the SubjectAltName extension data
and integrate with multiple OCSP Endpoints on page 19-45
Orchestrating Multi-Step Authentication with Plug-in Based Modules
Managing Authentication and Shared Policy Components 19-43
Figure 19–22 Default Orchestration for X509Plugin Steps
Password Policy Validation Module and Plug-ins
Oracle provides a Password Policy Validation Module that employs the following
plug-ins as individual steps in the authentication process:
■User Identification Step
■User Authentication Step
■User Password Status Step
Figure 19–23 shows the Steps tab. Additional details follow the figure.
Table 19–15 X509 Step Details (KEY_CERTIFICATE_ATTRIBUTE_TO_EXTRACT)
issuer.D Subject
subject. EDIPI
Note: EDIPI refers to the Electronic Data Interchange Personal
Identifier.
subjectAltName. OTHER_NAME (FASC-N)
Note: FASC-N refers to the Federal Agency Smart Credential Number.
subjectAltName. RFC822_NAME
subjectAltName. UNIFORM_RESOURCE_IDENTIFIER
See Also: "Example: Leveraging SubjectAltName Extension Data
and Integrating with Multiple OCSP Endpoints"
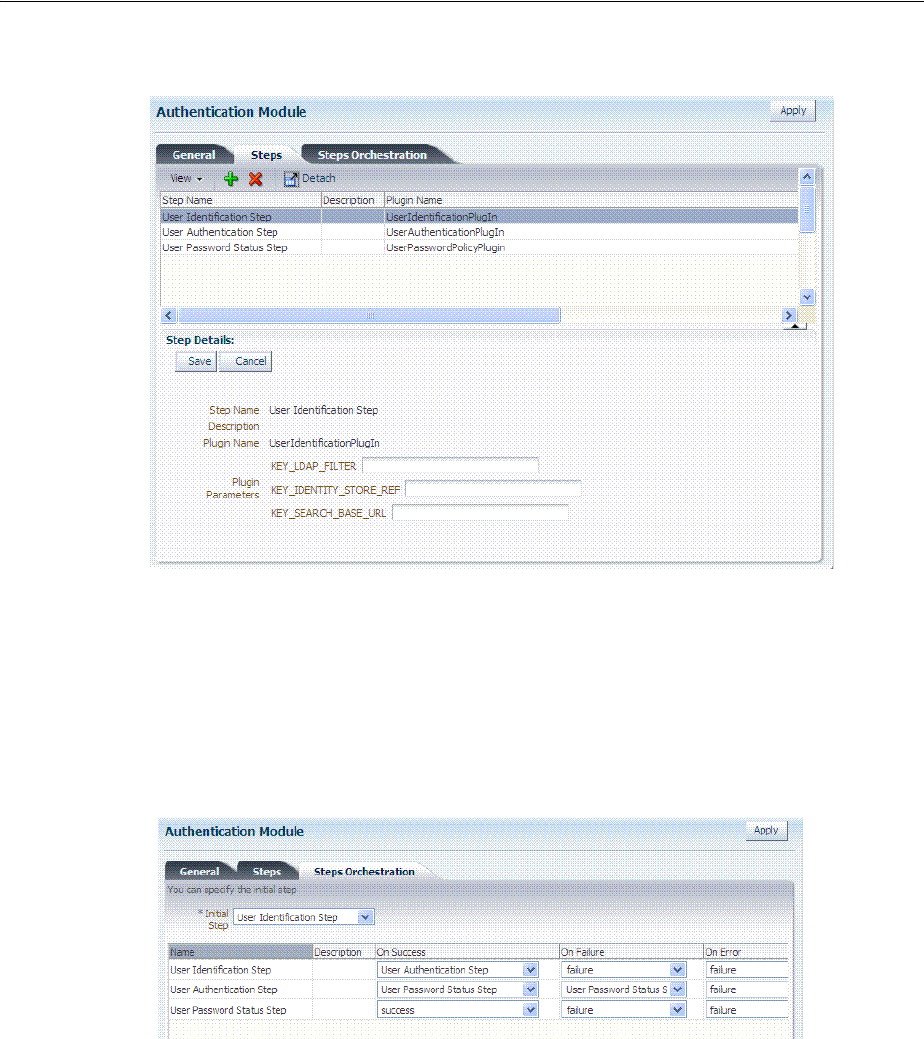
Orchestrating Multi-Step Authentication with Plug-in Based Modules
19-44 Administrator's Guide for Oracle Access Management
Figure 19–23 Password Policy Validation Module Plug-ins
Figure 19–24 shows the Steps Orchestration page for the Password Policy Validation
Module plug-ins, which is self explanatory.
Figure 19–24 Steps Orchestration: Password Policy Validation Plug-ins
19.7.4 Example: Leveraging SubjectAltName Extension Data and Integrating with
Multiple OCSP Endpoints
Access Manager 11g support for personal identity verification (PIV) cards (a United
States Federal smart card), is to use FASC-N and EDIPI attributes from the
SubjectaltName extension to map the user during X.509 authentication. While multiple
OCSP providers are not supported, you can use an OCSP Gateway or write a custom
authentication plug-in that uses the OSDT OCSP APIs to validate against multiple
OCSP providers.
See Also:
■Table 19–13, " Parameter Details for Various Plug-ins"
■"Understanding Password Policy" on page 19-89

Orchestrating Multi-Step Authentication with Plug-in Based Modules
Managing Authentication and Shared Policy Components 19-45
The following functionality is available only with the X.509 Plug-in (not the X.509
Authentication module). The Plug-in configuration specifies the LDAP attribute to
which the extracted attribute from the X.509 client certificate will be mapped.
Example: How to leverage the SubjectAltName extension data and integrate with
multiple OCSP Endpoints
1. From the Oracle Access Management Console, click Authentication Modules,
Custom Authentication Modules and X509plugin.
General Tab:
a. Name: CustomX509Plugin.
b. Description: Custom Plug-in for X509.
Steps Tab:
a. Click + to add a step to the plug-in.
b. Enter a Name and Description, then select the X509CredentialExtractor plug-in.
Step Details:
a. KEY_IS_CERT_VALIDATION_ENABLED
true
.
b. KEY_CERTIFICATE_ATTRIBUTE_TO_EXTRACT (Table 19–15):
subject.EDIPI, subjectAltName.OTHER_NAME (FASC-N),
subjectAltName.RFC822_NAME, subjectAltName.UNIFORM_RESOURCE_
IDENTIFIER
c. Click the Save button.
Add Another Plug-in:
a. Click + to add a different plug-in.
b. Enter the Name, Description, and select UserIdentificationPlugin
Step Details for Second Plug-in:
a. Set KEY_IDENTITY_STORE_REF to the required identity store.
b. Add the LDAP filter to the KEY_LDAP_FILTER attribute. For example:
(&(uid=
Unknown macro: {subject.CN}
)(mail=
Unknown macro: {subject.E}
))
c. Add the user search base, if required, to the KEY_SEARCH_BASE_URL
attribute.
d. Click the Save button.
e. Proceed to Step Orchestration tab (Step2).
2. Orchestrate Steps:
a. Initial Step: Select the X509CredentialPlugin Step from the drop down.
b. On Success: X509CredentialPlugin step, select the UserIdentificationPlugin Step
from the drop down list.
See Also: "Creating and Orchestrating Plug-in Based Multi-Step
Authentication Modules" on page 19-46

Orchestrating Multi-Step Authentication with Plug-in Based Modules
19-46 Administrator's Guide for Oracle Access Management
c. On Success: UserIdentificationPlugin step, select
Success
from the drop down
list.
d. On Failure: Select
Failure
for both X509CredentialPlugin and
UserIdentificationPlugin steps.
e. On Error: Select
Failure
for both X509CredentialPlugin and
UserIdentificationPlugin steps.
f. Click the Apply button and review the confirmation window stating that the
plug-in has been created successfully.
3. Set up the Certificate Validation Module for Certificate Validation and Revocation
using OCSP.
a. From the Oracle Access Management Console, click Certificate Validation.
b. In the Certificate Revocation list section, confirm that Enabled is checked, then
click Save.
c. In the OCSP/CDP section, enable OCSP, enter the OCSP URL and the Subject
of the OCSP Server's certificate, then click Save.
d. On the command line, use the Java keytool application to import the trusted
certificates into the $DOMAIN_HOME/config/fmwconfig/amtruststore
keystore, as trusted certificate entries.
19.7.5 Creating and Orchestrating Plug-in Based Multi-Step Authentication Modules
Users with valid Administrator credentials can use the following procedure to create
custom authentication plug-in module that uses one or more authentication plug-ins.
This procedure outlines general steps for any authentication module (with sample
information to configure an authentication X509 module for use with the Online
Certificate Status Protocol (OCSP) to maintain the security of a server and other
network resources).
Prerequisites
Ensure that any user identity store associated with the module is running and includes
the required user population.
To create a custom authentication module using bundled plug-ins
1. From the Oracle Access Management Console, click Authentication Modules.
2. Create New:
a. Click the Custom Authentication Module node.
See Also: "Managing Certificate Validation and Revocation" on
page 3-7
Note: Initially the keystore is empty; its password is set the first time
the Java keytool application is used.
See Also:
■"Example: How to leverage the SubjectAltName extension data
and integrate with multiple OCSP Endpoints" on page 19-45
■"Creating and Managing Step-Up Authentication" on page 19-48

Orchestrating Multi-Step Authentication with Plug-in Based Modules
Managing Authentication and Shared Policy Components 19-47
b. Click the Create (+) button.
c. Add General Information: Name and optional Description. For example:
CustomX509Plugin and Plugin for X509, respectively.
Click Apply to save general information.
3. Add Steps:
a. Click the Steps subtab.
b. Click the Add (+) button above the Steps table.
c. In the Add New Step dialog box, enter a unique Step Name and optional
Description.
d. Browse for and select the desired plug-in name (X509CredentialExtractor, for
instance) and click OK.
e. Confirm information in the results table.
f. Repeat b through e to add other steps until you have listed all required
plug-ins for your module.
4. Define Step Details: Use appropriate values for requested parameters
(Table 19–12, Table 19–13, Table 19–17, " Managing Custom Plug-ins Actions" and
"Example: How to leverage the SubjectAltName extension data and integrate with
multiple OCSP Endpoints"):
a. Click a StepName in the table to reveal required details, enter appropriate
values for the requested details.
b. Validate User Cert using OCSP:
Confirm that KEY_IS_CERT_VALIDATION_ENABLED is set to
true
.
Add the certificate attributes to be extracted with KEY_CERTIFICATE_
ATTRIBUTE_TO_EXTRACT (Table 19–15):
subject.EDIPI
subjectAltName.OTHER_NAME (FASC-N)
subjectAltName.RFC822_NAME
subjectAltName.UNIFORM_RESOURCE_IDENTIFIER
c. Click the Save button.
d. Repeat to configure each step appropriately.
e. Ensure that users are provisioned in any user identity stores assigned in the
steps.
5. Orchestrate Steps: See Table 19–14 as you perform following steps.
a. Click the Steps Orchestration subtab.
b. From the InitialStep list, choose the name of the first step to be used.
c. Select a StepName in the table.
d. From the OnSuccess List, choose a condition (success or failure) or a step
name.
e. From the OnFailure List, choose the desired condition or a StepName.
f. From the OnError List, choose the desired condition or a StepName.
g. Repeat Steps c through f to orchestrate operations for each plug-in this
module.
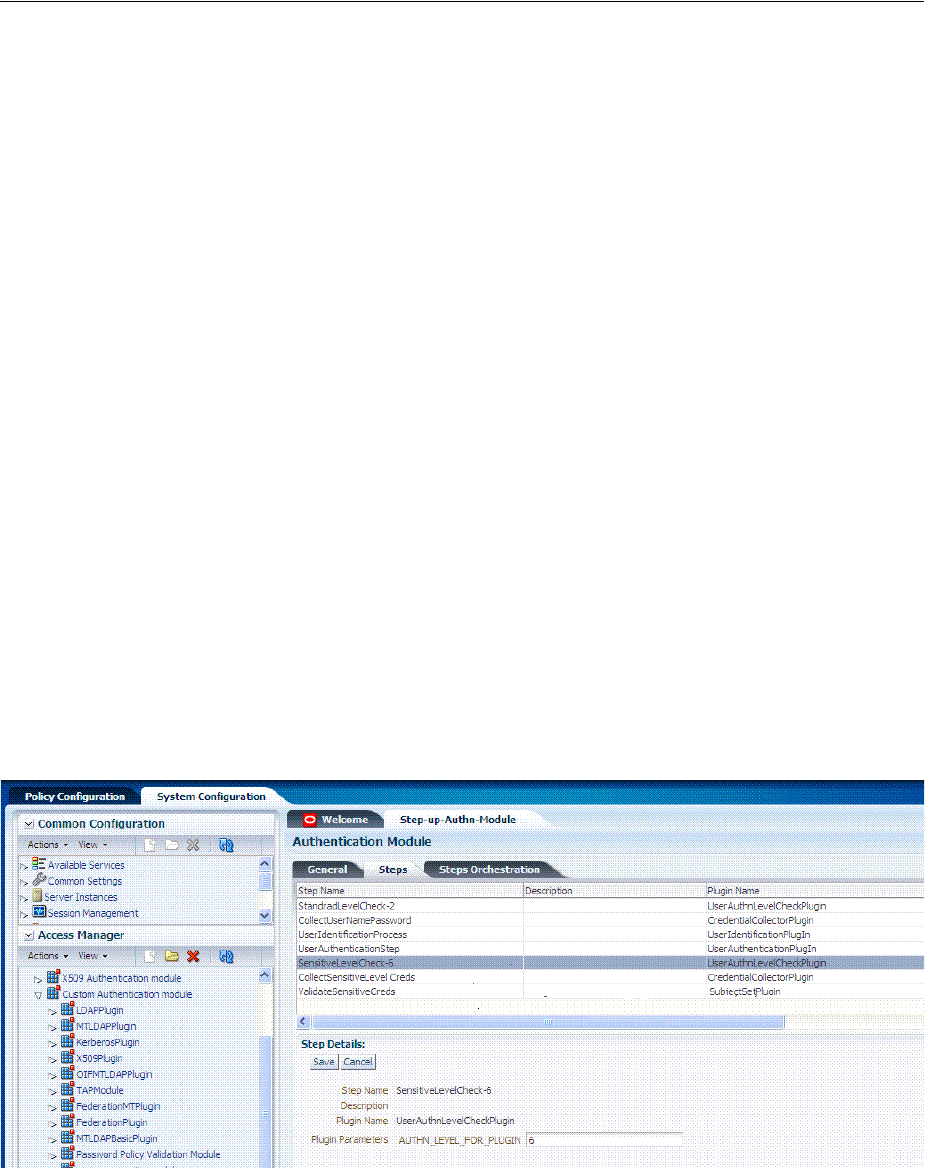
Orchestrating Multi-Step Authentication with Plug-in Based Modules
19-48 Administrator's Guide for Oracle Access Management
h. Review your orchestration.
6. Initiate Strategy Validation: Click Apply to initiate validation of your
orchestration strategy:
■Successful Strategy: The orchestration strategy is applied and the module is
ready to include in an authentication scheme. Continue with Steps 9 and 10.
■Invalid Strategy: Click OK in the Error box, then edit your OnSuccess,
OnFailure, OnError strategies (or add or remove plug-ins) to correct the
problem. Repeat this step until your strategy is successful.
7. In the navigation tree, confirm the new Custom Authentication Module is listed,
and then close the page when you finish.
8. Use your custom module in an authentication scheme, as described in "Managing
Authentication Schemes" on page 19-64.
19.7.6 Creating and Managing Step-Up Authentication
This section describes how to define step-up authentication using plug-ins within a
customized module. In this example, there are users who need standard level access to
pages on the corporate portal and those who need access to sensitive information. For
standard applications, authentication credentials include username and password. For
sensitive applications, credentials include username, password, and a security code
(the later obtained with a custom plugin that validates the code).
Figure 19–25 shows the steps within Step-up-Authn_Module. The processing that
occurs with this customized step-up authentication module is driven by the steps and
plug-ins described in Table 19–16. For more information, see Table 19–13.
Figure 19–25 StandardLevelCheck-2 and SensitiveLevelCheck-6 Modules

Orchestrating Multi-Step Authentication with Plug-in Based Modules
Managing Authentication and Shared Policy Components 19-49
Table 19–16 Steps and Plug-ins in a Customized Step-up Authentication Module
Step
# Step Name Plug-in Name Description
1 StandardLevelCheck-2 UserAuthnLevelCheckPlu
gin
Configurable with the LevelCheck Rule and credentials
parameters associated with the SUCCESS or FAILURE
outcome resulting from the check.
This plugin communicates with the authentication engine to
determine the current authentication level of the user and
compares it with the plugin level parameter AUTHN_LEVEL_
FOR_PLUGIN. It interacts with a custom credential collector
and checks the current Authentication Level of the user against
the value specified. For example, if 2 is specified for X:
■Authentication Level >= X returns
ExecutionStatus.SUCCESS and proceeds to the next step;
for example it will check for higer level authentication.
■Authentication Level < X returns
ExecutionStatus.FAILURE and proceeds to the next step
in the plugin; for example it will collect the standard
credentials for level 2 (username and password).
Specifies parameters to collect depending on whether the
Authentication Level check succeeded or failed:
■ON SUCCESS, go to SensitiveLevelCheck-6
■ON FAILURE, go to CollectUserNamePassword
■ON ERROR, Failure
2 CollectUserNamePassword CredentialCollectorPlugin
Flow must start with the
Plug-in communicating
the credential parameters
to collect. The Action must
support allowing the
Server to mark parameters
as immutable.
This plugin interacts with the credential collector
(CustomReadServlet) to allow the administrator to configure
the credentials collected for authentication. Credentials to be
collected are configured as step parameters. The plugin
validates these parameters and renders the UI to collect them.
The user provides the credentials that need to be collected in
the step parameter. In this example, since in previous step user
was not authenticated to level 2, he will be prompted to enter a
user name and password.
■loginPageURL: /CustomRead/Servlet (generic credential
collector for UserAuthnLevelCheckPlugin to render the
interface to acquire plug-in specified credentials.
■No_OF_CREDENTIALS: 4
■CRED_PARAM_4
■CRED_PARAM_3
■CRED_PARAM_2: {ID=KEY_PASSWORD},{DISPLAY_
NAME=KEY_PASSWORD},{TYPE=password}
■CRED_PARAM_1: {ID=KEY_USERNAME},{DISPLAY_
NAME=KEY_USERNAME },{TYPE=text}
■actiontype: FORWARD
Credentials to be collected should be specified in this format
only for the credential collector to render the UI interface.
Also specifies action on:
■ON SUCCESS, go to UserIdentificationProcess
■ON FAILURE, Failure
■ON ERROR, Failure
3 UserIdentificationProcess UserIdentificationPlugIn Out of the box plug-in that maps the user to a specific LDAP
user record:
■ON SUCCESS, go to UserAuthenticationStep
■ON FAILURE, Failure
■ON ERROR, Failure
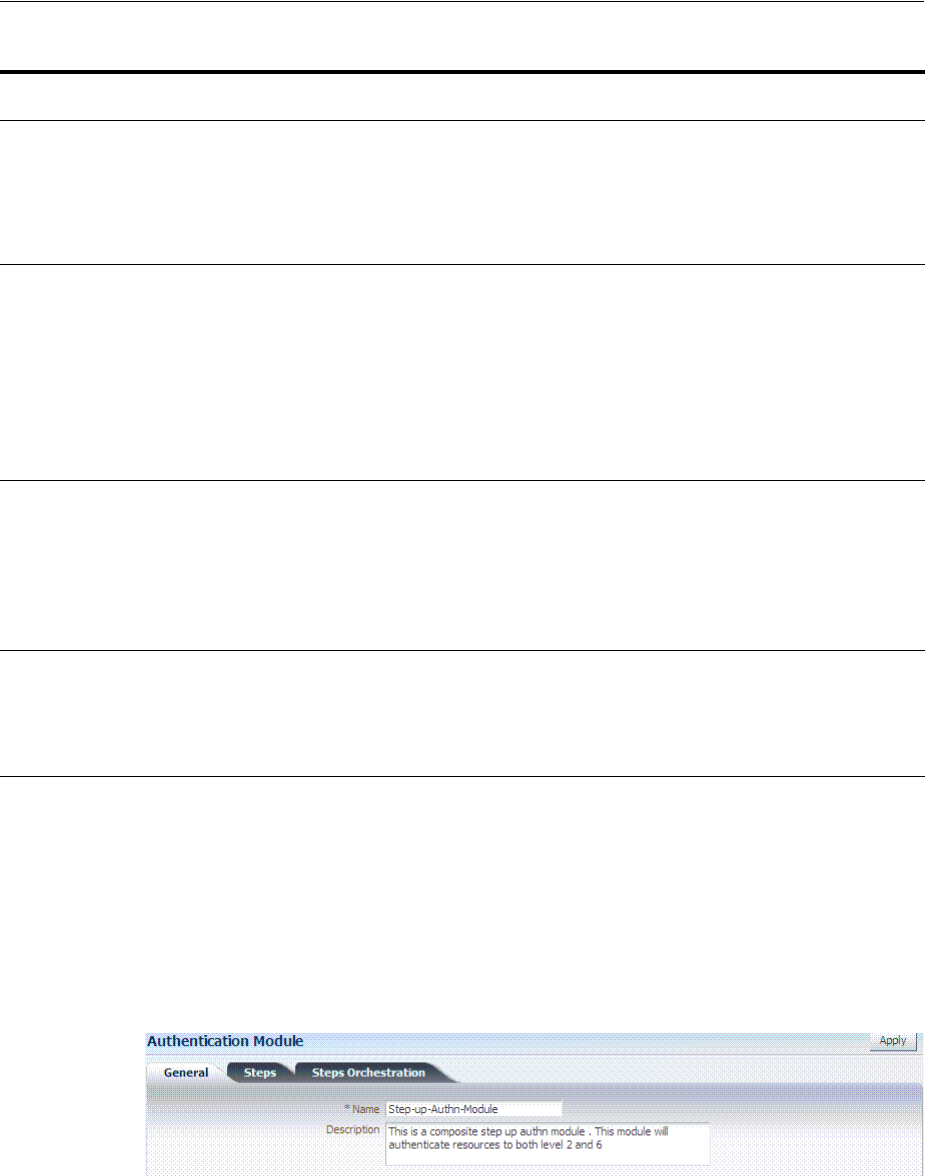
Orchestrating Multi-Step Authentication with Plug-in Based Modules
19-50 Administrator's Guide for Oracle Access Management
After defining and orchestrating plug-ins in an authentication module, you can use the
module in an authentication scheme and use the scheme in a policy.
Task overview: Configuring Step-up Authentication
1. Create or edit a custom authentication module for step up authentication:
2. Define your custom authentication module based on the Steps shown here.
4 UserAuthenticationStep UserAuthenticationPlugin Out of the box plug-in that authenticates the supplied
username and password credentials against an LDAP
directory.
■ON SUCCESS, go to SensitiveLevelCheck-6
■ON FAILURE go to CollectSensitiveLevelCreds
■ON ERROR, Failure
5 SensitiveLevelCheck-6 UserAuthnLevelCheckPlu
gin
This plugin communicates with the authentication engine to
determine the current authentication level of the user and
compares it with the plugin level parameter AUTHN_LEVEL_
FOR_PLUGIN. It interacts with a custom credential collector
and checks the current Authentication Level of the user against
the value specified. Specifies parameters to collect depending
on whether the check succeeded or failed:
■ON SUCCESS, Success
■ON FAILURE, go to CollectSensitiveLevelCreds
■ON ERROR, Failure
6 CollectSensitiveLevelCreds CredentialCollectorPlugin This plugin renders the UI for collecting credentials for level 6
authentication. This is similar to CollectUserNamePwd.
■ON SUCCESS, go to ValidateSensitiveLevelCreds
■ON FAILURE, Failure
■ON ERROR, Failure
■CRED_PARAM_1: {ID=securitycode},{DISPLAY_
NAME=form_securecode},{TYPE=text}
7 ValidateSensitiveLevelCred
s
SubjectSetPlugin This custom developed plug-in validates the security code
against the server.
■ON SUCCESS, Success
■ON FAILURE, Failure
■ON ERROR, Failure
See Also: "Creating and Orchestrating Plug-in Based Multi-Step
Authentication Modules"
Table 19–16 (Cont.) Steps and Plug-ins in a Customized Step-up Authentication Module
Step
# Step Name Plug-in Name Description
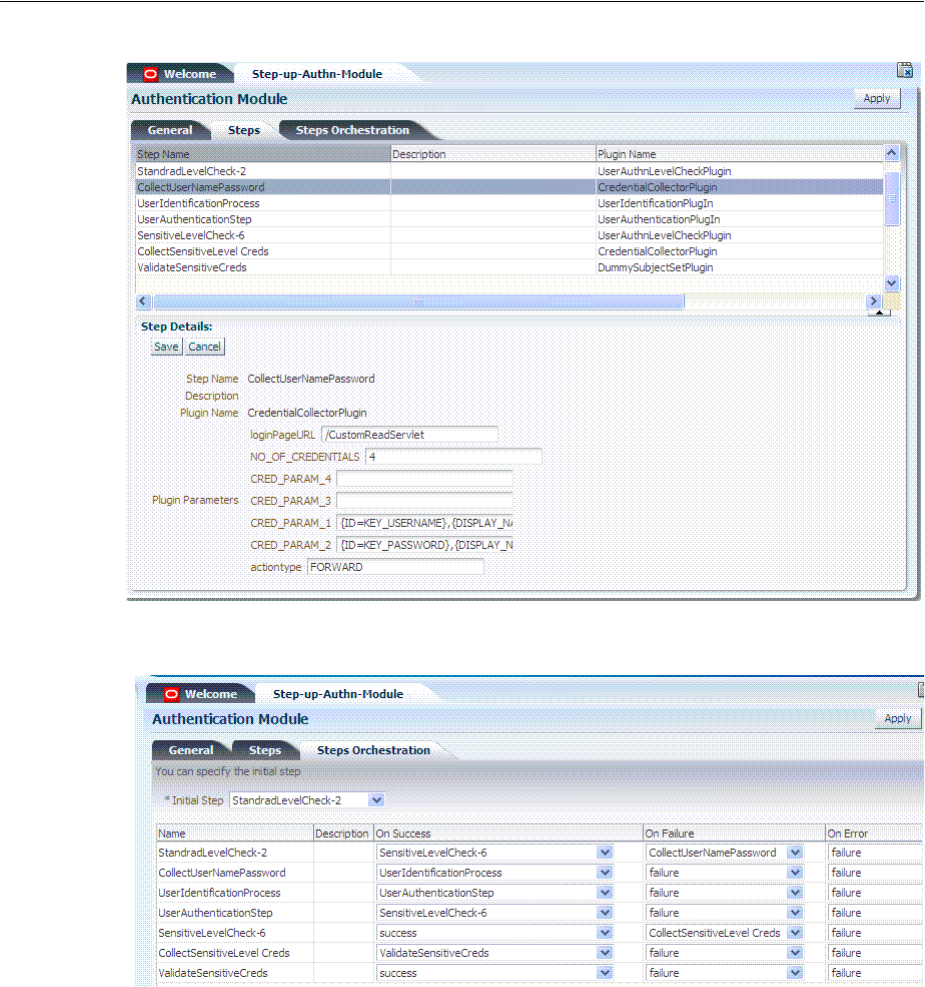
Orchestrating Multi-Step Authentication with Plug-in Based Modules
Managing Authentication and Shared Policy Components 19-51
3. Orchestrate your Steps and Plug-ins as shown here and described in Table 19–16.
4. Sensitive Scheme: Create or edit an Authentication Scheme for sensitive
applications that uses your customized step-up authentication module . For
example:
See Also: "Managing Authentication Schemes" on page 19-64
Orchestrating Multi-Step Authentication with Plug-in Based Modules
19-52 Administrator's Guide for Oracle Access Management
5. Lower-Level Scheme: Create or edit an Authentication Scheme for the lowest level
applications using your customized step-up authentication module F.or example:
6. Sensitive Policy: Create or edit an Authentication Policy for sensitive-level
resources using your customized step-up Authentication Scheme. For example:
7. Lower-Level Policy: Create or edit an Authentication Policy for the lowest level
resources using your customized step-up Authentication Scheme. For example:
See Also: Chapter 20, "Managing Policies to Protect Resources and
Enable SSO"
Orchestrating Multi-Step Authentication with Plug-in Based Modules
Managing Authentication and Shared Policy Components 19-53
8. Veri fy : Verify your resources and the policies that protect them. For example:
19.7.7 Configuring an HTTPToken Extractor Plug-in
The following process should be followed to configure an HTTPToken Extractor
plug-in.
1. Create a sample plug-in that will re-direct the user to the authenticating
application.
The authenticating application will authenticate the user and set the user name in
the HTTP header or cookie.
2. Create a custom authentication module that will access any applicable plug-ins.
For example, if you add the plug-in created in the previous step and the
HTTPToken Extractor and User identification plug-ins, successful authentication
occurs when the process for all three plug-ins has been successfully completed.
3. Add values for the header name and the user search filter properties.
The KEY_HEADER_PROPERTY is set in the HTTPToken Extractor plug-in while
KEY_LDAP_FILTER is set in the UI plug-in. For example:
■KEY_HEADER_PROPERTY =
cookieorheadername
■KEY_LDAP_FILTER = (uid={
cookieorheadername
})

Orchestrating Multi-Step Authentication with Plug-in Based Modules
19-54 Administrator's Guide for Oracle Access Management
19.7.8 Configuring a JSON Web Token Plug-in
Use this plug-in when you need to protect REST or Web services using standard
tokens. The JSON Web Token Plug-in issues both an OAM token and a Mobile and
Social JWT token that can be used for Web services access. Oracle API Gateway and
Oracle Web Services Manager can use this JWT token for Web services protection.
19.7.8.1 Understanding the JSON Web Token Plug-in
The following flow describes how this authentication plug-in can be used in
deployments:
■Configure the Oracle Access Management WebGate to use both OAM
authentication and the JSON Web Token Plug-in.
■When a user accesses a resource protected by the WebGate, the WebGate redirects
the user to authenticate with Access Manager.
■Upon authentication, the plug-in identifies which OAuth service end point should
generate the JWT token. (OAuth service end points are unique and can be
configured to point to a specific OAuth service profile within a specific Identity
Domain.) Oracle Access Manager Mobile and Social creates the JWT token and the
plug-in returns it as a cookie. (The cookie name can be configured in the plug-in
configuration.)
■The Web application intercepts the response and accesses the cookie so that it can
be used later for Web service access. Depending on how the web application is
deployed, there may be other options to retrieve the JWT token. The user can now
access the Web resource.
■When the Web resource needs to access a Web service, it extracts the OAM Mobile
and Social JWT token and sends it to the Oracle API Gateway.
■The Oracle API Gateway uses the Oracle OAuth Service REST API to validate the
token. It then grants access to the Web service. The Oracle API Gateway can also
validate the JWT token locally without making a remote call to the OAuth service.
19.7.8.2 Configure the JSON Web Token Plug-In
Use these steps to configure the JSON Web Token (JWT) plug-in. You will be creating a
custom authentication module.
1. Click Authentication Modules from the Launch Pad.
The Search Authentication Modules screen is displayed.
2. Click Create Authentication Module and from the drop down select Create
Custom Authentication Module.
Note: The user should be present in the data store which is being
used.
Notes: Currently there is not a mechanism to pass scope to the
OAuth service while issuing a JWT token with OAM authentication.
Consequently, the token should be considered to have global scope.
Both the OAM token timeout and the JWT token timeout can be set to
the same value to have the same validity. The OAM tokens and JWT
token are not linked, so they cannot be terminated using single logout.

Deploying and Managing Individual Plug-ins for Authentication
Managing Authentication and Shared Policy Components 19-55
The General tab is displayed.
3. Enter a name (and optional description) for the custom authentication module.
For this example, we name the module JWTToken AuthnModule.
4. Click the Steps tab and the + (plus sign) to add a new step.
The Add New Step dialog is displayed. Three new steps will be added.
5. Specify a step name (and optional description), select an activated plug-in from
the Plug-in name drop down list and click OK.
For this example, the values are StepUI and UserIdentificationPlugin. The flow
parameters for that plug-in can be edited after it is added to the step
6. Enter values for the UserIdentificationPlugin parameters and click Save.
7. Click the + (plus sign) to add a second step, enter the name StepUA, select
UserAuthenticationPlugin from the drop down list and click OK.
8. Enter values for the UserAuthenticationPlugin parameters and click Save.
9. Click the + (plus sign) to add a third step, enter the name StepOAuth, select
OAuthTokenResponsePlugin from the drop down list and click OK.
10. Enter values for the OAuthTokenResponsePlugin parameters and click Save.
11. Click the Steps Orchestration tab to configure the orchestration of the steps in the
following order.
a. StepUI
b. StepUA
c. StepOAuth
12. Click Apply and close the Custom Authentication Module tab.
13. Click Authentication Schemes from the Launch Pad.
14. Select LDAPScheme and click Duplicate.
A Copy of LDAPScheme screen displays.
15. Change the value of Name to JWTToken AuthnScheme and the value of
Authentication Module to JWTToken AuthnModule.
16. Click Save.
17. Configure an Authentication policy with the newly defined JWTToken
AuthnScheme Authentication Scheme.
19.8 Deploying and Managing Individual Plug-ins for Authentication
This section provides the following topics:
■About Managing Your Own Authentication Plug-ins
■Deploying and Managing Individual Plug-ins for Authentication
■Deleting Your Custom Authentication Plug-ins
Deploying and Managing Individual Plug-ins for Authentication
19-56 Administrator's Guide for Oracle Access Management
19.8.1 About Managing Your Own Authentication Plug-ins
Using information in the Oracle Fusion Middleware Developer's Guide for Oracle
Access Management, custom authentication plug-ins can be created and used to define
customized multi-step authentication modules.
After development, the plug-in must be deployed on the AdminServer, as a JAR file,
which is validated automatically. After validation, an Administrator can configure and
distribute the plug-in using the Oracle Access Management Console.
The server processes the XML configuration file within the plug-in JAR file to extract
data about the plug-in. After the plug-in is imported, an Administrator can see and
modify the various plug-in states based on information available from the
AdminServer.
Figure 19–26 illustrates the Plug-ins Node under the Common Configuration section
of the System Configuration tab, and the Plugins page. This Plugins page includes a
tool bar with command buttons, most of which operate on the plug-in that is selected
in the table. The table provides information about the existing custom plug-ins and
their state. The Plugin Details section at the bottom of the page reflects configuration
details for the selected plug-in the table.
Figure 19–26 Plug-ins Page
Administrators control plug-in states using the command buttons across the table at
the top of the Plugins page, as described in Table 19–17.

Deploying and Managing Individual Plug-ins for Authentication
Managing Authentication and Shared Policy Components 19-57
Table 19–17 Managing Custom Plug-ins Actions
Action Button Description
Import Plugin... Adds the plug-in JAR file to the AdminServer $DOMAIN_HOME/oam/plugins and begins
plug-in validation.
■Same JAR Name: If the new plug-in JAR name (in $DOMAIN_HOME/oam/plugins)
matches an existing plug-in JAR name (in $DOMAIN_
HOME/config/fmwconfig/oam/plugins), Oracle Access Manager extracts new
configuration metadata from the XML file in the JAR (in $DOMAIN_HOME/oam/plugins)
and checks the version of the new plug-in.
■XML Version: If the new plug-in XML version (in $DOMAIN_HOME/oam/plugins) is
greater than the existing XML version (in $DOMAIN_
HOME/config/fmwconfig/oam/plugins), validation is successful. Otherwise, "invalid
plugin name with invalid version" is returned and the new plug-in JAR is removed (from
$DOMAIN_HOME/oam/plugins).
■Different JAR Name: If the new plug-in JAR name (in $DOMAIN_HOME/oam/plugins) is
different then existing plug-in JAR names (in $DOMAIN_
HOME/config/fmwconfig/oam/plugins), the new plug-in JAR is uploaded and validation
is successful.
On Success: Status is reported as "Uploaded" (even if an OAM Server is down). If all registered
OAM Servers report "Uploaded", then the status on AdminServer is also "Uploaded".
On Failure: Status is reported as "Upload Failed"
See Also: "About the Custom Plug-in Life Cycle" in the Oracle Fusion Middleware Developer's
Guide for Oracle Access Management
Distribute Selected ... ■Propagates the plug-in to all registered OAM Servers.
■Sets the plug-in flag in oam-config.xml to "Distribute=true".
■Starts the distribution listener and notification mechanism between AdminServer and OAM
Servers
■Distributes the plug-in JAR from AdminServer node to each OAM Server node under
$DOMAIN_HOME/config/fmwconfig/oam/plugins
On Success: Status is reported as "Distributed" (even if an OAM Server is down). If all registered
OAM Servers report "Distributed", then the status on AdminServer is also "Distributed".
On Failure: Status is reported as "Distribution Failed"

Deploying and Managing Individual Plug-ins for Authentication
19-58 Administrator's Guide for Oracle Access Management
Table 19–18 describes elements in the Plugins status table.
Activate Selected ... After successful distribution the plug-in can be activated on all registered OAM Servers.
Activation:
■Updates the plug-in flag in oam-config.xml to "Activate=true"
■Starts the Message listener and notification mechanism between AdminServer and OAM
Servers
■AdminServer sends message "Activate" to all registered OAM Servers
On Success: Status is reported as "Activated" (even if an OAM Server is down). If all registered
OAM Servers report "Activated", then the status on AdminServer is also "Activated".
On Failure: Status is reported as "Activation Failed"
Following activation on all OAM Servers, the plug-in can be used and executed in any
authentication module construction or orchestration.
Deactivate Selected ... Following plug-in activation, an Administrator can choose to deactivate the plug-in: if the plug-in
is not used in any authentication module or scheme, for example. The selected plug-in from all
registered OAM Servers.
Deactivate:
■Updates the plug-in flag in oam-config.xml to "De-activate=true"
■Starts the Distribution listener and notification mechanism between AdminServer and OAM
Servers
■Removes the plug-in JAR from AdminServer and each registered OAM Server ($DOMAIN_
HOME/config/fmwconfig/oam/plugins)
■AdminServer sends message "De-activation" to all registered OAM Servers
■OAM Servers send status message to AdminServer using the "Message" listeners on both
AdminServer and OAM Server
On Success: Status is reported as "De-activation" (even if an OAM Server is down). If all
registered OAM Servers report "De-activation", then the status on AdminServer is also
"De-activation". Plug-in configuration is removed from oam-config.xml.
Note: After deactivation, the plug-in cannot be used or executed in any authentication module or
orchestration.
On Failure: Status is reported as "De-activation Failed"
Remove Selected ... Following plug-in deactivation, an Administrator can delete the selected plug-in. During this
process, Access Manager:
Delete:
■Updates the plug-in flag in oam-config.xml to "Remove=true"
■Starts the Distribution listener and notification mechanism between AdminServer and OAM
Servers
■Removes the plug-in JAR from AdminServer and each registered OAM Server ($DOMAIN_
HOME/config/fmwconfig/oam/plugins)
■AdminServer sends message "Activate" to all registered OAM Servers
On Success: Status is reported as "Removed" (even if an OAM Server is down). If all registered
OAM Servers report "Removed", then the status on AdminServer is also "Removed". Plug-in
configuration is removed from oam-config.xml.
On Failure: Status is reported as "Removal Failed"
Table 19–18 Plugins Status Table
Element Description
Plugin Name Extracted from the Plugin name element of the XML metadata file.
Description Extracted from the description element of the XML metadata file.
Activation Status Reported activation status based on information from AdminServer.
Table 19–17 (Cont.) Managing Custom Plug-ins Actions
Action Button Description
Deploying and Managing Individual Plug-ins for Authentication
Managing Authentication and Shared Policy Components 19-59
In the Plugin Details section of the page, the Activation Status is maintained by the
AdminServer, as shown in Table 19–18.
Figure 19–27 Plugin Details: Activation Status of Selected Plug-in
Depending on your plug-in, various configuration details are extracted from the
configuration element of the XML metadata file to populate Configuration Parameters
in the Plugin Details section. Examples are shown in Table 19–19; see also, Table 19–13
on page 19-34.
Type Extracted from the type element of the XML metadata file.
Last Updated on Extracted from the creation date element of the XML metadata file.
Last Updated by Extracted from the author element of the XML metadata file.
Table 19–18 (Cont.) Plugins Status Table
Element Description
Deploying and Managing Individual Plug-ins for Authentication
19-60 Administrator's Guide for Oracle Access Management
Table 19–19 Example of Plugin Details Extracted from XML Metadata File
Configuration
Element Description
DataSource
- <configuration>
- <AttributeValuePair>
<Attribute type="string" length="20">DataSource</Attribute>
<mandatory>true</mandatory>
<instanceOverride>false</instanceOverride>
<globalUIOverride>true</globalUIOverride>
<value>jdbc/CISCO</value>
<AttributeValuePair>
<configuration>
Kerberos Details Defines Kerberos details for this plug-in to use.
Deploying and Managing Individual Plug-ins for Authentication
Managing Authentication and Shared Policy Components 19-61
19.8.2 Making Custom Authentication Plug-ins Available for Use
Users with valid Administrator credentials can perform the following task to add,
validate, distribute, and activate a custom plug-in.
Prerequisites
Developing a custom plug-in as described in the Oracle Fusion Middleware
Developer's Guide for Oracle Access Management
To make available for use a custom authentication plug-in
1. Import the Plug-in:
a. Log in to the Oracle Access Management Console.
https://hostname:port/oamconsole/
b. From the Oracle Access Management Console, click Plug-ins and then click
Open from the Actions menu.
c. Click the Import Plugin button.
d. In the Import Plugin dialog box, click Browse and select the name of your
plug-in JAR file.
User Identification
Details
Defines the User Identity Store and filter details for this plug-in to use.
User Authentication
Details
Defines the User Identity Store for this plug-in to use.
X.509 Details Defines the certificate details for this plug-in to use.
Table 19–19 (Cont.) Example of Plugin Details Extracted from XML Metadata File
Configuration
Element Description
Deploying and Managing Individual Plug-ins for Authentication
19-62 Administrator's Guide for Oracle Access Management
e. Review the message in the dialog box, then click Import.
The JAR file is validated as described in Oracle Fusion Middleware
Administrator's Guide for Oracle Access Management.
2. Configure Parameters: Expand the Plugin Details section, click Configuration
Parameters, and enter appropriate information as needed. For example:
3. Distribute the Plug-in to OAM Servers:
a. In the Plugins table, click your plug-in name to select it.
b. Click the Distribute Selected button, then check its Activation Status.
4. Activate the Plug-in (and the custom plugin implementation class) so it is ready to
be used by OAM Server:
a. In the Plugins table, click your plug-in name to select it.
b. Click the Activate Selected button, then check its Activation Status.
5. Perform the following tasks as needed:
Deploying and Managing Individual Plug-ins for Authentication
Managing Authentication and Shared Policy Components 19-63
■Checking an Authentication Plug-in's Activation Status
■Deleting Your Custom Authentication Plug-ins
■Creating and Orchestrating Plug-in Based Multi-Step Authentication Modules
19.8.3 Checking an Authentication Plug-in's Activation Status
Users with valid Administrator credentials can perform the following task to add,
validate, distribute, and activate a custom plug-in.
Prerequisites
Making Custom Authentication Plug-ins Available for Use
To check the activation status of a custom authentication plug-i
1. From the Oracle Access Management Console, click Plug-ins and then click Open
from the Actions menu.
2. In the Plugins table, click the desired plug-in name to select it.
3. Server Instance Name: Expand the Plugin Details section and click Activation
Status to display the location and status of the plug-in. For example:
4. Perform the following tasks as needed:
■Deleting Your Custom Authentication Plug-ins
■Creating and Orchestrating Plug-in Based Multi-Step Authentication Modules
19.8.4 Deleting Your Custom Authentication Plug-ins
Users with valid Administrator credentials can use the following procedure to
deactivate and then delete a custom plug-in.
When an Administrator deletes a custom authentication plug-in, its name is not
removed from the list of plug-ins. To delete the plug-in (for the purpose of
re-importing the same plug-in later), the Administration must stop the WebLogic
Server and edit the oam-config.xml manually.
Prerequisites
The plug-in must have been added and available in the console

Managing Authentication Schemes
19-64 Administrator's Guide for Oracle Access Management
To delete a custom authentication plug-in
1. Log in to the Oracle Access Management Console. For example:
https://hostname:port/oamconsole/
2. From the Oracle Access Management Console, click Plug-ins.
3. Deactivate the Plug-in: You must perform this before removing a plug-in.
a. In the Plugins table, click your plug-in name to select it.
b. Click the Deactivate Selected button, then check the plug-ins Activation
Status.
4. Delete a Deactivated Plug-in:
a. In the Plugins table, click your plug-in name to select it.
b. Click the Delete Selected button.
c. Stop the WebLogic Administration Server, locate and edit oam-config.xml
manually to remove the deactivated plug-in, and then restart the WebLogic
Administration Server.
5. Perform the following tasks as needed:
■Making Custom Authentication Plug-ins Available for Use
■Creating and Orchestrating Plug-in Based Multi-Step Authentication Modules
19.9 Managing Authentication Schemes
Access to a resource or group of resources can be governed by a single authentication
process known as an authentication scheme. An authentication scheme is a named
component that defines the challenge mechanism required to authenticate a user. Each
authentication scheme must also include a defined authentication module (standard or
custom, as described in "Deploying and Managing Individual Plug-ins for
Authentication" on page 19-55).
When you register a partner (either using the Administration Console or the remote
registration tool), the Application Domain that is created is seeded with a policy that
uses the authentication scheme that is set as the default scheme. You can choose any of
the existing authentication schemes as the default for use during policy creation.
You can also create a new authentication scheme, copy an existing definition to use as
a template, modify a definition, or delete the definition. The copy uses a default name
that is based on the original. For example, if you copy the scheme named
KerberosScheme, the copy is named Copy of KerberosScheme.
This section is divided into the following topics:
■About Authentication Schemes and Pages
■Understanding Multi-Level and Step-Up Authentication
■Creating an Authentication Scheme
■Viewing, Editing, or Deleting an Authentication Scheme
■Searching for an Authentication Scheme
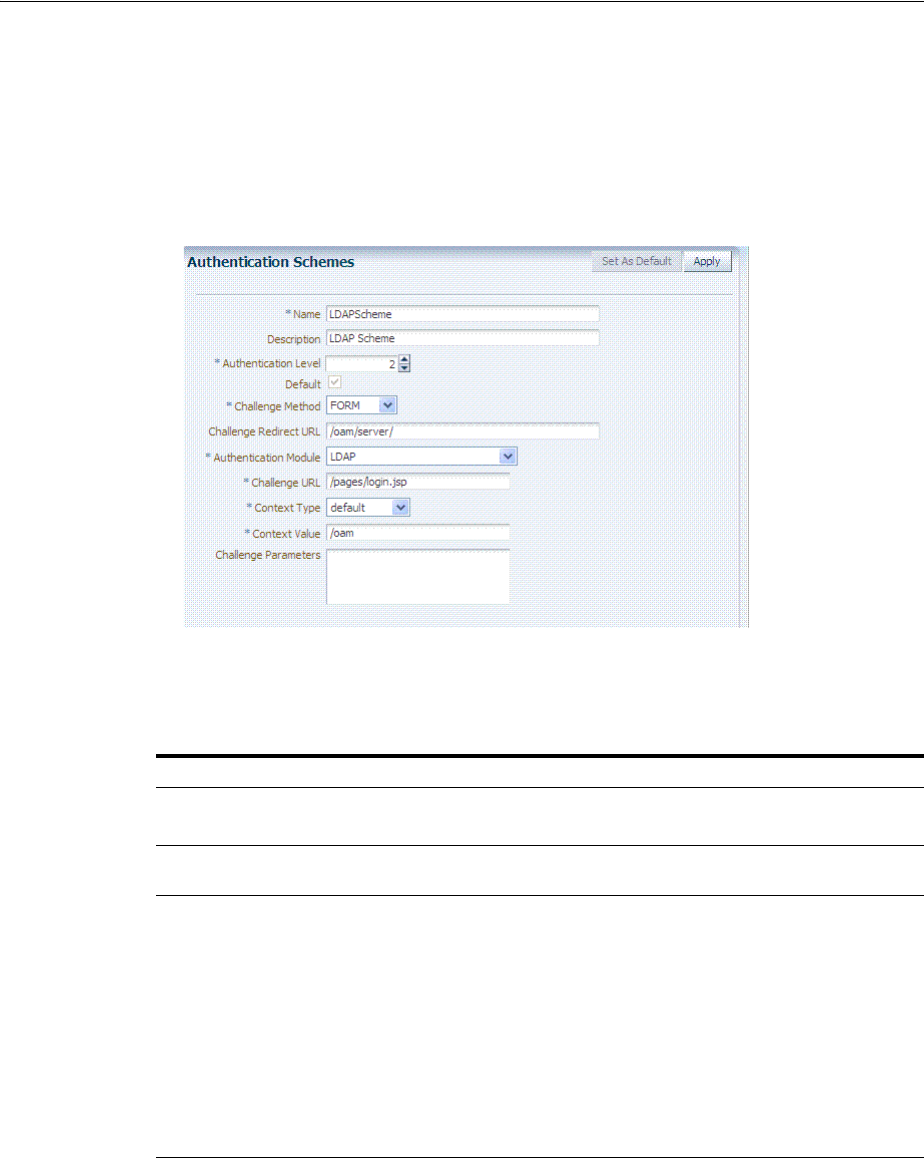
Managing Authentication Schemes
Managing Authentication and Shared Policy Components 19-65
19.9.1 About Authentication Schemes and Pages
All authentication schemes include the same elements with differing values.
Figure 19–28 shows the default LDAPScheme page as an example. The Authentication
Schemes navigation tree lists other default schemes that are delivered.
Figure 19–28 Default LDAPScheme Page
Table 19–20 provides information about each of the elements and values in any
authentication scheme. Use the Set as Default button to make this the default scheme.
Table 19–20 Authentication Scheme Definition
Element Description
Name The unique name for this scheme, which appears in the navigation tree.
See Also:"Pre-configured Authentication Schemes" on page 19-68
Description The optional description, up to 200 characters, that explains the use of this
scheme.
Authentication Level The trust level of the authentication scheme. This reflects the challenge method
and degree of trust used to protect transport of credentials from the user.
The trust level is expressed as an integer value between 0 (no trust) and 99
(highest level of trust).
Note: Level 0 is unprotected. Only unprotected resources can be added to an
Authentication Policy that uses an authentication scheme at protection level 0.
For more information, see Table 20–1, " Resource Definition Elements".
Note: After a user is authenticated for a resource at a specified level, the user is
automatically authenticated for other resources in the same Application Domain
or in different Application Domains, if the resources have the same or a lower
trust level as the original resource.
See Also: "About Multi-Level and Step-Up Authentication" on page 19-79.
Default A non-editable box that is checked when the Set as Default button is clicked.

Managing Authentication Schemes
19-66 Administrator's Guide for Oracle Access Management
Challenge Method One challenge method must be selected from those listed as available:
■Form
■Basic (LDAP)
■X509 (Certificate)
■WNA (Windows Native Authentication)
■None
■DAP
■OAM10g
See Also: "About Challenge Methods" on page 19-71
Challenge Redirect
URL
This URL declares the end point referencing the Credential Collector (ECC or
DCC). For example:
ECC:
/oam/server
DCC:
http://
<
dcc-host:port
>/
See Also:
■"About Host Identifiers" on page 19-8
■"Configuring 11g WebGates and Authentication Policy for DCC" on
page 19-109
Authentication Module Identifies the pre-configured authentication module to be used to challenge the
user for credentials. The module or plug-in specified here identifies the exact
user identity store to be used.
■FederationMTPlugin
■FederationPlugin
■Kerberos Plugin (Authentication Modules and Custom Authentication
Module)
■MTLDAPBasic
■MTLDAPPlugin
■OIFMTLDAPPlugin
■Password Policy Validation Module
■TAPModule
■X509 Plugin (under the X509 Authentication Modules node)
See Also "Managing Native Authentication Modules" on page 19-23 and
"Orchestrating Multi-Step Authentication with Plug-in Based Modules" on
page 19-28.
Challenge URL This URL is associated with the designated Challenge Method (FORM, for
instance).
FORM-based, out of the box authentication scheme (LDAPScheme and
LDAPNoPasswordValidationScheme), Challenge URL is "/pages/login.jsp". The
context type and context values are used to build the final URL.
X509-based Challenge URL takes the form:
https://managed_server_
host:managed_server_ssl_port/oam/CredCollectServlet/X509
Note: The default Challenge URL is based on the credential collector embedded
with the OAM Server (ECC). If you are using detached credential
collector-enabled Webgate and related DCC pages installed with Webgate, see
"Configuring 11g WebGates and Authentication Policy for DCC" on page 19-109.
Challenge Parameters Supported challenge parameters are discussed in "About Challenge Parameters
for Authentication Schemes" on page 19-74.
For schemes using
Challenge Method
FORM, X509, or DAP
Only Schemes with the Challenge Method of FORM, X509, or DAP include the
following additional elements. Other schemes use defaults that require no
change.
Table 19–20 (Cont.) Authentication Scheme Definition
Element Description

Managing Authentication Schemes
Managing Authentication and Shared Policy Components 19-67
About Custom Login Pages
Only Schemes with the Challenge Method of FORM, X509, or DAP include additional
elements described at the end of Table 19–20. All custom login pages must meet the
following requirements:
■Custom login pages require two form fields (username and password). Access
Manager supports custom forms as described in Oracle Fusion Middleware
Developer's Guide for Oracle Access Management.
■CustomWar and external context types, require logic within the custom login page
to perform the following two tasks:
–Send back the request ID the page received from the Access Manager server.
For example:
String reqId = request.getParameter("request_id");
<input type="hidden" name="request_id" value="<%=reqId%>">
–Submit back to the OAM Server the end point, "/oam/server/auth_cred_
submit". For example:
<form action="/oam/server/auth_cred_submit"> or
"http://oamserverhost:port/oam/server/auth_cred_submit
".
For more information, see the following topics:
■Pre-configured Authentication Schemes
Context Type Used to build the final URL for the Embedded Credential Collector (ECC only,
DCC does not use this) based on the following possible values:
■default: The Context Value is used to construct the final URL to forward to
for credential collection. For example: with a challenge URL of
"/pages/login.jsp" and a context value of /oam, the server forwards to
"/oam/pages/login.jsp" for credential collection by the ECC.
■customWar: If a customized credential collector page "customlogin.jsp" is
deployed in a WAR file (with context root, "custom") within the same
domain, it should be used to collect credentials. Then set the following
values to have server forward to the WEB application page
"/custom/customlogin.jsp" to collect credentials:
challenge_url = "/customlogin.jsp"
contextType="customWar"
contextValue="/contextroot of custom application"
■customHtml: A custom html credential collector page. This file can be
placed in a location that is accessible to the application. Set the following
values to have the server forward to the custom servlet provided to read the
html file and render the page:
challenge_url = "/CustomReadServlet"
contextType="customHtml"
contextValue="html file location"
■external: If the login page is external, the file can be placed in a location that
is accessible to the application. Set the following values to have the server
redirect to the challenge URL (the fully-qualified URL of the external
credential collector page) for credential collection. The username and
password are collected by the external form (HTML or jsp) and submitted
to the OAM Server:
challenge_url = "http://host:port/externallogin.jsp"
contextType="external"
contextValue=Not applicable
See Also: "About Custom Login Pages" on page 19-67 and "Managing
Global Password Policy" on page 19-97
Context Value Used to build the final URL for the credential collector. The default value is
/oam.
Table 19–20 (Cont.) Authentication Scheme Definition
Element Description
Managing Authentication Schemes
19-68 Administrator's Guide for Oracle Access Management
■About Challenge Methods
■About Challenge Parameters for Authentication Schemes
19.9.1.1 Pre-configured Authentication Schemes
Table 19–21 identifies the pre-configured authentication schemes available with Access
Manager and some specific details of each. For more information about challenge
parameters, see Table 19–21.
See Also: Oracle Fusion Middleware Developer's Guide for Oracle
Access Management for details about customizing login pages and
messages.
Table 19–21 Pre-configured Authentication Schemes
Scheme Name Specifications Purpose
AnonymousScheme Authentication Level: 0
Challenge Method: None
Authentication Module: AnonymousModule
Leaves unprotected specific Access Manager URLs
and allows users to access such URLs without a
challenge. Users are not challenged and do not need to
enter their credentials.
Note: Authentication Level 0 is for public pages.
Oracle recommends that you do not use Level: 0 in a
custom authentication scheme.
Also: When a resource is protected by
AnonymousScheme, it is not displayed in a session
search.
BasicFAScheme
Only for Oracle Fusion
Applications
For Fusion Applications For specific information about this authentication
scheme, refer to the Oracle Fusion Applications
Technology Library located on the Oracle Technology
Network (OTN) web site:
http://www.oracle.com/technetwork
BasicScheme Authentication Level: 1
Challenge Method: Basic
Authentication Module: LDAP
Protects Access Manager-related resources (URLs) for
most directory types.
Note: Authentication Level 1 is only one step higher
than 0 public pages. Oracle recommends that you do
not use Level: 1 in a custom authentication scheme.
BasicSessionlessScheme Authentication Level: 1
Challenge Method: Basic
Authentication Module: LDAP
Primarily used for clients that don't support URL
redirect or cookies.
Challenge Parameters: CookieLessMode=true
Note: Authentication Level 1 is only one step higher
than 0 public pages. Oracle recommends that you do
not use Level: 1 in a custom authentication scheme.
FAAuthScheme
Only for Oracle Fusion
Applications
Authentication Level: 2
Challenge Method: FORM
Authentication Module: LDAP
Context: customWar
Context Value: /fusion_apps
For specific information about this authentication
scheme, refer to the Oracle Fusion Applications
Technology Library located on the Oracle Technology
Network (OTN) web site:
http://www.oracle.com/technetwork
FederationMTScheme
Only for Oracle Fusion
Applications
Authentication Level: 2
Challenge Method: FORM
Authentication Module: FederationMTPlugin
Context Type: customWar
Context Value: /fusion_apps
Challenge Parameters: initial_
command=NONE
is_rsa=true
For specific information about this authentication
scheme, refer to the Oracle Fusion Applications
Technology Library located on the Oracle Technology
Network (OTN) web site:
http://www.oracle.com/technetwork
See Also: "About Challenge Parameters for
Authentication Schemes" on page 19-74.

Managing Authentication Schemes
Managing Authentication and Shared Policy Components 19-69
FederationScheme
Only for Identity
Federation 11.1.2.
Authentication Level: 2
Challenge Method: FORM
Authentication Module: FederationPlugin
Context Type: customWar
Context Value: /oam
Challenge Parameters: initial_
command=NONE
is_rsa=true
See Also: Part VII, "Managing Oracle Access
Management Identity Federation".
Note: With Oracle Identity Federation 11.1.1, use
OIFScheme as described in the Oracle Fusion
Middleware Integration Guide for Oracle Access
Manager.
KerberosScheme Authentication Level: 2
Challenge Method: WNA
Authentication Module: Kerberos
Context Type: customWar
Context Value: /fusion_apps
Protects Access Manager-related resources (URLs) for
most directory types based on a Windows Native
Authentication challenge method and valid WNA
credentials in Active Directory.
LDAPNoPasswordValid
ationScheme
Authentication Level: 2
Challenge Method: FORM
Authentication Module:
LDAPNoPasswordAuthModule
Context Type: default
Context Value: /oam
Note: LDAPNoPasswordAuthModule is
similar to the DAP (asserter) mechanism.
See Also OAM10gScheme, later in this table.
Protects Access Manager-related resources (URLs) for
most directory types based on a form challenge
method.
Used with the Identity Asserter for SSO when you
have resources in a WebLogic Container. For details,
see the Oracle Fusion Middleware Application
Security Guide.
LDAPScheme Authentication Level: 2
Challenge Method: FORM
Authentication Module: LDAP
Context Type: customWar
Context Value: /fusion_apps
Protects Access Manager-related resources (URLs) for
most directory types based on a form challenge
method.
OAAMAdvanced Authentication Level: 2
Challenge Method: FORM
Authentication Module: LDAP
Context Type: external
Protects OAAM-related resources with an external
context type. This authentication scheme is used when
complete integration with OAAM is required. A
Webgate must front ending the partner.
OAAMBasic Authentication Level: 2
Challenge Method: FORM
Authentication Module: LDAP
Context Type: default
Context Value: /oam
Challenge Parameters
oaamPostAuth=true
oaamPreAuth=true
Protects OAAM-related resources with a default
context type. This scheme should be used when basic
integration with OAAM is required. Here, advanced
features like OTP are not supported. This is more of an
integration when mod_osso is used as the agent.
OAM10gScheme Authentication Level: 2
Challenge Method: OAM10G
Authentication Module:
LDAPNoPasswordAuthModule
See Also
LDAPNoPasswordValidationScheme, earlier
in this table.
enableCoexistMode and disableCoexistMode
in the Oracle Fusion Middleware WebLogic
Scripting Tool Command Reference.
Facilitates integration and coexistence with Oracle
Access Manager 10g. In the coexistence mode, Oracle
Access Manager 10g is the authenticator and Access
Manager 11g is the asserter.
This scheme requires challenge mechanism OAM10G,
specifically for OAM10g coexistence with OSSO as
described in "OAM10G" on page 19-74.
OAMAdminConsoleSch
eme
Authentication Level: 2
Challenge Method: FORM
Authentication Module: LDAP
Context Type: default
Context Value: /oam
Authentication scheme for Oracle Access Management
Console.
Table 19–21 (Cont.) Pre-configured Authentication Schemes
Scheme Name Specifications Purpose

Managing Authentication Schemes
19-70 Administrator's Guide for Oracle Access Management
OICScheme Authentication Level: 2
Challenge Method: DAP
Authentication Module: TAPModule
Context Type: External
Challenge Parameters:
TAPPartnerId=RPPartner
MatchLDAPAttribute=mail
Access Manager uses this scheme to delegate
authentication to Mobile and Social services and
redirects the user to the Mobile and Social login page
for authentication.
See Also: Part IX, "Managing Oracle Access
Management Mobile and Social"
OIFScheme
Only for Oracle Identity
Federation 11.1.1.
For Identity Federation
11.1.2, use
FederationScheme.
Authentication Level: 2
Challenge Method: DAP
Authentication Module: DAP
Context Type: External
This scheme delegates authentication to OIF, after
which, Oracle Identity Federation sends back a token
that is asserted by the OAM Server as described in the
Oracle Fusion Middleware Integration Guide for
Oracle Access Manager.
The Delegated Authentication Protocol (DAP)
challenge method is used to delegate authentication to
a third-party (OIF in this case).
Challenge Parameters: TAPPartnerId=OIFDAPPartner
See Also: "About Challenge Parameters for
Authentication Schemes" on page 19-74.
OIMScheme Authentication Level: 1
Challenge Method: FORM
Authentication Module: LDAP
Context Type: default
Context Value: /oam
Protects Oracle Identity Manager-related resources
with a default context type.
Note: When integrating OAM and OIM, OAM
downgrades the user's authentication level when any
of the following is detected:
password expiry
forced password change
challenge setup not done
This enables the user to access the pages only after
performing necessary operations in the identity
management (OIM) page to which the user is
redirected.
At Level 1, only public and OIM pages for the required
operations can be accessed.
Note: Authentication Level 1 is only one step higher
than 0 public pages. Oracle recommends that you do
not use Level: 1 in a custom authentication scheme.
OSSOCoexistMigrateSc
heme
Set as the Default authentication scheme for
environments that have been migrated from OSSO 10g
to Access Manager 11g.
See Also: Oracle Fusion Middleware Upgrade Guide
for Oracle Identity and Access Management.
PasswordPolicyValidati
onScheme
Authentication Level: 2
Challenge Method: FORM
Authentication Module: Password Policy
Validation Module
Context: External
Enables password policy evaluation.
Table 19–21 (Cont.) Pre-configured Authentication Schemes
Scheme Name Specifications Purpose
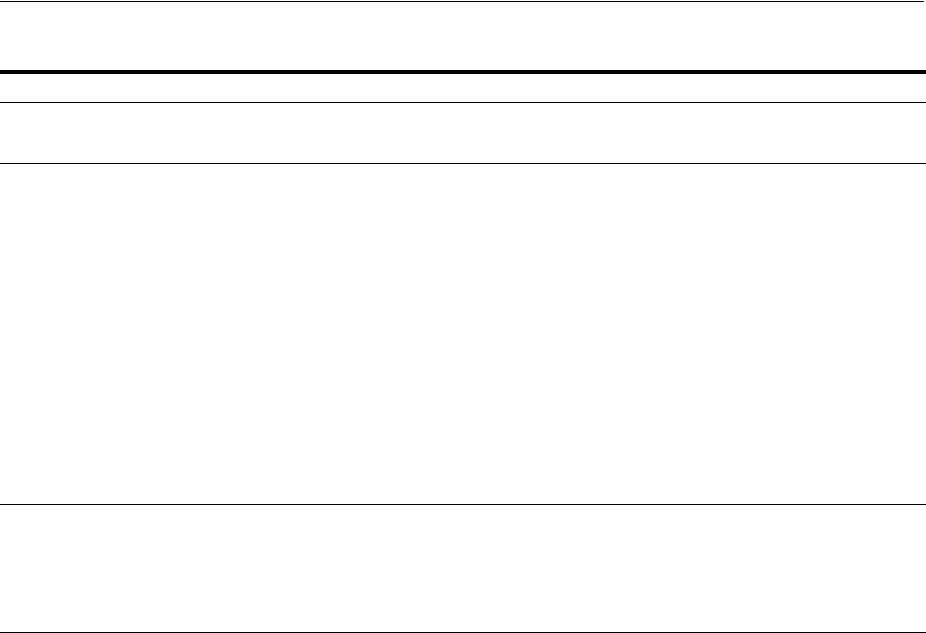
Managing Authentication Schemes
Managing Authentication and Shared Policy Components 19-71
19.9.1.2 About Challenge Methods
Authentication involves determining what credentials a user must supply when
requesting access to a resource, gathering credentials over HTTP, and returning an
HTTP response that is based on the results of credential validation. Access Manager
provides the following credential challenge methods for use in an authentication
scheme:
■FORM
■BASIC
■X509
■WNA
■NONE
■DAP
■OAM10G
FORM
This authentication challenge uses an HTML form with one or more text input fields
for user credentials. In a typical form-based challenge, users enter a user name and
password in two text boxes on the form. The most common credential choices are user
name and password; however, you can use any user attributes: for example, user
name, password, and domain.
A Submit button posts the content of the form. When the user clicks the Submit
button, the form data is posted to the Web server. OAM and OSSO Agents intercept
and process the form data. Upon validation of the user credentials collected in the
form, the user is authenticated.
TAPResponseOnlySche
me
Authentication Level: 2
Challenge Method: DAP
Authentication Module: DAP
TAPScheme Authentication Level: 2
Challenge Method: DAP
Authentication Module: DAP
Context Type: External
To use TAPScheme for IDM product resources in the
IAM Suite Application Domain, Protected
HigherLevel Policy, the following configuration must
be done in addition to changing the Authentication
Scheme.
1. From the IAM Suite Application Domain,
Protected Higher Level Policy, remove
IAMSuiteAgent:/oamTAPAuthenticate.
2. Create a new Authentication Policy in the IAM
Suite Application Domain, that uses
LDAPScheme.
3. Protect IAMSuiteAgent:/oamTAPAuthenticate
using the newly created policy.
Challenge Parameters:
TAPPartnerId=TAPPartnerName
X509Scheme Authentication Level: 5
Challenge Method: X509
Authentication Module: X509
This authentication scheme is a certificate-based user
identification method. To use this method, a certificate
must be installed on the user's browser and the Web
server must be SSL-enabled.
Note: This scheme relies on SSL to deliver the use's
X.509 certificate to the OAM Server.
Table 19–21 (Cont.) Pre-configured Authentication Schemes
Scheme Name Specifications Purpose

Managing Authentication Schemes
19-72 Administrator's Guide for Oracle Access Management
You might want to use form-based authentication challenge for reasons such as:
■A consistent user experience: Using form-based login and a standardized logout
means that the user experience for login and logout features will be consistent
across browsers.
■A Custom Form: You can apply your organization's look and feel in the
authentication process.
For example, a custom form can include a company logo and a welcome message
instead of the standard user name and password window used in Basic
authentication.
■Additional Information: You can gather additional information at the time of
login.
■Additional Functionality: You can provide additional functionality with the login
procedure, such as a link to a page for lost password management.
BASIC
This built-in Web server challenge mechanism requires a user to enter her login ID and
password. The credentials supplied are compared to the user's definition in the LDAP
directory server. Thus, a Basic challenge relies on the LDAP Authentication Module
and user identity store associated with that module.
X509
With the X509 certificate challenge method, a user's browser must supply an X.509
digital certificate over SSL to the OAM Server through the Agent to perform
authentication.
The X.509 client certificate must be verified against the trusted CAs in the keystore
used by OAM Proxy and OAM Servers to ensure the validity of X.509 Client certificate
for authentication.
The following attributes of the X.509 certificate can be validated against the user
identity store associated with Access Manager:
■SubjectDN
■SubjectUniqueID
Note: This challenge method relies on an LDAP Authentication
Module and the user identity store associated with that module.
Note: If a URL is protected by Access Manager using Basic
Authentication with OID configured as the identity store, OID defined
users can not log in. To resolve this, add the following line before the
closing
</security-configuration>
tag in the
config.xml
file.
<enforce-valid-basic-auth-credentials>false
</enforce-valid-basic-auth-credentials>
Note: X509 is the challenge method for the X509Scheme. The user's
organization can determine how to obtain a certificate.

Managing Authentication Schemes
Managing Authentication and Shared Policy Components 19-73
■Mail
■CN
To acquire the user entry, the X509 Authentication Module takes the attribute name of
the X.509 certificate to be validated and the LDAP attribute against which the search
will be launched. The expected result is the single user entry matching the criteria. If
the search returns no user entry, or more than one entry, authentication fails.
Authentication scheme parameters are located in oam-policy.xml.
The online certificate status protocol (OCSP) capabilities are also provided. Any
certificate passed for X.509 certificate-based authentication is validated using an OCSP
request. Administrators can configure the system to communicate with one or more
OCSP servers to retrieve the certificate status.
The X509 Authentication Module configuration for the OCSP responder URL indicates
whether OCSP validation is to be done. The value, if specified, indicates the URL for
validation of the X.509 client certificate using OCSP. No value indicates no OCSP
validation.
WNA
Uses Windows Native Authentication with Active Directory, and the Kerberos
Authentication Module.
NONE
The challenge method of None means that users are not challenged and do not need to
enter their credentials. This is used in the AnonymousScheme authentication scheme,
which allows users to access Access Manager-specific URLs that you do not want to
protect.
DAP
The Delegated Authentication Protocol (DAP) challenge method is required for
OIFScheme (Oracle Identity Federation 11.1.1 integration) with the DAP
authentication module and external context type (Table 19–20). The DAP challenge
mechanism indicates that Access Manager does an assertion of the token that it
receives, which differs from the standard challenge "FORM" mechanism with the
external option.
DAPModule is an assertion module, though it is specialized for this one application
and does not appear in the list of Authentication Modules in the Oracle Access
Management Console. This integration replaces OSSO 10g with Access Manager 11g,
with no changes from the Identity Federation side.
Note: For X509 authentication, Administrators must configure the
Oracle HTTP Server as a reverse proxy (or a server with the wl-proxy
plug-in). The Oracle HTTP Server must be configured in two way SSL
Mode to acquire X.509 certificate for authentication. Oracle HTTP
Server can also be configured for CRL verification.
Note: The KerbScheme relies on the WNA challenge method and
Kerberos Authentication Module.
See Also: Chapter 50 for details about integration with Windows
Native Authentication

Managing Authentication Schemes
19-74 Administrator's Guide for Oracle Access Management
The DAP challenge mechanism delegates authentication to a third party (Identity
Federation in this case). The challenge_url points to the Identity Federation Server
URL. When a resource is protected by this scheme, the OAM Server redirects to the
Identity Federation Server URL for credential collection. OAM Server does not
perform the credential collection or validation in this case. Identity Federation collects
the credentials, authenticates the user against its identity store and returns an assertion
token to the OAM Server consisting of the username. Access Manager receives and
decrypts this token, checks whether the user is a valid user in the default identity store
for Oracle Access Management. If the user is valid, Access Manager gives access to the
resource.
The DAPToken is encrypted and decrypted with a key that is shared between Access
Manager and Identity Federation. The DAPToken is built from the Access Manager
side.
The Identity Federation Administration EM Console provides a way to generate the
keystore containing the encryption keys that will be used to secure communications
between the Access Manager and Identity Federation. Access Manager provides a
WLST command (
registerOIFDAPPartner
), that takes the keystore location generated
by the Identity Federation store and retrieves the keys and stores it on the Identity
Federation side.
OAM10G
This mechanism is created for Oracle Access Manager 10g coexistence with OSSO 10g.
The OAM10G method always acts as the authentication and authorization provider
and is required for OAM10gScheme with the LDAPNoPasswordAuthModule to
facilitate trust when you have Oracle Access Manager 10g protecting a domain that
also includes an OSSO 10g integrated classic application (Portal, Disco, and so on).
OSSO10g is protected with OAM10G challenge method through Webgate; OAM10G
always acts as the authentication and authorization provider.
Facilitating Integration: The OSSO 10g integrated classic applications can be
upgraded to Access Manager, which then acts only as an asserter. Access Manager
creates the tokens that mod_osso can consume so that access can be provided to these
applications. The mod_osso applications are protected by the new "OAM10gScheme".
There is a Webgate front ending the OAM Server and configured against the 10g
Access Server.
Setup: When the resource is accessed, Webgate intercepts the request and sends it to
the 10g Access Server for authentication. Oracle Access Manager 10g collects the
credentials, validates it against its identity store, and sets the username as a header
variable (OAM_REMOTE_USER). The request now goes to the OAM Server which
uses the OAM10gScheme to locate the username in the header variable. Access
Manager retrieves the header variable and asserts the presence of the user against the
primary identity store. If present, the required cookies (OAM_ID) are generated and
redirected to the resource.
19.9.1.3 About Challenge Parameters for Authentication Schemes
Challenge parameters are short text strings consumed and interpreted by Webgates
and Credential Collector modules to operate in the manner indicated by those values.
See Also:
■OAM10gScheme in Table 19–21
■
enableCoexistMode
and
disableCoexistMode
in the Oracle Fusion
Middleware WebLogic Scripting Tool Command Reference

Managing Authentication Schemes
Managing Authentication and Shared Policy Components 19-75
The syntax for specifying any challenge parameter is:
<parmatername>=<value>
This syntax is not specific to any Webgate release (10g versus 11g). Authentication
schemes are independent of Webgate release.
Table 19–22 identifies the pre-configured schemes with challenge parameters.
An authentication scheme can collect context-specific information before submitting
the request to the Access Server. Context-specific information can be in the form of an
external call for information. Table 19–23 lists user-defined challenge parameters you
can use in Authentication Schemes.
Table 19–22 Challenge Parameters in Pre-configured Schemes
Pre-configured Schemes Challenge Parameter
BasicSessionlessScheme CookieLessMode=true
Primarily used for clients that do not support URL redirect or cookies.
FederationMTScheme initial_command=NONE
Primarily used for Fusion Applications that support multiple factor authentication.
is_rsa=true
Used with RSA multi-step authentication, as described in Chapter 49, "Integrating RSA
SecurID Authentication with Access Manager" and the Oracle Fusion Middleware
Developer's Guide for Oracle Access Management.
FederationScheme
For Identity Federation 11.1.2.only.
Use OIFScheme for Oracle Identify
Federation 11.1.1.
Primarily used for clients that do not support URL redirect or cookies.
Context Value: /fusion_apps
Challenge Parameters: initial_command=NONE
is_rsa=true
Primarily used for clients that do not support URL redirect or cookies.
OAAMBasic oaamPostAuth=true
oaamPreAuth=true
Protects OAAM-related resources. These parameters should be used when basic
integration with OAAM is required.
OIFScheme
For Oracle Identify Federation 11.1.1
only. Use FederationScheme for
Identity Federation 11.1.2.
TAPPartnerId=OIFDAPPartner
This scheme delegates authentication to Oracle Identity Federation 11.1.1, after which,
Federation sends back a token that is asserted by the OAM Server.
TapScheme TAPPartnerId=TAPPartnerName

Managing Authentication Schemes
19-76 Administrator's Guide for Oracle Access Management
Table 19–23 User-Defined Challenge Parameters for Authentication Schemes
Challenge Parameter Definition
initial_command=NONE Required to enable the plug-in to indicate which credentials are to be collected.
For example, for Form-based authentication, the framework typically expects to collect
"username" and "password" (submitted from the login page). However, you might want
credentials from different fields of the login page; "form_username" and "form_password" for
example. Setting this challenge parameter shifts initial control from the login page to the
plug-in, which decides the parameters to collect from the login page then appropriately
forwards or redirects to the page.
Default: blank (not set)
action= The actions parameter identifies the URL to which the HTML form is posting when you do not
want to use the hard coded ECC default
/oam/server/auth_cred_submit
.
Note: ECC does not use the
action=
parameter. When the
action=
challenge parameter is not
specified, both the DCC and ECC use the default:
/oam/server/auth_cred_submit
.
See Also: "Configuring the PasswordPolicyValidationScheme" on page 19-106
creds=
DCC Only
Supported by the detached credential collector (DCC) only.
In the following 11g example, username and password are the names of relevant fields in the
login form:
creds=username password
NOTE: Format of this challenge parameter has changed since the 10g release.
The Web server source (server parameter) takes precedence over other sources. This prevents
the request data, which is under control of the user, from overriding Web server data. For
example, a remote_user cookie sent from a user will not override a remote_user variable set by
the Web server
Generally, when the user submits a login form that is protected by an authentication scheme
with a Form-based challenge method, the DCC processes the credentials that were specified
with this
creds=
parameter.
For forms using METHOD=POST processing, the browser sends a POST request to the Web
server with the credential data from the form in the body of the request. If the form uses
METHOD=GET, the browser sends a GET request with query string parameters with the same
names as those specified on the creds parameter. Oracle recommends that you use POST
processing, if possible.
Note: You can specify the
creds
parameter with the other types of challenge methods. For a
plug-in to make use of the
creds
parameter, you specify what is passed in the obMap
credentials parameter of the ObUserSession object, as described in the Oracle Fusion
Middleware Developer's Guide for Oracle Access Management.
See Also: "Configuring the PasswordPolicyValidationScheme" on page 19-106
extracreds=
DCC Only
Supported by the DCC only. Specifies optional parameters which, if present, are made available
to the authentication plug-in for collection during each iteration of a multi-step authentication
using the DCC.
The
extracreds
parameter uses the same syntax as the
creds
parameter:
extracreds
=
separated qualified or unqualified names [{any | cookie | header | server | query | post}:]
<name>. However, the value
any
is used by
extracreds
only. For example:
extracreds=[{any | cookie | header | server | query | post}:] <name>
See Also: "Configuring the PasswordPolicyValidationScheme" on page 19-106
OverrideRetryLimit=0 The number of tries that can override the RetryLimit for login.
The value must be a positive integer.
A value of zero (0) disables this function.
See Also: "Configuring the PasswordPolicyValidationScheme" on page 19-106
ChallengeRedirectMethod Authentication POST data preservation parameter for both the embedded credential collector
(ECC) and the detached credential collector (DCC).
Value: GET|POST|DYNAMIC
Note: Preference is given first to the Authentication Scheme containing this parameter; second
to the Webgate providing this user defined parameter. Otherwise, default behavior is Dynamic.
See Also: "Configuring Authentication POST Data Handling"
Table 16–2, " User-Defined WebGate Parameters"

Managing Authentication Schemes
Managing Authentication and Shared Policy Components 19-77
MaxPreservedPostDataBytes Configure this Authentication Scheme challenge parameter (or user-defined Webgate
parameter) for authentication POST-data preservation.
Default: 8192 bytes
Note: Preference is given first to the Authentication Scheme containing this parameter; second
to the Webgate providing this user-defined parameter. Otherwise, default behavior is 8192
bytes.
This parameter defines the maximum length of POST data that Webgate can preserve. If the size
of inbound raw user POST data (or encrypted post data after processing), crosses this limit,
POST data is dropped and the existing authentication flow continues. The event is logged as
usual.
See Also: "Configuring Authentication POST Data Handling" on page 19-120
Table 16–2, " User-Defined WebGate Parameters"
MaxPostDataBytes=
DCC Only
Configure this Authentication Scheme challenge parameter to restrict the maximum number of
bytes of POST data that is submitted as user credentials and sent to the OAM Server.
Configure this challenge parameter for POST-data preservation by the DCC only to limit the
maximum size of the POST data that can be posted as credentials on the form and sent to the
OAM Server. DCC compares the value of the content-length header with the limit set.
Default: 8192 bytes
This challenge parameter requires a positive integer value.
See Also:
Table 16–2, " User-Defined WebGate Parameters"
"Configuring the PasswordPolicyValidationScheme" on page 19-106
"Configuring Authentication POST Data Handling" on page 19-116
ssoCookie= Controls the OAMAuthnCookie cookie, as described in "Configuring Challenge Parameters for
Encrypted Cookies" on page 19-87.
Default:
ssoCookie=httponly
ssoCookie=Secure
Disable either setting:
ssoCookie=disablehttponly
ssoCookie=disableSecure
Note: These parameters are configured differently depending on your credential collector
configuration.
■For detached credential collector-enabled 11g Webgates, set these parameters directly in
the agent registration page.
■For non-DCC agents (Resource Webgates), these parameters are configured through
user-defined challenge parameters in authentication schemes.
See Also:
Table 19–30, " Challenge Parameters for 10g/11g Encrypted Cookies"
Table 19–23 (Cont.) User-Defined Challenge Parameters for Authentication Schemes
Challenge Parameter Definition

Managing Authentication Schemes
19-78 Administrator's Guide for Oracle Access Management
miscCookies= Controls other miscellaneous Access Manager internal cookies. By default, httponly is enabled
for all other (miscellaneous) cookies.
Default:
miscCookies=httponly
miscCookies=Secure
Disable either setting:
miscCookies=disablehttponly
miscCookies=disableSecure
Note: These parameters are configured differently depending on your credential collector
configuration.
■For detached credential collector-enabled Webgates, set these parameters directly in the
agent registration page.
■For non-DCC agents (Resource Webgates), these parameters are configured through
challenge parameters of the same name.
See Also:
Table 19–30, " Challenge Parameters for 10g/11g Encrypted Cookies"
"Configuring the PasswordPolicyValidationScheme" on page 19-106
DCCCtxCookieMaxLength=
DCC Only
Defines the maximum length of the DCC cookie.
Default: 4096
See Also: TempStateMode in this table for more information.
Table 19–23 (Cont.) User-Defined Challenge Parameters for Authentication Schemes
Challenge Parameter Definition

Managing Authentication Schemes
Managing Authentication and Shared Policy Components 19-79
19.9.2 Understanding Multi-Level and Step-Up Authentication
This section provides the following topics:
■About Multi-Level and Step-Up Authentication
■Detection of Insufficient Authentication Level by OAM Agent
■Multi-Level Authentication Processing with 10g OSSO Agent
19.9.2.1 About Multi-Level and Step-Up Authentication
Every authentication scheme requires a strength level. The higher the number, the
more more secure the authentication mechanism; the lower the number, the less
stringent the scheme. For example:
■LDAPScheme authLevel=1
■KerbScheme authLevel=3
TempStateMode= Controls how the DCC stores the OAM Server state (cookie or form) as specified with the
parameter's value:
■form: This is the default, and is required for retaining authentication POST data. The OAM
Server state stored and passed through the form parameter "OAM_REQ", to avoid the case
when the OAM Server configuration
serverRequestCacheType=COOKIE
, bloated server
state causes DCCCtxCookie to explode beyond limit resulting in incorrect behavior.
The cookie cache mode can be changed to
FORM
mode from default
COOKIE
mode.
FORM
mode works with long URLs. The only difference in behavior is for programmatic
authentication, which requires a proper form Submit to pass the
OAM_REQ
parameter set to
the form. Custom credential collection pages need to handle the
OAM_REQ
parameter that is
submitted with the form.
■cookie: Adding this parameter and value stores the OAM Server state through part of the
DCCCtxCookie
(
encdata=… svrctx=…)
. However, when
serverRequestCacheType=COOKIE
or =FORM
, this could cause incorrect behavior if the resulting cookie length is beyond
browser limit.
Note:
■When
serverRequestCacheType=COOKIE
, Oracle recommends TempStateMode=form.
■When
serverRequestCacheType=BASIC
, either mode is fine.
To update
serverRequestCacheType
, use the WLST command configRequestCacheType as
described in the Oracle Fusion Middleware WebLogic Scripting Tool Command Reference.
Editing
serverRequestCacheType
is not supported using the Oracle Access Management
Console.
With ECC: The serverRequestCacheType dictates whether OAM Server stores its state in
memory(BASIC) or not (FORM or COOKIE). serverRequestCacheType = COOKIE or FORM
only makes difference when ECC is used. OAM Server stores its state in a request token, which
ECC keeps in a cookie or hidden form field as specified with the parameter:
serverRequestCacheType=COOKIE, for example.
With DCC: There is no difference between serverRequestCacheType=COOKIE or FORM.
TempStateMode controls how the DCC stores the OAM Server state (cookie or form) as
specified with the parameter's value: TempStateMode=cookie, for example. With the DCC,
POST data restoration with a Form-based Authentication Scheme requires the challenge
parameter TempStateMode=form.
See Also:
■"Configuring 11g WebGates and Authentication Policy for DCC" on page 19-109
■Table 16–2, " User-Defined WebGate Parameters"
■" Parameters Required for Authentication POST Data Handling"
■"Configuring the PasswordPolicyValidationScheme"
Table 19–23 (Cont.) User-Defined Challenge Parameters for Authentication Schemes
Challenge Parameter Definition

Managing Authentication Schemes
19-80 Administrator's Guide for Oracle Access Management
SSO capability enables users to access more than one protected resource or application
with a single sign in. After a successful user authentication at a specific level, the user
can access one or more resources protected by one or more Application Domains.
However, the authentication schemes used by the Application Domains must be at the
same level (or lower). When a user accesses a resource protected with an
authentication level that is greater than the level of his current SSO token, he is
re-authenticated. In the step-up case, the user maintains his current level of access
even if failing the challenge presented for the higher level. This is "additional
authentication".
Access Manager policies allow different resources of the same application to be
protected with different authentication levels.
In such cases, the application must enforce the Level and send the Dynamic Directive
to mod_osso for re-authentication. On receiving the Dynamic Directive, mod_osso will
redirect to Access Manager for re-authentication at the appropriate level.
Both agent types redirect the user to the OAM Server to authenticate again. The
challenge is presented according to the level of the authentication scheme configured
in the policy for the resource.
Registered agents detect the authentication level as follows:
■OAM Agents receive an insufficient level error message from the OAM Server, as
described in "Detection of Insufficient Authentication Level by OAM Agent" on
page 19-81.
■mod_osso detects the authentication level from dynamic directives, as described in
Multi-Level Authentication Processing with 10g OSSO Agent on page 19-81.
Note: Multi-level authentication does not affect, negate, or alter
X.509 certificate authentication.
Note: A user who is authenticated to access resources at level 3, is
eligible to access resources protected at levels less than or equal to 3.
However, if the user is authenticated to access resources at level 2 and
then attempts to access resources protected by level 3, the user is
asked to re-authenticate (this is known as step-up authentication).
Note: mod_osso delegates authentication to Access Manager. Oracle
recommends that mod_osso-protected resources be protected with
Access Manager authentication levels. the mod_osso plug-in does not
support two resources on the same application with a different trust
level.

Managing Authentication Schemes
Managing Authentication and Shared Policy Components 19-81
19.9.2.2 Detection of Insufficient Authentication Level by OAM Agent
When the user requests a resource that is protected with a higher level authentication
scheme, the following process occurs.
Process overview: OAM Agent detects insufficient session level
No check of the authentication level is made on the server side. The following example
refers to a 10g OAM Agent.
1. The OAM Agent sends the request to the OAM Proxy to obtain the scheme details
for the protected resource.
2. The OAM Agent sends the request for session information to the OAM Proxy.
3. The OAM Proxy returns details of the ObSSOCookie, including the authenticated
level of the ObSSOCookie.
4. The OAM Agent compares the level of ObSSOCookie with that of the
authentication scheme.
■If insufficient, the agent invokes the authentication process again.
■If sufficient, the access is granted access.
19.9.2.3 Multi-Level Authentication Processing with 10g OSSO Agent
In contrast to OAM Agents, all the resources protected by mod_osso on a host (or
virtual host) are protected at the same level.
With mod_osso, multi-level authentication applies when user is already authenticated
using one mod_osso host (or virtual host) at Level 2 and then tries to access another
mod_osso protected host (or virtual host) at level 3.
Process overview: OSSO Agent multi-level authentication flow
1. The user tries to access a resource protected by mod_osso on host1 at level 2.
2. The OSSO Agent sends the request to the OAM Proxy to obtain the authentication
scheme details for the protected resource.
3. The OAM_ID cookie for SSO Server and a host based cookie "HOST_port" for
host1 are set and contain authentication level information.
See Also: Oracle Fusion Middleware Integration Guide for Oracle
Identity Management Suite; for example, the chapter Integrating
Access Manager and Oracle Adaptive Access Manager. The user was
already authenticated when he accessed another resource with a lower
authentication level using Access Manager. Oracle Adaptive Access
Manager does not show the user name and password pages because
the user is already authenticated. However, the flows that are
executed in Oracle Adaptive Access Manager depend on whether the
user was already logged in to Oracle Adaptive Access Manager.
See Also: "Understanding Authentication Methods and Credential
Collectors" on page 19-17
Note: 11g OAM Agents are associated with individual per-agent
OAMAuthnCookies.

Managing Authentication Schemes
19-82 Administrator's Guide for Oracle Access Management
4. After authentication, the user tries to access a resource on host2 that is protected
with a higher level of authentication.
5. The user is redirected to the OAM Server for authentication because this is the first
time accessing host2.
6. The OAM Server (OSSO Proxy) receives the OAM_ID cookie which has an
insufficient level to access the resource on host2.
■If the level is insufficient, the OAM Server (OSSO Proxy) triggers
re-authentication.
■If the level is sufficient, the access is granted access.
19.9.3 Creating an Authentication Scheme
Users with valid Administrator credentials can use the following procedure to add a
new authentication scheme for use in an Application Domain.
Prerequisites
The authentication module must be defined and ready to use as described in
"Deploying and Managing Individual Plug-ins for Authentication" on page 19-55.
To create an authentication scheme
1. From the Oracle Access Management Console, click Authentication Schemes.
2. Click the Create button in the tool bar.
3. Fill in the fresh Authentication Scheme page (Table 19–20) by supplying
information based on your deployment:
a. Name: LDAPSimpleFormScheme
b. Authentication Level
c. Challenge Method: FORM
d. Challenge Redirect URL: http://CredentialCollectorhost:port
e. Authentication Module: LDAP
f. Challenge URL: /CredentialCollector/loginform...
g. Challenge Parameters: Table 19–22, Table 19–23, Table 19–30
h. Context Type
4. Click Apply to submit the new scheme (or close the page without applying
changes).
5. Dismiss the Confirmation window.
6. Optional: Click the Set as Default button to automatically use this with new
Application Domains, then close the Confirmation window.
7. In the navigation tree, confirm the new scheme is listed (Refresh the tree, if
needed).
See Also:
■"About Authentication Schemes and Pages" on page 19-65
■"Adding PasswordPolicyValidationScheme to Authentication
Policy for DCC" on page 19-111 if needed

Managing Authentication Schemes
Managing Authentication and Shared Policy Components 19-83
8. Proceed to "Defining Authentication Policies for Specific Resources" on page 20-32.
19.9.4 Searching for an Authentication Scheme
Users with valid Administrator credentials can perform the following task to search
for a specific authentication scheme.
To search for an authentication scheme
1. From the Oracle Access Management Console, click Authentication Schemes.
2. In the text field, enter the desired scheme name (with or without wild card *). For
example:
OA*
3. Click the Search button to initiate the search.
4. Click the Search Results tab to display the results table, and then:
■Edit: Click the Edit button in the tool bar to display the configuration page.
■Delete: Click the Delete button in the tool bar to remove the instance; confirm
removal in the Confirmation window.
■Detach: Click Detach in the tool bar to expand the table to a full page.
■View: Select a View menu item to alter the appearance of the results table.
5. Click the Browse tab to return to the navigation tree when you finish with the
Search results.
19.9.5 Viewing, Editing, or Deleting an Authentication Scheme
Users with valid Administrator credentials can use the following procedure to view or
modify an existing authentication scheme.
To view or modify an authentication scheme
1. From the Oracle Access Management Console, click Authentication Schemes and
find the desired scheme.
2. Edit:
a. On the Authentication Scheme page, modify values for your environment
(Table 19–20).
See Also: "Conducting A Search"
Note: During a delete operation, if the Authentication Scheme is
associated with any authentication policy, she is prompted with
association details. Without policy associations, the scheme is deleted.
See Also:
■"About Authentication Schemes and Pages"
■"Configuring the PasswordPolicyValidationScheme"

Extending Authentication Schemes with Advanced Rules
19-84 Administrator's Guide for Oracle Access Management
b. Click Apply to submit the changes (or close the page without applying
changes).
c. Dismiss the Confirmation window.
3. Set as Default: Click the Set as Default button to automatically use this scheme
when creating policies in fresh Application Domains, then close the Confirmation
window.
4. Delete:
a. Review any Application Domain using this authentication scheme and assign
a different scheme.
b. Review the Authentication Scheme page to confirm this is the scheme to
remove, then close the page.
c. In the navigation tree, click the name of the scheme and then click the Delete
button in the tool bar.
d. Confirm removal (or dismiss the Confirmation window).
19.10 Extending Authentication Schemes with Advanced Rules
Advanced Rules have been added to allow for extending an existing authentication
policy. Both Pre-Authentication and Post-Authentication rules can be applied.
Advanced Rules contain Boolean expressions. If there is more than one triggered
Authentication Rule outcome, the lowest execution order outcome will be chosen as
the final outcome. Table 19–24 documents the attributes that need be defined when
creating an Advanced Rule.
Certain customers need the form-based authentication scheme to be extended to
support non-browser clients. The requirement is that a form-based login page should
be presented to the browser but allow a non-browser client to do a basic authentication
based on credentials passed via header. See the following sections for details.
■Using Pre-Authentication Advanced Rules
■Understanding Sample Advanced Rules
Note: In an upgraded deployment with OSSO Agents, change the
Authentication Scheme and any Protected Resource Policies to use
SSOCoExistMigrateScheme.
Table 19–24 Advanced Rules Attributes
Name Description
Name AuthnRule name. Name has to be unique within the checkpoint
Description Description of the rule
Execution Order Order in which the outcome will be executed in cases of more than 1
outcome
Condition Script; the user can configure condition based on the HTTP request
header's availability and set the desired outcome
Outcome ID of the Authentication Scheme to which the rule applies. Access / Deny.

Extending Authentication Schemes with Advanced Rules
Managing Authentication and Shared Policy Components 19-85
19.10.1 Using Pre-Authentication Advanced Rules
For user authentication, a form-based login page is presented through the browser for
the user to complete. In some cases, a non-browser client (switches, routers and the
like) might need to do basic authentication based on credentials passed via the request
header. (This might arise when a particular resource protected by a form-based
authentication scheme can be accessed by both users with a browser as well as
switches, routers and other types of non-browser clients.) Non-browser client
authentication support has been added (and can be configured) as one of the
pre-authentication Advanced Rules. To support non browser client authentication, a
user can configure the desired condition in an Authentication Rule (based on the
HTTP request header's availability) and set a desired outcome.
Before executing the Authentication Condition, the Access Manager server prepares a
request context using the available Request data (to construct a Boolean expression
based condition). The following tables describe the various request context data
details.
■Table 19–25, " Request Context Data"
■Table 19–26, " Location Context Data"
■Table 19–27, " Session Context Data"
■Table 19–28, " User Context Data"
Table 19–25 Request Context Data
Attribute Name Description
requestMap Map of all the request headers, parameters and post data values.
This example can get the custom-header key from request
header and compare it with value 'test'.
str(request.requestMap['custom-header']).lower().find('test') > 0
resourceMap Map of matched resource details
accept Returns 'Accept' header value
acceptCharset Returns 'Accept-Charset' header value
acceptEncoding Returns 'Accept-Encoding' header value
acceptLanguage Returns 'Accept-Language' header value
authorization Returns 'Authorization' header value
connection Returns 'Connection' header value
contentLength Returns 'ContentLength' header value
cookie Returns 'Cookie' header value
host Returns 'Host' header value
ifModifiedSince Returns 'ifModifiedSince' header value
pragma Returns 'Pragma' header value
referer Returns 'Referer' header value
userAgent Returns 'UserAgent' header value
resourceHost Returns matched Resource's Host value
resourcePost Returns matched Resource's Port value
resourceOperation Returns matched Resource's Operation value
resourceQueryString Returns matched Resource's QueryString

Extending Authentication Schemes with Advanced Rules
19-86 Administrator's Guide for Oracle Access Management
19.10.2 Understanding Sample Advanced Rules
Table 19–29 contains sample Advanced Rules.
resourceName Returns matched Resource's name
resourceType Returns matched Resource's Type
resourceURL Returns matched Resource's URL; for example, if 'landingPage'
is in request.resourceURL, condition will evaluate to true if
resourceURL has landingPage in it.
Table 19–26 Location Context Data
Attribute Name Description
locationMap Map of all the location data values; for example:
location.locationMap['CLIENT_IP'] == '10.1.23.4'
clientIP Returns client IP address; for example:
location.clientIP.startswith('10.2')
proxyIP Returns Proxy IP address
Table 19–27 Session Context Data
Attribute Name Description
sessionMap Map of all the session data values; for example:
location.sessionMap['count'] > 2;
count Returns number of sessions for the current user; for example:
session.count > 2
Table 19–28 User Context Data
Attribute Name Description
userMap Map of all the user profile data; for example:
user.userMap['email'] == 'john.joe@example.com'
Table 19–29 Sample Advanced Rules
Sample Rule
Sample Jython Script-based
Condition Notes
Switching authentication
scheme based on private or
public IP rule
location.clientIP.startswith('10.') or
location.clientIP.startswith('172.16') or
location.clientIP.startwith('192.168')
This rule can be used in
Pre and Post
authentication
checkpoints
Black listed IP location.clientIP in ['130.35.50.115',
'130.35.50.112', '130.35.50.113']
This rule can be used in
Pre and Post
authentication
checkpoints
Client Browser Type request.userAgent.lower().find('firefo
x') > 0
This rule can be used in
Pre and Post
authentication
checkpoints
Table 19–25 (Cont.) Request Context Data
Attribute Name Description

Configuring Challenge Parameters for Encrypted Cookies
Managing Authentication and Shared Policy Components 19-87
19.11 Configuring Challenge Parameters for Encrypted Cookies
This section provides the following topics:
■About Challenge Parameters for Encrypted Cookies
■Configuring Challenge Parameters for Security of Encrypted Cookies
■Setting Challenge Parameters for Persistence of Encrypted Cookies
19.11.1 About Challenge Parameters for Encrypted Cookies
In addition to the OAM Server cookie (OAM_ID), Access Manager implements single
sign-on through an encrypted cookie:
■11g Webgate, One per agent: OAMAuthnCookie_<host:port>_<random number>
set by Webgate using the authentication token received from the OAM Server after
successful authentication
Note: A valid OAMAuthnCookie is required for a session.
■10g Webgate, One ObSSOCookie for all 10g Webgates.
Access Manager provides the
ssoCookie
challenge parameter that you can use within
any authentication scheme to control how Webgates set the flags of the encrypted
cookie. For example:
■Securing Encrypted Cookie: Ensures that the encrypted cookie is sent only over
an SSL connection and prevents the encrypted cookie from being sent back to a
non-secure Web server.
■Persisting Encrypted Cookie: Allows the user to log in for a time period rather
than a single session. Persistent cookie functionality works with Internet Explorer
and Mozilla browsers.
Blocking access to user
having user attribute
'description' equals 'test'
user.userMap['description'] == 'test' This rule can be used
only in Post
authentication
checkpoints
Non browser client request.authorization.lower().startswi
th('basic')
This rule can be used
only in Pre
authentication
checkpoints
Customer HTTP Header
value
request.requestMap['param'] == 'test' This rule can be used in
Pre and Post
authentication
checkpoints
Table 19–29 (Cont.) Sample Advanced Rules
Sample Rule
Sample Jython Script-based
Condition Notes

Configuring Challenge Parameters for Encrypted Cookies
19-88 Administrator's Guide for Oracle Access Management
Table 19–30 describes specific challenge parameters that control how Webgates set
encrypted cookie flags for single sign-on.
19.11.2 Configuring Challenge Parameters for Security of Encrypted Cookies
The challenge parameter is not case sensitive.
Note: The value of the challenge parameter is note case sensitive.
Syntax is the same regardless of your Webgate release. A single value
is specified after the equal sign (=):
ssoCookie=value
Multiple values must be separated by a semicolon (;). For example:
ssoCookie=value1;value2;...
■For detached credential collector-enabled Webgates, set these
parameters directly in the agent registration page (Table 16–2).
■For non-DCC agents (Resource Webgates), these parameters are
configured through Authentication Scheme challenge parameters
(Table 19–30).
Table 19–30 Challenge Parameters for 10g/11g Encrypted Cookies
11g /10g Webgate Challenge
Parameter Syntax for Encrypted
Cookies Description
ssoCookie=
Parameter that controls flags for the SSO cookie OAMAuthnCookie.
miscCookies=
Parameter that controls flags for all other Access Manager encrypted
cookies.
Secure
Ensures that the encrypted cookie is sent only when the resource is
accessed through HTTPS. A secure cookie is required only when a
browser is visiting a server using HTTPS.
ssoCookie=Secure
miscCookies=Secure
disableSecure
Explicitly disables Secure cookies.
ssoCookie=disableSecure
miscCookies=disableSecure
httponly
Enabled by default with 11g Webgate SSO OAMAuthnCookie and
miscellaneous cookies.
ssoCookie=httponly
miscCookies=httponly
disablehttponly
Explicitly disables
httponly
functionality, making the encrypted
cookies accessible to client-side scripts.
ssoCookie=disablehttponly
miscCookies=disablehttponly
ssoCookie=max-age=time-in-secon
ds
Creates a persistent cookie in browsers, rather than one that lasts for
a single session, and specifies the time interval in-seconds when the
cookie expires.
For example, to set the cookie to expire in 30 days (2592000 seconds):
max-age=2592000
See Also: "Creating an Authentication Scheme" on page 19-82

Understanding Password Policy
Managing Authentication and Shared Policy Components 19-89
To secure the encrypted cookie
1. Create an authentication scheme.
2. In the Challenge Parameter field, enter your specification for the desired
encrypted cookies (Table 19–30).
3. Confirm that the OAM Servers and clients (OAM Agents) are communicating
securely across the Oracle Access Protocol channel, as described in Appendix C.
19.11.3 Setting Challenge Parameters for Persistence of Encrypted Cookies
The challenge parameter is not case sensitive.
To define encrypted cookie persistence
1. Define an authentication scheme.
2. In the challenge parameter for this scheme, add the following (Table 19–30):
Webgate
ssoCookie=max-age=
time-in-seconds
19.12 Understanding Password Policy
This section provides the following topics:
■Previewing Oracle-Provided Password Forms and Functionality
■Previewing the Password Policy Page in Oracle Access Management Console
■About Credential Collectors and Password Policy Validation
19.12.1 Previewing Oracle-Provided Password Forms and Functionality
Access Manager provides several pages for user interactions during credential
collection, as described in Credential Collector Password Pages. The location can be
customized, depending on the desired topology of the authentication scheme being
developed.
See Also: "Creating an Authentication Scheme" on page 19-82
Table 19–31 Credential Collector Password Pages
Credential
Collector Description
ECC pages The default embedded credential collector jsp forms, by default, reside on the OAM
Servers.
■Login page: /pages/login.jsp
■Logout page: /pages/logout.jsp
■Error page: /pages/servererror.jsp
■Multi-step authentication page: /pages/mfa.jsp
DCC pages Dynamic pages general login/logout and password policy with the DCC are excluded
automatically through the OHS httpd.conf/webgate.conf file--you do not need to
configure a policy to exclude these. See the Webgate host:
■
$WEBGATE_HOME/webgate/ohs/oamsso/*
■$
WEBGATE_HOME/webgate/ohs/oamsso-bin/*pl
(update the Perl location in the
first line of the login, logout, and securid scripts)
■
$WEBGATE_HOME
/webgate/ohs/
oamsso-bin/templates
/*
See Also:
For details about customizing pages and messages, see the Oracle Fusion Middleware
Developer's Guide for Oracle Access Management.
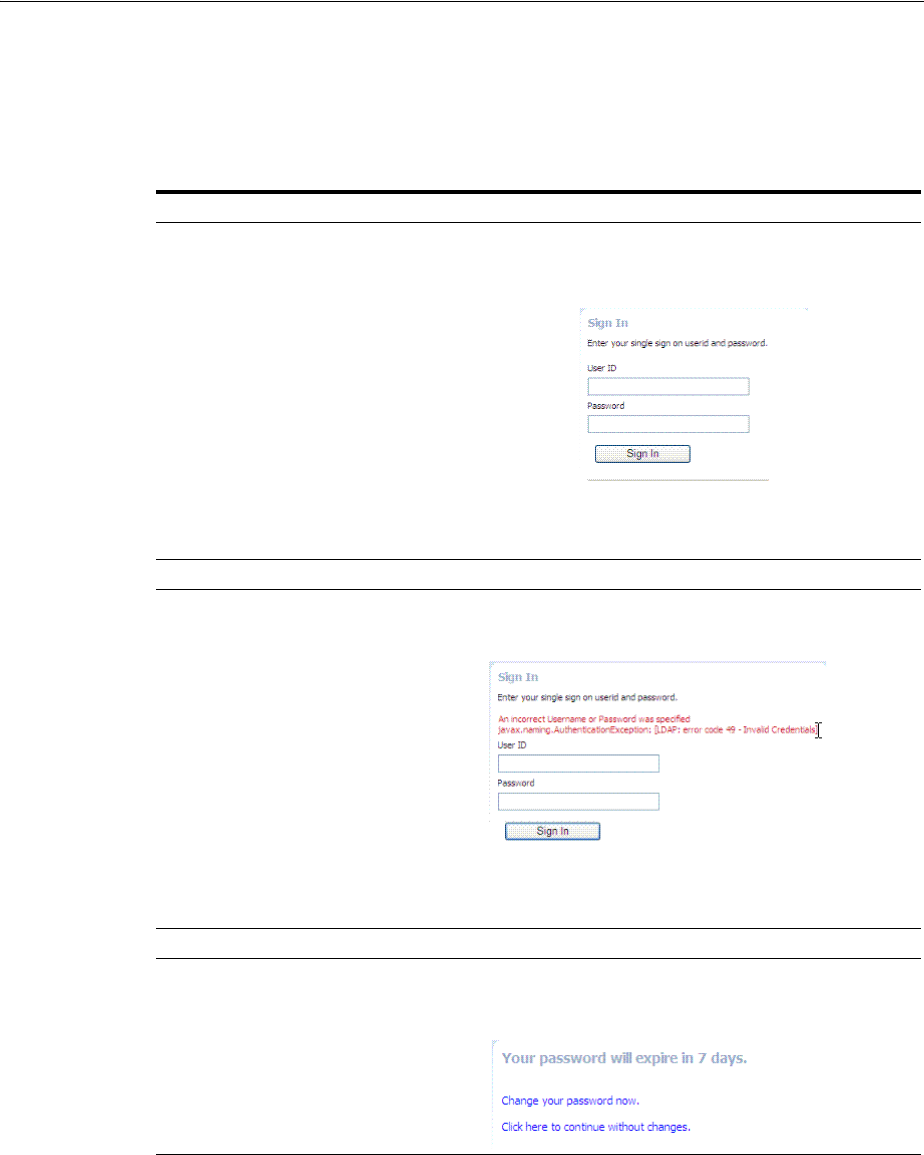
Understanding Password Policy
19-90 Administrator's Guide for Oracle Access Management
Table 19–32 shows the password forms provided.The default pages can be customized
for your enterprise, or replaced entirely with custom pages. For example, you can
design, implement, and deploy a custom page that displays a different version of the
login form for a mobile browser than is used for a desktop browser.
Table 19–32 Password Management Forms and Functions
Form Function
Sign In Form The standard login form provides fields for userID and password.
Clicking the Login button initiates authentication processing
governed by the authentication module.
See: Oracle Fusion Middleware Developer's Guide for Oracle Access
Management for details about customizing login forms.
Sign In Error This standard login form appears when an error occurs. The text in
red identifies the errors, which can be suppressed or displayed.
See: Oracle Fusion Middleware Developer's Guide for Oracle Access
Management for details about suppressing or displaying.
Password Expiry Notification The following message appears to inform the user that her password
will expire, based on the notification policy.
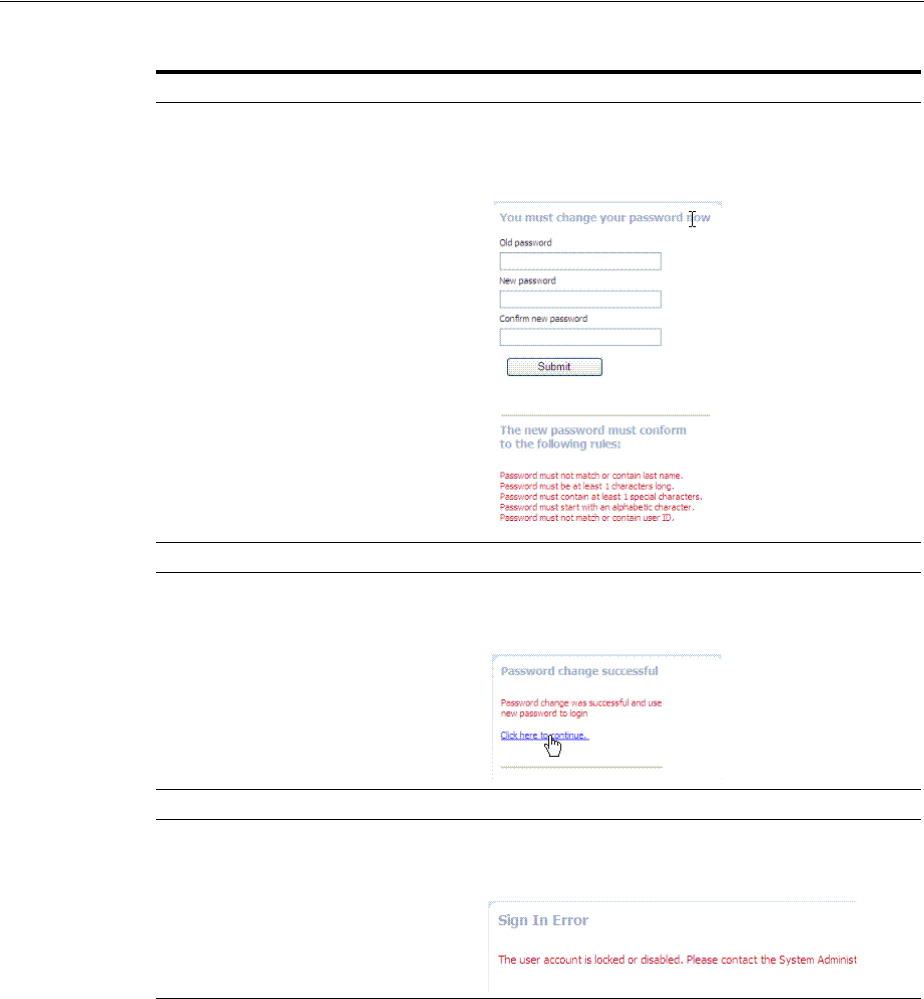
Understanding Password Policy
Managing Authentication and Shared Policy Components 19-91
19.12.2 Previewing the Password Policy Page in Oracle Access Management Console
Figure 19–29 shows the Password Policy page in the Oracle Access Management
Console. Administrators use this page to define policy based on enterprise
requirements.
Change Password Form Based on password expiration policy configuration, the following
window appears to enforce the policy and require user to change his
password.
Password Change Success The following message appears to confirm the password change was
successful.
Locked or Disabled User Account Based on the password policy, user account lockout occurs when
supplied credentials fail during the maximum allowed login attempts.
Table 19–32 (Cont.) Password Management Forms and Functions
Form Function
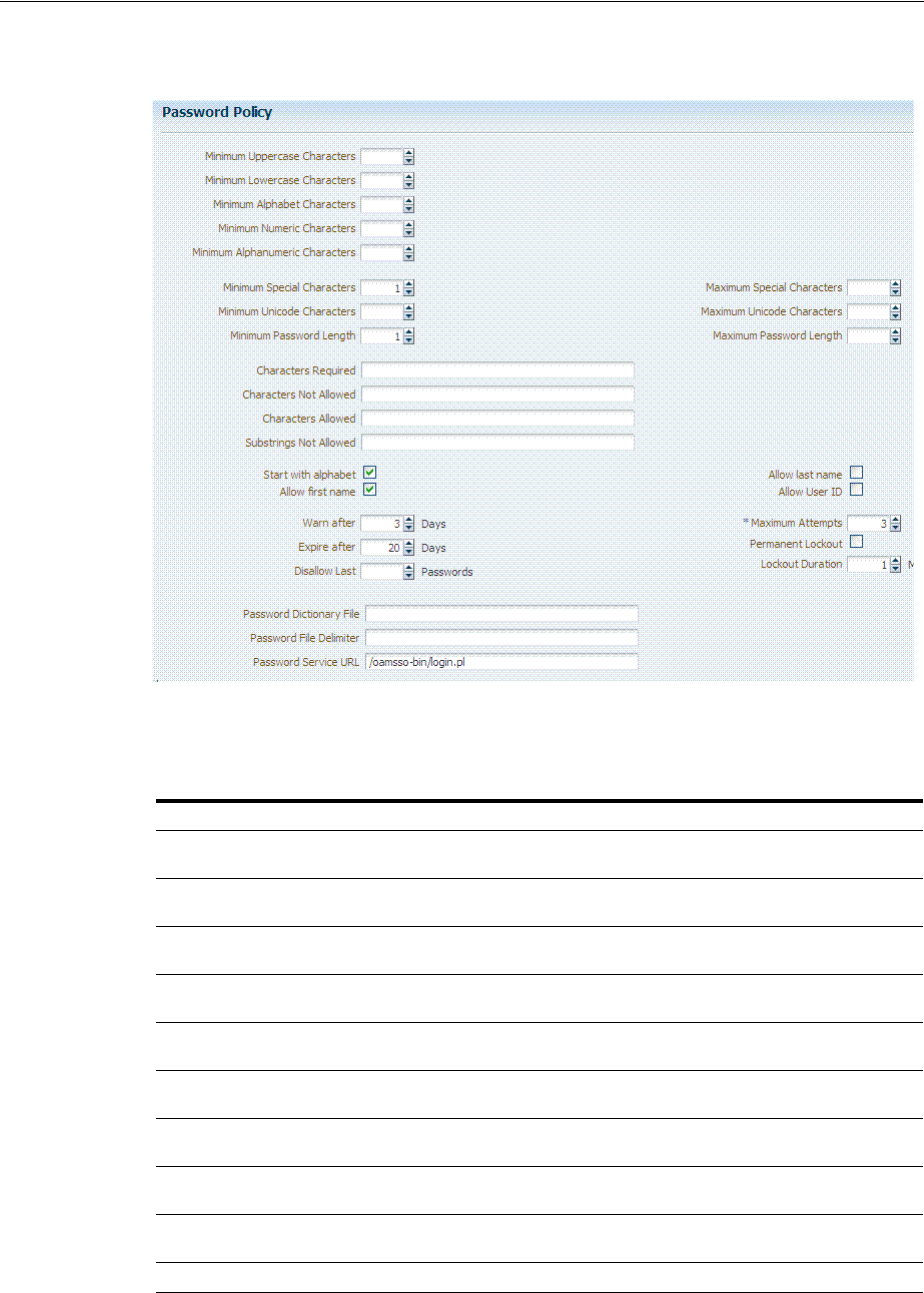
Understanding Password Policy
19-92 Administrator's Guide for Oracle Access Management
Figure 19–29 Password Policy Configuration Page
Table 19–33 describes configurable password policy elements (as read from left to right
in the console).These elements are used by both the ECC and DCC.
Table 19–33 Password Policy Elements
Element Description
Minimum Uppercase Characters Defines the minimum number of uppercase characters required in a
password.
Minimum Lowercase Characters Sets the minimum number of lowercase characters required in a
password.
Minimum Alphabetic Characters Defines the minimum number of special characters allowed in the
password.
Minimum Numeric Characters Sets the minimum number of numeric characters required in a
password.
Minimum Alphanumeric
Characters
Defines the minimum number of alphanumeric characters required in
a password.
Minimum Special Characters Sets the minimum number of special characters required in a
password.
Maximum Special Characters Defines the maximum number of special characters allowed in a
password.
Minimum Unicode Characters Defines the minimum number of unicode characters required in a
password.
Maximum Unicode Characters Sets the maximum number of unicode characters allowed in a
password.
Minimum Password Length Sets the total minimum number of characters required in a password.
Maximum Password Length Defines the total maximum number of characters allowed in a
password.

Understanding Password Policy
Managing Authentication and Shared Policy Components 19-93
19.12.3 About Credential Collectors and Password Policy Validation
Regardless of the credential collection method you choose, you can configure one
global password policy that applies to all Access Manager-protected resources (using
the Password Policy Validation Module in the authentication scheme). Also, the
relevant URLs for the credential collector and related forms must be specified as
outlined in Table 19–34.
Characters Required Defines the specific characters that are required in a password. No
delimiter is needed or allowed in this definition.
Characters Not Allowed Sets the specific characters that cannot be used in a password. No
delimiter is needed or allowed in this definition
Characters Allowed Defines all allowed characters in a password. No delimiter is needed
or allowed in this definition
Substrings Not Allowed Specific character strings that are not allowed in a password. Use a
comma as the delimiter in this definition.
Start with alphabet Specifies that the first character in a password must be alphabetic,
when checked.
Allow last name Specifies that the user's last name is allowed in the password, when
checked.
Allow first name Specifies that the user's first name is allowed in the password, when
checked.
Allow User ID Specifies that the user's userID is allowed in the password, when
checked.
Warn after Defines when (in days) to warn a user before her password will
expire.
Maximum Attempts Identifies the maximum number of login attempts a user can make
before a lockout.
Expire after Defines the period of time (in days) that the password is valid.
Lockout Duration Identifies the period of time the user is locked out (in minutes) after
the designated number of failed login attempts. After this period, the
user can attempt a fresh login.
Permanent Lockout specifies permanent lockout after the designated number of failed
login attempts.
Disallow Last Defines the number of previous passwords that cannot be used when
the user changes her password.
Password Dictionary File Identifies the physical file on OAM Servers that contain the list of
restricted words that can not be specified in a password.
Password File Delimiter Defines the delimiter used in the Password Dictionary file to separate
various words. For example, if the file contains
abc,def,welcome
and
the dictionary delimiter is comma (,), the words that are restricted and
cannot be used in a user password are
abc def
and
welcome
.
Password Service URL The location of various password pages.
Table 19–33 (Cont.) Password Policy Elements
Element Description

Understanding Password Policy
19-94 Administrator's Guide for Oracle Access Management
Table 19–34 Specifying Credential Collectors and Related Forms for Authentication
In the . . . For the ECC . . . For the DCC . . .
OAM Agent Registration
DCC Only
N/A. Check the box beside Allow Management
Operations in the OAM Agent registration page.
See Also: "Enabling DCC Credential Operations"
on page 19-109
login, error, and password
pages
Pages where the user enters credentials
arrive out of the box on the OAM Server and
require no additional settings or changes.
■Login page: /pages/login.jsp
■Logout page: /pages/logout.jsp
■Error page: /pages/servererror.jsp
■Multi-step authentication: /pages/mfa_
login.jsp
Dynamic pages for general login/logout and
password policy with the DCC are excluded
automatically through the OHS
httpd.conf/webgate.conf
file--you do not need to
configure a policy to exclude these.
See Webgate host directories
$WEBGATE_
HOME/webgate/ohs/oamsso/*,
$
WEBGATE_
HOME/webgate/ohs/oamsso-bin/*pl
, and
$WEBGATE_
HOME/webgate/ohs
/
oamsso-bin/templates
/* for:
■Login page:
/oamsso-bin/login.pl
■Logout:
/oamsso-bin/logout.pl
■RSA SecurID login pages:
/oamsso-bin/securid.pl
Perl Scripts for DCC-based Login and Logout
The path name of the Perl executable must be
updated in Oracle-provided Perl scripts on the
Webgate host
$WEBGATE_
HOME/webgate/ohs/oamsso-bin/*pl
to be
consistent with the actual location.
See Also: Table 19–5, " Comparing the DCC and
ECC"
Password Policy, Password
Service URL
The Default/ECC password page is used
automatically:
Password Service URL for ECC:
/oam/pages/pswd.jsp
See Also: "Defining Your Global Password
Policy" on page 19-98
Enter the DCC password page:
Password Service URL for DCC:
/oamsso-bin/login.pl
See Also: "Locating and Updating DCC Forms for
Password Policy" on page 19-110
User Identity Store The user data object definition in the Access
Manager schema is extended with attributes
that enable password user status and
password history maintenance. This
definition is provided in an LDIF file, and
must be added to each user identity store
using the
ldapadd
tool. Oracle-provided
LDIFs are identified in Table 19–35.
Same for both DCC and ECC:
See Also:
■"Adding Key Password Attributes to the
Default Store" on page 19-99
■"Adding an Administrator to Change User
Attributes After a Password Change"
Password Policy Validation
Authentication Module
Enter the Default Store as the KEY_
IDSTORE_REF for each of the three plug-ins
/ steps (with an Error redirect on Failure):
See Also:
■Table 19–13, " Parameter Details for
Various Plug-ins"
■"Configuring the Password Policy
Validation Authentication Module"
Same for both DCC and ECC:
Authentication Scheme,
Challenge Redirect URL
Enter the Credential Collector host:
■For ECC, relative URI format:
/oam/server (server prepends the
host:port)
See Also: "Configuring the
PasswordPolicyValidationScheme"
Enter the Credential Collector host:
■For DCC, full URL: http://dcchost:port
■For DCC combined with Resource Webgate:
Leave empty
See Also: "Configuring the
PasswordPolicyValidationScheme"

Understanding Password Policy
Managing Authentication and Shared Policy Components 19-95
Authentication Scheme,
Challenge URL
Enter the Credential Collector login form
relative URI:
■For ECC: /pages/login.jsp
See Also: "Configuring the
PasswordPolicyValidationScheme"
Enter the Credential Collector login form relative
URI:
■For DCC: /oamsso-bin/login.pl
See Also: "Configuring the
PasswordPolicyValidationScheme"
Authentication Scheme,
Challenge Parameters
ECC: User-defined Challenge Parameters:
OverrideRetryLimit=0
initial_command=NONE
See Also:
■Table 19–23, " User-Defined Challenge
Parameters for Authentication
Schemes"
■"Configuring the
PasswordPolicyValidationScheme"
DCC: User-defined Challenge Parameters:
■creds
■extracreds
■MaxPostDataBytes
■DCCCtxCookieMaxLength
■TempStateMode
See Also:
■Table 19–23, " User-Defined Challenge
Parameters for Authentication Schemes"
■"Configuring the
PasswordPolicyValidationScheme"
Table 19–34 (Cont.) Specifying Credential Collectors and Related Forms for Authentication
In the . . . For the ECC . . . For the DCC . . .

Understanding Password Policy
19-96 Administrator's Guide for Oracle Access Management
Caveats for Integrated Deployments
When you are using Oracle Identity Management and Oracle Access Management
with Oracle Internet Directory, there are two sets of password policy definitions and
enforcement.
■Password Policy Definition in both Oracle Identity Management and in Oracle
Internet Directory
■Password Policy Enforcement by one of the following:
Oracle Access Management enforces state policies (incorrect password, for
example) during Web access; Oracle Internet Directory enforces its own state
policies as well as LDAP operations (bind and compare, for example).
Server Error Mode Same for both DCC and ECC.
See: "Setting the Error Message Mode for
Password Policy Messages" on page 19-113
Same for both DCC and ECC.
See: "Setting the Error Message Mode for Password
Policy Messages" on page 19-113
Authentication Policy Credential collectors in authentication
policies:
■ECC: Use any authentication scheme
configured for the ECC in the
application domain for the protecting
Webgate (Resourcre Webgate)
See Also: "Adding Your
PasswordPolicyValidationScheme to ECC
Authentication Policy"
Credential collectors in Authentication Policies:
DCC Separate from Resource Webgate:
***Protecting (Resource) Webgate Application
Domain, (Authentication Policy protecting
resources), use the DCC-related Authentication
Scheme.
***DCC Webgate Application Domain,
Authentication Policy protecting resources, use
the DCC-related Authentication Scheme. Consider:
--With No Action URL: DCC uses the
default /oam/server/auth_cred_submit, which is
automatically protected with the DCC-related
authentication scheme.
--With an Action URL: Explicitly protect the
specified Action URL with the DCC Scheme.
See Also: "Adding
PasswordPolicyValidationScheme to
Authentication Policy for DCC"
Logout Configuration ECC:
In the protecting (Resource) Webgate Agent
registration, configure the
Logout URL
as
shown in Table 16–3, " Elements on
Expanded 11g and 10g WebGate/Access
Client Registration Pages"
See "Configuring Centralized Logout for 11g
Webgates" on page 22-4
DCC:
■In the DCC Agent registration page the
Logout Redirect URL is ignored.
■In the protecting (Resource) Webgate
registration, define the:
Logout Redirect URL
:
http//
dcchost:port/
oamsso-bin/logout.pl
Note: If the Resource Webgate's Logout Redirect
URL is anything other than
logout.*
, then that
URL must be defined in the
Logout URL
parameter
of the DCC Webgate registration. For example:
If Resource Webgate registration has:
Logout Redirect URL
http//dcchost:port/someurl.html
then DCC Webgate registration must have:
Logout URL:
someurl.html
■DCC: Perl path must be updated in
Oracle-provided scripts.
See "Configuring Logout When Using Detached
Credential Collector-Enabled Webgate" on
page 22-6
Table 19–34 (Cont.) Specifying Credential Collectors and Related Forms for Authentication
In the . . . For the ECC . . . For the DCC . . .

Managing Global Password Policy
Managing Authentication and Shared Policy Components 19-97
Oracle Identity Management enforces value policies (characteristics of the
password) during user creation of the password update; Oracle Internet Directory
enforces it's own value policies as well for policies for LDAP operations (add,
modify for example).
To use just one set of policies you can either:
1. Make the Oracle Internet Directory policies weaker or the same strength as the
Oracle Identity Management and Oracle Access Management policies. However,
this leads to a double enforcement.
2. Disable native LDAP password policy validation, which unfortunately leaves no
enforcement for direct LDAP operations.
19.13 Managing Global Password Policy
Authentication involves determining which credentials a user must supply when
requesting access to a resource, gathering credentials, and returning a response that is
based on the results of credential validation.
Access Manager authentication processing relies on an authentication module (or
plug-in) to define the rules governing requirements and transmission of information to
the back-end authentication scheme. By default, Access Manager supports using the
OAM Server Embedded Credential Collector (ECC) for authentication processing.
However, you can also configure an 11g Webgate to use as an detached credential
collector (DCC) instead.
Both the ECC and DCC facilitate multi-step authentication flows where credentials are
not provided all at once. This increases the flexibility of interaction with users or
programmatic entities for the purpose of collecting authentication-related information.
For more information on multi-factor authentication, see the Oracle Fusion
Middleware Developer's Guide for Oracle Access Management.
Regardless of the credential collection method you choose (default ECC or optional
DCC), you can configure a global password policy as described in this section that
applies to all Access Manager-protected resources.
Prerequisites
■Previewing Oracle-Provided Password Forms and Functionality
■Previewing the Password Policy Page in Oracle Access Management Console
■About Credential Collectors and Password Policy Validation
The following overview provides links to topics that describe how to configure and
use the password policy. Unless explicitly stated, all tasks apply equally to the ECC
and DCC. Skip any tasks that do not apply to your deployment.
Task overview: Password policy management includes
1. Defining Your Global Password Policy
2. Adding Key Password Attributes to the Default Store
3. Adding an Administrator to Change User Attributes After a Password Change
4. Configuring Password Policy Authentication
5. DCC: Configuring 11g WebGates and Authentication Policy for DCC
6. Completing Password Policy Configuration
7. Testing Your Multi-Step Authentication

Managing Global Password Policy
19-98 Administrator's Guide for Oracle Access Management
19.13.1 Defining Your Global Password Policy
Users with Oracle Access Management Administrator credentials can use the
following procedure to define a common password policy based on enterprise-defined
requirements.
The specifications in this example are for illustration only. Your environment will be
different.
To configure the password policy in Oracle Access Management
1. From the Oracle Access Management Console, click Password Policy under the
Access Manager panel.
2. On the Password Policy page, enter the Password Service URL for the desired
credential collector login page (ECC or DCC, Table 19–34).
3. On the Password Policy page, enter values (Table 19–33) based on requirements
for your enterprise. For example:
■Warn After 3
■Expire After 20
■Permanent Lockout (Disable)
■Lockout duration 1
■Minimum Special Characters 1
4. Click Apply to submit the policy.
5. Proceed as needed for your environment; skip any tasks that have been completed
already:
■Adding Key Password Attributes to the Default Store
■Adding an Administrator to Change User Attributes After a Password Change
19.13.2 Designating the Default Store for Your Password Policy
The Password Policy operates only with the designated Default Store. Administrator
roles and credentials must reside in the System Store.
To designate a Default Store for the global password policy
1. From the Oracle Access Management Console, click User Identity Stores.
2. Set the System Store: Administrator roles and credentials must reside in this store.
a. Open the page of the store to designate as the System Store.
Note: The only difference between a global password policy for the
ECC versus the DCC is
Password Service URL
, which is credential
collector-specific and defaults to ECC pages as shown in Step 2.
ECC Password Service URL DCC Password Service URL
/pages/login.jsp /oamsso-bin/login.pl
See Also: "Setting the Default Store and System Store"

Managing Global Password Policy
Managing Authentication and Shared Policy Components 19-99
b. Check Set as system store (for domain wide authentication and authorization
operations).
c. Click Applyn.
d. Add Administrators: See "Managing the Administrators Role" on page 5-22.
e. Authentication Module: Set the LDAP Authentication Module used by the
OAMAdminConsoleScheme
(authentication scheme) to use this System Store.
f. Configure one or more authentication plug-ins to use this store, as described
in "Orchestrating Multi-Step Authentication with Plug-in Based Modules" on
page 19-28.
3. Set Default Store: This store is required for Password Policy, Security Token
Service, and migration when patching.
a. Open the page of the store to designate as the Default Store.
b. Check the box beside Set as default store.
c. Authentication Module: Locate
OAMAdminConsoleScheme
and confirm that the
LDAP module does not refer to this store. See "Managing Native
Authentication Modules" on page 19-23.
d. Authorization Policy Conditions: Choose the desired user identity store
when setting Identity Conditions in Authorization Policies. See "Defining
Authorization Policy Conditions" on page 20-52.
e. Token Issuance Policy Conditions: Choose the desired user identity store
when setting Identity Conditions in Token Issuance Policies. See "Managing
Token Issuance Policies, Conditions, and Rules" on page 38-27.
4. Close the registration page.
19.13.3 Adding Key Password Attributes to the Default Store
The Password Policy operates only with the designated Default Store. This section
provides steps for extending the default store schema for Oracle Access Management
password policy operations.
■About Extending the Default Store Schema
■Extending the Default Store Schema with Password Policy Attributes
19.13.3.1 About Extending the Default Store Schema
The LDIF (Lightweight Directory Interchange Format) files distributed as part of
Access Manager are meant to extend the schema with required object classes.
Generally, these are applied using the idmConfigTool or Access Manager and Oracle
Identity Management wiring has been performed manually.
The user data object definition in the Access Manager schema is extended with
attributes that enable password user status and password history maintenance. This
definition is provided in an LDIF file, and must be added to each user identity store
using the
ldapadd
tool. Oracle-provided LDIFs are identified in Table 19–35.
Note: OAM_HOME contains installed files necessary to host Oracle
Access Management. OAM_HOME resides within the directory
structure of the Middleware home ($MW_HOME).

Managing Global Password Policy
19-100 Administrator's Guide for Oracle Access Management
The attributes that enable password user status and password history maintenance are
shown in Table 19–36. The user data object of each user identity store must include the
attributes shown in Table 19–36. These can be added with the
ldapadd
tool, LDIF
(Lightweight Directory Interchange Format) file.
Table 19–35 Location of Oracle-provided LDIFs for LDAP Providers
LDAP Provider LDIF Location
OID: Oracle Internet Directory
$OAM_HOME/
oam/server/pswdservice/ldif/OID_PWDPersonSchema.ldif
OVD: Oracle Virtual Directory
$OAM_HOME/
oam/server/pswdservice/ldif/OVD_PWDPersonSchema.ldif
AD: Microsoft Active Directory
$OAM_HOME/
oam/server/pswdservice/ldif/AD_PWDPersonSchema.ldif
SJS: sun Java System Directory
$OAM_HOME/
oam/server/pswdservice/ldif/IPLANET_PWDPersonSchema.ldif
eDirectory: Novell eDirectory
$OAM_HOME/
oam/server/pswdservice/ldif/EDIR_PWDPersonSchema.ldif
ODSEE: Oracle Directory Server
Enterprise Edition
$OAM_HOME/
oam/server/pswdservice/ldif/IPLANET_PWDPersonSchema.ldif
OUD: Oracle Unified Directory
$OAM_HOME/
oam/server/pswdservice/ldif/OUD_PWDPersonSchema.ldif
SLAPD: OpenLDAP Directory
$OAM_HOME/
oam/server/pswdservice/ldif/OLDAP_PWDPersonSchema.ldif
IBM: OBM Tivoli Directory
$OAM_HOME/
oam/server/pswdservice/ldif/TIVOLI_PWDPersonSchema.ldif
Table 19–36 Key Password Attributes in a Password Policy
Attribute Description Format and Values
obPasswordCreationDate The date and time used to calculate
(at the time of user login) whether
the password has expired and
whether a warning needs to be
issued.
YYYY-MM-DDThh:mm:ssZ
obPasswordHistory Used to track the number of last
passwords used. Access Manager
understands 10g
oblixPersonPwdPolicy format and
changes it to new format.
New format:
password1###password2###
Previous format:
passwordX = SHA256
(password+canonical userid)
obPasswordChangeFlag Used during forced password
change for first time user login (or
forced password change initiated by
the Administrator.
Boolean string value.
true | false
Empty string represents
false
.
obuseraccountcontrol Used to represent a disabled user. Non-encrypted string value.
activated | deactivated
Empty string represents "activated".
obpasswordexpirydate The time after which the user
password is considered to be
expired.
YYYY-MM-DDThh:mm:ssZ
Empty value represents
not
expired
.
obLockoutTime The time up to which the user is
considered to be locked out due to
too many login attempts.
Epoch value (in seconds)
representing time in the future.
Seconds
(since 01 January, 1970)

Managing Global Password Policy
Managing Authentication and Shared Policy Components 19-101
19.13.3.2 Extending the Default Store Schema with Password Policy Attributes
You can skip this task if the environment has been configured using
idmConfigTool
-prepareIDStore
.
If your user identity store has not been extended with the
oblix
schema, you must
update the schema to include the object classes required by the password service.
LDAP tools should be run from the
/bin
directory beneath
$OAM_HOME
. The following
procedure illustrates extending the Oracle Internet Directory schema. Your
environment might be different.
To extend the Default User Identity Store schema
1. Use the following command to update the Oracle Internet Directory object classes
of the designated Default Store required by the password service:
ldapadd -D "cn=orcladmin" -w <password> –h <hostname> -p 3060 –x -f $OAM_HOME/
oam/server/pswdservice/ldif/OID_PWDPersonSchema.ldif
2. Proceed to "Adding an Administrator to Change User Attributes After a Password
Change".
19.13.4 Adding an Administrator to Change User Attributes After a Password Change
In this procedure, you modify the Default Store (Oracle Internet Directory in this
example) to use a different privileged account as the Bind DN. This enables sufficient
privileges to change user attributes after a password change.
Prerequisites
Register a supported LDAP store and designate it as the Default Store. Ensure that the
user you add is defined within the Default Store.
Figure 19–30 shows the completed registration page for the designated Default Store.
The procedure to add an Administrator follows the figure.
obLoginTrvCount The number of consecutive login
failures by the user. This counter is
reset on the first correct password
entry.
Non-encrypted integer value.
1,2,
3, and so on.
oblastsuccessfullogin The time of the last successful login. YYYY-MM-DDThh:mm:ssZ
oblastfailedlogin The time of the last failed login. YYYY-MM-DDThh:mm:ssZ
See Also: "Managing the Administrators Role" on page 5-22
Table 19–36 (Cont.) Key Password Attributes in a Password Policy
Attribute Description Format and Values
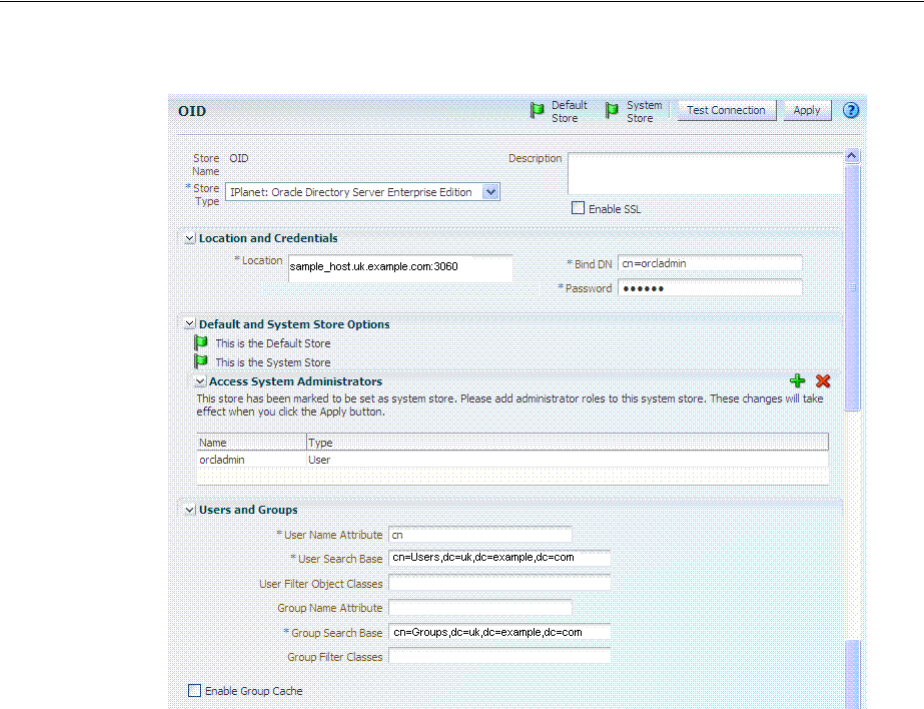
Managing Global Password Policy
19-102 Administrator's Guide for Oracle Access Management
Figure 19–30 Default Store with New Administrator Designated
To add a new Administrator
1. Log in to the Oracle Access Management Console, as usual.
https://hostname:port/oamconsole/
2. Open the desired User Identity Store registration page:
System Configuration tab
Common Configuration section
Data Sources node
User Identity Stores
OID
3. Add a New Administrator:
a. In the Access System Administrators section of the page, click + above the
table.
b. In the dialog box, search All Users, highlight desireduser, then click Add
Selected.
c. Click Apply to submit the changes.
4. Default Store: Confirm the designated Default Store (or click Default Store) then
click Apply.
5. Proceed with "Configuring Password Policy Authentication".
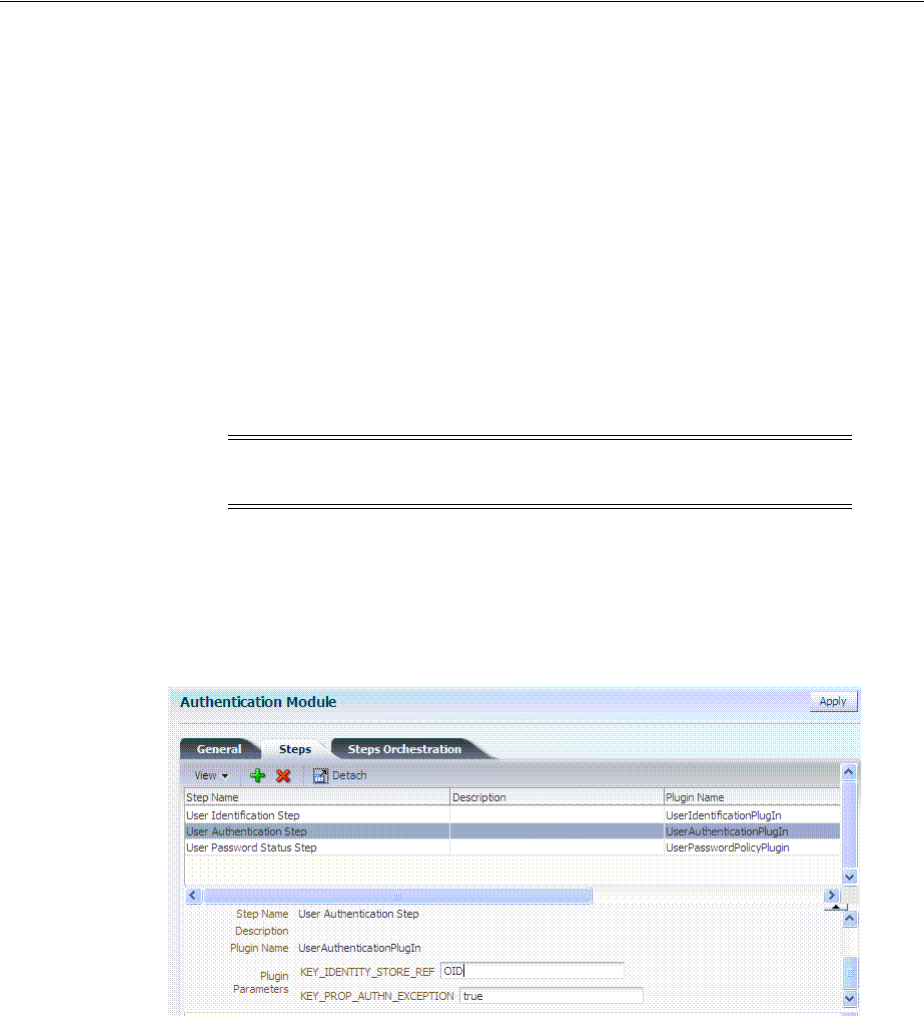
Configuring Password Policy Authentication
Managing Authentication and Shared Policy Components 19-103
19.14 Configuring Password Policy Authentication
After preparing your password policy, Default Store, and Administrator, you can
develop your authentication module and scheme as described in this section.
■Configuring the Password Policy Validation Authentication Module
■Configuring the PasswordPolicyValidationScheme
■Adding Your PasswordPolicyValidationScheme to ECC Authentication Policy—If
you are using the DCC, skip this topic and go to "Configuring 11g WebGates and
Authentication Policy for DCC"
19.14.1 Configuring the Password Policy Validation Authentication Module
You must also configure the Password Policy Validation Authentication Module to use
the Default Store.
A sample module is shown in Figure 19–31. The User Password Status Step is the
unique step that relies on the
UserPasswordPolicyPlugin
.
Figure 19–31 Password Policy Validation Authentication Module with Orchestrated
Plug-ins
Each step identifies the action provided by a specific named plug-in.
Figure 19–32 shows the orchestration of steps within the authentication module. For
more information on modules and steps, see "About Plug-in Based Modules for
Multi-Step Authentication" on page 19-38.
Note: There are no credential collector dependencies when defining
the Password Policy Validation Module for authentication.
See Also: "Orchestrating Multi-Step Authentication with Plug-in
Based Modules" and Table 19–19.
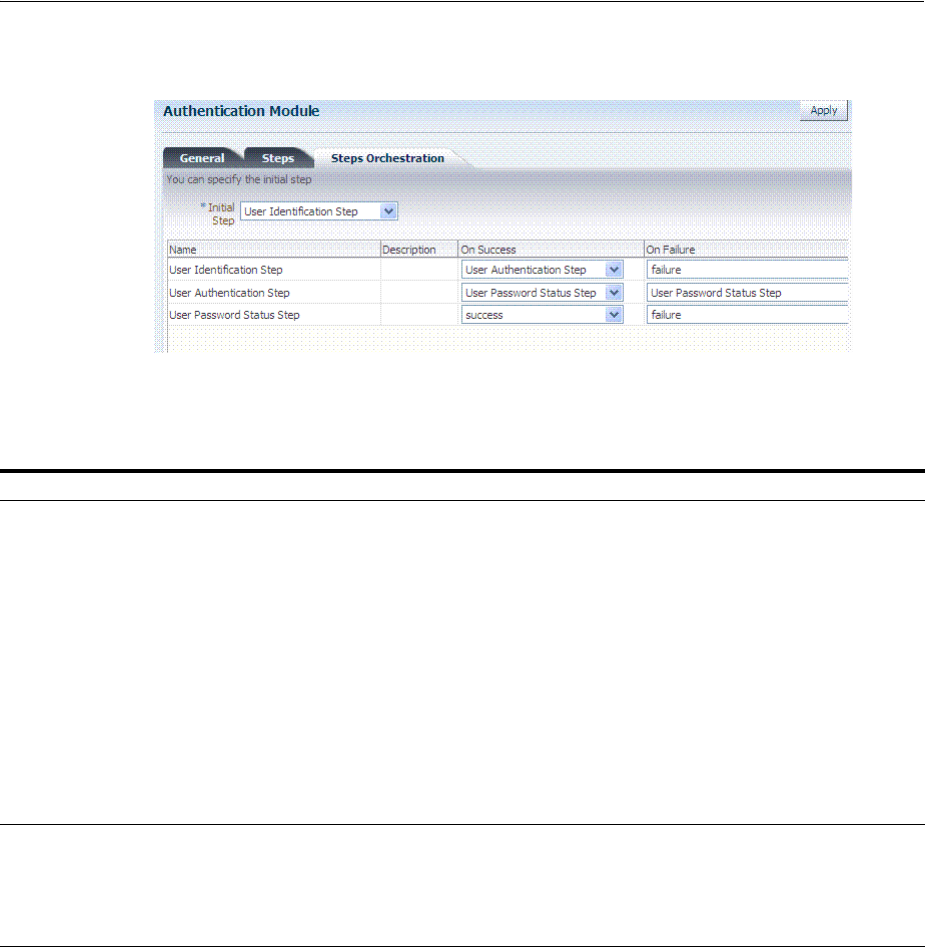
Configuring Password Policy Authentication
19-104 Administrator's Guide for Oracle Access Management
Figure 19–32 Step Orchestration for Password Policy Validation Module
Table 19–37 describes the Password Policy Validation module step details that you
specify.
Table 19–37 User Password Step Details
Step Name Step Details Description
User Identification Step KEY_LDAP_FILTER Add the LDAP filter to the KEY_LDAP_FILTER attribute.
Only standard LDAP attributes can be used when
defining an LDAP search filter. For example:
(uid={KEY_USERNAME})
See Also: Table 20–22, " LDAP Search Filter Examples for
Access Manager" and your vendor documentation for the
exact syntax for your identity store
KEY_IDENTITY_STORE_REF The name of the registered Identity Store containing the
module users.
Default: The registered Default Store.
KEY_SEARCH_BASE_URL Base URL for user searches. For example:
dc=us,dc=example,dc=com
User Authentication Step KEY_IDENTITY_STORE_REF The name of the registered Identity Store containing the
module users.
Default: The registered Default Store.
KEY_PROP_AUTHN_
EXCEPTION
Enable or disable the propagation of LDAP errors.
User Password Status Step PLUGIN_EXECUTION_MODE The execution mode of plug-in. Depending upon the
configuration, this plug-in can operate either alone or
with other default plug-ins. Values are one of the
following:
■PSWDONLY: The most preferred configuration
where only the password status is determined. The
ID and authentication must be performed using the
UserIdentification and UserAuthentication Plugins.
■AUTHWITHPSWD: Both authentication and
password are performed using this plug-in.
■AUTHONLY: Only the user identification and
authentication is performed using this plug-in
Default: PSWDONLY
KEY_IDENTITY_STORE_REF The name of the registered Identity Store containing the
module users.
Default: The registered Default Store.

Configuring Password Policy Authentication
Managing Authentication and Shared Policy Components 19-105
Prerequisites
Defining Your Global Password Policy
To configure the Password Policy Validation Module
1. From the Oracle Access Management Console, click Authentication Modules,
Custom Authentication Modules and then Password Policy Validation Module.
2. Click the Steps tab; for each of the three steps add the Default Store name in the
field beside KEY_IDSTORE_REF (Save after each change). For example:
a. User Identification Step
KEY_IDSTORE_REF: OID
Save.
b. User Authentication Step
KEY_IDSTORE_REF: OID
Save.
c. User Password Status Step
KEY_IDSTORE_REF: OID
Save.
3. Click Apply.
NEW_USERPSWD_BEHAVIOR Configures retroactive behavior of the new-user
password-policy. Values are either:
■FORCEPASSWORDCHANGE: Forces a password
change.
■NOFORCEPASSWORDCHANGE: The password
policy change does not affect user passwords that
are already set.
Default: FORCEPASSWORDCHANGE
POLICY_SCHEMA Policy schema for password service. Currently only
OAM10G is supported.
Default: OAM10G
URL_ACTION The type of servlet action needed for redirecting the user
to the specific password page for expiry and warning
pages. Values can be either:
■REDIRECT_POST
■REDIRECT_GET
■FORWARD
Default: REDIRECT_POST
DISABLED_STATUS_SUPPORT Specifies whether the disabled status is to be supported
and acted upon in this password service. Valid values are
either True or False.
Default: TRUE
Note: There are no credential collector dependencies when defining
the Password Policy Validation Module. Enter the Default Store as the
KEY_IDSTORE_REF for each of the three plug-ins (with an Error
redirect on Failure).
Table 19–37 (Cont.) User Password Step Details
Step Name Step Details Description
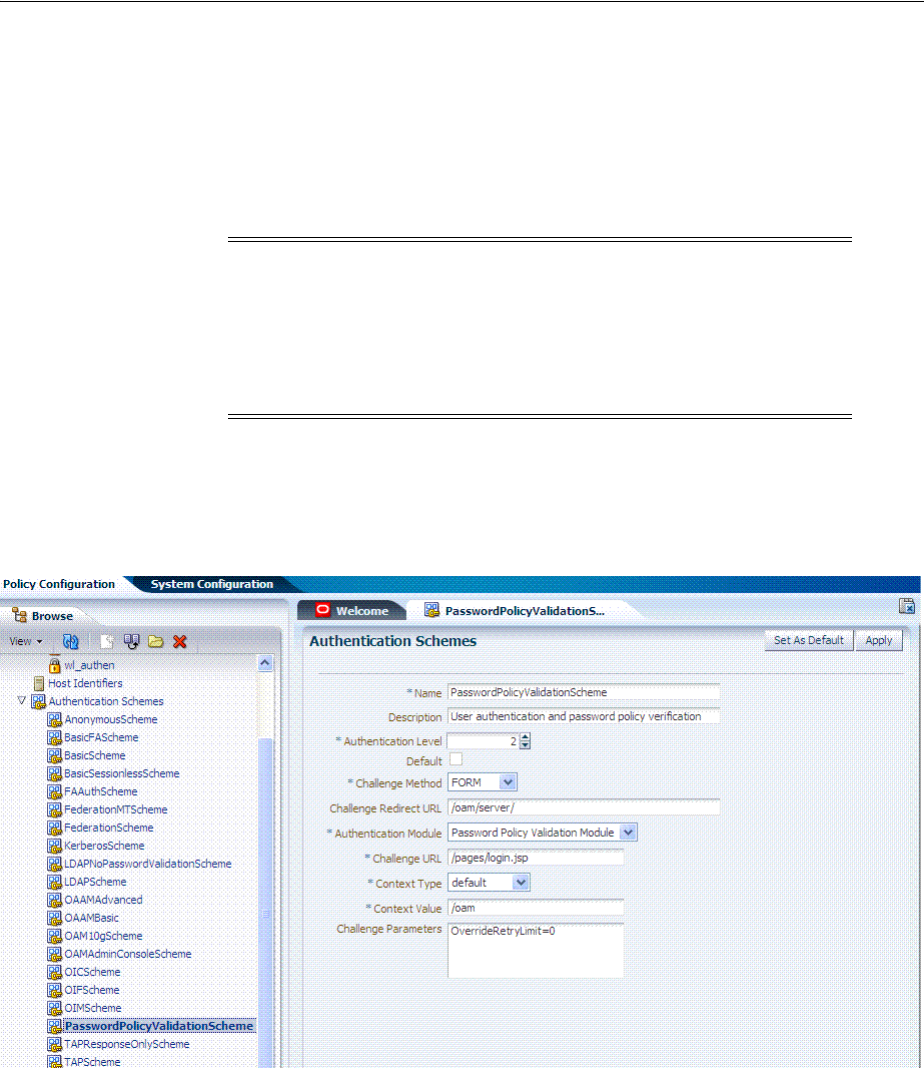
Configuring Password Policy Authentication
19-106 Administrator's Guide for Oracle Access Management
4. Proceed to "Configuring the PasswordPolicyValidationScheme".
19.14.2 Configuring the PasswordPolicyValidationScheme
You can have multiple authentication schemes for use with the global password policy.
Users with Administrator credentials can follow this procedure to configure the
PasswordPolicyValidationScheme.
The sample scheme in Figure 19–33 is configured for the ECC. The sample scheme in
Figure 19–34 is configured for the ECC. Your authentication scheme will be different.
Figure 19–33 Sample ECC PasswordPolicyValidationScheme
Note: Differences between values for the ECC versus the DCC
include (Table 19–34):
■Challenge Redirect URL: Credential Collector host and port
■Challenge URL: Credential Collector Pages
■Challenge Parameters: Table 19–23
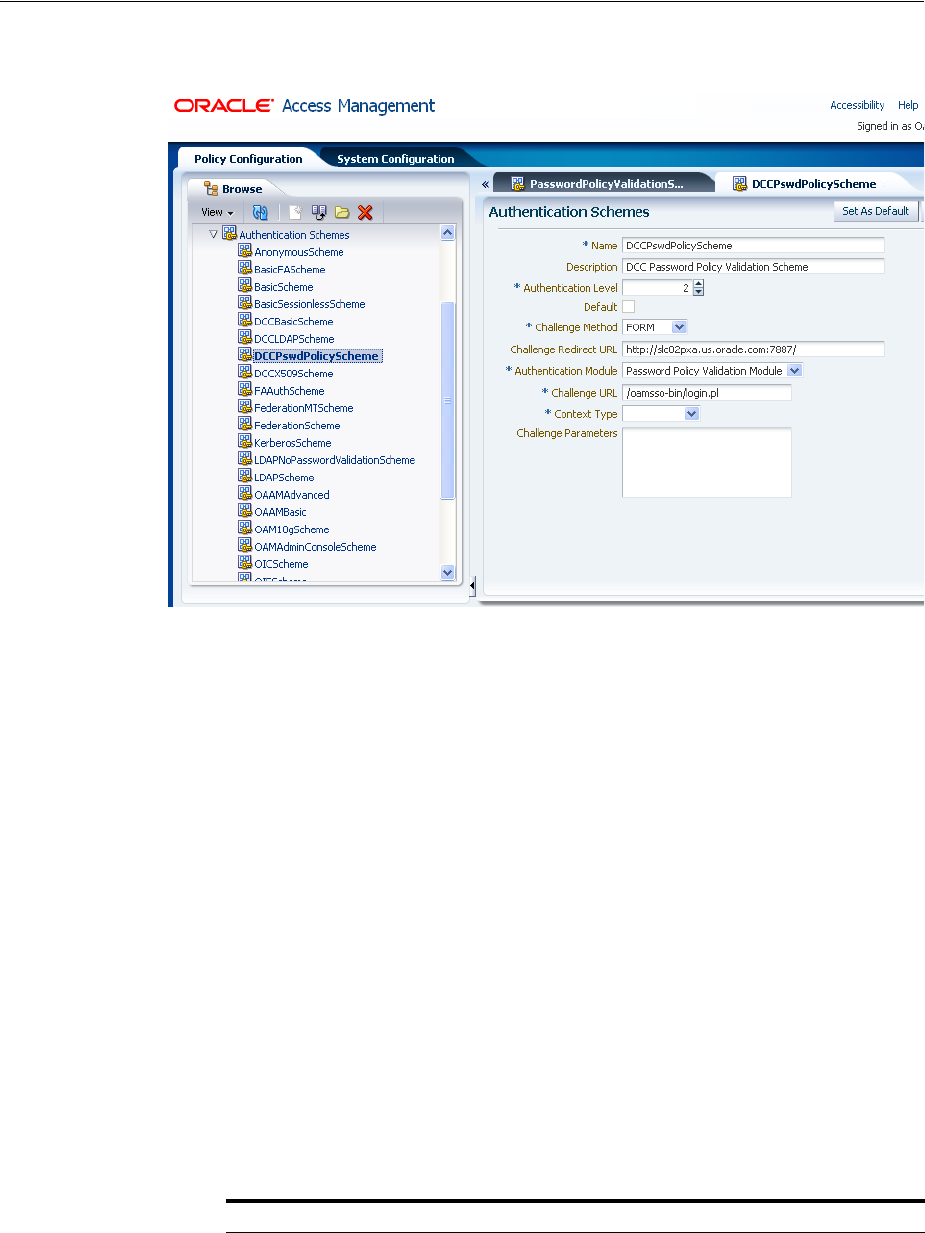
Configuring Password Policy Authentication
Managing Authentication and Shared Policy Components 19-107
Figure 19–34 Sample DCC PasswordPolicyValidationScheme
Prerequisites
Configuring the Password Policy Validation Authentication Module
To configure the PasswordPolicyValidationScheme
1. From the Oracle Access Management Console, click Authentication Schemes and
then PasswordPolicyValidationScheme.
2. Set up the scheme for your environment. For example:
■Authentication Level 2
■Default (blank)
■Challenge Method: Form
■Challenge Redirect URL:
http://
CredCollector_host:port/
■Authentication Module: Password Policy Validation Module
■Challenge URL:
/CredCollector_pages/
■Context Type: External
■Challenge Parameters:
See Also: "Managing Authentication Schemes" on page 19-64
ECC Challenge Parameters DCC Challenge Parameters
OverrideRetryLimit=0
initial_command=NONE
OverrideRetryLimit=0
creds=userid password
Configuring Password Policy Authentication
19-108 Administrator's Guide for Oracle Access Management
3. Click Apply.
4. Proceed to "Adding Your PasswordPolicyValidationScheme to ECC
Authentication Policy".
19.14.3 Adding Your PasswordPolicyValidationScheme to ECC Authentication Policy
A user with Administrative privileges can use the PasswordPolicyValidationScheme
configured for the ECC in the application domain of the protecting Webgate (Resource
Webgate).
Prerequisites
Configuring the PasswordPolicyValidationScheme
To add PasswordPolicyValidationScheme to an ECC authentication policy
1. ECC: In the console, search for and open the appropriate Application Domain.
(See "Searching for an Existing Application Domain" on page 20-12).
2. ECC: Protect Resources using the PasswordPolicyValidationScheme:
a. Find and open your Protected Resource Policy on the Authentication Policies
tab (see "Viewing or Editing an Authentication Policy" on page 20-36):
Authentication Policies
Protected Resource Policy
b. Select PasswordPolicyValidationScheme for the Protected Resource Policy
(Authentication Scheme) and click Apply.
c. Finish updating your Authentication and Authorization policies, as desired
(Chapter 20).
See Also: Table 19–23, " User-Defined Challenge
Parameters for Authentication Schemes"
action
If not specified, the default for both ECC and DCC is
/oam/server/auth_cred_submit.
DCCCtxCookieMaxLength
(default is 4096)
TempStateMode
controls how the DCC stores the OAM Server state:
cookie or form (the default) as specified with the
parameter's value.
MaxPostDataBytes
Restricts the maximum number of bytes of POST data
submitted as user credentials.
creds
Whatever is passed must be specified in the
obMap
credentials parameter of the
ObUserSession
object, as
described in the Oracle Fusion Middleware
Developer's Guide for Oracle Access Management
See Also: "Adding PasswordPolicyValidationScheme to
Authentication Policy for DCC" on page 19-111
ECC Challenge Parameters DCC Challenge Parameters

Configuring 11g WebGates and Authentication Policy for DCC
Managing Authentication and Shared Policy Components 19-109
3. Proceed as needed for your environment:
■ECC: Completing Password Policy Configuration
■DCC: Configuring 11g WebGates and Authentication Policy for DCC
19.15 Configuring 11g WebGates and Authentication Policy for DCC
The following task overview documents how to configure an 11g WebGate and
Authentication Policy for use with the DCC. The appropriate sub sections are linked
within each step.
1. Enabling DCC Credential Operations provides steps for either configuration:
DCC Combined with Resource Webgate: Enable Allow Credential Collector
Operations in the DCC's OAM Agent registration page.
Separate DCC and Resource Webgate: Enable Allow Credential Collector
Operations in the DCC's OAM Agent registration page and edit the Resource
Webgate registration page to set the
Logout Redirect URL
to the DCC's logout.pl.
2. Locating and Updating DCC Forms for Password Policy
3. Adding PasswordPolicyValidationScheme to Authentication Policy for DCC
provides steps for either configuration:
DCC Combined with Resource Webgate: In the combined DCC/Resource
Webgate Application Domain, update the Protected Resources Authentication
Policy to use your DCC Authentication Scheme.
Separate DCC and Resource Webgate: In the separate Resource Webgate
Application Domain, update the Protected Resources Authentication Policy to use
your DCC Authentication Scheme.
4. Supporting Federation Flows With DCC provides steps to incorporate the DCC
into Federation flows.
19.15.1 Enabling DCC Credential Operations
Whether you are using a separate DCC or combined DCC and Resource WebGate, you
must enable Allow Credential Collector Operations in the DCC's OAM Agent
registration page.
With a separate DCC and Resource WebGate, you must also edit the Resource
WebGate registration page to set the
Logout Redirect URL
to the DCC's logout.pl, as
described in Step 3.
The following procedure presumes your deployment uses Open mode
communication. If your deployment uses Simple or Cert mode communication, be
sure to copy the appropriate artifacts when you perform Step 4.
Prerequisites
■Configuring and Managing Registered OAM Agents Using the Console
■Managing Global Password Policy
■Configuring Password Policy Authentication using DCC-specific details
Note: If your environment uses the ECC, go to "Completing
Password Policy Configuration".

Configuring 11g WebGates and Authentication Policy for DCC
19-110 Administrator's Guide for Oracle Access Management
To enable DCC credential operations
1. In the Access Manager section of the Oracle Access Management Console, click
SSO Agents to find and open the registration page for the 11.1.2 Webgate that will
function as the DCC.
2. DCC Webgate Registration: Check Allow Credential Collector Operations, click
Apply, then perform Steps 4 and 5.
3. Separate Resource Webgate: Edit the Resource WebGate registration to set the
Logout Redirect URL
to the DCC's logout.pl (Table 19–34), click Apply, then
perform Steps 4 and 5.
4. Copy Agent configuration file (including Simple or Cert mode files) from the
AdminServer (Console) host to the Agent host. For example:
5. Restart the OHS Web server.
6. Proceed to "Locating and Updating DCC Forms for Password Policy".
19.15.2 Locating and Updating DCC Forms for Password Policy
Access Manager provides several dynamic pages for user interactions with the DCC.
Prerequisites
Enabling DCC Credential Operations
To locate and update the DCC forms
1. Locate the DCC forms in the Webgate host (
Table 19–34):
$WEBGATE_HOME/webgate/ohs/oamsso/*,
$
WEBGATE_HOME/webgate/ohs/oamsso-bin/*pl
, and
$WEBGATE_HOME/webgate/ohs/oamsso-bin/templates/*
.
2. Customize their location, depending on the desired topology of the authentication
scheme being developed.
3. Update Perl Location: Update the Perl location to be consistent with the actual
location, in the first line of the login, logout, and securid scripts on Webgate host
in
$WEBGATE_HOME/webgate/ohs/oamsso-bin/*pl
("Perl Scripts for DCC-based
Note: If the DCC is combined with a Resource WebGate, skip Step 3.
Agent & Artifacts Artifacts
11g Webgate/Access Client
ObAccessClient.xml and
cwallet.sso
From the AdminServer (Console) host:
$DOMAIN_HOME/output/$Agent_Name/
To the Agent host: $11gWG_install_dir/webgate/config
Simple or Cert Mode Copy to the Agent host: $11gWG_install_dir/webgate/config
■aaa_key.pem
■aaa_cert.pem
■aaa_chain.pem
■password.xml
See Also: Appendix C, "Securing Communication"
See Also: Oracle Fusion Middleware Developer's Guide for Oracle Access
Management

Configuring 11g WebGates and Authentication Policy for DCC
Managing Authentication and Shared Policy Components 19-111
Login and Logout" in Table 19–34).
4. Customize the default pages for your enterprise, or replace them entirely with
custom pages. For example, you can design, implement, and deploy a custom
page that displays a different version of the login form for a mobile browser than
is used for a desktop browser.
5. Proceed to "Adding PasswordPolicyValidationScheme to Authentication Policy for
DCC".
19.15.3 Adding PasswordPolicyValidationScheme to Authentication Policy for DCC
The following procedure provides steps that you must perform to use your DCC
Authentication Scheme in a Protected Resources Authentication Policy. The steps you
perform depend on the type of deployment you have:
■Combined DCC/Resource Webgate: Perform Step 1 to add your DCC
Authentication Scheme to the Protected Resources Authentication Policy of the
combined DCC/Resource Webgate Application Domain.
■Separate Resource Webgate: Perform Step 3 to add your DCC Authentication
Scheme to the Protected Resources Authentication Policy of the separate Resource
Webgate Application Domain.
Perform Step 2 regardless of your DCC deployment type. By default, login and logout
forms are excluded through OHS /httpd.conf/webgate.conf so that you do not need
to exclude them through policies. However, with the Chrome browser, you must
explicitly exclude the async favicon.ico request (which overrides the DCCCtxCookie).
Prerequisites
Locating and Updating DCC Forms for Password Policy
To use the DCC Authentication Scheme in an Authentication Policy
1. Combined DCC/Resource Webgate: Open the DCC application domain:
Policy Configuration
Application Domains
DCCDomain
a. Locate and open the Authentication Policy, Protected Resource Policy (see
"Searching for an Authentication Policy" on page 20-35).
b. Add your DCC Authentication Scheme to this policy (see "Defining
Authentication Policies for Specific Resources" on page 20-32).
PasswordPolicyValidationScheme (DCC Authentication Scheme)
c. Perform Step 2 if you have the Chrome Browser. Otherwise, go to Step 4.
2. Chrome Browser: Add and exclude resource
/favicon.ico
in the DCCDomain, as
follows.
a. From DCCDomain, click the Resources tab.
Note: This example refers to the PasswordPolicyValidationScheme
set for the DCC in Section 19.14, "Configuring Password Policy
Authentication."

Configuring 11g WebGates and Authentication Policy for DCC
19-112 Administrator's Guide for Oracle Access Management
b. Find and open the HTTP resource
/favicon.ico
(or click the New Resource
button and then add this resource).
c. Confirm or edit the Resource URL to:
/favicon.ico
d. In the Protection section, Protection Level list, select Excluded, then click
Apply.
e. Proceed to Step 4.
3. Separate Resource Webgate: Open the Resource Webgate application domain.
Policy Configuration
Application Domains
ResourceWGDomain
a. Locate and open the Authentication Policy, Protected Resource Policy (see
"Searching for an Authentication Policy" on page 20-35).
b. Add your DCC Authentication Scheme and an optional Failure URL (when
not specified, Failure URL displays the default error page) to this policy (see
"Defining Authentication Policies for Specific Resources" on page 20-32):
DCC Authentication Scheme
Failure URL (optional)
c. Perform Step 2 if you have the Chrome Browser. Otherwise, go to Step 4.
4. Restart your Web server and proceed to "Completing Password Policy
Configuration".
19.15.4 Supporting Federation Flows With DCC
The DCC is enhanced to work as a public end-point to the Access Manager server.
HTTP requests to the DCC are tunneled via NAP to the proxy module of the Access
Manager server. The JSP pages and servlets are executed in the Access Manager server
and the response is tunneled back to the DCC. The end user effectively communicates
only to the DCC.
To use DCC for converged Federation flows, perform the following manual steps.
1. Configure the following internal resources as Public instead of Excluded.
/oamfed/…/*
/oam/…/*
/…/*
2. In the DCC WebGate, set the logout value to a valid DCC WebGate logout URL;
for example,
/oamsso-bin/logout.pl
See Also: "Configuring Logout When Using Detached Credential
Collector-Enabled Webgate" on page 22-6
Note: If a WebGate is configured as a DCC and federated flows are
in use, the DCC WebGate cannot be used to protect the resource. A
separate WebGate must be configured and used to protect the
resource.
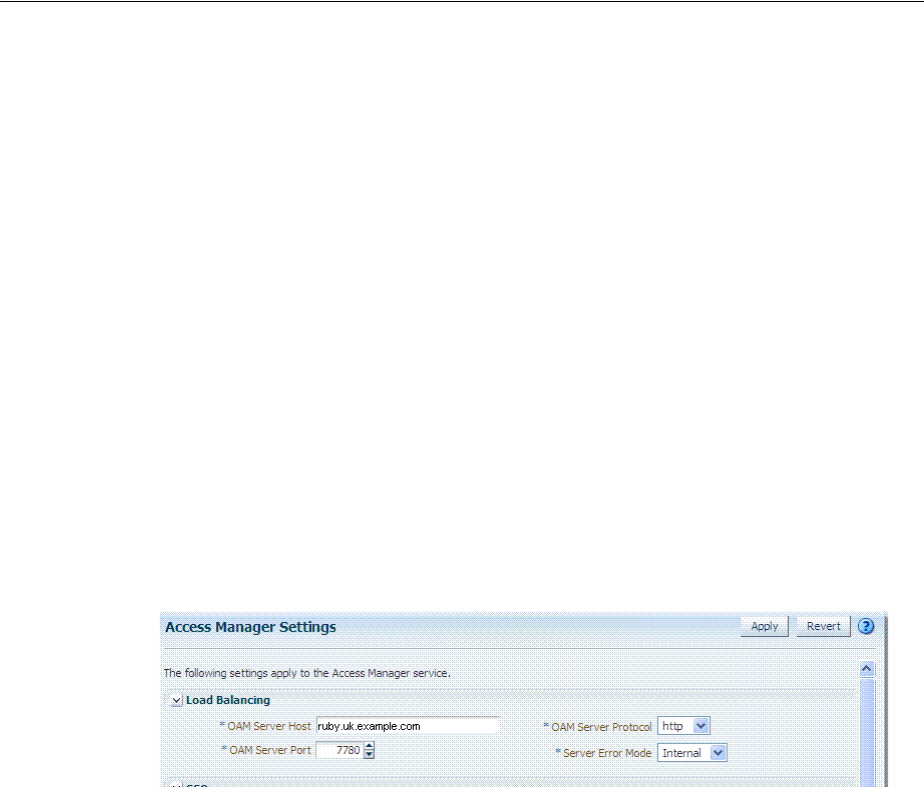
Completing Password Policy Configuration
Managing Authentication and Shared Policy Components 19-113
3. Update the DCC Agent entry by adding the following entry to the User Defined
Parameters list using the Access Manager Administration Console.
TunneledUrls=/oam,/oamfed
19.16 Completing Password Policy Configuration
These tasks are the same regardless of the credential collector you have configured.
Perform the following tasks to complete your password policy configuration:
■Setting the Error Message Mode for Password Policy Messages
■Overriding Native LDAP Password Policy Validation
■Disabling ECC Operation and Using DCC Exclusively
■Testing Your Multi-Step Authentication
19.16.1 Setting the Error Message Mode for Password Policy Messages
Users with administrative privileges can use this procedure to set the Server Error
Mode for password policy messages, as shown in Figure 19–35.
Figure 19–35 Server Error Mode for Password Management
Prerequisites
■Managing Global Password Policy
■Configuring Password Policy Authentication
■Optional: Configuring 11g WebGates and Authentication Policy for DCC
To set the error message mode
1. From the Oracle Access Management Console, click Access Manager settings.
2. In the Load Balancing section, set the Server Error Mode to Internal.
3. Click Apply.
4. Proceed with "Overriding Native LDAP Password Policy Validation".
19.16.2 Overriding Native LDAP Password Policy Validation
As described earlier, you need to disable native LDAP password policy validation
before the non-native password policy can be used.
For example, with Oracle Internet Directory registered for Oracle Access Management,
native password policy is generally located as follows:
dn: cn=default,cn=pwdPolicies,cn=Common,cn=Products,cn=OracleContext,<DOMAIN_

Completing Password Policy Configuration
19-114 Administrator's Guide for Oracle Access Management
CONTAINER>
You can disable the Oracle Internet Directory password policy by setting the
orclpwdpolicyenable
parameter to zero (0).
The following procedure is only an example. Your environment will be different.
Prerequisites
Setting the Error Message Mode for Password Policy Messages
To override native LDAP policy with Oracle Access Management password
policy
1. Refer to the manual from your LDAP directory vendor.
2. Oracle Internet Directory: Disable native policy by setting
orclpwdpolicyenable
to zero (0).
■Confirm the location of the password policy for your domain.
■When you are sure you have the proper native LDAP policy, disable the
policy. For example:
orclpwdpolicyenable = 0
3. Proceed as follows, depending on your deployment:
■"Disabling ECC Operation and Using DCC Exclusively"
■"Testing Your Multi-Step Authentication"
■Chapter 22: "Configuring Logout When Using Detached Credential
Collector-Enabled Webgate"
19.16.3 Disabling ECC Operation and Using DCC Exclusively
You can skip this task to allow the DCC and ECC to co-exist, and maintain
authentication schemes and policies for both credential collectors.
To disable ECC, you must edit the oam-config.xml file as described here. Generally,
Oracle recommends not editing oam-config.xml. Changes to this file could result in
lost data or overwriting of the file during data sync operations. However, there is no
other way to disable the ECC completely in favor of the DCC.
Caution: Disabling the native LDAP password policy validation
leaves no enforcement for direct LDAP operations. There are various
password policies in Oracle Internet Directory, including one in the
following:
dn:
cn=default,cn=pwdPolicies,cn=Common,cn=Products,cn=OracleContext
However, this might not apply to your domain.
See Also: The various attributes described in Oracle Fusion
Middleware Administrator's Guide for Oracle Internet Directory

Completing Password Policy Configuration
Managing Authentication and Shared Policy Components 19-115
Prerequisites
Configuring 11g WebGates and Authentication Policy for DCC
To disable ECC operation and use DCC exclusively
1. Make your changes on the node running the AdminServer to minimize possible
conflicts that another AdminConsole user might make.
2. Back up oam-config.xml in $DOMAIN_HOME/config/fmwconfig/ and store the
copy in a different location for use later if needed.
3. Locate the
ECCEnabled
parameter in the
OAMServicesDescriptor
section and make
the changes shown here in bold:
<Setting Name="OAMServicesDescriptor" Type="htf:map">
... ...
<Setting Name="ECCEnabled" Type="htf:map">
<Setting Name="ServiceStatus" Type="xsd:boolean">false</Setting>
</Setting>
4. Increment by 1, the configuration version number at the top of the file to associate
your change and enable automatic propagation and dynamic activation across all
running OAM Servers (see the next to last line of this example):
<Setting Name="Version" Type="xsd:integer">
<Setting xmlns="http://www.w3.org/2001/XMLSchema"
Name="NGAMConfiguration" Type="htf:map:>
<Setting Name="ProductRelease" Type="xsd:string">11.1.1.3</Setting>
<Setting Name="Version" Type="xsd:integer">2</Setting>
</Setting>
5. Proceed to "Testing Your Multi-Step Authentication".
19.16.4 Testing Your Multi-Step Authentication
This section provides a number of evaluations you can perform to confirm that your
deployment is working properly.
To confirm your multi-step authentication
1. Confirm access after login:
a. Open a new browser and request a resource.
b. Log in with your user credentials.
c. Confirm that you have access to the resource.
2. Confirm no access on incorrect login:
a. Open a new browser and request a resource.
b. Log in with incorrect user credentials.
c. Confirm that you must re-authenticate.
Note: After disabling the ECC, access to resources protected by
schemes and policies that rely on the ECC will be prohibited,
including access to the Oracle Access Management Console.
See Also: Chapter 22, "Configuring Centralized Logout for Sessions
Involving 11g WebGates"

Configuring Authentication POST Data Handling
19-116 Administrator's Guide for Oracle Access Management
3. Confirm lockout after exceeding maximum incorrect login attempts:
a. Open a new browser and request a resource.
b. Log in with incorrect user credentials repeatedly.
c. Confirm that the user account is locked.
4. Modify and evaluate your password expiry policy:
a. Log in to the Oracle Access Management Console.
b. In your password policy, reset the expiry and lockout periods (Table 19–33) so
that you will see warnings on your next login.
c. Save the policy updates.
d. Open a new browser and request a resource.
e. Verify the warning page appears advising that the password will expire.
f. Click the link to continue without password change.
5. Change your password:
a. Open a new browser and request a resource.
b. On the password expiry warning page, click the link to change your
password.
c. On the password change page, enter your correct old password.
d. In the new password field, enter a different new password that does not
follow the password policy and confirm the password validation error.
e. Enter a new password that meets requirements and confirm success and
access to the resource.
19.17 Configuring Authentication POST Data Handling
Post data preservation and restoration functions apply to both credential collectors
(ECC or DCC). This section provides the following topics:
■About Authentication Post Data Preservation and Restoration
■About Configuring Authentication POST Data Handling
■Configuring Authentication POST Data Handling
■Testing POST Data Handling Configuration
19.17.1 About Authentication Post Data Preservation and Restoration
POST data preservation and restoration functions come into play when an application
has a form wherein the user has entered a credential (or other data) but the session has
expired, an idle session timeout has occurred, or the token validity period has ended
by the time the user submits the form. If this scenario occurs, the user is presented
with a fresh login form (depending on the authentication scheme) unless POST data is
preserved and restored.
Administrators can configure the Resource Webgate to perform POST data
preservation when the expired user and newly authenticated user are the same.
Table 19–38 describes Resource Webgate support and behavior for post data.

Configuring Authentication POST Data Handling
Managing Authentication and Shared Policy Components 19-117
Table 19–39 describes credential collector feature support for POST data handling.
Note: Authentication POST data preservation and restoration is not
supported when Access Manager performs authentication through
custom agents.
Table 19–38 Resource Webgate Support of POST Data Preservation and Restoration
Resource Webgate Description
Supports Authentication
Schemes
LDAP, Basic, Sessionless Basic, X509, WNA
Supports form encoding with text/html, text/plain, multipart/form-data, and
application/x-www-form-urlencoded type data posted by the
application form.
Preserves The encoding type of the data posted by the original application form,
except the input field of file type.
Ensures The downstream application sees the same post data that was posted by
the original application form.
Constrains The overall size of the inbound request data or the inbound front channel
message. There shall be a configuration parameter to override the code
default value. This shall be per application.
Maintains application data
confidentiality and integrity
Neither the Resource Webgate nor credential collector will interpret, nor
log, application post data.
If, after expiration and during re-authentication, the user authenticates
with different credentials, then the post data of the previous user is
cleared by the Resource Webgate and not restored. However, Webgate
will post to the downstream application URL that was posted by the
original application form.
Ignores Preservation if ...
Logs a Message when ...
Performs Standard
Authentication if ...
Shows an Error when ...
Post data is larger than the configured or hard-coded limit, preservation
is ignored.
Post data is skipped because it is bigger than the allowed limit, a
message is logged.
Post data size is larger than the hard-coded limit (or the configured
value), the standard authentication flow is used.
Together, if both front channel message data and application post data
are large an error occurs.
Table 19–39 Credential Collector Support for POST Data Handling
Credential Collector Support
ECC and DCC
Compatible with earlier 11g Webgates
Supports post data preservation for Form based authentication scheme with the default login form
provided out of the box.
Preserves application post data during authentication processing by:
■Challenging the user
■Re-challenging the user if invalid credentials are provided
Does not interpret application post data.
Constrains the overall size of inbound front-channel messages using a configuration parameter to override
the default value, per application.
Logs a warning when post data is skipped because it is larger than the allowed limit.

Configuring Authentication POST Data Handling
19-118 Administrator's Guide for Oracle Access Management
19.17.2 About Configuring Authentication POST Data Handling
Table 19–40 summarizes the authentication schemes that support authentication POST
data handling.
Table 19–41 summarizes complete configuration requirements for authentication POST
data handling. All requirements described in Table 19–41 are supported end to end
with the authentication schemes in Table 19–40.
Does not preserve application post data when:
■Authentication policy is configured with Success or Failure authentication URLs
■Password management (password expiration and so on) is involved
■Access Manager is used for performing authentication through custom agents.
ECC Only
■The embedded credential collector does not support POST data handling with the external login
page.
DCC Only
■POST data is preserved through the HTTP header, and the amount of POST data that can be handled
to 8192 characters.
■POST data restoration with a Form-based Authentication Scheme requires the challenge parameter
TempStateMode=form.
■DCC does not support custom login pages.
■DCC does not support POST data restoration during password management operations (password
expiration, for instance) when the URL_ACTION in the password policy plug-in is set to anything
other than FORWARD.
Table 19–40 Authentication Schemes Supporting POST Data Handling
Authentication Schemes
■FORM challenge method, supported with the out of the box login page.
■WNA
■Basic
■Basic+Sessionless
■X509
■OIF, OIM, OAAM integrations using TAP
Table 19–41 Parameters Required for Authentication POST Data Handling
Parameter Description
MaxPostDataBytes Configure this Authentication Scheme challenge parameter for
POST-data preservation used by the DCC only to limit the maximum
size of the POST data that can be posted as on the login form. DCC
compares the value of the content-length header with the limit set.
Default: unlimited
This Authentication Scheme challenge parameter requires a positive
integer value that restricts the maximum number of bytes of POST
data that is submitted as user credentials and sent to the OAM Server.
Table 19–39 (Cont.) Credential Collector Support for POST Data Handling
Credential Collector Support

Configuring Authentication POST Data Handling
Managing Authentication and Shared Policy Components 19-119
MaxPreservedPostDataBytes Configure this Authentication Scheme challenge parameter (or
user-defined Webgate parameter) for authentication POST-data
preservation.
Default: 8192 bytes
Note: Preference is given first to the Authentication Scheme
containing this parameter; second to the Webgate providing this
user-defined parameter. Otherwise, default behavior is 8192 bytes.
This parameter defines the maximum length of POST data that
Webgate can preserve. If the size of inbound raw user POST data (or
encrypted post data after processing), crosses this limit, POST data is
dropped and the existing authentication flow continues. The event is
logged as usual.
See Also: "Configuring Authentication POST Data Handling" on
page 19-116
Table 16–2, " User-Defined WebGate Parameters"
TempStateMode=form
DCC Only
With the DCC, a Form-based Authentication Scheme requires the
challenge parameter TempStateMode=form for POST data restoration
For Form authentication scheme, if this parameter is not defined, the
value will be "form".
See Also: "Configuring Authentication POST Data Handling" on
page 19-116
Table 16–2, " User-Defined WebGate Parameters"
ChallengeRedirectMaxMessageBy
tes
Configure this user-defined Webgate parameter to limit the size of the
message data received as obrareq.cgi and obrar.cgi. Message data is
comprised of query string length (if present) or POST data length (if
POST data is present). If message size exceeds this limit, the message
is not processed and the existing message is shown in the browser. The
event is logged as usual.
Default: 8192 bytes
Notes:
obrareq.cgi is the authentication request in the form of a query string
redirected from Webgate to the credential collector (OAM Server or
DCC).
obrar.cgi is the authentication response string redirected from the
credential collector (OAM Server or DCC) to Webgate.
See Also: "Configuring Authentication POST Data Handling" on
page 19-116
Table 16–2, " User-Defined WebGate Parameters"
PostDataRestoration Configure this user-defined Webgate parameter to initiate
authentication POST-data preservation for the resource Webgate. This
parameter requires a value of
true
or
false
.
Default:
false
When set to
true
, Webgate initiates POST data preservation.
See Also: "Configuring Authentication POST Data Handling" on
page 19-116
Table 16–2, " User-Defined WebGate Parameters"
Table 19–41 (Cont.) Parameters Required for Authentication POST Data Handling
Parameter Description
Configuring Authentication POST Data Handling
19-120 Administrator's Guide for Oracle Access Management
19.17.3 About Post Data Size Limits
Assuming the usual form data entered by users is about several kilobytes, putting a
limit on data comsumption from the incoming request is a general requirement. The
data transferred in the front channel protocol (either request or response) must also go
through the size check. Considering these situations:
■Limit the size of data passed to the OAM Server on the back channel using the
maxpostdatabytes authentication challenge parameter
In cases where the DCC is used, the maxpostdatabytes authentication challenge
parameter performs this check on the overall POST data.
■Limit the size of the POST data from the end user application using
MaxPreservedPostDataBytes authentication scheme challenge parameter.
The MaxPreservedPostDataBytes authentication scheme challenge parameter
handles this. Additionally, this can be set as a user-defined Webgate parameter.
■Limit size of the front channel payload on obrar.cgi or obrareq.cgi with a Webgate
user-defined parameter ChallengeRedirectMaxMessageBytes.
19.17.4 Configuring Authentication POST Data Handling
Be sure to read all POST data topics in this section before attempting this procedure.
There is no need to make any explicit change in your authentication scheme.
To configure authentication POST data handling
1. Configure the Authentication Scheme:
a. From the Oracle Access Management Console, create or find the desired
scheme (Table 19–40).
b. On the Authentication Scheme page, modify values for POST data handling.
This example uses the embedded credential collector (Table 19–20) and values
for POST data handling (Table 19–23):
Name: DesiredScheme
Authentication Level 2
Challenge Method: Form
Challenge Redirect URL: /oam/server/
Authentication Module: LDAP
Challenge URL: /pages/login.jsp
Context Type: External
serverRequestCacheType
ECC Only
Configure this OAM parameter to define the mechanism used to
remember the request context by the embedded credential collector
(ECC).
This OAM Server parameter in $DOMAIN_
HOME
/config/fmwconfig/oam-config.xml
indicates mechanism to
be used to remember the request context. Possible values are FORM,
COOKIE, or CACHE.
Default: COOKIE
FORM is the required value for POST data preservation, Long URL
handling and Form-based authentication schemes.
See Also:
TempStateMode
in this table.
"Configuring Authentication POST Data Handling" on page 19-116
Table 19–41 (Cont.) Parameters Required for Authentication POST Data Handling
Parameter Description

Configuring Authentication POST Data Handling
Managing Authentication and Shared Policy Components 19-121
Challenge Parameters
c. Click Apply to submit the changes.
2. ECC: Configure serverRequestCacheType, the OAM parameter in oam-config.xml,
if using ECC.
a. Stop the managed server.
b. Stop the administration server.
c. Open oam-config.xml and modify the value of serverRequestCacheType.
d. Save the file.
e. Restart the administration server.
f. Restart the managed server.
3. Configure Webgate Parameters for POST data handling:
a. From the System Configuration tab, Access Manager section, create or find the
desired OAM Agent registration.
b. On the agent registration page, submit values for POST data handling
(Table 19–23):
Name: DesiredAgent
User-Defined Parameters
c. Click Apply to submit the changes.
19.17.5 Testing POST Data Handling Configuration
The following actions can be performed in sequence to test your POST data handling
configuration.
1. Complete all configurations as documented.
2. Develop a simple script to print the POST data and the URL protected by Webgate.
3. Use a browser to access the protected resource.
4. Provide credentials and establish SSO. Wait for the idle session timeout period.
5. With the same browser, use the form to post data to the same Webgate using the
URL which can print the POST data. You will be redirected to credential collector.
6. Enter the same credentials previously used.
From the HTTP headers you can see, after getting obrar.cgi from the credential
collector, the protected resource Webgate will give a 200 response (previously it
was 302) and the POST data can be printed by your script.
Authentication Scheme Challenge
Parameters for Post Data with ECC
Authentication Scheme Challenge
Parameters for Post Data with DCC
MaxPreservedPostDataBytes=
9000
MaxPreservedPostDataBytes=
9000
TempStateMode=form
User-Defined Webgate
Post Data Parameters with ECC
User-Defined Webgate
Post Data Parameters with DCC
PostDataRestoration=true PostDataRestoration=true

Long URL Handling During Authentication
19-122 Administrator's Guide for Oracle Access Management
19.18 Long URL Handling During Authentication
Long URL handling applies to both credential collectors (ECC or DCC) and is a default
operation.
19.18.1 About Long URLs and Authentication Handling
Authentication involves redirecting the user's request to a centralized component that
performs authentication, known as a Credential Collector. The mechanism used to
redirect user from the policy enforcement point (OAM Agent) to the Credential
Collector, is a proprietary front channel protocol over HTTP. This protocol currently
provides the context of the request and the authentication response on the query
string. In situations where the URL of the requested page is larger, the overall context
becomes larger and can go beyond the browser's permissible size. This is referred to as
Long URL Handling.
By default, the Resource Webgate checks the payload size of the front channel protocol
message to determine if it is larger than the coded limit. When long URL handling is
explicitly enabled, the limit is ignored and has no impact.
The credential collector determines if the front channel response payload is to be sent
as HTTP Post data when:
■The incoming request indicates that the agent is capable of handling HTTP POST
or REDIRECT type of response
■The credential collector is configured to always send the payload as HTTP post
data
■The credential collector is configured to always send the payload as a query string
If no explicit configuration is present, then if the payload size is greater than
predefined limit, then it shall send payload as the HTTP post data. But if the payload
size is lower than the predefined limit, then it shall send it on the query string.
Table 19–42 identifies Long URL handling functionality with both the ECC and DCC.
19.18.2 About Configuring Long URL Handling
Table 19–43 summarizes the authentication schemes that support authentication Long
URL handling.
Note: If application post data is also preserved there is no impact.
Table 19–42 ECC and DCC: Long URL Handling
ECC Long URL Handling DCC Long URL Handling
ECC is compatible with all 11g Webgates. Same as ECC.
N/A Long URL handling is limited to the maximum
allowed size of the DCCContextCookie.
The DCC does not perform explicit long URL
handling.
There is no support to preserve the front channel
payload on the form.

Long URL Handling During Authentication
Managing Authentication and Shared Policy Components 19-123
Table 19–44 summarizes the parameters and complete configuration requirements for
authentication Long URL handling. All requirements described in Table 19–44 are
supported end to end with the authentication schemes in Table 19–43.
Table 19–43 Authentication Schemes Supporting Long URL Handling
Authentication Schemes
■FORM challenge method, supported with the out of the box login page.
■WNA
■Basic
■Basic+Sessionless
■X509
■OIF, OIM, OAAM integrations using TAP
Table 19–44 Parameters Required for Long URL Handling
Parameter Description
ChallengeRedirectMethod Configure this as either as an Authentication Scheme challenge
parameter (or as a user-defined Webgate parameter) for POST-data
preservation for both the embedded credential collector (ECC) and the
detached credential collector (DCC).
Note: Preference is given first to the Authentication Scheme
containing this parameter; second to the Webgate providing this
user-defined parameter. Otherwise, default behavior is Dynamic.
Value: GET|POST|DYNAMIC
Behavior when value is:
■POST: Webgate sends encquery as POST data and credential
collectors send encreply as POST data.
■GET: Webgate sends encquery as query string and expects
encreply as query string.
■DYNAMIC: Default behavior, based on the length of the
encquery/encreply. Webgate/credential collector sends data
either as a query string or as POST data. Code default maximum
length is 2000 characters.
See Also: "Configuring Authentication POST Data Handling"
Table 16–2, " User-Defined WebGate Parameters"
ChallengeRedirectMaxMessageBy
tes
Configure this user-defined Webgate parameter to limit the size of the
message data received as obrareq.cgi and obrar.cgi. Message data is
comprised of query string length (if present) or POST data length (if
POST data is present). If message size exceeds this limit, the message
is not processed and the existing message is shown in the browser. The
event is logged as usual.
Default: 8192 bytes
Notes:
obrareq.cgi is the authentication request in the form of a query string
redirected from Webgate to the credential collector (OAM server or
DCC).
obrar.cgi is the authentication response string redirected from the
credential collector (OAM server or DCC) to Webgate.
See Also: "Configuring Authentication POST Data Handling" on
page 19-116
Table 16–2, " User-Defined WebGate Parameters"

Using Application Initiated Authentication
19-124 Administrator's Guide for Oracle Access Management
Long URL handling is enabled by default. The Webgate/credential collector sends
data either as a query string or a POST. The length of the querystring parameter sent
with obrareq.cgi and obrar.cgi is 2000 characters maximum.
19.19 Using Application Initiated Authentication
Access Manager exposes a Reauthentication URL that applications may choose to
invoke if the user is accessing a sensitive URL or operation. This re-authentication will
be triggered irrespective of whether or not the user already has a valid session. An
application can trigger re-authentication by invoking the
/oamreauthenticate
URL at:
http://<ohs_host>:<ohs_port>/oamreauthenticate
Access Manager will expect the /oamreauthenticate to be registered and associated
with an authentication policy. Re-authentication will be performed using the scheme
associated with this policy. The re-authentication URL takes the redirection URL as a
query parameter. After re-authentication is complete, Access Manager redirects the
user to this URL. A request to re-authenticate the user might look like the following:
http://<host>:<port>/oamreauthenticate?
redirect_url=http://<host>:<port>/<redirection_resource_url>
If the redirection URL is not specified, a 404 error code is returned. If the incorrect
credentials are specified during re-authentication, the user will remain on the login
page and, after the maximum retry limit, the user will be redirected to an appropriate
error page. The following process is how to configure for application initiated
authentication.
1. Create an
http://<ohs_host>:<ohs_port>/oamreauthenticate
resource and
assign the desired authentication scheme to it.
2. In the redirect URL, set the appropriate responses to verify that re-authentication
has been successful and to communicate back to the application about the
re-authentication responses.
Access Manager sets the last re-authentication time as a "OAM_LAST_
REAUTHENTICATION_TIME" header and this value is updated every time the user
is re-authenticated.
19.20 Using the Adaptive Authentication Service
Oftentimes, passwords alone are not enough to protect resources from hackers and
cyber-criminals. The Adaptive Authentication Service is a One Time Password
serverRequestCacheType
ECC Only
Configure this OAM parameter to define the mechanism used to
remember the request context by the embedded credential collector
(ECC).
This OAM Server parameter in $DOMAIN_
HOME
/config/fmwconfig/oam-config.xml
indicates mechanism to
be used to remember the request context. Possible values are FORM,
COOKIE, or CACHE.
Default: COOKIE
FORM is the required value for POST data preservation, Long URL
handling and Form-based authentication schemes.
See Also:
TempStateMode
in this table.
"Configuring Authentication POST Data Handling" on page 19-116
Table 19–44 (Cont.) Parameters Required for Long URL Handling
Parameter Description

Using the Adaptive Authentication Service
Managing Authentication and Shared Policy Components 19-125
Authenticator that provides multifactor authentication in addition to the standard user
name and password type authentication. Multifactor authentication is a two-step
process in which users are required to provide a user name, password and a second
generated password before access to a requested service is allowed. The second
password, referred to as a One Time Password (OTP), is generated using an app on a
mobile device. The supported apps are Oracle Mobile Authenticator and Google
Authenticator. (For this release, only iOS and Android devices are supported.)
To use the Adaptive Authentication Service, a user downloads one of the authenticator
apps to a mobile device (for example, Oracle Mobile Authenticator to an Apple
iPhone) and configures it by clicking a link provided by the Access Manager
administrator. Then, to obtain a secret key, the user launches the app, clicks Online
Configuration, and enters his/her credentials. Following a successful authentication,
the app displays a OTP with validity. The following sections have more details.
■Understanding the Adaptive Authentication Service
■Configuring Access Manager for Two-Factor Authentication
■Configuring the Oracle Mobile Authenticator App
■Configuring the Google Authenticator App
19.20.1 Understanding the Adaptive Authentication Service
The following sections contain specific details on the Adaptive Authentication Service.
■Understanding the One Time Password Flow
■Generating a Secret Key
■Understanding Adaptive Authentication Configurations
19.20.1.1 Understanding the One Time Password Flow
When using an Authenticator mobile app to generate a One Time Password (OTP), the
Authenticator app is first configured with the Access Manager server details in order
to obtain the secret key to generate a OTP. Following this, the user authenticates with
Access Manager using the proper credentials and Access Manager returns the user's
secret key. This secret key is unique to each user and known only to Access Manager
and the Authenticator app. (See Generating a Secret Key for details.)
When the user accesses a protected resource, a page is displayed that requests a user
name and password. If these initial credentials are authenticated successfully, a OTP
page is displayed. The user enters the OTP displayed by the mobile Authenticator app
in the OTP page. Once the OTP is validated by Access Manager, access is allowed.
Note: Time-based One Time Password (TOTP) is a two-factor
authentication scheme specified by the Internet Engineering Task
Force (IETF) under RFC 6238 and used by the Adaptive
Authentication Service. TOTP is an extension of the HMAC-based
One Time Password algorithm and supports a time-based moving
factor (a value that must be changed each time a new password is
generated).
Note: The Adaptive Authentication Service requires either an Oracle
Adaptive Access Manager license or an Application Management
Services license.

Using the Adaptive Authentication Service
19-126 Administrator's Guide for Oracle Access Management
19.20.1.2 Generating a Secret Key
Businesses can generate secret keys in different ways. The means in which the secret
key is generated makes no difference to Access Manager although the specific
information required by Access Manager must be integrated within it. The secret key
needs to be shared with Access Manager and the Authenticator app. The following list
of parameters and their values must be passed to the business before they generate a
shared secret key.
■Client Id - identifier for the Mobile and Social client configured in Configuring
OAuth for the Google Authenticator. For example, 54321id
■Client Pass - is the Mobile and Social client password configured in Configuring
OAuth for the Google Authenticator.
■OAMMS Endpoint URL - is the URL where the Mobile and Social REST services
are deployed. For example, http://host.example.com:14100/ms_oauth
■Secret Key Attribute Name - is the LDAP attribute in which the shared secret key
will be stored.
19.20.1.3 Understanding Adaptive Authentication Configurations
To use the Adaptive Authentication Service, you must configure Access Manager and
the mobile authenticator app. For information on configuring Access Manager to use
the Adaptive Authentication Service, see:
■Configuring Access Manager for Two-Factor Authentication
For information on configuring your mobile authenticator app for use with the
Adaptive Authentication Service, see the applicable section:
■Configuring the Oracle Mobile Authenticator App
■Configuring the Google Authenticator App
19.20.2 Configuring Access Manager for Two-Factor Authentication
The following sections contain details on two-factor authentication configurations
using the Administration Console. They assume that Access Manager 11gR2PS2, a
WebGate and the Oracle HTTP Server (OHS) are installed and configured.
■Configuring OAuth for the Oracle Mobile Authenticator
■Configuring OAuth for the Google Authenticator
■Configuring Access Manager
19.20.2.1 Configuring OAuth for the Oracle Mobile Authenticator
Using the Administration Console, follow this procedure to enable the Mobile and
Social Service and update the User Profile Service to protect the REST Secret Key
Service using the Basic Authentication Scheme. This configuration is for use with the
Oracle Mobile Authenticator.
Note: The Authenticator app refreshes the OTP every 30 seconds so
the OTP entered by a user is valid only for that period of time. Access
Manager also generates a OTP for the user with the same secret key
and refresh period. Thus if the OTP generated by Access Manager
matches the OTP entered by the user, access to the protected resource
is allowed. If the OTP entries do not match, access is not allowed.
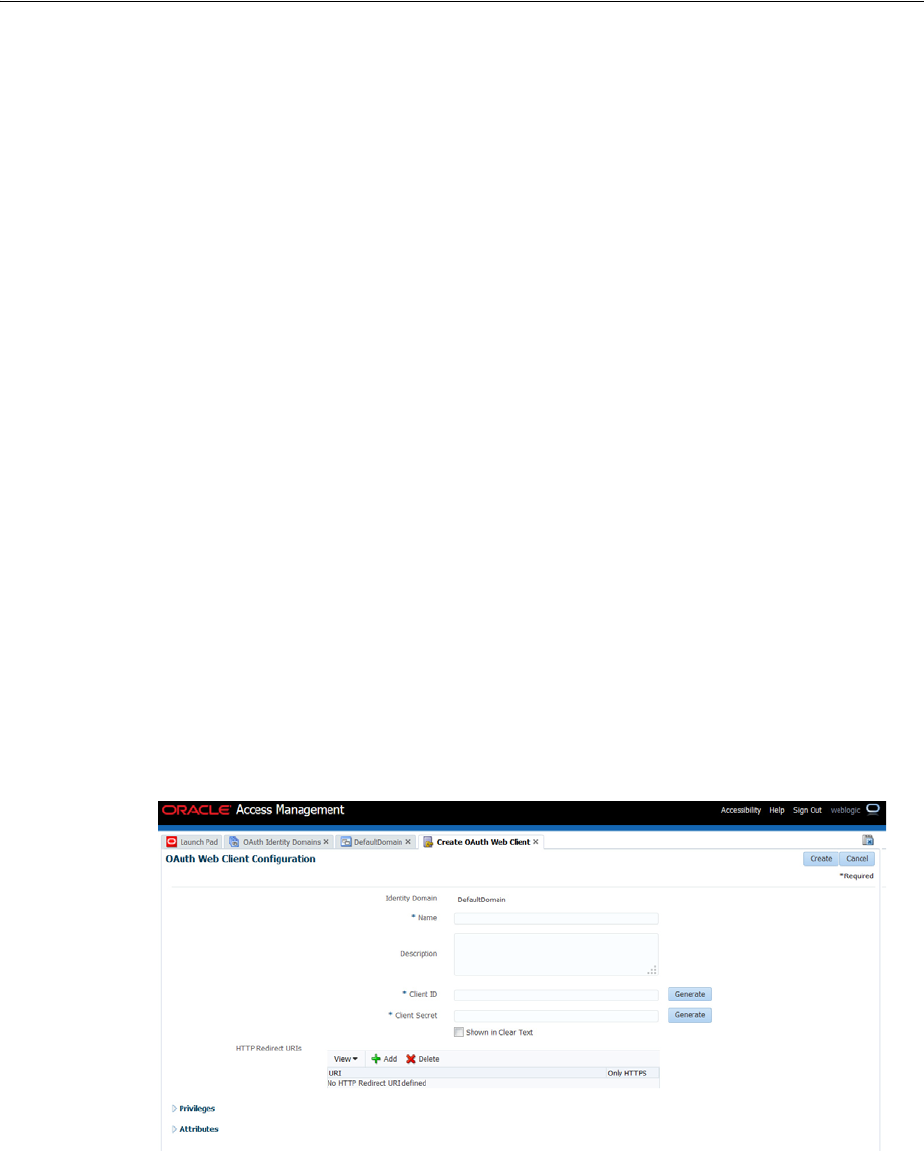
Using the Adaptive Authentication Service
Managing Authentication and Shared Policy Components 19-127
1. From the Launch Pad, navigate to the Configuration panel and click Available
Services.
2. Click Enable to enable Mobile and Social.
3. From the Launch Pad, click OAuth Service under the Mobile and Social panel.
4. Click DefaultDomain under OAuth Identity Domains.
5. From the Resource Servers tab, click UserProfile under User Profile Services.
6. Expand the Resource URIs.
7. From the
/secretkey
tab, update the value of
basicauth.allowed
to true.
8. Click Apply.
19.20.2.2 Configuring OAuth for the Google Authenticator
Using the Administration Console, follow this procedure to create an OAuth web
client. This configuration is for use with the Google Authenticator.
1. From the Launch Pad, navigate to the Configuration panel and click Available
Services.
2. Click Enable to enable Mobile and Social.
3. From the Launch Pad, click OAuth Service under the Mobile and Social panel.
4. From the OAuth Identity Domain tab, open the DefaultDomain identity domain.
5. From the DefaultDomain tab, click the OAuth Clients tab.
6. From the Oauth Clients tab, click Create to create a Web Client.
This opens a new configuration tab.
Figure 19–36 Creating an OAuth Web Client
7. Enter the following details.
■Name - a mandatory name for the Mobile and Social client.
■Description - an optional description of the Mobile and Social client.
■Client Id - a mandatory identifier for the Mobile and Social client. For
example, 54321id
■Client Secret - is the mandatory Mobile and Social client password.

Using the Adaptive Authentication Service
19-128 Administrator's Guide for Oracle Access Management
See Generating a Secret Key for details.
8. Open the Privileges section and tick the "Allow access to all scopes" check box.
Scopes are configured per use case.
9. Tick the All check box under Grant Types.
Grants are configured per use case.
10. Click Create.
19.20.2.3 Configuring Access Manager
The following configurations are for Access Manager.
■Creating an Instance of TOTPModule
■Configuring the TOTP Plug-in Parameters
■Creating an OTP Authentication Scheme
■Configuring Specific Use Case Values
19.20.2.3.1 Creating an Instance of TOTPModule Access Manager provides an
authentication module called TOTPModule that can be used out-of-the-box for TOTP
authentication. Follow this procedure to create an instance of this module.
1. From the Launch Pad, click Authentication Modules in the Access Manager panel.
2. From the Authentication Modules tab, click Search.
The search results are displayed.
3. Click TOTPModule to open its tab.
4. Under the TOTPModule tab, click the Steps tab.
5. Click the plus sign (+) to create a new step.
A step instance is created by default. You can use it to configure or delete it, create
a new one and configure.
6. Enter a step name (for example, OTPInstance) and select TOTP Plugin from the
Plugin drop down.
7. Configure the KEY_OTP_SECRETKEY_ATTRIBUTE and KEY_IDENTITY_
STORE_REF properties.
These parameters take as values the name of the user attribute in which the secret
key will be stored. Leave the other properties as default.
8. Save the changes and click Apply.
19.20.2.3.2 Configuring the TOTP Plug-in Parameters Follow this procedure to configure
the parameters for the TOTP plug-in.
1. Click "Plug-ins" under the Access Manager panel on the Launch Pad.
Note: The value of KEY_OTP_TIME_WINDOW is the number of
OTP codes generated by the mobile device that Access Manager will
accept for validation. Since the mobile device generates a new OTP
every 30 seconds, if the property’s value is 3, Access Manager will
accept the current and last three OTPs generated by the mobile device.

Using the Adaptive Authentication Service
Managing Authentication and Shared Policy Components 19-129
2. Click "TOTPPlugin".
A configuration details page is displayed.
3. Configure the plugin properties KEY_OTP_SECRETKEY_ATTRIBUTE and KEY_
IDENTITY_STORE_REF.
Leave default values in the other properties.
4. Click Save.
19.20.2.3.3 Creating an OTP Authentication Scheme Follow this procedure to create an
OTP Authentication Scheme to use with the module instance previously created.
1. From the Launch Pad, click Authentication Schemes under the Access Manager
panel.
2. Under Authentication Schemes, click LDAPScheme.
The LDAPScheme tab is displayed.
3. Under the LDAP Scheme tab, click Duplicate to create a copy.
4. Under the the new copy's tab, change the values of the name (currently,
TOTPScheme) and the Challenge URL (currently, /pages/getOTP.jsp).
The scheme name may be any valid name.
5. Click Apply.
19.20.2.3.4 Configuring Specific Use Case Values Configure details for a specific use case.
This procedure is an example. Your procedure might differ.
1. From the Launch Pad, click Application Domains under the Access Manager
panel.
2. Search for the Application Domain in which the protected resource is configured.
Search results are displayed.
3. Click the name of the applicable Application Domain in the search results to
display its configuration.
4. Navigate through Authentication Policies to the Protected Resource Policy that is
protecting the resource.
5. Under the Protected Resource Policy, click the Advanced Rules tab and then Post
Authentication Rules.
6. Create a new Rule.
a. Click on the + icon to create a new Rule.
b. Enter values for the Rule Name and Description.
c. Enter a value for the condition.
Note: The value of KEY_OTP_TIME_WINDOW is the number of
OTP codes generated by the mobile device that Access Manager will
accept for validation. Since the mobile device generates a new OTP
every 30 seconds, if the property’s value is 3, Access Manager will
accept the current and last three OTPs generated by the mobile device.

Using the Adaptive Authentication Service
19-130 Administrator's Guide for Oracle Access Management
Condition is a Jython script. An example value might be
location.clientIP.startwith("127.1"). See Using Pre-Authentication Advanced
Rules for details.
d. Specify what to do when the condition evaluates to true.
Two options are Deny Access and Change the Authentication Scheme. In the
current example, change the authentication scheme to "TOTPScheme".
e. Click Add to add the Rule.
f. Click Apply to save the changes made to the policy.
7. Click Apply.
19.20.3 Configuring the Oracle Mobile Authenticator App
The following sections contain configuration details when using the Oracle Mobile
Authenticator (OMA) app on an iOS or Android mobile device.
■Understanding Oracle Mobile Authenticator Configuration
■Configuring the Oracle Mobile Authenticator App on iOS
■Configuring the Oracle Mobile Authenticator App on Android
19.20.3.1 Understanding Oracle Mobile Authenticator Configuration
The Oracle Mobile Authenticator (OMA) app can retrieve the secret key required to
generate a OTP. This can be done online or offline.
■Online Configuration enables the REST web services using the Mobile and Social
OAuth functionality described in Configuring OAuth for the Oracle Mobile
Authenticator. Once enabled, the Oracle Mobile Authenticator app can invoke this
service to get a secret key from Access Manager.
To invoke REST, the Oracle Mobile Authenticator needs to know its location URL
so the administrator creates a web page with a link to configure it. When the user
clicks this link (provided via e-mail), it launches the Oracle Mobile Authenticator,
passes the URL to it and the REST location is configured. The format of the URL
follows.
oraclemobileauthenticator://settings?LoginURL::=http://host:port/secretKeyURL
The value specified for the LoginURL query parameter is based on the OAuth
settings for Oracle Mobile Authenticator. See Configuring OAuth for the Oracle
Mobile Authenticator for details. Online configuration details are documented in
Configuring OMA on iOS Using the Online Option and Configuring OMA on
Android Using the Online Option.
■Offline Configuration supports use cases in which the mobile device does not have
access to a network or could not connect to the REST end point. The Access
Manager administrator sets up a web application which allows the user to
generate or recreate a secret key. The user logs into this web application and, after
authentication, the user is allowed to view the secret key and enter it in the
Authenticator app manually (after clicking the Offline Configuration button). This
web application is protected using OAuth as described in Configuring OAuth for
the Google Authenticator. Offline configuration details are documented in
Configuring OMA on Android Using the Online Option and Configuring OMA on
Android Using the Offline Option.
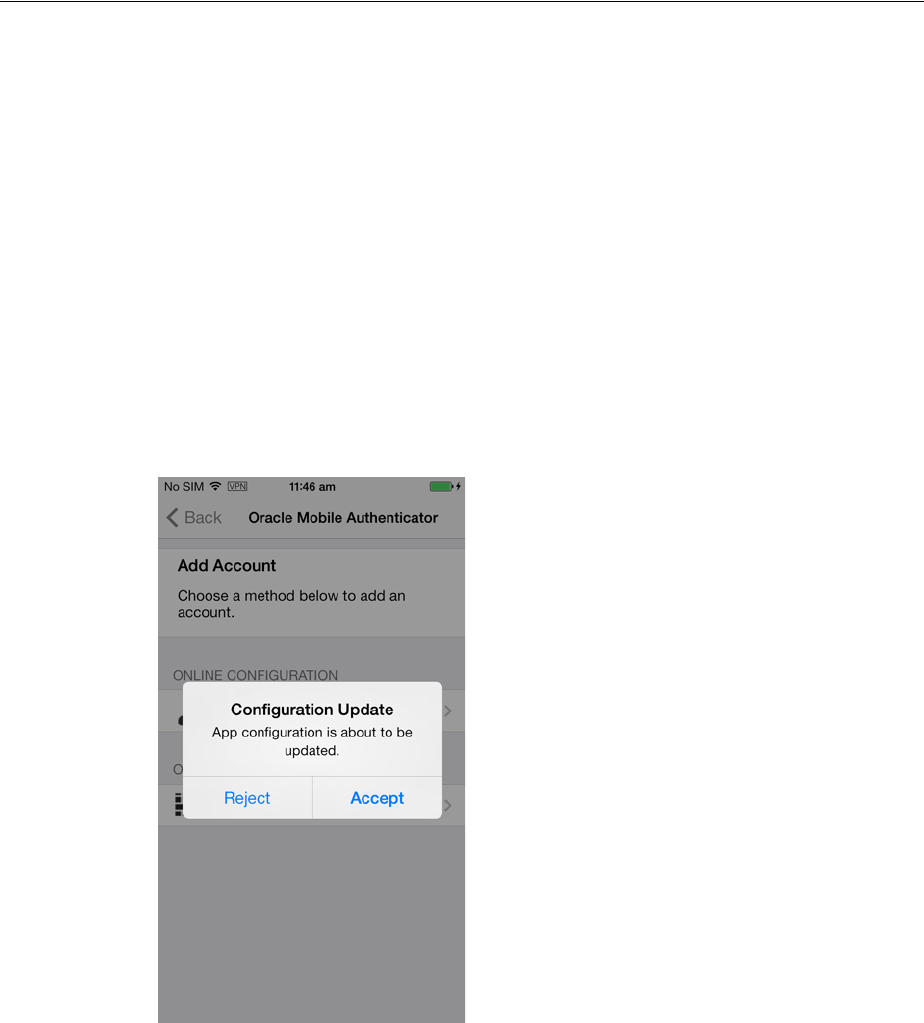
Using the Adaptive Authentication Service
Managing Authentication and Shared Policy Components 19-131
19.20.3.2 Configuring the Oracle Mobile Authenticator App on iOS
The following sections contain configuration details when using OMA on an iOS
mobile device.
■Configuring OMA on iOS Using the Online Option
■Configuring OMA on iOS Using the Offline Option
■Copying a One-Time Password from the Oracle Mobile Authenticator
■Editing an Account on the Oracle Mobile Authenticator
■Deleting an Account on the Oracle Mobile Authenticator
19.20.3.2.1 Configuring OMA on iOS Using the Online Option This procedure will configure
the OMA on iOS using the administrator URL and create an account. Details about the
URL are in Understanding Oracle Mobile Authenticator Configuration.
1. Use the browser on your mobile device to navigate to the URL provided by the
Access Manager administrator.
2. Click the link provided on that page to configure Oracle Mobile Authenticator.
The OAM app will open and the user is prompted to accept the update
3. Tap Accept to update.
When the update is complete, a notification is displayed.
4. Tap OK on the notification screen.
5. Tap Sign in.
This will take you to a new screen.
6. Enter your user name, password and tap Submit.

Using the Adaptive Authentication Service
19-132 Administrator's Guide for Oracle Access Management
If the user name and password is correct, the OTP screen with details of the new
account is displayed. If authentication with the server is successful but an account
with the same user name already exists, you will be asked to enter a new user
name. Once the user name is unique, you will be taken to the OTP screen with
details of the new account.
19.20.3.2.2 Configuring OMA on iOS Using the Offline Option You can also create an account
and retrieve the OTP by manually entering the secret key.
1. Tap on Enter Provided Key.
This will take you to a new screen.
2. Enter a user name and secret key and tap Add Account.
If the user name and key are valid, you will be taken to the OTP screen with
details of the new account. If user name is not unique or the key is not valid, you
will be prompted to enter the information again.
19.20.3.2.3 Copying a One-Time Password from the Oracle Mobile Authenticator
1. Tap on the account from which you want to copy the OTP.
Three icons are displayed.
2. Tap on the left icon to copy the account.
The OTP will be copied to the clipboard and you can paste it in any text input
area.
19.20.3.2.4 Editing an Account on the Oracle Mobile Authenticator
1. Tap on the account you want to edit.
Three icons are displayed.
2. Tap the middle icon to edit an account.
A new screen in which you can edit the user name and secret key is displayed. You
can update both user name and password
3. Tap Update Account to complete the modifications.
19.20.3.2.5 Deleting an Account on the Oracle Mobile Authenticator
1. Tap on the account you want to delete.
Three icons are displayed.
2. Tap the right icon to delete an account.
You will be prompted to confirm your decision.
3. Tap Delete Account to confirm and delete.
19.20.3.3 Configuring the Oracle Mobile Authenticator App on Android
The following sections contain configuration details when using OMA on an Android
mobile device.
■Configuring OMA on Android Using the Online Option
■Configuring OMA on Android Using the Offline Option
■Copying a One-Time Password from the Oracle Mobile Authenticator
■Editing an Account on the Oracle Mobile Authenticator

Using the Adaptive Authentication Service
Managing Authentication and Shared Policy Components 19-133
■Deleting an Account on the Oracle Mobile Authenticator
19.20.3.3.1 Configuring OMA on Android Using the Online Option This procedure will
configure the OMA on Android using the administrator URL and create an account.
Details about the URL are in Understanding Oracle Mobile Authenticator
Configuration.
1. Use the browser on your mobile device to navigate to the URL provided by the
Access Manager administrator.
The OMA app will open and the user is prompted to accept the update.
2. Tap Accept to update.
When the update is complete, a notification is displayed.
3. Tap OK on the notification screen.
After configuring the account, get the secret key and generate a OTP.
4. Open the OMA app.
5. Tap Sign in.
This will take you to a new screen.
6. Enter your user name, password and tap Submit.
If the user name and password is correct, the Authentication Code screen with
details of the new account is displayed. If authentication with the server is
successful but an account with the same user name already exists, you will be
asked to enter a new one. If authentication with the server is successful but the
account is already configured on a different device, you cannot configure that
account as an account can be configured from the server only on a single device. It
will show an error as below.
19.20.3.3.2 Configuring OMA on Android Using the Offline Option You can also create an
account and retrieve the OTP by manually entering the secret key.
1. Open the OMA app.
2. Tap on Enter Provided Key.
This will take you to a new screen.

Using the Adaptive Authentication Service
19-134 Administrator's Guide for Oracle Access Management
3. Enter a name and key and tap Add Account.
If the user name and key are valid, you will be taken to the OTP screen with
details of the new account. If the user name is not unique or the key is not valid,
you will be prompted to enter the information again.
4. Tap Sign in.
This will take you to a new screen.
5. Enter your user name, password and tap Submit.
If the user name and password is correct, the Authentication Code screen with
details of the new account is displayed. If authentication with the server is
successful but an account with the same user name already exists, you will be
asked to enter a new one. If authentication with the server is successful but the
account is already configured on a different device, you cannot configure that
account as an account can be configured from the server only on a single device. It
will show an error as below.
19.20.3.3.3 Copying a One-Time Password from the Oracle Mobile Authenticator
1. Long click on the account from which you want to copy the OTP.
A menu bar opens and three icons are displayed.
2. Tap on the left icon to copy the account.
The OTP will be copied to clipboard. You can then paste it in any text input area.
19.20.3.3.4 Editing an Account on the Oracle Mobile Authenticator
1. Long click on the account you want to edit.
A menu bar opens and three icons are displayed.
2. Tap the middle icon to edit an account.
A pop-up is displayed in which you can edit user name and key.
3. Enter the new name and/or key value.
4. Tap Save to update the account.
19.20.3.3.5 Deleting an Account on the Oracle Mobile Authenticator
1. Long click on the account you want to delete.
A menu bar opens and three icons are displayed.
2. Tap the right icon to delete an account.
You will be prompted to confirm your decision.
3. Tap Delete Account to confirm and delete.
19.20.4 Configuring the Google Authenticator App
After receipt of the secret key, it is entered manually into the TOTP client mobile app
by the user. For example, to initiate configuration in the supported Google
Authenticator, the user creates an account for two-factor authentication using the app.
After account creation, the user manually enters the shared secret key received from
the resource owner. Additionally, ensure that Time Based OTP is enabled at the bottom
of the Google Authenticator screen. The Google Authenticator app generates the OTP
code in an offline, disconnected mode; it does not interact with Access Manager.

20
Managing Policies to Protect Resources and Enable SSO 20-1
20
Managing Policies to Protect Resources and
Enable SSO
Access Manager Application Domains and policies can be accessed and managed
through the Oracle Access Management Console. This chapter describes how to create
and manage policies, and identify the resources to be governed by these policies. It
includes the following topics:
■Prerequisites
■Introduction to Application Domain and Policy Creation
■Understanding Application Domain and Policy Management
■Managing Application Domains and Policies Using the Console
■Configuring Policy Ordering
■Adding and Managing Policy Resource Definitions
■Defining Authentication Policies for Specific Resources
■Defining Authorization Policies for Specific Resources
■Introduction to Policy Responses for SSO
■Adding and Managing Policy Responses for SSO
■Introduction to Authorization Policy Rules and Conditions
■Defining Authorization Policy Conditions
■Defining Authorization Policy Rules
■Validating Authentication and Authorization in an Application Domain
■Understanding Remote Policy and Application Domain Management
■Managing Policies and Application Domains Remotely
■Defining an Application
20.1 Prerequisites
Preview:
■Understanding Application Domain and Policy Management
See Also: Appendix D, "Reviewing Bundled, Generated, and
Migrated Artifacts"

Introduction to Application Domain and Policy Creation
20-2 Administrator's Guide for Oracle Access Management
System level requirements for tasks in this chapter include the following:
■OAM Server should be running
■Users and groups who can access a protected resource should already be created
in the User Identity Store associated with Oracle Access Management.
■Policy-enforcement Agents should be registered as described in Chapter 15.
■Shared components for use in any Application Domain should be defined, as
described in Chapter 19.
20.2 Introduction to Application Domain and Policy Creation
Application domains are the top-level constructs of the Access Manager 11g policy
model. Each Application Domain provides a logical container for resources or sets of
resources, and the associated policies that dictate who can access specific protected
resources. Certain shared components are used within each Application Domain. Each
Application Domain represents a singular application on a particular host or
Administrators can define different Application Domains for resources that reside on
the same Web server and are closely tied to each other in one way or another. For
example, an Administrator can create a single Application Domain for a financial
application and an accounts receivable application, or have a different Application
Domain for each. Configurable policies allow or deny access to the resources.
Each Access Manager Application Domain contains information regarding:
■Resource Definitions
Each resource definition in an Application Domain requires a Resource Type, Host
Identifier (for HTTP resources), and a URL to the specific resource. You can have
as many resource definitions as you need in an Application Domain.
■Authentication Policies and Responses for Specific Resources
Each authentication policy includes a unique name, one authentication scheme,
success and failure URLs, one or more resources to which this policy applies, and
Administrator-defined responses to be applied after successful authentication.
■Authorization Policies, Conditions, Rules, and Responses for Specific Resources
Each authorization policy includes a unique name, success and failure URLs, and
one or more resources to which this policy applies. In addition, Administrators can
define specific conditions that must be fulfilled for a successful authorization and
define responses to be applied after successful authorization.
■Token Issuance Policies, Conditions, and Rules for Specific Resources
Note: To enhance security, Access Manager, by default, will deny
access when a resource is not protected by a policy that explicitly
allows access.
Note: Depending on the policy responses specified for
authentication or authorization success and failure, the end user might
be redirected to a specific URL, or user information might be passed to
other applications through a header variable or a cookie value.

Introduction to Application Domain and Policy Creation
Managing Policies to Protect Resources and Enable SSO 20-3
A Token Issuance Policy defines the rules under which the Security Token Service
can issue a token for a resource (Relying Party Partner) based on the client's
identity, with the client either being a Requester Partner or an end user.
■Policy Ordering
Policy ordering is a new feature in which the administrator manually designates
the order in which policies within an application domain will be matched to
incoming requests for access to protected resources. Previous versions of Access
Manager used the best match algorithm for this purpose.
When a new application is placed behind an existing agent, the Administrator must
decide if the application should be protected by a separate (new) Application Domain
and policies or an existing Application Domain and policies. This section provides
information in the following sections to inform your choice.
■Generating Application Domains and Policies Automatically
■Managing Application Domains and Policies Remotely
■Creating or Managing an Application Domain and Policies
20.2.1 Generating Application Domains and Policies Automatically
When you register a policy-enforcement Agent with Access Manager, you can choose
to have the domain and policies generated automatically or decline the automatic
generation. An automatically generated Application Domain is named for the Agent
and seeded with default resources and basic policies (authentication and
authorization). No Token Issuance Policy is defined, though an empty container is
provided.
During Agent registration, it is presumed that the Agent resides on the same Web
Server as the application it protects. However, the Agent can be on a proxy Web server
and the application can be on a different host. Default resources are protected by basic
policies until an Administrator adds more resources or modifies or adds policies.
20.2.2 Managing Application Domains and Policies Remotely
Access Manager provides two modes to manage Application Domains and their
policies without registering or modifying the companion agent. Remote policy and
Application Domain management supports only create and update functions. Remote
management does not support removing Application Domains or policies. For more
information, see "Understanding Remote Policy and Application Domain
Management" on page 20-76.
20.2.3 Creating or Managing an Application Domain and Policies
The following overview outlines the procedures that must be performed to manually
create or manage an Application Domain and policies, and identifies the topics that
provide the steps to complete the procedure.
Task overview: Managing an Application Domain
1. Get acquainted with the following details:
Note: IAMSuiteAgent is a pre-registered Java Agent filter that
provides an Application Domain (IAMSuite) to protect the Oracle
Fusion Middleware console and other consoles. For more information,
see "Bundled 10g IAMSuiteAgent Artifacts" on page D-1.

Understanding Application Domain and Policy Management
20-4 Administrator's Guide for Oracle Access Management
■Chapter 18, "Understanding Single Sign-On with Access Manager"
■Chapter 19, "Managing Authentication and Shared Policy Components"
■Understanding Application Domain and Policy Management
■Understanding Remote Policy and Application Domain Management
2. Perform all prerequisite tasks for this chapter, as described in:
■Prerequisites
3. Start a fresh Application Domain (or view an existing one), as described in:
■Creating a Fresh Application Domain
■Viewing or Editing an Application Domain
■Managing Policies and Application Domains Remotely
4. Add resource definitions to your Application Domain as described in:
■Adding and Managing Policy Resource Definitions
5. Define your Authentication Policy, as described in:
■Creating an Authentication Policy for Specific Resources
■Adding and Managing Policy Responses for SSO
6. Define your Authorization Policy, as described in:
■Creating an Authorization Policy and Specific Resources
■Adding and Managing Policy Responses for SSO
■Defining Authorization Policy Conditions
■Defining Authorization Policy Rules
7. Define your Token Issuance Policy, as described in:
■Chapter 38: Managing Token Issuance Policies and Conditions
■Adding and Managing Policy Responses for SSO
■Defining Authorization Policy Conditions
■Defining Authorization Policy Rules
8. Configure SSO settings and policy evaluation caches, as described in:
■Chapter 14: "Managing SSO Tokens and IP Validation"
■Chapter 14: Managing Run Time Policy Evaluation Caches
9. Validate your policies and configuration, as described in:
■Chapter 22: Validating Global Sign-On and Centralized Logout
20.3 Understanding Application Domain and Policy Management
Whether you create an Application Domain manually or you accept automatic policy
generation when registering an Agent, the elements of an Application Domain are the
same. All policies and Application Domains are managed using the Oracle Access
Management Console. For details, see the following topics:
■About Application Domain Pages and Navigation
■About the Application Domain Summary Page
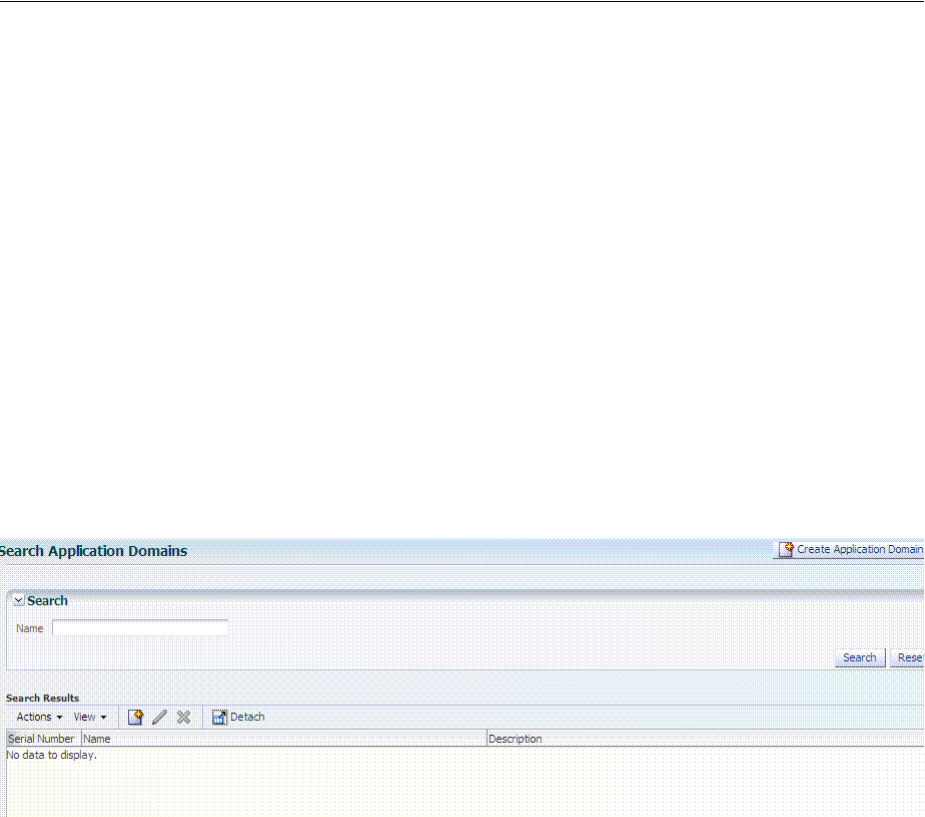
Understanding Application Domain and Policy Management
Managing Policies to Protect Resources and Enable SSO 20-5
■Defining an Application
■About the Resource Container in an Application Domain
■About Authentication Policy Pages
■About Authorization Policy Pages
■About Token Issuance Policy Pages
20.3.1 About Application Domain Pages and Navigation
Regardless of the method you choose to create an Application Domain, a unique name
is required to be used as an identifier. When you click Application Domains, a Search
page is displayed. The Create Application Domain button in the upper-right corner
enables you to start a fresh domain definition. Otherwise, enter a name (or leave the
Name field blank) and click the Search button to list existing Application Domains.
Figure 20–1 is the Application Domains Search page, controls, and the Search Results
table with its own tool bar.
Figure 20–1 Application Domains Search Page
20.3.2 About the Application Domain Summary Page
When you display an Application Domain by clicking its name in the Search results,
the Name, an optional description and Policy Ordering configuration are displayed on
the Summary tab. Other information is organized in the following tabs.
■Resources
■Authentication Policies
■Authorization Policies
■Token Issuance Policies
■Administration
Figure 20–2 is a screenshot of the Application Domain page for the Acme Application
Application Domain. In a generated Application Domain, the Name and Description
are populated as shown. When you create an Application Domain manually, the
Description is entered by the Administrator.
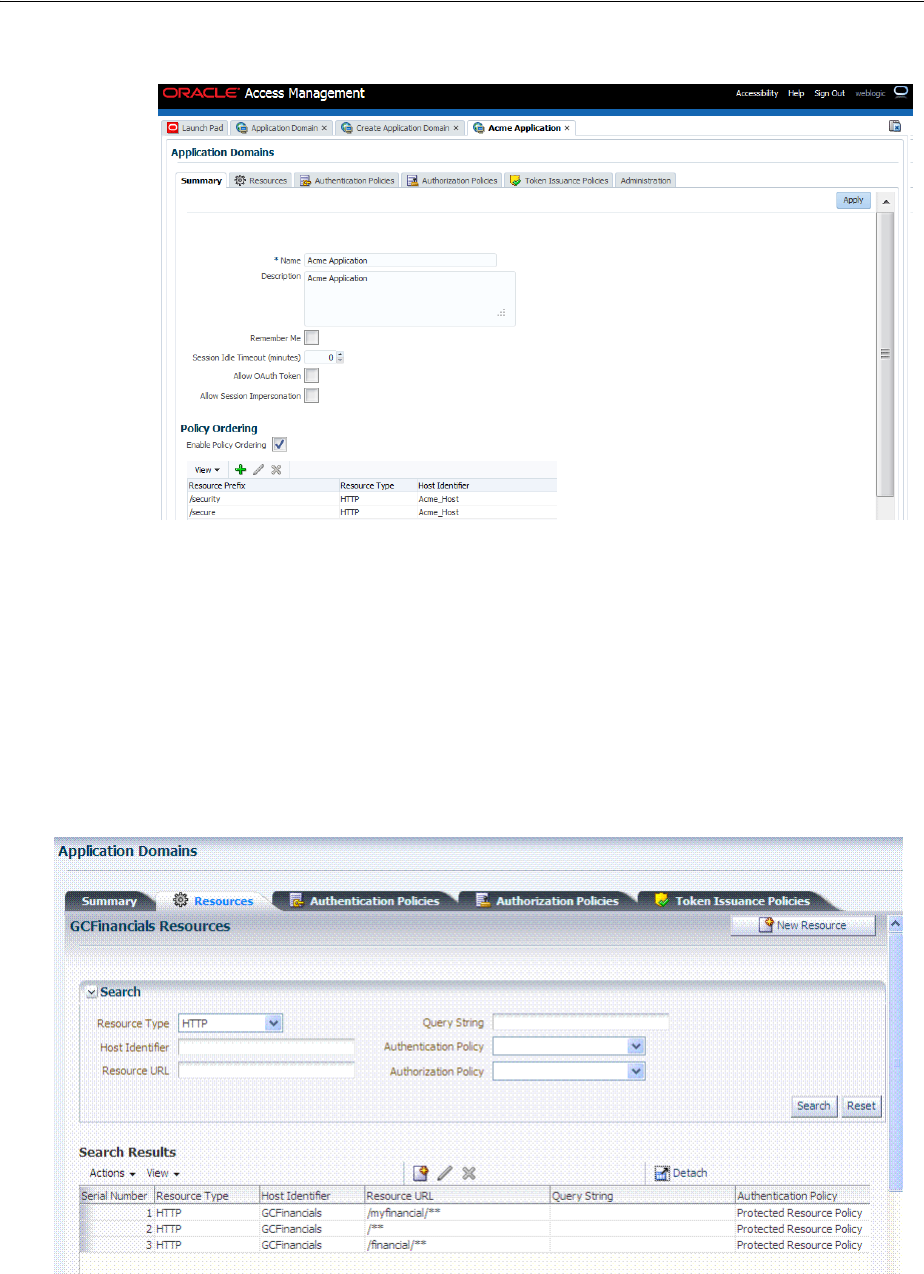
Understanding Application Domain and Policy Management
20-6 Administrator's Guide for Oracle Access Management
Figure 20–2 Application Domain Page for Acme Application
20.3.3 About the Resource Container in an Application Domain
The Resources tab in the Application Domain represents the container for all resource
definitions in that domain. When the Resources tab is displayed, the Search controls
are available to help you find specific definitions quickly.
Figure 20–3 illustrates Search controls that you can use to refine your resource
definition search. There is also a New Resource button in the upper-right corner. The
Search Results table provides key information about each definition found.
Figure 20–3 Search Results for Resources in an Application Domain
The default Resource Type is HTTP; default Resource URL is /**. With HTTP resource
definitions you can also search on a query string defined for that resource. The query
string can be only the Base URL and can include optional pattern-matching special
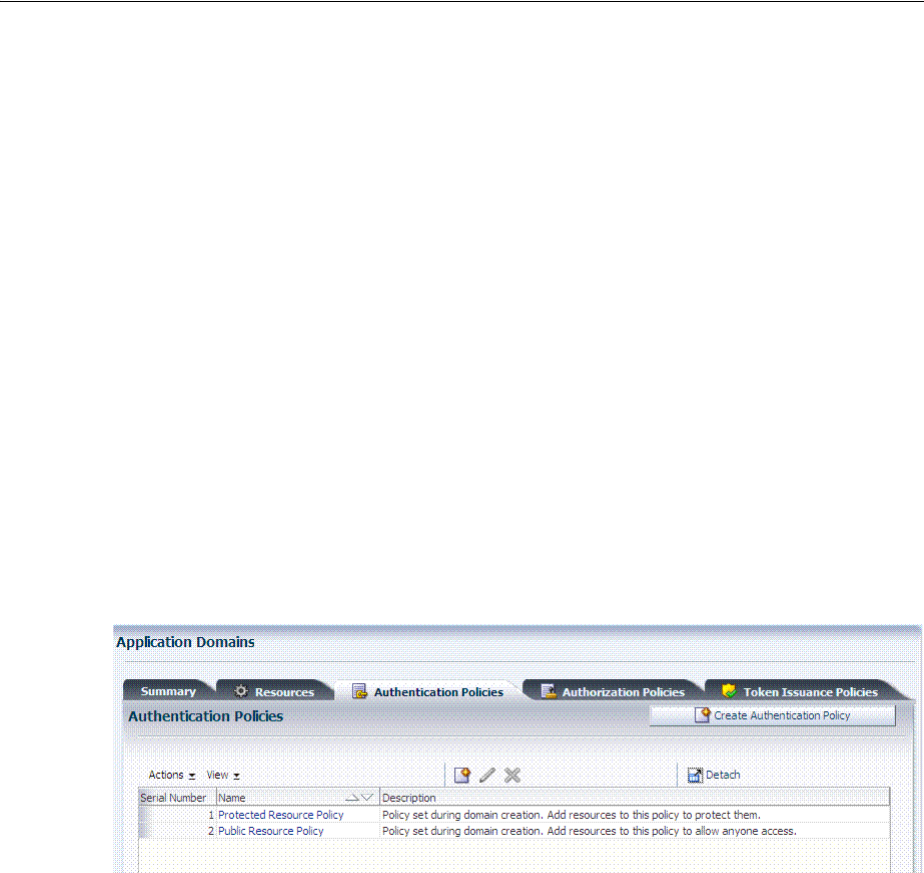
Understanding Application Domain and Policy Management
Managing Policies to Protect Resources and Enable SSO 20-7
characters to represent a set of URLs. In this generated domain, the Host Identifier
matches the name of the HTTP agent that was registered. Basic information about the
policies is also provided.
20.3.4 About Authentication Policy Pages
The Authentication Policies tab provides access to defined or generated policies with
no search controls needed. When an Administrator creates an Application Domain
manually she must also manually create all policies. In a generated Application
Domain, two Authentication policies are created automatically, as shown in
Figure 20–5:
■Authentication Policy: Protected Resource Policy
■Authentication Policy: Public Resource Policy
Figure 20–4 Authentication Policies Tab
Authentication policies are local, which means that each policy applies only to the
resources specified for the policy. Each resource can be protected by only a single
authentication policy.
Figure 20–5 shows the Protected Resource Policy and the columns of information
displayed automatically on the policy's Resources tab. The Responses tab is available.
See Also:
■"Adding and Managing Policy Resource Definitions" on
page 20-14
■Appendix D, "Reviewing Bundled, Generated, and Migrated
Artifacts"
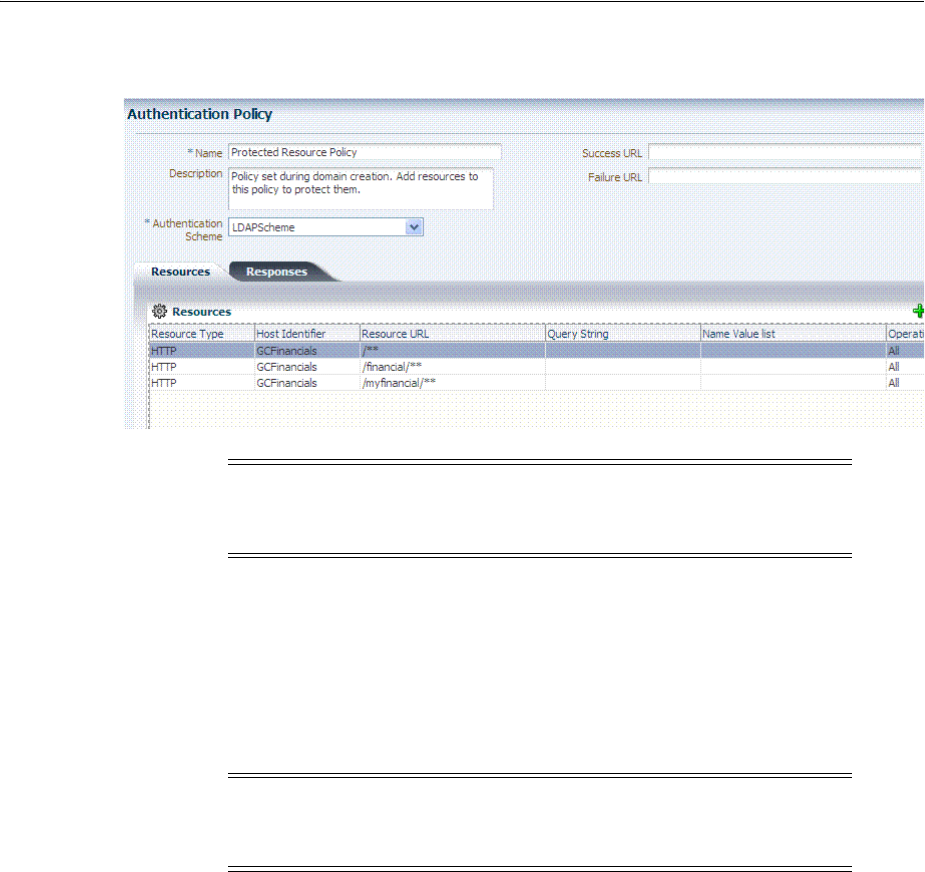
Understanding Application Domain and Policy Management
20-8 Administrator's Guide for Oracle Access Management
Figure 20–5 Authentication Policy Page: Resources and Responses
A description is provided during automatic generation:
"Policy set during domain creation. Add resources to this policy to protect them."
This generated policy uses the LDAPScheme as the authentication scheme. However,
the optional elements of the policy are not yet defined.
Protected Resources are identified on the Resources tab as
HostIdentifier/**
.
Public Resource Policy: A second authentication policy is also generated
automatically. This policy uses AnonymousScheme as the default scheme for
authentication, which allows anyone access.
Initially, this Public Resource Policy does not include or serve any Resources. The
Description tells Administrators what is needed:
Policy set during domain creation. Add resources to this policy to allow anyone
access.
20.3.5 About Authorization Policy Pages
The Authorization Policies tab also provides access to defined or generated policies
with no search controls needed. In a generated Application Domain, two
Authorization policies are created automatically; however, each resource can be
protected by only a single authorization policy:
■Protected Resource Policy
■Public Resource Policy
Note: Initially, all resources are protected. Success and Failure URLs
and Responses must be added manually; no default values are
supplied.
Note: Administrators can change the authentication scheme, specify
Success and Failure URLs, add other resources, and define SSO
Responses.
See Also: "Introduction to Policy Responses for SSO" on page 20-41
Understanding Application Domain and Policy Management
Managing Policies to Protect Resources and Enable SSO 20-9
The Authorization Policy tab is shown in Figure 20–7. From this tab, you can select a
policy to edit or create a new policy.
Figure 20–6 Authorization Policies Page
The Authorization Policy page is shown Figure 20–7. It provides several tabs where
you can define the various components of this Authorization policy. Initially, all
resources are protected and access is denied. Success and Failure URLs Conditions,
Rules, and Responses must be added manually (no default are supplied).
Figure 20–7 Individual Authorization Policy Page
The Authorization Policy Resources tab is shown in Figure 20–8. You use this page to
add (or remove) resources for this policy.
Figure 20–8 Individual Authorization Policy Resources tab
Administrators can also define Conditions, Rules, and Responses for this policy. None
are generated automatically.
Managing Application Domains and Policies Using the Console
20-10 Administrator's Guide for Oracle Access Management
20.3.6 About Token Issuance Policy Pages
By default, only a container for Token Issuance Policies is provided in a generated
Application Domain. Any Resources, Conditions, Rules, and Responses must be
added manually.
Figure 20–9 Token Issuance Policies Page
For specific information on this policy type, see:
■"Managing TokenServiceRP Type Resources" on page 38-30
■"Managing Token Issuance Policies, Conditions, and Rules" on page 38-27
20.4 Managing Application Domains and Policies Using the Console
This section describes how to create and manage an Application Domain using Oracle
Access Management Console. It includes the following topics:
■About Application Domains Summary Page
■Creating a Fresh Application Domain
■Searching for an Existing Application Domain
■Viewing or Editing an Application Domain
■Deleting an Application Domain and Its Contents
20.4.1 About Application Domains Summary Page
Managing an Application Domain involves adding, modifying, or deleting general
and resource-related settings and policies.
When creating or editing an Application Domain using the Oracle Access
Management Console, several pages are involved. Initially, you add general details
(name and optional description) on the form show in Figure 20–10.
See Also:
■"Introduction to Policy Responses for SSO" on page 20-41
■"Introduction to Authorization Policy Rules and Conditions" on
page 20-49

Managing Application Domains and Policies Using the Console
Managing Policies to Protect Resources and Enable SSO 20-11
Figure 20–10 Create Application Domain
Each Application Domain must have a unique name that matches the agent name.
After applying the name and optional description for the new Application Domain, it
is created. If this was a manual creation, the complete series of tabs becomes available:
Summary, Resources, Authentication Policies, Authorization Policies, Token Issuance
Policies. If this was created using remote registration or while registering an agent,
basic policy information is generated with it.
20.4.2 Creating a Fresh Application Domain
Decide whether you need a fresh Application Domain or if you can add resources to
an existing Application Domain. You can protect multiple applications using the same
Agent by manually creating one Application Domain and manually adding resources
and policies.
Users with valid Administrator credentials can perform the following task to manually
create an Application Domain using the Oracle Access Management Console.
Alternatively, Application Domains can be generated automatically during agent
registration, as described in Chapter 15 and Chapter 16.
Prerequisites
See Prerequisites at the beginning of this chapter.
To create a fresh Application Domain
1. From the Oracle Access Management Console, click Application Domains, and
then click the Create button.
2. On the Create Application Domains page, add a unique name, an optional
description and other details, then click Apply and close the Confirmation
window.
See Configuring Policy Ordering.
3. View and manage the following containers (tabs) within the Application Domain
container:
■Resources: See "Adding and Managing Policy Resource Definitions" on
page 20-14.
■Authentication Policies: See "Defining Authentication Policies for Specific
Resources" on page 20-32.
■Authorization Policies: See "Defining Authorization Policies for Specific
Resources" on page 20-37.

Managing Application Domains and Policies Using the Console
20-12 Administrator's Guide for Oracle Access Management
■Token Issuance Policies: See "Managing Token Issuance Policies, Conditions,
and Rules" on page 38-27.
20.4.3 Searching for an Existing Application Domain
Users with valid Administrator credentials can use the following procedure to search
for a specific Application Domain.
To search for an Application Domain
1. From the Oracle Access Management Console, click Application Domains.
2. In the field provided, enter the name of the Application Domain you want to find
(or partial name and wild card, *, or leave the field blank to retrieve all domains).
For example:
DesiredDomain
3. Click the Search button to initiate the search.
4. Choose a name in the Search Results table to perform the desired task. For
instance:
■Edit: Click the Edit button in the tool bar to display the configuration page
and go to "Viewing or Editing an Application Domain".
■Delete: See "Deleting an Application Domain and Its Contents" before you
perform this task.
■Detach: Click Detach in the tool bar to expand the table to a full page.
■View: Select a View menu item to alter the appearance of the results table.
20.4.4 Viewing or Editing an Application Domain
Users with valid Administrator credentials can perform the following task to view or
modify an Application Domain (including its resources, policies, conditions, and
responses) using the Oracle Access Management Console.
Oracle recommends that you consider grouping similar applications into the same
Application Domain. While editing the Application Domain, be aware that different
applications are using the same domain. Editing the description and domain name are
supported.
To view or modify an Application Domain and its content
1. Locate the desired Application Domain as described in "Searching for an Existing
Application Domain".
2. Click to open each of the following tabs to add, view, modify, or delete specific
details:
■Resources: See "Adding and Managing Policy Resource Definitions" on
page 20-14.
■Authentication Policies: See "Defining Authentication Policies for Specific
Resources" on page 20-32.
Note: This Search operation is case sensitive.
See Also: "Managing Policies and Application Domains Remotely"

Configuring Policy Ordering
Managing Policies to Protect Resources and Enable SSO 20-13
■Authorization Policies: See "Defining Authorization Policies for Specific
Resources" on page 20-37
■Token Issuance Policies: See "Managing Token Issuance Policies, Conditions,
and Rules" on page 38-27.
20.4.5 Deleting an Application Domain and Its Contents
Users with valid Administrator credentials can perform the following task to delete an
Application Domain (including its resources, policies, conditions, and responses)
using the Oracle Access Management Console.
Deleting the Application Domain and its content removes all referenced objects,
including the Agent registration. Using this method, if you later need to re-register the
same Agent, you can because there are no remaining references to the previous
Application Domain and its content.
Prerequisites
Ensure that resources in the domain to be deleted are placed in another Application
Domain for protection.
To delete an Application Domain
1. Locate the desired Application Domain as described in "Searching for an Existing
Application Domain".
2. Ensure that resources in the domain to be deleted are placed in another
Application Domain for protection.
3. In the Search Results table, click the Serial Number beside the desired name, and
then click the Delete (x) button in the tool bar.
4. In the Warning window, click Delete (or click Cancel to dismiss the window).
5. Check the results table to confirm the Application Domain has been removed.
20.5 Configuring Policy Ordering
Previous releases of Access Manager used a policy matching algorithm to match
incoming resource URLs with the stored patterns in an Application Domain. A best
match is arrived at based on a predefined algorithm. (This algorithm can not be
changed.) If multiple patterns are matched with an incoming URL, the best match
pattern is selected and its associated policy is evaluated.
With this 11gR2 PS2 release, rather than the best match algorithm, an Administrator
manually designates the order of policies within an Application Domain. To turn on
Policy Ordering, the Administrator must first add one or more resource prefixes to the
Application Domain. Once these have been added, you can click the Enable Policy
Ordering flag. (See Figure 20–2, "Application Domain Page for Acme Application".)
Note: During a Delete operation, if the Application Domain contains
any policy elements, you are alerted.
Note: You may create resource prefixes and not enable policy
ordering. In this case, the resource prefixes are ignored and the best
match algorithm is used.
Adding and Managing Policy Resource Definitions
20-14 Administrator's Guide for Oracle Access Management
Figure 20–11 is a screenshot of the Resource Prefix configuration pop up.
Figure 20–11 Adding a Resource Prefix for Policy Ordering
During runtime, the incoming URL of the protected resource is checked to determine if
it starts with any resource prefix defined in the Application Domain. If the URL
matches a resource prefix, the policies in the Application Domain configured with that
resource prefix are checked (in the order defined by the Administrator) to see if any
resource in the policy matches the incoming resource. If the incoming resource
matches a particular policy, it is evaluated and the results are returned; the other
policies are not checked.
To configure Policy Ordering
1. From the Oracle Access Management Console, click Application Domains, and
then click the Create button.
2. On the Create Application Domain page, add a unique name and an optional
description.
3. Click Add to add a Resource Prefix.
4. Tick the Enable Policy Ordering box.
5. Select the ResourceType from the drop down list.
See Table 20–1 for definitions of the default Resource Types.
6. Add an optional host identifier.
Host identifier is mandatory for an HTTP Resource Type.
7. Add the Resource Prefix.
For example, if the policy Resource being protected is /em/**, the Resource Prefix
is /em. If the policy Resource being protected is /blog/**, the Resource Prefix is
/blog.
8. Click Add.
20.6 Adding and Managing Policy Resource Definitions
Each Application Domain includes a container for resource definitions, the Resources
tab. Once you have defined a resource in this container, you can add it to a policy in
the Application Domain.

Adding and Managing Policy Resource Definitions
Managing Policies to Protect Resources and Enable SSO 20-15
Protecting resources requires an Application Domain containing specific resource
definitions. With OAM, you can protect different types of resources, including
non-HTTP/HTTPS-based resources and HTTP/HTTPS-based resources such as:
■An entire external Web site
■Specific pages in a Web site
■Partner portals
■A parts order application
■Invoice applications
■A benefits enrollment application on Web servers of an enterprise in many
countries
This section provides the following topics:
■Defining Resources in an Application Domain
■Searching for a Resource Definition
■Defining Resources in an Application Domain
■Viewing, Editing, or Deleting a Resource Definition
20.6.1 Defining Resources in an Application Domain
Each resource must be defined separately in an Application Domain. Within an
Application Domain, resource definitions exist as a flat collection of objects. Each
resource is defined as a specific type, and the URL prefix that identifies the resource
(document or entity) stored on a server and available for access by a large audience.
The location is specified using an existing shared Host Identifier.
Resource Definition Guidelines
1. No URL prefixes. Resource definitions are treated as complete URLs.
2. Pattern matching (with limited features) for:
' * ' and '...' are supported
3. Resources need not be unique across domains.
4. Query-string protection for HTTP URLs.
5. Each HTTP resource is defined as a URL path, and associated with a host
identifier. However, resources of other types are associated with a specific name
(not a host identifier).
6. Non-HTTP resource types are supported, with definition of specific operations.
Non-HTTP resource types are never associated with a host identifier.
7. Resources can designated as either Protected, Unprotected, or Excluded.
8. Custom resource types are allowed.
Figure 20–12 illustrates a fresh Resources definition page.
Note: If a resource that is not explicitly marked as excluded, is not
associated with a policy, then access is denied to all users because
there is no policy match.
Adding and Managing Policy Resource Definitions
20-16 Administrator's Guide for Oracle Access Management
Figure 20–12 Fresh Resources (Definition) Page in the Application Domain
Table 20–1 describes elements that comprise a resource definition.
Table 20–1 Resource Definition Elements
Elements Description
Resource Type The
HTTP
type is the default; it covers resources that are accessed using either the HTTP or HTTPS
protocol. Policies that govern a particular resource apply to all operations defined for the resource.
The
wl_authen
resource type is used for Fusion Middleware application scenarios, as described in
the Oracle Fusion Middleware Application Security Guide.
The
TokenServiceRP
resource type is used to represent the Token Service Relying Party as
described in "Managing TokenServiceRP Type Resources" on page 38-30.
Any custom resource type that has been defined is listed with default resource types when you
add a resource definition (or search for resources).
See Also: "About the Resource Type in a Resource Definition" on page 20-18.
Host Identifier A list of host identifiers is available, which contains all identifiers that were defined as a shared
component. You must choose a host identifier to assign this resource.
Note: The combination of the host identifier and URL string that make up a resource definition
must be unique across all Application Domains.
See Also: "Managing Host Identifiers" on page 19-7.
Description An optional unique description for this resource.
URI Section Information will differ depending on the selected Resource Type.
Query
Name-Value list
For HTTP resource types only. You can provide a list of Name and Value pairs for use in access
policies.
See Also: "About Query String Name and Value Parameters for Resource Definitions" on
page 20-22.

Adding and Managing Policy Resource Definitions
Managing Policies to Protect Resources and Enable SSO 20-17
Query
String
For HTTP resources, you can provide a query string for literal full query string matching within
access policies.
See Also: "About Literal Query Strings in Resource Definitions" on page 20-26.
Resource URL The value must be expressed as a single relative URL string that represents a path component of a
full URL composed of a series of hierarchical levels separated by the '/' character. The URL value
of a resource must begin with / and must match a resource value for the chosen host identifier.
Based on its contents, a URL is matched in response to an incoming request as a literal or a wild
card pattern. The special characters available to define a pattern, if included, are:
■The asterisk (*) is allowed only at the lowest, terminating level of the path. The asterisk
matches zero or more characters.
■An ellipses (…) is allowed at any level of the path except the terminating level. The ellipses
represents a sequence of zero or more intermediate levels.
See Also Table 20–2.
Operations Section You can define specific allowed operations to customize you own resource definitions.
Note: Oracle-provided Resource Types are read-only. Operations associated with Oracle-provided
Resource Types need not be defined and cannot be modified. Policies developed and applied to
resources of Oracle-provided types apply to all operations.
Operations Available Identify all HTTP operations that are allowed for this resource definition. Policies developed and
applied to this customized resource apply to only the operations you identify. Unless explicitly
noted, all of the following possible operations are for HTTP resource types:
■Connect
■Options
■Put
■Post
■Trace
■Head
■Delete
■Connect
■Login (wl_authen resource type only)
■Issue (TokenServiceRP resource type only)
Note: During Agent registration, if no operation is specified for the resource definition itself, then
All operations for that resource type are supported.
See Also: "About Resource Types and Their Use" on page 19-3.
Protection Using the controls in this section of the Resource Definition, you can identify the desired level of
protection for this resource and name the policies to be used.
Table 20–1 (Cont.) Resource Definition Elements
Elements Description

Adding and Managing Policy Resource Definitions
20-18 Administrator's Guide for Oracle Access Management
After adding the resource, it is grouped under the Resources node of the named
Application Domain. When you create policies all defined resources for the domain
are listed and you can choose one or more for inclusion in the policy.
For more information about different specifications within a resource definition, see
the following topics:
■About the Resource Type in a Resource Definition
■About the Host Identifier in a Resource Definition
■About the Resource URL, Prefixes, and Patterns
■About Query String Name and Value Parameters for Resource Definitions
■About Literal Query Strings in Resource Definitions
■About Run Time Resource Evaluation
20.6.1.1 About the Resource Type in a Resource Definition
When adding a resource definition to an Application Domain, Administrators must
choose from a list of defined Resource Types. Native Resource Types are read-only
cannot be modified or deleted; these include HTTP, TokenserviceRP, and wl_authen.
Protection Level Choose the appropriate protection level from the following:
■Protected (the default)
Protected resources are associated with a protected-level Authentication policy that uses a
variety of authentication schemes (LDAP, or example).
Authorization policies are allowed for protected resources.
Responses, conditions, auditing, and session management are enabled for protected
resources using a policy that protects the resource.
■Unprotected
Unprotected resources are associated with an unprotected-level Authentication policy (level
0) that can use a variety of authentication schemes (LDAP, for example).
Authorization policies are allowed for unprotected resources, and a basic one is needed to
allow such access. However, an elaborate policy with conditions and responses is irrelevant.
Responses, conditions, and auditing are enabled for Unprotected resources using a policy
that protects the resource. Only Session Management is not enabled. Access to Unprotected
resources incur an OAM Server check from Webgate, which can be audited.
■Excluded (these are public)
Only HTTP resource types can be excluded. Typically security insensitive files like Images
(*.jpg, *.png), protection level Excluded resources do not require an OAM Server check for
Authentication, Authorization, Response processing, Session management, and Auditing.
Excluded resources cannot be added to any user-defined policy in the console.
While allowing access to excluded resources, Webgate does not contact the OAM
Server.Therefore, such access is not audited. Most regular resource validations apply to
Excluded resources. However, excluded resources are not listed when you add resources to a
policy.
There is no Authentication or Authorization associated with the resource.
Note: If a resource protection level is modified from "Protected" to "Excluded" and a policy
exists for that resource, modification will fail until the resource is first disassociated with the
policy.
Authentication Policy A list of Authentication policies based on the specified resource protection level becomes
available. Only policies within this domain, and that match the specified protection level, are
listed.
Authorization Policy A list of authorization policies defined in the domain become available from which you can
choose the one to protect this resource.
Table 20–1 (Cont.) Resource Definition Elements
Elements Description

Adding and Managing Policy Resource Definitions
Managing Policies to Protect Resources and Enable SSO 20-19
When adding an HTTP type resource to an Application Domain, Administrators
choose from a list of existing host identifiers and then add the resource URL.
Operations associated with the HTTP resource type need not be defined by an
Administrator. Instead, policies apply to all HTTP operations.
Table 20–2 shows sample URL values for resources. For more information, see "About
the Resource URL, Prefixes, and Patterns" on page 20-19.
20.6.1.2 About the Host Identifier in a Resource Definition
Administrations identify resources in an Application Domain by the host where the
resources reside and the resource URL.
Host identifiers create a context for each resource, which is useful when adding
resources that have the same URL paths on different computers. Administrations can
protect all of these resources in the same way within the same Application Domain.
The only variable that distinguishes one set of resources from another is identification
of its host computer.
All defined host identifiers appear on the Host Identifiers list on the Resources page.
When adding a resource to an Application Domain, administrations must choose one
host identifier for the computer hosting the resource.
To ensure that Access Manager recognizes the URL for a resource, Access Manager
must know the various ways used to refer to that resource's host computer.
20.6.1.3 About the Resource URL, Prefixes, and Patterns
During automated Application Domain generation, a URL prefix is defined under
which all resources are protected. Resources are linear, not hierarchical. Resource
definitions are treated as complete URLs.
See Also: "About Resource Types and Their Use" on page 19-3
Table 20–2 HTTP Resources Sample URL Values
Resource Sample URL Values
Directories ■/mydirectory
■/mydirectory/**
Pages ■/mydirectory/projects/index.html
■/mydirectory/projects/*.html
■/mydirectory/.../*.html
Web applications ■/mydirectory/projects/example.exe
■/mydirectory/projects/*.exe
■/mydirectory/**
Note: Non-HTTP resource types are not associated with a host
identifier. Instead, Administrators must enter the type's name into the
Resource URL field of the resource definition page.
Note: No host identifier is associated with a non-HTTP resource
type.

Adding and Managing Policy Resource Definitions
20-20 Administrator's Guide for Oracle Access Management
Administrations identify individual resources in the Application Domain using a
specific resource URL. Individual resource URLs need not be unique across domains.
However, the combination of a resource URL, Query String, and a host identifier must
be unique across domains.
An HTTP type resource is expressed as a single relative URL string representing a
path. The string is composed of a series of hierarchical levels separated by the '/'
character. Based on its content, a URL is matched in response to an incoming request
as a literal or a wild card pattern.
URL Prefixes
The Access Manager policy model does not support a resource prefix. In other words,
there is no policy inheritance.
If a policy is defined for
/mydirectory/projects/
, it only applies to this URL (and
does not apply to
/mydirectory/projects/index.html
, for example).
If you need a policy for all resources with the same prefix string, you can define the
resource using special characters (three periods ... (ellipsis) or * (asterisk) for instance:
/mydirectory/projects/.../*
.
URL Patterns, Matching, and Precedence
Administrators can create granular URL patterns to specify the fine-grained portion of
a resource's namespace. All matching is case insensitive.
■Supported wildcard matching is provided for the patterns in Table 20–3
■Sample Resource URLs and their correctness are shown in Table 20–4
Note: The Access Manager policy model does not support a resource
prefix. In other words, there is no policy inheritance.
Table 20–3 Supported Wildcards in Resource URL Patterns (Precedence Order)
Pattern Description Example
/** The default. Matches any sequence of zero or more
characters that starts with the forward slash character (/).
You can use this pattern to protect a path under a specific,
named directory.
Note: This is not an existing 10g wildcard. In 10g, the /.../*
pattern yielded an exclusive match that did not include the
root of the level at which the pattern was defined. For
example, /foo/.../* matched /foo/bar but not directory
/foo/ itself. 10g had the notion of a prefix (the "root"), and
most evaluation occurred after striping off the prefix.
·/**
Matches
/foo/bar
/foo/
Compare with
/foo/…/*
for which
/foo/bar
would match but
/foo/
would not.
Literals The resource's pattern contains no special characters.
{pattern1,patter
n2,...}
Matches one from a set of patterns.
The patterns inside the braces can themselves include any
other special characters (except braces; sets of patterns
cannot be nested).
■a{ab,bc}b matches aabb and abcb.
■a{x*y,y?x}b matches axyb, axabayb, ayaxb,
and so on.

Adding and Managing Policy Resource Definitions
Managing Policies to Protect Resources and Enable SSO 20-21
Table 20–4 illustrates a number of resource definitions within an Application Domain,
organized alphabetically according to the Host Identifier and Resource URL. The
right-hand column in Table 20–4 declares whether the form is correct or not.
[range or set] Matches one from a set of characters.
A set can be specified as a series of literal characters or as a
range of characters. A range of characters is any two
characters (including -) with a hyphen (-) between.
A range of characters is any two characters (including -)
with a hyphen (-) between them.
The forward slash character (/) is not a valid character to
include in a set.
A set of characters will not match / even if a range that
includes / is specified.
■[nd] matches only n or d.
■[m-x] matches any character between m and
x, inclusive.
■[--b] matches any character between - and b
inclusive (except for /; see /usr/pub/ascii
for order of punctuation characters).
■[abf-n] matches a, b, and any character
between f and n, inclusive.
■[a-f-n] matches any character between a and f
inclusive, -, or n. (The second - is interpreted
literally because the f preceding it is already
part of a range.)
Single
Character
Wildcard ?
The ? (question mark) matches any one character other
than /. This is not treated as a query string delimiter.
a?b matches aab and azb but not a/b.
Wildcard * The * (asterisk) wildcard matches any sequence of zero or
more characters. However, the * (asterisk) does not match
the forward slash character (/).
a*b matches ab, azb, and azzzzzzb but not a/b.
* The * (asterisk) can be used only at the lowest, terminating
level of the path. It matches zero or more characters.
Every character in a URL pattern must match the
corresponding character in the URL path exactly.
Exceptions:
■At the end of a pattern, /* matches any sequence of
characters from that point forward.
■The pattern *.extension matches any file name ending
with the named extension.
■Does not match /.
The following URL pattern:
/.../update.html
Matches:
/humanresources/benefits/update.html
/corporate/news/update.html
update.html
See Also: Table 20–4
/.../ Hierarchy
/.../* Host
wide
Matches any sequence of one or more characters that starts
and ends with the forward slash character (/).
Evaluation descends from the root /. At each directory
level, resources matching the highest precedence level are
selected as candidates for continued evaluation and then
descend to the next level. This continues until resources
representing the best match possible, based solely on the
path information, is obtained.
Host wide; the entirety of the pattern.
■The pattern /.../index.html matches:
/index.html
/oracle/index.html
/oracle/sales/index.html
index.html
It does not match xyzindex.html or
xyz/index.html.
■/oracle/.../*.html matches:
/oracle/index.html
/oracle/sales/order.html, and so on.
\ The backslash character is used to escape special
characters. Any character preceded by a backslash matches
itself.
■Escaped special characters need to be ignored if
putting the pattern in wildcard buckets
■Escaped special characters are matched literally to the
special characters, if any, within the incoming URL
■abc\*d only matches abc*d
■abc\\d only matches abc\d
Table 20–3 (Cont.) Supported Wildcards in Resource URL Patterns (Precedence Order)
Pattern Description Example

Adding and Managing Policy Resource Definitions
20-22 Administrator's Guide for Oracle Access Management
20.6.1.4 About Query String Name and Value Parameters for Resource Definitions
The Policy Model supports Query String Name and Value parameters in a Resource
pattern definition:
■Name: A string literal that can contain any characters, including symbols; all
characters are treated as literal.
■Value: Can be a string literal with any characters and can contain a wildcard (*
only) to match a sequence of 0 or more characters. Asterisk (*) is treated as a
wildcard.
■Amount: There is no limit to the number of name and value pairs in a query
string. However, for a single resource there will be only a few pairs.
■Order: Any order can be used for name and value pairs because at run time these
might come in any order as part of the query string.
Resource Matching and Precedence: Query String Name and Value Parameters
Access Manager uses an algorithm that locates the least specific match and continues
to the most specific possible resource. When you have candidates defined with both a
single-query string and query parameters, those with the single string take
precedence.
For resources containing parameter lists, the best match is determined as follows:
1. Path Matching: Access Manager attempts to match the path of the requested
resource. There may be multiple candidates matched, differing by query
component and/or operations declared.
2. Query String Matching: For matches obtained, Access Manager attempts to match
the query string (if present in the requested URL). If candidates are defined with
both single query string and query parameters, those with the literal string take
precedence. There may be multiple candidates remaining, differing by operation.
3. Operation Matching: For matches obtained, attempt to match the requested
operation. If there is no exact match present, then check for resources for which no
specific operation(s) have been defined. In other words, they apply to any
operation defined as part of the resource's type. In either case, this yields a single,
best match.
Path Matching: Defined resources are evaluated for potential match, against the
requested URL's path component, in the following precedence order:
■Literals (as in, the resource's pattern contains no special characters)
Table 20–4 Sample Resource URLs
Resource URL Correct Form
/bank/accounts/* Yes
/bank/accounts/*.jsp Yes
/bank/accounts/checking Yes
/bank/.../checking.jsp Yes
/.../*.jsp Yes
/bank/accounts/checking*.jsp No
/bank/accounts/c*.jsp No
/bank/.../accounts/def.gif No

Adding and Managing Policy Resource Definitions
Managing Policies to Protect Resources and Enable SSO 20-23
■Choice: {pattern1,pattern2,...} , each of which may itself contain the below special
characters and is evaluated, in turn, using this same precedence order
■Range: [ ]
■Single-char wildcard: ?
■Wildcard: *
■Hierarchy: /.../
■Hostwide: /…/* is the entirety of the pattern
Evaluation descends from the root '/'. At each directory level, resource(s) matching
with the highest precedence level are selected as candidates for continued evaluation
and then descent to the next level occurs. This continues until resource(s) representing
the best match possible, based solely on the path information, is obtained.
Table 20–5 illustrates the matching pattern for each of several requested URLs.
Query String Matching
When you have candidates defined with both single query string and query
parameters, those with the single string take precedence. Single query strings are
scored using the algorithm already-mentioned.
For resources containing parameter lists, the best match is determined as follows:
■Resources with parameter values without wildcards are given higher order of
precedence; the combined length of the parameter names and values is used to
determine the best match among the set of such resources.
■As for query string literals, if there are two or more matches with the same
combined length, then matching will fail.
■Resources with parameter values containing wildcards are considered next. The
total number of wildcards within each resource is used to determine the best
match among such resources. If there are two or more matches having same
number of wildcards, then the combined length of the parameter names and
values determines the best match
■Matching fails if multiple resources contain the same combined length.
Query String Matching Patterns: Second and subsequent patterns use parameter lists:
/oam/index.html::a=*d (a single query string)
/oam/index.html::a:b
/oam/index.html::a:b,c:d
/oam/index.html::a:b*
Note: All matching in 11g has been, and remains, case insensitive.
Table 20–5 Pattern Matching for Requested URLs
Requested URL Matching Pattern
/oam/sales/oam/page8.html /oam/.../*.html
/oam/Dept1/page8.html /oam/Dept?/page8.html
/oam/DeptQ/page8.html /oam/Dept[A-Z]/page[1-8].html
/oam/DeptQ/page8.html /oam/Dept[A-Z]/page?.html
/oam/saals/foo/aba/zzz/indexp.html sa{*,le,l?,a[k-m],[a-f-m]}s/.../{*b,?a}{a,/../ii}/.../{index,test}[
pa].?tml

Adding and Managing Policy Resource Definitions
20-24 Administrator's Guide for Oracle Access Management
/oam/index.html::a:b*,c:d
/oam/index.html::a:b*,c:d*
/oam/index.html::a:b*,c:*d*
Table 20–6 illustrates the matching pattern for each of several requested URLs.
Operation Matching Examples: At this point in request processing, there are one or
more candidate resources, all of which match the requested URL path and query string
components equally. Access Manager now matches the requested operation to one of
those candidates: a resource defined to protect that operation specifically (as well as
other, specific operations). As only a single resource can be defined to protect any
given operation, this will give the single best match.
Run Time Evaluation: Name value pairs are evaluated at run time as follows:
NAME VALUE
a ab
a a*
Same Resource URL Specified Differently: Resources with the same URL and with
the same characters in the query string (although specified differently in the console
(one as a key and value and the other as a single string)) are considered different and
are allowed. For example, the two following resource patterns are considered as
different:
Resource URL:
/test.html
Query string:
area=*&dept=*
Resource URL:
/test.html
Query NAME VALUE
area *
dept *
Resource Matching During Policy Evaluation: The order in which name and value
pairs arrive at run time does not matter. As long as all the names and values match the
query string, the match is successful. The incoming request can have more name and
value parameters than defined and still have a successful match.
Example 1: The following pattern matches the incoming URL if no other pattern is
defined with the same URL, query string variables, and the extra query string variable
(revenue=1000):
Incoming URL =>
/test.html?area=emea&dept=engg&revenue=1000
resource pattern =>
/test.html
Query String NAME VALUE
area emea
dept engg
Table 20–6 Query String Matching: Examples
Requested URL Matching Pattern
/oam/index.html?a=b&c=d /oam/index.html::a=*d
/oam/index.html?a=b1&c=d /oam/index.html::a:b*,c:d
/oam/index.html?a=b1,c=d1 /oam/index.html::a:b*,c:d*
/oam/index.html?a=b1,c=1d1 /oam/index.html::a:b*,c:*d*

Adding and Managing Policy Resource Definitions
Managing Policies to Protect Resources and Enable SSO 20-25
Example 1: For a resource with the same resource URL and the same query string,
with one defined as a single string and the other defined as name and value pairs, the
policy evaluation preference matches the literal query string before considering name
and value pairs. For instance, in the following example, a) is matched:
Runtime Request: URL =>
/test.html?area=emea&dept=engg
Resource Patterns:
a)
Resource:
/test.html
Query string:
area=emea&dept=engg
b)
Resource:
/test.html
Query String NAME VALUE
area emea
dept engg
Best Match, Multiple Resources: When you have multiple resources with query string
name and value pairs defined, the best resource match is the pattern that matches the
most number of query string parameters. When wildcard values are used, this is
followed by how closely each parameter value matches.
For example: With the following two query string patterns defined:
Query String NAME VALUE
area e*
dept e*
and
area em*
dept en*
Run Time Query String Parameters:
area emea
dept engg
Result: The second name and value pattern match order is higher.
Figure 20–13 shows the resource definition page. Here, "rev*" is a valid name (the
asterisk character is allowed and treated as a literal character, which is equivalent to
10g behavior). The Oracle Access Management Console enables you to add query
strings as name and value pairs. You can also add the query string as a literal string. If
If you select a literal query string, then the name and value option is disabled (and vice
versa).
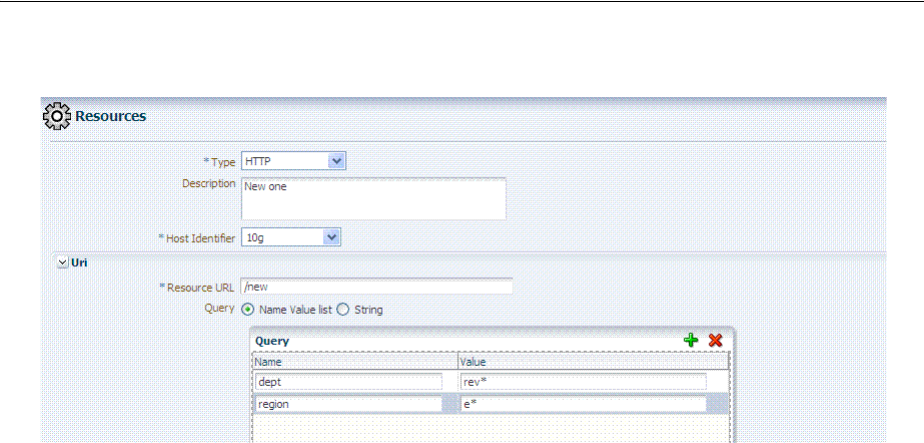
Adding and Managing Policy Resource Definitions
20-26 Administrator's Guide for Oracle Access Management
Figure 20–13 HTTP Resources, Query String Resource URL Controls
Behavior When Migrating to Access Manager: If you upgrade to Access Manager
(from 10g), previous query strings are created in 11g appropriately (whether a single
string or a name and value pair). The appropriate type of query string is created in
Access Manager.
20.6.1.5 About Literal Query Strings in Resource Definitions
The Policy Model supports resource protection based on matching literal, full
query-string-based HTTP resource definitions within Access Policies.
A single Query String Pattern that would be matched against the entire input Query
string (as opposed to matching only portions (selected name and value pairs) of the
query string. For example:
status=active&adminrole=*
A Query String pattern specified as a regular free form string with these extra features:
■Optional: Special character (*) that matches zero or more characters, which is
applied to a set of names in the run time Query String.
■Two resource definitions can exist with same URL base path pattern and different
Query String patterns. These two are independent and non-equal resources. For
example, these are all valid and can exist at same time:
/foo
/foo?bar=true
/foo?bar=false
The Query String is free form with no restriction in terms of format or characters. It is
not required to specify Query String as key/value pairs
At run time, only the Query String that is part of HTTP GET requests is processed;
Query String pattern does not apply to HTTP POST data.
Resource Matching at run time:
■The base URL path is matched and then the Query String is matched
■Multiple resource patterns that contain matching Query Strings: The best match is
determined based on the number of tokens (pattern delimited by '*') and the
length of the token at each position. Patterns with longer tokens in the beginning
are preferred and then the pattern that contains more number of tokens. (If there

Adding and Managing Policy Resource Definitions
Managing Policies to Protect Resources and Enable SSO 20-27
are matching patterns that contain same number of tokens and same length at each
position then the match would fail.)
Conflicts:
■Super Set: The input resource definition contains a set of name-value Query String
patterns that are a super set of patterns of an existing resource definition in the
policy store.
■Overlap: The input resource specification contains a set of name-value Query
string patterns that overlap a set of patterns of an existing resource definition in
the policy store.
Remote Registration: For OAM Agents, the remote registration tool (oamreg) accepts
Query-string based HTTP resource definitions and generates the relevant policy
objects for securing access of these resources. If any conflicts are encountered during
policy provisioning, only policies for resources that do not have any conflicts are
provisioned. This feature does not apply to 10g OSSO agent-based partners and
applications. OSSO agents are not capable of enforcing authentication scheme per
resource. Instead, a single authentication scheme is applied to all resources of an
application.
20.6.1.6 About Run Time Resource Evaluation
While processing requests for resources, an evaluation is made to ensure that the
proper policy is invoked for the resource.
Process overview: Resource evaluation
1. A user specifies the URL for a requested resource.
2. Access Manager creates a fully qualified URL that includes the URL pattern, based
on the host identifier and URL.
3. Access Manager compares the incoming URL for the requested resource to the
fully-qualified URL constructed from Application Domain information and the
policy's URL pattern:
■If there is a match, the various policies are evaluated to determine whether the
requester should be allowed or denied access to the resource.
■If the requester is allowed access, the resource is served.
Table 20–7 describes the possible outcomes.
See Also: Other processing details in the following topics:
■"About the Resource URL, Prefixes, and Patterns" on page 20-19
■"About Query String Name and Value Parameters for Resource
Definitions" on page 20-22
■"About Literal Query Strings in Resource Definitions" on
page 20-26
■"Managing Run Time Policy Evaluation Caches" on page 14-9
Table 20–7 Resource Evaluation Outcomes
Outcome Description
Best Match The best match is when a resource definition has the least resource scope compared
to other possible matches to the run time resource. The term resource scope
represents all possible resources that could be matched using a particular resource
definition

Adding and Managing Policy Resource Definitions
20-28 Administrator's Guide for Oracle Access Management
Look Up Mechanism Examples
■The default resource URL in an Application Domain defines the broadest scope of
content possible (all directories and below):
/.../*
■The pattern /.../index.html matches:
/index.html
/oracle/index.html
/oracle/sales/index.html
index.html
It does not match, for example,
xyzindex.html
.
■/oracle/.../*.html matches:
/oracle/index.html
/oracle/sales/order.html
and so on
Resource Scope Examples
■Resource scope of the following resource definition (includes the asterisk):
/mybank/…/*
includes all URLs prefixed with "/mybank/"
■Resource scope of the following resource definition (no special characters in the
definition):
/mybank/account.html
includes only one URL: "/mybank/account.html"
20.6.2 Defining Resources in an Application Domain
Users with valid Administrator credentials can use the following procedure to add the
resource definitions to protect to the corresponding Application Domain.
Resource protection based on a list of discrete query parameters is more secure and
easier to administer than literal query strings. You might want to create a policy based
on resource URL with query parameters (string and name-value pairs).
Prerequisites
The Resource Type must be defined as a Shared Component. Several elements in the
Resource definition page are based on the defined and selected Resource Type. For
details, see "Managing Resource Types" on page 19-2.
No Match1 If no match is found, the default evaluation outcome is FAILURE. Depending on
what kind of policy was being evaluated, this could mean no authentication is
attempted, or no resource access is granted.
Note: An error can occur if you specify a host identifier value that is
invalid:
The challenge URL is invalid
.
Table 20–7 (Cont.) Resource Evaluation Outcomes
Outcome Description

Adding and Managing Policy Resource Definitions
Managing Policies to Protect Resources and Enable SSO 20-29
To add resource definitions to an Application Domain
1. In the Oracle Access Management Console, locate and view the desired
Application Domain, as described in "Searching for an Existing Application
Domain" on page 20-12.
2. In the Application Domain, click the Resources tab, then click the New Resource
button in the upper-right corner of the Search page.
3. On the Resource Definition page:
a. Select or enter your details for a single resource (Table 20–1):
Type
Description
Host Identifier
Resource URL (Table 20–4)
Operations
Query String (Table 20–6)
Protection Level
Authentication Policy (if level is Protected)
Authorization Policy (if level is Protected and Authentication Policy is chosen)
b. Click Apply to add this resource to the Application Domain.
c. Repeat this procedure to add other resources to this Application Domain.
4. Proceed by adding defined resources to specific policies in the
Application domain as described in:
■Defining Authentication Policies for Specific Resources
■Defining Authorization Policies for Specific Resources
■Managing Token Issuance Policies, Conditions, and Rules
20.6.3 Searching for a Resource Definition
This section provides the following topics:
■About Searching for a Specific Resource Definition
■Searching for a Specific Resource Definition
20.6.3.1 About Searching for a Specific Resource Definition
Figure 20–14 shows the default Search elements and Search Results table for resource
definitions in an Application Domain.
See Also: "Defining Resources in an Application Domain" on
page 20-15

Adding and Managing Policy Resource Definitions
20-30 Administrator's Guide for Oracle Access Management
Figure 20–14 Sample Resource Definitions Search within an Application Domain
You can simply click the Search button using the defaults or refine your search by
supplying as much or as little of the information in Table 20–8 as needed to find the
resource.
You can click Reset to clear the form or Search to initiate the search. The results table is
shown in Example 20–15. Each resource listed includes everything specified when it
was added to the domain. The Actions and View menus are available for use with the
table. Also you can click the Create command button to add a new resource definition
to this domain.
Table 20–8 Search Elements for a Resource in an Application Domain
Search Elements Description
Resource Type Provides a list of defined resource types from which you can choose. You can
also leave this blank.
Default: HTTP
Host Identifier Enter a host identifier here, if desired. You can leave this blank
Default: blank
Resource URL Enter a resource URL, if desired. You can leave this blank
Default: blank
Query String Enter a query string for the resource, or leave this blank. You can include this in
the search criteria if a query string was defined for the resource when it was
added to the Application Domain.
Default: blank
Authentication Policy Provides a list of defined authentication policies for this Application Domain.
You can choose one or leave the space blank.
Default: blank
Authorization Policy Provides a list of defined authorization policies for this Application Domain.
You can choose one or leave the space blank.
Default: blank
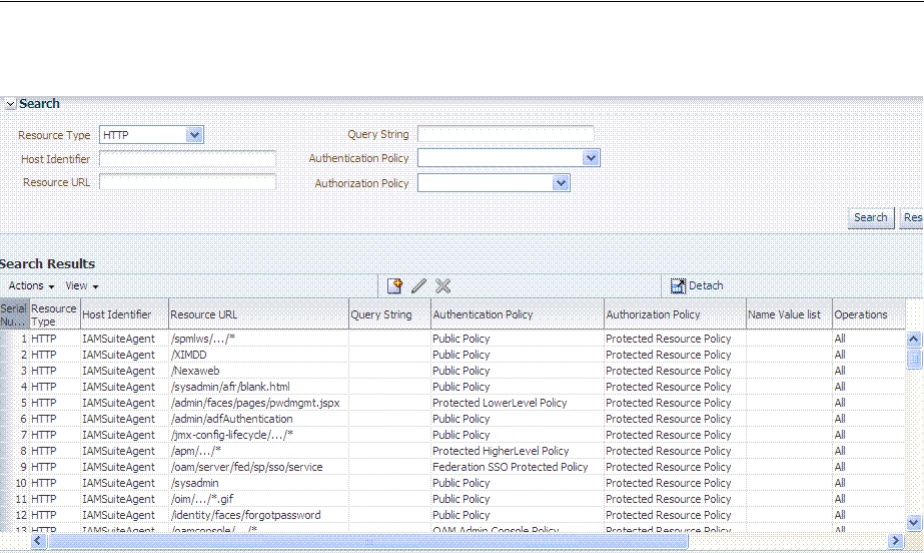
Adding and Managing Policy Resource Definitions
Managing Policies to Protect Resources and Enable SSO 20-31
Figure 20–15 Sample Search Results for Resource Definitions in an Application Domain
20.6.3.2 Searching for a Specific Resource Definition
Users with valid Administrator credentials can use the following procedure to search
for a specific resource definition.
To find a resource definition
1. In the Oracle Access Management Console, locate and view the desired
Application Domain, as described in "Searching for an Existing Application
Domain" on page 20-12.
2. Click the Resources tab to display Resources Search controls.
3. Fill in your search criteria (Table 20–8), and click the Search button.
4. In the Search Results table, click the desired resource definition and take the
desired action:
■Actions Menu: Select an item to Create, Edit, or Delete the selected resource.
■View Menu: Select an item to alter the appearance of the results table.
■Edit Button: Click the button in the tool bar to display the configuration page.
■Delete: See "Viewing, Editing, or Deleting a Resource Definition".
■Detach: Click Detach in the tool bar to expand the table to a full page.
20.6.4 Viewing, Editing, or Deleting a Resource Definition
Users with valid Administrator credentials can use the following procedure to modify
resource definitions within a specific Application Domain.
If a resource protection level is modified from "Protected" to "Excluded" while it is
associated with a policy, the modification will fail. First, remove the resource from the
policy, make the change, and add the resource to the policy.

Defining Authentication Policies for Specific Resources
20-32 Administrator's Guide for Oracle Access Management
Prerequisites
You must have the desired resource type defined as a shared component. For details,
see "Managing Resource Types" on page 19-2.
To view, modify, or delete resource definitions
1. Find the Resource, as described in "Searching for a Resource Definition".
■View Only: Close the page when you finish.
■Modify: Alter the definition as desired and then click Apply to submit
changes (or close the page without applying changes).
■Delete:
–Open the resource definition and confirm this is the one to be deleted,
then close the page.
–Click the name of the desired resource definition and then click the Delete
button in the tool bar.
–In the Confirmation window, click Delete (or click Cancel to dismiss the
window).
If the Resource is associated with a policy, remove it from the policy first.
–Repeat as needed to delete other resources in the Application Domain.
20.7 Defining Authentication Policies for Specific Resources
Each resource assigned to an Application Domain can be protected by only one
authentication policy. After adding a resource definition to the Application Domain,
the Administrator can begin refining a default authentication policy, adding a new
policy, and assigning resources to the authentication policy.
In an automatically generated Application Domain, the following authentication
policies are seeded as defaults to help streamline the Administrator's tasks:
■Protected Resource
■Public Resource
This section provides the following topics:
■About the Authentication Policy Page
■Creating an Authentication Policy for Specific Resources
■Searching for an Authentication Policy
■Viewing or Editing an Authentication Policy
■Deleting an Authentication Policy
Note: During a Delete, you are alerted if the resource is associated
with a policy. Without a policy association, the resource is deleted.
See Also: "Defining Resources in an Application Domain" on
page 20-15
See Also: "Understanding Application Domain and Policy
Management" on page 20-4
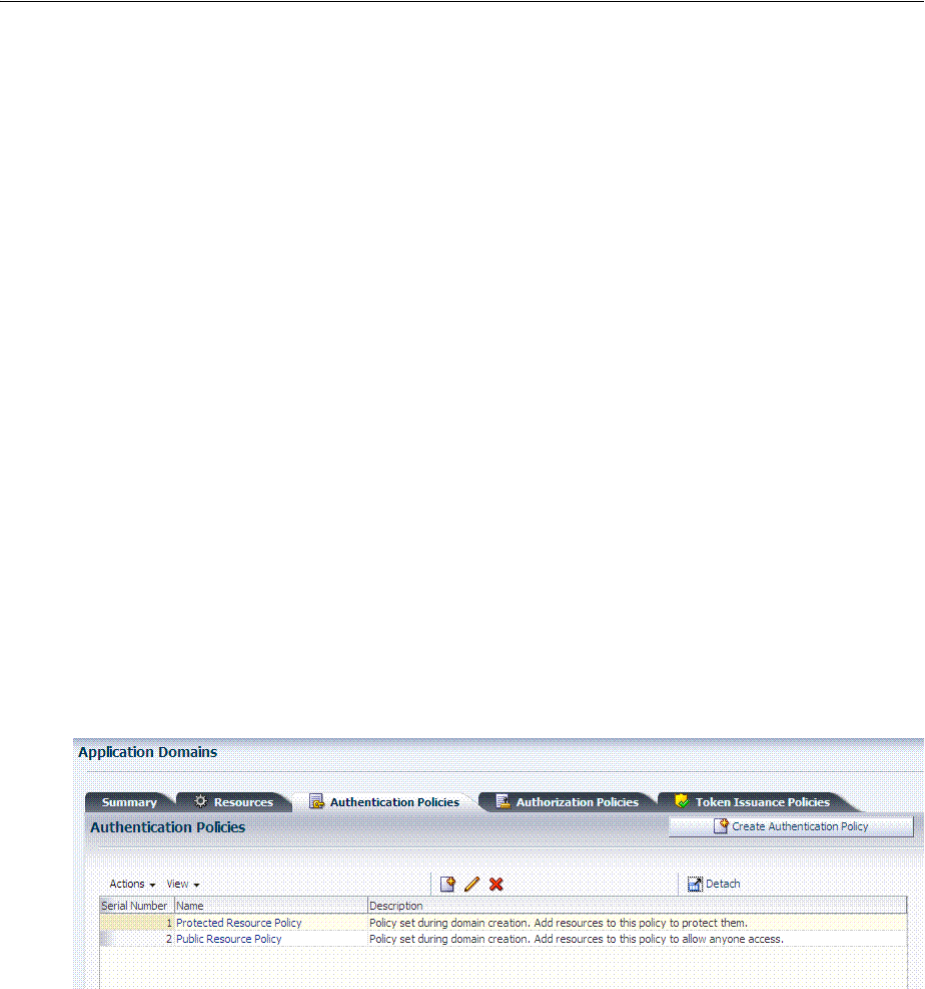
Defining Authentication Policies for Specific Resources
Managing Policies to Protect Resources and Enable SSO 20-33
20.7.1 About the Authentication Policy Page
Administrators use authentication policies to protect specific resources. The
authentication policy provides the sole authentication method for resources governed
by the policy.
Each authentication policy defines the type of verification that must be performed to
provide a sufficient level of trust for Access Manager to grant access to the user
making the request.
Authentication policies are local. A single policy can be defined to protect one or more
resources in the Application Domain. However, each resource can be protected by only
one authentication policy.
Authentication Policy Guidelines
1. Authentication policies include resources, success responses, and an
authentication scheme.
2. Authentication and Authorization policies can evaluate to Success or Failure.
3. Query Builder and support for LDAP filters (for retrieving matches based on an
attribute of a certain display type, for example).
4. Define a policy for resource: /…/* which can be used within a determined scope.
5. Token Issuance Policies can be defined using resources and user- or partner-based
conditions.
Figure 20–16 shows the Authentication Policies page of an Application Domain.
Figure 20–16 Sample Authentication Policies Page in the Application Domain
Figure 20–17 shows a specific Authentication Policy. The resources assigned to this
policy are displayed on the Resources tab of the policy. This example is from the IAM
Suite Application Domain.
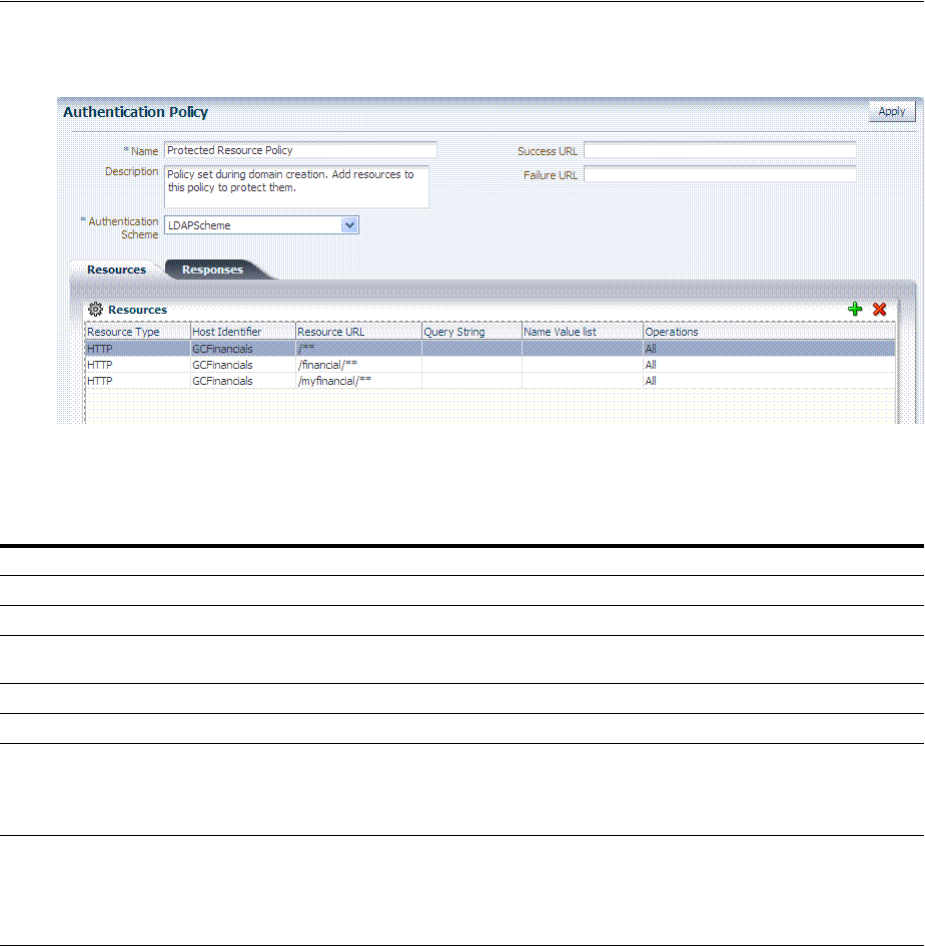
Defining Authentication Policies for Specific Resources
20-34 Administrator's Guide for Oracle Access Management
Figure 20–17 Sample Individual Authentication Policy Page
Table 20–9 describes authentication policy elements. The IAM Suite Application
Domain is shown simply as an example.
20.7.1.1 About Resources in an Authentication Policy
You can choose to add one or more resources to be protected by the authentication
policy. The Resources tab on the Authentication Policy page provides a table where
you can enter resource URLs. A list is also provided from which you can choose from
defined resources within the Application Domain.
To add a resource, click the + button and select from the list. To delete a resource, select
the name from the Resources table and click the Delete button in the table.
20.7.2 Creating an Authentication Policy for Specific Resources
Users with valid Administrator credentials can use the following procedure to add an
authentication policy and resources to an Application Domain. You can use a
pre-configured authentication scheme or a custom authentication scheme in the
authentication policy.
Table 20–9 Authentication Policy Elements and Descriptions
Element Description
Name A unique name used as an identifier.
Description Optional unique text that describes this authentication policy.
Authentication Scheme A single, previously-defined authentication scheme to be used by this policy for user authentication.
See Also: "Managing Authentication Schemes" on page 19-64 for details.
Success URL The redirect URL to be used upon successful authentication.
Failure URL The redirect URL to be used if authentication fails.
Resources The URL of a resource chosen from those listed. The listed URLs were added to this Application
Domain earlier. You can add one or more resources to protect with this authentication policy. The
resource definition must exist within the Application Domain before you can include it in a policy.
See Also: "About Resources in an Authentication Policy" on page 20-34.
Responses The obligations (post authentication actions) to be carried out by the Web agent. After a successful
authentication, the application server hosting the protected application should be able to assert the
User Identity based on these responses.After a failed authentication, the browser redirects the
request to a pre-configured URL
See Also: "Introduction to Policy Responses for SSO" on page 20-41.

Defining Authentication Policies for Specific Resources
Managing Policies to Protect Resources and Enable SSO 20-35
Prerequisites
Any resource to be added to a policy must be defined within the same Application
Domain as the policy.
To add an authentication policy for specific resources
1. Locate the desired domain as described in "Searching for an Existing Application
Domain".
2. Click the Authentication Policies tab, then click the Create Authentication Policy
button to open a fresh page.
3. Required Elements: Add your information for this policy.
■Name
■Authentication Scheme
4. Optional Elements (Table 20–9): Add as needed for your policy.
■Description (optional)
■Success URL
■Failure URL
5. Add Resources: A Resource must be defined within the Application Domain
before you can add the resource to a specific policy.
■Click the Resources tab on the Authentication Policy page.
■Click the Add button on the Resources tab.
■Click the Search button.
■Click a URL in the Results table, then click Add Selected.
■Repeat these steps as needed to add more resources.
6. Click Apply to save changes and close the Confirmation window.
7. Responses: Add policy Responses as described in "Adding and Managing Policy
Responses for SSO" on page 20-47.
8. Close the page when you finish.
20.7.3 Searching for an Authentication Policy
Users with valid Administrator credentials can use the following procedure to search
for a specific authentication policy.
To search for an authentication policy in an Application Domain
1. Locate the desired domain as described in "Searching for an Existing Application
Domain".
2. Click the Authorization Policies tab and:
■Edit: See "Viewing or Editing an Authentication Policy".
■Delete: "Deleting an Authentication Policy".
See Also:
■"About the Authentication Policy Page" on page 20-33
■"Managing Authentication Schemes" on page 19-64

Defining Authentication Policies for Specific Resources
20-36 Administrator's Guide for Oracle Access Management
■Detach Table: Click Detach in the tool bar to expand the table to a full page.
■View Menu: Select a menu item to alter the appearance of the results table.
20.7.4 Viewing or Editing an Authentication Policy
Users with valid Administrator credentials can use the following procedure to modify
an authentication policy in an Application Domain. This includes changing the
authentication scheme, adding or removing resources or responses, and altering the
Success or Failure URLs.
To view or modify an authentication policy
1. Locate the desired policy as described in "Searching for an Authentication Policy".
2. Click the desired policy name to display its configuration.
3. Edit Policy Elements (Table 20–9):
4. Resource: Click the Resources tab and:
■Add: Click the Add button on the Resources table, click a URL in the list, click
Apply.
■Delete: Click a URL in the Resources table, click the Delete button on the table.
5. Click Apply to submit changes and close the Confirmation window (or close the
page without applying changes)
6. Responses: View or edit responses as described in "Adding and Managing Policy
Responses for SSO" on page 20-47.
7. Close the page when you finish.
20.7.5 Deleting an Authentication Policy
Users with valid Administrator credentials can use the following procedure to delete
an authentication policy from an Application Domain.
When you remove the policy, all resource definitions remain within the Application
Domain. However, the policy and all responses are eliminated.
The following procedure describes how to delete the entire policy. To simply alter an
element in the policy, see "Viewing or Editing an Authentication Policy".
To delete an authentication policy
1. Locate the desired policy as described in "Searching for an Authentication Policy".
2. Click the desired policy name to display and confirm this configuration.
3. Ensure that resources governed by this policy are added to a different policy.
4. Delete all responses, as described in "Adding and Managing Policy Responses for
SSO" on page 20-47.
See Also: "About the Authentication Policy Page" on page 20-33
Note: During a Delete operation, you are alerted to confirm removal
of the policy. Confirmation is required to complete the operation.
See Also: "About the Authentication Policy Page" on page 20-33

Defining Authorization Policies for Specific Resources
Managing Policies to Protect Resources and Enable SSO 20-37
5. On the Authentication Policies tab, click the Serial Number beside the policy, then
click the Delete button in the tool bar.
6. In the Confirmation window, click Delete to confirm (or click Cancel to dismiss
the window).
20.8 Defining Authorization Policies for Specific Resources
Each resource assigned to an Application Domain can be protected by only one
authorization policy.
In an automatically generated Application Domain, the following authorization
policies are seeded as defaults:
■Protected Resource
■Public Resource
After adding resource definitions to the Application Domain, Administrators can
begin refining a default authorization policy, adding a new policy, and adding
resources to authorization policies. This section provides the following topics:
■About Authorization Policies for Specific Resources
■Creating an Authorization Policy and Specific Resources
■Searching for an Authorization Policy
■Viewing or Editing an Authorization Policy and Resources
■Deleting an Entire Authorization Policy
20.8.1 About Authorization Policies for Specific Resources
Administrators can create an authorization policy to protect access to one or more
resources based on attributes of an authenticated user or the environment. The
authorization policy provides the sole authorization protection for resources included
in the policy.
Authorization policies are local, which means that each policy applies only to the
resources specified for the policy. A policy cannot be derived or applied to any other
resource.
A single policy can be defined to protect one or more resources in the Application
Domain. However, each resource can be protected by only one authorization policy.
Figure 20–18 shows the Authorization Policy page within an Application Domain. The
resources assigned to this policy are displayed on the Resources tab of the policy.
See Also: "Understanding Application Domain and Policy
Management" on page 20-4
Defining Authorization Policies for Specific Resources
20-38 Administrator's Guide for Oracle Access Management
Figure 20–18 Sample Individual Authorization Policy Page
Table 20–10 describes authorization policy elements. The elements are the same
regardless of the domain; only the details will differ.
20.8.2 Creating an Authorization Policy and Specific Resources
Users with valid Administrator credentials can use the following procedure to add an
authorization policy to an Application Domain.
Prerequisites
Any resource to be added to a policy must be defined within the same Application
Domain as the policy.
To create an authorization policy and resources
1. Locate the desired domain as described in "Searching for an Existing Application
Domain".
2. Click the Authorization Policies tab, then click the Create Authorization Policy
button to open a fresh page.
3. Summary Tab: Add your information to the Summary tab (Table 20–10).
Table 20–10 Authorization Policy Elements and Descriptions
Element Description
Name A unique name used as an identifier in the navigation tree.
Description Optional unique text that describes this authorization policy.
Success URL The redirect URL to be used upon successful authorization.
Failure URL The redirect URL to be used if authorization fails.
Summary General information (usually Name and optional Description).
Resources One or more previously-defined resource URLs to be protected by this
authorization policy.
Conditions See Also "Introduction to Authorization Policy Rules and Conditions" on
page 20-49.
Rules See Also "Introduction to Authorization Policy Rules and Conditions" on
page 20-49.
Responses See Also "Introduction to Policy Responses for SSO" on page 20-41.
See Also: "About Authorization Policies for Specific Resources" on
page 20-37
Defining Authorization Policies for Specific Resources
Managing Policies to Protect Resources and Enable SSO 20-39
4. Add Resources: The Resource must be defined in the Application Domain before
you can add the resource to a specific policy.
■Click the Resources tab on the Authorization Policy page.
■Click the Add button on the Resources tab.
■Click the Search button.
■Click a URL in the Results table, then click Add Selected.
■Repeat these steps to add more resources.
5. Click Apply to save changes and close the Confirmation window.
6. Responses: Add policy Responses as described in "Adding and Managing Policy
Responses for SSO" on page 20-47.
7. Conditions: Add authorization conditions, as described in "Defining
Authorization Policy Conditions" on page 20-52.
8. Rules: Add authorization rules, as described in "Defining Authorization Policy
Rules" on page 20-52.
9. Close the page when you finish.
20.8.3 Searching for an Authorization Policy
Users with valid Administrator credentials can use the following procedure to locate a
specific authorization policy.
Figure 20–19 Authorization Policies Page
To search for an authorization policy
1. Locate the desired domain as described in "Searching for an Existing Application
Domain".
2. Click the Authorization Policies tab and:
■Edit: See "Viewing or Editing an Authorization Policy and Resources".
■Delete: "Deleting an Entire Authorization Policy".
■Detach Table: Click Detach in the tool bar to expand the table to a full page.
■View Menu: Select a menu item to alter the appearance of the results table.

Defining Authorization Policies for Specific Resources
20-40 Administrator's Guide for Oracle Access Management
20.8.4 Viewing or Editing an Authorization Policy and Resources
Users with valid Administrator credentials can use the following procedure to view or
modify an authorization policy within an Application Domain.
To view or edit an authorization policy
1. Locate the desired domain as described in "Searching for an Authorization Policy".
2. Summary: Edit as needed (Table 20–10):
3. Resource: Click the Resources tab and add or delete resources as needed:
■Add: Click the Add button on the Resources table, click a URL in the list, click
Apply.
■Delete: Click a URL in the Resources table, click the Delete button on the table
then confirm.
4. Click Apply to submit changes and close the Confirmation window (or close the
page without applying changes).
5. Conditions: See "Viewing, Editing, or Deleting Authorization Policy Conditions"
on page 20-69.
6. Rules: See "Defining Authorization Policy Rules" on page 20-52.
7. Responses: See "Viewing, Editing, or Deleting a Policy Response for SSO" on
page 20-48.
8. Close the page when you finish.
20.8.5 Deleting an Entire Authorization Policy
Users with valid Administrator credentials can use the following procedure to delete
an authorization policy or simply delete resources within the policy.
When you remove the entire policy, all resource definitions remain within the
Application Domain. However, the authorization policy and the conditions and rules
governing access are eliminated.
To simply alter an element in the policy see "Viewing or Editing an Authentication
Policy".
Prerequisites
Assign resources governed by this policy to another authorization policy, either before
or after deleting the policy.
To delete an authorization policy
1. Locate the desired domain as described in "Searching for an Authorization Policy".
See Also: "About Authorization Policies for Specific Resources" on
page 20-37
Note: During a Delete operation, you are alerted to confirm removal
of the policy. Confirmation is required to complete the operation.
See Also: "About Authorization Policies for Specific Resources" on
page 20-37

Introduction to Policy Responses for SSO
Managing Policies to Protect Resources and Enable SSO 20-41
2. Optional: Double-click the policy name to review its content, and then close the
page when finished.
3. Delete: Click the policy name, and then click the Delete button in the tool bar.
4. In the Confirmation window, click Delete (or click Cancel to dismiss the window).
5. Confirm that the policy is no longer listed in the navigation tree.
20.9 Introduction to Policy Responses for SSO
Each policy can optionally contain one or more authentication or authorization
responses, or both. Responses are post-processing actions (obligations) to be carried
out by the web agent.
This section provides the following information:
■About Authentication and Authorization Policy Responses for SSO
■About the Policy Response Language
■About the Namespace and Variable Names for Policy Responses
■About Constructing a Policy Response for SSO
■About Policy Response Processing
■About Assertion Claims and Processing
20.9.1 About Authentication and Authorization Policy Responses for SSO
Administrators can define responses that declare the actions that must be fulfilled after
successful authentication or authorization. Authentication and authorization data is
returned to the client (typically a Web Agent).
Policy responses enable the insertion of information into a session or application and
the ability to withdraw the information at a later time to enable SSO. For instance,
identity mappings can be inserted into the customer's application or actions can be
carried out by the Agent or the application.
Depending on the responses specified for authentication or authorization success and
failure, the user might be redirected to a specific URL, or user information might be
passed on to other applications through a header variable or a cookie value.
There are no default response provided. Figure 20–20 illustrates an Authorization
Policy Response defined by an Administrator in the Oracle Access Management
Console. Authorization responses can operate in conjunction with authorization
conditions.
Note: There are no responses in Token Issuance Policies.
Note: Oracle Access Manager 10g provided data passage to (and
between) applications only by redirecting to URLs in a specific
sequence.
Introduction to Policy Responses for SSO
20-42 Administrator's Guide for Oracle Access Management
Figure 20–20 Authorization Policy Response in the Console
Each response consists of two inputs (a type and an expression) and a single output
(the value of the evaluated expression). The expression declares how the value should
be constructed when the expression is processed. The response type defines the form
of action to be taken with the value string.
■The authentication policy determines the identity of the user. Each authentication
policy requires an authentication scheme and responses (expressions).
■The authorization policy determines whether the user has the right to access the
resource. Each authorization policy requires authorization conditions and
responses (expressions).
Response Guidelines
1. Cookie, Header, and Session responses are supported.
2. URL redirection can be set.
3. Response definitions are part of each policy. Response values can be literal strings
or can contain additional embedded expressions that derive values from request,
user, and session attributes.
Administrators set Responses in the Oracle Access Management Console, as described
Table 20–11.
Table 20–11 Response Elements
Element Description
Name A unique name to distinguish this response from other responses that use the same
mechanism (type).
Type The mechanism used to convey the response. form of the action to be taken with the
value string:
■HEADER (Header variables): Sets an HTTP request header for downstream
applications using the defined value to dictate the action to be taken (such as the
assertion of a User ID using a pre-defined HTTP header name). Another example
gets the subscriber information (realm DN and so on) for OSSO and creates a
response during the upgrade; a fresh OSSO Agent requires manual configuration.
■SESSION: Sets an attribute inside the user session by the client (to enable single
sign-on) based on the defined session variable name and value.
■COOKIE: Sets a variable name and value (typically set by Web agents) inside the
authentication session cookie to enable single sign-on.
In cookie-less mode, Web-cache is currently used to store cookies from Webgate.
However, in cookie-less mode, the end application does not have access to cookies
and cannot use them.
■Asserted Attribute: With this type, Identity Assertion must be enabled for the
policy to collect Assertion Attribute type responses when this policy is executed.
The Name list provides valid identifiers from which to choose.

Introduction to Policy Responses for SSO
Managing Policies to Protect Resources and Enable SSO 20-43
20.9.2 About the Policy Response Language
Access Manager authentication and authorization responses are defined using a very
small, domain-specific language (DSL) with two main constructs:
■Literal strings: For example:
This is a valid expression
■Variable references:
–Declared using a dollar sign prefix
$
–Scoped to a namespace: $
namespace.var_name
20.9.3 About the Namespace and Variable Names for Policy Responses
With the namespace mechanism, the following variable types are to enable single
sign-on:
■Request: Information on the requested resource, the client making the request, and
the policy matched during evaluation
■Session: User session details
■User: User details (user ID, group, and attribute information)
For details of each, see:
■Table 20–12, " Namespace Request Variables for Single Sign-On"
■Table 20–13, " Namespace Session Variables for Single Sign-On"
■Table 20–14, " Namespace User Variables"
Value The response expression, set as a variable.
For more information, see "About the Policy Response Language".
Identity
Assertion
Identity Assertion is required for ID propagation for any issued token from Access
Manager that represents an end user (and possibly its Access Manager session).
Security Token Service clients that are Web applications protected by Access Manager
requesting tokens to gain proxy access to a Relying Party (ID Propagation use case) are
required to pass an Access Manager Identity Assertion token that represents the end
user.
The Identity Assertion Token is generated and returned as a policy response (HTTP
HEADER named "OAM_IDENTITY_ASSERTION", value as a SAML token) after a
successful authentication.
As you add each (non-Asserted Attribute Type) Response, you might be informed that
Identity Assertion has not been enabled for this policy....
Enable Identity
Assertion to collect Assertion Attribute type responses when this policy is executed.
See Also:
■"Scenario: Identity Propagation with the Access Manager Token" on page 35-2
■"Authentication Policy Response for Identity Assertion by Webgate" on page 35-13
■Chapter 48, "Using Identity Context"
Note: Certain variables include an attribute:
$ns.name.attribute
Table 20–12 Namespace Request Variables for Single Sign-On
Namespace Description
agent_id Name of the requesting agent
Table 20–11 (Cont.) Response Elements
Element Description

Introduction to Policy Responses for SSO
20-44 Administrator's Guide for Oracle Access Management
20.9.4 About Constructing a Policy Response for SSO
This section is divided as follows:
■Simple Responses
■Compound and Complex Responses
■Multi-Valued Responses
client_ip IP address of the user browser
policy_appdomain Name of the Application Domain holding the policy matched for the
request
policy_eval_success_conditions List of policy conditions that evaluated to true, separated by COLON or
configured response separator
policy_eval_failure_conditions List of policy conditions that evaluated to false, separated by COLON or
configured response separator
policy_res Resource host ID and URL pattern matched for the request
policy_name Name of the specific policy matched for the request
res_host Requested resource's hostname
res_port Requested resource's port number
res_type Requested resource's type
res_url Requested resource URL
Table 20–13 Namespace Session Variables for Single Sign-On
Namespace Description
attr Reference to an arbitrary session attribute, the name of which is passed
to us as a variable attribute. Its value has been bound to the session by
executing a session response during a previous request
authn_level Current authentication level for the session
authn_scheme Name of the authentication scheme executed to achieve the current
authentication level
count Session count for the user bound to this session
creation Session creation time
expiration Session expiration time
Table 20–14 Namespace User Variables
Namespace Description
attr.<attrName> Value of user attribute attrName. If attrName is multivalued, contains a
list of attr values, separated by COLON or configured response
separator
groups List of user's group membership, separated by COLON or configured
response separator
userid The user ID
user.id_domain The user's identity domain (essentially the same as the identity store)
guid A unique identifier that locates the user entry in an Identity Store
Table 20–12 (Cont.) Namespace Request Variables for Single Sign-On
Namespace Description

Introduction to Policy Responses for SSO
Managing Policies to Protect Resources and Enable SSO 20-45
20.9.4.1 Simple Responses
After deciding on the response type and determining which namespace and variable,
you simply enter the response attributes in the Oracle Access Management Console. A
simple response might look like one of the several authorization responses shown in
Figure 20–21.
Figure 20–21 Simple Response Samples
Simple responses stand alone. Each is preceded with the dollar sign ($), followed by
the namespace, which is separated from the variable Value by a dot (.). For example:
$namespace1.var1
Table 20–15 illustrates several simple responses and a description of what each one
returns.
20.9.4.2 Compound and Complex Responses
When crafting a compound or complex policy response, Administrators can combine
literals and variables arbitrarily using braces { } to construct an expression. A colon (:)
is used as a separator. For example:
${namespace1.var1}:${namespace2.var2}
Literal String (LS): ${namespace1.var1}:${namespace2.var2}
LS: ${namespace1.var1}, LS:${namespace2.var2}
Figure 20–22 illustrates several complex responses defined by an Administrator. All
are Header type responses, which set values in a header variable of an HTTP request
for consumption by a downstream application.
See Also: Guidelines for Authorization Responses Based on
Conditions
Table 20–15 Simple Responses and Descriptions
Name Type
Value (Simple
$Namespace.Variable) Returned Environment Variables and Values
oam_sessioncount Header $session.count HTTP_OAM_SESSIONCOUNT integer
oam_userid Header $user.userid HTTP_OAM_USERID name
oam_ipaddress Header $request.client_ip HTTP_OAM_IPADDRESS nnn.nn.nn.nnn
oam_literal Header This is a response string. HTTP_OAM_LITERAL This is a response string
Introduction to Policy Responses for SSO
20-46 Administrator's Guide for Oracle Access Management
Figure 20–22 Complex Response Sample
Table 20–16 describes the complex responses shown in Figure 20–22.
For more information, see "About Policy Response Processing".
20.9.4.3 Multi-Valued Responses
Access Manager 11g supports responses with multiple values. These can be
multivalued user attribute responses, user's group membership responses and the like.
For multivalued responses, Access Manager uses a COLON as the separator and a
BACKSLASH as the escape character. For example, if a user attribute
genType
has the
values "Gold", "Platinum" and "Silver", the policy response for
$user.attr.genType
would be:
"Gold:Platinum:Silver"
If a COLON appears in any of the attribute values, it will be escaped with
BACKSLASH. For example, for a user with group memberships as "Administrators",
"Special:Users", the policy response for
$user.groups
would be
"Administrators:Special\:Users"
It is possible to change the default separator and escape character using the
configurePolicyResponses(responseSeparator, responseEscapeChar) WLST command.
Refer to the Oracle Fusion Middleware WebLogic Scripting Tool Command Reference
for details.
20.9.5 About Policy Response Processing
Policy response processing occurs during the authorization request for which the
authentication responses are replayed. Variable references are filled with appropriate
Table 20–16 Complex Responses
Name Value Returned Environment Variables and Values
oam_resinfo Runtime resource: ${request.res_host}:${request.res_
port}${request.res_url}
HTTP_OAM_RESINFO
Runtime resource:
myhost.domain.com:1234/cgi-bin/myres3
oam_clientinfo Runtime client: Agent ID: ${request.agent_id}, Browser IP:
$request.client_ip
HTTP_OAM_CLIENTINFO
Runtime client: Agent ID: RREG_OAM, Browser
IP: 123.45.67.891
oam_userinfo ${user.userid}'s groups: ${user.groups}, description:
${user.attr.description}
HTTP_OAM_USERINFO
WebLogic's groups: Administrators, description: This
user is the default Administrator
oam_sessioninfo Session creation/expiration/count:
${session.creation}/${session.expiration}/${session.count}
HTTP_OAM_SESSIONINFO
Session creation/expiration/count: Tu e Oct 2 3
17:47:42 PST 2011/Wed Oct 24 01:47:42 PST 2011/7
oam_app_user $user.userid HTTP_OAM_USERID name

Adding and Managing Policy Responses for SSO
Managing Policies to Protect Resources and Enable SSO 20-47
values to ensure that all variables have a value set, and can be set consistently with
authorization values.
Processing a response expression is done through a series of steps:
■Scanner/tokenizer
■Parser
■Interpreter
During interpretation, variable references are resolved to values. The result after
processing is a simple String value, which is propagated to the Agent or saved
within the session for future use.
Authentication success responses are saved and then "replayed" along with any
authorization responses on the first applicable authorization request.
Authorization response expressions create the actions to be taken, depending on the
evaluation of the expression: success, failure, or inconclusive.
When referencing a variable, either the value is returned, or the following is returned:
■NOT FOUND is returned if the variable is not set
■NULL is returned if the variable is set to a null value
Pass Through Without Processing
A value that must be passed through without processing, can be identified using a \.
For example:
\$1000
results in the value
$1000
appearing in the returned value.
20.9.6 About Assertion Claims and Processing
For details, see Chapter 48, "Using Identity Context".
20.10 Adding and Managing Policy Responses for SSO
Policies and responses enable single sign-on and can override other directives. Before
starting activities in this section, be sure to review the "Introduction to Policy
Responses for SSO" on page 20-41.
Unless explicitly stated, information in this section applies equally to authentication
and authorization responses.
■Adding a Policy Response for SSO
■Viewing, Editing, or Deleting a Policy Response for SSO
Note: Oracle Access Manager 10g exhibits the same behavior in the
"authenticating Webgate" configuration. This is also employed by
Access Manager 11g with 10g Webgates: The 10g Webgate always
redirects to the Access Manager 11g credential collector which acts like
the authenticating Webgate.
Note: Verify the Responses.
Adding and Managing Policy Responses for SSO
20-48 Administrator's Guide for Oracle Access Management
20.10.1 Adding a Policy Response for SSO
Users with valid Administrator credentials can use the following procedure to add a
policy response for authentication or authorization to the Protected Resource Policy.
For example, you can collect the DN of the realm that is created when Oracle Internet
Directory is installed. Optionally, you can also configure the global user ID of the
subscriber in Oracle Internet Directory or a subscriber name rather than the default
company as shown in Table 20–17.
Prerequisites
Analyze desired conditions before crafting authorization responses to ensure the
appropriate actions are taken by the response. You need an Application Domain with
an existing authentication or authorization policy.
To add a policy Response
1. Locate the desired domain as described in "Searching for an Authorization Policy".
2. In the individual policy page, click to activate the Responses tab, then click the
Add button and:
■In the Name field, enter a unique name for this response.
■From the Type list, choose a response type (Session or Header or Cookie).
■In the Value field, enter a value for this response. For example:
$namespace1.var1
■Repeat as needed.
3. Click Apply, then close the Confirmation window.
4. Close the page when you finish.
5. Verify the Responses based on your definitions.
20.10.2 Viewing, Editing, or Deleting a Policy Response for SSO
Users with valid Administrator credentials can use the following procedure to view or
edit a policy response for authentication or authorization.
Table 20–17 Fresh OSSO Installation: Protected Policy Response (Header)
Response
Parameter
Collect Realm DN when OID
is Installed
Configure GUID of Subscriber
IN OID to Different Company
Configure GUID of Subscriber IN OID to
Default Company
Name osso-subscriber-dn (lowercase) osso-subscriber (optional) osso-subscriber-guid (optional)
Type Header Header Header
Value dc=country,dc=example,dc=com dc=country_or_region,dc=com ,dc=default_company,dc=com
Go to the subscriber DN (in Oracle Internal
Directory for example) and find the value (of
orclguid for the DN, for example).
See Also: "Introduction to Policy Responses for SSO" on page 20-41
See Also: "About the Namespace and Variable Names for Policy
Responses" on page 20-43

Introduction to Authorization Policy Rules and Conditions
Managing Policies to Protect Resources and Enable SSO 20-49
Prerequisites
You must have an Application Domain with an existing authentication or
authorization policy.
To view, modify, or delete a policy response
1. Locate the desired domain as described in "Searching for an Existing Application
Domain".
2. Click the Authentication (or Authorization) Policies tab, then click the desired
policy name.
3. On the individual policy page, click the Responses tab and proceed as needed:
■Add: See "Adding a Policy Response for SSO"
■Edit: Click the desired Response Name, Type, or Value, edit as needed, and
click Apply.
■Delete: Click the desired response, then click the Delete button for the
Response table.
4. Close the Confirmation window.
5. Close the page when you finish.
6. Verify Responses based on your definitions for:
■Header
■Session
■Cookie: Use a browser plug-in tool or turn on the browser "show cookies"
settings.
■Assertion Claim
20.11 Introduction to Authorization Policy Rules and Conditions
In Access Manager 11g, each Authorization policy includes a rule that defines whether
the policy allows or denies access to resources protected by the policy. The rule
references conditions that define the user or population to be granted or denied access
and other considerations for authorization. Authorization rules and conditions apply
to all resources within a specific authorization policy.
Evaluation of conditions and rules determines if the authorization policy applies to the
incoming request. The appropriate obligations take affect after successful
authentication and work in concert with defined authorization rules, conditions, and
responses. For each incoming request, the authorization policy determines if there are
any conditions that apply. If so, these conditions are evaluated.
This section provides the following topics:
■About Allow or Deny Rules
■About Authorization Policy Conditions
■About Classifying Users and Groups for Conditions
■Guidelines for Authorization Responses Based on Conditions
See Also: "Introduction to Policy Responses for SSO" on page 20-41

Introduction to Authorization Policy Rules and Conditions
20-50 Administrator's Guide for Oracle Access Management
20.11.1 About Allow or Deny Rules
In an authorization policy, a Rule contains all (or a subset) of conditions defined for the
policy. The effect of the Rule determines the effect of the policy.
You can set one or more rule effects (outcomes) per policy. However, you can specify
only one Rule per outcome. The following outcomes can be applied to authorization
and token issuance policies:
■Allow authorized users access to a protected resource. If Allow conditions do not
apply to a user, the user is not qualified by the policy and, by default, the user is
denied access to the requested resource.
■Deny authorized users access to a protected resource.
You can develop simple rules that rely on a single condition, or use expressions to
define more complex rules based on multiple conditions. For more information, see
"About Expressions and Expression-Based Policy Evaluation" on page 20-72.
20.11.2 About Authorization Policy Conditions
A condition is an element that specifies one or more criteria to be satisfied by the
access request. In structure, conditions are similar to constraints (in 11.1.1.3 and
11.1.1.5). However, earlier constraints included Allow and Deny rules that are now
specified independently on the Rules tab.
Each authorization policy can contain one or more conditions. Using different
condition types, you can:
■Identify the users or groups of users who are either allowed or denied access
(based on the rule) to protected resources.
■Stipulate the range of IP addresses who are either allowed or denied access to
protected resources.
■Set a time period defining when the condition applies.
■Specify attributes that enforces evaluation of request context, user session state,
and user attributes
The Conditions tab provides a table of defined conditions, organized by name, and a
table of details for the selected condition, as shown in Figure 20–23.
Note: If the user's IP address falls outside the range of denied
addresses, this by itself is not enough for authorization to be
successful. For authorization to be successful, the user must
specifically be granted access based on an Allow rule.
Introduction to Authorization Policy Rules and Conditions
Managing Policies to Protect Resources and Enable SSO 20-51
Figure 20–23 Individual Authorization Policy Conditions Tab
Table 20–18 describes elements and controls on the Conditions tab.
20.11.3 About Classifying Users and Groups for Conditions
Oracle recommends that you consider the same information for the policies and
conditions when analyzing users and groups to determine who is explicitly allowed or
denied access. For example, one authorization policy might be constrained to a
particular time of day (Temporal Type) while another might be constrained to a
specific group of users (Identity Type).
Table 20–18 Authorization Policy Condition Tab
Element Description
Conditions Table Elements Lists all conditions defined for this policy.
Name A unique name used as an identifier for the condition.
Type The kind of condition you want to use. Only one Type can be
specified:
■Identity
■IP4 Range
■Temporal
■Attribute
■True (see Table 18–5)
Description Optional unique text that describes this condition.
Condition Details Section Depending on the Type of the selected condition, the information in
this table will differ. For details, see:
■"About Identity Conditions" on page 20-55
■"About IP4 Range Condition Types" on page 20-62
■"About Temporal Conditions" on page 20-63
■"About Attribute Conditions" on page 20-65
Note: Do not be concerned about users who are denied access under
any conditions. Users are denied access by default if none of the
conditions qualify them for access.

Defining Authorization Policy Conditions
20-52 Administrator's Guide for Oracle Access Management
When classifying users Oracle recommends that you divide the users, and groups of
users, into groups for whom different conditions apply. For example, conditions can
determine when the users can access the resources, the computers from which they
must make their requests, and so on.
If some users fall into multiple categories, for example, a user in the marketing group
belongs to a certain project group, or a user in the human resources group also belongs
to the project group, put the user in both categories. You can require that the user meet
the conditions of two conditions.
To create policies for subsets of resources in an Application Domain and protect them
with different authorization rules and conditions, consider the same information: who
can access the resources protected by this policy and under what conditions you want
explicitly to allow or deny access to the resources.
20.11.4 Guidelines for Authorization Responses Based on Conditions
For each condition type, consider the response actions that you want to occur for
authorized users. For example, you might want the system to return user profile
information and pass that information to a downstream application. For example:
■If the user is authorized, you might want to pass the user's common name (cn) to
another application so that the application can present a customized greeting to
the user.
■If the user is not authorized, you might also want to return information about the
user for security purposes.
20.12 Defining Authorization Policy Conditions
You use conditions in an authorization policy to:
■Identify the users by user name, role, or an LDAP filter whose criteria the user
must satisfy.
■Stipulate the computers where users can access resources.
■Set a time period when the rule applies.
■Specify attributes that enforces evaluation of request context, user session state,
and user attributes
The mechanism to add a condition is the same regardless of the type you choose. A
dialog box pops up where you define the name and type to create the condition
container. Afterward you are presented with controls to define the specifics of the
condition.
This section is divided as follows:
■Choosing a Condition Type
■Defining Identity Conditions
■Defining IP4 Range Conditions
■Defining Temporal Conditions
■Defining Attribute Conditions
■Viewing, Editing, or Deleting Authorization Policy Conditions
Defining Authorization Policy Conditions
Managing Policies to Protect Resources and Enable SSO 20-53
20.12.1 Choosing a Condition Type
This section provides the following topics:
■About Choosing a Condition Type
■Choosing a Condition Type
20.12.1.1 About Choosing a Condition Type
You can have more than one instance of a given type of condition within a policy.
When an Administrator adds a condition to an authorization policy, a window
(Figure 20–24) appears where you enter capture the Name, Type, and optional
Description. When submitted, this information is used to create a container for
condition details that must be also specified.
Figure 20–24 Add Condition Window
Table 20–19 describes the Add Condition elements.
After the container is added it is displayed on the Condition tab as shown in
Figure 20–25. The Name, Type, and Description are displayed in the Results table at
the top of the tab. The lower panel contains the details of the condition
Table 20–19 Add Condition Window Elements
Element Description
Name A unique name for this condition.
Type Only one Type can be specified:
■Identity (See "About Identity Conditions" on page 20-55)
■IP4 Range (See "About IP4 Range Condition Types" on page 20-62)
■Temporal (See "About Temporal Conditions" on page 20-63)
■Attribute (See "About Attribute Conditions" on page 20-65)
Description Optional.
Defining Authorization Policy Conditions
20-54 Administrator's Guide for Oracle Access Management
Figure 20–25 Condition Containers on the Authorization Policy Page
20.12.1.2 Choosing a Condition Type
Users with valid Administrator credentials can use the following procedure to choose
a condition class for the authorization policy.
Prerequisites
The Application Domain must exist.
To choose a condition class
1. Locate the desired policy as described in "Searching for an Authorization Policy".
2. Click the policy name to open its configuration.
3. On the individual policy page, click the Conditions tab.
4. Click the Add (+) button and (Table 20–19):
■Name: Enter a unique name.
■Type list, choose the kind of condition (Identity, for example).
■Click the Add Selected button.
5. Proceed to one of the following topics to complete your definition:
■Defining Identity Conditions
■Defining IP4 Range Conditions
■Defining Temporal Conditions
■Defining Attribute Conditions
See Also: "Defining Authorization Policy Conditions" for
information and procedures
Note: You can have more than one instance of a given class of
condition in a policy.
See Also: "About Choosing a Condition Type" on page 20-53

Defining Authorization Policy Conditions
Managing Policies to Protect Resources and Enable SSO 20-55
20.12.2 Defining Identity Conditions
This section provides all information about Identity Conditions in the following topics:
■About Identity Conditions
■Specifying Identity Type Conditions
20.12.2.1 About Identity Conditions
When defining an Identity Condition, you must add one or more members of a user
population from one or more User Identity Stores. You can add the user population as
a list of users or groups. Alternatively, you can add LDAP search filters to be used at
runtime to identify the user population. LDAP search filters provide a simple way to
specify a target identity population without having to reorganize or create new groups
in the identity store (directory server). For details see:
■About Identity Conditions and User Populations
■About LDAP Search Filter Support in Identity Conditions
■About LDAP Search Filter Syntax
20.12.2.1.1 About Identity Conditions and User Populations After opening the condition
container, any defined user population is displayed. As with the other condition types,
the Identity type can be used in conjunction with identity and temporal conditions.
When adding an identity condition, you open the popup menu beside the Add (+)
button (labeled 1 in Figure 20–26), choose to Add Users and Groups or Add Search
Filter (2). Figure 20–26 shows the popup menu and the Add Identities window that
appears (3). After locating the desired identities, select the desired Identities and click
Add Selected (4).
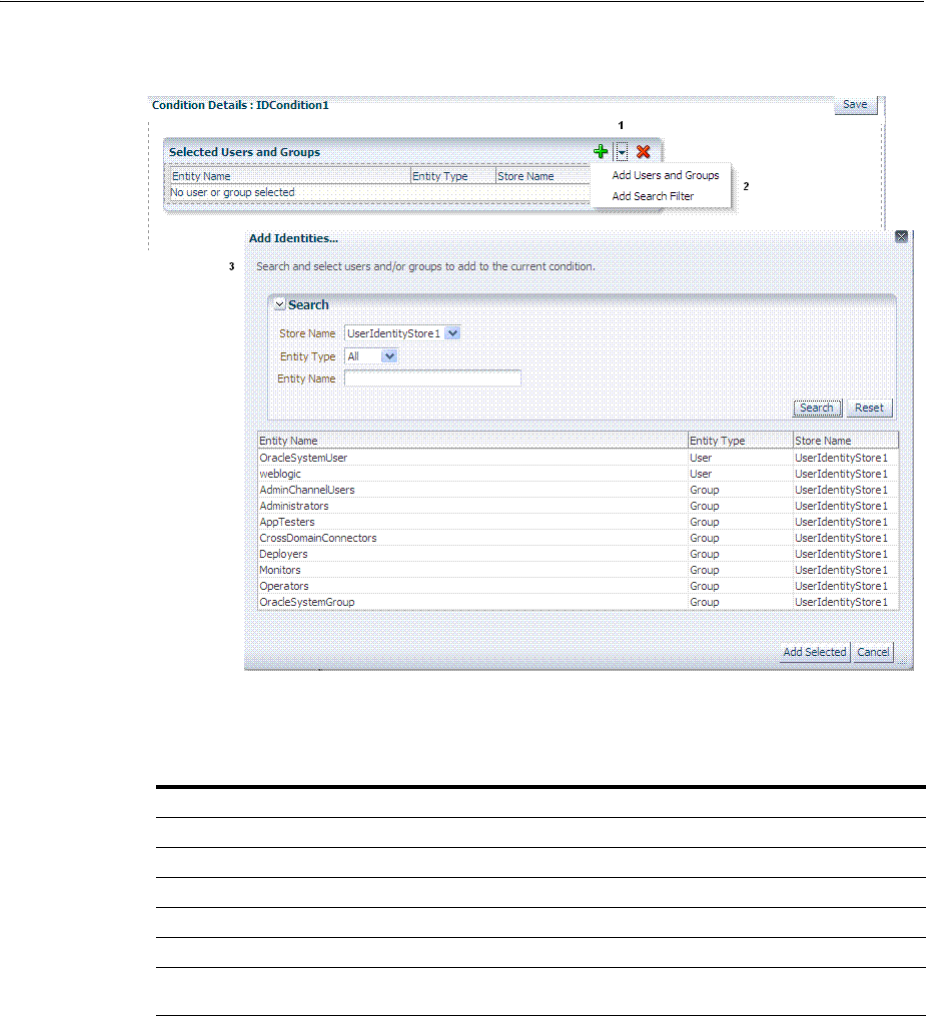
Defining Authorization Policy Conditions
20-56 Administrator's Guide for Oracle Access Management
Figure 20–26 Add Identities Window
Table 20–20 describes the Add Identities elements.
After selecting one or more identities and clicking the Add Selected button, your
Conditions tab might look something like Figure 20–27.
Table 20–20 Add identities Elements
Element Description
Store Name Select the desired LDAP store for this search from the list of registered LDAP stores.
Entity type Choose either Users, Groups, or All to define your search criteria.
Entity Name Enter information to further refine your search criteria.
Search Click this button when your search criteria are defined.
Results table Displays the results of your search.
Add Selected Click to add the selected users or groups from the results table to the Condition's
Details.
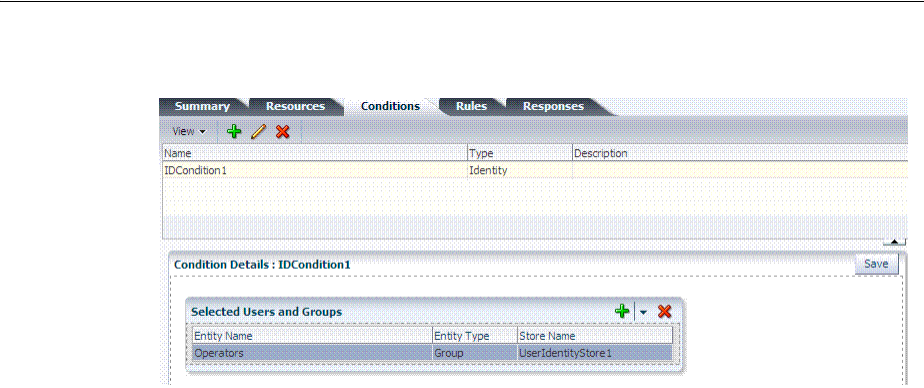
Defining Authorization Policy Conditions
Managing Policies to Protect Resources and Enable SSO 20-57
Figure 20–27 Identity Condition and Details
To save these details as a condition, click the Save button in the upper-right corner of
the tab.
20.12.2.1.2 About LDAP Search Filter Support in Identity Conditions Access Manager 11g
authorization conditions accept a list of users, groups, and LDAP search filters as part
of allowed or denied identities. An LDAP filter is a text string that expresses specific
criteria for the search operation. LDAP search filters provide a simple way to specify a
target population without reorganizing or creating new groups in the identity store
(directory server).
Access Manager 11g accepts LDAP search filter data for the following conditions and
resource types:
■Identity Conditions
■Token Requestor Identity Conditions
■All resource types (HTTP, TokenServiceRP, and other custom resource types)
When a user tries to access a resource protected by a condition containing an LDAP
search filter, Access Manager performs a directory lookup (LDAP search) on the
identity domain (identity store) specified as a part of the filter. Search results are
cached to avoid repeated directory server lookups.
If you choose
Add Search Filter ...
, the controls shown in Figure 20–28 appear. You
can add more than one LDAP Search Filter in an authorization rule for evaluation at
runtime. The field where you enter your LDAP search filter is used to identify
allowed/denied users.
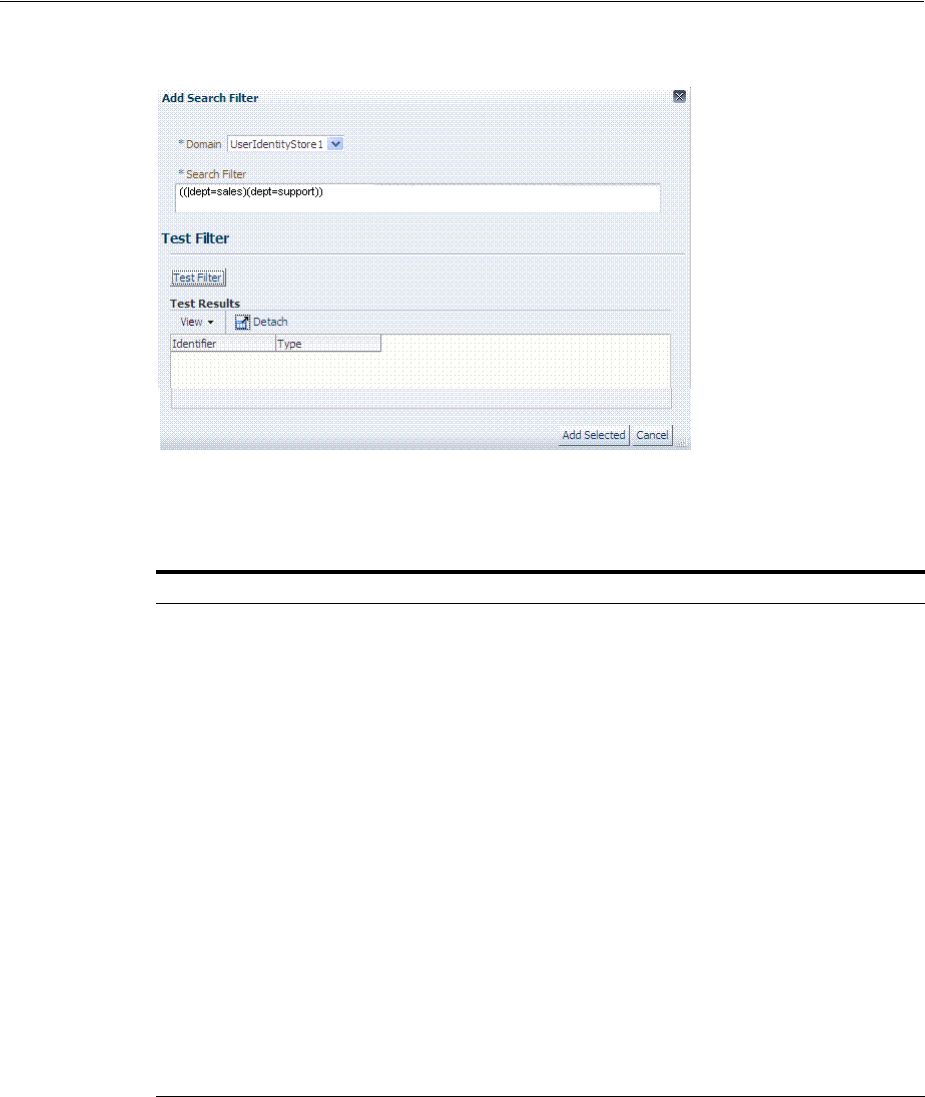
Defining Authorization Policy Conditions
20-58 Administrator's Guide for Oracle Access Management
Figure 20–28 Add Search Filter Controls
Table 20–21 describes elements associated with adding a Search Filter.
Figure 20–29 shows the Identity Conditions: Details page, displayed after adding an
LDAP Search Filter.
Table 20–21 Add Search Filter Elements
Element Description
Domain The Identity Domain (registered user identity store) in which
the search should be conducted during runtime. Each filter
must be associated with a specific user identity store. With
Access Manager 11g, a directory lookup (LDAP Search) is
performed only on the specified identity domain (identity
store).
Search Filter The field where you enter your LDAP search filter. For
example:
((|dept=sales)(dept=support))
See Also: "About LDAP Search Filter Syntax" on page 20-59
Test Filter This button enables you to test your LDAP Search Filter to
ensure it returns the expected result.
Test Results The results of your filter test are displayed with your own
designations for:
■Type: LDAPSearchFilter
■Identifier: Your LDAP Search Filter
Add Filter Click to Add the filter to this identity condition.
Cancel Click to dismiss the Add Search Filter dialog without adding a
filter.
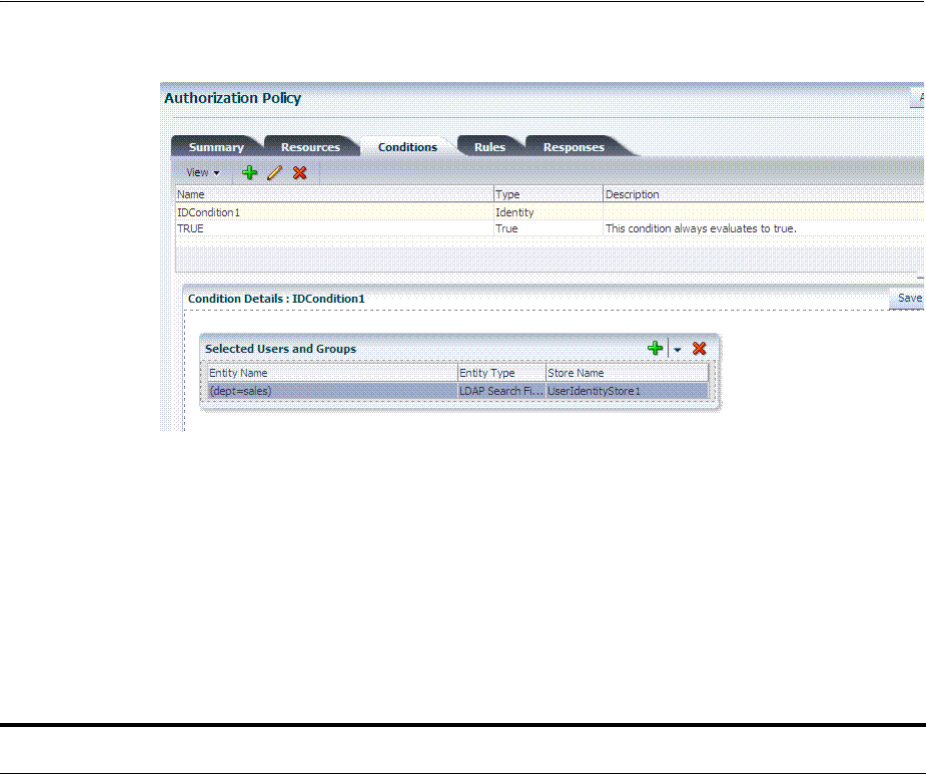
Defining Authorization Policy Conditions
Managing Policies to Protect Resources and Enable SSO 20-59
Figure 20–29 Identity Conditions: Details
20.12.2.1.3 About LDAP Search Filter Syntax Only standard LDAP attributes can be used
when defining an LDAP search filter. Exact syntax depends on your identity store; see
your vendor documentation. Table 20–22 illustrates LDAP Search Filter examples for
Access Manager.
See Also:
■"About LDAP Search Filter Syntax" on page 20-59
■"Defining Identity Conditions" on page 20-55
Table 20–22 LDAP Search Filter Examples for Access Manager
Filter Type and
Operators Description Syntax Example
Static LDAP Search
Filters
When you implement a static search filter, all search results
must match a fixed value. For example, you can restrict a
search to return only people whose directory profiles show
an organizational unit of Sales.
As an example of a simple static filter, suppose you want to
provide Selector searches for the seeAlso attribute. The filter
returns search results that show only people whose
directory profiles contain a businessCategory value of
dealership.
(attribute=value)
For example:
(businessCategory=dealership)
Static Searches Using
Wild Cards
As an example of a static filter that uses wild cards, suppose
you want only people with the word Manager in their title
to be returned on a search using the Selector. You can create
a filter that searches for the string Manager with the asterisk
(*) wildcard.
(attribute=*value*)
For example:
(title=*manager*)
Dynamic LDAP Search
Filters
A dynamic filter allows a search to return results that are
based on a user profile. A dynamic filter is a conventional
LDAP search filter with filter substitution syntax.
(attribute=$attribute$)

Defining Authorization Policy Conditions
20-60 Administrator's Guide for Oracle Access Management
During migration to Access Manager 11g (from 10g), each LDAP Rule maps to
corresponding 11g identity domains (user identity stores) based on Oracle Access
Manager 10g directory profiles. Access Manager 11g identity domains (user identity
stores) must be associated with each LDAP search filter.
20.12.2.2 Specifying Identity Type Conditions
Users with valid Administrator credentials can use the following procedure to add
identity type conditions to an Application Domain.
Substitution syntax Substitution syntax is evaluated dynamically, according to
the person executing a task. For instance, you can enter
substitution syntax where the attribute value for the source
DN (the person logged into the application) is substituted
and evaluated against the target DN (the entry you are
trying to view).
Note: Setting a searchbase can present significant
administrative overhead. A filter-based approach
accomplished by substitution syntax can provide the same
functionality in a more scalable and simplified design.
Using substitution syntax, you can create a function that
starts searches higher in the directory structure, but filters
the search data by comparing an attribute of information
from the search initiator's record (for example, using the
substitution
$ou$
) to an attribute of data on each possible
result (for example,
ou=
). You can use substitution syntax
for attribute access control and searchbases. For example, by
placing a filter on the type attribute Login for
inetOrgPerson, the ability of a user to view any records
outside their scope is removed.
Note: For the selected searchbase, users can search only for
entries from the same
ou
as their own. This applies only to
the attribute on the person's record, not the ou of the branch
of the directory in which they reside. Additionally, users
from
ou=
people can search for entries within the selected
searchbase.
(attribute=$attribute$)
For example: The following filter finds
all those in the same organizational
unit as the person logged in to the
application:
(ou=$ou$)
Dynamic Searches Using
Wild Cards
Wildcards are supported in a dynamic filter.
For example, suppose you want to supply a contactPerson
attribute in an organizationalUnit object. The contactPerson
attribute should return people in same Zip code as the
organizationalUnit object. If the organizationalUnit profile
contains an attribute zipCode, and the Zip code is specified
at the end of a postalAddress directory attribute.
(attribute=*$attribute$)
For example:
(postalAddress=*$zipCode$)
Searches Using the Not
Operator: (!)
The Not operator is supported when constructing a filter.
The optimized algorithm causes the filter (!(sn=white)) to
not give the expected result.
((!(sn=white))(objectclass=personO
C))
See Also: "Specifying Identity Type Conditions" on page 20-60
See Also: Oracle Fusion Middleware Upgrade Guide for Oracle
Identity Management
Note: You must save each condition definition individually, before
adding or selecting another condition.
Table 20–22 (Cont.) LDAP Search Filter Examples for Access Manager
Filter Type and
Operators Description Syntax Example

Defining Authorization Policy Conditions
Managing Policies to Protect Resources and Enable SSO 20-61
Prerequisites
The Application Domain must exist.
To add identity conditions to an authorization policy
1. Locate the desired policy as described in "Searching for an Authorization Policy".
2. Click the Conditions tab, click the Add (+) button.
3. Enter a Name, select Identity from the Type list (or Token Requestor Identity) and
click Add Selected.
4. Add Users/Groups:
■In the Condition Details section click the Add (+) button.
■Choose Add Users and Groups from the list.
■Store Name: Choose the desired name from the list of registered LDAP stores.
■Enter criteria (Identity Type and Identity Name) for the population you want
to find, and click the Search button.
■Select desired results.
■Click Add Selected.
■Repeat to add another User or Group condition.
5. Add Search Filter:
■In the Condition Details section click the Add (+) button.
■Domain Name: Choose the desired user identity store for this filter.
■Search Filter: Enter your search filter syntax (Table 20–21).
■Test: Click the Test Filter button and review the results table.
■Click the Add Selected button.
■Repeat to add another LDAP Search Filter condition.
6. Click Apply and then close the Confirmation window.
7. Close the page when you finish.
8. Verify the Conditions by logging in as different users and test access to the
resource.
20.12.3 Defining IP4 Range Conditions
This section provides the following information:
■About IP4 Range Condition Types
■Defining IP4 Range Conditions
See Also:
■"About Identity Conditions" on page 20-55
■"About LDAP Search Filter Support in Identity Conditions" on
page 20-57
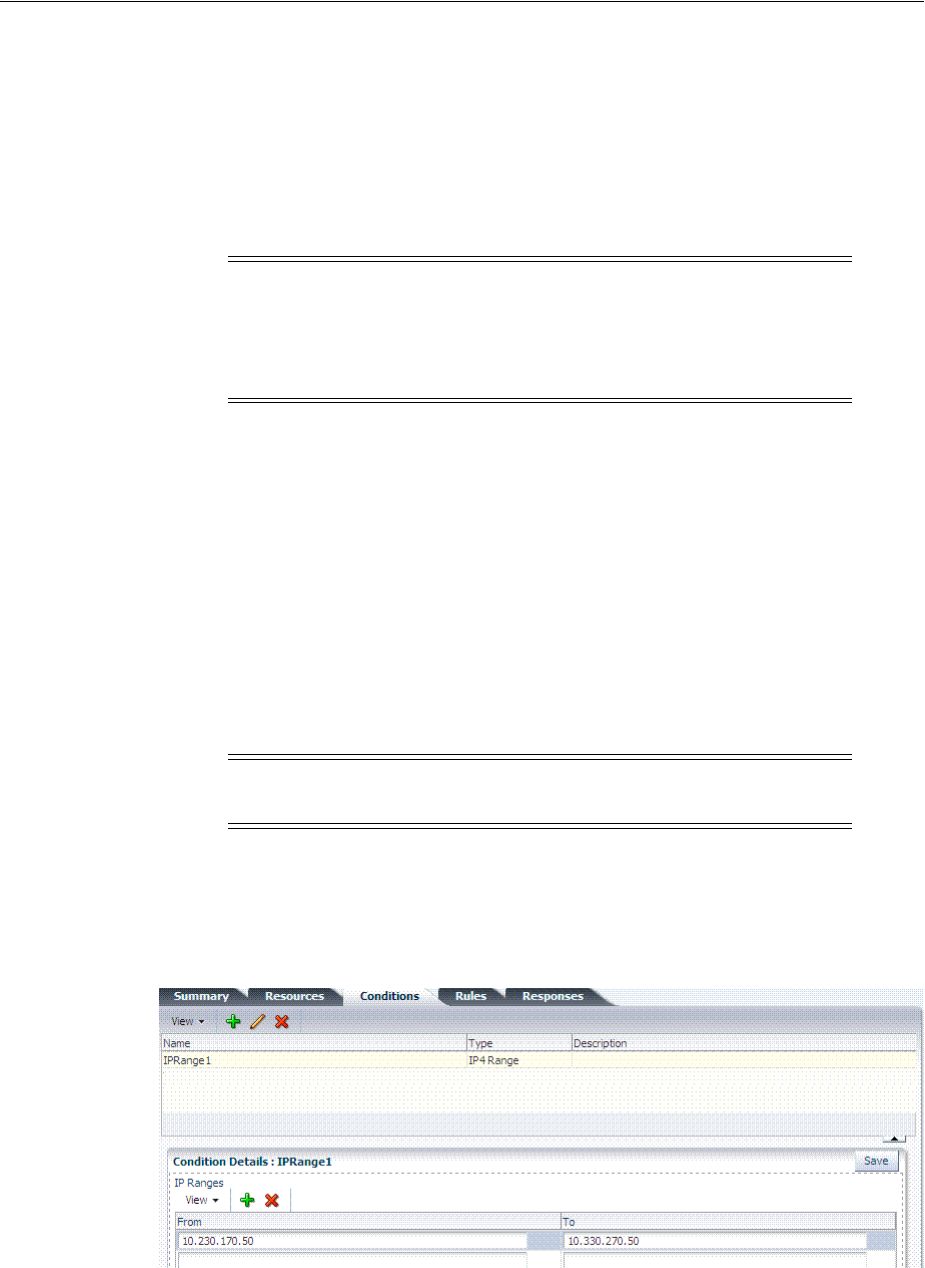
Defining Authorization Policy Conditions
20-62 Administrator's Guide for Oracle Access Management
20.12.3.1 About IP4 Range Condition Types
With the IP4 Range condition type, Administrators can specify a list of IP address
ranges that will either be allowed or denied access. Like the other authorization
conditions, IP4 Range condition types can be used in conjunction with identity and
temporal conditions.
Explicit Addresses: Each IP address you specify must be an explicit, valid address
(format nnn.nnn.nnn.nnn): 192.2.2.2, for example.
IP4 Range: You define a range by entering
From
(start) and
To
(end-range) address
values. Each IP address you specify must be an explicit, valid address (format
nnn.nnn.nnn.nnn): 192.2.2.2, for example. The address specified in the
To
field should
be greater than the address specified in the
From
field. During authorization, Access
Manager checks to ensure that the client IP address falls between the
From
(start)) and
To
(end-range) addresses specified. If multiple overlapping ranges are specified, and
the client's IP address falls within even one of the ranges, the condition evaluates to
"
true
" and allows (or denies) access based on the condition that was set for the
condition.
If multiple overlapping ranges are specified, and the client's IP address falls within
any one of the ranges, the condition evaluates to "
true
" and allows (or denies) access
based on the condition.
Figure 20–30 illustrates the IP4 Range Conditions table with a sample starting and
ending IP4 Range. If you enter an invalid range, you are notified and unable to save it.
Figure 20–30 IP4 Range Conditions
Note: Oracle Access Manager 10g accepts a wildcard as the last entry
(192.2.2.* or 192.2.*, for example). IP4 Ranges with no wildcards can be
easily ported to 11g by creating a Condition containing multiple IP4
Range values. However, 10g IP4 Ranges with wildcards are expanded
by upgrade tooling into multiple ranges relevant to the wildcard.
Note: If the
From
IP address is greater than the
To
address, the
condition cannot match any client IP address.

Defining Authorization Policy Conditions
Managing Policies to Protect Resources and Enable SSO 20-63
20.12.3.2 Defining IP4 Range Conditions
Users with valid Administrator credentials can use the following procedure to add IP4
Range type conditions to an Application Domain. You must save each condition
definition individually, before adding or selecting another condition.
Prerequisites
The Application Domain must exist.
To add IP4 Range type conditions to an authorization policy
1. Locate the desired policy as described in "Searching for an Authorization Policy".
2. Click the Conditions tab, click the Add (+) button.
3. Enter a Name, select IP Range from the Type list, enter an optional Description,
and click Add Selected.
4. Add the desired IP address range (Table 20–30):
■In the Details panel, click the Add (+) button to display the Add IP Range
dialog.
■
From
: Enter the start of the range.
■
To
: Enter the end of the range.
■Click the Add button to include this range in the Condition Details section.
■Repeat these steps to add another range.
5. Click Apply and then close the Confirmation window.
6. Verify your IP4 Range Conditions by logging from different clients with different
IP addresses to test access to the protected resource.
20.12.4 Defining Temporal Conditions
This section provides the following topics:
■About Temporal Conditions
■Defining Temporal Conditions
20.12.4.1 About Temporal Conditions
With the Temporal condition type, Administrators must add the start and end time
and the range of days. Like the other conditions, this one can be used in conjunction
with identity and IP4 Range conditions.
By default, all days in the range are enabled (though none are checked in the form as
shown in Figure 20–31.
Note: If the user's IP address falls outside the range of denied
addresses, this by itself is not enough for authorization to be
successful. For authorization to be successful, the user must
specifically be granted access based on an Allow rule.
See Also: "About IP4 Range Condition Types" on page 20-62
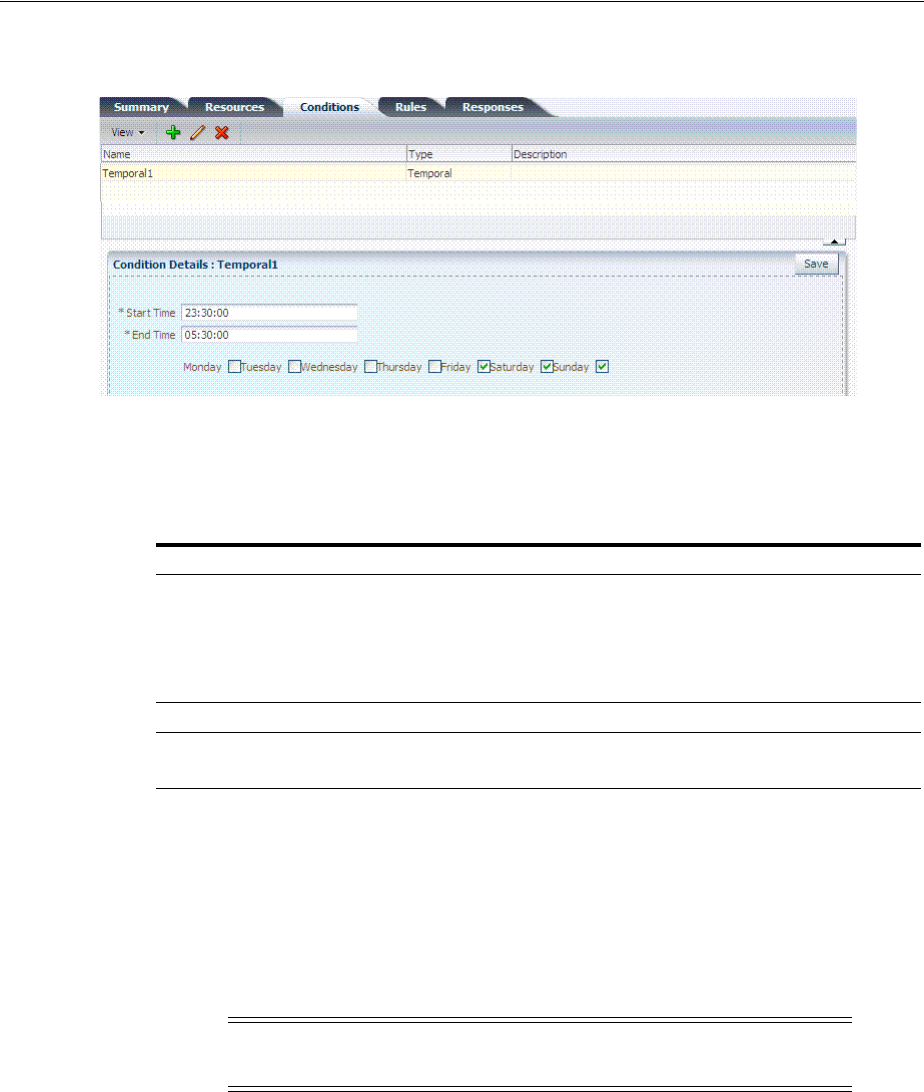
Defining Authorization Policy Conditions
20-64 Administrator's Guide for Oracle Access Management
Figure 20–31 Temporal Condition Type Details Page
Time periods must be specified in the HH:MM:SS (hour, minute, and second) format
based on a 24-hour clock based on Greenwich Mean Time (GMT). Midnight is
specified as 00:00:00 (start). The day ends at 24:59:59.
Save the details before closing this page.
20.12.4.2 Defining Temporal Conditions
Users with valid Administrator credentials can use the following procedure to add
temporal type conditions to an Application Domain.
Prerequisites
The Application Domain must exist.
To add temporal conditions to an authorization policy
1. Locate the desired policy as described in "Searching for an Authorization Policy".
2. Click the Conditions tab, click the Add (+) button.
Table 20–23 Temporal Condition Details
Elements Description
Start Time
Notes: Time is specified using a
full 24-hour range. For instance,
midnight is specified as 00:00:00
and 11:00 PM is specified as
23:00:00.
Specifies the hour, minute, and second that this condition begins.
Notes: Time is based on Greenwich Mean Time (GMT). GMT is the
same all year with no adjustments for daylight savings time or
summer time.
End Time Specifies the hour, minute, and second that this condition concludes.
Days Specifies the days where this policy is active.
Default: All Days (even though these are not checked).
See Also: "Defining Temporal Conditions"
Note: You must save each condition definition individually, before
adding or selecting another condition.
See Also: "About Temporal Conditions" on page 20-63

Defining Authorization Policy Conditions
Managing Policies to Protect Resources and Enable SSO 20-65
3. Enter a Name, select Tem por al from the Type list, enter an optional Description,
and click Add Selected.
4. In the Details panel (Table 20–23): Click the condition name in the table to open the
details panel:
■Enter the Start time.
■Enter the End time.
■Click the days of the week to which this condition applies (or leave all blank to
specify every day of the week).
■Click Save.
5. Click Apply and then close the Confirmation window.
6. Verify the Temporal Conditions by logging in at different times to validate access
to the protected resource.
20.12.5 Defining Attribute Conditions
This section provides the following topics:
■About Attribute Conditions
■Defining Attribute Type Conditions
20.12.5.1 About Attribute Conditions
An attribute-type condition enforces the evaluation of request context, user session
state and user attributes for Allow or Deny access pertaining to all resource types and
authorization policies in the Application Domain. With an attribute-type condition
defined, access is based on a list of name-value pairs scoped by the:
■Request context: Information on the requested resource, the client making the
request, and the policy that was matched during evaluation.
■Session: User Session details (pre-defined session attributes or a reference to an
arbitrary session attribute) when the user has an established session.
■User: User attribute information (reference to a LDAP attribute). This condition is
used to define a condition on a reference to a user's arbitrary LDAP attribute only.
However, conditions based on userID or groupID are defined using Identity
Conditions.
Attribute type conditions are required when access is based on one of the situations
described in Table 20–24.
Table 20–24 Access Conditions that Require Attribute-Type Conditions
When Access is based on ... Description
Session attribute A user is authorized to access the resource if the session
attribute "Authentication level" is xx and Session Attribute
"s1" = "v1" and Session Start Time = "xxxx".
See: Table 20–27, " Attribute Names for Session Built-ins"
Requested resource hostname and port number
See: Table 20–26, " Attribute Names for Request Built-ins"
User details A user is authorized to access the resource if its "Empno" =
"xxxx" (department=sales, for example)
See: Table 20–28, " Attribute Condition Data (Aggregation of
Conditions)"
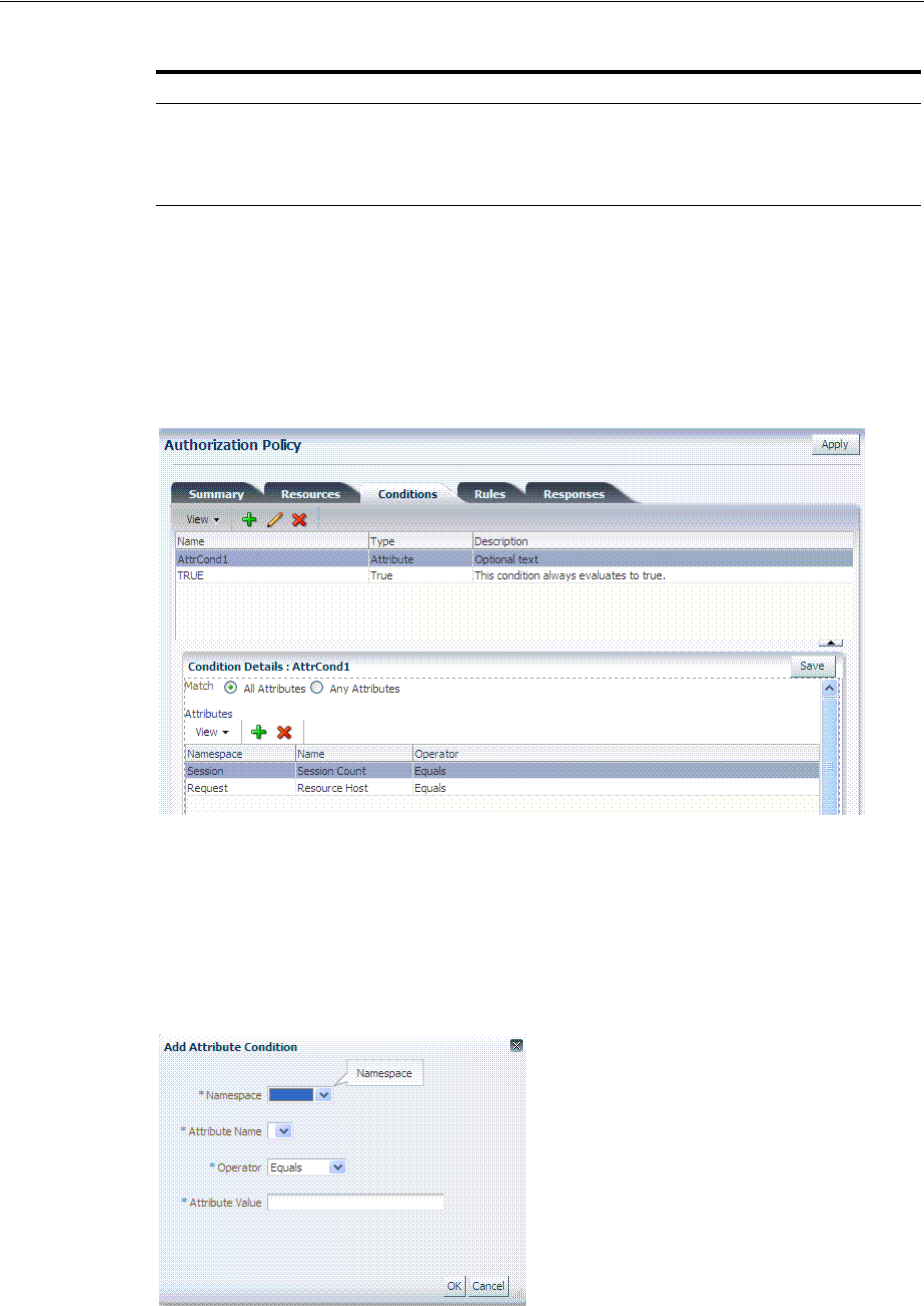
Defining Authorization Policy Conditions
20-66 Administrator's Guide for Oracle Access Management
An Administrator defining attribute type conditions enters data into fields for built-in
attributes and known attributes. The attribute name can be entered in a text field or
selected from a list of values. The condition to be executed is constructed using
"AND" or "OR" conjunctions on the condition. Figure 20–32 illustrates the Attribute
Conditions page.
Figure 20–32 Attribute Conditions Page
Figure 20–33 shows the Add Attributes dialog box. Each attribute condition is defined
by the fields described in Table 20–25.
Figure 20–33 Add Attributes Dialog
Token Issuance based on a
session attribute
The Requester Partner can issue a token to the Relying Party if
the claim contains an attribute "SessionActiveTime" = "15000".
You define claims-based conditions of the Token Issuance
policy based on the assertions created using session data.
See Also: "Defining Attribute Conditions"
Table 20–24 (Cont.) Access Conditions that Require Attribute-Type Conditions
When Access is based on ... Description

Defining Authorization Policy Conditions
Managing Policies to Protect Resources and Enable SSO 20-67
Request Built-ins
Table 20–26 identifies the list of built-in attribute names for Request Built-ins:
Session Built-ins
Table 20–27 identifies the list of attribute names for Session-based attribute-type
conditions.
Table 20–25 Attribute Condition Elements
Condition Description
Namespace Supported namespaces:
■Request Built-ins
■Session Built-ins
■Session (User Session)
■User (User Attributes)
Name Attribute name, which can be added as follows, depending on the:
■Selected from a list if the Namespace is Request (Table 20–26) or
Session (Table 20–27)
■Entered manually into a text field if the Namespace is User
Operator Allowed operators:
■STARTS WITH
■EQUALS
■CONTAINS
■ENDS WITH
Value Literal value with no special wildcard characters.
Table 20–26 Attribute Names for Request Built-ins
Attribute Name Description
agent_id Name of the requesting agent.
client_ip IP address of the user browser.
Policy_appdomain Name of the Application Domain holding the policy matched
for the request.
Policy_res Resource host ID and URL pattern matched for the request.
policy_name Name of the specific policy matched for the request.
res_host Requested resource's hostname.
res_port Requested resource's port number.
res_type Requested resource's type.
res_url Requested resource URL.
Table 20–27 Attribute Names for Session Built-ins
Attribute Name Description
Authentication Level Current authentication level for the session.
Authentication Scheme Name of the authentication scheme executed to achieve the
current authentication level.
Session Count Session count for the user bound to this session.
Session Creation Time Session creation time.

Defining Authorization Policy Conditions
20-68 Administrator's Guide for Oracle Access Management
Example: Attribute Condition Data (Aggregation of Conditions)
Table 20–28 illustrates sample condition data for each allowable namespace.
20.12.5.2 Defining Attribute Type Conditions
Users with valid Administrator credentials can use the following procedure to add
attribute type conditions to an Application Domain.
Prerequisites
The Application Domain must exist.
To add attribute type conditions to an authorization policy
1. Locate the desired policy as described in "Searching for an Authorization Policy".
2. Click the Conditions tab, click the Add (+) button.
3. Enter a Name, select Attribute from the Type list, enter an optional Description,
and click Add Selected.
4. Add Details for Attribute Condition: Click the name of the condition to expand
the details panel, and:
■Match: Click either All or Any.
■Namespace: Select from the list (Table 20–25).
■Name: Select from the list or enter manually (Table 20–26 or Table 20–27).
■Operator: Select from the list (Table 20–25).
■Value: Enter manually (Table 20–28).
■Click Save.
■Repeat as needed.
5. Click Apply and then close the Confirmation window.
6. Verify the Attribute Conditions by logging in with different scenarios.
Session Expiry Time Session expiration time.
Table 20–28 Attribute Condition Data (Aggregation of Conditions)
Namespace Name Operator Value
Request-Builtins Res_host Equals 7777
Session-Builtins Authn_level Equals 2
Session Sessionattr1 Contains Foo
User department Equals sales
Note: You must save each condition definition individually, before
adding or selecting another condition.
See Also: "About Attribute Conditions" on page 20-63
Table 20–27 (Cont.) Attribute Names for Session Built-ins
Attribute Name Description

Defining Authorization Policy Rules
Managing Policies to Protect Resources and Enable SSO 20-69
20.12.6 Viewing, Editing, or Deleting Authorization Policy Conditions
Users with valid Administrator credentials can use the following procedure to add
identity type conditions to an Application Domain.
Prerequisites
The Application Domain and authorization policy exist.
To view, edit, or delete authorization policy conditions
1. Locate the desired policy as described in "Searching for an Authorization Policy".
2. Click the Conditions tab.
3. Edit Condition Details: Click the desired condition, click the Edit button to
display the Details panel. Depending on the condition type, perhaps only the
Description can be edited.
■"Defining Identity Conditions" on page 20-55
■"Defining IP4 Range Conditions" on page 20-61
■"Defining Temporal Conditions" on page 20-63
■"Defining Attribute Conditions" on page 20-65
■True: Click the name, click the Edit button; only the Description can be edited.
4. Delete Conditions: Click the condition to remove and click the Delete button on
the Condition tab.
5. Click Apply and then close the Confirmation window.
6. Close the page when you finish.
7. Verify the Conditions by accessing the resource and evaluating the results.
20.13 Defining Authorization Policy Rules
When Allow access rules, Deny access rules, or both are specified and do not apply to
a user, the user is not qualified by the rule, and is denied access to the requested
resource by default.
To specify who is allowed or denied access to the resource, the rule can do the
following:
■Identify the users by user name, role, or an LDAP filter whose criteria the user
must satisfy.
■Stipulate the computers where users can access resources.
■Set a time period when the rule applies.
This section provides the following topics:
■About Defining Rules in an Authorization Policy
■About Expressions and Expression-Based Policy Evaluation
■Defining Rules in an Authorization Policy
See Also: "Introduction to Authorization Policy Rules and
Conditions" on page 20-49

Defining Authorization Policy Rules
20-70 Administrator's Guide for Oracle Access Management
20.13.1 About Defining Rules in an Authorization Policy
Rules are new constructs in the Access Manager 11g policy model. A Rule specifies of
how to combine condition evaluation outcomes. Each Rule also contains a rule effect
(ALLOW or DENY), which determines the overall policy outcome.
Authorization rules define the actions to take during evaluation of the policy,
conditions, and rules as well as what to do based on the outcome. There are three
possible outcomes:
■True (Allow access): If the user meets the Allow access condition, the user qualifies
for the Allow access part of the rule.
■False (Deny access): If the user meets the Deny access condition, the user qualifies
for the Deny access part of the rule.
■Inconclusive: If the user satisfies neither the Allow access nor the Deny access
conditions, the rule is said to be unqualified for that user. You can also think of this
as the user not qualifying for the rule. If evaluation of a rule results in an
unqualified user, the user is denied access to the resource based on that rule.
In some cases, a single authorization rule is all that is required to protect the resources
of an Application Domain or a policy. You can configure a rule to identify who is
allowed access to the resources it protects, who is denied access to them, and under
what conditions these controls apply (for example, when they apply and from which
computer). An authorization rule does not need to cover all users in its Allow access
and Deny access conditions. Users who request access to a resource that is protected
by the rule but do not qualify for any of the conditions are, by default, denied access to
the resource.
For other cases, it may be necessary to configure multiple authorization conditions
into rules to protect resources. You can impose complex conditions on different users.
For example, you can define a rule that includes several authorization conditions, one
or more of which a user must meet to qualify for access to a protected resource (or to
qualify for denial of access to it). For example, you might require the user to meet two
conditions—such as belonging to one group and using a computer assigned a specific
IP address—to be granted access to the resource.
Oracle Access Management Console makes it easy for you to form expressions for an
authorization rule. Conditions are declared outside of rules and are referenced within
rules. Evaluation outcomes are combined in either Simple mode or Expression mode.
Figure 20–34 shows the Rules tab in an authorization policy.
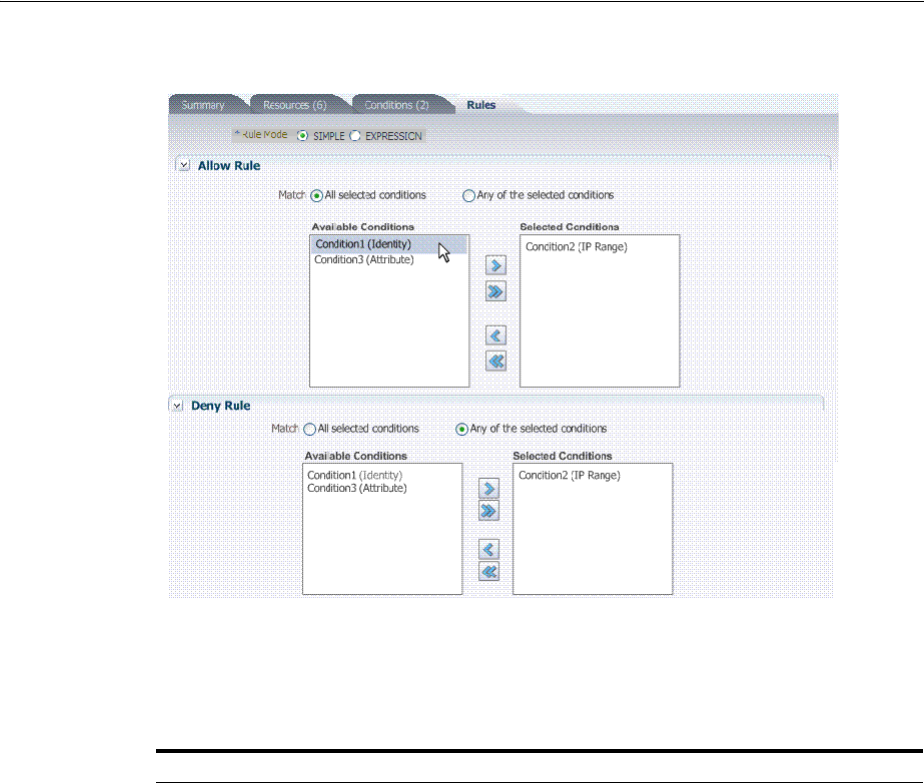
Defining Authorization Policy Rules
Managing Policies to Protect Resources and Enable SSO 20-71
Figure 20–34 Authorization Policy Rules Tab: Simple Mode
Table 20–29 describes the elements and controls on the Rules tab for Simple Mode
evaluations.
Table 20–29 Authorization Policy Rules Elements
Element Description
Rule Mode The method used for evaluation of conditions and rules:
■Simple: Accepts a list of condition names that are
combined using a simple algorithm:
ALLOW conditions are combined using logical AND. All
Allow conditions must be met to get access.
DENY conditions are combined using logical OR. Any
Deny condition that is true denies access. DENY always
takes precedence over ALLOW.
■Expression: Accepts a user-specified Boolean expression
to combine conditions using condition names, "(", ")", "|",
"&" and "!" special characters. Combines conditions into
complex policies.
See Also: "About Expressions and Expression-Based
Policy Evaluation" on page 20-72
■A policy in which there are one or more conditions that
are not part of either Allow rule or Deny rule is treated as
a valid policy.
Allow Rule The rule that allows access based on evaluation of your rules
and the Selected Conditions list.
Deny Rule The rule that denies access based on the evaluation of your
rules and the Selected Conditions list.
Match Criteria you choose to either match All conditions in the
Selected Conditions list or Any conditions the Selected
Conditions list.
Defining Authorization Policy Rules
20-72 Administrator's Guide for Oracle Access Management
20.13.2 About Expressions and Expression-Based Policy Evaluation
When a user requests access to a resource that is protected by an authorization
condition and rule, information about the user is checked against the rule. If the
condition stipulates other information, such as time period or time of day the
condition applies, that, too, is checked. This process is referred to as evaluation of the
rule.
An authorization expression consists of a single rule or a group of rules combined to
express more complex conditions. For example, you can create an expression that
requires a user to meet the Allow access conditions of two rules to be granted access to
the resource. You use the Oracle Access Management Console to create these
expressions, which include the following elements:
■Authorization conditions that you select from those that are defined and available
in the authorization policy
■Operators that you use to combine rules to provide the kind of authorization
protection that you want (Table 20–31)
For expressions that contain multiple conditions, a user may qualify for none of the
expression's conditions, one of the conditions, or for the conditions of multiple rules.
In any case, it is the result of evaluation of the expression—all of its conditions and
how they are combined—not any one condition, that determines whether a user is
allowed or denied access to a resource.
About the Definitive Result of an Authorization Expression: Access Manager
evaluates the rules of an expression until it can produce a definitive result. Evaluation
of an authorization expression may produce a definitive Allow access result, a Deny
access result, or an Inconclusive result.
Figure 20–35 shows the Rules tab when you use Expression as a Rule Mode.
Available Conditions A list of all defined conditions for this authorization policy.
Selected Conditions A list of the specific conditions that you build by moving
items from the Available Conditions list to this list for use
during the policy evaluation process.
Controls in the form of arrows enable you to add a condition
to the Selected Conditions list (or vice versa to remove a
condition from those selected).
Table 20–29 (Cont.) Authorization Policy Rules Elements
Element Description
Defining Authorization Policy Rules
Managing Policies to Protect Resources and Enable SSO 20-73
Figure 20–35 Rules Tab: Expression Rule Mode
Table 20–30 describes the elements on the Rule tab in Expression mode.
Table 20–31 identifies the operators you can use when building an authorization
expression.
Table 20–30 Rule Tab in Expression Mode
Element Description
Rule Mode The method used for evaluation of conditions and rules:
■Expression: Accepts a user-specified Boolean expression to
combine conditions using condition names, "(", ")", "|", "&" and "!"
special characters. Combines conditions into complex policies.
■A policy in which there are one or more conditions that are not
part of either Allow rule or Deny rule is treated as a valid policy.
See Also: Table 20–31, " Operators for Expressions in Authorization
Rules"
Allow Rule The rule that allows access based on evaluation of your rules and the
Selected Conditions list.
Deny Rule The rule that denies access based on the evaluation of your rules and
the Selected Conditions list.
Conditions Provides a list of all conditions defined for this authorization policy.
Insert Condition Adds the selected Condition to the expression window.
Validate Automatically tests the validity of the expression and reports results.
Table 20–31 Operators for Expressions in Authorization Rules
Operator Description
( ) By default, two rules on either side of an AND operator compose the compound AND
condition. Rules on either side of an OR operator are alternatives. When no
parenthesis are used to enforce grouping of rules, the AND operator takes precedence
over the OR operator.
You can use parenthesis to override the default way in which the rules of an
expression are grouped. Evaluation still occurs from left to right, but the rules are
organized within the couplings and groups you create through use of parenthesis.

Defining Authorization Policy Rules
20-74 Administrator's Guide for Oracle Access Management
20.13.2.1 Expression Evaluation in Authorization Rules
The result of evaluation of an authorization rule, in conjunction with other
authorization rules, if more than one is included in the expression, determines if a user
is granted access to the requested resource. Evaluation of the rule occurs as follows:
■Each authorization rule specified in the expression is evaluated from left to right.
The outcome is combined progressively with the previously evaluated rules.
■When the evaluation outcome is good enough to decide the overall policy
outcome without having to evaluate any more rules, evaluation stops and the
overall outcome is returned.
■Each evaluation outcome can be either True, False, or Inconclusive.
Authorization Success: In this case, the user succeeds in gaining access to the
requested resource. This result is associated with the Allow Access condition of
the expression.
Authorization Failure: In this case, the user fails to gain access to the requested
resource. This result is associated with the Deny Access condition of the
expression.
Authorization Inconclusive: In this case, the rules of the expression produce
conflicting results, and the user is denied access to the resource. If the match for
Identity, IP4 address, or timing condition fails then expression evaluation stops
and the result of the overall evaluation is deemed Inconclusive. However, based
on the other rules present in the expression, this result might not affect the overall
policy evaluation.
For example, the following expression:
(Rule1 AND Rule 2) OR (Rule 3 AND Rule 4)
Yields the following outcomes:
■Rule1 - INCONCLUSIVE
■Rule2 - FALSE
& The AND operator, which you use to form a compound condition which combines
authorization rules. Any number of rules can be combined using the AND operator to
implement the full scope of conditions a user must meet to satisfy the authorization
requirement. However, a user must satisfy the same kind of condition—either Allow
Access or Deny Access—of all of the rules of the AND compound condition for the
AND clause to produce a definitive result.
An authorization expression can contain more than one coupling or grouping of rules
combined using AND. For example, it may contain several AND clauses, one
connected to another by an OR operator.
| The AND operator. An authorization expression can include a complex rule
containing two or more alternative authorization conditions. Authorization rules
forming a complex condition are combined using the OR operator. Each of the
authorization rules specified by a complex OR condition stands on its own. Unlike
compound conditions using the AND operator, the user need qualify for the condition
of only one of the authorization rules connected by OR operators.
An authorization expression can contain as many authorization rules connected using
the OR operator as are required to express the authorization policy for the resources it
protects. You can use the OR operator to connect authorization rules all of which have
Deny Access conditions, all of which have Allow Access conditions, or which specify
a mix of Deny Access and Allow Access conditions. You can connect single rules to
single rules using OR, and you can connect a single rule to a clause containing rules
combined using AND.
Table 20–31 (Cont.) Operators for Expressions in Authorization Rules
Operator Description

Defining Authorization Policy Rules
Managing Policies to Protect Resources and Enable SSO 20-75
■Rule3 - TRUE
■Rule4 - TRUE
■Overall: TRUE (Allow)
The following sample expression uses (in order of type) Identity, Temporal, IP4Range,
and Attribute conditions:
(IsEMEAemployee & IsEMEAWorkingHours & !(ConnectedOverVPN |NotReadDisclaimer))
Condition names that include spaces, tabs, or special characters (if properly escaped
when defining the expression) are properly handled
20.13.3 Defining Rules in an Authorization Policy
Users with valid Administrator credentials can use the following procedure to add
rules to an authorization policy.
Prerequisites
Defining Authorization Policy Conditions.
To define authorization policy rules
1. Locate the desired domain as described in "Searching for an Authorization Policy".
2. Click the Rules tab.
3. Expression:
a. Click Expression as the Rule Mode.
b. In the Allow Rule Expression field, build your expression by entering
operators (Table 20–31) and choosing and inserting conditions (Table 20–30).
c. Click the Val ida te button to confirm your expression.
d. Repeat Steps b and c for the Deny Rule.
e. Click Apply.
4. Simple Rule Mode:
a. Click Simple as the Rule Mode.
b. Allow Rule:
Click to Match either:
All selected conditions
Any of the selected conditions
Using arrows for Allow (or Deny) Rule, move desired conditions from the
Available Conditions column into the Selected Conditions column.
Click Apply.
c. Repeat step b for the Deny Rule.
5. Click Apply and then close the Confirmation window.
6. Verify the rules by accessing the resource and evaluating the results.
See Also: "About Defining Rules in an Authorization Policy"

Validating Authentication and Authorization in an Application Domain
20-76 Administrator's Guide for Oracle Access Management
20.14 Validating Authentication and Authorization in an Application
Domain
The procedure here provides several methods for confirming that Agent registration
and authentication and authorization policies are operational. The procedures are
nearly identical for both OAM Agents and OSSO Agents (mod_osso). However, OSSO
Agents use only the authentication policy and not the authorization policy.
Prerequisites
■Users and groups who are granted access must exist in the primary LDAP User
Identity Store that is registered with Oracle Access Management
■Agents must be registered to operate with Access Manager. After registration,
protected resources should be accessible with proper authentication without
restarting the Administration or Managed Server.
■Application domain, authentication policies, and authorization policies must be
configured.
■Logout should be configured as described in Chapter 22, "Configuring Centralized
Logout for Sessions Involving 11g WebGates"
To verify authentication and access
1. Using a Web browser, enter the URL for an application protected by the registered
Agent to confirm that the login page appears (proving that the authentication
redirect URL was specified appropriately). For example:
http://exampleWebserverHost.example.com:8100/resource1.html
2. Confirm that you are redirected to the login page.
3. On the Sign In page, enter a valid username and password when asked, and click
Sign In.
4. Confirm that you are redirected to the resource and proceed as follows:
■Success: If you authenticated successfully and were granted access to the
resource; the configuration is working properly.
■Failure: If you received an error during login or were denied access to the
resource, check the following:
–Authentication Failed: Sign in again using valid credentials.
– Access to URL ... denied: This userID is not authorized to access this
resource.
– Resource not Available: Confirm that the resource is available.
– Wrong Redirect URL: Verify the redirect URL in the Oracle Access
Management Console.
20.15 Understanding Remote Policy and Application Domain
Management
Several remote management modes enable Administrators to update, or validate, or
delete an existing agent registration. This section provides the following topics:
See Also: Chapter 21, "Validating Connectivity and Policies Using
the Access Tester"

Understanding Remote Policy and Application Domain Management
Managing Policies to Protect Resources and Enable SSO 20-77
■About Managing Policies Remotely
■About the Create Policy Request Template
■About the Update Policy Request Template
■About Remote Policy Management and Templates
20.15.1 About Managing Policies Remotely
Access Manager provides two modes to manage Application Domains and their
policies without registering or modifying the companion agent. Remote policy and
Application Domain management supports only create and update functions. Remote
management does not support removing Application Domains or policies.
Table 20–32 describes these remote Application Domain management modes. Again,
command parameters include the mode, and an input
*Request.xml
file using a
relative path with respect to $OAM_REG_HOME, the preferred location for input
files):
./oamreg.sh <mode> <input_file> [prompt_flag] [component.oam.config_file] <mode>
value
Note: Application Domain removal is a manual task that must be
performed using the Oracle Access Management Console.
Table 20–32 Remote Policy Management Modes, Templates, and Flags
Mode and Template Description
policyCreate
$OAM_REG_HOME/input/
CreatePolicyRequest.xml
Allows Administrators to create Host Identifiers and an Application
Domain without registering an Agent.
./bin/oamreg.sh policyCreate input/myCreatePolicyRequest.xml
See Also: "About the Create Policy Request Template" on page 20-78
policyUpdate
$OAM_REG_HOME/input/
UpdatePolicyRequest.xml
Allows Administrators to update existing Host Identifiers and
Application Domain without updating an Agent.
./bin/oamreg.sh policyUpdate input/UpdatePolicyRequest.xml
See Also: "About the Update Policy Request Template" on page 20-79
Flag Optional
[prompt_flag] value: [-noprompt] When the optional -
noprompt
flag is used, oamreg can read input from
system.in by using echo and pipe to pass data.
Examples from $OAM_REG_HOME location:
(echo username; echo password; echo webgate_password;) |
./bin/oamreg.sh inband input/Request.xml -noprompt
component.oam.conf
(echo username; echo password; echo webgate_password; echo
httpscert_trust_prompt;) | ./bin/oamreg.sh inband
input/Request.xml -noprompt
(echo username; echo password; echo webgate_password; echo
cert_password;) | ./bin/oamreg.sh inband input/Request.xml
-noprompt
(echo username; echo password; echo webgate_password; echo
httpscert_trust_prompt; echo cert_password;) |
./bin/oamreg.sh inband input/Request.xml -noprompt

Understanding Remote Policy and Application Domain Management
20-78 Administrator's Guide for Oracle Access Management
20.15.2 About the Create Policy Request Template
The
CreatePolicyRequest.xml
file with the remote
policyCreate
mode allows
Administrators to create Host Identifiers and an Application Domain without creating
or updating an agent registration.
■Create a Host Identifier add multiple
hostPortVariations
(host port pairs).
■Create an Application Domain.
■Add multiple protected, public, and excluded resources. Resources can be with or
without query strings, both are supported.
■Create default authentication and authorization policies for the resources that do
not require customized policies.
Many of the same parameters are found in the
CreatePolicyRequest.xml
file and the
expanded (full) Agent registration templates discussed earlier.
CreatePolicyRequest.xml
provides elements for Authentication and Authorization
Policies and resources (with no <agentName> element).
Some parameters in the
CreatePolicyRequest.xml
file are new and not included in
the full agent registration XML files, while certain elements in the original agent
registration file are used to create or update. However, some elements are The primary
differences of
CreatePolicyRequest.xml
are specific to:
component.oam.config_file Optional. Remote registration accepts a configuration file with a URI
list as an argument. component.oam.config_file defines the full path to
a file containing any number of protected or public URIs. Ensure that
the file uses the following syntax and format:
■At least one protected URI is required
■Only one product family is allowed per file
■Comments begin with '#'
■Keyword 'public_uris': list public URIs on separate lines after this
key word.
■Keyword 'protected_uris': list URIs to be protected on separate
lines after this key word
Note: You can configure the authentication scheme for a policyusing
the following format (the policy name and authentication scheme
name must be separated by a Tab character):
<Policy Name> 'tab' <Authentication Scheme Name>
For example:
########################
protected_uris
########################
protected policy1 Basic Over LDAP
/finance/protected1/**
/finance/protected2/**
protected policy2 Client Certificate
/finance/protected3/*.js,*.png,*.gif
########################
public_uris
########################
/finance/public
/finance/test1/public
Table 20–32 (Cont.) Remote Policy Management Modes, Templates, and Flags
Mode and Template Description

Understanding Remote Policy and Application Domain Management
Managing Policies to Protect Resources and Enable SSO 20-79
■Elements for Authentication and Authorization Policies and resources are
provided
■No <agentName> element or related elements are provided
20.15.3 About the Update Policy Request Template
UpdatePolicyRequest.xml
and
CreatePolicyRequest.xml
are nearly identical. Both
provide the same elements, with the exception of the <
protectedAuthnScheme
>
element.
Using
UpdatePolicyRequest.xml
, Administrators can:
■Update a Host Identifier add multiple
hostPortVariations
(host port pairs)
■Update an Application Domain
■Add multiple protected, public, and excluded resources.(with or without query
strings).
■Update default authentication and authorization policies for the resources that do
not require customized policies
■Create customized policies that include:
■Policy display name
■Policy description
■Authentication scheme (Authentication policies only)
■A subset of resources to be associated with the policy
20.15.4 About Remote Policy Management and Templates
This section describes the unique remote management elements for Application
Domain management found in the
CreatePolicyRequest.xml
and
UpdatePolicyRequest.xml
files. These elements are described in Table 20–33.
See Also: "About Remote Policy Management and Templates" on
page 20-79
See Also: "About Remote Policy Management and Templates" on
page 20-79
See Also: Table 16–8, " Common Elements in Remote Registration
Requests" for a description of elements common to remote registration
and remote management.

Understanding Remote Policy and Application Domain Management
20-80 Administrator's Guide for Oracle Access Management
Table 20–33 Remote Management Template Elements
Element Description Example
<rregAuthenticationPolicies>
<rregAuthenticationPolicy>
Specifies the name and description for
the Authentication Policy (to use when
creating a new policy or updating an
existing policy).
<rregAuthenticationPolicies>
<rregAuthenticationPolicy>
<name>AuthenticationPolicy1</name>
<description>Authentication policy
created using policyUpdate mode of
rreg tool</description>
.
.
</rregAuthenticationPolicy>
</rregAuthenticationPolicies>
<authnSchemeName>
Specifies the Authentication Scheme to
use in the Authentication Policy.
<rregAuthenticationPolicies>
.
.
authnSchemeName>LDAPScheme
</authnSchemeName>
.
.
</rregAuthenticationPolicy>
</rregAuthenticationPolicies>
<uriList> Identifies a resource that requires
authentication using the policy.
<rregAuthenticationPolicies>
.
.
<uriList>
- <uriResource>
<uri>/res1</uri>
<queryString />
</uriResource>
</uriList>
.
.
</rregAuthenticationPolicy>
</rregAuthenticationPolicies>
<rregAuthorizationPolicies>
<rregAuthorizationPolicy>
Specifies the name and description for
the Authorization Policy (to use when
creating it anew or updating an existing
policy).
<rregAuthorizationPolicies>
<rregAuthorizationPolicy>
<name>AuthorizationPolicy1</name>
<description>Authorization policy
created using policyUpdate mode of
rreg tool</description>
.
.
</rregAuthorizationPolicy>
</rregAuthorizationPolicies>
<uriList> Identifies a resource that requires
Authorization using the Authorization
Policy.
<rregAuthorizationPolicies>
.
.
<uriList>
- <uriResource>
<uri>/res1</uri>
<queryString />
</uriResource>
</uriList>
.
.
</rregAuthorizationPolicy>
</rregAuthorizationPolicies>

Defining an Application
Managing Policies to Protect Resources and Enable SSO 20-81
20.16 Managing Policies and Application Domains Remotely
The following procedure describes how Administrators can create or update existing
policies remotely, without revising an agent's registration.
Prerequisites
Review About Managing Policies Remotely
To managing policies or an Application Domain remotely without an Agent
1. Set up the registration tool as described in, "Acquiring and Setting Up the Remote
Registration Tool" on page 16-32.
2. Copy the appropriate request template and develop your own policy-management
request (including any Application Domain revisions needed):
■Create Policy Request File
■Update Policy Request File
3. On the Agent host, run the following command with the appropriate mode and
your own *Request*.xml input file. For example:
policyCreate Mode:
./bin/oamreg.sh policyCreate input/myCreatePolicyRequest.xml
policyUpdate Mode:
./bin/oamreg.sh policyUpdate input/myUpdatePolicyRequest.xml
4. Provide the registration Administrator user name and password when asked.
5. Confirm success by reading on-screen messages, then use the Oracle Access
Management Console to manage the domain and policies:
agentUpdate process completed successfully!
Native Configuration File Location: "... created in output folder ...
"
The output folder is in the same location where RREG.tar.gz was expanded:
.../rreg/output/AgentName/
20.17 Defining an Application
Application is a new concept introduced in PS2. An Application contains:
■launch-url (that will be used by the end user of the application)
■icons, description and other meta-data that is used to display it in the Access
Portal (which is user facing)
The following Application types are supported:
■SSO Agent Application (protected by a WebGate)
■Federation Service Provider Partner Application (through Federation, launch a
third-party partner application)
■Form-Fill Application (Access Portal Application template based application)
The Application should have the configuration required to SSO enable it. However, for
PS2, only Form-Fill application and Federation SP applications have their
configuration in the Application. SSO applications have only the launch URL.
Additional functionality will be added in subsequent releases.

Defining an Application
20-82 Administrator's Guide for Oracle Access Management
Note: Application registration will work only if ESSO is configured
and enabled. In order to register an Application, an ESSO IDS Profile
must be created because the Application's policy information is stored
in the ESSO directory store.

21
Validating Connectivity and Policies Using the Access Tester 21-1
21
Validating Connectivity and Policies Using the
Access Tester
Oracle provides a portable, stand-alone Java application, Access Tester, which
simulates registered Agents connecting to OAM Servers. The scripted execution allows
for command-line processing. You can record and playback scripts and capture output
for different functions. Encrypted and multiple-server connections are supported.
IT professionals and Administrators can use the Access Tester to troubleshoot agent to
server connections in addition to on-the-fly testing of request and response semantics
and access policy designs.
This chapter introduces the Access Tester and how to use it in the following sections:
■Prerequisites
■Introduction to the Access Tester for Access Manager 11g
■Installing and Starting the Access Tester
■Introduction to the Access Tester Console and Navigation
■Testing Connectivity and Policies from the Access Tester Console
■Creating and Managing Test Cases and Scripts
■Evaluating Scripts, Log File, and Statistics
21.1 Prerequisites
Before you can perform tasks in this chapter:
■Ensure that the Oracle Access Management Console and OAM Server are running.
■Confirm the Application Domain and policies for one or more resources, as
described in Chapter 20.
21.2 Introduction to the Access Tester for Access Manager 11g
The Access Tester is a portable, stand-alone Java application that ships with Access
Manager 11g. The Access Tester provides a functional interface between an individual
IT professional or Administrator and the OAM Server.
IT professionals can use the Access Tester to verify connectivity and troubleshoot
problems with the physical deployment. Application Administrators can use the
Access Tester to perform a quick validation of policies. In this chapter, the term
"Administrator" represents any individual who is using the Access Tester.

Introduction to the Access Tester for Access Manager 11g
21-2 Administrator's Guide for Oracle Access Management
The Access Tester can be used from any computer having a network connection to the
OAM Server. Both a graphical user interface (known as the Tester Console in this
chapter) and a command-line interface are provided. Command line mode enables
complete automation of test script execution in single or multi-client mode
environments.
By appearing to be a real agent, the Access Tester helps with policy configuration
design and troubleshooting, and sometimes with troubleshooting OAM Server
responsiveness. When using the Access Tester, you must appear to be the real end
user; the Access Tester does not actually communicate with a real end user.
To use the Access Tester, you must understand and administer authentication and
authorization policies for an application or resource that is protected by Access
Manager.
The Access Tester enables you to:
■Configure a request to be sent to the OAM Server that emulates what a real agent
would send to the OAM Server in a real environment.
■Send your request to the OAM Server and receives a response that is the same as
the response that would received by a real Agent. The Access Tester uses the OAM
Access Protocol (OAP) API to send requests over the OAP channel to the OAM
Proxy running as part of the OAM Server. The OAM Server processes the request
and returns a response.
■Process and display the server response.
■Proceed in the manner a real agent would to handle the response. For example, if a
Webgate determines that a resource is protected by a certificate authentication
scheme, then it must obtain the end user's certificate from the http SSL connection.
In the case of a certificate authentication scheme, you must point the Access Tester
to a certificate to be used as the end user's credentials.
In addition to simulating the Agent while performing functions in the previous list,
the Access Tester enables you to:
■Review performance characteristics of intended policy changes
■Track the latency of authentication and authorization requests
■Stress test the OAM Server to establish low- and high-performance watermarks
relative to desired user loads, and to size back-end hardware
■Stress test the policy server by running multiple concurrent tests (multi-threaded
mode) with command-line mode only.
■Establish performance metrics and measuring on an ongoing basis to prove
desired outcomes
During basic operations, the Access Tester does not make any determination about the
Server response and whether it is a right or wrong response (for instance, whether or
not resource X is protected, or user Y is authorized to access resource X). When
operating the Access Tester, you must be aware of the policy configuration to
determine if a specific response is appropriate.
The Access Tester offers advanced functionality that enables you to group a number of
individual requests into a test script that can be sent to the OAM Server for processing.
The output of such a test run can be captured by the Access Tester and used to
compare against a similar document containing "known good" responses. In this way,
the Access Tester can be used for automated testing of policy configuration against
errant changes.

Introduction to the Access Tester for Access Manager 11g
Validating Connectivity and Policies Using the Access Tester 21-3
Additionally, the Access Tester provides a multi-threaded capability designed to stress
test the policy server. In the multi-threaded approach, you identify the number of
virtual test clients to connect to the policy server and the number of iterations that
each virtual client should execute a test script. This enables you to stress test the policy
server.
For more information, see the following topics in this chapter:
■About OAM Agent and Server Interoperability
■About Access Tester Security and Processing
■About Access Tester Modes and Administrator Interactions
21.2.1 About OAM Agent and Server Interoperability
The two primary types of actors in the OAM architecture are the policy servers (OAM
Servers) and OAM policy enforcement agents (Webgates or Access Clients). In the
security world, Agents represent the policy enforcement point (PEP), while OAM
Servers represent the policy decision point (PDP):
■The Agent plays the role of a gatekeeper to secure resources such as http-based
applications and manage all interactions with the user who is trying to access that
resource. This is accomplished according to access control policies maintained on
the policy server (OAM Server).
■The role of the OAM Server is to provide policy, identity, and session services to
the Agent to properly secure application resources, authenticate and authorize
users, and manage user sessions.
This core OAM product architecture revolves around the following exchanges, which
drive the interaction between the Agent and OAM Server. To expose inter-operability
and the key decision points, Figure 21–1 illustrates a typical OAM Agent and OAM
Server interaction during a user's request for a resource.
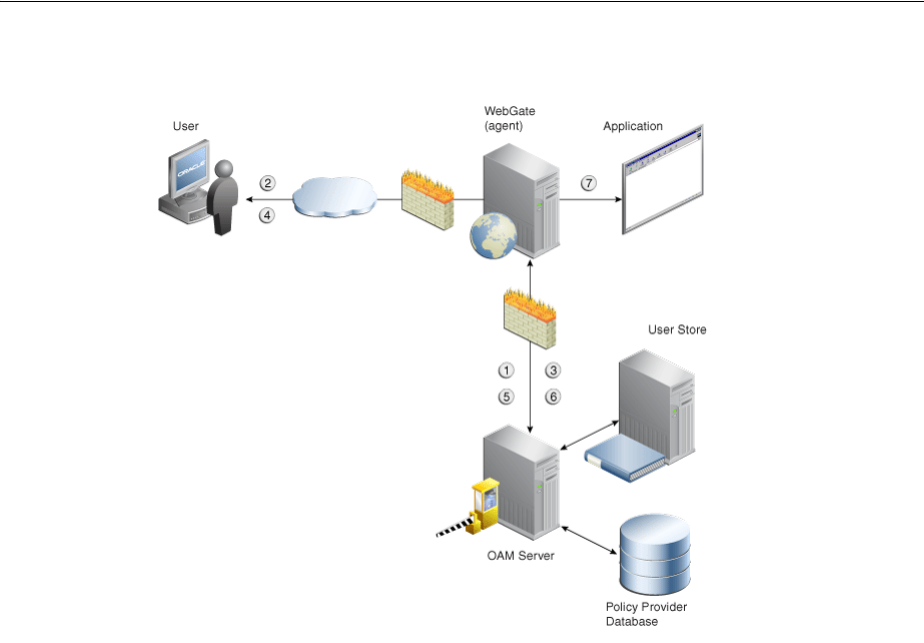
Introduction to the Access Tester for Access Manager 11g
21-4 Administrator's Guide for Oracle Access Management
Figure 21–1 OAM Agent (PEP) and OAM Server (PDP) Inter-operability
The following overview outlines the processing that occurs between OAM Agents and
OAM Servers. During testing, the Access Tester emulates the Agent and communicates
with the OAM Server while the Administrator emulates the end user.
Process overview: Interoperability between OAM Agents and OAM Servers
1. Establish server connectivity: The registered OAM Agent connects to the OAM
Server.
2. The user requests accesses to a resource.
3. Validate resource protection: The Agent forwards the request to the OAM Server
to determine if the resource is protected.
Protected: The OAM Server responds with the type of credentials required.
4. User credentials: Establishing the user identity enables tracking for Audit and SSO
purposes, and conveyance to the application. For this, the Agent prompts the user
for his credentials.
5. Authenticate user credentials: The Agent forwards the supplied user credentials to
the OAM Server for validation.
Authentication Success: The Agent forwards the resource request to the OAM
Server.
6. Authorize user access to a resource: The Agents must first determine if the user is
allowed to access the resource by forwarding the request for access to the OAM
Server for authorization policy evaluation.
7. The Agent grants or denies access based on the policy response.

Introduction to the Access Tester for Access Manager 11g
Validating Connectivity and Policies Using the Access Tester 21-5
21.2.2 About Access Tester Security and Processing
This topic provides information about secure communications, connections, storage,
input, logging, and Analysis.
Secure Communication: The Access Tester supports Open, Simple, or Cert connection
modes for communication with the OAM Server:
■Open mode: No security on the physical connection
■Simple mode: The physical connection is encrypted using built-in certificates. With
Simple mode, you are asked to enter the Global Pass Phrase that is configured for
the OAM Server.
■Cert mode: The physical connection is encrypted using a field-provided
certificates. Access Tester Cert Mode requires:
–Configuring the agent (either existing or new) for Cert mode communication.
–Obtaining certificates for the agent being emulated.
Access Tester Cert Mode requires two JKS key stores, created using the importcert tool
from the supplied PEM (BASE64-encoded ASCII) certificates: aaa_trust.pem, aaa_
key.pem, aaa_cert.pem:
■A Trust Store (file containing the JKS key store with the root CA certificate) is
required.
■A Key Store (file containing the JKS key store with the agent's private key and
certificate) is required.
■A Key Store Password is used to encrypt the Key Store with the agent certificates.
Connections: The Access Tester encrypts all password-type values that it saves to
configuration files and test cases. Access Tester validates whether the pool contains
valid connections. Cache flush requests are sent over an established connection (not an
out-of-band connection to delete the user session (to simulate logout) over OAP. Using
an already established connection can improve performance.
Persistent Storage: The Access Tester manages a number of data structures that
require persistent storage between Access Tester invocations. XML-file-based storage
is provided for the following types of information:
■Configuration data to minimize data entry between invocations of the application
(OamTestConfiguration)
■Test scripts consisting of captured test cases (OamTestScriptCase)
■Statistical data representing execution metric from a test run (OamTestStats)
XML Files for Input, Logging, and Analysis: The Access Tester uses a single XML
schema to define all the XML documents it generates. The following XML files are
produced when you run the Access Tester to process test scripts:
■Configuration Script: config.xml is the output file generated using the Save
Configuration command within the Access Tester. The name of this document is
See Also:
■Appendix C, "Securing Communication" for details about Simple
and Cert mode configuration for OAM Server and clients
(Webgates)
■"Introduction to the Access Tester Console and Navigation" on
page 21-12

Introduction to the Access Tester for Access Manager 11g
21-6 Administrator's Guide for Oracle Access Management
used within the input script to provide proper connection information to the
Access Tester running in command line mode. For details, see "About the Saved
Connection Configuration File" on page 21-33.
■Input Script: script.xml represents a script that is generated by the Access Tester
after capturing one or more test cases. For details, see "About the Generated Input
Test Script" on page 21-33.
■Target Output Script: oamtest_target.xml is generated by running the Access
Tester in command line mode and specifying the input script. For details, see
"About the Target Output File Containing Test Run Results" on page 21-35. For
example:
-Dscript.scriptfile="script.xml" -jar oamtest.jar
■Statistics: oamtest_stats.xml is generated together with the output script. For
details, see "About the Statistics Document" on page 21-37.
■Execution Log: lamtest_log.log is generated together with the output script. For
details, see "About the Execution Log" on page 21-39.
For more information, see "About Access Tester Modes and Administrator
Interactions".
21.2.3 About Access Tester Modes and Administrator Interactions
This topic describes modes, interactions, and the jar files needed to start and run the
Access Tester.
Console: The Access Tester provides a single window for interactions with the user.
All Access Tester operations are available in the main window, which performs as a
central dashboard where users can submit specific details for the test case and view
responses.
Command Line and Scripts: You can use the Access Tester command line and develop
test scripts, which you can run interactively or in batches for computerized execution
to maximize productivity and minimize costs and resources.
Startup and Run Time JAR Files: The Access Tester requires nap-api.jar in the same
directory as the main jar oamtest.jar, which is used to start the application.
Interactions: Regardless of the mode you choose for running the Access Tester, your
primary interactions with the Access Tester include:
■Issuing Requests and Reviewing Results
You use the Access Tester to issue requests to the OAM Server to validate resource
protection, policy configuration, user authentication, and user authorization. You
can immediately analyze test case results and also retain the data for longer-term
analysis, if needed.
■Managing Test Scripts
You can build test scripts by capturing the data generated by test execution, which
is available as stand-alone documents. You can run the test script for manual or
automated analysis. The Access Tester provides for some automated analysis after
each test run, while collecting full set of statistics to enable analysis after the fact.
■Managing OAM Server Connectivity
You can manage application settings that include server connection information.
Figure 21–2 depicts the flow of information during operations in both Console and
command-line modes. Details follow the figure. Advanced operations include building
and executing test scripts.
Introduction to the Access Tester for Access Manager 11g
Validating Connectivity and Policies Using the Access Tester 21-7
Figure 21–2 User Interactions with the Access Tester
Table 21–1 describes the process flow of information during both Tester Console mode
operations and command-line mode operations.
Note: Command-line mode enables complete automation of test
script execution in single or multi-client mode environments. The
Access Tester exposes a control mechanism to configure test runs
without having to change "known good" input test scripts which are
available in read-only mode.
Table 21–1 User Interactions: Tester Console Mode versus Command Line Mode Operations
Tester Console mode Command Line Mode
The user starts the Access Tester from the command line. The user or a shell script starts the Access Tester in command
line mode.
Cert mode for secure communication: The keystores are
specified in the OamTestConfiguration.xml file containing
previously saved configuration information.
The user opens a previously saved OamTestConfiguration.xml
file to populate the application fields and minimize data entry,
including server connection fields. Alternatively, the user can
use the Tester Console and enter data manually
The Access Tester starts processing test cases based on the
input script.
The user clicks the Connect button to open the connection with
the OAM Server.
The Access Tester opens a connection with the OAM Server
based on details in the input script.
Resource Protection: The user performs steps in a sequence to
validate resource protection, authenticate user credentials, and
authorize user access.
Resource Protection: The Access Tester starts processing test
cases based on the input script.

Installing and Starting the Access Tester
21-8 Administrator's Guide for Oracle Access Management
The following overview outlines the tasks involved with using the Access Tester, and
the topics where more information can be found in this chapter.
Task overview: Testing Access Manager connections and policies
1. Review the following topics:
■Installing and Starting the Access Tester
■Introduction to the Access Tester Console and Navigation
2. Perform and capture tests using the Access Tester Console as described in "Testing
Connectivity and Policies from the Access Tester Console"
3. Proceed to "Creating and Managing Test Cases and Scripts"
21.3 Installing and Starting the Access Tester
The Access Tester consists of two jar files that can be used from any computer, either
within or outside the WebLogic Server domain. This section describes how to install
the Access Tester, which involves copying the Access Tester jar files to a computer
from which you want to run tests. The Access Tester must be started from a command
line regardless of the mode you choose for test input: Tester Console mode or
command line mode. This section is divided into the following topics:
■Installing the Access Tester
■About Access Tester Supported System Properties
■Starting the Tester Without System Properties For Use in Tester Console Mode
■Starting the Access Tester with System Properties For Use in Command Line Mode
21.3.1 Installing the Access Tester
This topic describes how to install the Access Tester for use on any computer.
Following installation, the Access Tester is ready to use. No additional setup is
required.
To install the Access Tester
1. Ensure that the computer from which the tester will be run includes JDK/JRE 6.
For example, you can test for Java as follows:
java -version
The previous command returns the following information:
java version "1.6.0_18"
When the test completes, the Access Tester generates:
■A script with results
■A file with execution statistics including information
about mismatched responses
■A log file detailing processing flow
Once the script completes, the Access Tester generates:
■A script with results
■A file with execution statistics including information
about mismatched responses
■A log file detailing processing flow
The user repeats steps as needed to complete validation The user repeats steps as needed to complete validation.
In Cert mode, you will be prompted to identify the necessary
keystores.
In Cert mode, the keystores are specified in the XML file
containing previously saved configuration information.
Table 21–1 (Cont.) User Interactions: Tester Console Mode versus Command Line Mode Operations
Tester Console mode Command Line Mode

Installing and Starting the Access Tester
Validating Connectivity and Policies Using the Access Tester 21-9
Java(TM) SE Runtime Environment (build 1.6.0_18-b07)
Java HotSpot(TM) Client VM (build 16.0-b13, mixed mode)
2. On a computer hosting the OAM Server, locate and copy the Access Tester Jar files.
For example:
$ORACLE_HOME/oam/server/tester/oamtest.jar
$ORACLE_HOME/oam/server/tester/nap-api.jar
3. Store the jar file copies together in the same directory on any computer from
which you want to run the Access Tester.
4. Cert Mode: If the OAM Server communication mode is Cert, ensure that the
computer from which you will run the Access Tester includes the same keystores
that are defined on the agent registration page of the Oracle Access Management
Console. See Chapter 15.
5. Proceed as follows, depending on your environment and requirements:
■Starting the Tester Without System Properties For Use in Tester Console Mode
enables you to manually drive requests.
■Starting the Access Tester with System Properties For Use in Command Line
Mode
■Executing a Test Script enables you to use a test script that has been created
against a "Known Good" policy configuration and marked as "Known Good"
21.3.2 About Access Tester Supported System Properties
The Access Tester supports a number of configuration options that are used for
presentation or during certain aspects of testing. These options are specified at startup
using the Java-D mechanism, as shown in Table 21–2, which describes all supported
system properties.
Table 21–2 Access Tester Supported System Properties
Property
Access Tester
Mode Description and Command Syntax
log.traceconnfile Tester Console and
Command Line
modes
Logs connection details to the specified file
name.
-Dlog.traceconnfile="<file-name>"
display.fontname Tester Console
mode
Starts the Access Tester with the specified font.
This could be useful in compensating for
differences in display resolution.
- Ddisplay.fontname ="<font-name>"
display.fontsize Tester Console
mode
Starts the Access Tester with the specified font
size. This could be useful in compensating for
differences in display resolution.
- Ddisplay.fontsize ="<font-size>"
display.usesystem Tester Console
mode
Starts the Access Tester with the default font
name and size (Dialog font, size 10).
- Ddisplay.usesystem
script.scriptfile Command Line
mode
Runs the script <file-name> in command line
mode.
-Dscript.scriptfile="<file-name>"

Installing and Starting the Access Tester
21-10 Administrator's Guide for Oracle Access Management
21.3.3 Starting the Tester Without System Properties For Use in Tester Console Mode
To manually drive (and capture) requests and view real-time response through the
graphical user interface, start the tester in Tester Console mode. This procedure omits
all system properties, even though several can be used with Tester Console mode.
The jar file defines the class to be started by default; no class name need be specified.
Ensure that the nap-api.jar is present in the same directory as oamtest.jar.
control.configfile Command Line
mode
Overwrites script's "configfile" attribute
containing the absolute path to the
configuration XML file with the connection
information. The Access Tester uses the
configuration file to establish a connection to
the Policy Server indicated by Connection
element.
-Dcontrol.config="<file-name>"
control.testname Command Line
mode
Overwrites script's "testname" attribute of the
Control element containing a string
representing a name of the test series to be used
in naming output script, stats, and log files.
Output log files begin with <testname>_
<testnumber>.
-Dcontrol.testname="<String>"
control.testnumber Command Line
mode
Specifies the control number to be used in
naming output script, stats, and log files.
Output log files begin with <testname>_
<testnumber>.
-Dcontrol.testnumber="<String>".
Although the auto generated string is a 7 digit
number based on current local time (2 character
minutes + 2 character seconds + 3 character
hundredths), any string can be used to denote
the control number as long as it can be used in
a filename.
control.ignorecontent Command Line
mode
Overwrites script's "ignorecontent" attribute of
the Control element indicating the Access
Tester should ignore differences in Content
between the original test case and current
results.
-Dcontrol.testname="true|false"
control.displayiteration
stats
Command Line
mode
Controls whether or not to display intermediate
statistics after each iteration of the test run.
-Dcontrol.displayiterationstats="true|false"
control.loopback Command Line
mode
Runs the Access Tester in loopback mode to test
the Access Tester for internal regressions
against a known good script. Used for unit
testing the Access Tester.
-Dcontrol.loopback="true"
Table 21–2 (Cont.) Access Tester Supported System Properties
Property
Access Tester
Mode Description and Command Syntax

Installing and Starting the Access Tester
Validating Connectivity and Policies Using the Access Tester 21-11
To start the Access Tester in console mode without system properties
1. From the directory containing the Access Tester jar files, enter the following
command:
java -jar oamtest.jar
2. Use the -help option to list all the options available for the oamtest command-line
tool.
java -jar oamtest.jar -help
3. Proceed to one of the following topics for more information:
■Introduction to the Access Tester Console and Navigation
■Testing Connectivity and Policies from the Access Tester Console
■Creating and Managing Test Cases and Scripts
21.3.4 Starting the Access Tester with System Properties For Use in Command Line
Mode
This section is divided into the following topics:
■About the Access Tester Command Line Mode
■Starting the Tester Without System Properties For Use in Tester Console Mode
21.3.4.1 About the Access Tester Command Line Mode
To run a test script, or to customize Access Tester operations, you must start the tester
in command line mode and include system properties using the Java -D option.
When running in command line mode, the Access Tester returns completion codes that
can be used by shell scripts to manage test runs. When you run the Access Tester in
Console mode, you do not need to act upon codes that might be returned by the
Access Tester.
Shell scripts that wrap the Access Tester to execute specific test cases must be able to
recognize and act upon exit codes communicated by the Access Tester. In command
line mode, the Access Tester exits using System.Exit (N), where N can be one of the
following codes:
■0 indicates successful completion of all test cases with no mismatches. This also
includes a situation where no test cases are defined in the input script.
■3 indicates successful completion of all test cases with at least one mismatch.
■1 indicates that an error prevented the Access Tester from running or completing
test cases. This includes conditions such as No input script specified, Unable to
read the input script, Unable to establish server connection, Unable to generate the
target script.
See Also:
■"About Access Tester Supported System Properties"
■"Starting the Access Tester with System Properties For Use in
Command Line Mode"
See Also: "About Access Tester Supported System Properties" on
page 21-9

Introduction to the Access Tester Console and Navigation
21-12 Administrator's Guide for Oracle Access Management
These exit codes can be picked up by shell scripts ($? In Bourne shell) designed to
drive the Access Tester to execute specific test cases.
21.3.4.2 Starting the Access Tester with System Properties
Use the following procedure to start the Access Tester in command line mode and
specify any number of configuration options using the Java-D mechanism.
To start the Access Tester with system properties or for use in command line
mode
1. From the directory containing the Access Tester jar files, enter the command with
the appropriate system properties for your environment. For example:
java -Dscript.scriptfile="\tests\script.xml" -Dcontrol.ignorecontent="true"
-jar oamtest.jar
2. After startup, proceed to one of the following topics for more information:
■Testing Connectivity and Policies from the Access Tester Console
■Creating and Managing Test Cases and Scripts
21.4 Introduction to the Access Tester Console and Navigation
This section introduces the Access Tester Console, navigation, and controls.
Figure 21–3 shows the fixed-size Access Tester Console. This is the window through
which users can interact with the application if the Access Tester is started in Console
mode. The window can not be resized. Details follow the screen.
See Also: "About Access Tester Supported System Properties" on
page 21-9
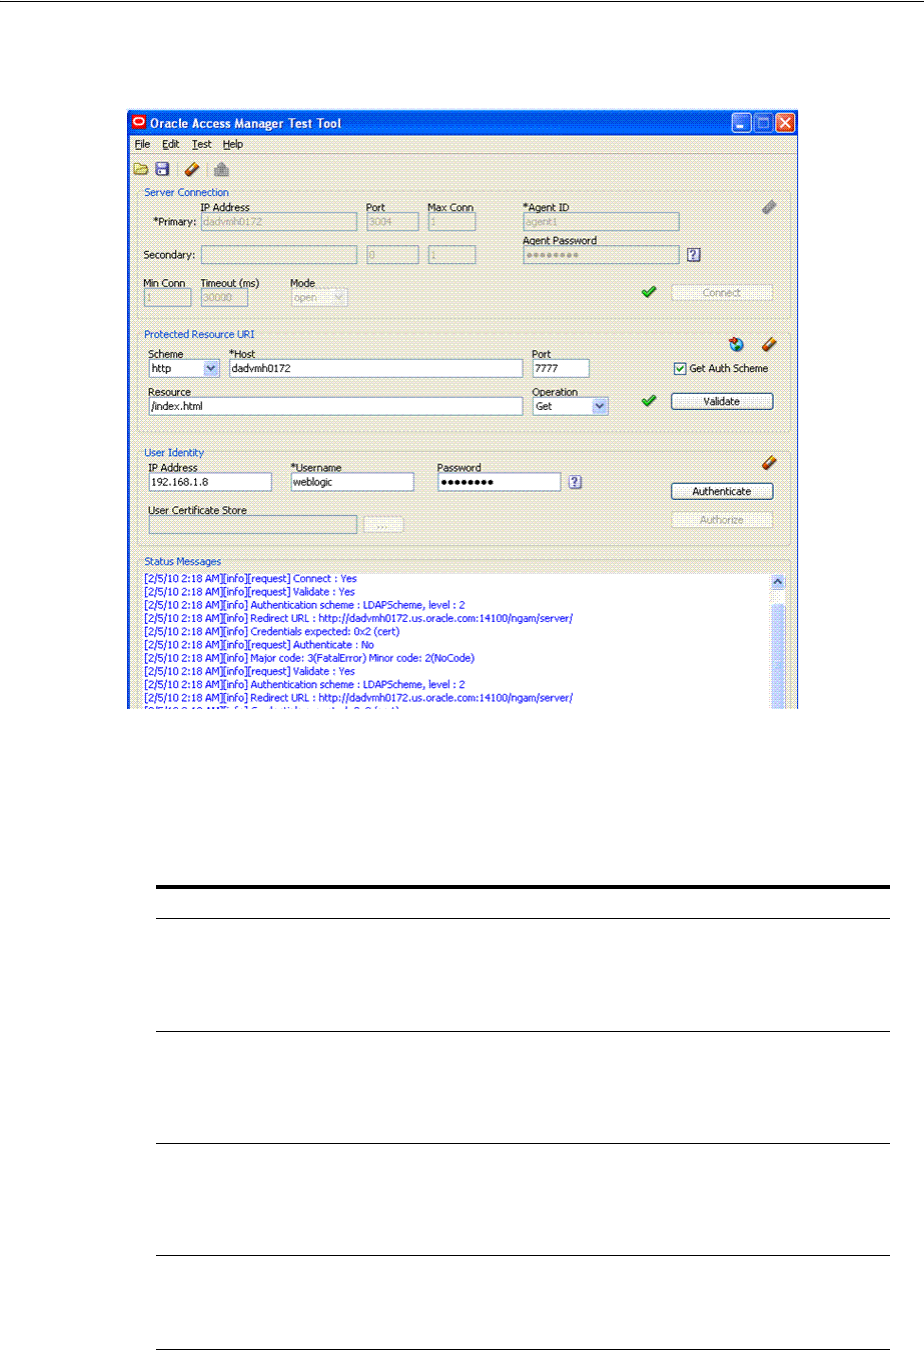
Introduction to the Access Tester Console and Navigation
Validating Connectivity and Policies Using the Access Tester 21-13
Figure 21–3 Access Tester Console
At the top of the main window are the menu names within a menu bar. Under the
menu bar is the tool bar. All of the commands represented by buttons in the tool bar
are also available as menu commands.The Access Tester Console is divided into four
panels, described in Table 21–3.
Table 21–3 Access Tester Console Panels
Panel Name Description
Server Connection Provides fields for the information required to establish a connection to
the OAM Server (a single primary server and a single secondary server),
and the Connect button:
See also: "Establishing a Connection Between the Access Tester and the
OAM Server" on page 21-16.
Protected Resource URI Provides information about a resource whose protected status needs to
be validated. The Validate button is used to submit the Validate Resource
server request.
See also: "Validating Resource Protection from the Access Tester
Console" on page 21-19.
User Identity Provides information about a user whose credentials need to be
authenticated. The Authenticate button is used to submit the
Authenticate User server request.
See also: "Testing User Authentication from the Access Tester Console"
on page 21-21.
Status Messages Provides a scrollable status message area containing messages displayed
by the application in response to user gestures. The Authorize button is
used to submit the Authorize User server request.
See also: "Observing Request Latency" on page 21-24.
Introduction to the Access Tester Console and Navigation
21-14 Administrator's Guide for Oracle Access Management
Text fields support right-clicking to display the Edit menu and drag-and-drop
operations using the mouse and cursor.
There are four primary buttons through which you submit test requests to the OAM
Server. Each button acts as a trigger to initiate the named action described in
Table 21–4.
21.4.1 Access Tester Menus and Command Buttons
Table 21–5 identifies additional Access Tester Console buttons and their use. All
command buttons provide a tip when the cursor is on the button.
Table 21–4 Command Buttons in Access Tester Panels
Panel Button Description
Connect Submits connection information and initiates connecting.
Validate Submits information provided in the Protected Resource URI panel and initiates
validation of protection.
Authenticate Submits information provided in the User Identity panel and initiates
authentication confirmation.
Authorize Submits information provided in the User Identity panel and initiates
authorization confirmation.
See Also: "Access Tester Menus and Command Buttons"
Table 21–5 Additional Access Tester Buttons
Command Buttons Description
Loads connection configuration details that were saved to an XML file
(config.xml, by default).
You can refresh the information in the Console by clicking this button.
Saves connection configuration details to a file (default name,
config.xml). You can add the name of this document to the input script
to provide proper connection information to the Access Tester running
in command line mode.
The Save command button at the bottom of the Console saves the
content of the Status Message panel to a log file.
Clears fields on a panel containing the icon. Tool bar action clears all
fields except connection fields if the connection has already been
established.
Captures the last named request to the capture queue with the
corresponding response received from the OAM Server. Together, the
request and response create a test case.
The capture queue status at the bottom of the Console is updated to
reflect the number of test cases in the queue.
You can save the contents of the capture queue to create a test script
containing multiple test cases using the Generate Script command on
the Test menu or a command button.
Generates a test script that includes every test case currently in the
capture queue, and asks if the queue should be cleared. Do not clear
the queue until all your test cases have been captured and saved to a
test script.
Runs a test script against the current OAM Server. The Status message
window is populated with the execution status as the script
progresses through each test case.
Testing Connectivity and Policies from the Access Tester Console
Validating Connectivity and Policies Using the Access Tester 21-15
The Access Tester provides the menus described in Table 21–6. All menu items have
mnemonics that are exposed by holding down the ALT key (on Windows systems).
There are also command accelerators (keyboard activation) available using the
CTRL-<KEY> combination defined for each menu command.
21.5 Testing Connectivity and Policies from the Access Tester Console
This section describes how to perform quick spot checks using the Access Tester in
Console mode with OAM Servers.
Spot checks or troubleshooting connections between the Agent and OAM Server can
help you assess whether the Agent can communicate with the OAM Server, which is
especially helpful after an upgrade or product migration. Spot checks or
troubleshooting resource protection that can be exercised by Agents and OAM Servers
can help you develop end-to-end tests of policy configuration during the application
lifecycle.
The following overview identifies the tasks and sequence to be performed and where
to locate additional information about each task.
Imports a copied URI from the clipboard after parsing it to populate
fields in the URI panel.
Displays a dialog showing the password in clear text
Table 21–6 Access Tester Menus
Menu Title Menu Commands
File ■Open Configuration
■Save Configuration
■Exit
Note: To minimize the amount of data entry the Save Configuration and Open
Configuration menu (and tool bar command buttons) allow for specific Connection,
URI, and Identity information to be saved to (and read from) a file. Thus, it becomes
fairly simple to manage multiple configurations. Also, the configuration file can be
used as input to the Access Tester when you run it in command line mode and execute
a test script.
Edit Provides standard editing commands, which act on fields:
■Cut
■Copy
■Paste
■Clear all fields
■Import URI fields from a saved URL
Test ■Capture last "..." request (for example, Capture last "authorize" request)
■Save test script
■Run test script
Note: You can use functions here to capture the last request and response to create a
test case that you can save to a test script to be run at a later time.
Help The command About, which displays usage information.
Table 21–5 (Cont.) Additional Access Tester Buttons
Command Buttons Description

Testing Connectivity and Policies from the Access Tester Console
21-16 Administrator's Guide for Oracle Access Management
Task overview: Performing spot checks from the Access Tester Console
1. Start the Access Tester, as described in "Installing and Starting the Access Tester"
on page 21-8.
2. Add relevant details to the Server Connection panel and click Connect, as
described in "Establishing a Connection Between the Access Tester and the OAM
Server" on page 21-16.
3. Enter or import details into the Protected Resource URI pane and click Validate, as
described in "Validating Resource Protection from the Access Tester Console" on
page 21-19.
4. Add relevant details to the User Identity panel and click Authenticate, as
described in "Testing User Authentication from the Access Tester Console" on
page 21-21.
5. After successful authentication, click Authorize in the User Identity panel, as
described in "Testing User Authorization from the Access Tester Console" on
page 21-23.
6. Check the latency of requests, as described in "Observing Request Latency" on
page 21-24.
21.5.1 Establishing a Connection Between the Access Tester and the OAM Server
Before you can send a request to the OAM Server you must establish a connection
between the Access Tester and the server. This section describes how to establish that
connectivity.
■About the Connection Panel
■Connecting the Access Tester with the OAM Server
21.5.1.1 About the Connection Panel
You enter required information for the OAM Server and the Agent you are emulating
in the Access Tester Connection panel and then click the Connect button. The Tester
initiates the connection, and displays the status in the Status Messages panel. Once the
connection is established, it is used for all further operations.
Figure 21–4 illustrates the Server Connection panel and controls. This panel contains
information needed to establish a connection to the OAM Server's Proxy port.
Note: You can capture each request and response pair to create a test
case, and save the test cases to a script file that can be run later. For
details, see "Creating and Managing Test Cases and Scripts" on
page 21-25.
Caution: Once the connection is established, it cannot be changed
until you restart the Access Tester Console.
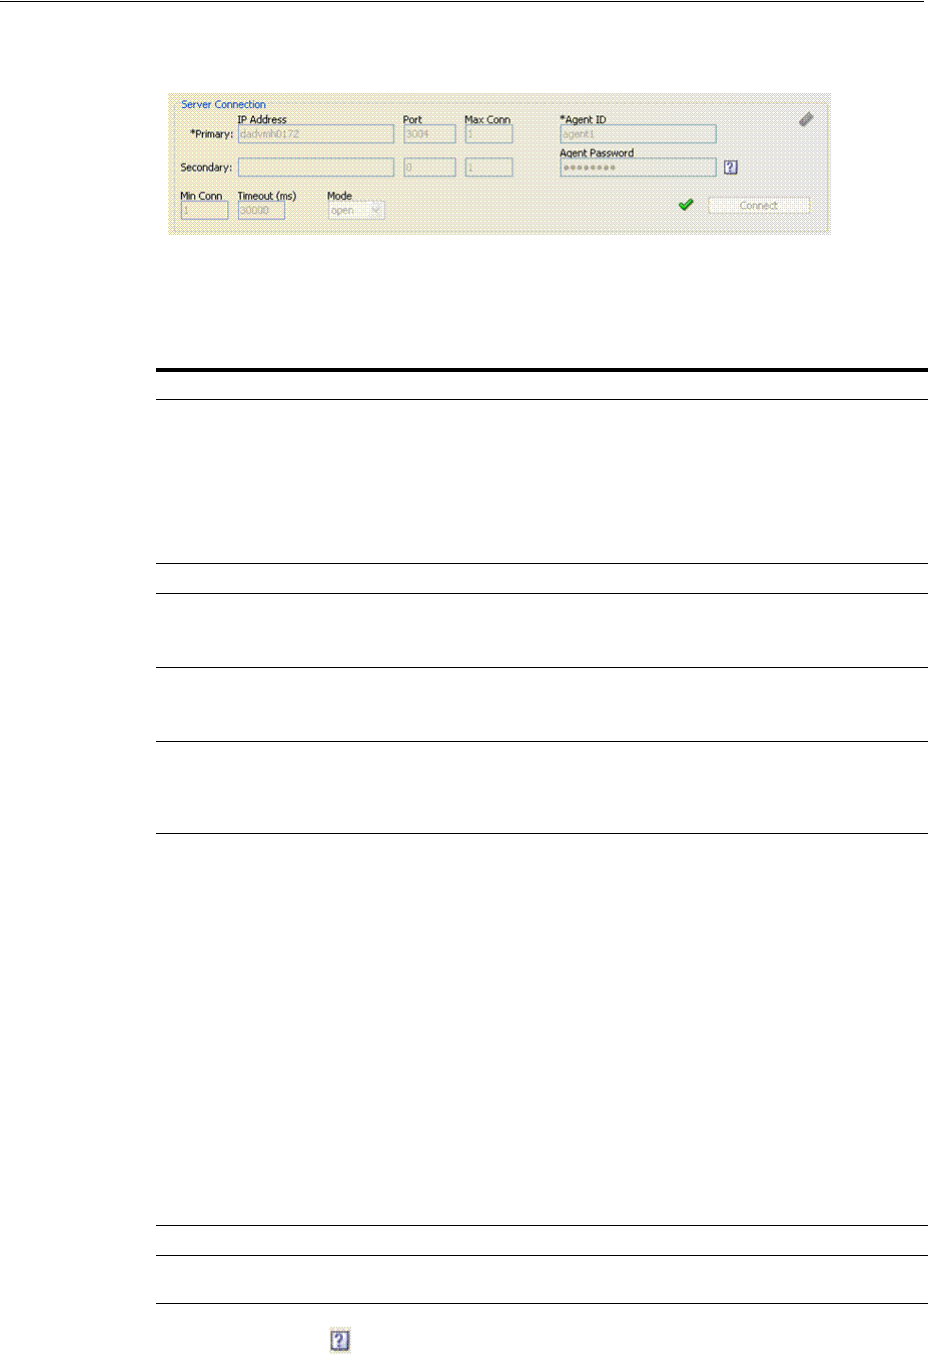
Testing Connectivity and Policies from the Access Tester Console
Validating Connectivity and Policies Using the Access Tester 21-17
Figure 21–4 Server Connection Panel in the Access Tester
Table 21–7 describes the information needed to establish the connection. The source of
your values is the Oracle Access Management Console, System Configuration tab.
Table 21–7 Connection Panel Information
Fields Description
IP Address The IP Address of the Primary and Secondary OAM Proxy listens on
for this set of tests.
Note: Oracle recommends that you enter values for only the Primary
OAM Proxy. The Secondary OAM Proxy is needed only if you want to
test failover between the primary and secondary OAM Server.
However, a more practical use of the Secondary Server is reserved for
later use, when the OAP API supports load balancing between
Primary and Secondary OAM Server.
Port Enter the port number of the Primary and Secondary OAM Server.
Max Conn The maximum number of physical connection (TCP) sockets the
Access Tester will use. Access Tester emulates a single threaded Agent.
Note: Oracle recommends that you accept the default value, 1.
Min Conn The minimum number of physical connection (TCP) sockets the Access
Tester will use. The Access Tester emulates a single threaded Agent.
Note: Oracle recommends that you accept the default value, 1.
Timeout The number of milliseconds the Access Tester should wait for the
connection to be established or to receive a response from the OAM
Server.
Note: Oracle recommends that you accept the default value.
Mode The level of communication security that is designated for the Agent to
be emulated.
■Open--No special configuration needed for this mode.
■Simple--Presents a field for the global pass phrase set for the
OAM Server. See Also: "Retrieving the Global Passphrase for
Simple Mode" on page C-14.
■Cert--Presents a Configure Certs ... button that opens a dialog
asking for the following:
Trust Store (Root Store Alias): A file containing the JKS key store
with the root CA certificate.
Key Store: A file containing the JKS key store with the agent's
private key and certificate. Currently, the agent certificate is used
for encrypting the connection and not the agent identification.
Key Store Password: The password used to encrypt the Key Store
with the agent certificates.
See Also: "About Access Tester Security and Processing" on page 21-5,
and "Generating Client Keystores for OAM Tester in Cert Mode" on
page C-5.
Agent ID Enter the identity of the OAM Agent the Tester is simulating.
Agent Password Enter the password for the OAM Agent the Tester is simulating, if
there is one configured.
Click ? beside the Agent Password field for help.
Testing Connectivity and Policies from the Access Tester Console
21-18 Administrator's Guide for Oracle Access Management
After entering information and establishing a connection, you can save details to a
configuration file that can be re-used later.
21.5.1.2 Connecting the Access Tester with the OAM Server
Use the following procedure to submit your connection details for the OAM Server.
Prerequisites
Installing and Starting the Access Tester
To test connectivity between the Access Tester and the OAM Server
1. Start the Access Tester, as described in "Installing and Starting the Access Tester"
on page 21-8.
2. In the Server Connection Panel (Table 21–7), enter:
■Primary and secondary OAM Proxy details
■Timeout period
■Communication encryption mode
■Agent details
3. Click the Connect button.
4. Beside the Connect button, look for the green check mark indicating the
connection is established.
5. In the Status Messages panel, verify a Yes response.
Not Successful: If there is a problem connecting to the OAM Server, ensure that
you entered all connection information correctly (IP address and port, Agent name
and password, connection mode and related certificates and passwords, as
needed).
If the connection still cannot be made, start the Access Tester Console using the
Trace Connection command mode and look for additional details in the connection
log. Also, ask the Administrator of the OAM Server to review the policy server
log.
The green check mark beside the Connect button indicates a "Yes"
response; the connection is made. The Status Messages panel also
indicates a "Yes" response for the connection.
The red circle beside the Connect button indicates a "No" response; no
connection exists. The Status Messages panel also indicates a "No"
response for the connection.
See Also: "Establishing a Connection Between the Access Tester and
the OAM Server"
Note: Cert mode requires the presence of keystores generated as
described in Appendix C, "Securing Communication"
See Also: "About the Connection Panel"
Table 21–7 (Cont.) Connection Panel Information
Fields Description
Testing Connectivity and Policies from the Access Tester Console
Validating Connectivity and Policies Using the Access Tester 21-19
21.5.2 Validating Resource Protection from the Access Tester Console
Before a user can access a resource, the Agent must first validate that the resource is
protected. Using the Access Tester, you can act as the Agent to have the OAM Server
validate whether or not the given URI is protected and communicate the response to
the Access Tester, as described here.
■About the Protected Resource URI Panel
■Validating Resource Protection
21.5.2.1 About the Protected Resource URI Panel
You must enter required information for the resource you want to validate in the
Access Tester Protected Resource URI panel, and then click the Validate button.
To minimize data entry, you can import long URIs that you have copied from a
browser and then click the Import URI command button. The Tester parses the URI
saved to the clipboard and populates the URI fields in the Access Tester.
Figure 21–5 illustrates the panel where you enter the URI details to validate that the
resource is protected. When combined, the URI fields follow RFC notation. For
example:
http://oam_server1:7777/index.html
.
Figure 21–5 Protected Resource URI Panel in the Access Tester
Table 21–8 describes the information needed to perform this validation.
Table 21–8 Protected Resource URI Panel Fields and Controls
Field or Control Description
Scheme Enter http or https, depending on the communication security
specified for the resource.
Note: The Access Tester supports only http or https resources.
You cannot use the Access Tester to test policies that protect
custom non-http resources.
Host Enter a valid host name for the resource.
Note: Your <host:port> combination specified in the Access
Tester must match one of the Host Identifiers defined in the
Oracle Access Management Console. If the host identifier is
not recognized, OAM cannot validate resource protection.
Port Enter a valid port for the URI.
Note: The <host:port> combination specified in the Access
Tester must match one of the Host Identifiers as defined in the
OAM Server. If the host identifier is not recognized, OAM
cannot validate resource protection.
Testing Connectivity and Policies from the Access Tester Console
21-20 Administrator's Guide for Oracle Access Management
You can capture each request and response pair to create a test case, and save multiple
test cases to a script file that can be run later.
21.5.2.2 Validating Resource Protection
Use the following procedure to submit your resource information to the OAM Server
and verify responses in the Status Messages panel.
Prerequisites
Establishing a Connection Between the Access Tester and the OAM Server
To confirm that a resource is protected
1. In the Access Tester Protected Resource URI panel, enter or import your own
resource information (Table 21–8).
Resource Enter the Resource component of the URI (/index.htm in the
example). This resource should match a resource defined for
an authentication and authorization policy in the Oracle
Access Management Console.
Note: If protected, the resource identifier that you provide
here must match the one specified in an authorization policy
in the Oracle Access Management Console.
Click this button to parse and import a URI that is saved on a
clipboard.
Operation Select the operational component of the URI from the list
provided in the Access Tester. The OAM Server does not
distinguish between different actions, however. Therefore,
leaving this set to Get should suffice.
Get Auth Scheme Check this box to request the OAM Server to return details
about the Authentication Scheme that is used to secure the
protected resource. If the URI is protected, this information is
displayed in the Status Messages panel.
Validate Click the Validate button to submit the request to the OAM
Server. When the response is received, the Access Tester
displays it in the Status Messages panel.
A green check mark appearing beside the Validate button
indicates a "Yes" response; the resource is protected. The Status
Messages panel provides the redirect URL for the resource and
that credentials are expected.
Note: If you checked the Get Auth Scheme box, the name and
level of the Authentication Scheme that protects this resource
are also provided in the Status Messages panel.
A red circle appearing beside the Validate button indicates that
the resource is not protected. A No response will also appear
in the Status Messages.
See Also:
■"Validating Resource Protection from the Access Tester Console"
■"Creating and Managing Test Cases and Scripts" on page 21-25
See Also: "About the Protected Resource URI Panel"
Table 21–8 (Cont.) Protected Resource URI Panel Fields and Controls
Field or Control Description
Testing Connectivity and Policies from the Access Tester Console
Validating Connectivity and Policies Using the Access Tester 21-21
2. Click the Validate button to submit the request.
3. Review Access Tester output, including the relevant data about the resource such
as how the resource is protected, level of protection, and so on.
4. Beside the Validate button, look for the green check mark indicating the resource is
protected.
5. In the Status Messages panel, verify the redirect URL, authentication scheme, and
that credentials are expected.
6. Capture the request and response to create a test case for use later, as described in
"Creating and Managing Test Cases and Scripts" on page 21-25.
7. Retain the URI to minimize data entry and server processing using one of the
following methods.
8. Proceed to "Testing User Authentication from the Access Tester Console"
21.5.3 Testing User Authentication from the Access Tester Console
This topic provides the following information:
■About the User Identity Panel
■Testing User Credential Authentication
21.5.3.1 About the User Identity Panel
Before a user can access a resource, the Agent must validate the user's identity based
on the defined authentication policy on the OAM Server. Using the Access Tester, you
can act as the Agent to have the OAM Server authenticate a specific userID for the
protected resource. All relevant authentication responses are considered during this
policy evaluation.
Figure 21–6 illustrates the Access Tester panel where you enter the information needed
to test authentication.
Figure 21–6 Access Tester User Identity Panel
Table 21–9 describes the information you must provide.
Table 21–9 Access Tester User Identity Panel Fields and Controls
Field or Control Description
IP Address Enter the IP Address of the user whose credentials are being validated. All
Agents communicating with the OAM Server send the IP address of the
end user.
Default: The IP address that is filled in belongs to the computer from which
the Access Tester is run.
To test a policy that requires a real user IP address, replace the default IP
address with the real IP address.

Testing Connectivity and Policies from the Access Tester Console
21-22 Administrator's Guide for Oracle Access Management
You can capture each request and response pair to create a test case, and save multiple
test cases to a script file that can be run later.
User Name Enter the userID of the individual whose credentials are being validated.
Note: The Access Tester enables or disables the username and password
fields if the resource is protected by an authentication scheme that requires
those credentials. Similarly the Access Tester enables or disables the
certificate field if the resource is protected by an authentication scheme that
requires a user's X509 certificate.
Password Enter the password of the individual whose credentials are being
validated.
? Click this button to display the password in clear text within a popup
window.
User Certificate Store The PEM format file containing the X.509 certificate of the user whose
credentials should be authenticated.
If the URI is protected by the X509 Authentication Scheme then the Tester
will use the PEM-formatted X509 certificate as a credential instead of or in
addition to the username/password. The X509 cert may also be used for
authorization if security policies are so configured on the OAM Server.
Note: For certificate-based authentication to work, the OAM Server must
be properly configured with root CA certificates and SSL keystore
certificates. See Appendix C for details about securing communication
between OAM Servers and Webgates.
... Click this button to browse the file system for the user certificate store path.
Authenticate Click the Authenticate button to submit the request to the OAM Server and
look for a response in the Status Messages panel.
Note: The type of credentials supplied (username/password or X.509
certificate) must match the requirements of the authentication scheme that
protects the URI.
Note: For certificate-based authentication, the OAM Server deployment
must be properly configured with certificates as described in Appendix C.
Authorize After the user's credentials are validated, you can click the Authorize
button to submit the request for the resource to the OAM Server. Check the
Status Messages panel for a response.
This request submits information collected in the URI and Identity panels
to the OAM Server to decide if the user defined on the Identity panel can
access the resource defined on the URI panel. The server returns Yes (user
can access the resource) or No (user can not access the resource). The OAM
Server might return additional information such as actions (responses) that
the real Agent would normally handle.
A green check mark appearing beside the Authenticate button indicates
authentication success; The Status Messages panel also indicates "yes"
authentication was successful, and provides the user DN and session id.
A green check mark appearing beside the Authorize button indicates
authorization success; The Status Messages panel also indicates "yes"
authorization was successful, and provides Application Domain details.
A red circle appearing beside the Authenticate button indicates
authentication failure; The Status Messages panel also indicates "no"
authentication was not successful.
A red circle appearing beside the Authorize button indicates authorization
failure; The Status Messages panel also indicates "no" authorization was
not successful.
See Also:
■"Testing User Authentication from the Access Tester Console"
■"Creating and Managing Test Cases and Scripts" on page 21-25
Table 21–9 (Cont.) Access Tester User Identity Panel Fields and Controls
Field or Control Description

Testing Connectivity and Policies from the Access Tester Console
Validating Connectivity and Policies Using the Access Tester 21-23
21.5.3.2 Testing User Credential Authentication
Use the following procedure to submit the end user credentials to the OAM Server and
verify authentication. All relevant authentication responses are considered during this
policy evaluation.
Prerequisites
Validating Resource Protection from the Access Tester Console with URI information
retained in the Console.
To test user credential authentication
1. In the Access Tester User Identity panel, enter information for the user to be
authenticated (Table 21–9).
2. Click the Authenticate button to submit the request.
3. Beside the Authenticate button, look for the green check mark indicating the user
is authenticated.
Not Successful: Confirm that you entered the correct userID and password and
try again. Also, check the Oracle Access Management Console for an active user
session that you might need to end, as described in Chapter 17.
4. Capture the request and response to create a test case for use later, as described in
"Creating and Managing Test Cases and Scripts" on page 21-25.
5. Retain the URI and user identity information and proceed to "Testing User
Authorization from the Access Tester Console".
21.5.4 Testing User Authorization from the Access Tester Console
Before a user can access a resource, the Agent must validate the user's permissions
based on defined policies on the OAM Server. Using the Access Tester, you can act as
the Agent to have the OAM Server validate whether or not the authenticated user
identity can be authorized to access the resource.
Use the following procedure to verify the authenticated end user's authorization for
the resource. All relevant authorization conditions and responses are considered
during this policy evaluation.
Prerequisites
Testing User Authentication from the Access Tester Console with all information
retained in the Console.
See Also: "About the User Identity Panel"
See Also: "About the User Identity Panel"
Note: Once the protected resource URI is confirmed and the user's
identity is authenticated from the Access Tester, no further
information is needed. You simply click the Authorize button to
submit the request. However, if the resource is changed to another you
must start the sequence anew and validate, then authenticate, and
then authorize.

Testing Connectivity and Policies from the Access Tester Console
21-24 Administrator's Guide for Oracle Access Management
To test user authorization
1. In the Access Tester User Identity panel, confirm the user is authenticated
(Table 21–9).
2. In the Access Tester User Identity panel, click the Authorization button.
3. Beside the Authorization button, look for the green check mark indicating the user
is authorized.
Not Successful: Confirm the authorization policy using the Oracle Access
Management Console.
4. In the Status Messages panel (or execution log file), verify details about the test
run.
5. Capture the request and response to create a test case for use later, as described in
"Creating and Managing Test Cases and Scripts" on page 21-25.
6. Proceed to:
■Observing Request Latency
■Creating and Managing Test Cases and Scripts
■Evaluating Scripts, Log File, and Statistics
21.5.5 Observing Request Latency
To understand OAM Server performance you must know how well the OAM Server
handles requests passed by the Agent. While there are many ways to expose a server's
metrics, it is sometimes useful to expose server performance from the standpoint of the
Agent. Using the Access Tester, you can do just that as described here.
Prerequisites
"Installing and Starting the Access Tester" on page 21-8
Task overview: Observing request latency includes
1. "Validating Resource Protection" on page 21-20
2. "Testing User Authentication from the Access Tester Console" on page 21-21
3. "Testing User Authorization from the Access Tester Console" on page 21-23
4. Check latency information in the execution log file as shown here, as well as in
other files generated during a test run. For example:
...
[2/3/12 11:03 PM][info] Summary statistics
[2/3/12 11:03 PM][info] Matched 4 of 4, avg latency 232ms vs 238ms
[2/3/12 11:03 PM][info] Validate: matched 2 of 2, avg latency 570ms vs 578ms
[2/3/12 11:03 PM][info] Authenticate: matched 1 of 1, avg latency 187ms vs
187ms
[2/3/12 11:03 PM][info] Authorize: matched 1 of 1, avg latency 172ms vs 188ms
...
5. Proceed to:
■Creating and Managing Test Cases and Scripts
■Evaluating Scripts, Log File, and Statistics
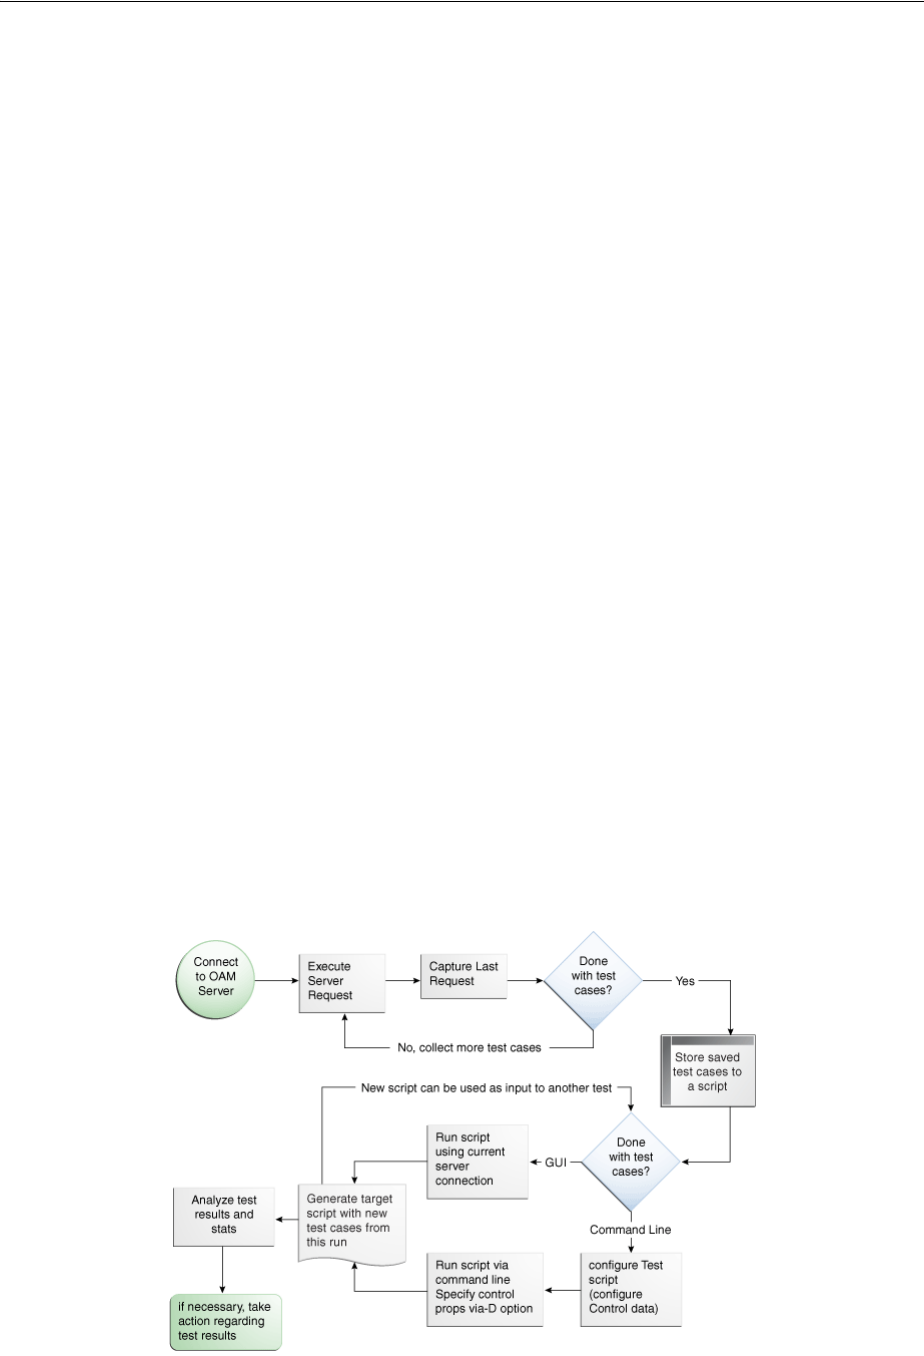
Creating and Managing Test Cases and Scripts
Validating Connectivity and Policies Using the Access Tester 21-25
21.6 Creating and Managing Test Cases and Scripts
Test management refers to the creation of repeatable tests that can be executed at any
time by an individual Administrator or system. Quick spot checks are very useful and
effective in troubleshooting current issues. However, a more predictable and
repeatable approach to validating server and policy configuration is often necessary.
This approach can include testing OAM Server configuration for regressions after a
product revision, or during a policy development and QA cycle.
To be useful such tests must allow for multiple use cases to be executed as group. Once
the test scripts have been designed and validated as correct, replaying the tests against
the OAM Server helps identify regressions in a policy configuration.
This section provides the information you need to perform test management in the
following topics:
■About Test Cases and Test Scripts
■Capturing Test Cases
■Generating an Input Test Script
■Personalizing an Input Test Script
■Executing a Test Script
21.6.1 About Test Cases and Test Scripts
A test case is created from the request sent to, and response data received from, the
OAM Server using the Access Tester. Among other data elements, a test case includes
request latency and other identifying information that enables analysis and
comparison of old and new test cases.
Once captured, the test case can be replayed without new input, and then new results
can be compared with old results. If the old results are marked as "known good" then
deviations from those results constitute failed test cases.
The test case workflow is illustrated by Figure 21–7.
Figure 21–7 Test Case Workflow

Creating and Managing Test Cases and Scripts
21-26 Administrator's Guide for Oracle Access Management
Task overview: Creating and managing a test case
From the Access Tester Console, you can connect to the OAM Server and manually
conduct individual tests. You can save the request to the capture queue after a request
is sent and the response is received from the OAM Server. You can continue capturing
additional test cases before generating a test script and clearing the capture queue. If
you exit the Access Tester before saving the capture queue, you are asked if the test
cases should be saved to a script before exiting. Oracle recommends that you do not
clear the queue until all your test cases have been captured.
Once you have the test script, you can run it from either the Access Tester Console or
from the command line.
21.6.2 Capturing Test Cases
You can save each test case to a capture queue after sending the request from the
Access Tester to the OAM Server and receiving the response. You can capture as many
individual test cases as you need before generating a test script that will automate
running the group of test cases. For instance, the following outlines three test cases
that must be captured individually:
■A validation request and response
■An authentication request and response
■An authorization request and response
Table 21–10 describes the location of the capture options.
If you exit the Access Tester before saving the capture queue, you are asked if the test
cases should be saved to a script before exiting. Do not clear the Access Tester capture
queue until all your test cases have been captured.
To capture one or more test cases
1. Initiate a request from the Access Tester Console, as described in "Testing
Connectivity and Policies from the Access Tester Console" on page 21-15.
2. After receiving the response, click the Capture last "..." request command button in
the tool bar (or choose it from the Test menu).
3. Confirm the capture in the Status Messages panel and note the Capture Queue test
case count at the bottom of the Console, as shown here.
Table 21–10 Access Tester Capture Request Options
Location Description
Test menu
Capture last "..." request
Select this command from the Test menu to add the last request
issued and results received to the capture queue (for inclusion
in a test script later).
Select this command button from the tool bar to add the last
request issued and results received to the capture queue (for
inclusion in a test script later).
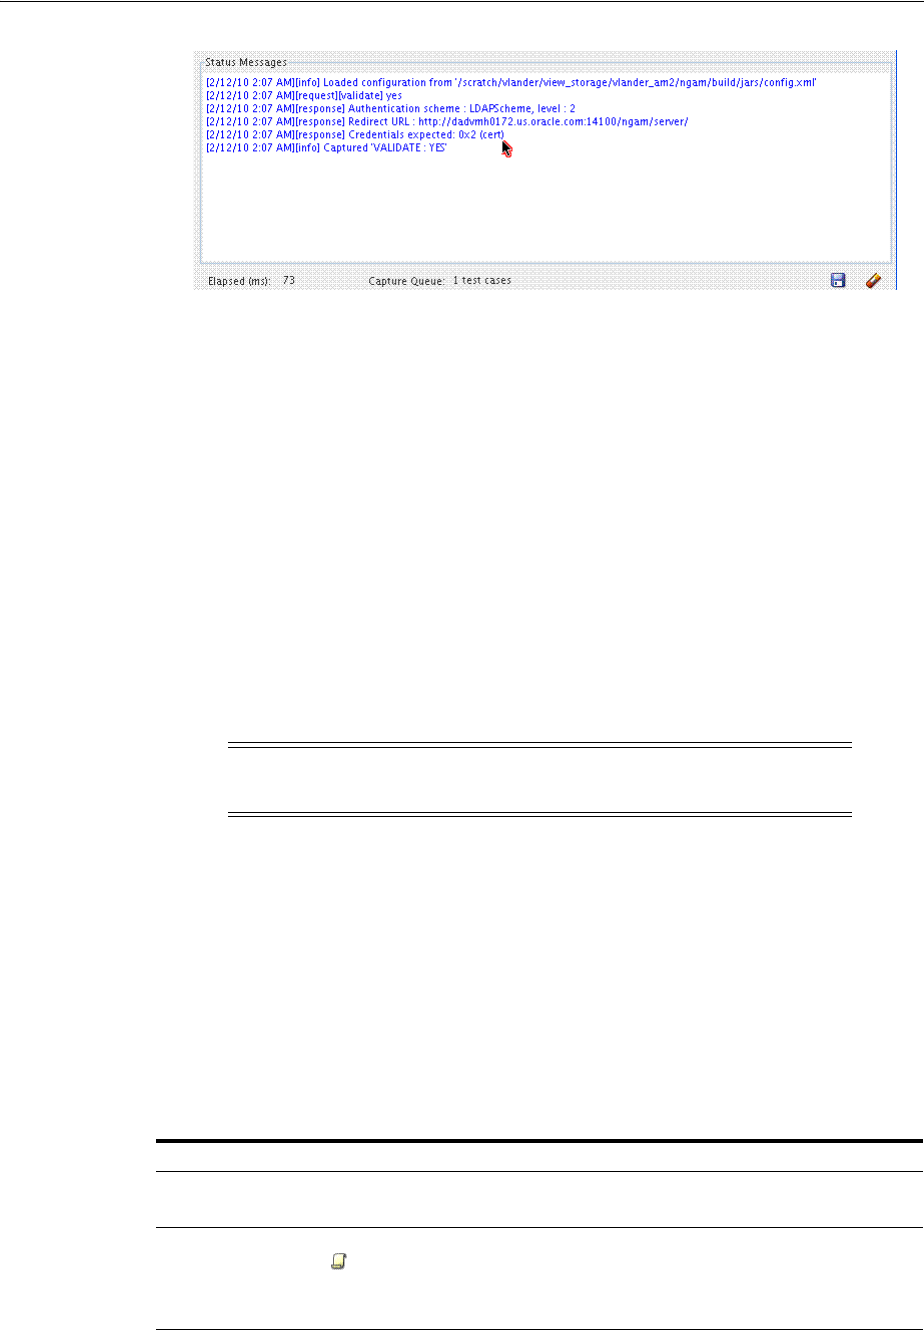
Creating and Managing Test Cases and Scripts
Validating Connectivity and Policies Using the Access Tester 21-27
4. Repeat steps 1, 2, and 3 to capture in the queue each test case that you need for
your test script.
5. Proceed to "Generating an Input Test Script".
21.6.3 Generating an Input Test Script
A test script is a collection of individual test cases that were captured using the Access
Tester Console. When individual test cases are grouped together, it becomes possible
to automate test coverage to validate policy configuration for a specific application or
site.
You can create a test script to be used as input to the Access Tester and drive
automated processing of multiple test cases. The Generate Script option enables you to
create an XML file test script and clear the capture queue. If you exit the Access Tester
before saving the capture queue, you are asked if the test cases should be saved to a
script before exiting.
21.6.3.1 About Generating an Input Test Script
You can create a test script to be used as input to the Access Tester and drive
automated processing of multiple test cases. Such a script must follow these rules:
■Allows possible replay by a person or system
■Allows possible replay against different policy servers w/o changing the script, to
enable sharing of test scripts to drive different Policy Servers
■Allows comparison of test execution results against "Known Good" results
Following are the locations of the Generate Script command.
Note: Do not clear the capture queue until you have captured all the
test cases you want to include in the script.
Table 21–11 Generate Script Command
Location of the Command Description
Test menu
Generate Script
Select Generate Script from the Test menu to initiate creation of the
script containing your captured test cases.
Select the Generate Script command button from the tool bar to
initiate creation of the script containing your captured test cases. After
you specify or select a name for your script, you are asked if the
capture queue should be cleared. Do not clear the capture queue until
all your test cases are saved to a script.

Creating and Managing Test Cases and Scripts
21-28 Administrator's Guide for Oracle Access Management
21.6.3.2 Generating an Input Test Script
Prerequisites
Capturing Test Cases
To record a test script containing captured test cases
1. Perform and capture each request that you want in the script, as described in
"Capturing Test Cases" on page 21-26.
2. Click the Generate Script command button in the tool bar (or choose it from the
Test menu to include all captured test cases.
3. In the new dialog box, select or enter the name of your new XML script file and
then click Save.
4. Click Yes to overwrite an existing file (or No to dismiss the window and give the
file a new name).
5. In the Save Waning dialog box, click No to retain the capture queue and continue
adding test cases to your script (or click Yes to clear the queue of all test cases).
6. Confirm the location of the test script before you exit the Access Tester.
7. Personalize the test script to include details such as who, when, and why the script
was developed, as described next.
21.6.4 Personalizing an Input Test Script
This section describes how to personalize and customize a test script.
■About Customizing a Test Script
■Customizing a Test Script
21.6.4.1 About Customizing a Test Script
The control block of a test script is used to tag the script and specify information to be
used during the execution of a test. You might want to include details about who
created the script and when and why the script was created. You might also want to
customize the script using one or more control parameters.
The Access Tester provides command line "control" parameters to change processing
of the script without changing the script. (test name, test number, and so on). This
enables you to configure test runs without having to change "known good" input test
scripts. Table 21–12 describes the control elements and how to customize these.
Table 21–12 Test Script Control Parameters
Control Parameter Description
i
gnorecontent=true
Ignores differences in the Content section of the use case when
comparing the original OAM Server response to the current response.
The default is to compare the Content sections. This parameter can be
overwritten by a command line property when running in the command
line mode.
Default: false (Compare Content sections).
Values: true or false
In command line mode, use ignorecontent=true to over ride the specified
value in the Control section of the input script.

Creating and Managing Test Cases and Scripts
Validating Connectivity and Policies Using the Access Tester 21-29
21.6.4.2 Customizing a Test Script
Prerequisites
Generating an Input Test Script
To customize a test script
1. Locate and open the test script that was generated by the Access Tester.
2. Add any details that you need to customize or personalize the script.
3. Save the file and proceed to "Executing a Test Script".
21.6.5 Executing a Test Script
Once a test script has been created against a "Known Good" policy configuration and
marked as "Known Good", it is important to drive the Access Tester using the script
rather than specifying each test manually using the Console. This section provides the
following topics:
■About Test Script Execution
■Running a Test Script
21.6.5.1 About Test Script Execution
You can interactively execute tests scripts from within the Access Tester Console, or
use automated test runs performed by command scripts. Automated test runs can be
scheduled by the operating system or a harness such as Apache JMeter, and executed
without manual intervention. Other than lack of human input in command line mode,
the two execution modes are identical.
testname="oamtest" Specifies a prefix to add to file names in the "results bundle" as described
in the previous section.
In command line mode, use Testname=name to over ride the specified
value in the Control section.
configfile="config.xml" Specifies the absolute path to a configuration XML file that was
previously created by the Access Tester.
In command line mode, this file is used by the Access Tester to locate
connection details to establish a server connection.
numthreads="1" Indicates the number of threads (virtual clients) that will be started by
the Access Tester to run multiple copies of the test script. Each thread
opens its own pool of connections to the policy server. This feature is
designed for stress testing the Policy Server, and is available only in
command line mode.
Default: 1
Note that when running a test script in GUI mode, the number of threads
is ignored and only one thread is started to perform a single iteration of
the test script.
numiterations="1" Indicates the number of iterations that will be performed by the Access
Tester. This feature is designed for stress testing and longevity testing the
Policy Server and is available only in command line mode.
Default: 1
Table 21–12 (Cont.) Test Script Control Parameters
Control Parameter Description

Creating and Managing Test Cases and Scripts
21-30 Administrator's Guide for Oracle Access Management
Table 21–13 describes the commands to execute a test script.
The following overview describes how the Access Tester operates when running a test.
Other than lack of human input in command line mode, the two execution modes are
identical.
Process overview: Access Tester behavior when running a test script
1. The Access Tester loads the input xml file.
In command line mode, the Access Tester opens the configuration XML file
defined within the input test script's Control element.
2. The Access Tester connects to the primary and secondary OAM Proxy using
information in the Server Connection panel of the Console.
In command line mode, the Access Tester uses information in the Connection
element of the configuration XML file.
3. In command line mode, the Access Tester checks the Control elements in the input
script XML file to ensure none have been overwritten on the command line
(command line values take precedence).
4. For each original test case defined in the script, the Access Tester:
a. Creates a new target test case.
b. Sends the original request to the OAM Server and collects the response.
c. Makes the following comparisons:
Compares the new response to the original response.
Compares response codes and marks as "mismatched" any new target test case
where response codes differ from the original test case. For instance, if the
original Validate returned "Yes", and now returns "No", a mismatch is marked.
When response codes are identical, and "the ignorecontent" control parameter
is "false", the Access Tester compares Content (the name of the Authentication
Note: A script such as .bat (Windows) or .sh (Unix) executes a test
script in command line mode. Once a test script is created, it can be
executed using either the Run Script menu command or the Access
Tester command line.
Table 21–13 Run Test Script Commands
Location Description
Test menu
Run Script
Select the Run Script command from the Test menu to begin
running a saved test script against the current policy server.
The Status message panel is populated with the execution
status as the script progresses.
Select the Run Script command button from the tool bar to
begin running a saved test script against the current policy
server. The Status message panel is populated with the
execution status as the script progresses.
Command line mode A script such as .bat (Windows) or .sh (Unix) executes a test
script in command line mode. Once a test script is created, it
can be executed using either the Run Script menu command or
the Access Tester command line.

Creating and Managing Test Cases and Scripts
Validating Connectivity and Policies Using the Access Tester 21-31
scheme or post authorization actions that are logged after each request). If
Content sections differ, the new target test case is marked "mismatched".
d. Collect new elapsed time and store it in the target use case.
e. Build a new target test case containing the full state of the last server request
and the same unique ID (UUID) as the original test case.
f. Update the internal statistics table with statistics for the target test case
(request type, elapsed time, mismatched, and so on).
5. After completing all the input test cases, the Access Tester:
a. Displays summary results.
b. Obtains and combines the testname and testnumber, and generates a name for
the "results bundle" (three files whose names start with <testname>_
<testnumber>.
Obtain testname from the command line parameter. If not specified in the
command line, use the testname element of the input script's Control block.
Obtain testnumber from the command line parameter. If not specified,
testnumber defaults to a 7-character numeric string based on the current local
time: 2 character minutes, 2 character seconds, 3 character hundredths.
c. Generates the "results bundle": three files whose names start with <testname>_
<testnumber>:
The target XML script contains the new test cases: <testname>_<testnumber_
results.xml.
The statistics XML file contains a summary and detailed statistics of the entire
test run, plus those test cases marked as "mismatched": <testname>_
<testnumber_stats.xml
The execution log file contains information from the Status Message panel:
<testname>_<testnumber_log.log.
d. When running in multi-threaded mode, only the statistics XML file and
execution log file will be generated.
e. In command line mode, the Access Tester exits with the exit code as described
in "About the Access Tester Command Line Mode" on page 21-11.
21.6.5.2 Running a Test Script
Prerequisites
Generating an Input Test Script
To run a test script
1. Confirm the location of the saved test script before exiting the Access Tester., as
described in "Generating an Input Test Script" on page 21-27.
2. Submit the test script for processing using one of the following methods:
Note: Shell scripts can automate generating the bundle by providing
testname and testnumber command line parameters.

Evaluating Scripts, Log File, and Statistics
21-32 Administrator's Guide for Oracle Access Management
■From the Access Tester Console, click the Run Script command button in the
tool bar (or select Run Script from the Test menu), then follow the prompts
and observe messages in the Status Message panel as the script executes.
■From the command line, specify your test script with the desired system
properties, as described in "Starting the Access Tester with System Properties
For Use in Command Line Mode" on page 21-11.
java -Dscript.scriptfile="\tests\script.xml" -Dcontrol.ignorecontent="true"
-jar oamtest.jar
3. Review the log and output files and perform additional analysis after the Access
Tester compares newly generated results with results captured in the input script,
as described in "Evaluating Scripts, Log File, and Statistics".
21.7 Evaluating Scripts, Log File, and Statistics
This section provides the following information:
■About Evaluating Test Results
■About the Saved Connection Configuration File
■About the Generated Input Test Script
■About the Target Output File Containing Test Run Results
■About the Statistics Document
■About the Execution Log
21.7.1 About Evaluating Test Results
At the end of a test run a "results bundle" gets generated containing three documents:
■Target script: An XML document containing new test cases
■Execution log: A text file containing the messages displayed during script
execution
■Execution statistics: An XML document containing test metrics and a list of
mismatched elements
The matching pair of test cases in the original and target scripts shares the test case ID.
This ID is represented by a UUID value, which makes it possible to compare
individual test cases in the original script with those in the target script. For more
information, see "About the Generated Input Test Script" on page 21-33.
The statistics document contains the summary and detail statistics, as well as a list of
test cases that did not match. The detailed statistics can be used for further analysis or
to keep a historical trail of results. The summary statistics are the same statistics
displayed at the end of the test run and can be used to quickly assess the state of a test
run. The list of mismatched test cases as created in the statistics document contains test
case IDs that have triggered mismatch and includes the reason for the mismatch, as
seen in Table 21–14.
Note: The target script is not created if the Access Tester is
configured to run in multi-threaded mode.
Evaluating Scripts, Log File, and Statistics
Validating Connectivity and Policies Using the Access Tester 21-33
21.7.2 About the Saved Connection Configuration File
This is the output files that is saved using the Save Configuration command on the File
menu; the default file name is config.xml. This connection configuration file includes
details that were specified in the Access Tester Console, Server Connection panel.
Example 21–1 Connection Configuration File
<?xml version="1.0" encoding="UTF-8" standalone="yes"?>
<oamtestconfig xmlns="http://xmlns.example.com/idm/oam/oamtest/schema"
version="1.0">
<connection timeout="30000" minnconn="1" mode="open">
<agent password="00030d05101b050c42" name="agent1"/>
<keystore rootstore="" keystore_password="" keystore=""
global_passphrase=""/>
<primary>
<server maxconn="1" port="2100" addr="oam_server1"/>
</primary>
<secondary>
<server maxconn="1" port="0" addr=""/>
</secondary>
</connection>
<uri getauthscheme="true">
<scheme>http</scheme>
<host>oam_server1</host>
<port>7777</port>
<resource>/index.html</resource>
<operation>Get</operation>
</uri>
<identity>
<id>admin1</id>
<password>00030d05101b050c42</password>
<certstore></certstore>
<ipaddr>111.222.3.4</ipaddr>
</identity>
</oamtestconfig>
21.7.3 About the Generated Input Test Script
The input test script is generated by using the Access Tester and capturing your own
test cases. The "configfile" attribute of the "Control" element is updated after creation
to specify the connection configuration file to be used in command line mode for
establishing a connection to the OAM Server.
Table 21–14 Mismatched Results Reasons in the Statistics Document
Reason for a MisMatch Description
Result The test cases did not match because of the difference in OAM Server
response codes (Yes versus No).
Content The test cases did not match because of the differences in the specific
data values that were returned by the OAM Server. The specific values
from the last test run that have triggered the mismatch are included.
Note: An input test script file is also generated as described in the
following topic. The name of the configuration file is used in the input
test script to ensure that running the Access Tester in command line
mode picks up connection information defined in the connection file.

Evaluating Scripts, Log File, and Statistics
21-34 Administrator's Guide for Oracle Access Management
Example 21–2 Generated Input Test Script
<?xml version="1.0" encoding="UTF-8" standalone="yes"?>
<oamtestscript xmlns="http://xmlns.example.com/idm/oam/oamtest/schema"
version="1.0">
<history description="Manually generated using agent 'agent1'"
createdon="2012-02-03T22:28:00.468-05:00" createdby="test_user"/>
<control numthreads="1" numiterations="1" ignorecontent="false"
testname="samplerun1" configfile="config.xml"/>
<cases numcases="4">
<case uuid="465a4fda-d814-4ab7-b81b-f3f1cd72bbc0">
<request code="Validate">
<uri getauthscheme="true">
<scheme>http</scheme>
<host>oam_server1</host>
<port>7777</port>
<resource>/index.html</resource>
<operation>Get</operation>
</uri>
</request>
<response elapsed="984" code="Yes">
<comment></comment>
<status>Major code: 4(ResrcOpProtected) Minor code:
2(NoCode)</status>
<content>
<line type="auth.scheme.id">LDAPScheme</line>
<line type="auth.scheme.level">2</line>
<line type="auth.scheme.required.creds">2</line>
<line
type="auth.scheme.redirect.url">http://emerald.uk.example.com:14100/oam/server/</l
ine>
</content>
</response>
</case>
<case uuid="009b44e3-1a94-4bfc-a0c3-84a38a9e0f2a">
<request code="Authenticate">
<uri getauthscheme="true">
<scheme>http</scheme>
<host>oam_server1</host>
<port>7777</port>
<resource>/index.html</resource>
<operation>Get</operation>
</uri>
<identity>
<id>weblogic</id>
<password>00030d05101b050c42</password>
<certstore></certstore>
<ipaddr>192.168.1.8</ipaddr>
</identity>
</request>
<response elapsed="187" code="Yes">
<comment></comment>
<status>Major code: 10(CredentialsAccepted) Minor code:
2(NoCode)</status>
<content>
<line
type="user.dn">cn=weblogic,dc=uk,dc=example,dc=com</line>
</content>
</response>
</case>
<case uuid="84fe9b06-86d1-47df-a399-6311990743c3">

Evaluating Scripts, Log File, and Statistics
Validating Connectivity and Policies Using the Access Tester 21-35
<request code="Authorize">
<uri getauthscheme="true">
<scheme>http</scheme>
<host>oam_server1</host>
<port>7777</port>
<resource>/index.html</resource>
<operation>Get</operation>
</uri>
<identity>
<id>weblogic</id>
<password>00030d05101b050c42</password>
<certstore></certstore>
<ipaddr>192.168.1.8</ipaddr>
</identity>
</request>
<response elapsed="188" code="Yes">
<comment></comment>
<status>Major code: 8(Allow) Minor code: 2(NoCode)</status>
<content/>
</response>
</case>
<case uuid="61579e47-5532-42c3-bbc7-a00828256bf4">
<request code="Validate">
<uri getauthscheme="false">
<scheme>http</scheme>
<host>oam_server1</host>
<port>7777</port>
<resource>/index.html</resource>
<operation>Get</operation>
</uri>
</request>
<response elapsed="172" code="Yes">
<comment></comment>
<status>Major code: 4(ResrcOpProtected) Minor code:
2(NoCode)</status>
<content/>
</response>
</case>
</cases>
</oamtestscript>
21.7.4 About the Target Output File Containing Test Run Results
This example was generated by running the Access Tester in command line mode and
specifying the script.xml file as input to execute the 4 captured test cases:
Dscript.scriptfile="script.xml" -jar oamtest.jar
Notice the various sections in Example 21–3. As shown in the execution log, this test
run found no mismatches, and shows that 4 out of 4 requests matched.
Example 21–3 Output File Generated During a Test Run
<?xml version="1.0" encoding="UTF-8" standalone="yes"?>
<oamtestscript xmlns="http://xmlns.example.com/idm/oam/oamtest/schema"
version="1.0">
<history description="Generated from script 'script.xml' using agent 'agent1'"
createdon="2012-02-03T23:03:02.171-05:00" createdby="test_user"/>
<control numthreads="1" numiterations="1" ignorecontent="false"

Evaluating Scripts, Log File, and Statistics
21-36 Administrator's Guide for Oracle Access Management
testname="oamtest" configfile=""/>
<cases numcases="4">
<case uuid="465a4fda-d814-4ab7-b81b-f3f1cd72bbc0">
<request code="Validate">
<uri getauthscheme="true">
<scheme>http</scheme>
<host>oam_server1</host>
<port>7777</port>
<resource>/index.html</resource>
<operation>Get</operation>
</uri>
</request>
<response elapsed="969" code="Yes">
<comment></comment>
<status>Major code: 4(ResrcOpProtected) Minor code:
2(NoCode)</status>
<content>
<line type="auth.scheme.id">LDAPScheme</line>
<line type="auth.scheme.level">2</line>
<line type="auth.scheme.required.creds">2</line>
<line
type="auth.scheme.redirect.url">http://emerald.uk.example.com:14100/oam/server/
</line>
</content>
</response>
</case>
<case uuid="009b44e3-1a94-4bfc-a0c3-84a38a9e0f2a">
<request code="Authenticate">
<uri getauthscheme="true">
<scheme>http</scheme>
<host>oam_server1</host>
<port>7777</port>
<resource>/index.html</resource>
<operation>Get</operation>
</uri>
<identity>
<id>weblogic</id>
<password>00030d05101b050c42</password>
<certstore></certstore>
<ipaddr>111.222.3.4</ipaddr>
</identity>
</request>
<response elapsed="187" code="Yes">
<comment></comment>
<status>Major code: 10(CredentialsAccepted) Minor code:
2(NoCode)</status>
<content>
<line type="user.dn">cn=weblogic,dc=us,dc=oracle,dc=com</line>
</content>
</response>
</case>
<case uuid="84fe9b06-86d1-47df-a399-6311990743c3">
<request code="Authorize">
<uri getauthscheme="true">
<scheme>http</scheme>
<host>oam_server1</host>
<port>7777</port>
<resource>/index.html</resource>
<operation>Get</operation>
</uri>

Evaluating Scripts, Log File, and Statistics
Validating Connectivity and Policies Using the Access Tester 21-37
<identity>
<id>weblogic</id>
<password>00030d05101b050c42</password>
<certstore></certstore>
<ipaddr>111.222.3.4</ipaddr>
</identity>
</request>
<response elapsed="172" code="Yes">
<comment></comment>
<status>Major code: 8(Allow) Minor code: 2(NoCode)</status>
<content/>
</response>
</case>
<case uuid="61579e47-5532-42c3-bbc7-a00828256bf4">
<request code="Validate">
<uri getauthscheme="false">
<scheme>http</scheme>
<host>oam_server1</host>
<port>7777</port>
<resource>/index.html</resource>
<operation>Get</operation>
</uri>
</request>
<response elapsed="171" code="Yes">
<comment></comment>
<status>Major code: 4(ResrcOpProtected) Minor code:
2(NoCode)</status>
<content/>
</response>
</case>
</cases>
</oamtestscript>
21.7.5 About the Statistics Document
The statistics file (_stats.xml) is generated together with the target output script during
the test run identified in the Execution log. The script.xml file was used as input to
execute the 4 captured test cases. The test run found no mismatches, and shows that 4
out of 4 requests matched.
A sample statistics document is shown in Example 21–4. The various sections that
provide statistics for this run, which you can compare against statistics for an earlier
"known good" run.
Example 21–4 Sample Statistics Document
A sample statistics document is shown here. Notice,
<oamteststats xmlns="http://xmlns.example.com/idm/oam/oamtest/schema"
version="1.0">
<history description="Generated from script 'script.xml' using agent
'agent1'" createdon="2012-02-03T23:03:02.171-05:00" createdby="test_user"/>
<summary>
<total>
<nummatched>4</nummatched>
<numtotal>4</numtotal>
<avgelapsedsource>238</avgelapsedsource
<avgelapsedtarget>232</avgelapsedtarget>
</total>
<validate>

Evaluating Scripts, Log File, and Statistics
21-38 Administrator's Guide for Oracle Access Management
<nummatched>2</nummatched>
<numtotal>2</numtotal>
<avgelapsedsource>578</avgelapsedsource>
<avgelapsedtarget>570</avgelapsedtarget>
</validate>
<authenticate>
<nummatched>1</nummatched>
<numtotal>1</numtotal>
<avgelapsedsource>187</avgelapsedsource>
<avgelapsedtarget>187</avgelapsedtarget>
</authenticate>
<authorize>
<nummatched>1</nummatched>
<numtotal>1</numtotal>
<avgelapsedsource>188</avgelapsedsource>
<avgelapsedtarget>172</avgelapsedtarget>
</authorize>
<summary>
<detail>
<source>
<validate>
<yes>2</yes>
<no>0</no>
<error>0</error>
<mismatch>0</mismatch>
<elapsed>1156</elapsed>
</validate>
<authenticate>
<yes>1</yes>
<no>0</no>
<error>0</error>
<mismatch>0</mismatch>
<elapsed>187</elapsed>
</authenticate>
<authorize>
<yes>1</yes>
<no>0</no>
<error>0</error>
<mismatch>0</mismatch>
<elapsed>188</elapsed>
</authorize>
</source>
<target>
<validate>
<yes>2</yes>
<no>0</no>
<error>0</error>
<mismatch>0</mismatch>
<elapsed>1140</elapsed>
</validate>
<authenticate>
<yes>1</yes>
<no>0</no>
<error>0</error>
<mismatch>0</mismatch>
<elapsed>187</elapsed>
</authenticate>
<authorize>
<yes>1</yes>
<no>0</no>

Evaluating Scripts, Log File, and Statistics
Validating Connectivity and Policies Using the Access Tester 21-39
<error>0</error>
<mismatch>0</mismatch>
<elapsed>172</elapsed>
</authorize>
<target>
</detail>
<mismatch numcases="0"/>
</oamteststats>
21.7.6 About the Execution Log
This sample execution log was generated together with the target output script during
a test run using script.xml to execute 4 test cases. The test run found no mismatches,
and shows that 4 out of 4 requests matched.
As you review this example, notice the information provided which is the same as the
information you see in the Status Messages panel of the Access Tester. Notice the test
cases, test name, connection configuration file, agent name, connection status, request
validation status, authentication scheme, redirect URL, credentials expected,
authentication status and user DN, session ID, authorization status, validation status,
and summary statistics. Also notice that the target script and statistics document were
generated by this run.
Example 21–5 Execution Log
[2/3/12 11:02 PM][info] Setting up to run script 'script.xml'
[2/3/12 11:02 PM][info] Loading test cases and control parameters from script
[2/3/12 11:02 PM][info] Loaded 4 cases
[2/3/12 11:02 PM][info] Control data for this test run:
[2/3/12 11:02 PM][info] Test name : 'samplerun1'
[2/3/12 11:02 PM][info] Configuration file : 'config.xml'
[2/3/12 11:02 PM][info] Ignore content : 'false'
[2/3/12 11:02 PM][info] Loading server configuration from file
[2/3/12 11:02 PM][info] Loaded server configuration
[2/3/12 11:02 PM][info] Connecting to server as agent 'oam_agent1'
[2/3/12 11:03 PM][info][request] Connect : Yes
...
[2/3/12 11:03 PM][info] Test 'samplerun1' will process 4 cases
[2/3/12 11:03 PM][info][request] Validate : Yes
[2/3/12 11:03 PM][info] Authentication scheme : LDAPScheme, level : 2
[2/3/12 11:03 PM][info] Redirect URL :
http://oam_server1.uk.example.com:2100/server/
[2/3/12 11:03 PM][info] Credentials expected: 0x01 (password)
[2/3/12 11:03 PM][info][request] Authenticate : Yes
[2/3/12 11:03 PM][info] User DN : cn=admin1,dc=us,dc=company,dc=com
[2/3/12 11:03 PM][info] Session ID : -1
[2/3/12 11:03 PM][info][request] Authorize : Yes
[2/3/12 11:03 PM][info][request] Validate : Yes
[2/3/12 11:03 PM][info] Summary statistics
[2/3/12 11:03 PM][info] Matched 4 of 4, avg latency 232ms vs 238ms
[2/3/12 11:03 PM][info] Validate: matched 2 of 2, avg latency 570ms vs 578ms
[2/3/12 11:03 PM][info] Authenticate: matched 1 of 1, avg latency 187ms vs 187ms
[2/3/12 11:03 PM][info] Authorize: matched 1 of 1, avg latency 172ms vs 188ms
[2/3/12 11:03 PM][info] Generated target script 'samplerun1_0302171__target.xml'
[2/3/12 11:03 PM][info] Generated statistics log 'samplerun1_0302171__stats.xml'

Evaluating Scripts, Log File, and Statistics
21-40 Administrator's Guide for Oracle Access Management

22
Configuring Centralized Logout for Sessions Involving 11g WebGates 22-1
22
Configuring Centralized Logout for Sessions
Involving 11g WebGates
[11]
This chapter describes Access Manager single logout (also known as global logout) for
sessions involving 11g Webgates. With Access Manager, single logout refers to the
process of terminating an active session. Oracle recommends using the logout
mechanism provided by Access Manager in the manner described in this chapter (not
custom logout scripts).
This chapter provides the following sections:
■Prerequisites
■Introduction to Centralized Logout for Access Manager 11g
■Configuring Centralized Logout for 11g Webgates
■Validating Global Sign-On and Centralized Logout
22.1 Prerequisites
Before you can perform tasks in this chapter:
■The application must be deployed on the Web server where the agent is
configured and registered with Access Manager
■One OAM Agent, on any supported Web server and platform, must be running
and registered with Access Manager 11g (Chapter 16)
■Policies must be configured to protect the resource in an Access Manager 11g
Application Domain (Chapter 20)
22.2 Introduction to Centralized Logout for Access Manager 11g
Unless explicitly stated, information in this chapter applies to OAM 11g Webgate
Agents using the default embedded credential collector (ECC).
This section provides the following topics:
■About Centralized Logout for 11g Webgates
■About Logout Parameters for 11g Webgates
See Also: Different agents require different logout implementation
steps described as follows:
■10g Webgate logout Chapter 25
■OSSO Agent (mod_osso) logout Chapter 24

Introduction to Centralized Logout for Access Manager 11g
22-2 Administrator's Guide for Oracle Access Management
22.2.1 About Centralized Logout for 11g Webgates
Access Manager provides centralized logout (also known as global log out) for
sessions. Centralized logout refers to the process of terminating an active session,
which means that:
■Applications must not provide their own logout page for use in an SSO
environment.
■Applications must make their logout links configurable with a value that points to
the logout URL specified by the Webgate Administrator.
Unlike partner applications, external applications (Yahoo! Mail, for example), do not
delegate authentication to OAM and do not cede logout control to the OAM single
sign-on server. It is the user's responsibility to log out of each of these applications.
Table 22–1 describes the circumstances under which centralized logout occurs. When
the logout URL is encountered and the cookie is removed (OAMAuthnCookie for 11g
Webgates; ObSSOcookie for 10g Webgates). Webgate logs out the user and requires
user re-authentication.
22.2.2 About Logout Parameters for 11g Webgates
Generally speaking, during centralized logout, the SSO Engine receives a
user-session-exists
request. The Session Management Engine looks up the session
and responds with
the-session-exists
response. The SSO engine sends a
Clear
Session
request. The Session management engine clears the token and session context.
The SSO engine then sends a
Session Cleared
response.
Clearing the user token and the session context clears the server-side state, which
includes clearing the OAM_ID cookie set on the server side. When the agent is
notified, the agent clears the client-side state of the application.
Configuring 11g Webgates for logout against OAM Servers requires a
Logout
Callback URL
(Table 16–3). Centralized logout for 11g agents sets the cookie from
Note: Oracle strongly recommends that applications use the ADF
Authentication servlet, which interfaces with OPSS where a
domain-wide configuration parameter can be used to specify the
logout URL. This way applications need not be modified or
redeployed to change logout configuration.
Table 22–1 Centralized Logout Circumstances
Circumstance Description
Explicitly The client state is invalidated and the session ends. If a new attempt is
made to access the resource, the client must re-authenticate.
When the user logs out.
When the Administrator terminates the session
When the session is terminated based on changes on the identity side
Implicitly When no user activity occurs within the defined session timeout period,
the user is logged out automatically and redirected back to the partner
with a new session ID and a new prompt for credentials. This occurs if
no lower-level authentication is configured for the resource.
With Access Manager, the user is not logged out if 10g Webgate simply
encounters a logout URL unless the logout.html provides an explicit
redirection to the Server logout. The Webgate redirects the user to the
Server logout.

Introduction to Centralized Logout for Access Manager 11g
Configuring Centralized Logout for Sessions Involving 11g WebGates 22-3
loggedout
to
empty
and expires OAMAuthnCookie_<host:port>_<random number> to
explicitly clear it during logout, (rather than leaving behind an empty or logged out
cookie).
11g Webgates differ only slightly from 10g Webgates, and match only the URI part of
Logout Callback URL
.
The SSO Engine supports the central logout page on the OAM Server and:
■Calls back to
Logout Callback URL
of 11g Webgates during logout
The Webgate parameter
Logout Callback URL
can be configured using a URI
format (recommended), without host:port. OAM Server dynamically constructs the
full URL based on the host:port in the original request and calls back on it. This can
also be a full URL format with a host:port, where OAM Server calls back directly
without reconstructing callback URL.
■Lands on
end_url
(passed in as query parameter) after logout
Several elements in the 11g Webgate registration page enable centralized logout for 11g
Webgates. After registration, the ObAccessClient.xml file is populated with the
information in Table 22–2.
Table 22–2 Logout Details After Registration (ObAccessClient.xml)
Element Description
Logout URL
10g and 11g Webgates
The Logout URL triggers the logout handler, which removes the cookie (ObSSOCookie for 10g
Webgates; OAMAuthnCookie for 11g Webgates) and requires the user to re-authenticate the next
time he accesses a resource protected by Access Manager.
■If there is a match, the Webgate logout handler is triggered.
■If Logout URL is not configured the request URL is checked for "
logout.
" and, if found
(except "
logout.gif
" and "
logout.jpg
"), also triggers the logout handler.
Default = [] (not set)
Note: This is the standard 10g Webgate configuration parameter used to trigger initial logout
through a customized local logout page as described in "Configuring Centralized Logout for 10g
WebGate with 11g OAM Servers" on page 25-22.
Additional Logout for 11g
Webgate Only
For 11g Webgate single sign-off behavior, the following elements and values automate the redirect
to a central logout URL, callback URL, and end URL. This replaces 10g Webgate single sign-off only
through a customized local logout page.

Configuring Centralized Logout for 11g Webgates
22-4 Administrator's Guide for Oracle Access Management
22.3 Configuring Centralized Logout for 11g Webgates
This section provides the following topics:
■Configuring Centralized Logout for 11g Webgates When the ECC is Used
■Configuring Logout When Using Detached Credential Collector-Enabled Webgate
Logout Callback URL The URL to
oam_logout_success
, which clears cookies during the call back. This can be a URI
format without host:port (recommended), where the OAM Server calls back on the host:port of the
original resource request. For example:
Default = /oam_logout_success
This can also be a full URL format with a host:port, where OAM Server calls back directly without
reconstructing callback URL.
When the request URL matches the Logout Callback URL, Webgate clear its cookies and streams an
image .gif in the response. This is similar to OSSO agent behavior.
When Webgate redirects to the server logout page, it records an "end" URL as a query parameter
(
end_url=http://host:port/..."
), which becomes the landing page that the OAM Server
redirects back to after logout.
Note: In the remote registration template this parameter is named logoutCallbackUrl (Table 16–10).
Other Oracle Access Management services support the central logout page on the server. The end_
url relies on the target URL query parameter passed from OPSS integrated applications. See Also:
"Configuring Centralized Logout for Oracle ADF-Coded Applications" on page A-7.
Logout Redirect URL This parameter is automatically populated after agent registration completes. By default, this is
based on the OAM Server host name with a default port of 14200. For example:
Default = http://OAMServer_host:14200/oam/server/logout
The Logout URL triggers the logout handler, which removes the OAMAuthnCookie_<host:port>_
<random number> and requires the user to re-authenticate the next time he accesses a resource
protected by Access Manager.
■When Webgate logout handler is triggered, it redirects to the central logout page specified by
the Logout Redirect URL parameter if it is configured.
■If this is explicitly cleared (and not configured), then 10g behavior is triggered. The local
logout page can have a customized script to redirect to the central logout page and can clear
additional 3rd party cookies if desired.
Logout Target URL The value for this is name for the query parameter that the OPSS applications passes to Webgate
during logout. This query parameter specifies the target URL of the landing page after logout.
Default: end_url
Note: The end_url value is configured using param.logout.targeturl in jps-config.xml.
■If Logout Target URL is configured, Webgate searches for the value passed in the logout
request's query parameter and passes it as end_url query parameter in the redirect URL to
OAM Server.
■If Logout Target URL is not configured, Webgate searches for the default name "end_url" and
passes that end_url query parameter along.
See Also:
■"Configuring Centralized Logout for 10g WebGate with 11g OAM
Servers" on page 25-22
■"Configuring Logout for OSSO Agents with Access Manager
11.1.2" on page 24-16
■"Configuring Centralized Logout for Oracle ADF-Coded
Applications" on page A-7
Table 22–2 (Cont.) Logout Details After Registration (ObAccessClient.xml)
Element Description

Configuring Centralized Logout for 11g Webgates
Configuring Centralized Logout for Sessions Involving 11g WebGates 22-5
22.3.1 Configuring Centralized Logout for 11g Webgates When the ECC is Used
During 11g Resource Webgate registration or editing, you configure the logout
parameters as described here.
To configure centralized logout for 11g Webgates
1. Choose your method for registration described in Chapter 16, "Registering and
Managing OAM 11g Agents"
2. When creating or editing an agent registration, include appropriate logout values
for your environment (Table 22–2):
■Logout URL
■Logout Callback URL
■Logout Redirect URL
■Logout Target URL
3. Finish and save your agent registration, as usual.
4. Multiple DNS Domains: Perform the following steps if you have multiple DNS
domains configured for Access Manager 11g SSO.
a. Configure the
Logout Callback URL
as the second value in the
logOutUrls
parameter on each resource Webgate.
Logout Callback URL
is the location on Webgate that the request must be sent
to, for clearing the SSO Cookie in that domain. The
Logout Callback URL
cannot be logout.html.
b. Ensure that a file physically exists on each Web server at the
Logout Callback
URL
location (usually, at the same location as logout.html).
For example, if you configure a file named logout.png in the same location as
logout.html, then the
Logout Callback URL
of logout.png would be:
/oamsso/logout.png
5. Perform steps in "Validating Global Sign-On and Centralized Logout" on
page 22-6.
Note: If the
LogOutUrl
parameter is already configured for the 11g
Webgate (with a value other than
/oamsso/logout.html
), then ensure
that is also present as part of the
LogOutUrl
parameter.
See Also: "Configuring Logout When Using Detached Credential
Collector-Enabled Webgate" on page 22-6
Note: The
Logout Callback URL
can be unique for each Webgate;
however, to construct the
Logout Callback URL
for each Webgate, it is
sufficient for the OAM Server to know the host and port of each
Webgate from each domain. The file that the
Logout Callback URL
points to must differ from the logout.html script in the Webgate
installation directory.

Validating Global Sign-On and Centralized Logout
22-6 Administrator's Guide for Oracle Access Management
22.3.2 Configuring Logout When Using Detached Credential Collector-Enabled
Webgate
When the DCC receives a logout request from the Agent, the DCC:
■Decrypts the logout request, if needed
■Retrieves the
end_url
, constructs the full URL with the Agent's host:port if needed
■Clears the DCC cookie (DCCCtxCookie)
■Sends the logout request across the back channel to terminate the session
■
Logout Callback URLLogout Callback URLs
Gets a logout page containing links
to all visited agent from OAM Sever (which has this information), or get only a
list of the visited from OAM Sever to construct a logout page locally, and redirect
user to this page on DCC.
■Returns to the
end_url
after logout completes
To configure logout for Resource Webgates separate from DCC
1. Confirm that the Perl scripts for DCC logout include the actual location of the Perl
executable on the Webgate host
$WEBGATE_HOME/oamsso-bin/*pl
.
2. Resource Webgate: Modify the Logout Redirect URL to point to DCC's logout.pl:
a. Find the Resource Webgate Registration: See "Searching for an OAM Agent
Registration".
b. Modify the
Logout Redirect URL to
point to the DCC's logout.pl. For
example:
http://DCCWGhost:port/oamsso-bin/logout.pl
3. Perform steps in "Validating Global Sign-On and Centralized Logout" on
page 22-6.
22.4 Validating Global Sign-On and Centralized Logout
This section provides the following topics:
■Confirming Global Sign-On
■Validating Global Sign-On with Mixed Agent Types
■Observing Centralized Logout
22.4.1 Confirming Global Sign-On
Use the following procedure to observe single sign-on global login.
Prerequisites
■Agents and Servers must be registered with Access Manager and running
Note: The DCC ignores the
Logout Redirect URL
parameter in the
Webgate registration page. However, if the Resource Webgate
Logout
Redirect URL
is anything other than
logout.*
, then that URL must be
defined in DCC
Logout URLs
. See Table 19–34, " Specifying Credential
Collectors and Related Forms for Authentication"

Validating Global Sign-On and Centralized Logout
Configuring Centralized Logout for Sessions Involving 11g WebGates 22-7
■Resources and policies controlling SSO must be defined within Access Manager
Application Domains
To observe global sign-on
1. From a browser, enter the URL to a protected resource.
2. On the login page, sign in using proper credentials.
3. Verify that the resource is presented; do not log out.
4. In the same browser window, enter the URL to another protected resource and
confirm that the resource is presented without having to re-authenticate.
22.4.2 Validating Global Sign-On with Mixed Agent Types
Use the following procedure to observe single sign-on global login with different
applications and agents that have the same authentication level.
For example, suppose you have:
■OSSO Partner at
http://host1.example.com:7777/private/index.html
protected using mod_osso
■Webgate Partner at
http://host2.example.com:8888/mydomain/finance/index.html
protected using
OAM Agent
Within the same browser session, you can access all applications protected by either
agent with only a single sign in.
Prerequisites
■Agents and Servers must be registered with Access Manager and running
■Resources and policies must be defined within Access Manager Application
Domains
■Both partners must be protected at the same authentication level
■Single sign-on must be configured as described in this chapter
To observe global sign-on with mixed agent types
1. OSSO Agent Protected Application:
a. From a browser, enter the URL of the OSSO-protected resource
b. Confirm that the login page appears and sign in using proper credentials.
c. Confirm that the protected resource is served.
d. Remain in the same browser session and proceed to Step 2.
2. Same Browser Session, OAM Agent Protected Application:
a. In the same browser session as Step 1, enter the URL of the OAM
Agent-protected resource.
b. Confirm that the protected resource is served and that no login page appears.
3. Log out of the browser session.
4. Fresh Browser Session, OAM Agent Protected Application:
a. In a fresh browser session, enter the URL of the OAM-protected resource.
b. Confirm that the login page appears and sign in using proper credentials.

Validating Global Sign-On and Centralized Logout
22-8 Administrator's Guide for Oracle Access Management
c. Confirm that the protected resource is served.
d. Remain in the same browser session and proceed to Step 5.
5. Same Browser Session, OSSO Agent Protected Application:
a. In the same browser session as Step 4, enter the URL of the OSSO
Agent-protected resource.
b. Confirm that the protected resource is served and that no login page appears.
22.4.3 Observing Centralized Logout
Use the following procedure to observe centralized logout:
■With OAM Agents, the logout URL redirects to the server and cookies are cleared
and invalidated so that a subsequent request cannot locate the cookie.
■With mod_osso, each agent destroys its own cookies. The logout URL redirects to
the global logout page on the server and each partner sends cookies to the server.
Prerequisites
■Agents must be registered and running
■Resources must be protected by Access Manager Application Domains
■Single sign-on must be configured with authentication and authorization policies
and responses in Access Manager Application Domains
To observe centralized logout
1. Single Application:
a. From a browser, enter the URL of the protected resource.
b. Confirm that the login page appears and sign in using proper credentials.
c. Confirm that the protected resource is served.
d. Open a new browser tab or window and access the same resource to confirm
that the second attempt does not require another login.
e. Logout from one tab.
f. Access the resource again to confirm that a login page appears.
2. Two Applications:
a. From a browser, enter the URL of the protected resource.
b. Confirm that the login page appears and sign in using proper credentials.
c. In a new tab or window, access another protected application and confirm that
the second application does not require another login.
d. Log out of the first application.
e. Access the second application and confirm that the login page appears.

Part VI
Par t VI
Registering and Using Agents with Access
Manager
When your enterprise includes Web server types other than Oracle HTTP Server, you
can install 10g WebGates to use with Access Manager.
Part VI contains the following chapters:
■Chapter 23, "Registering and Managing Legacy OpenSSO Agents"
■Chapter 24, "Registering and Managing Legacy OSSO Agents"
■Chapter 25, "Registering and Managing 10g WebGates with Access Manager 11g"
■Chapter 26, "Configuring Apache, OHS, IHS for 10g WebGates"
■Chapter 27, "Configuring the ISA Server for 10g WebGates"
■Chapter 28, "Configuring the IIS Web Server for 10g WebGates"
■Chapter 29, "Configuring Lotus Domino Web Servers for 10g WebGates"

23
Registering and Managing Legacy OpenSSO Agents 23-1
23
Registering and Managing Legacy OpenSSO
Agents
[12]
If OpenSSO is already in place as the enterprise solution for your existing Oracle
deployment, Oracle Fusion Middleware continues to support this as a solution.
Additionally, you can register existing OpenSSO agents for use with Access Manager.
This chapter explains how to register or manage legacy OpenSSO agents for use with
Access Manager 11.1.2 and provides the following sections:
■Introduction to OpenSSO, Agents, Migration and Co-existence
■Runtime Processing Between OpenSSO Agents and Access Manager
■Understanding OpenSSO Agent Registration Parameters
■Registering and Managing OpenSSO Agents Using the Console
■Performing Remote Registration for OpenSSO Agents
■Updating Registered OpenSSO Agents Remotely
■Locating Other OpenSSO Agent Information
23.1 Introduction to OpenSSO, Agents, Migration and Co-existence
OpenSSO is the open source version of the Sun Access Management, Federation
Management, and Web Services Security product. Each OpenSSO Agent is a filter that
is plugged into a container (Oracle WebLogic Server, JBoss, Apache, and so on) that
hosts applications.
OpenSSO Agents can co-exist together with Webgates, Access Clients, or OSSO
Agents. Oracle provides OpenSSO Assessment and OpenSSO Migration tools that you
can use to transition existing OpenSSO agents, profiles, and policies in to Access
Manager.
Each OpenSSO Agent provides restricted access to applications by intercepting
requests to these applications. After provisioning, OpenSSO Agents use OAM Server
instead of the OpenSSO Server.
See Also: Oracle Fusion Middleware Upgrade Guide for Oracle
Identity and Access Management for details about Oracle-provided
tools and processes to assess and transition OpenSSO agents, profiles,
and policies in to Access Manager.

Introduction to OpenSSO, Agents, Migration and Co-existence
23-2 Administrator's Guide for Oracle Access Management
After provisioning, OpenSSO Agents use OAM Server instead of the OpenSSO Server.
Restricted access to applications is provided by intercepting requests to these
applications. OAM Server provides an OpenSSO Proxy that enables communication
between the agent and OAM Server and facilitates SSO to the agent-protected
application.
OAM Server provides an OpenSSO Proxy that enables communication between the
agent and OAM Server and facilitates SSO to the agent-protected application. Using
registered OpenSSO Agents, Access Manager provides the features outlined in
Table 23–1 (authentication features and a subset of authorization features).
For more information, see:
■About Migration and Co-existence Between OpenSSO and Access Manager
■About OpenSSO Agent Reliance on Access Manager
■Runtime Processing Between OpenSSO Agents and Access Manager
23.1.1 About Migration and Co-existence Between OpenSSO and Access Manager
Access Manager supports co-existence with an existing OpenSSO Server deployment
that has been migrated using the OpenSSO to Access Manager upgrade tool.
The OpenSSO to Access Manager Upgrade makes use of OpenSSO Discovery Agents
and Policy mapping logic, which fulfills requirements described in following topics:
■OpenSSO Policy Migration
■Application Domain Creation During OpenSSO Migration
■OpenSSO Authentication Policy Migration
■Host Identifier Creation in Access Manager
For System Requirements and Supported Platforms for Access Manager and
OpenSSO, see the Oracle Identity and Access Management matrix on the following
site:
http://www.oracle.com/technetwork/middleware/ias/downloads/fusion-certification-10
0350.html
Note: OpenSSO Agents must be registered with Access Manager to
use OAM Server instead of the OpenSSO Server.
Table 23–1 Features: OpenSSO Agents with Access Manager
Agent Authentication User Authentication
User Single-Sign-On User Single Logout
SSO in mixed agents case (between OpenSSO agent
and WebGate agent)
User Authorization
Self and Sub-tree mode search Policy Conditions (Identity, LDAP filter, Session
attribute, IP Range, Temporal)
User profile attributes retrieval Centralized Agent configuration with REST request
or response
Migration of Agent profiles, Policies, User Stores,
Authentication Stores
Migration Assessment tool

Introduction to OpenSSO, Agents, Migration and Co-existence
Registering and Managing Legacy OpenSSO Agents 23-3
OpenSSO Policy Migration
The OpenSSO policy is mapped to Access Manager authentication and authorization
policies based on available artifacts in the OpenSSO deployment. Table 23–2 table
outlines the mapping that occurs between OpenSSO and Access Manager during
Policy migration.
Application Domain Creation During OpenSSO Migration
If an existing Access Manager Application Domain and policies do not match an
OpenSSO policy domain, a new Application Domain is created in Access Manager.
The created Application Domain corresponds to an OpenSSO Realm. With respect to
each Realm, (OpenSSO Top-level and Sub -level Realms), an Application Domain is
created in Access Manager.
All existing Application Domains are compared against OpenSSO Policy Domains.
The policy name is checked against all existing policies. If a policy of the same name
exists, an error occurs. Otherwise, a new policy is created in Access Manager.
OpenSSO Authentication Policy Migration
An OpenSSO policy containing valid rules and conditions is migrated to an Access
Manager Authentication Policy: either a new policy to be created or an existing policy
to be updated. During policy creation, the OpenSSO policy rule host:port information is
used to create the host identifier and exact resource URL (or URI) to the Application
Domain.
A policy with conditions is valid for OpenSSO. However, these are migrated based on
the default Authentication Policy for Access Manager. Such policies with IP or
Temporal conditions can be migrated to Access Manager Authorization Policy
conditions.
See Also: Oracle Fusion Middleware Upgrade Guide for Oracle
Identity and Access Management
See Also: "Migrated Artifacts: OpenSSO" on page D-12
Table 23–2 OpenSSO Policy Migration
Serian OpenSSO Access Manager
1 Policy Realm Policy Domain
2 Policy Authentication and Authorization Policies
3 Resources Resources plus Host Identifier
4 Actions Not specified (By default only "GET")
5 Subject Identity Conditions in Authorization Policies
6 Conditions Authentication Scheme plus Authorization Conditions
7 Response Providers Policy Responses
Note: An OpenSSO policy referral policy is not migrated.
Note: An OpenSSO policy containing artifacts with no rules is not a
valid policy.

Introduction to OpenSSO, Agents, Migration and Co-existence
23-4 Administrator's Guide for Oracle Access Management
If the OpenSSO policy is a non-referral policy, an Access Manager Authentication
Policy is created containing an authentication scheme with the corresponding
authentication module from OpenSSO, host identifier, and resources from OpenSSO
policy. In the Access Manager Authorization policy, corresponding OpenSSO
constraints and subjects are set.
Limitation: Authentication policy creation exception if the resource already exists (in
one of the policy in same Application Domain or Realm. If the resource is already
protected by another policy (already exists under the host identifier), new policy
creation for the same resource causes an exception. This new policy is not created. The
errors are logged in a log file and also displayed in the Oracle Access Management
Console.
Host Identifier Creation in Access Manager
One Host Identifier is created within Access Manager for each unique host:port
combination from OpenSSO. Need to retrieve all the host:port from each policy rules in
each realm and will create the number of hostIdentifiers = number of unique host:port
combinations.
Top Realm: By default, OpenSSO has only one top-level realm (/). All other realms
can be created under this top-level realm. Ideally, the top-level realm will contain all
the host:port combinations for which Host Identifiers are created in Access Manager.
Sub Realm: host:port combinations in policy rules within sub realms depend on the
host:port in the Referral policy created under the top realm. The host:port in referral
policy is not necessarily from any of the host:port in other non-referral policies in top
realm (also referral policy is not applicable for migration). Hence, the host:port in sub
realm's policies can be different from the host:port in top realm's policies which are
applicable for migration.The host:port from each realm's policies is checked.
Limitation: In OpenSSO, if there are 2 (or more) policies with same rule yet with
different authentication schemes to protect the same resource, then only one (the first
one in occurrence) can be migrated to Access Manager; the others are ignored and are
not created in Access Manager. There are rare chances for such an occurrence.
23.1.2 About OpenSSO Agent Reliance on Access Manager
Access Manager supports OpenSSO Agents and processing as outlined in Table 23–3.

Introduction to OpenSSO, Agents, Migration and Co-existence
Registering and Managing Legacy OpenSSO Agents 23-5
Table 23–3 OpenSSO Reliance on Access Manager
Component Description
OpenSSO Agent OpenSSO agents must be registered with Access Manager to establish trust by authenticating
themselves. The OAM Server:
■Authenticates the agents with the credentials provided.
■Creates a session for the agent.
■Stores this information in the cache so that any server in the group/cluster can service the next
request from the agent.
■Passes the session identifier to the agent so that it can present this to OAM Server during
subsequent interactions.
This agent session does not expire, which enables the Agent to maintain trust continuity with the
OAM Server.
The agent registration can be enabled or disabled. When disabled, the Agent does not respond.
Multiple OpenSSO agents can share same centralized configuration (if required and if registered in
centralized configuration mode). Even so, each agent has its own unique session and session ID. The
agent registration can be configured for the "maximum number of agent sessions allowed" per
registration.
It might have a session timeout property that defines whether the agent's session should expire or
not.
See Also:
"Registering and Managing OpenSSO Agents Using the Console" on page 23-20
"Introducing Access Manager Credential Collection and Login" on page 18-14
OpenSSO Proxy This Oracle-provided proxy is bundled and installed with Access Manager 11.1.2. OpenSSO Proxy
enables communication between the OpenSSO Agent and OAM Server. OpenSSO Proxy serves all
OpenSSO Agent requests and responses for Authentication, Authorization, and SSO. OpenSSO
Proxy provides protocol binding and message (request or response) conversion functionality.
See Also: "Runtime Processing Between OpenSSO Agents and Access Manager" on page 23-6
Protocol Binding Layer This Oracle-provided framework is responsible for agent-specific protocol handling and mapping
authentication protocol messages. This framework also unmarshals incoming protocol-specific
requests to protocol agnostic requests and marshals back protocol-agnostic responses to
protocol-specific responses.
Partner and Trust Store Stores OpenSSO Agent centralized configuration. The Access Manager Partner and Trust Store also
supports Agent authentication by providing GET APIs for the Agent ID and Agent Password.
OpenSSO Application
Domain
This can be generated automatically by using the Auto Create Policies option during OpenSSO
Agent registration.
Cookies The end user has the following valid cookies:
■OAM_ID cookie (represents the end session after agent authentication); see
■OpenSSO cookie (the agent finds this cookie after the OpenSSO Proxy triggers session
validation). The default name of the OpenSSO cookie is:
iPlanetDirectoryPro
Authorization Policy for
Protected Resources
Set up the Authorization policy with
■An IP Range Condition that allows access to only the specified range of IP Addresses.
■A Temporal Condition that allows access to only during the specified time period.
■An Identity Condition that allows only the configured Identity (user or group) to access the
protected resource.
■An LDAP Filter condition that allows access only if the filter condition is satisfied.
■A Session attribute condition that allows access only if the session has the configured session
attribute with required value
■An attribute condition for namespaces Request, User, and Session that allows access only if the
attribute has been configured with required values
SSO Controller Fulfills protocol requests by invoking functional components (SSO Engine, Authentication Engine,
and so on):
SSO Engine Provides enterprise and same domain Sign-on and Single logout (SLO) during an online session.
Manages the session lifecycle. Facilitates Global logout by orchestrating logout across all Relying
Parties in the valid session. Communicates with the Token Processing Engine to create a valid session
and persist the user.

Runtime Processing Between OpenSSO Agents and Access Manager
23-6 Administrator's Guide for Oracle Access Management
23.2 Runtime Processing Between OpenSSO Agents and Access
Manager
The OAM Server includes an OpenSSO Proxy to handle communication with the
OpenSSO Agent and facilitate interoperability with the OpenSSO server. Single Sign
On (SSO) and Single Logout (SLO) between OpenSSO policy agents and the OAM
Server, for instance. Interoperability is accomplished by honoring HTML/HTTP
Authentication requests for end-user authentication (as an HTTP redirect) and
XML/HTTP SSO requests for end-user session validation.
Session Management
Engine
Manages session and token context information with support for user- and Administrator-initiated
and time-out based events. The SSO Engine uses Session Management Engine capabilities for session
management:
■Create Session
■Read Session
■Update Session
■Delete Session
■Validate Session
■Get Session Id
■Set/Get creation instant
■Set/Get expiry instant
■Set/Get Last access time
■Set/Get Session state
■Purge Sessions
Note: There is no support for viewing or managing OpenSSO agent sessions using the Oracle Access
Management Console. The OpenSSO engine controller layer invokes the appropriate session
management interfaces as required. Session manager invokes the agent session cache manager
internally to manage the distributed cache for the agent session.
A unique session is created for each registered OpenSSO agent, which becomes the trust mechanism
between the Agent and the OAM Server. The unique session ID accompanies all XML/HTTP
requests for session validation, user authorization, and so on, as the agent token that must be
validated by the OAM Server before it can serve any user requests.
By default, the agent session does not expire. Agent sessions are stored within the in-memory session
cache. Agent sessions are not required to be persisted if the OAM Server restarts.
The agent session resides on the OAM Server and the unique agent session ID is passed back to
Agent in a form it can use. The agent session supports two states: Invalid (unauthenticated), and
Valid (authenticated). The OAM Server can successfully communicate with only an agent with a
Valid session state.
Token Processing Engine Responsible for token generation and token validation in response to token issuance and validation
protocol requests. Default capability manages (issues, validates, renews, cancels) Username, SAML,
and X509 tokens. This can also be extended to handle custom tokens beyond out-of-box/default
supported security token types.
Oracle Access
Management Console
Administrators use the console to:
■Provision/register OpenSSO Agents
■Manage an Application Domain and authentication and authorization policies for protected
resources.
Remote registration
utility
Administrators can use the remote registration utility to provision the agent and generate
configuration files to be consumed by the agent in Centralized mode. The agent has a copy of all
required configuration information and does not contact the OAM Server for this.
Note: If you are migrating an OpenSSO agent profile to Access Manager, both localized and
centralized modes are supported.
WLST commands Administrators can use WLST commands to:
■Migrate OpenSSO Agents to the OAM Server
See Also: "Migrated Artifacts: OpenSSO" on page D-12.
Table 23–3 (Cont.) OpenSSO Reliance on Access Manager
Component Description
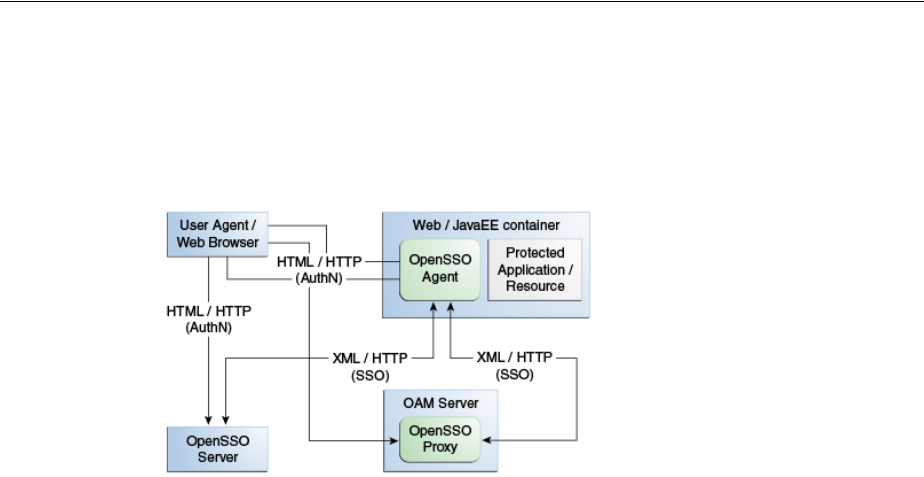
Runtime Processing Between OpenSSO Agents and Access Manager
Registering and Managing Legacy OpenSSO Agents 23-7
Figure 23–1 shows a deployment that includes OpenSSO and Access Manager. The
OpenSSO Agent resides with the Web/Java EE container and the protected resource.
The OpenSSO Server resides on a different host.
Figure 23–1 Typical Deployment with OpenSSO and Access Manager
Table 23–4 describes SSO processing between Access Manager and OpenSSO Agents.

Runtime Processing Between OpenSSO Agents and Access Manager
23-8 Administrator's Guide for Oracle Access Management
Table 23–4 Access Manager Processing with OpenSSO
Functionality Description
OpenSSO Agent
Authentication
OpenSSO agents are authenticated and a valid agent session is established before user
authentication.
The OpenSSO agent authenticates itself to the OAM Server through the OpenSSO Proxy.
OpenSSO Agent Authentication (Agent authenticating itself to the OpenSSO Proxy occurs based
on the Agent type:
J2EE Agents: Upon Agent container startup.
Web Agents: With the first user authentication request to the Web Server.
1. End user sends a request to access an application or resource protected by the OpenSSO
agent.
2. OpenSSO agent redirects this un-authenticated user to the OAM Server for authentication
as follows:
J2EE Agents: Upon Agent container startup.
Web Agents: With the first user authentication request to the Web Server.
3. Agent sends the naming request to the proxy to fetch all the other service URLs
(Authentication service, Session Service, and so on).
4. Agent sends the xml Authentication request to the Proxy with its credentials on the
Authentication service endpoint (obtained from the naming request in Step 3).
5. Proxy authenticates the Agent against an Agent authentication module and creates a
non-expiry session in the proxy layer itself.
6. Proxy sends the Authentication xml Response with the agent session details to the agent
over http.
Once the agent is authenticated, a valid agent session is created. The key that is generated
following agent authentication is stored in the Partner and Trust store.
SSO User Login and
Authentication
After the agent is authenticated by the OAM Server, the user request is authenticated by the
OAM Server. SSO is then provided to the authenticated user accessing resources protected by the
agent.
After the OpenSSO agent is authenticated and logged in, the gent verifies whether the user has
an OpenSSO cookie. If not, the user authentication request is initiated from the OpenSSO agent.
User Login
1. OpenSSO agent intercepts the request to protected application. OpenSSO agent checks if the
user has an OpenSSO cookie. If not, OpenSSO agent redirects the user to the OpenSSO
Proxy for authentication service. OpenSSO Proxy fetches the requested resource URL and
the agent ID.
2. The OpenSSO Login event in the OpenSSO proxy wraps this request in a way that the core
login events can understand. The OpenSSO login event passes the resource URL and the
agent ID to the core login event.
3. Core Login events are performed, which checks if the request object contains an OAM_ID
cookie. If yes, OAM Server checks if the session represented by the OAM_ID cookie is a
valid session.
4. If the session represented by the OAM_ID cookie is valid, core login event returns the Login
response event, which is wrapped by the OpenSSO Login event and is passed on to the
OpenSSO login response handler. Core login event returns the identifier of the validated
session.
5. OpenSSO login response handler (part of OpenSSO proxy) creates an OpenSSO session
identifier in the format that the OpenSSO agent understands and extends this identifier
with the OAM session identifier. OpenSSO cookie is created, which contains the OpenSSO
session identifier and this cookie is set in the user's browser.

Runtime Processing Between OpenSSO Agents and Access Manager
Registering and Managing Legacy OpenSSO Agents 23-9
End User Session Validation OpenSSO agents intercept the request to the protected application.
End user Session Validation
1. OpenSSO agent intercepts the request to the protected application and finds an OpenSSO
cookie.
2. OpenSSO agent constructs an XML/HTTP request to validate this OpenSSO cookie. Here
XML request would have Application / Agent token ID and session ID. This request
reaches the OpenSSO proxy layer.
3. OpenSSO Proxy gets the Application Token associated with the request and validates the
Application Token with the OAM Server.
4. OAM Server validates the token and sends the response to the OpenSSO Proxy
5. If the Application Token is invalid, the OpenSSO proxy communicates that to the OpenSSO
agent and OpenSSO agent starts the agent authentication flow to obtain that valid
Application Token.
6. If the Application Token is valid, OpenSSO proxy decrypts the OpenSSO cookie, fetches the
OpenSSO session ID and gets the OAM session ID which is stored as the extension in the
OpenSSO session ID.
7. The OpenSSO Proxy triggers the session validation flow.
8. If the session represented by the OAM session ID valid, the OpenSSO proxy communicates
that to the Agent and the protected application is displayed to the user. This session
validation returns the session data (session attributes and values) to the proxy layer as the
output of session validation event response.
9. If the session is invalid, authentication flow is initiated by the OAM Server, where the OAM
Server collects the user credentials and validates the user.
User profile attributes
retrieval for Web Agent types
OpenSSO agents can request user profile attributes once the user is successfully logged in and a
valid session is created, by providing the session ID. The OpenSSO proxy layer must receive
these requests and fetch the OAM session ID from the OpenSSO session ID extension. OpenSSO
Web agents use the Policy service URL for these requests.
OpenSSO proxy then fetches these attributes and passes the session ID to the OAM Server
(which uses the responses framework to fetch the User Profile attributes and return the data to
the OpenSSO Proxy).
User profile attributes
retrieval for J2EE Agent types
OpenSSO J2EE agents use jax-rpc calls to retrieve user profile attributes. The flow is similar as
the one for Web agents types to retrieve these properties.
User Single Logout 1. The OpenSSO Proxy receives a User logout request and forwards the user to the OAM
logout URL
2. OpenSSO Proxy decrypts the OpenSSO cookie, fetches the OpenSSO session identifier and,
from that, fetches the OAM session ID. OpenSSO proxy sends the logout request to
controller through the OpenSSO logout event with the OAM session ID.
3. Core logout events are performed, which includes the controller calls to the SSO engine to
confirm the session exists. If the session exists, the OAM_ID cookie is deleted, and global
logout is performed.
4. The SSO engine returns the response to the controller indicating the session has been
cleared.
5. The controller sends a request to the proxy to clear tokens.
6. The Proxy sends the request to the agent to clear tokens through the OpenSSO Logout
response handler.
Table 23–4 (Cont.) Access Manager Processing with OpenSSO
Functionality Description

Understanding OpenSSO Agent Registration Parameters
23-10 Administrator's Guide for Oracle Access Management
23.3 Understanding OpenSSO Agent Registration Parameters
Whether you migrate existing OpenSSO Agents to Access Manager or register a fresh
OpenSSO Agent, the Oracle Access Management Console provides centralized
registration and management of OpenSSO Agents.
■About OpenSSO Agent Registration Parameters
■About the Expanded OpenSSO Agent Page and Parameters
23.3.1 About OpenSSO Agent Registration Parameters
Figure 23–2 shows the New OpenSSO Agent page where Administrators enter
information during new OpenSSO agent registration.
SSO Agent Logout Access Manager handles single logout requests originating from the OpenSSO agents.
Note: The user must be logged out from resources protected by other agents (WebGate and
MOD_OSSO, for instance). Agent logout is not required other than in the multi-domain
environment.
1. The OpenSSO Agent requests logout to OpenSSO Proxy.
2. The Proxy fetches the Application token from the request and verifies that the request is
initiated by an authenticated agent.
3. Opensso Agent Logout is handled within the proxy as the session is created in an
independent Agent Session Management Module.
4. The decrypted token is returned to the OpenSSO Proxy. If there is no OpenSSO token
present, steps 2 and 3 are absent.
5. The OpenSSO Login event in the OpenSSO proxy wraps this request in a way that the core
login events can understand.
6. Core Login events are performed, which includes forwarding the request to the SSO Engine
through the controller and authenticating the user. A new session is created for the
authenticated user.
7. Core login event returns the Login response event, which is wrapped by the OpenSSO
Login event and is passed on to the OpenSSO login response handler.
8. OpenSSO login response handler sends the response to the OpenSSO agent.
Token Genera tion for
OpenSSO Agents
Access Manager processes the tokens generated for, and to be consumed by the OpenSSO agents.
Logging Enables you to track events during end user access enforcement for following events, using the
OAM Server log component:
■Login success and login failure events
■Logout success and logout failure events
■Log messages at different logging levels (FATAL, ERROR, WARNING, DEBUG, TRACE),
each of which indicates severity in descending order.
Auditing Using the OAM Server audit component to:
■Audit Login events
■Audit Logout success events
Polling Polling is not Supported. Only Session Destroy notifications are supported by the OpenSSO
Proxy.
Table 23–4 (Cont.) Access Manager Processing with OpenSSO
Functionality Description

Understanding OpenSSO Agent Registration Parameters
Registering and Managing Legacy OpenSSO Agents 23-11
Figure 23–2 New OpenSSO Agent Page
Table 23–5 describes the elements on the New OpenSSO Agent page.
Table 23–5 Elements on the New OpenSSO Agent Page
Element Description
Agent Type OpenSSO agent types can be either:
■Web: Use with Web resources and Web resource URLs.
■J2EE: Default agent type. Use J2EE type agents for Java EE resources and
applications.
For the J2EE Agent, Filter modes must be set by choosing either:
SSO_ONLY (Access Manager Authentication Only): Enables the least
restrictive mode of operation for the filter; the agent simply ensures that all
users who try to access protected web resources are authenticated.
URL_Policy (Access Manager Authentication and Authorization): Enables
the agent filter to enforce URL policies. By default, with Web Agents,
.com.sun.identity.agents.config.sso.onlyattribute is set to "false".
Note: Both agent types provide access protection when you also choose SSO
only.
Agent Name Unique name for this agent.
Password
Re-enter Password
A required, unique password for this OpenSSO agent, which can be assigned
during this registration process. The entry will appear in obfuscated format in
the console, in oam-config.xml, and in OpenSSOAgentBootstrap.properties.
When a registered agent connects to an OAM Server, the user is prompted for
the password. The password is used for authentication to prevent unauthorized
agents from connecting and obtaining policy information.
Host Identifier A name that identifies the host and port for the OpenSSO agent.
Default: Agent Name
See Also: "About Virtual Web Hosting" on page 19-10.
Base URL The protocol, host, and port of the computer on which the OpenSSO agent is
installed.
For example, http://host.example.domain.com:port or
https://example.domain.com:port.
Auto Create Policies During agent registration, you can have authentication and authorization
policies created automatically. This option is checked (enabled) by default. The
agent name is used as the Application Domain name by default.
Default: Enabled
See Also: "Generated Artifacts: OpenSSO" on page D-8.
Notes: An Application Domain in Access Manager corresponds to a Realm in
OpenSSO. If you already have an Application Domain and policies, you can
simply add new resources to it. If you clear this option (no check), no
Application Domain or policies are generated automatically.

Understanding OpenSSO Agent Registration Parameters
23-12 Administrator's Guide for Oracle Access Management
OpenSSO Agent Properties
OpenSSO Agent properties are stored in the following files, which are updated during
agent registration and configuration changes and consumed during run time:
■OpenSSOAgentBootstrap.properties
■OpenSSOAgentConfiguration.properties
These files are stored on the console host (AdminServer) and must be relocated to the
OpenSSO Agent /config directory as shown in Table 23–6.
For details about the generated Application Domain for an Open SSO Agent, see
"Generated Artifacts: OpenSSO" on page D-8.
23.3.2 About the Expanded OpenSSO Agent Page and Parameters
This topic describes expanded OpenSSO Agent page that is available when managing
the agent using the Oracle Access Management Console.
During registration, only a small subset of available parameters is displayed to
streamline the process. Whether you registered the agent using the Oracle Access
Management Console or the remote registration utility, you can view the full agent
configuration page in the console. Default values populate the page after initial
registration and are displayed when you open the Agent's page, as shown in
Figure 23–3.
Table 23–6 Relocating OpenSSO Artifacts
From AdminServer . . . To OpenSSO Agent /config Directory
$MW_HOME/Oracle_
IDM1/oam/server/rreg/client/rreg/output
$Policy-Agent-base/AgentInstance-Dir/config/
Understanding OpenSSO Agent Registration Parameters
Registering and Managing Legacy OpenSSO Agents 23-13
Figure 23–3 Expanded OpenSSO Web Agent Registration Page
Information on the J2EE Agent registration page is nearly the same as details for Web
Agents. The J2EE Agent registration page is shown in Figure 23–4.

Understanding OpenSSO Agent Registration Parameters
Registering and Managing Legacy OpenSSO Agents 23-15
Table 23–7 Expanded OpenSSO Agent Registration Elements
Element Description
Status The state of this agent registration: Enabled or Disabled.
Default: Enabled
See Also: Table 23–5, " Elements on the New OpenSSO Agent Page"
Filter mode
J2EE Agent Type
only
The Agent filter is installed within the protected application. It facilitates the enforcement of security
policies, governing the access to all resources within the protected application. Every application
protected by the J2EE Agent must have its deployment descriptors changed to reflect that it is configured
to use the agent filter. Applications that do not have this setting are not protected by J2EE the Agent and
might malfunction or become unusable if deployed on a deployment container where the Agent realm is
installed.
Filter modes must be set for the J2EE Agent by choosing one of the following options: SSO_ONLY or
URL_Policy.
Default: URL_Policy
■SSO_ONLY (Access Manager Authentication Only): Enables the least restrictive mode of operation
for the filter; the agent simply ensures that all users who try to access protected web resources are
authenticated.
■URL_Policy (Access Manager Authentication and Authorization): Enables the agent filter to enforce
URL policies. By default, with Web Agents, .com.sun.identity.agents.config.sso.onlyattribute is set to
"false".
Process overview: Authentication Only (SSO_ONLY J2EE Filter Mode)
1. End user requests access to an application or resource protected by OpenSSO Agent.
2. OpenSSO Agent redirects this un-authenticated user to OAM Server for authentication.
3. After successful authentication, OpenSSO Proxy redirects the user back to the protected resource
with OpenSSO session ID set in the response cookie.
4. Authenticated end user with valid OpenSSO session, accesses application or resource protected by
OpenSSO Agent.
5. OpenSSO Agent validates the OpenSSO Session against OAM Server through the OpenSSO Proxy
and enables SSO for the end user.
6. End user gets access to the protected application or resource.
Process overview: Authentication and Authorization with URL_Policy J2EE Filter Mode
1. End user requests access to an application or resource protected by OpenSSO agent.
2. OpenSSO Agent redirects this un-authenticated user to OAM Server for authentication.
3. After successful authentication, OpenSSO Proxy redirects the user back to the protected resource
with OpenSSO session ID set in the response cookie.
4. Authenticated end user with valid OpenSSO session, accesses application or resource protected by
OpenSSO Agent.
5. OpenSSO Agent validates the OpenSSO Session against OAM Server through the OpenSSO Proxy.
6. OpenSSO Agent sends Policy requests to OAM Server through the OpenSSO Proxy to ensure the
authenticated user is authorized to access the resource.
7. OpenSSO Proxy evaluates the Policies for the protected resource (using OAM Policy Engine) and
sends the Policy decision to the Agent:
Allow
or
Deny
.
8. End user gets access if the Policy decision is
Allow
.
Note: The following Filter Modes are not supported: NONE, J2EE_Policy, All.
See Also: "Understanding OpenSSO Agent Registration Parameters" on page 23-10.
Session Timeout in
seconds (User)
Click the arrows to specify the period, after which the session times out and the user must
re-authenticate.
Default: 0
Cookie Name The default name of the OpenSSO cookie is:
Default: iPlanetDirectoryPro
Cookie Separator Defines the character to be used as a separator when multiple values of the same attribute are being set as
a cookie. For example, the pipe symbol "|", can be used.
Default:

Understanding OpenSSO Agent Registration Parameters
23-16 Administrator's Guide for Oracle Access Management
Enable Cookie
Encoding
J2EE-type Agent
Only
Identifies whether cookie encoding is enabled or not.
Default: Enabled
SSO Only
Web-type Agent
Only
Enables OpenSSO Agent to bootstrap and authenticate with the OAM Server using the OpenSSO proxy
provided by Access Manager:
The end user accesses the application or resource protected by the OpenSSO Agent, which redirects the
unauthenticated user to the OAM Server for authentication.
After successful authentication, the OpenSSO proxy redirects the user back to the protected application or
resource and sets the OpenSSO Session ID in the response cookie.
The authenticated user with a valid OpenSSO session accesses the application or resource protected by
the OpenSSO Agent, which validates the session against the OAM Server using the OpenSSO Proxy.
The end user gets access based on Access Manager authorization policy.
Urls
Login URLs Enter the login URL, which must include the appropriate protocol (HTTP or HTTPS), host, domain, and
port in the following form:
http://example.domain.com:port
Default:
http://oamhost:port/opensso/UI/Login
Note: The port number is optional.
Logout URLs The Logout URL triggers the logout handler, which requires the user to re-authenticate the next time he
accesses a resource protected by Access Manager.
When yo enter the Logout URL, it must include the appropriate protocol (HTTP or HTTPS), host,
domain, and port. For example:
http://example.domain.com:port/opensso/UI/Logout
Default: http://oamhost:port/opensso/UI/Logout
Note: The port number is optional. The user must be logged out from resources protected by other agents
(WebGate and MOD_OSSO, for instance). Agent logout is not required other than in the multi-domain
environment.
Not enforced URLs
Web-type Agent
Only
The URLs you enter in this list have no policy enforcement. These equate to Public URLs, with no
protection and access is allowed by all.
Access Denied URI The URI to which the user is directed if access to the requested resource is denied. This is available for
both Web and J2EE Agents, each with its own format requirements:
Web Agent (full URL): http://host:port/context/accessDeniedURL.html
J2EE Agent (relative URI): /context/accessDeniedURL.htm
Default: (blank)
Audit
Debug Level
J2EE-type Agent
Only
When set, the OAM Server logs messages for:
■Login success and login failure events
■Logout success and logout failure events
■Log messages at different logging levels (ERROR, WARNING, MESSAGE, each of which indicates
severity in descending order.
Default: Error
See Also: Chapter 8, "Logging Component Event Messages"
Debug Directory
J2EE-type Agent
Only
The filesystem directory path for audit logs from the OAM Server:
■Audit Login events
■Audit Logout success events
See Also: Chapter 9, "Auditing Administrative and Run-time Events"
Debug File
Web-type Agent
Only
Defines the filesystem directory path to the local component event logging file.
Default:
Table 23–7 (Cont.) Expanded OpenSSO Agent Registration Elements
Element Description

Understanding OpenSSO Agent Registration Parameters
Registering and Managing Legacy OpenSSO Agents 23-17
Local Log File Defines the filesystem directory path to the local component event logging file.
Default:
User Mapping
Mapping Mode ■HTTP_HEADER
■USER_ID
■PROFILE_ATTRIBUTE
■SESSION_PROPERTY
Default: User_ID
User Identity Default: User ID
User Attribute
Name
Default:
Attribute Mapping Attribute retrieval fetches and sets user attributes in the HTTP request for consumption by the
applications.
The following Attribute Mapping panels are available:
■Profile Attributes
■Response Attributes
■Session Attributes
Fetch Mode: Certain applications rely on the presence of user-specific profile information in some form to
process user requests appropriately. The agent can make these attributes from the user's profile available
in various forms. when you specify a Fetch Mode for Profile, Response, or Session Attributes:
■NONE: No attributes are fetched.
■HTTP_HEADER: When the agent is configured to provide the LDAP attributes as HTTP headers,
these attributes can be retrieved.
■REQUEST_ATTRIBUTE: When the agent is configured to provide the LDAP attributes as request
attributes, the agent populates these attribute values into HttpServletRequest as attributes that can
later be used by the application as necessary. For example, fetch profile attributes, assign a mode to
the profile attribute property, and map the profile attributes to be populated under specific names
for the currently authenticated user.
■HTTP_COOKIE: When the agent is configured to provide the LDAP attributes as cookies, the
necessary values are set as server specific cookies by the agent with the path specified as "/."
Multi-valued attributes are set as a single cookie value such that all values of the attribute are
concatenated into a single string using a separator character that can be specified by the property
labeled Cookie Separator.
Default: None
Profile Attributes User profile information can be populated under specific names for the currently authenticated user. For
example:
Fetch Mode: REQUEST_ATTRIBUTE
Name (Map key): cn
Value: CUSTOM-Common-Name
Name (Map key): mail
Value: CUSTOM-Email
Default: No data
Response Attributes Obtains user-specific information by fetching policy response attributes, assigns a mode to the policy
response attribute property, and maps the policy response attributes to be populated under specific
names for the currently authenticated user.
Fetch Mode: REQUEST_ATTRIBUTE
Name (Map key): cn
Value: CUSTOM-Common-Name
Name (Map key): mail
Value: CUSTOM-Email_Addr
Default: No data
Table 23–7 (Cont.) Expanded OpenSSO Agent Registration Elements
Element Description

Understanding OpenSSO Agent Registration Parameters
23-18 Administrator's Guide for Oracle Access Management
Session Attributes The attributes in the session object maintained by the OAM Server. These are sent as part of a session
validation response to the Agents.
Fetch Mode: REQUEST_ATTRIBUTE
Name (Map key): UserToken
Value: CUSTOM-userid
Default: No data
Table 23–7 (Cont.) Expanded OpenSSO Agent Registration Elements
Element Description
Understanding OpenSSO Agent Registration Parameters
Registering and Managing Legacy OpenSSO Agents 23-19
Miscellaneous Most agent properties are hot-swap enabled. Changing configuration properties can have unexpected
results. Hot-swappable properties take effect immediately. Therefore, mistakes are instantly
implemented.
Most agent properties are presented in a format that is most useful for configuring using Oracle Access
Management Console. However, this format is not used in the OpenSSOAgentBootstrap.properties file.
List Properties: Certain properties are specified as lists composed of a key that represents the property
name; a positive number (starting from 0) that increments by 1 for every value specified in the list; and a
value. For example:
com.sun.identity.agents.config.notenforced.uri[0]=/agentsample/public/*
com.sun.identity.agents.config.notenforced.uri[1]=/agentsample/images/*
com.sun.identity.agents.config.notenforced.uri[2]=/agentsample/index.html
Map Constructs: Certain properties are specified as map constructs composed of a key that represents the
property name; a name string that forms the lookup key as available in the map; and the value associated
with the name in the map. For example:
com.sun.identity.agents.config.filter.mode[app1]=ALL
com.sun.identity.agents.config.filter.mode[app2]=SSO_ONLY
Note: For a given name, there can only be one entry in the configuration for a given configuration key. If
multiple entries with the same <name> for a given configuration key are present only one of the values
will be loaded in the system and the other values are discarded.
Application-Specific Properties: Certain properties can be configured for specific applications. Thee
agent can use different values of the same property for different applications as defined in the
configuration file. Application Specific configuration properties must follow the rules and syntax of the
map construct. The following settings for a single property serve as an example which illustrates that for
applications other than the ones deployed on the root context and the context /Portal, the value of the
property defaults to value3.
com.sun.identity.agents.config.example[Portal] = value1
com.sun.identity.agents.config.example[DefaultWebApp] = value2
com.sun.identity.agents.config.example = value3
Global Properties: Properties that are not configured for specific applications apply to all the applications
on that deployment container. Such properties are called global properties.
Serial number: Assigned automatically
Name: Select from one of the following
Val u e: Enter the appropriate value for the Name you chose.
Note: To enable OpenSSO Agent configuration hotswap, make sure the opensso agents have the
following properties in the Miscellaneous properties section of their profile in the OpenSSO Proxy on
OAM Server, and the agent servers are restarted:
J2ee Agents:
com.sun.identity.client.notification.url =http://
<
AGENT_SERVER_HOST
>:<
AGENT_
SERVER_PORT
>
/agentapp/notification
Web Agents:
com.sun.identity.client.notification.url =http://AGENT_SERVER_HOST
:
AGENT_SERVER_
PORT
/
UpdateAgentCacheServlet?shortcircuit=false
Not Supported, Web Agents:
com.sun.identity.agents.config.change.notification.enable = true
Table 23–7 (Cont.) Expanded OpenSSO Agent Registration Elements
Element Description

Registering and Managing OpenSSO Agents Using the Console
23-20 Administrator's Guide for Oracle Access Management
23.4 Registering and Managing OpenSSO Agents Using the Console
This topic provides the following topics:
■Registering an OpenSSO Agent using the Oracle Access Management Console
■Configuring and Managing Registered OpenSSO Agents Using the Console
See Also: "Reviewing OpenSSO Bootstrap Configuration Mappings"
Element Description
See Also: Table 23–5, " Elements on the New OpenSSO Agent Page"
Status The state of this agent registration: Enabled or Disabled.
Default: Enabled
Filter mode
J2EE Agent Type
only
The Agent filter is installed within the protected application. It facilitates the enforcement of security
policies, governing the access to all resources within the protected application. Every application
protected by the J2EE Agent must have its deployment descriptors changed to reflect that it is configured
to use the agent filter. Applications that do not have this setting are not protected by J2EE the Agent and
might malfunction or become unusable if deployed on a deployment container where the Agent realm is
installed.
Filter modes must be set for the J2EE Agent by choosing one of the following options: SSO_ONLY or
URL_Policy.
Default: URL_Policy
■SSO_ONLY (Access Manager Authentication Only): Enables the least restrictive mode of operation
for the filter; the agent simply ensures that all users who try to access protected web resources are
authenticated.
■URL_Policy (Access Manager Authentication and Authorization): Enables the agent filter to enforce
URL policies. By default, with Web Agents, .com.sun.identity.agents.config.sso.onlyattribute is set to
"false".
Process overview: Authentication Only (SSO_ONLY J2EE Filter Mode)
1. End user requests access to an application or resource protected by OpenSSO Agent.
2. OpenSSO Agent redirects this un-authenticated user to OAM Server for authentication.
3. After successful authentication, OpenSSO Proxy redirects the user back to the protected resource
with OpenSSO session ID set in the response cookie.
4. Authenticated end user with valid OpenSSO session, accesses application or resource protected by
OpenSSO Agent.
5. OpenSSO Agent validates the OpenSSO Session against OAM Server through the OpenSSO Proxy
and enables SSO for the end user.
6. End user gets access to the protected application or resource.
Process overview: Authentication and Authorization with URL_Policy J2EE Filter Mode
1. End user requests access to an application or resource protected by OpenSSO agent.
2. OpenSSO Agent redirects this un-authenticated user to OAM Server for authentication.
3. After successful authentication, OpenSSO Proxy redirects the user back to the protected resource
with OpenSSO session ID set in the response cookie.
4. Authenticated end user with valid OpenSSO session, accesses application or resource protected by
OpenSSO Agent.
5. OpenSSO Agent validates the OpenSSO Session against OAM Server through the OpenSSO Proxy.
6. OpenSSO Agent sends Policy requests to OAM Server through the OpenSSO Proxy to ensure the
authenticated user is authorized to access the resource.
7. OpenSSO Proxy evaluates the Policies for the protected resource (using OAM Policy Engine) and
sends the Policy decision to the Agent:
Allow
or
Deny
.
8. End user gets access if the Policy decision is
Allow
.
Note: The following Filter Modes are not supported: NONE, J2EE_Policy, All.
See Also: "Understanding OpenSSO Agent Registration Parameters" on page 23-10.
Table 23–7 (Cont.) Expanded OpenSSO Agent Registration Elements
Element Description

Registering and Managing OpenSSO Agents Using the Console
Registering and Managing Legacy OpenSSO Agents 23-21
23.4.1 Registering an OpenSSO Agent using the Oracle Access Management Console
Users with Oracle Access Management Administrator credentials can either use
Oracle-provided tools to analyze and migrate an OpenSSO environment or use the
Oracle Access Management Console, as described here, to manually provision
OpenSSO Agents.
Registration steps are the same regardless of the OpenSSO agent type you choose: Web
or J2EE. You can register an OpenSSO agent before you deploy it. Users with valid
Administrator credentials can perform the following task to register an OpenSSO
agent using the Oracle Access Management Console.
After agent registration, you can change the communication mode of the OAM Server
if needed. Communication between the agent and server continues to work as long as
the Agent uses SSO Only filter mode.
Prerequisites
Confirm that at least one OAM Server is running in the same mode as the agent to be
registered. Install the Agent, as described in:
■Oracle Sun OpenSSO Enterprise Policy Agent 3.0 User's Guide for Web Agents
■Oracle Sun OpenSSO Enterprise Policy Agent 3.0 User's Guide for J2EE Agents
To register an OpenSSO agent using the console
1. From the Oracle Access Management Console, click the New OpenSSO Agent link:
Welcome page
SSO Agent panel
New OpenSSO Agent link
Alternatively: Open the System Configuration tab, Access Manager section, SSO
Agents node, OpenSSO Agent node, then click the Create ... OpenSSO Agent
button in the upper-right corner.
2. On the New: OpenSSO Agent page, enter required details (with an *) (Table 23–5).
3. Confirm that the Auto Create Policies box is checked (or clear the box to disable
this function if you do not need a new Application Domain).
4. Click Apply to submit the registration (or close the page without submitting it):
5. Check the Confirmation window for the location of generated artifacts and then
close the window.
6. In the navigation tree, confirm the Agent name is listed.
7. Copy OpenSSO Agent bootstrap and configuration files from the console host
(AdminServer) to the Agent host Web server:
Note: Only centralized configuration mode is supported for new
OpenSSO Agent creation.
See Also: "Understanding OpenSSO Agent Registration Parameters"

Registering and Managing OpenSSO Agents Using the Console
23-22 Administrator's Guide for Oracle Access Management
8. Restart the OAM Server hosting the Agent.
9. Proceed to the following topics, as needed:
■"Configuring and Managing Registered OpenSSO Agents Using the Console"
■Part V, "Managing Access Manager SSO, Policies, and Testing"
23.4.2 Configuring and Managing Registered OpenSSO Agents Using the Console
Steps in this procedure are the same whether you are editing (view, modify, or delete)
a J2EE or Web type OpenSSO agent. Users with valid Administrator credentials can
change any setting for a registered agent using the Oracle Access Management
Console.
After changes, updated details are propagated through a runtime configuration
update process. There is usually no need to copy the artifacts over to OpenSSO agent
configuration area. Artifacts need only be copied to the OpenSSO agent directory path
if the agent name, password, or security mode is changed.
Prerequisites
The agent must be registered and the registration visible in the Oracle Access
Management Console. The AdminServer and one OAM Server must be running.
To view or modify registration details (or delete a registration)
1. From the System Configuration tab, Access Manager section, expand the SSO
Agents node.
a. Open the OpenSSO Agents node to display the Search page.
b. Find a Registration: Fill in the form (Agent Name or Agent Type or both) or
simply click the Search button.
c. Open a Registration: Click the Agent name in the results table to open the
page.
2. Modify Existing Details:
OpenSSO Properties Files From ... Path ...
From the AdminServer (Console) host $DOMAIN_HOME/output/$Agent_Name/
■OpenSSOAgentBootstrap.properties
■OpenSSOAgentConfiguration.properties
To the OpenSSO Agent host Web server $OHS_
dir/config.
For example:
$WebTier_MW_HOME/Oracle_
WT1/instances1/config/OHS/ohs1/config/
Note: Deleting an agent registration removes only the registration
(not the associated host identifier, Application Domain, resources, or
the agent instance itself), which prevents registering the same agent
again if required. However, deleting the Application Domain and its
content removes all referenced objects including the Agent
registration, as described in "Deleting an Application Domain and Its
Contents" on page 20-13.
See Also: "About the Expanded OpenSSO Agent Page and
Parameters" on page 23-12

Performing Remote Registration for OpenSSO Agents
Registering and Managing Legacy OpenSSO Agents 23-23
a. Add or modify agent details as desired (Table 23–5).
b. Click Apply to submit changes, then dismiss the Confirmation window.
c. Copy OpenSSO Agent configuration files only if the Agent name, password,
or security mode was changed.
3. Delete OpenSSO Agent Registration: This does not remove the Agent instance
itself, only the registration page from the console.
a. Close the agent's registration page if it is open.
b. Click the desired agent's name, click the Delete button in the tool bar, and
confirm the removal in the Confirmation window.
c. Confirm the Agent name is absent in the navigation tree.
4. Restart the OAM Server hosting the Agent.
5. Proceed to Part V, "Managing Access Manager SSO, Policies, and Testing".
23.5 Performing Remote Registration for OpenSSO Agents
This section provides a brief review of remote registration using the Oracle-provided
tool: oamreg. this section provides the following topics:
■Understanding Request Templates for OpenSSO Agent Remote Registration
■Reviewing OpenSSO Bootstrap Configuration Mappings
■Performing In-Band Remote Registration with OpenSSO Agents
■Performing Out-of-Band Remote Registration with OpenSSO Agents
23.5.1 Understanding Request Templates for OpenSSO Agent Remote Registration
Each OpenSSO Agent provides restricted access to applications by intercepting
requests to these applications. OpenSSO Agent provisioning is the process of
registering an OpenSSO agent to use Access Manager.
Both
inband
and
outofband
remote registration modes require a request file with the
input argument, as listed in Table 23–8
Table 23–8 OpenSSO Request Files for Remote Registration
Templates for . . . Description
Register OpenSSO Agents $OAM_REG_HOME/input/OpenSSORequest.xml
$OAM_REG_HOME/input/OpenSSORequest_short.xml
When you run oamreg with the short request, default values are
applied automatically for elements found only in the extended
request.
Other Templates
Update Agent: $OAM_REG_HOME/input/OpenSSOUpdateAgentRequest.xml
See Also: "Updating Agents Remotely" on page 16-37
Create Policies:
Create New Host Identifiers and
an Application Domain without
Registering an Agent
$OAM_REG_HOME/input/CreatePolicyRequest.xml
See Also: "Managing Policies and Application Domains Remotely" on
page 20-81

Performing Remote Registration for OpenSSO Agents
23-24 Administrator's Guide for Oracle Access Management
Remote OpenSSO Agent registration automatically:
■Creates the agent page for the Oracle Access Management Console
■Creates an Application Domain and basic policies to protect applications
■Produces OpenSSO properties files on the client to be consumed by the agent at
run time
Table 23–9 identifies the elements in OpenSSO Agent request templates. Unless
explicitly stated, all elements are found in both the short and the extended request
files.
Update Policies:
Existing Host Identifiers and
Application Domain (not
associated with an Agent
Registration)
$OAM_REG_HOME/input/UpdatePolicyRequest.xml
See Also: "Managing Policies and Application Domains Remotely" on
page 20-81
Table 23–9 OpenSSO Agent Remote Registration Request
Element Description Example
<serverAddress>
<agentName>
<hostIdentifier>
<agentBaseUrl>
<autoCreatePolicy>
<applicationDomain>
<virtualhost>
Elements common to all remote
registration request templates.
See Table 16–8, " Common
Elements in Remote Registration
Requests"
<agentType> Choose between J2EE or Web type
OpenSSO agents.
<agentType>WEB</agentType>
Password
Re-enter Password
A required, unique password for this
OpenSSO agent, which can be assigned
during this registration process. The
entry will appear in obfuscated format
in the console, in oam-config.xml, and
in OpenSSOAgentBootstrap.properties.
When a registered agent connects to an
OAM SServer, the user is prompted for
the password. The password is used
for authentication to prevent
unauthorized agents from connecting
and obtaining policy information.
You are asked to supply a
password during remote
registration. This does not appear
in the template.
Extended OpenSSO Template
Only
<agentDebugDir> With <debug> set to true, you can
configure the directory path for logged
agent messages.
Default: None
See Also: Chapter 8, "Logging
Component Event Messages"
<agentDebugDir>/scratch/debug
</agentDebugDir>
<agentAuditDir> Defines the directory path for audit
logs from the OAM Server:
■Audit Login events
■Audit Logout success events
See Also: Chapter 9, "Auditing
Administrative and Run-time Events"
<agentAuditDir>/scratch/audit
</agentAuditDir>
Table 23–8 (Cont.) OpenSSO Request Files for Remote Registration
Templates for . . . Description

Performing Remote Registration for OpenSSO Agents
Registering and Managing Legacy OpenSSO Agents 23-25
23.5.2 Reviewing OpenSSO Bootstrap Configuration Mappings
This section describes the bootstrap configuration mappings of an OpenSSO Agent.
■Table 23–10, " J2EE Request File Mappings to the Properties File"
■Table 23–11, " Mapping the Web Request File to the Properties File"
<agentAuditFileName> Defines the audit log file name.
<agentAuditFileName>audit.log
</agentAuditFileName>
<debug> When set to
true
, the OAM Server logs
messages for:
■Login success and login failure
events
■Logout success and logout failure
events
■Log messages at different logging
levels (FATAL, ERROR,
WARNING, DEBUG, TRACE),
each of which indicates severity in
descending order.
Default: false
See Also: Chapter 8, "Logging
Component Event Messages"
<debug>false</debug>
<cookieName> The name of the cookie, which the
agent finds this cookie after the
OpenSSO Proxy triggers session
validation
The end user has the following valid
cookies:
■OAM_ID cookie (represents the
end user session after agent
authentication)
■OpenSSO cookie
<cookieName>iPlanetDirectoryP
ro</cookieName>
<accessDeniedUrl> If access is denied, the user is
redirected to this URL.
<accessDeniedUrl></accessDeni
edUrl>
<protectedAuthnScheme> Specifies the Authentication Scheme to
use in the Authentication Policy.
In an upgraded environment, use
SSOCoExistMigrateScheme for the
Protected Resource Policy for any new
OSSO Agents you register.
<protectedAuthnScheme></prote
ctedAuthnScheme>
Table 23–10 J2EE Request File Mappings to the Properties File
Property Name Default Value Sample Value
com.iplanet.am.naming.url from input xml as
<serverAddress>/opensso/nami
ngservice
http://example.com:7575/opensso/nami
ngservice
com.sun.identity.agents.app.username from input xml as <agentName> <Agent registration ID>
com.iplanet.am.service.secret from input xml as
<agentPassword>
Note: This is not collected as part
of the input XML file but is
prompted for by the remote
registration tool.
<Encrypted Agent registration ID
password>
Table 23–9 (Cont.) OpenSSO Agent Remote Registration Request
Element Description Example

Performing Remote Registration for OpenSSO Agents
23-26 Administrator's Guide for Oracle Access Management
Table 23–11 shows the mappings between a Web Agent request file and properties file.
23.5.3 Performing In-Band Remote Registration with OpenSSO Agents
This is a brief summary of tasks required to perform in-band remote registration for
your OpenSSO agent. Full details are provided in other chapters, as described here.
com.iplanet.services.debug.directory from input xml as
<agentDebugDir>
/opt/30j2ee/j2ee_agents/tomcat_v6_
agent/Agent_001/logs/debug
com.sun.identity.agents.config.local.logfile from input xml as
<agentAuditDir>/<agentAuditFil
eName>
/opt/30j2ee/j2ee_agents/tomcat_v6_
agent/Agent_001/logs/audit/amAgent_
example_com_7676.log
com.sun.identity.agents.config.organization.name from input xml as <realmName>
Note: This is the <hostIdentifier>
value collected from the input
xml file. By default it is taken as
the <agentName> unless
explicitly provided.
com.sun.identity.agents.config.profilename from input xml as <agentName> <Agent registration ID>
Not included in the remote registration file ...
com.iplanet.am.naming.url N/A N/A
com.sun.identity.agents.config.service.resolver N/A N/A
com.sun.services.debug.mergeall N/A
N/A
com.sun.identity.agents.config.lock.enable FALSE
N/A N/A
am.encryption.pwd N/A N/A
Table 23–11 Mapping the Web Request File to the Properties File
Property Name Default Value Sample Value
com.iplanet.am.naming.url from input xml as
<serverAddress>/<serverAddres
s>/opensso/namingservice
http://example.com:7575/opensso/nami
ngservice
com.sun.identity.agents.config.username from input xml as <agentName> <Agent profile ID>
com.sun.identity.agents.config.password from input xml as
<agentPassword>
Note: This is not collected as part
of the input XML file but is
prompted for by the remote
registration tool.
<Encrypted Agent registration ID
password>
com.iplanet.services.debug.directory from input xml as
<agentDebugDir>
/opt/30j2ee/j2ee_agents/tomcat_v6_
agent/Agent_001/logs/debug
com.sun.identity.agents.config.local.logfile from input xml as
<agentAuditDir>/<agentAuditFil
eName>
/opt/30j2ee/j2ee_agents/tomcat_v6_
agent/Agent_001/logs/audit/amAgent_
redsky_red_iplanet_com_7676.log
com.sun.identity.agents.config.organization.name from input xml as <realmName>
Note: It is the <hostIdentifier>
value collected from the input
xml. Status: Open Fixed or Closed
com.sun.identity.agents.config.profilename from input xml as <agentName>
Table 23–10 (Cont.) J2EE Request File Mappings to the Properties File
Property Name Default Value Sample Value

Performing Remote Registration for OpenSSO Agents
Registering and Managing Legacy OpenSSO Agents 23-27
Prerequisites
"Introduction to Remote Registration" on page 15-8
Task overview: In-band Administrators performing remote registration
1. Acquire the registration tool and set environment variables as described in
"Acquiring and Setting Up the Remote Registration Tool" on page 16-32.
$ORACLE_HOME/oam/server/rreg/client/RREG.tar.gz
2. Create your input file with unique values for the agent and Application Domain as
described in "Creating Your Remote Registration Request" on page 16-33.
From: OpenSSORequest.xml
To: myopenssoagent_request.xml
3. Run the registration tool to configure the Agent, create a default Application
Domain for the resources, and copy the updated agent configuration file as
described in "Performing In-Band Remote Registration" on page 16-33.
From the console host (AdminServer):
/rreg/output/Agent_Name/
■OpenSSOAgentBootstrap.properties
■OpenSSOAgentConfiguration.properties
To the OpenSSO Agent host Web server $OHS_dir/config. For example:
$WebTier_MW_HOME/Oracle_WT1/instances1/config/OHS/ohs1/config/
4. Validate the configuration as described in "Validating Remote Registration and
Resource Protection" on page 16-38.
5. Perform access checks to validate that the configuration is working, as described
in "Validating Authentication and Access After Remote Registration" on
page 16-39.
23.5.4 Performing Out-of-Band Remote Registration with OpenSSO Agents
This is a brief summary of tasks required to perform out-of-band remote registration
for your OpenSSO agent. Full details are provided in other chapters, as described here.
Prerequisites
"Introduction to Remote Registration" on page 15-8
Task overview: Out-of-band remote registration (Agent is outside the network)
1. Out-of-band Administrator: Creates a starting request input file containing
specific application and agent details and submits it to the in-band Administrator.
■Acquire the registration tool and set environment variables as described in
"Acquiring and Setting Up the Remote Registration Tool" on page 16-32.
$ORACLE_HOME/oam/server/rreg/client/RREG.tar.gz
■Copy and edit a template to input unique values for the agent and Application
Domain as described in "Creating Your Remote Registration Request" on
page 16-33.
$OAM_REG_HOME/input/OpenSSORequest.xml

Updating Registered OpenSSO Agents Remotely
23-28 Administrator's Guide for Oracle Access Management
■Submit the starting request input file to the in-band Administrator using a
method you choose (email or file transfer).
2. In-band Administrator:
■Acquire the registration tool and set environment variables as described in
"Acquiring and Setting Up the Remote Registration Tool" on page 16-32.
$ORACLE_HOME/oam/server/rreg/client/RREG.tar.gz
■Use the out-of-band starting request with the registration tool to register the
agent and create the response and native agent configuration files to return to
the out-of-band Administrator. See "Performing Out-of-Band Remote
Registration" on page 16-34:
–opensso_Response.xml is generated for the out of band Administrator to
use in Step 3.
–OpenSSO properties files are modified for the out-of-band Administrator
to bootstrap the OSSO module.
3. Out-of-band Administrator: Use the registration tool with the response file and
copy artifacts to the appropriate file system directory.
–opensso_Response.xml.
–opensso....properties files
4. In-band Administrator: Validates the configuration as described in "Validating
Remote Registration and Resource Protection" on page 16-38.
5. Out-of-band Administrator: Performs several access checks to validate that the
configuration is working, as described in "Validating Authentication and Access
After Remote Registration" on page 16-39.
23.6 Updating Registered OpenSSO Agents Remotely
This section describes how to update, validate, and delete OSSO Agents using remote
registration templates and modes described in "Introduction to Updating Agents
Remotely" on page 16-36.
The update request file passes specific values to the remote registration tool, oamreg.
The primary differences between the update template and the original registration
template is that the update template.
Table 23–12 Delta: OpenSSO Remote Registration versus Remote Updates
Delta Element
Adds <startDate>yyyy_mm_dd</startDate> element to track changes
Adds <homeUrl> element that specifies the agent_base_url_port
Omits <hostidentifier>
Omits <agentbaseURL>
See Also:
■Table 23–7, " Expanded OpenSSO Agent Registration Elements"
■Updating OpenSSO Agents Remotely

Locating Other OpenSSO Agent Information
Registering and Managing Legacy OpenSSO Agents 23-29
23.6.1 Updating OpenSSO Agents Remotely
To remotely update OAM 10g Agent registration
1. Set up the registration tool as described in, "Acquiring and Setting Up the Remote
Registration Tool" on page 16-32.
2. Update Agent:
a. Create your update request using the
OAMUpdateAgentRequest.xml
template.
b. On the computer hosting the Agent, run the following command with
agentUpdate
mode specify your own *Request*.xml as the input file. For
example:
./bin/oamreg.sh agentUpdate input/OpenSSOUpdateAgentRequest.xml
c. Provide the registration Administrator user name and password when asked.
d. Confirm success with on-screen messages.
e. Relocate to the agent host OpenSSOAgentBootstrap and
OpenSSOAgentConfiguration.properties files:
From the AdminServer (Console) host: /rreg/output/Agent_Name/
To the OpenSSO Agent host Web server $OHS_dir/config. For example:
$WebTier_MW_HOME/Oracle_
WT1/instances1/config/OHS/ohs1/config/*.properties
f. Restart the OAM Server that is hosting this agent
3. Validating Agent:
a. On the Agent host, run the following command in
agentValidate
mode. For
example:
./bin/oamreg.sh agentValidate agentname
b. Provide the registration Administrator user name and password when asked.
c. Confirm success with on-screen messages.
4. Deleting an Agent:
a. On the computer hosting the Agent, run the following
agentDelete
command.
For example:
./bin/oamreg.sh agentDelete agentname
b. Provide the registration Administrator user name and password when asked.
c. Confirm success with on-screen messages.
Success: On-screen message confirms
AgentDelete process completed successfully
!
23.7 Locating Other OpenSSO Agent Information
See Table 23–13 for additional information on legacy OpenSSO agents with Access
Manager.

Locating Other OpenSSO Agent Information
23-30 Administrator's Guide for Oracle Access Management
Table 23–13 Other OpenSSO Information in this Guide
Topic Location
Component Loggers Table 8–3, " Oracle Access Management Server-Side Component
Loggers"
OpenSSO Metrics in the DMS
Console
"Reviewing OpenSSO Metrics in the DMS Console" on page 12-11
Sessions and Session Management Chapter 17, "Maintaining Access Manager Sessions"
Artifacts "Generated Artifacts: OpenSSO" on page D-8
"Migrated Artifacts: OpenSSO" on page D-12

24
Registering and Managing Legacy OSSO Agents 24-1
24
Registering and Managing Legacy OSSO
Agents
[13]
If legacy OracleAS SSO 10g is already in place as the enterprise solution for an existing
deployment, Oracle Fusion Middleware continues to support this as a solution.
Additionally, you can register existing OSSO 10g mod_osso modules as agents for
Access Manager as described in Chapter 15.
This chapter explains how to register or manage legacy OSSO agents for use with
Access Manager 11.1.2 and provides the following sections:
■Understanding OSSO Agents with Access Manager
■Registering OSSO Agents Using Oracle Access Management Console
■Configuring and Managing Registered OSSO Agents Using the Console
■Performing Remote Registration for OSSO Agents
■Updating Registered OSSO Agents Remotely
■Configuring Logout for OSSO Agents with Access Manager 11.1.2
■Locating Other OSSO Agent Information
24.1 Understanding OSSO Agents with Access Manager
This section provides the following topics:
■About OSSO Agents with Access Manager
■Comparing Access Manager 11g SSO versus OSSO 10g
24.1.1 About OSSO Agents with Access Manager
The mod_osso module is an Oracle HTTP Server module that simplifies the
authentication process by serving as the sole application to the single sign-on server. In
this way, mod_osso renders authentication transparent to OracleAS applications. It
enables applications protected by OracleAS Single Sign-On to accept HTTP headers in
lieu of a user name and password once the user has logged in. The values for these
headers are stored in a mod_osso cookie.
The Administrator for these applications is spared the burden of integrating them with
an SDK. After authenticating a user, mod_osso transmits the simple header values that
applications may use to authorize the user:
■User name
■User GUID (global user identity)
Understanding OSSO Agents with Access Manager
24-2 Administrator's Guide for Oracle Access Management
■Language and territory
After registration with Access Manager, OSSO 10g Agents can communicate directly
with Access Manager 11g services through the OSSO proxy. The OSSO proxy supports
existing OSSO agents when upgrading to Access Manager. The proxy handles requests
from OSSO Agents and translates the OSSO protocol into a protocol for Access
Manager 11g authentication services.
The OSSO Proxy supports inter-operability between Access Manager and OSSO agents
(using an OSSO agent to access a valid SSO session created for a Webgate or Access
Client and vice versa).
After registering 10g mod_osso as an agent, Access Manager gives mod_osso the
redirect URL for the user based on the authentication scheme associated with the
OAM policy defined for the resource (Table 24–1).
24.1.2 Comparing Access Manager 11g SSO versus OSSO 10g
This topic introduces key components for implementing and enforcing Access
Manager 11g single sign-on policies as compared to OSSO 10g. Access Manager 11g
default behavior is to deny access when a resource is not protected by a policy that
explicitly allows access. OracleAS SSO 10g provides only authentication. Table 24–2
summarizes the differences.
OSSO Proxy Supports Description
SSO login From an OSSO Agent to the OAM Server (and OSSO-specific tokens)
SSO logout From the OSSO Agent to the OAM Server
OSSO Agent requests
and protocols
OSSO Proxy translates the OSSO protocol into a protocol for Access Manager.
Table 24–1 OSSO Agents with Access Manager
Checks for an existing valid Oracle HTTP Server
cookie
Redirects to the OAM Server if needed to contact the
directory during authentication
Decrypts the encrypted user identity populated by
the OSSO server
Sets the headers with user attributes

Understanding OSSO Agents with Access Manager
Registering and Managing Legacy OSSO Agents 24-3
Table 24–2 11g Access Manager SSO versus OSSO 10g Component Summary
Component Description 11g Access Manager OSSO 10g
Oracle Identity Management
Infrastructure
Enables secure, central management of
enterprise identities.
Enables secure, central management of
enterprise identities.
Agents
Resides with the relying parties and
delegate authentication and authorization
tasks to OAM Servers.
■11g OAM Agents
■10g OAM Agents
■10g OSSO Agents (mod_osso)
■OpenSSO Agents
Note: Nine Administrator languages are
supported.
■mod_osso (partner)
Note: The mod_osso module is an
Oracle HTTP Server module that
provides authentication to OracleAS
applications.
Servers
Notes: Administrative users access the
console home page by typing the URL:
https://host:port/oamconsole.
Non-administrative users first gain access
to the single sign-on server by entering
the URL of an application, which returns
the SSO login page.
■OAM Server
■Oracle Access Management Console
(installed on the WebLogic
Administration Server)
See Also:
"Using the New Oracle Access
Management Console" on page 2-4.
"Introducing Access Manager Credential
Collection and Login" on page 18-14.
■OracleAS SSO server (OSSO server)
See Also: Oracle Application Server Single
Sign-On Administrator's Guide.
Proxy
Provides support for legacy systems:
■OAM Proxy supports legacy Access
Manager implementations by acting
as a legacy Access Server.
■OSSO Proxy supports OSSO Agents
by acting as the legacy OSSO Server.
■Oracle-provided OpenSSO Proxy
handles requests for resources
protected by OpenSSO Agents
■OSSO Proxy supports legacy SSO
implementations by acting as the
legacy OSSO Server.
Console Oracle Access Management Console No console equivalent before Access
Manager 11g.
Protocols that secure information
exchange on the Internet
Front channel protocols exchanged
between Agent and Server:
HTTP/HTTPS.
11g Webgate secures information
exchange using the Agent key.
-See Also: Cryptographic keys.
N/A
Policy Store Database mod_osso and partner application
Applications An application that delegates
authentication and authorization to
Access Manager and accepts headers
from a registered Agent.
Note: External applications do not
delegate authentication. Instead, these
display HTML login forms that ask for
application user names and passwords.
For example, Yahoo! Mail is an external
application that uses HTML login forms.
An application that delegates
authentication to mod_osso and the
OracleAS Single Sign-On server.
Note: After registering mod_osso with
Access Manager 11g, mod_osso delegates
authentication to OAM.
The mod_osso module enables the
applications to accept authenticated user
information once the user is logged in. Re
authenticating is avoided by accepting
headers from the registered OSSO Agent.
The application is responsible for
determining whether the authenticated
user is authorized to use the application.

Understanding OSSO Agents with Access Manager
24-4 Administrator's Guide for Oracle Access Management
SSO Engine Manages the session lifecycle, facilitates
global logout across all relying parties in
the valid session, and provides consistent
service across multiple protocols.
Uses Agents registered with Access
Manager 11g:
■Authentication (credential
collection) occurs across the HTTP
(HTTPS) channel
■Authorization occurs across the
Oracle Access Protocol (OAP)
channel
■mod_osso delegates authentication
only and communicates exclusively
through the HTTP channel.
Cryptographic keys ■During 11g agent registration, a key
is generated for the agent and also
shared with the OAM Server
The key is used for encrypting and
decrypting SSO cookies
■During 10g agent registration, a
global shared secret key is generated
across all of Access Manager 11g (all
Agents and OAM Servers).
■During OSSO agent registration,
One key per partner shared between
mod_osso and OSSO server.
■OpenSSO Agent: Host- or
Domain-based key stored locally in
bootstrap file on Agent host.
■During OAM Server installation,
one OAM Server key is generated
Note: One key is generated and used per
registered mod_osso Agent. However,
one single key is generated for all 10g
Webgates.
■One key per partner shared between
mod_osso and OSSO server
■OSSO server's own key
■One global key per OSSO setup for
the GITO domain cookie
Keys storage ■Agent side: A per-agent key is
stored locally in the Oracle Secret
Store in a wallet file
■OAM Server side: A per- agent key,
and server key, are stored in the
credential store on the server side
■Security Token Service
■mod_osso side: partner keys and
GITO global key stored locally in
obfuscated configuration file
■OSSO server side: partner keys,
GITO global key, and server key are
all stored in the directory server
Cookies
See Also: Table 18–8
and
"About Single Sign-On Cookies During
User Login"
Host-based authentication cookie:
■11g Webgate, One per agent:
OAMAuthnCookie_<host:port>_
<random number>
■10g Webgate, One ObSSOCookie for
all 10g Webgates.
■One for the OAM Server: OAM_ID
(Table 18–8)
■Host-based authentication cookie:
one per partner: OHS-host-port
one for OSSO server: (not with
Access Manager 11g)
■Domain-level session cookie for
global inactivity timeout (GITO) if
enabled
Policies Registered agents rely on Access
Manager authentication, authorization,
and token issuance policies to determine
who gets access to protected applications
(defined resources).
mod_osso uses only Access Manager 11g
authentication policies to determine who
gets access to defined resources.
mod_osso provides authentication only.
Table 24–2 (Cont.) 11g Access Manager SSO versus OSSO 10g Component Summary
Component Description 11g Access Manager OSSO 10g

Understanding OSSO Agents with Access Manager
Registering and Managing Legacy OSSO Agents 24-5
Client IP ■Maintain this Client IP, and include
it in the host- based
OAMAuthnCookie.
■Include the original client IP inside
the host cookie.
In later authentication requests,
when the cookie is presented, the
original client IP is compared with
the presenter's IP.
Rejection occurs if there is no match
Encryption / Decryption (converting
encrypted data back into original form)
Introduces client-side cryptography and
ensures that cryptography is performed
at both the agent and server ends:
1. Webgate encrypts obrareq.cgi using
the agent key.
Note: obrareq.cgi is the
authentication request in the form of
a query string redirected from
Webgate to OAM Server.
2. OAM Server decrypts the request,
authenticates, creates the session,
and sets the server cookie.
3. OAM Server also generates the
authentication token for the agent
(encrypted using the agent key),
packs it in obrar.cgi with a session
token (if using cookie-based session
management), authentication token
and other parameters, then encrypts
obrar.cgi using the agent key.
Note: obrar.cgi is the authentication
response string redirected from the
OAM Server to Webgate.
4. Webgate decrypts obrar.cgi, extracts
the authentication token, and sets a
host-based cookie.
Cryptography is performed at both mod_
osso and OSSO server:
1. site2pstore token (request from
mod_osso to server) is encrypted
using the partner key locally at
mod_osso.
2. OSSO server decrypts site2pstore
token, authenticates, and generates
its own cookie.
3. urlc token (the response from OSSO
server to mod_osso) is encrypted
using the partner key at the server.
4. mod_osso decrypts the urlc token
locally and re-encrypts using its
own format to set in a host-based
cookie.
Session Management ■Session idle timeout behavior is
supported through the 11g Session
Management Engine (SME).
■Single domain supported through a
domain-level cookie for global
inactivity timeout (GITO).
Multi-domain SSO: After a user
logs in to one domain, and then goes
to a different domain, he is
considered idle from the first
domain. When the idle times out on
the original domain, the user must
re-authenticate on the original
domain.
Table 24–2 (Cont.) 11g Access Manager SSO versus OSSO 10g Component Summary
Component Description 11g Access Manager OSSO 10g

Registering OSSO Agents Using Oracle Access Management Console
24-6 Administrator's Guide for Oracle Access Management
24.2 Registering OSSO Agents Using Oracle Access Management
Console
This section describes how to manage OSSO Agent registrations (mod_osso) using the
Oracle Access Management Console. For details, see:
■Understanding the Create OSSO Agent Registration Page and Parameters
■Registering an OSSO Agent (mod_osso) Using the Console
24.2.1 Understanding the Create OSSO Agent Registration Page and Parameters
This topic describes OSSO Agent registration using the Oracle Access Management
Console.
Figure 24–3 shows a Create OSSO Agent page, under the System Configuration tab in
the Oracle Access Management Console.
Response token replay prevention ■Include RequestTime (the timestamp
just before redirect) in obrareq.cgi
and copy it to obrar.cgi to prevent
response token replay.
■Include RequestTime (timestamp
just before redirect) in the
site2pstore token and copy it to the
urlc token to prevent token replay.
Multiple network domain support Access Manager 11g supports
cross-network-domain single sign-on out
of the box.
Oracle recommends you use Oracle
Federation for this situation.
N/A
Centralized log-out ■The
logOutUrls
(10g Webgate
configuration parameter) is
preserved. 10g logout.html requires
specific details for Access Manager
11g.
■11g Webgate parameters are new:
Logout Redirect URL
Logout Callback URL
Logout Target URL
See Chapter 22.
There is no change required for Access
Manager 11g with mod_osso (OSSO
Agents).
Applications that use dynamic directives
require no entry in mod_osso.conf.
Instead, protection is written into the
application as one or more dynamic
directives.
See Chapter 22.
See Also: "Introducing Access Manager Credential Collection and
Login" on page 18-14
Note: Before you register an OSSO Agent, ensure that the Oracle
HTTP Server is installed on the client computer and that the Web
server is configured for mod_osso.
Table 24–2 (Cont.) 11g Access Manager SSO versus OSSO 10g Component Summary
Component Description 11g Access Manager OSSO 10g
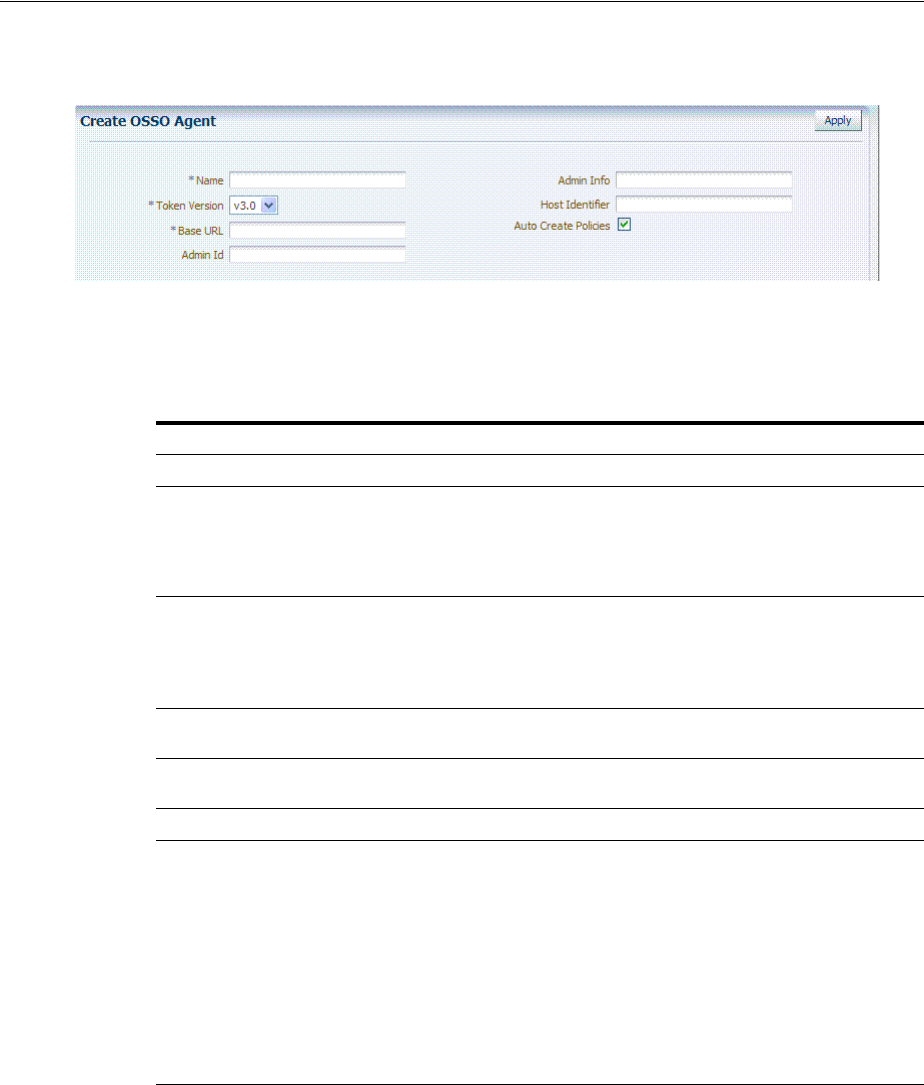
Registering OSSO Agents Using Oracle Access Management Console
Registering and Managing Legacy OSSO Agents 24-7
Figure 24–1 Create OSSO Agent Page
On the Create OSSO Agent page, required information is identified by the asterisk (*).
Table 24–3 describes the required and optional details that you can specify when you
register a new agent.
To help streamline Agent registration, several elements are concealed and default
values are used during registration with the console. When you view an agent's
registration page in the Oracle Access Management Console, all elements and values
are revealed as described in "Understanding the Expanded OSSO Agent Page in the
Console" on page 24-9.
OSSO Agent Configuration File
The OSSO Agent configuration file, osso.conf, is updated during agent registration
and configuration changes. It is stored on the console host (AdminServer). Following
registration or configuration updates, you must relocate the artifacts to the mod_osso
Table 24–3 Create OSSO Agent Page Elements
Element Description
Name The identifying name for this mod_osso Agent.
Token Version The default version of the token is 3.0; the following options are available:
■1.2
■1.4
■3.0
Base URL
Required for OSSO
agents.
The required protocol, host, and port of the computer on which the Web server for
the agent is installed. For example, http://host.example.domain.com:port or
https://example.domain.com:port.
Note: The host and port are used as defaults for the expanded registration. See
Table 24–5.
Admin ID Optional Administrator log in ID for this mod_osso instance. For example,
SiteAdmin.
Admin Info Optional Administrator details for this mod_osso instance. For example, Application
Administrator.
Host Identifier The host identifier is filled in automatically based on the Agent name
Auto Create Policies During agent registration, you can have authentication and authorization policies
created automatically. This option is checked (enabled) by default.
The OSSO Proxy requires an Application Domain that includes a resource with the
generic URL (/**) protected by a policy based on the LDAP scheme (default). This is
why a generic URL is used at the server side.
Default: Enabled
Notes: If you already have a domain and policies registered, you can simply add
new resources to it. If you clear (uncheck) this option, no Application Domain or
policies are generated automatically.
In an upgraded deployment, you must change the Authentication Scheme in your
Authentication Policy to use SSOCoExistMigrateScheme.

Registering OSSO Agents Using Oracle Access Management Console
24-8 Administrator's Guide for Oracle Access Management
directory path on the Agent host as shown in Table 24–4.
24.2.2 Registering an OSSO Agent (mod_osso) Using the Console
Users with Oracle Access Management Administrator credentials can perform the
following procedure to register an OSSO Agent using the Oracle Access Management
Console.
Prerequisites
Ensure that the Oracle HTTP Server is installed and running on the client computer,
and is configured for mod_osso.
To register an OSSO Agent
1. From the Oracle Access Management Console, click the New OpenSSO Agent link:
Welcome page
SSO Agent panel
New OSSO Agent link
Alternatively: Open the System Configuration tab, Access Manager section, SSO
Agents node, OSSO Agent node, then click the Create ... OSSO Agent button in the
upper-right corner.
2. On the Create: OSSO Agent page, enter required details, as shown in Table 24–3:
■Name
■Base URL
3. Select the desired Token Version, and enter optional details as desired (Table 24–3).
4. Click Apply to submit the registration (or close the page without applying
changes).
5. In the Confirmation window, check the path to generated artifacts and then close
the window. For example:
Artifacts are generated in following location : /.../base_domain/output/$Agent_
Name
6. Copy osso.conf file from the console host (AdminServer) to the Agent host Web
server. For example:
Table 24–4 Relocating OSSO Artifacts
From AdminServer . . . To OHS_dir/osso.conf
$DOMAIN_HOME/output/$Agent_Name/ $WebTier_MW_HOME/Oracle_
WT1/instances1/config/OHS/ohs1/config/osso
See Also: Understanding the Create OSSO Agent Registration Page
and Parameters
osso.conf From ... Path ...
From the AdminServer (Console) host $DOMAIN_HOME/output/$Agent_Name/
To the mod_osso directory path on the Agent
host Web server: $OHS_dir/osso.conf.
$WebTier_MW_HOME/Oracle_
WT1/instances1/config/OHS/ohs1/config/oss
o.conf
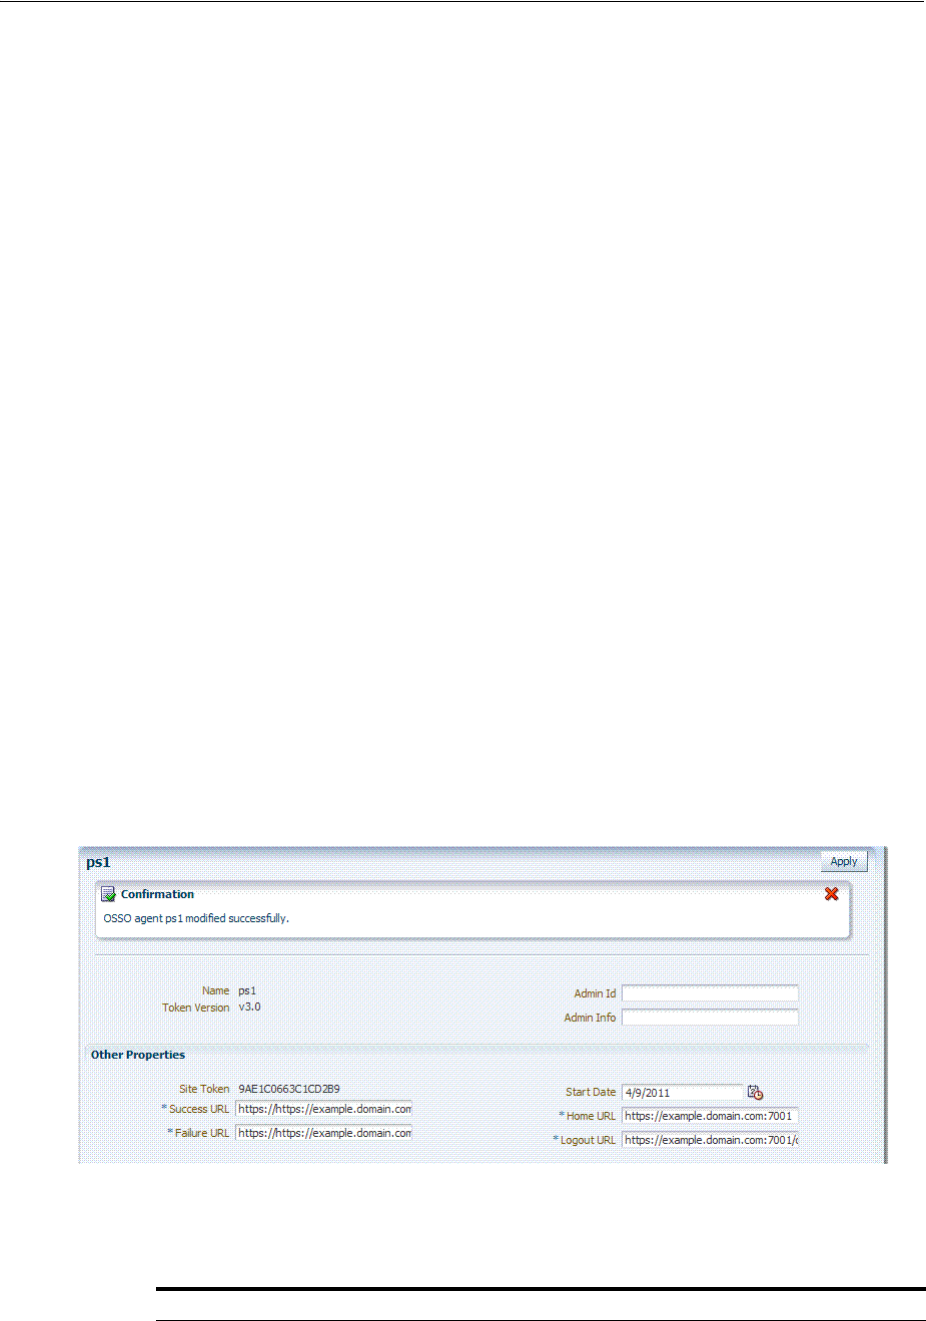
Configuring and Managing Registered OSSO Agents Using the Console
Registering and Managing Legacy OSSO Agents 24-9
7. In an upgraded deployment, change the Authentication Scheme in the Protected
Resources Policy to use SSOCoExistMigrateScheme.
8. Restart the OAM Server hosting the Agent.
9. Proceed as needed:
■"Configuring and Managing Registered OSSO Agents Using the Console"
■Part V, "Managing Access Manager SSO, Policies, and Testing"
24.3 Configuring and Managing Registered OSSO Agents Using the
Console
This section describes how to manage OSSO Agent registrations (mod_osso) using the
Oracle Access Management Console. For details, see:
■Understanding the Expanded OSSO Agent Page in the Console
■Searching for an OSSO Agent (mod_osso) Registration
■Viewing or Editing OSSO Agent (mod_osso) Registration
■Deleting an OSSO Agent (mod_osso) Registration
24.3.1 Understanding the Expanded OSSO Agent Page in the Console
During registration, only a subset of available parameters is displayed to streamline
the registration process. Whether you registered the agent using the Oracle Access
Management Console or the remote registration utility, you can view the full agent
configuration page in the console after registration. Default values populate
previously concealed elements, which are visible when you open the Agent's page, as
shown in Figure 24–2. The Confirmation window is still visible.
Figure 24–2 OSSO Agent Page and Confirmation Window
Table 24–5 summarizes the expanded elements and defaults that are used by the OSSO
Agent.
Table 24–5 Expanded OSSO Agent Elements
Element Description
Site Token The Application Token used by the partner when requesting authentication. This
cannot be edited.

Configuring and Managing Registered OSSO Agents Using the Console
24-10 Administrator's Guide for Oracle Access Management
24.3.2 Searching for an OSSO Agent (mod_osso) Registration
When you first open the OSSO Agents node, the Search form appears. The Results
table lists all OSSO Agents. If there are too many to quickly locate the one you want,
you can use the controls to refine your search.
There are only two element on which you can refine an OSSO Agent search: The Agent
Name that assigned during registration or the Agent ID assigned by the system.
Prerequisites
The OSSO Agent must be registered to be available in the Oracle Access Management
Console.
To search for an OSSO Agent registration
1. Activate the System Configuration tab, Access Manager section.
2. Expand the SSO Agents node, and open the OSSO Agents node.
3. In the Name field, enter criteria for your search (with or without including the
wild card (*)). For example:
my*
4. Click the Search button.
5. In the Search Results table:
■Crreate: Click the Create OSSO Agent button at the top of the Search page.
■Edt or View: Click the Edit command button in the tool bar to display the
configuration page.
■Delete: Proceed to "Deleting an OSSO Agent (mod_osso) Registration" on
page 24-11.
■Detach: Click Detach in the tool bar to expand the table to a full page.
■Reconfigure Table: Select a View menu item to alter the appearance of the
results table.
Success URL The redirect URL to be used upon successful authentication. By default, osso_login_
success on the fully qualified host and port specified with the Base URL are used. For
example:
Default: https://example.domain.com:7001/osso_login_success
Failure URL The redirect URL to be used if authentication fails.By default, osso_login_failure on
the fully qualified host and port specified with the Agent Base URL are used:
Default: https://example.domain.com:7001/osso_login_failure
Start Date First month, day, and year for which log in to the application is allowed by the server.
Default: The date the Agent was registered.
Home URL The redirect URL to be used for the Home page after authentication. By default, the
fully qualified host and port specified with the Agent Base URL are used:
Default: https://example.domain.com:7001
Logout URL The redirect URL to be used when logging out. This redirects the user to the global
logout page on the server: osso_logout_success. By default, the fully qualified host
and port specified with the Agent Base URL are used:
Default: https://example.domain.com:7001/osso_logout_success
See Also: "Introduction to Centralized Logout for Access Manager 11g" on page 22-1.
Table 24–5 (Cont.) Expanded OSSO Agent Elements
Element Description

Configuring and Managing Registered OSSO Agents Using the Console
Registering and Managing Legacy OSSO Agents 24-11
6. Apply any changes (or dismiss the page) when finished.
24.3.3 Viewing or Editing OSSO Agent (mod_osso) Registration
Users with valid Administrator credentials can change any setting for a registered
OSSO Agent using the Oracle Access Management Console, as described in the
following procedure. For example, you might want to revise the end date or add
Administrator information.
Prerequisites
Ensure that the Oracle HTTP Server is installed and running on the client computer,
and is configured for mod_osso.
To view or modify an OSSO Agent registration
1. From the System Configuration tab, Access Manager section, expand the SSO
Agents node.
2. Double-click the OSSO Agents node.
3. Find the Agent: See "Searching for an OSSO Agent (mod_osso) Registration".
4. View or Modify: On the registration page, view or modify details as needed
(Table 24–3 and Table 24–5).
5. Click Apply to submit the changes (or close the page without applying changes),
and close the Confirmation window.
6. Copy osso.conf file from the console host (AdminServer) to the Agent host Web
server. For example:
7. Restart the OAM Server hosting the Agent.
8. Proceed to Part V, "Managing Access Manager SSO, Policies, and Testing".
24.3.4 Deleting an OSSO Agent (mod_osso) Registration
Users with valid Administrator credentials can perform the following procedure to
delete a registered OSSO Agent from the Oracle Access Management Console.
See Also:
■Understanding the Expanded OSSO Agent Page in the Console
osso.conf From ... Path ...
From the AdminServer (Console) host $DOMAIN_HOME/output/$Agent_Name/
To the mod_osso directory path on the Agent
host Web server: $OHS_dir/osso.conf.
$WebTier_MW_HOME/Oracle_
WT1/instances1/config/OHS/ohs1/config/oss
o.conf
Note: Deleting an agent registration removes only the registration
(not the associated host identifier, Application Domain, resources, or
the agent instance itself), which prevents registering the same agent
again if required. However, deleting the Application Domain and its
content removes all referenced objects including the Agent
registration, as described in "Deleting an Application Domain and Its
Contents" on page 20-13.

Performing Remote Registration for OSSO Agents
24-12 Administrator's Guide for Oracle Access Management
Prerequisites
Evaluate the Application Domain, resources, and policies associated with this agent
and ensure that these are configured to use another agent or that they can be removed.
To delete an OSSO Agent registration
1. From the System Configuration tab, Access Manager section, expand the SSO
Agents node, and open the OSSO Agents node.
2. Click Search and choose the desired name (or refine your search as needed).
3. Optional: Double-click the desired name to display the registration page; confirm
this is the agent to remove, and close the page.
4. Click the Agent name, click the Delete button in the tool bar, and confirm removal
in the Confirmation window.
24.4 Performing Remote Registration for OSSO Agents
This section provides a brief review of remote registration using the Oracle-provided
tool (oamreg) with OSSO Agents.
This section provides the following topics:
■Understanding Request Templates for OSSO Remote Registration
■Performing In-Band Remote Registration of OSSO Agents
■Performing Out-of-Band Remote Registration for OSSO Agents
24.4.1 Understanding Request Templates for OSSO Remote Registration
This topic provides the OSSO Registration Request for use with the remote registration
tool oamreg.sh (Linux) or oamreg.bat (Windows). The information highlighted in bold
must be modified for a mod_osso agent. However, all other fields can use the default
values.
Both
inband
and
outofband
remote registration modes require a request file with the
input argument, as listed in Table 24–6.
See Also: Searching for an OSSO Agent (mod_osso) Registration
Table 24–6 OpenSSO Request Files for Remote Registration
Templates for . . . Description
Register OSSO Agents (mod_
osso)
$OAM_REG_HOME/input/OSSORequest.xml
Other Templates
Update Agent: $OAM_REG_HOME/input/OSSOUpdateAgentRequest.xml
See Also: "Updating Agents Remotely" on page 16-37
Create Policies:
Create New Host Identifiers and
an Application Domain without
Registering an Agent
$OAM_REG_HOME/input/CreatePolicyRequest.xml
See Also: "Managing Policies and Application Domains Remotely" on
page 20-81
Update Policies:
Existing Host Identifiers and
Application Domain (not
associated with an Agent
Registration)
$OAM_REG_HOME/input/UpdatePolicyRequest.xml
See Also: "Managing Policies and Application Domains Remotely" on
page 20-81
Performing Remote Registration for OSSO Agents
Registering and Managing Legacy OSSO Agents 24-13
Table 24–7 describes elements in the OSSO request file: OSSORequest.xml.
Remote OSSO Agent registration automatically:
■Creates the agent page for the Oracle Access Management Console
■Creates an Application Domain and basic policies to protect applications
■Updates the OSSO configuration file on the client to be consumed by the agent at
run time
24.4.2 Performing In-Band Remote Registration of OSSO Agents
This is a brief summary of tasks required to perform in-band remote registration for
your OSSO agent. Full details are provided in Chapter 16.
Table 24–7 OSSO-Specific Elements in a Remote Registration Request
Elements Description Example
<serverAddress>
<agentName>
<hostIdentifier>
<agentBaseUrl>
<autoCreatePolicy>
<applicationDomain>
<virtualhost>
Elements common to all remote registration request
templates.
See Table 16–8, " Common Elements in
Remote Registration Requests"
<ssoServerVersion> SSO Token version values:
■v3.0: Most secure token using AES encryption
standard for encrypting tokens exchanged between
OAM Server and mod_osso. This is the default
value. This was supported by OSSO 10.1.4.3 patch
set.
■v1.4: This is supported by OSSO 10g prior to OSSO
10.1.4.3 patch set. Uses DES encryption standard.
■v1.2: This used to be version of tokens exchanged
between OSSO partners prior to OSSO 10.1.4.0.1.
Uses DES.
<ssoServerVersion>
>...</ssoServerVersion> >
<OracleHomePath> The absolute file system directory path to the mod_osso
agent.
<oracleHomePath>
$ORACLE_HOME
</oracleHomePath>
<updateMode> Default: None specified
<updateMode></updateMode>
<adminInfo> Optional.
Administrator details for this mod_osso instance. For
example, Application Administrator.
Default: None specified
<adminInfo></adminInfo>
<adminId> Optional.
Administrator log in ID for this mod_osso instance. For
example, SiteAdmin.
Default: None specified
<adminId></adminId>
<logoutUrl> Include the Logout URLs for consumption during
remote registration.
Default: None specified
<logoutUrl>logout1.html</logoutUrl>
<failureUrl> Include the Failure URLs for consumption during remote
registration.
Default: None specified
<failureUrl>failure1.html</failureUrl>

Performing Remote Registration for OSSO Agents
24-14 Administrator's Guide for Oracle Access Management
Prerequisites
Introduction to Remote Registration on page 15-8
Task overview: In-band Administrators performing remote registration
1. Acquire the registration tool and set environment variables as described in
"Acquiring and Setting Up the Remote Registration Tool" on page 16-32.
$ORACLE_HOME/oam/server/rreg/client/RREG.tar.gz
2. Create your input file with unique values for the agent and Application Domain as
described in "Creating Your Remote Registration Request" on page 16-33.
From: OSSORequest.xml
To: myossoagent_request.xml
3. Run the registration tool to configure the Agent, create a default Application
Domain for the resources, and copy the updated agent configuration file as
described in "Performing In-Band Remote Registration" on page 24-13.
From AdminServer (Console) host:
$DOMAIN_HOME/output/$Agent_Name/osso.conf
To: mod_osso directory path on the Agent host: $OHS_dir/osso.conf. For example:
$WebTier_MW_HOME/Oracle_WT1/instances1/config/OHS/ohs1/config/
osso.conf
4. Validate the configuration as described in "Validating Remote Registration and
Resource Protection" on page 16-38.
5. Perform access checks to validate that the configuration is working, as described
in "Validating Authentication and Access After Remote Registration" on
page 16-39.
24.4.3 Performing Out-of-Band Remote Registration for OSSO Agents
The term out-of-band registration refers to manual registration that involves
coordination and actions by both the in-band Administrator and the out-of-band
Administrator.
In
outofband
mode, the in-band Administrator uses the starting request file submitted
by the out-of-band Administrator, and returns a generated response file to the
out-of-band Administrator for additional processing. The out-of-band Administrator
runs the remote registration tool with the response file as input to update the agent
configuration file.
This is a brief summary of tasks required to perform out-of-band remote registration
for your OSSO agent. Full details are provided in other chapters, as described here.
Prerequisites
"Introduction to Remote Registration" on page 15-8
Task overview: Out-of-band remote registration (Agent is outside the network)
1. Out-of-band Administrator: Creates a starting request input file containing
specific application and agent details and submits it to the in-band Administrator.
■Acquire the registration tool and set environment variables as described in
"Acquiring and Setting Up the Remote Registration Tool" on page 16-32.

Updating Registered OSSO Agents Remotely
Registering and Managing Legacy OSSO Agents 24-15
$ORACLE_HOME/oam/server/rreg/client/RREG.tar.gz
■Copy and edit a template to input unique values for the agent and Application
Domain as described in "Creating Your Remote Registration Request" on
page 16-33.
$OAM_REG_HOME/input/OSSORequest.xml
■Submit the starting request input file to the in-band Administrator using a
method you choose (email or file transfer).
2. In-band Administrator:
■Acquire the registration tool and set environment variables as described in
"Acquiring and Setting Up the Remote Registration Tool" on page 16-32.
$ORACLE_HOME/oam/server/rreg/client/RREG.tar.gz
■Use the out-of-band starting request with the registration tool to register the
agent and create the response and native agent configuration files to return to
the out-of-band Administrator. See "Performing Out-of-Band Remote
Registration" on page 16-34:
–osso_Response.xml is generated for the out of band Administrator to use
in Step 3.
–osso.conf is modified for the out-of-band Administrator to bootstrap the
OSSO module.
3. Out-of-band Administrator: Use the registration tool with the response file and
copy artifacts to the appropriate file system directory.
–osso_Response.xml.
–osso.conf
4. In-band Administrator: Validates the configuration as described in "Validating
Remote Registration and Resource Protection" on page 16-38.
5. Out-of-band Administrator: Performs several access checks to validate that the
configuration is working, as described in "Validating Authentication and Access
After Remote Registration" on page 16-39.
24.5 Updating Registered OSSO Agents Remotely
This section describes how to update, validate, and delete OSSO Agents using remote
registration templates and modes described in "Introduction to Updating Agents
Remotely" on page 16-36.
The update request file passes specific values to the remote registration tool, oamreg.
The primary differences between the update template and the original registration
template is that the update template.
Table 24–8 Delta: OSSO Remote Registration versus Remote Updates
Delta Element
Adds <startDate>yyyy_mm_dd</startDate> element to track changes
<homeUrl> element that specifies the agent_base_url_port
Omits <hostidentifier>
Omits <agentbaseURL>

Configuring Logout for OSSO Agents with Access Manager 11.1.2
24-16 Administrator's Guide for Oracle Access Management
To remotely update OSSO Agent registration
1. Set up the registration tool as described in, "Acquiring and Setting Up the Remote
Registration Tool" on page 16-32.
2. Update Agent:
a. Create your update request using the
OSSOUpdateAgentRequest.xml
template.
b. On the computer hosting the Agent, run the following command with
agentUpdate
mode specify your own *Request*.xml as the input file. For
example:
./bin/oamreg.sh agentUpdate input/*OSSOUpdateAgentRequest.xml
c. Provide the registration Administrator user name and password when asked.
d. Confirm success with on-screen messages.
e. Relocate to the agent host osso.conf:
From the AdminServer (Console) host: /rreg/output/Agent_Name/
To the mod_osso directory path (Agent host Web server $OHS_dir/osso.conf):
$WebTier_MW_HOME/Oracle_
WT1/instances1/config/OHS/ohs1/config/osso.conf
f. Restart the OAM Server that is hosting this agent
3. Validating Agent:
a. On the Agent host, run the following command in
agentValidate
mode. For
example:
./bin/oamreg.sh agentValidate agentname
b. Provide the registration Administrator user name and password when asked.
c. Confirm success with on-screen messages.
4. Deleting an Agent:
a. On the computer hosting the Agent, run the following
agentDelete
command.
For example:
./bin/oamreg.sh agentDelete agentname
b. Provide the registration Administrator user name and password when asked.
c. Confirm success with on-screen messages.
Success: On-screen message confirms
AgentDelete process completed successfully
!
24.6 Configuring Logout for OSSO Agents with Access Manager 11.1.2
This section provides the following topics:
■About Centralized Logout with OSSO Agents (mod_OSSO) and Access Manager
■Removing Custom mod_osso Cookies on Logout

Configuring Logout for OSSO Agents with Access Manager 11.1.2
Registering and Managing Legacy OSSO Agents 24-17
24.6.1 About Centralized Logout with OSSO Agents (mod_OSSO) and Access Manager
With OSSO Agents (mod_osso 10g), partner applications also cede logout control to
the OAM Server (single sign-on server). When the user logs out of one application, she
is automatically logged out of all other applications.
Process overview: Centralized logout with mod_osso
1. Clicking Logout in an application takes the user to the page where logout occurs
2. When a user has signed off successfully, each of the applications listed on the
centralized logout page has a check mark beside the application name.
3. A broken image beside an application name identifies an unsuccessful logout.
4. Once all of the application names activated in a session have a check mark, you
can click Return to go to the application from which you initiated logout.
5. Delete the custom mod_osso agent cookies on logout.
24.6.2 Removing Custom mod_osso Cookies on Logout
The OSSO server cookie includes a list of partner IDs.
Process overview: When a user logs off from one partner application
1. OSSO server pulls a list of the logout URLs.
2. OSSO server clears its own cookie.
3. OSSO server redirects to a customized JSP page (hosted on the OSSO server), and
passes the list of logout URLs in the request.
4. The JSP page loads those logout URLs that contains some image tags of check
marks, and as a result of the loading, the cookies for those mod_osso instances are
cleared
However, on user logout, some custom cookies set by OAM Server through
authentication response settings might not get deleted. However, you can edit
oam-config.xml to configure the OAM Server to delete custom cookies set during
authentication when a user logs out of OAM. For instance, when integrating with
Oracle E-Business Suite, the ORASSO_AUTH_HINT cookie is set by the application
and should be included in the
CookieNames
list (or the UCM cookie, for example).
Syntax (beneath
PluginClass" Type=
...):
<Setting Name="CookieDelMap" Type="htf:map">
<Setting Name="CookieNames" Type="xsd:string">COOKIE_NAME</Setting>
</Setting>
The following procedure guides as you edit the
CookieDelMap
element and add
CookieNames as a single value or a comma-separated list of custom cookies to delete
when a user logs out. This procedure also explains how to increment the
oam-config.xml file version to propagate your change to all managed servers without
restarting.
Note: No change is needed in the logout URL configuration of
existing applications that use the OSSO Agent.

Locating Other OSSO Agent Information
24-18 Administrator's Guide for Oracle Access Management
To delete custom mod_osso cookies on logout
1. Back up $DOMAIN_HOME/config/fmwconfig/oam-config.xml.
2. In oam-config.xml, add (or edit) the
CookieDelMap
element and
CookieNames
. For
example:
<Setting Name="ResponsePluginSetting" Type="htf:map">
<Setting Name="PluginClass" Type=... </Settings>
<Setting Name="CookieDelMap" Type="htf:map">
<Setting Name="CookieNames" Type="xsd:string">ORASSO_AUTH_HINT
</Setting>
</Setting>
</Setting>
3. Configuration Version: Increment the
Version xsd:integer
as shown in the next
to last line of this example (existing value (25, here) + 1):
Example:
<Setting Name="Version" Type="xsd:integer">
<Setting xmlns="http://www.w3.org/2001/XMLSchema"
Name="NGAMConfiguration" Type="htf:map:>
<Setting Name="ProductRelease" Type="xsd:string">11.1.1.3</Setting>
<Setting Name="Version" Type="xsd:integer">25</Setting>
</Setting>
4. Save the file.
24.7 Locating Other OSSO Agent Information
See Table 24–9 for additional information on legacy OSSO agents with Access
Manager.
Caution: Work carefully. In general, Oracle recommends that you do
not edit the oam-config.xml file. This, however, is a rare exception.
Table 24–9 Other OSSO Information in this Guide
Topic Location
Component Loggers Table 8–3, " Oracle Access Management Server-Side Component
Loggers"
OSSO Metrics in the DMS
Console
"Reviewing OSSO Agent Metrics" on page 12-8
Sessions and Session Management Chapter 17, "Maintaining Access Manager Sessions"

25
Registering and Managing 10g WebGates with Access Manager 11g 25-1
25
Registering and Managing 10g WebGates with
Access Manager 11g
The Oracle Fusion Middleware Installation Guide for Oracle Identity and Access
Management describes initial deployment of Access Manager 11g with the Oracle
HTTP Server. However, when your enterprise includes Web server types other than
Oracle HTTP Server you might want to use existing 10g WebGates or install fresh 10g
WebGates for use with Access Manager. Also, you might want to switch from using
the pre-registered IAMSuiteAgent to using a 10g WebGate to protect Oracle Identity
Management Consoles.
The following sections describe how to install fresh instances of 10g WebGates for use
with Access Manager:
■Prerequisites
■Introduction to 10g OAM Agents for Access Manager 11g
■Comparing Access Manager 11.1.2 and 10g
■Configuring Centralized Logout for IAMSuiteAgent
■Registering a 10g WebGate with Access Manager 11g Remotely
■Managing 10g OAM Agents Remotely
■Locating and Installing the Latest 10g WebGate for Access Manager 11g
■Configuring Centralized Logout for 10g WebGate with 11g OAM Servers
■Removing a 10g WebGate from the Access Manager 11g Deployment
25.1 Prerequisites
Review the latest certification matrix from Oracle Technology Network to locate the
latest WebGates for your deployment:
http://www.oracle.com/technetwork/middleware/id-mgmt/fusion-certification-
100350.html
Ensure that your Oracle Access Management Console is running and get familiar with:
■Introduction to Policy Enforcement Agents on page 15-1
■Introduction to 10g OAM Agents for Access Manager 11g in this chapter

Introduction to 10g OAM Agents for Access Manager 11g
25-2 Administrator's Guide for Oracle Access Management
25.2 Introduction to 10g OAM Agents for Access Manager 11g
This section provides the following topics:
■About IAMSuiteAgent: A Pre-Configured 10g WebGate Registered with Access
Manager
■About Legacy Oracle Access Manager 10g Deployments and WebGates
■About Installing Fresh 10g WebGates to Use With Access Manager 11.1.2
■About Centralized Logout with 10g OAM Agents and 11g OAM Servers
25.2.1 About IAMSuiteAgent: A Pre-Configured 10g WebGate Registered with Access
Manager
IAMSuiteAgent is a Java agent filter that is pre-registered with Access Manager 11.1.2
out of the box. This agent and the companion Application Domain are installed
pre-configured with Access Manager.
The IAMSuiteAgent is a domain-wide agent:
■Once Access Manager is deployed, the IAMSuiteAgent is installed on every server
in the domain
■Unless disabled, every request coming into the WebLogic Application Server is
evaluated and processed by the IAMSuiteAgent
■Certain IAMSuiteAgent configuration elements are available in the WebLogic
Administration Console (in the Security Provider section) and others in the Oracle
Access Management Console.
IAMSuiteAgent and related policies provide SSO protection for the IDM
Administration Console, Oracle Identity Console, Oracle Access Management
Console, and specific resources in the Identity Management domain.
You can replace the IAMSuiteAgent with a 10g WebGate to protect Oracle Identity
Management Consoles and resources in the Identity Management domain, if you
choose.
25.2.2 About Legacy Oracle Access Manager 10g Deployments and WebGates
11g OAM Servers support 10g WebGates that are registered to operate with Access
Manager 11.1.2. Such WebGates might include:
■Legacy 10g WebGates currently operating with Oracle Access Manager 10g.
■Legacy 10g WebGates configured as the Identity Assertion Provider (IAP) for SSO
(for applications using IAP WebLogic container-based security with Oracle Access
Manager 10g, as described in the Oracle Fusion Middleware Application Security
Guide).
■Legacy 10g WebGates currently operating with Web Applications coded for Oracle
ADF Security and the OPSS SSO Framework
See Also:
■Section 25.4, "Configuring Centralized Logout for
IAMSuiteAgent"
■Section 16.11, "Replacing the IAMSuiteAgent with an 11g
WebGate"
■Section D.1, "Bundled 10g IAMSuiteAgent Artifacts"

Introduction to 10g OAM Agents for Access Manager 11g
Registering and Managing 10g WebGates with Access Manager 11g 25-3
You can register these agents to use Access Manager SSO using either the Oracle
Access Management Console or the remote registration tool. After registration, 10g
WebGates directly communicate with Access Manager through a Java-based OAM
Proxy that acts as a bridge.
The following overview outlines the tasks that must be performed to set up an existing
10g WebGate to operate with Access Manager.
Task overview: Setting up a legacy 10g WebGate to operate with Access
Manager
1. Registering a 10g WebGate with Access Manager 11g Remotely
2. Configuring Centralized Logout for 10g WebGate with 11g OAM Servers
3. Optional: Deploying Applications in a WebLogic Container as described in the
Oracle Fusion Middleware Application Security Guide.
25.2.3 About Installing Fresh 10g WebGates to Use With Access Manager 11.1.2
You can install fresh 10g WebGates for use with Access Manager 11g as described in
this chapter. 10g WebGates are available for a number of Web server platforms.
After installation and registration, 10g WebGates directly communicate with Access
Manager through a Java-based OAM proxy that acts as a bridge.
There are several differences between installing a 10g WebGate to operate in an 11g
Access Manager deployment versus installing the 10g WebGate in an 10g Oracle
Access Manager deployment. Table 25–1 outlines these differences.
See Also:
■Table 1–2
■Appendix A, "Integrating Oracle ADF Applications with Access
Manager SSO"
Note: When installing fresh 10g WebGates for Access Manager,
Oracle recommends that you use the latest WebGates. Oracle also
recommends that you install multiple WebGates for failover and load
balancing.

Introduction to 10g OAM Agents for Access Manager 11g
25-4 Administrator's Guide for Oracle Access Management
The following overview lists the topics in this chapter that describe 10g WebGate
installation and registration tasks for Access Manager 11g in detail. You must complete
all procedures for successful operation with Access Manager 11g.
Task overview: Registering and installing a 10g WebGate for Access
Manager 11g
1. Registering a 10g WebGate:
2. Locating and Downloading 10g WebGates for Use with Access Manager 11g
3. Configuring Centralized Logout for 10g WebGate with 11g OAM Servers
4. Optional: Deploying Applications in a WebLogic Container as described in Oracle
Fusion Middleware Application Security Guide.
25.2.4 About Centralized Logout with 10g OAM Agents and 11g OAM Servers
Logout is initiated when an application causes the invocation of the logout.html file
configured for any registered 10g WebGate.
Generally speaking, during centralized logout with 10g WebGates the SSO Engine
receives a user-session-exists request. The Session Management Engine looks up the
session and responds that the session exists. The SSO engine sends a Clear Session
request. The Session management engine clears the token and session context. The
SSO engine sends a Session Cleared response.
Table 25–1 Installation Comparison with 10g WebGates
10g WebGates in 11g Deployments 10g WebGates in 10g Deployments
1. Packages: 10g WebGate installation packages are found on
media and virtual media that is separate from the core
components.
2. Provisioning: Before installation, provision WebGate with
Access Manager 11g as described in "Registering a 10g
WebGate with Access Manager 11g Remotely" on
page 25-11.
3. Associating with OAM Server: Occurs during WebGate
registration (task 2 of this sequence).
4. Installing: Install the 10g WebGate in front of the
application (or for Fusion Middleware, in front of the
WebLogic Server).
5. Language Packs: 10g WebGate Language Packs are
supported with Access Manager.
6. Web Server Configuration: Copy Access Manager
generated files to the WebGate installation directory path
to update the Web server configuration.
7. Certificate Installation: Copy files to the WebGate
installation directory path.
8. Forms: 10g forms provided with 10g WebGates cannot be
used with 11g OAM Servers.
Using 10g WebGates with 11g OAM Servers is similar in
operation and scope to a resource WebGate (one that
redirects in contrast to the Authentication WebGate). With
a 10g WebGate and 11g OAM Server, the 10g WebGate
always redirects to the 11g credential collector which acts
like the authenticating WebGate.
9. Single Log Out: Configure using information in
Chapter 22, "Configuring Centralized Logout for Sessions
Involving 11g WebGates."
10. Multi-Domain Support: Does not apply with Access
Manager 11g.
1. Packages: 10g WebGate installation packages are found on
media and virtual media that is separate from the core
components.
2. Provisioning: Before installation, you create a WebGate
instance in the Access System Console.
3. Associating with AAA: Before installation, you associated
the WebGate with an Access Server in the Access System
Console.
4. Installing: Using 10g WebGate packages.
5. Language Packs: 10g WebGate Language Packs could be
installed during WebGate installation (or later).
6. Web Server Configuration: Automatic during WebGate
installation (or manually after WebGate installation).
7. Certificate Installation: You copied files to the WebGate
installation directory path.
8. Forms: Were provided for use in 10g deployments.
9. Centralized Log Out for Oracle Access Manager 10g.
10. Multi-Domain Support: Could be configured for Oracle
Access Manager 10g.

Comparing Access Manager 11.1.2 and 10g
Registering and Managing 10g WebGates with Access Manager 11g 25-5
Clearing the user token and the session context clears the server-side state, which
includes clearing the OAM_ID cookie set on the server side. When the agent is
notified, the agent clears the client-side state of the application. For more information,
see Section 25.8, "Configuring Centralized Logout for 10g WebGate with 11g OAM
Servers."
25.3 Comparing Access Manager 11.1.2 and 10g
This topic provides a comparison against the 10g architecture for Access Manager and
OSSO. Included are the following topics:
■Comparing Access Manager 11g versus 10g
■Comparing Access Manager 11g versus 10g Policy Model
25.3.1 Comparing Access Manager 11g versus 10g
Access Manager 11g differs from 10g in that the identity administration features have
been transferred to Oracle Identity Manager 11g (including user self-service and self
registration, workflow functionality, dynamic group management, and delegated
identity administration).
Access Manager 10g supported Single Sign-on using a single session cookie (the
ObSSOCookie) that contained the user identity and session information required to
access target resources that had the same or lower authentication level. The
ObSSOCookie was encrypted and decrypted using a global shared secret key, the
value of which was stored in the directory server. The ObSSOCookie was consumed
by Access System components to verify the user identity and allow or disallow access
to protected resources.
To close any possible security gaps, Access Manager 11g provides new server-side
components that maintain backward compatibility with existing Access Manager 10g
policy-enforcement agents (WebGates) and OSSO 10g agents (mod_osso). New Access
Manager 11g WebGates are enhanced versions of 10g WebGates, that support a
per-agent secret key for the Single Sign-on (SSO) solution. Thus, cookie-replay type of
attack are prevented. The 11g WebGates are all trusted at the same level; a cookie
specific for the WebGate is set and cannot be used to access any other
WebGate-protected applications on a user's behalf.
Unless explicitly stated, the term "WebGate" refers to both an out of the box WebGate
or a custom Access Client.
Access Manager 11g uses technology from Oracle Coherence to provide centralized,
distributed, and reliable session management.
Table 25–2 provides a comparison of Access Manager 11g versus 10g. For a list of
names that have changed with Access Manager 11g, see "Product and Component
Name Changes with 11.1.2."
See Also: Section 25.4, "Configuring Centralized Logout for
IAMSuiteAgent"

Comparing Access Manager 11.1.2 and 10g
25-6 Administrator's Guide for Oracle Access Management
Table 25–2 Comparison: Access Manager 11g versus 10g
Access Manager 11g 10g
Agents ■Agents: WebGate, Access Client, OpenSSO,
OSSO (mod_osso), IAMSuiteAgent
Note: Nine Administrator languages are supported.
■Resource WebGate (RWG)
■Authentication WebGate (AWG)
■AccessGate
■Access Server
■Policy Manager
■Identity System
Note: Nine Administrator languages are supported.
Server-side
components
■OAM Server (installed on a WebLogic Managed
Sever)
Security Token Service and Identity Federation
run on OAM Server
■Access Server
■Policy Manager
■Identity Server
Console Oracle Access Management Console Access System Console
Identity System Console
Protocols that
secure
information
exchange on the
Internet
Front channel protocols exchanged between Agent
and Server: HTTP/HTTPS.
11g WebGate secures information exchange using the
Agent key.
-See Also: Cryptographic keys.
10g Agent information exchange is unsecured, in
plain text.
Cryptographic
keys
■One per-agent secret key shared between 11g
WebGate and OAM Server
■One OAM Server key, generated during Server
registration
Note: One key is generated and used per registered
mod_osso agent.
One global shared secret key per Access Manager
deployment which is used by all the 10g WebGates
Keys storage ■Agent side: A per-agent key is stored locally in
the Oracle Secret Store in a wallet file
■OAM Server side: A per- agent key, and server
key, are stored in the credential store on the
server side
■Security Token Service
Global shared secret stored in the directory server
only (not accessible to WebGate)
Cookies Host-based authentication cookie, described in
Table 1–2, " Features in Access Manager 11.1.2"
■One domain-based ObSSOCookie for all
WebGates (including the AWG), for both
authentication and session management
Encryption /
Decryption (The
process of
converting
encrypted data
back into its
original form)
Introduces client-side cryptography and ensures that
cryptography is performed at both the agent and
server ends:
1. WebGate encrypts obrareq.cgi using the agent
key.
Note: obrareq.cgi is the authentication request in
the form of a query string redirected from
WebGate to OAM Server.
2. OAM Server decrypts the request, authenticates,
creates the session, and sets the server cookie.
3. OAM Server also generates the authentication
token for the agent (encrypted using the agent
key), packs it in obrar.cgi with a session token (if
using cookie-based session management),
authentication token and other parameters, then
encrypts obrar.cgi using the agent key.
Note: obrar.cgi is the authentication response
string redirected from the OAM Server to
WebGate.
4. WebGate decrypts obrar.cgi, extracts the
authentication token, and sets a host-based
cookie.
■Token generation/ encryption, and validation/
decryption are delegated to the Access Server.
■Both obrareq.cgi and obrar.cgi are sent
unencrypted, relying on the underlying
HTTP(S) transport for security.

Comparing Access Manager 11.1.2 and 10g
Registering and Managing 10g WebGates with Access Manager 11g 25-7
25.3.2 Comparing Access Manager 11g versus 10g Policy Model
Access Manager 11g default behavior is to deny access when a resource is not
protected by a policy that explicitly allows access.
Access Manager 10g provides authentication and authorization based on policies
within a policy domain. Access Manager 10g default behavior allowed access when a
resource was not protected by a rule or policy that explicitly denied access to limit the
number of WebGate queries to the Access Server.
Table 25–3 compares the Access Manager 11g policy model with the 10g model. Access
Manager 11g default behavior is to deny access when a resource is not protected by a
policy that explicitly allows access. In contrast, Access Manager 10g default behavior
allowed access when a resource was not protected by a rule or policy that explicitly
specified access.
Session
Management
■Chapter 17, "Maintaining Access Manager
Sessions"
■Single domain supported.
Multi-domain: If a user idles out on one
domain, but not on the authentication WebGate,
the AWG cookie is still valid (re-authentication
is not needed).A new cookie is generated with
the refreshed timeout.
Client IP ■Maintain this Client IP, and include it in the
host- based OAMAuthnCookie.
■Include the original client IP inside the
ObSSOCookie.
If IP validation is configured, when cookie
presented in later authentication or
authorization requests this original client IP is
compared with the presenter's IP.
Rejection occurs if there is no match
Response token
replay
prevention
■Include RequestTime (the timestamp just before
redirect) in obrareq.cgi and copy it to obrar.cgi
to prevent response token replay.
N/A
Multiple network
domain support
Cross-network-domain single sign-on out of the box.
Oracle recommends you use Oracle Federation for
multiple network domain support.
A proprietary multiple network domain SSO
capability predates Oracle Access Management
Identity Federation. If this is implemented in your
10g deployment, register 10g Agents with Access
Manager 11g to continue this support.
■Single domain is supported.
Once a user logs off from one WebGate, the
domain cookie is cleared and the user is
considered to be logged off the entire domain.
■Multi-domain SSO can be supported through
chained customized logout pages.
Centralized
log-out
■The
logOutUrls
(10g WebGate configuration
parameter) is preserved. 10g logout.html
requires specific details for Access Manager 11g.
■11g WebGate parameters are new:
Logout Redirect URL
Logout Callback URL
Logout Target URL
See Chapter 22, "Configuring Centralized Logout for
Sessions Involving 11g WebGates."
logout.html requires specific details when using a 10g
WebGate with Access Manager 11g. See Chapter 22,
"Configuring Centralized Logout for Sessions
Involving 11g WebGates."
■Single domain is supported.
Once a user logs off from one WebGate, the
domain cookie is cleared and the user is
considered to be logged off the entire domain.
■Multi-domain SSO can be supported through
chained customized logout pages.
Table 25–2 (Cont.) Comparison: Access Manager 11g versus 10g
Access Manager 11g 10g
Comparing Access Manager 11.1.2 and 10g
25-8 Administrator's Guide for Oracle Access Management
Table 25–3 Comparing Access Manager 11g Policy Model versus 10g
Policy Elements 11g Policy Model 10g Policy Model
Policy Authoring Oracle Access Management Console Policy Manager
Policy Store Database LDAP directory server
Domain Application Domain Policy Domain
Resources 1. No URL prefixes. Resource definitions are
treated as complete URLs.
2. Pattern matching (with limited features) for:
' * ' and '...' are supported
3. Resources need not be unique across domains.
4. Query-string protection for HTTP URLs.
5. Each HTTP resource is defined as a URL path,
and associated with a host identifier.
However, resources of other types are
associated with a specific name (not a host
identifier).
6. Non-HTTP resource types are supported, with
definition of specific operations. Non-HTTP
resource types are never associated with a
host identifier.
7. Resources can designated as either Protected,
Unprotected, or Excluded.
8. Custom resource types are allowed.
1. URL prefixes are defined in domains
2. Pattern matching for:
{ } * …
3. Resources need not be unique across domains.
4. http resources can be protected based on URL
query string contents and/or HTTP operation.
5. Non-HTTP resource types and operations can
be defined.
Host identifiers 1. Host Identifiers are defined outside of policies
and are used while defining HTTP resources.
2. Host Identifiers are mandatory for defining
HTTP resources.
1. Host Identifiers are defined outside of policies
and are used while defining HTTP resources.
2. Host Identifiers are not mandatory, for
defining HTTP resources, till there are no Host
Identifiers defined in the system.
Authentication
Policies
1. Authentication policies include resources,
success responses, and an authentication
scheme.
2. Authorization policies can also contain
success responses, and time based, IP based
and user-based conditions.
3. Only one authentication policy and one
authorization policy can be associated with
any resource.
4. Authentication and Authorization policies can
evaluate to Success or Failure.
5. No Query Builder and no support for LDAP
filters for (for retrieving matches based on an
attribute of a certain display type, for
example).
6. There is no notion of a default policy in an
Application Domain. However, you can
define a policy for resource: /…/* which can
be used as a default policy within a
determined scope).
7. Token Issuance Policies can be defined using
resources and user- or partner-based
conditions. See Section 20.3.6, "About Token
Issuance Policy Pages.".
1. Authentication policies are simple and contain
only authentication-scheme-based rule.
2. One resource can be associated with a set of
Authorization policies. Evaluation of these
policies can be based on an expression that
combines the policies within the set using
logical operators as desired.
A resource can also be associated with
multiple authentication policies and
authorization policy sets. However, only one
set applies.
3. An Authorization policy can evaluate to
Success or Failure, or Inconclusive.
4. Users can be specified using LDAP filters.
5. Default authentication policy and
authorization policy set can be defined for a
policy domain. This policy is only applicable
if there are no other applicable policies for a
runtime resource in that domain.
6. There is no support for Token Issuance
Policies.
Comparing Access Manager 11.1.2 and 10g
Registering and Managing 10g WebGates with Access Manager 11g 25-9
Authentication
Schemes
Authentication Schemes are defined globally and
can be shared (referenced within authentication
policies).
The trust level is expressed as an integer value
between 0 (no trust) and 99 (highest level of trust).
Note: Level 0 is unprotected. Only unprotected
resources can be added to an Authentication Policy
that uses an authentication scheme at protection
level 0.
See Also: Table 19–20, " Authentication Scheme
Definition".
Authentication Schemes can be defined outside of
policies and can be referenced within
authentication policies.
Authorization Policy Each resource assigned to an Application Domain
can be protected by only one authorization policy.
Each policy can include one or more conditions and
a rule.
See Also: Rule, later in this table, and Section 20.8,
"Defining Authorization Policies for Specific
Resources.".
To protect resources, you define authorization rules
that contain one or more conditions.You also
configure authorization expressions using one or
more authorization rules. A policy domain (and a
policy) can each contain only one authorization
expression.
Token Issuance Policy By default, only a container for Token Issuance
Policies is provided in a generated Application
Domain. No Conditions or Rules are generated
automatically. You must add these manually.
See Also: Section 20.3.6, "About Token Issuance
Policy Pages.".
N/A
Responses Available for all policy types:
1. Authentication and Authorization success
Responses can be defined within the policies.
These are applied after evaluation of policies.
2. Cookie, Header, and Session responses are
supported.
3. URL redirection can be set.
4. Response definitions are part of each policy.
Response values can be literal strings or can
contain additional embedded expressions that
derive values from request, user, and session
attributes.
1. Authentication and Authorization Responses
can be defined within the policies for Success,
Failure, and Inconclusive events. These are
returned to the caller after evaluation of
policies.
2. HTTP_HEADER and Cookie based variables
can be set.
3. Redirect URLs can be set for Success and
Failure events of authentication and
authorization policy evaluations.
4. Response values can contain literal strings
and list of user attribute values.
Cookies See Also: Table 18–8
and
Section 18.6.1, "About Single Sign-On Cookies
During User Login."
See Also: Table 18–8
and
Section 18.6.1, "About Single Sign-On Cookies
During User Login."
Table 25–3 (Cont.) Comparing Access Manager 11g Policy Model versus 10g
Policy Elements 11g Policy Model 10g Policy Model

Configuring Centralized Logout for IAMSuiteAgent
25-10 Administrator's Guide for Oracle Access Management
25.4 Configuring Centralized Logout for IAMSuiteAgent
The IAMSuiteAgent is pre-configured with the logout parameters needed to perform
central logout against the OAM Server. While similar to a 10g WebGate, the
IAMSuiteAgent does not have a local logout.html page to be configured. Instead, the
IAMSuiteAgent is delivered with a pre-deployed application oamsso_logout), that is
used by the agent to perform the logout.
The logout functionality for the IAMSuiteAgent requires that the oamsso_logout
application is deployed in the Server where the IAMSuiteAgent is used. The initial
installation adds this application to AdminServer and to OAM Servers. However, you
must update this application's Target servers to include all those that are using the
IAMSuiteAgent.
To configure logout for the IAMSuiteAgent
1. Log in to the WebLogic Server Administration Console.
2. Navigate to Domain, Deployments, oamsso_logout, Targets.
3. Select all the Servers where the IAMSuiteAgent is enabled and where logout is
performed. For example, oim_server, oaam_admin, oaam_server, and so on.
4. Click Save.
5. Proceed to:
Query String-based
HTTP Resource
Definitions
Supported within Access Policies, as described in
Table 20–1, " Resource Definition Elements"
This Policy Model supports query string-based
HTTP resource definitions within Access Policies.
At run time, the OAM Proxy passes the Query
String to the policy layer after URL encoding, just
like for base resource URL. Only Query String that
are part of HTTP GET requests are passed. Query
String pattern does not apply to HTTP POST data.
Rule Available for only Authorization and Token
Issuance Policies.
Each Authorization policy includes a rule that
defines whether the policy allows or denies access
to resources protected by the policy.
The rule references Authorization conditions,
described next.
See Also: Section 20.11, "Introduction to
Authorization Policy Rules and Conditions.".
A policy is defined using authorization rules
(among other policy elements). Authorization
rules:
■Are defined outside of policies (but scoped
within a policy domain) and are referenced in
policies.
■Appear in two places: 1) as part of default
rules for the domain and 2) in policy
definitions.
Each rule specifies who (which users, groups or IP4
addresses) is allowed or denied access and the time
period in which this rule applies.
There is also a provision to specify whether Allow
takes precedence over Deny.
Condition Available for only Authorization and Token
Issuance Policies.
Each Authorization policy rule references
conditions that define to whom the rule applies, if
there is a time Condition, and how evaluation
outcomes are to be applied.
Conditions are declared outside of rules and are
referenced within a rule.
See Also: Section 20.11, "Introduction to
Authorization Policy Rules and Conditions."
N/A
Table 25–3 (Cont.) Comparing Access Manager 11g Policy Model versus 10g
Policy Elements 11g Policy Model 10g Policy Model

Registering a 10g WebGate with Access Manager 11g Remotely
Registering and Managing 10g WebGates with Access Manager 11g 25-11
■Section 20.14, "Validating Authentication and Authorization in an Application
Domain"
■Chapter 21, "Validating Connectivity and Policies Using the Access Tester"
25.5 Registering a 10g WebGate with Access Manager 11g Remotely
Whether you have a legacy 10g WebGate installed, or you are installing a fresh 10g
WebGate instance to use with Access Manager 11g, you must register WebGate to use
Access Manager 11g authentication and authorization services.
You can use either the Oracle Access Management Console or the remote registration
tool to perform this task. The remote registration tool enables you to specify all
WebGate parameters before registration using a template.
The following procedure walks through provisioning using the remote registration
tool, in-band mode. In this example, OAMRequest_short.xml is used as a template to
create an agent named my-10g-agent1, protecting /.../*, and declaring a public resource,
/public/index.html. Your values will be different. You can use a full registration
template to specify public, private, and excluded resources.
To use remote registration with a 10g WebGate for Access Manager 11g
1. Acquire the remote registration tool and set up the script for your environment.
For example:
a. Locate RREG.tar.gz file in the following path:
$ORACLE_HOME/oam/server/rreg/client/RREG.tar.gz
b. Untar RREG.tar.gz file to any suitable location. For example:
rreg/bin/oamreg.
c. In the oamreg script (oamreg.bat or oamreg.sh), set the following environment
variables based on your situation (client side or server side) and information
in Table 16–5:
OAM_REG_HOME = exploded_dir_for_RREG.tar/rreg
JAVA_HOME = Java_location_on_the_computer
2. Create the registration request:
a. Locate OAMRequest_short.xml and copy it to a new file. For example:
$OAM_REG_HOME/input/OAMRequest_short.xml/
Copy: OAMRequest_short.xml
To: my-10g-agent1.xml
b. Edit my-10g-agent1.xml to include details for your environment. For example:
<OAMRegRequest>
<serverAddress>http://ruby.uk.example.com:7001</serverAddress>
<hostIdentifier>my-10g</hostIdentifier>
<agentName>my-10g-agent1</agentName>
<protectedResourcesList>
<resource>/myapp/</resource>
<resource>/myapp/.../*</resource>
See Also: The following, if needed:
■Section 16.7, "Performing Remote Registration for OAM Agents"

Registering a 10g WebGate with Access Manager 11g Remotely
25-12 Administrator's Guide for Oracle Access Management
</protectedResourcesList>
<publicResourcesList>
<resource>/public/index.html</resource>
</publicResourcesList>
<excludedResourcesList>
<resource>/excluded/index.html</resource>
</excludedResourcesList>
<autoCreatePolicy>true</autoCreatePolicy>
<primaryCookieDomain>.uk.example.com</primaryCookieDomain>
<logOutUrls>
<url>/oamsso/logout.html</url>
</logOutUrls>
</OAMRegRequest>
3. Register the agent. For example:
a. Locate the remote registration script.
Linux: rreg/bin/oamreg.sh
Windows: rreg\bin\oamreg.bat
b. From the directory containing the script, execute the script using inband
mode. For example:
$ ./bin/oamreg.sh inband input/my-10g-agent1.xml
Welcome to OAM Remote Registration Tool!
Parameters passed to the registration tool are:
Mode: inband
Filename: ...
c. When prompted, enter the following information using values for your
environment:
Enter your agent username: userame
Username: userame
Enter agent password: ********
Do you want to enter a WebGate password?(y/n)
n
iv.Do you want to import an URIs file?(y/n)
n
d. Review the final message to confirm that this was a successful registration:
Inband registration process completed successfully! Output artifacts are
created in the output folder"
4. Ignore the ObAccessClient.xml file created during registration for now.
5. Log in to the Oracle Access Management Console and add resources the new
registration:
a. From the System Configuration tab, Access Manager section, expand the
following nodes to reveal Search controls:
System Configuration
Access Manager
SSO Agents
OAM Agents
See Also: Section 16.7.2, "Creating Your Remote Registration
Request"

Managing 10g OAM Agents Remotely
Registering and Managing 10g WebGates with Access Manager 11g 25-13
b. Use the Search controls to locate your WebGate registration page, then click
the name in the Results table to display the page.
c. OAM Proxy Port—From the System Configuration tab, Common
Configuration section, double click Server Instances and locate the port on
which the OAM Proxy is running (Table 6–3).
6. Add resources to the Application Domain (Table 20–1).
7. Proceed as needed for your environment:
■Existing WebGate: Configuring Centralized Logout for 10g WebGate with 11g
OAM Servers
■Uninstalled WebGate: Locating and Installing the Latest 10g WebGate for
Access Manager 11g
■Optional: Managing 10g OAM Agents Remotely
25.6 Managing 10g OAM Agents Remotely
This section describes how to update, validate, and delete OAM 10g Agents using
remote registration templates and modes described in Section 16.8, "Introduction to
Updating Agents Remotely."
To remotely update OAM 10g Agent registration
1. Set up the registration tool as described in Section 16.7.1, "Acquiring and Setting
Up the Remote Registration Tool."
2. Update Agent:
a. Create your update request using the
OAMUpdateAgentRequest.xml
template.
b. On the computer hosting the Agent, run the following command with
agentUpdate
mode specify your own *Request*.xml as the input file. For
example:
./bin/oamreg.sh agentUpdate input/*OAMUpdateAgentRequest.xml
c. Provide the registration Administrator user name and password when asked.
d. Confirm success with on-screen messages.
e. Relocate to the agent host ObAccessClient.xml:
From the AdminServer (Console) host: /rreg/output/Agent_Name/
To the Agent host: $10gWG_install_dir/oblix/lib. For example:
$WebTier_MW_HOME/Oracle_WT1/instance1/
config/OHS/ohs1/oblix/lib
f. Restart the OAM Server that is hosting this agent
3. Validating Agent:
a. On the Agent host, run the following command in
agentValidate
mode. For
example:
./bin/oamreg.sh agentValidate agentname
b. Provide the registration Administrator user name and password when asked.

Locating and Installing the Latest 10g WebGate for Access Manager 11g
25-14 Administrator's Guide for Oracle Access Management
c. Confirm success with on-screen messages.
4. Deleting an Agent:
a. On the computer hosting the Agent, run the following
agentDelete
command.
For example:
./bin/oamreg.sh agentDelete agentname
b. Provide the registration Administrator user name and password when asked.
c. Confirm success with on-screen messages.
Success: On-screen message confirms
AgentDelete process completed successfully
!
25.7 Locating and Installing the Latest 10g WebGate for Access Manager
11g
Use the procedures in this section if you need to install a fresh 10g WebGate for use
with Access Manager 11g. Otherwise, skip this section and proceed to Section 25.8,
"Configuring Centralized Logout for 10g WebGate with 11g OAM Servers."
Task overview: Installing the WebGate includes
1. Preparing for a Fresh 10g WebGate Installation with Access Manager 11g
2. Locating and Downloading 10g WebGates for Use with Access Manager 11g
3. Starting WebGate 10g Installation
4. Specifying a Transport Security Mode
5. Specifying WebGate Configuration Details
6. Requesting or Installing Certificates for Secure Communications
7. Updating the WebGate Web Server Configuration
8. Finishing WebGate Installation
9. Installing Artifacts and Certificates
10. Confirming WebGate Installation
25.7.1 Preparing for a Fresh 10g WebGate Installation with Access Manager 11g
Table 25–4 outlines the requirements that must be met before starting an 10g WebGate
installation.

Locating and Installing the Latest 10g WebGate for Access Manager 11g
Registering and Managing 10g WebGates with Access Manager 11g 25-15
Table 25–4 Preparing for 10g WebGate Installation with Access Manager 11g
About the ... Description
Latest Supported
WebGates
Always use the latest supported 10g (10.1.4.3) WebGates with Access Manager 11g. However, if the desired
10g (10.1.4.3) WebGate is not provided, use the next latest WebGate (10g (10.1.4.2.0).
See Also: Section 25.7.2, "Locating and Downloading 10g WebGates for Use with Access Manager 11g."
Location for
installation
Consider:
■WebGate in front of the application server.
■Applications using WebLogic Server container-managed security: In front of the WebLogic Application
Server in which your application is deployed
User Accounts The account that is used to install the WebGate is not the account that runs the WebGate:
■The 10g WebGate should be installed using the same user and group as the Web server.
■Unix: You can be logged in as root to install the WebGate. The WebGate can be installed using a
non-root user if the Web server process runs as a non-root user
Root Level versus
Site Level
■The WebGate can be installed at the root level or the site level.
■Installing WebGate on multiple virtual sites amounts to only one instance of WebGate.
Transport Security
Mode
Ensure that at least one OAM Server is configured to use the same mode as the agent to be installed.
See Also Appendix C, "Securing Communication."
Computer Level
or Virtual Web
Server Level
The WebGate can be configured to run at either the computer level or the virtual Web server level. Do not
install at both the computer level and the virtual Web server levels.
Oracle HTTP
Server Web
Server:
The 10g WebGate for Oracle HTTP Server is based on open source Apache. WebGate package names
include:
■OHS (based on Apache v1.3)
■OHS2 (based on Apache v2)
■OHS11g (based on Apache v2.2 and is not the subject of this chapter)
Apache Web
Servers
Access Manager 11g provides a single package for components that support Apache with or without SSL
enabled:
■The APACHE2_WebGate supports v2 with or without SSL (and with or without reverse proxy enabled
on Solaris and Linux). See also Chapter 26, "Configuring Apache, OHS, IHS for 10g WebGates."
■The APACHE22_WebGate supports v2.2 with or without SSL (and with or without reverse proxy
enabled on Solaris and Linux). See also Chapter 26, "Configuring Apache, OHS, IHS for 10g
WebGates."
Note: For SSL-enabled communication, Access Manager supports Apache with mod_ssl only, not
Apache-SSL. mod_ssl is a derivative of, and alternative to, Apache-SSL.
IBM HTTP Server
(IHS) v2 Web
Servers:
IHS2_WebGate is powered by Apache v2 on IBM-AIX. Access Manager supports IHS v2 and IHS v2
Reverse Proxy servers with or without SSL enabled.
For details, see Chapter 26, "Configuring Apache, OHS, IHS for 10g WebGates."

Locating and Installing the Latest 10g WebGate for Access Manager 11g
25-16 Administrator's Guide for Oracle Access Management
25.7.2 Locating and Downloading 10g WebGates for Use with Access Manager 11g
Use the following procedure to obtain an 10g WebGate, if needed. Be sure to choose
the appropriate installation package for your Web server.
To find and download 10g WebGates
1. Review the latest Oracle Access Manager 10g certification information on the
Oracle Technology Network at:
http://www.oracle.com/technetwork/middleware/id-mgmt/fusion-certificati
on-100350.html
2. Go to Oracle Fusion Middleware 11gR1 Software Downloads at:
http://www.oracle.com/technology/software/products/middleware/htdocs/fm
w_11_download.html
Domino Web
Servers:
Before you install the 10g WebGate with a Domino Web server, you must have properly installed and set up
the Domino Enterprise Server R5.
See Also: Chapter 29, "Configuring Lotus Domino Web Servers for 10g WebGates."
IIS Web Servers Before installing WebGate, ensure that your IIS Web server is not in lock down mode. Otherwise things will
appear to be working until the server is rebooted and the metabase re-initialized, at which time IIS will
disregard activity that occurred after the lock down.
If you are using client certificate authentication, before enabling client certificates for the WebGate you must
enable SSL on the IIS Web server hosting the WebGate.
Setting various permissions for the /access directory is required for IIS WebGates only when you are
installing on a file system that supports NTFS. For example, suppose you install the ISAPI WebGate in
Simple or Cert mode on a Windows 2000 computer running the FAT32 file system. The last installation
panel provides instructions for manually setting various permissions that cannot be set on the FAT32
fleshiest. In this case, these instructions may be ignored.
Each IIS Virtual Web server can have it's own WebGate.dll file installed at the virtual level, or can have one
WebGate affecting all sites installed at the site level. Either install the Webgate.dll at the site level to control
all virtual hosts or install the Webgate.dll for one or all virtual hosts.
You may also need to install the postgate.dll file at the computer level. The postgate.dll is located in the
\WebGate_install_dir, as described in Section 28.5.3.4.2, "Installing the Postgate ISAPI Filter." If you perform
multiple installations, multiple versions of this file may be created which may cause unusual Access
Manager behavior. In this case, you should verify that only one webgate.dll and one postgate.dll exist.
See Also: Chapter 28, "Configuring the IIS Web Server for 10g WebGates"
Removal: To fully remove a WebGate and related filters from IIS, you must do more than simply remove the
filters from the list in IIS. IIS retains all of its settings in a metabase file. On Windows 2000 and later, this is
an XML file that can be modified by hand. There is also a tool available, MetaEdit, to edit the metabase.
MetaEdit looks like Regedit and has a consistency checker and a browser/editor. To fully remove a
WebGate from IIS, use MetaEdit to edit the metabase.
ISA Proxy Servers On the ISA proxy server, all ISAPI filters must be installed within the ISA installation directory. They can be
anywhere within the ISA installation directory structure:
1. Before installing the WebGate on the ISA proxy server:
Check for general ISAPI filter with ISA instructions on:
http://msdn.microsoft.com/library/default.asp?url=/library/en-us/isa/isaisapi_5cq8.asp
Ensure that the internal and external communication layers are configured and working properly.
2. During installation you will asked if this is an ISA installation; be sure to:
Indicate that this is an ISA proxy server installation, when asked.
Specify the ISA installation directory path as the WebGate installation path.
Use the automatic Web server update feature to update the ISA proxy server during WebGate
installation.
3. After WebGate installation, locate the file configureISA4webgate.bat, which calls a number of scripts
and the process to configure the ISA server filters that must be added programmatically.
See Also: Chapter 27, "Configuring the ISA Server for 10g WebGates"
Table 25–4 (Cont.) Preparing for 10g WebGate Installation with Access Manager 11g
About the ... Description

Locating and Installing the Latest 10g WebGate for Access Manager 11g
Registering and Managing 10g WebGates with Access Manager 11g 25-17
3. Click Accept License Agreement, at the top of the page.
4. From the Access Manager WebGates (10.1.4.3.0) row, click the download link for
the desired platform and follow on-screen instructions.
5. Store the WebGate installer in the same directory with any 10g Access System
Language Packs you want to install.
6. Proceed to Section 25.7.3, "Starting WebGate 10g Installation."
25.7.3 Starting WebGate 10g Installation
The following procedure walks through the steps, which are the same regardless of
Web server type.
Installation options are identified and can be skipped if they do not apply to your
environment. During WebGate installation, information is saved at specific points. You
can cancel WebGate installation processing if needed. However, if you cancel WebGate
installation after being informed that the WebGate is being installed, you must
uninstall the component.
To start WebGate 10g installation
1. On the computer to host WebGate 10g, log in as a user with Web server
Administrator privileges.
2. Stop the Web server instance.
3. Launch the WebGate installer for your preferred platform, installation mode, and
Web server. For example:
GUI Method:
Windows— Oracle_Access_Manager10_1_4_3_0_Win32_API_Webgate.exe
Console Method:
Solaris—./ Oracle_Access_Manager10_1_4_3_0_sparc-s2_API_Webgate
Linux—./ Oracle_Access_Manager10_1_4_3_0_linux_API_Webgate
where API refers to the API used by your Web server (for example, ISAPI for IIS
Web servers).
4. Dismiss the Welcome screen; follow on-screen instructions with Administrator
privileges.
5. Specify the installation directory for the WebGate.
6. Linux or Solaris: Specify the location of the GCC runtime libraries on this
computer.
7. Language Pack—Choose a Default Locale and any other Locales to install, then
click Next.
8. Record the installation directory name in the preparation worksheet if you haven't
already, then click Next to continue.
Note: On HP-UX and AIX systems, you can direct an installation to a
directory with sufficient space using the -is:tempdir path parameter.
The path must be an absolute path to a file system with sufficient
space.

Locating and Installing the Latest 10g WebGate for Access Manager 11g
25-18 Administrator's Guide for Oracle Access Management
The WebGate installation begins, which may take a few seconds. On Windows
systems, a screen informs you that the Microsoft Managed Interfaces are being
configured.
The installation process is not yet complete. You are asked to specify a transport
security mode. At this point, you cannot go back to restate information.
9. Specify the location where you unzipped the previously downloaded GCC
libraries, if needed.
25.7.4 Specifying a Transport Security Mode
Transport security between at least one OAM Server must match.
To specify a transport security mode
1. Choose Open, Simple, or Cert for the WebGate.
2. Proceed according to your specified transport security mode:
■Simple or Certificate Mode—Go to "Requesting or Installing Certificates for
Secure Communications"
■Open Mode—Skip to Section 25.7.7, "Updating the WebGate Web Server
Configuration"
25.7.5 Requesting or Installing Certificates for Secure Communications
If your Access Manager 11g environment uses Open mode transport security, you can
skip to Section 25.7.7, "Updating the WebGate Web Server Configuration."
WebGate Certificate Request: Generates the request file (aaa_req.pem), which you
must send to a root CA that is trusted by the OAM Server. The root CA returns signed
certificates, which can then be installed for WebGate.
Requested certificates must be copied to the \WebGate_install_dir\access\oblix\config
directory and then the WebGate Web server should be restarted.
To request or install certificates for WebGate 10g
1. Indicate whether you are requesting or installing a certificate, then click Next and
continue. For example:
■Requesting a certificate, proceed with step 2.
■Installing a certificate, skip to step 3.
2. Request a Certificate:
■Enter the requested information, then click Next and issue your request for a
certificate to your CA.
■Record certificate file locations, if these are displayed.
■Click Yes if your certificates are available and continue with step 3. Otherwise,
skip to Section 25.7.7, "Updating the WebGate Web Server Configuration."
3. Install a Certificate During Installation: Specify the full paths to the following
files, then click Next:
See Also: Appendix C, "Securing Communication"
See Also: Appendix C, "Securing Communication"

Locating and Installing the Latest 10g WebGate for Access Manager 11g
Registering and Managing 10g WebGates with Access Manager 11g 25-19
WebGate_install_dir\access\oblix\config
■cacert.pem the certificate request, signed by the Oracle-provided openSSL
Certificate Authority
■password.xml contains the random global passphrase that was designated
during installation, in obfuscated format. This is used to prevent other
customers from using the same CA. Access Manager performs an additional
password check during the initial handshake between the OAM Agent and
OAM Server.
■aaa_key.pem contains your private key (generated by openSSL).
■aaa_cert.pem signed certificates in PEM format.
■Proceed to Section 25.7.7, "Updating the WebGate Web Server Configuration."
25.7.6 Specifying WebGate Configuration Details
You perform the following task using information provided during WebGate
provisioning and registration with Access Manager 11g.
To provide WebGate configuration details
1. Provide the information requested for the WebGate as specified in the Access
System Console.
■WebGate ID—Enter the agent name that you supplied during registration.
■WebGate password—Enter the password supplied during registration, if any.
If no password was entered, leave the field blank.
■Access Server ID—Enter the name of the OAM Server with which this
WebGate is registered, if desired, or use any name you choose.
■Access Server Host Name—Enter the DNS host name for the OAM Server
with which this WebGate is registered
■Port number—Enter the port on which the OAM Proxy is running. If a port
was not entered during provisioning, the default port is 3004.
2. Click Next to continue.
25.7.7 Updating the WebGate Web Server Configuration
Your Web server must be configured to operate with the WebGate. Oracle recommends
automatically updating your Web server configuration during installation. However,
procedures for both automatic and manual updates are included.
Note: To manually update your Web server configuration
1. Click No when asked if you want to proceed with the automatic update,
then click Next.
2. Review the screen that appears to assist you in manually setting up your
WebGate Web server, and see Section 25.7.7.1, "Manually Configuring
Your Web Server."
3. Return to the WebGate installation screen, click Next, and proceed to
Section 25.5, "Registering a 10g WebGate with Access Manager 11g
Remotely."

Locating and Installing the Latest 10g WebGate for Access Manager 11g
25-20 Administrator's Guide for Oracle Access Management
To automatically update your Web server configuration
1. Click Yes to automatically update your Web server then click Next (or click No and
see Section 25.7.7.1, "Manually Configuring Your Web Server"):
■Most Web servers—Specify the absolute path of the directory containing the
Web server configuration file.
■IIS Web Servers—The process begins immediately and may take more than a
minute. For more information, see Chapter 28, "Configuring the IIS Web
Server for 10g WebGates."
You might receive special instructions to perform before you continue. Setting
various permissions for the /access directory is required for IIS WebGates only
when you are installing on a file system that supports NTFS. The last
installation panel provides instructions for manually setting various
permissions that cannot be set on the FAT32 file system. In this case, these
instructions may be ignored.
■Sun Web Servers—Be sure to apply the changes in the Web server
Administration console before you continue.
A screen announces that the Web server configuration has been updated.
2. Click Next and continue with Section 25.7.8, "Finishing WebGate Installation."
25.7.7.1 Manually Configuring Your Web Server
If, during WebGate installation, you declined automatic Web server updates, you must
perform the task manually.
To manually configure your Web server for the WebGate
1. Launch your Web browser, and open the following file, if needed. For example:
\WebGate_install_dir\access\oblix\lang\langTag\docs\config.htm
where \WebGate_install_dir is the directory where you installed the WebGate.
2. Select from the supported Web servers and follow all instructions, which are
specific to each Web server type, as you:
■Make a back up copy of any file that you are required to modify during
WebGate set up, so it is available if you need to start over.
■Ensure that you return to and complete all original setup instructions to
enable your Web server to recognize the appropriate Access Manager files.
Note: If the manual configuration process was launched during
WebGate installation, you can skip Step 1 in the following procedure.
Note: If you choose manual IIS configuration during 64-bit WebGate
installation, you can access details in the following path
WebGate_install_dir\access\oblix\lang\en-us\docs\dotnet_isapi.htm

Locating and Installing the Latest 10g WebGate for Access Manager 11g
Registering and Managing 10g WebGates with Access Manager 11g 25-21
3. Continue with Section 25.7.8, "Finishing WebGate Installation."
25.7.8 Finishing WebGate Installation
The ReadMe information provides details about documentation and Oracle.
To finish the WebGate installation
1. Review the ReadMe information, then click Next to dismiss it.
2. Click Finish to conclude the installation.
3. Restart your Web server to enable configuration updates to take affect.
■IIS Web Servers—Consider using
net stop iisadmin
and
net start w3svc
after installing the WebGate to help ensure that the Metabase does not become
corrupted.
■Security-Enhanced Linux: Run the chcon commands for the WebGate you just
installed on this platform.
4. Proceed with following topics before installing artifacts and certificates:
■Native POSIX Thread Library: When installing Access Manager WebGate for
use with NPTL, there is no need to set the environment variable LD_
ASSUME_KERNEL to 2.4.19.
■Apache2, OHS2, IHS2 Web Servers: Chapter 26, "Configuring Apache, OHS,
IHS for 10g WebGates."
■IIS Web Servers: Consider using
net stop iisadmin
and
net start w3svc
after installing the WebGate to help ensure that the Metabase does not become
corrupted. See also Chapter 28, "Configuring the IIS Web Server for 10g
WebGates."
■ISA Web Servers: Chapter 27, "Configuring the ISA Server for 10g WebGates."
■Lotus Domino Web Servers: Chapter 29, "Configuring Lotus Domino Web
Servers for 10g WebGates."
5. Proceed to Section 25.7.9, "Installing Artifacts and Certificates."
25.7.9 Installing Artifacts and Certificates
The ObAccessClient.xml file is one result of product of provisioning. After WebGate
installation, you must copy the file to the WebGate installation directory path. If you
received signed WebGate 10g certificates after installing WebGate, you can use the
following procedure to install these as well.
Note: If you accidentally closed the window, return to step 1 and
click the appropriate link again. Some setups launch a new browser
window or require you to launch a Command window to input
information.
Note: If you are installing a 64-bit IIS WebGate, see Section 28.8,
"Finishing 64-bit Webgate Installation."

Configuring Centralized Logout for 10g WebGate with 11g OAM Servers
25-22 Administrator's Guide for Oracle Access Management
Prerequisites
Configuring your Web server
To install artifacts (and certificates) for WebGate 10g
1. Copy
ObAccessClient.xml
■From:
$WLS_DOMAIN_HOME/output/AGENT_NAME
■To:
$WebGate_install_dir/oblix/lib
Copy
password.xml
■From:
$WLS_DOMAIN_HOME/output/AGENT_NAME
■To:
$WebGate_install_dir/oblix/config
2. Copy aaa_key.pem and aaa_cert.pem:
■From:
$IDM_DOMAIN_HOME/output/AGENT_NAME
■To:
$WebGate_install_dir/oblix/config/simple
3. Restart the WebGate Web server.
25.7.10 Confirming WebGate Installation
After WebGate installation and Web server updates, you can enable WebGate
diagnostics to confirm that your WebGate is running properly.
To review WebGate diagnostics
1. Confirm Access Manager 11g components are running.
2. Specify the following URL for WebGate diagnostics. For example:
Most Web
Servers—http(s)://hostname:port/access/oblix/apps/webgate/bin/webgate.cgi?
progid=1
IIS Web Servers—http(s)://hostname:port/access/oblix/apps/
webgate/bin/webgate.dll?progid=1
where hostname refers to the name of the computer hosting the WebGate; port
refers to the Web server instance port number.
3. The WebGate diagnostic page should appear.
■Successful: If the WebGate diagnostic page appears, the WebGate is
functioning properly and you can dismiss the page. Go to Section 25.8,
"Configuring Centralized Logout for 10g WebGate with 11g OAM Servers."
■ Unsuccessful: WebGate should be uninstalled and reinstalled, as described in
Section 25.9, "Removing a 10g WebGate from the Access Manager 11g
Deployment."
25.8 Configuring Centralized Logout for 10g WebGate with 11g OAM
Servers
This section provides the following topics:
■About Centralized Logout with 10g OAM Agents and 11g OAM Servers
■About the Centralized Logout Script for 10g WebGates with 11g OAM Servers

Configuring Centralized Logout for 10g WebGate with 11g OAM Servers
Registering and Managing 10g WebGates with Access Manager 11g 25-23
■Configuring Centralized Logout for 10g WebGates with Access Manager
25.8.1 About Centralized Logout Processing for 10g WebGate with 11g OAM Server
The following process overview outlines the Access Manager centralized logout
process that occurs when the application is deployed on the Web server for which the
protecting 10g WebGate is configured.
Logout is initiated when an application causes the invocation of the logout.html file
configured for the OAM agent (in this case, a 10g WebGate).
Process overview: Centralized logout for 10g WebGate with 11g OAM Server
1. The application causes invocation of the logout.html file configured for the 10g
WebGate.
The application might also pass
end_url
as a query string to logout.html. The end_
url parameter could either be a URI or a URL. For example:
/oamsso/logout.html?end_url=/welcome.html
or
/oamsso/logout.html?end_url=http://my.site.com/welcome.html
2. WebGate clears the ObSSOCookie for its domain and loads the logout.html script.
3. If the
end_url
parameter does not include host:port, the logout.html script gets the
host:port of the local server and constructs the
end_url
parameter as a URL. For
example:
http://serverhost:port/oam/server/logout?end_url=http://my.site.com/
welcome.html
4. Logic in logout.html redirect to the OAM Server. For example:
http://myoamserverhost:port/oam/server/logout?end_url=http://my.site.com/
welcome.html
5. The OAM Server executes logout as follows:
a. Cleans up the session information associated with the user at the server side.
b. Validates the
end_url
and sends a page with callback URLs to the user's
browser.
c. From the callback page, a new request is initiated to a specific URI on each
WebGate. When this request reaches the specific WebGate in the specific
domain, the ObSSOCookie for that domain is cleared.
d. The user is redirected to the
end_url
in the logout script. However, if the
end_
url
parameter is not present, an appropriate message is sent by the OAM
Server.
For more information, see Section 25.8.2, "About the Centralized Logout Script for 10g
WebGates with 11g OAM Servers."
Note: The
Logout Callback URL
is specified in the expanded OAM
Agent registration page, as described in "About Create OAM WebGate
Page and Parameters" on page 16-2 (or remote registration template in
Table 16–3, " Elements on Expanded 11g and 10g WebGate/Access
Client Registration Pages").

Configuring Centralized Logout for 10g WebGate with 11g OAM Servers
25-24 Administrator's Guide for Oracle Access Management
25.8.2 About the Centralized Logout Script for 10g WebGates with 11g OAM Servers
With an 10g WebGate, the logout.html script is required for both single- and multiple
DNS-domain centralized logout processing. The logout.html activates JavaScripts that
perform the actual logout.
Example 25–1 is a logout.html script that you can use as a template by editing certain
lines for your own environment, which are described at the top of the script. For
instance,
SERVER_LOGOUTURL
must be changed. Additional information is provided
after the example.
Example 25–1 logout.html Script
<html>
<head>
<script language="javascript" type="text/javascript">
///////////////////////////////////////////////////////////////////////////////
//Before using, you need to change the values of:
//a. "oamserverhost" to point to the host where the OAM Server is running.
//b. "port" to point to the port where the OAM Server is running.
///////////////////////////////////////////////////////////////////////////////
var SERVER_LOGOUTURL = "http://oamserverhost:port/oam/server/logout";
///////////////////////////////////////////////////////////////////////////////
function handleLogout() {
//get protocol used at the server (http/https)
var webServerProtocol = window.location.protocol;
//get server host:port
var webServerHostPort = window.location.host;
//get query string present in this URL
var origQueryString = window.location.search.substring(1);
var newQueryString = "";
//vars to parse the querystring
var params = new Array();
var par = new Array();
var val;
if (origQueryString != null && origQueryString != "") {
params = origQueryString.split("&");
for (var i=0; i<params.length; i++) {
if (i == 0)
newQueryString = "?";
if (i > 0)
newQueryString = newQueryString + "&";
par = params[i].split("=");
//prepare a new query string, if the end_url value needs to be changed
newQueryString = newQueryString + (par[0]);
newQueryString = newQueryString + "=";
Note: 11g WebGates do not use the logout.html script and instead
require additional details in their Agent registration configuration, as
described in Section 25.8, "Configuring Centralized Logout for 10g
WebGate with 11g OAM Servers."

Configuring Centralized Logout for 10g WebGate with 11g OAM Servers
Registering and Managing 10g WebGates with Access Manager 11g 25-25
val = par[1];
if ("end_url" == par[0]) {
//check if val (value of end_url) begins with "/" or "%2F" (is it an URI?)
if (val.substring(0,1) == "/" || val.substring(0,1) == "%") {
//modify the query string now
val = webServerProtocol + "//" + webServerHostPort + val;
}
}
newQueryString = newQueryString + val;
}
}
//redirect the user to this URL
window.location.href = SERVER_LOGOUTURL + newQueryString;
}
</script>
</head>
<body onLoad="handleLogout();">
</body>
</html>
Process overview: Logic in logout.html
1. Gets the host and port from the incoming request.
2. Gets the
end_url
parameter from the query string.
If the
end_url
parameter is not a URL, then the logout.html script constructs a
URL using the host and port from task 1. See "Guidelines for the end_url
parameter in logout.html" following this section.
3. Redirects to the OAM Server logout URL (SERVER_LOGOUTURL). For example:
http://myoamserver/host:port/oam/server/logout.
■Use the
end_url
constructed in process 2 as the query string.
■Preserve all other query string parameters in the query string.
Guidelines for the end_url parameter in logout.html
The
end_url
parameter can be either a URI or an URL.
■If the
end_url
query string is a URI, without host and port, then the logout.html
must construct the URL by determining the host and port of the Web Server where
logout.html is hosted. For example:
http://myoamserverhost:port/oam/server/logout?end_url=http://my
.site.com/welcome.html
■If the
end_url
parameter is a URL with the host and port, the logout.html script
simply passes that on without reconstructing it.
Note: An ADF application must pass the
end_url
parameter
indicating where to redirect the user after logout, as described in
Section A.3, "Configuring Centralized Logout for Oracle ADF-Coded
Applications."
/<app context root>/adfAuthentication?logout=true&end_url=<any uri>

Configuring Centralized Logout for 10g WebGate with 11g OAM Servers
25-26 Administrator's Guide for Oracle Access Management
Table 25–5 illustrates how a logout link in the logout.html file might be specified:
25.8.3 Configuring Centralized Logout for 10g WebGates with Access Manager
The following procedures describe how to configure centralized logout for 10g
WebGates with Access Manager.
Oracle Fusion Middleware Application Security Guide includes a sample procedure
that includes steps for deploying an application in a WebLogic Server domain.
Task overview: Configuring centralized logout for 10g WebGates
1. Create a default logout page (logout.html) and make it available on the WebGate
installation directory:
a. Create and edit logout.html for the WebGate based on Example 25–1,
"logout.html Script".
b. Store your logout.html script in the following directory path:
WebGate_install_dir/oamsso/logout.html
c. Proceed with following steps, as needed.
2. Ensure that the logout.html (from Step 1) redirects the user to this central logout
URI, "/oam/server/logout' on the 11g OAM Server.
3. Optional: Allow the application to pass the end_url parameter indicating where to
redirect the user after logout, as described in "Guidelines for the end_url
parameter in logout.html" in Section 25.8.2.
4. Check the Web server file for which the 10g WebGate is configured and perform
the appropriate step:
■OHS Web server, httpd.conf file: If the following lines exist, delete them:
<LocationMatch "/oamsso/*">
Table 25–5 Sample end_url Parameter Specifications
As a ... Sample end_url Value
URI
/oamsso/logout.html?end_url=<someUri>
For example:
/oamsso/logout.html?end_url=/welcome.html
URL
/oamsso/logout.html?end_url=<someUrl>
For example:
/oamsso/logout.html?end_url=http://my.site.com/welcome.html
Note: Optional tasks or those required for only multiple DNS
domain logout are identified and can be skipped unless needed.
Note: If the logout.html file is located elsewhere, ensure that the
logout link is correctly specified in the agent registration to point to
the correct location of the logout.html file.

Removing a 10g WebGate from the Access Manager 11g Deployment
Registering and Managing 10g WebGates with Access Manager 11g 25-27
Satisfy any
</LocationMatch>
■Other Web servers, configuration file: Add the following line:
Alias /oamsso "WebGateInstallationDirectory/oamsso"
25.9 Removing a 10g WebGate from the Access Manager 11g Deployment
Use the following procedure to remove the 10g WebGate from the Access Manager 11g
deployment, if needed.
Considerations
Web Server Configuration Changes: Web server configuration changes must be
manually reverted after uninstalling the WebGate). For more information about what
is added, see the appropriate chapter for your Web server.
WebGate IIS Filters: To fully remove a WebGate and related filters from IIS, you must
do more than simply remove the filters from the list in IIS. IIS retains all of its settings
in a metabase file. On Windows 2000 and later, this is an XML file that can be modified
by hand.
Prerequisites
Evaluate the Application Domain, resources, and policies associated with this agent
and ensure that these are configured to use another agent or that they can be removed.
To uninstall the 10g WebGate
1. Turn off the Web server for the WebGate you will remove.
2. On the WebGate registration page in the Oracle Access Management Console, click
the Disable box beside the State option to disable the WebGate.
3. Language Packs: Remove installed Language Packs (except the one selected as the
default Administrator language (locale)) as follows:
■Locate the appropriate Language Pack file in the component's uninstall
directory. For example:
WebGate_install_dir\uninstIdentityLP_fr-fr
\uninstaller.exe
■Run the Language Pack Uninstaller program to remove the files.
■Repeat this process to remove the same Language Pack from associated
components.
■Stop and restart WebGate Web server to re-initialize proper language support.
Note: Deleting an agent registration does not remove the associated
host identifier, Application Domain, resources, or the agent instance.
Note: If you don't turn off the Web server, uninstall might fail and
the backup folder will not be removed. If this happens, you need to
manually remove the backup folder.

Removing a 10g WebGate from the Access Manager 11g Deployment
25-28 Administrator's Guide for Oracle Access Management
■Repeat this process to remove each Language Pack (except the one selected as
the default Administrator language (locale)).
4. Perform the following steps to remove 10g WebGate configuration data:
■If you have only one instance of an Access Manager component, complete step
4 to remove it.
■If you have multiple instances of a component, see also step 5.
5. Locate and run the Uninstaller program for the specific component to remove
Access Manager files. For example:
WebGate_install_dir\access\_uninstWebGate\uninstaller.exe
6. Multiple Instances: If you have multiple WebGate instances and want to remove
one or all of them, you must use a specific method for your platform:
■Windows: The last component can be uninstalled from Add/Remove
programs. Others can be uninstalled by running the uninstall program from
the \access \uninstComponent directory.
■UNIX: You must always run uninstaller.bin.
7. Remove Access Manager-related updates to your Web server configuration. For
details about specific Web servers, see Chapter 26, "Configuring Apache, OHS, IHS
for 10g WebGates," Chapter 27, "Configuring the ISA Server for 10g WebGates,"
Chapter 28, "Configuring the IIS Web Server for 10g WebGates,", and Chapter 29,
"Configuring Lotus Domino Web Servers for 10g WebGates."
8. Restart the Web server.
9. Remove the WebGate_install_dir directory if it remains, especially if you plan to
reinstall it.
Note: On UNIX systems, use uninstaller.bin

26
Configuring Apache, OHS, IHS for 10g WebGates 26-1
26
Configuring Apache, OHS, IHS for 10g
WebGates
Oracle provides Webgates for Web servers powered by Apache v2. This includes
Apache, Oracle HTTP Server, and IBM HTTP Server (IHS).
This chapter provides details about configuring the three Web server types, and
includes:
■About Oracle HTTP Server and Access Manager
■About Access Manager with Apache and IHS v2 Webgates
■About Apache v2 Architecture and Access Manager
■Requirements for Oracle HTTP Server, IHS, Apache v2 Web Servers
■Preparing Your Web Server
■Activating Reverse Proxy for Apache v2 and IHS v2
■Verifying httpd.conf Updates for Webgates
■Tuning Oracle HTTP Server Webgates for Access Manager
■Tuning OHS /Apache Prefork and Worker MPM Modules for OAM
■Starting and Stopping Oracle HTTP Server Web Servers
■Tuning Apache/IHS v2 Webgates for Access Manager
■Removing Web Server Configuration Changes After Uninstall
■Helpful Information
26.1 Prerequisites
Ensure that your Oracle Access Management Console is running and get familiar with:
■"Introduction to Policy Enforcement Agents" on page 15-1
■"About Installing Fresh 10g WebGates to Use With Access Manager 11.1.2" on
page 25-3
26.2 About Oracle HTTP Server and Access Manager
Access Manager Web component package names for Oracle HTTP Server are
designated with OHS, as follows:
■Oracle HTTP Server 11g is based on Apache v2.2; package names include OHS11g,
for example:

About Access Manager with Apache and IHS v2 Webgates
26-2 Administrator's Guide for Oracle Access Management
Oracle_Access_Manager10_1_4_3_0_ platform_OHS11g_Webgate
■Oracle HTTP Server 10g R2 (10.1.2) and 10g (10.1.3.1.0) provide packages based on
Apache v1.3 and Apache v2.0:
Apache v2.0-based packages include OHS2, for example:
Oracle_Access_Manager10_1_4_3_0_platform_OHS2_Webgate
Apache v1.3-based packages include OHS, for example:
Oracle_Access_Manager10_1_4_3_0_platform_OHS_Webgate
The following Oracle HTTP Server releases operate with Access Manager:
Oracle HTTP Server 11g: Access Manager Webgates Oracle HTTP Server 11g can be
used like Webgates for any other Web server. In addition, this Webgate for Oracle
HTTP Server 11g is a key component when configuring enterprise-level single sign-on
for Oracle Fusion Middleware 11g. For details, see the Oracle Fusion Middleware
Security Guide. See also the Oracle Fusion Middleware Administrator's Guide for HTTP
Server 11g Release 1 (11.1.1).
Oracle HTTP Server 10g (10.1.3.1.0): Provides two packages (one based on Apache v1.3
and another based on Apache v2.0). Webgates can be installed on a standalone Oracle
HTTP Server. OHS2 Webgate must be installed on the Oracle Application Server to
enable integration with Oracle single sign-on. During installation, the Webgate is
installed as a module on OHS2.
Be sure to familiarize yourself with Oracle HTTP Server Web component
requirements, as described in "Preparing Your Web Server" on page 26-7.
26.3 About Access Manager with Apache and IHS v2 Webgates
Access Manager provides components for Apache v2 Web servers and the IBM HTTP
Server in addition to the Oracle HTTP Server. The IBM HTTP Server (IHS2) is a
variation of Apache v2. Unless otherwise stated, the following information applies to
all three:
■Apache v2.0.5.2 Webgate
■Apache v2.0.48 Webgate, including reverse proxy if you choose to activate this
capability.
■Apache v2.0.47 Webgate for the IBM HTTP Server (IHS2) powered by Apache,
including reverse proxy if you choose to activate this capability.
Each platform-specific installation package supports both plain and SSL-capable
Apache modes. The number 2 in a file name indicates that this component is based on
Apache v2. For example:
AIX: Oracle_Access_Manager10_1_4_3_0_power-aix_IHS2_Webgate
Linux: Oracle_Access_Manager10_1_4_3_0_ linux_Apache2_Webgate
Solaris: Oracle_Access_Manager10_1_4_3_0_sparc-s2_Apache2_Webgate
Windows: Oracle_Access_Manager10_1_4_3_0_Win32_APACHE2_Webgate
Note: For the latest Access Manager certification information, see:
http://www.oracle.com/technology/products/id_mgmt/coreid_
acc/pdf/oracle_access_manager_certification_10.1.4_r3_matrix.xls

About Access Manager with Apache and IHS v2 Webgates
Configuring Apache, OHS, IHS for 10g WebGates 26-3
Earlier Access Manager releases included separate platform-specific installation
packages for plain versus SSL-capable modes. For example, two Webgate files were
provided for each platform: the APACHE_Webgate, and the APACHESSL_Webgate.
There have been no functional changes to Access Manager components to support
these Web servers. Access Manager authentication occurs through the Webgate using
HTTP basic, form, or SSL client certificates. Authorization for Web resources by
authenticated users, and simple and multi-domain SSO with other Web servers or
applications, also occurs through the Webgate.
26.3.1 About the Apache HTTP Server
The Apache HTTP Server is an open-source HTTP Web server project of the Apache
Software Foundation. The project goal is to provide a secure, efficient and extensible
server and HTTP services that meet current HTTP standards.
For more information, see "About Apache v2 Architecture and Access Manager" on
page 26-4.
26.3.2 About the IBM HTTP Server
The IBM HTTP Server (IHS) is a variation of Apache v2. Portions of the IBM HTTP
Server are based on software developed by The Apache Group. The IBM HTTP Server
component also includes software developed by the OpenSSL Project and software
developed by Eric Young.
Details about the Apache architecture and Access Manager, discussed in "About
Apache v2 Architecture and Access Manager" on page 26-4 apply to IHS with the
following exceptions:
■Previous versions of IHS required a separate IDS Client to use the mod_ibm_ldap
module. With IHS powered by Apache v2.0.47, this is not a requirement.
■IHS v2.0.47 supports FIPS 140-2. FIPS support is disabled by default. To enable
FIPS support, just add the SSLFIPSEnable directive to the httpd.conf file. Similarly,
use SSLFIPSDisable directive to disable FIPS support.
■On AIX, ensure that the appropriate runtime library is installed before you install
IHS v2.0.47.
For example on AIX 5.1, the xlC.rte 6.0 runtime library (for example: xlC.rte.6.0.0.0)
must be installed before you install IHS v2.0.47. This library is required on AIX to
install and use SSL with IHS v2. You can download this library from the following
Web site:
http://www-912.ibm.com/eserver/support/fixes/fcgui.jsp
26.3.3 About the Apache and IBM HTTP Reverse Proxy Server
Typically, a reverse proxy is used in the following situations:
■To provide Internet users with access to a server behind a firewall
■To balance the load among several back-end servers, or to provide caching for a
slower back-end server
■To bring several servers into the same URL space
The proxy_module implements a proxy/gateway for Apache and IHS powered by
Apache. The client requires no special configuration; a reverse proxy appears like an

About Apache v2 Architecture and Access Manager
26-4 Administrator's Guide for Oracle Access Management
ordinary Web server. The client makes requests as usual for content in the name-space
of the reverse proxy. It is the reverse proxy that decides where those requests are sent.
Content is returned as if the reverse proxy was the origin.
For more information, see "Requirements for Apache v2 Web Servers" on page 26-6.
26.4 About Apache v2 Architecture and Access Manager
The Apache v2 Web server provides a hybrid multi-threaded, multi-process
architecture that is compatible with the thread-safe Access Manager libraries.
In addition to the standard set of modules, the Apache v2 Web server includes
Multi-Process Modules (MPMs) to bind network ports on the computer and to accept
and process requests. The appropriate MPM must be compiled into the server and
activated before you install an Apache or IHS v2 Webgate:
■On Windows: mpm_winnt is the default MPM on Windows platforms. mpm_
winnt can use native networking features rather than the POSIX layer used in
Apache 1.3.
■On UNIX: The prefork MPM is the default MPM for Apache v2 Web servers on
UNIX platforms. The prefork MPM implements a non-threaded, pre-forking Web
server that handles requests in a manner similar to Apache v1.3.
■On AIX: The worker MPM is the default MPM for IHS v2 on the AIX platform.
The worker MPM implements a hybrid multi-process, multi-threaded server. The
most important directives used to control this MPM are ThreadsPerChild and
MaxClients. For details, see "Tuning Apache/IHS v2 Webgates for Access
Manager" on page 26-27.
The Apache v2 Web server includes an Apache Portable Runtime (APR) library that
provides an interface to platform-specific implementations, assures API developers
predictable if not identical behavior regardless of platform, and eliminates the need for
conditional compilation #lfdefs. Although backward compatibility is supported with
the include/apu_compat.h file, using the Apache v2 APR is recommended.
For more information, see your Apache v2 documentation. See also, "Tuning
Apache/IHS v2 Webgates for Access Manager" on page 26-27.
Important: The proxy_module can be used to implement a proxy
capability for FTP, CONNECT (for SSL), HTTP/0.9, HTTP/1.0, and
HTTP/1.1. However, only the reverse proxy capability is supported
with the Webgate.
Important: Unless explicitly stated otherwise, all details in this
discussion apply equally to Apache v2 and IHS v2 Web Servers for
10g Webgates.
Note: If you compile Apache on UNIX with the mpm_worker_
module for Webgate, you need to optimize the default pthread
stacksize for Webgate to ensure optimal performance during
multithreaded server implementation as described in "Apache v2 on
UNIX with the mpm_worker_module for Webgate" on page E-31.

Requirements for Oracle HTTP Server, IHS, Apache v2 Web Servers
Configuring Apache, OHS, IHS for 10g WebGates 26-5
The Apache architecture affects Access Manager components in different ways, as
discussed in the following sections.
For Webgates installed with IHS and Apache v2
■There is no shared cache between processes.
■Each process maintains its own connections to the Access Server. Therefore, you
should limit the number of Webgate connections. This issue is partially affected by
the performance of the systems running the Web servers and Access Servers.
Limitations of Apache and IHS v2 Web Servers
Due to limitations of the Apache v2 Web server, plug-ins configured for the Access
Manager form-based authentication scheme do not pass variables when:
■The optional challenge parameter, passthrough:Yes, is included in the
authentication scheme to pass login credentials through to a post-processing
program.
■The form action is a CGI script that dumps all headers and variables passed to it
and the method is called using the HTTP POST method.
For example:
<html>
<form name="myloginform" action="/access/...cgi" method="post">
26.5 Requirements for Oracle HTTP Server, IHS, Apache v2 Web Servers
Access Manager HTML pages use UTF-8 encoding. Apache-based Web servers,
including Apache, Oracle HTTP Server, and IBM HTTP Server (IHS) allow
Administrators to specify a default character set for all HTML pages sent out using the
AddDefaultCharset
directive. This directive overrides any character specified by the
application generating the HTML pages. If the
AddDefaultCharset
directive enables a
character set other than UTF-8, Access Manager HTML pages are garbled.
Oracle recommends that you specify the
AddDefaultCharset
directive in the Web
server configuration file (httpd.conf) as follows to ensure the correct display of Access
Manager HTML pages:
AddDefaultCharset Off
See your Web server documentation for more information about this directive.
The following topics provide additional details you should be aware of:
■Requirements for IHS2 Web Servers
■Requirements for Apache and IHS v2 Reverse Proxy Servers
Note: Webgates for Apache v2 (and derivatives) can be used in
installations that contain Webgates for other Web servers.
If you compile Apache on UNIX with the mpm_worker_module for
Webgate, you need to optimize the default pthread stacksize for
Webgate to ensure optimal performance during multithreaded server
implementation as described in "Apache v2 on UNIX with the mpm_
worker_module for Webgate" on page E-31.

Requirements for Oracle HTTP Server, IHS, Apache v2 Web Servers
26-6 Administrator's Guide for Oracle Access Management
■Requirements for Apache v2 Web Servers
26.5.1 Requirements for IHS2 Web Servers
This discussion identifies specific requirements for IHS v2 with Access Manager. With
IHS v2, you do not compile any source code to get the binaries. However, the
following requirements do apply to IHS v2 Web servers:
■For an SSL capable configuration on AIX, the xLC.rte.6.0 runtime library is
required.
■For an SSL capable configuration, the GSKit7 is required and can be downloaded
from
https://techsupport.services.ibm.com/server/aix.fdc
.
26.5.2 Requirements for Apache and IHS v2 Reverse Proxy Servers
As discussed earlier, the proxy_module implements a proxy/gateway. The client
requires no special configuration. Although the proxy_module can be used to
implement a proxy capability for FTP, CONNECT (for SSL), HTTP/0.9, HTTP/1.0, and
HTTP/1.1, only the reverse proxy capability is supported with certain Access Manager
Apache and IHS v2 Webgates.
For Apache Web Servers: To use reverse proxy functions with Access Manager, you
need to include the proxy module in the configure command. For example:
--enable-proxy: Apache proxy module
--enable-proxy-connect: Apache proxy CONNECT module
--enable-proxy-ftp: Apache proxy FTP module
--enable-proxy-http: Apache proxy HTTP module
You also need to load mod_proxy and the mod_proxy_http module into the server
dynamically. A reverse proxy is activated using the ProxyPass directive or the [P] flag
to the RewriteRule directive.
For IHS Web Servers: After installing the IHS Web server, reverse proxy
configurations must be completed in the httpd.conf file in the following directory:
IHS_install_dir/conf directory
For more information, see "Activating Reverse Proxy for Apache v2 and IHS v2" on
page 26-19.
26.5.3 Requirements for Apache v2 Web Servers
This discussion identifies specific requirements for Apache v2 with Access Manager.
Additional information can be found in your Apache documentation:
PATH Variable: On UNIX systems, your PATH variable must contain the gcc location
before you compile Apache v2. However, the Sun C compiler location must not be in
your PATH variable. On Windows systems, Apache can be built using either
command-line tools or the Visual Studio IDE Workbench. The command-line build
requires that the environment reflect the PATH, INCLUDE, LIB and other variables
that can be configured with the vcvars32 batch file.
Multi-Process Module (MPM): With Apache v2, a default MPM is provided for each
platform to bind network ports on the computer and to accept and process requests.
Apache must have one, and only one, MPM in use at any time. If no MPM is selected
during compilation, the default will be loaded into the Web server. You may activate
the MPM during compilation.

Preparing Your Web Server
Configuring Apache, OHS, IHS for 10g WebGates 26-7
mod_ssl: Access Manager supports Apache with or without SSL-capable
communication. The base Apache Web server does not use SSL for browser
connections and will not respond to HTTPS requests. For SSL-capable communication,
Access Manager supports Apache with mod_ssl only. No SSL-specific Access Manager
features operate with Apache-SSL.
mod_ssl relies on OpenSSL to provide the cryptography engine; mod_ssl provides an
interface to the OpenSSL library. The OpenSSL library provides Strong Encryption
using the Secure Sockets Layer and Transport Layer Security protocols.
With previous versions of Apache, the mod_ssl module had to be downloaded
separately and compiled into the server. With Apache HTTP Server v2 module, mod_
ssl comes as a loadable module that you can enable during configuration.
Multi-threading: Multi-threading is required for installations with Apache v1.3.27 or
later.
Dynamic Shared Object (DSO): DSO support is required for Webgate. Apache
modules that extend basic core server functionality may be either statically compiled
for permanent inclusion in the Apache binary, or dynamically compiled and stored
separately to load at runtime without recompiling. With Apache v1.3, mod_so had to
be compiled. With Apache v2 on Windows systems, mod_so is a Base module and
always included. With Apache v2 on UNIX, the loaded code typically comes from
shared object files.
mod_perl: mod_perl embeds the Perl programming language in the Apache Web
server. Without Perl, Apache v2 can still be built and installed; however, some support
scripts written in Perl cannot be used.
26.6 Preparing Your Web Server
The methods and steps to prepare your host computer for the Access Manager Web
component installation depends upon the specific Web server and platform, as
discussed in the following task overview.
To use reverse proxy functions with Access Manager, you need to include the proxy
module in the configure command, as discussed in "About the Apache and IBM HTTP
Reverse Proxy Server" on page 26-3. See also "Activating Reverse Proxy for Apache v2
and IHS v2" on page 26-19.
Task overview: Preparing your Web server and installing Access Manager
1. Install the IHS v2 Web server or compile and install the Apache v2 Web server as
discussed in:
■Preparing the IHS v2 Web Server
■Preparing Apache and Oracle HTTP Server Web Servers on Linux
Note: Dynamically loaded Apache 1.3 modules cannot be used
directly with Apache v2. Apache v1.3 modules must be modified to
load dynamically or compile into Apache v2.
Note: With Apache v.1.3.2x, some operating systems required
additional options during configuration. However, to build Apache
v2, there is no need to set any additional variables.

Preparing Your Web Server
26-8 Administrator's Guide for Oracle Access Management
■Preparing Oracle HTTP Server Web Servers on Linux and Windows Platforms
■Setting Oracle HTTP Server Client Certificates
■Preparing the Apache v2 Web Server on UNIX
■Preparing the Apache v2 SSL Web Server on AIX
■Preparing the Apache v2 Web Server on Windows
2. Activate reverse proxy capability if desired, as described in "Activating Reverse
Proxy for Apache v2 and IHS v2" on page 26-19.
3. Install Oracle Access Management, as described in Oracle Fusion Middleware
Installation Guide for Oracle Identity and Access Management.
4. Finish Web server configuration, as described in "Verifying httpd.conf Updates for
Webgates" on page 26-22.
5. Refer to the following topics as needed:
■"Tuning Oracle HTTP Server Webgates for Access Manager" on page 26-25
■"Tuning OHS /Apache Prefork and Worker MPM Modules for OAM" on
page 26-25
■"Tuning Apache/IHS v2 Webgates for Access Manager" on page 26-27
26.6.1 Preparing the IHS v2 Web Server
To prepare your IHS v2 Web server to accept and use the Webgate for IHS v2, you
need to complete one or more of the following procedures, depending on your
environment and requirements:
■Preparing the Host for IHS v2 Installation
■Installing the IBM HTTP Server v2
■Setting Up SSL-Capability
■Starting a Secure Virtual Host
■Activating Reverse Proxy for Apache v2 and IHS v2
When you have completed the appropriate procedures, you are ready to install the
Webgate for IHS v2.
26.6.1.1 Preparing the Host for IHS v2 Installation
You need to complete this procedure to set up the host computer before you install the
IHS Web server. For additional information, see "Requirements for IHS2 Web Servers"
on page 26-6 and "Requirements for Apache v2 Web Servers" on page 26-6.
This example illustrates installation on AIX 5.1. Your environment may vary.
To prepare for IHS v2 installation
1. On the host computer, download and install the IBM Developer Kit, Java
Technology Edition version 1.4 from the following site:
Note: In all the procedures that follow, path name variables,
modules, and options are examples provided only to illustrate the
steps. Your environment will vary. Refer to your Web server
documentation for additional details.

Preparing Your Web Server
Configuring Apache, OHS, IHS for 10g WebGates 26-9
http://www.ibm.com/java/jdk
The IBM Developer Kit ships with the WebSphere Application Server or can be
downloaded from this site.
2. On the host computer, download and install the xlC.rte 6.0 runtime for AIX 5.1,
which is required by the GSKit7 runtime executable from the following site:
https://techsupport.services.ibm.com/server/aix.fdc
3. On the host computer, create a new directory in which you will uncompress the
IBM HTTP Server install image.
4. On the host computer, download the IBM HTTP Server install image from the
following Web site:
http://www-306.ibm.com/software/webservers/httpservers/
5. On the host computer, uncompress the install image in your new directory.
For example:
tar -xf IHS.tar
A listing of the following files appears, based on your operating system:
gskit.sh
setup.jar
gskta.rte (a GSKit runtime executable for AIX)
You are ready to begin the installation, as described next.
6. Proceed to "Installing the IBM HTTP Server v2" on page 26-9.
26.6.1.2 Installing the IBM HTTP Server v2
The procedure that follows walks you through a typical IBM HTTP Web server
installation. Alternatively, you may choose to perform a silent installation. In this case,
you use silent.res file with the
java -jar setup.jar
-silent -options silent.res
command. You can customize silent install options by editing the silent.res text file. All
options are set to true by default. To disable an option, set its value to false.
To install the IBM HTTP Web server powered by Apache v2
1. Set your path to point to the Java Technology Edition version 1.4 installed on your
computer in the previous example. For example:
export PATH=$PATH:/usr/java14/java/bin
2. From to the directory where you uncompress the install image, type the following
command:
java -jar setup.jar
3. Choose the language in which to run the installation.
The Welcome to the InstallShield Wizard for the IBM HTTP Server appears.
4. Click Next to dismiss the Welcome screen.
5. Specify the directory name. For example:
AIX: /usr/IBMIHS/

Preparing Your Web Server
26-10 Administrator's Guide for Oracle Access Management
6. Click Next to continue.
Options appear for a typical, custom, or developer installation. When you choose a
typical installation, a list will appear with everything included and the size of the
image. If you choose a custom installation, a list of components appears and you
can clear the box next to the any components you do not want to install.
7. Select the type of installation you would like to perform, then click Next. For
example:
Typical
The following message appears. You can click Cancel to stop the installation.
Installing IBM HTTP Server. Please wait.
The next message also appears. You can click Cancel to stop the inventory update.
Updating the inventory.
8. Click Finish to complete your installation.
9. Stop then start the IHS server using the apachectl commands, as follows:
For example:
IHS2_install_dir/bin
./apachectl stop
./apachectl start
where IHS2_install_dir is the directory where you installed the IHS v2 Web server.
You may configure the IHS v2 Web server in several modes either before or after
installing the Webgate for IHS v2:
■Setting Up SSL-Capability
■Starting a Secure Virtual Host
■Activating Reverse Proxy for Apache v2 and IHS v2
26.6.1.3 Setting Up SSL-Capability
If you need to setup SSL-capability, use the following procedure either before or after
installing the Webgate for IHS v2.
To setup SSL for IHS v2 using the default configuration file
1. Locate and open the following file:
IHS2_install_dir/conf/httpd.conf
2. Specify the SSLEnable directive to enable SSL.
3. Specify a Keyfile directive and any SSL directives you want to enable.
4. Stop then start the IHS server, as follows. For example:
IHS2_install_dir/bin
./apachectl stop
./apachectl start
where IHS2_install_dir is the directory where you installed the IHS v2 Web server.
5. Continue with the following procedures:
■Starting a Secure Virtual Host

Preparing Your Web Server
Configuring Apache, OHS, IHS for 10g WebGates 26-11
■Activating Reverse Proxy for Apache v2 and IHS v2
26.6.1.4 Starting a Secure Virtual Host
If you need to start a secure virtual host, use the following procedure either before or
after installing the Webgate for IHS v2.
To start an IHS v2 secure virtual host
1. Locate and open the following file:
IHS2_install_dir/conf/httpd.conf
where IHS2_install_dir is the directory where you installed the IHS v2 Web server.
2. Specify the SSLEnable directive in the virtual host stanza of the configuration file,
to enable SSL for a virtual host.
You can specify any directive, with the exception of the cache directives, inside a
virtual host.
3. Specify a Keyfile directive and any SSL directives you want to enable for that
particular virtual host.
4. Load the mod_ibm_ssl.so using the LoadModule directive in the conf file.
5. Stop then start the IHS virtual host, as follows. For example:
IHS2_install_dir/bin
./apachectl stop
./apachectl start
6. Continue with Activating Reverse Proxy for Apache v2 and IHS v2.
26.6.2 Preparing Apache and Oracle HTTP Server Web Servers on Linux
When installing Webgates for Apache or Oracle HTTP Server on Linux, you are
prompted to install as the same user under which the Web server is running. See the
User and Group directive entries in the httpd.conf file.
When installing Access Manager Webgates for vendor-bundled Apache v2 on Red Hat
Enterprise Linux 4, ensure that all Webgates are installed for Web server user & group
(default: apache). See also "Tuning Apache/IHS v2 Webgates for Access Manager" on
page 26-27.
26.6.3 Preparing Oracle HTTP Server Web Servers on Linux and Windows Platforms
When using Webgates for Oracle HTTP Server v2 on Windows and Linux platforms,
both the Perl module and the PHP module must be commented out in the httpd.conf.
Note: The start and stop instructions for an SSL implementation are
the same as non-SSL-capable implementations.
Note: On Linux, Webgates for Oracle HTTP Server 11g use only
NPTL; you cannot use the LinuxThreads library. In this case, do not
set the environment variable LD_ASSUME_KERNEL to 2.4.19.

Preparing Your Web Server
26-12 Administrator's Guide for Oracle Access Management
26.6.4 Setting Oracle HTTP Server Client Certificates
When using cert_decode and credential_mapping authentication modules, you must
ensure that the Client Certificate authentication scheme works properly with
SSL-enabled Oracle HTTP Server by adding
+EarlierEnvVars
and
+ExportCertData
to the existing SSL options in the Oracle HTTP Server Web server configuration file.
For example:
credential_mapping:
obMappingBase="o=company,c=us",obMappingFilter=
"(&(objectclass=InetOrgPerson)(mail=%certSubject.E%))"
ssl.conf must include:
SSLOptions +StdEnvVars +ExportCertData +EarlierEnvVars
To add ssl options to Oracle HTTP Server
1. Locate and open the Oracle HTTP Server Web server configuration file with a text
editor. For example:
$ORACLE_INSTANCE/ohs/conf/ssl.conf
2. In the ssl.conf file, add the following information to existing SSL options. For
example:
SSLOptions +StdEnvVars +ExportCertData +EarlierEnvVars
3. Save the file and restart the Web server.
26.6.5 Preparing the Apache v2 Web Server on UNIX
This discussion provides an overview and steps to prepare the Apache v2 HTTP Web
server for Access Manager on UNIX platforms, including Solaris, UNIX, Linux, and
AIX. See also "Preparing the Apache v2 SSL Web Server on AIX" on page 26-16
Apache v2 can be configured, built, and installed plain or as SSL-capable. After
downloading and extracting Apache source files, you use a script (configure script on
UNIX and the makefile.win make script for Windows) to compile the source tree for
your environment.
When you configure Apache v2 on UNIX platforms, you specify the installation
directory path name using the
-prefix=
option with the
./configure
command.
During configuration you enable the modules that are appropriate for your
environment. For example, mod_so is included in the server automatically when
dynamic modules are included in the compilation. However, you can ensure the server
is capable of loading DSOs by including the
-enable-so
option with the configure
Note: With Oracle HTTP Server 11g, there is no need to comment out
any module for Webgates on any platform.
Note: Basic requirements are the same regardless of your platform.
However, the remainder of this discussion and the procedures that
follow focus on UNIX platforms. For more information, see also
"Preparing the Apache v2 SSL Web Server on AIX" on page 26-16.

Preparing Your Web Server
Configuring Apache, OHS, IHS for 10g WebGates 26-13
command. If you have multiple Perl interpreters installed, you can include the
-with-perl option to ensure the correct interpreter is selected during configuration.
In the configure command, you can also include the options to enable mod_ssl, and to
activate an MPM. After configuration, you can verify which MPM was chosen using
./httpd -l
to list every module that is compiled into the server.
When you finish configuring Apache, you build the various parts that form the
Apache package using the make command then install the package under the
installation directory you specified with the
-prefix=
option during configuration.
For steps and examples, see the following procedures and your Apache
documentation:
■To prepare plain Apache v2 for UNIX
■To prepare SSL-capable Apache v2 on UNIX
■To prepare Apache v2 for Windows
■Activating Reverse Proxy for Apache v2 and IHS v2
In the procedures that follow, path name variables, modules, and options are examples
provided only to illustrate the steps. Your environment will vary. Refer to your Web
server documentation for additional details. There is no difference in the build
procedure between Apache v2.0.48 and v2.0.52.
To prepare plain Apache v2 for UNIX
1. Confirm that your environment meets Apache requirements for the appropriate
compiler and build tools, as described in Apache documentation located at:
http://httpd.apache.org/docs-2.0/install.html#requirements
2. Download a complete, unmodified version of the Apache HTTP Server v2, as
described in the Apache documentation. For example:
http://httpd.apache.org/download.cgi
3. Extract (uncompress, then untar) source files from the tarball, as described in the
Apache documentation. For example:
gzip -d httpd-2_0_48.tar.gz
tar -xvf httpd-2_0_48.tar
You can use the following step as an example of configuring the Apache source
tree. If you compile Apache on UNIX with the mpm_worker_module for Webgate,
see "Apache v2 on UNIX with the mpm_worker_module for Webgate" on
page E-31.
Note: There are no known restrictions with regard to supported
compiler versions for Apache v2 and Access Manager plug-ins. See
the Apache documentation.
Note: Be sure to download Perl, if needed.

Preparing Your Web Server
26-14 Administrator's Guide for Oracle Access Management
4. Ensure that you have the correct version of GNU gcc libraries in the proper path to
build the Apache source; gcc libraries should be in the PATH:
export PATH=/usr/local/packages/gcc-3.4.6/bin:$PATH
5. Configure the Apache source tree and enable or activate the desired modules
using details in the Apache documentation. For example:
cd apache_source_dir
./configure --with-mpm=prefork --prefix=apache_install_dir --with-included-apr
./configure --with-mpm=worker --prefix=apache_install_dir --with-included-apr
where apache_source_dir refers to the directory where you extracted Apache and
apache_install_dir refers to the directory where you want to install Apache.
6. Compile the Apache package you configured using the make command. For
example:
make
7. Install the Apache package in the configured directory path that you specified
earlier using the --prefix= option. For example:
make install
8. Customize the installation using instructions in the Apache documentation.
For example, you may need to tune the httpd.conf to set basic values for:
ServerName
User/owner of the WebServer
Group
9. Stop then restart the Apache Web server to test the installation using commands in
the apache_install_dir/bin directory. For example:
./apachect1 stop
./apachectl start
10. Continue with appropriate tasks for your environment, as follows:
■To prepare SSL-capable Apache v2 on UNIX
■Preparing the Apache v2 Web Server on UNIX
■Activating Reverse Proxy for Apache v2 and IHS v2
The following procedure outlines how to prepare an SSL-capable Apache v2 Web
server on UNIX. The Apache mod_ssl is loadable; however, this installation requires
the Open Source toolkit for SSL/TLS. Again, be sure to download Perl, if needed. If
AIX is the platform you are using, be sure to see "Preparing the Apache v2 SSL Web
Note: To use reverse proxy functions with Access Manager, you need
to include the proxy module in the configure command, as discussed
in "About the Apache and IBM HTTP Reverse Proxy Server" on
page 26-3.
Note: To view the complete list of values, use the command:
./configure --help.

Preparing Your Web Server
Configuring Apache, OHS, IHS for 10g WebGates 26-15
Server on AIX" on page 26-16 for additional information.
To prepare SSL-capable Apache v2 on UNIX
1. Confirm that your environment meets Apache requirements for the appropriate
compiler and build tools, as described in Apache documentation located at:
http://httpd.apache.org/docs-2.0/install.html
2. Download a complete, unmodified version of the Apache HTTP Server v2 and
Open Source, as described in the Apache documentation.
http://httpd.apache.org/download.cgi
http://www.openssl.org/
3. Extract (uncompress, then untar) source files from the tarballs, as described in the
Apache documentation. For example:
gzip -d httpd-2_0_48.tar.gz
tar -xvf httpd-2_0_48.tar
gzip -d openssl-0_9_6f.tar.gz
tar -xvf openssl-0_9_6f.tar
4. Configure the OpenSSL source tree, as described in Apache documentation. For
example:
cd openssl_source_dir
./config -fPIC --prefix=openssl_install_dir
where openssl_source_dir refers to the directory where you extracted OpenSSL and
openssl_install_dir refers to the directory where you want to install the configured
OpenSSL package.
5. Compile the OpenSSL package in the installation directory you configured using
the make command with the --prefix= option. For example:
make
6. Issue the make test command to complete any sanity testing of OpenSSL and
check the correct version of the tools required. For example:
make test
7. Install the OpenSSL package in the configured directory path that you specified
earlier using the --prefix= option. For example:
make install
8. Configure the Apache source tree and enable or activate desired modules, as
described in your Apache documentation. For example:
cd apache_source_dir ./configure --prefix=apache_install_dir
--enable-so \ --with-mpm='prefork' --with-perl=perl_interpreter_path \
--with-port=non_ssl_port --enable-ssl \ --with-ssl=openssl_install_dir
where apache_source_dir refers to the directory where you extracted Apache;
apache_install_dir refers to the directory where you want to install Apache; and
openssl_install_dir refers to the directory where you installed the configured
OpenSSL package.
9. Compile using the make command to build the Apache SSL-capable package in
the installation directory you configured using the --prefix= option. For example:

Preparing Your Web Server
26-16 Administrator's Guide for Oracle Access Management
make install
10. Install the Apache SSL-capable package in the configured directory path that you
specified earlier using the --prefix= option. For example:
make install
You must explicitly make certificates for the Apache v2 server to enable SSL using
the openssl tool located at openssl_install_dir/bin/. The make certificate command
does not work with Apache v2.
11. Make certificates using the OpenSSL tool in the openssl_install_dir/bin directory, as
described in your OpenSSL documentation and remember that "Common Name"
is the fully qualified host name.
12. Customize the installation using instructions in the Apache documentation:
■Tune the httpd.conf to set basic values for:
ServerName
User/owner of the WebServer
`Group
■Tune the ssl.conf to set basic values for:
Listen 7000
<VirtualHost _default_:7000>
ServerName ps0733.persistent.co.in:7000
SSLCertificateFile /home/qa/software/ws/apache/
apache-2.0.48_ssl_7000/conf/ssl.crt/server.crt
SSLCertificateKeyFile /home/qa/software/ws/apache/
apache-2.0.48_ssl_7000/conf/ssl.key/server.key
13. Stop then restart the Apache Web server to test the installation using commands in
the apache_install_dir/bin directory. For example:
./apachectl stop
./apachectl startssl
14. Continue with Activating Reverse Proxy for Apache v2 and IHS v2, if needed.
26.6.6 Preparing the Apache v2 SSL Web Server on AIX
While building the Apache v2 SSL Web server, the symbols from the OpenSSL Library
libssl.a are exported into the httpd executable in Apache. The symbols needed by
Access Manager from the OpenSSL library are:
■SSL_get_peer_certificate( )
■i2d_X509( )
During linking and binding on the AIX platform, any unused or unreferenced symbols
are deleted. Therefore, the two symbols required by Access Manager are missing from
the httpd executable.
You need to use openssl-0.9.7d to compile on AIX (openssl-0.9.7e does not compile on
AIX). The rest of the steps are the same as on UNIXopenssl-0.9.7d.
Client Cert Authentication: If you are using Client Cert Authentication on the AIX
platform, be sure to use AIX 5.2 Maintenance Level 4 with the following hot fix
applied for dlsym problem on AIX:
http://www-1.ibm.com/support/docview.wss?uid=isg1IY63366

Preparing Your Web Server
Configuring Apache, OHS, IHS for 10g WebGates 26-17
To prepare the AIX platform for Apache v2
1. Ensure that your AIX platform meets the system requirements for Access
Manager.
2. See details in "Preparing the Apache v2 Web Server on UNIX" on page 26-12 and
when building the Apache v2 Web server:
■Use openssl-0.9.7d to compile the Web server for AIX.
■Use the make command in the following manner:
make MFLAGS=EXTRA_LDFLAGS='-Wl,-bE:OpenSSL_Symbols.exp'
where OpenSSL_Symbols.exp is the file containing the two required symbols. The
symbol must be exported using the export file only, as shown.
26.6.7 Preparing the Apache v2 Web Server on Windows
Following are some details about how installing and configuring Apache v2 on
Windows differs from Apache v2 on UNIX. For more information, see your Apache
documentation.
During Installation: Apache will configure files in the \conf subdirectory to reflect the
chosen installation directory. If any configuration files in this directory already exist, a
new copy of the corresponding file will be written with the extension .ORIG. For
example, \conf\httpd.conf.ORIG.
After Installation: Apache is configured using the files in the \conf subdirectory.
These are the same files used to configure the UNIX version. However, there are a few
differences.
You must edit the configuration files in the \conf subdirectory to customize Apache
for your environment. These files will be configured during the installation; Apache is
ready to run from the installation directory, with the documents server from the
subdirectory htdocs. There are many options you should set before starting to use
Apache. For example, Apache listens on port 80 unless you change the Listen directive
in the configuration files or install Apache only for the current user.
Multi-Threading: Apache for Windows is multi-threaded, which means that it does
not use a separate process for each request as Apache does on UNIX. Instead there are
usually only two Apache processes running: a parent process, and a child which
handles the requests. Within the child process each request is handled by a separate
thread.
UNIX-Style Names: Apache uses UNIX-style names internally. The directives that
accept filenames as arguments must use Windows filenames instead of UNIX
filenames. However, you must use forward slashes, not back slashes. Drive letters may
be used. However, if a drive letter is omitted, the drive with the Apache executable is
assumed.
LoadModule Directive: Apache for Windows includes the ability to load modules at
runtime without recompiling the server. If Apache is compiled normally, it will install
a number of optional modules in the \Apache2\modules directory. To activate these
or other modules, you must use the LoadModule directive. For example, to activate
Note: Do not export the symbol on AIX with the following methods:
-bnog: To suppress garbage collection of symbols -bexpal: To export all
symbols -uSymbolName: To export a particular symbol.

Preparing Your Web Server
26-18 Administrator's Guide for Oracle Access Management
the status module, use the following (in addition to the status-activating directives in
access.conf):
LoadModule status_module modules/mod_status.so
On UNIX, the loaded code typically comes from shared object files (.so extension), on
Windows this may be either the .so or .dll extension.
Process Management Directives: These directives are also different for Apache on
Windows.
Error Logging: During Apache startup, any errors are logged into the Windows event
log, which provides a backup to the error.log file. For more information, see your
Apache documentation.
Apache Service Monitor: Apache comes with an Apache Service Monitor utility. With
it you can see and manage the state of all installed Apache services on any computer
on your network. To manage an Apache service with the monitor, you must first install
the service. Apache may be run as a service on Windows. For details, see your Apache
documentation.
Starting, Restarting, Shutting Down: Running Apache as a service is the
recommended method. An Apache service is typically started, restarted, and shut
down using the Apache Service Monitor and commands like NET START Apache2
and NET STOP Apache2. You may also use standard Windows service management.
You may work with Apache from the command line using the apache command.
Apache will execute and remain running until it is stopped by pressing Control-C. You
may also run Apache from the Start Menu during installation.
Apache Services Accounts: By default, all Apache services are registered to run as the
system user (the LocalSystem account). The LocalSystem account has no network
privileges through any Windows-secured mechanism. However, the LocalSystem
account has wide privileges locally. For details about creating a separate account to
run one or more Apache services, see your Apache documentation.
To prepare Apache v2 for Windows
1. Confirm that your environment meets Apache requirements, as described in
Apache documentation located at:
http://httpd.apache.org/docs-2.0/install.html
For Windows installations a list of HTTP and FTP mirrors from which you can
download Apache v2 is provided online.
When you complete the next step, be sure to download the version of Apache for
Windows with the .msi extension.
2. Download a complete, unmodified version of the Apache HTTP Server v2 (and
OpenSSL), as described in the Apache documentation. For example:
http://httpd.apache.org/download.cgi
http://www.openssl.org/
3. Install Apache v2 (run the .msi file you downloaded and supply requested
information), using your Apache documentation as a guide.
Note: Pressing Control-C may not allow Apache to end any current
operations and clean up gracefully.

Activating Reverse Proxy for Apache v2 and IHS v2
Configuring Apache, OHS, IHS for 10g WebGates 26-19
4. Locate the .default.conf file, verify new settings, then update your existing
configuration file if needed.
5. Start Apache, either in a console window or as a service.
6. Launch a browser and enter the following URL to connect to the server and access
the default page. For example:
http://localhost/
A welcome page and a link to the Apache manual should appear. If not, look in
the error.log file in the logs subdirectory.
Once your basic installation is working, you need to configure it properly by
editing the files in the \conf subdirectory.
7. Configure the Apache installation for your environment, using the Apache
documentation as a guide.
8. Test your customized environment.
9. Continue with Activating Reverse Proxy for Apache v2 and IHS v2, if needed.
26.7 Activating Reverse Proxy for Apache v2 and IHS v2
The Webgates for Apache v2 and IHS v2 powered by Apache support reverse proxy
capability, if you choose to activate this capability. The procedures to implement
reverse proxy capability differ, depending on your environment:
■To activate reverse proxy capability for Apache v2 Web servers
■To activate reverse proxy capability for IHS v2 Web servers
26.7.1 Activating Reverse Proxy For Apache v2 Web Servers
For reverse proxy functions with Access Manager, you need to include the Apache
proxy module in the configure command for the Web server. You also need to load
mod_proxy and the mod_proxy_http module into the server dynamically. A reverse
proxy is activated using the ProxyPass directive or the [P] flag to the RewriteRule
directive.
Reverse proxy capability is activated using the ProxyPass directive or the [P] flag to
the RewriteRule directive. It is not necessary to turn ProxyRequests on to configure a
reverse proxy. Access control is less critical when using a reverse proxy (ProxyPass
directive with ProxyRequests Off), because clients can contact only the hosts that you
have specifically configured. You can control access to your proxy using the <Proxy>
control block.
To activate reverse proxy capability for Apache v2 Web servers
1. Review "About the Apache and IBM HTTP Reverse Proxy Server" on page 26-3.
2. Include the Apache proxy module in the configure command for the Web server, if
needed.
For example:
--enable-proxy
--enable-proxy-connect
--enable-proxy-ftp
--enable-proxy-http
See the Apache documentation for more information.

Activating Reverse Proxy for Apache v2 and IHS v2
26-20 Administrator's Guide for Oracle Access Management
3. Use the ProxyPass directive or the [P] flag to the RewriteRule directive to activate
a reverse proxy, as follows:
Reverse Proxy
ProxyRequests Off
<Proxy *>
Order deny,allow
Allow from all
</Proxy>
ProxyPass /foo http://foo.example.com/bar
ProxyPassReverse /foo http://foo.example.com/bar
4. Control access to your proxy using the <Proxy> control block as follows:
<Proxy *>
Order Deny,Allow
Deny from all
Allow from 192.168.0
</Proxy>
5. Perform steps in Chapter 25, "Registering and Managing 10g WebGates with
Access Manager 11g", if you haven't yet done so.
26.7.2 Activating Reverse Proxy For IHS v2 Web Servers
Use the following procedure after installing the Web server.
To activate reverse proxy capability for IHS v2 Web servers
1. Review "About the Apache and IBM HTTP Reverse Proxy Server" on page 26-3
2. Install the IHS v2 Web server, as described in "Preparing the IHS v2 Web Server"
on page 26-8.
3. Load the modules by including these lines (uncommented) in the Dynamic Shared
Object section of the httpd.conf file in:
IHS_install_dir/conf/httpd.conf
LoadModule access_module modules/mod_access.so
LoadModule auth_module modules/mod_auth.so
LoadModule auth_dbm_module modules/mod_auth_dbm.so
LoadModule include_module modules/mod_include.so
LoadModule log_config_module modules/mod_log_config.so
LoadModule env_module modules/mod_env.so
LoadModule unique_id_module modules/mod_unique_id.so
LoadModule setenvif_module modules/mod_setenvif.so
LoadModule proxy_module modules/mod_proxy.so
LoadModule proxy_connect_module modules/mod_proxy_connect.so
LoadModule proxy_ftp_module modules/mod_proxy_ftp.so
LoadModule proxy_http_module modules/mod_proxy_http.so
LoadModule mime_module modules/mod_mime.so
LoadModule dav_module modules/mod_dav.so
LoadModule autoindex_module modules/mod_autoindex.so
LoadModule asis_module modules/mod_asis.so
LoadModule info_module modules/mod_info.so
LoadModule cgid_module modules/mod_cgid.so
LoadModule dav_fs_module modules/mod_dav_fs.so
LoadModule vhost_alias_module modules/mod_vhost_alias.so
LoadModule dir_module modules/mod_dir.so
LoadModule imap_module modules/mod_imap.so
LoadModule actions_module modules/mod_actions.so

Activating Reverse Proxy for Apache v2 and IHS v2
Configuring Apache, OHS, IHS for 10g WebGates 26-21
LoadModule userdir_module modules/mod_userdir.so
LoadModule alias_module modules/mod_alias.so
LoadModule rewrite_module modules/mod_rewrite.so
4. Directives Under the IfModule mod_proxy.c Tag--Use the information and the
following examples to ensure that:
■Allow or Deny conditions are appropriately commented.
For example:
<Proxy *>
Order deny, allow
# Deny from all
Allow from all
# Allow from .domain.com
</Proxy>
■URLs to be protected are mentioned in both the ProxyPass and the
ProxyPassReverse directives.
For example:
<IfModule mod_proxy.c>
ProxyRequests Off
ProxyPass /testproxy http://bedford: 8809/testrev/
ProxyPassReverse /testproxy http://bedford: 8809/testrev/
ProxyPass /test2 http://bedford: 8809/testrev/
ProxyPassReverse /test2 http://bedford: 8809/testrev/
5. Restart the Web server after any modifications to the httpd.conf file.
6. Tes ti ng : To access the proxy URL, access
http://<proxy_host>:80/testproxy/
7. Enabling SSL on Reverse Proxy Server: Use the documentation on the IHS default
page.
For example, sample SSL settings in the DSO section of the httpd.conf file load the
ibm_ssl_module as:
LoadModule ibm_ssl_module modules/mod_ibm_ssl.so
8. Include the following directives in your httpd.conf file:
SSLEnable
Keyfile /opt/IBMIHS/bin/key.kdb
SSLClientAuth none
SSLProxyEngine on
9. Restart server.
10. Access the Web server URL and confirm that the browser is presented with a
certificate.
Note:
While testing, make sure the URLs have a trailing forward slash.
Sometimes resources cannot be accessed without the forward slash at
the end.

Verifying httpd.conf Updates for Webgates
26-22 Administrator's Guide for Oracle Access Management
11. key.kdb: To generate the key.kdb, use the ikeyman utility (preferably in GUI
mode) provided in the IHS_install_dir/bin directory.
12. Perform the following steps:
■Complete 10g Webgate installation with Access Manager 11g as described in
Chapter 25, "Registering and Managing 10g WebGates with Access Manager
11g", if you haven't yet done so
■Return to this chapter to perform remaining tasks in this chapter as needed.
26.8 Verifying httpd.conf Updates for Webgates
It is a good idea to complete the following procedures to ensure that the Apache or
IHS v2 httpd.conf file includes Web server configuration updates for Access Manager.
For details, see:
■Verifying Webgate Details
■Verifying Language Encoding
To update httpd.conf for reverse proxy on IHS Web servers, see "Activating Reverse
Proxy For IHS v2 Web Servers" on page 26-20. To customize httpd.conf for your Web
server, see your Web server documentation.
26.8.1 Verifying Webgate Details
The example that follows shows the Webgate section in the httpd.conf file. The details
will vary, depending on your environment. This example is provided only to illustrate
the type of changes you will see in httpd.conf.
To verify the Webgate section in httpd.conf
1. Locate the updated httpd.conf file on the computer hosting the Webgate.
2. Open the httpd.conf file and ensure that the section that loads the Webgate in your
platform is present.
For example:
On Windows
#*** BEGIN Oblix NetPoint Webgate Specific ****
<IfModule mod_ssl.c>
LoadModule obWebgateModule "WebGate_install_
dir\access\oblix\apps\webgate\bin\webgatessl.d ll"
WebGateInstalldir "WebGate_install_dir"
WebGateMode PEER
</IfModule>
<IfModule !mod_ssl.c>
LoadModule obWebgateModule "WebGate_install_
dir\access\oblix\apps\webgate\bin\webgate.dll"
Note: You can switch back to open mode for the Web server simply
by commenting out the preceding directives and restarting the server.
Note: The ikeyman utility uses the gsk7bas utility. However, you
need to apply fix pack PQ83048 on gsk7bas.

Verifying httpd.conf Updates for Webgates
Configuring Apache, OHS, IHS for 10g WebGates 26-23
WebGateInstalldir "WebGate_install_dir"
WebGateMode PEER
</IfModule>
<Location "\oberr.cgi">
SetHandler obwebgateerr
</Location>
<LocationMatch "/*">
AuthType Oblix
require valid-user
</LocationMatch>
#*** END Oblix NetPoint Webgate Specific ****
On UNIX
#*** BEGIN Oblix NetPoint Webgate Specific ****
LoadFile "/home/qa/netpoint/703/c1-copy/wg/access/oblix/lib/libgcc_s.so.1"
LoadFile "/home/qa/netpoint/703/c1-copy/wg/access/oblix/lib/libstdc++.so.5"
<IfModule mod_ssl.c>
LoadModule obWebgateModule "/home/qa/netpoint/703/c1-copy/wg/access/oblix/
apps/webgate/bin/webgatessl.so"
</IfModule>
<IfModule !mod_ssl.c>
LoadModule obWebgateModule "/home/qa/netpoint/703/c1-copy/wg/access/oblix/
apps/webgate/bin/webgate.so"
</IfModule>
WebGateInstalldir "/home/qa/netpoint/703/c1-copy/wg/access"
WebGateMode PEER
<Location /access/oblix/apps/webgate/bin/webgate.cgi>
SetHandler obwebgateerr
</Location>
<Location "/oberr.cgi">
SetHandler obwebgateerr
</Location>
<LocationMatch "/*">
AuthType Oblix
require valid-user
</LocationMatch>
#*** END Oblix NetPoint Webgate Specific ****
Notes for UNIX
When running Apache v2 on HP-UX, do not use nobody for User or Group, because
shared memory may not work. Instead, use your login name as User Name with a
group Group as "Oblix" (or "www" as User Name and "others" as Group Name). On
HP-UX, "www" is equivalent to "nobody" on Solaris.
When running Apache v2 on HPUX 11.11, ensure that the AcceptMutex directive in
the Apache httpd.conf file is set to "fcntl". If the directive is not present, add it to the
httpd.conf file (AcceptMutex fcntl). For more information, see
http://issues.apache.org/bugzilla/show_bug.cgi?id=22484).
Notes for IHS on AIX
#*** BEGIN Oblix NetPoint Webgate Specific ****
LoadModule obWebgateModule DR/oblix/apps/webgate/bin/webgate.so
WebGateInstalldir DR
WebGateMode PEER
<Location "/oberr.cgi">
SetHandler obwebgateerr
</Location>

Verifying httpd.conf Updates for Webgates
26-24 Administrator's Guide for Oracle Access Management
<LocationMatch "/*">
AuthType Oblix
require valid-user
</LocationMatch>
#*** END Oblix NetPoint Webgate Specific ****
1. Use the chmod -r username:groupname directory/file to change the User Name
and Group Name of a directory or a file.
When you do this, you need to change the User and Group parameters in the
httpd.conf file accordingly.
2. See "Tuning Apache/IHS v2 Webgates for Access Manager" on page 26-27 for
more information and complete any additional steps needed to finish the Access
Manager implementation for Apache v2.
To start httpd.conf updates anew
1. Restore the original httpd.conf file to remove any Access Manager entries that are
present.
2. Update the httpd.conf file for Access Manager using one of the following methods:
■Either open the file component_install_
dir/access/oblix/lang/LangTag/docs/config.htm and perform a manual
configuration, as described in Chapter 25, "Registering and Managing 10g
WebGates with Access Manager 11g".
■Or launch the ManageHttpConf program in component_install_
dir/access/oblix/tools/setup/InstallTools/ManageHttpConf without any
options to print instructions on its use.
3. Complete activities in "Tuning Apache/IHS v2 Webgates for Access Manager" on
page 26-27.
26.8.2 Verifying Language Encoding
As mentioned earlier, Access Manager HTML pages use UTF-8 encoding.
Apache-based Web servers allow Administrators to specify a default character set for
all HTML pages sent out using the
AddDefaultCharset
directive, which overrides any
character specified by the application generating the HTML pages. If the
AddDefaultCharset
directive enables a character set other than UTF-8, Access
Manager HTML pages are garbled.
To ensure proper language encoding
1. Open the httpd.conf file.
2. Locate the
AddDefaultCharset
directive.
Important: You use the following procedure only if you need to clear
the httpd.conf file of Webgate-related changes, then complete the
Apache v2 Web server configuration for the Webgate anew.
Note: If the ManageHttpConf program is run with Webgate entries
already present in the httpd.conf file, an error message will be printed
and the httpd.conf file will not be updated.

Tuning OHS /Apache Prefork and Worker MPM Modules for OAM
Configuring Apache, OHS, IHS for 10g WebGates 26-25
3. Complete one of the following activities to ensure that proper encoding of Access
Manager HTML pages:
■Either set the
AddDefaultCharset
directive to Off.
■Or Comment out the
AddDefaultCharset
directive.
4. Save the httpd.conf file and restart the Web server.
26.9 Tuning Oracle HTTP Server Webgates for Access Manager
After installing the Access Manager Web component for Oracle HTTP Server, you need
to complete the steps that follow.
As mentioned earlier, before installing Webgates for Oracle HTTP Server, in the
httpd.conf file you must change the user and group to match the user that is installing
the component.
To tune Oracle HTTP Server for Webgates
1. Shut down opmn, as you usually do.
2. Locate and open the opmn.xml file for editing. For example:
$ORACLE_HOME/opmn/bin/opmn.xml
3. In the opmn.xml file, adjust items as follows:
<ias-component id="HTTP_Server">
<process-type id="HTTP_Server" module-id="OHS2">
<environment>
<variable id="TMP" value="/tmp"/>
<variable id="LD_ASSUME_KERNEL" value="2.4.19"/>
</environment>
<module-data>
<category id="start-parameters">
<data id="start-mode" value="ssl-disabled"/>
</category>
</module-data>
<process-set id="HTTP_Server" numprocs="1"/>
</process-type>
</ias-component>
4. Refresh the OPMN configuration by executing the following script:
#ORACLE_HOME/opmn/bin/opmnctl reload
5. Start the Oracle HTTP Server Web server, as described in "Starting and Stopping
Oracle HTTP Server Web Servers"
26.10 Tuning OHS /Apache Prefork and Worker MPM Modules for OAM
Oracle recommends specific tuning parameters with Webgates for these Web servers.
The tuning parameters described in this section are configured in the httpd.conf file
with Apache v2.0 and OHS11g.
Note: On Linux, Webgates for Oracle HTTP Server 11g use only
NPTL; you cannot use the LinuxThreads library. In this case, do not
set the environment variable LD_ASSUME_KERNEL to 2.4.19.

Tuning OHS /Apache Prefork and Worker MPM Modules for OAM
26-26 Administrator's Guide for Oracle Access Management
For Apache v2.2, however, tuning is configured in the following files:
apache_install_dir/conf/extra/httpd-mpm.conf
apache_install_dir/conf/extra/httpd-default.conf
Also for Apache v2.2, the entries for httpd-mpm.conf and httpd-default.conf should be
uncommented, as follows:
From:
#Include conf/extra/httpd-mpm.conf
#Include conf/extra/httpd-default.conf
To:
Include conf/extra/httpd-mpm.conf
Include conf/extra/httpd-default.conf
Use the following topics as needed for your environment:
■Tuning Oracle HTTP Server /Apache Prefork MPM Module
■Tuning Oracle HTTP Server /Apache Worker MPM Module
■Tuning Kernel Parameters
26.10.1 Tuning Oracle HTTP Server /Apache Prefork MPM Module
Oracle recommends the following as broad guidelines when using Access Manager
with either the Oracle HTTP Server or Apache Prefork MPM module:
Timeout 300
KeepAlive On
MaxKeepAliveRequests 500
KeepAliveTimeout 10
StartServers: 5 (Initial number of processes to start; used only on startup.)
MaxClients: 500 (Total number of processes to handle load at peak time. Determines
how many child processes will be created to handle requests at peak period.
ServerLimit: 500 (The maximum configured value for MaxClients for the lifetime of
the process. If MaxClients is set to a value higher than the default, ServerLimit value
should be specified above the rest of the parameters.
MinSpareServers, MaxSpareServers: Default values should suffice requirements to
handle a heavy load. During operation, these values regulate how the parent process
creates children to serve requests.
MaxRequestsPerChild: 0 - Number of requests sent to each child process. 0 indicates
the process never expires/dies
26.10.2 Tuning Oracle HTTP Server /Apache Worker MPM Module
Oracle recommends the following as broad guidelines when using Access Manager
with either the Oracle HTTP Server or the Apache Worker MPM module:
Timeout 300
KeepAlive On
MaxKeepAliveRequests 500

Tuning Apache/IHS v2 Webgates for Access Manager
Configuring Apache, OHS, IHS for 10g WebGates 26-27
KeepAliveTimeout 10
StartServers: 2 (Initial number of processes to start; used only on startup.)
MaxClients: 500 (Total number of processes to handle load at peak time. Determines
how many child processes will be created to handle requests at peak period.
ServerLimit: 25 (The maximum configured value for MaxClients for the lifetime of the
process. If MaxClients is set to a value higher than the default, ServerLimit value
should be specified above the rest of the parameters.
MinSpareServers, MaxSpareServers: 25, 75. During operation, these values regulate
how the parent process creates children to serve requests.
ThreadsPerChild: 25 (The number of worker threads in single httpd process.)
MaxRequestsPerChild: 0 (This directive sets the limit on the number of requests that
an individual child server process will handle. The value 0 will ensure that the process
never expires.)
26.10.3 Tuning Kernel Parameters
Oracle recommends that you ensure the kernel parameters for the soft and hard limit
on the file descriptors are set to a high value. For example:
Hard limit (rlim_fd_max): 65535
Soft limit (rlim_fd_cur): 65535
The high value of the file descriptor is a strong recommendation for the Apache server
that will open and close sockets for requests.
26.11 Starting and Stopping Oracle HTTP Server Web Servers
Starting and stopping an Oracle HTTP Server Web server is the same procedure for
both v1.3 and v2, on all platforms.
To start the Oracle HTTP Server Web server
1. Locate and change to the following directory:
$ORACLE_HOME\opmn\bin\
2. From the command line, enter the following command:
opmnctl/startproc process-type=HTTP_Server
To stop the Oracle HTTP Server Web server
1. Locate and change to the following directory:
$ORACLE_HOME\opmn\bin\
2. From the command line, enter the following command:
opmnctl/stopproc process-type=HTTP_Server
26.12 Tuning Apache/IHS v2 Webgates for Access Manager
Unless explicitly stated, information here applies to both Apache and IHS v2 Webgate
(also known as plug-ins). For details about Oracle HTTP Server, see the Oracle HTTP
Server Administrator's Guide 10 g R2 (10.1.2).

Tuning Apache/IHS v2 Webgates for Access Manager
26-28 Administrator's Guide for Oracle Access Management
Apache v2 bundled with Security-Enhanced Linux: With SELinux, errors could be
reported in WebServer logs/console when starting a Web server on Linux distributions
that have more strict SELinux policies in place after installing an Access Manager
Webgate. You can avoid these errors by running appropriate
chcon
commands for the
installed Web component before restarting the Web server.
Apache v2 bundled SELinux-enabled Linux Distribution: Security-enhanced Linux
(SELinux) is an automatically enabled implementation of a mandatory access-control
mechanism. As described in your Linux documentation, SELinux policies provide
access to certain pre-defined system directories such as /etc/httpd/conf,
/usr/sbin/apachect, and /var/log/ (to name a few) for system daemons.
When Webgates are installed with the bundled Apache Web server, certain policies
must be added to allow Apache processes to access installation files.
The bundled Apache Web server runs as user "apache" with a security context defined
as
context=user_u:system_r:unconfined_t
. As a result, when Webgates are installed
in any of the user folders, the Apache Web server will not start.
The $SELINUX_SRC variable represents the SELinux policy source directory. The
default value is /etc/selinux/targeted/src/policy. However, your environment may
vary. Be sure to consult your system Administrator for the actual value for your
system.
To add Access Manager policies to Apache bundled with Red Hat Enterprise
Linux 4
1. After installing each Access Manager Webgate, log in as the 'root' user.
2. Ensure that all Webgates are installed for Web server user & group (default:
apache).
3. Create an oracle_access_manager.te policy file in the $SELINUX_
SRC/domains/programs/directory and add the following rules:
type oracle_access_manager_t, file_type, sysadmfile;
allow httpd_t oracle_access_manager_t:file { rw_file_perms create rename
link unlink setattr execute };
allow httpd_t oracle_access_manager_t:dir { rw_dir_perms create append
rename link unlink setattr };
4. Create an oracle_access_manager.fc file context in the directory $SELINUX_
SRC/file_contexts/program, then register the Webgate installation directory
(without identity or access suffix). For example:
Oracle_Access_Manager_install_dir(/.*)? system_u:object_r:oracle_access_
manager_t
5. Compile and deploy the policy files as follows:
cd $SELINUX_SRC
make load
Label Oracle Access Manager files
See Also: "SELinux Issues" on page E-24
Note: When the Webgate is installed in a separate directory from the
Access Manager, be sure to register the Webgate installation directory
separately.

Tuning Apache/IHS v2 Webgates for Access Manager
Configuring Apache, OHS, IHS for 10g WebGates 26-29
run restorecon -R Oracle_Access_Manager_install_dir (without the identity or
access suffix)
Apache v2 Directives: Apache 1.3 uses a process model for serving multiple HTTP
requests at once. This differs from the single process (thread) model employed by
other Web servers, which manage several requests simultaneously in one process.
Several directives in the Apache v2 Web server configuration file (httpd.conf) affect
how the Apache Web server decides to create or destroy worker processes. The
following parameters affect the performance of the Apache v2 Web server:
■ThreadsPerChild: This directive sets the number of threads created by each child
process. The child creates these threads at startup and never creates more.
■If you are using an MPM like mpm_winnt, where there is only one child
process, this number should be high enough to handle the entire load of the
server.
■If you are using an MPM like mpm_worker, where there are multiple child
processes, the total number of threads should be high enough to handle the
common load on the server.
■MinSpareThreads: This value is only used with mpm_worker. Since Access
Manager plug-in initialization is deferred until the first request, there is minimal
advantage of keeping high value for this directive. However, it is useful to keep
this parameter as high as possible.
■MaxSpareThreads: This value is only used with mpm_worker. The value for
MaxSpareThreads must be greater than or equal to the sum of MinSpareThreads
and ThreadsPerChild or the Apache HTTP Server automatically corrects it.
Recommendation: Keep the value high. For a dedicated server this will not be a
problem.
■MaxSpareServers: With Apache v2, this is used only with the prefork MPM
model. To preserve as much state as possible in the server, set the
MaxSpareServers to a high value. Setting this value to the maximum of 255 keeps
all Apache worker-processes available indefinitely, but it does not provide an
opportunity for worker-process recycling during low-load periods.
■MinSpareServers: With Apache v2, this is used only with the prefork MPM
model. Since Access Manager plug-in initialization is deferred until the first
request, using a high value for the MinSpareServers parameter provides minimal
advantage. However, it is useful to keep this parameter as high as possible. For
dedicated Web server systems, this should pose no great burden.
■MaxClients: With IHS v2 and the worker MPM, MaxClients restricts the total
number of threads that will be available to serve clients. For hybrid MPMs, the
default value is 16 (ServerLimit) multiplied by a value of 25 (ThreadsPerChild). To
increase MaxClients to a value that requires more than 16 processes, you must also
raise ServerLimit.
Appropriate values for the preceding parameters depend on the expected load and the
performance class of the systems involved, including the Access Server and LDAP
server.
Note: Only the prefork MPM in Apache v2 uses the same process
model for serving HTTP requests as Apache v1.3. For all other MPMs,
Apache v2 uses a hybrid process-thread model.

Removing Web Server Configuration Changes After Uninstall
26-30 Administrator's Guide for Oracle Access Management
Apache servers on very high performance systems with high expected loads may be
recompiled with a larger limit on the number of worker processes. These systems may
see a greater performance impact on the StartServers and MinSpareServers parameters
for dealing with sudden load spikes.
You may need to adjust operating system limits for the Access Server for proper
operation. In particular, the maximum number of file descriptors available for any one
Access Server may need to be increased beyond the default value. Configuring more
than one connection between each Apache-based Webgate and an Access Server may
quickly exceed this limit.
For additional information, see your Apache documentation.
26.13 Removing Web Server Configuration Changes After Uninstall
Web server configuration changes that occur during installation must be manually
removed after uninstalling the Webgate). This type of information must be removed
manually.
Further, you must remove any changes that you manually made to your Web server
configuration file for the Webgate) should be removed. For more information about
what is added for each component, look elsewhere in this chapter.
26.14 Helpful Information
Consult the following manual for more information about the Oracle HTTP Server:
Oracle HTTP Server Administrator's Guide 10 g R2 (10.1.2)
The following URLs provide information about building an Apache release and source
code:
Apache v2 documentation:
http://httpd.apache.org/docs-2.0/
Apache v2 source code:
http://httpd.apache.org/download.cgi
Mod-SSL documentation:
http://httpd.apache.org/docs-2.0/mod/mod_ssl.html
OpenSSL documentation:
http://www.openssl.org/docs/
OpenSSL source code:
http://www.openssl.org/source/
Compiling and Installing Apache v2:
http://httpd.apache.org/docs-2.0/install.html#test
IHS:
http://www-306.ibm.com/software/webservers/httpservers/doc/v2047/manual/re
adme.html

27
Configuring the ISA Server for 10g WebGates 27-1
27
Configuring the ISA Server for 10g WebGates
This chapter describes how to configure the Access Manager ISAPI Webgate and
Microsoft Internet Security and Acceleration Server (ISA Server) to operate together.
Topics include:
■Prerequisites
■About Access Manager and the ISA Server
■Compatibility and Platform Support
■Installing and Configuring Webgate for the ISA Server
■Configuring the ISA Server for the ISAPI Webgate
■Starting, Stopping, and Restarting the ISA Server
■Removing Access Manager Filters Before Webgate Uninstall on ISA Server
27.1 Prerequisites
Ensure that your Oracle Access Management Console is running and get familiar with:
■"Introduction to Policy Enforcement Agents" on page 15-1
■"About Access Manager and the ISA Server" on page 27-1
27.2 About Access Manager and the ISA Server
The ISA Server is Microsoft's "integrated edge security gateway". It is designed to
protect IT environments from Internet-based threats and to give users secure remote
access to applications and data.
Webgate is the Access Manager Web server plug-in access client that intercepts HTTP
requests for Web resources and forwards them to the Access Server for authentication
and authorization. ISAPI is the Internet Web server extension that Access Manager
uses to identify Webgates that communicate with the ISA Server (and the IIS Web
Server).
This Webgate has been tested to operate with the ISA Server in scenarios that use both
Access Manager Basic and Form (form-based) authentication schemes. You develop
Basic and Form authentication schemes and policy domains using Access Manager as
usual.
Note: Access Manager Client Certificate authentication is not
supported for the ISA Server.

Compatibility and Platform Support
27-2 Administrator's Guide for Oracle Access Management
Using ISA Server with Access Manager is similar to using the IIS Web server.
However, the ISA Server provides firewall and Virtual Private Network (VPN)
functions.
ISA Server can be configured for third-party security filters. To enforce Access
Manager security during authentication and authorization when you use ISA Server,
both webgate.dll and postgate.dll must be registered as ISA Server Web filters. Every
request to the Access Server that passes through ISA Server requires webgate.dll and
postgate.dll.
The following overview outlines the tasks that you must perform and the topics
where you will find the steps to set up the ISAPI Webgate with the ISA Server.
Task overview: Installing and configuring the ISAPI Webgate on ISA Server
1. Confirming "Compatibility and Platform Support" on page 27-2
2. "Installing and Configuring Webgate for the ISA Server" on page 27-2.
3. "Configuring the ISA Server for the ISAPI Webgate" on page 27-3.
4. Perform the following tasks, as described in:
a. "Ordering the ISAPI Filters" on page 27-6
b. "Removing Access Manager Filters Before Webgate Uninstall on ISA Server"
on page 27-7
27.3 Compatibility and Platform Support
Get the latest certification matrix from Oracle Technology Network at the following
URL:
http://www.oracle.com/technology/products/id_mgmt/coreid_acc/pdf/oracle_access_
manager_certification_10.1.4_r3_matrix.xls
27.4 Installing and Configuring Webgate for the ISA Server
After ISA Server installation, you perform the following tasks to install Webgate for
use with ISA Server.
Task overview: Performing Webgate configuration for ISA Server includes
1. "Installing Webgate with ISA Server" on page 27-2
2. "Changing /access Directory Permissions" on page 27-3
3. "Registering Access Manager Plug-ins as ISA Server Web Filters" on page 27-3
27.4.1 Installing Webgate with ISA Server
When you install Webgate with the ISA Server, the destination for the ISAPI Webgate
installation (also known as the Webgate_install_dir) should be same as that of the
See Also: Oracle Fusion Middleware Administrator's Guide for
Oracle Access Management for more information about authentication
management and policy domains.
See Also: "Compatibility and Platform Support" on page 27-2

Configuring the ISA Server for the ISAPI Webgate
Configuring the ISA Server for 10g WebGates 27-3
Microsoft ISA Server. For example, if ISA Server is installed on C:\Program
Files\Microsoft ISA Server, the ISAPI Webgate should also be installed there.
Task overview: Installing the ISAPI Webgate for the ISA Server
1. See Chapter 25 for details on the following topic, as these apply to your
environment:
■Registering a 10g WebGate with Access Manager 11g Remotely
■Locating and Installing the Latest 10g WebGate for Access Manager 11g
■Configuring Centralized Logout for 10g WebGate with 11g OAM Servers
2. Changing /access Directory Permissions on page 27-3
27.4.2 Changing /access Directory Permissions
After finishing ISAPI Webgate installation and configuration for the ISA Server, you
need to change permissions to the \access subdirectory. This subdirectory was created
in the ISA Server (also Webgate) installation directory. You need to add the user
NETWORK SERVICE and grant full control to NETWORK ADMINISTRATOR.
This enables the ISA Server to establish a connection between the Webgate and Access
Server. Certain configuration files should be readable by network Administrators,
which is why you grant NETWORK ADMINISTRATOR full control.
To change permissions for the \access subdirectory
1. In the file system, right-click Webgate_install_dir\access, and select Properties.
2. In the Properties window, click the Security tab.
3. Add user "NETWORK SERVICE" and then select "Allow" to give "Full Control".
4. For the "NETWORK ADMINISTRATOR", select "Full Control".
27.5 Configuring the ISA Server for the ISAPI Webgate
The following topics describe how to configure the ISA Server to operate with the
Access Manager ISAPI Webgate.
Task overview: Performing Webgate configuration for ISA Server includes
1. "Registering Access Manager Plug-ins as ISA Server Web Filters" on page 27-3
2. "Configuring ISA Firewall Policies for ISA Web Filters" on page 27-4
27.5.1 Registering Access Manager Plug-ins as ISA Server Web Filters
After resetting ISAPI Webgate permissions, you need to register Access Manager
webgate.dll and postgate.dll plug-ins as Web Filters within ISA Server. Web filters
screen all HTTP traffic that passes through the ISA Server host. Only compliant
requests are allowed to pass through.
Access Manager authentication schemes define how the user is challenged for
credentials, maps user-supplied information, verifies it, and so forth. With the ISA
Note: During Webgate installation, do not automatically update the
ISA Server configuration. Instead, choose "No" when asked about
automatic updates to the ISA Server configuration.

Configuring the ISA Server for the ISAPI Webgate
27-4 Administrator's Guide for Oracle Access Management
Server, you must choose either Form or Basic authentication as the challenge method.
You must also specify a Challenge Parameter to map the credentials provided by the
user to the corresponding user profile stored in the directory server.
The following procedure describes how to register Access Manager plug-ins in the ISA
Server.
To register Access Manager plug-ins as ISA Server Web filters
1. Locate the ISA Server installation directory, from which you will perform the
following tasks.
2. Run
net stop fwsrv
to stop the ISA Server.
3. Register the webgate.dll as an ISAPI Web filter by running
regsvr32 ISA_
install_dir\access\oblix\apps\webgate\bin\webgate.dll
.
4. Register the postgate.dll as an ISAPI Web filter by running
regsvr32 ISA_
install_dir\access\oblix\apps\webgate\bin\postgate.dll
.
5. Restart the ISA Server by running
net start fwsrv
to restart the ISA Server.
6. Proceed to "Configuring ISA Firewall Policies for ISA Web Filters".
27.5.2 Configuring ISA Firewall Policies for ISA Web Filters
To authenticate users, ISA Server must be able to communicate with the authentication
servers. After registering Access Manager webgate.dll and postgate.dll as ISA Web
filters, you must configure the ISA Firewall Policy rule to protect resources using these
Web filters.
Web publishing rules essentially map incoming requests to the appropriate Web
servers. Access rules determine how clients on a source network access resources on a
destination network. ISA Firewall Policy rules require client membership in a user set:
either Firewall clients, authenticated Web clients, or virtual private network (VPN)
clients. The ISA Server attempts to match authenticated users based upon ISA Firewall
Policy rules.
Note: If Access Manager libraries are not registered as ISA Web
filters, Access Manager authentication could fail. Do not point to
webgate.dll in the action path for form-based login in the
authentication scheme. Instead, specify the path to a dummy file in
the /access directory as shown here:
action= "/access/dummy
"
For form based authentication, postgate.dll must be installed and
should be at a higher level than webgate.dll.
Note: If you need to undo the filter registration, you can use the
following procedure with the
/u
option in the
regsvr32
command. For
example:
regsvr32 /u ISA_install_
dir\access\oblix\apps\webgate\bin\webgate.dll
See Also: Your ISA Server documentation for details about ISA
Firewall Policies and rules

Configuring the ISA Server for the ISAPI Webgate
Configuring the ISA Server for 10g WebGates 27-5
The following procedure describes how to configure an ISA Firewall Policy rule to use
with ISA Web filters for Access Manager webgate.dll and postgate.dll.
To configure ISA policies to enable Access Manager authentication and
authorization
1. From the Start menu, click All Programs, click Microsoft ISA Server, and then
click ISA Server Management.
2. From the tree of the ISA Server Management console, locate the name of this
server, and then click Firewall Policy.
3. From the Tasks tab, click Publish Web Sites.
4. In the Web publishing rule name field, type a descriptive name for the rule, and
then click Next.
5. On the Select Rule Action page, confirm that the Allow option is selected, and then
click Next.
6. In the Publishing type, confirm that the Publish a single Web site or load
balancer option is selected, and then click Next.
7. On the Server Connection Security page, click Use non-secured connections to
connect the published Web server or server farm, and then click Next.
8. Perform the following steps to set internal publishing details:
a. In the Internal site name box, type the internally-accessible name of the Web
server.
b. Check the Use a computer name or IP address to connect to the published
server check box.
c. Type the internally-accessible and fully qualified domain name, or type the IP
address of the Web server computer, in the Computer name or IP address box
d. Click Next.
9. In the Public name box, type the publicly-accessible domain name of the Web
server computer, and then click Next.
10. To publish a particular folder in the Web site:
a. Type the folder name in the Path (optional) box to display the full path of the
published Web site in the Web site box.
b. Click Next.
11. In the Accept requests for list:
a. Click This domain name (type below).
b. In the Public name box, type the publicly-accessible fully qualified domain
name of the Web site.
Note: After you perform the following procedure, when you create a
listener in the authentication click Allow client authentication over
HTTP in Advanced Properties.
Note: If you are using secured connections, see the server connection
security settings provided by ISA Server.

Configuring the ISA Server for the ISAPI Webgate
27-6 Administrator's Guide for Oracle Access Management
c. Click Next.
12. In the Web listener list, either click the Web listener to use for this Web publishing
rule; otherwise or create a new Web listener, as follows:
a. Click New, type a descriptive name for the new Web listener, and then click
Next.
b. Click Do not require SSL secured connections with clients, and then click
Next.
c. In the Listen for requests from these networks list, click the required
networks and click to check the External box, then click Next.
d. In the Select how clients will provide credentials to ISA Server list, click No
Authentication, and then click Next.
e. On the Single Sign On Settings page, click Next, and then click Finish.
13. Authentication Delegation: Perform the following steps in the Select the method
used by ISA Server to authenticate to the published Web server list:
a. Click No Delegation.
b. Click Client Cannot Authenticate Directly.
c. Click Next.
This is used by ISA Server to authenticate to the published Web server.
14. On the User Sets page:
a. Choose All (the default user setting) to set the rule that applies to requests
from the user sets box.
b. Click Next and then click Finish.
15. Click Apply to update the firewall policy, and then click OK.
16. Validate that only applicable ports are open and that the traffic that you would like
to pass through is allowed.
27.5.3 Ordering the ISAPI Filters
It is important to ensure that the Webgate ISAPI filters are included in the right order.
postgate.dll should be loaded before webgate.dll.
To order the Webgate ISAPI filters for ISA Server
1. From the Start menu, click All Programs, click Microsoft ISA Server, and then click
ISA Server Management.
2. Expand Configuration, then check Add-ins to display your Web-filters.
3. Right-click the Web-filters and select Properties.
4. Confirm the following .dll files appear.
For example:
postgate.dll
webgate.dll
5. Add any missing filters, if needed, then select a filter name and use the up and
down arrows to arrange the filter order as shown in step 5.

Removing Access Manager Filters Before Webgate Uninstall on ISA Server
Configuring the ISA Server for 10g WebGates 27-7
27.6 Starting, Stopping, and Restarting the ISA Server
When instructed to restart your ISA Server during Access Manager Web component
installation or setup, be sure to follow any instructions that appear on the screen. Also,
consider using
net stop fwsrv
and
net start fwsrv
are good ways to stop and
start the ISA Server. The
net
commands help to ensure that the Metabase does not
become corrupted following an installation.
For more information, see your ISA Server documentation.
27.7 Removing Access Manager Filters Before Webgate Uninstall on ISA
Server
If you plan to uninstall the Webgate that is configured to operate with the ISA Server,
you must first unregister the Access Manager filters manually, and then uninstall
Webgate.
To unregister filters before Webgate uninstall
1. Stop the ISA Server.
2. Run the following command to unregister webgate.dll. For example:
regsvr32 /u ISA_install_dir\access\oblix\apps\webgate\bin\webgate.dll
3. Run the following command to unregister postgate.dll. For example:
regsvr32 /u ISA_install_dir\access\oblix\apps\webgate\bin\postgate.dll
WARNING: Confirm that there is only one webgate.dll and one
postgate.dll filter and ensure that these are in an enabled state. Also,
ensure that postgate.dll is installed at higher priority level than
webgate.dll.
See Also: Chapter 25 for details about uninstalling 10g Webgates

Removing Access Manager Filters Before Webgate Uninstall on ISA Server
27-8 Administrator's Guide for Oracle Access Management

28
Configuring the IIS Web Server for 10g WebGates 28-1
28
Configuring the IIS Web Server for 10g
WebGates
This chapter summarizes activities that you need to perform to configure 10.1.4
Webgate with a Microsoft Internet Information Server (IIS Web server for Windows
environments). Unless explicitly stated, information and steps in this chapter apply
equally to 32-bit and 64-bit Webgate installations. Topics include:
■Prerequisites
■Webgate Guidelines for IIS Web Servers
■Prerequisite for Installing Webgate for IIS 7
■Updating IIS 7 Web Server Configuration on Windows 2008
■Completing Webgate Installation with IIS
■Installing and Configuring Multiple 10g Webgates for a Single IIS 7 Instance
■Installing and Configuring Multiple Webgates for a Single IIS 6 Instance
■Finishing 64-bit Webgate Installation
■Confirming Webgate Installation on IIS
■Starting, Stopping, and Restarting the IIS Web Server
■Removing Web Server Configuration Changes Before Uninstall
28.1 Prerequisites
Ensure that your Oracle Access Management Console is running and get familiar with:
■Introduction to Policy Enforcement Agents on page 15-1
■About Installing Fresh 10g WebGates to Use With Access Manager 11.1.2 on
page 25-3
28.2 Webgate Guidelines for IIS Web Servers
ISAPI is an Internet Web server extension that the Webgate that communicates with
the IIS Web server. For example, you will need the following package to install the
Webgates for IIS:
Oracle_Access_Manager10_1_4_3_0_Win32_ISAPI_Webgate
64-bit Webgate: Oracle_Access_Manager10_1_4_3_0_Win64_ISAPI_Webgate.exe

Webgate Guidelines for IIS Web Servers
28-2 Administrator's Guide for Oracle Access Management
Updating the IIS Web server configuration file is required when installing Webgates.
With IIS Web servers, a configuration update involves updating the Web server
directly by adding the ISAPI filter and creating extensions required by Access
Manager. A filter listens to all requests to the site on which it is installed. Filters can
examine and modify both incoming and outgoing streams of data to enhance IIS
functionality. ISAPI extensions are implemented as DLLs that are loaded into a process
that is controlled by IIS. Like ASP and HTML pages, IIS uses the virtual location of the
DLL file in the file system to map the ISAPI extension into the URL namespace that is
served by IIS.
Oracle recommends that you update the IIS Web server configuration file
automatically during Webgate installation. Automatic updates may take more than a
minute. However, updating the IIS Web server configuration file manually takes
longer and could introduce unintended errors.
For more specific guidelines, see:
■Guidelines for ISAPI Webgates
■Prerequisite for Installing Any 10g Webgate for IIS 7
■Prerequisite for Installing a 32-bit Webgate for IIS 7
28.2.1 Guidelines for ISAPI Webgates
General Webgate preparation and installation details apply to ISAPI Webgates.
Additionally, this topic provides specific guidelines for ISAPI Webgates installed with
an IIS Web server. You can install multiple Webgates with a single IIS Web server
instance or you might have a 64-bit Webgate.
lockdown Mode: Before installing the Webgate, ensure that your IIS Web server is not
in lockdown mode. Otherwise things will appear to be working until the server is
rebooted and the metabase re-initialized, at which time IIS will disregard activity that
occurred after the lockdown.
Permissions: Setting various permissions for the /access directory is required for IIS
Webgates only when you are installing on a file system that supports NTFS. For
example, suppose you install the ISAPI Webgate in Simple or Cert mode on a
Windows 2000 computer running the FAT32 file system. The last installation panel
provides instructions for manually setting various permissions that cannot be set on
the FAT32 file system. In this case, these instructions may be ignored.
Virtual Hosts: Each IIS Virtual Web server can have it's own Webgate.dll file installed
at the virtual level, or can have one Webgate affecting all sites installed at the site level.
Either install the Webgate.dll at the site level to control all virtual hosts or install the
Webgate.dll for one or all virtual hosts.
postgate.dll: You may also need to install the postgate.dll file at the computer level.
The postgate.dll is located in the \Webgate_install_dir, as described in "Installing the
Postgate ISAPI Filter". If you perform multiple installations, multiple versions of this
file may be created which may cause unusual Access Manager behavior. In this case,
you should verify that only one webgate.dll and one postgate.dll exist.
Note: Unless explicitly stated, details apply equally to 32-bit and
64-bit Webgates.

Webgate Guidelines for IIS Web Servers
Configuring the IIS Web Server for 10g WebGates 28-3
Updating Web Server Configuration for Webgate: As with other Webgates, your Web
server must be configured to operate with the Webgate. Oracle recommends
automatically updating your Web server configuration during installation. However,
you can decline the automatic update and instead manually configure your Web
server as described in "Registering a 10g WebGate with Access Manager 11g Remotely"
on page 25-11.
FAT32 file system: You may receive special instructions to perform during Webgate
installation. For example: Setting various permissions for the /access directory is
required for IIS Webgates only when you are installing on a file system that supports
NTFS. The last installation panel provides instructions for manually setting various
permissions that cannot be set on the FAT32 file system. In this case, these instructions
can be ignored.
SSL and Client Certificate Authentication: On IIS, if you are using client certificate
authentication you must enable SSL on the IIS Web server hosting the Webgate before
enabling client certificates for Webgate. You must also ensure that various filters are
installed in a particular order. In addition, you may need to install the postgate.dll as
an ISAPI filter.
Web Server Releases: Web server details in this chapter apply to the stated release. If
the release is not stated, you can presume it is IIS v5. Details specific to IIS v6 or IIS v7
are identified.
32-bit versus 64-bit Webgates: Unless explicitly stated, all information applies equally
to both 32-bit and 64-bit Webgates.
General Webgate Preparation and Installation Details: Refer to this chapter for
IIS-specific guidelines. Refer to Chapter 25 for general preparation and installation
details.
Completing and Confirming Webgate Installation: Perform tasks relevant to your
ISAPI Webgate and IIS version:
Note: The postgate.dll is always installed at the site level. If for some
reason the Webgate is reinstalled, the postgate.dll is also reinstalled. In
this case, ensure that only one copy of the postgate.dll exists at the site
level.
See Also:
■Webgates for IIS v7 on page 28-4
■Webgates for IIS v6 on page 28-4
See Also:
■Webgates for IIS v6 on page 28-4
■Finishing 64-bit Webgate Installation on page 28-24
See Also:
■Completing Webgate Installation with IIS
■Finishing 64-bit Webgate Installation
■Confirming Webgate Installation on IIS

Webgate Guidelines for IIS Web Servers
28-4 Administrator's Guide for Oracle Access Management
28.2.1.1 Webgates for IIS v7
General guidelines and Webgate installation are usually the same regardless of the IIS
release for which you are installing a Webgate. However, there are several specific
topics to review when you are installing one or more Webgates for IIS v7:
■Prerequisite for Installing Webgate for IIS 7 on page 28-5
■Updating IIS 7 Web Server Configuration on Windows 2008 on page 28-6
■Installing and Configuring Multiple 10g Webgates for a Single IIS 7 Instance on
page 28-14
28.2.1.2 Webgates for IIS v6
General guidelines and Webgate installation are usually the same regardless of the IIS
release for which you are installing a Webgate. However, there are several specific
topics of interest.
Multiple Webgates with a Single IIS 6 Instance: IIS v6.0 supports hosting multiple
Web sites on a single Web server instance and ISAPI Webgate allows you to protect
each Web site with a different Webgate.
64-bit IIS v6 Webgate: Perform installation as you do for all others, using instructions
available in Chapter 25. If you choose manual Web server configuration during
Webgate installation, you can access details in the following path:
Webgate_install_dir\access\oblix\lang\en-us\docs\dotnet_isapi.htm
Following Webgate installation and IIS configuration, perform tasks in "Finishing
64-bit Webgate Installation" on page 28-24.
Earlier Release Webgate Installations: Previously Oracle recommended that Webgate
be installed in the same physical directory location as Policy Manager. This required a
virtual directory named "access" for both Policy Manager and Webgate, which is
mapped to the physical location of both Policy Manager and Webgate.
If you have an earlier, combined Webgate and Policy Manager installation, you can
de-couple the components using the following steps.
To de-couple an earlier Webgate/Policy Manager installation
1. Uninstall any patches applied to the earlier Webgate and Policy Manager, if any.
2. Uninstall the earlier Policy Manager and Webgate combination.
3. Install Policy Manager 10g (10.1.4.3).
4. In a separate directory location, install Webgate 10g (10.1.4.3)
28.2.1.3 Multiple Webgates with a Single IIS 6 Instance
Unless explicitly stated, details in this topic apply equally to 32-bit and 64-bit
Webgates.
IIS v6.0 supports hosting multiple Web sites on a single Web server and ISAPI Webgate
allows you to protect each Web site with a different Webgate.
See Also: Multiple Webgates with a Single IIS 6 Instance
Note: You can install Webgate 10g (10.1.4.3) for IIS in any location,
separate from that of Policy Manager.

Prerequisite for Installing Webgate for IIS 7
Configuring the IIS Web Server for 10g WebGates 28-5
IIS 6 provides application pools that are used to run virtual servers. You can think of
an application pool as a group of one or more URLs that are served by a worker
process or a set of worker processes. An application pool is a configuration that links
one or more applications to a set of one or more worker processes. Because
applications in this pool are separated from other applications by worker process
boundaries, an application in one application pool is not affected by problems caused
by applications in other application pools. Today, Webgate instances can run in
different process spaces.
When you have multiple Web sites on a single IIS v6.0 Web server instance, you need
to ensure that user requests reach the correct Web site. To do this, you need to
configure a unique identity for each site on the server using at least one of three
unique identifiers:
■Host header name
■IP address
■TCP port number
You can install multiple Webgates on different Web sites of the same IIS Web server
instance. However, several manual steps are required.
28.3 Prerequisite for Installing Webgate for IIS 7
This section provides prerequisites for installing Webgates with IIS v7 Web servers. It
includes the following topics:
■Prerequisite for Installing Any 10g Webgate for IIS 7
■Prerequisite for Installing a 32-bit Webgate for IIS 7
28.3.1 Prerequisite for Installing Any 10g Webgate for IIS 7
The following procedure applies to 32-bit and 64-bit Webgates equally.
With Webgate for IIS v7 Web Server, you can use Form-based authentication without
enabling pass through functionality only when the
<add segment="bin"/>
entry is not
present in the applicationHost.config file. For example, if you have
access/oblix/apps/webgate/bin/webgate.dll as an action in the Form-based
authentication scheme, ensure that the
<add segment="bin"/>
entry is not present in
Note: Previous ISAPI Webgate releases did not support multiple
Webgates with a single IIS Web server instance. You either had to
install one Webgate for all Web sites at the top level, or protect a single
Web site by configuring Webgate at the Web site level.
Note: If you have multiple Web sites on a single server and these are
distinguished by IP address and port, multiple Webgates are not
required. Starting with release 10.1.4.2.0 virtual hosts on Apache and
IIS 6.0 are supported. As a result, a single Webgate on the top level can
protect all the Web sites even if the IP addresses are different. This is
handled by using different Host Identifiers for each Web site.
See Also: "Installing and Configuring Multiple Webgates for a
Single IIS 6 Instance" on page 28-19

Updating IIS 7 Web Server Configuration on Windows 2008
28-6 Administrator's Guide for Oracle Access Management
the applicationHost.config file. If the entry is present, you must remove it, as described
next
To locate and remove the
<add segment="bin"/>
entry
1. Go to Windows\System32\inetsrv\config and open the applicationHost.config
file.
2. Search for the <
hiddenSegments
> module.
3. Remove the entry
<add segment="bin"/>
if it is present.
4. Save the file.
28.3.2 Prerequisite for Installing a 32-bit Webgate for IIS 7
The following procedure applies to 32-bit Webgates only.
The following procedure provides steps to configure a 32-bit Webgate for IIS 7 Web
Server to use either Simple or Cert transport security mode. This configuration
requires that the IIS 6 Management Compatibility module be installed.
To add the IIS 6 Management Compatibility module for a 32-bit Webgate for IIS 7
and Simple or Cert security
1. From the State menu, click Administrative Tools, and then click Server Manager.
2. In the Server Manager tree, expand Roles, and then click Web Server (IIS).
3. In the Web Server (IIS) pane, Role Services section, click Add Role Services.
4. On the Select Role Services page of the Add Role Services Wizard, click IIS6
Management Compatibility under Management Tools.
5. On the Confirm Installation Selections page, click Install.
6. On the Results page, click Close.
28.4 Updating IIS 7 Web Server Configuration on Windows 2008
You can display these steps when you decline automatic Web server updates during
Webgate installation.
To display steps to configure IIS 7 Web server on Windows 2008 for ISAPI
Webgates
1. When installing Webgate, click No when asked if you want the automatic Web
server update and:
a. Read information on a new screen to assist in manually setting up your Web
server for the Webgate.
b. Click the following item in the table that appears perform the steps that are
displayed.
Table 28–1 IIS 7 Webgate Windows Server 2008
Supported Server OS Microsoft IIS
Windows Server 2008 ISAPI
... ...

Completing Webgate Installation with IIS
Configuring the IIS Web Server for 10g WebGates 28-7
2. After performing steps to update the IIS 7 Web server on Windows 2008, return to
the Webgate installation screen and click Next, as described in the chapter on
Webgate installation.
3. Proceed with "Completing Webgate Installation with IIS".
28.5 Completing Webgate Installation with IIS
Unless explicitly stated, details in this topic apply equally to 32-bit and 64-bit
Webgates.
Completing Webgate installation with an IIS Web server, includes the following
activities after the installation is complete.
Task overview: Completing IIS Webgate installations includes
1. Enabling Client Certificate Authentication on the IIS Web Server on page 28-7
2. Ordering the ISAPI Filters on page 28-8
3. Enabling Pass-Through Functionality for POST Data on page 28-9
4. Protecting a Web Site When the Default Site is Not Setup on page 28-13
28.5.1 Enabling Client Certificate Authentication on the IIS Web Server
Unless explicitly stated, details in this topic apply equally to 32-bit and 64-bit
Webgates.
If you are using client certificate authentication, you must enable SSL on the IIS Web
server. If you select client certificate authentication during setup, you must also add
the cert_authn.dll as one of the ISAPI filters.
To enable SSL on the IIS Web server
1. Start the Internet Information Services console, if needed: Click Start, Programs,
Administrative Tools, Internet Information Services.
2. Expand the local computer to display your Web Sites.
3. Expand the Default Web Site (or the appropriate Web site), then expand
\access\oblix\apps\webgate\bin.
See Also:
As needed, see:
■Finishing 64-bit Webgate Installation on page 28-24
■Installing and Configuring Multiple Webgates for a Single IIS 6
Instance on page 28-19
If you have IIS v7, Oracle recommends the following topics:
■Updating IIS 7 Web Server Configuration on Windows 2008 on
page 28-6
■Installing and Configuring Multiple 10g Webgates for a Single IIS
7 Instance on page 28-14
Note: The procedures here reflect the sequence for IIS v5. Your
environment might be different.

Completing Webgate Installation with IIS
28-8 Administrator's Guide for Oracle Access Management
4. Right click cert_authn.dll and select Properties.
5. In the Properties panel, select the File Security tab.
6. In the Secure Communications sub-panel, click Edit.
7. In the Client Certificate Authentication sub-panel, click Accept Certificates and
click OK.
8. Click OK in the cert_authn.dll Properties panel.
9. Proceed to the next procedure: "To add cert_authn.dll as an ISAPI filter".
To add cert_authn.dll as an ISAPI filter
1. Start the Internet Information Services console, if needed: Click Start, Programs,
Administrative Tools, Internet Information Services.
2. Expand the local computer to display your Web Sites.
3. Right click the appropriate Web Site to display the Properties panel.
4. Click the ISAPI Filters tab, then click the Add button to display the Filter
Properties panel.
5. Enter filter name "cert_authn".
6. Click the Browse button and navigate to the following directory:
\Webgate_install_dir\access\oblix\apps\webgate\bin
7. Select cert_authn.dll as the executable.
8. Click OK on the Filter Properties panel.
9. Click Apply on the ISAPI Filters panel.
10. Click OK.
11. Ensure the filters are listed in the correct order.
28.5.2 Ordering the ISAPI Filters
Unless explicitly stated, details in this topic apply equally to 32-bit and 64-bit
Webgates.
It is important to ensure that the Webgate ISAPI filters are included in the right order.
To order the Webgate ISAPI filters
1. Start the Internet Information Services console, if needed: Click Start, Programs,
Administrative Tools, Internet Information Services.
2. Expand the local computer to display your Web Sites.
3. Right-click the Web Site and select Properties.
4. Click Properties, select ISAPI filters.
5. Confirm the following .dll files appear.
For example:
Note: This task is the same whether you are installing one or more
Webgates per IIS Web server instance.

Completing Webgate Installation with IIS
Configuring the IIS Web Server for 10g WebGates 28-9
cert_authn.dll
webgate.dll
6. Add any missing filters, if needed, then select a filter name and use the up and
down arrows to arrange the filter order as shown in step 5.
28.5.3 Enabling Pass-Through Functionality for POST Data
This section describes how the Webgate can be set up in conjunction with IIS 6.0
Worker Process Isolation Mode. It also covers configuration steps required for IIS 6.0
running in IIS 5.0 Isolation Mode.
Topics here include:
■About ISAPI Webgate 10.1.4.2.3
■About Pass-Through Functionality for POST Data
■Implementing Pass-Through: IIS 6.0 in Worker Process Isolation Mode
■Implementing Pass-Through with IIS 6.0 Web Server in IIS 5.0 Isolation Mode
28.5.3.1 About ISAPI Webgate 10.1.4.2.3
Starting with ISAPI Webgate release 10.1.4.2.3, Access Manager pass-through
functionality is supported with IIS 6.0 running in a Worker Process Isolation Mode.
ISAPI Webgate 10.1.4.2.3 also operates with IIS 6.0 running in IIS 5.0 Isolation Mode
using postgate.dll.
This section describes how to set up ISAPI Webgate release 10.1.4.2.3 in conjunction
with IIS 6.0 Worker Process Isolation Mode. It also provides configuration steps
required for IIS 6.0 running in IIS 5.0 Isolation Mode. This section supersedes
information in Section 19-6 (Installing Postgate.dll on IIS Web Servers) of the Oracle
Access Manager Installation Guide.
28.5.3.2 About Pass-Through Functionality for POST Data
POST data is required for pass through during a form login on the IIS Web server
when using the Webgate extension method (where the Webgate is the action of the
form). In other words, if a form authentication scheme on the IIS Web server is
WARNING: Confirm that there is only one webgate.dll and one
postgate.dll filter. If you perform multiple Webgate installations on
one computer, multiple versions of the postgate.dll file might be
created and cause unusual Access Manager behavior.
Note: This section supersedes information in "Installing Postgate.dll
on IIS Web Servers" in the 10g Oracle Access Manager Installation
Guide. For the IIS 5.0 Web server, the existing functionality using
postgate.dll continues to be supported.
Note: Oracle recommends using Worker Process Isolation Mode for
new or existing implementations. Worker Process Isolation Mode is a
default setting for the IIS 6.0 Web server. For the IIS 5.0 Web server, the
existing functionality (using postgate.dll) continues to be supported.

Completing Webgate Installation with IIS
28-10 Administrator's Guide for Oracle Access Management
configured with the pass-through option, and the target of the login form requires the
data posted by the form, the Webgate extension method (where the Webgate DLL is
the action of the form) cannot be used. The Webgate filter method (where the action of
the form is a protected URL that is not the Webgate DLL) must be used instead, and
based on IIS version, the postgate.dll must be installed or configure webgate.dll as
ISAPI extension.
IIS 6.0 in Worker Process Isolation Mode: webgate.dll must be configured as an ISAPI
filter and also as an ISAPI extension to achieve pass-through functionality. (This does
not apply to ISA server integration.) Pass-through functionality is supported with
10.1.4.2.3 and higher ISAPI Webgates. However, you must also set a new user-defined
parameter
"UseWebGateExtForPassthrough"
to
true
in the Webgate configuration
profile in the Access System Console.
IIS 5.0 or IIS6.0 running in IIS 5.0 Isolation Mode: postgate.dll must be configured as
an ISAPI filter to achieve the pass-through functionality.
28.5.3.3 Implementing Pass-Through: IIS 6.0 in Worker Process Isolation Mode
The following steps outline this task.
Task overview: Implementing Pass-Through Functionality with IIS 6.0 Web
Server in Worker Process Isolation Mode
1. Install Webgate as described in "Locating and Installing the Latest 10g WebGate
for Access Manager 11g" on page 25-14.
2. Set the pass-through parameter as described in "Setting the
UseWebGateExtForPassthrough Parameter in the Webgate Profile".
3. Configure webgate.dll as described in "Configuring webgate.dll as an ISAPI
Extension".
28.5.3.3.1 Setting the UseWebGateExtForPassthrough Parameter in the Webgate Profile You
must set the new user-defined parameter,
UseWebGateExtForPassthrough
, in the
Webgate profile to implement pass-through functionality with the IIS 6.0 Web server in
Worker Process Isolation Mode. You must set
UseWebGateExtForPassthrough
to
true
.
If this parameter is set to
false
, pass-through functionality will not work.
To set the UseWebGateExtForPassthrough Parameter in the Webgate Profile
1. Launch the Access System Console and click Access System Configuration.
2. Click AccessGate Configuration.
3. Enter your search criteria for the Webgate, and then click Go.
4. In the Search Results table, click a Webgate name.
5. At the bottom of the Details for AccessGate page, click Modify.
6. On the Modify AccessGate page, locate the User Defined Parameters section of the
page, enter the following parameter, and value, and then click the Add button:
Parameter:
UseWebGateExtForPassthrough
Val ue:
true
7. Click the Add button if you want to add more user-defined parameters.
8. Save to save this new information.
See Also: "IIS Web Server Issues" on page E-18

Completing Webgate Installation with IIS
Configuring the IIS Web Server for 10g WebGates 28-11
9. Repeat for each Webgate in your deployment.
10. Proceed to "Configuring webgate.dll as an ISAPI Extension".
28.5.3.3.2 Configuring webgate.dll as an ISAPI Extension
The webgate.dll is part of the Webgate installation. The following procedure describes
how to configure webgate.dll as an ISAPI extension. This task must also be performed
to implement pass-through functionality with IIS 6.0 Web Server in Worker Process
Isolation Mode.
To configure webgate.dll as an ISAPI extension
1. Go to websites, right click, and select Properties.
2. In the Properties dialog box, select the Home Directory tab.
3. Click the Configurations button to open the Application Configurations dialog
box.
4. In Wild Card Application Maps, click the Inset button.
5. Provide the path to webgate.dll. For example:
Webgate_install_dir/access/oblix/apps/webgate/bin/webgate.dll
6. Uncheck the "verify that file exists" box.
7. Confirm and finalize the changes: click OK, then click OK again; click Apply, and
then click OK.
8. Stop the IIS Administration Server from Services and restart the IIS Web server.
28.5.3.4 Implementing Pass-Through with IIS 6.0 Web Server in IIS 5.0 Isolation
Mode
The following steps outline this task.
Task overview: Implementing Pass-Through Functionality with IIS 6.0 Web
Server in IIS 5.0 Isolation Mode
1. Install Webgate as described in the Chapter 25, "Registering and Managing 10g
WebGates with Access Manager 11g".
2. Set up IIS 6.0 as described in "Setting Up IIS 6.0 Web Server in IIS 5.0 Isolation
Mode" on page 28-11.
3. Install postgate.dll as described in "Installing the Postgate ISAPI Filter""Installing
the Postgate ISAPI Filter".
28.5.3.4.1 Setting Up IIS 6.0 Web Server in IIS 5.0 Isolation Mode The following information
is updated for the 10.1.4.2.3 Webgate.
Note: You can have multiple webgate.dlls configured at different
website levels from the top level Web Sites. In this case, you also need
to configure webgate.dll as an ISAPI extension for each website
protected by Webgate.
Note: Skip this task if you are using IIS 6.0 Web server in Worker
Process Isolation Mode.

Completing Webgate Installation with IIS
28-12 Administrator's Guide for Oracle Access Management
When IIS 6.0 Web server is used, the following steps outline how to set up the WWW
Service to run in IIS 5.0 Isolation Mode. This is required by the ISAPI postgate filter.
To set IIS 5.0 isolation on IIS 6 Web servers
1. Start the Internet Information Services console, if needed: Click Start, Programs,
Administrative Tools, Internet Information Services.
2. Expand the local computer to display your Web Sites.
3. Right-click the Web Site and select Properties.
4. Select the Service tab in the Web Site Properties window.
5. Check the box beside Run WWW service in IIS 5.0 Isolation Mode.
6. Click OK.
7. Proceed with "Installing the Postgate ISAPI Filter".
28.5.3.4.2 Installing the Postgate ISAPI Filter
The following information is updated for the 10.1.4.2.3 Webgate.
For single Webgate installations, you should install the filters in the following order:
■The ISAPI Webgate filter should be installed after the sspifilt filter and before any
others.
■The postgate filter should be installed before the Webgate filter, only if needed.
■All other Access Manager filters can be installed at the end.
You can have multiple webgate.dlls configured at different levels from the top level
Web Sites. However, they share the same postgate.dll. If you perform multiple
Webgate installations on one computer, multiple versions of the postgate.dll file can be
created which might cause unusual Access Manager behavior. There can only be one
postgate.dll configured at the (top) Web Sites level of a computer
The following procedures guide as you install and position the postgate ISAPI filter
when you have a single Webgate installed with a single IIS Web server instance.
To install the postgate ISAPI filter
1. Start the Internet Information Services console, if needed: Click Start, Programs,
Administrative Tools, Internet Information Services.
2. Expand the local computer to display your Web Sites.
3. Right-click the Web Site and select Properties.
4. Select the ISAPI Filters tab in the Web Site Properties window.
Note: Before installation (or after uninstallation) the filters must be
removed manually. If multiple copies of a filter are installed, this
means that they were not manually removed before installing the new
filters.
Note: postgate.dll is not supported when you have more than one
Webgate installed and configured for a single IIS Web server instance.

Completing Webgate Installation with IIS
Configuring the IIS Web Server for 10g WebGates 28-13
5. Click the Add button to display the Filter Properties panel.
6. Enter the filter name "postgate".
7. Click the Browse button and navigate to the following directory:
\Webgate_install_dir\access\oblix\apps\webgate\bin
8. Select postgate.dll as the executable.
9. Click OK on the Filter Properties panel.
10. Click Apply on the ISAPI Filters panel.
11. Reposition the postgate ISAPI filter, as follows:
a. Start the Internet Information Services console, if needed.
b. Right-click your local computer, then select All Tasks, select Restart IIS.
c. Select the ISAPI Filters tab on the Properties panel.
d. Select the postgate filter and move it before Webgate, using the up arrow.
For example:
postgate.dll
webgate.dll
e. Restart IIS.
28.5.4 Protecting a Web Site When the Default Site is Not Setup
Unless explicitly stated, this topic applies equally to 32-bit and 64-bit Webgates.
When you install a Webgate on an IIS Web server that does not have the "Default Web
Site" configured, the installer does not create "Virtual Directory access", which must be
done manually using the following procedure.
To protect a Web site (not the default site)
1. Start the Internet Information Services console, if needed
2. Select the name of the Web site to protect.
3. Right-click the name of the Web site to protect and select New, and then select
Virtual Directory in the menu.
4. Click Next.
5. Select Alias: access, then click Next.
6. Directory: Enter the full path to the /access directory, then click Next.
Webgate_install_dir\access
7. Select Read, Run Scripts, and Execute, then click Next.
8. Click Finish.
9. Restart IIS. For example:
Note: Consider using
net stop iisadmin
and
net start w3svc
to
help ensure that the Metabase does not become corrupted.
See Also: "Setting Access Permissions, ISAPI filters, and Directory
Security Authentication" on page 28-25

Installing and Configuring Multiple 10g Webgates for a Single IIS 7 Instance
28-14 Administrator's Guide for Oracle Access Management
Select Start, then Run.
Type
net start w3svc.
Click OK.
28.6 Installing and Configuring Multiple 10g Webgates for a Single IIS 7
Instance
This section describes how to install and configure multiple Webgates for different
Web sites on the same IIS 7 Web server instance. Several steps are manual and will
differ from those that are performed when you install a single Webgate with a single
IIS instance. When installing multiple Webgates for a single IIS instance:
■The webgate.dll must be configured as an ISAPI filter at the individual Web site
level, not the default (top) Web server level
■The /access virtual directory is mapped at the Web site level to the respective
/access directory in the Webgate installation.
When configuring the impersonation DLL for multiple Webgates, you need to
configure a user to act as the operating system.
Task overview: Installing and configuring multiple Webgates for a single IIS 7
instance
1. Installing Each IIS 7 Webgate in a Multiple Webgate Scenario
2. Setting the Impersonation DLL for Multiple IIS 7 Webgates
3. Enabling Client Certification for Multiple IIS 7 Webgates
4. Configuring IIS 7 Webgates for Pass Through Functionality
5. Confirming IIS 7 Webgate Installation
6. Perform the following tasks, which are the same whether you install one or more
Webgates per IIS Web server instance:
■"Ordering the ISAPI Filters" on page 28-8
■"Confirming Webgate Installation on IIS" on page 28-26
28.6.1 Installing Each IIS 7 Webgate in a Multiple Webgate Scenario
After installing the ISAPI Webgate, there are several manual steps to perform as
described here.
By default, webgate.dll is configured as an ISAPI filter at the host name (top) level.
When installing multiple Webgates with a single IIS 7 instance, you need to remove
the respective webgate.dll from the top level and configure it for the appropriate
individual Web site after each Webgate installation.
To install each Webgate when you will have several with one IIS 7 instance
1. Install the ISAPI 7 Webgate as described in Chapter 25.
2. Go to the Web site to protect, and configure webgate.dll as the ISAPI filter using
these steps:
a. Start the Internet Information Services (IIS) Manager: Click Start, Programs,
Administrative Tools, Internet Information Services (IIS) Manager.
See Also: "Confirming Multiple Webgate Installation" on page 28-24

Installing and Configuring Multiple 10g Webgates for a Single IIS 7 Instance
Configuring the IIS Web Server for 10g WebGates 28-15
b. Select the hostname from the Connections pane.
c. From the hostname Home pane, double-click ISAPI Filters, look for any
Webgate.dll; if it is present, select it and click Remove from the Action pane.
d. In the Connection pane, under Sites, click the name of the Web Site for which
you want to configure a Webgate filter.
e. In the Home pane, double-click ISAPI Filters.
f. In the Actions pane, click Add…
g. In the Filter name text box of the Add ISAPI Filter dialog box, type "Webgate"
as name for the ISAPI filter.
h. In the Executable box, type the file system path of the Webgate ISAPI filter file
or click the ellipsis button (...) to go to the folder that contains the Webgate.dll
ISAPI filter file, and then click OK.
Webgate_install_dir\access\oblix\apps\webgate\bin\webgate.dll
3. Creating a Virtual Directory:
a. Expand the Sites pane and select the Web Site for which you just configured
the ISAPI filter (Webgate.dll).
b. On the Action pane, click View Virtual Directories and then select Add Virtual
Directory.
c. Specify access in the Alias text box and the physical path to the Webgate
access folder of Webgate or click the ellipsis button (...) to go to the "access"
folder, and then click OK.
Webgate_install_dir\access\
d. Save and apply these changes.
4. Setting permissions to the Virtual Directory:
a. Select the "access" virtual directory created in Step 3.
b. From the access Home pane, double click Handler Mappings; from the Action
pane, select Edit Feature Permissions….
c. Check boxes beside Read, Script, and Execute, then click OK.
5. Setting Directory Permissions for Webgate:
a. In Explorer, right click the Webgate installation directory
Webgate_install_
dir\access
and select Properties.
b. Click the Security tab and click the Edit button.
c. Add user "IUSR", select "Allow" for "Modify".
d. Add user "IIS_IUSRS", select "Allow" for "Modify".
e. Add user "NETWORK", select "Allow" for "Modify".
f. Add user "NETWORK SERVICE", select "Allow" for "Modify".
g. For group "Administrators" select "Allow" for "Modify".
6. Webgate in Simple or Cert Mode:
a. In the file system, locate and right-click the "password.xml" file in Webgate_
install_dir\access\oblix\config\password.xml, and select Properties.
b. Click the Security tab.

Installing and Configuring Multiple 10g Webgates for a Single IIS 7 Instance
28-16 Administrator's Guide for Oracle Access Management
c. Give "Allow" for "Read" rights to users "IUSR", "NETWORK SERVICE", "IIS_
WPG", "IIS_IUSRS".
7. Ensure that there is no webgate.dll in the top level (the hostname level).
8. Perform the next set of tasks using instructions in the following topics:
a. "Setting the Impersonation DLL for Multiple IIS 7 Webgates" on page 28-16
b. "Enabling Client Certification for Multiple IIS 7 Webgates" on page 28-17
9. Repeat these steps when you install the next Webgate for the IIS instance.
28.6.2 Setting the Impersonation DLL for Multiple IIS 7 Webgates
The client's access token is known as an impersonation token. The impersonation
token identifies the client, the client's groups, and the client's privileges. The
information in the token is used during access checks when the thread requests access
to resources on the client's behalf.
Access Manager authenticates and authorizes the user. The Access Manager
IISImpersonationExtension.dll in the wildcard extension behaves like a filter for each
request to the Web server. Access Manager designates a special user that does have the
right to impersonate another user by configuring it using the impersonation
username/password on the AccessGate Configuration page. That designated user
must have "act as operating system" rights. DLL impersonates the user authenticated
and authorized by Access Manager and generates the impersonation token.
You perform the following steps to set the impersonation DLL for each Webgate that
protects a Web site for a single IIS 7 Web server instance. You can do this either
immediately after the installation task in the previous topic or all at one time.
To add the impersonation DLL to IIS 7 configuration for individual Web sites
1. Start the Internet Information Services (IIS) Manager, if needed: Click Start,
Programs, Administrative Tools, Internet Information Services (IIS) Manager.
2. Add "IISImpersonationExtension.dll" as a Wildcard Script Map to the required
Web Site:
a. Expand Sites in the connection pane.
b. Click the Web Site name to which you want to add
IISImpersonationExtension.dll.
c. Double click Handler Mappings from the selected Web Site's "home" pane.
d. From the Action pane, click Add Wildcard Script Map.
e. In the Name text box of the Add Wildcard Script Map dialog box, type "Oracle
Impersonation Plugin" as name for the dll.
f. In the Executable box, type the file system path of the Webgate
IISImpersonationExtension.dll or click the ellipsis button (...) to go to the
folder that contains IISImpersonationExtension.dll, and then click OK.
Webgate_install_dir/access/oblix/apps/Webgate/bin/
IISImpersonationExtension.dll
Note: This task must be performed for each Webgate that protects an
individual Web site for a single IIS Web server instance.

Installing and Configuring Multiple 10g Webgates for a Single IIS 7 Instance
Configuring the IIS Web Server for 10g WebGates 28-17
This example shows the default path, where Webgate_install_dir is the file
system directory where you have installed this particular Webgate.
3. Proceed as follows:
■Client Certificate Authentication: "Enabling Client Certification for Multiple
IIS 7 Webgates"
■"Confirming IIS 7 Webgate Installation" on page 28-19.
28.6.3 Enabling Client Certification for Multiple IIS 7 Webgates
You perform this task to set the enable client certification for each Webgate that
protects a Web site for a single IIS 7 Web server instance. You can do this either
immediately after the adding the impersonation DLL to an individual Web site or all at
one time.
If you select client certificate authentication during setup, you must also enable and
then add the cert_authn.dll as one of the ISAPI filters in the respective Web site.
To enable cert_authn.dll on the IIS 7 Web server
1. Start the Internet Information Services (IIS) Manager, if needed: Click Start,
Programs, Administrative Tools, Internet Information Services (IIS) Manager.
2. Expand Sites in the connection pane.
3. Expand the Web Site to \access\oblix\apps\webgate\bin.
4. Right click the "bin" directory and select Switch To Content View.
5. Right click the "cert_authn.dll".and from the drop down menu, select Switch To
Feature View.
6. From the cert_authn.dll Home pane, double click SSL Settings.
7. From SSL Settings pane, select Require SSL check-box and select Accept from
Client Certificates.
8. Select Apply from Action pane.
9. Repeat for each Webgate installed on this host, for which you want to enable client
certification.
10. Restart the IIS 7 Web server.
11. Proceed to the next task: "To add cert_authn.dll as an ISAPI v7 filter".
To add cert_authn.dll as an ISAPI v7 filter
1. Start the Internet Information Services (IIS) Manager, if needed: Click Start,
Programs, Administrative Tools, Internet Information Services (IIS) Manager.
2. Expand Sites in the connection pane.
3. Click on the Web Site name for which you want to add "cert_authn.dll".
4. In the Home pane, double-click ISAPI Filters.
5. In the Actions pane, click Add.
Note: SSL should be enabled on the Web Site before configuring the
client certification for Webgate. Follow these steps after the Web Site is
SSL enabled.

Installing and Configuring Multiple 10g Webgates for a Single IIS 7 Instance
28-18 Administrator's Guide for Oracle Access Management
6. In the Filter name box of the Add ISAPI Filter dialog box, type Oracle Certification
Authentication Plugin as name for the ISAPI filter.
7. In the Executable box, type the file system path of the Webgate cert_authn.dll or
click the ellipsis button (...) to go to the folder that contains cert_authn.dll, and
then click OK.
Webgate_install_dir/access/oblix/apps/Webgate/bin/cert_authn.dll
This example shows the default path, where Webgate_install_dir is the file system
directory where you have installed this particular Webgate.
8. Click View Ordered List from the Action pane and arrange the filters as shown
here by using "Move Up" or "Move Down":
cert_authn.dll
webgate.dll
9. Select Apply from Action pane.
10. Repeat for each Webgate installed on this host, for which you want to enable client
certification.
11. Restart the IIS 7 Web server.
12. Proceed as needed for your deployment:
■"Configuring IIS 7 Webgates for Pass Through Functionality"
28.6.4 Configuring IIS 7 Webgates for Pass Through Functionality
Here you will add Webgate.dll as a Wildcard Script Map to the required Web Site.
While configuring Webgate to work with pass through functionality, you must ensure
that "Physical Path" of the Web sites on which you are installing Webgates differ.
Otherwise, the changes in "Handler Mappings" are reflected in all the Web Sites
sharing the same physical path.
To configure Webgate for pass through functionality
1. Start the Internet Information Services (IIS) Manager, if needed: Click Start,
Programs, Administrative Tools, Internet Information Services (IIS) Manager.
2. Expand Sites in the connection pane.
3. Click the Web Site name for which you want to enable pass through.
4. Double click Handler Mappings from the selected Web Site's "home" pane.
5. From the Action pane, click Add Wildcard Script Map.
6. In the Name text box of the Add Wildcard Script Map dialog box, type Webgate as
name for the ISAPI filter.
Note: "Physical Path" is the path that is provided at the time of
creating the Web Site. To check this path after the creation of the Web
Site, , In Action pane click on Basic Settings..., you will be presented
with a window showing the physical path of the Web Site.
■Click the Web Site name.
■In the Action pane, click Basic Settings.

Installing and Configuring Multiple Webgates for a Single IIS 6 Instance
Configuring the IIS Web Server for 10g WebGates 28-19
7. In the Executable box, type the file system path of the Webgate ISAPI filter file
(Webgate.dll) or click the ellipsis button (...) to go to the folder that contains the
Webgate.dll ISAPI filter file, and then click OK.
Webgate_install_dir/access/oblix/apps/Webgate/bin/Webgate.dll
8. In the Access System Console:
a. Locate the Web Gate profile and click Modify.
b. Under User Defined Parameters, enter the following parameter and value:
UseWebGateExtForPassthrough
true
c. Save the profile.
9. Repeat for each Webgate installed on this host, for which you want to enable pass
through.
10. Restart the IIS 7 Web server.
11. Proceed to the next task: "Confirming IIS 7 Webgate Installation".
28.6.5 Confirming IIS 7 Webgate Installation
You can use the following procedure to confirm IIS 7 Webgate installation.
To verify IIS 7 Webgate installation
1. Go to the URL:
http(s)://hostname:port/access/oblix/apps/webgate/bin/webgate.dll?progid=1
where hostname refers to the name of the computer hosting the Webgate; port refers
to the Web server instance port number.
2. The Webgate diagnostic page should appear.
■Successful: If the Webgate diagnostic page appears, the Webgate is
functioning properly and you can dismiss the page.
■Unsuccessful: If the Webgate diagnostic page does not open, the Webgate is
not functioning properly. In this case, the Webgate should be uninstalled and
reinstalled. For more information about removing Access Manager see the
OAM Installation Guide Chapter 22, then return to the chapter on installing a
Webgate.
28.7 Installing and Configuring Multiple Webgates for a Single IIS 6
Instance
Unless explicitly stated, this topic applies equally to 32-bit and 64-bit Webgates.
This section describes how to install and configure multiple Webgates for different
Web sites on same IIS Web server instance. Several steps are manual and will differ
from those that are performed when you install a single Webgate with a single IIS
instance. When installing multiple Webgates for a single IIS instance:
See Also: "Installing and Configuring Multiple 10g Webgates for a
Single IIS 7 Instance" on page 28-14

Installing and Configuring Multiple Webgates for a Single IIS 6 Instance
28-20 Administrator's Guide for Oracle Access Management
■The webgate.dll must be configured as an ISAPI filter at the individual Web site
level, not the default (top) Web server level
■The /access virtual directory is mapped at the Web site level to the respective
/access directory in the Webgate installation.
When configuring the impersonation DLL for multiple Webgates, you need to
configure a user to act as the operating system.
There can only be one postgate.dll configured at the (top) Web Sites level of a machine.
However, you might have multiple webgate.dlls configured at different levels below
the top level Web Sites. If you perform multiple Webgate installations on one machine,
multiple versions of the postgate.dll file might be created that can cause unusual
Access Manager behavior.
Task overview: Installing and configuring multiple Webgates for a single IIS
instance
1. Installing Each Webgate in a Multiple Webgate Scenario
2. Setting the Impersonation DLL for Multiple Webgates
3. Enabling SSL and Client Certification for Multiple Webgates
4. Perform the following tasks, which are the same whether you install one or more
Webgates per IIS Web server instance:
■"Ordering the ISAPI Filters" on page 28-8
■"Confirming Webgate Installation on IIS" on page 28-26
28.7.1 Installing Each Webgate in a Multiple Webgate Scenario
Unless explicitly stated, this topic applies equally to 32-bit and 64-bit Webgates.
After installing the ISAPI Webgate, there are several manual steps to perform as
described here.
By default, webgate.dll is configured as an ISAPI filter at the Web sites (top) level.
When installing multiple Webgates with a single IIS instance, you need to remove the
respective webgate.dll from the top level and configure it for the appropriate
individual Web site after each Webgate installation.
To install each Webgate when you will have several with one IIS instance
1. Install the ISAPI Webgate as described in Chapter 25.
2. Go to the Web site to protect, and configure webgate.dll as the ISAPI filter using
these steps:
a. Start the Internet Information Services (IIS) Manager: Click Start, Programs,
Administrative Tools, Internet Information Services (IIS) Manager
b. Right click Web Sites, and then click the Properties option.
See Also: "Confirming Multiple Webgate Installation" on page 28-24
Note: If you perform multiple Webgate installations on one machine,
multiple versions of the postgate.dll file might be created which can
cause unusual Access Manager behavior. The postgate.dll is not
supported in environments where you have multiple Webgates
configured with a single IIS v6 web server instance.

Installing and Configuring Multiple Webgates for a Single IIS 6 Instance
Configuring the IIS Web Server for 10g WebGates 28-21
c. Click the ISAPI filter tab, look for the path to webgate.dll; if it is present in the
filter, then select it and click the Remove button.
d. Under Web Sites, right-click the name of the Web site to protect, and select the
Properties option.
e. Click the ISAPI filter tab to add the filter DLLs.
f. Add the following filter to identify the path to the webgate.dll file, and name
it "webgate".
Webgate_install_dir/access/oblix/apps/webgate/bin/webgate.dll
g. Save and apply these changes.
h. Go to the Directory Security tab.
i. Confirm that "anonymous access" and "basic authentication" are selected so
that Access Manager provides authentication for this Web server.
j. Save and apply these changes.
3. Go to Web sites level to protect and create an /access virtual directory that points
to the newly installed Webgate_install_dir:
a. Under Web Sites, right-click the name of the Web site to be protected.
b. Select New and create a new virtual directory named
access
that points to the
appropriate Webgate_install_dir/access.
c. Under Access Permissions, check Read, Run Scripts, and Execute.
d. Save and apply these changes.
4. In the file system, set directory permissions for Access Manager:
a. In the file system, locate and right-click Webgate_install_dir\access, and the
select Properties.
b. Click the Security tab.
c. Add user "IUSR_machine_name" and then select "Allow" for "Modify".
For example, for a machine_name of Oracle, select IUSR_ORACLE.
d. Add user "IWAM_machine_name" and then select "Allow" for "Modify"
For example, for a machine_name Oracle, select IWAM_ORACLE.
e. Add user "IIS_WPG" and then select "Allow" for "Modify".
f. Add user "NETWORK SERVICE" and then select "Allow" for "Modify".
g. For the group "Administrators", select "Allow" for "Modify".
5. If Webgate has been set up in Simple or Cert mode, perform the follow steps:
a. In the file system, locate and right-click the "password.xml" file in Webgate_
install_dir\access\oblix\config\password.xml.
b. Click the Security tab.
c. Give "Allow" for "Read" rights to users "IUSR_machine_name", IWAM_
machine_name, "IIS_WPG", and "NETWORK SERVICE".
6. Add a new Web service extension using the following steps:
a. Right click Web Service Extensions, and then select Add a new Web service
extension....

Installing and Configuring Multiple Webgates for a Single IIS 6 Instance
28-22 Administrator's Guide for Oracle Access Management
b. Add the Extension name
Oracle Webgate
.
c. Click Add to add the path to the extension file, and then enter the path to the
appropriate webgate.dll.
Webgate_install_dir\access\access\oblix\apps\webgate\bin\webgate.dll
d. Click OK to save the changes.
e. Check box beside Set extension status to allowed.
f. Click OK to save the changes.
7. Ensure that there is no webgate.dll in the ISAPI filter at the top Web site level
("web sites").
8. Perform the next set of tasks using instructions in the following topics:
a. "Setting the Impersonation DLL for Multiple Webgates" on page 28-22
b. "Enabling SSL and Client Certification for Multiple Webgates" on page 28-23
9. Repeat these steps when you install the next Webgate for the IIS instance.
28.7.2 Setting the Impersonation DLL for Multiple Webgates
Unless explicitly stated, this topic applies equally to 32-bit and 64-bit Webgates and IIS
v6.
The client's access token is known as an impersonation token. The impersonation
token identifies the client, the client's groups, and the client's privileges. The
information in the token is used during access checks when the thread requests access
to resources on the client's behalf.
The Access System authenticates and authorizes the user.
IISImpersonationExtension.dll of Access Manager in the wildcard extension behaves
like a filter for each request to the Web server. The Access System designates a special
user that does have the right to impersonate another user by configuring it using the
impersonation username/password on the AccessGate Configuration page. That
designated user must have "act as operating system" rights. DLL impersonates the
user authenticated and authorized by Access Manager and generates the
impersonation token.
You perform the following steps to set the impersonation DLL for each Webgate that
protects a Web site for a single IIS Web server instance. You can do this either
immediately after the installation task in the previous topic or all at one time.
To add the impersonation DLL to IIS configuration for individual Web sites
1. Start the Internet Information Services (IIS) Manager, if needed: Click Start,
Programs, Administrative Tools, Internet Information Services (IIS) Manager.
2. Click the plus icon (+) beside the Local Computer icon in the left pane to display
your Web Sites.
3. Click Web Service Extensions in the left pane.
4. Double-click Webgate in the right pane to open the Properties panel.
5. Click the Required Files tab.
Note: This task must be performed for each Webgate that protects an
individual Web site for a single IIS Web server instance.

Installing and Configuring Multiple Webgates for a Single IIS 6 Instance
Configuring the IIS Web Server for 10g WebGates 28-23
6. Click Add.
7. In the Path to file text box, type the full path to IISImpersonationExtension.dll, and
then click OK. For example:
Webgate_install_dir\access\oblix\apps\webgate\bin\IISImpersonationExtension.dll
This example shows the default path, where Webgate_install_dir is the file system
directory where you have installed this particular Webgate.
8. Verify that the Allow button beside the Webgate icon is grayed out, which
indicates that the dll is allowed to run as a Web service extension.
9. Right click the Web site name, and then click Properties.
10. Click the Home Directory tab, and then click the Configuration button.
11. In the list box for Wildcard application maps, click the entry for
IISImpersonationExtension.dll
to highlight it, then click Edit.
12. Ensure that the box is unchecked, and then click OK.
13. Repeat these steps for each Webgate and Web site pair for the IIS Web server
instance.
14. Proceed as follows:
■Client Certificate Authentication: "Enabling SSL and Client Certification for
Multiple Webgates"
■"Confirming Multiple Webgate Installation" on page 28-24.
28.7.3 Enabling SSL and Client Certification for Multiple Webgates
You perform this task to set the enable client certification for each Webgate that
protects a Web site for a single IIS Web server instance. You can do this either
immediately after the adding the impersonation DLL to an individual Web site or all at
one time.
If you select client certificate authentication during setup, you must also add the cert_
authn.dll as one of the ISAPI filters in the respective Web site.
To enable SSL on the IIS v6 Web server
1. Start the Internet Information Services (IIS) Manager, if needed: Click Start,
Programs, Administrative Tools, Internet Information Services (IIS) Manager.
2. Expand the local computer icon to display your Web Sites.
3. Expand the appropriate individual Web Site, then expand
\access\oblix\apps\webgate\bin.
4. Right click
cert_authn.dll
and select Properties.
5. In the Properties panel, select the File Security tab.
6. In the Secure Communications sub-panel, click Edit.
7. In the Client Certificate Authentication sub-panel, click Accept Certificates and
click OK.
Note: Procedures in this topic apply equally to 32-bit and 64-bit
Webgates, and IIS 6, unless stated otherwise.

Finishing 64-bit Webgate Installation
28-24 Administrator's Guide for Oracle Access Management
8. Click OK in the cert_authn.dll Properties panel.
9. Repeat for each Webgate installed on this host.
10. Proceed to the next task: "To add cert_authn.dll as an ISAPI filter".
To add cert_authn.dll as an ISAPI filter
1. Start the Internet Information Services console, if needed.
2. Expand the local computer to display your Web Sites.
3. Right click the appropriate Web Site to display the Properties panel.
4. Click the ISAPI Filters tab, then click the Add button to display the Filter
Properties panel.
5. Enter filter name "
cert_authn
".
6. Click the Browse button and navigate to the following directory:
\Webgate_install_dir\access\oblix\apps\webgate\bin
7. Select
cert_authn.dll
as the executable.
8. Click OK on the Filter Properties panel.
9. Click Apply on the ISAPI Filters panel.
10. Click OK.
11. Repeat for each Webgate installed on this host.
12. Ensure the filters are listed in the correct order.
13. Proceed to "Confirming Multiple Webgate Installation".
28.7.4 Confirming Multiple Webgate Installation
This task applies equally to 32-bit and 64-bit Webgates, and IIS v6 Web servers.
If you perform multiple Webgate installations on one machine, multiple versions of
the postgate.dll file might be created which can cause unusual Access Manager
behavior. the postgate.dll is not supported in environments where you have multiple
Webgates configured with a single IIS v6 web server instance.
28.8 Finishing 64-bit Webgate Installation
This section describes how to complete installation of a 64-bit Webgate. You can skip
this section if you are installing a 32-bit Webgate. In this case, see instead, "Completing
Webgate Installation with IIS" on page 28-7.
Before you start tasks here, be sure that you have completed Webgate installation
according to information in Chapter 25. You must also have completed Web server
configuration updates for this Webgate either automatically during Webgate
installation or manually, as described in "Webgates for IIS v6" on page 28-4.
See Also:
■"Finishing 64-bit Webgate Installation" on page 28-24
■"Confirming Webgate Installation on IIS" on page 28-26

Finishing 64-bit Webgate Installation
Configuring the IIS Web Server for 10g WebGates 28-25
Task overview: Finishing installation of a 64-bit Webgate
1. Perform steps in "Setting Access Permissions, ISAPI filters, and Directory Security
Authentication" on page 28-25.
2. Enable client certificates, if desired. See "Setting Client Certificate Authentication"
on page 28-26.
3. When finished, you can:
■Confirm operations as described in "Confirming Webgate Installation on IIS"
on page 28-26
■Implement Windows Impersonation, as described in the Oracle Fusion
Middleware Integration Guide for Oracle Access Manager.
28.8.1 Setting Access Permissions, ISAPI filters, and Directory Security Authentication
Unless explicitly stated, this topic applies equally to 32-bit and 64-bit Webgates. It
describes setting access permissions for the Web site that you are using as a default.
To set or confirm access Permissions, ISAPI filters, and Directory Security
Authentication
1. Start the Internet Service Manager. For example, from the Start menu click
Programs then click Administrative Tools, and click Internet Service Manager.
2. Expand the local computer by clicking +, in the left panel.
3. Click to expand the Web Sites tab.
4. Right-click Default Web Site (or the site you are using as a default), and create a
virtual directory as described in "Protecting a Web Site When the Default Site is
Not Setup" on page 28-13.
5. Right-click Web Sites in the Internet Information Services tab, click Properties,
and perform the following steps:
a. From the Internet Information Services tab, click the Edit button.
b. Locate the ISAPI filter tab to confirm (or add) the filter DLLs, as follows:
Filter: If you updated the IIS Web server configuration file, webgate.dll should
be properly located.
No Filter: Add the webgate.dll filter from Webgate_install_
dir\oblix\access\apps\webgate\bin\webgate.dll
c. Save and apply any changes.
d. Click the Directory Security tab and confirm that both Anonymous Access
and Basic Authentication are selected.
Selected: Proceed to Step 6.
Not Selected: Select Anonymous Access and Basic Authentication, then save
and apply these changes.
6. Proceed as follows:
■"Setting Client Certificate Authentication", if desired
■No Client Certificate Authentication: Restart the IIS Web server.
■Filter Positions: Perform instructions in "Ordering the ISAPI Filters" on
page 28-8 to ensure that all filters have been added and are in the proper order.

Confirming Webgate Installation on IIS
28-26 Administrator's Guide for Oracle Access Management
28.8.2 Setting Client Certificate Authentication
This task is optional and should be performed only if you want to use client certificate
authentication. In this case, IIS and Webgate must be SSL-enabled.
Information in this topic is a sub set of details in "Enabling Client Certificate
Authentication on the IIS Web Server" on page 28-7.
To add cert_authn.dll as an ISAPI filter
1. Start the Internet Information Services console, if needed: Click Start, Programs,
Administrative Tools, Internet Service Manager.
2. Expand the local computer to display your Web Sites.
3. Right-click the Default Web Site (or the Web site that you use as a default), then
expand \access\oblix\apps\webgate\bin.
4. Right click cert_authn.dll and select Properties, then:
a. In the Properties panel, select the File Security tab.
b. In the Secure Communications sub-panel, click Edit.
c. In the Client Certificate Authentication sub-panel, click Accept Certificates
and click OK.
d. Click OK in the Secure Communications panel.
e. Click OK in the cert_authn.dll Properties panel.
5. Click the ISAPI Filters tab, click the Add button to display the Filter Properties
panel, and then:
6. Ensure the filters are listed in the correct order, as described in "Ordering the
ISAPI Filters" on page 28-8.
7. Proceed to "Confirming Webgate Installation on IIS" on page 28-26.
28.9 Confirming Webgate Installation on IIS
After installing Webgate and updating the IIS Web server configuration file, you can
use the Webgate diagnostics to verify the Webgate is properly installed.
To verify Webgate installation
1. Go to the URL:
http(s)://hostname:port/access/oblix/apps/webgate/bin/webgate.dll?progid=1
where hostname refers to the name of the computer hosting the Webgate; port refers
to the Web server instance port number.
2. The Webgate diagnostic page should appear.
■Successful: If the Webgate diagnostic page appears, the Webgate is
functioning properly and you can dismiss the page.
■ Unsuccessful: If the Webgate diagnostic page does not open, the Webgate is
not functioning properly. In this case, the Webgate should be uninstalled and
Note: This task is the same for both 32-bit and 64-bit Webgates. It is
the same whether you are installing one or more Webgates per IIS Web
server instance.

Removing Web Server Configuration Changes Before Uninstall
Configuring the IIS Web Server for 10g WebGates 28-27
reinstalled. For more information about removing Access Manager see
"Removing a 10g WebGate from the Access Manager 11g Deployment" on
page 25-27, in the chapter on installing a 10g Webgate Chapter 25.
28.10 Starting, Stopping, and Restarting the IIS Web Server
When instructed to restart your IIS Web server during Webgate installation or setup,
be sure to follow any instructions that appear on the screen. Also, consider using
net
stop iisadmin
and
net start w3svc
are good ways to stop and start the Web server.
The
net
commands help to ensure that the Metabase does not become corrupted
following an installation.
28.11 Removing Web Server Configuration Changes Before Uninstall
The information in this section applies equally to 32-bit and 64-bit Webgates.
Web server configuration changes that occur during installation must be manually
reverted after uninstalling the Webgate. For example, the ISAPI transfilter will be
installed for IIS Webgate. However, if you uninstall Webgate this is not removed
automatically. Also, the created Web service extension and the link to the identity
directory will not be removed. This type of information must be removed manually.
These are examples of information to remove, not a complete list.
Further, you must remove any changes that you manually made to your Web server
configuration file for the Webgate should be removed. For more information about
what is added for each component, look elsewhere in this chapter.
To fully remove a Webgate and related filters from IIS, you must do more than simply
remove the filters from the list in IIS. IIS retains all of its settings in a metabase file. On
Windows 2000 and later, this is an XML file that can be modified by hand. There is also
a tool available, MetaEdit, to edit the metabase. MetaEdit looks like Regedit and has a
consistency checker and a browser/editor. To fully remove a Webgate from IIS, use
MetaEdit to edit the metabase.

Removing Web Server Configuration Changes Before Uninstall
28-28 Administrator's Guide for Oracle Access Management

29
Configuring Lotus Domino Web Servers for 10g WebGates 29-1
29
Configuring Lotus Domino Web Servers for
10g WebGates
This chapter provides tips about installing and configuring Lotus Domino to operate
with the WebGate. Topics include:
■Prerequisites
■Installing the Domino Web Server
■Setting Up the First Domino Web Server
■Starting the Domino Web Server
■Enabling SSL (Optional)
■Installing a Domino Security (DSAPI) Filter
29.1 Prerequisites
Ensure that your Oracle Access Management Console is running and get familiar with:
■"Introduction to Policy Enforcement Agents" on page 15-1
■"About Installing Fresh 10g WebGates to Use With Access Manager 11.1.2" on
page 25-3
29.2 Installing the Domino Web Server
Before you install the WebGate with a Domino Web server, you need a properly
installed and set up Domino Enterprise Server R5. The following information focuses
on Solaris. However, with some modifications, these steps can be used as a guide for
other UNIX systems.
To download the Domino Web server on UNIX
1. Download Lotus Domino from the following URL:
Note: The information here presumes that you are familiar with your
operating system commands, Lotus Notes, and the Domino Web
server.
Note: You need to register if this is the first time you download from
lotus.com.

Setting Up the First Domino Web Server
29-2 Administrator's Guide for Oracle Access Management
http://www-10.lotus.com/ldd/down.nsf
2. Untar the downloaded file to your staging area. For example:
gct@planetearth[/export/users2/gct/temp] 433 : ls C37UUNA.tar
gct@planetearth[/export/users2/gct/temp] 434 : tar xf C37UUNA.tar
gct@planetearth[/export/users2/gct/temp] 435 : ls C37UUNA.tar sol/
You need to install Domino as user "root". The installation script creates soft link,
/opt/lotus, to link to your Lotus Domino installation directory.
To install the Domino Web server on UNIX
1. Run the install script for the Domino Web server. For example:
gct@planetearth[/export/users2/gct/temp/sol] 441 : su root
Password:
root@planetearth[/export/users2/gct/temp/sol] 1 : ls
install* license.txt script.dat sets/ tools/
root@planetearth[/export/users2/gct/temp/sol] 2 :
root@planetearth[/export/users2/gct/temp/sol] 2 : ./install
========================================================
Domino Server Installation
========================================================
Welcome to the Domino Server Install Program.
Type h for help on how to use this program.
Press TAB to begin the installation.
--------------------------------------------------------
Type h for help
Type e to exit installation
Press TAB to continue to the next screen.
--------------------------------------------------------
You are asked to select the setup type.
2. Select Setup type. For example:
Select Setup type: [Domino Enterprise Server]
3. Complete the installation with the following considerations in mind. For example:
■The default program directory is set to /opt/lotus. You may over write it to
another directory. For example, /export/home/WWW/lotus.
■The default data directory is set to /local/notesdata1. You may also over write
this to something else. For example, /export/home/WWW/lotus/data1.
■Over write Domino UNIX user to own data directory. The default user is set to
notes. You may change it to a valid UNIX user. For example, gct or root.
■Over write "The UNIX user for this directory must be a member of this group".
The default group is set to notes. You may change it to a valid UNIX group
name. For example: oblix.
29.3 Setting Up the First Domino Web Server
After successfully installing, you must set up the first Domino server.
Note: Be sure to put Domino data directory in your $PATH before
you proceed from here.

Enabling SSL (Optional)
Configuring Lotus Domino Web Servers for 10g WebGates 29-3
To set up first Domino server
1. Run /opt/lotus/bin/http httpsetup.
By default, Domino will use port 8081.
2. Ensure that port 8081 is not already in use.
3. Launch your browser and enter the URL that follows. For example:
http://hostname:8081
4. Follow instructions on the screen and keep the following in mind.
■Check HTTP to get the Web server.
■Ensure the designated Administrator has a first and last name.
■Keep passwords simple, and record them in a safe location. For example,
oracleoracle.
5. Run all commands as the UNIX user that you've configured for this Domino Web
server.
29.4 Starting the Domino Web Server
After successfully setting up the first Domino Web server, you must start it.
To start Domino server
1. Run /opt/lotus/bin/server.
2. Launch your browser and enter the following URL.
For example:
http://hostname:80/names.nsf
You will be prompted for login name and password.
3. Select Server-Server.
4. Select your intended server.
5. Select Edit Server.
6. Select Ports, select Internet Ports, then click Web.
7. Change the value for TCP/IP port number to your desired port number.
8. Click Save and Close to save all your changes.
9. Restart server /opt/lotus/bin/server.
29.5 Enabling SSL (Optional)
Enabling SSL is not mandatory for the WebGate. However, if you need to generate a
keyring file (.kyr) and its corresponding stash file (.sth) from the Lotus Notes client on
a Windows system to the UNIX system, use the steps that follow.
To generate the keyring and stash files
1. Launch the Lotus Notes Client on your Windows system.
WARNING: Do not run as root.

Installing a Domino Security (DSAPI) Filter
29-4 Administrator's Guide for Oracle Access Management
For example:
File, select Databases, then click Open
2. Select Server Certificate Admin.
3. Create the key ring file.
4. Create the certificate request.
5. Install the trusted root certificate into the key ring file.
6. Install the certificate into the key ring file.
7. Copy or ftp the newly created keyring file and stash file from the Windows system
to your UNIX computer.
8. Store both files in your Domino data directory.
To enable SSL
1. Launch your browser and enter the following URL.
For example:
http://hostname:port/names.nsf
You will be prompted for login name and password
2. Select Server-Server.
3. Select your intended server.
4. Select Edit Server.
5. Select Ports, select Internet Ports, then click Web.
6. In the SSL Key file name field, enter the absolute path to the keyring file.
7. Change the SSL Port number value to your desired port number.
8. Enable SSL port status.
9. Select Client Certificate "Yes" for Client Certificate authentication.
10. Click Save and Close to save all your changes.
11. Restart the Web server.
For example:
/opt/lotus/bin/server
29.6 Installing a Domino Security (DSAPI) Filter
The Domino security API filter, DSAPI, is an authentication method that enables you
to register a DLL with the Domino Web server. In this case, the Web server calls the
WebGate DLL to authenticate the user when a request for authentication occurs rather
than using SSL or basic authentication.
Authentication within Domino is optional with the Access Manager DSAPI filter. You
can implement certain aspects of authentication that the default Web server does not
support.
Task overview: Completing the WebGate and filter installation
1. Before you install the WebGate on a Domino Web server, complete all steps
described earlier.

Installing a Domino Security (DSAPI) Filter
Configuring Lotus Domino Web Servers for 10g WebGates 29-5
2. Complete the WebGate installation and Web server update as described in
"Locating and Installing the Latest 10g WebGate for Access Manager 11g" on
page 25-14.
3. Set
ObWebGateInstallDir=$WEBGATE_INSTALL_DIR
in your
notes.ini
file.
4. See "Completing the WebGate Installation" on page 29-5 and choose one of the two
options discussed there.
29.6.1 Completing the WebGate Installation
To ensure the Domino Web Server can use the WebGate DLL, you need to edit the
enter the name or names of the DLL/DLLs (DSAPI libraries) to be called for
authentication in the DSAPI filter file names field of the HTTP tab under the Internet
Protocols tab in the Server document.
There are two ways to install the filter:
■Through a Web browser and names.nsf (option 1)
■Through a Lotus Notes workstation and the Address Book (option 2)
Option 1: To setup the DSAPI filter to access names.nsf
1. Go to the names.nsf URL and log in. For example:
http://hostname:port/names.nsf
2. Click the Server-Servers link.
A Java applet will be loaded.
3. Select a server from those listed.
4. Click the Edit Server link to go to Edit mode.
5. Click the Internet Protocols link.
By default, the HTTP tab is selected and information is displayed in Edit mode.
6. Look for DSAPI where it says "DSAPI filter file names:", then type in the absolute
path to the libwebgate.so file.
7. Save your changes.
8. Restart the Domino http server task.
Option 2: To access the Address Book through Lotus Notes
1. Open Domino Name and Address book. For example, select:
File, Database, Open, then click Address Book
2. Switch to server view and open the server document.
3. Edit the server document.
4. Click the Internet Protocols tab.
By default, the HTTP tab is selected and information is displayed in Edit mode.
Note: Relative paths will be based on the Domino executable
directory. DSAPI filter libraries will be called to handle events in the
order they appear in this list.

Installing a Domino Security (DSAPI) Filter
29-6 Administrator's Guide for Oracle Access Management
5. Look for DSAPI where it says "DSAPI filter file names:", then type in the absolute
path to the libwebgate.so file.
6. Save your changes.
7. Restart the Domino http server task.

Part VII
Par t VII
Managing Oracle Access Management
Identity Federation
Part VII contains the following chapters:
■Chapter 30, "Introducing Identity Federation in Oracle Access Management"
■Chapter 31, "Managing Identity Federation Partners"
■Chapter 32, "Managing Settings for Identity Federation"
■Chapter 33, "Managing Federation-related Schemes and Policies"

30
Introducing Identity Federation in Oracle Access Management 30-1
30
Introducing Identity Federation in Oracle
Access Management
[14]
A federation is defined as "an association formed by merging several groups or parties".
A federated environment (as defined in the identity management realm) is one in
which organizations that provide services and identity data (business partners) have
established trust in order to share access to a set of protected resources while
protecting the same from unauthorized access. Oracle Identity Federation enables
business partners to achieve this by providing the mechanism with which companies
can form a federation and securely share services and data across their respective
security domains.
With the 11g Release 2 (11.1.2.2) of Oracle Access Management, the standalone Oracle
Identity Federation product has begun it's integration with Oracle Access Manager.
This chapter introduces the integrated Identity Federation and includes the following
sections.
■Understanding Identity Federation Concepts
■Integrating Identity Federation with Access Manager
■Deploying Identity Federation with Oracle Access Management
■Exchanging Identity Federation Data
■Understanding How Identity Federation Works
■Using Identity Federation
■Administrating Identity Federation
■Enabling Identity Federation
30.1 Understanding Identity Federation Concepts
The Identity Federation topics in this book presume familiarity with federation in
general and how it works. See "Introduction to Oracle Identity Federation" in the
Oracle Fusion Middleware Administrator's Guide for Oracle Identity Federation for
background and conceptual information.
30.2 Integrating Identity Federation with Access Manager
The Oracle Identity Management framework supports either of the following
approaches to cross-domain single sign-on. You cannot mix-and-match these
approaches as each stands on its own.

Deploying Identity Federation with Oracle Access Management
30-2 Administrator's Guide for Oracle Access Management
1. Beginning with the 11g Release 2 (11.1.2), the Oracle Access Management Access
Manager server (OAM Server) has been integrated with an Oracle Access
Management Identity Federation server. All configuration for the Identity
Federation server is performed using the Oracle Access Management Console.
2. Previous, separate releases of Oracle Identity Federation (11.1.1) and Oracle Access
Manager can still be deployed to provide federation capabilities. Both servers
must be configured and managed for this integration. This approach existed in 11g
Release 1 (11.1.1) and is still available.
This current document is limited to describing Oracle Identity Federation functionality
as it has been integrated with Access Manager in 11g Release 2 (11.1.2.2). For details
about the previous separate release of Oracle Identity Federation, see Oracle Fusion
Middleware Administrator's Guide for Oracle Identity Federation.
Benefits of using the new Identity Federation 11g Release 2 (11.1.2.2) server integrated
with Access Manager include:
■Eliminating the need to install and maintain separate servers.
■Simplifying post-install configuration of the federation features, particularly when
accessing those features through the Oracle Access Management Console.
■Improving the scalability of the two services working together.
■Providing enhanced diagnostics and troubleshooting.
30.3 Deploying Identity Federation with Oracle Access Management
From a functional perspective, the components in an 11g Release 2 (11.1.2.2) scenario
using the Identity Federation service (when a user attempts to log in to a protected
resource using a Web browser) include:
■The Access Manager server contains all the components needed to provide access
management services in the federated context, including:
–a credential collector
–a federation authentication plugin
–the Identity Federation engine to generate and process assertions
–a federation data cache
■Oracle WebLogic Server hosts and provides key infrastructure services, including:
–the authorization engine, which interacts with Oracle Entitlement Server
–federation data including circle of trust details and other configuration
–the Coherence map store
■Data stores, including the identity store and Coherence database, maintain the
identity data needed for authentication tasks. Identity Federation supports the
Access Manager common user store and provides multiple identity store support.
Federation data for persistent account linking can be stored in a database.
Note: Calls are routine HTTP calls.

Exchanging Identity Federation Data
Introducing Identity Federation in Oracle Access Management 30-3
30.4 Exchanging Identity Federation Data
The integrated Identity Federation server supports the transport and receipt of request
and response messages using either the Security Access Markup Language (SAML) 2.0
specifications, SAML 1.1 or OpenID 2.0. The following sections contain more
information.
■Using SAML 2.0
■Using SAML 1.1
■Using OpenID 2.0
■Initiating Federation SSO
30.4.1 Using SAML 2.0
SAML uses an eXtensible Markup Language (XML) framework to define a simple
request-response protocol in order to achieve interoperability between vendor
platforms that provide SAML assertions. A SAML requester sends a SAML Request
element to a responder. Similarly, a SAML responder returns a SAML Response
element to the requester.
Within the SAML 2.0 protocol, Identity Federation supports the functionality
described in the following sections.
■SAML 2.0 Bindings for SSO and Federation
■SAML 2.0 Bindings for Single Logout
■SAML 2.0 NameID Formats
■Securing SAML 2.0 Data
■SAML 2.0 Service Details
30.4.1.1 SAML 2.0 Bindings for SSO and Federation
SSO and Federation relies on SAML artifacts and assertions to relay authentication
information. The following bindings are supported for the exchange of data regarding
SSO and federation.
■The HTTP Artifact Binding uses the Artifact Resolution Protocol and the SAML
SOAP Binding (over HTTP) to resolve a SAML message by reference. The IdP will
store the Assertion in its repository and redirect the user to the SP with a string
(artifact) that references the stored Assertion. The SP will retrieve the Assertion by
connecting to the IdP directly over SOAP/HTTP and presenting the artifact
■The HTTP POST Binding relies on an HTML form to communicate authentication
information between providers. For example, the service provider may use HTTP
Redirect to send a request while the identity provider uses HTTP POST to transmit
the response. The IdP can also redirect the user to the SP in an HTML FORM that
contains the Assertion itself.
■The Reverse SOAP binding (PAOS) is only supported when Access Manager is
configured as an IdP. In this flow, the client sends a SOAP request containing a
SAML 2.0 Authn Request message to the IdP. The IdP authenticates the user
Note: The specification describing how SAML might be used in a
given context is referred to as a SAML profile. The specification
describing how a SAML assertion and/or message is conveyed in, or
transported over, another protocol is referred to as a SAML Binding.

Exchanging Identity Federation Data
30-4 Administrator's Guide for Oracle Access Management
locally, and returns a SOAP response containing a SAML 2.0 Assertion. The client
then presents the results to the remote SP.
30.4.1.2 SAML 2.0 Bindings for Single Logout
Single Logout defines how providers notify each other of logout events. This message
exchange terminates all sessions when a logout occurs at the SP or IdP. The following
profiles are supported for exchanging data regarding single logout.
■The HTTP Redirect profile relies on HTTP redirects between providers. For
example, the IdP redirects the user to the SP using a 302 redirect operation with
the URL containing the Logout Request/Response message. This profile can be
used for sending and receiving data regarding single logout.
■The HTTP POST profile occurs when the IdP redirects the user to the SP using an
HTML FORM containing the Logout Request/Response message. This profile can
be used for sending and receiving data regarding single logout.
■The SOAP Binding Profile allows the IdP to connect directly with the SP and send
a Logout Request message. During logout, the IdP redirects the user to the various
SPs in a sequential manner. The SP will respond with a Logout Response message.
This profile relies on asynchronous SOAP over HTTP messaging calls between
providers and can be used only for sending data regarding single logout.
30.4.1.3 SAML 2.0 NameID Formats
The Name Identifier Mapping defines how an SP can obtain name identifiers assigned
to a principal that has authenticated in the name space of a different SP. When a
principal authenticated to one SP requests access to a second site, the second SP can
use this protocol to obtain the name identifier and communicate with the first SP about
the principal - even though no federation for the principal exists between them. The
SAML 2.0 NameID formats listed in Table 30–1 are supported in both IdP and SP
mode.
Table 30–1 Supported SAML 2.0 NameID Formats
NameID Format Description
urn:oasis:names:tc:SAML:1.1:nameid-format:
unspecified
SP/IdP will use the applicable user attribute to
populate/process the NameID value
urn:oasis:names:tc:SAML:1.1:nameid-format:
emailAddress
SP/IdP will use the applicable user attribute to
populate/process the NameID value
urn:oasis:names:tc:SAML:1.1:nameid-format:
X509SubjectName
SP/IdP will use the applicable user attribute to
populate/process the NameID value
urn:oasis:names:tc:SAML:1.1:nameid-format:
WindowsDomainQualifiedName
SP/IdP will use the applicable user attribute to
populate/process the NameID value
urn:oasis:names:tc:SAML:2.0:nameid-format:
kerberos
SP/IdP will use the applicable user attribute to
populate/process the NameID value
urn:oasis:names:tc:SAML:2.0:nameid-format:
persistent
SP/IdP will use either:
■A user attribute to populate the NameID
value
■A user attribute (such as DN) to set the
value (same for every operations)
■A random value and will store that value
in the Federation Data Store (only this
mode will require the use of a Federation
Data Store)

Exchanging Identity Federation Data
Introducing Identity Federation in Oracle Access Management 30-5
30.4.1.4 Securing SAML 2.0 Data
Regarding the security of identity data transported using the SAML 2.0
specifications,the following is true.
■All outgoing Assertions will be signed.
■All outgoing responses containing Assertions will not be signed.
■All outgoing requests/responses not containing Assertions will be signed.
■The signing certificate will not be included in the messages.
■Identity Federation (acting as the IdP) will not require signatures on any messages
except when specified in the SP Partner metadata.
■NameIDs, attributes and Assertions will not be encrypted.
■Information on the default XML Encryption algorithm is located at
http://www.w3.org/TR/2002/REC-xmlenc-core-20021210/Overview.html#aes12
8-cbc
■The hashing algorithm for signatures is SHA-1 by default. Identity Federation can
be configured to use SHA-256.
30.4.1.5 SAML 2.0 Service Details
The SAML 2.0 Metadata for the IdP and SP is contained in a single XML document
and can be retrieved using either the Oracle Access Management Console or by
accessing either of the following URLs:
http://public-oam-host:public-oam-port/oamfed/idp/metadata
http://public-oam-host:public-oam-port/oamfed/sp/metadata
The certificates used for signature and encryption operations are published via the
SAML 2.0 Metadata. The certificates can be retrieved by using a Service URL that
specifies the Key ID of the key/certificate entry as defined in the Keystore Settings.
(See Section 32.5, "Defining Keystore Settings for Federation.") For example,
http://public-oam-host:public-oam-port/oamfed/idp/cert?id=osts_signing
The Provider ID and the Issuer ID of the IdP and SP profiles are identical and can be
retrieved from the applicable Provider Partner profile using the Oracle Access
Management Console.
Table 30–2 documents the SAML 2.0 URLs for use when Identity Federation is
configured to act as an IdP.
urn:oasis:names:tc:SAML:2.0:nameid-format:
transient
IdP will generate a random value
custom value When this NameID format is used, OIF/IdP will
use a user attribute to populate the NameID
value
Table 30–2 SAML 2.0 URLs for Identity Federation Acting As Identity Provider
Description URL
Single Sign On Service URL
for HTTP Redirect binding
http://public-oam-host:public-oam-port/oamfed/idp/samlv20
Table 30–1 (Cont.) Supported SAML 2.0 NameID Formats
NameID Format Description

Exchanging Identity Federation Data
30-6 Administrator's Guide for Oracle Access Management
Table 30–3 documents the SAML 2.0 URLs for use when Identity Federation is
configured to act as an SP.
30.4.2 Using SAML 1.1
Although the standards address the same use case, SAML 2.0 and SAML 1.1 get there
in different ways. The most important type of SAML 1.1 request is a query. A SP
makes a query directly to an IdP over a secure back channel (using SOAP). Within the
SAML 1.1 protocol, Identity Federation supports the features described in the
following sections.
■SAML 1.1 Profiles for Web Browser SSO
■SAML 1.1 Logout Profile
■SAML 1.1 NameID Formats
■Securing SAML 1.1 Data
■SAML 1.1 Service Details
30.4.2.1 SAML 1.1 Profiles for Web Browser SSO
SAML 1.1 profiles rely on pushing SAML artifacts and assertions to an SP to relay
authentication information. The following profiles are supported.
■The Browser/Artifact Profile passes a SAML assertion from the IdP to the SP by
reference (through the browser using HTTP Redirect). This artifact is subsequently
Single Sign On Service URL
for HTTP POST binding
http://public-oam-host:public-oam-port/oamfed/idp/samlv20
Single Sign On Service URL
for SOAP binding
http://public-oam-host:public-oam-port/oamfed/idp/soap
Artifact Resolution Service
URL for SOAP binding
http://public-oam-host:public-oam-port/oamfed/idp/soap
Single Logout Service URL
for HTTP Redirect binding
http://public-oam-host:public-oam-port/oamfed/idp/samlv20
Single Logout Service URL
for HTTP POST binding
http://public-oam-host:public-oam-port/oamfed/idp/samlv20
Attribute Authority Service
URL for SOAP binding
http://public-oam-host:public-oam-port/oamfed/aa/soap
Table 30–3 SAML 2.0 URLs for Identity Federation Acting as Service Provider
Description URL
Assertion Consumer Service
URL for Artifact binding
http://public-oam-host:public-oam-port/oam/server/fed/sp/s
so
Assertion Consumer Service
URL for HTTP POST
binding
http://public-oam-host:public-oam-port/oam/server/fed/sp/s
so
Single Logout Service URL
for HTTP Redirect binding
http://public-oam-host:public-oam-port/oamfed/sp/samlv20
Single Logout Service URL
for HTTP POST binding
http://public-oam-host:public-oam-port/oamfed/sp/samlv20
Table 30–2 (Cont.) SAML 2.0 URLs for Identity Federation Acting As Identity Provider
Description URL

Exchanging Identity Federation Data
Introducing Identity Federation in Oracle Access Management 30-7
dereferenced through a back-channel exchange in which the SP retrieves the
assertion from the IdP using SAML over SOAP over HTTP.
■The Browser/POST Profile passes an SSO assertion to an SP through the browser
using HTTP POST. We say that the identity provider "pushes" the assertion to the
service provider.
30.4.2.2 SAML 1.1 Logout Profile
The SAML 1.1 specifications do not define a logout profile thus Identity Federation is
not able to notify remote partners regarding a user logging out.
30.4.2.3 SAML 1.1 NameID Formats
When a principal authenticated to one SP requests access to a second site, the second
SP can obtain the name identifier and communicate with the first SP regarding the
principal - even though no federation for the principal exists between them. The
SAML 1.1 NameID formats listed in Table 30–4 are supported in both IdP and SP
mode.
30.4.2.4 Securing SAML 1.1 Data
Regarding the security of identity data transported using the SAML 1.1
specifications,the following is true.
■All outgoing Assertions will be signed.
■All outgoing responses containing Assertions will not be signed.
■The signing certificate will not be included in the messages.
■Identity Federation (acting as the IdP) will not require signatures on any messages.
■The hashing algorithm for signatures is SHA-1 by default. Identity Federation can
be configured to use SHA-256.
30.4.2.5 SAML 1.1 Service Details
The certificates used for signature and encryption operations can be retrieved by using
a Service URL that specifies the Key ID of the key/certificate entry as defined in the
Keystore Settings. (See Section 32.5, "Defining Keystore Settings for Federation.") For
example,
Table 30–4 Supported SAML 1.1 NameID Formats
NameID Format Description
urn:oasis:names:tc:SAML:1.1:nameid-format:
unspecified
SP/IdP will use the applicable user attribute to
populate/process the NameID value
urn:oasis:names:tc:SAML:1.1:nameid-format:
emailAddress
SP/IdP will use the applicable user attribute to
populate/process the NameID value
urn:oasis:names:tc:SAML:1.1:nameid-format:
X509SubjectName
SP/IdP will use the applicable user attribute to
populate/process the NameID value
urn:oasis:names:tc:SAML:1.1:nameid-format:
WindowsDomainQualifiedName
SP/IdP will use the applicable user attribute to
populate/process the NameID value
urn:oasis:names:tc:SAML:2.0:nameid-format:
kerberos
SP/IdP will use the applicable user attribute to
populate/process the NameID value
custom value When this NameID format is used, OIF/IdP will
use a user attribute to populate the NameID
value

Exchanging Identity Federation Data
30-8 Administrator's Guide for Oracle Access Management
http://public-oam-host:public-oam-port/oamfed/idp/cert?id=osts_signing
The Provider ID and the Issuer ID of the IdP and SP profiles are identical and can be
retrieved from the applicable Provider Partner profile using the Oracle Access
Management Console.
Table 30–5 documents the SAML 1.1 URLs for use when Identity Federation is
configured to act as an IdP.
Table 30–6 documents the SAML 1.1 URL for use when Identity Federation is
configured to act as an SP.
30.4.3 Using OpenID 2.0
OpenID 2.0 allows users to create accounts with a preferred OpenID IdP and use the
account as the basis for signing on to any website that accepts OpenID authentication.
Identity data is communicated through the exchange of an OpenID identifier (a URL
or XRI chosen by the end-user) and the IdP provides OpenID authentication. Within
the OpenID protocol, Identity Federation supports the functionality described in the
following sections.
■OpenID 2.0 Authentication/SSO
■OpenID 2.0 Logout
■OpenID 2.0 NameID Format
■Securing OpenID 2.0 Data
■Using OpenID 2.0 Extensions
■OpenID 2.0 Service Details
30.4.3.1 OpenID 2.0 Authentication/SSO
OpenID 2.0 allows a user to sign into a new web site using a special OpenID URL. For
example, if you have a blog at myblog.com, you might have created the OpenID URL,
yourname.myblog.com. Then if you navigate to a second web site that accepts OpenID
logins and click on the OpenID button, you can type in the URL and click to log in.
The second SP discovers the OpenID IdP URL with this OpenID identifier. When the
OpenID IdP redirects the authenticated user to the SP, it includes the OpenID
Assertion which contains the result of the operation, the NameID of the user and
(optional) attributes.
Table 30–5 SAML 1.1 URLs for Identity Federation Acting As Identity Provider
Description URL
Single Sign On Service
URL
http://public-oam-host:public-oam-port/oamfed/idp/samlv11sso
Artifact Resolution
Service URL
http://public-oam-host:public-oam-port/oamfed/idp/soapv11
Table 30–6 SAML 1.1 URL for Identity Federation Acting as Service Provider
Description URL
Assertion Consumer
Service URL
http://public-oam-host:public-oam-port/oam/server/fed/sp/sso

Exchanging Identity Federation Data
Introducing Identity Federation in Oracle Access Management 30-9
30.4.3.2 OpenID 2.0 Logout
The OpenID 2.0 specifications do not define a logout profile thus Identity Federation is
not able to notify remote partners regarding a user logging out.
30.4.3.3 OpenID 2.0 NameID Format
OpenID defines the NameID as being a random string thus Identity Federation will
use one of the following as the value for the NameID.
■A hashed user attribute (such as DN)
■A generated, random value that will be stored in the Federation Data Store; this
mode requires the use of a Federation Data Store
30.4.3.4 Securing OpenID 2.0 Data
Regarding the security of identity data transported using the OpenID 2.0
specifications,the following is true.
■All outgoing Assertions will be signed.
■The default Association Algorithm is HMAC SHA-1.
■The default Session Agreement Algorithm is Diffie-Hellmann SHA-1.
30.4.3.5 Using OpenID 2.0 Extensions
OpenID is an extensible specification. The following extensions are available when
using the integrated Identity Federation.
■Attribute Exchange (AX): If enabled, a SP can request attributes to be included in
the OpenID Assertion response. The IdP can include the requested attributes or
attributes configured to be in the response. (Default: enabled)
■Provider Authentication Policy Extension (PAPE): If enabled, advanced
authentication methods can be defined and specified. This might include, for
example, a phishing-resistant authentication method or multi-factor
authentication. (Default: disabled)
■GSA Level 1: identifier in the OpenID Assertion indicating if this server is
compliant with the
http://www.idmanagement.gov/schema/2009/05/icam/openid-trust-level1.pdf
policy. If enabled and if PAPE is enabled, OIF will include this policy in the
OpenID response (Default: disabled)
■Level Of Assurance (LOA): identifier in the OpenID Assertion indicating if this
server is compliant with the
http://csrc.nist.gov/publications/nistpubs/800-63/SP800-63V1_0_2.pdf policy. If
enabled, OIF/IdP will use the mapping between Level of Assurance and
schemeID to determine the value to use for LOA in the OpenID response (see 2.5.2
for more information) (Default: disabled)
■No Private Identifier Information (NoPII): identifier in the OpenID Assertion
indicating if this server is compliant with the
http://www.idmanagement.gov/schema/2009/05/icam/no-pii.pdf policy. Note,
if enabled, OIF will not include attributes in the OpenID Assertion
■Persistent Personal Identifier (PPID): identifier in the OpenID Assertion indicating
if this server is compliant with the
http://schemas.xmlsoap.org/ws/2005/05/identity/claims/privatepersonalidenti
fier policy. If enabled and if PAPE is enabled, OIF will include this policy in the
OpenID response (Default: disabled)

Exchanging Identity Federation Data
30-10 Administrator's Guide for Oracle Access Management
■Registration (SReg): extension for attributes in the OpenID Assertion. If enabled,
the SP can request attributes to be included in the response, and the IdP can
include requested attributes or attributes configured to be in the response (Default:
disabled)
■UI Extension (UIExt): extension for UI. In OIF/IdP, support for this extension is
limited to advertisement in the XRDS metadata (Default: disabled)
30.4.3.6 OpenID 2.0 Service Details
The following URL is the realm of the OpenID 2.0 SP component.
http://public-oam-host:public-oam-port
Table 30–7 documents the OpenID 2.0 URLs for use when Identity Federation is
configured to act as an IdP.
Table 30–8 documents the OpenID 2.0 URLs for use when Identity Federation is
configured to act as an SP.
30.4.4 Initiating Federation SSO
The following sections contain details about initiating the Federation SSO process.
■IdP Initiated Federation SSO Service
■SP Initiated Federation SSO Service
30.4.4.1 IdP Initiated Federation SSO Service
When Identity Federation is working as an IdP, the URL for initiating Federation SSO
is:
http://public-oam-host:public-oam-port/oamfed/idp/initiatesso
The query parameters are:
■providerid: name of the SP partner with which to perform Federation SSO or the
issuer ID / provider ID of the SP partner with which to perform Federation SSO.
(required)
■returnurl: the SP URL where the user will be redirected after a successful
Federation SSO (optional)
Table 30–7 OpenID 2.0 URLs for Identity Federation Acting As Identity Provider
Description URL
Single Sign On Service
URL
http://public-oam-host:public-oam-port/oamfed/idp/openidv20
Discovery Service URL http://public-oam-host:public-oam-port/oamfed/idp/openidv20
Table 30–8 OpenID 2.0 URLs for Identity Federation Acting as Service Provider
Description URL
Single Sign On Service
URL
http://public-oam-host:public-oam-port/oam/server/fed/sp/sso
Discovery Service URL http://public-oam-host:public-oam-port/oamfed/sp/openidv20
Realm URL http://public-oam-host:public-oam-port

Understanding How Identity Federation Works
Introducing Identity Federation in Oracle Access Management 30-11
■acsurl: the SAML 2.0 Assertion Consumer Service URL where Identity Federation
will redirect the user with the SAML 2.0 Assertion. This URL must be declared in
the SP SAML 2.0 Metadata. (optional)
30.4.4.2 SP Initiated Federation SSO Service
When Identity Federation is working as an SP, the URL for initiating Federation SSO
is:
http://public-oam-host:public-oam-port/oamfed/sp/initiatesso
The query parameters are:
■providerid: name of the IdP partner with which to perform Federation SSO or the
issuer ID / provider ID of the IdP partner with which to perform Federation SSO.
(required)
■returnurl: the URL where the user will be redirected after a successful Federation
SSO (optional)
30.5 Understanding How Identity Federation Works
A federation can comprise any number of identity providers and service providers.
One common federated network topology is referred to as the hub-and-spoke model.
In this topology, there is either a single service provider accepting authentication from
multiple identity providers, or a single identity provider authenticating users for
multiple service providers. An instance of Identity Federation in a federated network
can serve as either an identity provider, a service provider, or both.
■A service provider (SP) is a commercial or not-for-profit organization that offers a
web-based service such as a news portal, a financial repository, or retail outlet.
When configured as the SP in a federated network and a user wants to access a
resource protected by an authentication engine such as Oracle Access Manager,
Identity Federation redirects the user to an IdP for global authentication. The IdP
will obtain credentials, authenticate the user, and redirect the user back to the
Identity Federation server instance - which retrieves the asserted identity from the
IdP and redirects the authenticated user to the authentication engine which
provides access to the protected resource.
■An identity provider (IdP) is a service provider that stores identity profiles.
(Identity providers might also offer services above and beyond those related to
identity profile storage.) When configured as the IdP in a federated network and a
user wants to access a protected resource, the resource's SP directs the user to the
Identity Federation server instance - which uses the Access Manager
authentication engine to obtain credentials and authenticate the user. Following
successful authentication, the Identity Federation instance can assert the user's
identity to the resource's SP - which then authenticates the user itself and provides
access to the requested resource.
The integrated Identity Federation server can operate as an IdP or an SP. See
Chapter 31, "Managing Identity Federation Partners" for information on configuring
Identity Federation to operate in one of these provider modes and communicate with
remote partners in the federation.

Using Identity Federation
30-12 Administrator's Guide for Oracle Access Management
The OIF WLST Authentication commands configure authentication based on specific
Service Providers. See the Oracle Fusion Middleware WebLogic Scripting Tool Command
Reference for details.
30.6 Using Identity Federation
In SP-initiated SSO, the federated SSO process begins when the SP sends an
authentication request to the IdP. In IdP-initiated SSO, the IdP sends the SP an
unsolicited assertion response (in the absence of an authentication request from the
SP). Supported runtime flows in both modes include SSO, Logout (initiated from a
remote federation partner or Access Manager protected application) and Attribute
Query. The following sections have more information.
■Achieving SSO
■Logging Out
■Authorizing
■Forcing Authentication
■Indicating a Passive Identity Provider
■User and Assertion Mapping
■Platform Dependencies
30.6.1 Achieving SSO
When the Identity Federation (acting as an IdP) is performing federated SSO with an
SP, the Access Manager server authenticates the user or ensures an authenticated user
doesn't need to be challenged due to inactivity. Additionally, the Access Manager
server will check that any requested federation authentication method specified by the
SP does not require a challenge based on authentication level. The Authentication
Scheme mappings to the authentication methods will determine this. (If the SP does
not specify a Federation Authentication Method, the IdP will use the one specified for
the SP partner in the defaultschemeid property.)
30.6.2 Logging Out
With Identity Federation, a logout operation is dissociated from the authentication
operation. Logout can be initiated by user the (Access Manager server) or a partner in
the federation.
■When initiated by the user accessing the Access Manager Logout service, Access
Manager kills the user's Access Manager session and displays a logout page that
Note: If the Administrator terminates a user session using the Oracle
Access Management Console, the logout is not propagated to any
remote identity providers involved in the session. This could result in
a logged-out user being automatically re-authenticated to Access
Manager through Identity Federation.
Note: The OIF WLST Authentication commands configure
authentication based on specific Service Providers. See the Oracle
Fusion Middleware WebLogic Scripting Tool Command Reference for
details.

Using Identity Federation
Introducing Identity Federation in Oracle Access Management 30-13
will instruct the various WebGate agents to remove the user cookies. Access
Manager then redirects the user to the Identity Federation Logout service which
notifies each partner involved in this session by either redirecting the user with a
Logout Request message via HTTP Redirect or HTTP POST or by directly sending
a Logout Request message via SOAP. Identity Federation then kills the OIF session
and redirects the user to the defined return URL.
■When initiated by the user on a web site from a partner in the federation, the
partner redirects the user to the Identity Federation server which marks the user
session as logging out. Identity Federation then redirects the user to the Access
Manager server which kills the user's Access Manager session. Access Manager
then displays a logout page that will instruct the various WebGate agents to
remove the user cookies, and redirects the user back to Identity Federation to
resume the Federation logout process by notifying each partner involved in this
session (except the one who first redirected the user) by either redirecting the user
with a Logout Request message via HTTP Redirect or HTTP POST or by directly
sending a Logout Request message via SOAP. Identity Federation then kills the
OIF session and redirects the user with a Logout Response message to the partner
who first redirected the user to the Identity Federation server.
30.6.3 Authorizing
When the Identity Federation server acts as an IdP, it has the need to issue an Identity
Token to the SP during the Federation SSO operation. The Identity Token will contain
user information as well as session information. By default, the authorization feature is
turned off. It can be enabled or disabled using the
configureFedSSOAuthz
WLST
command. You also need to create a resource of type TokenServiceRP (with the
Resource URL set to the SP Partner ID) and a Token Issuance Policy to which the
Resource is added. The Token Issuance Policy indicates the conditions under which
the token should be issued.
30.6.4 Forcing Authentication
SAML 2.0 and OpenID 2.0 provide a way for a SP to indicate during Federation SSO
whether the user should be challenged by the IdP, even if a valid user session already
exists. In this case, the SP will send an authentication request with a parameter
indicating that the IdP should re-challenge the user or force authentication.
30.6.5 Indicating a Passive Identity Provider
SAML 2.0 and OpenID 2.0 provide a way for the SP to indicate during Federation SSO
whether the Identity Provider should interact with the user. In this case, the SP will
send an authentication request with a parameter indicating that the IdP should not
interact with the user or is passive. The IdP recognizes the parameter and returns to
the SP:
■An error if the IdP must interact with the user but cannot because of this
parameter.
■A Federation Assertion that indicates whether the user has a valid session.
30.6.6 User and Assertion Mapping
In Identity Federation, after a SP validates the SAML assertion created by it's IdP
partner, it can map the assertion to the local user in one of the following ways.

Administrating Identity Federation
30-14 Administrator's Guide for Oracle Access Management
■By mapping the SAML subject to a user record with a user attribute (for example,
mail
).
■By mapping a SAML Assertion Attribute to a user record with a user attribute (for
example, the SAML Assertion Attribute
emailAddress
mapped to
mail
).
■By mapping one or more attributes contained in the SAML assertion's
AttributeStatement
element or the SAML subject with an LDAP query. You must
configure both the SAML attribute name and the user attribute to which it is
mapped.
30.6.7 Platform Dependencies
This architecture leverages the Oracle Fusion Middleware platform for the Credential
Store Framework (CSF). CSF securely stores keystore passwords as well as server
credentials such as HTTP Basic Authentication usernames and passwords.
30.7 Administrating Identity Federation
Identity Federation integrated with Access Manager can be administered with a
combination of configurations using the Oracle Access Management Console and
Oracle WebLogic Scripting Tool (WLST) commands. Use the Oracle Access
Management Console to enable the Identity Federation service, manage IdP and SP
partner profiles, and work with federated authentication schemes and policies. Use the
WLST utilities to manage additional server and partner configuration properties.
The Oracle Access Management Console enables Administrators to manage
configuration related to the federation service and partners. Table 30–9 summarizes
the types of information that you can configure for Identity Federation using Oracle
Access Management Console.
Note: Not all WLST command functionality is duplicated in the
Oracle Access Management Console and not all console functionality
is duplicated on the command line.
Table 30–9 Configuring Identity Federation Settings
Configuring ... Description
Federation Administrators Administrators who can manage federated partners and related
configuration. See "Understanding the Controls" on page 2-6.
Federation Service Enable and disable the Identity Federation service in Access Manager. See
"Enabling Identity Federation" on page 30-15.
Federation Settings Manage basic Identity Federation service configuration properties. See
Chapter 32, "Managing Settings for Identity Federation".
Providers for Federation IdP partners are managed within the context of administering Identity
Federation as a SP. Conversely, SP partners are managed within the context
of administering Identity Federation as an IdP. See Section 31.3,
"Administering Identity Federation As A Service Provider" or Section 31.4,
"Administering Identity Federation As An Identity Provider.".
Authentication Schemes and
Modules for Federation
Manage federation authentication schemes. See "Using Authentication
Schemes and Modules for Identity Federation 11g Release 2 (11.1.2.2)" on
page 33-2.
Policies for Use with
Federation
Manage policies for use with federation partners. See "Managing Access
Manager Policies for Use with Identity Federation" on page 33-8.
Enabling Identity Federation
Introducing Identity Federation in Oracle Access Management 30-15
Table 30–10 outlines the tasks required to implement identity federation using the
Oracle Access Management Console.
30.8 Enabling Identity Federation
Identity Federation is an authentication module in Oracle Access Management so both
the Access Manager service and Identity Federation must be enabled. Figure 30–1
illustrates the Available Services page in Oracle Access Management Console with the
Access Manager service and Identity Federation aleady enabled. Use this page to
enable (or disable) Identity Federation together with the Access Manager service.
Figure 30–1 Available Services Page
To enable the Identity Federation service with Access Manager
1. Log in to the Oracle Access Management Console.
https://hostname:port/oamconsole/
2. From the Welcome page, under Configuration, click Available Services.
3. Enable Identity Federation: Click Enable beside Identity Federation (or confirm
that the green Status check mark displays).
Table 30–10 Implementing Identity Federation
Task Reference
Enable the Identity Federation service. Section 30.8
Configure federation settings. Section 32.3
Identity IdP and/or SP partners, and configure attributes for them. Section 31.3
Configure an authentication or authorization policy. Chapter 33
Protect a resource with this policy. Chapter 20
Note: Once enabled, it is possible to enable or disable specific
Federation features such as IdP, SP, Attribute Authority and/or
Attribute Requester. Use the
configureFederationService()
WLST
command as documented in Oracle Fusion Middleware WebLogic
Scripting Tool Command Reference.

Enabling Identity Federation
30-16 Administrator's Guide for Oracle Access Management
4. Enable Access Manager: Click Enable beside Access Manager (or confirm that the
green Status check mark displays).

31
Managing Identity Federation Partners 31-1
31
Managing Identity Federation Partners
This chapter introduces the concept of federation partners (service providers and
identity providers) in Oracle Access Management Identity Federation. This chapter
includes the following sections:
■Understanding Federation And Partners
■Managing Federation Partners
■Administering Identity Federation As A Service Provider
■Administering Identity Federation As An Identity Provider
■Using Attribute Mapping Profiles
■Mapping Federation Authentication Methods to Access Manager Authentication
Schemes
■Using the Attribute Sharing Plug-in for the Attribute Query Service
■Using the Federation Proxy
■Using WLST for Identity Federation Administration
31.1 Understanding Federation And Partners
The topics in this chapter assume some familiarity with the federation and partner
concepts described in the Oracle Fusion Middleware Administrator's Guide for Oracle
Identity Federation. The current chapter also assumes that you have performed
Section 30.8, "Enabling Identity Federation" as described.
31.2 Managing Federation Partners
This 11g Release 2 (11.1.2.2) of the integrated Identity Federation provides the ability to
be configured as a Service Provider (SP) or an Identity Provider (IdP). Following this
provider definition, remote providers (whether service or identity) partnered in
Federation SSO need to be managed as well. Towards this end, Identity Federation
developed the configuration hierarchy concepts of a partner and a partner profile.
■A partner profile refers to settings specific to a partner type (IdP or SP) or a protocol
version (SAML 2.0, SAML 1.1, OpenID 2.0). It is a configuration group that
represents a sets of common properties that apply to all partners that reference it.
It contains mostly secondary configuration objects such as Authentication Method
mappings, cryptographic settings (SHA-1 vs SHA-256) and the like.
■A partner refers to the configuration for a specific organization partnered in the
Federation SSO process. Each partner is associated with a partner profile. The

Administering Identity Federation As A Service Provider
31-2 Administrator's Guide for Oracle Access Management
partnerprofileid
property in a Partner entry defines the partner profile to which
this partner is assigned. If the
partnerprofileid
property is not defined, the
default Partner Profile for the Partner (based on the Partner type and the Partner
protocol) will be used.
All Partners associated with the same Partner Profile will share its defined settings
unless they are specifically overridden for a partner at the Partner configuration level.
A Partner configuration overrides a Partner Profile configuration which, in turn,
overrides a global configuration.
Partner profiles are only manageable using WLST commands. Each new partner
created will be bound to one of the default partner profiles listed in Table 31–1. To
assign a new partner profile to a partner, use the
setFedPartnerProfile()
WLST
command after creating the partner. See Section 31.9, "Using WLST for Identity
Federation Administration" for details.
31.3 Administering Identity Federation As A Service Provider
When the integrated Identity Federation is configured as an SP, you must define any
remote IdP partners as trusted by creating and managing profiles that contain details
regarding each remote IdP. To begin administration of the integrated Identity
Federation server as an SP, click the Service Provider Administration link under
Identity Federation from the Launch Pad in the Oracle Access Management Console.
This section provides the following topics.
■Creating Remote Identity Provider Partners
■Managing the Remote Identity Provider Partners
31.3.1 Creating Remote Identity Provider Partners
Use the New Identity Provider Page to define an identity provider (IdP) partner record
for Access Manager. You can specify service details manually or load them from a
metadata file.
Figure 31–1 shows the Create Identity Provider Partner page when service details are
configured by loading an XML metadata file.
Table 31–1 Default Partner Profiles
Default Partner Profile Description
saml20-idp-partner-profile SAML 2.0 Partner Profile for IdP partners
saml20-sp-partner-profile SAML 2.0 Partner Profile for SP partners
saml11-idp-partner-profile SAML 1.1 Partner Profile for IdP partners
saml11-sp-partner-profile SAML 1.1 Partner Profile for SP partners
openid20-idp-partner-profile OpenID 2.0 Partner Profile for IdP partners
openid20-sp-partner-profile OpenID 2.0 Partner Profile for SP partners
Administering Identity Federation As A Service Provider
Managing Identity Federation Partners 31-3
Figure 31–1 New Identity Provider Page, Service Details Loaded from Metadata
Figure 31–2 shows the Create Identity Provider Partner page when service details are
configured by entering values manually.
Figure 31–2 New Identity Provider Page, Service Details entered Manually
Table 31–2 describes each element on the New Identity Provider page.
Table 31–2 Identity Provider Partner Settings
Element Description
Name This is the provider name.
Description This is a brief description of the provider. (Optional).
Protocol This is the provider protocol (SAML 1.1, SAML 2.0 and so on).
Service Details This drop-down enables you to choose whether to enter service details
manually or load from metadata.

Administering Identity Federation As A Service Provider
31-4 Administrator's Guide for Oracle Access Management
Metadata File This field appears if loading metadata from a file. Click Browse to
select a file to use. Applies to SAML 2.0 only.
Issuer ID This is the issuer ID of the provider. Applies to SAML 2.0 and SAML
1.1 only.
Succinct ID This is the succinct ID of the provider. This element is required if using
the artifact profile. Applies to SAML 2.0 and SAML 1.1 only.
SSO Service URL This is the URL address to which SSO requests are sent.
SOAP Service URL This is the URL address to which a SOAP service request is sent. This
element is required if using artifact profile.
Logout Request Service URL This is the URL address to which a logout request is sent by the
provider. This element is required if using the logout feature. Applies
to SAML 2.0 only.
Logout Response Service URL This is the URL address to which a logout response is sent. This
element is required if using the logout feature. Applies to SAML 2.0
only.
Signing Certificate This is the signing certificate used by the provider. You can specify it in
pem
and
der
formats. Applies to SAML 2.0 and SAML 1.1 only.
User Identity Store This is the identity store in which the IdP's users will be located and
mapped. Identity Federation supports multiple identity stores, defined
on a per-partner basis. Optionally, if no user identity store is selected,
the default Access Manager store is used.
User Search Base DN This is the base search DN used when looking up user records.
(Optional.) If omitted, the default user search base DN configured for
the selected user identity store is used.)
Mapping Option This setting indicates how an incoming assertion is mapped to a user
in the identity store. Select one of the following:
■Map Assertion Name ID to User ID Store Attribute
Enter the identity store attribute to which the assertion NameID
will be mapped.
■Map Assertion Attribute to User ID Store Attribute
Enter assertion attribute and the identity store attribute to which
it will be mapped.
■Map Assertion to User Record Using LDAP Query
Enter an LDAP query with placeholders for incoming data. You
may use:
- an attribute from the SAML assertion's
AttributeStatement
element, referenced by its name prefixed and suffixed with the
%
character
- the SAML assertion subject's
NameID
, referenced by
%fed.nameidvalue%
- the identity provider's partner name, referenced by
%fed.partner%.
For example, an LDAP query to map an incoming assertion based
on two assertion attributes (lastname and email) would be
(&(sn=%lastname%)(mail=%email%)).
Enable Basic HTTP
Authentication
Check this box to accept HTTP basic credentials. (Advanced element,
available only in provider Edit mode.)
Attribute Mapping Profile Indicates the attribute profile to which the partner is bound.
Service Details Indicates which of the following options Identity Federation (the RP)
uses to perform Federation SSO with the IdP. Applies to OpenID 2.0
only.
■By discovering the IdP SSO URLs via the IdP XRDS metadata
available at the Discovery Service URL.
■By using the specified static OpenID login endpoint which is the
IDP SSO service URL.
Table 31–2 (Cont.) Identity Provider Partner Settings
Element Description

Administering Identity Federation As A Service Provider
Managing Identity Federation Partners 31-5
To Define SAML 2.0 Identity Providers for Federation
Take these steps to define a new SAML 2.0 identity provider (IdP):
1. From the Oracle Access Management Console, click Service Provider
Administration.
2. Click the Create ID Provider button to display the New Identity Provider Page.
3. SAML 2.0 is typically configured with metadata. In the Service Details drop-down,
select "Load from Provider Metadata."
4. A new field appears named Metadata File. Click Browse.
5. Select the metadata file of interest.
6. The metadata is loaded from the file.
7. Click Save to create the Identity Provider definition.
To Define SAML 1.1 Identity Providers for Federation
Take these steps to create a new SAML 1.1 identity provider (IdP):
1. From the Oracle Access Management Console, click Service Provider
Administration.
2. Click the Create ID Provider button to display the New Identity Provider page.
3. Fill in the New Identity Provider page using values for your environment
(Table 31–2). The information you provide depends on the protocol chosen for the
provider and other factors.
4. Click Save to create the identity provider definition.
Discovery URL Defines the location where the IdP publishes its XRDS metadata.
Applies to OpenID 2.0 only.
Endpoint URL Defines the IdP SSO Service location. Applies to OpenID 2.0 only.
Enable Global Logout Indicates whether or not Identity Federation should notify the remote
partner when the user is signing off during the logout flow. Applies to
SAML 2.0 only.
HTTP POST SSO Response
Binding
Indicates whether the SAML Assertion should be sent back from the
IdP using the HTTP POST Binding or the Artifact Binding. Applies to
SAML 2.0 only.
Authentication Request NameID
Format
Indicates the NameID format that Identity Federation will request
from the IdP during the Federation SSO operation. If none is selected,
a NameID format is not specified in the request. Applies to SAML 2.0
only.
Note: For IdP functionality, use the 11g Release 1 (11.1.1) Oracle
Identity Federation server. For details, see Oracle Fusion Middleware
Administrator's Guide for Oracle Identity Federation.
Table 31–2 (Cont.) Identity Provider Partner Settings
Element Description

Administering Identity Federation As A Service Provider
31-6 Administrator's Guide for Oracle Access Management
To Define OpenID 2.0 Identity Providers for Federation
In 11g Release 2 (11.1.2.2) the Identity Federation supports OpenID, and acts as an
OpenID RP/SP. OpenID Providers can be registered as IdP partners. Authentication
schemes created using these OpenID partners protect Access Manager resources using
authentication services provided by the OpenID identity providers. Take these steps to
create a new OpenID 2.0 identity provider (IdP).
1. Log in to the Oracle Access Management Console.
2. From the Launch Pad, click Service Provider Administration under Identity
Federation.
3. Click the Create Identity Provider Partner button.
The Create Identity Provider Partner page is displayed.
4. Fill in the values appropriate for your environment either manually or by
uploading a metadata file.
The information you provide depends on the protocol chosen for the provider and
other factors.
5. Click Save to create the identity provider definition.
Google IdP Partners
Take these steps to add Google as an OpenID 2.0 IdP.
1. Log in to the Oracle Access Management Console.
2. From the Launch Pad, click Service Provider Administration under Identity
Federation.
3. Click the Create Identity Provider Partner button.
The Create Identity Provider Partner page is displayed.
4. Select OpenID 2.0 from the Protocol drop down menu.
5. Select Google provider default settings from the Service Details drop down menu.
6. Click Save to create the identity provider definition.
The partner is configured so that the SP requests the assertion attributes listed in
Table 31–3 from the Google IdP and maps them to the corresponding session attribute
names:
Note: Some SAML 1.1 configuration parameters are not exposed
through the Oracle Access Management Console. The values of these
parameters can be modified using the
updatePartnerProperty
WLST
command. For details, see the Oracle Fusion Middleware WebLogic
Scripting Tool Command Reference.
Table 31–3 Attributes for Google OpenID Partner
Assertion Attribute Name Session Attribute Name
http://axschema.org/contact/country/home country
http://axschema.org/contact/email email
http://axschema.org/namePerson/first firstname
http://axschema.org/pref/language language

Administering Identity Federation As A Service Provider
Managing Identity Federation Partners 31-7
The Google partner uses
mail
as the user mapping attribute, so that an incoming
http://axschema.org/contact/email
attribute should match the
mail
attribute of the
user in the user identity store.
Yahoo IdP Partners
Take these steps to add Yahoo as an OpenID 2.0 IdP.
1. Log in to the Oracle Access Management Console.
2. From the Launch Pad, click Service Provider Administration under Identity
Federation.
3. Click the Create Identity Provider Partner button.
The Create Identity Provider Partner page is displayed.
4. Select OpenID 2.0 from the Protocol drop down menu.
5. Select Yahoo provider default settings from the Service Details drop down menu.
6. Click Save to create the identity provider definition.
The partner is configured so that the SP requests the assertion attributes listed in
Table 31–4 from the Yahoo IdP and maps them to the corresponding session attribute
names:
The yahoo partner uses
mail
as the user mapping attribute, so that an incoming
http://axschema.org/contact/email
attribute should match the
mail
attribute of the
user in the user identity store.
To Enable OpenID Simple Registration
By default, Identity federation uses the Attribute Exchange extension to obtain user
identity attributes from an OpenID IdP. However, if you need to use the older Simple
Registration (SREG) extension, you can enable it by running the following WLST
commands:
putBooleanProperty("/spglobal/openid20axenabled", "false")
putBooleanProperty("/spglobal/openid20sregenabled", "true")
To Disable OpenID Simple Registration
To switch from the Simple Registration (SREG) extension to the Attribute Exchange
extension to obtain user identity attributes from an OpenID IdP:
putBooleanProperty("/spglobal/openid20axenabled", "true")
http://axschema.org/namePerson/last lastname
Table 31–4 Attributes for Yahoo OpenID Partner
Assertion Attribute Name Session Attribute Name
http://axschema.org/contact/country/home country
http://axschema.org/contact/email email
http://axschema.org/namePerson/first firstname
http://axschema.org/pref/language language
http://axschema.org/namePerson/last lastname
Table 31–3 (Cont.) Attributes for Google OpenID Partner
Assertion Attribute Name Session Attribute Name
Administering Identity Federation As A Service Provider
31-8 Administrator's Guide for Oracle Access Management
putBooleanProperty("/spglobal/openid20sregenabled", "false")
31.3.2 Managing the Remote Identity Provider Partners
You can use the following procedure to manage an existing IdP for Identity
Federation.
To Search for Existing Identity Providers
Follow these steps:
1. From the Oracle Access Management Console, click Service Provider
Administration.
2. In the Search section of the page, enter appropriate search criteria for identity
provider(s). The characters "
*
" (asterisk) and "
.
" (period) are supported as search
wildcards. See Table 31–5 for details about the search parameters.
3. Click Search.
4. The search results are displayed in a table.
Table 31–5 demonstrates an example of search results from an IdP search.
Figure 31–3 Searching for Identity Providers
To Update Identity Providers for Federation
1. From the Oracle Access Management Console, click Service Provider
Administration.
2. Search for the provider you wish to update. See "To Search for Existing Identity
Providers" for details.
3. Select the provider of interest from the search results table.
Table 31–5 Elements Used for IdP Provider Search
Element Description
Partner Name Searches for a specific partner name.
Provider ID Searches by provider ID.
Status Searches providers matching a status.
Description Searches by provider description.
Protocol Searches for providers that use a specified protocol.
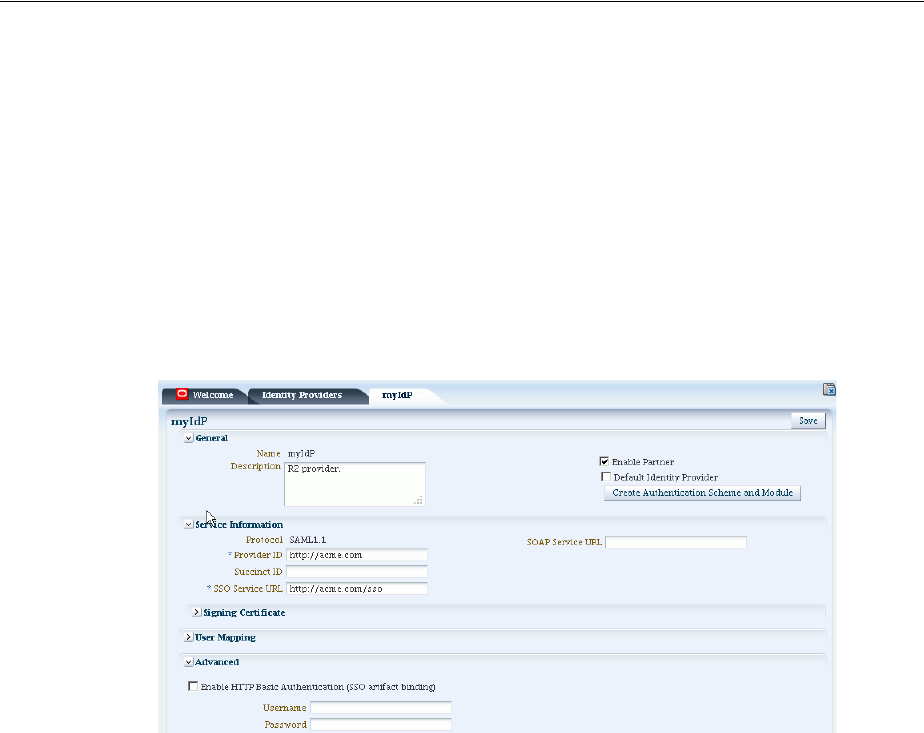
Administering Identity Federation As An Identity Provider
Managing Identity Federation Partners 31-9
4. Click the pencil icon to display the provider update page. The page is divided into
sections for: Service Information, Signing Certificates, User Mapping, and
Advanced.
5. Update the provider information. See Table 31–2 for details.
For information on configuring HTTP Basic Authentication to protect SOAP URLs
after it has been enabled, see the Oracle Fusion Middleware Administrator's Guide for
Oracle Identity Federation.
6. Click Save to update the Identity Provider definition.
Figure 31–4 shows an example of updating an IdP definition.
Figure 31–4 Updating an Identity Provider
31.4 Administering Identity Federation As An Identity Provider
When the integrated Identity Federation is configured as an IdP, you must define any
remote SP partners as trusted by creating and managing profiles that contain details
regarding each remote SP. This section provides the following topics.
■Creating Remote Service Provider Partners
■Managing the Remote Service Provider Partners
31.4.1 Creating Remote Service Provider Partners
Use the Service Provider Partner page to define a partner profile when Identity
Federation is configured as an IdP. You can specify service details manually or load
them from a metadata file.
1. Log in to the Oracle Access Management Console as administrator.
The Launch Pad is displayed.
2. Click Identity Provider Administration under Identity Federation.
The Identity Provider Administration page is displayed.
3. Click the Create Service Provider Partner button.
The Create Service Provider Partner page is displayed.
4. Enter values for the parameters.

Administering Identity Federation As An Identity Provider
31-10 Administrator's Guide for Oracle Access Management
Table 31–6 describes each element on the New Service Provider page.
5. Click Save to create the remote SP partner profile.
Table 31–6 Service Provider Partner Settings
Element Description
Name This is the provider name.
Enable Partner Select whether this partner is currently participating in the federation.
Description This is a brief description of the provider. (Optional).
Protocol This is the provider protocol (SAML 1.1, SAML 2.0 or OpenID 2.0).
Service Details Select whether to enter service details manually or load from metadata. If
selecting the latter, browse for the metadata file. Applies to SAML 2.0 only.
Metadata File This field appears if loading metadata from a file. Click Browse to select a
file to use. Applies to SAML 2.0 only.
Provider ID The provider ID or issuer ID of the remote Service Provider. Applies to
SAML 2.0 and SAML 1.1 only.
Assertion Consumer URL A URL to which Assertion responses are sent. Applies to SAML 2.0 and
SAML 1.1 only.
Load Signing Certificate Upload the signing certificate used by this SP. Only visible when Enter
Manually is selected. Applies to SAML 2.0 and SAML 1.1 only.
Logout Request URL A URL to which logout requests are sent. Applies to SAML 2.0 only.
Logout Response URL A URL to which responses to logout requests are sent. Applies to SAML 2.0
only.
Load Encryption Certificate Upload the encryption certificate used by this SP. Only visible when Enter
Manually is selected. Applies to SAML 2.0 only.
NameID Format Indicates which NameID format should be used for this SP. Applies to
SAML 2.0 and SAML 1.1 only. See Section 30.4.1, "Using SAML 2.0" or
Section 30.4.2, "Using SAML 1.1" respectively for details on the NameID
format.
NameID Value Indicates how to populate the NameID Value. Applies to SAML 2.0 and
SAML 1.1 only.
■If User ID Store Attribute is selected, specify the user attribute to be
used.
■If Expression is specified, enter the expression to be used
Attribute Mapping Profile Indicates the attribute mapping profile to which the partner is bound.
Applies to SAML 2.0 and SAML 1.1 only.
User Identity Store This is the identity store in which the IdP's users will be located and
mapped. Identity Federation supports multiple identity stores, defined on a
per-partner basis. If no user identity store is selected, the default store
defined for Access Manager is used. (This is only relevant when OIF is an
Attribute Authority for the SAML Attribute Sharing protocol. It is not used
during SSO.)
User Search Base DN This is the base search DN used when looking up user records. (Optional. If
omitted, the default user search base DN configured for the selected user
identity store is used.)
Enable Global Logout Indicates whether or not OIF should notify the remote partner when the
user is signing off, during the logout flow. Applies to SAML 2.0 only.
SSO Response Binding Indicates whether the SAML Assertion should be sent back from the IdP
using the HTTP POST Binding or the Artifact Binding, Applies to SAML 2.0
and SAML 1.1 only.
Encrypt Assertion Indicates whether or not the Assertion should be encrypted for this partner.
Applies to SAML 2.0 only.
Realm The URL identifying an OpenID SP. Applies to OpenID 2.0 only.
Endpoint URL The URL to which the IdP will redirect the user with the OpenID Assertion.
Applies to OpenID 2.0 only.

Using Attribute Mapping Profiles
Managing Identity Federation Partners 31-11
31.4.2 Managing the Remote Service Provider Partners
To edit and manage the profiles of remote SP partners, search for the profile and make
changes to the attribute values.
To Search for Existing Service Provider Partner Profiles
1. Click Identity Provider Administration under Identity Federation in the Oracle
Access Management Console Launch Pad.
The Identity Provider Administration page is displayed.
2. In the Search section of the page, enter appropriate search criteria for identity
provider(s). The characters "
*
" (asterisk) and "
.
" (period) are supported as search
wildcards. See Table 31–5 for details about the search parameters.
3. Activate the Search Service Provider Partners tab.
4. Enter the search criteria and click Search.
The search results are displayed.
5. Select the appropriate partner in the Search Results table and select Edit under
Actions (or click the pencil).
A new tab is activated that displays the partner's attributes. In addition to the
attributes documented in Table 31–6, the following advanced attributes can be
modified.
■Enable Global Logout
■Encrypt Assertion
■SSO Response Binding (HTTP POST or Artifact)
6. Click Save to keep the changes.
31.5 Using Attribute Mapping Profiles
Identity Federation (when configured as an SP) supports the capability to request
attributes from an IdP during the Federation process. To configure for this, map the
name of an attribute from the incoming Assertion to a local attribute that will be
available in the Access Manager session (
$session.attr.fed.attr.ATTR_NAME
, for
example). An IdP Attribute Mapping Profile contains these mappings.
Similarly, Identity Federation (when configured as an IdP) supports including
attributes in an SSO Assertion or allowing SP partners to request that attributes be
placed in the SSO Assertion. Configuring Identity Federation as an IdP involves
setting up an SP Attribute Mapping profile that defines the name of the attribute in the
SSO assertion, the expression to be used to populate the attribute value, and whether
or not to always send the attribute in the SSO Assertion.
Note: If using SAML 1.1, you can include a certificate in the
signature. See Oracle Fusion Middleware WebLogic Scripting Tool
Command Reference for details.
Note: The protocol used by the provider must support the feature;
for example, OpenID 2.0.

Using Attribute Mapping Profiles
31-12 Administrator's Guide for Oracle Access Management
Each partner type (IdP or SP) references an Attribute Mapping Profile that defines the
applicable mappings. It indicates how to map attributes for that partner to attributes
defined in the Identity Federation server. If a partner does not have an Attribute
Mapping Profile defined, the default Attribute Mapping Profile (based on the partner
type) will be used. There is a default Attribute Mapping Profile for each provider type.
■SP Attribute Mapping Profile: Each SP partner profile will reference an SP
Attribute Mapping Profile. A default SP Attribute Mapping Profile will be used if
none is configured. See Section 31.5.1, "Using the SP Attribute Mapping Profile"
for details.
■IdP Attribute Mapping Profile: Each IdP partner profile will reference an IdP
Attribute Mapping Profile. A default IdP Attribute Mapping Profile will be used if
none is configured. See Section 31.5.2, "Using the IdP Attribute Mapping Profile"
for details.
31.5.1 Using the SP Attribute Mapping Profile
When the Identity Federation instance is configured as an IdP, the SP Attribute
Mapping Profile allows the administrator to define which message attributes
(included in an incoming or outgoing Identity Federation message) map to which
Access Manager session attributes. An expression is used to find the value for the
Access Manager attribute when including it in an Assertion or outgoing message.
Table 31–7 documents some sample SP attribute mappings.
Always Send indicates if the attribute should be sent even when it has not been
specifically requested. If an attribute has to be included in an outgoing Assertion
irrespective of whether it has been requested, Always Send should be set to true. If
Always Send is false, this attribute will not be included in the Assertion unless
requested. When an SP sends a request, message attributes are looked up and the
mapping value for this message attribute is calculated by evaluating its expression.
When creating or modifying an SP partner profile (as documented in Section 31.4.1,
"Creating Remote Service Provider Partners"), the available Attribute Mapping Profiles
are displayed in a drop-down list.
sp-attribute-profile
is the default profile. Select
the default or click the green plus sign to create a custom mapping profile. When
creating a new Attribute Mapping for an SP partner, the expressions documented in
Table 31–8 can be embedded in the value string of the attribute. These expressions will
be replaced by their runtime values.
Table 31–7 Sample SP Attribute Mappings
Message Attribute Access Manager Session Attribute Always Send
mail $user.attr.mail
firstname $user.attr.givenname true
lastname $user.attr.sn true
authn-level $session.authn_level true
Note: The Value expression will use the OAM Policy Expression
Language as documented in Section 20.9, "Introduction to Policy
Responses for SSO." More than one message attribute can have the
same value expression.

Using Attribute Mapping Profiles
Managing Identity Federation Partners 31-13
Table 31–8 Attribute Mapping Value Expressions
Value Type Accepted Values Expression
request httpheader.HTTP_HEADER_
NAME
HTTP_HEADER_NAME being the name of
an HTTP Header stored as
$request.httpheader.HTTP_HEADER_
NAME
cookie.COOKIE_NAME COOKIE_NAME being the name of a
cookie stored as $request.cookie.COOKIE_
NAME
client_ip stored as $request.client_ip
session authn_level stored as $session.authn_level
authn_scheme stored as $session.authn_scheme
count stored as $session.count
creation stored as $session.creation
expiration stored as $session.expiration
attr.ATTR_NAME ATTR_NAME being the name of an Access
Manager Session Attribute stored as
$session.attr.ATTR_NAME
user userid stored as $user.userid
id_domain stored as $user.id_domain
guid stored as $user.guid
groups stored as $user.groups
attr.ATTR_NAME ATTR_NAME being the name of an LDAP
User Attribute stored as $user.attr.ATTR_
NAME
expression
(Based on the
identifiers
defined above
and qualified
with the type
of data)
- request:
■$request.httpheader.HTTP_
HEADER_NAME
■$request.cookie.COOKIE_
NAME
■$request.client_ip
-
■HTTP_HEADER_NAME being the
name of an HTTP Header
■COOKIE_NAME being the name of a
cookie
■
- session:
■$session.authn_level
■$session.authn_scheme
■$session.count
■$session.creation
■$session.expiration
■$session.attr.ATTR_NAME
-
■
■
■
■
■
■ATTR_NAME being the name of an
Access Manager Session Attribute

Using Attribute Mapping Profiles
31-14 Administrator's Guide for Oracle Access Management
31.5.2 Using the IdP Attribute Mapping Profile
When the Identity Federation instance is configured as an SP, the IdP Attribute
Mapping Profile allows the administrator to define which attributes (included in an
incoming or outgoing Identity Federation message) map to which Access Manager
session attributes. The profile allows for the inclusion of the following data:
■Message Attribute: the name of the attribute in the incoming/outgoing Federation
messages.
■Access Manager Session Attribute: the name by which the attribute is known to
the local Access Manager server.
■Request From Partner: Indicates if this attribute is sent in the Request made to the
IdP (a value for this attribute is requested by the SP).
Table 31–9 documents sample IdP attribute mappings.
In a protocol where a SP can specify which attributes are required in a response from
the IdP, a Message Attribute name is sent in the request to the IdP. In cases when the
SP receives an assertion or response from an IdP, the Attributes from the assertion are
stored in the Access Manager session. If no Access Manager value is specified, the
Message Attribute is stored.
When creating or modifying an IdP partner profile (as documented in Section 31.3.1,
"Creating Remote Identity Provider Partners"), the Attribute Mapping Profile is
displayed with a drop-down list. The
idp-attribute-profile
is the default profile.
Select the default or click the green plus sign to create a custom mapping profile.
The Ignore Umapped Attributes checkbox (in the configuration screen) indicates how
to deal with Assertion Attributes not present (or that are present but have no value in
- from user:
■$user.userid
■$user.id_domain
■$user.guid
■$user.groups
■$user.attr.ATTR_NAME
■can be any string, with '.'
(dot) characters, spaces
characters (like
"$user.userid" or
"$user.attr.givenname
$user.attr.sn" or "This is the
number of sessions:
$session.count")
-
■
■
■
■
■ATTR_NAME being the name of an
LDAP User Attribute
■
Table 31–9 Sample IdP Attribute Mappings
Message Attribute Access Manager Session Attribute Request for Inclusion
mail email true
givenname true
sn surname
uid uid
Table 31–8 (Cont.) Attribute Mapping Value Expressions
Value Type Accepted Values Expression

Mapping Federation Authentication Methods to Access Manager Authentication Schemes
Managing Identity Federation Partners 31-15
the Access Manager Session Attribute column). If this checkbox is not checked, all
Assertion Attributes that are not present in the table (or don't have a value mapped to
Access Manager) will be stored in the Access Manager session with the same attribute
name it had in the Assertion. If checked, any Assertion Attribute not present in the
table (or with no value mapped to Access Manager) will be ignored and not added to
the Access Manager session.
31.6 Mapping Federation Authentication Methods to Access Manager
Authentication Schemes
A Federation Authentication Method (FAM) is an identifier representing an
authentication mechanism in Federation messages. This identifier can either be well
known (such as the identifiers defined in the SAML specifications like
urn:oasis:names:tc:SAML:2.0:ac:classes:PasswordProtectedTransport
or
urn:oasis:names:tc:SAML:1.0:am:password
) or it can be an arbitrary identifier
agreed upon between the two communicating partners.
In its responsibilities as an IdP, Identity Federation generates an Assertion (SAML or
OpenID) that might contain information on how the user was authenticated. During
the Assertion generation process, the IdP will retrieve the Authentication Scheme with
which the user was authenticated and attempt to map it to a FAM. If such a mapping
exists, the IdP will include the FAM in the outgoing Assertion. If no mapping exists,
the IdP will include the defined Authentication Scheme as the FAM in the Assertion.
Table 31–10 lists the default, out-of-the-box mappings between FAMs and Access
Manager Authentication Schemes.
Note: When the Identity Federation instance is configured as an SP it
can request attributes only if the federation protocol used supports it.
OpenID 2.0 supports this feature; SAML 2.0 and SAML 1.1 do not.
Note: Session attributes can be used in proxy mode when a mapping
is not defined. Identity Federation (when acting as an IdP) can use
session attributes for the FAM value when creating the assertion, if
both protocols are equivalent.
Table 31–10 Default Federation Authentication Method and Access Manager
Authentication Scheme Mappings
Protocol Mapping
saml20-sp-partner-profile urn:oasis:names:tc:SAML:2.0:ac:classes:PasswordProtectedTranspor
t to:
■LDAPScheme (scheme used if the SP Partner requests
urn:oasis:names:tc:SAML:2.0:ac:classes:PasswordProtectedTran
sport)
■FAAuthScheme
■BasicScheme
■BasicFAScheme

Mapping Federation Authentication Methods to Access Manager Authentication Schemes
31-16 Administrator's Guide for Oracle Access Management
More details are in the following sections.
■Understanding Federation SSO As An IdP
■Understanding Federation SSO As An SP
■Configuring an Alternate Authentication Scheme
■Using WLST For Mapping Administration
31.6.1 Understanding Federation SSO As An IdP
When Identity Federation acts as an IdP, it processes incoming Authentication Request
messages sent by SP partners. These messages might specify a FAM with which the
user should be challenged by Access Manager (the IdP). If the Authentication Request
contains a FAM, the IdP will attempt to map it to an Access Manager Authentication
Scheme. If such a mapping is defined, Access Manager will authenticate the user using
that scheme - only if the user needs to be challenged. The user would need to be
challenged if, for example, the session timed out or does not exist or, the
authentication level of the current session is lower than the level of the mapped
Authentication Scheme or, the user has not yet been authenticated by Access Manager.
If no mapping is defined, the IdP will return an error to the SP indicating that the FAM
is unknown.
When the IdP Authentication Module invokes Access Manager to challenge the user, it
will determine the Authentication Scheme to be used for the operation in one of the
following ways:
■The SP requests a specific means to authenticate the user with a Federation
Authentication Request.
■The SP settings in the IdP configuration that define a default scheme. The Partner
configuration is checked first, followed by the Partner Profile configuration and
finally the global default Authentication Scheme defined in the IdP configuration
(LDAPScheme).
After authentication, the IdP creates an Assertion and maps the Access Manager
Authentication Scheme (and appropriate level) to a FAM, if such a mapping exists. The
FAM is set as the Authentication Context. If no mapping exists, Identity Federation
sends the default Access Manager Authentication Scheme as the Authentication
Context. Following this process, the user is redirected back to Identity Federation.
saml11-sp-partner-profile urn:oasis:names:tc:SAML:1.0:am:password to:
■LDAPScheme (scheme used if the SP Partner requests
urn:oasis:names:tc:SAML:1.0:am:password)
■FAAuthScheme
■BasicScheme
■BasicFAScheme
Note: By default, the Partner and Partner Profile configurations do
not define a default Authentication Scheme. As such, the global
default Authentication Scheme is in effect: LDAPScheme.
Table 31–10 (Cont.) Default Federation Authentication Method and Access Manager
Authentication Scheme Mappings
Protocol Mapping

Mapping Federation Authentication Methods to Access Manager Authentication Schemes
Managing Identity Federation Partners 31-17
31.6.2 Understanding Federation SSO As An SP
When acting as an SP in a Federation SSO process, Identity Federation processes an
incoming Assertion generated by an IdP partner. This process results in the creation of
an Access Manager session for the user and the mapping of the FAM contained in the
Assertion to the default SchemeID/Access Manager authentication scheme. Identity
Federation provides the authentication level, if set, that should be used when Access
Manager creates the user session. (By default, the Authentication Level of the Access
Manager session will be set to the Authentication Level of the defined
FederationScheme.) The FAM will be saved as a session attribute.
The administrator can define a mapping where the SP will create an Access Manager
session with a level set to the mapped Authentication Level for the FAM contained in
the Assertion. This provides a way to reflect the strength of the mechanism with which
the user was originally authenticated by the IdP.
31.6.3 Configuring an Alternate Authentication Scheme
During a Federation SSO operation, the IdP invokes the Access Manager
Authentication Module to challenge the user when required; for example, if the user is
not authenticated in Access Manager, has an Access Manager session that has been
inactive too long or timed out or, if the Service Provider indicates (with a Federation
Authentication Request) that the IdP must re-challenge the user. For certain clients, an
IdP might be required to use another Authentication Scheme to challenge a user
besides the default one. This is especially true for mobile phones when an
administrator might want to challenge a user with an Authentication Scheme that is
different than the one used for computer-based browsers; for example, instead of an
HTTP Basic Authentication Scheme, a scheme designed for mobile clients would be
used.
Identity Federation (when working as an IdP) can be configured to evaluate whether
an alternate Authentication Scheme should be used instead of the configured one by
examining the HTTP Header sent by the user's browser. Identity Federation evaluates
based on the following configurable settings:
■A setting indicating which HTTP Header attribute is sent by the user's browser.
■A setting containing a regular expression that will evaluate the value of the above
HTTP Header attribute.
■A setting containing the alternate Authentication Scheme to use.
An alternate Authentication Scheme is only configurable using WLST commands and
not the Oracle Access Management Console. For information on the
setSPPartnerAlternateScheme
and
setSPPartnerProfileAlternateScheme
WLST
commands, see the Oracle Fusion Middleware WebLogic Scripting Tool Command Reference.
31.6.4 Using WLST For Mapping Administration
All Authentication Method/Scheme/Level mappings are configured using the WLST
commands. This can be done either at the partner level or, if not defined at the partner
level, at the partner profile level. See Section 31.9, "Using WLST for Identity Federation
Administration" for details.
Note: If the SP requested a specific Authentication Scheme,
evaluation does not apply.
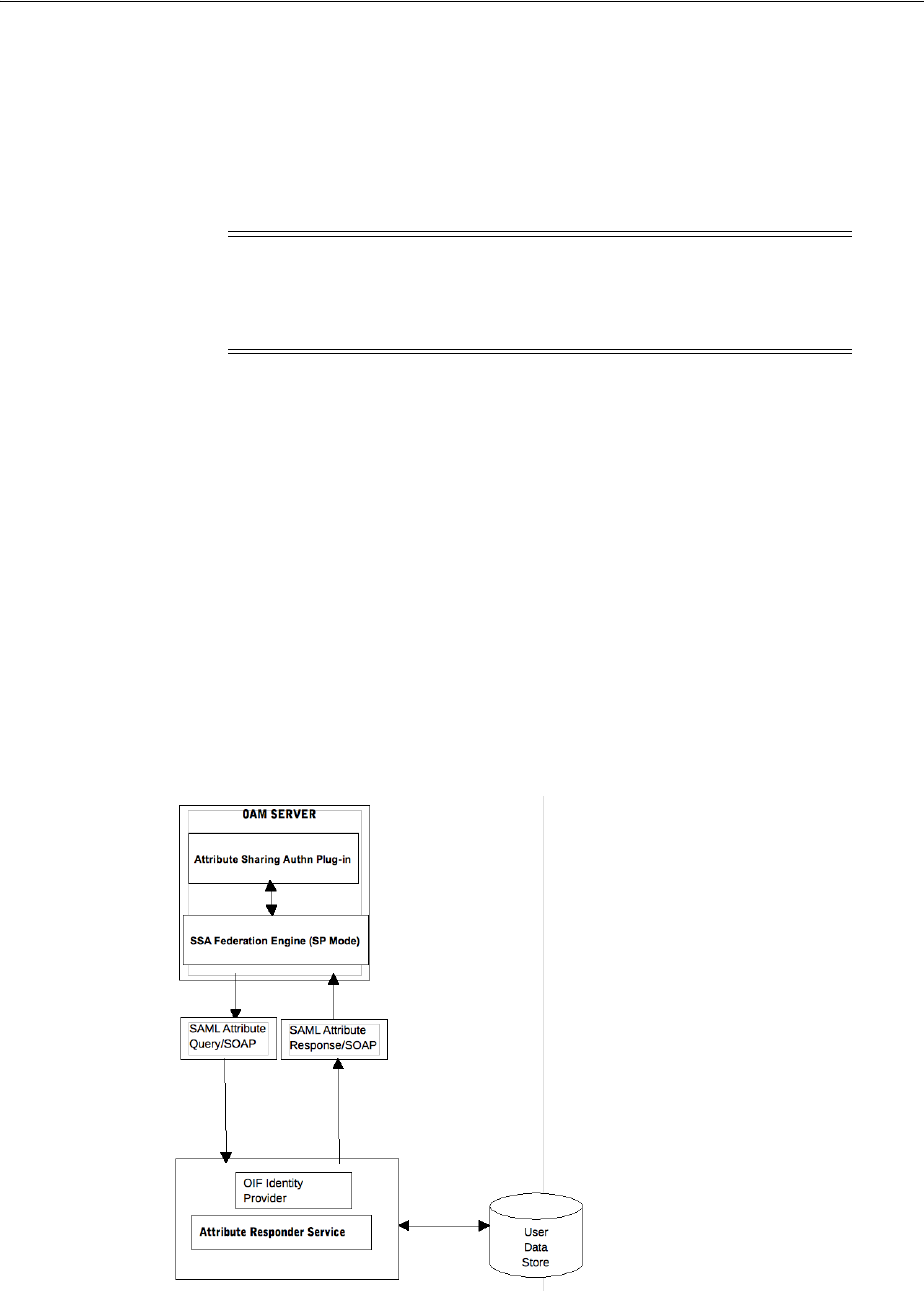
Using the Attribute Sharing Plug-in for the Attribute Query Service
31-18 Administrator's Guide for Oracle Access Management
31.7 Using the Attribute Sharing Plug-in for the Attribute Query Service
Identity Federation provides an attribute sharing plug-in to enable Access Manager to
request user attributes from an IdP. In this interaction, the SP is an <AttributeQuery>
requestor and the IdP is an <AttributeQuery> responder. The Attribute Sharing
Plug-in depends on the Attribute Query Service, a request/response protocol
transported using SOAP.
Identity Federation (when configured as an SP) can send a SAML 2.0
<AttributeQuery> to the IdP in response to a SOAP call. The plug-in can be configured
as a step in an Authentication Scheme. It can be invoked after authentication (by
another plug-in) to fetch attributes for the authenticated user and set them into the
Access Manager session. The following sections contain additional details.
■Understanding the Plug-in and Query Service Design
■Configuring for Attribute Sharing
31.7.1 Understanding the Plug-in and Query Service Design
Identity Federation must be configured as an SP to request user attributes from a
remote IdP. From a high level, the design of the Attribute Sharing plug-in is illustrated
in Figure 31–5.
Figure 31–5 Attribute Sharing Plug-in Design
The Attribute Sharing plug-in can be part of an Access Manager Custom
Authentication Module and is invoked after a user has been authenticated. The
Note: The Attribute Sharing Plug-in leverages the AttributeQuery
requestor service to implement (a superset of) the X.509
Authentication Based Attribute Sharing Profile (XASP) in the context
of Access Manager authentication flows.

Using the Attribute Sharing Plug-in for the Attribute Query Service
Managing Identity Federation Partners 31-19
Attribute Sharing plug-in will fetch the user attributes by invoking the Identity
Federation Java API, setting the attributes into the Access Manager session and
transforming the Java arguments into an Attribute Request that can be processed by
the SP. The Identity Federation SP receives the Attribute Request (at an exposed SOAP
endpoint), determines the attributes being requested and sends an (optionally) signed
and encrypted SAML 2.0 <AttributeQuery> using the requested attribute names over
a SOAP/HTTP/SSL channel to the IdP's Attribute Responder Service.
The Attribute Responder Service (at the remote IdP) receives the <AttributeQuery>,
decrypts it (verifying the signature if necessary) and determines (from its local policy)
if the SP is authorized to request the attributes. If so, it retrieves the attributes from a
user repository, constructs and (optionally) signs and encrypts an <Assertion> (with
an <AttributeStatement> containing the attribute values) and returns a <Response>
with the assertion to the SP. On receiving the <Response>, the SP decrypts the
assertion, verifies (if necessary) its signature, extracts the attributes from the assertion
and set the information in the Access Manager session. The following sections contain
more details.
■Using the SP Attribute Requester
■Using the IdP Attribute Responder
■Using the SOAP Endpoint
31.7.1.1 Using the SP Attribute Requester
The Attribute Requester Service processes the SOAP Attribute Request and returns a
SOAP Attribute Response. (See Section 31.7.1.3, "Using the SOAP Endpoint" for
details.) The Attribute Request will contain a SubjectDN and a list of other requested
attributes and their values. The Attribute Requester Service identifies the IdP from
which to fetch attributes by extracting one of the following (searched for in the order
listed) from the request.
1. The partner/IdP name if the request comes from the Federation engine.
2. The IdP configured in the plug-in used for authentication.
3. The request's Subject DN to determine which IdP will get the query from the
configured SubjectDN-IdP map. Map the SubjectDN from most specific (cn=Joe
User,ou=Finance,o=Company,c=US) to least specific (c=US).
4. The default IdP.
Following this discovery, the Attribute Requester Service retrieves the SOAP Attribute
Responder Service endpoint URL from the IdP's metadata and creates a list of
attributes to fetch by processing the attributes in the request through the Attribute
Mapping profile.
Note: When invoking the Attribute Sharing plug-in, the framework
will provide the following for inclusion in the <AttributeQuery>:
■User ID of the authenticated user or SubjectDN if available
■Partner ID user session attribute (available only if the Federation
Authentication plug-in was used to authenticate user)
■Tenant Name
■IdP Name if the plug-in was created specifically for an IdP

Using the Attribute Sharing Plug-in for the Attribute Query Service
31-20 Administrator's Guide for Oracle Access Management
A SAML Attribute Query is generated with the attribute list and sent to the IdP's
SOAP endpoint. Once a response is received, the subject is verified and the each
attribute is extracted from the Assertion, its value is found and both attribute and
value are cached. Finally, an Attribute Response SOAP message is constructed and
returned to the caller. Example 31–1 is a sample SOAP Attribute Request.
Example 31–1 Sample SOAP Attribute Request
<SOAP-ENV:Envelope xmlns:SOAP-ENV="http://schemas.xmlsoap.org/soap/envelope/">
<SOAP-ENV:Body>
<attrreq:AttributeRequest TargetIDP="adc.example.com"
xmlns:attrreq="http://www.example.com/fed/ar/10gR3">
<attrreq:Subject
Format="oracle:security:nameid:format:emailaddress">alice@example.com
</attrreq:Subject>
<attrreq:Attribute Name="cn">
</attrreq:Attribute>
</attrreq:AttributeRequest>
</SOAP-ENV:Body>
</SOAP-ENV:Envelope>
Example 31–2 is a sample SOAP attribute response.
Example 31–2 Sample SOAP Attribute Response
<?xml version="1.0" encoding="UTF-8" standalone="yes"?>
<soap:Envelope xmlns:wsa="http://schemas.xmlsoap.org/ws/2004/08/addressing"
xmlns:ns2="http://www.w3.org/2005/08/addressing"
xmlns:wsp="http://schemas.xmlsoap.org/ws/2004/09/policy"
xmlns:enc="http://www.w3.org/2001/04/xmlenc#"
xmlns:md="urn:oasis:names:tc:SAML:2.0:metadata"
xmlns:wst14="http://docs.oasis-open.org/ws-sx/ws-trust/200802"
xmlns:samlp="urn:oasis:names:tc:SAML:2.0:protocol"
xmlns:ic="http://schemas.xmlsoap.org/ws/2005/05/identity"
xmlns:mdext="urn:oasis:names:tc:SAML:metadata:extension"
xmlns:wst="http://schemas.xmlsoap.org/ws/2005/02/trust"
xmlns:ns11="http://docs.oasis-open.org/ws-sx/ws-trust/200512"
xmlns:soap="http://schemas.xmlsoap.org/soap/envelope/"
xmlns:saml="urn:oasis:names:tc:SAML:1.0:assertion"
xmlns:ns14="urn:oasis:names:tc:SAML:2.0:assertion"
xmlns:xrds="xri://$xrds" xmlns:xrd="xri://$xrd*($v*2.0)"
xmlns:tns="http://schemas.xmlsoap.org/ws/2005/07/securitypolicy"
xmlns:ns18="http://docs.oasis-open.org/ws-sx/ws-securitypolicy/200702"
xmlns:ns19="urn:oasis:names:tc:SAML:1.0:protocol"
xmlns:ns20="http://www.w3.org/2003/05/soap-envelope"
xmlns:wsse11="http://docs.oasis-open.org/wss/
oasis-wss-wssecurity-secext-1.1.xsd"
xmlns:dsig="http://www.w3.org/2000/09/xmldsig#"
xmlns:query="urn:oasis:names:tc:SAML:metadata:ext:query"
xmlns:wsu="http://docs.oasis-open.org/wss/2004/01/
oasis-200401-wss-wssecurity-utility-1.0.xsd"
xmlns:wsse="http://docs.oasis-open.org/wss/2004/01/
oasis-200401-wss-wssecurity-secext-1.0.xsd"
Note: Attribute Mapping profile specified for the target IdP will be
used to change any incoming attribute names as well as add any
attributes that are configured as
send-with-sso
(always requested) in
the Attribute Mapping for this IdP.

Using the Attribute Sharing Plug-in for the Attribute Query Service
Managing Identity Federation Partners 31-21
xmlns:xsi="http://www.w3.org/2001/XMLSchema-instance"
xmlns:x500="urn:oasis:names:tc:SAML:2.0:profiles:attribute:X500"
xmlns:orafed-arxs="http://www.oracle.com/fed/ar/10gR3"
xmlns:mdattr="urn:oasis:names:tc:SAML:metadata:attribute"
xmlns:ns31="urn:oasis:names:tc:SAML:profiles:v1metadata"
xmlns:ecp="urn:oasis:names:tc:SAML:2.0:profiles:SSO:ecp">
<soap:Body><orafed-arxs:AttributeResponse CacheFor="899">
<orafed-arxs:Status>Success</orafed-arxs:Status>
<orafed-arxs:Subject Format="oracle:security:nameid:format:emailaddress">
alice@example.com</orafed-arxs:Subject>
<orafed-arxs:Attribute Name="cn">
<orafed-arxs:Value>alice</orafed-arxs:Value>
</orafed-arxs:Attribute>
</orafed-arxs:AttributeResponse>
</soap:Body>
</soap:Envelope>
31.7.1.2 Using the IdP Attribute Responder
The Identity Federation IdP Attribute Responder receives the SAML Attribute Query
and returns a SAML response with an Attribute Statement that contains values for the
requested attributes. The IdP first identifies the requester as an SP partner and then
confirms that the user is in the user data store by searching on the NameId or
SubjectDN value. It then uses the Attribute Mapping profile of the SP partner to
retrieve values for each of the requested attributes. Finally, it constructs and returns a
SAML response containing an Attribute Statement with attribute values. (This is only
relevant when OIF is an Attribute Authority for the SAML Attribute Sharing protocol.
It is not used during SSO.)
31.7.1.3 Using the SOAP Endpoint
The Attribute Requester Service on the SP exposes a SOAP interface for client requests.
The SOAP service is available on the SP at the following URL:
http://<SP-managed-server>:<SP-port>/oamfed/ar/soap
31.7.2 Configuring for Attribute Sharing
The Attribute Sharing Plug-in can optionally be provided with the configuration
parameters documented in Table 31–11.
Note: The Attribute Responder uses the SP partner's Attribute
Mapping profile to retrieve values. An empty value is returned for an
attribute if there is no mapping present in the Attribute Mapping
profile. If the value expression contains variables in the namespace of
a session or request, this also evaluates to an empty string. Value
Expressions in the Attribute Mapping Profile can only use variables in
the namespace of
user.attr
to be evaluated correctly.
Table 31–11 Configuration Parameters for Attribute Sharing Plug-in
Parameter Description
NameIDValueAttribute The name of the session attribute from which the user's nameID
can be retrieved.

Using the Attribute Sharing Plug-in for the Attribute Query Service
31-22 Administrator's Guide for Oracle Access Management
The Attribute Sharing Plug-in can also access the attributes documented in
Table 31–12. These attributes may be present in the Access Manager session during its
operation.
The following sections have additional details on parameters and how they determine
how the Attribute Sharing process.
■NameID
■NameID Format
■IdP
■RequestedAttributes
31.7.2.1 NameID
This is the name identifier of the user for whom the SP is requesting attributes. To
determine the NameID, the following searches will be conducted in order.
In the Attribute Sharing plug-in
1. If the NameIDValueAttribute is specified, retrieve the value of the specified
attribute from the session and use it as the NameID.
NameIDFormatAttribute The name of the attribute that contains the value to be used as
the nameID format.
AttributeAuthorityAttribute The name of the attribute that contains the value used as the IdP
to which the SP will send the <AttributeQuery>.
RequestedAttributes This parameter can be used to specify attributes to be requested
in the URL query format; for example,
attr1&attr2&attr3=value1
. In this case, attr1 and attr2 will be
fetched but attr3 will be present in the response ONLY if one of
its values is value1.
DefaultNameIDFormat The nameID format to be used if it is undetermined from the
other parameters and session attributes.
DefaultAttributeAuthority The default IdP partner from whom to request the user's
attributes.
Table 31–12 Session Attributes Accessible To Attribute Sharing Plug-in
Attribute Description
fed.partner If Federation was used to authenticate the user, this value is used to
determine the IdP used. The same IdP would then be used for
Attribute Sharing.
fed.nameidformat If Federation was used to authenticate the user, the value of this
attribute is used to determine the NameID format.
fed.nameidvalue If Federation was used to authenticate the user, the value of this
attribute is used to determine the NameID of the user. If present in
the session, it will be used as the DN to locate the user in the SP's
identity store.
KEY_USERNAME_DN If this value is present, it will be used as the DN to locate the user in
the SP's identity store.
Table 31–11 (Cont.) Configuration Parameters for Attribute Sharing Plug-in
Parameter Description

Using the Attribute Sharing Plug-in for the Attribute Query Service
Managing Identity Federation Partners 31-23
2. If NameIDValueAttribute is not specified, use the value of
fed.nameidvalue
for
the NameID.
3. If undetermined by the above, the Attribute Sharing Plug-in will invoke the
Federation Engine with a null/empty NameID and the UserID (specified in the
KEY_USERNAME_DN session attribute) is sent to the SP Attribute Requester.
In the Attribute Requester (SP)
1. If the NameID is in the Request, use its value for the user's nameID.
2. If a NameID is undetermined but a UserID is present (which occurs when
invoking the Authentication Plug-in), retrieve the value of the
defaultattrrequestnameiduserattribute
attribute (found in the SP
configuration for this IdP) and use it as the NameID.
3. When using SAML 2.0 only: If a NameID is not determined and SSO is configured
for Simple NameID mapping, use the
nameiduserattribute
attribute (found in
the SP configuration for this IdP). For example, if the value of this attribute is
$user.attr.mail
, extract the name of the user from this attribute and use it as the
NameID.
4. If a NameID is still undetermined, an error is thrown.
31.7.2.2 NameID Format
This is the format of the user's NameID. To determine the NameID format, the
following searches will be conducted in order.
In the Attribute Sharing plug-in
1. If the NameIDFormatAttribute parameter (Table 31–11) is specified, retrieve the
value of the specified attribute and use it as the NameID format.
2. Use the value of the
fed.nameidformat
attribute (Table 31–12) as the NameID
format.
3. Use the value of the
DefaultNameIDFormat
(Table 31–11) as the NameID format.
4. If NameID Format is still undetermined, the Attribute Sharing plug-in will invoke
Federation with a null/empty NameID Format.
In the Attribute Requester (SP)
1. Use the NameID Format specified in the request.
2. Use the value of the
defaultattrrequestnameidformat
attribute (found in the SP
configuration for this IdP).
3. When using SAML 2.0 only: If the NameID Format is still undetermined, use the
value of the
defaultauthnrequestnameidformat
attribute (found in the SP
configuration for this IdP).
4. If a NameID Format is still undetermined, an error is thrown.
31.7.2.3 IdP
This is the IdP partner to which the attribute request should be sent. To determine the
IdP partner, the following searches will be conducted in order.
In the Attribute Sharing plug-in
1. If the AttributeAuthorityAttribute (Table 31–11) is specified, retrieve its value and
use it as the IdP name.

Using the Federation Proxy
31-24 Administrator's Guide for Oracle Access Management
2. Use the value of the
fed.partner
attribute (Table 31–12) as the IdP name.
3. Use the value of the
DefaultAttributeAuthority
parameter (Table 31–11) as the
IdP name.
4. If the IdP is still undetermined, the Attribute Sharing plug-in will invoke
Federation with a null/empty NameID Format.
In the Attribute Requester (SP)
1. Use the IdP name included with the request sent to the Attribute Sharing plugin.
2. When using x509 only: look up the dn-idp mapping to determine the IdP for this
user DN.
3. Use the value of the
defaultattrauthority
attribute (found in the SP
configuration).
4. Use the value of the
defaultssoidp
attribute (found in the SP configuration).
5. If an IdP name is still undetermined, an error is thrown.
31.7.2.4 RequestedAttributes
These are the attributes to be requested from the Attribute Authority. To determine the
attributes, the following searches will be conducted in order.
In the Attribute Sharing plug-in
If the
RequestedAttributes
parameter (Table 31–11) is defined, use the attributes
specified. If none are specified, no attributes are sent.
In the Attribute Requester (SP)
1. If the
RequestedAttributes
parameter (Table 31–11) is defined, use the attributes
specified.
2. Append (or add) attributes to the
request from partner(send-with-sso)
attribute in the IdP partner profile.
In the Attribute Responder (IdP)
1. If the <AttributeQuery> from the SP contains requests for specific attribute values,
return values for those attributes.
2. If no attribute values are requested, return any attributes specified as
Always Send
(send-with-sso)
in the SP attribute profile configuration.
31.8 Using the Federation Proxy
When configured as an IdP, Identity Federation can enable the Federation Proxy to
receive an Authentication Request from a remote SP partner. Rather than
authenticating the user locally, the IdP begins a second Federation SSO flow (SP2) with
a second, remote IdP (IdP2). IdP2 then authenticates the user, creates an Assertion and
redirects the user back to the Federation Proxy (IdP/SP2). The proxy validates the
Assertion, identifies the user and resumes the first Federation SSO flow by creating a
second Assertion and redirecting the user back to the original SP. With Federation
Proxy, the first IdP is proxying the authentication to the second IdP.

Using WLST for Identity Federation Administration
Managing Identity Federation Partners 31-25
To use Federation IdP Proxy, the administrator configures Identity Federation to use
FederationScheme for authentication rather than a local scheme (like LDAPScheme or
BasicScheme). At runtime, if the user needs to be authenticated using the
FederationScheme, Identity Federation will act as an SP and start the Federation SSO
flow with a remote IdP.
For information on how to enable Federation Proxy using the
useProxiedFedAuthnMethod
WLST command, see the Oracle Fusion Middleware
WebLogic Scripting Tool Command Reference.
31.9 Using WLST for Identity Federation Administration
Identity Federation uses WLST commands for administration. There are commands
for managing authentication mappings, partner profiles and SAML 1.1 that do not
have applicable administrative fields for configuration in the Oracle Access
Management Console. For information on these and other WLST commands, see the
Oracle Fusion Middleware WebLogic Scripting Tool Command Reference.
Note: The Federation Proxy does not refer to the HTTP Proxy
settings listed under Federation Settings. That is used by Identity
Federation to connect to remote servers when a firewall is present.
Note: There is an option to include the proxied Federation
authentication method used by the second IdP in the Assertion
created for the first SP. This is only possible if the Federation SSO
operation between SP2 and IdP2 use the same protocol as the one
used between SP1 and IdP1.

Using WLST for Identity Federation Administration
31-26 Administrator's Guide for Oracle Access Management

32
Managing Settings for Identity Federation 32-1
32
Managing Settings for Identity Federation
This chapter introduces the settings that must be configured for use by Oracle Access
Management Identity Federation. This chapter includes the following sections:
■Prerequisites
■Introduction to Federation Settings
■Managing General Federation Settings
■Managing Proxy Settings for Federation
■Defining Keystore Settings for Federation
■Exporting Metadata
32.1 Prerequisites
The topics in this chapter presume that you have performed tasks in Chapter 31,
"Managing Identity Federation Partners".
32.2 Introduction to Federation Settings
This section introduces the federation settings that must be configured to enable the
Identity Federation functionality available from the Oracle Access Management
Console.
Figure 32–1 shows the Federations Settings page as it appears in the Oracle Access
Management Console. This page is the same whether you choose Identity Federation
Service Settings from the Welcome page, Configuration panel, or you display the
Federation section of the System Configuration tab and choose Federation Settings.
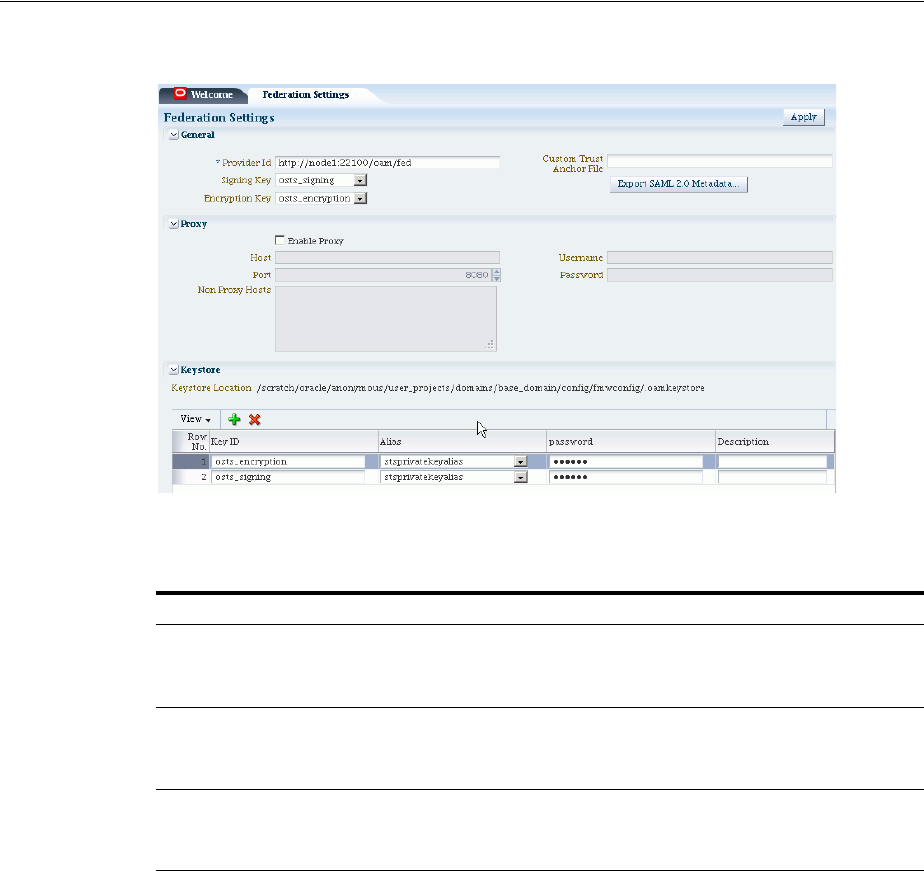
Managing General Federation Settings
32-2 Administrator's Guide for Oracle Access Management
Figure 32–1 Identity Federation Service Settings Page
Table 32–1 outlines the types of federation settings you can configure.
32.3 Managing General Federation Settings
This topic is divided as follows:
■About Managing General Federation Settings
■Managing General Federation Settings
32.3.1 About Managing General Federation Settings
You view and manage general federation properties on the Federation Settings page of
the console.
Figure 32–2 shows the General section of the Federation Settings page.
Table 32–1 Federation Settings in the Console
Elements Description
General General federation settings include basic information about
the provider and the keys used to send assertions.
See Also: Managing General Federation Settings
Proxy Proxy settings enable you to set up a proxy server for
federation.
See Also: Managing Proxy Settings for Federation
Keystore Keystore settings enable you to create aliases (a short hand
notation) for keys in the keystore.
See Also: Defining Keystore Settings for Federation
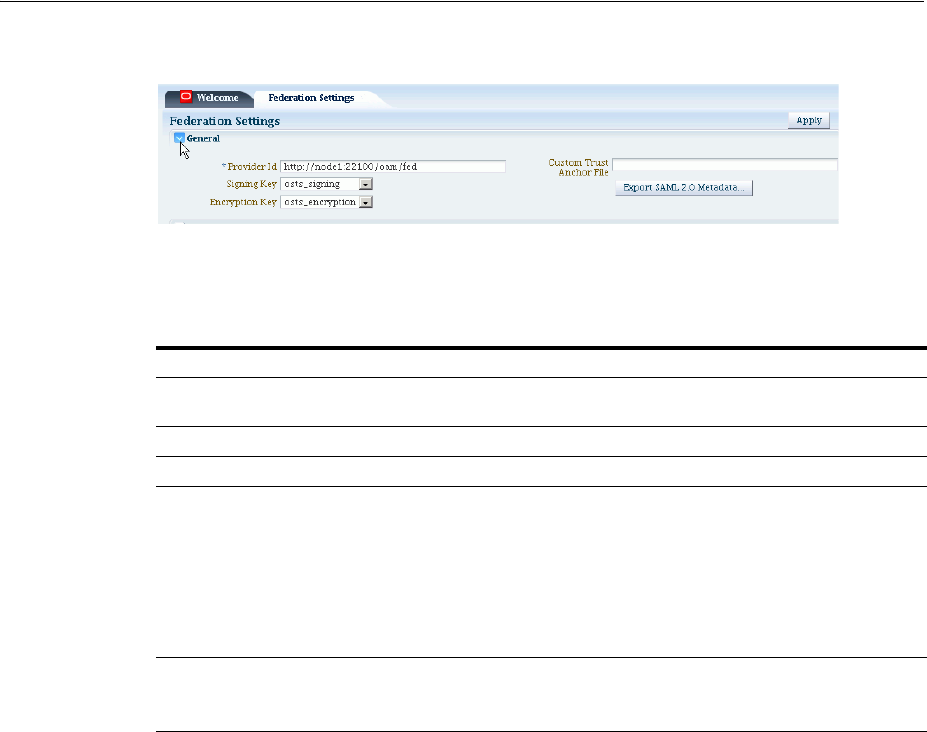
Managing Proxy Settings for Federation
Managing Settings for Identity Federation 32-3
Figure 32–2 General Section of Federation Settings Page
Table 32–2 describes each element on the General section of the Federation Settings
page.
32.3.2 Managing General Federation Settings
General settings include basic information about a provider.
Prerequisites
None.
To set or modify General settings for Federation
1. From the Oracle Access Management Console, click Federation Settings:
2. On the Federation Settings page, enter General Settings values for your
(Table 32–2).
3. Click Apply to save your changes.
4. Proceed to "Managing Proxy Settings for Federation".
32.4 Managing Proxy Settings for Federation
This topic is organized in the following sections.
■About Proxy Settings for Federation
■Managing Proxy Settings for Identity Federation
Table 32–2 General Federation Settings
Element Description
Provider ID This is the provider ID of this federation server. For example,
http://foo.example.com/fed
.
Signing Key This key is used to sign assertions.
Encryption Key This key is used to decrypt incoming messages.
Custom Trust Anchor File Specifies a keystore that contains trusted root certificates use in
federation. The default trust store is
$DOMAIN_HOME/config/fmwconfig/amtruststore
.
In most cases, the default trust anchor should be enough. If necessary,
specify the location of an alternate keystore to use.
Note: When you use a custom trust anchor keystore, it will not be
replicated automatically across the cluster. You must manage
replication of this keystore.
Export SAML 2.0 Metadata After changes to the General settings, you must export the metadata
for use by federation partners.
See Also: Exporting Metadata
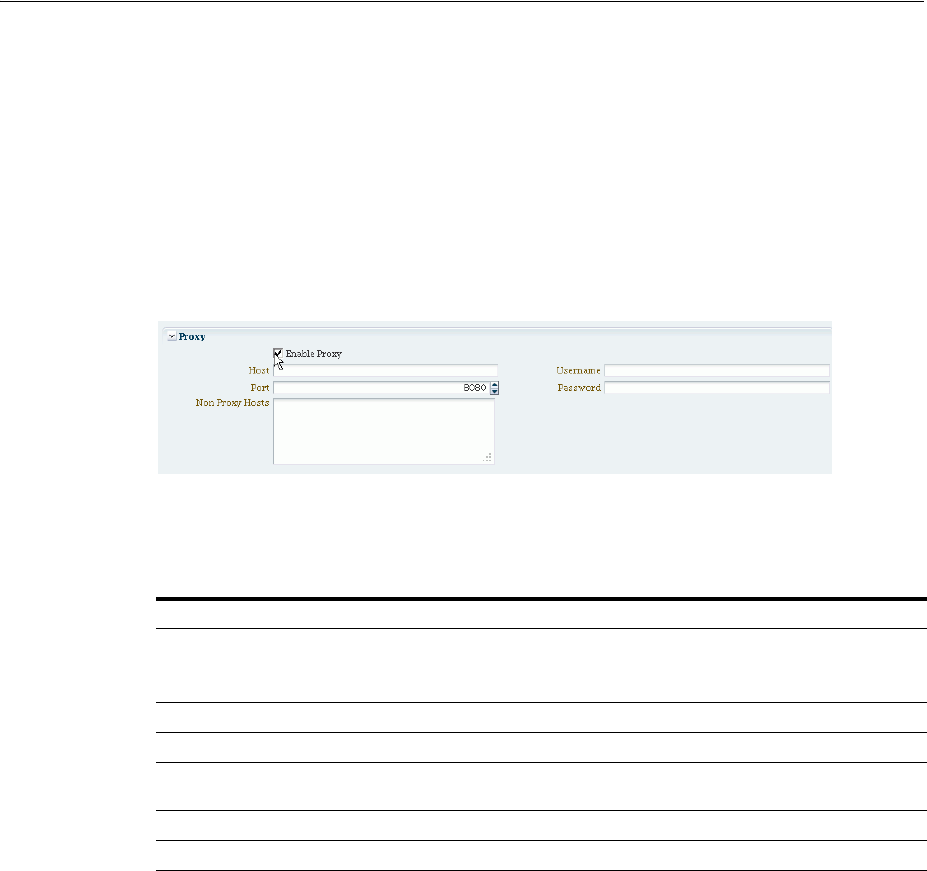
Managing Proxy Settings for Federation
32-4 Administrator's Guide for Oracle Access Management
32.4.1 About Proxy Settings for Federation
A proxy may be required when Identity Federation needs to directly connect to the
federation partner, such as in a SAML artifact SSO operation.
You view and manage a proxy configured for use with federation partners on the
Federation Settings page of the console.
Figure 32–3 illustrates the Federation Proxy Settings section of the Federation Settings
page. Subsequently, Table 32–3 describes each element on this section of the page.
Figure 32–3 Federation Proxy Settings
Table 32–3 describes each element on the Federation Proxy Settings section of the
Federation Settings page.
32.4.2 Managing Proxy Settings for Identity Federation
Skip Step 1 if viewing the Federation Settings page.
Prerequisites
None.
To set or modify Proxy settings for Federation
1. From the Oracle Access Management Console, click Federation Settings.
2. On the Federation Settings page, evaluate current proxy settings values against
those needed for your environment.
3. Fill in the Proxy settings using values for your environment (Table 32–3).
4. Click Apply to save your changes.
5. Proceed to "Defining Keystore Settings for Federation".
Table 32–3 Federation Proxy Settings
Element Description
Enable Proxy Checking the box enables the proxy server.
When the box is unchecked, the Proxy function is disabled and related
fields are inaccessible for editing.
Host This element specifies the proxy hostname.
Port This element specifies the proxy port number.
Non-proxy Hosts This is a list of hosts for which the proxy should not be used. Use ';' to
separate multiple hosts.
Username This is the proxy user name to use when connecting to the proxy.
Password This is the proxy password to use when connecting to the proxy.
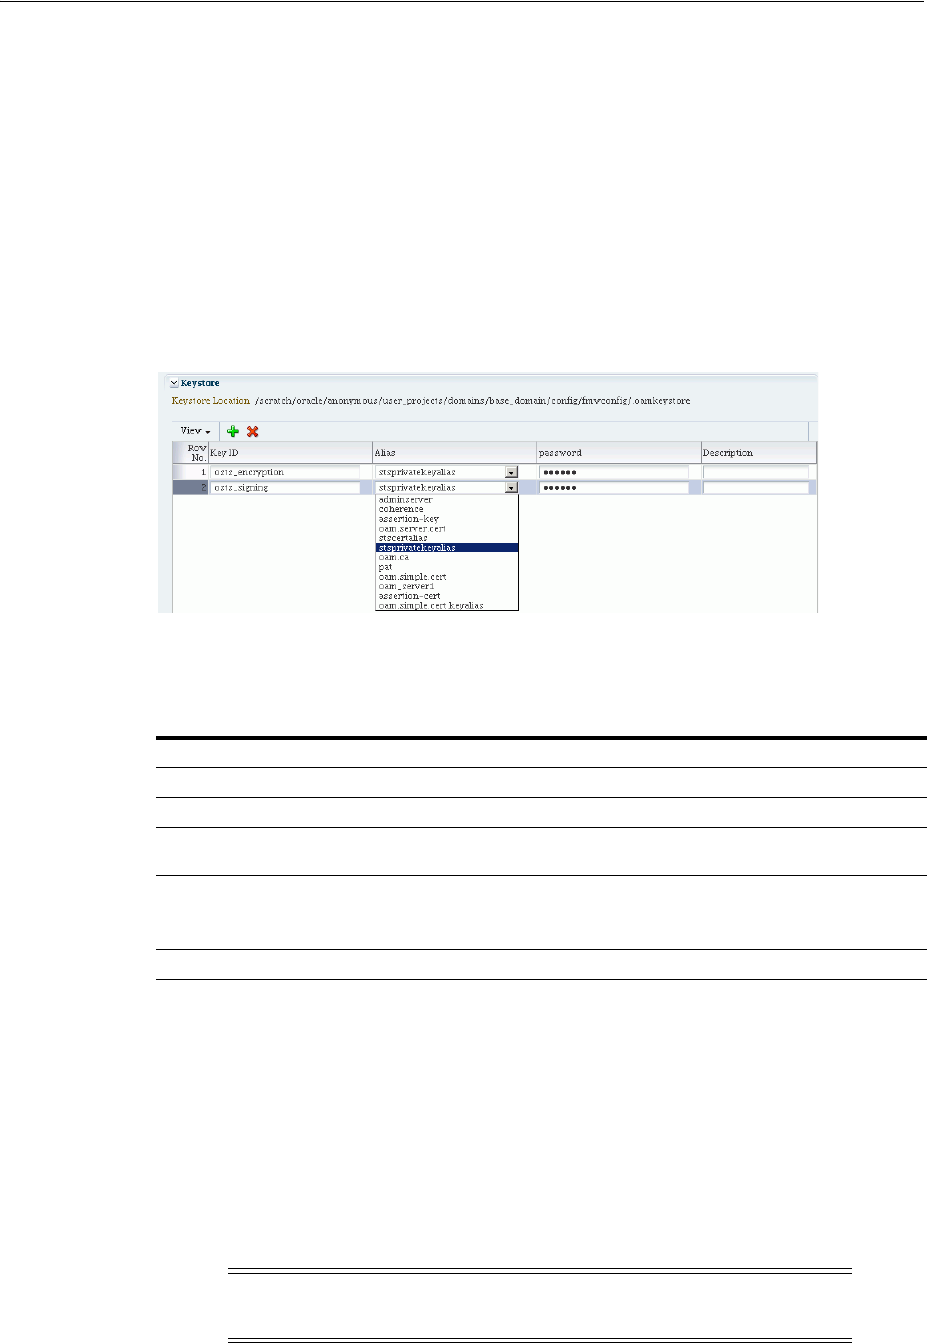
Defining Keystore Settings for Federation
Managing Settings for Identity Federation 32-5
32.5 Defining Keystore Settings for Federation
This topic is organized in the following sections.
■About Managing Keytore Settings for Identity Federation
■Managing Identity Federation Encryption/Signing Keys
32.5.1 About Managing Keytore Settings for Identity Federation
You view and manage keystores configured for use with federation partners on the
Federation Settings page of the console.
Figure 32–4 Keystore Settings
Table 32–4 describes each element on the Keystore Settings section of the Federation
Settings page.
32.5.2 Managing Identity Federation Encryption/Signing Keys
As described in Chapter 5, Identity Federation uses keys in the following keystore to
store encryption and signing certificates:
$DOMAIN_HOME/config/fmwconfig/.oamkeystore
Task overview: Managing Identity Federation Encryption/Signing Keys
■Resetting the System (.oamkeystore) and Trust (amtruststore) Keystore Password
■Adding a New Key Entry to the System Keystore (.oamkeystore)
Table 32–4 Keystore Settings for Federation
Element Description
Keystore Location This element specifies the keystore path.
Key ID This is the unique key ID.
Description This element provides a brief description of the key, such as its usage
type.
Alias This element specifies the key alias.
Note: You can choose one of the aliases that is available in the keystore
using the drop-down.
Password This element specifies the key password.
Note: AM denotes Access Manager, STS denotes Security Token
Service, and IF denotes Identity Federation in this discussion.

Defining Keystore Settings for Federation
32-6 Administrator's Guide for Oracle Access Management
32.5.2.1 Resetting the System (.oamkeystore) and Trust (amtruststore) Keystore
Password
Use the following procedure to reset the password that protects the keystores as well
as the key entries which use the same password as the keystore.
Note that the keystores were created and configured by the IM/OAMAM/OSTS
installer, and the password and the key entries password were randomly generated.
The WLST
resetKeystorePassword
method allows you to set the .oamkeystore
password and any key entries with a password identical to the .oamkeystore password
to a new value. The command:
■updates the .oamkeystore password
■updates the key entries in the .oamkeystore which had the same password as the
keystore
■updates the OAMAM/STS/IF configuration to reflect the change
■updates the amtruststore password if the keystore is protected by the same
password as the .oamkeystore (default)
To set the system keystore (.oamkeystore) password:
1. Enter the WLST scripting environment.
2. Connect to the WebLogic Server AdminServer, using the
connect()
command.
3. Navigate to the domain runtime tree:
domainRuntime()
.
4. Execute the following command:
resetKeystorePassword()
5. Enter and confirm the password.
32.5.2.2 Adding a New Key Entry to the System Keystore (.oamkeystore)
You can add a new key entry into the system keystore (.oamkeystore) using the
keytool
command to create and add the new key entry. Once the entry has been
added, it must be defined in the Identity Federation settings configuration screen so
that it can be used to sign assertions and decrypt incoming messages.
This topic provides the following procedures to add a new entry to the system
keystore to sign SAML assertions or decrypt XML-encrypted data not covered by WSS:
■Adding a New Entry in the .oamkeystore
■Adding a New Entry in the Identity Federation Settings
■Configuring the Signing and Encryption Key
32.5.2.2.1 Adding a New Entry in the .oamkeystore
Prerequisites
The system keystore (.oamkeystore) password has been reset.
To configure a new entry:
1. Locate keytool.
2. Use keytool to:
■ generate a self-signed certificate, or

Exporting Metadata
Managing Settings for Identity Federation 32-7
■generate a certificate request, export the request to a remote Certificate
Authority (CA), and finally import the certificate issued by the CA.
32.5.2.2.2 Adding a New Entry in the Identity Federation Settings
The steps are as follows:
1. From the Oracle Access Management Console, click Federation Settings.
2. On the Federation Settings page, navigate to the Keystore table.
3. Add a row.
4. Enter a key ID that will be used to reference this key when configuring Identity
Federation.
5. Select the alias of the key entry stored in .oamkeystore.
6. Enter the key password.
7. Click Apply.
32.5.2.2.3 Configuring the Signing and Encryption Key
Once the key has been added to the keystore table, you can configure Identity
Federation to use the key. The steps are as follows:
1. From the Oracle Access Management Console, click Federation Settings.
2. Navigate to the General section.
3. Select the Signing Key from the list of available key entries that were defined in
the keystore table.
4. Select the encryption key from the list of available key entries that were defined in
the keystore table.
5. Click Apply.
Identity Federation will now use those keys to sign and decrypt messages.
32.6 Exporting Metadata
After changes to the general settings, you can export the metadata for use by
federation partners.
To Export SAML 2.0 Metadata
Take these steps to export the metadata:
1. From the Oracle Access Management Console, click Federation Settings.
2. On the Federation Settings page, click Export SAML 2.0 Metadata.
3. A dialog box appears where you must specify the file for the exported metadata.
4. Click Save to save your new metadata file.

Exporting Metadata
32-8 Administrator's Guide for Oracle Access Management

33
Managing Federation-related Schemes and Policies 33-1
33
Managing Federation-related Schemes and
Policies
This chapter introduces the federation-related authentication schemes and policies that
must be configured for Oracle Access Management Identity Federation.
This chapter includes the following sections:
■Prerequisites
■Using Identity Federation and Access Manager in Concert Together
■Using Authentication Schemes and Modules for Identity Federation 11g Release 2
(11.1.2.2)
■Using Authentication Schemes and Modules for Oracle Identity Federation 11g
Release 1
■Managing Access Manager Policies for Use with Identity Federation
■Testing Identity Federation Configuration
■Using the Default Identity Provisioning Plug-in
■Configuring the Identity Provider Discovery Service
■Configuring the Federation User Self-Registration Module
33.1 Prerequisites
You define one or more authentication schemes to enable Oracle Access Management
Access Manager to work with federation providers to authenticate users that request
access to Access Manager-protected resources.
For Identity Federation concepts, background and high-level flows, see
"Authentication Overview" in Chapter 3, Deploying Oracle Identity Federation, of
Oracle Fusion Middleware Administrator's Guide for Oracle Identity Federation.
33.2 Using Identity Federation and Access Manager in Concert Together
The use of federation features with Access Manager varies depending on the release.
When integrating with Identity Federation:
■11g Release 1 (11.1.1) sites, and those upgrading from 11g Release 1 (11.1.1) to 11g
Release 2 (11.1.2), can use the integration described in Oracle Fusion Middleware
Integration Guide for Oracle Identity Management Suite.
■Sites with new 11g Release 2 (11.1.2) installations can leverage federation features
using the Oracle Access Management Console.
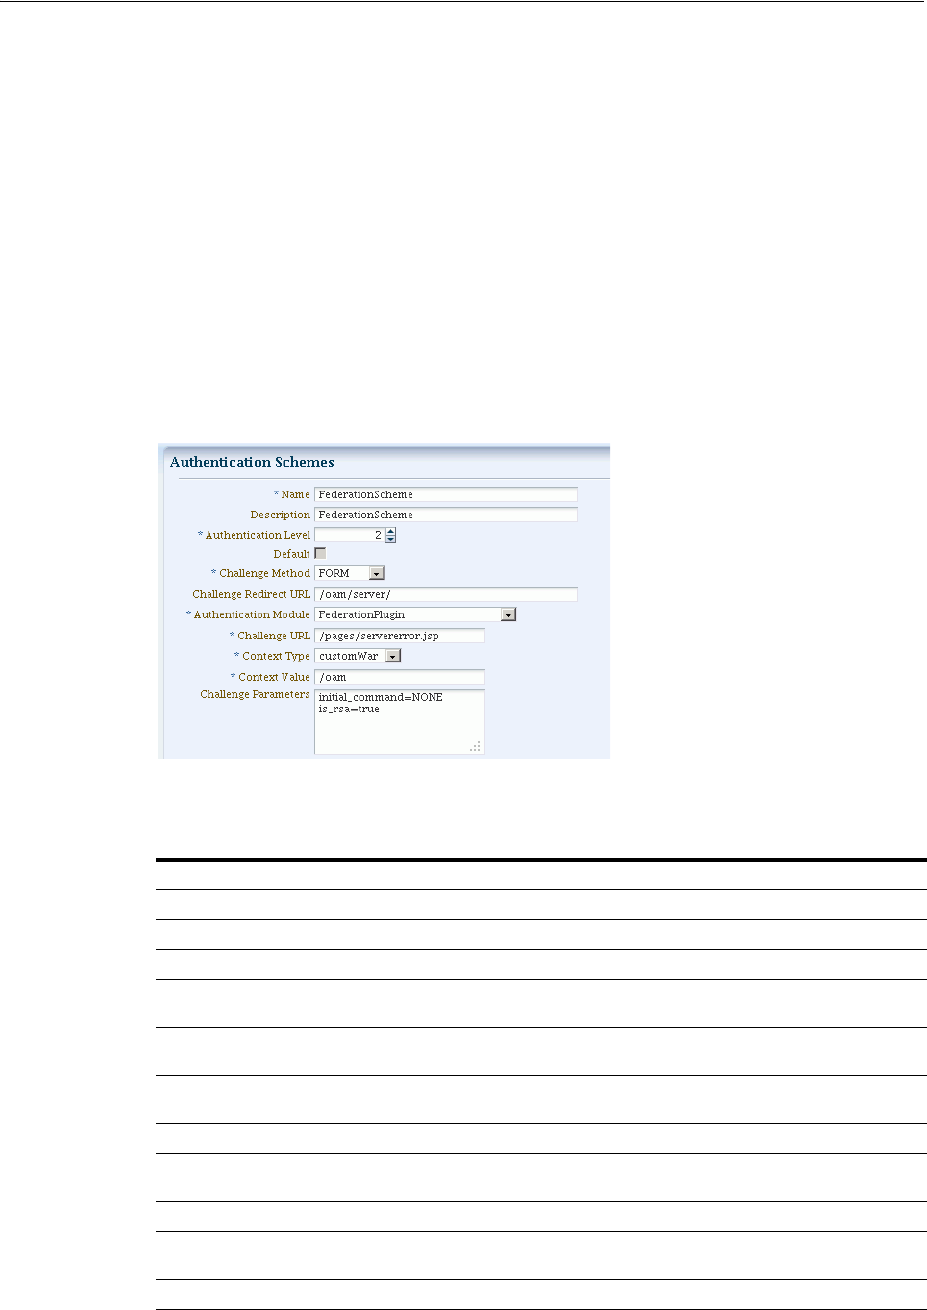
Using Authentication Schemes and Modules for Identity Federation 11g Release 2 (11.1.2.2)
33-2 Administrator's Guide for Oracle Access Management
33.3 Using Authentication Schemes and Modules for Identity Federation
11g Release 2 (11.1.2.2)
This topic is divided as follows:
■About the FederationScheme Authentication Scheme
■About the FederationPlugin Authentication Module
33.3.1 About the FederationScheme Authentication Scheme
FederationScheme
is a general-purpose scheme for use with Identity Federation 11g
Release 2 (11.1.2.2).
Figure 33–1 shows the Access Console page for
FederationScheme
:
Figure 33–1 FederationScheme
Table 33–1 describes the
FederationScheme
.
Table 33–1 FederationScheme Element Definitions
Element Description
Name This is the scheme name.
Description This is a brief description of the scheme.
Authentication Level This is the trust level of the authentication scheme.
Default This is a non-editable box that is checked when the Set as Default
button is clicked.
Challenge Method You may select a challenge method from those available in the
drop-down box.
Challenge Redirect URL This is the URL of another server to which user requests must be
redirected for processing.
Authentication Module This is the authentication module to use with the scheme.
Challenge URL This is the URL to which the credential collector will redirect for
credential collection. Not used by the federation plug-in.
Context Type This element is used to build the final URL for the credential collector.
Context Value This element is used to build the final URL for the credential collector.
The value depends on the context type.
Challenge Parameters This is the list of parameters, if any, to use with the challenge.
See Also: Table 19–21 for
FederationScheme
specifications.
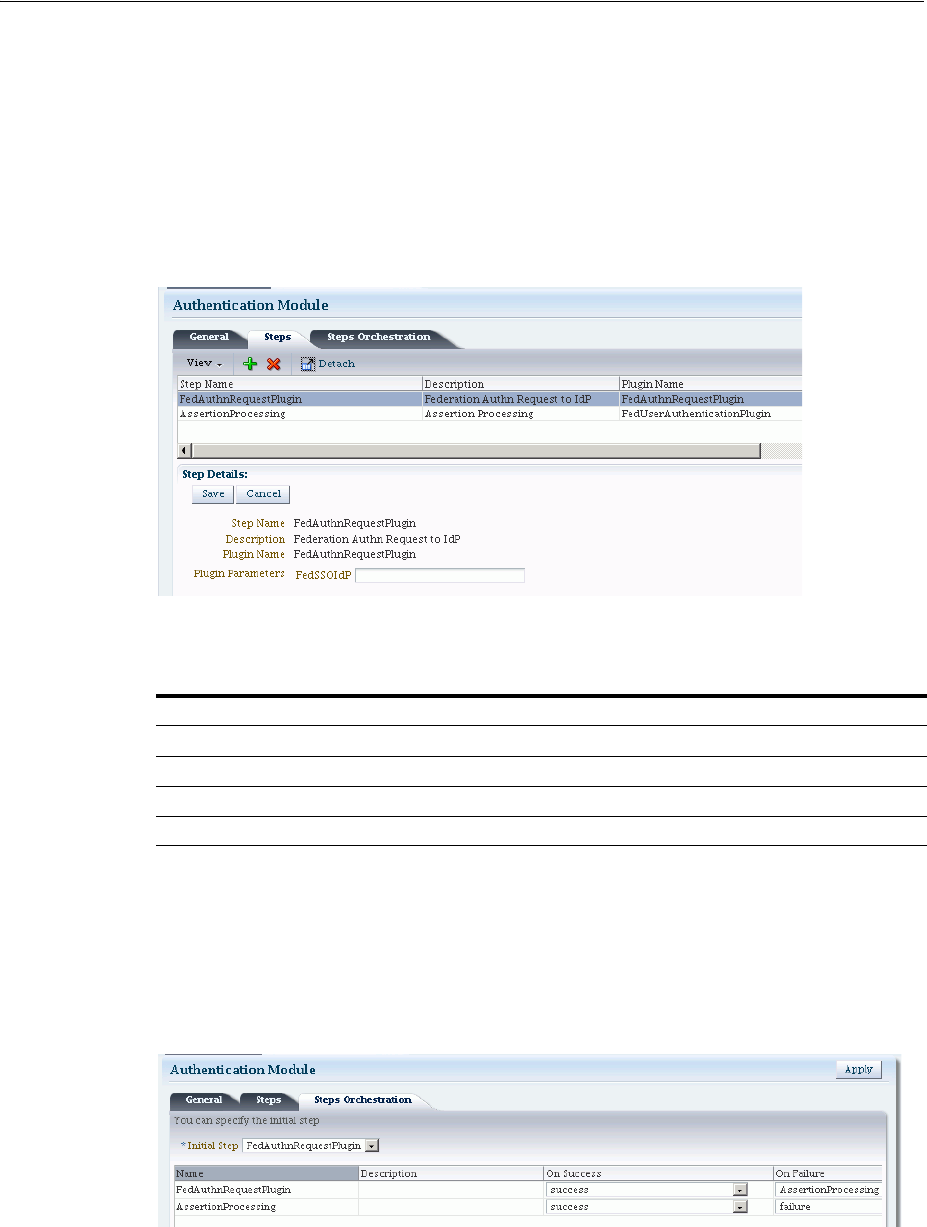
Using Authentication Schemes and Modules for Identity Federation 11g Release 2 (11.1.2.2)
Managing Federation-related Schemes and Policies 33-3
About Scheme FederationMTScheme
The authentication scheme
FederationMTScheme
is another scheme designed for use
with 11g Release 2 (11.1.2.2). It is meant for multi-tenancy environments.
33.3.2 About the FederationPlugin Authentication Module
FederationPlugin
provides a custom authentication module.
Figure 33–2 FederationPlugin
Table 33–2 describes the steps for FederationPlugin.
Figure 33–3 illustrates the orchestration of the
FederationPlugin
, which is similar to
the orchestration described in Table 19–14, " Steps Orchestration Subtab".
Orchestration enables you to specify the ordering of steps within the plugin, and what
to do if each of those steps succeeds or fails.
Figure 33–3 FederationPlugin Orchestration
Table 33–3 describes the orchestration of the
FederationPlugin
.
Table 33–2 FederationPlugin Steps
Element Description
Step Name This is the name of the step within the module.
Description This element contains a brief description of the step.
Plugin Name This element specifies the plugin associated with the step.
The value of FedSSOIdP is the IDP provider to be picked up by the authentication plugin.

Using Authentication Schemes and Modules for Identity Federation 11g Release 2 (11.1.2.2)
33-4 Administrator's Guide for Oracle Access Management
33.3.3 Managing Authentication with Identity Federation in 11g Release 2
This section explains how to manage the
FederationScheme
; and
Federation
plugin, a
custom authentication module.
Prerequisites
None.
To view or modify FederationScheme
1. From the Oracle Access Management Console, click Authentication Schemes and
open the FederationScheme.
2. Review
FederationScheme
details to ensure these are desired for your
deployment. Table 33–1 describes field details.
3. Click the Save button.
To view or modify FederationPlugin
1. From the Oracle Access Management Console, click Authentication Modules,
Custom Authentication Module and then
FederationPlugin
:
2. Review
FederationPlugin
details to ensure these are desired for your
deployment. Table 33–2 provides plugin step details.
3. Use the icons above the step table to add a step (+) or delete a step (x).
4. Modify the order of steps as needed using the Steps Orchestration tab. Table 33–3
provides orchestration details.
5. Click the Save button.
To Add an Authentication Policy with FederationScheme
Prerequisite: Any resource to be added to a policy must be defined within the same
Application Domain as the policy.
Take these steps to set up an authentication policy that uses
FederationScheme
, and
associate a resource that will be protected using this policy:
1. From the Oracle Access Management Console, click Application Domains and
search for the desired domain.
2. Again, from the console, click Authentication Policies, then click the Create button
to open a fresh page.
Table 33–3 Orchestration of FederationPlugin
Element Description
Name This is the step name. The steps appear in this column in order
of execution, which can be modified with the Initial Step
drop-down.
Description This is a brief description of the step.
On Success This is the action to take upon successful completion of the
step, such as execution of next step in the orchestration.
On Error This is the action to take upon error, such as taking the
specified failure action.
On Failure This is the action to take upon step failure.
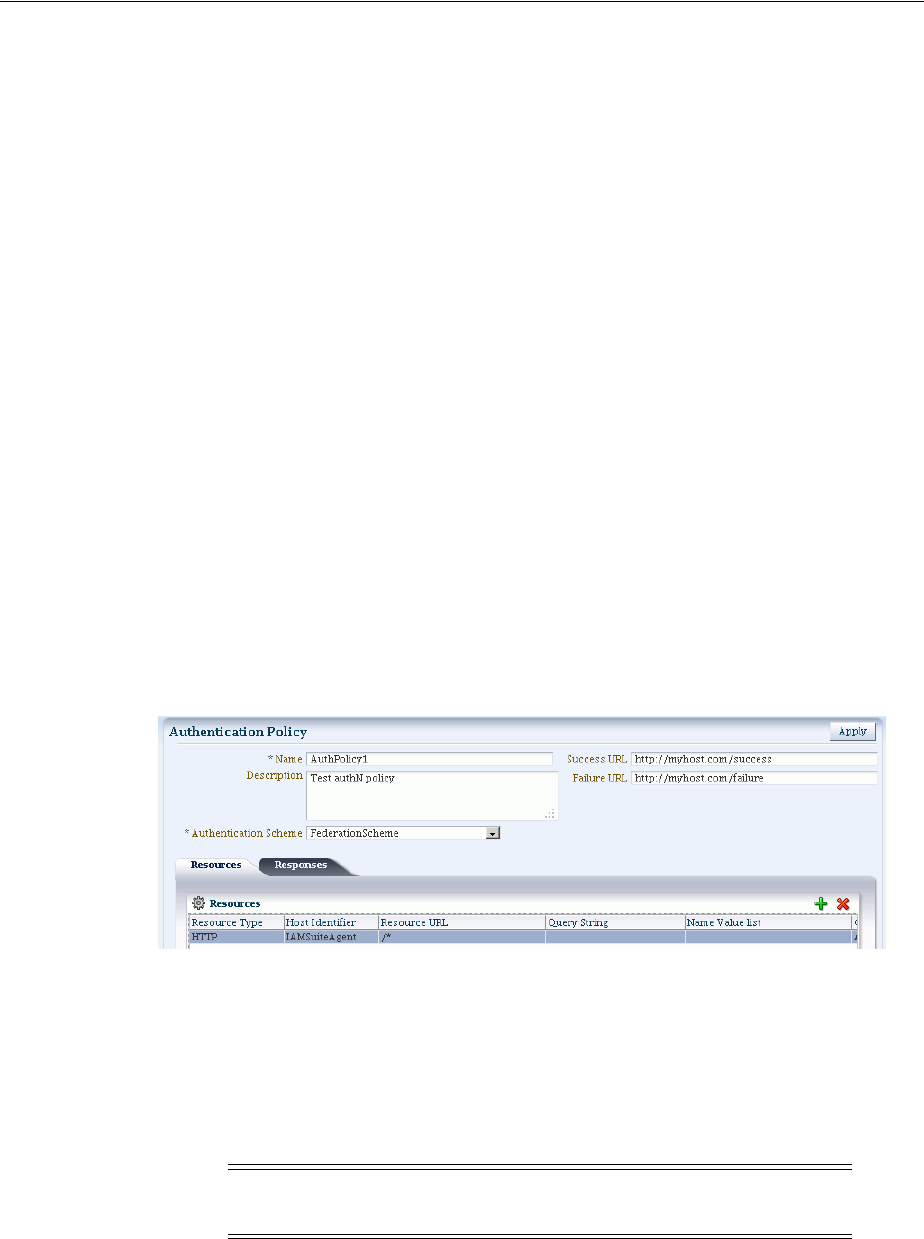
Using Authentication Schemes and Modules for Oracle Identity Federation 11g Release 1
Managing Federation-related Schemes and Policies 33-5
3. Add these General Policy Details (Table 20–9, " Authentication Policy Elements
and Descriptions"):
■Name
■Authentication Scheme
4. Add these Global Policy Elements and Specifications:
■Description (optional)
■Success URL
■Failure URL
5. To add resources:
a. Click the Resources tab on the Authentication Policy page.
b. Click the Add button on the tab.
c. Choose a URL from the list.
d. Repeat these steps as needed to add more resources.
6. Click Apply to save changes and close the confirmation window.
7. Responses: See "Introduction to Policy Responses for SSO" on page 20-41 and
"Adding and Managing Policy Responses for SSO" on page 20-47.
Figure 33–4 shows the console page to define the authentication policy and associate
the policy to the resources.
Figure 33–4 Setting Up the Authentication Policy with FederationScheme
33.4 Using Authentication Schemes and Modules for Oracle Identity
Federation 11g Release 1
This section describes the authentication schemes and modules available for use with
the Oracle Identity Federation server in Oracle Fusion Middleware Release 11g R1
(11.1.1).
An authentication scheme is a named component that defines the challenge
mechanism required to authenticate a user. Each authentication scheme must also
include a defined authentication module.
Note: The schemes used for Identity Federation in 11g Release 2
(11.1.2.2) are described in Section 33.3.
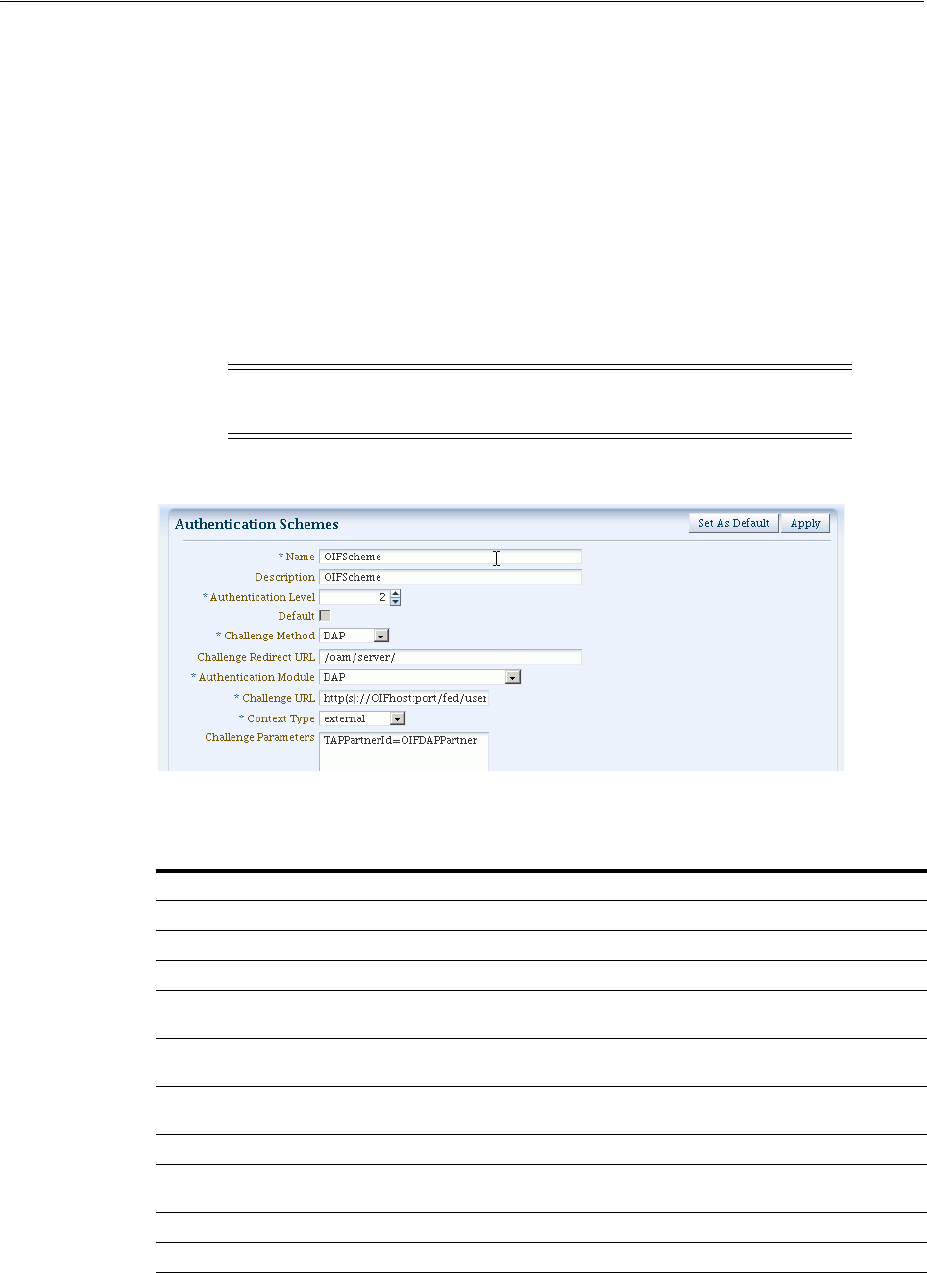
Using Authentication Schemes and Modules for Oracle Identity Federation 11g Release 1
33-6 Administrator's Guide for Oracle Access Management
■About Scheme OIFScheme
■About Module OIFMTLDAPPlugin
■Managing Authentication with Oracle Identity Federation Release 11gR1
33.4.1 About Scheme OIFScheme
OIFScheme
and
OIFMTScheme
are used for integration with Oracle Identity Federation
11g Release 1 (11.1.1).
Figure 33–5 OIFScheme
Table 33–4 describes the scheme
OIFScheme
.
See Also: For additional information about schemes, see
Section 19.9.
Note: See Section 33.3 for the schemes available with Identity
Federation 11g Release 2 (11.1.2.2).
Table 33–4 OIFScheme Definition
Element Description
Name This is the scheme name.
Description This is a brief description of the scheme.
Authentication Level This is the trust level of the authentication scheme.
Default This is a non-editable box that is checked when the Set as Default
button is clicked.
Challenge Method Use to select a challenge method from those available in the
drop-down box.
Challenge Redirect URL This is the URL of another server to which user requests must be
redirected for processing.
Authentication Module This is the authentication module to use with the scheme.
Challenge URL This is the URL the credential collector will redirect to for credential
collection.
Context Type Use this element to build the final URL for the credential collector.
Challenge Parameters This is the list of parameters, if any, to use with the challenge.
See Also: Table 19–21 for
OIFScheme
specifications.
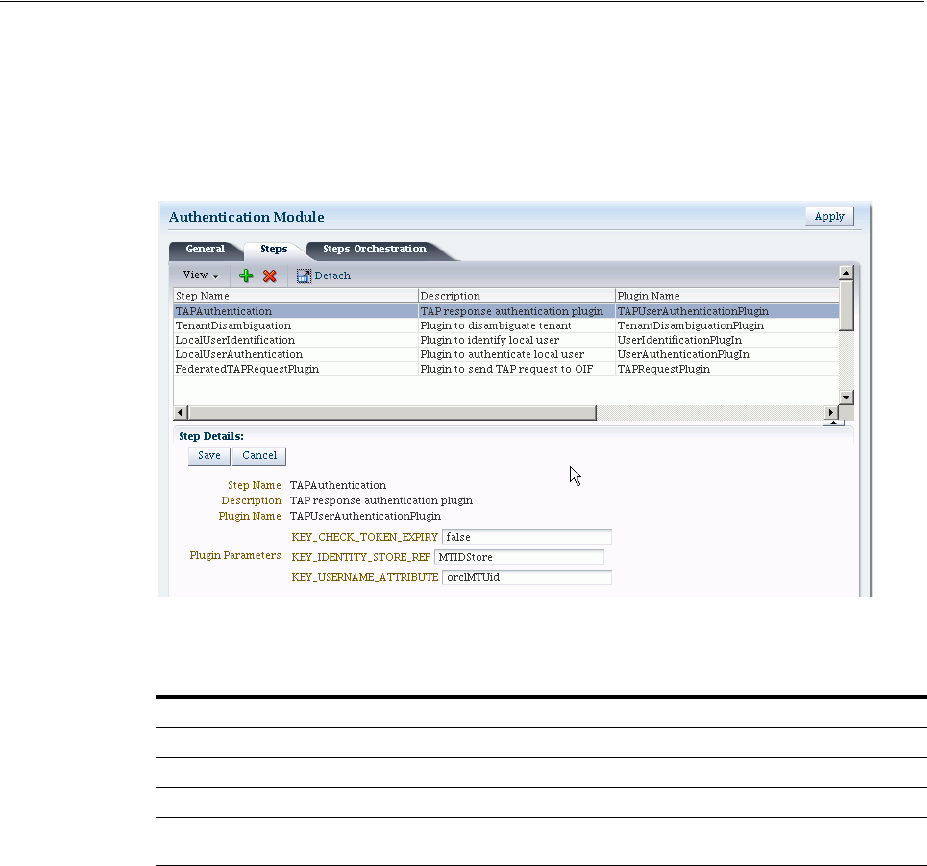
Using Authentication Schemes and Modules for Oracle Identity Federation 11g Release 1
Managing Federation-related Schemes and Policies 33-7
33.4.2 About Module OIFMTLDAPPlugin
OIFMTLDAPPlugin
authenticates federated tenants through Identity Federation and
non-federated tenants with the identity store associated with Access Manager.
Figure 33–6 OIFMTLDAPPlugin
Table 33–5 describes the steps for
OIFMTLDAPPlugin
.
33.4.3 Managing Authentication with Oracle Identity Federation Release 11gR1
This section explains how to manage
OIFScheme
; and
OIFMTLDAPPlugin
, a custom
authentication module for Identity Federation 11g Release 1 (11.1.1).
Prerequisites
None
To view or modify OIFScheme
1. From the Oracle Access Management Console, click Authentication Schemes and
open the
OIFScheme
.
2. Review
OIFscheme
details to ensure these are desired for your deployment. For
field details, see Table 33–4.
3. Click the Save button.
Prerequisites
None.
Table 33–5 OIFMTLDAPPlugin Steps
Element Description
Step Name This is the name of the step within the module.
Description This element contains a brief description of this step.
Plugin Name This element specifies the plugin associated with this step.
Plugin Parameters This element lists the parameters, if any, needed for plugin execution.
The parameter list varies with the plugin.
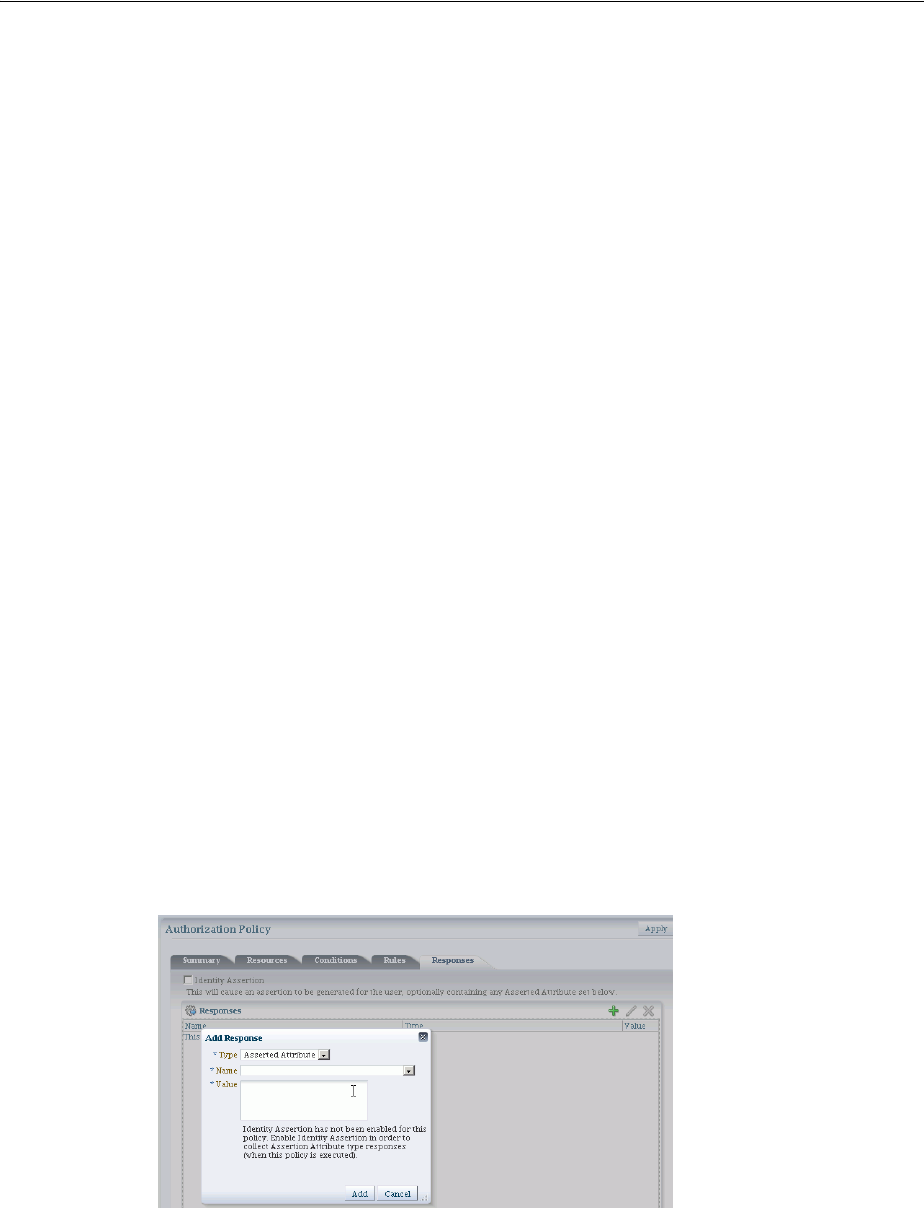
Managing Access Manager Policies for Use with Identity Federation
33-8 Administrator's Guide for Oracle Access Management
To view or modify OIFMTLDAPPlugin
1. From the Oracle Access Management Console, click Authentication Modules,
Custom Authentication Module and open the
OIFMTLDAPPlugin
:
2. Review
OIFMTLDAPPlugin
details to ensure these are configured as desired for your
deployment. For field details, see Table 33–5.
3. Click the Save button.
To add an Authentication Policy with OIFScheme
The procedure for this task is the same as described in "To Add an Authentication
Policy with FederationScheme".
33.5 Managing Access Manager Policies for Use with Identity Federation
This section explains the use of policy responses in Access Manager in the context of
federation policies.
■About Policy Responses with Assertion Attributes for Identity Federation
■Defining Policy Responses with Assertion Attributes for Identity Federation
33.5.1 About Policy Responses with Assertion Attributes for Identity Federation
A policy can optionally contain one or more authentication responses, or authorization
responses, or both. You can configure the use of assertion attributes when setting up
Access Manager policy responses with Identity Federation.
You use assertion attributes in the following contexts:
■Authorization policy conditions
■Response attributes as HTTP headers
■Response attributes for identity context
Figure 33–7 shows the Response configuration tab for an authorization policy:
Figure 33–7 Authorization Policy Response Tab
Table 33–6 describes the elements for a policy response.

Managing Access Manager Policies for Use with Identity Federation
Managing Federation-related Schemes and Policies 33-9
33.5.2 Defining Policy Responses with Assertion Attributes for Identity Federation
Use the Oracle Access Management Console to configure policy responses with
assertion attributes.
Background on Conditions and Responses for Identity Federation
Identity Federation conditions and responses must be specified separately because
they are used for different tasks.
A condition is used to control access to a resource within Access Manager.
For example, if the identity provider is sending a role assertion and the service
provider wished to only allow people who had a role of
sales
to access the resource,
you would add a condition wherein:
■the Condition Namespace would be "Session".
■the Name would be "fed.attr.role".
■the Operator is set to EQUALS.
■value is "sales".
A response, on the other hand, enables you to pass an asserted attribute to the
application. For example, if you wanted to pass the asserted attribute
role
to a
back-end application in an HTTP header, you would:
■go to the Response tab.
■Add a Header, name
Role
(this is the name of the HTTP header).
■The value would be
$session.attr.fed.attr.role
.
Again, replace the role in this example to correspond to the actual SAML asserted
attribute.
Prerequisites
None.
Table 33–6 Policy Response Elements
Element Description
Name This is a unique name to distinguish this response from other
responses that use the same mechanism (type).
Type This is the mechanism used to convey the response form of the action
to be taken with the value string. Select Assertion Attribute.
Value This is the response expression, set as a variable. To provide the
federation data as response attributes in the authentication or
authorization policy, the values can reference:
■$session.attr.fed.nameidvalue for the name ID value
■$session.attr.fed.attr.AttributeName for any other assertion
attribute
Notes:
■Replace the role in this example to the actual SAML asserted
attribute.
■If you wanted to use the standard SAML NameID value as the
condition then the value would be "attr.fed.nameidvalue".

Testing Identity Federation Configuration
33-10 Administrator's Guide for Oracle Access Management
To View or Configure Policy Responses with Assertion Attributes
1. From the Oracle Access Management Console, click Authentication Domains,
search for the desitred domain and open the desired policy to view or configure a
response.
2. Select the Responses tab.
3. Click the relevant icon to add, delete or update a response.
4. When updating, review the response details to ensure these are desired for your
deployment. For field details, see Table 33–6.
5. Click the Save button.
Figure 33–8 shows an example of federation response attribute configuration:
Figure 33–8 Adding a Federation Response Attribute to an AuthZ Policy
33.6 Testing Identity Federation Configuration
After performing the procedure described in the previous section, you have completed
all the steps to configure federation in SP mode. To recap, these steps are:
1. Enabling the Identity Federation service using Oracle Access Management
Console.
2. Creating an IdP partner or using an existing IdP partner.
3. Ensuring that IdP setup including SAML attributes, global logout, and nameID
format are configured.
4. Configuring an authentication/authorization policy that uses
FederationScheme
with federation response attributes; and
5. Protecting a resource with this policy.
To test this configuration, access the resource that is protected by the authentication
policy and verify that access is granted or denied according to the policy.
Test SP Module
Identity Federation provides a Test SP module which allows you to:
■test Federation SSO with an IdP Partner

Using the Default Identity Provisioning Plug-in
Managing Federation-related Schemes and Policies 33-11
■see the result of the Federation SSO operation as well as the assertion sent by the
Identity Provider
Follow these steps to enable or disable the Test SP Module:
1. Enter the WLST environment:
$OH/common/bin/wlst.sh
2. Connect to the Admin Server:
connect()
3. Move to the domain runtime location:
domainRuntime()
4. Execute the following WLST command to enable the Test SP Module:
configureTestSPEngine("true")
5. Execute the following WLST command to disable the Test SP Module:
configureTestSPEngine("false")
To access the Test SP module and perform a federation SSO operation with an IdP
partner, perform the following steps:
1. Access the following service:
http(s)://oam-hostname:oam-port/oamfed/user/testspsso
2. Select the IdP with which to perform a federation SSO (note: only enabled IdP
partners are listed).
3. Start the federation SSO operation. The browser will be redirected to the IdP
Partner for authentication and redirected back to Identity Federation with a
federation response.
4. Identity Federation will process the federation assertion and the Test SP module
will display the result of the processing (note: no Access Manager session will be
created as a result of the operation).
33.7 Using the Default Identity Provisioning Plug-in
11g Release 2 (11.1.2.2) features a plug-in that you can optionally use to provision a
missing identity during a federated SSO operation.
■Why Use a Provisioning Plug-in?
■About the Default Provisioning Plug-in
■Using the Default Provisioning Plug-in
■Switching to a Custom Provisioning Plug-in
Note: The Test SP Module should be disabled in a production
environment.

Using the Default Identity Provisioning Plug-in
33-12 Administrator's Guide for Oracle Access Management
33.7.1 Why Use a Provisioning Plug-in?
When a federated SSO transaction is initiated, the processing flows as follows:
1. The IdP authenticates a user and sends an assertion to Oracle Access Management
Identity Federation.
2. Acting as SP, Identity Federation maps the user to the local identity store.
3. If the user does not exist in the local store, the mapping fails.
Resolving this issue requires the ability to provision the user so the transaction can
continue.
33.7.2 About the Default Provisioning Plug-in
To handle the identity mapping failure, Identity Federation supports the ability to set
up a plug-in, known as the default provisioning plug-in, to provision the missing user
in the identity store and enable the federated single sign-on to proceed.
The user is provisioned in the identity store associated with the IdP partner.
You can specify a list of attributes to use in provisioning the plug-in, as explained in
the next section.
33.7.3 Using the Default Provisioning Plug-in
You can enable this default provisioning plug-in from the plug-in configuration
interface. The steps are as follows:
1. From the plug-in configuration interface select
FedUserProvisioningPlugin
.
2. In the configuration parameters tab, set the following parameters:
■
KEY_USER_RECORD_ATTRIBUTE_LIST
- This is the list of attributes with which
the user should be provisioned. These attributes are available as part of the
assertion, for example:
mail
,
givenname
. (optional)
■
KEY_PROVIDERID_ATTRIBUTE_NAME
– This is the tenant ID attribute name in the
identity store which Identity Federation populates at run-time with the tenant
name. (optional)
■
KEY_USERID_ATTRIBUTE_NAME
– This is the attribute name to use for the
userid
value from the assertion attributes. (optional)
3. Enable user provisioning with the default plug-in by executing the WLST
command:
putBooleanProperty("/fedserverconfig/userprovisioningenabled","true")
33.7.4 Switching to a Custom Provisioning Plug-in
A custom provisioning plug-in is also available with Identity Federation.
To switch from the default plug-in to the custom plug-in, follow the guidelines in
Developing a Custom User Provisioning Plug-in chapter of the Oracle Fusion
Middleware Developer's Guide for Oracle Access Management.
When using the custom plug-in, set the plug-in name with the WLST command:
putStringProperty("/fedserverconfig/userprovisioningplugin","CustomPlugin")

Configuring the Identity Provider Discovery Service
Managing Federation-related Schemes and Policies 33-13
33.8 Configuring the Identity Provider Discovery Service
Identity provider discovery is a service that selects an identity provider (possibly
through interaction with the user) to use during SSO. While Identity Federation does
not provide an identity provider discovery service, it provides support for using such
a service to select an IdP, if one is not passed in the authentication request to the SP
during SP-initiated SSO.
For more information about IdP discovery refer to the specifications at:
http://docs.oasis-open.org/security/saml/Post2.0/sstc-saml-idp-discovery-c
s-01.pdf
When acting as a service provider, Identity Federation can be configured so that if an
SSO operation is initiated without the provider ID of the partner IdP, the user is
redirected to an IdP discovery service to select the identity provider with which to
perform SSO.
After the user selects an identity provider, the custom page resubmits the SSO request
with the chosen IdP to Identity Federation.
■Using the Bundled IdP Discovery Service
■Creating a custom IdP Discovery Service
■Disabling the use of an IdP Discovery Service
33.8.1 Using the Bundled IdP Discovery Service
Identity Federation provides a simple Identity Provider Discovery Service that can be
used to determine the Federation IdP Partner to be used at runtime during a
Federation SSO operation.
Follow these steps to configure IdP discovery:
1. Enter the WLST environment:
$OH/common/bin/wlst.sh
2. Connect to the Admin Server:
connect()
3. Move to the domain runtime location:
domainRuntime()
4. Execute the following WLST command to configure Identity Federation to use an
IdP Discovery Service:
putBooleanProperty("/spglobal/idpdiscoveryserviceenabled", "true")
5. Execute the following WLST command to configure Identity Federation to use the
default out-of-the-box IdP Discovery Service:
putBooleanProperty("/spglobal/idpdiscoveryservicepageenabled", "true")
putStringProperty("/spglobal/idpdiscoveryserviceurl", "/oamfed/discovery.jsp")
33.8.2 Creating a custom IdP Discovery Service
You can configure Identity Federation to interact with a custom IdP Discovery Service
deployed remotely.

Configuring the Identity Provider Discovery Service
33-14 Administrator's Guide for Oracle Access Management
Follow these steps to configure Identity Federation to use a custom IdP discovery:
1. Enter the WLST environment:
$OH/common/bin/wlst.sh
2. Connect to the Admin Server:
connect()
3. Move to the domain runtime location:
domainRuntime()
4. Execute the following WLST command to configure Identity Federation to use an
IdP Discovery Service:
putBooleanProperty("/spglobal/idpdiscoveryserviceenabled", "true")
5. Execute the following WLST command to configure Identity Federation to use a
custom IdP Discovery Service (replace IDP_DISCOVERY_SERVICE_URL with the
fully qualified URL of the Discovery Service):
putBooleanProperty("/spglobal/idpdiscoveryservicepageenabled", "false")
putStringProperty("/spglobal/idpdiscoveryserviceurl", "IDP_DISCOVERY_SERVICE_
URL")
At runtime, Identity Federation redirects to the IdP Discovery Service page with the
following parameters:
■
return
: This is the URL to which the page should send the new request containing
the chosen IdP provider ID to Identity Federation.
■
returnIDParam
: This is the name of the parameter to use to specify the chosen IdP
provider ID in the request sent to Identity Federation.
The discovery service gets the values of these parameters, displays a list of IdPs, and
sends a new request to Identity Federation specifying the chosen IdP Provider ID.
Example
The following is an example of an IdP discovery service page. This page allows the
user to select an identity provider (from the list of provider IDs: http://idp1.com,
http://idp2.com, http://idp3.com), and submit the chosen provider ID to Identity
Federation to continue the SSO flow.
<%@ page buffer="5kb" autoFlush="true" session="false"%>
<%@ page language="java" import="java.util.*, java.net.*"%>
<%
// Set the Expires and Cache Control Headers
response.setHeader("Cache-Control", "no-cache");
response.setHeader("Pragma", "no-cache");
response.setHeader("Expires", "Thu, 29 Oct 1969 17:04:19 GMT");
// Set request and response type
request.setCharacterEncoding("UTF-8");
response.setContentType("text/html; charset=UTF-8");
Note: Check that the URL query parameter values are correctly
URL-encoded.

Configuring the Identity Provider Discovery Service
Managing Federation-related Schemes and Policies 33-15
String submitURL = request.getParameter("return");
String returnIDParam = request.getParameter("returnIDParam");
List idps = new ArrayList();
idps.add("http://idp1.com");
idps.add("http://idp2.com");
idps.add("http://idp3.com");
%>
<html>
<title>
Select an Identity Provider
</title>
<body bgcolor="#FFFFFF"><form method="POST" action="<%=submitURL%>" id="PageForm"
name="PageForm" autocomplete="off">
<center>
<table cellspacing="2" cellpadding="5" border="0" width="500">
<tr><td colspan="2" align="center">
Select an Identity Provider
</td></tr>
</tr>
<tr>
<td align="right">Provider ID</td>
<td>
<select size="1" name="<%=returnIDParam%>">
<%
Iterator idpIT = idps.iterator();
while(idpIT.hasNext())
{
String idp = (String)idpIT.next();
%>
<option value="<%=(idp)%>"><%=idp%></option>
<%
}
%>
</select>
</td>
</tr>
<tr>
<td colspan="2" align="center">
<input type="submit" value="Continue"/>
</td>
</tr>
</table>
</center>
</form>
</body>
</html>
33.8.3 Disabling the use of an IdP Discovery Service
Follow these steps to configure Identity Federation to stop using an IdP discovery
service:
1. Enter the WLST environment:
$OH/common/bin/wlst.sh

Configuring the Federation User Self-Registration Module
33-16 Administrator's Guide for Oracle Access Management
2. Connect to the Admin Server:
connect()
3. Move to the domain runtime location:
domainRuntime()
4. Execute the following WLST command to configure Identity Federation to stop
using an IdP Discovery Service:
putBooleanProperty("/spglobal/idpdiscoveryserviceenabled", "false")
putBooleanProperty("/spglobal/idpdiscoveryservicepageenabled", "false")
putStringProperty("/spglobal/idpdiscoveryserviceurl", "/oamfed/discovery.jsp")
33.9 Configuring the Federation User Self-Registration Module
When Identity Federation is acting in Service Provider (SP) mode, the user assertion is
mapped to a local user record in the LDAP directory to complete the federated single
sign-on. If the mapping fails because the user performing the Federation SSO
operation does not have a local account, Identity Federation can be configured to
trigger a user self-registration flowto enable the user to create an account locally.
At runtime, when the Assertion mapping operation fails, if self-registration is enabled,
the user self-registration framework will:
■redirect the user to a self-registration page.
■the self-registration page will contain the following fields:
–username
–password
–confirm password
–first name
–last name
–email address
These fields might be pre-populated with data from the Assertion. Also, any field
used in the Assertion Mapping process cannot be edited: the user will not be able
to change the information used for the Assertion Mapping operation for security
reasons.
■Once the user creates the account, the Federation SSO flow will resume and result
with the creation of an Access Manager session. At that point, the user will be
redirected to the protected resource.
Follow these steps to enable or disable the user self registration module:
1. Enter the WLST environment:
$OH/common/bin/wlst.sh
2. Connect to the Admin Server:
connect()
3. Move to the domain runtime location:
domainRuntime()

Configuring the Federation User Self-Registration Module
Managing Federation-related Schemes and Policies 33-17
4. Execute the following WLST command to enable the user self-registration module:
putBooleanProperty("/fedserverconfig/userregistrationenabled", "true")
putStringProperty("/fedserverconfig/userregistrationurl",
"/oamfed/registration.jsp")
5. Execute the following WLST command to disable the user self-registration
module:
putBooleanProperty("/fedserverconfig/userregistrationenabled", "false")
putStringProperty("/fedserverconfig/userregistrationurl",
"/oamfed/registration.jsp")
You can configure Identity Federation to pre-populate the fields of the self-registration
page with the data contained in the Assertion. By default, the self-registration page
will populate those fields based on the following:
■first name: Identity Federation will use either the firstname or givenname
attributes contained in the Assertion. The userregistrationfirstnameattr
configuration property indicates the list of comma separated attributes that should
be used to populate this field. By default, that field is set to firstname,givenname.
■last name: Identity Federation will use either the lastname or sn attributes
contained in the Assertion. The userregistrationlastnameattr configuration
property indicates the list of comma separated attributes that should be used to
populate this field. By default, that setting is set to lastname,sn.
■email address: Identity Federation will use either the mail attribute contained in
the Assertion, or the Assertion's NameID (referenced by fed.nameidvalue). The
userregistrationemailattr configuration property indicates the list of comma
separated attributes that should be used to populate this field. By default, that
setting is set to mail,fed.nameidvalue.
■username: Identity Federation is not configured to use any Assertion attributes to
populate this field. The userregistrationusernameattr configuration property
indicates the list of comma separated attributes that should be used to populate
this field. By default, that setting is empty.
If the attributes or NameID are missing from the assertion, the fields will be empty.
To configure the userregistrationfirstnameattr, userregistrationlastnameattr,
userregistrationemailattr and userregistrationusernameattr properties:
1. Enter the WLST environment:
$OH/common/bin/wlst.sh
2. Connect to the Admin Server:
connect()
3. Move to the domain runtime location:
domainRuntime()
4. Execute the following WLST command to set the first name field rule:
putStringProperty("/fedserverconfig/userregistrationfirstnameattr",
"firstname,givenname")
5. Execute the following WLST command to set the last name field rule:
putStringProperty("/fedserverconfig/userregistrationlastnameattr",
"lastname,sn")

Configuring the Federation User Self-Registration Module
33-18 Administrator's Guide for Oracle Access Management
6. Execute the following WLST command to set the email address field rule:
putStringProperty("/fedserverconfig/userregistrationemailattr",
"mail,fed.nameidvalue")
7. Execute the following WLST command to set the username field rule:
putStringProperty("/fedserverconfig/userregistrationusernameattr",
"uid,fed.nameidvalue")

Part VIII
Part VIII
Managing Oracle Access Management
Security Token Service
Part VIII provides information to help Administrators manage the Security Token
Services available with Oracle Access Management.
Part VIII contains the following chapters:
■Chapter 34, "Introducing the Oracle Access Management Security Token Service"
■Chapter 35, "Security Token Service Implementation Scenarios"
■Chapter 36, "Configuring Security Token Service Settings"
■Chapter 37, "Managing Security Token Service Certificates and Keys"
■Chapter 38, "Managing Templates, Endpoints, and Policies"
■Chapter 39, "Managing Token Service Partners and Partner Profiles"
■Chapter 40, "Troubleshooting Security Token Service"

34
Introducing the Oracle Access Management Security Token Service 34-1
34
Introducing the Oracle Access Management
Security Token Service
[15]
The Oracle Access Management Security Token Service provides the foundation for
the security infrastructure, facilitating a consistent and streamlined model for token
acquisition, renewal, and cancellation that is protocol and security infrastructure
agnostic. It helps simplify the effort needed to bridge access to various systems by
using a standardized set of interfaces. Security Token Service facilitates Federated SSO
and Single Logout (SLO) for users accessing resources through a Web browser and
across different security domains or administrative boundaries.
The following sections contain introductory material regarding the Security Token
Service.
■Understanding the Security Token Service
■Using the Security Token Service
■Security Token Service Key Terms and Concepts
■Integrating the Oracle Web Services Manager
■Architecting the Security Token Service
■Security Token Service Supported Token Matrix
■Deploying Security Token Service
■Installing Security Token Service
■Administrating the Security Token Service
34.1 Understanding the Security Token Service
Security Token Service is a Web Service (WS) Trust-based token service that allows for
policy-driven trust brokering and secure identity propagation and token exchange
between Web Services. Security Token Service can be deployed as a Security and
Identity Service and used to simplify the integration of distributed or federated Web
services within an enterprise and its service providers.
Security Token Service brokers trust between a Web Service Consumer (WSC) and a
Web Service Provider (WSP) and provides security token lifecycle management
Note: Security Token Service is primarily based on the OASIS
WS-Trust protocol but it also delegates the processing of other WS-*
protocols present in the SOAP message.

Using the Security Token Service
34-2 Administrator's Guide for Oracle Access Management
services to both. It allows for the use of various federation protocols like SAML,
WS-Federation, Liberty, or OpenID.The Oracle Access Management Security Token
Service (Security Token Service) is deployed with Access Manager and must be
activated as a service.
34.2 Using the Security Token Service
Security Token Service is installed with Oracle Access Management 11g on Managed
Servers. Each Managed Server must be registered with Access Manager to open
communication channels. Security Token Service leverages the common infrastructure
for shared services and the Access Manager 11g administration model. All Security
Token Service system configuration is done using the Oracle Access Management
Console, providing a unified and consistent administration experience. Security Token
Service also inter-operates with third party security token servers.
Security Token Service is compliant and co-exists with Access Manager (using Access
Manager as the primary authenticator for Web clients requesting tokens). Security
Token Service also uses Oracle Web Services Manager Agents. WebGate is used as an
Agent for identity propagation. The WebGate must be registered with Access Manager
11g to open a communication channel. Security Token Service processing:
■Integrates with STS Audit events
■Publishes, in the Oracle Access Management Console and WLST scripts, available
Security Token Service methods to manage partner data
■Performs validation operations specific to the Security Token Service use cases and
configuration model
The Security Token Service 11g infrastructure is described in Table 34–1.
Note: Security Token Service adopts the same frameworks,
guidelines, and practices for diagnostics, monitoring, auditing, and
high availability used by Oracle Access Management 11g. For more
information, see Part III, "Logging, Auditing, Reporting and
Monitoring Performance".

Security Token Service Key Terms and Concepts
Introducing the Oracle Access Management Security Token Service 34-3
34.3 Security Token Service Key Terms and Concepts
Security tokens contain claims or statements that are used to assert trust. To secure
communication between a Web service client and a Web service, the two parties must
exchange security credentials. These credentials can be obtained from a trusted
Security Token Service.
Modern IT environments have numerous types of security tokens (most of them based
on browser cookies) for facilitating SSO and session management for Web
applications. These token types include Kerberos (primarily for Windows Native
Authentication), Security Assertion Markup Language (SAML) assertions, and even
digital certificates.
Table 34–2 identifies common Security Token Service terminology.
Table 34–1 Security Token Service 11g Infrastructure
Component Description
Default Trust Keystore Security Token Service private keys used for Signing/Encryption are stored in the common
keystore used with Access Manager. Security Token Service and Access Manager use the common
infrastructure certification validation module. Trusted Certificates and Certificate Revocation Lists
(CRLs) used during certificate validation are stored in Trust Keystore and CRL ZIP file. The
Security Token Service configuration stores the OCSP/CDP settings.
The token security key pair is populated to Access Manager/Security Token Service keystore.
Note: When the Oracle WSM Agent is used as the WS_Trust client in the Security Token Service
deployment, Oracle strongly recommends that the Oracle WSM Agent keystore and the Security
Token Service/Access Manager keystore always be different. Do not merge the two. Otherwise,
Access Manager/Security Token Service keys could be available to any modules authorized by
OPSS to access the keystore and Access Manager keys might be accessed.
See Also: "About Access Manager Keystores" on page 5-28.
Default User Identity Store Security Token Service authenticates and maps users against the User Identity stores configured
through the Common Configuration section of System Configuration in the Oracle Access
Management Console. Security Token Service maps the incoming token to user records and
attributes in the default User Identity Store, which operates with both Access Manager and
Security Token Service.
See Also: "Setting the Default Store and System Store"
Certificates The certificates used by Security Token Service are self signed. The subject and the issuer field are
identical. Out of the box, the OAM Server hosting Security Token Service is uniquely identified:
■The keys and certificates used in Security Token Service are generated during installation.
The subject and issuer fields are linked to the host name. This applies to the signing and
encryption keys and certificates used by Security Token Service, as well as the
keys/certificates used by the OWSM Agent protecting Access Manager. The OWSM Agent is
the certified WS-Trust client that can be used to communicate with Security Token Service.
■The SAML Issuer settings are configured to refer to the host name of the local computer.
This ensures that two servers are not identical in terms of cryptographic materials and identifiers.
The trust granted to one server by third-party modules is not granted to the other server because
the identifiers and cryptographic keys differ. There are no identical keys, no identical identifiers,
and authorization policies are in denial mode.
Oracle Coherence Security Token Service integrates with the Oracle Coherence module to store and share run time
WS-Trust data across all the physical instances of Security Token Service. The UserNameToken
Nonce are stored in the Coherence store. This implementation supports the following
requirements, which might be specific to Security Token Service:
■Cleanup of timed out records
■Existence of the records limited to several minutes (< 30)
Note: To provide interoperable security tokens, the Security Token
Service must be trusted by both the Web service client and the Web
service.

Security Token Service Key Terms and Concepts
34-4 Administrator's Guide for Oracle Access Management
Table 34–2 Security Token Service Terms
Term Description
Security Token A security mechanism that protects messages using a token issued by a
trusted Secure Token Service for message integrity and confidentiality
protection. The issued tokens contain a key, which is encrypted for the server
and which is used for deriving new keys for signing and encrypting.
Service providers and consumers in potentially different managed
environments can use a single Security Token Service to establish a chain of
trust. The service does not trust the client directly, but instead trusts tokens
issued by a designated Security Token Service. The Security Token Service is
taking on the role of a second service with which the client must securely
authenticate.
Security Token Service A trusted third party in an explicit trust relationship with the server (and a
trust relationship with the client). Security Token Service is one example.
Secure Token Service A shared Web service that provides a standards-based consolidated
mechanism of trust brokerage between different identity domains and
infrastructure tiers.
The service implements the protocol defined in the WS-Trust specification by
making assertions based on evidence that it trusts, to whoever trusts it (or to
specific recipients). This protocol defines message formats and message
exchange patterns for issuing, renewing, canceling, and validating security
tokens.
To communicate trust, a service requires something to prove knowledge of a
security token or set of security tokens. An XML Signature binds the sender's
identity (or "signing entity") to an XML document, for example. The document
is signed using the sender's private key, the signature is verified using the
sender's public key.
Request Security Token
(RST)
Request for a security token.
Request Security Token
Response (RSTR)
Response generated by Security Token Service in response to the Request for
Security Tokens with claims for the requested user.
On Behalf Of (OBO) An OBO Request Security Token (RST) is used when only the identity of the
original client is important. An OBO RST indicates that the requestor wants a
token containing claims about only one entity:
■the external entity represented by the token in the
OnBehalfOf
element.
ActAs An
ActAs
RST requires composite delegation. The final recipient of the issued
token can inspect the entire delegation chain (not just the client). An
ActAs
RST indicates that the requestor wants a token that contains claims about
distinct entities:
■The requestor
■An external entity represented by the token in the
ActAs
element
Token Exchange The exchange of one security token for another. The requestor (in order to
invoke a web service) requires a particular token. It uses Security Token
Service to exchange the incoming token with a token required by the service.

Security Token Service Key Terms and Concepts
Introducing the Oracle Access Management Security Token Service 34-5
WS-Security Web Services Security (WS-Security) specifies SOAP security extensions that
provide confidentiality using XML Encryption and data integrity using XML
Signature.
The most prevalent security tokens used with WS-Security are Username,
X.509 Certificates, SAML assertions, and Kerberos tickets (all supported by
Oracle Web Service Manager).
WS-Security also includes profiles that specify how to insert different types of
binary and XML security tokens in WS-Security headers for authentication
and authorization purposes:
WS-* specifications often depend on each other. For example, WS-Policy is
used in conjunction with WS-Security. WS-* specifications also leverage
non-WS-* specifications; for example, WS-Security uses XML Encryption and
XML Signature.
For WS-Security, only SAML assertions are used. The protocols and bindings
are provided by the WS-Security framework.
Note: WS-Security, WS-Trust, WS-Policy have been transferred over to
standards bodies such as the Organization for the Advancement of Structured
Information Standards (OASIS) or the World Wide Web Consortium (W3C).
WS-Trust Web Services Trust Language (WS-Trust) is a specification that uses the secure
messaging mechanisms of WS-Security to facilitate trust relationships.
WS-Trust defines a request and response protocol that enables applications to
construct trusted SOAP message exchanges. Trust is represented through the
exchange and brokering of security tokens.
In a message exchange using WS-Security only, it is assumed that both parties
involved in the exchange have a prior agreement on which type of security
tokens they must use for sharing security information. However, there are
cases where these parties do not have such an agreement, as a result trust
must be established before exchanging messages. Trust between two parties
exchanging SOAP / WS-Security-based messages is established by
implementing the WS-Trust specification.
WS-Policy Web Services Policy (WS-Policy). Together with WS-Security, WS-Policy is
another key industry standard for Oracle Fusion Middleware security.
WS-Policy is used in conjunction with WS-Security. A web service provider
may define conditions (or policies) under which a service is to be provided.
The WS-Policy framework enables one to specify policy information that can
be processed by web services applications, such as Oracle Web Services
Manager.
A policy is expressed as one or more policy assertions representing a web
service's capabilities or requirements. For example, a policy assertion may
stipulate that a request to a web service be encrypted. Likewise, a policy
assertion can define the maximum message size that a web service can accept.
Certificates The certificates used by Security Token Service are self signed. The subject and
the issuer field are identical. Out of the box, the OAM Server hosting Security
Token Service is uniquely identified:
Keystore Security Token Service key stores include:
■System Keystore
■Trust Keystore
■Partner Keystore
See Also: Chapter 37, "Managing Security Token Service Certificates and Keys"
User Name Token (UNT) Identifies the requestor by their username, and optionally using a password
(or shared secret, or password equivalent) to authenticate that identity. When
using a username token, the user must be configured in the Default User
Identity Store.,
Table 34–2 (Cont.) Security Token Service Terms
Term Description

Integrating the Oracle Web Services Manager
34-6 Administrator's Guide for Oracle Access Management
34.4 Integrating the Oracle Web Services Manager
In the 11g release, Oracle Web Services Manager (WSM) security and management has
been integrated into the Oracle WebLogic Server along with Oracle WSM Agent
functionality. Table 34–3 describes the WSM components.
X.509 Certificates A signed data structure designed to send a public key to a receiving party. A
certificate includes standard fields such as certificate ID, issuer's Distinguished
Name (DN), validity period, owner's DN, owner's public key, and so on.
Certificates are issued by certificate authorities (CA), for example Verisign. A
CA verifies an entity's identity and grants a certificate, signing it with the CA's
private key. The CA publishes its own certificate which includes its public key.
Each network entity has a list of the certificates of the CAs it trusts. Before
communicating with another entity, a given entity uses this list to verify that
the signature of the other entity's certificate is from a trusted CA.
Security Assertion
Markup Language
(SAML)
SAML Assertion
An open framework for sharing security information on the Internet through
XML documents. SAML provides:
■Assertions that define authentication and authorization information.
■Protocols to ask (SAML Request) and get (SAML Response) the
assertions you need.
■Bindings that define how SAML Protocols ride on industry-standard
transport (HTTP for instance) and messaging frameworks (SOAP for
instance).
■Profiles that define how SAML Protocols and Bindings combine to
support specific use cases.
For WS-Security, only SAML assertions are used. However, the protocols and
bindings are provided by the WS-Security framework.
SAML assertions can include three types of statements:
■Authentication statement: issued by an authentication authority upon
successful authentication of a subject. It asserts that Subject S was
authenticated by Means M at Time T.
■Attribute statement: issued by an attribute authority, based on policies. It
asserts that Subject S is associated with Attributes A, B, etc. with values a,
b, and so on.
■Authorization decision statement (deprecated in SAML 2.0, now
supported by XACML): issued by an authorization authority which
decides whether to grant the request by Subject S, for Action A (read,
write, and so on.), to Resource R (e.g., a file, an application, a web
service), given Evidence E.
Kerberos A cross-platform authentication and single sign-on system. The Kerberos
protocol provides mutual authentication between two entities relying on a
shared secret (symmetric keys). Kerberos authentication requires a client, a
server, and a trusted party to mediate between them called the Key
Distribution Center (KDC). Also required:
■A Principal: An identity for a user (a user is assigned a principal), or an
identity for an application offering Kerberos services.
■A Realm is a Kerberos server environment, which can be a domain name
such as EXAMPLE.COM (by convention expressed in uppercase). Each
Kerberos realm has at least one Web Services Security KDC.
The Kerberos Token profile of WS-Security allows business partners to use
Kerberos tokens in service-oriented architectures (SOAs).
See Also: "About Access Manager Security Keys and the Embedded
Java Keystore"
Table 34–2 (Cont.) Security Token Service Terms
Term Description

Integrating the Oracle Web Services Manager
Introducing the Oracle Access Management Security Token Service 34-7
Table 34–3 Integrated Oracle Web Services Manager
Component Description
Java Keystore (JKS) Required to store the signature and encryption keys required by the X.509 token on the client. JKS
the proprietary keystore format defined by Sun Microsystems. Trusted certificates and public and
private keys are stored in the keystore. To create and manage the keys and certificates in the JKS,
use the keytool utility. Keys are used for a variety of purposes, including authentication and data
integrity.
If the client and Web service are in the same domain with access to the same keystore, they can
share the same private/public key pair:
■The client can use the private key
orakey
to endorse the signature of the request message and
the public key
orakey
to encrypt the symmetric key.
■The Web service in turn uses the public key
orakey
to verify the endorsement, and the
private key
orakey
to decrypt the symmetric key.
Policy Interceptors In Oracle Fusion Middleware 11g, Oracle WSM Agents are managed by the security and
management policy interceptors. Policy Interceptors enforce policies, including reliable messaging,
management, addressing, security, and Message Transmission Optimization Mechanism (MTOM).
The Oracle WSM Agent manages the enforcement of policies using the Policy Interceptor Pipeline.
For complete Oracle Web Services Manager details, including the differences between release 10g
and 11g, see Oracle Fusion Middleware Security and Administrator's Guide for Web Services.
Oracle WSM Agent The OWSM agent is the certified WS-Trust client that can be used to communicate with Security
Token Service. The OWSM agent is embedded and used by Security Token Service for message
protection only (to publish WS Policy and to enforce message protection on inbound and
outbound WS messages). Security Token Service performs token validation/request
authentication.
■Security Token Service embedded Oracle WSM Agent is used in the mode of "Message
Protection Only" with authentication functionality disabled. This way all aspects related to
authentication of incoming token are performed by Security Token Service only.
■Oracle WSM supports disabling of authentication using configuration overrides that Security
Token Service must declare with each policy.
Exception: The Kerberos token is handled by Oracle WSM and Security Token Service is
involved in mapping only the identity.
■The OWSM Agent is one of the certified WS-Trust clients that can be used to communicate
with Security Token Service. Other 3rd party WS-Trust clients can be used to interact with
Security Token Service.
Note: Embedded means that the OWSM Agent is available as part of the JRF layer on the
WebLogic Server that Security Token Service uses:
Message/Token Protection Security Token Service/Access Manager manages its own keystore and trust store.
For Oracle WSM to enforce message protection for Security Token Service, the OWSM key store is
seeded with its own self-signed certificate; passwords for its corresponding keys are stored in CSF.
It does not work with Security Token Service keystore.
Note: Conversely, Oracle WSM requires Access Manager/Security Token Service to store keys
related to message protection in the OPSS Keystore. For cases where the client uses schemes such
as SKI, Thumbprint, and so on to refer to its certificate, Oracle WSM requires that client
certificate(s) are present in the OPSS Keystore.
Token Signing Key Security Token Service has strong security requirements around its token signing key and uses the
token signing key to broker trust between a client and a relying party. Therefore, this key must be
stored in an exclusive partition that only Security Token Service can access.
Security Key Pairs Security Token Service creates separate key pairs for issued token security and message security to
provide security of token signing keys and eliminate the need for Oracle WSM agents to work
with Access Manager/Security Token Service keystore:
■The message security key pair is populated to OPSS Keystore
■The token security key pair is populated to Access Manager/Security Token Service keystore
OPSS Keystore The message security key pair is populated to OPSS Keystore. For special cases where clients use
referencing schemes such as SKI (not a certificate token being received as part of the Web service
request), Security Token Service populates OPSS Keystore with the requesting party's certificates.
This is an uncommon scenario. Security Token Service can provide instructions on manually
provisioning the keys to OPSS keystore to make it work.
Architecting the Security Token Service
34-8 Administrator's Guide for Oracle Access Management
34.5 Architecting the Security Token Service
Security Token Service is a centralized token service that supports WS-Trust protocol.
It also defines extensions to the WS-Security specification for issuing and exchanging
security tokens and establishing trust relationships. The Security Token Service is
hosted as a web service endpoint and coordinates security based interactions between
a WSC and a WSP. All communication with the Security Token Service occurs through
a WS_Trust client, as shown in Figure 34–1.
Figure 34–1 Security Token Service Architecture
When a WSC makes a call to the WSP, it gets the WS-Security policy that will indicate
that a security token issued by Security Token Service should be presented. The policy
will contain the location of the Security Token Service, and the WSC will use that
location to contact the Security Token Service to retrieve the token expected by the
WSP. (Alternately, the WSP could register its acceptable security mechanisms with the
Security Token Service and, before validating the incoming SOAP request, check with
the Security Token Service to determine its security mechanisms). When an
authenticated WSC (carrying credentials that confirm either the identity of the end
user or the application) requests a token for access to a WSP, the Security Token
Service verifies the credentials and, in response, issues a security token that provides
proof that the WSC has been authenticated. The WSC presents the security token to the
WSP which verifies that the token was issued by a trusted Security Token Service.
34.6 Security Token Service Supported Token Matrix
Figure 34–2 documents the token support matrix for Security Token Service.
Figure 34–2 Security Token Service Token Support
Deploying Security Token Service
Introducing the Oracle Access Management Security Token Service 34-9
34.7 Deploying Security Token Service
This section provides overviews of different deployment options:
■Centralized Token Authority Deployment
■Tokens Behind a Firewall Deployment
■Web Services SSO Deployment
34.7.1 Centralized Token Authority Deployment
The need for a token exchange for security integration between Web SSO and Web
service security tiers is in demand in a deployment where a Web application makes
internal or external Web service calls. An example of this is an intranet portal
integration with an external Web service provided by a partner or another
organization within the same company. The portal needs a way to securely access the
service but the difficulty of security integration in this case stems from the fact that the
Web SSO tier and WS tier use different methods of user authentication.
In the Web SSO environment, the Web application can accept WAC-issued session
tokens (SMSESSION, OBSSO), SAML assertions or proprietary tokens to authenticate
the users. The WS* security tier also uses a variety of standard and proprietary tokens
and, in most cases, local translation of token is required to achieve integration between
the two tiers. Additionally, the WS performing the translation must contact the
authority by which the token was issued (Oracle Adaptive Access Manager) to
decompose the token before it can be translated. Decomposition requires every WS
service to maintain trust with WAC systems; this is complex and not very secure
because of multiple trust links that need to be maintained. With the introduction of
Security Token Service, the translation of tokens can be done at the centralized
authority as illustrated in Figure 34–3.
Figure 34–3 Token Translation at a Centralized Authority
34.7.2 Tokens Behind a Firewall Deployment
The situation when applications rely on special form of credentials for their business
logic is very common in deployments of Oracle access products. Integrations of WAC
See Also: "Scenario: Identity Propagation with the Access Manager
Token" on page 35-2
Deploying Security Token Service
34-10 Administrator's Guide for Oracle Access Management
systems with both Oracle and custom applications almost always require extensive
coding for:
1. Decomposing tokens issued by one token authority (such as OAM or SiteMinder)
by calling a proprietary vendor API (SM agent API or ASDK).
2. Composing a new token format (PSFT, Siebel), that the application requires for its
internal business logic.
Although such translations are often handled through application coding, it introduces
the risk of exposing user names and passwords when the code is deployed on multiple
application instances in the DMZ. Thus, Security Administrators need an ability to
control the translation process by externalizing it from the application. Introducing the
Security Token Service provides significant relief in this situation. Security Token
Service plays the role of a centralized token authority, performing token translation
behind the firewall, as shown in Figure 34–4.
Figure 34–4 Translating Tokens Behind a Firewall
Application 1 and Application 2 are protected by Access Manager. Application 2 relies
on a different type of token for its internal business logic. It has a client-side connector
that contacts Security Token Service for exchanging the OBSSO token for a username
token. The Security Token Service relies on Access Manager for decomposing the
OBSSO token and generates the new token required by Application 2. This is more
secure, because the same authority (Access Manager) performs both operations
(composing and decomposing the OBSSO token) thus, there is no need to decompose
the token on the application side.
34.7.3 Web Services SSO Deployment
As in the Web SSO case, Web services SSO is a convenience feature. The difference is
that in the case of Web SSO the party who benefits from the feature is a user; in the WS
SSO environment, the Security Administrator benefits.
With Web services SSO different Web services have different token requirements (that
change often). Externalizing the exchange to Security Token Service enables the
application to simply supply the target and the current token in its possession.
Security Token Service takes charge of determining the token type for each requested
service. When one or more Web services change their authentication requirements,
Security Token Service can seamlessly verify the token type submitted by the
application. If the token is not of the requested type, the old token is revoked and the
new one of the correct type is issued. Figure 34–5 illustrates Web services SSO.
Installing Security Token Service
Introducing the Oracle Access Management Security Token Service 34-11
Figure 34–5 Web Services SSO
34.8 Installing Security Token Service
This section provides an overview of the installation options:
■Security Token Service Cluster in Single WLS Domain
■Endpoint Exposure through a Web Server Proxy
■Security Token Service Installation Overview
■Post-Installation Tasks: Security Token Service
34.8.1 Security Token Service Cluster in Single WLS Domain
This installation option leverages clustering across Security Token Service instances
deployed in different managed servers within a single WebLogic domain. This
deployment topology facilitates High Availability capabilities through a load balancer.
By default, Access Manager co-exists on the same managed server as Security Token
Service. However, Security Token Service is disabled by default and must be manually
enabled before it can be used. This deployment topology supports:
■Deploying multiple instances of Security Token Service through the suite installer.
■Deploying a load balancer to support the High Availability and failover scenarios
on the front of the Security Token Service cluster.
For more information, see the Oracle Fusion Middleware High Availability Guide.
34.8.2 Endpoint Exposure through a Web Server Proxy
This installation option provides inter-operability of Requester and Relying Party with
Third-party STS Servers. At runtime, Security Token Service supports interoperability
with Requesters and Relying Parties of third-party security token servers using the
OPSS WS-Trust-Provider. For instance, a third-party Security Token Service can create
a valid SAML Assertion that can be consumed by Security Token Service.

Administrating the Security Token Service
34-12 Administrator's Guide for Oracle Access Management
34.8.3 Interoperability of Requester and Relying Party with Other Oracle WS-Trust
based Clients
All run-time scenarios for Requesters and Relying Parties are supported by other
Oracle WS-Trust Clients, including WLSClient, MetroClient, and Oracle Web Services
Manager (Oracle WSM). All Web services clients are supported with Security Token
Service only through the WS-Trust binding.
34.8.4 Security Token Service Installation Overview
Access Manager and Security Token Service are installed together from a single EAR
file and deployed on the same managed server in a WebLogic domain. The Oracle
WSM Agent uses a keystore for various cryptographic operations. For those tasks, the
Oracle WSM Agent uses the keystore configured for Oracle WSM tasks. During
installation, if the Oracle WSM keystore service has not been configured, the installer:
■Creates a new keystore in the $DOMAIN_HOME/config/fmwconfig folder
(default name is default-keystore.jks
■Creates a key entry with the corresponding certificate to be used by OWSM for
signature and encryption operations. This key entry is stored in the OWSM
Keystore under the
orakey
alias
■Stores the passwords of the key entry and of the keystore in CSF
Having access to the keystore is sometimes required to:
■Extract the signing or encryption certificate to distribute to clients, if needed
■Update or replace the signing or encryption key entry
■Add trusted certificates
For more information, see the Oracle Fusion Middleware Installation Guide for Oracle
Identity and Access Management.
34.8.5 Post-Installation Tasks: Security Token Service
Any server hosting Security Token Service must be registered with Access Manager.
This can occur automatically during installation, or manually after installation.
All Security Token Service system configuration is done using the Oracle Access
Management Console. Elements in the Oracle Access Management Console enable
Administrators to easily configure the Security Token Service to exchange WS Trust
tokens with partners. Other Security Token Service elements provide for creation,
viewing, modification, and removal of partners, endpoints, validation templates,
issuance templates, and data store connections.
For more details on the Security Token Service, see Part VIII, "Managing Oracle Access
Management Security Token Service".
34.9 Administrating the Security Token Service
During initial deployment, using the Oracle Fusion Middleware Configuration
Wizard, the Administrator userID and password are set. Administrators can log in and
use the Oracle Access Management Console (and WebLogic Server Administration
Console). A single LDAP group, the WebLogic Server "Administrators" group, is set by
default. For more information, see Chapter 2, "Getting Started with Oracle Access
Management".

35
Security Token Service Implementation Scenarios 35-1
35
Security Token Service Implementation
Scenarios
This chapter introduces several Security Token Service implementation and processing
scenarios. Regardless of scenario specifics, there are many similarities in both
configuration tasks and token handling. This chapter provides the following sections:
■Prerequisites
■Typical Token Ecosystem
■Scenario: Identity Propagation with the Access Manager Token
■Scenario: Web Service Security With On Behalf Of Username Token
35.1 Prerequisites
"Introducing the Oracle Access Management Security Token Service" on page 34-1.
35.2 Typical Token Ecosystem
The abstract model chosen here is of interest because of the requirements placed on
Security Token Service to support such models.
The phrase security token ecosystem is used here to represent a typical environment
where security tokens are in use. In such environments the security token, based on
the security model required for the environment, could be used to serve an end goal
such as to enable brokered trust or single-sign-on and so on. Regardless of the
environment and the type of security token, several aspects are common across all
models, as shown and described here.
Figure 35–1 illustrates a typical token ecosystem, which includes: Token Issuing
Authority, Token Requestor, Token Consumer, and the Security Token.
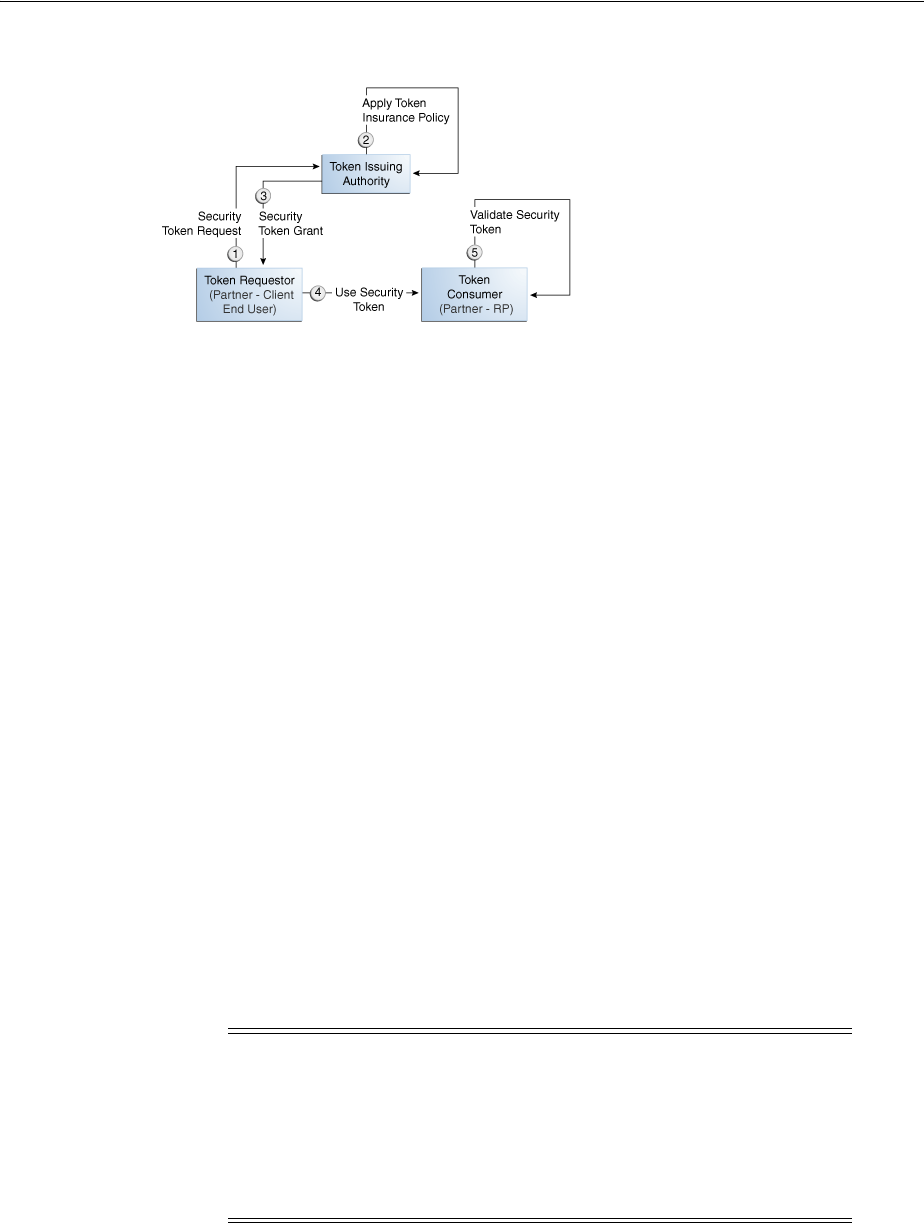
Scenario: Identity Propagation with the Access Manager Token
35-2 Administrator's Guide for Oracle Access Management
Figure 35–1 Typical Token Ecosystem
Actors and Process overview: In a typical token ecosystem
1. The Token Requestor places a request for a security token at the Token Issuing
Authority.
This security token is required to communicate and request access to a service
provided by a Service Provider (a Token Consumer who accepts the security
token).
■A Token Requestor could be a Partner of the Token Issuing Authority
(generally registered with the Token Issuing Authority).
■A Token Requestor could be an End User (generally not registered with the
Token Issuing Authority).
2. The Token Issuing Authority (Access Manager and Security Token Service, for
example) receives and processes the security token request and returns a security
token, as follows:
■Authenticate the input credentials.
■Authorize the security token request based on a Token Issuance Policy that
specifies which Token Requestors are authorized to request a security token
for a given Token Consumer.
3. The Token Consumer (typically a service provider).
■Accepts the security token as part of the service request and provides service
based on the validity of the input security token.
■Validates the input security token with Token Issuing Authority.
35.3 Scenario: Identity Propagation with the Access Manager Token
This is a deployment where the user's Identity information needs to be propagated
from a Web application to a Web service provider. The Web service provider can reside
in the same security domain as the web application or in a different security domain.
Note: A Token Consumer is typically a registered Partner of the
Token Issuing Authority. A Token Consumer is also known as a
Relying Party, because it trusts and relies on the Token Issuing
Authority for Token Requestor authentication. Token Consumers
(Relying Party Partner) are Web Applications (for Access Manager,
Security Token Service is the Token Issuing Authority) or STS Relying
Party Web Services.
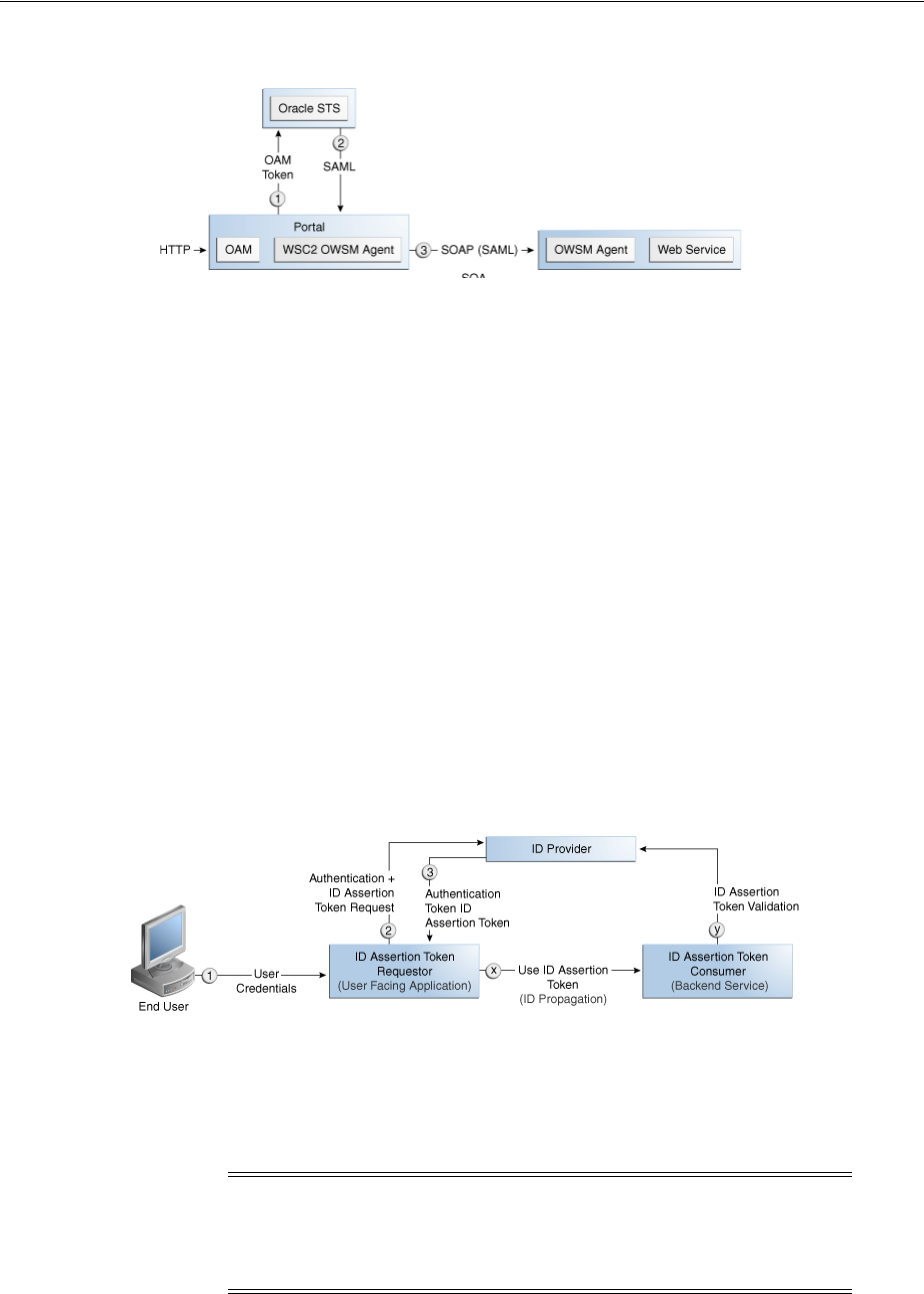
Scenario: Identity Propagation with the Access Manager Token
Security Token Service Implementation Scenarios 35-3
Figure 35–2 Identity Propagation with the OAM Token
Identity propagation means that the original user context becomes visible outside its
original security tier or domain boundaries. The user security context is propagated
across different security tiers or domains to support tier-specific or domain-specific
security needs such as step-up authentication, authorization, audit and/or internal
application-specific business logic.
ID Propagation is said to occur in a distributed processing of a request when the
identity context established in the first node is propagated to subsequent nodes to
enable further processing of the request in the context of that identity.
ID Propagation can be achieved in several ways. One of them is based on a
brokered-trust model where an ID provider acts as a trust-broker for ID Assertions.
The discussion here is pertains to this model.
Figure 35–3 illustrates an ID Propagation scenario in a brokered-trust model, where a
user-facing application needs to request processing by a backend service application in
the context of the end user. To bring out the main aspects of ID propagation all other
interaction and relationship details between end user, application, and backend service
application are ignored.
Figure 35–3 Process Flow During Identity Propagation
Actors and Process overview: Identity Propagation
1. The ID Assertion Token Requestor (an End User-Facing Application), upon end
user access, requests authentication and ID Assertion Token at the identity
Provider.
2. The ID Provider (Security Token Service) processes the request and returns an
Authentication Token and an ID Assertion Token. An ID Assertion Token, in itself,
Note: Examples of ID Assertion Token Requestors include Web
applications that are protected by OAM. The ID Assertion Token
request could be either implicit or could be driven by a policy at the
ID Provider.
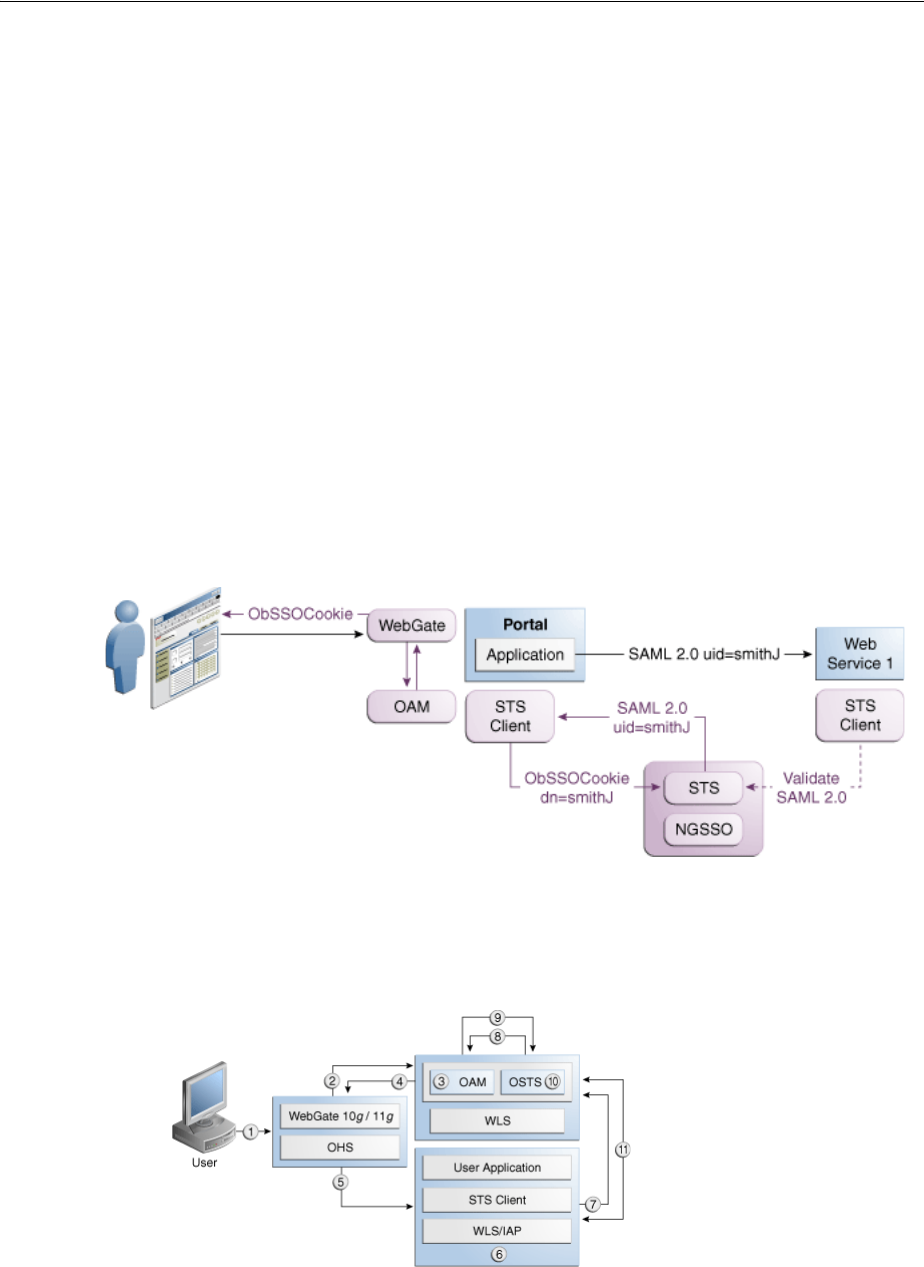
Scenario: Identity Propagation with the Access Manager Token
35-4 Administrator's Guide for Oracle Access Management
does not represent a user session and cannot be used independently to request
direct access to a resource or service.
3. The ID Assertion Token Requestor uses this Token later, during the end user
session, as part of a backend service processing request (on behalf of the end user).
4. The ID Assertion Token Consumer (Security Token Service), as part of the request
processing, first validates the ID Assertion Token and then (on validation success)
processes the request in the context of the end user Identity
For more information, see the following topics:
■Component Processing: Identity Propagation with the OAM Token
■Request Security Token Attributes and Run Time Processing
■Configuration Requirements: Identity Propagation with the OAM Token
35.3.1 Component Processing: Identity Propagation with the OAM Token
Figure 35–4 illustrates a typical deployment topology for Identity propagation using
Security Token Service with Access Manager.
Figure 35–4 Identity Propagation Deployment
Figure 35–5 illustrates a processing of Identity propagation using Security Token
Service with Access Manager. Details follow the figure.
Figure 35–5 Identity Propagation Processing

Scenario: Identity Propagation with the Access Manager Token
Security Token Service Implementation Scenarios 35-5
Process overview: Component interactions for Identity Propagation
1. User attempts to access a protected resource.
2. Webgate is protecting the resource; it sends request to Access Manager for
authentication and authorization.
3. Access Manager authenticates the user using the policy configured for this
Webgate Application Domain. It sees the response type "IDENTITY_ASSERTION"
is configured for this Webgate, so it generates ID Assertion token as well.
4. Access Manager sends authentication and ID assertion token to Webgate
5. Webgate processes the response; sets ID assertion token to the header; (OHS where
Webgate is installed on) then redirect the request to the WLS that hosts the
resource.
6. IAP (Access Manager Identity Asserter on WebLogic Server) sees OAM_
IDENTITY_ASSERTION header is set, processes the headers, then sets ID
assertion token to Subject's private credential as
OamIdentity
.
7. When the resource is finally accessed, a Web Service Client can then obtain the ID
assertion token from current user's Subject, generates a OnBehalfOf (OBO) token
with it, then creates and sends Request Security Token (RST) to Security Token
Service.
8. Security Token Service sees the ID assertion Token inside OBO token, it sends
validation/authentication request to Access Manager using Access Manager
library.
9. Access Manager validates and authenticates the ID Assertion Token, then sends
response (user identity) to Security Token Service.
10. Security Token Service uses this user identity to do further processing: policy
evaluation, token issuance, and so on. It then generates Request Security Token
Response.
11. Security Token Service sends Request Security Token Response to the client, which
can then use the token inside the Request Security Token Response (RSTR) to
create a web service request to access a service hosted on a relying party.
35.3.2 Request Security Token Attributes and Run Time Processing
For an incoming Request Security Token (RST) with the following attributes, Security
Token Service must be configured to process a request and issue a token):
RST Attributes for Identity Propagation with the OAM Token
■The SOAP header contains a Username token referencing a WS Requester. The
Username token contains at least a username and a password.
■The SOAP body contains a WS-Trust RST message
■The RST contains a OAM ID Propagation token in the OnBehalfOf field
referencing a user in LDAP. The token included in the OnBehalfOf element is a
BinarySecrityToken, whose text value is the Base 64 encoded format of the OAM
Session Propagation Token, and whose ValueType attribute is
http://something.example.com/am/2012/11/token/session-propagation
and
whose EncodingType attribute is
http://docs.oasis-open.org/wss/2004/01/oasis-200401-wss-soapmessage-sec
urity-1.0#Base64Binary

Scenario: Identity Propagation with the Access Manager Token
35-6 Administrator's Guide for Oracle Access Management
■The RST can possibly contain an AppliesTo field holding a URL pointing to the
endpoint of the Relying Party Web Service
■The RST can possibly contain a TokenType field holding the type of token that
needs to be returned
■The RST can possibly contain an Entropy field holding random data that will be
used when creating the SecretKey when a symmetric proof key is required in the
SAML Assertion
■The RST can possibly contain a UseKey field holding the certificate or public key
to be used as an asymmetric proof key in the SAML Assertion, but this field will
be ignored by Security Token Service
Process overview: Identity Propagation with the OAM Token
1. Client prepares the request by:
a. Creating the SOAP message
b. Creating the Username token referencing the client and including it in the
SOAP header
c. Creating the WS-Trust RST message
d. Creating the OAM ID Propagation token referencing the user and including it
in the OnBehalfOf field of the RST
e. Including the RST message in the SOAP body
2. Client sends the message to the Security Token Service, to an endpoint protected
by a WS-Security User Name Token (UNT) Policy, with that endpoint being
mapped to an Security Token Service WSS Validation Template.
3. Security Token Service will process the incoming request
4. Security Token Service validates the token included in the SOAP header by using
the settings contained in the WS-Security Validation Template:
a. Validates the format of the Username token
b. Validates the credentials contained in the Username token against the Security
Token Service Partner store, thus mapping this token to a Requester Partner
c. Knowing the Requester Partner, Security Token Service will retrieve the
Requester Partner Profile associated with this Requester
5. Security Token Service then validates the token present in the OnBehalfOf field:
a. Determines the type of token present in the OnBehalfOf field
b. Retrieves the WS-Trust Validation Template to be used for OAM Token Type,
from the Requester Partner Profile
c. Validates the format of the OAM token
d. Validates the OAM token, and maps the token to a user
e. Creating the OAM ID Propagation token referencing the user and including it
in the OnBehalfOf field of the RST
6. Security Token Service then examines the AppliesTo field:
■If present, Security Token Service will attempt to map the AppliesTo URL to a
Relying Party Partner, using the WS Endpoint Mapping of the Relying Party
Partner. If the mapping is successful, then the AppliesTo field has been
mapped to a Relying Party Partner, and Security Token Service will retrieve

Scenario: Identity Propagation with the Access Manager Token
Security Token Service Implementation Scenarios 35-7
the Relying Party Partner Profile from this Partner. If mapping was not
successful, then the AppliesTo field could not be mapped to a Relying Party
Partner, and Security Token Service will retrieve the Default Relying Party
Partner Profile from the Requester Partner Profile.
■If absent, Security Token Service will retrieve the Default Relying Party
Partner Profile from the Requester Partner Profile.
7. Security Token Service then examines the TokenType field:
■If present, Security Token Service will map the TokenType string to a local
token type value using the Requester Partner Profile, and it will then use the
Relying Party Partner Profile to retrieve the Issuance Template to be used to
create the outgoing token.
■If absent, Security Token Service will retrieve the default token type from the
Relying Party Partner Profile, and it will then use the Relying Party Partner
Profile to retrieve the Issuance Template to be used to create the outgoing
token.
8. Security Token Service will perform an Authorization evaluation to check that the
Requester Partner is authorized to request a token for the Relying Party referenced
in the flow (see Authorization Trust Policy for more information)
9. Security Token Service will then create the token:
■If the token to be issued is of SAML type, then the Issuance Template will list
how to populate the NameID, the Relying Party Partner Profile will list which
attributes need to be sent in the token, the Issuance Template will indicate
whether or not to translate the names and values of the attributes, the Issuance
Template will indicate whether or not to sign/encrypt the token.
■If the token to be issued if of SAML type, the Security Token Service server
will examine the KeyType to determine the Subject Confirmation Method of
the Assertion. If it is missing, it will use the Default Confirmation Method
from the Issuance Template.
10. Security Token Service will create the Response that the client will process:
a. Creates the WS-Trust RSTRC
b. Includes the returned token
c. Includes proof key if necessary
35.3.3 Configuration Requirements: Identity Propagation with the OAM Token
This topic walks through the configuration requirements for the identity propagation
scenario. It includes:
■Configuration overview: Identity Propagation with the OAM Token
■WebLogic Server Identity Assertion Providers
■Access Manager Identity Asserter Details
■LDAP Authentication Provider Details
■Default Identity Store Configuration
■Token Issuance Policy
■Authentication Policy Response for Identity Assertion by Webgate
■Endpoint Configuration
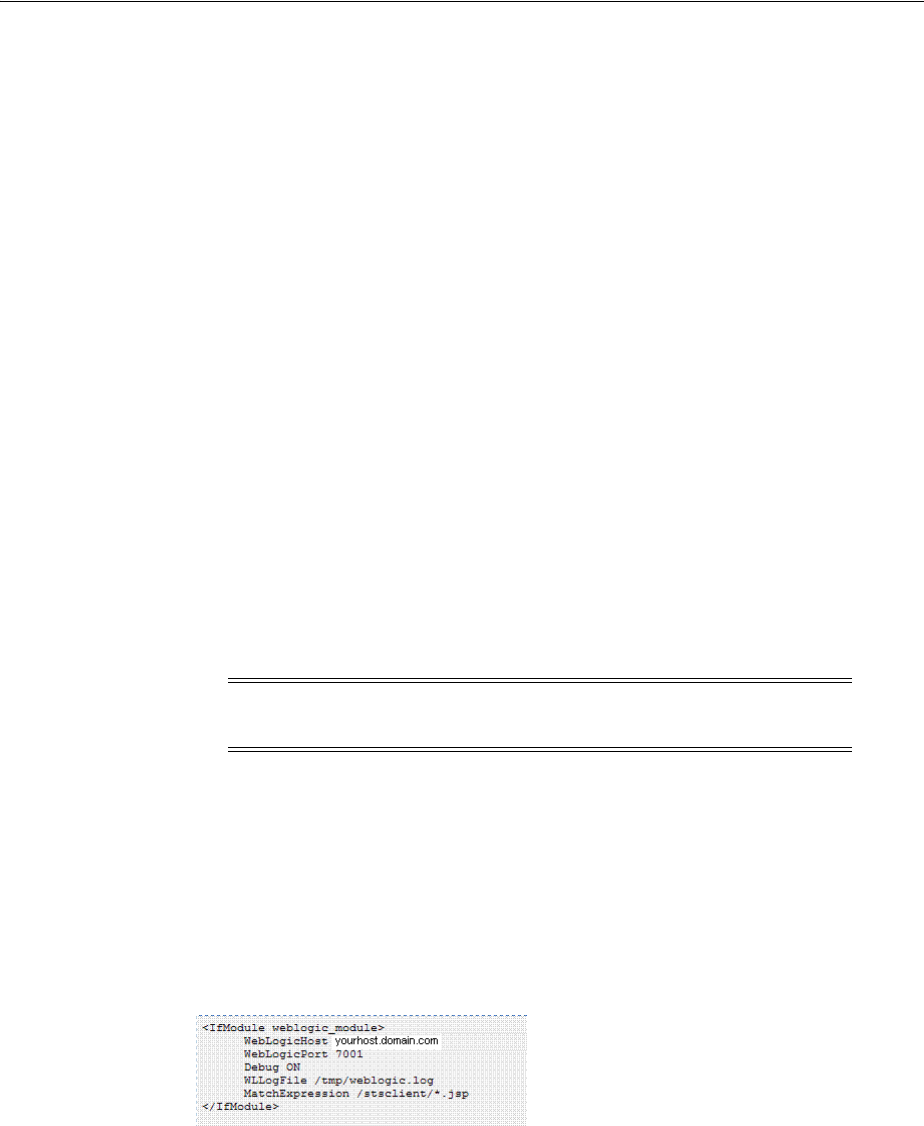
Scenario: Identity Propagation with the Access Manager Token
35-8 Administrator's Guide for Oracle Access Management
■Issuance Template Configuration
■Partner Configuration: Requester
■Partner Profile: Relying Party
■Partner Profile: Requester
■Validation Template for WS-TRUST
■Cookies and Headers (Truncated)
■Request Security Token Sent By the Client (Truncated)
■Request Security Token Response sent by the Security Token Service (Truncated)
Configuration overview: Identity Propagation with the OAM Token
Following is an overview of the Identity Propagation environment and
implementation tasks:
■A custom application module that will act as a client to:
–Retrieve the OAM Session Propagation token from the HTTP request
–Send a WS-Trust request to the Security Token Service server with Access
Manager Session Propagation token as the OnBehalfOf element
■A web application that will be protected by Webgate and will invoke the client
web application that will send a WS-Trust request to Security Token Service
■Security Token Service URL: http://myhost.domain.com:14100/sts/<endpoint>
■An OHS 11g with Webgate protecting the web application
Provision (register) a Webgate (11g or 10g) to protect the application deployed in
WebLogic Server. The
OAMSuite
Application Domain is pre-seeded and delivered
with Access Manager 11g. When you provision an OAM Agent to use this (or
another existing) Application Domain, decline the option of having policies
automatically created.
Reverse Proxy mapping for Webgate in the OHS Server mod_wl_ohs.conf, is
shown here.
The following Security Token Service configuration is required to implement token
processing for identity propagation:
■One Requester Partner Profile
■One Relying Party Partner Profile
■One Issuance Template
■One WS-Trust Validation Template
Note: Replace <endpoint> with the path configured in the STS
Endpoints section.
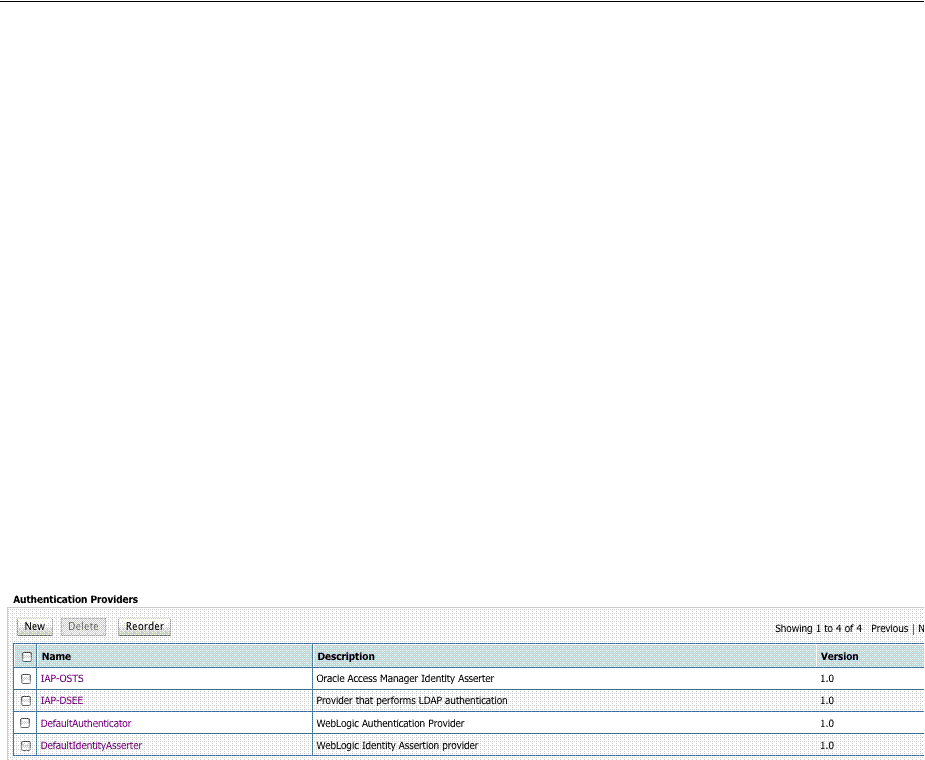
Scenario: Identity Propagation with the Access Manager Token
Security Token Service Implementation Scenarios 35-9
■Security Token Service Endpoint
■An LDAP server is required for Security Token Service to map the Username token
referencing the user to an LDAP User record, and thus use that record to populate
the outgoing token.
Ensure that the desired LDAP server is configured as the Default Identity Store.
WebLogic Server Identity Assertion Providers
Deploy the Identity Assertion Providers war. The Access Manager Identity Asserter is
available in the following path with Oracle Fusion Middleware installed:
$ORACLE_HOME/modules/oracle.oamprovider_11.1.1/oamauthenticationprovider.war
Copy oamauthenticationprovider.war to the following location:
$BEA_HOME/wlserver_10.x/server/lib/console-ext/autodeploy/oamauthentication
provider.war
Figure 35–6 illustrates the required WebLogic Server Identity Assertion Providers
configuration for this scenario.
Figure 35–6 Required v1.0 WebLogic Server Identity Assertion Providers
Access Manager Identity Asserter Details
The IAP-Security Token Service identity asserter must be the first, and set using the
REQUIRED Control flag. The Active Types should be set as ObSSOCookie and OAM_
REMOTE_USER, with an SSO Header name of OAM_REMOTE_USER1.
Figure 35–7 illustrates the configuration.

Scenario: Identity Propagation with the Access Manager Token
35-10 Administrator's Guide for Oracle Access Management
Figure 35–7 IAP-Security Token Service Details
LDAP Authentication Provider Details
Create the Authenticator for the LDAP with the OPTIONAL JAAS flag. This will point
to the Default System Store of Oracle Access Management, which provides the Access
Manager token.
Figure 35–8 illustrates this.
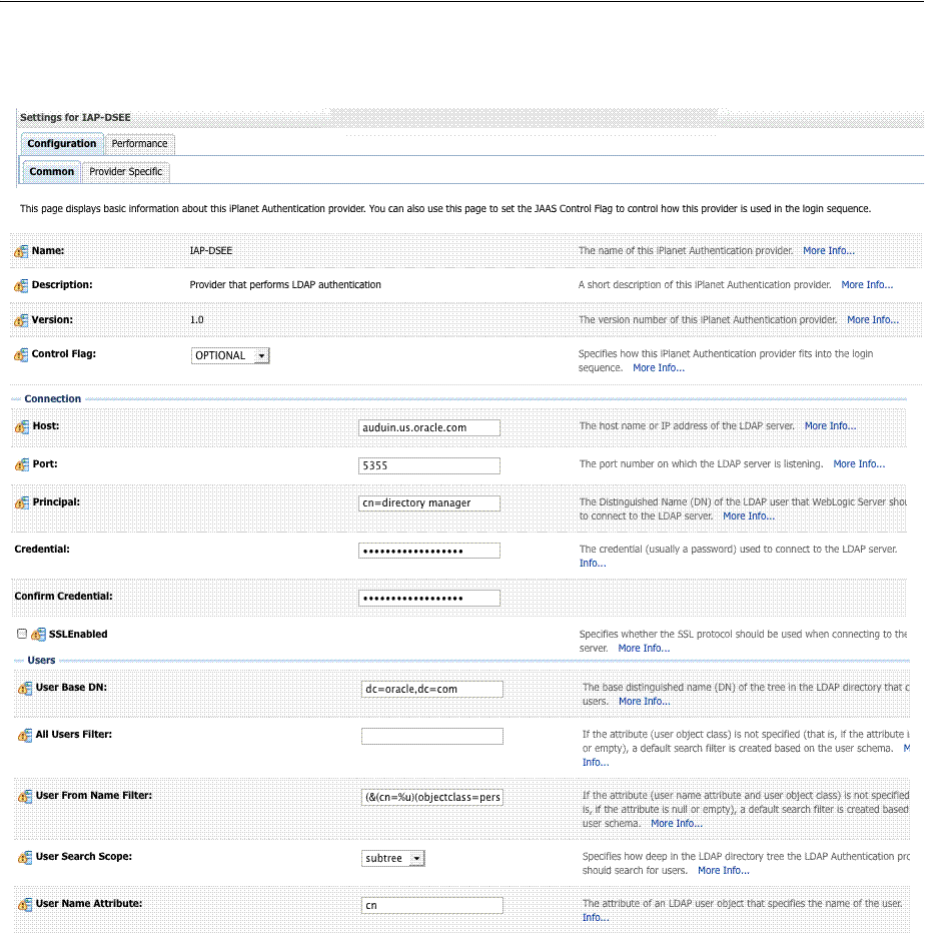
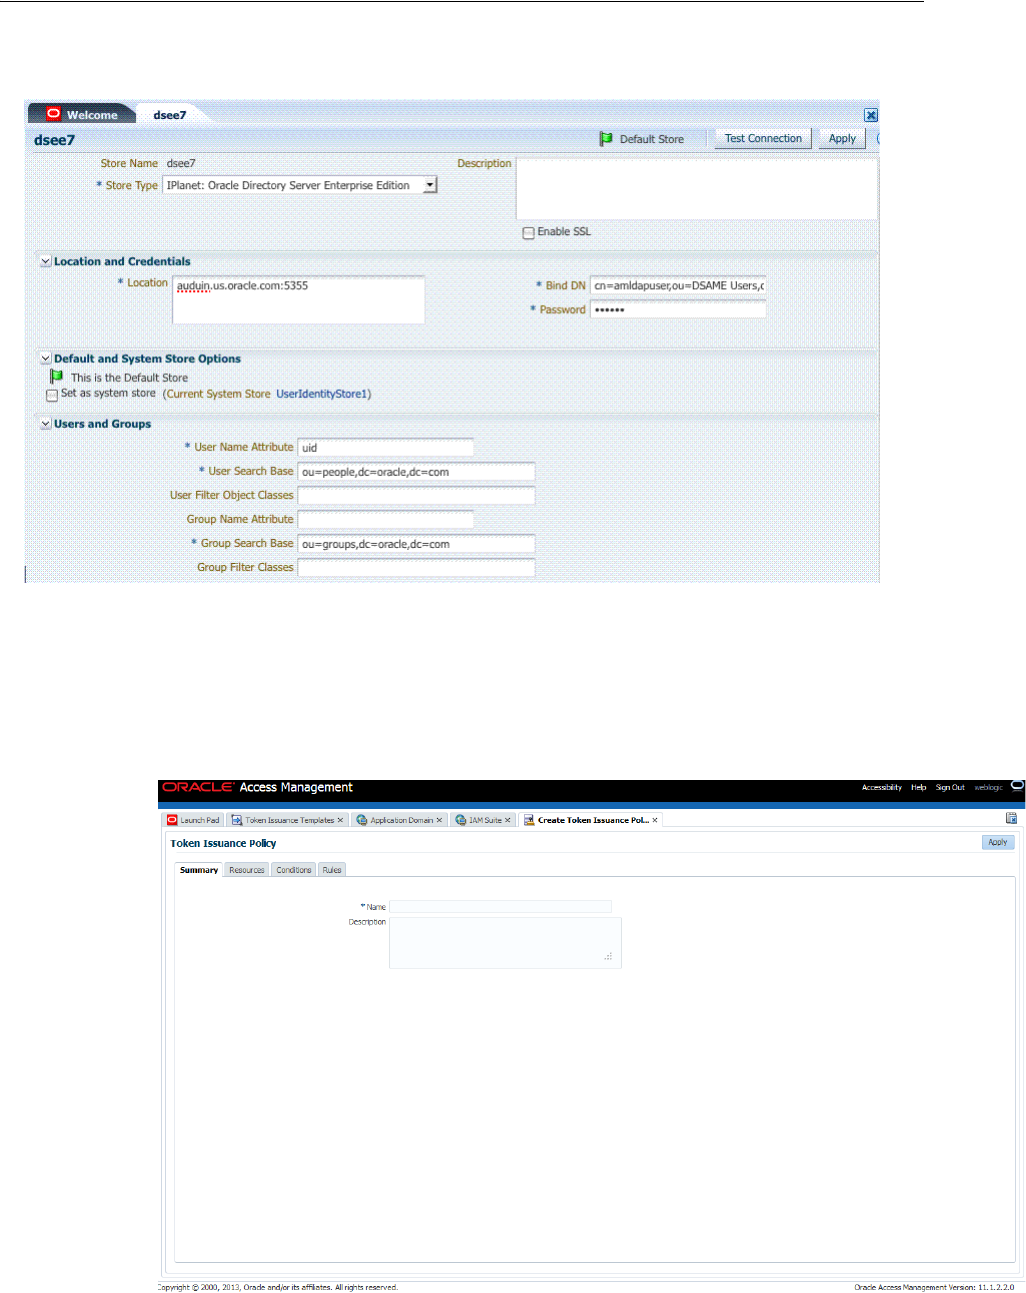
Scenario: Identity Propagation with the Access Manager Token
35-12 Administrator's Guide for Oracle Access Management
Figure 35–9 Default Identity Store Defined in Access Manager
Token Issuance Policy
Create the Token Issuance Policy for the resource URL within the IAM Suite
Application Domain. Figure 35–10 is a screenshot of the Token Issuance Policy page.
Figure 35–10 Token Issuance Policy for Identity Propagation
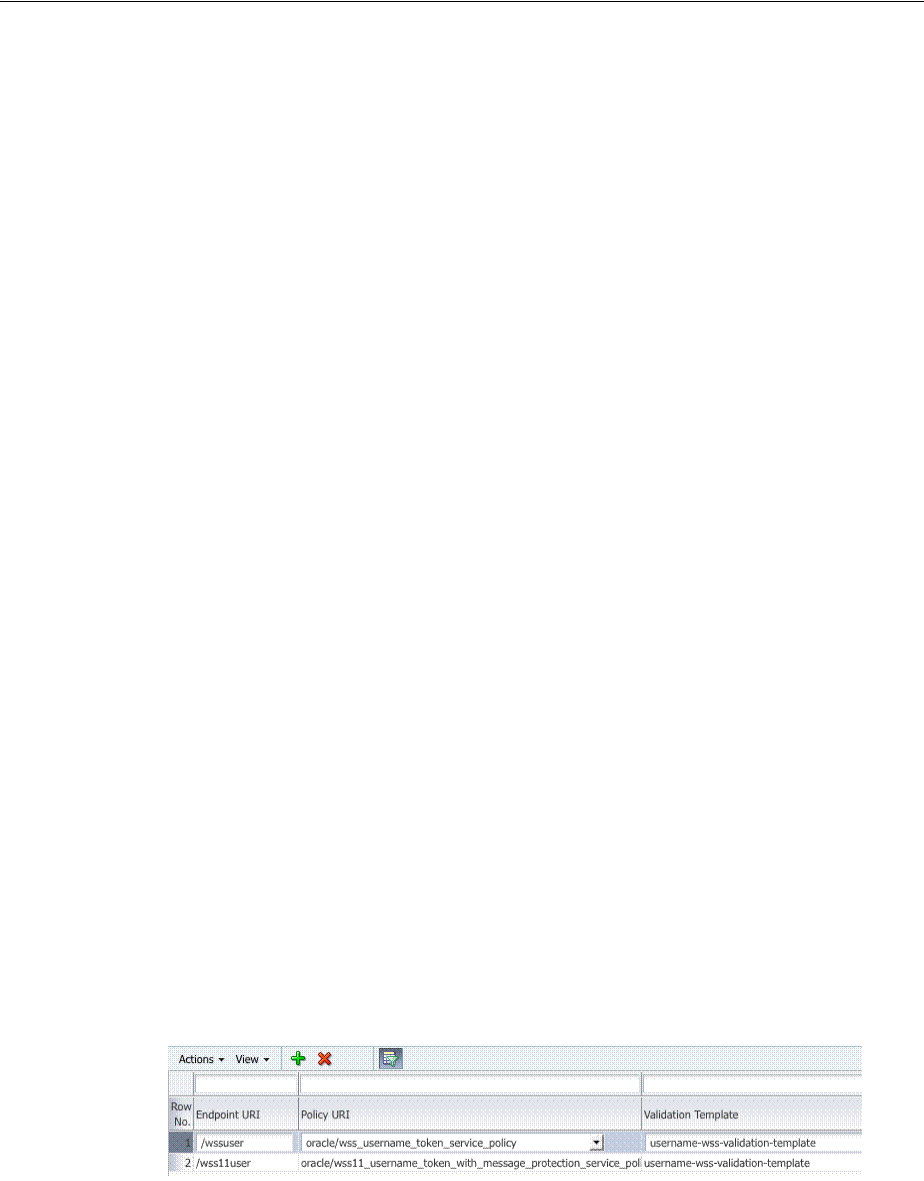
Scenario: Identity Propagation with the Access Manager Token
Security Token Service Implementation Scenarios 35-13
Authentication Policy Response for Identity Assertion by Webgate
Identity Assertion is required for ID propagation for any issued token from Access
Manager that represents an end user (and possibly its OAM session).
The Identity Assertion Token is generated and returned as a policy response (HTTP
HEADER named "OAM_IDENTITY_ASSERTION" with a value as a SAML token)
after a successful authentication.
Security Token Service clients that are Web applications protected by Access Manager
requesting tokens to gain proxy access to a Relying Party (ID Propagation use case) are
required to pass an OAM Identity Assertion token that represents the end user.
The ID Provider (Access Manager) processes the request and returns an
Authentication Token and an ID Assertion Token. An ID Assertion Token, in itself,
does not represent a user session and cannot be used independently to request direct
access to a resource or service.
The ID Assertion Token Requestor uses this Token later, during the end user session,
as part of a backend service processing request (on behalf of the end user).
The ID Assertion Token Consumer (Security Token Service), as part of request
processing, first validates the ID Assertion Token and then (on validation success)
processes the request in the context of the end user Identity.
Confirm that the Identity Assertion box is checked as part of the Authentication Policy
Response within the IAM Suite Application Domain. This enables Webgate to perform
Identity Assertion for protected resources.
As you add each Response, you might be informed that
Identity Assertion has not
been enabled for this policy. Enable Identity Assertion in order to
collect Assertion Attribute type responses (when this policy is executed)
.
Endpoint Configuration
The /wss10user Endpoint is needed, as shown in Figure 35–11. This endpoint is
protected by the default WS-Security Validation Template. This is the one that will be
used in the Web application to post the RST.
Figure 35–11 /wssuser Endpoint for Identity Assertion
Issuance Template Configuration
The Issuance Template requires the following configuration for Identity Propagation:
■Name: iap-issuance-template
■Description: Custom issuance template
See Also: "Introduction to Policy Responses for SSO" on page 20-41.
See Also: "Adding and Managing Policy Responses for SSO" on
page 20-47.

Scenario: Identity Propagation with the Access Manager Token
35-14 Administrator's Guide for Oracle Access Management
■Token Type: SAML 2.0
■Signing Key Id: osts_signing
■Description: Custom issuance template
Partner Configuration: Requester
Create a new Requester Partner configuration for Identity Propagation with the OAM
token as follows:
■Partner Name: iap-request-partner
■Requester Type: STS_REQUESTER
■Partner Profile: iap-requestor-profile
■Description: Custom requester
■Trusted
■Username Token Authentication
–Username <enter username used by the Web Service Client>
–Password <enter password used by the Web Service Client>
–Confirm Password <enter password used by the Web Service Client>
■Identity Attribute values for:
–httpbasicusername
–sslclientcertdn
Partner Profile: Relying Party
Create a new Relying Party Profile for Identity Propagation as follows:
■Profile ID: iap-relyingparty-profile
■Description: iap-issuance-template
■Default Token Type: SAML 2.0
■Default Template: iap-issuance-template
Partner Profile: Requester
Create a new Requester Profile for Identity Propagation as follows:
■Profile ID: iap-requestor-profile
■Description: iap-requestor-profile partner profile
■Default Relying Party Profile: iap-relyingparty-profile
Validation Template for WS-TRUST
The Validation Template requires the following configuration for Identity Propagation:
■Validation Template Name: iap_wstrust_validation_template
■Description: iap_wstrust_validation_template
■Token Protocol: WS-Trust
■Token Type: OAM
■Timestamp Lifespan:
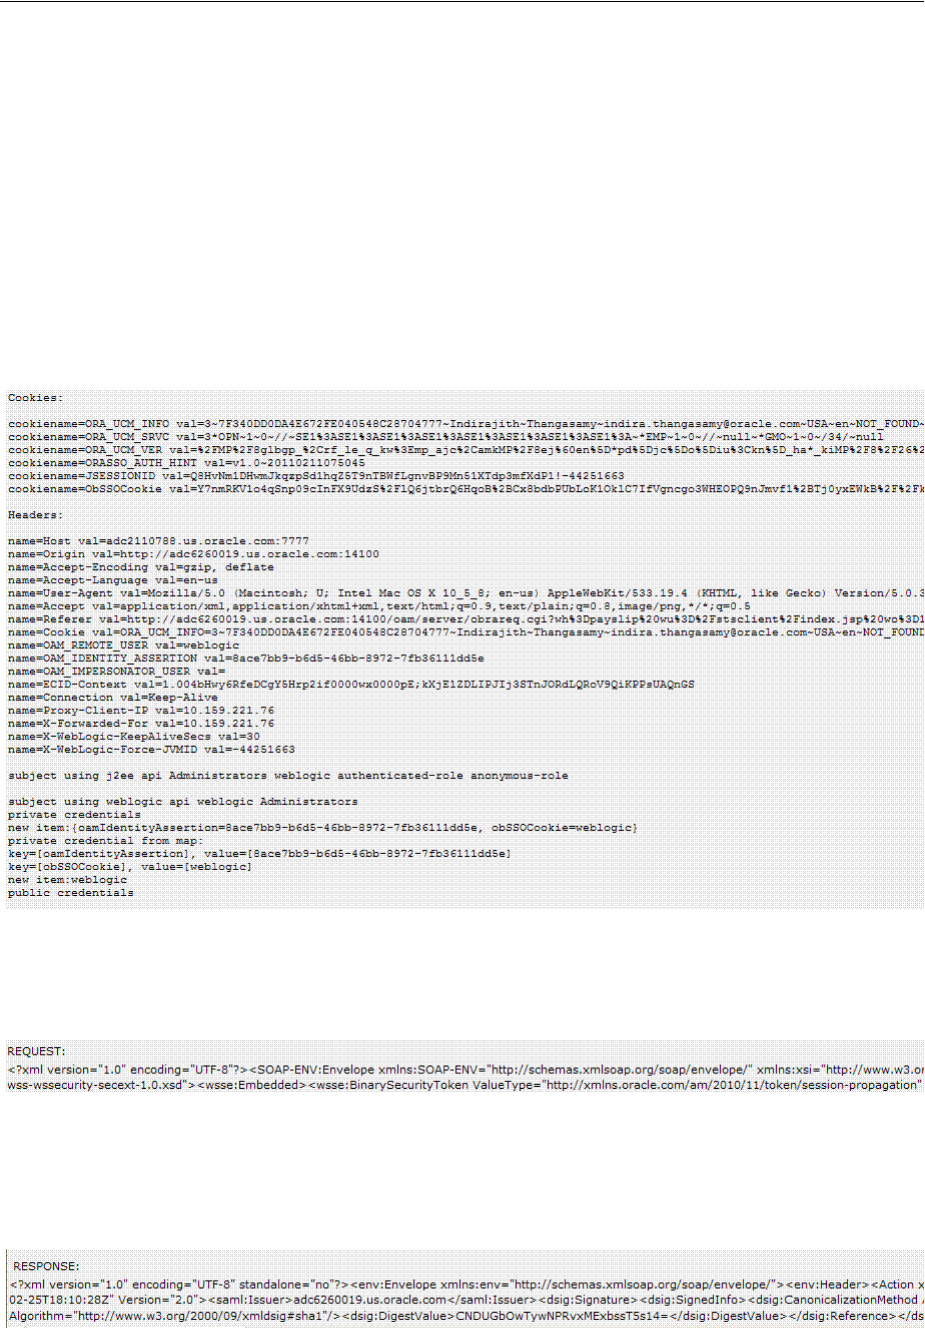
Scenario: Identity Propagation with the Access Manager Token
Security Token Service Implementation Scenarios 35-15
This completes the configuration requirements for the Identity Propagation with OAM
Token scenario.
35.3.4 Testing Your Implementation
Following configuration, you can try to access the resource to confirm your
implementation is working properly.
Webgate should redirect to the OAM Server if there is no existing session for the user
Upon successful authentication, you should be able to see the RST and RSTR sent by
the STS server.
Cookies and Headers (Truncated)
Request Security Token Sent By the Client (Truncated)
Here is a (truncated) request for security token sent by the client.
Request Security Token Response sent by the Security Token Service
(Truncated)
Here is a (truncated) response to the RST sent by the Security Token Service.

Scenario: Web Service Security With On Behalf Of Username Token
35-16 Administrator's Guide for Oracle Access Management
35.4 Scenario: Web Service Security With On Behalf Of Username Token
This section provides the following topics:
■Component interactions for Identity Propagation with Username Token
■RST Attributes and Processing for Identity Propagation with a Username Token
■Configuration Requirements: Identity Propagation with the Username Token
35.4.1 Component interactions for Identity Propagation with Username Token
Process overview: Component interactions for Identity Propagation
1. User attempts to access a protected resource.
2. User is authenticated.
3. The WebLogic container sets the user's identity into a Subject for this session.
4. When the resource is finally accessed, a Web Service Client can then obtain the
user's identity from current user's Subject, generates a OnBehalfOf (OBO) token
with it, then creates and sends Request Security Token (RST) to Security Token
Service.
5. Security Token Service authenticates the Web Service Client as a Requester Partner.
6. Security Token Service sees the Username Token inside OBO token, it maps the
maps the user's identity to a user record in LDAP.
7. Security Token Service then generates Request Security Token Response.
8. Security Token Service sends Request Security Token Response to the client, which
can then use the token inside the Request Security Token Response (RSTR) to
create a web service request to access a service hosted on a relying party.
35.4.2 RST Attributes and Processing for Identity Propagation with a Username Token
For an incoming Request Security Token (RST) with the following attributes, Oracle
Security Token Service must be configured to process a request and issue a token.
RST Attributes for Identity Propagation with a Username Token
■The SOAP header contains a Username token referencing a WS Requester. The
Username token contains at least a username and a password.
■The SOAP body contains a WS-Trust RST message.
■The RST contains a Username Token in the OnBehalfOf field referencing a user in
LDAP.
■The RST can possibly contain an AppliesTo field holding a URL pointing to the
endpoint of the Relying Party Web Service.
■The RST can possibly contain a TokenType field holding the type of token that
needs to be returned.
■The RST can possibly contain an Entropy field holding random data that will be
used when creating the SecretKey when a symmetric proof key is required in the
SAML Assertion.
■The RST can possibly contain a UseKey field holding the certificate or public key
to be used as an asymmetric proof key in the SAML Assertion, but this field will
be ignored by Security Token Service.

Scenario: Web Service Security With On Behalf Of Username Token
Security Token Service Implementation Scenarios 35-17
Process overview: Identity Propagation with the OAM Token
1. Client prepares the request by:
■Creating the SOAP message
■Creating the Username token referencing the client and including it in the
SOAP header.
■Creating the WS-Trust RST message.
■Creating the Username Token referencing the user and including it in the
OnBehalfOf field of the RST.
■Including the RST message in the SOAP body.
2. Client sends the message to the Security Token Service, to an endpoint protected
by a WS-Security User Name Token (UNT) Policy, with that endpoint being
mapped to an Security Token Service WSS Validation Template.
3. Security Token Service will process the incoming request.
4. Security Token Service validates the token included in the SOAP header by using
the settings contained in the WS-Security Validation Template:
■Validates the format of the Username token.
■Validates the credentials contained in the Username token against the Security
Token Service Partner store, thus mapping this token to a Requester Partner.
■Knowing the Requester Partner, Security Token Service will retrieve the
Requester Partner Profile associated with this Requester.
5. Security Token Service then validates the token present in the OnBehalfOf field:
■Determines the type of token present in the OnBehalfOf field.
■Retrieves the WS-Trust Validation Template to be used for Username Token
Type, from the Requester Partner Profile.
■Validates the Username Token, and maps the token to a user.
6. Security Token Service then examines the AppliesTo field:
■If present, Security Token Service will attempt to map the AppliesTo URL to a
Relying Party Partner, using the WS Endpoint Mapping of the Relying Party
Partner. If the mapping is successful, then the AppliesTo field has been
mapped to a Relying Party Partner, and Security Token Service will retrieve
the Relying Party Partner Profile from this Partner. If mapping was not
successful, then the AppliesTo field could not be mapped to a Relying Party
Partner, and Security Token Service will retrieve the Default Relying Party
Partner Profile from the Requester Partner Profile.
■If absent, Security Token Service will retrieve the Default Relying Party
Partner Profile from the Requester Partner Profile.
7. Security Token Service then examines the TokenType field:
■If present, Security Token Service will map the TokenType string to a local
token type value using the Requester Partner Profile, and it will then use the
Relying Party Partner Profile to retrieve the Issuance Template to be used to
create the outgoing token.
■If absent, Security Token Service will retrieve the default token type from the
Relying Party Partner Profile, and it will then use the Relying Party Partner
Profile to retrieve the Issuance Template to be used to create the outgoing
token.

Scenario: Web Service Security With On Behalf Of Username Token
35-18 Administrator's Guide for Oracle Access Management
8. Security Token Service will perform an Authorization evaluation to check that the
Requester Partner is authorized to request a token for the Relying Party referenced
in the flow (see Authorization Trust Policy for more information).
9. Security Token Service will then create the token:
■If the token to be issued is of SAML type, then the Issuance Template will list
how to populate the NameID, the Relying Party Partner Profile will list which
attributes need to be sent in the token, the Issuance Template will indicate
whether or not to translate the names and values of the attributes, the Issuance
Template will indicate whether or not to sign/encrypt the token.
■If the token to be issued if of SAML type, the Security Token Service server
will examine the KeyType to determine the Subject Confirmation Method of
the Assertion. If it is missing, it will use the Default Confirmation Method
from the Issuance Template.
10. Security Token Service will create the Response that the client will process:
■Creates the WS-Trust RSTRC
■Includes the returned token
■Includes proof key if necessary
35.4.3 Configuration Requirements: Identity Propagation with the Username Token
This topic walks through the configuration requirements for the identity propagation
scenario. It includes:
■Configuration overview: Identity Propagation with the Username Token
■Default Identity Store Configuration
■Token Issuance Policy
■Endpoint Configuration
■Issuance Template Configuration
■Partner Configuration: Requester
■Partner Profile: Relying Party
■Partner Profile: Requester
■Validation Template for WS-TRUST
■Example 35–1, "Sample exchange: Request Security Token Sent By the Client"
■Example 35–2, "Request Security Token Response sent by the Security Token
Service"
Configuration overview: Identity Propagation with the Username Token
Following is an overview of the Identity Propagation environment and
implementation tasks:
■A web application where the user will request. This web application will
authenticate the user, then attempt to send a SOAP message to a remote Web
Service Provider. As part of that SOAP exchange, the WS-Security client will
download the WS-Security policy of the Web Service Provider, connect to the
Security Token Service to retrieve the token requested by the Web Service Provider,
send the Security Token with the SOAP message to the Web Service Provider.
■Security Token Service URL: http://myhost.domain.com:14100/sts/<endpoint>
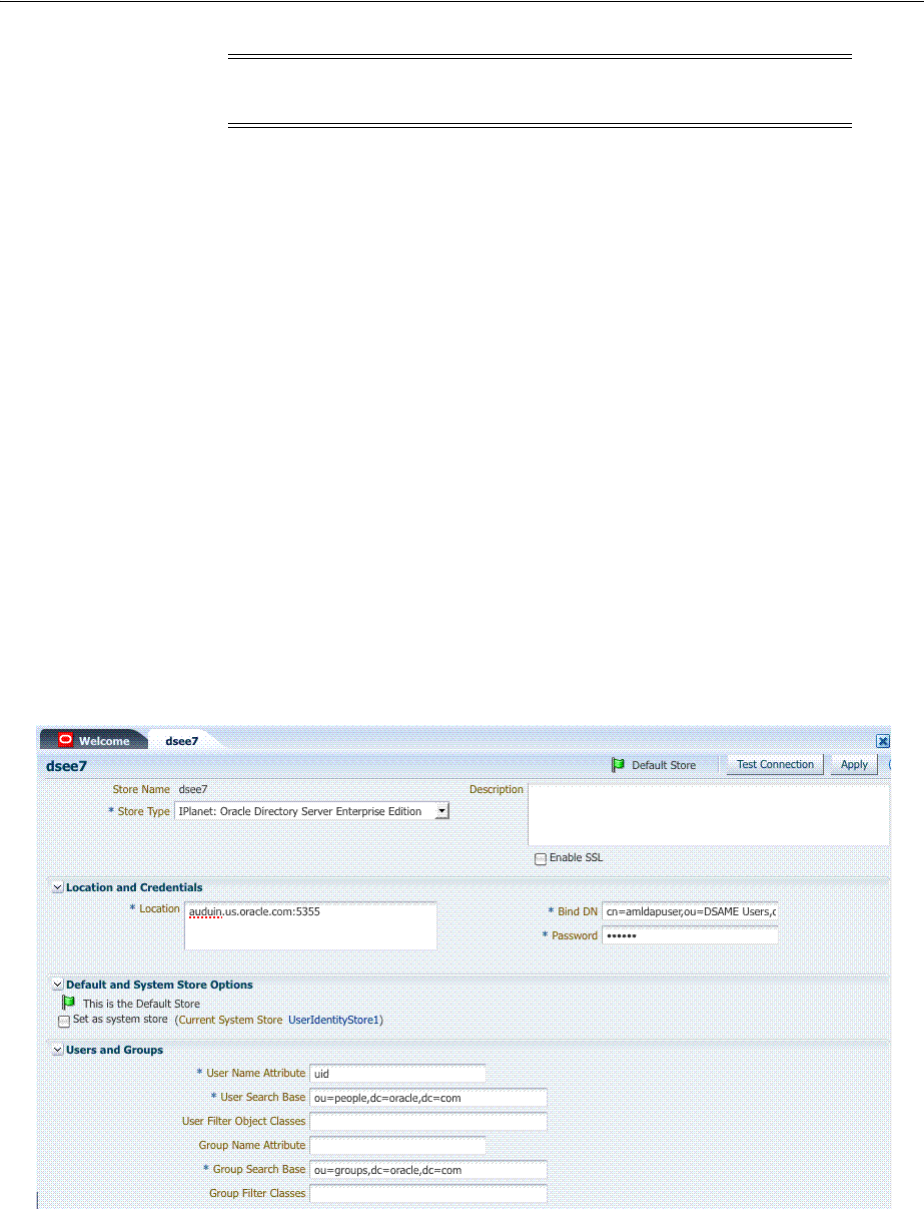
Scenario: Web Service Security With On Behalf Of Username Token
Security Token Service Implementation Scenarios 35-19
The following Security Token Service configuration is required to implement token
processing for identity propagation:
■One Requester Partner Profile
■One Relying Party Partner Profile
■One Issuance Template
■One WS-Trust Validation Template
■Security Token Service Endpoint
■An LDAP server is required for Security Token Service to map the Username token
referencing the user to an LDAP User record, and thus use that record to populate
the outgoing token.
■Ensure that the desired LDAP server is configured as the Default Identity Store for
Access Manager.
Default Identity Store Configuration
Figure 35–12 illustrates the Default Identity Store configuration within Oracle Access
Management Console.
Figure 35–12 Default Identity Store Defined for Access Manager
Token Issuance Policy
Create the Token Issuance Policy for the resource URL within the IAMSuite
Application Domain. Figure 35–13 is a screen shot of the Token Issuance Policy page.
Note: Replace <endpoint> with the path configured in the STS
Endpoints section.
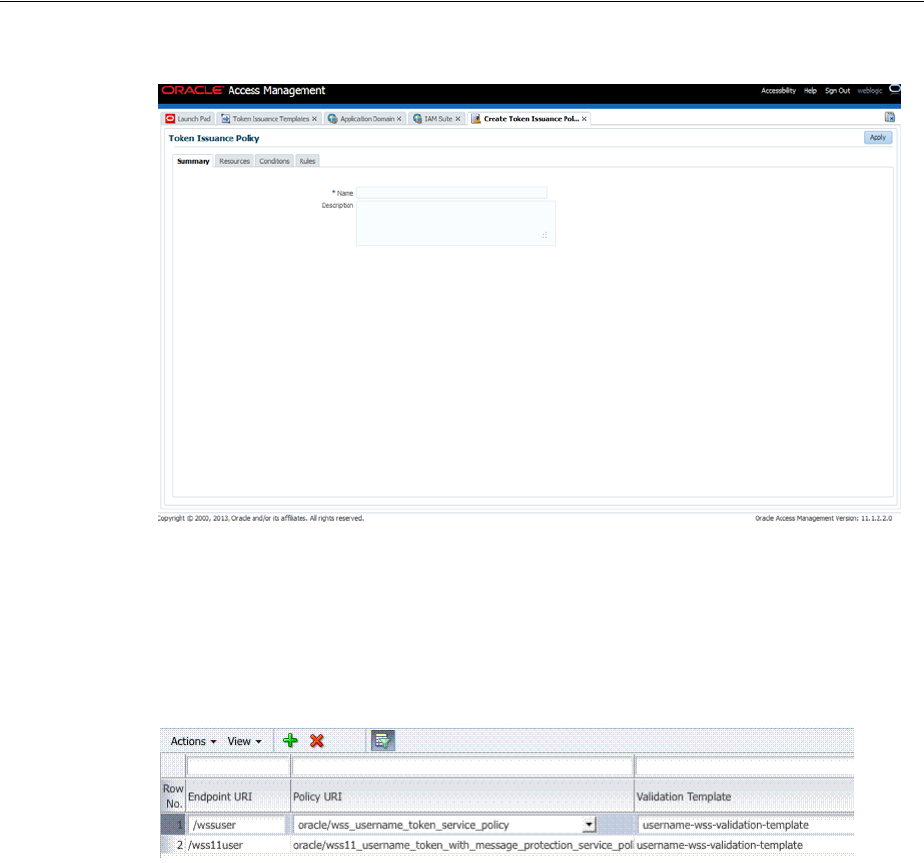
Scenario: Web Service Security With On Behalf Of Username Token
35-20 Administrator's Guide for Oracle Access Management
Figure 35–13 Token Issuance Policy for Identity Propagation
Endpoint Configuration
The /wss11user Endpoint is needed, as shown in Figure 35–14. This endpoint is
protected by the default WS-Security Validation Template. This is the one that will be
used in the Web application to post the RST.
Figure 35–14 /wss11user Endpoint for Identity Assertion
Issuance Template Configuration
The Issuance Template requires the following configuration for Identity Propagation:
■Name: saml-issuance-template
■Description: SAML issuance template
■Token Type: SAML 2.0
■Signing Key Id: osts_signing
Partner Configuration: Requester
Create a new Requester Partner configuration for Identity Propagation with the OAM
token as follows:
■Partner Name: requester-partner
■Partner Type: Requester
■Partner Profile: requester-profile
■Description: Requester

Scenario: Web Service Security With On Behalf Of Username Token
Security Token Service Implementation Scenarios 35-21
■Trusted
■Username Token Authentication
–Username <enter username used by the Web Service Client>
–Password <enter password used by the Web Service Client>
–Confirm Password <enter password used by the Web Service Client>
■Identity Attribute values for:
–httpbasicusername
–sslclientcertdn
Partner Profile: Relying Party
Create a new Relying Party Profile for Identity Propagation as follows:
■Profile ID: relying-party-profile
■Description: Relying Party Profile
■Default Token Type: SAML 2.0
■Issuance Template: iap-issuance-template for SAML 2.0
Partner Profile: Requester
Create a new Requester Profile for Identity Propagation as follows:
■Profile ID: requester-profile
■Description: Requester Partner Profile
■Default Relying Party Profile: relying-party-profile
Validation Template for WS-TRUST
The Validation Template requires the following configuration for Identity Propagation:
■Validation Template Name: username_wstrust_validation_template
■Description: Username WS-Trust Template
■Token Protocol: WS-Trust
■Token Type: Username
■Timestamp Lifespan: 600
■Enable Credential Validation: unchecked
■Token Mapping:
–Map Token To User: checked
–Enable Simple User Mapping: checked
–Datastore Attribute: uid
This completes the configuration requirements for the Identity Propagation with
Username Token scenario.
Example 35–1 Sample exchange: Request Security Token Sent By the Client
Here is a request for security token sent by the client.
<SOAP-ENV:Envelope xmlns:SOAP-ENV="http://schemas.xmlsoap.org/soap/envelope/"
xmlns:xsi="http://www.w3.org/1999/XMLSchema-instance">

Scenario: Web Service Security With On Behalf Of Username Token
35-22 Administrator's Guide for Oracle Access Management
<SOAP-ENV:Header><wsse:Security
xmlns:wsse="http://docs.oasis-open.org/wss/2004/01/oasis-200401-wss-wssecurity-sec
ext-1.0.xsd">
<wsse:UsernameToken><wsse:Username>requester-test</wsse:Username><wsse:Password
Type="http://docs.oasis-open.org/wss/2004/01/oasis-200401-wss-username-token-profi
le-1.0#PasswordText">welcome1</wsse:Password></wsse:UsernameToken></wsse:Security>
<wsa:Action
xmlns:wsa="http://www.w3.org/2005/08/addressing">http://docs.oasis-open.org/ws-sx/
ws-trust/200512/RST/Issue</wsa:Action></SOAP-ENV:Header>
<SOAP-ENV:Body><wst:RequestSecurityToken
xmlns:wst="http://docs.oasis-open.org/ws-sx/ws-trust/200512"><wst:RequestType>http
://docs.oasis-open.org/ws-sx/ws-trust/200512/Issue</wst:RequestType>
<wst:TokenType>http://docs.oasis-open.org/wss/oasis-wss-saml-token-profile-1.1#SAM
LV1.1</wst:TokenType><wst:OnBehalfOf>
<wsse:UsernameToken
xmlns:wsse="http://docs.oasis-open.org/wss/2004/01/oasis-200401-wss-wssecurity-sec
ext-1.0.xsd"><wsse:Username>user-alice</wsse:Username>
</wsse:UsernameToken></wst:OnBehalfOf></wst:RequestSecurityToken></SOAP-ENV:Body><
/SOAP-ENV:Envelope>
Example 35–2 Request Security Token Response sent by the Security Token Service
Here is a response to the RST sent by the Security Token Service.
<env:Envelope
xmlns:env="http://schemas.xmlsoap.org/soap/envelope/"><env:Header><Action
xmlns="http://www.w3.org/2005/08/addressing">http://docs.oasis-open.org/ws-sx/ws-t
rust/200512/RSTRC/IssueFinal</Action>
</env:Header><env:Body><wst:RequestSecurityTokenResponseCollection
xmlns:ns6="http://schemas.xmlsoap.org/ws/2004/08/addressing"
xmlns:wsa="http://www.w3.org/2005/08/addressing"
xmlns:wsp="http://schemas.xmlsoap.org/ws/2004/09/policy"
xmlns:wsse="http://docs.oasis-open.org/wss/2004/01/oasis-200401-wss-wssecurity-sec
ext-1.0.xsd" xmlns:wst="http://docs.oasis-open.org/ws-sx/ws-trust/200512"
xmlns:wsu="http://docs.oasis-open.org/wss/2004/01/oasis-200401-wss-wssecurity-util
ity-1.0.xsd">
<wst:RequestSecurityTokenResponse><wst:TokenType>http://docs.oasis-open.org/wss/oa
sis-wss-saml-token-profile-1.1#SAMLV1.1</wst:TokenType><wst:RequestedSecurityToken
><saml:Assertion AssertionID="id-1LNkSUVcpbH7O0oQwbHJ5JOd5fs-"
IssueInstant="2011-04-22T18:48:05Z" Issuer="myhost.uk.example.com"
MajorVersion="1" MinorVersion="1" xmlns:dsig="http://www.w3.org/2000/09/xmldsig#"
xmlns:enc="http://www.w3.org/2001/04/xmlenc#"
xmlns:saml="urn:oasis:names:tc:SAML:1.0:assertion"
xmlns:xsi="http://www.w3.org/2001/XMLSchema-instance">
<saml:Conditions NotBefore="2011-04-22T18:48:05Z"
NotOnOrAfter="2011-04-22T19:48:05Z"/><saml:AttributeStatement><saml:Subject><saml:
NameIdentifier
Format="urn:oasis:names:tc:SAML:1.1:nameid-format:emailAddress">user-alice@example
.com</saml:NameIdentifier><saml:SubjectConfirmation>
<saml:ConfirmationMethod>urn:oasis:names:tc:SAML:1.0:cm:sender-vouches</saml:Confi
rmationMethod></saml:SubjectConfirmation>
</saml:Subject><saml:Attribute AttributeName="sn"
AttributeNamespace="urn:oracle:security:fed:attrnamespace"><saml:AttributeValue
xmlns:xs="http://www.w3.org/2001/XMLSchema"
xsi:type="xs:string">user-alice-last</saml:AttributeValue></saml:Attribute>
</saml:AttributeStatement><dsig:Signature><dsig:SignedInfo><dsig:CanonicalizationM
ethod Algorithm="http://www.w3.org/2001/10/xml-exc-c14n#"/>
<dsig:SignatureMethod
Algorithm="http://www.w3.org/2000/09/xmldsig#rsa-sha1"/><dsig:Reference
URI="#id-1LNkSUVcpbH7O0oQwbHJ5JOd5fs-"><dsig:Transforms><dsig:Transform
Algorithm="http://www.w3.org/2000/09/xmldsig#enveloped-signature"/>

Scenario: Web Service Security With On Behalf Of Username Token
Security Token Service Implementation Scenarios 35-23
<dsig:Transform
Algorithm="http://www.w3.org/2001/10/xml-exc-c14n#"/></dsig:Transforms><dsig:Diges
tMethod Algorithm="http://www.w3.org/2000/09/xmldsig#sha1"/>
<dsig:DigestValue>1GF2ZT9h+gs8sxyO+/yG/N6jxk8=</dsig:DigestValue></dsig:Reference>
</dsig:SignedInfo>
<dsig:SignatureValue>InZVb5aRM5+KKI1VqXg9HiIgLjKyGm0VkD6sMJ/8SIbFbbxuNm7Mnky5W35p2
P0c5bCPRx02uzLEE4KhLkyM2GsLsVaDNkRztGMphQW/Mcg7DprJIEyR2OYMYDOQSipa/k2K98C4zO/RNiv
o1KvyJsd6a3h6CBHwoO1RKip039w=</dsig:SignatureValue>
<dsig:KeyInfo><dsig:X509Data><dsig:X509Certificate>MIIB/DCCAWWgAwIBAgIBCjANBgkqhki
G9w0BAQQFADAjMSEwHwYDVQQDExhhZGMyMTEwNjE4LnVzLm9yYWNsZS5jb20wHhcNMTEwNDE5MTUxNTI2W
hcNMjEwNDE2MTUxNTI2WjAjMSEwHwYDVQQDExhhZGMyMTEwNjE4LnVzLm9yYWNsZS5jb20wgZ8wDQYJKoZ
IhvcNAQEBBQADgY0AMIGJAoGBAJnSxVc86TGcwewieaueIVG33C3Qouve6HuJxHsoM8cRRkJcmv+0auyvD
LJfYAEOfHo5OsF4+za11iNPln9ZFaOjUy/Y8JC0kSVxatgU36RveIrpOJvp978Oa6IlMNUtdFf8q3Trsiz
spE2hnbLY+0SMofgnAPcJEKPxkd6b0b0ZAgMBAAGjQDA+MAwGA1UdEwEB/wQCMAAwDwYDVR0PAQH/BAUDA
wfYADAdBgNVHQ4EFgQU47ZqWHgTOmZO67uw4YzsbrRMNOswDQYJKoZIhvcNAQEEBQADgYEAH0QIHaLMN/7
hD2VP0SLOCtNdEmY5IqLY1CDW+GpUZZ9e+MCgE/rvr34566D9Q8lvET6T9u+sg3h+hSkb3gE4a4wgShH/V
7nfHzx8ZntlxccvCZK6ePVDMt0Lfj2iVnE7IJxou4bO0w0m9DrvyKop7ncnSEzaVpxIZgCDo7+8Zdw=</d
sig:X509Certificate>
</dsig:X509Data></dsig:KeyInfo></dsig:Signature></saml:Assertion></wst:RequestedSe
curityToken><wst:RequestedAttachedReference><wsse:SecurityTokenReference><wsse:Key
Identifier
ValueType="http://docs.oasis-open.org/wss/oasis-wss-saml-token-profile-1.0#SAMLAss
ertionID">id-1LNkSUVcpbH7O0oQwbHJ5JOd5fs-</wsse:KeyIdentifier></wsse:SecurityToken
Reference></wst:RequestedAttachedReference>
<wst:RequestedUnattachedReference><wsse:SecurityTokenReference><wsse:KeyIdentifier
ValueType="http://docs.oasis-open.org/wss/oasis-wss-saml-token-profile-1.0#SAMLAss
ertionID">id-1LNkSUVcpbH7O0oQwbHJ5JOd5fs-</wsse:KeyIdentifier></wsse:SecurityToken
Reference></wst:RequestedUnattachedReference>
<wst:Lifetime><wsu:Created>2011-04-22T18:48:05Z</wsu:Created><wsu:Expires>2011-04-
22T19:48:05Z</wsu:Expires></wst:Lifetime></wst:RequestSecurityTokenResponse></wst:
RequestSecurityTokenResponseCollection></env:Body></env:Envelope>

Scenario: Web Service Security With On Behalf Of Username Token
35-24 Administrator's Guide for Oracle Access Management

36
Configuring Security Token Service Settings 36-1
36
Configuring Security Token Service Settings
This chapter introduces how to manage components involved in the protection of
Security Token Service endpoints. This chapter provides the following topics:
■Prerequisites
■Introduction to Security Token Service Configuration
■Enabling and Disabling Security Token Service
■Defining Security Token Service Settings
■Using and Managing WSS Policies for Oracle WSM Agents
■Configuring OWSM for WSS Protocol Communication
■Managing and Migrating Security Token Service Policies
■Logging Security Token Service Messages
■Auditing the Security Token Service
36.1 Prerequisites
Before beginning tasks in this chapter, be sure to review the following chapters.
■Chapter 34, "Introducing the Oracle Access Management Security Token Service"
■Chapter 2, "Getting Started with Oracle Access Management"
■Chapter 6, "Managing Server Registration"
36.2 Introduction to Security Token Service Configuration
Security Token Service a Web Service co-existing with Access Manager. Security Token
Service invokes some Access Manager components to validate and issue security
tokens. Typically, the Web client can use the Security Token Service to request an
outbound token, such as SAML, by providing a security token, like a Username Token
or an X.509 Token.
Security Token Service is integrated with the Oracle Access Management Console to
provide a unified and consistent administration experience. All Security Token Service
system configuration is done using the Oracle Access Management Console.
Security Token Service provides:
■Tokens:
–Validation Tokens: Standard (Username, X.509, Kerberos, SAML 1.1/2.0) and
custom tokens. OnBehalfOf use cases (OAM Session ID Propagation Token

Introduction to Security Token Service Configuration
36-2 Administrator's Guide for Oracle Access Management
and custom tokens through the integration engine) also supports the following
standard tokens along with OAM sessionID propagation token and custom
token (Username, X.509, SAML 1.1/2.0).
–Issuance Tokens: Standard (Username, SAML 1.1/2.0) and custom tokens
through the integration engine
■Configuration-driven token issuance and validation
■Enhanced auditing through identity propagation across multiple tiers and
domains
■Consolidated shared-platform service interacts with internal (Access Manager
SSO, Federation, Oracle Web Services Manager) and external services
This section provides the following topics:
■Post-Installation Configuration
■About OAM Servers and Security Token Service
■About Security Token Service Clients
■About Agents and Security Token Service
36.2.1 Post-Installation Configuration
After installation and server startup, you can access the Oracle Access Management
Console on the OAM Server. For example, if the URL to the OAM Server is
http://machine:14100/oam, you might access:
■Oracle Access Management Console at http://machine:7001/oamconsole
■Security Token Service: http://machine:14100/sts/wss11user?wsdl to view the
WSDL of the /sts/wss11user endpoint that is available by default, to ensure that
Security Token Service is available.
By default, Security Token Service is disabled and as such all runtime functionality
as well as Web Service endpoints are disabled. To access those endpoints, Security
Token Service must first be enabled using the Oracle Access Management Console.
Afterwards, the endpoints might be accessed
Post-installation configuration includes the tasks in the following outline, which point
to other areas in this book for details.
Task overview: Security Token Service configuration requires
1. Server Side Configuration: Use the Oracle Access Management Console for the
following tasks.
a. Service enablement "Enabling and Disabling Services for Security Token
Service" on page 36-9
b. Settings configuration "Managing Security Token Service Settings" on
page 36-12
c. Endpoint registration "Managing EndPoints" on page 38-26
d. Token Issuance Template configuration "Managing Token Issuance Templates"
on page 38-6
See Also: Oracle Fusion Middleware Security and Administrator's Guide
for Web Services

Introduction to Security Token Service Configuration
Configuring Security Token Service Settings 36-3
e. Token Validation Template configuration "Managing Token Validation
Templates" on page 38-14
f. Partner Profile creation "Managing Token Service Partner Profiles" on
page 39-7
g. Partner configuration "Managing Token Service Partners" on page 39-3
h. Token Issuance Policies to define an authorization rule for issuing tokens with
Security Token Service, for a specific Relying Party "Managing Token Issuance
Policies, Conditions, and Rules" on page 38-27
2. Set up interactions with the Oracle WSM Agent as described in following topics:
a. Using and Managing WSS Policies for Oracle WSM Agents
b. Configuring OWSM for WSS Protocol Communication
3. Set up message logging, as described in "Logging Security Token Service
Messages" on page 36-20.
4. Configure event auditing, as described in "Setting Up Auditing for Oracle Access
Management" on page 9-20.
5. Configure lifecycle management
a. Register the Security Token Service trust endpoint, as described in item 1c.
b. Register the Requester or Relying Party Partner with Security Token Service,
as described in "Managing Token Service Partners" on page 39-3.
c. Monitor performance, as described in Chapter 13, "Monitoring Performance
and Logs with Fusion Middleware Control".
36.2.2 About OAM Servers and Security Token Service
With Oracle Access Management, all Security Token Service instances are installed on
OAM Servers (also known as Managed Servers). Each server must be registered with
Access Manager.
Security Token Service leverages the common infrastructure for shared services and
the Oracle Access Management administration model.
Security Token Service support Web Services Security protocol 1.0 and 1.1 and process
the following tokens, if present in the Security SOAP headers:
■Username token (UNT)
■SAML 1.1 or SAML 2.0 Assertion
■Kerberos
■X.509
Third-Party Servers: Security Token Service interoperates with third party security
token servers. For instance, a third party Security Token Service can create a valid
Security Assertion Markup Language (SAML) Assertion that can be consumed by
Security Token Service.
Note: Managed servers hosting Security Token Service must be
registered with Access Manager as described in Chapter 6, "Managing
Server Registration".

Introduction to Security Token Service Configuration
36-4 Administrator's Guide for Oracle Access Management
36.2.3 About Security Token Service Clients
Security Token Service provides services to various Oracle clients (Oracle Web Services
Manager client) or third party clients (Microsoft and IBM are two).
Oracle WSM Client: Oracle Web Services Manager client bindings are the
responsibility of Oracle Web Services Manager (and out of scope for this book). For
more information, see "Configuring Oracle WSM Agent for WSS Kerberos Policies" on
page 36-18.
Third Party Clients: Require a secure key exchange between the Oracle WSM client
and server. You simply import the Security Token Service certificate to the client.
During SOAP interactions, the WS-Security protocol might require the client to trust
the signing/encryption certificate used for WSS operations by the OWSM Agent
protecting the Security Token Service endpoint. In those cases, the Oracle Access
Management Administrator should extract the Security Token Service OWSM
signing/encryption certificate used for WSS operations and provide it to the WS
Client. For more information, see "Extracting the Oracle STS/Oracle WSM Signing and
Encryption Certificate" on page 36-16.
36.2.4 About Agents and Security Token Service
Oracle Web Services Manager communicates through agents. This topic introduces the
agents that operate with Security Token Service.
Oracle WSM Agent: The Oracle Web Services Manager (Oracle WSM) Agent is
integrated with Security Token Service. This agent provides the Web Services Security
support for Security Token Service Web Services endpoints.
■Protects Web Services endpoints of Security Token Service
■Provides WS-Security support for sending SOAP messages to Relying Parties. As
part of that process, the OWSM Client might interact with Security Token Service
to get a security token that will be presented to the Relying Party
■Interacts with Security Token Service for token acquisition and token validation
Security Token Service supports token acquisition and token validation by Oracle Web
Services Manager (Oracle WSM) agents. Oracle Web Services Manager Agents are not
required to use Security Token Service as part of their inbound or outbound security
policy enforcement. Oracle Web Services Manager client bindings are the
responsibility of Oracle Web Services Manager Administrators.
The Oracle WSM Agent is used by Security Token Service to enforce message
protection of the SOAP communication channel between Security Token Service and
the client. The Oracle WSM Agent caches the OPSS Keystore (by default the
default-keystore.jks keystore located in $DOMAIN_HOME/config/fmwconfig
directory) which contains the trusted certificates involved when validating the WSS
clients' certificates. Subsequent changes to the contents of the keystore or to its name,
require a restart of the Managed Server using Oracle Enterprise Manager Fusion
Middleware Control or WebLogic Server console, or NodeManager.
The Oracle WSM Agent available to Security Token Service must be configured to
protect the Security Token Service endpoints, to perform the following tasks:
■Decrypt the request, if necessary
See Also: "WS-Trust Policies and Configuration Steps" in Oracle
Fusion Middleware Security and Administrator's Guide for Web
Services
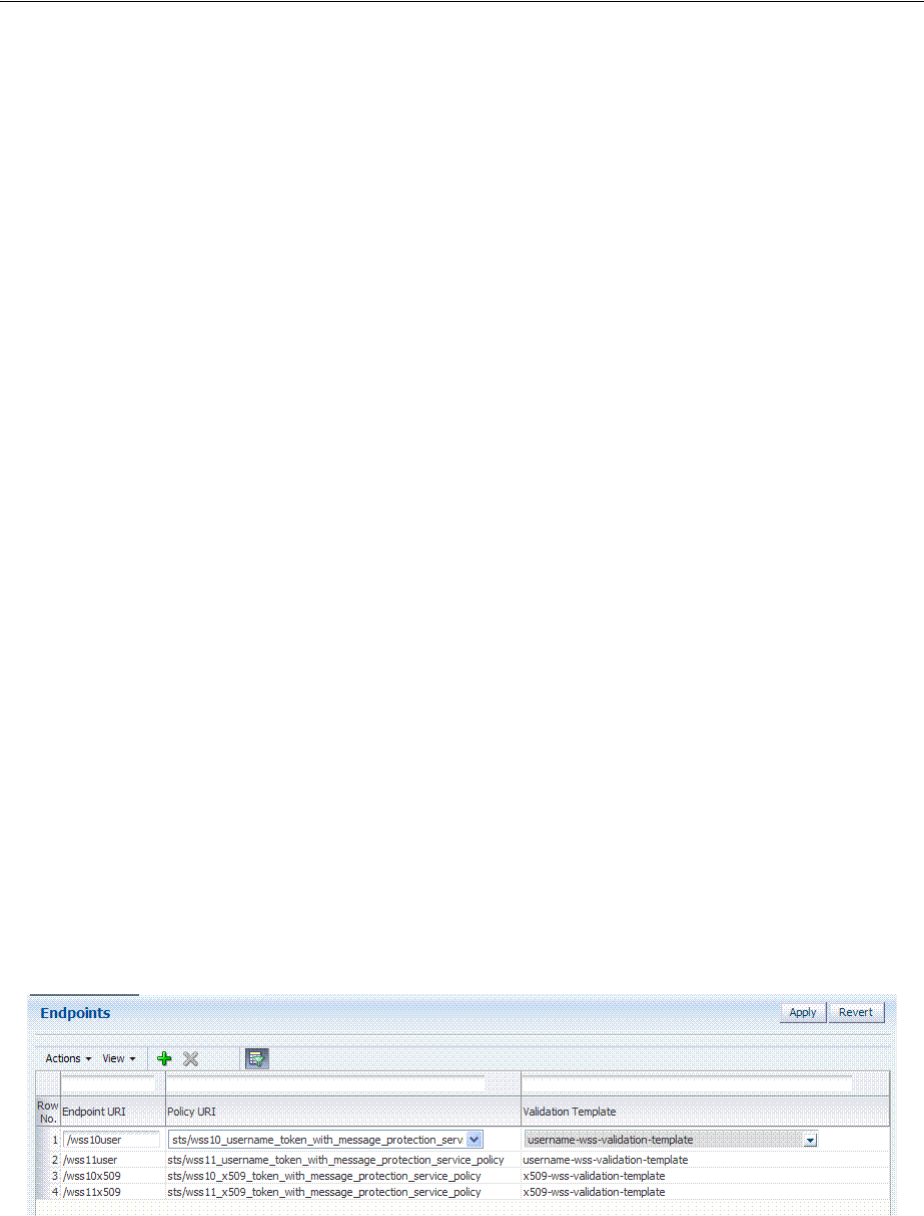
Introduction to Security Token Service Configuration
Configuring Security Token Service Settings 36-5
■Verify any digital signatures present in the request
■Validate any certificate used to create the request's digital signatures, if the
signatures were created with a private key
■Validate any X.509 token, if present, in the SOAP headers
■Validate the Kerberos token, if present, in the SOAP headers
■Sign the outgoing response, if needed
■Encrypt the outgoing response, if required
Oracle WSM Agent Keystore: The Oracle WSM Agent uses a keystore for various
cryptographic operations. For these operations, the Oracle WSM Agent uses the
keystore configured for Oracle WSM tasks.
Webgate: Security Token Service uses Webgate for the Access Manager session
propagation token. This, identity propagation, use case is more advanced. It requires
the Identity Assertion Provider in WebLogic Server and some custom integration.
36.2.5 About Security Token Service End Points and Policies
When you add an endpoint, you can choose from a list of Policy URI's and validation
templates with which to associate the Security Token Service endpoint. By default,
Security Token Service is configured with the endpoints shown in Figure 36–1.
Figure 36–1 Default Endpoints, Policies, and Validation Templates
The ORAPROVIDER is integrated with the Oracle WSM Agent, which provides Web
Services Security support on the SOAP messages being exchanged between the client
and Security Token Service. Security Token Service leverages ORAPROVIDER for Web
Services to:
■publish Web Services endpoints dynamically
See Also:
■"Introduction to Oracle Access Management Keystores" on
page 5-27
■Chapter 37, "Managing Security Token Service Certificates and
Keys"
See Also:
■Chapter 35, "Security Token Service Implementation Scenarios"
■"About the Oracle Web Services Manager Keystore
(default-keystore.jks)" on page 37-3

Introduction to Security Token Service Configuration
36-6 Administrator's Guide for Oracle Access Management
■invoke Security Token Service to process SOAP messages
■publish a WSDL file for each WS endpoint
Oracle WSM Agent WSS Policy Stores: The Oracle WSM Agent requires a repository
to retrieve the Web Services Security (WSS) policies it needs. Security Token Service
supports two types of repositories:
■JAR file with WSS Policies: Used when the WLS Domain is configured for
classpath.
■Oracle WSM Policy Manager available from the SOA deployment
Policy Assertions: Out of the box, Security Token Service provides a set of security
policy assertions for use with the WS-Policy framework to describe how messages are
to be secured in the context of Oracle Workspace Studio: SOAP Message Security and
WS-Trust.
■Security Token Service makes its associated security policy files publicly available
by attaching them to its deployed WSDL.
■Security Token Service runtime uses the private key and X.509 certificate pairs,
stored in the keystores defined by the jps-config.xml file, for its WS-Security
encryption and digital signature operations.
The following paragraphs and tables identify the policies that are available out of the
box for Security Token Service and the Oracle WSM Agent.
Message-level Security Not Required: When message level-security is not required,
use an Security Token Service policy that does not specify message_protection in its
name. This authenticates users using credentials provided in tokens in the WS-Security
SOAP header. The credentials in the Fusion Applications token are mapped based on
the rules specified in the validation template. Both plain text and digest mechanisms
are supported.
Transport Security when Message-level Security Not Required: You can configure
two-way SSL where both the client applications and WebLogic server present
certificates to each other. To configure two-way or one-way SSL for the core WebLogic
Server security see "Configuring SSL" in Oracle Fusion Middleware Securing Oracle
WebLogic Server guide. Use the policies described in Table 36–1.
Interoperability WS-Security 1.0 and 1.1 Policies: Use policies in Figure 36–2 if you
require interoperability with WS-Security 1.0 or 1.1 (depending on your authentication
requirements and credential availability). Use WS-Security 1.1 policies if you have
strong security requirements.
See Also:
■"Configuring OWSM for WSS Protocol Communication" on
page 36-15
■Managing Oracle Workspace Studio policies for Security Token
Service
■Oracle Fusion Middleware Security and Administrator's Guide for Web
Services for details about the policies for Security Token Service
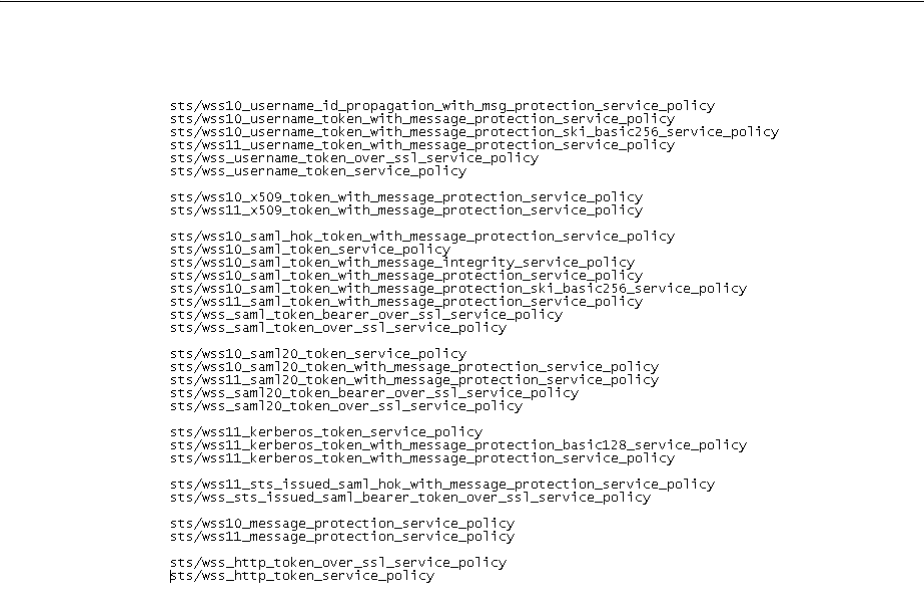
Enabling and Disabling Security Token Service
Configuring Security Token Service Settings 36-7
Figure 36–2 WS-Security 1.0 and 1.1 Policies
Task overview: Using and modifying WS-S policies
1. From the Oracle Access Management Console, System Configuration tab, open the
Security Token Service section.
2. From the Endpoints node, proceed as described in "Managing Security Token
Service Endpoints" on page 38-25 to locate or create the endpoint to be protected.
3. From the Policy URI list, choose a specific WS Security policy to protect the
endpoint, as described in:
■Managing WSS Policies for Security Token Service: Classpath
■Managing WSS Policies for Security Token Service: Oracle WSM Policy
Manager
36.3 Enabling and Disabling Security Token Service
This topic includes the following topics:
■About Security Token Service and the Oracle Access Management Console
■About Enabling Services for Security Token Service
■Enabling and Disabling Services for Security Token Service
36.3.1 About Security Token Service and the Oracle Access Management Console
Elements in the Oracle Access Management Console enable Administrators to easily
configure the Token Service to exchange WS Trust tokens with partners. Token Service
See Also: "Using and Managing WSS Policies for Oracle WSM
Agents"

Enabling and Disabling Security Token Service
36-8 Administrator's Guide for Oracle Access Management
elements provide for creation, viewing, modification, and removal of partners,
endpoints, validation templates, issuance templates, and data store connections.
All Security Token Service system configuration is done using the Oracle Access
Management Console. This includes the following common tasks covered in Part II of
this book:
■Registering and managing common OAM Servers and proxy information
■Registering and managing the common Default User Identity Store
■Configuring the OAM Keystore, which differs from the OWSM Keystore used for
WSS processing
■ Certificate Validation and Revocation
The Oracle Access Management Console enables Administrators to perform the
following Security Token Service-specific tasks:
■Manage validation token templates: The validation templates include
configuration properties to validate a Web Services Security/WSTrust token, and
map it to a Requester Partner or a User record in the Default User Identity Store.
■Manage issuance templates: The issuance templates contain rules on how a token
will be created
■Manage Partner Data: A partner represents a partner trusted by Security Token
Service. Security Token Service defines three types of partners: Requester, Relying
Party and Issuing Authority. Each partner entry is associated to a partner profile.
The partner entry contains signing and encryption certificates and identifiers used
to uniquely identify a partner
■Manage Partner Profile: A partner profile contains configuration properties that
are common to a set of partners:
–Claim Mapping
–Token Types definition
–Issuance and Validation templates defined for the token Types
–Override Validation Template rules for Issuing Authorities(Other STS)
■Manage Security Token Service Endpoints
■Manage Token Issuance Policies (authorization policies that will be evaluated to
determine if a Requester Partner can request a token based on the Relying Party
referenced in the request)
■Security Token Service Global Settings
■Custom tokens
36.3.1.1 About Security Token Service Administrators
Users with administrative access to the Oracle Access Management Console, have
access to Security Token Services.
Initially, administrative users must log in to the Oracle Access Management Console
using the WebLogic Administrator credentials set during initial configuration.
However, your enterprise might require independent sets of Administrators: one set of
users responsible for Access Manager and another for Security Token Service.
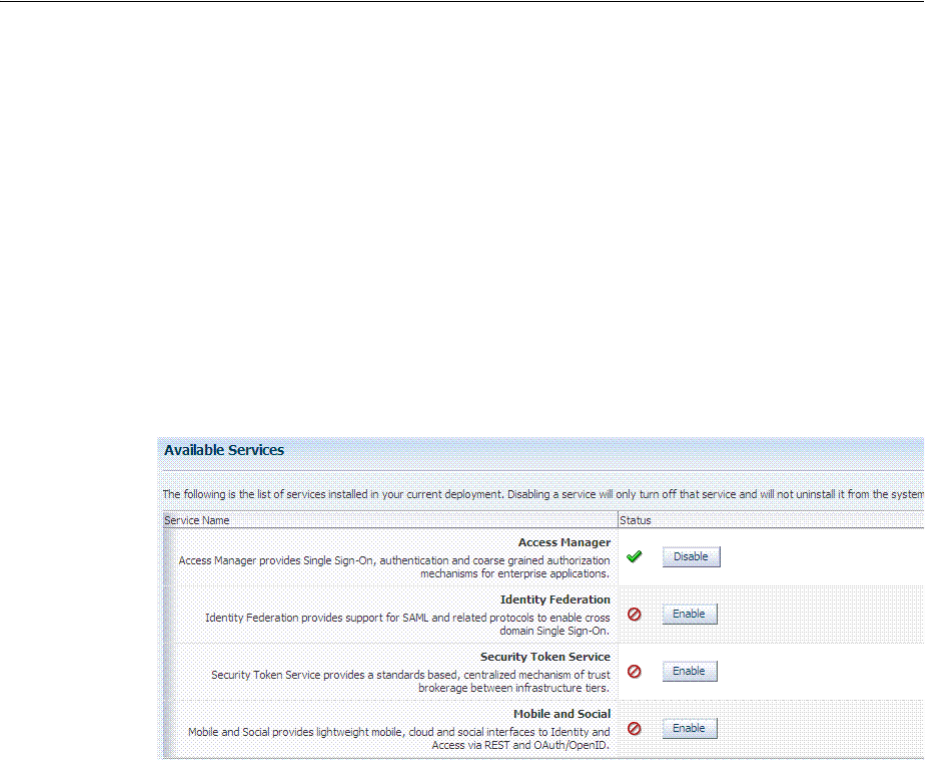
Enabling and Disabling Security Token Service
Configuring Security Token Service Settings 36-9
36.3.1.2 About Logging In To, and Signing Out Of, Security Token Service
When using Security Token Service with Access Manager, logging in to, and signing
out of the Oracle Access Management Console is the same.
36.3.2 About Enabling Services for Security Token Service
To use Security Token Service, both it and Access Manager must be enabled, as shown
in Figure 36–3. By default Security Token Service is disabled and needs to be enabled.
Figure 36–3 Available Services Panel
A green check mark in the Status field beside the service name indicates the service is
enabled. A red circle with a line through it indicates that the corresponding service is
disabled.
36.3.3 Enabling and Disabling Services for Security Token Service
Prerequisites
Oracle Access Manager service must be enabled.
To enable or disable Security Token Service
1. Log in to the Oracle Access Management Console, as usual
https://hostname:port/oamconsole/
2. From the System Configuration tab, Common Configuration section, click
Available Services.
3. Enable Security Token Service: Beside Security Token Service, click Enable (or
confirm that the Status check mark is green) and confirm that the Access Manager
Service is also enabled.
4. Disable Security Token Service: Beside Security Token Service, click Disable (or
confirm that the Status check mark is red).
See Also: Chapter 2 for the following topics:
■Logging In
■Signing Out
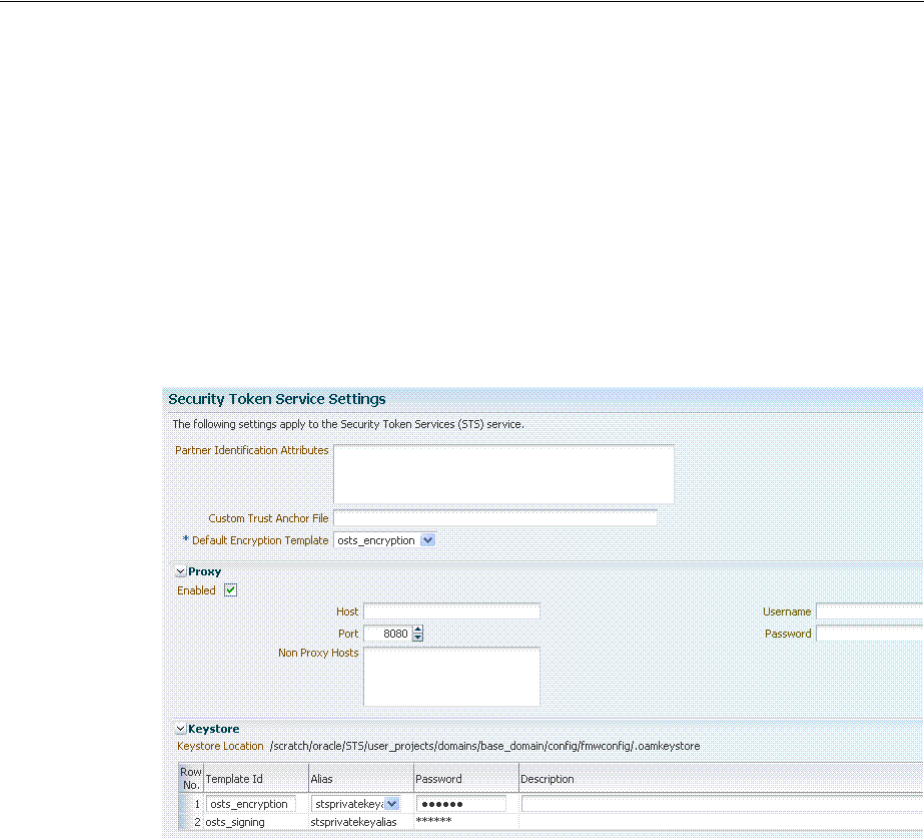
Defining Security Token Service Settings
36-10 Administrator's Guide for Oracle Access Management
36.4 Defining Security Token Service Settings
This section provides the following information:
■About Security Token Service Settings
■Managing Security Token Service Settings
36.4.1 About Security Token Service Settings
Security Token Service can be viewed or altered from the Security Token Service
section of the System Configuration tab. These settings are show in Figure 36–4.
Figure 36–4 Security Token Service Page
Table 36–1 describes the elements on the Security Token Service Settings page.

Defining Security Token Service Settings
Configuring Security Token Service Settings 36-11
Table 36–1 Security Token Service Settings
Element Description
Partner Identification
Attributes
A field where you list attributes, other than the standard ones
available by default, that should be available in "Identity
Attributes" Table in the Partner page. These attributes can be
used to identify a partner by matching their values against
those in the incoming request.
When a Requester sends a WS-Trust request to Security Token
Service, the server might map the incoming token containing
the requester's identity to a partner entry in the Security Token
Service partner store.
To do so, Security Token Service will use the mapping settings
configured in a validation template and will attempt to map
the token data to a partner entry by performing a lookup by
matching the token data to a Partner Identification Attribute.
By default, each requester partner contains three identification
attributes that can be set: username, HTTP Basic Username,
SSL Client Certificate DN.
It is possible to define additional Identification Attributes that
could be set for each requester partner entry.
This section allows new attributes to be set. After defining a
new attribute, it becomes available in the Requester Partner
entry section, and it can be used in mapping rules in the WSS
Validation Templates.
Custom Trust Anchor File By default, Access Manager and Security Token Service use the
default
$DOMAIN_HOME/config/fmwconfig/amtruststore
keystore containing the trust anchors used for certificate
validation by Security Token Service, when verifying X.509
Tokens, or when verifying certificates used in SAML Assertion
signatures.
It is possible to configure Security Token Service to use a
specific trust anchor file if necessary, that will contain trust
anchors only used for Security Token Service operations and
validations. In this case, this field should contain the location
of the JKS keystore to use.
Note the following:
■When using a custom trust anchor keystore, it will not be
replicated automatically across the cluster. You must
manage replication.
■In most cases, the default Access Manager and Security
Token Service trust anchor should be enough.
See Also: Chapter 37, "Managing Security Token Service
Certificates and Keys"
Default Encryption Template A list from which you choose the default template for Security
Token Service encryption:
■osts_encryption
■osts_signing
See Also: Setting the Default Encryption Key on page 37-6.
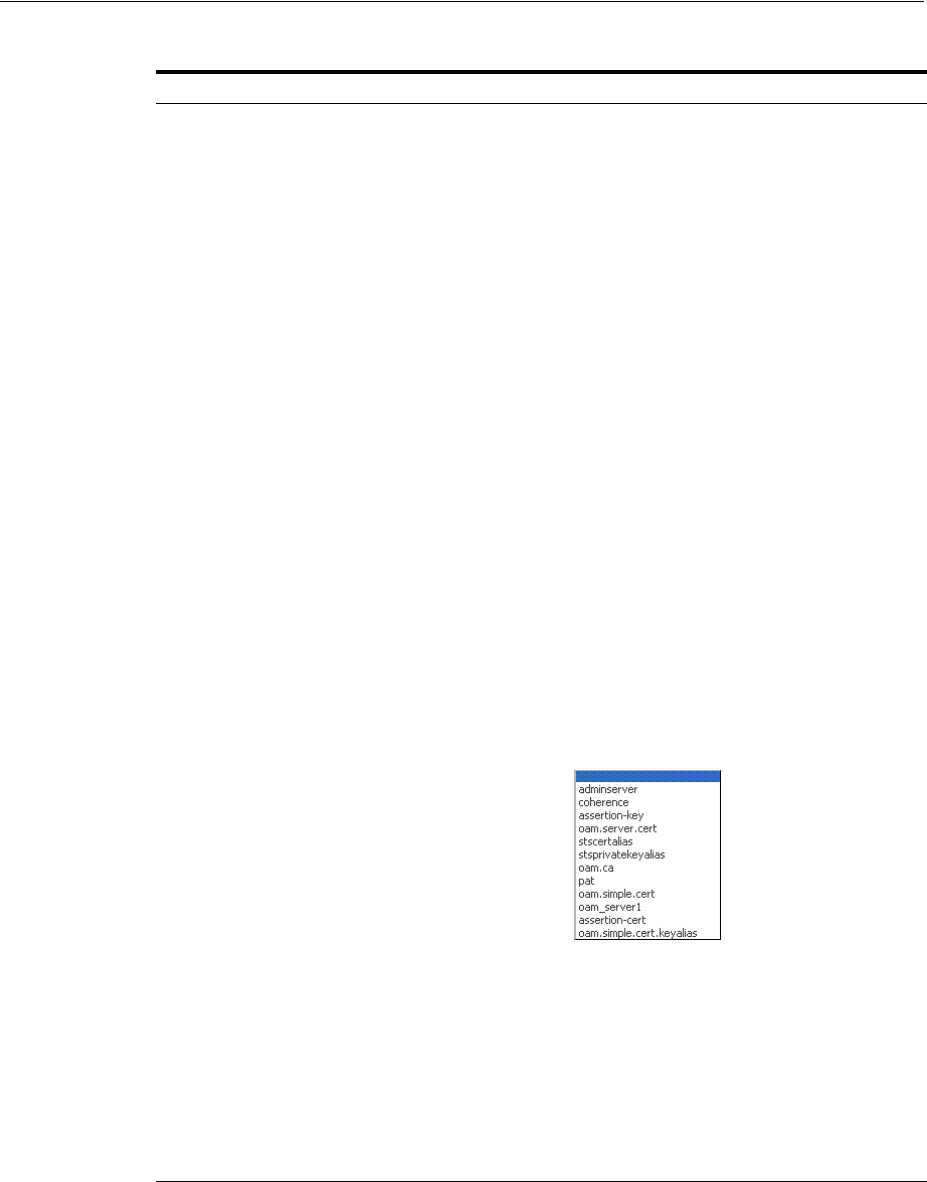
Defining Security Token Service Settings
36-12 Administrator's Guide for Oracle Access Management
36.4.2 Managing Security Token Service Settings
Users with valid Administrator credentials can use this procedure to confirm or alter
Security Token Service Settings.
Prerequisites
Both the Access Manager Service and the Security Token Service must be enabled.
Proxy Outbound Connection Properties, HTTP Proxy Settings Use
this section to configure Security Token Service to use a proxy
for outgoing HTTP connections when optionally retrieving the
WS-Sec Policy of Relying Parties at runtime:
■Enabled: When this box is checked the Proxy function is
enabled and will be used when retrieving the WS-Security
Policy of Relying Parties. When the box is not checked, the
Proxy function is disabled and related fields are
inaccessible for editing.
■Host: The proxy hostname
■Port: The proxy port number. Default is 8080
■Non Proxy Hosts: A list of hosts for which the proxy
should not be used. Use ';' to separate multiple hosts.
■Username: The username to use when connecting to the
proxy.
■Password: The password to use when connecting to the
proxy.
Keystore Location: Path of the active keystore that was set up during
Security Token Service installation.
The Keystore table includes the following information for each
of the templates in the table, which are available for use as the
Default Encryption Template:
■Template ID: The name of the template that can access the
keystore.
■Alias: Identifies the alias for the template. When adding a
template, you can choose from the Aliases listed. For
example:
■Password: The password for the selected Alias.
■Description: Optional.
The keystore section defines key entries that exist in the
Security Token Service keystore:
$DOMAIN_
HOME/config/fmwconfig/.oamkeystore
After an entry is defined an entry, it can be used in other
Security Token Service templates (like SAML Issuance
Templates).
Table 36–1 (Cont.) Security Token Service Settings
Element Description

Using and Managing WSS Policies for Oracle WSM Agents
Configuring Security Token Service Settings 36-13
To view or edit Security Token Service Settings
1. Log in to the Oracle Access Management Console.
https://hostname:port/oamconsole/
2. Click Security Token Service Settings.
3. On the Security Token Service Settings page view (or modify) the following
information (see Table 36–1):
■Partner Identification Attributes
■Custom Trust Anchor File
■Proxy details
4. Keystore Table: View, add, or remove new encryption templates
5. Click Apply to submit changes (or Revert to cancel changes).
6. Close the page when finished.
36.5 Using and Managing WSS Policies for Oracle WSM Agents
You can use existing Oracle Workspace Studio policies to protect Security Token
Service Web Service endpoints. For instance:
■classpath mode: Existing Oracle Workspace Studio policies defined in
$ORACLE_
IDM_HOME/oam/server/policy/sts-policies.jar
are used in this mode
■SOA deployment: Policies defined in the Oracle WSM Policy Manager available
from a SOA deployment are used
This section describes how to manage Web Service Security Policies for Security Token
Service in the following topics:
■Using and Modifying Oracle Workspace Studio Policies
■Managing WSS Policies for Security Token Service: Classpath
■Managing WSS Policies for Security Token Service: Oracle WSM Policy Manager
36.5.1 Using and Modifying Oracle Workspace Studio Policies
This section introduces WS-Security Policies used to protect Security Token Service WS
Endpoint and how to modify these policies. TheWS-Security Policies that are provided
by Oracle should cover most use cases.
36.5.2 Managing WSS Policies for Security Token Service: Classpath
Predefined Oracle Web Services Manager policies are constructed using assertions
based on predefined assertion templates. For WSS Policy classpath mode, the OWSM
Agent retrieves policies from sts-policies.jar located on the classpath.
If SOA is not deployed in the WebLogic Server domain, the Security Token Service
installer configures the WebLogic Server domain for WSS Policy classpath mode. The
See Also:
■"About Security Token Service End Points and Policies" on
page 36-5
■Attaching Policies to Web Services in the Oracle Fusion Middleware
Security and Administrator's Guide for Web Services

Using and Managing WSS Policies for Oracle WSM Agents
36-14 Administrator's Guide for Oracle Access Management
JAR file containing the WSS Policies used when the WLS Domain is configured for
classpath is located at:
$ORACLE_IDM_HOME/oam/server/policy/sts-policies.jar
When your environment is in classpath mode, perform the following tasks to
Administrators confirm sts-policies.jar is located on the classpath.
Task overview: Managing WSS Policies for Security Token Service: Classpath
1. Define an OWSM Assertion Template.
2. Proceed as follows, depending on your need:
■Modify an OWSM Policy
■Define a Policy using the OWSM Assertion Template
3. Bundle the Assertion Template and policy in the sts-policies.jar file:
META-INF/assertiontemplates/oracle of the $ORACLE_IDM_HOME/oam/server/policy/
sts-policies.jar
4. Confirm that
sts-policies.jar
is located in the following path to enable the
policy URI to be available the Policy URI drop down list.
$ORACLE_IDM_HOME/oam/server/policy/sts-policies.jar
5. Restart the Managed Servers running Security Token Service.
6. Proceed to the Oracle Access Management Console to configure the Security Token
Service Endpoints.
36.5.3 Managing WSS Policies for Security Token Service: Oracle WSM Policy Manager
The Oracle WSM Policy Manager is the security linchpin for Oracle Fusion
Middleware Web services and SOA applications. For more information about how the
Oracle WSM Policy Manager manages the policy framework, see "Understanding
Oracle WSM Policy Framework" in Oracle Fusion Middleware Security and
Administrator's Guide for Web Services.
At design time, you attach Oracle WSM and WebLogic Web service policies to
applications programmatically using your favorite IDE, such as Oracle JDeveloper.
Alternatively, at deployment time you attach policies to SOA composites, ADF, and
WebCenter applications using the Oracle Enterprise Manager Fusion Middleware
Control, and to WebLogic Web services (Java EE) using the WebLogic Server
Administration Console.
System Administrators can leverage the Oracle WSM through the Oracle Enterprise
Manager Fusion Middleware Control to:
■Centrally define policies using the Oracle WSM Policy Manager.
■Enforce Oracle WSM security and management polices locally at run time.
See Also:
■"About Security Token Service End Points and Policies" on
page 36-5
■Oracle WSM Predefined Policies and Assertion Templates in the
Oracle Fusion Middleware Security and Administrator's Guide for Web
Services

Configuring OWSM for WSS Protocol Communication
Configuring Security Token Service Settings 36-15
When your environment is integrated with the OWSM Policy Manager, perform the
following tasks to add or modify WSS policies for Security Token Service using Oracle
Web Services Manager.
Task overview: Managing WSS Policies for Security Token Service: OWSM Policy
Manager
1. From the OWSM Policy Manager, locate and open the desired policy.
2. Refer to the Oracle Fusion Middleware Security and Administrator's Guide for Web
Services and make any required changes to the policy.
3. Restart all Managed Servers running Security Token Service.
4. Proceed to "Configuring OWSM for WSS Protocol Communication".
36.6 Configuring OWSM for WSS Protocol Communication
This section describes how to configure communication between WS-Sec Clients and
the Oracle WSM Agent embedded with Security Token Service.
The Oracle WSM Agent protects the Web Service endpoints of Security Token Service,
and provides support for WSS protocol exchanges. To ensure a client is
communicating successfully with the Oracle WSM Agent:
■The client might need to be aware of the signing and encryption certificates used
by the Oracle WSM Agent (this will require extracting and distributing the signing
and encryption certificates used by the OWSM Agent embedded with Security
Token Service).
■The Oracle WSM Agent might need to be aware, depending on the policies, of the
signing certificate used by the client (this will require adding the client's certificate
as a trusted certificate for the Oracle WSM Agent)
Task overview: Configuring communication with Oracle WSM agents
1. See "About Oracle WSM Agent WS-Security Policies for Security Token Service"
2. Retrieving the Oracle WSM Keystore Password
3. Extracting the Oracle STS/Oracle WSM Signing and Encryption Certificate
4. Adding Trusted Certificates to the Oracle WSM Keystore
5. Validating Trusted Certificates in the Oracle WSM Keystore
6. Configuring Oracle WSM Agent for WSS Kerberos Policies
Note: All of Oracle WSM's functionality is accessible to
Administrators from Oracle Enterprise Manager Fusion Middleware
Control.
See Also: Oracle Fusion Middleware Security and Administrator's
Guide for Web Services
■Part II, "Basic Administration"
■Part III, "Advanced Administration"
See Also: Chapter 37, "Managing Security Token Service Certificates
and Keys"

Configuring OWSM for WSS Protocol Communication
36-16 Administrator's Guide for Oracle Access Management
36.6.1 About Oracle WSM Agent WS-Security Policies for Security Token Service
The Oracle WSM Agent requires a repository to retrieve the Web Services Security
(WSS) policies it needs. Access Manager supports two types of repositories for
Security Token Service:
■JAR file with WSS Policies: Used when the WLS Domain is configured for
classpath. The required JAR file is located in $ORACLE_IDM_
HOME/oam/server/policy/ sts-policies.jar.
■Oracle WSM Policy Manager available from the SOA deployment
During Security Token Service installation, the installer detects if the Oracle Web
Services Manager Policy Manager is present and deployed in the WebLogic Security
domain.
■If not deployed in the WebLogic Security domain, the installer configures the
WebLogic Security domain for the Web Services Security Policy classpath mode,
where the WSM Agent will retrieve the policies from a JAR file.
■If present, the installer connects to the Oracle Web Services Manager Policy
Manager and uploads the policies that are used to protect Security Token Service
endpoints.
36.6.2 Retrieving the Oracle WSM Keystore Password
Administrators need to retrieve the keystore password and key entry password from
CSF for certain activities. Otherwise, keystore or key entry cannot be changed. Having
access to the keystore is sometimes required to:
■Extract the signing/encryption certificate to distribute to clients if necessary
■Update or replace the signing/encryption key entry
■Add trusted certificates
The following procedure displays the password used to protect the Oracle WSM
keystore as well as the key entry.
To retrieve the Oracle WSM keystore password
1. Enter the WSLT scripting environment.
2. Connect to the WebLogic Server AdminServer, using the
connect()
command.
3. Execute the following command by providing the connection information to the
AdminServer:
listCred(map="OAM_STORE", key="jks")
.
4. Note the password.
5. Proceed to "Extracting the Oracle STS/Oracle WSM Signing and Encryption
Certificate".
36.6.3 Extracting the Oracle STS/Oracle WSM Signing and Encryption Certificate
During SOAP interactions, the WS-Security protocol might require the client to trust
the signing/encryption certificate used for WSS operations by the OWSM Agent
protecting the Security Token Service endpoint. In those cases, the Oracle Access
See Also: "About the Database Store for Policy, Password
Management, and Sessions" on page 5-25 for details about the
required database for Access Manager policy data and (optionally)
Access Manager session data.

Configuring OWSM for WSS Protocol Communication
Configuring Security Token Service Settings 36-17
Management Administrator should extract the Security Token Service OWSM
signing/encryption certificate used for WSS operations and provide it to the WS
Client.
The Administrator must export the signing and encryption certificate used by Security
Token Service for WSS cryptographic operations. The following procedure guides as
you do this by:
■Replacing $DOMAIN_HOME with the path to the Domain directory
■CERT_FILE with the location of the file where the certificate will be saved
If you are prompted to enter a password, simply press the Enter key.
Prerequisites
Retrieving the Oracle WSM Keystore Password
To export the signing and encryption certificate
1. Locate keytool.
2. Execute the following command.
keytool -exportcert -keystore $DOMAIN_HOME/config/fmwconfig/default-keystore.j
ks -storetype JKS -alias orakey -file $CERT_FILE
3. Enter the keystore password retrieved in the previous section if prompted.
4. Proceed to "Adding Trusted Certificates to the Oracle WSM Keystore".
36.6.4 Adding Trusted Certificates to the Oracle WSM Keystore
To add a trusted certificate to the OWSM keystore for WSS cryptographic operations:
■perform the command in the following procedure
■replace the $DOMAIN_HOME with the path to the Domain directory
■replace the TRUSTED_CERT_FILE with the location of the file containing the
trusted certificate
■replace the TRUSTED_CERT_ALIAS with the alias under which the trusted
certificate will be stored
When prompted to enter a password, enter the password of the OWSM keystore that
you retrieved earlier.
Prerequisites
Retrieving the Oracle WSM Keystore Password
The Administrator must have the certificate to import.
To add trusted certificates to the Oracle WSM keystore
1. Locate keytool.
2. Execute the following command.
keytool -importcert -trustcacerts -keystore $DOMAIN_HOME/config/fmwconfig/de
fault-keystore.jks -storetype JKS -alias $TRUSTED_CERT_ALIAS -file $TRUSTED_
CERT_ALIAS
3. Observe messages on the screen, enter a password if requested.

Configuring OWSM for WSS Protocol Communication
36-18 Administrator's Guide for Oracle Access Management
4. Proceed to "Validating Trusted Certificates in the Oracle WSM Keystore".
36.6.5 Validating Trusted Certificates in the Oracle WSM Keystore
When the Oracle WSM Agent performs a certificate validation, it uses the keystore
configured for Oracle WSM tasks, and will validate the certificate against the trusted
certificate entries contained in the keystore. For those operations, it might be required
to add trusted certificate entries (the certificate itself or the issuer's certificate) in the
OWSM keystore.
When receiving a SOAP requester, the Oracle WSM Agent processes the request for
message protection. Part of the steps might include a certificate validation operation if
the incoming message:
■is of type WSS 1.0, and includes a digital signature created with a private key,
without the certificate being present. In this case:
Remedy: The Oracle WSM keystore must contain the signing certificate.
■is of type WSS 1.0, and includes a digital signature created with a private key, with
the certificate being present.
Remedy: The Oracle WSM keystore must contain either the signing certificate or
the issuer's certificate of the signing certificate.
■is of type WSS 1.1, and includes a digital signature created with a private key,
without the certificate being present.
Remedy: The Oracle WSM keystore must contain the signing certificate.
■is of type WSS 1.1, and includes a digital signature created with a private key, with
the certificate being present. In this case, the OWSM keystore will need to contain
either the signing certificate or the issuer's certificate of the signing certificate
Remedy: The Oracle WSM keystore must contain either the signing certificate or
the issuer's certificate of the signing certificate
36.6.6 Configuring Oracle WSM Agent for WSS Kerberos Policies
Security Token Service provides services to various Oracle clients (Oracle Web Services
Manager client) or third party clients (Microsoft and IBM are two). the Oracle WSM
Agent performs only message protection (not authentication) on the incoming request.
The Oracle WSM agent does not attempt to map the incoming Kerberos ticket to a user
record in the OPSS Identity Store.
If Oracle WSM is the client that will interact with Security Token Service using WSS
Kerberos policies, then the entire Oracle WSM Kerberos setup section in Oracle Fusion
Middleware Security and Administrator's Guide for Web Services applies.
However, if the client is not Oracle WSM, see Table 36–2 and disregard sections on
how to configure the client, sections related to authenticating the user referenced in the
Kerberos ticket.
See Also: Chapter 37, "Managing Security Token Service Certificates
and Keys"
Table 36–2 Configuring a Non-Oracle WSM Client for WSS Kerberos Policies
Perform Tasks for Non-Oracle Client Skip These Tasks for Non-Oracle Client
Configure the KDC
Initialize and Start the MIT Kerberos KDC

Managing and Migrating Security Token Service Policies
Configuring Security Token Service Settings 36-19
36.7 Managing and Migrating Security Token Service Policies
This section provides the following topics:
■About Managing and Migrating Security Token Service Policies
■Managing Security Token Service Policies
■Migrating Security Token Service Policies
36.7.1 About Managing and Migrating Security Token Service Policies
Security Token Service policies for endpoints reside in sts-policies.jar. This jar is copied
to following location under $WLS_HOME ($Oracle_IDM1, for example):
$WLS_HOME/oam/server/policy
The sts-policies.jar contains the stspolicies.prop file at the following location in the
JAR:
META-INF/policies/sts/
This file lists all the policies packaged in the directory as file names to allow the server
to read the JAR entries programmatically when migrating policies to destination
repository.
Create Principals
Configure the Web Service Client to Use the Correct
KDC
Set the Service Principal Name In the Web Service
Client
Set the Service Principal Name In the Web Service
Client at Design Time
Configure the Web Service to Use the Right KDC
Use the Correct Keytab File in Enterprise Manager
Extract and Export the Keytab File
Modify the krb5 Login Module to use the Keytab
File
Authenticate the User Corresponding to the Service
Principal
Create a Ticket Cache for the Web Service Client
Use Active Directory with Kerberos and Message
Protection
Set Up the Web Service Client
Create a User Account
Create a Keytab File
Set the Service Principal Name
Set Up the Web Service
Table 36–2 (Cont.) Configuring a Non-Oracle WSM Client for WSS Kerberos Policies
Perform Tasks for Non-Oracle Client Skip These Tasks for Non-Oracle Client

Logging Security Token Service Messages
36-20 Administrator's Guide for Oracle Access Management
36.7.2 Managing Security Token Service Policies
The following procedure outlines the various scenarios for policy updates.
Task overview: Updating policies and stspolicies.prop
1. Add a Policy to sts-policies jar: Before creating the new jar, you must also update
the stspolicies.prop file at META-INF/policies/sts/ to include this new policy file
name.
2. Delete a Policy from sts-policies jar: You must also delete the entry from file
META-INF/policies/sts/stspolicies.prop.
3. Update Existing Policy File Name: When re-naming a policy file at
META-INF/policies/sts/, you must also update the corresponding entry in the
file META-INF/policies/sts/stspolicies.prop file.
4. Update Existing Policy Content: When updating the content of a policy file,
without touching the file name, there is no need to do anything else.
36.7.3 Migrating Security Token Service Policies
During installation a check is performed to establish whether SOA is deployed within
the domain where Security Token Service is being installed:
■If SOA is not installed, the Oracle WSM protocol is set to classpath and policies are
read from the JAR on the class path.
■If SOA is present within the domain, Security Token Service reads the policies
from sts-policies.jar and migrates them to the Oracle WSM PM repository by
calling Oracle WSM Mbeans.
■If SOA is installed after Security Token Service within the same domain, ensure
smooth operations between SOA and Security Token Service as follows:
–The Oracle WSM protocol must be set to 'remote'.
–Security Token Service policies from sts-policies jar must be migrated to Oracle
WSM PM repository using Oracle WSM provided tools.
36.8 Logging Security Token Service Messages
Logging is the mechanism by which components write messages to a file.
Administrators can use the logging mechanism to capture critical component events.
Access Manager uses the same logging infrastructure and guidelines as any other
component in Oracle Fusion Middleware 11g. This is accomplished by using the
package
java.util.logging
, which is standard and available in all Java environments.
The logging system writes output to flat files only. Logging to an Oracle Database
instance is not supported.
Configuring logging and locating log files are the focus of this section. Diagnosing
problems using the information in log files is outside the scope of this manual.
Note: Be sure to update policies and stspolicies.prop as needed
before migration.
See Also: "Using and Managing WSS Policies for Oracle WSM
Agents" on page 36-13.

Auditing the Security Token Service
Configuring Security Token Service Settings 36-21
Log messages are used for problem diagnosis. The logging infrastructure records
messages from Access Manager. The Administrator controls the amount of
information that is logged in a message by specifying log levels for each component or
service for which a logger is defined.
By default, the log level for Access Manager is the Notification level. Logging at the
Error level produces a small amount of output while other log levels can result in
voluminous logging output, which can impact OAM performance. In production
environments, logging is usually either disabled or the log level is set to a level that
results in a small volume of logging output (the error level, for example).
Access Manager and Security Token Service uses the WebLogic container's logging
defaults:
■Logging File: $DOMAIN_
HOME/servers/SERVER-NAME/logs/SERVER-NAME-diagnostics.log
■Logging Configuration File: Provides logging level and other configuration
information for logging. This file is stored in the following path: $DOMAIN_
HOME/config/fmwconfig/servers/SERVER-NAME/logging.xml
36.9 Auditing the Security Token Service
Oracle Fusion Middleware auditing provides a measure of accountability and answers
to the "who has done what and when" types of questions. Audit data can be used to
create dashboards, compile historical data, and assess risks. Analyzing recorded audit
data allows compliance officers to perform periodic reviews of compliance policies.
Configuring common auditing settings for Security Token Service and validating your
auditing configuration is the subject of this section; analyzing and using audit data is
outside it's scope.
The Oracle Fusion Middleware Common Audit Framework supports auditing for a
number of run-time events, and administrative events (changes to the system). It also
provides uniform logging, and exception handling and diagnostics for all audit events.
While auditing can be enabled or disabled, it is typically enabled in production
environments. Auditing has minimal performance impact, and the information
captured can be useful (even mission-critical). The Auditing Framework uses
configuration parameters set in the Oracle Access Management Console that enable
data capture for a user or set of users.
Audit data can be written to either a single, centralized Oracle Database instance or to
flat files. Regardless of where the audit record is stored, it contains a sequence of items
that can be configured to meet particular requirements. The audit log file helps the
audit Administrator track errors and diagnose problems if the audit framework is not
working properly. More information is in the following sections.
■About Security Token Service Audit Record Storage
■About Audit Reports and Oracle Business Intelligence Publisher
■About the Audit Log
Note: Generally, you enable logging to produce files that you send to
Oracle Technical Support for problem diagnosis. Documentation for
log messages is not available. In some cases, you might be able to
diagnose problems on your own by reading log files.

Auditing the Security Token Service
36-22 Administrator's Guide for Oracle Access Management
■About Auditing Security Token Service Events
36.9.1 About Security Token Service Audit Record Storage
Security Token Service can be configured to write audit records to a variety of targets
supported by the Common Audit Framework:
■Local flat files: By default, Security Token Service records audit data to a file.
■Central database: In production environments, Oracle recommends using a
database audit store to provide scalability and high-availability for the Common
Audit Framework. Audit data is cumulative and grows over time. Ideally this is a
database for only audit data; not used by other applications.
■Platform-specific log (Linux Syslog and Windows Event Log)
■Audit Vault
To switch to a database as the permanent store for your audit records, you must first
use the Repository Creation Utility (RCU) to create a database schema for audit data.
The RCU seeds that database store with the schema required to store audit records in a
database. After the schema is created, configuring a database audit store involves:
■Creating a data source that points to the audit schema you created
■Configuring the audit store to point to the data source
36.9.2 About Audit Reports and Oracle Business Intelligence Publisher
The data in the database audit store is exposed through pre-defined reports in Oracle
Business Intelligence Publisher. These reports allow you to drill down the audit data
based on various criteria, such as user name, time range, application type, and
execution context identifier (ECID).
Out-of-the-box, there are several sample audit reports available with Security Token
Service and accessible with Oracle Business Intelligence Publisher. You can also use
Oracle Business Intelligence Publisher to create your own custom audit reports.
36.9.3 About the Audit Log
An audit log file helps the audit Administrator track errors and diagnose problems
when the audit framework is not working properly. An audit log file records several
fields including: Date, Time, Initiator, EventType, EventStatus, MessageText, ECID,
RID ContextFields, SessionId, TargetComponentType, ApplicationName, and
EventCategory to name a few.
Note: Security Token Service integrates with Oracle Business
Intelligence Publisher which provides a pre-defined set of compliance
reports.
See Also:
■Oracle Fusion Middleware Application Security Guide
■"Setting Up the Audit Database Store" on page 9-21
■"Adding, Viewing, or Editing Audit Settings" on page 9-24
See Also: "About Audit Reports and Oracle Business Intelligence
Publisher" on page 9-4

Auditing the Security Token Service
Configuring Security Token Service Settings 36-23
36.9.4 About Auditing Security Token Service Events
Specific administrative and run-time events that you can audit for Security Token
Service are grouped together in Chapter 9, "Auditing Administrative and Run-time
Events". Included with the events are the common instructions for setting up and
validating auditing. For details, see:
■Security Token Service Events You Can Audit
■Setting Up Auditing for Oracle Access Management
■Validating Auditing and Reports
See Also: The topic on audit logs in the chapter on configuring and
managing auditing in the Oracle Fusion Middleware Security Guide

Auditing the Security Token Service
36-24 Administrator's Guide for Oracle Access Management

37
Managing Security Token Service Certificates and Keys 37-1
37
Managing Security Token Service Certificates
and Keys
This chapter provides the following sections:
■Prerequisites
■Introducing the Security Token Service Certificates and Keys
■Managing Security Token Service Encryption/Signing Keys
■Managing Partner Keys for WS-Trust Communications
■Managing Certificate Validation
37.1 Prerequisites
Security Token Service services must be running, as described in "Enabling and
Disabling Security Token Service" on page 36-7.
37.2 Introducing the Security Token Service Certificates and Keys
Depending on the public key infrastructure, the digital certificate establishes
credentials for Web-based transactions, as described in "About Certificates,
Authorities, and Encryption Keys" on page C-3.
Public Keys at Run Time: There are distinct cases where public key infrastructure
materials are used at run time. For instance, during Web Services Security (WSS)
protocol communication between Requesters and Security Token Service (with OWSM
Agent). See also Table 37–1.

Introducing the Security Token Service Certificates and Keys
37-2 Administrator's Guide for Oracle Access Management
37.2.1 About Keystores and Security Token Service
Following is a brief summary of the keystore files distributed across all OAM Servers
in the domain by the JMX framework and used for Security Token Service:
■.oamkeystore: For keys and certificates associated with OAM Server instances
■.oamkeystore: Partner Keystore for keys and certificates used to establish trust
with partners, clients, and agents.
■amtruststore: Trust Keystore for keys and certificates that are used to establish
trust in entities that are interacting with the OAM Server instances
■amcrl.jar: Certificate Revocation Lists (CRL) are used by the OAM Server instances
when performing CRL-based certificate revocation checking
The files in Table 37–2, are distributed across all OAM Servers in the domain by the
JMX framework. The $DOMAIN_HOME/config/fmwconfig /mbeans directory
defines a registration mbeans.xml for each file that indicates the MBean to manage the
file and also identify that the file should be propagated across the domain.
The token security key pair is populated to the common keystore shared by Security
Token Service. This eliminates the need for Oracle Web Services Manager agents to
interact with the common keystore.
Table 37–1 Security Token Service Public Keys Used at Run Time
When Security Token Service ... Description
Issues SAML Assertions ■Security Token Service Signing Assertions using a key defined
in the STS Global settings
■Security Token Service using the Requester's signing certificate
as a proof key for Holder-of-Key of type Public Key
confirmation method
■Security Token Service using the Relying Party's encryption
certificate to encrypt the secret proof key for Holder-of-Key of
type Secret Key confirmation method
■Security Token Service using the Requester's encryption
certificate to encrypt a secret proof/entry in the RSTR for
Holder-of-Key of type Secret Key confirmation method
Issues tokens ■Security Token Service uses the Relying Party's encryption
certificate to encrypt the outgoing token
Validates SAML Assertions ■Security Token Service uses the Issuing Authority's signing
certificate to verify the signature of the incoming SAML
Assertion
Uses Web Services Security (WSS) protocol
communication
Between Requesters and Security Token Service (with OWSM
Agent)
See Also: "Introduction to Oracle Access Management Keystores" on
page 5-27
Table 37–2 Keystore Mbeans
Keystore Mbean and Description
System/Partner Keystore:
.oamkeystore
Configuration of the .oamkeystore is done using the JRE's keytool application.
Trust Keystore: .amtruststore Configuration of the amtruststore is done using the JRE's keytool application.
CRL: amcrl.jar CRL MBean: Can be used to manage CRLs.

Introducing the Security Token Service Certificates and Keys
Managing Security Token Service Certificates and Keys 37-3
You can use a WLST command to retrieve the password for keystores and for the
amtruststore, as described in "Resetting System Keystore (.oamkeystore) and Trust
Keystore (amtruststore) Password" on page 37-4.
37.2.2 About the Oracle Web Services Manager Keystore (default-keystore.jks)
This topic describes the keystore of type JKS required by the Oracle WSM Agent to
contain System and Partner keys and certificates.
Oracle WSM Agent functionality is available to Security Token Service to publish WS
Policies and enforce message protection on inbound and outbound WS messages.
Oracle WSM requires a separate keystore to contain System and Partner keys and
certificates.
The Oracle WSM Agent uses a keystore for various cryptographic operations. For
these tasks, the Oracle Web Services Manager Agent uses the keystore configured for
Oracle Web Services Manager tasks (containing OWSM private keys and OWSM
trusted certificates). The OPSS modules publish a keystore service used by Oracle Web
Services Manager for certificate validation operations, and the $DOMAIN_
HOME/config/fmwconfig/jps-config.xml will contain the settings for the keystore
service. The default name is default-keystore.jks, which is specified in jps-config.xml.
Oracle strongly recommends that the Oracle WSM Agent keystore and the Security
Token Service keystore always be different. Otherwise, keys could be available to any
modules authorized by OPSS to access the keystore and Access Manager keys might
be accessed.
During installation, if the Oracle WSM keystore service has not been configured, the
installer:
■Creates a new keystore in the $DOMAIN_HOME/config/fmwconfig folder
(default name is default-keystore.jks)
■Creates a key entry with the corresponding certificate that will be used by OWSM
for signature and encryption operations. This key entry will be stored in the
OWSM Keystore under the
orakey
alias
■Stores the passwords of the key entry and of the keystore in CSF
Having access to the keystore is sometimes required, to:
■Extract the signing/encryption certificate to distribute to clients if necessary
■Update or replace the signing/encryption key entry
■Add trusted certificates
37.2.3 About Using the OPSS Keystore for Requester Certificates
For the special cases where clients use referencing schemes such as SKI (as opposed to
a certificate token being received as part of the web service request), the requester's
Note: Oracle strongly recommends that the Oracle WSM Agent
keystore and the Security Token Service keystore always be different.
See Also:
■"Configuring OWSM for WSS Protocol Communication" on
page 36-15

Managing Security Token Service Encryption/Signing Keys
37-4 Administrator's Guide for Oracle Access Management
certificates need to be populated in the OPSS Keystore. This is an uncommon scenario
that requires manually provisioning keys to the OPSS keystore.
For more information on this, see "About Agents and Security Token Service" on
page 36-4.
37.3 Managing Security Token Service Encryption/Signing Keys
Security Token Service uses keys to:
■Sign outgoing Assertions
■Decrypt any incoming XML encrypted data contained inside the RST message
(tokens, entropies...), which is not handled by the WSS Protocol
Security Token Service uses the following keystore for storing Encryption and Signing
Certificates.
$DOMAIN_HOME/config/fmwconfig/.oamkeystore
Task overview: Managing Security Token Service Keys
1. Resetting System Keystore (.oamkeystore) and Trust Keystore (amtruststore)
Password
2. Adding a New Key Entry to the System Keystore (.oamkeystore)
3. Extracting an Security Token Service Certificate
37.3.1 Resetting System Keystore (.oamkeystore) and Trust Keystore (amtruststore)
Password
Use the following procedure to reset the password that protects keystores, and the key
entries that are using the same password as the keystore.
These keystores were created and configured during installation, as described in the
Oracle Fusion Middleware Installation Guide for Oracle Identity and Access
Management. The password and key entries password were randomly generated.
The WLST
resetKeystorePassword
method allows the Administrator to set the
.oamkeystore password and any key entries with a password identical to the
.oamkeystore password to a new value:
■Updates the .oamkeystore password
■Updates the key entries in .oamkeystore that had the same password as the
keystore
■Updates Access Manager, Identity Federation, and Security Token Service
configuration to reflect the changes
■Updates the amtruststore password (if the keystore is protected by the same
password as the default .oamkeystore)
To reset system and trust keystore passwords
1. Enter the WSLT scripting environment, as usual.
See Also: "Configuring OWSM for WSS Protocol Communication"
on page 36-15
See Also: Oracle Fusion Middleware WebLogic Scripting Tool
Command Reference

Managing Security Token Service Encryption/Signing Keys
Managing Security Token Service Certificates and Keys 37-5
2. Connect to the WebLogic Server AdminServer, using the
connect()
command.
3. Navigate to the domain runtime tree:
domainRuntime()
.
4. Execute the following:
resetKeystorePassword(
)
5. Enter and confirm the password.
37.3.2 Adding a New Key Entry to the System Keystore (.oamkeystore)
An Administrator can use the following procedure to add a new key entry into the
System keystore (.oamkeystore) using the keytool command to create and add the new
key entry. Once the entry has been added, it must be defined in the Security Token
Service configuration screen so that it can be used to sign assertions and decrypt
incoming messages.
This topic provides the following procedures to add a new entry to sign SAML
Assertions or decrypt XML-Encrypted data not covered by WSS:
■Adding a New Entry
■Configuring a SAML Issuance Template to use a Signing Key
■Setting the Default Encryption Key
37.3.2.1 Adding a New Entry
Prerequisites
Resetting System Keystore (.oamkeystore) and Trust Keystore (amtruststore) Password
To configure a new entry
1. Locate keytool.
2. Either generate a self signed certificate or generate a certificate request, export the
request to a remote Certificate Authority, and import the certificate issued by the
Certificate Authority.
3. Observe messages on the screen.
4. Proceed as needed:
■"Configuring a SAML Issuance Template to use a Signing Key", if needed
■"Setting the Default Encryption Key", if needed
37.3.2.2 Configuring a SAML Issuance Template to use a Signing Key
Users with valid Administrator credentials can use this procedure as a guide when
editing an existing template to use a signing key.
To configure a SAML Issuance Template to use a signing key
1. Display the list of existing Token Issuance Templates.
Oracle Access Management Console
System Configuration
Security Token Services
See Also:
■About Managing Token Issuance Templates
■Searching for an Existing Template

Managing Security Token Service Encryption/Signing Keys
37-6 Administrator's Guide for Oracle Access Management
Token Issuance Templates
2. Find and open the SAML issuance template that will use the new key. For
example:
saml11-issuance-template
.
3. On the SAML Issuance Template page, click the Security tab.
4. On the Security tab, Signing And Encryption section, click Sign Assertion.
5. From the Signing Keystore Access Template Id list, choose the KeyID as the
Signing Keystore Entry.
6. Click Apply at the top of the page to save this information.
7. Proceed to "Setting the Default Encryption Key", if needed.
37.3.2.3 Setting the Default Encryption Key
Users with valid Administrator credentials can use this procedure as a guide when
editing an existing template to use a signing key.
To set the default encryption key
1. Go to the Security Token Service Settings page.
Oracle Access Management Console
System Configuration
Security Token Service
Security Token Service Settings
2. From the Default Encryption Template list, select the new key entry.
3. Click Apply at the top of the page to save this information.
4. Proceed to "Setting the Default Encryption Key".
37.3.3 Extracting an Security Token Service Certificate
In some cases, it is required to distribute the Security Token Service keys used for
SAML Signature operations or XML encryption operations:
■When a Relying Party needs to have access to the Security Token Service signing
key, in order to validate the SAML Assertion issued by Security Token Service
■When a token needs to be encrypted for Security Token Service Server
To distribute the certificate of a key entry used by Security Token Service for SAML
Signature operations or XML encryption operations, use the Certificate Retrieval
Service by specifying the KeyID (listed in System Configuration, Security Token
Service, Security Token Service Settings and the preferred encoding (der vs pem). For
more information, see "Using the Certificate Retrieval Service".
37.3.3.1 Using the Certificate Retrieval Service
To use the Certificate Retrieval service
1. Retrieve the KeyID of the entry for which the certificate should be retrieved (listed
in Oracle Access Management Console System Configuration tab, Security Token
Service section, Security Token Service Settings).
See Also: "About Security Token Service Settings" on page 36-10

Managing Partner Keys for WS-Trust Communications
Managing Security Token Service Certificates and Keys 37-7
2. Create a URL. For example:
http(s)://osts-hostname:osts-port/sts/servlet/samlcert?id=<KEYID>&encoding=<E
NCODING>, with:
■id holding the KeyID of the entry
■encoding representing the format with which the certificate will be returned.
Possible values are pem (PEM format) or der (DER format). (optional, default
value is pem)
3. Review the certificate returned in the browser.
37.4 Managing Partner Keys for WS-Trust Communications
This topic provides the following information:
■About Partner Certificates
■About Downloading the Relying Party's Certificate at Run Time
■Setting the Partner's Signing or Encryption Certificate
37.4.1 About Partner Certificates
During the processing of the WS-Trust messages, Security Token Service might need to
use a partner's certificate. The certificate needed depends on the situation, as described
in Table 37–3.
Table 37–3 Partner Keys for WS-Trust Communications
If Security Token Service Must ... The OAM Server ...
Issue a SAML Assertion encrypted for the
Relying Party
Uses the Relying Party's encryption certificate to encrypt the
outgoing token
Issue a SAML Assertion with the Subject
Confirmation being of type Holder of Key /
Asymmetric
Uses the Requester Partner's signing certificate as the proof key to
be included in the Assertion
Note: if the WS-Trust RST contains a UseKey element referencing
an X.509 Binary Security Token in the SOAP header that was used
in a signature, then Security Token Service will be able to use this
certificate as the proof key.
Issue a SAML Assertion with the Subject
Confirmation being of type Holder of Key /
Symmetric
Uses the Relying Party's encryption certificate to encrypt the secret
proof key to be included in the Assertion.
Issue a SAML Assertion with the Subject
Confirmation being of type Holder of Key /
Symmetric
Can encrypt in the RSTR for the Requester, the secret or the server
entropy.
In this case, the server:
■uses the Requester's encryption certificate to encrypt the secret
(if the secret was generated using only server entropy)
■or uses the server entropy to encrypt the secret in the RSTR (if
the secret was derived from client and server entropy).
Note: if the WS-Trust RST contains a ProofEncryption element
referencing an X.509 Binary Security Token in the SOAP header
that was used in a signature, then Security Token Service will be
able to use this certificate to encrypt the secret or entropy returned
to the client.
Validate an incoming SAML Assertion Uses the Issuing Authority's signing certificate to verify the XML
digital signature present on the Assertion.

Managing Partner Keys for WS-Trust Communications
37-8 Administrator's Guide for Oracle Access Management
37.4.2 About Downloading the Relying Party's Certificate at Run Time
At runtime, Security Token Service is capable of downloading the Relying Party WSS
Policy of the service listed in the AppliesTo field of the RST. If Security Token Service is
configured to download the Relying Party's WS-Sec policy, then ensure that the Proxy
settings are correctly entered, if needed, so that Security Token Service can connect to
the Relying Party.
If the Relying Party Partner Profile is configured to do so, it instructs Security Token
Service to download the WS-Sec Policy from the service. Security Token Service then
extracts the certificate located in the policy and uses it for cryptographic operations, if
necessary. Also:
■If Security Token Service issues a SAML Assertion encrypted for the Relying Party,
the server uses the certificate downloaded from the Relying Party's WS-Sec Policy
to encrypt the outgoing token.
■If Security Token Service issues a SAML Assertion with the Subject Confirmation
of type Holder of Key / Symmetric, Security Token Service uses the certificate
downloaded from the Relying Party's WS-Sec Policy to encrypt the secret proof
key to be included in the Assertion.
To configure the Relying Party Partner Profile to download the certificate at run time,
see "Setting the Partner's Signing or Encryption Certificate".
37.4.3 Setting the Partner's Signing or Encryption Certificate
To set the signing or encryption certificate of a partner, perform the following
operations.
Alternatively: Use the WLST Partner commands to set the signing or encryption
certificate of a specific partner.
Prerequisites
Review Table 37–3, " Partner Keys for WS-Trust Communications"
To set the certificate of a partner
1. From the Oracle Access Management Console System Configuration, tab, Security
Token Service section, and expand the Partners node.
2. Within the Partners node, expand Requester (or Relying Party or IssuingAuthority
(see Table 37–3)).
3. Search for and open (or Create) the Partner for which the certificate must be set.
4. Edit Partner settings as needed (see "Managing Token Service Partners" on
page 39-3) and click Save.
5. Encryption Certificate: Click the Browse button to locate and choose the
Encryption certificate.
6. Signing Certificate: Click the Browse button to locate and choose the Signing
certificate.
7. Save the information and close the page.
8. Proceed with "Managing Certificate Validation".

Managing Certificate Validation
Managing Security Token Service Certificates and Keys 37-9
37.5 Managing Certificate Validation
This section describes managing certificate validation. Conditions for certificate
validation are described in Table 37–4.
Successful validation requirements are listed in Table 37–5.
Certificate validation requires the Trust Anchors Store (.amtruststore). Procedures for
managing this store and validation are described in following topics:
■Managing the Trust Anchors Store (amtruststore)
■Managing Certificate Revocation Lists
■Using a Custom Trust Anchor Store for Security Token Service
37.5.1 Managing the Trust Anchors Store (amtruststore)
The Trust Anchors keystore is managed using the keytool command. Certificates
added to the keystore are detected by the Certificate Validation module.
Prerequisites
Resetting System Keystore (.oamkeystore) and Trust Keystore (amtruststore) Password
To manage the Trust Anchors store (amtruststore)
1. Locate keytool.
Table 37–4 Conditions for Security Token Service Certificate Validation
STS Validates a Certificate When ...
The security token to be validated is one of the following types:
■X.509
■X.509v3
■PKCS#7
A SAML Assertion must be validated
Security Token Service is configured to validate the signing certificate of a SAML Issuing Authority
Table 37–5 Successful Certificate Validation Requirements
Certificates Must ... How ...
Be linked to a trusted anchor: ■by being a trusted anchor
■or by having its issuer being a trusted
anchor
Not be revoked:
■by being a trusted anchor
■or by having its issuer being a trusted
anchor
The revocation status of a certificate can be
decided by checking:
■Against a list of CRLs that were uploaded
by the Administrator
■Against an OCSP server
■CRL Distribution Points
Note: Notification is performed using the JMX Notification
Framework and might take some time, depending on the notification
refreshing time (60 seconds by default).

Managing Certificate Validation
37-10 Administrator's Guide for Oracle Access Management
2. Execute the following command.
keytool -keystore $DOMAIN_HOME/config/fmwconfig/amtruststore
-storetype JKS -alias orakey -file $CERT_FILE
3. Observe messages on the screen and enter a password if requested.
4. Proceed to "Managing Certificate Revocation Lists".
37.5.2 Managing Certificate Revocation Lists
Security Token Service uses the common infrastructure certification validation module.
Trusted Certificates and Certificate Revocation Lists (CRLs) used during certificate
validation are stored in Trust Keystore and CRL ZIP file. The Security Token Service
configuration stores the OCSP/CDP settings.
This section outlines how to add or remove certificate revocation lists (CLRs) to check
the revocation status of a certificate, perform the following operations.
Prerequisites
Have your Certificate Revocation List ready to import.
Task overview: Manage Certificate Validation and Revocation Lists
1. From the Oracle Access Management Console System Configuration tab, Common
Configuration section, select Certificate Validation.
2. See "Managing Certificate Revocation Lists" on page 3-7.
3. See "Enabling OCSP Certificate Validation" on page 3-8:
4. See "Enabling CRL Distribution Point Extensions" on page 3-8.
37.5.3 Using a Custom Trust Anchor Store for Security Token Service
Optionally, if a particular deployment requires a set of trust anchors separate from that
of Access Manager, another keystore can be configured as the trusted certificate store
for Security Token Service. This can be done by having the Administrator perform the
following tasks.
Task overview: Deploying a custom keystore for trusted certificates
1. Create the JKS keystore in the $DOMAIN_HOME/config/fmwconfig directory.
2. In the Oracle Access Management Console, Security Token Service Settings page,
enter the full path name of the new trust store and Apply your changes.
3. In the domain where Security Token Service is deployed, the Custom Trust Anchor
Keystore must be propagated manually by the Administrator across all the
servers.
See Also: "Managing Certificate Validation and Revocation" on
page 3-7
Note: Using a Custom Trust Anchor Store is an optional feature that
most customers will not need.

38
Managing Templates, Endpoints, and Policies 38-1
38
Managing Templates, Endpoints, and Policies
[16]
The Security Token Service must be enabled as documented in Section 36.3, "Enabling
and Disabling Security Token Service."
This chapter provides information about managing the templates, endpoints and
policies for the Security Token Service.
■Introduction
■Searching for an Existing Template
■Managing Token Issuance Templates
■Managing Token Validation Templates
■Managing Security Token Service Endpoints
■Managing Token Issuance Policies, Conditions, and Rules
■Managing TokenServiceRP Type Resources
■Making Custom Classes Available
■Managing a Custom Security Token Service Configuration
38.1 Introduction
The Security Token Service controls who can access a Web Service Provider (WSP) by
defining Application Domains that provide access to resources based on configured
policies. Application Domains identify Web Services and the authorization rules that
determine who can request a security token.
The following functionality is established by Trust Issuance Policies. A Trust Issuance
Policy can be managed by clicking the Application Domains link from the Oracle
Access Management Console Launch Pad.
■Resource of type TokenServiceRP representing Relying Parties or Web Service
Providers.
■Token Issuance Policy defining a policy for a set of resources of type
TokenServiceRP.
■Condition defining the identities of the clients that are allowed or denied issuance
of tokens for the resources listed in the policy. The clients can either be Requester
Partners or User from the Default Identity Store.
Security Token Service supports the creation of Relying Party Partner, representing a
remote Web Service Provider that will be the consumer of a security token issued by
Security Token Service.

Searching for an Existing Template
38-2 Administrator's Guide for Oracle Access Management
For each Relying Party Partner, it is possible to define URLs that will be mapped to the
partner, so that WS-Addressing endpoint specified in a WS-Trust Request can be
mapped to an Security Token Service Relying Party Partner.
At runtime, when a client requests a token to be issued, Security Token Service will
evaluate the Trust Issuance Policies to determine whether or not the token can be
issued:
■The client will be identified either as a Requester Partner or as an end user
■If an AppliesTo element was present in the WS-Trust Request and was mapped to
a Relying Party Partner, then the TokenServiceRP resource for the Trust Issuance
Policy evaluation will be the Partner ID of that Security Token Service Relying
Partner.
■If an AppliesTo element was present in the WS-Trust Request and could not be
mapped to a Relying Party Partner, then the TokenServiceRP resource for the Trust
Issuance Policy evaluation will be the UnknownRP defined in the Access Manager
Application Domain.
■If an AppliesTo element was missing in the WS-Trust Request, then the
TokenServiceRP resource for the Trust Issuance Policy evaluation will be the
MissingRP defined in the Access Manager Application Domain.
Security Token Service requires the following items (at a minimum) to process a
request and issue a token based on an incoming request (RST):
■EndPoints
■One Issuance Template
■One Validation Template
■One Requester Partner Profile that contains the token
■One Relying Party Partner Profile
An LDAP server is required for the Security Token Service to map the Username token
that references the user to an LDAP User record, and then use that record to populate
the outgoing token. Partners might need to be provisioned before they are available.
38.2 Searching for an Existing Template
All defined template names appear in the Search Results Table when you open either
the Token Validation Template or Token Issuance Template node. To quickly find a
specific template or set of templates, you can use the Search controls.
This section explains the controls you can use to refine your search, which are similar
whether you are searching for a Token Validation Template or a Token Issuance
Template. It includes the following topics:
■About Template Search Controls
■Searching For a Template
Note: Partners might need to be provisioned.
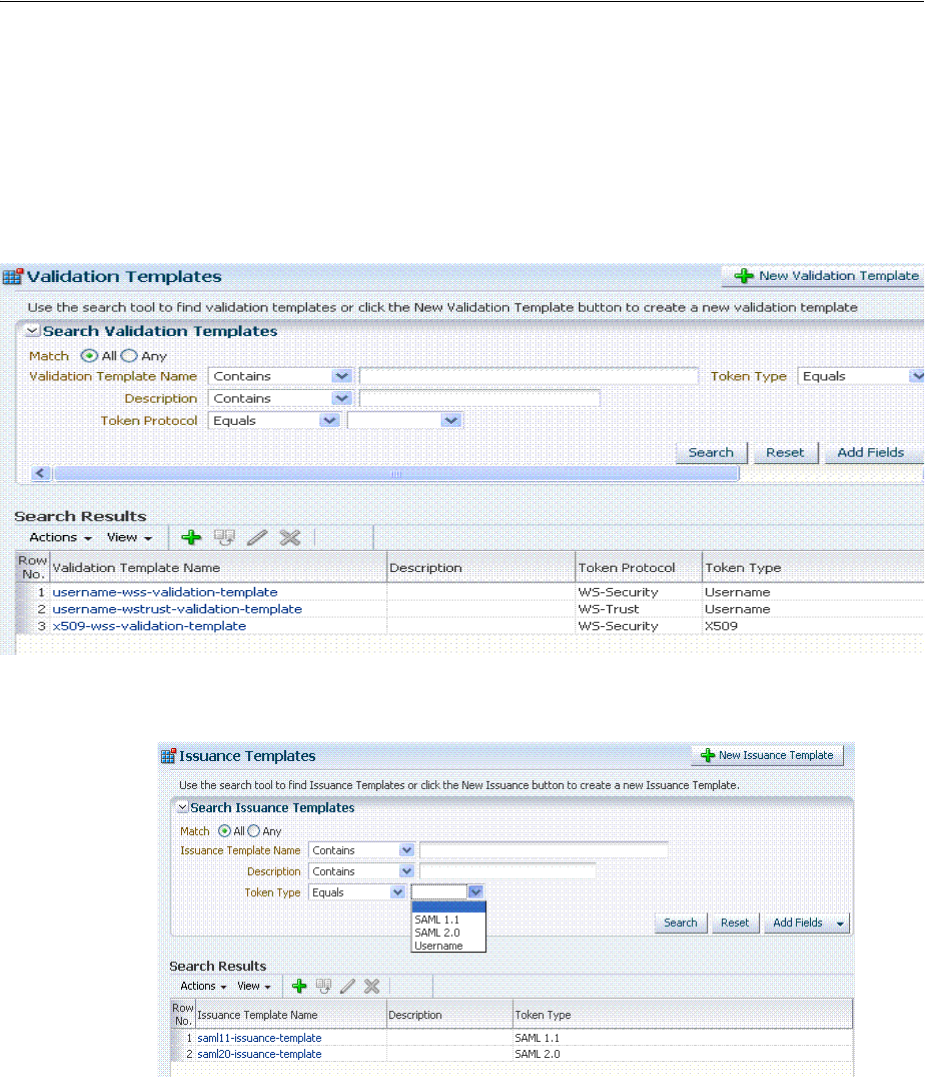
Searching for an Existing Template
Managing Templates, Endpoints, and Policies 38-3
38.2.1 About Template Search Controls
The following figures show the search pages where you will see many similarities:
■Figure 38–1, "Validation Templates Search Controls"
■Figure 38–2, "Issuance Template Search Controls"
Figure 38–1 Validation Templates Search Controls
Figure 38–2 Issuance Template Search Controls
Table 38–1 describes the controls available to refine a template search. Unless explicitly
stated, all elements are available for both Validation and Issuance Template searches.
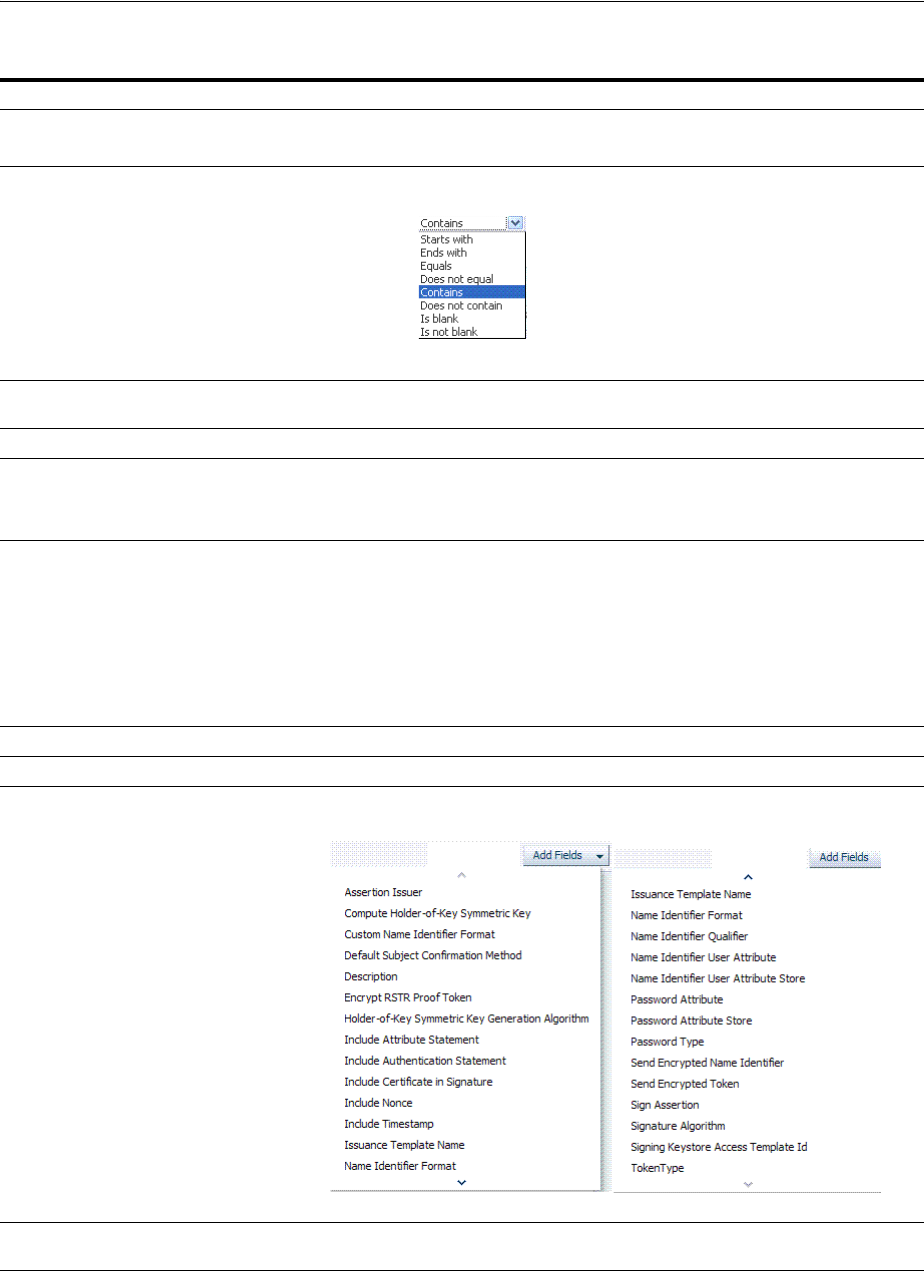
Searching for an Existing Template
38-4 Administrator's Guide for Oracle Access Management
Table 38–1 Search Validation Template
Element Description
Match Choose All to search for a template that matches all your specifications.
Choose Any to search for a template that matches at least one of your specifications.
Search Operations List A list of operations from which you choose one to help refine your search.
... Template Name Choose an operation from the list and enter information in the field to help refine your
search.
Description Refine your search using the optional description field.
Token Protocol
Validation Template only
Choose the token protocol from those listed:
■WS-Trust
■WS-Security
Token type Choose the token type. Both standard and custom token types are included.
■Username: Consumption and Creation
■X.509: Consumption
■SAML: Consumption & Creation
■OAM 11g: Consumption using the OBO (on behalf of) field
■Kerberos: Consumption
■Custom: Consumption the OBO (on behalf of) field and Creation
Search Initiates the Search function using criteria in the form.
Reset Resets the Search form with defaults only.
Add Fields A list of additional items you can add as search criteria.
Search Results Table Itemizes the results of your search based on choices in the View menu, described later in this
table.
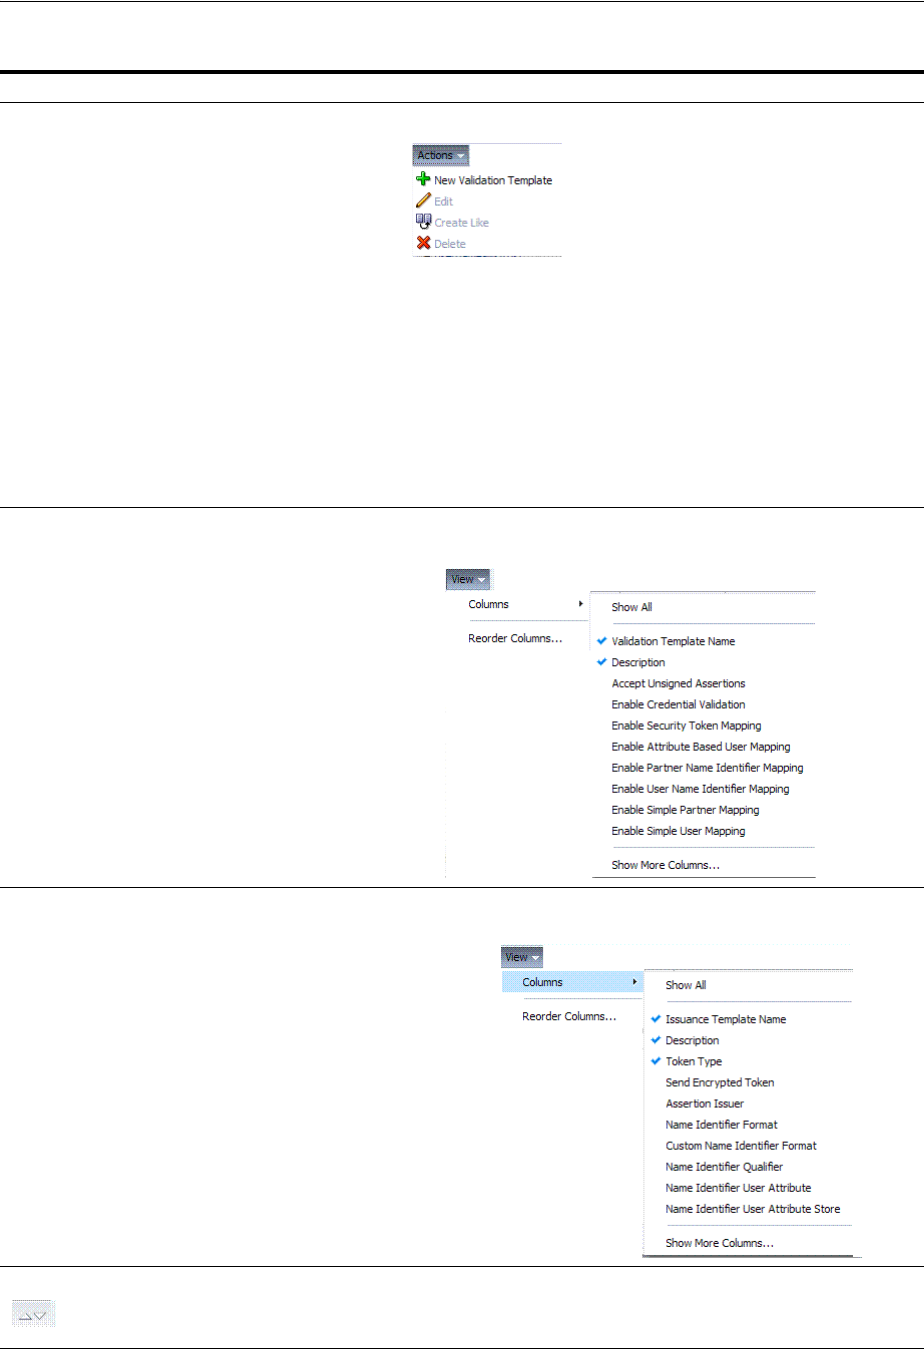
Searching for an Existing Template
Managing Templates, Endpoints, and Policies 38-5
Actions menu
Shown: Actions for Validation
Temp l a te
Provides the following functions that can be performed on a selection in the results table:
Note: Actions menu functions mirror command buttons above the results table. For example:
■New ... Template: Click the New ... Template button at the top of the Search page, or
select New ... Template from the menu, or click the + button above the table.
■Edit: Click a name in the Results Table, or select Edit from the Actions menu, or click the
Edit (pencil) command button above the Results Table.
■Create Like: Select the desired row in the table and either select Create Like from the
Actions menu, or click the Create Like command button above the table
■Remove: Select the desired row in the Results Table and either select Delete from the
Actions menu, or click the Delete (X) command button above the table.
View menu
Validation Template only
A list from which you can identify which information to display in the results table.
View menu
Issuance Template only
A list from which you can identify which information to display in the results table.
Controls you can choose to define the order of items listed in the results table:
■Ascending
■Descending
Table 38–1 (Cont.) Search Validation Template
Element Description

Managing Token Issuance Templates
38-6 Administrator's Guide for Oracle Access Management
38.2.2 Searching For a Template
Users with valid Administrator credentials can use the following procedure to use
search controls to locate a specific template or set of templates. For example, to locate
all templates of a certain token type you can simply choose the type of token. To refine
the search further to all templates of a specific token type and name.
When performing these steps, fill in as much or as little as you want. Skip any steps
that do not apply to you.
To search for a template
1. From the Oracle Access Management Console, click Token Validation Templates.
2. Edit Search Criteria (Table 38–1). For example:
■Match: All
■Name: contains em
■Token Type: equals Username
3. Click Search, review results, and click the one you want to open.
38.3 Managing Token Issuance Templates
An issuance template contains rules on how a token will be created and is specific to a
token type. Each issuance template indicates Signing and Encryption and also contains
Attribute Name, Value Mapping, and Filtering settings to be sent as part of the token.
This section provides the following information:
■About Managing Token Issuance Templates
■Managing a Token Issuance Template
38.3.1 About Managing Token Issuance Templates
Each Token Issuance Template indicates how to construct a token. In other words,
which signing or encryption to use when constructing a token. Each Token Issuance
Template also defines the attributes mapping and filtering rules to be applied to the
attributes that will be included in the outgoing token. However, Issuance Templates do
not list the attributes that will be sent in the outgoing token: these are defined in the
Relying Party Partner Profile.
Token Issuance Template details which will differ depending on your chosen token
type. Table 38–2 describes where to find more information.
See Also: "About Template Search Controls"
Table 38–2 Issuance Template Requirements
Topic Figures and Tables
General Details Figure 38–3, Table 38–3
Issuance Properties: Username Tokens Figure 38–4, Table 38–4
Issuance Properties: SAML Tokens Figure 38–5, Table 38–6
Security: SAML Tokens Figure 38–6, Table 38–6
Attribute Mapping: SAML Tokens Figure 38–9, Table 38–7
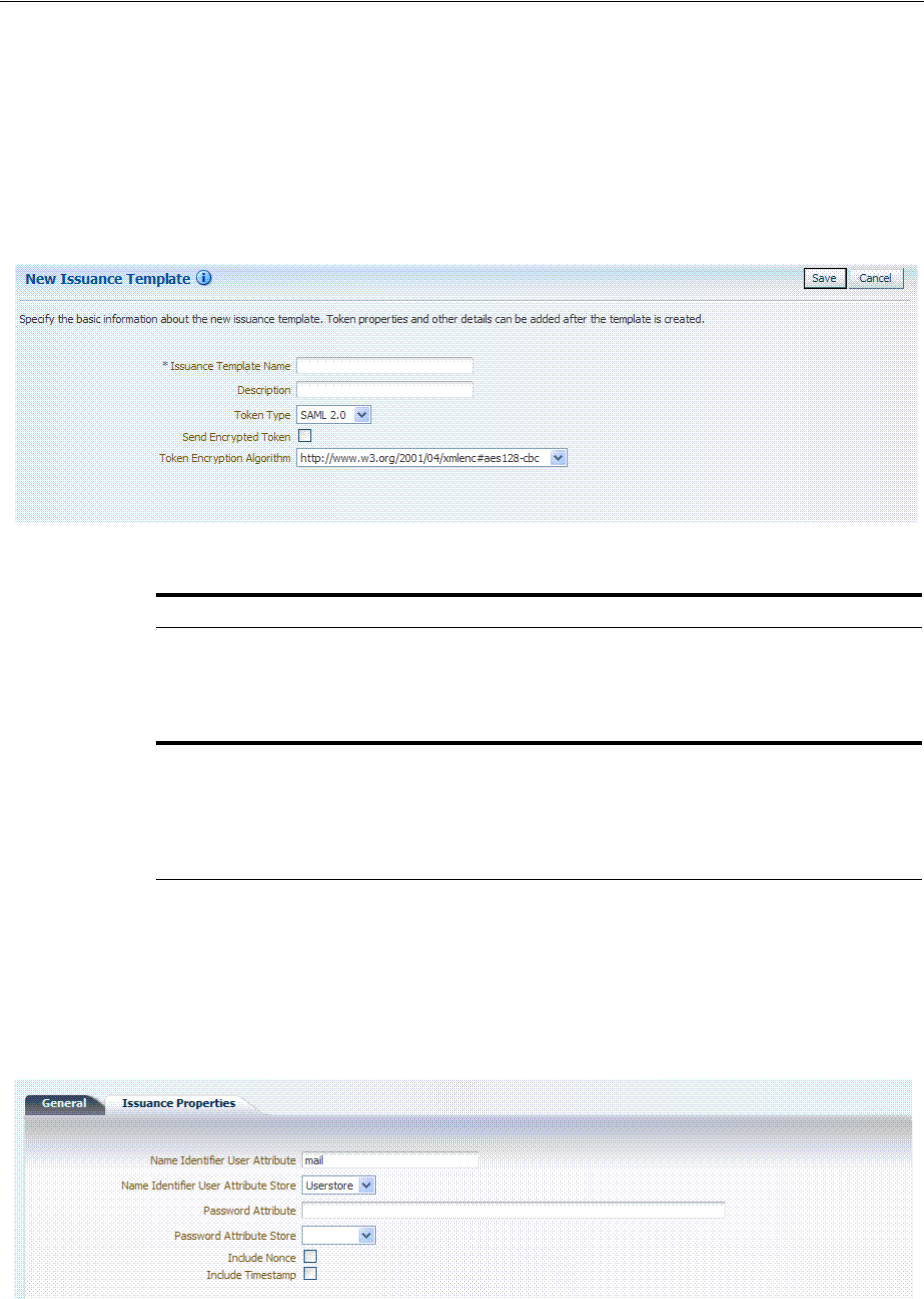
Managing Token Issuance Templates
Managing Templates, Endpoints, and Policies 38-7
General Details
Figure 38–3 shows the New Issuance Template page with defaults showing. Unless
explicitly stated, General information is the same regardless of the Token Type you
choose. For more information, see Table 38–3. After you fill in General information and
click Save, you cannot return and edit the template name or token type.
Figure 38–3 Issuance Template: General Details and Defaults
Issuance Properties: Username Token Type
If the token type is Username, the Issuance Properties shown in Figure 38–4 are
needed for a Username token type template.
Figure 38–4 Issuance Properties: Username Token Type
Table 38–4 describes the Issuance Properties for the Username token type.
Table 38–3 Issuance Template: General Details
Elements Description
Issuance Template Name Enter a unique name for this template.
Description Optional.
Token Type Choose a standard (or custom, if any) token type from those
listed.
SAML, Username, and Custom
Token Types
Send Encrypted Token Click to enable token encryption.
Token Encryption Algorithm When token encryption is enabled, choose a Token Encryption
Algorithm from those listed.
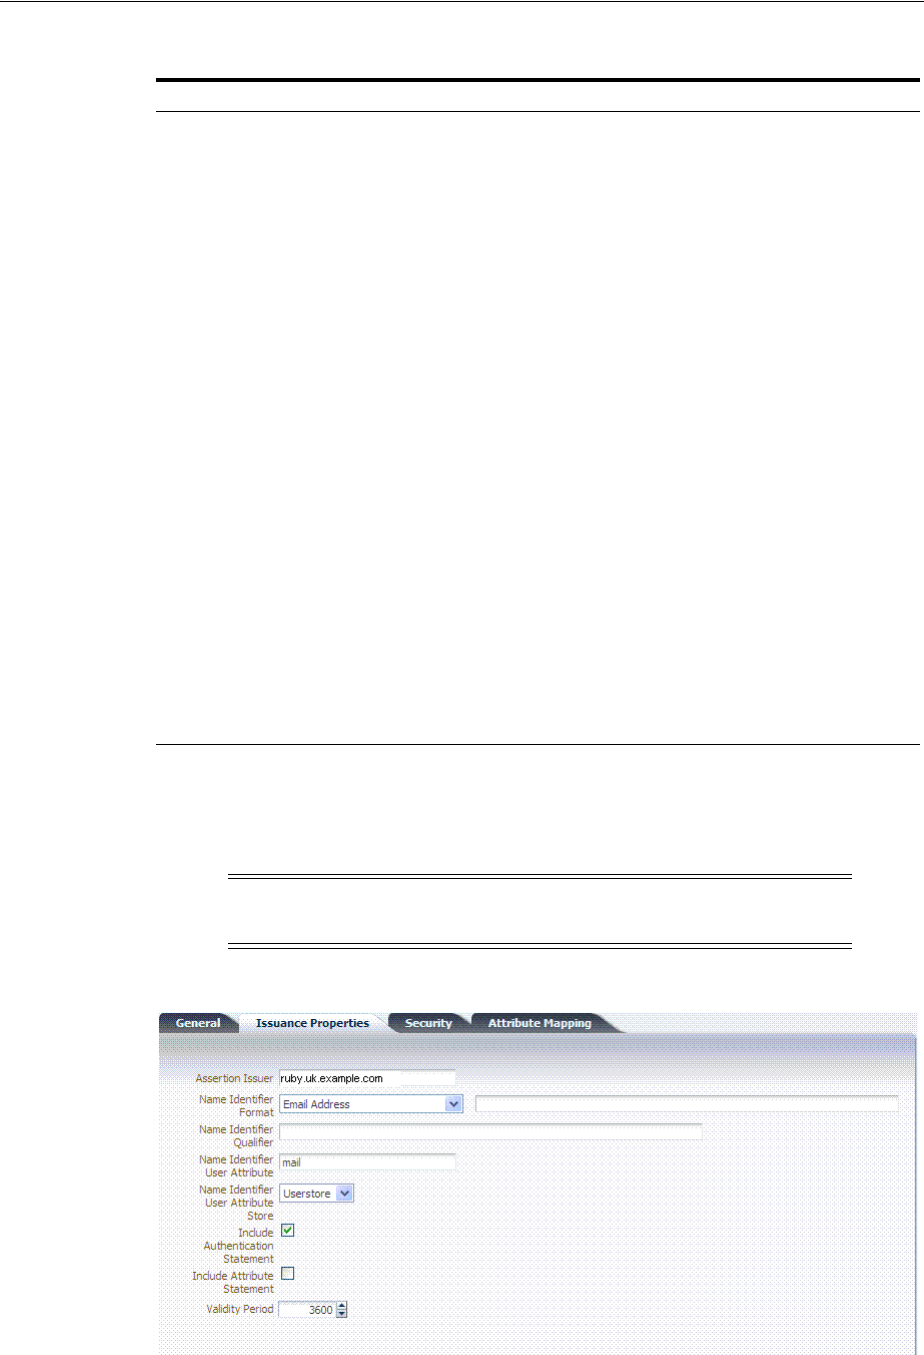
Managing Token Issuance Templates
38-8 Administrator's Guide for Oracle Access Management
Issuance Properties: SAML Token Types
SAML 1.1 and 2.0 token types require the issuance properties illustrated in
Figure 38–5.
Figure 38–5 Issuance Properties: SAML Token Types
Table 38–4 Issuance Properties: Username Token Type
Element Description
Name Identifier User
Attribute
Attribute to be used to populate the Username element in the
Username Token.
Name Identifier User
Attribute Store
Choose the user attribute store type:
■Userstore
■Context
Note: If the Attribute Store is the Userstore, LDAP is used to
retrieve the attribute from the user record. If the Attribute
Store is context, data from the incoming token is used as the
attribute source.
Password Attribute Attribute to be used to populate the Password element in the
Username Token.
Password Attribute Store Choose the password attribute store type:
■Userstore
■Context
Note: If the Attribute Store is the Userstore, LDAP is used to
retrieve the attribute from the user record. If the Attribute
Store is context, data from the incoming token is used as the
attribute source.
Include Nonce Indicates whether or not a Nonce made of random data
should be included in the Username token.
Default: Disabled
Include Timestamp Indicates whether or not a the Created element should be
included in the Username token.
Default: Disabled
Note: These issuance properties differ from those for Username
token type.
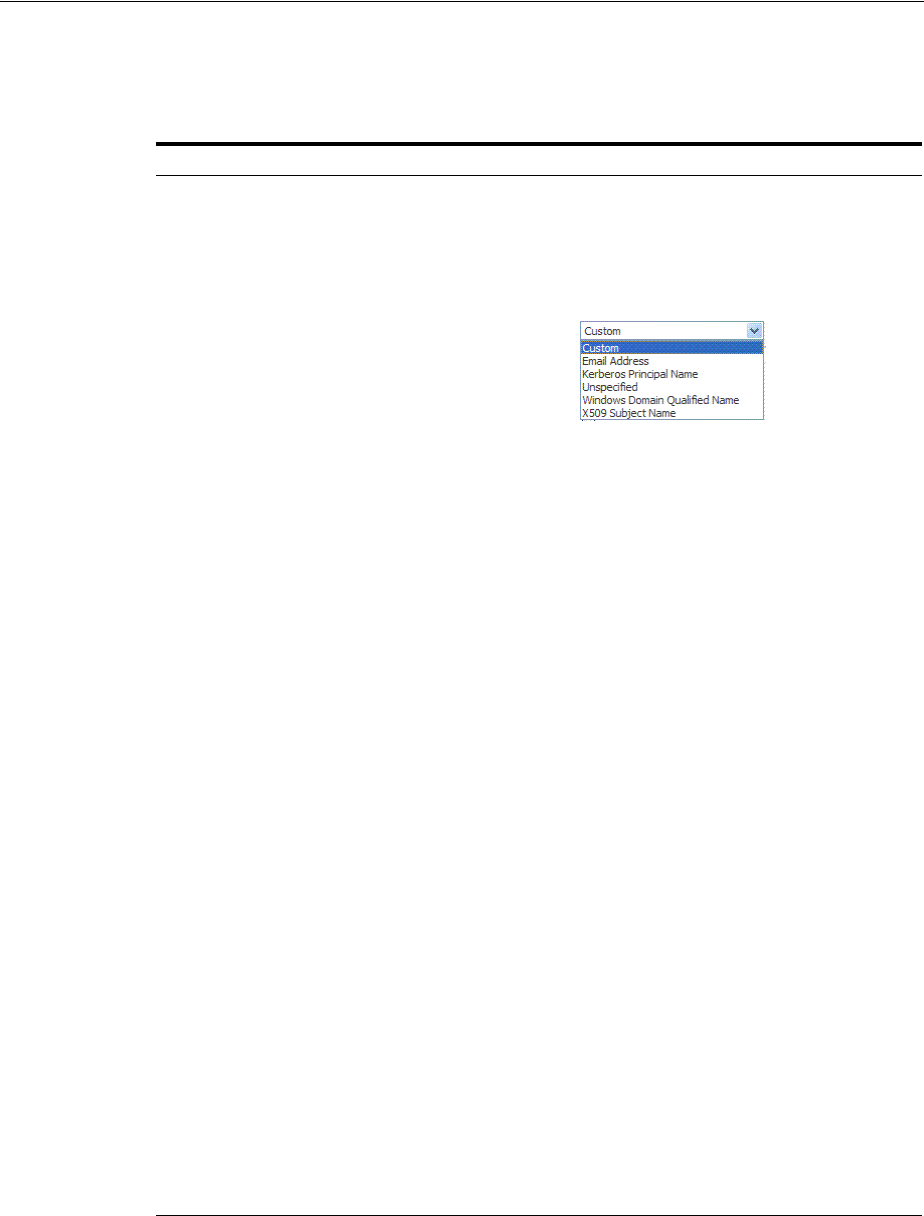
Managing Token Issuance Templates
Managing Templates, Endpoints, and Policies 38-9
Table 38–5 describes all Issuance Properties by token type. Only SAML token types
require issuance properties.
Security Details: SAML Tokens
Only SAML token types require Security Details, as shown in Figure 38–6 and
described in Table 38–6.
Table 38–5 Issuance Properties: SAML Token Types
Element Description
Assertion Issuer Specifies the identifier representing the issuer of the assertion.
This string is used to represent this Security Token Service as
the issuer of the assertion.
Name Identifier Format Choose a format from the list and then enter the details in the
text field.
Name Identifier Qualifier Contains the string that will be set as the Name Identifier
Qualifier.
Name Identifier User
Attribute
References the attribute that will be used to populate the value
of the Name Identifier.
Name Identifier User
Attribute Store
■Userstore
■Context
Note: If the Attribute Store is the Userstore, LDAP is used to
retrieve the attribute from the user record. If the Attribute
Store is context, data from the incoming token is used as the
attribute source.
Include Authentication
Statement
Indicates whether or not a SAML Authentication Statement
should be included in the Assertion.
Default: Disabled
Note: An authentication operation is required for a statement
of this type to be included. An authentication statement will
be included if the incoming token contained some
authentication data and that those were validated (for
example, the incoming SAML Assertion contains an
authentication statement, or a Username Token contains
credentials that were validated).
Include Attribute Statement Indicates whether or not a SAML Attribute Statement will be
included in the outgoing Assertion.
A statement of this type will be included only if this flag is set
to true and if at least one attribute is included in the outgoing
Assertion.
Default: Enabled
Note: the RP PP will determine which attributes need to be
included in an outgoing token.
Validity Period Specify the length of time (in seconds) that the token will be
valid.
Default: 3600 (seconds)

Managing Token Issuance Templates
38-10 Administrator's Guide for Oracle Access Management
Figure 38–6 Security Details: SAML Tokens
Table 38–6 Security Details: SAML Tokens
Elements Description
Signing And Encryption Indicates whether or not the Assertion will be signed using the Key
referenced by the Signing Keystore Access Template ID field.
Sign Assertion Indicates whether or not the signing certificate will be included in the
Assertion.
Default: Enabled
Include Certificate in Signature Default: Enabled
Signing Keystore Access Template
Id
References the key to be used to sign assertions created with this
issuance template. The key templates are defined in the Security
Token Service Settings section.
Subject Confirmation
Default Subject Confirmation
Method
Indicates which Subject Confirmation Method will be used by default,
if the requester did not specify a method in the WS-Trust request.
Possible values are:
■Bearer
■Holder of Key with Public Key
■Holder of Key with Symmetric Key
■Sender Vouches
Compute Holder-of-Key
Symmetric Key
Default: Enabled
Indicates whether or not Security Token Service will generate random
data when creating the Secret Key for the Holder of Key Symmetric
Key data.
■If true, the server will generate the secret key if the client did not
specify entropy. Otherwise it will derive the key from the client
and server entropy
■If false, the client entropy will be used as the secret key
Encrypt RSTR Proof Token Indicates whether or not the Proof Token must be encrypted when
returning the server entropy or secret key to the requester in the
WS-Trust response, when the Subject Confirmation method is Holder
of Key with Symmetric Key
Default: Disabled
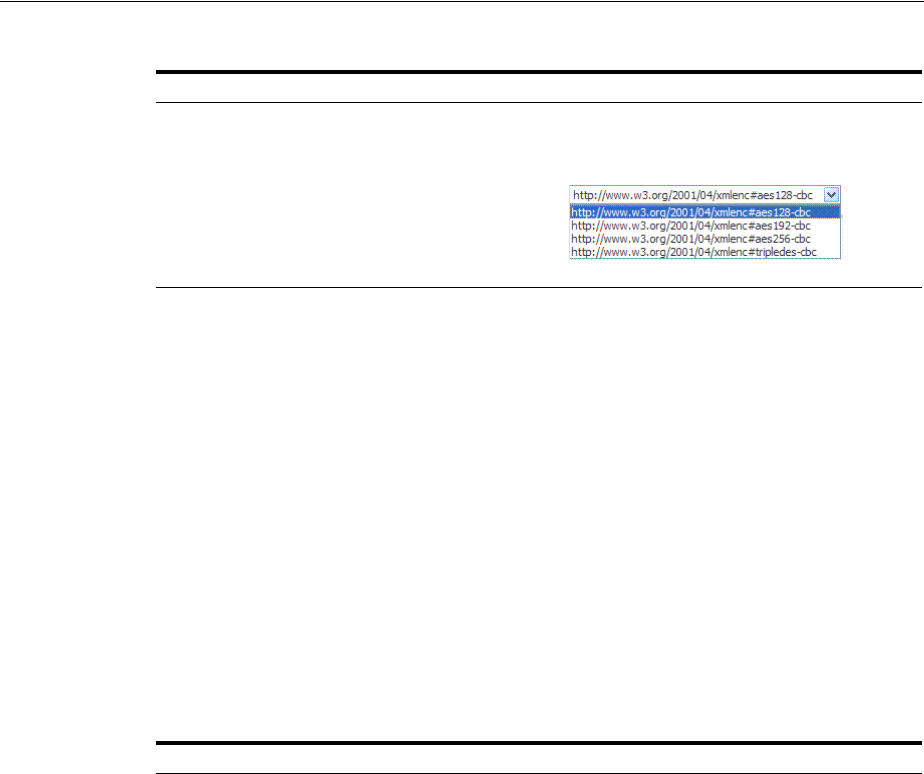
Managing Token Issuance Templates
Managing Templates, Endpoints, and Policies 38-11
Attribute Mapping: SAML Tokens
When the token type is SAML 1.1 or 2.0, it is possible to define attribute mapping and
filter rules that will be applied to the attributes included in the Assertion.
There are three different rules:
■Attribute name mapping where the local name of an attribute can be changed to
another value. For example, givenname can be changed to firstname.
■Attribute value mapping where the local value of an attribute can be translated to
another value. For example, President to CEO.
■Attribute value filtering where the local value of an attribute can be filtered so it is
not included in the outgoing assertion. For example, some sensitive attribute
values could be removed while others would be issued.
Holder-of-Key Symmetric Key
Generation Algorithm
Indicates the symmetric key generation algorithm to use to create the
secret key when the Subject Confirmation method is Holder of Key
with Symmetric Key:
See Also: Token Mapping attributes in Figure 38–9 and Table 38–11.
Table 38–7 Issuance Template: Attribute Mapping, SAML Token
Element Description
Attribute Name Mapping Defines an optional mapping between the local name of an attribute, and
the name used to reference this attribute in the assertion.
The mapping is optional. If an attribute does not have a mapping defined,
then its local name will be used, and the namespace will be set to
urn:oracle:security:fed:attrnamespace
for SAML 1.1 Assertions or the
format will be set to
urn:oasis:names:tc:SAML:2.0:attrname-format:basic
for SAML 2.0
Assertions.
■External Attribute: Contains the externam name of the attribute as it
will appear in the Assertion.
■Local Attribute: Contains the local name of the attribute.
■Format of Namespace: Contains an optional Format or Namespace. If
missing, the namespace will be set to
urn:oracle:security:fed:attrnamespace for SAML 1.1 Assertions or the
format will be set to
urn:oasis:names:tc:SAML:2.0:attrname-format:basic for SAML 2.0
Assertions.
Table 38–6 (Cont.) Security Details: SAML Tokens
Elements Description

Managing Token Issuance Templates
38-12 Administrator's Guide for Oracle Access Management
Attribute Value Condition Filters
This optional value filtering applies to an Attribute Name mapping and will be
included in the Assertion. To define an attribute filtering for an attribute, you must
first define an attribute name mapping for that attribute. The Condition is associated
with the expression to determine whether or not the attribute value should be filtered.
The possible Condition values are:
■regexp: the expression will contain a regular expression, and if it evaluates to true,
the attribute value will be filtered.
■equals: if the attribute value matches the data contained in the expression field,
then it will be filtered.
■not-equals: if the attribute value does not match the data contained in the
expression field, then it will be filtered.
■not-equals: if the attribute value does not match the data contained in the
expression field, then it will be filtered.
■endswith: if the attribute value ends with the data contained in the expression
field, then it will be filtered.
■contains: if the attribute value contains an occurrence of the data contained in the
expression field, then it will be filtered.
■not-contains: if the attribute value does not contains any occurrence of the data
contained in the expression field, then it will be filtered.
■equals-null: if the attribute value is null, then it will be filtered.
Attribute Value Mapping Defines an optional value mapping for an attribute that will be included in
the Assertion.
Note: this attribute value mapping applies to an Attribute Name mapping.
In order to define an attribute mapping for an attribute, it is required to
first define an attribute name mapping for that attribute.
■External Attribute: Contains the value that should be included in the
Assertion, if the local attribute value matches the Local
Attribute/Local Null fields.
■Local Attribute: Contains the local value of the attribute.
■External Null: Indicates if the value to be included in the Assertion
should be null, if the local value of the attribute matches the Local
Attribute/Local Null fields.
■Local Null: Represents a null local value.
■Ignore Case: Indicates whether or not Security Token Service should
ignore case when comparing the attribute value to the Local Attribute
field.
Attribute Value Filters Defines an optional value filtering for an attribute that will be included in
the Assertion.
Note: This attribute value filtering applies to an Attribute Name mapping.
In order to define an attribute filtering for an attribute, it is required to first
define an attribute name mapping for that attribute.
■Condition: Contains the condition associated with the expression to
determine whether or not the attribute value should be filtered. The
possible values are described in "Attribute Value Condition Filters".
■Expression: Contains data that will be used to evaluate the filtering
rule.
■Ignore Case: Indicates whether or not Security Token Service should
ignore case when comparing the attribute value to the expression
field.
Table 38–7 (Cont.) Issuance Template: Attribute Mapping, SAML Token
Element Description

Managing Token Issuance Templates
Managing Templates, Endpoints, and Policies 38-13
■not-equals-null: if the attribute value is not null, then it will be filtered.
38.3.2 Managing a Token Issuance Template
Users with valid Oracle Access Management Administrator credentials can use this
procedure as a guide when developing a new Token Issuance Template (or editing an
existing template) Skip any steps that do not apply to you.
The following procedure describes how to create a new Token Issuance Template for a
Security Assertion Markup Language (SAML) token.
Prerequisites
Confirm that the desired LDAP Identity Store is registered with and configured as the
Default Store.
To create a new token Issuance template
1. Display the list of existing Token Issuance Templates.
Oracle Access Management Console Launch Pad
Security Token Service
Token Issuance Templates
2. New Token Issuance Template:
a. Click the New Issuance Template button in the upper-right corner (or click
the Add (+) command button above the Search Results table).
b. General: Define general information for this template and see:
Table 38–3, " Issuance Template: General Details"
c. Click Save and dismiss the confirmation window (or click Cancel without
saving).
d. Username Token Type: Define issuance parameters for this template and see:
Table 38–4, " Issuance Properties: Username Token Type"
e. SAML Token Type: Define parameters for this template and see:
Table 38–5, " Issuance Properties: SAML Token Types"
Table 38–6, " Security Details: SAML Tokens"
Table 38–7, " Issuance Template: Attribute Mapping, SAML Token"
f. Click Apply (or click Revert without saving it).
g. Close the definition.
3. Find an Existing Template: From the Security Token Service section of the Oracle
Access Management Launch Pad:
a. Find All: Double-click the Token Issuance Templates node and review the
results table.
b. Narrow the Search: Specify your search criteria (Table 38–1), click the Search
Button, and review the results table.
See Also:
■About Managing Token Issuance Templates
■Searching for an Existing Template

Managing Token Validation Templates
38-14 Administrator's Guide for Oracle Access Management
c. Reset the Search Form: Click the Reset button.
4. Edit a Template: Start with the saved page you just created.
Alternatively: Use Step 3 to find the desired template and click the name in the
Search Results table to display the definition.
a. Edit details as needed.
b. Click the Apply button at the top of the page to submit changes (or Revert to
undo your changes).
5. Remove a Template:
a. Click the desired name in the Search Results table to select the item to remove.
b. From the Actions menu, click Delete (or click the Delete (X) command button
above the table.
c. Click the Delete button in the Confirmation window (or click No to cancel the
operation).
38.4 Managing Token Validation Templates
A validation template is used to validate an incoming token and, optionally, map the
incoming token to either a Requester Partner or a user record:
■For OnBehalfOf use cases, a WS-Trust Validation Template must be present.
■For validating an Assertion, one Issuing Authority Partner Profile must be present.
The Security Token Service Endpoint is linked to a WSS Validation Template that
indicates how to validate the token in the WSS header and how to map the token and
binding data to a Requester.
This section provides the following topics.
■About Managing Token Validation Templates
■Managing Token Validation Templates
38.4.1 About Managing Token Validation Templates
A Security Token Service Endpoint is always mapped with a WS-Security Validation
Template that indicates how to map the request to a requester entry or to a user:
■If mapping is required and no match is found, processing will fail.
■If no mapping is required, a default requester partner profile will be used.
■In either case, a requester partner profile is retrieved.
■If a mapping is performed to a user record, a default requester partner profile will
be used.
■If a mapping is performed to a requester partner entry, the requester partner
profile for this partner will be used.
A validation template determines the token validation rules:
■Whether or not to validate and map the incoming token.
■The mapping rules to be used if mapping is enabled.
A validation template is specific to a token type and specific to a protocol as described
in Table 38–8.
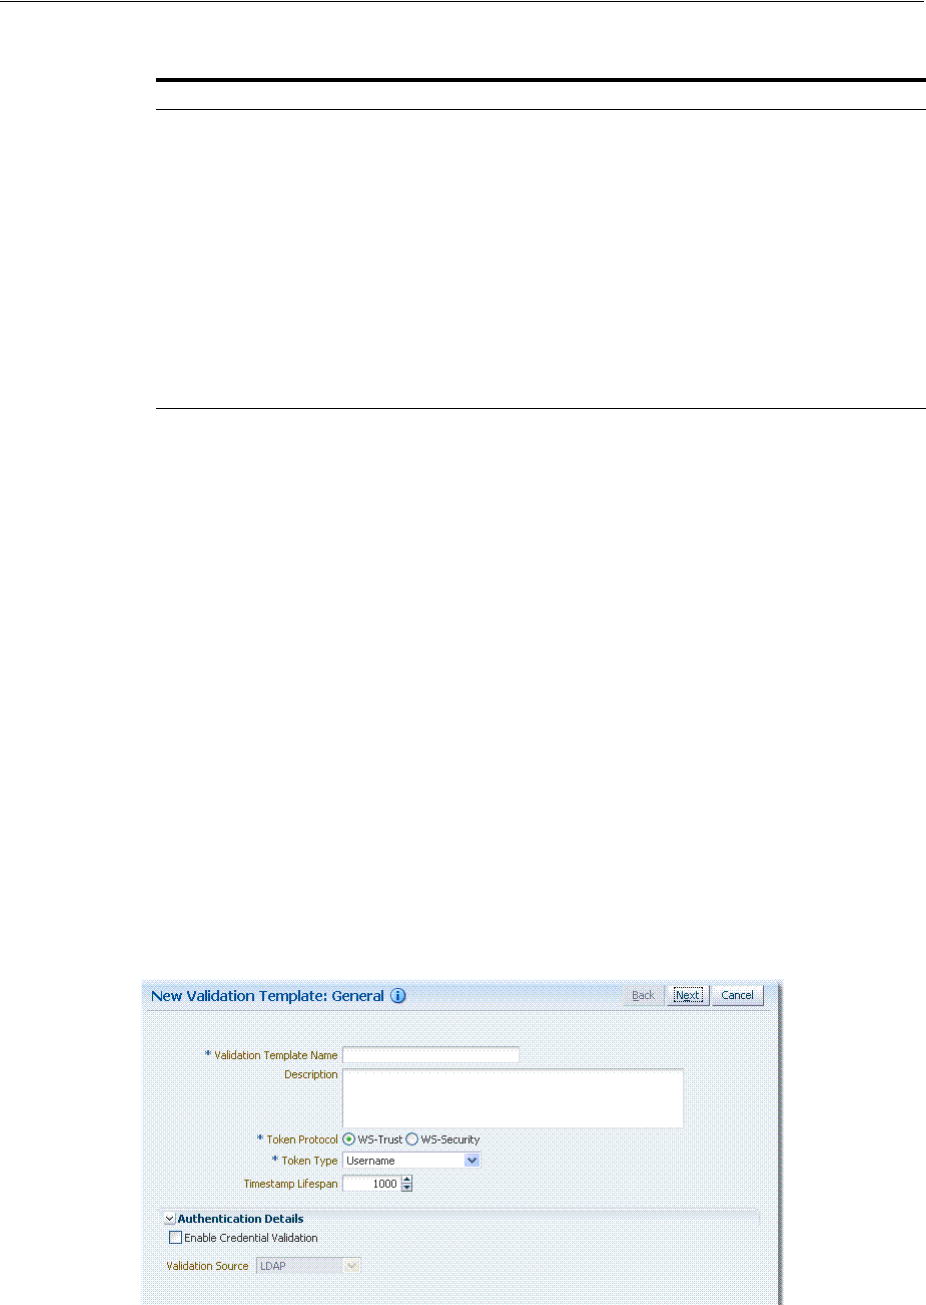
Managing Token Validation Templates
Managing Templates, Endpoints, and Policies 38-15
A validation template mapping rules determines how the incoming data is mapped to
a user or a partner, using data from the incoming token:
■Username for Username Token
■UserID for Kerberos Token
■NameID and attributes for SAML Token
■DN Components for X.509 Token
■Attributes from a Custom
Mapping is performed as follows:
■Simple mapping: one incoming attribute matched against one user record
attributes
■Complex LDAP query: LDAP query with placeholders for incoming data (e.g.:
(&(sn=%lastname%)(mail=%email%))
■NameID Mapping table for SAML Token
Figure 38–7 illustrates default General details on the New Validation Template page.
Figure 38–7 New Validation Template page: General Page Defaults
Table 38–9 describes the elements on the New Validation Template, General page.
Table 38–8 Validation Template Protocols
Protocol Description
WS-Security Validates only WS-Security Tokens:
■Possible Mapping actions: no action, map binding data to partner, map
incoming token to partner, map incoming token to user and binding data to
partner, map incoming token to user
■Token Types supported: SAML 1.1, SAML 2.0, Username X.509, Kerberos,
None.
When you toggle the Token Protocol from WS-Trust to WS-Security, options in
the Token Type list do not ch ange. However, the required "Default Partner
Profile" list appears from which you must choose one profile for WS-Security.
WS-Trust Validates only Tokens included in OBO (on behalf of) field of the RST (request):
■Possible Mapping actions: none, map incoming token to user
■Token Types supported: SAML 1.1, SAML 2.0, Username, X.509, Kerberos,
OAM, Custom.

Managing Token Validation Templates
38-16 Administrator's Guide for Oracle Access Management
Figure 38–8 illustrates the General details page when Enable Credential Validation is
checked and, as a result, the Authentication Details section of the page is visible with
its default values. This is specific to username token validation.
Table 38–9 New Validation Template: General Details
Element Description
Back Click this button to return to the previous page.
Next Click this button to proceed to the next page.
Cancel Click this button to dismiss the page.
Validation Template Name The name you choose for this template. For example:
email-wstrust-valid-temp
Description Optional.
Token Protocol The type of Validation Template to be created. Type can be either:
■WS-Trust: This template will be used to validate and map tokens
included in the OnBehalfOf element of the WS-Trust request.
■WS-Security: This template will be used to validate and map tokens
located in the Security SOAP Header of the incoming message
Token Type A list of in-bound token types from which you choose the one to use for this
template. The token type options depends on the protocol type:
■WS-Trust: SAML 1.1, SAML 2.0, Username, X.509, Kerberos, OAM,
Custom
■WS-Security: SAML 1.1, SAML 2.0, Username, X,509, Kerberos, None
Default Partner Profile Only applies to WS-Security Validation Template
References the default requester partner profile to use, in case the incoming
request is not mapped to a requester partner. For example, if the request is
mapped to a user instead.
A requester partner profiles contains settings that are used during the
request processing. If the incoming request was mapped to a requester
partner, then the partner profile for that requester will be retrieved and used
as the requester partner profile
Timestamp Lifespan Applies only to Username and SAML Validation Templates. It determines the
validity time of a Token (for Username Token, only if it contains a Created
element indicating the instant it was created).
Default: 1000 (seconds)
Authentication Details Specific to username token validation template.
Enable Credential
Validation
Check this box to enable validation using credentials contained in the
username token.
When enabled, Security Token Service will validate the username and the
password elements contained in the username token, using the specified
validation source.
Note: password digest as defined in the Username Token WS-Security Profile
is not supported in this release.
See Also: Table 38–10, " New Validation Template: Authentication Details"
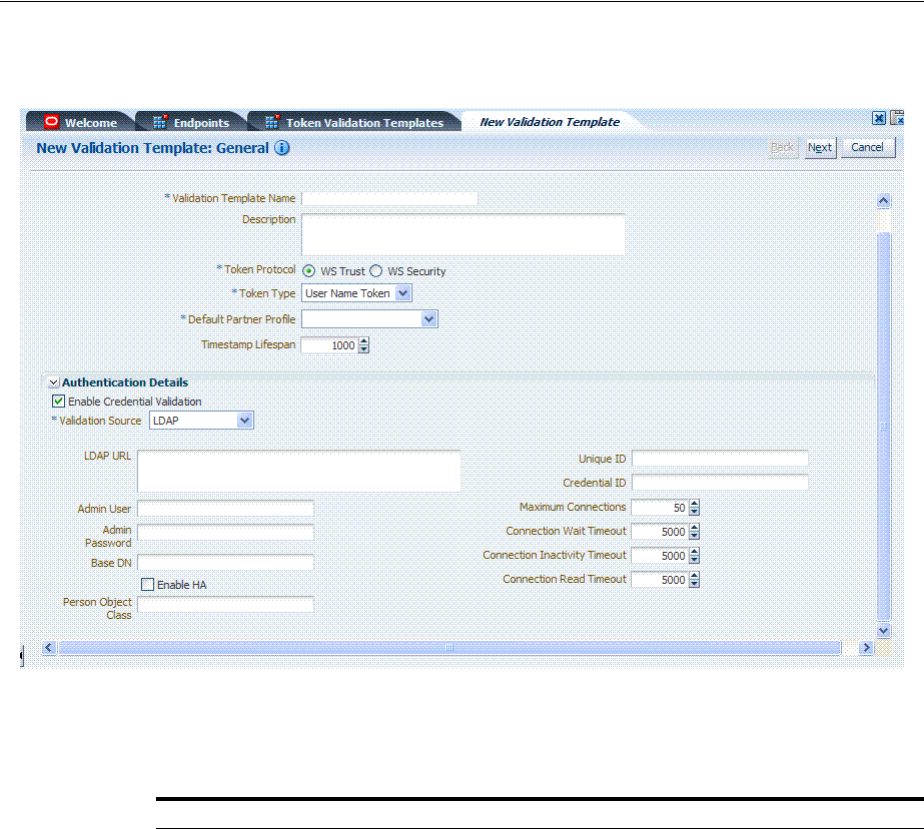
Managing Token Validation Templates
Managing Templates, Endpoints, and Policies 38-17
Figure 38–8 New Validation Template: General Authentication Details
Table 38–10 describes Authentication related details that are available when you
choose Enable Credential Validation.
Table 38–10 New Validation Template: Authentication Details
Element Description
Validation Source A list from which you can choose a credential validation sources
There are four types of validation sources when validating the credentials
contained in a username token:
■LDAP: a standalone LDAP server will be used to validate the credentials.
The connection information will need to be entered
■Embedded LDAP: the LDAP server embedded in the WebLogic server will
be used to validate the credentials. No information is required.
■Userstore: the default User Identity Store configured in the Common
Configuration -> Data Sources will be used to validate the credentials. No
information is required in this validation template screen
■Partner: the credentials will be verified against the username/password
information entered in the Requester Partner entries.
Note: When selected, the Token Mapping configuration section is disabled,
because the token will have been mapped to a requester partner after the
credentials validation operation.
LDAP URL The URL of the LDAP server.
Admin User The username of an account used to perform lookups in the LDAP server.
Admin Password The password of an account used to perform lookups in the LDAP server.
Base DN The Base search DN used when looking up user records.
Enable HA Indicates whether or not the LDAP server is in HA mode, fronted by a load
balancer.
Person Object Class The person object class associated with the user records.

Managing Token Validation Templates
38-18 Administrator's Guide for Oracle Access Management
Token Mapping
The Token Mapping section indicates the following:
■If an incoming token needs to be mapped.
■If the incoming token needs to be mapped, what kind of mapping is done. For
example, mapping token to user, mapping token to partner, and so on.
■How the mapping is done. For example, by mapping a token attribute to a
partner/user attribute, or by using an LDAP query involving several token
attributes.
Mapping rules determine how the incoming data is mapped to a user or a partner. The
following data of the incoming token is used:
■Username for UNT
■UserID for Kerberos
■NameID and attributes for SAML
■DN Components for X.509
■Attributes from custom
Mapping is performed using the following:
■Simple mapping: One incoming attribute matched against one user record
attributes.
■Complex LDAP query: An LDAP query with placeholders for incoming data. For
example,
(&(sn=%lastname%)(mail=%email%))
■A NameID Mapping table for SAML
Following are several Token Mapping Examples for a new Validation Template:
■Figure 38–9, "Token Mapping: SAML2 WS-Security Validation Template"
■Figure 38–10, "Token Mapping, username-wstrust-validation-template"
■Figure 38–11, "Token Mapping: x509-wss-validation-template"
Figure 38–9 shows the mapping configuration settings required for Security Token
Service to map the token to a user record, by matching the NameID value to user
records that have a matching attribute, based on the NameID format:
Unique Id The attribute of the user record containing the user unique identifier data.
In most cases, is identical to the Credential ID field.
Credential Id The attribute of the user record containing the username data. This field will be
used to lookup user records, based on the username.
Maximum Connections The maximum number of concurrent opened LDAP connections
Default: 50
Connection Wait
Timeout
Maximum amount of time to wait when opening a new connection.
Default: 5000 (seconds)
Connection Inactivity
Timeout
Maximum amount of inactivity time for an LDAP connection, before closing it.
Default: 5000 (seconds)
Connection Read
Timeout
Maximum number of concurrent opened LDAP connections.
Default: 5000 (seconds)
Table 38–10 (Cont.) New Validation Template: Authentication Details
Element Description
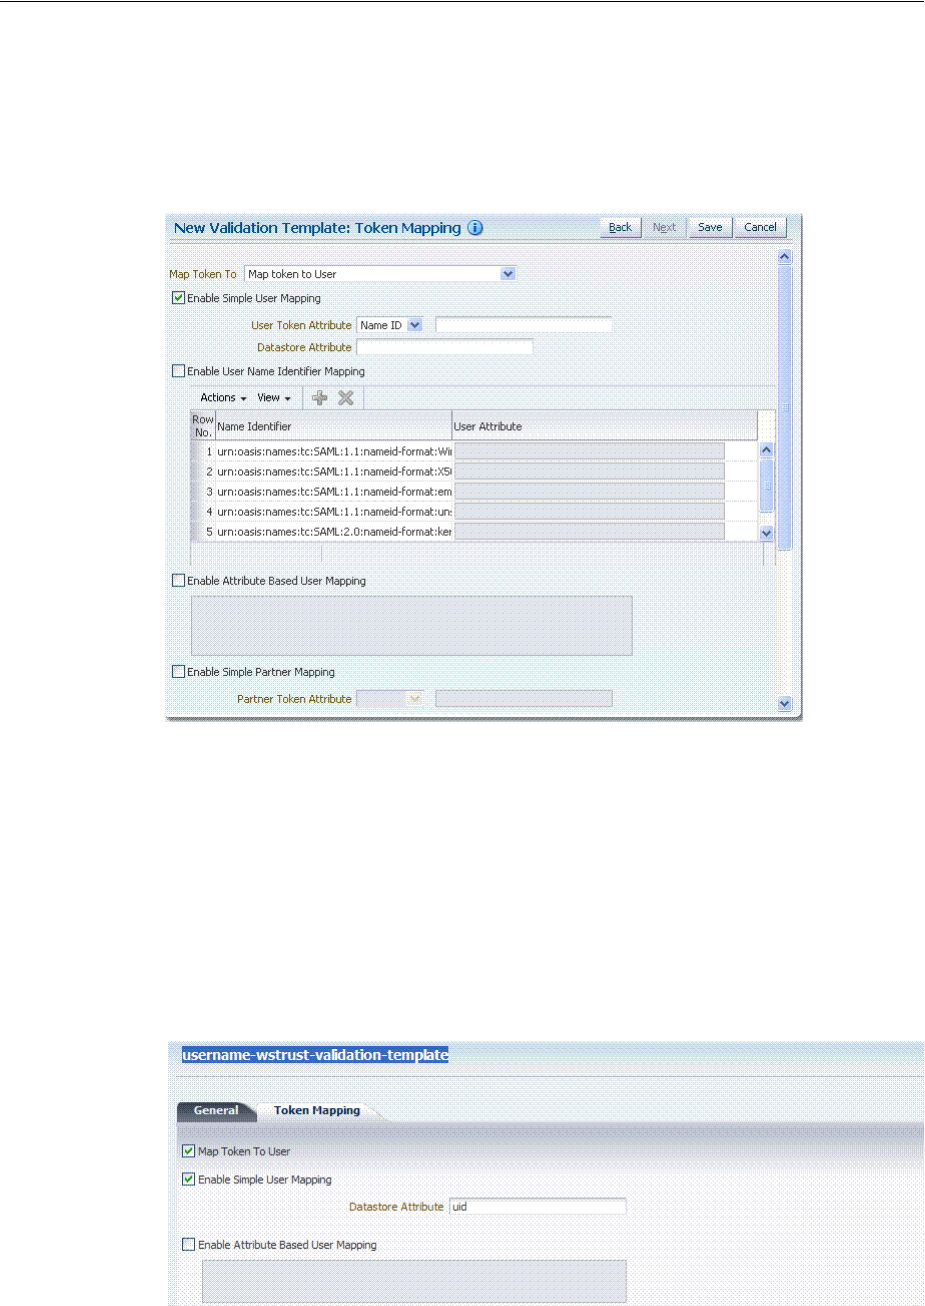
Managing Token Validation Templates
Managing Templates, Endpoints, and Policies 38-19
■Enable Map Token to User
■Enable Simple User Mapping
■Disable Attribute Based User Mapping
Figure 38–9 Token Mapping: SAML2 WS-Security Validation Template
Figure 38–10 shows the mapping configuration settings required for Security Token
Service to map the token to a user record by matching the username element of the
Username token to a user record that has a matching uid. The required settings are:
■Enable Map Token to User
■Enable Simple User Mapping
■Datastore Attribute set to uid
■Disable Attribute Based User Mapping
Figure 38–10 Token Mapping, username-wstrust-validation-template
Figure 38–11 shows the mapping configuration settings required for Security Token
Service to map the token to a requester partner entry by matching the Subject DN of
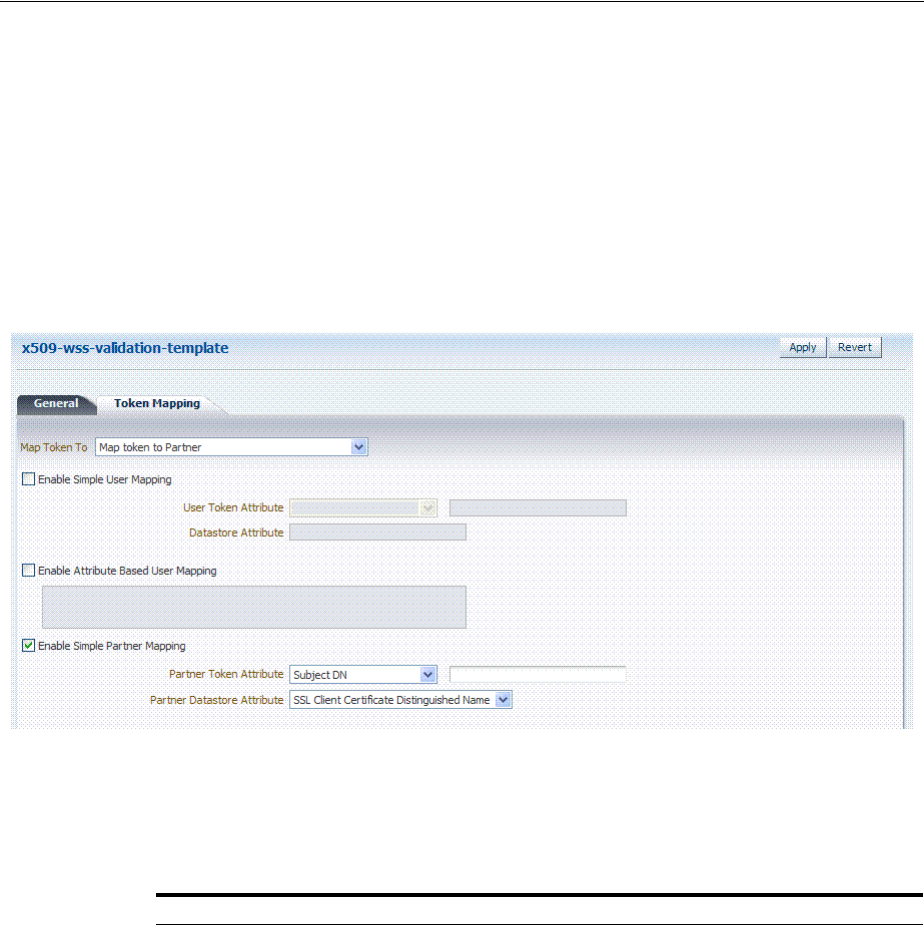
Managing Token Validation Templates
38-20 Administrator's Guide for Oracle Access Management
the certificate to a Requester Partner that has a match on SSL Client Cert DN
Identification attribute. The required settings are:
■Map Token to Partner
■Disable Simple User Mapping
■Disable Attribute Based User Mapping
■Enable Simple Partner Mapping
Figure 38–11 Token Mapping: x509-wss-validation-template
Not all elements apply to all token types and token protocols. The elements that you
must define will vary.
Table 38–11 describes the token mapping elements for validation templates.
Table 38–11 New Validation Template: Token Mapping
Element Description
Map Token to WS-Security Validation Template: Map Token to list
■<empty>: no token mapping operation will occur
■Map token to Partner: The token will be mapped to a requester partner
■Map Token to User and map binding data to Partner: The token will be
mapped to a user, and binding data (such as SSL Client Cert DN or HTTP
Basic Auth Username) will be used to map the HTTP request to a requester
partner
■Map token to User: The token will be mapped to a user
- - - - - - - - - -
WS-Trust Validation Template: Map Token to User
Check the box to enable (or clear the checkbox to disable).

Managing Token Validation Templates
Managing Templates, Endpoints, and Policies 38-21
Enable Simple User
Mapping
Simple user mapping consists of mapping the incoming token to a user record by
using a single token attribute and matching it against a single user record
attribute.
WS-Security Validation Template: Only Username, SAML Assertion, Kerberos.
and X.509.
WS-Trust Validation Template: Username, SAML Assertion, Kerberos, X.509,
OAM and custom token. The layout is different, depending on the token type of
this validation template:
Username Token:
■Datastore attribute references the user record attribute that will be matched
against the username element of the username token.
SAML Assertion:
■User Token attribute references an attribute from the incoming token that
will be matched against the Datastore attribute (defined below) of a user
record. The values can be STS_SUBJECT_ID for the NameID Value, or the
name of an Attribute contained in the Assertion's AttributeStatement.
In the Token Mapping section of a SAML Validation template, the User
Token Attribute will either be the NameID selected from the drop down or a
SAML Attribute name entered in the text field.
■Datastore attribute references the user record attribute that will be matched
against the User token attribute referenced above.
In the Token Mapping section of a SAML Validation template, the Datastore
Attribute is the name of the directory attribute that will be used for the
LDAP matching query.
Kerberos:
■User Token attribute references an attribute from the incoming token that
will be matched against the Datastore attribute (defined below) of a user
record. The User Token Attribute can be specified by selecting one of the
pre-populated attribute (Kerberos Principal, Kerberos Principal Primary or
Kerberos Principal No Domain) or by entering a specific value.
■Datastore attribute references the user record attribute that will be matched
against the User token attribute referenced above.
X.509:
■User Token attribute references an attribute from the incoming token that
will be matched against the Datastore attribute (defined below) of a user
record. The User Token Attribute can be specified by selecting one of the
pre-populated attribute (Subject DN, Common Name, Country Name, State
or Province Name, Locality Name, Organizational Name, Organizational
Unit Name or Domain Component) or by entering a specific value (which
can be set to STS_X509_### by replacing ### with the upper case X.500
component name, for example STS_X509_CN to reference the common name
component of the certificate subject).
■Datastore attribute references the user record attribute that will be matched
against the User token attribute referenced above.
OAM:
■Datastore attribute references the user record attribute that will be matched
against the username element of the username token. Should be the user ID
attribute defined in the Default User Identity Store.
Custom:
■User Token attribute references an attribute from the incoming token that
will be matched against the Datastore attribute (defined below) of a user
record. The possible values are the names of the attribute returned by the
custom token validation module.
■Datastore attribute references the user record attribute that will be matched
against the User token attribute referenced above.
Table 38–11 (Cont.) New Validation Template: Token Mapping
Element Description

Managing Token Validation Templates
38-22 Administrator's Guide for Oracle Access Management
Enable User Name
Identifier Mapping
When enabled, define the following:
WSS and WS-Trust Validation Templates will contain the same section for the
Name Identifier mapping settings.
A NameID user mapping operation consists of mapping the incoming SAML
Assertion to a user record by mapping the NameID Value to a single user record
attribute, based on the NameID format
When enabled, Security Token Service evaluates the NameID format, and based
on the Name Identifier mapping table which user record attribute should be
matched against the Name ID value contained in the Assertion. The Name
Identifier mapping table holds the user record attributes to be used for the
mapping operation. It contains standard NameID formats, but it can be
customized to define custom Name ID formats.
To add custom NameID format, click the add button on the Name Identifier
mapping table, and enter the custom URI.
To set an attribute for a specific NameID format to be used for mapping operation,
set the user record attribute on the line for that format.
Enable Attribute
Based User Mapping
WSS Validation Template: only Username, SAML Assertion, Kerberos and X.509.
WS-Trust Validation Template: only Username, SAML Assertion, Kerberos, X.509
and custom token
An Attribute Based User Mapping operation consists of mapping the incoming
token to a user record by using an LDAP query and token attributes. The format
of the LDAP query defines the mapping rule and specifies the token attributes to
be used by their names, surrounded by the percent (%) character. For example, an
LDAP query that will map a token based on two token attributes (firstname and
lastname) would be (&(sn=%lastname)(givenname=%firstname%)).
The possible token attributes depend on the token type.
Username Token
■STS_SUBJECT_ID is the only available token attribute containing the
username element of the Username token.
SAML Assertion
■STS_SUBJECT_ID contains the NameID Value.
■STS_NAMEID_FORMAT contains the NameID Format
■STS_NAMEID_QUALIFIER contains the NameID Qualifier
■STS_SAML_ASSERTION_ISSUER contains the Issuer of the Assertion
■Attributes present in the Assertion's AttributeStatement
Kerberos
■STS_KERBEROS_PRINCIPAL_SHORT contains the Kerberos Principal
attribute.
■STS_KERBEROS_PRINCIPAL_FULL contains the Kerberos Principal
Primary attribute
■STS_KERBEROS_PRINCIPAL_NODOMAIN contains the Kerberos Principal
No Domain attribute
X.509
■STS_SUBJECT_ID contains the Subject DN.
■STS_X509_CN contains the Common Name
■STS_X509_C contains the Country Name
■STS_X509_ST contains the State or Province Name
■STS_X509_L contains the Locality Name
■STS_X509_O contains the Organizational Name
■STS_X509_OU contains the Organizational Unit Name
■STS_X509_DC contains the Domain Component
Custom Token
■The possible values are the names of the attribute returned by the custom
token validation module.
Table 38–11 (Cont.) New Validation Template: Token Mapping
Element Description

Managing Token Validation Templates
Managing Templates, Endpoints, and Policies 38-23
38.4.2 Managing Token Validation Templates
This is a server side configuration. A default Token Validation Template exists. Users
with valid Administrator credentials can use can use the procedure in this section to
add, find, edit, or delete token validation templates. Skip any steps that you do not
need.
Enable Simple Partner
Mapping
Only for WSS Validation Template and for the following token types: Username,
SAML Assertion, Kerberos, and X.509.
A simple partner mapping operation consists of mapping the incoming token to a
partner requester by using a single token attribute and matching it against a
partner identification attributes.
The layout is different, depending on the token type of this validation template
Username Token
■Partner Datastore attribute references the partner identification attribute that
will be matched against the username element of the username token.
SAML Assertion
■Partner Token attribute references an attribute from the incoming token that
will be matched against the Partner Datastore attribute (defined below) of a
Requester Partner. The values can be STS_SUBJECT_ID for the NameID
Value, or the name of an Attribute contained in the Assertion's
AttributeStatement.
■Partner Datastore attribute references the partner identification attribute that
will be matched against the Partner token attribute referenced above
Kerberos
■Partner Token attribute references an attribute from the incoming token that
will be matched against the Partner Datastore attribute (defined below) of a
requester partner. The Partner Token Attribute can be specified by selecting
one of the pre-populated attribute (Kerberos Principal, Kerberos Principal
Primary or Kerberos Principal No Domain) or by entering a specific value.
■Partner Datastore attribute references the partner identification attribute that
will be matched against the Partner token attribute referenced above
X.509
■Partner Token attribute references an attribute from the incoming token that
will be matched against the Partner Datastore attribute (defined below) of a
requester partner. The Partner Token Attribute can be specified by selecting
one of the pre-populated attribute (Subject DN, Common Name, Country
Name, State or Province Name, Locality Name, Organizational Name,
Organizational Unit Name or Domain Component) or by entering a specific
value (which can be set to STS_X509_### by replacing ### with the upper
case X.500 component name, for example STS_X509_CN to reference the
common name component of the certificate subject).
■Partner Datastore attribute references the partner identification attribute that
will be matched against the Partner token attribute referenced above.
Enable Partner Name
Identifier Mapping
When enabled, defines the following only for WSS Validation Template and for
SAML token types:
A NameID user mapping operation consists of mapping the incoming SAML
Assertion to a user record by mapping the NameID Value to a single requester
partner identification attribute, based on the NameID format.
When enabled, Security Token Service will evaluate the NameID format, and
based on the Name Identifier mapping table which partner identification attribute
should be matched against the Name ID value contained in the Assertion. The
Name Identifier mapping table holds the requester partner identification
attributes to be used for the mapping operation. It contains standard NameID
formats, but it can be customized to define custom Name ID formats.
To add custom NameID format, click the Add button on the Name Identifier
mapping table, and enter the custom URI.
To set an attribute for a specific NameID format to be used for mapping operation,
set the requester partner identification attribute on the line for that format.
Table 38–11 (Cont.) New Validation Template: Token Mapping
Element Description

Managing Token Validation Templates
38-24 Administrator's Guide for Oracle Access Management
The Security Token Service Endpoint must be linked to a WS Security Validation
Template that indicates:
■how to validate the token in the Webservice Security header
■how to map the token and binding data to a Requester
The information here can be applied when you want to validate the following:
■WS-Security tokens present in the SOAP Header, of type: Username, SAML 1.1,
SAML 2.0, X.509 and Kerberos.
■WS-Trust tokens present in the OnBehalfOf element or in the ValidateTarget
element of the WS-Trust request, of type: Username, SAML 1.1, SAML 2.0, X.509,
Kerberos, OAM Session Propagation Token and custom tokens.
The following procedure includes several examples of input following specific
parameters. Also, a brief translation appears within parentheses (). For instance: Name
(username-token):
email-wstrust-valid-temp
. Values in your environment will be
different.
Prerequisites
To manage token validation templates
1. Locate and open the desired Token Validation Template as described in "Searching
For a Template" on page 38-6.
2. New Token Validation Template:
a. Click the New Validation Template button in the upper-right corner (or click
the Add (+) command button above the Search Results table).
b. General: Define parameters for this template (Table 38–9). For example:
Name (username-token):
email-wstrust-valid-temp
Token Protocol (WS-Security for token protocol): Webservice
Token Type (username):
email
Default Partner Profile:
requester-profile
c. Authentication: Enable Credential Validation for this template, if needed, and
provide details (Table 38–10). If the token type is username, enable credential
validation if needed for this template and provide the details.
d. Token Mapping: Specify preferences for this template based on your token
type (Table 38–11).
e. Click Save and dismiss the confirmation window (or click Cancel without
saving it).
f. Close the definition (or edit it as described in Step 4).
3. Edit a Template: Start with the saved page you just created.
a. Edit the template definition as needed.
b. Click the Apply button at the top of the page to submit changes (or click
Revert to undo your changes).
See Also:
■"About Managing Token Validation Templates"
■"Searching for an Existing Template"
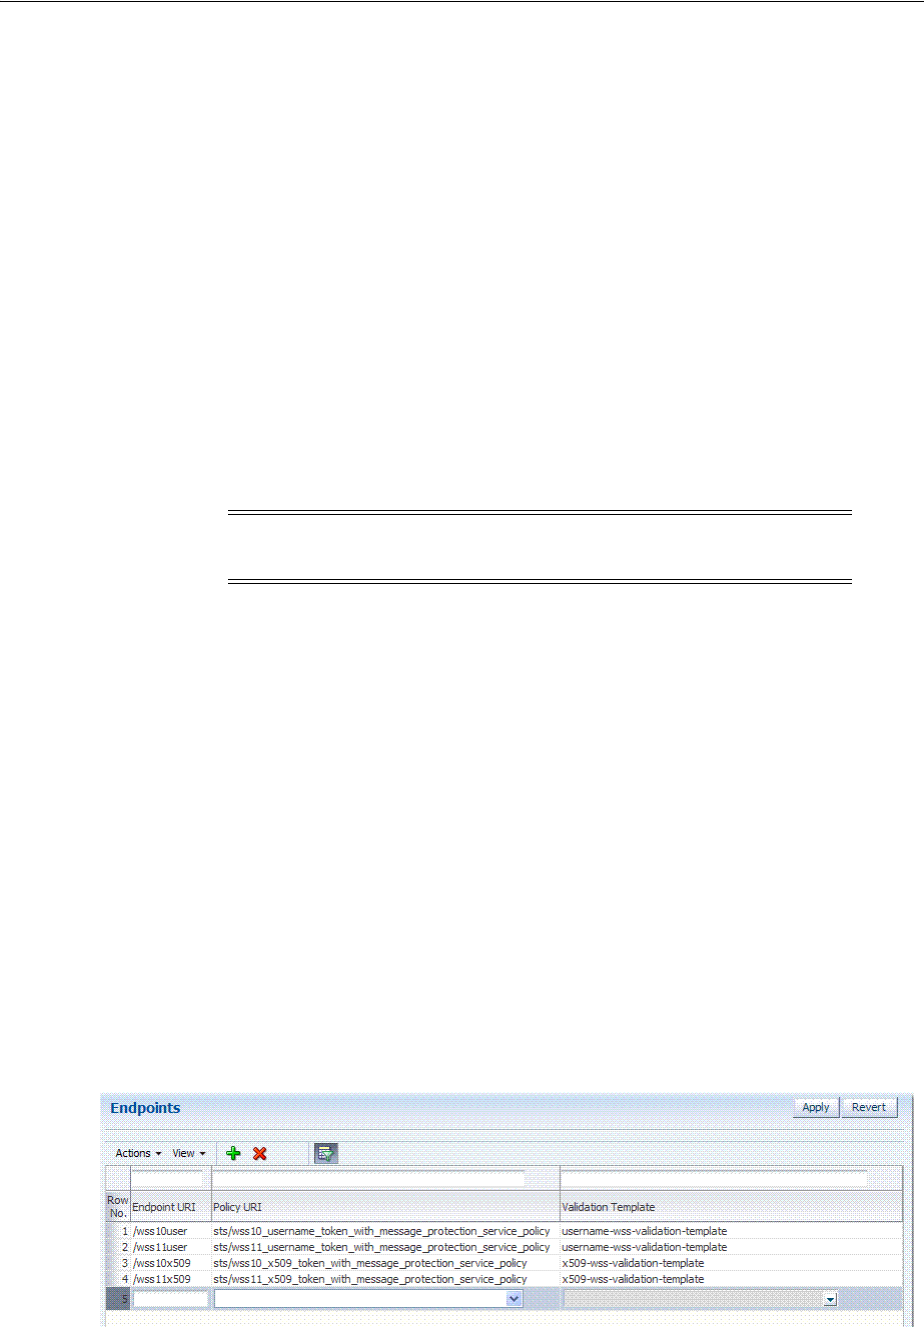
Managing Security Token Service Endpoints
Managing Templates, Endpoints, and Policies 38-25
4. Remove a Token Validation Template:
a. Click the desired name in the Search Results table to select the item to remove.
b. From the Actions menu, click Delete (or click the Delete (X) command button
above the table.
c. Click the Delete button in the Confirmation window (or click No to cancel the
operation).
38.5 Managing Security Token Service Endpoints
An endpoint is a Web Service published by Security Token Service where clients can
send WS-Trust requests over SOAP. An endpoint is:
■Protected by a WS Security Policy.
■Bound to WSS Validation Template that will indicate how to validate the security
token and how to map it.
■Specific to a token type, namely, the one specified in the WSS Validation Template.
An endpoint is a Web Service endpoint published by Security Token Service and
protected by OWSM Agent. An endpoint is bound to:
■A WS-Security policy that will determine the WSS requirements in terms of
message protection and security tokens
■A WSS Validation template that will indicate how the request will be processed,
how the security token will be validated.
This section provides the following information:
■About Managing Endpoints
■Managing EndPoints
38.5.1 About Managing Endpoints
Security Token Service Endpoint definitions consist of three categories, as shown in
Figure 38–12.
Figure 38–12 Endpoints Page
Table 38–12 describes the required Endpoints categories.
Note: The WS-Security policy protecting the endpoint must be
compatible with the WSS Validation Template bound to the endpoint.

Managing Security Token Service Endpoints
38-26 Administrator's Guide for Oracle Access Management
Once an Endpoint is created, you can remove it but you cannot edit the definition.
38.5.2 Managing EndPoints
Users with valid Oracle Access Management Administrator credentials can perform
the following task to add, edit, or remove an Endpoint.
Prerequisites
Creating a Token Validation Template to reference
To create or delete an endpoint
1. From the Oracle Access Management Console Launch Pad, open the Security
Token Service section.
2. Open the Endpoints node to display a list of existing Endpoints.
3. New Endpoint: see Table 38–12 and
a. Click the Add (+) button above the table (or choose New Endpoint from the
Actions menu).
b. Enter the new Endpoint URI.
c. Choose one of the Oracle WSM policies to protect this Endpoint.
d. Choose the Validation Template to use with this Endpoint.
e. Click Apply to submit the definition and dismiss the confirmation window (or
click Revert to dismiss the page without submitting it).
f. Close the page.
4. Remove Endpoint:
a. Highlight a row in the Endpoints table and click the Delete (X) button (or
choose Delete Selected from the Actions menu).
b. Confirm removal (or cancel the removal).
Table 38–12 Endpoints Page
Elements Description
Endpoint URI The path to the Endpoint, relative to the Security Token Service
base URL The Security Token Service base URL is /sts.
Policy URI Choose from a listing of Oracle WSM policies the one used to
protect this Endpoint.
Oracle Access Management Administrators can add a new
custom policy to the available listing.To show this newly
created Policy URI in the endpoints table list, use the following
wlst command to update the owsmpolicies map:
putStringProperty("/stsglobal/owsmpolicies/<index>",
"<newcustom_policypath>)
For example:
putStringProperty("/stsglobal/owsmpolicies/31",
"sts/newcustom_policy")
Validation Template ID Choose from a listing of Validation Template names to identify
one for use with this Endpoint.

Managing Token Issuance Policies, Conditions, and Rules
Managing Templates, Endpoints, and Policies 38-27
38.6 Managing Token Issuance Policies, Conditions, and Rules
This section provides the following topics:
■About Token Issuance Policies
■About Managing Token Issuance Conditions and Rules
■Managing Token Issuance Policies and Conditions
38.6.1 About Token Issuance Policies
A Token Issuance Policy defines the rules under which a token can be issued for a
resource (Relying Party Partner) based on the client's identity, with the client either
being a Requester Partner or an end user. If a Requester is NOT present, it is assumed
that the User (represented by the on-behalf-of (OBO) token or WSS Token) is trying to
access the RelyingParty.
When issuing a token, Security Token Service will determine for which Relying Party
that token is created, and it will then evaluate if the client is authorized to request the
token for that Relying Party. In order to issue a token, a Token Issuance Policy must be
created with the resource involved in the operation, and with possibly a condition. At
runtime if the policy evaluation is successful, the token will be issued.
You can add Conditions, Rules, and Responses to this Token Issuance Policy.
38.6.2 About Managing Token Issuance Conditions and Rules
The Token Issuance Policy allows the Administrator to define conditions along with
"Allow" and "Deny" rules for the policy. Each Token Issuance Policy can contain one or
more conditions, and rules that determine whether access to the requested resource
should be granted or denied:
■An Allow type rule specifies who is authorized to access a protected resource.
Only partners and users listed in the Condition are granted access; everyone else is
denied access to the resource.
■A Deny type rule specifies explicitly who is denied access to the protected
resource.
Only partners and users listed in the Condition are denied access; everyone else is
granted access to the resource.
Managing Token Issuance Conditions is similar to managing Authorization
Conditions and Rules. Figure 38–4 shows the Conditions tab of a Token Issuance
Policy.
Note: When adding User conditions, the identity store from which
the users are to be chosen can be selected from a list. Ensure that you
choose the Default User Identity Store, which is the only one used by
Security Token Service.
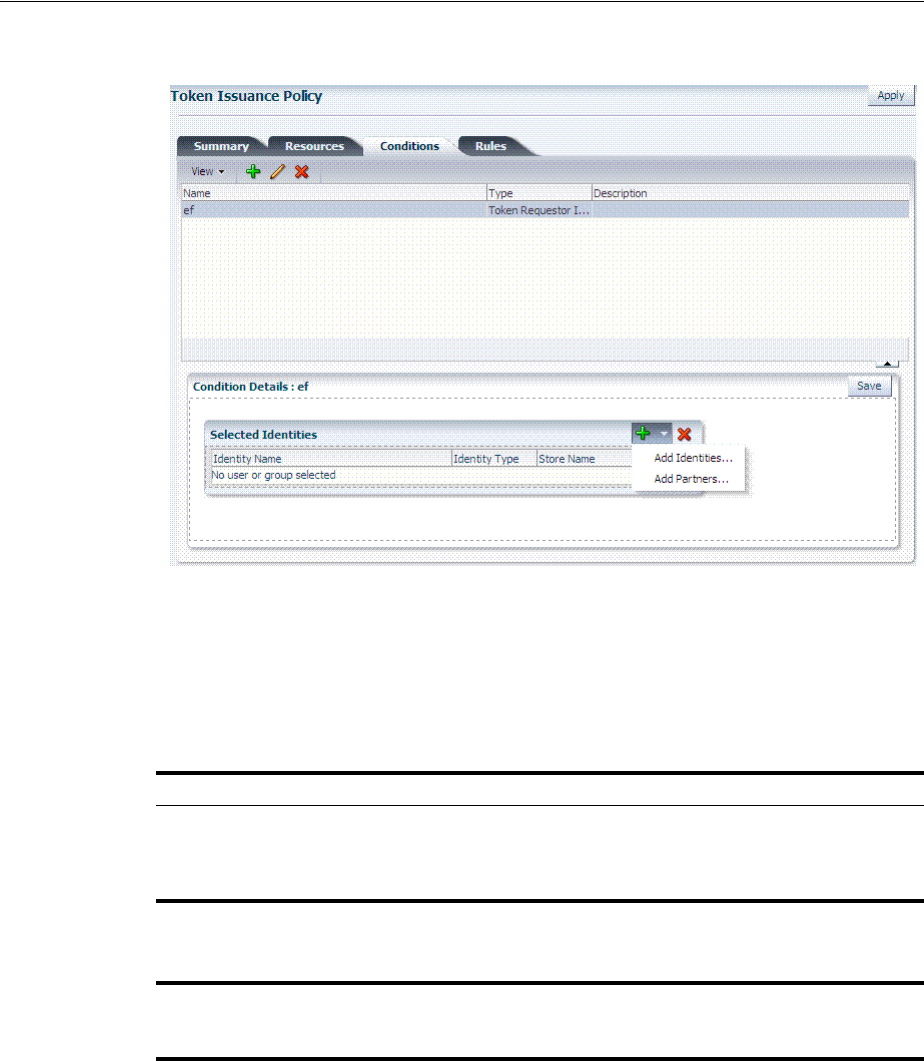
Managing Token Issuance Policies, Conditions, and Rules
38-28 Administrator's Guide for Oracle Access Management
Figure 38–13 Token Issuance Policies and Conditions
Table 38–13 describes the Token Issuance Condition requirements.
See Also: Part IX, "Managing Oracle Access Management Mobile
and Social" for details about Adding a Token Issuance Policy for
Mobile and Social Authentication Service
Table 38–13 Conditions tab: Token Issuance Policy
Element Description
Summary tab
Name A unique name for this Token Issuance Policy.
Description Optional.
Conditions tab Table 20–18 describes elements and controls on the Conditions tab.
Class Only Token Requester Identity is allowed for Token Issuance Policy
conditions. You choose this in the Add Condition dialog box.
Rules tab Table 20–29 describes the elements and controls on the Rules tab for
Simple Mode evaluations.
Table 20–30 describes the elements on the Rule tab in Expression mode.
Condition Details
Add Choose from the following populations:
■Add Identities: This choice opens a Search window where you can
set the Store Name, Choose an Entity Type (All, User, or Group),
and Provide an Entity Name. You then choose one or more results
from those listed and click Add Selected to populate the condition.
■Add Partners: This choice opens a Search window where you can
locate specific partners to populate the condition. Enter your search
criteria (or click the arrow key beside the field to find all partners),
then choose one or more results and click Add Selected to populate
the condition.
Entity Name The name of the User or Group, as defined in the selected User Identity
Store.

Managing Token Issuance Policies, Conditions, and Rules
Managing Templates, Endpoints, and Policies 38-29
38.6.3 Managing Token Issuance Policies and Conditions
Users with valid Administrator credentials can use the following procedure to add a
Token Issuance Policy and Conditions to an Application Domain. When adding
resources to this policy, you might want to add the UnknownRP and MissingRP
resources.
Prerequisites
The Application Domain must already exist.
To manage Token Issuance Policies and conditions
1. Locate the desired domain as described in "Searching for an Existing Application
Domain" on page 20-12.
2. On the individual Application Domain page, click Token Issuance Policies tab.
3. Create a Token Issuance Policy:
a. In the desired domain, click the Token Issuance Policies tab and then click the
Create Token Issuance Policy button to open a fresh page.
b. On the Summary page, enter a unique name and optional description.
4. Add Resources: This step presumes that the resource has been defined in the
Application Domain and is ready to be added to policies.
a. Click the Resources tab.
b. Click the Add (+) button.
c. Click the Search button to display a list of defined resources you can add.
d. Click the desired resource in the results table, then click Add Selected.
e. Repeat as needed to add any other resources to this policy.
5. Add Conditions to a Policy: The only types available are Token Requester Identity
or True.
a. Click the Conditions tab, then click the Add button on the Conditions tab to
display the Add Condition window.
b. Enter a unique name for this condition in the dialog box.
c. Choose Token Requester Identity from the Type list.
d. Click Add Selected.
e. Proceed with Step 5 to add details for Token Requestor Identity. Otherwise,
skip to Step 6.
Entity Type The type of entity you want to locate during a search to add identifies to
the condition: User, or Group.
Store Name Choose the name of the User Identity Store to search for users or groups
to populate the condition. Remember, Security Token Service uses only
the Default Identity Store.
Note: You can add Token Issuance Policies to the IAM Suite
Application Domain.
Table 38–13 (Cont.) Conditions tab: Token Issuance Policy
Element Description

Managing TokenServiceRP Type Resources
38-30 Administrator's Guide for Oracle Access Management
6. Add Conditions Details:
a. Click the Condition name to display Conditions: Details.
b. From the Selected Identities table, click the Add button and choose either:
Add Partners: In the Search field, enter criteria (or click the arrow key beside
the field to find all partners); click one or more results then click Add Selected
to populate the condition.
Add Identities: Select the Store Name, select the desired Identity Type, enter
search criteria and click the Search button; choose one or more results and
click Add Selected to populate the condition.
c. Click the Save button on the Condition Details panel.
7. Add Rules: Perform these steps to Allow or Deny access based on your
Conditions.
a. Click the Rules tab.
b. Check the Rule Mode: Simple or Expression.
c. Expression Mode: Build your expression by entering operators (Table 20–31)
and choosing and inserting conditions (Table 20–30).
d. Simple Mode: Click to Match either All or Any of the selected conditions,
then using arrows for Allow (or Deny) Rule, move desired conditions from the
Available Conditions column into the Selected Conditions column.
8. Click Apply and then close the Confirmation window.
9. Find (or Add) TokenServiceRP Resources in the Application Domain: See
"Managing TokenServiceRP Type Resources".
38.7 Managing TokenServiceRP Type Resources
A Token Issuance Policy defines the rules under which a token can be issued for a
resource (Relying Party Partner) based on the client's identity, with the client either
being a Requester Partner or an end user.
When issuing a token, Security Token Service will determine for which Relying Party
that token is created, and it will then evaluate if the client is authorized to request the
token for that Relying Party.
The resource(s) in a policy can be:
■A TokenServiceRP type resource represents resources for, and is based on, the
Token Service Relying Party (required for Mobile and Social REST clients).
Note: To issue a token, a Token Issuance Policy must be created with
the resource involved in the operation and, possibly, with a condition.
At run time if the policy evaluation is successful, the token will be
issued.
See Also: Part IX, "Managing Oracle Access Management Mobile
and Social" for details about Configuring Access Manager for Mobile
and Social Authentication Service
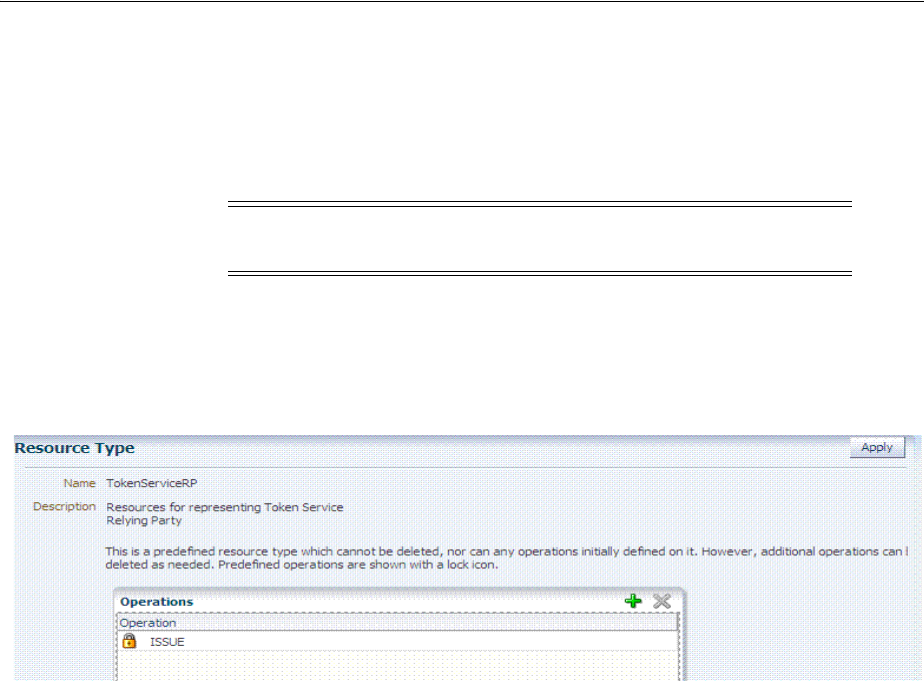
Managing TokenServiceRP Type Resources
Managing Templates, Endpoints, and Policies 38-31
■The pre-existing UnknownRP resource which is needed when Security Token
Service is not able to map the Service URL referenced in the
AppliesTo
element of
the WS-Trust request to an Security Token Service Relying Party Partner entry.
■The pre-existing MissingRP resource which is needed when the
AppliesTo
element of the WS-Trust request is missing.
A resource of type TokenServiceRP, Figure 38–14, represents an Security Token Service
Relying Party Partner defined in the Security Token Service Partner Store.
Figure 38–14 Pre-defined Resource Type: TokenServiceRP
Resources of type TokenServiceRP are used in Token Issuance Policies, which are
evaluated when Security Token Service issues tokens at run time. This is a predefined
resource type, which cannot be deleted. However, additional operations can be
created, edited or deleted as needed. Predefined operations are shown with a lock
icon.
For more information, see:
■About Managing TokenServiceRP Type Resources in Access Manager
■Managing TokenServiceRP Type Resources in Application Domains
38.7.1 About Managing TokenServiceRP Type Resources in Access Manager
Use the Search controls for the Application Domain to locate resources of a specific
type within the domain. Figure 38–15 shows the search controls for the IAM Suite
resources. Resource Type TokenServiceRP is the search criteria. The Search Results
table lists all resources of this type within the Application Domain.
Note: Both the MissingRP and UnknownRP are defined in the IAM
Suite Application Domain.
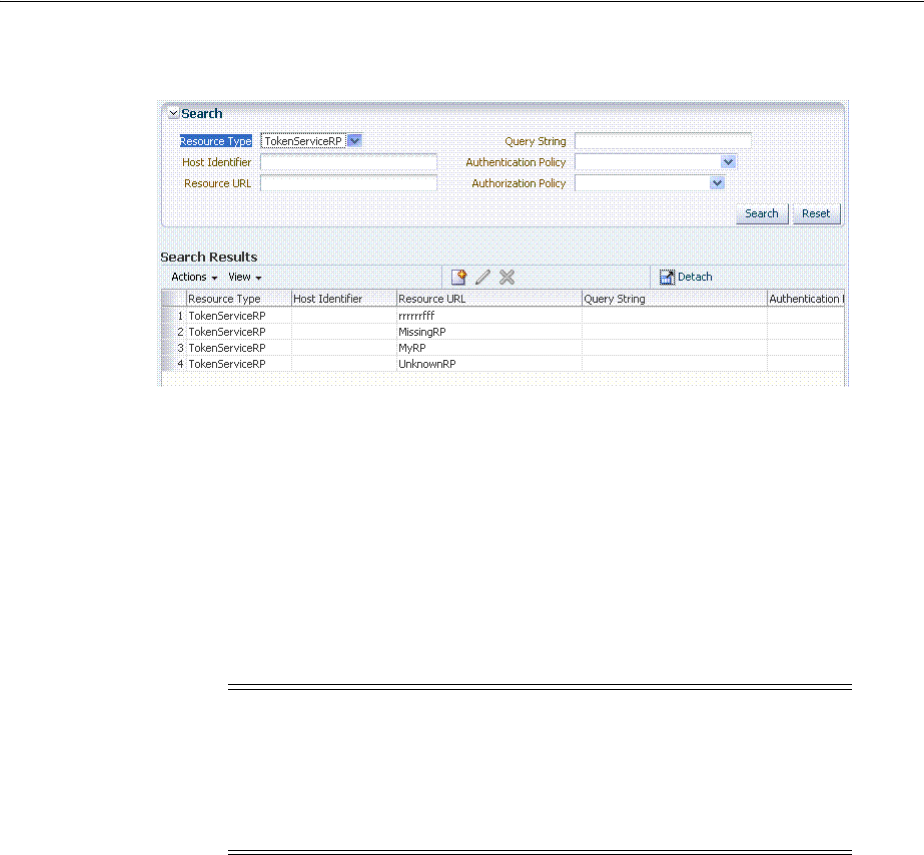
Managing TokenServiceRP Type Resources
38-32 Administrator's Guide for Oracle Access Management
Figure 38–15 Search: Resource Type TokenServiceRP in Application Domain
The TokenServiceRP resources in this domain include those provided out of the box,
and described earlier:
■UnknownRP resource
■MissingRP resource
38.7.2 Managing TokenServiceRP Type Resources in Application Domains
Users with valid Administrator credentials can use the following procedure to add
TokenServiceRP resources to an Application Domain.
To manage TokenServiceRP Resources
1. Locate the desired Application Domain as described in "Searching for an Existing
Application Domain" on page 20-12.
2. Add TokenServiceRP Resource to the Application Domain:
a. Click the New Resource button on the Application Domain Search page.
b. Specify the Resource Type as TokenServiceRP.
c. Enter a Resource URL that is the Relying Party ID for whom the token
issuance policy will be defined.
d. Click the Apply button at the top of the page to submit this and dismiss the
confirmation window.
e. See Also: "Defining Resources in an Application Domain" on page 20-28.
3. Find TokenServiceRP Resources:
Note:
■If
AppliesTo
is present in the RST but the requester could not be
mapped, use the
TokenServiceRP:UnknownRP
resource.
■If
AppliesTo
is not present, use
TokenServiceRP:MissingRP
,
otherwise select the appropriate resource.
See Also: "About Managing TokenServiceRP Type Resources in
Access Manager"

Making Custom Classes Available
Managing Templates, Endpoints, and Policies 38-33
a. In the desired Application Domain, open the Resources tab to display the
Search controls.
b. From the Resource Type, choose TokenServiceRP, and click Search.
c. Review the Search Results table and click a name to open the Resource
Definition.
38.8 Making Custom Classes Available
When Security Token Service does not support the token that you want to validate or
issue out-of-the-box, a developer can write custom validation and issuance module
classes. This section describes how to make custom classes available using the console.
The information here can be applied when you have:
■WS-Security User Name Token
■WS-Trust Custom Token
■Issuing Custom Token
This section provides the following topics:
■About Making Classes Available
■About Narrowing a Search for Custom Tokens
■Managing Custom Tokens
38.8.1 About Making Classes Available
After writing the custom token validation and/or issuance classes, you must add
Custom Token Configuration to Security Token Service to indicate when and how
these classes should be used.
On the New Custom Token page only the Token Type Name is required (identified
with an asterisk, *), as shown in Figure 38–16. Not all elements apply to all custom
tokens. However, if you submit information that is incomplete, a dialog box appears to
identify what is missing.
Note: You can also write a script that includes WebLogic Scripting
Tool commands for any operation that you can accomplish through
the console. For more information, see Oracle Fusion Middleware
WebLogic Scripting Tool Command Reference.
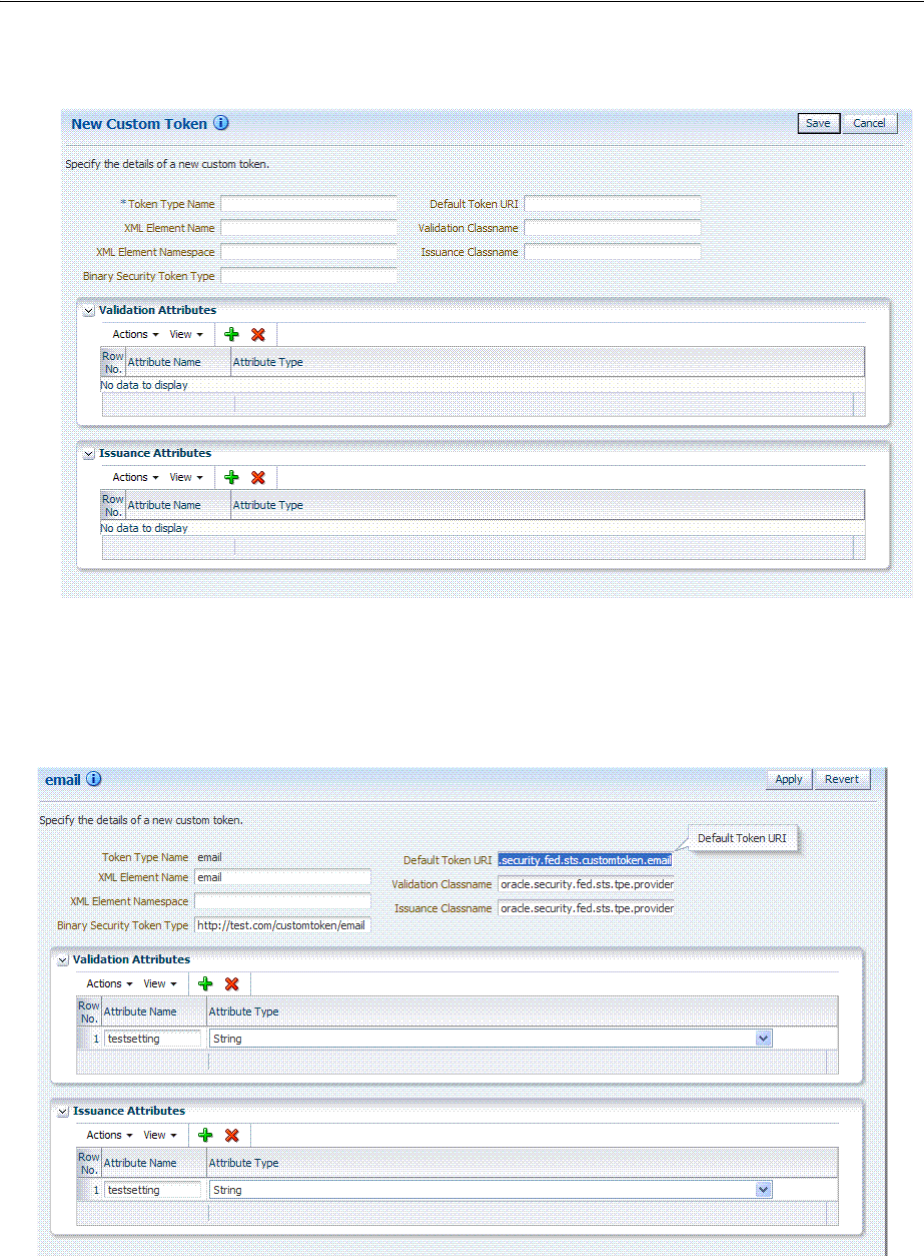
Making Custom Classes Available
38-34 Administrator's Guide for Oracle Access Management
Figure 38–16 New Custom Token Page
After successful submission of new custom token details, the saved page is available
for editing as shown in Figure 38–17.
Figure 38–17 Custom Token Definition: email
For the custom token, you must decide on the XML Element Name, XML Element
Namespace, Binary Security Token Type, and so on. Table 38–14 describes the elements
on a Custom Token page based on the examples in this chapter.

Making Custom Classes Available
Managing Templates, Endpoints, and Policies 38-35
Table 38–14 New Custom Token Elements
Element Description
Token Type Name The unique name you choose for this custom token. For example:
email_token
Note: After you save a new custom token configuration, you cannot
edit this name.
Default Token URI The URI for this custom token. This URI can then be used in the RST to
request that a custom token of this type should be issued. For the
example in this chapter, the value would be:
oracle.security.fed.sts.customtoken.email
XML Element Name The name you decide on, which will be associated with the Token Type
Name. For example:
email
If you specify
email
as the XML Element Name, each time the element
name,
email
, appears in an incoming token it will be associated with
the Token Type Name (in this case
email_token
).
Note: Minimally, you need either an XML Element Name or Binary
Security Token Type.
Validation Classname The name of the custom token validation class that you made available
to Security Token Service. For example:
oracle.security.fed.sts.tpe.providers.email.EmailTokenValidat
orModuleImpl
Note: Minimally, you need either an issuance class name or validation
class name, depending on whether you want to issue or validate a
custom token.
XML Element Namespace The namespace of the custom token element name. For example:
http://email.example.com
Issuance Classname The name of the custom token issuance class that you made available
to Security Token Service. For example:
oracle.security.fed.sts.tpe.providers.email.EmailTokenIssuerM
oduleImpl
Note: Minimally, you need either an Issuance classname or Validation
classname, depending on whether you want to issue or validate a
custom token.
Binary Security Token Type Enables the class to validate a custom token sent in as a
BinarySecurityToken.
The ValueType of the BinarySecurityToken for this custom token. If
Security Token Service receives a Binary Security Token with this
ValueType, it will be forwarded to this custom token's Validation class
for validation.
Validation Attributes This section enables you to add (or remove) validation attributes. The
table displays existing validation attributes, if any. For this example:
■Attribute Name:
testsetting
■Attribute Type:
String
Note: You will add a value to the attribute when creating a Token
Validation Template.
Issuance Attributes This section enables you to add (or remove) issuance attributes. The
table displays the following information for existing issuance
attributes.
■Attribute Name:
testsetting
■Attribute Type:
String
Note: You will add a value to the attribute when creating a Token
Issuance Template.
Save Click this button on the New Custom Tokens page to save your
configuration information.
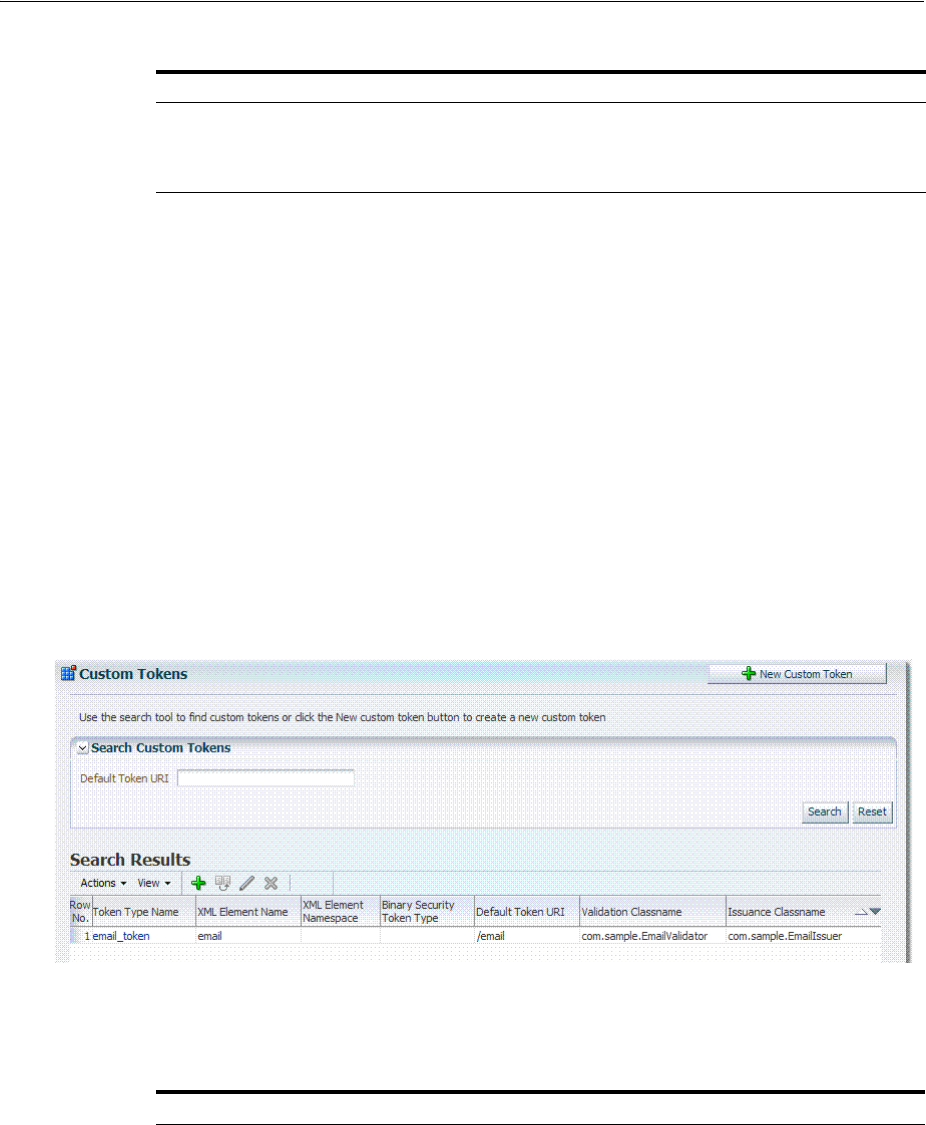
Making Custom Classes Available
38-36 Administrator's Guide for Oracle Access Management
Task overview: Adding custom tokens for custom classes
1. Create a JAR file containing only your custom
TokenIssuerModule or
TokenValidatorModule
classes (or both). No XML metadata or manifest is needed.
2. Review information in Figure 38–17 and Table 38–14.
3. Add the JAR to the OAM Server hosting Security Token Service and create a new
custom token, as described in Section 38.8.3, "Managing Custom Tokens".
38.8.2 About Narrowing a Search for Custom Tokens
Figure 38–18 illustrates the Custom Tokens Search controls and Results table. These
appear when you double-click the Custom Tokens node in the navigation tree. By
default, all currently defined custom tokens are listed when the Search Results table is
displayed.
Figure 38–18 Custom Tokens Search Page and Controls
Table 38–15 describes the Custom Tokens Search elements and controls. No wild cards
(*) are allowed in Custom Token searches.
Cancel Click this button to dismiss your configuration details.
Apply Click this button to submit your changes.
Revert Click this button to dismiss your changes.
Table 38–15 Custom Tokens Search Elements and Controls
Element Description
Default Token URI The URI that was defined for the custom token. You can enter the
entire URI or only part of it. For instance, if you enter "ai" the Search
Results table will display all custom tokens defined with a token URI
that includes the letters "ai".
Note: Wild cards are not allowed in Custom Token searches.
Search Initiates the Search function using criteria provided in the form.
Reset Resets the Search form with defaults only.
Search Results Provides the results of your search based on your choices in the View
menu.
Table 38–14 (Cont.) New Custom Token Elements
Element Description
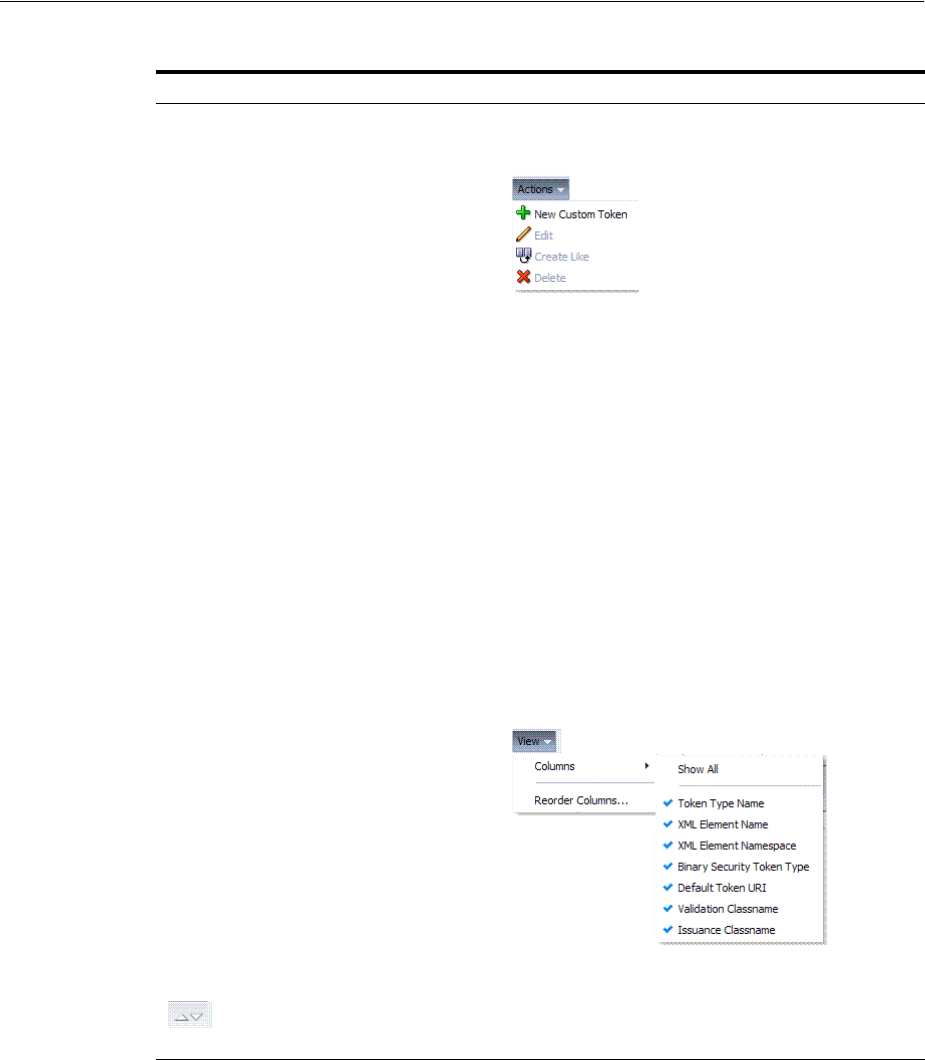
Making Custom Classes Available
Managing Templates, Endpoints, and Policies 38-37
38.8.3 Managing Custom Tokens
Users with valid Administrator credentials can use the procedure in this section to
manage custom tokens for custom Token Module classes.
The following procedure includes steps to add, edit, and delete custom tokens or
attributes of a custom token. Skip any steps that you do not need.
Prerequisites
Refer to the developer creating the custom tokens and the Oracle Fusion Middleware
Developer's Guide for Oracle Access Management for details about:
Writing a TokenValidatorModule Class
Actions menu Provides the following functions that can be performed on a selection
in the results table:
Note: Actions menu functions mirror command buttons above the
results table. For example:
■New Custom Token: Click the New Custom Token button at the
top of the Search page, or select New Custom Token from the
menu, or click the + button above the table.
■Edit: Double-click a name in the Token Type Name column of the
Search Results table, or select Edit from the Actions menu, or click
the Edit (pencil icon) command button above the Results Table.
■Create Like: Select the desired row in the table and either select
Create Like from the Actions menu, or click the Create Like
command button above the table
■Remove: Select the desired row in the table and either select Delete
from the Actions menu, or click the Delete (X) command button
above the table.
View menu Provides functions you can use to display various information in the
results table:
Controls affecting the ordering of items listed in the results table:
■Ascending
■Descending
Table 38–15 (Cont.) Custom Tokens Search Elements and Controls
Element Description

Making Custom Classes Available
38-38 Administrator's Guide for Oracle Access Management
Writing a TokenIssuanceModule Class
To make custom classes available
1. Create and add the JAR containing your Issuance and Validation classes to the
OAM Server hosting Security Token Service using one of these methods:
■Add the custom token jar and the sts-common.jar that is available in
$DOMAIN_HOME/config/fmwconfig/mbeans/oam to the Managed Server
classpath by editing the startup script.
■Add the custom token jar and the sts-common.jar that is available in
$DOMAIN_HOME/config/fmwconfig/mbeans/oam to the $DOMAIN_
HOME/lib directory to automatically add these jars to the Managed Server
classpath.
■Restart the OAM Server.
2. New Custom Token: From the Oracle Access Management Console Launch Pad,
click the Security Token Service link.
a. Open the Custom Tokens node to open the Search controls.
b. Click the New Custom Token button.
c. Fill in the New Custom Token page with details for your custom classes
(Table 38–14).
d. Click Save and dismiss the confirmation window (or click Cancel to dismiss
the page without submitting it).
e. Close the page (or edit as described in Step 4).
f. Proceed to Step 4, if needed, or to "Managing a Custom Security Token Service
Configuration" on page 38-39.
3. Find Custom Tokens: From the Oracle Access Management Console Launch Pad,
click the Security Token Service link.
a. Find All: Click the Search button and view the results table with all custom
tokens listed.
b. Narrow the Search: Enter some or all characters in the desired Default Token
URI, click the Search Button, and review the results table.
c. Reset the Search Form: Click the Reset button.
4. Edit Custom Token Configuration: Start with the saved page you just created.
Alternatively: Use Step 3 to find the desired Custom Token, then double-click the
name in the Search Results table to open the page.
a. In the named Custom Token page, click the appropriate field and edit as
needed.
b. Add Attributes: Click the Add (+) icon for the Attributes table, enter the
Attribute Name and an Attribute Type (Table 38–14).
c. Remove Attributes: From the Attributes table, click the row containing the
attribute to remove, click the Delete (X) icon for the table, and dismiss the
Confirmation window.
See Also:
■"Making Custom Classes Available" on page 38-33
■"About Narrowing a Search for Custom Tokens" on page 38-36

Managing a Custom Security Token Service Configuration
Managing Templates, Endpoints, and Policies 38-39
d. Apply Changes: Click the Apply button at the top of the page to submit
changes.
5. Remove a Custom Token:
a. Click the desired name in the Search Results table to select the item to remove.
b. From the Actions menu, click Delete (or click the Delete (X) command button
above the table.
c. Click the Delete button in the Confirmation window (or click No to cancel the
operation).
38.9 Managing a Custom Security Token Service Configuration
This tasks consists of the following procedures:
■Creating the Validation Template
■Creating the Issuance Template for a Custom Token
■Adding the Custom Token to a Requester Profile
■Adding the Custom Token to the Relying Party Profile
■Mapping the Token to a Requestor
■Creating an /wssuser EndPoint
38.9.1 Creating the Validation Template
Users with valid Oracle Access Management Administrator credentials can perform
the following task to create a Validation Template with a Token Protocol of Webservice
Trust to map the token to the requester.
The template in this example can be used for the module classes described earlier in
this chapter. Full implementation details are shown in the following figures. As you
review these, notice how specifications for this template reference the module class
code:
■Figure 38–19, "General Details: email-wstrust-valid-temp"
■Figure 38–20, "Token Mapping: email-wstrust-valid-temp"
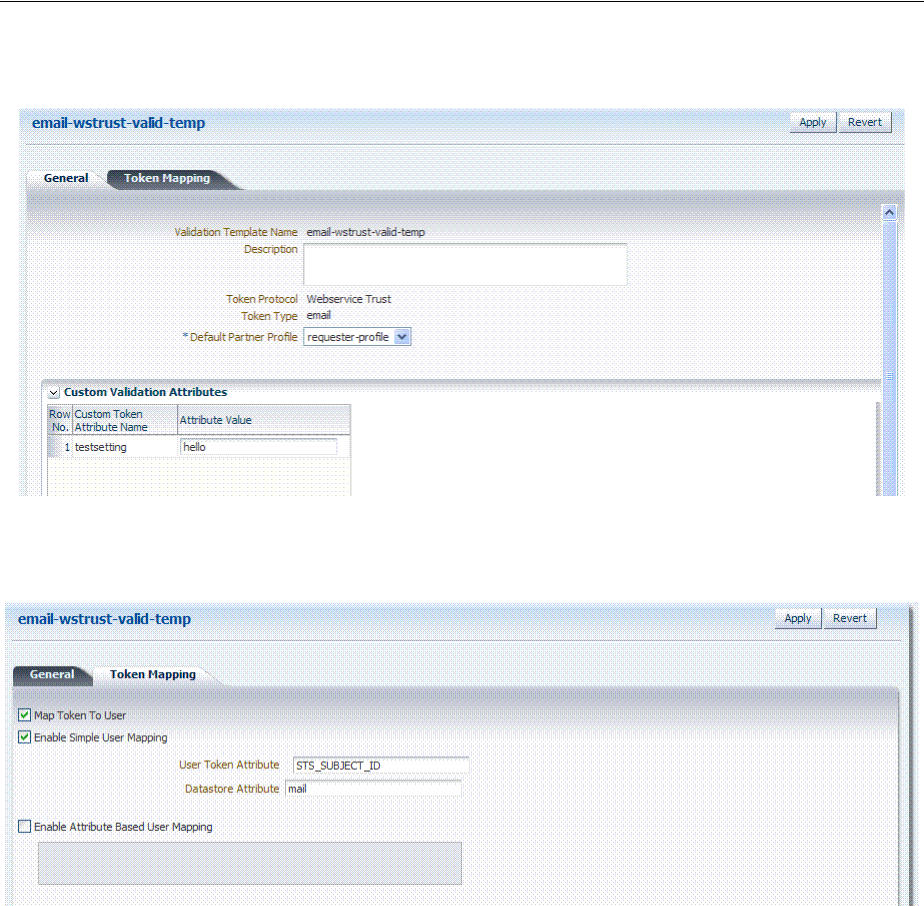
Managing a Custom Security Token Service Configuration
38-40 Administrator's Guide for Oracle Access Management
Figure 38–19 General Details: email-wstrust-valid-temp
Figure 38–20 Token Mapping: email-wstrust-valid-temp
To create the validation template for the custom module classes
1. Display the list of existing Token Validation Templates.
Oracle Access Management Console Launch Pad
Security Token Service
Token Validation Templates
2. Click the New Validation Template button in the upper-right corner (or click the
Add (+) command button above the Search Results table).
3. General: Set the following for use with the custom token.
Validation Template Name: email-wstrust-valid-temp
Token Protocol: Webservice Trust
Token Type: email
Default Partner Profile: requester-profile
Custom Validation Attributes: testsetting: hello
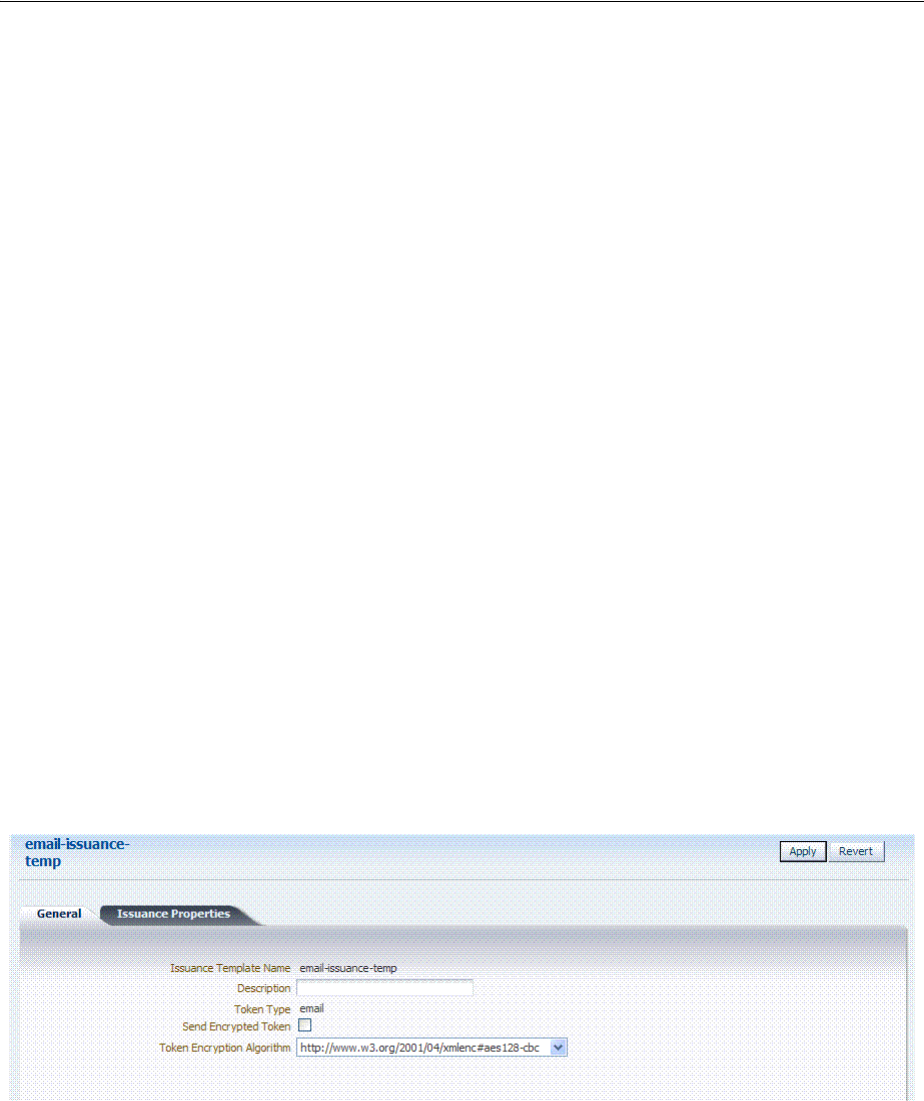
Managing a Custom Security Token Service Configuration
Managing Templates, Endpoints, and Policies 38-41
4. Token Mapping: Set the following for use with the custom token in this chapter.
Check the box beside Map Token To User (to enable it).
Check the box beside Enable Simple User Mapping and enter:
User Token Attribute: STS_SUBJECT_ID
Datastore Attribute: mail
5. Click Save and dismiss the confirmation window.
6. Proceed to "Creating the Issuance Template for a Custom Token".
38.9.2 Creating the Issuance Template for a Custom Token
This is a server side configuration. Users with valid Oracle Access Management
Administrator credentials can perform the following task to create a Token Issuance
Template.
Each Token Issuance Template indicates how to construct a token, and which signing
or encryption to use when constructing a token. Each Token Issuance Template also
defines the attributes to be sent as part of the outbound token for mapping, and
filtering data. However, Issuance Templates do not list mapping or filtering rules,
which are defined in the Relying Party Partner Profile.
The template in this example can be used for the email custom token described earlier
in this chapter. Implementation details are shown in the following figures, and
described in the accompanying procedure. As you review these, notice how
specifications for this template reference the module class code:
■Figure 38–21, "General Details: email-issuance-temp"
■Figure 38–22, "Issuance Properties: email-issuance-temp"
Figure 38–21 General Details: email-issuance-temp
When you have a custom token type deployed, the Issuance Properties are tailored to
accommodate the custom token. For instance, the custom email token type was chosen
for the issuance template show in Figure 38–22.
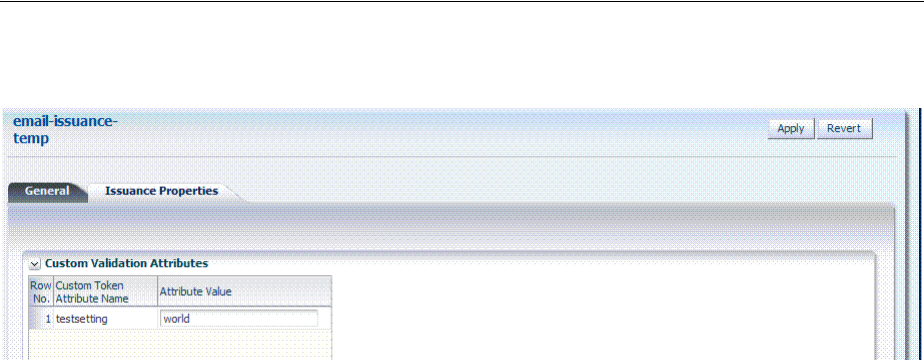
Managing a Custom Security Token Service Configuration
38-42 Administrator's Guide for Oracle Access Management
Figure 38–22 Issuance Properties: email-issuance-temp
This procedure produces a companion Issuance Template for the custom module
classes in this chapter. For the example:
■Ignore the Token Encryption Algorithm, which is not used for the custom token
type: email.
■Fill in a value for the Custom Token Attribute, which is populated from the
custom token code.
To create the Issuance Template for the custom module classes
1. Find existing Token Issuance Templates.:
Oracle Access Management Console Launch Pad
Security Token Service
Token Issuance Templates
Search button (with or without filling in search criteria)
2. New Token Issuance Template:
a. Click the New Issuance Template button in the upper-right corner (or click the
Add (+) command button above the Search Results table).
b. General: Set the following for use with the custom token in this chapter.
Issuance Template Name: email-issuance-temp
Token Type: email
c. Click Save and dismiss the confirmation window (or click Cancel without
saving).
d. Issuance Properties: Set the following for use with the custom token in this
chapter.
Custom Token Attribute Value: world
e. Click Apply and dismiss the confirmation window (or click Revert without
saving it).
f. Close the definition (or edit it as described in Step 4).
3. Edit a Template: Find the desired template, edit details, and click Apply.
See Also: Oracle Fusion Middleware Administrator's Guide for Oracle
Access Management

Managing a Custom Security Token Service Configuration
Managing Templates, Endpoints, and Policies 38-43
Alternatively: Use Step 3 to find the desired template and click the name in the
Search Results table to display the definition.
38.9.3 Adding the Custom Token to a Requester Profile
You can either edit an existing requester profile to add your custom token to the Token
Type Configuration table, or create a new requester profile to use with the custom
token. Either way, configure:
■Token Type: email (your custom token)
■Validation Template: email-wstrust-valid-temp
Prerequisites
Your Custom Token and Validation Template must be defined.
To create or edit a requester profile for the custom token
1. From the Oracle Access Management Console Launch Pad, click the Security
Token Service link.
2. In the navigation tree, open the Partner Profiles node and double-click the
Requestor Profiles node to display a list of existing profiles
3. Existing Profile:
a. In the Search Results table of the Requester Profiles page, click the name of the
desired profiles.
b. Token and Attributes: Fill in the following details for the custom token in this
chapter and then click the Save button at the top of the page.
Token type:
email
Validation Template:
email-wstrust-valid-temp
c. Click Save, dismiss the confirmation window, and close the page (or click
Cancel to dismiss the page without submitting it).
d. Proceed to "Adding the Custom Token to a Requester Profile".
4. New Profile: Click the New Requester Profile button to display the New Partner
Profile page where you enter details:
a. General: Fill in the following details for the custom token in this chapter and
then click the Next button at the top of the page.
Profile ID:
unique_requesterprofile_name
Default Relying Party Profile:
unique_relyingparty_name
b. Add Token Type Configuration: Fill in the following details for the custom
token in this chapter and then click the Save button at the top of the page.
Token type:
email
Validation Template:
email-wstrust-valid-temp
c. Proceed to "Adding the Custom Token to a Requester Profile".
38.9.4 Adding the Custom Token to the Relying Party Profile
You can either edit an existing Relying Party profile, or create a new one to issue the
custom token by default, and refer to the Issuance Template and related information.
Either way, configure:

Managing a Custom Security Token Service Configuration
38-44 Administrator's Guide for Oracle Access Management
■Default token to issue: email (your custom token)
■Issuance Template:
email-issuance-temp
Prerequisites
Your Custom Token and Issuance Template must be defined.
To edit the requester profile for the custom module classes
1. From the Oracle Access Management Console Launch Pad, click the Security
Token Service link.
2. In the navigation tree, open the Partner Profiles node and double-click the Relying
Party Profiles node to display a list of existing profiles.
3. Existing Profile:
a. In the Search Results table of the Relying Party Profiles page, click the name of
the desired profile.
b. Click the Token and Attributes tab.
c. Token Type Configuration: Click the Add (+) button above the Token Type
Configuration table and enter the following details:
Token type:
email
Issuance Template:
email-issuance-temp
d. Attributes: Click the Add (+) button above the Attributes table and define the
following:
Attribute name: mail
Store Type:
Userstore
Include in Token:
(check to enable)
Encryption (leave blank)
Value (leave blank)
e. Click Apply, dismiss the confirmation window, and close the page (or click
Cancel to dismiss the page without submitting it).
4. New Profile: Click the New Relying Party Profile button to display the New
Partner Profile page where you enter details:
a. General: Fill in the following details for the custom token in this chapter and
then click the Next button at the top of the page.
Profile ID:
unique_relyingparty-name
Default Token:
email
b. Click the Token and Attributes tab and perform Steps 2c and 2d, then click
Apply.
38.9.5 Mapping the Token to a Requestor
If you don't have a Username Validation Template (username-wss-valid-template), use
the Oracle Access Management Console to create one to map the token to the
requester.
Validation Template Name: username-wss-valid-template
Token Type: Username
Proceed to "Creating an /wssuser EndPoint"

Managing a Custom Security Token Service Configuration
Managing Templates, Endpoints, and Policies 38-45
38.9.6 Creating an /wssuser EndPoint
Prerequisites
Mapping the Token to a Requestor
To create an endpoint
1. From the Oracle Access Management Console System Configuration tab, open the
Security Token Service section.
2. Double-click the Endpoints node to display a list of existing Endpoints.
3. New Endpoint:
a. Click the Add (+) button above the table (or choose New Endpoint from the
Actions menu).
b. Enter the new Endpoint URI: /wssuser
c. Choose the Oracle WSM policy: sts/wss_username_service_policy
d. Choose the Validation Template: username-wss-validation-template.
e. Click Apply to submit the definition and dismiss the confirmation window (or
click Revert to dismiss the page without submitting it).
f. Close the page.

Managing a Custom Security Token Service Configuration
38-46 Administrator's Guide for Oracle Access Management

39
Managing Token Service Partners and Partner Profiles 39-1
39
Managing Token Service Partners and Partner
Profiles
This chapter provides the following topics describing management of Token Service
Partners and Partner Profiles:
■Prerequisites
■Introduction Token Service Partners and Partner Profiles
■Managing Token Service Partners
■Managing Token Service Partner Profiles
39.1 Prerequisites
Chapter 34, "Introducing the Oracle Access Management Security Token Service"
Chapter 35, "Security Token Service Implementation Scenarios"
Any task you can perform using the Oracle Access Management Console can also be
performed using the
39.2 Introduction Token Service Partners and Partner Profiles
This section provides the following topics:
■About Token Service Partners
■About Partner Profiles
■About Partner Entries
39.2.1 About Token Service Partners
A Token Service partner represents a partner trusted by the Security Token Service.
Table 39–1 describes the partner types.
See Also: Oracle Fusion Middleware WebLogic Scripting Tool Command
Reference
Table 39–1 Security Token Service Partners
Partner Type Description
Requester Represents a Web Service Client interacting directly with Security Token
Service in order to issue or validate tokens
Relying Party References a Web Service Provider that will be the recipient of tokens issued
by the Security Token Service server

Introduction Token Service Partners and Partner Profiles
39-2 Administrator's Guide for Oracle Access Management
The Security Token Service is capable of interacting with client types described in
Table 39–2.
39.2.2 About Partner Profiles
A Partner Profile contains configuration properties that are common to a set of
partners, and each partner entry is associated to a Partner Profile. Similar to the
partners, there are three types of partner profiles: Requester, and Issuing Authority
Partner Profiles.
■Requester Profile
■Relying Party Profile
■Issuing Authority Partner Profile
39.2.2.1 About Partner Entries
A partner entry contains the information in Table 39–3:
39.2.2.2 About Partner Profile Data
A partner profile entry contains the information in Table 39–4, depending on the type
of profile.
Issuing Authority Represents an Assertion issuer. When validating an Assertion, its issuer must
be a known Issuing Authority Partner entry in Security Token Service
Table 39–2 Security Token Service Clients
Client Type Description
Web Service Client Modules defined as requester partners in Security Token Service
(typically SOAP clients).
End users End users are not defined as requester partners, but possibly present in
the User Identity Store.
Table 39–3 Security Token Service Partner Entry
Partner Entry Description
Certificates Signing and Encryption Certificates
Reference Reference to a Partner Profile
Requester only When the partner is a Requester, the partner entry also contains
Username Token credentials, and Identification strings used to map
incoming data to a requester.
Table 39–4 Security Token Service Partner Profile Data
Client Type Description
Requester ■Claims Mappings
■WS-Trust Validation Templates used to validate tokens present in
the OnBehalfOf element
Relying Party ■Attributes to be sent to RP
■Issuance Templates to be used
Issuing Authority ■Attribute Name/Value Mapping settings
■Specific Mapping Actions Rules used to map an incoming token
to a partner/user
Table 39–1 (Cont.) Security Token Service Partners
Partner Type Description
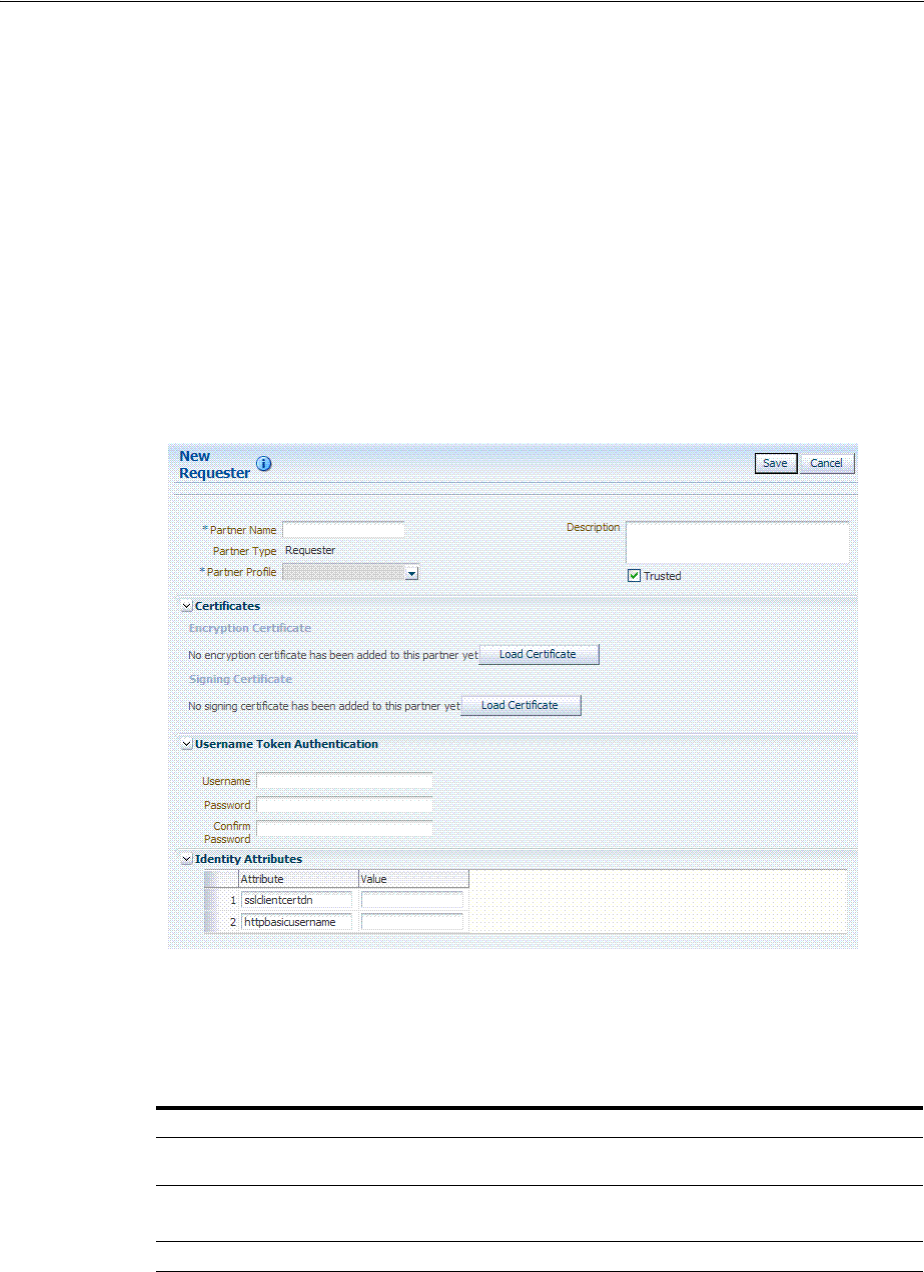
Managing Token Service Partners
Managing Token Service Partners and Partner Profiles 39-3
39.3 Managing Token Service Partners
This section provides the following topics.
■About Managing Token Service Partners
■Managing a Token Service Partner
■Refining Partner Searches
39.3.1 About Managing Token Service Partners
When you choose to create a new partner, a fresh page appears for the specific Partner
Type you selected. Figure 39–1 shows the New Requester partner page in the Oracle
Access Management Console, which includes all Partner elements.
Figure 39–1 New Requester Partner Page
While most elements are common to all partners (name, description, and whether this
partner is trusted), certain elements depend upon the specific partner type, as
described in Table 39–5.
Table 39–5 Partner Elements for Partner Types
Partner Type Description
Requester partners Can specify an encryption certificate and a signing certificate, as well
as Token Authentication and Identity Attributes.
Relying Party partners Can specify only an encryption certificate and Resource URLs.
See Figure 39–2
Issuing Authority partners Can specify only a signing certificate.
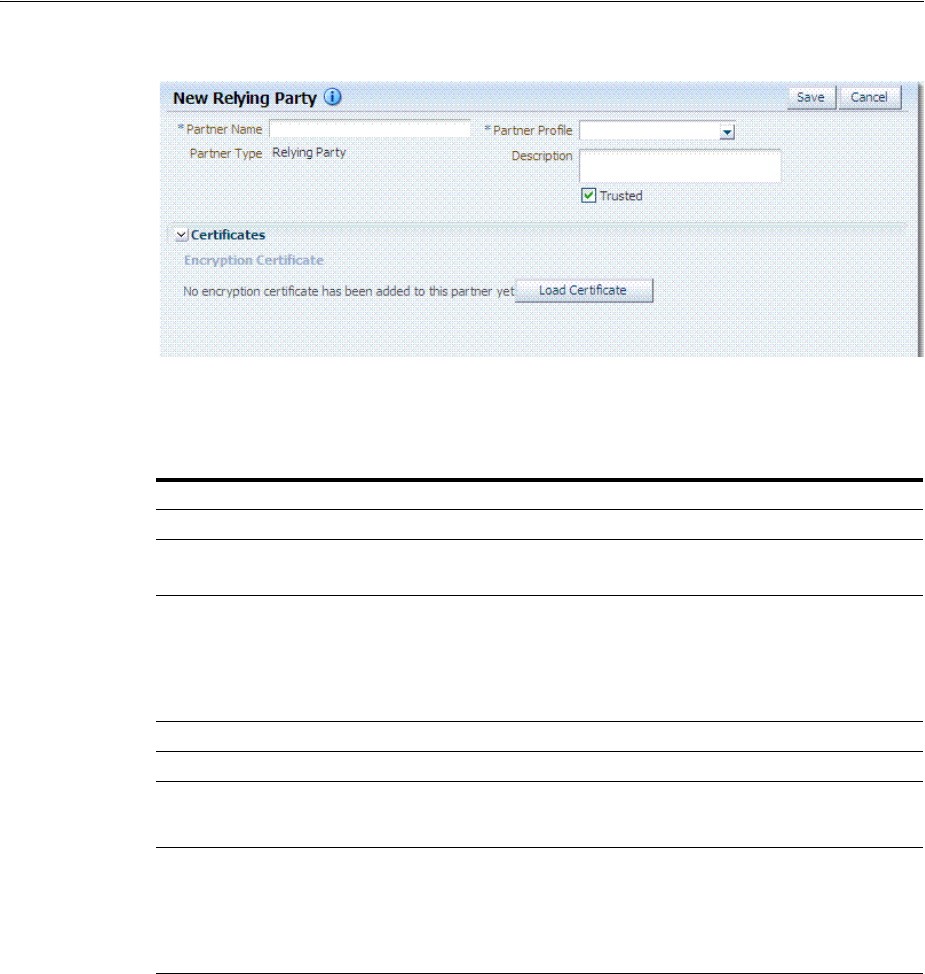
Managing Token Service Partners
39-4 Administrator's Guide for Oracle Access Management
Figure 39–2 New Relying Party Partners Page
Table 39–6 describes elements for Security Token Service partners. Unless explicitly
stated otherwise, all elements apply to every partner type.
Table 39–6 Elements for Security Token Service Partners
Element Description
Partner Name Enter a name for this partner.
Issuer ID
Issuing Authority Only
Unique identifier used in SAML Assertion Issuer field referencing this
Issuing Authority.
Partner Type Uneditable description, depending upon the type of partner you are
creating or editing:
■Requester
■Relying Party
■Issuing Authority
Partner Profile Choose from the profiles listed to define your chosen partner.
Description Optional.
Trusted Check this box to indicate whether or not the partner is trusted. If not
checked, the Security Token Service server will report an error when a
request involves such an entry.
Load Certificate Browse for and upload the requested certificates, which depend on
partner type:
■Encryption and signing certificates
■Encryption certificate
■Signing certificate
Username Token Authentication
Requester only
Values can be entered for the following for Username Token
Authentication:
■Username
■Password
■Confirm Password
New Requester Partner Identification Attributes can be defined in the
STS Settings section and will appear in the requester partner Identity
Attributes table.
Note: the username and password data will be used to validate the
credentials of a username token. It is also possible to only enter a
username and no password, when the data will be used only to map
an incoming token to this requester partner using the username.
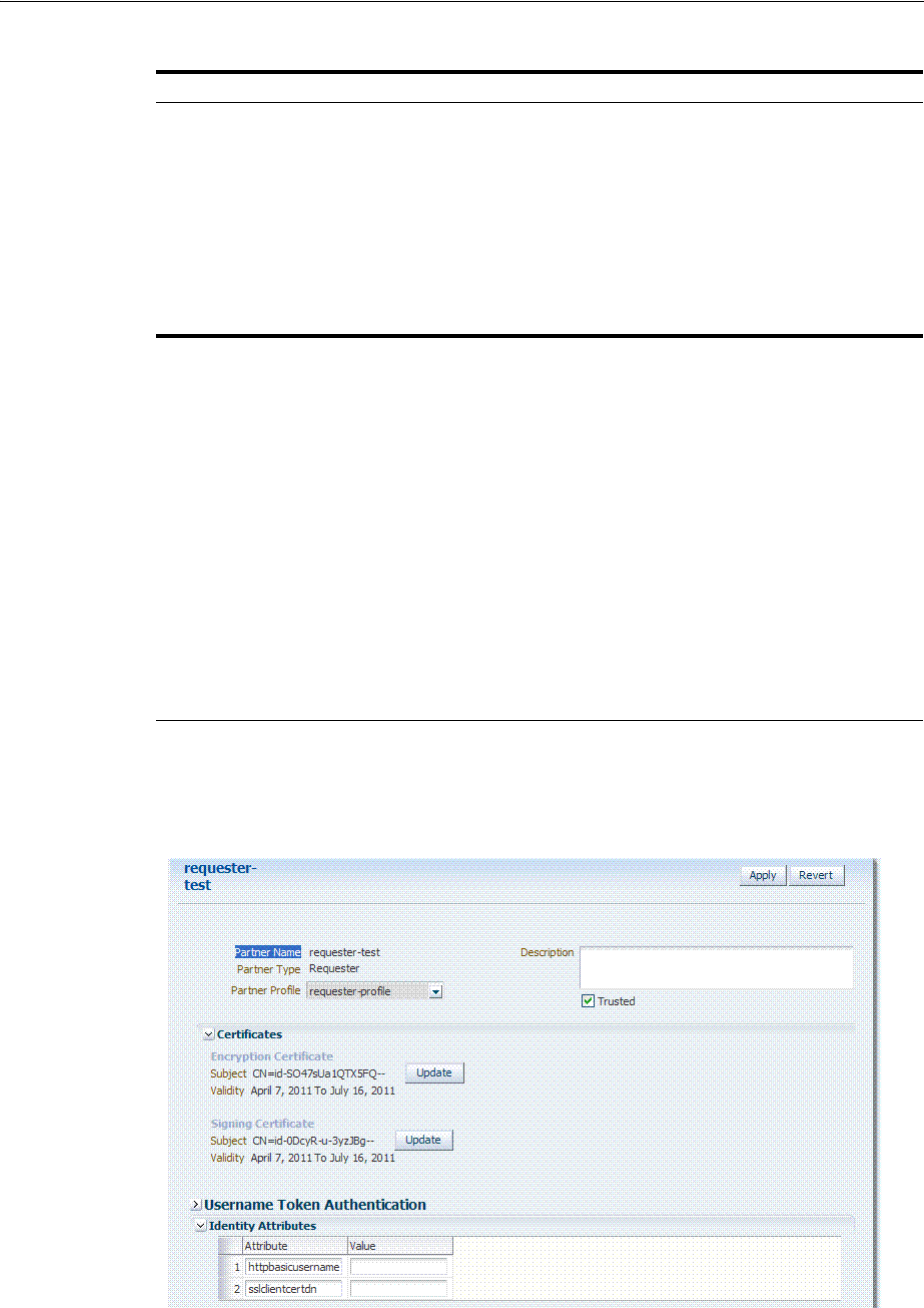
Managing Token Service Partners
Managing Token Service Partners and Partner Profiles 39-5
Figure 39–3 shows a Requester Partner page that is filled in.
Figure 39–3 Defined Requester Partner
Identity Attributes
Requester only
At runtime, Security Token Service will use the data defined in the
section to map an incoming request to a requester partner entry, using:
■The token data or binding data such as the SSL Client
Certificate's Subject DN if present, or HTTP Basic Authentication
username.
■The identity attributes present in each requester partner entry.
New mappings can be added in the Relying Party Partner section as
follows: http://relying.party.test.com/testing.service. At runtime, the
Security Token Service server will use those URLs to map the
AppliesTo service location contained in a WS-Trust request to a
Relying Party Partner.
Resource URL
Relying Party only
Enter the resource URL in the resource pattern column of the table,
and enter a description beside it. For instance:
Pattern:
http://relying.party.test.com/testing/service
The resource URL listed in the table will be used when mapping the
AppliesTo location element from the WS-Trust request to this Relying
Party Partner.
The AppliesTo location value will be mapped to this Relying Party
Partner:
■A Resource URL matches exactly the AppliesTo location value.
For example, the AppliesTo location is
http://relying.party.test.com/testing/service and the Resource URL
is also http://relying.party.test.com/testing/service).
■Or, a Resource URL is the parent of the AppliesTo location value.
For example, the AppliesTo location is
http://relying.party.test.com/testing/service and the Resource URL
is http://relying.party.test.com/testing, or Resource URL is
http://relying.party.test.com/
Table 39–6 (Cont.) Elements for Security Token Service Partners
Element Description

Managing Token Service Partners
39-6 Administrator's Guide for Oracle Access Management
39.3.2 Managing a Token Service Partner
Users with valid Administrator credentials can use the following procedure to create,
find, edit, or delete a token service partner using Oracle Access Management Console.
Prerequisites
A partner profile must be defined for the type of partner you will create.
To manage a token service partner
1. From the Oracle Access Management Console, click Partners.
2. Under the Partners node, double-click the desired partner type and proceed with
following steps as needed.
■Requesters
■Relying Parties
■Issuing Authorities
3. New Partner:
a. Click the New PartnerType button to display a fresh page for your definition.
b. Enter general information for the chosen partner type (Table 39–6).
c. Tru st ed : Click to select (or leave blank if this is not a trusted partner).
d. Certificates: Load any necessary certificates.
e. Relying Party: Enter Resource URLs, if needed.
f. Issuing Authority: Enter the Issuer ID of this Authority.
g. Requester: Enter Username Token credentials, if needed.
h. Click Save to submit (or click Cancel to dismiss the page) and then dismiss the
confirmation window.
4. Refine a Partner Search: "Refining Partner Searches"
a. Perform Steps 1 and 2.
b. Define your query and click the Search button.
c. In the Search Results table, click the name of partner to view, edit, or remove.
5. Edit a Partner:
a. In the Search Results table, click the name of partner to edit and click the Edit
button (or choose Edit from the Actions menu).
b. Make desired changes to partner information (Table 39–6).
c. Click Apply to submit the changes (or Revert to cancel changes) and then
dismiss the confirmation window.
6. Remove a Partner: Use the Search controls to refine and submit your query, as
needed.
a. In the Search Results table, highlight the row containing the partner to
remove.
b. Click the Delete (X) button (or choose Delete Selected from the Actions menu),
then dismiss the confirmation window.
Managing Token Service Partner Profiles
Managing Token Service Partners and Partner Profiles 39-7
39.3.3 Refining Partner Searches
From the console Launch Pad, when you click Partners, all Partner types can be
viewed from tabs. When you choose a specific Partner, relevant Search controls, and
the Search Results table, become available. Figure 39–4 illustrates a Requester Partner,
where only the results differ from that of other Partner Types.
Figure 39–4 Partner Search Controls
From the Search page you can simply select a name in the Search Results table, or use
the controls to refine your search to locate a specific Partner or Partners with specific
characteristics.
39.4 Managing Token Service Partner Profiles
This section provides information about Token Service Partner Profiles.
■About Managing Partner Profiles
■Managing a Token Service Partner Profile
■Refining a Profile Search
39.4.1 About Managing Partner Profiles
Figure 39–5 shows a completed Requester Profile page, with both a General tab and
Token and Attributes tab.
Figure 39–5 Requester Profile: General

Managing Token Service Partner Profiles
39-8 Administrator's Guide for Oracle Access Management
Table 39–7 describes the General elements for all profile types.
Requester Profile: Token and Attributes
Figure 39–6 illustrates the Token and Attributes tab and accompanying tables for the
Requester profile. The Token Type Configuration section indicates which WS-Trust
Validation Template to use to validate tokens contained in the OnBelhalfOf element of
the WS-Trust request, based on the token type. This section defines mappings between
WS-Trust claims requested by the client and local attribute names
Table 39–7 Profile: General
Element Description
Profile ID A unique identifier for this profile
Description Optional.
Profile Type Type of profile, which cannot be edited: Requester, Relying
Party or Issuing Authority.
Default Relying Party Profile
Requester Partner Profile Only
References the Relying Partner Profile to use, if the WS-Trust
request does not reference the Relying Party (for example, the
AppliesTo element is missing), or if the AppliesTo element
could not be mapped to a known Relying Party Partner
Profile.
Choose a Relying Party profile to use as the default and enable
or disable the following characteristics as needed:
■Return error for missing claims.
Indicates whether or not Security Token Service will
return an error if the issued token does not contain claims
that were requested by the client.
Since the Relying Party Partner Profile defines the list of
attributes/claims that can be included in the issued token,
it is possible that some claims requested by the client
cannot be returned.
■Allow unmapped claims.
Claims listed in a WS-Trust request are specified in a
dialect that will be translated to map to local attributes
using the Token and Attributes section.
This flag indicates whether or not claims that cannot be
translated should be referenced as is. This allows to
control which claims can be requested by the client.
Default Token to Issue
Relying Party Only
This table indicates which Issuance Template to use to issue a
token for Relying Parties linked to this profile.
Choose a token type as the default for this profile:
■SAML 1.1
■SAML 2.0
■Username
■Custom
Check the box beside Download Policy to associate a policy
with the token. When checked, Security Token Service will
download at runtime the WS-Security policy of the Relying
Party referenced by the AppliesTo element in the RST. If
present, Security Token Service will use that URL to download
the policy, and then determine the type of token to return
based on the information located in the policy.
Managing Token Service Partner Profiles
Managing Token Service Partners and Partner Profiles 39-9
Figure 39–6 Requester Profile: Token and Attributes
Table 39–8 describes Requester Profile Token and Attributes elements and controls.
Table 39–8 Requester Profile: Token and Attributes
Element Description
Token Type Configuration Click the + above the table to display the following dialog box
and then make one selection from each list:
Token Type list provides all supported (and custom) token
types deployed.
Validation Template list contains all currently defined
WS-Trust validation templates.
Attribute Name Mapping This table defines how Security Token Service maps a claim,
represented by its name and optional Format/Namespace, to a
local attribute.
Security Token Service supports the Infocard Claims dialect. To
translate Infocard claims to local attributes, a mapping will
need to be defined where the Incoming Attribute will contain
the claim name and the Local Attribute will contain the local
name (The Format/Namespace column will be empty).
For example, one mapping could be:
■Incoming Attribute: surname
■Local Attribute: sn
Another mapping could be:
■Incoming Attribute: givenname
■Local Attribute: givenname
Another mapping could be:
■Incoming Attribute: emailaddress
■Local Attribute: mail
Managing Token Service Partner Profiles
39-10 Administrator's Guide for Oracle Access Management
Relying Party Profile: Token and Attributes
Figure 39–7 illustrates the Token and Attributes defined for a Relying Party Profile.
This section allows the Administrator to define which Issuance Template should be
used to issue a token for a Relying Party associated with this profile.
Also, it lists the attributes that might be included in an issued token, by their names,
the source of those attributes, and whether or not the attributes should be included in
the issued token only if requested by the client or always.
On this page, Relying Party Profiles require an Issuance Template in addition to the
token type. Also, the attribute types differ from other profiles.
Figure 39–7 Relying Party Profile Token and Attributes
Table 39–9 describes the elements needed for the Relying Party Profile.
Table 39–9 Relying Party Profile Requirements
Element Descrip[tion
Token Type Configuration Click the + above the table to display the following dialog box
and then make one selection from each list:
Token Type list provides all supported (and custom) token
types deployed.
Issuance Template list contains all currently defined Issuance
Templates.

Managing Token Service Partner Profiles
Managing Token Service Partners and Partner Profiles 39-11
Relying Party Profile Attributes
When defining an attribute, you can indicate:
■The attribute source: User Store (LDAP), Incoming Token Data or static value.
■Whether or not to include the attribute in the token only if requested by the client
or in all tokens.
■Whether or not to encrypt the attribute (only SAML 2.0; requires the Relying Party
Encryption Certificate).
■The value of the attribute if this is a static attribute.
Example: To include the mail attribute retrieved from LDAP in all outgoing tokens:
■Attribute Name: mail
■Store Type: User Store
■Include in Token: checked
■Encrypt: unchecked
■Value: empty
Example: To include the username element of an incoming Username Token in all
outgoing tokens
■Attribute Name: STS_SUBJECT_ID
■Store Type: Incoming Token
■Include in Token: checked
■Encrypt: unchecked
■Value: empty
Attributes The attributes that might be included in an issued token:
■Attribute Name: Indicates the name of the attribute.
■Store Type: Indicates the source of the attribute:
Userstore: the default User Identity Store where the LDAP
user record will be used to retrieve the attribute value.
Incoming Token: the attribute will reference an element of
the incoming token.
Static: the value will be specified in the Value field.
■Include in Token: Indicates whether or not the attribute
should always be included in the issued token. If
unchecked, the attribute will only be included if the client
requested this attribute.
■Encrypt: Indicates whether or not the attribute should be
encrypted.
Note: only supported for SAML 2.0. Also, the Encryption
Certificate must be set in the Relying Party Partner entry,
or it must be present in the WS-Trust request.
■Value: Contains the value to be used if the Store Type is
static value.
See Also: "Relying Party Profile Attributes".
Table 39–9 (Cont.) Relying Party Profile Requirements
Element Descrip[tion

Managing Token Service Partner Profiles
39-12 Administrator's Guide for Oracle Access Management
Example: To include a static attribute in all outgoing tokens:
■Attribute Name: rp-version
■Store Type: Static
■Include in Token: checked
■Encrypt: unchecked
■Value: 2.0
The following attributes are available from the incoming token data. The SAML
attributes referenced by their names are also available as incoming token data:
STS_SUBJECT_ID
Contains the subject identifier (username for Username token, NameID Value for
SAML assertions, Subject DN for X.509 certificates)
STS_NAMEID_FORMAT
Contains the SAML NameID Format.
STS_NAMEID_QUALIFIER
Contains the SAML NameID Format.
STS_SPNAME_QUALIFIER
Contains the SAML NameID Qualifier.
STS_SP_PROVIDED_ID
Contains the SAML NameID SP Qualifier
STS_SESSION_INDEX
Contains the session index.
STS_AUTHENTICATION_INSTANT
Contains the authentication instant (current after Username token credentials
validation, from the authentication statement for SAML Assertions, current for X.509
validation, current for Kerberos Validation, authentication instant for OAM Session
Propagation tokens).
STS_AUTHENTICATION_TIMEOUT
Contains the session expiration time if set (applies to SAML assertions and OAM
Session Propagation tokens if present).
STS_X509_CN
Contains the CN component of the X.509 Certificate's Subject DN
STS_X509_OU
Contains the OU component of the X.509 Certificate's Subject DN.
STS_X509_O
Contains the O component of the X.509 Certificate's Subject DN.
STS_X509_L
Contains the L component of the X.509 Certificate's Subject DN.
STS_X509_ST
Contains the ST component of the X.509 Certificate's Subject DN.
STS_X509_C
Contains the C component of the X.509 Certificate's Subject DN.

Managing Token Service Partner Profiles
Managing Token Service Partners and Partner Profiles 39-13
STS_X509_DC
Contains the DC component of the X.509 Certificate's Subject DN.
STS_X509_*
Contains the component identified by * of the X.509 Certificate's Subject DN.
STS_X509_VERSION
Contains the version attribute of the X.509 Certificate.
STS_X509_ISSUER_X500_PRINCIPAL_NAME
Contains the issuer DN of the X.509 Certificate.
STS_X509_NOT_AFTER
Contains the not after attribute of the X.509 Certificate.
STS_X509_NOT_BEFORE
Contains the not before attribute of the X.509 Certificate.
STS_X509_SUBJECT_X500_PRINCIPAL_NAME
Contains the subject DN of the X.509 Certificate.
STS_X509_SUBJECT_ALTERNATIVE_NAMES
Contains the subject alternative name extension value of the X.509 Certificate.
STS_X509_SERIAL_NUMBER
Contains the serial number of the X.509 Certificate.
STS_OAM_LAST_ACCESS_TIME
Contains the last access time of the OAM Session Propagation Token.
STS_OAM_LAST_UPDATE_TIME
Contains the last update time of the OAM Session Propagation Token.
STS_OAM_CREATION_TIME
Contains the creation time of the OAM Session Propagation Token.
STS_KERBEROS_PRINCIPAL_SHORT
Contains the Principal Short value of the Kerberos Token.
STS_KERBEROS_PRINCIPAL_FULL
Contains the Principal Full value of the Kerberos Token.
STS_KERBEROS_PRINCIPAL_NODOMAIN
Contains the Principal No Domain value of the Kerberos Token.
STS_SAML_ASSERTION_ID
Contains the AssertionID of the SAML Assertion.
STS_SAML_SUBJECT_DNS
Contains the Subject DNS attribute of the SAML Assertion.
STS_SAML_SUBJECT_IP_ADDRESS
Contains the Subject IP Address attribute of the SAML Assertion.
STS_SAML_ASSERTION_ISSUER
Contains the Issuer of the SAML Assertion.
Managing Token Service Partner Profiles
39-14 Administrator's Guide for Oracle Access Management
STS_SAML_AUTHN_INSTANT
Contains the authentication instance of the SAML Assertion.
STS_SAML_AUTHN_METHOD
Contains the authentication method of the SAML Assertion.
Issuing Authority Profile: Token and Attributes
The Issuing Authority Partner Profile defines settings that can be common to different
Issuing Authority Partners.
The Token and Attributes section, as shown in Figure 39–8, allows the Administrator
to define mapping rules that will be used to translate the name and value of attributes
to local names and values.
Figure 39–8 Token and Attributes: Issuing Authority
Table 39–10 describes the Token and Attributes elements for Issuing Authority. It is
possible to define attribute mapping rules that will be applied to the attributes
included in the Assertion, when extracting them from the token. There are two
different sets of rules:
■Attribute name mapping where the name of a SAML Attribute can be translated to
a local name (for example, firstname could be translated to givenname).
■Attribute value mapping where the value of a SAML Attribute can be translated to
a local value (for example, President to CEO).

Managing Token Service Partner Profiles
Managing Token Service Partners and Partner Profiles 39-15
Issuing Authority Profile: Token Mapping
Using the Token Mapping tab, shown in Figure 39–9, Administrators can override the
Mapping Rules defined in a SAML Validation Template with the ones defined in an
Issuing Authority Partner Profile. This way, Security Token Service can map SAML
Assertions based on rules specific to a set of Assertion Issuers.Table 39–10 describes
the Token Mapping elements for the Issuing Authority.
Table 39–10 Token and Attributes Elements: Issuing Authority
Element Description
Attribute Name Mapping Define an optional mapping between the name of a SAML
Attribute and the local name of an attribute.
The mapping is optional. If an attribute does not have a
mapping defined, then its SAML attribute name will be used.
■Incoming Attribute: Contains the external name of the
attribute as it will appear in the Assertion.
■Local Attribute: Contains the local name of the attribute.
■Format or Namespace: Contains an optional Format or
Namespace. If missing, the namespace value for mapping
purposes will be assumed to be
urn:oracle:security:fed:attrnamespace
for SAML 1.1
Assertions or the format value for mapping purposes will
be assumed to be
urn:oasis:names:tc:SAML:2.0:attrname-format:basic
for SAML 2.0 Assertions
Value Mapping Define an optional value mapping for a SAML attribute. This
will indicate how to translate an attribute value to a local
value, if needed.
Note: This attribute value mapping applies to an Attribute
Name mapping. In order to define an attribute mapping for an
attribute, it is required to first define an attribute name
mapping for that attribute.
■External Value: Contains the value of the SAML Attribute.
■Local Value: Contains the local value that will be set, if the
SAML attribute value matches the External
Attribute/Local Null fields.
■External Null: Represents a null SAML attribute value.
■Local Null: Indicates if the local value should be null, if
the SAML attribute value matches the External
Attribute/Local Null fields.
■Ignore Case: Indicates whether or not Security Token
Service should ignore case when comparing the attribute
value to the Local Attribute field.
Managing Token Service Partner Profiles
39-16 Administrator's Guide for Oracle Access Management
Figure 39–9 Issuing Authority Profile: Token Mapping Tab
Table 39–11 Issuing Authority Token Mapping Elements
Element Description
Override Token Mapping Indicates whether or not the Mapping Rules defined in this section
should override the ones listed in the SAML Validation Template used
to process the assertion. This allows Security Token Service to use
Mapping Rules that are specific to the Assertion Issuer. If true, all the
Mapping Rules will be overridden by the settings listed in this section.
Override Simple User Mapping Simple user mapping consists of mapping the incoming token to a
user record by using a single token attribute and matching it against a
single user record attribute.
■User Token attribute references an attribute from the incoming
token that will be matched against the Datastore attribute
(defined below) of a user record. The values can be STS_
SUBJECT_ID for the NameID Value, or the name of an Attribute
contained in the Assertion's AttributeStatement
■Datastore attribute references the user record attribute that will
be matched against the User token attribute referenced above

Managing Token Service Partner Profiles
Managing Token Service Partners and Partner Profiles 39-17
Override User Name Identifier
Mapping
When enabled, define a NameID user mapping operation, which
consists of mapping the incoming SAML Assertion to a user record by
mapping the NameID Value to a single user record attribute, based on
the NameID format.
When enabled, Security Token Service will evaluate the NameID
format, and based on the Name Identifier mapping table which user
record attribute should be matched against the Name ID value
contained in the Assertion. The Name Identifier mapping table holds
the user record attributes to be used for the mapping operation. It
contains standard NameID formats, but it can be customized to define
custom Name ID formats.
■To add custom NameID format, click the add button on the Name
Identifier mapping table, and enter the custom URI.
■To set an attribute for a specific NameID format to be used for
mapping operation, set the user record attribute on the line for
that format.
Override Attribute Based User
Mapping
An Attribute Based User Mapping operation consists of mapping the
incoming token to a user record by using an LDAP query and token
attributes.
The format of the LDAP query defines the mapping rule and specifies
the token attributes to be used by their names, surrounded by %
character. For example, an LDAP query that will map a token based on
two token attributes (firstname and lastname) would be:
(&(sn=%lastname)(givenname=%firstname%))
STS_SUBJECT_ID contains the NameID Value.
STS_NAMEID_FORMAT contains the NameID Format
STS_NAMEID_QUALIFIER contains the NameID Qualifier
STS_SAML_ASSERTION_ISSUER contains the Issuer of the Assertion
Attributes present in the Assertion's AttributeStatement
Override Simple Partner Mapping A simple partner mapping operation consists of mapping the
incoming token to a partner requester by using a single token attribute
and matching it against a partner identification attributes.
■Partner Token attribute references an attribute from the incoming
token that will be matched against the Partner Datastore attribute
(defined below) of a Requester Partner. The values can be STS_
SUBJECT_ID for the NameID Value, or the name of an Attribute
contained in the Assertion's AttributeStatement.
■Partner Datastore attribute references the partner identification
attribute that will be matched against the Partner token attribute
referenced above.
Override Partner Name Identifier
Mapping
When enabled, define the following: A NameID user mapping
operation consists of mapping the incoming SAML Assertion to a user
record by mapping the NameID Value to a single requester partner
identification attribute, based on the NameID format.
When enabled, Security Token Service will evaluate the NameID
format, and based on the Name Identifier mapping table which
partner identification attribute should be matched against the Name
ID value contained in the Assertion. The Name Identifier mapping
table holds the requester partner identification attributes to be used for
the mapping operation. It contains standard NameID formats, but it
can be customized to define custom Name ID formats.
■To add custom NameID format, click the add button on the Name
Identifier mapping table, and enter the custom URI.
■To set an attribute for a specific NameID format to be used for
mapping operation, set the requester partner identification
attribute on the line for that format.
Table 39–11 (Cont.) Issuing Authority Token Mapping Elements
Element Description

Managing Token Service Partner Profiles
39-18 Administrator's Guide for Oracle Access Management
39.4.2 Managing a Token Service Partner Profile
Users with valid Administrator credentials can use this procedure to create, locate,
view, edit, or remove a token service partner profile.
Prerequisites
The prerequisites for Requester Partner Profiles are:
■A Relying Party Partner Profile must exist, in order to be able to set the default
Relying Partner Profile.
■WS-Trust Validation Templates must exist in order to set the templates that will be
used to validate tokens located in the OnBehalfOf element.
The prerequisites for Relying Partner Profiles are:
■Issuance Template must exist in order to configure which templates to use for
token issuance operations.
There are no prerequisites for Issuing Authority Partner Profiles.
To create, find, edit, or remove a partner profile
1. From the Oracle Access Management Console, click Partner Profiles.
2. Under the Partner Profiles node, double-click the desired profile type and proceed
with following steps as needed.
■Requester Profiles
■Relying Party Profiles
■Issuing Authority Profiles
3. New Profile:
a. Click the New ProfileType button to display a fresh page for your definition.
b. Enter general information for the chosen profile type (Table 39–7) and click the
Next Button.
c. Token and Attributes: Use the appropriate table to provide details for the
chosen profile type:
Requester Profile Table 39–8
Relying Party Profile Table 39–9
Issuing Authority Profile Table 39–10
d. Click Save to submit (or click Cancel to dismiss the page) and then dismiss the
confirmation window.
4. Refine a Profile Search: "Refining a Profile Search"
a. Perform Steps 1 and 2.
b. Define your query and click the Search button.
c. In the Search Results table, click the name of partner to view, edit, or remove.
5. Edit a Profile:
a. In the Search Results table, click the name of profile to edit and click the Edit
button (or choose Edit from the Actions menu).
b. Make desired changes to partner information.
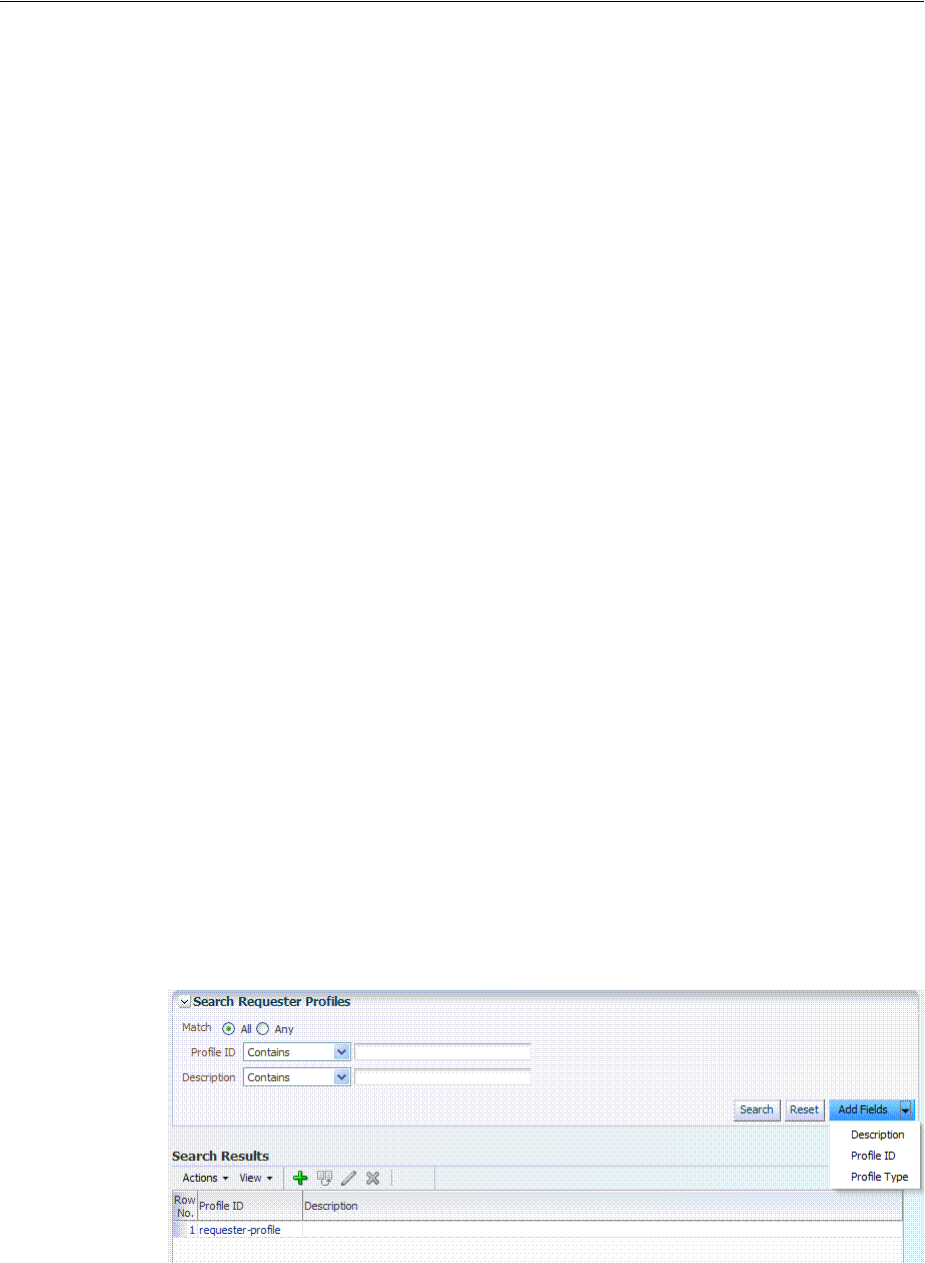
Managing Token Service Partner Profiles
Managing Token Service Partners and Partner Profiles 39-19
Requester Profile Table 39–8
Relying Party Profile Table 39–9
Issuing Authority Profile Table 39–10
c. Click Apply to submit the changes (or Revert to cancel changes) and then
dismiss the confirmation window.
6. Remove a Profile: To remove a profile, it is required not to be referenced
anywhere else.
To remove a Requester Partner Profile, it is required that:
■No Requester Partner references the profile.
■No WS-Security Validation Template references the profile
To remove a Relying Party Partner Profile, it is required that:
■No Relying Party Partner references the profile.
■No Requester Partner Profile references the profile.
To remove an Issuing Authority Partner Profile, it is required that:
■No Issuing Authority Partner references the profile
If these prerequisites are met, proceed as follows:
a. In the Search Results table, highlight the row containing the profile to remove.
b. Click the Delete (X) button (or choose Delete Selected from the Actions menu),
then dismiss the confirmation window.
39.4.3 Refining a Profile Search
As with Partner definitions, when you open the Partner Profiles node, all Partner
Profiles nodes become available. When you choose a specific type of Partner Profile
node, relevant Search controls, and the Search Results table, become available.
Figure 39–4 illustrates a typical Search Profiles page. This one is for a Requester
Profile. However, all controls are the same; only the results differ for different profile
types.
Figure 39–10 Search Profiles Page: Requester
From the Search page you can simply select a name in the Search Results table to view
or edit the Profile, or use the controls to refine your search to locate a specific Profile or
a Profile with specific characteristics.

Managing Token Service Partner Profiles
39-20 Administrator's Guide for Oracle Access Management

40
Troubleshooting Security Token Service 40-1
40
Troubleshooting Security Token Service
This chapter provides troubleshooting tips for Security Token Service:
■Authorization Issues
■Endpoint Issues
■Mapping Operation Issues
40.1 Authorization Issues
Problem: Authorization Failure during Token Issuance operation
During a WS-Trust request issuance operation, the Security Token Service returns an
error.
Error Message
The following are sample error messages that can be seen in the logs:
<Error> <oracle.security.fed.controller.ApplicationController> <STS-12064>
<Exception: {0}
oracle.security.fed.event.EventException:
oracle.security.fed.event.EventException: Authorization Failure for Relying
Party=%RELYING_PARTY_ID%, Requester=%REQUESTER_ID% and User=%USER_ID%
When:
■
%RELYING_PARTY_ID%
indicates the Relying Party Partner ID.
–If the WS-Trust request did not contain an AppliesTo element, then the
%RELYING_PARTY_ID%
is set to MissingRP
–if the WS-Trust request contained an AppliesTo element but it could not be
mapped to a Relying Party Partner, then the
%RELYING_PARTY_ID%
is set to
UnknownRP
–if the WS-Trust request contained an AppliesTo element and it was mapped to
a Relying Party Partner, then the
%RELYING_PARTY_ID%
is set to Relying Party
Partner ID.
■
%REQUESTER_ID%
is set to the Requester Partner ID, if the incoming request was
mapped to a Requester Partner. If
%REQUESTER_ID%
is not null, it will be used when
evaluating the Token Issuance Policy, against any present Identity Condition.
■
%USER_ID%
is set to the User ID, if the incoming request was mapped to a user
record. If
%USER_ID%
is not null and if
%REQUESTER_ID%
is null, it will be used when
evaluating the Token Issuance Policy, against any present Identity Condition.

Endpoint Issues
40-2 Administrator's Guide for Oracle Access Management
Issue
The Token Issuance Policy evaluation failed due to one of the following reasons:
■No TokenServiceRP resource referencing the
%RELYING_PARTY_ID%
is defined and
assigned to a Token Issuance Policy. In this case, create TokenServiceRP resource
referencing the
%RELYING_PARTY_ID%
and assign it to a Token Issuance Policy.
■A TokenServiceRP resource referencing the
%RELYING_PARTY_ID%
exists and is
assigned to a Token Issuance Policy, but the policy contains conditions that are not
met. In this case, review the policy rules: if the policies are correct, then the client
is not allowed to request a token; otherwise, update the policies/conditions to
include the client's identity.
40.2 Endpoint Issues
Problem: Endpoint not found
When accessing an Security Token Service endpoint that has been added via the Oracle
Access Management Console, the server returns an error indicating that the page does
not exist when retrieving the WSDL policy or that the endpoint does not exist.
Error Message
The following are possible error messages:
■When retrieving the WSDL policy, a 404 HTTP error code is returned.
■When sending a WS-Trust request, an error is reported:
<Error> <oracle.webservices.service> <OWS-04115> <An error occurred for port:
PortableProvider: oracle.j2ee.ws.server.EndpointNotFoundException: /PATH.>
Solution
Security Token Service is deployed but not enabled. To enable Security Token Service,
perform the following operations:
1. Go to the Oracle Access Management Console.
2. Navigate to System Configuration, select Common Configuration, then select
Available Services.
3. Enable Security Token Service.
Security Token Service detects the change and publishes the endpoints. No restart is
required.
40.3 Mapping Operation Issues
Problem: Failure to map the AppliesTo element to a Relying Party Partner
When Security Token Service processes a WS-Trust request with an AppliesTo element
referencing the Web Service Provider, the server will attempt to map the location
contained in the AppliesTo element to an Security Token Service Relying Party Partner
using the Resource URL defined in the Partner entry. If such a mapping fails, the
server will log an Info message in the logs indicating that the operation failed and
indicating what was the AppliesTo address used.
Error Message
The following is a sample of an error message:

Mapping Operation Issues
Troubleshooting Security Token Service 40-3
[2011-04-22T15:08:12.632-07:00] [oam_server1] [NOTIFICATION] [STS-15542]
[oracle.security.fed.eventhandler.sts.creation.v13.CreateV13TokenEventHandler]
[tid: [ACTIVE].ExecuteThread: '0' for
queue: 'weblogic.kernel.Default (self-tuning)'] [userId: <anonymous>] [ecid:
f00aacae2d3f3ded:125005ed:12f7f412274:-8000-0000000000000016,0] [WEBSERVICE_
PORT.name: wssuser-port] [APP:
oam_server] [J2EE_MODULE.name: sts] [WEBSERVICE.name: wssuser-serviceSoap12]
[J2EE_APP.name: oam_server] The mapping
of the AppliesTo element from the WS-Trust Request to a Relying Party Partner
failed: could not map
http://relying.party.test.com/testing/service
Solution
If the AppliesTo location should have been mapped to a Relying Party Partner, then
the Partner settings should be verified to ensure that the Resource URLs are correctly
defined to:
■be the exact match of the AppliesTo address
■be a parent of the AppliesTo address.
For example, if the AppliesTo address is http://relying.party.test.com/testing/service,
a parent could be http://relying.party.test.com/testing/ or
http://relying.party.test.com/. In both cases, the AppliesTo location would be
mapped to a Relying Party Partner with any of those Resource URLs defined.
In certain cases, failure to correctly map the AppliesTo address to a Relying Party
Partner will result in errors due to:
■Authorization evaluation failures
■Security Token Service not being able to retrieve certificate belonging to the
Relying Party Partner.
Note: this message is recorded at Notification level, thus in order for
Security Token Service to record it, the appropriate logging level must
be set to include the Notification:1 level.

Mapping Operation Issues
40-4 Administrator's Guide for Oracle Access Management

Part IX
Part IX
Managing Oracle Access Management
Mobile and Social
This part documents Oracle Access Management Mobile and Social.
Mobile and Social serves as an intermediary between a user or client seeking to access
protected resources, and the back-end Oracle Access Management and Oracle Identity
Management services that protect the resources. Mobile and Social provides simplified
client libraries that allow developers to quickly add feature-rich authentication,
authorization, and Identity capabilities to registered applications. On the back-end, the
Mobile and Social service's pluggable architecture lets system Administrators
customize the access management services without having to update the installed
software.
Part IX contains the following chapters:
■Chapter 41, "Understanding Mobile and Social"
■Chapter 42, "Configuring Mobile Services"
■Chapter 43, "Configuring Social Identity"
■Chapter 44, "Configuring Mobile and Social System Settings"

41
Understanding Mobile and Social 41-1
41
Understanding Mobile and Social
This chapter describes the purpose and capabilities of Oracle Access Management
Mobile and Social. It includes the following topics.
■Introducing Mobile and Social
■Understanding Mobile Services
■Understanding the Mobile Services Processes
■Using Mobile Services
■Understanding Social Identity
■Understanding Social Identity Processes
■Using Social Identity
41.1 Introducing Mobile and Social
The Oracle Access Management Mobile and Social service acts as an intermediary
between a user or client seeking to access protected resources, and the back-end Access
Management and Identity Management services that protect the resources. Mobile and
Social provides simplified client libraries that allow developers to quickly add
feature-rich authentication, authorization, and identity capabilities to registered
applications. On the back-end, the Mobile and Social server's pluggable architecture
lets system administrators customize identity and access management services
without updating the user's client software or mobile applications. Mobile and Social
provides two complimentary feature sets:
■Mobile Services connects applications and devices to the enterprise Access
Management and Identity Management services available in the Oracle Identity
Access Management product suite. This makes it easy to utilize sophisticated
authentication and authorization services functionality (such as mobile device and
application registration, and device fingerprinting) to restrict access to authorized
devices only. Client applications can also implement knowledge-based
authentication, a powerful feature that goes beyond basic password-based
authentication.
Mobile Services can be configured to require a valid device and client credential
and a User Token with each application token request. This ensures that only an
authorized user can access a protected resource, and then only if the user is
Note: Device fingerprinting and knowledge-based authentication
both require Oracle Adaptive Access Manager.

Introducing Mobile and Social
41-2 Administrator's Guide for Oracle Access Management
running an authorized application on an authorized device. Mobile Services also
provides easy access to User Profile Services if Mobile and Social is integrated with
an LDAP compliant directory server.
■Social Identity allows Mobile and Social to serve as the relying party when
interacting with popular cloud-based identity authentication and authorization
services, such as Google, Yahoo, Facebook, Foursquare, Windows Live, Twitter,
and/or LinkedIn. After deploying Mobile and Social, a user is provided with
multiple log-in options without the need to implement each provider individually.
This allows users to access protected resources using their credentials from a
trusted Identity Provider.
In addition to tight integration with Access Manager, Mobile and Social is "pre-wired"
to work with other back-end Identity and Access Management Service offerings,
including Oracle Adaptive Access Manager and a variety of LDAP compliant
directory servers. On the front-end, Mobile and Social provides easy to use SDKs for
integration of client applications on the Java, Android, and iOS platforms. The client
applications then use simple REST calls to communicate with the Mobile and Social
server.
You can configure Mobile Services and Social Identity to work together. For example,
use Social Identity to let users authenticate with Google, Facebook, Twitter, and so on,
and use Mobile Services to (a) provide local authentication functionality, or (b)
generate a User Token by accepting a User Identity assertion from a social Identity
Provider. Mobile Services can also enhance device registration security when used in
conjunction with Social Identity.
The following sections contain additional information and documentation links
regarding the installation and deployment of Mobile and Social.
■Installing Mobile and Social
■Deploying Mobile and Social
■Enabling Mobile and Social
Note: Prior to version 11.1.2.2, Social Identity was named Internet
Identity Services.
Note: REST (REpresentational State Transfer) is the software
architectural style with which the World Wide Web has been
developed. It is lightweight and especially well-suited to building
web-based applications and services.
Note: Mobile and Social provides security layer functionality to
registered applications that run on either Android or iOS devices, or
in a Java SE JVM, or that communicate with the service using REST
calls. If you require additional mobile functionality, ADF Mobile, a
complimentary Oracle product offering, provides an application
development framework for creating full-featured applications for
iOS-powered devices. For more information, see the Oracle Fusion
Middleware Mobile Developer's Guide for Oracle Application Development
Framework.

Introducing Mobile and Social
Understanding Mobile and Social 41-3
41.1.1 Installing Mobile and Social
You install Mobile and Social together with Access Manager. You can configure Mobile
and Social to run by itself, or in combination with either Access Manager or Oracle
Adaptive Access Manager (OAAM), or you can deploy all three together. Depending
on the software deployed alongside Mobile and Social, the available features may vary.
Table 41–1 provides the details.
For installation details, see the Oracle Fusion Middleware Installation Guide for Oracle
Identity and Access Management.
41.1.2 Deploying Mobile and Social
The following list contains information and links regarding several Mobile and Social
deployments.
■If deploying Mobile and Social together with Access Manager, both can be
deployed together on the same server, either in the same domain or in separate
Table 41–1 Features in Mobile and Social Based on the Companion Services Installed
Feature
Mobile and
Social Only
Mobile and
Social +
Access
Manager
Mobile and
Social +
OAAM
Mobile and
Social +
Access
Manager +
OAAM
Access Manager token support
using native Access Manager
authentication dialogs
✔✔
JWT token support for
authentication and
authorization
✔✔ ✔ ✔
Ability to uniquely identify
connecting mobile devices
(Device fingerprinting)
✔✔
Basic (limited) device security
checks during device
registration, access requests
✔✔
Advanced device security
checks during device
registration and access
requests, including risk-based
access controls (for example,
allow or deny access based on
geolocation and other device
attributes)
✔✔
Multi-step authentication
support (knowledge-based
authentication and one time
password support)
✔✔
Interact with a Directory server
and support User Profile
services
✔✔ ✔ ✔
Relying party support for
Internet-based Identity
Providers (Facebook, Google,
Twitter, LinkedIn, Yahoo)
✔✔ ✔ ✔

Understanding Mobile Services
41-4 Administrator's Guide for Oracle Access Management
domains. For details, see the Oracle Fusion Middleware Installation Guide for Oracle
Identity and Access Management.
■If deploying Mobile and Social alongside Oracle Access Manager 10g or 11gR1
PS1, Mobile and Social and Oracle Access Manager need to be installed on
different servers in different domains. For details, see Section 44.3, "Deploying
Mobile and Social With Oracle Access Manager."
■If deploying Mobile and Social with a WebGate, Mobile and Social can generate
the Oracle Access Management token that clients need to access the
WebGate-protected resources. The following restrictions apply:
–If you deployed Oracle Access Management 11gR2 (11.1.2), Mobile and Social
can generate a token that can access either an 11g WebGate or a 10g WebGate.
–If you deployed either Access Manager 11gR1 (11.1.1) or 10g, Mobile and
Social can generate an Oracle Access Management token that can access a 10g
WebGate only.
■When moving Mobile and Social from a test environment to a production
environment, see Section 44.4, "Configuring Mobile and Social After Running
Test-to-Production Scripts."
41.1.3 Enabling Mobile and Social
To leverage the Mobile and Social functionality, the service should be explicitly
enabled. Follow these steps to enable the Mobile and Social service.
1. Log in to the Oracle Access Management Console.
The Launch Pad opens.
2. Click Available Services in the Configuration pane.
The Available Services page opens.
3. Click Enable next to Mobile and Social.
41.2 Understanding Mobile Services
Mobile Services connect applications running on client devices to the security services
and products available in the Oracle Identity Access Management product suite. In
addition, User Profile Services is a Mobile Services feature that connects client
applications to many popular LDAP compliant directory servers. Mobile Services
consists of the following components:
■A server component that interfaces with your backend Identity Services
infrastructure. The server acts as an intermediary between supported client
applications (and the users using those applications) and your backend Identity
services. This arrangement decouples the client applications from the backend
Note: If Access Manager is already installed, you cannot add Mobile
and Social to an Oracle Access Management installation by extending
the OAM domain. Attempting to do so will result in an error similar
to the following:
CFGFWK-64071- the selection conflicted with templates
already installed in the domain OAM with database policy
store 11.1.1.3.0

Understanding Mobile Services
Understanding Mobile and Social 41-5
infrastructure so that you can modify your backend infrastructure without having
to update your client programs. You can enable the Mobile and Social service to
run by itself or in combination with the Access Manager service and/or the
OAAM product as discussed in Section 41.1, "Introducing Mobile and Social."
■A server-side device store that can store security material, such as security tokens
and security information required by the OAAM Security Handler Plug-in. The
server-side device store provides several benefits: It improves security because
tokens managed by the server-side device store are not sent to the client
application where they can be copied if the device or client app is compromised; it
eliminates the need for mobile client applications to manage and synchronize
security material; and finally it allows security material to be shared and
synchronized among multiple client apps.
■A Mobile and Social Mobile Services Client Software Development Kit (Client
SDK) is available for Android and iOS devices and Java. It is used to build
authentication, authorization, and directory-access functionality into applications
that run on mobile and desktop devices. The Mobile Services Client SDK can also
be used to build a mobile single sign-on (SSO) agent application (for Android and
iOS devices only). Mobile SSO is described in Section 41.2.3, "Understanding
Single Sign-on (SSO) for Mobile Services." The Mobile and Social Mobile Services
Client SDK is described in Section 41.2.4, "Introducing the Mobile and Social
Mobile Services Client SDK."
The following sections contain more detailed information regarding the Mobile
Services portion of Mobile and Social.
■Introducing Authentication Services and Authorization Services
■Understanding the Mobile Services Authorization Flow
■Understanding Single Sign-on (SSO) for Mobile Services
■Introducing the Mobile and Social Mobile Services Client SDK
■Introducing User Profile Services
41.2.1 Introducing Authentication Services and Authorization Services
Authentication and Authorization Services lets you extend an existing authentication
and authorization infrastructure to include mobile and non-mobile applications.
Mobile Services supports the following common token types:
■A User Token grants the token bearer with the permissions associated with the
person who has been authenticated.
■An Access Token grants access to a specific protected resource, such as a web
resource or a URL.
■A Client Token grants access to a non-mobile hardware device, such as a web
application or server application.
■A Client Registration Handle (similar to a Client Token) is also used by Mobile
Services. It represents a mobile client application running on a mobile device.
Mobile and Social uses the Client Registration Handle to register mobile devices,
whereas non-mobile Service Providers use Client Tokens to authenticate
non-mobile devices.
A mobile device is a device that runs a mobile operating system, such as the Android
mobile operating system from Google or the iOS mobile operating system from Apple,
while a non-mobile device is a device that runs a non-mobile operating system, such
as Mac OS X, Windows 7, and Lynx desktop. Because mobile devices and non-mobile

Understanding Mobile Services
41-6 Administrator's Guide for Oracle Access Management
devices present different security challenges, mobile authentication and non-mobile
authentication are managed separately in Mobile and Social. New mobile devices
come online much more frequently and therefore require greater scrutiny, including
heightened fraud detection measures.
Mobile and Social supports Oracle Access Manager tokens (if Access Manager is
installed with Mobile and Social) and JWT (JSON Web Token) tokens. Each token type
has a corresponding mobile and a non-mobile Service Provider. Mobile and Social
provides four pre-configured Authentication Service Providers:
■OAM Authentication
■Mobile OAM Authentication
■JWT Authentication
■Mobile JWT Authentication
Two additional Authentication Service Providers can also be created:
■JWT-OAM Authentication
■Mobile JWT-OAM Authentication
Table 41–2 describes the Authentication Service Providers.
Note: A non-mobile device can use either mobile services or
non-mobile services as long as the correct input is provided.
Table 41–2 Mobile and Non-Mobile Authentication Service Providers in Mobile Services
Authentication Service
Provider Description
OAMAuthentication Lets users running a web application from a desktop device
authenticate using Access Manager.
MobileOAMAuthentication Lets users using mobile devices authenticate using Access
Manager
JWTAuthentication Lets users running a web application from a desktop device
authenticate using the JSON Web Token format. JSON Web
Token is a compact token format that is suitable for
space-constrained environments such as HTTP
Authorization headers.
MobileJWTAuthentication Lets users using mobile devices authenticate using the JSON
Web Token format.
JWTOAMAuthentication Allows lightweight, long-duration JWT tokens to be
exchanged for OAM tokens. OAM tokens provide SSO and
OAM resource access to clients. This provider allows users
using non-mobile applications to get a new OAM token
without having to provide credentials if they have a valid,
long-duration JWT token.
MobileJWTOAMAuthentication Allows lightweight, long-duration JWT tokens to be
exchanged for OAM tokens. OAM tokens provide SSO and
OAM resource access to clients. This provider allows users
using mobile applications to get a new OAM token without
having to provide credentials if they have a valid,
long-duration JWT token.

Understanding Mobile Services
Understanding Mobile and Social 41-7
41.2.2 Understanding the Mobile Services Authorization Flow
The Mobile Services authorization flow is used if the client application implements
mobile security using the Mobile and Social Client SDKs for Android, iOS, or Java, or
if the client app goes through a Mobile SSO Agent app (covered later) to establish
mobile security. In this flow the client app (or the Mobile SSO Agent) collects user
inputs and maintains the user session on the mobile device.
The diagrams in the following sections depict the Mobile Services authorization flow:
■Section 41.3.1, "Registering a Mobile Device With User Authentication"
■Section 41.3.2, "Authenticating a User With a Registered Device"
■Section 41.3.3, "Using REST Calls for User Authentication"
■Section 41.3.4, "Authenticating the User With a Mobile Browser-Based Web App"
41.2.3 Understanding Single Sign-on (SSO) for Mobile Services
Mobile Single Sign-on (Mobile SSO) lets a user run multiple mobile applications on the
same device without having to provide credentials for each one. Both native and
browser-based applications can participate in Mobile SSO.
Understanding the Mobile SSO Agent App
A special application installed on a mobile device can be designated as a Mobile SSO
Agent. This application serves as a proxy between the remote Mobile and Social server
and the other applications on the device that need to authenticate with the back-end
Identity services. The Agent can either be a dedicated agent (that is, an application that
serves no other purpose), or a business (client) application that also provides agent
functionality.
The Mobile SSO Agent handles device registration and advanced authentication
schemes (including multi-factor authentication and one time password
authentication), so this functionality does not have to be built into each mobile
application. When the Mobile SSO Agent is present, user credentials are never exposed
to the mobile business applications. The Mobile SSO Agent and SSO Client interact as
follows:
■The SSO Client application sends the device registration request, the application
registration request, and the User Token request to the SSO Agent.
■The SSO Agent makes the necessary acquisitions on behalf of the SSO Client.
■The SSO Client application then requests any Access Tokens it needs using the
registration handle and User Token.
Note: Mobile Services apps and Mobile OAuth apps require separate
SSO implementations. For information about single sign-on for Mobile
OAuth applications, see Section 45.2.8, "Understanding Mobile OAuth
Single Sign-on (SSO)."
Note: Before an application can use the Mobile SSO agent app to
authenticate with the Mobile and Social server, you must configure the
application as either a Mobile SSO Agent or Client on the server. For
more information about configuring Mobile Services security for
Mobile SSO, see Section 42.7, "Defining Service Domains."

Understanding Mobile Services
41-8 Administrator's Guide for Oracle Access Management
■The SSO Agent app stores tokens and security material on behalf of the mobile
SSO Client, similar to the server-side device store.
A browser-based business application can also be configured to use a Mobile SSO
Agent for authentication. If that is the case, launching a browser-based business
application invokes the Mobile SSO Agent and causes the agent to collect a user name
and password, and send them to the Mobile and Social server. If the business
application and the agent are authorized for SSO, the Mobile and Social server
authorizes access. The agent then requests an Access Token for the resource (on behalf
of the business application) and redirects the browser to the URL of the business
application with the Access Token included in the headers.
From the user's perspective, native and browser-based application open on the device
without asking the user to provide credentials. If the agent is not installed on the
mobile device, or if the business application is not approved for Mobile SSO, the user
will have to directly and independently send his or her credentials to the Mobile and
Social server with each and every application that is launched.
The Mobile SSO Agent can time-out idle sessions, manage global logout for all
applications, and assist in device selective wipe outs. Furthermore, it supports basic
offline authentication. The agent one-way encrypts user passwords for local storage.
During offline authentication, the agent validates the user name and password with
the locally stored version. The agent then enforces all session idle time-outs and local
password expiration policies.
When using a mobile SSO agent, applications open on the device without asking the
user to provide credentials. If the agent is not installed on the mobile device, or if the
business application is not approved for Mobile SSO, the user will have to directly and
independently send his or her credentials to the Mobile and Social server with each
and every application that is launched.
Oracle does not provide a pre-built Mobile SSO Agent, however, documentation is
provided so that you can build a Mobile SSO Agent application using the Mobile and
Social Mobile Services Client SDK for Android or iOS. For more information about
creating a Mobile SSO Agent application, refer to either the Android or the iOS Mobile
Services SDK documentation in the Oracle Fusion Middleware Developer's Guide for
Oracle Access Management.
41.2.4 Introducing the Mobile and Social Mobile Services Client SDK
The Mobile and Social Mobile Services Client SDK contains individual SDKs for
Android and iOS devices, and for Java Virtual Machines (JVMs). Table 41–3 documents
each Mobile Services Client SDK feature and the software on which it works.
Note: The Mobile SSO Agent is only supported on Android and iOS
devices.
Table 41–3 Android, iOS, and Java Features of Mobile and Social Mobile Services Client
SDK
Feature Android iOS Java
Build a mobile application that can acquire Client
Registration Handle, User, and Access Tokens
through a Mobile and Social Server
✔✔
Build a desktop application that can acquire Client,
User, and Access Tokens through a Mobile and
Social Server
✔

Understanding the Mobile Services Processes
Understanding Mobile and Social 41-9
41.2.5 Introducing User Profile Services
User Profile Services makes it possible to build an application that lets a user in your
organization access the User Profile Services from mobile devices. User Profile Services
allows Web, mobile, and desktop applications to perform a variety of LDAP compliant
directory server tasks including:
■Create, read, update, and delete functionality for users and groups
■Search functionality
■Org (organization) chart reporting functionality
Towards this end, the Mobile and Social server can interface with many popular LDAP
compliant directory servers including:
■Microsoft Active Directory
■Novell eDirectory
■Oracle Directory Server Enterprise Edition
■Oracle Internet Directory
■Oracle Unified Directory
■Oracle Virtual Directory
■Open LDAP
■WebLogic Server Embedded LDAP
Refer to the Oracle Fusion Middleware Developer's Guide for Oracle Access Management for
sample code that demonstrates how to use the SDK for User Profile Services.
41.3 Understanding the Mobile Services Processes
When a user tries to access a protected resource, Mobile and Social requires either a
Client Token (if the user is connecting through a server or a computer which securely
stores client credentials) or a Client Registration Handle (if the user is using a mobile
device). Thus, client devices (including mobile devices) and client applications must
register with Mobile and Social before access to protected resources can be granted.
Interact with a Directory server and implement User
Profile Services
✔✔✔
Create a mobile single sign-on (SSO) application ✔✔
Note: Any device capable of HTTP communication can use User
Profile Services by sending REST calls to the Mobile and Social server.
See "Sending Mobile and Social REST Calls With cURL" in the Oracle
Fusion Middleware Developer's Guide for Oracle Access Management.
Note: Applications are also typically configured to require a User
Token and an Access Token.
Table 41–3 (Cont.) Android, iOS, and Java Features of Mobile and Social Mobile
Services Client SDK
Feature Android iOS Java

Understanding the Mobile Services Processes
41-10 Administrator's Guide for Oracle Access Management
Client applications running on mobile devices follow this high-level authentication
process before the mobile application can access a protected resource.
1. The user enters a user name and password at the application login screen and
authenticates with the Mobile and Social server.
2. If a mobile device has not previously registered with the Mobile and Social server,
the server sends the mobile device a Client Registration Handle after
authenticating the user.
3. The Client Registration Handle is submitted back to the Mobile and Social server
to get a User Token.
4. The Client Registration Handle and User Token are submitted back to the Mobile
and Social server to get an Access Token.
A non-mobile application can also make use of Authentication Services provided by
Mobile Services. In such cases, a Client Token takes the place of the Client Registration
Handle. After the Client Token is obtained, a User Token and Access Token can be
requested as documented above. Additional scenarios are documented in these
sections.
■Registering a Mobile Device With User Authentication
■Authenticating a User With a Registered Device
■Using REST Calls for User Authentication
■Authenticating the User With a Mobile Browser-Based Web App
■Authorization Using the Mobile OAuth Authorization Flow
41.3.1 Registering a Mobile Device With User Authentication
When the mobile device attempting to access a protected resource has not previously
registered with Mobile and Social, a Mobile SSO Agent must be installed. The
registration authentication process is documented in the following flow. Figure 41–1
and Figure 41–2 follow the text and illustrate the process.
1. The user launches an application on a mobile device.
2. The application redirects the user to the Mobile SSO Agent.
3. The Mobile SSO Agent displays a login page.
4. The user enters a user name and password.
5. The Mobile SSO Agent sends the user name and password to the Mobile and
Social server along with the device attributes and application ID.
6. The Mobile and Social server forwards the user name and password to Access
Manager which authenticates the user.
7. The Mobile and Social server sends device attributes and other authentication
results to the OAAM Mobile Security Handler Plug-in which executes the policy
stored on the OAAM server.
Note: OAAM has two registration flows—active and passive. The
active flow prompts the user with a challenge before allowing the
device registration process to proceed. The passive flow continues
without challenging the user.

Understanding the Mobile Services Processes
Understanding Mobile and Social 41-11
The OAAM Security Handler Plug-in creates two security handles (snippets of
data that Mobile and Social stores with either the Mobile SSO Agent or the
business application itself). Each handle stores a name, value, and expiration
timestamp.
■The
oaam.device
handle represents the mobile device. (Different client
applications on the same device all have the same device handle value.)
OAAM uses this handle as a key to retrieve the full device profile stored in the
OAAM database. This handle has a relatively long life span.
■The
oaam.session
handle represents an OAAM login session for a client
application. (Each client application on a device has a unique session handle
value.) OAAM uses this handle as a key to retrieve details about the OAAM
session stored in the OAAM database. When the user logs out from the client
application, the
oaam.session
handle is removed.
8. The Mobile and Social server returns the Mobile Client Registration Handle and
OAAM device and session handles to the Mobile SSO Agent.
9. The Mobile SSO Agent gets a User Token by passing the Client Registration
Handle and OAAM device handles that it previously received to the server.
10. The Mobile SSO Agent requests an Access Token from Access Manager. The
request contains the Client Registration Handle and OAAM device handles. See
Figure 41–2.
Understanding the Mobile Services Processes
41-12 Administrator's Guide for Oracle Access Management
Figure 41–1 First Time Device/Application Registration and Authentication Process
Mobile User
Customer
App (Mobile
Device)
Mobile
SSO
Agent
Mobile and
Social
Server
Access
Manager OAAM
Access App
getSession() &
getAccessToken()
Get App Profile
Register (User, password, device attributes, appID)
Register App (appID, device profile attribute)
OAAM Device Handle and
OAAM Session Handle
*Authenticate (User, password, attributes)
Mobile Client Registration Handle,
OAAM Device and Session Handles
Get User Token
Get Access To ke n
Successful User Authentication
Present Login Page
User name/Password
Understanding the Mobile Services Processes
Understanding Mobile and Social 41-13
Figure 41–2 Mobile SSO Agent Requests Access Token from Access Manager
41.3.2 Authenticating a User With a Registered Device
This scenario describes a user with a mobile device (already registered with Mobile
and Social) launching a Mobile and Social compatible business application. In this
scenario the Mobile SSO Agent is already installed and the user needs to access a
protected resource that requires an Access Token. The business application must first
acquire the User Token before it can request the Access Token. The accompanying
figures (Figure 41–3 and Figure 41–4) illustrate the process.
1. The user launches the business application on a mobile device.
2. The business application asks the Mobile SSO Agent for a User Token and one of
the following occurs.
a. If a valid User Token exists in the local credential store, the Mobile SSO Agent
returns it to the business application. The business application inserts the User
Mobile User
Customer
App (Mobile
Device)
Mobile
SSO
Agent
Mobile and
Social
Server
Access
Manager OAAM
Access App
getSession() &
getAccessToken()
Get App Profile
Register App (appID, oaam device handle,
device profile attributes)
OAAM Result/ Action
Authenticate (User, password, attributes)
Client Registration Handle for Customer App
Get Access Token
Successful Authentication
Present Login Page
User name/Password
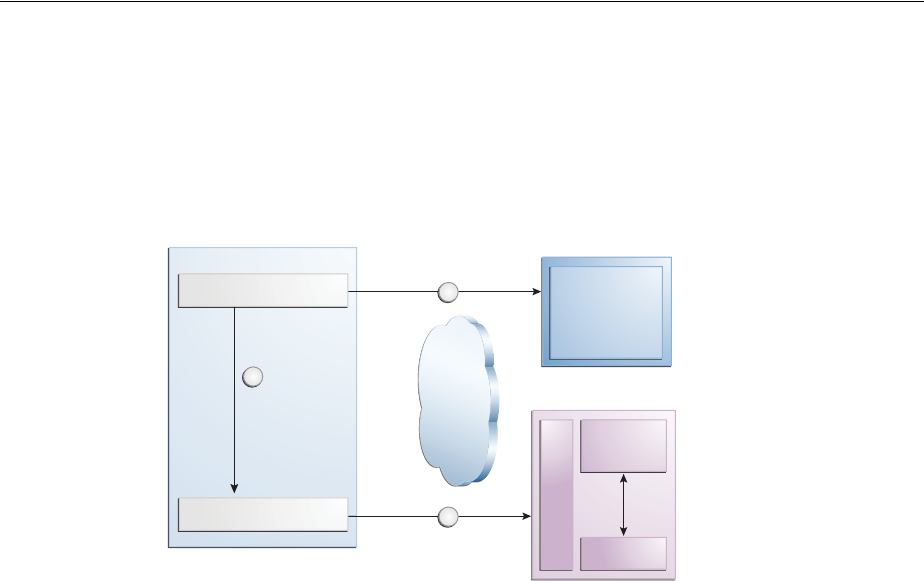
Understanding the Mobile Services Processes
41-14 Administrator's Guide for Oracle Access Management
Token into a direct request to the Mobile and Social server for the Access
Token. The flow completes when the business application uses the Access
Token returned by the server to access the protected resource (as in
Figure 41–3).
Figure 41–3 Mobile SSO Agent Has Valid Access Token in Credential Store
b. If a valid User Token does not exist in the local credential store, the login flow
continues (as in Figure 41–4).
3. The Mobile SSO Agent presents a login page and the user enters a user name and
password.
4. The Mobile SSO Agent sends the user name, password, and Client Registration
Handle to the Mobile and Social server. (Step 2 in Figure 41–4).
5. The Mobile and Social server validates the Client Registration Handle,
authenticates the user credentials (with either the JWT token service or the Access
Manager token service), invokes OAAM for risk analysis and then returns the
User Token to the Mobile SSO Agent. (Step 3 in Figure 41–4).
6. The Mobile SSO Agent stores a copy of the user token in its local credential store
and returns the User Token to the business application. (Step 4 in Figure 41–4).
7. The business application uses the User Token to make a direct request to the
Mobile and Social server for the Access Token. (This step is not shown in the
diagram.)
8. The Mobile and Social server returns the Access Token to the Mobile SSO Agent.
9. The business application uses the Access Token to make calls to the resource
protected by Access Manager or Oracle Enterprise Gateway (OEG). (Step 5 in
Figure 41–4).
Access
Manager
Mobile and Social
Client
REST/
SOAP
Server
OAAM
1
Access
To k e n
Authentication
REST/SOAP
2
3
Mobile SSO Agent
User App
Client Web Tier
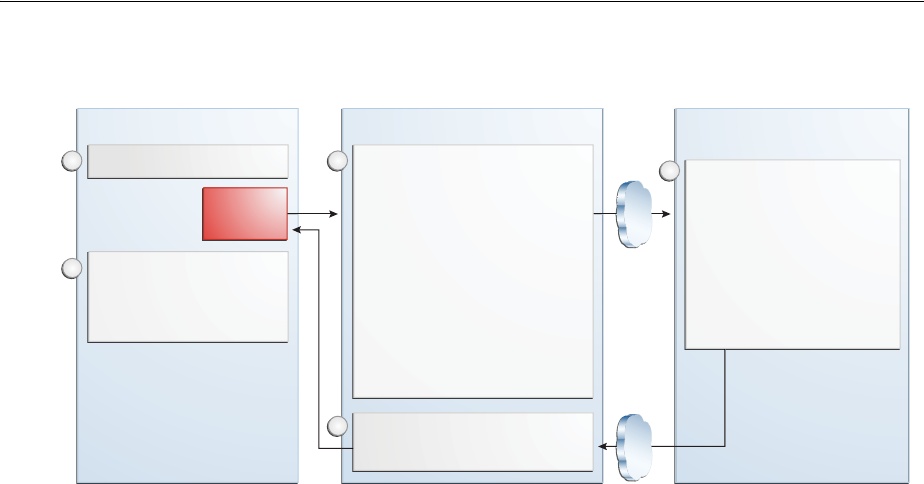
Understanding the Mobile Services Processes
Understanding Mobile and Social 41-15
Figure 41–4 Mobile SSO Agent Does Not Have Valid Access Token in Credential Store
41.3.3 Using REST Calls for User Authentication
In this scenario an application running on a mobile device interfaces with the Mobile
SSO Agent, which communicates with the Mobile and Social server using REST calls.
The server interfaces with Access Manager and OAAM as needed and returns the
necessary tokens to the Mobile SSO Agent (again using REST calls). The agent
forwards the tokens back to the application, which can now access the protected
resource using either REST or SOAP calls. The process is documented in the following
flow. Figure 41–5 follows the text and illustrates the process.
1. The user launches an application on a mobile device.
2. Because the client application needs to access a resource protected by Access
Manager, the client application asks the Mobile SSO Agent for an Access Token.
3. The Mobile SSO Agent gets the Application Profile from the Mobile and Social
server.
4. The Mobile SSO Agent prompts for a user name and password.
5. The Mobile SSO Agent sends the user name and password to the Mobile and
Social server along with the device attributes and application ID.
6. The Mobile and Social server registers the device and authenticates the user.
7. The server returns an Access Token to the Mobile SSO Agent.
8. The Mobile SSO Agent saves the hashed password in its local credential store.
9. The Mobile SSO Agent passes the Access Token to the client application.
10. The client application accesses the protected resource by presenting the Access
Token.
Client App (Mobile)
Request User Token
Use token to make
REST/SOAP calls to
client server protected by
Access Manager or OEG
Mobile SSO Agent Mobile and Social Server
(Server)
2
4
5
13
Oracle
SDK
• If valid User token exists in
localcredential store,
return the token to App.
Else continue below.
• Present login page.
• Accept username/password.
• Extract device attributes
and ID contexts.
• Makes authentication call
with user/password, and
device attributes.
• Stores User/Access To ke n
• Returns token to Client App
• Authenticates with
Access Manager
• Publishes ID context to
Access Manager
• Invokes OAAM for risk
analysis
• Responds User/Access
To ke n s
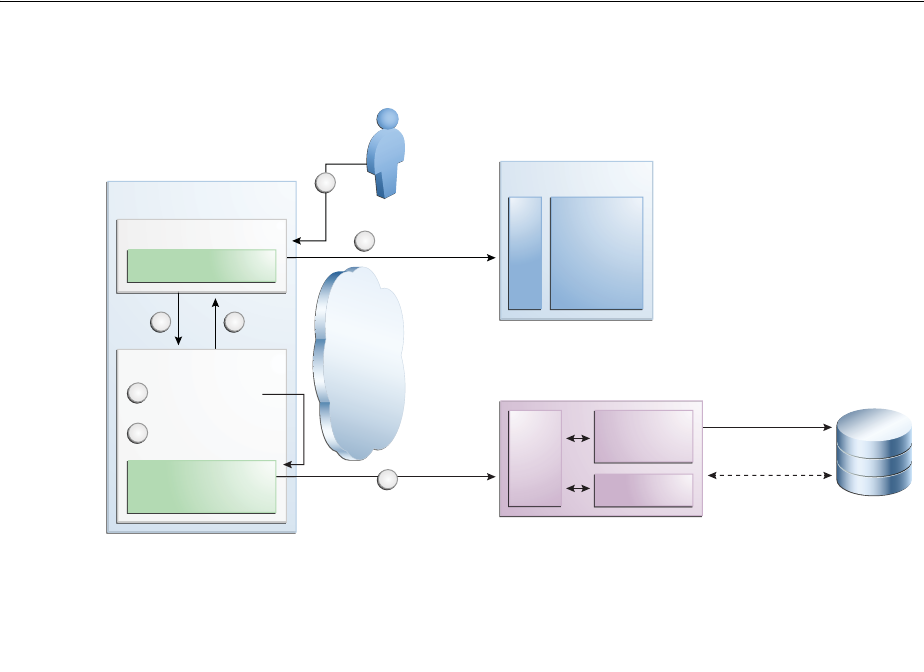
Understanding the Mobile Services Processes
41-16 Administrator's Guide for Oracle Access Management
Figure 41–5 User Authentication Using REST
41.3.4 Authenticating the User With a Mobile Browser-Based Web App
This scenario describes a user with a Mobile and Social registered mobile device
launching a Mobile and Social compatible browser-based web application. In this
scenario the Mobile SSO Agent is installed. The legacy authentication process is
documented in the following flow. Figure 41–6 follows the text and illustrates the
process.
1. The user opens a URL in a web browser on a mobile device.
2. The application web server redirects the browser to Access Manager.
3. Access Manager sends the web browser a URL redirect.
4. The web browser responds to the redirect by launching the Mobile SSO Agent.
If the agent is not installed, a link with instructions to install the Mobile SSO Agent
application is displayed.
5. The Mobile SSO Agent displays the User login page.
6. The user enters a user name and password.
7. The Mobile SSO Agent sends the user name, password, and Client Registration
Handle to the Mobile and Social server. (This step is not shown in the diagram.)
8. The Mobile and Social server validates the Client Registration Handle,
authenticates the credentials with Access Manager, publishes the ID context to the
Access Manager server, and invokes OAAM for risk analysis.
9. Access Manager returns a User Token or an Access Token to the Mobile and Social
server which, in turn, returns the User Token or the Access Token to the Mobile
SSO Agent. (This step is not shown in the diagram.)
Client Web Tier
Access
Manager
OAAM
Mobile
and Social
Client
REST/
SOAP
Server
Agent
7
Mobile Device
Mobile SSO Agent
Mobile and Social
SDK
Native App #1...#n
IDM SDK
2 6
1
3
5
Prompt Login
Store Credential
Device
Registration
REST/SOAP
Device
Provisioning
/Deprovisioning
Database
• Register Device/App
• Authenticate User
• Get Access To ke n
• Get User Attributes
4
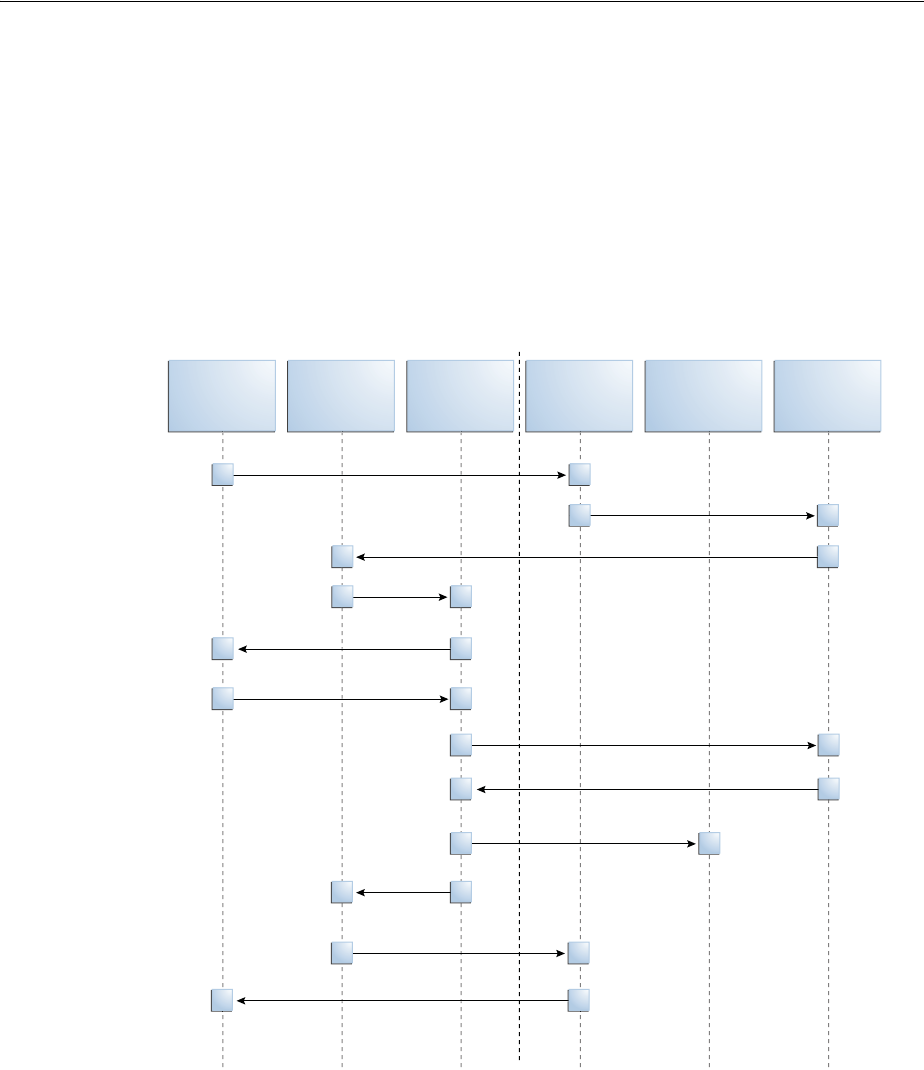
Understanding the Mobile Services Processes
Understanding Mobile and Social 41-17
10. The Mobile SSO Agent directs the browser to the Mobile and Social server where it
injects a cookie.
11. The Mobile SSO Agent sends the web browser a URL redirect and an Access
Token.
12. The mobile web browser responds to the redirect and opens the original web URL
because the access request now includes an Access Token.
13. The application web server sends the requested pages to the mobile web browser.
Figure 41–6 Authenticating User From Browser-based Web App on Registered Mobile
Device
41.3.5 Authorization Using the Mobile OAuth Authorization Flow
The following diagram shows at a high level the interactions between a mobile app
and the Oracle Access Management OAuth service in the context of Mobile Services.
To understand the difference between the legacy authorization flow and the Mobile
OAuth authorization flow, see Section 41.2.2, "Understanding the Mobile Services
Authorization Flow."
For a detailed look at the OAuth authorization flow in the context of the OAuth
Service, see Section 45.3.3, "Understanding Mobile OAuth Authorization."
1. The mobile app requests a client verification code by sending a device token.
Mobile User
Browser
(Mobile
Device)
Mobile
SSO
Agent
App Web
Server
Mobile and
Social Server
Access
Manager &
OAAM
Access Web URL
App Pages
Redirected to original Web URL
Fingerprint & Authenticate
Access To ke n
Pages from App Web Server
Inject cookie
Redirect
Present Login Page
Redirect to local app
Redirect to Access Manager
Redirect
User name/Password

Understanding the Mobile Services Processes
41-18 Administrator's Guide for Oracle Access Management
The OAuth service returns the client verification code. If the APNS/GCM option is
enabled, the OAuth service returns half of the code using push notification, and
the other half over HTTPS. Push notification provides an extra level of assurance
for confirming the identity of the application and device.
2. The mobile app requests an authorization code by sending device claims and the
client verification code.
The OAuth service:
■Authenticates the user
■Requests the user's consent to register the app (optional)
■Invokes OAAM for risk analysis
■Returns the authorization code using push notification (optional) and HTTPS
3. The mobile app requests a Client Token by sending the authorization code and
device claims.
The OAuth service returns the Client Token using push notification (optional) and
HTTPS.
4. The mobile app requests an Access Token by sending the Client Token, the
authorization code, and the device claims.
The OAuth service returns the Access Token.
5. The mobile app requests access to the protected resources using the Access Token.
(Not shown in the diagram.)
The resource server returns the protected resources to the client application. (Not
shown in the diagram.)
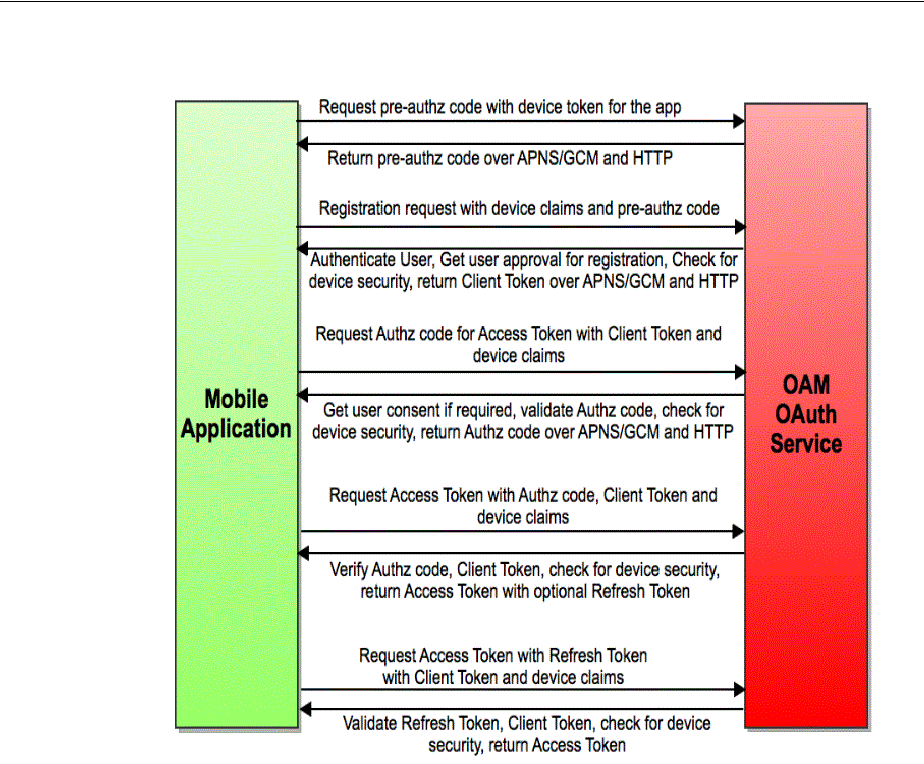
Using Mobile Services
Understanding Mobile and Social 41-19
Figure 41–7
41.4 Using Mobile Services
The following sections describe how you might use the Mobile Services.
■Protecting the Mobile Client Registration Endpoint
■Exchanging Credentials
■Protecting User Profile Services And Authorization Services
■Using Mobile Services with Oracle Access Manager
■Using Mobile Services with Oracle Adaptive Access Manager Services
41.4.1 Protecting the Mobile Client Registration Endpoint
A mobile device attempting to access a protected resource must register with the
Mobile and Social server as the server rejects anonymous requests sent to its
registration endpoint. Additionally, each Service Domain should be configured to
require either a User password or a User Token to register an application. The
following is a sample registration endpoint for mobile clients and mobile applications:
https:// host : port /idaas_rest/rest/mobileservice1/register

Using Mobile Services
41-20 Administrator's Guide for Oracle Access Management
When registering with the Mobile and Social server, client applications using either the
Java Client SDK or the REST API must present valid credentials to the server using
one or more of the following schemes:
■HTTP Basic Authentication
■User ID and Password (UIDPASSWORD)
■OAM Token Authentication
Client applications using the Android or iOS SDK will acquire a Client Registration
Handle which uses the UIDPASSWORD authentication scheme to secure registration.
41.4.2 Exchanging Credentials
The Android, iOS, and Java SDKs will send the tokens, credentials, and other data
required by the Mobile and Social server. Table 41–4 describes the tokens required and
returned based on the client device or application.
Note: For a detailed look at the credentials, see “Mobile Services
REST Reference: Authentication and Authorization” in the “Sending
Mobile and Social REST Calls With cURL” chapter of the Oracle Fusion
Middleware Developer's Guide for Oracle Access Management.
Table 41–4 Token Requirements for the Mobile and Social Server
Device or App Type
Seeking to Register
Token(s), Credentials, and/or Data
Required by the Mobile and Social
Server Type of Token Returned
Non-Mobile Device
(Unregistered)
An ID and password associated with
a client application sent over
HTTPS.
Client Token
Mobile SSO Agent App ■A user ID and password sent
over HTTPS.
■Device profile data for the
Mobile Device.
■The name of the application
(that is, the Client ID).
Note - An Administrator must
also add the name of the mobile
SSO Agent to a Service Domain.
Client Registration
Handle

Using Mobile Services
Understanding Mobile and Social 41-21
41.4.3 Protecting User Profile Services And Authorization Services
You can choose to protect User Profile Services and Authorization Services as follows
when configuring a Mobile Services Service Domain.
User Profile Services - Configure User Profile Services security by making the
following selections for the Service Profile:
■Choose the Authentication Service Provider (OAMAuthentication,
MobileOAMAuthentication, JWTAuthentication, Mobile JWT Authentication,
Social Identity Authentication, and so on)
■Protect the service by requiring a “Secured Application” security token and a
“Secured User” security token
■Set the “Allow Read” and “Allow Write” options
Authorization Services - Configure Authorization Services security by making the
following selections for the Service Profile:
■Choose the Authentication Service Provider (OAMAuthentication,
MobileOAMAuthentication, JWTAuthentication, Mobile JWT Authentication,
Social Identity Authentication, and so on)
■Protect the service by requiring a “Secured Application” security token and a
“Secured User” security token.
41.4.4 Using Mobile Services with Oracle Access Manager
Developers can quickly create applications that access resources protected by either
Oracle Access Management Access Manager, or the 10g or 11gR1 PS1 (11.1.1.5)
Mobile SSO Client App
(For example, a business
application that uses the
Mobile SSO Agent App to
register with Mobile and
Social.)
■One of the following:
A user ID and password sent to
the Mobile and Social server
over HTTPS.
- or -
A User Token.
■Device profile data for the
Mobile Device.
■The name of the application
(that is, the Client ID).
Note - An Administrator must
also add the name of the mobile
SSO Client application to a
Service Domain.
■The
oaam.device
handle (if
Mobile and Social is integrated
with OAAM).
■Mobile SSO Client Registration
Handle (previously obtained for
the SSO agent), if the SSO Client
application tries to register
through the SSO agent
application.
Client Registration
Handle
Table 41–4 (Cont.) Token Requirements for the Mobile and Social Server
Device or App Type
Seeking to Register
Token(s), Credentials, and/or Data
Required by the Mobile and Social
Server Type of Token Returned

Understanding Social Identity
41-22 Administrator's Guide for Oracle Access Management
versions of Oracle Access Manager. The Mobile and Social SDK handles authentication
programatically after it collects user credentials using the credential collection
interface. The SDK then uses the Mobile and Social REST interfaces to authenticate the
user with the token service configured for the application. For more information about
the Mobile Services' authentication flow with Access Manager, see Section 41.3.1,
"Registering a Mobile Device With User Authentication."
41.4.5 Using Mobile Services with Oracle Adaptive Access Manager Services
Oracle Adaptive Access Manager (OAAM) can be used to make runtime
authentication decisions, such as blocking authentication if the user is authenticating
from an unauthorized country or location. The following functionality is also
supported.
■Multi-part login flows - for example, OAAM can challenge the user with
knowledge-based authentication questions, or require the user to authenticate
using one-time password (OTP) functionality if OAAM detects a risky or unusual
usage pattern (using the device at unusual hours or if the user is geographically
distant from the place where authentication last took place).
■Check device attributes (such as the MAC Address assigned to a device) and
verify that the device is not jail broken. Based on device attributes, OAAM can
allow or deny access.
■Device-selective wipeouts are also an option when using OAAM together with
Mobile and Social.
■Based on registered device info, OAAM can white-list or black-list specific devices.
For more information about using Mobile and Social with OAAM, see Section 42.9.2,
"Configuring Mobile Services for Oracle Adaptive Access Manager."
41.5 Understanding Social Identity
Social Identity lets Mobile and Social serve as the relying party (RP) when interacting
with cloud-based Identity Authentication and Authorization Services, such as Google,
Yahoo, Facebook, Twitter, Windows Live, Foursquare and/or LinkedIn. Allowing
users to log in to a protected resource using their credentials from a trusted Identity
Provider is a convenience for the user. By deploying Mobile and Social, you can
provide users with a convenient multiple log-in option without the need to implement
each Provider individually. Users can use their credentials from cloud-based identity
services to log in to any of the following application types.
■Web applications that run on Java-compliant application servers. To add Social Identity
functionality to a Web application, a developer connects the Web application to the
Mobile and Social server using the Social Identity Client SDK. For details, see the
"Developing Applications Using the Social Identity Client SDK" chapter in the
Oracle Fusion Middleware Developer's Guide for Oracle Access Management.
■Applications protected by either Access Manager, or the 10g or 11.1.1.5 versions of Oracle
Access Manager. Applications protected by either the Access Manager service in the
Oracle Access Management product, or the 10g or 11gR1 PS1 versions of Oracle
Access Manager can be configured to work with Social Identity without using an
SDK. For details about the authentication flow, see Section 41.6.4, "Authenticating
a User With Access Manager and Social Identity."
■Mobile applications running Android or iOS. Mobile applications running Android or
iOS can be configured to authenticate with an Social Identity Provider. To connect

Understanding Social Identity Processes
Understanding Mobile and Social 41-23
to the Mobile and Social server, Android and iOS applications use the Mobile
Services SDKs for those platforms. A separate SDK is not required.
Social Identity provides services for Identity Providers that support the following
standards:
■OpenID version 2.0
■OpenID Simple Registration Extension 1.0
■Open ID Attribute Exchange Extension 1.0
■OpenID Provider Authentication Policy Extension 1.0
■OAuth 1.0 and 2.0
Native support for the Identity Providers listed in Table 41–5 is provided by Mobile
and Social after installation.
Java programmers can add relying party support for additional OpenID and OAuth
Identity Providers by implementing a Java interface and using the Mobile and Social
console to add the Java class to the Mobile and Social deployment. For more
information, see the “Extending the Capabilities of the Mobile and Social Server”
chapter in the Oracle Fusion Middleware Developer's Guide for Oracle Access Management.
41.6 Understanding Social Identity Processes
The following scenario documents the basic authentication process when using Social
Identity.
1. A user requests access to a protected resource and is redirected to Mobile and
Social.
2. Mobile and Social (RP) asks the user if they would like to log in using their
credentials from, for example, Google (the Identity Provider).
3. Mobile and Social redirects the user to a Google login page where a user name and
password is entered.
4. Google verifies the credentials and redirects the user back to Mobile and Social. At
the same time the Identity Provider returns identity attributes to Mobile and Social
based on its configuration.
If the user does not have an account with your organization, the user can be
prompted to register for one; the registration form will be prepopulated with the
information that the Identity Provider returns.
Table 41–5 Identity Providers That Mobile and Social Natively Supports
Identity Provider Supported Protocol
Facebook OAuth 2.0
Google OAuth 2.0
LinkedIn OAuth 2.0
Twitter OAuth 2.0
Yahoo OpenID 2.0
Foursquare OAuth 2.0
Windows Live OAuth 2.0

Understanding Social Identity Processes
41-24 Administrator's Guide for Oracle Access Management
Additional scenarios are documented in these sections.
■Authenticating a Returning User With a Local Account
■Authenticating a New User With No Local Account
■Using OAuth For Access Token Retrieval
■Authenticating a User With Access Manager and Social Identity
■Authenticating a User Locally
41.6.1 Authenticating a Returning User With a Local Account
This scenario describes the authentication flow between the User, the Mobile and
Social server (the relying party), the Identity Provider, and the local user
authentication service (represented by Local Auth and ID Repository in the diagram).
In this scenario, the local Identity repository determines that the user already has a
local account. Consequently Mobile and Social does not prompt to create one.
Figure 41–8, following the text, illustrates the process.
1. The user opens a URL for a protected resource in a web browser and the Mobile
and Social server presents the user with a login page and a menu of Identity
Providers (Google, Yahoo, Facebook, Windows Live, Foursquare, Twitter, or
LinkedIn) from which to choose.
2. The user chooses an Identity Provider.
3. The Mobile and Social server redirects the user to the selected Identity Provider
and a login page is displayed.
4. The user enters a user name and password and, upon authentication, the Identity
Provider sends the Mobile and Social server an authentication assertion.
5. The Mobile and Social server checks with the Identity repository to see if the user
has a local account.
The Identity repository could be a directory server, a database, Oracle Identity
Manager, or similar. The user is determined to be a User with a local account:
■If a mobile application or a directly-integrated Web application is
authenticating with Mobile and Social, the Mobile and Social server sends an
authentication assertion to the user's browser.
■If an application protected by Access Manger is authenticating, Access
Manager creates the session for the user only if the user has a local account.
(Newly registered users count as local account holders.)
6. The user's browser sends the authentication assertion sent by Mobile and Social to
the protected resource's Access Management Service.
7. The Access Management Service carries out additional authentication steps as
needed.
8. The Access Management Service allows the user access to the protected resource.
Note: In the case of Access Manager, a user MUST register locally,
otherwise access is not given. If not using Access Manager, the user is
redirected to the protected resource and allowed access even if they
don't register. For details, see Section 41.7.1, "Using Social Identity
With Oracle Access Manager."

Understanding Social Identity Processes
Understanding Mobile and Social 41-25
Figure 41–8 Authenticating a Returning User with a Local Account
41.6.2 Authenticating a New User With No Local Account
This scenario describes the authentication flow between the User, the Mobile and
Social server (the relying party), the Identity Provider, and the local User
authentication service (represented by Local Auth and ID Repository in the diagram).
In this scenario, the User does not have a local account so Mobile and Social prompts
to create one. Figure 41–9, following the text, illustrates the process.
1. The user opens a URL for a protected resource in a web browser and the Mobile
and Social server (RP in the diagram) presents the user with a login page and a
menu of Identity Providers (Google, Yahoo, Facebook, Twitter, or LinkedIn) from
which to choose.
2. The user chooses an Identity Provider.
3. The Mobile and Social server redirects the user to the selected Identity Provider
which displays a login page.
4. The user enters a user name and password and, upon user authentication, the
Identity Provider sends the Mobile and Social server an authentication assertion.
5. The Mobile and Social server checks with the Identity repository to see if the User
has a local account.
The Identity repository could be a directory server, a database, Oracle Identity
Manager or similar. The user is determined to be a user who does not have a local
account. Mobile and Social proceeds as follows:
AAA/Idm or App
User Browser
AuthUI
Mobile and
Social
Server
Local
Auth ID Repository Local
Reg IDP
IDP Select
New or Existing User?
SSO + Attr Protocol (Eg: OPENID)
POST <Assertion>
Existing User: Authentication
AuthUI
New Session
Existing user:
AuthN flow

Understanding Social Identity Processes
41-26 Administrator's Guide for Oracle Access Management
■If the Identity Provider uses the Open ID protocol, the Mobile and Social
server retrieves the user's profile attributes by processing data in the
previously obtained authentication assertion.
■If the Identity Provider uses the OAuth protocol, the Mobile and Social server
makes a separate HTTP call to the Identity Provider with the previously
obtained Access Token to retrieve the user's profile attributes.
6. The Mobile and Social server sends a new user registration form to the user's
browser.
The registration form is pre-populated with the user profile attributes sent by the
Identity Provider in the previous step.
7. The user completes the registration form and sends it to which interfaces with the
user registry (either a directory server or Oracle Identity Manager) to create the
account.
In cases where an Access Token is retrieved from the Identity Provider, the Access
Token is also returned to the client application by way of Mobile and Social.
8. The Access Management Service for the client application carries out additional
authentication steps as needed.
9. The Access Management Service allows the user access to the protected resource.
Understanding Social Identity Processes
Understanding Mobile and Social 41-27
Figure 41–9 Authenticating a New User with No Local Account
41.6.3 Using OAuth For Access Token Retrieval
This section provides supplemental detail about the OAuth authentication and Access
Token retrieval flow between the User, the Mobile and Social server (the relying party),
and an OAuth Identity Provider. (Facebook, Foursquare, and Windows Live use the
OAuth 2.0 protocol, and LinkedIn and Twitter use the OAuth 1.0 protocol.) In this
scenario, the server interfaces with the OAuth Identity Provider to get an
authorization code and Access Token to access a resource protected by the OAuth
Identity Provider. The Client application in this scenario could be either a Web
application running on a Java-compliant application server, or a mobile application.
Figure 41–10, following the text, illustrates the process.
1. The user opens the client application which returns a protected web page to the
user's browser.
2. The user attempts to open the protected resource on the client application.
3. The client application asks the Mobile and Social server for an Access Token so
that the user can access the protected resource.
If Mobile and Social has the valid Access Token in its cache, it will forward the
Access Token to the client application and the authentication scenario would skip
AAA/IdM or App
User Browser
AuthUI [C1]
Mobile and
Social
Server
Local
Auth ID Repository Local
Reg IDP
IDP Select
New or Existing User
SSO + Attr Protocol (Eg: OPENID)
New User: Retrieve user attrs
New User: POST <Assertion>
New User: Registration
AuthUI
Registration Complete
New Session
New User:
Initiate REG flow

Understanding Social Identity Processes
41-28 Administrator's Guide for Oracle Access Management
to step 10. This flow assumes Mobile and Social does not have the Access Token in
its local cache.
4. Because the Access Token is not in its local cache, on behalf of the user, Mobile and
Social initiates an authorization request (utilizing HTTP headers to embed an
OAuth Client ID, scope information, and a redirect URL) with the OAuth Identity
Provider.
5. The OAuth Identity Provider displays a login page.
6. The user enters a user name and password into the OAuth Identity Provider login
page and gives consent to the Identity Provider to provide the user's profile
attributes to the Mobile and Social server (and, by extension, the client
application).
7. The OAuth Identity Provider sends an authorization code to the Mobile and Social
server.
8. The Mobile and Social server sends an Access Token request to the OAuth Identity
Provider.
Included in the request is the authorization code received in the previous step and
the OAuth Client ID and client credential.
9. The OAuth Identity Provider returns an Access Token to the Mobile and Social
server.
10. The Mobile and Social server caches the Access Token (with the User ID and the
OAuth Client ID) and forwards the Access Token to the client application.
11. The client application uses the Access Token to access the protected resource and
returns the protected page to the user's browser.
Understanding Social Identity Processes
Understanding Mobile and Social 41-29
Figure 41–10 Authenticating a User With an OAuth Identity Provider
41.6.4 Authenticating a User With Access Manager and Social Identity
This scenario describes the authentication process between the User, Access Manager,
the Mobile and Social server (the relying party), and the Identity Provider. Note that
the user must either have a local account or must register for a local account when
prompted; otherwise Access Manager will not let the user access the protected
resource and the User will be redirected to the login page. Figure 41–11, following the
text, illustrates the process.
1. The user attempts to open a protected resource on the client application.
2. The WebGate protecting the resource intercepts the access request.
AAA/Idm or App
User Browser
Mobile and
Social
Server
Client
App ID Repository Local
Reg OAuth SP
Client Apps UI to access
OAuth resource
User accesses
protected
resource
1
2
Get Access To ke n
for given scope
3
Persist Access Token with User ID, scope, and return Access Token
to client URL.
9
Access the resource using the Access To ke n
Access Token not found.
Get authorization code with Mobile and Social ID, scope, and redirect URL
4
OAuth Provider returns authorization code to Mobile and Social
User authenticates with the Provider and gives consent to allow resources to be accessed by the client
6
Get Access Token using the authorization code, OAuth Client ID and
Credential used by the Mobile and Social Server.
7
OAuth Provider returns token to Mobile and Social
8
5.1
10
5.2

Understanding Social Identity Processes
41-30 Administrator's Guide for Oracle Access Management
3. Access Manager identifies the authentication policy protecting the resource and
redirects the user to a login page provided by the Mobile and Social server.
4. The login page presents a menu of Social Identity Providers.
5. The user chooses an OpenID Identity Provider and Access Manager redirects the
user's browser to the Mobile and Social server, which redirects the user's browser
to the login page for the selected Social Identity Provider (Google, Facebook,
Twitter, and so on).
6. The user types a user name and password into the Social Identity Provider's login
page.
The Identity Provider completes the authentication process and requests the User's
consent to share Identity information (if applicable).
7. When authentication is complete, the Social Identity Provider redirects the
browser back to the Mobile and Social server.
After further processing of Identity assertions supplied by the Identity Provider
and after retrieving user identity information, the Mobile and Social server
redirects the user's browser to Access Manager. This time HTTP headers in the
page request provide Access Manager with the user's authentication status and
attributes.
8. Access Manager creates a user session and redirects the user to the protected
resource.
Understanding Social Identity Processes
Understanding Mobile and Social 41-31
Figure 41–11 Authenticating a User with Access Manager
41.6.5 Authenticating a User Locally
This scenario describes the authentication process if the user chooses not to
authenticate through a Social Identity Provider but instead authenticates using a local
account. Figure 41–12, following the text, illustrates the process.
1. The user opens a URL for a protected resource in a web browser and the Mobile
and Social server presents the user with a login page and a menu of Identity
Providers from which to choose.
2. The user chooses to use local authentication and types a user name and password
at the login page.
3. The client application's Access Management Service carries out additional
authentication steps as needed.
■If using the JWT Token Service, a User Token may be created.
■The OAM Token Service does not return tokens during the local
authentication flow.
4. The Access Management Service creates a session for the user and the user
accesses the protected resource.
User
Browser
Protected
Application WebGate Credential
Collector
Access
Manager
Mobile and
Social
Social
Identity
Provider
User tries to access
protected application
1
WebGate Intercepts
and redirects to Access Manager
2
Access Manager Identifies the authentication policy and redirects for Credential Collection
3
Credential collector presents Identity Provider Login Selection Page.
4
Access Manager reads the selection and redirect to Mobile and Social as per the contract
5
Mobile and Social redirects to the Access Manager Auth scheme with status and user attributes
7
Access Manager creates a session and completes the access protection
8
Mobile and Social
completes the
authentication process
6
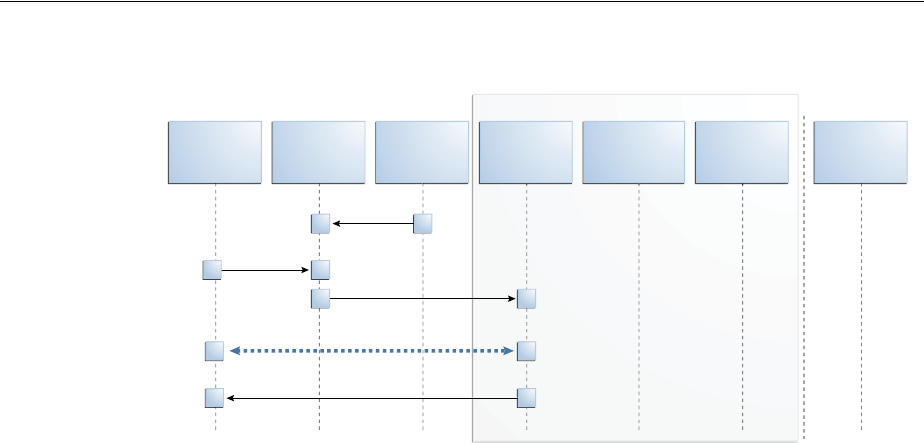
Using Social Identity
41-32 Administrator's Guide for Oracle Access Management
Figure 41–12 Authenticating a User Locally
41.7 Using Social Identity
The following sections contain details about how you might use the Social Identity.
For examples of ways to integrate Social Identity, see Section 41.6, "Understanding
Social Identity Processes."
■Using Social Identity With Oracle Access Manager
■Using Social Identity With Mobile Services
■Using the Social Identity SDK
41.7.1 Using Social Identity With Oracle Access Manager
Users can choose to log in to Access Manager protected resources using credentials
from a Social Identity Provider if you integrate Social Identity with Access Manager. In
this arrangement, users enter their Identity Provider credentials. Access Manager
forwards the User's login request to Mobile and Social, which completes the
authentication process with the Identity Provider in the background. Mobile and
Social (the relying party) redirects the User to Access Manager. At the same time,
Mobile and Social provides Access Manager with the User's authentication status and
User attributes, which were sent by the Identity Provider. For more information about
how Access Manager uses Social Identity for authentication, see Section 41.6.4,
"Authenticating a User With Access Manager and Social Identity."
41.7.2 Using Social Identity With Mobile Services
You can configure Mobile Services to allow mobile devices to authenticate using Social
Identity. After an Identity Provider verifies a user's credentials, Social Identity can
prompt the user to create an account with your organization. To pre-populate the new
user registration form with data returned from the Identity Provider, refer to the
"Developing Applications Using the Social Identity Client SDK" chapter in the Oracle
Fusion Middleware Developer's Guide for Oracle Access Management.
AAA/Idm or App
User Browser
AuthUI
Mobile and
Social
Server
Local
Auth ID Repository Local
Reg IDP
Local Login
Select
Existing User: authentication
AuthUI
New Session

Using Social Identity
Understanding Mobile and Social 41-33
41.7.3 Using the Social Identity SDK
Developers who maintain Java-compliant Web applications can add Social Identity
functionality to their Web offering using the Mobile and Social Social Identity SDK.
This SDK is available for Java-powered Web applications only. For information about
the SDK, see the "Developing Applications Using the Social Identity Client SDK"
chapter in the Oracle Fusion Middleware Developer's Guide for Oracle Access Management.

Using Social Identity
41-34 Administrator's Guide for Oracle Access Management

42
Configuring Mobile Services 42-1
42
Configuring Mobile Services
[17]
Mobile and Social provides a graphical user interface for configuring Mobile Services.
This chapter describes how to use the Oracle Access Management Console to
configure Mobile Services and contains the following topics.
■Opening the Mobile Services Configuration Page
■Understanding Mobile Services Configuration
■Defining Service Providers
■Defining Service Profiles
■Defining Security Handler Plug-ins
■Defining Application Profiles
■Defining Service Domains
■Using the Jail Breaking Detection Policy
■Configuring Mobile Services with Other Oracle Products
42.1 Opening the Mobile Services Configuration Page
Follow these steps to open the Mobile Services configuration page in the Oracle Access
Management Console.
1. Log in to the Oracle Access Management Console.
The Launch Pad opens.
2. Click Mobile Services in the Mobile and Social pane.
The Welcome to Mobile and Social - Mobile Services page opens.
42.2 Understanding Mobile Services Configuration
The Welcome to Mobile and Social - Mobile Services configuration page is divided into
separate panels that can be expanded and collapsed by clicking the arrow button in
the top left corner of the panel. The following sections contain more information about
the Mobile Services panels.
Note: Mobile Services can be configured from the command line
using WLST. For more information about the Mobile and Social WLST
commands, see the Oracle Fusion Middleware WebLogic Scripting Tool
Command Reference.

Understanding Mobile Services Configuration
42-2 Administrator's Guide for Oracle Access Management
■Understanding Service Providers
■Understanding Service Profiles
■Understanding Security Handler Plug-ins
■Understanding Application Profiles
■Understanding Service Domains
42.2.1 Understanding Service Providers
A Service Provider is defined for each back-end service that you are making available
to client applications. By configuring the back-end service as a Service Provider, the
Mobile and Social server knows how to communicate with it. You can configure a
back-end service as one of the following Service Provider types.
■Authentication Service Provider - Interfaces with an Identity Provider so that the
back-end service can authenticate users, mobile devices, client applications, access
permissions, and issue authentication tokens accordingly. Mobile and Social
supports Access Manager and JSON Web Tokens (JWT) with their own Service
Provider and Service Profile configuration objects. Further, mobile client
authentication and non-mobile client authentication is managed separately so each
token type has a separate mobile and non-mobile Service Provider and Service
Profile. The following pre-configured Authentication Service Providers are
available for typical deployments.
–OAMAuthentication - Oracle Access Manager Authentication Token Service
Provider
–MobileOAMAuthentication - Mobile Oracle Access Manager Authentication
Token Service Provider
–JWTAuthentication - JSON Web Token Authentication Service Provider
–MobileJWTAuthentication - Mobile JSON Web Token Authentication Service
Provider
–JWTOAMAuthentication - Allows lightweight, long-duration JWT tokens to
be exchanged for OAM tokens. OAM tokens provide SSO and OAM resource
access to clients. This provider allows users using non-mobile applications to
get a new OAM token without having to provide credentials if they have a
valid, long-duration JWT token.
–MobileJWTOAMAuthentication - Allows lightweight, long-duration JWT
tokens to be exchanged for OAM tokens. OAM tokens provide SSO and OAM
resource access to clients. This provider allows users using mobile applications
to get a new OAM token without having to provide credentials if they have a
valid, long-duration JWT token.
–InternetIdentityAuthentication -The Social Identity JSON Web Token
Authentication Service Provider provides pre-configured support for apps
using Mobile Services to accept an authentication result from the Mobile and
Note: Mobile and Social includes pre-configured objects to support
typical deployment scenarios. These objects are designed to help you
get Mobile and Social up and running with only minor modifications
required. Each section lists the pre-configured objects available after
installation.

Understanding Mobile Services Configuration
Configuring Mobile Services 42-3
Social Social Identity (as described in Section 41.5, "Understanding Social
Identity").
Also see Section 42.3.1, "Defining, Modifying or Deleting an Authentication
Service Provider" for instructions on how to create a custom Authentication
Service Provider.
■Authorization Service Provider - Interfaces with a back-end Identity Provider that
makes authorization (access) decisions. The pre-configured OAMAuthorization
Authorization Service Provider is provided for typical deployments. See
Section 42.3.2, "Defining, Modifying or Deleting an Authorization Service
Provider" for instructions on how to create a custom Authorization Service
Provider.
■User Profile Service Provider - Interfaces with a directory server to lookup and
update User Profile records. The pre-configured User Profile Service Provider is
provided for typical deployments. See Section 42.3.3, "Defining, Modifying or
Deleting a User Profile Service Provider" for instructions on how to create a
custom User Profile Service Provider.
42.2.2 Understanding Service Profiles
After defining a Service Provider, you configure one or more Service Profiles for it. A
Service Profile is a logical envelope that defines a Service Endpoint URL for a Service
Provider on the Mobile and Social server. You can create multiple Service Profiles for a
Service Provider to define different token capabilities and service endpoints. Each
Service Provider instance requires at least one corresponding Service Profile. Mobile
and Social includes a pre-configured Service Profile for each pre-configured Service
Provider configuration object documented in Section 42.2.1, "Understanding Service
Providers."
42.2.3 Understanding Security Handler Plug-ins
A Security Handler Plug-in enhances security by consulting additional logic for trust
and risk analysis. (Such additional logic may deny certain risky operations.) The
Security Handler Plug-in applies the logic during Authentication Service operations,
including client application registration. Using a Security Handler Plug-in is optional.
The Security Handler Plug-ins provided with this version of the software are
optimized for mobile applications. If used, only apply it to mobile-related Service
Domains, its authentication services and client applications. Do not use a Security
Handler Plug-in with a non-mobile application.
Mobile and Social invokes the Security Handler Plug-in during sensitive security
operations (such as authentication) as well as during operations that involve token
acquisition. Mobile and Social includes the following preconfigured Security Handler
Plug-ins:
■The
OAAMSecurityHandlerPlugin
enables the sophisticated device registration and
risk-based strong authentication logic available in Oracle Adaptive Access
Manager.
■The
Default
Security Handler Plug-in offers more limited device registration
logic.
42.2.4 Understanding Application Profiles
An Application Profile describes the configuration and security properties of the client
application that will consume services provided by the Service Provider. An

Defining Service Providers
42-4 Administrator's Guide for Oracle Access Management
Application Profile is required either when mobile applications are used, or when a
non-mobile application is used with a service that does not have secured application
protection. Attributes defined include an Application Profile name, a short description
of the application, a list of name-value attribute pairs, and its mobile configuration
settings. (Mobile configuration settings include options such as the maximum duration
in minutes that the Profile can be cached, the number of allowable authentication
retries, and whether offline authentication is allowed.) You can also choose which
mobile device attributes (such as
phonecarriername
,
phonenumber
,
osversion
, and so
on) are required for the application. A single Application Profile can be assigned to
multiple Service Domains.
42.2.5 Understanding Service Domains
A Service Domain is a logical grouping that serves to associate a Service Profile with an
Application Profile and (optionally) a Security Handler Plug-in. A Service Domain
specifies how applications are allowed to access services in Mobile and Social.
Typically an organization should have one Service Domain for managing mobile apps,
and a separate Service Domain for managing non-mobile apps. When creating a
Service Domain you:
■Decide whether the Service Domain is for managing mobile applications or
desktop applications.
■Choose an authentication scheme and, optionally, a Security Handler Plug-in for
the Service Domain.
■Add one or more Mobile SSO Agents and configure which agents have priority
over the others.
■Add one or more applications to the Service Domain and configure which can use
a Mobile SSO Agent.
■Choose at least one Service Profile for the Service Domain.
■Configure security settings to protect the Service Domain services.
Mobile and Social includes the following pre-configured Service Domains:
■The Default (Service Domain) is pre-configured for non-mobile applications.
■The Mobile Service Domain is pre-configured for mobile applications.
Use one of these Service Domains as a template to create your own, or modify them to
suit the needs of your organization. Only mobile authentication Service Profiles can be
added to a mobile Service Domain.
42.3 Defining Service Providers
A Service Provider is defined for each back-end service that is available to client
applications. This configures how the Mobile and Social server will interface with the
defined back-end Service Provider. Depending on the services that you are providing,
you may only need to configure one or two of the available Service Provider options.
For example, if you are only providing authentication services, you do not need to
define the User Profile Service Provider or Authorization Service Provider. This section
includes the following procedures:
■Defining, Modifying or Deleting an Authentication Service Provider
■Defining, Modifying or Deleting an Authorization Service Provider
■Defining, Modifying or Deleting a User Profile Service Provider

Defining Service Providers
Configuring Mobile Services 42-5
42.3.1 Defining, Modifying or Deleting an Authentication Service Provider
An Authentication Service Provider allows Mobile and Social to authenticate users, client
applications, and access permissions using a back-end Authentication Service by way
of a token exchange. Upon successful authentication and verification, a token may be
returned to the client application. The following authentication types are supported.
■When installed with Access Manager, Mobile and Social supports JSON Web
Tokens (JWT) and Access Manager (OAM) tokens.
■When installed without Access Manager, only the JSON Web Token (JWT) type is
supported.
The following sections contain more information regarding Authentication Service
Providers.
■Understanding the Pre-Configured Authentication Service Providers
■Understanding the JWT-OAM Token Authentication Service Provider
■Creating an Authentication Service Provider
■Editing or Deleting an Authentication Service Provider
■Requiring User Credentials to Exchange a JWT Token for an OAM Token
■Configuring OAM to use the JWT-OAM + PIN Token Service Provider
42.3.1.1 Understanding the Pre-Configured Authentication Service Providers
Mobile and Social provides pre-configured Authentication Service Providers for the
Authentication Services listed in Table 42–1.
For each token type (Access Manager and JWT), Mobile and Social provides separate
"out-of-the-box" mobile and non-mobile (or desktop) Service Provider configurations.
Separate configurations are provided so that you can optimize each to best meet the
needs of each access mode. Mobile devices must use a mobile Service Provider,
however, non-mobile devices can use either a mobile service provider or a non-mobile
service provider if correct input is provided.
Mobile Service Providers use Client Registration Handles to register mobile devices,
whereas non-mobile Service Providers use Client Tokens to authenticate non-mobile
devices. The Client Token capability in Mobile and Social can be disabled, but the
Client Registration Handle capability cannot.
Note: See Section 41.1.2, "Deploying Mobile and Social" for
information about deploying Mobile and Social with a WebGate.

Defining Service Providers
42-6 Administrator's Guide for Oracle Access Management
Table 42–1 Pre-configured Authentication Service Providers
Authentication
Service
Mobile and Social Service
Provider Name Description
Access Manager OAMAuthentication Provides pre-configured support for users using
desktop devices to authenticate using Access Manager.
This Service Provider can issue a Client Token, but it
cannot register mobile devices.
The following Java class implements this Service
Provider:
oracle.security.idaas.rest.provider.token.OAMSD
KTokenServiceProvider
Mobile Access Manager MobileOAMAuthentication Provides pre-configured support for users using mobile
devices to authenticate using Access Manager.
This Service Provider supports registering new devices
using a Client Registration Handle when the User
authenticates.
The following Java class implements this Service
Provider:
oracle.security.idaas.rest.provider.token.Mobil
eOAMTokenServiceProvider
JSON Web Token JWTAuthentication Provides pre-configured support for users using
non-mobile applications to authenticate using the JSON
Web Token format. JSON Web Token is a compact
token format that is suitable for space-constrained
environments such as HTTP Authorization headers.
This Service Provider can issue a Client Token, but it
cannot register new devices using a Client Registration
Handle.
The following Java class implements this Service
Provider:
oracle.security.idaas.rest.provider.token.JWTTo
kenServiceProvider
Mobile JSON Web
Token
MobileJWTAuthentication Provides pre-configured support for users using mobile
devices to authenticate using the Mobile JSON Web
Token format.
This Service Provider supports registering new devices
using a Client Registration Handle.
The following Java class implements this Service
Provider:
oracle.security.idaas.rest.provider.token.Mobil
eJWTTokenServiceProvider

Defining Service Providers
Configuring Mobile Services 42-7
42.3.1.2 Understanding the JWT-OAM Token Authentication Service Provider
The JWTOAMAuthentication and the MobileJWTOAMAuthentication Service
Provider types require further explanation. The JWT-OAM token provider lets mobile
and non-mobile clients use a JSON Web Token (JWT) to retrieve an OAM User token
and an OAM Master token. Depending on your deployment, you may want to have a
long-duration JWT token instead of one or more long-duration OAM tokens. A JWT
token is lightweight and makes an ideal token to hold for a long duration.
Using the JWT-OAM token exchange feature, your application authenticates the user
with a user name and password, then obtains a JWT token, an OAM user token, and
an OAM master token. You can configure the JWT token to have a very long duration
compared to the duration of OAM tokens. Once the OAM tokens expire, clients use
the still-valid long-duration JWT token to get OAM tokens again.
The presence of OAM tokens can provide mobile and non-mobile clients with access to
resources protected by Access Manager. Exchanging a JWT token for OAM tokens
benefits the user, who does not need to provide credentials to get new OAM tokens to
replace the expired tokens.
As an added security measure, Mobile and Social can require users to enter an
additional credential, such as a PIN, when using a JWT user token to get an OAM
token. For details, see Section 42.3.1.5, "Requiring User Credentials to Exchange a JWT
Token for an OAM Token."
JWT-OAM Token
Provider
JWTOAMAuthentication Allows lightweight, long-duration JWT tokens to be
exchanged for OAM tokens. OAM tokens provide SSO
and OAM resource access to clients. This provider
allows users using non-mobile applications to get a
new OAM token without having to provide credentials
if they have a valid, long-duration JWT token.
Mobile JWT-OAM
Token Provider
MobileJWTOAMAuthentication Allows lightweight, long-duration JWT tokens to be
exchanged for OAM tokens. OAM tokens provide SSO
and OAM resource access to clients. This provider
allows users using mobile applications to get a new
OAM token without having to provide credentials if
they have a valid, long-duration JWT token.
Social Identity Web
Token
InternetIdentityAuthentication Provides pre-configured support for apps using Mobile
Services to accept an authentication result from Social
Identity (for example, Google, Facebook, Twitter, and
so on).
This Service Provider supports registering new devices
using a Client Registration Handle. After the User
authenticates with the Identity Provider, this Service
Provider issues a User Token to the requesting client
application. The User Token allows the User to obtain a
Client Registration Handle for the device.
This service uses the same Java class as the JSON Web
Token service, but it is configured with two additional
name-value attribute pairs.
The following Java class implements this Service
Provider:
oracle.security.idaas.rest.provider.token.JWTTo
kenServiceProvider
Table 42–1 (Cont.) Pre-configured Authentication Service Providers
Authentication
Service
Mobile and Social Service
Provider Name Description

Defining Service Providers
42-8 Administrator's Guide for Oracle Access Management
42.3.1.3 Creating an Authentication Service Provider
1. Open the Mobile Services Home Page in the Oracle Access Management Console
as described in Section 42.1, "Opening the Mobile Services Configuration Page."
2. Click Create in the Service Providers panel in the home area and choose Create
Authentication Service Provider.
The Authentication Service Provider Configuration page displays.
3. Enter values for the Authentication Service Provider properties.
■Name - Type a unique name for this Authentication Service Provider.
■Description - (Optional) Type a short description that will help you or another
Administrator identify this service in the future.
■Service Provider Java Class - Type the name of the Java class that implements
this Authentication Service Provider.
4. Add or delete Authentication Service Provider Attributes and their values based
on either Table 42–2 (OAMAuthentication and the MobileOAMAuthentication
Service Provider types), Table 42–4 (JWTAuthentication and the
MobileJWTAuthentication Service Provider types), or Table 42–5 (JWT-OAM
Authentication Service Provider Default Attributes).
■Table 42–2 and Table 42–3 are specific to a Mobile and Social integration with
Access Manager. The values in Table 42–2 apply to both the
OAMAuthentication and the MobileOAMAuthentication Service Provider
types. The values in Table 42–3 configure the WebGate agent.
Note: If you created a custom Authentication Service Provider, use
the Attributes panel to further configure it. For the JWTAuthentication
and MobileJWTAuthentication Service Providers, custom attributes
are not used.
Table 42–2 Access Manager Authentication Service Provider Default Attributes
Name Default Value Notes
OAM_VERSION OAM_11G
Either
OAM_11G
or
OAM_10G
, depending on
the Oracle Access Manager version in
use.
DEBUG_VALUE 0
TRANSPORT_SECURITY OPEN
Specify the method for encrypting
messages between this AccessGate and
the Access Servers. The encryption
methods need to match. Valid values
include:
■
OPEN
■
SIMPLE
■
CERT
To update these settings, see
Section 42.9.1.1, "Configuring Mobile
Services to Work With Access Manager in
Simple and Certificate Mode."
OAM_SERVER_1 localhost:5575
Specify the host name and port number
of the primary Oracle Access
Management server.

Defining Service Providers
Configuring Mobile Services 42-9
■Table 42–4 is specific to connecting a Mobile and Social server to JWT
Authentication Service Providers. The configuration values in this section
apply to both the JWTAuthentication and the MobileJWTAuthentication
Service Provider types.
OAM_SERVER_1_MAX_CONN 4
Specify the maximum number of
connections that this Mobile and Social
instance can establish with OAM_
SERVER_1. The default value is 4.
OAM_SERVER_2 oam_server_2:5575
Specify the host name and port number
of the secondary Oracle Access
Management server.
OAM_SERVER_2_MAX_CONN 4
Specify the maximum number of
connections that this Mobile and Social
instance can establish with OAM_
SERVER_2. The default value is 4.
IDContextEnabled true
Add this attribute with a value of
true
to
enable Identity Context, as described in
Section 48.5.7, "Configuring Oracle
Access Management Mobile and Social."
Table 42–3 WebGate Agent for Authentication Service Provider Default Attributes
Name Default Value Notes
WebGate ID
Type the WebGate agent name that
identifies the WebGate instance to which
you are connecting.
Encrypted Password Copy and paste the
encrypted password for
the WebGate ID
Locate the
OAM-Domain-Directory
/output/
Profile-N
ame
/ObAccessClient.xml
file and copy
the encrypted password value located in
the element
ParamName=accessClientPasswd
.
Table 42–4 JWT Authentication Service Provider Default Attributes
Name Default Value Notes
Identity Directory
Service Name
Select from the menu the
Directory Service that should be
used to verify the User.
The JWT token service verifies the
user with a directory server.
Crypto Scheme RS512
The cryptographic algorithm used
to sign the contents of the JWT
token. The default value is
RS512
.
(RSA encryption using SHA-512
hash algorithm.)
Validity Period 3600
The length of time in seconds that
the token is considered to be valid.
The default value is
3600
.
Relying Party Token Enabled
Select Enabled if the Service
Provider should accept security
tokens from an external issuer.
Table 42–2 (Cont.) Access Manager Authentication Service Provider Default Attributes
Name Default Value Notes

Defining Service Providers
42-10 Administrator's Guide for Oracle Access Management
Table 42–5 is specific to the JWTOAMAuthentication and the
MobileJWTOAMAuthentication Service Provider types.
Issuer
If Relying Party Token is enabled,
specify the Security Token Service
issuer
Table 42–5 JWT-OAM Authentication Service Provider Default Attributes
Name Default Value Notes
OAM_VERSION OAM_11G
Either
OAM_11G
or
OAM_10G
, depending on
the Oracle Access Manager version in
use.
DEBUG_VALUE 0
TRANSPORT_SECURITY OPEN
Specify the method for encrypting
messages between this AccessGate and
the Access Servers. The encryption
methods need to match. Valid values
include:
■
OPEN
■
SIMPLE
■
CERT
OAM_SERVER_1 localhost:5575
Specify the host name and port number
of the primary Oracle Access
Management server.
OAM_SERVER_1_MAX_CONN 4
Specify the maximum number of
connections that this Mobile and Social
instance can establish with OAM_
SERVER_1. The default value is 4.
OAM_SERVER_2 oam_server_2:5575
Specify the host name and port number
of the secondary Oracle Access
Management server.
OAM_SERVER_2_MAX_CONN 4
Specify the maximum number of
connections that this Mobile and Social
instance can establish with OAM_
SERVER_2. The default value is 4.
user.Authenticator
■Default value for
JWTOAMAuthenti
cation
provider:
oracle.securit
y.idaas.rest.p
rovider.token.
OAMSDKTokenSer
viceProvider
■Default value for
MobileJWTOAMAu
thentication
provider:
oracle.securit
y.idaas.rest.p
rovider.token.
JWTTokenServic
eProvider
Optional. Specify which of two available
authenticators to use for user
authentication.
■For OAM Authentication:
oracle.security.idaas.rest.prov
ider.token.OAMSDKTokenServicePr
ovider
■For IDS Authentication:
oracle.security.idaas.rest.prov
ider.token.JWTTokenServiceProvi
der
Table 42–4 (Cont.) JWT Authentication Service Provider Default Attributes
Name Default Value Notes

Defining Service Providers
Configuring Mobile Services 42-11
5. Click Create to create the Service Provider configuration object.
42.3.1.4 Editing or Deleting an Authentication Service Provider
To edit or delete an Authentication Service Provider, select the Service Provider in the
panel and click Edit or Delete on the panel's tool bar.
UserAuthenticationInput UIDPASSWORD
Specify how the client application should
authenticate the user. The only supported
value is
UIDPASSWORD
.
UserAuthenticationOutput USERTOKEN
Specify all possible token types that the
client application will receive if user
authentication is successful.
Configure this parameter with any
combination of the following:
■
USERTOKEN::JWTUT
■
USERTOKEN::OAMUT
■
USERTOKEN
::
OAMMT
JWTUT
specifies the JWT-type user token.
OAMUT
specifies the OAM-type user token.
OAMMT
specifies the OAM-type master
token.
If no value is supplied, all three token
types are assumed.
TokenExchangeInput JWT_UT+CRED
Specifies what is required to exchange a
JWT type user token for an OAM token.
Configure this parameter with one of the
following:
■
JWT_UT
■
JWT_UT+CRED
JWT_UT
specifies that a JWT type user
token is required to get OAM tokens.
JWT_UT+CRED
specifies that, in addition to
a JWT user token, an additional
credential such as a personal
identification number is required to get
OAM tokens.
If no value is supplied, the token
exchange feature is disabled.
TokenExchangeOutput USERTOKEN::OAMUT,U
SERTOKEN::OAMMT
Configure this parameter with any
combination of the following:
■
USERTOKEN::OAMUT
■
USERTOKEN::OAMMT
OAMUT
specifies the OAM type user token.
OAMMT
specifies the OAM type master
token.
Table 42–5 (Cont.) JWT-OAM Authentication Service Provider Default Attributes
Name Default Value Notes

Defining Service Providers
42-12 Administrator's Guide for Oracle Access Management
42.3.1.5 Requiring User Credentials to Exchange a JWT Token for an OAM Token
As an added security measure, Mobile and Social can require users to enter an
additional credential, such as a PIN, when using a JWT user token to get an OAM
token. To enable the user PIN requirement, specify the
JWT_UT+CRED
parameter as
described in Table 42–5 when configuring the
TokenExchangeInput
attribute.
To use this feature, the user PIN or other credential must be present in the user entry in
the directory server. Mobile and Social does not put restrictions on credential values; it
simply validates the credential value submitted by the user with the value present in
the user entry. For security reasons, user credentials should be saved as hashed
attributes. See Section 42.3.1.6, "Configuring OAM to use the JWT-OAM + PIN Token
Service Provider" for the steps required to get this configuration to work.
42.3.1.6 Configuring OAM to use the JWT-OAM + PIN Token Service Provider
1. Open your directory server and extend the LDAP Schema for the PIN Attribute.
After the LDAP schema change, you can add new users and modify existing users
to have a PIN value.
a. Create the PIN attribute. See Figure 42–1 for an example using Oracle
Directory Services Manager (ODSM) and Oracle Unified Directory (OUD).
Figure 42–1 Using ODSM to create the PIN attribute in OUD
b. Create a PINPERSON object class. See Figure 42–2 for an example using
Oracle Directory Services Manager (ODSM).
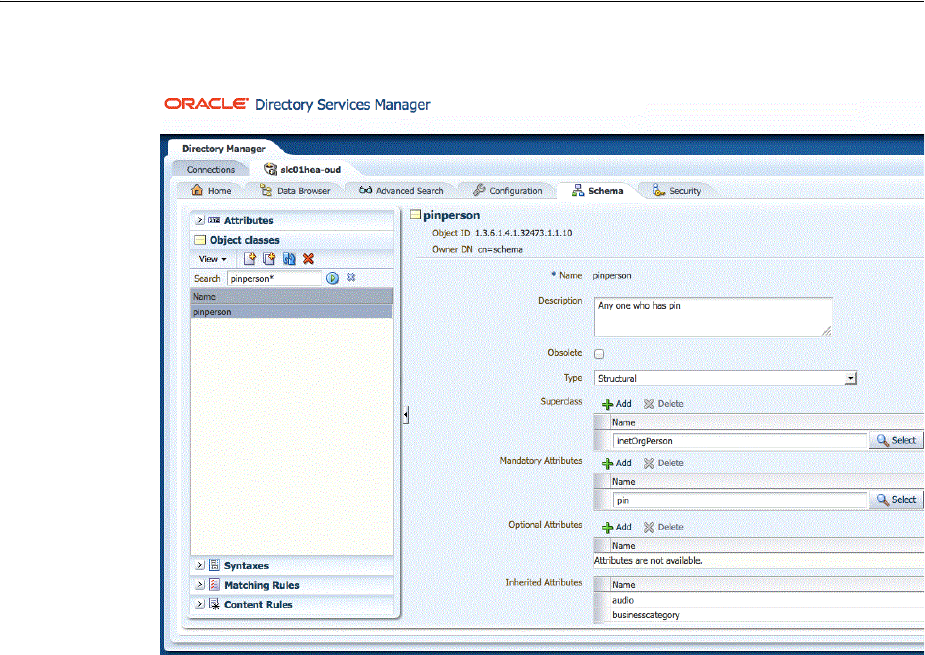
Defining Service Providers
Configuring Mobile Services 42-13
Figure 42–2 Using ODSM to create the pinperson object class
2. Using the OAM Console, create a new IdentityStore for the external LDAP server
that you extended to use the PIN attribute.
a. Log in to the OAM Console and choose Launch Pad > User Identity Stores.
b. Click the Create button to create a new IdentityStore in OAM ID Stores. See
Figure 42–3 for details.
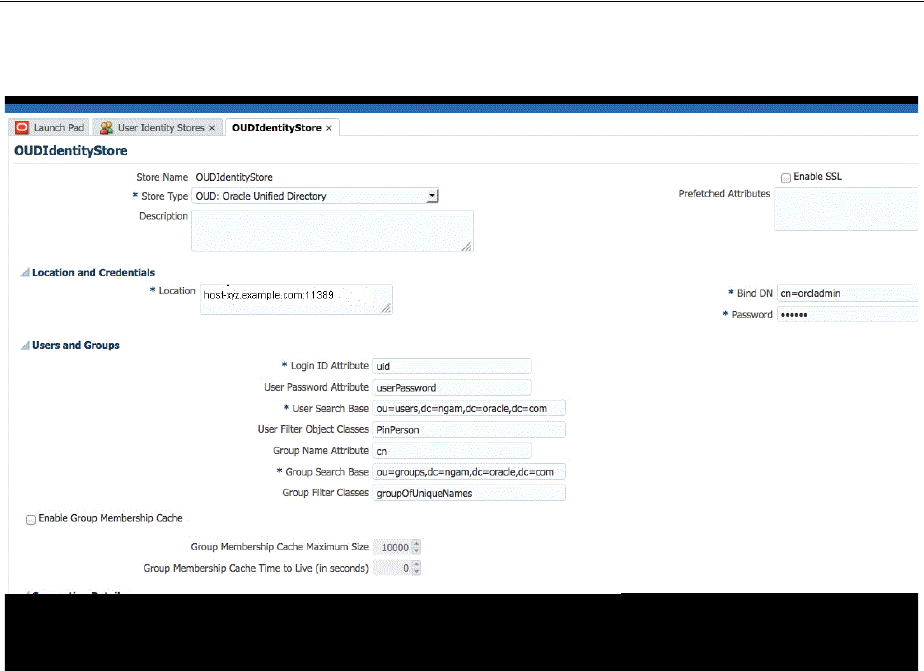
Defining Service Providers
42-14 Administrator's Guide for Oracle Access Management
Figure 42–3 Using the OAM Console to create an IdentityStore
3. Add a new OAM authentication module for the new Identity Store.
a. Open the OAM console and choose Launch Pad > Authentication Modules.
b. Create a new authentication module by clicking the Create New button and
selecting Create Custom Authentication Module.
c. On the General tab, type a Name--for example,
PINBasedUserPlugin
.
d. On the Steps tab, type the following values:
Step Name:
UI
Plug-in Name:
UserIdentificationPlugIn
Plug-in Parameters:
- KEY_LDAP_FILTER:
(&(uid={KEY_USERNAME})(pin={cred}))
-KEY_IDENTITY_STORE_REF:
OUDIdentityStore
(This data store has to be
added first to do this step.)
-KEY_SEARCH_BASE_URL:
ou=users,dc=ngam,dc=oracle,dc=com
e. On the Steps Orchestration tab, choose UI from the Initial Step menu.
4. Add a new authentication scheme.
a. Open the OAM Console and choose Launch Pad > Authentication Schemes.
b. Click the Create button to create a new authentication scheme.
c. Complete the form:
Name:
PINBasedUserAuthNScheme

Defining Service Providers
Configuring Mobile Services 42-15
Authentication Level:
3
Challenge Method:
FORM
Authentication Module: Choose the authentication module you created in the
previous step--for example,
PINBasedUserPlugin
.
5. Change the authentication policy to use the new authentication scheme.
a. Open the OAM Console and choose Launch Pad > Application Domain >
IAM Suite > OICTokenExchangePolicy.
b. From the Authentication Scheme drop-down menu, choose
PINBasedUserAuthNScheme.
6. Configure the (Mobile) JWTOAMAuthenticationProvider.
a. Open the OAM Console and choose Launch Pad > Mobile Service >
MobileJWTOAMAuthenticationProvider.
b. From the Identity Directory Service Name drop-down menu, choose the
directory service that points to the IdentityStore you created in step 2.
c. If a desktop (or non-mobile) service is required, repeat steps a and b to
configure the JWTOAMAuthenticationProvider.
7. Create an application profile.
a. Open the OAM Console and choose Launch Pad > Application Profiles.
b. Click the Create button and create a new application profile--for example,
mobileapp1
.
8. Update the MobileServiceDomain.
a. Open the OAM Console and choose Launch Pad > Mobile Services >
MobileServiceDomain.
The Service Domain Configuration page opens.
b. In the Application Profiles section (subtab), add the application profile you
created in the previous step (
mobileapp1
).
c. Click the Service Profiles subtab to open it and change the Authentication
Service to
MobileJWTOAMAuthentication
.
42.3.2 Defining, Modifying or Deleting an Authorization Service Provider
An Authorization Service Provider allows a back-end Identity service to make
authorization decisions on behalf of a connected application. This section contains the
following topics about Authorization Service Providers.
■Creating an Authorization Service Provider
■Editing or Deleting an Authorization Service Provider
■Understanding the Pre-Configured Authorization Service Provider
42.3.2.1 Creating an Authorization Service Provider
1. Open the Mobile Services Home Page in the Oracle Access Management Console
as described in Section 42.1, "Opening the Mobile Services Configuration Page."
2. Click Create in the Service Providers panel in the home area and choose Create
Authorization Service Provider.

Defining Service Providers
42-16 Administrator's Guide for Oracle Access Management
The Authorization Service Provider Configuration page displays.
3. Enter values for the Authorization Service Provider properties.
■Name - Type a unique name for this Authorization Service Provider.
■Description - (Optional) Type a short description that will help you or another
Administrator identify this service in the future.
■Service Provider Java Class - Type the name of the Java class that implements
this Authorization Service Provider.
4. Add or delete Authorization Service Provider Attributes and their values based on
Table 42–6.
5. Configure the WebGate agent by creating a new agent or entering values for an
existing agent as per Table 42–7. The WebGate agent configuration values are
specific to the integration between Mobile Services and Access Manager.
Table 42–6 Access Manager Authorization Service Provider Default Attributes
Name Value Notes
OAM_VERSION OAM_11G
Either
OAM_11G
or
OAM_10G
, depending on
the Oracle Access Manager version in
use.
DEBUG_VALUE 0
TRANSPORT_SECURITY OPEN
Specify the method for encrypting
messages between this AccessGate and
the Access Servers. The encryption
methods need to match. Valid values
include:
■
OPEN
■
SIMPLE
■
CERT
OAM_SERVER_1 localhost:5575
Specify the host name and port number
of the primary Oracle Access
Management server.
OAM_SERVER_1_MAX_CONN 4
Specify the maximum number of
connections that this Mobile and Social
instance can establish with OAM_
SERVER_1. The default value is 4.
OAM_SERVER_2 oam_server_2:5575
Specify the host name and port number
of the secondary Oracle Access
Management server.
OAM_SERVER_2_MAX_CONN 4
Specify the maximum number of
connections that this Mobile and Social
instance can establish with OAM_
SERVER_2. The default value is 4.
Table 42–7 WebGate Agent for Authorization Service Provider Default Attributes
Name Value Notes
WebGate ID
Type the WebGate agent name that
identifies the WebGate instance to which
you are connecting.

Defining Service Providers
Configuring Mobile Services 42-17
6. Click Create to create the Service Provider configuration object.
42.3.2.2 Editing or Deleting an Authorization Service Provider
To edit or delete an Authorization Service Provider, select the Service Provider in the
panel and click Edit or Delete on the panel's tool bar.
42.3.2.3 Understanding the Pre-Configured Authorization Service Provider
Mobile and Social provides a pre-configured Authorization Service Provider for
Access Manager named the OAMAuthorization Authorization Service Provider. The
oracle.security.idaas.rest.provider.authorization.OAMSDKAuthZServiceProvid
er
Java class implements the pre-configured Authorization Service Provider.
42.3.3 Defining, Modifying or Deleting a User Profile Service Provider
A User Profile Service Provider allows an application to query and update a directory
server. Many LDAP compliant directory servers are supported including:
■Microsoft Active Directory
■Novell eDirectory
■Oracle Directory Server Enterprise Edition
■Oracle Internet Directory
■Oracle Unified Directory
■Oracle Virtual Directory (using the Oracle Internet Directory template)
■OpenLDAP
■IBM Tivoli Directory Server (using the OpenLDAP template)
■WebLogic Server Embedded LDAP
Mobile and Social includes a pre-configured User Profile Service Provider that your
organization can use, or you can create your own. Before you can create a User Profile
Service Provider you must first create an Identity Directory Service profile. The Identity
Directory Service (IDS) is a flexible service used by Access Manager as the means for
accessing multiple identity data stores. For more information about the Identity
Directory Service, see Section 5.3, "Managing the Identity Directory Service User
Identity Stores."
The following sections contain more information about User Profile Service Providers.
■Creating a User Profile Service Provider
■Editing or Deleting a User Profile Service Provider
■Understanding the Pre-Configured User Profile Service Provider
Encrypted Password Copy and paste the
encrypted password for
the WebGate ID
Locate the
OAM-Domain-Directory
/output/
Profile-N
ame
/ObAccessClient.xml
file and copy
the encrypted password value located in
the element
ParamName=accessClientPasswd
.
Table 42–7 (Cont.) WebGate Agent for Authorization Service Provider Default Attributes
Name Value Notes

Defining Service Providers
42-18 Administrator's Guide for Oracle Access Management
42.3.3.1 Creating a User Profile Service Provider
1. Open the Mobile Services Home Page in the Oracle Access Management Console
as described in Section 42.1, "Opening the Mobile Services Configuration Page."
2. Click Create in the Service Providers panel in the home area and choose Create
User Profile Service Provider.
The Service Provider Configuration page displays.
3. Enter values for the User Profile Service Provider properties.
■Name - Type a unique name for this User Profile Service Provider.
■Description - (Optional) Type a short description that will help you or another
Administrator identify this service in the future.
4. Add or delete User Profile Service Provider Attributes and their values based on
Table 42–8.
5. In the Identity Directory Service section, choose from the Name menu the
Identity Directory Service profile to use with this User Profile Service Provider.
■To create an Identity Directory Service profile, see Section 5.3.2, "Creating an
Identity Directory Service Profile."
■If you choose either of the default Identity Directory Services (
userrole
or
idxuserrole
) you can't view or edit the configuration values in this section.
■If you choose an Identity Directory Service connection that you or another
administrator created, select the View option to view and edit additional
Note: LDAP attribute names are generally not case sensitive but
when communicating with the Oracle Identity Governance
Framework (IGF), LDAP attribute names are case sensitive.
Table 42–8 User Profile Service Provider Default Attribute Names and Values
Name Value Notes
accessControl
false Supported values include
true
or
false
(enable/disable, respectively) depending
on whether the accessControl feature is to
be disabled or enabled.
adminGroup
cn=Administrators,ou=groups,
ou=myrealm,dc=base_domain
If accessControl is enabled, specify the
distinguished name (DN) of the
adminGroup to see if the User is in it.
selfEdit true
Supported values include
true
or
false
depending on if the User can edit his or
her profile for the accessControl feature.
This is also one of the accessControl
feature's configuration properties.
proxyAuth
- Supported values include
true
or
false
depending on if the proxyAuth feature is
enabled or disabled, respectively. This
attribute is required only if proxyAuth is
supported and the Administrator does
not want to use the proxyAuth feature.
This attribute is not included in a new
installation of Mobile and Social. An
Administrator can add this property.

Defining Service Providers
Configuring Mobile Services 42-19
properties as documented in Section 42.3.3.2, "Editing or Deleting a User
Profile Service Provider."
6. Click Create to create the Service Provider configuration object.
42.3.3.2 Editing or Deleting a User Profile Service Provider
To edit or delete a User Profile Service Provider, select the Service Provider in the
panel and click Edit or Delete on the panel's tool bar. This section describes the
additional User Profile Service Provider Configuration properties for the Identity
Directory Service connection as they appear when editing a User Profile Service
Provider that you or another Administrator created.
Name - The name of this User Profile Service Provider.
Description - (Optional) Type a short description that will help you or another
Administrator identify this service in the future.
Attributes
Add or delete User Profile Service Provider Attributes and their values based on
Table 42–8.
Identity Directory Service
Name - The Identity Directory Service profile that connects the User Profile Service
Provider to one or more directory servers. For more information about the Identity
Directory Service, see Section 5.3, "Managing the Identity Directory Service User
Identity Stores."
Note: LDAP attribute names are generally not case sensitive but
when communicating with the Oracle Identity Governance
Framework (IGF), LDAP attribute names are case sensitive.
Table 42–9 User Profile Service Provider Default Attribute Names and Values
Name Default Value Notes
accessControl
false Supported values include
true
or
false
(enable/disable, respectively) depending
on whether the accessControl feature is to
be disabled or enabled.
adminGroup cn=Administrators,ou=groups,
ou=myrealm,dc=base_domain
If accessControl is enabled, specify the
distinguished name (DN) of the
adminGroup to see if the User is in it.
selfEdit true
Supported values include
true
or
false
depending on if the User can edit his or
her profile for the accessControl feature.
This is also one of the accessControl
feature's configuration properties.
proxyAuth
true Supported values include
true
or
false
depending on if the proxyAuth feature is
enabled or disabled, respectively. This
attribute is required only if proxyAuth is
supported and the Administrator does
not want to use the proxyAuth feature.
This attribute is not included in a new
installation of Mobile and Social. An
Administrator can add this property.

Defining Service Profiles
42-20 Administrator's Guide for Oracle Access Management
■If either of the default Identity Directory Services are selected (either
userrole
or
idxuserrole
) you cannot view or edit the configuration values.
■If an Identity Directory Service connection that you or another Administrator
created is selected, you can view and edit the configuration values as needed.
Relationship Configuration
Type the URI segment used to access the corresponding column in the Identity
Directory Service. Use Add to add a new relationship or Remove to remove a
configured relationship.
■Access URI - Type a URI segment that will be used to access a corresponding data
column in the Identity Directory service. For example, if
memberOf
is the Access
URI, then:
http://host:port/.../idX/memberOf
would be the URI to access related entities of an entity with ID
idX
.
■Identity Directory Service Relation - Choose the Directory Service relationship
that is to be accessed by the Access URI segment. You can configure relationships
on the Relationships tab in the Identity Directory Service configuration section
provided that the Identity Directory Service is not the pre-configured UserProfile
Identity Provider. (You cannot configure Identity Directory Service relationships
for the UserProfile Service Provider.)
■Entity URI Attribute - Type the JSON attribute name to be used in the URI
response sent from the Mobile and Social server. For example, if person-uri is the
specified entity URI attribute, the URI response would be as follows:
{ {"person-uri":uriY1, ...}, {"person-uri":uriY2, ...}, ... }
where
uriY1
and
uriY2
are the direct URIs to access each of the related entities.
■Scope for Requesting Recursion - Use Scope attribute values with the scope
query parameter to retrieve a nested level of attributes in a relationship search. To
access related entities recursively, type the value to be used. The Mobile and Social
default configuration uses two scope attribute values:
toTop
and
all
. If the Scope
for Requesting Recursion value is the attribute value
all
, then the following
REST URI example is used to make the request:
http://host:port/.../idX/reports?scope=all
In this example, the URI returns the entities related to the entity with ID
idX
, as
well as all further related entities.
42.3.3.3 Understanding the Pre-Configured User Profile Service Provider
Mobile and Social provides a pre-configured User Profile Service Provider for
LDAP-compliant directory servers named UserProfile. This Service Provider allows
lookup and update tasks to be performed on directory objects using Mobile and Social.
42.4 Defining Service Profiles
A Service Profile defines a Service Endpoint URL for a Service Provider on the Mobile
and Social server. Each Service Provider instance requires at least one corresponding
Service Profile instance. You can create multiple Service Profiles for a single Service
Provider; each Service Profile will define different token capabilities and service
endpoints for the Service Provider.

Defining Service Profiles
Configuring Mobile Services 42-21
Create one or more Service Profiles after creating the required Service Provider(s). This
section covers the following topics:
■Defining, Modifying and Deleting an Authentication Service Profile
■Defining, Modifying and Deleting an Authorization Service Profile
■Defining, Modifying and Deleting a User Profile Service Profile
42.4.1 Defining, Modifying and Deleting an Authentication Service Profile
The following sections contain information regarding Authentication Service Profiles.
■Creating an Authentication Service Profile
■Editing or Deleting an Authentication Service Profile
42.4.1.1 Creating an Authentication Service Profile
1. Open the Mobile Services Home Page in the Oracle Access Management Console
as described in Section 42.1, "Opening the Mobile Services Configuration Page."
2. Click Create in the Service Profiles panel in the home area and choose Create
Authentication Service Profile.
The Authentication Service Profile Configuration page displays.
3. Enter values for the Authentication Service Profile general properties.
Note: One Service Profile can be assigned to multiple Service
Domains. In general, mobile Service Profiles should be assigned to
mobile Service Domains, and non-mobile Service Profiles should be
assigned to non-mobile Service Domains. See Section 42.7, "Defining
Service Domains."
Table 42–10 Authentication Service Profile Default General Properties
Name Notes
Name Type a unique name for this Authentication Service Profile.
Description (Optional) Type a short description that will help you or another
Administrator identify this service in the future.
Service Type Shows the type of Service Profile that you are creating (either a
User Profile Service, an Authentication Service, or an
Authorization Service).The value is read-only.
Service Endpoint Create a unique uniform resource identifier (URI) address for this
service by typing a string in the box; for example,
localhost:5575
.
■If creating an Authentication Service Profile, the URI Category
Information section shows the URIs that will be created to
create, validate, manage, and delete the Profile's client, user,
and Access Tokens, as well as the "Client Registration Handle"
URI that is used to register devices.
■If creating an Authorization Service Profile, the URI Category
Information section shows the authorization URI category that
will be created on the Service.
■If creating a User Profile Service Profile, the URI Category
Information section shows the URI categories that will be
created on the Service (one URI to manage Users, and another
to manage Groups).

Defining Service Profiles
42-22 Administrator's Guide for Oracle Access Management
4. Select an option under Token Support and URI Category Information to enable
support for the token type on the service, or clear the option box to disable
support for the token type on the service.
Token Support applies to Authentication Service Profiles only. The corresponding
uniform resource identifier (URI) is listed alongside each token type.
5. Click Create to create the Service Profile configuration object.
42.4.1.2 Editing or Deleting an Authentication Service Profile
To edit or delete an Authentication Service Profile, select the Service Profile in the
panel and click Edit or Delete on the panel's tool bar.
42.4.2 Defining, Modifying and Deleting an Authorization Service Profile
The following sections contain information regarding Authentication Service Profiles.
■Creating an Authorization Service Profile
■Editing or Deleting an Authorization Service Profile
Service Provider Choose the Service Provider on which this Service Profile should be
based. The contents of this list are determined by the Service Type.
A Service Provider must be defined before you can create a
corresponding Service Profile.
Service Enabled Select the box to enable the service; clear the box to disable.
Table 42–11 Token Support and URI Category Information Default Properties
Name Notes
Client Registration
Handle
Required for mobile token services so that the client device can register
with the Mobile and Social server. The server issues a Client
Registration Handle after authenticating the user. When OAAM and its
Security Handler Plug-in is used in conjunction with a mobile
Authentication Service, the Plug-in can run fraud detection and risk
analysis policy checks, enhancing authenticity and the trust level of a
client. To add an Authentication Service Profile to a mobile Service
Domain, Client Registration Handle must be enabled. Client
Registration Handles are not used in non-mobile Service Domains.
Client Token Select to enable Client Tokens on the Service. A Client Token is a
security grant issued by the Mobile and Social server to prove that a
non-mobile device or client is authenticated. The server issues a Client
Token after authenticating the client based on a name and password or
other credentials. Client Tokens are optional in non-mobile Service
Domains. They are not used in mobile Service Domains.
User Token Select to enable User Tokens on the Service. A User Token is a security
grant issued by the Mobile and Social server to prove that a user is
authenticated. A User Token can be used to request an Access Token.
Access Token Select to enable Access Tokens on the Service. An Access Token is a
security grant issued by the Mobile and Social server so that a client
application can access a specific protected resource. A client application
can get an Access Token by presenting a User Token, provided that the
user is authorized to access the resource.
Table 42–10 (Cont.) Authentication Service Profile Default General Properties
Name Notes

Defining Service Profiles
Configuring Mobile Services 42-23
42.4.2.1 Creating an Authorization Service Profile
1. Open the Mobile Services Home Page in the Oracle Access Management Console
as described in Section 42.1, "Opening the Mobile Services Configuration Page."
2. Click Create in the Service Profiles panel in the home area and choose Create
Authorization Service Profile.
The Authorization Service Profile Configuration page displays.
3. Enter values for the Authorization Service Profile general properties.
4. Click Create to create the Service Profile configuration object.
42.4.2.2 Editing or Deleting an Authorization Service Profile
To edit or delete an Authorization Service Profile, select the Service Profile in the panel
and click Edit or Delete on the panel's tool bar.
42.4.3 Defining, Modifying and Deleting a User Profile Service Profile
The following sections contain information regarding Authentication Service Profiles.
■Creating a User Profile Service Profile
■Editing or Deleting a User Profile Service Profile
Table 42–12 Authorization Service Profile Default General Properties
Name Notes
Name Type a unique name for this Authorization Service Profile.
Description (Optional) Type a short description that will help you or another
Administrator identify this service in the future.
Service Type Shows the type of Service Profile that you are creating (either a
User Profile Service, an Authentication Service, or an
Authorization Service).The value is read-only.
Service Endpoint Create a unique uniform resource identifier (URI) address for this
service by typing a string in the box; for example,
localhost:5575
.
■If creating an Authentication Service Profile, the URI Category
Information section shows the URIs that will be created to
create, validate, manage, and delete the Profile's client, user,
and Access Tokens, as well as the "Client Registration Handle"
URI that is used to register devices.
■If creating an Authorization Service Profile, the URI Category
Information section shows the authorization URI category that
will be created on the Service.
■If creating a User Profile Service Profile, the URI Category
Information section shows the URI categories that will be
created on the Service (one URI to manage Users, and another
to manage Groups).
Service Provider Choose the Service Provider on which this Service Profile should be
based. The contents of this list are determined by the Service Type.
A Service Provider must be defined before you can create a
corresponding Service Profile.
Service Enabled Select the box to enable the service; clear the box to disable.

Defining Security Handler Plug-ins
42-24 Administrator's Guide for Oracle Access Management
42.4.3.1 Creating a User Profile Service Profile
1. Open the Mobile Services Home Page in the Oracle Access Management Console
as described in Section 42.1, "Opening the Mobile Services Configuration Page."
2. Click Create in the Service Profiles panel in the home area and choose Create User
Profile Service Profile.
The User Profile Service Profile Configuration page displays.
3. Enter values for the User Profile Service Profile general properties.
4. Click Create to create the Service Profile configuration object.
42.4.3.2 Editing or Deleting a User Profile Service Profile
To edit or delete a User Profile Service Profile, select the Service Profile in the panel
and click Edit or Delete on the panel's tool bar.
42.5 Defining Security Handler Plug-ins
A Security Handler Plug-in enhances security by consulting additional logic for trust
and risk analysis. Such additional logic may deny access based on certain risky
operations. Mobile authentication invokes the Security Handler Plug-in during
sensitive security operations; for example, during virtually all token acquisition
operations including client application registration.
Table 42–13 User Profile Service Profile Default General Properties
Name Notes
Name Type a unique name for this Authorization Service Profile.
Description (Optional) Type a short description that will help you or another
Administrator identify this service in the future.
Service Type Shows the type of Service Profile that you are creating (either a
User Profile Service, an Authentication Service, or an
Authorization Service).The value is read-only.
Service Endpoint Create a unique uniform resource identifier (URI) address for this
service by typing a string in the box; for example,
localhost:5575
.
■If creating an Authentication Service Profile, the URI Category
Information section shows the URIs that will be created to
create, validate, manage, and delete the Profile's client, user,
and Access Tokens, as well as the "Client Registration Handle"
URI that is used to register devices.
■If creating an Authorization Service Profile, the URI Category
Information section shows the authorization URI category that
will be created on the Service.
■If creating a User Profile Service Profile, the URI Category
Information section shows the URI categories that will be
created on the Service (one URI to manage Users, and another
to manage Groups).
Service Provider Choose the Service Provider on which this Service Profile should be
based. The contents of this list are determined by the Service Type.
A Service Provider must be defined before you can create a
corresponding Service Profile.
Service Enabled Select the box to enable the service; clear the box to disable.

Defining Security Handler Plug-ins
Configuring Mobile Services 42-25
Mobile and Social includes the following pre-configured Security Handler Plug-ins.
■
OAAMSecurityHandlerPlugin
enables sophisticated device and client application
registration logic as well as the advanced risk and fraud analysis logic found in
OAAM.
■
Default
offers very limited risk analysis logic.
The following sections contain information regarding defining Security Handler
Plug-ins.
■Creating a Security Handler Plug-in
■Editing or Deleting a Security Handler Plug-in
■Device Fingerprinting and Device Profile Attributes
42.5.1 Creating a Security Handler Plug-in
1. Open the Mobile Services Home Page in the Oracle Access Management Console
as described in Section 42.1, "Opening the Mobile Services Configuration Page."
2. Click Create in the Security Handler Plug-ins panel in the home area.
The Security Handler Plug-in Configuration page displays.
3. Enter values for the Security Handler Plug-in general properties.
4. Enter name-value pairs for the Security Handler Plug-in Attributes.
■For descriptions of the
OaamSecurityHandlerPlugin
attributes, see
Section 42.9.2.7.3, "Setting Up OTP E-Mail Integration."
■The
DefaultSecurityHandlerPlugin
has a single attribute setting,
allowJailBrokenDevices
. This specifies if jail-broken client devices should be
allowed or denied access to protected resources. Set the attribute's value to
false
to deny access (default setting) or set it to
true
to allow access. The
OAAMSecurityHandlerPlugin does not need to be configured for jail break
enforcement. See Section 42.8.1, "Adding a New Jail Breaking Detection
Policy," for more information.
5. Click Create to create the Security Handler Plug-in configuration object.
Note: Security Plug-in usage is optional. If used, it should only be
applied to mobile-related Service Domains and its authentication
services and client applications.
Table 42–14 Security Handler Plug-in General Properties
Name Notes
Name Type a unique name for this Authorization Service Profile.
Description (Optional) Type a short description that will help you or another
Administrator identify this service in the future.
Security Handler Class Choose the Java class that defines the Security Handler Plug-in that
you want to use. This release of Mobile and Social supports two
Security Handler Plug-ins, the DefaultSecurityHandlerPlugin and
the OAAMSecurityHandlerPlugin.

Defining Application Profiles
42-26 Administrator's Guide for Oracle Access Management
42.5.2 Editing or Deleting a Security Handler Plug-in
To edit or delete a Security Handler Plug-in, select the definition in the panel and click
Edit or Delete on the panel's tool bar.
42.5.3 Device Fingerprinting and Device Profile Attributes
When a mobile application is started, Mobile Client SDK logic in the application will
attempt to detect a number of Device Profile attributes. Some Device Profile attributes
are general attributes that cannot uniquely identify a device, such as OS Type,
OS Version, language locale setting, network setting, and geographic location. Some
attributes are hardware identifiers that can uniquely identify a device. An example of a
hardware identifier is a MAC Address on a mobile device. The mobile OS type and
version will dictate the kinds of Device Profile attributes that can be detected.
When a mobile application requests a token through the Mobile Client SDK, the SDK
logic will send the Device Profile attributes as a part of an HTTP request. This set of
Device Profile attributes enhances security by creating an audit trail for devices that
assists device identification.
When the OAAM Security Plug-in is used, a particular combination of Device Profile
attribute values is treated as a device finger print, known as the Digital Finger Print in
the OAAM Administration Console. Each finger print is assigned a unique fingerprint
number. Each OAAM session is associated with a finger print and the finger print
makes it possible to log (and audit) the devices that are performing authentication and
token acquisition.
42.6 Defining Application Profiles
An Application Profile defines the client application that will consume services
provided by the Service Providers. A single Application Profile can be assigned to
multiple Service Domains. More information can be found in the following sections.
■Creating an Application Profile
■Editing or Deleting an Application Profile
42.6.1 Creating an Application Profile
1. Open the Mobile Services Home Page in the Oracle Access Management Console
as described in Section 42.1, "Opening the Mobile Services Configuration Page."
2. Click Create in the Application Profiles panel in the home area.
The Application Profiles Configuration page displays.
3. Enter values for the Application Profile general properties.
Table 42–15 Application Profile General Properties
Name Notes
Name The value must be a unique one that distinguishes the application
from all other applications on the server. This value and the
application name value embedded in the client application must
match.
Description (Optional) Type a short description that will help you or another
Administrator identify this service in the future.

Defining Application Profiles
Configuring Mobile Services 42-27
4. Enter name-value pairs for the attributes used by the Mobile and Social server to
perform server functions for this application; for example, creating a Client
Registration Handle.
■
Mobile.clientRegHandle.baseSecret
is a mandatory attribute used by the
server as a private secret to sign each Client Registration Handle for this
application.
■
userId4BasicAuth
is the user ID attribute used by the server and the
application to perform HTTP Basic authentication. For more information see
Section 41.4.1, "Protecting the Mobile Client Registration Endpoint."
■
sharedSecret4BasicAuth
is the shared secret attribute used by the server and
application to perform HTTP Basic authentication.
5. Define the Mobile Application Profile properties.
■Jail Breaking Detection - Select the Enabled box to activate Jail Breaking
Detection for this application, or clear the box to disable it. If Jail Breaking
Detection is grayed out, the Jail Breaking Detection Policy is disabled in
Mobile and Social. For more information, see Section 42.8, "Using the Jail
Breaking Detection Policy."
■Mobile Configuration - Select this option to expose additional mobile
configuration settings on the Application Profile Configuration page.
6. Click Create to create the Application Profile configuration object.
See Section 42.6.2, "Editing or Deleting an Application Profile" for information on
properties that can be configured only after the Application Profile is created.
42.6.2 Editing or Deleting an Application Profile
To edit or delete an Application Profile, select the definition in the panel and click Edit
or Delete on the panel's tool bar. This section describes additional Application Profile
properties as they appear when editing a User Profile Service Provider that you or
another Administrator previously created.
■Configuration Settings
– Profile Cache Duration - The maximum amount of time that the Application
Profile details cached on the mobile device will remain valid. If the time is
elapsed when the mobile client application requests the Application Profile,
the cached Profile is replaced with a freshly downloaded version. If the time is
not elapsed, the cached Profile is used.
– Authentication Retry Count - The maximum number of retries that a User is
allowed if invalid credentials are provided during registration/authentication.
This setting is not honored in the iOS Mobile SDK.
– Offline Authentication - Select the Allowed box to allow users to log in and
authenticate to the application locally. Clear the box to block users from
authenticating locally.
– Claim Attributes - The set of attributes that will be fetched from the device
and passed to the server during registration/authentication.
– Social Identity WebView - Choose Embedded if users should be presented
with the Mobile and Social login page inside the application using the
embedded WebView class, or choose External if the login page should be
presented in an external browser.
■Platform Specific Settings

Defining Service Domains
42-28 Administrator's Guide for Oracle Access Management
– URL Scheme - Type the URL scheme that is used to invoke this mobile client
application, as configured in the application itself.
– Apple iOS Bundle ID - Type the unique Bundle ID that is configured in the
mobile client application. Each iOS mobile application has a unique Bundle
ID.
– Android Package - Type the fully qualified name of an activity in the Android
application. This activity should have
<data android:scheme="xyz" />
in its
<intent-filter>
.
For details regarding the
<data>
element, please see the following web page:
http://developer.android.com/guide/topics/manifest/data-element.htm
l
– Android Application Signature - Enter the signature of the Android
application. You can obtain the signature from the certificate with which the
application is signed. On Linux, you can obtain the signature using the
following command:
keytool -exportcert -alias <alias_name>
-keystore
<keystore_name>
-storepass
<keystore_password>
| xxd -c 256 -ps
You can also retrieve the signature programmatically. For details, see
"Invoking the Mobile Single Sign-on Agent App" in the Developer's Guide for
Oracle Access Management.
■Custom Settings / Mobile Custom Attributes - Configure attributes or properties
specific to the mobile client application. Mobile Custom Attributes are returned by
the server to the mobile application as part of the Application Profile
42.7 Defining Service Domains
Create a Service Domain to associate Service Profiles with Application Profiles and the
corresponding configuration settings. When the Create Service Domain page is
displayed, you can:
■Choose if the Service Domain is for managing mobile applications or desktop
applications.
■Choose an authentication scheme and, optionally, a Security Handler Plug-in for
the Service Domain.
■Add one or more Mobile SSO Agents to the Service Domain and configure which
agents have priority over others.
■Add one or more applications to the Service Domain and configure which
applications can use a Mobile SSO Agent.
■Choose at least one Service Profile for the Service Domain.
Note: The
scheme (xyz)
should be the same as the URL scheme.
Note: The signature obtained using the above command will have a
carriage return after 256 characters. Remove it before entering the
signature in this field.

Defining Service Domains
Configuring Mobile Services 42-29
■Configure security settings to protect the Service Domain's selected services.
More information can be found in the following sections.
■Creating a Service Domain
■Editing or Deleting a Service Domain
42.7.1 Creating a Service Domain
1. Open the Mobile Services Home Page in the Oracle Access Management Console
as described in Section 42.1, "Opening the Mobile Services Configuration Page."
2. Click Create in the Service Domains panel in the home area.
The Create Service Domain Configuration page displays.
3. Enter values for the Service Domain general properties.
4. Use one or all of the following options to add or select Application Profiles.
If configuring a mobile domain, only mobile apps can be selected. Similarly, if
configuring a non-mobile domain, only desktop apps can be selected
a. Click Browse Application Profiles (under Application Profile Selection) to
open a Search window from which you can search for one or more previously
Table 42–16 Service Domain General Properties
Name Notes
Name Type a unique name for this Service Domain.
Description (Optional) Type a short description that will help you or another
Administrator identify this service in the future.
Type Choose Mobile Application or Desktop Application. A mobile
application is an application that runs on a mobile operating system,
such as the Android or iOS operating systems. A desktop application
is an application that runs on a non-mobile operating system.
Credential for
Registering an
Application
If configuring a mobile Service Domain, choose the minimum
credential level required to register an application. If you choose
User Password, the server will prompt the User for a user name
and password every time an application is registered, even if a
mobile single sign-on agent is installed on the device. If you choose
User Token, the server asks the mobile SSO agent to provide the
User name and password. Subsequent application registrations on
that device then will use the User Token issued to the mobile SSO
agent for that purpose. User Password provides added security
around the application registration process. User Token makes the
application registration process more convenient for the User.
Authentication Scheme If configuring a mobile Service Domain, choose Mobile Service
Authentication or Social Identity Authentication. If you choose
Mobile Service Authentication, the client will prompt the User for a
User name and password. If you choose, Social Identity
Authentication, the client will redirect to the Mobile and Social
server and the User will use Social Identity to authenticate with an
Identity Provider, for example Google or Facebook. This selection
determines which Authentication Service Profiles you can choose
on the Service Profile Selection configuration screen.
Security Handler Plug-in
Name
Security Handler Plug-in Name - If configuring a mobile Service
Domain, choose the Security Handler Plug-in to use. For
information about the available Security Handler Plug-ins, see
Section 42.2.3, "Understanding Security Handler Plug-ins."

Defining Service Domains
42-30 Administrator's Guide for Oracle Access Management
configured Application Profiles to add to the Service Domain. Select the
Profiles to add and click Select.
b. Alternately, if you know the exact name of the Application Profile, click Add
and type the name directly into the table.
5. Click Next to select a Service Profile.
The Service Profile page displays.
6. Use one or both of the following options to add at least one Service Profile to the
Service Domain.
For a mobile Service Domain, you can add one Service Profile for each
authentication, authorization, and User Profile Services Service Provider. For a
non-mobile Service Domain, you can add multiple Service Profiles for each
authentication, authorization, and User Profile Services Service Provider.
a. Click Select to open a Search window from which you can search for a
previously configured Service Profile. If configuring a mobile Domain, you
can only select a mobile-compatible Authentication Service Profile. Similarly, if
configuring a non-mobile domain, you can only select a desktop-compatible
Authentication Service Profile. Select the Profile to assign and click Select. If
you know the exact name of the Service Profile, click Add and type the name
directly into the table.
b. Click Create to create a new Service Profile.
Table 42–17 Application Profile Selection Properties
Name Notes
Application Profile Name The name that uniquely identifies the client application to Mobile
and Social.
Mobile Single Sign-on
(SSO) Configuration
If configuring a mobile Service Domain, choose if each application
should participate in mobile single sign-on as an SSO Agent, as an
SSO Client, or not at all (None).
■Choose None if this application does not want to participate in
mobile SSO and instead wants to perform User authentication
with the Mobile and Social server directly.
■Choose As an SSO Agent if the application is a mobile single
sign-on agent that can accept authentication requests from
other apps. For details about creating a custom mobile SSO
agent, refer to the Android or iOS SDK information in the
Developer's Guide for Oracle Access Management.
■Choose As an SSO Client if the application is configured to
work with mobile single sign-on and it delegates user
authentication and user session management responsibilities to
a mobile SSO agent.
Agent Priority Displays the numerical ranking for applications that are configured
as mobile SSO Agents. When multiple agent apps are installed on
the device, the Agent application with highest priority (smallest
numerical rank) acts as the Agent application for all other Agent
apps. If that Agent is deleted from the device, the Agent with the
next highest ranking becomes the active Agent. Click Move Up and
Move Down to reorder the agents by priority.
Description (Optional) Type a short description that will help you or another
Administrator identify this service in the future.

Defining Service Domains
Configuring Mobile Services 42-31
7. Click Next to configure Service Protection (authentication).
The Service Protection page displays.
8. Configure authentication for the Service Profile using one of the following options.
a. If you previously selected a User Profile Service for this Service Domain,
configure the security settings to protect it.
b. If you previously selected an Authorization Service for this Service Domain,
configure the security settings to protect it.
Table 42–18 Service Profile Selection Properties
Name Notes
Authentication Service (Optional) Displays the name of the Authentication Service Profile
configured for this Service Domain and the corresponding Service
Endpoint. If creating a new Service Profile, see Section 42.4.1,
"Defining, Modifying and Deleting an Authentication Service
Profile."
Authorization Service (Optional) Displays the name of the Authorization Service Profile
configured for this Service Domain and the corresponding Service
Endpoint. If creating a new Service Profile, see Section 42.4.2,
"Defining, Modifying and Deleting an Authorization Service
Profile."
User Profile Service (Optional) Displays the name of the User Profile Service Profile
configured for this Service Domain and the corresponding Service
Endpoint. If creating a new Service Profile, see Section 42.4.3,
"Defining, Modifying and Deleting a User Profile Service Profile."
Table 42–19 User Profile Service Protection Properties
Name Notes
Authentication Choose from the menu the Authentication Service Profile
configured for this Service Domain, with which you would like to
protect this User Profile service.
Secured Application Select to require the client application to authenticate, either by
presenting a Client Resource Handle or a Client Token.
Secured User Select to require a User to authenticate, either by presenting a User
Token or an Access Token, where the access token is previously
acquired with a User Token.
Allow Read Select to allow users to view User Profile data.
Allow Write Select to allow users to update User Profile data.
Table 42–20 Authorization Service Protection Properties
Name Notes
Authentication Choose the Authentication Service Profile configured for this
Service Domain, with which you would like to protect this
Authorization service.
Secured Application Select to require the client application to authenticate, either by
presenting a Client Resource Handle or a Client Token.
Secured User Select to require a User to authenticate, either by presenting a User
Token or an Access Token, where the access token is previously
acquired with a User Token.

Using the Jail Breaking Detection Policy
42-32 Administrator's Guide for Oracle Access Management
9. Click Next to verify your selections.
10. Click Finish to create the Service Domain.
42.7.2 Editing or Deleting a Service Domain
To edit or delete an Service Domain, select the definition in the panel and click Edit or
Delete on the panel's tool bar.
42.8 Using the Jail Breaking Detection Policy
Jail breaking is the process of removing or circumventing the limitations that
manufacturers impose on their mobile devices. While legal, jail breaking can present a
heightened security risk to protected resources. To counter this risk, Mobile and Social
provides a preconfigured Jail Breaking Detection Policy for iOS devices.
The Jail Breaking Detection Policy consists of one or more statements that instruct a
client application (built using the Mobile and Social SDK for iOS) to search for files
that may indicate the device is jail broken. The Mobile and Social server sends the
Policy statements to the iOS client application. The client device then returns a true (jail
breaking is detected) or false value back to the Mobile and Social server. This value is
forwarded to the Security Handler Plug-in and, depending on the security policies of
the Security Handler Plug-in in use, Mobile and Social can allow access, deny access,
or wipeout any Mobile and Social specific data from the application.
■If the Default Security Handler Plug-in is active and the policy logic says the device
is jail broken, the Plug-in can ALLOW or DENY access to the client device
depending on how the
allowJailBrokenDevices
Plug-in attribute is set.
■If the Oaam Security Handler Plug-in is active and the policy logic says the device
is jail broken, the Plug-in can ALLOW or BLOCK access to the client device
depending on how the OAAM policy rules are configured. (Refer to the
Administrator's Guide for Oracle Adaptive Access Manager for information on the
policy rules as in, for example, the Jail broken Mobile Device rule under the
"OAAM Post-Authentication Security" policy.)
Additionally, if a device is blacklisted, lost or stolen, this Plug-in can send a
WIPEOUT command that will delete any Mobile and Social specific data from the
device and block the device from future requests. If the user recovers the missing
device, the device can be reset in OAAM.
See Section 42.5, "Defining Security Handler Plug-ins" for more information.
The following sections contain more information.
■Adding a New Jail Breaking Detection Policy
■Editing the Jail Breaking Detection Policy
42.8.1 Adding a New Jail Breaking Detection Policy
If you choose to create a new Jail Breaking Detection Policy using XML, click the Load
button to overwrite the default Policy completely. A schema file is available from
customer support.
Note: OAAM's BLOCK and Mobile and Social's DENY mean the
same thing.

Using the Jail Breaking Detection Policy
Configuring Mobile Services 42-33
Use the following procedure to create a new Jail Breaking Detection Policy with the
Oracle Access Management Console.
1. Open the Mobile Services Home Page in the Oracle Access Management Console
as described in Section 42.1, "Opening the Mobile Services Configuration Page."
2. Click JailBreaking Detection Policy in the navigation pane.
The JailBreaking Detection Policy page displays.
3. Click Add to configure the Conditions and Detection Logic properties for a new
JailBreaking Detection Policy.
■Jail Breaking Detection - Select Enabled to turn the Jail Breaking Detection
policy on, or clear this option to turn it off for all client Application instances.
If you enable the Jail Breaking Detection Policy here, you can disable it on an
application by application basis. If you disable the Policy here, you cannot
enable or disable the feature on an application by application basis.
■Min OS Version - The minimum iOS version to which the policy applies. If
the value is 1.0, the policy will apply to iOS devices running at least version
1.0 of iOS.
■Max OS Version - The maximum iOS version to which the policy applies. If
the value is empty, a maximum iOS version number is not checked so the
policy applies to any iOS version higher than the value specified for Min OS
Vers ion .
■Min Client SDK Version - The minimum Mobile and Social Client SDK
version number. For example, 11.1.2.0.0.
■Max Client SDK Version - The maximum Mobile and Social Client SDK
version number. For example, 11.1.2.2.0.
■Policy Expiration Duration - Type the length of time in seconds that the SDK
on the iOS client device should wait before expiring the local copy of the
policy and retrieving a newer version.
■Auto Check Period - Type the interval of time in minutes that the iOS client
device should wait before executing the Jail Breaking Detection Policy
statements again.
■Detection Location - The iOS client device uses a logical-OR operator to
evaluate Policy statements. Add a Detection Location as follows:
– File Path - Type the absolute path to the file or directory on the device for
which the Detection Policy should search.
–Action - Select Exists which instructs the Detection Policy to evaluate
whether it can access a file path.
– Success - Select if the Policy should flag the device as jail broken if the
specified files or directories are found on the device. Use this option if the
policy is checking for unauthorized files or directories. Clear this option if
the Policy should flag the device as jail broken if the specified files or
directories are not found. (Use this option if checking for required files or
directories.)
42.8.2 Editing the Jail Breaking Detection Policy
In most cases you can use the Policy Statements editor on the Jail Breaking Detection
Policy Configuration page to change a Jail Breaking Detection Policy.

Configuring Mobile Services with Other Oracle Products
42-34 Administrator's Guide for Oracle Access Management
1. Open the Mobile Services Home Page in the Oracle Access Management Console
as described in Section 42.1, "Opening the Mobile Services Configuration Page."
2. Click JailBreaking Detection Policy in the navigation pane and choose one of the
following options:
■To append changes to the Jail Breaking Detection Policy, click Load in the tool
bar, browse to the XML file that contains the Jail Breaking Detection Policy
statements that you want to append, choose Append after existing policy
statements, and click OK. A schema file is available from customer support.
■To overwrite the Jail Breaking Detection Policy, click Load in the tool bar,
browse to the XML file that contains the Jail-Breaking Detection Policy
statements that you want to load, choose Overwrite existing policy
statements, and click OK. A schema file is available from customer support.
■To edit the Jail Breaking Detection Policy, select it in the Policy Statements
table to display its properties, make changes (as per Section 42.8.1, "Adding a
New Jail Breaking Detection Policy") and click Apply.
42.9 Configuring Mobile Services with Other Oracle Products
The following sections contain information on configuring Mobile and Social with
other Oracle products.
■Configuring Mobile Services for Access Manager
■Configuring Mobile Services for Oracle Adaptive Access Manager
42.9.1 Configuring Mobile Services for Access Manager
The following sections describe how to configure Mobile and Social to work with
different versions of Access Manager.
■Configuring Mobile Services to Work With Access Manager in Simple and
Certificate Mode
■Configuring an Authentication Service Provider for Remote Oracle Access
Manager Server 10g
■Configuring an Authentication Service Provider for Remote Access Manager
11gR2 or Oracle Access Manager 11gR1 PS1
42.9.1.1 Configuring Mobile Services to Work With Access Manager in Simple and
Certificate Mode
Use the following procedure to configure Mobile Services to work with Access
Manager if Access Manager is configured in Simple Mode.
Change the Server Mode to Simple
1. Open the Oracle Access Management Administration Console.
The Launch Pad opens.
Note: During installation, the Oracle Fusion Middleware
Configuration Wizard generates a domain that supports both Mobile
and Social and Access Manager. For more information, see the
"Configuring Mobile and Social" chapter in the Oracle Fusion
Middleware Installation Guide for Oracle Identity and Access Management.

Configuring Mobile Services with Other Oracle Products
Configuring Mobile Services 42-35
2. Scroll down to the Configuration panel and click Server Instances.
3. Click Search and click oam_server1 in the Search Results.
Click the Open button.
4. In the OAM Proxy section, choose Simple from the Mode menu and click Apply.
Change the WebGate Communication Mode to Simple
1. Open the Oracle Access Management Administration Console for the WebGate.
The Launch Pad opens.
2. In the Access Manager panel, click SSO Agents > OAM Agents and click Search.
3. Select the WebGate and open it for editing.
4. Change the security mode for the WebGate to Simple, then click Apply.
The system creates a new directory for the WebGate under
~/oam-domain/output/accessgate-oic
with the following files:
■
aaa_cert.pem
■
aaa_key.pem
■
cwallet.sso
■
ObAccessClient.xml
■
password.xml
Change the OIC OAMASDKAuthNProvider Security Mode to Simple
1. Copy the
.jks
files from the
~/oam-domain/output/webgate-ssl
directory to the
~/oam-domain/config/fmwconfig
directory.
2. Go to the
~/oam-domain/output/accessgate-oic
directory and open
password.xml
.
Copy the
passwd
value from the file.
3. Open the Oracle Access Management Administration Console.
The Launch Pad opens.
Go to the Mobile and Social panel and click Mobile Services > Service Providers
> Authentication Service Providers > OAMAuthentication.
4. Add the following name-value pairs to the Attributes table.
5. In the Attributes table, locate
TRANSPORT_SECURITY
and change the value from
OPEN
to
SIMPLE
or
CERT
and click Save.
6. Restart the Oracle Access Management server.
Name Value
PASSPHRASE
The
passwd
value from step 2.
KEYSTORE
<fully qualified
path>
/oam-domain/config/fmwconfig/oamclient-keystore.jks
TRUSTSTORE
<fully qualified
path>
/oam-domain/config/fmwconfig/oamclient-truststore.jks

Configuring Mobile Services with Other Oracle Products
42-36 Administrator's Guide for Oracle Access Management
42.9.1.2 Configuring an Authentication Service Provider for Remote Oracle Access
Manager Server 10g
The following procedure documents how to configure an Authentication Service
Provider to work with a remote instance of the Oracle Access Manager 10g server.
1. Log in to the 10g Console and create the WG Profile.
The OAM 10g Access Management Service must be turned on.
2. Navigate through the Mobile and Social Console to Mobile Services > Service
Providers > Authentication Service Providers.
3. Click New to create a new Authentication Service Provider configuration.
4. Enter the appropriate values for the parameters.
a. Change OAM_VERSION to OAM_10G from OAM_11G.
b. Change WEBGATE_ID to the name you previously used to create the WG
profile.
c. Change OAM_SERVER_1 to the hostname:port# of the machine hosting the
OAM 10G server.
d. Add a new parameter named and populate it with the URL for any protected
resource; for example,
http://server1.example.com/index.html
.
5. Save the Authentication Service Provider configuration.
6. Navigate through the Mobile and Social console to Mobile Services > Service
Profiles > Authentication Services > OAMAuthentication.
7. From the Service Provider drop down menu, select the Authentication Service
Provider just created; for example,
10GOAMAuthentication
.
8. Check the Client Token checkbox.
9. Clear the Access Token checkbox.
10. Save the OAMAuthentication configuration.
If Mobile and Social is configured to work with a remote instance of the Oracle Access
Manager 10g server, you must also do either of the following:
■Define a
uid
attribute in the directory
DN
entry for user records in the Oracle
Access Manager
UserStore
.
■Define a unique directory user entry attribute that can be used to identify the
directory user entry in Mobile and Social.
The following procedure demonstrates setting the value to
CN
. Set the value to a
unique user entry as configured on your directory server;
uid
or
loginid
may also be
possible choices. Before beginning, confirm that the Oracle Access Manager DN for
UserStore
does not include a
uid
attribute for the Application Profile
profileid1
,
and that the DN is as follows:
"CN=profileid1 profileid1, OU=Test, ..."
Note: Mobile and Social can dynamically obtain the unique directory
user attribute name from Oracle Access Manager version 11g but the
earlier 10g release requires that you specify the attribute to use when
configuring Mobile and Social. If this attribute is not set, Client Token
validation will fail in Mobile and Social.

Configuring Mobile Services with Other Oracle Products
Configuring Mobile Services 42-37
Complete the next steps upon confirming that both are true.
1. Open the Application Profile Configuration page for
profileid1
in Mobile and
Social as documented in Section 42.6, "Defining Application Profiles."
2. In the Attributes section, add the following name-value pair and click Apply.
Name:
userPrincipalAttrValue
Val ue:
CN
3. Open the Service Provider Configuration page for your Oracle Access Manager
10g Authentication Service Provider as documented in Section 42.3.1, "Defining,
Modifying or Deleting an Authentication Service Provider."
4. In the Attributes section, add the following name-value pair and click Apply.
Name:
userPrincipalAttrName
Val ue:
CN
42.9.1.3 Configuring an Authentication Service Provider for Remote Access
Manager 11gR2 or Oracle Access Manager 11gR1 PS1
The following procedure documents how to configure an Authentication Service
Provider to work with releases 11gR2 and 11gR1 PS1. The differences for the 11gR1 PS1
release console are documented in notes within each 11gR2 step.
1. Log in to the Oracle Access Management Console and register a WebGate (OAM
Agent) for Mobile and Social.
Be sure to enable the following options.
■Allow Management Operations
■Allow Token Scope Operations
■Allow Master Token Retrieval
■Allow Credential Collector Operations
2. Navigate through the Mobile and Social Console to Mobile Services > Service
Providers > Authentication Service Providers.
3. Click New to create a new Authentication Service Provider configuration.
4. When using an OAM 11.1.2 release console, enter the following values:
a. Keep the default value of
OAM_VERSION
as
OAM_11G
.
b. Change
WEBGATE_ID
to the name you previously used to create the WG profile.
c. Change
OAM_SERVER_1
to the hostname:port# of the machine hosting the OAM
11G server.
Note: See Section 41.1.2, "Deploying Mobile and Social" for
information about deploying Mobile and Social with a WebGate.
Note: If using an OAM 11.1.1.n release console, enable Allow
Management Operations.

Configuring Mobile Services with Other Oracle Products
42-38 Administrator's Guide for Oracle Access Management
5. Save the Authentication Service Provider configuration.
6. Navigate through the Mobile and Social Console to Mobile Services > Service
Profiles > Authentication Services > OAMAuthentication.
7. From the Service Provider drop-down menu, select the Authentication Service
Provider just created; for example,
10GOAMAuthentication
.
8. Select the Client Token checkbox.
9. Clear the Access Token checkbox only if using OAM 11g R1 PS1.
10. Save the OAMAuthentication configuration.
11. Merge the CSF wallet files.
OAM 11G generates the
cwallet.sso
file when the administrator creates the WG
profile for Mobile and Social. To communicate with this WG profile, the
administrator must merge the secret value in
cwallet.sso
into the Mobile and
Social wallet.
a. Copy
cwallet.sso
from OAM (~/domain-home/output) to the Mobile and
Social host machine directory,
/tmp/oam
.
b. Copy
cwallet.sso
from the Mobile and Social host machine directory
(
~/config/fmwconfig
) to the Mobile and Social host machine directory,
/tmp/oic
.
c. Download
merge-creds.xml
to the Mobile and Social host machine directory,
/tmp
.
Example 42–1 is a sample
merge-creds.xml
file.
Example 42–1 Sample merge-creds.xml
<?xml version="1.0" encoding="UTF-8" standalone='yes'?>
<jpsConfig xmlns="http://xmlns.oracle.com/oracleas/schema/11/jps-config-11_1.xsd"
xmlns:xsi="http://www.w3.org/2001/XMLSchema-instance"
xsi:schemaLocation=
"http://xmlns.oracle.com/oracleas/schema/11/jps-config-11_1.xsd"
schema-major-version="11" schema-minor-version="1">
<serviceProviders>
Note: If using an OAM 11.1.1.n release console:
1. Change the default value of
OAM_VERSION
to
OAM_10G
.
2. Change
WEBGATE_ID
to the name you previously used to create the WG
profile.
3. Change
OAM_SERVER_1
to the hostname:port# of the machine hosting the
OAM 11.1.1.5 server.
4. Add a new parameter named and populate it with the URL for any
protected resource; for example,
http://server1.example.com/index.html
.
Note: Use the following command to display the wallet before and
after the merge for verification that the merge has been successful.
orapki wallet display -wallet wallet_location

Configuring Mobile Services with Other Oracle Products
Configuring Mobile Services 42-39
<serviceProvider
class="oracle.security.jps.internal.credstore.ssp.SspCredentialStoreProvider"
name="credstoressp" type="CREDENTIAL_STORE">
<description>File-based credential provider</description>
</serviceProvider>
</serviceProviders>
<serviceInstances>
<!-- Source file-based credential store instance -->
<serviceInstance location="/tmp/oam" provider="credstoressp"
name="credential.file.source">
</serviceInstance>
<!-- Destination file-based credential store instance -->
<serviceInstance location="/tmp/oic" provider="credstoressp"
name="credential.file.destination">
</serviceInstance>
</serviceInstances>
<jpsContexts>
<jpsContext name="FileSourceContext">
<serviceInstanceRef ref="credential.file.source"/>
</jpsContext>
<jpsContext name="FileDestinationContext">
<serviceInstanceRef ref="credential.file.destination"/>
</jpsContext>
</jpsContexts>
</jpsConfig>
d. Set the PATH variable to include ~/oracle_common/bin:~/oracle_
common/common/bin:~
e. Initialize the WebLogic Scripting Tool by running
wlst.sh
on the command
line.
f. Run the
migrateSecurityStore
WLST command.
Following is sample syntax for the WLST command.
$ wlst.sh
wls:/offline> connect("weblogic", "weblogic-passwd", "localhost:<port>")
wls:/WLS_IDM/serverConfig>
migrateSecurityStore(type="credStore",configFile="/tmp/merge-creds.xml",
src="FileSourceContext",dst="FileDestinationContext")
12. Restart the Mobile and Social server.
42.9.2 Configuring Mobile Services for Oracle Adaptive Access Manager
To configure a Service Domain to use the Oracle Adaptive Access Manager (OAAM)
device registration functionality, open the Service Domain Configuration page and
choose the OAAMSecurityHandlerPlugin option from the Security Handler Plugin
Name list. See Section 42.7.1, "Creating a Service Domain."

Configuring Mobile Services with Other Oracle Products
42-40 Administrator's Guide for Oracle Access Management
The following sections describe how to configure the required policies, conditions,
rules, and actions to complete integration between Mobile and Social and OAAM.
■Understanding OAAM Support in Mobile and Social
■Configuring the WebLogic Administration Domain
■Configuring OAAM if Social Identity Authentication is Enabled in Mobile Services
■Setting up a Lost or Stolen Device Rule
■Configuring Blacklisted Devices and Applications
■Understanding the OAAM Sessions for Mobile Applications
■Registering Users for OAAM Authentication
■Setting up OAAM Knowledge-Based Authentication
■Setting up OAAM One Time Password
42.9.2.1 Understanding OAAM Support in Mobile and Social
Mobile and Social supports the OAAM policies listed (by OAAM checkpoint) in
Table 42–21.
Mobile and Social and OAAM also use similar terminology to describe the security
actions that can be taken to respond to authentication and authorization events.
Table 42–22 maps the the Mobile and Social term to the OAAM term.
Note: During installation, the Oracle Fusion Middleware
Configuration Wizard can generate a domain that supports both
Mobile and Social and Oracle Adaptive Access Manager. Mobile and
Social requires at least Oracle Adaptive Access Manager version 11g
Release 2. For more information, see the "Configuring Mobile and
Social" chapter in the Fusion Middleware Installation Guide for Oracle
Identity and Access Management.
Note: See the Administrator's Guide for Oracle Adaptive Access Manager
for information on how to set up OAAM rule and policy ordering.
Table 42–21 OAAM Policies Supported By Mobile and Social
Checkpoint Supported Policies
Post-Authentication OAAM Post-Authentication Security
OAAM User vs Themselves
OAAM User vs. All Users
OAAM Does User Have Profile
OAAM Predictive Analysis Policy
Challenge OAAM Challenge Policy
Device Identification OAAM Device ID Policy
OAAM System Deep Analysis Flash Policy
OAAM System Deep Analysis No Flash Policy
Table 42–22 Mapping Terms Between OAAM and Mobile and Social
OAAM Action Groups Mobile and Social Actions
OAAM Allow ALLOW

Configuring Mobile Services with Other Oracle Products
Configuring Mobile Services 42-41
■For information about the OAAM policies, rules and checkpoints, see the Oracle
Fusion Middleware Administrator's Guide for Oracle Adaptive Access Manager.
■To customize OAAM policies and rules, use the Oracle Adaptive Access Manager
Administrator's Console.
42.9.2.2 Configuring the WebLogic Administration Domain
Before configuring OAAM policies, complete the steps in this section.
■Creating an Administrator for OAAM Administration
■Adding Oracle Access Management Server as Target of OAAM Data Source
42.9.2.2.1 Creating an Administrator for OAAM Administration 1.Log in to the Oracle
WebLogic Administration Console for your WebLogic administration domain.
2. In the Domain Structure tab on the left side of the page, select Security Realms.
3. On the Summary of Security Realms page, select the realm that you are
configuring; for example, myrealm.
4. Click New and provide the required information to create a User in the security
realm: Name (for example, user1), Description (optional), Provider (enter
DefaultAuthenticator), Password, and Confirm Password.
5. Click to select the new created User.
6. Click the Groups tab.
7. Assign to the User all groups with an OAAM prefix.
8. Click Save.
42.9.2.2.2 Adding Oracle Access Management Server as Target of OAAM Data Source 1.Log in
to the Oracle WebLogic Administration Console for your WebLogic administration
domain.
2. In the Domain Structure tab on the left side of the page, select Services.
3. On the Summary of Services page, select Data Sources.
4. Open
OAAM_SERVER_DS
in the Data Sources table.
5. Click the Targets tab.
6. Select
oam_server1
.
7. Click Save.
OAAM Block DENIED
OAAM Challenge CHALLENGE
OAAM Black-Listed Mobile Device WIPE_OUT
OAAM Lost Device WIPE_OUT
Table 42–22 (Cont.) Mapping Terms Between OAAM and Mobile and Social
OAAM Action Groups Mobile and Social Actions

Configuring Mobile Services with Other Oracle Products
42-42 Administrator's Guide for Oracle Access Management
42.9.2.3 Configuring OAAM if Social Identity Authentication is Enabled in Mobile
Services
If Mobile Services is configured to accept an authentication result from Social Identity,
complete the following steps to configure OAAM to work with Mobile and Social
when users authenticate.
1. Log in to the OAAM Administration Console.
2. Click Policies and search for the OAAM Mobile and Social Integration
Post-Authentication Security policy.
3. In the policy find the following rule: Mobile device is not registered.
4. Add a condition:
a. Search on "Session: Check value in comma separated values."
b. Add the following:
Parameter Key : oic.userIdType
Value to Check : URI
Return if in list : false
42.9.2.4 Setting up a Lost or Stolen Device Rule
Users should report lost or stolen devices to the support department so that the
missing device can be added to the OAAM Lost or Stolen Device group. Then if an
authentication attempt comes from the missing device, OAAM can send Mobile and
Social a DENY or WIPE_OUT action to wipe out the application's data associated with
the Mobile and Social server. If a User recovers a missing device, the device status can
be reset in OAAM. The following procedure documents how to create a Lost or Stolen
Device Rule for each device reported as missing by adding the Device ID to the OAAM
Lost or Stolen Devices device group.
1. Log in to the OAAM Administration Console.
2. Double-click Sessions in the Navigation pane.
The Sessions Search page displays.
3. Search by User Name, Client Application name, Device ID or similar to find the
lost or stolen device.
4. Click the Session ID in the Search Results table.
The Session Details page opens.
5. Click Add to Group.
The Add to Group pop-up window opens.
6. In the Choose Data Type to Add section, choose Device and click Next.
7. Select the OAAM Lost or Stolen Devices Group and click Next.
8. Verify your selection and click Finish.
9. Click OK.
For information about managing the Lost Devices policy and group, see the Oracle
Fusion Middleware Administrator's Guide for Oracle Adaptive Access Manager.

Configuring Mobile Services with Other Oracle Products
Configuring Mobile Services 42-43
42.9.2.5 Configuring Blacklisted Devices and Applications
Rules can be configured to block access to specific devices or applications. The
following sections contain more information.
■Setting up a Blacklisted Device Rule
■Setting up a Blacklisted Application Rule
42.9.2.5.1 Setting up a Blacklisted Device Rule Create a Blacklisted Device Rule for each
device to which you want to block access. The following procedure documents how to
create a Blacklisted Device Rule by adding the Device ID to the OAAM Black-listed
Mobile Devices group.
1. Log in to the OAAM Administration Console.
2. Double-click Sessions in the Navigation pane.
The Sessions Search page displays.
3. Use the Search page to find the device to block. For example, search by a User
Name, a Client Application name, a Device ID, and so on.
4. Click the Session ID in the Search Results table.
The Session Details page opens.
5. Click Add to Group.
The Add to Group pop-up window opens.
6. In the Choose Data Type to Add section, choose Device and click Next.
7. Select the OAAM Black-listed mobile devices Group and click Next.
8. Verify your selection and click Finish.
9. Click OK.
42.9.2.5.2 Setting up a Blacklisted Application Rule The task of adding a Blacklisted
Application Rule is broken into the following procedures. Follow them (in order) to
add the application to the OAAM Blacklisted Mobile Devices group.
■Creating a New Alert Group
■Creating a Generic Strings Group to Store Blacklisted Application Names
■Creating a New Blacklisted Application Rule
42.9.2.5.3 Creating a New Alert Group
1. Log in to the OAAM Administration Console.
2. Double-click Groups in the Navigation pane.
The Groups Search page displays.
3. Click New Group.
The Create Group pop-up window opens.
4. Complete the form as follows and click Create:
■Group Name - Type
OAAM Blacklisted mobile application used
. (This is
the name of the mobile application to be blacklisted.)
■Group Type - Choose Alerts from the menu.
■Cache Policy - Choose Full Cache from the menu.

Configuring Mobile Services with Other Oracle Products
42-44 Administrator's Guide for Oracle Access Management
■Description - Type
Session coming from a blacklisted mobile
application
.
5. Click the Alerts tab.
6. Click the Add member to this group button.
The Add Alerts pop-up window opens.
7. In the Options to add a new element section, choose Create new Alerts.
Complete the form as follows and click Add:
■Alert Type - Choose Fraud from the menu.
■Alert Level - Choose Medium from the menu.
■Alert Message - Type
Session coming from a blacklisted mobile
application
.
The Add Alerts window displays a message confirming that the new element was
created successfully.
42.9.2.5.4 Creating a Generic Strings Group to Store Blacklisted Application Names
1. Double-click Groups in the Navigation pane.
The Groups Search page displays.
2. Click New Group.
The Create Group pop-up window opens.
3. Complete the form as follows and click Create:
■Group Name - Type
OAAM blacklisted mobile application
.
■Group Type - Choose Generic Strings from the menu.
■Cache Policy - Choose Full Cache from the menu.
■Description - Type
OAAM blacklisted mobile application
.
4. Click the Generic Strings tab, then click the Add member to this group button.
5. Type the name of the app.
The Add Generic Strings window displays a message confirming that the new
element was created successfully.
Click OK.
42.9.2.5.5 Creating a New Blacklisted Application Rule
1. Double-click Policies in the Navigation pane.
The Policies Search page displays.
2. Choose Post authentication from the Checkpoint menu, then click Search.
3. Click OAAM Post-Authentication Security.
The OAAM Post-Authentication Security page opens.
4. Click the Rules tab.
5. Click the Add Rule button.
Complete the form as follows and click Add:
■Rule Name - Type
Check for blacklisted mobile applications
.

Configuring Mobile Services with Other Oracle Products
Configuring Mobile Services 42-45
■Rule Status - Choose Active from the menu.
■Rule Notes - Type
Check if application is in the Oaam blacklisted
mobile application group
.
6. Click the Conditions tab.
7. Click Add Conditions.
The Add Condition pop-up window opens.
8. Complete the form as follows and click Search:
■Condition Name - Type
Check Current Session
■Type - Choose In Session from the menu.
9. In the table of results, click Session: Check Current Session using the filter
conditions.
The filter condition details display.
10. Do the following and click Save:
a. Under Check if select Client Application.
b. Select in as the operator.
c. Select Group as the Target Type.
d. Select Generic Strings as the Group Type.
e. Select OAAM blacklisted mobile application as the Group Name.
In English the condition reads as "Check if the Client Application is in the "OAAM
blacklisted mobile application" group."
11. Click the Results tab.
12. Choose OAAM Block from the Action Group menu.
13. Choose OAAM Blacklisted application used from the Alert Group menu.
14. Click Apply.
42.9.2.6 Understanding the OAAM Sessions for Mobile Applications
The OAAM Session is a commonly used conceptual entity in OAAM rule execution. A
rule can use a session attribute as input (for example, Client App Name and OAAM
Device ID) and affect the status of the session at the output (that is, changing the status
to "Blocked").
When OAAM is used in a non-mobile environment such as a web browser, there is a
one-to-one relationship between a user authentication session (an OAM session, for
example) and the OAAM session. For example, each OAAM session contains data
associated with the following fields:
■User ID
■Client IP Address
■OAAM Device ID and Fingerprint
■(Auth) Status: Success, Pending, Blocked, and so on
■Client Application Name

Configuring Mobile Services with Other Oracle Products
42-46 Administrator's Guide for Oracle Access Management
In a mobile application environment, different apps running on the same device used
by the same user are expected to have different OAAM sessions, even in a mobile SSO
scenario. For example, assume the following apps are installed on a mobile device:
■SSO Security Agent App
■White Pages App
■Expense Report App
These apps are listed together as participants of the same Service Domain and they all
participate in single sign-on. A user just needs to log in once using the mobile SSO
agent app. This means that there will only be a single User Authentication session
(that is, a single Access Manager session) shared by multiple apps on the same device.
On the other hand, if the user uses all three apps simultaneously within the same
Access Manager session, each mobile application will have its own OAAM session
entry and three OAAM sessions will be seen in the OAAM Admin Console.
The reason to have separate OAAM sessions for each mobile application is to allow
rules to take the mobile client application into account. The same rule can block
sessions from some apps, while letting sessions from other apps succeed. (The
Blacklisted Application Rule in Section 42.9.2.5.2 is an example of this.) A more
sophisticated rule can consider multiple factors from a session; for example an
Expense Report application might rate as security sensitive while a "White Pages"
(directory look-up) application might rate as less sensitive. The same Risky-IP rule
may block sessions from the Expense Report application but not the White Pages app,
even if the sessions come from the same medium-risky IP address.
42.9.2.7 Registering Users for OAAM Authentication
OAAM provides strong authentication features, such as Knowledge-Based
Authentication and One-Time Password. One-Time Password delivers a password
using e-mail or a mobile text message. These features require end users to register a
security profile that may contain security questions, mobile phone numbers, and
e-mail addresses.
The following sections contain information on setting up these authentication
processes.
■Setting up OAAM Knowledge-Based Authentication
■Setting up OAAM One Time Password
42.9.2.7.1 Setting up OAAM Knowledge-Based Authentication Mobile and Social provides
support for Knowledge-Based Authentication (KBA) if OAAM is installed. KBA is the
default option for Strong Authentication in OAAM. Administrators do not need to
perform extra configuration for KBA to work. Users should use the OAAM Managed
Server Console to record their KBA questions in their User Profile registration. For
more information about KBA, see the Administrator's Guide for Oracle Adaptive Access
Manager.
42.9.2.7.2 Setting up OAAM One Time Password Mobile and Social provides One Time
Password (OTP) support if OAAM is installed. OTP allows end users to authenticate
themselves by entering a server generated one-time-password that might be received
Note: For more information about the OAAM user registration flow,
see the Authentication Flow section in the Administrator's Guide for
Oracle Adaptive Access Manager.

Configuring Mobile Services with Other Oracle Products
Configuring Mobile Services 42-47
by either SMS or e-mail. Because the one-time-password is sent out-of-band, the risk is
reduced that someone other than the valid user could obtain access to it. The following
sections contain more information.
■Setting Up OTP E-Mail Integration
■Setting Up OTP Integration for SMS Messages
■Changing the OAAM Challenge Policy Trigger Combination
42.9.2.7.3 Setting Up OTP E-Mail Integration
Mobile and Social can send e-mail in either of the following ways.
■Using the included SMTP client.
■Using the Oracle User Messaging Service (UMS).
This section contains a procedure for each of these integrations. Choose either Setting
Up SMTP for E-mail or Setting Up UMS for E-mail to begin.
After configuring the SMTP or UMS attribute values, enable the Challenge Types on
the OAAM server as documented in this section's third procedure, Enable "Challenge
Types" on the OAAM Server for E-mail.
Setting Up SMTP for E-mail
1. Open the Mobile Services Home Page in the Oracle Access Management Console
as described in Section 42.1, "Opening the Mobile Services Configuration Page."
2. In the Security Handler Plugins section on the right side of the screen, click
OaamSecurityHandlerPlugin and click Edit in the tool bar.
3. In the Attributes section provide values for the following attribute names and
click Apply.
mail.smtp.host - The SMTP server host.
mail.smtp.port - The SMTP server port.
mail.smtp.security.type - The SMTP security type. Either
SSL
or
TLS
.
mail.smtp.user - The user name to log on to the SMTP server.
mail.smtp.fromadd - The Mobile and Social "From" address, for example:
mobileadmin@example.com
mail.smtp.password - The password for the
mail.smtp.user
account.
mail.smtp.truststore.location - The file name with the location of the trust store to
be used to validate the server identity.
mail.smtp.keystore.location - The file name of the key store containing the client
certificate.
mail.smtp.keystore.password - The key store password.
mail.smtp.truststore.password - The trust store password.
4. Complete the steps in Enable "Challenge Types" on the OAAM Server for E-mail.
Note: Configure either SMTP or UMS. Do not configure both.

Configuring Mobile Services with Other Oracle Products
42-48 Administrator's Guide for Oracle Access Management
Setting Up UMS for E-mail
1. Open the Mobile Services Home Page in the Oracle Access Management Console
as described in Section 42.1, "Opening the Mobile Services Configuration Page."
2. In the Security Handler Plugins section on the right side of the screen, click
OaamSecurityHandlerPlugin and click Edit in the tool bar.
3. In the Attributes section provide values for the following attribute names and
click Apply.
ums.service.uri - The UMS server Web service URL, for example:
http://
<UMS Server URL>
:
<UMS Port>
/ucs/messaging/webservice
ums.username - The user name for the UMS server.
ums.password - The password for the UMS server.
ums.from.address - The Mobile and Social "From" address, for example:
mobileadmin@example.com
ums.from.name - The Mobile and Social "From" name.
ums.email.enabled - Set to
true
.
4. Complete the steps in Enable "Challenge Types" on the OAAM Server for E-mail.
Enable "Challenge Types" on the OAAM Server for E-mail
1. Log in to the OAAM Administration Console.
2. Choose Environment > Properties in the Navigation pane and double-click
Properties.
The Properties Search page displays.
3. In the Search box, type
bharosa.uio.default.register.userinfo.enabled
in the
Name field and click Search.
Click to select the record in the Search Results section, change the value to
true
,
and click Save.
4. In the Search box, type
bharosa.uio.default.userinfo.inputs.enum.email.enabled
in the Name field
and click Search.
Click to select the record in the Search Results section, change the value to
true
,
and click Save.
5. In the Search box, type
bharosa.uio.default.challenge.type.enum.ChallengeEmail.available
in the
Name field and click Search.
Click to select the record in the Search Results section, change the value to
true
,
and click Save.
42.9.2.7.4 Setting Up OTP Integration for SMS Messages
Mobile and Social sends SMS messages using the Oracle UMS. Complete Setting Up
SMS Using UMS and then Enable "Challenge Types" on the OAAM Server for SMS.
Setting Up SMS Using UMS
1. Open the Mobile Services Home Page in the Oracle Access Management Console
as described in Section 42.1, "Opening the Mobile Services Configuration Page."

Configuring Mobile Services with Other Oracle Products
Configuring Mobile Services 42-49
2. In the Security Handler Plugins section on the right side of the screen, click
OaamSecurityHandlerPlugin and click Edit in the tool bar.
3. In the Attributes section provide values for the following attribute names and
click Apply.
ums.service.uri - The UMS server Web service URL, for example:
http://
<UMS Server URL>
:
<UMS Port>
/ucs/messaging/webservice
ums.username - The user name for the UMS server.
ums.password - The password for the UMS server.
ums.from.address - The Mobile and Social "From" address, for example:
mobileadmin@example.com
ums.from.name - The Mobile and Social "From" name.
ums.email.enabled - Set to
true
.
4. Complete the steps in the Enable "Challenge Types" on the OAAM Server for SMS.
Enable "Challenge Types" on the OAAM Server for SMS
1. Log in to the OAAM Administration Console.
2. Choose Environment > Properties in the Navigation pane and double-click
Properties.
The Properties Search page displays.
3. In the Search box, type
bharosa.uio.default.register.userinfo.enabled
in the
Name field and click Search.
Click to select the record in the Search Results section, change the value to
true
,
and click Save.
4. In the Search box, type
bharosa.uio.default.challenge.type.enum.ChallengeSMS.available
in the
Name field and click Search.
Click to select the record in the Search Results section, change the value to
true
,
and click Save.
42.9.2.7.5 Changing the OAAM Challenge Policy Trigger Combination
OAAM evaluates the Challenge policy when an event triggers the Challenge action. If
KBA is active for a User, the system challenges the User with questions from the
OAAM Challenge Question Action Group. If the User fails the OAAM challenge
questions three times, the system starts the OAAM SMS Challenge Action group.
You can reorder the Action Group using OAAM Challenge Policy trigger
combinations. So other Challenge Action Groups, such as the OAAM Challenge
E-Mail group or the OAAM Challenge SMS group, will take precedence over the
OAAM Challenge question. The following procedure documents how to change the
OAAM Challenge Policy Trigger Combination.
1. Log in to the OAAM Administration Console.
2. Double-click Policies in the Navigation pane.
The Policies Search page displays.
3. Choose Challenge from the Checkpoint menu, then click Search.
4. Click to select OAAM Challenge Policy in the Search Results table.

Configuring Mobile Services with Other Oracle Products
42-50 Administrator's Guide for Oracle Access Management
5. Click the Trigger Combinations tab.
6. Click Reorder.
The Reorder Trigger Combinations pop-up window opens.
7. Use the controls to move trigger combinations to higher or lower positions.

43
Configuring Social Identity 43-1
43
Configuring Social Identity
[18]
Mobile and Social provides a graphical user interface for configuring Social Identity.
(Note that prior to version 11.1.2.2, Social Identity was named Internet Identity
Services.) This chapter describes how to use the Oracle Access Management Console to
configure Mobile Services and contains the following topics.
■Opening the Social Identity Configuration Page
■Understanding Social Identity Configuration
■Defining Social Identity Providers
■Defining Service Provider Interfaces
■Defining Application Profiles
■Integrating Social Identity With Mobile Applications
■Linking Social Identity Provider Accounts
43.1 Opening the Social Identity Configuration Page
Follow these steps to open the Social Identity configuration page in the Oracle Access
Management Console.
1. Log in to the Oracle Access Management Console.
The Launch Pad opens.
2. Click Social Identity in the Mobile Security and Social Identity pane.
The Social Identity tab opens.
3. Click an OAuth Identity Domain to configure it.
The Welcome to Mobile and Social - Social Identity page opens.
43.2 Understanding Social Identity Configuration
The Welcome to Mobile and Social - Social Identity configuration page is divided into
separate panels that can be expanded and collapsed by clicking the arrow button in
Note: Social Identity can also be configured from the command line
using WLST. For more information about the Mobile and Social WLST
commands, see the Oracle Fusion Middleware WebLogic Scripting Tool
Command Reference.

Understanding Social Identity Configuration
43-2 Administrator's Guide for Oracle Access Management
the top left corner of the panel. The following sections contain more information about
the Social Identity panels.
■Understanding Social Identity Providers
■Understanding Service Provider Interfaces
■Understanding Application Profiles
43.2.1 Understanding Social Identity Providers
The Social Identity Providers panel is used to edit the (preconfigured) configuration
details for Identity Providers such as Google, Facebook, Twitter, and the like. Once
established, you should not need to modify these settings very often.
You can also define configuration details for Social Identity Providers that you add
yourself by implementing the
oracle.security.idaas.rp.spi.IdentityProvider
Java interface. For information about adding additional Social Identity Providers, see
"Extending the Capabilities of the Mobile and Social Server" in the Developer's Guide for
Oracle Access Management.
More information on Social Identity Providers is in Section 43.3, "Defining Social
Identity Providers."
43.2.2 Understanding Service Provider Interfaces
The Service Provider Interface refers to the set of rules that govern the authentication
flow for the specified Application Profile. Mobile and Social provides the following
Service Provider Interfaces.
■DefaultServiceProviderInterface - provides support for web applications that run
on Java-compliant application servers.
■OAMServiceProviderInterface - provides support for web applications that run
on the Access Manager service.
More information on Service Provider Interfaces is in Section 43.4, "Defining Service
Provider Interfaces."
43.2.3 Understanding Application Profiles
An Application Profile defines an application that uses Social Identity Provider
services on the Mobile and Social server. Use this panel to configure mobile
applications, web applications that run on Java-compliant application servers, and
web applications that are integrated with Access Manager to use Social Identity.
■If a web application is not integrated with Access Manager, integrate the Social
Identity login page with the web application. See the "Developing Applications
Using the Social Identity Client SDK" chapter in the Developer's Guide for Oracle
Access Management for details.
■If the web application is integrated with Access Manager, edit the preconfigured
Application Profile named OAMApplication. When Access Manager and Mobile
and Social are installed together during Oracle Access Management installation,
Note: A Java developer can write custom implementations of one or
more of the Identity Provider interface contracts. Use the Service
Provider Interfaces section only if you need to add a custom Service
Provider created by a developer.

Defining Social Identity Providers
Configuring Social Identity 43-3
both products are registered as trusted partners and the preconfigured Application
Profile is included. As a result, you do not need to write code to integrate web
applications that are integrated with Access Manager and Social Identity. The
OAMApplication Application Profile that is included with Mobile and Social is
preconfigured to work with Access Manager and requires only minor
configuration changes to get working in your environment.
More information on Application Profiles is in Section 43.5, "Defining Application
Profiles."
43.3 Defining Social Identity Providers
The Social Identity Provider collects configuration details for Identity Providers such
as Google, Facebook, Twitter, and the like. Once created, you should not need to
modify Social Identity Provider settings very often. The following sections provide
information regarding creating, modifying and deleting Social Identity Providers.
■Creating a Social Identity Provider
■Editing or Deleting a Social Identity Provider
■Generating the Consumer Key and Consumer Secret for OAuth Providers
■Troubleshooting Facebook Social Identity Providers
43.3.1 Creating a Social Identity Provider
Social Identity Providers can also be created using the WebLogic Scripting Tool. See
the Oracle Fusion Middleware WebLogic Scripting Tool Command Reference for details.
1. Open the Social Identity Home Page in the Oracle Access Management Console as
described in Section 43.1, "Opening the Social Identity Configuration Page."
2. Click Create in the Social Identity Provider panel in the home area.
The Create New Social Identity Provider configuration page displays.
3. Enter values for the Social Identity Provider properties.
■Name - Type a unique name for this Authentication Service Provider.
■Description - (Optional) Type a short description that will help you or another
Administrator identify this service in the future.
■Social Identity Provider Protocol - Select the Identity Provider Protocol from
the drop down menu.
–OpenID
–OAuth
–Custom
Select Custom to configure a custom Identity Provider. Your choice here will
change the displayed Protocol Attributes and User Attributes Returned panels
to reflect properties more specific to the authentication protocol being used by
the Social Identity Provider - either OpenID or OAuth.
■Implementation Class - Based on the Social Identity Provider Protocol
selection, the appropriate provider-specific implementation of the
oracle.security.idaas.rp.spi.IdentityProvider
Java interface will be
populated in this field. (If Custom, enter the corresponding implementation
class that should interact with the Identity Provider.) The Mobile and Social

Defining Social Identity Providers
43-4 Administrator's Guide for Oracle Access Management
server will use this information to communicate with this Social Identity
Provider.
4. Enter values for the Protocol Attributes properties based on the protocol being
used by the Social Identity Provider previously selected: OpenID (Table 43–1) or
OAuth (Table 43–2). (If Custom, add all values required by the custom Provider
and related to the authentication protocol used.)
■Provide values required by the Identity Provider implementing the OpenID
protocol as specified in Table 43–1.
■Provide values required by the Identity Provider implementing the OAuth
protocol as specified in Table 43–2.
Table 43–1 OpenID Protocol Attributes
Name Values Notes
Yadis Endpoint Must be an absolute
HTTP or HTTPS URL
Type the published URL that accepts
OpenID authentication protocol
messages for this Identity Provider.
Mobile and Social uses this URL to make
user authentication requests.
Hashing Algorithm ■SHA256 is a 256-bit
key length
algorithm
■SHA1 is a 160-bit
key length
algorithm
■None
Choose a signature algorithm. Mobile
and Social uses this value internally to
configure the Session Type and
Association Type properties for
communicating with the Identity
Provider.
Authentication Policy
Choose Yes to request
that an authentication
policy be applied by the
OpenID Provider when
authenticating a user.
Otherwise, choose No.
Usage of PAPE (Provider Authentication
Policy Extension) allows web developers
to request other modifications to the flow,
such as asking that the Identity Provider
re-prompt the User for their password.
Authentication Policy
Maximum Age
Provide a value greater
than or equal to zero
seconds. Specify
0
to
force a password
re-prompt.
Type the maximum length of time in
seconds that a User who has not actively
authenticated can use a login session
before being required to authenticate
using the requested authentication policy.
Use this parameter to ensure that the
login session of the user at the Identity
Provider is recent.
Preferred
Authentication
Policies
Type zero or more URIs separated by a
space that represent authentication
policies that the Identity Provider must
satisfy when authenticating the user. For
example:
http://schemas.openid.net/pape/poli
cies/2007/06/phishing-resistant
http://schemas.openid.net/pape/poli
cies/2007/06/multi-factor

Defining Social Identity Providers
Configuring Social Identity 43-5
Table 43–2 OAuth Protocol Attributes
Name Value Notes
Authorization URL
The Identity Provider's
published OAuth authorization
URL. If an Identity Provider
changes a published OAuth
URL, update this value to
match.
Mobile and Social directs the User to
this URL after the Identity Provider
returns the request token (see
Request Token URL). The Identity
Provider verifies the User's identity,
and the User grants the Identity
Provider permission to release the
User's protected information to the
Mobile and Social server.
Access Token URL
Type the Identity Provider's
published access token URL.
Mobile and Social uses this URL to
request an access token from the
Identity Provider after the User
authorizes the request token (using
the Authorization URL).
Request Token URL
Type the Identity Provider's
published Request Token URL.
(Not applicable to Facebook.)
Mobile and Social uses this URL to
obtain a request token from the
Identity Provider. After the Identity
Provider grants the request token,
the Mobile and Social server directs
the User to the Identity Provider's
Authorization URL. (The term
temporary credentials supplants the
terms request token and request secret
in RFC 5849, The OAuth 1.0 Protocol.)
Profile URL
Type the Identity Provider's
published Profile URL.
Mobile and Social uses this URL to
request User attributes based on a
OAuth access token.
Consumer Key
Type the value that the Mobile
and Social server should use to
identify itself to the Identity
Provider.
See Section 43.3.3, "Generating the
Consumer Key and Consumer
Secret for OAuth Providers" for
information about requesting a
Consumer Key from the Identity
Provider.
Consumer Secret
Type the secret that the Mobile
and Social server should use to
establish ownership of the
Consumer Key.
See Section 43.3.3, "Generating the
Consumer Key and Consumer
Secret for OAuth Providers" for
information about requesting a
Consumer Secret from the Identity
Provider.
Server Time Sync
If the Mobile and Social server
and a remote Identity Provider
are not time synchronized, type
the number of minutes of skew
to add to the current server time
when sending requests to the
remote Provider. This field
accepts both positive and
negative integers.
Typically LinkedIn requires
synchronized server time values.
Not applicable for Facebook or
Twitter.
In the Attribute Name column type
the local application attribute name
that should be assigned to the
attribute name returned by the
OpenID Identity Provider. In the
Attribute Schema Name column,
type the URL where the Mobile and
Social server can request user data
from the Identity Provider.
If you add attributes in the Attribute
Name column that the Identity
Provider does not support, those
attributes will not be available in
Mobile and Social.

Defining Social Identity Providers
43-6 Administrator's Guide for Oracle Access Management
5. Add values to the User Attributes Returned panel based on the Social Identity
Provider Protocol previously selected: OpenID, OAuth or Custom.
■OpenID: In the Attribute Name column type the local application attribute
name that should be assigned to the attribute name returned by the Identity
Provider. In the Attribute Schema Name column, type the URL where the
Mobile and Social server can request user data from the Identity Provider. If
you add attributes in the Attribute Name column that the Identity Provider
does not support, those attributes will not be available in Mobile and Social.
Table 43–3, " User Attributes Returned By Google" and Table 43–4, " User
Attributes Returned By Yahoo" lists the user attributes supported by Google
and Yahoo.
■OAuth: Specify the User Attributes that the OAuth Identity Provider should
return. In the Attribute Name column type the local application attribute
name that corresponds to the attribute name returned by the Identity Provider.
In the Attribute Schema Name column, type the Identity Provider attribute
name. For OAuth Providers, Attribute Name values and Attribute Schema
Name values are usually the same.
Table 43–3 User Attributes Returned By Google
Attribute Description
country Requests the user's home country. Must be set to:
http://axschema.org/contact/country/home
email Requests the user's Gmail address. Must be set to:
http://axschema.org/contact/email
firstname Requests the user's first name. Must be set to:
http://axschema.org/namePerson/first
language Requests the user's preferred language. Must be set to:
http://axschema.org/pref/language
lastname Requests the user's last name. Must be set to:
http://axschema.org/namePerson/last
Table 43–4 User Attributes Returned By Yahoo
Attribute Description
gender Requests the user's gender. Must be set to:
http://axschema.org/person/gender
email Requests the user's e-mail address. Must be set to:
http://axschema.org/contact/email
fullname Requests the user's full name. Must be set to:
http://axschema.org/namePerson
language Requests the user's preferred language. Must be set to:
http://axschema.org/pref/language
nickname Requests the user's preferred name. Must be set to:
http://axschema.org/namePerson/friendly
Timezone Requests the user's preferred time zone. Must be set to:
http://axschema.org/pref/timezone

Defining Social Identity Providers
Configuring Social Identity 43-7
Table 43–5, " User Profile Attributes Returned By Foursquare" and Table 43–6,
" User Profile Attributes Returned By Windows Live" lists the user attributes
supported by Foursquare and Windows Live.
■Custom: In the Attribute Name column type the local application attribute
name that should be assigned to the attribute name returned by the Custom
Identity Provider. In the Attribute Schema Name column, type the URL
where the Mobile and Social server can request user data from the Identity
Provider.
6. Click Create to create the Social Identity Provider configuration object.
43.3.2 Editing or Deleting a Social Identity Provider
To edit or delete a Social Identity Provider, select the Provider in the panel and click
Edit or Delete on the panel's tool bar. See Section 43.3.1, "Creating a Social Identity
Provider" for attribute descriptions.
Note: LinkedIn does not return an e-mail address or an unencrypted
login ID when it returns User Identity attributes to Mobile and Social.
Please note this limitation when using Identity attributes from
LinkedIn to pre-populate the registration form for Users.
Table 43–5 User Profile Attributes Returned By Foursquare
Attribute Description
id Requests the user's ID.
firstname Requests the user's first name.
lastname Requests the user's last name.
contact.email Requests the user's email address.
homecity Requests the user's home city.
gender Requests the user's gender.
photo Requests the user's photo.
Table 43–6 User Profile Attributes Returned By Windows Live
Attribute Description
id Requests the user's ID.
first_name Requests the user's first name.
last_name Requests the user's last name.
name Requests the user's name.
link Requests the user's link.
email.preferred Requests the user's preferred email address.
gender Requests the user's gender.
locale Requests the user's local.
updated_time Requests the updated time.

Defining Social Identity Providers
43-8 Administrator's Guide for Oracle Access Management
43.3.3 Generating the Consumer Key and Consumer Secret for OAuth Providers
The following sections describe how to generate the Consumer Key and Consumer
Secret for the Social Identity Providers that support the OAuth protocol.
■Generating a Consumer Key and Consumer Secret for Facebook
■Generating a Consumer Key and Consumer Secret for Twitter
■Generating a Consumer Key and Consumer Secret for LinkedIn
■Generating a Consumer Key and Consumer Secret for Foursquare
■Generating a Consumer Key and Consumer Secret for Windows Live
■Generating a Consumer Key and Consumer Secret for Google
43.3.3.1 Generating a Consumer Key and Consumer Secret for Facebook
This section describes how to generate a Consumer Key and Consumer Secret for
Facebook.
1. Open the following URL in a web browser:
https://developers.facebook.com/apps
2. Click Create New App.
3. Complete the Create New App form.
Facebook creates the application and assigns it a unique App ID and App Secret.
4. Complete the information in the Basic Info section.
In the Select how your application integrates with Facebook section, select
Website with Facebook Login.
5. In the Site URL field, provide the URL where the Mobile and Social Server can be
reached. For example:
http://
OAM-Hosted-Machine
:
Port
/
6. Click Save Changes.
7. From the Mobile and Social Console, open the "Social Identity Providers" >
"Facebook" configuration page as described in section Section 43.3.2.
8. Paste the App ID in the Consumer Key field and paste the App Secret in the
Consumer Secret field.
Click Apply to save your changes.
43.3.3.2 Generating a Consumer Key and Consumer Secret for Twitter
This section describes how to generate a Consumer Key and Consumer Secret for
Twitter.
1. Open the following URL in a web browser:
https://dev.twitter.com/apps/new
2. Complete the Create an application form.
Note: The steps in this section are accurate as of the date that this
documentation was published. The steps required to create a
Consumer Key and Consumer Secret using the Facebook, Twitter, and
LinkedIn web sites are subject to change at any time.

Defining Social Identity Providers
Configuring Social Identity 43-9
In the Callback URL field provide the URL where the Mobile and Social Server
can be reached. For example:
http://
OAM-Hosted-Machine
:
Port
/oic_rp/return
Twitter creates the application and assigns it a unique Consumer key and
Consumer secret.
3. (Optional) Configure your Twitter application as needed and save your changes.
4. From the Mobile and Social Console, open the "Social Identity Providers" >
"Twitter" configuration page as described in section Section 43.3.2.
5. Paste the Consumer Key in the Consumer Key field and paste the Consumer
Secret in the Consumer Secret field.
Click Apply to save your changes.
43.3.3.3 Generating a Consumer Key and Consumer Secret for LinkedIn
This section describes how to generate a Consumer Key and Consumer Secret for
LinkedIn.
1. Open the following URL in a web browser:
https://www.linkedin.com/secure/developer?newapp=
2. Complete the Add New Application form.
In the OAuth User Agreement section, add the URL in the OAuth Redirect URL
field where the Mobile and Social Server can be reached. For example:
http://
OAM-Hosted-Machine
:
Managed Server Port
/
3. Click Add Application.
LinkedIn creates the application and assigns it a unique API Key and Secret Key.
4. From the Mobile and Social Console, open the "Social Identity Providers" >
"LinkedIn" configuration page as described in section Section 43.3.2.
5. Paste the API Key in the Consumer Key field and paste the Secret Key in the
Consumer Secret field.
Click Apply to save your changes.
43.3.3.4 Generating a Consumer Key and Consumer Secret for Foursquare
This section describes how to generate a Consumer Key and Consumer Secret for
Foursquare.
1. Open the following URL in a web browser:
https://foursquare.com/developers/register
2. Fill in the application name and website URL.
3. Enter the URL where the Mobile and Social Server can be reached in the Callback
URL field.
For example:
http://
OAM-Hosted-Machine
:
Port
/
4. Save your changes.
From the screen that is displayed, copy the 'Client ID' and 'Client secret' codes.

Defining Social Identity Providers
43-10 Administrator's Guide for Oracle Access Management
5. From the Mobile and Social Console, open the "Social Identity Providers" >
"Foursquare" configuration page as described in section Section 43.3.2.
6. Paste the Client ID in the Consumer Key field and the Client Secret in the
Consumer Secret field and click Apply to save your changes.
43.3.3.5 Generating a Consumer Key and Consumer Secret for Windows Live
This section describes how to generate a Consumer Key and Consumer Secret for
Windows Live.
1. Open the following URL in a web browser:
https://manage.dev.live.com/
2. Sign in with your Windows Live ID and password.
3. Click Create Application.
4. Fill in the application name.
5. Read and accept the terms of use.
From the screen that is displayed, copy the 'Client ID' and 'Client secret' codes.
6. From the Mobile and Social Console, open the "Social Identity Providers" >
"Windows Live" configuration page as described in section Section 43.3.2.
7. Paste the Client ID in the Consumer Key field and the Client Secret in the
Consumer Secret field and click Apply to save your changes.
43.3.3.6 Generating a Consumer Key and Consumer Secret for Google
This section describes how to generate a Consumer Key and Consumer Secret for
Google.
1. Open the following URL in a web browser:
https://code.google.com/apis/console
2. Under APIs & auth (on the left side) click Credentials.
3. Under OAuth click Create new Client ID.
The Create Client ID form opens.
4. Complete and submit the form.
The new Client ID and secret are added.
5. From the Mobile and Social Console, open the "Social Identity Providers" >
"Google" configuration page as described in section Section 43.3.2.
6. Paste the Client ID in the Consumer Key field and the Client Secret in the
Consumer Secret field.
Click Apply to save your changes.
43.3.4 Troubleshooting Facebook Social Identity Providers
This section documents known configuration issues that affect the Facebook Social
Identity Provider.
■Configuring WebLogic Server for Facebook Compatibility
■Configuring WebLogic Server 10.3.5 and Older for Facebook Compatibility

Defining Service Provider Interfaces
Configuring Social Identity 43-11
43.3.4.1 Configuring WebLogic Server for Facebook Compatibility
Follow these steps to configure WebLogic Server to support Facebook.
1. Open the WebLogic Console.
http://
host
:
port
/console
2. Choose Domain > Environment > Servers > Managed Server.
3. Click the SSL tab, then click Advanced.
4. Click Lock and Edit configuration.
5. Change the Host Name Verifier to None.
6. Restart the Managed Server.
If Host Name Verifier is not set to None, the following error may display when trying
to access a protected resource if Facebook is the Identity Provider:
Exception in processRequest method: oracle.security.idaas.rp.RPException:
oracle.security.idaas.rp.RPException: Request failed:
43.3.4.2 Configuring WebLogic Server 10.3.5 and Older for Facebook Compatibility
Facebook's SSL certificate contains
*.facebook.com
as a wildcard host identifier.
WebLogic Server versions 10.3.5 and older have a problem verifying host names that
contain wildcards that can lead to communication failures between Facebook and
installations of Oracle Access Management Mobile and Social deployed on WebLogic
Server. The following workarounds are available.
■If using WebLogic Server versions 10.3.5 or older, follow these steps:
1. In the administration console, choose servers > oam_server_where_Mobile_and_
Social_is_deployed > SSL > Advanced.
2. Change Hostname Verifier to NONE.
■This WebLogic Server bug has been fixed in version 10.3.6 as follows: A new
custom hostname verifier
SSLWLSWildcardHostnameVerifier
was implemented,
derived from the default hostname verifier, so that it supports everything the
default hostname verifier does, including SANs. You must configure your
WebLogic server to use this custom hostname verifier if support for wildcard
certificates is required during the SSL handshake. One option is to use the
following WebLogic property:
-Dweblogic.security.SSL.hostnameVerifier=weblogic.security.utils.SSLWLSWildca
rdHostnameVerifier
43.4 Defining Service Provider Interfaces
The Service Provider Interface refers to the set of rules that govern the authentication
flow for the specified Application Profile. Mobile and Social provides the following
Service Provider Interfaces.
■DefaultServiceProviderInterface - provides support for web applications that run
on Java-compliant application servers.
■OAMServiceProviderInterface - provides support for web applications that run
on the Access Manager service.
If necessary, a Java developer can write custom implementations of one or more of the
Identity Provider interface contracts. This section includes the following topics:

Defining Service Provider Interfaces
43-12 Administrator's Guide for Oracle Access Management
■Creating a Service Provider Interface
■Editing or Deleting an Service Provider Interface
■Adding a Custom Service Provider Interface Implementation
43.4.1 Creating a Service Provider Interface
1. Open the Social Identity Home Page in the Oracle Access Management Console as
described in Section 43.1, "Opening the Social Identity Configuration Page."
2. Click Create in the Service Provider Interface panel in the home area.
The Create New Service Provider Interface configuration page displays.
3. Enter values for the Service Provider Interface properties.
■Name - Type a unique name for this Authentication Service Provider.
■Description - (Optional) Type a short description that will help you or another
Administrator identify this service in the future.
4. Enter values for the Interface Information properties as specified in Table 43–7.
5. Click Create to create the Service Provider Interface configuration object.
43.4.2 Editing or Deleting an Service Provider Interface
To edit or delete a Service Provider Interface, select the Provider in the panel and click
Edit or Delete on the panel's tool bar. See Section 43.4.1, "Creating a Service Provider
Interface" for attribute descriptions.
43.4.3 Adding a Custom Service Provider Interface Implementation
To add a custom interface implementation, create a new Social Identity Provider and
choose a mix of custom and/or default implementation classes as needed to meet your
business objectives. See "Developing Applications Using the Social Identity Client
SDK" in the Developer's Guide For Oracle Access Management for information.
Table 43–7 Service Provider Interface Information Properties
Name Notes
IDP Selector
Choose the IDP Selector implementation class for the
custom Provider.
NOTE: The console will not check the validity of the
provided class.
Post IDP Selector
Choose the Post IDP Selector implementation class for the
custom Provider.
IDP Interaction Provider
Choose the IDP Interaction Provider implementation class
for the custom Provider.
Registration Status Check
Choose the Registration Status Check implementation class
for the custom Provider.
Session Creation Provider
Choose the Session Creation Provider implementation class
for the custom Provider.

Defining Application Profiles
Configuring Social Identity 43-13
43.5 Defining Application Profiles
An Application Profile defines an application that uses Social Identity Provider
services on the Mobile and Social server. Use this panel to configure mobile
applications, web applications that run on Java-compliant application servers, and
web applications that are integrated with Access Manager to use Social Identity.
■If a web application is not integrated with Access Manager, integrate the Social
Identity login page with the web application. See the "Developing Applications
Using the Social Identity Client SDK" chapter in the Developer's Guide for Oracle
Access Management for details.
■If the web application is integrated with Access Manager, edit the preconfigured
Application Profile named OAMApplication. When Access Manager and Mobile
and Social are installed together during Oracle Access Management installation,
both products are registered as trusted partners and the preconfigured Application
Profile is included. As a result, you do not need to write code to integrate web
applications that are integrated with Access Manager and Social Identity. The
OAMApplication Application Profile that is included with Mobile and Social is
preconfigured to work with Access Manager and requires only minor
configuration changes to get working in your environment.
Typically, when a WebGate is configured in Access Manager, an Application Domain is
created involving resources and policies. In Mobile and Social, OAMApplication is the
Application Profile that corresponds to the Access Manager Application Domain. So, if
you define 10 WebGates in Access Manager, and each represents an application that
needs to use Mobile and Social for user authentication, use OAMApplication as a
template to create 10 corresponding Application Profiles with names that match the 10
Application Domains.
This section provides help for the Create Application Profile wizard and the Edit
Application Profiles page.
The following sections contain more information.
■Creating an Application Profile
■Editing or Deleting an Application Profile
43.5.1 Creating an Application Profile
1. Open the Social Identity Home Page in the Oracle Access Management Console as
described in Section 43.1, "Opening the Social Identity Configuration Page."
2. Click Create in the Application Profiles panel in the home area.
The Create New Application Profile configuration page displays.
3. Enter values for the general Application Profile properties.
■Name - Displays the context name of the web application or mobile
application. This name should match the name registered with the agent
protecting the resource. If the application is integrated with Access Manager,
Note: When you install a WebGate to protect an application in
Access Manager, the WebGate setup automatically creates an
Application Domain that has LDAP as the authentication mechanism.
To use Mobile and Social authentication, change the Authentication
Scheme to OICScheme.

Defining Application Profiles
43-14 Administrator's Guide for Oracle Access Management
the Application Domain name as defined in Access Manager is displayed. This
should be the same value as that of the Name defined in the Mobile Services
Application Profile, if applicable.
■Description - (Optional) Type a short description that will help you or another
Administrator identify this service in the future.
■Shared Secret - For mobile or web applications, provide the security secret
that the application and the Mobile and Social server share to facilitate secure
communication. This is needed to use the Mobile and Social user registration
functionality. It can be any string.
■Return URL - This value is not used if the application is a mobile application
but it is a mandatory attribute. So for mobile applications, use the Mobile
Application Return URL. For web applications, provide the URL that Mobile
and Social should use to send back authentication responses. If the application
is integrated with Access Manager, provide the following URL which Mobile
and Social uses to send back authentication responses:
http://oam-host:port/oam/server/dap/cred_submit
■Mobile Application Return URL - For mobile applications, provide the URL
that Mobile and Social should use to send back authentication responses. This
value should match the mobile application's return URL.
4. Enter values for the following Application Profile configuration properties.
■Login Type - If configuring a non-mobile application, choose Local
Authentication and Social Identity Provider Authentication if the User login
page should let users choose between authenticating locally and
authenticating using an Identity Provider. If configuring either a mobile
application or a non-mobile application, choose Social Identity Provider
Authentication only if the User login page should not give the users the
option of authenticating locally.
The Mobile and Social login page supports Social Identity Provider
Authentication only. Local login is not supported.
■Enable Browser Popup - Choose Yes if the login page should open in a
pop-up window. This value should be false if this is a mobile application.
■User Registration - Choose Enabled to allow users to register with the
application after authenticating against a Social Identity Provider. The login
page for the application will show a User Registration form and prompt the
User to register. The User can complete the form and register, or click the Skip
Registration button. Choose Disabled if the login page should not show a
User Registration form and should not prompt the User to register.
■Registration URL - Type the URL that the system should forward the User to
so that the User can register for a local account. Typically the User is directed
to a form with fields that correspond to the registration service attributes
defined in the Application Profile. An encrypted token with attribute objects
in a map are also passed to the client application as a parameter. These
Note: If configuring a mobile application, choose Social Identity
Provider Authentication only from the Login Type menu. The Local
Authentication and Social Identity Provider Authentication option
is not valid for mobile applications.

Defining Application Profiles
Configuring Social Identity 43-15
attributes are used to pre-populate the registration page with the User's profile
data.
■UserID Attribute - Type the attribute name that is used to uniquely identify
the User. This attribute name should also appear in the Application User
Attribute section of the Application Profile Configuration page.
■User Profile Service Endpoint - Choose the User Profile Service endpoint that
the application should use. The User Profile Service directs the application to
the LDAP Directory service where the User will be created upon registration.
User Profile Service endpoints are configured in Mobile Services.
■Authentication Service Endpoint - The Authentication Service endpoint
determines how the user should be authenticated when local login is
requested. If a mobile application, choose InternetIdentityAuthentication or
any custom authentication of the type InternetIdentityAuthentication.
–Choose /oamauthentication to forward the authentication request to
Access Manager. The authentication scheme associated with the Mobile
and Social Authentication Policy inside the IAMSuite Application domain
determines how the user will be authenticated.
–Choose /internetidentityauthentication to use the Identity Store specified
in the corresponding endpoint.
■Application Profile Properties - Click Add to add Application Profile
attributes to the table. The following are supported.
–
app.passwd.field
- Encrypts the password on the registration page. Add
password
as the value. To mask the password with asterisks (*) on the
registration page, add the
app.passwd.field
property and add
password
as the value.
–
oic.app.idp.oauth.token
- Instructs Mobile and Social to include the
OAuth Access Token as part of the final redirect to the application. Add
true
as the value. Only applies if the User selected an OAuth provider
(Facebook, Twitter, LinkedIn).
–
oic.app.user.token
- Creates a JWT User Token when a User
authenticates with an Identity Provider and gets redirected back to the
application. Add
true
as the value. This token contains the Identity
Provider related URI and the User identifier value on record with the
Identity Provider. Use this token to access other protected Mobile and
Social REST services, for example the User Profile REST Service.
5. Click Add to add the Application User Attributes that the Social Identity Provider
should return to the application after authentication.
Configure more details for these attributes in the following Registration Service
Details with Application User Attribute Mapping step.
6. Add rows to the Registration Service Details with Application User Attribute
Mapping table to map local (User) registration attributes to the application
attributes provided by the Social Identity Provider.
Add any additional Application User Attributes in the previous step first. The
following definitions apply to the Registration Service Details with Application
User Attribute Mapping table properties.
■Registration Service Attribute - Choose from the menu the registration
service attribute to configure.

Integrating Social Identity With Mobile Applications
43-16 Administrator's Guide for Oracle Access Management
■User Attribute Display Name - For the attribute in the Registration Service
Attribute column, type the name that should appear on the User registration
form. This is the attribute name that the user sees.
■Read-only - Select to prevent the user from updating the attribute value. The
attribute value will display grayed-out on the form and the user will be
blocked from making updates.
■Mandatory - Select to make the attribute a required item on the user
registration form.
■Application User Attribute - Choose the attribute that corresponds to the
attribute in the Registration Service Attribute column.
7. Click Next to configure the Service Provider Interface.
The Service Provider Interface page displays.
8. Choose the DefaultServiceProviderInterface from the drop down menu.
For information about the Service Provider Interface, see Section 43.4, "Defining
Service Provider Interfaces."
9. Click Next to configure the Social Identity Provider.
The Social Identity Provider page displays. Use this section to select one or more
Social Identity Providers, and to map local application user attributes to Social
Identity Provider attributes. For example, to use an e-mail address as the unique
local user identifier when Google is the Social Identity Provider:
a. Select Google in the Social Identity Provider column.
A two-column table opens.
b. Create the mapping as follows:
a. Choose uid in the first row of the Application User Attribute column.
b. Choose e-mail in the Social Identity Provider User Attributes column.
10. Click Finish to create the Application Profile.
43.5.2 Editing or Deleting an Application Profile
To edit or delete an Application Profile, select the Profile in the panel and click Edit or
Delete on the panel's tool bar. See Section 43.5.1, "Creating an Application Profile" for
attribute descriptions.
43.6 Integrating Social Identity With Mobile Applications
You can configure Mobile Services to allow applications on mobile devices to
authenticate using Social Identity. Any application that needs to use Social Identity
must have a corresponding Application Profile in Social Identity. If you want a mobile
application to use Social Identity, the application needs to have a profile under Social
Identity and under Mobile Services.
Note: Do not select the Read-only option for First Name and Last
Name if Yahoo is the Social Identity Provider. Yahoo does not return
values for these attributes. Selecting the Read-only option will cause
user registration to fail and an exception error to display.

Linking Social Identity Provider Accounts
Configuring Social Identity 43-17
1. Under Social Identity, open the Create Application Profile wizard.
2. Populate the Application Profile attributes with values applicable to the mobile
application being protected and click Next.
See Section 43.5.1, "Creating an Application Profile" for attribute definitions.
3. Select the Service Provider Interface and click Next.
See Section 43.4, "Defining Service Provider Interfaces."
4. Select the Social Identity Provider and click Next.
See Section 43.2, "Understanding Social Identity Configuration."
5. View the Application Profile summary and click Finish to create the Application
Profile.
6. Under Mobile Services, open the Create Service Domain wizard.
If modifying an existing Service Domain, open it for editing. See Section 42.4,
"Defining Service Profiles" for information.
7. Complete the form as follows.
■For Type, select Mobile Application.
■For Authentication Scheme, select Social Identity Authentication.
See Section 42.7, "Defining Service Domains" for information.
8. In the Application Profile Selection section, add the Mobile Services Application
Profile that represents the mobile application being protected and choose if it will
participate in mobile SSO as an agent, a client or not at all.
Select the appropriate Application Profile by browsing existing Profiles or entering
a name. The Application Profile must already be created. (To create Mobile
Services Application Profiles, see Section 42.6, "Defining Application Profiles"; for
Social Identity Application Profiles, see Section 43.5, "Defining Application
Profiles.")
9. Click Next to select (or create) a Service Profile.
See Section 42.4, "Defining Service Profiles."
10. Click Next to select the Service Protection.
For example, use InternetIdentityAuthentication as the authentication service to
protect the User Profile Services.
11. Click Next to view the Create Service Domain summary.
12. Click Finish to create the Service Domain.
43.7 Linking Social Identity Provider Accounts
Social Identity Account Linking allows users to link several Internet identities together
with an existing or new local user account. The following sections contain information
about how to enable and use this feature.
Note: See "Integrating Social Identity With a Mobile Application" in
the "Developing Applications Using the Social Identity Client SDK"
chapter of the Developer's Guide for Oracle Access Management for more
information.
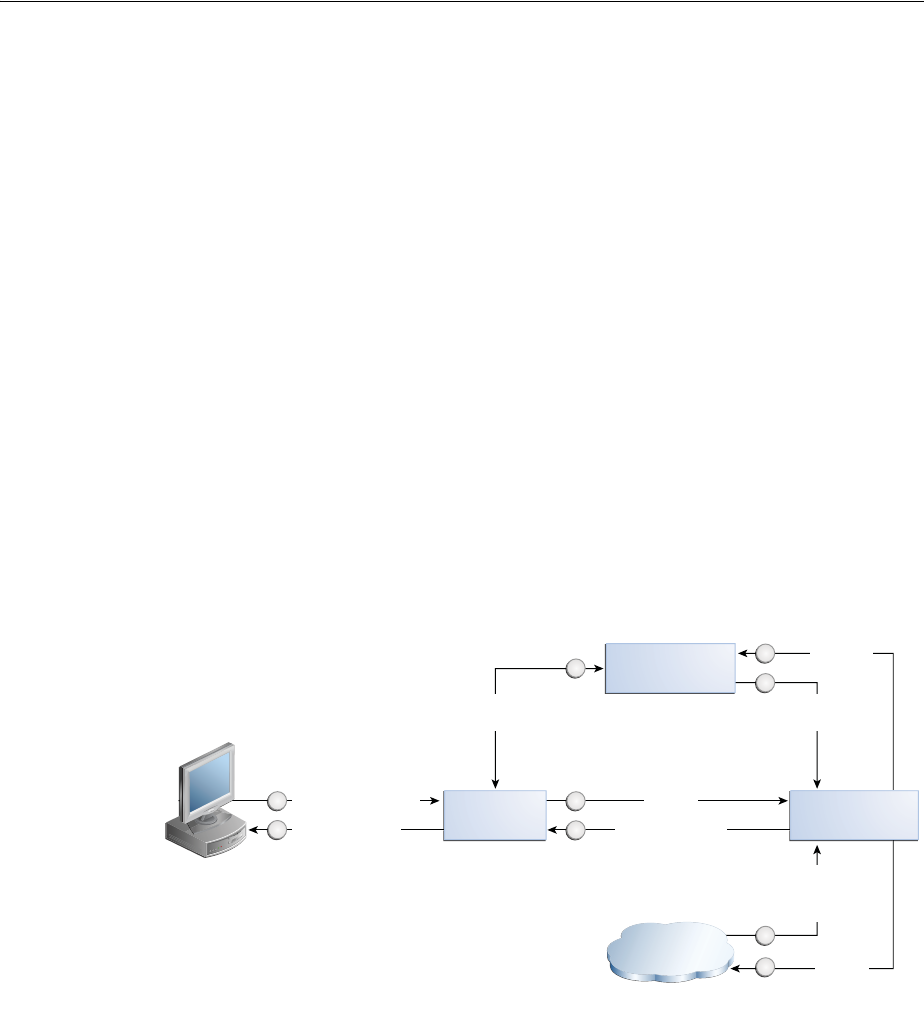
Linking Social Identity Provider Accounts
43-18 Administrator's Guide for Oracle Access Management
■Section 43.7.1, "Using Social Identity Provider Account Linking"
■Section 43.7.2, "Configuring Social Identity Provider Account Linking"
43.7.1 Using Social Identity Provider Account Linking
The following sequence documents the steps in the Account Linking Flow.
1. The user lands at the Mobile and Social Login Page.
2. The user is prompted to log in locally or with an Identity Provider.
3. The user selects Identity Provider Login (for example, Google) and enters
password credentials.
Once authenticated (and if determined that the user is already registered with a
local account), the user is automatically logged in as the local user and then
presented with a Linked Accounts page that has the option to link the Identity
Provider to this local account.
By clicking the link next to Google, the user will link the local account to the
Google Identity Provider account. The user may choose to link and unlink
additional Identity Providers from this page. Figure 43–1 illustrates this scenario.
Figure 43–1 Social Identity Account Linking
Additional scenarios include:
■If the user logs into an Identity Provider account without having a local account
and selects the Register option after Identity Provider authentication, an enterprise
ID will be created and the Identity Provider account will be automatically
associated with this enterprise ID. In other words, the user logs in with the
Identity Provider Login ID and Mobile and Social creates a local account with the
same user name as the Identity Provider Login ID. The user is then redirected to
the linked accounts page associated with the newly created local account. From
this page, the user may choose to link or unlink Identity Provider accounts or
return back to the application.
User Clicks Login
Return to user
1
9
Internet Identity
(Google, Yahoo, etc.)
User logs in using
Enterprise ID
IDP account
successfully linked
IDP account is
linked to Enterprise
account
Mobile Services
(REST)
6
7
Internet Identity
Services (RP)
2
3
Third- Party
Application
Authenticated
user, requests
account linking
via IDP
Account linking
response
complete
8
User
authenticated
by IDP
5
4
User is
redirected to IDP
for authentication

Linking Social Identity Provider Accounts
Configuring Social Identity 43-19
■If the user logs in using the local account only, in the app the user has to choose
the linked accounts page displaying Identity Providers. From this page, the user
may choose to link (or unlink) Identity Provider accounts or return back to the
app. When the accounts are linked, Social Identity will detect that the user is
linked to a local account even when the user logs in using Identity Provider
credentials.
43.7.2 Configuring Social Identity Provider Account Linking
The properties documented in Table 43–8 need to be configured to use Account
Linking. They are set in the Application Profile Properties table.
The following should also be taken into account when enabling Account Linking.
■Ensure the proxy setting is correct. This setting can be found by navigating the
Oracle Access Management Console: System Configuration > Mobile & Social >
Mobile & Social Settings.
■Images for Identity Provider icons or logos can only be specified using WLST. If
the image path starts with
http
, the image is retrieved from the location using the
img
tag. Otherwise, it uses the internal references that come with Social Identity.
■Ensure that the
username
attribute and the account linking attribute are different.
If they are the same then it can cause inconsistent behavior. For example, you can
set the
username
attribute to
uid
and the linking attribute to
mail
.
■Set the Shared Secret for the application. Set the Auth Scheme on the
authentication policy to point to OICScheme and ensure that the settings are
Note: The linked accounts page can be provided by the relying party
(by way of Social Identity) or a third-party application that hosts the
options for linking accounts. In either case, the following items will
need to be provided:
■An API call (for example,
AccountLinkingHelper.getProviders
()
) listing the various Identity Providers that can be linked. This
will include linkage status and IDs.
■An RP-specific account linking page (for example,
linkedAccounts.jsp
) that will display the various Identity
Providers that can be linked. This will include linkage status and
IDs.
Table 43–8 Account Linking Properties
Property Details
app.acct.link.enabled
This configuration property is set to true to enable Account
Linking.
app.acct.link.attr
Specify the OAM entity attribute name that corresponds to the
LDAP attribute where the multi-valued account linking
information is to be stored. Use the OAM entity attribute name
defined in the IDS Profile. To look up this name in the OAM
console, choose Configuration > User Identity Stores > IDS
Profiles. Select the identity profile and click edit, then click
Entity Attributes. The Entity Attributes page lists both the entity
attribute names defined by OAM, and the corresponding LDAP
physical attributes. Use the OAM name listed in the first
column. Note: This value is case-sensitive.

Linking Social Identity Provider Accounts
43-20 Administrator's Guide for Oracle Access Management
correct. For example, the
MatchLDAPAttribute
should match the
username
attribute set in the relying party Application Profile, typically
uid
.

44
Configuring Mobile and Social System Settings 44-1
44
Configuring Mobile and Social System Settings
[19]
This chapter discusses system configuration tasks for Oracle Access Management
Mobile and Social. It contains the following sections.
■Accessing the Mobile and Social Settings Interface
■Logging and Auditing
■Deploying Mobile and Social With Oracle Access Manager
■Configuring Mobile and Social After Running Test-to-Production Scripts
■Configuring Mobile and Social for High Availability (HA)
■Enabling the REST Client to Specify the Tenant Name
44.1 Accessing the Mobile and Social Settings Interface
Use the Mobile and Social Settings page in the Oracle Access Management Console to
configure system level settings.
Follow this procedure to access the Mobile and Social Settings page.
1. Log in to the Oracle Access Management Console.
The Launch Pad opens.
2. Click Mobile and Social Settings in the Configuration panel.
The Mobile and Social Settings page opens in a separate tab.
44.1.1 Understanding the Mobile and Social Settings Page
This section describes the form fields on the Mobile and Social Settings page.
Configuration Settings for Social Identity
Configure the following Social Identity settings if a proxy server is in place between
the Mobile and Social server and an Identity Provider.
■Proxy URL - Choose the protocol to use to connect to the proxy server (HTTP or
HTTPS), then type the proxy server host name and port number.
Note: You can perform many Mobile and Social configuration tasks
from the command line using the WebLogic Scripting Tool (WLST).
For more information, see the Oracle Fusion Middleware WebLogic
Scripting Tool Command Reference.

Logging and Auditing
44-2 Administrator's Guide for Oracle Access Management
■Proxy Authentication - Type the user name and password required to authenticate
with the proxy server.
■SAE Token Validity Period - Type the number of seconds that the system should
wait before expiring the Secured Attribute Exchange token. SAE is the default
scheme used to secure communication between the Mobile and Social server and
any application integrating directly with Social Identity.
44.2 Logging and Auditing
For information about Fusion Middleware logging, see the "Monitoring Oracle Fusion
Middleware" chapter in the Oracle Fusion Middleware Administrator's Guide.
For information about Fusion Middleware auditing, see the "Configuring and
Managing Auditing" chapter in the Oracle Fusion Middleware Application Security Guide.
44.3 Deploying Mobile and Social With Oracle Access Manager
Mobile and Social can be configured for use with either Oracle Access Manager 10g or
11gR1 PS1. For this to work, however, Oracle Access Manager and Mobile and Social
need to be installed on different servers in different domains. Mobile and Social and
Oracle Access Manager then need to be configured to work together. The following
procedure documents how to do this using Oracle Access Manager 11gR1 PS1. Before
you Begin - Install Mobile and Social on Host 1 and Oracle Access Manager 11gR1 PS1
on Host 2.
1. Log on to the Oracle Access Management Console on Host 2 and create a WebGate
profile for Mobile and Social using the default settings.
2. In Mobile and Social, create an Authentication Service Provider for Oracle Access
Manager 11.1.1.5.
See Section 42.3.1.3, "Creating an Authentication Service Provider," for
instructions.
Set the Attributes as described in the following table.
3. In Mobile and Social, create a Service Profile for the Authentication Service
Provider that you created in the previous step.
See Section 42.4, "Defining Service Profiles," for instructions.
4. In Mobile and Social, create a Service Domain.
Table 44–1 Attribute Settings for an Oracle Access Manager 11gR1 PS1 Authentication
Service Provider
Name Value
OAM_VERSION OAM_10G
DEBUG_VALUE 0
TRANSPORT_SECURITY OPEN
OAM_SERVER_1 host:port
OAM_SERVER_1_MAX_CONN 4
OAM_SERVER_2 host:port
OAM_SERVER_2_MAX_CONN 4
AuthNURL wl_authen://Authen/Basic

Deploying Mobile and Social With Oracle Access Manager
Configuring Mobile and Social System Settings 44-3
See Section 42.7.1, "Creating a Service Domain," for instructions.
5. Merge the
cwallet.sso
file on Host 2 with the
cwallet.sso
file on Host 1 as
follows:
a. Copy
cwallet.sso
from Host 2 to Host 1.
b. On Host 1 type
# mkdir /tmp/oam /tmp/oic
# cp <host>/cwallet.sso /tmp/oam
# cp config/fmwconfig/cwallet.sso /tmp/oic
c. Create file
merge-creds.xml
:
<?xml version="1.0" encoding="UTF-8" standalone='yes'?>
<jpsConfig xmlns="http://xmlns.oracle.com/oracleas/schema/11/jps-config-11_
1.xsd"
xmlns:xsi="http://www.w3.org/2001/XMLSchema-instance"
xsi:schemaLocation="http://xmlns.oracle.com/oracleas/schema/11/jps-config-1
1_1.xsd"
schema-major-version="11" schema-minor-version="1">
<serviceProviders>
<serviceProvider
class="oracle.security.jps.internal.credstore.ssp.SspCredentialStoreProvide
r"
name="credstoressp" type="CREDENTIAL_STORE">
<description>File-based credential provider</description>
</serviceProvider>
</serviceProviders>
<serviceInstances>
<!-- Source file-based credential store instance -->
<serviceInstance location="/tmp/oam" provider="credstoressp"
name="credential.file.source">
</serviceInstance>
<!-- Destination file-based credential store instance -->
<serviceInstance location="/tmp/oic" provider="credstoressp"
name="credential.file.destination">
</serviceInstance>
</serviceInstances>
<jpsContexts>
<jpsContext name="FileSourceContext">
<serviceInstanceRef ref="credential.file.source"/>
</jpsContext>
<jpsContext name="FileDestinationContext">
<serviceInstanceRef ref="credential.file.destination"/>
</jpsContext>
</jpsContexts>
</jpsConfig>
d. Set the path variable to include
$MW_HOME/oracle_common/bin:$MW_
HOME/oracle_common/common/bin
e. Execute the command to merge the
cwallet.sso
files:
# wlst.sh
wlst:/> migrateSecurityStore(type="credStore",
configFile="/tmp/mergecreds.xml",src="FileSourceContext",dst="FileDestinati
onContext")
f. Copy the merged file to
config/fmwconfig
:
# cp /tmp/oic/cwallet.sso /scratch/kerwin/wls10/user_projects/domain/base_

Configuring Mobile and Social After Running Test-to-Production Scripts
44-4 Administrator's Guide for Oracle Access Management
domain/cfnfig/fmwconfig
g. Restart the OAM Server on Host 1.
44.4 Configuring Mobile and Social After Running Test-to-Production
Scripts
When moving Mobile and Social from a test environment to a production
environment, complete the following configuration steps on each production machine
after running the Test-to-Production scripts.
1. Launch the Oracle Access Management Console.
2. On the Policy Configuration tab, choose Shared Components > Authentication
Schemes > OIC Scheme and click Open.
The Authentication Schemes configuration page opens.
3. Update the Challenge Redirect URL value to point to the production machine
(not the test machine) and click Apply.
For example:
https://
production_machine
:
port
/oic_rp/login.jsp
4. Run the following WLST command to update the Mobile and Social credential
store framework (CSF) entry to point from the test machine to the production
machine.
createCred(map="OIC_MAP", key=" https://<production machine host>:<production
machine port>/oam/server/dap/cred_submit ", user="="<description>", password="
DCC5332B4069BAB4E016C390432627ED", desc="<description>");
For
password
, use the value from the
RPPartner
entry,
TapCipherKey
attribute in
oam-config.xml
, located in the domain home
/config/fmwconfig
directory on the
production machine.
5. In the Oracle Access Management Console, do the following:
a. Select the System Configuration tab.
b. Choose Mobile and Social > Social Identity.
c. In the Application Profiles section, select OAMApplicaton and click Edit. (If
using an application profile name other than OAMApplication, edit that
instead.)
d. Update the Registration URL field host name and port to point to the
production machine.
Click Apply.
44.5 Configuring Mobile and Social for High Availability (HA)
For information about configuring Mobile and Social High Availability, see
"Configuring High Availability for Mobile and Social" in the Fusion Middleware High
Availability Guide for Oracle Identity and Access Management.
44.6 Enabling the REST Client to Specify the Tenant Name
Follow these steps to enable the REST client to specify the tenant name. Refer to
"Specifying the Tenant Name in the Header" in the Developer's Guide for Oracle Access
Management for more information.

Enabling the REST Client to Specify the Tenant Name
Configuring Mobile and Social System Settings 44-5
1. Navigate to the following directory:
~/OAM-Domain-dir/bin
2. In a text editor, add the following line to the
./startManagedWebLogic.sh
file:
MT_OPTION="-Doracle.multitenant.headername=MY-MT-NAME"
JAVA_OPTIONS="${MY_OPTIONS} ${JAVA_OPTIONS}" export JAVA_OPTIONS
3. Save the file.
Note: If you do not specify the JVM option, the server will expect the
client to use the default header name,
X-ID-TENANT-NAME
.

Enabling the REST Client to Specify the Tenant Name
44-6 Administrator's Guide for Oracle Access Management

Part X
Part X
Managing the Oracle Access Management
OAuth Service
The Oracle Access Management OAuth Service allows organizations to implement the
open standard OAuth 2.0 Web authorization protocol in an Access Manager
environment. OAuth enables a client to access Access Manager protected resources
that belong to another user (that is, the resource owner).
Part IX contains the following chapters:
■Chapter 45, "Understanding the OAuth Service"
■Chapter 46, "Configuring OAuth Services"

45
Understanding the OAuth Service 45-1
45
Understanding the OAuth Service
This chapter describes the purpose and capabilities of the OAuth Service. It includes
the following topics.
■Introducing the OAuth Service
■Understanding the OAuth Service
■Understanding the OAuth Service Processes
45.1 Introducing the OAuth Service
The OAuth Service allows organizations to implement the open standard OAuth 2.0
Web authorization protocol in an Access Manager environment. OAuth enables a
client to access Access Manager protected resources that belong to another user (that
is, the resource owner).
45.2 Understanding the OAuth Service
The OAuth Service allows organizations to implement OAuth 2.0 in a new or existing
Access Manager environment so that OAuth clients can use OAuth 2.0 flows to access
resources protected by Access Manager. An OAuth client can be an application or
service created and controlled by your organization, or it can be an application or
service created and controlled by another organization that requires access to resources
protected by Access Manager.
The following sections contain more detailed information regarding the OAuth
Service:
■Understanding OAuth 2.0 Roles
■Understanding the OAuth Service Components
■Understanding the OAuth Service Supported Features
■The Mobile OAuth Authorization Flow
■Understanding the OAuth Service Authorization and Authentication Endpoints
■Understanding Refresh Tokens
Note: For information about using OAuth flows to allow users to log
in to a protected resource using their credentials from cloud-based
identity services, see Section 41.6.3, "Using OAuth For Access Token
Retrieval."

Understanding the OAuth Service
45-2 Administrator's Guide for Oracle Access Management
■Understanding the Mobile OAuth Client UI Form Factor Options
■Understanding Mobile OAuth Single Sign-on (SSO)
45.2.1 Understanding OAuth 2.0 Roles
OAuth is an open standard Web authorization protocol that has become the preferred
method of providing tokenized authentication and access control between any type of
client (including mobile apps and other services) and another service on the Web. The
Oracle Access Management OAuth Service implements the OAuth 2.0 specification
developed by the IETF OAuth Working Group.
OAuth enables a client to access resources on a remote server that belong to another
user (the resource owner). In the most common OAuth authorization flow, the client is
issued a different set of credentials than those of the user. An intermediary
authorization service interacts directly with the client and the service hosting the
user's resources so the user does not disclose their credentials to the client.
The OAuth specification defines four roles:
■resource owner – A person or entity capable of granting access to a protected
resource.
■resource server – The server hosting the protected resources. The resource server
must be capable of accepting and responding to protected resource requests using
access tokens.
■client - An application making protected resource requests on behalf of the
resource owner and with the resource owner's authorization.
■authorization server – The server issuing access tokens to the client after successfully
authenticating the resource owner and obtaining authorization. A single
authorization server instance can issue access tokens accepted by multiple
resource servers.
The OAuth specification does not impose any special requirements on the interaction
between the resource server and the authorization server. The resource server only
needs to be capable of accepting and responding to protected resource requests using
access tokens.
45.2.2 Understanding the OAuth Service Components
The OAuth Service consists of the following components:
■A server component that you administer as part of Oracle Access Management. The
server component, together with Access Manager, provides authorization services
and the OAuth token service. The server interacts with the client, the resource
owner, and the resource server. The server component is where you register clients
and resource servers and manage token life-cycle management.
■A User Profile Service that supports OAuth 2.0 authorization and allows clients to
interact with a back-end directory server and perform User Profile REST
operations on Person, Group, and Relationship entities.
■A Consent Management Service that stores and tracks OAuth user consent
responses.
45.2.3 Understanding the OAuth Service Supported Features
The OAuth Service supports 3-legged OAuth, 2-legged OAuth, and enhanced security
support if the OAuth client resides on a mobile device.

Understanding the OAuth Service
Understanding the OAuth Service 45-3
3-Legged OAuth Authorization
In OAuth 3-legged authorization, the resource owner grants access to the
OAuth-enabled client (the requesting site) to access resources stored on an OAuth
resource server. The Oracle Access Management authorization server validates the
resource owner's identity and presents the owner a consent form when approval is
required. The third leg in this authentication scheme is the step in which the user
grants or denies the client access.
2-Legged OAuth Authorization
In OAuth 2-legged authorization, the OAuth client is pre-approved to access
resources. This arrangement fits a service-to-service model, especially when the
requesting service and the resource service are in a close partnership and the resource
owner approval is either assumed or not required.
Mobile OAuth
The Oracle Access Management OAuth Service provides enhanced security support if
the OAuth client resides on a mobile device. This enhanced security support is in
addition to the baseline security measures defined in the OAuth 2.0 specification. On a
mobile device, the OAuth client must obtain a client verification code before the
authorization endpoint on the OAM server will interact with the mobile app. Further,
the OAM server component can restrict token delivery to a specific app installed on a
specific device by sending part of a token through HTTPS, and sending the other part
through push notification using either the Apple Push Notification Service (APNS) or
Google Cloud Messaging (GCM). Mobile OAuth single sign-on allows multiple mobile
apps on a device to share the same user session, which resides on the server, not the
client.
SDK Support
SDKs for OAuth Service application development are not available in this release. This
includes SDKs for Android and iOS devices, and for Java Virtual Machines (JVMs).
45.2.4 The Mobile OAuth Authorization Flow
Apps that go through a browser for mobile security use the Mobile OAuth
authorization flow. In this flow the user session is created on the server and
maintained in the browser with cookies. Except for access tokens, the server does not
send security material, such as OAAM device and session handles and user tokens to
the mobile device, but stores it in the Server-Side Device Store. Access tokens are both
sent to the client and stored in the Server-Side Device Store to provide for validation
and life cycle management.
Client apps that use the mobile OAuth authorization flow must be registered with the
OAuth service in the OAuth identity domain that your organization uses to manage
mobile OAuth clients. This flow also requires the client to obtain a pre-authorization
client verification code before the server's authorization endpoint will interact with the
mobile app. If enabled, the server can further ensure that it is communicating with a
specific app installed on a specific device by sending part of an additional client
verification code through HTTPS, and sending the other part through push
notification using either the Apple Push Notification Service (APNS) or Google Cloud
Messaging (GCM).
This flow supports user consent management. If consent management is enabled, the
client app prompts the user to accept or decline the app's request to register with
Access Manager.

Understanding the OAuth Service
45-4 Administrator's Guide for Oracle Access Management
For a diagram that describes the Mobile OAuth authorization flow in detail, see
Section 45.3.3, "Understanding Mobile OAuth Authorization."
45.2.5 Understanding the OAuth Service Authorization and Authentication Endpoints
The OAuth Service has three authentication endpoints that receive and respond to
HTTPS requests: the authorization endpoint, the token endpoint, and the push endpoint.
Each endpoint is an URL that clients use to make OAuth authentication requests.
■Authorization Endpoint – The client uses the authorization endpoint to get
authorization from the resource owner to access the requested resources. The
endpoint redirects the user agent and prompts the resource owner to log in and
consent to the access request. The client application initiates the authorization
endpoint request. This endpoint accepts the HTTPS request, validates the input
parameters and headers (if any), appends the authorization code to the redirect
URI, and finally redirects the client to the URL. The URI for this endpoint always
ends in authorize. For example:
http(s)://<host>:<port>/ms_
oauth/oauth2/endpoints/<yourOauthServiceName>/authorize
■Token Endpoint – The client application interacts with the token endpoint to
exchange an authorization grant or refresh token for an access token. The client
uses a Refresh token to obtain a new access token. The URI for this endpoint
always ends in token. For example:
http(s)://<host>:<port>/ms_
oauth/oauth2/endpoints/<yourOauthServiceName>/token
■Push Endpoint – Mobile OAuth client apps interact with the push endpoint to
obtain (depending on configuration) part of the authorization codes, and/or part
of the client tokens, access tokens, and refresh tokens that are sent through either
the Apple Push Notification Service (APNS) or the Google Cloud Messaging
(GCM) service.
■User Consent Revocation Endpoint - Resource owners (end-users), who
authenticate and authorize client applications using the browser-based
authorization endpoint flow, use this endpoint to revoke their consent to client
applications. For example:
http(s)://<host>:<port>/ms_
oauth/oauth2/ui/<yourOauthServiceName>/showrevokeconsent
When configuring the OAuth server, you also need to provide at least one client
redirect URI where the server can return authorization credentials to the client.
■Client Redirect URIs – The OAuth server returns authorization credentials to the
client using the URI specified in the request provided that it exactly matches a URI
configured in the client profile.
45.2.6 Understanding Refresh Tokens
The OAuth Service can be configured to allow the client to use a refresh token to
obtain additional access tokens with identical or narrower scope. The offline scope is
Note: Register browser-based apps that use the Mobile OAuth
authorization flow under OAuth Services in the OAM console.

Understanding the OAuth Service
Understanding the OAuth Service 45-5
the scope that issues an access token for a refresh token if the client is offline. The
server issues a refresh token if the client requests the offline scope defined in the
resource server configuration. See Section 46.4.5.3, "Understanding the OAuth
Resource Servers Configuration Page" for details.
The client must also be configured to use refresh token. See Section 46.4.2.3,
"Understanding the OAuth Service Profile Configuration Page" and Section 46.4.3.3,
"Understanding the OAuth Web Clients Configuration Page" for information about
refresh token settings.
45.2.7 Understanding the Mobile OAuth Client UI Form Factor Options
Developers in your organization can implement mobile security in a client app using
an external browser or an embedded browser. This section briefly discusses the
different approaches.
The External Browser Approach
In this approach the client app switches to an external browser, which executes the
logic for user authentication and user consent management. A shared browser cookie
maintains the user session and can be used to provide single sign-on across multiple
apps. The external browser uses a typical Web single sign-on mechanism, including
OAM SSO user authentication and third-party SSO user authentication. One drawback
of using an external browser is the screen “flickering” that occurs when the application
context switches between the browser and the application.
The Embedded Browser Approach
This approach uses an embedded browser, which eliminates the screen flickering that
occurs when the application context switches between the application and the external
browser. The browser cookie, however, cannot be shared across multiple apps so the
typical Web single sign-on mechanism cannot be used. Instead, OAM uses its own
Web user authentication for single sign-on.
45.2.8 Understanding Mobile OAuth Single Sign-on (SSO)
Understanding OAM and Third-Party SSO User Authentication
Mobile OAuth client apps can use either OAM SSO user authentication or third-party
SSO user authentication provided that the participating client apps are implemented
using an external browser. Because the external browser can share its security cookie,
this allows multiple mobile and Web clients to use either OAM or third-party SSO at
the same time.
Understanding JWT SSO User Authentication
Embedded browsers cannot use OAM or third-party SSO user authentication if the user
needs to log in to multiple apps on the same mobile device. Instead, a JWT user
session token is used and single sign-on is established using device identification
together with the user session. (If the ability to use multiple apps on the same mobile
device is not a requirement, then either OAM SSO or third-party SSO is sufficient.)
Oracle Access Management generates a JWT user session token upon user
authentication, and this token forms the basis of the single sign-on user session. The
JWT user session is stored and maintained in the server-side device store, so multiple
mobile client apps running on the same device can share the JWT user session token.

Understanding the OAuth Service Processes
45-6 Administrator's Guide for Oracle Access Management
45.3 Understanding the OAuth Service Processes
This section details the OAuth Service concepts and transaction flows.
■Understanding OAuth 3-Legged Authorization
■Understanding OAuth 2-Legged Authorization
■Understanding Mobile OAuth Authorization
45.3.1 Understanding OAuth 3-Legged Authorization
In OAuth 3-legged authorization, the resource owner grants the client permission to
access resources stored on a resource server. The authorization server validates the
resource owner's identity and presents a consent form when approval is required.
Figure 45–1 following the text illustrates the process.
1. The resource owner (user) undertakes an action in the user-agent (a browser, for
example) that requires the client app to access protected resources on a different
site that belong to the resource owner.
2. The client app initiates the OAuth flow by invoking the authorization server's
authorization endpoint. The client app sends its client identifier, the requested
scope, and the redirection URI to which the authorization server will direct the
user-agent once access is granted or denied (see step 10).
3. Because the OAuth authorization service requires the resource owners credentials,
the authorization service redirects the user-agent to request the resource owner's
password credentials.
4. Access Manager displays the user login UI and asks the resource owner for a user
name and password. The authorization server supports all authentication schemes
provided by Access Manager.
5. The resource owner enters a user name and password.
6. Access Manager validates the login and redirects the user-agent to the
authorization service.
7. The authorization service determines that the resource server requires the user's
consent before the authorization code can be sent to the client.
8. The authorization service displays the user consent form.
9. The user approves the request.
10. The authorization service returns an authorization code to the client using the
redirection URI from step 2.
11. The client sends the authorization code in a POST request to the token endpoint
and requests an OAuth access token. When making the request, the client
authenticates with the authorization server. The client includes the redirection URI
used to obtain the authorization code for verification.
12. If the client type requires client credentials, the OAuth Service authenticates the
client credentials, validates the authorization code, and ensures that the
redirection URI received matches the URI used to redirect the client in step 10.
The OAuth Service then validates the requested scope based on the resource
server's configuration and the user's consent details.
13. The OAuth Service returns an access token to the client for the following grant
types:
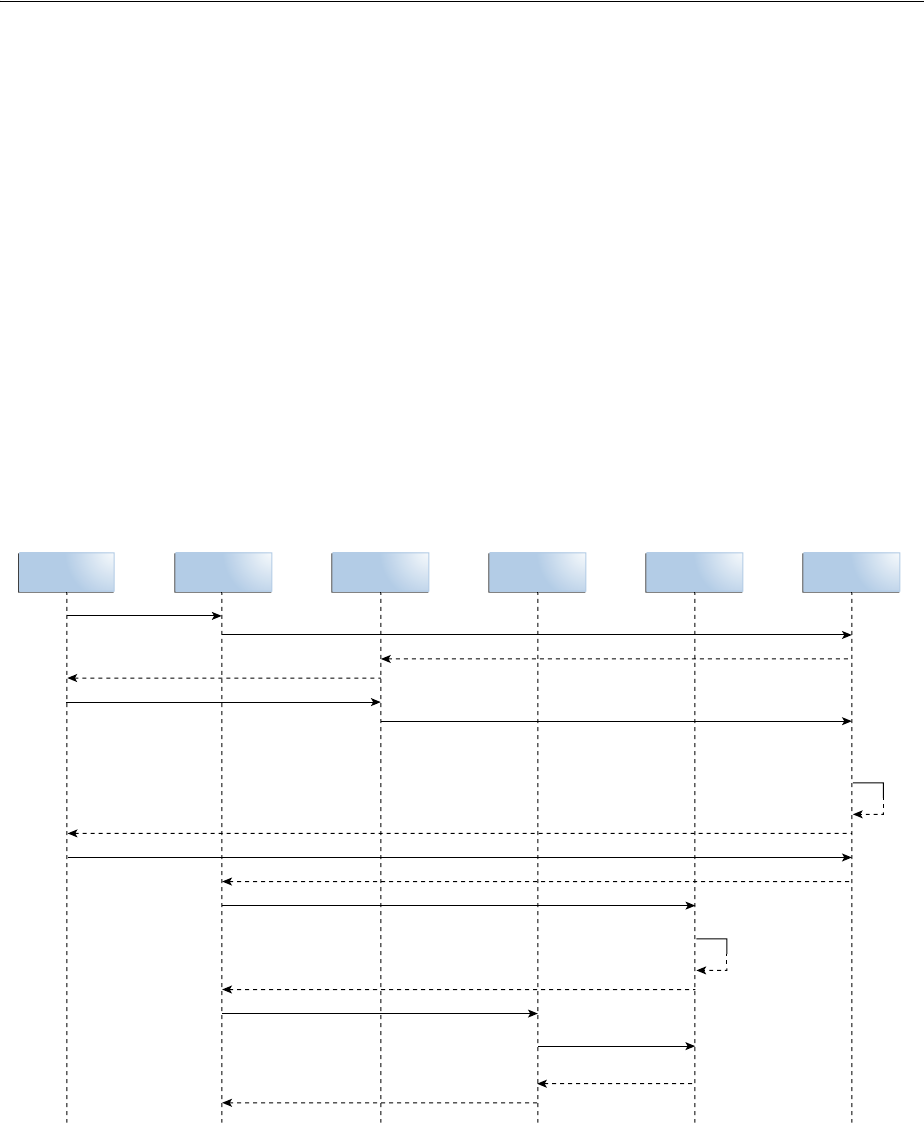
Understanding the OAuth Service Processes
Understanding the OAuth Service 45-7
■Authorization code
■Resource owner credentials
■Client credentials
■Extension Grant type to support JWT tokens
A refresh token may also be returned with the access token if the client sends a
refresh token request. For more information, see Section 45.2.6, "Understanding
Refresh Tokens."
14. The client presents the access token to the resource server.
15. The resource server validates the access token by sending a request to the
authorization server's token endpoint. The resource can also validate the token
itself because the access token is a standard JWT token.
16. The access service sends the token validation response back to the resource server.
17. The resource server returns the requested resources to the client.
Figure 45–1 OAuth 3-Legged Flow Diagram
45.3.2 Understanding OAuth 2-Legged Authorization
In OAuth 2-legged authorization, the user consent step is not required. The
authorization server returns a request token to the client, which the client then uses to
request an access token. Because the request token is pre-authorized, the authorization
server's token service returns an access token to the client.
User
Agent
OAM User
Login
Token
Service
Authorization
Service
Resource
Server
Client
Application
1. Access Client App
2. Authorization request
3. Redirect to OAM user login
8. Show user consent page
10. Return authorization code client app
11. Access token request
14. Access the resource with access token
17. Return resource details to client
15. Validate access
token
16. Access token
validation response
13. Return access token after validation
9. User gives consent
6. OAM redirect to authorization after valid login
7. User
needs
to give
consent
4. OAM user login UI
5. Enter user credentials
12. Verify client and
user consent

Understanding the OAuth Service Processes
45-8 Administrator's Guide for Oracle Access Management
45.3.3 Understanding Mobile OAuth Authorization
The Oracle Access Management OAuth Service provides enhanced security support if
the OAuth client resides on a mobile device. Mobile applications need to register with
OAM prior to using the OAuth Service and each registration is specific to one app on
the device. Following registration, an OAuth client on a mobile device must obtain a
client verification code before the OAM authorization endpoint will interact with the
mobile app. As an added precaution, the OAM server component can restrict token
delivery to one specific app installed on one specific device by sending part of a token
through HTTPS or HTTP, and sending the other part through push notification using
either the Apple Push Notification Service (APNS) or Google Cloud Messaging
(GCM).
The user flow detailed in this section describes the additional interactions that Oracle
Access Management undertakes when authenticating with a mobile client. The process
is shown in the following diagrams.
1. The resource owner opens the mobile OAuth client app.
An OAM administrator has already registered this client app as a mobile OAuth
client.
2. The mobile OAuth client sends the client ID and the device token to the OAuth
server and requests a client verification code.
3. The OAuth server returns half of the client verification code over HTTPS or HTTP.
This behavior can be configured in the Mobile Service Settings section of the
OAuth Service Profile configuration page.
■If the security level is set to Advanced, all codes and tokens are returned using
both HTTP and push notification.
■If the security level is set to Hybrid, registration related codes and tokens are
are returned using both HTTP and push notification, whereas access tokens
are sent over HTTP only.
■If the security level is set to Standard mode, all codes and tokens are sent over
HTTP only.
4. The mobile OAuth client requests the second half of the client verification code
from the OAuth server's push endpoint.
The push endpoint forwards the request to the Apple Push Notification Service
(APNS) or the Google Cloud Messaging (GCM) service depending on if the mobile
device is an iOS or Android device.
5. The APNS or GCM service sends the second half of the client verification code to
the mobile client app.
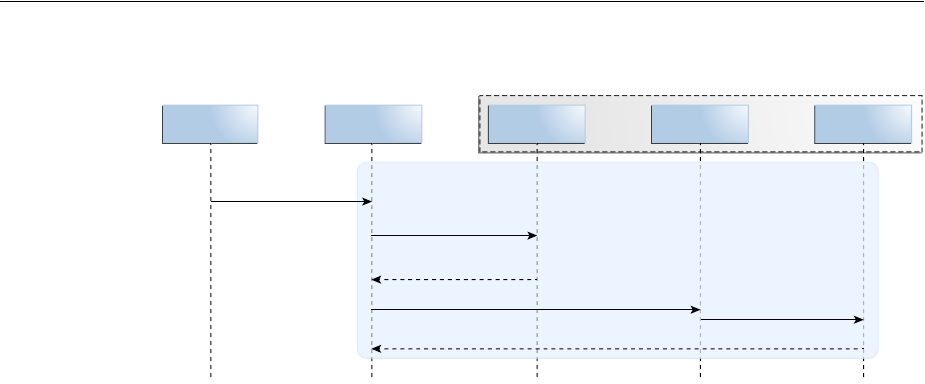
Understanding the OAuth Service Processes
Understanding the OAuth Service 45-9
Figure 45–2 Using a Split Request to get a Client Verification Code
6. The mobile OAuth client requests an authorization code from the OAuth server by
sending the client verification code and the device token.
7. The OAuth server redirects to Access Manager.
8. Access Manager sends a login page to the user-agent so that the user can log in.
9. The resource owner enters a user ID and password.
10. Access Manager validates the login and redirects to the OAuth authorization
service.
11. The OAuth server is configured to obtain the user's approval to register the device.
(The server will not ask for the user's consent prior to registration if the Require
User Consent for Client Registration option is disabled on the OAuth Service
Profile Configuration page.)
12. The consent page is sent to the resource owner.
13. The resource owner provides (or denies) consent.
14. The OAuth server checks the Oracle Adaptive Access Manager (OAAM) plug-in
to determine if additional authentication steps are required.
15. The plug-in determines that an additional challenge question is required.
16. The OAAM challenge question is sent to the resource owner.
17. The resource owner provides the challenge answer, which is forwarded to the
OAAM plug-in.
18. The OAAM plug-in validates the challenge answer.
19. The OAuth server uses the mobile redirect URI to return half of the authorization
code that the mobile app will need to request a client token.
20. The mobile OAuth client requests the second half of the authorization code from
the OAuth server's push endpoint.
The push endpoint forwards the request to the APNS or GCM service.
21. The mobile client app receives the second half of the authorization code from the
APNS or GCM service.
The mobile client app assembles the authorization code in preparation for
requesting a client token.
User Token
Service
APNS / GCM
Service
Push ServiceMobile Client
App
1. Launch app
Typical communication pattern involving APNS
2. Acquire
pre-Authorization code
4. Request second part of pre-authorization code
5. Receive second part of pre-authorization
3. Return first part of
pre-authorization code

Understanding the OAuth Service Processes
45-10 Administrator's Guide for Oracle Access Management
22. After validating the authorization code, the mobile OAuth client uses the code to
request the first half of the client token from the OAuth server's token endpoint.
23. The token endpoint returns the first half of the client token to the mobile client.
24. The mobile client requests the second half of the client token from the OAuth
server's push endpoint.
25. The APNS or GCM service sends the second half of the client token to the mobile
client app.
The mobile client assembles the client token as well as a refresh token. The client
can use the refresh token to request a new client token.
26. The mobile client prepares to request an access token by completing the following
steps:
■The client requests and receives a client verification code from the OAuth
server (as shown in steps 2-5).
■The client requests and receives the first part of the authorization code from
the OAuth server (as shown in step 6, steps 10-13, and step 19).
■The resource owner does not need to log in (steps 7-9) if the user session is still
valid.
■User consent may be required based on the resource server scope that the
client is requesting access to.
■The OAAM plug-in does not repeat its challenge (steps 14-18).
■The client requests the second part of the authorization code (as shown in
steps 20-21).
27. The APNS or GCM service returns the second half of the authorization code for
the access token.
The client assembles the authorization code in preparation for the access token
request.
28. The mobile client requests an access token by sending the client token and the
access token authorization code.
29. The token endpoint sends the access token to the client. This behavior depends on
whether the Security Level setting in the Mobile Service Settings section of the
OAuth Service Profile configuration page is set to Advanced, Hybrid, or Standard.
30. The mobile OAuth client requests access to the protected resources by sending the
access token to the resource server.
31. The resource server validates the access token with the OAuth token service. The
resource server can also validate the token locally. If the certificates are configured
correctly, JWT token signing is verified at the resource server.
32. The OAuth token service sends a response to the resource server.
33. The resource server sends the requested resources to the mobile client.
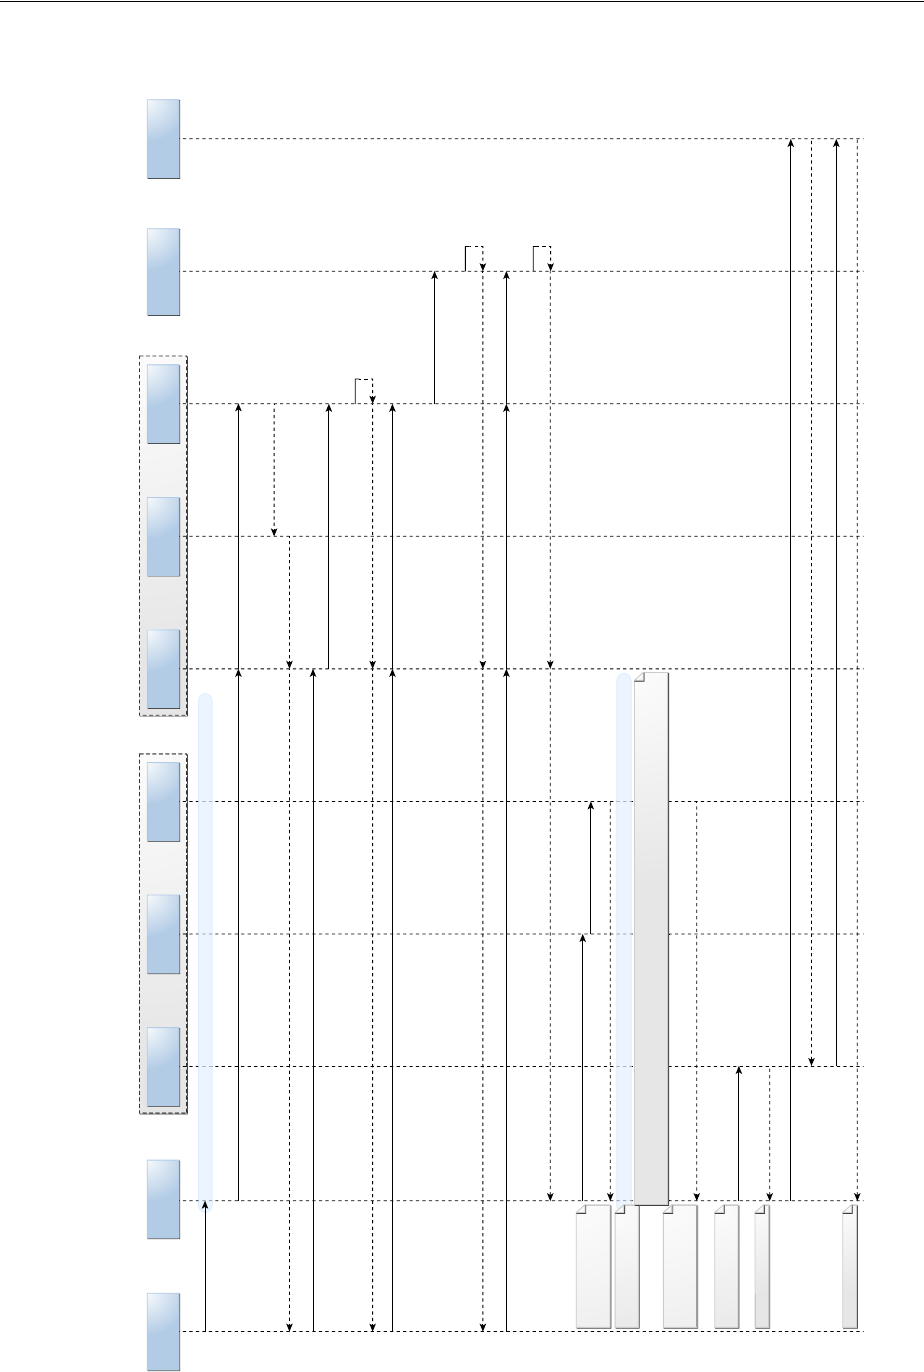
Understanding the OAuth Service Processes
Understanding the OAuth Service 45-11
Figure 45–3 The Complete Mobile App Authorization Request Flow
User Token
Service
APNS / GCM
Service
User Agent Authorization
Service
Adaptive
Access Plug-in
Resource
Server
OAM User
Login
Push ServiceMobile Client
App
1. Launch app
Authorization code assembled
in preparation for the client token
request.
Authorization code assembled
in preparation for the access
token request.
Client token assembled along
with a refresh token.
Client token assembled along
with a refresh token.
Access token received.
Requested resources received.
Step 26: The client prepares to request an access token by completing the following steps: * The client requests and receives a pre-authorization code
from the OAuth server (as shown in steps 2-5). The client requests and receives the first part of the authorization code from the OAuth server (as shown
in step 6, steps 10-13, and step 19). * The client requests the second part of the authorization code (as shown in steps 20-21).
9. Enter user ID and password
12. Show user consent page
13. User gives consent
Steps 22-25: Client gets a client token by including the authorization code in a split request to the Token Service and the APNS/GCM Service.
Steps 2-5: Get a pre-authorization code by sending a split request to the Token Service and the APNS/GCM Service.
17. User provides challenge answer
16. Show user challenge question
6. Authorization request with pre-authorization code
20. Request the second part of the authorization
code (in preparation for requesting a client token)
28. Acquire AT with client
token + authorization
code
21. Client receives the second part of the authorization code
27. Client receives the second part of the authorization code
7. Redirect to
OAM user login
14. Check with plug-in
before returning to
authorization code
8. OAM user login UI
10. OAM redirect to authorization after valid login
19. Return first part of authorization code through mobile redirect URL
11. User needs
to give consent
18. Plug-in validates the
challenge answer
15. Plug-in may
decide to challenge
30. Request resources with AT
33. Resource response
31. Validate access token
32. Token validation response
29. Return to complete
access token (AT)

Understanding the OAuth Service Processes
45-12 Administrator's Guide for Oracle Access Management

46
Configuring OAuth Services 46-1
46
Configuring OAuth Services
[20]
Oracle Access Management provides a graphical user interface for configuring OAuth
Services. This chapter describes how to use the Oracle Access Management Console to
configure OAuth Services and contains the following topics.
■Enabling OAuth Services
■Opening the OAuth Services Configuration Page
■Understanding OAuth Services Configuration
■Configuring OAuth Services Settings
■Configuring OAuth to Accept Third-Party JWT Bearer Assertions
■Configuring a WebGate to Support the OAuth Service
46.1 Enabling OAuth Services
The standard OAuth Service is enabled if the Oracle Access Management Identity
Federation service is enabled in Available Services. To also enable Mobile OAuth,
enable the Mobile and Social service in addition to the Identity Federation service.
■To learn about enabling the Identity Federation service, see "Enabling Identity
Federation" in the “Introducing Identity Federation in Oracle Access
Management” chapter.
■To learn about enabling the Mobile and Social service, see "Enabling Mobile and
Social" in the “Understanding Mobile and Social” chapter.
46.2 Opening the OAuth Services Configuration Page
Follow these steps to open OAuth Services configuration page in the Oracle Access
Management Console.
1. Log in to the Oracle Access Management Console.
The Launch Pad opens.
2. Click OAuth Service in the Mobile and Social pane.
The OAuth Identity Domains page opens in its own tab.
Note: OAuth Services can be configured from the command line
using WLST. For more information about the Mobile and Social WLST
commands, see the Oracle Fusion Middleware WebLogic Scripting Tool
Command Reference.

Understanding OAuth Services Configuration
46-2 Administrator's Guide for Oracle Access Management
46.3 Understanding OAuth Services Configuration
The OAuth Identity Domains page lists all of the OAuth Identity Domains on the OAM
Server. Click a domain to configure it. The following sections contain information
about the tabs used to configure OAuth Services.
■Understanding OAuth Identity Domains Configuration
■Understanding OAuth Service Provider Configuration
■Understanding OAuth Service Profiles Configuration
■Understanding OAuth Resource Servers Configuration
■Understanding OAuth Client Profiles Configuration
■Understanding OAuth Consent Management Service Configuration
■Understanding OAuth Access Token Custom Attributes
■Understanding OAuth Services Security
46.3.1 Understanding OAuth Identity Domains Configuration
OAuth Services ship with one OAuth identity domain named DefaultDomain. You
can create additional domains as needed. Each OAuth identity domain has a
universally unique identifier (UUID) that uniquely identifies it on the Internet.
Define the following configuration objects to configure an OAuth identity domain:
■An OAuth Service Provider
■One or more OAuth Service Profiles
■One or more OAuth Clients
■One or more OAuth Resource Servers
You can also configure the following settings at the identity domain level:
■OAuth Server settings
■OAuth plug-ins
■The OAuth Jailbreak detection policy
■User profile service settings (available on the Resource Servers configuration tab)
■Consent management service settings (available on the Resource Servers
configuration tab)
The following screen is available to help you search for and revoke tokens across an
identity domain:
■Token life cycle management
46.3.2 Understanding OAuth Service Provider Configuration
The OAuth Service Provider settings page is used to manage the connection between
OAuth Services and Access Manager, which is the back-end authorization service
provider that supports OAuth Services.
46.3.3 Understanding OAuth Service Profiles Configuration
A Service Profile defines the following configuration settings categories for the OAuth
service:

Understanding OAuth Services Configuration
Configuring OAuth Services 46-3
■The clients that can interact with the service
■The custom resource servers that the service protects and can provide access to
■Token settings for the service, including refresh token settings, expiration settings,
and the option to enable token life-cycle management
■The User Profile Service profile and Consent Management Service profile that are
enabled on the service
■The security profile plug-ins that are enabled on the service
■The mobile service settings for the service, including security settings for the
supported mobile platform(s)
■The root URL for the OAuth Services endpoints
If necessary, you can create multiple Service Profiles to define different service
endpoints with different configuration settings.
46.3.4 Understanding OAuth Resource Servers Configuration
Use the Resource Servers tab to define settings for each resource server independently.
Define a custom resource server for your applications or services. OAuth Services also
includes two built-in resource servers, the User Profile Service and the Consent
Management Service.
Scope and User Consent
The Resource Server Configuration page is where you define access request scope,
which determines the range of access the client will have to the requested resources.
Based on this setting, the authorization server restricts access and informs the client of
the scope of the access token issued.
The access service enforces scope checking when handling both authorization requests
and token requests. The client sends the scope parameter as part of an authorization
request. If any part of the scope parameter value is invalid, the OAuth Server sends
the client application a "Bad request" (code 400) error response with the error text
invalid_scope
.
The Resource Server Configuration page is also where you select the Require User
Consent option, which requires the authorization server to display a user consent
form so that the user can approve (or deny) access to the requested resources. The
Require User Consent option can be enabled on a scope by scope basis. For example,
you can require user consent for a scope request that allows "write" access, but not
"read" access.
The User Profile Resource Service
The Oracle User Profile Resource Service is a native resource server included with the
Oracle Access Management OAuth Server. This service allows your organization to
use OAuth 2.0 to interact with User Profile Services, which is described in
Section 41.2.5, "Introducing User Profile Services." This service makes it possible to use
OAuth 2.0 to interact with a back-end directory server and performs the following
User Profile REST operations on Person, Group, and Relationship entities:
Note: The OAuth Client Configuration page has a Bypass User
Consent option. If this option is selected, the client setting overrides
the resource server setting.

Understanding OAuth Services Configuration
46-4 Administrator's Guide for Oracle Access Management
■Create
■Update
■Delete
■Read
■Search
The User Profile service receives and responds to HTTPS requests using
service-specific endpoints for Person, Group, and Relationship entities. Each service
endpoint can be individually disabled if it is not needed.
The following tables summarize the HTTP(S) methods and user profile attributes that
an OAuth client can use to interact with the User Profile resource server.
Table 46–1 User Profile Resource Server - Resource Categories
Resource
Category
HTTP(S)
Methods Resource Endpoint Use Details
/me
GET
PUT
http://host:port/ms_oauth/resources/
userprofile/me
The OAuth client can request read
and update privileges for the
specified user profile.
/users
GET
POST
PUT
DELETE
http://host:port/ms_oauth/resources/
userprofile/users
The OAuth client can request create,
read, search, update, and delete
privileges for any user profile.
/groups
GET
POST
PUT
DELETE
http://host:port/ms_
oauth/resources/userprofile/groups
The OAuth client can request create,
read, search, update, and delete
privileges for any group profile.
/secretkey
POST
http://host:port/ms_
oauth/resources/userprofile/secretkey
Table 46–2 User Profile Resource Server - Scope Settings
Scope
HTTP(S)
Method
Resource
Category Attributes
UserProfile.me
GET
PUT
/me uid, mail,description,
commonname, firstname, lastname
UserProfile.users
GET
POST
PUT
DELETE
/users uid, mail,description,
commonname, firstname, lastname
UserProfile.groups
GET
POST
PUT
DELETE
/groups name, description
UserProfile.secretkey.management
POST
/secretkey

Understanding OAuth Services Configuration
Configuring OAuth Services 46-5
46.3.5 Understanding OAuth Client Profiles Configuration
Use the Client Profile page to register clients with OAuth Services. OAuth clients need
to register with the OAuth server before initiating the protocol. Provide the application
name, a client secret, and one or more redirect URIs that the OAuth server will use to
redirect the user-agent to the client once access is granted or denied.
The OAuth Service or a system administrator issues each client a client identifier. This
ID is a unique string that represents registration information provided for the OAuth
client.
Two types of OAuth client can be defined:
■Web - Requires a client ID, a secret, and one or more HTTP redirect URIs.
■Mobile - Requires a client ID, one or more mobile redirect URIs, and mobile
OAuth implementation-specific attributes.
Privileges
You can configure allowed scopes and bypass the need for user consent on a client by
client basis. Before obtaining an access token, the client must obtain an authorization
grant that it can exchange with the OAuth service for an access token. Client privileges
determine which clients are allowed which grant types. The OAuth 2.0 specification
provides several authorization grant types for different security use-cases.
The following grant types are supported in OAM OAuth Services:
■Authorization Code - The resource owner logs in using the authorization server.
The token endpoint exchanges the authorization code along with client credentials
for an access token.
■Resource Owner Credentials - The resource owner provides the client with his or
her user name and password. This is only suitable for highly trusted client
applications because the client could abuse the password, or the password could
unintentionally be disclosed to an attacker. Per the OAuth 2.0 specification, the
authorization server and client should minimize use of this grant type and utilize
other grant types whenever possible.
■Client Credentials – The client requests an access token using only its client
credentials (or another supported means of authentication). This is suitable if the
client is requesting access to protected resources under its control, or those of
another resource owner when previously arranged with the authorization server.
In addition to the OAuth grant types defined in the OAuth 2.0 standard, the following
options are also available:
■Refresh Token - Select this option to return a refresh token together with an access
token in the token response. See Section 45.2.6, "Understanding Refresh Tokens"
for more information.
■JWT Bearer - Allows a JWT assertion to be used to request an OAuth access token.
■SAML 2 Bearer - Allows a SAML2 assertion to be used to request an OAuth access
token.
Note: For detailed information about the OAuth grant types, see
IETF RFC 6749, which defines the OAuth 2.0 standard:
http://tools.ietf.org/html/rfc6749#section-1.3

Understanding OAuth Services Configuration
46-6 Administrator's Guide for Oracle Access Management
■OAM Credentials - Used to request OAM tokens, such as a master token, an access
token, or an OAuth access token.
■Client Verification Code - Used by mobile clients to request a pre-verification code
from OAuth server, which subsequently gets used mobile client flows.
46.3.6 Understanding OAuth Consent Management Service Configuration
The Consent Management Services configuration page is opened from the Resource
Servers tab. The default Consent Management service handles consent storage,
retrieval, revocation, and consent validation operations. Consent data is stored in the
Oracle Access Management database.
46.3.7 Understanding OAuth Access Token Custom Attributes
The OAuth authorization server can embed custom attributes in access tokens. You
can define two attribute types, static attributes and dynamic attributes:
■Static Attributes - Attribute name and value pairs where the value is fixed at the
time that you define the attribute. For example,
name1=value1
.
■Dynamic Attributes - User-profile specific attributes. You must also configure the
User Store setting on the OAuth Service Profile Configuration page. This setting
defines the source of the User Profile attributes. The User Profile Service (and/or
the underlying IDS interface) may be used to retrieve attribute names and values.
Because dynamic attributes are user related, the user consent page (if configured)
shows that the configured attributes are being shared with clients and resources.
You can define static and dynamic attributes using the following OAuth Services
configuration objects:
■OAuth service profile
■Resource server
Keep the following guidelines in mind when configuring custom attributes:
■Do not use the same name for a static and dynamic attribute.
■Avoid using the same name when adding custom attributes to the service profile
configuration and the scope configuration. If you define the same attribute name
in both locations, the scope-based attribute value takes precedence.
Custom attributes appear as claims in access tokens. JWT-based access tokens contain
standard JWT claims along with OAuth server specific ones. For example:
■Standard
"exp":1357596398000,
"iat":1357589198000,
"aud":"oam_server1",
"iss":"OAuthServiceProfile",
"prn":null,
"jti":"340c8324-e49f-43cb-ba95-837eb419e068",
■OAuth Server Specific
"oracle.oauth.user_origin_id":"john101",
"oracle.oauth.user_origin_id_type":"LDAP_UID",
"oracle:idm:claims:client:macaddress":"1C:AB:A7:A5:F0:DC",
"oracle.oauth.scope":"brokerage",
"oracle.oauth.client_origin_id":"oauthssoapp1id",
"oracle.oauth.grant_

Understanding OAuth Services Configuration
Configuring OAuth Services 46-7
type":"oracle-idm:/oauth/grant-type/resource-access-token/jwt"
These claims are available as part of the access token generated by the OAuth server.
Because the custom attributes appear as claims in a JWT-based access token, the
following naming restrictions apply:
■Avoid JWT standard claim names.
■Avoid names with an "Oracle" prefix (as shown above)
46.3.8 Understanding OAuth Services Security
This section briefly discusses features and options that help protect OAuth Services
transactions.
IDs and Secrets
OAuth Services requires a client secret when you register the client. Upon registration
create a unique client ID for each client. (If you prefer, the system can create one for
you.) The OAuth Service compares its stored values with the values the client sends
when it interacts with the OAuth Service's endpoints over HTTPS or HTTP. If the
values do not match, the request is rejected. Client secrets are Base64 values that are
sent as authorization headers.
■The client sends the OAuth server its client ID as part of an authorization request,
and it sends the client ID and client secret in token endpoint requests.
OAuth Plug-ins
Optional plug-ins can be configured to provide additional security.
■The adaptive-access plug-in runs fraud detection and risk analysis policy checks,
enhancing authenticity and the trust level of a user.
■The token attributes plug-in defines security policy around the token service
provider.
■The authorization and consent service plug-in defines security policy around
interactions where authorization and user consent are granted. This plug-in can
influence claims in a generated token as well.
■Within an OAuth identity domain, the client plug-in defines a security policy for
OAuth clients, and the resource server profile plug-in defines a security policy for
resource servers.
Jail Breaking Detection Policy
A preconfigured Jail Breaking Detection Policy for iOS devices can search for files that
indicate a device is jail broken and, if found, deny that device access to the OAuth
flow.
Mobile Security
For information about mobile security, see the Mobile OAuth Authorization flow
diagrams in Chapter 45.3.3, "Understanding Mobile OAuth Authorization."
Standard OAuth Security
Security measures provided for in the OAuth 2.0 specification also apply.
For a discussion of OAuth security considerations, see section 10 in IETF RFC 6749:
http://tools.ietf.org/html/rfc6749#section-10

Configuring OAuth Services Settings
46-8 Administrator's Guide for Oracle Access Management
46.4 Configuring OAuth Services Settings
This section describes how to use the user interface to configure OAuth Services. It
includes the following topics:
■Configuring OAuth Identity Domains
■Configuring OAuth Service Profiles
■Configuring OAuth Clients
■Configuring the OAuth Service Provider
■Configuring OAuth Resource Servers
■Configuring User Profile Services
■Configuring OAuth Consent Management Services
■Configuring OAuth Plug-Ins
■Configuring OAuth Server Settings
■Configuring the OAuth Services Jail Breaking Detection Policy
■Configuring Token Life Cycle Management
46.4.1 Configuring OAuth Identity Domains
See Section 46.3.1, "Understanding OAuth Identity Domains Configuration" for
introductory information about OAuth Identity Domains. The following section
describes how to use the user interface to configure an OAuth Identity Domain. It
includes the following topics:
■Creating an OAuth Identity Domain
■Editing or Deleting an OAuth Identity Domain
■Understanding the Identity Domain Configuration Page - Summary Tab
■Understanding the Create OAuth Identity Domain Wizard Page
46.4.1.1 Creating an OAuth Identity Domain
1. Open the OAuth Services Configuration page as described in Section 46.2,
"Opening the OAuth Services Configuration Page."
2. Choose one of the following:
■To quickly create an Identity Domain with only basic information, click
Create.
The Identity Domain Configuration page opens.
Complete the form and click Create to save your changes. You will need to
provide additional configuration detail later.
■To create an Identity Domain and configure essential Service Profile settings,
click the wizard flow button.
The Create OAuth Identity Domain wizard flow page opens.
Click Back and Next to move backwards and forward through the wizard
flow. Click Finish to save your changes.

Configuring OAuth Services Settings
Configuring OAuth Services 46-9
46.4.1.2 Editing or Deleting an OAuth Identity Domain
1. Open the OAuth Identity Domains page as described in Section 46.2, "Opening the
OAuth Services Configuration Page."
■To view or edit an Identity Domain, click its name in the table.
■To delete an Identity Domain, select it by clicking the column to the left of the
domain name and then click the delete button in the command bar.
46.4.1.3 Understanding the Identity Domain Configuration Page - Summary Tab
This section describes the form fields on the Identity Domain Configuration Summary
tab when viewing an existing identity domain or creating a new one.
Identity Domain - The name of the identity domain. If creating or editing an identity
domain, type a unique name without spaces.
Description - (Optional) A short description to help you or another administrator
identify this identity domain in the future.
Identity Domain UUID - The identification code that uniquely identifies this identity
domain on the Internet. Click Generate to populate this field with a universal unique
identifier code.
Allow Multiple Resource Servers - Select this option if the identity domain supports
more than one resource server.
Enable Mobile - Select this option if the identity domain will support mobile clients. If
this option is cleared, mobile services configuration settings will not be available in the
user interface for this identity domain.
Service Configuration
These fields appear on the Create Identity Domain page.
Service Profile Name - The name of the identity domain's service profile. Each
identity domain requires at least one service profile. See Section 46.3.3,
"Understanding OAuth Service Profiles Configuration," for more information.
User Profile Service Name - The name of the identity domain's user profile service. A
user profile service is created automatically for each identity domain. See
Section 46.3.4, "Understanding OAuth Resource Servers Configuration," for more
information.
Consent Management Service Name - The name of the identity domain's consent
management service. Each identity domain must have a consent management service,
which stores and retrieves consent records, and performs consent validation and
consent revocation operations. See Section 46.3.6, "Understanding OAuth Consent
Management Service Configuration," for more information.
Service Profile Endpoint - The URL where the OAuth authorization service for this
identity domain responds to authorization requests.
User Profile Service Endpoint - The URL where the User Profile Service receives and
responds to create, read, update, and delete requests.
Consent Management Service Endpoint - The URL where the Consent Management
Service receives and responds to client and resource owner service requests.
46.4.1.4 Understanding the Create OAuth Identity Domain Wizard Page
For help understanding the form fields on the Create OAuth Identity Domain wizard
pages, refer to the following sections.

Configuring OAuth Services Settings
46-10 Administrator's Guide for Oracle Access Management
■Information - For help, see Section 46.4.1.3, "Understanding the Identity Domain
Configuration Page - Summary Tab."
■Service Profile - For help, see Section 46.4.2.3, "Understanding the OAuth Service
Profile Configuration Page."
■Mobile Service - For help, see "Mobile Service Settings" in Section 46.4.2.3.
■Tokens - For help, see "Token Settings" in Section 46.4.2.3.
■Summary - Review your settings and click Finish to create the identity domain.
46.4.2 Configuring OAuth Service Profiles
See Section 46.3.3, "Understanding OAuth Service Profiles Configuration" for
introductory information about OAuth Service Profiles. The following section
describes how to use the user interface to configure an OAuth Service Profile. It
includes the following topics:
■Creating an OAuth Service Profile
■Editing or Deleting an OAuth Service Profile
■Understanding the OAuth Service Profile Configuration Page
46.4.2.1 Creating an OAuth Service Profile
1. Open the OAuth Services Configuration page as described in Section 46.2,
"Opening the OAuth Services Configuration Page," then click the identity domain
to open it.
2. Click the OAuth Service Profiles tab.
3. Click the Create button and complete the wizard.
46.4.2.2 Editing or Deleting an OAuth Service Profile
1. Open the OAuth Services Configuration page as described in Section 46.2,
"Opening the OAuth Services Configuration Page," then click an identity domain
to open it for editing.
2. Click the OAuth Service Profiles tab.
3. Do the following:
■To edit a service profile, click its name in the table.
■To delete a service profile, select it by clicking the box to the left of the name
and then click the delete button in the command bar.
46.4.2.3 Understanding the OAuth Service Profile Configuration Page
Identity Domain - The name of the identity domain to which this service profile
applies. (Read-only)
Name - The name of this service profile.
Description - (Optional) A short description to help you or another administrator
identify this service profile in the future.
Service Enabled - Select to activate the service profile, or clear the option box to
inactivate it.

Configuring OAuth Services Settings
Configuring OAuth Services 46-11
Service Provider - The name of the OAuth Service Provider that corresponds with this
OAuth Service Profile.
Service Endpoint - The URL where the OAuth authorization service responds to
authorization requests.
User Store
User Authenticator - For user authentication, choose OAM to use the Oracle Access
Management token provider, or choose IDS to use the Identity Directory Service token
provider. Only choose IDS authentication if the OAM token is not used at all (for
example, if only the JWT token is used). If both OAM and JWT tokens are used, choose
OAM authentication to avoid duplicated authentication attempts sent by both IDS and
OAM.
Identity Store Name - The name of the identity store when IDS is configured as the
user authenticator.
Plug-Ins
Choose available plug-ins from the menus in the following categories.
Adaptive Access - Runs Oracle Adaptive Access Manager (OAAM) fraud detection
and risk analysis policy checks, enhancing authenticity and the trust level of a user
Token Attributes - Defines security policy around the token service provider.
Client - Delegates the following to an external security module: confidential client
authentication, client authorization, and client profile reading.
Resource Server Profile - Delegates the following to an external security module:
confidential resource server authentication, resource server authorization, and
resource server profile reading.
Consent Management Service - Defines security policy around interactions where
authorization and user consent are granted. This plug-in can influence claims in a
generated token as well.
Attributes
Add or delete service profile attributes and their values to further configure the OAuth
service profile.
For JWT token generation and validation, configure the following parameters:
■
jwt.cert.alias
■
jwt.trusted.issuer.size
■
jwt.trusted.issuer.1
■
jwt.trusted.issuer.2
Note: For details, see Section 46.5, "Configuring OAuth to Accept
Third-Party JWT Bearer Assertions."

Configuring OAuth Services Settings
46-12 Administrator's Guide for Oracle Access Management
Table 46–3 OAuth Service Profile Configuration Attributes
Name Value Notes
jwt.cert.alias
Private key alias name for the signing
certificate in the keystore. The default
alias will be used if this attribute is
not specified.
jwt.CryptoScheme RS512
The cryptographic algorithm used to
sign the contents of the JWT token.
The default value is
RS512
. (RSA
encryption using SHA-512 hash
algorithm.)
jwt.issuer www.oracle.example.com
This issuer of the tokens (that is, the
iss
claim value in the JWT token
generated by the OAuth server). The
default value,
www.example.oracle.com
,needs to be
changed in the deployment.
jwt.trusted.issuer.size
2 The number of trusted issuers. The
value can be any number of trusted
issuers. For example, if the number is
2, the following matching params
need to be specified.
jwt.trusted.issuer.1
The alias name for the public key of
the first trusted issuer in the key store.
See
jwt.trusted.issuer.size
for
details.
jwt.trusted.issuer.2
The alias name for the public key of
the second trusted issuer in the key
store. See
jwt.trusted.issuer.size
for details.
createdByDefault true
If set to true, the current OAuth
service profile is created automatically
as part of domain creation. Otherwise,
it's created manually.
clientPWDValidation false
If set to true, a client ID and secret,
can be used as credentials to interact
with the OAuth server.
tokenTenantClaimName
user.tenant.name
The tenant claim name in the tokens
issued by the OAuth server. By
default this is set using the identity
domain name.
oauthServerSelfClientId
Value to be specified By default this is set with the value of
the
jwt.issuer attribute
. This
attribute gets used when the OAuth
server generates a client assertion for
itself when interacting with other
services such as service-to-service
interactions.
oauthServerSelfCTValidi
tyInSec
Value in seconds to be
specified
The default value is
300sec
. This
attribute is related to
oauthServerSelfClientId
(that is,
the OAuth server's own client
assertion validity period).

Configuring OAuth Services Settings
Configuring OAuth Services 46-13
Mobile Service Settings
Supported Platforms - Choose iOS, Android, and/or Others:
■iOS - The authorization server accepts requests from iOS clients if selected.
■Android - The authorization server accepts requests from Android clients if
selected.
■Others - The authorization server accepts requests from clients other than iOS or
Android if selected.
iOS Security Level - Choose High, Medium, or Low:
■Advanced - All client registrations and token acquisitions are done using both
push notification and HTTP(S).
■Hybrid - All client registrations are done using both push notification and
HTTP(S), and access token acquisitions are done using HTTP(S) only.
■Standard - All client registrations and token acquisitions are done using HTTP(S)
Android Security Level - Choose High, Medium, or Low:
■Advanced - All client registrations and token acquisitions are done using both
push notification and HTTP(S).
■Hybrid - All client registrations are done using push notification and HTTP(S),
and access token acquisitions are done using HTTP(S) only.
■Standard - All client registrations and token acquisitions are done using HTTP(S)
Android Sender ID - Enter the GCM sender ID that is required for Android push
notification.
Android API Key - Enter the API key required for Android push notification.
Consent Service Protection - Authorization requests are routed to the consent service,
which requires the user to log in and give consent. Select OAM or Third-Party Access
Management to use either Oracle Access Management or a third-party option for
consent page protection. Clear this option to use the OAuth server itself for consent
msAlwaysShowLogin true/false
This attribute is used with 3-legged
mobile clients using the JWT SSO
authentication mechanism. (Not
applicable to 2-legged mobile clients
in this release.)
true - Mobile applications are not
registered using the server-side JWT
user token. The OAuth server shows a
login page for the user to submit
credentials.
false - Mobile Applications are
registered using the server side JWT
user token.
By default
true
. If this attribute is not
defined in the service profile, the
server does not allow mobile
applications to use the server-side
JWT user token to register without a
user name and password.
Table 46–3 (Cont.) OAuth Service Profile Configuration Attributes
Name Value Notes

Configuring OAuth Services Settings
46-14 Administrator's Guide for Oracle Access Management
page protection. If using the OAuth server for consent page protection, the
authentication flow is determined by the User Store setting.
Require User Consent for Client Registration - Select this option to require the user to
give authorization before registering each mobile OAuth application installation
instance on a mobile device.
Preferred Hardware IDs - Use the list to prioritize the hardware ID attributes that
should be used to uniquely identify mobile devices. The first available hardware ID
from the list will be used.
Mobile Client Attributes - Add or delete mobile client attributes and their values
based on the following table.
Clients
Allow access to all clients - Select if all clients in the identity domain should use this
service profile. Clear this option to select which clients will be able to access the service
profile.
Clients - Add to the table the clients that should be able to access the service profile.
Click Browse Clients, then select the clients to add to the Clients table. To assign a
client to a different service profile, click the box to the left of the client name and click
Remove.
Token Settings
Use this tab to configure token settings, as well as settings for custom attribute that the
OAuth service should embed in access tokens.
Tokens
■Token Name - The name of the token.
■Expires - The length of time in minutes after which the token is no longer valid.
■Refresh Token Enabled - Select this option to allow a refresh token to be used. A
refresh token cannot be used with a client verification code or an authorization
code. See Section 45.2.6, "Understanding Refresh Tokens" for more information.
■Refresh Token Expires - The length of time in minutes after which the refresh
token is no longer valid.
■Life Cycle Enabled - Select this option if the OAuth server should cache a token
and save it in the database until the token expires.
Custom Attributes
Use this section to define custom attributes that the OAuth service embeds in the
access tokens. See Section 46.3.7, "Understanding OAuth Access Token Custom
Attributes" for more information about custom attributes.
■Static Attributes - Attribute name and value pairs where the value is fixed at the
time that you define the attribute. For example,
name1=value1
.
Table 46–4 Mobile Client Attributes Names and Values
Name Value Notes
oracle.oauth.debug.override.preAuthz
CodeRequired
true
Supported values include
true
or
false
(enable/disable,
respectively).

Configuring OAuth Services Settings
Configuring OAuth Services 46-15
■Dynamic Attributes - User-profile specific attributes.
Custom Resource Servers
Use this tab to choose which custom resource servers clients should have access to. A
custom resource server is any resource server that is not the User Profile and Consent
Management resource servers that are included with OAuth Services.
Allow clients access to all resource servers - Select to allow clients to access all
resource servers configured in the identity domain. Clear this option to select which
resource servers clients will be able to access.
Custom Resource Servers - Use the arrows to move the resource servers that clients
should be able to access from the Available Servers box to the Selected Servers box.
(This option is only available if the Allow clients access to all resource servers option
is not selected.)
System Resource Servers
Use this tab to configure if clients should have access to the user profile service and/or
consent management service.
User Profile Services -Use the arrows to move the user profile server that clients
should be able to access from the Available Servers box to the Selected Servers box.
Services listed in the Selected Servers box are active services.
Consent Management Services - Use the arrows to move the consent management
server that clients should be able to access from the Available Servers box to the
Selected Servers box. Services listed in the Selected Servers box are active services.
46.4.3 Configuring OAuth Clients
See Section 46.3.5, "Understanding OAuth Client Profiles Configuration" for
introductory information about OAuth clients. The following section describes how to
use the user interface to configure an OAuth Web client and an OAuth mobile client. It
includes the following topics:
■Creating an OAuth Client
■Editing or Deleting a Client
■Understanding the OAuth Web Clients Configuration Page
■Understanding the OAuth Mobile Clients Configuration Page
46.4.3.1 Creating an OAuth Client
1. Open the OAuth Services Configuration page as described in Section 46.2,
"Opening the OAuth Services Configuration Page," then click the identity domain
to open it.
2. Click the OAuth Clients tab.
3. To create an OAuth Web (non-mobile) client, click the Create button located
directly under the OAuth Web Clients heading and complete the form.
To create an OAuth mobile client, click the Create button located directly under
the OAuth Mobile Clients heading and complete the form.

Configuring OAuth Services Settings
46-16 Administrator's Guide for Oracle Access Management
46.4.3.2 Editing or Deleting a Client
1. Open the OAuth Services Configuration page as described in Section 46.2,
"Opening the OAuth Services Configuration Page," then click an identity domain
to open it for editing.
2. Click the OAuth Clients tab.
3. Do the following:
■To edit a client configuration, click its name on the page.
The client configuration page opens in a new tab.
■To delete a client, select it by clicking the box to the left of the name and then
click the delete button in the command bar.
46.4.3.3 Understanding the OAuth Web Clients Configuration Page
This section describes the form fields on the OAuth Web Client Configuration page
when viewing an existing OAuth Web client or creating a new one.
Identity Domain - The name of the identity domain in which this OAuth Web client is
registered. (Read-only)
Name - The name of this OAuth client.
Description - (Optional) A short description to help you or another administrator
identify this OAuth Web client in the future.
HTTP Redirect URIs - The client URIs that the OAuth server is allowed to redirect the
user-agent to once access is granted or denied.
Client ID - The unique ID that the authorization server created for this client during
registration. (Read-only).
Allow Token Attributes Retrieval - Select this option to allow custom attributes (both
attribute names and values) to be shared with resource servers and the resource
owner. See Section 46.3.7, "Understanding OAuth Access Token Custom Attributes"
for more information about custom attributes.
Client Secret - A secret value known to the OAuth authorization service and the
client. The authorization service checks the client secret and the client ID when it
receives token endpoint requests from the client.
Privileges
Bypass User Consent - If selected, the client will not ask for the user's explicit
authorization to access the user's protected resources. If this option is selected, this
setting overrides the resource server setting. Clear this option if the client should be
subject to the resource server setting.
Allow Access to all Scopes - If selected, the client can obtain an access token
regardless of scope limitations for any resource server in the identity domain. Clear
this option if the client should be subject to scope limitations.
Allowed Scopes - Lists the range of access the client has to the requested resources. To
grant additional access, click Add to add a row to the table, then choose from the
drop-down menu the scope to be added. To restrict access, select the scope that you
want to remove by clicking the table row, then click Delete to remove the highlighted
row. Click OK at the prompt to confirm that you want to remove the selected scope.

Configuring OAuth Services Settings
Configuring OAuth Services 46-17
Grant Types - The OAuth 2.0 specification provides several authorization grant types
for different security use-cases. Before obtaining an access token, the client must obtain
an authorization grant that it can exchange with the OAuth service for an access token.
Client privileges determine which clients are allowed which grant types. The
following grant types are supported in OAM OAuth Services:
■Authorization Code - The resource owner logs in using the authorization server.
The token endpoint exchanges the authorization code along with client credentials
for an access token.
■Resource Owner Credentials - The resource owner provides the client with his or
her user name and password. This is only suitable for highly trusted client
applications because the client could abuse the password, or the password could
unintentionally be disclosed to an attacker. Per the OAuth 2.0 specification, the
authorization server and client should minimize use of this grant type and utilize
other grant types whenever possible.
■Client Credentials - The client requests an access token using only its client
credentials (or another supported means of authentication). This is suitable if the
client is requesting access to protected resources under its control, or those of
another resource owner when previously arranged with the authorization server.
In addition to the OAuth grant types defined in the OAuth 2.0 standard, the following
options are also available:
■Refresh Token - Select this option to return a refresh token together with an access
token in the token response. See Section 45.2.6, "Understanding Refresh Tokens"
for more information.
■JWT Bearer - Allows a JWT assertion to be used to request an OAuth access token.
■SAML 2 Bearer - Allows a SAML2 assertion to be used to request an OAuth access
token.
■OAM Credentials - Used to request OAM tokens, such as a master token, an
access token, or an OAuth access token.
■Client Verification Code - Used by mobile clients to request a pre-verification
code from OAuth server, which subsequently gets used mobile client flows.
Attributes
Add or delete custom attributes that the authorization server returns to the client
along with the the scope settings.
Avoid using the same name when adding custom attributes to the service profile
configuration and the scope configuration. If you define the same attribute name in
both locations, the scope-based attribute value takes precedence.
46.4.3.4 Understanding the OAuth Mobile Clients Configuration Page
This section describes the form fields on the OAuth Web Client Configuration page
when viewing an existing OAuth Web client or creating a new one.
Table 46–5 Web Client Attributes Names and Values
Name Value Notes
jwt.audience
Space separated values. Used when the OAuth server
generates a client assertion and a
user assertion. The
aud
claim for
those JWT tokens contain the
defined values in this token.

Configuring OAuth Services Settings
46-18 Administrator's Guide for Oracle Access Management
Identity Domain - The name of the identity domain in which this OAuth mobile client
is registered. (Read-only)
Name - The name of this OAuth client.
Description - (Optional) A short description to help you or another administrator
identify this OAuth mobile client in the future.
Client ID - The unique ID that the authorization server created for this client during
registration. (Read-only).
Allow Token Attributes Retrieval - Select this option to allow custom attributes (both
attribute names and values) to be shared with resource servers and the resource
owner. See Section 46.3.7, "Understanding OAuth Access Token Custom Attributes" for
more information about custom attributes.
Jail Breaking Detection - Select to enable jail breaking detection for mobile devices.
See "Jail Breaking Detection Policy" for more information.
Mobile Redirect URIs - The client URIs that the OAuth server is allowed to redirect
the user-agent to once access is granted or denied.
Privileges
Bypass User Consent - If selected, the client will not ask for the user's explicit
authorization to access the user's protected resources. If this option is selected, this
setting overrides the resource server setting. Clear this option if the client should be
subject to the resource server setting.
Allow Access to all Scopes - If selected, the client can obtain an access token
regardless of scope limitations for any resource server in the identity domain. Clear
this option if the client should be subject to scope limitations.
Allowed Scopes - Lists the range of access the client has to the requested resources. To
grant additional access, click Add to add a row to the table, then choose from the
drop-down menu the scope to be added. To restrict access, select the scope that you
want to remove by clicking the table row, then click Delete to remove the highlighted
row. Click OK at the prompt to confirm that you want to remove the selected scope.
Grant Types - The OAuth 2.0 specification provides several authorization grant types
for different security use-cases. Before obtaining an access token, the client must obtain
an authorization grant that it can exchange with the OAuth service for an access token.
Client privileges determine which clients are allowed which grant types. The
following grant types are supported in OAM OAuth Services:
■Authorization Code - The resource owner logs in using the authorization server.
The token endpoint exchanges the authorization code along with client credentials
for an access token.
■Resource Owner Credentials - The resource owner provides the client with his or
her user name and password. This is only suitable for highly trusted client
applications because the client could abuse the password, or the password could
unintentionally be disclosed to an attacker. Per the OAuth 2.0 specification, the
authorization server and client should minimize use of this grant type and utilize
other grant types whenever possible.
■Client Credentials - The client requests an access token using only its client
credentials (or another supported means of authentication). This is suitable if the
client is requesting access to protected resources under its control, or those of
another resource owner when previously arranged with the authorization server.

Configuring OAuth Services Settings
Configuring OAuth Services 46-19
■Refresh Token - Select this option to return a refresh token together with an access
token in the token response. See Section 45.2.6, "Understanding Refresh Tokens"
for more information.
Apple Push Notification
Applies to iOS devices only. The OAuth authorization server can restrict token
delivery to a specific app installed on a specific mobile device by sending part of the
client registration handle through HTTPS, and sending the other part through push
notification using the Apple Push Notification Service (APNS). Use the following
fields to configure how the OAuth server connects to APNS for this specific client app.
Connection Settings - Select Enabled to send a portion of security codes and tokens to
the mobile client app using APNS. (The portions not sent using APNS are sent using
HTTPS.) Clear this option if you do not want to use APNS for this mobile client app.
Minimum Connection Pool Size - Specifies the minimum number of connections in
the connection pool.
Maximum Connection Pool Size - Specifies the maximum number of connections in
the connection pool.
Keep Alive - The Apple Push Notification keep alive value in seconds.
Communication Mode - Choose Development to use the Apple development
environment for initial development and testing of the application; choose Production
to use Apple's production environment.
SSL/TLS Certificate for Development - Click Browse to navigate to the development
SSL/TLS certificate issued by Apple for the Apple Push Notification Service.
Development Certificate Password - Type the development password for the Apple
Push Notification certificate.
SSL/TLS Certificate for Production - Click Browse to navigate to the production
SSL/TLS certificate issued by Apple for the Apple Push Notification Service.
Production Certificate Password - Type the production password for the Apple Push
Notification certificate.
Google Application Settings
Applies to Android devices only. The OAuth authorization server can restrict token
delivery to a specific app installed on a specific mobile device by sending part of the
client registration handle through HTTPS, and sending the other part through push
notification using Google Cloud Messaging (GCM) for Android. Use the following
fields to configure how the OAuth server connects to the GCM service for this specific
client app.
Restricted Package Name - The Google restricted package name.
Configuration Settings
Device Claim Attributes - Specifies the device attributes that the system should collect
for device fingerprinting. If empty, the system collects every attribute in the SDK.
Mobile Custom Attributes - Specifies key-value pairs that should be sent to mobile
applications using app profiles. (Mobile applications request app profiles that contain
server-side settings, including endpoints, jail break detection policies, and security
level details.

Configuring OAuth Services Settings
46-20 Administrator's Guide for Oracle Access Management
Attributes
Add or delete custom attributes that the authorization server returns to the client
along with the scope settings.
Avoid using the same name when adding custom attributes to the service profile
configuration and the scope configuration. If you define the same attribute name in
both locations, the scope-based attribute value takes precedence.
46.4.4 Configuring the OAuth Service Provider
See Section 46.3.2, "Understanding OAuth Service Provider Configuration" for
introductory information about OAuth Service Providers. The following section
describes how to use the user interface to configure an OAuth Service Provider. It
includes the following topics:
■Editing or Deleting the OAuth Service Provider
■Understanding the OAuth Service Provider Configuration Page
46.4.4.1 Editing or Deleting the OAuth Service Provider
1. Open the OAuth Services Configuration page as described in Section 46.2,
"Opening the OAuth Services Configuration Page," then click the identity domain
to open it for editing.
2. Click the OAuth Service Providers tab.
3. Do the following:
■To edit a service provider, click its name in the table.
■To delete a service provider, select it by clicking the box to the left of the name
and then click the delete button in the command bar.
46.4.4.2 Understanding the OAuth Service Provider Configuration Page
This section describes the form fields on the OAuth Service Provider Configuration
page.
Identity Domain - The name of the identity domain with which this OAuth service
provider is registered. (Read-only)
Name - The name of this service provider.
Description - (Optional) A short description to help you or another administrator
identify this service provider.
Service Provider Java Class - The Java class that implements this service provider.
Attributes
Use the attribute settings in Table 46–6 to configure the OAuth service provider
connection with Access Manager.
Table 46–6 OAuth Service Provider Attributes for Access Manager
Name Value Notes
oam.OAM_VERSION OAM_11G
Either
OAM_11G
or
OAM_10G
, depending on
the Oracle Access Manager version in
use.
oam.WEBGATE_ID accessgate-oic
oam.ENCRYPTED_PASSWORD

Configuring OAuth Services Settings
Configuring OAuth Services 46-21
46.4.5 Configuring OAuth Resource Servers
See Section 46.3.4, "Understanding OAuth Resource Servers Configuration" for
introductory information about OAuth Resource Servers. The following section
describes how to use the user interface to configure an OAuth resource server. It
includes the following topics:
■Creating an OAuth Resource Server
■Editing or Deleting an OAuth Resource Server
■Understanding the OAuth Resource Servers Configuration Page
46.4.5.1 Creating an OAuth Resource Server
1. Open the OAuth Services Configuration page as described in Section 46.2,
"Opening the OAuth Services Configuration Page," then click the identity domain
to open it.
2. Click the Resource Servers tab.
3. Choose from the following:
oam.DEBUG_VALUE 0
oam.TRANSPORT_SECURITY OPEN
Specify the method for encrypting
messages between this AccessGate and
the Access Servers. The encryption
methods need to match. Valid values
include:
■
OPEN
■
SIMPLE
■
CERT
To update these settings, see
Section 42.9.1.1, "Configuring Mobile
Services to Work With Access Manager in
Simple and Certificate Mode."
oam.OAM_SERVER_1 localhost:5575
Specify the host name and port number
of the primary Oracle Access
Management server.
oam.OAM_SERVER_1_MAX_CONN 4
Specify the maximum number of
connections that this Mobile and Social
instance can establish with OAM_
SERVER_1. The default value is 4.
oam.OAM_SERVER_2 oam_server_2:5575
Specify the host name and port number
of the secondary Oracle Access
Management server.
oam.OAM_SERVER_2_MAX_CONN 4
Specify the maximum number of
connections that this Mobile and Social
instance can establish with OAM_
SERVER_2. The default value is 4.
oam.AuthNURLForUID wl_
authen://sample_
ldap_no_pwd_
protected_res
Table 46–6 (Cont.) OAuth Service Provider Attributes for Access Manager
Name Value Notes

Configuring OAuth Services Settings
46-22 Administrator's Guide for Oracle Access Management
■To define a new resource server for use with OAuth Services, click the Create
button in the Custom Resource Servers section.
The Custom Resource Server Configuration page opens.
■To define a new User Profile Services instance, click the Create button in the
User Profile Services section.
The OAuth User Profile Service Configuration page opens.
■To define a new Consent Management Services instance, see Section 46.4.7,
"Configuring OAuth Consent Management Services."
46.4.5.2 Editing or Deleting an OAuth Resource Server
1. Open the OAuth Services Configuration page as described in Section 46.2,
"Opening the OAuth Services Configuration Page," then click the identity domain
to open it for editing.
2. Click the Resource Servers tab.
3. Choose from the following:
■To open a resource server for editing, click it. The Custom Resource Server
Configuration page opens.
■To open an OAuth User Profile Service configuration for editing, click it in the
User Profile Services section. The User Profile Service Configuration page
opens.
■See Section 46.4.7, "Configuring OAuth Consent Management Services" for
help configuring consent management services.
46.4.5.3 Understanding the OAuth Resource Servers Configuration Page
Identity Domain - The name of the identity domain to which this resource server
applies. (Read-only)
Name - The name of this resource server (or resource service).
Description - (Optional) A short description to help you or another administrator
identify this resource server in the future.
Allow Token Attributes Retrieval - Select this option to allow custom attributes (both
attribute names and values) to be shared with clients and the resource owner. See
Section 46.3.7, "Understanding OAuth Access Token Custom Attributes" for more
information about custom attributes.
Authorization & Consent Service Plug-in - From the menu, choose an authorization
plug-in for the resource server. This plug-in type defines security policy around
interactions where authorization and user consent are granted. It can influence claims
in a generated token as well.
Audience Claim - Identifies the audiences that the OAuth token is intended for. Each
principal intended to process the OAuth token must identify itself with a value in
Audience Claim.
Resource Server ID - The unique ID created for this resource server during
registration. (Read-only)

Configuring OAuth Services Settings
Configuring OAuth Services 46-23
Scopes
Click Add to add a new row to the scopes table. Click to select a row, then click Delete
to remove it.
Name - Type a scope definition. Use dot notation, for example:
photo.read
Description - Type a short note that describes the scope.
Require User Consent - Select to require the authorization server to display a user
consent form so that the user can approve (or deny) the access request.
Offline Scope - Allows client applications to request a refresh token that can be used
to obtain an access token even when the user is offline or not present. Client
applications use the refresh token to get a new access token to access resources. See
Section 45.2.6, "Understanding Refresh Tokens" for more information.
Token Settings
Override the default settings - Select this option if the token settings defined on the
resource server configuration page should override the default token settings defined
on the OAuth service profile page.
Token Name - The name of the token.
Expires - The length of time in minutes after which the token is no longer valid.
Refresh Token Enabled - Select this option to allow a refresh token to be used. A
refresh token cannot be used with a client verification code or an authorization code.
See Section 45.2.6, "Understanding Refresh Tokens" for more information.
Refresh Token Expires - The length of time in minutes after which the refresh token is
no longer valid.
Life Cycle Enabled - Select this option if the OAuth server should cache the token and
save it in the database until the token expires.
Custom Attributes
Use this section to define custom attributes that the OAuth service embeds in the
access tokens. See Section 46.3.7, "Understanding OAuth Access Token Custom
Attributes" for more information about custom attributes.
■Static Attributes - Attribute name and value pairs where the value is fixed at the
time that you define the attribute. For example,
name1=value1
.
■Dynamic Attributes - User-profile specific attributes.
46.4.6 Configuring User Profile Services
The following section describes how to use the console to configure the OAuth User
Profile Service.
■Creating a New User Profile Service
■Editing the User Profile Service
■Understanding the OAuth User Profile Services Configuration Page
46.4.6.1 Creating a New User Profile Service
1. Open the OAuth Services Configuration page as described in Section 46.2,
"Opening the OAuth Services Configuration Page," then click the identity domain
to open it.

Configuring OAuth Services Settings
46-24 Administrator's Guide for Oracle Access Management
2. Click the Resource Servers tab.
3. Click the Create button in the User Profile Services section.
46.4.6.2 Editing the User Profile Service
1. Open the OAuth Services Configuration page as described in Section 46.2,
"Opening the OAuth Services Configuration Page," then click the identity domain
to open it for editing.
2. Click the Resource Servers tab.
3. In the User Profile Services section, click the service name to edit it. The OAuth
User Profile Service Configuration page opens.
46.4.6.3 Understanding the OAuth User Profile Services Configuration Page
Use this page to configure the User Profile Service. This service supports OAuth 2.0
authorization and allows clients to interact with a back-end directory server and
perform User Profile REST operations on Person, Group, and Relationship entities.
Identity Domain - The name of the identity domain to which this service profile
applies. (Read-only)
Name - The name of this service profile.
Description - (Optional) A short description to help you or another administrator
identify this service profile in the future.
Resource Server ID - The unique ID that OAuth Services created for this User Profile
resource server. (Read-only)
Service Endpoint - The URI where the service receives and responds to create, read,
update, and delete user profile service requests. Create a unique uniform resource
identifier (URI) address for this service; for example,
localhost:5575
Service Enabled - Select to enable the service, or clear the option box to disable it.
Allow Token Attributes Retrieval - Select this option to allow custom attributes (both
attribute names and values) to be shared with clients. If enabled, the user consent form
notifies the user that user-profile-specific details will be shared with the client. See
Section 46.3.7, "Understanding OAuth Access Token Custom Attributes" for more
information about custom attributes.
Authorization & Consent Service Plug-in - From the menu, choose an authorization
plug-in for the service. This plug-in type defines security policy around interactions
where authorization and user consent are granted. It can influence claims in a
generated token as well.
Identity Store Name - The name of the identity store that contains the user records.
Protected by OAuth Service Profile - From the menu, choose the OAuth service
profile that protects the user profile service.
Scopes
Configure individual permission settings for person, relationship, and group entities.
The service uses the following default entity names:
■/me - Designates operations that apply to the user logged in to the client
■/users - Designates operations that apply to other users
■/groups - Designates operations that apply to groups

Configuring OAuth Services Settings
Configuring OAuth Services 46-25
URI - The URI segment for which the scope is defined.
Allow Read - Select to allow read operations for this scope.
Allow Write - Select to allow write operations for this scope.
Allow Anonymous Access - Select this option if you do not want to limit access, or
clear this option to limit access by scope.
OAuth Scope - Type a scope definition. Use dot notation, for example:
UserProfile.me.write
Description - Type a short note that describes the scope.
Require User Consent - Select to require the authorization server to display a user
consent form so that the user can approve (or deny) the access request.
Offline Scope - Allows client applications to request a refresh token that can be used
to obtain an access token even when the user is offline or not present. Client
applications use the refresh token to get a new access token to access resources. See
Section 45.2.6, "Understanding Refresh Tokens" for more information.
Token Settings
Override the default settings - Select this option if the token settings defined on the
resource server configuration page should override the default token settings defined
on the OAuth service profile page.
Token Name - The name of the token.
Expires - The length of time in minutes after which the token is no longer valid.
Refresh Token Enabled - Select this option to allow a refresh token to be used. A
refresh token cannot be used with a client verification code or an authorization code.
See Section 45.2.6, "Understanding Refresh Tokens" for more information.
Refresh Token Expires - The length of time in minutes after which the refresh token is
no longer valid.
Life Cycle Enabled - Select this option if the OAuth server should cache the token and
save it in the database until the token expires.
Attributes
Use this section to define user-profile specific (dynamic) attributes.
Resource URIs
Use this section to enable or disable the /me, /users, and /groups services, and define
the service endpoint URIs and provider implementation class paths for these services.
Table 46–7 User Profile Service Attributes
Name Value Notes
accessControl false
adminGroup cn=Administrators,ou=groups,
ou=myrealm,dc=base_domain
selfEdit true

Configuring OAuth Services Settings
46-26 Administrator's Guide for Oracle Access Management
Service Endpoint - The URI where the service receives and responds to service
requests. Create a unique uniform resource identifier (URI) address for this service; for
example,
localhost:5575
Service Enabled - Select to enable the service, or clear the option box to disable it.
Provider Implementation Class - The name of the Java class that implements the user
profile service provider.
Entities - Use the fields in this section to configure entity relationships.
■Name - The name of the defined entity.
■Identity Directory Service Relation - Choose the directory service relationship
that is to be accessed by the End Point segment.
■End Point - Type a URI segment that will be used to access a corresponding data
column in the Identity Directory service. For example, if
memberOf
is the End Point
URI, then:
http://host:port/.../idX/memberOf
would be the URI to access related entities of an entity with ID
idX
.
■Source Entity URI - The URI (or URL) of the source entity.
■Destination Entity URI - The URI (or URL) of the destination entity.
■Scope for Requesting Recursion - Use Scope attribute values with the scope
query parameter to retrieve a nested level of attributes in a relationship search. To
access related entities recursively, type the value to be used. The default
configuration uses two scope attribute values:
toTop
and
all
. If the Scope for
Requesting Recursion value is the attribute value
all
, then the following REST
URI example is used to make the request:
http://host:port/.../idX/reports?scope=all
In this example, the URI returns the entities related to the entity with ID
idX
, as
well as all further related entities.
Attributes - Use this section to define user-profile entity specific (dynamic) attributes.
46.4.7 Configuring OAuth Consent Management Services
See Section 46.3.6, "Understanding OAuth Consent Management Service
Configuration" for introductory information about the OAuth consent management
service. The following section describes how to use the user interface to configure the
consent management service.
■Creating a New Consent Management Service
■Editing the Consent Management Service
■Understanding the OAuth Consent Management Service Configuration
46.4.7.1 Creating a New Consent Management Service
1. Open the OAuth Services Configuration page as described in Section 46.2,
"Opening the OAuth Services Configuration Page," then click the identity domain
to open it.

Configuring OAuth Services Settings
Configuring OAuth Services 46-27
2. Click the Resource Servers tab.
3. Click the Create button in the Consent Management Services section.
46.4.7.2 Editing the Consent Management Service
1. Open the OAuth Services Configuration page as described in Section 46.2,
"Opening the OAuth Services Configuration Page," then click the identity domain
to open it for editing.
2. Click the Resource Servers tab.
3. In the Consent Management Services section, click the service name to edit it. The
OAuth Consent Management Service Configuration page opens.
46.4.7.3 Understanding the OAuth Consent Management Service Configuration
The Consent Management service handles consent storage, retrieval, revocation, and
consent validation operations.
Identity Domain - The name of the identity domain to which this consent
management service applies. (Read-only)
Name - The name of this consent management service.
Description - (Optional) A short description to help you or another administrator
identify this service in the future.
Resource Server ID- The unique ID that the authorization server created for this
resource server during registration. (Read-only)
Service Endpoint - The URL where the Consent Management Service receives and
responds to client and resource owner service requests.
Service Enabled - Select to enable the service, or clear the option box to disable it.
Allow Token Attributes Retrieval - Select this option to allow custom attributes (both
attribute names and values) to be shared with clients, resource servers, and the
resource owner.
Authorization & Consent Service Plug-in - From the menu, choose an authorization
plug-in for the service. This plug-in type defines security policy around interactions
where authorization and user consent are granted. It can influence claims in a
generated token as well.
Protected by OAuth Service Profile - From the menu, choose the OAuth service
profile that protects the consent management service.
Scopes
URI - The URI segment for which the scope is defined.
Allow Read - Select to allow read operations for this scope.
Allow Write - Select to allow write operations for this scope.
Allow Anonymous Access - Select this option if you do not want to limit access, or
clear this option to limit access by scope.
OAuth Scope - Type a scope definition. Use dot notation, for example:
UserProfile.me.write
Description - Type a short note that describes the scope.
Require User Consent - Select to require the authorization server to display a user
consent form so that the user can approve (or deny) the access request.

Configuring OAuth Services Settings
46-28 Administrator's Guide for Oracle Access Management
Offline Scope - Allows client applications to request a refresh token that can be used
to obtain an access token even when the user is offline or not present. Client
applications use the refresh token to get a new access token to access resources. See
Section 45.2.6, "Understanding Refresh Tokens" for more information.
Token Settings
Override the default settings - Select this option if the token settings defined on the
resource server configuration page should override the default token settings defined
on the OAuth service profile page.
Token Name - The name of the token.
Expires - The length of time in minutes after which the token is no longer valid.
Refresh Token Enabled - Select this option to allow a refresh token to be used. A
refresh token cannot be used with a client verification code or an authorization code.
See Section 45.2.6, "Understanding Refresh Tokens" for more information.
Refresh Token Expires - The length of time in minutes after which the refresh token is
no longer valid.
Life Cycle Enabled - Select this option if the OAuth server should cache the token and
save it in the database until the token expires.
Attributes
Use this section to define custom attributes
Resources URIs
Use this section to enable or disable the retrieve, grant, and revoke services. You can
also define the service endpoint URIs and provider implementation class paths for
these services.
Service Endpoint - The URI where the service receives and responds to requests.
Create a unique URI address for this service.
Service Enabled - Select to enable the service, or clear the option box to disable it.
Provider Implementation Class - The name of the Java class that implements this
consent management service provider.
46.4.8 Configuring OAuth Plug-Ins
Use this page to configure OAuth security plug-ins.
■The Adaptive Access Plug-ins run fraud detection and risk analysis policy checks,
enhancing authenticity and the trust level of a user.
■The Custom Token Attributes Plug-ins define security policy around the token
service provider.
■The Authorization and Consent Service Plug-ins define security policy around
interactions where authorization and user consent are granted. This plug-in can
influence claims in a generated token as well.
■Within an OAuth identity domain, the Client Plug-ins define a security policy for
OAuth clients, and the Resource Server Profile Plug-ins defines a security policy
for resource servers.

Configuring OAuth Services Settings
Configuring OAuth Services 46-29
46.4.8.1 Creating a new OAuth Plug-in
1. Open the OAuth Services Configuration page as described in Section 46.2,
"Opening the OAuth Services Configuration Page," then click the identity domain
to open it.
2. Click the OAuth Plug-ins tab.
3. Click the Create button in one of the plug-in category sections.
The Plug-in Configuration page opens.
46.4.8.2 Understanding the Plug-in Configuration Page
Use this page to add an OAuth plug-in to an identity domain or edit an existing
plug-ins configuration information.
Identity Domain - The name of the identity domain where the plug-in is located.
Name - The name of the plug-in.
Description - (Optional) A short description to help you or another administrator
identify this plug-in in the future.
Security Handler Class - Choose the Java class that defines the Security Handler
Plug-in.
Attributes - Use this section to define custom plug-in attributes.
46.4.9 Configuring OAuth Server Settings
Use the OAuth Server Settings Configuration page to configure general server settings
for the identity domain named.
Identity Domain - The name of the identity domain to which the settings on this
configuration page apply. (Read-only)
HTTP Proxy Settings
Configure the following settings if a proxy server is in place between the OAuth Token
Service (the Push Service) and the Apple Push Notification Service (APNS) or Google
Cloud Messaging (GCM) service.
Proxy URL - Choose the protocol to use to connect to the proxy server (HTTP or
HTTPS), then type the proxy server host name and port number.
Proxy Authentication - Type the user name and password required to authenticate
with the proxy server.
Apple Push Notification
Configure the default values that should be used for this identity domain. Use the
OAuth Mobile Client Configuration page to customize these settings on an app by app
basis.
Minimum Connection Pool Size - Specifies the minimum number of connections in
the connection pool.
Note: See Section 41.1.2, "Deploying Mobile and Social" for
information about deploying Mobile and Social with a WebGate.

Configuring OAuth Services Settings
46-30 Administrator's Guide for Oracle Access Management
Maximum Connection Pool Size - Specifies the maximum number of connections in
the connection pool.
Keep Alive - The Apple Push Notification keep alive value in seconds.
Token Life Cycle Management
Maximum Search Results - Specify the maximum number of token entry search
results that should be returned on the Token Life Cycle Management page.
Attributes
Attributes - Use this section to define custom attributes.
46.4.10 Configuring the OAuth Services Jail Breaking Detection Policy
See Section 46.4.10, "Configuring the OAuth Services Jail Breaking Detection Policy"
for introductory information about the jail breaking detection policy. The following
section describes how to use the user interface to configure the policy.
Jailbreak Detection - Select Enabled to turn the Jail Breaking Detection policy on, or
clear this option to turn it off for all client application instances. If you enable the Jail
Breaking Detection Policy here, you can disable it on an application by application
basis. If you disable the Policy here, you cannot enable or disable the feature on an
application by application basis.
Policy Statements
Policy Statements - Use the buttons in the menu to add, delete, and re-order policy
statements.
Policy Statement Conditions
Enabled - Select this option to activate the policy statement condition.
Minimum OS Version - The minimum iOS version to which the policy applies. If the
value is 1.0, the policy will apply to iOS devices running at least version 1.0 of iOS.
Maximum OS Version - The maximum iOS version to which the policy applies. If the
value is empty, a maximum iOS version number is not checked so the policy applies to
any iOS version higher than the value specified for Min OS Version.
Minimum Client SDK Version - The minimum Mobile and Social Client SDK version
number. For example, 11.1.2.0.0.
Maximum Client SDK Version - The maximum Mobile and Social Client SDK version
number. For example, 11.1.2.2.0.
Table 46–8 OAuth Server Settings Attributes
Name Value Notes
wgAuthnUserHeader
OAM_REMOTE_USER
This attribute usage is optional. If an
OAM WebGate is front
ending/proxying requests to an
OAuth server, set this attribute. The
OAM WebGate sets the
OAM_REMOTE_
USER
header to identify the
authenticated user. If a deployment
uses another header name instead of
OAM_REMOTE_USER
, then this attribute
needs to be set with that header
name.

Configuring OAuth Services Settings
Configuring OAuth Services 46-31
Policy Statement Detection Logic
Policy Expiration Duration - Type the length of time in seconds that the SDK on the
mobile client device should wait before expiring the local copy of the policy and
retrieving a newer version.
Auto Check Period - Type the interval of time in minutes that the client device should
wait before executing the Jail Breaking Detection Policy statements again.
Detection Location - The iOS client device uses a logical-OR operator to evaluate
Policy statements. Add a Detection Location as follows:
■File Path - Type the absolute path to the file or directory on the device for which
the Detection Policy should search.
■Action - Select Exists which instructs the Detection Policy to evaluate whether it
can access a file path.
■Success - Select if the Policy should flag the device as jail broken if the specified
files or directories are found on the device. Use this option if the policy is checking
for unauthorized files or directories. Clear this option if the Policy should flag the
device as jail broken if the specified files or directories are not found. (Use this
option if checking for required files or directories.)
46.4.11 Configuring Token Life Cycle Management
Use this screen to search for and revoke tokens that have been issued. You can search
for tokens using criteria such as user ID, client ID/name, client IP address, service
profile, assertion token category, and token creation/expiration time. Enter your
criteria and click Search. The maximum number of token entry search results returned
is determined by the Maximum Search Results setting on the OAuth Server Settings
page.
Search Criteria
Identity Domain - The name of the identity domain that you are searching for tokens.
(Read only)
User - Specify an LDAP UID (
john.smith
) or an LDAP Fully Qualified DN
(
cn=jane.smith,dc=example,dc=com
) to search by.
Client - Specify a client ID to search for tokens by.
Client IP Address - Specify a client IP address (for example,
192.168.100.1
) to search
for tokens by
Service Profile - Choose a profile from the menu, or leave this selection empty.
Assertion Token Category - Choose a category from the menu, or leave this selection
empty.
Token Issued - Search for tokens by the date and time that they were issued.
Token Expiring at - Search for tokens by the date and time that they expire.
Mobile Device Claim Attributes
IMEI - Specify the unique 15-digit IMEI (International Mobile Equipment Identity)
code to search by. The IMEI can be displayed on most mobile handsets by dialing
*#06#.
MAC Address - Specify the unique MAC (Media Access Control) address to search by.
Phone Number - Specify a phone number to search by.

Configuring OAuth to Accept Third-Party JWT Bearer Assertions
46-32 Administrator's Guide for Oracle Access Management
46.5 Configuring OAuth to Accept Third-Party JWT Bearer Assertions
The Oracle Access Management OAuth Service accepts third-party (non-Oracle) JWT
assertions. You must, however, configure a trust relationship by adding the
third-party’s certificate into the OAuth Service Profile keystore. The service uses the
keystore to verify the JWT assertion’s digital signature. Create a separate keystore for
each OAuth Service Profile that needs its own signing certificate. This section covers
the following topics:
■Understanding the default OAuth Service Profile Keystore
■Creating a Non-Default Keystore for an OAuth Service Profile
■Configuring an OAuth Service Profile for Third-Party JWT Assertion Validation
46.5.1 Understanding the default OAuth Service Profile Keystore
The role of the OAuth Service Profile is described in Section 46.3.3, "Understanding
OAuth Service Profiles Configuration." The default OAuth Service Profile
(OAuthServiceProfile) included in the DefaultDomain uses the Java Keystore (JKS)
included with Oracle Access Management. The default service consists of the
following files.
You can use the following Java
keytool
command to list all of the private key and
certificate information in the default keystore (
default-keystore.jks
).
keytool -list -keystore default-keystore.jks
46.5.2 Creating a Non-Default Keystore for an OAuth Service Profile
The steps in this section describe how to do the following:
■Create a separate keystore to store the third-party’s certificates
■Import the certificates into the keystore
■Configure the keystore
■Add the keystore service to the appropriate OAuth Service Profile
Create the Keystore
Create a new Java Keystore (JKS) using the
keytool
utility that is distributed with the
Java JDK.
1. Go to
$JDK_HOME/jdk/bin
and open a prompt.
2. Using
keytool
, generate a key pair:
Table 46–9 Default OAuth JKS Keystore File and Settings File
File Path
JKS keystore file
$DOMAIN_HOME/config/fmwconfig/default-keystore.jks
Keystore settings file
$DOMAIN_HOME/config/fmwconfig/jps-config.xml
Note: Oracle Web Services Manager also uses the
default-keystore.jks
service. For details see Section 37.2.2, "About
the Oracle Web Services Manager Keystore (default-keystore.jks)."

Configuring OAuth to Accept Third-Party JWT Bearer Assertions
Configuring OAuth Services 46-33
keytool -genkeypair -keyalg RSA -dname
dname
-alias aliasname
-keypass
key_password
-keystore
keystore
-storepass
keystore_password
-validity
days_valid
Where:
■
dname
is the X.500 Distinguished Name to be associated with
alias
, and is
used as the issuer and subject fields in the self-signed certificate. This can be
any string as long as it's in the correct format (for example,
cn=spaces,dc=example,dc=com
).
■
aliasname
is a short name that identifies the new keystore entry
■
key_password
is the password for the new public key
■
keystore
is the keystore name, (for example,
oauth-xyz-keystore.jks
)
■
keystore_password
is the keystore password
■
days_valid
is the number of days for which the certificate should be
considered valid (for example, 1064).
Example 46–1 Creating the Keystore
keytool -genkeypair -keyalg RSA -dname "cn=spaces,dc=example,dc=com"
-alias oauthkey -keypass password123 -keystore oauth-xyz-keystore.jks
-storepass passwordxyz -validity 1064
Load the Certificates Into the Keystore
Use the
keytool
utility to import the certificates into the keystore.
1. Using
keytool
, type the following command:
keytool -importcert -alias
aliasname
-file
certfile
-keystore
keystore
-storepass
keystore_passwor
d
Where:
■
aliasname
is a short name that identifies the keystore
■
certfile
is the file containing the certificates to load
■
keystore
is the keystore name, (for example,
oauth-xyz-keystore.jks
)
■
keystore_password
is the keystore password
Example 46–2 Loading the Certificates
keytool -importcert -alias oauthkey_123 -file samplekey.cer -keystore
oauth-xyz-keystore.jks -storepass passwordxyz
Add the Keystore Instance to jps-config.xml
Configure the keystore service and update the credential store so that OAM can read
the keystore and keys correctly. In the
jps-config.xml
keystore settings file, add the
following new keystore service instance in the
<serviceInstances>
element.
1. In a text editor, open the keystore settings file:
$DOMAIN_HOME/config/fmwconfig/jps-config.xml

Configuring OAuth to Accept Third-Party JWT Bearer Assertions
46-34 Administrator's Guide for Oracle Access Management
2. Find the
<serviceInstances>
node for the keystore.provider
Provider
, and add
the following:
<serviceInstance name="<service-instance-name>" provider="keystore.provider"
location="<keystore-location>">
<property name="keystore.provider.type" value="db"/>
<property name="keystore.sig.csf.key" value="sign-csf-key"/>
<property name="keystore.enc.csf.key" value="enc-csf-key"/>
<property name="keystore.csf.map" value="oracle.oauth.security"/>
<property name="keystore.pass.csf.key" value="keystore-csf-key"/>
<property name="keystore.type" value="JKS"/>
<propertySetRef ref="props.db.1"/>
</serviceInstance>
Where:
■
service-instance-name
= Any
service-instance-name
■
keystore-location
= Path to the keystore file
Example 46–3 Update jps-config.xml
<serviceInstance name="oauth-xyz-keystore.db" provider="keystore.provider"
location="./oauth-xyz-keystore.jks">
<property name="keystore.provider.type" value="db"/>
<property name="keystore.sig.csf.key" value="sign-csf-key"/>
<property name="keystore.enc.csf.key" value="enc-csf-key"/>
<property name="keystore.csf.map" value="oracle.oauth.security"/>
<property name="keystore.pass.csf.key" value="keystore-csf-key"/>
<property name="keystore.type" value="JKS"/>
<propertySetRef ref="props.db.1"/>
</serviceInstance>
3. Find the
<jpsContexts>
node and add the new service instance into the default
context section. The following example shows the addition of a
<serviceInstanceRef>
element with a
ref
to the
oauth-xyz-keystore.db
service
instance (defined in the previous step).
Example 46–4 Adding the new Service Instance
<jpsContexts default="default">
<jpsContext name="default">
<serviceInstanceRef ref="oauth-xyz-keystore.db"/>
... other serviceInstanceRef elements ...
</jpsContext>
Create a CSF Entry for the Keystore Service Instance
Use the following WLST commands to create the necessary Credential Store
Framework (CSF) entries. Restart the server when you are done.
createCred(map="oracle.wsm.security", key="sign_csf_key", user="alias_
name", password=keystore_password, desc="Description of the signing key
credential")
createCred(map="oracle.wsm.security", key="enc_csf_key", user="alias_
name", password=keystore_password, desc="Description of the encryption key
credential")
createCred(map="oracle.wsm.security", key="keystore_csf_key",
user="oauth", password=keystore_password
,
desc="Description of the keystore
credential")

Configuring OAuth to Accept Third-Party JWT Bearer Assertions
Configuring OAuth Services 46-35
Where:
■
sign_csf_key
= the password for the signing key
■
alias_name
= the alias name for the key
■
keystore_password
= the keystore password
■
enc_csf_key
= the password for the encryption key
■
keystore_csf_key
= the password for the keystore
Example 46–5 Creating Credential Store Entries
createCred(map="oracle.wsm.security", key="oauth-sign-csf-key",
user="ms-oauth-key", password=passwordxyz, desc="Signing key credential")
createCred(map="oracle.wsm.security", key="oauth-enc-csf-key",
user="ms-oauth-key", password=passwordxyz, desc="Encryption key credential")
createCred(map="oracle.wsm.security", key="keystore_csf_key", user="oauth",
password=passwordxyz, desc="Keystore credential")
Add the Provider Service Name to the OAuth Service Profile
Apply the updated configuration to the OAuth Service Profile. See Section 46.4.2.1,
"Creating an OAuth Service Profile" if you have not yet created an OAuth Service
Profile for the third-party service.
1. Open the OAuth Services Configuration page as described in Section 46.2,
"Opening the OAuth Services Configuration Page," then click the identity domain
to open it for editing.
2. Click the OAuth Service Profiles tab.
3. Click the Service Profile name in the table.
4. Expand the Attributes section.
5. Add the keystore service information you configured in Example 46–4, "Adding
the new Service Instance" to the Attributes table using the
keystore.service
name. Refer to the following screen capture.
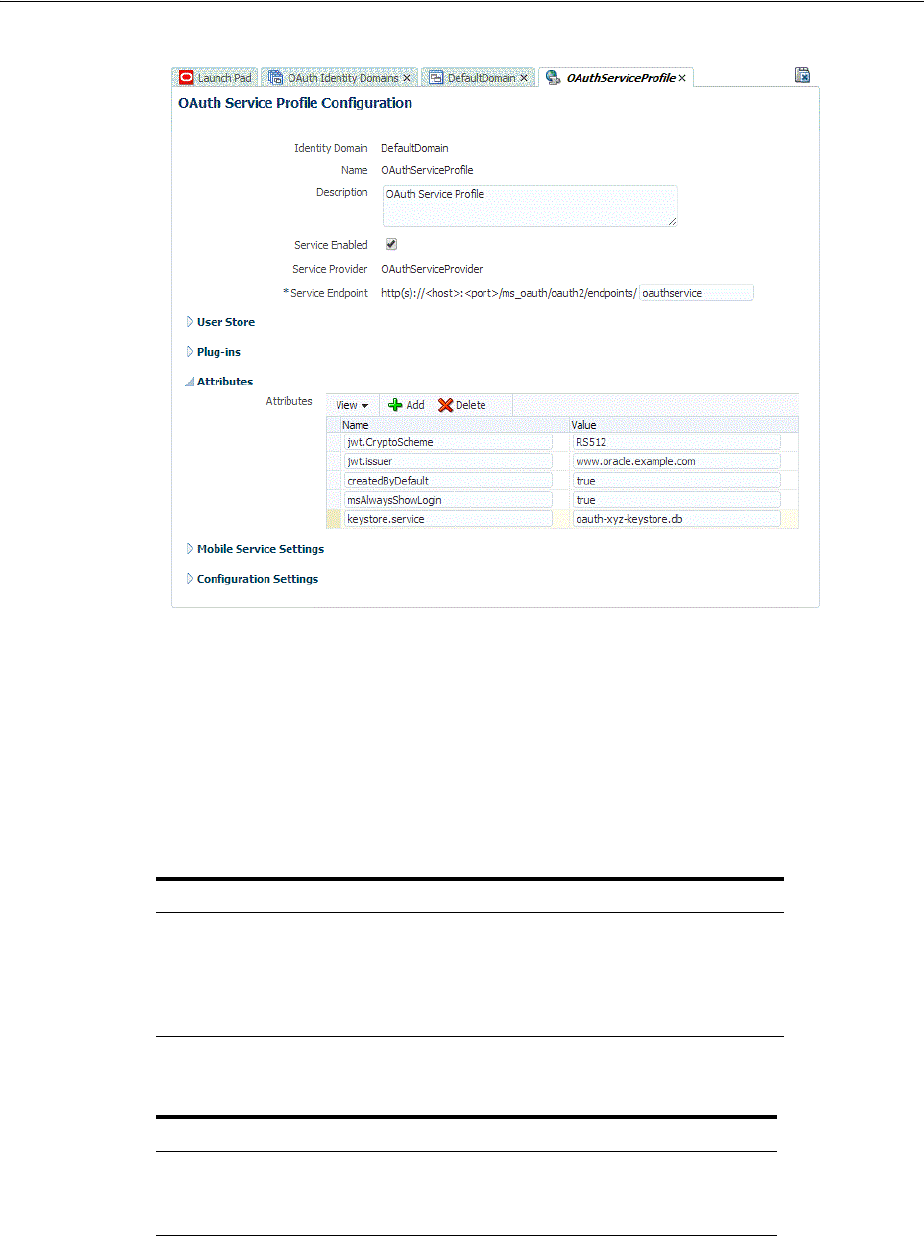
Configuring OAuth to Accept Third-Party JWT Bearer Assertions
46-36 Administrator's Guide for Oracle Access Management
46.5.3 Configuring an OAuth Service Profile for Third-Party JWT Assertion Validation
This section describes how to configure OAuth services to support JWT bearer
assertion validation. For each token provider, configure the following:
■The JWT bearer assertion issuer name(s). This is a required attribute.
■The key ID (KID) for the certificate alias. This is an optional attribute.
Configure the JWT bearer assertion issuer name(s) as follows:
Configure the key ID as follows:
The OAuth server has to Base64 decode the JWT assertion to validate it. The server
looks for the issuer name, and the signing method and key ID values.
If the signing method and the key ID value are not included, the system uses the issuer
name to get the necessary configuration information. It then invokes the OPSS
Attribute Name Attribute Value
jwt.trusted.issuer.1
jwt.trusted.issuer.2
...
jwt.trusted.issuer.
n
alias-1 <cert-alias-name in keystore>
alias-2 <cert-alias-name in keystore>
...
alias-n <cert-alias-name in keystore>
Attribute Name Attribute Value
jwt.trusted.issuer.size
n
Where n is the number of configured
issuer alias names

Configuring a WebGate to Support the OAuth Service
Configuring OAuth Services 46-37
validation method. If the signing method and the key ID value are included, the
system verifies that the information matches the configured values, and then invokes
the OPSS validation method.
46.6 Configuring a WebGate to Support the OAuth Service
This section describes how to configure a WebGate for use with the OAuth Service.
The WebGate serves as a proxy so that client authorization and token endpoint
requests access the WebGate instead of accessing the Oracle Access Management
server directly. These steps are for WebLogic environments only.
1. Install the Oracle HTTP Server 11g WebGate for OAM using the instructions in
Installing WebGates for Oracle Access Manager.
2. Configure the WebGate by defining the following resource and creating an
authentication policy and authorization policy.
a. Open the Oracle Access Management console.
b. Under Access Manager, click Application Domains. and click Search to view
the Application Domains on the Search Application Domains page.
c. Click to edit the Application Domain.
d. On the Application Domains page, click the Resources tab.
e. Create the following resource. If you are using the existing IAMSuiteAgent
Host Identifier, the resource is already present and can be searched on using
the Resource URL field.
/ms_oauth/oauth2/ui/**
Click to select the resource, then click the Edit button.
f. Under the Protection heading, choose the following options from the menus
and click Apply:
Protection Level - Protected
Authentication Policy - Protected HigherLevel Policy
Authorization Policy - Protected Resource Policy
These settings allow the WebGate to perform user authentication and user
authorization.
g. Add the following resources and set the Protection Level to Excluded:
/ms_oauth/oauth2/endpoints/**
/ms_oauth/oauth2/oammsui/**
/ms_oauth/style/**
/ms_oauth/img/**
/oam/**
The WebGate does not protect Excluded resources and allows them to be
accessed.
3. Add the following lines to the
mod_wl_ohs.conf
file and restart the WebGate. For
WebLogicPort
, be sure to add the managed port details for your environment.
# the following directive proxies all the OAuth requests
<IfModule weblogic_module>
WebLogicHost host123.us.example.com
WebLogicPort 17100

Configuring a WebGate to Support the OAuth Service
46-38 Administrator's Guide for Oracle Access Management
Debug ON
WLLogFile /tmp/weblogic.log
MatchExpression /ms_oauth/*
</IfModule>
# the following directive proxies all the OAM managed server requests.
<IfModule weblogic_module>
WebLogicHost host123.us.example.com
WebLogicPort 17100
Debug ON
WLLogFile /tmp/weblogic.log
MatchExpression /oam/*
</IfModule>
4. Update the Access Manager Load Balancing settings as follows:
a. Open the Oracle Access Management console.
b. Under Configuration, click Access Manager Settings.
c. In the Load Balancing section, change the OAM Server Host and the OAM
Server Port settings to the WebGate's host and port settings.
d. Click Apply.
5. Complete the following steps.
a. Open
$ORACLE_HOME/ORACLE_IDM1/oam/server/apps/
and locate the
oam-server.ear
file. For example:
cd /scratch/test/Oracle/Middleware/Oracle_IDM1/oam/server/apps
b. Back up the
.ear
file:
cp oam-server.ear oam-server.ear.original
c. Create a temporary directory and go to that directory:
mkdir tmp-ear
cd tmp-ear/
d. Extract the
oam-server.ear
file into the
tmp-ear
directory:
jar -xvf ../oam-server.ear
e. Create another temporary directory inside
tmp-ear
and go to that directory:
mkdir tmp-ms-war
cd tmp-ms-war
You should be in this directory:
/scratch/test/Oracle/Middleware/Oracle_
IDM1/oam/server/apps/tmp-ear/tmp-ms-war
f. Extract the
ms_oauth.war
into the
tmp-ms-war
directory:
jar -xvf ../ms_oauth.war
g. Open the
WEB-INF/web.xml
file for editing and update it by adding comment
tags around the security-constraint as follows:
<!-- BEGIN: Comment the following security constraint if either the OAM
WebGate is front-ending OAM in a WebSphere setup or if the WebLogic server
Domain Agent is not used.

Configuring a WebGate to Support the OAuth Service
Configuring OAuth Services 46-39
<security-constraint>
<web-resource-collection>
<web-resource-name>OAuthSecuredResources</web-resource-name>
<url-pattern>/oauth2/ui/*</url-pattern>
</web-resource-collection>
<auth-constraint>
<role-name>valid-users</role-name>
</auth-constraint>
</security-constraint>
END of security constraint needing to be commented -->
h. Recreate the
.war
file in the
tmp-ms-war
directory:
jar cvf ms_oauth.war
i. Copy the updated
.war
file to the parent directory, then remove the
tmp-ms-war
directory located in
tmp-ear/
:
cp /scratch/test/Oracle/Middleware/Oracle_
IDM1/oam/server/apps/tmp-ear/tmp-ms-war/ms_oauth.war
/scratch/test/Oracle/Middleware/Oracle_IDM1/oam/server/apps/tmp-ear
rm -rf /scratch/test/Oracle/Middleware/Oracle_
IDM1/oam/server/apps/tmp-ear/tmp-ms-war
j. Create the
oam-server.ear
archive in the
tmp-ear
directory:
jar cvf oam-server.ear .
k. Copy the
tmp-ear/oam_server.ear
archive file to the parent directory:
cp /scratch/test/Oracle/Middleware/Oracle_
IDM1/oam/server/apps/tmp-ear/oam-server.ear
/scratch/test/Oracle/Middleware/Oracle_IDM1/oam/server/apps/oam-server.ear
l. Restart the WebSphere server.
The WebGate will now reverse-proxy OAuth URLs as well as OAM managed
server URLs. All authorization and token endpoint requests are now accessed
using the WebGate host and port values instead of the actual OAM host and port
values.

Configuring a WebGate to Support the OAuth Service
46-40 Administrator's Guide for Oracle Access Management


47
Configuring the Access Portal Service 47-1
47
Configuring the
Access Portal Service
[21]
The Access Portal Service is a hosted single sign-on proxy service that enables intranet
and extranet applications with Oracle's form-fill single sign-on technology. It also
provides the REST interfaces that implement the Web Logon Manager end-user web
application. Web Logon Manager, available as a standalone download from Oracle
Support, provides end-users with the ability to create, modify, and delete application
credentials as well as log on to provisioned applications through both desktop and
mobile browsers.
This chapter contains the following sections.
■Prerequisites for Deploying the Access Portal Service
■Overview of the Access Portal Service Deployment Process
■Deploying the Access Portal Service
■Enabling Form-Fill Single Sign-On for an Application
■Adding a Federated Partner Provider Application
■Adding an Oracle SSO Agent Application
■Common Interface Controls
■Managing Password Generation Policies
■Managing Credential Sharing Groups
■Managing Global Agent Settings
47.1 Prerequisites for Deploying the Access Portal Service
Before completing the steps in this section, you must have completed the following
prerequisites. Refer to the documentation for the respective supporting software for
instructions on configuring that software. The documentation is available on the
Oracle Support web site.
■Install and configure an Oracle database instance
■Install and configure a supported repository (refer to the Certification Matrix for a
list of supported repositories)
■Install and configure an instance of the WebLogic Administration server
■Install and configure an instance of Oracle Access Manager managed server
■Install the Oracle Enterprise Single Sign-On Administrative Console

Overview of the Access Portal Service Deployment Process
47-2 Administrator's Guide for Oracle Access Management
■(Optional) If you're planning to use the Detached Credential Collector, install and
configure an instance of Oracle HTTP Server
47.2 Overview of the Access Portal Service Deployment Process
The Access Portal Service provides form-fill single sign-on functionality to intranet
and extranet Web applications by acting as a proxy between the target application and
the user's browser.
Through the Oracle Traffic Director proxy, the Access Portal Service intercepts user
connections to the target application, fetches the application's logon or password
change page, and injects JavaScript code necessary to perform form-fill single sign-on
tasks (such as credential capture or injection), then delivers the modified page to the
user's browser.
The Access Portal Service utilizes the following components:
■Oracle Traffic Director - intercepts user connections to the target application and
provides path-proxy and DNS-proxy functionality, allowing for path and DNS
rewriting. Also hosts the Webgate and Access Proxy plugins.
■Webgate plugin - a plugin that monitors whether the intercepted user connections
require authentication via Oracle Access Manager (based on the assigned
authentication policy) and redirects the user to the authentication page as
necessary.
■Access Proxy plugin - a plugin that enables single sign-on functionality (logon,
password change, and credential capture) in internal and external Web
applications.
■Oracle Access Manager - provides the authentication service to users as defined in
the authentication policy.
■An LDAP Directory - serves as a data repository for the Access Proxy plugin and
as the authentication back-end mechanism for Oracle Access Manager. For a list of
supported directories, see the Certification Matrix accessible via the Oracle
Support site.
■(Optional) Web Logon Manager - a reference client application that acts as a
launchpad for applications enabled with Oracle's single sign-on technologies.
Web Logon Manager supports Web applications enabled with the Access Portal
Service's form-fill single sign-on technology and is available for download on the
Oracle Technology Network web site. For more information, please contact Oracle
Support.
■Oracle Enterprise Single Sign-On Administrative Console - provides the means
to create and edit form-fill application policies (templates), password generation
policies, delegate credentials, and configure other Access Proxy features not
accessible via the Oracle Access Manager Console.
■(Optional) Oracle HTTP Server - hosts the Detached Credential Collector Web
pages.
The following is a high-level overview of the deployment process:
1. Deploy the Java Cryptography Extension files on your Oracle Access Manager
server. These files enable unlimited strength jurisdiction policy encryption on
Oracle Access Manager.
2. Create the identity store configuration file. This file contains the connection
specifics for the directory that will host the Access Portal Service data repository.

Overview of the Access Portal Service Deployment Process
Configuring the Access Portal Service 47-3
3. Prepare and enable the Access Portal Service. You must use the IDM
Configuration Tool to extend the directory schema, create the necessary users and
groups, create the Webgate profile, create and assign an authentication scheme,
and create a data repository; then, you must enable the Access Portal Service.
4. Set the Oracle Access Manager policy cache refresh interval. If you plan to use
the Enterprise Single Sign-On Administrative Console to create and modify Access
Portal Service application policies (templates), you must configure the Oracle
Access Manager policy cache refresh interval to ensure that Oracle Access
Manager periodically checks for updated policies in the Access Portal Service
repository.
5. (Optional) Install the Oracle Protected Account Manager certificates. If you plan
to enable Oracle Privileged Account Manager-protected applications with the
Access Portal Service, you must install the Oracle Protected Account Manager
certificates into the instance of Oracle Access Manager running the Access Portal
Service. (Only supported on WebLogic.)
6. Deploy the Oracle Traffic Director Administration Server instance. This instance
will provide the means to administrate Oracle Traffic Director proxy instance(s)
(such as configuring listeners, origin servers, and server pools).
7. Deploy the Webgate binaries and Oracle Access Manager secure trust artifacts.
You will run the Webgate installer to deploy the required plugin binaries into
Oracle Traffic Director and copy the Oracle Access Manager secure trust artifacts
into the deployed Webgate instance.
8. (Optional) Deploy the ESSOProvisioning plugin. This plugin enables
provisioning of LDAP credentials as application credentials for single sign-on and
the automatic updating of stored application credentials when the
directory-provided credentials change. This plugin is optional and is not required
by the Access Portal Service.
9. Create an Oracle Traffic Director configuration. An Oracle Traffic Director
configuration is a collection of elements that define the run-time behavior of an
Oracle Traffic Director instance. A configuration contains information about
various elements of an Oracle Traffic Director instance such as listeners, origin
servers, failover groups, and logs.
10. Protect the Oracle Traffic Directory instance with the Webgate and Access Proxy
plugins. To allow the Webgate and Access Proxy plugins to process user traffic
and provide authentication and single sign-on services, you must place them "in
front of" your Oracle Traffic Director instance. This is called "protecting" the
instance with the selected plugins.
11. (Optional) Enable the Detached Credential Collector for the Webgate.
The Detached Credential Collector adds a layer of security by intercepting user
authentication requests normally sent directly to Oracle Access Manager,
collecting the user's credentials, and passing them to Oracle Access Manager.
This avoids the need for users to connect directly to your Oracle Access Manager
instance. The Detached Credential Collector pages run on an instance of Oracle
HTTP Server.
12. Enable target applications for form-fill single sign-on. Once the Access Portal
Service has been successfully deployed, you can begin enabling your target
applications with form-fill single sign-on functionality. This includes configuring
the necessary proxy rules in Oracle Traffic Director, and creating and publishing a
form-fill application policy in Oracle Access Manager.

Deploying the Access Portal Service
47-4 Administrator's Guide for Oracle Access Management
47.3 Deploying the Access Portal Service
This section describes the steps necessary to configure the environment and deploy
Access Portal. It covers the following tasks.
■Deploying the Java Cryptography Extension Policy Files
■Creating the Identity Store Configuration File
■Creating the Oracle Access Manager Configuration File
■Understanding the Access Portal Service Repository Objects
■Integrating with Oracle Privilege Account Manager
■Preparing and Enabling the Access Portal Service on an Oracle Repository
■Preparing and Enabling the Access Portal Service on Microsoft Active Directory
■(Active Directory Only) Deploying the OAMAgent Web Application
■Integrating with Oracle Privilege Account Manager
■Deploying the Oracle Traffic Director Administration Server
■Deploying the Webgate Binaries and Secure Trust Artifacts
■(Optional) Configuring the ESSOProvisioning Plugin
■Creating an Oracle Traffic Director Configuration
■Protecting the Oracle Traffic Director Instance with the Webgate and Access Proxy
Plugins
■(Optional) Enabling the Detached Credential Collector for the Target Webgate
47.3.1 Deploying the Java Cryptography Extension Policy Files
In order to enable unlimited strength jurisdiction policy encryption on your Oracle
Access Manager server, you must download the appropriate policy files and place
them into your server's Java Runtime Environment.
1. Download the latest policy files from one of the following locations, depending on
your Java Runtime Environment version:
■For Java 7:
http://www.oracle.com/technetwork/java/javase/downloads/
jce-7-download-432124.html
■For Java 6:
http://www.oracle.com/technetwork/java/javase/downloads/
jce-6-download-429243.html
■For IBM JDK on WebSphere:
http://www.ibm.com/developerworks/java/
jdk/security/60/
2. Decompress the downloaded archive and place the
US_export_policy.jar
and
local_policy.jar
in
$JDK_Home/jre/lib/security/
within the target Java
Runtime Environment (replace any existing files when prompted).
3. Reboot the Weblogic Administration Server and the Oracle Access Manager
Managed Server.
47.3.2 Creating the Identity Store Configuration File
Use the guidelines below to create the
idstore.props
file that will configure the
identity keystore for the Access Portal Service. You will pass this file to the IDM
Configuration Tool in Preparing and Enabling the Access Portal Service on an Oracle

Deploying the Access Portal Service
Configuring the Access Portal Service 47-5
Repository.
Oracle Unified Directory Example
# Common
IDSTORE_HOST: IDMHOST1.mycompany.com
IDSTORE_PORT: 1389
IDSTORE_ADMIN_PORT: 4444
IDSTORE_KEYSTORE_FILE: OUD_ORACLE_INSTANCE/OUD/config/admin-keystore
IDSTORE_KEYSTORE_PASSWORD: Password key
IDSTORE_BINDDN: cn=oudadmin
IDSTORE_GROUPSEARCHBASE: cn=Groups,dc=mycompany,dc=com
IDSTORE_SEARCHBASE: dc=mycompany,dc=com
IDSTORE_USERNAMEATTRIBUTE: cn
IDSTORE_LOGINATTRIBUTE: uid
IDSTORE_USERSEARCHBASE: cn=Users,dc=mycompany,dc=com
IDSTORE_NEW_SETUP: true
POLICYSTORE_SHARES_IDSTORE: true
# OAM
IDSTORE_OAMADMINUSER:oamadmin
IDSTORE_OAMSOFTWAREUSER:oamLDAP
OAM11G_IDSTORE_ROLE_SECURITY_ADMIN:OAMAdministrators
# OAM and OIM
IDSTORE_SYSTEMIDBASE: cn=systemids,dc=mycompany,dc=com
# OIM
IDSTORE_OIMADMINGROUP: OIMAdministrators
IDSTORE_OIMADMINUSER: oimLDAP
# WebLogic
IDSTORE_WLSADMINUSER : weblogic_idm
IDSTORE_WLSADMINGROUP : WLSAdmins
Oracle Internet Directory Example
# Common
IDSTORE_HOST: OIDHOST1.mycompany.com
IDSTORE_PORT: 3060
IDSTORE_BINDDN: cn=orcladmin
IDSTORE_GROUPSEARCHBASE: cn=Groups,dc=mycompany,dc=com
IDSTORE_SEARCHBASE: dc=mycompany,dc=com
IDSTORE_USERNAMEATTRIBUTE: cn
IDSTORE_LOGINATTRIBUTE: uid
IDSTORE_USERSEARCHBASE: cn=Users,dc=mycompany,dc=com
POLICYSTORE_SHARES_IDSTORE: true
IDSTORE_NEW_SETUP: true
# OAM
IDSTORE_OAMADMINUSER:oamadmin
IDSTORE_OAMSOFTWAREUSER:oamLDAP
OAM11G_IDSTORE_ROLE_SECURITY_ADMIN:OAMAdministrators
# OAM and OIM
IDSTORE_SYSTEMIDBASE: cn=systemids,dc=mycompany,dc=com
# OIM
IDSTORE_OIMADMINGROUP: OIMAdministrators
IDSTORE_OIMADMINUSER: oimLDAP
# WebLogic
IDSTORE_WLSADMINUSER : weblogic_idm
IDSTORE_WLSADMINGROUP : WLSAdmins
Microsoft Active Directory Example
# Common

Deploying the Access Portal Service
47-6 Administrator's Guide for Oracle Access Management
IDSTORE_HOST: <AD-server-hostname>
IDSTORE_PORT: <AD-server-port>
IDSTORE_DIRECTORYTYPE: ad
IDSTORE_BINDDN: <domain>\Administrator
IDSTORE_PASSWD: <password>
IDSTORE_USERNAMEATTRIBUTE: cn
IDSTORE_LOGINATTRIBUTE: cn (or another login attribute)>
IDSTORE_USERSEARCHBASE: CN=Users,DC=essodev,DC=idc,DC=local
IDSTORE_SEARCHBASE: DC=essodev,DC=idc,DC=local
IDSTORE_GROUPSEARCHBASE: CN=Users,DC=essodev,DC=idc,DC=local
IDSTORE_SYSTEMIDBASE: CN=Users,DC=essodev,DC=idc,DC=local
IDSTORE_OAMSOFTWAREUSER: oamSoftwareUser
IDSTORE_OAMADMINUSER: oamAdminUser
OAM11G_CREATE_IDSTORE: true
ESSO_IDSTORE_HOST : <AD-server-hostame>
ESSO_IDSTORE_PORT : <AD-server-port>
ESSO_IDSTORE_BINDDN : <domain>\Administrator
ESSO_IDSTORE_TYPE : ad
IS_ESSO_PRESENT : true
ESSO_IDSTORE_PASSWD : <password>
Where:
■
IDSTORE_HOST
and
IDSTORE_PORT
are, respectively, the host and port of your
Identity Store directory. Specify the back end directory here, rather than OVD. In
the case of OID and OUD, specify, respectively, one of the Oracle Internet
Directory or Oracle Unified Directory instances, for example:
OID:
OIDHOST1
and
3060
OUD:
IDMHOST1
and
1389
■
IDSTORE_ADMIN_PORT
(
LDAP_DIR_ADMIN_PORT
) is the administration port of your
Oracle Unified Directory instance. If you are not using Oracle Unified Directory,
you can leave out this parameter.
■
IDSTORE_KEYSTORE_FILE
is the location of the Oracle Unified Directory Keystore
file. It is used to enable communication with Oracle Unified Directory using the
Oracle Unified Directory administration port. It is called
admin-keystore
and is
located in
OUD_ORACLE_INSTANCE/OUD/config
. If you are not using Oracle Unified
Directory, you can leave out this parameter. This file must be located on the same
host that the
idmConfigTool
command is running on. The command uses this file
to authenticate itself with OUD.
■
IDSTORE_KEYSTORE_PASSWORD
is the encrypted password of the Oracle Unified
Directory keystore. This value can be found in the file
OUD_ORACLE_
INSTANCE/OUD/config/admin-keystore.pin
. If you are not using Oracle Unified
Directory, you can leave out this parameter.
■
IDSTORE_BINDDN
is an administrative user in the Identity Store Directory
■
IDSTORE_GROUPSEARCHBASE
is the location in the directory where Groups are
Stored.
■
IDSTORE_SEARCHBASE
is the location in the directory where Users and Groups are
stored.
■
IDSTORE_USERNAMEATTRIBUTE
is the name of the directory attribute containing the
user's name. Note that this is different from the login name.
■
IDSTORE_LOGINATTRIBUTE
is the LDAP attribute which contains the users Login
name.

Deploying the Access Portal Service
Configuring the Access Portal Service 47-7
■
IDSTORE_USERSEARCHBASE
is the location in the directory where Users are Stored.
■
IDSTORE_NEW_SETUP
is always set to true for Oracle Unified Directory. If you are
not using OUD, you do not need to specify this attribute.
■
POLICYSTORE_SHARES_IDSTORE
is set to
true
for IDM 11g.
■
IDSTORE_OAMADMINUSER
is the name of the user you want to create as your Access
Manager Administrator.
■
IDSTORE_OAMSOFTWAREUSER
is a user that gets created in LDAP that is used when
Access Manager is running to connect to the LDAP server.
■
OAM11G_IDSTORE_ROLE_SECURITY_ADMIN
is the name of the group which is used to
allow access to the OAM console.
■
IDSTORE_SYSTEMIDBASE
is the location of a container in the directory where users
can be placed when you do not want them in the main user container. This
happens rarely but one example is the Oracle Identity Manager reconciliation user
which is also used for the bind DN user in Oracle Virtual Directory adapters.
■
IDSTORE_OIMADMINGROUP
Is the name of the group you want to create to hold your
Oracle Identity Manager administrative users.
■
IDSTORE_OIMADMINUSER
is the user that Oracle Identity Manager uses to connect to
the Identity store.
■
IDSTORE_WLSADMINUSER
: The username to be used for logging in to the web logic
domain once it is enabled by SSO.
■
IDSTORE_WLSADMINGROUP
: is the name of the group to which users who are allowed
to log in to the WebLogic system components, such as the WLS Console and EM,
belong.
Use OIM entries only if your topology includes Oracle Identity Manager. Use OAM
entries only if your topology includes Access Manager.
47.3.3 Creating the Oracle Access Manager Configuration File
Use the guidelines below to create the
config-oam.props
file that will configure your
Oracle Access Manager instance. You will pass this file to the IDM Configuration Tool
in Preparing and Enabling the Access Portal Service on an Oracle Repository.
Note that the Access Portal Service requires the Simple mode security posture.
To enable this posture, set the parameters below as follows:
OAM11G_OAM_SERVER_TRANSFER_MODE: simple
OAM_TRANSFER_MODE: simple
The file will have the following structure:
Create a properties file called
config_oam.props
with the following contents:
WLSHOST: ADMINVHN.mycompany.com
WLSPORT: 7001
WLSADMIN: weblogic
WLSPASSWD: Admin Password
IDSTORE_DIRECTORYTYPE: OUD
IDSTORE_HOST: IDSTORE.mycompany.com
IDSTORE_PORT: 389
IDSTORE_BINDDN: cn=oudadmin
IDSTORE_USERNAMEATTRIBUTE: cn
IDSTORE_LOGINATTRIBUTE: uid
OAM11G_SERVER_LOGIN_ATTRIBUTE: uid

Deploying the Access Portal Service
47-8 Administrator's Guide for Oracle Access Management
IDSTORE_USERSEARCHBASE: cn=Users,dc=mycompany,dc=com
IDSTORE_SEARCHBASE: dc=mycompany,dc=com
IDSTORE_GROUPSEARCHBASE: cn=Groups,dc=mycompany,dc=com
IDSTORE_SYSTEMIDBASE: cn=systemids,dc=mycompany,dc=com
IDSTORE_OAMSOFTWAREUSER: oamLDAP
IDSTORE_OAMADMINUSER: oamadmin
PRIMARY_OAM_SERVERS: IDMHOST1.mycompany.com:5575,IDMHOST2.mycompany.com:5575
WEBGATE_TYPE: ohsWebgate11g
ACCESS_GATE_ID: Webgate_IDM
OAM11G_OIM_WEBGATE_PASSWD: password to be assigned to WebGate
COOKIE_DOMAIN: .mycompany.com
OAM11G_WG_DENY_ON_NOT_PROTECTED: true
OAM11G_IDM_DOMAIN_OHS_HOST: SSO.mycompany.com
OAM11G_IDM_DOMAIN_OHS_PORT: 443
OAM11G_IDM_DOMAIN_OHS_PROTOCOL: https
OAM11G_SERVER_LBR_HOST: SSO.mycompany.com
OAM11G_SERVER_LBR_PORT: 443
OAM11G_SERVER_LBR_PROTOCOL: https
OAM11G_OAM_SERVER_TRANSFER_MODE: simple
OAM_TRANSFER_MODE: simple
OAM11G_IDM_DOMAIN_LOGOUT_URLS:
/console/jsp/common/logout.jsp,/em/targetauth/emaslogout.jsp
OAM11G_IDSTORE_ROLE_SECURITY_ADMIN: OAMAdministrators
OAM11G_SSO_ONLY_FLAG: false
COOKIE_EXPIRY_INTERVAL: 120
OAM11G_IMPERSONATION_FLAG: false
OAM11G_OIM_INTEGRATION_REQ: false
OAM11G_OIM_OHS_URL:https://SSO.mycompany.com:443
SPLIT_DOMAIN:true
Where:
■
WLSHOST
(
ADMINVHN
) is the host of your administration server. This is the virtual
name.
■
WLSPORT
is the port of your administration server.
■
WLSADMIN
is the WebLogic administrative user you use to log in to the WebLogic
console.
■
WLSPASSWD
is the WebLogic administrator password.
■
IDSTORE_DIRECTORYTYPE
is
OUD
,
OID
or
OVD
.
■
IDSTORE_HOST
and
IDSTORE_PORT
are the host and port of the Identity Store
directory when accessed through the load balancer.
■
IDSTORE_BINDDN
is an administrative user in the Identity Store directory.
■
IDSTORE_USERSEARCHBASE
is the location in the directory where Users are stored.
■
IDSTORE_GROUPSEARCHBASE
is the location in the directory where Groups are
stored.
■
IDSTORE_SEARCHBASE
is the location in the directory where Users and Groups are
stored.
■
IDSTORE_SYSTEMIDBASE
is the location of a container in the directory where the
user oamLDAP is stored.
■
IDSTORE_OAMSOFTWAREUSER
is the name of the user account to be used to interact
with LDAP.

Deploying the Access Portal Service
Configuring the Access Portal Service 47-9
■
IDSTORE_OAMADMINUSER
is the name of the user account that can access your OAM
Console.
■
PRIMARY_OAM_SERVERS
is a comma separated list of your OAM Servers and the
proxy ports they use, for example: IDMHOST1:OAM_PROXY_PORT
■
ACCESS_GATE_ID
is the name you want to assign to the WebGate.
■
OAM11G_OIM_WEBGATE_PASSWD
is the password to be assign to the WebGate.
■
OAM11G_IDM_DOMAIN_OHS_HOST
is the name of the load balancer which is in front of
the OHS's.
■
OAM11G_IDM_DOMAIN_OHS_PORT
is the port that the load balancer listens on (HTTP_
SSL_PORT).
■
OAM11G_IDM_DOMAIN_OHS_PROTOCOL
is the protocol to use when directing requests
at the load balancer.
■
OAM11G_WG_DENY_ON_NOT_PROTECTED
, when set to
false
, allows login pages to be
displayed. It should be set to
true
when using webgate11g.
■
OAM_TRANSFER_MODE
is the security model that the Oracle Access Manager Servers
function in. Valid values are
simple
and
open
. If you use the
simple
mode, you
must define a global passphrase.
■
OAM11G_OAM_SERVER_TRANSFER_MODE
is the security model that the OAM Servers
function in.
■
OAM11G_IDM_DOMAIN_LOGOUT_URLS
is set to the various logout URLs.
■
OAM11G_SSO_ONLY_FLAG
confgures Access Manager as authentication only mode or
normal mode, which supports authentication and authorization.
If
OAM11G_SSO_ONLY_FLAG
is
true
, the OAM Server operates in authentication only
mode, where all authorizations return true by default without any policy
validations. In this mode, the server does not have the overhead of authorization
handling. This is recommended for applications which do not depend on
authorization policies and need only the authentication feature of the OAM Server.
If the value is
false
, the server runs in default mode, where each authentication is
followed by one or more authorization requests to the OAM Server. WebGate
allows the access to the requested resources or not, based on the responses from
the OAM Server.
■
OAM11G_IMPERSONATION_FLAG
is set to
true
if you are configuring OAM
Impersonation.
■
OAM11G_SERVER_LBR_HOST
is the name of the load balancer fronting your site. This
and the following two parameters are used to construct your login URL.
Note: To determine the proxy ports your OAM Servers use:
1. Log in to the OAM console.
2. Click the System Configuration tab.
3. Expand Server Instances under the Common Configuration section
4. Click an OAM Server, such as WLS_OAM1, and select Open from the
Actions menu.
5. Proxy port is the one shown as Port.

Deploying the Access Portal Service
47-10 Administrator's Guide for Oracle Access Management
■
OAM11G_SERVER_LBR_PORT
is the port that the load balancer is listening on (HTTP_
SSL_PORT).
■
OAM11G_SERVER_LBR_PROTOCOL
is the URL prefix to use.
■
OAM11G_OIM_INTEGRATION_REQ
should be set to
true
if you are building a topology
which contains both OAM and OIM. Otherwise set to
false
at this point. This
value is only set to true when performing Access Manager/Oracle Identity
Manager integration and is set during the integration phase.
■
OAM11G_OIM_OHS_URL
should be set to the URL of your load balancer. This
parameter is only required if your topology contains OAM and OIM.
■
COOKIE_DOMAIN
is the domain in which the WebGate functions.
■
WEBGATE_TYPE
is the type of WebGate agent you want to create.
■
OAM11G_IDSTORE_NAME
is the Identity Store name. If you already have an Identity
Store in place which you wish to reuse (rather than allowing the tool to create a
new one for you), then set the value of this parameter to the name of the Identity
Store you wish to reuse.
■
OAM11G_SERVER_LOGIN_ATTRIBUTE
when set to
uid
, ensures that when users log in,
their username is validated against the
uid
attribute in LDAP.
■
SPLIT_DOMAIN
should be set to
true
If you are creating a domain with just OAM
or OAM located in a different domain from OIM (Split Domain). Otherwise, it is
not necessary to specify this parameter.
47.3.4 Understanding the Access Portal Service Repository Objects
The
vGoLocator
object is required for all repositories and the value of its
vGOLocatorAttribute
attribute specifies the path to the People container in which the
Access Portal Service stores application credentials for each user. The
vGOLocator
object must point to the same data store instance as the Oracle Access Manager
instance on which the Access Portal Service is deployed.
For Oracle LDAP directories, the following applies:
■If there is a single object under the
vGOLocator
container, the
vGoLocatorAttribute
value is parsed regardless of the object's name.
■If there are multiple objects under the
vGOLocator
container, the object named
default is parsed. If no object named
default
exists, the request will fail.
■If
thevGOLocatorAttribute
attribute has no value or does not exist, or if the
vGOLocator
container does not exist, the request will fail.
When using Microsoft Active Directory, the Access Portal Service stores application
credentials under the
USERS
container as described below:
■If there is a single object under the
vGOLocator
container, the
vGoLocatorAttribute
value is parsed regardless of the object's name.
■If there are multiple objects under the
vGOLocator
container, the object named
default is parsed. If no object named
default
exists, the data will be within the
USERS
container.
■If
thevGOLocatorAttribute
attribute has no value or does not exist, or if the
vGOLocator
container does not exist, the data will be stored within the
USERS
container.

Deploying the Access Portal Service
Configuring the Access Portal Service 47-11
You must explicitly enable the storage of user credentials under respective user objects
using the Oracle Enterprise Single Sign-On Suite Administrative Console. This makes
the following changes to the repository:
■The User class is added as a possible superior to the vGOUserData class.
■All users are granted the right to create vGOUserData objects. These rights are
granted at the directory root and are recursively inherited down to the user
objects.
47.3.5 Preparing and Enabling the Access Portal Service on an Oracle Repository
Before completing this procedure, make sure you have created the required
configuration files as described in Creating the Identity Store Configuration File and
Creating the Oracle Access Manager Configuration File.
The
idmConfigTool
is located at:
IAM_ORACLE_HOME/idmtools/bin
The syntax of the command on Linux is:
idmConfigTool.sh -configOAM input_file=configfile
For example:
idmConfigTool.sh -configOAM input_file=config_oam1.props
When the command runs you are prompted to enter the password of the account you
are connecting to the Identity Store with. You are also asked to specify the passwords
you want to assign to these accounts:
■
IDSTORE_PWD_OAMSOFTWAREUSER
■
IDSTORE_PWD_OAMADMINUSE
R
1. On the machine running your target Oracle Access Manager instance, change into
the following directory:
/Oracle/Middleware/Oracle_IDM1/idmtools/bin
2. Set the following environment variables:
setenv ORACLE_HOME /Oracle/Middleware/Oracle_IDM1
setenv MW_HOME /Oracle/Middleware
setenv JAVA_HOME
JDKPath
(where JDKPath is the full path to the Java Development Kit used by the Oracle
Access Manager instance)
3. Pre-configure the identity store to extend the directory schema with the required
object classes by running the following command:
Note: When you run the
idmConfigTool
, it creates or appends to the
file
idmDomainConfig.param
. This file is generated in the same
directory that the
idmConfigTool
is run from. To ensure that each time
the tool is run, the same file is appended to, always run the
idmConfigTool
from the directory:
IAM_ORACLE_HOME/idmtools/bin

Deploying the Access Portal Service
47-12 Administrator's Guide for Oracle Access Management
./idmConfigTool.sh -preConfigIDStore input_file=idstore.props
where
idstore.props
is a property file containing configuration parameters
specific to your environment. For information on assembling this file, see Creating
the Identity Store Configuration File.
4. Create the required users and groups by running the following command:
./idmConfigTool.sh -prepareIDStore mode=all input_file=idstore.props
where
idstore.props
is a property file containing configuration parameters
specific to your environment. For information on assembling this file, see Creating
the Identity Store Configuration File.
This command does the following:
■Adds the Access Portal Service object classes and attributes to the schema
■Creates the
CO
,
People
, and
vGoLocator
containers (with create permissions
only, including children). For more information on these containers, see
Understanding the Access Portal Service Repository Objects.
5. Create and configure the required Webgate profile by running the following
command:
./idmConfigTool.sh -configOAM input_file=config_oam.props
where
config_oam.props
is a property file containing configuration parameters
specific to your environment. For information on assembling this file, see Creating
the Oracle Access Manager Configuration File.
6. Add conditions to the Admin role in the Security Realm as follows:
a. Log in to the WebLogic Administration Server Console.
b. In the left pane of the console, click Security Realms.
c. On the "Summary of Security Realms" page, click myrealm under the Realms
table.
d. On the "Settings" page for myrealm, click the Roles & Policies tab.
e. On the "Realm Roles" page, expand the Global Roles entry under the Roles
table. This brings up the entry for Roles.
f. Click the Roles link to go to the Global Roles page.
g. On the "Global Roles" page, click the Admin role to go to the Edit Global Role
page:
h. On the "Edit Global Roles" page, under Role Conditions, click Add
Conditions.
i. On the "Choose a Predicate" page, select Group from the predicates list and
click Next.
j. On the Edit Arguments Page, specify
OAMAdministrators
in the Group
Argument field and click Add.
k. Click Finish to return to the "Edit Global Rule" page.
The Role Conditions now show the
OAMAdministrators
Group as an entry.
l. Click Save to finish adding the Admin role to the
OAMAdministrators
Group.
7. Check the log file for any errors or warnings and correct them. A file named
automation.log
is created in the directory where you run the tool.

Deploying the Access Portal Service
Configuring the Access Portal Service 47-13
8. Restart the WebLogic Administration Server.
9. Enable the Access Portal Service:
a. Log on to the Oracle Access Manager Console.
b. Select the Launch Pad tab.
c. In the Configuration section, click Available Services.
d. In the screen that appears, click Enable next to Access Portal Service.
47.3.6 Preparing and Enabling the Access Portal Service on Microsoft Active Directory
The following LDIF file is required for extending the Active Directory schema with
Access Portal Service classes and attributes:
<ORACLE_HOME>/idmtools/templates/ad/esso_schema_extn.ldif
The file is a template file; before proceeding, modify the values such as domain names
and paths to match the target environment.
Complete the following steps to prepare and enable the Access Portal Service with
Microsoft Active Directory:
1. Extend the Active Directory schema by running the following command on the
server machine hosting the repository:
ldifde –i –f esso_schema_extn.ldif
Upon completion, a message will confirm that importing data was successful:
2. Use the
ADSIEdit
tool to create containers named
CO
,
People
, and
vGoLocator
under the repository root.
3. Under the
vGoLocator
container, create an object named
default
of class
vGoLocatorClass
and set its attribute value to the DN of the container that holds
the
People
container. For more information, see Understanding the Access Portal
Service Repository Objects.
4. Enable the storage of user credentials under user objects:
a. Launch the Oracle Enterprise Single Sign-On Suite Administrative Console
and connect to the target repository.
Note: After you run
idmConfigTool
, several files are created that you
need for subsequent tasks. Keep these in a safe location.
Two 11g WebGate profiles are created:
Webgate_IDM
, which is used for
intercomponent communication and
Webgate_IDM_11g
, which is used
by 11g Webgates.
The following files exist in the directory
ASERVER_
HOME/output/Webgate_IDM_11g
. You need these when you install the
WebGate software.
■
cwallet.sso
■
ObAccessClient.xml
■
password.xml
Additionally, you need the files
aaa_cert.pem
and
aaa_key.pem
,
which are located in the directory
ASERVER_HOME/output/Webgate_
IDM
.

Deploying the Access Portal Service
47-14 Administrator's Guide for Oracle Access Management
b. In the Console, select Enable Storing Credentials Under User Object (AD
Only) from the Repository menu.
c. The Console displays a dialog informing you of the changes about to be made
to your Active Directory schema. Click OK.
d. Wait for a dialog confirming the changes to appear, then click OK to dismiss it.
5. Create the target users with object class
InetOrgPerson
.
6. Create a user data store:
a. Log on to the Oracle Access Manager console and select the Launch Pad tab.
b. In the Configuration section, click User Identity Stores.
c. In the screen that appears, click Create under OAM ID Stores.
d. In the dialog that appears, fill in the following required values, leaving the rest
at their defaults:
7. Test the connection and correct any errors if necessary, then click Apply.
8. Update the LDAP plugin:
a. Log on to the Oracle Access Manager console.
b. Select the Launch Pad tab.
c. In the Access Manager section, click Authentication Modules.
d. In the screen that appears, click Search.
e. In the list of search results, select the LDAPPlugin module.
f. In the Steps tab, select the stepUI step.
g. In the KEY_IDENTITY_STORE_REF drop-down list, select the user data
store you created in step 5 of this procedure.
h. Repeat the above for the stepUA step.
Note: Members of protected groups (i.e., users whose ACLs are
governed by the AdminSDHolder object) will not be able to store
credentials under their user objects until the AdminSDHolder ACL is
updated with permissions required by this feature. See the guide
Deploying Logon Manager with a Directory-Based Repository for
instructions on how to remedy this issue.
Field Value
Store Name
ESSOAuthnStore
Store Type Microsoft Active Directory
Location ad-server-hostname:port
Bind DN domain\username
Password password
Login ID Attribute
cn
User Search Base Fully qualified DN of the Users container
Object Search Base Fully qualified DN of the Groups container

Deploying the Access Portal Service
Configuring the Access Portal Service 47-15
i. Click Save to save your changes.
9. Create the identity data store (IDS) profile in Oracle Access Manager:
a. Log on to the Oracle Access Manager console.
b. Select the Launch Pad tab.
c. In the Configuration section, click User Identity Stores.
d. In the IDS Profile section, click Create Form Fill Application IDS Profile.
e. In the form that appears, fill in the fields as follows:
f. Test the connection, then click Apply.
10. Configure the relational mapping of users and groups:
a. Edit the IDS profile you just created.
b. Select the Entity Attributes tab.
c. Add the following new attributes, one at a time (adding multiple attributes at
once is not supported):
member
,
memberOf
,
distinguishedName
d. Select the Entities tab.
e. Under Users and Groups, enable the
member
,
memberOf
, and
distinguishedName
entity attributes.
f. Set the User Base, Group Base, Search Base, and Create Base entities to the
fully qualified DNs of the respective containers in the repository.
g. Select the Relationships tab.
h. Configure the entity relationships as shown in the following illustration:
Field Value
Name meaningful profile name
Description meaningful profile description
Repository Options Create New
Repository Name meaningful repository name
Directory Type Microsoft Active Directory
Host name Active Directory server host name
Port Active Directory server port
Bind DN domain/user name of repository account
Bind password password of repository account
Base DN fully qualified DN of the repository root
User search base fully qualified DN of the Users container
App template search base fully qualified DN of the CO (ESSO policy data) container
Top search base fully qualified DN of the repository root
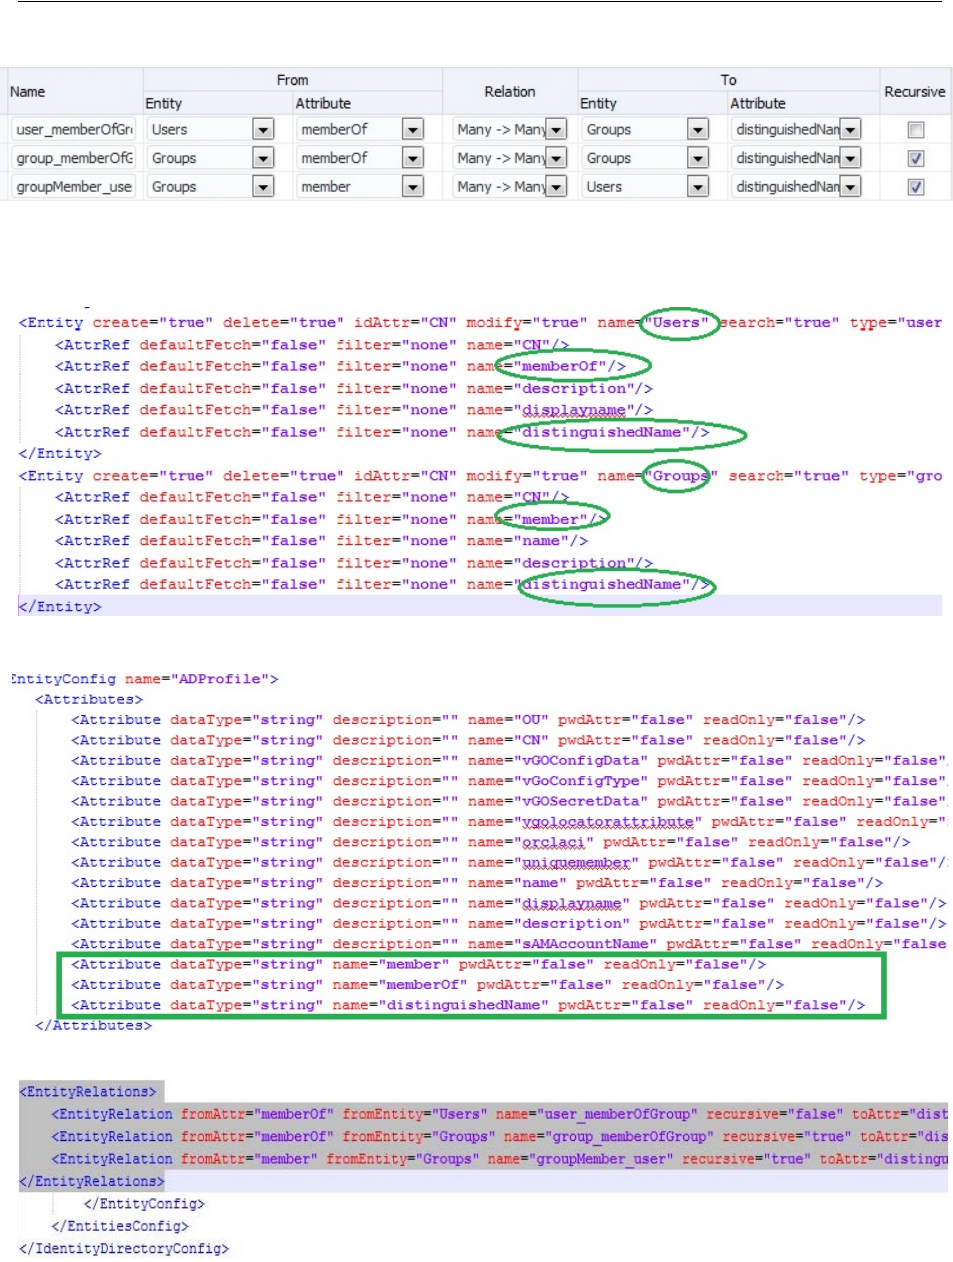
Deploying the Access Portal Service
47-16 Administrator's Guide for Oracle Access Management
This makes the following changes in the file
DOMAIN_HOME
/config/fmwconfig/ids-config.xml
:
11. Enable the IDS profile:
a. Select the Launch Pad tab in the main console window.

Deploying the Access Portal Service
Configuring the Access Portal Service 47-17
b. In the Configuration section, click Access Portal Service Settings.
c. In the screen that appears, select the IDS profile you created earlier
from the IDS Profile drop-down list.
d. Click Apply.
12. Add the Active Directory schema XML definition file to the IDS server
configuration file:
a. Open the following file in a text editor:
DOMAIN_HOME/config/fmwconfig/ovd/ids/server.os_xml
b. Locate the
<schema check="true">
section and add the following
line inside it:
<location>schema.ms.xml</location>
c. Save and close the file.
d. Restart the managed server instance to apply your changes.
47.3.7 (Active Directory Only) Deploying the OAMAgent Web Application
The
OAMAgent
web application provides the means to configure Access Control Lists
within an Active Directory-based Access Portal Service repository via a web interface
running on Microsoft Internet Information Server.
To deploy th
OAMAgent
web application, do the following:
1. Extract the
OAMAgent.zip
file (available in the Logon Manager folder of the
Enterprise Single Sign-On Suite ZIP archive) into a directory.
2. Using the IIS Manager application, create a new IIS web site; when prompted, in
the Physical Path field, enter the full path to the directory into which you
extracted the
OAMAgent.zip
archive.
3. Edit the newly created web application’s
Web.config
file as follows:
a. Add the following to the
system.webServer
section:
<configuration>
<system.webServer>
<httpHandlers>
<add type="ColumbiaWindowsAgent.Rest.AgentAcl, OAMAgent"
path="ColumbiaWindowsAgent/V1/AgentAcl" verb="POST"/>
</httpHandlers>
</system.webServer>
</configuration>
b. Add the following to the
system.web
section:
<compilation targetFramework="4.0">
<assemblies>
<add assembly="Interop.ActiveDs, Version=1.0.0.0, Culture=neutral"/>
</assemblies>
</compilation>
c. Save and close the file.
4. In the IIS Manager application, navigate to IIS Manager > Target Site > .NET
Compilation > Assemblies and ensure that the new assembly appears in the list
of assemblies (i.e., that the
Interop.ActiveDs.dll
file appears in the web root
directory).

Deploying the Access Portal Service
47-18 Administrator's Guide for Oracle Access Management
5. Create a new handler mapping:
a. In the IIS Manager application, navigate to IIS Manager > Target Site >
Handler Mappings and click Add Managed Handler in the right-hand pane.
b. In the dialog that appears, fill in the fields as follows and save your changes:
6. Enable 32-bit application support:
a. In the IIS Manager application, navigate to IIS Manager > Application Pools.
b. Right-click the target site and select Advanced Settings from the context
menu.
c. Set the Enable 32-bit Applications option to True and save your changes.
7. Make the following site configuration changes:
a. In the IIS Manager application, navigate to IIS Manager > Application Pools.
b. Select the target site.
c. Set the .NET Version to 4.0.
d. Set the Identity option to LocalSystem.
e. Save your changes.
8. In the IIS Manager application, select the host machine, click Server Certificates,
and click Import a Certificate, and provide the path to a root CA certificate trusted
by both the IIS server running the
OAMAgent
web application as well as the server
running the target Access Portal Service instance.
Additionally, the Access Portal Service server must have a certificate signed by
that CA in its keystore. That CA must also be present in the server’s
cacert
file
(trust store).
9. Create a https binding using the newly installed certificate:
a. In the IIS Manager application, right-click the target site and select Edit
Bindings from the context menu.
b. Click Add New Site Binding.
c. Select https from the Type drop-down list.
d. Select the certificate you imported in step 8.
e. Click Close.
10. Enable SSL for the target site:
a. In the IIS Manager application, select the target site.
b. Click SSL Settings.
c. Select the Require SSL check box.
d. Select the Require client certificates check box.
e. Click Apply in the right-hand pane.
Field Value
Path
ColumbiaWindowsAgent/V1/AgentAcl
Type
ColumbiaWindowsAgent.Rest.AgentAcl, OAMAgent
Name
OAMAgent

Deploying the Access Portal Service
Configuring the Access Portal Service 47-19
11. Add the following to the
oam-config.xml
file on the Access Portal Service server
instance, then restart the instance to apply your changes:
<Setting Name="RestServicePath"
Type="xsd:string">ColumbiaWindowsAgent/V1/AgentAcl</Setting>
<Setting Name="IPAddress" Type="xsd:string">iis-server-hostname</Setting>
<Setting Name="Protocol" Type="xsd:string">https</Setting>
<Setting Name="Port" Type="xsd:string">iis-server-port</Setting>
<Setting Name="Version" Type="xsd:string">1</Setting>
<Setting Name="ADPath" Type="xsd:string">AD-server-hostname:port</Setting>
12. Add the following keystore parameters to the managed server’s startup script
JAVA_OPTIONS
line:
-Djavax.net.ssl.keyStore=
keystore-location
-Djavax.net.ssl.keyStorePassword=
keystore-password
47.3.8 Setting the Policy Cache Refresh Interval
When using the Oracle Enterprise Single Sign-On Administrative Console to create
and modify Access Portal Service application policies, the Access Portal Service must
periodically fetch the modified policies from the repository to keep the policy cache up
to date. By default, the cache refresh interval is set to
-1
(never refresh).
To set a custom policy cache refresh interval, complete the steps below. A value of 0
disables the policy cache and causes every request to fetch the corresponding policy
from the repository.
1. Open the following file in a text editor:
OAMDomainHome
/config/fmwconfig/oam-config.xml
2. Locate the following setting string (or add it if it does not already exist):
<Setting Name="TimeToLive" Type="xsd:long">-1</Setting>
3. Change the default value (
-1
) to the desired number of minutes.
4. Save and close the file.
5. Increment the file's version and restart both the administration server and the
managed server to apply the new refresh interval.
47.3.9 Integrating with Oracle Privilege Account Manager
When integrating with Oracle Privileged Account Manager, keep the following in
mind:
■Only Oracle Privileged Account Manager templates of type "Privileged" are
supported. Templates of type "Delegated" are not supported when created on the
server side; creating such a template will result in unpredictable behavior.
■You must specify the Oracle Privileged Account Manager server URL in the
Access Portal Service settings in the target Oracle Access Manager server instance.
47.3.9.1 Installing the Oracle Privileged Account Manager Certificates
You must import the certificates into the identity keystore of the application server
running the Oracle Access Manager instance. This procedure is currently only
available for WebLogic; do not perform it on other application servers.

Deploying the Access Portal Service
47-20 Administrator's Guide for Oracle Access Management
1. Obtain the location and name of the identity keystore by examining the value of
the following environment variables in the WebLogic console (where
OAMServerName is the name of the target Oracle Access Manager instance):
environment-servers-
OAMServerName
-keystores
environment-servers-
OAMServerName
-ssl
2. Import the certificate into the identity keystore using the following command:
keytool -importcert -alias
CertificateAlias
-file
CertificateName.crt
-keystore
./IdentityStoreName.jks
-storepass
IdentityStorePassword
where CertificateAlias is a meaningful alias you want to assign to the certificate for
identification, CertificateName is the name of the certificate file, IdentityStoreName is
the name of the target identity store and IdentityStorePassword is the password for
that identity store.
3. Obtain the location and name of the CA certificate by examining the value of the
following environment variable via the WebLogic console:
environment-servers-oam_server1-keystores
4. Import the CA certificate into the identity keystore using the following command:
keytool -importcert -alias
CertificateAlias
-file
CertificateName.der
-keystore
./cacerts
-storepass
IdentityStorePassword
where CertificateAlias is a meaningful alias you want to assign to the certificate for
identification, CertificateName is the name of the certificate file, IdentityStoreName is
the name of the target identity store and IdentityStorePassword is the password for
the
cacerts
identity keystore.
5. Export the target Oracle Access Manager domain's private key certificate (used for
generating the SAML assertion) using the following command:
keytool -export -alias orakey -file orakey.der -keystore
./
IdentityStoreName
.jks
-storepass
IdentityStorePassword
where IdentityStoreName is the name of the target identity store and
IdentityStorePassword is the password for that identity keystore.
6. Change to the following directory:
OPAMDomainHome
/config/fmwconfig
Note: Keystore passwords can be obtained by running the following
command from the WebLogic Console:
listCred(map='oracle.wsm.security',key='keystore-csf-key');
Note: If a keystore type is not explicitly specified in the embedded
trust provider configuration section of the following file:
OAMDomainHome
/config/fmwconfig/jps-config.xml
then the Oracle Key Store Service keystore type is assumed.
If no application stripe name is specified for that KSS keystore, the
service defaults to the following location:
OAMDomainHome
/config/fmwconfig/default-keystore.jks

Deploying the Access Portal Service
Configuring the Access Portal Service 47-21
7. Import the target Oracle Access Manager domain's private key into the target
Oracle Privileged Account Manager domain using the following command:
keytool -importcert -alias orakey -file orakey.der -keystore
./
IdentityStoreName
.jks
-storepass
IdentityStorePassword
where IdentityStoreName is the name of the target identity store and
IdentityStorePassword is the password for that identity keystore.
8. Restart the affected Oracle Access Manager instance and the affected Oracle
Privileged Account Manager instance.
47.3.9.2 Configuring the Oracle Privileged Account Manager Server
Before completing the steps below, make sure you have created a provider on the
target Oracle Access Manager instance for the desired Oracle Privileged Account
Manager instance and placed it as the first provider in the provider list.
On the Oracle Privileged Account Manager instance, do the following:
1. Create a target with the following parameter values:
2. Search for targets and click the target you created in step 1.
3. Click the Privileged Accounts tab.
4. In the Privileged Accounts tab, add the desired privileged account (stored on the
target you created in step 1).
5. Add the desired grantees to the privileged account.
6. Restart both the admin and the privileged Oracle Privileged Account Manager
server instances to apply your changes.
47.3.9.3 Configuring the Provisioning Gateway Server
To create the required template mapping on the Provisioning Gateway server, do the
following:
1. Run the following command on the Provisioning Gateway server machine:
Field Value
Storage Type Deployed repository type
Server Hostname:port of the repository server
Root DN Fully qualified DN of the repository root
User Path Fully qualified DN of the Users container
Connect as User CN of the repository connection account
Password Password of the repository connection account
Use secure connection (SSL) Disabled
Use configuration objects
instead of application list
Enabled
Role/Group support Enabled
Configuration and
role/group objects root DN
Fully qualified DN of the CO container
Admin Group DN (not applicable; leave blank)
User Name Prepend
UID

Deploying the Access Portal Service
47-22 Administrator's Guide for Oracle Access Management
certutil -setreg chain\minRSAPubKeyBitLength 512
2. Restart the Provisioning Gateway server machine.
3. Log on to the Provisioning Gateway Administrative Console.
4. Select the Settings tab, then the Template Mapping section.
5. Click Edit and select the privileged template associated with your Oracle
Privileged Account Manager target, then save your changes. This will create the
required
cn=OpamTemplateMap
mapping in the repository.
6. Test the configuration:
a. Log on to Web Logon Manager as one of the grantees assigned to the target
privileged account.
b. Click Add next to the target privileged template. The privileged account
details will appear in a separate tab.
47.3.10 Deploying the Oracle Traffic Director Administration Server
The Oracle Traffic Director Administration Server provides the means to deploy and
manage Oracle Traffic Director proxy instance(s).
Before beginning this procedure, delete all previous Oracle Traffic Director 11g
installations; the installer will fail if it encounters a non-empty installation directory.
Linux security restricts the opening of ports under 1024 to the
root
user. If you wish to
run Oracle Traffic Director proxies on ports 80 or 443, follow the configuration
gudielines for running as the
root
user described in the "Creating an Administration
Server and Administration Node" chapter of the Oracle Traffic Director Installation
Guide.
1. Launch the installer:
./OTD11.1.1.1.7/Disk1/runinstaller
2. In the screen that appears, click Next.
3. In the screen that appears, select Skip Updates and click Next.
4. In the screen that appears, set the Oracle Traffic Director home directory to the
following and click Next:
/OTD11g/trafficdirector_Home_1
5. Wait for the installation to complete, then change into the following directory:
/OTD11g/trafficdirector_Home_1/bin
6. Create an Oracle Traffic Director administration server instance using the
following command (only include
--server-user=root
if you want to run the
server as the
root
user):
./tadm configure-server --user=admin --host=
otd.hostname
--server-user=root --instance-home=/OTD11g/trafficdirector_Home_
1/instances
WARNING: Oracle highly recommends against running Oracle
Traffic Director as the
root
user due to increased security risk; you
should limit the use of the
root
user to development environments
only.

Deploying the Access Portal Service
Configuring the Access Portal Service 47-23
Oracle recommends using the default port (
8989
) for the Oracle Traffic Director
administration server.
7. Start the Oracle Traffic Director administration server with the following
command:
./OTD11g/trafficdirector_Home_1/instances/admin-server/bin/startserv
8. Log on to the Oracle Traffic Director Admin Console at the following URL:
https://
otd.hostname
:8989
For detailed information on installing Oracle Traffic Director, see the Oracle Traffic
Director Installation Guide.
47.3.10.1 Applying the Required Oracle Traffic Director Patch
You must apply patch ID 17025628 (available from Oracle Support) which addresses
the following issues that are required by the Access Portal Service to function:
■Forward proxy functionality. Required if your organization utilizes an
enterprise-wide Web proxy that filters all Internet traffic.
■Rewriting of HTTP page content using
sed
. Required for rewriting HTML, CSS,
and JavaScript code referencing relative paths to objects and hosts.
47.3.11 Deploying the Webgate Binaries and Secure Trust Artifacts
Before completing this procedure, make sure you have created a Webgate profile in
your Oracle Access Manager server as described in Preparing and Enabling the Access
Portal Service on an Oracle Repository; the secure trust artifacts generated during that
procedure are required to complete the steps below.
1. Decompress the Webgate binaries installer into a local directory on the Oracle
Traffic Director host and launch the installer with the following command:
./runInstaller
2. When prompted, specify the full path to your Java runtime environment.
For example:
/usr/local/packages/jdk16
3. In the installer's "Prerequisite Checks" screen, click Next.
4. Specify the installation path and click Next:
/MW_HOME/OAM_OTD_WebGate_HOME
5. Click Install and wait for the installation to complete.
6. Change into the following directory:
/MW_HOME/OAM_OTD_WebGate_HOME/webgate/iplanet/tools/deployWebGate
7. Deploy the Webgate binaries using the following command:
./deployWebGateInstance.sh -w /MW_HOME/wginst1 -oh /MW_HOME/OAM_OTD_
WebGate_HOME -ws otd
8. Copy the Oracle Access Manager artifact files (generated while completing the
steps in Preparing and Enabling the Access Portal Service on an Oracle Repository
as follows:
■Copy the
ObAccessClient.xml
,
cwallet.sso
, and
password.xml
artifact files
to:
/MW_HOME/wginst1/webgate/config

Deploying the Access Portal Service
47-24 Administrator's Guide for Oracle Access Management
■Copy the
aaa_key.pem
and
aaa_cert.pem
artifact files to:
/MW_HOME/wginst1/webgate/config/simple
9. (Optional) If you deployed your Oracle Traffic Director administration server
instance as the root user, grant that instance permissions to the Webgate
(otherwise, skip this step).
a. Change into
/MW_HOME/wginst1
b. Execute
chmod -R 777 .
47.3.12 (Optional) Configuring the ESSOProvisioning Plugin
When you successfully log on to Oracle Access Manager, the
ESSOProvisioning
plugin
will provision your directory credentials to a specific application in your Access Proxy
(ESSO) wallet. It will also update the target application credentials if your directory
credentials change.
To enable the plugin, you must assign the ESSOProvAuthnScheme to the
ESSOAuthnPolicy authentication policy in the IAMSuiteAgent application domain
profile.
1. Log on to the Oracle Access Manager Console.
2. Select the Launch Pad tab.
3. In the Access Manager section, click Authentication Modules.
4. In the screen that appears, click Search.
5. From the list of search results, locate and double-click the
ESSOProvisioningModule module.
6. In the screen that appears, select the Steps tab.
7. Edit the
ESSO_PROV_Step
step and enter the name of the target application for
which you want to provision directory credentials.
8. Edit the
ESSO_UI_Step
and
ESSO_UA_Step
steps and add a User Identity Store
value of
KEY_IDENTITY_STORE_REF
to each.
9. Click Save to save the steps, then click Apply to apply your changes to the
module.
10. In the Access Manager section, click Application Domains.
11. In the screen that appears, click Search.
12. From the list of search results, locate and double-click the IAMSuiteAgent profile.
13. Select the Authentication Policies tab.
14. In the list of policies, select ESSOAuthnPolicy.
15. From the Authentication Scheme drop-down menu, select the
ESSOProvAuthnScheme authentication scheme.
16. Click Apply to save your changes.
WARNING: Oracle highly recommends against running Oracle
Traffic Director instances as the
root
user due to increased security
risk; you should limit the use of the
root
user to development
environments only.

Deploying the Access Portal Service
Configuring the Access Portal Service 47-25
47.3.13 Creating an Oracle Traffic Director Configuration
1. Log on to the Oracle Traffic Director Admin Console at the following URL:
https://
otd.hostname
:8989
2. Create a new Oracle Traffic Director configuration with the following parameters:
■Name: a descriptive name for the configuration
■Server User: leave at the default value, unless you deployed the Oracle Traffic
Director administration server as root
■Select Origin Server Type:
HTTP
3. Create a listener (your Oracle Traffic Director instance will listen for requests from
the user's browser on this port) with the following parameters:
■Port:
8282
■ServerName: otd.hostname
4. Create an origin server pool with the following parameters:
■Add your target application host as applicationHostname:port
■Select the target node as applicationHostname
5. Click the Instance node in the tree on the left and start the instance.
6. Test the page by accessing the following URL and logging on with your
administrator credentials:
http://
otd.hostname
:8282/
target_webgate_profile
47.3.14 Protecting the Oracle Traffic Director Instance with the Webgate and Access
Proxy Plugins
To protect your Oracle Traffic Director instance with the Webgate and Access Proxy
plugins, complete the steps below.
47.3.14.1 Generating the Secure Trust Artifacts
1. Change into the following directory:
/MW_HOME/OAM_OTD_WebGate_HOME/webgate/iplanet/tools/setup/InstallTools
2. Set the
LD_LIBRARY_PATH
variable:
bash export LD_LIBRARY_PATH=/MW_HOME/OAM_OTD_WebGate_HOME/lib
csh setenv LD_LIBRARY_PATH /MW_HOME/OAM_OTD_WebGate_HOME/lib
3. Run the following command to modify the
magnus.conf
file to include the
directives to load the
webgate
and
esso_webProxy
libraries into the Oracle Traffic
Director instance as well as modify the associated Oracle Traffic Director
configuration file to include the directives to activate the two plugins.
./EditObjConf -f /OTD11g/trafficdirector_Home_
1/instances/
targetInstance
/config/
targetOTDconfiguration
.conf -oh /MW_
HOME/OAM_OTD_WebGate_HOME -w /MW_HOME/wginst1 -ws otd -enableESSO
-enableWLM

Deploying the Access Portal Service
47-26 Administrator's Guide for Oracle Access Management
47.3.14.2 Loading the Required WebGate Libraries into the OTD Instance
1. Change into the following directory:
/OTD11g/trafficdirector_Home_1/instances/
targetOTDConfiguration
/bin
2. Edit the
startsrv
script in a text editor and add the Webgate library path to the
LD_LIBRARY_PATH
variable as follows:
LD_LIBRARY_PATH="${SERVER_LIB_PATH}:/MW_HOME/OAM_OTD_WebGate_
HOME/lib:${SERVER_JVM_LIBPATH}:${LD_LIBRARY_PATH}";
47.3.14.3 Deploying the Configuration Changes
1. Log into the Oracle Traffic Director Admin Console.
2. Select your configuration and click the Instance Modified notification at the top of
the page.
3. Pull and deploy the changes.
4. When prompted to restart the instance, click OK, then click Finish.
47.3.14.4 Testing the WebGate
1. Navigate to
http://
otd.hostname
:8282/
target_webgate
2. Log on to the Webgate using your repository credentials.
If the target application does not appear, check your configuration for errors.
47.3.15 (Optional) Enabling the Detached Credential Collector for the Target Webgate
This section describes how to enable the Detached Credential Collector for the target
Webgate and how to deploy the Detached Credential Collector pages on Oracle HTTP
Server.
47.3.15.1 Creating and Applying the Detached Credential Collector Authentication
Scheme
1. Select the Launch Pad tab.
2. In the Access Manager section, click Authentication Schemes.
3. In the screen that appears, click Search.
4. From the list of search results, locate and click the ESSOAuthnScheme
authentication scheme.
5. In the screen that appears, click Duplicate.
6. Give the new scheme a descriptive name - for example
DCC-ESSOAuthnScheme
.
7. In the Challenge Method drop-down list, select FORM.
Note: Only include the
-enableWLM
flag if you have deployed the
Access Portal reference application. Otherwise, the flag is not
necessary.
If you do not include the
-enableWLM
flag and wish to deploy the
Access Portal reference application later, you must manually modify
the appropriate Oracle Traffic Director configuration file as described
in the Access Portal reference application deployment instructions.

Deploying the Access Portal Service
Configuring the Access Portal Service 47-27
8. In the Challenge Redirect URL field, enter the Oracle Traffic Director host name
and port in the format
http://
otd.hostname:port
/
(including the trailing slash).
9. In the Challenge URL field, enter
/oamsso-bin/login.pl
10. In the Context Type drop-down list, select external.
11. Click Apply to save your changes.
12. Select the Launch Pad tab.
13. In the Access Manager section, click Application Domains.
14. In the screen that appears, click Search.
15. From the list of search results, locate and click the IAMSuiteAgent profile.
16. Select the Authentication Policies tab.
17. In the Authentication Scheme drop-down list, select the DCC authentication
scheme you just created.
18. Click Apply to save your changes.
47.3.15.2 Deploying Detached Credential Collector Pages on Oracle HTTP Server
1. Enable CGI on the target instance of Oracle HTTP Server if you have not already
done so.
2. Copy the files from the following location:
$WG_ORACLE_HOME/webgate/iplanet/oamsso
To the folowing location:
$OHS_INSTANCE_DIR/config/OHS/ohs1/htdocs
3. Copy the files from the following location:
$WG_ORACLE_HOME/webgate/iplanet/oamsso-bin
To the following location:
$OHS_INSTANCE_DIR/config/OHS/ohs1/
4. Enable CGI for the following directory:
$OHS_INSTANCE_DIR/config/OHS/ohs1/oamsso-bin
5. Test your configuration by accessing the following URL:
http://
ohs.host:port
/oamsso-bin/login.pl
47.3.15.3 Routing Oracle Traffic Director Authentication Requests via the Detached
Credential Collector
1. Under your target Oracle Traffic Director configuration, create a new origin server
pool that points to the Oracle HTTP Server hostname and port.
2. Create a new route that points to the origin server pool created in step 1.
3. Add the following URI condition to the route:
/oamsso-bin
OR
/oamsso
4. Save your changes and restart the Oracle Traffic Director instance.
5. Test your configuration by accessing the target application's proxy URL.

Deploying the Access Portal Service
47-28 Administrator's Guide for Oracle Access Management
47.3.16 Configuring Logon Manager for Compatibility with the Access Portal Service
Complete the steps below to enable interoperability between Logon Manager and the
Access Portal Service.
If you have not already done so, install the Authentication Manager component of
Logon Manager on each target end-user machine; this enables the MultiAuth
authenticator within Logon Manager.
For more information on configuring Logon Manager repository settings, see the guide
Deploying Logon Manager with a Directory-Based Repository.
47.3.16.1 Modifying the Access Portal Service Configuration
1. In the IDS profile you have configured for the Access Portal Service, ensure that
you are connecting with a user who possesses root privileges (e.g.,
orcladmin
).
2. If you are using Oracle Internet Directory as your repository, set the following
permissions to permit Logon Manager to its First Time Use wizard:
a. For the
vGoLocator
object and its
default
child object:
orclaci = access to attr=(*) by * BindMode="Simple"
(read,search,compare)
orclaci = access to entry by * BindMode="Simple" (browse)
b. For t he
People
container:
orclaci = access to attr=(*) by * BindMode="Simple"
(read,write,search,compare)
orclaci: access to entry by * BindMode="Simple" (browse,add,delete)
47.3.16.2 Modifying the Logon Manager Configuration
1. Launch the Enterprise Single Sign-On Suite Administrative Console and connect
to the Access Portal Service repository.
2. If you are using Active Directory as your repository, do the following (otherwise,
skip this step):
a. Navigate to Global Agent Settings > Live > Synchronization > ADEXT.
b. Select the check box next to the Use secure location for storing user settings
option and select Yes from the drop-down menu.
3. Navigate to Global Agent Settings > Live > Authentication > Authentication
Manager and configure the graded authenticators as required by your
environment. For more information, refer to the Enterprise Single Sign-On Suite
Administrator’s Guide.
4. Navigate to Global Agent Settings > Live > Authentication and configure each
authenticator as required by your environment, noting the following:
■If using Oracle Internet Directory as your repository, set the Recovery Method
option to Passphrase suppression using entryUUID.
■If using Active Directory as your repository, set the Recovery Method option
to Passphrase suppression using user’s SID.
For more information, see the guide Deploying Logon Manager with a Directory-Based
Repository.
5. Navigate to Global Agent Settings > Live > Synchronization and configure the
appropriate synchronizer as required by your environment, noting the following:

Enabling Form-Fill Single Sign-On for an Application
Configuring the Access Portal Service 47-29
■Enable the Use aggressive synchronization option.
■Enable the Resynchronize when network or connection status changes
option.
■Set the Interval for automatic resynchronization option to
1
.
6. Publish your settings to the repository:
a. In the tree on the left-hand side right-click Live and select Publish from the
context menu.
b. Click Browse and select the target path within the repository. (If prompted,
enter the appropriate connection parameters and click OK to connect.)
c. In the Available configuration objects list, double-click Live to move it to the
list of objects selected for publishing.
d. Click Publish and wait for the operation to complete.
47.4 Enabling Form-Fill Single Sign-On for an Application
This section describes the steps necessary to enable form-fill single sign-on
functionality for an application with the Access Portal Service.
■Configuring a Form-Fill Application Policy
■Guidelines for Configuring Proxy Rules in Oracle Traffic Director
47.4.1 Configuring a Form-Fill Application Policy
This section describes how to configure a form-fill application policy. After you create
the policy, you must add a proxy-enabled application URL to the policy to enable
form-fill functionality. Once configured, you must you must publish the policy to the
repository and test it to ensure that form-fill single-sign on is functioning as expected.
47.4.1.1 Creating a Form-Fill Application Policy
1. Launch the Oracle Enterprise Single Sign-On Administrative Console.
2. In the left-hand tree right-click the Applications node and select New Web
Application from the context menu.
3. In the dialog that appears, enter a descriptive name and click Next. This will
appear as the application policy name in Oracle Access Manager Console.
4. In the screen that appears, select the desired form type and click OK.
5. In the screen that appears, enter the URL of the target application.
6. Click Detect Fields. The application's logon form appears in the window and the
appropriate fields are automatically detected and configured. Double-check the
field list to ensure the fields have been detected and configured correctly.
For more information on creating application policies (also known as templates),
see the guide Creating and Configuring Logon Manager Application Templates.
7. Click OK to save the application policy.
8. In the General tab, provide optional metadata describing the application (this
metadata will appear in the Access Portal reference application or another user
interface of your choice, if parsed):
■Description – a meaningful description of the application for the user.

Enabling Form-Fill Single Sign-On for an Application
47-30 Administrator's Guide for Oracle Access Management
■Reference – internal reference describing the version/variant of the
application template.
■Category – the category under which the application will appear in the Access
Portal reference application; for example, "Finance," "Development," and so
on.
■Icon Image URL – URL to the icon image that will appear next to the
application entry in the Access Portal reference application.
■Logo Image URL – URL to the full-size application logo image that will
appear in the Access Portal reference application.
■Vendor – the vendor of the application.
■Administrator – contact information for the application's administrator within
your organization.
9. Select the desired users and/or user groups to whom this template will be
available:
a. Select the Security tab.
b. Select the Access Portal Service repository from the Directory drop-down
menu.
c. Click Add.
d. In the dialog that appears, enter the name of the target user or group.
e. Click Check Names to verify the user or group exists in the directory; if you
receive an error, re-enter the name and try again.
f. Click OK to save your changes.
47.4.1.2 Adding a Proxy-Enabled URL to a Form Fill Application Policy
1. In the policy's General tab, double-click the target form.
2. In the dialog that appears, select the Identification tab and click Add.
3. In the dialog that appears, select the Regular Expression radio button and enter a
launch URL in regular expression format for the target application.
You must trim any session IDs or other session-sensitive parameters from the
URL, as they will become invalid as soon as the session expires. For example:
.*?https://
otd_proxy_host
\\.oracle\\.com:8282/
target_webgate
/login\\.jsp.*
4. Click OK; then click OK in the parent dialog to save your changes.
47.4.1.3 Publishing the Policy to the Repository
1. In the left-hand tree, right-click the target application policy and select Publish
from the context menu.
2. If prompted to connect to the repository, fill in the fields in the "Connect to
Repository" dialog as required.
3. In the "Browse" dialog, navigate to the policies and credentials container you
created in Preparing and Enabling the Access Portal Service on an Oracle
Repository.
For example:
ou=CO,dc=us,dc=oracle,dc=com
4. Click Publish.

Enabling Form-Fill Single Sign-On for an Application
Configuring the Access Portal Service 47-31
47.4.1.4 (Optional) Importing the Policy into the Oracle Access Manager Console
Instead of publishing the policy to the repository, you can import it into the Oracle
Access Manager Console to further edit its basic settings there. If you have already
published it to the repository, you can skip this step, as the Oracle Access Manager
console will retrieve it from the repository and display it in its policies list.
If you modify the policy in the Oracle Access Manager console and then decide to edit
it in the Enterprise Single Sign-On Administrative Console, you will need to manually
pull down the updated version from the Access Portal Service repository.
1. Launch the Enterprise Single Sign-On Administrative Console and load the
desired policy (template) from the repository.
2. Export the policy to a file:
a. From the File menu, select Export.
b. In the "Export to .INI File" dialog that appears, select the policy from the list
and click OK.
c. In the dialog that appears, provide the desired path and name for the exported
file, then click Save.
3. Import the template file into Oracle Access Manager:
a. Log on to the Oracle Access Manager console.
b. In the "Access Manager" section of the page that appears, click Applications.
c. In the toolbar above the application list, click Import (blue down-arrow).
d. In the "Import Applications" pop-up that appears, click Browse.
e. In the dialog that appears, navigate to the policy file, and click Open.
f. Click OK in the "Import Applications" pop-up.
g. In the list of applications to import displayed by the pop-up, select the desired
application and click Import.
h. In the application configuration page that appears, verify that the
configuration settings in each tab have been properly carried over and make
any changes if necessary. When you have finished, click Save.
The imported application policy appears in the application list.
47.4.1.5 Testing the Policy
Test the configuration of your policy as follows:
1. In a Web browser, navigate to
http://
otd.hostname:
8282/
target_webgate and log on
with your repository credentials.
The logon form's fields will highlight indicating Access Proxy is ready to capture
application credentials.
2. Enter your application credentials into the logon form and submit them.
Note: Oracle recommends creating and configuring the policy in the
Enterprise Single Sign-On Administrative Console as not all Access
Proxy features can be configured in the Oracle Access Manager
Console.

Enabling Form-Fill Single Sign-On for an Application
47-32 Administrator's Guide for Oracle Access Management
3. Close the browser and access the application URL again. You will be automatically
logged on to the application.
If either the credential capture or automatic logon (after credentials have been
captured) do not occur, check your configuration for errors.
47.4.2 Guidelines for Configuring Proxy Rules in Oracle Traffic Director
This section provides the basic guidelines for creating the proxy rules necessary to
intercept the user connections to the target application and redirect them to pass
through the Webgate and Access Proxy plugins. For in-depth information on
configuring Oracle Traffic Director, please see the Oracle Traffic Director Administrator's
Guide.
Since the user connection requested is intercepted by Oracle Traffic Director and
redirected to the origin server, all resources referenced within the page's code must
have their path rewritten to point to the Oracle Traffic Director origin server instead of
the original host; otherwise, those elements will not be loaded and the page will
display improperly and likely not function as intended.
This section contains guidelines for the following types of resources that must be
rewritten for the page to function properly after proxy redirection:
■Path Rewriting Guidelines for HTTP Request/Response Headers
■Path Rewriting Guidelines for Browser Cookies
■Path Rewriting Guidelines for Page Content
47.4.2.1 Path Rewriting Guidelines for HTTP Request/Response Headers
HTTP request and response headers contain parameters that must be rewritten to
point to the Oracle Traffic Director origin server. Oracle Traffic Directory can rewrite
basic location headers that contain the origin server host name and exact protocol, or a
relative path.
A typical HTTP request header looks as follows:
GET /web/en-US/default.aspx HTTP/1.1
Host: www.oracle.com
User-Agent: Mozilla/5.0 (Windows NT 6.1; WOW64; rv:23.0) Gecko/20100101
Firefox/23.0
Accept: text/html, application/xhtml+xml,application/xml;q=0.9,*/*;q=0.8
Accept-Language: en-US,en;q=0.5
Accept-Encoding: gzip, deflate
Referer: http://www.oracle.com/web/en-US/default.aspx ?root=1
Connection: keep-alive
This example header contains the following parameters that require path rewriting:
■
GET
- contains the path of the requested page relative to the Web root, plus HTTP
protocol version.
For example:
GET /web/en-US/default.aspx HTTP/1.1
An example proxy rule for rewriting the
GET
parameter:
NameTrans fn="map" to="/" from="/myLocalPath
"

Enabling Form-Fill Single Sign-On for an Application
Configuring the Access Portal Service 47-33
■
Host
- contains the URL of the page host.
For example:
www.oracle.com
An example proxy rule for rewriting the
Host
parameter:
Route fn="set-origin-server" origin-server-pool="myoriginserverpool"
rewrite-host="true"
■
Referer
- contains the URL of the page that referred the request. For example:
http://www.oracle.com/web/en-US/default.aspx ?root=1
An example rule for rewriting the
Referer
parameter:
<If defined $referer and $referer =~
"https://myoriginserver.oracle.com/myLocalPath/(.*)$"
>
AuthTrans fn="set-variable"
set-headers="referer=https://www.oracle.com/$1"
</If>
A rewritten version of our example header would then look as follows:
GET /myLocalPath/web/en-US/default.aspx HTTP/1.1
Host: myoriginserver.oracle.com:8484
User-Agent: Mozilla/5.0 (Windows NT 6.1; WOW64; rv:23.0) Gecko/20100101
Firefox/23.0
Accept: text/html, application/xhtml+xml,application/xml;q=0.9,*/*;q=0.8
Accept-Language: en-US,en;q=0.5
Accept-Encoding: gzip, deflate
Referer: https://myoriginserver.oracle.com:8484/myLocalPath/
web/en-US/default.aspx?root=1
Connection: keep-alive
Oracle Traffic Director can not handle location redirects to another origin server.
For example, if a logon page hosted on one host redirects the user to a page on another
host upon successful logon, you must configure the rewriting rules for this remapping
manually. For example:
<
Object name="route-oracle-travel-sso">
<If defined $srvhdrs{'location'} and $srvhdrs{'location'} =~
"(http|https)://portal.myapplication.com(.*)$">
Output fn="set-variable"
$srvhdrs{'location'}="https://myoriginserver.oracle.com:8484/travel-portal
$2"
</If>
Output fn="sed-response-header" name="set-cookie"
sed="s|path=/travel-sso/|path=/|g"
Note: Since Web applications vary widely, in addition to the above
examples, you must examine your HTTP headers to account for any
other parameters referencing a URL or a relative path.

Enabling Form-Fill Single Sign-On for an Application
47-34 Administrator's Guide for Oracle Access Management
</Object>
<Object name="route-travel-portal">
Route fn="set-origin-server"
origin-server-pool="origin-server-portal-oracle-travle"
rewrite-host="true"
</Object>
47.4.2.2 Path Rewriting Guidelines for Browser Cookies
The path and domain parameters in cookies need to be rewritten to point to the Oracle
Traffic Director origin server instead of the target application host. For example:
Set-cookie: v1st=1666B5EACC906D6; path=/; expires=Wed, 19 Feb 2020
14:28:00 GMT; domain=.www.oracle.com
Must become:
Set-cookie: v1st=1666B5EACC906D6; path=/myLocalPath/; expires=Wed, 19 Feb
2020 14:28:00 GMT; domain=.myoriginserver.oracle.com
When configuring cookie rewriting rules, note the following:
■Oracle Traffic Director cannot rewrite wildcarded domains, such as
.oracle.com
.
A target host name must be specified, for example:
.www.oracle.com
.
■If your application shares cookies across multiple domains, you must create
separate cookie rewriting rules for each domain.
■You must strip out the Oracle Authentication Manager cookie from the cookie set
request, as it interferes with certain Web applications, such as Dropbox.
Example rule for stripping out the Oracle Authentication Manager cookie:
AuthTrans fn="sed-request-header" name="cookie"
sed="s|OAMAuthnCookie[^;]*;| |g" sed="s|OAMRequestContext[^;]*;| |g"
■You must strip out Oracle Authentication Manager headers before sending them
to the application host.
47.4.2.3 Path Rewriting Guidelines for Page Content
Oracle Traffic Director does not directly provide the means to rewrite host names and
resource paths within the HTML code of the target page. You must use sed expressions
to rewrite those values. Common HTML elements whose values will require rewriting
include
src
,
href
, and
action
.
Example sed rule set for rewriting the
src
,
href
, and
action
elements:
Output fn="insert-filter" filter="sed-response"
sed="s|\\(src\\)=\"/\\([^\"|^/]\\)|\\1=\"/myLocalPath/\\2|g"
sed="s|\\(src\\)='/\\([^'|^/]\\)|\\1='/myLocalPath/\\2|g"
sed="s|\\(href\\)=\"/\\([^\"|^/]\\)|\\1=\"/myLocalPath/\\2|g"
sed="s|\\(href\\)='/\\([^'|^/]\\)|\\1='/myLocalPath/\\2|g"
sed="s|\\(action\\)=\"/\\([^\"|^/]\\)|\\1=\"/myLocalPath/\\2|g"
sed="s|\\(action\\)='/\\([^'|^/]\\)|\\1='/myLocalPath/\\2|g"
type="text/html*"
Example rule for rewriting hardcoded host names:
Output fn="insert-filter" filter="sed-response"
sed="s|https://www.oracle.com|https://myoriginserver.oracle.com:8484/myLoc
alPath|g" type="(text*|application*)"

Enabling Form-Fill Single Sign-On for an Application
Configuring the Access Portal Service 47-35
Example rule for rewriting path references within CSS elements:
Output fn="insert-filter" filter="sed-response"
sed="s|url(\"/\\([^\"|^/]\\)|url(\"/myLocalPath/\\1|g"
sed="s|url('/\\([^'|^/]\\)|url('/myLocalPath/\\1|g"
sed="s|url(/\\([^) |^/]\\)|url(/myLocalPath/\\1|g" type="text/css*"
Note the following when creating host name and path rewriting rules:
■You must include the
"Content-Type"
attribute values for content types used by
the target page in your Oracle Traffic Director configuration file to provide
maximum content compatibility when rewriting.
■Compressed content is not directly supported by sed; you must configure Oracle
Traffic Director to decompress compressed HTML content before applying sed
rewriting rules to the content, and recompress it afterwards.
Example rules for decompressing and recompressing HTML content:
Output fn="insert-filter" type="(text*|application*)"
filter="http-decompression"
Output fn="insert-filter" type="(text*|application*)"
filter="http-compression"
■In some cases, you may be able to strip out the
"Accept Encoding"
parameter in
the request header to prevent the application host from sending compressed data
in the first place.
Example rule for stripping out the
"Accept Encoding"
header:
AuthTrans fn="set-variable" remove-headers="accept-encoding"
■JavaScript code varies widely in complexity and must be examined on a
case-by-case basis in order to create clean, compatible rewriting rules.
47.4.3 Configuring the Access Proxy Request Filtering
The Access Proxy plugin provides the following HTTP request filtering mechanisms:
■JavaScript tag injection into incoming (to the user browser) HTML pages
■Mock credential substitution in outgoing POST requests
■HTTP Basic Authentication credential injection and credential capture
■Sanitization of outgoing HTTP requests to remove OAM/ESSO cookies and
headers before the request is forwarded to the origin server
The proxy plugin uses the following
Init
directives in
magnus.conf
:
■Loads NSAPI filters:
Init fn="load-modules" shlib="
esso_webproxy.so
" NativeThread="no"
obinstalldir="
WebGate_Home_Oracle
" obinstancedir="
WebGate_Instance_Dir
"
■Loads NSAPI SAFs:
Init fn="load-modules"
funcs="EssoBasicAuthInit,EssoBasicAuth,EssoClean" shlib="
esso_
webproxy.so
"
■Enables HTTP Basic Authentication:
Init fn="EssoBasicAuthInit" obinstalldir="
WebGate_Home_Oracle
"
obinstancedir="
WebGate_Instance_Dir
" Mode="PEER"

Enabling Form-Fill Single Sign-On for an Application
47-36 Administrator's Guide for Oracle Access Management
where:
47.4.3.1 Configuring the JavaScript Injection Filter
The JavaScript injection filter provides tag injection into pages incoming into the target
user’s Web browser. The following table describes the supported parameters.
Parameter Description
shlib ="
esso_proxy.so
"
Full path to the
esso_proxy.s
o module.
obinstalldir ="
WebGate_Oracle_Home
"
full path to the target WebGate installation
directory.
obinstancedir ="
WebGate_Instance_Dir
"
full path to the WebGate instances directory.
ESSOEnable ="On|Off"
, default "On"
Enable or disable all plugins.
Parameter Description
ESSOEnable ="on|off"
, default
"on"
Add to either
magnus.conf
or
obj.conf
Enable or disable the JavaScript injection filter. Specifying this
directive in
magnus.conf
disables all ESSO plugin features.
ESSOSearchTag ="str"
, default
"</head>"
Add to
obj.conf
HTML tag to match on for JavaScript injection.
ESSOInjectTag ="before|after"
, default
"before"
Add to
obj.conf
Determines whether to inject the JavaScript tag before or after the
ESSOSearchTag
parameter.
ESSOSearchCaseSensitive ="yes|no"
, default
"no"
Add to
obj.conf
Determines whether the match is case sensitive.
ESSOProxyType ="str"
, default
"DNS"
Add to
obj.conf
Passed through to JavaScript as
"essoProxyType"
, e.g.
"DNS"
ESSOScriptPath
="path", default
"/oamsso/columbiaWeb.js"
Add to
obj.conf
Passed through to JavaScript as
"src"
ESSOConsoleLoggingLevel ="n"
, default
"0"
,
"5"
is trace.
Add to
obj.conf
Passed through to JavaScript as
"essoConsoleLoggingLevel"

Enabling Form-Fill Single Sign-On for an Application
Configuring the Access Portal Service 47-37
For example:
Output fn="insert-filter" type="text/*" filter="esso_webproxy"
ESSOSearchTag="</title>"
47.4.3.2 Configuring the Mock Credentials Filter
The Mock Credentials filter provides substitution of ESSO mock credentials in the
outgoing POST request. By default, OAM headers are stripped before the request is
passed on to the origin server, but they can be forwarded with the
pass-oam-headers
parameter.
To enable, add a directive with the parameter to your directive in
obj.conf
as follows:
pass-oam-headers="true|false"
, default
"false"
This includes the following headers (by default, they are omitted):
■
OAM_IMPERSONATOR_USER
■
OAM_REMOTE_USER
■
OAM_LAST_REAUTHENTICATION_TIME
■
OAM_IDENTITY_DOMAIN
For example:
Input fn="insert-filter" type="application/x-www-form-urlencoded"
filter="esso_webproxy_input" pass-oam-headers="true"
47.4.3.3 Configuring HTTP Basic Authentication
HTTP Basic Authentication provides the ability to capture and inject credentials from
and into Web browser basic authentication (modal) dialogs, using a SAF for header
injection and a filter for credential capture.
For example, to configure all filters with the same directive:
Init fn="load-modules" shlib="/scratch/OTDWGHome/Oracle_
OAMWebGate2/webgate/iplanet/lib/esso_webproxy.so" NativeThread="no"
obinstalldir="/scratch/OTDWGHome/Oracle_OAMWebGate2/webgate/iplanet"
obinstancedir="/scratch/OTDWGHome/wginst2
And, to configure the header injection SAF:
Init fn="load-modules" funcs="EssoBasicAuthInit,EssoBasicAuth"
shlib="/scratch/OTDWGHome/Oracle_OAMWebGate2/webgate/iplanet/lib/esso_
webproxy.so"
Init fn="EssoBasicAuthInit" obinstalldir="/scratch/OTDWGHome/Oracle_
OAMWebGate2/webgate/iplanet" obinstancedir="/scratch/OTDWGHome/wginst2"
Mode="PEER"
Then add one or more of the following parameters to
obj.conf
for the header
injection SAF and the credential capture filter:
ESSOPartnerId ="str"
Add to
magnus.conf
Partner ID value. Passed through to JavaScript as
"oam_partner"
.
If present, takes precedence over
the "id"
value in
.../webgate/config/ObAccessClient.xml
Parameter Description

Enabling Form-Fill Single Sign-On for an Application
47-38 Administrator's Guide for Oracle Access Management
For example:
NameTrans fn="EssoBasicAuth" policy="BasicAuth1" realm="realm1"
Output fn="insert-filter" filter="esso_output_capture" policy="BasicAuth1"
realm="realm1"
47.4.3.4 Configuring the HTTP Request Sanitizer Directive
The HTTP request sanitizer directive sanitizes the proxied HTTP request of any
cookies and headers added by Oracle Access Manager and the ESSO proxy plugin
before the request is forwarded to the origin server.
The directive removes cookies with the following names:
■
OAM_Partner
■
OAMAuthnCookie_*
■
OAMRequestContext*
■
OAMAuthnHintCookie
■
OAM_*
■
ESSO_BAH*
(Basic Authentication Hint, caches policy, realm, and credential GUID)
Request-specific cookie names (for example, containing the server name) are matched
using a wildcard, indicated above by the trailing asterisk.
The directive removes the following headers:
■
OAM_IMPERSONATOR_USER
■
OAM_REMOTE_USER
■
OAM_LAST_REAUTHENTICATION_TIME
■
OAM_IDENTITY_DOMAIN
The directive definition in the
magnus.conf
file is as follows:
Init fn="load-modules" funcs="EssoClean"
shlib="esso_webproxy.so"
obinstalldir="WebGate_Oracle_Home"
obinstancedir="WebGate_Instance_Dir"
Parameter Description
policy
="
policy name
"
Required. Name of the ESSO policy (application
template) to use for authentication.
realm
="
realm name
"
Optional. The desired authentication realm of the
target website, if more than one realm is in use.
Note: The Mock Credentials filter also provides this sanitization, but
only while processing HTTP POST requests that contain mock
credentials. The Access Proxy HTTP request sanitizer directive
performs this function unconditionally on all requests.

Adding a Federated Partner Provider Application
Configuring the Access Portal Service 47-39
where:
■esso_webproxy.so - full path to the
esso_webproxy.so
module
■WebGate_Oracle_Home - full path to the target WebGate installation directory
■WebGate_Instance_Dir - full path to the WebGate instances directory
If
EssoBasicAuth
is also required, include both
EssoBasicAuth
and
EssoClean
in a
single
Init
directive as follows:
Init fn="load-modules" funcs="EssoBasicAuthInit,EssoBasicAuth,EssoClean"
shlib= [...]"
The directive is enabled automatically during the installation of the Access Portal
Service. The following is added to the
obj.conf
file:
<If not $uri =~ "/oamsso">
NameTrans fn="EssoClean"
</If>
The ESSO proxy plugin passes the target credential’s GUID value in the proxied URL
to the origin server. If the target application does not function properly due to this
value being passed, add the following rewrite rule to the Oracle Traffic Director
configuration to strip out the GUID value:
<If defined $query and $query =~ "(.*?)(ESSOCredGuid={.*?})(.*)$">
AuthTrans fn="set-variable" set-reqpb="query=$1$3"
</If>
47.5 Adding a Federated Partner Provider Application
To add a federated partner provider application to the Access Portal Service
application catalog, do the following:
1. Log on to the Oracle Access Manager console.
2. In the Quick Start Wizards section of the Launch Pad tab, click Application
Registration.
3. In the page that appears, fill in the fields as follows:
a. Vendor - the vendor of the application.
b. Name - a descriptive name for the application.
c. Type - select Federated Server Partner Provider Application from this
drop-down menu, as desired.The application will be available to all Access
Portal users.
d. Description - a meaningful description of the application for the user.
e. Reference - internal reference describing the version/variant of the application
template.
f. Category - the category under which the application will appear; for example,
"Finance," "Development," and so on.
g. Reference - an internal reference for the application template, such as a
version number or features that are enabled.

Adding an Oracle SSO Agent Application
47-40 Administrator's Guide for Oracle Access Management
h. Icon Image URL - URL to the icon image that will appear next to the
application entry. A preview of the image is displayed below the field to
confirm the URL is valid.
i. Logo Image URL - URL to the full-size application logo image. A preview of
the image is displayed below the field to confirm the URL is valid.
j. When you have finished, click Next.
4. In the "Configuration" page that appears, do the following:
a. In the Partner field, enter the desired federated partner name. If you don't
know the exact name, click the Search (magnifier) icon, enter the desired
search term in the pop-up that appears, select the desired partner from the list
of results, and click OK to add that partner to the template.
If you want to create a new partner, click Create and refer to the "Identity
Federation" chapter for more information on creating a new federation
partner.
b. In the Application URL field, enter the URL to the target application; obtain
this URL from your application administrator.
c. Click Next.
5. In the summary page that appears, review your configuration choices. To make
changes, click Back; otherwise, click Finish.
47.6 Adding an Oracle SSO Agent Application
To add an Oracle SSO Agent application to the Access Portal Service application
catalog, do the following:
1. Log on to the Oracle Access Manager console.
2. In the Quick Start Wizards section of the Launch Pad tab, click Application
Registration.
3. In the page that appears, fill in the fields as follows:
a. Vendor - the vendor of the application.
b. Name - a descriptive name for the application.
c. Type - select SSO Agent Application from this drop-down menu, as
desired.The application will be available to all Access Portal users.
d. Launch URL - enter the URL of the target application; obtain this URL from
your application administrator.
e. Description - a meaningful description of the application for the user.
f. Reference - internal reference describing the version/variant of the application
template.
g. Category - the category under which the application will appear; for example,
"Finance," "Development," and so on.
h. Reference - an internal reference for the application template, such as a
version number or features that are enabled.
i. Icon Image URL - URL to the icon image that will appear next to the
application entry. A preview of the image is displayed below the field to
confirm the URL is valid.
Common Interface Controls
Configuring the Access Portal Service 47-41
j. Logo Image URL - URL to the full-size application logo image. A preview of
the image is displayed below the field to confirm the URL is valid.
k. When you have finished, click Next.
4. In the summary page that appears, review your configuration choices. To make
changes, click Back; otherwise, click Finish.
47.7 Common Interface Controls
The interface pages of the three features in the Access Portal Service group contain
several common interface elements and controls. This section reviews these elements.
Icon/Button Name Function
New Element
dropdown
Available from the Access Portal Service
section of the Oracle Access Management
Launch Pad, this dropdown lets you quickly
select which element you want to create
from the main screen.
Credential
Sharing Group
icon
Indicates this is a Credential Sharing Group
page.
Password
Generation
Policies icon
Indicates this is a Password Generation
Policy page.
Global Agent
Settings icon
Indicates this is a Global Agent Settings
page.
Create button Available on each element's Search page;
click to create a new element.
Actions menu Offers options to perform the following
functions:
■Create a new element (Credential
Sharing Group, Password Generation
Policy, set of Global Agent Settings)
■Edit the selected element
■Delete the selected element
■Add applications to the selected
element
View menu Allows you to select which columns to view,
and in what order. Also offers the option to
detach the current tab and open it in a new
browser window.
Managing Password Generation Policies
47-42 Administrator's Guide for Oracle Access Management
47.8 Managing Password Generation Policies
Password policies facilitate user logons while ensuring the organization's security. the
Access Portal Service lets administrators set policies that control automatic password
generation.
Reorder
Columns
dialog
Select a column from the list and click the up
or down arrow to change its position in the
Search Results list.
Add icon Click to add applications to the current
element.
New icon Click to create a new element of the same
type as the page you are currently on.
Edit icon Select a line item in the list and click to edit
it.
Alternatively, you can click directly on the
name of the list item to open its
configuration page.
Remove icon Select a line item in the current list and click
to remove that line item from the list.
Import icon Available only for Global Agent Settings.
Select to locate an INI file with a settings
configuration.
Export icon Available only for Global Agent Settings.
Select to export an INI file with settings you
have configured.
Detach icon Click to detach the current tab and open it in
a new browser window.
Close icon Click to close multiple tabs simultaneously.
Icon/Button Name Function
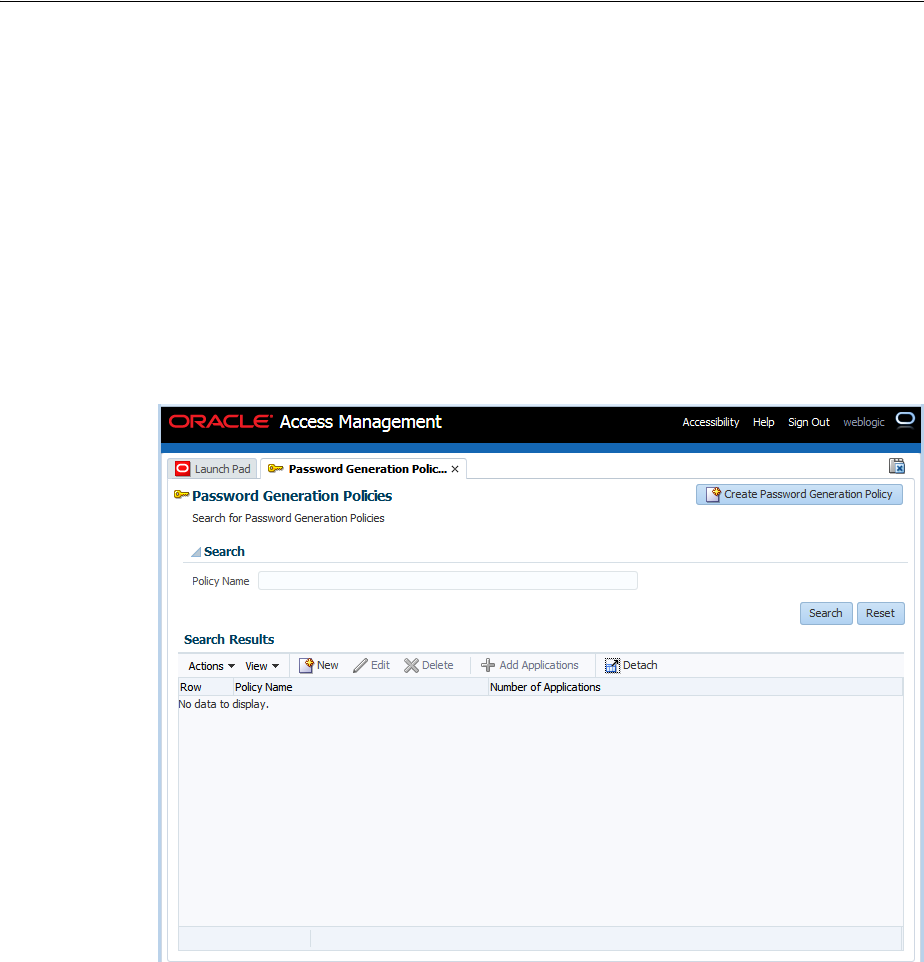
Managing Password Generation Policies
Configuring the Access Portal Service 47-43
Most applications have constraints for passwords: how long they can or must be,
whether they must or must not include numbers or symbols, and so on. the Access
Portal Service's password generation feature improves application logon security by
automatically creating passwords made up of random characters according to
predefined sets of constraints, stored as password policies. Each policy can apply to
multiple applications or subscribers.
Using predefined password policies, you can completely automate password changes
and implement sophisticated security schemes, including complex passwords and
application-specific passwords unknown to users.
From the Launch Pad's Access Portal Service group, click Password Generation
Policies. A new tab containing options to search and create opens.
Figure 47–1 Password Generation Policies Search/Create Tab
47.8.1 Searching for Password Generation Policies
To search for an existing policy:
1. Enter a name or partial string in the Name field, and click the Search button. The
results appear in the Search Results table.
2. Click on any policy in the Search Results list to edit the policy configuration.
Continue to 3.in the next section to learn more about configuring these settings.
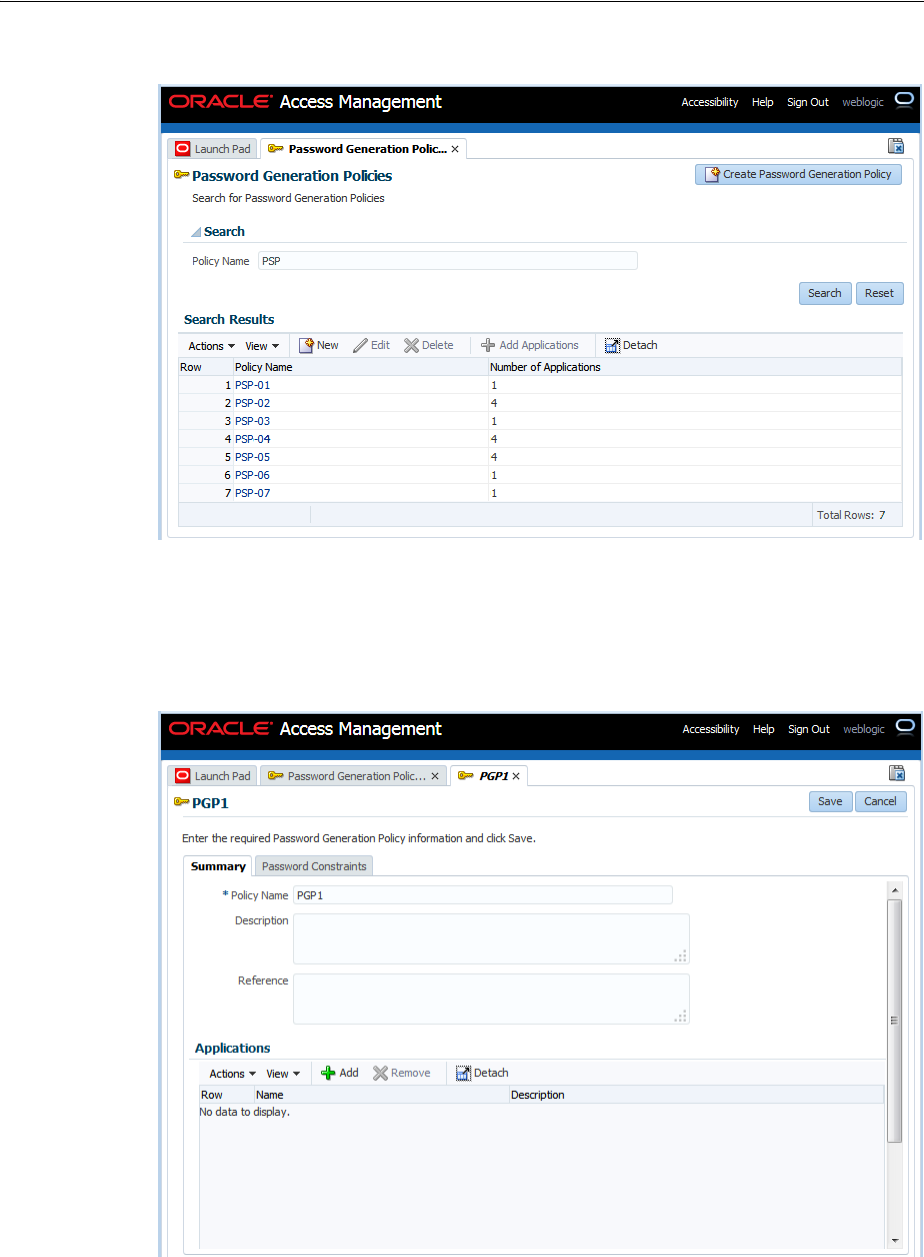
Managing Password Generation Policies
47-44 Administrator's Guide for Oracle Access Management
Figure 47–2 Password Generation Policies Search Results
47.8.2 Creating Password Generation Policies
To create a new policy:
Figure 47–3 New Password Generation Policy Summary Tab
1. Click the Create Password Generation Policy button to launch the New Password
Policy page, which contains two tabs:
■Summary

Managing Password Generation Policies
Configuring the Access Portal Service 47-45
■Password Constraints
2. On the Summary tab, enter the following information:
■A distinct name for the policy.
■(Optional) A meaningful description to identify the policy.
■(Optional) Internal reference information describing the version/variant of the
policy.
3. Click the Password Constraints tab.
4. On the Password Constraints tab, specify the following:
■Length Constraints
–The minimum password length. Options are 1-128. Default is 8 characters.
–The maximum password length. Options are 1-128. Default is 8 characters.
■Alphabetic Characters
–Check the box to allow uppercase characters. If you check the box, you
must specify the minimum number required. Default is 0.
–Check the box to allow lowercase characters. If you check the box, you
must specify the minimum number required. Default is 0.
■Special Characters
–Check the box to allow non-alphabetical and/or non-numeric characters.
If you check the box, you must specify the minimum and maximum
number permitted. Default minimum is 0. Default maximum is 8.
–Check the box(es) to allow a special character to start and/or end a
password.
■Excluded Characters
–Enter a list of specific characters to exclude from a password. Do not use
any delimiters.
■Repeat Constraints
–Enter the maximum number of times a given character can be repeated in
a password (in any position). Options are 0-127. Default is 7.
–Enter the number of times a given character can be repeated consecutively
(adjacent to itself). Options are 0-127. Default is 7.
■Numeric Characters
–Check the box to allow numeric characters. If you check the box, you must
specify the minimum and maximum number permitted. Default
minimum and maximum is 0.
–Check the box(es) to allow a numeric character to start and/or end a
password.
■Other Characters
–Check to allow other characters to be included in a password.
■Previous Password Constraints
– Disallow use of previous password. Check the box to prohibit reusing the
previous password entirely.

Managing Password Generation Policies
47-46 Administrator's Guide for Oracle Access Management
– Limit use of previous password characters. Select to limit repetition of
characters from the previous password.
– Maximum previous password characters. If you checked the previous
box to permit usage of some previous password characters, select the
maximum number of characters to allow.
5. Click Save to complete policy configuration, or Cancel to close the tab without
saving the policy.
Figure 47–4 Password Constraints Tab of a Password Generation Policy
47.8.3 Managing Policy Subscribers
Applications that use a password generation policy are called subscribers. You can add
subscribers during creation of the policy or at any time thereafter. Following is the
procedure to add subscribers to a policy.
Note: The Access Portal Service recognizes multiple occurrences of a
character as the same character and will therefore permit more than
one occurrence of that character in the new password.
So, if the previous password contained three "A"s, and you specify
that one character from the previous password can repeat, the Access
Portal Service will allow more than one instance of "A" in the new
password.
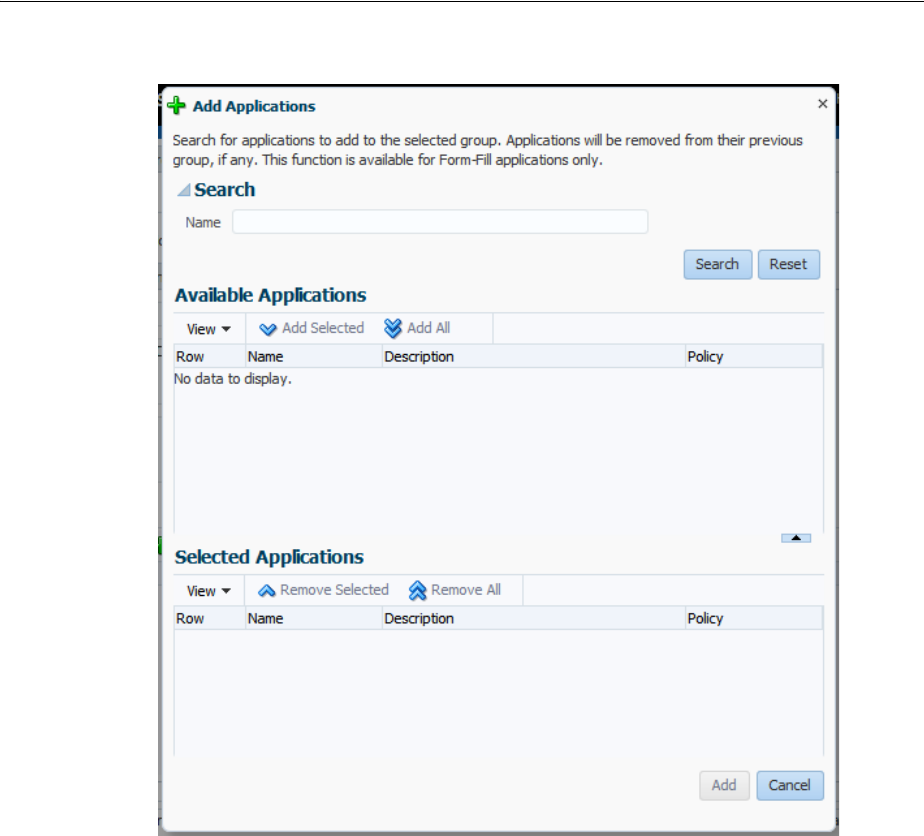
Managing Password Generation Policies
Configuring the Access Portal Service 47-47
Figure 47–5 Add Applications Dialog
1. On the Password Generation Policy Summary page, click the Add icon. The Add
Applications dialog appears.
2. In the Name field, enter a name or text string and click Search. You can also leave
this field blank to return every available application.
3. After a search, all applications that fit your search criteria appear in the Available
Applications list. For each application, the list includes any policy to which it
subscribes.
4. Select one or more applications from the Available Applications list, and click
Add Selected. Or simply click Add All to add every application returned by the
search.
If you select an application that is already a subscriber to another policy, it will no
longer be subcribed to the other policy.
5. Click Add when you are finished, or Cancel to dismiss the dialog without making
changes.

Managing Credential Sharing Groups
47-48 Administrator's Guide for Oracle Access Management
Figure 47–6 Add Applications Dialog Search Results
47.9 Managing Credential Sharing Groups
Credential sharing groups are sets of applications that share the information of one or
more fields to facilitate account management, allowing users to apply a credential
change made in one application to other specified applications automatically. For each
group that you create, you can include any number of applications and designate
which credentials they have in common.
When the Access Portal Service handles a credential change for any application that is
a member of the sharing group, it automatically applies the credential change to all
other group members. Any number or combination of applications can share a single
credential. You can also designate a key field; that is, a field that the Access Portal
Service uses when updating shared credentials, changing credentials only for accounts
with the same key value.
the Access Portal Service provides flexibility and granularity for you to control how
credential sharing groups work. You can configure the following options:
Note: Applications will share credentials only for their initial
deployment unless you enable credential sharing groups.
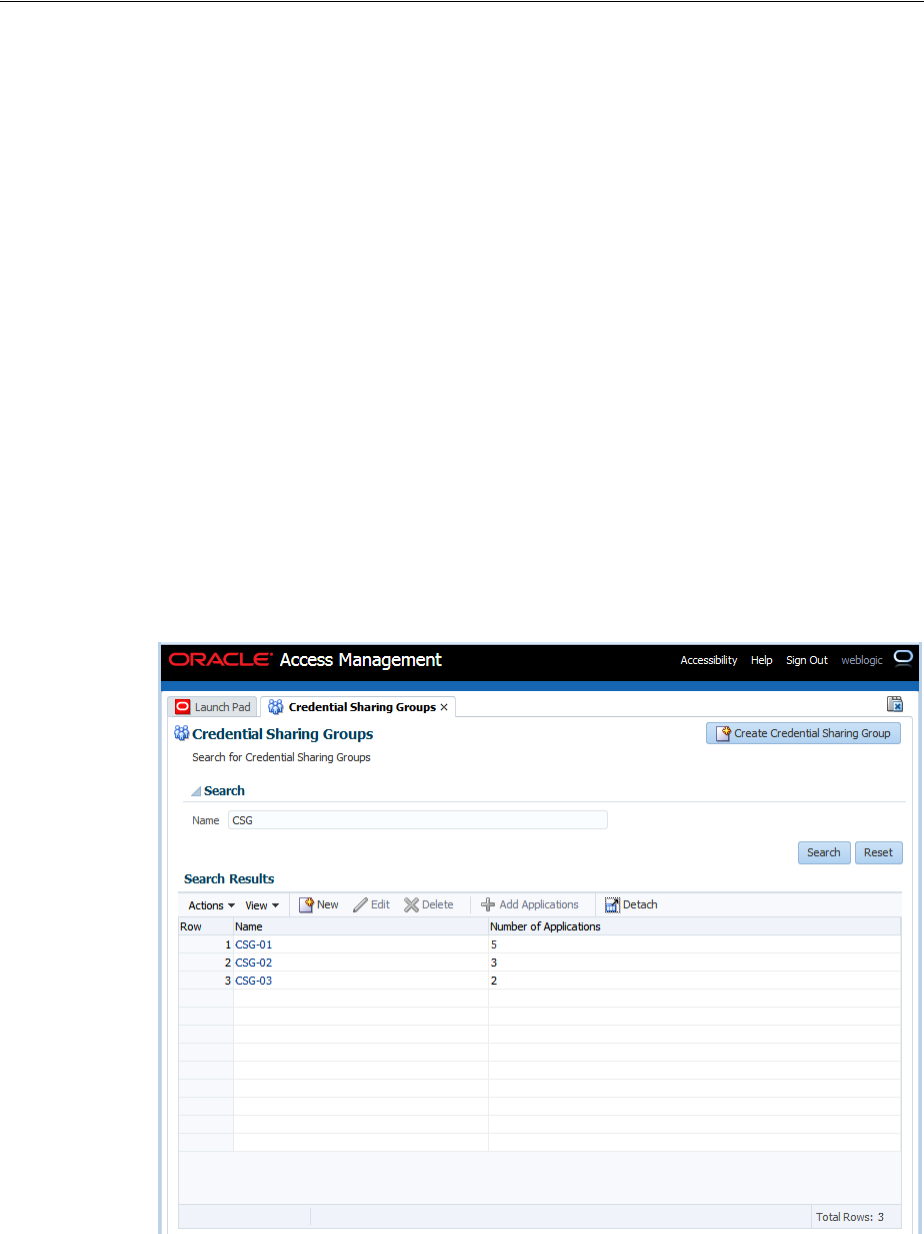
Managing Credential Sharing Groups
Configuring the Access Portal Service 47-49
■Sharing any or all fields for a group of applications:
■Pre-filling all shared fields when a user first encounters an application in a sharing
group, thus requiring the user to enter information only for fields that are not
shared by the group.
■Automatically creating an account when a user encounters an application for
which all credentials are pre-determined.
■Designating a key field; that is, a field that the Administrative Console uses when
updating shared credentials, changing credentials only for accounts with the same
key value.
The next sections describe how to create new groups or edit existing ones. After you
create a group, the process for configuring it is the same as editing an existing one.
47.9.1 Searching for Credential Sharing Groups
To search for an existing group:
1. Enter a name or partial string in the Name field, and click the Search button. The
results appear in the Search Results table.
2. Click on any group in the Search Results list to edit its configuration. Continue to
3.in the next section to learn more about configuring these settings.
Figure 47–7 Credential Sharing Groups Search Results
47.9.2 Creating Credential Sharing Groups
To create a new group:

Managing Credential Sharing Groups
47-50 Administrator's Guide for Oracle Access Management
1. Click the Create Credential Sharing Group button to launch the New Credential
Sharing Group page.
2. In the Name field, enter a name for the group. Optionally, you can add a
description and reference information in the fields at the bottom of this section.
3. In the Shared credentials settings, select which credentials the group will share.
You can include any or all fields:
–Username
–Password
–Third Field
–Fourth Field
4. From the Key Credential within group dropdown, select a field. The key
credential field provides more granular criteria for updating shared credentials
within a group. When a credential changes, updates will only occur for members
that share the key field. to update shared credentials only for accounts that share
this field value.s only for accounts that share this field value.:
If the user wants to create an account that is not constrained by the key field, that
account must have a new key field to avoid updating all existing accounts.
Choose one of the following from the dropdown:
■None (Default)
■Username
■Third Field
■Fourth Field
5. If desired, select to pre-fill shared fields. This specifies that shared fields will be
pre-populated with the shared credentials when the user creates a new account for
an application. By default, this option is enabled.
6. If desired, select to automatically create accounts when all credentials are known.
This means that the Access Portal Service will create an account automatically
when the user encounters an application that has all fields pre-determined.
7. Click Save to complete policy configuration, or Cancel to close the tab without
saving the group.
Note: This field is available only if Key credential within group is
set to None.
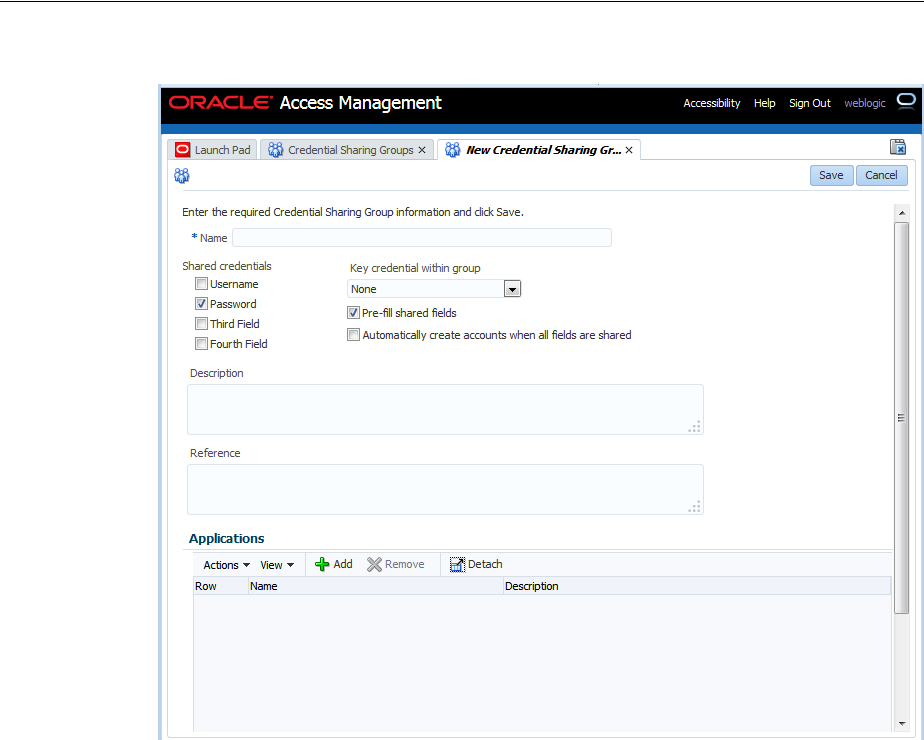
Managing Credential Sharing Groups
Configuring the Access Portal Service 47-51
Figure 47–8 New Credential Sharing Group Page
47.9.3 Managing Applications in Credential Sharing Groups
You can add applications to a group during creation of the group or at any time
thereafter. Following is the procedure to add applications to a group.
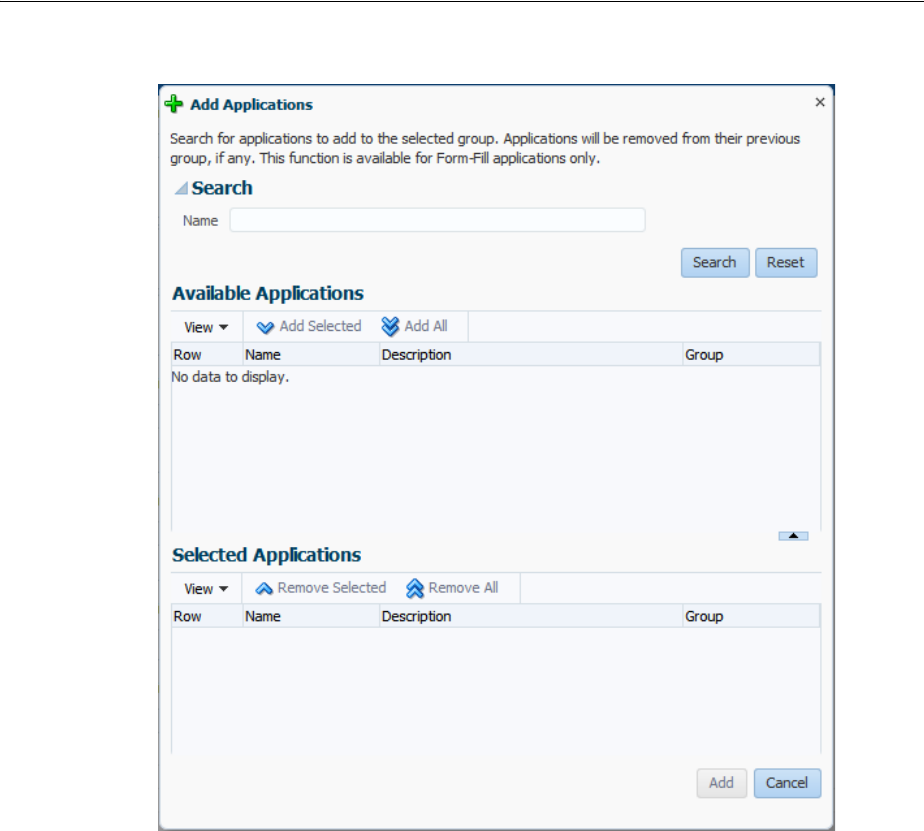
Managing Credential Sharing Groups
47-52 Administrator's Guide for Oracle Access Management
Figure 47–9 Add Applications Dialog
1. In the Applications section of the group page, click the Add icon. The Add
Applications dialog appears.
2. In the Name field, enter a name or text string and click Search. You can also leave
this field blank to return every available application.
3. After a search, all applications that fit your search criteria appear in the Available
Applications list. For each application, the list includes any credential sharing
group to which it belongs.
4. Select one or more applications from the Available Applications list, and click
Add Selected. Or simply click Add All to add every application returned by the
search.
If you select an application that is already a member of another group, it will no
longer be part of that group.
5. Click Add when you are finished, or Cancel to dismiss the dialog without making
changes.
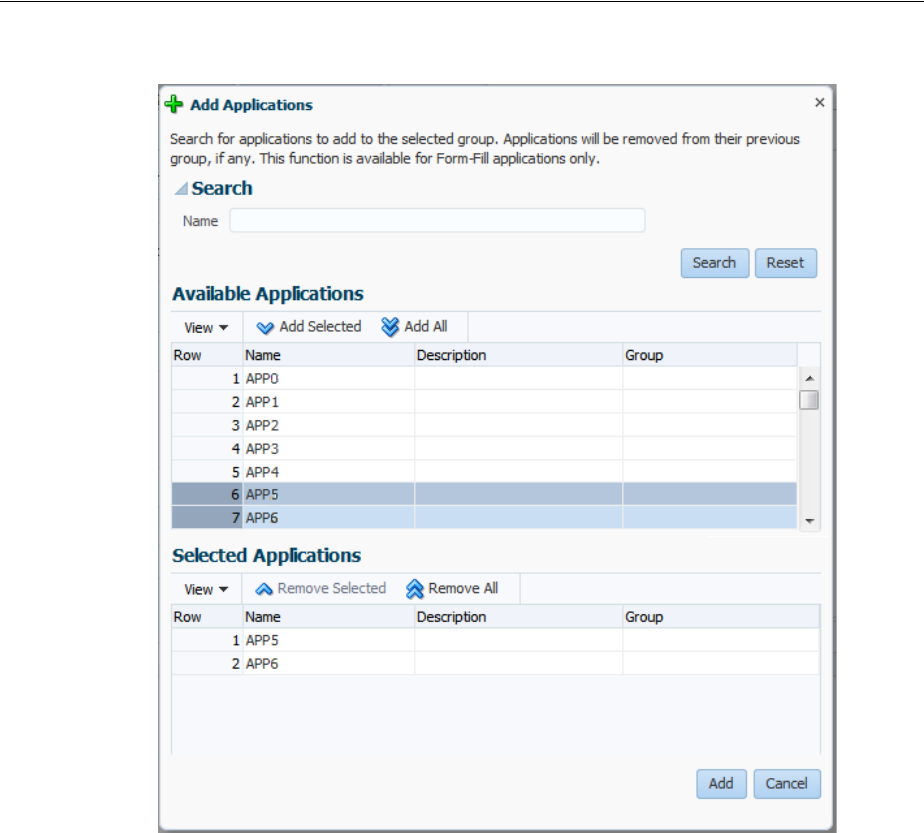
Managing Global Agent Settings
Configuring the Access Portal Service 47-53
Figure 47–10 Add Applications Dialog Search Results
47.10 Managing Global Agent Settings
Global Agent Settings determine single sign-on behavior when users encounter
password-protected applications. With these settings you specify what the user sees
and is allowed to do when navigating to an application.
The next sections describe how to create new sets of Global Agent Settings or edit
existing sets. You can use existing sets created in the the Access Portal Service, or
import preconfigured settings in the format of INI files. After you create a set, the
process for configuring it is the same as that for editing an existing one.
47.10.1 Searching for Sets of Global Agent Settings
To search for an existing set:
1. Enter a name or partial string in the Name field, and click the Search button. The
results appear in the Search Results table.
2. Click on any group in the Search Results list to edit its configuration. Continue to
3.in Creating a Set of Global Agent Settings to learn more about configuring these
settings.
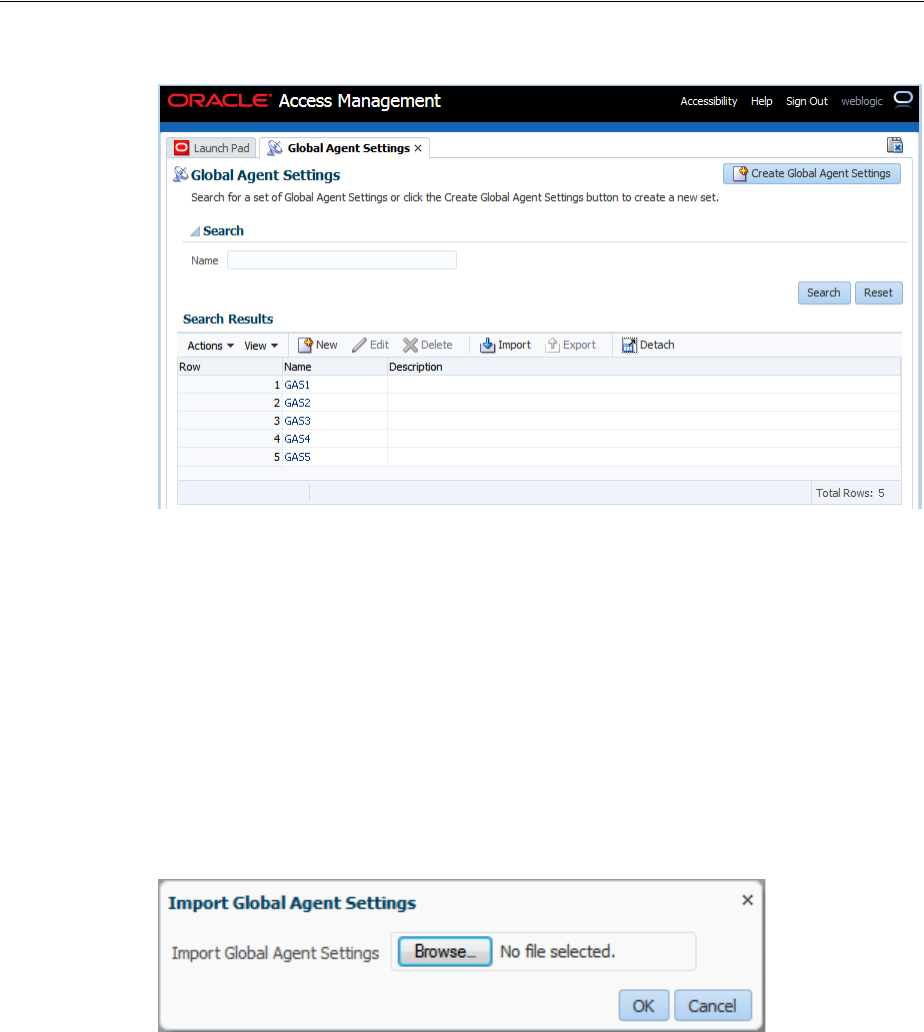
Managing Global Agent Settings
47-54 Administrator's Guide for Oracle Access Management
Figure 47–11 Global Agent Settings Search Results
47.10.2 Importing an INI File with a Global Agent Settings Configuration
To import an INI file:
1. Click the Import icon to launch the Import Global Agent Settings dialog, and
click the Browse button.
2. Navigate to an existing INI file, select it and click Open. Then click the Update
button. The Global Agent Settings' configuration page opens. Continue to 3.in
Creating a Set of Global Agent Settings to learn more about configuring these
settings
Figure 47–12 Import Global Agent Settings Dialog
47.10.3 Creating a Set of Global Agent Settings
To create a new set:
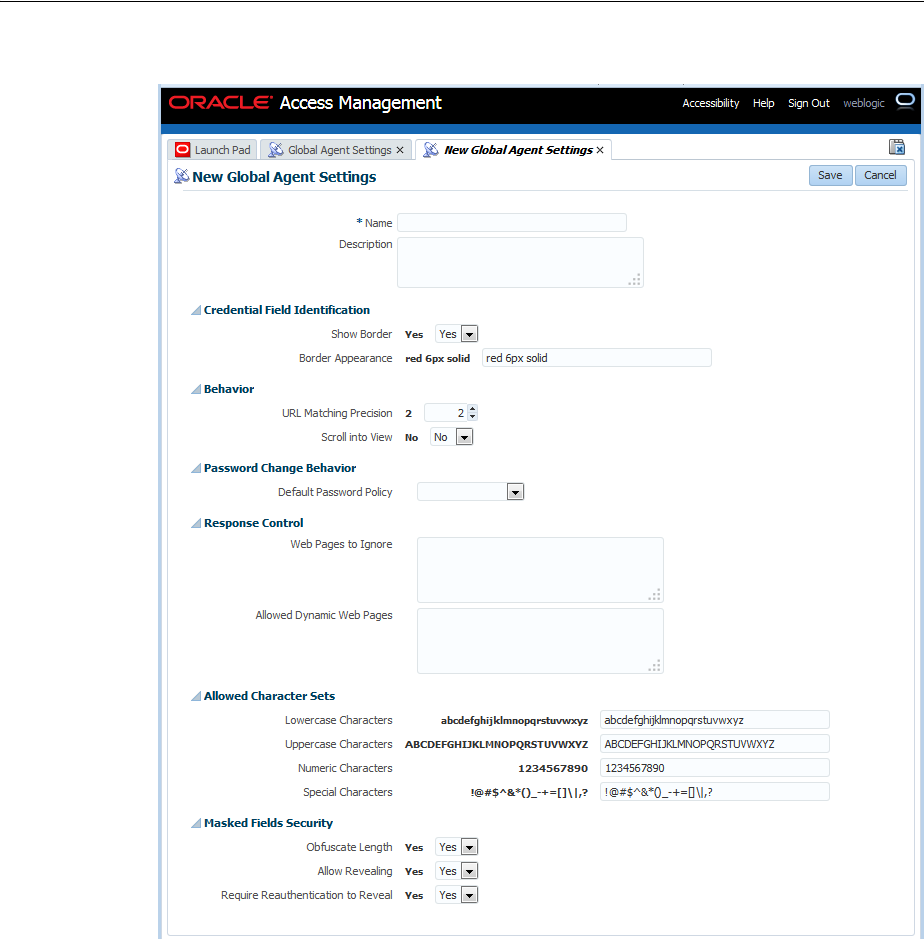
Managing Global Agent Settings
Configuring the Access Portal Service 47-55
Figure 47–13 New Global Agent Settings Page
1. Click the Create Global Agent Settings button to launch the Create Global Agent
Settings page.
2. In the Name field, enter a name for the group. Optionally, you can add a
description of this set.
3. In the Credential Field Identification settings, specify the following:
–Whether to display a highlighted border around the credential fields of an
application during logon. The default is to show the border.
–The default border color/size/style for highlighting detected web page fields.
The default is a solid red border, six pixels in width.
Following is an example of the results of using the default settings for this
group.

Managing Global Agent Settings
47-56 Administrator's Guide for Oracle Access Management
4. In the Behavior settings, specify the following:
■URL Matching Precision. The number of levels of the host portion of the URL
used for application detection and response. Default is 2.
For example, for the URL
http://mail.company.co.uk
:
2=match to
*.co.uk
3=match to
*.company.co.uk
4=match to
*.mail.company.co.uk
■Scroll into View. Enables or disables scrolling the browser window to bring
the logon fields into view. Default is No.
This setting disables scrolling when the user has not yet stored credentials for
a Web application. Scrolling always occurs when injecting credentials into the
logon fields for an account that already exists.
5. In the Password Change Behavior settings, select a Default Password Policy from
the dropdown list, if desired. Default is None.
6. In the Response Control settings:
■Enter the list of Web pages to Ignore. This is typically used when the BHO
causes conflicts with specific Web applications or sites. Click the ellipsis ("…")
button to enter the regular expressions that match the URLs to be ignored (one
per line).
Examples:
–
.*http://login\.company\.com/.*
–
.*http://.*\.company\.com/.*
■Enter the list of Allowed Dynamic Web Pages. Use this setting to list the
permissible dynamic (DHTML) Web pages. By default, the BHO does not
detect changes made to a dynamic page after the initial presentation of the
page.
Examples:
–
.*http://login\.company\.com/.*
–
.*http://.*\.company\.com/.*
7. In the Allowed Character Sets settings, enter the permissible characters for each of
the four types of fields. The fields are pre-populated with the defaults for each
character set.
8. In the Masked Fields Security settings, specify the following.
■Obfuscate Length. Specifies whether to display encrypted fields with a string
of blank characters different from the length of the obfuscated data. Default is
Yes.
Note: Values less than 2 are treated as 2.

Managing Global Agent Settings
Configuring the Access Portal Service 47-57
■Allow Revealing. Specifies whether the user is permitted to reveal masked
fields. Default is Yes.
■Require Reauthentication to Reveal. Specifies whether the user must enter
the Access Portal Service credentials in order to reveal masked fields,
assuming that you have set Allow revealing to Yes. Default is Yes.
9. Click Save to complete global agent setting configuration, or Cancel to close the
tab without saving the set.

Managing Global Agent Settings
47-58 Administrator's Guide for Oracle Access Management


48
Using Identity Context 48-1
48
Using Identity Context
Identity Context allows organizations to meet growing security threats by leveraging
the context-aware policy management and authorization capabilities built into the
Oracle Access Management platform. Identity Context secures access to resources
using traditional security controls (such as roles and groups) as well as dynamic data
established during authentication and authorization (such as authentication strength,
risk levels, device trust and the like). The following sections contain additional
information on Identity Context and how to use it.
■Introducing Identity Context
■Understanding Identity Context
■Working With the Identity Context Service
■Using the Identity Context API
■Configuring the Identity Context Service Components
■Validating Identity Context
48.1 Introducing Identity Context
Over the last decade, changes have been made to enterprise application infrastructures
in order to web-enable the business applications that these infrastructures support.
The changes allow for access by a greater number of users using different types of
devices. To compensate for the additional risk associated with the greater number of
users, the underlying security models used for access management have evolved from
a silo-based implementation to a more dynamic one in which identity and risk data is
shared across components of the entire application delivery process. This dynamic
implementation relies on systems that offer Web single sign-on (SSO), fine-grained
authorization, Web Services Security, Identity Federation and the like to aggregate
security controls within a particular run-time deployment environment (web server or
application server container) and provide policy-based security controls to manage
access to application resources. Additionally, the identity and risk data provides a
context for the user who is requesting access.
Initially, application security controls focused on unifying silos within a specific
enterprise application deployment paradigm (for example, all web server applications,
all web services applications, or all application server applications) but a growing
presence of external and internal security threats now requires the unification of
disparate security models in order to properly manage the greater amount of risk.
This requirement is further magnified by the advent of the cloud and mobile
computing paradigm in which applications are no longer made up of components
running neatly in the protected confines of a secure enterprise.

Introducing Identity Context
48-2 Administrator's Guide for Oracle Access Management
The ability of applications to leverage cloud services comes at the cost of having to
account for the greater amount of risk stemming from those services being silos in
their own way. With the number of threats to cloud deployments and mobile delivery
channels growing steadily, it is required for the end-to-end application delivery
process to implement the necessary policy controls for dealing with the greater range
of threats. These policy controls require access to information about the requesting
user on the basis of which security decisions must be made. Thus, a security policy
management infrastructure must be context-aware to allow for an Administrator to
create policy that controls the level of security imposed on a user who is requesting
access to a protected application environment.
Previously, Identity Context was defined by the presence of an identity record in one
or more identity stores (such as an LDAP directory or a SQL database). The identity
record includes profile attributes, groups of which the user is a member, and enterprise
roles. However, the constantly expanding reach of web, cloud, and mobile application
delivery channels requires authorization policy controls that are aware of more
dynamic information regarding the identity. This information is associated with the
identity attempting to access the protected resource and may include some or all of the
following:
■Presence (location, historical patterns)
■Authentication strength (weak, strong)
■Level of Assurance (NIST levels, X509 certificates)
■Risk Assessment (pattern analysis)
■Federation (partner attributes)
■Device characteristics (fingerprint, device health, device protection, trusted data)
■Assertions from trusted partners (SAML tokens, etc.)
■Single Sign On sessions (session time outs)
The following examples illustrate how Identity Context data might be used by an
application. The application might:
■Disable a particular business function if the user is not authenticated using a
strong credential such as smart card.
■Secure access to a transaction based on the identity data supplied by a business
partner (via Identity Federation) with whom the organization does business.
■Request additional authentication credentials if it detects that access is originating
from a location known for fraudulent activities.
■Limit the scope of administrative authority if the Administrator's industry
certification (as maintained by a third party) has expired.
■Disable certain business functions if it detects that access is originating from an
unknown device.
By incorporating the concept of Identity Context into access management, control can
now be determined using dynamic data that is not necessarily contained in an identity
profile (referred to as Identity Context attributes). In short, Identity Context is
considered the environment and circumstances surrounding a user's request to access
a particular protected resource. It can be a sphere of activity, a geographical region, a
communication platform, an application, or a logical or physical domain.
Understanding Identity Context
Using Identity Context 48-3
48.2 Understanding Identity Context
With this release, Access Manager enables context-aware access management by
incorporating Identity Context as a built-in service of the Oracle Access Management
platform. Figure 48–1 illustrates the flow of the Identity Context process, implemented
by multiple system components. Each application delivery component has its own
security policy infrastructure responsible for protecting its individual slice of the
application. This specific use case involves the end user device, a Web Server running
static GUI pages, an Application Server running the Portal Server rendering dynamic
content, a Service Bus Server exposing the Web service endpoint, a database server
containing transactional data, and an LDAP server containing identity profile data.
Figure 48–1 End to End Identity Context Process
Each component of the process has its own security infrastructure where the
authorization policies governing access to protected resources are defined
administratively and enforced at runtime. Additionally, some or all of the components
may have externalized policy management to an external authorization server such as
Oracle Entitlements Server - which is the case if the applications were built leveraging
Oracle Platform Security Services. Figure 48–2 illustrates the functional architecture of
Identity Context based on the Oracle applications of which it is comprised.
Figure 48–2 End To End Identity Context Process Components
As seen in the illustrations, context-aware security policy management is achieved by
leveraging the Oracle Access Management platform. This platform contains native

Working With the Identity Context Service
48-4 Administrator's Guide for Oracle Access Management
support for working with and enforcing Identity Context attributes (including risk
score, trusted device data, authentication data, and the like) without changing
end-user applications.
48.3 Working With the Identity Context Service
The Oracle Access Management platform enables Identity Context data to be collected,
propagated across the involved components (as defined in Figure 48–2), and made
available for granting or denying authorization to access protected resources. The
Identity Context Service allows access to the Identity Context Runtime through the
Identity Context API. The Identity Context Dictionary schema specifies the Identity
Context attributes. The following sections contain more information on these
components.
■Using the Identity Context Dictionary
■Understanding Identity Context Runtime
48.3.1 Using the Identity Context Dictionary
At the core of the Identity Context architecture is the Identity Context Dictionary. The
dictionary defines the Identity Context schema by specifying the identity context
attributes as defined by the Oracle Access Management platform. The Schema
describes each attribute with a unique name that equals namespace : attribute.
Table 48–1 documents the Schema attributes.
Note: Virtual attributes (as documented in Table 48–1) represent an
abstract class of identity information from which specific attributes are
created. When publishing virtual attributes, the Identity Context API
expects the attribute value to contain attr-name=attr-value. The actual
attribute will be created using the name namespace : attribute :
attr-name and a value of attr-value. This approach allows the
publication of attributes whose value comes from a source not directly
managed by the Oracle Access Management components.
Table 48–1 Identity Context Schema Attributes
Namespace Attribute Type Virtual
Primary
Publisher Description
oracle:idm:claims:n
ameid
value string no OAM Indicates a unique user identifier.
Access Manager currently
publishes User DN
oracle:idm:claims:n
ameid
format string no OAM Indicates the type of user
identifier. Access Manager
currently publishes
"urn:oasis:names:tc:SAML:1.1:nam
eid-format:x509SubjectName"
oracle:idm:claims:n
ameid
qualifier string no OAM Indicates a logical Identity
Domain to whom the user
belongs. Access Manager
currently publishes a logical name
of the identity store, such as
UserIdentityStore1.

Working With the Identity Context Service
Using Identity Context 48-5
oracle:idm:claims:n
ameid
spprovidedid string no OAM Indicates unique identifier that
can be used by any SP to locate
the user in SP's own identity
store(s). Access Manager currently
publishes the value of the unique
id attribute as configured in a
registered identity store.
oracle:idm:claims:c
lient
firewallenable
d
boolean no OESSO Indicates client device has firewall
enabled.
oracle:idm:claims:c
lient
antivirusenabl
ed
boolean no OESSO Indicates client device has
antivirus enabled.
oracle:idm:claims:c
lient
fingerprint string no OESSO,
Oracle
Access
Manageme
nt Mobile
and Social
(OMS)
Indicates fingerprint of the client
device.
oracle:idm:claims:c
lient
ostype string no OMS Indicates client device's Operating
System type.
oracle:idm:claims:c
lient
osversion string no OMS Indicates client device's operating
system version.
oracle:idm:claims:c
lient
jailbroken boolean no OMS Indicates if client device is
Jailbroken (iOS) or Rooted
(Android).
oracle:idm:claims:c
lient
macaddress string no OMS Indicates client device's Ethernet
(MAC) Address.
oracle:idm:claims:c
lient
ipaddress string no OMS Indicates client device's Client IP
Address.
oracle:idm:claims:c
lient
vpnenabled boolean no OMS Indicates if client's device has
VPN enabled.
oracle:idm:claims:c
lient
geolocation string no OMS Indicates client device location's
geographical coordinates in the
form of "latitude,longitude.
oracle:idm:claims:ri
sk
newdevice boolean no OAAM Indicates if the client device has
been seen before. True when
logging in from a device never
seen before; otherwise, false.
oracle:idm:claims:ri
sk
level integer no OAAM Indicates risk level. Level
increases after unsuccessful logins.
oracle:idm:claims:ri
sk
safeforuser boolean no OAAM Indicates if the user answered a
secondary challenge question.
True after the user successfully
answers it; otherwise false.
oracle:idm:claims:ri
sk
fingerprint string no OAAM Indicates device fingerprint as
measured by OAAM. Different
devices will leave different
fingerprints; can be switched
between device (obtained via
Flash) fingerprint and browser
(http-only) fingerprint
oracle:idm:claims:s
ession
authnlevel integer no OAM Indicates authentication level for
Access Manager
oracle:idm:claims:s
ession
usercount integer no OAM Indicates number of sessions held
by the users
Table 48–1 (Cont.) Identity Context Schema Attributes
Namespace Attribute Type Virtual
Primary
Publisher Description

Working With the Identity Context Service
48-6 Administrator's Guide for Oracle Access Management
oracle:idm:claims:s
ession
appdomain string no OAM Indicates name of the Access
Manager Application Domain
containing policies
oracle:idm:claims:s
ession
apppolicy string no OAM Indicates name of the Access
Manager policy that allowed
access
oracle:idm:claims:s
ession
appagent string no OAM Indicates the name of the agent
from which the request came to
Access Manager
oracle:idm:claims:s
ession
appclientip string no OAM Indicates the IP address of the
client sending the request to
Access Manager
oracle:idm:claims:s
ession
sessionid string no OAM Indicates the Access Manager
session ID
oracle:idm:claims:s
ession
attributes string yes OAM Indicates session attributes as
retrieved from the session store.
For example, in Access Manager,
select
"oracle:idm:claims:session:attribut
es" as the claim name and then
specify the session attribute using
the following notation:
"attr-name=$session.attr.name
where name is the name of the
attribute stored in the session. The
claim will be created with the
name of
"oracle:idm:claims:session:attribut
es:attr-name" and value equal to
session's name attribute.
oracle:idm:claims:f
ed
partner string no OAM--or
IF?
Indicates partner ID as
determined by Identity Federation
oracle:idm:claims:f
ed
nameidvalue string no OAM--or
IF?
Indicates user ID from a
federation partner as determined
by Identity Federation
oracle:idm:claims:f
ed
nameidformat string no OAM--or
IF?
Indicates format of the user ID
from a federation partner as
determined by Identity Federation
oracle:idm:claims:f
ed
attributes string yes OAM Indicates federation attribute as
supplied by the partner and
determined by Identity
Federation. For example, in Access
Manager, select
"oracle:idm:claims:fed:attributes"
as the claim name and then
specify the federation attribute
using the following notation:
"attr-name=$session.attr.fed.attr.na
me, where name is the name of the
SAML attribute in the partner's
SAML assertion. The claim will be
created with the name of
"oracle:idm:claims:fed:attributes:at
tr-name" and value equal to the
partner's assertion provided in the
SAML's name attribute.
Table 48–1 (Cont.) Identity Context Schema Attributes
Namespace Attribute Type Virtual
Primary
Publisher Description

Working With the Identity Context Service
Using Identity Context 48-7
48.3.2 Understanding Identity Context Runtime
Identity Context Runtime refers to a collection of Identity Context attributes (as
defined in the Identity Context Dictionary) that is asserted by various trusted
application components and/or security frameworks known to be authoritative for the
attributes; this is the Oracle Access Management platform. Runtime context represents
current surroundings, circumstances, environment, background, or settings which
determine, specify, or clarify the meaning of an event for an identity in the runtime
application environment.
The Oracle Access Management platform leverages a common infrastructure
component called the Context Management Engine (CME). CME ensures that an
Identity Context is generated for every transaction that is processed through the
Oracle Access Management platform. The context data gathered by CME applies to
transactions a user performs over the web channel or web service channel and using
many of the software products available in the Oracle Access Management platform.
Some transactions that are initiated on the back end may also require access to Identity
Context, and may require Identity Context to be persisted for some duration of time.
In a typical Oracle middleware deployment the Identity Context Runtime will be
utilized primarily by the Oracle Access Management platform to perform policy-based
decisions on behalf of protected applications. However, it is also possible for any
applications running in the container to directly integrate with, and consume, the
Identity Context Runtime by leveraging the Identity Context API. The amount of
available Identity Context data will vary depending on what products have been
deployed. There will be a default set of Identity Attributes that will be available out-of
the box, which are mainly configured in the Access Manager by leveraging the
Identity Assertion. Table 48–1, " Identity Context Schema Attributes" documents these
default attributes. The following list provides details on the end-to-end flow of the
Identity Context Runtime. Figure 48–3 below the list illustrates the flow.
Process overview: End-to-end flow of the Identity Context Runtime
1. User accesses a protected application from a device.
oracle:idm:claims:i
ds
attributes string yes OAM For example, in Access Manager,
select
"oracle:idm:claims:ids:attributes"
as the claim name, and then
specify the ID Store attribute
using the following notation:
"attr-name=$user.attr.name where
name is the name of the attribute
on the user profile. The claim will
be created with the name of
"oracle:idm:claims:ids:attributes:at
tr-name" and value equal to user
profile's name attribute.
oracle:idm:claims:t
enant
tenantid string no OAM Currently reserved for future use.
(Indicates tenant id.)
oracle:idm:claims:t
enant
attributes string yes OAM Currently reserved for future use.
(Indicates tenant attributes as
supplied by the Publisher. The
claim value is meant to contain
"attr-name=attr-value". The claim
will be created with the name of
"oracle.idm:claims:tenant:attr-nam
e" and value of attr-value.)
Table 48–1 (Cont.) Identity Context Schema Attributes
Namespace Attribute Type Virtual
Primary
Publisher Description
Working With the Identity Context Service
48-8 Administrator's Guide for Oracle Access Management
2. Access Manager asserts the identity, collects Identity Attributes from the
participating Access Management publishing components and creates an Identity
Context.
3. Access Manager generates an Identity Assertion (a SAML Session token) and
incorporates the Identity Context attributes. The Access Manager Identity Asserter
processes the Identity Assertion and publishes the Identity Context to the
WebLogic Server container using the OPSS Attribute Service.
4. The protected application calls the OES PEP API to make an authorization
decision. OES automatically propagates the Identity Context to the local OES PDP.
5. OES finds the appropriate Authorization Policy and evaluates it's Conditions
(based on the Identity Context attributes). Evaluation can be done using a built-in
Identity Context function or a custom function.
6. The protected application makes a JRF web service call in which the Oracle Web
Service Manager (OWSM) client uses the SAML token to propagate Identity
Context into the Web Service application environment.
7. OWSM (on the web service side) processes the SAML assertion with the Identity
Context and publishes the Identity Context to the WebLogic Server container by
using the OPSS Attribute Service.
8. Web Service application calls OES PEP API to make an authorization decision.
9. OES automatically propagates Identity Context to the remote OES PDP where
conditions based on Identity Context attributes are evaluated using a built-in
Identity Context function or a custom function.
Figure 48–3 Identity Context Process Flow
Once CME propagates Identity Context into the application tier and underlying
Application Server container, the Identity Context is then made available to the
container and applications running in it. Table 48–2 documents which Access
Management platform products do what when working with Identity Context.

Using the Identity Context API
Using Identity Context 48-9
48.4 Using the Identity Context API
The Identity Context API is a set of Java classes designed to work with the Identity
Context Dictionary and Identity Context Runtime. The API is delivered as
IdentityContext.jar
, a part of Oracle Java Required Files (JRF). Example 48–1
illustrates an application working with Identity Context Dictionary.
Example 48–1 Working with Identity Context Dictionary
// Display Identity Context Dictionary
try {
ClaimDictionary idCtxDict = new ClaimDictionary();
System.out.println
("IDC Dictionary :" + idCtxDict.getClaimCount() + "attributes");
Iterator<String> iterNamespace = idCtxDict.getAllNamespaces();
while (iterNamespace != null && iterNamespace.hasNext()) {
String namespace = iterNamespace.next();
System.out.println("Namespace : " + namespace);
Iterator<ClaimSchema>
Table 48–2 Mapping Identity Context Operations
Role and Context
Operation Description Components
Publisher - publishes
Identity Context
Trusted security framework protecting an
application component obtains from another
trusted security framework, or derives from the
information available to it, suitable facts about
the identity and/or identity's access request.
The information collected by the authoritative
component is based on the environmental context
available to component's runtime framework. For
example, Access Manager determines the user's
level of authentication strength, OAAM
computes the risk score associated with a specific
online session, and OESSO determines whether
or not the client device has a firewall enabled.
■OAM – Session,
Federation, and identity
store attributes
■OAAM – Risk attributes
■OESSO – Device attributes
■OMS Mobile SDK - Device
attributes
Propagator -
propagates Identity
Context
Trusted security framework propagates Identity
Context attributes for use by another application
security framework or directly by the application.
For example, OAAM propagates user's risk score
into the Access Manager session for the user,
Access Manager propagates Identity Assertion
(SAML token) for with the authenticated user's
unique id and authentication level, and OWSM
client propagates the current Identity Context
over to the web service where OWSM agent will
rebuild Identity Context in the web service
application.
■OAM is between Web tier
and container tier
■OWSM is between web
service client tier and web
service tier
■OPSS is between Access
Manager Identity Asserter
or OWSM agent and
WebLogic Server container
■OMS is between the OMS
Mobile SDK and Access
Manager
Evaluators -
evaluate Identity
Context
Trusted security framework or end-user
application using Identity Context attributes to
perform policy decisions or personalize
application business logic. For example, when
OAAM is present and configured to compute the
risk score, the application's authorization policy
in OES allows access only when the risk score is
under a certain threshold. Also, when Identity
Federation in Access Manager is configured, the
application uses a partner-supplied assertion
(available in the Identity Context) to authorize
access to a transaction using OES.
■OAM – Web Perimeter
Policy
■OWSM – Web Service
policy
■OES – App-specific or
WLS-specific policy for all
PEP API calls made from
the container where
Identity Context exists.
This includes all ADF apps,
IAM apps, custom apps,
etc.

Using the Identity Context API
48-10 Administrator's Guide for Oracle Access Management
iterClaimSchema=idCtxDict.getClaimsForNamespace(namespace);
while (iterClaimSchema != null && iterClaimSchema.hasNext()) {
out.println(iterClaimSchema.next().getUniqueName());
}
}
} catch (Exception e) {
System.out.println("Unable to acquire IDC Dictionary. " + toString());
}
Applications work with the Identity Context Runtime to obtain the runtime state of
the Identity Context as it currently exists in the application infrastructure. In order to
work with the Identity Context Runtime, the protected application must be deployed
to either a WebLogic Server domain built on Oracle Fusion Middleware PS5 with the
OPSS Opatch for PS5, or Oracle Fusion Middleware PS6 or later.
Additionally, working with the Identity Context Runtime is a privileged operation that
requires applications running in the WebLogic Server (with the required Identity
Context support) to have proper source code grants. The privileged application,
running in the WebLogic Server container, can then access the Identity Context
Runtime by requesting it from the OPSS Attribute Service. Example 48–2 demonstrates
how to use WLST to grant the OPSS Attribute Service permission to access an
application (in this case,
ssofilter.jar
).
Example 48–2 Using WLST To Grant Attribute Service Access To Application
# sh ../oracle_common/common/bin/wlst.sh
connect ('<username>', '<password>','t3://localhost:7001')
grantPermission(codeBaseURL="file:${common.components.home}/
modules/oracle.ssofilter_11.1.1/ssofilter.jar",
permClass="oracle.security.jps.service.attribute.AttributeAccessPermission",
permTarget="*", permActions="get, set, remove")
exit()
Example 48–3 illustrates an application working with Identity Context Runtime.
Example 48–3 Working with Identity Context Runtime
import java.security.AccessController;
import java.security.PrivilegedAction;
import oracle.security.jps.internal.api.runtime.AppSecurityContext;
import oracle.security.idm.IdentityContext;
…
// get runtime ID Context from OPSS
private static Object getIDContext() {
Object idc = AccessController.doPrivileged(new PrivilegedAction<Object>() {
public Object run() {return
AppSecurityContext.getSecurityContext().getAttribute
(oracle.security.idm.IdentityContext.Constants.IDC_API_ID); }});
return idc;
}
…
// Display runtime ID Context
try {
Context idCtx = (Context)getIDContext();
if (idCtx != null) {
System.out.println("IDC Runtime :" + idCtx.getSize() + "attributes");

Configuring the Identity Context Service Components
Using Identity Context 48-11
Iterator<Claim> i = idCtx.getClaims();
while (i != null && i.hasNext()) {
Claim c = i.next();
System.out.println(c.getName() + " : " + c.getValue());
}
} else {
System.out.println("Identity Context Runtime is not available");
}
} catch (Exception e) {
System.out.println("Unable to acquire Identity Context Runtime. " +
e.toString());
}
…
// Obtain few attributes from Identity Context Runtime
Attr authnLevel = ctx.getAttr (Constants.ATTR_SESSION_AUTHN_LEVEL);
Attr isFirewallEnabled = ctx.getAttr(Constants.ATTR_CLIENT_FIREWALL_ENABLED);
Attr isTrustedDevice = ctx.getAttr(Constants.ATTR_RISK_TRUSTED_DEVICE);
// Use user's authentication strength established at login by OAM
int authLevel = new Integer(authnLevel.getValue()).intValue();
if (authLevel < 20) {
// do something
}
More information can be found in the Oracle Fusion Middleware Java API Reference for
Oracle Platform Security Services.
48.5 Configuring the Identity Context Service Components
Support for Identity Context is pre-integrated into each participating Oracle Access
Management component listed in Table 48–2, " Mapping Identity Context Operations".
Because of this, each component must be configured to accommodate business
requirements.
The following sections provide a high level overview of the necessary Identity Context
configurations. However, detailed information can be found in documentation
accompanying individual products.
■Configuring Oracle Fusion Middleware
■Configuring Access Manager
■Configuring Oracle Adaptive Access Manager
■Configuring Web Service Security Manager
■Configuring Oracle Entitlements Server
■Configuring Oracle Enterprise Single Sign On
■Configuring Oracle Access Management Mobile and Social
48.5.1 Configuring Oracle Fusion Middleware
The application to be protected must be deployed in a WebLogic Server domain built
on Oracle Fusion Middleware 11.1.1 patch set 5 (PS5) with the Oracle Platform
Security Services (OPSS) Opatch for PS5 or, Oracle Fusion Middleware PS6 or later.
The WebLogic Server domain in which the application is running must be protected by
the Access Manager Identity Asserter component that will validate the Identity

Configuring the Identity Context Service Components
48-12 Administrator's Guide for Oracle Access Management
Assertion received from Access Manager and start the process of creating the Identity
Context Runtime. The Access Manager Identity Asserter must be configured to detect
the token type, OAM_IDENTITY_ASSERTION. Also, the protected application
working with the Identity Context Runtime directly must be granted source code
grants to work with the OPSS Attribute Service (as in Example 48–2).
48.5.2 Configuring Access Manager
As the main publisher and propagator of Identity Context, OAM serves as the central
configuration point for collecting Identity Context data from its participating
components. The following sections describe key elements of the architecture behind
Identity Context management.
■Configuring Identity Assertion
■Configuring Federation Attributes
■Configuring Session Attributes
■Configuring Identity Store Attributes
48.5.2.1 Configuring Identity Assertion
Oracle recommends that you define Asserted Attributes in Access Manager
Authorization policies for proper enforcement of end-to-end security between the Web
and application tiers.
In addition to ensuring trust between the WebGate protecting a Web resource and the
Application Server container, Identity Assertion (a SAML Session token) is used to
publish the Identity Context data as SAML attributes.
Identity Assertion must be enabled and populated with Asserted Attributes as
required by the business logic expecting specific attributes in the Identity Context. It is
configured within the OAM Policy Responses tab and can be defined for both
Authentication and Authorization policies.
48.5.2.2 Configuring Federation Attributes
Once a resource is protected by the Access Manager authentication scheme
FederationScheme, Access Manager will act as the service provider and receive the
SAML assertion as provided by the federation partner. After the federation single sign
on (SSO) operation, the following attributes will be present in the authenticated
identity's Access Manager session:
■
$session.attr.fed.partner
(contains the partner name)
■
$session.attr.fed.nameidvalue
(contains the SAML NameID Value)
■
$session.attr.fed.nameidformat
(contains the SAML NameID Format)
■one
$session.attr.fed.attr.
name entry per SAML Attribute (contained in the
SAML Assertion received from the partner)
These federation attributes can be used in configuring an Identity Assertion by
selecting
oracle:idm:claims:fed:attributes
as the Asserted Attribute, and
See Also: Oracle Fusion Middleware Application Security Guide for
more information on configuring Access Manager Identity Asserter, as
well a source code grants.
See Also: Access Manager Identity Assertion and Asserted
Attributes (Table 20–11).

Configuring the Identity Context Service Components
Using Identity Context 48-13
setting the value to "attr-name
=$session.attr.fed.attr.
name" where attr-name is
the name given to the Identity Context attribute and name is the name of the
SAML attribute in the partner's SAML assertion.
For example, defining
oracle:idm:claims:fed:attributes
with the value of
partner-role=$session.attr.fed.attr.role
will result in the creation of the
Identity Context attribute
oracle:idm:claims:fed:attributes:partner-role
having a value of "manager" (assuming
$session.attr.fed.attr.role
contains
"manager" as specified in the partner's SAML assertion for the SAML attribute
"role").
48.5.2.3 Configuring Session Attributes
Access Manager session attributes can be used in configuring Identity Assertion by
selecting
oracle:idm:claims:session:attributes
as the Asserted Attribute and
setting the value to "attr-name=$session.attr.name" where attr-name is the name given to
Identity Context attribute and name is the name of the Access Manager session
attribute.
For example, defining
oracle:idm:claims:session:attributes
with the value of
authn-strength=$session.attr.authnlevel
will result in the creation of the Identity
Context attribute
oracle:idm:claims:session:attributes:authn-strength
having a
value as defined by the authentication scheme used during the login process.
48.5.2.4 Configuring Identity Store Attributes
Identity Store attributes can be used to configure an Access Manager Identity
Assertion by selecting
oracle:idm:claims:ids:attributes
as the Asserted Attribute
and setting the value to "attr-name=
$user.attr
.name" where attr-name is the name
given to the Identity Context attribute and name is the name of the Identity Store
attribute.
For example, defining
oracle:idm:claims:ids:attributes
with the value of
first-name=$user.attr.fname
will result in the creation of the Identity Context
attribute
oracle:idm:claims:ids:attributes:first-name
having a value from the
user's
fname
attribute as maintained in the identity store.
48.5.3 Configuring Oracle Adaptive Access Manager
As part of the integration between Oracle Access Manager and Oracle Adaptive
Access Manager (OAAM), OAAM publishes and propagates risk-based Identity
Context attributes. In this case, OAAM attributes are passed to OAM at the end of user
authentication flow (on the OAAM side) in a DAP Token. The DAP Token will carry
attributes as defined by the oracle:idm:claims:risk namespace in Table 48–1, " Identity
Context Schema Attributes". OAM then pushes these attributes into the
$session.risk.attr namespace. The following sections contain information regarding
configuration of OAAM and OAM.
■Setting Up Oracle Adaptive Access Manager
■Configuring Access Manager for OAAM Integration
■Validating Identity Context Data Published by OAAM
48.5.3.1 Setting Up Oracle Adaptive Access Manager
This section contains information on installing and setting up OAAM.

Configuring the Identity Context Service Components
48-14 Administrator's Guide for Oracle Access Management
To setup Oracle Adaptive Access Manager
1. Set up OAAM by importing snapshots.
See Oracle Fusion Middleware Administrator's Guide for Oracle Adaptive Access
Manager for details.
2. Integrate OAAM and Access Manager as documented in the Oracle Fusion
Middleware Integration Guide for Oracle Access Manager.
The TAP token version must be v2.1 and not v2.0.
3. Ensure that the following properties are set to true.
■
oracle.oaam.idcontext.enabled
is true by default; use the OAAM
Administration Console to change the value.
■
bharosa.uio.default.registerdevice.enabled
must be true for proper
operation of the 'safeforuser' claim.
4. From the OAAM Administration Console, go to Properties, Create New Property.
5. Enter the property name
oaam.uio.oam.dap_token.version
with a value equal to
v2.1
.
6. Restart oaam_server_server1.
48.5.3.2 Configuring Access Manager for OAAM Integration
Perform the following steps. Using the TAPScheme forces the user to authenticate
using the OAAM authentication schemes.
To configure Access Manager for Integration with OAAM Integration
1. Protect a resource (Defining Authentication Policies for Specific Resources on
page 20-32) using the TAPScheme for authentication (Table 19–21).
2. Add the following challenge parameter to the TAPScheme (Table 19–22):
TAPOverrideResource=http://IAMSuiteAgent:80/oamTAPAuthenticate
48.5.3.3 Validating Identity Context Data Published by OAAM
The following information describes how you might validate Identity Context data
published by OAAM.
■
oracle:idm:claims:risk:newdevice
will be true after a login from a new device;
false otherwise.
■
oracle:idm:claims:risk:level
will have a high value after a couple of
unsuccessful logins followed by a successful login. To test for this, try a few
unsuccessful logins and then a successful one.
■
oracle:idm:claims:risk:safeforuser
will have true after a user successfully
answers the challenge question.
■
oracle:idm:claims:risk:fingerprint
contains the user's device's fingerprint. By
default, the fingerprint built out of HTTP header data is used; if that is not
available, fingerprint data built out of Flash will be used. To test for different
fingerprints, try different devices.
Note: Do not use OAAM Advanced or OAAM Basic.

Configuring the Identity Context Service Components
Using Identity Context 48-15
48.5.4 Configuring Web Service Security Manager
Do the following to enable Oracle Web Service Security Manager (OWSSM) to
propagate Identity Context.
To configure Web Service Security Manager for Identity Context
1. Configure Security Policy by modifying the Identity Context supported OWSSM
security policies to contain the
propagate.identity.context
element with a value
of true.
2. Configure the Keystore and Credential Store to sign the SAML assertion and
messages: copy the updated Keystore and Credential Store to your
$DOMAIN_
HOME/config/fmwconfig/
directory.
48.5.5 Configuring Oracle Entitlements Server
Runtime integration with Oracle Entitlements Server (OES) is fully automated. When
an application invokes the PEP API to make an authorization call, the PEP API
automatically propagates the entire Identity Context Runtime to the OES PDP where
Conditions (the policy objects that define the Identity Context) are evaluated.
Conditions are built, based on the Identity Context schema, by a security
Administrator using the OES Administration Console. The following built-in functions
are used to specify Conditions using Identity Context attributes:
■ASSERT_IDENTITY_CONTEXT
■GET_STRING_IDENTITY_CONTEXT
■GET_INTEGER_IDENTITY_CONTEXT
■GET_BOOLEAN_IDENTITY_CONTEXT
Custom OES functions receive the full Identity Context Runtime information as a
well-known request attribute. This data structure can be converted into Identity
Context Runtime using the Identity Context API. Example 48–4 shows a custom OES
function creating a context from the received parameter.
Example 48–4 Custom Function Creating Identity Context
public OpssString GET_STRING_IDENTITY_CONTEXT_V2 (
Note: propagate.identity.context (by default, false) is a configuration
override property on SAML related policies. To enable it globally,
configure a global policy with the property set to true.
Note: When making authorization calls, ensure that the last
argument passed into the
newPepRequest()
method is not null, and is
at least an empty hashmap as shown in this example:
PepRequestFactory requestFactory =
PepRequestFactoryImpl.getPepRequestFactory();
PepRequest request = requestFactory.newPepRequest (subject,
action, resource, new HashMap<String, Object>());
PepResponse response = request.decide();
boolean isAuthorized = response.allowed();

Configuring the Identity Context Service Components
48-16 Administrator's Guide for Oracle Access Management
RequestHandle requestHandle,
Object[] args,
Subject subject,
Map roles,
Resource resource,
ContextHandler contextHandler) throws RuntimeException {
// Obtain string representation of the runtime ID Context from the request handle.
Context runtimeCtx = null;
try {
AttributeElement ctxAttr = requestHandle.getAttribute
(Constants.IDM_IDC_API_ID, false);
if (ctxAttr != null) {
String ctxStr = (String) ctxAttr.getValue();
runtimeCtx = new Context(ctxStr);
} else {
throw new RuntimeException ("Unable to acquire ID Context from request
handle");
}
} catch (Exception e) {
throw new RuntimeException (e.toString());
}
…
// start using Context which now contains the same exact Identity Context Runtime
as was present in the application that made the PEP API call
…
}
48.5.6 Configuring Oracle Enterprise Single Sign On
As part of the Identity Context Service, Oracle Enterprise Single Sign-on (OESSO) can
publish and propagate client-based Identity Context attributes. Once full integration
has been configured, client-specific Identity Context attributes (as documented in
Section 48.3.1, "Using the Identity Context Dictionary") will be sent by OESSO to OAM
in the session initiation request together with the user credentials submitted in the
access request.
After the request has been received, OESSO makes a call to an SSL-protected OAM
REST API (previously configured by the OESSO Administrator and included as part of
the OESSO client distribution). This API returns the OAM_ID cookie to OESSO.
OESSO then propagates the valid OAM_ID cookie to the client browsers (Internet
Explorer and Firefox) which enables OESSO resources to be protected and enables
single sign-on (SSO) with those resources that are protected by the OAM Embedded
Credential Collector. (This does not include resources that are protected by the
Distributed Credential Collector.) OESSO then provides OAM credentials that are
acceptable to the OAM Embedded Credential Collector as well as client context
information in the payload.
Note: The payload is secured by:
■Generating a 16 byte Random Salt
■Generating a SHA-256 Hash using the 16 Byte Random Salt
■Encrypting the claims using the OAM password protected by
OESSO

Configuring the Identity Context Service Components
Using Identity Context 48-17
To configure OESSO to get attributes for Identity Context
1. Refer to "Installing Logon Manager Client-Side Software" in the Oracle Enterprise
Single Sign-On Suite Plus Installation Guide for details on integrating OAM and
OESSO.
2. See additional details in the Oracle Enterprise Single Sign-On Suite Plus
Administrator's Guide section "Oracle Access Management Support in Logon
Manager".
48.5.7 Configuring Oracle Access Management Mobile and Social
Oracle Access Management Mobile and Social (Mobile and Social) provides
REST-based authentication services, in addition to a user profile service and an
authorization service, for mobile and desktop devices. When Mobile and Social is
configured to provide authentication using Access Manager, it can publish Identity
Context attributes provided by the mobile client to Access Manager. The Identity
Context attributes are published by the Mobile and Social SDK for iOS and Java
platforms.
Mobile applications use the Mobile and Social SDK to access and use services
provided by the Mobile and Social server. When a mobile application uses the iOS or
Android API to perform authentication, it captures the Identity Context attributes and
publishes the data to the Mobile and Social server which, in turn, publishes the
attributes to the Access Manager server. The Administrator can configure the Mobile
and Social server to get all the attributes or only the required ones.
The Administrator configures the Identity Context attributes to be sent by the
application in the Application Profile configuration page of the Mobile and Social
accordion under the System Configuration tab in the Access Manager Administration
Console.
The Mobile and Social server passes the required Identity Context attributes to the
Mobile and Social SDK when it contacts the server for the application profile. (An
application profile has information regarding the type of authentication to be
performed as well as the Identity Context attributes to be collected.) The SDK collects
the attributes, if allowed by the user or the platform, and publishes them to the Mobile
and Social server as part of the authentication request.
To configure the Mobile and Social server to publish the attributes collected from the
Mobile and Social SDK to the user session created on and maintained by the OAM
Server, the administrator must configure Mobile and Social server to enable ID
Context, as illustrated in Figure 48–4.
Note: Some mobile platforms (iOS, for example) forbid applications
from collecting certain device attributes (for example, the UDID or
IMEI device number). The user can also deny an application from
getting a location update. Thus, even if the server requests attributes,
it is not guaranteed that all of them can be collected by the SDK.
Validating Identity Context
48-18 Administrator's Guide for Oracle Access Management
Figure 48–4 OAM Authentication Provider Configuration
To configure Mobile and Social to get attributes for Identity Context
1. Confirm that the Mobile and Social Service is enabled as described in "Enabling or
Disabling Available Services" on page 3-2.
2. On the
MobileOAMAuthentication
Service Provider page, add the
IDContextEnabled
Attribute with the value of
true
.
48.6 Validating Identity Context
Use the following procedure to ensure correct operation of the Identity Context with
Access Manager.
To validate your Identity Context operations
1. Perform the following to validate the Identity Assertion response that Access
Manager is constructing.
a. Configure Access Manager to protect the
/testidc
resource with a WebGate
agent and return the Identity Assertion with the desired Asserted Attributes
as part of the Authorization response.
See Also:
■Chapter 42, "Configuring Mobile Services" for full configuration
details
■Oracle Fusion Middleware Developer's Guide for Oracle Access
Management for details on how to develop applications using the
iOS SDK

Validating Identity Context
Using Identity Context 48-19
b. Use the OAM Tester to validate that the Identity Assertion is returned as an
OAM_IDENTITY_ASSERTION attribute in response to the authorization
request for /testidc.
2. Perform the following to validate that WebGate is creating an HTTP header that
contains the Identity Assertion.
a. Ensure the
/cgi-bin/printenv.pl
script is protected by the same policy that
protects the /testidc resource.
b. Access the
printenv.pl
to trigger a login and display the HTTP headers.
c. Ensure that the HTTP_OAM_IDENTITY_ASSERTION header contains a
SAML token with Asserted Attributes.
Note:
printenv.pl
ships as part of OHS and must have permission
to execute. Any script to display header information can be used
instead.

Validating Identity Context
48-20 Administrator's Guide for Oracle Access Management

Part XIII
Part XIII
Integrating Access Manager with Other
Products
Part XI describes how to integrate Access Manager with products from other vendors.
Part XI contains the following chapters:
■Chapter 49, "Integrating RSA SecurID Authentication with Access Manager"
■Chapter 50, "Configuring Access Manager for Windows Native Authentication"
■Chapter 51, "Integrating JBoss with Access Manager"
■Chapter 52, "Integrating Microsoft SharePoint Server with Access Manager"
■Chapter 53, "Integrating Access Manager with Outlook Web Application"
■Chapter 54, "Integrating Microsoft Forefront Threat Management Gateway 2010
with Access Manager"
■Chapter 55, "Integrating Access Manager 11.1.2 with SAP NetWeaver Enterprise
Portal"
■Chapter 56, "Integrating Oracle Access Manager 11.1.2 with SAP NetWeaver
Enterprise Portal Using OpenSSO Policy Agent 2.2"

49
Integrating RSA SecurID Authentication with Access Manager 49-1
49
Integrating RSA SecurID Authentication with
Access Manager
[22]
Oracle provides components that interface with RSA Security products to provide
native RSA SecurID® authentication for Access Manager protected resources.
This chapter introduces SecurID authentication and the components, requirements,
and processes needed to successfully integrate SecurID authentication with Access
Manager 11.1.2. The following topics are included:
■Introduction to Access Manager and RSA SecurID Authentication
■Components Required for SecurID Authentication
■SecurID Authentication Modes
■Configuring Access Manager for RSA SecurID Authentication
■Running a Custom RSA Plug-in
49.1 Introduction to Access Manager and RSA SecurID Authentication
Access Manager 11.1.2 integrates with RSA components to provide SecurID
authentication. RSA SecurID authentication is based on two factors: something the
user knows and something the user has:
■Something the User Knows: This is a secret personal identification number (PIN),
similar in concept to a personal bank code PIN. In this case, the PIN may be
system generated or personally chosen and registered with the RSA
Authentication Manager.
■Something the User Has: This is the current code generated by a hand held device
known as a token. Oracle Access Manager supports all RSA SecurID token form
factors, both hardware and software-based.
These tokens algorithmically, based on an internal clock or event, generate tokencodes
with unpredictable values. Together, the user's PIN and the SecurID tokencode become
the user's Passcode.
Access Manager uses and supports RSA two-factor SecurID authentication security
features and enables integration with SecurID authentication by providing:
■The HTML forms required for SecurID authentication operations
■The RSA SecurID Plugin you can use with the User Identification Plugin to create
and orchestrate authentication
Access Manager integrates with RSA Authentication Manager and provides the
integration features described in Table 49–1.

Introduction to Access Manager and RSA SecurID Authentication
49-2 Administrator's Guide for Oracle Access Management
Access Manager does not support the RSA features in Table 49–2.
Table 49–1 Access Manager Support for RSA Features
RSA Feature Access Manager Support
Authentication method Native SecurID authentication
New PIN Mode (user-generated PINs) Asks for new PIN with confirmation.
The token may be in New PIN mode the first time the user logs in
or the Authentication Manager Administrator can enable New
PIN mode. New PIN mode requires the user to complete a
sequence of forms to define, or have the system generate, a new
PIN number.
Oracle-Provided New PIN Forms and Functions:
■System Generated PIN (not supported)
■User Defined (4-8 Alpha/numeric characters)
■User Defined (5-7 Numeric)
■Deny 4 and 8 Digit PIN
■Deny Alphanumeric PIN
■Deny Numeric PIN
■PIN Reuse
See Also: "SecurID New PIN Authentication" on page 49-6.
Next Tokencode During authentication, the Authentication Manager may direct
the user to provide the next tokencode that appears on their
SecurID token to prove that they have the assigned token. This
operation is known as Next Tokencode mode, which can be
triggered by one of the following situations:
See Also: "SecurID Next Tokencode Authentication". on
page 49-6.
Passcode ■16 Digit Passcode
■4 Digit Fixed Passcode
Load Balancing RSA Authentication Manager Replicas.
Secondary server support Yes
SecurID user specification Designated users
SecurID protection of Administrators Yes
Access Manager features and functions All
Table 49–2 RSA Features Not Supported
RSA Feature Not supported by Access Manager
RSA Authentication
Manager 7.1 SP2
Is not supported in an Active Directory Forest multi-domain environment
Multiple ACE Realms The RSA Authentication API uses an automatic response time load balancing
algorithm to determine where to send an authentication request. Such requests
go to either a primary RSA Authentication Manager or a replica. The
automatic algorithm can be overridden by creating a manual load balancing
configuration file, sdopts.rec. However manually weighting an RSA
Authentication Manager as a server of last resort does not preclude the Agent
from communicating with it. As such, a true failover setup cannot be achieved
with this method. For more information, see your RSA Authentication
Manager documentation
System Generated PINs Not supported by Access Manager.
Failover Not supported for OAM SecurID Servers because only one OAM SecurID
Server can perform SecurID authentication.

Components Required for SecurID Authentication
Integrating RSA SecurID Authentication with Access Manager 49-3
49.2 Components Required for SecurID Authentication
The following components are needed for the integration:
■Supported Versions and Platforms
■Required RSA Components
■Installation and Configuration Requirements
49.2.1 Supported Versions and Platforms
For the latest support information, see the Oracle Technology Network (OTN). You
must register with OTN to view this information.
The certification matrix provides platform and version support for this integration,
which includes RSA Authentication Manager v7.x and the SecurID Authentication
API:
http://www.oracle.com/technetwork/middleware/ias/downloads/fusion-certification-10
0350.html
49.2.2 Required RSA Components
The following RSA components are required for integrating Access Manager and
SecurID Authentication.
■RSA Authentication Manager
■RSA SecurID Tokens
49.2.2.1 RSA Authentication Manager
Residing somewhere in your network are records of users, agents, tokens, and user's
PINs. Portions of these records might reside in the Authentication Manager or in
LDAP directories. During authentication, Authentication Manager compares these
records to the information it receives when a user attempts to access the network. If
the records and tokencode or passcode match, the user is granted access.
49.2.2.2 RSA SecurID Tokens
An RSA SecurID token is either a hardware device or software-based security token
that generates and displays a random number that enables users to securely access
protected resources. The random number is called a tokencode. Before a user can
authenticate with a token, the token must be recognized by Authentication Manager.
RSA, or your vendor, ships a token seed file that you must import into the data store.
Seeds listed in this file are assigned to tokens for generating the tokencode when an
authentication request is received from an Authentication Manager agent.
During the SecurID authentication process, users must submit their username and
passcode using an HTML form. The RSA Authentication Manager authenticates the
identity of each user through a server that is registered with the Authentication
Manager as a client (RSA Authentication Agent). One Access Server (known as the
Oracle SecurID Access Server to distinguish it from other Access Servers) must be
registered and set up as a client/Agent.
The RSA Authentication Manager compares the tokencode it has generated with the
tokencode the user has entered. Tokencodes change at a specified interval, typically 60
seconds. Time synchronization ensures that the tokencode displayed on a user's token
is the same code the Authentication Manager software has generated for that moment.

Components Required for SecurID Authentication
49-4 Administrator's Guide for Oracle Access Management
Authentication is successful when the tokencodes match. Two-factor authentication
provides stronger legal evidence of who performed the task. When properly
configured, the Authentication Manager tracks all login requests and operations to
reliably identify the user who is responsible for each logged action.
49.2.3 Installation and Configuration Requirements
SecurID requires affinity between the OAM Server and the RSA Authentication
Manager for a user interaction. Therefore, the authentication dialog between the user
and OAM Server must be sticky (this constraint is a security feature of SecurID
authentication). In a cluster environment, if a load balancer is used to route requests to
multiple managed server, ensure that stickiness is set between the load balancer and
OAM Server.
The SecurID Authentication API is bundled with Access Manager and installed on all
OAM Servers. The SecurID Authentication API provides the connection functionality
that eliminates the need for an Authentication Agent to be installed on the OAM
Server. In other words, the API is the agent.
Every OAM Server must be registered as an RSA Authentication Agent host on the
Authentication Manager along with other requirements in Table 49–3.
Table 49–3 Installation and Configuration Guidelines
Only one designated OAM SecurID Server can complete SecurID authentication. However,
every OAM Server must be registered as an RSA Authentication Agent Host on the
Authentication Manager.
Enable the OAM SecurID Server to be recognized as an Authentication Manager client.
Port 5500 (UDP) should be available for the Authentication Manager to communicate with
authentication agents (OAM SecurId Server). This service receives authentication requests
from Oracle SecurId Server and sends replies. For more details refer to your RSA
Authentication Manager documentation.
Manage authentication requests from the client to the Authentication Manager.
Enforce two-factor authentication and block unauthorized access.
Provide automatic load balancing by detecting replica Authentication Manager response times
and routing authentication requests accordingly.
Ensure that the system time on the client is correct to prevent the server and client from being
out of sync.
Failover is not supported for Access Manager.
The SecurID Authentication Manager must be installed on a supported platform.
The system time must be correct to prevent the server and client from being out of sync.
The SecurID tokens or key fobs must be provisioned with the Authentication Manager by
providing it with the token seed records
Each user name must be mappable through an LDAP filter to a Distinguished Name in the
directory
An Authentication Manager slave and/or replicated Authentication Manager can provide
failover if the primary Authentication Manager is down

SecurID Authentication Modes
Integrating RSA SecurID Authentication with Access Manager 49-5
49.3 SecurID Authentication Modes
The following scenarios illustrate the three modes of operation:
■Standard SecurID Authentication
■SecurID Next Tokencode Authentication
■SecurID New PIN Authentication
49.3.1 Standard SecurID Authentication
When a user attempts to access a resource protected by the SecurID authentication
scheme, the following process occurs.
Process overview: When the user requests a resource
1. The WebGate intercepts the resource request and queries the Access Server to
determine if and how the resource is protected, and if the user is authenticated.
2. The OAM SecurId Server queries the directory for the authentication scheme, and
receives authentication information from the directory.
3. The Webgate redirects to the Credential Collector, which presents a form
challenging the user for a two-part SecurID Passcode.
4. The user submits credentials to the Credential Collector
5. The Credential Collector hands off the credentials to the OAM SecurId Server
6. The SecurID Authentication API on the OAM SecurId Server performs the
authentication dialog and sends an LDAP bind to the Authentication Manager.
7. The Authentication Manager database matches the SecurID passcode to the user
ID and returns a success response to the Authentication Manager, which matches
the user's PIN.
8. The Authentication Manager returns the response to its Agent, the OAM SecurId
Server.
9. When the user's credentials are valid, SecurID authentication is successful. The
OAM SecurId Server creates a session for the user and redirects the user to the
Webgate, which then queries the OAM SecurId Server for resource authorization:
This integration requires a custom HTML login form and a properties file. Sample
Oracle-provided custom html and custom html properties files can be found in:
$ORACLE_HOME/oam/server/tools/customLoginHtml
See Also:
■Developing Custom Login Pages in the Oracle Fusion Middleware Developer's Guide for
Oracle Access Management
■"Configuring Access Manager for RSA SecurID Authentication" on page 49-7
Note:References to the 11.1.2 Credential Collector can be either the
default Embedded Credential Collector or the optional Detached
Credential Collector. For more information, see "Understanding
Authentication Methods and Credential Collectors" on page 19-17.
Table 49–3 (Cont.) Installation and Configuration Guidelines

SecurID Authentication Modes
49-6 Administrator's Guide for Oracle Access Management
■Under certain conditions a New Tokencode mode is initiated, as described in
"Standard SecurID Authentication".
■Under certain conditions a New Pin mode is initiated, as described in "SecurID
Next Tokencode Authentication".
10. The OAM SecurId Server evaluates the authorization request, which allows or
denies access based upon the authorization rule.
11. When access is granted, the OAM SecurId Server passes authorization to the
WebGate, which presents the resource to the user.
49.3.2 SecurID Next Tokencode Authentication
When Next Tokencode mode is On, the user must supply the next tokencode on their
SecurID token. This mode can be triggered when:
■An incorrect Passcode was provided repeatedly during login. When a user
attempts authentication with incorrect passcodes four consecutive times, the
Authentication Manager turns on Next Tokencode mode, as noted in the
Authentication Manager's Activity Report. The next time the user successfully
authenticates with their correct Passcode, they are challenged for the next
tokencode that appears on their SecurID token.
■The Authentication Manager requires confirmation of, or synchronization with the
token. Even with a correct Passcode, the Authentication Manager Administrator
might set the Next Tokencode mode On to force the user to confirm that they have
the SecurID token or to synchronize the token with the Authentication Manager.
When Next Tokencode mode is On, the Next Tokencode challenge form is
presented to the user immediately following a successful login.
Process overview: When Next Tokencode is On
1. The Credential Collector presents a form to challenge the user for the next
tokencode on the token following a successful login.
2. The user enters a username, waits 60 seconds, then enters the next tokencode on
the SecurID token.
3. When the tokencode is correct, the Passcode the user originally entered is accepted
and the user is authenticated.
49.3.3 SecurID New PIN Authentication
When the user is required to have a new PIN, the Credential Collector prompts the
user with specific forms.
Process overview: When New PIN is required
1. The Credential Collector presents a form that allows the user to enter the PIN they
want.
2. The user enters the new PIN and then re-enters the new PIN to complete the form.
3. The OAM SecurID Server forwards the information to the Authentication
Manager.
4. The Authentication Manager registers the new PIN, which becomes part of the
Pincode the user must supply during subsequent logins.
5. The Login Form appears again where the user enters the username and Passcode
for a forced re-authentication.

Configuring Access Manager for RSA SecurID Authentication
Integrating RSA SecurID Authentication with Access Manager 49-7
49.4 Configuring Access Manager for RSA SecurID Authentication
Users with valid Oracle Access Management Administrator credentials can follow the
steps in this section to enable RSA SecurID authentication.
Prerequisites
See Table 49–3 for installation and configuration that is outside the scope of this
manual) and which must be completed before you begin SecurID integration with
Access Manager.
To set up SecurID Authentication with Access Manager
1. In your oam-config.xml, set the OAM SecurID Sever serverRequestCacheType
parameter to BASIC, as follows:
a. Stop all WebLogic servers (OAM Servers and AdminServer).
b. Locate oam-config.xml in the following path:
$DOMAIN_HOME/config/fmwconfig/oam-config.xml
c. Change the
serverRequestCacheType
from
COOKIE
(default) to
BASIC
, as
follows:
<Setting Name="serverRequestCacheType" Type="xsd:string">BASIC</Setting>
d. Start all WebLogic Servers (OAM Servers and AdminServer).
2. Register a Web agent from the RSA Console that will be used by Access Manager,
then copy the agent configuration file (sdconf.rec) as follows:
$DOMAIN_HOME/config/fmwconfig/servers/$SERVER_NAME/oam/sdconf.rec
3. From Oracle Access Management Console, create a custom authentication module
for RSA, as follows:
a. Open the System Configuration tab, Access Manager section, Authentication
modules node, Custom Authentication module node.
b. Create a new module, RSA_AUTH, by clicking the Add (+) button on the Steps
tab and entering the following information:
c. General tab:
Name: RSA_AUTH
d. Steps tab: Enter a name for the Step, then choose the RSA SecurID Plugin
Step Name: stepRSA
Plugin Name: RSA SecurID Plugin
OK
e. stepRSA, Step Details: Enter and Save the Step Details shown in the next
screen, which should also appear in your customhtml.properties file:
See Also:
■Developing Custom Login Pages in the Oracle Fusion Middleware
Developer's Guide for Oracle Access Management
See Also: "Orchestrating Multi-Step Authentication with Plug-in
Based Modules" on page 19-28
Configuring Access Manager for RSA SecurID Authentication
49-8 Administrator's Guide for Oracle Access Management
f. Steps tab: Add the User Identification Plugin: Enter a name for the Step, then
choose the RSA SecurID Plugin:
Step Name: rsa_useridentification
Plugin Name: UserIdentificationPlugin
OK
g. rsa_useridentification, Step Details: Enter and Save the following details for
your environment:
KEY_LDAP_FILTER: (uid={KEY_USERNAME})
KEY_IDENTITY_STORE_REF: The registered Default Store.
KEY_SEARCH_BASE_URL: dc=us,dc=example,dc=com
4. Orchestrate the steps as follows: stepRSA should be first (to authenticate the user
with the RSA Server); designate your User Identification Plugin for the success
step.
Initial Step: stepRSA
Name: StepRSA
On Success: rsa_useridentification
On Failure: failure
On Error: failure
Apply
Name: rsa_useridentification
On Success: Success
On Failure: failure
On Error: failure
Apply
5. Create a new authentication scheme (RSACredScheme, for example) that uses the
custom authentication module that you just created for RSA with a custom HTML
login form. Sample values are shown in the following screen:
Note: The On Failure and On Error fields must both be set to failure.
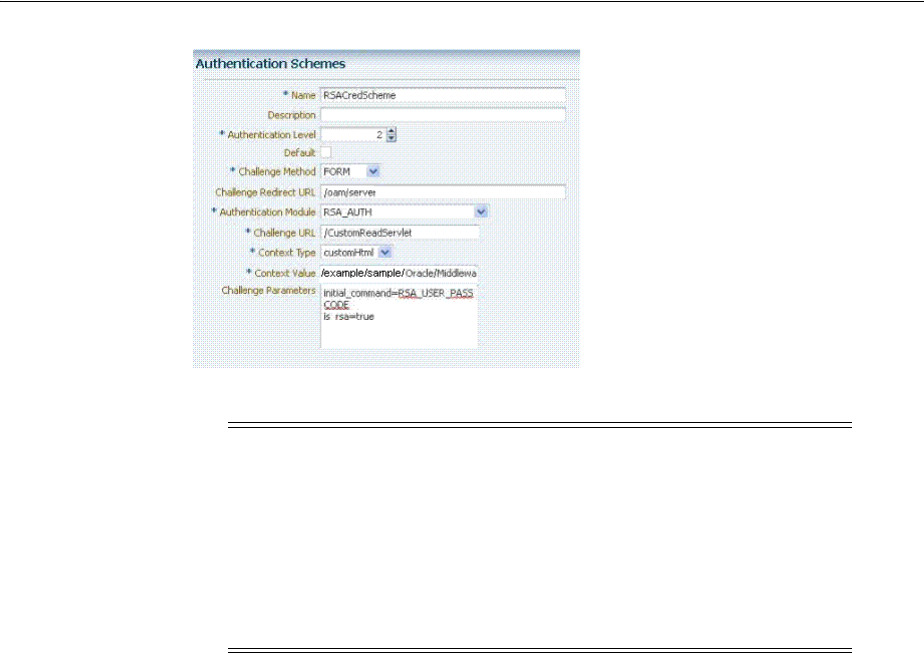
Configuring Access Manager for RSA SecurID Authentication
Integrating RSA SecurID Authentication with Access Manager 49-9
6. Use this scheme in the Application Domain protecting resources requiring SecurID
authentication.
7. Ensure that your custom HTML file is present in:
$DOMAIN_HOME/config/fmwconfig/customhtml.html
The Custom HTML for RSA Login Form requires form action set to
/oam/server/auth_cred_submit
, as follows:
<form id="loginData" action="/oam/server/auth_cred_submit" method="post"
name="loginData">
<div id="oam_credentials" class="input-row">
<span class="ctrl"></span>
</div>
div class="button-row">
<span class="ctrl">
<input id="login_button" type="submit" value="Login" class="formButton"
onclick="this.disabled=true;document.body.style.cursor = 'wait';
this.className='formButton-disabled';form.submit();return false;"/>
</span>
</div>
<div id="oam_error_messages"></div>
</form>
8. Ensure that your
customHTML
.
properties
file is:
■Named as your custom HTML file with a .
properties
extension
■Stored in the same path as your custom HTML file
Note: The authentication scheme's Context Value specifies the path
to your custom HTML login form. Your custom HTML properties file
must share the same name as the form (with a .properties extension)
in the same directory path. This example uses customhtml.html and
customhtml.properties.
Challenge parameters specify the initial RSA command for
authentication (RSA_USER_PASSCODE). The
is_rsa=true
parameter
and value must be specified for RSA.

Running a Custom RSA Plug-in
49-10 Administrator's Guide for Oracle Access Management
■Confirmed; settings match the RSA SecurID plugin configuration parameters.
For example:
username=Username
password=Password
passcode=Mother's maiden name
rsa_new_pin=RSA New Pin
rsa_new_pin_confirm=RSA Confirm New Pin
Pin=RSA Pin
rsa_sysgen_pin=RSA Create New Pin
rsa_sysgen_pin_confirm=RSA System Generated Pin
error1=Username not specified
9. Restart OAM Servers.
10. Test your configuration by accessing the appropriate protected resource and
validating the various modes.
11. See "RSA SecurID Issues and Logs" on page E-23 for details if you experience
problems.
49.5 Running a Custom RSA Plug-in
These steps should be followed to run a custom RSA plug-in, located in <ORACLE_
HOME>/oam/custom_plugins/rsa/RSAPlugin.jar.
1. Download the RSA dependent libraries named
authapi.jar
and
cryptoj.jar
.
2. Add the
authapi.jar
and
cryptoj.jar
libraries to <DOMAIN_
HOME>/config/fmwconfig/oam/plugin-lib.
3. Get the custom RSAPlugin.jar file from its directory and import the plugin to add
it to the list of custom plugins.
4. Once successfully imported, distribute and activate the plug-in.
Activation will fail the first time. When it does, restart the server and activate
again. After activation, use the plugin to specify the necessary orchestration steps.

50
Configuring Access Manager for Windows Native Authentication 50-1
50
Configuring Access Manager for Windows
Native Authentication
[23]
Access Manager enables Microsoft Internet Explorer users to automatically
authenticate to their Web-based single sign-on applications using their desktop
credentials. This is known as Windows Native Authentication (WNA)
This chapter contains the following sections to describe how to prepare your
environment and perform this integration using Active Directory:
■Introducing Access Manager with Windows Native Authentication
■Preparing Your Active Directory/Kerberos Topology
■Performing Oracle-Specific Prerequisite Tasks
■Enabling the Browser to Return Kerberos Tokens
■Integrating KerberosPlugin with Oracle Virtual Directory
■Integrating Access Manager KerberosPlugin with Search Failover
■Configuring Access Manager for Windows Native Authentication
■Validating WNA with Access Manager-Protected Resources
■Configuring WNA For Use With DCC
■Configuring Access for Multiple Untrusted Active Directory Forests
■Troubleshooting WNA Configuration
50.1 Introducing Access Manager with Windows Native Authentication
Access Manager supports Active Directory Multi-Domain and Multi-Forest topology
integration with Windows Native Authentication (WNA). The Active Directory
directory service uses a data store (known as the directory) for all directory
information about objects (users, groups, computers, domains, organizational units,
and security policies).
For the integration described in this chapter, an application must be protected by an
Access Manager authentication policy that uses the Kerberos authentication scheme
(KerberosScheme) with WNA as the Challenge Method with the KerberosPlugin
See Also: The System Requirements and Supported Platforms for
Oracle Identity and Access Management 11gR1 at
https://www.oracle.com/technetwork/middleware/ias/downloads/
fusion-certification-100350.html

Introducing Access Manager with Windows Native Authentication
50-2 Administrator's Guide for Oracle Access Management
Authentication Module. In this case, credentials must be stored in a Windows Active
Directory instance that is registered as a user-identify store with Access Manager.
Put another way, each protected resource is defined in an Access Manager Application
Domain. The Authentication Policy includes the Authentication Scheme
(KerberosScheme) that uses an Authentication Module (Kerberos) that is tied to the
default User Identity Store. The store uses the value of "User Name Attribute" for
authentication. This value is tied to the user in Active Directory and its values for
userprincipalname = username@domian
or
SamAccountName = username
, depending
on the specific Access Manager release.
When Access Manager single sign-on is combined with WNA, a Kerberos session
ticket is generated that contains the user's login credentials (among other things). This
Kerberos session ticket is not visible to the user.
Access Manager interoperates with Windows Native Authentication (WNA), which
uses Kerberos credentials obtained when the user logs in to a Windows Domain. This
cross-platform authentication is achieved by emulating the negotiate behavior of
native Windows-to-Windows authentication services that use the Kerberos protocol.
For this cross-platform authentication to work, OAM Servers must parse SPNEGO
tokens to extract the Kerberos tokens that are then used for authentication.
■SPNEGO is a Generic Security Services Application Programming Interface
(GSSAPI) "pseudo mechanism" used to negotiate one of a number of possible real
mechanisms. SPNEGO is largely employed in the Microsoft "HTTP Negotiate"
authentication extension which uses it to allow initiators and acceptors to
negotiate either Kerberos or NTLMSSP mechanisms. GSSAPI implementation is
included with most major Kerberos distributions. For more information on
SPNEGO see
http://tools.ietf.org/html/rfc4559
.
■Kerberos is a network authentication protocol that provides strong authentication
for client/server applications and services using a secret-key cryptography. A free
implementation of Kerberos protocol is available from the Massachusetts Institute
of Technology and is also commercially available.
For more information, see:
■Access Manager WNA Login and Fall Back Authentication
■Supported Integration Approaches
50.1.1 Access Manager WNA Login and Fall Back Authentication
With WNA implemented, a user can click her Web application without another
challenge for credentials because her Kerberos session ticket is passed through the
browser to the OAM Server. The OAM Server decrypts the received token (using
keytab) and derives the authenticated user name from that. If authentication succeeds
the user is granted access to her Web applications automatically.
This section describes several WNA login scenarios.
Process overview: Successful Access Manager WNA Authentication
1. The Browser is configured for Integrated Windows Authentication (IWA).
See Also: Supported browsers in the System Requirements and
Supported Platforms for Oracle Identity and Access Management
11gR1 at
https://www.oracle.com/technetwork/middleware/ias/downloads/
fusion-certification-100350.html

Introducing Access Manager with Windows Native Authentication
Configuring Access Manager for Windows Native Authentication 50-3
2. A resource protected by Access Manager and WNA is called.
3. A valid Kerberos ticket is present - Http headers... Authorization: Negotiate
YIIJ/...
4. The user is not challenged for authentication.
5. The requested resource is displayed, proving that WNA works.
In other words, when the browser is configured to use Integrated Windows
Authentication, and a resource is protected by the Access Manager Kerberos
authentication module, then:
■If a Kerberos ticket is received by Access Manager (regardless of the domain),
authentication is attempted:
–Successful: Access is granted.
–Failure: An incorrect user name or password error occurs if information from
the Kerberos ticket is either not present or does not match the value of the
User Name Attribute defined in the Default User Identity Store. Access is
denied. The browser automatically submits the ticket, and the interaction with
Access Manager is repeated until the user has been locked out. The browser
cannot be made to pause before the start of each exchange.
■If the user is not logged on to a Windows Domain by way of Kerberos
authentication, the browser sends OAM an NTLM token for authentication instead
of a Kerberos token. Depending on how Access Manager is configured, it either
uses WNA Fallback Authentication upon receiving an NTLM token or
authentication fails.
NTLMSSP is a security support provider that is available on all versions of the
Distributed Component Object Model (DCOM). It uses the NTLM protocol for
authentication, which does not actually transmit the user's password to the server
during authentication.
■If the browser being used is not configured to use Integrated Windows
Authentication, no TGT is supplied when a resource protected by Access Manager
Kerberos authentication module is requested. A browser basic authentication
window is displayed where you can enter a valid username/password
combination defined in the Default Identity Store for Access Manager
User login
attribute
.
WNA Fallback Authentication: Fallback uses the authentication scheme
"BasicScheme" with a challenge method of "Basic" and authentication module "LDAP".
The authentication module can be changed using the console.
Note: You need to configure Access Manager to provide fallback
authentication when the browser sends an NTLM token. Without
configuration, authentication fails. For configuration steps, see
Section 50.7.3, "Configuring WNA for NTLM Fallback."
Note: If a Kerberos ticket cannot be identified by Access Manager
(regardless of browser, Operating System, domain-login, and so on),
the fallback mechanism is invoked.

Preparing Your Active Directory/Kerberos Topology
50-4 Administrator's Guide for Oracle Access Management
This LDAP Authentication Module uses the LDAP plug-in. In this plug-in, the User
Identity Store can be defined as any currently registered User Identity Store in which
you define the attribute to be used for "User Name Attribute."
Process overview: Access Manager WNA Fallback Authentication
1. The Browser is configured for Integrated Windows Authentication (IWA).
2. A resource protected by Access Manager WNA is requested.
3. No ticket is present (NTLM/Kerberos) - Http headers... Authorization: Basic
4. A basic authentication window pops up.
5. The user enters a valid username/password.
6. The requested resource is displayed (WNA Fallback works).
50.1.2 Supported Integration Approaches
Access Manager supports the following approaches:
■Kerberos Plugin with Oracle Virtual Directory: Using Access Manager with
orchestrated authentication plug-ins integrated with Oracle Virtual Directory
virtualize multiple Active Directory Global Catalogs.
■Kerberos Plugin with Search Failover Across Multiple ADGCs: Using Access
Manager with orchestrated authentication plug-ins that exercise a failover pattern
across multiple Active Directory Global Catalogs.
50.2 Preparing Your Active Directory/Kerberos Topology
The tasks in this section are required regardless of the approach you choose.
You need a fully-configured Microsoft Active Directory authentication service set up
as described here. The procedure in this section ensures that Active Directory and the
Kerberos client will operate together. However, none of this is Oracle specific.
The following sample scenario represents a typical Active Directory topology, and is
not a requirement dictated by or for Access Manager. The naming used here is an
example only. Your environment will be different.
Sample Forests and Trust
As an example, consider two Active Directory forests operating within a company.
See Also:
■Preparing Your Active Directory/Kerberos Topology
■Performing Oracle-Specific Prerequisite Tasks
■Integrating KerberosPlugin with Oracle Virtual Directory
See Also:
■Preparing Your Active Directory/Kerberos Topology
■Performing Oracle-Specific Prerequisite Tasks
■Integrating Access Manager KerberosPlugin with Search Failover

Preparing Your Active Directory/Kerberos Topology
Configuring Access Manager for Windows Native Authentication 50-5
Consider that a child domain exists within the ORACLE forest:
child.lm.example.com
.
Trust is required as follows:
■Between forests: Two-way, non-transitive trust.
■Between the child domain and its parent: Two-way, transitive trust.
Suffixes and Inheritance
■SPRITE users have UPN suffixes such as
sun.com
or
java.com
. The SPRITE forest
contains
testuser.java.com
.
■ORACLE users have suffixes such as
myoracleco.com
and
oracleco.com
. The
ORACLE forest contains
testuser.oracleco.com
.
■ORACLE child domain inherits the UPN suffixes of the parent domain.
Default Identity Store User Name Attribute for WNA
For integration with WNA, the
User Name Attribute
defined for the Default Identity
Store an be any attribute whose value matches the Active Directory user's
samAccountName
.
Encryption Type
You need to know which encryption type your environment will use. In some cases a
user might be created with "Use DES encryption types for this account" enabled.
However, Active Directory is not using DES encryption.
Access Manager supports what JGSS/JDK6 supports. The limitation on the TGT
encryption that can be used would be determined by the piece that is the least
common or lowest encryption supported: KDC, Keytab, Operating System, Kerberos
client.
Access Manager does not support any specific Kerberos encryption type. It is
dependent on the Generic Security Services (GSS)/Kerberos jdk encryption types with
which it is certified. Access Manager is not dependent on any encryption type and
does not use TGT encryption. As part of SPNEGO token Access Manager only looks
into the Service Ticket which is encrypted with a key that the service (in this case
Access Manager) has registered when executing the ktpass/keytab commands.
Forest Domain Name
ORACLE
lm.example.com
SPRITE
lmsib.sprite.com
Note: Pre-Windows usernames, formed as DOMAIN\USERNAME,
are not supported.
Note: The keytab file created in the following procedure uses
RC4-HMAC encryption.
Note: The keytab file created in the following procedure uses
RC4-HMAC encryption.

Preparing Your Active Directory/Kerberos Topology
50-6 Administrator's Guide for Oracle Access Management
Encryptions are used for communication among the different OS (Windows/Linux
acting as Kerberos Server/Client). OAM Server just needs the SPNEGO token, from
which it extracts the user credential. The encryption used in this three way negation
process between the Windows Client (Browser), the Windows KDC, and the Generic
Security Services (GSS) classes used by Access Manager, depend on the versions used
(which must match).
Domain Requirements
In the trusted domain (for example, the root domain
lm.example.com
), you will follow
steps provided to:
■Create an account for the OAM Server.
■Extract the keytab file that was configured with the Active Directory
Multi-Domain or Multi-Forest topology and trust relationships.
■Specify the Service Principal Name (SPN) using the fully-qualified hostname of
the OAM Server (or the load balancer that represents the OAM Cluster), followed
by the Realm name.
Sample Naming
For this example the names in Table 50–1 are used.
See Also: My Oracle Support for details about the Kerberos
Encryption types Access Manager Supports [Doc 1212906.1] at:
https://support.oracle.com/CSP/main/article?cmd=show&type=NO
T&id=1212906.1
Table 50–1 Sample Naming
Name Description
kdc.lm.example.com
KDC hostname
KDC is a trusted network service that supplies session tickets and
temporary session keys to users and computers within an Active
Directory domain. The KDC runs on each domain controller as
part of Active Directory Domain Services and is implemented as a
domain service. The KDC uses Active Directory as its account
database. In implementations of the Kerberos protocol, the KDC
is a single process that provides two services: Authentication
Service (AS) and Ticket Granting Service (TGS).
kdc.lm.example.com
AdminServer hostname
This is the same as the KDC hostname.
oam11g.example.com
OAM Server hostname
LM.EXAMPLE.COM
LMSIB.SPRITE.COM
Default Active Directory Realm
Second Active Directory Realm
The realm name identifies the location of the user account. A
realm name can be either a prefix or a suffix.
When an access client sends user credentials, a user name is often
included. Within the user name are two elements: a user account
name and user account location.

Preparing Your Active Directory/Kerberos Topology
Configuring Access Manager for Windows Native Authentication 50-7
Commands in the following procedure are for a Unix Operating System. Command
syntax will vary depending on the specific Operating System in your environment.
To prepare Active Directory and Kerberos
1. Check the Oracle certification matrix to ensure you are installing a supported
version of Active Directory for this integration:
https://www.oracle.com/technetwork/middleware/ias/downloads/fusion-certificatio
n-100350.html
2. Install and configure Active Directory as follows:
■Multi-Forest topology with requisite trust relationships configured and
functional, including:
a. User accounts to map Kerberos services
b. Service Principal Names (SPNs) for these user accounts (the name by which
a client uniquely identifies an instance of a service).
c. Key tab files
■Active Directory Global Catalog (ADGC) enabled and functional within each
forest
■Multi-Forest Deployment: In this case, ensure there exists a naming attribute
(available in global catalog) that uniquely identifies the users originating from
various forests. Generally,
userprincipalname
is unique for the forest and
samAccountName
is unique for the domain
■One domain that is directly or indirectly trusted by every other domain,
regardless of forest affiliation.
3. Create a user for Access Manager, use during WNA authentication and record this
username for generating the keytab file (no DES encryption).
4. Record the OAM Server hostname. For example:
oam11g.example.com
5. Record the KDC hostname and the Active Directory domain/realm:
KDC = kdc.lm.example.com
Default AD Realm = lm.example.com
6. Create the Service Principal Name (SPN) of the Active Directory user that the
OAM Server client is using, and record the results (including encryption type). For
example:
ktpass -princ <protocol/oamserver_host> -pass <mypassword> -mapuser <user from
step 1> -out <path_to_filename>
ktpass -princ HTTP/oam11g.example.com@lm.example.com -mapuser oam -pass
HTTP/fully_qualified_
OAMServerhostname@REAL
M_NAME (in CAPITAL
letters
Service Principal Names (SPNs) are needed for user accounts (the
name by which a client uniquely identifies an instance of a
service).
Note: If you install multiple instances of a service on computers
throughout a forest, each instance must have its own Service
Principal Name.
Table 50–1 (Cont.) Sample Naming
Name Description

Preparing Your Active Directory/Kerberos Topology
50-8 Administrator's Guide for Oracle Access Management
examplepw -out c:\temp\oam.keytab
C:\Users\Administrator>ktpass -princ HTTP/oam11g.example.com@LM.EXAMPLE.COM
-mapuser oam -pass welcome1 -out c:\temp\oam.keytab
Targeting domain controller: kdc.lm.example.com
Using legacy password setting method
Successfully mapped HTTP/oam11g.example.com to oam.
WARNING: pType and account type do not match. This might cause problems.
Key created.
Output keytab to c:\temp\oam.keytab:
Keytab version: 0x502
keysize 80 HTTP/oam11g.example.com@lm.example.com ptype 0 (KRB5_NT_
UNKNOWN) vno 3 etype 0x17 (RC4-HMAC) keylength 16 (0xa3a685f89364d4a
5182b028fbe79ac38)
7. Copy the newly created keytab file to the proper location on the OAM Server and
ensure permissions are correct so that the user who created Access Manager can
access this file for running
ktpass
command.
8. Create a simple OAM Server Kerberos krb5.conf or krb5.ini configuration. For
example:
[libdefaults]
default_realm = lm.example.com
ticket_lifetime = 600
clock_skew = 600
[realms]
lm.example.com = { --
kdc = kdc.lm.example.com
admin_server = kdc.lm.example.com
default_domain = lm.example.com
}
[domain_realm]
lm.example.com =LM.EXAMPLE.COM
.lm.example.com = LM.EXAMPLE.COM
9. Veri fy t he
klist
and
kinits
work using the keytab file and SPN of the Active
Directory and Access Manager user created, then record the results.
Note: If the user is not part of the Administrators group, follow this
procedure to explicitly allow a remote desktop connection for the user.
1. From the Oracle Access Management Console, navigate to the Remote tab
through Control Panel -> Remote Settings -> System Properties.
2. Select the "allow connections from computers running any version of
Remote Desktop" option.
3. Click Select Users.
4. Add the user.
5. Click Apply.
Note: The OAM account is created in one domain that is trusted by
all, lm.example.com. This is not required for lmsib.sprite.com.

Performing Oracle-Specific Prerequisite Tasks
Configuring Access Manager for Windows Native Authentication 50-9
a. kdestroy
b. klist [-k] [-t <keytab_filename>]. For example:
bash-3.2$ klist -k -t -K -e FILE:/refresh/home/oam.keytab
Keytab name: FILE:/refresh/home/oam.keytab
KVNO Timestamp Principal
---- ----------------- ---------------------------------------------------
3 12/31/69 19:00:00 HTTP/oam11g.example.com@lm.example.com (ArcFour
with HMAC/md5)(0xa3a685f89364d4a5182b028fbe79ac38)
bash-3.2$
c. kdestroy
d. kinit [-k] [-t <keytab_filename>] [<principal>]. For example:
klist -k -t -K -e FILE:/refresh/home/oam.keytab
bash-3.2$ kinit -V -k -t /refresh/home/oam.keytab
HTTP/oam11g.example.com@lm.example.com
Authenticated to Kerberos v5
e. klist -e
bash-3.2$ klist -e
Ticket cache: FILE:/tmp/krb5cc_8000
Default principal: HTTP/oam11g.example.com@lm.example.com
Valid starting Expires Service principal
02/25/12 18:46:55 02/25/12 18:56:55 krbtgt/LM.EXAMPLE.COM@LM.EXAMPLE.COM
Etype (skey, tkt): ArcFour with HMAC/md5, AES-256 CTS mode with 96-bit
SHA-1 HMAC
Kerberos 4 ticket cache: /tmp/tkt8000
klist: You have no tickets cached
bash-3.2$
10. Proceed as follows:
Successful: Continue with "Performing Oracle-Specific Prerequisite Tasks".
Not Successful: Stop and resolve the issue which is not related to this integration.
Any failure at this point indicates Access Manager WNA cannot work.
50.3 Performing Oracle-Specific Prerequisite Tasks
You need a fully-functioning Access Manager deployment. The tasks in this section are
required regardless of the approach you choose. See:
■Confirming Access Manager Operation
50.3.1 Confirming Access Manager Operation
In this procedure you will install and register a WebGate, which configures an
Application Domain to protect resources. Then you verify that the environment is
working with an authentication scheme other than Kerberos.
Note: Information in this chapter is based on Access Manager.

Enabling the Browser to Return Kerberos Tokens
50-10 Administrator's Guide for Oracle Access Management
To validate your Access Manager environment
1. Log in to the Oracle Access Management Console using Administrator credentials,
as described in the Chapter 2.
2. Verify the Default Identity Store connection.
3. Register and install WebGate as an OAM Agent and accept automatic policy
generation, as described in the Chapter 16.
4. Add resources to the Application Domain and customize the authentication policy
protecting resources to use any Authentication Scheme other than Kerberos.
5. Test the configuration to ensure that resource protection and access are working as
expected.
6. Proceed to "Enabling the Browser to Return Kerberos Tokens".
50.4 Enabling the Browser to Return Kerberos Tokens
Use either of the following procedures to configure the Internet Explorer or Mozilla
Firefox browsers to return Kerberos tokens. Perform the appropriate procedure on all
Active Directory servers.
To enable Kerberos tokens in Internet Explorer
1. On a Windows host in the Active Directory domain, sign in as a domain user.
2. Open the Internet Explorer browser.
3. From the Tools menu, click Internet Options, click Security, click Local Intranet,
click Advanced.
4. On the Advanced tab, Security section, check the box beside Enable Integrated
Windows Authentication, and click OK.
5. Add Oracle Access Manager CC host or domain name to Local Intranet zone (use the
format
http://node.host:port
(the port is not required)). For example:
http://oam11g.example.com
6. Restart the Internet Explorer browser to enable the change.
To enable Kerberos tokens in Mozilla Firefox
1. In the browser Address bar, enter
about:config
.
2. Add Oracle Access Manager CC host or domain name under
network.negotiate-auth.trusted-uris as:
network.negotiate-auth.trusted-uris=http://oam11g.example.com
Multiple URIs are separated with a comma.
See Also: Oracle Fusion Middleware High Availability Guide for
details about high availability environments with two or more
Managed Servers configured to operate as a cluster
Note: With Internet Explorer browsers, Integrated Windows
Authentication is enabled by default and you might not need any
changes to the default configuration for WNA to work.

Integrating KerberosPlugin with Oracle Virtual Directory
Configuring Access Manager for Windows Native Authentication 50-11
50.5 Integrating KerberosPlugin with Oracle Virtual Directory
Oracle Virtual Directory provides the ability to integrate LDAP-aware applications
into diverse directory environments while minimizing or eliminating the need to
change either the infrastructure or the applications. This section provides the tasks you
must perform to configure Access Manager KerberosPlugin authentication for WNA
with Oracle Virtual Directory.
This section provides the following topics with steps you can follow:
Task overview: Integrating Access Manager KerberosPlugin with Oracle Virtual
Directory
1. Perform tasks in this section:
■Preparing Oracle Virtual Directory for Integration
■Registering Oracle Virtual Directory as the Default Store for WNA
■Setting Up Authentication with Access Manager KerberosPlugin and OVD
2. Configuring Access Manager for Windows Native Authentication
3. Enabling the Browser to Return Kerberos Tokens
4. Validating WNA with Access Manager-Protected Resources
50.5.1 Preparing Oracle Virtual Directory for Integration
Oracle Virtual Directory communicates with other directories through adapters. Before
you can start using Oracle Virtual Directory as an identity store, you must create
adapters to each of the directories you want to use.
The procedure differs slightly, depending on the directory to which you are
connecting. If you choose to use Oracle Internet Directory, Active Directory, Oracle
Directory Server Enterprise Edition (ODSEE), or Oracle Unified Directory, the required
adapters are created and configured while installing and configuring the Oracle
Identity Management Server. For more information on managing the adapters, see
"Managing Identity Virtualization Library (libOVD) Adapters" in the Oracle Fusion
Middleware Administrator's Guide for Oracle Identity Manager.
In the following procedure you create an account for the OAM Server in the trusted
domain. Additionally, you create two Active Directory Adapters (one for each forest)
using the fully-qualified domain names as namespaces.
By default Active Directory uses
dc
to construct the root context distinguished name. If
this is different in your deployment, adjust your adapter namespaces accordingly.
To deploy Oracle Virtual Directory for this integration
1. Perform tasks described in "Confirming Access Manager Operation".
2. Install Oracle Virtual Directory, as described in Oracle Fusion Middleware
Installation Guide for Oracle Identity and Access Management.
3. In Oracle Virtual Directory Console, create two Active Directory Adapters (one
for each forest) using the fully-qualified domain names as namespaces as follows:
a. Adapter 1, EXAMPLE Adapter namespace (domain DNS
lm.example.com
):
dc=lm,dc=example,dc=com
b. Adapter 2, SPRITE Adapter namespace (domain DNS
lmsib.sprite.com
):
dc=lmsib,dc=sprite,dc=com

Integrating KerberosPlugin with Oracle Virtual Directory
50-12 Administrator's Guide for Oracle Access Management
4. Shut down the OAM Cluster.
5. Restart the AdminServer and all OAM Servers.
6. Proceed with "Registering Oracle Virtual Directory as the Default Store for WNA".
50.5.2 Registering Oracle Virtual Directory as the Default Store for WNA
Users with valid Oracle Access Management Administrator credentials can perform
the following task to register Oracle Virtual Directory as the user store for Access
Manager interoperating with Windows Native Authentication.
For Windows Native Authentication, the user credentials must reside in Microsoft
Active Directory. Access Directory can be managed by Oracle Virtual Directory
instance. For single sign-on with Access Manager, each User Identity Store must be
registered to operate with Access Manager.
Typically,
userprincipalname
reflects the Windows login name. For WNA with Access
Manager, either leave the User Search Base and Group Search Base blank or provide
the distinguished name path that is common to both the adapters configured while
performing prerequisite tasks.
Prerequisites
Preparing Your Active Directory/Kerberos Topology
Performing Oracle-Specific Prerequisite Tasks
To register the Oracle Virtual Directory with Access Manager
1. From the Oracle Access Management Console, open the Data Sources node:
System Configuration tab
Common Configuration section
Data Sources node
2. Click the User Identity Stores node, and then click the Add button in the tool bar.
3. Enter required values for your Oracle Virtual Directory instance. For example:
Name:
OVD
LDAP Url:
ldap://ovd_host.domain.com:389
Principal:
cn=Administrator,cn=users,dc=lm,dc=example,dc=com
Credential:
********
User Search Base:
dc=com
User Name Attribute:
userprincipalname
Group Name: cn
Group Search Base:
dc=com
LDAP Provider: Oracle Virtual Directory
4. Default Store: Click the Default Store button to make this the user Identity Store
for Access Manager.
5. Click Apply to submit the registration, then dismiss the Confirmation window.
6. Restart the AdminServer and OAM Servers.
7. Proceed to "Setting Up Authentication with Access Manager KerberosPlugin and
OVD".
See Also: Chapter 5

Integrating KerberosPlugin with Oracle Virtual Directory
Configuring Access Manager for Windows Native Authentication 50-13
50.5.3 Setting Up Authentication with Access Manager KerberosPlugin and OVD
When a native authentication module does not offer enough flexibility for your needs,
you can create a custom authentication module using plug-ins designed to meet
specific needs.
The
KerberosPlugin
is a credential mapping module that matches the credentials
(encrypted username in the Kerberos ticket (SPNEGO token)) of the user who requests
the resource. By default,
KerberosPlugin
maps the domain DNS name to the
corresponding distinguished name using the
dc
component. However, if the mapping
is different, you can specify the correct mapping as a semi-colon (;) separated list of
name:value tokens. For example:
LM.EXAMPLE.COM:dc=lm,dc=example,dc=com;LMSIB.SPRITE.COM:dc=lmsib,dc=sprite,dc=com
Users with valid Oracle Access Management Administrator credentials can perform
the following task to replace default
KerberosPlugin
steps with steps that enable
integration for Windows Native Authentication using the Oracle Access Management
Console.
To set up the Access Manager KerberosPlugin for OVD
1. From the Oracle Access Management Console, open the:
System Configuration tab
Access Manager section
Authentication Modules node
Custom Authentication Modules node
KerberosPlugin
2. On the KerberosPlugin page, click the Steps tab.
Steps Tab: Replace stepKTA, as described here, then click Save.
a. Click stepKTA then click the Delete (x) button to remove this step.
b. Click the Add (+) button and add the following step to the plug-in:
Step Details:
Edit this new stepKTA to change the Step Orchestration value from NULL
(defined during the step deletion) to its default value of:
On Success: StepUIF Failure Failure
Also, confirm that this new stepKTA includes the parameter
KEY_DOMAIN_DNS2DN_
MAP
(created earlier), enter the appropriate values for your deployment and click
Save.
See Also: Chapter 14
Element Description
Name stepKTA
Class KerberosTokenAuthenticator

Integrating Access Manager KerberosPlugin with Search Failover
50-14 Administrator's Guide for Oracle Access Management
3. stepUIF Details: Configure as follows and click Save:
4. stepUI and stepUA: Configure as follows and Save:
5. Save the changes.
6. Restart the OAM Cluster.
7. Proceed with "Configuring Access Manager for Windows Native Authentication".
50.6 Integrating Access Manager KerberosPlugin with Search Failover
In cases where Oracle Virtual directory deployment is not viable, and it is acceptable to
perform search failover based on some order or hierarchy when finding the user, you
can configure Access Manager as described in this section.
Task overview: Integrating Access Manager KerberosPlugin with Search Failover
1. Completing tasks in the following earlier sections:
■"Preparing Your Active Directory/Kerberos Topology"
■"Performing Oracle-Specific Prerequisite Tasks" (except "Preparing Oracle
Virtual Directory for This Integration", which is not needed for Search
Failover)
■"Enabling the Browser to Return Kerberos Tokens"
2. Performing tasks in this section:
■"Registering Microsoft Active Directory Instances with Access Manager"
■"Setting Up Access Manager KerberosPlugin for ADGCs"
3. "Configuring Access Manager for Windows Native Authentication"
4. "Validating WNA with Access Manager-Protected Resources"
Element Description
KEY_DOMAIN_DNS2DN_MAP Active Directory Forests in your deployment. For example:
LM.EXAMPLE.COM:dc=lm,dc=example,dc=com;LMSIB.SPR
ITE.COM:dc=lmsib,dc=sprite,dc=com
Note: By default, a DN domain name a.b.c is mapped into
dc=a,dc=b,dc=c. Only if the mapping is different, one has to
specify the parameter. Otherwise it is best not to use it and let
the default behavior take its course.
Service Principal HTTP/oam11g.example.com@LM.EXAMPLE.COM
keytab.conf keytab.conf location for stepKTA
krb5.conf krb5.conf location for stepKTA
Element Description
KEY_LDAP_FILTER (samAccountName={KEY_USERNAME})
KEY_IDENTITY_STORE_REF OVD
KEY_SEARCHBASE_URL Leave this empty
KEY_IDENTITY_STORE_REF OVD

Integrating Access Manager KerberosPlugin with Search Failover
Configuring Access Manager for Windows Native Authentication 50-15
50.6.1 Registering Microsoft Active Directory Instances with Access Manager
Users with valid Oracle Access Management Administrator credentials can perform
the following task to register each Active Directory Global Catalog (ADGC), with
relevant search bases and naming attributes, as an individual User Identity Store for
Oracle Access Management.
Prerequisites
A fully-configured Microsoft Active Directory authentication service should be set up
with User accounts for mapping Kerberos services, Service Principal Names (SPNs) for
those accounts, and Key tab files. For more information, see Oracle Fusion Middleware
Securing Oracle WebLogic Server 11g Release 1 (10.3.3).
To register Microsoft Active Directory Global Catalogs with Access Manager
1. From the Oracle Access Management Console, open the Data Sources node:
System Configuration tab
Common Configuration section
Data Sources node
2. Click the User Identity Stores node, and then click the Add button in the tool bar.
3. Enter required values for your first ADGC. For example:
Name:
ADGC1-EXAMPLE
LDAP Url:
ldap://ADGC1_host.domain.com:389
Principal:
cn=Administrator,cn=users,dc=lm,dc=example,dc=com
Credential: ********
User Search Base:
dc=lm,dc=example,dc=com
User Name Attribute:
userprincipalname
Group Search Base:
dc=lm,dc=example,dc=com
LDAP Provider: AD
4. Default Store: Click the Default Store button.
5. Click Apply to submit the changes and dismiss the confirmation window.
6. Repeat these steps to add the second ADGC (ADGC2-SPRITE) with appropriate
search bases and naming attributes.
Name:
ADGC2-SPRITE
LDAP Url:
ldap://ADGC2_host.domain.com:389
Principal:
cn=Administrator,cn=users,dc=lm,dc=example,dc=com
Credential: ********
User Search Base:
dc=lmsib,dc=example,dc=com
User Name Attribute:
userprincipalname
Group Search Base:
dc=lmsib,dc=example,dc=com
LDAP Provider: AD
7. Restart the AdminServer and OAM Servers.
8. Proceed to "Setting Up Access Manager KerberosPlugin for ADGCs".
See Also: Chapter 5 for details about registering data sources

Integrating Access Manager KerberosPlugin with Search Failover
50-16 Administrator's Guide for Oracle Access Management
50.6.2 Setting Up Access Manager KerberosPlugin for ADGCs
When a native authentication module does not offer enough flexibility for your needs,
you can create a custom authentication module using plug-ins designed to meet
specific needs.
The KerberosPlugin is a credential mapping module that matches the credentials
(username and password) of the user who requests a resource to the encrypted
"Kerberos ticket". By default, KerberosPlugin maps the domain DNS name to the
corresponding distinguished name using the
dc
component. However, if the mapping
is different, you can specify the correct mapping as a semi-colon (;) separated list of
name:value tokens. For example:
LM.EXAMPLE.COM:dc=lm,dc=example,dc=com;LMSIB.SPRITE.COM:dc=lmsib,dc=sprite,dc=com
Users with valid Oracle Access Management Administrator credentials can perform
the following task to replace or update KerberosPlugin steps with steps that point to
the ADGCs you have created. These will operate in tandem with their counterparts (if
the initial step and ADGC fail, the secondary ADGC is used).
Prerequisites
Preparing Your Active Directory/Kerberos Topology
Performing Oracle-Specific Prerequisite Tasks
To set up the Access Manager KerberosPlugin for ADGCs
1. From the Oracle Access Management Console, open the:
System Configuration tab
Access Manager section
Authentication Modules node
Custom Authentication Modules node
KerberosPlugin
2. On the KerberosPlugin page, click the Steps tab.
Steps Tab: Replace stepKTA, as described here, then click Save.
a. Click stepKTA then click the Delete (x) button to remove this step.
b. Click the Add (+) button and add the following step to the plug-in:
New stepKTA Details:
Confirm that this new stepKTA includes the parameter
KEY_DOMAIN_DNS2DN_MAP
(created earlier) and enter values for your deployment:
See Also: Chapter 14 for plug-in details
Element Description
Name stepKTA
Class KerberosTokenAuthenticator
Element Description
KEY_DOMAIN_DNS2DN_MAP
LM.EXAMPLE.COM:dc=lm,dc=example,dc=com;LMSIB.
SPRITE.COM:dc=lmsib,dc=sprite,dc=com
Service Principal HTTP/oam11g.example.com@LM.EXAMPLE.COM

Integrating Access Manager KerberosPlugin with Search Failover
Configuring Access Manager for Windows Native Authentication 50-17
3. stepUIF: Step Details (configure as follows and save):
4. stepUI and stepUA: Step Details (configure these steps and save):
5. Save the changes.
6. Add stepUIF2: This will operate in tandem and execute if stepUIF fails:
7. Add stepUI2: This will operate in tandem and execute if stepUI fails:
8. Add stepUA2: This executes when stepUI2 succeeds:
9. Add Step Details: Common Configuration, Plugins, KerberosTokenAutheticator.
Enter values for your deployment:
keytab.conf keytab.conf location for stepKTA. For example:
/refresh/home/oam.keytab
krb5.conf krb5.conf location for stepKTA.
/etc/krb5.conf
Element Description
KEY_IDENTITY_STORE_REF ADGC1-ORACLE
KEY_SEARCHBASE_URL {KEY_USERDOMAIN}
KEY_LDAP_FILTER (samAccountName={KEY_USERNAME})
NOTE: For untrusted, multi-domain Active
Directory environments, use the
userPrincipalName
user attribute.
Element Description
KEY_IDENTITY_STORE_REF ADGC1-ORACLE
Element Description
KEY_IDENTITY_STORE_REF ADGC2-SPRITE
KEY_SEARCHBASE_URL {KEY_USERDOMAIN}
KEY_LDAP_FILTER (samAccountName= {KEY_USERNAME})
NOTE: For untrusted, multi-domain Active
Directory environments, use the
userPrincipalName
user attribute.
Element Description
KEY_IDENTITY_STORE_REF ADGC2-SPRITE
Element Description
KEY_IDENTITY_STORE_REF ADGC1-EXAMPLE and ADGC2-SPRITE,
respectively
Element Description

Configuring Access Manager for Windows Native Authentication
50-18 Administrator's Guide for Oracle Access Management
10. Restart the OAM Cluster.
11. Proceed with "Configuring Access Manager for Windows Native Authentication".
50.7 Configuring Access Manager for Windows Native Authentication
Whether you are using Oracle Virtual Directory or Active Directory with Global
Catalogs, this section provides the following topics with steps you can follow:
■Creating the Authentication Scheme for Windows Native Authentication
■Configuring Access Manager Policies for Windows Native Authentication
■Configuring WNA for NTLM Fallback
■Verifying the Access Manager Configuration File
50.7.1 Creating the Authentication Scheme for Windows Native Authentication
Users with valid Oracle Access Management Administrator credentials can perform
the following task to define an authentication scheme for the Access Manager to use in
policies protecting applications for Windows Native authentication.
Prerequisites
Integrating KerberosPlugin with Oracle Virtual Directory
Or
Integrating Access Manager KerberosPlugin with Search Failover
To create the Kerberos authentication scheme for WNA
1. Open the Oracle Access Management Console, Launch Pad and click
Authentication Schemes in the Access Manager section.
The Search Authentication Schemes page opens.
2. Under Search, type KerberosScheme in the Name box and click Search.
3. Click KerberosScheme in the search results to open it.
Set (or confirm) the following attributes:
Challenge Method: WNA
Authentication Module: KerberosPlugin
4. Finish configuring KerberosScheme for your deployment.
5. Click Apply and close the confirmation window.
6. Proceed to "Configuring Access Manager Policies for Windows Native
Authentication".
Element Description
keytab.conf keytab.conf location for stepKTA. For example:
/refresh/home/oam.keytab
krb5.conf krb5.conf location for stepKTA. For example:
/etc/krb5.conf
See Also: Chapter 19 for authentication scheme details

Configuring Access Manager for Windows Native Authentication
Configuring Access Manager for Windows Native Authentication 50-19
50.7.2 Configuring Access Manager Policies for Windows Native Authentication
In this procedure you edit (or Create) an Application Domain and policies to protect
resources for Windows Native Authentication.
Prerequisites
Creating the Authentication Scheme for Windows Native Authentication
To set Access Manager policies for Windows Native Authentication
1. Open the Oracle Access Management Console, Launch Pad and click Application
Domains in the Access Manager section.
2. Open (or Create) the desired Application Domain, as described in "Managing
Application Domains and Policies Using the Console" on page 20-10.
3. Resource Definitions: Add Resource Definitions to the domain as described in
"Adding and Managing Policy Resource Definitions" on page 20-14.
4. Authentication Policies:
a. Open the Authentication Policies node, and open (or Create) the desired
Authentication Policy with the following attributes:
Authentication Scheme: KerbScheme as the and ensure that it includes the
updated KerberosPlugin.
Choose KerbScheme as the Authentication Scheme and ensure that it includes
the updated KerberosPlugin.
b. Click Apply, close the Confirmation window.
c. Resources for Authentication Policy: Add Resources to the Authentication
Policy as described in the Oracle Fusion Middleware Administrator's Guide
for Oracle Access Management.
d. Complete the Authentication Policy with any desired Responses.
5. Authorization Policies: Complete the Authentication Policy with any desired
Responses or Conditions as described in "Defining Authorization Policies for
Specific Resources" on page 20-37.
6. Proceed to "Verifying the Access Manager Configuration File".
50.7.3 Configuring WNA for NTLM Fallback
Follow these steps to configure Access Manager to use WNA Fallback Authentication
upon receiving an NTLM token. For more information, see Section 50.1.1, "Access
Manager WNA Login and Fall Back Authentication."
1. Stop the OAM managed server.
2. Back up the following file to a safe location:
<WLS domain>/config/fmwconfig/oam-config.xml
3. Modify
<WLS domain>/config/fmwconfig/oam-config.xml
as follows:
a. Find the following line:
<Setting Name="CredentialCollector" Type="htf:map">
b. After the line, add the following elements (if they are not already present):
See Also: Chapter 20 for details about managing policies

Validating WNA with Access Manager-Protected Resources
50-20 Administrator's Guide for Oracle Access Management
--------------------------------------------------------------------------
<Setting Name="WNAOptions" Type="htf:map">
<Setting Name="HandleNTLMResponse" Type="xsd:string">BASIC</Setting>
</Setting>
--------------------------------------------------------------------------
If the following parameter already exists:
<Setting Name="HandleNTLMResponse" Type="xsd:string">DEFAULT</Setting>
change the
HandleNTLMResponse
value from
DEFAULT
to
BASIC
. For example:
<Setting Name="HandleNTLMResponse" Type="xsd:string">BASIC</Setting>
4. Restart the OAM server processes.
50.7.4 Verifying the Access Manager Configuration File
Verify that the following are specified in the
oam-config.xml
file:
■path to the
krb5.conf
file
■path to the
keytab
file
■a principal to connect with KDC
Example: oam-config.xml
<Setting Name="KerberosModules" Type="htf:map">
<Setting Name="6DBSE52C" Type="htf:map">
<Setting Name="principal"
Type="xsd:string">HTTP/oam11g.example.com@LM.EXAMPLE.COM
</Setting>
<Setting Name="name" Type="xsd:string">XYZKerberosModule</Setting>
<Setting Name="keytabfile"
Type="xsd:string">/refresh/home/oam.keytab
</Setting>
<Setting Name="krbconfigfile" Type="xsd:string">/etc/krb5.conf</Setting>
</Setting>
</Setting>
50.8 Validating WNA with Access Manager-Protected Resources
Integrated Windows Authentication (IWA) is associated with Microsoft products that
use SPNEGO, Kerberos, and NTLMSSP authentication protocols included with certain
Windows operating systems. The term Integrated Windows Authentication (IWA) is
used for the automatic authentication process that happens between Microsoft Internet
Information Services, Internet Explorer, and Microsoft's Active Directory.
WNA authentication occurs internally. When integrated with Access Manager:
■The user is redirected to the Access Manager for authentication.
Note: IWA is also known by other names such as HTTP Negotiate
authentication, NT Authentication, NTLM Authentication, Domain
authentication, Windows Integrated Authentication, Windows NT
Challenge/Response authentication and Windows Authentication.

Configuring WNA For Use With DCC
Configuring Access Manager for Windows Native Authentication 50-21
■The OAM Server requests authentication with a www-negotiate header when the
resource is protected by Access Manager with a challenge method of WNA.
■The browser configured for Integrated Windows Authentication (IWA) sends the
Kerberos SPNEGO token to the OAM Server for decryption.
■The OAM Server decrypts the received user SPNEGO token (using keytab) and
redirects the user back to the Agent with the cookie and gets access to the resource.
To validate WNA with Access Manager-protected resources
1. Log in to a Windows system in the Active Directory domain as a domain user.
2. Sign in to the Windows OS client using the Windows domain credentials stored in
a hosted Active Directory that is registered with Access Manager.
3. Open an Internet Explorer browser window, and enter the URL for the
OAM-protected application in your environment.
4. Confirm that you are logged in to the application with your Windows domain
credentials with no additional login.
50.9 Configuring WNA For Use With DCC
The Kerberos authentication protocol provides a mechanism for mutual authentication
between entities before a secure network connection is established. This section
provides information on how to configure Windows Native Authentication and
Kerberos to use the DCC with Access Manager. It contains the following topics.
■Initializing the Kerberos Protocol
■Configuring Access Manager
50.9.1 Initializing the Kerberos Protocol
To initialize Access Manager for the Kerberos protocol, do the following.
1. Run the
ktpass
command on the Windows data store, substituting the appropriate
values for service, realm, user and user password.
ktpass -princ <SPN>@<REALM> -pass <Password> -mapuser <UserName>
-out <Keytab file name>
For example:
ktpass -princ HTTP/adc.example1.com@EXAMPLE.COM -pass Welcome1 -mapuser
anil@example.com -out foobar2.keytab
This command creates an SPN and associates it with the local service account
created in the previous step.
2. Copy the keytab output generated by the
ktpass
command and leave it at an
appropriate location on the Access Manager server.
Note: See Section 18.5, "Introducing Access Manager Credential
Collection and Login" for details on DCC.
Note: Only RC4-HMAC encryption is supported; do not use DES
encryption.

Configuring WNA For Use With DCC
50-22 Administrator's Guide for Oracle Access Management
3. Modify the
/etc/krb5.conf
file on the Access Manager server accordingly.
For example:
[loggings]
default = FILE:/scratch/anikukum/krb/krb5libs.log
kdc = FILE:/scratch/anikukum/krb/krb5kdc.log
admin_server = FILE:/scratch/anikukum/krb/krbadmin.log
[libdefaults]
default_realm = EXAMPLE.COM
ticket_lifetime = 24h
forwardable = yes
dns_lookup_realm = false
dns_lookup_kdc = false
default_tkt_enctypes = rc4-hmac
default_tgs_enctypes = rc4-hmac
permitted_enctypes = rc4-hmac
clockskew = 3600
[realms]
EXAMPLE.COM = {
kdc = adc.example1.com
admin_server = adc.example1.com
default_domain = EXAMPLE.COM
}
[domain_realm]
example.com = EXAMPLE.COM
.example.com = EXAMPLE.COM
4. Run the
kinit
command on the Access Manager machine to obtain a Kerberos
ticket.
kinit -k -t <keytab file> <SPN>@<Realm>
Note: For multiple domain Active Directory environments, add
entries for each domain as documented below.
[realms]
EXAMPLE.COM = {
kdc = adc.example1.com
admin_server = adc.example1.com
default_domain = EXAMPLE.COM
}
SPRITE.COM = {
kdc = lmsib.sprite.com
admin_server = lmsib.sprite.com
default_domain = SPRITE.COM
}
[domain_realm]
example.com = EXAMPLE.COM
.example.com = EXAMPLE.COM
sprite.com = SPRITE.COM
.sprite.com = SPRITE.COM

Configuring Access for Multiple Untrusted Active Directory Forests
Configuring Access Manager for Windows Native Authentication 50-23
For example:
kinit -k -t foobar1.keytab HTTP/adc.example1.com@EXAMPLE.COM
5. Validate the Kerberos ticket on the Access Manager machine using the klist
command.
klist
50.9.2 Configuring Access Manager
This procedure will configure Access Manager to use the Kerberos Authentication
Module.
1. Modify the Challenge Method of the Kerberos authentication scheme to WNA, if
applicable.
a. Click Authentication Schemes from the Launch Pad.
b. Search for KerberosScheme and click Edit.
c. Change the Challenge Redirect URL to DCC WebGate URL.
For example, http://<DCC-WebGate-Hostname>:<Port>
d. Click Apply and close the page.
2. Configure the User Identity Store for LDAP Authentication Module to the
configured Windows data store.
a. Click Authentication Modules from the Launch Pad.
b. Search for LDAP and click Edit.
c. Change the User Identity Store to, for example, Active Directory.
d. Click Apply and close the page.
3. Configure the Application Domain protecting the resource to use the Kerberos
authentication scheme.
Before accessing the protected resource ensure that its URL is added to the local
intranet Site of Security. Additionally, check the Enable Integrated Windows
Authentication option under Security in the Advance tab.
50.10 Configuring Access for Multiple Untrusted Active Directory Forests
Windows Native Authentication (WNA) allows a User who is logged into their
desktop, and is a member of an Active Directory domain, to open an Internet browser,
locate an Access Manager protected application, and login using their Windows
Kerberos ticket without being challenged (essentially, single sign-on). This solution
currently works against a single Active Directory Forest, but if a client has multiple
untrusted Active Directory Forests the procedure documented in this section must be
followed. This procedure requires that:
■(Minimally) OAM11gR1 with Bundle Patch 05 (11.1.1.5.5) or OAM11gR2
(11.1.2.0.1) is installed and working.
This procedure requires that OAM11gR1 (11.1.1.5.0) be patched with bundle patch
BP05 (patch 14760839). It is not necessary to patch OAM11gR2 (11.1.2.0.1) although
it is a best practice to apply the latest patch which usually includes fixes and some
new features.

Configuring Access for Multiple Untrusted Active Directory Forests
50-24 Administrator's Guide for Oracle Access Management
■OVD11gR1+ is installed and configured against all three Active Directory Forests.
An alternative is to use a single Enterprise Directory Server LDAP store as long as
the userPrincipalName or samAccountNames are synchronized in all Active
Directory domains from which the Users would login.
■An experienced Administrator who is familiar with OAM11g, OVD11g, and has
knowledge of Kerberos and WNA is following the procedure.
Additionally, out-of-the-box the standard OAM Kerberos plugin works to accomplish
basic WNA integration against a single domain. However, a custom Kerberos
authentication module is required to authenticate against multiple untrusted forests or
domains. The following sections guide you through the procedure.
■Create Service Principal Accounts
■Generating a Master Keytab File
■Configuring the krb5.conf File
■Validating Access to the KDC Servers Using the Keytabs
■Creating the Active Directory or Oracle Virtual Directory User Stores
■Creating the Custom Kerberos Authentication Module
■Configuring Integrated Windows Authentication
■Testing the Configurations
■Troubleshooting the Configurations
50.10.1 Create Service Principal Accounts
A service principal account must be created on each Kerberos Key Distribution Center
(KDC) server that will be used by the Access Manager server for WNA. The service
principal account is created like any User, does not need any special permission or to
be part of any group, and the user name can be different across individual KDC
servers. However, even though this new account is created like a regular User, it
should be considered a service account. The account is not meant for a User to login to
a domain; it is only meant as a service principal that is mapped and encrypted into a
keytab. Access Manager will use the keytab for WNA against each respective KDC
server.
50.10.2 Generating a Master Keytab File
A keytab is a file that contains an unencrypted list of service principals and their
respective keys. The Access Manager Kerberos authentication module will use the
keytab to validate the User's Kerberos service ticket as part of the SSO process.
Note: If the user is not part of the Administrators group, you must
explicitly Allow Remote Desktop connection using the KDC console as
follows.
1. Navigate through Control Panel -> Remote Settings -> System Properties
(Remote tab).
2. Select the Allow connections from computers running any version of Remote
Desktop option.
3. Click Select Users and add the service principal user.
4. Click Apply.

Configuring Access for Multiple Untrusted Active Directory Forests
Configuring Access Manager for Windows Native Authentication 50-25
The ktpass tool is a utility, available with the Windows Server, used to create keytab
files. The first keytab generated for a KDC server is considered the seed keytab file.
ktpass will then be used to generate a keytab for each KDC server to which Access
Manager will be authenticating. These additional keytabs will be appended to the seed
file so that the final keytab file will contain all keytabs from all KDC servers to be used
by WNA and Access Manager. This final file is called the master keytab file.
1. Run one of the following ktpass commands to generate the first seed keytab file
based on the server you are running.
■If running a Windows 2003 Server, use:
ktpass -princ HTTP/myoam.hostname.com@FOREST1.SPRITE.COM /
-mapuser oamkrb5 /
-pass Oracle123 /
-out forest1.krb5.keytab
■If running a Windows 2008 Server, use:
ktpass -princ HTTP/myoam.hostname.com@FOREST1.SPRITE.COM /
-mapuser oamkrb5 /
-pass Oracle123 /
-ptype KRB5_NT_PRINCIPAL /
-crypto ALL /
-out forest1.krb5.keytab
The parameters are described in Table 50–2.
Successful keytab file generation will display the following message. The warning
is benign and can be ignored.
Targeting domain controller: orcl.forest1.sprite.com
Using legacy password setting method
Successfully mapped HTTP/myoam.hostname.com to oamkrb5.
WARNING: pType and account type do not match. This might cause problems.
Key created.
Output keytab to forest1.krb5.keytab:
Keytab version: 0x502
keysize 75 HTTP/myoam.hostname.com@FOREST1.SPRITE.COM ptype 0
(KRB5_NT_UNKNOWN) vno 3 etype 0x17
(RC4-HMAC) keylength 16 (0x8b2318524d2e3e2e31885afc21024cf5)
2. Using the Active Directory console, validate that the seed keytab was correctly
mapped to the service account.
Table 50–2 ktpass Keytab Generation Parameter Descriptions
Parameter Description
-princ HTTP/<oam_server_hostname>@<kdc_server_hostname>
-mapuser samAccountName of the security principal account
-pass Password for the security principal account
-ptype The general principal type (for Windows 2008 Server only)
-crypto Tells ktpass to output all crypto types (for Windows 2008 Server only)
-out The keytab output file name. The file name is arbitrary and can be anything.
This command generates a keytab file named forest1.krb5.keytab. A tip to
remember: prefix the file name with the KDC server on which it was generated.

Configuring Access for Multiple Untrusted Active Directory Forests
50-26 Administrator's Guide for Oracle Access Management
a. Open Active Directory Users and Computers in the Active Directory console
and navigate to the container in which the service account was created.
b. Right click on the service principal user created and select Properties.
In this procedure, the service principal account is oamkrb5.
c. Select the Account tab and check to see that the User logon name field has the
value HTTP/myoam.hostname.com.
This shows that when ktpass was run it mapped oamkrb5 to the keytab file
that was generated. This validation sequence can be used for any keytab
generation.
3. Generate the keytabs for each KDC server being used, appending these
subsequent keytabs to the seed keytab file just created.
This is an iterative process that will create a single master file containing all
keytabs; this file will be named the master.krb5.keytab file. Follow this sub
procedure to build a master keytab file in a systematic way.
a. Copy the seed forest1.krb5.keytab file previously created to the server on
which you are creating the second/next keytab.
The seed file will be configured as the input file when you run ktpass on the
next server; in this example, forest2.
b. Run the ktpass tool using an additional -in parameter.
The value of this parameter would be the name of the seed keytab file
previously created on forest1 but currently residing on forest2. The value of -in
will be <kdc_server_host>.krb5.keytab; in this example, forest1.krb5.keytab.
ktpass -princ HTTP/myoam.hostname.com@FOREST2.PIXIE.COM /
-mapuser oamkrb5 /
-pass Oracle123 /
-ptype KRB5_NT_PRINCIPAL /
-crypto ALL /
-in forest1.krb5.keytab /
-out forest2.krb5.keytab
Note that the new keytab file (with two defined keytabs) is now named
forest2.krb5.keytab, the value of the -out parameter.
c. Repeat these steps on each KDC server for which you are generating a keytab.
For example, copy the new forest2.krb5.keytab file to the next forest3 KDC
server and run ktpass. Be sure to change the values of the -in and -out
parameters, and use the correct parameters (Table 50–2) based on the server.
Each new keytab file will be appended with the appropriate generated keytab.
d. After configuring a keytab and appending it to the keytab file for each KDC
server, copy the last keytab file created to master.krb5.keytab.
For example:
copy forest3.krb5.keytab master.krb5.keytab
Note: Be sure to use the correct parameters for your server as
documented in Table 50–2.

Configuring Access for Multiple Untrusted Active Directory Forests
Configuring Access Manager for Windows Native Authentication 50-27
e. Copy the master.krb5.keytab file to each of the Access Manager Servers being
used in the topology.
You can place it anywhere as long as it is accessible by the Access Manager
server. It is recommended that the file is owned by the same user account that
can start and stop the Access Manager server.
4. Run the following command in a Linux terminal session to display and validate
the contents of the master keytab file.
klist -k -t -K -e /u01/oracle/wna/master.krb5.keytab
klist is a Linux tool. If using a different platform, search for a tool that will do this
on your platform. The output lists each keytab line-by-line. Ensure that the proper
crypto is used for your Windows server. Following is a sample output for our
example input.
Keytab name: FILE:/u01/oracle/wna/master.krb5.keytab
KVNO Timestamp Principal
---- ----------------- --------------------------------------------------------
3 12/31/69 18:00:00 HTTP/iam.acme.com@FOREST1.SPRITE.COM (ArcFour with
HMAC/md5) (0x8b2318524d2e3e2e31885afc21024cf5)
5 12/31/69 18:00:00 HTTP/iam.acme.com @FOREST2.PIXIE.COM (ArcFour with
HMAC/md5) (0x8b2318524d2e3e2e31885afc21024cf5)
3 12/31/69 18:00:00 HTTP/iam.acme.com @FOREST3.PIXIE.COM (ArcFour with
HMAC/md5) (0x8b2338524d2e3a2e31885afc21024cf5)
Follow this step on every Access Manager server to which the master keytab file is
copied.
50.10.3 Configuring the krb5.conf File
The /etc/krb5.conf file contains Kerberos configuration information including a
mapping to all the KDC and administration servers for the Kerberos realms that the
Access Manager server will use. The following example illustrates KDC mapping for
this example. If additional KDC configuration is required, copy the respective lines
from the [realms] and [domain_realm] sections as needed. Once created, the krb5.conf
file can be copied to all the Access Manager servers.
[libdefaults]
default_realm = FOREST1.SPRITE.COM
ticket_lifetime = 600
dns_lookup_realm = false
dns_lookup_kdc = false
forwardable = yes
udp_preference_limit=1
default_tkt_enctypes = RC4-HMAC
default_tgs_enctypes = RC4-HMAC
[realms]
FOREST1.SPRITE.COM = {
kdc = AD_HOSTNAME_FQN
admin_server = AD_HOSTNAME_FQN
default_domain = FOREST1.SPRITE.COM
}
FOREST2.PIXIE.COM = {
Note: You need to be root to make changes to the krb5.conf file.

Configuring Access for Multiple Untrusted Active Directory Forests
50-28 Administrator's Guide for Oracle Access Management
kdc = host1.server.com
admin_server = host1.server.com
default_domain = FOREST2.PIXIE.COM
}
FOREST3.FAY.COM = {
kdc = host2.server.com
admin_server = host2.server.com
default_domain = FOREST3.FAY.COM
}
[domain_realm]
.forest1.sprite.com = FOREST1.SPRITE.COM
forest1.sprite.com = FOREST1.SPRITE.COM
.forest2.pixie.com = FOREST2.PIXIE.COM
forest2.pixie.com = FOREST2.PIXIE.COM
.forest3.fay.com = FOREST3.FAY.COM
forest3.fay.com = FOREST3.FAY.COM
50.10.4 Validating Access to the KDC Servers Using the Keytabs
Since the master.krb5.keytab file lives on each Access Manager server, the Access
Manager server must be able to reach each KDC server across the network or Kerberos
authentication will fail. The command line tool kinit is used for this validation. It
forces each keytab to attempt authentication against its respective KDC server. The
following commands will attempt authentication of the keytabs in our example.
kinit -V HTTP/iam.acme.com@FOREST1.SPRITE.COM /
-k -t /u01/oracle/wna/master.krb5.keytab
Authenticated to Kerberos v5
kinit -V HTTP/iam.acme.com@FOREST2.PIXIE.COM /
-k -t /u01/oracle/wna/master.krb5.keytab
Authenticated to Kerberos v5
kinit -V HTTP/iam.acme.com@FOREST3.FAY.COM /
-k -t /u01/oracle/wna/master.krb5.keytab
Authenticated to Kerberos v5
Each time kinit is run an output should be displayed that proves the Kerberos
authentication was successful against the KDC. If an error is displayed, verify that the
Access Manager server can reach the KDC host by checking that there is no firewall
causing problems or network issues. In a worst case scenario, recreate the
master.krb5.keytab file. Perform this validation on each Access Manager server to
which the master.krb5.keytab was copied.
50.10.5 Creating the Active Directory or Oracle Virtual Directory User Stores
This procedure will create the User Directory profiles for each user store in the
topology.
1. Log into Access Manager Administration Console using Administrator
credentials.
2. Click the User Identity Stores link.

Configuring Access for Multiple Untrusted Active Directory Forests
Configuring Access Manager for Windows Native Authentication 50-29
3. Click Create in the resulting tab.
4. Enter the appropriate details in the attribute fields.
5. In the Access System Administrators section, click the + above the table.
6. Follow the displayed dialog boxes to add administrative users from the directory.
7. Click Apply and log out of the Administration Console.
8. Validate the configuration by logging into the Access Manager Administration
Console as one of administrative users added.
You should be able to see the store’s profile.
9. Set the store to be the Default Store if it is the primary store.
Follow these steps to add other user stores as required.
50.10.6 Creating the Custom Kerberos Authentication Module
The Kerberos authentication module retrieves the Kerberos ticket, iterates through the
keytabs to find a match that will validate the ticket and, based on the domain into
which the user is logged, it provides the correct search base to find the user in the
correct forest. The latter function allows for identification of the correct person even if
there are duplicate samAccountNames. This procedure will create the custom
Kerberos authentication module needed for this function.
1. Log into Access Manager Administration Console using Administrator
credentials.
2. Navigate to System Configuration > Access Manager Settings and expand
Authentication Modules.
3. Select Custom Authentication module.
4. Click the Create (+) button.
5. Enter a name.
For example, wnaMultiDomainAuthnModule.
6. Enter a description.
For example, WNA Multi-domain Untrusted Authentication Module.
7. Select the Steps tab.
8. Click the + sign to add a new step.
The Add new step dialog is displayed.
9. Enter values for this first step (stepKTI as documented in Table 50–3) and click OK.
10. Create four more steps using the values documented in Table 50–3.
Table 50–3 Values for Kerberos Authentication Module Steps
Step Name Description Plugin Name
stepKTI KTI KerberosTokenIdentifier
stepKTA KTA KerberosTokenAuthenticator
stepUIF UIF UserIdentificationPlugin
stepUI UI UserIdentificationPlugin
stepUA UA UserAuthenticationPlugin

Configuring Access for Multiple Untrusted Active Directory Forests
50-30 Administrator's Guide for Oracle Access Management
11. Click Apply after (and only after) all five steps have been created.
When all five steps have been created they will be listed under the Steps tab. For
multiple Active Directory instances in your environment, you need only repeat
"stepUIF", "stepUI" and "stepUA" plugins for each instance as illustrated in
Figure 50–1.
Figure 50–1 Steps After Creation
12. Click the Steps Orchestration tab to configure the Steps order.
a. Select "stepKTI" as the Initial Step.
b. Configure the orchestration of the remaining steps as in Table 50–4 .
For the multiple Active Directory instances example previously referred to, the
orchestration is illustrated in Figure 50–2.
Figure 50–2 Steps After Orchestration
c. Click Apply only after all the orchestration steps have been properly
configured.
A message is displayed that the Authentication Module has been successfully
created.
13. Click the Steps tab to enter values for the parameters.
Table 50–4 Steps Orchestration Order
Step Name On Success On Failure On Error
stepKTI stepKTA stepUI failure
stepKTA stepUIF failure failure
stepUIF success failure failure
stepUI stepUA failure failure
stepUA success failure failure

Configuring Access for Multiple Untrusted Active Directory Forests
Configuring Access Manager for Windows Native Authentication 50-31
In this step, click Save and Apply after entering the values for each step.
Appropriate values are documented in Table 50–5.
Table 50–5 Steps Parameter Values
Step Name Parameter Value
StepKTA KEY_KRB_CONFIG_FILE /etc/krb5.conf
KEY_PRINCIPAL HTTP/myoam.hostname.com@forest1.sprite.co
m
This value is only the first domain because
Access Manager iterates through the master
keytab file to find the correct server.
KEY_KEYTAB_FILE /u01/oracle/wna/master.krb5.keytab
KEY_DOMAIN_DNS2DN_
MAP
<KDC SERVER NAME>:<top_namespace_of_
KDC>
For example:
FOREST1.SPRITE.COM:dc=forest1,dc=sprite,dc
=com;
FOREST2.PIXIE.COM:dc=forest2,dc=pixie,dc=c
om;
FOREST3.FAY.COM:dc=forest3,dc=fay,dc=com
If there are more or less KDC servers, simply
add or subtract as needed. Use a semi-colon as a
delimiter to separate each KDC server.
StepUIF KEY_IDNETITY_STORE_REF <IdentityStoreName> (the name of identity store
defined in the Access Manager Console)
KEY_LDAP_FILTER (uid={KEY_USERNAME})
This parameter uses a value to tell the plugin
which attribute to search in order to find the
user's samAccountName. For example,
(uid={KEY_USERNAME}) tells Access Manager
to use uid because the OVD adapter uses the
OAM/AD Adapter with Mapper, which maps
the standard inetOrgPerson attribute to the
Microsoft implementation of the User object
classes which translates to samAccountName.
You should change the attribute to whatever
your OVD adapter is mapping to the attribute
samAccountName.
KEY_SEARCH_BASE_URL {KEY_USERDOMAIN}
This parameter tells the plugin to grab the
domain from which the User has logged in and
uses that name space to set the searchbase when
searching in OVD. For example, if the user is
user.name@forest1.sprite.com, the plugin
constructs (dc=forest1,dc=sprite,dc=com) for the
searchbase. This helps deal with duplicate
samAccountNames across forests.
StepUI KEY_IDENTITY_STORE_REF <IdentityStoreName> (the name of identity store
defined in the Access Manager Console)
StepUA KEY_IDENTITY_STORE_REF <IdentityStoreName> (the name of identity store
defined in the Access Manager Console)

Configuring Access for Multiple Untrusted Active Directory Forests
50-32 Administrator's Guide for Oracle Access Management
14. Apply the new authentication module to an Authentication Scheme.
a. As an OAM administrator, navigate through Policy Configuration -> Shared
Components -> Authentication Schemes.
b. Select KerberosScheme.
c. Click Duplicate.
d. Enter the values as per Table 50–6.
15. Navigate to all Protected Resource Policies that require WNA and apply the new
authentication scheme.
50.10.7 Configuring Integrated Windows Authentication
Integrated Windows Authentication (IWA) may not be supported over a reverse proxy
so this solution is best used on Intranets. But, for WNA to work with an Internet
browser, the browser has to be configured for IWA or the default NTLM pop-up login
prompt will display. The following steps need to be performed on Active Directory
host machines based on the four most common Internet browsers.
Internet Explorer 2+ (Windows only)
1. Open Internet Explorer.
2. Select Tools > Internet Options > Security.
3. Select the Local intranet zone and click Sites > Advanced.
4. Enter all the site host names that are protected including the OAM hosts where the
URL goes to "http://iam.acme.com:14100/oam/server" used for authentication
processing.
If there is a common top domain, for example my.sprite.com, help.sprite.com, etc.
you can enter "http://*.sprite.com".
Tip: Another option is to use the values (userprincipalname={KEY_
USERNAME}@{KEY_USERREALM}). The plugin would extract the
username and realm; for example with user.name@forest1.sprite.com
the search passed from OAM to LDAP would be
(&(userprincipalname=user.name@FOREST1.SPRITE.COM)(objectclas
s=user)). If the attribute in your LDAP store is not userprincipalname,
then change it.
Table 50–6 Kerberos Authentication Scheme Parameter Values
Parameter Value
Name WNA_AuthnScheme
Description WNA Kerberos Scheme
Authentication Level 2
Default leave unchecked
Challenge Method WNA
Challenge Redirect URL /oam/server/
Authentication Module wnaMultiDomainAuthnModule
Challenge Parameters leave blank

Configuring Access for Multiple Untrusted Active Directory Forests
Configuring Access Manager for Windows Native Authentication 50-33
5. Click OK > OK.
6. Select the Advanced tab and make sure under Security > Enable Integrated
Windows Authentication option is selected.
7. Click OK to save the changes and close the Internet Options dialog.
Firefox 3+ (Windows or OSX)
1. Open FireFox.
2. Type "about:config" in the address bar and press Enter.
3. Click the button "I'll be careful, I promise!"
4. Type in the Preference Name according to Table 50–7 and change the value as
documented. Multiple values need to be comma-separated.
5. Restart Firefox.
Chrome 8+ (Windows or OSX)
Follow the steps for Internet Explorer, and Google Chrome will automatically pick up
the Internet Options. No special configuration is needed beyond the computer being a
domain member.
Safari 4+ (OSX Only)
Safari is enabled for IWA automatically. No special configuration is needed beyond the
OSX computer being a domain member.
50.10.8 Testing the Configurations
1. Login to a desktop that is a member of one of the Active Directory domains.
2. Open an Internet browser and browse to an OAM protected application.
If working properly, you should not be challenged to login.
Table 50–7 Firefox Preferences for IWA
Preference Name Type Value
network.automatic-ntlm-auth.trusted-u
ris
string http://,https://
network.negotiate-auth.allow-proxies boolean true
network.negotiate-auth.delegation-uris string http://,https://
network.negotiate-auth.gsslib string <blank> 1
network.negotiate-auth.trusted-uris string http://,https://
network.negotiate-auth.using-native-gs
slib
boolean true
Note: Be sure that for http(s) values, enter all site host names that are
protected, along with the Access Manager host where the URL goes to
"http://iam.acme.com:14100/oam/server" used for authentication
processing.

Configuring Access for Multiple Untrusted Active Directory Forests
50-34 Administrator's Guide for Oracle Access Management
50.10.9 Troubleshooting the Configurations
The following sections contain troubleshooting procedures.
50.10.9.1 Adding Kerberos Debugging to the Access Manager Server
This procedure provides Kerberos debugging output from the Access Manager server
logs. This is useful to review the Kerberos output and make sure there are no issues
with Access Manager mapping the User Principal Name to the correct user in the
Domain of which that user is a member.
1. Login to the Access Manager installation directory using the command line.
2. Go to the <FMW_HOME>/user_projects/domains/<DOMAIN_HOME>/bin
directory.
3. Backup the setDomainEnv.sh file.
4. Open the setDomainEnv.sh file in a text editor.
5. Search for the first line with EXTRA_JAVA_PROPERTIES.
6. Add the following two lines.
EXTRA_JAVA_PROPERTIES="-Dsun.security.krb5.debug=true -
Dsun.security.spnego.debug=true ${EXTRA_JAVA_PROPERTIES}"
export EXTRA_JAVA_PROPERTIES
Note the first line should not wrap in the file.
7. Save the file.
8. Restart both the Admin Server and Access Manager Server.
You should now be able to tail the Access Manager Server logs and see Kerberos
debug output. The following is an example.
Entered Krb5Context.acceptSecContext with state=STATE_NEW
>>> EType: sun.security.krb5.internal.crypto.ArcFourHmacEType
Using builtin default etypes for permitted_enctypes
default etypes for permitted_enctypes: 3 1 23 16 17.
>>> EType: sun.security.krb5.internal.crypto.ArcFourHmacEType
object 0: 1359604847000/156
object 1: 1359604776000/152
object 2: 1359604739000/151
object 0: 1359604847000/156
object 1: 1359604776000/152
object 2: 1359604739000/151
replay cache found.
>>> KrbApReq: authenticate succeed.
Krb5Context setting peerSeqNumber to: 227772863
>>> EType: sun.security.krb5.internal.crypto.ArcFourHmacEType
Krb5Context setting mySeqNumber to: 349851240
SPNEGO Negotiated Mechanism = 1.2.840.113554.1.2.2 Kerberos V5
SpNegoContext.acceptSecContext: mechanism wanted = 1.2.840.113554.1.2.2
SpNegoContext.acceptSecContext: negotiated result = ACCEPT_COMPLETE
SpNegoContext.acceptSecContext: sending token of type = SPNEGO NegTokenTarg
SpNegoToken NegTokenTarg: sending additional token for MS Interop
SpNegoContext.acceptSecContext: sending token = a1 81 eb 30 81 e8 a0 03 0a 01
00 a1 0b 06 09 2a 86 48 86 f7 12 01 02 02 a2 69 04 67 60 65 06 09 2a 86 48 86
f7 12 01 02 02 02 00 6f 56 30 54 a0 03 02 01 05 a1 03 02 01 0f a2 48 30 46 a0
03 02 01 17 a2 3f 04 3d e9 4b 77 88 6c ac f7 6a c6 8e 52 e0 16 66 51 fa 7b 59
da 15 ff e0 a7 ce b7 39 0f 57 3b 80 31 15 fa ed 92 b2 0c 03 2c dd 3a 54 42 52
40 ba b2 bd df b7 f5 90 af 35 aa 6b 1e ac b9 4d 04 a3 69 04 67 60 65 06 09 2a

Configuring Access for Multiple Untrusted Active Directory Forests
Configuring Access Manager for Windows Native Authentication 50-35
86 48 86 f7 12 01 02 02 02 00 6f 56 30 54 a0 03 02 01 05 a1 03 02 01 0f a2 48
30 46 a0 03 02 01 17
50.10.9.2 Turning Access Manager Server Debug Mode to TRACE
TRACE mode in Access Manager server debug logs can capture information like the
Principal that logged in, the User Domain that shows the namespace to search, the
authentication scheme used and other details. Before you begin, make sure the
WebLogic Admin Server is running.
1. Login as the administrator that starts and stops the Access Manager Managed
server using the command line.
2. Change to the directory <FMW_HOME>/common/bin.
3. Run the command ./wlst.sh.
4. Connect to the Admin Server by running the following command.
connect('weblogic','<weblogic_password>','t3://localhost:7001');
5. Run the following command to list the logging modules.
listLoggers(pattern='oracle.oam.*',target='oam_server1')
6. Run the following command to set the Access Manager server to TRACE mode.
setLogLevel(logger='oracle.oam',level='TRACE:32',persist='0',
target='oak_server1');
To revert back to the normal mode, run the following command.
setLogLevel(logger='oracle.oam',level='NOTIFICATION:1', persist='1',
target='oam_server1')
50.10.9.3 Verifying LDAP Searches in OVD
You can tail the diagnostic logs in OVD to determine if the correct search is being
made.
1. Login as the administrator that starts and stops OVD using the command line.
2. Change to the <FMW_HOME>/ovd1/diagnostics/logs/OVD/ovd1 directory.
3. Use a text editor or tail to view the diagnostic.log log file.
For example:
[2013-02-06T15:38:59.192-06:00] [octetstring] [NOTIFICATION] []
[com.octetstring.vde.chain.plugins.DumpTransactions.DumpTransactions] [tid: 27]
[ecid: 4aaf7073ad441920:-49d5bd7a:13cb14e92f1:-8000-0000000000000232,0:2]
!SEARCH Operation: (Transaction#Adapter_Forest4.Dump Before.30)[[
BindDN: cn=orcladmin
Base: dc=FOREST4,dc=MELANDER,dc=US
Scope: 2
Filter: (&(uid=tim.melander)(objectclass=inetorgperson))
TypesOnly: FALSE
Attrs: [uid, mail, cn, description, orclguid, objectclass, displayname, uid]!
]]

Troubleshooting WNA Configuration
50-36 Administrator's Guide for Oracle Access Management
50.11 Troubleshooting WNA Configuration
This section provides the following topics:
■Keytab Format Results in Authentication Error When Using IBM JDK
■Kinit Fails
■Unable To Access a Protected Resource Using WNA Authentication Scheme
■User Identity Store is Not Active Directory
50.11.1 Keytab Format Results in Authentication Error When Using IBM JDK
When using the IBM JDK, format the path to the keytab file in the
oam-config.xml
file
using the following syntax.
file://<absolute path to keytab file>/<keytab file name>
For example,
<Setting Name="keytabfile"
Type="xsd:string">file:///refresh/home/oam.keytab</Setting>
50.11.2 Kinit Fails
Error
Client not found in Kerberos database while getting initial credentials
Cause
This is Kerberos version of "User not found", which might be related to one of the
following:
■Misspelling or typo of the principal name
■The principal was not added to the Kerberos database, the principal doesn't exist.
■The user name does not exist in Active Directory or has not been registered as a
Kerberos user.
■The SPN is not unique.
■On the Active Directory side one or more duplicate entries were found.
Solution
Have the Active Directory Administrator search the LDAP tree for duplicate entries of
the SPN, and remove them.
50.11.3 Unable To Access a Protected Resource Using WNA Authentication Scheme
Unable to access a resource protected by Access Manager-protected resource using
WNA authentication scheme. Error: An incorrect Username or password was
specified.
See Also: Access Manager WNA Quick Start Guide on My Oracle
Support, Knowledge Base note 1416903.1 at:
https://support.oracle.com/

Troubleshooting WNA Configuration
Configuring Access Manager for Windows Native Authentication 50-37
Error
An incorrect username or password was specified.
50.11.4 User Identity Store is Not Active Directory
Cause
The Identity Store used by Access Manager might not point to Windows Active
Directory. By default, the identity store is Embedded LDAP.
Solution
1. Register Active Directory: Oracle Access Management Console, System
Configuration, Data Sources, User Identity Store, Create ActiveDirectory.
2. Set Active Directory as the Default Store, as described in "Setting the Default Store
and System Store" on page 5-21.

Troubleshooting WNA Configuration
50-38 Administrator's Guide for Oracle Access Management

51
Integrating JBoss with Access Manager 51-1
51
Integrating JBoss with Access Manager
Oracle provides a J2EE-type JBoss Agent and JBoss Login Module for a smooth
integration between Access Manager and JBoss. This chapter provides the following
information to assist you with this integration:
■Introduction to JBoss with Access Manager
■Integration Topology
■Preparing Your Environment for JBoss Integration
■Protecting JBoss-Specific Resources
■Protecting Web Applications with the JBoss Agent
■Configuring JBoss Server to Access a Host Name (not localhost)
■Configuring the Login Module to Secure EJBs
■Configuring the Login Module to Secure Web Service Access
■Configuring Logging for the JBoss Agent and Login Module
■Validating Your Configuration
51.1 Introduction to JBoss with Access Manager
JBoss application server is an open source alternative to IBM WebSphere and SAP
NetWeaver application servers. The JBoss application server and related services are a
J2EE platform used for developing and deploying enterprise Java applications, Web
applications services, and portals. J2EE allows the use of standardized modular
components and enables the Java platform to handle many aspects of programming
automatically.
For integration with JBoss, Oracle provides:
■Access Manager JBoss Agent (a J2EE type agent)
■JAAS-compliant Login Module, which can be used with any client to authenticate
against Access Manager
Integration with JBoss and Access Manager enables you to:
■Protect Web applications and establish user single sign-on
■Secure EJB access by configuring the login module for EJBs
Note: There is no special processing within (or by) Access Manager
with (or for) the JBoss Agent.

Introduction to JBoss with Access Manager
51-2 Administrator's Guide for Oracle Access Management
■Secure Web Services using the login module with Web service handlers to
authenticate and authorize the caller
There are no client interfaces. For more information, see the following topics:
■About Configuration and Processing by Access Manager JBoss Agent
■About Configuration and Processing by Access Manager Login Module
51.1.1 About Configuration and Processing by Access Manager JBoss Agent
The JBoss Agent is a fully capable agent running on the JBoss Server.
This JBoss Agent supports Access Manager Web single sign-on flows with (or without)
a Webgate. Authentication and authorization are based on resource URLs defined
within Access Manager policies. The JBoss Agent intercepts every incoming request to
the OAM Server and checks for access permissions for the requested resource. If the
resource is protected by an OAM policy, the JBoss Agent initiates authentication and
authorization for the user trying to access the resource.
Whenever an unauthenticated user requests access to any protected resource, the JBoss
Agent redirects the user to the credential collector for a username and password. The
username and password that is entered is authenticated by the OAM Server. The JBoss
Agent then establishes user session on the JBoss Container using the login module for
the user. The login module queries the LDAP directory and fetches the authenticated
user principals to set the subject.
The JBoss Agent depends on the Pure Java ASDK classes and APIs for accessing and
communicating with the OAM Server. The JBoss Agent implements the
javax.servlet.Filter interface. For more information, see the Oracle Fusion Middleware
Access SDK Java API Reference for Oracle Access Management Access Manager.
The JBoss Agent requires OAM Server communication details, certificate store, and
more, which can be configured as:
■A properties file containing all configuration details (the path to this file can be set
as a filter parameter)
■The absolute path of the properties file added within the filter configuration in
web.xml
The application filter should log messages at different logging levels (FATAL, ERROR,
WARNING, DEBUG, TRACE). Each level indicates the severity of information logged,
in descending order. The filter should be able to log the detailed trace of an incoming
message as one set. The JBoss Agent and the Login Module are both equipped with
messages for various log levels. For logging in the same log file (server.log):
<category name="<<Component_code_package>>">
<priority value="FINEST" class="org.jboss.logging.log4j.JDKLevel"/>
</category>
For example, for ASDK, the category name in the previous tag is
oracle.security.am.asdk, as shown:
<category name="<<oracle.security.am.asdk>>">
<priority value="FINEST" class="org.jboss.logging.log4j.JDKLevel"/>
</category>
Note: The custom headers that are defined by the Oracle Access
Management Administrator can only be defined using these methods.

Introduction to JBoss with Access Manager
Integrating JBoss with Access Manager 51-3
The following overview outlines processing functions for the Access Manager JBoss
Agent.
Process overview: Access Manager JBoss Agent functions
1. Query the OAM Server to check whether the requested resource is protected.
2. Call the OAM Server to retrieve the authentication scheme.
3. Analyze the authentication scheme for the protected resource, and redirect the
request to the credential collector.
4. Authenticate the user credentials.
5. Successful Authentication: Set the authentication token generated from the OAM
Server in the cookie.
6. Authentication Token: Validate the integrity of the token before servicing the
request. Request the OAM Server to verify the user is authorized to access the
protected resource and handle the response from the OAM Server accordingly.
7. Depending upon the user requests and OAM Server responses, the JBoss Agent
identifies where user requests should be redirected to allow or deny access to the
protected resource.
51.1.2 About Configuration and Processing by Access Manager Login Module
The JAAS-compliant OAM Login Module is a pluggable authentication module using
JAAS APIs provided by the Access Manager
javax.security.*
package. The
JAAS-compliant Access Manager Login Module interfaces enable the client to pass
authentication data to the server. The login module is configured with the JBoss server
and application to integrate the module with the JBoss application server.
The JAAS-compliant Access Manager Login Module implementation class is:
public class OAMLoginModule implements LoginModule
The standard JAAS packages required by this class are
javax.security.*
. The login
module class is stored in a jar file: $JBOSS_HOME/server/default/lib
The Login Module operates in two modes:
■usernamePassword: Authenticates the user based on username and password or a
user and certificate combination that forms a security identity and credential pair.
The login module does not directly query the LDAP. Instead the login module uses
the OAM Java ASDK to communicate and authenticate the user credentials with
the OAM Server; user and group information is retrieved as responses.
■tokenBased: Sets the Subject by validating the SSO token
The JAAS-compliant Access Manager Login Module consumes username, password,
or Access Manager token. This module authenticates and validates the credentials or
token with the OAM Server (using the Access Manager Java ASDK APIs) and
populates the JAAS subject with user and group information obtained from the OAM
Server.
JAAS-compliant Access Manager Login Module Configuration
The login-config.xml file is the default JBoss Login Module configuration file. This
Login Module requires a JAAS security domain name (
OAMLoginModule
, for instance).
Information is stored in login-config.xml as a list of named security domains, each of
which specifies a number of JAAS Login Modules that are used for authentication

Introduction to JBoss with Access Manager
51-4 Administrator's Guide for Oracle Access Management
within that domain. For example, you add this manually and then restart the JBoss
Server:
<application-policy name="OAMLoginModule">
<authentication>
<login-module
code="oracle.security.am.agent.common.jaas.login.OAMLoginModule"
flag="required">
<module-option name="loginType">tokenBased</module-option>
<module-option name="configPath">D:/agentconfig</module-option>
<module-option name="publicAuthnResourceName">/Authen/Basic</module-option>
<module-option name="rolesParam">OAM_GROUPS</module-option>
<module-option
name="publicAuthzResourceName">/Authen/SSOToken</module-option>
</login-module>
</authentication>
</application-policy>
Security Domains and Deployment Descriptors
Whenever an application requires security, you must specify the domain name to use
in the application's JBoss-specific deployment descriptors (either one or both):
■jboss.xml: Defines JBoss-specific configurations for an application.
■jboss-web.xml: Defines JBoss for a Web application. This file must declare the
security domain and should be placed in the WEB-INF folder.
The JAAS-compliant OAM Login Module operates as outlined in the following
overviews.
Process overview: JAAS-compliant OAM Login Module in usernamePassword
mode
1. Fetches login information.
2. Authenticates the user with Access Manager based on credentials collected by the
JBoss Agent.
3. Creates the container session for the client on the server.
4. Sets the JAAS subject with the userID and roles.
5. On logout, clears the principal settings of the subject in the session and removes
the privilege settings associated with the roles of the subject.
Although the Login Module processing that occurs in token based mode is similar to
usernamePassword mode, the differences are outlined in the next overview.
Process overview: JAAS-compliant OAM Login Module in tokenBased mode
1. Fetches login information.
2. Validates the SSO authentication token generated from the OAM Server in the
cookie.
3. Creates the container session for the client on the server.
4. Sets the JAAS subject with the userID and roles fetched using the existing SSO
session token.
5. On logout, clears the principal settings of the subject in the session and removes
the privilege settings associated with the roles of the subject.

Integration Topology
Integrating JBoss with Access Manager 51-5
51.2 Integration Topology
This section provides the following topics:
■Access Manager JBoss Agent Functionality
■Topology: Access Manager with JBoss Agent
■Topology: JBoss Agent Behind Web Server Configured with Webgate
■Sample Integration Topology
51.2.1 Access Manager JBoss Agent Functionality
The JBoss Agent is comprised of components described in Table 51–1. Each component
uses the Access ASDK to communicate with the OAM Server.
51.2.2 Topology: Access Manager with JBoss Agent
Figure 51–1 illustrates the various clients (whether browser, EJB, or Webserivce) that
can securely access any J2EE application deployed on the JBoss Application Server.
The JBoss Agent is configured for this access and is deployed within the JBoss
Application Server.
Table 51–1 JBoss Agent Composition
Component Description
Authentication Valve Invoked during the JBoss Authentication phase for all incoming requests. If
the resource is marked as protected by security constraints in the
application's Web descriptor, the Authentication Valve checks for the
presence of a user principal in the HTTP session:
■Valid User Present: The Authentication Valve evaluates whether the
user principal satisfies the security constraints from the application's
Web description. If constraints are satisfied, the request proceeds.
Otherwise, an authorization failure message is displayed.
■Valid Single Sign On Cookie Present (ObSSOCookie) (No Valid User):
The Authentication Valve verifies the cookie's validity by using the
Access Manager Login module (and sets the user principal in the
session).
■No Valid Single Sign On Cookie Present (ObSSOCookie) / No Valid
User: The Valve redirects to the OAM Login page when the resource is
marked as protected using Access Manager policies.
Authentication Filter Invoked for each incoming request following the JBoss authentication
phase. For each incoming request, the filter verifies whether a token is
present.
■Token Present: The filter uses the ASDK to validate the token.
■Invalid Token: The filter redirects to the Access Manager Login page.
Access Manager Login
Module
Used internally by the JBoss Agent to authenticate the user based on the
SSO token.
Any client (stand alone or deployed within the JBoss Container) can use the
Login Module to authenticate the incoming user based on username and
password or a valid token.
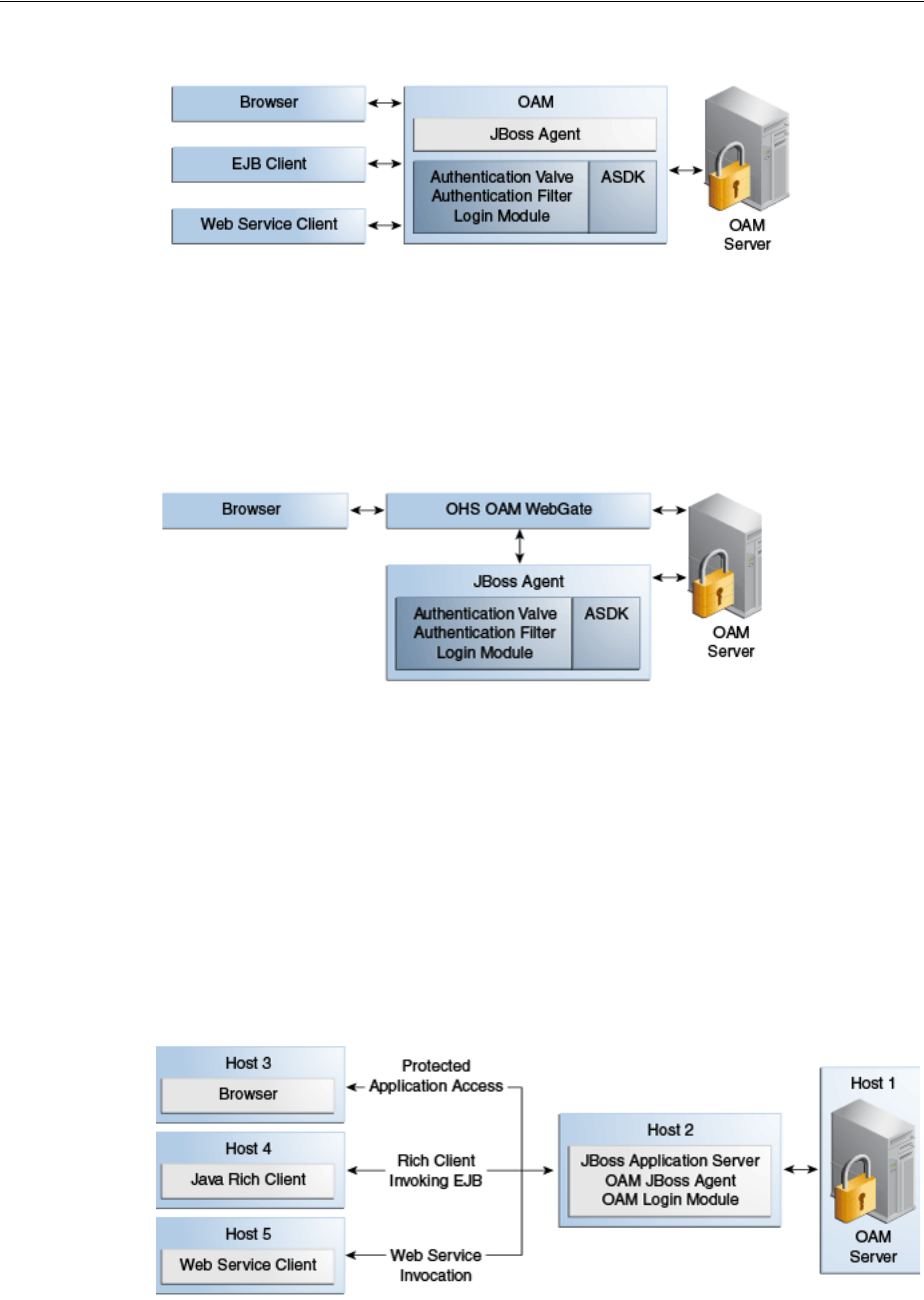
Integration Topology
51-6 Administrator's Guide for Oracle Access Management
Figure 51–1 Various Clients Deployed on JBoss Application Server
51.2.3 Topology: JBoss Agent Behind Web Server Configured with Webgate
In addition to operating alone, the JBoss Agent can be also work in conjunction with
an Oracle HTTP Server (proxy) configured with a WebGate, as shown in Figure 51–2.
Figure 51–2 JBoss Agent Deployed with an Oracle HTTP Server Webgate
Applications are deployed in the JBoss Application Server protected with the JBoss
Agent. Additionally the request comes through an Oracle HTTP Server instance that is
configured with a WebGate. Both the WebGate and the JBoss Agent are configured
against the same Access Manager deployment. Here, the JBoss Agent plays the role of
an Identity Asserter that simply validates that the token forwarded by the Webgate is
valid and uses the identity established by the WebGate.
51.2.4 Sample Integration Topology
Figure 51–3 illustrates the topology used in this chapter for integration between Access
Manager and JBoss.
Figure 51–3 Sample Integration Topology

Preparing Your Environment for JBoss Integration
Integrating JBoss with Access Manager 51-7
Details for this deployment are described in "Preparing Your Environment for JBoss
Integration" on page 51-7.
Use Cases
The topology in Figure 51–3 supports:
■Protecting Web Applications
This use case is Application specific and JBoss specific. It uses Access Manager
SSO with the JBoss Agent and an authorization policy for browsers accessing Web
applications on JBoss (with local EJB invocation, if any).
–Access Manager (Host 1)
–Application hosted on JBoss Application Server (Host 2)
■Invoking Secured EJBs using Rich Java Clients
The client can access an EJB in different ways depending on the client architecture,
as follows:
a. Configure the JAAS-compliant Access Manager Login Module on the JBoss
Container to secure access to the EJB. The client can then make use of
JBoss-specific mechanism to propagate the Access Manager SSO token to the
JBoss Container.
The client can either make use of an already procured Access Manager SSO
token or the client can use the JAAS-compliant Access Manager Login Module
to obtain the SSO token based on user's credentials.
b. Alternatively, the Access Manager SSO token can be obtained using a custom
HTTP Web server-based Access Manager Authentication Service exposed to
Rich Java clients.
■EJB invocation as a Web Service Provider (WSP)
JAAS-compliant Access Manager Login Module can be configured on the Web
Service Provider side to validate the Username and Password or the SSO Token.
Alternatively: If only the Username is available for Web Services Consumption
(WSC), you need the WSP requiring the SAML token issued by Security Token
Service asserting the Username, followed by invocation of JAAS-compliant Access
Manager Login Module with extra username-only assertion capability).
–Secure EJB access using the JAAS-compliant Access Manager Login Module
on (Host 2)
–Host the EJB Application on the JBoss server (Host 2)
–Access Manager (Host 1)
Remaining sections in this chapter describe how to complete this integration.
51.3 Preparing Your Environment for JBoss Integration
The following procedure describes how to prepare your environment for integrating
JBoss Application Server with Access Manager, which includes:
■Oracle Access Management Console and OAM Server
■JBoss Application Server 5.1.0
■Access Manager Access SDK
■Access Manager Jboss Agent

Protecting JBoss-Specific Resources
51-8 Administrator's Guide for Oracle Access Management
To prepare for integrating JBoss Application Server with Access Manager
1. Check the latest support information on:
http://www.oracle.com/technetwork/middleware/ias/downloads/fusion-certification
-100350.html
2. Host 1:
a. Install Access Manager as described in Oracle Fusion Middleware Installation
Guide for Oracle Identity Management
3. Host 2:
a. Install JBoss 5.1.0 Application Server, as described in your JBoss installation
guide.
b. Edit JBoss server.xml to change <Engine name="jboss.web"
defaultHost="localhost"> to <Engine name="jboss.web"
defaultHost="0.0.0.0">. For example:
JBoss_install_directory\server\default\deploy\jbossweb.sar\server.xml
From
<Engine name="jboss.web" defaultHost="localhost">
To
<Engine name="jboss.web" defaultHost="0.0.0.0">
4. Host 2, Install Access Manager Access SDK, as described in the Oracle Fusion
Middleware Installation Guide for Oracle Identity and Access Management. For
example:
5. Host 2, Install OAM JBoss Agent. For example:
a. Extract
oam-j2eeagent.zip
:
From
/agentconfig/oam_config.properties
file
b. Copy
oam-authenticatorvalve.jar
and
j2eeagent.jar
:
To
JBoss_install_directory\server\default\lib
6. Proceed to "Protecting JBoss-Specific Resources":
51.4 Protecting JBoss-Specific Resources
This task is JBoss specific and is required for all JBoss integration use cases: protecting
applications, Web Services, or EJBs.
This section describes how to create an Agent registration and how to add resources
and configure authorization policies for use with the Access Manager JBoss Agent. For
details, see:
■Registering the JBoss Agent with Automatic Policy Creation
■Creating a Custom Policy for JBoss Resource Protection

Protecting JBoss-Specific Resources
Integrating JBoss with Access Manager 51-9
51.4.1 Registering the JBoss Agent with Automatic Policy Creation
For this task, you can use either the Oracle Access Management Console as described
here, or remote registration as described in Oracle Fusion Middleware Administrator's
Guide for Oracle Access Management.
For communication between Access Manager and the JBoss Agent, you can use Open,
Simple, or Cert Security Mode. Configuring the JBoss Agent to use Simple or Cert
mode signals the Java ASDK to operate in the same mode. During registration, a new
file system directory is created for the agent on the Oracle Access Management
Console host (AdminServer). After registration, you copy artifacts to the Agent
directory path:
■ObAccessClient.xml
■password.xml (Simple or Cert mode only)
■oamclient-keystore.jks (see "Setting Up The Keystore" in: Oracle Fusion
Middleware Developer's Guide for Oracle Access Management
In the following procedure, replace variables with values for your environment. This
example uses Cert mode. Your deployment will be different.
To create a fresh registration for a 10g OAM Agent
1. Go to the Oracle Access Management Console (host 1) and log in using
Administrator credentials. For example:
https://host1:port/oamconsole
User: adminuserID
Password ********
2. From the Welcome page, SSO Agent panel, click New OAM 10g Agent to open a
fresh page.
3. On the Create: OAM Agent page, enter the following (and required details) to
register this OAM Agent. For example:
■Name: JBoss
■Security: Cert (see Oracle Fusion Middleware Developer's Guide for Oracle
Access Management)
■User-defined Parameter:
logoutRedirectUrl=http://OAM_Server.domain.com:14100/oam/server/logout
4. Protected Resource List: Click the Add (+) button in this table and enter the
resources you want protected by the default Authentication and Authorization
policies:
/Authen/Basic
/Authen/SSOToken
5. Auto Create Policies: Check to create fresh policies and an Application Domain.
6. Click Apply to submit the registration.
7. Check the Confirmation window for the location of generated artifacts and then
close the window.
8. In the navigation tree, confirm the Agent name is listed.
See Also: Chapter 25

Protecting JBoss-Specific Resources
51-10 Administrator's Guide for Oracle Access Management
9. Copy ObAccessClient.xml from the AdminServer to the JBoss Agent installation
directory path:
From:
$WLS_HOME/middleware/user_projects/domains/base_
domain/output/AGENTNAME
To:
D:\agentconfig
10. Proceed with "Creating a Custom Policy for JBoss Resource Protection".
51.4.2 Creating a Custom Policy for JBoss Resource Protection
In this task, you create a custom Authorization Policy and add responses that return
the user groups as header variables. For example, name the response
OAM_GROUPS
(with
value
$user.groups
).
Skip Step 1 if the JBoss Application Domain is open in the Console.
To create a custom authorization policy to protect JBoss Agent-specific
resources
1. From the Oracle Access Management Console Policy Configuration tab, open the
JBoss Application Domain:
Application Domains
JBoss
2. Authorization Policies:
a. Click the Authorization Policies node and click the Create (+) button.
b. In the Name field of the Summary tab, enter a unique name. For example:
Custom Authorization Policy
3. Add Resources: JBoss Agent-specific resources were defined during agent
registration.
a. Click the Resources tab on the Authorization Policy page.
b. Click the Add (+) button.
c. Click the Search button.
d. Choose a URL from the list, then click Add Selected:
/Authen/Basic
e. Repeat Steps a through d to add:
/Authen/SSOToken
f. Click Apply
Note: For this custom authorization policy, the success and failure
redirect URLs are not needed because the single purpose of this policy
is to provide responses for an authorized user. If redirect URLs are
provided, no redirection occurs with the processing logic of the JBoss
Agent or Login Module.
See Also: Chapter 20

Protecting Web Applications with the JBoss Agent
Integrating JBoss with Access Manager 51-11
4. Add Responses: Click the Responses tab, click the Add (+) button and:
■In the Name field, enter a unique name for this response:
OAM_GROUPS
.
■From the Type list, choose a response type (Header).
■In the Valu e field, enter a value for this response. For example:
$user.groups
5. Click Apply to save changes and close the Confirmation window.
6. Proceed to the proper topic for your deployment:
■Protecting Web Applications with the JBoss Agent
■Configuring the Login Module to Secure EJBs
■Configuring the Login Module to Secure Web Service Access
51.5 Protecting Web Applications with the JBoss Agent
This section provides the following tasks required to protect Web Applications with
the JBoss Agent:
■Creating Configuration Properties for the JBoss Agent
■Configuring the Authentication Valve
■Mapping the Filter in the Application's web.xml File
■Configuring the JBoss Login Module to Use Access Manager Policies
Prerequisites
Deploy the application as usual.
51.5.1 Creating Configuration Properties for the JBoss Agent
In this task, you copy Jboss Agent registration artifacts from the AdminServer to the
JBoss host and create a filter configuration properties file that is referenced later.
The JBoss Agent requires a configuration file (oam_config.properties) that defines a
number of critical properties. These include the file system path to the agent's
registration artifact (
ObAccessClient.xml
), the security domain defined in the JBoss
server's login configuration file, parameters and values that return to the JBoss Agent
during authentication, and an optional attribute to check for the presence of
authToken
in the request.
To create configuration properties for the JBoss Agent
1. Create a JBoss Agent configuration file named oam_config.properties using the
following sample as a guide:
##Path of the folder containing the ObAccessClient.xml
configPath=D:\\agentconfig
##Name of the security domain as configured in JBoss's login-config.xml
realmName=oamrealm
##Optional. If not specified then defaults to /Authen/Basic
Note: The JBoss Agent relies on the 11g Java ASDK which operates
in the same mode as the registered JBoss Agent.

Protecting Web Applications with the JBoss Agent
51-12 Administrator's Guide for Oracle Access Management
##publicAuthnResourceName=/Authen/Basic
##Optional. If not specified then defaults to http
##publicAuthnResourceType=http
##Optional. If not specified then defaults to GET
##publicAuthnResourceOperation=GET
##Optional. If not specified then defaults to /Authen/SSOToken
##publicAuthzResourceName=/Authen/SSOToken
##Optional. If not specified then defaults to http
##publicAuthzResourceType=http
##Optional. If not specified then defaults to GET
##publicAuthzResourceOperation=GET
rolesParam=OAM_GROUPS
##Optional. This attribute is responsible to check whether the credential in
##the subject / callback handler is an authn token. Defaults to authnToken.
authToken=authToken
####################################
##### OAM logout related properties #####
####################################
##Host name of the OAM 11g Server
##oamHost=abchost.us.example.com
##Managed server port number of the OAM 11g Server
##oamPort=Port_value
2. Save oam_config.properties on the JBoss host:
/agentconfig/oam_config.properties
3. Proceed to "Configuring the Authentication Valve".
51.5.2 Configuring the Authentication Valve
This procedure must be performed to configure the authentication valve. There are
two methods to perform this task. Choose the one that is best suited to your
environment:
■To add the Authentication Valve to context.xml: This global configuration causes
the Authentication Valve to intercept all requests to the Jboss Agent.
■To add the Valve to the application's deployment: This configuration affects only
the concerned application (the Authentication Valve intercepts requests coming
only to this specific application).
To add the Authentication Valve to context.xml
1. Locate and open for editing the JBoss Agent context.xml file in:
JBoss_install_dir\server\default\deploy\jbossweb.sar\context.xml
2. Add the following Valve entry and save the file:
<Valve
className="oracle.security.am.agent.common.authenticator.OAMAuthenticatorValve"
configFile="<full_path_to_oamagent_config_properties_file> " />

Protecting Web Applications with the JBoss Agent
Integrating JBoss with Access Manager 51-13
3. Proceed to "Mapping the Filter in the Application's web.xml File".
Rather than adding the Authentication Valve to context.xml for global use, you can
instead perform the following task to add a context.xml as part of the application's
deployment.
To add the Valve to the application's deployment
1. Create a fresh context.xml file and store it under WEB-INF with web.xml:
JBoss_install_dir\server\default\deploy\jbossweb.sar\context.xml
2. Add the following Valve entry:
<?xml version="1.0" encoding="UTF-8"?>
<Context privileged="true">
<Valve
className="oracle.security.am.agent.common.authenticator.OAMAuthenticatorValve"
configFile="<full_path_to_oamagent_config_properties_file> " />
</Context>
3. Redeploy the application.
4. Proceed to "Mapping the Filter in the Application's web.xml File".
51.5.3 Mapping the Filter in the Application's web.xml File
In this procedure, you add filter mapping for this integration to the application's
web.xml. You also add the name of the filter's configuration properties file.
To add filter mapping to web.xml
1. Locate the web.xml file in the application EAR file:
my_app/WEB-INF/web.xml
2. Add the following filter mapping to the application's web.xml. For example:
<filter>
<filter-name>OAMFilterAgent</filter-name>
<filter-class>
oracle.security.am.agent.common.filter.OAMAuthenticationFilter
</filter-class>
<init-param>
<param-name>configFile</param-name>
<param-value>D:/oam_config.properties</param-value>
</init-param>
</filter>
<filter-mapping>
<filter-name>OAMFilterAgent</filter-name>
<url-pattern>/*</url-pattern>
</filter-mapping>
3. Save the file.
4. Proceed to Configuring the JBoss Login Module to Use Access Manager Policies.

Configuring JBoss Server to Access a Host Name (not localhost)
51-14 Administrator's Guide for Oracle Access Management
51.5.4 Configuring the JBoss Login Module to Use Access Manager Policies
This procedure describes the required login module entry for JBoss to use Access
Manager policies.
After you add filter mapping to web.xml, you redeploy the application and start the
JBoss Server.
To configure the login module that enables JBoss to use OAM policies
1. Locate and open the login-config.xml file:
JBoss_install_dir\server\default\conf\login-config.xml
2. Add a new entry for the login module, as follows:
<application-policy name="oamrealm">
<authentication>
<login-module
code="oracle.security.am.agent.common.jaas.login.OAMLoginModule"
flag="required">
<module-option name="loginType">tokenBased</module-option>
<module-option name="configPath">D:/agentconfig</module-option>
<module-option>
<module-option
name="publicAuthnResourceName">/Authen/Basic</module-option>
<module-option name="rolesParam">OAM_GROUPS</module-option>
<module-option
name="publicAuthzResourceName">/Authen/SSOToken</module-option>
</login-module>
</authentication>
</application-policy>
The name of
application-policy
in this entry should have the same value as that
defined for the
realmname
property in
oam_config.properties
.
3. Deploy the application.
4. Start JBoss as follows using the following command:
JBoss_install_dir\bin\run –b 0.0.0.0
See "Configuring JBoss Server to Access a Host Name (not localhost)".
51.6 Configuring JBoss Server to Access a Host Name (not localhost)
This procedure is optional. Perform this only to access the JBoss Server using the host
name (rather than localhost/127.0.0.1).
Note: Starting JBoss Server using -b 0.0.0.0 allows the user to access
the server by the host name rather than
localhost / 127.0.0.1
.
Without this parameter, JBoss Server can be accessed using
localhost
/ 127.0.0.1
as well as the host name.
Note: Starting JBoss Server using -b 0.0.0.0 allows the user to access
the server using host name rather than localhost / 127.0.0.1.
Otherwise, JBoss Server can be accessed using localhost / 127.0.0.1 as
well as host name.

Configuring the Login Module to Secure EJBs
Integrating JBoss with Access Manager 51-15
To access the JBoss Server using the host name
1. On the JBoss Server host, locate the server.xml file in the following path:
JBoss_install_dir\server\default\deploy\jbossweb.sar\server.xml
2. Edit server.xml to change the default host, as follows:
From:
<Engine name="jboss.web" defaultHost="localhost">
To:
<Engine name="jboss.web" defaultHost="defaultHost="0.0.0.0">
3. Save server.xml.
51.7 Configuring the Login Module to Secure EJBs
This task involves both the server-side and client-side configuration, as explained in
following topics:
■Configuring the Server to Secure EJBs
■Configuring the Client Side to Secure EJBs
51.7.1 Configuring the Server to Secure EJBs
On the server side, you must add the security domain annotation to the EJB and add
descriptors to jboss.xml. You also add a new entry to the JBoss server configuration file
for the Login Module.
Securing EJBs, Web applications or a Web Service based on roles requires additional
configuration in login-config.xml as follows:
<module-option name="rolesParam">OAM_GROUPS</module-option>
Here OAM_GROUPS is the response configured when "Creating a Custom Policy for
JBoss Resource Protection" on page 51-10.
You can use either the agent configured in previous steps or a new agent.
To configure the server to secure EJBs
1. Copy ObAccessClient.xml as follows (one or the other):
■From: $WLS_HOME/middleware/user_projects/domains/base_
domain/output/agent_name.
■To: A directory on the JBoss host.
2. Add the
@SecurityDomain("oamrealm")
annotation to the EJB. For example, if the
EJB class is DemoEJB the following should be added at the code level:
import org.jboss.security.annotation.SecurityDomain;
@SecurityDomain("oamrealm")
public class DemoEJB{ ... }
Note: To use a new agent you must copy the ObAccessClient.xml
from the /agent directory on the JBoss host, to another directory.

Configuring the Login Module to Secure EJBs
51-16 Administrator's Guide for Oracle Access Management
The
application-policy
defined as the value of
@SecurityDomain
(in this
example,
oamrealm
) should have the same value as that defined for the
realmname
property in
oam_config.properties
.
3. Option: Add the following descriptor to the
jboss.xml
file to define the security
domain.
META-INF/jboss.xml
<jboss>
<security-domain>java:/jaas/myother</security-domain>
</jboss>
The application-policy name defined in this descriptor (myother) should have the
same value as the realmname property defined in oam_config.properties.
4. JBoss Server Login Configuration: Add an entry for the Login Module class name,
which must be part of the login mechanism:
JBoss_install_dir\server\default\conf\login-config.xml
<application-policy name="oamrealm">
<authentication>
<login-module
code="oracle.security.am.agent.common.jaas.login.OAMLoginModule"
flag="required">
<module-option name="loginType">tokenBased</module-option>
<module-option name="configPath">D:/agentconfig</module-option>
<module-option name="rolesParam">OAM_GROUPS</module-option>
<module-option
name="publicAuthnResourceName">/Authen/Basic</module-option>
<module-option
name="publicAuthzResourceName">/Authen/SSOToken</module-option>
</login-module>
</authentication>
</application-policy>
5. Deploy the application.
6. Start JBoss using the following command:
JBoss_install_dir\bin\run –b 0.0.0.0
See "Configuring JBoss Server to Access a Host Name (not localhost)".
51.7.2 Configuring the Client Side to Secure EJBs
This procedure describes how to create a client-login configuration file.
Note: The name associated with the security domain annotation
should be specified in the Login Module to be used, as described in
Step 4. See Also: Configuring the JBoss Login Module to Use Access
Manager Policies on page 51-14.
Note: The
name
value in the
application-policy
element should
match the
realmname
property value defined in
oam_
config.properties
.

Configuring the Login Module to Secure Web Service Access
Integrating JBoss with Access Manager 51-17
To configure the client side for the Login Module to secure EJBs
1. Copy ObAccessClient.xml as follows (one or the other):
■New Agent: From $MW_HOME/middleware/user_projects/domains/base_
domain/output/agent_name to a folder on the Agent host.
■Existing Agent: From its location on the JBoss host to another directory on the
Agent host.
2. On the client host, create a client-login configuration text file as follows:
oamauth {
oracle.security.am.agent.common.jaas.login.OAMLoginModule required
loginType="usernamePassword"
configPath="D:/agentconfig"
publicAuthzResourceName="/Authen/Basic"
publicAuthzResourceName="/Authen/SSOToken";
};
3. Add the following to your entry to configure the login module to propagate
identity to the EJB Container:
propagate {
org.jboss.security.ClientLoginModule required
restore-login-identity="true";
};
4. Save the file.
5. Rich Client: Add the following to the client code before invoking the EJB from the
Client side:
System.setProperty("java.security.auth.login.config", authFile);
MyCallbackHandler handler = new MyCallbackHandler(<USERNAME>,<PASSWORD>);
LoginContext lc = new LoginContext("oamauth", handler);
lc.login();
//Fetch the private credentials of type String.class
Set<String> set = lc.getSubject().getPrivateCredentials(String.class);
//Set the SSO Token in callback handler along with the username
handler = new MyCallbackHandler(<USERNAME>, set.iterator().next());
LoginContext lc2 = new LoginContext("propagate", handler);
lc2.login();
51.8 Configuring the Login Module to Secure Web Service Access
The Web Service Provider may provide for one of the various mechanisms to intercept
and handle the incoming web service SOAP message in order to enforce security on
the web service invocation.
This task involves both the server-side and client-side configuration, as explained in
following topics:
Note: Perform Step 5 while invoking EJBs from a Rich Client to
ensure that Access Manager performs authentication (using the Pure
Java ASDK) and then propagates the credentials to the EJB
Application Server.

Configuring the Login Module to Secure Web Service Access
51-18 Administrator's Guide for Oracle Access Management
■Configuring the Server to Secure Web Services Access
■Configuring the Client to Secure Web Services Access
51.8.1 Configuring the Server to Secure Web Services Access
Configuring the Server to Secure Web Services Access involves copying Agent
registration artifacts, and adding the Access Manager JAAS-compliant Login Module
for Web Service security to the JBoss Server login-configuration file.
You can use either the agent configured in previous steps or a new agent. To use a new
agent you must copy the ObAccessClient.xml from the /agent directory on the JBoss
host, to another directory on this host.
No specific details are provided for configuring or deploying a Web Service because
any of several frameworks can be used to create a Web Service. The provider of the
Web Services deployed on the JBoss Container should adhere to the following
guidelines in general:
■Include functionality to look for specific headers injected by the client order to
retrieve the OAM SSO token.
■Use the OAM JAAS Login Module to validate the OAM SSO token
■If any EJB Session Beans are exposed as Web Services, the JBoss-specific JAAS
Login Module
ClientLoginModule
must be used to propagate the OAM token to
the EJB container.
To configure the server to secure Web Services access
1. Copy ObAccessClient.xml as follows (one or the other):
■Existing Agent: From its location on the JBoss host to another directory on the
Agent host.
■New Agent: From $MW_HOME/middleware/user_projects/domains/base_
domain/output/agent_name to another directory on the Agent host.
2. Register the SOAP Handler with the Web Service (ideally using the .wsdd file).
The .wsdd file is generated when the WS stubs are created (and is located inside
the application's WEB-INF folder).
3. Edit the JBoss Server login-configuration file to add an entry for the Access
Manager JAAS-compliant Login Module for Web Service security, as follows:
JBoss_install_dir\server\default\conf\login-config.xml
<application-policy name="WSRealm">
<authentication>
<login-module
code="oracle.security.am.agent.common.jaas.login.OAMLoginModule"
flag="required">
<module-option name="loginType">tokenBased</module-option>
<module-option name="configPath">D:/agentconfig</module-option>
<module-option name="rolesParam">OAM_GROUPS</module-option>
<module-option
name="publicAuthnResourceName">/Authen/Basic</module-option>
<module-option
name="publicAuthzResourceName">/Authen/SSOToken</module-option>
</login-module>
</authentication>
</application-policy>

Configuring Logging for the JBoss Agent and Login Module
Integrating JBoss with Access Manager 51-19
4. Save the JBoss Server login configuration file.
5. Deploy the application.
6. Start JBoss using the following command:
JBoss_install_dir\bin\run –b 0.0.0.0
See "Configuring JBoss Server to Access a Host Name (not localhost)".
7. Proceed to "Configuring the Client to Secure Web Services Access".
51.8.2 Configuring the Client to Secure Web Services Access
In this task, you configure user authentication with the OAM Server and then create a
security header element, containing the SSO token, for the SOAP message.
To configure the client to secure Web Services Access
1. On the WS-client: Perform user authentication with OAM Server and then create
a security header element, containing the SSO token, for the SOAP message.
2. Invoke the Web service, as usual.
3. Proceed with "Configuring Logging for the JBoss Agent and Login Module".
51.9 Configuring Logging for the JBoss Agent and Login Module
The JBoss Agent and the Login Module are both equipped with logging messages at
various log levels. To log these messages, you must edit the jboss-log4j.xml file as
described in this procedure.
To configure logging for the JBoss Agent and Login Module
1. Locate the jobss-log4j.xml file in the following path:
$JBOSS_HOME/server/default/conf/jboss-log4j.xml
2. Open the file in an editor and add the following information:
<appender name="J2EEAGENT"
class="org.jboss.logging.appender.DailyRollingFileAppender">
<errorHandler class="org.jboss.logging.util.OnlyOnceErrorHandler"/>
<param name="File" value="${jboss.server.log.dir}/j2eeagent.log"/>
<param name="Append" value="true"/>
<param name="DatePattern" value="'.'yyyy-MM-dd"/>
<layout class="org.apache.log4j.PatternLayout">
<param name="ConversionPattern" value="%d %-5p [%c] (%t) %m%n"/>
</layout>
</appender>
<category name="oracle.security.am.agent.common">
<appender-ref ref="J2EEAGENT"/>
</category>
<root>
...
Note: Ideally, this step is performed before invoking a Web Service
method, which means that this code must be added in the client code
while invoking the Web Service.

Validating Your Configuration
51-20 Administrator's Guide for Oracle Access Management
<appender-ref ref="J2EEAGENT"/>
</root>
3. Save the file.
51.10 Validating Your Configuration
There is no specific mechanism to validate your configuration. However, you can
manually determine whether the configuration is correctly functioning.
To validate your configuration
1. Authorized User: Invoke the Web Service manually by providing the SSO token
generated for the user who is authorized to invoke the Web Service.
■Success: The authorized user is granted access.
■Failure: The authorized user is denied access.
■Error: The configuration is incorrect. Review the OAM Server logs for the
entries generated by the Login Module.
2. Unauthorized User: Invoke the Web Service manually and provide the SSO token
for a non-authorized user.
■Success: The unauthorized user is denied access.
■Failure: The unauthorized user is granted access.
■Error: If any error occurs, the configuration is incorrect. Review the OAM
Server logs for the entries generated by the Login Module.

52
Integrating Microsoft SharePoint Server with Access Manager 52-1
52
Integrating Microsoft SharePoint Server with
Access Manager
This chapter explains how to integrate Access Manager with a 10g WebGate and
Microsoft SharePoint Server. It covers the following topics:
■What is Supported in This Release?
■Introduction to Integrating With the SharePoint Server
■Integration Requirements
■Preparing for Integration With SharePoint Server
■Integrating With Microsoft SharePoint Server
■Setting Up Microsoft Windows Impersonation
■Completing the SharePoint Server Integration
■Integrating With Microsoft SharePoint Server Configured With LDAP Membership
Provider
■Configuring Single Sign-On for Office Documents
■Configuring Single Sign-off for Microsoft SharePoint Server
■Setting Up Access Manager and Windows Native Authentication
■Synchronizing User Profiles Between Directories
■Testing Your Integration
■Troubleshooting
52.1 What is Supported in This Release?
Support for integration between Access Manager and SharePoint enables the following
functionality:
Note: Access Manager with a 10g WebGate supports both Microsoft
SharePoint Server 2010 and Microsoft SharePoint Server 2013. Other
versions of Microsoft SharePoint Server are not supported in this
release.
Unless explicitly stated, all details in this chapter apply equally to
Access Manager integration with Microsoft SharePoint Server using
the OAM impersonation plug-in, and Microsoft SharePoint Server
configured with the LDAP Membership Provider.

Introduction to Integrating With the SharePoint Server
52-2 Administrator's Guide for Oracle Access Management
■When a user accesses SharePoint before SSO login with Access Manager, the user
is prompted for Access Manager SSO login credentials.
■When a user with a valid Access Manager login session wants to access SharePoint
documents, he must be established with SharePoint (logged in and authenticated
with SharePoint). Once the Access Manager session is established, it is also
respected by SharePoint for integration with Access Manager and SharePoint
using LDAP Membership Provider, OAM WNA, and impersonation. Based on
authentication status, SharePoint either allows or denies access to documents
stored in SharePoint.
■When a user opens an Office document from SharePoint using a browser, the SSO
session should persist into the MS Office program so that access to the document
through the MS Office program is maintained. See "Configuring Single Sign-On
for Office Documents" on page 52-33.
■Full feature parity with SharePoint integration with Access Manager 10g is
provided to ease upgrades to Access Manager.
52.2 Introduction to Integrating With the SharePoint Server
SharePoint Server is a Microsoft-proprietary secure and scalable enterprise portal
server that builds on Windows Server Microsoft Internet Information Services (IIS) and
Windows SharePoint Services (WSS). SharePoint Server is typically associated with
Web content and document management systems. SharePoint Server works with
Microsoft IIS web server to produce sites intended for collaboration, file sharing, web
databases, social networking and web publishing. In addition to WSS functionality,
SharePoint Server incorporates additional features such as News and Topics as well as
personal and public views for My Site, and so on.
Microsoft SharePoint Server enhances control over content, business processes, and
information sharing. Microsoft SharePoint Server provides centralized access and
control over documents, files, Web content, and e-mail, and enables users to submit
files to portals for collaborative work.
SharePoint server farms can host web sites, portals, intranets, extranets, Internet sites,
web content management systems, search engine, wikis, blogs, social networking,
business intelligence, workflow as well as providing a framework for web application
development.
When integrated with Microsoft SharePoint Server, Access Manager handles user
authentication through an ISAPI filter and an ISAPI Module. This enables single
sign-on between Access Manager and SharePoint Server.
SharePoint Server supports the following authentication methods:
■Form Based Authentication
■Impersonation Based Authentication
■Windows Authentication: Used only for the configuration where the information
about the users is stored in Active Directory server
The integrations in this chapter provide single sign-on to Microsoft SharePoint Server
resources and all other Access Manager-protected resources. For more information,
see:
Note: 11g WebGates are not supported on the IIS Web server. Only
the WebGate 10g WebGate for IIS can be used for this integration.

Introduction to Integrating With the SharePoint Server
Integrating Microsoft SharePoint Server with Access Manager 52-3
■About Windows Impersonation
■About Form Based Authentication With This Integration
■About Authentication With Windows Impersonation and SharePoint Server
Integration
■About Access Manager and Windows Native Authentication
52.2.1 About Windows Impersonation
Unless explicitly stated, the integrations described in this chapter rely on Windows
impersonation.
Windows impersonation enables a trusted user in the Windows server domain to
assume the identity of any user requesting a target resource in Microsoft SharePoint
Server. This trusted impersonator maintains the identity context of the user while
accessing the resource on behalf of the user.
Impersonation is transparent to the user. Access appears to take place as if the
SharePoint resource were a resource within the Access System domain.
52.2.2 About Form Based Authentication With This Integration
You can integrate Access Manager with SharePoint Server using any of the three
authentication methods. Given common use of LDAP servers (Sun Directory Server
and Active Directory for instance), your integration can include any LDAP server.
Form-based authentication in SharePoint Server is claims-aware. When a user enters
credentials on the Forms login page of SharePoint Relying Party (RP), these are passed
to the SharePoint Security Token Service (STS). SharePoint STS authenticates the users
against its membership provider and generates the SAML token, which is passed to
SharePoint RP. SharePoint RP validates the SAML token and generates the FedAuth
cookie. The user is then allowed to access the SharePoint RP site.
With form-based authentication, the WebGate is configured as an ISAPI filter. The
form login page of SharePoint RP is customized such that the user is not challenged to
enter the credentials by the SharePoint RP. Also, the membership provider is
customized such that it just validates the ObSSOCookie set by the WebGate to
authenticate the user.
The following overview outlines the authentication flow for this integration using
form-based authentication.
Process overview: Request processing with form-based authentication
1. The user requests access to an SharePoint Server RP site.
Note: Windows impersonation is not used when integrating
Microsoft SharePoint Server configured with the LDAP Membership
Provider.
Note: The WebGate only supports Form Based Authentication using
the HTTP validation method (
OAMHttp
validation mode). The ASDK
validation method (
OAMAsdk
validation mode) is not supported for
Form Based Authentication.

Introduction to Integrating With the SharePoint Server
52-4 Administrator's Guide for Oracle Access Management
2. The WebGate protecting the site intercepts the request, determines if the resource
is protected, and challenges the user.
3. The user enters their OAM credentials. Next the OAM WebGate server verifies the
credentials from LDAP and authenticates the user.
The WebGate generates the OAM native SSO cookie (ObSSOCookie), which
enables single sign-on and sets the User ID header variable (to the user name) in
the HTTP request and redirects the user to the SharePoint RP site.
4. The SharePoint RP custom login page is invoked, which sets the user name to the
user ID passed in the header variable, and sets the password to the ObSSOCookie
value. The login page also automatically submits these credentials to the
SharePoint RP site.
5. The SharePoint RP site passes the credentials to SharePoint STS, which invokes the
custom membership provider to validate the user credentials.
6. The custom membership provider gets the ObSSOCookie value (passed as a
password) and sends it as part of the HTTP request to a resource protected by the
WebGate to validate the ObSSOCookie.
7. If the ObSSOCookie is valid, SharePoint STS generates the SAML token and passes
it to SharePoint RP.
8. SharePoint RP validates the SAML token and generates the FedAuth cookie. The
user is then allowed to access the SharePoint RP site.
52.2.3 About Authentication With Windows Impersonation and SharePoint Server
Integration
As described earlier, Windows impersonation enables a trusted user in the Windows
server domain to assume the identity of any user requesting a target resource in
SharePoint Portal Server. This trusted impersonator maintains the identity context of
the user while accessing the resource on behalf of the user. Impersonation is
transparent to the user. Access appears to take place as if the SharePoint resource were
a resource within the OAM Server domain. Windows based integration with
SharePoint Server 2010 and 2013 is the same as the supported integration with
SharePoint 2007.
The next overview identifies the authentication processing flow with SharePoint
Server and Windows impersonation enabled.
Process overview: Integration Authentication with Windows Impersonation
1. The user requests access to a SharePoint Portal Server resource.
2. The WebGate ISAPI filter protecting SharePoint Portal Server intercepts the
request, determines whether the target resource is protected, and if it is, challenges
the user for authentication credentials.
3. If the user supplies credentials and the OAM Server validates them, the WebGate
sets an ObSSOCookie in the user's browser, which enables single sign-on. The
Note: With the SharePoint 2007 integration, the Access Manager
ISAPI extension (
IISImpersonationExtension.dll
) was used.
Because the internal architecture of event handing changed with
SharePoint 2010, Access Manager has changed the ISAPI extension to
an HTTP module.

Introduction to Integrating With the SharePoint Server
Integrating Microsoft SharePoint Server with Access Manager 52-5
WebGate also sets an HTTP header variable named "impersonate," whose value is
set to one of the following:
■the authenticated user's LDAP
uid
■
samaccountname
, if the user account exists in Active Directory
4. The Access Manager HTTP module
IISImpersonationModule.dll
checks for the
Authorization Success Action header variable named
impersonate
.
5. When the header variable exists, the Oracle ISAPI module obtains a Kerberos
ticket for the user.
This Service for User to Self (S4U2Self) impersonation token enables the
designated trusted user to assume the identity of the requesting user and obtain
access to the target resource through IIS and the SharePoint Portal Server.
52.2.4 About Access Manager and Windows Native Authentication
Access Manager provides support for Windows Native Authentication (WNA). Your
environment may include:
■Windows 2008 or 2008 R2 server
■Internet Information services (IIS) 7 or 7.5
■Active Directory
If the user's directory server has, for example, an NT Logon ID, or if the user name
is the same everywhere, then a user is able to authenticate into any directory
server. The most common authentication mechanism on Windows Server 2008 is
Kerberos.
The use of WNA by Access Manager is seamless. The user does not notice any
difference between a typical authentication and WNA when they log on to their
desktop, open an Internet Explorer (IE) browser, request a protected web resource, and
complete single sign-on.
Process overview: Using WNA for authentication
1. The user logs in to the desktop computer, and local authentication is completed
using the Windows Domain Administrator authentication scheme.
2. The user opens an Internet Explorer (IE) browser and requests an Access
System-protected Web resource.
3. The browser notes the local authentication and sends a Kerberos token to the IIS
Web server.
4. The WebGate installed on the IIS Web server sends the Kerberos token to the OAM
11g sever. The OAM 11g Server negotiates the Kerberos token with the KDC (Key
distribution center).
5. Access Manager sends authentication success information to the WebGate.
6. The WebGate creates an ObSSOCookie and sends it back to the browser.
7. Access Manager authorization and other processes proceed as usual.
Note: Ensure that Internet Explorer’s security settings for the
Internet and (or) intranet security zones are adjusted properly to allow
automatic logon.

Integration Requirements
52-6 Administrator's Guide for Oracle Access Management
The maximum session time-out period configured for the WebGate is applicable to
the generated ObSSOCookie.
52.3 Integration Requirements
Unless explicitly stated, this section introduces components required for integrations
described in this chapter. It includes the following topics:
■Confirming Requirements
■Required Access Manager Components
■Required Microsoft Components
52.3.1 Confirming Requirements
References to specific versions and platforms are for demonstration purposes. For the
latest Access Manager certification information, see the certification matrix on Oracle
Technology Network at:
http://www.oracle.com/technetwork/middleware/ias/downloads/fusion-certification-10
0350.html
52.3.2 Required Access Manager Components
Access Manager provides access and security functions, including Web-based single
sign-on, policy management, reporting, and auditing. When integrated with Microsoft
SharePoint Server, Access Manager handles user authentication through an ISAPI filter
and an ISAPI Module, which enables single sign-on between the two products.
The components in Table 52–1 are required to integrate with Microsoft SharePoint
Server (or Microsoft SharePoint Server configured with LDAP Membership Provider.)
Table 52–1 Access Manager Component Requirements
Component Description
10g WebGate The ISAPI version 10g WebGate must reside on the same computer
as the SharePoint Server.
Within the context of this integration, this WebGate is an ISAPI
filter that intercepts HTTP requests for Web resources and forwards
them to the OAM Server to authenticate the user who made the
request. If authentication is successful, the WebGate creates an
ObSSOCookie and sends it to the user's browser, thus facilitating
single sign-on. The WebGate also sets impersonate as a HeaderVar
action for this user session.
For LDAP Membership Provider Scenario: See "Integrating With
Microsoft SharePoint Server Configured With LDAP Membership
Provider" on page 52-23.
IISImpersonationModule.dll
This IIS-native module is installed with the WebGate. The
IISImpersonationModule.dll
module determines whether the
Authorization Success Action HeaderVar has been set to
impersonate and, if it has, the DLL file creates a Kerberos S4U2Self
ticket that enables the special trusted user in the SharePoint Server
Active Directory to impersonate the user who originally made the
request.
After a WebGate installation, you must configure
IISImpersonationModule.dll
manually to enable impersonation
and this integration.
For LDAP Membership Provider Scenario: Do not configure
IISImpersonationModule.dll
.

Integration Requirements
Integrating Microsoft SharePoint Server with Access Manager 52-7
52.3.3 Required Microsoft Components
Minimum requirements dictate a 64-bit, four cores processor. However, references to
specific versions and platforms are for demonstration purposes. For the latest Access
Manager certification information, see the following Microsoft library location for
Microsoft SharePoint Server:
https://technet.microsoft.com/en-us/library/cc262485.aspx
The SharePoint multi-purpose platform allows for managing and provisioning of
intranet portals, extranets, and Web sites; document management and file
management; collaboration spaces; social networking tools; enterprise search and
intelligence tooling; process and information integration; and third-party developed
solutions.
Table 52–2 describes the other components required for this integration.
Directory Server Access Manager can be connected to any supported directory
server including, but not limited to, LDAP and Active Directory.
Access Manager can even connect to the same instance of Active
Directory used by SharePoint Server.
In any case, the directory is not required on the same machine as
SharePoint Server and the protecting WebGate.
OAM Server The integration also requires installation of the OAM Server with
which the WebGate protecting your SharePoint Server installation
is configured to inter-operate.
Except for the WebGate protecting SharePoint Server, your
components do not need to reside on the machine hosting
SharePoint Server.
See Also: "Preparing for Integration With SharePoint Server" on
page 52-8.
Note: Minimum requirements dictate a 64-bit, four cores processor.
However, references to specific versions and platforms are for
demonstration purposes. For the latest Access Manager certification
information, see Oracle Technology Network at:
http://www.oracle.com/technetwork/middleware/ias/downloads/fusion-c
ertification-100350.html
See Also: The following library location for Microsoft SharePoint
Server and access to applicable software:
http://technet.microsoft.com/en-us/library/cc262485.aspx
Table 52–2 Microsoft Requirements for this Integration
Component Description
Custom Login Page for
SharePoint site
When the user tries to access a SharePoint site configured to use Form
Based Authentication, the user is redirected to a login page where the
user enters his or her credentials (user name and password). The
custom login page passes the credentials to the SharePoint site.
Table 52–1 (Cont.) Access Manager Component Requirements
Component Description

Preparing for Integration With SharePoint Server
52-8 Administrator's Guide for Oracle Access Management
52.4 Preparing for Integration With SharePoint Server
Tasks in the following procedure are required for all integration scenarios described in
this chapter.
After installing and testing Microsoft components, perform steps here to install Access
Manager for your integration. This task applies to both integration scenarios in this
chapter. To avoid repetition, information here is not repeated elsewhere.
The ISAPI 10g WebGate must be installed on the same computer as the SharePoint
Server. Other components in this integration can reside on the same host as the
WebGate or any other computer in your deployment (Solaris, Linux, or Windows
platforms). A different host can be set up for Active Directory or some other directory
service. If both Access Manager and SharePoint Server are set up for different
instances of Active Directory, both instances must belong to the same Active Directory
domain.
SharePoint site You create the SharePoint site using the SharePoint Central
Administration application. The site is configured to use Form Based
Authentication as the authentication method by following the steps
mentioned in
http://technet.microsoft.com/en-us/library/ee806890.aspx
.
The SharePoint site passes the user credentials to the SharePoint STS
that generates SAML token upon successful ObSSOCookie validation
by the custom membership provider. The SharePoint site also
generates FedAuth cookie upon receiving the SAML token from
SharePoint STS. The SharePoint site passes the FedAuth cookie to the
user so that he/she can access the SharePoint site.
SharePoint Security Token Service
(STS)
The SharePoint site passes the user credentials (user name and
password) to SharePoint STS, which invokes the custom membership
provider and passes the credentials to it. Once the custom
membership provider validates the ObSSOCookie passed to it, the
SharePoint STS generates the SAML token for the user that is passed
to the SharePoint Relying Party (RP).
Custom Membership Provider for
SharePoint STS
The SharePoint STS invokes the membership provider (configured
with Form Based Authentication). STS passes the user credentials and
the URL for the IIS resource (configured in
web.config
on the
SharePoint site) to the custom membership provider for cookie
validation.
The membership provider is customized such that it returns success if
the ObSSOCookie value passed to it is valid.
The custom membership provider library
(
OAMCustomMembershipProvider.dll
) is packaged and installed with
the 10g WebGate for IIS Web server. You must deploy the library in the
global assembly cache of the SharePoint Server host.
The
CustomMembershipProvider
class is derived from
LdapMembershipProvider
class present in the
Microsoft.Office.Server.Security
namespace.
IIS resource for Cookie validation Configure the URL for the IIS resource in the SharePoint site’s
web.config
file.
For the HTTP validation method, the WebGate intercepts the request
sent by the custom membership provider, extracts the ObSSOCookie
from the request, and validates it. If the cookie is valid, then the
request is redirected to the IIS resource, which returns the response
with a 200 (OK) status code to the custom membership provider.
Otherwise, a 403 (Forbidden) error code is returned to the custom
membership provider.
See Also: Chapter 25 for information about the 10g WebGate
installation.
Table 52–2 (Cont.) Microsoft Requirements for this Integration
Component Description

Preparing for Integration With SharePoint Server
Integrating Microsoft SharePoint Server with Access Manager 52-9
Prerequisites
Install and test Microsoft components described in "Required Microsoft Components"
on page 52-7.
To prepare for integration with SharePoint Server
1. Install Oracle Identity Management and Access Manager as described in the
Oracle Fusion Middleware Installation Guide for Oracle Identity and Access
Management.
2. Register a 10g WebGate for IIS Web server with Access Manager:
a. Log in to the Oracle Access Management Console. For example:
http://
host:port
/oamconsole
.
b. From the Welcome page, SSO Agent panel, click New OAM 10g Agent to
open a fresh page.
c. On the Create: OAM Agent page, enter required details (those with an *):
Name
SharePoint user name and password
Security mode (Agent host must match OAM Server)
Auto Create Policies (Checked)
d. Protected Resource List: In this table, enter individual resource URLs to be
protected by this OAM Agent.
e. Public Resource List: In this table, enter individual resource URLs to be public
(not protected).
f. Click Apply to submit the registration, check the Confirmation window for the
location of generated artifacts, then close the window.
3. Proceed as follows:
■Install a fresh WebGate: Continue with steps 6, 7, and 8.
■Existing WebGate on SharePoint Host: Skip to "Integrating With Microsoft
SharePoint Server" on page 52-10.
4. Locate and download the 64-bit ISAPI WebGate installer as follows:
a. Go to Oracle Fusion Middleware 11gR1 Software Downloads at:
https://www.oracle.com/technology/software/products/middleware/htdocs/fmw_
11_download.html
b. Click Accept License Agreement, at the top of the page.
c. From the Access Manager Webgates (10.1.4.3.0) row, click the download link
for the desired platform and follow on-screen instructions.
Note: Do not specify a Base URL.
Note: Only 64-bit ISAPI WebGates are supported as described in
"Integrating With Microsoft SharePoint Server Configured With LDAP
Membership Provider" on page 52-23.

Integrating With Microsoft SharePoint Server
52-10 Administrator's Guide for Oracle Access Management
d. Store the WebGate installer in the same directory as any 10g (10.1.4.3) Access
System Language Packs you want to install.
5. Launch the WebGate installer for your platform, installation mode, and Web
server. See Chapter 25 for information about 10g WebGate installation.
Follow these steps:
a. Follow on-screen prompts.
b. Provide Administrator credentials for the Web server.
c. Language Pack—Choose a Default Locale and any other Locales to install,
then click Next.
d. WebGate installation begins (
IISImpersonationModule.dll
will be installed in
WebGate_install_dir
\access\Oblix\apps\Webgate\bin\
).
6. Before updating the Web server configuration, copy WebGate artifacts from the
Admin Server to the computer hosting the WebGate.
a. On the computer hosting the Oracle Access Management Console
(AdminServer), locate and copy ObAccessClient.xml (and any certificate
artifacts):
$DOMAIN_HOME
/output/
$Agent_Name
/
ObAccessClient.xml
password.xml
(if needed)
aaa_key.pem
(your private key generated by openSSL)
aaa_cert.pem
(signed certificates in PEM format)
b. On the OAM Agent host, add the artifacts to the WebGate path. For example:
WebGate_install_dir
/access/oblix/lib/ObAccessClient.xml
WebGate_install_dir
/access/oblix/config
c. Restart the WebGate Web server.
d. (Optional.) Restart the OAM Server that is hosting this Agent. This step is
recommended but not required.
7. Proceed as needed to complete this integration within your environment:
■Integrating With Microsoft SharePoint Server
■Integrating With Microsoft SharePoint Server Configured With LDAP
Membership Provider
52.5 Integrating With Microsoft SharePoint Server
The following overview outlines the tasks that you must perform for this integration
and the topics where you will find the steps and details.
The custom membership provider library (
OAMCustomMembershipProvider.dll
) is
packaged and installed with the 10g WebGate for IIS Web Server. You must deploy the
library in the global assembly cache of the computer hosting SharePoint Server as
outlined next.
Task overview: Integrating with Microsoft SharePoint Server includes
1. Performing prerequisite tasks:
■Installing "Required Microsoft Components" on page 52-7.

Integrating With Microsoft SharePoint Server
Integrating Microsoft SharePoint Server with Access Manager 52-11
■"Preparing for Integration With SharePoint Server" on page 52-8
2. Creating a new Web application (or site application) in SharePoint Server is
described in following topics:
■"Creating a New Web Application in Microsoft SharePoint Server" on
page 52-11
■Creating a New Site Collection for Microsoft SharePoint Server on page 52-13
3. "Setting Up Microsoft Windows Impersonation" on page 52-14 (not used with
LDAP Membership Provider).
4. "Completing the SharePoint Server Integration" on page 52-22.
5. "Configuring Single Sign-off for Microsoft SharePoint Server" on page 52-33.
6. "Synchronizing User Profiles Between Directories" on page 52-38.
7. "Testing Your Integration" on page 52-38.
52.5.1 Creating a New Web Application in Microsoft SharePoint Server
You perform this task when integrating with Microsoft SharePoint Server, with or
without LDAP Membership Provider.
Prerequisites
Installing Microsoft components. See "Required Microsoft Components" on page 52-7.
To create a new Web application in Microsoft SharePoint Server
1. On the host where SharePoint Server is installed, open the Central Administration
home page: Start, All Programs, SharePoint Products, SharePoint, Central
Administration.
2. From the Central Administration home page, click Application Management.
3. From the Application Management page, Web Applications section, click Manage
Web Applications.
4. In the top-left corner, click the New button to create a new web application.
5. Configure the items in Table 52–3 on the Create New Web Application page:
Table 52–3 Create Web Application Options for Microsoft SharePoint Server
Section What You Configure in This Section
Authentication In this section you select either Claim Based Authentication or Classic
Mode Authentication, as appropriate.

Integrating With Microsoft SharePoint Server
52-12 Administrator's Guide for Oracle Access Management
IIS Web Site In this section you configure the following settings for your new Web
application, as follows:
■To choose an existing Web site, click Use an Existing Web Site...
■To create a new site, click Create.
■In the Port field, enter the port number you want to use to access
the Web application.
For a new Web site, this field contains a default port number. For
an exiting site, this field contains the currently configured port
number.
■In the optional Host Header field, enter the URL for accessing the
Web application.
■In the Path field, enter the path to the directory that contains the
site on the server.
For a new Web site, this field contains a default path. For an
exiting site, this field contains the current path.
Security
Configuration
In this section you configure authentication and encryption for your
Web application, as follows:
■In the Authentication Provider section, select
Negotiate(Kerberos) or NTLM, as appropriate.
■In the Allow Anonymous section, choose Yes or No.
A value of Yes allows anonymous access to the Web site by using
a computer-specific anonymous access account. The account name
is IUSR_computername.
■In the Secure Sockets Layer (SSL) section, choose Yes or No.
If you choose to enable SSL for the Web site, you must configure
SSL by requesting and installing a certificate.
Public URL Enter the URL for the domain name for all sites that users will access
in this Web application. This URL domain will be used in all links
shown on pages in the Web application. By default, the box is
populated with the current server name and port. The Zone field is
automatically set to Default for a new Web application and cannot be
changed from this page.
Application Pool In the Application Pool section, choose whether to use an existing
application pool or create a new application pool for this Web
application, as follows:
■To use an existing application pool, select Use Existing
Application Pool, then select the application pool you wish to use
from the drop-down menu.
■To create a new application pool, select Create a New Application
Pool, and in the Application Pool Name field, type the name of
the new application pool, or keep the default name.
In the section Select a Security Account for This Application Pool,
select Predefined to use an existing application pool security
account, then select the security account from the drop-down
menu. To use a security account that is not currently being used
for an existing application pool, select Configurable, enter the user
name of the account you want to use in the User Name field, and
enter the password for the account in the Password field.
Table 52–3 (Cont.) Create Web Application Options for Microsoft SharePoint Server
Section What You Configure in This Section

Integrating With Microsoft SharePoint Server
Integrating Microsoft SharePoint Server with Access Manager 52-13
6. Click OK to create the new Web application, or click Cancel to cancel the process
and return to the Application Management page.
7. Proceed with "Creating a New Site Collection for Microsoft SharePoint Server".
52.5.2 Creating a New Site Collection for Microsoft SharePoint Server
You perform this task when integrating with Microsoft SharePoint Server, with or
without LDAP Membership Provider.
To create a new site collection for Microsoft SharePoint Server
1. From the Application Management page, Site Collection section, click Create Site
Collections.
2. On the Create Site Collection page, in the Web Application section, either select a
Web application to host the site collection (from the Web Application drop-down
list), or create a new Web application to host the site collection, as follows:
Database Name and
Authentication
In this section, choose the database server, database name, and
authentication method for your new Web application.
In the Database Name field, enter the name of the database or use the
default entry. In the Database Authentication field, choose whether to
use Windows authentication (recommended) or SQL authentication, as
follows:
■If you want to use Windows authentication, leave this option
selected.
■If you want to use SQL authentication, select SQL authentication.
In the Account field, type the name of the account that you want
the Web application to use to authenticate to the SQL Server
database, then type the password in the Password field.
Failover Server You can optionally choose to specify a fail-over database server to
configure a Fail-over Server.
Service Application
Connections
You can use the default value or choose custom value and optionally
select the services you want your web application to connect to.
Table 52–4 Create a Web Application to Host a Site Collection for SharePoint Server
Section What You Configure in This Section
Quota Template You can decide to use predefined quota template to limit
resources used for this site collection or use "No quota" as
appropriate.
Title and Description Enter a title and description for the site collection
Web Site Address Select a URL type, and specify a URL for the site collection.
Template Select a template from the tabbed template control.
Primary Site Collection
Administrator
Enter the user account name for the user you want to be the
primary Administrator for the site collection.
You can also browse for the user account by clicking the book
icon to the right of the text box. You can verify the user account
by clicking the check names icon to the right of the text box.
Table 52–3 (Cont.) Create Web Application Options for Microsoft SharePoint Server
Section What You Configure in This Section

Setting Up Microsoft Windows Impersonation
52-14 Administrator's Guide for Oracle Access Management
3. Refer to the following topics as you finish this integration:
■"Setting Up Microsoft Windows Impersonation" on page 52-14
■"Completing the SharePoint Server Integration" on page 52-22
■"Configuring Single Sign-off for Microsoft SharePoint Server" on page 52-33
■"Synchronizing User Profiles Between Directories" on page 52-38
■"Testing Your Integration" on page 52-38
52.6 Setting Up Microsoft Windows Impersonation
If you want to use a directory server other than Active Directory, use LDAP
Membership provider. The OAMCustomMembership provider leverages the
functionality of LDAP Membership provider.
This section describes how to set up impersonation, whether for SharePoint Server
integration or for use by some other application.
Task overview: Setting up impersonation
1. Create a trusted user account for only impersonation in the Active Directory
connected to SharePoint Server, as described in "Creating Trusted User Accounts"
on page 52-15.
2. Give the trusted user the special right to act as part of the operating system, as
described in "Assigning Rights to the Trusted User" on page 52-15.
3. Bind the trusted user to the WebGate by supplying the authentication credentials
for the trusted user, as described in "Binding the Trusted User to Your WebGate"
on page 52-16.
4. Add a header variable named IMPERSONATE to the Authorization Success
Action in the Application Domain for impersonation, as described in "Adding an
Impersonation Response to an Authorization Policy" on page 52-17.
5. Configure IIS by adding the
IISImpersonationModule.dll
to your IIS
configuration, as described in "Adding an Impersonation DLL to IIS" on
page 52-18.
6. Test impersonation, as described in "Testing Impersonation" on page 52-20.
Secondary Site Collection
Administrator (optional)
Enter the user account for the user that you want to be the
secondary Administrator for the site collection.
You can also browse for the user account by clicking the book
icon to the right of the text box. You can verify the user account
by clicking the Check Names icon to the right of the text box.
See Also: "Task overview: Integrating with Microsoft SharePoint
Server Configured with LDAP Membership Provider" on page 52-24
Note: Skip this section if you are integrating Microsoft SharePoint
Server configured with LDAP Membership Provider. Windows
impersonation is not used with the LDAP Membership Provider.
Table 52–4 (Cont.) Create a Web Application to Host a Site Collection for SharePoint
Section What You Configure in This Section

Setting Up Microsoft Windows Impersonation
Integrating Microsoft SharePoint Server with Access Manager 52-15
52.6.1 Creating Trusted User Accounts
This special user should not be used for anything other than impersonation.
The example in the following procedure uses Impersonator as the New Object - User.
Your environment will be different.
To create a trusted user account
1. Perform the following steps on the computer hosting your SharePoint Server
installation:
■Windows 2008: Select Start, Programs, Administrative tools, Active Directory
Users and Computers.
2. In the Active Directory Users and Computers window, right-click Users on the tree
in the left pane, then select New, User.
3. In the First name field of the pane entitled New Object - User, enter an
easy-to-remember name such as Impersonator.
4. Copy this same string to the User logon name field, then click Next.
5. In succeeding panels, you will be asked to choose a password and then retype it to
confirm.
Figure 52–1 Setting up a Trusted User Account for Windows Impersonation
52.6.2 Assigning Rights to the Trusted User
You need to give the trusted user the right to act as part of the operating system.
To give appropriate rights to the trusted user
1. Perform steps for your environment:
Note: Oracle recommends that you chose a very complex password,
because your trusted user is being given very powerful permissions.
Also, be sure to check the box marked Password Never Expires. Since
the impersonation module should be the only entity that ever sees the
trusted user account, it would be very difficult for an outside agency
to discover that the password has expired.
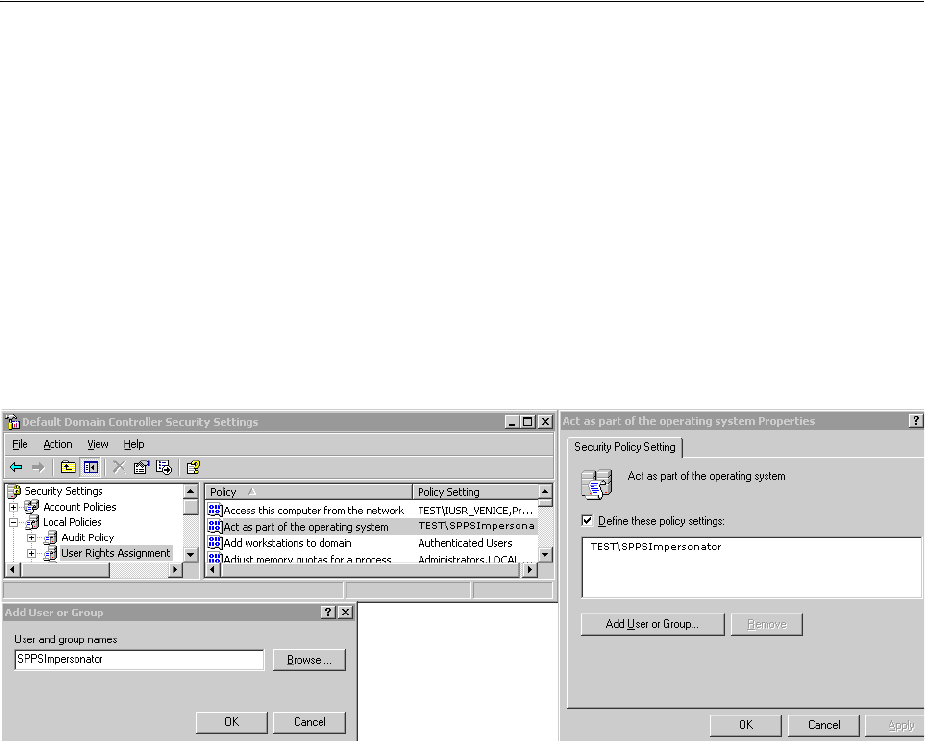
Setting Up Microsoft Windows Impersonation
52-16 Administrator's Guide for Oracle Access Management
■Windows 2008: Select Start, Programs, Administrative tools, Local Security
Policy.
2. On the tree in the left pane, click the plus icon (+) next to Local Policies.
3. Click User Rights Assignment on the tree in the left pane.
4. Double-click Act as part of the operating system in the right pane.
5. Click Add User or Group.
6. In the Add User or Group panel, type the User logon name of the trusted user
(SPPSImpersonator in our example) in the User and group names text entry box,
then click OK to register the change.
Figure 52–2 Configuring Rights for the Trusted User in Windows Impersonation
52.6.3 Binding the Trusted User to Your WebGate
You need to bind the trusted user to the 10g WebGate that communicates with Access
Manager by supplying the authentication credentials for the trusted user, as follows.
The following procedure presumes that you have not yet registered a 10g WebGate
with Access Manager. Values in the following procedure are provided as an example
only. Your environment will be different.
To bind your trusted user to your WebGate
1. Go to the Oracle Access Management Console.
For example:
http://hostname:port/oamconsole
where hostname is the fully-qualified DNS name of the computer hosting the
Oracle Access Management Console; port is the listening port configured for the
OAM Server; oamconsole leads to the Oracle Access Management Console.
2. From the Welcome page, SSO Agent panel, click New OAM 10g Agent to open a
fresh page:
3. On the Create: OAM Agent page, enter required details (those with an *) to
register this WebGate.
See Also: Chapter 25 for details on managing 10g WebGates
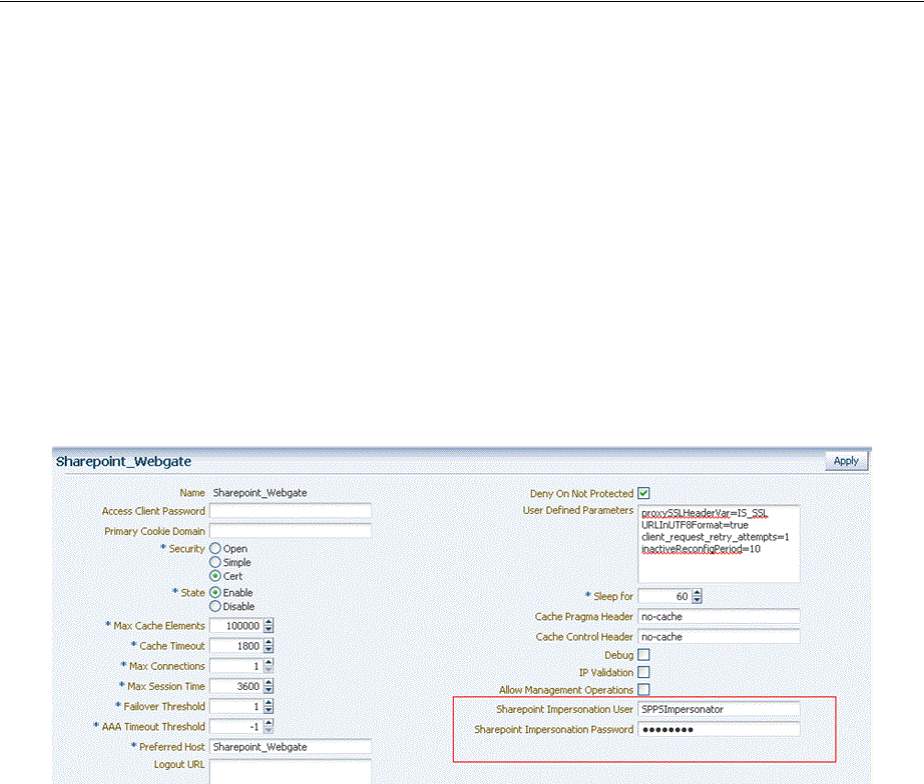
Setting Up Microsoft Windows Impersonation
Integrating Microsoft SharePoint Server with Access Manager 52-17
4. Protected Resource List: In this table, enter individual resource URLs to be
protected by this OAM Agent, as shown in Table 14–9.
5. Public Resource List: In this table, enter individual resource URLs to be public
(not protected), as shown in Table 14–9.
6. Auto Create Policies: Check to create fresh policies (or clear and use the same host
identifier as another WebGate to share policies (Table 14–9)).
7. Click Apply to submit the registration.
8. Check the Confirmation window for the location of generated artifacts, then close
the window.
9. In the navigation tree, open the Agent page.
10. SharePoint Requirements: Add trusted user credentials in the fields shown here:,
and click Apply.
11. Copy the artifacts as follows (or install the WebGate and then copy these artifacts):
a. On the Oracle Access Management Console host, locate the updated OAM
Agent ObAccessClient.xml configuration file (and any certificate artifacts). For
example:
$DOMAIN_HOME/output/$Agent_Name/ObAccessClient.xml
b. On the computer hosting the agent, copy the artifacts. For example
10g WebGate/AccessClient: $WebGate_install_dir/oblix/lib/
ObAccessClient.xml
c. Proceed to "Adding an Impersonation Response to an Authorization Policy".
52.6.4 Adding an Impersonation Response to an Authorization Policy
An Application Domain and basic policies to protect your SharePoint resources was
created when you registered the WebGate with Access Manager. Now you must add
an Authorization Success Action (Response) with a return type of Header, set the
name to
IMPERSONATE
, with the Response value of $user.userid, "samaccountname" for a
single-domain Active Directory installation or "userPrincipalName" for a
multi-domain Active Directory forest.
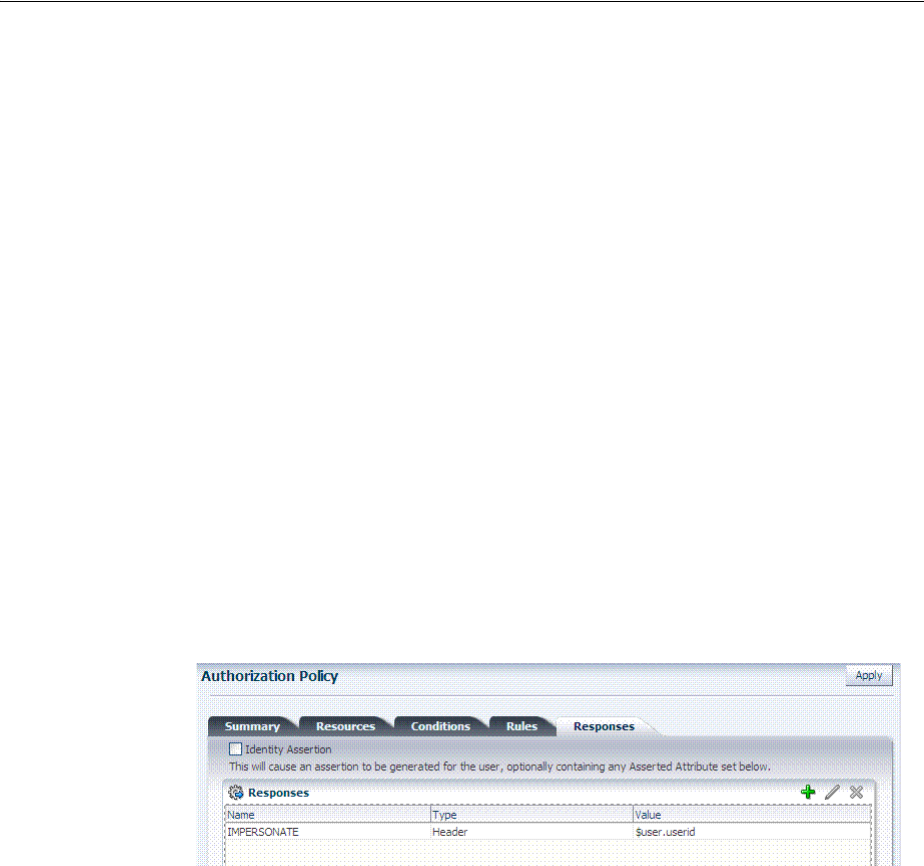
Setting Up Microsoft Windows Impersonation
52-18 Administrator's Guide for Oracle Access Management
To add an impersonation response to your Authorization Policy
1. From the Oracle Access Management Console Policy Configuration tab, open
Application Domains, find and open the DesiredDomain, then open the
DesiredPolicy.
See "Searching for an Existing Application Domain" on page 20-12.
Here DesiredDomain refers to the Application Domain created specifically for
impersonation (Impersonation for example). DesiredPolicy is your default policy
created during agent registration. By default, no policy Responses exist until you
create them.
2. Responses: On the open Policy page, click the Responses tab, click the Add (+)
button, and:
■From the Type list, choose Header.
■In the Name field, enter a unique name for this response:
IMPERSONATE
■In the Value field, enter a value for this Response. For example: $user.userid.
■See also: "Adding and Managing Policy Responses for SSO" on page 20-47.
3. Click Add to save the Response, which is used for the second WebGate request
(for authorization). Following is a sample.
52.6.5 Adding an Impersonation DLL to IIS
You are ready to configure IIS Web server for this integration by registering and
configuring the IISImpersonationModule.dll across all sites including central
administration and web services.
Alternatively, if you have multiple Web sites, where some are integrated with Access
Manager while others are not, you might want to enable impersonation only for those
Web sites that are integrated with Access Manager. To do this, you must configure the
Native Module only at those sites that require integration. See:
■To configure and register ImpersonationModule to IIS
■To configure site level Native Modules for Web sites
To configure and register ImpersonationModule to IIS
1. Select Start, Administrative Tools, Internet Information Services (IIS) Manager.
2. In the left pane of IIS 7, click the hostname.
3. In the middle pane, under the IIS header, double click Modules.
4. In the right pane, click Configure Native Modules and click Register.
See Also: Chapter 20 for details about Application Domains and
policies.
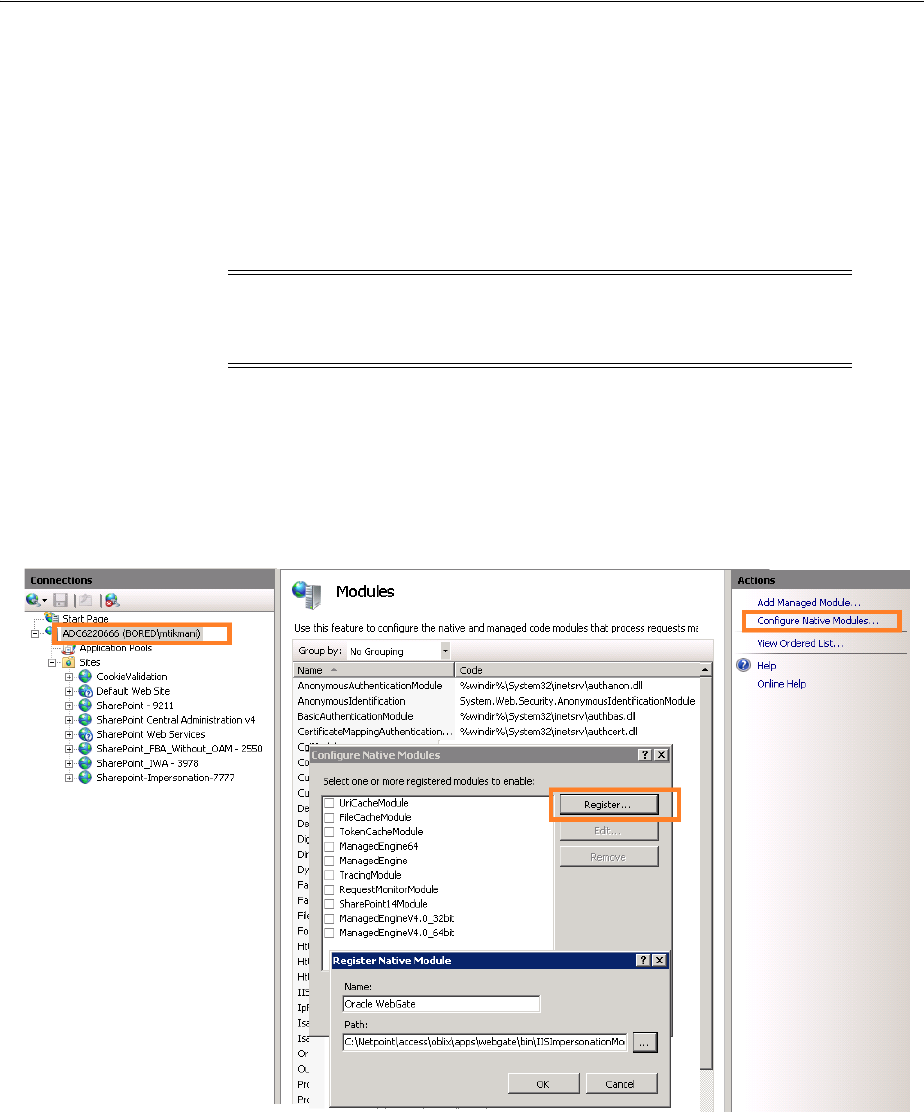
Setting Up Microsoft Windows Impersonation
Integrating Microsoft SharePoint Server with Access Manager 52-19
5. In the window, provide a module Name (for example, Oracle Impersonation
Module).
6. In the Path field, type the full path to IISImpersonationModule.dll.
By default, the path is:
WebGate_install_dir\access\oblix\apps\Webgate\bin\IISImpersonation
Where WebGate_install_dir is the directory of your WebGate installation.
7. Click OK to register the module.
8. Check the name of the newly created module and click OK to apply the module
across the Web sites.
Figure 52–3 Registering the Impersonation Module
To configure site level Native Modules for Web sites
1. Click the plus icon (+) icon to left of Sites.
2. Click the site where you want to enable Impersonation.
3. In the Middle pane, under IIS, double click Modules.
4. In the right pane, click Configure Native Modules and select the Impersonation
Module registered earlier.
5. Click OK.
Note: If any spaces exist in the path (for example,
C:\Program Files\Oracle\...
) surround the entire string with
double quotes (" ").

Setting Up Microsoft Windows Impersonation
52-20 Administrator's Guide for Oracle Access Management
6. Proceed with:
■Testing Impersonation
■Completing the SharePoint Server Integration
52.6.6 Testing Impersonation
You can test to ensure that impersonation is working properly in the following ways
before you complete the integration:
■Outside the SharePoint Server context or test single sign-on, as described in
"Creating an IIS Virtual Site Not Protected by SharePoint Server" on page 52-20
■Using the Event Viewer, as described in "Testing Impersonation Using the Event
Viewer" on page 52-21
■Using a Web page, as described in "Testing Impersonation using a Web Page" on
page 52-22
■Using negative testing as described in "Negative Testing for Impersonation" on
page 52-22
52.6.6.1 Creating an IIS Virtual Site Not Protected by SharePoint Server
To test the impersonation feature outside the SharePoint Server context or to test single
sign-on, you will need a target Web page on an IIS virtual Web site that is not
protected by SharePoint Server. You create such a virtual Web site by completing the
following task.
To create an IIS virtual site not protected by SharePoint Server
1. Select Start, Administrative Tools, Internet Information Services (IIS) Manager.
See Also: "Completing the SharePoint Server Integration" after
confirming impersonation configuration is working properly
Setting Up Microsoft Windows Impersonation
Integrating Microsoft SharePoint Server with Access Manager 52-21
2. Click the plus icon (+) to the left of the local computer icon on the tree in the left
pane.
3. Right-click Web Sites on the tree in the left pane, then navigate to New, Web Site
on the menu.
4. Respond to the prompts by the Web site creation wizard.
5. After you create the virtual site, you must protect it with policies in an Application
Domain. See Chapter 20 for details about Application Domains and policies.
52.6.6.2 Testing Impersonation Using the Event Viewer
When you complete impersonation testing using the Windows 2003 Event Viewer, you
must configure the event viewer before conducting the actual test.
To test impersonation through the Event Viewer
1. Select Start Menu, Event Viewer.
2. In the left pane, right-click Security, then click Properties.
3. Click the Filter tab on the Security property sheet.
4. Verify that all Event Types are checked, and the Event Source and Category lists
are set to All, then click OK to dismiss the property sheet.
Your Event Viewer is now configured to display information about the HeaderVar
associated with a resource request.
Figure 52–4 Verifying Event Viewer Settings
5. Create a new IIS virtual server (virtual site).
6. Place a target Web page anywhere in the tree on the virtual site.
7. Point your browser at the Web page.
If impersonation is working correctly, the Event Viewer will report the success of the
access attempt.

Completing the SharePoint Server Integration
52-22 Administrator's Guide for Oracle Access Management
52.6.6.3 Testing Impersonation using a Web Page
You can also test impersonation using a dynamic test page, such as an .asp page or a
Perl script, that can return and display information about the request.
To test impersonation through a Web page that displays server variables
1. Create an .asp page or Perl script that will display the parameters AUTH_USER
and IMPERSONATE, which can resemble the sample page presented in the
following listing:
Example 52–1 Sample .ASP Page Code
<TABLE border=1>
<TR>
<TD>Variable</TD>
<TD>  </TD>
<TD>Value</TD></TR>
<%for each servervar in request.servervariables%>
<TR>
<TD><%=servervar%></TD>
<TD>  </TD>
<TD><%=request.servervariables(servervar)%> </TD>
</TR>
2. Create an IIS virtual site, or use the one you created for the previous task.
3. Place an .asp page or Perl script (such as the sample in the preceding listing)
anywhere in the tree of the new virtual site.
4. Point your browser at the page, which should appear, with both AUTH_USER and
IMPERSONATE set to the name of the user making the request.
52.6.6.4 Negative Testing for Impersonation
To conduct negative testing for impersonation, you need to unbind the trusted user
from the WebGate, as explained in the following procedure.
To unbind the trusted user from your WebGate
1. In the Oracle Access Management Console, locate the WebGate.
See "Searching for an OAM Agent Registration" on page 16-20.
2. Open the desired WebGate registration page and remove the credentials for the
trusted user.
3. Click Apply to save the change.
4. Restart the IIS server and in a browser window, go to a protected code page
(previously accessible to the trusted user).
5. Confirm that you receive an message page should appear. Values for AUTH_USER
and IMPERSONATE are necessary for impersonation credentials to be bound to a
WebGate.
6. Restore the trusted user to the WebGate registration page.
52.7 Completing the SharePoint Server Integration
You need to complete several procedures to set up Access Manager with SharePoint
Server integration.
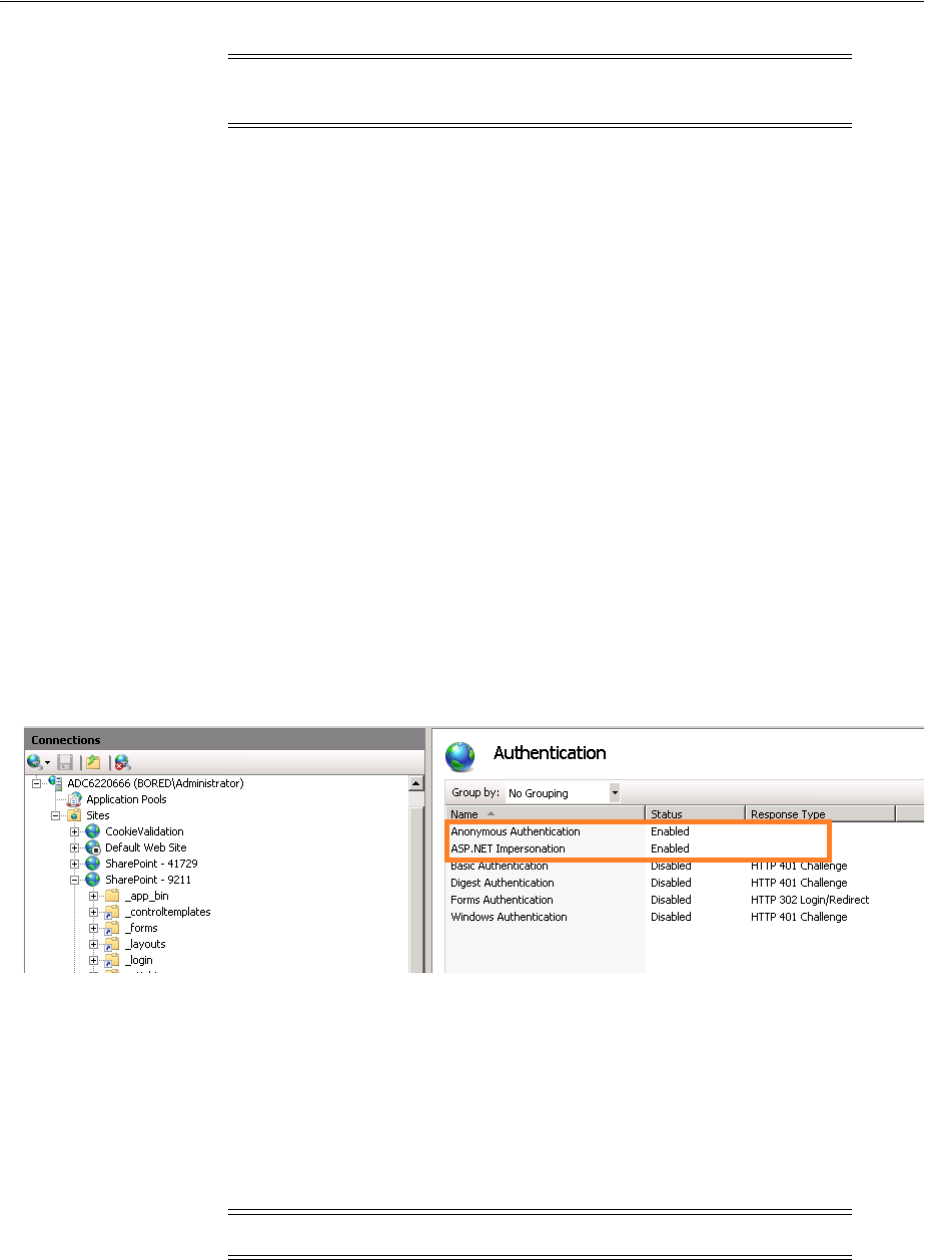
Integrating With Microsoft SharePoint Server Configured With LDAP Membership Provider
Integrating Microsoft SharePoint Server with Access Manager 52-23
Task overview: Completing the SharePoint Server integration
1. Set up IIS security, as described in "Configuring IIS Security" on page 52-23.
2. Test the integration, as described in "Testing the SharePoint Server Integration" on
page 52-38.
52.7.1 Configuring IIS Security
Be sure to configure IIS Security before you continue.
To configure IIS Security for the SharePoint Server integration
1. Select Start, Administrative Tools, Internet Information Services (IIS) Manager.
2. Click the plus icon (+) to the left of the local computer icon on the tree in the left
pane.
3. Click Web Sites on the tree in the left pane.
4. In the center pane, double-click on the Authentication under IIS.
5. Ensure that Anonymous access is enabled and Windows Authentication is
disabled.
Figure 52–5 Impersonation Authentication
52.8 Integrating With Microsoft SharePoint Server Configured With LDAP
Membership Provider
In this scenario, Access Manager gets integrated with SharePoint Server using
SharePoint Security Token Service (STS). This includes the ISAPI WebGate installation
on IIS, as well as Access Manager configuration and steps needed to achieve the
HeaderVar integration.
The following overview introduces the tasks that you must perform for this
integration, including prerequisites, and where to find the information you need for
each task.
Note: Skip this section if you are integrating with SharePoint Server
configured with LDAP Membership Provider.
Note: Only 64-bit ISAPI WebGates are supported for this integration.

Integrating With Microsoft SharePoint Server Configured With LDAP Membership Provider
52-24 Administrator's Guide for Oracle Access Management
Task overview: Integrating with Microsoft SharePoint Server Configured with
LDAP Membership Provider
1. Preparing for this integration:
a. Install "Required Microsoft Components", as described on page 52-7.
b. Create a SharePoint Web site, as described in "Creating a New Web
Application in Microsoft SharePoint Server" on page 52-11.
c. Configure the SharePoint site collection, as described in "Creating a New Site
Collection for Microsoft SharePoint Server" on page 52-13.
d. Configure the created Web site with LDAP directory using Claim-Based
Authentication type (which uses the LDAP Membership Provider), as
described in your SharePoint documentation.
e. Ensure that users who are present in the LDAP directory can log in to the
SharePoint Web site and get proper roles.
f. Test the configuration to ensure that users who are present in the LDAP
directory can log in to the SharePoint Web site and get proper roles, as
described in your SharePoint documentation.
2. Perform all tasks described in "Installing Access Manager for Microsoft SharePoint
Server Configured With LDAP Membership Provider" on page 52-25.
This task includes installing a 10g WebGate for IIS and configuring a
WebGate.dll
for the individual SharePoint Web site.
3. Add an authentication scheme for this integration, as described in "Configuring an
Authentication Scheme for Use With LDAP Membership Provider" on page 52-26.
4. Update the Application Domain that protects the SharePoint Web Site, as
described in "Updating the Application Domain Protecting the SharePoint Web
Site" on page 52-27.
5. In the new Application Domain, create an authorization rule for this integration,
as described in "Creating an Authorization Response for Header Variable SP_SSO_
UID" on page 52-29.
6. Perform all steps in "Creating an Authorization Response for the
OAMAuthCookie" on page 52-29.
7. Perform all steps in "Configuring and Deploying
OAMCustomMembershipProvider" on page 52-30.
8. Synchronize directory servers, if needed, as described in "Ensuring Directory
Servers are Synchronized" on page 52-33.
9. Configure single-sign-on for office documents as described in "Configuring Single
Sign-On for Office Documents" on page 52-33.
10. Configure single sign-off, as described in "Configuring Single Sign-off for
Microsoft SharePoint Server" on page 52-33.
11. Finish by testing your integration to ensure it operates without problem, as
described in "Testing the Integration" on page 52-33.
52.8.1 About Integrating With Microsoft SharePoint Server Configured With LDAP
Membership Provider
The previous scenario, "Integrating With Microsoft SharePoint Server" on page 52-10,
describes how to use Windows authentication. In that scenario, authentication and

Integrating With Microsoft SharePoint Server Configured With LDAP Membership Provider
Integrating Microsoft SharePoint Server with Access Manager 52-25
authorization are performed for users residing in Active Directory. Access Manager
used Windows impersonation for integration.
For the integration described in this section, support for the LDAP Membership
Provider is achieved by using a HeaderVar-based integration. The ISAPI WebGate
filter intercepts HTTP requests for Web resources and works with the OAM Server to
authenticate the user who made the request. When authentication is successful,
WebGate creates an ObSSOCookie and sends it to the user's browser to facilitate single
sign-on (SSO). The WebGate also sets
SP_SSO_UID
as a
HeaderVar
action for this user
session. The Oracle Custom Membership provider in SharePoint validates the
ObSSOCookie using the HTTP validation method, whereby the Access Manager
Custom Membership Provider makes an HTTP/HTTPS request to a protected
resource. Access Manager then validates and compares the user login returned on
Authorization success with
SP_SSO_UID
.
Requirements: This integration requires that Microsoft SharePoint Server:
■Must be integrated with the LDAP Membership Provider
■Must not use Windows authentication
■Must not have
IISImpersonationModule.dll
configured at the Web site using
Claim Based Authentication
52.8.2 Installing Access Manager for Microsoft SharePoint Server Configured With
LDAP Membership Provider
This procedure describes how to prepare your installation for integration with
Microsoft SharePoint Server Configured with LDAP Membership Provider.
Prerequisites
Perform Step 1 of the previous "Task overview: Integrating with Microsoft SharePoint
Server Configured with LDAP Membership Provider" on page 52-24.
To prepare your deployment for integration that includes LDAP Membership
Provider
1. Install Oracle Identity Management and Access Manager as described in the Oracle
Fusion Middleware Installation Guide for Oracle Identity and Access Management.
2. Provision and install an ISAPI WebGate using steps in Chapter 25 and Chapter 28
3. Configure
Webgate.dll
at the SharePoint Web site that you want to protect. For
example:
a. Start the Internet Information Services (IIS) Manager: Click Start, Programs,
Administrative Tools, Internet Information Services (IIS) Manager
b. Under Web Sites, double click the name of the SharePoint Web site to protect.
c. In the Middle pane, double click ISAPI Filters and click Add in the right pane.
d. Enter the filter name as
Oracle WebGate
.
e. Enter the following path to the
Webgate.dll
file.
See Also: "Introduction to Integrating With the SharePoint Server"
on page 52-2 for a look at processing differences between this
integration and the other integrations described in this chapter.
See Also: "Integration Requirements" on page 52-6

Integrating With Microsoft SharePoint Server Configured With LDAP Membership Provider
52-26 Administrator's Guide for Oracle Access Management
WebGate_install_dir/access/oblix/apps/Webgate/bin/Webgate.dll
f. Save and apply these changes.
g. Double click Authentication in the middle pane.
h. Verify that the following Internet Information Services settings are correct:
Anonymous Authentication and Forms Authentication is enabled, and
Windows Authentication is disabled.
i. Save and Apply these changes.
4. Go to the Web sites level to protect and create an /access application that points to
the newly installed WebGate_install_dir. For instance:
a. Under Web Sites, right-click the name of the Web site to be protected.
b. Select Add application named with the alias "access" that points to the
appropriate WebGate_install_dir\access.
c. Under Access Permissions, check Read, Run Scripts, and Execute.
d. Save and apply these changes.
5. Proceed to "Configuring an Authentication Scheme for Use With LDAP
Membership Provider".
52.8.3 Configuring an Authentication Scheme for Use With LDAP Membership Provider
When your integration includes the LDAP Membership Provider, only three Access
Manager authentication methods are supported, as described in this procedure.
To configure an authentication scheme for SharePoint with LDAP Membership
Provider
1. From the Oracle Access Management Console, Policy Configuration tab, expand
the Shared Components node.
2. Click the Authentication Schemes node, then click the Create button in the tool
bar.
3. On the Authentication Scheme page, fill in the:
Name: Enter a unique name for this scheme. For example: SharePoint w/LDAP-MP
Description: Optional
4. Authentication Level: Choose a level of security for the scheme.
5. Choose a Challenge Method:
Basic Authentication for SharePoint Web site root (/)
Form Authentication with Challenge Redirect for SharePoint Web site root (/)
Client Certificate Authentication for SharePoint Web site root (/)
Note: For Claim-based Authentication to work with the Access
Manager, Windows Authentication for the SharePoint Site must be
disabled.
See Also: Chapter 19 for details about managing authentication
schemes

Integrating With Microsoft SharePoint Server Configured With LDAP Membership Provider
Integrating Microsoft SharePoint Server with Access Manager 52-27
6. Challenge Redirect: Enter your challenge redirect value, if required.
7. Choose an Authentication Module from those listed.
8. Challenge Parameters: Enter your challenge parameter values, if required.
9. Challenge URL: The URL the credential collector will redirect to for credential
collection.
10. Click Apply to submit the new scheme, review details in the Confirmation
window.
11. Optional: Click the Set as Default button to automatically use this with new
Application Domains, then close the Confirmation window.
12. In the navigation tree, confirm the new scheme is listed, and then close the page.
13. Proceed with "Updating the Application Domain Protecting the SharePoint Web
Site".
52.8.4 Updating the Application Domain Protecting the SharePoint Web Site
This Application Domain was created when you provisioned the IIS WebGate to
protect the Microsoft SharePoint Server Web site for the integration scenario with
LDAP Membership Provider.
Within an Application Domain, resource definitions exist as a flat collection of objects.
Each resource is defined as a specific type, and the URL prefix that identifies a
document or entity stored on a server and available for access by a large audience. The
location is specified using an existing shared Host Identifier.
You need to use the authentication scheme that you created earlier. To validate the
ObSSOCookie, you must create another policy for a resource protected by a WebGate;
for example: /ValidateCookie. This resource should be deployed on a Web server
protected by a WebGate and you should be able to access it after providing correct
Access Manager credentials:
http(s)://
host:port
/
ValidateCookie
This example uses SharePoint w/LDAP-MP as the Application Domain name. Your
environment will be different.
Note: If the SharePoint resource is protected with an Access Manager
client-cert authentication scheme, you might need to add to the PATH
environment variable
C:\Program Files\Microsoft Office
Servers\14.0\Bin;C:\Program Files\Common Files\Microsoft
Shared\Web Server Extensions\14\BIN
.
Note: For this integration, leave empty the URL Prefix. Do not enter
a region to be appended to the URL prefix.
Note: Step 4 includes an alternative Authentication Scheme to
protect the SharePoint Web site with a Form authentication scheme.
See Also: Chapter 20 for details about managing policies to protect
resources
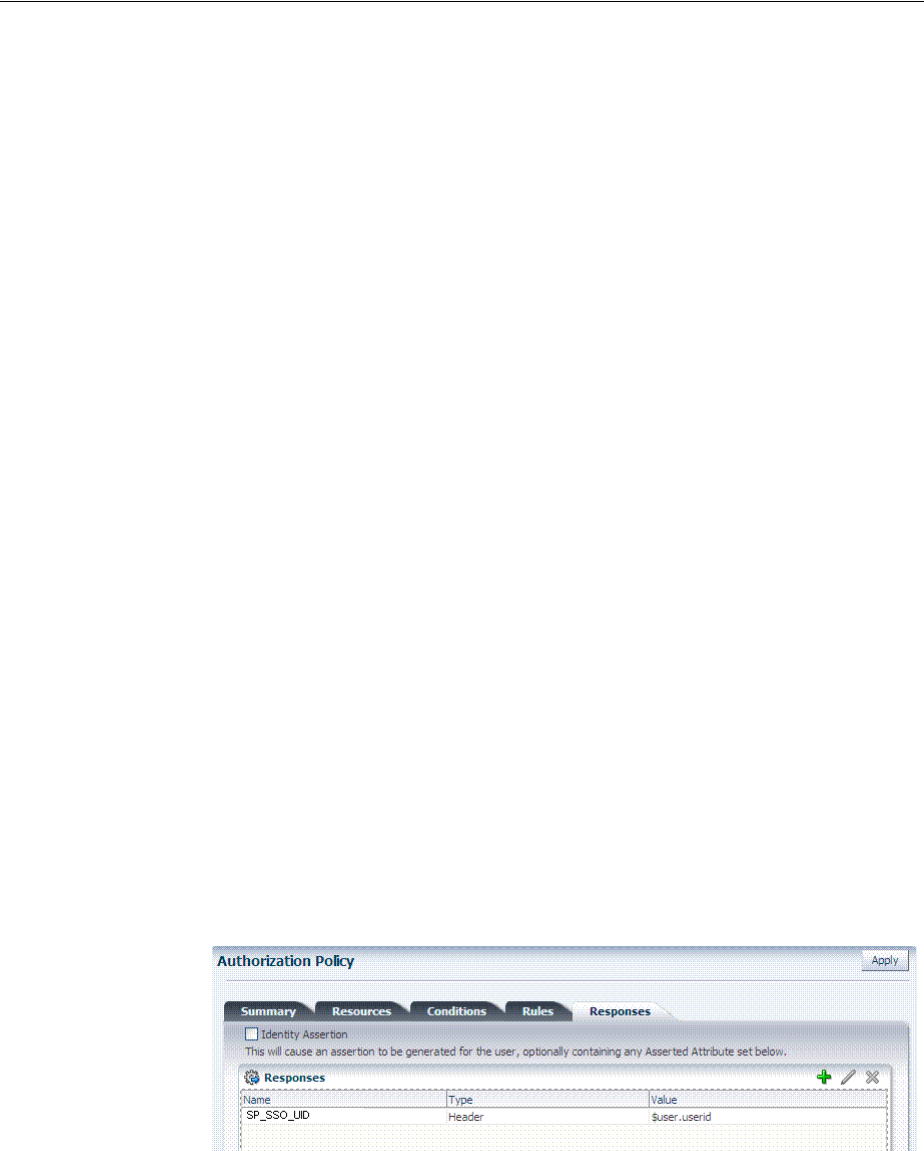
Integrating With Microsoft SharePoint Server Configured With LDAP Membership Provider
52-28 Administrator's Guide for Oracle Access Management
To update the Application Domain protecting the root SharePoint Web site
1. From the Oracle Access Management Console, open the SharePoint w/LDAP-MP
Application Domain.
See "Searching for an Existing Application Domain" on page 20-12.
2. Open the Resources tab, then click the New Resource button.
3. On the Resource Definition page, select or enter your details for a single resource
and click Apply:
Type: http
Description (optional): Protecting SharePoint Website
Host Identifier: Select the host identifier that you added earlier.
Resource URL: Enter /ValidateCookie.
Protection Level: Protected
Authentication Policy (if level is Protected)
Authorization Policy (if level is Protected and Authentication Policy is chosen)
4. In the Protected Resource Policy for Authentication, add a defined resource:
See "Viewing or Editing an Authentication Policy" on page 20-36.
■Click the Resources tab on the Authentication Policy page.
■Click the Add button on the Resources tab.
■Locate and select the desired resource definition, then click Add Selected.
■Click Apply to add the resources.
■Repeat to add more resources.
5. Click the Responses tab, then click its Add button and:
■In the Name field, enter a unique name for this response (SP_SSO_UID).
■From the Type list, choose Header.
■In the Value field, enter a value for this response. For example: $user.userid.
■Click Apply.
■See also: "Adding and Managing Policy Responses for SSO" on page 20-47.
6. Add a Policy: Add a policy for a resource used with the HTTP validation method,
If selected.
7. Before you enable this Application Domain, proceed to "Creating an Authorization
Response for Header Variable SP_SSO_UID"

Integrating With Microsoft SharePoint Server Configured With LDAP Membership Provider
Integrating Microsoft SharePoint Server with Access Manager 52-29
52.8.5 Creating an Authorization Response for Header Variable SP_SSO_UID
This topic describes how to add an Authorization Response for the integration
configured with LDAP Membership Provider. For this integration, you add the
following Header Variable to the Application Domain as Responses for Authorization
success:
Type = Header
Name = SP_SSO_UID
Return Attribute = $user.userid
In this case:
■ The Return Attribute is the login attribute used in Login
■ This authorization rule protects the root SharePoint Web site "/ "
To create an authorization response for SharePoint with LDAP Membership
Provider
1. From the Oracle Access Management Console, open the SharePoint w/LDAP-MP
Authorization Policy: ProtectedResourcePolicy.
See "Searching for an Authorization Policy" on page 20-39.
2. Click to activate the Authorization Policy Responses tab, then click its Add button:
■In the Name field, enter a unique name for this response (SharePoint
w/LDAP-MP).
■From the Type list, choose Header.
■In the Value field, enter a value for this response. For example: $user.userid.
■Click Apply.
■Repeat as needed.
3. Proceed to "Creating an Authorization Response for the OAMAuthCookie".
52.8.6 Creating an Authorization Response for the OAMAuthCookie
Here, you add the following Header Variable named
OAMAuthCookie
to the
Application Domain as Responses under Authorization success:
Type = Cookie
Name = OAMAuthCookie
Return Attribute = $user.userid
To create a Application Domain to protect the validation URL
1. From the Oracle Access Management Console, open the SharePoint w/LDAP-MP
Authorization Policy: Protected Resource Policy:
See "Searching for an Authorization Policy" on page 20-39.
2. Click the Responses tab, then click its Add button and:
Redirection URL: Not required for this integration
Return
Type = Cookie
See Also: Chapter 20 for details about authorization rules
See Also: Chapter 20 for details about policy responses

Integrating With Microsoft SharePoint Server Configured With LDAP Membership Provider
52-30 Administrator's Guide for Oracle Access Management
Name = OAMAuthCookie
Return Attribute = $user.userid
■In the Name field, enter a unique name for this response (OAMAuthCookie).
■From the Type list, choose Cookie.
■In the Valu e field, enter a value for this response. For example: $user.userid.
■Click Apply to submit the response, then close the confirmation window.
■Repeat as needed.
3. Proceed to "Configuring and Deploying OAMCustomMembershipProvider."
52.8.7 Configuring and Deploying OAMCustomMembershipProvider
You perform the following configuration steps in SharePoint to use the Access
Manager Authentication Module to authenticate and authorize the user.
To configure SharePoint to use OAM authentication Module
1. Go to the physical location of the SharePoint Web site directory. For example:
C:\Inetpub\wwwroot\wss\VirtualDirectories\SharePoint website Name
2. From the folder_forms, copy the file
Default.aspx
as
Default.ORIG.aspx
.
3. Open
Default.aspx
, search for
</asp:login>
, add the following after the line, and
then save the file:
<asp:HiddenField EnableViewState="false" ID="loginTracker" runat="server"
Value="autoLogin" />
<%bool autoLogin = loginTracker.Value == "autoLogin";%>
<script runat="server">
void Page_Load()
{
signInControl.LoginError += new EventHandler(OnLoginError);
NameValueCollection headers = Request.ServerVariables;
NameValueCollection queryString = Request.QueryString;
string loginasanotheruser = queryString.Get("loginasanotheruser");
string username = Request.ServerVariables.Get("HTTP_SP_SSO_UID");
HttpCookie ObSSOCookie = Request.Cookies["ObSSOCookie"];
bool isOAMCredsPresent = username != null && username.Length > 0 &&
ObSSOCookie != null && ObSSOCookie.Value != null;
bool signInAsDifferentUser = loginasanotheruser != null &&
loginasanotheruser.Contains("true");
if (isOAMCredsPresent)
{
//Handling For UTF-8 Encoding in HeaderName
if (username.StartsWith("=?UTF-8?B?") && username.EndsWith("?="))
{
Note: You can specify a default login page bundled in this file:
WebGate_install_dir
\access\oblix\apps\Webgate\
OAMCustomMembershipProvider\samples\Sample.Default.aspx

Integrating With Microsoft SharePoint Server Configured With LDAP Membership Provider
Integrating Microsoft SharePoint Server with Access Manager 52-31
username = username.Substring("=?UTF-8?B?".Length,
username.Length - 12);
byte[] decodedBytes = Convert.FromBase64String(username);
username = Encoding.UTF8.GetString(decodedBytes);
}
}
if (isOAMCredsPresent && loginTracker.Value == "autoLogin" &&
!signInAsDifferentUser)
{
bool
status=Microsoft.SharePoint.IdentityModel.SPClaimsUtility.AuthenticateFormsUser
(new
Uri(SPContext.Current.Site.Url),username,"ObSSOCookie:"+ObSSOCookie.Value);
if(status){
if (Context.Request.QueryString.Keys.Count > 1)
{
Response.Redirect(Context.Request.QueryString["Source"].ToString());
}
else
Response.Redirect(Context.Request.QueryString["ReturnUrl"].ToString());
}
else{
loginTracker.Value =
}
}
else
{
// DO NOTHING
}
}
void OnLoginError(object sender, EventArgs e)
{
loginTracker.Value = "";
}
</script>
4. Go to IIS Manager and click the Plus icon (+) before Sites.
5. Click on the plus icon (+) before SharePoint Web Services.
6. Right -click SecurityTokenServiceApplication, then click Explore.
7. Create a backup copy of
Web.config
as
Web.config.ORIG
, then open
Web.config
.
8. In the membership provider entries for enabling the LDAP membership provider
go to <membership>, <providers>, type, and then modify the type value as
follows:
type = "Oracle.CustomMembershipProvider, OAMCustomMembershipProvider,
Version=1.0.0.0, Culture=neutral, PublicKeyToken=52e6b93f6f0427a1
9. Add the following attribute at the end of the entry in Step 8
ValidationMode="OAMHttp"
to indicate the ObSSOCookie validation method.
<add name="membership"
type = "Oracle.CustomMembershipProvider,
OAMCustomMembershipProvider, Version=1.0.0.0, Culture=neutral,
PublicKeyToken=52e6b93f6f0427a1"

Integrating With Microsoft SharePoint Server Configured With LDAP Membership Provider
52-32 Administrator's Guide for Oracle Access Management
server="HOST1.COM"
port="389"
useSSL="false"
userDNAttribute="distinguishedName"
userNameAttribute="sAMAccountName"
userContainer="cn=users,dc=bored,dc=com"
userObjectClass="person"
userFilter="(&(ObjectClass=person))"
scope="Subtree"
otherRequiredUserAttributes="sn,givenname,cn"
ValidationURL="http(s)://host:port/ValidateCookie.html"
OAMAuthUser="OAMAuthCookie
ValidationMode="OAMHttp"
/>
10. Save the file.
11. Using command prompt go to the following directory:
C:\Program Files\Microsoft SDKs\Windows\v6.0A\Bin\gacutil.exe
12. Type:
gacutil -l OAMCustomMembershipProvider
13. Confirm that no results are returned.
14. Type the following.
gacutil -i <Webgate_install_
dir>\access\oblix\apps\Webgate\OAMCustomMembershipProvider\OAMCustomMembershipP
rovider.dll
15. Type:
gacutil -l OAMCustomMembershipProvider
16. Confirm that one result is returned.
17. Restart the SharePoint Web site.
18. Proceed as follows:
■Enabling Logging for CustomMemberShipProvider
■Ensuring Directory Servers are Synchronized
■Configuring Single Sign-off for Microsoft SharePoint Server
52.8.8 Enabling Logging for CustomMemberShipProvider
If you want to enable logs for the Oracle Custom Membership Provider, you must
configure the
DebugFile
parameter in the configuration file for the Oracle Custom
Membership Provider. For example: a sample entry for the
DebugFile=
Location_of_
logs_file":
Note: The resource configured for
ValidationURL
must be present
on the Web server. Also, the value of the
OAMAuthUser
parameter
should be configured as the authorization return action as described
in Step 6.

Configuring Single Sign-off for Microsoft SharePoint Server
Integrating Microsoft SharePoint Server with Access Manager 52-33
type = "Oracle.CustomMembershipProvider, OAMCustomMembershipProvider,
Version=1.0.0.0, Culture=neutral, PublicKeyToken=52e6b93f6f0427a1"
DebugFile="c:\Debug.txt"
52.8.9 Ensuring Directory Servers are Synchronized
Users in the directory server configured for Access Manager should be synchronized
with the directory server used by SharePoint if these are different. This is the same task
that you perform for other integration scenarios in this chapter. When your SharePoint
integration includes an LDAP Membership Provider, however, you can use a directory
server that supports LDAP commands.
52.8.10 Testing the Integration
This is similar to the task you perform for other integration scenarios in this chapter.
There are no differences when configured with LDAP Membership Provider.
52.9 Configuring Single Sign-On for Office Documents
Single sign-on for Office documents can be achieved by setting a persistent cookie in
the authentication scheme. To do this, you need to set
ssoCookie:max-age
in the
authentication scheme. This creates a persistent cookie which lasts for more than one
session.
To define a persistent cookie for single sign-on for Office Documents
1. Log in to the Oracle Access Management Console.
2. Find the Authentication Scheme being used and open the page.
3. In the Challenge Parameter, add:
ssoCookie:max-age=1000000 (Table 19–30)
Where,
time-in-seconds
represents the time interval when the cookie expires. For
example,
ssoCookie:max-age=3600
sets the cookie to expire in 1 hour (3600
seconds).
4. Save the change.
5. Configure centralized logout for the 10g WebGate, as described in Chapter 25.
52.10 Configuring Single Sign-off for Microsoft SharePoint Server
Manual Logout occurs when the user clicks the Logout button from SharePoint Server.
You can also configure the SharePoint Server logout URL in Access Manager so that
when a user clicks the Logout button from SharePoint Server site, Access Manager
logout is also triggered.
See Also: "Synchronizing User Profiles Between Directories" on
page 52-38
See Also: "Testing the SharePoint Server Integration" on page 52-38
Note: For integration based on Windows Native Authentication, you
need not set the persistent cookie parameter.

Configuring Single Sign-off for Microsoft SharePoint Server
52-34 Administrator's Guide for Oracle Access Management
Cookie time-out occurs when the overall user session is controlled by ObSSOCookie.
Consider the following use-case:
■FedAuth cookie time-out and ObSSOCookie is still valid: The user won't be
challenged again because the ObSSOCookie is present. A new FedAuth cookie is
generated (using the same flow described earlier).
■ObSSOCookie time-out and FedAuth Cookie is still valid: Since each request is
intercepted by the WebGate, the user is challenged for credentials again.
Access Manager provides single logout (also known as global or centralized log out)
for user sessions. With Access Manager, single logout refers to the process of
terminating an active user session.
This topic describes how to configure single sign-off for integration with SharePoint.
Single sign-off kills the user session.
■Configuring a Custom Logout URL in SharePoint Server
■Configuring Logout in SharePoint Server With Impersonation
52.10.1 Configuring a Custom Logout URL in SharePoint Server
To configure a Custom Logout URL in SharePoint Server
1. From the generated artifacts for WebGate, add
logout.html
to the SharePoint
Server Site
2. Locate
C:\Program Files\Common Files\Microsoft Shared\Web Server
Extensions\14\TEMPLATE\CONTROLTEMPLATES
.
3. In
\CONTROLTEMPLATES
, change the
welcome.ascx
by adding the following tag. For
example:
<SharePoint:MenuItemTemplate runat="server" id="ID_OverrideLogout" Text="Custom
Logout"
ClientOnClickNavigateUrl="/logout.html?end_url=_layouts/SignOut.aspx"
Description="My Custom Logout"
MenuGroupId="200"
Sequence="100"
UseShortId="true" />
4. Click Save.
5. Protect the two URLs /_layouts/SignOut.aspx and /_
layouts/closeConnection.aspx in an Application Domain using Anonymous
authentication.
6. Proceed to Configuring Logout in SharePoint Server With Impersonation.
52.10.2 Configuring Logout in SharePoint Server With Impersonation
You can skip this procedure if you do not have Impersonation configured.
Note: Closing the browser window after sign-off is always
recommended, for security.
See Also: Chapter 22 for details about configuring centralized
logout for 10g WebGate with OAM 11g Servers

Setting Up Access Manager and Windows Native Authentication
Integrating Microsoft SharePoint Server with Access Manager 52-35
To configure Logout in SharePoint Server with Impersonation
1. Copy
signout.aspx
from
C:\Program Files\Common Files\Microsoft
Shared\Web Server Extensions\14\TEMPLATE\LAYOUTS
) to
MySignout.aspx
in the
same path.
2. In
MySignout.aspx
, below (
<asp:content
contentplaceholderid="PlaceHolderAdditionalPageHead" runat="server">
)
add the following script details:
<script runat="server">
private void Page_Load(object sender, System.EventArgs e)
{
Response.Status = "302 Moved Temporarily";
Response.AddHeader("Location", "/logout.html?end_url=/_layouts/SignOut.aspx");
}
</script>
3. Save.
4. Use this URL
_layouts/Mysignout.aspx
as custom logout URL for SharePoint
Server in the case of Impersonation.
5. Proceed with "Testing Your Integration".
52.11 Setting Up Access Manager and Windows Native Authentication
This section provides the following topics:
■Setting Up Access Manager WNA
■Setting Up WNA With SharePoint Server
■Installing Access Manager for WNA and SharePoint Server
■Testing Your WNA Implementation
52.11.1 Setting Up Access Manager WNA
Configure Access Manager to use Windows Native Authentication, as described in
Chapter 50.
52.11.2 Setting Up WNA With SharePoint Server
The following overview outlines the tasks that must be performed to set up WNA
with Access Manager and the SharePoint Server.
Task overview: Setting up WNA with SharePoint Server
1. Complete the following prerequisite tasks:
■Perform tasks in "Required Microsoft Components" on page 52-7.
■Create a SharePoint Web site, as described in "Creating a New Web
Application in Microsoft SharePoint Server" on page 52-11.
■Configure the SharePoint site collection, as described in "Creating a New Site
Collection for Microsoft SharePoint Server".
■Test the configuration to ensure that users who are present in the directory
server can log in to the SharePoint Web site and get proper roles, as described
in your SharePoint documentation.

Setting Up Access Manager and Windows Native Authentication
52-36 Administrator's Guide for Oracle Access Management
2. Install Access Manager as described in "Installing Access Manager for WNA and
SharePoint Server" on page 52-36.
This step includes installing the WebGate for IIS and configuring
Webgate.dll
for
the individual SharePoint Web site.
3. Configure the Active Directory authentication provider, as follows:
a. Login to the WebLogic Console.
b. Go to Security Realm and click the realm being used.
c. Go to the Provider tab provider, click New.
d. Enter the provider name, select the Type ActiveDirectoryAuthenticator, click
OK.
e. Select the newly created Provider, change Control Flag to Sufficient, and Save.
f. Go to Provider Specific tab, enter details for your Active Directory, and save
these.
4. Perform "Testing Your WNA Implementation" on page 52-37.
52.11.3 Installing Access Manager for WNA and SharePoint Server
You perform this task after you perform all prerequisites described in step 1 of the
"Task overview: Setting up WNA with SharePoint Server". Installing most Access
Manager components for this integration scenario is the same as for any other
situation.
Installing the IIS WebGate is similar to installing any other WebGate. The WebGate
should be installed with the IIS v7 Web server; later it can be configured at the specific
SharePoint Web site level to be protected. For IIS, the WebGate must be configured at
the "web sites" level. For Microsoft SharePoint Server, you must configure the WebGate
for the specific SharePoint Web site level to be protected.
To install Access Manager for WNA and SharePoint Server
1. Install Oracle Access Management Access Manager as described in the Oracle
Fusion Middleware Installation Guide for Oracle Identity and Access
Management.
2. Install the ISAPI WebGate using steps in Chapter 25 for:
■Installing WebGates
■Installing Web components for the IIS Web server
Next, you configure
Webgate.dll
at the SharePoint Web site that yo want to
protect. Configuring
Webgate.dll
at the "Website level" protects all Web sites
on the IIS Web server. However, configuring
Webgate.dll
at the "SharePoint
Website" protects only the expected Web site.
3. Configure
Webgate.dll
at the SharePoint Web site that you want to protect. For
example:
a. Start the Internet Information Services (IIS) Manager: Click Start, Programs,
Administrative Tools, Internet Information Services (IIS) Manager.
b. Select the hostname from the Connections pane.
c. From the host name Home pane, double-click ISAPI Filters, look for any
Webgate.dll
; if it is present, select it and click Remove from the Action pane.

Setting Up Access Manager and Windows Native Authentication
Integrating Microsoft SharePoint Server with Access Manager 52-37
d. In the Connection pane, under Sites, click the name of the Web Site for which
you want to configure a WebGate filter.
e. In the Home pane, double-click ISAPI Filters.
f. In the Actions pane, click Add…
g. In the Filter name text box of the Add ISAPI Filter dialog box, type WebGate
as the name of the ISAPI filter.
h. In the Executable box, type the file system path of the WebGate ISAPI filter
file or click the ellipsis button (...) to go to the folder that contains the
Webgate.dll
ISAPI filter file, and then click OK.
WebGate_install_dir\access\oblix\apps\Webgate\bin\Webgate.dll
4. Creating a Virtual Directory
a. Expand the Sites pane and select the Web Site for which you just configured
the ISAPI filter (
Webgate.dll
).
b. On the Action pane, click View Virtual Directories and then select Add
Virtual Directory.
c. In the Alias field, specify access and the physical path to the WebGate \access
folder (or click the ellipsis button (...), go to the \access folder, then click OK).
WebGate_install_dir\access\
5. Set permissions on the Virtual Directory:
a. Select the "access" virtual directory created in Step 3.
b. From the access Home pane, double click Handler Mappings; from the Action
pane, select Edit Feature Permissions….
c. Select Read, Script, and Execute, then click OK
6. Configure Access Manager to use Windows Native Authentication, as described in
Chapter 50.
7. Configure Microsoft SharePoint Server Authentication to Classic Mode
Authentication while creating a new Web Application in Microsoft SharePoint. In
the Authentication Provider section, select Negotiate(Kerberos).
8. Go to IIS newly created SharePoint site and:
a. Open Authentication, Windows Authentication, Advance Settings.
b. Select Enable Kernel mode authentication.
c. Select providers, delete NTLM provider.
d. Add Negotiate:Kerberos and move it to the top level.
e. Restart IIS.
9. Proceed to "Testing Your WNA Implementation".
52.11.4 Testing Your WNA Implementation
Use the following steps to confirm your WNA implementation is working properly.
To test your WNA implementation
1. Log in to the machine as someone who is a user of both Access Manager and the
Windows operating system.

Synchronizing User Profiles Between Directories
52-38 Administrator's Guide for Oracle Access Management
2. Enter the URL of the protected resource.
52.12 Synchronizing User Profiles Between Directories
Unless explicitly stated, this task should be performed for all integration scenarios in
this chapter.
You need to synchronize user profiles between the SharePoint Server directory and the
Access Manager directory:
■Uploading user data—If your Access Manager installation is configured for any
directory server other than SharePoint Active Directory, you must load the user
profiles that reside on the other directory server to SharePoint Active Directory.
Proceed to "Testing Your Integration"
52.13 Testing Your Integration
After you complete the tasks to enable integration, you should test to verify that
integration is working.
This section contains the following topics:
■Testing the SharePoint Server Integration
■Testing Single Sign-On for the SharePoint Server Integration
52.13.1 Testing the SharePoint Server Integration
You can verify that a user can access SharePoint Server resources through Access
Manager authentication and SharePoint Server authorization.
To test your SharePoint Server integration
1. Navigate to any SharePoint Server Web page using your browser.
You are challenged for your credentials.
2. Log in by supplying the necessary credentials.
3. Verify that the page you requested is visible.
4. Optional: Check the Event Viewer to confirm that the access request was
successful.
52.13.2 Testing Single Sign-On for the SharePoint Server Integration
You can also test single sign-on by demonstrating that a user who has just supplied
credentials and accessed an SharePoint Server resource can (before the ObSSOCookie
expires) access a non-SharePoint Server resource without having to supply credentials
a second time. For example, use a resource defined in the Policy Manager.
When single sign-on is working, you should be granted access to the page without
having to supply credentials a second time.
Note: When your integration includes LDAP Membership Provider,
you can use any directory server that supports LDAP commands.

Troubleshooting
Integrating Microsoft SharePoint Server with Access Manager 52-39
To test single sign-on for your SharePoint Server integration
1. Create and protect a new virtual site with a Application Domain (or use one you
have already created.
2. Place a Web page anywhere in the tree of this virtual site.
3. Using a browser, navigate to the page in the new virtual site.
If you have already passed authentication, you should be granted access to the
page without having to supply credentials a second time.
52.14 Troubleshooting
■Internet Explorer File Downloads Over SSL Might Not Work
52.14.1 Internet Explorer File Downloads Over SSL Might Not Work
This issue may occur if the server sends a
Cache-control:no-store
header or sends a
Cache-control:no-cache
header. The WebGate provides configuration parameters to
control setting these headers. Following are the parameters and their default value:
CachePragmaHeader
no-cache
CacheControlHeader
no-cache
You can modify the WebGate configuration not to set these headers at all (the values
for these parameters would be kept blank). By this, it would mean that Access
Manager will not control the caching behavior.

Troubleshooting
52-40 Administrator's Guide for Oracle Access Management

53
Integrating Access Manager with Outlook Web Application 53-1
53
Integrating Access Manager with Outlook Web
Application
In a Windows environment, after a user authenticates, the authenticating application
can impersonate that user's identity. The primary purpose of impersonation is to
trigger access checks against a client's identity.
This chapter focuses on how to enable impersonation in Access Manager to override
impersonation enabled with IIS. The following topics are provided:
■What is New in This Release?
■Introduction to Integration with Outlook Web Application
■Enabling Impersonation With a Header Variable
■Setting Up Impersonation for Outlook Web Application (OWA)
■Setting Up Access Manager WNA for Outlook Web Application
53.1 What is New in This Release?
Support for integration between Access Manager and Outlook Web Application
(OWA) 2010.
This chapter illustrates:
■Enabling Impersonation With a Header Variable
■Setting Up Impersonation for Outlook Web Application (OWA)
■Setting Up Access Manager WNA for Outlook Web Application
53.2 Introduction to Integration with Outlook Web Application
This section provides the following information to introduce the integration described
in this chapter:
■About Impersonation Provided by Microsoft Windows
■About Access Manager 11g Support for Windows Impersonation
■About Single Sign-On for Authenticated Access Manager Users into Exchange
■About Confirming Requirements

Introduction to Integration with Outlook Web Application
53-2 Administrator's Guide for Oracle Access Management
53.2.1 About Impersonation Provided by Microsoft Windows
When running in a client's security context, a service can to an extent become a client.
After the user authenticates, the service can take on that user's identity through
impersonation. One of the service's threads uses an access token, known as an
impersonation token, to obtain access to objects the client can access. The access token
is a protected object that represents the client's credentials.
The impersonation token identifies the client, the client's groups, and the client's
privileges. The information in the token is used during access checks when the thread
requests access to resources on the client's behalf. When the server is impersonating
the client, any operations performed by the server are performed using the client's
credentials.
Impersonation ensures that the server can or cannot do exactly what the client can or
cannot do. Access to resources can be restricted or expanded, depending on what the
client has permission to do. Impersonation requires the participation of both the client
and the server. The client must indicate its willingness to let the server use its identity,
and the server must explicitly assume the client's identity programmatically.
When impersonation concludes, the thread uses the primary token to operate using
the service's own security context rather than the client's. The primary token describes
the security context of the user account associated with the process (the person who
started the application).
Services run under their own accounts and act as users in their own right. For
example, system services that are installed with the operating system run under the
Local System account. You can configure other services to run under the Local System
account, or separate accounts on the local system or in Active Directory.
The IIS Web server provides impersonation capabilities. However, the OAM Server
overrides IIS authentication, authorization, and impersonation functions. For more
information, see "About Access Manager 11g Support for Windows Impersonation" in
the next section.
53.2.2 About Access Manager 11g Support for Windows Impersonation
You can enable support for Windows impersonation to provide additional access
control for protected applications. You bind a trusted user to a Webgate and protect the
application with a application domain that includes an impersonation action in the
authorization rule. During the authorization process, the protected application creates
an impersonation token.
For more information, see, "Enabling Impersonation With a Header Variable" on
page 53-3. It provides prerequisites and details about implementing impersonation
using header variables.
53.2.3 About Single Sign-On for Authenticated Access Manager Users into Exchange
This is also supported using the Windows Impersonation feature. Outlook Web Access
(OWA) provides Web access to Exchange mail services and may be configured on
either of the following:
■An IIS Web server that does not reside on the same host as the Exchange server,
which is also known as a front-end server
■An IIS Web server running on the same host as the Exchange server, which is also
known as the back-end server

Enabling Impersonation With a Header Variable
Integrating Access Manager with Outlook Web Application 53-3
In a front-end server configuration, the front-end OWA server authenticates the user,
determines the back-end Exchange server that hosts the user's mailbox, then proxies
the request to the appropriate back-end Exchange server. No additional credential
information is passed. No delegation is performed. Setting up Impersonation on the
back-end Exchange server ensures that the Exchange server does not need to request
credentials before granting access.
For more information, see "Setting Up Impersonation for Outlook Web Application
(OWA)" on page 53-11.
53.2.4 About Confirming Requirements
The example in this chapter illustrates setting up the impersonation feature for the
OAM Server to Microsoft Exchange Server 2010 integration. The principles are the
same regardless of your application.
Any references to specific versions and platforms in this chapter are for demonstration
purposes. For the latest Access Manager certification information, see Oracle
Technology Network at:
http://www.oracle.com/technetwork/middleware/ias/downloads/fusion-certification-10
0350.html
53.3 Enabling Impersonation With a Header Variable
Enabling impersonation with a header variable involves the following procedures.
Task overview: Enabling impersonation with a header variable includes
1. Reviewing all Requirements for Impersonation with a Header Variable
2. Creating an Impersonator as a Trusted User
3. Assigning Rights to the Trusted User
4. Binding the Trusted User to Your Webgate
5. Adding an Impersonation Response to An Application Domain
6. Adding an Impersonation DLL to IIS
7. Testing Impersonation
53.3.1 Requirements for Impersonation with a Header Variable
Prepare the environment and confirm that it is operating properly before
implementing Windows impersonation with the OAM Server.
Table 53–1 identifies the Access Manager platform requirements when you enable
impersonation using a header variable.
See Also: "Setting Up Impersonation for Outlook Web Application
(OWA)" on page 53-11.
Table 53–1 Requirements for Impersonation with a Header Variable
Item Platform
10g Webgate (and
Impersonation dll)
Microsoft IIS 7.x and Windows Server 2008

Enabling Impersonation With a Header Variable
53-4 Administrator's Guide for Oracle Access Management
53.3.2 Creating an Impersonator as a Trusted User
Whether you enable impersonation using a HeaderVar or user profile attribute, the
return value must be a trusted user in Active Directory. This special user should not be
used for anything other than impersonation.
The example in the following procedure uses SPPSImpersonator as the New Object -
User. With OWAImpersonator as SPPSImpersonator denotes SharePoint impersonation
specifically. Your environment will be different.
To create a trusted user account
1. Perform the steps for your environment on the computer hosting your Microsoft
Exchange Server 2010 installation:
■Windows 2008: Select Start, Programs, Administrative tools, Active Directory
Users and Computers.
2. In the Active Directory Users and Computers window, right-click Users on the tree
in the left pane, then select New; User.
3. In the First name field of the pane entitled New Object - User, enter an
easy-to-remember name such as SPPSImpersonator.
4. Copy this same string to the User logon name field, then click Next.
5. In succeeding panels, you are asked to choose a password and then retype it to
confirm.
Impersonation dll Webgate_install_
dir\access\oblix\apps\webgate\bin\IISImpersonationModule.
dll
■Must be installed as an IIS Module.
■May be installed at any level of the Web site tree.
Kerberos Key Distribution
Center (KDC) and Active
Directory
Windows Server 2008
Client and Server machines ■Both must be in the same Windows Server 2008 domain
with a trust relationship.
■A bi-directional trust path is required because the service,
acting on the client's behalf, must request tickets from the
client's domain.
Security context Must have Act as operating system privileges.
Note: IWAM_Machine is not recommended
Mutual authentication is
required
Mutual authentication is supported remotely.
Note: Oracle recommends that you choose a very complex
password, because your trusted user is being given very powerful
permissions. Also, be sure to check the box marked Password Never
Expires. Since the impersonation module should be the only entity
that ever sees the trusted user account, it would be very difficult for
an outside agency to discover that the password has expired.
Table 53–1 (Cont.) Requirements for Impersonation with a Header Variable
Item Platform
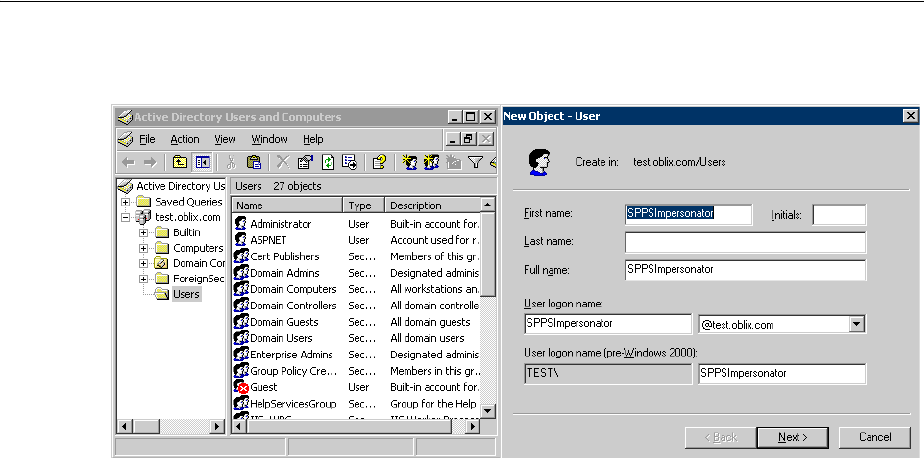
Enabling Impersonation With a Header Variable
Integrating Access Manager with Outlook Web Application 53-5
Figure 53–1 Setting up a Trusted User Account for Windows Impersonation
53.3.3 Assigning Rights to the Trusted User
You need to give the trusted user the right to act as part of the operating system
To give appropriate rights to the trusted user
1. Perform the appropriate step for your environment:
■Windows 2008: Select Start > Programs > Administrative tools > Local
Security Policy.
You must modify the group policy object that applies to the computer where
the Webgate is installed.
2. On the tree in the left pane, click the plus icon (+) next to Local Policies.
3. Click User Rights Assignment on the tree in the left pane.
4. Double-click "Act as part of the operating system" in the right pane.
5. Click Add User or Group.
6. In the Add User or Group panel, type the User logon name of the trusted user
(Microsoft Exchange Server 2010 Impersonator in our example) in the User and
group names text entry box, then click OK to register the change.
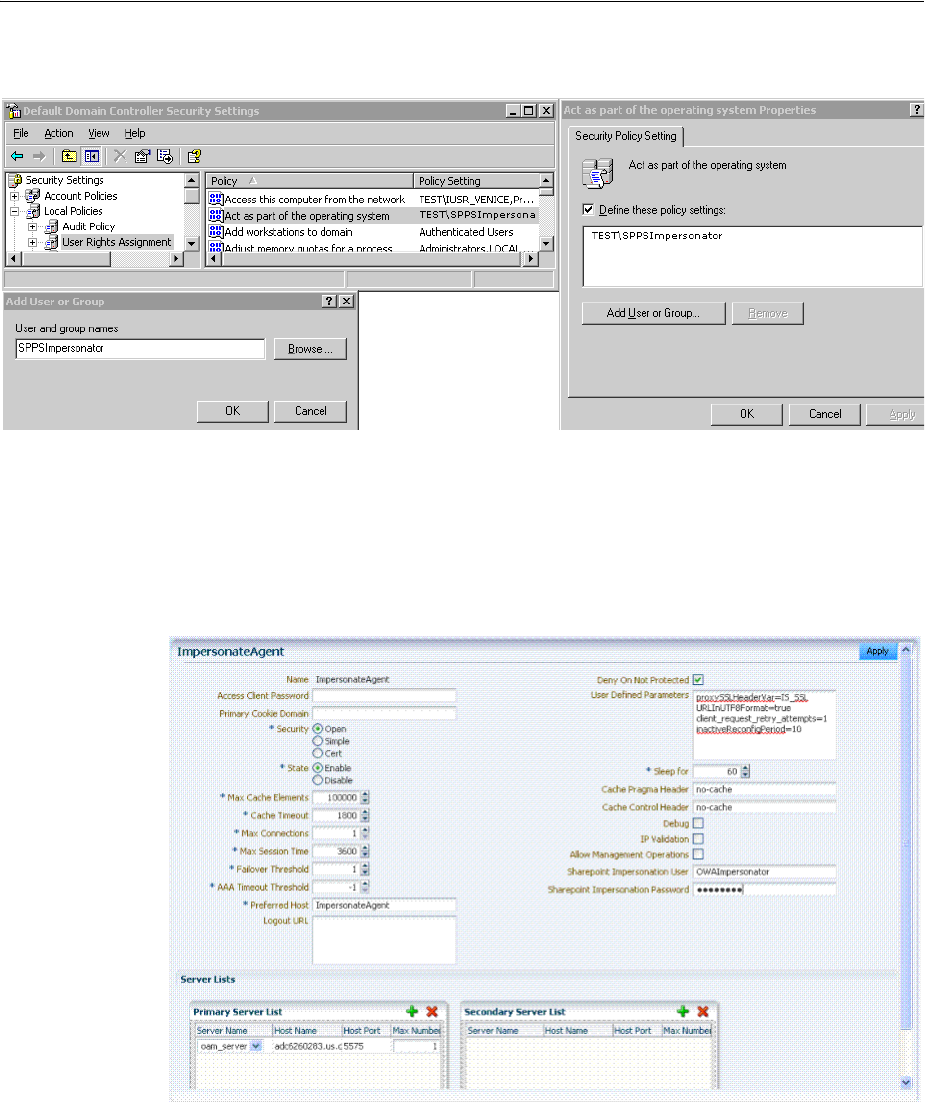
Enabling Impersonation With a Header Variable
53-6 Administrator's Guide for Oracle Access Management
Figure 53–2 Configuring Rights for the Trusted User in Windows Impersonation
53.3.4 Binding the Trusted User to Your Webgate
You need to bind the trusted user to the Webgate by supplying the authentication
credentials for the trusted user, as described in here.
Figure 53–3 Sample Webgate Registration Page
The following procedure presumes that you have registered a 10g Webgate with
Access Manager. The values in the following procedure are provided as an example
only. Your environment will be different.
To bind your trusted user to your Webgate
1. Go to the Oracle Access Management Console.
See Also: Chapter 25, "Registering and Managing 10g WebGates
with Access Manager 11g" in the Oracle Fusion Middleware
Administrator's Guide for Oracle Access Management .
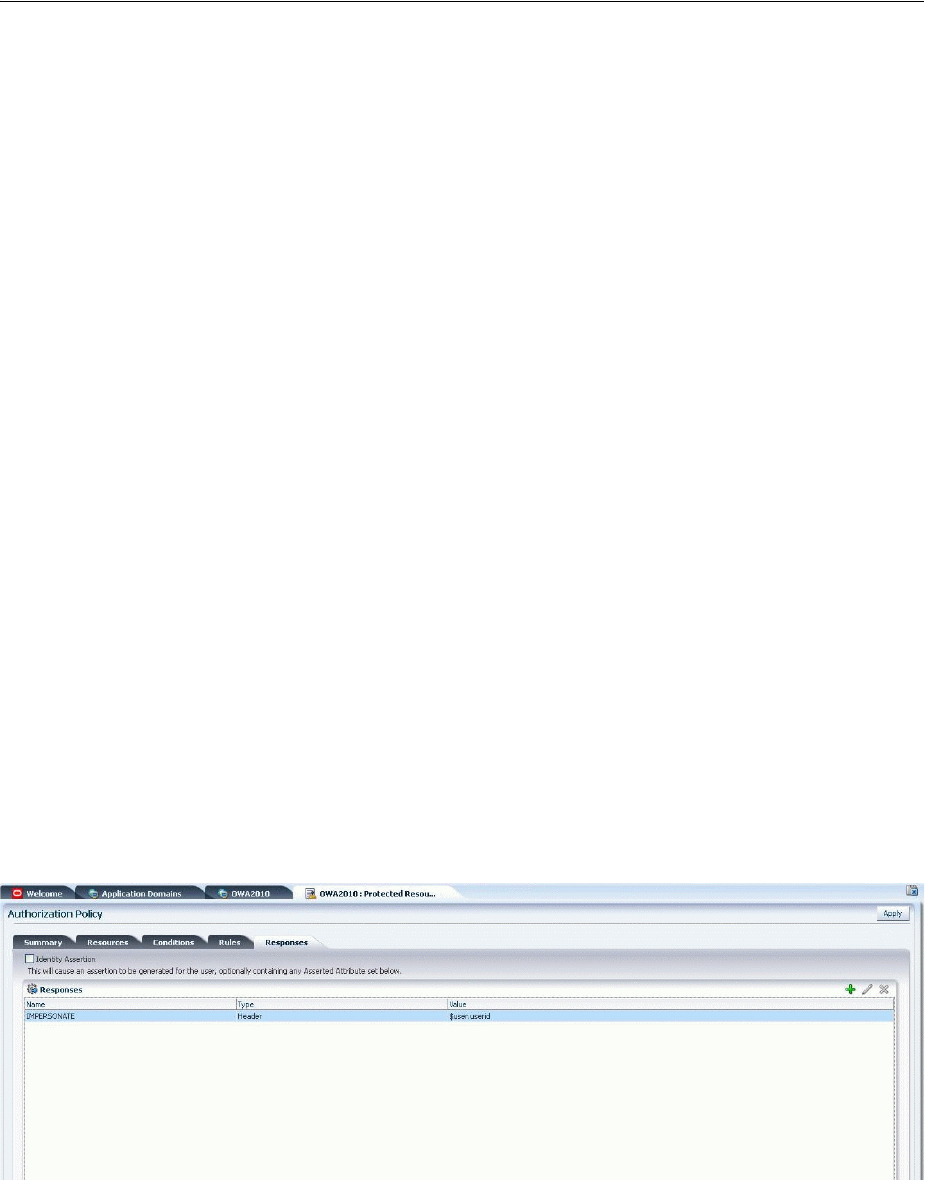
Enabling Impersonation With a Header Variable
Integrating Access Manager with Outlook Web Application 53-7
For example:
http://hostname:port/oamconsole
where hostname is the fully-qualified DNS name of the computer hosting the
Oracle Access Management Console; port is the listening port configured for the
OAM Server; oamconsole leads to the Oracle Access Management Console.
2. From the Oracle Access Management Console, open the:
System Configuration tab
Access Manager Settings section
SSO Agents node
OAM Agents node
3. Find the desired 10g Webgate registration to modify for this integration:
■Find All Enabled: Select State All, click the Search button, click the desired
Webgate name in the results list.
4. On the Webgate registration page, enter the SharePoint username and password
for the trusted user account, which you created earlier.
5. Click Apply to commit the changes.
A bind has been created for the Webgate and the trusted user. The Webgate is now
ready to provide impersonation on demand. The demand is created by an
Authorization Success Action in the application domain created for
impersonation.
53.3.5 Adding an Impersonation Response to An Application Domain
You must create or configure an application domain to protect your OWA resources.
For this you must add Responses in Authorization Policies (Header type Responses),
as described here and shown in Figure 53–4.
Figure 53–4 Impersonation Response in An Application Domain
See Also: Chapter 20, "Managing Policies to Protect Resources and
Enable SSO" in the Oracle Fusion Middleware Administrator's Guide for
Oracle Access Management.

Enabling Impersonation With a Header Variable
53-8 Administrator's Guide for Oracle Access Management
The procedure here presumes that you have an application domain created for the 10g
Webgate you registered. The application domain in this example is
MyImpersonationDomain. Your environment will be different.
To add an impersonation action to your application domain (type headerVar)
1. In the Oracle Access Management Console, navigate as follows:
Policy Configuration tab
Application Domains (Double-click to open).
Click Search in the Application Domains tab.
2. Open the OWA2010 Application Domain (the relevant application domain for
impersonation).
Navigate as follows:
Authorization Policies
Protected Resource Policy
Responses
3. Click the Add button, then Add Response.
Complete the form as follows:
■From the Type list, choose Header.
■In the Name field, type a unique name for this response. For example,
IMPERSONATE.
■In the Valu e field, type a value for this response. For example, $user.userid.
4. Click Add, then click Apply to submit the changes.
This Response is used for the second Webgate request (for authorization).
53.3.6 Adding an Impersonation DLL to IIS
You are ready to configure IIS by adding the
IISImpersonationModule.dll
to your IIS
configuration.
To configure and register ImpersonationModule to IIS
1. Select Start > Administrative Tools > Internet Information Services (IIS) Manager.
2. In the left pane of IIS 7.x, click the hostname.
3. In the middle pane, under the "IIS" header, double click on "Modules".
4. In the right pane, click "Configure Native Modules" and click "Register".
5. In the window, provide a module Name (for example, Oracle Impersonation
Module).
6. In the Path field, type the full path to
IISImpersonationModule.dll
.
By default, the path is:
Webgate_install_dir\access\oblix\apps\webgate\bin\IISImpersonationModule.dll
Where Webgate_install_dir is the directory of your Webgate installation.

Enabling Impersonation With a Header Variable
Integrating Access Manager with Outlook Web Application 53-9
7. Click OK to register the module.
8. Check the name of the newly created module and click OK to apply the module
across the Web sites.
9. Remove the module from the Default site level (otherwise, it inherits when you
add it on the machine level).
10. Ensure that the
IISImpersonationModule.dll
file added in these steps is applied
only to "owa" and "ecp" applications and removed from the site level.
Go to OWA, double-click modules, Configure Native Modules, and check the
desired module (for example, Oracle Impersonation Module).
Go to (ecp): Double-click modules, Configure Native Modules, and check the
desired module (for example, Oracle Impersonation Module).
53.3.7 Testing Impersonation
You can test Impersonation in the following two ways:
■Testing Impersonation Using the Event Viewer
■Testing Impersonation using a Web Page
53.3.7.1 Creating an IIS Virtual Site
To test the impersonation feature outside the Microsoft OWA 2010 context or to test
single sign-on, you will need a target Web page on an IIS virtual Web site You create
such a virtual Web site by performing the following task.
To create an IIS virtual site
1. Click Start > Administrative Tools > Internet Information Services (IIS) Manager.
2. Click the plus icon (+) to the left of the local computer icon on the tree in the left
pane.
3. Right-click Web Sites on the tree in the left pane, then select New, then select Web
Site on the menu.
4. Respond to the prompts by the Web site creation wizard.
5. After you create the virtual site, you must protect it with an application domain, as
described elsewhere in this guide.
53.3.7.2 Testing Impersonation Using the Event Viewer
When you perform impersonation testing using the Windows 2008 Event Viewer, you
must configure the event viewer before conducting the actual test.
To test impersonation through the Event Viewer
1. Select Start Menu > Event Viewer.
2. In the left pane, right-click Security, then click Properties.
3. Click the Filter tab on the Security property sheet.
Note: If any spaces exist in the path (for example,
C:\Program
Files\Oracle\...
) surround the entire string with double quotes (" ").
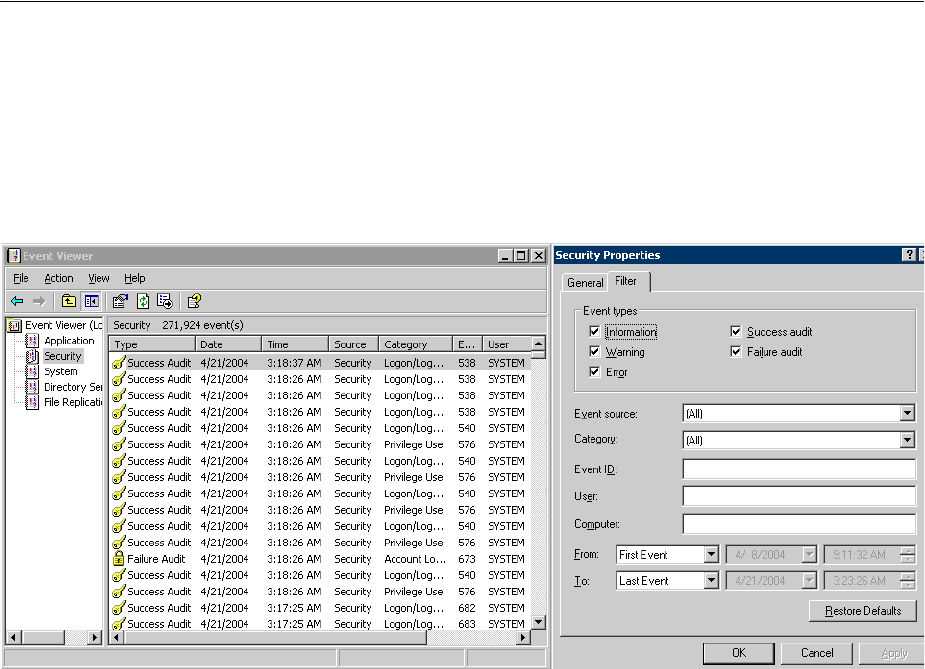
Enabling Impersonation With a Header Variable
53-10 Administrator's Guide for Oracle Access Management
4. Verify that all Event Types are checked and the Event Source and Category lists are
set to All, then click OK to dismiss the property sheet.
Your Event Viewer is now configured to display information about the headerVar
associated with a resource request.
Figure 53–5 Verifying Event Viewer Settings
5. Create a new IIS virtual server (virtual site).
6. Place a target Web page anywhere in the tree on the virtual site.
7. Point your browser at the Web page
If impersonation is working correctly, the Event Viewer will report the success of
the access attempt.
53.3.7.3 Testing Impersonation using a Web Page
You can also test impersonation using a dynamic test page, such as a
.asp
page or a
Perl script, that can return and display information about the request.
To test impersonation through a Web page that displays server variables
1. Create a
.asp
page or Perl script that will display the parameters AUTH_USER
and IMPERSONATE. It can resemble the sample page presented in the following
listing:
<TABLE border=1>
<TR>
<TD>Variable</TD>
<TD>  </TD>
<TD>Value</TD></TR>
<%for each servervar in request.servervariables%>
<TR>
<TD><%=servervar%></TD>
<TD>  </TD>
<TD><%=request.servervariables(servervar)%> </TD>
</TR>

Setting Up Impersonation for Outlook Web Application (OWA)
Integrating Access Manager with Outlook Web Application 53-11
2. Create an IIS virtual site, or use the one you created for the previous task.
3. Place a
.asp
page or Perl script (such as the sample in the preceding listing)
anywhere in the tree of the new virtual site.
4. Point your browser at the page. The page should display, with both AUTH_USER
and IMPERSONATE set to the name of the user making the request.
53.4 Setting Up Impersonation for Outlook Web Application (OWA)
In a distributed Exchange/OWA single sign-on environment, each server needs
Access Manager to impersonate the current user. When you enable Impersonation,
you need to include additional HTTP headers in the "Response" tab of the
Authorization Policy of your impersonation application domain.
The following solution has been tested in both standalone and distributed OWA
environments.
Task overview: Setting up impersonation for OWA
1. Install Access Manager 11g, as described in the Oracle Fusion Middleware Installation
Guide for Oracle Identity and Access Management.
2. Install a 10g Webgate on all OWA client servers, as described in the Oracle Fusion
Middleware Administrator's Guide for Oracle Access Management.
3. On the WebGate registration page, Disable IP Checking for Webgates on the
back-end server using the AccessGate (because the request comes from the
front-end server, not from the user's browser).
4. Ensure that OWA is not using Integrated Windows Authentication, as described in
"Prerequisites to Setting Impersonation for Outlook Web Application" on
page 53-12.
5. Create a trusted user account for only impersonation in the Active Directory, as
described in "Creating a Trusted User Account for Outlook Web Application" on
page 53-12.
6. Give the trusted user the special right to act as part of the operating system, as
described in "Assigning Rights to the Outlook Web Application Trusted User" on
page 53-12.
7. Bind the trusted user to the Webgate by supplying the authentication credentials
for the trusted user, as described in "Binding the Trusted Outlook Web Application
User to Your Webgate" on page 53-13.
8. Add a header variable named impersonate to the Authorization Policy Response
tab (in the impersonation application domain), as described in, as described in
"Adding an Impersonation Action to an Application Domain for Outlook Web
Application" on page 53-14.
9. Configure IIS by adding
IISImpersonationModule.dll
to your IIS configuration,
as described in "Adding an Impersonation dll to IIS" on page 53-15.
10. Test Impersonation, as described in "Testing Impersonation for Outlook Web
Application" on page 53-16.
See Also: "Enabling Impersonation With a Header Variable" on
page 53-3.

Setting Up Impersonation for Outlook Web Application (OWA)
53-12 Administrator's Guide for Oracle Access Management
53.4.1 Prerequisites to Setting Impersonation for Outlook Web Application
Before setting Impersonation for Outlook Web Application, ensure that OWA is not
using Integrated Windows (or any other) Authentication. If it is not, you can use the
following steps to get this working.
To set up OWA with Windows Authentication
1. Open Exchange Management console.
2. Go to Server Configuration and click Client Access.
3. Select Outlook Web Access and click Properties.
4. In the Properties dialog box, click the Authentication tab.
5. Clear (unselect) all the authentication methods.
6. Click Apply, and click OK.
7. Restart the IIS server.
8. Proceed with "Creating a Trusted User Account for Outlook Web Application."
53.4.2 Creating a Trusted User Account for Outlook Web Application
This special user should not be used for anything other than impersonation.
Oracle recommends that you chose a very complex password, because your trusted
user is being given very powerful permissions. Also, be sure to check the box marked
Password Never Expires. Since the impersonation module should be the only entity
that ever sees the trusted user account, it would be very difficult for an outside agency
to discover that the password has expired.
To create a trusted user account for OWA
1. On the Windows 2008 machine, select Start; Programs; Administrative tools,
Active Directory Users and Computers.
2. In the Active Directory Users and Computers window, right-click Users on the tree
in the left pane, then select New; User.
3. In the First name field of the pane entitled New Object - User, enter an
easy-to-remember name such as OWAImpersonator.
4. Copy this same string to the User logon name field, then click Next.
5. In succeeding panels, you will be asked to choose a password and then retype it to
confirm.
6. Proceed to "Assigning Rights to the Outlook Web Application Trusted User" on
page 53-12.
53.4.3 Assigning Rights to the Outlook Web Application Trusted User
You need to give the trusted user the right to act as part of the operating system.
To give appropriate rights to the trusted user
1. Select Control Panel, Administrative Tools; and click either the Domain Controller
Security Policy (if the computer is a domain controller) or Local Security Policy.
2. On the tree in the left pane, click the plus icon (+) next to Local Policies.
3. Click User Rights Assignment on the tree in the left pane.
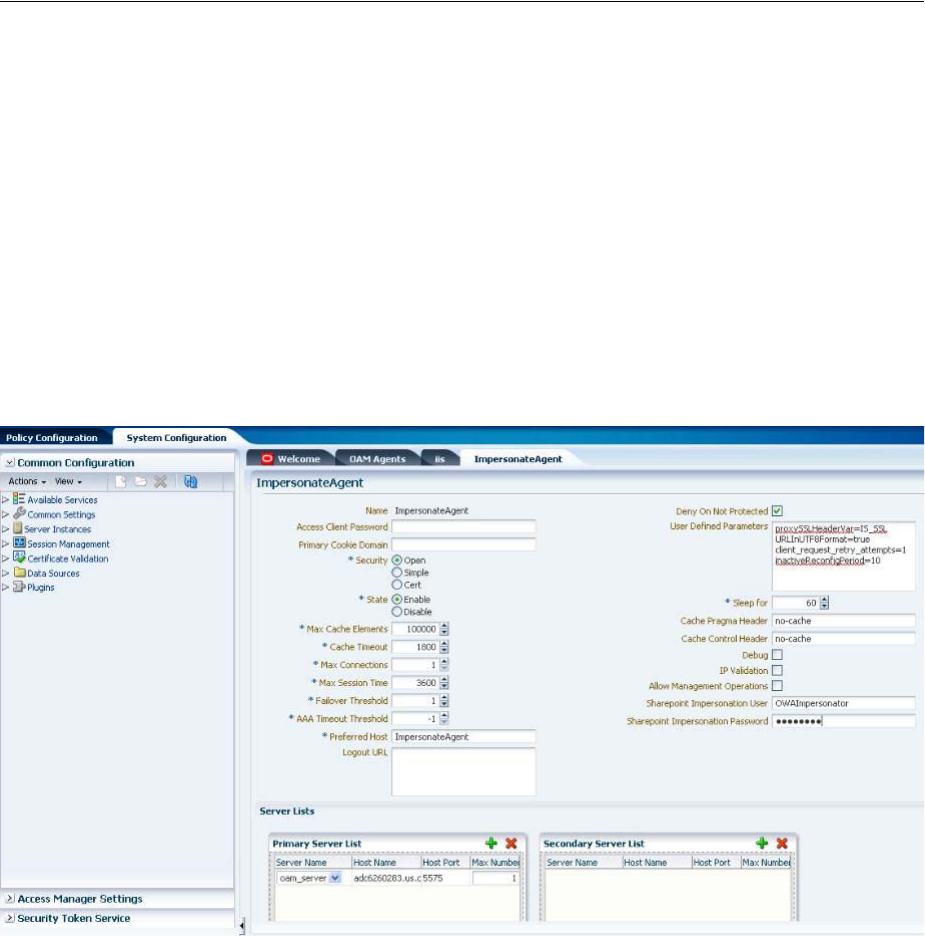
Setting Up Impersonation for Outlook Web Application (OWA)
Integrating Access Manager with Outlook Web Application 53-13
4. Double-click "Act as part of the operating system" in the right pane.
5. Click Add User or Group.
6. In the Add User or Group panel, type the User logon name of the trusted user
(OWAImpersonator in our example) in the User and group names text entry box,
then click OK to register the change.
7. Proceed to "Binding the Trusted Outlook Web Application User to Your Webgate."
53.4.4 Binding the Trusted Outlook Web Application User to Your Webgate
You need to bind the trusted user to the Webgate by supplying the authentication
credentials for the trusted user, as described in the following procedure.
Figure 53–6 Webgate Registration Page
When the bind has been created for the Webgate and the trusted user, Webgate is
ready to provide impersonation on demand. The demand is created by a Response set
in the Authorization Policy of application domain created for impersonation.
The following procedure presumes that you have registered a 10g Webgate
(ImpersonateAgent) with Access Manager. The values in the following procedure are
provided as an example only. Your environment will be different.
To bind your trusted OWA user to your Webgate
1. Go to Oracle Access Management Console.
For example:
http://hostname:port/oamconsole
See Also: Chapter 25, "Registering and Managing 10g WebGates
with Access Manager 11g" in the Oracle Fusion Middleware
Administrator's Guide for Oracle Access Management .

Setting Up Impersonation for Outlook Web Application (OWA)
53-14 Administrator's Guide for Oracle Access Management
where hostname is the fully-qualified DNS name of the computer hosting the
Oracle Access Management Console; port is the listening port configured for the
OAM Server; oamconsole leads to the Oracle Access Management Console.
2. From the Oracle Access Management Console, open the:
System Configuration tab
Access Manager Settings section
SSO Agents node
OAM Agents node
3. Find the desired 10g Webgate registration to modify for this integration. For
example: ImpersonateAgent.
■Find All Enabled: Select State All, click the Search button, click the desired
Webgate name in the results list.
4. Open the Webgate registration page and enter the SharePoint username and
password for the trusted user account, which you created earlier.
5. Click Apply to commit the changes.
A bind has been created for the Webgate and the trusted user. The Webgate is now
ready to provide impersonation on demand. The demand is created by an
Authorization Success Action in the application domain created for
impersonation.
53.4.5 Adding an Impersonation Action to an Application Domain for Outlook Web
Application
You must create or configure a application domain to protect your OWA resources
(/owa and /ecp only).
The Authorization policy must set several HTTP Header variables (Header type
Responses in the Authorization policy).
This procedure presumes that you have an existing application domain for the 10g
Webgate (ImpersonateAgent) you registered with Access Manager.
To add an impersonation action to your application domain
1. In the Oracle Access Management Console, navigate as follows:
Policy Configuration tab
Application Domains (Double-click to open).
Click Search in the Application Domains tab.
2. Open the OWA2010 Application Domain (the relevant application domain for
impersonation).
Navigate as follows:
Note: Ensure that
IISImpersonation Module.dll
is applied only to
"owa" and "ecp" applications in IIS7.x, and removed from the site
level.
See Also: The chapter on managing policies to protect resources and
enable SSO in the Oracle Fusion Middleware Administrator's Guide for
Oracle Access Management

Setting Up Impersonation for Outlook Web Application (OWA)
Integrating Access Manager with Outlook Web Application 53-15
Authorization Policies
Protected Resource Policy
Responses
3. Click the Add button, then Add Response.
Complete the form as follows:
■From the Type list, choose Header.
■In the Name field, type a unique name for this response. For example,
IMPERSONATE.
■In the Valu e field, type a value for this response. For example, $user.userid.
4. Click Add, then click Apply to submit the changes.
5. Go to the next section, "Adding an Impersonation DLL to IIS."
This Response is used for the second Webgate request (for authorization).
53.4.6 Adding an Impersonation dll to IIS
You are ready to configure IIS by adding the
IISImpersonationModule.dll
to your IIS
configuration. You also need to set Enable Anonymous Access because this is required
for impersonation of a user.
To configure IIS by adding the IISImpersonationModule.dll
1. Select Start, Administrative Tools, Internet Information Services (IIS) Manager.
2. In the left pane of IIS 7.x, click the hostname.
3. In the middle pane, under the "IIS" header, double click on "Modules".
4. In the right pane, click "Configure Native Modules" and click "Register".
5. In the window, provide a module Name (for example, Oracle Impersonation
Module).
6. In the Path field, type the full path to
IISImpersonationModule.dll
.
By default, the path is:
Webgate_install_dir\access\oblix\apps\webgate\bin\IISImpersonationModule.dll
Where Webgate_install_dir is the directory of your Webgate installation.
7. Click OK to register the module.
8. Check the name of the newly created module and click OK to apply the module
across the Web sites.
53.4.7 Configuring IIS Security
Be sure to configure IIS Security before you continue. Figure 53–7 shows an example.
Note: If any spaces exist in the path (for example,
C:\Program
Files\Oracle\...
) surround the entire string with double quotes (" ").
Setting Up Impersonation for Outlook Web Application (OWA)
53-16 Administrator's Guide for Oracle Access Management
Figure 53–7 Impersonation Authentication
To configure IIS Security for the Exchange Server integration
1. Select Start, Administrative Tools, Internet Information Services (IIS) Manager.
2. Click the plus icon (+) to the left of the local computer icon on the tree in the left
pane.
3. Click Web Sites on the tree in the left pane.
4. In the center pane, double-click Authentication under IIS.
5. Ensure that Anonymous Authentication is enabled and Windows Authentication
is disabled.
53.4.8 Testing Impersonation for Outlook Web Application
The following options are provided to test the Impersonation configuration for OWA.
■Testing Impersonation Using the Event Viewer
■Testing Impersonation using a Web Page
53.4.8.1 Testing Impersonation Using the Event Viewer
To test impersonation through the Event Viewer
1. Select Start Menu; Event Viewer.
2. In the left pane, right-click Security, then click Properties.
3. Click the Filter tab on the Security property sheet.
4. Verify that all Event Types are checked, and the Event Source and Category lists
are set to All, then click OK to dismiss the property sheet.
5. Your Event Viewer is now configured to display information about the headerVar
associated with a resource request.
6. Create a new IIS virtual server (virtual site).
7. Place a target Web page anywhere in the tree on the virtual site.
8. From your browser, enter the URl to the Web page.
If impersonation is working correctly, the Event Viewer will report the success of
the access attempt.

Setting Up Impersonation for Outlook Web Application (OWA)
Integrating Access Manager with Outlook Web Application 53-17
53.4.8.2 Testing Impersonation using a Web Page
You can also test impersonation using a dynamic test page, such as a.asp that can
return and display information about the request.
To test impersonation through a Web page
1. Create a
.asp
page or Perl script that will display the parameters
AUTH_USER
and
IMPERSONATE
, which can resemble the sample page presented in the following
listing:
<TABLE border=1>
<TR>
<TD>Variable</TD>
<TD>  </TD>
<TD>Value</TD></TR>
<%for each servervar in request.servervariables%>
<TR>
<TD><%=servervar%></TD>
<TD>  </TD>
<TD><%=request.servervariables(servervar)%> </TD>
</TR>
2. Create an IIS virtual site, or use the one you created for the previous task.
3. Place a
.asp
page or Perl script (such as the sample in the preceding listing)
anywhere in the tree of the new virtual site.
4. Point your browser at the page, which should appear, with both
AUTH_USER
and
IMPERSONATE
set to the name of the user making the request.
53.4.8.3 Negative Testing for Impersonation
To conduct negative testing for impersonation, you need to unbind the trusted user
from the Webgate, as explained in the following procedure.
To unbind the trusted user from your Webgate
1. In the Oracle Access Management Console, locate the Webgate Search page. For
example:
System Configuration tab
Access Manager Settings section
SSO Agents node
OAM Agents node
2. In the text field, enter the exact name of the desired instance. For example:
ImpersonateAgent
and click Search.
3. Open the desired WebGate registration page and Remove the credentials for the
trusted user.
4. Click Apply to save the change.
5. Restart the IIS server and in a browser window, go to a protected code page
(previously accessible to the trusted user).
6. Confirm that you receive a message page. Values for
AUTH_USER
and
IMPERSONATE
are necessary for impersonation credentials to be bound to a Webgate.
7. Restore the trusted user to the Webgate registration page.
Setting Up Access Manager WNA for Outlook Web Application
53-18 Administrator's Guide for Oracle Access Management
53.5 Setting Up Access Manager WNA for Outlook Web Application
Access Manager 11g interoperates with Windows Native Authentication (WNA). This
section describes setting up Access Manager with Windows Native Authentication
(WNA) for Outlook Web Application (OWA).
Enabling Windows Authentication for the IIS Site front-ending OWA is described here.
Prerequisites
A fully-configured Microsoft Active Directory authentication service should be set up
with user accounts to map Kerberos services, Service Principal Names (SPNs) for those
accounts, and key tab files. For more information, see Oracle Fusion Middleware
Securing Oracle WebLogic Server 11g Release 1 (10.3.3) E13707-03.
You need to configure Access Manager to use Windows Native Authentication
(WNA), as described in Chapter 50, "Configuring Access Manager for Windows
Native Authentication."
To enable WNA for IIS Outlook Web Application (OWA)
1. Perform all prerequisite tasks.
2. Open IIS Authentication (OWA on the front-ending Site).
3. Enable Windows authentication.
4. Click on Provider.
5. Add Negotiate to Provider and move it to the top of the list.
6. Create an Access Manager policy to protect OWA in IIS, as described in the Oracle
Fusion Middleware Administrator's Guide for Oracle Access Management.

54
Integrating Microsoft Forefront Threat Management Gateway 2010 with Access Manager 54-1
54
Integrating Microsoft Forefront Threat
Management Gateway 2010 with Access
Manager
This chapter describes how to configure communication between Access Manager and
Microsoft Forefront Threat Management Gateway (TMG) 2010. The following sections
are provided:
■What is New in This Release?
■Introduction to Integration with TMG Server 2010
■Creating a Forefront TMG Policy and Rules
■Installing and Configuring 10g Webgate for Forefront TMG Server
■Configuring the TMG 2010 Server for the ISAPI 10g Webgate
■Starting, Stopping, and Restarting the TMG Server
■Removing Access Manager Filters Before WebGate Uninstall on TMG Server
■Troubleshooting
54.1 What is New in This Release?
Support for integration between Access Manager and Microsoft Forefront Threat
Management Gateway (TMG) 2010.
Details in this chapter presume that you are familiar with Access Manager policies and
operation.
54.2 Introduction to Integration with TMG Server 2010
This section provides an overview of the tasks that, once perfoermed, enable this
integration. Topics included are:
■About This Integration
■About Confirming Certification Requirements
54.2.1 About This Integration
Microsoft Forefront Threat Management Gateway (TMG) 2010 is the next generation of
the Internet Security and Acceleration (ISA) Server 2006. This chapter provides steps to
configure an open (non-secured) connection between the Forefront TMG Web server
and Access Manager. This communication is based on using a 10g Webgate for ISAPI.

Creating a Forefront TMG Policy and Rules
54-2 Administrator's Guide for Oracle Access Management
For details about using a secured connection, see your Forefront TMG Server
documentation.
You can have IIS Web server and Forefront TMG installed on same or on different
computer. In examples in ths chapter, both reside on same host.
The following overview outlines the tasks that you must perform and the topics where
you will find the steps to set up the ISAPI Webgate with the TMG Server within this
chapter.
Task overview: Installing and configuring the ISAPI Webgate on TMG Server
1. Getting the latest certification matrix as described in "About Confirming
Certification Requirements".
2. "Creating a Forefront TMG Policy and Rules"
3. "Installing and Configuring 10g Webgate for Forefront TMG Server"
4. "Configuring the TMG 2010 Server for the ISAPI 10g Webgate"
54.2.2 About Confirming Certification Requirements
Any references to specific versions and platforms in this chapter are for demonstration
purposes.
For the latest Access Manager certification information, see Oracle Technology
Network at:
http://www.oracle.com/technetwork/middleware/ias/downloads/fusion-certification-10
0350.html
54.3 Creating a Forefront TMG Policy and Rules
After you install Forefront TMG 2010, other computers cannot ping the computer
hosting Forefront because the default firewall policy denies all the traffic from and to
the host. This section provides the information you need for:
■Creating a Custom Policy for Forefront TMG
■Creating a Forefront TMG Firewall Policy Rule
■Verifying Forefront TMG Proxy Configuration
54.3.1 Creating a Custom Policy for Forefront TMG
Use the following procedure to create a custom Forefront firewall policy.
Prerequisites
Install Forefront TMG 2010 using documentation from your vendor.
To create a custom policy to over ride the default firewall policy
1. Open the Forefront TMG console: Start, Programs, Microsoft Forefront TMG,
Forefront TMG Management.
2. From the left pane, click Firewall Policy.
3. From the right pane, click Create Access Rule to create a custom policy,
4. Create a rule with the following attributes and values assigned:
■Name: Name for custom policy

Creating a Forefront TMG Policy and Rules
Integrating Microsoft Forefront Threat Management Gateway 2010 with Access Manager 54-3
■Action =Allow
■Protocol =All Outbound
■Malware Inspection = Don not enable Malware Inspection for this rule
■From =External,Internal,Local Host
■To= External,Internal,Local Host
■Condition =All Users
5. Click Next to create the Access Rule, then click Apply.
6. Restart Forefront TMG to have changes take affect:
■Stop Firewall Service use the command
net stop fwsrv
■Start Firewall Service use the command
net start fwsrv
7. Proceed to "Creating a Forefront TMG Firewall Policy Rule"
54.3.2 Creating a Forefront TMG Firewall Policy Rule
To protect the resource, you must create a firewall policy rule using the Forefront TMG
console as described in the following procedure.
When you create a listener for Authentication Preferences, be sure to check Allow
client authentication over HTTP and Require All users to authenticate. Otherwise, you
will not be able to access the published Web site using the TMG proxy.
Authentication Delegation is used by the TMG server to authenticate to the published
Web server.
To create a custom policy to override the default firewall policy
1. Open the Forefront TMG console: Start, Programs, Microsoft Forefront TMG,
Forefront TMG Management.
2. From the left pane, click Firewall Policy.
3. From the Tasks tab, click Publish Web Sites.
4. In the Web publishing rule name field, type a descriptive name for the rule, and
then click Next.
5. On the Select Rule Action page, confirm that the Allow option is selected, and then
click Next.
6. In the Publishing type, confirm that the Publish a single Web site or load balancer
option is selected, and then click Next.
Step 7 describes configuration with an open (non-secured) connection with the
Web server. If you are using a secured connection, see your Forefront TMG Server
documentation.
7. On the Server Connection Security page, click Use non-secured connections to
connect the published Web server or server farm, and then click Next.
8. Perform the following steps to set internal publishing details:
Note: You can have IIS and Forefront TMG installed on the same (or
a different) computer. Here, both reside on same host.

Creating a Forefront TMG Policy and Rules
54-4 Administrator's Guide for Oracle Access Management
■In the Internal site name field, type the internally-accessible name of the
IIS/apache Web server host:
iis_host.us.example.com
, for example.
■Check the box beside Use a computer name or IP address to connect to the
published serve (or enter the IP address of the IIS Web server host).
■Click Next.
9. Protecting Resources: Perform following steps to protect resources within a
particular folder in the Web site (or a single resource):
■Folder Containing Resources: In the Path field, type the folder name to display
the full path of the published Web site in the Web site field (Res/* for
example).
■Single Resource: Type the resource name (
test.html
for example).
■Click Next.
10. In the Accept requests for list:
■Click your domain name (for example:
myhost.example.com
).
■In the Public name field, type the publicly-accessible fully-qualified Web site
domain name of the host where Forefront TMG will be installed (for example:
myhost.example.com
).
■Click Next.
11. In the Web listener list, either click the Web listener to use for this Web publishing
rule, or create a new Web listener as follows:
■Click New, type a descriptive name for the new Web listener, and then click
Next.
■Click Do not require SSL secured connections with clients, and then click Next.
■In the Listen for requests from these networks list, click the required networks
(External, Internal, and Localhost) then click Next.
■Click No on the message that appears.
■In the Select how clients will provide credentials to Forefront TMG Server list,
click No Authentication, and then click Next.
■On the Single Sign On Settings page, click Next, and then click Finish.
12. On the Select Web Listener page:
■Click Edit.
■Click connections tab.
■Provide any unused port for Enable HTTP connections on port attribute (This
will act as Forefront TMG port.)
■Click Apply; click Ok.
Note: The folder must reside within htdocs/wwwroot of the
corresponding Web server.
Note: Listener can also be configured in SSL mode if required; see
your Forefront TMG documentation.

Creating a Forefront TMG Policy and Rules
Integrating Microsoft Forefront Threat Management Gateway 2010 with Access Manager 54-5
■Click Next.
■On the Single Sign On Settings page, click Next, and then click Finish.
13. Authentication Delegation: Perform the following steps to choose the method used
by Forefront TMG to authenticate to the published Web server list.
■Click No Delegation, and Client Cannot Authenticate Directly.
■Click Next.
14. On the User Sets page:
■Choose All (the default user setting - All Users) to set the rule that applies to
requests from the user sets field.
■Click Next, and then click Finish.
15. Click Apply to update the firewall policy, and then click OK.
16. Double-click the recently created Firewall Policy.
17. Bridging:
■Open the Bridging tab.
■Provide suitable unused port for Redirect request to HTTP port attribute
(which will act as the IIS or Apache Web server port).
18. Click Apply to update the firewall policy, and then click OK.
19. IIS or Apache Web server.
20. Restart Forefront TMG to have changes take affect:
■Stop Firewall Service use the command net stop fwsrv
■Start Firewall Service use the command net start fwsrv
21. Double-click the rule just created:
■Open the Link Translation tab.
■Confirm that Apply Link Translation to this rule is checked.
■Click the Mapping button to see the mapping created between Forefront TMG
and IIS or Apache
22. Proceed to "Verifying Forefront TMG Proxy Configuration"
54.3.3 Verifying Forefront TMG Proxy Configuration
To validate the Forefront TMG proxy configuration, you can simply access the
protected resource using the TMG port, as described in the following procedure.
To verify Forefront TMG proxy configuration
1. Protected Single Resource: Enter the URL to the TMG host and port where the
protected resource resides. For example:
http://TMG_hostname:TMG_port/resource_name
2. Protected Folder: Enter the URL to the TMG host and port where the folder
containing the resource resides. For example:
http://TMG_hostname:TMG_port/folder-name/resource_name
3. Confirm there are no issues accessing the protected resource.

Installing and Configuring 10g Webgate for Forefront TMG Server
54-6 Administrator's Guide for Oracle Access Management
54.4 Installing and Configuring 10g Webgate for Forefront TMG Server
This section describes how to set up the 10g Webgate and register plug-ins as Web
filters.
Task overview: Configuring WebGate and Filters for TMG Server includes
1. Installing 10g WebGate with TMG Server
2. Changing /access Directory Permissions
3. Registering Access Manager Plug-ins as TMG Server Web Filters
4. Ordering the ISAPI Filters
5. Verifying Form-based Authentication
54.4.1 Installing 10g WebGate with TMG Server
When you install WebGate with the Forefront TMG Server, the destination for the
ISAPI WebGate installation (also known as the Webgate_install_dir) should be same as
that of the Microsoft Forefront TMG. For example, if Forefront TMG is installed in
C:\Program Files\Microsoft Forefront Threat Management Gateway
, the ISAPI
WebGate should also be installed there.
Task overview: Installing the ISAPI Webgate for Forefront TMG Server
1. Register a 10g ISAPI WebGate with Access Manager, as described in Chapter 25,
"Registering and Managing 10g WebGates with Access Manager 11g."
2. Install the ISAPI WebGate for TMG, as described in Section 25.7, "Locating and
Installing the Latest 10g WebGate for Access Manager 11g."
3. Proceed to the "Changing /access Directory Permissions" section.
54.4.2 Changing /access Directory Permissions
After finishing ISAPI WebGate installation and configuration for the Forefront TMG
Server, you must change permissions to the
\access
subdirectory. This subdirectory
was created in the Forefront TMG Server (also WebGate) installation directory. You
must add the user NETWORK SERVICE and grant full control to SYSTEM
ADMINISTRATOR.
This enables the Forefront TMG Server to establish a connection between the Webgate
and Access Server. Certain configuration files should be readable by system
administrators, which is why you grant SYSTEM ADMINISTRATOR full control.
To change permissions for the \access subdirectory
1. In the file system, right-click Webgate_install_dir
\access
, and select Properties.
2. In the Properties window, click the Security tab.
Note: During Webgate installation, select the TMG option.
Note: Webgate in Simple Mode: add user NETWORK SERVICE and
give Full Control for the
password.xml
file in TMG_install_
dir
\access\oblix\config\password.xml
.

Configuring the TMG 2010 Server for the ISAPI 10g Webgate
Integrating Microsoft Forefront Threat Management Gateway 2010 with Access Manager 54-7
3. Add user "NETWORK SERVICE" and then select "Allow" to give "Full Control".
4. For the "SYSTEM ADMINISTRATOR", select "Full Control".
5. Proceed to the "Configuring the TMG 2010 Server for the ISAPI 10g Webgate"
section.
54.5 Configuring the TMG 2010 Server for the ISAPI 10g Webgate
The following topics describe how to configure the TMG Server to operate with the
10g ISAPI Webgate for Access Manager.
Task overview: Configuring the TMG 2010 Server for the ISAPI 10g Webgate
1. Registering Access Manager Plug-ins as TMG Server Web Filters
2. Ordering the ISAPI Filters
3. Verifying Form-based Authentication.
54.5.1 Registering Access Manager Plug-ins as TMG Server Web Filters
After resetting ISAPI Webgate permissions, you need to register Access Manager
webgate.dll
and
postgate.dll
plug-ins as Web Filters within Forefront TMG Server.
Web filters screen all HTTP traffic that passes through the TMG Server host. Only
compliant requests are allowed to pass through.
The following procedure describes how to register Access Manager plug-ins in the
TMG Server.
To register Access Manager plug-ins as TMG Server Web filters
1. Locate the TMG Server installation directory, from which you will perform the
following tasks.
2. Run
net stop fwsrv
to stop the TMG Server.
3. Register the
webgate.dll
as an ISAPI Web filter by running:
regsvr32 TMG_install_dir\access\oblix\apps\webgate\bin\webgate.dll
4. Register the
postgate.dll
as an ISAPI Web filter by running:
regsvr32 TMG_install_dir\access\oblix\apps\webgate\bin\postgate.dll
5. Restart the TMG Server by running
net start fwsrv
.
6. Proceed to "Ordering the ISAPI Filters".
54.5.2 Ordering the ISAPI Filters
It is important to ensure that the Webgate ISAPI filters are included in the right order.
postgate.dll
should be loaded before
webgate.dll
.
Note: To undo the filter registration, you can use the following
procedure with the
/u
option in the
regsvr32
command. For example:
regsvr32 /u TMG_install_
dir\access\oblix\apps\webgate\bin\webgate.dll

Starting, Stopping, and Restarting the TMG Server
54-8 Administrator's Guide for Oracle Access Management
To order the Webgate ISAPI filters for TMG Server
1. From the Start menu, click All Programs, click Microsoft Forefront TMG, then click
Forefront TMG Management.
2. In the left pane, select System, then select Web Filters, to display your Web-filters.
3. Confirm the following .dll files appear.
For example:
postgate.dll
webgate.dll
4. Add any missing filters, if needed, then select a filter name and use the up and
down arrows to arrange the filter order as shown in Step 3.
5. Proceed with "Verifying Form-based Authentication".
54.5.3 Verifying Form-based Authentication
Here you ensure that the published Web site is accessible using the TMG proxy and
verify that form-based authentication is working.
TMG supports both Basic over LDAP and Form-based or Basic authentication. You can
choose the desired authentication scheme. TMG need access to
login.html
, which you
configure as described here.
To verify that form-based authentication is working
1. Store the login page at the docroot of the Web server protecting the resource so
that the TMG server can access the login page.
2. Ensure that the published Web site is accessible to the TMG proxy.
3. Open the Forefront TMG console: Start, Programs, Microsoft Forefront TMG,
Forefront TMG Management.
4. From the left pane, select the Firewall Policy.
5. On the right, under the Firewall Policy Rule, select the rule that was created to
protect the resource.
6. Go to the policy rule properties, select the Path tab, then add the
/login.html
and
click OK.
7. Click Apply to save changes and update the configuration.
8. Restart Forefront TMG to have changes take affect:
■Stop Firewall Service use the command net stop fwsrv
■Start Firewall Service use the command net start fwsrv
54.6 Starting, Stopping, and Restarting the TMG Server
When instructed to restart your TMG Server during Access Manager Web component
installation or setup, be sure to follow any instructions that appear on the screen. Also,
the
net
commands help to ensure that the Metabase does not become corrupted
following an installation. Consider the following commands, hich provide good ways
to stop and start the TMG Server:
■net stop fwsrv
■net start fwsrv

Troubleshooting
Integrating Microsoft Forefront Threat Management Gateway 2010 with Access Manager 54-9
For more information, see your TMG Server documentation.
54.7 Removing Access Manager Filters Before WebGate Uninstall on
TMG Server
If you plan to uninstall the WebGate that is configured to operate with the TMG
Server, you must first unregister the Access Manager filters manually, and then
uninstall WebGate.
To unregister filters before Webgate uninstall
1. Stop the TMG Server.
2. Run the following command to unregister
webgate.dll
. For example:
regsvr32 /u TMG_install_dir\access\oblix\apps\webgate\bin\webgate.dll
3. Run the following command to unregister
postgate.dll
. For example:
regsvr32 /u TMG_install_dir\access\oblix\apps\webgate\bin\postgate.dll
54.8 Troubleshooting
The error "Failed Connection Attempt" in TMG logs on accessing any Access
Manager-protected resource does not affect functionality and can be ignored.
See Also: Section 28.11, "Removing Web Server Configuration
Changes Before Uninstall."

Troubleshooting
54-10 Administrator's Guide for Oracle Access Management

55
Integrating Access Manager 11.1.2 with SAP NetWeaver Enterprise Portal 55-1
55
Integrating Access Manager 11.1.2 with
SAP NetWeaver Enterprise Portal
This chapter describes the integration of Access Manager 11.1.2 with SAP NetWeaver
Enterprise Portal.
This chapter covers the following topics:
■What is Supported in This Release?
■Supported Versions and Platforms
■Integration Architecture
■Configuring Oracle Access Management and NetWeaver Enterprise Portal 7.0.x
■Configuring Oracle Access Management and NetWeaver Enterprise Portal 7.4.x
■Testing the Integration
■Troubleshooting the Integration
55.1 What is Supported in This Release?
Vers ion s 7. 0.x and 7.4.x of SAP NetWeaver Enterprise Portal are supported in this
release.
Access Manager 11.1.2 supports SAP NetWeaver Enterprise Portal v7.4.x with the
following caveats:
■Apache 2.2.x and 2.0.x (from Apache.org) are supported Web servers with this
release.
■MySAP is not certified.
Access Manager 11.1.2 supports SAP NetWeaver Enterprise Portal v7.0.x with the
following caveats:
■Apache 2.0 (from Apache.org) is supported as a Web server with this release.
■MySAP is not certified.
55.2 Supported Versions and Platforms
Access Manager 11.1.2 supports the versions and platforms described on the following
site:
http://www.oracle.com/technetwork/middleware/ias/downloads/fusion-certification-10
0350.html
Integration Architecture
55-2 Administrator's Guide for Oracle Access Management
55.3 Integration Architecture
The following diagram illustrates the integration between Access Manager and SAP
NetWeaver Enterprise Portal.
55.3.1 Process Overview: Integration with SAP NetWeaver Enterprise Portal
1. A user attempts to access content via the SAP NetWeaver Enterprise Portal.
For example, the user may enter the following URL to access an HR application
through a proxy server:
https://
host:port
/irj
2. The WebGate intercepts the request and queries the Access Server for the security
policy that determines if the resource is protected.
The security policy consists of an authentication scheme, authorization rules, and
allowed operations. Based on the authentication and authorization success or
failure, specified actions are performed.
The Access System security policy for the SAP
/irj
login URL is applicable to all
resources accessed using the
https://
host
:
port
/irj
URL.
Note that the SAP NetWeaver Enterprise Portal has its own authorization system
that can be configured to set user access to iViews.
3. If the resource is protected, the WebGate prompts the user for authentication
credentials.
The credentials that the WebGate requests depend on the authentication scheme
configured in the Access System, for example, Basic over LDAP or Form-based
authentication.
4. If the credentials are validated, the Access System authenticates the user and sets
an encrypted ObSSOCookie in the user's browser.
5. After authenticating, the authorization rules defined in the Access System are
applied based on the security policy.
Specific actions are performed based on the authorization rules. If the user is
authorized, access to the SAP Portal login (the requested content) is allowed. For
SAP Enterprise Portal header variable integration, the Access Server sets the
authenticated user ID in a header variable.

Configuring Oracle Access Management and NetWeaver Enterprise Portal 7.0.x
Integrating Access Manager 11.1.2 with SAP NetWeaver Enterprise Portal 55-3
If the user is not authenticated or authorized, he or she is denied access and
redirected to another URL, as determined by the administrator. For example, the
user may be redirected to an "invalid credentials" page.
6. For the integration with SAP NetWeaver Enterprise Portal, the proxy Web server
redirects the request to the SAP NetWeaver Enterprise Portal internal Web server
that contains the header variable details.
7. The SAP NetWeaver Enterprise Portal uses the header variable value to check the
mapping of the user ID against the configured data source in the portal.
Both the Access Manager and SAP NetWeaver Enterprise Portal data source must
contain the same user ID value.
Upon successful mapping, SAP NetWeaver Enterprise Portal allows the user to
access the requested resource.
SAP NetWeaver Enterprise Portal sends a response to the proxy, and the proxy
redirects to the client browser.
8. All interaction with the SAP Enterprise Portal takes place through the proxy
server.
55.4 Configuring Oracle Access Management and NetWeaver Enterprise
Portal 7.0.x
This section describes how to configure Access Manager 11.1.2 and SAP NetWeaver
Enterprise Portal 7.0.x to work together.
This section contains the following tasks:
■Before You Begin
■Configuring the Apache HTTP Server as a Proxy
■Configuring SAP NetWeaver Enterprise Portal for External Authentication
■Adjusting the Login Module Stacks for using Header Variables
■Configuring Access Manager 11.1.2 for SAP Enterprise Portal
55.4.1 Before You Begin
■Install SAP NetWeaver Enterprise Portal version 7.0.x before completing the steps
in this section.
■Install the Apache HTTP Server by following the installation steps provided by
apache.org.
■Install and configure a WebGate on each Apache HTTP Server instance that
supports the proxy connection to the SAP Enterprise Portal instance. See Installing
Webgates for Oracle Access Manager for details.
■Install Access Manager 11.1.2 before completing the steps in Section 55.4.5,
"Configuring Access Manager 11.1.2 for SAP Enterprise Portal." See the Oracle
Fusion Middleware Installation Guide for Oracle Identity and Access Management
for details.
■Synchronize the time on all servers where SAP NetWeaver Enterprise Portal and
Access Manager components are installed.

Configuring Oracle Access Management and NetWeaver Enterprise Portal 7.0.x
55-4 Administrator's Guide for Oracle Access Management
■Ensure that the users exist in the Access Manager LDAP directory as well as on the
SAP R3 system database.
The user ID in Access Manager and the SAP database must be the same or be
mapped to each other. Any attribute in a user's profile can be configured as the
SAP ID and passed directly to SAP. Alternatively, SAP can be configured to map
the SAP ID to any user attribute that it receives from Access Manager.
■Verify that the Web browser is configured to allow cookies.
55.4.2 Configuring the Apache HTTP Server as a Proxy
The following procedure describes how to configure a proxy (Apache HTTP Server
2.0.x) to access SAP NetWeaver Enterprise Portal v7.0.x.
To configure Apache HTTP Server 2.0.x
1. Set up the Apache HTTP Server proxy in non-SSL mode or SSL mode, as described
in the Apache documentation.
If HTTPS communication is used with the SAP NetWeaver Enterprise Portal, use
SSL mode.
2. To enable the proxy to access the SAP NetWeaver Enterprise Portal, enter the
following in the
httpd.conf
configuration file:
ProxyRequests Off
ProxyPass /webdynpro http://sap_host:port/irj
ProxyPassReverse /webdynpro http://sap_host:port/irj
ProxyPreserveHost On
Where sap_host is the name of the machine hosting the SAP NetWeaver Enterprise
Portal instance and port is the listen port for the SAP NetWeaver Enterprise Portal
instance. This set of directives specifies that all of the requests to this Web server of
the form
http://
apache_host:port
/irj
or
https://
apache_host:port
/irj
are
redirected to
http://
sap_host:port/irj or
https://
sap_host:port
/irj
.
3. Restart the proxy Web server.
4. Access the following URL:
Non-SSL—
http://apachehost:port/irj
SSL—
https://apachehost:port/irj
This request should be redirected to the SAP NetWeaver Enterprise Portal login.
Note: Oracle suggests reviewing the following topics prior to
integrating Access Manager 11.1.2 with SAP NetWeaver Enterprise
Portal.
■Chapter 5, "Managing Data Sources" to understand how to add
and configure data sources in Access Manager.
■Chapter 19, "Managing Authentication and Shared Policy
Components" to understand how to configure Form and Basic
mode authentication in Access Manager.
■Section C.4, "Configuring Cert Mode Communication for Access
Manager" to understand how to configure Cert mode for Access
Manager.

Configuring Oracle Access Management and NetWeaver Enterprise Portal 7.0.x
Integrating Access Manager 11.1.2 with SAP NetWeaver Enterprise Portal 55-5
5. Log in using the SAP NetWeaver Enterprise Portal administrator login ID.
The administrator should be able to perform the available administrative
functions.
6. Log in as a non-administrative user.
This user should be able to perform non-administrative functions.
55.4.3 Configuring SAP NetWeaver Enterprise Portal for External Authentication
The following steps describe enabling external authentication in SAP Enterprise Portal
using the
OB_USER
header variable.
For more information about configuring authentication schemes for SAP Enterprise
Portal, see the SAP NetWeaver 7.0 Security Guide.
To configure the header variable
1. Stop the SAP J2EE dispatcher and server.
2. Browse to the following directory:
SAP_J2EE_engine_install_dir
\ume
3. Back up the file
authschemes.xml.bak
to another directory.
4. Rename
authschemes.xml.bak
to
authschemes.xml
.
5. Open
authschemes.xml
in an editor and change the reference of the default
authentication scheme to the authentication scheme header as follows:
<authscheme-refs>
<authscheme-ref name="default">
<authscheme>header</authscheme>
<authscheme>uidpwdlogon</authscheme>
</authscheme-ref>
</authscheme-refs>
6. In the authentication scheme header of
authschemes.xml
, specify the name of the
HTTP header variable where the Access System provides the user ID.
As described in "Configuring Access Manager 11.1.2 for SAP Enterprise Portal" on
page 55-7, this is the
OB_USER
header variable. You configure this header variable
as follows:
<authscheme name="header">
<loginmodule>
<loginModuleName>
com.sap.security.core.logon.imp.HeaderVariableLoginModule
</loginModuleName>
<controlFlag>REQUISITE</controlFlag>
<options>Header=OB_USER</options>
</loginmodule>
<priority>5</priority>
<frontEndType>2</frontEndType>
<frontEndTarget>com.sap.portal.runtime.logon.header</frontEndTarget>
</authscheme>
The control flag value
REQUISITE
means the login module must succeed. If login
succeeds, authentication continues through the list of login modules. If it fails,
control immediately returns to the application and authentication does not
continue through the list of login modules.

Configuring Oracle Access Management and NetWeaver Enterprise Portal 7.0.x
55-6 Administrator's Guide for Oracle Access Management
7. Restart the portal server and J2EE engine.
The modified
authschemes.xml
file will be loaded into the Portal Content
Directory (PCD). SAP Enterprise Portal will rename it as
authschemes.xml.bak
.
To Configure Logout
1. To enable logout from a single sign-on session in both SAP Enterprise Portal and
Access Manager, configure a logout URL in SAP Enterprise Portal from the
administration interface.
The URL for the administration interface is as follows:
http://
SAP_host:port
/irj/
Where SAP_host is the name of the machine hosting the SAP Enterprise Portal and
port is the listen port for the portal.
2. From the administration interface, click System Administration, then System
Configuration, then UM Configuration, then Direct Editing.
3. Add the following lines to the end of the configuration file:
ume.logoff.redirect.url=http(s)://proxy_host:port/logout.html
ume.logoff.redirect.silent=false
Where http(s) is either
http
or
https
, proxy_host is the name of the proxy Web
server, and port is the listen port for the proxy.
4. Save the changes and log out.
55.4.4 Adjusting the Login Module Stacks for using Header Variables
Add the
HeaderVariableLoginModule
to the appropriate login module stack or
template and configure the options as described here.
To adjust the Login Module Stacks for using Header Variables
1. Run the Visual Administrator tool, in the following location:
SAPJ2EEEngine_install_dir
\j2ee\admin\go.bat
2. In the Visual Administrator, choose Security Provider.
3. Switch to edit mode by choosing the pencil icon.
4. Choose Policy Configurations, then Authentication.
5. For each template or application that is to support header variable authentication,
add the login module HeaderVariableLoginModule to the login module stack (see
Table 55–1.
Table 55–1 Login Module Stacks for using Header Variables
Login Modules Flag Options
EvaluateTicketLoginModule SUFFICIENT
{ume.configuration.active=true
HeaderVariableLoginModule OPTIONAL
{ume.configuration.active=true, Header=<header_name>}
CreateTicketLoginModule SUFFICIENT
{ume.configuration.active=true}
BasicPasswordLoginModule REQUISITE
{}
CreateTicketLoginModule OPTIONAL
{ume.configuration.active=true}

Configuring Oracle Access Management and NetWeaver Enterprise Portal 7.4.x
Integrating Access Manager 11.1.2 with SAP NetWeaver Enterprise Portal 55-7
55.4.5 Configuring Access Manager 11.1.2 for SAP Enterprise Portal
The following procedure describes configuration of the security policy in Access
Manager to protect log-ins to SAP NetWeaver Enterprise Portal. For more information
about configuring application domains, see Oracle Fusion Middleware Administrator's
Guide for Oracle Access Management.
To configure Access Manager for SAP NetWeaver Enterprise Portal
1. Log in to the Oracle Access Management Console.
The Launch Pad opens.
2. Click the drop-down menu in the Access Manager section and choose Create 11g
Webgate.
The Create OAM 11g Webgate page opens.
3. Complete the form to create a WebGate for this integration. For example:
Name—SAP_AG
Host Identifier—Apache proxy host
Auto Create Policies—Enabled (checked)
Public Resource List—Add any public Resources to this list.
Apply—Click to create the WebGate.
4. Click the Authorization Policies tab, then click the Create Authorization Policy
button to open a fresh page (Chapter 20).
5. Summary Tab: Add your information to the Summary tab.
6. Add Resources: The Resource must be defined in the Application Domain before
you can add the resource to a specific policy.
■Click the Resources tab on the Authorization Policy page.
■Click the Add button on the Resources tab.
■Click the Search button.
■Click a URL in the Results table, then click Add Selected.
■Repeat these steps to add more resources.
7. Click Apply to save changes and close the Confirmation window.
8. Responses: Add policy Responses, as described in "Adding and Managing Policy
Responses for SSO" on page 20-47.
9. Conditions: Add authorization conditions, as described in "Defining
Authorization Policy Conditions" on page 20-52.
10. Rules: Add authorization rules, as described in "Defining Authorization Policy
Rules" on page 20-69.
11. Close the page when you finish.
55.5 Configuring Oracle Access Management and NetWeaver Enterprise
Portal 7.4.x
This section contains the following tasks.

Configuring Oracle Access Management and NetWeaver Enterprise Portal 7.4.x
55-8 Administrator's Guide for Oracle Access Management
■Before You Begin
■Configuring Access Manager for SAP NetWeaver Enterprise Portal 7.4.x
■Configuring Apache Web Server 2.0.x or 2.2.x
■Configuring SAP Enterprise Portal 7.4 for External Authentication
■Adjusting the Login Module Stacks for Using Header Variables
55.5.1 Before You Begin
■Install SAP NetWeaver Enterprise Portal version 7.4.x before completing the steps
in this section.
■Install Access Manager 11.1.2 as described in the Oracle Fusion Middleware
Installation Guide for Oracle Identity and Access Management.
■Install Apache HTTP Server 2.0.x or 2.2.x by following the installation steps
provided by apache.org.
■Install and configure an 11g WebGate on each Apache HTTP Server instance that
supports the proxy connection to the SAP Enterprise Portal 7.4 instance. See
Installing Webgates for Oracle Access Manager for details.
■Synchronize the time on all servers where SAP NetWeaver Enterprise Portal and
Access Manager components are installed.
■Ensure that the users exist in the Access Manager LDAP directory as well as on the
SAP R3 system database.
The user ID in Access Manager and the SAP database must be the same or be
mapped to each other. Any attribute in a user's profile can be configured as the
SAP ID and passed directly to SAP. Alternatively, SAP can be configured to map
the SAP ID to any user attribute that it receives from Access Manager.
■Verify that your Web browser is configured to allow cookies.
55.5.2 Configuring Access Manager for SAP NetWeaver Enterprise Portal 7.4.x
Complete the following steps to configure the Access Manager security policy that
protects SAP NetWeaver Enterprise Portal log-ins. For more information about
configuring application domains, see Oracle Fusion Middleware Administrator's Guide for
Oracle Access Management.
1. Log in to the Oracle Access Management Console.
Note: Oracle suggests reviewing the following topics prior to
integrating Access Manager 11.1.2 with SAP NetWeaver Enterprise
Portal.
■Chapter 5, "Managing Data Sources" to understand how to add
and configure data sources in Access Manager.
■Chapter 19, "Managing Authentication and Shared Policy
Components" to understand how to configure Form and Basic
mode authentication in Access Manager.
■Section C.4, "Configuring Cert Mode Communication for Access
Manager" to understand how to configure Cert mode for Access
Manager.

Configuring Oracle Access Management and NetWeaver Enterprise Portal 7.4.x
Integrating Access Manager 11.1.2 with SAP NetWeaver Enterprise Portal 55-9
The Launch Pad opens.
2. Click the drop-down menu in the Access Manager section and choose Create 11g
Webgate.
The Create OAM 11g Webgate page opens.
3. Complete the form to create a WebGate for this integration. For example:
Name—Type a meaningful name, for example, SAP_AG. Do not include spaces in
the name.
Access Client Password—Enter a password to be used during the installation of
the WebGate.
Security—Choose the type of communication that should occur between the
WebGate and the OAM server.
Click Apply.
A confirmation page opens.
4. At the bottom of the confirmation page, in the Server Lists section, associate the
WebGate with a defined Access Server.
Click Apply.
5. On the Launch Pad page, go to the Access Manager section and click Host
Identifiers.
Click Search, then click the WebGate in the search results.
Configure the host identifiers using the fully qualified proxy machine name and
port for the Apache proxy.
6. Click Application Domains and search for the application domain name that you
used to create the WebGate (for example, SAP_WG).
Click the application domain name in the search results to open it
a. Click the Resources tab and search for the resource that the WebGates should
protect. Select the resource in the search results then click the Create button.
Complete the form and click Apply.
Type - HTTP
Resource URL -
/irj
Protection Level - Protected
Authentication Policy - Protected Resource Policy
Authorization Policy - Protected Resource Policy
b. Click the Authentication Policies tab, then click Protected Resource Policy.
Choose the appropriate authentication scheme from the Authentication
Scheme drop-down that you want to configure for this particular domain. For
example, for a form-based authentication policy (FAAuthScheme), enter the
following:
Name - Protected Resource Policy
Authentication Scheme - FAAuthScheme

Configuring Oracle Access Management and NetWeaver Enterprise Portal 7.4.x
55-10 Administrator's Guide for Oracle Access Management
Click Apply to save your changes.
c. Click the Authorization Policies tab, then click Protected Resource Policy.
Click the Responses tab and add the following:
Type - Header
Name - OAM_REMOTE_USER
Val ue - Same account name
The other tabs in Authorization Policies include conditions and rules:
Condition - Creates a list of users and puts them in a group.
Rule - Allows or denies access to the group of users created in the conditions
tab.
Click Apply to save your changes.
7. If you configured a form-based authentication scheme, ensure that a
login.html
page is configured in the proxy server document root.
Also, ensure that a
logout.html
page is present on the proxy Web server
document root. You can create a custom logout page using HTML, a JSP file, or a
CGI protocol.
The default logout page (
logout.html
) is located here:
WebGate_install_dir/webgate/apache/oamsso/logout.html
Where:
WebGate_install_dir
is the directory where the WebGate is installed. Ensure that
the name of the logout page contains the string
logout
.
8. Ensure that the user ID that is returned by the
OAM_REMOTE_USER
header variable
exists in the user management data sources for SAP Enterprise 7.4.
9. On the Launch Pad page, go to the Access Manager section and click
Authentication Schemes.
Choose the authentication scheme to use. This is the scheme that you selected
inside the application domain of the WebGate.
55.5.3 Configuring Apache Web Server 2.0.x or 2.2.x
Follow these steps to configure a proxy to access SAP Enterprise Portal 7.4.
1. Set up the Apache proxy in non-SSL mode or in SSL mode. Refer to the Apache
documentation for details.
If HTTPS communication is used with the SAP Enterprise Portal 7.4, use SSL
mode.
2. To enable the proxy to the SAP Enterprise Portal 7.4, add the following to the
httpd.conf
file:
Note: Select either basic-over-LDAP or form-based authentication.
Oracle recommends that you use a form-based authentication scheme.
If you use the basic authentication scheme, also set the Challenge
Redirect field to another WebGate to ensure that the
ObSSOCookie
is
set.

Configuring Oracle Access Management and NetWeaver Enterprise Portal 7.4.x
Integrating Access Manager 11.1.2 with SAP NetWeaver Enterprise Portal 55-11
ProxyRequests Off
ProxyPass /http://sap_host:port/
ProxyPassReverse / http://sap_host:port//
ProxyPreserveHost On
Where:
sap_host
- The name of the machine hosting the SAP Enterprise Portal 7.4
instance
port
- The listening port for the SAP Enterprise Portal 7.4 instance.
This set of directives specifies that all requests to the Web server that take the form
http://apache_host:port/irj
or
https://apache_host:port/irj
are redirected
to
http://sap_host:port/irj
or
https://sap_host:port/irj
.
3. Uncomment the following proxy related modules:
■
LoadModule proxy_module modules/mod_proxy.so
■
LoadModule proxy_http_module modules/mod_proxy_http.so
4. Restart the proxy Web server.
5. Open a browser and access the following URL:
■Non-SSL:
http//apachehost
:
port/irj
■SSL:
https://apachehost:port/irj
This request should be redirected to the SAP Enterprise Portal 7.4 login ID.
6. Log in using the SAP Enterprise Portal 7.4 administrator login ID.
Verify that you can perform the provided administrative functions when logged in
as an administrator.
7. Log in as a non-administrative user.
Verify that you can perform the provided non-administrative functions when
logged in.
55.5.4 Configuring SAP Enterprise Portal 7.4 for External Authentication
Complete the following steps to enable external authentication in SAP Enterprise
Portal 7.4 using the OAM_REMOTE_USER header variable.
1. To enable logout from a single sign-on session in both SAP Enterprise Portal 7.4
and Access Manager, use the SAP NetWeaver Administrator interface to configure
a logout URL.
Set the SAP NetWeaver Portal Logoff URL (
ume.logoff.redirect.url
) to the
appropriate logout URL.
2. Open the config tool by running the
configtool.bat
file, which is located here:
SAP_J2EE_engine_install_dir\configtool
Note: See the SAP Enterprise Portal 7.4 Enterprise Postal Security Guide
for more information about configuring authentication schemes for
SAP Enterprise Portal.

Configuring Oracle Access Management and NetWeaver Enterprise Portal 7.4.x
55-12 Administrator's Guide for Oracle Access Management
Prepare to edit the configuration by switching to configuration editor mode, and
choosing edit mode.
3. Edit the properties for the following workernode service:
com.sap.security.core.ume.service
Update the
ume.logoff.redirect.url
property and the
ume.logoff.redirect.silent
property with the logoff URL configured in step 1.
ume.logoff.redirect.url=http(s)://proxy_host:port/logout.html
ume.logoff.redirect.silent=false
Save your changes and close the config tool.
4. Stop the SAP J2EE dispatcher and server.
5. Again, open the config tool by running the
configtool.bat
file, which is located
here:
SAP_J2EE_engine_install_dir\configtool
Prepare to edit the configuration by switching to configuration editor mode, and
choosing edit mode.
6. Back up the
authschemes.xml
file (cluster_config > globals > clusternode_config >
workernode > services > com.sap.security.core.service > persistent).
7. Open
authschemes.xml
in an editor and change the reference of the default
authentication scheme to the authentication scheme header as follows:
<authscheme-refs>
<authscheme-ref name="default">
<authscheme>header</authscheme>
</authscheme-ref>
</authscheme-refs>
<authscheme-ref name="default"> ----------------> (for fall back)
<authscheme>uidpwdlogon</authscheme>
</authscheme-ref>
</authscheme-refs>
8. In
authschemes.xml
, go to the authentication scheme header and specify the name
of the HTTP header variable where the access system provides the user ID.
Configure this header variable as follows:
<authscheme name="header">
<loginmodule>
<loginModuleName>
com.sap.security.core.logon.imp.HeaderVariableLoginModule
</loginModuleName>
<controlFlag>REQUISITE</controlFlag>
<options>Header=OAM_REMOTE_USER</options>
</loginmodule>
<priority>5</priority>
<frontEndType>2</frontEndType>
<frontEndTarget>com.sap.portal.runtime.logon.header</frontEndTarget>
</authscheme>
The REQUISITE control flag value specifies that the login module must succeed. If
login succeeds, authentication continues through the list of login modules. If it
fails, control immediately returns to the application and authentication does not
continue through the list of login modules.

Testing the Integration
Integrating Access Manager 11.1.2 with SAP NetWeaver Enterprise Portal 55-13
9. Save the XML to the same location.
10. Restart the portal server and J2EE engine.
The modified
authschemes.xml
file is loaded into the Portal Content Directory
(PCD). SAP Enterprise Portal 7.4 renames it as
authschemes.xml.bak
.
55.5.5 Adjusting the Login Module Stacks for Using Header Variables
Use the NetWeaver Admin console to add the
HeaderVariableLoginModule
to the
appropriate login module stack or template and configure the options as described
here. In the console, choose Configuration > Authentication and Single Sign-On.
Click Login Modules under the Authentication tab. Select the
HeaderVariableLoginModule
login module, choose ticket from the Login Module Use
tab, and add the login module
HeaderVariableLoginModule
to the login module stack
for each template or application that is to support header variable authentication.
55.6 Testing the Integration
Use the following procedures to test the integration.
Front-End Integration Test Procedure
Follow these steps to test the integration using a Web browser.
1. Open a protected URL. For example:
https://
host:port
/irj
Access Manager should prompt for authentication (either form based, or basic
authentication over LDAP, or Cert Mode authentication).
2. Enter the correct user credentials.
If the credentials are correct, you will be logged into the SAP NetWeaver
Enterprise Portal system.
Back-End Integration Test Procedure
To use these steps, download and install a plug-in for your Web browser that displays
the HTTP requests and responses that happen when your browser requests a resource.
Live HTTP Headers for Firefox, or ieHTTPHeaders for Internet Explorer are two such
plug-ins.
1. Open the plug-in and type a URL in your browser to request a protected resource,
for example:
https://
host:port
/irj
The plug-in window will be populated with the HTTP requests and responses.
2. Analyze the requests and responses and make sure that each request returns a
response without errors.
Once the user is authenticated you should see some sessions and cookies set in the
HTTP Header logs. The cookies that are set include the following:
Table 55–2 Login Module Stacks for using Header Variables
Login Modules Flag Options
EvaluateTicketLoginModule SUFFICIENT
{ume.configuration.active=true
HeaderVariableLoginModule OPTIONAL
{ume.configuration.active=true, Header=<header_name>}
CreateTicketLoginModule SUFFICIENT
{ume.configuration.active=true}
BasicPasswordLoginModule REQUISITE
{}
CreateTicketLoginModule OPTIONAL
{ume.configuration.active=true}

Troubleshooting the Integration
55-14 Administrator's Guide for Oracle Access Management
■ObSSOCookie
■JSESSIONID
■OAM_ID
■OAM_REQ
When the request reaches the SAP NetWeaver Enterprise Portal, you will receive
responses from the Enterprise Portal system in the header logs.
55.7 Troubleshooting the Integration
The following information is intended to help you troubleshoot issues with this
integration.
Problem: The browser has problems displaying the SAP 7.0.x administration interface
through the proxy server. You may receive an "object not found" error and related
JavaScript errors.
Solution: See the following SAP document for a list of supported browsers, "SAP
NetWeaver 7.0.x Product Availability Matrix."

56
Integrating Oracle Access Manager 11.1.2 with SAP NetWeaver Enterprise Portal Using OpenSSO Policy Agent2.2 56-1
56
Integrating Oracle Access Manager 11.1.2 with
SAP NetWeaver Enterprise Portal Using
OpenSSO Policy Agent 2.2
This chapter describes how to use Sun Java System Access Manager / OpenSSO Policy
Agent 2.2 to integrate Oracle Access Manager 11.1.2 with SAP NetWeaver Enterprise
Portal 7.01.
This chapter covers the following topics:
■What is Supported in This Release?
■Registering the OpenSSO Agent
■Installing the OpenSSO Policy Agent 2.2 on SAP Enterprise Portal
■Deploying the Agent Software Delivery Archive
■Making a Class Loader Reference to the Login Module
■Modifying the SAP Enterprise Portal 7.0 / Web Application Server 7.0 Class Path
■Deploying and Starting the Agentapp.war File
■Using Telnet to Create a Reference Between agentapp and Library
AmSAPAgent2.2
■Adding the Login Module to the Stack
■Modifying the Login Module Stack
■Updating the ume.logoff.redirect.uri
■Configuring the AMAgent.properties File
■Testing the Integration
56.1 What is Supported in This Release?
Only SAP Netweaver Enterprise Portal 7.01 is supported by the OpenSSO Policy
Agent 2.2 in this release. MySAP is not certified.
Note: The following patch must be applied to the OpenSSO Policy
Agent 2.2:
PSE ID: OpenSSO.J2EE.PSE.2.2.18810674
SAP single sign-on will not work without this patch.

Registering the OpenSSO Agent
56-2 Administrator's Guide for Oracle Access Management
56.2 Registering the OpenSSO Agent
Before you begin, complete the following steps:
■Remotely register the agent so that the Agent Profile is created on the Oracle
Access Management side. Use the remote registration tool on the OAM server
located here:
<Middleware_Home>/Oracle_IDM1/oam/server/rreg
■Ensure that the fully-qualified domain name of the OAM server and the SAP
server are updated in the
hosts
file on both systems.
Always use the SAP and OAM server’s fully-qualified domain name while
installing or registering the agent and doing OAM configuration.
1. Open the appropriate XML request file for editing. The request file will provide
inputs for the registration.
Request files are located inside the input folder.
2. Modify the specific values to match your environment.
<?xml version="1.0" encoding="UTF-8"?>
<!-- Copyright (c) 2009, 2013, Oracle and/or its affiliates. All rights
reserved.
NAME: OpenSSORequest.xml - Template (with all options) for OpenSSO Agent
Registration Request file
DESCRIPTION: Modify with specific values and pass file as input to the
tool-->
<OpenSSORegRequest>
<serverAddress>http://OAMserver.example.com:7001</serverAddress>
<hostIdentifier>OPENSSO_HOSTID8</hostIdentifier>
<agentName>OPENSSO_SAP8</agentName>
<agentBaseUrl>http://SAPserver.example.com:50000</agentBaseUrl>
<applicationDomain>OPENSSO_APPDOMAIN</applicationDomain> //Modify this.
<autoCreatePolicy>true</autoCreatePolicy>
<agentType>J2EE</agentType>
<agentVersion>2.2</agentVersion> //Important: Make sure the version is 2.2.
<agentDebugDir></agentDebugDir>
<agentAuditDir></agentAuditDir>
<agentAuditFileName></agentAuditFileName>
<protectedAuthnScheme></protectedAuthnScheme>
</OpenSSORegRequest>
3. To register the agent, open a command prompt and run the following command
from the
bin
directory in the rreg tool:
oamreg.sh inband input/OpenSSORequest
The command outputs the
AMAgent.properties
file, which is located in the output
directory.
This registration creates a footprint in the
oam-config.xml
file for the OAM
domain, which is located here:
Note: For OpenSSO agent 2.2, there is only one output file
(
AMAgent.properties
), whereas for OpenSSO agent 3 there are two
output files (
OpenSSOAgentBootstrap.properties
and
OpenSSOAgentConfiguration.properties
).
Installing the OpenSSO Policy Agent 2.2 on SAP Enterprise Portal
Integrating Oracle Access Manager 11.1.2 with SAP NetWeaver Enterprise Portal Using OpenSSO Policy Agent2.2 56-3
<Middleware_home>/user_projects/domains/base_
domain1/config/fmwconfig/oam-config.xml
The registered agent is in an entry similar to the following:
<Setting Name="<Agent_Name>" Type="htf:map">
The registration process is now complete.
56.3 Installing the OpenSSO Policy Agent 2.2 on SAP Enterprise Portal
Complete the following steps to install the agent on the SAP container.
1. Extract the OpenSSO Policy agent and navigate to the
bin
folder.
2. Open a command prompt and type the following command to install the agent on
the SAP container.
agentadmin.sh - -install
The command will prompt you for values as needed. The following table
summarizes the requested inputs.
56.3.1 Post-Installation Steps
After installation, an agent instance is created on the SAP container. Inside this
directory is another instance of the
AMAgent.properties
file. (So there are two
Table 56–1
Request prompt Sample Input Description
SAP <SID> Directory <SAP_Server_
Instance>\JC00\j2ee\clu
ster\server0
Path to the SAP directory
Agent installed on
WebAS domain
false
Access Manager Services
host
OAMserver.example.com
OAM server fully-qualified domain name
Access Manager Services
Port
8003 Port where the OAM server is running
Access Manager Services
protocol
http
Access Manager Services
deployment URI
/opensso
OpenSSO proxy URL
Agent host name SAPserver.example.com
SAP server fully-qualified domain name
Application server
instance port number
50000 Port where the SAP EP server is running
Protocol for
Application Server
instance
http
Deployment URI for the
Agent Application
/agentapp
URI of the WAR file that we deploy
Encryption key
gSwxyctnKWkx8fBgbwj8
Mn5ziksjaUqi
Agent profile name
OPENSSO_SAP8 Agent profile name given during registration
Agent profile password
file name
/Policy_Agent/sap_v7_
agent/Info/p.txt

Deploying the Agent Software Delivery Archive
56-4 Administrator's Guide for Oracle Access Management
AMAgent.properties
files: one generated during remote registration, and one
generated just previously during the Agent installation.)
1. Compare the two properties files and consolidate them so that you have one
properties file that contains all of the information.
Be sure that all of the settings in the
AMAgent.properties
file matches the Agent
Profile entry in the
oam-config.xml
file on the OAM server.
2. In
oam-config.xml
, add the following entry under the
<Setting
Name="NamingData" Type="htf:map">
element:
<Setting Name="iplanet-am-platform-server-id"
Type="xsd:string">serverprotocol://serverhost:serverport</Setting>
56.4 Deploying the Agent Software Delivery Archive
1. Go to the
etc
folder in the agent to locate the
AmSAPAgent2.2.sda
archive. The
.sda
file is a library that you will deploy onto the SAP server using the Software
Deployment Manager (SDM).
2. Use the Software Deployment Manager
(
/usr/sap/SID/InstanceName/SDM/program/RemoteGui.sh
) to deploy the
AmSAPAgent2.2.sda
file. Refer to the SAP documentation for details.
Once the deployment is complete, verify that the library is deployed by viewing
the Undeployment tab. The
AmSAPAgent2.2
library should be listed.
You can also use the SAP Visual Administrator tool
(
/usr/sap/SID/InstanceName/j2ee/admin/go.sh
) to verify that the deployed
library, along with the SAP-dependent libraries, are available in the container.
56.5 Making a Class Loader Reference to the Login Module
Use the SAP Visual Administrator tool
(
/usr/sap/SID/InstanceName/j2ee/admin/go.sh
) to make a class loader reference for
the newly deployed library. Add the reference to the
LoginModuleClassLoader
by
adding the following key-value pair on the Properties tab on the Security Provider
configuration page (Server Instance > Services > Security Provider).
Note: Be sure to increment the version integer every time you
update the
oam-config.xml
file:
<Setting Name="Version" Type="xsd:integer">113</Setting>
Table 56–2
Key Value
LoginModuleClassLoader library: AmSAPAgent2.2

Using Telnet to Create a Reference Between agentapp and Library AmSAPAgent2.2
Integrating Oracle Access Manager 11.1.2 with SAP NetWeaver Enterprise Portal Using OpenSSO Policy Agent2.2 56-5
56.6 Modifying the SAP Enterprise Portal 7.0 / Web Application Server 7.0
Class Path
Open the SAP Config Tool
(
/usr/sap/SID/InstanceName/j2ee/configtool/configtool.sh
), navigate to
Cluster_data > Instance ID > Server instance, and on the General tab, add the
following paths to the Classpath field:
/Policy_Agent/sap_v7_agent/j2ee_agents/sap_v7_agent/<Agent_
Instance>/config
/Policy_Agent/sap_v7_agent/j2ee_agents/sap_v7_agent/locale
56.7 Deploying and Starting the Agentapp.war File
1. Open the SAP Deployment Manager (
deploy.sh
) and create a new project.
2. Go to an empty directory owned by the SAP instance user (j2eeadm) and type
agentapp for the address field.
Go to the Assembler tab and add the
agentapp.war
archive (right-click the
agentapp node and select Add Archive from the context menu).
Save the project.
Browse to the directory specified previously as owned by the SAP Instance user
(j2eeadm), type agentapp for the address field, and click OK.
Right-click the agentapp root node and select Make Ear from the context menu.
56.8 Using Telnet to Create a Reference Between agentapp and Library
AmSAPAgent2.2
1. Telnet to the SAP host (for example,
saphost.example.com 50008
) and log on as
an administrator.
2. Issue the following commands:
a.
$ jump 0
The system returns a message similar to the following:
You jumped on node 4503950.
b.
$ add deploy
c.
$ CHANGE_REF -m sap.com/agentapp library:AmSAPAgent2.2
The system returns the following message:
The reference between application sap.com/agentapp and
library:AmSAPAgent2.2 was made!
3. Stop and Start the SAP Enterprise Portal instance.
Note: You can also use the SAP Visual Administrator tool
(
/usr/sap/SID/InstanceName/j2ee/admin/go.sh
) to verify that the
references were made properly. Choose Server Instance > Services >
ClassLoader Viewer.

Adding the Login Module to the Stack
56-6 Administrator's Guide for Oracle Access Management
56.9 Adding the Login Module to the Stack
Before You Begin - Start the SAP Enterprise Portal instance if it is not running.
1. Start the SAP Visual Administrator tool and log in.
(
/usr/sap/SID/InstanceName/j2ee/admin/go.sh
).
2. Select the Security Provider service, click the User Management tab, and switch to
edit mode.
3. Click Manage Security Stores > Add Login Module.
Click OK when the dialog box opens.
4. In the Class Name field, type the following:
com.sun.identity.agents.sap.v70.AmSAPEP70LoginModule
5. In the Display Name field, type the following:
AmSAPEP70LoginModule
56.10 Modifying the Login Module Stack
1. Start the SAP Visual Administrator tool and log in.
(
/usr/sap/SID/InstanceName/j2ee/admin/go.sh
).
2. Select the Security Provider service, click the Policy Configurations tab, and
switch to edit mode.
3. In the Components list, select the ticket authentication template.
4. Delete all login modules except for the following:
■
com.sap.security.core.server.jaas.EvaluteTicketLoginModule
■
com.sap.security.core.server.jaas.CreateTicketLoginModule
5. Click Add New and select AmSAPEP70LoginModule from the list of modules.
6. Click Modify and move
AmSAPEP70LoginModule
between the two remaining login
modules.
The new ticket authentication template should match the values in the following
table.
56.11 Updating the ume.logoff.redirect.uri
1. Open the SAP Config Tool
(
/usr/sap/SID/InstanceName/j2ee/configtool/configtool.sh
) and switch to
edit mode.
2. Click the pencil and glasses button and choose cluster_data > server > cfg >
services.
Table 56–3 Login Module Flags
Login Module Flags
EvaluateTicketLoginModule
SUFFICIENT
AmSAPEP70LoginModule
REQUISITE
CreateTicketLoginModule
OPTIONAL
EvaluateTicketLoginModule
SUFFICIENT

Testing the Integration
Integrating Oracle Access Manager 11.1.2 with SAP NetWeaver Enterprise Portal Using OpenSSO Policy Agent2.2 56-7
The UME service property sheet opens.
3. Open the
com.sap.security.core.ume.service
property sheet and add the
following custom value to the
ume.logoff.redirect.uri
property.
http://OAM-Server-Hostname:OAM-Port/oam/server/logout
56.12 Configuring the AMAgent.properties File
Open the
AMAgent.properties
file for the Agent Instance and edit the following
properties:
1. In Debug Service Properties, update the complete path of the log location similar
to the following:
com.iplanet.services.debug.directory = /Policy_Agent/sap_v7_agent/j2ee_
agents/sap_v7_agent/Agent_003/logs/debug
2. In COMMON ATTRIBUTE FETCH PROCESSING PROPERTIES, set cookie
encode to false.
com.sun.identity.agents.config.attribute.cookie.encode = false
3. In COOKIE RESET PROCESSING PROPERTIES, edit the following properties:
com.sun.identity.agents.config.cookie.reset.enable = true
com.sun.identity.agents.config.cookie.reset.name[0] = MYSAPSSO2
com.sun.identity.agents.config.cookie.reset.domain[MYSAPSSO2] =
.corp.example.com
4. In URL DECODE SSO TOKEN FLAG, set decode to false:
com.sun.identity.agents.config.sso.decode = false
5. In FILTER OPERATION MODE, add or update the following property:
com.sun.identity.agents.config.filter.mode = SSO_ONLY
56.13 Testing the Integration
Users in the Oracle Access Management user store should also be in the SAP server. Be
sure to allow user access in OAM.
To verify that the integration is working properly, try the following:
1. Access the protected URL (for example,
/irj
).
You should be redirected to the Oracle Access Manager login form.
2. Enter a valid user name and password.
Note: The following properties in
AMAgent.properties
must match
the properties in
oam-config.xml
. If the properties do not match,
update the properties in
oam-config.xml
.
Be sure to increment the version integer every time you update the
oam-config.xml
file:
<Setting Name="Version" Type="xsd:integer">113</Setting>

Testing the Integration
56-8 Administrator's Guide for Oracle Access Management
You should be authenticated and logged into the SAP server (
/irj
).

Part XIV
Par t XIV
Appendixes
Part XII provides information that is outside the scope of day-to-day administration
tasks with Oracle Access Management 11.1.2.
Part XII contains the following appendixes:
■Appendix A, "Integrating Oracle ADF Applications with Access Manager SSO"
■Appendix B, "Internationalization and Multibyte Data Support for 10g WebGates"
■Appendix C, "Securing Communication"
■Appendix D, "Reviewing Bundled, Generated, and Migrated Artifacts"
■Appendix E, "Troubleshooting"

A
Integrating Oracle ADF Applications with Access Manager SSO A-1
A
Integrating Oracle ADF Applications with
Access Manager SSO
The Oracle Application Developer Framework (ADF) and applications that are coded
to Oracle ADF standards interface with the OPSS SSO Framework. The Oracle
Platform Security Services (OPSS) single sign-on framework provides a way to
integrate applications in a domain with a single sign-on (SSO) solution.
You can integrate a Web application that uses Oracle ADF security and the OPSS SSO
Framework with an Access Manager SSO security provider for user authentication.
This chapter provides the following sections:
■Introducing Oracle Platform Security Services and Oracle Application Developer
Framework
■Integrating Access Manager With Web Applications Using Oracle ADF Security
and the OPSS SSO Framework
■Configuring Centralized Logout for Oracle ADF-Coded Applications
■Confirming Application-Driven Authentication During Runtime
A.1 Introducing Oracle Platform Security Services and Oracle Application
Developer Framework
This section provides the following topics:
■Oracle Platform Security Services Single Sign-on Framework
■Oracle Application Developer Framework
A.1.1 Oracle Platform Security Services Single Sign-on Framework
A single sign-on (SSO) solution must provide a standard way for applications to login
and logout users. After successful authentication, the SSO service is responsible to
redirect the user to the appropriate URL.
The Oracle Platform Security Services (OPSS) SSO Framework provides a way to
integrate applications in a domain with an SSO solution. Specifically, it provides
applications with a common set of APIs across SSO products to handle login, auto
login, and logout.
The Oracle Application Developer Framework (ADF) and applications that are coded
to Oracle ADF standards interface with the OPSS SSO Framework. For more
information about Oracle ADF, see "Oracle Application Developer Framework" on
page A-2.

Introducing Oracle Platform Security Services and Oracle Application Developer Framework
A-2 Administrator's Guide for Oracle Access Management
The Access Manager SSO solution is available out-of-the-box and provides the
following to applications that are coded to Oracle ADF standards and the OPSS SSO
Framework:
■Login (application-driven): Upon accessing a part of a secured artifact that
requires authentication, the application triggers authentication and redirects the
user to be authenticated by the appropriate solution.
■Auto login: A user who has initially accessed an application anonymously
registers an account with the application (Oracle Identity Manager, for instance);
upon a successful registration, the user is redirected to the authentication URL; the
user can also be automatically logged in without being prompted.
■Global logout: When a user logs out of one application, the logout propagates
across to any other application that is enabled by the solution.
A.1.2 Oracle Application Developer Framework
The Oracle Application Development Framework is an end-to-end application
framework that builds on Java EE standards and open-source technologies to simplify
and accelerate implementing service-oriented applications.
The development and run-time environment required to deploy and manage ADF
applications is similar in many ways to the environment required for other Java EE
applications.
The difference between a typical Java EE environment and an environment that
supports Oracle ADF applications is the availability of the Oracle ADF run-time
libraries:
■In Oracle Fusion Middleware 11g, an Oracle WebLogic Server domain, by default,
does not contain the Oracle ADF run-time libraries. However, you can optionally
configure or extend your domain to include the Java Run-time Files (JRF). The
Oracle ADF run-time libraries are included as part of the JRF component.
The Oracle WebLogic Server domain can be extended with the Java Run-time Files
(JRF) domain template, which includes the required Oracle ADF libraries, and
other important Oracle-specific technologies.
■In Oracle Application Server 10g, each instance of OC4J automatically provided
the Oracle ADF run-time libraries required to support Oracle ADF applications.
For information about the types of Java EE environments available in 10g and
instructions for upgrading those environments to Oracle Fusion Middleware 11g, refer
to the Oracle Fusion Middleware Upgrade Guide for Java EE.
Note: The OPSS SSO framework does not support multi-level
authentication.
See Also: Oracle Fusion Middleware Application Security Guide part
"Single Sign-On Configuration" for more information about choosing
an SSO solution, and the Access Manager solutions.

Integrating Access Manager With Web Applications Using Oracle ADF Security and the OPSS SSO Framework
Integrating Oracle ADF Applications with Access Manager SSO A-3
A.2 Integrating Access Manager With Web Applications Using Oracle
ADF Security and the OPSS SSO Framework
This section describes how to integrate a Web application that uses Oracle ADF
security and the OPSS SSO Framework with an Access Manager SSO security provider
for user authentication.
Before the Web application can be run, you must configure the domain-level
jps-config.xml
file on the application's target Oracle WebLogic Server for the Access
Manager security provider.
The domain-level
jps-config.xml
file is in the following path and should not be
confused with the deployed application's jps-config.xml file:
$DOMAIN_HOME/config/fmwconfig/jps-config.xml
You can use an Oracle JRF WLST script to configure the domain-level jps-config.xml
file, either before or after the Web application is deployed. This Oracle JRF WLST
script is named as follows:
Linux: wlst.sh
Windows: wlst.cmd
The Oracle JRF WLST script is available in the following path if you are running
through JDev:
$JDEV_HOME/oracle_common/common/bin/
In a standalone JRF WebLogic installation, the path is:
$MW_HOME/oracle_common/wlst
Command Syntax
addOAMSSOProvider(loginuri, logouturi, autologinuri)
Table A–1 defines the expected value for each argument in the addOAMSSOProvider
command line addOAMSSOProvider
Note: Do not confuse the domain-level
jps-config.xml
file with the
deployed application's jps-config.xml file.
Note: The Oracle JRF WLST script is required. When running WLST
for Oracle Java Required Files (JRF), do not use the WLST script under
$JDEV_HOME/wlserver_10.3/common/bin.

Integrating Access Manager With Web Applications Using Oracle ADF Security and the OPSS SSO Framework
A-4 Administrator's Guide for Oracle Access Management
The procedure to configure domain-level jps-config.xml for a Fusion Web application
with Oracle ADF Security enabled is part of a larger task. With the exception of the
command syntax, all tasks are the same for Access Manager 10g and 11g.
For more information, see:
■Sample SSO Configuration for Access Manager
■SSO Provider Configuration Details
A.2.1 Sample SSO Configuration for Access Manager
The SSO service configuration entered with the procedure described in Oracle Fusion
Middleware Application Security Guide for all tasks involving Access Manager SSO
providers and an OAM Configuration Example is written to the file
jps-config.xml
.
The data specified includes:
■A particular SSO service
■The auto-login and auto-logout URIs
■The authentication level
■The query parameters contained in the URLs returned by the selected SSO service
■The appropriate settings for token generation
Table A–1 addOAMSSOProvider Command-line Arguments
Argument Definition
loginuri Specifies the URI of the login page
Note: For ADF security enabled applications,
"/<context-root>/adfAuthentication" should be provided for the 'loginuri'
parameter. Here is the flow:
1. User accesses a resource that has been protected by authorization
policies in OPSS, fox example.
2. If the user is not yet authenticated, ADF redirects the user to the URI
configured in 'loginuri'.
3. Access Manager, should have a policy to protect the value in 'loginuri':
for example, "/<context-root>/adfAuthentication.
4. When ADF redirects to this URI, Access Manager displays a Login Page
(depending on the authentication scheme configured in Access
Manager for this URI).
logouturi Specifies the URI of the logout page
Note: For ADF security enabled applications, logouturi should be
configured based on logout guidelines in Chapter 22. For the:
■11g Webgate the value of the logouturi should be sought from the 11g
Webgate Administrator.
■10g Webgate requires a logouturi value of "/oamsso/logout.html
autologinuri Specifies the URI of the autologin page.
See Also:
■Oracle Fusion Middleware Oracle WebLogic Scripting Tool
■Oracle Fusion Middleware WebLogic Scripting Tool Command
Reference "Infrastructure Security Commands" chapter

Integrating Access Manager With Web Applications Using Oracle ADF Security and the OPSS SSO Framework
Integrating Oracle ADF Applications with Access Manager SSO A-5
The following fragment of a
jps-config.xml
file illustrates the configuration of an
Access Manager SSO provider. Some values are merely placeholders for actual content.
Your configuration should contain values for your implementation.
Example A–1 Sample SSO Configuration for Access Manager
<propertySets>
<propertySet name = "props.auth.url">
<property name = "login.url.BASIC" value = "http://host:port/oam_
login.cgi?level=BASIC"/>
<property name = "login.url.FORM" value = "http://host:port/oam_
login.cgi?level=FORM"/>
<property name = "login.url.DIGEST" value = "http://host:port/oam_
login.cgi?level= DIGEST"/>
<property name = "autologin.url" value = " http://host:port/obrar.cgi"/>
<property name = "logout.url" value = "http://host:port/logout.cgi"/>
<property name = "param.login.successurl" value = "successurl"/>
<property name = "param.login.cancelurl" value = "cancelurl"/>
<property name = "param.autologin.targeturl" value = "redirectto"/>
<property name = "param.autologin.token" value = "cookie"/>
<property name = "param.logout.targeturl" value = "targeturl"/>
</propertySet>
<propertySet name="props.auth.uri">
<property name="login.url.BASIC"
value="/${app.context}/adfAuthentication?level=BASIC" />
<property name="login.url.FORM"
value="/${app.context}/adfAuthentication?level=FORM" />
<property name="login.url.DIGEST"
value="/${app.context}/adfAuthentication?level=DIGEST" />
<property name="autologin.url" value="/obrar.cgi" />
<property name="logout.url" value="/${oamsso/logout.html" />
</propertySet>
<propertySet name = "props.auth.level">
<property name = "level.anonymous" value = "0"/>
<property name = "level.BASIC" value = "1"/>
<property name = "level.FORM" value = "2"/>
<property name = "level.DIGEST" value = "3"/>
</propertySet>
<propertySets>
<serviceProviders>
<serviceProvider name = "sso.provider"
class = "oracle.security.jps.internal.sso.SsoServiceProvider"
type = "SSO">
<description>SSO service provider</description>
</serviceProvider>
</serviceProviders>
<serviceInstances>
<serviceInstance name = "sso" provider = "sso.provider">
<propertySetRef ref = "props.auth.url"/>
<propertySetRef ref = "props.auth.level"/>
<property name = "default.auth.level" value = "2"/>
<property name = "token.type" value = "OAMSSOToken"/>
<property name = "token.provider.class" value =
"oracle.security.wls.oam.providers.sso.OAMSSOServiceProviderImpl"/>
See Also: "SSO Provider Configuration Details"

Integrating Access Manager With Web Applications Using Oracle ADF Security and the OPSS SSO Framework
A-6 Administrator's Guide for Oracle Access Management
</serviceInstance>
</serviceInstances>
<jpsContexts default = "default">
<jpsContext name = "default">
<serviceInstanceRef ref = "sso"/>
</jpsContext>
</jpsContexts>
A.2.2 SSO Provider Configuration Details
Note the following important points:
■Any SSO provider must define the URI for at least the FORM login with the
property
login.url.FORM
. The value need not be a URL.
■If the application supports a self-registration page URI or URL, it must be
specified with the property
autologin.url
.
■If the SSO solution supports a global logout URI or URL, it must be specified with
the property
logout.url
. The OAM solution supports global logout.
■The following properties, illustrated in Example A–1, are optional:
–
param.login.successurl
–
param.login.cancelurl
–
param.autologin.targeturl
–
param.login.token
–
param.logout.targeturl
■The use of the variable
app.context
in URI specifications, in values within the
property set
props.auth.uri
for instance, is allowed for only ADF applications
when integrating with the Access Manager solution.
■The property set
props.auth.level
is required.
■The reference to
props.auth.url
is required.
■The property
sso.provider.class
within a service instance of the SSO provider is
the fully qualified name of the class implementing a specific SSO solution.
In the case of the OAM solution, the provided class name is
oracle.security.wls.oam.providers.sso.OAMSSOServiceProviderImpl
.
■The property name
default.auth.level
within a service instance of the SSO
provider must be set to "2", as illustrated in Example A–1.
■The property
token.type
within a service instance of the SSO provider is required.
This token type identifies the token set on the HTTP request by the SSO provider
upon a successful authentication; the SSO provider uses this token, after the first
time, to ensure that the user does not need to be reauthenticated and that his
sign-on is still valid. In the case of the OAM solution, the token type must be
OAMSSOToken
, as illustrated in Example A–1.
■The property
token.provider.class
within a service instance of the SSO provider
is the fully qualified name of the token class, and it is provider-specific.
■An application that implements a self-registration logic and wants to auto login a
user after successful self-registration, it must call the OPSS autoLogin API; in turn,

Configuring Centralized Logout for Oracle ADF-Coded Applications
Integrating Oracle ADF Applications with Access Manager SSO A-7
to allow this call, it must grant that application a code source permission named
CredentialMapping
with class
JpsPermission
.
The following fragment of the file
system-jazn-data.xml
illustrates the
specification of this permission to the application
MyApp
:
<grant>
<grantee>
<codesource>
<url>file:${domain.home}/servers/MyApp/-</url>
</codesource>
</grantee>
<permissions>
<permission>
<class>oracle.security.jps.JpsPermission</class>
<name>CredentialMapping</name>
</permission>
</permissions>
</grant>
A.3 Configuring Centralized Logout for Oracle ADF-Coded Applications
The Access Manager SSO solution is available for applications that are coded to Oracle
ADF standards and the OPSS SSO Framework. ADF-coded applications that are
configured to perform logout with Access Manager, redirect to the
/oamsso/logout.html resource.
IAMSuiteAgent intercepts and processes the request, cleans up the session, redirects to
the central logout page (done by the OAM Server) and redirects back to the end_url.
Task overview: Protecting ADF-coded applications with Access Manager
1. Review "About Centralized Logout Processing for Applications Coded to Oracle
ADF Standards".
2. Protect the ADF-coded application using either an:
■11g Webgate
■10g Webgate
3. Perform the single extra configuration step for ADF-coded applications: configure
the OAMSSOProvider as described in "Configuring Centralized Logout for
ADF-Coded Applications with Access Manager" on page A-8.
4. Perform logout configuration steps for your chosen Webgate version.
A.3.1 About Centralized Logout Processing for Applications Coded to Oracle ADF
Standards
ADF-coded applications refer to either applications that have been fully integrated
with ADF or those that simply use ADF Authentication Servlet to integrate with OPSS.
See Also: Oracle Fusion Middleware Application Security Guide
Note: For ADF applications, only one extra configuration step is
needed (to configure the OAMSSOProvider for OPSS).

Configuring Centralized Logout for Oracle ADF-Coded Applications
A-8 Administrator's Guide for Oracle Access Management
In this case, logout is initiated when an ADF application causes the invocation of the
logout URI. The following process overview outlines the Access Manager centralized
logout process for applications coded to Oracle ADF standards.
Process overview: Centralized logout for ADF applications with 10g Webgate
1. An ADF application causes the invocation of the following URI.
/<application context root>/adfAuthentication?logout=true&end_url=<any uri>
The
end_url
parameter specifies the URI to which the application returns control
following logout.
2. ADF invokes the configured OPSS SSO provider (OAM in this case) and delegates
the logout functionality to the configured logout URI by redirecting the request to
the logout URI. The
end_url
value is passed as a query string to the logout URI.
For example:
/oamsso/logout.html?end_url=<end_uri>
.
3. The logout URI is invoked on the Webgate front-ending the application.
4. 10g Webgate clears the ObSSOCookie for its domain and loads the logout.html
script.
5. If the
end_url
parameter does not include host:port, the logout.html script gets the
host:port of the local server and constructs the
end_url
parameter as a URL. For
example:
http://serverhost:port/oam/server/logout?end_url=http://my.site.com/
welcome.html
6. Logic in logout.html redirect to the OAM Server. For example:
http://myoamserverhost:port/oam/server/logout?end_url=http://my.site.com/
welcome.html
7. The OAM Server executes logout as follows:
a. Cleans up the session information associated with the user at the server side.
b. Validates the
end_url
and sends a page with callback URLs to the user's
browser.
c. From the callback page, a new request is initiated to a specific URI on each
Webgate. When this request reaches the specific Webgate in the specific
domain, the ObSSOCookie for that domain is cleared.
d. The user is redirected to the
end_url
in the logout script. However, if the
end_
url
parameter is not present, an appropriate message is sent by the OAM
Server.
A.3.2 Configuring Centralized Logout for ADF-Coded Applications with Access
Manager
The following procedure is similar to configuring logout for 10g Webgates, with
specific step for ADF-coded applications. The ADF-coded application must send the
end_url
value to identify where to redirect the user after logout processing. However,
Note: The Logout Callback URL is specified in the expanded (not
short) OAM Agent registration, as described in Table 16–3.

Configuring Centralized Logout for Oracle ADF-Coded Applications
Integrating Oracle ADF Applications with Access Manager SSO A-9
with ADF-coded applications, logout occurs when the application causes the following
URI to be invoked:
/<app context root>/adfAuthentication?logout=true&end_url=<any uri>
Some steps in this procedure require the WebLogic Scripting Tool (WLST): wlst.sh
(Linux) or wlst.cmd (Windows), which you must invoke from the WLST_install_dir.
To configure centralized logout for ADF-coded applications
1. Check with the Administrator to confirm the location of the logout.html script
configured with the agent, which you need in following steps.
2. Configure OPSS for OAM as the SSO provider to update jps-config.xml for the
WebLogic administration domain, as follows:
a. On the computer hosting the Oracle WebLogic Server and the Web application
using Oracle ADF security, locate the Oracle JRF WLST script. For example:
cd $ORACLE_HOME/oracle_common/common/bin
b. Connect to the computer hosting the Oracle WebLogic Server, enter the
Administrator ID and password, and the host and port of the WebLogic
AdminServer:
wls:/> /connect('admin_ID', 'admin_pw', 'hostname:port'
For example, the Oracle WebLogic Administration Server host could be
localhost
using port
7001
. However, your environment might be different.
c. Check with the Administrator to confirm the location of the logout.html script
configured with the agent.
In Step d, you must use the value provided by the Administrator. Here,
logouturi
value is the URI of the logout script /logout.html. The value could
either begin with "logout." (exceptions are logout.gif and logout.jpg) or it
could be any other value configured by the Administrator.
d. Enter the loginuri for ADF authentication and the logouturi (location of the
logout.html script configured with the agent); the host and port are not
needed.
wls:/>addOAMSSOProvider(loginuri="/${app.context}/adfAuthentication",
logouturi="/oamsso/logout.html", autologinuri="/obrar.cgi")
Here, loginuri=/${app.context}/adfAuthentication; logouturival is the URI of
the logout script /logout.html. The logouturl could either begin with "logout"
(exceptions are logout.gif and logout.jpg) or it could be any other value
configured by the Administrator.
3. Required: The ADF application must pass the end_url parameter indicating where
to redirect the user after logout, as follows:
Note: The Applcore f/w could facilitate triggering of the above URL
and the ADF application could leverage that.
See Also:
■"Using Custom WLST Commands" in the Oracle Fusion
Middleware WebLogic Scripting Tool Command Reference

Confirming Application-Driven Authentication During Runtime
A-10 Administrator's Guide for Oracle Access Management
If the
end_url
parameter does not include host:port, the logout.html script gets the
host:port of the local server and constructs the
end_url
parameter as a URL. For
example:
http://serverhost:port/oam/server/logout?end_url=http://serverhost:port/
welcome.html
4. 11g Webgate: Perform steps in "Configuring Centralized Logout for 11g Webgates"
on page 22-4.
5. 10g Webgate: Perform steps in "Configuring Centralized Logout for 10g WebGate
with 11g OAM Servers" on page 25-22.
A.4 Confirming Application-Driven Authentication During Runtime
As mentioned earlier in this chapter, it is the application that triggers authentication
and redirects the user to be authenticated by the appropriate solution. For instance,
when the application determines that a user is accessing a part of a secured artifact
that requires authentication application-driven authentication is triggered, in this case
using Access Manager SSO.
To confirm application-driven authentication during run time
1. Create the application based on the Oracle ADF framework.
2. Configure the Access Manager SSO Security provider, as described in "Integrating
Access Manager With Web Applications Using Oracle ADF Security and the OPSS
SSO Framework" on page A-3.
3. Access the protected field and confirm that the application triggers authentication.
See Also: "Scenario: Identity Propagation with the Access Manager
Token" on page 35-2 for details about setting up providers for Access
Manager Identity Assertion.

B
Internationalization and Multibyte Data Support for 10g WebGates B-1
B
Internationalization and Multibyte Data
Support for 10g WebGates
The information here might be of interest if you are using 10g WebGates:
■Introduction to Internationalization and Multibyte Data Support
B.1 Introduction to Internationalization and Multibyte Data Support
Access Manager provides multi-lingual applications and software products that can be
accessed and run anywhere simultaneously, without modification, while rendering
content in the native user's language and locale preferences.
A locale is the linguistic and cultural environment in which a system or program is
running; data associated with a locale provides support for formatting and parsing of
dates, times, numbers, currencies, and the like based on the linguistic and cultural
requirements that corresponds to a given language and country.
Oracle product globalization is a two part process that includes internationalization
and localization. Internationalization (sometimes shortened to "I18N", meaning "I -
eighteen letters -N") requires that software products and applications must be usable
on a computer running any supported operating system (in any supported language),
with non-US keyboards or other country-specific hardware. Oracle applications do not
have hard-coded dependencies on language strings, and inter-operate with non-US
versions of other products. Oracle applications can handle multibyte characters and
differences in a distributed environment, and also being able to detect the user's
desired locale. Access Manager meets these requirements and conforms to Unicode
Standard 4.0.
Localization includes translation of separated file text. In Oracle products, information
is presented in a manner that is consistent with the user's local cultural conventions,
including data formatting, collation, currency, date, time, and directionality of text
(right-to-left or left-to-right), as discussed next.
For more information, see:
■Languages For Localized Messages
■Bi-directional Language Support
■UTF-8 Encoding
B.1.1 Languages For Localized Messages
Translatable information can be categorized into two types: end-user information
(accessible to all users) and administrative information (for users with Administrator
privileges). When you install Oracle Access Manager 10.1.4 without a Language Pack,

Introduction to Internationalization and Multibyte Data Support
B-2 Administrator's Guide for Oracle Access Management
English is the default language for Administrators and end users. When you install
10.1.4 with Oracle-provided Language Packs, you can choose the language to be used
as the default for Administrative activities. Regardless of the default Administrator
language you choose during installation, English is always installed.
For end-users, the display of static application data is provided in the End Users
languages identified in Table B–1: error messages, and display names for tabs, panels,
and properties. Administrative information can be displayed in only the
Administrators languages listed in Table B–1. If administrative pages are requested in
any other language (by the browser setting), the language that was selected as the
default during product installation is used to display the pages.
Note: Messages added for minor releases (10g (10.1.4.2.0) and 10g
(10.1.4.3) as a result of new functionality might not be translated and
can appear in only English.
Table B–1 Languages for Localized Messages
Language Tag for Installation
Directory End User Information Administrators
en-us English English
ar-ar Arabic
pt-br Brazilian Portuguese Brazilian Portuguese
fr-ca Canadian French
cs-cs Czech
da-dk Danish
nl-nl Dutch
fi-fi Finnish
fr-fr French French
de-de German German
el-gr Greek
he-il Hebrew
hu-hu Hungarian
it-it Italian Italian
ja-jp Japanese Japanese
ko-kr Korean Korean
es-mx Latin American Spanish
no-no Norwegian
pl-pl Polish
pt-pt Portuguese
ro-ro Romanian
ru-ru Russian
zh-cn Simplified Chinese Simplified Chinese
sk-sk Slovak

Introduction to Internationalization and Multibyte Data Support
Internationalization and Multibyte Data Support for 10g WebGates B-3
B.1.2 Bi-directional Language Support
Most Western languages are written left to right (LTR), from the top of the page to the
bottom. East Asian languages are usually written top to bottom, from the right side of
the page to the left (RTL)—although exceptions are frequently made for technical
books translated from Western languages.
Some languages, such as Hebrew and Arabic, are written and read predominantly
from right to left. Numbers reverse direction in Arabic and Hebrew. While the text is
written right to left, numbers within the sentence are written left to right with the most
significant digit on the left, as in European and other LTR languages.
When LTR languages are mixed in with RTL languages, the complete document or
content is considered bi-directional. Access Manager can support bi-directional
languages. If the browser on the host computer is configured to use any bi-directional
language, then Access Manager handles it properly.
To provide support for multiple languages and bi-directional languages, Access
Manager 10.1.4 supports the Unicode standard for encoding.
B.1.3 UTF-8 Encoding
UTF-8 encoding and support is provided automatically, whether you have a new
10.1.4 installation or upgrade an older installation to Access Manager. You do not need
to make any changes to your environment. As with previous releases, data in the
directory server is stored with UTF-8 encoding.
es-es Spanish/Spain Spanish
sv-sv Swedish
th-th Thai
zh-tw Traditional Chinese Traditional Chinese
tr-tr Turkish
Note: No administrative languages require bi-directional support.
Note: Writing direction does not affect the encoding of a character.
Regardless of the writing direction, Oracle stores data in logical
order—the order used by someone typing a language—rather than the
order in which it is presented on the screen.
Note: All of your directory data is UTF-8 format. Access Manager
does not support a mix of data types in the directory.
Table B–1 (Cont.) Languages for Localized Messages
Language Tag for Installation
Directory End User Information Administrators

Introduction to Internationalization and Multibyte Data Support
B-4 Administrator's Guide for Oracle Access Management

C
Securing Communication C-1
C
Securing Communication
This appendix provides the information and steps required to ensure that OAM
Servers and clients (OAM Agents) can communicate securely across the Access
Protocol channel. This chapter provides the following details:
■Prerequisites
■Securing Communication Between OAM Servers and WebGates
■Generating Client Keystores for OAM Tester in Cert Mode
■Configuring Cert Mode Communication for Access Manager
■Configuring Simple Mode Communication with Access Manager
C.1 Prerequisites
If OAM Server mode is Cert mode, agents must use Cert mode. During agent
registration, at least one OAM Server instance must be running in the same mode as
the agent. After agent registration, you can change the mode of the OAM Server.
C.2 Securing Communication Between OAM Servers and WebGates
Securing communication between OAM Servers and clients (WebGates) means
defining the transport security mode for the NAP (also known as the OAP) channel
within the component registration page. The security level for the channel is specified
as either:
■Open: Un-encrypted communication
In Open mode, there is no authentication or encryption between the WebGate and
OAM Server. The WebGate does not ask for proof of the OAM Server's identity
and the OAM Server accepts connections from all WebGates. Use Open mode if
communication security is not an issue in your deployment.
■Simple: Encrypted communication through the Secure Sockets Layer (SSL)
protocol with a public key certificate issued by Oracle.
See Also:
■"About Communication Between OAM Servers and Webgates" on
page 6-4
■Oracle Fusion Middleware Administrator's Guide for details
about the SSL automation tool, managing ports for WebLogic
Server, Oracle HTTP Server, and Oracle Fusion Middleware
Securing Communication Between OAM Servers and WebGates
C-2 Administrator's Guide for Oracle Access Management
Use Simple mode if you have some security concerns, such as not wanting to
transmit passwords as plain text, but you do not manage your own Certificate
Authority (CA). In this case, OAM Servers and WebGates use the same certificates,
issued and signed by Oracle CA. For more information, see "About Simple Mode,
Encryption, and Keys" on page C-13.
■Cert: Encrypted communication through SSL with a public key certificate issued
by a trusted third-party certificate authority (CA).
Use Cert mode if you want different certificates on OAM Servers and WebGates
and you have access to a trusted third-party CA. In this mode, you must encrypt
the private key using the DES algorithm. Access Manager components use X.509
digital certificates in PEM format only. PEM refers to Privacy Enhanced Mail,
which requires a passphrase. The PEM (Privacy Enhanced Mail) format is
preferred for private keys, digital certificates, and trusted certificate authorities
(CAs). The preferred keystore format is the JKS (Java KeyStore) format. For more
information, see "About Cert Mode Encryption and Files" on page C-6.
Figure C–1 illustrates the communication channels used by OAM Servers and
WebGates during user authentication and authorization. Logically the request is to the
Access Manager credential collector. However, when you have a Web server proxy in
front of the WebLogic AdminServer, with a <LocationMatch "/*">, all requests are
routed through the proxy. In this case, there is perimeter defense using the proxy.
Figure C–1 Communication Channels for OAM Servers and WebGates
See Also: "About Certificates, Authorities, and Encryption Keys" on
page C-3

Securing Communication Between OAM Servers and WebGates
Securing Communication C-3
Process overview: Authentication and authorization
1. Request is intercepted by WebGate.
2. Authentication (credential collection) occurs over HTTP(s) channel.
3. Authorization occurs over the NAP channel with OAM Agents only (not mod_
osso).
Using the secure-sockets layer (SSL) protocol helps prevent eavesdropping and
successful man-in-the-middle attacks across the HTTP (HTTPS) channel. The SSL
protocol is included as part of most Web server products and Web browsers. SSL uses
the public-and-private key encryption system, which includes the use of a digital
certificate. For details about enabling SSL communication for a Web server or directory
server, see your vendor's documentation.
The PEM (Privacy Enhanced Mail) format (BASE64-encoded ASCII) is preferred for
private keys, digital certificates, and trusted certificate authorities (CAs). The preferred
keystore format for OAM Servers is JCEKS and for OAM Clients is JKS (Java KeyStore)
format. Access Manager components use X.509 digital certificates in DER (binary form
of a certificate) format only.
For more information, see:
■About Certificates, Authorities, and Encryption Keys
■About Security Modes and X509Scheme Authentication
■About the Importcert Tool
C.2.1 About Certificates, Authorities, and Encryption Keys
Depending on the public key infrastructure, the digital certificate establishes
credentials for Web-based transactions based on:
■Certificate owner's name
■Certificate serial number
■Certificate expiration date
■A copy of the certificate holder's public key, which is used to encrypt messages
and digital signatures
■The digital signature of the certificate-issuing authority is provided so that a
recipient can verify that the certificate is real
Digital certificates can be stored in a registry from which authenticating users can look
up the public keys of other users.
In cryptography, a public key is a value provided by a designated authority to be used
as an encryption key. The system for using public keys is called a public key
infrastructure (PKI). As part of a public key infrastructure, a certificate authority
checks with a registration authority (RA) to verify information provided by the
requestor of a digital certificate. When the RA verifies the requestor's information, the
CA can issue a certificate.
Private keys can be derived from a public key. Combining public and private keys is
known as asymmetric cryptography, which can be used to effectively encrypt
messages and digital signatures.

Securing Communication Between OAM Servers and WebGates
C-4 Administrator's Guide for Oracle Access Management
C.2.2 About Security Modes and X509Scheme Authentication
Administrators must ensure that the OAM Server is reachable only over the transport
specified in the OAM Server configuration. OAM Server configuration defines the end
points for the Server and accounts for the deployment of load balancers or reverse
proxies. When the OAM Server is reachable over both HTTP and HTTPS, all requests
(over either transport) are accepted.
To allow the user to interact with the OAM Server (and logout) over SSL with
non-X509 authentication schemes, the specified Server Port must not be configured to
require CLIENT CERTS.
With the X509 authentication scheme (X509Scheme), the OAM Server SSL Port must
differ from the Server Port, and must be configured to require Client Certificates.
When X509Scheme is used, the X509 module is called after credential collection.
X509Scheme requires the X509 challenge method and the X509 authentication module.
The fully-qualified URL to the credential collector must be specified as the Challenge
URL within X509Scheme. For example:
https://managed_server_host:managed_
server_ssl_port/oam/CredCollectServlet/X509
C.2.3 About the Importcert Tool
Administrators use the Oracle-provided
importcert
tool for several different
procedures related to keystores, keys, and certificates. Table C–1 provides the syntax
for
importcert
commands.
See Also:
■"About Cert Mode Encryption and Files" on page C-6
■"About Simple Mode, Encryption, and Keys" on page C-13
Note: If a relative Challenge URL is specified with X509Scheme, the
OAM Server uses the specified Server Host/Port to construct the
fully-qualified URL of the X509 Credential Collector. However, this
configuration will not work.
See Also: "Managing SSO Tokens and IP Validation" on page 14-5
Table C–1 importcert Command Syntax
Option Description
keystore Follow this command with the path to an existing (or new)
keystore. For example:
/scratch/.oamkeystore
or
/scratch/clientKey.jks
privatekeyfile Follow this option with the path to your private key. For
example:
/scratch/aaa_key.der
signedcertfile Follow this option with the path to your signed certificate. For
example:
/scratch/aaa_cert.der

Generating Client Keystores for OAM Tester in Cert Mode
Securing Communication C-5
C.3 Generating Client Keystores for OAM Tester in Cert Mode
This section is required to generate JKS keystores to be used with OAM Tester in Cert
mode only. Otherwise, you can skip this section.
This section describes how to use importcert commands to generate client keystores
for OAM Tester in Cert mode to contain the imported trusted certificate chain.
To generate client keystores for OAM Tester in Cert mode
1. Use ImportCert tool to create JKS keystores (file name specified by -privatekeyfile
and -signedcertfile). For example:
- java -cp importcert.jar
oracle.security.am.common.tools.importcerts.CertificateImport -keystore
<Keystore path> -privatekeyfile <Private key file> -signedcertfile <Signed
alias Follow this option with your keystore entry alias. Required with
genkeystore.:
alias
storetype Follow this option with your keystore type. By default, the store
type is JCEKS (OAM Server keystore). For example:
Server keystore .oamkeystore, of type:
JCEKS
Client keystore/scratch/clientTrustStore.jks and
/scratch/clientKey.jks can be used. Both are type:
JKS
genkeystore This flag is required for generating OAM client certificates. The
client does not expose the alias and alias password parameters.
However, importcert tool sets the keystore password as the alias
password.
Specify:
Yes or No
Yes imports the certificates in a new keystore.
No imports certificates into an existing keystore.
Sample for OAM Server
- java -cp importcert.jar
oracle.security.am.common.tools.importcerts.Certificate
Import -keystore <path to .oamkeystore> -privatekeyfile
<path to aaa_key.der> -signedcertfile <path to aaa_
cert.der> -alias oam.certmode -aliaspassword <password>
-storetype <JCEKS> genkeystore <yes>
Enter the keystore password and alias password when
prompted.
Sample for OAM Client
See Also "Generating Client
Keystores for OAM Tester in
Cert Mode"
- java -cp importcert.jar
oracle.security.am.common.tools.importcerts.Certificate
Import -keystore <path to clientkey.JKS>
-privatekeyfile <path to aaa_key.der> -signedcertfile
<path to aaa_cert.der> -storetype <JKS> genkeystore
<yes>
Enter the keystore password when prompted.
See Also: "About the Importcert Tool" on page C-4
Table C–1 (Cont.) importcert Command Syntax
Option Description

Configuring Cert Mode Communication for Access Manager
C-6 Administrator's Guide for Oracle Access Management
certificate file> path -storetype <JKS> genkeystore <yes>
Enter the keystore password when prompted.
2. Proceed as needed for your environment:
■Configuring Cert Mode Communication for Access Manager
■Configuring Simple Mode Communication with Access Manager
3. Remove a Keystore: Use the following command to remove the JKS keystore. For
example:
keytool -delete -alias <alias> -keystore <path to clientkey.JKS> -storetype
<JKS>
Enter the keystore password when prompted.
C.4 Configuring Cert Mode Communication for Access Manager
This section describes how to configure Cert mode communication for Access
Manager. The following tasks apply to Cert mode only.
Prerequisites
During agent registration, at least one OAM Server instance must be running in the
same mode as the agent. Otherwise, registration fails. After agent registration,
however, you could change the communication mode of the OAM Server.
Task overview: Adding certificates for the OAM Server includes
1. Reviewing:
■Securing Communication Between OAM Servers and WebGates
■About Cert Mode Encryption and Files
2. Generating a Certificate Request and Private Key for OAM Server
3. Retrieving the OAM Keystore Alias and Password
4. Importing the Trusted, Signed Certificate Chain Into the Keystore
5. Adding Certificate Details to Access Manager Settings
6. Generating a Private Key and Certificate Request for WebGates
7. Updating WebGate to Use Certificates
C.4.1 About Cert Mode Encryption and Files
The certificate request for WebGate generates the request file aaa_req.pem, which you
must send to a root CA that is trusted by the OAM Sever. The root CA returns the
certificates, which can then be installed either during or after 10g WebGate installation
(for 11g WebGate these must be copied to the WebGate instance area manually after
WebGate installation and configuration).
■aaa_key.pem (reserved name for WebGate key file, which cannot be changed)
Note: In Simple mode, the bundled Access Manager-CA-signed
certificates are used and most of the following tasks are not needed.

Configuring Cert Mode Communication for Access Manager
Securing Communication C-7
■aaa_cert.pem (reserved name for WebGate certificate file, which cannot be
changed)
■aaa_chain.pem (reserved name for CA Cert for WebGate side)
During component installation in Cert mode, you are asked to present a certificate
obtained from an external CA. If you do not yet have a certificate you can request one.
Until you receive the certificate, you can configure the WebGate in Simple mode.
However, you cannot complete OAM deployment until the certificates are issued and
installed.
If you choose Cert mode when registering WebGate as an OAM Agent, a field appears
where you can enter the Agent Key Password. When editing an 11g WebGate
registration, password.xml is updated only when the mode is changed from Open to
Cert or Simple to Cert. In cert mode, once generated, password.xml cannot be
updated. Editing the agent Key Password does not result in creation of a new
password.xml.
You must create a Cert request and send that to the CA. When the certificate is
returned you must import it to the OAM Server (or copy it to the WebGate).
C.4.2 Generating a Certificate Request and Private Key for OAM Server
Use the following procedure to retrieve the private key, certificate, and CA certificate
for the OAM Server.
To retrieve the private key and certificates for OAM Server
1. Generate both the certificate request (aaa_req.pem) and Private Key (aaa_key.pem)
as follows:
–OpenSSL req –new –keyout aaa_key.pem –out aaa_req.pem –utf8
-nodes -config openssl_silent_ohs11g.cnf
2. Submit the certificate request (aaa_req.pem) to a trusted CA.
3. Download the CA Certificate in base64 as aaa_chain.pem.
4. Download the Certificate in both base64 and DER format as aaa_cert.pem and
aaa_cert.der.
5. Encrypt the private key (aaa_key.pem) using a password as follows:
openssl rsa -in aaa_key.pem -passin pass: -out aaa_key.pem -passout pass:
******** -des
6. Proceed to "Retrieving the OAM Keystore Alias and Password".
C.4.3 Retrieving the OAM Keystore Alias and Password
Users with valid Administrator credentials can perform the following task to retrieve
the alias of the certificate in the specified keystore to be used for authentication, and
the password that is required to import a certificate.
Note: The certified tool to maintain consistency between 10g and 11g
registration, is openSSL. Oracle recommends that you use openSSL
rather than other tools to generate certificates and keys in PEM
format.

Configuring Cert Mode Communication for Access Manager
C-8 Administrator's Guide for Oracle Access Management
To retrieve the OAM Keystore password
1. Confirm the Oracle Access Management Console is running.
2. On the computer hosting the Oracle Access Management Console, locate the
WebLogic Scripting Tool in the OAM Installation path to use when retrieving the
keystore password. For example:
$ORACLE_IDM_HOME/common/bin/
Here, $ORACLE_IDM_HOME is the base installation directory; /common/bin is
the path in which the scripting tool is located.
3. Start the WebLogic Scripting Tool:
·/ wlst.sh
4. In the WLST shell, enter the command to connect and then enter the requested
information. For example:
wls:/offline> connect()
Please enter your username [weblogic] :
Please enter your password [welcome1] :
Please enter your server URL [t3://localhost:7001] :
wls:/base_domain/serverConfig>
5. Enter the following command to change the location to the read-only
domainRuntime tree (For help, use help(domainRuntime)). For example:
wls:/OAM_AC> domainRuntime()
6. Enter the following command to list the credentials for the OAM keystore. For
example:
wls:/OAM_AC/domainruntime> listCred(map="OAM_STORE",key="jks")
Here, OAM_STORE represents the name of the Keystore used by Access Manager.
7. Pay close attention to the password of the OAM Keystore that is displayed because
this is required to import the certificates.
8. Proceed to "Importing the Trusted, Signed Certificate Chain Into the Keystore".
C.4.4 Importing the Trusted, Signed Certificate Chain Into the Keystore
The Oracle-provided importcert tool is used to import existing private key, signed
certificate (public key) files into the specified keystore format: JKS (client keystore
format) or JCEKS (OAM Server keystore format; .oamkeystore for instance.).
The keystores associated with Access Manager accepts only PKCS8 DER format
certificates:
■If you have PEM format certificates signed by your certificate authority (CA), the
following procedure describes how to convert and then import these using the
importcert
shipped with Access Manager.
■If PEM format certificates are not available, create a certificate request and have it
signed by your CA before beginning the following procedure.
Following are the steps for using the JDK version 6 keytool. If you have a different
version of keytool, refer the documentation for your JDK version.

Configuring Cert Mode Communication for Access Manager
Securing Communication C-9
Prerequisites
Retrieving the OAM Keystore Alias and Password
To import the trusted certificate chain into the keystore
1. Locate the keytool in the following path:
$MW_HOME/jdk160_18/bin/keytool
2. Unzip importcert.zip and locate the Readme file in the following location:
$ORACLE_IDM_HOME/oam/server/tools/importcert/README
3. aaa_chain.pem: Using a text editor, modify the aaa_chain.pem file to remove all
data except that which is contained within the CERTIFICATE blocks, then save the
file.
----BEGIN CERTIFICATE-----
...
CERTIFICATE
...
-----END CERTIFICATE-----
4. Import the trusted certificate chain using the following command with details for
your environment. For example:
keytool -importcert -file aaa_chain.pem -trustcacerts -storepass <password>
-keystore $ORACLE_HOME\user_projects\domains\$DOMAIN\config\fmwconfig\
.oamkeystore -storetype JCEKS
5. When prompted to trust this certificate, type
yes
.
6. aaa_cert.pem:
a. Edit aaa_certn.pem using TextPad to remove all data except that which is
contained within the CERTIFICATE blocks, and save the file in a new location
to retain the original. For example:
----BEGIN CERTIFICATE-----
...
CERTIFICATE
...
-----END CERTIFICATE-----
b. Enter the following command to convert the signed certificate (aaa_cert.pem)
to DER format using openSSL or any other tool. For example:
openssl x509 -in aaa_cert.pem -inform PEM -out aaa_cert.der -outform DER
7. aaa_key.pem:
a. Edit aaa_key.pem to remove all data except that which is contained within the
CERTIFICATE blocks, and save the file in a new location to retain the original.
For example:
Note: When you use the keytool utility, the default key pair
generation algorithm is Digital Signature Algorithm (DSA). However,
Oracle Access Management and WebLogic Server do not support DSA
and you must specify another key pair generation and signature
algorithm.

Configuring Cert Mode Communication for Access Manager
C-10 Administrator's Guide for Oracle Access Management
----BEGIN CERTIFICATE-----
...
CERTIFICATE
...
-----END CERTIFICATE-----
b. Enter the following command to convert the private key (aaa_key.pem) to
DER format using openSSL or any other tool. For example:
openssl pkcs8 -topk8 -nocrypt -in aaa_key.pem -inform PEM -out aaa_key.der
-outform DER
8. Import signed DER format certificates into the keystore. For example:
a. Import aaa_key.der using the following command line arguments and details
for your environment. For example:
c:\Middleware\idm_home\oam\server\tools\importcert
- java -cp importcert.jar
oracle.security.am.common.tools.importcerts.CertificateImport
-keystore <> -privatekeyfile <path> -signedcertfile <path>
-alias [ -storetype <> genkeystore <> -help]
9. Proceed to "Adding Certificate Details to Access Manager Settings".
C.4.5 Adding Certificate Details to Access Manager Settings
After importing the certificates into the keystore, you must add the alias and password
that you specified earlier into Access Manager settings configuration in Oracle Access
Management Console, as described here.
Prerequisites
Importing the Trusted, Signed Certificate Chain Into the Keystore
To add certificate details to Access Manager Settings
1. From the Oracle Access Management Console, click the System Configuration tab.
2. From the System Configuration tab, Access Manager section, open the Access
Manager Settings page.
3. Expand the Access Protocol section of the page, if needed.
4. Fill in the alias and alias password details acquired in the previous procedure. For
example:
Note: Enter the key store password and alias password when
prompted. On a Windows system, use a semicolon (;) instead of a
colon (:) in the command line.
Note: No explicit configuration is needed for Simple mode, which is
provided out of the box.
See Also:
■"Managing the Access Protocol for OAM Proxy Simple and Cert
Mode Security" on page 14-6

Configuring Cert Mode Communication for Access Manager
Securing Communication C-11
Cert Mode Configuration
PEM keystore Alias:
my_keystore_alias
PEM keystore Alias Password:
my_keystore_alias_pw
5. Click Apply to save the configuration.
6. Close the page.
7. Open the OAM Server registration page, click the Proxy tab, change the Proxy
mode to Cert, and click Apply.
8. Restart the OAM Server.
9. Proceed to "Generating a Private Key and Certificate Request for WebGates".
C.4.6 Generating a Private Key and Certificate Request for WebGates
Use the following procedure to retrieve the private key, certificate, and CA certificate
for the WebGate.
To retrieve the private key and certificates for WebGates
1. Generate both the certificate request (aaa_req.pem) and Private Key (aaa_key.pem)
as follows:
openssl req -new -keyout aaa_key.pem -out aaa_req.pem -utf8 -nodes
2. Submit the certificate request (aaa_req.pem) to a trusted CA.
3. Download the CA Certificate in base64 as aaa_chain.pem.
4. Download the Certificate in base64 format as aaa_cert.pem.
5. Encrypt the private key (aaa_key.pem) using a password as follows:
openssl rsa -in aaa_key.pem -passin pass: -out aaa_key.pem -passout pass:
******** -des
6. Proceed to "Updating WebGate to Use Certificates".
C.4.7 Updating WebGate to Use Certificates
For all communication modes (Open, Simple, or Cert), the Agent registration should
be updated from the Oracle Access Management Console:
■Registering an Agent: If you choose Cert mode when registering an OAM Agent, a
field appears where you can enter the Agent Key Password.
■Editing/Updating an Agent: When editing an 11g WebGate registration,
password.xml is updated only when the mode is changed from Open to Cert or
Simple to Cert.
Editing the agent Key Password does not result in creation of a new
password.xml. In Cert mode, once generated, password.xml cannot be updated.
Note: The certified tool to maintain consistency between 10g and 11g
registration, is openSSL. Oracle recommends that you use openSSL
rather than other tools to generate certificates and keys in PEM
format.

Configuring Cert Mode Communication for Access Manager
C-12 Administrator's Guide for Oracle Access Management
Prerequisites
Adding Certificate Details to Access Manager Settings
To update the communication mode in the WebGate Agent registration
1. From the System Configuration tab, Access Manager section, expand the SSO
Agents node, and expand OAM Agents.
2. On the Search page, define your criteria and open the desired agent registration, as
described in "Searching for an OAM Agent Registration" on page 16-20.
3. On the agent's registration page, locate the Security options and click Cert (or
Simple).
4. Cert Mode: Enter the Agent key Password as specified in Step 5 of "Generating a
Private Key and Certificate Request for WebGates".
5. Click Apply to submit the changes.
6. Copy your updated WebGate files as follows:
11g WebGate:
ObAccessClient.xml
cwallet.sso (11g WebGate only)
password.xml
■From: $IDM_DOMAIN_HOME/output/AGENT_NAME
■To: $OHS_INSTANCE_HOME/config/OHS/ohs2/webgate/config
10g WebGate: ObAccessClient.xml
■From: $WLS_DOMAIN_HOME/output/AGENT_NAME
■To: $WebGate_install_dir/oblix/lib
10g WebGate: password.xml
■From: $WLS_DOMAIN_HOME/output/AGENT_NAME
■To: $WebGate_install_dir/oblix/config
7. Copy the following files that were created when "Generating a Certificate Request
and Private Key for OAM Server":
11g WebGate:
■From:
aaa_key.pem: WebGate11g_home/webgate/ohs/tools/openssl
aaa_cert.pem: The location where this was saved after receiving from CA
aaa_chain.pem: The location where this was saved after receiving from CA
■To: OHS_INSTANCE_HOME/config/OHS/ohs2/webgate/config
10g WebGate:
■From:
aaa_key.pem: The location where the private key file was generated
aaa_cert.pem: The location where this was saved after receiving from CA
aaa_chain.pem: The location where this was saved after receiving from CA
■To: $WebGate_install_dir/oblix/config
8. Restart the OAM Server and the Oracle HTTP Server instance.

Configuring Simple Mode Communication with Access Manager
Securing Communication C-13
C.5 Configuring Simple Mode Communication with Access Manager
The transport security communication mode is chosen during OAM installation. In
Simple mode, the installer generates a random global passphrase initially, which can
be edited as required later.
When you register an OAM Agent or a new OAM Server, you can specify the Security
mode. However, changing the global passphrase requires that you reconfigure all
agents to use the mode and the new global passphrase.
The agent mode can be higher but not lower. The highest level of security is Cert
mode, the lowest is Open mode:
Cert mode Simple mode Open mode
This section provides the information you need to configure Simple mode
communication.
Task overview: Configuring Simple mode communication includes
1. Reviewing:
■"About Simple Mode, Encryption, and Keys"
■"About the Importcert Tool"
2. Retrieving the Global Passphrase for Simple Mode
3. Updating WebGate Registration for Simple Mode
4. Verifying Simple Mode Configuration
C.5.1 About Simple Mode, Encryption, and Keys
For Simple mode encryption, Access Manager includes a certificate authority with its
own private key, which is installed across all WebGates and OAM Servers. During
installation, the OAM Server generates and saves the private-public keypair for the
server. Similarly, for the OAM agent, an Oracle certificate authority is installed with
the agent installation.
The installer generates a random global passphrase initially, which can be edited or
viewed as needed. When an agent is registered in SIMPLE mode, the following client
certificates are generated to be consumed by clients:
■aaa_key.pem: Contains private key
■aaa_cert.pem: Signed certificate
■password.xml: Contains the random global passphrase in obfuscated format
Note: Communication between the agent and server works when the
WebGate mode matches (or is higher) than the OAM Server mode.
Note: During agent registration, at least one OAM Server instance
must be running in the same mode as the agent. Otherwise,
registration fails. After agent registration, however, you could change
the communication mode of the OAM Server.

Configuring Simple Mode Communication with Access Manager
C-14 Administrator's Guide for Oracle Access Management
C.5.2 Retrieving the Global Passphrase for Simple Mode
Access Manager generates a random global passphrase for Simple mode
communication during installation. The following procedure describes how to retrieve
this password.
To retrieve the random global passphrase for Simple mode communication
1. Ensure that the Oracle Access Management Console is running.
2. On the computer hosting the Oracle Access Management Console, locate the
WebLogic Scripting Tool in the following path. For example:
$ORACLE_IDM_HOME/common/bin
Where $ORACLE_IDM_HOME represents the base installation directory path;
/common/bin is the path wherein the scripting tool is located.
3. Start the WebLogic scripting tool. For example, on a Unix system:
./ wlst.sh
4. In the WLST shell, enter the command to connect and then enter the requested
information. For example:
wls:/offline> connect()
Please enter your username [weblogic] :
Please enter your password [weblogic] :
Please enter your server URL [t3://localhost:7001] :
wls:/base_domain/serverConfig>
5. Enter the following command to change the location to the read-only
domainRuntime tree (for help, use help(domainRuntime)). For example:
wls:/OAM_AC>domainRuntime()
6. View the global passphrase by entering the following command. For example:
wls:/OAM_AC> displaySimpleModeGlobalPassphrase()
7. Proceed to "Updating WebGate Registration for Simple Mode".
C.5.3 Updating WebGate Registration for Simple Mode
Artifacts generated for Simple Security mode use the Global Pass phrase and any
change must be propagated to WebGates.
To update an existing WebGate registration for Simple mode, you can delete the
WebGate registration using the Oracle Access Management Console, then re-register it
(specifying Simple mode and disabling the automatic generation of policies).
Alternatively, you can edit the WebGate registration and then copy the artifacts as
described here.
Note: Changing the global passphrase requires reconfiguring all
agents that are already configured in Simple mode.
See Also:
■"Viewing or Editing an OAM Agent Registration Page in the
Console" on page 16-22

Configuring Simple Mode Communication with Access Manager
Securing Communication C-15
To update the WebGate registration for Simple mode
1. From the System Configuration tab, Access Manager section, expand the SSO
Agents node, then expand OAM Agents.
2. On the Search page, define your criteria and open the desired agent registration, as
described in "Searching for an OAM Agent Registration" on page 16-20.
3. In the registration page, locate the Security options and click Simple.
4. Click Apply to submit the changes.
5. Copy the updated WebGate files as follows:
11g WebGate:
ObAccessClient.xml
cwallet.sso (11g WebGate only)
password.xml
■From: $WLS_DOMAIN_HOME/output/AGENT_NAME (the WebLogic
domain home where the OAM AdminServer is installed)
■To: $OHS_INSTANCE_HOME/config/OHS/ohs2/webgate/config
10g WebGate: ObAccessClient.xml
■From: $WLS_DOMAIN_HOME/output/AGENT_NAME
■To: $WebGate_install_dir/oblix/lib
10g WebGate: password.xml
■From: $WLS_DOMAIN_HOME/output/AGENT_NAME
■To: $WebGate_install_dir/oblix/config
6. Copy the following files, as directed for your WebGate release:
aaa_key.pem
aaa_cert.pem
11g WebGate:
■From: $IDM_DOMAIN_HOME/output/AGENT_NAME
■To: $OHS_INSTANCE_
HOME/config/OHS/ohs2/webgate/webgate/config/simple
10g WebGate:
■From: $IDM_DOMAIN_HOME/output/AGENT_NAME
■To: $WebGate_install_dir/oblix/config/simple
7. Restart the OAM Server and the Oracle HTTP Server instance.
C.5.4 Verifying Simple Mode Configuration
You must restart the Web server to instantiate the change to Simple mode. Then you
can validate the results
To validate Simple mode changes
1. From a command-line window, restart the Web server. For example:
d:\middleware\ohs_home\instances\ohs_webgate11g\bin
opmnctl stopall

Configuring Simple Mode Communication with Access Manager
C-16 Administrator's Guide for Oracle Access Management
opmnctl startall
2. In a browser window, enter the URL to a resource protected by the WebGate using
Simple mode.
3. Enter your login credentials, when asked.
4. Confirm that the resource is served.

D
Reviewing Bundled, Generated, and Migrated Artifacts D-1
D
Reviewing Bundled, Generated, and Migrated
Artifacts
[24]
This appendix provides a look at sample artifacts that are either bundled with Access
Manager, or generated during agent registration. This appendix includes the following
sections:
■Bundled 10g IAMSuiteAgent Artifacts
■Generated Artifacts: OpenSSO
■Migrated Artifacts: OpenSSO
D.1 Bundled 10g IAMSuiteAgent Artifacts
This section provides the following topics:
■Pre-Registered 10g IAMSuiteAgent
■IAMSuiteAgent Security Provider Settings, WebLogic Administration Console
■IAMSuiteAgent Registration
■Resources Protected by IAMSuiteAgent
■Pre-seeded IAM Suite Application Domain and Policies
D.1.1 Pre-Registered 10g IAMSuiteAgent
This 10g OAM Agent, and the companion Application Domain, described in
Chapter 20, are available with 11.1.1.5. Oracle strongly recommends that you do not
alter these definitions.
The IAMSuiteAgent provides single sign-on functionality for the IDM Administration
Console. The IAMSuiteAgent is installed and pre-configured as part of the OAM
Server installation and configuration.
The IAMSuiteAgent is a domain-wide agent:
■Once deployed, the IAMSuiteAgent is installed on every server in the domain
■Unless disabled, every request coming into the WebLogic Application Server is
evaluated and processed by the IAMSuiteAgent
Note: The original IDMDomainAgent is not available with this patch
set. It remains as an artifact after you apply the patch set. However, all
content is removed.

Bundled 10g IAMSuiteAgent Artifacts
D-2 Administrator's Guide for Oracle Access Management
■Configuration details are located under the 10g Webgates node (Policy
Configuration tab) in the Oracle Access Management Console
Certain IAMSuiteAgent configuration elements are available in the WebLogic
Administration Console (in the Security Provider section) and others in the Oracle
Access Management Console.
D.1.2 IAMSuiteAgent Security Provider Settings, WebLogic Administration Console
In the Security Provider section of the WebLogic Administration Console are five
bootstrap configuration parameters.
While Oracle recommends that you retain these without making changes, there are
circumstances where you might need to change one of the following parameters:
■Primary Access Server: You can replace this value with information for your actual
OAM Server. The default value (localhost:5575) can be replaced with information
for your actual OAM Server if more than one host is part of the IDM Domain. The
IAM Suite Agent and companion Application Domain (IAMSuite) replaces the
11.1.1.3.0 IDM Domain Agent and its companion Application Domain.
■Agent Password: By default there is no password. However, you can add one here
if you want to establish a password for the IAMSuiteAgent connection to the
OAM Server through the NetPoint (now Oracle) Access Protocol (NAP or OAP).
Figure D–1 illustrates the default Security Provider settings for the IAMSuiteAgent.
Bundled 10g IAMSuiteAgent Artifacts
Reviewing Bundled, Generated, and Migrated Artifacts D-3
Figure D–1 IAMSuiteAgent Settings in the WebLogic Administration Console
D.1.3 IAMSuiteAgent Registration
The IAMSuiteAgent registration page provides details about the agent, like all other
OAM agent registration pages.
■Security Mode: Open is the only security mode available for the IAMSuiteAgent.
This cannot be changed.
■Preferred Host: IAMSuiteAgent is the pre-configured host required by this agent
Figure D–2 shows the IAMSuiteAgent page. Notice the User Defined Parameter, which
informs behavior to fall back to the container policy in the WebLogic Server and
provides a redirect URL for logout.
Note: The Access Client Password here must match the Agent
Password in the WebLogic Administration Console. If you changed
the Agent Password, you must also change the Access Client
Password.
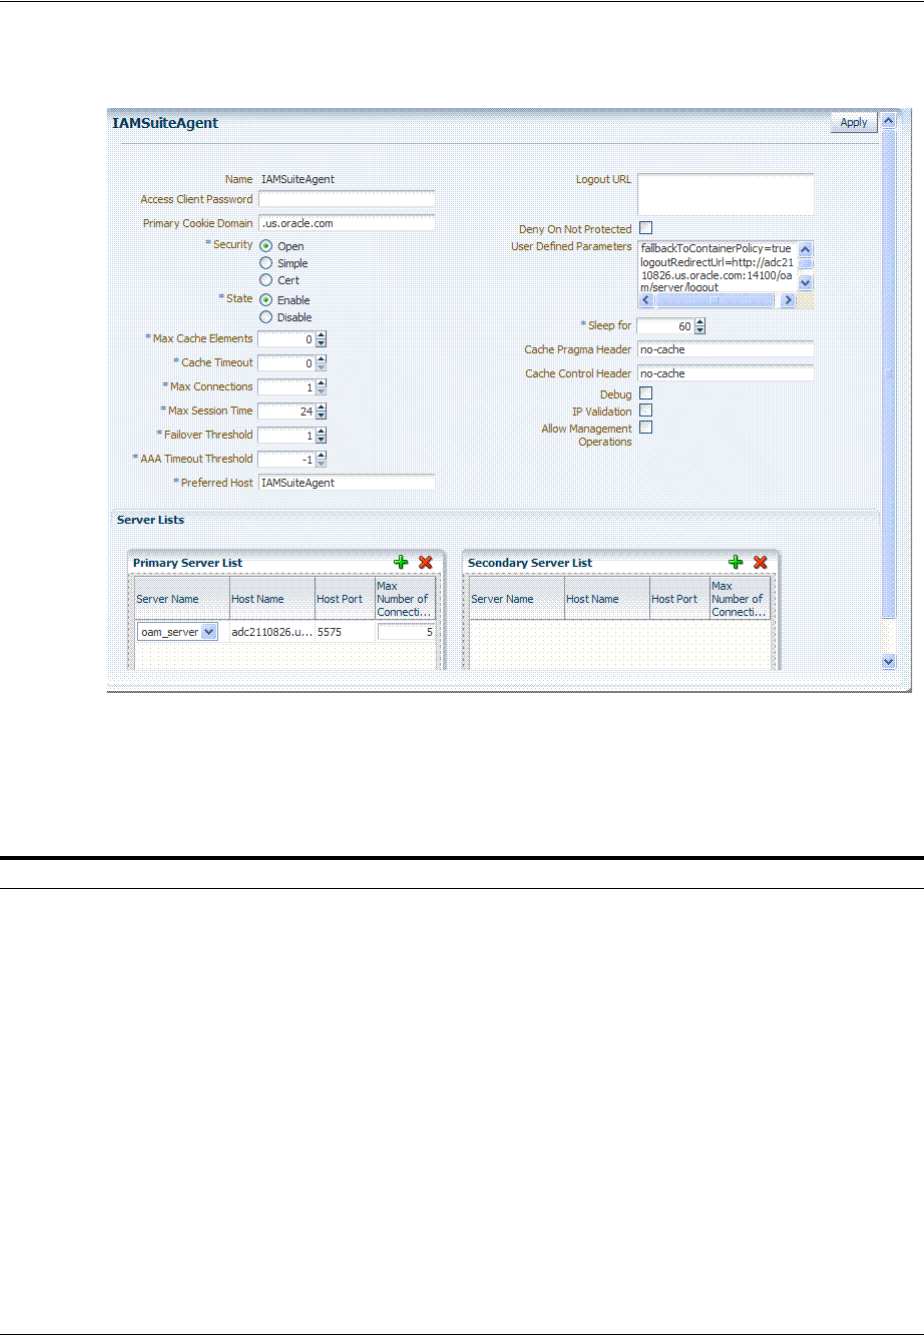
Bundled 10g IAMSuiteAgent Artifacts
D-4 Administrator's Guide for Oracle Access Management
Figure D–2 IAMSuiteAgent Registration
You can replace this agent with a 10g Webgate, as described in Chapter 25,
"Registering and Managing 10g WebGates with Access Manager 11g".
Table D–1 outlines the differences between IAMSuiteAgent and 11g and 10g Webgates.
Table D–1 Comparing IAMSuiteAgent with 11g and 10g Webgates
Element 11g Webgate 10g Webgate IAMSuiteAgent
Primary Cookie Domain N/A x x
Token Validity Period x N/A N/A
Preferred Host x x x
Logout URL x x x
Logout Callback URL x N/A N/A
Logout Redirect URL x N/A N/A
Logout Target URL x N/A N/A
Cache Pragma Header
Cache Control Header
x
x
x
x
x
x
User Defined Parameters
proxySSLHeaderVar=IS_SSL
URLInUTF8Format=true
client_request_retry_
attempts=1
inactiveReconfigPeriod=10
proxySSLHeaderVar=IS_SSL
URLInUTF8Format=true
client_request_retry_
attempts=1
inactiveReconfigPeriod=10
fallbackToContainerPolicy
=true
logoutRedirectUrl=http://
hostname.domain.com:14100
/oam/server/logout
protectWebXmlSecuredPages
Only=true
Deny on Not Protected x x x
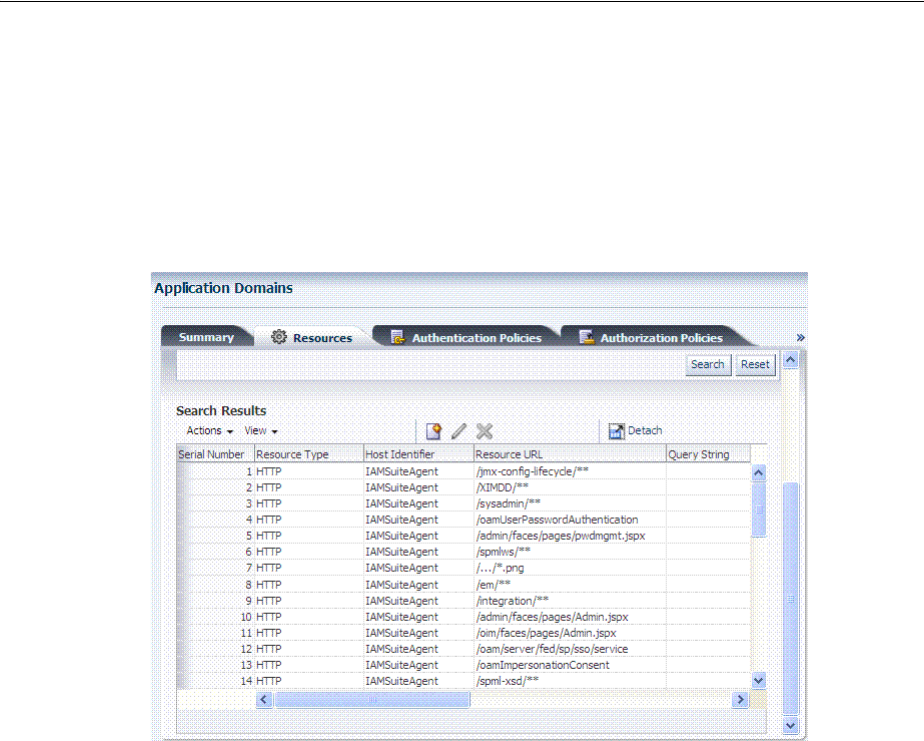
Bundled 10g IAMSuiteAgent Artifacts
Reviewing Bundled, Generated, and Migrated Artifacts D-5
D.1.4 Resources Protected by IAMSuiteAgent
Figure D–3 illustrates the resources protected by the IAMSuiteAgent, including the
exact Authentication and Authorization policies. Oracle recommends that you do not
make any additions or changes. The WebLogic Administration Console (/console) is
protected.
Figure D–3 Resources Protected by the IAMSuiteAgent
D.1.5 Pre-seeded IAM Suite Application Domain and Policies
The following figures present Authentication Policies in the IAM Suite Application
Domain:
■Figure D–4, "IAMSuite Authentication Policy: OAM Admin Console Policy"
■Figure D–5, "Protected HigherLevel Policy: Authentication, LDAP Scheme"
■Figure D–6, "Protected LowerLevel Policy: Authentication, OIMScheme"
■Figure D–7, "Public Policy: Authentication, AnonymousSheme"
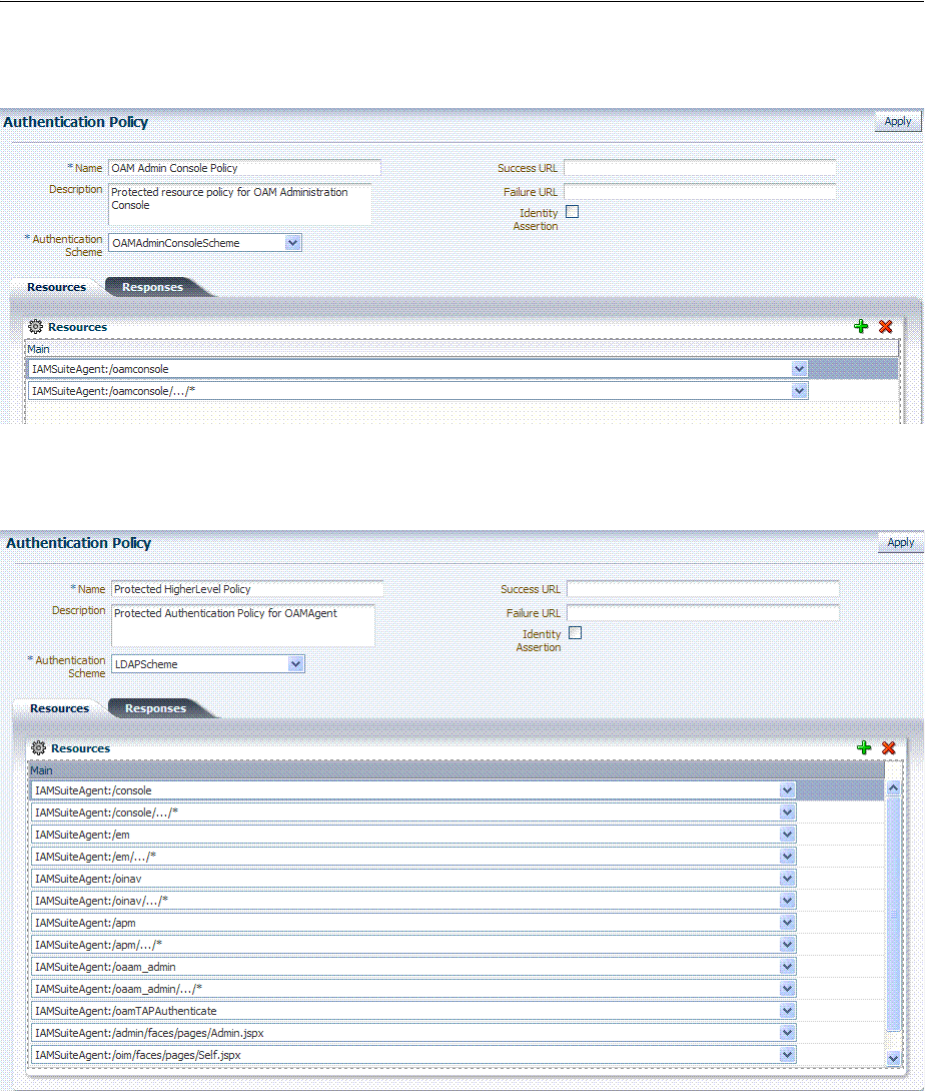
Bundled 10g IAMSuiteAgent Artifacts
D-6 Administrator's Guide for Oracle Access Management
Figure D–4 IAMSuite Authentication Policy: OAM Admin Console Policy
Figure D–5 Protected HigherLevel Policy: Authentication, LDAP Scheme
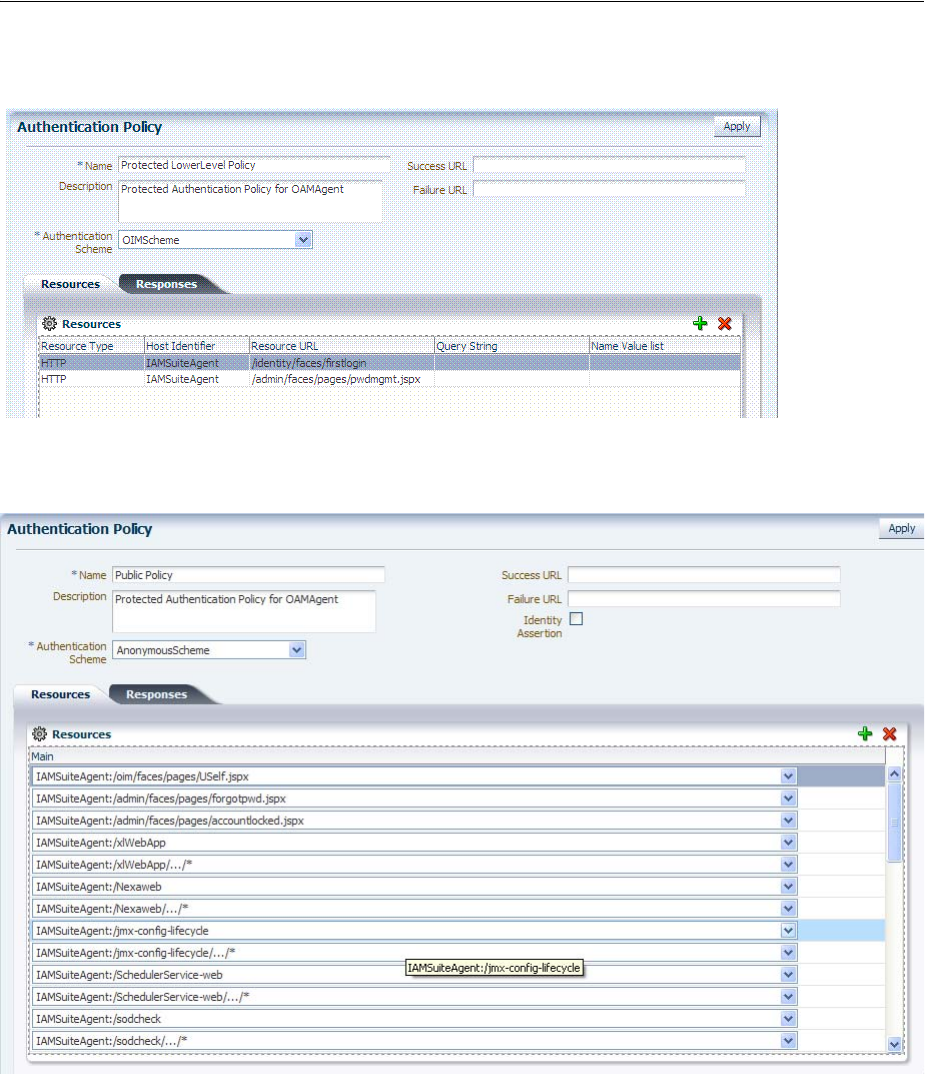
Bundled 10g IAMSuiteAgent Artifacts
Reviewing Bundled, Generated, and Migrated Artifacts D-7
Figure D–6 Protected LowerLevel Policy: Authentication, OIMScheme
Figure D–7 Public Policy: Authentication, AnonymousSheme
IAM Suite Authorization Policy
Figure D–8 presents Authorization Policy in the IAM Suite Application Domain. By
default, no explicit conditions or responses are defined. However, you can add any
that are appropriate for your environment.
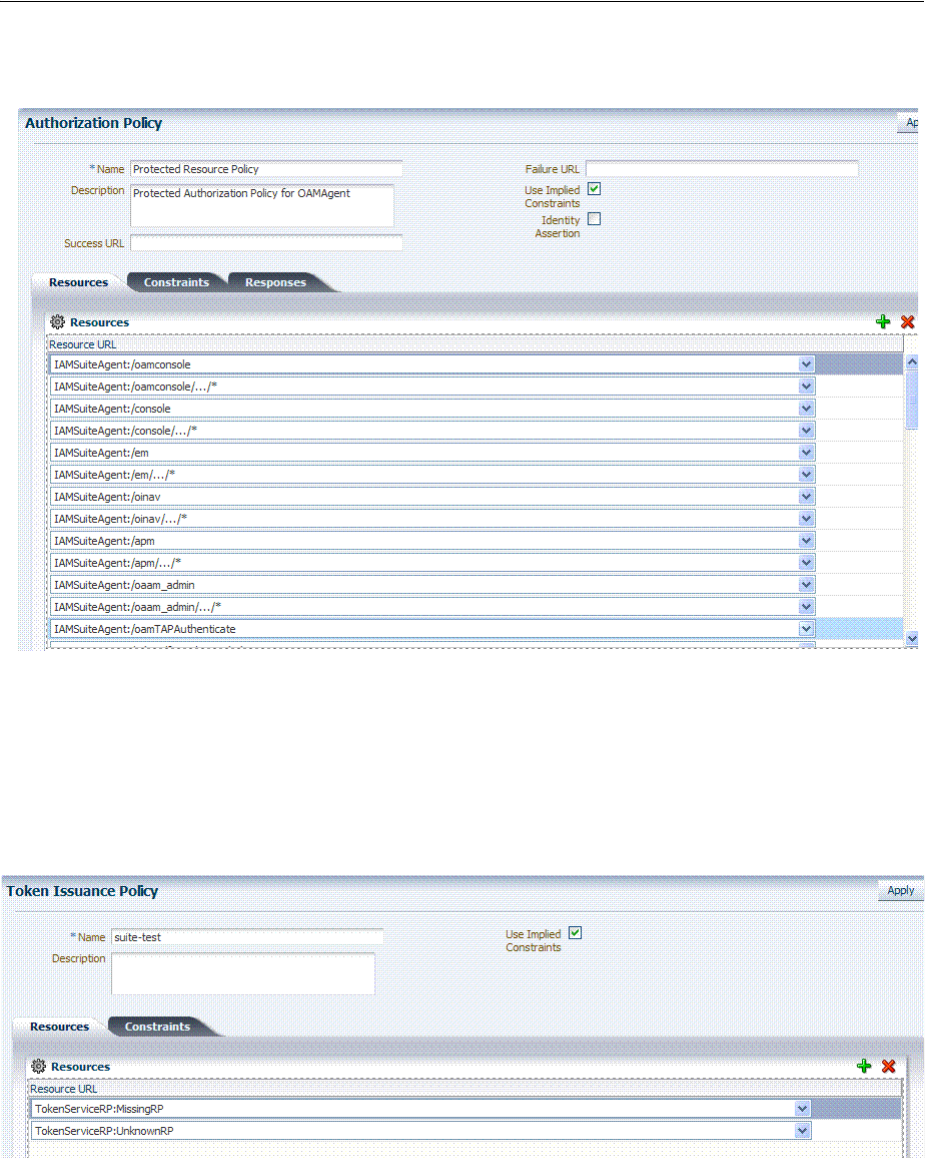
Generated Artifacts: OpenSSO
D-8 Administrator's Guide for Oracle Access Management
Figure D–8 IAM Suite Authorization Policy
IAM Suite Token Issuance Policy
Figure D–9 presents IAM Suite Token Issuance Policy in the IAM Suite Application
Domain. By default, there are no explicit conditions defined. However, you can define
any that are needed in your environment.
Figure D–9 IAM Suite Token Issuance Policy and Resource URLs
D.2 Generated Artifacts: OpenSSO
This section shows the custom authentication module, host identifier, Application
Domain, and policies generated during OpenSSO Agent provisioning.
■Generated OpenSSOAgentAuthPlugin
■Generated Host Identifier: OpenSSOAgent

Generated Artifacts: OpenSSO
Reviewing Bundled, Generated, and Migrated Artifacts D-9
■Generated Application Domain: OpenSSOAgent
■Generated Resources: OpenSSOAgent
■Generated Authentication Policy: OpenSSOAgent Application Domain
■Generated Authorization Policy: OpenSSOAgent Application Domain
D.2.1 Generated OpenSSOAgentAuthPlugin
Figure D–10 shows the OpenSSOAgent Custom Authentication Module:
OpenSSOAgentAuthPlugin.
Figure D–10 Generated Authentication Module: OpenSSOAgentAuthPlugin

Generated Artifacts: OpenSSO
D-10 Administrator's Guide for Oracle Access Management
D.2.2 Generated Host Identifier: OpenSSOAgent
Figure D–11 Generated Host Identifier: OpenSSOAgent
D.2.3 Generated Application Domain: OpenSSOAgent
Figure D–12 Generated Application Domain: OpenSSOAgent
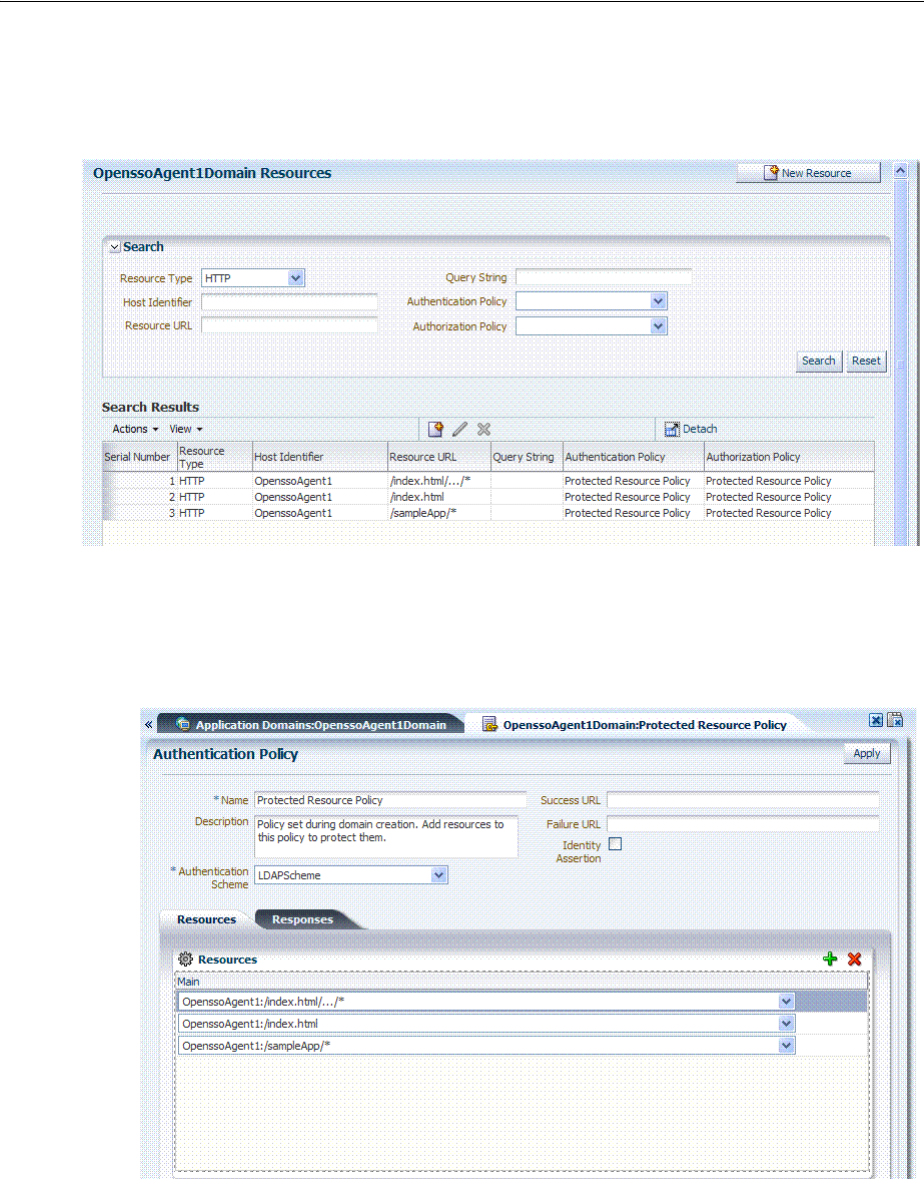
Generated Artifacts: OpenSSO
Reviewing Bundled, Generated, and Migrated Artifacts D-11
D.2.4 Generated Resources: OpenSSOAgent
Figure D–13 Application Domain Resources: OpenSSOAgent
D.2.5 Generated Authentication Policy: OpenSSOAgent Application Domain
Figure D–14 Generated Authentication Policy: OpenSSOAgent Application Domain
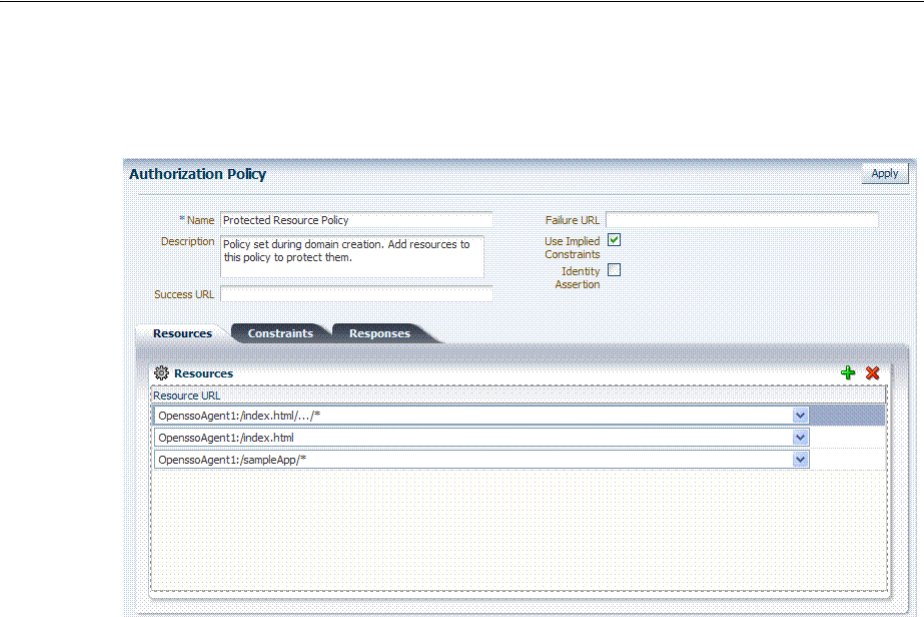
Migrated Artifacts: OpenSSO
D-12 Administrator's Guide for Oracle Access Management
D.2.6 Generated Authorization Policy: OpenSSOAgent Application Domain
Figure D–15 Generated Authorization Policy: OpenSSOAgent Application Domain
D.3 Migrated Artifacts: OpenSSO
This section shows the artifacts that are migrated when you use Oracle-provided tools
to analyze and migrate an OpenSSO environment to Oracle Access Management
Console.
■Migrated User Identity Store: OpenSSO
■Migrated Agents: OpenSSO
■Migrated Authentication Module: OpenSSO
■Migrated Host Identifier: OpenSSO
■Migrated Application Domain: OpenSSO
■Migrated Resources: OpenSSO
■Migrated Authentication Policy: OpenSSO
■Migrated Authorization Policy: OpenSSO
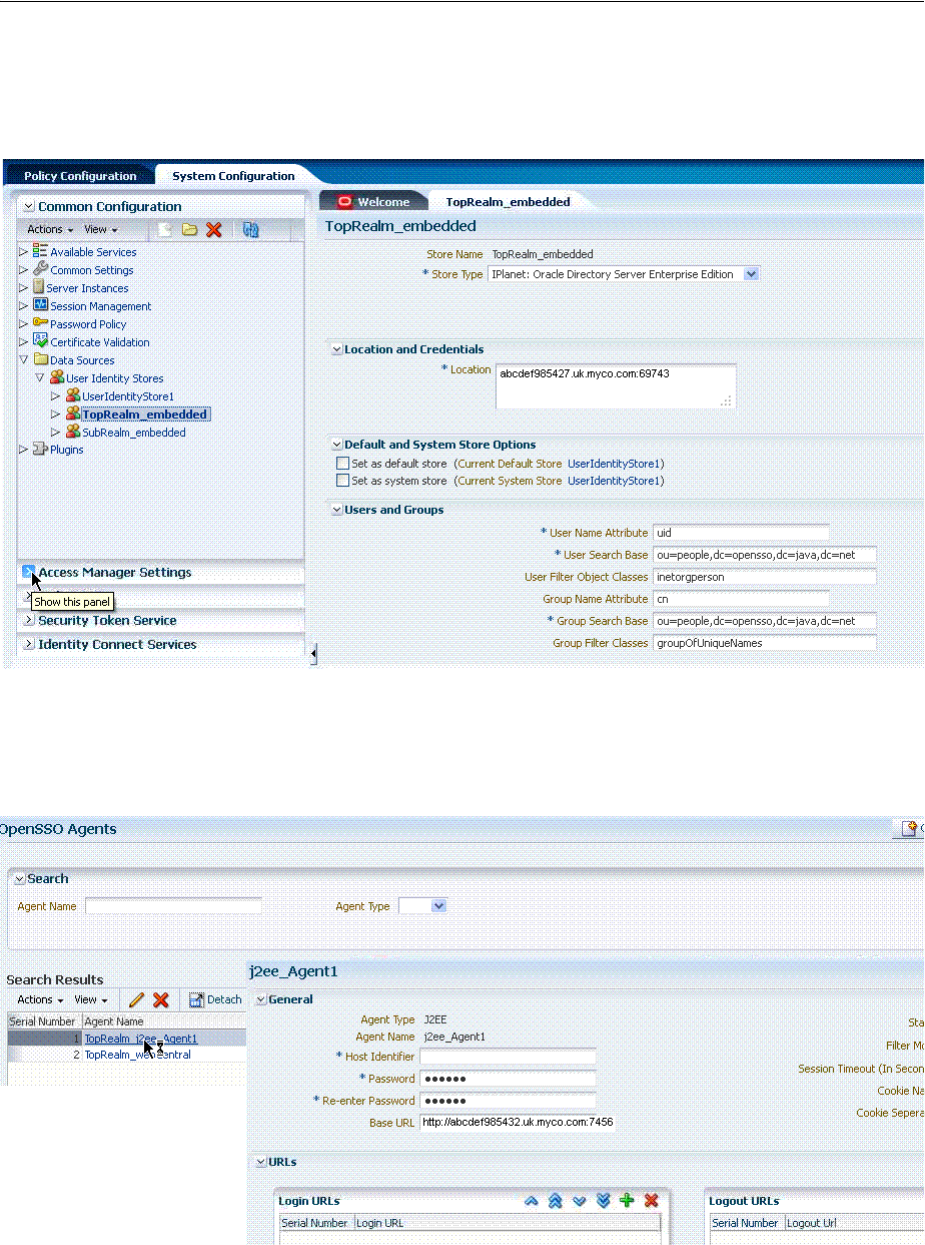
Migrated Artifacts: OpenSSO
Reviewing Bundled, Generated, and Migrated Artifacts D-13
D.3.1 Migrated User Identity Store: OpenSSO
Figure D–16 Migrated User Identity Store: OpenSSO
D.3.2 Migrated Agents: OpenSSO
Figure D–17 Migrated Agent: OpenSSO
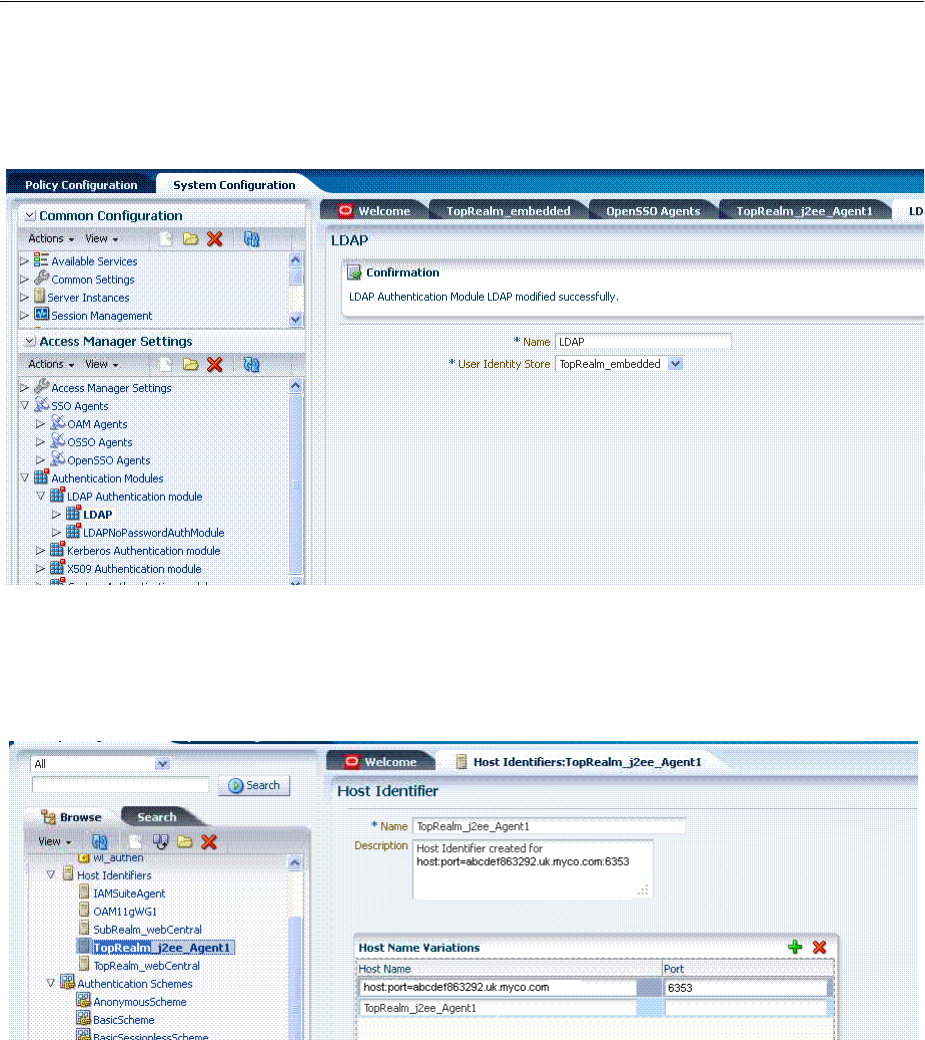
Migrated Artifacts: OpenSSO
D-14 Administrator's Guide for Oracle Access Management
D.3.3 Migrated Authentication Module: OpenSSO
Figure D–18 Migrated Authentication Module: OpenSSO
D.3.4 Migrated Host Identifier: OpenSSO
Figure D–19 Migrated Host Identifier: OpenSSO
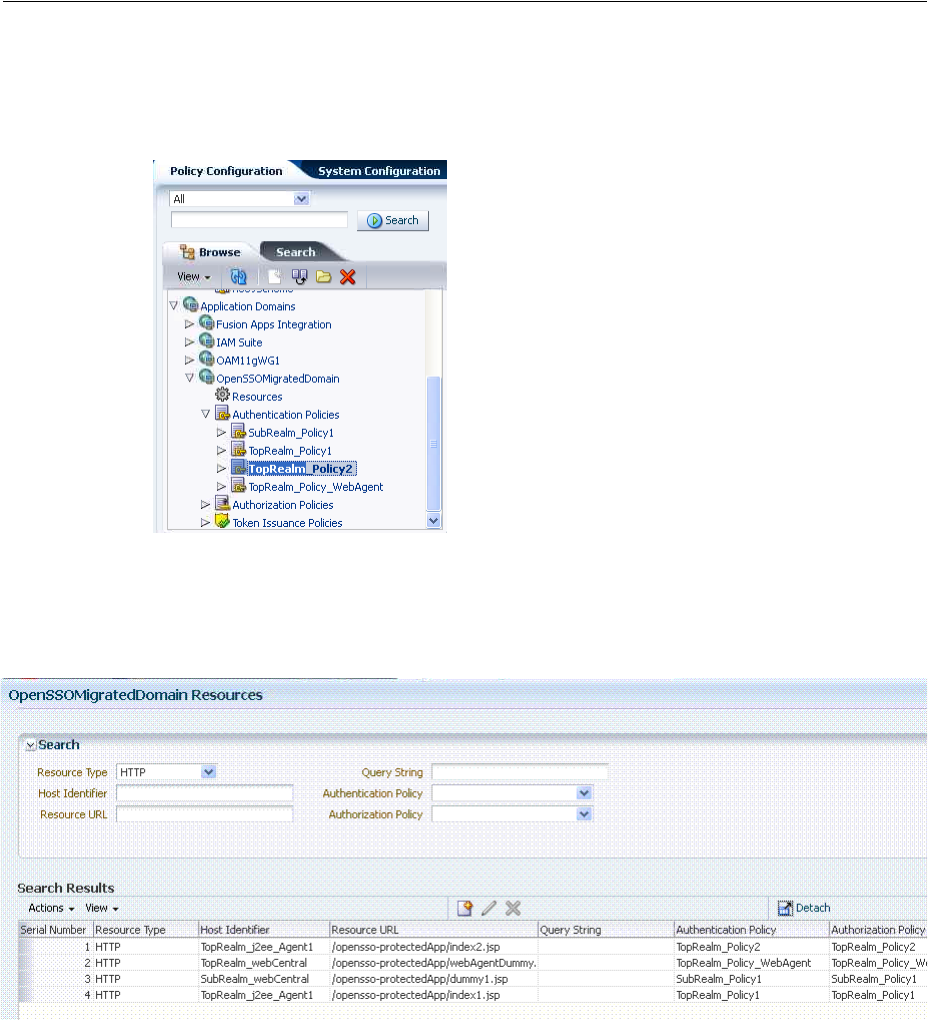
Migrated Artifacts: OpenSSO
Reviewing Bundled, Generated, and Migrated Artifacts D-15
D.3.5 Migrated Application Domain: OpenSSO
Figure D–20 Migrated Application Domain: OpenSSO
D.3.6 Migrated Resources: OpenSSO
Figure D–21 Migrated Resources: OpenSSO
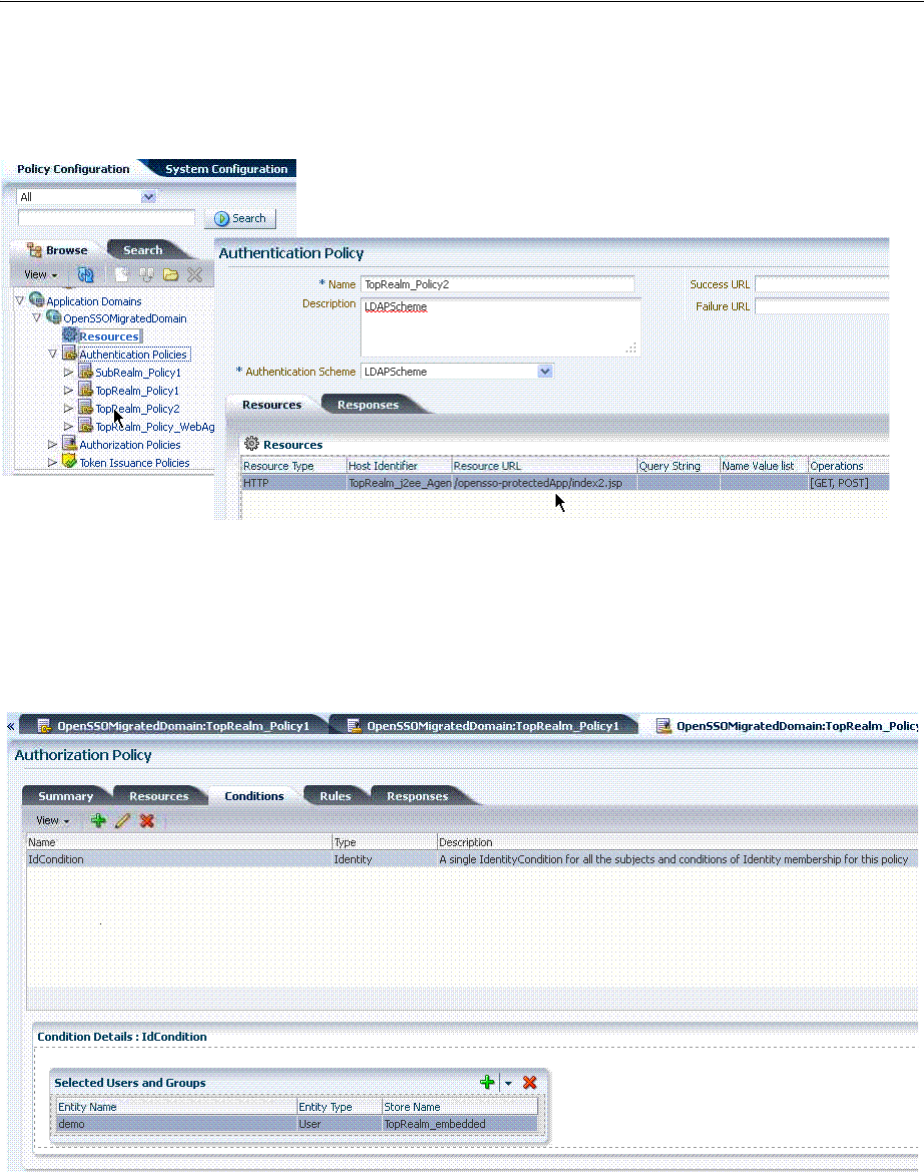
Migrated Artifacts: OpenSSO
D-16 Administrator's Guide for Oracle Access Management
D.3.7 Migrated Authentication Policy: OpenSSO
Figure D–22 Migrated Authentication Policy: OpenSSO
D.3.8 Migrated Authorization Policy: OpenSSO
Figure D–23 Migrated Authorization Policy2 Condition: OpenSSO
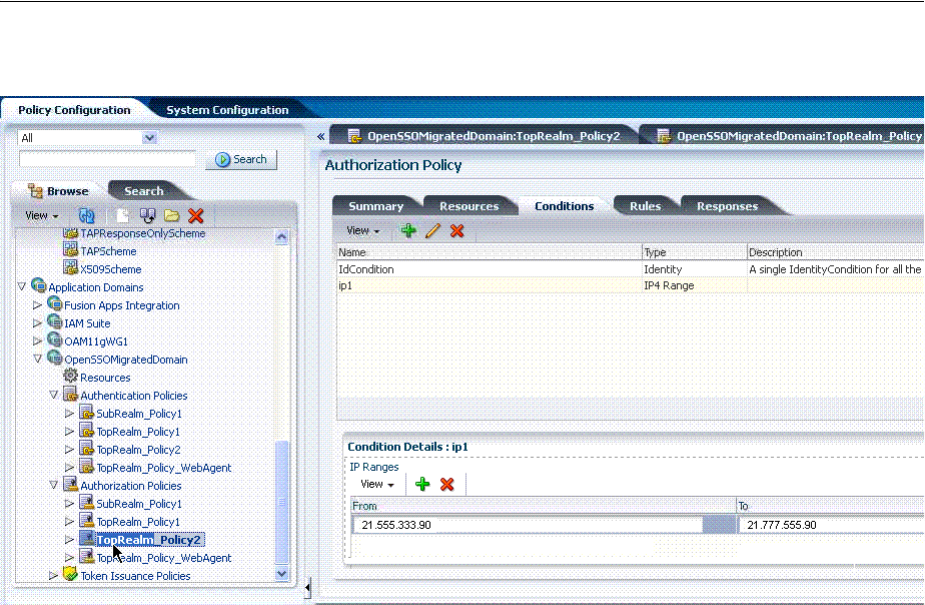
Migrated Artifacts: OpenSSO
Reviewing Bundled, Generated, and Migrated Artifacts D-17
Figure D–24 Migrated Authorization Policy2: IP Condition Details

Migrated Artifacts: OpenSSO
D-18 Administrator's Guide for Oracle Access Management

E
Troubleshooting E-1
E
Troubleshooting
This chapter provides troubleshooting tips.
■Introduction to Oracle Access Management Troubleshooting
■Using My Oracle Support for Additional Troubleshooting Information
■Oracle Access Management Console Inconsistent State
■AdminServer Won't Start if the Wrong Java Path Given with WebLogic Server
Installation
■Agent Naming Not Unique
■Application URL Requirements
■Authentication Issues
■Authorization Issues
■Cannot Access Authentication LDAP or Database
■Cannot Find Configuration
■Co-existence Between OSSO and Access Manager
■Could Not Find Partial Trigger
■Denial of Service Attacks
■Deployments with Freshly Installed 10g Webgates
■Disabling Windows Challenge/Response Authentication on IIS Web Servers
■Changing UserIdentityStore1 Type Can Lock Out Administrators
■IIS Web Server Issues
■jps Logger Class Instantiation Warning is Logged on Authentication
■Internationalization, Languages, and Translation
■Login Failure for a Protected Page
■OAM Metric Persistence Timer IllegalStateException: SafeCluster
■Partial Cluster Failure and Intermittent Login and Logout Failures
■RSA SecurID Issues and Logs
■Registration Issues
■Rowkey does not have any primary key attributes Error
■SELinux Issues

Introduction to Oracle Access Management Troubleshooting
E-2 Administrator's Guide for Oracle Access Management
■Session Issues
■SSL versus Open Communication
■Start Up Issues
■Synchronizing OAM Server Clocks
■Using Coherence
■Validation Errors
■Web Server Issues
■Windows Native Authentication
E.1 Introduction to Oracle Access Management Troubleshooting
Oracle Access Management is a business critical system; downtime comes with a
potentially high cost to your business. The goal of system analysis is to quickly isolate
and correct the cause of any problem. This requires a big picture view of your system
and the tools to observe the live system and correlate components to the bigger
picture.
To assist Administrators in performing a quick diagnosis, this section provides the
following topics:
■About System Analysis and Problem Scenarios
■About LDAP Server or Identity Store Issues
■About OAM Server or Host Issues
■About Agent-Side Configuration and Load Issues
■About Runtime Database (Audit or Session Data) Issues
■About Change Propagation or Activation Issues
■About Policy Store Database Issues
E.1.1 About System Analysis and Problem Scenarios
System analysis includes understanding how the product works, what can go wrong,
how likely the scenarios are, and the consequences or observable issues.
System problems can be divided into two basic categories:
■Cascading catastrophic failure
■Gradual breakdown in performance
Cascading catastrophic failure might be caused by:
■LDAP server is loaded and unresponsive
■Morning peak load starts
■Webgates send requests to the primary OAM Server
■Webgate requests time-out and Webgates retry to secondary OAM Server
Gradual breakdown in performance might occur over time when, for example:
■OAM is sized and rolled out for 10,000 users and 500 groups
■Over the course of a year, the number of users and groups increases significantly
(to 50,000 users and 250 groups for example)

Introduction to Oracle Access Management Troubleshooting
Troubleshooting E-3
For information on the most commonly encountered issues, see the following topics:
■About System Analysis and Problem Scenarios
■About LDAP Server or Identity Store Issues
■About OAM Server or Host Issues
■About Agent-Side Configuration and Load Issues
■About Runtime Database (Audit or Session Data) Issues
■About Change Propagation or Activation Issues
■About Policy Store Database Issues
E.1.2 About LDAP Server or Identity Store Issues
This topic provides symptoms, probable cause, and steps to diagnose the following
issues:
■Symptoms: Operational Slowness
■Symptoms: Total loss of service
Symptoms: Operational Slowness
■Poor user experience
■Agent time outs lead to retries
Cause
■Non-OAM load might be impacting OAM operations
■Capacity problems due to gradual increase in peak load
Symptoms: Total loss of service
Cause
■Outage of all LDAP servers
■The load balancer is timing out old connections
Diagnosis
1. Shut down the LDAP server.
2. Restart your browser.
3. Try to access a protected site.
4. Review errors in the OAM Server log file, as described in Chapter 8 (alternatively,
in Chapter 13).
5. Try to access Oracle Access Management Console.
6. Observe errors in WebLogic AdminServer log file.
7. Bring up the LDAP server again.
8. Retry access to a protected application.
9. Retry access to the Oracle Access Management Console.
10. Correct the issue based on the requirements in your environment.

Introduction to Oracle Access Management Troubleshooting
E-4 Administrator's Guide for Oracle Access Management
E.1.3 About OAM Server or Host Issues
This topic provides symptoms, probable cause, and steps to diagnose the following
issues:
■Symptoms: Capacity Problems
■Symptoms: Interference with Other Services on the Host
Symptoms: Capacity Problems
■Poor user experience due to slow operations
■Agent time outs and retry can result in extra load
Cause
■CPU cycles
■Memory issues
Symptoms: Interference with Other Services on the Host
■Poor user experience due to slow operations
■Agent time outs and retry may result in extra load
Cause
■CPU cycle contention
■Memory contention
■File system full
Diagnosis: OAM Server
1. Shut down the OAM Server
2. Try to access a Webgate or mod_osso protected resource
3. Bring up the OAM Server
4. Use the Access Tester to test authentication and authorization as described in
Chapter 21.
5. Use 'top' to figure out the CPU and Memory consumption of the OAM Server as
you use the access tester
6. Get a thread dump of the OAM Server.
Diagnosis: AdminServer
1. Shut down the AdminServer.
2. Restart your browser and access a protected resource, which should work.
3. Use remote registration to register a new partner, as described in Chapter 16 (this
should fail).
4. Startup OAM AdminServer.
E.1.4 About Agent-Side Configuration and Load Issues
This topic provides symptoms, probable cause, and steps to diagnose time issues
between agents and servers.

Introduction to Oracle Access Management Troubleshooting
Troubleshooting E-5
Symptoms: Difference in Clock time Between Agent and Server
■High CPU usage at both agent and server
■User experiences a system hang
Cause
■Agent thinks the token issued by the server is invalid
■Agent keeps going back to the server to re-issue the token
Diagnosis
1. Access protected resource.
2. Confirm: Client access hangs.
3. Confirm: High CPU usage on agent and server.
E.1.5 About Runtime Database (Audit or Session Data) Issues
The audit and session functions are both write intensive operations. The policy
database can be tuned for read intensive service.
Symptoms
■Audit and session operations are slow
■File system on the OAM Server is full with audit data that is not yet written to the
database
■Loss of in-memory session data when one of the servers in the cluster fails
Cause
■Database is not tuned for write intensive operations
■Database is unavailable due to maintenance
■Space issues in the database
Diagnosis
1. Shut down the database used to store Audit and Session data.
2. Try to access a protected resource.
3. Review error and warning messages in the OAM Server log files, as described in
Chapter 8 (alternatively, in Chapter 13).
E.1.6 About Change Propagation or Activation Issues
This topic provides symptoms, probable cause, and steps to diagnose the following
issues:
Symptoms
■Changes to policy do not take immediate effect
■Changes to system configuration do not take immediate effect
Cause
■Servers being too busy handling runtime requests (CPU contention)
■Coherence network slowness

Using My Oracle Support for Additional Troubleshooting Information
E-6 Administrator's Guide for Oracle Access Management
Diagnosis: See "About Policy Store Database Issues"
E.1.7 About Policy Store Database Issues
This topic provides symptoms, probable cause, and steps to diagnose policy database
issues.
Symptoms: No policy changes are allowed; no impact on runtime
Cause
■Database is unavailable (down for maintenance)
■Space issues in the database
Diagnosis
1. Shut down the database containing OAM policies.
2. Try to access a protected resource and observe the runtime access is not impacted.
3. Try to access the Oracle Access Management Console to edit policies, and then
observe errors in the AdminServer log file.
E.2 Using My Oracle Support for Additional Troubleshooting Information
You can use My Oracle Support (formerly MetaLink) to help resolve Oracle Fusion
Middleware problems. My Oracle Support contains several useful troubleshooting
resources, such as:
■Knowledge base articles
■Community forums and discussions
■Patches and upgrades
■Certification information
You can access My Oracle Support at
https://support.oracle.com
.
E.3 Administrator Lockout
Problem
Administrator cannot successfully log in to the Oracle Access Management Console.
The following message appears:
Manually Change Identity Store Settings at OPSS Level and configure the
IDMDOmainAgent.
Cause
Access Manager secures the Oracle Access Management Console based on
authentication information in the IAM Suite Application Domain: OAM Admin
Console Policy. This policy relies on a single Authentication Scheme
(OAMAdminConsoleScheme), which uses a Form challenge method and LDAP
Note: You can also use My Oracle Support to log a service request.

AdminServer Won't Start if the Wrong Java Path Given with WebLogic Server Installation
Troubleshooting E-7
Authentication Module. The LDAP Authentication Module must be pointing to the
User Identity Store designated as the System Store.
If, for example, your deployment is configured to use Oracle Internet Directory (with
all Administrators, users, and groups defined therein) ensure that the LDAP
Authentication Module points to this user identity store and that this is designated as
the System Store.
Solution
1. Insert a user identity into both your designated system store and the Embedded
LDAP store.
2. Log in to Oracle Access Management Console.
3. Configure the
LDAP
Authentication Module used by the designated System Store to
point to the appropriate User Identity Store, as described in "Managing Native
Authentication Modules" on page 19-23.
E.4 Oracle Access Management Console Inconsistent State
Problem
Administrators performing updates concurrently will result in an inconsistent state
within the system configuration of the Oracle Access Management Console.
Cause
Concurrent configuration updates are not supported.
Solution
Only one Administrator should be allowed to modify the system configuration at any
given time.
E.5 AdminServer Won't Start if the Wrong Java Path Given with WebLogic
Server Installation
WebLogic Server (wls1035_generic) installation is successful on Windows 64-bit with
32-bit Java (jdk1.6.0_24). When setup.exe is executed you must provide the path of the
64-bit java (jdk1.6.0_23) to successfully launch the install shield.
If you provide the 32-bit Java (jdk1.6.0_24) path, the install shield is not launched.
However, if you execute config.cmd from \Middleware\Oracle_IDM1\common\bin,
by default 32-bit Java (jdk1.6.0_24) path is used, but after successful installation Access
Manager installation, you cannot start AdminServer.
On Windows host, the path to 32-bit JAVA_HOME (c:\Program files
(x86)\java\jdkxxx) is not correctly handled by the startWeblogic.cmd. Replacing
SUN_JAVA_HOME to use the path with the shorter name (c:\progra~2\java\jdkxxxx)
works fine.
On Windows, the shorter names can be seen by executing "dir /X".
Alternatively, you can set windows cmd shell variable JAVA_HOME to path with
shorter name and execute startWeblogic.cmd within that. For example:
>set JAVA_HOME=c:\progra~2\java\jdkXXX
>startweblogic.cmd

Agent Naming Not Unique
E-8 Administrator's Guide for Oracle Access Management
E.6 Agent Naming Not Unique
A unique identifying name for each Agent registration is preferred. However:
■If the Agent Name exists, no error occurs and the registration does not fail.
Instead, Access Manager creates the policies if they are not already in place.
■ If the host identifier exists, the unique Agent Base URL is added to the existing
host identifier and registration proceeds.
E.7 Application URL Requirements
The number of characters allowed in a URL are based on browser version.
The main attribute that affects the size of a cookie is the length of the requested URL.
Some of the system generated URLs for ADF applications are quite long and can cause
the cookie to exceed the maximum size.
Another case is when using custom plug-ins. The data that a plug-in adds to the
authentication context is persisted in the cookie and can cause the cookie size to grow.
Multiple wrong password attempts can also add more context data to the cookie.
Combined with one of the above cases, the cookie size can rapidly grow.
Solutions
Ensure that your applications do not use URLs that exceed the length that Access
Manager and the browser can handle.
The cookie cache mode can be changed to
FORM
mode from default
COOKIE
mode.
FORM
mode works with long URLs. The only difference in behavior is for programmatic
authentication, which requires a proper form Submit to pass the
OAM_REQ
parameter set
to the form. Custom credential collection pages need to handle the
OAM_REQ
parameter
that is submitted with the form.
Also, to support long URLs, set the
serverRequestCacheType
parameter to
FORM
in
oam-config.xml under $
DOMAIN_HOME/config/fmwconfig/oam-config.xml
:
<Setting Name="serverRequestCacheType"
Type="xsd:string">FORM</Setting>
E.8 Authentication Issues
This section provides the following information:
■Anonymous Authentication Issues
■X.509Scheme and SSL Handshake Issues
■X.509 Protected Resource and Single Sign Off
■X509CredentialExtractor Certificate Validation Error
E.8.1 Anonymous Authentication Issues
Problem
Challenge Redirect URL can be NULL; however, Challenge Method cannot be NULL.
If you open the Anonymous authentication scheme to edit, and click Apply without
adding a value for Challenge method, the following errors might appear:

Authentication Issues
Troubleshooting E-9
Messages for this page are listed below.
* Challenge Method You must make at least one selection.
* Challenge Redirect You must enter a value.
Solution
You must include both a challenge method and a challenge redirect whenever you edit
an anonymous authentication scheme.
E.8.2 X.509Scheme and SSL Handshake Issues
The Access Manager X.509 Authentication Scheme relies on SSL to deliver the user's
X.509 certificate to the OAM Server. The X.509 Authentication Scheme requires the
X.509Plugin as the value of the Challenge Method (not the Authentication Module).
Problem
User has selected his certificate in the Browser but the Certificate is not available to the
OAM Server.
Solution
The specific solution will depend on the reason for the SSL Handshake failure. For
instance:
■For debugging SSL connections terminating on the Weblogic Server, please refer to
http://docs.oracle.com/cd/E12840_01/wls/docs103/secmanage/ssl.html
■For debugging SSL connections terminating on the OHS server, see
http://docs.oracle.com/cd/E12839_01/web.1111/e10144/under_
mods.htm#i1007687
.
Determine the reason for the SSL Handshake failure and the peer that is terminating
the SSL Handshake. The solution will fall into the following categories:
■Configuration Issues
■Trust Issues
■Certificate Validation Issues
E.8.2.1 Configuration Issues
If you are encountering problems establishing a SSL connection with the default
WebLogic server SSL implementation, switch to using the JSSE SSL implementation
which is supported with WLS 10.3.3+.
The following list identifies other possible configuration issues.
■OHS plugin is incorrectly configured and not sending the user certificate to the
WebLogic server.
■Cipher suites: As configured, are not compatible with the user certificate.
■Smart cards: The browser is not communicating with the smart card reader.
■PKCS#11 (or hardware cryptography): Ensure that the devices are in working
order.

Authorization Issues
E-10 Administrator's Guide for Oracle Access Management
E.8.2.2 Trust Issues
The server name within the certificate does not match the host name. This check can be
disabled through configuration.
The server does not contain a CA certificate on the user certificate path in its trust
store.
E.8.2.3 Certificate Validation Issues
The following list identifies possible configuration issues.
■Certificate has expired.
■Certificate has been revoked.
■Certificate validation is not working because this is incorrectly configured or there
are connectivity issues.
E.8.3 X.509 Protected Resource and Single Sign Off
Problem
Single Sign Off might not work after accessing the resource with X.509 authentication.
When the user is logged out with the logout URL and tries to access the resource in the
same browser, authentication might not occur. Instead, the user should be asked for
authentication using the certificate pop up.
This can occur with any Agent type.
Solution
After executing the logout URL, click on Clear SSL State from the browser as follows,
and the access the X.509-protected resource:
From the browser window, open the Tools menu, click Internet Options, choose
Content, and then Clear SSL state.
E.8.4 X509CredentialExtractor Certificate Validation Error
Problem
Client certificate authentication works fine using the standard X509 Authentication
Module after importing the root and sub CA certificates into the WebLogic Server and
.oamkeystore keystores.
However, a certificate validation error can occur when using a Custom X509Plugin
Authentication Module and root and sub CA certificates into the WebLogic Server and
.oamkeystore keystores.
Solution
With the Custom X509Plugin Authentication Module the root and sub CA certificates
must be added to the DOMAIN_HOME/config/fmwconfig/amtruststore because the
X509CredentialExtractor plug-in loads certificates from this location.
E.9 Authorization Issues
This section provides the following topics:
■Authorization Condition Error
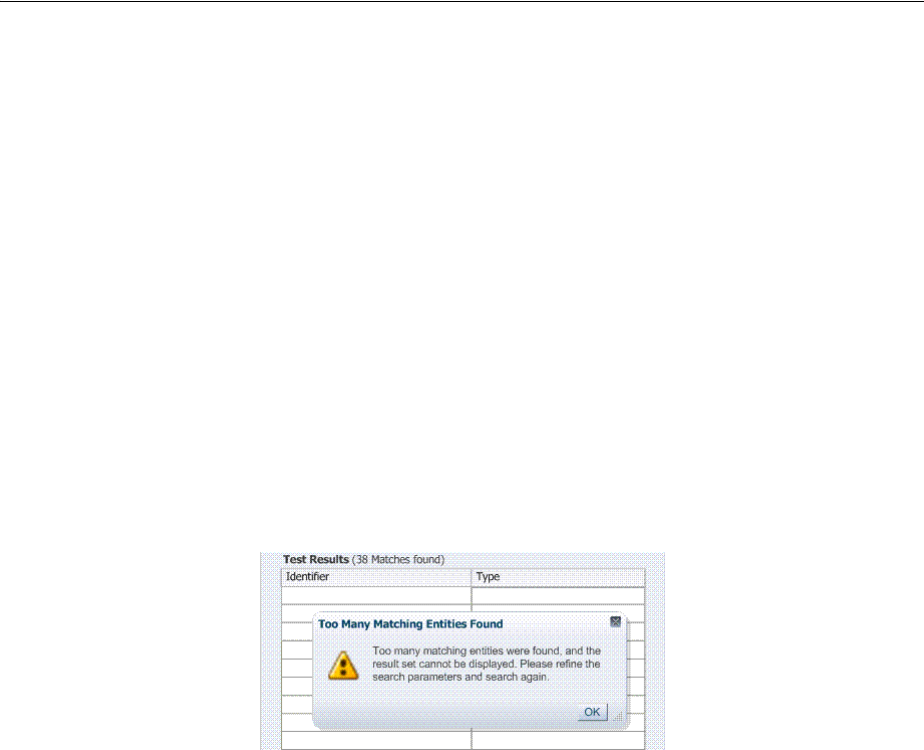
Cannot Access Authentication LDAP or Database
Troubleshooting E-11
■LDAP Search Filter Test Results
■Authorization Header Response Names
E.9.1 Authorization Condition Error
An error is logged in the oam-server diagnostic log file whenever you create or edit an
IPv4 range or temporal condition:
.... refreshPolicy specified but no response collector supplied
Cause
This is a message that is erroneously being logged at the ERROR level.
Solution
The correct level of the message is INFO.
E.9.2 LDAP Search Filter Test Results
If too many results are returned, you are informed as follows:
Solution
1. Click OK.
2. Click Test Filter button to initiate a new test.
3. In the Edit Search Filter dialog, make your changes.
4. Check the Test Results.
E.9.3 Authorization Header Response Names
Some characters might not be usable within header response names or values,
depending on whether the client receiving these responses is a Webgate, and if so
which Web server is protected. Certain characters might be subject to automatic
conversion to other characters in a server-specific way.
Oracle recommends that you refer to your Web server documentation for more details.
E.10 Cannot Access Authentication LDAP or Database
If the LDAP directory that is used for authentication is down or inaccessible (or the
database that is configured as the policy store), it might be due to a heavy load or a
timeout. You see a message when attempting to a protected resource that uses this
LDAP or policy store.

Cannot Find Configuration
E-12 Administrator's Guide for Oracle Access Management
Solution
1. Manually shut down the registered LDAP or database.
2. Restart the registered LDAP or database.
E.11 Cannot Find Configuration
E.11.1 Configuration Does Not Exist ...
If you attempt to create and apply configuration details for an OAM Server before
configuring the OAM Server in the WebLogic Server domain, a message informs you
of the following:
Configuration does not exist for path
/DeployedComponent/Server/oamServer/Instance/test
For more information, please see the server's error log for
an entry beginning with: Server Exception during PPR, #6.
To resolve this issue, you must configure the OAM Server in the WebLogic Server
domain before you register the configuration with Access Manager.
E.12 Co-existence Between OSSO and Access Manager
Problem
In the OSSO 10g coexistence with Access Manager 11g, if a user tries to access a
protected resource when the OAM server is down, the request is redirected to the
OSSO 10g login page through the load balancer. If the user enters valid credentials, the
resource is provided.
However, if the user deletes the Oracle HTTP Server cookie and brings the OSSO 10g
server down (and brings the OAM Server up), upon accessing the protected resource
the user is asked for Access Manager login (authentication). Instead, the application
should be accessible without authentication.
Solution
Confirm that the migrated User Identity Store is set as the Access Manager Default
Store and System Store.
E.13 Could Not Find Partial Trigger
In the Administration Server output, you might see a "Could Not Find Partial Trigger"
error (multiple times for each clicked policy configuration node or host identifier
node) and also when you click any of other nodes in the navigation tree. This does not
block functionality.
See Also:
■
enableCoexistMode
and
disableCoexistMode
in the Oracle Fusion
Middleware WebLogic Scripting Tool Command Reference
■Oracle Fusion Middleware Upgrade Guide for Oracle Identity and
Access Management

Denial of Service Attacks
Troubleshooting E-13
E.14 Denial of Service Attacks
A denial-of-service attack (DoS attack) or distributed denial-of-service attack (DDoS
attack) is an attempt to make a computer resource unavailable to its intended users.
One common method of attack involves saturating the target (victim) machine with
external communication requests, such that it cannot respond to legitimate traffic, or
responds so slowly as to be rendered effectively unavailable.
Denial of service attacks are classified into Authenticated and Unauthenticated
Requests, and further classified as:
■NAP Requests
■HTTP Requests
Authenticated NAP Requests
For Authenticated NAP Requests, the OAM Server maintains a counter in the session
and limits the number of retries. Despite this, after redirecting the user to an error page
the user can repeat the cycle. This needlessly consumes server resources and can lead
to OAM Server overloading.
Authenticated HTTP Requests
You can handle a flood of HTTP Authenticated requests with a combination of
WebLogic overload configuration and mod_security module settings.
Unauthenticated NAP Requests
Unauthenticated NAP Requests are handled by the WebLogic MDB pool throttling.
This limits the number of NAP Requests that are forwarded to the OAM Server.
Again, this does not differentiate legitimate users from malicious ones.
Unauthenticated HTTP Requests
Configuring the mod_security module for the OHS server that front-ends the OAM
Server enables rejection of malicious requests (unauthenticated HTTP Requests).
For more information, see:
■Protecting the OAM Server from Crashing Under Load
■Compensating for Network Latency
■Protecting OAM Servers from a Flood of HTTP Requests
E.14.1 Protecting the OAM Server from Crashing Under Load
If the number of requests to the OAM Server unexpectedly increases beyond what the
server can handle, it could crash.
To limit the number of requests to the OAM Server:
1. In the WebLogic Console, use the Message Driven Bean pool to restrict the number
of NAP requests to the OAM Server.
Note: To avoid OAM Server overloading with Authenticated NAP
Requests, use relevant WebLogic overload configuration settings.
These ensure that the server does not crash under load. However, this
does not differentiate legitimate users from malicious users.

Denial of Service Attacks
E-14 Administrator's Guide for Oracle Access Management
MDBeans pull NAP requests from the Server queue and deliver NAP requests to
the Server for processing. Limiting the number of MDBean instances helps control
the number of requests that are processed at a given time.
2. In the WebLogic Console, configure the number of WebLogic worker threads that
can be used (to restrict the number of requests to the OAM Server).
MDBeans pull NAP requests from the server queue and deliver NAP requests to
the Server for processing. Limiting the number of MDBean instances helps control
the number of requests that are processed at a given time.
3. In the WebLogic Console, configure the number of WebLogic worker threads that
can be used (to restrict the number of requests to the OAM Server).
See the topic on Thread Management in the guide to Oracle Fusion Middleware
Performance and Tuning for Oracle WebLogic Server.
4. In the WebLogic Console, specify a maximum incoming request size, complete
message timeout, and set the number of file descriptors, to optimize performance
as described in following topics in the Oracle Fusion Middleware Performance
and Tuning for Oracle WebLogic Server:
■Tuning Message Size
■Tuning Complete Message Timeout
■Tuning Number of File Descriptors
E.14.2 Compensating for Network Latency
Consider the scenario where Webgate sends an authentication request to the OAM
Server. After successful credential collection and validation, the OAM Server creates
the session and the relevant cookies (OAM_ID, ObSSOCookie). However, due to
network latency, the response times out by the time the OAM Server sends it to the
Webgate which triggers Webgate to re-send the authentication request to the Server.
The OAM Server recognizes the session, then recreates the ObSSOCookie, and sends
the response to the agent.
If the network latency persists, the cycle continues in an infinite loop between the
Server and the Webgate. The user is neither asked to login again nor presented with an
error message.
E.14.3 Protecting OAM Servers from a Flood of HTTP Requests
ModSecurity is a Web application firewall (WAF) that can be deployed as part of the
existing Apache-based Web server infrastructure. This module can be plugged into the
OHS Server that front-ends the OAM Server. In this way, Mod_security module
protects the OAM Server from denial of service attacks.
A flexible rule engine is at the heart of ModSecurity. It implements the ModSecurity
Rule Language, a specialized programming language designed to work with HTTP
transaction data. A new configuration directive uses the httpd-guardian script to
monitor for Denial of Service (DoS) attacks. By default httpd-guardian defends against
clients that send more than 120 requests in a minute, or more than 360 requests in five
minutes.
See Also:
http://www.modsecurity.org/documentation/modsecurity-apache/2
.5.12/html-multipage/configuration-directives.html#N10689

Deployments with Freshly Installed 10g Webgates
Troubleshooting E-15
To protect from a flood of HTTP Requests
1. Add the mod_security module to the OHS Server that front-ends the OAM Server.
2. In the OHS Server configuration, set the configuration directive to use the
httpd-guardian script to monitor for Denial of Service (DoS) attacks.
Syntax:
SecGuardianLog |/path/to/httpd-guardian
Example:
SecGuardianLog |/usr/local/apache/bin/httpd-guardian
E.15 Deployments with Freshly Installed 10g Webgates
Use the OAM Server's diagnostic features to debug on the OAM Server side. This
section includes the following topics:
■Authentication Issues with 10g Webgates
■Logout Issues with 10g Webgates
E.15.1 Authentication Issues with 10g Webgates
Use the following methods to troubleshoot authentication issues when you have
freshly installed 10g Webgates in your Access Manager deployment.
■Confirm that your request was protected using an http header trace like Internet
Explorer HTTP Headers or Firefox Live HTTP Headers
■Confirm that the request is sent to the OAM Server for authentication
–GET /oam/server/obrareq.cgi?....
–Host: oam-server:port
E.15.2 Logout Issues with 10g Webgates
Use the following methods to troubleshoot logout issues when you have freshly
installed 10g Webgates in your Access Manager deployment.
■Make liberal use of HTTP Header Trace
■Confirm that the specific logout.html was copied to /access/oamsso folder in the
10g Webgate installation directory. If not present, you must create the logout.html
as described in "Configuring Centralized Logout for 10g WebGate with 11g OAM
Servers" on page 25-22.
■Change the 10g Webgate's httpd.conf to remove the following lines:
<LocationMatch "/oamsso/*">
Satisfy any
</LocationMatch>
■From the Oracle Access Management Console, confirm that the LogoutUrls
parameter (/oamsso/logout.html) is configured for this Webgate
See Also: Chapter 22, "Configuring Centralized Logout for Sessions
Involving 11g WebGates"

Diagnosing Initialization and Performance Issues
E-16 Administrator's Guide for Oracle Access Management
E.16 Diagnosing Initialization and Performance Issues
This section includes the following topics:
■Diagnosing an Initialization Issue
■Diagnosing a Performance Issue
■Diagnosing Out-of-Memory Issues With a Heap Dump
E.16.1 Diagnosing an Initialization Issue
Problem
OAM Server does not start up.
Solution
1. Locate and review the OAM Server log file on the computer hosting the OAM
Server.
DOMAIN_HOME/servers/SERVER-NAME/logs/SERVER-NAME-diagnostics.log
2. Enable logging for this computer, as described in Chapter 8, "Logging Component
Event Messages":
DOMAIN_HOME/config/fmwconfig/servers/SERVER-NAME/logging.xml
3. Restart the OAM Server, observe the behavior, check the log file again if needed.
E.16.2 Diagnosing a Performance Issue
Problem
Monitoring the OAM Server reveals a significant spike in latency during
authentication.
Solution
1. Locate and review the OAM Server log file on the computer hosting the OAM
Server.
DOMAIN_HOME/servers/SERVER-NAME/logs/SERVER-NAME-diagnostics.log
2. Enable logging for this computer, as described in Chapter 8, "Logging Component
Event Messages":
DOMAIN_HOME/config/fmwconfig/servers/SERVER-NAME/logging.xml
3. Restart the OAM Server, observe the behavior, check the log file again if needed.
E.16.3 Diagnosing Out-of-Memory Issues With a Heap Dump
Problem
Debugging for all expression parsing and evaluation produced a significant
performance drag within ~20 hours due to memory growth; running out of memory in
~50 hours.

Changing UserIdentityStore1 Type Can Lock Out Administrators
Troubleshooting E-17
Configuration: 2GB heap; 3 minute session timeout; jdbc connections tuned min=32
max=200; jdbc connection idle timeout disabled; jbo pool size min = 10 & max=150
Solution
To generate heap-dumps for comparison, you use the following command-line tools
jmap for Sun jvm or jrcmd for jrockit jvm located under JAVA_HOME/bin.
For jrockit jvm
jrcmd pid <command>
/jrockit_160_14_R27.6.5-32/bin/jrcmd 16775 heap_diagnostics
/jrockit_160_14_R27.6.5-32/bin/jrcmd 16775 print_threads
/jrockit_160_14_R27.6.5-32/bin/jrcmd 16775 jrarecording ....
For Sun jvm
jmap -histo <pid>
jmap -dump:live,format=b,file=heap.bin <pid>
E.17 Disabling Windows Challenge/Response Authentication on IIS Web
Servers
The IIS Web server on Windows supports Challenge/Response Authentication, which
defaults to On when IIS is installed. This enables users to use their domain log-ins
when requesting resources from IIS and can conflict with Access Manager's
authentication.
For example, on the first request from an Internet Explorer (IE) browser to a resource
on IIS protected by Access Manager with a basic authentication scheme, IE displays a
login dialog box requesting a domain along with the user name and password login
provided by Access Manager.
To disable Windows challenge/response authentication
1. Launch the Microsoft Management Console for IIS.
2. Select the Web Server Host under Internet Information Server in the left hand
panel.
3. Right click and select Properties.
4. Scroll down and select Edit the Master Properties for WWW Service.
5. Select the Directory Security tab.
6. Select Edit Anonymous Access and Authentication Control.
7. Complete the appropriate step for your platform:
Windows 2000: Clear the Integrate Windows Authentication box.
8. Click OK.
9. In the Windows IIS properties screen, click OK.
10. Close the Microsoft Management Console.
E.18 Changing UserIdentityStore1 Type Can Lock Out Administrators
An Identity Store that is designated as the System Store should not be edited to change
the store type (from Embedded LDAP to OID, for instance) nor the connection URLs.

IIS Web Server Issues
E-18 Administrator's Guide for Oracle Access Management
If you do need to change the Identity Store that is designated as the System Store
should not be edited to change the store type, Oracle recommends that you create a
new Identity Store and then edit that registration to mark it as your System Store.
E.19 IIS Web Server Issues
The following topics are provided to assist you:
■Form Authentication or Pass-Through Not Working
■IIS and General Web Component Guidelines
■Issues with IIS v6 Web Servers
■Page Cannot Be Displayed Error
■Removing and Reinstalling IIS DLLs
E.19.1 Form Authentication or Pass-Through Not Working
If form authentication or pass-through functionality is not working, the problem might
be that either "
UseWebGateExtForPassthrough
" parameter is not set to true in the
Webgate profile or that webgate.dll is not configured as Wild Card Application
Mapping in IIS. In such cases, Webgate does not perform authentication or
authorization for HTTP "POST" requests for the resources protected by form-based
authentication.
Solution: Confirm that the
UseWebGateExtForPassthrough
parameter is configured in
the Webgate profile with a value of
true
and that webgate.dll is configured as Wild
Card Application Mapping.
E.19.2 IIS and General Web Component Guidelines
Following are some general guidelines to follow when installing Access Manager
Webgates with IIS Web servers.
Account Privileges: The account that performs Access Manager installation must have
administration privileges. The user account that is used to run OAM services must
have the "Log on as a service" right, which can be set by selecting Administrative
Tools, Local Policy, Local Policies, User Rights Assignments, Log on as a service.
IIS 6 Web Servers: You must run the WWW service in IIS 5.0 isolation mode. This is
required by the ISAPI postgate filter. During Access Manager installation, this is
usually set automatically. If it is not, you must set it manually for the Default Web site.
Webgate for IIS 7 Web Server: To use Form-based authentication without enabling
pass through functionality (for example,
"access/oblix/apps/webgate/bin/webgate.dll" is an action in the Form-based
authentication scheme), ensure that the entry "<add segment="bin"/>" is not present
in the applicationHost.config file. If the entry is present, you must remove it. Use the
following steps to check this entry:
■Go to Windows\System32\inetsrv\config and open the file
applicationHost.config.
■Search for the <
hiddenSegments
> module and remove the entry
<add
segment="bin"/>
if it is present.
Webgate: When installing IIS Webgates, setting various permissions for the /access
directory is required for IIS Webgates only when you are installing on a file system
that supports NTFS. For example, suppose you install the ISAPI Webgate in Simple or

IIS Web Server Issues
Troubleshooting E-19
Cert mode on a Windows 2000 computer running the FAT32 file system. The last
installation panel provides instructions for manually setting various permissions that
cannot be set on the FAT32 file system. In this case, these instructions may be ignored.
E.19.3 Issues with IIS v6 Web Servers
On IIS 6 Web servers only, you must run the WWW service in IIS 5.0 isolation mode,
which is a requirement of the ISAPI postgate filter. This scenario will work if you have
32-bit Access Manager binaries running on a 32-bit Windows operating system.
However, there is an issue if you attempt to run a 32-bit postgate.dll on a 64-bit
Windows machine with IIS running in 32-bit mode.
Problem
When running IIS in IIS5.0 isolation mode, you see the following message:
"ISAPI Filter 'C:\webgate\access\oblix\apps\webgate\bin\webgate.dll' could not be
loaded due to a configuration problem.
Cause
The current configuration only supports loading images built for an AMD 64-bit
processor architecture. The data field contains the error number.
Solution
To learn more about this issue, including how to troubleshoot this kind of processor
architecture mismatch error, see the following Web site:
http://go.microsoft.com/fwlink/?LinkId=29349
For more information, see Help and Support Center at:
http://go.microsoft.com/fwlink/events.asp
Problem
IIS5 never existed as 64-bit. However, IIS v6's IIS5 Compatibility Mode on 64-bit
Windows computers only runs as 64-bit.
Cause
It is architecturally impossible run IIS5 Isolation Mode 32- bit on 64-bit Windows, as
described in documentation available through the following URLs:
http://www.microsoft.com/communities/newsgroups/en-us/default.aspx?dg=microsoft.pu
blic.inetserver.iis&tid=5dd07102-8896-40cc-86cb-809060fa9426&cat=en_US_
02ceb021-bb43-476d-8f8f-6c00a363ccf5&lang=en&cr=US&p=1
http://blogs.msdn.com/david.wang/archive/2005/12/14/HOWTO-Diagnose-one-cause-of-W3
SVC-failing-to-start-with-Win32-Error-193-on-64bit-Windows.aspx
E.19.4 Page Cannot Be Displayed Error
A "The page cannot be displayed" error that appears after configuring Webgate for
pass-through functionality, indicates a configuration issue.
Solution: Confirm that the
UseWebGateExtForPassthrough
parameter is configured in
the Webgate profile with a value of
true
and that webgate.dll is configured as Wild
Card Application Mapping.

Import and File Upload Limits
E-20 Administrator's Guide for Oracle Access Management
E.19.5 Removing and Reinstalling IIS DLLs
When Access Manager is running with Microsoft's IIS Web server, you must manually
uninstall and reinstall the following ISAPI filters when reinstalling Access Manager.
■
tranfilter.dll
■
oblixlock.dll
(if you installed Webgate)
■
webgate.dll
(if you installed Webgate)
To remove and reinstall IIS DLLs
1. Uninstall Access Manager.
2. Manually uninstall the preceding DLLs.
3. Reinstall Access Manager.Active Directory.
4. Manually reinstall the DLLs.
E.20 Import and File Upload Limits
The UPLOAD_MAX_MEMORY and UPLOAD_MAX_DISK_SPACE is set to "50mb".
To upload more than 50mb, manually change these settings in web.xml.
To reset the memory and disk space parameters
1. Locate web.xml in WEB-INF/lib/ngam-ui.war.
2. Edit the file to change UPLOAD_MAX_MEMORY. For example:
<context-param>
<param-name>org.apache.myfaces.trinidad.UPLOAD_MAX_MEMORY</param-name>
<param-value>104857600</param-value>
<context-param>
3. Edit the file to change UPLOAD_MAX_DISK_SPACE. For example:
<context-param>
<param-name>org.apache.myfaces.trinidad.UPLOAD_MAX_DISK_SPACE</param-name>
<param-value>104857600</param-value>
<context-param>
4. Save the file.
5. Restart the OAM Server.
Note: These filters can change depending on the version of IIS you
are using. If these filters do not exist or there are others present,
contact Oracle to determine if the filters that are present need to be
removed.
See Also: "Providing File Upload Capability" in the Oracle
Application Development Framework Developer's Guide.

Internationalization, Languages, and Translation
Troubleshooting E-21
E.21 jps Logger Class Instantiation Warning is Logged on Authentication
A jps logger class instantiation warning is might appear on the back end upon
authentication. However, this is a harmless warning and no action is required.
E.22 Internationalization, Languages, and Translation
This section provides the following topics:
■Automatically Generated Descriptions Are Not Translated
■Console Looks Messy
■Authentication Fails: Users with Non-ASCII Characters
■Access Tester Does Not Work with Non-ASCII Agent Names
■Locales, Languages, and Oracle Access Management Console Login Page
E.22.1 Automatically Generated Descriptions Are Not Translated
The automatically generated Description for some components are not translated. This
is expected and enables Administrators to change the Description to whatever they
require. Following such a change, translation by Oracle is not possible.
E.22.2 Console Looks Messy
The Oracle Access Management Console displays policies and resources oddly when
the input configuration file for remote registration is not in UTF-8 format or when the
OAM Server is not started in UTF-8 locale (en_US.utf8, for instance).
Be sure to use UTF-8 encoding if creating a configuration file for the remote
registration tool, oamreg, to generate authentication policies and protected resources.
Also, be sure to start OAM Server in UTF-8 locale machines. Otherwise, the Oracle
Access Management Console might display policies and resources oddly following
successful inband registration.
E.22.3 Authentication Fails: Users with Non-ASCII Characters
Configure Access Manager to use Kerberos Authentication Scheme with WNA
challenge method, and create a non-ASCII user in Microsoft Active Directory.
Problem
An exception occurs when trying to get user details to populate the subject with the
user DN and GUID attributes. Authentication fails and an error is recorded in the
OAM Server log when a non-ASCII user in Active Directory attempts to access an
Access Manager-protected resource:
... Failure getting users by attribute : cn, value ....
Cause
The username in the attribute is passed without modification as a java string.
Solution
Non-ASCII users can access the resource protected by Kerberos WNA scheme now by
applying this JVM system property (for the built-in WebLogic SPNEGO support):
-Dsun.security.krb5.msinterop.kstring=true

Login Failure for a Protected Page
E-22 Administrator's Guide for Oracle Access Management
E.22.4 Access Tester Does Not Work with Non-ASCII Agent Names
Register a Webgate with Access Manager using a non-ASCII name. In the Access
Tester, enter the valid IP Address, Port, and Agent ID (non-ASCII name), then click
Connect.
Connection testing fails.
E.22.5 Locales, Languages, and Oracle Access Management Console Login Page
When the browser locale is not supported, the Oracle Access Management Console
Login page shows as server locale. It should fall back to English. This is the expected
behavior:
■If the client Locale is not supported, Oracle Access Management falls back to the
server locale.
■If the server locale is not supported, Oracle Access Management falls back to
English.
When users select an unsupported language and come to the Access Manager SSO
page, it shows as server locale (German, for example). However, after logging in, all
the pages are displayed as English.
To fall back to English
Disable the Access Manager SSO page and the original Access Manager login page
also falls back to English.
E.23 Login Failure for a Protected Page
Problem
After installing OAM and protecting a page using a physical host and port, register the
application using the OHS physical host and port. Login fails to prompt the user for
credentials when accessing the protected page. The log file shows that the URL is
re-directed to a Virtual Host despite the fact that all configuration and registration is
setup correctly.
Solution
Remove any Virtual Host Directives from httpd.conf when protecting a page using the
Oracle HTTP Server (OHS) physical host and port.
E.24 OAM Metric Persistence Timer IllegalStateException: SafeCluster
Problem
After using the WebLogic Configuration Wizard to create an OAM Server cluster on
two computers, and starting AdminServer, all servers start up properly. After shut
down, a third server is added using the WebLogic Server Administration Console to
create a new managed server and add it to the cluster. The third server goes into
Running mode when started, with some exceptions in the start up log.
... Exception in thread "OAM Metric Persistence Timer"

RSA SecurID Issues and Logs
Troubleshooting E-23
Solution
in addition to the actions in the WebLogic Administration Console, you must register
the server using the Oracle Access Management Console to ensure that the server can
identify itself.
For server registration details, see "Managing Individual OAM Server Registrations"
on page 6-5.
E.25 Partial Cluster Failure and Intermittent Login and Logout Failures
Problem
In the event of a partial outage of Access Manager (on some, but not all instances of
the cluster), end users might see intermittent login and logout failures.
Workarounds
1. Remove OHS from the deployment
2. Configure the OHS cluster such that each OHS instance is pinned to a WebLogic
Server instance.
3. The WebLogic Server container with the malfunctioning Access Manager
application must be removed from service (shutdown) and brought back up upon
recovery.
E.26 RSA SecurID Issues and Logs
Each OAM SecurID Server must be registered as a separate agent with the RSA
Authentication Manager. This provisions the OAM SecurID Server with its own node
secret file. Every OAM SecurID Server must have its configuration file stored under
$DOMAIN_HOME/config/fmwconfig/servers/$SERVER_NAME/oam.
If the RSA SecurID authentication plug-in returns an error, it is logged in the OAM
Server log. Web Server logs can also provide clues as to what might be going wrong.
Be sure the enable logging on your Web server.
If communication has been established between the Access Server and Authentication
Manager, the
sdadmin
tool provides access to logs under the Report menu. Both
Activity and Exception reports may give you helpful information.
Verify Authentication Manager Logging Configuration and Reports
1. Confirm that you have added the user and assigned a token using the
Authentication Manager Administrator tool,
sdadmin
.
2. Verify that you have copied the
sdconf.rec
file to the OAM Server.
3. In the Authentication Manager console, Report menu, open Activity and
Exception reports for helpful information.
Note: When adding and registering a second server instance for the
same computer, all port numbers must differ: OAM Proxy port; the
"port" that must match the one in the WebLogic Server Console; and
the Coherence port.

Registration Issues
E-24 Administrator's Guide for Oracle Access Management
Check SecurID Plug-In Parameters with Modified HTML Fields
If you have modified the HTML field names in the HTML forms, ensure that the RSA
SecurID plug-in parameters are configured to match.
Remove the @ character From any Login Attribute Value
User login can fail if there is an at-sign (@) in the login attribute value. This is a known
issue with SecurID.
E.27 Registration Issues
Problem: Remote Registration Tool Failure
Solution
Ensure that the agent name is unique (does not already exist) and that the
AdminServer is running.
Problem: No ObAccessClient.xml File Generated
Solution
Protected and public resources must be described as relative URLs of the format
'/index.html'. If the resource does not begin with a '/', no ObAccessClient.xml file will
be generated.Verify the protected and public resource URLs and ensure all begin with
a "/". For more information, see "About the Resource URL, Prefixes, and Patterns" on
page 20-19.
Problem: Partner Registration Failure
Partner registration can fail if you do not supply a unique agent name, which is also
used to create an Application Domain. The agent name and Application Domain name
must be the same and must be unique. Using the oamreg validate command can fail
when the agent name does not match the Application Domain name.
Solution
Ensure that the agent name and Application Domain name are the same.
E.28 Rowkey does not have any primary key attributes Error
While browsing across the Resources table in the Resource Type tab the following error
message is logged:
@ <Error>
<oracle.adfinternal.view.faces.model.binding.CurrencyRowKeySet>
@ <BEA-000000> <ADFv: Rowkey does not have any primary key attributes. Rowkey:
oracle.jbo.Key[], table: model.ResTypeVOImpl@620289.>
This is harmless and does not hinder any functionality.
E.29 SELinux Issues
Delivered with Oracle Enterprise Linux, SELinux modifications provide a variety of
policies through the use of Linux Security Modules (LSM) within the Linux kernel.
SELinux requires performing additional steps after installing Access Manager
Webgates and before starting the associated Web server.

Session Issues
Troubleshooting E-25
Problem
The following errors could be reported in logs/console when starting a Web server on
Linux distributions that have more strict SELinux policies in place (after installing an
Webgate):
11g Webgate
$Webgate_OH/webgate/ohs/lib/webgate.so: cannot restore segment prot after reloc:
Permission denied.
10g Webgate
$Webgate_install_dir/access/oblix/apps/webgate/bin/webgate.so: cannot restore
segment prot after reloc:
Permission denied.
Cause
These errors are reported due to Secure Linux security context policies on files.
Solution
To avoid these errors and start the Web server, run following
chcon
commands to
change the security context on files after installing each Access Manager Web
component and before restarting the associated Web server. For more information on
the
chcon
command, see your Linux documentation.
1. Run chcon -t texrel_shlib_t PATH_TO_LIBWEBPLUGINS.SO. For example:
chcon -t texrel_shlib_t /Webgate_install_dir/access/oblix/lib/webgate.so
... and libxmlengine.so
2. Run chcon -t texrel_shlib_t PATH_TO_LIBWEBGATE.SO. For example:
chcon -t texrel_shlib_t /Webgate_install_dir/access/oblix/apps/webgate/
bin/webgate.so
E.30 Session Issues
This section provides the following details:
■Session Impersonation Not Enabled by Default
■Sessions with Oracle Access Manager 11.1.1 Integrated with Oracle Identity
Federation 11.1.1
E.30.1 Session Impersonation Not Enabled by Default
Session impersonation is not enabled by default. You can update the value in
oam-config.xml, then update the version of oam-config.xml to automatically
propagate the ImpersonationConfig status to all managed servers without a restart.
To enable Session Impersonation
1. Back up DOMAIN_HOME/config/fmwconfig/oam-config.xml.
2. Set
ImpersonationConfig
to
true
:
<Setting Name="ImpersonationConfig" Type="htf:map">
<Setting Name="EnableImpersonation" Type="xsd:boolean">false</Setting>
</Setting>

SSL versus Open Communication
E-26 Administrator's Guide for Oracle Access Management
3. Configuration Version: Increment the
Version xsd:integer
as shown in the next
to last line of this example (existing value (25, here) + 1):
Example:
<Setting Name="Version" Type="xsd:integer">
<Setting xmlns="http://www.w3.org/2001/XMLSchema"
Name="NGAMConfiguration" Type="htf:map:>
<Setting Name="ProductRelease" Type="xsd:string">11.1.1.3</Setting>
<Setting Name="Version" Type="xsd:integer">25</Setting>
</Setting>
4. Save oam-config.xml.
E.30.2 Sessions with Oracle Access Manager 11.1.1 Integrated with Oracle Identity
Federation 11.1.1
Expected Behavior: Oracle Identity Federation 11.1.1 session is not cleared
When Oracle Access Manager 11.1.1 is integrated with Oracle Identity Federation
11.1.1, and you clear the session using the console, only the Oracle Access Manager
session is cleared. The Oracle Identity Federation session is not cleared.
E.31 SSL versus Open Communication
If both the SSL and Open ports of the Managed Server are enabled, then the Managed
Server is set to the SSL port by default.
If you must use the non-ssl port, the credential collector URL the authentication
scheme must be set to the absolute URL which points to 'http' as the protocol and
non-ssl port.
E.32 Start Up Issues
Problem: AdminServer Startup (or Remote Registration Tool Failure) on AIX
Platforms
AdminServer start up fails with following message:
"java.net.SocketException:
No buffer space available".
Configuration for the number of AIX file descriptors set for the operating system is
substantially high (
ulimit
file descriptor) resulting in a buffer overflow that causes
remote registration failure with the following message:
The ulimit value is application dependent and applies exclusively to application
program data and the application stack. The default number of open files setting
(2000) is typically sufficient for most applications. If the value is too low, errors might
occur when opening files or establishing connections. Because this value limits the
number of file descriptors that a server process might open, a value that is too low
prevents optimum performance. For the AIX operating system, the default setting is
2000.

Synchronizing OAM Server Clocks
Troubleshooting E-27
Solution
Increasing the
ulimit
file descriptor limits might improve performance. Increasing
some of the other limits might be needed depending on your application.
1. Log in as root.
2. Perform the following steps to change the open file limit to 10,000 files:
a. Open the command window.
b. Locate and edit /etc/security/limits file to add the following lines to the user
account on which the AdminServer process runs:
nofiles = 10000
nofiles_hard = 10000
c. Save the file and restart AIX.
3. In a command window, decrease the TCP_TIMEWAIT interval with the following
command to set the state to 15 seconds (which allows TCP to release closed
connections faster and increases the number of available resources for open
connections).
/usr/sbin/no –o tcp_timewait =1
4. Tune the following parameters to 256k, as shown:
no -a |grep space
tcp_recvspace = 262144
tcp_sendspace = 262144
udp_recvspace = 262144
udp_sendspace = 262144
5. Tune the following parameters as indicated here:
no -o rfc1323=1
no -o sb_max=4194304
Problem: Connection to OAM Server could not be established: Exception in
connecting to server. Connection refused.
Cause:
This is normal and expected behavior for the Managed Server where the OAM Server
runs because the IAMSuiteAgent agent is started before the OAM Server.
The IAMSuiteAgent is deployed on every WebLogic container. When the WebLogic
container starts, the agent tries to connect to the OAM Server. If it fails to connect, this
message is logged and the agent tries to establish the connection in subsequent
requests. When the agent is successful, this message is no longer displayed.
Solution
If the connection to the OAM Server is not successful, the IAMSuiteAgent falls back
and the WebLogic container handles protection (including login), if it is configured.
E.33 Synchronizing OAM Server Clocks
The state of a session is the source of truth for relying parties. Synchronization of
system clocks of the various Servers is required.

Using Coherence
E-28 Administrator's Guide for Oracle Access Management
The system clock of the relying party might be out of synchronization with the SME
clock. If the relying party's clock is:
■Ahead of the session clock A relying party's request for authentication is made and
the active sessionID is returned.
■Behind the session clock: Event notifications to the relying party help invalidate
the session.
For example, if a Web server clock is ahead of the server clock, a request sent from the
Webgate to the OAM Server will contain a time that, to the OAM Server, has not yet
occurred. This can cause login events to fail. When running in Simple or Cert mode,
time stamps might become out of sync, or the client certificate might appear to be
invalid.
For successful operation:
■Ensure all computer clocks are synchronized. There is no tolerance level. If, for
example, the Webgate clock is even slightly ahead of the OAM Server clock, a
cookie generated by the Webgate will appear to be in the future and can cause
problems in the OAM Server.
■Confirm that the clock on each computer running a Webgate is not running ahead
of the OAM Servers with which it is associated. The OAM Server must be ahead of
the Webgate clock by a maximum of 60 seconds.
E.34 Using Coherence
Access Manager uses Oracle Coherence to replicate session states within a distributed
installation. Coherence is used to communicate state changes between the Oracle
Access Management Console and OAM Servers.
Consider the following 2 distributed deployment topologies. Coherence relies on User
Datagram Protocol (UDP) for cluster discovery and heartbeat. If a firewall exists
between certain components of Access Manager, then the corresponding UDP ports
used by Coherence must be open. Otherwise, Access Manager might not work
correctly.
For example, the UDP ports used by Coherence must be opened as follows:
■The Oracle Access Management Console is deployed within the intranet, and
OAM Servers are deployed in the DMZ. In this case, the UDP ports used by
Coherence must be opened on the firewall between the DMZ and the intranet.
■The Oracle Access Management Console and OAM Servers are deployed in
different security zones of the DMZ, with firewalls between any two adjacent
zones. In this case, the UDP ports used by Coherence must be opened on the
firewall between the adjacent security zones, where one or more instances of
Oracle Access Management Console and OAM Servers run.
Access Manager 11g uses Oracle Coherence to provide a distributed cache with
low-data access latencies and to transparently move data between distributed caches
(and into the session store). Session data is redundant across these tiers. For example,
when a session is created, it then exists within the local cache on the server that created
it, the distributed cache, and (if enabled) within the session store database as well. For
Note: To avoid event notification issues, ensure that all OAM Server
clocks are synchronized to Time Services such as NIST internet time
service.

Web Server Issues
Troubleshooting E-29
more information, see Chapter 17, "Maintaining Access Manager Sessions".
Whether you are viewing Oracle Coherence settings for an individual server instance
or Oracle Coherence details that are common to all OAM Servers, Oracle recommends
that you do not modify Oracle Coherence settings unless requested to do so by an
Oracle Support Representative.
Oracle Coherence logging appears in the WebLogic Server log only. There is no bridge
from Oracle Coherence logging to Access Manager logging.
E.35 Validation Errors
Problem: Resource not added to Authentication or Authorization Policy
While creating an Authentication or Authorization Policy, if you add a resource that is
already used in another Authentication or Authorization Policy, a validation error
appears when you click Apply. This is expected.
If you click OK in the error window and then attempt to add a valid resource that is
not used within another Authentication or Authorization Policy, the resource is not
added and the Authentication or Authorization Policy is not created.
Solution
1. Click Apply and close the Authentication or Authorization Policy page.
2. From the navigation tree, click the named policy again, click the Edit to open the
page, and add the new resource.
Problem: Validation Failure - "description" attribute is not valid
A validation error appears if you enter an optional description longer than 200
characters.
Solution
Keep optional descriptions to 200 characters in length and less than 10 lines.
E.36 Web Server Issues
The following issues with Web servers may arise:
■Server Fails on an Apache Web Server
■Apache v2 on HP-UX
■Apache v2 Bundled with Red Hat Enterprise Linux 4
■Apache v2 Bundled with Security-Enhanced Linux
■Apache v2 on UNIX with the mpm_worker_module for Webgate
■Domino Web Server Issues
■Errors, Loss of Access, and Unpredictable Behavior
WARNING: Oracle recommends that you do not modify Oracle
Coherence settings unless requested to do so by an Oracle Support
Representative.
See Also: Oracle Coherence documentation.

Web Server Issues
E-30 Administrator's Guide for Oracle Access Management
■Known Issues for ISA Web Server
■Oracle HTTP Server Fails to Start with LinuxThreads
■Oracle HTTP Server Webgate Fails to Initialize On Linux Red Hat 4
■Oracle HTTP Server Web Server Configuration File Issue
■Issues with IIS v6 Web Servers
■PCLOSE Error When Starting Sun Web Server
■Removing and Reinstalling IIS DLLs
E.36.1 Server Fails on an Apache Web Server
Symptom: You are running an Apache Web server, and an OAM Server fails,
displaying the following message:
libthread panic: cannot create new lwp
(PID: 9035 LWP 2). stackrace:
ff3424cc
0
This symptom may be caused by the Apache Web server launching more instances of
itself. This can happen when the server determines that more instances are needed to
service the number of connections between one or more Webgates and the OAM
Server.
The additional instances create even more connections, which exceed the number of
connections by the OAM Server.
Solution: Reduce the number of
MinSpareServers
,
MaxSpareServers
,
StartServers
,
and
MaxClients
parameters.
Go to the OAM Server's configuration directory and open the
http.d
configuration
file.
Recommended parameter settings:
■
MinSpareServers
1
■
MaxSpareServers
5
■
StartServers
3
■
MaxClients
5
E.36.2 Apache v2 on HP-UX
When running Apache v2 on HP-UX, do not use
nobody
for User or Group, because
shared memory may not work. Instead, use your login name as User Name with a
your group as Group Name On HP-UX (on Solaris, "www" is equivalent to "nobody").
When running Apache v2 on HPUX 11.11, ensure that the
AcceptMutex
directive in the
Apache httpd.conf file is set to "
fcntl
". If the directive is not present, add it to the
httpd.conf file (
AcceptMutex fcntl
). For more information, see:
http://issues.apache.org/bugzilla/show_bug.cgi?id=22484
E.36.3 Apache v2 Bundled with Red Hat Enterprise Linux 4
After installing a Webgate on vendor-bundled Apache, the Web server may give the
following error upon startup:

Web Server Issues
Troubleshooting E-31
Error: Cannot load libgcc_s.so.1 library - Permission denied.
Solution: Change the Security-Enhanced Linux (SELinux) policy rules for Access
Manager Webgates as described in "Tuning Apache/IHS v2 Webgates for Access
Manager" on page 26-27.
E.36.4 Apache v2 Bundled with Security-Enhanced Linux
Errors might be reported in WebServer logs/console when starting a Web server on
Linux distributions, which have stricter SELinux policies in place, after installing an
Access Manager Web component. You can avoid these errors by running appropriate
chcon
commands for the installed Web component before restarting the Web server.
E.36.5 Apache v2 on UNIX with the mpm_worker_module for Webgate
The following item is required only if you compile Apache v2 for Webgate on UNIX
with the mpm_worker_module. In this case, you need to modify the thread.c file from
the Apache source for the UNIX environment. Making this change ensures that the
default pthread stacksize for Webgate produces optimal performance during
multi-threaded server implementation. If this change is not made, the default pthread
stack size would not be sufficient for Webgate and could result in a crash.
Apache 2.0 does not support the ThreadStackSize option. Therefore:
■With UNIX-based Apache v2.1 and later you must use the ThreadStackSize
directive to set the size of the stack (for autodata) of threads that handle client
connections and call modules to help process those connections.
■With UNIX-based Apache 2, it is best to use the compilable source while adding
the mpm_worker_module and changing the thread.c file to avoid a stack overflow.
The following procedure shows how to modify the Apache v2.0 thread.c file to
provide the default pthread stacksize needed by Webgate for optimal performance
during multi-threaded server implementation. For details about the Apache v2.1+
ThreadStackSize directive, see
http://httpd.apache.org/docs/2.2/mod/mpm_
common.html#threadstacksize.
To modify the Apache v2.0 thread.c file for Webgate in a UNIX environment
1. Locate the thread.c file. For example:
APACHE 2.0.52 source/srclib/apr/threadproc/unix/thread.c
2. Locate the function named apr_threadattr_create(apr_threadattr_t **new,apr_
pool_t *pool) in the following code segment:
**new,apr_pool_t *pool) in the following code segment:
1-----> apr_status_t stat;
2
3-----> (*new) = (apr_threadattr_t *)apr_pcalloc(pool, sizeof(apr_threadattr_
t));
4-----> (*new)->attr = (pthread_attr_t *)apr_pcalloc(pool, sizeof(pthread_attr_
t));
See Also: "SELinux Issues" on page E-24
Note: The following procedure should be performed only for the
Apache 2.0 Webgate. Otherwise, the default pthread stack size is not
sufficient for the Webgate and could result in a crash.

Web Server Issues
E-32 Administrator's Guide for Oracle Access Management
5
6-----> if ((*new) == NULL || (*new)->attr == NULL) {
7-----> return APR_ENOMEM;
8-----> }
9
10----->(*new)->pool = pool;
11----->stat = pthread_attr_init((*new)->attr);
12
13-----> if (stat == 0) {
14-----> return APR_SUCCESS;
15-----> }
16----->#ifdef PTHREAD_SETS_ERRNO
17----->stat = errno;
18----->#endif
19
20----->return stat;
21
3. Add the following code before line 13 shown earlier.
int stacksize = 1 << 20;
pthread_attr_setstacksize(&(*new)->attr, stacksize);
4. Run configure, make, and make install to set up the Apache Web server with the
mpm_worker_module.
E.36.6 Domino Web Server Issues
Failure Authentication Event: For Domino Web servers, the redirection of a URL
through Access Manager may not work if the authentication type is set as Basic Over
LDAP and the URL to be redirected is mentioned as one of the following:
Either a relative path present on the same Web server
Or the Full path URL on the same Web server containing a computer name
defined in the host identifier string combinations.
To overcome a failure authentication event, you must set the redirected URL with a
computer name that is not defined under the host identifier group. For example, the IP
address of the computer.
This problem does not occur with a form-based authentication type.
Header Variables: It may not be possible to pass header variables other than
REMOTE_USER to Webgates installed on Lotus Notes Domino Web servers when
using Client Certificate authentication scheme.
For example, header variables cannot be set on the one request where Client Certificate
authentication occurs. However, all other requests do allow header variables to be set.
For more information, see Chapter 29, "Configuring Lotus Domino Web Servers for
10g WebGates".
E.36.7 Errors, Loss of Access, and Unpredictable Behavior
Symptom: If you installed Access Manager on UNIX under a different user ID than
you used to create your Web server instance, Access Manager can become unstable.
Users may experience behavior such as:
■Random bug report pages

Web Server Issues
Troubleshooting E-33
■Failure to write to log file errors
■Loss of access to Web pages
Solution: Change file permissions using the chown command. Change the Access
Manager directory to the same user ID that you used to create your Web server
instance.
E.36.8 Known Issues for ISA Web Server
Webgate uses ISAPI extension for displaying user deny error message and for
displaying the diagnostic page. However, ISA 2006 does not support extensions.
Therefore:
■If the user is denied access by Webgate, the user gets Page Cannot be displayed
error message instead of Access Manager denied access error message.
■The following diagnostic URL does not work for ISA:
http(s)://hostname:port/access/oblix/apps/webgate/bin/webgate.dll?progid=1
for webgate.
E.36.9 Oracle HTTP Server Fails to Start with LinuxThreads
After installing a Webgate instance on an Oracle HTTP Server, the server does not start
up. This occurs because Access Manager uses an older Linux threading model.
Solution: When using LinuxThreads mode, comment out the Perl module in the
httpd.conf file, update the LD_ASSUME_KERNEL environment variable, and restart,
as described in the following procedure.
To resolve the failure to start Oracle HTTP Server in LinuxThreads mode
1. Comment out the Perl module in the httpd.conf file in the following location:
Oracle HTTP Server 11g:
$ORACLE_INSTANCE/config/OHS/ohs_name/httpd.conf
Oracle HTTP Server v2:
OH$/ohs/conf/httpd.conf
Oracle HTTP Server v1.3:
OH$/Apache/Apache/conf/httpd.conf
2. To update the LD_ASSUME_KERNEL value, open the following file in a text
editor:
OH$/opmn/conf/opm.xml
3. Find the following line:
<process-type id="HTTP_Server" module-id="OHS">
Add the following information under the line you found in the previous step:
<environment>
<variable id="LD_ASSUME_KERNEL" value="2.4.19" />
</environment>
4. Save this file.
Note: When running Access Manager, LinuxThreads is used by
default. This requires setting the environment variable LD_ASSUME_
KERNEL to 2.4.19. If you are using NPTL with Access Manager, you
do not set LD_ASSUME_KERNEL to 2.4.19.9

Web Server Issues
E-34 Administrator's Guide for Oracle Access Management
5. Run the following commands to implement your changes:
opmnctl stopall
opmnctl startall
E.36.10 Oracle HTTP Server Webgate Fails to Initialize On Linux Red Hat 4
This situation might arise whether you are using Access Manager with LinuxThreads
or NPTL.
Symptom: Webgate fails to initialize when installed on an Oracle HTTP Server
running Red Hat Enterprise Server version 4.0 with a kernel version lower than
2.6.9-34.EL. Version 2.6.9-34.EL is supplied with the Red Hat version 4, update 3.
Solution: To prevent this problem, you must upgrade to Red Hat version 4, update 3
or higher.
E.36.11 Oracle HTTP Server Web Server Configuration File Issue
Problem
With Oracle Application Server 10.1.x, OC4J, when the httpd.conf file is modified
automatically during Webgate installation, it can be corrupted.
Solution
Before installing Webgate, run the following command to prevent the httpd.conf file
from being overwritten.
$ORACLE_HOME/dcm/bin/dcmctl updateConfig -ct ohs
E.36.12 Issues with IIS v6 Web Servers
On IIS 6 Web servers only, you must run the WWW service in IIS 5.0 isolation mode,
which is a requirement of the ISAPI postgate filter. This scenario will work if you have
32-bit Access Manager binaries running on a 32-bit Windows operating system.
However, there is an issue if you attempt to run a 32-bit postgate.dll on a 64-bit
Windows machine with IIS running in 32-bit mode.
Problem
When running IIS in IIS5.0 isolation mode, you see the following message:
"ISAPI Filter 'C:\webgate\access\oblix\apps\webgate\bin\webgate.dll' could not be
loaded due to a configuration problem.
Cause
The current configuration only supports loading images built for an AMD 64-bit
processor architecture. The data field contains the error number.
Solution
To learn more about this issue, including how to troubleshoot this kind of processor
architecture mismatch error, see the following Web site:
http://go.microsoft.com/fwlink/?LinkId=29349
For more information, see Help and Support Center at:
http://go.microsoft.com/fwlink/events.asp

Web Server Issues
Troubleshooting E-35
Problem
IIS5 never existed as 64-bit. However, IIS v6's IIS5 Compatibility Mode on 64-bit
Windows computers only runs as 64-bit.
Cause
It is architecturally impossible run IIS5 Isolation Mode 32- bit on 64-bit Windows, as
described in documentation available through the following URLs:
http://www.microsoft.com/communities/newsgroups/en-us/default.aspx?dg=microsoft.pu
blic.inetserver.iis&tid=5dd07102-8896-40cc-86cb-809060fa9426&cat=en_US_
02ceb021-bb43-476d-8f8f-6c00a363ccf5&lang=en&cr=US&p=1
http://blogs.msdn.com/david.wang/archive/2005/12/14/HOWTO-Diagnose-one-cause-of-W3
SVC-failing-to-start-with-Win32-Error-193-on-64bit-Windows.aspx
E.36.13 PCLOSE Error When Starting Sun Web Server
Symptom: When attempting to start the Sun Web server, you get an error like the
following:
Unable to start, PCLOSE
Solution: A number of problems can cause this error:
■A syntax error in your
obj.conf
file
■Leading spaces in your
obj.conf
file
■Installing Access Manager as a different user ID than what you used to create your
Web server instance
■A carriage return at the end of the
obj.conf
file
E.36.14 Removing and Reinstalling IIS DLLs
When Access Manager is running with Microsoft's IIS Web server, you must manually
uninstall and reinstall the following ISAPI filters when reinstalling Access Manager.
■
tranfilter.dll
■
oblixlock.dll
(if you installed Webgate)
■
webgate.dll
(if you installed Webgate)
To remove and reinstall IIS DLLs
1. Uninstall Access Manager.
2. Manually uninstall the preceding DLLs.
3. Reinstall Access Manager.Active Directory.
4. Manually reinstall the DLLs.
Note: These filters can change depending on the version of IIS you
are using. If these filters do not exist or there are others present,
contact Oracle to determine if the filters that are present need to be
removed.

Windows Native Authentication
E-36 Administrator's Guide for Oracle Access Management
E.37 Windows Native Authentication
Problem
After setting up Windows Native Authentication, and accessing the WNA-protected
page, the browser might give an error indicating that the user name and/or password
are incorrect.
Cause
The Identity Store used by Oracle Access Management might not point to Windows
Active Directory. By default, the identity store is Embedded LDAP.
Solution
1. In the Oracle Access Management Console, review the identity store
configuration: System Configuration, Data Sources, User Identity Store.
2. Confirm the LDAP store settings point to Active Directory.
