Oracle Fusion Middleware System Administrator’s Guide For Content Server Administrators
User Manual:
Open the PDF directly: View PDF ![]() .
.
Page Count: 644 [warning: Documents this large are best viewed by clicking the View PDF Link!]
- Contents
- Preface
- What's New in This Guide
- 1 Introduction to Oracle Content Server Administration
- 2 Using Fusion Middleware Control to Manage Oracle Universal Content Management
- 2.1 Displaying the Fusion Middleware Control User Interface
- 2.2 Navigating to the Home Page for Oracle Content Server
- 2.3 Starting and Shutting Down Oracle Content Server
- 2.4 Modifying Configuration Parameters for Oracle Content Server
- 2.5 Viewing Performance Information for Oracle Content Server
- 2.6 Viewing Log Information for Oracle Content Server
- 2.7 Viewing MBean Information for Oracle Content Server
- 3 Managing System Processes
- 3.1 Starting, Stopping, and Restarting Oracle Content Server
- 3.2 Accessing Oracle Content Server With a Browser
- 3.3 Managing Oracle Content Server With the Admin Server
- 3.4 Starting Oracle Content Server Administration Applications
- 3.4.1 Running Administration Applications as Applets
- 3.4.2 Running Administration Applications in Standalone Mode
- 3.4.2.1 Configuring a SystemDatabase Provider for Standalone Mode
- 3.4.2.2 Configuring a JDBC Database Driver for Standalone Mode
- 3.4.2.3 Configuring an External Database Provider for Standalone Mode
- 3.4.2.4 Running a Standalone Application on a UNIX System
- 3.4.2.5 Running a Standalone Application on a Windows System
- 3.5 Using the IdcShell Command-Line Tool
- 3.6 Batch Loading Content
- 3.6.1 About Batch Loading
- 3.6.2 Preparing a Batch Load File
- 3.6.3 Running the Batch Loader
- 3.6.3.1 About Running the Batch Loader
- 3.6.3.2 Batch Loading from the Batch Loader Screen
- 3.6.3.3 Batch Loading from the Command Line
- 3.6.3.4 Using the IdcCommand Utility and Remote Access
- 3.6.3.5 Batch Loading Content as Metadata Only
- 3.6.3.6 Batch Loader -console Command Line Switch
- 3.6.3.7 Adding a Redirect
- 3.6.3.8 Correcting Batch Load Errors
- 3.6.4 Optimizing Batch Loader Performance
- 3.7 Finding Status and Error Information
- 3.7.1 Log Files
- 3.7.2 Configuration Information
- 3.7.3 System Audit Information
- 3.7.4 Monitoring Scheduled Jobs
- 3.7.5 Tracing
- 3.7.6 Environment Packager
- 3.7.7 Content Server Analyzer
- 3.7.7.1 Accessing the Content Server Analyzer
- 3.7.7.2 Specifying a Custom Analyzer Log Directory
- 3.7.7.3 Invoking the Analysis Process
- 3.7.7.4 Analyzing the Oracle Content Server Database
- 3.7.7.5 Analyzing the Oracle Content Server Search Index
- 3.7.7.6 Analyzing the Oracle Content Server File System
- 3.7.7.7 Viewing the Analysis Progress and Results
- 3.7.7.8 Generating a Status Report
- 3.7.7.9 Canceling the Status Report
- 3.7.8 Configuration Debug Entry
- 3.7.9 Stack Traces
- 4 Managing System Settings
- 4.1 Configuring System Properties
- 4.2 Configuring the Search Index
- 4.2.1 Variances in Indexing Tools and Methods
- 4.2.2 Working with the Search Index
- 4.2.3 Managing Zone Text Fields
- 4.2.4 Indexing with Databases
- 4.2.5 Searching Content Using the Oracle Query Optimizer Component
- 4.2.5.1 About The Oracle Query Optimizer Component
- 4.2.5.2 Query Optimization Process
- 4.2.5.3 How Reformatted Queries Optimize Searches
- 4.2.5.4 Types of Recognized Hints
- 4.2.5.5 Query Hints Syntax
- 4.2.5.6 Additional Supported Sort Constructs
- 4.2.5.7 The Hint Rules Table
- 4.2.5.8 Hint Rules Table Column Descriptions
- 4.2.5.9 Edit Hint Rules Form
- 4.2.5.10 The Hint Cache
- 4.2.5.11 Using Hint Rules
- 4.2.5.12 Using the Query Converter
- 4.2.5.13 Updating the Hint Cache
- 4.2.5.13.1 Accessing the Hint Cache Updater Page
- 4.2.5.13.2 Checking the Hint Cache from a Data Source
- 4.2.5.13.3 Checking from a Query
- 4.2.5.13.4 Modifying an Existing Hint Cache Query Using Data Source
- 4.2.5.13.5 Modifying an Existing Hint Cache Using a Query
- 4.2.5.13.6 Removing a Hint Cache Data Source Entry
- 4.2.5.13.7 Removing a Hint Cache Query
- 4.3 Configuring a File Store System
- 4.3.1 Introduction to the File Store System
- 4.3.2 FileStoreProvider Upgrade
- 4.3.3 Configuring FileStoreProvider
- 4.3.4 FileStoreProvider Resource Tables
- 4.3.5 FileStoreProvider Sample Implementations
- 4.4 Mapping URLs with WebUrlMapPlugin
- 4.5 Connecting to Outside Entities with Providers
- 4.5.1 About Providers
- 4.5.2 Managing Providers
- 4.5.2.1 Adding an Outgoing Provider
- 4.5.2.2 Adding a Database Provider
- 4.5.2.3 Adding an Incoming Provider
- 4.5.2.4 Adding a Preview Provider
- 4.5.2.5 Adding an Incoming Security Provider
- 4.5.2.6 Adding an Outgoing Security Provider
- 4.5.2.7 Adding a JPS User Provider
- 4.5.2.8 Adding an HTTP Outgoing Provider
- 4.5.2.9 Editing Provider Information
- 4.5.2.10 Deleting a Provider
- 5 Managing Security and User Access
- 5.1 Introduction to Oracle UCM and Oracle Content Server Security
- 5.2 Oracle Fusion Middleware Security Configuration for Oracle UCM
- 5.2.1 LDAP Authentication Providers
- 5.2.2 Configuring Oracle UCM to Use SSL
- 5.2.2.1 Configuring Oracle UCM for Two-Way SSL Communication
- 5.2.2.2 Invoking References in One-Way SSL Environments in Oracle JDeveloper
- 5.2.2.3 Configuring Oracle ECM Suite, Oracle HTTP Server for SSL Communication
- 5.2.2.4 Switching from Non-SSL to SSL Configurations for Oracle UCM
- 5.2.2.5 Configuring SSL Between Oracle UCM Instances and Oracle WebCache
- 5.2.2.6 Using a Custom Trust Store for One-Way SSL During Design Time
- 5.2.2.7 Enabling an Asynchronous Process to Invoke An Asynchronous Process
- 5.2.2.8 Configuring RIDC SSL for Valid Certificate Path
- 5.2.3 Configuring Oracle UCM for Single Sign-On
- 5.2.3.1 Configuring Oracle Access Manager 11g with Oracle UCM
- 5.2.3.2 Configuring Oracle Access Manager 10g with Oracle UCM
- 5.2.3.3 Configuring Oracle Single Sign-On for Oracle UCM
- 5.2.3.4 Configuring the First Authentication Provider
- 5.2.3.5 Configuring the Oracle UCM URL for Single Sign-On
- 5.2.3.6 Configuring Oracle UCM and Single Sign-On for WNA
- 5.2.4 Configuring Oracle WebLogic Server Web Services
- 5.3 User Types, Logins, and Aliases
- 5.4 Security Groups, Roles and Permissions
- 5.5 Accounts
- 5.5.1 Introduction to Oracle Content Server Accounts
- 5.5.2 Managing Oracle Content Server Accounts
- 5.5.2.1 Enabling Accounts on Oracle Content Server
- 5.5.2.2 Creating Predefined Accounts on Oracle Content Server
- 5.5.2.3 Creating Accounts When Checking In Content on Oracle Content Server
- 5.5.2.4 Deleting Predefined Accounts on Oracle Content Server
- 5.5.2.5 Assigning Accounts to a User with Oracle WebLogic Server
- 5.5.3 An Oracle Content Server Accounts Case Study
- 5.6 Access Control List Security
- 5.7 Oracle Content Server User Information Provider
- 5.8 Additional Oracle Content Server Security Connections
- 5.9 Oracle Content Server Communication Customization
- 6 Managing Components
- 6.1 About Components
- 6.2 Using the Component Manager
- 6.3 Using the Component Wizard
- 6.3.1 Component Wizard Overview
- 6.3.2 Creating a Component
- 6.3.2.1 Creating an Environment Resource
- 6.3.2.2 Creating a Template Resource
- 6.3.2.3 Creating a Query Resource
- 6.3.2.4 Creating a Service Resource
- 6.3.2.5 Creating an HTML Include
- 6.3.2.6 Creating a String Resource
- 6.3.2.7 Creating a Dynamic Table Resource
- 6.3.2.8 Creating a Static Table Resource
- 6.3.2.9 Enabling the Component
- 6.3.3 Additional Component Wizard Tasks
- 6.4 Using the Command Line
- 7 Managing Search Tools
- 7.1 OracleTextSearch
- 7.2 Oracle Secure Enterprise Search
- 7.2.1 Using Oracle SES as an External Full-Text Search Engine
- 7.2.2 Using SESCrawlerExport for Oracle SES to Search Oracle Content Server Content
- 8 Managing System Migration and Archiving
- 8.1 Introduction to Migration Tools and Components
- 8.2 Migrating System Configurations
- 8.2.1 Configuration Migration Utility
- 8.2.2 Migration Tips
- 8.2.3 Managing Configuration Migration
- 8.2.3.1 Creating a Configuration Migration Template
- 8.2.3.2 Editing a Configuration Template
- 8.2.3.3 Importing a Template
- 8.2.3.4 Creating a One-Time Export
- 8.2.3.5 Exporting a Configuration
- 8.2.3.6 Uploading a Bundle
- 8.2.3.7 Importing a Bundle
- 8.2.3.8 Downloading a Bundle
- 8.2.3.9 Viewing Status Information
- 8.3 Archives, Collections and Batch Files
- 8.4 Exporting Data in Archives
- 8.5 Importing Data
- 8.6 Transferring Files
- 8.7 Replicating Files
- 8.8 Archive and Migration Strategies
- 8.9 Folder Archiving
- 8.10 Folder Structure Archiving
- 8.11 Archiver Replication Exceptions
- 8.12 Troubleshooting Archiving Issues
- 8.12.1 Importing Issues
- 8.12.1.1 File Extension Errors on Import System
- 8.12.1.2 Selecting Specific Batch Files for Import
- 8.12.1.3 Import Maps Do Not Work After Archive Import
- 8.12.1.4 Identifying Imported Content Items From Archive
- 8.12.1.5 Duplicate Content Items in Oracle Content Server
- 8.12.1.6 Importing Archived Content to Proxied Server Fails
- 8.12.1.7 No Importing Errors But Documents Are Missing
- 8.12.1.8 Errors About Invalid Choice List Values
- 8.12.1.9 Import Fails Due to Missing Required Field
- 8.12.1.10 Changed Metadata Field Makes the Archiver Freeze During an Import
- 8.12.2 Exporting Issues
- 8.12.3 Transfer Issues
- 8.12.4 WebDAV Issues
- 8.12.5 Replication Issues
- 8.12.6 Oracle-Specific Issues
- 8.12.7 Miscellaneous Issues
- 8.12.1 Importing Issues
- A User Interface
- A.1 System Properties and Settings Interface
- A.1.1 Admin Server Interface
- A.1.2 System Properties Configuration Interface
- A.1.3 Indexing and Search Content Interface
- A.1.3.1 Repository Manager: Indexer Tab
- A.1.3.2 Automatic Update Cycle Screen
- A.1.3.3 Collection Rebuild Cycle Screen
- A.1.3.4 Indexer Rebuild Screen
- A.1.3.5 Admin Actions Page
- A.1.3.6 Zone Fields Configuration Page
- A.1.3.7 Oracle Query Optimizer Page
- A.1.3.8 Hint Rules Configuration Page
- A.1.3.9 Query Converter Page
- A.1.3.10 Hint Cache Updater Page
- A.1.4 File Store Administration Interface
- A.1.5 Web Server Interface
- A.1.6 Provider Interface
- A.1.6.1 Providers Page
- A.1.6.2 Provider Information Page
- A.1.6.3 Add/Edit Provider Page
- A.1.6.4 Outgoing Socket Provider Page
- A.1.6.5 Database Provider Page
- A.1.6.6 Incoming Provider Page
- A.1.6.7 Preview Provider Page
- A.1.6.8 LDAP Provider Page
- A.1.6.9 keepaliveincoming Provider Page
- A.1.6.10 keepaliveoutgoing Provider Page
- A.1.6.11 sslincoming Provider Page
- A.1.6.12 ssloutgoing Provider Page
- A.1.6.13 JPS User Provider Page
- A.1.6.14 Outgoing Http Provider Page
- A.1.7 Batch Loader Interface
- A.1.8 Content Server Analyzer Interface
- A.1.9 Error and Status Information Interface
- A.2 Security and User Access Interface
- A.2.1 Security Administration Interface
- A.2.2 Groups, Roles, and Permissions Interface
- A.2.3 Accounts Interface
- A.2.4 User Login and Alias Interface
- A.2.4.1 User Admin Screen: Users Tab
- A.2.4.2 Choose/Change the Authorization Type Screen
- A.2.4.3 Add/Edit User Screen
- A.2.4.4 Add/Edit User Screen: Info Tab (Local User)
- A.2.4.5 Add/Edit User Screen: Info Tab (Global User)
- A.2.4.6 Add/Edit User Screen: Roles Tab
- A.2.4.7 Add Role Screen
- A.2.4.8 Add/Edit User Screen: Accounts Tab
- A.2.4.9 Option List Screen
- A.2.4.10 User Admin Screen: Aliases Tab
- A.2.4.11 Add New Alias/Edit Alias Screen
- A.2.4.12 Select Users Screen
- A.2.4.13 Sub-Administration Interface: Edit Rights Screen
- A.2.4.14 User Admin Screen: Information Fields Tab
- A.2.4.15 Add Metadata Field Name Screen
- A.2.4.16 Edit Metadata Field Screen
- A.2.4.17 Update Database Design Screen
- A.2.5 Proxy Connections Interface
- A.3 Components Interface
- A.3.1 Component List Screen
- A.3.2 Component Wizard Main Screen
- A.3.3 Component Creation Screens
- A.3.3.1 Add Component Screen
- A.3.3.2 Install Screen
- A.3.3.3 Component Configuration Screen
- A.3.3.4 Add/Edit Action Screen
- A.3.3.5 Add Screen
- A.3.3.6 Add Query Table Information Screen
- A.3.3.7 Add Service Table Information Screen
- A.3.3.8 Add Dynamic Resource Table Information Screen
- A.3.3.9 Add Static Resource Table Information Screen
- A.3.3.10 Add Template Table Information Screen
- A.3.3.11 Add/Edit HTML Resource Include/String Screen
- A.3.3.12 Add/Edit Parameter Screen
- A.3.3.13 Add/Edit Query Screen
- A.3.3.14 Add Resource Screen
- A.3.3.15 Resource Selection Dialog Screen
- A.3.3.16 Add/Edit Service Screen
- A.3.3.17 Preview Information for Service Screen
- A.3.3.18 Preview Action Information Screen
- A.3.3.19 Add/Edit SearchResults Template Screen
- A.3.3.20 Column Information Screen
- A.3.3.21 Add/Edit Intradoc Template Screen
- A.3.3.22 Add/Edit Preference Screen
- A.3.4 Build Screens
- A.3.5 Component Manager Page
- A.3.6 Advanced Component Manager Page
- A.3.7 Update Component Configuration Interface
- A.3.7.1 Folders_g Update Component Configuration Screen
- A.3.7.2 PDF Watermark Update Component Configuration Screen
- A.3.7.3 Content Tracker Update Component Configuration Screen
- A.3.7.4 Content Tracker Reports Update Component Configuration Screen
- A.3.7.5 Site Studio Update Component Configuration Screen
- A.4 System Migration Interface
- A.4.1 Configuration Migration Interface Screens
- A.4.1.1 Migration Options
- A.4.1.2 Upload Configuration Bundle Screen
- A.4.1.3 Configuration Bundles Page
- A.4.1.4 Configuration Templates Page
- A.4.1.5 Config Migration Admin Screen
- A.4.1.6 Content Server Sections
- A.4.1.7 Preview Screen
- A.4.1.8 Edit Export Rule Screen
- A.4.1.9 Latest Action Screen
- A.4.1.10 Action History Page
- A.4.2 Archive, Collection, and Batch Interface
- A.4.2.1 Main Archiver Screen
- A.4.2.2 Archiver (General Tab)
- A.4.2.3 Add Archive Screen
- A.4.2.4 Copy Archive Screen
- A.4.2.5 Open Archive Collection Screen
- A.4.2.6 Find Archive Collection Definition File Screen
- A.4.2.7 Browse To Archiver Collection Screen
- A.4.2.8 Browse for Proxied Collection Screen
- A.4.2.9 View Batch Files Screen
- A.4.2.10 View Exported Content Items Screen
- A.4.3 Export Interface Screens
- A.4.3.1 Main Archiver Export Screen
- A.4.3.2 Export Data (Content) Screen
- A.4.3.3 Edit Export Query (Content) Screen
- A.4.3.4 Edit Export Options Screen
- A.4.3.5 Previewing Export Queries (Content) Screen
- A.4.3.6 Main Archiver Export Screen (Table)
- A.4.3.7 Add New/Edit Table Screen
- A.4.3.8 Edit Export Query (Table) Screen
- A.4.3.9 Previewing Export Queries (Table) Screen
- A.4.3.10 Export Archive Screen
- A.4.4 Import Interface Screens
- A.4.4.1 Import Maps Main Screen
- A.4.4.2 Import Maps (Content) Screen
- A.4.4.3 Edit Field Map/Edit Value Map Screen
- A.4.4.4 Browse for Fields/Value Screen
- A.4.4.5 Import Maps (Table) Screen
- A.4.4.6 Edit Archive Properties on Table Screen
- A.4.4.7 Edit Import Options (Select Rules) Screen
- A.4.4.8 Import Archive Screen
- A.4.5 Replication Interface Screens
- A.4.6 Transfer Interface Screens
- A.4.7 Folder Archive Configuration Page
- A.4.1 Configuration Migration Interface Screens
- A.1 System Properties and Settings Interface
- B Need to Know Component
- B.1 Introduction to Need to Know
- B.2 Installing the NTK Component
- B.3 Configuring the NTK Component
- B.4 Using the NTK Component
- B.5 NTK Administration Interface
- B.6 Security Customization Samples
- Index

Oracle® Fusion Middleware
System Administrator's Guide for Oracle Content Server
11g Release 1 (11.1.1)
E10792-03
April 2011
Oracle Fusion Middleware System Administrator's Guide for Oracle Content Server, 11g Release 1 (11.1.1)
E10792-03
Copyright © 2010, 2011, Oracle and/or its affiliates. All rights reserved.
Primary Author: Karen Johnson
Contributors: Prafulla Bhalekar, Brian Cheyne, Alec Han, Rene Madsen, Arun Mannava, Ron Mellum, Liju
Nair, Mark Plotnick, Evan Suits, Hui Ye
This software and related documentation are provided under a license agreement containing restrictions on
use and disclosure and are protected by intellectual property laws. Except as expressly permitted in your
license agreement or allowed by law, you may not use, copy, reproduce, translate, broadcast, modify,
license, transmit, distribute, exhibit, perform, publish, or display any part, in any form, or by any means.
Reverse engineering, disassembly, or decompilation of this software, unless required by law for
interoperability, is prohibited.
The information contained herein is subject to change without notice and is not warranted to be error-free. If
you find any errors, please report them to us in writing.
If this software or related documentation is delivered to the U.S. Government or anyone licensing it on
behalf of the U.S. Government, the following notice is applicable:
U.S. GOVERNMENT RIGHTS Programs, software, databases, and related documentation and technical data
delivered to U.S. Government customers are "commercial computer software" or "commercial technical
data" pursuant to the applicable Federal Acquisition Regulation and agency-specific supplemental
regulations. As such, the use, duplication, disclosure, modification, and adaptation shall be subject to the
restrictions and license terms set forth in the applicable Government contract, and, to the extent applicable
by the terms of the Government contract, the additional rights set forth in FAR 52.227-19, Commercial
Computer Software License (December 2007). Oracle USA, Inc., 500 Oracle Parkway, Redwood City, CA
94065.
This software is developed for general use in a variety of information management applications. It is not
developed or intended for use in any inherently dangerous applications, including applications which may
create a risk of personal injury. If you use this software in dangerous applications, then you shall be
responsible to take all appropriate fail-safe, backup, redundancy, and other measures to ensure the safe use
of this software. Oracle Corporation and its affiliates disclaim any liability for any damages caused by use of
this software in dangerous applications.
Oracle is a registered trademark of Oracle Corporation and/or its affiliates. Other names may be trademarks
of their respective owners.
This software and documentation may provide access to or information on content, products, and services
from third parties. Oracle Corporation and its affiliates are not responsible for and expressly disclaim all
warranties of any kind with respect to third-party content, products, and services. Oracle Corporation and
its affiliates will not be responsible for any loss, costs, or damages incurred due to your access to or use of
third-party content, products, or services.

iii
Contents
Preface ............................................................................................................................................................. xxv
Audience................................................................................................................................................... xxv
Documentation Accessibility................................................................................................................. xxv
Related Documents ................................................................................................................................. xxvi
Conventions ............................................................................................................................................. xxvi
What's New in This Guide................................................................................................................... xxvii
New Features for 11g Release 1 (11.1.1) .............................................................................................. xxvii
Changed Features for 11g Release 1 (11.1.1)........................................................................................ xxx
1 Introduction to Oracle Content Server Administration
1.1 Understanding Oracle Universal Content Management and Oracle Content Server ...... 1-1
1.2 Administrative Accounts and Responsibilities ...................................................................... 1-2
1.3 Oracle Content Server Administration Tools ......................................................................... 1-2
1.3.1 Oracle Enterprise Manager Fusion Middleware Control Console............................... 1-3
1.3.2 Oracle WebLogic Server Administration Console.......................................................... 1-3
1.3.3 Oracle WebLogic Scripting Tool (WLST) ......................................................................... 1-4
1.4 Oracle Content Server Administration Utilities and Applets .............................................. 1-4
1.4.1 Administration Interfaces................................................................................................... 1-4
1.4.1.1 Utilities ........................................................................................................................... 1-5
1.4.1.2 Management Pages ...................................................................................................... 1-5
1.4.1.3 Applications .................................................................................................................. 1-5
1.4.1.4 Command Line ............................................................................................................. 1-5
1.4.2 Administration Tray............................................................................................................ 1-6
1.4.3 Admin Applets Page ........................................................................................................... 1-6
2 Using Fusion Middleware Control to Manage Oracle Universal Content
Management
2.1 Displaying the Fusion Middleware Control User Interface ................................................. 2-1
2.2 Navigating to the Home Page for Oracle Content Server..................................................... 2-2
2.3 Starting and Shutting Down Oracle Content Server ............................................................. 2-4
2.3.1 Starting Oracle Content Server .......................................................................................... 2-4
2.3.2 Shutting Down Oracle Content Server............................................................................. 2-4
2.4 Modifying Configuration Parameters for Oracle Content Server ....................................... 2-4
2.4.1 Modifying Server Configuration Parameters for Oracle Content Server.................... 2-4
iv
2.4.2 Modifying E-mail Configuration Parameters for Oracle Content Server.................... 2-5
2.5 Viewing Performance Information for Oracle Content Server ............................................ 2-6
2.6 Viewing Log Information for Oracle Content Server............................................................ 2-7
2.7 Viewing MBean Information for Oracle Content Server ...................................................... 2-8
3 Managing System Processes
3.1 Starting, Stopping, and Restarting Oracle Content Server ................................................... 3-1
3.1.1 Starting Oracle Content Server .......................................................................................... 3-2
3.1.1.1 Starting Oracle Content Server with the Oracle WebLogic Server Administration
Console 3-2
3.1.1.2 Starting Oracle Content Server with Scripts............................................................. 3-2
3.1.1.3 Starting Oracle Content Server with Fusion Middleware Control ....................... 3-3
3.1.2 Stopping Oracle Content Server........................................................................................ 3-3
3.1.2.1 Stopping Oracle Content Server with the Oracle WebLogic Server Administration
Console 3-3
3.1.2.2 Stopping Oracle Content Server with Scripts........................................................... 3-4
3.1.2.3 Stopping Oracle Content Server with Fusion Middleware Control ..................... 3-4
3.1.3 Restarting Oracle Content Server...................................................................................... 3-5
3.1.3.1 Restarting Oracle Content Server with the Oracle WebLogic Server Administration
Console 3-5
3.1.3.2 Restarting Oracle Content Server with Scripts......................................................... 3-5
3.1.3.3 Restarting Oracle Content Server with Fusion Middleware Control ................... 3-6
3.2 Accessing Oracle Content Server With a Browser ................................................................. 3-7
3.3 Managing Oracle Content Server With the Admin Server................................................... 3-7
3.3.1 About the Admin Server..................................................................................................... 3-7
3.3.2 Viewing Server Output....................................................................................................... 3-8
3.4 Starting Oracle Content Server Administration Applications ............................................. 3-8
3.4.1 Running Administration Applications as Applets ......................................................... 3-8
3.4.2 Running Administration Applications in Standalone Mode ........................................ 3-8
3.4.2.1 Configuring a SystemDatabase Provider for Standalone Mode............................ 3-9
3.4.2.2 Configuring a JDBC Database Driver for Standalone Mode............................... 3-10
3.4.2.3 Configuring an External Database Provider for Standalone Mode ................... 3-11
3.4.2.4 Running a Standalone Application on a UNIX System....................................... 3-11
3.4.2.5 Running a Standalone Application on a Windows System ................................ 3-11
3.5 Using the IdcShell Command-Line Tool.............................................................................. 3-12
3.6 Batch Loading Content............................................................................................................ 3-12
3.6.1 About Batch Loading ....................................................................................................... 3-12
3.6.1.1 File Records ................................................................................................................ 3-13
3.6.1.2 Actions......................................................................................................................... 3-14
3.6.1.3 Insert............................................................................................................................ 3-14
3.6.1.3.1 Insert Requirements........................................................................................... 3-14
3.6.1.3.2 Insert Example .................................................................................................... 3-15
3.6.1.4 Delete........................................................................................................................... 3-16
3.6.1.4.1 Delete Requirements.......................................................................................... 3-17
3.6.1.4.2 Delete Example................................................................................................... 3-17
3.6.1.5 Update......................................................................................................................... 3-17
3.6.1.5.1 Update Requirements........................................................................................ 3-18
v
3.6.1.5.2 Update Example 1 .............................................................................................. 3-19
3.6.1.5.3 Update Example 2 .............................................................................................. 3-20
3.6.1.6 Optional Parameters ................................................................................................. 3-20
3.6.1.7 Custom Metadata Fields........................................................................................... 3-23
3.6.2 Preparing a Batch Load File ............................................................................................ 3-23
3.6.2.1 About Preparing a Batch Load File......................................................................... 3-23
3.6.2.2 Mapping Files............................................................................................................. 3-24
3.6.2.2.1 Mapping File Formats........................................................................................ 3-24
3.6.2.2.2 Mapping File Values.......................................................................................... 3-24
3.6.2.3 Creating a Batch Load File from the BatchBuilder Screen................................... 3-25
3.6.2.4 Creating a Mapping File........................................................................................... 3-26
3.6.2.5 Creating a Batch Load File from the Command Line .......................................... 3-27
3.6.2.5.1 Win32 Example................................................................................................... 3-28
3.6.2.5.2 UNIX Example.................................................................................................... 3-28
3.6.3 Running the Batch Loader............................................................................................... 3-28
3.6.3.1 About Running the Batch Loader ........................................................................... 3-29
3.6.3.2 Batch Loading from the Batch Loader Screen ....................................................... 3-29
3.6.3.3 Batch Loading from the Command Line................................................................ 3-29
3.6.3.3.1 Win32 Example................................................................................................... 3-30
3.6.3.3.2 UNIX Example.................................................................................................... 3-30
3.6.3.4 Using the IdcCommand Utility and Remote Access............................................ 3-30
3.6.3.4.1 Batch Load Command Files.............................................................................. 3-31
3.6.3.4.2 Preparing for Remote Batch Loading.............................................................. 3-31
3.6.3.5 Batch Loading Content as Metadata Only............................................................. 3-34
3.6.3.6 Batch Loader -console Command Line Switch ..................................................... 3-35
3.6.3.6.1 Win32 Example................................................................................................... 3-35
3.6.3.7 Adding a Redirect...................................................................................................... 3-36
3.6.3.8 Correcting Batch Load Errors .................................................................................. 3-36
3.6.4 Optimizing Batch Loader Performance......................................................................... 3-37
3.6.4.1 Example: Best Practice Case Study ......................................................................... 3-37
3.6.4.1.1 Background Information................................................................................... 3-37
3.6.4.1.2 Preliminary Troubleshooting ........................................................................... 3-37
3.6.4.1.3 Solution................................................................................................................ 3-38
3.7 Finding Status and Error Information .................................................................................. 3-38
3.7.1 Log Files ............................................................................................................................. 3-38
3.7.1.1 Log File Characteristics............................................................................................. 3-39
3.7.1.2 Accessing the Log Files............................................................................................. 3-39
3.7.1.3 Using Oracle Content Server Logs.......................................................................... 3-40
3.7.1.4 Using Archiver Logs ................................................................................................. 3-40
3.7.1.5 Inbound Refinery Logs ............................................................................................. 3-41
3.7.2 Configuration Information.............................................................................................. 3-41
3.7.3 System Audit Information............................................................................................... 3-42
3.7.3.1 System Audit General Information......................................................................... 3-42
3.7.3.2 System Audit Localization Information ................................................................ 3-43
3.7.3.3 System Audit Tracing Sections Information.......................................................... 3-43
3.7.3.4 System Audit Cache Information............................................................................ 3-43
3.7.3.5 System Audit Configuration Entry Information................................................... 3-44
vi
3.7.3.6 System Audit Component Report Information .................................................... 3-44
3.7.3.7 Server Output Page ................................................................................................... 3-44
3.7.4 Monitoring Scheduled Jobs ............................................................................................. 3-44
3.7.4.1 Viewing Active Scheduled Jobs............................................................................... 3-44
3.7.4.2 Viewing Scheduled Jobs History............................................................................. 3-45
3.7.4.3 Viewing Scheduled Jobs Information..................................................................... 3-45
3.7.5 Tracing................................................................................................................................ 3-45
3.7.5.1 Server-Wide Tracing ................................................................................................. 3-45
3.7.5.2 Applet-Specific Tracing ............................................................................................ 3-47
3.7.6 Environment Packager..................................................................................................... 3-48
3.7.7 Content Server Analyzer ................................................................................................. 3-48
3.7.7.1 Accessing the Content Server Analyzer................................................................. 3-49
3.7.7.2 Specifying a Custom Analyzer Log Directory ...................................................... 3-50
3.7.7.3 Invoking the Analysis Process................................................................................. 3-50
3.7.7.4 Analyzing the Oracle Content Server Database.................................................... 3-50
3.7.7.5 Analyzing the Oracle Content Server Search Index............................................. 3-51
3.7.7.6 Analyzing the Oracle Content Server File System................................................ 3-51
3.7.7.7 Viewing the Analysis Progress and Results .......................................................... 3-52
3.7.7.8 Generating a Status Report ...................................................................................... 3-53
3.7.7.9 Canceling the Status Report..................................................................................... 3-53
3.7.8 Configuration Debug Entry ............................................................................................ 3-53
3.7.9 Stack Traces ....................................................................................................................... 3-54
4 Managing System Settings
4.1 Configuring System Properties................................................................................................. 4-1
4.1.1 About System Properties .................................................................................................... 4-1
4.1.2 Configuring General Options ............................................................................................ 4-2
4.1.2.1 Revision Label Sequence ............................................................................................. 4-3
4.1.2.2 Revision Label Ranges ................................................................................................. 4-3
4.1.2.3 Revision Examples ....................................................................................................... 4-3
4.1.2.4 Revision Configuration Settings................................................................................. 4-3
4.1.2.5 Chunking Function....................................................................................................... 4-3
4.1.2.6 Configuring the Chunking Function ......................................................................... 4-4
4.1.3 Configuring Content Security............................................................................................ 4-4
4.1.4 Configuring Internet Information ..................................................................................... 4-4
4.1.5 Configuring the Database................................................................................................... 4-4
4.1.6 Configuring Oracle Content Server Options ................................................................... 4-5
4.1.7 Configuring Locales ............................................................................................................ 4-6
4.1.7.1 Date Format................................................................................................................... 4-6
4.1.7.2 Interface Language....................................................................................................... 4-7
4.1.8 Configuring Paths................................................................................................................ 4-7
4.2 Configuring the Search Index ................................................................................................... 4-7
4.2.1 Variances in Indexing Tools and Methods....................................................................... 4-7
4.2.2 Working with the Search Index ......................................................................................... 4-8
4.2.2.1 About the Search Index ............................................................................................... 4-8
4.2.2.2 Updating the Search Index.......................................................................................... 4-8
4.2.2.3 Rebuilding the Collection............................................................................................ 4-8
vii
4.2.2.4 Configuring the Update or Rebuild........................................................................... 4-9
4.2.2.5 Text File Full-Text Indexing........................................................................................ 4-9
4.2.2.6 Disabling Full-Text Indexing ...................................................................................... 4-9
4.2.2.7 Indexing Native Files by Default ............................................................................ 4-10
4.2.2.8 Indexing E-mail and Attachments .......................................................................... 4-10
4.2.3 Managing Zone Text Fields............................................................................................. 4-10
4.2.3.1 About Zone Text Fields ............................................................................................ 4-10
4.2.3.2 Enabling and Disabling Zone Text Fields.............................................................. 4-11
4.2.3.3 Changing the MinTextFullFieldLength Variable.................................................. 4-12
4.2.3.4 Disabling Database Search Contains Operator ..................................................... 4-13
4.2.4 Indexing with Databases ................................................................................................. 4-13
4.2.4.1 Database-Supported File Formats........................................................................... 4-15
4.2.4.1.1 FormatMap.......................................................................................................... 4-15
4.2.4.1.2 ExceptionFormatMap ........................................................................................ 4-15
4.2.5 Searching Content Using the Oracle Query Optimizer Component ........................ 4-15
4.2.5.1 About The Oracle Query Optimizer Component................................................. 4-16
4.2.5.2 Query Optimization Process.................................................................................... 4-16
4.2.5.2.1 Stage 1: Query Analysis..................................................................................... 4-17
4.2.5.2.2 Stage 2: Parsing................................................................................................... 4-17
4.2.5.2.3 Stage 3: Normalization ...................................................................................... 4-17
4.2.5.2.4 Stage 4: Select Hint............................................................................................. 4-18
4.2.5.2.5 Stage 5: Reformat Query.................................................................................... 4-18
4.2.5.3 How Reformatted Queries Optimize Searches ..................................................... 4-19
4.2.5.3.1 Example 1: Reformatting a Query by Adding a Single Hint ....................... 4-19
4.2.5.3.2 Example 2: Reformatting a Query by Adding Multiple Hints .................... 4-19
4.2.5.4 Types of Recognized Hints ...................................................................................... 4-20
4.2.5.5 Query Hints Syntax................................................................................................... 4-20
4.2.5.5.1 Oracle Hint Syntax ............................................................................................. 4-20
4.2.5.5.2 Oracle Content Server Hint Syntax.................................................................. 4-20
4.2.5.6 Additional Supported Sort Constructs................................................................... 4-21
4.2.5.7 The Hint Rules Table................................................................................................. 4-21
4.2.5.8 Hint Rules Table Column Descriptions.................................................................. 4-22
4.2.5.8.1 Key........................................................................................................................ 4-23
4.2.5.8.2 Table..................................................................................................................... 4-23
4.2.5.8.3 Column ................................................................................................................ 4-23
4.2.5.8.4 Operators............................................................................................................. 4-23
4.2.5.8.5 Index..................................................................................................................... 4-24
4.2.5.8.6 Order .................................................................................................................... 4-24
4.2.5.8.7 Values................................................................................................................... 4-24
4.2.5.8.8 AllowMultiple..................................................................................................... 4-25
4.2.5.8.9 Disabled ............................................................................................................... 4-25
4.2.5.9 Edit Hint Rules Form ................................................................................................ 4-25
4.2.5.10 The Hint Cache .......................................................................................................... 4-26
4.2.5.10.1 Reusing Hint Cache Entries.............................................................................. 4-26
4.2.5.10.2 Hint Cache Management................................................................................... 4-27
4.2.5.10.3 Default Capacity Algorithm ............................................................................. 4-27
4.2.5.10.4 Origin of Hint Cache Keys................................................................................ 4-27
viii
4.2.5.10.5 Hint Cache Persistence ...................................................................................... 4-28
4.2.5.11 Using Hint Rules........................................................................................................ 4-28
4.2.5.11.1 Adding and Enabling New Hint Rules........................................................... 4-28
4.2.5.11.2 Editing Existing Hint Rules .............................................................................. 4-28
4.2.5.11.3 Disabling Hint Rules.......................................................................................... 4-29
4.2.5.11.4 Enabling Hint Rules........................................................................................... 4-29
4.2.5.11.5 Removing Hint Rules......................................................................................... 4-29
4.2.5.12 Using the Query Converter...................................................................................... 4-30
4.2.5.12.1 Converting a Data Source ................................................................................. 4-30
4.2.5.12.2 Converting a Query ........................................................................................... 4-30
4.2.5.12.3 Editing a Converted Data Source or Query.................................................... 4-31
4.2.5.13 Updating the Hint Cache.......................................................................................... 4-31
4.2.5.13.1 Accessing the Hint Cache Updater Page ........................................................ 4-31
4.2.5.13.2 Checking the Hint Cache from a Data Source................................................ 4-32
4.2.5.13.3 Checking from a Query ..................................................................................... 4-32
4.2.5.13.4 Modifying an Existing Hint Cache Query Using Data Source .................... 4-33
4.2.5.13.5 Modifying an Existing Hint Cache Using a Query........................................ 4-33
4.2.5.13.6 Removing a Hint Cache Data Source Entry ................................................... 4-34
4.2.5.13.7 Removing a Hint Cache Query ........................................................................ 4-34
4.3 Configuring a File Store System ............................................................................................ 4-35
4.3.1 Introduction to the File Store System............................................................................. 4-35
4.3.1.1 Data Management ..................................................................................................... 4-36
4.3.1.1.1 File Management................................................................................................ 4-36
4.3.1.1.2 Metadata Management...................................................................................... 4-37
4.3.1.1.3 File Stores............................................................................................................. 4-37
4.3.1.2 FileStoreProvider Features....................................................................................... 4-37
4.3.2 FileStoreProvider Upgrade ............................................................................................. 4-37
4.3.2.1 DefaultFileStore Settings .......................................................................................... 4-38
4.3.2.2 Empty Storage Rule................................................................................................... 4-38
4.3.3 Configuring FileStoreProvider ....................................................................................... 4-38
4.3.3.1 Using Standard Oracle Content Server Variables................................................. 4-39
4.3.3.1.1 Database Options ............................................................................................... 4-39
4.3.3.1.2 Oracle Content Server Metadata Fields .......................................................... 4-40
4.3.3.2 Working with FileStoreProvider ............................................................................. 4-41
4.3.3.2.1 Adding or Editing a Partition........................................................................... 4-41
4.3.3.2.2 Editing FileStoreProvider.................................................................................. 4-42
4.3.3.2.3 Adding or Editing a Storage Rule.................................................................... 4-42
4.3.3.3 Understanding FileStoreProvider Storage Principles .......................................... 4-43
4.3.3.3.1 Using Storage Rules on Renditions to Determine Storage Class................. 4-44
4.3.3.3.2 Understanding Path Construction and URL Parsing ................................... 4-45
4.3.4 FileStoreProvider Resource Tables................................................................................. 4-46
4.3.4.1 PartitionList Table ..................................................................................................... 4-47
4.3.4.2 StorageRules Table .................................................................................................... 4-47
4.3.4.3 PathMetaData Table.................................................................................................. 4-48
4.3.4.4 PathConstruction Table ............................................................................................ 4-48
4.3.4.5 FileSystemFileStoreAlgorithmFilters Table........................................................... 4-49
4.3.4.6 FileStorage Table........................................................................................................ 4-50
ix
4.3.4.7 FileCache Table.......................................................................................................... 4-50
4.3.5 FileStoreProvider Sample Implementations................................................................. 4-50
4.3.5.1 Example PathMetaData Table Options .................................................................. 4-50
4.3.5.2 Configuration for Standard File Paths.................................................................... 4-51
4.3.5.2.1 Defining the Storage Rule ................................................................................. 4-51
4.3.5.2.2 Defining the Path Construction........................................................................ 4-51
4.3.5.3 Configuration for a Webless or Optional Web Store............................................ 4-53
4.3.5.3.1 Defining the Storage Rule ................................................................................. 4-53
4.3.5.3.2 Defining the Path Construction........................................................................ 4-53
4.3.5.4 Configuration for Database Storage ....................................................................... 4-54
4.3.5.4.1 Defining the Storage Rule ................................................................................. 4-54
4.3.5.4.2 Defining the Path Construction........................................................................ 4-55
4.3.5.5 Altered Path Construction and Algorithms .......................................................... 4-55
4.3.5.5.1 Using Partitioning .............................................................................................. 4-55
4.3.5.5.2 Adding a Partition to the Weblayout Path ..................................................... 4-56
4.3.5.5.3 Limiting the Number Files in a Directory....................................................... 4-56
4.4 Mapping URLs with WebUrlMapPlugin ............................................................................. 4-57
4.4.1 Script Construction........................................................................................................... 4-57
4.4.2 Supported Variables for Referencing............................................................................. 4-58
4.4.3 Add/Edit URL Mapping Entries.................................................................................... 4-58
4.4.4 Mapping Examples........................................................................................................... 4-59
4.4.4.1 Info Update Form ...................................................................................................... 4-59
4.4.4.2 Dynamic Conversion ................................................................................................ 4-59
4.4.4.3 CGI parameters.......................................................................................................... 4-60
4.5 Connecting to Outside Entities with Providers................................................................... 4-60
4.5.1 About Providers................................................................................................................ 4-61
4.5.1.1 Oracle Content Server Providers............................................................................. 4-61
4.5.1.2 Choosing an Appropriate Provider ........................................................................ 4-62
4.5.1.2.1 When to Add an Outgoing Provider............................................................... 4-62
4.5.1.2.2 When to Add a Database Provider.................................................................. 4-62
4.5.1.2.3 When to Add an Incoming Provider............................................................... 4-63
4.5.1.2.4 When to Add a Preview Provider.................................................................... 4-63
4.5.1.2.5 When to Add an LDAP Provider..................................................................... 4-64
4.5.1.2.6 When to Edit JpsUserProvider ......................................................................... 4-65
4.5.1.3 Security Providers ..................................................................................................... 4-65
4.5.1.3.1 About Security Providers.................................................................................. 4-66
4.5.1.3.2 Planning to Use Security Providers................................................................. 4-67
4.5.1.3.3 Keystores and Truststore................................................................................... 4-69
4.5.2 Managing Providers......................................................................................................... 4-71
4.5.2.1 Adding an Outgoing Provider ................................................................................ 4-71
4.5.2.2 Adding a Database Provider.................................................................................... 4-72
4.5.2.3 Adding an Incoming Provider................................................................................. 4-74
4.5.2.4 Adding a Preview Provider ..................................................................................... 4-74
4.5.2.5 Adding an Incoming Security Provider ................................................................. 4-74
4.5.2.6 Adding an Outgoing Security Provider................................................................. 4-75
4.5.2.7 Adding a JPS User Provider..................................................................................... 4-76
4.5.2.8 Adding an HTTP Outgoing Provider..................................................................... 4-77
x
4.5.2.9 Editing Provider Information .................................................................................. 4-77
4.5.2.10 Deleting a Provider ................................................................................................... 4-78
5 Managing Security and User Access
5.1 Introduction to Oracle UCM and Oracle Content Server Security...................................... 5-1
5.1.1 Changes in Security Compared to Oracle Content Server 10g ..................................... 5-2
5.1.2 Security within Oracle Content Server............................................................................. 5-3
5.1.3 Additional Security Options .............................................................................................. 5-4
5.2 Oracle Fusion Middleware Security Configuration for Oracle UCM ................................. 5-5
5.2.1 LDAP Authentication Providers ....................................................................................... 5-5
5.2.2 Configuring Oracle UCM to Use SSL ............................................................................... 5-6
5.2.2.1 Configuring Oracle UCM for Two-Way SSL Communication ............................. 5-6
5.2.2.2 Invoking References in One-Way SSL Environments in Oracle JDeveloper....... 5-8
5.2.2.3 Configuring Oracle ECM Suite, Oracle HTTP Server for SSL Communication.. 5-9
5.2.2.4 Switching from Non-SSL to SSL Configurations for Oracle UCM..................... 5-10
5.2.2.5 Configuring SSL Between Oracle UCM Instances and Oracle WebCache ....... 5-10
5.2.2.6 Using a Custom Trust Store for One-Way SSL During Design Time ................ 5-10
5.2.2.7 Enabling an Asynchronous Process to Invoke An Asynchronous Process ...... 5-10
5.2.2.8 Configuring RIDC SSL for Valid Certificate Path................................................. 5-11
5.2.3 Configuring Oracle UCM for Single Sign-On............................................................... 5-13
5.2.3.1 Configuring Oracle Access Manager 11g with Oracle UCM .............................. 5-13
5.2.3.2 Configuring Oracle Access Manager 10g with Oracle UCM .............................. 5-16
5.2.3.3 Configuring Oracle Single Sign-On for Oracle UCM........................................... 5-19
5.2.3.4 Configuring the First Authentication Provider..................................................... 5-22
5.2.3.5 Configuring the Oracle UCM URL for Single Sign-On........................................ 5-23
5.2.3.6 Configuring Oracle UCM and Single Sign-On for WNA.................................... 5-23
5.2.4 Configuring Oracle WebLogic Server Web Services ................................................... 5-26
5.3 User Types, Logins, and Aliases............................................................................................ 5-27
5.3.1 Introduction to User Login Types .................................................................................. 5-27
5.3.1.1 External Users ............................................................................................................ 5-27
5.3.1.2 Local Users ................................................................................................................. 5-28
5.3.2 Introduction to User Logins and Aliases....................................................................... 5-29
5.3.3 Managing Logins and Aliases......................................................................................... 5-30
5.3.3.1 Adding a User Login................................................................................................. 5-31
5.3.3.2 Editing a User Login ................................................................................................. 5-31
5.3.3.3 Deleting a User Login ............................................................................................... 5-32
5.3.3.4 Creating an Alias ....................................................................................................... 5-32
5.3.3.5 Editing an Alias.......................................................................................................... 5-33
5.3.3.6 Deleting an Alias ....................................................................................................... 5-33
5.3.4 User Information Fields ................................................................................................... 5-34
5.3.4.1 About User Information Fields................................................................................ 5-34
5.3.4.2 Managing User Information Fields......................................................................... 5-34
5.3.4.2.1 Adding a New User Information Field........................................................... 5-34
5.3.4.2.2 Editing an Option List ....................................................................................... 5-34
5.3.4.2.3 Editing a User Information Field ..................................................................... 5-35
5.4 Security Groups, Roles and Permissions.............................................................................. 5-35
5.4.1 Introduction to Oracle Content Server Security Groups ............................................ 5-35
xi
5.4.1.1 Best Practices for Working with Security Groups ................................................ 5-36
5.4.1.2 Performance Considerations.................................................................................... 5-36
5.4.1.2.1 Search Performance............................................................................................ 5-36
5.4.1.2.2 User Admin Performance ................................................................................. 5-37
5.4.2 Managing Oracle Content Server Groups..................................................................... 5-37
5.4.2.1 Adding a Security Group on Oracle Content Server............................................ 5-37
5.4.2.2 Deleting a Security Group on Oracle Content Server .......................................... 5-37
5.4.3 Introduction to Oracle Content Server Roles and Permissions.................................. 5-38
5.4.3.1 Predefined Roles........................................................................................................ 5-39
5.4.3.2 About Permissions .................................................................................................... 5-39
5.4.3.3 Predefined Permissions ............................................................................................ 5-40
5.4.4 Managing Oracle Content Server Roles and Permissions .......................................... 5-40
5.4.4.1 Creating a Role on Oracle Content Server............................................................. 5-41
5.4.4.2 Deleting a Role on Oracle Content Server ............................................................. 5-41
5.4.4.3 Assigning Roles to a User with Oracle WebLogic Server.................................... 5-41
5.4.4.4 Assigning Roles for a Similar User with Oracle WebLogic Server .................... 5-41
5.4.4.5 Adding and Editing Permissions on Oracle Content Server .............................. 5-42
5.5 Accounts.................................................................................................................................... 5-42
5.5.1 Introduction to Oracle Content Server Accounts......................................................... 5-42
5.5.1.1 Accounts and Security Groups................................................................................ 5-43
5.5.1.2 Hierarchical Accounts............................................................................................... 5-44
5.5.1.3 Performance Considerations.................................................................................... 5-46
5.5.1.4 External Directory Server Considerations ............................................................. 5-46
5.5.2 Managing Oracle Content Server Accounts ................................................................. 5-47
5.5.2.1 Enabling Accounts on Oracle Content Server....................................................... 5-47
5.5.2.2 Creating Predefined Accounts on Oracle Content Server................................... 5-47
5.5.2.3 Creating Accounts When Checking In Content on Oracle Content Server ...... 5-48
5.5.2.4 Deleting Predefined Accounts on Oracle Content Server ................................... 5-48
5.5.2.5 Assigning Accounts to a User with Oracle WebLogic Server............................. 5-48
5.5.3 An Oracle Content Server Accounts Case Study ......................................................... 5-49
5.5.3.1 Xalco Security............................................................................................................. 5-49
5.5.3.2 Xalco Accounts........................................................................................................... 5-50
5.5.3.3 Xalco Roles.................................................................................................................. 5-50
5.5.3.4 Roles and Permissions Table.................................................................................... 5-50
5.5.3.5 Roles and Users Table............................................................................................... 5-51
5.5.3.6 Accounts and Users Table........................................................................................ 5-51
5.6 Access Control List Security................................................................................................... 5-51
5.6.1 Configuring Access Control List Security..................................................................... 5-52
5.6.2 Metadata Fields................................................................................................................. 5-52
5.6.2.1 xClbraUserList Metadata Field................................................................................ 5-53
5.6.2.2 xClbraAliasList Metadata Field............................................................................... 5-53
5.6.2.3 xClbraRoleList Metadata Field................................................................................ 5-53
5.6.3 Access Control List Permissions..................................................................................... 5-53
5.6.3.1 Empty Access Control List Fields ........................................................................... 5-54
5.7 Oracle Content Server User Information Provider ............................................................. 5-55
5.8 Additional Oracle Content Server Security Connections................................................... 5-55
5.8.1 About Proxy Connections................................................................................................ 5-55
xii
5.8.2 Credential Mapping ......................................................................................................... 5-56
5.8.2.1 About Credential Mapping...................................................................................... 5-56
5.8.2.2 Credential Values ..................................................................................................... 5-57
5.8.2.3 Matching Accounts and Roles ................................................................................. 5-58
5.8.2.3.1 Reference Input Value ....................................................................................... 5-58
5.8.2.3.2 Privilege Levels................................................................................................... 5-58
5.8.2.3.3 Substitution ......................................................................................................... 5-59
5.8.2.3.4 Special Characters .............................................................................................. 5-59
5.8.2.4 Creating a Credential Map....................................................................................... 5-59
5.8.3 Secured Connections to Oracle Content Servers.......................................................... 5-59
5.8.3.1 About Named Password Connections ................................................................... 5-60
5.8.3.2 Guidelines for Proxy Connections Data................................................................. 5-60
5.8.3.3 Creating a Proxied Connection................................................................................ 5-61
5.8.4 Connections Using the HTTP Protocol.......................................................................... 5-61
5.8.4.1 About Using HTTP Protocol for Content Server Connection............................. 5-62
5.8.4.2 Configuring the HTTP Provider.............................................................................. 5-62
5.9 Oracle Content Server Communication Customization .................................................... 5-62
5.9.1 Login/Logout Customization......................................................................................... 5-63
5.9.2 Browser URL Customization .......................................................................................... 5-63
5.9.2.1 About BrowserUrlPath Customization.................................................................. 5-63
5.9.2.2 Affected Idoc Script Variables and Functions....................................................... 5-64
5.9.2.3 Determining the URL Path....................................................................................... 5-65
5.9.2.4 Changing Absolute Full Path Computation.......................................................... 5-66
5.9.2.5 Changing Administration Path Computation....................................................... 5-66
5.9.3 Extended User Attributes ................................................................................................ 5-67
5.9.3.1 ExtUserAttribInfo ResultSet..................................................................................... 5-67
5.9.3.2 Configuration Variable for ExtendedUserAttributes........................................... 5-68
5.9.4 Filter Data Input................................................................................................................ 5-68
5.9.4.1 encodeHtml Function ............................................................................................... 5-68
5.9.4.2 HtmlDataInputFilterLevel Configuration Variable.............................................. 5-69
6 Managing Components
6.1 About Components..................................................................................................................... 6-1
6.2 Using the Component Manager................................................................................................ 6-5
6.2.1 Viewing Information about a Component....................................................................... 6-5
6.2.2 Enabling and Disabling a Component.............................................................................. 6-6
6.2.3 Uploading a Component .................................................................................................... 6-6
6.2.4 Downloading a Component............................................................................................... 6-7
6.2.5 Modifying a Component Configuration .......................................................................... 6-7
6.2.5.1 Using the Advanced Component Manager.............................................................. 6-7
6.2.5.2 Using the Configuration for Instance Screen............................................................ 6-8
6.3 Using the Component Wizard .................................................................................................. 6-8
6.3.1 Component Wizard Overview .......................................................................................... 6-8
6.3.1.1 Working with Java Code ............................................................................................. 6-9
6.3.1.2 Editing the Readme File .............................................................................................. 6-9
6.3.2 Creating a Component........................................................................................................ 6-9
6.3.2.1 Creating an Environment Resource........................................................................ 6-10
xiii
6.3.2.2 Creating a Template Resource................................................................................. 6-11
6.3.2.3 Creating a Query Resource ...................................................................................... 6-13
6.3.2.4 Creating a Service Resource..................................................................................... 6-14
6.3.2.5 Creating an HTML Include...................................................................................... 6-15
6.3.2.6 Creating a String Resource....................................................................................... 6-16
6.3.2.7 Creating a Dynamic Table Resource....................................................................... 6-17
6.3.2.8 Creating a Static Table Resource ............................................................................. 6-18
6.3.2.9 Enabling the Component.......................................................................................... 6-19
6.3.3 Additional Component Wizard Tasks........................................................................... 6-19
6.3.3.1 Building a Component Zip File............................................................................... 6-20
6.3.3.2 Working With Installation Parameters................................................................... 6-21
6.3.3.3 Enabling and Disabling a Component ................................................................... 6-22
6.3.3.3.1 Option 1 ............................................................................................................... 6-22
6.3.3.3.2 Option 2 ............................................................................................................... 6-22
6.3.3.4 Removing a Component........................................................................................... 6-22
6.3.3.5 Opening a Component.............................................................................................. 6-23
6.3.3.6 Configuring the Default HTML Editor .................................................................. 6-23
6.3.3.7 Unpackaging a Component ..................................................................................... 6-24
6.3.3.8 Adding an Existing Component.............................................................................. 6-24
6.4 Using the Command Line....................................................................................................... 6-25
7 Managing Search Tools
7.1 OracleTextSearch ........................................................................................................................ 7-1
7.1.1 Considerations for Using OracleTextSearch.................................................................... 7-1
7.1.2 Configuring OracleTextSearch for Oracle Content Server ............................................ 7-2
7.1.3 Oracle Text 11g Features and Benefits.............................................................................. 7-3
7.1.3.1 Indexing and Query Speeds and Techniques........................................................... 7-3
7.1.3.2 Fast Rebuild................................................................................................................... 7-4
7.1.3.3 Query Syntax................................................................................................................. 7-4
7.1.3.4 OracleTextSearch Operators ....................................................................................... 7-4
7.1.3.4.1 Search Thesaurus................................................................................................... 7-4
7.1.3.5 Case Sensitivity and Stemming Rules ....................................................................... 7-5
7.1.3.6 Search Results Data Clustering .................................................................................. 7-5
7.1.3.7 Snippets.......................................................................................................................... 7-6
7.1.3.8 Additional Changes ..................................................................................................... 7-6
7.1.4 Managing OracleTextSearch .............................................................................................. 7-6
7.1.4.1 Determining Fields to Optimize................................................................................. 7-7
7.1.4.2 Assigning/Editing Optimized Fields........................................................................ 7-7
7.1.4.3 Performing a Fast Rebuild........................................................................................... 7-8
7.1.4.4 Modifying the Fields Displayed on Search Results................................................. 7-8
7.1.5 Searching with OracleTextSearch...................................................................................... 7-9
7.1.6 Metadata Wildcards ............................................................................................................ 7-9
7.1.7 Search Results with OracleTextSearch........................................................................... 7-10
7.2 Oracle Secure Enterprise Search ............................................................................................ 7-11
7.2.1 Using Oracle SES as an External Full-Text Search Engine.......................................... 7-12
7.2.1.1 Configuring Oracle SES for Use with OracleTextSearch..................................... 7-12
7.2.1.2 Reconfiguring the Search Engine to Use Oracle SES with OracleTextSearch... 7-14
xiv
7.2.2 Using SESCrawlerExport for Oracle SES to Search Oracle Content Server Content.........
7-16
7.2.2.1 Accessing the SESCrawlerExport Component...................................................... 7-16
7.2.2.2 Taking a Snapshot of Oracle Content Server Content ......................................... 7-17
7.2.2.3 Configuring SESCrawlerExport Parameters ......................................................... 7-17
7.2.2.3.1 Configuring an Oracle Content Server Source in Oracle SES...................... 7-19
7.2.2.3.2 Configuring an Oracle Content Server Source with Oracle Single Sign-On ........
7-19
7.2.2.3.3 Configuring an Oracle Content Server Source with Other Single Sign-On
Solutions 7-19
7.2.2.4 Configuring the Oracle Content Server Source Location Script......................... 7-20
8 Managing System Migration and Archiving
8.1 Introduction to Migration Tools and Components................................................................ 8-1
8.1.1 Configuration Migration .................................................................................................... 8-2
8.1.2 Archiver................................................................................................................................. 8-3
8.1.3 Folder Archiving.................................................................................................................. 8-4
8.1.4 FolderStructureArchive Component ................................................................................ 8-4
8.1.5 ArchiveReplicationExceptions Component..................................................................... 8-5
8.1.6 Archive Tool Summary and Comparison ........................................................................ 8-5
8.2 Migrating System Configurations ............................................................................................ 8-6
8.2.1 Configuration Migration Utility........................................................................................ 8-6
8.2.1.1 Migration Structure...................................................................................................... 8-7
8.2.1.2 About Migration Templates and Bundles................................................................. 8-8
8.2.2 Migration Tips...................................................................................................................... 8-9
8.2.2.1 Limitations..................................................................................................................... 8-9
8.2.2.2 Migration Logs........................................................................................................... 8-10
8.2.3 Managing Configuration Migration .............................................................................. 8-10
8.2.3.1 Creating a Configuration Migration Template ..................................................... 8-10
8.2.3.2 Editing a Configuration Template .......................................................................... 8-12
8.2.3.3 Importing a Template ............................................................................................... 8-12
8.2.3.4 Creating a One-Time Export.................................................................................... 8-13
8.2.3.5 Exporting a Configuration ....................................................................................... 8-13
8.2.3.6 Uploading a Bundle .................................................................................................. 8-14
8.2.3.7 Importing a Bundle ................................................................................................... 8-14
8.2.3.8 Downloading a Bundle............................................................................................. 8-15
8.2.3.9 Viewing Status Information..................................................................................... 8-16
8.3 Archives, Collections and Batch Files ................................................................................... 8-16
8.3.1 Archive Details.................................................................................................................. 8-16
8.3.1.1 Archive Structure....................................................................................................... 8-16
8.3.1.2 Collections .................................................................................................................. 8-17
8.3.1.3 Batch Files ................................................................................................................... 8-18
8.3.1.4 Archive Targets.......................................................................................................... 8-19
8.3.1.5 Using Archive Logs................................................................................................... 8-20
8.3.2 Managing Archives .......................................................................................................... 8-21
8.3.2.1 Creating a New Archive........................................................................................... 8-21
8.3.2.2 Copying an Existing Archive................................................................................... 8-21
xv
8.3.2.3 Creating a New Archive by Copying ..................................................................... 8-21
8.3.2.4 Deleting an Archive .................................................................................................. 8-22
8.3.2.5 Running the Archiver as a Standalone Application............................................. 8-22
8.3.3 Managing Collections ...................................................................................................... 8-23
8.3.3.1 Opening a Collection................................................................................................. 8-23
8.3.3.2 Creating a Collection................................................................................................. 8-24
8.3.3.3 Removing a Collection.............................................................................................. 8-24
8.3.3.4 Moving the Default Archive Collection ................................................................. 8-25
8.3.4 Managing Batch Files ....................................................................................................... 8-25
8.3.4.1 Removing Revisions from a Batch File................................................................... 8-25
8.3.4.2 Deleting a Batch File.................................................................................................. 8-26
8.4 Exporting Data in Archives.................................................................................................... 8-26
8.4.1 About Exporting Data...................................................................................................... 8-27
8.4.1.1 Export Uses................................................................................................................. 8-27
8.4.1.2 Export Methods ......................................................................................................... 8-27
8.4.2 Managing Exports............................................................................................................. 8-27
8.4.2.1 Manually Exporting .................................................................................................. 8-28
8.4.2.2 Creating a Content Item Export Query .................................................................. 8-28
8.4.2.3 Exporting Configuration Information.................................................................... 8-30
8.4.2.4 Adding a Table to an Archive.................................................................................. 8-30
8.4.2.5 Editing the Archive Properties of a Table.............................................................. 8-30
8.4.2.6 Creating a Table Export Query................................................................................ 8-31
8.4.2.7 Setting Export Options.............................................................................................. 8-32
8.4.2.8 Initiating the Export .................................................................................................. 8-32
8.5 Importing Data......................................................................................................................... 8-33
8.5.1 Imported Files ................................................................................................................... 8-33
8.5.1.1 Import Uses ................................................................................................................ 8-34
8.5.1.2 Import Methods......................................................................................................... 8-34
8.5.2 Import Rules ...................................................................................................................... 8-34
8.5.2.1 Update Import Rule .................................................................................................. 8-35
8.5.2.2 Insert Revision Import Rule..................................................................................... 8-36
8.5.2.3 Insert Create Import Rule......................................................................................... 8-36
8.5.2.4 Delete Revision Import Rule.................................................................................... 8-37
8.5.2.5 Delete All Revisions Import Rule............................................................................ 8-38
8.5.3 Import Process................................................................................................................... 8-39
8.5.3.1 Importing Archived Data Manually....................................................................... 8-39
8.5.3.2 Setting Field Maps..................................................................................................... 8-40
8.5.3.3 Setting Value Maps ................................................................................................... 8-41
8.5.3.4 Setting Import Options ............................................................................................. 8-42
8.5.3.5 Importing an Individual Revision........................................................................... 8-43
8.5.3.6 Initiating the Import.................................................................................................. 8-43
8.6 Transferring Files ..................................................................................................................... 8-44
8.6.1 File Transfer Overview .................................................................................................... 8-44
8.6.1.1 Transfer Uses.............................................................................................................. 8-44
8.6.1.2 Transfer Methods....................................................................................................... 8-45
8.6.1.3 Transfer Terms........................................................................................................... 8-45
8.6.2 Transfer Types................................................................................................................... 8-46
xvi
8.6.2.1 Local Transfer............................................................................................................. 8-46
8.6.2.2 Pull Transfer............................................................................................................... 8-46
8.6.2.3 Push Transfer ............................................................................................................. 8-47
8.6.3 Transferring Batch Files................................................................................................... 8-47
8.6.4 Managing Transfers.......................................................................................................... 8-49
8.6.4.1 Transfer Process......................................................................................................... 8-49
8.6.4.2 Making an Archive Targetable ................................................................................ 8-49
8.6.4.3 Defining an Outgoing Transfer Provider............................................................... 8-50
8.6.4.4 Setting a Transfer Destination (Target) .................................................................. 8-50
8.6.4.5 Initiating a Manual Transfer .................................................................................... 8-51
8.6.4.6 Deleting a Transfer .................................................................................................... 8-51
8.7 Replicating Files ....................................................................................................................... 8-52
8.7.1 Introduction to Replication ............................................................................................. 8-52
8.7.1.1 Single Revision Replications.................................................................................... 8-52
8.7.1.2 Replication Uses......................................................................................................... 8-53
8.7.1.3 Replication Methods ................................................................................................. 8-53
8.7.2 Managing Replication ...................................................................................................... 8-53
8.7.2.1 Setting Up Automatic Export .................................................................................. 8-53
8.7.2.2 Setting Up Automatic Import .................................................................................. 8-54
8.7.2.3 Setting Up Automatic Transfer................................................................................ 8-54
8.7.2.4 Disabling Automatic Import.................................................................................... 8-55
8.7.2.5 Disabling Automatic Export .................................................................................... 8-55
8.7.2.6 Disabling Automatic Transfer ................................................................................. 8-56
8.7.2.7 Deleting a Registered Exporter................................................................................ 8-56
8.8 Archive and Migration Strategies.......................................................................................... 8-56
8.8.1 Export ................................................................................................................................. 8-57
8.8.2 Import................................................................................................................................. 8-57
8.8.3 Self Export/Import........................................................................................................... 8-58
8.8.4 One-to-One Archiving ..................................................................................................... 8-59
8.8.5 One-to-Many Archiving .................................................................................................. 8-60
8.8.6 Many-to-One Archiving .................................................................................................. 8-62
8.8.7 Archiver Examples ........................................................................................................... 8-64
8.8.7.1 Copying an Oracle Content Server Instance to a Laptop .................................... 8-64
8.8.7.2 Transferring by Content Type and Author............................................................ 8-65
8.8.7.3 Changing Metadata Fields ....................................................................................... 8-66
8.8.7.4 Adding Content ID Prefixes..................................................................................... 8-66
8.8.7.5 Changing Release Dates ........................................................................................... 8-67
8.8.8 Configuration Migration Tips......................................................................................... 8-67
8.9 Folder Archiving...................................................................................................................... 8-68
8.9.1 Folder Archive Functions ................................................................................................ 8-68
8.9.2 Exporting an Archived Folder Structure....................................................................... 8-69
8.9.3 Importing an Archived Folder Structure ...................................................................... 8-70
8.10 Folder Structure Archiving..................................................................................................... 8-70
8.10.1 Overview of FolderStructureArchive Component...................................................... 8-71
8.10.2 Differences With Built-in Folders Archiving Features................................................ 8-71
8.10.3 Managing Folder Structure Archives ............................................................................ 8-72
8.10.3.1 Creating a Folder Structure Archive....................................................................... 8-72
xvii
8.10.3.2 Updating a Folder Structure Archive..................................................................... 8-72
8.10.3.3 Using a Folder Structure Archive............................................................................ 8-73
8.10.3.4 Configuration Variables ........................................................................................... 8-74
8.10.4 Important Implementation Considerations.................................................................. 8-75
8.11 Archiver Replication Exceptions ........................................................................................... 8-76
8.11.1 Overview of ArchiverReplicationExceptions ............................................................... 8-76
8.11.1.1 How ArchiverReplicationExceptions Works ........................................................ 8-77
8.11.1.2 Scenario 1.................................................................................................................... 8-77
8.11.1.3 Scenario 2.................................................................................................................... 8-77
8.11.2 Administering and Using ArchiverReplicationExceptions........................................ 8-77
8.12 Troubleshooting Archiving Issues ........................................................................................ 8-80
8.12.1 Importing Issues ............................................................................................................... 8-80
8.12.1.1 File Extension Errors on Import System ................................................................ 8-80
8.12.1.2 Selecting Specific Batch Files for Import ................................................................ 8-81
8.12.1.3 Import Maps Do Not Work After Archive Import............................................... 8-81
8.12.1.4 Identifying Imported Content Items From Archive............................................. 8-82
8.12.1.5 Duplicate Content Items in Oracle Content Server .............................................. 8-82
8.12.1.6 Importing Archived Content to Proxied Server Fails .......................................... 8-83
8.12.1.7 No Importing Errors But Documents Are Missing .............................................. 8-83
8.12.1.8 Errors About Invalid Choice List Values ............................................................... 8-84
8.12.1.9 Import Fails Due to Missing Required Field ......................................................... 8-85
8.12.1.10 Changed Metadata Field Makes the Archiver Freeze During an Import ......... 8-85
8.12.1.10.1 Checking the Metadata Field Properties......................................................... 8-86
8.12.1.10.2 Checking the Indexing Automatic Update Cycle.......................................... 8-86
8.12.2 Exporting Issues................................................................................................................ 8-87
8.12.2.1 Total Export Possible with Blank Export Query................................................... 8-87
8.12.2.2 New Check-Ins and Batch File Transfers............................................................... 8-87
8.12.2.3 Exporting User Attributes........................................................................................ 8-88
8.12.2.4 Folder Archive Export Doesn't Work If Collections Table Has Many Records 8-88
8.12.3 Transfer Issues................................................................................................................... 8-89
8.12.3.1 Transfer Stopped When Target Locked Up........................................................... 8-89
8.12.3.1.1 Verifying and Testing the Outgoing Provider............................................... 8-89
8.12.3.1.2 Restarting the Oracle Content Server.............................................................. 8-90
8.12.3.2 Aborting/Deleting a Running Transfer ................................................................. 8-90
8.12.3.2.1 Disabling the Outgoing Provider..................................................................... 8-90
8.12.3.2.2 Deleting a Transfer from the Transfer To Tab ............................................... 8-90
8.12.3.2.3 Deleting an Automated Transfer ..................................................................... 8-91
8.12.3.3 Verifying the Integrity of Transferred Files........................................................... 8-91
8.12.3.4 Transfer Process Is Not Working ............................................................................ 8-91
8.12.4 WebDAV Issues ................................................................................................................ 8-92
8.12.4.1 Archiver Error With WebDAV and Oracle Content Server................................ 8-92
8.12.5 Replication Issues ............................................................................................................. 8-93
8.12.5.1 Stopping the Automatic Import Function.............................................................. 8-93
8.12.5.1.1 Unregistering an Importer from the Replication Tab ................................... 8-93
8.12.5.1.2 Deleting a Registered Importer from the Automation for Instance Screen 8-93
8.12.6 Oracle-Specific Issues....................................................................................................... 8-94
8.12.6.1 Allotted Tablespace Exceeded................................................................................. 8-94
xviii
8.12.7 Miscellaneous Issues ........................................................................................................ 8-95
8.12.7.1 Archiving Does Not Work With Shared File System ........................................... 8-95
8.12.7.2 Archiving Does Not Work Over Outgoing Provider........................................... 8-95
A User Interface
A.1 System Properties and Settings Interface ............................................................................... A-2
A.1.1 Admin Server Interface ..................................................................................................... A-2
A.1.1.1 Admin Server Page...................................................................................................... A-2
A.1.1.2 Admin Server Status Page.......................................................................................... A-4
A.1.1.3 Admin Server Output Page........................................................................................ A-4
A.1.1.4 Administration Page ................................................................................................... A-4
A.1.2 System Properties Configuration Interface..................................................................... A-6
A.1.2.1 System Properties Page............................................................................................... A-6
A.1.2.2 General Options Configuration................................................................................. A-7
A.1.2.2.1 System Properties: Options Tab......................................................................... A-7
A.1.2.2.2 Admin Server: General Configuration Page .................................................. A-10
A.1.2.3 Content Security Configuration .............................................................................. A-12
A.1.2.3.1 System Properties: Content Security Tab........................................................ A-12
A.1.2.3.2 Admin Server: Content Security Page............................................................. A-13
A.1.2.4 Internet Information Configuration........................................................................ A-14
A.1.2.4.1 System Properties: Internet Tab ....................................................................... A-14
A.1.2.4.2 Admin Server: Internet Configuration Page .................................................. A-16
A.1.2.5 System Properties: Database Tab ............................................................................ A-17
A.1.2.6 System Properties: Server Tab ................................................................................. A-18
A.1.2.7 System Properties: Paths Tab................................................................................... A-20
A.1.3 Indexing and Search Content Interface ......................................................................... A-22
A.1.3.1 Repository Manager: Indexer Tab........................................................................... A-22
A.1.3.2 Automatic Update Cycle Screen.............................................................................. A-24
A.1.3.3 Collection Rebuild Cycle Screen.............................................................................. A-25
A.1.3.4 Indexer Rebuild Screen............................................................................................. A-26
A.1.3.5 Admin Actions Page ................................................................................................. A-27
A.1.3.6 Zone Fields Configuration Page.............................................................................. A-29
A.1.3.7 Oracle Query Optimizer Page ................................................................................. A-30
A.1.3.8 Hint Rules Configuration Page ............................................................................... A-30
A.1.3.9 Query Converter Page .............................................................................................. A-32
A.1.3.10 Hint Cache Updater Page......................................................................................... A-34
A.1.4 File Store Administration Interface................................................................................ A-36
A.1.4.1 Partition Listing Page................................................................................................ A-36
A.1.4.2 Add/Edit Partition Page .......................................................................................... A-37
A.1.4.3 File Store Provider Information Page..................................................................... A-38
A.1.4.4 Edit File Store Provider Page................................................................................... A-38
A.1.4.5 Storage Rule Name Dialog....................................................................................... A-39
A.1.4.6 Path Information Screen........................................................................................... A-41
A.1.5 Web Server Interface ........................................................................................................ A-42
A.1.5.1 Configure Web Server Filter Page........................................................................... A-42
A.1.5.2 WebUrlMaps Screen.................................................................................................. A-44
A.1.6 Provider Interface ............................................................................................................ A-45
xix
A.1.6.1 Providers Page ........................................................................................................... A-45
A.1.6.2 Provider Information Page....................................................................................... A-47
A.1.6.3 Add/Edit Provider Page .......................................................................................... A-48
A.1.6.4 Outgoing Socket Provider Page .............................................................................. A-49
A.1.6.5 Database Provider Page............................................................................................ A-51
A.1.6.6 Incoming Provider Page........................................................................................... A-53
A.1.6.7 Preview Provider Page ............................................................................................. A-54
A.1.6.8 LDAP Provider Page................................................................................................. A-55
A.1.6.9 keepaliveincoming Provider Page .......................................................................... A-60
A.1.6.10 keepaliveoutgoing Provider Page........................................................................... A-61
A.1.6.11 sslincoming Provider Page....................................................................................... A-63
A.1.6.12 ssloutgoing Provider Page ....................................................................................... A-65
A.1.6.13 JPS User Provider Page............................................................................................. A-67
A.1.6.14 Outgoing Http Provider Page.................................................................................. A-69
A.1.7 Batch Loader Interface ..................................................................................................... A-71
A.1.7.1 Batch Loader Screen.................................................................................................. A-71
A.1.7.2 BatchBuilder Screen .................................................................................................. A-72
A.1.7.3 BatchBuilder Mapping List Screen.......................................................................... A-73
A.1.7.4 Add BatchBuilder Mapping Screen........................................................................ A-74
A.1.7.5 Edit BatchBuilder Mapping Screen......................................................................... A-74
A.1.7.6 Add/Edit BatchBuilder Mapping Field Screen .................................................... A-75
A.1.8 Content Server Analyzer Interface................................................................................. A-76
A.1.8.1 Content Server Analyzer: Configuration Tab ....................................................... A-77
A.1.8.2 Content Server Analyzer: Progress Tab ................................................................. A-78
A.1.9 Error and Status Information Interface.......................................................................... A-78
A.1.9.1 Content Server Logs Screen ..................................................................................... A-79
A.1.9.2 Archiver Log Screen.................................................................................................. A-80
A.1.9.3 Database Log Screen ................................................................................................. A-80
A.1.9.4 Configuration Information Page ............................................................................. A-81
A.1.9.5 System Audit Information Page.............................................................................. A-83
A.1.9.6 Scheduled Jobs Administration Interface .............................................................. A-86
A.1.9.6.1 Active Scheduled Jobs Screen........................................................................... A-87
A.1.9.6.2 Scheduled Jobs History Screen......................................................................... A-87
A.1.9.6.3 Scheduled Jobs Information Screen................................................................. A-88
A.1.9.7 Environment Packager Page.................................................................................... A-89
A.2 Security and User Access Interface ....................................................................................... A-91
A.2.1 Security Administration Interface.................................................................................. A-91
A.2.1.1 User Admin Screen.................................................................................................... A-91
A.2.1.2 Define Filter Screen ................................................................................................... A-92
A.2.1.3 Show Columns Screen .............................................................................................. A-94
A.2.2 Groups, Roles, and Permissions Interface..................................................................... A-94
A.2.2.1 Permissions By Group Screen.................................................................................. A-95
A.2.2.2 Add New Group Screen ........................................................................................... A-95
A.2.2.3 Permissions By Role Screen ..................................................................................... A-96
A.2.2.4 Add New Role Screen............................................................................................... A-96
A.2.2.5 Edit Permissions Screen............................................................................................ A-97
A.2.3 Accounts Interface ............................................................................................................ A-97
xx
A.2.3.1 Predefined Accounts Screen .................................................................................... A-98
A.2.3.2 Add New Predefined Account Screen.................................................................... A-98
A.2.3.3 Add/Edit Account Permissions Screen ................................................................. A-99
A.2.4 User Login and Alias Interface ....................................................................................... A-99
A.2.4.1 User Admin Screen: Users Tab.............................................................................. A-100
A.2.4.2 Choose/Change the Authorization Type Screen................................................ A-101
A.2.4.3 Add/Edit User Screen ............................................................................................ A-101
A.2.4.4 Add/Edit User Screen: Info Tab (Local User)..................................................... A-102
A.2.4.5 Add/Edit User Screen: Info Tab (Global User)................................................... A-103
A.2.4.6 Add/Edit User Screen: Roles Tab......................................................................... A-104
A.2.4.7 Add Role Screen....................................................................................................... A-105
A.2.4.8 Add/Edit User Screen: Accounts Tab.................................................................. A-105
A.2.4.9 Option List Screen ................................................................................................... A-106
A.2.4.10 User Admin Screen: Aliases Tab........................................................................... A-107
A.2.4.11 Add New Alias/Edit Alias Screen........................................................................ A-108
A.2.4.12 Select Users Screen .................................................................................................. A-109
A.2.4.13 Sub-Administration Interface: Edit Rights Screen.............................................. A-110
A.2.4.14 User Admin Screen: Information Fields Tab....................................................... A-111
A.2.4.15 Add Metadata Field Name Screen........................................................................ A-113
A.2.4.16 Edit Metadata Field Screen .................................................................................... A-113
A.2.4.17 Update Database Design Screen............................................................................ A-114
A.2.5 Proxy Connections Interface ......................................................................................... A-115
A.2.5.1 Credential Maps Screen.......................................................................................... A-115
A.2.5.2 Proxied Connection Authentication/Authorization Information Screen....... A-116
A.3 Components Interface ........................................................................................................... A-117
A.3.1 Component List Screen.................................................................................................. A-118
A.3.2 Component Wizard Main Screen ................................................................................. A-119
A.3.2.1 Options Menu .......................................................................................................... A-120
A.3.2.2 Build Menu............................................................................................................... A-121
A.3.2.3 Help Menu................................................................................................................ A-121
A.3.3 Component Creation Screens........................................................................................ A-121
A.3.3.1 Add Component Screen ......................................................................................... A-122
A.3.3.2 Install Screen ............................................................................................................ A-122
A.3.3.3 Component Configuration Screen ........................................................................ A-123
A.3.3.4 Add/Edit Action Screen......................................................................................... A-124
A.3.3.4.1 Predefined Action Types................................................................................. A-125
A.3.3.5 Add Screen ............................................................................................................... A-126
A.3.3.6 Add Query Table Information Screen .................................................................. A-127
A.3.3.7 Add Service Table Information Screen................................................................. A-128
A.3.3.8 Add Dynamic Resource Table Information Screen ............................................ A-129
A.3.3.8.1 Predefined Dynamic Tables............................................................................ A-130
A.3.3.9 Add Static Resource Table Information Screen................................................... A-130
A.3.3.9.1 Predefined Static Tables .................................................................................. A-131
A.3.3.10 Add Template Table Information Screen............................................................. A-132
A.3.3.10.1 Predefined Template Tables ........................................................................... A-133
A.3.3.11 Add/Edit HTML Resource Include/String Screen............................................ A-133
A.3.3.12 Add/Edit Parameter Screen .................................................................................. A-134
xxi
A.3.3.13 Add/Edit Query Screen ......................................................................................... A-135
A.3.3.14 Add Resource Screen .............................................................................................. A-136
A.3.3.15 Resource Selection Dialog Screen.......................................................................... A-136
A.3.3.16 Add/Edit Service Screen........................................................................................ A-137
A.3.3.16.1 Subjects............................................................................................................... A-139
A.3.3.17 Preview Information for Service Screen............................................................... A-139
A.3.3.18 Preview Action Information Screen...................................................................... A-140
A.3.3.19 Add/Edit SearchResults Template Screen .......................................................... A-140
A.3.3.20 Column Information Screen................................................................................... A-142
A.3.3.21 Add/Edit Intradoc Template Screen.................................................................... A-142
A.3.3.22 Add/Edit Preference Screen.................................................................................. A-143
A.3.4 Build Screens ................................................................................................................... A-145
A.3.4.1 Install/Uninstall Settings Tab................................................................................ A-145
A.3.4.2 Main Build Screen.................................................................................................... A-146
A.3.4.3 Build Settings Screen............................................................................................... A-148
A.3.4.4 Advanced Build Settings Screen ........................................................................... A-149
A.3.4.5 Advanced Build Settings Review Screen ............................................................. A-150
A.3.5 Component Manager Page............................................................................................ A-151
A.3.6 Advanced Component Manager Page......................................................................... A-154
A.3.7 Update Component Configuration Interface.............................................................. A-157
A.3.7.1 Folders_g Update Component Configuration Screen........................................ A-157
A.3.7.2 PDF Watermark Update Component Configuration Screen ............................ A-159
A.3.7.3 Content Tracker Update Component Configuration Screen ............................ A-160
A.3.7.4 Content Tracker Reports Update Component Configuration Screen.............. A-161
A.3.7.5 Site Studio Update Component Configuration Screen ...................................... A-162
A.4 System Migration Interface .................................................................................................. A-163
A.4.1 Configuration Migration Interface Screens................................................................. A-164
A.4.1.1 Migration Options................................................................................................... A-164
A.4.1.2 Upload Configuration Bundle Screen .................................................................. A-164
A.4.1.3 Configuration Bundles Page.................................................................................. A-165
A.4.1.4 Configuration Templates Page.............................................................................. A-166
A.4.1.5 Config Migration Admin Screen........................................................................... A-167
A.4.1.6 Content Server Sections.......................................................................................... A-169
A.4.1.7 Preview Screen......................................................................................................... A-170
A.4.1.8 Edit Export Rule Screen.......................................................................................... A-171
A.4.1.9 Latest Action Screen................................................................................................ A-171
A.4.1.10 Action History Page................................................................................................ A-172
A.4.2 Archive, Collection, and Batch Interface..................................................................... A-173
A.4.2.1 Main Archiver Screen ............................................................................................. A-173
A.4.2.2 Archiver (General Tab)........................................................................................... A-174
A.4.2.3 Add Archive Screen ................................................................................................ A-176
A.4.2.4 Copy Archive Screen............................................................................................... A-176
A.4.2.5 Open Archive Collection Screen ........................................................................... A-177
A.4.2.6 Find Archive Collection Definition File Screen................................................... A-177
A.4.2.7 Browse To Archiver Collection Screen................................................................. A-178
A.4.2.8 Browse for Proxied Collection Screen .................................................................. A-179
A.4.2.9 View Batch Files Screen.......................................................................................... A-179
xxii
A.4.2.10 View Exported Content Items Screen................................................................... A-180
A.4.3 Export Interface Screens ................................................................................................ A-181
A.4.3.1 Main Archiver Export Screen ................................................................................ A-182
A.4.3.2 Export Data (Content) Screen ................................................................................ A-182
A.4.3.3 Edit Export Query (Content) Screen..................................................................... A-183
A.4.3.4 Edit Export Options Screen.................................................................................... A-186
A.4.3.5 Previewing Export Queries (Content) Screen ..................................................... A-186
A.4.3.6 Main Archiver Export Screen (Table) ................................................................... A-187
A.4.3.7 Add New/Edit Table Screen ................................................................................. A-188
A.4.3.8 Edit Export Query (Table) Screen ......................................................................... A-190
A.4.3.9 Previewing Export Queries (Table) Screen.......................................................... A-191
A.4.3.10 Export Archive Screen ............................................................................................ A-192
A.4.4 Import Interface Screens................................................................................................ A-192
A.4.4.1 Import Maps Main Screen...................................................................................... A-192
A.4.4.2 Import Maps (Content) Screen .............................................................................. A-193
A.4.4.3 Edit Field Map/Edit Value Map Screen............................................................... A-193
A.4.4.4 Browse for Fields/Value Screen............................................................................ A-194
A.4.4.5 Import Maps (Table) Screen................................................................................... A-195
A.4.4.6 Edit Archive Properties on Table Screen.............................................................. A-196
A.4.4.7 Edit Import Options (Select Rules) Screen........................................................... A-197
A.4.4.8 Import Archive Screen............................................................................................ A-198
A.4.5 Replication Interface Screens ........................................................................................ A-198
A.4.5.1 Main Archiver Replication Screen ........................................................................ A-198
A.4.5.2 Registered Exporter Screen .................................................................................... A-199
A.4.5.3 Automation (Exporters) Screen............................................................................. A-200
A.4.5.4 Automation (Importers) Screen............................................................................. A-200
A.4.5.5 Automation (Transfers) Screen.............................................................................. A-201
A.4.5.6 Automation (Queries) Screen ................................................................................ A-202
A.4.6 Transfer Interface Screens.............................................................................................. A-202
A.4.6.1 Main Archiver Transfer Screen.............................................................................. A-202
A.4.6.2 Transfer Options Screen ......................................................................................... A-204
A.4.6.3 Archive Collections Screen..................................................................................... A-204
A.4.7 Folder Archive Configuration Page............................................................................. A-205
B Need to Know Component
B.1 Introduction to Need to Know................................................................................................. B-1
B.1.1 Features ................................................................................................................................ B-2
B.1.2 Applications......................................................................................................................... B-2
B.2 Installing the NTK Component................................................................................................ B-3
B.3 Configuring the NTK Component .......................................................................................... B-3
B.4 Using the NTK Component...................................................................................................... B-5
B.4.1 Security Configuration Customization............................................................................ B-5
B.4.1.1 Content Security .......................................................................................................... B-5
B.4.1.2 Search Results............................................................................................................... B-7
B.4.1.3 Hit List Roles................................................................................................................ B-7
B.4.1.4 WHERE Clause Calculation....................................................................................... B-8
B.4.1.5 Content Metadata Security......................................................................................... B-8
xxiii
B.4.2 Disclosure Query Security Applet.................................................................................... B-8
B.4.3 Query Syntax..................................................................................................................... B-10
B.4.3.1 Like Operator ............................................................................................................. B-10
B.4.3.1.1 Substrings............................................................................................................ B-10
B.4.3.1.2 Wildcard Strings................................................................................................. B-10
B.4.3.2 Boolean Operators..................................................................................................... B-10
B.4.3.3 UserName Variable................................................................................................... B-10
B.4.3.4 stdSecurity Variable .................................................................................................. B-11
B.4.3.5 User Attribute Fields................................................................................................. B-11
B.4.3.6 User Roles................................................................................................................... B-11
B.4.4 Defining a Content-Level Query.................................................................................... B-11
B.5 NTK Administration Interface............................................................................................... B-12
B.5.1 NTK Configuration Information Page........................................................................... B-12
B.5.2 Content Security Configuration Information Page...................................................... B-15
B.5.3 Search Results Configuration Information Page.......................................................... B-18
B.5.4 Hit List Roles Configuration Information Page ........................................................... B-21
B.5.5 Test NTK Content Security Page.................................................................................... B-22
B.6 Security Customization Samples........................................................................................... B-23
B.6.1 Content Security Samples................................................................................................ B-23
B.6.1.1 Simple Idoc Script Function..................................................................................... B-23
B.6.1.2 Using stdSecurityCheck............................................................................................ B-23
B.6.1.3 Using isStrIntersect.................................................................................................... B-23
B.6.1.4 Using allStrIntersect.................................................................................................. B-24
B.6.1.5 Using includeNTKReadSecurityScript................................................................... B-24
B.6.2 Search Result Samples...................................................................................................... B-24
B.6.2.1 Disabling Links.......................................................................................................... B-25
B.6.2.2 Changing Links.......................................................................................................... B-25
B.6.2.3 Changing Images....................................................................................................... B-25
B.6.3 Hit List Roles Samples ..................................................................................................... B-25
B.6.3.1 Using the Query Hit List Role ................................................................................. B-25
B.6.3.2 Creating a Black Hole Check In............................................................................... B-25
Index
xxiv

xxv
Preface
This guide describes concepts and tasks for configuring and managing an Oracle
Content Server instance on an Oracle Universal Content Management system.
Audience
This guide is intended for people who are responsible for configuring and
administering the Oracle Content Server system.
Documentation Accessibility
Our goal is to make Oracle products, services, and supporting documentation
accessible to all users, including users that are disabled. To that end, our
documentation includes features that make information available to users of assistive
technology. This documentation is available in HTML format, and contains markup to
facilitate access by the disabled community. Accessibility standards will continue to
evolve over time, and Oracle is actively engaged with other market-leading
technology vendors to address technical obstacles so that our documentation can be
accessible to all of our customers. For more information, visit the Oracle Accessibility
Program Web site at http://www.oracle.com/accessibility/.
Accessibility of Code Examples in Documentation
Screen readers may not always correctly read the code examples in this document. The
conventions for writing code require that closing braces should appear on an
otherwise empty line; however, some screen readers may not always read a line of text
that consists solely of a bracket or brace.
Accessibility of Links to External Web Sites in Documentation
This documentation may contain links to Web sites of other companies or
organizations that Oracle does not own or control. Oracle neither evaluates nor makes
any representations regarding the accessibility of these Web sites.
Access to Oracle Support
Oracle customers have access to electronic support through My Oracle Support. For
information, visit http://www.oracle.com/support/contact.html or visit
http://www.oracle.com/accessibility/support.html if you are hearing
impaired.

xxvi
Related Documents
For more information, see the following documents:
■Oracle Fusion Middleware Installation Guide for Oracle Enterprise Content Management
Suite
■Oracle Fusion Middleware Quick Installation Guide for Oracle Enterprise Content
Management Suite
■Oracle Fusion Middleware Application Administrator's Guide for Oracle Content Server
■Oracle Fusion Middleware Developer's Guide for Oracle Universal Content Management
■Oracle Fusion Middleware User's Guide for Oracle Content Server
■Oracle Fusion Middleware Administrator's Guide for Oracle Access Manager
■Oracle Fusion Middleware Administrator's Guide for Oracle Identity Manager
■Oracle Fusion Middleware Administrator's Guide for Oracle Internet Directory
■Oracle Fusion Middleware Application Security Guide
■Oracle Fusion Middleware Authorization Policy Manager Administrator's Guide
■Oracle Fusion Middleware Concepts
■Oracle Fusion Middleware Enterprise Deployment Guide for Oracle Enterprise Content
Management Suite
■Oracle Fusion Middleware Installation Planning Guide
■Oracle Fusion Middleware Repository Creation Utility User's Guide
■Oracle Fusion Middleware Securing Oracle WebLogic Server
■Oracle Fusion Middleware WebLogic Scripting Tool Command Reference
Conventions
In this document, the term UNIX system or UNIX operating system refers to a
category of operating systems that includes Linux operating systems.
The following text conventions are used in this document:
Convention Meaning
boldface Boldface type indicates graphical user interface elements associated
with an action, or terms defined in text or the glossary.
italic Italic type indicates book titles, emphasis, or placeholder variables for
which you supply particular values.
monospace Monospace type indicates commands within a paragraph, URLs, code
in examples, text that appears on the screen, or text that you enter.

xxvii
What's New in This Guide
This preface introduces new and changed features of Oracle Content Server system
administration that are described in this guide.
New Features for 11g Release 1 (11.1.1)
11g Release 1 (11.1.1) includes the following features in this guide:
■This guide combines information that was previously contained in the following
Oracle Content Server version 10g documents:
–Managing Enterprise Search
–Managing Security and User Access
–Managing System Migration
–Managing System Settings and Processes
–System Overview
–Working with Components
–Need to Know Component Installation and Administration Guide
It includes a chapter on using Oracle Enterprise Manager Fusion Middleware
Control to manage Oracle Content Server configuration.
■An Oracle Content Server instance is deployed as part of the Oracle Universal
Content Management (Oracle UCM) system on an Oracle WebLogic Server
instance, which causes several changes in Oracle Content Server configuration.
– Using Oracle Enterprise Manager Fusion Middleware Control: Some Oracle
Content Server functions can be managed with the Fusion Middleware
Control user interface, including starting and stopping the server, modifying
certain server and e-mail configuration parameters, viewing log information,
and viewing performance information.
– Connecting to the System Database: The Oracle Content Server system uses
an Oracle WebLogic Server data source to communicate with the relational
database where metadata and other information is stored. Database
connection and communication information is managed with the Oracle
WebLogic Server Administration Console through the JpsUserProvider, as
opposed to Oracle Content Server's SystemProperties utility. As a result, JDBC
user name and password information is no longer stored in the Oracle Content
Server config.cfg file. (If you do set database connection information (for
example, JdbcUserName) using the SystemProperties utility, the information is
encrypted and stored in a secret location to prevent malicious attacks.)
xxviii
– Running Administration Utilities as Standalone Applications: In order to
run certain Oracle Content Server applications or administration utilities in
standalone mode (that is, from the command line or from the Windows Start
menu), database connection information must be entered into the Oracle
Content Server config.cfg file. The administrator must run the
SystemProperties utility to enter database connection information (database
type, database user name, database user password, and so forth) in the
config.cfg file. Unless this configuration is performed, the Oracle Content
Server standalone applications and utilities cannot function in standalone
mode because they cannot connect to the database. Only the administrator or
an assigned local user (created on the Oracle Content Server instance) can run
Admin Applets in standalone mode
– Database Connection Pooling and Management: The Oracle Content Server
system uses the Oracle WebLogic Server database connection pooling
mechanism to handle database communication. The SystemDatabase Provider
is still present and uses the Oracle WebLogic Server data source, which in turn
handles the actual database authentication and communication.
– Default User Provider: The JpsUserProvider is the default user provider for
communication between an Oracle Content Server instance and an Oracle
WebLogic Server domain.
– Database Providers: Oracle Content Server administrators can still create
database providers in the Oracle Content Server system in one of two ways.
Using one method, the administrator can create an Oracle WebLogic Server
data source to the database, then configure an Oracle Content Server database
provider to use that data source. The other method is for the administrator to
create an Oracle Content Server database provider to connect directly to the
database with JDBC without using the Oracle WebLogic Server data source.
This second method is provided primarily for sites who may have such
connections in Release 10gR3 deployments and are upgrading.
– Admin Server: Each Oracle Content Server instance must have one Oracle
Content Server Admin Server instance. The Admin Server can only manage
the Oracle Content Server instance that is installed on the same Oracle
WebLogic Server domain. The Admin Server no longer supports server starts,
stops, or restarts, but it does support configuration changes, status
information, and logs. Stopping and starting an Oracle Content Server
instance must be managed with the Enterprise Manager Fusion Middleware
Control Console, or the Oracle WebLogic Server Administration Console.
– Proxy Servers and Master Servers: Oracle UCM does not support proxy
Oracle Content Server instances. Only one Oracle Content Server can be
deployed on each Oracle WebLogic Server domain. A single Oracle WebLogic
Server domain can run one Oracle Content Server instance, one Inbound
Refinery instance, and one Universal Records Management instance, and other
Fusion Middleware applications. If you want to run more Oracle Content
Server instances, a separate Oracle WebLogic Server domain is required for
each Content Server instance (plus an Inbound Refinery instance and
Universal Records Management instance).
– Content Server Port: After initial installation of Oracle Content Server
software, the Oracle Content Server instance does not listen on any port. After
the IntradocServerPort parameter is set on the post-configuration page,
the Oracle Content Server instance starts listening on the specified port. If
necessary, the port number can be reconfigured using the Fusion Middleware
Control.
xxix
– HTTP and HTTPS: By default, an Oracle Content Server instance is accessible
with both HTTP and HTTPS. You can configure access methods with the
Oracle WebLogic Server Administration Console.
– Security Configuration: Security configuration for the Oracle Content Server
system is managed differently. User creation and authentication are managed
with the Oracle WebLogic Server Administration Console using Oracle
Platform Services Security (OPSS) and Oracle Access Manager (OAM). Single
Sign-On (SSO) is supported.
– User Administration: By default, Oracle UCM uses the Oracle WebLogic
Server user store to manage user names and passwords for an Oracle Content
Server instance. Therefore user management must be performed using the
Oracle WebLogic Server user management tools rather than the User Admin
applet in the Oracle Content Server instance. All user authentications are done
against the Oracle WebLogic Server user store. You can use the Admin applet
to create local users and assign passwords, but the users must also be created
and assigned passwords in the Oracle WebLogic Server user store.
For enterprise-level systems, Oracle Platform Security Services (OPSS) can be
used instead of the Oracle WebLogic Server user store to authenticate and
authorize users.
■The following information is new for managing system settings and processes:
– File Store System: A file store system for data management replaces the
traditional file system for storing and organizing content. The
FileStoreProvider component exposes the file store functionality in the Oracle
Content Server interface, and allows additional configuration options. The
FileStoreProvider component is installed, enabled, and upgraded by default
with Oracle Content Server installation. For details, see Section 4.3,
"Configuring a File Store System."
■The following information is new for managing security and user access:
– Access Control Lists: The Oracle Content Server instance can be configured to
support access control lists (ACLs). An access control list is a list of users,
groups, or enterprise roles with permission to access or interact with a content
item. For details, see Section 5.6, "Access Control List Security."
– Extended User Attributes: The Extended User Attributes component enables
administrators to add extended attributes to Oracle Content Server users. The
extended attributes are merged into pre-existing user attributes and enable
additional flexibility in managing users. The Extended User Attributes
component is installed and enabled by default with Oracle Content Server
installation. For details, see Section 5.9.3, "Extended User Attributes."
■The following information is new for managing search tools:
– Oracle SES Configuration: Oracle UCM can be configured to use Oracle
Secure Enterprise Search (Oracle SES) as an external search engine for an
Oracle Content Server instance. For details, see Section 7.2, "Oracle Secure
Enterprise Search."
– SESCrawlerExport: The SES Crawler Export component adds functionality as
an RSS feed generator to the Oracle Content Server instance and allows it to be
searched by Oracle Secure Enterprise Search (Oracle SES). The component
generates a snapshot of content currently on the Oracle Content Server
instance and provides it to the Oracle SES Crawler.
xxx
Changed Features for 11g Release 1 (11.1.1)
11g Release 1 (11.1.1) includes the following changes:
■Sysadmin user: The sysadmin user, which has functioned as the system
administrator for the Oracle Content Server instance, is no longer created by
default. You can explicitly create a user with administration privileges for your
Oracle Content Server instance.
■Directory Structure: The directory structure of an installed Oracle UCM server has
changed. Unlike in Release 10gR3, runtime files, configuration files, server
configuration files, file store, and files that must be shared between Oracle Content
Server, Oracle Inbound Refinery, and Oracle Universal Records Management
instances may be in various locations. The following locations and terms are
important to understanding an Oracle UCM 11g Release 1 (11.1.1) installation:
–IdcHomeDir: This variable refers to the directory in ECM_ORACLE_HOME
where the Oracle UCM (ucm) server media is located. The server media can
run Oracle Content Server, Oracle Inbound Refinery, and Oracle Universal
Records Management software.
–DomainHome: This variable refers to the user-specified directory where an
Oracle UCM server is deployed to run on an Oracle WebLogic Server
Application Server. The DomainHome/ucm/short-product-id/bin directory
contains the intradoc.cfg file and executables.
–short-product-id: This variable refers to the type of Oracle UCM server
deployed on an Oracle WebLogic Server. Possible values include:
*cs (Oracle Content Server)
*ibr (Oracle Inbound Refinery)
*urm (Oracle Universal Records Management)
–IntradocDir: This variable refers to the root directory for configuration and data
files specific to an Oracle Content Server instance deployed on an Oracle UCM
domain on an Oracle WebLogic Server instance. This Idoc Script variable is
configured for one type of Oracle Content Server instance: Oracle Content
Server (cs), Oracle Inbound Refinery (ibr), or Oracle Universal Records
Management (urm). The directory can be located elsewhere, but the default
location is DomainHome/ucm/short-product-id/.
■OracleTextSearch: The OracleTextSearch component has been incorporated into
the Oracle Content Server media, so the OracleTextSearch engine is one of several
search and indexing options. The OracleTextSearch interface has been integrated
with the Repository Manager Indexer functions, so there is no separate
OracleTextSearch page. For details, ee "OracleTextSearch" on page 7-1.

1
Introduction to Oracle Content Server Administration 1-1
1Introduction to Oracle Content Server
Administration
This guide assumes that Oracle Universal Content Management (Oracle UCM) and
Oracle Content Server software is already installed. For information on installing
Oracle UCM software with the Oracle Content Server instance and setting initial
post-installation configuration options, see Oracle Fusion Middleware Installation Guide
for Oracle Enterprise Content Management Suite.
This chapter provides an introduction to Oracle Content Server and its administration
tools. Subsequent chapters describe Oracle Content Server administration using Oracle
WebLogic Server, additional system configuration processes and settings, and
administration procedures for security, users, components, search tools, content
migration and archiving, and the Oracle Content Server user interface.
The following topics are covered:
■Section 1.1, "Understanding Oracle Universal Content Management and Oracle
Content Server"
■Section 1.2, "Administrative Accounts and Responsibilities"
■Section 1.3, "Oracle Content Server Administration Tools"
■Section 1.4, "Oracle Content Server Administration Utilities and Applets"
1.1 Understanding Oracle Universal Content Management and Oracle
Content Server
Oracle Universal Content Management and Oracle Content Server software enable
organizations to share, manage, and distribute business information using a web site
as a low-cost access point. Designed for the Web, this software is considered the
unrivaled solution for medium to large companies for building secure business
libraries with content check in, check out, revision control, and automated publishing
in web-ready formats. Current information is available to authorized users anytime,
anywhere. You can link virtually any type of file including letters, reports, engineering
drawings, spreadsheets, manuals, sales literature, and more under one powerful
system of knowledge distribution.
The Oracle Content Server system is designed for several types of users and
administrators:
■Consumers: Users who just need to find, view, and print files. In a typical system,
the majority of the users are consumers. These users do not need a user name and
password to access the content server system unless security is placed on the files.

Administrative Accounts and Responsibilities
1-2 Oracle Fusion Middleware System Administrator's Guide for Oracle Content Server
■Contributors: Users who need to create and revise files. To safeguard the integrity
of the files, the contributors need a user name and password to check files in and
out of the system.
■Administrators: Administrators who oversee an entire instance. Administrator
responsibilities include setting up, maintaining, and managing Oracle Content
Server users, content, and system configurations. Common tasks for an
administrator include configuring the system to manage and index files, archiving
and replicating information, working with security, adjusting system properties,
reviewing log files, and so forth.
Users and administrators must be set up on Oracle WebLogic Server for
authentication, and roles, groups and accounts can be assigned and modified in the
Oracle Content Server instance as needed.
1.2 Administrative Accounts and Responsibilities
An Oracle Content Server administrator must be assigned an administrator role on the
Oracle WebLogic Server Administration Console to have full administrative privileges
for the Oracle Content Server instance and the Admin Server. An Oracle Content
Server administrator can define system roles, permissions, and accounts to be assigned
to Oracle Content Server users with the Oracle WebLogic Server Administration
Console. An Oracle Content Server administrator is typically responsible for tasks
including:
■Configuring Oracle Content Server system settings and processes
■Managing Oracle Content Server security configuration
■Creating and managing user roles, user groups, and accounts
■Managing Oracle Content Server system and custom components
■Configuring Oracle Content Server search tools
■Managing Oracle Content Server system migration and archiving
■Monitoring and troubleshooting the Oracle Content Server instance
Additional tasks including managing Oracle Content Server applications. For details,
see Oracle Fusion Middleware Application Administrator's Guide for Oracle Content Server.
1.3 Oracle Content Server Administration Tools
Oracle provides the following tools for managing the Oracle Content Server instance:
■Section 1.3.1, "Oracle Enterprise Manager Fusion Middleware Control Console"
■Section 1.3.2, "Oracle WebLogic Server Administration Console"
■Section 1.3.3, "Oracle WebLogic Scripting Tool (WLST)"
■Section 1.4, "Oracle Content Server Administration Utilities and Applets"
An Oracle Content Server administrator should use these tools, rather than edit
configuration files, to perform administrative tasks unless a specific procedure requires
you to edit a file. Editing a file may cause the settings to be inconsistent and generate
problems.

Oracle Content Server Administration Tools
Introduction to Oracle Content Server Administration 1-3
1.3.1 Oracle Enterprise Manager Fusion Middleware Control Console
Oracle Enterprise Manager Fusion Middleware Control Console is a browser-based
management application deployed when Oracle Universal Content Management
(Oracle UCM) is installed with an Oracle Content Server instance. From the Oracle
Fusion Middleware Control Console an administrator can monitor and administer a
farm.
A farm is a collection of Oracle components managed by Fusion Middleware Control.
A farm can contain a Managed Server domain and other Oracle Fusion Middleware
system components that are installed, configured, and running on the domain. A
Managed Server domain contains one or more Managed Servers running one or more
applications, including the Oracle WebLogic Server Administration Console and an
Oracle Content Server instance.
Fusion Middleware Control organizes a wide variety of performance data and
administrative functions into distinct, web-based home pages. These home pages
make it easy to locate the most important monitoring data and the most commonly
used administrative functions for a component, all from your web browser.
Fusion Middleware Control is the top-level management tool for Oracle UCM with an
Oracle Content Server instance, and it can be used to:
■Deploy, undeploy, and re-deploy Oracle UCM with Oracle Content Server
■Configure back-end services
■Configure security management
■Control process lifecycle
■Export and import data
■Access log files and manage log configuration
■Manage migrations
■Monitor performance
■Diagnose run-time problems
1.3.2 Oracle WebLogic Server Administration Console
The Oracle WebLogic Server Administration Console is a browser-based management
application that you use to manage an Oracle WebLogic Server domain. The
Administration Server hosts the Administration Console, which is a web application
accessible from any supported web browser with network access to the
Administration Server Managed Servers host applications.
The Administration Console can be used to:
■Configure, start, and stop Oracle WebLogic Server domains
■Configure Oracle WebLogic Server clusters
■Configure Oracle WebLogic Server services, such as database connectivity (JDBC)
and messaging (JMS)
■Configure security parameters, including creating and managing users, groups,
and roles
■Configure and deploy applications
■Monitor server and application performance
■View server and domain log files

Oracle Content Server Administration Utilities and Applets
1-4 Oracle Fusion Middleware System Administrator's Guide for Oracle Content Server
■View application deployment descriptors
■Edit selected run-time application deployment descriptor elements
For more information about the Oracle WebLogic Server Administration Console, see
"Displaying the Oracle WebLogic Server Administration Console" in the Oracle Fusion
Middleware Administrator's Guide.
1.3.3 Oracle WebLogic Scripting Tool (WLST)
The Oracle WebLogic Scripting Tool (WLST) can be used to manage Oracle Fusion
Middleware components, such as Oracle Universal Content Management (Oracle
UCM) with an Oracle Content Server instance, from the command line.
The WebLogic Scripting Tool is a command-line scripting environment for creating,
managing, and monitoring Oracle WebLogic Server domains. It is based on the Java
scripting interpreter, Jython. In addition to supporting standard Jython features such
as local variables, conditional variables, and flow control statements, the WebLogic
Scripting Tool provides a set of scripting functions (commands) that are specific to
Oracle WebLogic Server instances. Administrators can extend the WebLogic scripting
language to suit site-specific needs by following the Jython language syntax.
Oracle UCM with an Oracle Content Server instance offers custom WLST commands
for managing Oracle Content Server application connections (to the repository, portlet
producers, external applications, and other back-end services). All the WLST
commands specific to Oracle UCM with an Oracle Content Server instance are
described in the section "Oracle UCM Content Server Custom WLST Commands" in
the Oracle Fusion Middleware WebLogic Scripting Tool Command Reference.
1.4 Oracle Content Server Administration Utilities and Applets
The Oracle Content Server system provides specific administration utilities and
applications for managing users, content, providers, archives, and so forth. This
section includes the following:
■Section 1.4.1, "Administration Interfaces"
■Section 1.4.2, "Administration Tray"
■Section 1.4.3, "Admin Applets Page"
See the browser considerations section in your installation and deployment guide for
information about Java-browser plug-ins and applet display issues.
1.4.1 Administration Interfaces
The Oracle Universal Content Management (Oracle UCM) system provides the
following tools to configure and maintain Oracle Content Server system operation:
■Utilities
■Management Pages
Note: When configuring a production environment, the
Administration Console's Change Center requires that before making
configuration changes the administrator must lock configuration
settings for a domain by clicking Lock & Edit.

Oracle Content Server Administration Utilities and Applets
Introduction to Oracle Content Server Administration 1-5
■Applications
■Command Line
1.4.1.1 Utilities
The following tools can be started only as standalone applications from the computer
where the Oracle Content Server instance is installed:
■Batch Loader: Update or check in a large number of content items simultaneously.
■System Properties: Configure the system options and functionality of the content
server.
■Content Analyzer: Confirm the integrity of the Oracle Content Server repository
components, including the file system, database, and search index.
■ComponentWizard: Create and install custom components to modify Oracle
Content Server behavior.
■ComponentTool: Install and enable or disable components using the command
line.
1.4.1.2 Management Pages
The following pages can be accessed by using a web browser and selecting the
Administration link from the Oracle Content Server portal:
■Admin Server: Configure system-wide settings and view Oracle Content Server
status. Each Oracle Content Server instance has its own Admin Server instance,
which manages the Oracle Content Server instance on the Oracle UCM domain
and Oracle WebLogic Server domain.
■Providers: Add providers, configure provider information, and test providers.
1.4.1.3 Applications
The following applications can be started as standalone applications from the Admin
Applets Page on an Oracle Content Server instance, as applets through a web browser,
or from the Apps menu in each of the tools. For details on the applications, see Oracle
Fusion Middleware Application Administrator's Guide for Oracle Content Server.
■User Admin: Manage the user base, set up security (by assigning roles and
permissions to users), define aliases, and manage security groups.
■Workflow Admin: Set up workflows to route content to specific people for action.
■Repository Manager: Perform file diagnostics, file management functions, search
data re-indexing, and subscription management functions.
■Configuration Manager: Manage content types, file formats, and custom
metadata fields.
■Archiver: Export, import, transfer, and replicate content server files and
information. For details, see the chapter on "Managing System Migration."
■Weblayout Editor: Build a web site, work with reports, write queries.
1.4.1.4 Command Line
The IdcShell tool enables administrators to run Idoc Script from a command line. Idoc
Script is a proprietary server-side scripting language for Oracle UCM.
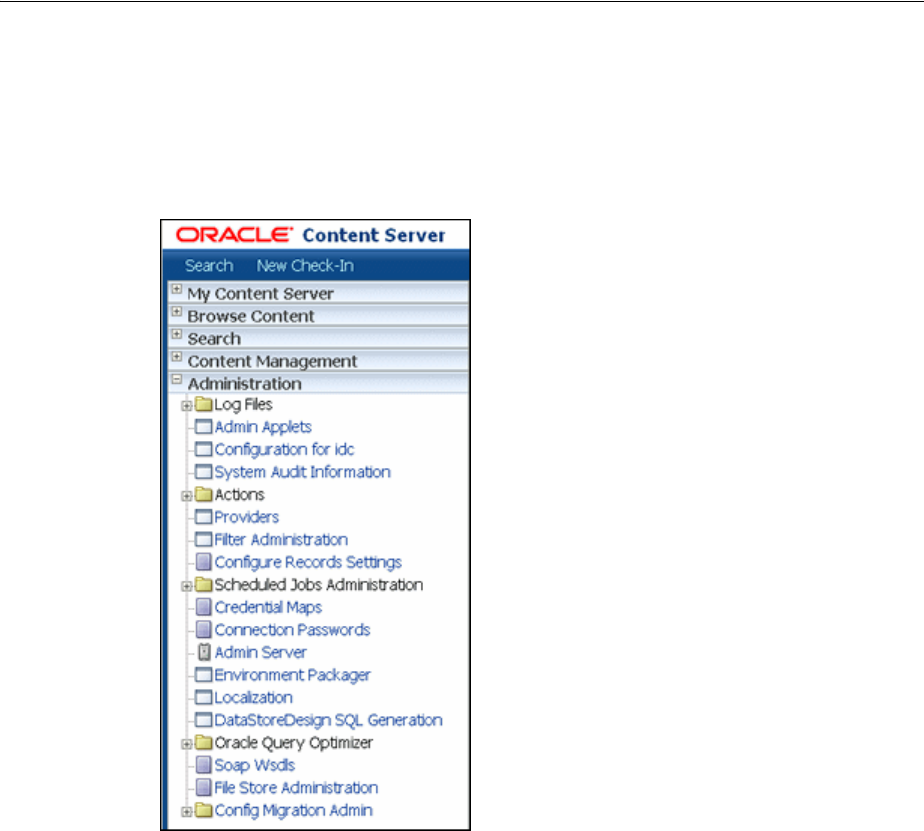
Oracle Content Server Administration Utilities and Applets
1-6 Oracle Fusion Middleware System Administrator's Guide for Oracle Content Server
1.4.2 Administration Tray
The Administration tray provide access to administration log files and administration
pages for configuring and managing Oracle Content Server applications and tools. To
access the Administration tray, log in as an Oracle Content Server administrator, then
select Administration in the portal navigation bar. If using the Menu option for the
portal, select Administration to view the same options in a menu.
1.4.3 Admin Applets Page
The Admin Applets page provides access to administration applets and configuration
tools. To access this page, log in as an administrator, click Administration in the portal
navigation bar, then click Admin Applets.
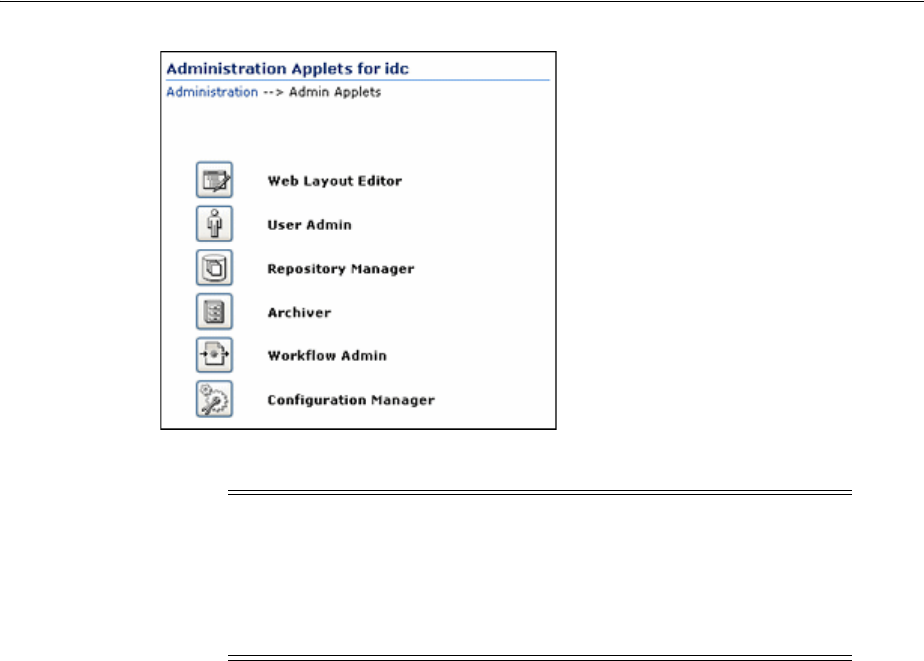
Oracle Content Server Administration Utilities and Applets
Introduction to Oracle Content Server Administration 1-7
Note: You may experience problems if you start any Java applets
(such as an Oracle Content Server administration applet or the
multiple-file upload applet) from a browser that is using Sun's JDK
1.3/1.4 Java plug-in. These issues are related to authentication when
launching an applet for the first time and applets closing when the
parent window is changed.

Oracle Content Server Administration Utilities and Applets
1-8 Oracle Fusion Middleware System Administrator's Guide for Oracle Content Server

2
Using Fusion Middleware Control to Manage Oracle Universal Content Management 2-1
2Using Fusion Middleware Control to Manage
Oracle Universal Content Management
This chapter describes how to use Oracle Enterprise Manager Fusion Middleware
Control to access Oracle Universal Content Management (Oracle UCM) Oracle
Content Server related pages and perform Oracle Content Server configuration,
monitoring, and other management tasks.
■Section 2.1, "Displaying the Fusion Middleware Control User Interface"
■Section 2.2, "Navigating to the Home Page for Oracle Content Server"
■Section 2.3.1, "Starting Oracle Content Server"
■Section 2.3.2, "Shutting Down Oracle Content Server"
■Section 2.4.1, "Modifying Server Configuration Parameters for Oracle Content
Server"
■Section 2.4.2, "Modifying E-mail Configuration Parameters for Oracle Content
Server"
■Section 2.5, "Viewing Performance Information for Oracle Content Server"
■Section 2.6, "Viewing Log Information for Oracle Content Server"
■Section 2.7, "Viewing MBean Information for Oracle Content Server"
Audience
The content of this chapter is intended for Oracle Fusion Middleware administrators
(users granted the Admin role through the Oracle WebLogic Server Administration
Console).
2.1 Displaying the Fusion Middleware Control User Interface
Fusion Middleware Control is a web browser-based interface that you can use to
monitor and administer a farm. A farm is a collection of components managed by
Fusion Middleware Control. It can contain Oracle WebLogic Server domains, one
Administration Server, one or more Managed Servers, clusters, and the Oracle Fusion
Middleware components that are installed, configured, and running in the domain.
Fusion Middleware administrators can use Fusion Middleware Control to access and
manage an Oracle Universal Content Management Oracle Content Server instance.
For more information, see "Getting Started Managing Oracle Fusion Middleware" in
the Oracle Fusion Middleware Administrator's Guide.

Navigating to the Home Page for Oracle Content Server
2-2 Oracle Fusion Middleware System Administrator's Guide for Oracle Content Server
To access Fusion Middleware Control:
Fusion Middleware Control is configured for a domain and it is automatically started
when you start the Oracle WebLogic Server Administration Server.
1. Enter the Fusion Middleware Control URL in your web browser. The URL must
include the name of the host and the port number assigned during the installation.
The following shows the format:
http://hostname.domain:port/em
For example: http://myhost.mycompany.com:7001/em
You can find the exact URL, including the administration port number, in the
config.xml file:
■On Windows: DOMAIN_HOME\config\config.xml
■On UNIX: ORACLE_INSTANCE/config/config.xml
If the port number is not listed in the file, the default port number is 7001.
2. Enter a valid Oracle Fusion Middleware administrator user name and password,
and click Login.
A default user name for the administrator user is provided with the software. This
is the account you can use to log in to Fusion Middleware Control for the first
time. The password is the one supplied during the installation of Oracle Fusion
Middleware.
The first page Fusion Middleware Control displays is the farm home page. You
can also view this page at any time by selecting the name of the farm in the
navigation pane.
From the navigation pane, you can expand the tree and select a target to view and
manage components in your farm, including Universal Content Management and
Oracle Content Server. For detailed instructions, see Section 2.2, "Navigating to
the Home Page for Oracle Content Server."
2.2 Navigating to the Home Page for Oracle Content Server
The Oracle Content Server home page is your starting place for managing an Oracle
UCM Oracle Content Server instance.
From the home page you can:
■Check the general status of an Oracle Content Server instance
■View overall response time for services
■View resource information on concepts and tasks
The Oracle Content Server home page displays the UCM menu. From the UCM menu
you can:
■Start and shut down an Oracle Content Server instance
■Configure Oracle Content Server instance parameters and e-mail settings
■Monitor Oracle Content Server instance performance metrics
■Analyze diagnostic information and log files
■Modify attributes using the system MBean browser
■View general information about the Oracle UCM configuration
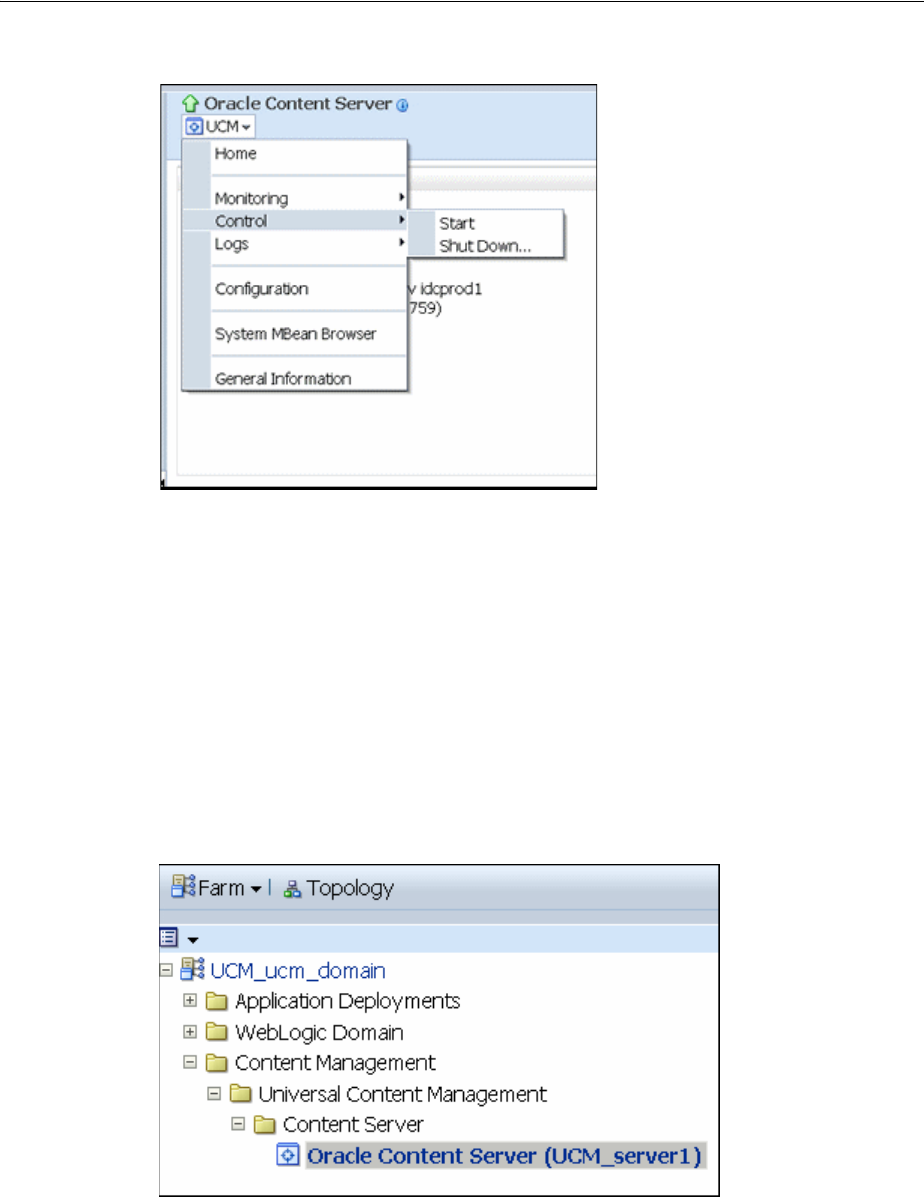
Navigating to the Home Page for Oracle Content Server
Using Fusion Middleware Control to Manage Oracle Universal Content Management 2-3
Figure 2–1 Oracle Content Server UCM Menu
To navigate to the Oracle Content Server home page:
1. Log in to Fusion Middleware Control. See Section 2.1, "Displaying the Fusion
Middleware Control User Interface."
2. In the navigation pane, expand the tree to select the appropriate target domain
name (for example, UCM_ucm_domain).
3. Expand Content Management, then Universal Content Management, then
Content Server.
4. Select Oracle Content Server (server_name) to navigate to the home page for your
Oracle Content Server instance.
Figure 2–2 Navigation to the Oracle Content Server Page

Starting and Shutting Down Oracle Content Server
2-4 Oracle Fusion Middleware System Administrator's Guide for Oracle Content Server
2.3 Starting and Shutting Down Oracle Content Server
This section covers the following topics:
■Section 2.3.1, "Starting Oracle Content Server"
■Section 2.3.2, "Shutting Down Oracle Content Server"
2.3.1 Starting Oracle Content Server
1. In the navigation tree, expand the appropriate domain name (for example, UCM_
ucm_domain).
2. Expand Content Management, then Universal Content Management, then
Content Server.
3. Select the Oracle UCM Oracle Content Server name (for example, Oracle
Content Server (UCM_server1)). The home page for your Oracle Content
Server instance displays.
4. From the UCM menu on the Oracle Content Server page, select Control, then
Start. The Oracle Content Server instance is started.
For more information, see "Starting and Stopping Oracle WebLogic Server Instances"
in Oracle Fusion Middleware Administrator's Guide.
2.3.2 Shutting Down Oracle Content Server
1. In the navigation tree, expand the appropriate domain name (for example, UCM_
ucm_domain).
2. Expand Content Management, then Universal Content Management, then
Content Server.
3. Select the Oracle Content Server instance name (for example, Oracle Content
Server (UCM_server1)). The home page for your Oracle Content Server
instance displays.
4. From the UCM menu on the Oracle Content Server page, select Control, then Shut
Down.... The Oracle Content Server instance is shut down.
For more information, see "Starting and Stopping Oracle WebLogic Server Instances"
in Oracle Fusion Middleware Administrator's Guide.
2.4 Modifying Configuration Parameters for Oracle Content Server
This section covers the following topics:
■Section 2.4.1, "Modifying Server Configuration Parameters for Oracle Content
Server"
■Section 2.4.2, "Modifying E-mail Configuration Parameters for Oracle Content
Server"
2.4.1 Modifying Server Configuration Parameters for Oracle Content Server
Server configuration contains information used to identify an Oracle UCM Oracle
Content Server deployment scenario.

Modifying Configuration Parameters for Oracle Content Server
Using Fusion Middleware Control to Manage Oracle Universal Content Management 2-5
From the Configuration page you can:
■Manage the HTTP address, which is the server address used to formulate full
URLs in the Oracle Content Server user interface. This prevents users from being
prompted to log in again because the domain name used to enter the server is not
changed when links on pages are relative. Example setting: pc.idc.oracle.com.
■Manage the Intradoc server port, which is the port number listened to by the
Oracle Content Server instance. This is a trusted connection where only the user
ID is required to authenticate. Example setting: 4056.
■Manage the IP address filter, which is a list of IP addresses that are allowed to
communicate to the Oracle Content Server instance through the Intradoc Server
Port. The field accepts both IP and IPv6 addresses, with a pipe as the separator
between addresses. This list must be well defined because it is a trusted
connection. Example setting: 10.131.123.*.
■Choose whether or not to use Secure Sockets Layer (SSL), which is related to the
HTTP server address and indicates that the full URL uses the secured HTTP
nomenclature. For example, it generates an address with
https://(HttpServerAddress)/... instead of http://(HttpServerAddress)/...
To modify the server configuration:
1. In the navigation tree, expand the appropriate domain name (for example, UCM_
ucm_domain).
2. Expand Content Management, then Universal Content Management, then
Content Server.
3. Select the Oracle Content Server instance name (for example, Oracle Content
Server (UCM_server1)). The home page for your Oracle Content Server
instance displays.
4. Use the UCM menu to select Configuration. The General Settings page displays.
5. In the Server Configuration section, in the HTTP Address field, enter an HTTP
server address.
6. In the Server Configuration section, in the Intradoc Server Port field, enter a server
port number.
7. In the Server Configuration section, in the IP Address Filter field, enter a list of IP
addresses that can be used to access the server.
8. In the Server Configuration section, select Use SSL to turn on SSL.
9. Click Apply.
The General Settings page updates with the configuration changes.
If you do not want to apply changes, click Revert to return to the previous
configuration settings.
2.4.2 Modifying E-mail Configuration Parameters for Oracle Content Server
E-mail configuration parameters contain information used to identify an Oracle UCM
Oracle Content Server deployment scenario.
From the Configuration page you can:
■Specify the mail server, which is the name of the mail server that the content
server uses to send SMTP based e-mail. Example: mymailserver.company.com.

Viewing Performance Information for Oracle Content Server
2-6 Oracle Fusion Middleware System Administrator's Guide for Oracle Content Server
■Specify the SMTP port, which is the port number used to connect to the mail
server. Example: 25.
■Specify the admin mail address, which is the administrator e-mail address that
receives error messages. Such messages are generally logged, but this is an
additional method of notification. Example: mymail@mail.com.
To modify the e-mail configuration:
1. In the navigation tree, expand the appropriate domain name (for example, UCM_
ucm_domain).
2. Expand Content Management, then Universal Content Management, then
Content Server.
3. Select the Oracle Content Server instance name (for example, Oracle Content
Server (UCM_server1)). The home page for your Oracle Content Server
instance displays.
4. From the UCM menu on the Oracle Content Server page, select Configuration.
The General Settings page displays.
5. In the Email Configuration section, in the Mail Server field, enter the name of a
mail server.
6. In the Email Configuration section, in the SMTP Port field, enter a port number.
7. In the Email Configuration section, in the Admin Mail Address field, enter an
e-mail address.
8. Click Apply.
The General Settings page updates with the configuration changes.
If you do not want to apply changes, click Revert to return to the previous
configuration settings.
2.5 Viewing Performance Information for Oracle Content Server
You can monitor performance information for an Oracle UCM Oracle Content Server
instance. Information includes a graphic of metrics for the Oracle Content Server
instance, a summary of the most recent metric values, and a listing of recent service
requests.
To view performance information:
1. In the navigation tree, expand the appropriate domain name (for example, UCM_
ucm_domain).
2. Expand Content Management, then Universal Content Management, then
Content Server.
3. Select the Oracle Content Server instance name (for example, Oracle Content
Server (UCM_server1)). The home page for your Oracle Content Server
instance displays.
4. From the UCM menu on the Oracle Content Server page, select Monitoring, then
Performance Summary.
The Performance Summary page displays. It contains information in graphic
format.
5. To select which metrics to display in performance graphs, click the Show Metric
Palette button on the Performance Summary page. The Metric Palette lists

Viewing Log Information for Oracle Content Server
Using Fusion Middleware Control to Manage Oracle Universal Content Management 2-7
available options for metrics to display in graphs on the Performance Summary
page.
To view metrics in a table format, select Table Vie w.
6. Check the box for each metric you want to display:
■Active Threads: The number of active threads.
■Active Database Connections: The number of active database connections
made by the Oracle Content Server instance.
■Search Queries Cached: The number of search queries cached (rows).
■Hit to Miss Ratio: The hit to miss ratio for the number of search queries
performed.
■Documents in GenWWW State: The number of documents waiting for
Inbound Refinery in a GenWWW state.
■Documents Waiting to be Indexed in Done State: The number of documents
waiting to be indexed in a Done state.
■Average Requests Per Sec: The average number of Services requested per
second.
More details about performance information for Oracle Fusion Middleware are
available from the Enterprise Manager Administration Console Online Help.
2.6 Viewing Log Information for Oracle Content Server
You can view log messages and manage the log configuration for the Oracle UCM
Oracle Content Server instance.
To view log information:
1. In the navigation tree, expand the appropriate domain name (for example, UCM_
ucm_domain).
2. Expand Content Management, then Universal Content Management, then
Content Server.
3. Select the Oracle Content Serverinstance name (for example, Oracle Content
Server (UCM_server1)). The home page for your Oracle Content Server
instance displays.
4. From the UCM menu on the Oracle Content Server page, select Logs, then View
Log Messages.
The Log Messages page displays. It contains information about the contents of all
available log files. You can use this page to:
■Search for log messages logged during the past "n" hours.
■Search for log messages that were logged between two time intervals.
■Filter log messages based on message type.
To modify log configuration:
1. In the navigation tree, expand the appropriate domain name (for example, UCM_
ucm_domain).
2. Expand Content Management, then Universal Content Management, then
Content Server.

Viewing MBean Information for Oracle Content Server
2-8 Oracle Fusion Middleware System Administrator's Guide for Oracle Content Server
3. Select the Oracle Content Server instance name (for example, Oracle Content
Server (UCM_server1)). The home page for your Oracle Content Server
instance displays.
4. From the UCM menu on the Oracle Content Server page, select Logs, then Log
Configuration.
The Log Configuration page displays. Use this page to configure basic and
advanced log configuration settings for log levels and log files:
■Change log levels of persistent loggers (loggers defined in the logging
configuration file).
■Change log levels of run-time loggers.
■Specify loggers that are currently neither persistent nor run time.
■Specify the log file configuration parameters such as the log file path and log
rotation policies.
■Create a new log file configuration.
■Create a new log file configuration using an existing log file configuration.
■View the log file configuration parameters.
■Associate one or more loggers with a log file configuration.
More details about log information for Oracle Fusion Middleware is available from the
Enterprise Manager Administration Console Online Help.
2.7 Viewing MBean Information for Oracle Content Server
You can use the MBean browser to view MBean attribute information about an Oracle
UCM Oracle Content Server instance.
To view MBean information:
1. In the navigation tree, expand the appropriate domain name (for example, UCM_
ucm_domain).
2. Expand Content Management, then Universal Content Management, then
Content Server.
3. Select the Oracle Content Server instance name (for example, Oracle Content
Server (UCM_server1)). The home page for your Oracle Content Server
instance displays.
4. From the UCM menu on the Oracle Content Server page, select System MBean
Browser.
The System MBean Browser page displays. This page shows the navigation pane
with the UCM server name highlighted, and shows configuration MBean
application deployment information for an Oracle Content Server instance.
You can use the MBean browser to view or modify individual MBean attribute
values, and to invoke MBean operations. Select the MBean and the attribute you
want to view or modify. If you change an attribute value, click Apply.
For more information see "Understanding WebLogic Server MBeans" in Oracle Fusion
Middleware Developing Custom Management Utilities With JMX for Oracle WebLogic
Server.

3
Managing System Processes 3-1
3 Managing System Processes
This chapter describes concepts and tasks for managing Oracle Content Server system
processes on an ongoing basis. It covers the following topics:
■Section 3.1, "Starting, Stopping, and Restarting Oracle Content Server"
■Section 3.2, "Accessing Oracle Content Server With a Browser"
■Section 3.3, "Managing Oracle Content Server With the Admin Server"
■Section 3.4, "Starting Oracle Content Server Administration Applications"
■Section 3.6, "Batch Loading Content"
■Section 3.7, "Finding Status and Error Information"
3.1 Starting, Stopping, and Restarting Oracle Content Server
There are several methods for starting, stopping, and restarting an Oracle Content
Server instance. Which method you choose depends on your requirements, your
authorization, and the task you want to complete. For example, when certain
configuration changes are made to an Oracle Content Server instance, such as when
components are enabled or disabled, the Oracle Content Server instance must be
restarted. Available methods include:
■Oracle WebLogic Server Administration Console
■Oracle WebLogic Server scripts
■Oracle Enterprise Manager Fusion Middleware Control
Procedures are described in these topics:
■Section 3.1.1, "Starting Oracle Content Server"
■Section 3.1.2, "Stopping Oracle Content Server"
■Section 3.1.3, "Restarting Oracle Content Server"
Note: In earlier releases, the Oracle Content Server Admin Server
could be used to start, stop, and restart an Oracle Content Server
instance. This functionality has been replaced as of 11g Release 1
(11.1.1), although other functions can still be managed with the Admin
Server.

Starting, Stopping, and Restarting Oracle Content Server
3-2 Oracle Fusion Middleware System Administrator's Guide for Oracle Content Server
3.1.1 Starting Oracle Content Server
An Oracle Content Server instance is initially started during the process of installing
and deploying the instance on an Oracle Universal Content Management (Oracle
UCM) server on an Oracle WebLogic Server domain. You might want to start an Oracle
Content Server instance at other times, for example, to start an instance after it has
been stopped when changing an Oracle Content Server configuration setting.
■Section 3.1.1.1, "Starting Oracle Content Server with the Oracle WebLogic Server
Administration Console"
■Section 3.1.1.2, "Starting Oracle Content Server with Scripts"
■Section 3.1.1.3, "Starting Oracle Content Server with Fusion Middleware Control"
3.1.1.1 Starting Oracle Content Server with the Oracle WebLogic Server
Administration Console
The Oracle WebLogic Server Administration Console is available to Oracle Content
Server administrators because they must have administrative privileges to manage the
UCM server with the Oracle Content Server instance. The Node Manager must be
configured and running in order to start the UCM server with the Oracle Content
Server instance.
To start Oracle Content Server with the Oracle WebLogic Server Administration
Console:
1. On the Administration Console Domain Structure navigation bar, select
Environment, then Servers.
2. On the Conversion tab for the Summary of Servers section, select the name of the
Oracle UCM server for the Oracle Content Server instance.
3. In the Settings for server_name section, click the Control tab.
4. In the Server Status area, click Start.
For more information, see "Starting and Stopping Oracle WebLogic Server Instances"
in Oracle Fusion Middleware Administrator's Guide.
3.1.1.2 Starting Oracle Content Server with Scripts
Scripts provide a quick method to execute actions on Oracle WebLogic servers. Before
you can start a Managed Server for an application, you must start the Administration
Server for the Oracle WebLogic Server domain.
The following examples assume that the Oracle Content Server instance has been
previously started as part of the software installation process. For details, see "Starting
the Administration Server" and "Starting Managed Servers" in Oracle Fusion
Middleware Installation Guide for Oracle Enterprise Content Management Suite.
Caution: These script commands control the Oracle WebLogic Server
Managed Server that includes the Oracle UCM server for the Oracle
Content Server, and the Oracle WebLogic Server Administration
Server, which includes the Administration Console. If you do not
want to start or stop the Oracle WebLogic Server Administration
Server, then use another method to start the Oracle Content Server
instance.

Starting, Stopping, and Restarting Oracle Content Server
Managing System Processes 3-3
To start Oracle Content Server with scripts:
Run the script to start the Oracle WebLogic Server Administration Console, then the
script to start the Oracle WebLogic Server Managed Server with the UCM server with
the Oracle Content Server instance (in this example, named UCM_server1):
Windows script:
MW_HOME\user_projects\domains\DOMAIN_HOME\bin\startWebLogic.sh
MW_HOME\user_projects\domains\DOMAIN_HOME\bin\startManagedWebLogic.sh UCM_server1
UNIX script:
MW_HOME/user_projects/domains/DOMAIN_HOME/bin/startWebLogic.sh
MW_HOME/user_projects/domains/DOMAIN_HOME/bin/startManagedWebLogic.sh UCM_server1
For more information on scripts, see Oracle Fusion Middleware WebLogic Scripting Tool
Command Reference.
3.1.1.3 Starting Oracle Content Server with Fusion Middleware Control
Oracle Enterprise Manager Fusion Middleware Control can be used by administrators
to manage multiple domains, including an Oracle WebLogic Server domain running
an Oracle Content Server instance. This method of starting an Oracle Content Server
instance also provides access to information about the Oracle UCM domain in which
the Oracle Content Server instance is deployed.
To start Oracle Content Server with Fusion Middleware Control:
1. In the Fusion Middleware Control navigation tree, expand the appropriate domain
name (for example, UCM_ucm_domain).
2. Expand Content Management, then Universal Content Management, then
Content Server.
3. Select the Oracle Content Server name (for example, Oracle Content Server
(UCM_server1)). The home page for your Oracle Content Server instance
displays.
4. From the UCM menu on the Oracle Content Server page, select Control, then
Start. The Oracle Content Server instance is started.
For more information, see "Starting and Stopping Oracle WebLogic Server Instances"
in Oracle Fusion Middleware Administrator's Guide.
3.1.2 Stopping Oracle Content Server
The Oracle Content Server instance can be stopped for several reasons, including
changing the configuration, such as enabling or disabling a server component.
■Section 3.1.2.1, "Stopping Oracle Content Server with the Oracle WebLogic Server
Administration Console"
■Section 3.1.2.2, "Stopping Oracle Content Server with Scripts"
■Section 3.1.2.3, "Stopping Oracle Content Server with Fusion Middleware Control"
3.1.2.1 Stopping Oracle Content Server with the Oracle WebLogic Server
Administration Console
The Oracle WebLogic Server Administration Console is available to Oracle Content
Server administrators because they must have administrative privileges to manage the

Starting, Stopping, and Restarting Oracle Content Server
3-4 Oracle Fusion Middleware System Administrator's Guide for Oracle Content Server
Oracle Content Server instance. The Node Manager must be configured and running
in order to stop the UCM server with the Oracle Content Server instance.
To stop Oracle Content Server with the Oracle WebLogic Server Administration
Console:
1. On the Administration Console Domain Structure navigation bar, select
Environment, then Servers.
2. On the Conversion tab for the Summary of Servers section, select the name of the
Oracle UCM server for the Oracle Content Server instance.
3. In the Settings for server_name section, click the Control tab.
4. In the Server Status area, click Shutdown.
For more information, see "Starting and Stopping Oracle WebLogic Server Instances"
in Oracle Fusion Middleware Administrator's Guide.
3.1.2.2 Stopping Oracle Content Server with Scripts
Scripts provide a quick method for executing actions on Oracle WebLogic servers.
To stop Oracle Content Server with Scripts:
Run the script to stop the UCM server with the Oracle Content Server instance (in this
example, named UCM_server1) on the Oracle WebLogic Server Managed Server.
Next, only if necessary, run the script to stop the Oracle WebLogic Server
Administration Console:
Windows script:
MW_HOME\user_projects\domains\DOMAIN_HOME\bin\stopManagedWebLogic.sh UCM_server1
MW_HOME\user_projects\domains\DOMAIN_HOME\bin\stopWebLogic.sh
UNIX script:
MW_HOME/user_projects/domains/DOMAIN_HOME/bin/stopManagedWeblogic.sh UCM_server1
MW_HOME/user_projects/domains/DOMAIN_HOME/bin/stopWebLogic.sh
For more information on scripts, see Oracle Fusion Middleware WebLogic Scripting Tool
Command Reference.
3.1.2.3 Stopping Oracle Content Server with Fusion Middleware Control
Oracle Enterprise Manager Fusion Middleware Control can be used by administrators
to manage multiple domains, including an Oracle WebLogic Server domain running
the Oracle Content Server instance. This method of stopping the Oracle Content Server
instance also provides access to information about the Oracle UCM domain in which
the Oracle Content Server instance is deployed.
Caution: These script commands control the Oracle WebLogic Server
Managed Server that includes the Oracle UCM server for the Oracle
Content Server, and the Oracle WebLogic Server Administration
Server, which includes the Administration Console. If you do not
want to start or stop the Oracle WebLogic Server Administration
Server, then use another method to stop the Oracle Content Server
instance.

Starting, Stopping, and Restarting Oracle Content Server
Managing System Processes 3-5
To stop Oracle Content Server with Fusion Middleware Control:
1. In the Fusion Middleware Control navigation tree, expand the appropriate domain
name (for example, UCM_ucm_domain).
2. Expand Content Management, then Universal Content Management, then
Content Server.
3. Select the Oracle Content Server instance name (for example, Oracle Content
Server (UCM_server1)). The home page for your Oracle Content Server
instance displays.
4. From the UCM menu on the Oracle Content Server page, select Control, then Shut
Down.... The Oracle Content Server instance is shut down.
For more information, see "Starting and Stopping Oracle WebLogic Server Instances"
in Oracle Fusion Middleware Administrator's Guide.
3.1.3 Restarting Oracle Content Server
The Oracle Content Server instance can be restarted for several reasons, including
changing the configuration, such as enabling or disabling a server component.
■Section 3.1.3.1, "Restarting Oracle Content Server with the Oracle WebLogic Server
Administration Console"
■Section 3.1.3.2, "Restarting Oracle Content Server with Scripts"
■Section 3.1.3.3, "Restarting Oracle Content Server with Fusion Middleware
Control"
3.1.3.1 Restarting Oracle Content Server with the Oracle WebLogic Server
Administration Console
The Oracle WebLogic Server Administration Console is available to Oracle Content
Server administrators because they must have administrative privileges to manage the
Oracle Content Server instance. The Node Manager must be configured and running
in order to stop and start the UCM server with the Oracle Content Server instance.
To restart Oracle Content Server with the Oracle WebLogic Server
Administration Console:
1. On the Administration Console Domain Structure navigation bar, select
Environment, then Servers.
2. On the Conversion tab for the Summary of Servers section, select the name of the
Oracle UCM server for the Oracle Content Server instance.
3. In the Settings for server_name section, click the Control tab.
4. In the Server Status area, click Shutdown.
5. Confirm that the Oracle Content Server instance has stopped, and then click Start.
For more information, see "Starting and Stopping Oracle WebLogic Server Instances"
in Oracle Fusion Middleware Administrator's Guide.
3.1.3.2 Restarting Oracle Content Server with Scripts
Scripts provide a quick method for executing actions on Oracle WebLogic servers.

Starting, Stopping, and Restarting Oracle Content Server
3-6 Oracle Fusion Middleware System Administrator's Guide for Oracle Content Server
To Restart Oracle Content Server with Scripts:
Run the script to stop the Oracle WebLogic Server Managed Server with Oracle UCM
(in this example, named UCM_server1). Next, only if necessary, run the script to stop
the Oracle WebLogic Server Administration Server. When the server or servers have
stopped, if appropriate run the script to start the Oracle WebLogic Server
Administration Server, and finally run the script to start the Oracle WebLogic Server
Managed Server with Oracle UCM.
Windows script:
MW_HOME\user_projects\domains\DOMAIN_HOME\bin\stopManagedWeblogic.sh UCM_server1
MW_HOME\user_projects\domains\DOMAIN_HOME\bin\stopWeblogic.sh
MW_HOME\user_projects\domains\DOMAIN_HOME\bin\startWeblogic.sh
MW_HOME\user_projects\domains\DOMAIN_HOME\bin\startManagedWeblogic.sh UCM_server1
UNIX script:
MW_HOME/user_projects/domains/DOMAIN_HOME/bin/stopManagedWeblogic.sh UCM_server1
MW_HOME/user_projects/domains/DOMAIN_HOME/bin/stopWeblogic.sh
MW_HOME/user_projects/domains/DOMAIN_HOME/bin/startWeblogic.sh
MW_HOME/user_projects/domains/DOMAIN_HOME/bin/startManagedWeblogic.sh UCM_server1
For more information on scripts, see Oracle Fusion Middleware WebLogic Scripting Tool
Command Reference.
3.1.3.3 Restarting Oracle Content Server with Fusion Middleware Control
Oracle Enterprise Manager Fusion Middleware Control can be used by administrators
to manage multiple domains, including an Oracle WebLogic Server domain running
an Oracle Content Server instance. This method of stopping and starting the Oracle
Content Server instance also provides access to information about the Oracle UCM
domain in which the Oracle Content Server instance is deployed.
To restart Oracle Content Server with Fusion Middleware Control:
1. In the navigation tree, expand the appropriate domain name (for example, UCM_
ucm_domain).
2. Expand Content Management, then Universal Content Management, then
Content Server.
3. Select the Oracle Content Server instance name (for example, Oracle Content
Server (UCM_server1)). The home page for your Oracle Content Server
instance displays.
4. From the UCM menu on the Oracle Content Server page, select Control, then Shut
Down....
5. Confirm that the Oracle Content Server instance is shut down.
Caution: These script commands control the Oracle WebLogic Server
Managed Server that includes the Oracle UCM server for the Oracle
Content Server, and the Oracle WebLogic Server Administration
Server, which includes the Administration Console. If you do not
want to start or stop the Oracle WebLogic Server Administration
Server, then use another method to restart the Oracle Content Server
instance.

Managing Oracle Content Server With the Admin Server
Managing System Processes 3-7
6. From the UCM menu on the Oracle Content Server page, select Control, then
Start. The Oracle Content Server instance is started.
For more information, see "Starting and Stopping Oracle WebLogic Server Instances"
in Oracle Fusion Middleware Administrator's Guide.
3.2 Accessing Oracle Content Server With a Browser
To access a running Oracle Content Server instance, start a web browser and enter the
following URL:
http://managedServerHost:managedServerPort/cs
For managedServerHost, specify the name of the computer that hosts the Oracle
WebLogic Server Managed Server for the Oracle Universal Content Management
(Oracle UCM) domain where the Oracle Content Server instance is installed. For
managedServerPort, specify the listen port number for the Oracle WebLogic Server
Managed Server for the Oracle UCM domain where the Oracle Content Server
instance is installed.
Log in with the administrator user name and password for Oracle WebLogic Server.
The default port number for Oracle UCM with the Oracle Content Server instance is
16200. For example:
http://myHost.example.com:16200/cs
3.3 Managing Oracle Content Server With the Admin Server
This section includes the following topics:
■Section 3.3.1, "About the Admin Server"
■Section 3.3.2, "Viewing Server Output"
3.3.1 About the Admin Server
The Oracle Content Server Admin Server is a collection of web pages that enable you
to configure system-wide settings for the Oracle Content Server instance. If you use
the Admin Server, keep the following restrictions in mind:
■You must be logged in as the system administrator or a user with the sysmanager
role to access the Admin Server.
■To administer the Oracle Content Server instance with the Admin Server, the
instance must be accessible on the local file system. The drive on which any
remote instance is installed must be mapped or mounted to the local drive.
■The Admin Server must run on the same file system as the Oracle Content Server
instance that it administrates.
■Previous to 11g Release 1 (11.1.1), the Admin Server could be used to start, stop,
and restart the Oracle Content Server instance. By default those functions are now
managed through the Oracle WebLogic Server Administration Console or Fusion
Middleware Control. See Section 3.1, "Starting, Stopping, and Restarting Oracle
Content Server."

Starting Oracle Content Server Administration Applications
3-8 Oracle Fusion Middleware System Administrator's Guide for Oracle Content Server
3.3.2 Viewing Server Output
To view the Java output of the Oracle Content Server instance Admin Server:
1. Display the Admin Server Page.
2. Click the View Server Output link.
The Admin Server Output Page is displayed.
3. To refresh the output messages, click Refresh. To clear the output messages, click
Clear.
3.4 Starting Oracle Content Server Administration Applications
You can run Content Server administration applications either as applets or in
standalone mode. Running applications in standalone mode requires additional
configuration for database connections.
■"Running Administration Applications as Applets" on page 3-8
■"Running Administration Applications in Standalone Mode" on page 3-8
3.4.1 Running Administration Applications as Applets
You can run several of the Oracle Content Server administration applications as
applets from any web browser with access to the Oracle Content Server instance.
Applets are convenient for remote administration.
To run an administration application as a Java applet within a Java-enabled browser:
1. Open a browser window.
2. Log in to the Oracle Content Server instance as an administrator.
3. Select Administration in the portal navigation bar.
4. Select Admin Applets.
5. Select an administration application from the list of applets.
3.4.2 Running Administration Applications in Standalone Mode
You can run several Oracle Content Server administration Java applications in
standalone mode from the computer where an Oracle Content Server instance is
deployed. Some of the applications are the same as the applets accessed using a web
browser, such as Configuration Manager and Repository Manager. Some applications
can only run in standalone mode, such as System Properties and Batch Loader. .
Note: The Batch Loader, Component Wizard, System Properties, and
Content Server Analyzer utilities cannot be run as applets; for security
reasons, they must be run in standalone mode from the computer
where the Oracle Content Server instance is deployed. For details, see
"Running Administration Applications in Standalone Mode" on
page 3-8.
Some functions that are available in the standalone version of an
application are not available from the applet version. See the
documentation for each application for more information.

Starting Oracle Content Server Administration Applications
Managing System Processes 3-9
Running the standalone version of an application offers greater security than browser
applets, and enables you to send passwords without having them captured or copied
from the web or a network.
■Section 3.4.2.1, "Configuring a SystemDatabase Provider for Standalone Mode"
■Section 3.4.2.2, "Configuring a JDBC Database Driver for Standalone Mode"
■Section 3.4.2.3, "Configuring an External Database Provider for Standalone Mode"
■Section 3.4.2.4, "Running a Standalone Application on a UNIX System"
■Section 3.4.2.5, "Running a Standalone Application on a Windows System"
3.4.2.1 Configuring a SystemDatabase Provider for Standalone Mode
Oracle Content Server administration applications and utilities that can only run in
standalone mode require specific configuration to run in an Oracle WebLogic
Serverdomain with Oracle UCM and an Oracle Content Server instance. The
configuration changes for a standard (non-customized) Oracle WebLogic Server
connection are necessary to have the applications authenticate Oracle WebLogic Server
users and to set up a JDBC connection to the Oracle WebLogic Server system database.
To configure Oracle WebLogic Server system database connections:
1. As system administrator, use VNC (or a similar tool such as putty or Xming) to
navigate to the DOMAIN_HOME/ucm/cs/bin directory. For example:
MW_HOME/user_projects/domains/ucm_domain/ucm/cs/bin
2. Run ./SystemProperties. The System Properties window is displayed.
3. On the Paths tab, the Specify Database Driver Classpath checkbox is selected by
default, so you must enter a path to a JDBC driver for your system database in the
Database Driver Classpath field. The Oracle driver ojdbc6dms.jar is provided
with the Enterprise Content Management install in the following directory.
MW_HOME/oracle_common/modules/oracle.jdbc_11.1.1/ojdbc6dms.jar
Important: Before you can run Oracle Content Server administration
applications in standalone mode, additional configuration is required
to authenticate the applications on Oracle WebLogic Server and to
have a JDBC connection to the system database and access to the
Oracle WebLogic Server database connection. See "Configuring a
SystemDatabase Provider for Standalone Mode" on page 3-9 and
"Configuring an External Database Provider for Standalone Mode" on
page 3-11.
If a standalone application is required to connect to an SSL-enabled
database where digital certificates are used for authentication, then
the database root CA certificate must be imported into the standard
Java key store that the application uses to check trusted sources. For
configuration details, see "Importing a Database Root CA Certificate
into the Key Store for a Standalone Application" in Oracle Fusion
Middleware Installation Guide for Oracle Enterprise Content Management
Suite.

Starting Oracle Content Server Administration Applications
3-10 Oracle Fusion Middleware System Administrator's Guide for Oracle Content Server
4. On the Database tab, enter all the necessary JDBC connection information in the
fields for your system database (database type, database user name, database user
password, and so on).
5. Click OK.
You should now be able to run a standalone application. For example, as the
Administrator user you created on the Oracle Content Server instance, run
./BatchLoader.
3.4.2.2 Configuring a JDBC Database Driver for Standalone Mode
For the Oracle Content Server system to work with applications that only run in
standalone mode, such as the Batch Loader utility, you must configure a JDBC driver
for the system database or an external database provider. Oracle Fusion Middleware
DataDirect JDBC drivers for SQL Server and DB2 databases are available to support
Oracle Content Server standalone applications. You can use the SystemProperties
utility to enter the configuration information.
1. As system administrator, run ./SystemProperties from the bin directory for
the Oracle Content Server instance.
■UNIX path: DOMAIN_HOME/ucm/cs/bin/SystemProperties
■Windows path: DOMAIN_HOME\ucm\cs\bin\SystemProperties
The SystemProperties utility starts.
2. On the System Properties page, click the Database tab, where you can select the
appropriate driver and enter the connection string, user name, and password.
You do not need to enter a classpath or driver name, or copy any jar files.
You can find JDBC connection string and user name information in the Oracle
WebLogic Server Administration Console. Log in to the Administration Console,
then select Services, then Data Sources, then CSDS (or URMDS), and then
Connection Pool. On the Connection Pool tab, the connection string is in the URL
field, and the user name is in the Properties field. For security, the password is not
displayed.
3. On the Database tab, select the appropriate driver under Use Java Database
Connectivity, and enter the connection string.
■For Microsoft SQL Server, select DataDirect SQL Server JDBC Driver, and
enter a connection string of this form:
jdbc:weblogic:sqlserver://database_hostname:database_port_
number;databaseName=database_name
■For IBM DB2, select DataDirect DB2 JDBC Driver, and enter a connection
string of this form:
jdbc:weblogic:db2://database_hostname:database_port_
number;databaseName=database_name
4. Enter the user name and password for the database in the JDBC User Name and
JDBC User Password fields.
5. Click OK.
6. Restart the Oracle Content Server instance.

Starting Oracle Content Server Administration Applications
Managing System Processes 3-11
3.4.2.3 Configuring an External Database Provider for Standalone Mode
You can create an external database provider in the Oracle Content Server instance for
standalone applications to directly connect to a database with JDBC without using the
SystemDatabase provider for the Oracle WebLogic Server data source.
For standalone applications to use the OracleTextSearch feature, you must configure
the external database provider to include the JDBC connection information.
By default, the configuration of an incoming provider does not include values for
JDBC Driver and JDBC Connection String. You must add these values, but be careful
not to change the provider name because you cannot rename an existing provider. To
change the name of a provider, you would need to delete it and then add it again.
3.4.2.4 Running a Standalone Application on a UNIX System
Follow these steps to run an Oracle Content Server administration application in
standalone mode on a UNIX operating system:
1. Navigate to the DomainHome/ucm/cs/bin/ directory. Executable applications
are listed.
2. Enter ./application_name, where application_name is the name of an executable file.
If an application is not listed, it can be entered as a parameter to the IntradocApp
application, as in this example:
DomainHome/bin/intradocApp workflow
3. Press Enter.
For all applications except for Component Wizard and System Properties, a login
screen is displayed. For Component Wizard and System Properties, the main
screen of the application is displayed.
4. Enter the administrator login name and password.
5. Click OK.
The main screen of the application is displayed.
3.4.2.5 Running a Standalone Application on a Windows System
Follow these steps to run an Oracle Content Server administration application in
standalone mode on a Windows operating system:
1. Select the application from the Windows Start menu:
■To run an administration application, from the Start menu select Programs,
Content Server, Oracle Content Server-instance, Applications, and then the
application.
■To run an administration utility, from the Start menu select Programs, Content
Server, Oracle Content Server-instance, Utilities, then the utility.
For all applications except for Component Wizard and System Properties, a login
screen is displayed. For Component Wizard and System Properties, the main
screen of the application is displayed. It may take several seconds for the login
screen or the application screen to appear, or the screen may be hidden by other
windows.
2. Enter the administrator login name and password.
3. Click OK.
The main screen of the application is displayed.

Using the IdcShell Command-Line Tool
3-12 Oracle Fusion Middleware System Administrator's Guide for Oracle Content Server
3.5 Using the IdcShell Command-Line Tool
The IdcShell tool enables administrators to run Idoc Script from a command line. Idoc
Script is a proprietary server-side scripting language.
The IdcShell tool also includes some additional Idoc Script functions, listed in
Table 3–1, and some dynamichtml definitions, listed in Table 3–2, which are useful for
managing a Content Server or Inbound Refinery instance.
The IdcShell tool has built-in help, which you can access by running the command:
bin/IdcShell "include shell_help"
3.6 Batch Loading Content
This section covers these topics:
■Section 3.6.1, "About Batch Loading"
■Section 3.6.2, "Preparing a Batch Load File"
■Section 3.6.3, "Running the Batch Loader"
■Section 3.6.4, "Optimizing Batch Loader Performance"
3.6.1 About Batch Loading
This section describes how to use the Batch Loader utility to check in (insert), delete, or
update a large number of files on your Oracle Content Server system simultaneously.
The Batch Loader can save you time and effort by automating the batch loading
process. The following are examples of when to use the Batch Loader:
■You just purchased the Oracle Content Server software, and you want check in all
of your existing files with metadata that exists in a database.
■You have documents checked into the Oracle Content Server repository, and you
just created a new custom metadata field. You can use the Batch Loader to add the
values you specify for the new metadata field to each existing content item.
Table 3–1 Command-Line Idoc Script Functions
Function Description
doService(serviceName) Executes a serviceName in the current context.
formatBinder() Formats a DataBinder for easy reading.
getWithTrace() Traces the get() function and reports on the source of the data.
promptUser(text, flags) Displays text on the console and reads a user response. If flags is
NO_ECHO, then it does not echo input.
Table 3–2 Dynamichtml Definitions
Dynamichtml definition Description
get_username Prompts for a user name on the console and assigns to
userName.
get_password Prompts for a password on the console and assigned to
dPassword.
set_user_password Sets a user's password.
create_user Creates a new user, by default with Admin role.

Batch Loading Content
Managing System Processes 3-13
■You want to remove a large number of specific files from the system.
The Batch Loader performs actions that are specified in a batch load file, which is a text
file that describes the action to perform and the metadata for each content item in the
batch.
A batch load file is a text file that tells the Batch Loader which actions to perform and
what metadata to assign to each content item in the batch.
This section covers these topics:
■Section 3.6.1.1, "File Records"
■Section 3.6.1.2, "Actions"
■Section 3.6.1.3, "Insert"
■Section 3.6.1.4, "Delete"
■Section 3.6.1.5, "Update"
■Section 3.6.1.6, "Optional Parameters"
■Section 3.6.1.7, "Custom Metadata Fields"
3.6.1.1 File Records
A batch load file is made up of file records, which are sets of name/value pairs that
specify the action to perform, or the metadata for individual content items, or both.
■Each file record ends with an <<EOD>> (end of data) marker.
■A pound sign (#) followed by a space at the beginning of a line indicates a
comment. The comment character must be followed by a space. For example: #
primaryFile=test.txt works properly, but #primaryFile=test.txt will
cause errors.
■The following is an example of a file record:
# This is a comment
Action=insert
dDocName=Sample1
dDocType=Document
dDocTitle=Batch Load record insert example
dDocAuthor=sysadmin
dSecurityGroup=Public
primaryFile=links.doc
dInDate=8/15/2001
<<EOD>>
Note: For the Batch Loader utility to function correctly with an
Oracle WebLogic Server instance, you must have JDBC connection
settings configured. See Section 3.4.2, "Running Administration
Applications in Standalone Mode."
Important: Field names and parameters are case sensitive. They must
appear in the batch load file exactly as they appear in the following
sections. For example, dDocName is not the same as ddocname,
dDocname, or DDOCNAME.
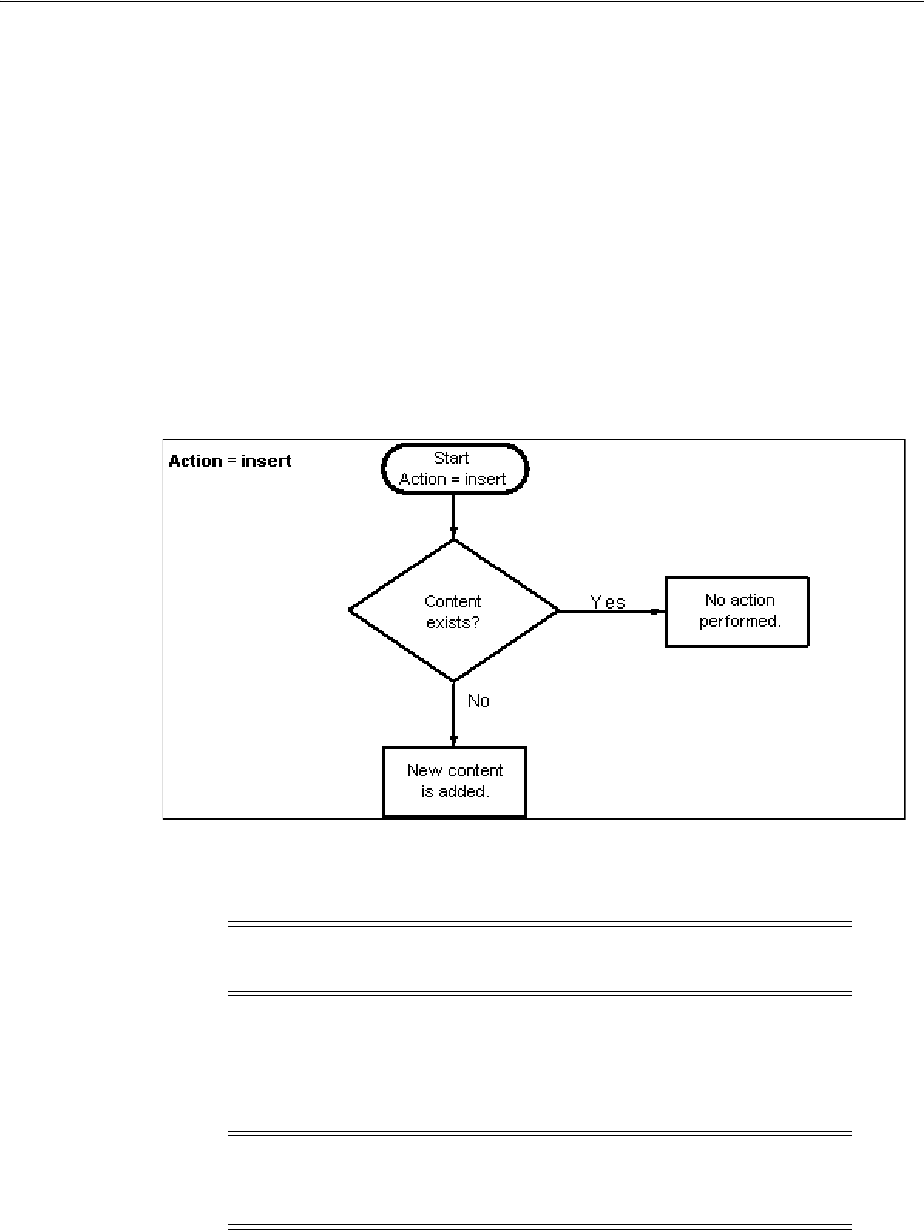
Batch Loading Content
3-14 Oracle Fusion Middleware System Administrator's Guide for Oracle Content Server
3.6.1.2 Actions
Valid actions for batch loading are Insert, Delete, and Update.
■If no action is specified for a file, the system tries to perform an update.
■Each file record can have only one action, but file records with different actions
can be present in the same batch load file.
■The logic process for each action is different.
3.6.1.3 Insert
The insert action checks a new file into the Oracle Content Server repository. If the
Content ID (dDocName) already exists in the Oracle Content Server database, no action
is performed.Figure 3–1 illustrates the insert action.
Figure 3–1 The Insert Action Sequence for Checking In a New File
3.6.1.3.1 Insert Requirements The following table defines the fields required for
successful performance of an insert action.
■Field Length: Maximum number of characters permitted in the field.
■Carried Over: If the next record does not contain this field, the value of this field
will be taken from the previous record.
Note: Batch loaded revisions will not enter a workflow even if they
meet the criteria for an active workflow.
Important: If you have defined any custom metadata fields as
required fields, those fields also need to be defined for an insert
action.

Batch Loading Content
Managing System Processes 3-15
3.6.1.3.2 Insert Example The following code fragments show the batch load file syntax
for inserting files. This example shows two file records.
The first file record includes all required fields and the action statement, Action=insert.
The second file record does not list the required fields dDocType, dDocAuthor, or
dSecurityGroup. However, the information for these items is taken from the previous
record. Also, the second record does not specify an action, so the insert action is
carried over. Therefore, if the Content ID HR003 does not exist, the file will be inserted.
However, if the Content ID does exist, it will not be inserted because the action is
insert and not update.
■First record:
Action=insert
dDocName=HR001
dDocType=Form
dDocTitle=New Employee Information Form
dDocAuthor=Olson
dSecurityGroup=Public
primaryFile=hr001.doc
dIndate=3/15/97
<<EOD>>
Required Items
Field
Length
Carried
Over Definition
Action=insert N/A Yes The command to insert a file.
The term Action is case sensitive and must be
initial capitalized.
dDocName 30 No The metadata field named Content ID.
dDocType 30 Yes The metadata field named Type.
dDocTitle 80 No The metadata field named Title.
dDocAuthor 30 Yes The metadata field named Author.
dSecurityGroup 30 Yes The metadata field named Security Group.
primaryFile N/A N/A The metadata field named Primary File. The
Primary File name can be a complete path or just
the file name. If a file name only is specified, the
location of the file is determined as follows:
■If the SetFileDir optional parameter has been
set in this file record or any previous file
record, the directory specified in SetFileDir
will be used.
■If the SetFileDir parameter has not been set,
the batch load file path is used. (The path is
specified in the Batch Load File field on the
Batch Loader Screen.)
dInDate N/A No The metadata field named Release Date.
■The dInDate must use the date format of the
locale of the user executing the Batch Loader.
For example, the US English date format is
mm/dd/yy hh:mm:ss am/pm.
■Time information is optional. If you specify
the time, only the hh:mm part is required.
The ss and am/pm parts are optional.
<<EOD>> N/A N/A Indicates the end of data for the file record.
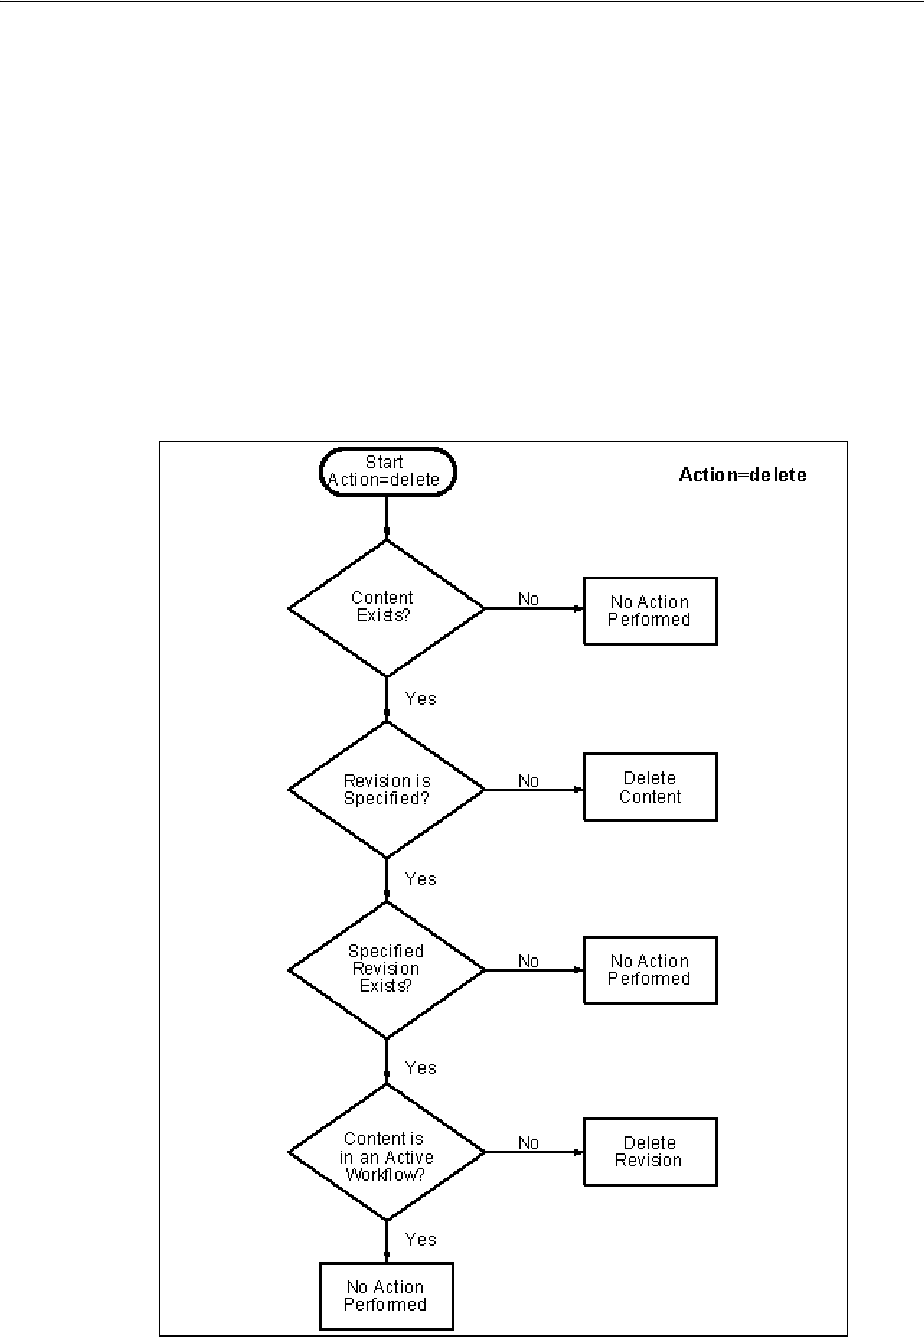
Batch Loading Content
3-16 Oracle Fusion Middleware System Administrator's Guide for Oracle Content Server
■Second record:
dDocName=HR003
dDocTitle=Performance Review
primaryFile=hr003.doc
dIndate=3/15/97
<<EOD>>
3.6.1.4 Delete
The delete action deletes one or all revisions of an existing file from the Oracle Content
Server repository. If the specified Content ID (dDocName) does not exist in the Oracle
Content Server database, no action is performed. Figure 3–2 illustrates the delete
action.
Figure 3–2 The Delete Action Sequence

Batch Loading Content
Managing System Processes 3-17
3.6.1.4.1 Delete Requirements The following table defines the fields required for
successful performance of a delete action.
3.6.1.4.2 Delete Example The following example shows the batch load file syntax for
deleting files. This example shows two file records. The first file record will delete all
revisions of the Content ID HR001. The second file record will delete revision 2 of the
content item HR002.
Action=delete
dDocName=HR001
<<EOD>>
Action=delete
dDocName=HR002
dRevLabel=2
<<EOD>>
3.6.1.5 Update
The update action updates existing content items. One of the following actions occurs,
depending on what items are present in the file record and what content exists in the
system:
■A new revision of an existing content item is created.
■An existing file's metadata is updated.
■A new content item is inserted (Action=insert is performed).
A new revision is created when one of the following scenarios occur:
Required Items Definition
Action=delete The command to delete a file.
The term Action is case sensitive and must be initial capitalized.
dDocName The metadata field named Content ID.
<<EOD>> Indicates the end of data for the file record.
Note: Batch loaded revisions will not enter a workflow even if they
meet the criteria for an active workflow.
Scenario
Content ID
(dDocName) Revision (dRevLabel)
Release Date in Batch Load
file (dInDate)
Scenario 1 Exists in Oracle
Content Server
instance
Not specified in the batch
load file. After the release date of the
latest revision of the file in
the system.
Scenario 2 Exists in Oracle
Content Server
instance
Specified in the batch load
file, but does not exist in the
Oracle Content Server
instance.
After the release date of the
latest revision of the file in
the system.
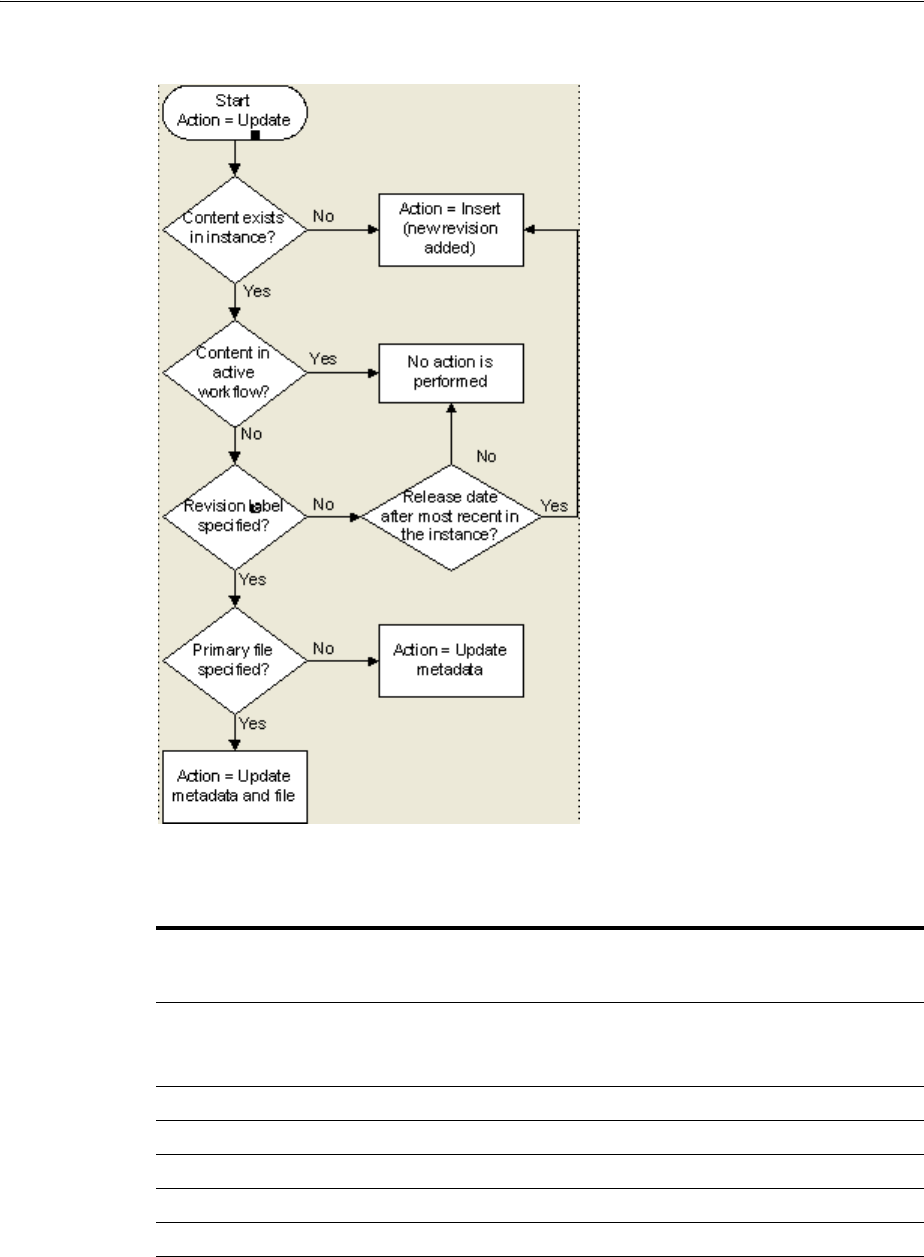
Batch Loading Content
3-18 Oracle Fusion Middleware System Administrator's Guide for Oracle Content Server
Figure 3–3 The Update Action Sequence
3.6.1.5.1 Update Requirements The following table defines the fields required for
successful performance of an update action.
Required Items
Field
Lengt
h
Carrie
d Over Definition
Action=update N/A Yes The command to update a file.
The term Action is case sensitive and must be initial
capitalized.
dDocName 30 No The metadata field named Content ID.
dDocType 30 Yes The metadata field named Type.
dDocTitle 80 No The metadata field named Title.
dDocAuthor 30 Yes The metadata field named Author.
dSecurityGroup 30 Yes The metadata field named Security Group.

Batch Loading Content
Managing System Processes 3-19
3.6.1.5.2 Update Example 1 This example assumes that two files are already checked
into the system with the following metadata:
■HR001 has a Release Date of 9/26/98 and Revision of 1
■HR002 has a Release Date of 3/15/99 and Revision of 2
The first file record, Content ID HR001, exists in the system, but it does not have a
Revision (dRevLabel) specified in the batch load file. Therefore, the Batch Loader will
compare the Release Date of the latest revision in the system with the Release Date
specified in the batch load file. Since 2/20/99 is after 9/26/98, a new revision 2 for
HR001 is added.
The second file record, Content ID HR002, exists in the system and has a Revision
(dRevLabel) specified, but Revision 3 does not exist in the system. Therefore, a new
revision 3 for HR002 is added.
Action=update
dDocName=HR001
dDocType=Form
dDocTitle=New Employee Form
dDocAuthor=Olson
dSecurityGroup=Public
primaryFile=hr001.doc
DInDate=2/20/99
primaryFile N/A N/A The metadata field named Primary File.
If only the metadata is being updated, the primaryFile
field is not required but dRevLabel is required.
If the optional dRevLabel field is specified and matches a
revision label that exists in the Oracle Content Server
instance, the primaryFile field is not required; the
primary file specified for that revision is used.
It is important to note that although dRevLabel is not a
required field, if the primaryFile is not present, then
dRevLabel becomes a required field.
The Primary File name can be a complete path or just the
file name. If a file name only is specified, the location of
the file is determined as follows:
■If the SetFileDir optional parameter has been set in
this file record or any previous file record, the
directory specified in SetFileDir will be used.
■If the SetFileDir parameter has not been set, the
batch load file path is used. (The path is specified in
the Batch Load File field on the Batch Loader
Screen.)
dInDate N/A No The metadata field named Release Date.
■The dInDate must use the date format of the locale
of the user executing the Batch Loader. For example,
the US English date format is mm/dd/yy hh:mm:ss
am/pm.
■Time information is optional. If you specify the time,
only the hh:mm part is required. The ss and am/pm
parts are optional.
<<EOD>> N/A N/A Indicates the end of data for the file record.
Required Items
Field
Lengt
h
Carrie
d Over Definition

Batch Loading Content
3-20 Oracle Fusion Middleware System Administrator's Guide for Oracle Content Server
<<EOD>>
dDocName=HR002
dDocTitle=Payroll Change Form
primaryFile=hr002.doc
DIndate=2/20/99
dRevLabel=3
<<EOD>>
3.6.1.5.3 Update Example 2 This example assumes that one file is already checked into
the system with the following metadata:
■Content ID = HR003
■Release Date = 3/15/97
■Revision = 1
■Title = Performance Review
■Author = Smith
Because Revision 1 of the Content ID HR003 exists in the system (and is not in an
active workflow), the revision will be updated with the new Title, Author, and Release
Date metadata.
Action=update
dDocName=HR003
dDocType=Form
dDocTitle=Performance Review Template
dDocAuthor=Smith
primaryFile=hr003.doc
dIndate=2/20/99
dRevLabel=1
<<EOD>>
3.6.1.6 Optional Parameters
The following table lists the optional parameters you can use in any file record in a
batch load file.
In a batchload file, there are two methods you can use to override the primary and
alternate formats assigned to a content item checkin:
■Specifying a value for the primaryFile:format parameter, or specifying a value for
the alternateFile:format parameter, both. However, it is possible to override these
values by using the primaryOverrideFormat or alternateOverrideFormat
parameters. It is also possible that certain components will force specific formats
on certain types of checkins or certain application functionality may exist in some
components that forces a different format.
■Specifying a value for the primaryOverrideFormat parameter, or specifying a
value for the alternateOverrideFormat parameter, or both. However, these will
only work as parameters in the batch load file if you enable the IsOverrideFormat
configuration variable. Note that using this method will override any values that
you set for the primaryFile:format and alternateFile:format parameters.

Batch Loading Content
Managing System Processes 3-21
Optional Parameters Definition
dRevLabel The metadata field named Revision.
Maximum field length is 10 characters.
Values must be an integer or comply with the Major/Minor
Revision Label Sequence established by the System Properties
settings (see Section 4.1.2, "Configuring General Options").
dDocAccount The metadata field named Accounts.
Maximum field length is 30 characters.
This field is not carried over to the next file record.
Do not specify this field if accounts are not enabled.
If accounts are enabled and this field is not specified, dDocAccount
will be set to an empty value.
xComments The metadata field named Comments. Maximum field length is 255
characters.
dOutDate The metadata field named Expiration Date.
The dOutDate must use the date format of the locale of the user
executing the Batch Loader. For example, the English-US date
format is mm/dd/yy hh:mm:ss am/pm.
Time information is optional. If you specify the time, only the hh:mm
part is required. The ss and am/pm parts are optional.
primaryFile:path Specifies the location of the file. If a primaryFile:path value is
specified, the value overrides the value specified for the primaryFile
parameter. However, the primaryFile:path value is not used to
determine the file conversion format. If a value for primaryFile:path
is not specified, the location is determined from the primaryFile
value.
This parameter uses the following syntax:
primaryFile:path=complete_path
primaryFile:format Specifies the file format to use for the Primary File. This file format
overrides the one specified by the file extension of the file and the
value specified for the primaryFile parameter. If a
primaryFile:format value is not specified, the file format is
determined from the file extension for the primaryFile value.
This parameter uses the following syntax:
primaryFile:format=application/conversion_type
alternateFile The metadata field named Alternate File. The Alternate File name
can be a complete path or just the file name. If a file name only is
specified, the location of the file is determined as follows:
If the SetFileDir optional parameter has been set in this file record or
any previous file record, the directory specified in SetFileDir will be
used.
If the SetFileDir parameter has not been set, the batch load file path
is used. (The path is specified in the Batch Load File field on the
Batch Loader Screen.)

Batch Loading Content
3-22 Oracle Fusion Middleware System Administrator's Guide for Oracle Content Server
alternateFile:path Specifies the location of the alternate file. If an alternateFile:path
value is specified, the value overrides the value specified for the
alternateFile parameter. However, the alternateFile:path value is not
used to determine the file conversion format. If an alternateFile:path
value is not specified, the location is determined from the
alternateFile parameter, if a value is specified. Otherwise, by default,
the primaryFile value is used for the computation.
This parameter uses the following syntax:
alternateFile:path=complete_path
alternateFile:format Specifies the file format to use for the Alternate File. This file format
overrides the one specified by the file extension of the file and the
value specified for the alternateFile parameter. If an
alternateFile:format value is not specified, the file format is
determined from the file extension for the alternateFile parameter, if
a value is specified. Otherwise, by default, the primaryFile value is
used for the computation.
This parameter uses the following syntax:
alternateFile:format=application/conversion_type
webViewableFile The webViewableFile name can be a complete path or just the file
name. If a webViewableFile value is specified, then the conversion
process is not performed. If a file name only is specified, the location
of the file is determined as follows:
If the SetFileDir optional parameter has been set in this file record or
any previous file record, the directory specified in SetFileDir will be
used.
If the SetFileDir parameter has not been set, the batch load file path
is used. (The path is specified in the Batch Load File field on the
Batch Loader Screen.)
webViewableFile:path Specifies the location of the web viewable file. If a
webViewableFile.path value is specified, the value overrides the
value specified for the webViewableFile parameter. However, the
webViewableFile:path value is not used to determine the file
conversion format. If a webViewableFile:path value is not specified,
the location is determined from the webViewableFile parameter, if a
value is specified. Otherwise, by default, the primaryFile value is
used for the computation.
This parameter uses the following syntax:
webViewableFile:path=complete_path
webViewableFile:format Specifies the file format to use for the web viewable file. This file
format overrides the one specified by the file extension of the file
and the value specified for the webViewableFile parameter. If a
webViewableFile:format value is not specified, the file format is
determined from the file extension for the webViewableFile
parameter, if a value is specified. Otherwise, by default, the
primaryFile value is used for the computation.
This parameter uses the following syntax:
alternateFile:format=application/conversion_type
primaryOverrideFormat Specifies which file format to use for the Primary File. This file
format overrides the one specified by the file extension of the file.
This option will only work as a parameter if you enable the
IsOverrideFormat configuration variable. You can set this variable
by selecting the Allow Override Format in the System Properties
application. However, a better (and recommended) alternative
would be to use the primaryFile:format parameter.
Optional Parameters Definition

Batch Loading Content
Managing System Processes 3-23
3.6.1.7 Custom Metadata Fields
Any custom metadata field that has been defined in the Configuration Manager can be
included in a file record.
■If you have defined any custom metadata fields as required fields, those fields
must be defined for an insert action or an update action.
■If a custom metadata field is not a required field, but it has a default value (even if
blank), then the default value will be used if the value is not specified in the batch
load file.
■When specifying a custom metadata field value, the field name preceded with an
x. For example, if you have a custom metadata field called Location, then the batch
load file entry will be xLocation=value.
■Keep in mind that some add-on products use custom metadata fields. For
example, if you have PDF Watermark, you will have created a field called
Watermark. To include this field in a batch load file, precede it with an x just like
any other custom metadata field (that is, xWatermark).
3.6.2 Preparing a Batch Load File
This section covers these topics:
■Section 3.6.2.1, "About Preparing a Batch Load File"
■Section 3.6.2.2, "Mapping Files"
■Section 3.6.2.3, "Creating a Batch Load File from the BatchBuilder Screen"
■Section 3.6.2.4, "Creating a Mapping File"
■Section 3.6.2.5, "Creating a Batch Load File from the Command Line"
3.6.2.1 About Preparing a Batch Load File
You can use any method you prefer to create a batch load file, if the resulting text file
conforms to the batch load file syntax requirements. However, the Batch Loader
provides a tool called the BatchBuilder to assist you in creating batch load files.
■The BatchBuilder creates a batch load file based on the files in a specified directory.
The BatchBuilder reads recursively through all the sub-directories to create the
batch load file.
■A mapping file tells the BatchBuilder how to determine the metadata for each file
record. You can use the BatchBuilder to create and save custom Mapping Files.
■You can run the BatchBuilder from the standalone application interface or from the
command line.
alternateOverrideFormat Specifies which file format to use for the Alternate File. This file
format overrides the one specified by the file extension of the file.
This option will only work as a parameter if you enable the
IsOverrideFormat configuration variable. You can set this variable
by selecting the Allow Override Format in the System Properties
application. However, a better (and recommended) alternative
would be to use the alternate File:format parameter.
SetFileDir Specifies the directory where the Primary Files and Alternate Files
are located. This field is carried over to the next file record.
Optional Parameters Definition

Batch Loading Content
3-24 Oracle Fusion Middleware System Administrator's Guide for Oracle Content Server
■The BatchBuilder can also be used to create external collections of content, which
are indexed and stored in a separate search collection rather than in the Oracle
Content Server database. You can set up read-only external collections, where
users can search for content but cannot update metadata or delete content. This
option is recommended when external content is also included in another Oracle
Content Server instance.
3.6.2.2 Mapping Files
Mapping files are text files that have a .hda extension, which identifies them as a type
of data file used by the Oracle Content Server instance.
See Oracle Fusion Middleware Developer's Guide for Oracle Universal Content Management
for more information on HDA files, LocalData properties, and ResultSets.
3.6.2.2.1 Mapping File Formats The metadata mapping can be defined in one of two
formats:
■As name/value pairs in a LocalData definition, a mapping file would look like the
following:
@Properties LocalData
dDocName=<$filename$>.<$extension$>
dInDate=<$filetimestamp$>
@end
■As a BatchBuilderMapping ResultSet, a mapping file would look like the
following:
@ResultSet SpiderMapping
2
mapField
mapValue
dDocName
<$filename$>.<$extension$>
dInDate
<$filetimestamp$>
@end
3.6.2.2.2 Mapping File Values The following values can be used in a mapping file:
Value Description Example
Normal string All files will have the specified
metadata value. dDocType=Document
All files will be the Document content
type.
Idoc script Any supported Idoc script.
For more information, see
Oracle Fusion Middleware Idoc
Script Reference Guide.
xLanguage=<$if
strEquals(dir2,
"EN")$>English<$elseif
strEquals(dir2,
"SP")$>Spanish<$else$>Frenc
h<$endif$>

Batch Loading Content
Managing System Processes 3-25
3.6.2.3 Creating a Batch Load File from the BatchBuilder Screen
Use the following procedure to create a batch load file from the BatchBuilder screen:
1. Start the BatchLoader utility:
Windows operating system: Select Start, the Programs, then Oracle Content
Server, then instance_name, then Utilities, then BatchLoader.
UNIX operating system: Change to the DomainHome/ucm/cs/bin/ directory, type
BatchLoader in a shell window, and press the RETURN key.
<$dir1$>, <$dir2$> The directory name at the
specified level in the file's
path. <$dir1$> refers to the
root directory specified in the
"Directory" field, <$dir2$>
refers to the next level
directory, and so on.
dDocType=<$dir1$>
dSecurityGroup=<$dir2$>
dDocAccount=<$dir3$>
If the file path is
"f:/docs/public/sales/march.doc"
and you have specified the
"Directory" value as "f:/docs", the
values would be:
<$dir1$> = "docs"
<$dir2$> = "public"
<$dir3$> = "sales"
<$dUser$> The user currently logged in.
dDocAuthor=<$dUser$>
If "administrator" is logged in, then
<$dUser$> would equal
"administrator".
<$extension$> The file extension of the file.
dDocTitle=<$filename$>.<$extensi
on$>
If the file path is
"d:/salesdocs/sample.doc", then
<$extension$> would equal "doc".
<$filename$> The name of the file.
dDocName=<$filename$>
If the file path is
"d:/salesdocs/sample.doc", then
<$filename$> would equal
"sample".
<$filepath$> The entire directory path of
the file, including the file
name.
xPath=<$filepath$>
If the file path is
"c:/docs/public/acct/sample.doc",
then <$filepath$> is
"c:/docs/public/acct/sample.doc".
<$filesize$> The size of the file (in bytes).
xFileSize=<$filesize$>
For a 42KB file, <$filesize$>
would be 43008.
<$filetimestamp$> The date and time the file was
last modified.
dInDate=<$filetimestamp$>
If the last modified date is September
13, 2001 at 4:03 pm, then
<$filetimestamp$> would equal
"9/13/01 4:03 PM" for an English-US
locale.
<$URL$> The URL of the file, based on
the values of the physical file
root and relative web root.
Value Description Example

Batch Loading Content
3-26 Oracle Fusion Middleware System Administrator's Guide for Oracle Content Server
The login screen is displayed.
2. Enter the Oracle Content Server administrator user name and password, then click
OK.
The Batch Loader Screen is displayed.
3. Select Options, Build Batch File.
The BatchBuilder Screen is displayed.
4. In the Directory field, enter the location of the files to be included in the batch load
file.
5. In the Batch Load File field, enter the path and file name for the batch load file.
You can click the Browse button to navigate to and select the directory and file.
6. From the Mapping list, select a mapping file. To create a new mapping file or edit
an existing one, see Section 3.6.2.4, "Creating a Mapping File."
7. Optional: In the File Filter field, enter filter settings to include or exclude
particular files from the batch load file.
8. Optional: To batch load a read-only external collection, select External, and select
the external collection options.
9. Click Build.
10. When the build process is complete, click OK.
11. Open the batch load file in a text editor and double-check the file records.
12. To save the current batch load file settings as the default, select Options, then Save
Configuration.
3.6.2.4 Creating a Mapping File
Use the following procedure to create a mapping file.
1. Display the BatchBuilder Screen.
2. Click Edit next to the Mapping field.
The BatchBuilder Mapping List Screen is displayed.
3. Click Add.
The Add BatchBuilder Mapping Screen is displayed.
4. Enter a name and description for the mapping file, and click OK.
The Edit BatchBuilder Mapping Screen is displayed.
5. Click Add.
The Add/Edit BatchBuilder Mapping Field Screen is displayed.
6. Enter a metadata field name to be defined. For example, enter dDocName for the
Content ID field, or xComments for the Comments field.
7. Enter the value for the metadata field.
■Type any constant text and Idoc script directly in the Value field. For example,
to set Document as the Type for all documents in the batch load file, enter
dDocType in the Field field, and enter Document in the Value field. See the
Oracle Fusion Middleware Idoc Script Reference Guide for more information on
Idoc Script.

Batch Loading Content
Managing System Processes 3-27
■To add a predefined variable to the Value field, select the variable in the right
column and click the << button. For example, to set each document's
second-level directory as the Security Group, enter dSecurityGroup in the
Field field, and insert the <$dir1$> variable in the Value field.
8. Click OK.
9. Repeat steps 4 through 8 for as many metadata fields as you want to define.
10. Click OK to save changes and close the Edit BatchBuilder Mapping screen.
The mapping file is saved as MapFileName.hda in the
IntradocDir/search/external/mapping/ directory.
11. Click Close to close the BatchBuilder Mapping List screen.
3.6.2.5 Creating a Batch Load File from the Command Line
You can create a batch load file by entering the BatchBuilder parameters from a
command line rather than entering them in the BatchBuilder screen. Use the following
procedure to create a batch load file from the command line:
1. Open the DomainHome/ucm/cs/bin/intradoc.cfg file in a text editor, and add the
following line, where sysadmin is the user name of the Oracle Content Server
system administrator:
BatchLoaderUserName=sysadmin
This is required so that the system logs in as the system administrator, because
only users who have admin rights have permission to run the Batch Loader and
BatchBuilder applications.
2. Save and close the file.
3. Open a command line window and change to the DomainHome/ucm/cs/bin/
directory.
4. Enter the following command:
Win32:
BatchLoader.exe /spider /q /ddirectory /mmappingfile /nbatchloadfile
UNIX:
BatchLoader -spider -q -ddirectory -mmappingfile -nbatchloadfile
Caution: Be careful when choosing predefined variables. Many
metadata fields have length limitations and cannot contain certain
characters (such as spaces or punctuation marks). See "Managing
Repository Content" in the Oracle Fusion Middleware Application
Administrator's Guide for Content Server for more information.
Caution: Run the BatchBuilder using the same operating system
account that runs the Oracle Content Server instance. Otherwise, the
software might not process your data due to permissions problems.

Batch Loading Content
3-28 Oracle Fusion Middleware System Administrator's Guide for Oracle Content Server
The following flags can be used with the BatchLoader command to run the
BatchBuilder from the command line:
3.6.2.5.1 Win32 Example The following example shows the correct syntax to run the
BatchBuilder from a Win32 command line, where:
■Directory = c:/myfiles
■Mapping File = MyMappingFile
■Batch Load File = c:/batching/batchinsert.txt
■Excluded files = *.exe and *.zip
BatchLoader.exe /spider /q /dc:/myfiles /mMyMappingFile
/nc:/batching/batchinsert.txt /eexe,zip
3.6.2.5.2 UNIX Example The following example shows the correct syntax to run the
BatchBuilder from a UNIX command line, where:
■Directory = /myfiles
■Mapping File = MyMappingFile
■Batch Load File = /batching/batchinsert.txt
■Excluded files = index.htm and index.html
BatchLoader -spider -q -d/myfiles -mMyMappingFile -n/batching/batchinsert.txt
-eindex.htm,index.html
3.6.3 Running the Batch Loader
This section covers these topics:
■Section 3.6.3.1, "About Running the Batch Loader"
■Section 3.6.3.2, "Batch Loading from the Batch Loader Screen"
■Section 3.6.3.3, "Batch Loading from the Command Line"
■Section 3.6.3.4, "Using the IdcCommand Utility and Remote Access"
■Section 3.6.3.5, "Batch Loading Content as Metadata Only"
■Section 3.6.3.6, "Batch Loader -console Command Line Switch"
■Section 3.6.3.7, "Adding a Redirect"
Flag Required? Description
-spider or
/spider Yes Runs the BatchBuilder application.
-q or /q No Runs the BatchBuilder in quiet mode in the background. (If the
BatchBuilder is run from the command line without this flag, the
BatchBuilder screen will be displayed.)
-d or /d Yes Directory field value.
-m or /m Yes Mapping field value.
-n or /n Yes Batch Load File field value.
-e or /e No Exclude specified files (Exclude checkbox selected).
-i or /i No Include specified files (Exclude checkbox deselected).

Batch Loading Content
Managing System Processes 3-29
■Section 3.6.3.8, "Correcting Batch Load Errors"
3.6.3.1 About Running the Batch Loader
The Batch Loader uses the information from a batch load file to check in (insert),
delete, or update a large number of files on your Oracle Content Server system
simultaneously.
■You can run the Batch Loader from the standalone application interface or from
the command line.
■After you run the Batch Loader, the Oracle Content Server instance processes files
through the Inbound Refinery and the Indexer as it would for any other content
item.
3.6.3.2 Batch Loading from the Batch Loader Screen
Use the following procedure to batch load content using the Batch Loader screen:
1. Display the Batch Loader Screen.
2. Click Browse, and navigate to and select the batch load file.
3. To change the number of errors that can occur before the Batch Loader stops
processing, enter the number in the Maximum errors allowed field.
4. To delete files from the hard drive after they are successfully checked in or
updated, select Clean up files after successful check in.
5. To create a text file containing the file records that failed during batch loading,
select Enable error file for failed revision classes.
6. Click Load Batch File to start the Batch Loader process.
When the batch load process is complete, a Batch Loader message screen is
displayed, indicating the number of errors that occurred, if any.
7. If you enabled the error file, write down the file name shown in the message box.
8. Click OK.
9. Correct any problems with the batch load.
10. To save the current Batch Loader settings as the default, select Options, Save
Configuration.
3.6.3.3 Batch Loading from the Command Line
You can batch load content by entering the Batch Loader parameters from a command
line rather than entering them in the Batch Loader screen. Use the following procedure
to run the Batch Loader from the command line:
1. Open the DomainHome/ucm/cs/bin/intradoc.cfg file in a text editor, and add the
following line, where sysadmin is the user name of the Oracle Content Server
system administrator:
BatchLoaderUserName=sysadmin
This is required so that the system logs in as the system administrator, because
only users who have admin rights have permission to run the Batch Loader
application.
2. Save and close the file.

Batch Loading Content
3-30 Oracle Fusion Middleware System Administrator's Guide for Oracle Content Server
3. Open a command line window and change to the DomainHome/ucm/cs/bin/
directory.
4. Enter the following command:
Win32: BatchLoader.exe /q /nbatchloadfile
Unix: BatchLoader -q -nbatchloadfile
The Batch Loader processes the batch load file, but message boxes will not be
displayed.
5. Correct any problems with the batch load.
The following flags can be used with the BatchLoader command from the command
line:
3.6.3.3.1 Win32 Example The following example shows the correct syntax to run the
Batch Loader from a Win32 command line, where the batch load file is
c:/batching/batchinsert.txt:
BatchLoader.exe /q /nc:/batching/batchinsert.txt
3.6.3.3.2 UNIX Example The following example shows the correct syntax to run the
Batch Loader from a UNIX command line, where the batch load file is
/batching/batchinsert.txt:
BatchLoader -q -n/batching/batchinsert.txt
3.6.3.4 Using the IdcCommand Utility and Remote Access
Occasionally, you may need to use remote access when managing your Oracle Content
Server instance. This does not necessarily mean that remote terminal access is
required. However, you must have the ability to submit commands to the server from
a remote location.
Combining remote access with the IdcCommand utility provides a powerful toolset
and an easy way to check in a large number of files to your instance. To take advantage
of this functionality, you will need to properly set up the workstation to submit
commands and be able to use the IdcCommand utility with a batch load command
file.
Caution: Run the Batch Loader using the same operating system
account that runs the Oracle Content Server instance. Otherwise, the
software might not process your files due to permissions problems.
Flag Required? Description
-q or /q No Runs the Batch Loader in quiet mode in the background. (If the
Batch Loader is run from the command line without this flag, the
Batch Loader screen will be displayed.)
-n or /n Yes Batch Load File field value.
-console No Echoes all output to the HTML Oracle Content Server log and to
the console window that is running the Batch Loader. For details,
see Section 3.6.3.6, "Batch Loader -console Command Line Switch."

Batch Loading Content
Managing System Processes 3-31
This section covers the following topics:
■Section 3.6.3.4.1, "Batch Load Command Files"
■Section 3.6.3.4.2, "Preparing for Remote Batch Loading"
3.6.3.4.1 Batch Load Command Files A batch load command file contains a set of
commands for each file that is loaded. If you are loading a large number of files, the
command file may contain hundreds of lines. Using an editing tool can simplify the
task of creating the numerous required lines. For example, the procedure for Preparing
for Remote Batch Loading shows how you can prepare a batch load command file
using the editing and mail merge features of Microsoft Office.
The following is an example Batch Load Command File:
@Properties LocalData
IdcService=CHECKIN_UNIVERSAL
doFileCopy=1
dDocTitle=thisfile
dDocType=Native
dSecurityGroup=Internal
dDocAuthor=sysadmin
primaryFile=filename
primaryFile:Path=pathtothefile
xComments=Initial Check In
@end
<<EOD>>@Properties LocalData
IdcService=CHECKIN_UNIVERSAL
doFileCopy=1
dDocTitle=99.tif
dDocType=Native
dSecurityGroup=Internal
dDocAuthor=sysadmin
primaryFile=350.afp
primaryFile:path=/lofs/invoices/350.afp
xComments=Initial Check In
@end
<<EOD>>
3.6.3.4.2 Preparing for Remote Batch Loading To perform batch loading from remote
locations, complete the following procedure. The procedure is written for a Microsoft
Windows operating system.
To Configure the Local Computer:
1. Open Windows Explorer.
2. Create a working directory (for example, c:\working_dir).
3. In the working directory, create one or more directories for the various Oracle
Content Server instances you will be accessing (for example, c:\working_
dir\development and c:\working_dir\contribution). These directories can be
referred to as DomainHomeName.
4. In each DonainHomeName directory, create a cmdfiles subdirectory.
5. From the remote Oracle Content Server instance, copy the following directories
from Middleware\user_projects\domains\Domain_Name\ucm\cs into their
respective DomainHomeName (in this case C:\working_dir\development and
C:\working_dir\contribution).
■working_dir\DomainHomeName\ucm\cs\bin

Batch Loading Content
3-32 Oracle Fusion Middleware System Administrator's Guide for Oracle Content Server
■working_dir\DomainHomeName\ucm\cs\config
6. From the remote Oracle Content Server instance, copy the following directories
(and their files) to your working directory:
■working_dir\idc\bin
■working_dir\idc\components
(copying the CSDms and NativeOsUtils component files should be sufficient)
■working_dir\idc\config
■working_dir\idc\jlib
■working_dir\idc\resources\core\lang
■working_dir\idc\resources\core\table
■working_dir\idc\resources\core\config
7. Using a text editor, open the DomainHomeName\ucm\cs\bin\intradoc.cfg file on
your local system and update the IntradocDir configuration variable to match
your directory structure. For example:
IntradocDir=working_dir\DomainHomeName\ucm\cs,
IdcHomeDir=working_dir\idc
WeblayoutDir=working_dir\DomainHomeName\ucm\cs\weblayout
8. Using a text editor, open the working_
dir\DomainHomeName\ucm\cs\config\config.cfg file on your local system and
verify the following settings are correct.
IntradocServerPort=4444
IntradocServerHostName=HostMachineName
9. On the remote Oracle Content Server instance, add the IP address of the local
computer to the Security Filter, using the SystemsProperties utility.
10. Restart the remote Oracle Content Server instance.
To Test the Configuration for the Remote Workstation:
1. In the cmdfiles directory, create a file named pingservertest.hda and add the
following lines:
@Properties LocalData
IdcService=PING_SERVER
@end
1. Open a command prompt and change to your working bin directory (for example,
cd C:\working_dir\development\bin
2. Issue the following command:
IdcCommand -f ..\cmdfiles\pingservertest.hda -u sysadmin -l
..\pingservertest.log -c server
1. Confirm the output. If you are successful, you will get the following message from
the server.
3/24/04: Success executing service PING_SERVER.
You have completed your setup for remote commands.

Batch Loading Content
Managing System Processes 3-33
Create a Batch Load Command File:
This procedure uses the editing and mailmerge features of Microsoft Office to create a
batch load command file.
1. Create a file listing of your directory contents:
a. Open a command prompt and change to the root directory representing the
files you intend to load.
b. Create a file listing, using the following command to redirect the output into a
file:
c. dir /s /b > filelisting.txt
d. Check your filelisting.txt file; it will look something like this:
V:\policies\ADMIN\working_dir_Admin\AbbreviationList.doc
V:\policies\ADMIN\working_dir_Admin\Abbreviations.doc
V:\policies\ADMIN\working_dir_Admin\AbsencePres.doc
V:\policies\ADMIN\working_dir_Admin\AdmPatientCare.doc
V:\policies\ADMIN\working_dir_Admin\AdmRounds.doc
V:\policies\ADMIN\working_dir_Admin\AdverseEvents.doc
V:\policies\ADMIN\working_dir_Admin\ArchivesPermanent.doc
V:\policies\ADMIN\working_dir_Admin\ArchivesRetrieval.doc
V:\policies\ADMIN\working_dir_Admin\ArchivesStandardReq.doc
2. Edit the file listing to create your filename and title data:
a. Open your filelisting.txt file in Excel.
b. Using Replace, remove all the directory information leaving only the file
name. Also look for and remove the line for filelisting.txt.
c. Copy column A (containing the file names) to column B. In this example the
file name is also used for the title and Column B will become the title.
d. Using Replace, remove the file extension from the names in column B.
e. Insert a new first line and enter filename in the first column and title in the
second.
f. Save the file.
3. Create an hda file from the file listing using Mail Merge features:
a. Open Word and create a new document with your set of batch load
commands. The following example shows basic batch load commands. You
must match your configuration settings when you create your batch load
commands.
@Properties LocalData
IdcService=CHECKIN_UNIVERSAL
doFileCopy=1
dDocTitle=
dDocType=Native
dSecurityGroup=Internal
Note: When working with batch loads, it is important to note that
the file must exist on the server indicated by the primaryFile
statement in the batch load command file. Optimally, you should use
the same letter to map the directory of files to the server and to your
local system. Alternatively, you can copy the directory of files to the
server temporarily.

Batch Loading Content
3-34 Oracle Fusion Middleware System Administrator's Guide for Oracle Content Server
dDocAccount=Policy/Admin
dDocAuthor=sysadmin
primaryFile=d:/temp/working_dir_Admin/
xComments=Initial Check In
@end
<<EOD>>
1. Select Tools / Letters and Mailing / Mail Merge Wizard and advance through the
wizard. Choose the selections below to use your filelisting.txt file as input to the
mail merge.
–Letter Document (step 1)
–Current document (step 2)
–Existing List (step 3) and select your Excel spreadsheet as the data source
–More Items (step 4), place the title and filename fields into the word document
so that it looks like the following:
@Properties LocalData
IdcService=CHECKIN_UNIVERSAL
doFileCopy=1
dDocTitle="title"
dDocType=Native
dSecurityGroup=Internal
dDocAccount=Policy/Admin
dDocAuthor=sysadmin
primaryFile=d:/temp/working_dir_Admin/"filename"
xHistory=Initial Check In
@end
<<EOD>>
2. Complete the mail merge (Steps 5 and 6) and you will have a new Word document
with one merge record per page.
3. Edit the letters, selecting all, and use the Replace feature to remove all of the
section breaks.
4. Save the file as a plain text file to the /cmdfiles directory with the file extension of
hda (for example, filelisting.hda)
Execute the Upload:
1. Open a command prompt.
2. Navigate to the working bin directory.
3. Issue the command:
IdcCommand -f ../cmdfiles/filelisting.hda -u sysadmin -l ../filelisting.log -c
server
Your files will be checked into the Oracle Content Server repository and a message is
displayed in the command window as each file is checked in.
3.6.3.5 Batch Loading Content as Metadata Only
Depending on the action you plan to perform using the Batch Loader, certain fields are
required in the batch load file. If you are updating only the metadata in existing
content items, the primaryFile field is not required in the batch load file; see
Section 3.6.1.5.1, "Update Requirements."

Batch Loading Content
Managing System Processes 3-35
However, if you want to load (insert action) content into the Oracle Content Server
instance as metadata only, then the primaryFile field is required in the batch load file.
Although the field is ignored by the import, the Batch Loader expects it to be defined.
If the primaryFile field is missing, you will get an error as follows (or similar):
Please check record number <number>. BatchLoader: unable to check in '<record>'
because the required field 'primaryFile' is missing.
To batch load content as metadata only:
1. Open the Oracle Content Server instance config.cfg file:
IntradocDir/config/config.cfg
2. Add the following configuration variables:
createPrimaryMetaFile=true
AllowPrimaryMetaFile=true
3. Save and close the config.cfg file.
4. In the batch load file, add the following fields for each record:
primaryFile=
createPrimaryMetaFile=true
Note that leaving the primaryFile field blank is acceptable. The field is ignored
but must be included.
5. Continue to batch load your content using the Batch Loader procedure or the
command line procedure. See Section 3.6.3.2, "Batch Loading from the Batch
Loader Screen" or Section 3.6.3.3, "Batch Loading from the Command Line."
3.6.3.6 Batch Loader -console Command Line Switch
Adding the -console switch to the Batch Loader command line causes all output to be
echoed to the HTML Oracle Content Server log and to the console window that is
running the Batch Loader. Alternatively, you can use operating system redirects to
send the output to a separate log file.
3.6.3.6.1 Win32 Example Win32 command line:
BatchLoader.exe /q -console /nc:/batching/batchinsert.txt
UNIX command line:
BatchLoader -q -console -n/u2/apps/batching/batchinsert.txt
Sample output:
Processed 1 of 4 record.
Processed 2 of 4 records.
Processed 3 of 4 records.
Processed 4 of 4 records.
Done processing batch file 'c:/batching/batchinsert.txt'. Out of 4 records
processed, 4 succeeded and 0 errors occurred.
Important: The -console switch does not follow standard Windows
command line syntax (although this may be corrected in later
versions). You must use the -console syntax usually associated with
UNIX instead of the /console syntax. With most other command line
utilities, both syntaxes will work on both platforms.
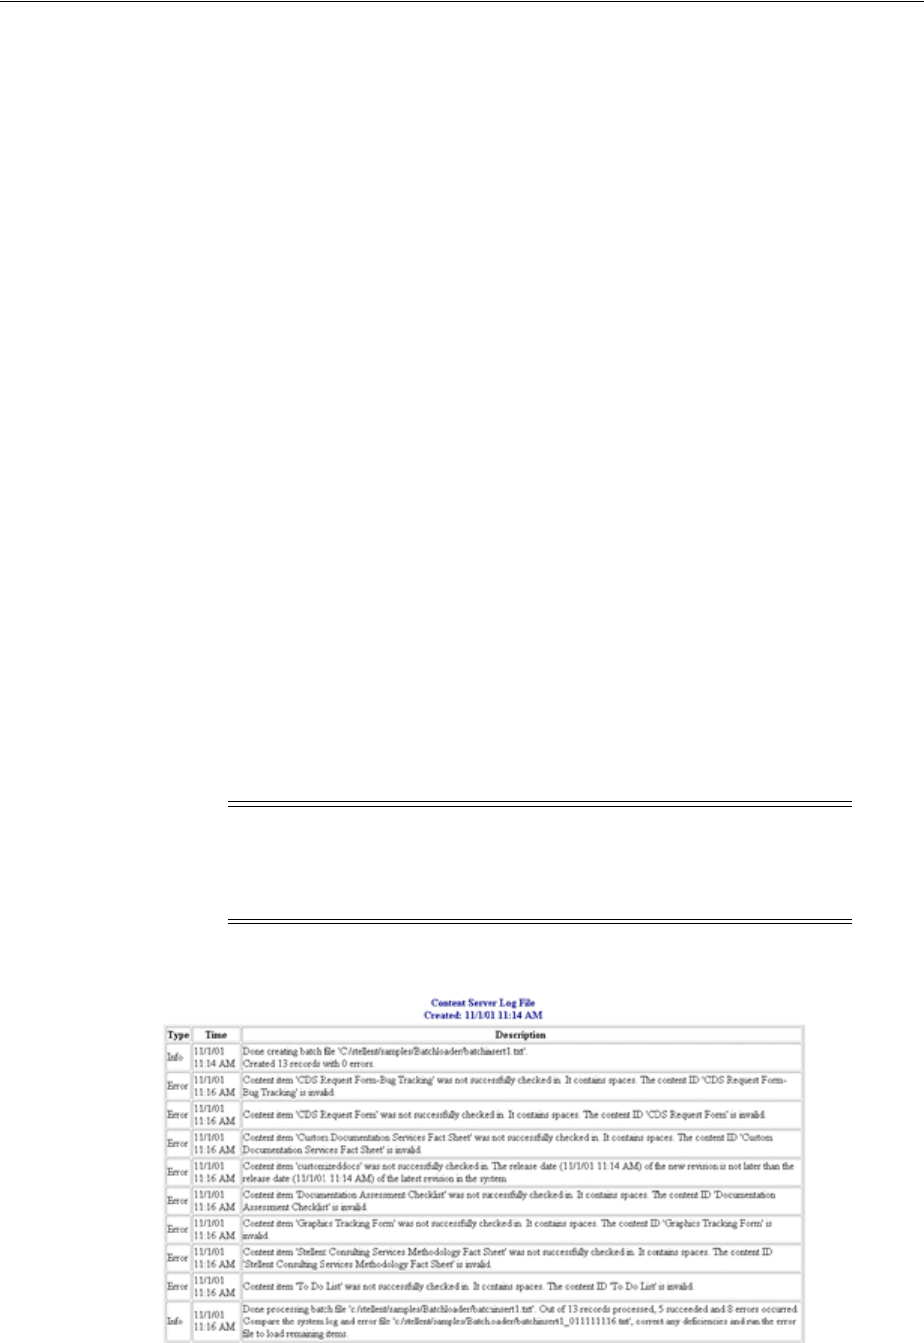
Batch Loading Content
3-36 Oracle Fusion Middleware System Administrator's Guide for Oracle Content Server
3.6.3.7 Adding a Redirect
You can use a redirect symbol on the command line to send the Batch Loader output to
a separate log file. The symbol works on both UNIX and Windows. By default, the
-console switch sends the Batch Loader's output to stderr. To redirect the output to a
different file, use the special redirect symbol 2>.
In the following examples, each command must be entered all on one line.
Win32 command line with redirect:
BatchLoader.exe /q -console /nc:/batching/batchinsert.txt 2> batchlog.txt
UNIX command line with redirect:
BatchLoader -q -console -n/u2/apps/batching/batchinsert.txt 2>
/logs/CSbatchload.log
3.6.3.8 Correcting Batch Load Errors
Use the following procedure to correct any errors that occur during batch loading.
1. Open the Oracle Content Server log. Select Administration, then Log Files, then
click Content Server Logs.
2. Look through the Type column for the word Error.
3. Read the description to determine the problem.
4. Fix the error in one of these files:
■Batch load file
■The error file for the failed content. (This option is available only if you
enabled it on the Batch Loader Screen.) The error file is located in the same
directory as the batch load file, with several digits appended to the batch load
file name.
Figure 3–4 Oracle Content Server log file
Tip: If you rerun an entire batch load file, content items that have
already been checked in will usually fail. This occurs because the
release dates of the existing content items will be the same as the ones
you are trying to insert.

Batch Loading Content
Managing System Processes 3-37
3.6.4 Optimizing Batch Loader Performance
This section provides some basic guidelines that you can use to improve Batch Loader
performance. These suggestions can minimize potentially slow batch load
performance when you are checking in a large number of content items. In many
cases, proper tuning for batch loading can significantly speed up a slow server.
To minimize batch loading slow downs, try implementing the following Batch Loader
adjustments:
■Temporarily disable other activities such as shutting down Inbound Refinery (see
the Oracle Fusion Middleware Administrator's Guide for Conversion) and suspending
the automatic update cycle feature of the Repository Manager. See Section A.1.3.1,
"Repository Manager: Indexer Tab."
■Analyze your database usage during a batch load to help the database query
optimizer. Databases have built-in optimizer utilities that can help make database
queries more efficient. However, to maximize the efficiency of optimizers, it is
necessary to update or re-create the statistics about the physical characteristics of a
table and the associated indexes. These characteristics include number of records,
number of pages, and the average record length. The optimizers use these statistics
to access data.
Each database has a proprietary command that you can use to invoke the statistic
update or recreation process. For example:
–For Oracle, use the ANALYZE TABLE COMPUTE STATISTICS command
–For SQL Server, use the CREATE STATISTICS statement
–For DB2, use the RUNSTATS command
3.6.4.1 Example: Best Practice Case Study
This case study describes a very slow load batch performance and the steps taken to
diagnose and correct the situation. This information can serve as a model for isolating
underlying issues and resolving batch loading performance problems.
3.6.4.1.1 Background Information A user wanted to load 27,000 content items into the
Oracle Content Server instance that was running on an AIX server. The DB2 database
was running on a separate AIX server. The content items included TIFs as the native
files and corresponding PDFs as the Web-viewable files. Inbound Refinery generated
thumbnails from the native files.
Initially during the batch load, the performance was acceptable with sub-second insert
times. However, after a few thousand content items were loaded, the performance
began to degrade. Content items started to require a few seconds to load and,
eventually, the load time was over 10 seconds per content item.
3.6.4.1.2 Preliminary Troubleshooting While the batch load was running, nothing seemed
to be wrong with the Oracle Content Server instance. It had sufficient memory, the
CPU utilization was low (less than 5%), and there were no disk bottlenecks. The
Inbound Refinery server was busy, but was processing thumbnails at an acceptable
rate.
Two issues were found with the database server:
■Two processes were taking turns to update the database. While one process was
executing, the second process waited for other process to release database locks.
When the first process completed, the second process executed while the first
process waited. The processes in this execute/wait cycle included:

Finding Status and Error Information
3-38 Oracle Fusion Middleware System Administrator's Guide for Oracle Content Server
–The actual batch load process that was updating the database tables after
inserting a content item.
–The Oracle Content Server instance was updating the database tables;
changing the status from GENWWW to DONE after receiving notification that
a thumbnail had been completed.
The two processes should not have been contending with each other because they
were not updating the same content items. It seemed that the two processes were
locking each other out because DB2 had performed lock escalation and was now
locking entire database pages instead of single rows.
■There were a large number of tablespace scans being performed by both processes.
3.6.4.1.3 Solution A two-step solution was used:
1. Inbound Refinery was shut down to prevent the status update process from
competing with the batch loading process. The performance did improve because
there was a 2000+ backlog of content items from the completed thumbnails.
2. A RUNSTATS command was issued on all the Oracle Content Server database
tables to update the table statistics. This dramatically improved the performance
of the batch load. The insert time returned to sub-second and the batch load
completed within a short amount of time. It took 21 hours to insert the first 22,000
content items. After updating the table statistics, the remaining 5,000 content items
were inserted in 13 minutes.
3.7 Finding Status and Error Information
Effective troubleshooting relies on the availability of useful, detailed information. The
Oracle Content Server products provide various sources of information that can be
helpful in the troubleshooting process.
This section covers the following topics:
■Section 3.7.1, "Log Files"
■Section 3.7.2, "Configuration Information"
■Section 3.7.3, "System Audit Information"
■Section 3.7.4, "Monitoring Scheduled Jobs"
■Section 3.7.5, "Tracing"
■Section 3.7.6, "Environment Packager"
■Section 3.7.7, "Content Server Analyzer"
■Section 3.7.8, "Configuration Debug Entry"
■Section 3.7.9, "Stack Traces"
3.7.1 Log Files
The Oracle Content Server system stores status information and errors in log files. Log
files are used to register system events, with their date and time of occurrence. They
can be valuable tools for troubleshooting, especially if verbose logging is turned on.
Not only do logs indicate that specific events occurred, they also provide important
clues about a chain of events that led to an error or problem.

Finding Status and Error Information
Managing System Processes 3-39
Information is also captured in logs controlled by the Oracle WebLogic Server
Administration Console using Oracle log APIs. The Oracle UCM interface provides
access to these logs. For details, see Section 2.6, "Viewing Log Information for Oracle
Content Server."
This section covers the following topics:
■Section 3.7.1.1, "Log File Characteristics"
■Section 3.7.1.2, "Accessing the Log Files"
■Section 3.7.1.3, "Using Oracle Content Server Logs"
■Section 3.7.1.4, "Using Archiver Logs"
3.7.1.1 Log File Characteristics
The log files associated with the Oracle Content Server instance have the following
characteristics:
■They are created only once each day at the time the first status, error, or
irrecoverable error occurs.
■No empty log files are generated.
Each log file contains the following columns:
■Type: Specifies the kind of incident that prompted the log entry: Information,
Error, or Fatal.
■Time: Lists the date and time the log entry occurred.
■Description: Describes the incident that occurred.
The log files are standard HTML pages and are maintained for each Oracle Content
Server instance. Logs are kept in revolving file name format for a maximum of 30 files.
When the 31st file is created, the oldest one is deleted. Therefore, log file names in
Oracle Content Server bear no relation to the date they were generated. To find a
certain day in the log file, view the index file in a browser and select that day's link.
The file name is displayed in the browser's status bar (if it is enabled).
3.7.1.2 Accessing the Log Files
The log files of the Oracle Content Server instance are normally accessed from the Log
Files folder in the Administration tray.
Note: When applied to process log output, verbose logging can
quickly increase the size of a log file and possibly cause the Oracle
Content Server instance to slow down. It is recommended that for
process logs, verbose logging is only used when troubleshooting a
specific issue. Regular Oracle Content Server logs do not have this
issue with verbose logging.
Tip: Bookmark your log file pages. This will help you to
troubleshoot problems, even if the Oracle Content Server instance is
unavailable. Also, know where your configuration files are so you can
find them if the Oracle Content Server instance is unavailable.

Finding Status and Error Information
3-40 Oracle Fusion Middleware System Administrator's Guide for Oracle Content Server
If, for whatever reason, you cannot view the log files from the Administration tray,
you can also access them on the file system of the Oracle Content Server computer. The
log files are located in the following locations:
3.7.1.3 Using Oracle Content Server Logs
The Oracle Content Server logs are listed by date and time. One file is generated for
each day. Entries are added to the file throughout the day as events occur.
The following types of server log entries are generated:
■Info: Displays basic status information. For example, status information is logged
if the server is ready and waiting.
■Error: Displays errors that occur but do not stop the software from functioning.
For example, an error is logged if a user requests secure information that they are
not allowed to access.
■Fatal: Displays errors that stop the software from functioning. For example, a fatal
error is logged if the Oracle Content Server instance cannot access the database.
To open an Oracle Content Server log:
To open a server log, complete the following steps:
1. Ensure that you are logged into Oracle Content Server as an administrator.
2. Click Content Server Logs on the Administration page or in the Administration
tray's Log Files folder.
The Content Server Logs Screen is displayed.
3. Select the link that corresponds to the date and the time of the log that you want to
view.
3.7.1.4 Using Archiver Logs
Archiver logs show information about imports, exports, and replications. The Archiver
logs are listed by date and time. They are generated once a day when the first Archiver
information status, fatal error, or error occurs.
The following types of archiver log entries are generated:
■Info: Displays basic status information. For example, status information is logged
when an export and an import starts and finishes.
Note: You must be logged into the Oracle Content Server instance as
an administrator to be able to view the log files.
Log Files Found in:
Oracle Content
Server IntradocDir/weblayout/groups/secure/logs
Console Output
Logs IntradocDir/bin/classname.log
Refinery IntradocDir/weblayout/groups/secure/logs/refinery
Archiver IntradocDir/weblayout/groups/secure/logs/archiver

Finding Status and Error Information
Managing System Processes 3-41
■Error: Displays user/administration errors that occur but do not stop the software
from functioning. For example, an error is logged if there is no file information for
a content item that you are trying to export.
■Fatal: Displays errors that stop the software from functioning. For example, a fatal
error is logged if the Oracle Content Server instance cannot access the database.
Check the connection string, user name, and password.
To open an Archiver log:
To open an Archiver log, complete the following steps:
1. Ensure that you are logged into Oracle Content Server as an administrator.
2. Click the Archiver Logs link, found on the Administration page or in the
Administration tray's Log Files folder.
The Archiver Log Screen is displayed.
3. Select the link that corresponds to the date and the time of the log.
A table showing the type, date and time, and description of each action is
displayed. It also includes the name of the Oracle Content Server instance that
created the archive.
3.7.1.5 Inbound Refinery Logs
With the release of Inbound Refinery version 11gR2, all Refinery logging is accessed
through the Inbound Refinery interface. For more information see the Oracle Fusion
Middleware Administrator's Guide for Conversion.
3.7.2 Configuration Information
The Oracle Content Server system provides a Configuration Information Page that
displays configuration information for a Oracle Content Server instance, which may be
useful while troubleshooting a problem or working with the Oracle support
organization. To access this page, select Administration in the portal navigation bar,
then select Configuration for Instance. To display more details, click the link for each
type of configuration information.
Configuration information is provided for:
■Server name
■Version
■Class loader
■Instance directory
■Database type
■Database version
■HTTP server address
■Mail server
■Search engine name
■Index engine name
■Number of installed features
■Number of enabled components

Finding Status and Error Information
3-42 Oracle Fusion Middleware System Administrator's Guide for Oracle Content Server
■Number of disabled components
■Auto number prefix
■Use accounts
■Ntlm security enabled
■Allow get copy for user with read privilege
■Allow only original contribute to check out
■Java version
3.7.3 System Audit Information
The Oracle Content Server system provides a System Audit Information Page for the
Oracle Content Server instance, which may be useful while troubleshooting a problem
or adjusting a server's performance. To access this page, select Administration in the
portal navigation bar, then select System Audit Information.
The System Audit Information page provides several types of information:
■Section 3.7.3.1, "System Audit General Information"
■Section 3.7.3.2, "System Audit Localization Information"
■Section 3.7.3.3, "System Audit Tracing Sections Information"
■Section 3.7.3.4, "System Audit Cache Information"
■Section 3.7.3.5, "System Audit Configuration Entry Information"
■Section 3.7.3.6, "System Audit Component Report Information"
3.7.3.1 System Audit General Information
The General Information section of the System Audit Information Page provides the
following:
■Information regarding whether the system is receiving too many requests. If it is
receiving too many requests, an e-mail is sent to the system administrator
regarding load performance.
■Information about the memory cache for the system, and is useful in
troubleshooting any "out of memory" errors you may receive. This is important
when running the Oracle Content Server instance with many users and a large
quantity of data.
■Information about which Java threads are currently running. This is useful in
determining the cause of an error.
■Information about database activity.
■Listing of any audit messages.
To display more information, click the link on the page for the type of configuration
information.
Note: Some options are specified during the software installation,
while others are set using the System Properties utility.

Finding Status and Error Information
Managing System Processes 3-43
3.7.3.2 System Audit Localization Information
The Localization Information section of the System Audit Information Page provides
information on:
■String key count
■Whether the Localization system is using a string index
■Localization test run time
■Localization test lookups per second
3.7.3.3 System Audit Tracing Sections Information
The Tracing Sections Information section of the System Audit Information Page
enables tracing in the Oracle Content Server instance, which can be activated on a
section-by-section basis. Tracing for active sections is displayed on the Server Output
Page. Section tracing is useful for determining which section of the server is causing
trouble, or when you want to view the details of specific sections.
Sections can be added for tracing by appending extra sections to create a comma
separated list in the Active Sections field. A listing of the sections available for tracing,
with brief descriptions, is available by clicking the Info icon next to the Tracing
Sections Information heading. The wildcard character * is supported so that using
schema* will trace all sections that begin with the prefix schema.
Some tracing sections also support verbose output. Enable Full Verbose Tracing if you
want to see in-depth tracing for any active section that supports it. For more
information, see Section 3.7.5, "Tracing."
3.7.3.4 System Audit Cache Information
The Oracle Content Server instance caches various items for quick access. The Cache
Information section of the System Audit Information Page displays current
information of three main caches:
■Search cache: Information about the number of searches currently being run, how
many executed searches are currently in cache, and when the cache is emptied.
These details are useful when troubleshooting any search related issues.
■Schema cache: Details of any schema items currently in cache.
■Buffer: Information about Java objects in cache and how much memory each object
is using, which is reflected in the memory information under the System Audit
General Information section. This information can be useful in pinpointing which
object may be responsible for any memory leaks or other memory issues.
To display more information, click the link for the type of cache information on the
page.
Important: Any options set in Tracing Sections Information will be
lost when the Oracle Content Server instance is restarted unless you
enable Save and click Update.

Finding Status and Error Information
3-44 Oracle Fusion Middleware System Administrator's Guide for Oracle Content Server
3.7.3.5 System Audit Configuration Entry Information
The Configuration Entry Information section of the System Audit Information Page
provides information on:
■Number of environment keys
■Number of overwritten config values
■Number of ignored settings
■Number of removed settings
To display more information, click the link for the type of configuration entry
information on the page.
3.7.3.6 System Audit Component Report Information
The Component Report Information section of the System Audit Information Page
provides the following information for components on the Oracle Content Server
instance:
■Location: pathname for the component in the instance
■Version: date, build, and revision
■Status: current status of the component (Loaded or Skipped)
■Reason: an explanation of the component status
To display details about a component, click the link for the component name on the
page.
3.7.3.7 Server Output Page
The Server Output page displays the console output of the Oracle Content Server
instance. This is the same information that is located in the
DomainHome/ucm/cs/bin/classname.log file. It includes information pertaining to all
the sections selected for audit tracing in the System Audit Tracing Sections
Information. To access the Server Output page, click View Server Output on the
System Audit Information page.
3.7.4 Monitoring Scheduled Jobs
Scheduled jobs run as part of events scheduled by system components. The Scheduled
Jobs Administration Interface can be used to monitor information about scheduled
jobs on the Oracle Content Server instance.
3.7.4.1 Viewing Active Scheduled Jobs
1. Select Administration from the portal navigation bar.
2. Select Scheduled Jobs Administration.
3. Select Active Scheduled Jobs.
The job name, job description, processed date and time, current status, and
available actions are listed for each scheduled job on the Active Scheduled Jobs
Screen.
4. Click Actions to select any of the following actions for a scheduled job:
■Info: Display the Scheduled Jobs Information Screen.
■Cancel: Cancel the scheduled job.

Finding Status and Error Information
Managing System Processes 3-45
■Edit: Edit the scheduled job.
■Delete: Delete the scheduled job.
5. Click Info to display the Scheduled Jobs Information Screen.
3.7.4.2 Viewing Scheduled Jobs History
1. Select Administration from the portal navigation bar.
2. Select Scheduled Jobs Administration.
3. Select Scheduled Jobs History.
The job name, description, last process date, process status, and actions are listed
for each scheduled job on the Scheduled Jobs History Screen.
3.7.4.3 Viewing Scheduled Jobs Information
1. Select Administration from the portal navigation bar.
2. Select Scheduled Jobs Administration.
3. Select either Active Scheduled Jobs or Scheduled Jobs History, then click Info for
a specific job to view information.
The job name, description, category, exception parent job, initial user, queue type,
schedule type, current state, priority, interval, start token, progress status, create
date, update date, process date, last processed date, and last processed status are
displayed.
4. To display a Scheduled Jobs Information Screen that can be edited, select Edit from
the Actions menu on the Active Scheduled Jobs Screen.
3.7.5 Tracing
You can activate Oracle Content Server tracing to display detailed system information
that may be very useful for troubleshooting and optimizing system performance.
3.7.5.1 Server-Wide Tracing
Server-wide tracing is used to view activities throughout the system. There are two
ways to activate server-wide tracing.
To activate tracing from the Administration interface:
1. Select Administration from the portal navigation bar.
2. Select System Audit Information.
3. Enable Full Verbose Tracing to see in-depth tracing for any active section that
supports it.
4. Specify the traces to activate.
5. Click Update.
6. Click View Server Output.
Tip: Tracing options are lost on system restart. To ensure your
settings are retained after restarting the Oracle Content Server
instance, enable Save before clicking Update.

Finding Status and Error Information
3-46 Oracle Fusion Middleware System Administrator's Guide for Oracle Content Server
To activate tracing from an applet:
1. Start an administrative applet.
2. Select Options and then Tracing.
3. Select Server tracing.
4. Select the tracings to activate or all and click OK.
The following tracing options are available. Additional tracing sections can be
displayed in the list if components are added.
■applet: This trace contains result sets from initialized applets, such as the
Configuration Manager or User Admin.
■archiver: This trace provides information about archiving activities, including the
reading and writing of archiver data files and the time the activities were initiated
and finished.
■archiverlocks: This trace provides information about the locks put on files during
archiving activities, including time initiated.
■chunkedrequest: This trace displays the messages and headers that are created
when large requests are 'chunked' into smaller requests.
■docprofile: This trace displays the computation of content profiles, specifically the
evaluation of the rules that determine which fields are labels, hidden, and so on.
■encoding: This trace provides information about encoding transformations that
have occurred and the activities where encoding occurred.
■filelock: This trace displays information about short-term system locks put on
directories (during activities like archiving, for example) with a focus on collisions
that occur and time outs.
■filelonglock: This trace displays information about the creation, removal, and
maintenance of long term locks imposed by the system.
■filequeue: This trace displays information about accesses to a file queue.
■indexer: This trace displays information about index functions that occur when
the database is updated, including the steps taken to update the index and the
time elapsed for each step.
■indexermonitor: This trace provides a brief summary of automatic index activities,
including time started and ended.
■indexerprocess: This trace displays information about a manually launched index
process and indicates if the process terminated properly.
■localization: This trace displays information about localization usage and
activities.
■mail: This trace describes mail sent by the Oracle Content Server instance.
■pagecreation: This trace displays information about the creation of displayed
pages, including the server thread and the time taken to generate the page.
■requestaudit: This trace provides summary reports on service requests, including
the elapsed time for the requests and the number of requests made.
■scheduledevents: This trace provides a list of hourly or daily background
scheduled events.

Finding Status and Error Information
Managing System Processes 3-47
■schema: This trace provides information about schema publishing (tables and
views published as .js files) and caching (tables cached into Oracle Content Server
memory).
■searchquery: This trace displays information about recent searches, including the
fields used to search on and the order of sorting for results.
■socketrequests: This trace displays the date, time, and thread number of socket
requests and the actions during the request.
■system: This trace displays internal system messages, such as system socket
requests and responses.
■systemdatabase: This trace provides information about database activities,
including queries executed, index updates, threads used, and time initiated.
■transfermonitor: This trace displays information about the archiver and the batch
file transfer activities.
■userstorage: This trace describes the access of external user repositories, including
what actions were taken during access.
■workflow: This trace displays a list of metadata on content items going through
workflow, including document title and revision number.
3.7.5.2 Applet-Specific Tracing
For applet-specific tracing, the output goes to the browser Java console. To perform
tracing by applet:
1. Start the administration applet to be traced.
2. Select Options, then select Tracing.
3. Make your selections, and click OK. The output is directed to the browser Java
console.
Note: To facilitate international support, most tracing messages are
in English and do not have translations.
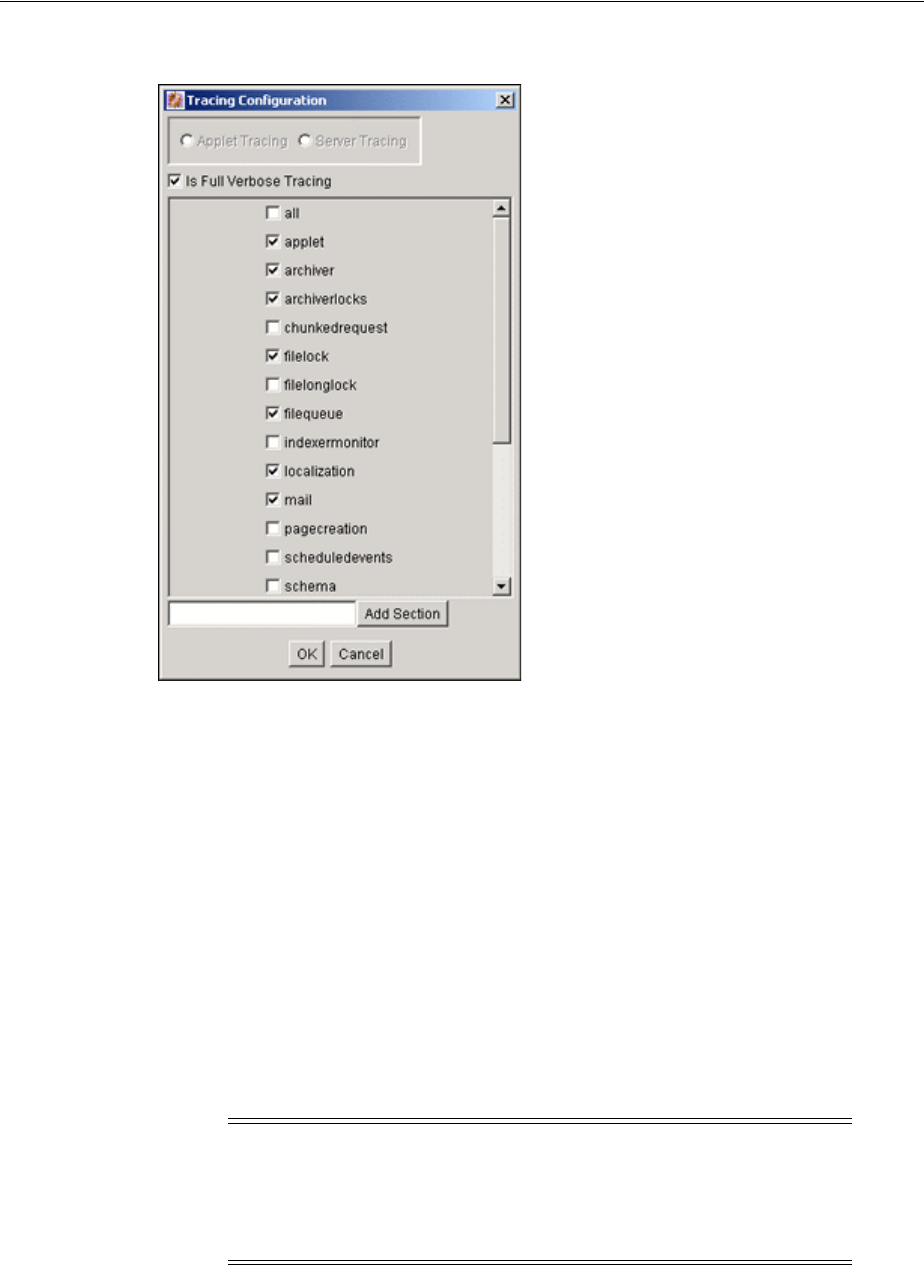
Finding Status and Error Information
3-48 Oracle Fusion Middleware System Administrator's Guide for Oracle Content Server
Figure 3–5 Applet-specific Tracing
3.7.6 Environment Packager
The Environment Packager is a diagnostic tool. It creates a zip file of the desired state
directories, log files, and other component and resource directories.
To create an environment zip file, complete the following steps:
1. Ensure that you are logged in to Oracle Content Server as an administrator.
2. From the Administration tray, click the Environment Packager link. The
Environment Packager Page is displayed.
1. Select which parts of the environment should be packaged.
2. When you are ready to create the environment zip file, click Start Packaging.
A message is displayed while the zip file is being built, with a link to the zip file.
The packaging process may take several minutes. The zip file link will not be
available until the process has finished.
3.7.7 Content Server Analyzer
The Content Server Analyzer application enables you to confirm the integrity of the
Oracle Content Server repository components, including the file system, database, and
Note: The packaged zip is named server_environment_*.zip. While
the Oracle Content Server instance builds the packaged zip file, it will
be located in IntradocDir/vault/~temp. When the build of the zip file
is complete, it is moved to
IntradocDir/weblayout/groups/secure/logs/env.

Finding Status and Error Information
Managing System Processes 3-49
search index. It can also assist system administrators in repairing some problems that
are detected in the repository components.
Using the Content Server Analyzer, system administrators can do the following:
■Confirm the accuracy of synchronization between three important Oracle Content
Server database tables (Revisions, Documents, and DocMeta).
■Confirm that the dRevClassID and dDocName fields are consistent across all
revisions of content items.
■Determine if the file system (native and Web-viewable file repositories) contains
any duplicate or missing files.
■Ensure the accuracy of synchronization between the search index and the file
system.
■Ensure the accuracy of synchronization between the search index and the
Revisions database table.
■Ensure that the file system contains all necessary files.
■Remove duplicate files from the Oracle Content Server repository either
permanently or provisionally by moving them into the logs/directory.
■Produce a general report on the state of content items in the Oracle Content Server
repository.
The method to start the Content Server Analyzer depends on the operating system:
■Windows: Select Start, then Oracle Content Server, then Instance_Name, then
Content Server Analyzer.
■UNIX: Navigate to the DomainHome/ucm/cs/bin directory and run the Oracle
Content Server Analyzer program.
These sections describe Oracle Content Server Analyzer tasks:
■Section 3.7.7.1, "Accessing the Content Server Analyzer"
■Section 3.7.7.2, "Specifying a Custom Analyzer Log Directory"
■Section 3.7.7.3, "Invoking the Analysis Process"
■Section 3.7.7.4, "Analyzing the Oracle Content Server Database"
■Section 3.7.7.5, "Analyzing the Oracle Content Server Search Index"
■Section 3.7.7.6, "Analyzing the Oracle Content Server File System"
■Section 3.7.7.7, "Viewing the Analysis Progress and Results"
■Section 3.7.7.8, "Generating a Status Report"
■Section 3.7.7.9, "Canceling the Status Report"
3.7.7.1 Accessing the Content Server Analyzer
To display the Content Server Analyzer, use one of the following methods:
■Windows: Select Start, then Programs, then Content Server, then instance_name,
then Utilities and then Content Server Analyzer.
■UNIX: Change to the DomainHome/ucm/cs/bin directory, type IdcAnalyze in a
shell window, and press the RETURN key.
The Content Server Analyzer application is displayed.

Finding Status and Error Information
3-50 Oracle Fusion Middleware System Administrator's Guide for Oracle Content Server
3.7.7.2 Specifying a Custom Analyzer Log Directory
The logs/ directory is the default logging directory for the Content Server Analyzer.
Analysis output files are written to this directory and extra files detected during a file
system analysis process can be transferred here as well. Optionally, the default logs/
directory name and path can be changed as desired.
To customize the Analyzer log directory name and path:
1. On the Content Server Analyzer: Configuration Tab, place the cursor in the
Analyzer log dir field.
2. Enter the desired directory path.
During the next analysis process, the Content Server Analyzer automatically
creates the specified directory or directories in the DomainHome/ucm/cs/bin/
directory hierarchy.
3.7.7.3 Invoking the Analysis Process
To invoke the analysis process:
1. On the Content Server Analyzer: Configuration Tab, select and activate the desired
options (checking the corresponding checkboxes).
2. Click Start Analysis.
3. Click Yes to overwrite the existing log file.
The Content Server Analyzer: Progress Tab is displayed automatically.
A completion message is displayed when all of the selected analysis processes are
finalized.
4. Click OK.
The results are displayed in the console area on the Progress tab.
3.7.7.4 Analyzing the Oracle Content Server Database
The Check RevClassIDs and Clean database options are used to check the integrity of
the database columns. The available options enable users to examine the three tables
that are used to store content item revision information (DocMeta, Documents, and
Revisions). The DocMeta file is examined for extra entries that are not found in the
Revisions table. Similarly, the Documents table is examined to verify that there are
sufficient entries to correspond to the entries in the Revisions table.
Note: If this is the very first time the Content Server Analyzer has
been run, the output files in the logs/ directory are automatically
created. On subsequent analysis processes, a confirmation message is
displayed asking to overwrite the existing log file.
Note: If you click No, the analysis process is terminated and you are
prompted to manually remove files from the logs/ directory before
running the Content Server Analyzer again.
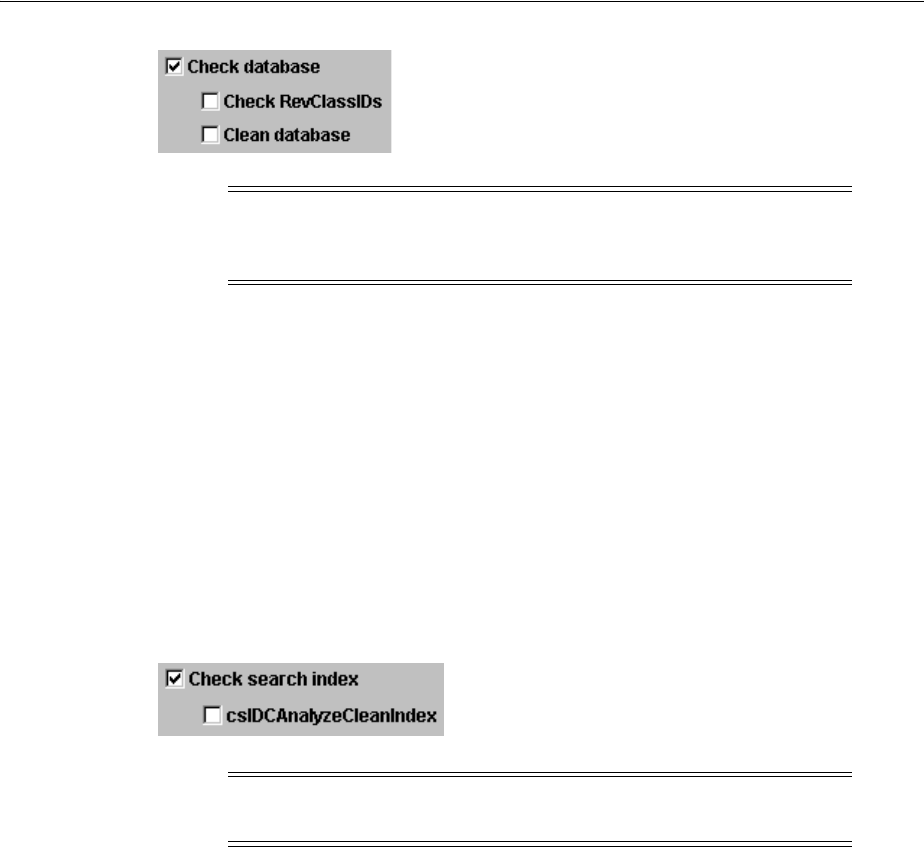
Finding Status and Error Information
Managing System Processes 3-51
To analyze the Content Server database:
1. On the Content Server Analyzer: Configuration Tab, select the applicable options.
2. Click Start Analysis.
The results are displayed in the console area on the Content Server Analyzer:
Progress Tab. For information about the analysis procedure, see Section 3.7.7.3,
"Invoking the Analysis Process."
3.7.7.5 Analyzing the Oracle Content Server Search Index
The Check search index and csIDCAnalyzeCleanIndex options are used to check the
entries in the Revisions table to ensure that all of the documents that belong in the
index are properly listed. Additionally, a check can be performed to ensure that there
are no duplicate entries in the search index.
To analyze the Oracle Content Server search index:
1. On the Content Server Analyzer: Configuration Tab, select the applicable options.
2. Click the Start Analysis button (for information about the analysis procedure, see
Section 3.7.7.3, "Invoking the Analysis Process."
The results are displayed in the console area on the Content Server Analyzer:
Progress Tab.
3.7.7.6 Analyzing the Oracle Content Server File System
The Check file system, Delete, Safe delete, and Check for extra files options are
used to check the integrity of the file system (weblayout and vault file repositories).
Using the information in the database, these options ensure that every file in the
Revisions table contains accurate entries corresponding to the items in the file system.
A check can also be completed to locate any extra files in the vault and weblayout file
repositories.
Note: The Check RevClassIDs and Clean database options are
activated and selectable only when the Check database option is
selected.
Note: The csIDCAnalyzeCleanIndex option is activated and
selectable only when the Check search index option is selected.

Finding Status and Error Information
3-52 Oracle Fusion Middleware System Administrator's Guide for Oracle Content Server
To analyze the Oracle Content Server file system (vault and weblayout file
repositories):
1. On the Content Server Analyzer: Configuration Tab, select the applicable options.
2. Click Start Analysis.
The results are displayed in the console area on the Content Server Analyzer:
Progress Tab. For information about the analysis procedure, see Section 3.7.7.3,
"Invoking the Analysis Process."
3.7.7.7 Viewing the Analysis Progress and Results
The Content Server Analyzer: Progress Tab is displayed automatically when the Start
Analysis button is clicked. The progress bars show when the Content Server Analyzer
has completed processing the selected analysis options. The following image shows a
partially finished analysis:
When the analysis process is complete, the results are displayed in the console area of
the Progress tab. The results depend on what analysis options were selected. The
following image of the console area shows the results from selecting database, search
index, and file system options:
Note: The Delete, Safe delete, and Check for extra files options are
activated and selectable only when the Check file system option is
selected.
Note: The Generate report option was not selected for this example.
For an example of the generated status report, see Section 3.7.7.8,
"Generating a Status Report."
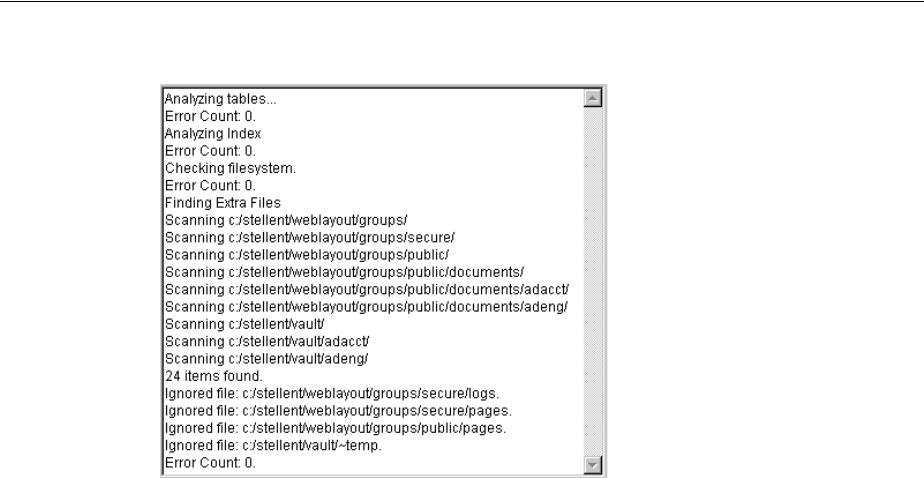
Finding Status and Error Information
Managing System Processes 3-53
Figure 3–6 Example Console Display of Results
3.7.7.8 Generating a Status Report
The status report generated by the Content Server Analyzer provides statistics about
the content items in the repository. The status report output is displayed in the console
area of the Progress tab.
To generate a status report:
1. On the Content Server Analyzer: Configuration Tab, select Generate report.
2. Click Start Analysis.
When the analysis process is complete, the status report information is displayed
immediately following the standard analysis results in the console area of the
Content Server Analyzer: Progress Tab.
3.7.7.9 Canceling the Status Report
The report generation feature can be suppressed after the analysis process has already
started. To cancel the content item status report during the analysis process:
1. During the analysis process, click Cancel on the Content Server Analyzer
Application.
You are prompted about canceling after the current task is finished.
2. Click Yes to suppress the status report.
The status report is not included with the analysis results that are displayed in the
console area of the Progress tab.
3.7.8 Configuration Debug Entry
The Oracle Content Server system also provides a debugging configuration variable
that, when set, contributes applicable diagnostic information. The configuration
variable is named IsDevelopmentEnvironment, and it is set in the Oracle Content
Server instance's configuration file (IntradocDir/config/config.cfg) during installation
and when the Oracle Content Server instance is updated. This entry does the
following:
■Defines whether the Oracle Content Server instance should run in debug mode.

Finding Status and Error Information
3-54 Oracle Fusion Middleware System Administrator's Guide for Oracle Content Server
■Enables a trace of script errors. If used as a parameter to a service call, script error
information can be added to the bottom of the displayed page.
Another debug configuration variable is named AlwaysReportErrorPageStackTrace.
When this variable is set, whenever an error occurs the stack trace is reported on the
browser showing the Oracle Content Server user interface.
3.7.9 Stack Traces
The stack trace enables you to see what threads are currently running in the Oracle
Content Server instance. It is a useful troubleshooting tool that provides information
about the threads and enables you to monitor Oracle Content Server processing.
For instructions to initiate a current stack trace for the Oracle Content Server instance,
see Oracle WebLogic Server documentation.
Note: For further details refer to the Oracle Fusion Middleware Idoc
Script Reference Guide.

4
Managing System Settings 4-1
4Managing System Settings
This chapter describes concepts and tasks for managing Oracle Content Server system
settings on an ongoing basis. It covers the following topics:
■Section 4.1, "Configuring System Properties"
■Section 4.2, "Configuring the Search Index"
■Section 4.3, "Configuring a File Store System"
■Section 4.4, "Mapping URLs with WebUrlMapPlugin"
■Section 4.5, "Connecting to Outside Entities with Providers"
4.1 Configuring System Properties
This section covers the following topics:
■Section 4.1.1, "About System Properties"
■Section 4.1.2, "Configuring General Options"
■Section 4.1.3, "Configuring Content Security"
■Section 4.1.4, "Configuring Internet Information"
■Section 4.1.5, "Configuring the Database"
■Section 4.1.6, "Configuring Oracle Content Server Options"
■Section 4.1.7, "Configuring Locales"
■Section 4.1.8, "Configuring Paths"
4.1.1 About System Properties
System properties are system-wide settings that enable you to tailor Oracle Content
Server to your particular requirements. System properties are set during installation
and are generally updated occasionally, or as needed, in contrast to other
administration tools, which are used more regularly for maintenance of users and
content.
There are several ways to interact with system properties:
Important: Regardless of which method is used to modify system
properties, you must restart the Oracle Content Server instance for
any configuration changes to take effect.

Configuring System Properties
4-2 Oracle Fusion Middleware System Administrator's Guide for Oracle Content Server
■The Admin Server enables you to configure a single Oracle Content Server
instance. You also can enable and disable system components. The Admin Server
can be accessed by using a web browser and selecting the Administration link.
■The System Properties application enables you to configure a specific Oracle
Content Server instance from the system on which the Oracle Content Server
instance is deployed. For information on accessing the System Properties utility,
see Section 3.4.2, "Running Administration Applications in Standalone Mode."
■Most system properties settings correspond to a configuration variable in one of
the following configuration files:
–IntradocDir/config/config.cfg
–DomainHome/ucm/short-product-id/bin/intradoc.cfg
–IntradocDir/search/search.cfg
It is recommended that you make changes to these files through the Admin Server
or System Properties application to ensure that the settings are entered correctly.
While it is possible to edit these files directly using a text editor, it might allow
errors to be introduced. See the Oracle Fusion Middleware Idoc Script Reference Guide
for more information on configuration variables.
There are many techniques for optimizing the performance of Oracle Content Server.
One of the types of tuning involves changing default parameters and software settings
that affect the core Oracle Content Server performance. System optimization and
performance tuning is often accomplished by adjusting system settings and
configuration variables or tuning resources such as databases and indexes.
For example, as the content in your Oracle Content Server instance increases, you
might experience a shortage of available space. In this case, moving the vault,
weblayout, and search index directories to another drive with more space can help
alleviate storage problems. Moving these directories requires adding entries into the
DomainHome/ucm/cs/bin/intradoc.cfg file.
You do not have to log in as the system administrator to access the System Properties
application. You only need access to the local computer where the Oracle Content
Server instance is installed.
4.1.2 Configuring General Options
You can set general options on the System Properties: Options Tab or on the Admin
Server: General Configuration Page. You must restart the Oracle Content Server
instance for any configuration changes to take effect.
If you plan to use the Batch Loader utility to update and insert a large number of files
on your Oracle Content Server system simultaneously, you must create a batch load
file. Two of the optional parameters that you can include in your batch load file are
primaryOverrideFormat and alternateOverrideFormat. However, these options only
work as parameters in the batch load file if you enable the IsOverrideFormat
Note: For the System Properties utility to run as a standalone
application for an Oracle Content Server instance on an Oracle
WebLogic Server instance, additional configuration is required. See
Section 3.4.2.1, "Configuring a SystemDatabase Provider for
Standalone Mode."

Configuring System Properties
Managing System Settings 4-3
configuration variable. You can set this variable using the System Properties
application.
4.1.2.1 Revision Label Sequence
The metadata field named Revision has a default revision number sequence of 1, 2, 3,
4, 5, and so forth. This number increments automatically for each revision of a
document.
You can override the Revision default by changing the definition of the revision label.
The revision label consists of two parts: a major and minor revision sequence. The
Major Revision Label Sequence is the first number or letter and the Minor Revision Label
Sequence follows. For example, in the revision sequence 1a, 1b, 1c, 2a, 2b, 2c, 3a, 3b, 3c,
and so forth, the numbers 1, 2, 3 are the major revision sequence and a, b, c are the
minor revision sequence.
4.1.2.2 Revision Label Ranges
Both the major and minor revision sequences are defined as a range of numbers or
letters. The major sequence can have multiple ranges, while the minor sequence can
only have one range.
The following are the restrictions on defining the range:
■Numbers or letters can be used, but not both. For example, 1-10 is a valid range
but A-10 is not a valid range.
■Letter ranges can have only one letter. For example, A-Z is a valid range but
AA-ZZ is not a valid range.
4.1.2.3 Revision Examples
The following are examples of different revision sequences and how you would define
the major and minor revision entries in the config.cfg file.
Example 1
MajorRevSeq=A-D,1-99
The revision sequence is A, B, C, D, 1, 2, 3, 4, and so forth.
Example 2
MajorRevSeq=1-99
MinorRevSeq=a-c
The revision sequence is 1a, 1b, 1c, 2a, 2b, 2c, 3a, 3b, 3c, and so forth.
4.1.2.4 Revision Configuration Settings
To change the default revision sequence manually in the IntradocDir/config/config.cfg
file, enter the following name/value pairs:
■MajorRevSeq=range1,range2,range3...
■MinorRevSeq=range
where range1,range2,range3... and range are the defined range sequence.
4.1.2.5 Chunking Function
The Oracle Content Server Chunking function protects large data transfers from
transfer failures by dividing data into chunks and transferring one chunk at a time. If a

Configuring System Properties
4-4 Oracle Fusion Middleware System Administrator's Guide for Oracle Content Server
transfer fails, all chunks transferred to the Oracle Content Server instance before
failure are saved, and the transfer can be resumed from the point of failure.
You can use the Chunking function with the upload applet.
4.1.2.6 Configuring the Chunking Function
To enable and configure the Chunking function:
1. Enable the upload applet or the HTTP provider. See Section 4.1.2, "Configuring
General Options."
■To enable the upload applet, see Section 4.1.2, "Configuring General Options."
■To create an HTTP provider, see Section 5.8, "Additional Oracle Content Server
Security Connections."
2. Set the following configuration settings in the Additional Configuration Variables
box on the Admin Server: General Configuration Page:
DisableHttpUploadChunking=false
AppletChunkThreshold=size in bytes
AppletChunkSize=size in bytes
The AppletChunkSize setting sets the size of the individual chunks. The
AppletChunkThreshold setting sets the minimum file size that will use the
Chunking function. Both of these values default to 1M.
3. To debug the Chunking function, set ChunkedRequestTrace=true.
This setting enables you to view the chunked requests on Admin Server Output
Page.
4. Save the changes.
5. Restart the Oracle Content Server instance.
4.1.3 Configuring Content Security
You can set Oracle Content Server content security options on the System Properties:
Content Security Tab or on the Admin Server: Content Security Page.
You must restart the Oracle Content Server instance for any configuration changes to
take effect.
4.1.4 Configuring Internet Information
You can set Oracle Content Server Internet options on the System Properties: Internet
Tab or on the Admin Server: Internet Configuration Page.
You must restart the Oracle Content Server instance for any configuration changes to
take effect.
4.1.5 Configuring the Database
The Oracle Content Server system uses an Oracle WebLogic Server data source to
communicate with the system relational database where metadata and other
Note: If the client session using the Chunking function is killed,
either by timeout or by closing the client browser, the transfer will fail.

Configuring System Properties
Managing System Settings 4-5
information is stored. The Oracle WebLogic Server Administration Console must be
used to manage the database connection information for the system relational
database, therefore JDBC user name and password information is not stored in the
IntradocDir/config/config.cfg file, and it is not managed through the SystemProperties
utility.
For information about supported databases, see the "System Requirements and
Supported Platform" document for your product on the Oracle Fusion Middleware
Supported System Configurations page on Oracle Technology Network at
http://www.oracle.com/technology/software/products/ias/files/fus
ion_certification.html
For information on configuring database connections for an Oracle Content Server
system running standalone applications, see Section 3.4.2.1, "Configuring a
SystemDatabase Provider for Standalone Mode," Section 3.4.2.2, "Configuring a JDBC
Database Driver for Standalone Mode," and Section 3.4.2.3, "Configuring an External
Database Provider for Standalone Mode."
Configuring Oracle Content Server for IBM DB2 Database Searches
An IBM DB2 database does not support the keyword CONTAINS in search queries. The
correct configuration of the Oracle Content Server instance for IBM DB2 searches
requires the addition of the flag SSUseContains=false variable. To configure the
Oracle Content Server instance:
1. Open a new browser window, and log in to the Oracle Content Server instance as
system administrator.
2. In the navigation tree, choose Administration, then Admin Server.
3. In the option list for the Oracle Content Server instance, choose General
Configuration.
The General Configuration page is displayed.
4. Add the following line in the Additional Configuration Variables area:
SSUseContains=false
5. Click Save.
6. Restart the Oracle Content Server instance.
4.1.6 Configuring Oracle Content Server Options
You can set Oracle Content Server options on the System Properties: Server Tab. For
security reasons, the Admin Server cannot be used to configure these options. You
must use the standalone application to configure Oracle Content Server options. For
details about using standalone applications, see Section 3.4.2, "Running
Administration Applications in Standalone Mode."
Certain Oracle Content Server configuration options are set using Oracle Enterprise
Manager Fusion Middleware Control. For details, see Chapter 2, "Using Fusion
Middleware Control to Manage Oracle Universal Content Management."
Note: If you set database connection information for an Oracle
WebLogic Server domain using the Oracle Content Server
SystemProperties utility, the JDBC user name and password are
encrypted and stored in an unspecified location.

Configuring System Properties
4-6 Oracle Fusion Middleware System Administrator's Guide for Oracle Content Server
You must restart the Oracle Content Server instance for any configuration changes to
take effect.
Hostname filter or IP Address filter values must be set to allow communication with
the Oracle Content Server instance in the following situations:
■Running Inbound Refinery and PDF Converter (even on the same physical
computer as the Oracle Content Server instance).
■Transferring Oracle Content Server archives between computers.
■Configurations where the web server and the Oracle Content Server instance are
on different systems.
■EJB-enhanced operations.
■Using the IdcCommand or IdcCommandX utilities on a system separate from the
Oracle Content Server instance. (You must change the default value and specify
the IP address of the web server.)
4.1.7 Configuring Locales
You can use the System Properties Localization tab to change language-specific issues
such as date/time format, default time zone, sort order, and default interface
language. For more information about localization, see Oracle Fusion Middleware
Application Administrator's Guide for Content Server.
4.1.7.1 Date Format
The default English-US locale uses two digits to represent the year (yy), where the
year is interpreted to be between 1969 and 2068. In other words, 65 is considered to be
2065, not 1965. If you want years before 1969 to be interpreted correctly in the
English-US locale, you must change the default date format for that locale to use four
digits to represent years (yyyy).
This issue does not apply to the English-UK locale, which already uses four digits for
the year.
To modify the default English-US data format:
1. Start the System Properties applet:
Windows operating system:
Select Start, then All Programs, then Oracle Content Server, then [Instance
Name], then Utilities, then System Properties.
UNIX operating system:
The SystemProperties utility is located in the /bin subdirectory of the Oracle
Content Server installation directory.
2. Open the Localization tab.
3. Choose the English-US entry in the list of locales, and click Edit.
Caution: If you do not use a Hostname filter, IP Address filter, or
some other network-based security, you will have a security hole in
your Oracle Content Server instance. For example, with no login, any
user with in-depth knowledge of the system could create or modify
any other user to have system administrator access.

Configuring the Search Index
Managing System Settings 4-7
The Configure Locale dialog is displayed.
4. Modify the date format to use four digits for the year (yyyy) rather than two (yy).
5. After you are done editing, click OK to close the Configure Locale dialog.
6. Click OK to apply the change and exit System Properties.
7. Stop and restart the Oracle Content Server instance for configuration changes to
take effect.
4.1.7.2 Interface Language
The default interface language for the Oracle Content Server system can be specified in
several ways:
■Select a default language in the Localization tab of the System Properties utility,
using the same basic procedure described in Section 4.1.7.1, "Date Format."
■Use the Oracle Content Server navigation portal to selection Administration, then
Localization. Select the checkbox for a default language from the list of Enabled
Locales on the Localization Administration page.
4.1.8 Configuring Paths
You can use the System Properties: Paths Tab to change the location of the help
browser, Java classpath, and the shared directory path. For security reasons, the
Admin Server cannot be used to configure the path options. You must use the
standalone application for this configuration.
You must restart the Oracle Content Server instance for configuration changes to take
effect.
4.2 Configuring the Search Index
This section covers the following topics:
■Section 4.2.1, "Variances in Indexing Tools and Methods"
■Section 4.2.2, "Working with the Search Index"
■Section 4.2.2.5, "Text File Full-Text Indexing"
■Section 4.2.3, "Managing Zone Text Fields"
■Section 4.2.4, "Indexing with Databases"
■Section 4.2.5, "Searching Content Using the Oracle Query Optimizer Component"
4.2.1 Variances in Indexing Tools and Methods
Oracle Content Server interfaces with a variety of indexing tools such as commercial
search engines and databases. The indexing tool to use is chosen before installation
based on the purpose and environment in which the Oracle Content Server system
performs.
Each indexing tool provides full-text indexing and metadata-only indexing. Full-text
indexing means that every word in a file is indexed, not only its metadata. Full-text
indexing takes longer than metadata indexing; however, it can return a more
comprehensive result set. Metadata-only indexing means that every word in the stored
content information is indexed. Metadata-only indexing is faster than full-text

Configuring the Search Index
4-8 Oracle Fusion Middleware System Administrator's Guide for Oracle Content Server
indexing. By default an Oracle Content Server instance is configured to use
metadata-only indexing.
4.2.2 Working with the Search Index
This section covers these topics:
■Section 4.2.2.1, "About the Search Index"
■Section 4.2.2.2, "Updating the Search Index"
■Section 4.2.2.3, "Rebuilding the Collection"
■Section 4.2.2.4, "Configuring the Update or Rebuild"
■Section 4.2.2.5, "Text File Full-Text Indexing"
■Section 4.2.2.6, "Disabling Full-Text Indexing"
■Section 4.2.2.7, "Indexing Native Files by Default"
■Section 4.2.2.8, "Indexing E-mail and Attachments"
4.2.2.1 About the Search Index
The Repository Manager utility provides an Indexer tab which administrators can use
to perform actions on the search index.
To access the Repository Manager, in the Administration tray click Admin Applets,
then click Repository Manager. You can also access the Repository Manager as a
standalone application. For details, see Section 3.4.2, "Running Administration
Applications in Standalone Mode."
The Indexer tab on the Repository Manager screen enables administrators to perform
these actions:
■Update the Search Index: Incrementally updates the index database. This is
usually not necessary because the index is automatically updated approximately
every five minutes by the server.
■Rebuild the Collection: The search index is entirely rebuilt, and the old index
collection is replaced with a new index collection.
■Suspend an Update or a Rebuild: Stops the update or rebuild temporarily. You
can restart the process by clicking the appropriate Start button.
■Cancel Update Search: Index update process terminates, and only files processed
to that point are accessible to the search engine.
■Cancel Rebuild Collection: Index rebuild process terminates, and the previous
index database continues to be used by the search engine.
For more information about managing the repository, see Oracle Fusion Middleware
Application Administrator's Guide for Content Server.
4.2.2.2 Updating the Search Index
1. On the Repository Manager screen, click the Indexer tab.
2. Click Start in the Automatic Update Cycle area.
4.2.2.3 Rebuilding the Collection
1. On the Repository Manager screen, click the Indexer tab.
2. Click Start in the Collection Rebuild Cycle area.

Configuring the Search Index
Managing System Settings 4-9
4.2.2.4 Configuring the Update or Rebuild
To set the parameters for a search index update or collection rebuild:
1. On the Repository Manager screen, click the Indexer tab.
2. Click Configure in either the Automatic Update Cycle portion of the screen or
the Collection Rebuild Cycle portion.
Either the Automatic Update Cycle Screen or the Collection Rebuild Cycle Screen
is displayed.
3. Specify the number of content items (files) per indexer batch. This is the maximum
number of files that the search index will process simultaneously.
4. Specify the content items (files) per checkpoint. This is the number of files that will
go through all relevant indexing states at a time. You can have multiple batches of
files indexed per checkpoint.
5. Specify the indexer debug level. This is the amount of information pertaining to
each file to display in the server window.
6. Click OK.
4.2.2.5 Text File Full-Text Indexing
If you have configured the Oracle Content Server instance to use
DATABASE.FULLTEXT or ORACLETEXTSEARCH as your indexing engine, the Oracle
Content Server system uses the Outside In Content Access module to export content to
a text file upon check-in. The text file is then passed to the full-text indexer for full-text
indexing.
If you use DATABASE.FULLTEXT, a full-text search can be problematic on large
documents. By default, the maximum document size that is indexed is 10MB. This can
be changed by setting the MaxIndexableFileSize configuration variable in the Oracle
Content Server repository. The default is MaxIndexableFileSize=10485760. If
larger documents require full-text indexing, the value of MaxIndexableFileSize should
be increased.
4.2.2.6 Disabling Full-Text Indexing
You might want to disable full-text indexing if, for example, you want to conserve file
space or if you do not require full-text searching for specific content types. Even if you
disable full-text indexing, metadata is still indexed.
To disable full-text indexing on specific files:
1. Define a format in the Configuration Manager screen named application/noindex.
Note: OracleTextSearch provides a Fast Rebuild function, which you
can use through the Repository Manager Indexer function if your site
uses the OracleTextSearch feature. For details, see Section 7.1.3.2, "Fast
Rebuild."
Note: When the Outside In Content Access module converts a
PostScript file, the conversion process produces text that contains
extra characters. Unfortunately, this creates a file that is full-text
indexed but cannot be full-text searched.

Configuring the Search Index
4-10 Oracle Fusion Middleware System Administrator's Guide for Oracle Content Server
2. Enable the Allow Override Format on Check In setting. See Section 4.1.2,
"Configuring General Options."
3. When a user checks in a file that they do not want to be indexed, they should
select the application/noindex format. This applies to standard files, batch loads,
and archived revisions.
4.2.2.7 Indexing Native Files by Default
The search index uses weblayout files for indexing by default. In certain situations it
may be useful to index native files by default instead of weblayout files. For example,
if a converted PDF file cannot be extracted and indexed because of processing issues,
the native Word document or an alternate type of document could be extracted and
indexed. Another example is if the primary file cannot be indexed because it is an
.exe file, but it has an alternate .txt file, then the alternate file could be indexed.
To have the search index use native files for indexing by default, set the following
parameter in the Oracle Content Server instance:
UseNativeFormatInIndex=true
4.2.2.8 Indexing E-mail and Attachments
Oracle Content Server software supports indexing of e-mail and e-mail attachments
(such as original files and zip files). E-mail messages are indexed by default, and if a
message contains an attachment it is extracted and indexed as full text. There is no
change on what gets returned on search result: if a search finds information in a
document, the document metadata is returned.
All e-mail attachments supported by Outside In Technology are supported by the
search index.
4.2.3 Managing Zone Text Fields
The functionality described in this section is only available if you have installed and
enabled the Database Search Contains Operator feature.
This section covers these topics:
■Section 4.2.3.1, "About Zone Text Fields"
■Section 4.2.3.2, "Enabling and Disabling Zone Text Fields"
■Section 4.2.3.3, "Changing the MinTextFullFieldLength Variable"
■Section 4.2.3.4, "Disabling Database Search Contains Operator"
4.2.3.1 About Zone Text Fields
The Database Search Contains Operator feature enables you to use the Contains search
operator to search text fields when performing Database and Database Full Text
searches on SQL Server and Oracle. You must first enable the text fields that can be
queried using the Contains search operator. These text fields are called zone text
fields.
When a text field is added as a zone text field, the text within the field is parsed and a
full-text index for the field is created in the database. The database performs all the
Note: This feature is not required in the OracleTextSearch
component.
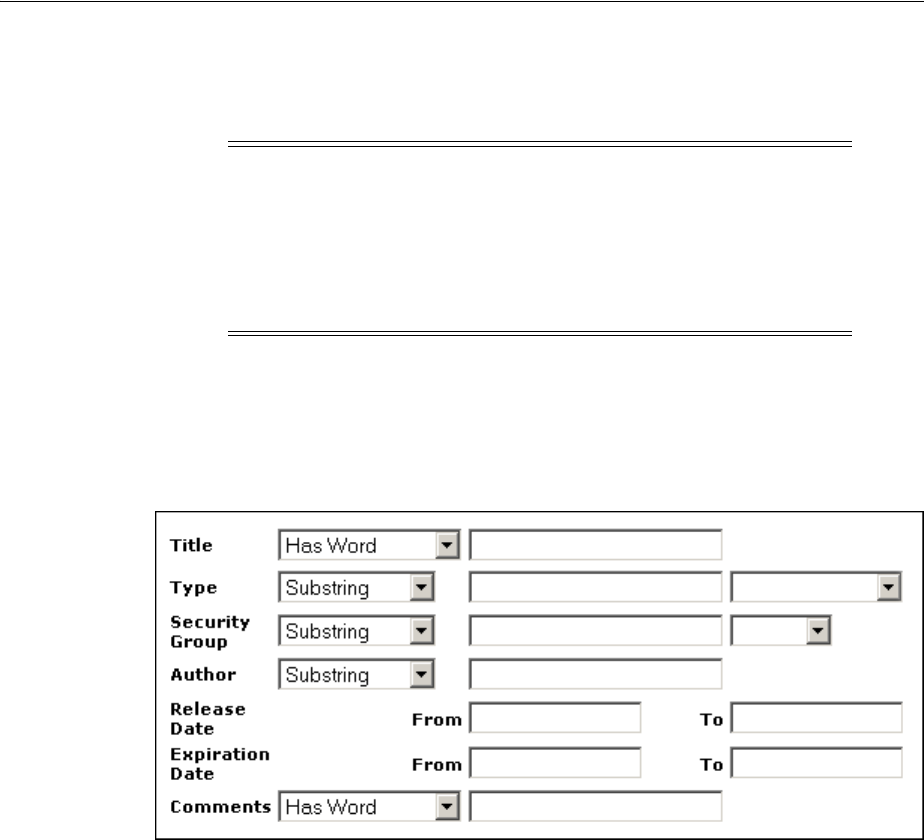
Configuring the Search Index
Managing System Settings 4-11
work of creating the index, and the index is dropped from the database if the text field
is disabled as a zone text field. Therefore, there is no need to rebuild the collection
after enabling or disabling text fields as a zone text fields.
When a text field has been enabled as a zone text field, the Contains search operator is
available for the text field on the Advanced Search page. It is represented as the Has
Word option in the list next to the text field.
Figure 4–1 Has Word option
4.2.3.2 Enabling and Disabling Zone Text Fields
To enable or disable zone text fields, complete the following steps:
1. Log in to the Oracle Content Server instance as an administrator.
2. Select Zone Fields Configuration from the Administration menu or the Admin
Applets page. The Zone Fields Configuration Page is displayed.
3. Select the search engine from the list.
4. To enable text fields as zone text fields, complete the following steps:
a. Select the text fields in the Text Fields list. You can use the [Ctrl] and [Shift]
keys on your keyboard to select multiple fields.
By default, text fields with a field length of 20 characters or less are not
included in the Text Fields list. You can change this setting by modifying the
MinFullTextFieldLength configuration variable. For details, see Section 4.2.3.3,
"Changing the MinTextFullFieldLength Variable."
b. Click the left arrow button to move the text fields to the Zone Text Fields list.
c. Click Update.
Important: Changing a text field to a zone text field can be a very
time-consuming operation. The amount of time it takes to parse the
text and create the full-text index depends on the number of content
items in the Oracle Content Server repository and the amount of text
stored in the text field. However, after the text field has been indexed,
you should not experience significant performance issues when
updating and adding content items.

Configuring the Search Index
4-12 Oracle Fusion Middleware System Administrator's Guide for Oracle Content Server
1. To disable zone text fields, complete the following steps:
a. Select the zone text fields in the Zone Text Fields list. You can use the [Ctrl]
and [Shift] keys on your keyboard to select multiple fields.
b. Click the right arrow button to move the text fields to the Text Fields list.
c. Click Update.
2. When enabling and disabling zone text fields, consider the following:
■If you start making changes to the lists and you then want to revert to the last
saved lists, click Reset.
■Custom text fields (the Comments field and any customer created text fields)
are shared between the Database and Database search engines, and therefore
changing the status of these text fields for one search engine also applies the
changes to the other search engine.
■Standard text fields (Author, Content ID, Content Type, Title, and so on) can
be enabled or disabled independently for each search engine.
■The database performs all the work of creating the indexes, and the index are
dropped from the database if the text fields are disabled as zone text fields.
Therefore, there is no need to rebuild the collection after enabling or disabling
text fields as a zone text fields.
■You must disable a zone text field before the field can be deleted from the
Oracle Content Server instance using Configuration Manager. If you delete an
enabled zone text field using Configuration Manager and then click Update
Database Design, you will receive an error.
Disabling the zone text field drops the index for the field from the database,
allowing the field to be deleted from the database. As an alternative to
disabling the zone text field, you could log in to the database and issue a
command to drop the index for the field, and then delete the field.
■You might want to disable all zone text fields before uninstalling the feature.
Otherwise, you are not able to delete the zone text fields from the Oracle
Content Server instance unless you reinstall the feature to disable the zone text
fields or drop the indexes for the zone text fields from the database manually.
4.2.3.3 Changing the MinTextFullFieldLength Variable
By default, text fields with a field length of 20 characters or less are not included in the
Text Fields list. You can change this setting by modifying the MinFullTextFieldLength
configuration variable. To change this variable, complete the following steps:
1. Using a text editor, open the config.cfg file located in the IntradocDir/config/
directory.
2. Add the MinFullTextFieldLength configuration variable, and set its value (the
default value is 21). For example:
Important: Changing a text field to a zone text field can be a very
time-consuming operation. The amount of time it takes to parse the
text and create the full-text index depends on the number of content
items in the Oracle Content Server repository and the amount of text
stored in the text field. However, when the text field has been
indexed, you should not experience significant performance issues
when updating and adding content items.

Configuring the Search Index
Managing System Settings 4-13
MinFullTextFieldLength=16
3. Save your changes to the config.cfg file.
4. Restart the Oracle Content Server instance.
4.2.3.4 Disabling Database Search Contains Operator
Before disabling the feature, you might want to disable all zone text fields. The
database contains an index for each enabled zone text field (the indexes are dropped
when the zone text fields are disabled). If the database contains an index for a field, it
will not let you delete the field from your Oracle Content Server instance using
Configuration Manager. For more information, see Section 4.2.3.2, "Enabling and
Disabling Zone Text Fields."
If you disable the feature and later want to delete a field that is enabled as a zone text
field, you can use one of the following options:
■Reinstall the feature, disable the zone text field, use Configuration Manager to
delete the field, and uninstall the feature.
■Log in to the database and issue a command to drop the index for the field, and
then use Configuration Manager to delete the field.
4.2.4 Indexing with Databases
If your system is set up to provide indexing and searching capabilities with databases,
your system integrator would have added one of the following lines in
IntradocDir/config/config.cfg:
■Metadata Searching Only:
SearchIndexerEngineName=DATABASE.METADATA
DATABASE.METADATA is supported in all databases supported by Oracle
Fusion Middleware 11g Release 1 (11.1.1).
■Full-text Searching:
SearchIndexerEngineName=ORACLETEXTSEARCH
ORACLETEXTSEARCH is supported in Oracle Database version 11.1.0.7 and
newer.
■Full-text Searching:
SearchIndexerEngineName=DATABASE.FULLTEXT
DATABASE.FULLTEXT is supported in SQL Server, and in Oracle Database (all
supported versions).
The dbfulltextsearch script appropriate for the supported database would then
be run.
■By default, full-text indexing is applied to all converted files.
■By default, the Oracle Content Server full-text indexes files that are passed
through or converted to any of the following formats:
Oracle Supported Formats
–pdf
–html

Configuring the Search Index
4-14 Oracle Fusion Middleware System Administrator's Guide for Oracle Content Server
–htm
–xls
–hcsp
–text
–txt
–doc
–rtf
–ppt
MS SQL Supported Formats
–text
–txt
–htm
–html
–doc
–msword
–ms-word
–ms-powerpoint
–ppt
–ms-excel
–xls
For example, if you want to convert your Microsoft Word (.doc) files to text files
instead of PDF, you can specify this in the Configuration Manager. That is, when
you use the File Formats option to map the .doc file extension to a text format,
then this defines how the file is converted to a web viewable format. In this case,
the text file is fully indexed before it is passed to the web site.
For more information about the Configuration Manager's File Formats option, see
the Oracle Fusion Middleware Application Administrator's Guide for Content Server.
■You can enable contributors to specify whether to full-text index a file by enabling
the format override feature in System Properties. See Section 4.1.2, "Configuring
General Options."
For example, if you have used the Configuration Manager's File Formats option to
map Corel WordPerfect (.wpd) files to use a text format and a contributor selects
the use default option in the Format field on the checkin page, the file will be
converted to text and full-text indexed. If the contributor selects Corel
WordPerfect Document, the file will be passed through in its native format and
will not be full-text indexed.
For more information about the Configuration Manager's File Formats option, see
the Oracle Content Server Application Administrator's Guide for Content Server.
■When you use full-text searching, a search is case sensitive for metadata, and case
insensitive for full text. For Content ID, however, lowercase letters are converted
to uppercase letters, so Content ID can not be searched with lowercase letters.

Configuring the Search Index
Managing System Settings 4-15
4.2.4.1 Database-Supported File Formats
If you define a file format to PASSTHRU in the native format, and the format name
contains one of the types listed above (such as application/ms-excel.native),
the passed through native file will be full-text indexed by default.
Alternatively, you can use configuration variables to control whether a document is
full-text indexed. To manage the full-text indexing and search of specific document
format types, add applicable entries to IntradocDir/config/config.cfg, and save the file.
Full-text indexing configuration variables include:
■FormatMap
■ExceptionFormatMap
4.2.4.1.1 FormatMap The FormatMap configuration variable controls whether files of a
specific format should be included in the full-text search index. It is a
comma-delimited list of all the formats that will be full-text indexed. The decision is
made by taking the MIME type assigned to a file, splitting the MIME type apart at any
slash (/) or period (.), and then checking if that value is in the FormatMap list.
For example, application/vnd.msword will turn into a list of three items:
■application
■vnd
■msword
If FormatMap has msword in its list, then the indexer engine will attempt to full-text
index the file. the comparison test is not case sensitive.
4.2.4.1.2 ExceptionFormatMap The ExceptionFormatMap configuration variable is used
to exclude document formats from the FormatMap test. Any format that satisfies the
ExceptionFormatMap test will not be full-text indexed. This test is done after splitting
the MIME format at slashes (/), but not periods(.). For example, if msword is included
in the exceptions list, then the MIME format application/msword is excluded but
not application/vnd.mssword.
4.2.5 Searching Content Using the Oracle Query Optimizer Component
The Oracle Query Optimizer component is installed (enabled) by default with the
Oracle Content Server system. The functionality only works with the Oracle database.
This section covers these topics:
■Section 4.2.5.1, "About The Oracle Query Optimizer Component"
■Section 4.2.5.2, "Query Optimization Process"
■Section 4.2.5.3, "How Reformatted Queries Optimize Searches"
■Section 4.2.5.4, "Types of Recognized Hints"
■Section 4.2.5.5, "Query Hints Syntax"
■Section 4.2.5.6, "Additional Supported Sort Constructs"
■Section 4.2.5.7, "The Hint Rules Table"
■Section 4.2.5.10, "The Hint Cache"
■Section 4.2.5.11, "Using Hint Rules"
■Section 4.2.5.12, "Using the Query Converter"

Configuring the Search Index
4-16 Oracle Fusion Middleware System Administrator's Guide for Oracle Content Server
■Section 4.2.5.13, "Updating the Hint Cache"
4.2.5.1 About The Oracle Query Optimizer Component
Oracle database does not automatically select the best execution plan for certain types
of user queries. To counter this, the Oracle Query Optimizer adds hints to queries that
force Oracle database to perform searches more efficiently.
The hints are based on an intrinsic knowledge of Oracle Content Server's table data
distribution and its index selectivity. To take advantage of this knowledge, Oracle
Query Optimizer uses a pre-defined Hint Rules Table to analyze the database query
and then add appropriate hints to the query. In turn, the added hints improve Oracle's
search performance.
Oracle Query Optimizer takes advantage of Content Server's data distribution in
database tables and its index selection preferences. Based on these characteristics, the
Hint Rules Table included with Oracle Query Optimizer contains pre-defined rules.
The feature uses these rules to analyze a database query and to add one or more
appropriate hints to the query to optimize the search performance.
In very large collections containing millions of content items, the Oracle Content
Server software generally has a difficult time selecting an appropriate optimization
strategy to resolve even simple queries. To counteract this problem, Oracle Query
Optimizer examines the submitted query and, based on its analysis, reformats the
query by adding appropriate hints to optimize the search process. To add hints, the
feature uses Oracle Content Server hints, The Hint Rules Table, and The Hint Cache.
4.2.5.2 Query Optimization Process
The stages of the optimization process are completed in the following sequence:
1. The submitted query is analyzed to verify if it contains one or more hints and, if
so, determine the type of hint; see "Stage 1: Query Analysis" on page 4-17.
2. If the query's WHERE clause does not contain a hint, the optimization feature
must parse out the WHERE clause; see "Stage 2: Parsing" on page 4-17.
3. After parsing, each condition in the query's WHERE clause is evaluated against
the Hint Rules Table in an attempt to qualify the condition and normalize the
query; see "Stage 3: Normalization" on page 4-17.
4. After the WHERE clause conditions are qualified and the query is normalized, a
hint is selected or retrieved from the hint cache; see "Stage 4: Select Hint" on
page 4-18.
5. The query is reformatted using the selected hint; see "Stage 5: Reformat Query" on
page 4-18.
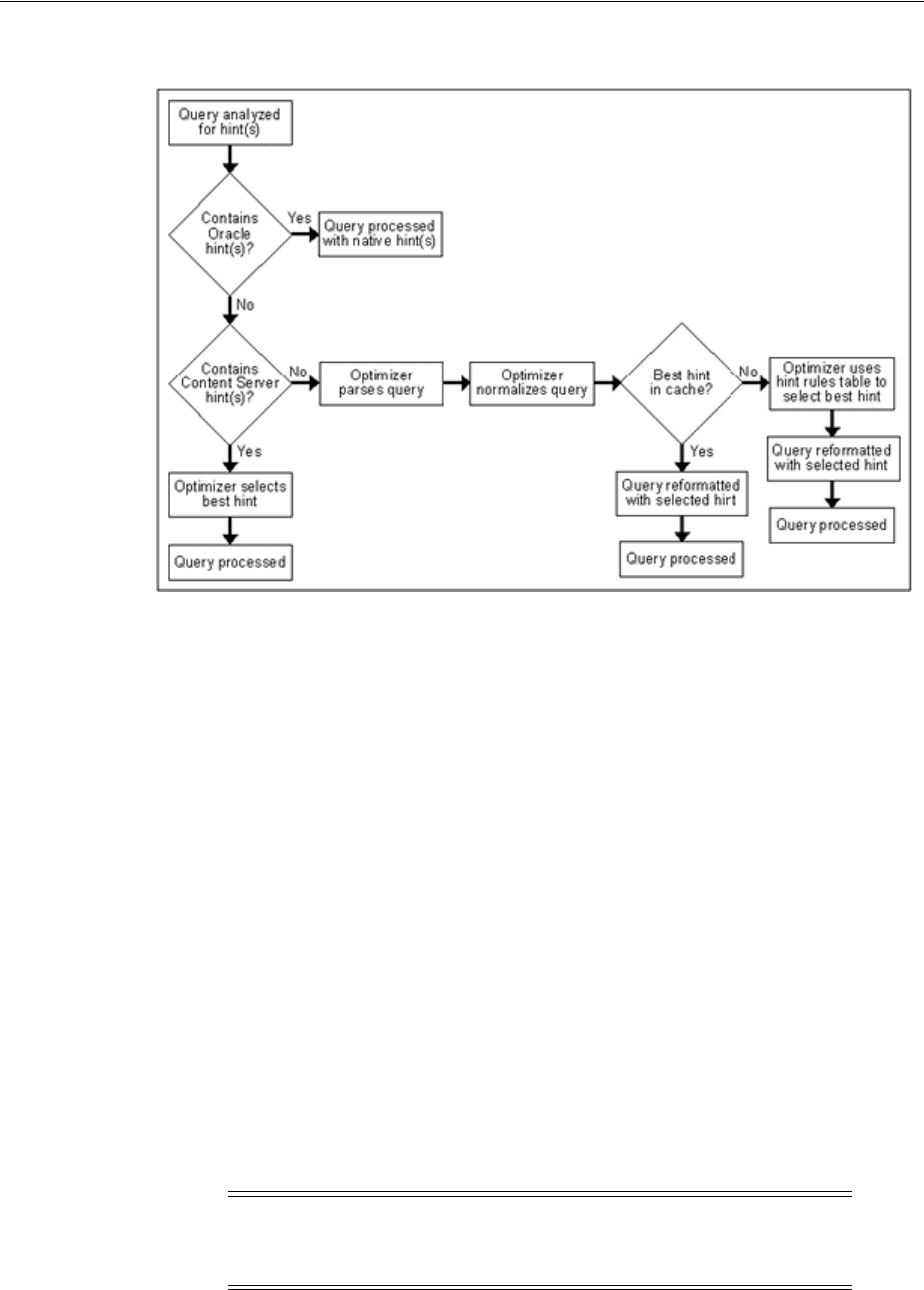
Configuring the Search Index
Managing System Settings 4-17
Figure 4–2 Optimization Process Sequence
4.2.5.2.1 Stage 1: Query Analysis In this stage, a query is checked for both Oracle
(native) and Content Server hints. This is determined based on the hint syntax: Query
Hints Syntax. A query that contains Oracle hints is passed through. A query that
contains Content Server hints bypasses Stage 2: Parsing and Stage 3: Normalization. If
a query contains multiple Content Server hints, the best hint is chosen. Queries that do
not contain any hints must be parsed and normalized.
4.2.5.2.2 Stage 2: Parsing In this stage, a query that does not contain any hints is sent
through the query parser and the WHERE clause is parsed out. A WHERE clause
consists of one or more conditions joined with either AND or OR conjunctions. For
each condition, the field name, operator, and field value are extracted. The AND/OR
conjunctions of the clause are preserved; the parentheses are dropped. Conditions
must use the following format:
fieldname operator value
For example, a properly formatted condition would be dID = 3. An incorrect
condition would be 3 = dID.
4.2.5.2.3 Stage 3: Normalization In this stage, normalization simplifies conditions,
finalizes query operators, and provides a stable view of the WHERE clause for
additional steps. The result of the normalization process produces a base for
generating the cache key and the list of fields to use to search for hints.
■Qualifying WHERE Clause Conditions:
Note: To establish which database tables and columns have indexes,
the Hint Rules Table is defined on Content Server resources and on
the running system.

Configuring the Search Index
4-18 Oracle Fusion Middleware System Administrator's Guide for Oracle Content Server
Each condition in the WHERE clause is checked against The Hint Rules Table. If a
condition's field name is included in the Hint Rules Table, then it is qualified and
the condition is considered to be normalized. The condition contains its table
name and alias. Then the normalized conditions are sorted to ensure that the same
set of conditions is always listed consistently.
■Discarding WHERE Clause Conditions During Normalization:
During normalization, the following conditions are not considered relevant and
are eliminated from further processing:
–Join conditions.
–Conditions that contain subqueries.
–Conditions whose field names do not have entries in the Hint Rules Table and
cannot be qualified.
–OR conditions that contain more than one field. For example:
(dSecurityGroup = 'Secure' or dDocAccount LIKE 'prj%')
–Conditions that contain the LIKE operator whose value begins with a
wildcard.
■Reformatting WHERE Clause Conditions:
In the normalization step, the query conditions are rewritten to consolidate
complex query conditions. OR conditions are reevaluated as follows:
–If all the fields are the same and all the operators are equal (or all the operators
are LIKE and no values begin with a wildcard), the conditions are combined
and changed to an IN query.
–If the fields are the same but have different operators, the conditions are
combined and the generic operator is assigned.
–If the fields are different, the conditions are dropped.
For example, during normalization, the following condition is reformatted:
(dReleaseState = 'Y' OR dReleaseState = 'O")
It is reformatted as follows:
dReleaseState IN ('Y', 'O')
■Finding Potential Range Queries:
The parsed query is analyzed to find potential range queries that are then
consolidated during the normalization process. For example, the conditions
dIndate > date1 and dInDate < date2 are changed to one condition with
the operator 'range'.
4.2.5.2.4 Stage 4: Select Hint In this stage, the normalized conditions are checked
against the hint cache. If one or more conditions have applicable hints in the cache,
they are included. If applicable hints are not found in the cache, the conditions are
analyzed and the preference orders are compared to determine the best possible hint.
4.2.5.2.5 Stage 5: Reformat Query In this stage, the query is reformatted by adding in the
selected hint. For more information about how reformatting queries with hints helps
to optimize searches and some examples of reformatted queries, see Section 4.2.5.3,
"How Reformatted Queries Optimize Searches."

Configuring the Search Index
Managing System Settings 4-19
4.2.5.3 How Reformatted Queries Optimize Searches
The majority of queries in an Oracle Content Server instance involve a small, targeted
set of content items or return a hundred rows, at most. Oracle Content Server software
can easily scale to millions of content items. However, testing on an Oracle database
with a collection containing 10 million content items indicates that the execution plan
that Oracle selects is not the most efficient. Oracle generally does not choose the best
optimization strategies to resolve many queries, even some that are trivial. The
following examples explain this issue:
■"Example 1: Reformatting a Query by Adding a Single Hint" on page 4-19
■"Example 2: Reformatting a Query by Adding Multiple Hints" on page 4-19
4.2.5.3.1 Example 1: Reformatting a Query by Adding a Single Hint In the environment
described above, Oracle does not resolve the following query as efficiently as possible:
SELECT *
FROM Revisions, Documents, DocMeta
WHERE Revisions.dID = Documents.dID
AND Revisions.dID = DocMeta.dID
AND Revisions.dRevClassID = 333
Order By Revisions.dID
Because a fairly selective index is available (dRevClassID_2 for
Revisions.dRevClassID), this query should access dRevClassID_2 and perform a sort
on the rows that match the dRevClassID. However, in this query example, Oracle
chooses to use the Revisions.dID index.
This choice is actually worse than performing a full table scan on the Revisions table
because it does a full index scan and accesses the table to obtain the dRevClassID for
each row. Obviously, resolving the query using this execution plan does not work well
when the Oracle Content Server repository has over 10 million content items. In this
case, it requires approximately 500 seconds to return the results.
However, the performance improves dramatically when the query is modified by
adding a hint as follows:
SELECT /*+ INDEX(Revisions dRevClassID_2)*/ *
FROM Revisions, Documents, DocMeta
WHERE Revisions.dID = Documents.dID
AND Revisions.dID = DocMeta.dID
AND Revisions.dRevClassID = 333
Order By Revisions.dID
The query is modified by adding the following hint to the SELECT clause:
/*+ INDEX(Revisions dRevClassID_2)*/
This forces Oracle database to choose the dRevClassID_2 index instead of the index for
Revisions.dID. Because no more than a few content items share dRevClassID in this
example, the modified query returns the results instantly.
4.2.5.3.2 Example 2: Reformatting a Query by Adding Multiple Hints In a typical Oracle
Content Server instance, most documents have a 'Y' (released) status for the
dReleaseState with a dInDate earlier than the current date. However, only a few
documents have an 'N' (new, not yet indexed) status for the dReleaseState. The
following query is searching for content items that have not yet been released:
SELECT dID
FROM Revisions

Configuring the Search Index
4-20 Oracle Fusion Middleware System Administrator's Guide for Oracle Content Server
WHERE Revisions.dReleaseState = N'N' AND Revisions.dStatus in
(N'DONE', N'RELEASED', N'DELETED')
AND Revisions.dInDate<={ts '2005-02-23 17:46:38.321'}
The optimized result for the query uses the index for dReleaseState:
SELECT/*+ LEADING(Revisions) INDEX (Revisions dReleaseState)*/
dID
FROM Revisions
WHERE Revisions.dReleaseState = N'N' AND Revisions.dStatus in
(N'DONE', N'RELEASED', N'DELETED')
AND Revisions.dInDate<={ts '2005-02-23 17:46:38.321'}
4.2.5.4 Types of Recognized Hints
Oracle Content Server queries can be static queries defined in various resources, data
sources with additional dynamic WHERE clauses, and dynamic queries that are
ad-hoc or defined in the application such as Archiver. Static queries can be updated
with Oracle database hints. However, it is nearly impossible to predefine hints for
ad-hoc queries and dynamic WHERE clauses.
Content Server hints use a database-neutral hint syntax that supports multiple hints in
the same query. An Oracle Content Server hint can be used in any query, data source,
and WHERE clause. However, it cannot be combined with an Oracle database hint. If a
query contains both types of hints, Oracle Query Optimizer will retain the Oracle
database hint and ignore the Content Server hint.
4.2.5.5 Query Hints Syntax
During the optimization processing stages, Oracle Query Optimizer recognizes the
distinct syntaxes of both types of hints and correspondingly processes the submitted
query. For more detailed information, see Section 4.2.5.2, "Query Optimization
Process."
4.2.5.5.1 Oracle Hint Syntax An Oracle hint uses the following format:
/*+ hint */
For example:
/*+ Index(Revisions dID)*/
4.2.5.5.2 Oracle Content Server Hint Syntax The Oracle Content Server hint syntax is
database neutral and can support multiple Oracle Content Server hints in the same
query. During the optimization process, Oracle Content Server hints are evaluated and
the best hints are formatted and added back to the query.
During the optimization process, a query that includes one or more Oracle Content
Server hints is not parsed. Only Oracle Content Server hints are considered when
choosing indexes.
■Oracle Content Server Hint Syntax:
When a query undergoes the optimization process, Oracle Content Server hints
are added to the reformatted query using the following syntax:
/*$tableName[ aliasName]:columnName[:operator [:<value>]][, …]*/
Where:
–Values enclosed in angle brackets (<value>) are required.
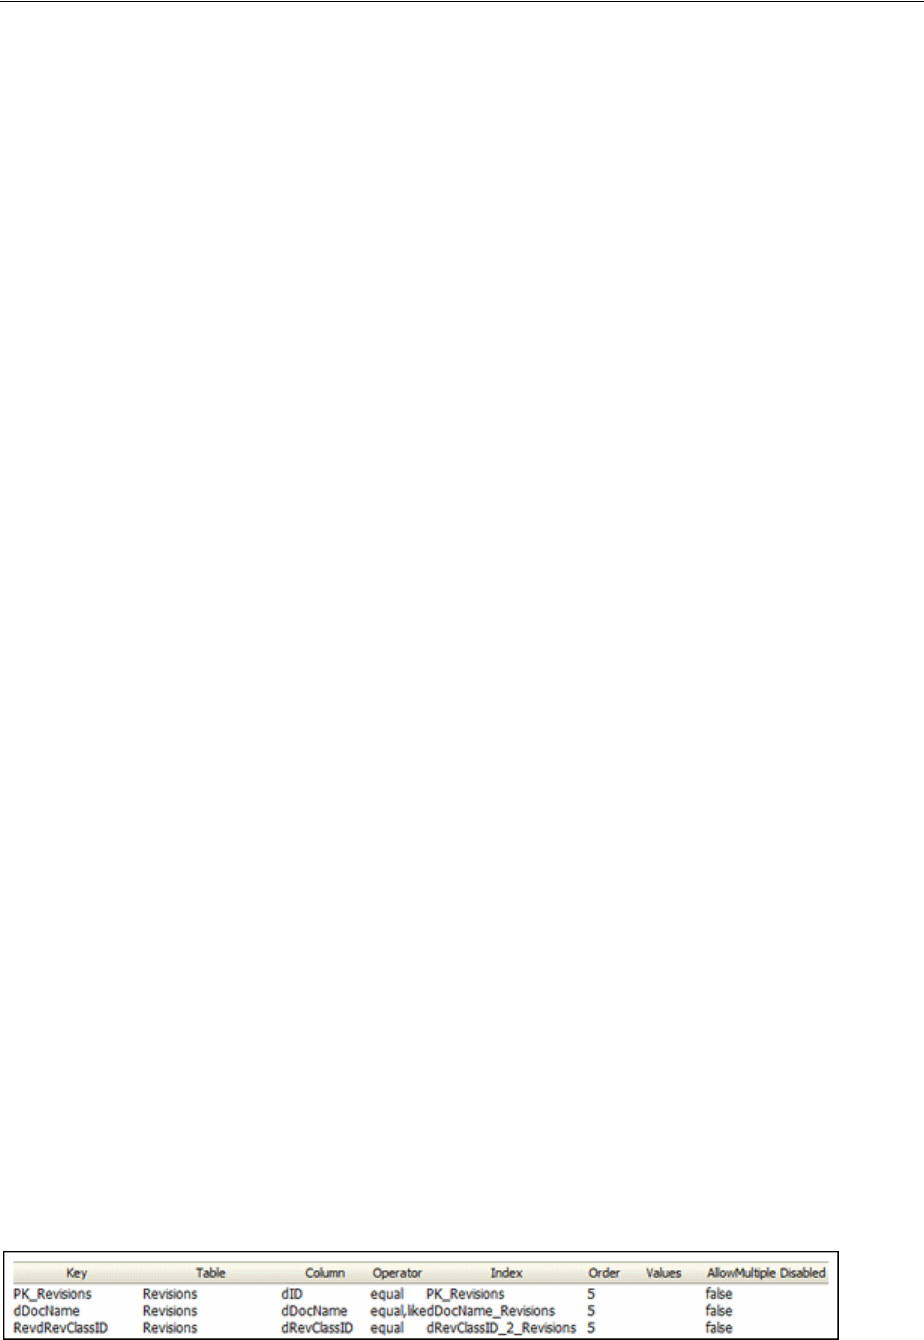
Configuring the Search Index
Managing System Settings 4-21
–Values enclosed in brackets ([value]) are optional.
–Ellipses (…) indicates a repetition of the previous expression(s).
■Query Before Optimization Process:
SELECT *
FROM Revisions, DocTypes, RoleDefinition
WHERE /*$Revisions:dStatus*/(Revisions.dStatus<>'DELETED' AND
Revisions.dStatus<>'EXPIRED' AND Revisions.dStatus<>'RELEASED') AND
Revisions.dDocType = DocTypes.dDocType AND
/*$Revisions:dReleaseState*/Revisions.dReleaseState<>'E' AND
(Revisions.dSecurityGroup = RoleDefinition.dGroupName AND
RoleDefinition.dRoleName = ? AND RoleDefinition.dPrivilege > 0)
■Reformatted Query with Oracle Content Server Hints Added:
After the query has undergone the optimization process, both indexes are used
and are added to the native indexes.
SELECT/*+ LEADING(revisions) INDEX (revisions dStatus dReleaseState)*/ *
FROM Revisions, DocTypes, RoleDefinition
WHERE (Revisions.dStatus<>'DELETED' AND Revisions.dStatus<>'EXPIRED' AND
Revisions.dStatus<>'RELEASED') AND Revisions.dDocType = DocTypes.dDocType AND
Revisions.dReleaseState<>'E' AND (Revisions.dSecurityGroup =
RoleDefinition.dGroupName AND RoleDefinition.dRoleName = ? AND
RoleDefinition.dPrivilege > 0)
4.2.5.6 Additional Supported Sort Constructs
Using Oracle sort constructs in search query clauses allows users greater flexibility
when performing a query. Sort constructs specify the row data in two or more tables
to be extracted, sorted, and combined. Essentially, the sort constructs serve the
purpose of limiting the number of rows that are returned. Oracle Query Optimizer
recognizes the following sort constructs:
■Group by: Sorts a set of records and specifies how to group the results.
■Order by: Sorts a set of records and specifies whether the results are to be returned
in ascending or descending order.
■Inner join: Sorts a set of records by looking for and returning those that match.
■Outer join: Sorts a set of records by looking for and returning those that do not
match.
4.2.5.7 The Hint Rules Table
The Hint Rules Table contains the rules that the optimization feature uses to determine
the proper hints to add to dynamic queries or data sources during the optimization
process. Using the Edit Hint Rules Form, a hint rule can be defined for a particular
field and operator. A hint rule can also be defined based on values or date/number
ranges. The hint rule table is extensible by other components, and can be updated
while the Oracle Content Server instance is running.
Figure 4–3 Hint Rules Table

Configuring the Search Index
4-22 Oracle Fusion Middleware System Administrator's Guide for Oracle Content Server
Several default hint rules included with Oracle Query Optimizer are described in the
following text. For more detailed descriptions of the table columns, see Section 4.2.5.8,
"Hint Rules Table Column Descriptions." The content of the Hint Rules Table is
available on the Hint Rules Configuration Page that is accessed through the
Administration tray.
The Hint Rules Table is scheduled to reload every night, and when a rule is added or
modified. The hint value is recalculated at each reload.
■Explanation of First Hint Rule:
For this rule, if the WHERE clause contains the following condition the PK_
Revisions index is used and added as a hint to the optimized query:
Revisions.dID = some_value
■Explanation of Second Hint Rule:
For this rule, if the WHERE clause contains either of the following conditions the
dDocName index is used and added as a hint to the optimized query:
Revisions.dDocName = some_value
Revisions.dDocName LIKE 'some_value'
■Explanation of Third Hint Rule:
For this rule, if the WHERE clause contains the following condition the condition
does not meet the requirements and cannot be qualified:
dStatus = 'DONE'
However, if the WHERE clause contains the following condition the dStatus index
is used and added as a hint to the optimized query.:
dStatus = 'RELEASED'
4.2.5.8 Hint Rules Table Column Descriptions
This section describes the following columns in the Hint Rules Table:
■Key
■Table
■Column
■Operators
■Index
■Order
Important: Although the Hint Rules Table includes a column
allowing multiple indexes to be used with each other, in Oracle only
the bitmap index can be combined. This is because the Hint Rules
Table was designed for core Content Server functionality.
Therefore, it might not be sufficient for a system with components that
create additional tables or add additional metadata fields, or both.
However, the Hint Rules Table can be extended or overwritten by
other components to provide knowledge of additional tables, indexes
and fields.

Configuring the Search Index
Managing System Settings 4-23
■Values
■AllowMultiple
■Disabled
4.2.5.8.1 Key This column contains the unique name to identify the rule. A component
can use the unique key to overwrite a particular rule. This key is usually identical to its
index name because the index name is unique in the same database schema.
By default, Oracle uses a B+ Tree (binary tree) as the indexing structure to provide
efficient access to logical records. B+ Tree indexes are most useful for queries
involving a small number of result rows or when the user needs to execute queries
using varying criteria (such as equality and range conditions). Because B+ Tree
indexes store the indexed data values, these indexes are useful as sources of data if the
requested value is the stored value.
However, bitmapped indexes offer substantial performance improvements with
minimal storage cost compared to the default B+ Tree indexes. Bitmapped indexes are
particularly effective for searching columns with poor selectivity due to having very
few distinct values. Also, a bitmap is built for each value including the NULL value
(which means the NULL is indexed). Overall, using bitmapped indexes is very
efficient because the index lookup process is a bit-level operation and allows access to
multiple indexes.
Oracle recommends that you use bitmapped indexes for the table columns listed
below, and set the index name to the corresponding column name.
■Revisions table:
–dIndexerState
–dReleaseState
–dProcessingState
–dIsCheckedOut
–dSecurityGroup
–dStatus
■WorkflowDocuments table:
–dWfDocState
4.2.5.8.2 Table This column identifies the specific database table.
4.2.5.8.3 Column This column identifies the specific column within the database table
listed in the Table column.
4.2.5.8.4 Operators This column is a comma-delimited list of allowable operators. For
more information about the valid operator options, see the Operators field and menu
on the Hint Rules Configuration Page. The hint rule's operator is important in the
decision of whether a hint rule will be applied to a condition.
Note: Because hint rules can be overwritten, Oracle Query Optimizer
does not allow you to add a hint rule using an existing key. Therefore,
it is important when you are creating your bitmapped indexes for
columns that you assign unique keys.

Configuring the Search Index
4-24 Oracle Fusion Middleware System Administrator's Guide for Oracle Content Server
For example, if the WHERE clause contains the following condition using the PK_
Revisions index would be a very valuable hint to include in an optimized query:
Revisions.dID = 3
However, if the WHERE clause contains the following condition then using the PK_
Revisions index would not be useful:
Revisions.dID > 3
4.2.5.8.5 Index This column identifies the specific index to use in the optimized query
if the condition meets the hint rule requirements.
4.2.5.8.6 Order This column contains the preferred order to use when the rule is
included in the Hint Rules Table. The highest ordered rules in a query are given
precedence when deciding which hint to use.
The order values include:
■5: This value indicates that the specified index is unique or does not match more
than 50 rows for any value. For example, specifying dID with the Revisions,
Documents, or DocMeta tables.
■4: This value indicates that the specified index should be somewhat less selective.
The specified value should typically match a few rows and, at the very most,
several hundred rows. For example, specifying dDocTitle with the Revisions table.
■3: This value indicates that the specified index matches less than a thousand rows.
For example, specifying dInDate or dOutDate.
■2: This value indicates that the specified index matches less than ten thousand
rows.
■1: This value indicates that the specified index matches more than ten thousand
rows.
4.2.5.8.7 Values This column is Idoc scriptable. This column can only be defined when
the Operators column value is one of the following:
■in or notIn: When you use either of these operators, the value should be a
comma-delimited list enclosed in parenthesis.
■range: When you use this operator, the value must use one of the following
formats:
– Format 1:
([<lowValue>],range[,<highDateValue>])
Examples of acceptable values include:
('Y', 'O')
(,7d)
({ts '2004-12-11 12:03:23.000'}, 2d, <$dateCurrent()$>)
– Format 2:
#[d|h]
For example, a range of five days is 5d and seven hours is 7h.

Configuring the Search Index
Managing System Settings 4-25
The following use cases demonstrate how this column provides additional flexibility
to the hint rules:
■Use Case 1: State or Status Table Columns
Table columns that indicate a state or status such as dReleaseState or dStatus are
biased regarding the finished states. For example, dReleaseState is predisposed for
'Y' (released) or 'O' (old version). Likewise, dStatus is predisposed for RELEASED.
Therefore, in WHERE clauses, conditions such as dReleaseState = Y or
dStatus = RELEASED match the majority of rows in the Revisions table. Thus,
indexes for these two columns are almost useless. Conversely, the condition
dReleaseState = N (new, not yet indexed) matches only a few rows.
Consequently, indexes on this column would be very helpful.
■Use Case 2: Date or Number Table Columns
Table columns that indicate a date or number exhibit similar behavior to state or
status. For example, the condition dInDate < <$dateCurrent()$> matches
most of the table rows and makes indexes on this field irrelevant. However, the
combined conditions dInDate < <$dateCurrent()$> AND dInDate >
<$dateCurrent(-1)$> usually match only a small set of rows and would
benefit from using the corresponding index as a hint.
4.2.5.8.8 AllowMultiple This column indicates whether the defined index is used with
other indexes. In Oracle, only the bitmap index can be combined.
4.2.5.8.9 Disabled This column indicates whether a hint rule has been disabled. Any
rule in the table can be enabled/disabled. If you disable a hint rule, a value of 'Y' is
displayed. Existing rules can be disabled to match the current Content Server state.
For example, if a Content Server instance contains only a few distinct content
revClasses, each revClass may have thousands of revisions. Therefore, the dRevClass_
2 index is not very effective. In this case, this corresponding hint rule should be
disabled and you should add one or more new rules with different preference orders.
4.2.5.9 Edit Hint Rules Form
The Edit Hint Rules Form provides a way to add, remove, enable, or disable rules
using the Hint Rules Configuration Page. You can add a new rule to reflect new tables
and indexes. Existing rules can be removed or disabled to match the current state of
Content Server. If you select a hint rule from the hint rule table, the Edit Hint Rules
Form fields are automatically populated with the applicable values.
The Edit Hint Rules Form is displayed next to the hint rules configuration table on the
Hint Rules Configuration Page.
Tip: The operators in or notIn can substitute for the operators equal
and notEqual, respectively, along with their matching values. For
more information about operator options, see the Operators field and
menu on the Edit Hint Rules Form.
Note: Although any rule in the table can be enabled/disabled, only
the rules that are added using the Edit Hint Rules Form can be
removed. The default hint rules that are included with the Oracle
Query Optimization feature can only be disabled; they cannot be
removed.

Configuring the Search Index
4-26 Oracle Fusion Middleware System Administrator's Guide for Oracle Content Server
The hint rules configuration table is scheduled to reload every night and whenever a
new rule is added or an existing rule is modified. The hint value is recalculated at each
reload.
Although any rule in the table can be enabled/disabled, only the rules that are added
through the Edit Hint Rules Form can be removed. The default hint rules that are
included with the Oracle Query Optimizer component can only be disabled; they
cannot be removed.
4.2.5.10 The Hint Cache
Oracle Query Optimizer also contains a hint cache to store dynamically generated
hints. For example, a hint derived from a parsed query or data source is cached to
maintain persistence. In this way, the hint cache provides stability for queries and data
sources.
The hint cache is used during the optimization process to select hints for queries that
do not contain Oracle or Content Server hints. The hint cache provides a mechanism to
fine tune query hints. In addition, administrator can check/edit cache and change hint
for queries at run time.
The hint cache is stored to disk every two hours and is reloaded when the Oracle
Content Server instance is started.
The characteristics of the hint cache include:
■Reusing Hint Cache Entries
■Hint Cache Management
■Default Capacity Algorithm
■Origin of Hint Cache Keys
■Hint Cache Persistence
4.2.5.10.1 Reusing Hint Cache Entries The same query matches the same cache entry
regardless of its values unless the new value does not satisfy the hint rule conditions.
Two examples are included below to demonstrate how the same hint cache entry can
and cannot be used for multiple queries.
Example 1: Using Similar Hint Cache Entries
In the following two queries, the same hint cache entry is used because both queries
match the hint rule requirements.
■QueryA:
SELECT *
FROM Revisions
WHERE dDocName = 'name1'
■QueryB:
SELECT *
FROM Revisions
WHERE dDocName = 'name2'
Example 2: Using Different Hint Cache Entries
In the following two queries, the same hint cache entry cannot be used because
QueryB violates the requirements for the dReleaseState hint rule. The dReleaseState

Configuring the Search Index
Managing System Settings 4-27
hint rule requires that the dReleaseState values are neither Y (released) nor O (old
revision).
■QueryA:
SELECT *
FROM Revisions
WHERE dReleaseState = 'U' AND dStatus = 'DONE'
■QueryB:
SELECT *
FROM Revisions
WHERE dReleaseState = 'Y' AND dStatus = 'DONE'
4.2.5.10.2 Hint Cache Management In the hint cache, you can add a new entry, edit an
existing entry, or remove an existing entry using the Hint Cache Updater Page. When
adding or editing hint cache entries, you must use the Oracle Content Server Hint
Syntax. The ability to manage the hint cache is very useful for fine tuning query hints.
The example below demonstrates the benefits of fine tuning a hint cache entry.
Example: Batchloading Unindexed Content
If you have just batchloaded 100K content items into the Content Server and they are
not yet indexed, the index-based query used above (Example 2: Using Different Hint
Cache Entries) would match all of the batchloaded documents.
■QueryA:
If most of the batchloaded documents have not been indexed, the dReleaseState
index that is used in this query is not the best choice. For the best results in this
case, you should fine tune the hint cache entry to use both the dReleaseState and
the dStatus indexes. Use the Hint Cache Updater Page to update hint cache
entries.
SELECT dID
FROM Revisions
WHERE Revisions.dReleaseState = N'N' AND Revisions.dStatus in (N'DONE',
N'RELEASED', N'DELETED') AND Revisions.dInDate<={ts '2005-02-23 17:46:38.321'}
■QueryB:
After updating the hint cache entry, the new optimized query is:
SELECT/*+ LEADING(revisions) INDEX (revisions dReleaseState dStatus)*/ dID
FROM Revisions
WHERE Revisions.dReleaseState = N'N' AND Revisions.dStatus in (N'DONE',
N'RELEASED', N'DELETED') AND Revisions.dInDate<={ts '2005-02-23 17:46:38.321'}
4.2.5.10.3 Default Capacity Algorithm By default, the hint cache has a maximum capacity
of 1000 hints. The hint cache uses the midpoint insertion least-recently-used (LRU)
algorithm which is similar to the one used by Oracle and mySQL. A new entry is
inserted into the middle of the queue and each subsequent execution moves the entry
up one spot.
When the number of hints in the cache exceed the maximum capacity, the entry at the
bottom of the queue is removed from the cache. Thus, the LRU algorithm ensures that
the most recently executed query hints are in the upper levels of the queue.
4.2.5.10.4 Origin of Hint Cache Keys The hint cache key is generated from the
normalized query; see Section 4.2.5.2.3, "Stage 3: Normalization." It consists of the

Configuring the Search Index
4-28 Oracle Fusion Middleware System Administrator's Guide for Oracle Content Server
qualified columns (columns that are qualified by table/alias names) and columns that
have a hint rule defined. The cache key excludes conditions that contain joins or
subqueries.
The following example illustrates how the cache key is generated from a given query:
SELECT DocMeta.*, Documents.*, Revisions.*
FROM DocMeta, Documents, Revisions
WHERE DocMeta.dID = Revisions.dID AND Revisions.dID=Documents.dID AND
Revisions.dDocName='abc' AND Revisions.dStatus<>'DELETED' AND
(Revisions.dReleaseState='U' OR Revisions.dReleaseState='I' OR
Revisions.dReleaseState='Y') AND Documents.dIsPrimary<>0
The generated cache key is as follows:
documents.disprimary:notequal:documents|revisions.ddocname:equal:revisions|revisio
ns.dreleasestate:in:revisions|revisions.dstatus:notequal:revisions
4.2.5.10.5 Hint Cache Persistence The hint cache is designed to be persistent. To ensure
the persistence, the hint cache is saved to the file system every two hours. The
persisted hint cache is reloaded when the Oracle Content Server instance is started.
4.2.5.11 Using Hint Rules
The following tasks are involved in using hint rules:
■Adding and Enabling New Hint Rules
■Editing Existing Hint Rules
■Disabling Hint Rules
■Enabling Hint Rules
■Removing Hint Rules
To access the Edit Hint Rules Form:
1. Open the Administration tray.
2. Click Oracle Query Optimizer, then Hint Rules Configuration.
The Hint Rules Configuration Page is displayed, including the Edit Hint Rules
Form.
4.2.5.11.1 Adding and Enabling New Hint Rules To add a new hint rule to the Hint Rules
Table:
1. Open the Administration tray.
2. Click Oracle Query Optimizer, then Hint Rules Configuration.
3. In the Edit Hint Rules Form, complete the fields. For more detailed explanations of
each field, see Section 4.2.5.7, "The Hint Rules Table" and the Section A.1.3.8, "Hint
Rules Configuration Page."
4. Click the Add button.
The new hint rule is added to the Hint Rules Table and is effective immediately.
4.2.5.11.2 Editing Existing Hint Rules To edit an existing hint rule in the Hint Rules
Table:
1. Open the Administration tray.
2. Click Oracle Query Optimizer, then Hint Rules Configuration.

Configuring the Search Index
Managing System Settings 4-29
3. Select the desired hint rule in the Hint Rules Table on the Hint Rules Configuration
Page.
All of the applicable fields in the Edit Hint Rules Form are populated with the hint
rule's values.
4. Edit the fields as desired. For more detailed explanations of each field, see
Section 4.2.5.7, "The Hint Rules Table" and the Section A.1.3.8, "Hint Rules
Configuration Page."
5. Change the key.
6. Click the Add button.
The Hint Rules Table is refreshed and the new hint rule is added. The
modifications are effective immediately.
7. Delete the old hint rule.
4.2.5.11.3 Disabling Hint Rules Although any rule in the table can be enabled/disabled,
only the rules that are added through the Hint Rules Configuration Page can be
removed. The default hint rules that are included with the Oracle Query Optimization
feature can only be disabled; they cannot be removed.
To disable a hint rule in the Hint Rules Table:
1. Open the Administration tray.
2. Click Oracle Query Optimizer, then Hint Rules Configuration.
3. Select the desired hint rule in the Hint Rules Table on the Hint Rules Configuration
Page.
All of the applicable fields in the Edit Hint Rules Form are populated with the hint
rule's values.
4. Click the Disable button.
The Hint Rules Table is refreshed and 'Y' is displayed in the Disabled column,
indicating that the hint rule is deactivated.
4.2.5.11.4 Enabling Hint Rules Although any rule in the table can be enabled/disabled,
only the rules that are added through the Hint Rules Configuration Page can be
removed. The default hint rules that are included with the Oracle Query Optimization
feature can only be disabled; they cannot be removed.
To enable a disabled hint rule in the Hint Rules Table:
1. Open the Administration tray.
2. Click Oracle Query Optimizer, then Hint Rules Configuration.
3. Select the desired hint rule in the Hint Rules Table on the Hint Rules Configuration
Page.
All of the applicable fields in the Edit Hint Rules Form are populated with the hint
rule's values.
4. Click the Enable button.
The Hint Rules Table is refreshed and the Disabled column is clear, indicating that
the hint rule is reactivated.
4.2.5.11.5 Removing Hint Rules Although any rule in the table can be enabled/disabled,
only the rules that are added through the Hint Rules Configuration Page can be

Configuring the Search Index
4-30 Oracle Fusion Middleware System Administrator's Guide for Oracle Content Server
removed. The default hint rules that are included with the Oracle Query Optimization
feature can only be disabled; they cannot be removed.
To delete a hint rule from the Hint Rules Table:
1. Open the Administration tray.
2. Click Oracle Query Optimizer, then Hint Rules Configuration.
3. Select the desired hint rule in the Hint Rules Table on the Hint Rules Configuration
Page.
All of the applicable fields in the Edit Hint Rules Form are populated with the hint
rule's values.
4. Ensure that the hint rule is enabled. If the hint rule is disabled it cannot be
removed. To reactivate a disabled hint rule, see Section 4.2.5.11.4, "Enabling Hint
Rules."
5. Click the Remove button.
The Hint Rules Table is refreshed and the selected hint rule is removed.
4.2.5.12 Using the Query Converter
To access the Query Converter page, select Administration, then Oracle Query
Optimizer, then Query Converter. The Query Converter Page is displayed.
The following tasks are involved when you use the Query Converter:
■Converting a Data Source
■Converting a Query
■Editing a Converted Data Source or Query
4.2.5.12.1 Converting a Data Source To convert a data source query.
1. If applicable, select Use Data Source.
The data source-related fields are displayed on the Query Converter page.
2. Select the desired data source from the DS Name menu.
The data source query is displayed in below the DS Name field.
3. Enter the applicable information for additional parameters and WHERE clauses.
4. Click Convert Query.
The data source is converted and the results are displayed in a text area above the
Use Data Source checkbox. To view an example of a converted data source query,
see Figure 4–4.
4.2.5.12.2 Converting a Query To convert a query:
1. If applicable, unselect Use Data Source.
The data source-related fields are hidden from the Query Converter page.
2. Enter the applicable information for the query.
3. Click Convert Query.
The query is converted and the results are displayed in a text area above the Use
Data Source checkbox. To view an example of a converted query, see Figure 4–5.
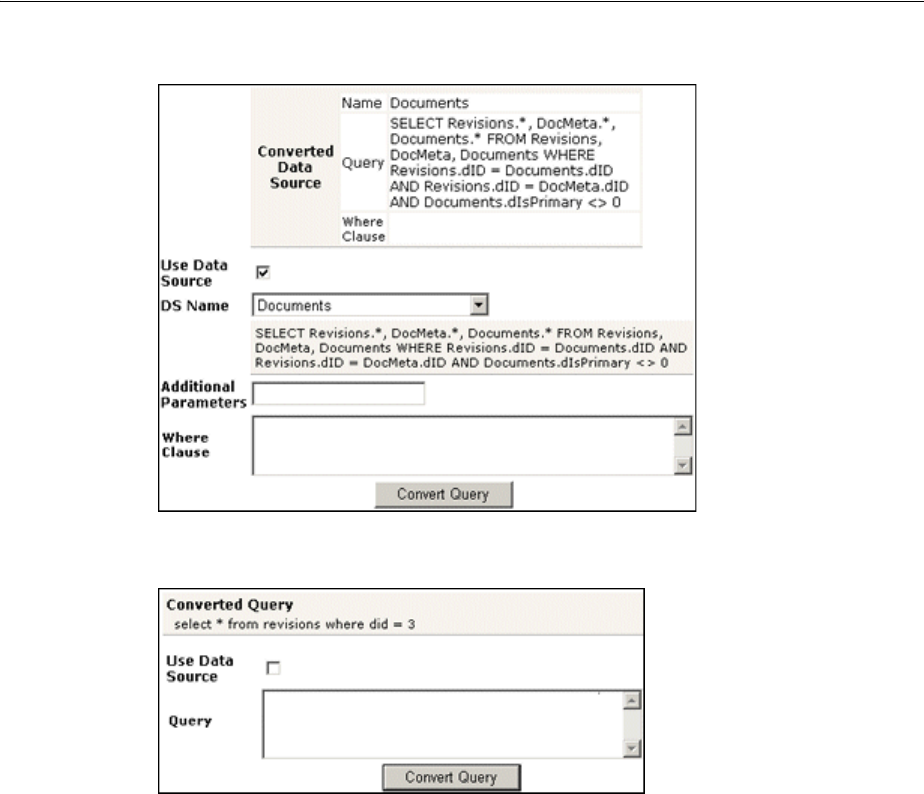
Configuring the Search Index
Managing System Settings 4-31
Figure 4–4 Example of Converted Data Source Screen
Figure 4–5 Example of Converted Query Screen
4.2.5.12.3 Editing a Converted Data Source or Query After the data source or query is
converted, the results are displayed above the Use Data Source checkbox. Because the
conversion process clears the fields, the converted query can only be modified by
entering new information in the fields. To edit information for a data source or query,
see the applicable sections in Section 4.2.5.12.1, "Converting a Data Source."
4.2.5.13 Updating the Hint Cache
The following tasks are involved when updating the hint cache:
■Accessing the Hint Cache Updater Page
■Checking the Hint Cache from a Data Source
■Checking from a Query
■Modifying an Existing Hint Cache Query Using Data Source
■Modifying an Existing Hint Cache Using a Query
■Removing a Hint Cache Data Source Entry
■Removing a Hint Cache Query
4.2.5.13.1 Accessing the Hint Cache Updater Page To access the Hint Cache Updater page,
select Administration, then Oracle Query Optimizer, then click Hint Cache Updater.
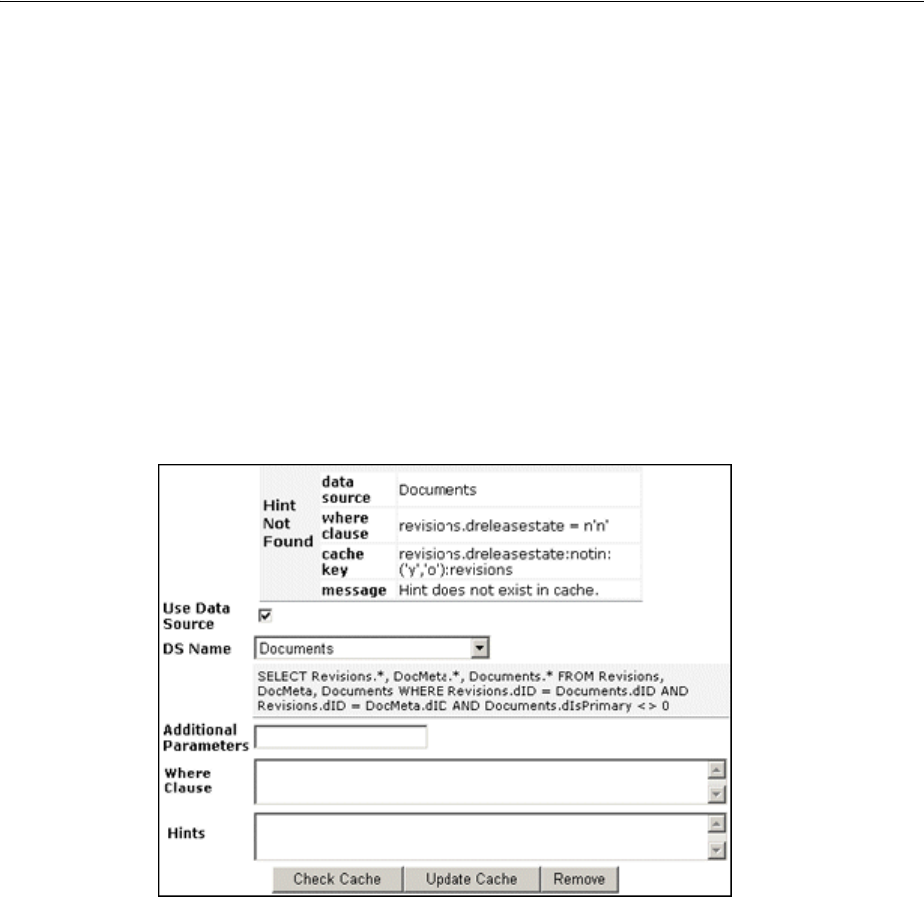
Configuring the Search Index
4-32 Oracle Fusion Middleware System Administrator's Guide for Oracle Content Server
4.2.5.13.2 Checking the Hint Cache from a Data Source To check the hint cache using a
data source:
1. On the Hint Cache Update page, select Use Data Source.
The data source-related fields are displayed on the Hint Cache Updater page.
2. Select the desired data source from the DS Name menu.
The data source query is displayed in below the DS Name field.
3. Enter the applicable information for the additional parameters, WHERE clause,
and hints.
4. Click Check Cache.
The results are displayed above the Use Data Source checkbox. To view an
example of an unsuccessful hint search, see Figure 4–6.
Figure 4–6 Example of Hint Cache Updater Results with Data Source
4.2.5.13.3 Checking from a Query To check the hint cache using a query:
1. On the Hint Cache Update page, ensure the Use Data Source checkbox is
unselected.
The data source-related fields are hidden from the Query Converter page.
2. Enter the applicable information.
3. Click Check Cache.
The results are displayed above the Use Data Source checkbox. To view an
example of an unsuccessful hint search, see Figure 4–7. To view an example of a
successful hint search, see Figure 4–8.
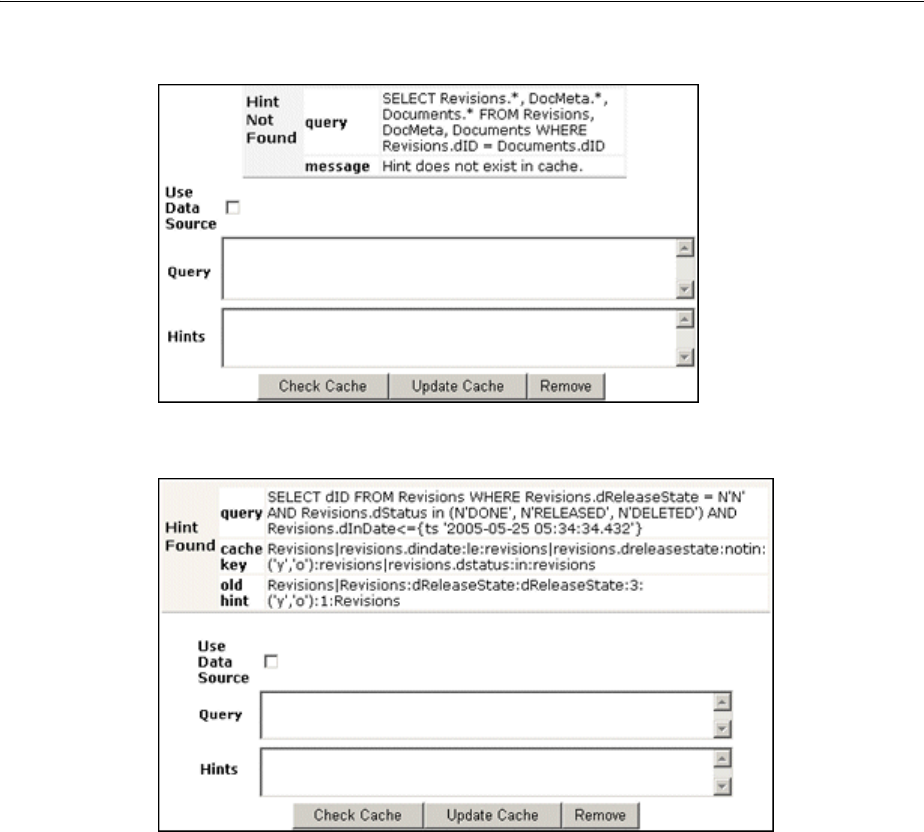
Configuring the Search Index
Managing System Settings 4-33
Figure 4–7 Example of Hint Cache Updater Results without Data Source
Figure 4–8 Hint found in hint cache
4.2.5.13.4 Modifying an Existing Hint Cache Query Using Data Source To modify a hint cache
query using a data source:
1. On the Hint Cache Updater page, select Use Data Source.
The data source-related fields are displayed on the Hint Cache Updater page.
2. Select the desired data source from the DS Name menu.
The data source query is displayed in below the DS Name field.
3. Enter the applicable information for the additional parameters, WHERE clause,
and hints.
4. Click Update Cache to overwrite the previous hint cache.
The results are displayed in a text box above the Use Data Source checkbox. To see
an example of successfully adding a new hint to a query and updating the hint
cache, see the screen capture included in this section.
4.2.5.13.5 Modifying an Existing Hint Cache Using a Query To modify a hint cache using a
query:
1. On the Hint Cache Page, ensure that the Use Data Source checkbox is unselected.
The data source-related fields are hidden from the Query Converter page.
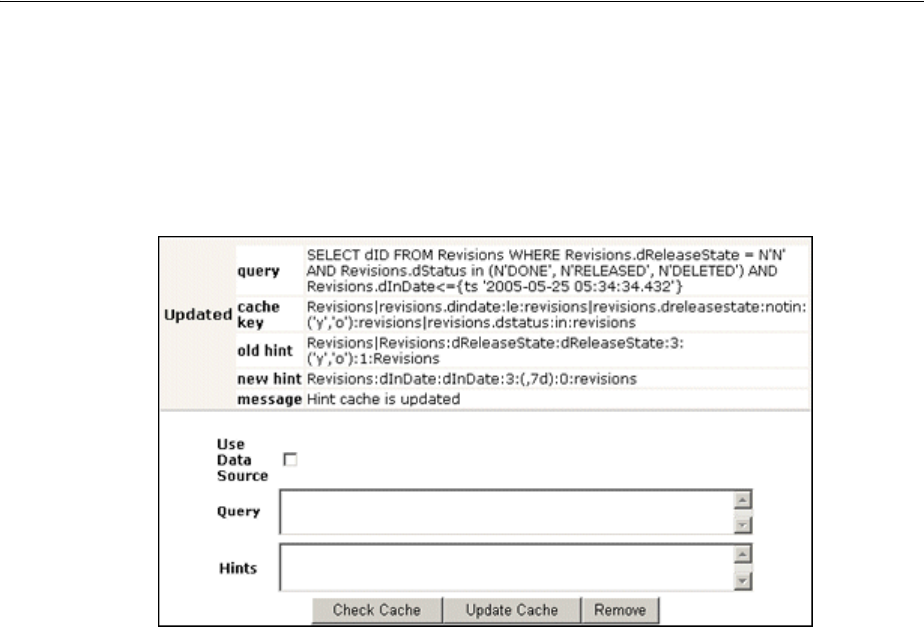
Configuring the Search Index
4-34 Oracle Fusion Middleware System Administrator's Guide for Oracle Content Server
2. Enter the applicable information.
3. Click Update Cache to overwrite the previous hint cache.
The results are displayed above the Use Data Source checkbox. In the screen
capture note that the new hint was added and the hint cache was updated.
Figure 4–9 New hint added, hint cache updated
4.2.5.13.6 Removing a Hint Cache Data Source Entry To remove a hint cache data source
entry:
1. On the Hint Cache Updater page, select Use Data Source.
The data source-related fields are displayed on the Hint Cache Updater page.
2. Select the desired data source from the DS Name menu.
The data source query is displayed below the DS Name field.
3. Enter the applicable information for the additional parameters, WHERE clause,
and hints.
4. Click Remove.
The information entered into the fields is removed. To see an example of
successfully removing a hint from a query and the hint cache, see the screen
capture included in this section.
4.2.5.13.7 Removing a Hint Cache Query To remove a hint cache query:
1. On the Hint Cache Updater page, ensure that the Use Data Source checkbox is
unselected.
The data source-related fields are hidden from the Query Converter page.
2. Enter the applicable information for the query and hints.
3. Click Remove.
The results are displayed above the Use Data Source checkbox. In the screen
capture note that the previously added hint was deleted from the query and hint
cache.
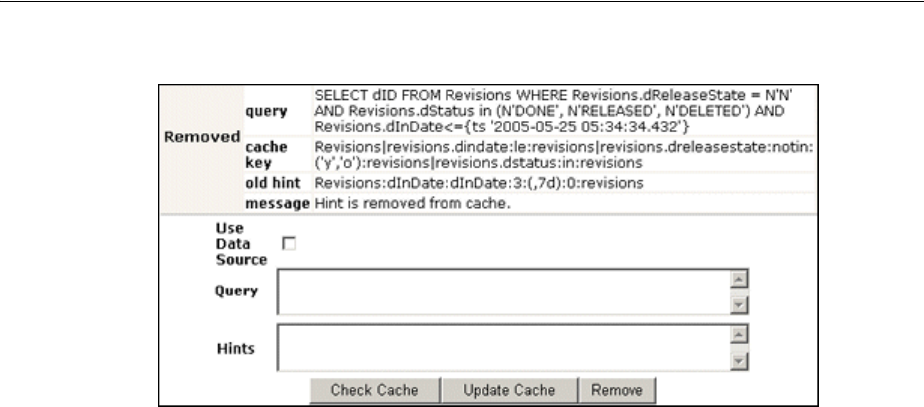
Configuring a File Store System
Managing System Settings 4-35
Figure 4–10 Example of a deleted hint from cache
4.3 Configuring a File Store System
This section contains the following topics:
■Section 4.3.1, "Introduction to the File Store System"
■Section 4.3.2, "FileStoreProvider Upgrade"
■Section 4.3.3, "Configuring FileStoreProvider"
■Section 4.3.4, "FileStoreProvider Resource Tables"
■Section 4.3.5, "FileStoreProvider Sample Implementations"
4.3.1 Introduction to the File Store System
With the release of version 11gR1, the Oracle Content Server system implemented a
file store system for data management, replacing the traditional file system for storing
and organizing content. The FileStoreProvider component exposes the file store
functionality in the Oracle Content Server interface and allows additional
configuration options. For example, you can configure the Oracle Content Server
instance to use binary large object (BLOB) data types to store content in a database,
instead of using a file system. This functionality offers several advantages:
■Integrates repository management with database management for consistent
backup and monitoring processes.
■Helps overcome limitations associated with directory structure and number of
files per directory in a file system approach.
■Aids in distributing content more easily across systems, for better scaling of the
Oracle Content Server system.
■Allows for different types of storage devices not commonly associated with a file
system, for example, content addressed storage systems and write-only devices
necessary in some business uses.

Configuring a File Store System
4-36 Oracle Fusion Middleware System Administrator's Guide for Oracle Content Server
This section covers the following topics:
■Section 4.3.1.1, "Data Management"
■Section 4.3.1.2, "FileStoreProvider Features"
4.3.1.1 Data Management
The Oracle Content Server system manages content by tracking the storage of
electronic files and their associated metadata. It provides the ability for users to store
and access their checked in files, any associated information, and any associated
renditions. This section discusses the data management methods historically used by
the Oracle Content Server system and how they are addressed with the
FileStoreProvider component.
■Section 4.3.1.1.1, "File Management"
■Section 4.3.1.1.2, "Metadata Management"
■Section 4.3.1.1.3, "File Stores"
4.3.1.1.1 File Management The first half of data management is storing electronic files
checked into an Oracle Content Server repository. With the Oracle Content Server
system, file storage has typically been done with a traditional file system, storing
electronic files in a hierarchical directory structure that includes vault and weblayout
directories. By using the revision information specified by the content type, security
group, and account (if used), files and their associated renditions are placed into
particular directories within the vault and weblayout directories. For example, the
primary and alternate files specified at check in are stored in subdirectories in the
vault directory. The specific file location is defined to be the following:
IntradocDir/vault/dDocType/account/dID.dExtension
In this path name, dDocType is the content type chosen by the user on check in, dID is
the unique system-generated identification that identifies this revision, and
dExtension is the extension of the file checked in. In this hierarchical model, the
system uses the dDocType metadata field to distribute the files within the hierarchy
established in the vault directory. Similarly, any web rendition is distributed across
the hierarchy within the IntradocDir/weblayout/groups directory. The web rendition
is the file served out of a web server, and in the historical file system storage method,
could be the native file, the alternate file, or a web-viewable file generated by Inbound
Refinery or some other conversion application.
This straightforward determination of file storage location is helpful to component
and feature writers, helping them understand where files are located and how to
manipulate them. However, it also has the effect of limiting storage management.
Caution: The FileStoreProvider component is installed, enabled, and
upgraded by default during Oracle Content Server deployment. It
should not be uninstalled or disabled after the default file store is
upgraded. For more information, see Section 4.3.2, "FileStoreProvider
Upgrade."
If you have an earlier version of the Oracle Content Server software
where you have not yet upgraded the default file store, you can
disable the component following the procedure in Section 6.3.3.3,
"Enabling and Disabling a Component."

Configuring a File Store System
Managing System Settings 4-37
Without careful management of the location metadata, directories can become
saturated, causing the system to slow down.
4.3.1.1.2 Metadata Management The second half of data management is storing
metadata associated with an electronic file. With the Oracle Content Server system,
metadata management has typically been done using a relational database, primarily
involving three database tables. Metadata enables users to catalogue content and
provides a means for creating file descriptors to facilitate finding it within the Oracle
Content Server repository. For users, the retrieval is done by the Oracle Content Server
system, and how and where the file is stored can be completely hidden. For
component and feature writers, who may need to generate or manipulate files, the
metadata provides a robust means of access.
4.3.1.1.3 File Stores The traditional file system model historically used by the Oracle
Content Server system limits scalability. As data management needs grow, adding
extra storage devices to increase storage space is not conducive to easy file sharing
through a web-based interface. Complex, nested file structures could slow
performance. Suppressing the creation of a duplicate web-viewable file when the
native file format could be used could be difficult. As a consequence of dealing with
large systems, for example over 100 million content items, the Oracle Content Server
system has shifted to using a file store. This offers the advantages of scalability,
flexibility, and manageability.
4.3.1.2 FileStoreProvider Features
The FileStoreProvider component enables you to define data-driven rules to store and
access content managed by the Oracle Content Server system. FileStoreProvider offers
the following features:
■The ability to relocate files easily.
■The ability to have the web-viewable file be optional.
■The ability to manage and control directory saturation.
■The ability to integrate with third-party storage devices.
■An API to use, extend, and enhance different storage paradigms.
With FileStoreProvider, checked-in content and associated metadata are examined and
assigned a storage rule based on criteria established by a system administrator.
Criteria can include metadata, profiles, or other considerations. The storage rule
determines how vault and web files are stored by the Oracle Content Server system
and how they are accessed by a web server.
4.3.2 FileStoreProvider Upgrade
The FileStoreProvider component is installed, enabled, and upgraded by default for a
new Oracle Content Server instance (with no documents in it). The upgrade includes
creation of metadata fields with default values for the file store system
(DefaultFileStore). Earlier versions of the Oracle Content Server software did not
automatically upgrade the file store system, and sites could choose to not use the file
store system, to not upgrade to use FileStoreProvider, and to uninstall the
FileStoreProvider component and metadata fields.
If you do not want to upgrade FileStoreProvider from your current settings, prior to
installation you must enter the configuration variable FsAutoConfigure=false in
the Additional Configuration Variables field on the General Configuration page of
the Oracle Content Server Admin Server page.

Configuring a File Store System
4-38 Oracle Fusion Middleware System Administrator's Guide for Oracle Content Server
4.3.2.1 DefaultFileStore Settings
An Oracle Content Server system containing no documents and with the
FileStoreProvider component automatically upgraded uses these DefaultFileStore
settings.
■Vault Path:
$#env.VaultDir$$dDocType$/$dDocAccount$/$dispersion$/$dID$$ExtensionSeparator$
$dExtension$
■Dispersion Rule:
$dRevClassID[-9:-6:0:b]/$dRevClassID[-6:-3:0:b]
■Web-viewable Path:
$#env.WeblayoutDir$groups/$dSecurityGroup$/$dDocAccount$/documents/$dDocType$/
$dispersion$/$edisp$/$dDocName$$RenditionSpecifier$$RevisionLabel$
$ExtensionSeparator$$dWebExtension$
■Web URL File Path:
$HttpWebRoot$groups/$dSecurityGroup$/$dDocAccount$/documents/$dDocType$/
$dispersion$/$edisp$/$dDocName$$RenditionSpecifier$$RevisionLabel$
$ExtensionSeparator$$dWebExtension$
The dispersion field is added in Path information for the storage rule and can be
edited. The Web-viewable Path and Web URL File Path fields cannot be edited. The
dispersion rule is added in web paths at the $dispersion$ location.
The dispersion rule allows you to specify :b for base 64 encoding of that part of the
URL. For example, the following dispersion rule encodes the two parts to be base 64:
$dRevClassID[-9:-6:0:b]/$dRevClassID[-6:-3:0:b]
An Oracle Content Server system containing documents and which does not have the
FileStoreProvider component upgrade will return an informational message that the
Revisions table is not empty, therefore dispersion for the default storage rule is not set
for DefaultFileStore.
4.3.2.2 Empty Storage Rule
If a site has used an earlier version of the Oracle Content Server system without using
the file store system, then upgraded and implemented the FileStoreProvider
component, or a site has uninstalled the FileStoreProvider component completely and
also removed the metadata fields added by FileStoreProvider, then when a user checks
in a document it will not have an associated storage rule (no xStorageRule field).
When FileStoreProvider is implemented after these types of situations, users will find
that documents checked in before FileStoreProvider was implemented will have an
empty xStorageRule field. To fix this situation, users must perform an Update to the
Content Information for those documents. The documents will be updated to the
default value of the xStorageRule field and will be moved to the location specified by
the storage rule. For details on xStorageRule, see Section 4.3.3.1.2, "Oracle Content
Server Metadata Fields."
4.3.3 Configuring FileStoreProvider
A file store for data management is used in the Oracle Content Server system instead
of the traditional file system for storing and organizing content. The FileStoreProvider
component is installed and enabled by default during Oracle Content Server

Configuring a File Store System
Managing System Settings 4-39
deployment. The FileStoreProvider component automatically upgrades the default file
store (DefaultFileStore) to make use of functionality exposed by the component,
including modifying the web, vault, and web URL path expressions.
Three resource tables are used to define and handle file paths. The defaults for the
PathMetaData Table and PathConstruction Table cover most scenarios. The
StorageRules Table stores the values specified when a storage rule is defined. These
three tables are provider-specific, and as such are defined in the provider.hda file of
the defaultfilestore directory. The defaultfilestore directory is located in the
IntradocDir/data/providers directory. A fourth table, the
FileSystemFileStoreAlgorithmFilters Table, requires a component along with Java code
to modify.
This section covers the following topics:
■Section 4.3.3.1, "Using Standard Oracle Content Server Variables"
■Section 4.3.3.2, "Working with FileStoreProvider"
■Section 4.3.3.3, "Understanding FileStoreProvider Storage Principles"
4.3.3.1 Using Standard Oracle Content Server Variables
The FileStoreProvider component makes several modifications to the Oracle Content
Server database, Oracle Content Server metadata fields, and other configuration files,
allowing for possible configuration options.
This section covers the following topics:
■Section 4.3.3.1.1, "Database Options"
■Section 4.3.3.1.2, "Oracle Content Server Metadata Fields"
4.3.3.1.1 Database Options In some situations, content stored in a database may have to
be forced onto a file system. One example would be when Oracle Inbound Refinery
must have access to a file for conversion. Files forced onto a file system are considered
Note: Partitions are not required to run the Oracle Content Server
system, but any attempt to check in content before creating a partition,
changing the vault path root, or creating a new, well-formed storage
rule will fail. For more information, see Section 4.3.3.3,
"Understanding FileStoreProvider Storage Principles", including the
sections on storage rules and path construction.
Note: Oracle WebLogic Server does not support configuring its web
server for the Oracle Content Server instance to add a new virtual
directory and alias to point to the weblayout directory for each
partition that is created. Partitions can be used for the vault files, and
partitions are supported for web files.
Caution: Resource files should not be edited directly. Proper
modification of resource files should be done within the Oracle
Content Server user interface or through additional component
development. For more information on component development, see
Chapter 6, "Managing Components".

Configuring a File Store System
4-40 Oracle Fusion Middleware System Administrator's Guide for Oracle Content Server
temporary cache. The following configuration values are used to control when the
temporarily cached files are to be cleaned up. Note that the system only cleans up files
that have an entry in the FileCache Table.
4.3.3.1.2 Oracle Content Server Metadata Fields FileStoreProvider adds several Oracle
Content Server metadata fields and makes additional options available for use in
configuration files.
This section covers the following topics:
■Section , "Configuring Metadata Fields"
■Section , "Setting the Default Storage Directory"
■Section , "Standard FileStoreProvider Variables"
Configuring Metadata Fields
FileStoreProvider adds three metadata fields to the Oracle Content Server instance:
■xPartitionId: This metadata field is used in conjunction with the PartitionList table
to determine the root location of the content item files. It is recommended that this
field be hidden on the user interface, because the partition selection algorithm
provides a value.
■xWebFlag: This metadata field is used to determine whether a content item has a
web-viewable file. Consequently, if the system has content items that have only
vault files, then removing this metadata field causes the system to expect the
presence of a web-viewable and may cause harm to the system. The metadata field
can be specified by the configuration value WebFlagColumn.
■xStorageRule: This metadata field is used to track the rule that was used to
determine how the file is to be stored. The metadata field may be specified by the
configuration value StorageRuleField.
Variable Description
FsCacheThreshold Specifies the maximum cache size, in megabytes. The
default is 100. When the threshold is met, the Oracle
Content Server instance starts deleting files that are
older than the minimum age, as specified by the
FsMinimumFileCacheAge parameter.
FsCleanUpCacheDuringIndex Specifies if the cache will be cleaned during the
indexing cycle. The default is false.
FsCleanUpCacheIndexingMax Specifies the number of cache files to delete in each
indexing cycle, which limits the load on the cycle. The
default is to delete all eligible cache files for the
indexing cycle.
FsMaximumFileCacheAge Specifies the maximum age at which files are cached,
expressed in days. The default is 365.
FsMinimumFileCacheAge Specifies the minimum age at which cached files can be
deleted, expressed in days. The default is 1. This
parameter is used in conjunction with the
FsCacheThreshold parameter to determine when to
delete cached files.

Configuring a File Store System
Managing System Settings 4-41
Setting the Default Storage Directory
A StorageDir parameter can be set equal to a root directory, used for all partitions
where the PartitionRoot column value has not been specified. In this case the storage
directory and the partition name is used to create the PartitionRoot parameter. The
StorageDir parameter is set in the intradoc.cfg file, located in the
DomainHome/ucm/cs/bin directory.
Standard FileStoreProvider Variables
In the provider.hda located in the IntradocDir/data/providers/defaultfilestore
directory, the following parameters and classes are standard for a file system store:
ProviderType=FileStore
ProviderClass=intradoc.filestore.BaseFileStore
IsPrimaryFileStore=true
# Configuration information specific to a file system store provider.
ProviderConfig=intradoc.filestore.filesystem.FileSystemProviderConfig
EventImplementor=intradoc.filestore.filesystem.FileSystemEventImplementor
DescriptorImplementor=intradoc.filestore.filesystem.FileSystemDescriptorImplementor
AccessImplementor=intradoc.filestore.filesystem.FileSystemAccessImplementor
4.3.3.2 Working with FileStoreProvider
When the FileStoreProvider default file store is upgraded, checked-in content and
associated metadata are examined and assigned a storage rule based on criteria
established by the system administrator. Criteria can include metadata, profiles, or
other considerations. The storage rule determines how vault and web files are stored
and accessed by Oracle Content Server software and how they are accessed by a web
server. Files can be stored in a database or placed on one or more file systems or
storage media. Partitions can be created to help manage storage location, but are not
required.
This section covers the following topics:
■Section 4.3.3.2.1, "Adding or Editing a Partition"
■Section 4.3.3.2.2, "Editing FileStoreProvider"
■Section 4.3.3.2.3, "Adding or Editing a Storage Rule"
4.3.3.2.1 Adding or Editing a Partition You can create partitions to define additional root
paths to files managed by the Oracle Content Server system but requiring storage in
different locations or on different types of media. You create partitions using the
Partition Listing Page. When a new partition is created, the Oracle Content Server
system modifies the PartitionList resource table in the fsconfig.hda file, located in the
IntradocDir/data/filestore/config/ directory.
Note: These metadata fields are added by FileStoreProvider on
startup and if deleted are added again when the Oracle Content
Server instance restarts. If the metadata fields must be permanently
deleted, set the configuration variable
FsAddExtraMetaFields=false in the intradoc.cfg file to disable
the automatic creation of the fields. The intradoc.cfg file is located in
the DomainHome/ucm/cs/bin directory.
Caution: The FileStoreProvider component should not be disabled
once it has been used with the Oracle Content Server system.

Configuring a File Store System
4-42 Oracle Fusion Middleware System Administrator's Guide for Oracle Content Server
To add a partition to the Oracle Content Server instance, perform these steps:
1. Log in to the Oracle Content Server instance as system administrator.
2. Open the Administration tray and select File Store Administration.
3. If there are no partitions defined, click Add Partition. Otherwise, the Add/Edit
Partition Page is displayed.
4. Enter a partition name. The name must be unique.
5. Modify the partition root, duplication methods, and any other pertinent
parameters. See Add/Edit Partition Page for more information.
6. Ensure that Is Active is enabled.
7. Click Update. The Partition Listing Page is displayed.
4.3.3.2.2 Editing FileStoreProvider You can edit the FileStoreProvider at any time. To
edit the provider, perform these steps:
1. Log in to the Oracle Content Server instance as system administrator.
2. Open the Administration tray and select Providers. The Providers Page is
displayed.
3. Click Info in the Action column next to the DefaultFileStore provider. The File
Store Provider Information Page is displayed.
4. Click Edit. The Edit File Store Provider Page is displayed.
5. Make the necessary modifications and click Update to submit the changes. The
Providers Page is displayed.
6. Restart the Oracle Content Server instance.
4.3.3.2.3 Adding or Editing a Storage Rule You can add multiple storage rules to the file
store.
Note: Oracle WebLogic Server does not support configuring its web
server for the Oracle Content Server instance to add a new virtual
directory and alias to point to the weblayout directory for each
partition that is created. Partitions can be used for the vault files, and
partitions are supported for web files.
Note: Do not navigate away from the Edit File Store page before
clicking Update to submit the change.
Important: Storage rules cannot be deleted. Carefully consider each
storage rule before you create it.
Caution: Changing a storage rule after content has been checked in
to an Oracle Content Server repository may cause the Oracle Content
Server system to lose track of the content.

Configuring a File Store System
Managing System Settings 4-43
To add or edit storage rules:
1. Log in to the Oracle Content Server instance as a system administrator.
2. Open the Administration tray, and select Providers. The Providers Page is
displayed.
3. Click Info in the Action column next to the DefaultFileStore provider. The File
Store Provider Information Page is displayed.
4. Click Edit. The Edit File Store Provider Page is displayed.
5. Click Add new rule, or select the name of the rule to edit from the Storage choice
list, and click Edit rule. The Storage Rule Name Dialog is displayed.
6. Make the necessary modifications to the storage rule, and click OK. The Edit File
Store Provider Page is displayed.
7. Click Update. The Providers Page is displayed.
4.3.3.3 Understanding FileStoreProvider Storage Principles
When a content item is checked in to the Oracle Content Server system, it consists of
metadata, a primary file selected by the user, and potentially an alternate file. The
alternate file may also be selected and checked in by the user, and is presumed to be a
web-viewable file. In a file system approach to the Oracle Content Server system, the
primary file is stored in the vault directory at the root of the DomainHome directory
and is called the native file. If an alternate file is checked in, it is also stored in the
vault, but is copied to the weblayout directory or passed to a conversion application,
such as Oracle Inbound Refinery. If no alternate file is checked in, then the native file
is copied from the vault directory to the weblayout directory, existing in two places. If
no alternate file is checked in and Oracle Inbound Refinery is installed, a rendition of
the native file could be created and stored in weblayout directory.
In a file system approach to the Oracle Content Server system, storing content in
specified directories defines a path to the content. You can access content from a
browser by using a static web URL file path, when you know the content is in a
specific location, or using a dynamic Oracle Content Server service request, such as
GET_FILE, when you do not. With FileStoreProvider, content may or may not be
stored in a file system. Consequently, a new approach to defining paths to the content
must be taken.
Note: If there are records associated with the storage rule being
edited, then the following rules can not be modified:
FsWeblayoutDir (the weblayout directory) and FsHttpWebRoot
(the HttpWebRoot and URL prefix).
Important: If the web root used in the web URL file path defined in
the storage rule is something other than the default weblayout
directory defined for the Oracle Content Server system, you must add
an alias or virtual directory in your web server for the web root used
in the storage rule. Otherwise, the Oracle Content Server system does
not know where to access the file. For information on adding virtual
directories to your web server, see the documentation that came with
your web server.

Configuring a File Store System
4-44 Oracle Fusion Middleware System Administrator's Guide for Oracle Content Server
Depending on how you set up FileStoreProvider, you may or may not have a static
web URL. By using a dynamic Oracle Content Server service request, you can access
content when you do not know the specific location. With FileStoreProvider, the static
web URL is defined as the web URL file, and the dynamic access is simply called the
web URL. Using the FileStoreProvider user interface, you can configure only the static
web URL file path. However, you can decide to have the static web URL done as an
Oracle Content Server service request, essentially making it dynamic.
This section covers the following topics:
■Section 4.3.3.3.1, "Using Storage Rules on Renditions to Determine Storage Class"
■Section 4.3.3.3.2, "Understanding Path Construction and URL Parsing"
4.3.3.3.1 Using Storage Rules on Renditions to Determine Storage Class When content is
checked in, all versions of the content managed by the Oracle Content Server system
are considered renditions. These renditions include the native file, web-viewable file,
and any other files that may have been rendered by Inbound Refinery or third-party
conversion applications.
Renditions are grouped together into a storage class, which determines where and
how a rendition is accessed. Storage classes are grouped together into a storage rule,
which defines the vault, web, and web URL path expressions, through a storage class.
Additionally, a storage rule determines if a rendition is not stored, as in a web-less file
store, or if it is stored in a different device, such as a database rather than a file system.
The following examples illustrate how storage rules can determine where and how
different content items can be stored.
Example 1
A storage rule is defined as File system only on the Storage Rule Name Dialog and Is
Webless File Store is selected. In this scenario, the system makes a copy of the
primary files and places them in the weblayout directory.
This traditional file system storage example typically offers the advantage of faster
access time to content when compared with database storage. This advantage
diminishes if the file system hierarchy is complex or becomes saturated, or as the
quantity of content items increases.
Example 2
A storage rule is defined as File system only on the Storage Rule Name Dialog and Is
Webless File Store is selected. In this scenario, no copy is made of the primary files
and so the native files are the only renditions. Requests for web-viewable files are
routed to the native files stored in the vault.
This traditional file system storage example, like the previous one, offers the
advantage of faster access time to content. It also saves on storage space by not
copying a version of the content from the vault directory to the weblayout directory.
Instead, it redirects web-viewable access to the content in the vault directory. This is
useful if most of the native files checked in are in a web-viewable format, or if the
Note: The web-less option of FileStoreProvider can specify that no
web rendition be created. When this is used in conjunction with
Inbound Refinery, a web rendition is always created and stored in
either the file system or the database, depending on the storage rule in
effect.

Configuring a File Store System
Managing System Settings 4-45
Oracle Content Server system is being used to manage content that is not required to
be viewed in a browser.
Example 3
A storage rule is defined as JDBC Storage on the Storage Rule Name Dialog and no
selection is made from the Renditions choice list. In this scenario, both the vault and
web files are stored in the database.
This database storage example offers the advantage of integrating repository
management with database management for consistent backup and monitoring
processes, and helps overcome limitations associated with directory structure and
number of files per directory in a file system approach.
Example 4
A storage rule is defined as JDBC Storage on the Storage Rule Name Dialog and Web
Files is selected from the Renditions choice list. In this scenario, the vault files are
stored in the database and the web files are permanently stored on the file system.
This mixed approach of storing native files in a database but web-viewable files on a
file system offers the advantages of database storage in the previous example
(integrated backup and monitoring, overcoming file system limitations) for the native
files, while providing speedy web access to web-viewable renditions. Like the first
example, this advantage can be diminished if the file system structure is overly
complex, or the quantity of files is extreme.
4.3.3.3.2 Understanding Path Construction and URL Parsing The path to content stored in
the Oracle Content Server system is defined in the PathExpression column of the
PathConstruction Table. Paths are made up of pieces, with each piece separated by a
slash (/). Each piece can be made of a static string or a sequence of dynamic parts. A
dynamic part is encapsulated by a dollar sign ($). A part can be calculated using an
algorithm, Idoc Script variable, environment variable, or a metadata lookup, and can
have the following interpretations:
■It can be a field defined in the PathMetaData table. If it is defined in the
PathMetaData table, it can be mapped to an algorithm, for example, $dDocType$.
■If it has the prefix #env., it is an environment variable, for example,
$#env.VaultDir$ or $#env.WeblayoutDir$.
■It can be an Idoc Script variable, for example, $HttpWebRoot$.
For example, the standard vault location is defined as
$PartitionRoot$/vault/$dDocType$/$dDocAccount$/$dID$$ExtensionSeparator$$dExten
sion$
When parsed, the path expression turns into five pieces, interpreted according to the
rules specified in the PathMetaData table, as follows:
■$PartitionRoot$: mapped to the partitionSelection algorithm and uses the
xPartitionId as a lookup into the PartitionList table to determine the partition root
Important: When necessary, content items stored in a database can
be forced onto the file system, for example, during indexing or
conversion. The files on the file system are treated as temporary cache
and deleted following the parameters specified in the config.cfg file
located in the IntradocDir/config directory. For more information on
the parameters used, see Section 4.3.4.7, "FileCache Table."

Configuring a File Store System
4-46 Oracle Fusion Middleware System Administrator's Guide for Oracle Content Server
■/vault/: a string, so no calculation or substitution
■$dDocType$: by the PathMetaData table this is a look up in the file parameters
■$dDocAccount$: this is mapped to a documentAccount algorithm which takes
dDocAccount and parses it into the standard Oracle Content Server account
presentation with all the appropriate delimiters
■$dID$$ExtensionSeparator$$dExtension$: this piece has three parts:
–$dID$: similar to dDocType, this is defined in the file parameters and is a
required field
– $ExtensionSeparator$: determined by an algorithm and by default it returns '.'
– $dExtension$: similar to dDocType
In the standard configuration for the web-viewable path, the URL contains variables to
add the partition root to the web-viewable path, security, dDocType, and dispersion
information, as well as the dDocName, rendition, and extension information.
FsWeblayoutDir denotes $#env.WeblayoutDir$ by default.
$FsWeblayoutDir$groups/$dSecurityGroup$/$dDocAccount$/documents/$dDocType$/$dispersion$/~edisp/$dDocName$$Rendit
ionSpecifier$$RevisionLabel$$ExtensionSeparator$$dWebExtension$
In the standard configuration for the web URL file path, the URL contains variables to
add the partition root to the web-viewable path, security, dDocType, and dispersion
information, as well as the dDocName, rendition, and extension information.
FsHttpWebRoot denotes $HttpWebRoot$ by default.
$FsHttpWebRoot$groups/$dSecurityGroup$/$dDocAccount$/documents/$dDocType$/$dispersion$/~edisp/$dDocName$$Renditi
onSpecifier$$RevisionLabel$$ExtensionSeparator$$dWebExtension$
The groups separator indicates to the Oracle Content Server system that the
directories that follow are the name of the security group and account to which the
content item belongs. Accounts are optional and consequently computed by an
algorithm. After the security information is the documents separator, which is
immediately followed by the dDocType. Dispersion is optional. The last part of the
URL is the dDocName, its rendition and revision information, and its format
extension.
Because the URL is expected in this format, the Oracle Content Server system can
successfully extract metadata from it. More importantly, it can determine the security
information for the content item and derive the access privileges for a particular user.
The parsing guidelines have been expanded to allow for dispersion in the web
directory. When $dRevClass$ is encountered, the system processes the dispersion
information, then continues with dDocName and dWebExtension as before. This
means that the system can now successfully parse URLs of the form:
../groups/$dSecurityGroup$/$dDocAccount$/documents/$dDocType$/$dispersion$/~edisp/$dDocName$$RenditionSpecifier$
$RevisionLabel$$ExtensionSeparator$$dWebExtension$
4.3.4 FileStoreProvider Resource Tables
This section covers the following topics:
■Section 4.3.4.1, "PartitionList Table"
■Section 4.3.4.2, "StorageRules Table"
■Section 4.3.4.3, "PathMetaData Table"
■Section 4.3.4.4, "PathConstruction Table"

Configuring a File Store System
Managing System Settings 4-47
■Section 4.3.4.5, "FileSystemFileStoreAlgorithmFilters Table"
■Section 4.3.4.6, "FileStorage Table"
■Section 4.3.4.7, "FileCache Table"
4.3.4.1 PartitionList Table
The PartitionList table defines the partitions that are available for the
partitionSelection algorithm. The table is defined in the fsconfig.hda file, located in the
DomainHome/ucm/cs/data/filestore/config/ directory, and modified using the
Add/Edit Partition Page in the Oracle Content Server user interface. The columns of
the table are used as follows:
4.3.4.2 StorageRules Table
The StorageRules table defines the rules used for storing content items. The rule
specifies which path expression to use for which storage class, and how content items
are to be stored.
The table is defined in the provider.hda file, located in the
DomainHome/ucm/cs/data/providers/defaultfilestore directory, and it can be
modified using the Storage Rule Name Dialog in the Oracle Content Server user
interface. The columns of the table are used as follows:
Column Description
PartitionName Specifies the name of the partition. This name is referenced in the
path expression.
PartitionRoot An argument passed into the partitionSelection algorithm.
IsActive Determines if the partition is currently active and accepts new files.
CapacityCheckInterval Specifies the interval in seconds used in determining the available
disk space. This may not work on all platforms.
SlackBytes Determines if there is sufficient space on a partition to store
content. If the available space is lower than the slack bytes, the
partition is deactivated and no longer used for contribution.
DuplicationMethods Specifies how native files are treated when not converted to a
web-viewable rendition.
copy (default): copies the native file to the web path.
link: Resolves the web path to the native file in the vault
Copy and Link rely on functionality of the operating system on
which the Oracle Content Server instance is installed. As such, not
all methods are available on all platforms
Column Description
StorageRule The name of the storage rule. Computed from a dynamic include
and stored in the xStorageRule metadata field of a content item.
StorageType Determines the storage implementation.
FileStorage: files are stored on the file system
JdbcStorage: files are stored in the database

Configuring a File Store System
4-48 Oracle Fusion Middleware System Administrator's Guide for Oracle Content Server
4.3.4.3 PathMetaData Table
The PathMetaData table defines what metadata is used to determine the location of a
file. The metadata may come directly from a content item's metadata, or be calculated
using an algorithm. The PathMetaData table is defined in the provider.hda file of the
defaultfilestore directory. The defaultfilestore directory is located in the
DomainHome/ucm/cs/data/providers/ directory.
The columns of the table are used as follows:
4.3.4.4 PathConstruction Table
The PathConstruction table maps a file to a path. The PathConstruction table is
defined in the provider.hda file of the defaultfilestore directory. The defaultfilestore
directory is located in the DomainHome/ucm/cs/data/providers/ directory. For more
information, see also Section 4.3.3.3.2, "Understanding Path Construction and URL
Parsing."
IsWeblessStore Used to specify if system allows web-less files.
true: By default, newly created content items do not have a
web-viewable file. In certain circumstances it is necessary to insist
on a web-viewable file. In such situations, an argument in the
calling code can be used to specify that a web-viewable file must be
created. Information regarding whether there is a web-viewable
file is stored in the xWebFlag metadata field.
false: By default, newly created content items do have a
web-viewable file.
RenditionsOnFileSystem Used by JdbcStorage to determine if any files are to be stored on
the file system instead of the database.
Column Description
FieldName Name of the field as it appears in the path expression.
GenerationAlgorithm Specifies the algorithm used to resolve or compute the value for the
field.
RequiredForStorage Defines for which storage class the metadata is required.
#all: Both vault and web-viewable renditions require the metadata
web: Just the web-viewable rendition requires the metadata
vault: Just the native file rendition requires the metadata
The field is optional for all renditions not specified. Consequently,
if this column is empty, then the metadata field is optional for all
renditions or storage classes. If an algorithm has been specified,
this value is empty. The algorithm uses the value specified in the
ArgumentFields column to dictate which fields are required.
Arguments Optional arguments passed into the algorithm specified in the
GenerationAlgorithm field.
ArgumentFields A comma-delimited list of fields required by the arguments
defined in the Arguments column, and consequently required by
the algorithm specified in the GenerationAlgorithm field.
Column Description

Configuring a File Store System
Managing System Settings 4-49
The columns of the PathConstruction table are defined as follows:
4.3.4.5 FileSystemFileStoreAlgorithmFilters Table
The FileSystemFileStoreAlgorithmFilters table is used to map an algorithm name to an
implementation of the FilterImplementor interface. The algorithm can be referenced in
the PathMetaData Table and is used to calculate the desired path field. The class
implementing the algorithm must return the required metadata fields it uses for
calculation, when the file parameters object is null. Through the ExecutionContext, the
doFilter method is passed in information about the field, content item, and file store
provider that initiated the call. In particular, for the file system provider, the algorithm
will be passed the following information through the ExecutionContext. Bear in mind
that other file store providers may choose to pass in more or possibly different
information.
Properties fieldProperties = (Properties)
context.getCachedObject("FieldProperties");
Parameters data = (Parameters)
context.getCachedObject("FileParameters");
Map localData = (Map) context.getCachedObject("LocalProperties");
String algorithm = (String) context.getCachedObject("AlgorithmName");
The FileSystemFileStoreAlgorithmFilters table is part of FileStoreProvider and
requires a component along with Java code to modify.
Caution: The defaults provided in the PathConstruction table should
work for most scenarios. This resource file should not be edited
directly. Proper modification should be done through additional
component development. For more information on component
development, see the chapter about components in the Oracle Fusion
Middleware Developer's Guide for Oracle Universal Content Management.
Column Description
FileStore Specifies the storage path that is being calculated.
web: Path to the web-viewable file.
vault: Path to the native file.
weburl: Generated by the Oracle Content Server system. Tends to
be GET_FILE.
weburl.file: Nicely constructed URL used to access the
web-viewable rendition in a browser.
dispersion: Variable for dispersion of content on the file system.
FsWeblayoutDir: Variable for the web-viewable path for the
weblayout directory.
FsHttpWebRoot: Variable for the web URL file path for the
weblayout directory
PathExpression Defines the path.
AutoCreateLimit Specifies the depth of the directories that may be created.
StorageRule Specifies to which storage rule this path construction belongs.

Configuring a File Store System
4-50 Oracle Fusion Middleware System Administrator's Guide for Oracle Content Server
4.3.4.6 FileStorage Table
The FileStorage table is added to the Oracle Content Server system when
FileStoreProvider is installed. It is used exclusively by the JdbcStorage storage type,
when content is stored in a database. The FileStorage table contains the renditions of
content items and uses the dID of the content item and rendition to uniquely identify
what renditions belong to which content item.
4.3.4.7 FileCache Table
The FileCache table is added to the Oracle Content Server system when
FileStoreProvider is installed. It is used exclusively by the JdbcStorage storage type to
remember which renditions have been placed on a file system. Renditions stored in a
database are placed on a file system when required for a specific event, for example
indexing or conversion. These files are often temporary and deleted after a specified
interval as part of a scheduled event.
4.3.5 FileStoreProvider Sample Implementations
This section list the contents of the tables contained in the provider definition file
(provider.hda) for each of the examples. The provider.hda file does not need to be
edited manually. Proper modification of the provider.hda file should be done within
the Oracle Content Server user interface using the Add/Edit Partition Page, or
through additional component development. The provided default options for other
resource tables, such as PathMetaData Table, PathConstruction Table, and
FileSystemFileStoreAlgorithmFilters Table, should have sufficient flexibility for most
scenarios.
This section covers the following topics:
■Section 4.3.5.1, "Example PathMetaData Table Options"
■Section 4.3.5.2, "Configuration for Standard File Paths"
■Section 4.3.5.3, "Configuration for a Webless or Optional Web Store"
■Section 4.3.5.4, "Configuration for Database Storage"
■Section 4.3.5.5, "Altered Path Construction and Algorithms"
4.3.5.1 Example PathMetaData Table Options
In most of the examples, the following PathMetaData Table configuration definitions
are used. The table has been trimmed of some it columns not pertinent to the examples
for clarity.
@ResultSet PathMetaData
6
FieldName
GenerationAlgorithm
RequiredForStorage
Caution: The defaults provided in the
FileSystemFileStoreAlgorithmFilters table should work for most
scenarios. This resource file should not be edited directly. Proper
modification should be done with Java code and through additional
component development. For more information on component
development, see Oracle Fusion Middleware Developer's Guide for Oracle
Universal Content Management.

Configuring a File Store System
Managing System Settings 4-51
<trimmed columns>
dID
#all
dDocName
#all
dDocAccount
documentAccount
dDocType
#all
dExtension
#all
dWebExtension
weburl
dSecurityGroup
#all
dRevisionID
#all
dReleaseState
#all
dStatus
web
xPartitionId
partitionSelection
ExtensionSeparator
extensionSeparator
xWebFlag
RenditionId
#all
RevisionLabel
revisionLabel
RenditionSpecifier
renditionSpecifier
@end
4.3.5.2 Configuration for Standard File Paths
FileStoreProvider can be configured to place content on a file system in the standard
Oracle Content Server locations.
4.3.5.2.1 Defining the Storage Rule The first step is to define the storage rule. In this case,
the storage rule will be of type FileStorage, because all content is to be stored on
the file system.
Example:
@ResultSet StorageRules
4
StorageRule
StorageType
IsWeblessStore
RenditionsOnFileSystem
default
FileStorage
@end@
4.3.5.2.2 Defining the Path Construction The second step is to define the path
construction for each of the storage classes for the rule. In general, the last part of the
path should be standard for all usage examples. If not, then the Oracle Content Server
system does not work well with hcs* files. However, the root path can be changed

Configuring a File Store System
4-52 Oracle Fusion Middleware System Administrator's Guide for Oracle Content Server
without affecting functionality, assuming that changing the web URL file path root is
properly acknowledged by the web server as a Oracle Content Server web root.
In this configuration, the vault, web, and web URL storage classes need to be defined
in the PathConstruction Table. The path expression for the vault has already been
discussed in Section 4.3.3.3.2, "Understanding Path Construction and URL Parsing."
$dispersion$ implements dispersion of content on the file system. The caller can
provide this dispersion on the storage rule page.
This setup only looks at the web path expression, which differs from the web URL
only in its root. In other words, the web path is an absolute path on the file system,
while the web URL is a URL served up by a web server.
Example:
@ResultSet PathConstruction
4
FileStore
PathExpression
AutoCreateLimit
IsWritable
StorageRule
vault
$#env.VaultDir$$dDocType$/$dDocAccount$/$dispersion$/$dID$$ExtensionSeparator$
$dExtension$
6
true
default
weburl
$FsHttpWebRoot$groups/$dSecurityGroup$/$dDocAccount$/documents/$dDocType$/
$dispersion$/~edisp/$dDocName$$RenditionSpecifier$$RevisionLabel$
$ExtensionSeparator$$dWebExtension$
3
false
default
web
$FsWeblayoutDir$groups/$dSecurityGroup$/$dDocAccount$/documents/$dDocType$/
$dispersion$/~edisp/$dDocName$$RenditionSpecifier$$RevisionLabel$
$ExtensionSeparator$$dWebExtension$
3
true
default
@end
■The web path construction is defined to be:
$FsWeblayoutDir$groups/$dSecurityGroup$/$dDocAccount$/documents/$dDocType$/
$dispersion$/~edisp/$dDocName$$RenditionSpecifier$$RevisionLabel$
$ExtensionSeparator$$dWebExtension$
■This is parsed into its parts as follows:
Path Segment Description
$FsWeblayoutDir$ Variable for the web-viewable path for the weblayout directory.
$FsHttpWebRoot$ Alternate Idoc Script variable for web URL.
/groups/ String.
$dSecurityGroup$ Used by the PathMetaData table. This is a required field and must
consequently be provided by the caller or descriptor creator. It is
part of a content item's metadata information.

Configuring a File Store System
Managing System Settings 4-53
4.3.5.3 Configuration for a Webless or Optional Web Store
In this example, the previous example storage rule is configured to have
IsWeblessStore set to true and consequently the web-viewable file will not be created
by default. However, if the document is processed through Inbound Refinery or
WebForms or any other component that requires a web-viewable, the web file will be
created. The location of the files is as above in the standard configuration. However,
because a file might not have a web rendition, the web URL path must be adjusted.
Also, note the use of weburl.file. This is used to compute the URL when the
web-viewable actually exists. The metadata field xWebFlag is used to determine how
the file is to be served up in the browser.
4.3.5.3.1 Defining the Storage Rule
@ResultSet StorageRules
4
StorageRule
StorageType
IsWeblessStore
RenditionsOnFileSystem
default
FileStorage
true
@end@
4.3.5.3.2 Defining the Path Construction
@ResultSet PathConstruction
4
FileStore
PathExpression
AutoCreateLimit
$dDocAccount$ This is mapped to a documentAccount algorithm which takes
dDocAccount and parses it into the standard Oracle Content Server
account presentation with all the appropriate delimiters.
/documents/ String.
$dDocType$ Used by the PathMetaData table. This is a required field and must
consequently be provided by the caller or descriptor creator. It is
part of a content item's metadata information.
$dispersion$ Implements dispersion of content on the file system.
!edisp Indicates that dispersion has ended at the point where this marker
is placed. Even if dispersion is empty there will be an ~edisp
marker.
$dDocName$ Used by the PathMetaData table. This is a required field and must
consequently be provided by the caller or descriptor creator. It is
part of a content item's metadata information.
$RenditionSpecifier$ This is provided by the renditionSpecifier, which is only of interest
if the system is creating additional renditions such as thumbnails.
Otherwise, this returns an empty string.
$RevisionLabel$ The revision label is provided by the revisionLabel algorithm
which, depending on the status of the content item, adds a
'~dRevLabel' to the path.
$ExtensionSeparator$ The extensionSeparator algorithm is used here and by default it
returns '.'.
$dWebExtension$ The dWebExtension is a required field for the web and web URL
storage classes and is passed in through the file parameters.
Path Segment Description

Configuring a File Store System
4-54 Oracle Fusion Middleware System Administrator's Guide for Oracle Content Server
IsWritable
vault
$#env.VaultDir$$dDocType$/$dDocAccount$/$dispersion$/$dID$$ExtensionSeparator$
$dExtension$
6
true
default
weburl
$HttpCgiPath$?IdcService=GET_FILE&dID=$dRevClassID$
&dDocName=$dDocName$&allowInterrupt=1&noSaveAs=1&fileName=$dOriginalName$
3
false
default
weburl.file
$FsHttpWebRoot$groups/$dSecurityGroup$/$dDocAccount$/documents/$dDocType$/
$dispersion$/~edisp/$dDocName$$RenditionSpecifier$$RevisionLabel$
$ExtensionSeparator$$dWebExtension$
3
false
default
web
$FsWeblayoutDir$groups/$dSecurityGroup$/$dDocAccount$/documents/$dDocType$/
$dispersion$/~edisp/$dDocName$$RenditionSpecifier$$RevisionLabel$
$ExtensionSeparator$$dWebExtension$
3
true
default
@end
4.3.5.4 Configuration for Database Storage
To store files in the database, you need a storage rule that is of type JdbcStorage. By
default, all content items belonging to this rule have their files stored in the database.
However, even though the files are stored in the database, there is the presumption of
an underlying file system and the system may need to temporarily cache a file on the
file system. In particular, this may happen for indexing or for some conversions.
4.3.5.4.1 Defining the Storage Rule In the default rule below, all files are stored in the
database, while the filesInWeb rule stores the vault files in the database and the
web files on the file system.
@ResultSet StorageRules
4
StorageRule
StorageType
IsWeblessStore
RenditionsOnFileSystem
default
JdbcStorage
filesInWeb
JdbcStorage
web
@end@
Tech Tip: A rule can be configured to always store renditions
belonging to a given storage class on the file system. This is most
useful for systems that store vault files in the database, but web files
on the file system.

Configuring a File Store System
Managing System Settings 4-55
4.3.5.4.2 Defining the Path Construction
@ResultSet PathConstruction
4
FileStore
PathExpression
AutoCreateLimit
IsWritable
StorageRule
vault
$#env.VaultDir$$dDocType$/$dDocAccount$/$dispersion$/$dID$$ExtensionSeparator$
$dExtension$
6
true
default
weburl.file
$FsHttpWebRoot$groups/$dSecurityGroup$/$dDocAccount$/documents/$dDocType$/
$dispersion$/~edisp/$dDocName$$RenditionSpecifier$$RevisionLabel$
$ExtensionSeparator$$dWebExtension$
3
false
default
web
$FsWeblayoutDir$groups/$dSecurityGroup$/$dDocAccount$/documents/$dDocType$/
$dispersion$/~edisp/$dDocName$$RevisionLabel$$RenditionSpecifier$
$ExtensionSeparator$$dWebExtension$
3
true
default
@end
4.3.5.5 Altered Path Construction and Algorithms
The previous examples have kept the file paths consistent with the standard
configuration. For very large implementations, this can result in directory saturation
and slow performance. The following examples aid in dispersing files over several
storage options.
4.3.5.5.1 Using Partitioning FileStoreProvider makes it easy to use partitions to create a
sparser directory structure. By default, the xPartitionId metadata field is used and
becomes a part of a content item revision's metadata information. It is recommended
that this field is disabled on the Oracle Content Server user interface, instead letting
the partition selection algorithm determine the partition to use. The partition selection
algorithm looks at all the active partitions, and as a new content enters the system, the
partitions are selected in order. Each partition has an entry in the PartitionList Table
and can be declared active. The PartitionRoot is calculated from xPartitionId,
where the value is a look up key into the PartitionList table. If no xPartitionId is
specified, the system finds the next available and active partition and uses this value
for the location calculation. The xPartitionId is then stored as part of the content
item's metadata.
To use the partition selection, define the vault storage class in the PathConstruction
table as follows:
vault
$PartitionRoot$/$dDocType$/$dDocAccount$/$dRevClassID$$ExtensionSeparator$$dExtens
ion$
6
true

Configuring a File Store System
4-56 Oracle Fusion Middleware System Administrator's Guide for Oracle Content Server
Partitions can be deactivated using the "Add/Edit Partition Page" at any time if a
system administrator needs to close a partition to contribution, for example if
maintenance is required on the storage device.
4.3.5.5.2 Adding a Partition to the Weblayout Path This example shows how to partition
both vault and weblayout directories, and also maintain valid web URL file paths.
Add the partition root to the web-viewable path and web URL file path, and edit the
variables $FsWeblayoutDir$ and $FsHttpWebRoot$ on the Storage Rule Name
Dialog.
$FsWeblayoutDir$ represents $PartitionRoot$/weblayout.
$FsHttpWebRoot$ represents $HttpWebRoot$/$xPartitionId$/weblayout/.
Define partitionRoot in the Add/Edit Partition Page as follows:
In order to keep the web URL file path consistent with the web-viewable path in the
weblayout directory, the variable xPartitionId is used so that partition1 or
partition2 is correctly replaced when creating the web URL file path.
Ensure that the web-viewable path and the web URL file path evaluate into the same
path.
■$FsWeblayoutDir$ represents $PartitionRoot$/weblayout/. For
partition1 this evaluates to
$#env.WeblayoutDir$/partition1/weblayout/. For partition2 this
evaluates to $#env.WeblayoutDir$/partition2/weblayout/.
■$FsHttpWebRoot$ represents
$HttpWebRoot$/$xPartitionId$/weblayout/. For partition1 this
evaluates to $HttpWebRoot$/partition1/weblayout/. For partition2
this evaluates to $HttpWebRoot$/partition2/weblayout/.
If you set up the partitions (partition1 and partition2) to use the partition root
of $#env.VaultDir$/partition1 and $#env.VaultDir$/partition2 instead
of the $#env.WeblayoutDir$ and $HttpWebRoot$ settings, then the weblayout
file will end up stored in the vault directory. It then can be used only for partitioning
the vault files.
4.3.5.5.3 Limiting the Number Files in a Directory Another way of dispersing files is to
alter the path so that files get partitioned out by the dRevClassID of the content item.
In the example below, the directories are limited to 10,000 files plus extra files for
additional renditions.
If your path expression contains
$RevClassID[-12:-10:0]/$dRevClassID[-10:-8:0]$/$dRevClassID[-8:-
4:0]$ and $dRevClassID is 1234567890, the result is 00/12/3456.
Note the $dRevClassID[-12:-10:0] in the path expression. This is interpreted as
follows:
■Get the characters starting at 12 back from the end of the string until you get the
character 10 back from the end of the string.
■Pad the resulting string to length 2, which 12-10, with 0 characters.
Partition Name Partition Root
partition1 $#env.WeblayoutDir$/partition1/
partition2 $#env.WeblayoutDir$/partition2/

Mapping URLs with WebUrlMapPlugin
Managing System Settings 4-57
4.4 Mapping URLs with WebUrlMapPlugin
An Oracle Content Server system uses an Oracle WebLogic server, which has a built-in
web server, to filter pages through a web browser. User requests are authenticated
with the Oracle WebLogic server user store and communicated with the Oracle
Content Server system.
The WebUrlMapPlugin component enables you to map shortened URLs to other URLs
in g] using a substitution script for the mapping, which also enables you to map long
URLs to abbreviated versions. The WebUrlMapPlugin component is installed
(enabled) by default with the Oracle Content Server instance.
This section covers these topics:
■Section 4.4.1, "Script Construction"
■Section 4.4.2, "Supported Variables for Referencing"
■Section 4.4.3, "Add/Edit URL Mapping Entries"
■Section 4.4.4, "Mapping Examples"
4.4.1 Script Construction
The shortened URLs that you can create generally use the following format:
http://myhostname.com/prefix/suffix
The actual mapping process is based on the part of the URL that follows the host name
portion. To resolve the shortened URL, the Oracle Content Server instance compares
the prefix to those in the list of defined WebUrlMapPlugin entries. If a match exists,
the Oracle Content Server instance uses the map script that corresponds to the
matching prefix to display the applicable document or Oracle Content Server page.
For more information about the suffix, see Section 4.4.2, "Supported Variables for
Referencing."
To construct a URL mapping entry using the WebUrlMaps Screen, you must establish
a prefix and define the corresponding map.
■Prefix
The prefix portion of the mapping entry is any abbreviation you want to use to
identify URLs of a certain form. For example, if you want your short URL to
return the dynamic conversions of documents, you can use idc as your prefix (for
example, the abbreviated form of dynamic converter).
When you create your prefix, do not enter a slash (/) character at the beginning of
it because the Oracle Content Server instance removes the first slash from the
incoming URL before the prefix test is performed.
■Map
The map portion of the mapping entry is the Idoc Script code that the Oracle
Content Server instance uses to resolve the shortened URL. You can use
substitution tags (<!--$variable-->) in the map portion. Examples include:
–<!--$cgipath-->
Caution: Include a slash (/) at the end of your URL map prefix.
Otherwise, your mappings can apply to many more URLs and
interfere with standard Oracle Content Server operations.

Mapping URLs with WebUrlMapPlugin
4-58 Oracle Fusion Middleware System Administrator's Guide for Oracle Content Server
–<!--$internetuser-->
–<!--$suffix-->
These substitution tags are variables that refer to the applicable parameters of a
URL.
Simple 'if' constructions are also supported. For example, the following script
segment performs a test to determine whether a value exists and is not empty:
<!--$if myconfigvar-->something<!--$endif-->
4.4.2 Supported Variables for Referencing
The map portion of the URL mapping entry uses the following standard variables for
referencing:
■The CGI path
This is the current CGI path of the Oracle WebLogic Server web server filter's
configured Oracle Content Server instance. The web server filter is configured to
provide both communication and security for this Oracle Content Server instance.
A typical example is /idcm1/idcplg.
■The 'suffix' parameter
The value of the suffix variable (<!--$suffix-->) is derived from the part of the
URL that follows the preliminary mapping 'prefix' and before the question mark
(?). Any slashes (/) at the beginning of the suffix are removed before being
substituted into this variable. For example, in the following URL, 'dc' is the
mapping prefix followed by the suffix.
http://myhostname.com/dc/mydocumentname
After removing the slash, mydocumentname is used as the value for the suffix
variable that is used as a substitution tag in the map portion of the mapping entry.
Also, the suffix variable does not include any CGI parameters. Therefore, in the
following URL, mydocumentname is still used as the suffix variable's value.
http://myhostname.com/dc/mydocumentname?a=1
To enforce the slash separation between the prefix and suffix, add the slash at the
end of your prefix abbreviation.
■Any plugin variable
For example, you could use the construct <!--$internetuser--> to substitute
for the user ID of the currently logged-in user.
■Any CGI parameter
4.4.3 Add/Edit URL Mapping Entries
To add or edit URL mapping entries:
1. Select the Administration tray, then click WebUrlMapPlugin.
The WebUrlMaps Screen is displayed.
2. Enter the appropriate values in the Prefix and Map fields to edit the existing
mapping entries, or define new entries, or both.
3. Click Update.

Mapping URLs with WebUrlMapPlugin
Managing System Settings 4-59
The screen refreshes and the Prefix and Map field values are saved. If all of the
displayed fields are populated, two additional Prefix and Map field pairs are
displayed after the screen is redisplayed.
4.4.4 Mapping Examples
The following examples demonstrate mapping scripts and techniques.
■Section 4.4.4.1, "Info Update Form"
■Section 4.4.4.2, "Dynamic Conversion"
■Section 4.4.4.3, "CGI parameters"
4.4.4.1 Info Update Form
You can define a web URL mapping script that enables you to create a shortened URL
to generate the Info Update Form for existing content items. You can write the
mapping script to allow users to enter any identification variable for a particular
document. For example, all URLs with the following format:
http://myhostname.com/u/mydoc_parameter
can be mapped to the URL:
http://myhostname.com/idcm1//idcplg?IdcService=GET_UPDATE_
FORM&dDocName=mydocumentname
To map URLs, define the following web URL map entry using the WebUrlMaps
Screen:
■Prefix:
u/
■Map:
<!--$cgipath-->?IdcService=GET_UPDATE_
FORM<!--$suffix-->&myparam=<!--$myparam-->
4.4.4.2 Dynamic Conversion
Dynamic Converter must be installed for this URL mapping example to work.
You can define a web URL mapping script that enables you to create shortened URLs
to various dynamic conversions of documents. For example, all URLs with the
following format:
http://myhostname.com/dc/mydocumentname
can be mapped to the URL:
http://myhostname.com/idcm1/idcplg?IdcService=GET_DYNAMIC_
CONVERSION&dDocName=mydocumentname&RevisionSelectionMethod=LatestReleased
To map URLs, define the following web URL map entry using the WebUrlMaps
Screen:
Important: The WebUrlMapPlugin feature is designed to support
hundreds of mapping entries. However, be aware that thousands of
mapping entries will impact performance of the web server.

Connecting to Outside Entities with Providers
4-60 Oracle Fusion Middleware System Administrator's Guide for Oracle Content Server
■Prefix:
dc/
■Map:
<!--$cgipath-->?IdcService=GET_DYNAMIC_
CONVERSION&dDocName=<!--$suffix-->&RevisionSelectionMethod=LatestReleased
4.4.4.3 CGI parameters
You can also directly reference CGI parameters. For example, URLs with the following
format:
http://myhostname.com/dcp/mydocumentname?myparam=myvalue
can be mapped to the URL:
http://myhostname.com/idcm1/idcplg?IdcService=GET_DYNAMIC_
CONVERSION&dDocName=mydocumentname&RevisionSelectionMethod=LatestReleased&myparam=myvalue
To map URLs, define the following web URL map entry using the WebUrlMaps
Screen:
■Prefix:
dcp/
■Map:
<!--$cgipath-->?IdcService=GET_DYNAMIC_
CONVERSION&dDocName=<!--$suffix-->&RevisionSelectionMethod=LatestReleased&myparam=<!--$myparam-->
4.5 Connecting to Outside Entities with Providers
This section covers these topics:
■Section 4.5.1, "About Providers"
■Section 4.5.1.1, "Oracle Content Server Providers"
■Section 4.5.1.2, "Choosing an Appropriate Provider"
■Section 4.5.1.3, "Security Providers"
■Section 4.5.2.1, "Adding an Outgoing Provider"
■Section 4.5.2.2, "Adding a Database Provider"
■Section 4.5.2.3, "Adding an Incoming Provider"
■Section 4.5.2.4, "Adding a Preview Provider"
■Section 4.5.2.7, "Adding a JPS User Provider"
■Section 4.5.2.5, "Adding an Incoming Security Provider"
■Section 4.5.2.6, "Adding an Outgoing Security Provider"
■Section 4.5.2.9, "Editing Provider Information"
■Section 4.5.2.10, "Deleting a Provider"

Connecting to Outside Entities with Providers
Managing System Settings 4-61
4.5.1 About Providers
A provider is an Application Programming Interface (API) that establishes connection
between the Oracle Content Server instance and outside entities. These entities can be:
■Oracle WebLogic Server
■LDAP servers
■databases
■server sockets
■file store system
■Inbound Refinery
4.5.1.1 Oracle Content Server Providers
By default, an Oracle Content Server instance has three system providers:
■SystemDatabase: The system database.
■SystemServerSocket: A server socket that listens for browser requests.
■DefaultFileStore: A file store system.
In addition, you can create the following types of providers:
■Outgoing: A connection initiated to an outside entity. You can use this type to
communicate between Oracle Content Server instances. If you want to use SSL
with an outgoing provider, see details in Section 4.5.1.3, "Security Providers."
■Database: An information repository server that provides an API for connecting
and communicating with it. This retrieves information and enables information to
be changed in the database. Examples of this type are system databases.
■Incoming: A connection initiated from an outside entity like a browser or client
application. The provider listens on a specified port to be aware of incoming
connections. If you want to use SSL with an incoming provider, see details in
Section 4.5.1.3, "Security Providers."
■Preview: An outgoing provider connection to Oracle Content Publisher, for use
with the optional HTML Preview feature.
■LDAP: A connection initiated to an LDAP (Lightweight Directory Access Protocol)
server for managing external user access to the Oracle Content Server instance.
This type of provider is supported by the ActiveDirectoryLdap component, which
is installed (disabled) by default during Oracle Content Server installation. As of
11g Release 1 (11.1.1) its functionality is mostly superseded by JpsUserProvider, in
particular for nested group support.
■HTTP: A connection that allows communication between Oracle Content Server
instances using the HTTP protocol. This type of provider requires the Proxy
Credentials Extension component, which is installed (enabled) by default during
Oracle Content Server installation.
■JpsUserProvider: A connection to an Oracle WebLogic Server instance. This
provider uses Java Platform Security (JPS) to perform user authentication, user
authorization, and retrieval of user metadata through an Oracle WebLogic Server
instance. This type of provider is supported by the JpsUserProvider component,
which is installed (enabled) by default with the Oracle Content Server instance.

Connecting to Outside Entities with Providers
4-62 Oracle Fusion Middleware System Administrator's Guide for Oracle Content Server
4.5.1.2 Choosing an Appropriate Provider
The different types of providers described in the previous section are added under
specific circumstances to work with various other Oracle products or utilities. The
following subsections describe those conditions and the particular provider types that
must be added in each scenario.
■Section 4.5.1.2.1, "When to Add an Outgoing Provider"
■Section 4.5.1.2.2, "When to Add a Database Provider"
■Section 4.5.1.2.3, "When to Add an Incoming Provider"
■Section 4.5.1.2.4, "When to Add a Preview Provider"
■Section 4.5.1.2.5, "When to Add an LDAP Provider"
■Section 4.5.1.2.6, "When to Edit JpsUserProvider"
4.5.1.2.1 When to Add an Outgoing Provider Outgoing providers are added to use the
Oracle Content Server Archiver utility and Inbound Refinery. If you want to use SSL or
keepalive with an outgoing provider, see details in Section 4.5.1.3, "Security
Providers."
■Archiver Utility (Oracle Content Server): The Archiver is a utility within the core
Oracle Content Server product that enables system administrators to copy and
remove content and store it for future use. Users can query a set of content from
the Oracle Content Server instance and export it to an archive. Archives can then be
imported to other Oracle Content Server instances or can be imported back to the
same instance with changed metadata fields.
An outgoing provider is required to use the Archiver Transfer feature, which is
used to archive content across a firewall or between two systems that do not share
a file system. For more information about the Transfer feature, the different types
of transfers and the outgoing provider requirements, see the Managing Migration
chapter for more information.
For additional reference information about outgoing providers and each specific
field, see Section A.1.6.4, "Outgoing Socket Provider Page."
■Inbound Refinery: The Inbound Refinery server processes content checked in to
Oracle Content Server and converts it to specified formats. An outgoing
connection to the Inbound Refinery server is necessary for communication with
Oracle Content Server. For details, see Oracle Fusion Middleware Administrator's
Guide for Conversion.
4.5.1.2.2 When to Add a Database Provider Database providers are added to use external
databases.
Frequently, it is desirable or necessary to perform database queries on databases that
are not the default Oracle Content Server database. In this case, customized database
providers can be created that make it possible to access any data from any application,
regardless of which database management system is handling the data. Using
customized database providers to integrate external databases into a Oracle Content
Server system, search results can be combined and viewed on a single search screen.
Additionally, data can be imported from these external database sources.
Administrators can create a database provider in one of two methods:
■Use the Oracle WebLogic Server Administration Console to create an Oracle
WebLogic Server data source to the database, then configure an Oracle Content
Server database provider to use that data source. For information, see "Creating a

Connecting to Outside Entities with Providers
Managing System Settings 4-63
JDBC Data Source for a WebLogic Domain Server" in Oracle Fusion Middleware
Developer's Guide for Oracle Application Development Framework.
■Create an Oracle Content Server database provider to connect directly to the
database through a JDBC connection, without using an Oracle WebLogic Server
data source. This mode is provided for instances with pre-existing connections in
their configurations.
For additional reference information about Oracle Content Server database providers
and each specific field, see Section A.1.6.5, "Database Provider Page."
4.5.1.2.3 When to Add an Incoming Provider Incoming providers are added to use
WebDAV support and the Oracle Content Server Archiver utility. If you want to use
SSL or keepalive with an incoming provider, see details in Section 4.5.1.3, "Security
Providers."
■Oracle WebDAV Support: With version 6.2 of Oracle Content Server, you could
implement WebDAV (Web-Based Distributed Authoring and Versioning) support
using an incoming provider and the Oracle Content Server integrated Tomcat
servlet engine. In Oracle Content Server version 7.0 and later, however, WebDAV
support is provided by a custom feature, so the provider and servlet engine are no
longer necessary.
See the Oracle Fusion Middleware Applications Administrator's Guide for Content
Server for more information.
■Archiver Utility (Oracle Content Server): The Archiver is a utility within the core
Oracle Content Server product that enables system administrators to copy and
remove content and store it for future use. Users can query a set of content from
the Oracle Content Server instance and export, import, or replicate to another
instance, or change metadata fields. Tasks most frequently performed involve
transfer, backup, and reorganization of information within the system.
Generally, when data or content items are moved from one repository to another,
the Archiver utility uses a push technology to relocate the files. However,
occasionally your system might require that the files be pulled rather than pushed.
In this case, an incoming provider must be created. For additional reference
information about incoming providers and each specific field, see Section A.1.6.6,
"Incoming Provider Page."
Consulting Services are required perform this operation.
4.5.1.2.4 When to Add a Preview Provider Preview providers are added to use HTML
Preview and Content Categorizer.
■HTML Preview: HTML Preview is a feature that provides users with instant
feedback on how their content will display on the published web site. This feature
enables users to modify the original content before it is actually checked in. HTML
Preview also helps users ensure that correct metadata has been assigned to the
content. During the installation process, a preview provider must be created. For
additional overview and installation information about HTML Preview, see the
Oracle Fusion Middleware Application Administrator's Guide for Content Server.
■Content Categorizer: Content Categorizer suggests metadata values for
documents being checked into Oracle Content Server or for existing documents
that need to have metadata reapplied. For Content Categorizer to recognize
structural properties of a document, the file must be converted to XML.
If you are using Content Publisher to set up a template for the required XML
conversion process, the HTML Preview feature must be configured as a preview

Connecting to Outside Entities with Providers
4-64 Oracle Fusion Middleware System Administrator's Guide for Oracle Content Server
provider. (HTML Preview is a feature that enables users to preview their content
and see what the converted output from Content Publisher will look like.)
For more information about Content Categorizer, see the Oracle Fusion Middleware
Application Administrator's Guide for Content Server. This guide provides relevant
information about any additional products that may be required or are optional.
For additional reference information about preview providers and each specific
field, see Section A.1.6.7, "Preview Provider Page."
4.5.1.2.5 When to Add an LDAP Provider Lightweight Directory Access Protocol (LDAP)
is a directory service protocol that runs over TCP/IP. It provides high-level
functionality to manage resources within a network and works with Oracle Content
Server to manage security and user authentication. The LDAP directory service model
is based on a collection of attributes and is used to access information stored in an
information directory. As such, LDAP is used to validate a set of user name and
password credentials against an authentication source. This process will grant
privileges to a user to give them access to web resources.
An LDAP server provides a single source for user-related information that can be
accessed from applications such as Oracle Content Server and other Oracle product
modules. Instead of maintaining user information within the Oracle Content Server
instance, you can integrate an LDAP directory to authenticate user credentials to the
Oracle Content Server instance.
If you decide to use an LDAP server (other than Active Directory, which can be
integrated directly with the Oracle Content Server instance), you must create an LDAP
provider to set up communication between the Oracle Content Server instance and the
LDAP server. When properly configured, the LDAP provider authorizes external
users through the mapping properties that are linked to role assignments and account
permissions (defined on the Ldap Provider page).
For additional reference information about LDAP providers and each specific field, see
Section A.1.6.8, "LDAP Provider Page."
Although not required, you are encouraged to have Consulting Services assist you
with creating an LDAP security model and deploying the LDAP integration. Contact
your sales representative for more information.
LDAP integration is also useful with the following content management products and
architectures:
■Portlets on WebSphere: WebSphere users can access Oracle Content Server
through the Oracle Content Integration Suite. This portal interface enables users
and developers to retrieve, view, and download Oracle Content Server content
items based on full text or metadata search queries. When using the Content
Integration Suite, the WebSphere Application Server is recommended. If you are
using a WebSphere Portal Server, the Oracle Content Portal Suite is a
recommended addition to the Content Integration Suite.
The Content Integration Suite connects directly to the Oracle Content Server
instance instead of the database. This direct connection avoids the authentication
step at the web server and enables the developer total control over the
authentication and authorization of users. The advantage is you can authenticate
Note: As of 11g Release 1 (11.1.1), LDAP provider functionality is
superseded by JpsUserProvider. Use of the LDAP provider is not
recommended. See Section 4.5.1.2.6, "When to Edit JpsUserProvider."

Connecting to Outside Entities with Providers
Managing System Settings 4-65
users at the Content Integration Suite layer however you want. You can integrate
with an LDAP server at the application server level, or you can ask the Oracle
Content Server instance to validate the passwords for you.
For more information about using WebSphere with the Content Integration Suite
and the Content Portal Suite, see the documentation provided with the WebSphere
Portal Server, WebSphere Application Server, Oracle Content Integration Suite,
and Oracle Content Portal Suite.
■Content Tracker: Content Tracker is a system that is built from a collection of
software features that, when combined, enable users to use a standard browser to
track content usage through an integrated set of analytical tools. The data
provided by the Oracle Content Server instance is derived from logged data that
includes web server log data, Oracle Content Server data, and user information.
Content Tracker accesses this data, performs analysis on it, and produces
descriptive reports. Integrating an LDAP directory server with Content Tracker is
optional. However, if LDAP is used, an LDAP provider must be created.
For more information about the related data repositories, report generation,
producing queries and installation procedures, see the Oracle Fusion Middleware
Application Administrator's Guide for Content Server.
4.5.1.2.6 When to Edit JpsUserProvider The system-defined JpsUserProvider connects to
an Oracle WebLogic Server instance and supports the Oracle WebLogic Server
authentication mechanism (Basic, Form, Single Sign-On, WNA, and so forth). Java
Platform Security (JPS) provides a uniform interface for authenticating and
authorizing users from Oracle Fusion Middleware applications regardless of the
back-end user storage (XML, LDAP, database, Active Directory, and so on). JPS API
calls are used to perform user authentication, user authorization and retrieval of user
metadata.
The JpsUserProvider component is installed and enabled as a system component when
the Oracle Content Server instance is installed against an Oracle WebLogic Server
instance. It also is available as a standard Oracle Content Server component. You can
edit the JpsUserProvider configuration from the Providers page in the Oracle Content
Server instance. The connection configuration also can be edited through the
jps-config.xml file to use identity and credential stores.
It is unlikely that a site would ever add a JpsUserProvider in addition to the
system-defined JpsUserProvider. Adding another such provider could cause problems
for the Oracle Content Server installation.
If you want to authenticate against a JPS store, JpsUserProvider can be used to share
the same security storage as another application on an Oracle WebLogic Server
instance. For example, you could use JpsUserProvider to share security storage with
Image and Processing Manager software installed on an Oracle WebLogic Server
instance.
4.5.1.3 Security Providers
This section covers the following topics:
■Section 4.5.1.3.1, "About Security Providers"
Note: As of 11g Release 1 (11.1.1), LDAP provider functionality is
superseded by JpsUserProvider, in particular for cases such as nested
group support.

Connecting to Outside Entities with Providers
4-66 Oracle Fusion Middleware System Administrator's Guide for Oracle Content Server
■Section 4.5.1.3.2, "Planning to Use Security Providers"
■Section 4.5.1.3.3, "Keystores and Truststore"
4.5.1.3.1 About Security Providers The SecurityProviders component can be used to add
security by extending the functionality of basic incoming and outgoing socket
providers with two new types of providers:
■Secure Socket Layer (SSL) provider
■Keepalive provider
Appropriate use of security providers, along with keys and certificates, can improve
the security for network and Internet communication with the Oracle Content Server
instance. Benefits of using the SecurityProviders component include the following:
■SSL enhances security for web communication by providing communication
encryption and authentication.
■Security providers enable use of certificates for socket or server authentication.
■Keepalive and connection pooling logic help avoid SSL expense overhead by
reducing the amount of SSL socket creation and teardown.
The SecurityProviders component is installed (enabled) by default with the Oracle
Content Server instance.
References
To use the SecurityProviders component it is necessary to be familiar with socket
providers, security and authentication, SSL, keepalive, and other aspects of security
for network communication. The following sources of information can be useful in
working with the SecurityProviders component:
■Section 4.5, "Connecting to Outside Entities with Providers"
■Sun Java Secure Socket Extension (JSSE) Reference Guide for the Java 2 SDK, Standard
Edition
This online document is available from Sun Microsystems at www.sun.com. It
contains an extensive Related Documents section that includes web links to
reference books, security standards, government security policies and regulations,
and a list of books on cryptography and SSL.
■keytool Key and Certification Management Tool
This online document is available from Sun Microsystems at www.sun.com.
■RSA's Public Key Cryptography Standards
This online document is available from RSA at www.rsasecurity.com.
■RSA's Cryptography FAQ
This online document is available from RSA at www.rsasecurity.com.
■SSL Certificate FAQ
This online document is available from The Linux Documentation Project at
www.tldp.org.
Terminology
The following table shows definitions for some of the security terms used in this
section. For detailed information refer to the list of information references or to
security and authentication standards sources.

Connecting to Outside Entities with Providers
Managing System Settings 4-67
4.5.1.3.2 Planning to Use Security Providers It is recommended that you determine how
you want to use security providers before implementing SSL socket providers or
keepalive socket providers. Examine the keepalive and SSL connection types and
determine whether additional configuration is required to use the security providers
you select, such as a need to create keystores or a truststore. See the additional sources
of information listed in Section 4.5.1.3.1, "About Security Providers."
The following sections provide more information about the SSL and keepalive
provider types, including the Java classes used to control the behavior of the provider
types, and additional configuration that may be necessary.
■Section , "Keepalive Connections"
■Section , "SSL Connections"
■Section , "Additional Configuration"
Keepalive Connections
The keepalive feature enables persistent connections and the pooling of socket
connections for service requests. The setup for keepalive connections is most useful in
situations where connection setup and teardown can take a considerable amount of
time, and you want to minimize the time spent on that activity. The SecurityProviders
component provides two keepalive socket providers: incoming and outgoing.
The following Java classes are used to set up the keepalive incoming socket provider:
The following Java classes are used to set up the keepalive outgoing socket provider:
Term Description
Certificate A digital signature that verifies the identity and public key for an
entity (a person or company). A certificate can be issued by a
Certification Authority or by an individual entity.
Certificate Authority (CA) An entity that issues certificates for other entities, and is
recognized as a well-known and trusted source for certificates,
such as VeriSign and Thawte.
Keystore A file or database of information for keys, used for authentication
processing.
Private key Information packaged as a key that is known only to the entity
that issues it. Private keys are used in generating signatures.
Public key Information packaged as a key that is publicly associated with an
entity. Public keys are used in verifying signatures.
SSL Secure Socket Layer, a protocol for secure network
communication using a combination of public and secret key
technology.
Truststore A file or database of keys that the trust manager has determined
can be trusted.
Java Class Description
Provider Class idc.provider.ExtendedSocketIncomingProvider
Connection Class idc.provider.KeepaliveSocketIncomingConnection
Server Thread Class idc.server.KeepaliveIdcServerThread

Connecting to Outside Entities with Providers
4-68 Oracle Fusion Middleware System Administrator's Guide for Oracle Content Server
SSL Connections
The SSL provider setup enables the use of SSL connections in a keepalive
environment. This setup is recommended over a simple SSL provider setup because it
helps minimize the cost of SSL socket setup and teardown. The SecurityProviders
component provides two SSL socket providers with keepalive: incoming and
outgoing.
The following Java classes are used to set up the SSL keepalive incoming socket
provider:
The following Java classes are used to set up the keepalive SSL outgoing socket
provider:
Additional Configuration
Depending on which type of security provider you choose, there can be additional
required configuration.
■Keepalive and SSL outgoing providers—The Add Provider page includes a Num
Connections field, which specifies the number of connections to pool.
■SSL incoming providers—The Add Provider page includes two additional
options:
– Request Client Auth option—If clients are able, they should authenticate
themselves when they make a connection.
– Require Client Auth option—Clients must authenticate themselves in order
to make a connection.
SSL providers may also require setup of a keystore or keystores, and a truststore, for
both the client and server, depending on the value of the Request Client Auth option,
the value of the Require Client Auth option, and what type of Certification Authority
signed the certificates handled by these options. For information on keystores and
truststore refer to Section 4.5.1.3.3, "Keystores and Truststore."
Java Class Description
Provider Class idc.provider.KeepaliveSocketOutgomingProvider
Connection Class idc.provider.KeepaliveSocketOutgomingConnection
Request Class idc.server.KeepaliveServerRequest
Java Class Description
Provider Class idc.provider.ssl.SSLSocketIncomingProvider
Connection Class idc.provider.KeepaliveSocketIncomingConnection
Server Thread Class idc.server.KeepaliveIdcServerThread
Java Class Description
Provider Class idc.provider.KeepaliveSocketOutgoingProvider
Connection Class idc.provider.ssl.SSLSocketOutgoingConnection
Request Class idc.provider.KeepaliveServerRequest

Connecting to Outside Entities with Providers
Managing System Settings 4-69
4.5.1.3.3 Keystores and Truststore SSL providers may require use of keystores and may
require a truststore. Keystores are files that hold public and secret key information for
use in SSL. A truststore contains certificates that have been determined to be trusted. If
a certificate used on the server and client is signed by a well-known Certification
Authority (CA) such as VeriSign or Thawte, then a truststore is not necessary, because
the default JVM truststore contains the certificates of these CAs. Truststores are
needed when certificates used by the SSL providers are self-signed or signed by a
private CA. If SSL providers require keystores, and a truststore, then they must be
created and managed.
The following sections provide overview information about keystores and truststore.
■Section , "When to Use Keystores and Truststore"
■Section , "Specifying Keystore and Truststore Information"
■Section , "Generating a Keystore"
■Section , "Creating a Truststore"
For detailed information on keystores and truststores refer to the sources of
information listed in Section 4.5.1.3.1, "About Security Providers."
When to Use Keystores and Truststore
The following examples present different situations and uses for keystores and a
truststore.
■The server requires a keystore containing a signed SSL certificate in order to create
SSL sockets.
■The server requests or requires client authentication, which may require a
truststore. If the client's certificate is not signed by a well-known CA, then the
server will need a truststore containing that CA's certificate.
■The server requests or requires client authentication, which may require that the
client have a keystore in which it stores the certificate the client presents for
authentication.
■The server uses a certificate that hasn't been signed by a well-known CA, therefore
the client will require a truststore that contains the server's certificate.
Specifying Keystore and Truststore Information
In order to use keystore and truststore information, the SSL incoming and outgoing
providers require that a file named sslconfig.hda be set up in the providers directory
(next to the provider.hda file). The sslconfig.hda file contains configuration
information you specify for your keystore and truststore. It has a format similar to the
following example. For security reasons, there is no web interface to assist in editing
this file; all edits must be done manually using a text editor. Make certain no trailing
spaces are included at the end of each line of this or any .hda file.
@Properties LocalData
TruststoreFile=/servers/idc/data/providers/ssloutgoing1/truststore
KeystoreFile=/servers/idc/data/providers/ssloutgoing1/keystore
@end
Configuration Name Value Description
TruststoreFile The full path to the truststore file.
KeystoreFile The full path to the keystore file.

Connecting to Outside Entities with Providers
4-70 Oracle Fusion Middleware System Administrator's Guide for Oracle Content Server
Generating a Keystore
This section describes the basic process for generating a keystore. You must determine
the specific requirements and names for keys and keystores you want to create for
your SSL providers. You can store keystore files wherever you want, because the
sslconfig.hda file contains full paths for its KeystoreFile config settings. However, it is
recommended that keystore files are stored in the
IntradocDir/data/providers/provider_name directory (next to the provider.hda and
sslconfig.hda files) or in the IntradocDir/config/ directory. Aliases and passwords are
set using the provider page in the Oracle Content Server instance.
For detailed information on how to use the keytool utility to generate a keystore, see
the document titled keytool Key and Certification Management Tool, available online from
Sun at www.sun.com.
To use keytool you must have the utility in your path when you enter the command.
1. Create a key in a keystore. The following command-line example shows how to
create a key entry with the name alias in a keystore with the name keystore. This
command prompts for a keystore password, for information that will be used to
generate the key, and for a password for the key itself. If the password on the key
is different from the password on the keystore, then the values KeystoreAlias and
KeystoreAliasPassword are required to retrieve the key.
keytool -genkey -v -alias alias -keystore keystore
2. Generate a certificate signing request.The following command-line example shows
how to generate a certificate signing request for the key entry named alias in the
keystore named keystore, which is then stored in the file named csr_file. This file
can be sent to a CA to be signed.
keytool -certreq -v -alias alias -keystore keystore -file csr_file
3. Import the CA's certificate into the keystore. The keytool checks the chain of trust
on the user's certificate upon import. If the certificate was signed by a CA that is
not well-known and the keytool knows nothing about the CA, the certificate is
rejected. Therefore any certificate from a CA that is not well-known must first be
imported into the keystore to permit the user's certificate to successfully be
imported in the next step. The following command line example shows how to
import a certificate in a file named cert_file into the keystore named keystore:
keytool -import -v -alias ca_alias -keystore keystore -file cert_file
4. Import the signed certificate back into the keystore. Once the certificate signing
request has been received by a CA and the signed certificate is sent back from the
CA, the certificate can be read into the keystore entry identified by alias.The
following command line example shows how to import the signed certificate.
Note: The Java keytool utility has a feature that prevent direct
interaction with private keys. This feature means that a certificate that
is generated using keytool is "stuck" in the keystore; there is no way to
retrieve the private key portion of the certificate. Inversely, there is no
way for keytool to import a pre-existing certificate into a Java
keystore.
The Portecle Java keystore allows the import and export of private
keys from Java keystores. For information refer to
portecle.sourceforge.net.

Connecting to Outside Entities with Providers
Managing System Settings 4-71
keytool -import -v -alias alias -keystore keystore_name -file csr_file
5. Check that everything is in the keystore.
keytool -list -v -keystore keystore_name
Creating a Truststore
This section describes the basic process for generating a truststore. A truststore is
necessary when an SSL provider uses keys that have not been signed by a well-known
Certification Authority. A truststore contains only public certificates that have been
verified by the person managing the truststore (the trust manager) for the Oracle
Content Server instance. You must determine the specific requirements and name for
the truststore you want to create. You can store a truststore file wherever you want,
because the sslconfig.hda file contains a full path for a TruststoreFile config setting.
However, it is recommended that a truststore file is stored in the
IntradocDir/data/providers/provider_name directory (next to the provider.hda and
sslconfig.hda files) or in the IntradocDir/config/ directory.
For detailed information on how to use the keytool utility to generate a truststore refer
to the document titled keytool Key and Certification Management Tool, available
online from Sun at www.sun.com.
To use keytool you must have the utility in your path when you enter the command.
The following command line example shows how to create a truststore:
keytool -import -v -alias alias -keystore keystore -file cert_files
4.5.2 Managing Providers
The following tasks are involved in managing providers.
■Adding an Outgoing Provider
■Adding a Database Provider
■Adding an Incoming Provider
■Adding a Preview Provider
■Adding an Incoming Security Provider
■Adding an Outgoing Security Provider
■Adding a JPS User Provider
■Adding an HTTP Outgoing Provider
■Editing Provider Information
■Deleting a Provider
4.5.2.1 Adding an Outgoing Provider
To add an outgoing provider:
Variable Description
alias Alias name for the key.
keystore Name of the keystore.
cert_file Path to the Certification
Authority's certificate.

Connecting to Outside Entities with Providers
4-72 Oracle Fusion Middleware System Administrator's Guide for Oracle Content Server
1. Using a web browser, access your Oracle Content Server home page and select
Administration, then Providers.
The Providers Page is displayed.
2. In the Create a New Provider table, click Add in the Action column for the
outgoing provider type.
The Outgoing Socket Provider Page is displayed.
3. Enter configuration values for the following:
Required Fields
■Provider Name
■Provider Description
■Server Host Name
■Server Port
■Provider Class (predefined)
Optional Fields
■Connection Class (predefined)
■Configuration Class
■Relative Web Root
■HTTP Server Address
■Instance Name
■Required Roles
■Account Filter
Optional Checkboxes
■Proxied
■Notify Target
■Users
■Released Documents
4. Click Add.
The Providers page is displayed, with the new provider added to the Providers
table.
5. Restart the Oracle Content Server instance.
4.5.2.2 Adding a Database Provider
Database provider configuration is specified when Oracle Universal Content
Management and the Oracle Content Server instance is installed in an Oracle
WebLogic Server domain.

Connecting to Outside Entities with Providers
Managing System Settings 4-73
To add a database provider:
1. Using a web browser, access your Oracle Content Server home page and select
Administration, then Providers.
The Providers Page is displayed.
2. In the Create a New Provider section, click Add in the Action column for the
database provider type.
The Database Provider Page is displayed.
3. Enter configuration values for the following:
Required Fields
■Provider Name
■Provider Description
■Provider Class (predefined)
■Database Type
■JDBC Driver
■JDBC Connection String
■Test Query
Optional Fields
■Connection Class (predefined)
■Configuration Class
■Data Source
■Database Directory
■Database Name
■JDBC User
■JDBC Password
■Number of Connections (default provided)
■Extra Storage Keys (default provided)
■Additional Settings
Optional Checkboxes
■Use Data Source
4. Click Add.
The Providers Page is displayed, with the new provider added to the Providers
table.
Note: If you want to configure database connections for a standalone
Oracle Content Server system, see Section 3.4.2.1, "Configuring a
SystemDatabase Provider for Standalone Mode," Section 3.4.2.2,
"Configuring a JDBC Database Driver for Standalone Mode," and
Section 3.4.2.3, "Configuring an External Database Provider for
Standalone Mode."

Connecting to Outside Entities with Providers
4-74 Oracle Fusion Middleware System Administrator's Guide for Oracle Content Server
5. Restart the Oracle Content Server instance.
4.5.2.3 Adding an Incoming Provider
Consulting Services are required to use providers to connect to server sockets.
To add an incoming provider:
1. Using a web browser, access your Oracle Content Server home page and select
Administration, then Providers.
The Providers Page is displayed.
2. In the Create a New Provider section, click Add in the Action column for the
incoming provider type.
The Incoming Provider Page is displayed.
3. Enter configuration values for the following:
Required Fields
■Provider Name
■Provider Description
■Server Port
■Provider Class (predefined)
Optional Fields
■Connection Class (predefined)
■Configuration Class
4. Click Add.
The Providers page is displayed, with the new provider added to the Providers
table.
5. Restart the Oracle Content Server instance.
4.5.2.4 Adding a Preview Provider
See the Oracle Fusion Middleware Application Administrator's Guide for Content Server for
instructions on adding the Preview provider. The HTML Preview feature zip file and
guide are available for download from the Oracle Technology Network web site.
4.5.2.5 Adding an Incoming Security Provider
To add an incoming security provider, follow these steps:
1. Using a web browser, access your Oracle Content Server home page and select
Administration, then Providers.
The Providers Page is displayed.
2. In the Create a New provider table, click Add in the Action column for the
keepaliveincoming or the sslincoming provider type. The keepaliveincoming
Provider Page or the sslincoming Provider Page is displayed.
3. Enter configuration values for the following:
Required Fields
■Provider Name
■Provider Description

Connecting to Outside Entities with Providers
Managing System Settings 4-75
■Provider Class (predefined)
■Server Port
Optional Fields
■Connection Class (predefined)
■Configuration Class
■Server Thread Class (predefined)
Optional Checkboxes (sslincoming provider only)
■Request Client Authentication
■Require Client Authentication
4. Click Add. The Providers Page is displayed with the new provider added to the
Providers table.
5. Restart the Oracle Content Server instance.
4.5.2.6 Adding an Outgoing Security Provider
To add an outgoing security provider, follow these steps:
1. Using a web browser, access your Oracle Content Server home page and select
Administration, then Providers.
The Providers Page is displayed.
2. In the Create a New provider table, click Add in the Action column for the
keepaliveoutgoing or ssloutgoing provider type. The keepaliveoutgoing Provider
Page or the ssloutgoing Provider Page is displayed.
3. Enter configuration values for the following:
Required Fields
■Provider Name
■Provider Description
■Provider Class (predefined)
■Server Host Name (predefined)
■Server Port
■Instance Name
■Relative Web Root
Optional Fields
■Connection Class (predefined)
■Configuration Class
■Request Class (predefined)
■Number of Connections (predefined)
■HTTP Server Address
■Required Roles
■Account Filter
Optional Checkboxes

Connecting to Outside Entities with Providers
4-76 Oracle Fusion Middleware System Administrator's Guide for Oracle Content Server
■Proxied
■Notify Target
■Users
■Released Documents
4. Click Add. The Providers Page is displayed, with the new provider added to the
Providers table.
5. Restart the Oracle Content Server instance.
4.5.2.7 Adding a JPS User Provider
A defaut JPS User provider, which integrates with Oracle JPS (for an Oracle WebLogic
Server instance), is provided with installation of the Oracle Content Server system. It is
unlikely that another JPS User provider would be needed. However, if you need to
add a user provider, follow these steps:
1. Using a web browser, access your Oracle Content Server home page and select
Administration, then Providers.
The Providers Page is displayed.
2. In the Create a New Provider table, click Add in the Action column for the jpsuser
provider type.
The JPS User Provider Page is displayed.
3. Enter configuration values for the following:
Required fields
■Provider Name
■Provider Description
■Provider Class (predefined)
■Source Path
Optional fields
■Connection Class
■Configuration Class
■JPS Context
■Default Network Roles
4. To specify an attribute map:
a. Select an information field from the JPS Attributes list.
b. Select an Oracle Content Server user information field from the User Attribute
list.
c. Click Add.
The attribute map is added to the text box.
d. If necessary, edit the attributes directly in the Attribute Map text box.
5. If necessary, change or add Default Network Roles.
6. Click Add.

Connecting to Outside Entities with Providers
Managing System Settings 4-77
The Providers page is displayed, with the new provider added to the Providers
table.
7. Restart the Oracle Content Server instance.
8. Restart the web server.
4.5.2.8 Adding an HTTP Outgoing Provider
To add an HTTP outgoing provider:
1. Using a web browser, access your Oracle Content Server home page and select
Administration, then Providers.
The Providers Page is displayed.
2. In the Create a New Provider table, click Add in the Action column for the
httpoutgoing provider type.
The Outgoing Http Provider Page is displayed.
3. Enter configuration values for the following:
Required fields
■Provider Name
■Provider Description
■Provider Class (predefined)
■CGI URL
■Instance Name
■Relative Web Root
Optional fields
■Connection Class (predefined)
■Configuration Class
■Connection Password Name
■Connection Password
■Client IP Filter
4. Click Add.
The Providers page is displayed, with the new provider added to the Providers
table.
5. Restart the Oracle Content Server instance.
4.5.2.9 Editing Provider Information
To edit information for an existing provider (except for default system providers):
1. Using a web browser, access your Oracle Content Server home page and select
Administration, then Providers.
The Providers Page is displayed.
2. In the Providers table, click Info in the Action column for the provider to edit.
The Provider Information Page is displayed.
3. Click Edit.

Connecting to Outside Entities with Providers
4-78 Oracle Fusion Middleware System Administrator's Guide for Oracle Content Server
The Add/Edit Provider Page is displayed.
4. Make the required changes.
5. Click Update to save the changes and return to the Providers page.
6. Restart the Oracle Content Server instance.
4.5.2.10 Deleting a Provider
To delete an existing provider (except for default system providers):
1. Using a web browser, access your Oracle Content Server home page and select
Administration, then Providers.
The Providers Page is displayed.
2. In the Providers table, click the Info link in the Action column for the provider
you want to delete.
The Provider Information Page is displayed.
3. Click Delete.
A confirmation screen is displayed.
4. Click OK.
The provider is removed from the Providers table.
Important: Ensure that you intend to delete the provider and not just
edit the information. When you delete a provider, the provider name
and all of its related information is permanently removed from the
Providers table.

5
Managing Security and User Access 5-1
5Managing Security and User Access
This chapter describes concepts and tasks for managing Oracle Content Server system
security and user access. It covers the following topics:
■Section 5.1, "Introduction to Oracle UCM and Oracle Content Server Security"
■Section 5.2, "Oracle Fusion Middleware Security Configuration for Oracle UCM"
■Section 5.3, "User Types, Logins, and Aliases"
■Section 5.4, "Security Groups, Roles and Permissions"
■Section 5.5, "Accounts"
■Section 5.6, "Access Control List Security"
■Section 5.7, "Oracle Content Server User Information Provider"
■Section 5.8, "Additional Oracle Content Server Security Connections"
■Section 5.9, "Oracle Content Server Communication Customization"
5.1 Introduction to Oracle UCM and Oracle Content Server Security
The Oracle Content Server instance is deployed on the Oracle Universal Content
Management (Oracle UCM) domain, which is deployed on the Oracle WebLogic
Server domain in Oracle Fusion Middleware. Security is supported at multiple levels
including the Oracle Content Server instance, the Oracle WebLogic Server domain, and
Oracle Platform Security Services (OPSS).
Access to content in the Oracle Content Server repository requires an Oracle Content
Server administrator to manage content, users, and groups, as well as roles,
permissions, and accounts. An Oracle WebLogic Server administrator functions as the
Oracle Content Server administrator. The Oracle WebLogic Server administrator must
log in to the Oracle Content Server instance and set up the primary Oracle Content
Server administrator account and password, if no such user was configured during
deployment. After the Oracle Content Server administrator is configured, then
management tasks can be performed on the Oracle Content Server instance.
Most user management tasks must be performed using the Oracle WebLogic Server
Administration Console rather than the User Admin applet in the Oracle Content
Server instance. By default, Oracle UCM uses the Oracle WebLogic Server user store to
manage user names and passwords for the Oracle Content Server instance. Oracle
Platform Security Services (OPSS) can be used instead of the default Oracle WebLogic
Server user store to authenticate users for an enterprise-level system.
Oracle Content Server software offers two levels of security for repository content:
security groups (which are required) and accounts (which are optional). Each content

Introduction to Oracle UCM and Oracle Content Server Security
5-2 Oracle Fusion Middleware System Administrator's Guide for Oracle Content Server
item is assigned to a security group, and if accounts are enabled then content items can
also be assigned to an account. Users are assigned a certain level of permission (Read,
Write, Delete, or Admin) for each security group and account, which enables them to
work with a content item only to the extent that they have permissions to the item's
security group and account.
Access control lists (ACLs) can be configured for the Oracle Content Server instance to
provide extended control of content access to enterprise users. An access control list is
a list of users, groups, or enterprise roles with permission to access or interact with a
content item.
This section covers the following topics:
■Section 5.1.1, "Changes in Security Compared to Oracle Content Server 10g"
■Section 5.1.2, "Security within Oracle Content Server"
■Section 5.1.3, "Additional Security Options"
5.1.1 Changes in Security Compared to Oracle Content Server 10g
In 11g Release 1 (11.1.1) of Oracle Universal Content Management (Oracle UCM), the
Oracle Content Server instance is deployed with the Oracle UCM domain on an Oracle
WebLogic server. Oracle UCM and the Oracle Content Server system use Oracle
Platform Security Services (OPSS) to authenticate and manage user access through the
Oracle WebLogic Server Administration Console.
If you have used Oracle Content Server version 10gR3 or earlier, be aware of the
following key changes to security:
■During Oracle Content Server installation and configuration, an Oracle WebLogic
Server administration user must be specified for the Oracle Content Server system
administration user. For details, see Oracle Fusion Middleware Installation Guide for
Oracle Enterprise Management Suite.
■When Oracle Content Server software is installed, a JPS user provider
(JpsUserProvider) is set up by default to communicate with the Oracle WebLogic
Server user store for user authentication and access.
■All users are authenticated through external security and are considered external
Oracle Content Server users. The first time users log in to the Oracle Content
Server system through Oracle WebLogic Server, they are added to the Oracle
Content Server database, and administrators can view the external user
information through the Repository Manager. External users are not automatically
included in Oracle Content Server user lists, such as the Author field on a content
Check In page.
■By default, the Oracle Content Server system uses the Oracle WebLogic Server
user store to manage user names and passwords. Most user management tasks
must be performed with the Oracle WebLogic Server Administration Console
instead of the Oracle Content Server User Admin applet. Although an Oracle
Content Server administrator can use the User Admin applet to create local users
and assign passwords and roles on the Oracle Content Server system, for local
users to be authenticated for access to the Oracle Content Server system they must
also be created and assigned passwords and roles using the Oracle WebLogic
Server Administration Console.
Note: Any user created solely on the Oracle Content Server system is
not recognized by the Oracle WebLogic Server domain.

Introduction to Oracle UCM and Oracle Content Server Security
Managing Security and User Access 5-3
■The Oracle WebLogic Server user store also manages some additional user
metadata such as e-mail and display names. You can use the Oracle WebLogic
Server Administration Server interface to edit these values.
User metadata can be changed in the Oracle Content Server system, but only after
users have logged in to the Oracle Content Server instance at least one time to
establish themselves as users in the Oracle Content Server metadata. After the first
login, users can update their User Profile page, or an Oracle Content Server
administrator can set user attribute values with the User Admin applet.
■Users can be assigned groups with the Oracle WebLogic Server Administration
Console. When a user logs in to the Oracle Content Server instance, the user's
groups are mapped to Oracle Content Server roles. For Oracle WebLogic Server
groups to be recognized in the Oracle Content Server system, roles with the exact
same names must be created in the Oracle Content Server system and assigned to
security groups. If this is not done, the Oracle WebLogic Server groups assigned to
users have no impact on users' privileges in the Oracle Content Server system.
■Configuration with an external user store is performed using the Oracle WebLogic
Server Administration Server instead of the Oracle Content Server Admin Server.
The Oracle WebLogic Server Administration Server has an embedded Lightweight
Directory Access Protocol (LDAP) server, but it can be configured to work with
other LDAP servers such as Oracle Internet Directory (OID) for enterprise-level
systems. Integration with an external user store applies to the domain and all its
servers; the Oracle WebLogic Server Administration Server could be shut down,
and Oracle UCM and other applications could continue to use the configured
LDAP server.
For more information on security integration and configuration, see Section 5.2,
"Oracle Fusion Middleware Security Configuration for Oracle UCM."
5.1.2 Security within Oracle Content Server
The administrator sets up initial user and content security within the Oracle Content
Server system by using the User Admin application to define user roles, permissions
to groups, and accounts. Then the administrator uses the Oracle WebLogic Server
Administration Console to create users and assign each user to one or more of the
Oracle Content Server roles, which in turn are assigned specific permissions to
security groups. If accounts are enabled on the Oracle Content Server system, the
administrator can assign users specific permissions to certain accounts, which then
limits the permissions the users might otherwise have through their assigned roles.
For details, see Section 5.3, "User Types, Logins, and Aliases," Section 5.4, "Security
Groups, Roles and Permissions," and Section 5.5, "Accounts."
The following components also can be used to provide additional internal Oracle
Content Server security:
■Security can be customized for user access by using the ExtranetLook component,
which is installed (disabled) with Content Server. For details, see Section 5.9.1,
"Login/Logout Customization."
Note: The ExtranetLook component is not applicable when the
Oracle WebLogic Server domain is used as the web server for the
Oracle Content Server instance. Modification of the security
implementation is controlled through direct customization of the
Oracle WebLogic Server domain and administrative configuration.

Introduction to Oracle UCM and Oracle Content Server Security
5-4 Oracle Fusion Middleware System Administrator's Guide for Oracle Content Server
■Security can be customized for user access and search results by using the Need to
Know component. This component enables you to further configure user access
restrictions, modify the display of search results, alter search behavior, and set up
hit list roles. To use this component, you must install and enable it. For more
information, see Appendix B, "Need to Know Component".
Be aware that Internet Explorer 7 supplies the following message to users logging in
with basic authentication without a secure connection:
Warning: This server is requesting that your username and password be sent in an
insecure manner
The behavior (sending user name and password in text) is not new for basic
authentication and does not cause problems.
5.1.3 Additional Security Options
The Oracle Content Server system can combine authentication methods. For example,
you can define some users with the Oracle WebLogic Server Administration Console,
allow some users to log in using their Microsoft domain identity, and grant other users
access to the Oracle Content Server instance based on their external Lightweight
Directory Access Protocol (LDAP) credentials. However, authentication is configured
through Oracle WebLogic Server, so the combination of methods is limited. Users can
authenticate against multiple authentication stores, but because of the Oracle Platform
Security Services (OPSS) and Oracle WebLogic Server integration, only one of the
configured user stores can be used to extract authorization (group) information.
The following options can be used to provide additional security:
■Security can be customized to support encrypted socket communication and
authentication by using the SecurityProviders component, which is installed
(enabled) by default with the Oracle Content Server system. This component
enables a Secure Sockets Layer (SSL) provider, which can be configured to use
certificates for socket or server authentication.
If you use SSL and HTTPS to connect to Oracle UCM, and are unable to connect
through WebDAV, try connecting to the Oracle Content Server instance through
the browser using the same URL you used in your WebDAV connection string.
This lets you see if there is a problem with the certificate, which is used to encrypt
communications. If you get a dialog box stating a problem with the certificate,
resolve the issue and then try to connect through WebDAV again.
■For users to access the Oracle Content Server instance using different web server
front ends, when one server front end is HTTPS and the other is HTTP, you can
customize the Oracle Content Server configuration using the BrowserUrlPath
component. This component is installed (disabled) by default with the Oracle
Content Server system and supports a web server front end using HTTPS and a
load balancer that forwards itself as the HTTP Host header. If you only use one
access method (only HTTPS, or only HTTP), or you are not using a load balancer
that blocks the "Host" parameter from the browser, then this component is
unnecessary. For more information, see Section 5.9.2, "Browser URL
Customization."
■Extended security attributes can be assigned to external users or to users for a
specific application. The extended attributes are merged into pre-existing user
attributes and enable additional flexibility in managing users. For more
information, see Section 5.9.3, "Extended User Attributes."

Oracle Fusion Middleware Security Configuration for Oracle UCM
Managing Security and User Access 5-5
■The Oracle Content Server instance can be customized to filter data input for
illegal or corruptive HTML constructs. For more information, see Section 5.9.4,
"Filter Data Input."
In all environments, a comprehensive understanding of your organization's security
needs and a thorough planning phase is crucial to a successful security integration.
5.2 Oracle Fusion Middleware Security Configuration for Oracle UCM
This section describes security configuration information for integrating Oracle Fusion
Middleware, including Oracle WebLogic Server and Oracle Platform Security Services
(OPSS), with Oracle UCM and the Oracle Content Server system.
■Section 5.2.1, "LDAP Authentication Providers"
■Section 5.2.2, "Configuring Oracle UCM to Use SSL"
■Section 5.2.3, "Configuring Oracle UCM for Single Sign-On"
■Section 5.2.4, "Configuring Oracle WebLogic Server Web Services"
5.2.1 LDAP Authentication Providers
The Oracle WebLogic Server domain includes an embedded Lightweight Directory
Access Protocol (LDAP) server that acts as the default security provider data store for
the Default Authentication, Authorization, Credential Mapping, and Role Mapping
providers. Oracle UCM provides the default JpsUserProvider to communicate with
Oracle WebLogic Server. For information on the embedded LDAP server, see
"Managing the Embedded LDAP Server" in Oracle Fusion Middleware Securing Oracle
WebLogic Server, and "Configure the Embedded LDAP Server" in Oracle WebLogic
Server Administration Console Online Help.
In almost all cases you want to reassociate the identity store with an external LDAP
authentication provider rather than use the embedded LDAP server. The external
LDAP authentication provider, such as Oracle Internet Directory (OID), must be listed
before all other authentication providers including the default authentication provider.
For information on Oracle UCM configuration for an external LDAP provider, see
"Reassociating the Identity Store with an External LDAP Authentication Provider" in
Installation Guide for Oracle Enterprise Content Management Suite.
Table 5–1 lists some of the LDAP providers that can be configured for user
authentication.
Table 5–1 LDAP Authenticator Types
LDAP Authentication Provider Authenticator Type
Microsoft AD ActiveDirectoryAuthenticator
SunOne LDAP IPlanetAuthenticator
Oracle Internet Directory OracleInternetDirectoryAuthenticator
Oracle Virtual Directory OracleVirtualDirectoryAuthenticator
EDIRECTORY NovellAuthenticator
OpenLDAP OpenLDAPAuthenticator
EmbeddedLDAP DefaultAuthenticator

Oracle Fusion Middleware Security Configuration for Oracle UCM
5-6 Oracle Fusion Middleware System Administrator's Guide for Oracle Content Server
5.2.2 Configuring Oracle UCM to Use SSL
You can configure Oracle Fusion Middleware to secure communications with Oracle
UCM using SSL, which is an industry standard for securing communications. Oracle
Fusion Middleware supports SSL version 3, as well as TLS version 1.
This section covers the following topics:
■Section 5.2.2.1, "Configuring Oracle UCM for Two-Way SSL Communication"
■Section 5.2.2.2, "Invoking References in One-Way SSL Environments in Oracle
JDeveloper"
■Section 5.2.2.3, "Configuring Oracle ECM Suite, Oracle HTTP Server for SSL
Communication"
■Section 5.2.2.4, "Switching from Non-SSL to SSL Configurations for Oracle UCM"
■Section 5.2.2.5, "Configuring SSL Between Oracle UCM Instances and Oracle
WebCache"
■Section 5.2.2.6, "Using a Custom Trust Store for One-Way SSL During Design
Time"
■Section 5.2.2.7, "Enabling an Asynchronous Process to Invoke An Asynchronous
Process"
■Section 5.2.2.8, "Configuring RIDC SSL for Valid Certificate Path"
For additional information, see "Configuring SSL" in Oracle Fusion Middleware Securing
Oracle WebLogic Server Guide. For information on Web Tier configuration, see "SSL
Configuration in Oracle Fusion Middleware" in Oracle Fusion Middleware
Administrator's Guide.
5.2.2.1 Configuring Oracle UCM for Two-Way SSL Communication
Oracle ECM Suite uses both the Oracle WebLogic Server and Sun secure socket layer
(SSL) stacks for two-way SSL configurations.
■For the inbound Web service bindings, Oracle ECM Suite uses the Oracle
WebLogic Server infrastructure and, therefore, the Oracle WebLogic Server
libraries for SSL.
■For the outbound Web service bindings, Oracle ECM Suite uses JRF HttpClient
and, therefore, the Sun JDK libraries for SSL.
Due to this difference, start Oracle WebLogic Server with the following JVM option.
1. Open the following file:
■On UNIX operating systems, open $MIDDLEWARE_HOME/user_
projects/domains/domain_name/bin/setDomainEnv.sh.
■On Window operating systems, open MIDDLEWARE_HOME\user_
projects\domains\domain_name\bin\setDomainEnv.bat.
2. Add the following lines in the JAVA_OPTIONS section, if the server is enabled for
one-way SSL (server authorization only):
-Djavax.net.ssl.trustStore=your_truststore_location
For two-way SSL, the keystore information (location and password) is not
required.
In addition, perform the following steps to enable two-way SSL for Oracle UCM to
invoke another application.

Oracle Fusion Middleware Security Configuration for Oracle UCM
Managing Security and User Access 5-7
1. On the client side, provide the keystore location.
a. From the SOA Infrastructure menu, select SOA Administration then
Common Properties.
b. At the bottom of the page, click More SOA Infra Advanced Configuration
Properties.
c. Click KeystoreLocation.
d. In the Value column, enter the keystore location.
e. Click Apply.
f. Click Return.
2. On the client side, provide the keystore location in DOMAIN_
HOME\config\soa-infra\configuration\soa-infra-config.xml.
<keystoreLocation>absolute_path_to_the_keystore_location_and_the_file_name
</keystoreLocation>
3. During design time in Oracle JDeveloper, update the reference section in the
composite.xml file with the oracle.soa.two.way.ssl.enabled property.
<reference name="Service1"
ui:wsdlLocation=". . .">
<interface.wsdl interface=". . ."/>
<binding.ws port=". . .">
<property name="oracle.soa.two.way.ssl.enabled">true</property>
</binding.ws>
</reference>
4. In Oracle Enterprise Manager Fusion Middleware Control Console, select
WebLogic Domain, then domain_name.
5. Right-click domain_name and select Security then Credentials.
6. Click Create Map.
7. In the Map Name field, enter a name (for example, SOA), and click OK.
8. Click Create Key.
9. Enter the following details.
Note: Both the server and client are assumed to have been
configured for SSL with mutual authentication.
Field Description
Select Map Select the map created in Step 7 (for this example, SOA).
Key Enter the key name (KeystorePassword is the default).
Type Select Password.
User Name Enter the keystore user name (KeystorePassword is the default).
Password Enter the password that you created for the keystore.

Oracle Fusion Middleware Security Configuration for Oracle UCM
5-8 Oracle Fusion Middleware System Administrator's Guide for Oracle Content Server
10. Set the keystore location in Oracle Enterprise Manager Fusion Middleware Control
Console. See Step 1 for instructions.
11. Modify the composite.xml syntax to use https and sslport to invoke Oracle
UCM. For example, change the syntax shown in bold:
<?xml version="1.0" encoding="UTF-8" ?>
<!-- Generated by Oracle SOA Modeler version 1.0 at [4/1/09 11:01 PM]. -->
<composite name="InvokeEchoBPELSync"
revision="1.0"
label="2009-04-01_23-01-53_994"
mode="active"
state="on"
xmlns="http://xmlns.oracle.com/sca/1.0"
xmlns:xs="http://www.w3.org/2001/XMLSchema"
xmlns:wsp="http://schemas.xmlsoap.org/ws/2004/09/policy"
xmlns:orawsp="http://schemas.oracle.com/ws/2006/01/policy"
xmlns:ui="http://xmlns.oracle.com/soa/designer/">
<import
namespace="http://xmlns.oracle.com/CustomApps/InvokeEchoBPELSync/BPELProcess1"
location="BPELProcess1.wsdl" importType="wsdl"/>
<import namespace="http://xmlns.oracle.com/CustomApps/EchoBPELSync/
BPELProcess1"location="http://hostname:port/soa-infra/services/default/EchoBPEL
Sync/BPELProcess1.wsdl"
importType="wsdl"/>
to use https and sslport:
location="https://hostname:sslport/soa-infra/services/default/EchoBPELSync
/BPELProcess1.wsdl"
5.2.2.2 Invoking References in One-Way SSL Environments in Oracle JDeveloper
When invoking a Web service as an external reference from Oracle UCM in one-way
SSL environments, ensure that the certificate name (CN) and the host name of the
server exactly match. This ensures a correct SSL handshake.
For example, if a Web service is named adfbc and the certificate has a server name of
myhost05, the following results in an SSL handshake exception.
<import namespace="/adfbc1/common/"
location="https://myhost05.us.oracle.com:8002/CustomApps-adfbc1-context-root/AppModuleService?WSDL"
importType="wsdl"/>
<import namespace="/adfbc1/common/" location="Service1.wsdl"
importType="wsdl"/>
If you switch the order of import, the SSL handshake passes.
<import namespace="/adfbc1/common/" location="Service1.wsdl"
importType="wsdl"/>
<import namespace="/adfbc1/common/"
location="https://myhost05.us.oracle.com:8002/CustomApps-adfbc1-context-root/AppModuleService?WSDL"
importType="wsdl"/>
Note the following restrictions around this issue:
Note: When you set up SSL on an Oracle WebLogic Server domain, a
key alias is required. You must enter mykey as the alias value. This
value is required.

Oracle Fusion Middleware Security Configuration for Oracle UCM
Managing Security and User Access 5-9
■There are no options for ignoring host name verification in Oracle JDeveloper as
exist with the Oracle WebLogic Server Administration Console. This is because the
SSL kit used by Oracle JDeveloper is different. Only the trust store can be
configured from the command line. All other certificate arguments are not passed.
■In the WSDL file, https://hostname must match with that in the certificate, as
described above. You cannot perform the same procedures as you can with a
browser. For example, if the host name is myhost05.us.oracle.com in the
certificate's CN, then you can use myhost05, myhost05.us.oracle.com, or the
IP address from a browser. In Oracle JDeveloper, always use the same name as in
the certificate (that is, myhost05.us.oracle.com).
5.2.2.3 Configuring Oracle ECM Suite, Oracle HTTP Server for SSL Communication
Follow these procedures to configure SSL communication between Oracle ECM Suite
and Oracle HTTP Server.
For addition information, see "Configuring SSL for the Web Tier" in Oracle Fusion
Middleware Administrator's Guide.
Configure Oracle HTTP Server for SSL Communication:
1. Append ssl.conf with the <Location /cs> location directive, where port is
the port number of the target managed server.
<Location /cs>
WebLogicPort 8002
SetHandler weblogic-handler
ErrorPage http://host.domain.com:port/error.html
</Location>
2. Start the Oracle WebLogic Server as described in Section 5.2.2.1, "Configuring
Oracle UCM for Two-Way SSL Communication."
Configure Certificates for Oracle Client, Oracle HTTP Server, and Oracle
WebLogic Server:
1. Export the user certificate from the Oracle HTTP Server wallet.
orapki wallet export -wallet . -cert cert.txt -dn 'CN=\"Self-Signed
Certificate for ohs1 \",OU=OAS,O=ORACLE,L=REDWOODSHORES,ST=CA,C=US'
2. Import the above certificate into the Oracle WebLogic Server truststore as a trusted
certificate.
keytool -file cert.txt -importcert -trustcacerts -keystore DemoTrust.jks
3. Export the certificate from the Oracle WebLogic Server truststore.
keytool -keystore DemoTrust.jks -exportcert -alias wlscertgencab -rfc -file
certgencab.crt
4. Import the above certificate to the Oracle HTTP Server wallet as a trusted
certificate.
orapki wallet add -wallet . -trusted_cert -cert certgencab.crt -auto_login_only
5. Restart Oracle HTTP Server.
6. Restart the Oracle WebLogic Server as described in Section 5.2.2.1, "Configuring
Oracle UCM for Two-Way SSL Communication."

Oracle Fusion Middleware Security Configuration for Oracle UCM
5-10 Oracle Fusion Middleware System Administrator's Guide for Oracle Content Server
5.2.2.4 Switching from Non-SSL to SSL Configurations for Oracle UCM
Switching from non-SSL to SSL configurations for Oracle UCM requires the Frontend
Host and Frontend HTTPS Port fields to be set in the Oracle WebLogic Server
Administration Console. Not doing so results in exception errors when you attempt to
create to-do tasks.
1. Log in to the Oracle WebLogic Server Administration Console.
2. In the Environment section, select Servers.
3. Select the name of the managed server (for example, ucm_server1).
4. Select Protocols, then select HTTP.
5. In the Frontend Host field, enter the host name on which Oracle UCM is located.
6. In the Frontend HTTPS Port field, enter the SSL listener port.
7. Click Save.
5.2.2.5 Configuring SSL Between Oracle UCM Instances and Oracle WebCache
The Test Web Service page, in an Oracle WebCache and Oracle HTTP Server
environment, may require communication back through Oracle WebCache. Therefore,
SSL must be configured between the Oracle UCM instance and Oracle WebCache (that
is, export the user certificate from the Oracle WebCache wallet and import it as a
trusted certificate in the Oracle WebLogic Server truststore).
See "Enabling SSL for Oracle Web Cache Endpoints" in Oracle Fusion Middleware
Administrator's Guide.
5.2.2.6 Using a Custom Trust Store for One-Way SSL During Design Time
To invoke Oracle UCM over HTTPS when using a custom trust store created with a
tool such as keytool or orapki, perform the following actions in Oracle JDeveloper.
1. To fetch a WSDL file in the reference section, set the trust store information in
Tools, then Preferences, then Http Analyzer, then HTTPS Setup, then Client
Trusted Certificate Keystore.
2. During deployment to an SSL-enabled server, use the JSSE property at the
command line:
jdev -J-Djavax.net.ssl.trustStore=your_trusted_location
5.2.2.7 Enabling an Asynchronous Process to Invoke An Asynchronous Process
To enable an asynchronous process deployed to an SSL-enabled, managed server to
invoke another asynchronous process over HTTP, start by assuming you create the
following environment:
■Asynchronous BPEL process A that invokes asynchronous BPEL process B
■Asynchronous BPEL process A is deployed to a one-way SSL enabled, managed
server
■All WSDL reference and bindings use plain HTTP
At run time, the WSDL is looked for over HTTPS, and the callback message from
asynchronous BPEL process B fails.
To resolve this issue, the callbackServerURL property must be passed at the
reference binding level in the composite.xml file. This explicitly indicates the value

Oracle Fusion Middleware Security Configuration for Oracle UCM
Managing Security and User Access 5-11
of the callback URL for the given reference invocation. If the client composite is
running in an SSL-managed server, then the callback defaults to SSL.
<reference name="Service1" ui:wsdlLocation="http://localhost:8000/soa-infra/services/default/
AsyncSecondBPELMTOM/BPELProcess1.wsdl">
<interface.wsdl interface="http://xmlns.oracle.com/Async/AsyncSecondBPELMTOM/BPELProcess1#
wsdl.interface(BPELProcess1)" callbackInterface="http://xmlns.oracle.com/Async/
AsyncSecondBPELMTOM/BPELProcess1#wsdl.interface(BPELProcess1Callback)"/>
<binding.ws port="http://xmlns.oracle.com/Async/AsyncSecondBPELMTOM/BPELProcess1#
wsdl.endpoint(bpelprocess1_client_ep/BPELProcess1_pt)"
location="http://localhost:8000/soa-infra/services/default/AsyncSecondBPELMTOM
/bpelprocess1_client_ep?WSDL">
<wsp:PolicyReference URI="oracle/wss_username_token_client_policy"
orawsp:category="security" orawsp:status="enabled"/>
<wsp:PolicyReference URI="oracle/wsaddr_policy" orawsp:category="addressing"
orawsp:status="enabled"/>
<property name="callbackServerURL">http://localhost:8000/</property>
</binding.ws>
<callback>
<binding.ws port="http://xmlns.oracle.com/Async/AsyncSecondBPELMTOM/BPELProcess1#
wsdl.endpoint(bpelprocess1_client_ep/BPELProcess1Callback_pt)">
<wsp:PolicyReference URI="oracle/wss_username_token_service_policy"
orawsp:category="security" orawsp:status="enabled"/>
</binding.ws>
</callback>
</reference>
5.2.2.8 Configuring RIDC SSL for Valid Certificate Path
To use Remote Intradoc Client (RIDC) and self-signed certificates, you must import the
certificate into your local JVM certificate store so the certificate will be trusted.
1. Retrieve the key from the Oracle Content Server instance. For example:
openssl s_client -connect dadvmc0022.us.company.com:7045 2>/dev/null
CONNECTED(00000003)
---
Certificate chain
0 s:/C=US/ST=MyState/L=MyTown/O=MyOrganization/OU=FOR TESTING ONLY/CN=hostname
i:/C=US/ST=MyState/L=MyTown/O=MyOrganization/OU=FOR TESTING ONLY/CN=CertGenCAB
---
Server certificate
-----BEGIN CERTIFICATE-----
MIIB6zCCAZUCEItVMwHDFXAnYG//RoVbXQgwDQYJKoZIhvcNAQEEBQAweTELMAkG
A1UEBhMCVVMxEDAOBgNVBAgTB015U3RhdGUxDzANBgNVBAcTBk15VG93bjEXMBUG
A1UEChMOTXlPcmdhbml6YXRpb24xGTAXBgNVBAsTEEZPUiBURVNUSU5HIE9OTFkx
EzARBgNVBAMTCkNlcnRHZW5DQUIwHhcNMDkwMzI5MjM0NDM0WhcNMjQwMzMwMjM0
NDM0WjB5MQswCQYDVQQGEwJVUzEQMA4GA1UECBYHTXlTdGF0ZTEPMA0GA1UEBxYG
TXlUb3duMRcwFQYDVQQKFg5NeU9yZ2FuaXphdGlvbjEZMBcGA1UECxYQRk9SIFRF
U1RJTkcgT05MWTETMBEGA1UEAxYKZGFkdm1jMDAyMjBcMA0GCSqGSIb3DQEBAQUA
A0sAMEgCQQCmxv+h8kzOc2xyjMCdPM6By5LY0Vlp4vzWFKmPgEytp6Wd87sG+YDB
PeFOz210XXGMx6F/14/yFlpCplmazWkDAgMBAAEwDQYJKoZIhvcNAQEEBQADQQBn
uF/s6EqCT38Aw7h/406uPhNh6LUF7XH7QzmRv3J1sCxqRnA/fK3JCXElshVlPk8G
hwE4G1zxpr/JZu6+jLrW
-----END CERTIFICATE-----
subject=/C=US/ST=MyState/L=MyTown/O=MyOrganization/OU=FOR TESTING
ONLY/CN=dadvmc0022
issuer=/C=US/ST=MyState/L=MyTown/O=MyOrganization/OU=FOR TESTING
ONLY/CN=CertGenCAB

Oracle Fusion Middleware Security Configuration for Oracle UCM
5-12 Oracle Fusion Middleware System Administrator's Guide for Oracle Content Server
---
No client certificate CA names sent
---
SSL handshake has read 625 bytes and written 236 bytes
---
New, TLSv1/SSLv3, Cipher is RC4-MD5
Server public key is 512 bit
Compression: NONE
Expansion: NONE
SSL-Session:
Protocol : TLSv1
Cipher : RC4-MD5
Session-ID: 23E20BCAA4BC780CE20DE198CE2DFEE4
Session-ID-ctx:
Master-Key:
4C6F8E9B9566C2BAF49A4FD91BE90DC51F1E43A238B03EE9B700741AC7F4B41C72D2990648DE103
BB73B3074888E1D91
Key-Arg : None
Start Time: 1238539378
Timeout : 300 (sec)
Verify return code: 21 (unable to verify the first certificate)
---
2. Copy and paste the Server Certificate including the surrounding -----BEGIN
CERTIFICATE----- and -----END CERTIFICATE----- lines. Save the
certificate into a new file. For example:
/tmp/dadvmc0022.pem:
-----BEGIN CERTIFICATE-----
MIIB6zCCAZUCEItVMwHDFXAnYG//RoVbXQgwDQYJKoZIhvcNAQEEBQAweTELMAkG
A1UEBhMCVVMxEDAOBgNVBAgTB015U3RhdGUxDzANBgNVBAcTBk15VG93bjEXMBUG
A1UEChMOTXlPcmdhbml6YXRpb24xGTAXBgNVBAsTEEZPUiBURVNUSU5HIE9OTFkx
EzARBgNVBAMTCkNlcnRHZW5DQUIwHhcNMDkwMzI5MjM0NDM0WhcNMjQwMzMwMjM0
NDM0WjB5MQswCQYDVQQGEwJVUzEQMA4GA1UECBYHTXlTdGF0ZTEPMA0GA1UEBxYG
TXlUb3duMRcwFQYDVQQKFg5NeU9yZ2FuaXphdGlvbjEZMBcGA1UECxYQRk9SIFRF
U1RJTkcgT05MWTETMBEGA1UEAxYKZGFkdm1jMDAyMjBcMA0GCSqGSIb3DQEBAQUA
A0sAMEgCQQCmxv+h8kzOc2xyjMCdPM6By5LY0Vlp4vzWFKmPgEytp6Wd87sG+YDB
PeFOz210XXGMx6F/14/yFlpCplmazWkDAgMBAAEwDQYJKoZIhvcNAQEEBQADQQBn
uF/s6EqCT38Aw7h/406uPhNh6LUF7XH7QzmRv3J1sCxqRnA/fK3JCXElshVlPk8G
hwE4G1zxpr/JZu6+jLrW
-----END CERTIFICATE-----
3. Import the certificate into the local JVM certificate store. You will need the
keystore password. For example (the password is changeit):
sudo /opt/java/jdk1.6.0_12/bin/keytool -import -alias dadvmc0022 -keystore
/opt/java/jdk1.6.0_12/jre/lib/security/cacerts -trustcacerts -file
/tmp/dadvmc0022.pem
Enter keystore password: changeit
Owner: CN=dadvmc0022, OU=FOR TESTING ONLY, O=MyOrganization, L=MyTown,
ST=MyState, C=US
Issuer: CN=CertGenCAB, OU=FOR TESTING ONLY, O=MyOrganization, L=MyTown,
ST=MyState, C=US
Serial number: -74aaccfe3cea8fd89f9000b97aa4a2f8
Valid from: Sun Mar 29 16:44:34 PDT 2009 until: Sat Mar 30 16:44:34 PDT 2024
Certificate fingerprints:
MD5: 94:F9:D2:45:7F:0D:E3:87:CF:2B:32:7C:BF:97:FF:50
SHA1: A8:A5:89:8B:48:9B:98:34:70:56:11:01:5C:14:32:AC:CB:18:FF:1F
Signature algorithm name: MD5withRSA

Oracle Fusion Middleware Security Configuration for Oracle UCM
Managing Security and User Access 5-13
Version: 1
Trust this certificate? [no]: yes
Certificate was added to keystore
5.2.3 Configuring Oracle UCM for Single Sign-On
Oracle provides several single sign-on solutions. Oracle Access Manager (OAM) is the
recommended single sign-on (SSO) solution for Oracle Fusion Middleware
enterprise-class installations including Oracle Universal Content Management (Oracle
UCM). OAM is part of Oracle's suite of enterprise-class products for identity
management and security. For more information, see "Choosing the Right SSO
Solution for Your Deployment" in Oracle Fusion Middleware Application Security Guide.
If your enterprise-class installation uses Microsoft desktop logins that authenticate
with a Microsoft domain controller with user accounts in Active Directory, then
configuring single sign-on may be an option. See Section 5.2.3.6, "Configuring Oracle
UCM and Single Sign-On for WNA."
Configuration information is provided in the following sections:
■Section 5.2.3.1, "Configuring Oracle Access Manager 11g with Oracle UCM"
■Section 5.2.3.2, "Configuring Oracle Access Manager 10g with Oracle UCM"
■Section 5.2.3.3, "Configuring Oracle Single Sign-On for Oracle UCM"
■Section 5.2.3.4, "Configuring the First Authentication Provider"
■Section 5.2.3.5, "Configuring the Oracle UCM URL for Single Sign-On"
■Section 5.2.3.6, "Configuring Oracle UCM and Single Sign-On for WNA"
5.2.3.1 Configuring Oracle Access Manager 11g with Oracle UCM
This section describes how to integrate Oracle UCM with Oracle Access Manager
(OAM) 11g. Configuration information is provided for Universal Content
Management (UCM), Universal Records Management (URM), Inbound Refinery (IBR),
and Site Studio (SS).
Before you can configure Oracle Access Manager (OAM) 11g, install the software using
the instructions provided in "Installing the Oracle Identity Management 11g Software"
in Oracle Fusion Middleware Installation Guide for Oracle Identity Management.
1. Configure Oracle Access Manager (OAM), Oracle HTTP Server (OHS), and
WebGate as described in "Setting Up OAM Agents" in Oracle Fusion Middleware
Installation Guide for Oracle Identity Management.
a. Append entries to the mod_wl_ohs.conf file for Oracle UCM to add Enterprise
Content Management (ECM) Uniform Resource Identifiers (URIs) to forward.
Use the appropriate location entries from the following example. Each entry in
the example maps the incoming path to the appropriate Oracle WebLogic
Server on which the corresponding application resides.
In the following list of entries, hostname represents the name of the computer
hosting the Oracle UCM server, and portnumber represents the port number of
the Oracle WebLogic Server on which the corresponding applications resides.
Replace hostname and portnumber with your system's host name and port
name.

Oracle Fusion Middleware Security Configuration for Oracle UCM
5-14 Oracle Fusion Middleware System Administrator's Guide for Oracle Content Server
# UCM Content Server
<Location /cs>
SetHandler weblogic-handler
WebLogicHost <hostname>
WebLogicPort <portnumber>
</Location>
# UCM Content Server authentication
<Location /adfAuthentication>
SetHandler weblogic-handler
WebLogicHost <hostname>
WebLogicPort <portnumber>
</Location>
# UCM online help
<Location /_ocsh>
SetHandler weblogic-handler
WebLogicHost <hostname>
WebLogicPort <portnumber>
</Location>
# IBR
<Location /ibr>
SetHandler weblogic-handler
WebLogicHost <hostname>
WebLogicPort <portnumber>
</Location>
# URM
<Location /urm>
SetHandler weblogic-handler
WebLogicHost <hostname>
WebLogicPort <portnumber>
</Location>
# SS
<Location /customer-configured-site-studio
SetHandler weblogic-handler
WebLogicHost <hostname>
WebLogicPort <portnumber>
</Location>
Note: The URIs you forward depend on the Oracle UCM
functionality that you have installed. Use the appropriate location
entry for your functionality. For example: /cs,
/adfAuthentication, /_ocsh, /ibr, /urm.
For Site Studio, the URI to forward is configured by the customer. For
example, if the site is accessed as /mysite, then you need to append
a location entry for /mysite.
Caution: The Oracle UCM Content Server location /cs can be
customized, so the /cs designation can not guarantee that HTTP
requests will include the correct location. If /cs has been changed,
then forward the location the administrator has configured.

Oracle Fusion Middleware Security Configuration for Oracle UCM
Managing Security and User Access 5-15
b. Use the OAM remote registration tool (oamreg) to register an OAM Agent,
specifying Oracle UCM URIs to protect and to make public. See "Provisioning
an OAM Agent with Oracle Access Manager 11g" in Oracle Fusion Middleware
Application Security Guide.
For more information, see "Setting Up OAM Agents" in Oracle Fusion
Middleware Installation Guide for Oracle Identity Management.
2. Configure the Oracle UCM domain by ensuring you perform these tasks. See
"Deploying the Oracle Access Manager 11g SSO Solution" in Oracle Fusion
Middleware Application Security Guide.
a. Configure the OAM Identity Asserter. The control flag for the OAM Identity
Asserter must be set to REQUIRED, and both OAM_REMOTE_USER and
ObSSOCookie must be selected as Active Types.
See "Identity Asserter for Single Sign-on Function," "About Using the Identity
Asserter for SSO with OAM 11g and 11g WebGates," and "Configuring
Identity Assertion for SSO with Oracle Access Manager 11g" in Oracle Fusion
Middleware Application Security Guide.
b. Configure the Authentication provider. This is necessary to specify the
external LDAP server for the user store, such as Oracle Internet Directory
(OID) or Oracle Virtual Directory (OVD), to match the LDAP server used by
Note: The URIs you protect and make public depend on the Oracle
UCM functionality that you have installed: Universal Content
Management (UCM), Inbound Refinery (IBR), Universal Records
Management (URM), Site Studio (SS).
For Site Studio, the URI to protect is configured by the customer. For
example, if the site is accessed as /mysite, then you need to specify
the URI /mysite.
Functionality Type URI
UCM Protect /adfAuthentication
UCM Public /cs
UCM Public /_ocsh
IBR Protect /ibr/adfAuthentication
IBR Public /ibr
URM Protect /urm/adfAuthentication
URM Public /urm
SS Protect /customer-configured-for-site-studio
Note: If the URL for Oracle UCM does not link correctly after
completing the OAM configuration, you might need to change the
server host and server port values. For details, see Section 5.2.3.5,
"Configuring the Oracle UCM URL for Single Sign-On."

Oracle Fusion Middleware Security Configuration for Oracle UCM
5-16 Oracle Fusion Middleware System Administrator's Guide for Oracle Content Server
OAM. For example, if OAM is using OID, then an OID Authentication
provider must be added to the Oracle UCM domain.
See "Installing the Authentication Provider with Oracle Access Manager 11g"
and "Setting Up Providers for Oracle Access Manager Identity Assertion" in
Oracle Fusion Middleware Application Security Guide.
See Table 12-1 in Oracle Fusion Middleware Application Security Guide for
information on the differences when deploying the Authentication Provider
with OAM 10g versus OAM 11g.
c. Configure the OPSS (OAM) Single Sign-On provider.
See "Configuring Oracle WebLogic Server for a Web Application Using ADF
Security, OAM SSO, and OPSS SSO" in Oracle Fusion Middleware Application
Security Guide.
3. After installing and configuring OAM 11g, check that you can access all of the
configured applications, and that the login is giving you access to all of your
configured applications without prompting you to sign in again. Also test global
logout where available and make sure you are logged out of all other related
applications.
For more information, see "Configuring Centralized Log Out for Oracle Access
Manager 11g" in Oracle Fusion Middleware Application Security Guide and Oracle
Fusion Middleware Administrator's Guide for Oracle Access Manager.
5.2.3.2 Configuring Oracle Access Manager 10g with Oracle UCM
This section describes how to integrate Oracle UCM with Oracle Access Manager
(OAM) 10g. Configuration information is provided for Universal Content
Management (UCM), Universal Records Management (URM), and Inbound Refinery
(IBR).
Before you can configure Oracle Access Manager (OAM), install the software. See
"Oracle Access Manager Integration" in Oracle Fusion Middleware Enterprise Deployment
Guide for Oracle Enterprise Content Management Suite, and "Installing the Oracle Identity
Note: When the Oracle WebLogic Server domain for Oracle UCM is
configured to use a different authentication provider than the
DefaultAuthenticator provider, the new authentication provider must
be the first authentication provider listed in the security realm
configuration, or Oracle UCM will fail to load any user privileges.
Make sure to re-order the authentication providers so the new
authentication provider is listed before the DefaultAuthenticator
provider. Also ensure that the DefaultAuthenticator control flag
is set to SUFFICIENT. For more information, see Section 5.2.3.4,
"Configuring the First Authentication Provider."
Note: Deploying Oracle UCM version 11gR1 in an environment
using Oracle Access Manager version 10g requires additional
configuration to process logout requests properly. For detailed
information, see the section "Configuring Global Logout for Oracle
Access Manager 10g and 10g WebGates" in the Oracle Fusion
Middleware Application Security Guide.

Oracle Fusion Middleware Security Configuration for Oracle UCM
Managing Security and User Access 5-17
Management 10g Software" in Oracle Fusion Middleware Installation Guide for Oracle
Identity Management.
1. Configure Oracle Access Manager (OAM), Oracle HTTP Server (OHS), and
WebGate as described in "Deploying SSO Solutions with Oracle Access Manager
10g" in Oracle Fusion Middleware Application Security Guide.
a. Append entries to the mod_wl.conf file for Oracle UCM to add Enterprise
Content Management (ECM) Uniform Resource Identifiers (URIs) to forward.
Use the appropriate location entries from the following example. The entries
in the following Location list map the incoming paths to the appropriate
Oracle WebLogic Server on which the corresponding applications reside.
In the following list of entries, hostname represents the name of the computer
hosting the Oracle UCM server, and portnumber represents the port number of
the Oracle WebLogic Server on which the corresponding applications resides.
Replace hostname and portnumber with your system's host name and port
name.
# UCM Content Server
<Location /cs>
SetHandler weblogic-handler
WebLogicHost <hostname>
WebLogicPort <portnumber>
</Location>
# UCM Content Server authentication
<Location /adfAuthentication>
SetHandler weblogic-handler
WebLogicHost <hostname>
WebLogicPort <portnumber>
</Location>
# UCM online help
<Location /_ocsh>
SetHandler weblogic-handler
WebLogicHost <hostname>
WebLogicPort <portnumber>
</Location>
# IBR
<Location /ibr>
Note: The URIs you forward depend on the Oracle UCM
functionality that you have installed. Use the appropriate location
entry for your functionality. For example: /cs,
/adfAuthentication, /_ocsh, /ibr, /urm.
For Site Studio, the URI to forward is defined by the customer. For
example, if the site is accessed as /mysite, then you need to append
a location entry for /mysite.
Caution: The Oracle UCM Content Server location /cs can be
customized, so the /cs designation can not guarantee that HTTP
requests will include the correct location. If /cs has been changed,
then forward the location the administrator has configured.

Oracle Fusion Middleware Security Configuration for Oracle UCM
5-18 Oracle Fusion Middleware System Administrator's Guide for Oracle Content Server
SetHandler weblogic-handler
WebLogicHost <hostname>
WebLogicPort <portnumber>
</Location>
# URM
<Location /urm>
SetHandler weblogic-handler
WebLogicHost <hostname>
WebLogicPort <portnumber>
</Location>
# SS
<Location /customer-configured-for-site-studio>
SetHandler weblogic-handler
WebLogicHost <hostname>
WebLogicPort <portname>
</Location>
b. Use the OAM Configuration tool (oamcfgtool) to specify Oracle UCM URIs
to protect.
The Oracle Access Manager Configuration tool is a command-line utility,
which you can use to launch a series of scripts to request information and set
up the required profiles and policies in Oracle Access Manager. For details, see
"About Using OAMCtgTool" in Oracle Fusion Middleware Installation Guide for
Oracle Identity Management.
2. Configure the Oracle UCM domain by ensuring you perform these tasks. For
details, see "Deploying SSO Solutions with Oracle Access Manager 10g" in Oracle
Fusion Middleware Application Security Guide.
a. Configure the OAM Identity Asserter. The control flag for the OAM Identity
Asserter must be set to REQUIRED.
Note: The URIs you protect depend on the Oracle UCM functionality
that you have installed: Content Server (UCM), Inbound Refinery
(IBR), Universal Records Management (URM), Site Studio (SS).
For Site Studio, the URI to protect is configured by the customer. For
example, if the site is accessed as /mysite, then you need to specify
the URI /mysite.
Functionality URI
UCM /adfAuthentication
IBR /ibr/adfAuthentication
URM /urm/adfAuthentication
SS /customer_configured_site_studio
Note: If the URL for Oracle UCM does not link correctly after
completing the OAM configuration, you might need to change the
server host and server port values. For details, see Section 5.2.3.5,
"Configuring the Oracle UCM URL for Single Sign-On."

Oracle Fusion Middleware Security Configuration for Oracle UCM
Managing Security and User Access 5-19
See "Configuring OAM Identity Assertion for SSO with Oracle Access
Manager 10g" in Oracle Fusion Middleware Application Security Guide.
b. Configure the Authentication provider. This is necessary to specify the
external LDAP server for the user store, such as Oracle Internet Directory
(OID) or Oracle Virtual Directory (OVD), to match the LDAP server used by
OAM. For example, if OAM is using OID, then an OID Authentication
provider must be added to the Oracle UCM domain.
See "Installing and Setting Up Authentication Providers for OAM 10g" and
"Configuring the Authenticator for Oracle Access Manager 10g" in Oracle
Fusion Middleware Application Security Guide.
See Table 12-1 in Oracle Fusion Middleware Application Security Guide for
information on the differences when deploying the Authentication Provider
with OAM 10g versus OAM 11g.
c. Configure the OPSS (OAM) Single Sign-On provider.
See "Configuring Single Sign-On using Oracle Access Manager 10g" in Oracle
Fusion Middleware Application Security Guide.
3. After installing and configuring OAM 10g, check that you can access all of the
configured applications, and that the login is giving you access to all of your
configured applications without prompting you to sign in again. Also test global
logout where available and make sure you are logged out of all other related
applications.
For more information, see "Configuring Global Logout for Oracle Access Manager
10g and 10g WebGates" in Oracle Fusion Middleware Application Security Guide, and
Oracle Fusion Middleware Administrator's Guide for Oracle Access Manager.
5.2.3.3 Configuring Oracle Single Sign-On for Oracle UCM
Oracle Single Sign-On (OSSO) is part of the 10g Oracle Application Server suite. OSSO
is an enterprise-level single sign-on solution that works with the OC4J application
server in conjunction with Oracle Internet Directory and Oracle HTTP Server (OHS)
11g.
If OSSO is already in place as the enterprise solution for your existing Oracle
deployment, Oracle Fusion Middleware continues to support the existing OSSO as a
solution. However, Oracle recommends that you consider upgrading to Oracle Access
Manager 11g Single Sign-On solution.
This section provides information for integrating Oracle UCM with Oracle Single
Sign-On. Configuration information is provided for Universal Content Management
Note: When the Oracle WebLogic Server domain for Oracle UCM is
configured to use a different authentication provider than the
DefaultAuthenticator provider, the new authentication provider
must be the first authentication provider listed in the security realm
configuration, or Oracle UCM will fail to load any user privileges.
Make sure to re-order the authentication providers so the new
authentication provider is listed before the DefaultAuthenticator
provider. Also ensure that the DefaultAuthenticator control flag is set
to SUFFICIENT. For more information, see Section 5.2.3.4,
"Configuring the First Authentication Provider."

Oracle Fusion Middleware Security Configuration for Oracle UCM
5-20 Oracle Fusion Middleware System Administrator's Guide for Oracle Content Server
(UCM), Universal Records Management (URM), and Inbound Refinery (IBR), and Site
Studio (SS).
See also Oracle Fusion Middleware Enterprise Deployment Guide for Oracle Identity
Management, Oracle Fusion Middleware Application Security Guide, Oracle Fusion
Middleware Upgrade Planning Guide, and Oracle Fusion Middleware Upgrade Guide for
Oracle Identity Management.
Before you can configure Oracle Single Sign-On (OSSO), ensure that the software is
installed. Oracle Single Sign-On and Oracle Delegated Administration Service are not
part of the 11g release. Customers must download the 10.1.4.* versions of these
products, which are compatible with 11g Oracle Internet Directory and Oracle
Directory Integration Platform, to form what was known in 10g as the Application
Server Infrastructure. For deployment instructions on these 10g products, read
Chapter 4 "Installing and Configuring JAZN-SSO/DAS" in the Oracle Application
Server Enterprise Deployment Guide (B28184-02) for Oracle Identity Management
release 10.1.4.0.1. This manual is available on Oracle Technology Network at:
http://download.oracle.com/docs/cd/B28196_
01/core.1014/b28184/toc.htm
1. Configure Oracle Single Sign-On (OSSO). See Oracle Fusion Middleware Application
Security Guide.
a. Append Oracle UCM Uniform Resource Identifier (URI) entries to the mod_
wl_ohs.conf file. Use the appropriate location entries from the following
example. Each entry in the example maps the incoming path to the
appropriate Oracle WebLogic Server on which the corresponding application
resides.
In the following list of entries, hostname represents the name of the computer
hosting the Oracle UCM server, and portnumber represents the port number of
the Oracle WebLogic Server on which the corresponding applications resides.
Replace hostname and portnumber with your system's host name and port
name.
# UCM Content Server
<Location /cs>
SetHandler weblogic-handler
WebLogicHost <hostname>
WebLogicPort <portnumber>
</Location>
Note: The URIs you forward depend on the Oracle UCM
functionality that you have installed. Use the appropriate location
entry for your functionality. For example: /cs,
/adfAuthentication, /_ocsh, /ibr, /urm.
For Site Studio, the URI to forward is configured by the customer. For
example, if the site is accessed as /mysite, then you need to append
a location entry for /mysite.
Caution: The Oracle UCM Content Server location /cs can be
customized, so the /cs designation can not guarantee that HTTP
requests will include the correct location. If /cs has been changed,
then forward the location the administrator has configured.

Oracle Fusion Middleware Security Configuration for Oracle UCM
Managing Security and User Access 5-21
# UCM Content Server authentication
<Location /adfAuthentication>
SetHandler weblogic-handler
WebLogicHost <hostname>
WebLogicPort <portnumber>
</Location>
# UCM online help
<Location /_ocsh>
SetHandler weblogic-handler
WebLogicHost <hostname>
WebLogicPort <portnumber>
</Location>
# IBR
<Location /ibr>
SetHandler weblogic-handler
WebLogicHost <hostname>
WebLogicPort <portnumber>
</Location>
# URM
<Location /urm>
SetHandler weblogic-handler
WebLogicHost <hostname>
WebLogicPort <portnumber>
</Location>
# SS
<Location /customer-configured-site-studio
SetHandler weblogic-handler
WebLogicHost <hostname>
WebLogicPort <portnumber>
</Location>
b. Modify the mod_osso.conf file (at ORACLE_HOME/ohs/conf/) to include
Oracle UCM Enterprise Content Management (ECM) Uniform Resource
Identifiers (URIs) to protect.
Note: The URIs you protect depend on the Oracle UCM functionality
that you have installed: Content Server (UCM), Inbound Refinery
(IBR), Universal Records Management (URM), Site Studio (SS).
For Site Studio, the URI to protect is configured by the customer. For
example, if the site is accessed as /mysite, then you need to specify
the URI /mysite.
Functionality URI
UCM /adfAuthentication
IBR /ibr/adfAuthentication
URM /urm/adfAuthentication
SS /customer_configured_site_studio

Oracle Fusion Middleware Security Configuration for Oracle UCM
5-22 Oracle Fusion Middleware System Administrator's Guide for Oracle Content Server
2. Configure the Oracle UCM domain by ensuring you perform these tasks. See
"Configuring Single Sign-On using OracleAS SSO 10g" in Oracle Fusion Middleware
Application Security Guide.
a. Add and configure the OSSO Identity Asserter for the Oracle WebLogic Server
for Oracle UCM. Oracle recommends the following Authentication Providers:
OSSO Identity Asserter, OID Authenticator, Default Authenticator.
The OID Authenticator provider is for the Oracle Internet Directory server,
which is used in production-level systems. The Default Authenticator
provider is for the Oracle WebLogic Server embedded LDAP server.
Ensure that OSSOIdentityAsserter is set as the primary provider authenticator
for the domain, so that user profiles can be retrieved from the associated
Oracle Internet Directory server. If necessary, reorder the providers so they
appear in the following order, with control flags set as listed:
OSSOIdentityAsserter (REQUIRED)
OIDAuthenticator (SUFFICIENT)
DefaultAuthenticator (SUFFICIENT)
b. Configure the Authentication provider. This is necessary to specify the
external LDAP server for the user store, such as Oracle Internet Directory
(OID) or Oracle Virtual Directory (OVD), to match the LDAP server used by
OAM. For example, if OSSO is using OID, then an OID Authentication
provider must be added to the Oracle UCM domain.
5.2.3.4 Configuring the First Authentication Provider
When the Oracle WebLogic Server domain for Oracle UCM is configured to use an
authentication provider other than its default authentication provider for user
authentication (such as Oracle Internet Directory or another LDAP provider), the
primary provider must be the first authentication provider listed in the security realm
configuration, or login authentication will fail.
If the primary provider is not listed first (for example, it is listed below the Oracle
WebLogic Server provider, DefaultAuthenticator), then Oracle UCM will fail to
successfully load users' Group membership and therefore fail to load any user
Note: When the Oracle WebLogic Server domain for Oracle UCM is
configured to use a different authentication provider than the
DefaultAuthenticator provider, the new authentication provider must
be the first authentication provider listed in the security realm
configuration, or Oracle UCM will fail to load any user privileges.
Make sure to re-order the authentication providers so the new
authentication provider is listed before the DefaultAuthenticator
provider. Also ensure that the DefaultAuthenticator control flag
is set to SUFFICIENT. For more information, see Section 5.2.3.4,
"Configuring the First Authentication Provider."
Note: If the URL for Oracle UCM does not link correctly after
completing the OSSO configuration, you might need to change the
server host and server port values. For details, see Section 5.2.3.5,
"Configuring the Oracle UCM URL for Single Sign-On."

Oracle Fusion Middleware Security Configuration for Oracle UCM
Managing Security and User Access 5-23
privileges. You can use the Oracle WebLogic Server Administration Console to change
the order in which the configured authentication providers are called. For details, see
Oracle Fusion Middleware Securing Oracle WebLogic Server.
5.2.3.5 Configuring the Oracle UCM URL for Single Sign-On
When you configure an Oracle application for use with Single Sign-On (SSO) and have
set up Oracle Access Manager (OAM) and Oracle Single Sign-On (OSSO), the Oracle
UCM GET_ENVIRONMENT service provides the server name, server port, and relative
webroot to the application service call (for example, the Oracle WebCenter Doclib
service). However, the values provided by GET_ENVIRONMENT might not be correct
for your SSO configuration.
If you want to redirect the application service to use the OHS server host and server
port (because both OAM and OSSO solutions require front-end applications with
OHS), you must modify the Oracle UCM server host and server port configuration
values.
You can use either of the following two methods to modify the Oracle UCM server
host and server port values:
■Use the Oracle WebLogic Server Administration Console. See Section 2.4.1,
"Modifying Server Configuration Parameters for Oracle Content Server."
■Use the Oracle UCM standalone application named SystemProperties.
1. Go to the Oracle UCM domain directory.
2. Change the directory to ucm/cs/bin
3. Run the standalone application: ./SystemProperties
4. On the SystemProperties screen, select the Internet tab.
5. Update the HTTP Server address to the OHS (or Load Balancer) server host
and server port values.
6. Exit the SystemProperties screen.
7. Restart the Oracle WebLogic Server domain.
5.2.3.6 Configuring Oracle UCM and Single Sign-On for WNA
Setting up Oracle UCM and single sign-on (SSO) with Microsoft clients for Windows
Native Authentication (WNA) requires configuring the Microsoft Active Directory, the
Note: When you use Oracle Internet Directory, all Oracle UCM
administrator and other users must be defined in Oracle Internet
Directory.
Note: The Oracle Content Server system assigns an Oracle Content
Server administrator role to administrative users defined in the
internal Oracle WebLogic Server user store. This is true regardless of
whether Oracle Internet Directory is used or not used. However, if
you use Oracle Internet Directory and the Oracle Internet Directory
Authentication provider is not listed first, then any request by the
Oracle Content Server instance to retrieve the roles of the Oracle
WebLogic Server defined administrative users will fail.

Oracle Fusion Middleware Security Configuration for Oracle UCM
5-24 Oracle Fusion Middleware System Administrator's Guide for Oracle Content Server
client, and the Oracle WebLogic Server domain. Details including system requirements
for SSO with Microsoft clients are provided in "Configuring Single Sign-On with
Microsoft Clients" in Oracle Fusion Middleware Securing Oracle WebLogic Server.
As part of configuring SSO with Microsoft clients, you must specify an LDAP
authentication provider to access the external Microsoft Active Directory. Oracle
WebLogic Server offers an LDAP provider already configured for Microsoft Active
Directory: the Active Directory Authentication provider. See "Configuring LDAP
Authentication Providers" in Oracle WebLogic Server Securing Oracle WebLogic Server.
As part of configuring SSO with Microsoft clients, you must configure the Negotiate
Identity Assertion provider in Oracle WebLogic Server security realm. The identity
assertion provider decodes Simple and Protected Negotiate (SPNEGO) tokens to
obtain Kerberos tokens, validates the Kerberos tokens, and maps Kerberos tokens to
WebLogic users. Use the Oracle WebLogic Server Administration Console to add a
new provider in the appropriate security realm in the domain structure, assign it a
name, then select NegotiateIdentityAsserter for its Type. Activate the changes and
restart the Oracle WebLogic Server. Now your server can use the Kerberos ticket it
receives from the browser.
You must redeploy each Oracle UCM application (Oracle Content Server, Inbound
Refinery, Universal Records Management) that will be used in the Windows Native
Authentication (Kerberos) environment, using an associated deployment plan. A
deployment plan is an XML document. Oracle provides a plan for each of the three
Oracle UCM applications: cs-deployment-plan.xml, ibr-deployment-plan.xml, and
urm-deployment-plan.xml. You also can implement a deployment plan using the
Oracle WebLogic Scripting Tool.
1. Log in to the Oracle WebLogic Server Administration Console.
2. Click Deployments in the Domain Structure navigation tree.
3. On the Control tab, click Next until you see the Oracle UCM deployment you
want to change:
■Oracle Universal Content Management - Content Server
■Oracle Universal Content Management - Inbound Refinery
■Oracle Universal Records Management
4. Select the checkbox to the left of the deployment to be changed.
5. Click Update.
6. Under the Deployment plan path, select Change Path.
Note: When the Oracle WebLogic Server domain for Oracle UCM is
configured to use a different authentication provider than the
DefaultAuthenticator provider, the new authentication provider must
be the first authentication provider listed in the security realm
configuration, or Oracle UCM will fail to load any user privileges.
Make sure to re-order the authentication providers so the new
authentication provider is listed before the DefaultAuthenticator
provider. Also ensure that the DefaultAuthenticator control flag
is set to SUFFICIENT. For more information, see Section 5.2.3.4,
"Configuring the First Authentication Provider."

Oracle Fusion Middleware Security Configuration for Oracle UCM
Managing Security and User Access 5-25
7. Navigate to and select the appropriate plan file:
■cs-deployment-plan.xml (for Content Server)
■ibr-deployment-plan.xml (for Inbound Refinery)
■urm-deployment-plan.xml (for Universal Records Management)
8. Verify that Redeploy this application using the following deployment files is
selected.
9. Click Next.
10. Click Finish.
11. To verify that SSO with Microsoft clients is configured properly, point a browser to
the Microsoft Web application or Web service you want to use. If you are logged
on to a Windows domain and have Kerberos credentials acquired from the Active
Directory server in the domain, you should be able to access the Web application
or Web service without providing a username or password.
cs-deployment-plan.xml
Use the provided cs-deployment-plan.xml file, or create an .xml file and name it
cs-deployment-plan.xml.
<?xml version='1.0' encoding='UTF-8'?>
<deployment-plan
xmlns="http://xmlns.oracle.com/weblogic/deployment-plan"
xmlns:xsi="http://www.w3.org/2001/XMLSchema-instance"
xsi:schemaLocation="http://xmlns.oracle.com/weblogic/deployment-plan
http://xmlns.oracle.com/weblogic/deployment-plan/1.0/deployment-plan.xsd"
global-variables="false">
<application-name>cs.ear</application-name>
<variable-definition>
<variable>
<name>http-only</name>
<value>false</value>
</variable>
</variable-definition>
<module-override>
<module-name>cs.war</module-name>
<module-type>war</module-type>
<module-descriptor external="false">
<root-element>weblogic-web-app</root-element>
<uri>WEB-INF/weblogic.xml</uri>
<variable-assignment>
<name>http-only</name>
<xpath>/weblogic-web-app/session-descriptor/cookie-http-only</xpath>
</variable-assignment>
</module-descriptor>
</module-override>
</deployment-plan>
ibr-deployment-plan.xml
Use the provided ibr-deployment-plan.xml file, or create an .xml file and name it
ibr-deployment-plan.xml.
<?xml version='1.0' encoding='UTF-8'?>
<deployment-plan xmlns="http://xmlns.oracle.com/weblogic/deployment-plan"
xmlns:xsi="http://www.w3.org/2001/XMLSchema-instance" xsi:schemaLocation=
"http://xmlns.oracle.com/weblogic/deployment-plan
http://xmlns.oracle.com/weblogic/deployment-plan/1.0/deployment-plan.xsd" global-variables="false">

Oracle Fusion Middleware Security Configuration for Oracle UCM
5-26 Oracle Fusion Middleware System Administrator's Guide for Oracle Content Server
<application-name>ibr.ear</application-name>
<variable-definition>
<variable>
<name>http-only</name>
<value>false</value>
</variable>
</variable-definition>
<module-override>
<module-name>ibr.war</module-name>
<module-type>war</module-type>
<module-descriptor external="false">
<root-element>weblogic-web-app</root-element>
<uri>WEB-INF/weblogic.xml</uri>
<variable-assignment>
<name>http-only</name>
<xpath>/weblogic-web-app/session-descriptor/cookie-http-only</xpath>
</variable-assignment>
</module-descriptor>
</module-override>
</deployment-plan>
urm-deployment-plan.xml
Use the provided urm-deployment-plan.xml file, or create an .xml file and name it
urm-deployment-plan.xml.
<?xml version='1.0' encoding='UTF-8'?>
<deployment-plan
xmlns="http://xmlns.oracle.com/weblogic/deployment-plan"
xmlns:xsi="http://www.w3.org/2001/XMLSchema-instance"
xsi:schemaLocation="http://xmlns.oracle.com/weblogic/deployment-plan
http://xmlns.oracle.com/weblogic/deployment-plan/1.0/deployment-plan.xsd"
global-variables="false">
<application-name>urm.ear</application-name>
<variable-definition>
<variable>
<name>http-only</name>
<value>false</value>
</variable>
</variable-definition>
<module-override>
<module-name>urm.war</module-name>
<module-type>war</module-type>
<module-descriptor external="false">
<root-element>weblogic-web-app</root-element>
<uri>WEB-INF/weblogic.xml</uri>
<variable-assignment>
<xpath>/weblogic-web-app/session-descriptor/cookie-http-only</xpath>
</variable-assignment>
</module-descriptor>
</module-override>
</deployment-plan>
5.2.4 Configuring Oracle WebLogic Server Web Services
Oracle WebLogic Server Web Services are implemented according to the Web Services
for Java EE 1.2 specification, which defines the standard Java EE runtime architecture
for implementing Web Services in Java. The specification also describes a standard

User Types, Logins, and Aliases
Managing Security and User Access 5-27
Java EE Web Service packaging format, deployment model, and runtime services, all
of which are implemented by Oracle WebLogic Server Web Services.
For information on applying OWSM security to Web Services, see "Using Oracle Web
Service Security Policies" in Oracle Fusion Middleware Security WebLogic Web Services for
Oracle WebLogic Server. For information on using MTOM with Web Services, see
"Example of Adding Security to MTOM Web Services" in Oracle Fusion Middleware
Security WebLogic Web Services for Oracle WebLogic Server.
5.3 User Types, Logins, and Aliases
This section covers the following topics:
■Section 5.3.1, "Introduction to User Login Types"
■Section 5.3.2, "Introduction to User Logins and Aliases"
■Section 5.3.3, "Managing Logins and Aliases"
■Section 5.3.4, "User Information Fields"
5.3.1 Introduction to User Login Types
Oracle Content Server software supports the following user login types:
■Section 5.3.1.1, "External Users"
■Section 5.3.1.2, "Local Users"
5.3.1.1 External Users
External users are defined outside the Oracle Content Server system and authenticated
by external security using the Oracle WebLogic Server Administration Console and
Oracle Platform Security Services (OPSS). Once authenticated, external users can
access the Oracle Content Server system through Oracle WebLogic Server. Generally,
external users are users in a trusted domain to whom you grant access, but do not
manage through the Oracle Content Server system. Their passwords are owned by the
Oracle WebLogic Server domain, the network domain, or another provider such as
Oracle Internet Directory, although the User Admin applet can be used to set a user
password when converting an external user to a local user. Unlike local users,
undefined external users are not assigned the guest role.
The first time users log in to the Oracle Content Server instance through Oracle
WebLogic Server they are added to the Oracle Content Server database, and
administrators can view external user information through the Repository Manager.
However, external users are not automatically included in user lists, such as the
Author field on a content Check In page. If an Override checkbox is selected on a
user's User Profile page, any user information defined in the Oracle Content Server
database overrides the user information derived from the external user base.
The Admin User applet only shows users after they have logged in at least one time to
an Oracle Content Server instance. All users from the Oracle WebLogic Server user
store or other user store outside the Oracle Content Server instance are shown as
external users.
By default, external security integrations map a limited set of user information (user
name, password, roles, accounts, and some additional information such as e-mail
address) from the external user base to the Oracle Content Server system. If you are
using LDAP integration, then additional user information, such as e-mail address or
user locale, can be mapped from the embedded LDAP server with the Oracle

User Types, Logins, and Aliases
5-28 Oracle Fusion Middleware System Administrator's Guide for Oracle Content Server
WebLogic Server Administration Console and integrated with Oracle Platform
Security Services.
The following is a list of common characteristics of external users:
■Login (authentication) is defined by: User ID and password are stored in a user
database external to the Oracle Content Server system, such as:
–Trusted domain (such as Oracle WebLogic Server)
–Lightweight Directory Application Protocol (LDAP)
–Other database
■Access (authorization) is determined by: Credentials (for example, roles) from a
trusted domain or other user database (such as the Oracle WebLogic Server user
store, Oracle Internet Directory, or another LDAP provider) and Oracle UCM.
■User login: Oracle WebLogic Server and the Oracle Content Server instance must
be running for users to log in.
■User password: User passwords are defined on Oracle WebLogic Server or
another user database (such as an LDAP server) by the administrator. Users
cannot change their passwords on the Oracle Content Server system.
■Interface issues: User names do not appear in the content check-in lists. However,
users can participate in workflows.
Follow this process to set up roles, groups, and accounts for external users:
1. Set up security groups. See Section 5.4.2.1, "Adding a Security Group on Oracle
Content Server."
2. Establish roles. See Section 5.4.4.1, "Creating a Role on Oracle Content Server."
3. Arrange permissions. See Section 5.4.4.5, "Adding and Editing Permissions on
Oracle Content Server."
4. (Optional) Use accounts. See Section 5.5.2.1, "Enabling Accounts on Oracle
Content Server."
For details about creating external users, see Administrator's Guide for Oracle WebLogic
Server Administration Console Online Help.
5.3.1.2 Local Users
Local users are defined by an administrator within the Oracle Content Server system.
Administrators assign these users one or more roles, which provide the user with
access to security groups.
The following is a list of common characteristics of local users:
■Logins (authentication) are created by: Administrator in the Oracle Content
Server system.
Caution: Local users are not supported on the Oracle WebLogic
Server domain. Although Oracle Content Server administrators can
create and configure local users with the User Admin applet, for local
users to be authenticated for access to the Oracle Content Server
instance, the users and passwords also must be created with the
Oracle WebLogic Server Administration Console. The default user
type supported in 11g Release 1 (11.1.1) is External Users.

User Types, Logins, and Aliases
Managing Security and User Access 5-29
■Access (authorization) is determined by: Oracle Content Server roles, which
provide access to security groups.
■User login: Local users cannot log in to the Oracle Content Server Admin Server
because the Admin Server requires logging in through Oracle WebLogic Server.
■User password: Users can change their passwords.
■Interface issues: User names appear in the content check-in lists. Users can specify
whether to change full name, e-mail address, and user type.
■Considerations: Previously recommended for 1000 or fewer users, but now
recommended only when required by the system administrator for purposes such
as troubleshooting the Oracle Content Server system. Because of performance
considerations, do not configure more than 1000 local users.
Follow this process to set up local users:
1. Set up security groups. See Section 5.4.2.1, "Adding a Security Group on Oracle
Content Server."
2. Establish roles. See Section 5.4.4.1, "Creating a Role on Oracle Content Server."
3. Arrange permissions. See Section 5.4.4.5, "Adding and Editing Permissions on
Oracle Content Server."
4. Assign user logins. See Section 5.3.3.1, "Adding a User Login."
5. (Optional) Use accounts. See Section 5.5.2.1, "Enabling Accounts on Oracle
Content Server."
5.3.2 Introduction to User Logins and Aliases
User logins are the names associated with the people who access the Oracle Content
Server system. In 11g Release 1 (11.1.1) and later, by default user logins must be created
on the Oracle WebLogic Server domain that hosts Oracle Universal Content
Management (Oracle UCM) and the Oracle Content Server instance. Authentication
and credentials are handled by default with the Oracle WebLogic Server user store and
associated security software instead of by the Oracle Content Server system. For more
information, see Oracle Fusion Middleware Application Security Guide.
Note: Instructions for using the Oracle WebLogic Server
Administration Console apply to users and groups in the Oracle
WebLogic Authentication provider only. If you customize the default
security configuration to use a custom Authentication provider, use
the administration tools supplied by that security provider to create a
user. If you are upgrading to the Oracle WebLogic Server
Authentication provider, you can load existing users and groups into
its database. See "Migrating Security Data" in Oracle Fusion Middleware
Securing Oracle WebLogic Server. .

User Types, Logins, and Aliases
5-30 Oracle Fusion Middleware System Administrator's Guide for Oracle Content Server
The Oracle WebLogic Server administrator assigns one or more groups to each user. A
group provides the user access to files within the security groups. Undefined users are
assigned to the guest group, which allows viewing of documents only in the Public
security group by default.
You can also create a group of users that can be then referenced by a single name, or
alias, in workflows, subscriptions, and projects. For example, it is much easier to add
an alias called Support to a workflow than it is to add user1, user2, user3, and so on.
If you log in to multiple browser windows on the same computer using different login
methods (such as standard login, Microsoft login, or self-registered login), the Oracle
Content Server system can become confused about which user is logged in to each
window. Remember to close any open browser windows while testing different login
methods.
5.3.3 Managing Logins and Aliases
By default, user logins must be created and managed with the Oracle WebLogic Server
Administration Console. For information and instructions on creating and managing
user logins, see Oracle WebLogic Server Administration Console Online Help. If you
customize the default security configuration to use another Authentication provider,
such as Oracle Internet Directory, use the administration tools supplied by that
security provider to create and manage user logins.
If you need to set up a user (other than the Oracle Content Server administrator) to
work with a standalone Oracle Content Server utility such as SystemProperties, you
can use the User Admin applet in the Oracle Content Server system to create a local
user. However, a user created with the User Admin applet cannot be authenticated for
any other functions than standalone Oracle Content Server utilities, unless the user is
also created with the Oracle WebLogic Server Administration Console.
The remainder of this section discusses the tasks involved in managing only Oracle
Content Server user logins for standalone utilities.
■Section 5.3.3.1, "Adding a User Login"
■Section 5.3.3.2, "Editing a User Login"
■Section 5.3.3.3, "Deleting a User Login"
■Section 5.3.3.4, "Creating an Alias"
■Section 5.3.3.5, "Editing an Alias"
■Section 5.3.3.6, "Deleting an Alias"
Caution: Although user logins still can be created and managed on
the Oracle Content Server system with the User Admin applet, they
are not valid for authentication purposes unless they also have been
created with the Oracle WebLogic Server Administration Console.
If you use an LDAP server and create a user login with the same name
as a local user defined in the Oracle Content Server system with the
User Admin applet, the LDAP user is authenticated against LDAP
when logging in, but receives roles assigned to the local user.
Important: User logins are case sensitive.

User Types, Logins, and Aliases
Managing Security and User Access 5-31
5.3.3.1 Adding a User Login
To add a user login only for use with Oracle Content Server standalone utilities:
1. From the User Admin Screen: Users Tab, click Add.
2. Set the Authorization Type from the menu. For more information, see Section 5.3.1,
"Introduction to User Login Types."
3. Click OK.
The Add/Edit User Screen is displayed.
4. Enter information about the user.
■If you enter a password, you must reenter the same password in the Confirm
Password field.
■Keep in mind that the user name and password are case-sensitive.
5. Assign roles to the user.
6. If accounts are enabled, assign accounts to the user.
7. Click OK.
5.3.3.2 Editing a User Login
To edit a user login only for use with Oracle Content Server standalone utilities:
1. From the Users tab of the User Admin Screen, double-click the user name, or select
the user name and click Edit.
The Add/Edit User Screen or Add/Edit User Screen: Info Tab (Global User) is
displayed.
2. Edit the user login as necessary.
If you change the user locale for a user who has the sysmanager role, you must restart
the Admin Server service for the Admin Server interface to appear in the user's locale
language.
Note: As of 11g Release 1 (11.1.1), user logins must be added using
the Oracle WebLogic Server Administration Console. Although user
logins can be managed in the Oracle Content Server system for special
purposes, they are not valid for authentication to the Oracle Content
Server system until they have been created with the Oracle WebLogic
Server Administration Console. For information and instructions on
creating and managing user logins, see Oracle WebLogic Server
Administration Console Online Help.
Note: As of 11g Release 1 (11.1.1), user logins must be edited using
the Oracle WebLogic Server Administration Console. Although user
logins can be managed in the Oracle Content Server system for special
purposes, they are not valid for authentication to the Oracle Content
Server system until they have been created with the Oracle WebLogic
Server Administration Console. For information and instructions on
editing and managing user logins, see Oracle WebLogic Server
Administration Console Online Help.

User Types, Logins, and Aliases
5-32 Oracle Fusion Middleware System Administrator's Guide for Oracle Content Server
5.3.3.3 Deleting a User Login
To delete a user login only for use with Oracle Content Server standalone utilities:
1. From the Users tab of the User Admin Screen, select the user name.
2. Click Delete.
A confirmation screen is displayed.
3. Click Yes.
If you delete a user who is involved in a workflow, you are prompted to confirm the
deletion. You must adjust the workflow and remove the user from the list of workflow
reviewers.
5.3.3.4 Creating an Alias
To define an alias only for use with Oracle Content Server standalone utilities:
1. Display the User Admin Screen: Aliases Tab.
2. Click Add.
The Add New Alias/Edit Alias Screen is displayed.
3. In the Alias Name field, enter a name that identifies the group of users.
4. In the Description field, enter a detailed description of the alias.
5. Click Add.
The Select Users Screen is displayed.
6. Select the user names from the list.
■To narrow the list of users on the Select Users screen, select Use Filter, click
Define Filter, select the filter criteria, and click OK.
■To select a range of users, click one user login and then hold down the Shift
key while clicking another user login.
Note: As of 11g Release 1 (11.1.1), user logins must be deleted using
the Oracle WebLogic Server Administration Console. Although user
logins can be managed in the Oracle Content Server system for special
purposes, they are not valid for authentication to the Oracle Content
Server system until they have been created with the Oracle WebLogic
Server Administration Console. For information and instructions on
deleting and managing user logins, see Oracle WebLogic Server
Administration Console Online Help.
Note: As of 11g Release 1 (11.1.1), user logins must be managed
using the Oracle WebLogic Server Administration Console. Although
user logins can be managed in the Oracle Content Server system for
special purposes, they are not valid for authentication to the Oracle
Content Server system until they have been created with the Oracle
WebLogic Server Administration Console. For information and
instructions on creating and managing user logins, see Oracle WebLogic
Server Administration Console Online Help.

User Types, Logins, and Aliases
Managing Security and User Access 5-33
■To select users individually, hold down the Ctrl key while clicking each user
login.
7. Click OK.
8. Close the User Admin screen.
5.3.3.5 Editing an Alias
To edit an alias only for use with Oracle Content Server standalone utilities:
1. Display the User Admin Screen: Aliases Tab.
2. Highlight an alias and click Edit.
The Add New Alias/Edit Alias Screen is displayed.
3. Alter the information as needed.
4. In the Description field, enter a detailed description of the alias.
5. Click OK.
6. Close the User Admin screen.
5.3.3.6 Deleting an Alias
To delete an alias only for use with Oracle Content Server standalone utilities:
1. Display the Add New Alias/Edit Alias Screen.
2. Highlight the alias to be deleted and click Delete.
A screen appears, asking you to confirm the deletion. Click Yes to delete the entry
or No to retain it.
3. Close the User Admin screen.
Note: As of 11g Release 1 (11.1.1), user logins must be managed with
the Oracle WebLogic Server Administration Console. Although user
logins can be managed in the Oracle Content Server system for special
purposes, they are not valid for authentication to the Oracle Content
Server system until they have been created with the Oracle WebLogic
Server Administration Console. For information and instructions on
editing and managing user logins, see Oracle WebLogic Server
Administration Console Online Help.
Note: As of 11g Release 1 (11.1.1), user logins must be managed with
the Oracle WebLogic Server Administration Console. Although user
logins can be managed in the Oracle Content Server system for special
purposes, they are not valid for authentication to the Oracle Content
Server system until they have been created with the Oracle WebLogic
Server Administration Console. For information and instructions on
deleting and managing user logins, see Oracle WebLogic Server
Administration Console Online Help.

User Types, Logins, and Aliases
5-34 Oracle Fusion Middleware System Administrator's Guide for Oracle Content Server
5.3.4 User Information Fields
This section covers these topics:
■Section 5.3.4.1, "About User Information Fields"
■Section 5.3.4.2.1, "Adding a New User Information Field"
■Section 5.3.4.2.2, "Editing an Option List"
■Section 5.3.4.2.3, "Editing a User Information Field"
5.3.4.1 About User Information Fields
User information defines the unique attributes of a user, such as full name, password,
and e-mail address. User information fields describe a user in the same way that
metadata fields describe a content item. User information is stored in the Oracle
Content Server database, and can be used to sort users, display user information on
Oracle Content Server Web pages, or customize the display of Web pages based on
user attributes.
The following user information fields are predefined in the system. These fields cannot
be deleted, and the field name and type cannot be changed.
5.3.4.2 Managing User Information Fields
This section describes the tasks involved in managing user information fields.
■Section 5.3.4.2.1, "Adding a New User Information Field"
■Section 5.3.4.2.2, "Editing an Option List"
■Section 5.3.4.2.3, "Editing a User Information Field"
5.3.4.2.1 Adding a New User Information Field To add a new user information field:
1. On the User Admin Screen: Information Fields Tab, click Add.
The Add Metadata Field Name Screen is displayed.
2. Enter a new field name. Duplicate names are not allowed. Maximum field length
is 29 characters. The following are not acceptable: spaces, tabs, line feeds, carriage
returns and ; ^ ? : @ & + " # % < * ~ |
3. Click OK.
The Edit Metadata Field Screen is displayed.
4. Configure the properties for the field, and click OK.
5. Click Update Database Design.
5.3.4.2.2 Editing an Option List To edit an option list key:
1. On the Edit Metadata Field Screen, select Enable Option List.
2. Click Edit.
Name Type Caption Is Option List
dFullName Long Text Full Name False
dEmail Long Text E-mail Address False
dUserType Text User Type True
dUserLocale Text User Locale True

Security Groups, Roles and Permissions
Managing Security and User Access 5-35
The Option List Screen is displayed.
3. Add, edit, or delete option values.
■Each value must appear on a separate line.
■A blank line will result in a blank value in the option list.
4. To sort the list, select sort options and click Sort Now.
5. Click OK.
5.3.4.2.3 Editing a User Information Field To edit a user information field:
1. Double-click the field, or select the field and click Edit.
The Edit Metadata Field Screen is displayed.
2. Add, edit, or delete option values.
3. Click OK.
5.4 Security Groups, Roles and Permissions
This section covers the following topics:
■Section 5.4.1, "Introduction to Oracle Content Server Security Groups"
■Section 5.4.2, "Managing Oracle Content Server Groups"
■Section 5.4.3, "Introduction to Oracle Content Server Roles and Permissions"
■Section 5.4.4, "Managing Oracle Content Server Roles and Permissions"
5.4.1 Introduction to Oracle Content Server Security Groups
A security group is a set of files grouped under a unique name. Every file in the Oracle
Content Server repository belongs to a security group. Access to security groups is
controlled by the permissions, which are assigned to roles on the Oracle Content
Server system. Roles are assigned to users where they are managed with Oracle
WebLogic Server.
Users are assigned groups with the Oracle WebLogic Server Administration Console.
When a user logs in to the Oracle Content Server instance, the user's groups are
mapped to Oracle Content Server roles. Oracle WebLogic Server user groups that start
with a @ ("at") symbol are mapped to Oracle Content Server accounts.
For Oracle WebLogic Server groups to be recognized in the Oracle Content Server
system, roles with the exact same names must be created in the Oracle Content Server
system and assigned to security groups. If this is not done, the Oracle WebLogic Server
groups assigned to users has no impact on users' privileges on the Oracle Content
Server system.
Security groups enable you to organize content files into distinct groups that can be
accessed only by specific users. For example, files could be assigned to a security
group with the name HRDocs, which could represent documents under the Human
Resources designation, and could be accessed only by people who worked in the
Human Resources department. There are two predefined security groups:
■Public: By default, any user can view documents in the Public group without
logging in.
■Secure: System files are stored in the Secure group and are available only to the
system administrator.
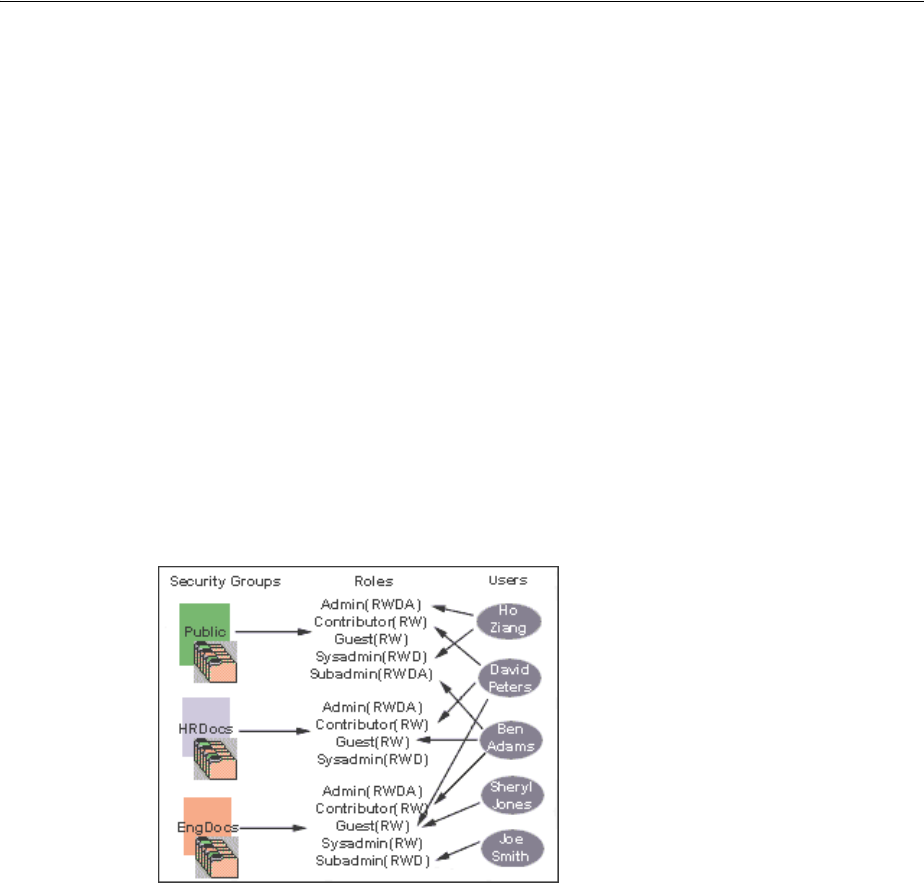
Security Groups, Roles and Permissions
5-36 Oracle Fusion Middleware System Administrator's Guide for Oracle Content Server
5.4.1.1 Best Practices for Working with Security Groups
Keep these considerations in mind when you define security groups:
■Define security groups before anyone checks in files that must be secure.
■The number of security groups should be kept at a minimum to provide optimum
search performance and user administration performance. If your security model
requires more than 50 security classifications, you should enable accounts and use
them to control user permissions. This number varies depending on Search
Performance and User Admin Performance.
■Put all files that share the same access into one security group.
■Set up a logical naming convention for your security groups. For example, use
department names if you are setting up an intranet, and use levels of security
(internal, classified, and so forth) if you are setting up an extranet.
For example, Figure 5–1 shows three defined security groups (Public, HRDocs, and
EngDocs). They are associated with five users assigned different roles (Admin,
Contributor, Guest, Sysadmin, Subadmin) and specific sets of permissions (Read,
Write, Delete, Admin).
Figure 5–1 Example of Defining Security Groups
5.4.1.2 Performance Considerations
Your user access choices for security groups and roles can affect the following system
performance areas:
■Search Performance
■User Admin Performance
5.4.1.2.1 Search Performance Search performance is affected by the number of security
groups a user has permission to access. To return only content that a user has
permission to view, the database WHERE clause includes a list of security groups. The
WHERE clause either includes all of the security groups the user has permission to
access, or it includes all of the security groups the user does not have permission to
access. Which approach is taken depends on whether the user has permission to more
than 50% or fewer than 50% of the defined security groups.
For example, if 100 security groups are defined, and a user has permission to 10
security groups, the 10 security groups will be included in the WHERE clause. In
contrast, for a user with permission to access 90 security groups, the WHERE clause
includes the 10 security groups the user does not have permission to access.

Security Groups, Roles and Permissions
Managing Security and User Access 5-37
Therefore, if a user has permission to almost 50% of the security groups, the search
performance is less efficient. If a user has permission to all or none of the security
groups, the search performance is more efficient.
5.4.1.2.2 User Admin Performance The total number of security groups multiplied by the
total number of roles determines the number of rows in the RoleDefinition database
table, which affects the performance of the User Admin application for operations
involving local users. To determine the approximate time required to perform an
operation in the User Admin application, such as adding a security group or changing
permission for a role, use the following formula:
(# of security groups) X (# of roles) / 1000 = Time of operation in seconds
For example, using a PC with a 400 MHz processor, 128 MB of RAM, it took
approximately 10 seconds to add a security group, or role, or both, using the User
Admin application when the RoleDefinition table has 10,000 rows.
As the number of security groups increases, administration performance is affected
more than consumer search performance.
5.4.2 Managing Oracle Content Server Groups
The following tasks are used to manage security groups using the Oracle Content
Server system.
■Section 5.4.2.1, "Adding a Security Group on Oracle Content Server"
■Section 5.4.2.2, "Deleting a Security Group on Oracle Content Server"
For information on managing groups, see Oracle WebLogic Server Admin Console Help.
5.4.2.1 Adding a Security Group on Oracle Content Server
To create a security group and assign permissions:
1. From the User Admin Screen, select Security, and then Permissions by Group.
The Permissions By Group Screen is displayed.
2. Click Add Group to display the Add New Group Screen.
3. Enter a group name and description.
4. Click OK.
5. Set permissions for the security group:
a. Select the security group.
b. Select the role to edit.
c. Click Edit Permissions.
d. After enabling the permissions that you want the role to have for the group,
click OK to close the Permissions by Group screen.
5.4.2.2 Deleting a Security Group on Oracle Content Server
Note: Never delete a security group or account if it is associated with
a content item stored in the Oracle Content Server repository.
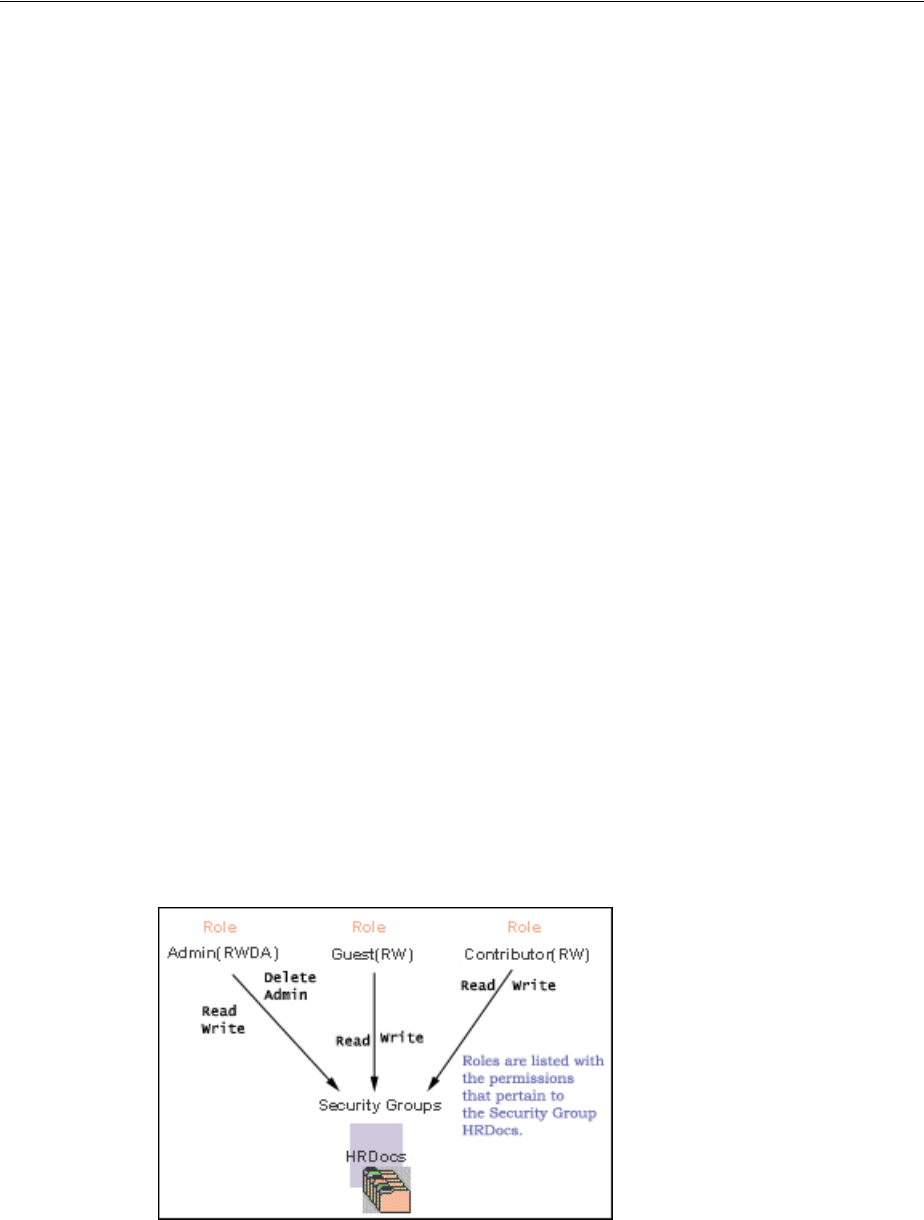
Security Groups, Roles and Permissions
5-38 Oracle Fusion Middleware System Administrator's Guide for Oracle Content Server
To delete a security group:
1. Make sure that no content items are assigned to the security group you want to
delete. You cannot delete a security group if content still exists in that security
group.
2. From the User Admin Screen, select Security, and then Permissions by Group.
The Permissions By Group Screen is displayed.
3. Select the group you want to delete.
4. Click Delete Group.
A confirmation screen is displayed.
5. Click Yes.
The security group is deleted.
6. After you have deleted the security group, click OK to close the Permissions by
Group screen.
5.4.3 Introduction to Oracle Content Server Roles and Permissions
A role is a set of permissions (Read, Write, Delete, Admin) for each security group. You
can think of a role as a user's job. Users can have different jobs for various security
groups. Users can also have different jobs to identify the different teams in which they
participate. You can:
■Define roles.
■Assign multiple roles to a user.
■Set up multiple users to share a role.
■Set the role's permissions to multiple security groups.
For example, Figure 5–2 shows three roles and the permissions those roles have to the
same security group.
Figure 5–2 Example of Roles and Their Permissions
Roles are assigned to one or more users by the system administrator to provide access
to the security groups. Figure 5–3 shows the EngUsers role with only Read permission
to the HRDocs security group. However, this role provides Read, Write, and Delete
permissions to the EngDocs security group. This provides an added measure of
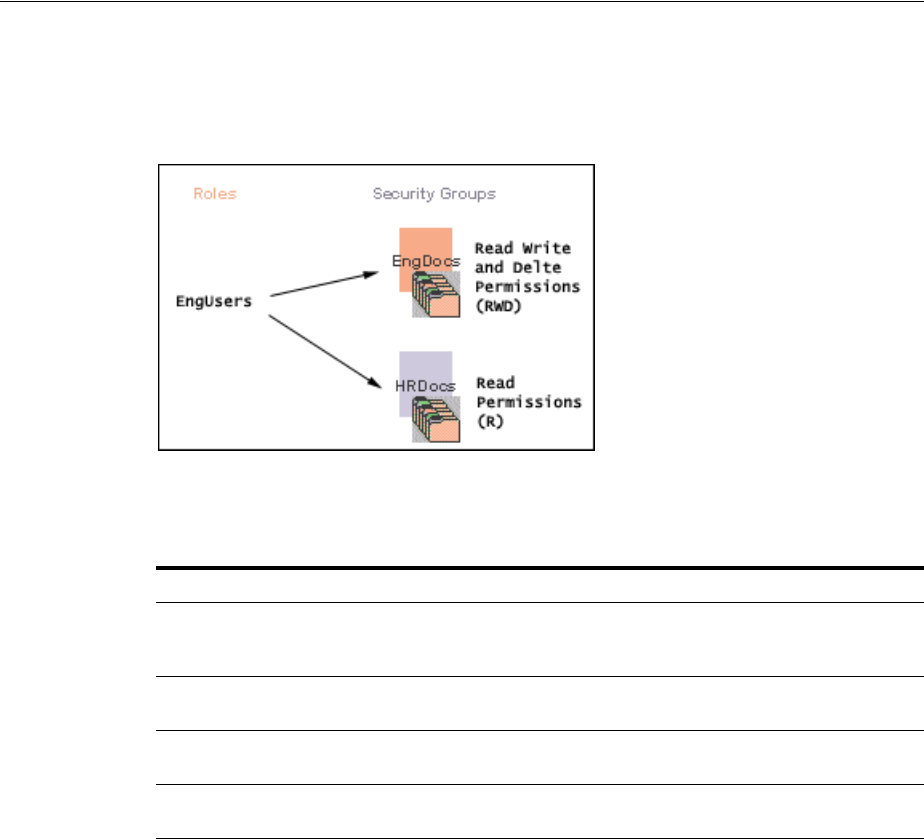
Security Groups, Roles and Permissions
Managing Security and User Access 5-39
security, ensuring that only users who need access to certain documents can modify
them.
Figure 5–3 Example of Roles and Security Group Access
5.4.3.1 Predefined Roles
The following roles are predefined on the Oracle Content Server system:
5.4.3.2 About Permissions
Each role allows the following permissions for each security group: Read (R), Write
(W), Delete (D), or Admin (A). The permission that a user has to access the files in a
security group is the highest permission defined by any of the user's roles. If a user has the
guest and contributor roles, where guest is given Read permission and contributor is
given Write permission to the Public security group, the user will have Write
permission to content in the Public security group.
As shown in Figure 5–4, Joe Smith and Ann Wallace have permissions to two security
groups:
■Joe Smith has Read, Write, and Delete permission to the EngDocs security group,
but only Read permission to the HRDocs security group. As a member of the
EngUsers role, he has been given Read, Write, and Delete access to Engineering
Documents, but only Read access to Human Resource documents.
■Ann Wallace has Read, Write, and Delete permission to the HRDocs security
group, but only Read permission to the EngDocs security group. As a member of
the HRUsers role, she has been given Read, Write, and Delete access to Human
Resource documents, but only Read access to Engineering documents.
Roles Description
admin The admin role is assigned to the system administrator. By default, this role has
Admin permission to all security groups and all accounts, and has rights to all
administration tools.
contributor The contributor role has Read and Write permission to the Public security group,
which enables users to search for, view, check in, and check out content.
guest The guest role has Read permission to the Public security group, which enables
users to search for and view content.
sysmanager The sysmanager role has privileges to access the Admin Server on the Oracle
Content Server system.
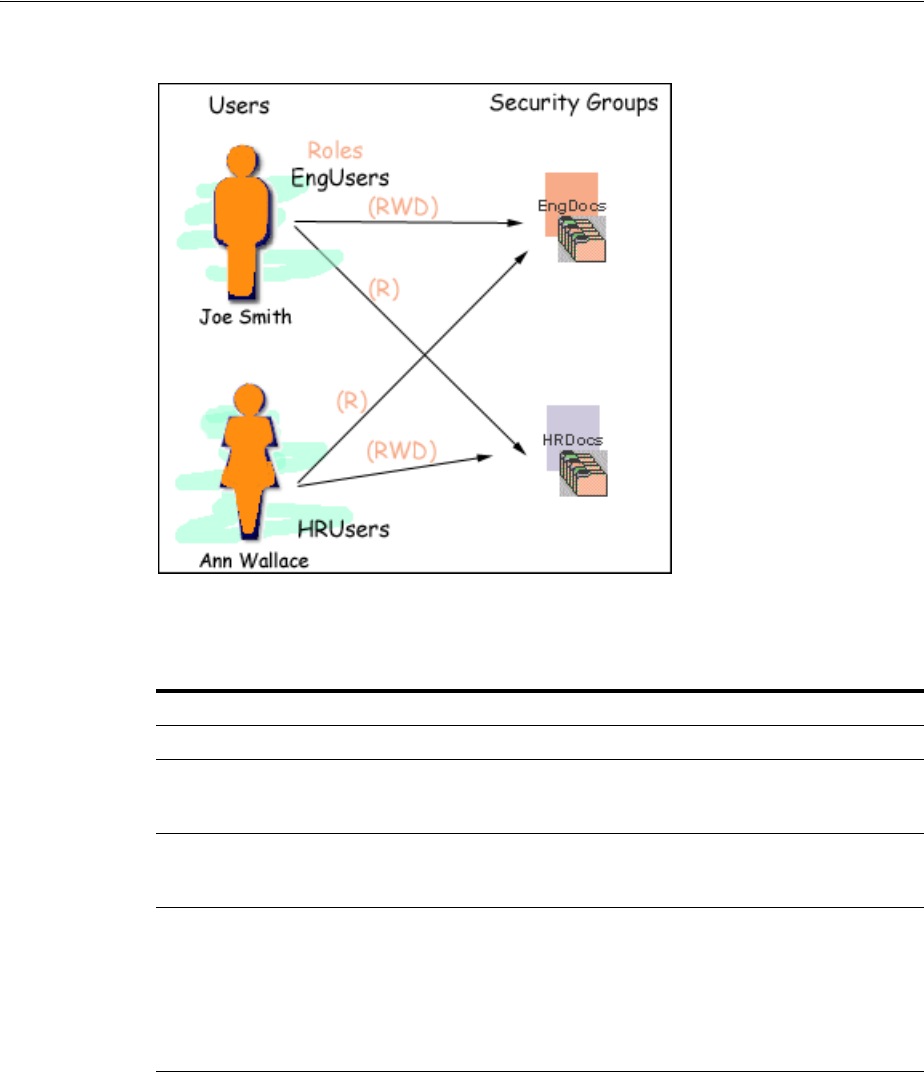
Security Groups, Roles and Permissions
5-40 Oracle Fusion Middleware System Administrator's Guide for Oracle Content Server
Figure 5–4 Example of Assigned Permissions
5.4.3.3 Predefined Permissions
Each role allows the following permissions to be assigned for each security group:
5.4.4 Managing Oracle Content Server Roles and Permissions
Roles and permissions are defined and managed on the Oracle Content Server system.
Roles are assigned to user logins, which by default are managed with the Oracle
WebLogic Server Administration Console.
The following tasks are used to manage user roles.
■Section 5.4.4.1, "Creating a Role on Oracle Content Server"
■Section 5.4.4.2, "Deleting a Role on Oracle Content Server"
■Section 5.4.4.3, "Assigning Roles to a User with Oracle WebLogic Server"
Permission Description
Read Allowed to view documents in the security group.
Write Allowed to view, check in, check out, and get a copy of documents in the
security group. The author can change the security group setting of a document
if the author has Write permission in the new security group.
Delete Allowed to view, check in, check out, get a copy, and delete documents in the
security group. The configuration setting AuthorDelete=true adds delete
permission to all security groups to which the author has Write permission.
Admin Allowed to view, check in, check out, get a copy, and delete files in the security
group. If the user has Workflow rights, the user can start or edit a workflow in
the security group.
The user is allowed to check in documents in the security group with another
user specified as the Author. As a non-author of a document, the user can
change the security group setting of the document if the user has Write
permission in the new security group.

Security Groups, Roles and Permissions
Managing Security and User Access 5-41
■Section 5.4.4.4, "Assigning Roles for a Similar User with Oracle WebLogic Server"
■Section 5.4.4.5, "Adding and Editing Permissions on Oracle Content Server"
5.4.4.1 Creating a Role on Oracle Content Server
To create a role and configure permissions on the Oracle Content Server system:
1. From the User Admin Screen, select Security, and then Permissions by Role.
The Permissions By Role Screen is displayed.
2. Click Add New Role.
The Add New Role Screen is displayed.
3. Enter a Role Name.
4. Set permissions for the role:
a. Select the role.
b. Select the security group to edit.
c. Click Edit Permissions.
d. Edit the permissions.
e. Click OK and close the Permissions By Role Screen.
5.4.4.2 Deleting a Role on Oracle Content Server
To delete a role on the Oracle Content Server system:
1. Make sure that no users are assigned to the role to delete. (You can not delete a
role if any users are assigned to it.)
2. From the User Admin Screen, select Security, and then Permissions by Role.
The Permissions By Role Screen is displayed.
3. Select the role to delete.
4. Click Delete Role.
A confirmation screen is displayed.
5. Click Yes.
5.4.4.3 Assigning Roles to a User with Oracle WebLogic Server
To assign roles to a user for the Oracle Content Server system, use the Oracle
WebLogic Server Administration Console. While roles are defined on Oracle Content
Server, they must be assigned to users with the Administration Console.
Users can be assigned groups with the Oracle WebLogic Server Administration
Console. For Oracle WebLogic Server groups to be recognized in the Oracle Content
Server system, roles with the exact same names must be created in the Oracle Content
Server system and assigned to security groups.
5.4.4.4 Assigning Roles for a Similar User with Oracle WebLogic Server
To assign roles when creating a user for the Oracle Content Server system that has
similar access to that of another user login, use the Oracle WebLogic Server
Administration Console. While roles are defined on the Oracle Content Server system,
they must be assigned to users with the Administration Console.

Accounts
5-42 Oracle Fusion Middleware System Administrator's Guide for Oracle Content Server
Users can be assigned groups with the Oracle WebLogic Server Administration
Console. For Oracle WebLogic Server groups to be recognized in the Oracle Content
Server system, roles with the exact same names must be created in the Oracle Content
Server system and assigned to security groups.
5.4.4.5 Adding and Editing Permissions on Oracle Content Server
To add permissions to a role or edit existing permissions on the Oracle Content Server
system:
1. From the User Admin Screen, select Security, and then Permissions by Role.
The Permissions By Role Screen is displayed.
2. Either select an existing role, or add a new role.
The permissions associated with the security groups are displayed.
3. Select an item in the Groups/Rights column.
4. Click Edit Permissions.
The Edit Permissions Screen is displayed.
5. Specify the permissions to associate with this role and security group. See
Section 5.4.3.3, "Predefined Permissions."
6. Click OK.
5.5 Accounts
Accounts are defined and managed on the Oracle Content Server system. Account
permissions are assigned to user logins with the Oracle WebLogic Server
Administration Console.
This section covers the following topics:
■Section 5.5.1, "Introduction to Oracle Content Server Accounts"
■Section 5.5.2, "Managing Oracle Content Server Accounts"
■Section 5.5.3, "An Oracle Content Server Accounts Case Study"
5.5.1 Introduction to Oracle Content Server Accounts
Accounts give you greater flexibility and granularity in your security structure than
security groups alone provide. Accounts and account permissions are assigned to
users with the Oracle WebLogic Server Administration Console, and the server maps
groups to Oracle Content Server roles and accounts. An account also can be assigned
to each content item. To access a content item that has an account assigned to it, the
user must have the appropriate permission to the account.
Oracle WebLogic Server user groups that start with a @ ("at") symbol are mapped to
Oracle Content Server accounts.

Accounts
Managing Security and User Access 5-43
There are several ways accounts can be created:
■The system administrator creates predefined accounts using the User Admin tool.
See Section 5.5.2.2, "Creating Predefined Accounts on Oracle Content Server."
■A user administrator creates an account while checking in content. See
Section 5.5.2.3, "Creating Accounts When Checking In Content on Oracle Content
Server."
You must enable accounts to use them. For more information, see Section 5.5.2.1,
"Enabling Accounts on Oracle Content Server."
5.5.1.1 Accounts and Security Groups
When accounts are used, the account becomes the primary permission to satisfy before
security group permissions are applied. You can also think of a user's access to a
particular document as the intersection between their account permissions and security
group permissions.
For example, the EngAdmin role has Read, Write, Delete, and Admin permission to all
content in the EngDocs security group. A user is assigned the EngAdmin role, and is
also assigned Read and Write permission to the AcmeProject account. Therefore, the
user has only Read and Write permission to a content item that is in the EngDocs
security group and the AcmeProject account.
Note: If you enable accounts and use them, then later choose to
disable accounts, you can have the perception of losing data. The
repository remains intact. However, if you make certain changes to the
security model, then you also must update the users' access rights so
they can continue to access the secure content.
To avoid this situation, examine your requirements and the Oracle
UCM security model of groups and accounts to determine what
would best match your needs. Unless you are certain that you want to
use accounts, do not enable them.
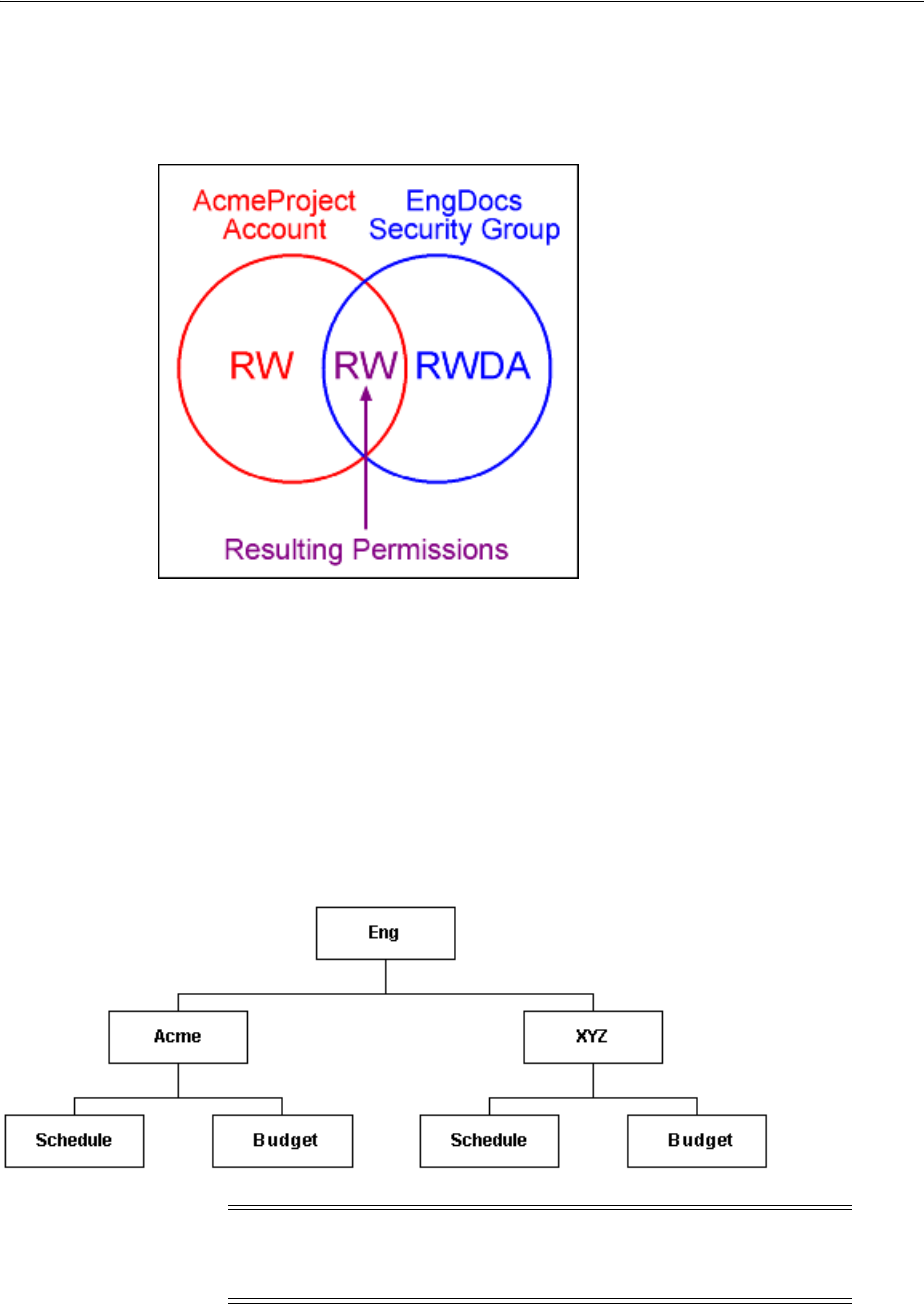
Accounts
5-44 Oracle Fusion Middleware System Administrator's Guide for Oracle Content Server
Figure 5–5 shows the intersection of the AcmeProject account and EngDocs security
group permissions.
Figure 5–5 Example of Security Group Permissions
Security group permissions are ignored if the account does not permit access to any
content. Remember that the account acts as a filter that supersedes the permissions
defined by the user's roles.
5.5.1.2 Hierarchical Accounts
Accounts can be set up in a hierarchical structure, which enables you to give some
users access to entire branches of the structure, while limiting permissions for other
users by assigning them accounts at a lower level in the structure. Figure 5–6 shows a
typical hierarchical account structure.
Figure 5–6 Example of Hierarchical Account Structure
■If you use slashes to separate the levels in account names (for example,
Eng/Acme/Budget), the Oracle Content Server system creates a weblayout
Important: Because account names form part of the directory path
for the URL of a content item, account names cannot exceed 30
characters.

Accounts
Managing Security and User Access 5-45
directory structure according to your account structure. (However, each actual
directory will not be created until a content item is assigned to the account during
the check-in process.) Each lower level in the account name becomes a
subdirectory of the upper level, with an @ symbol prefix to indicate that the
directory is an account level.
■If a user has permission to a particular account prefix, they have access to all
accounts with that prefix. For example, if you are assigned the Eng/XYZ account,
you have access to the Eng/XYZ account and any accounts that begin with the
Eng/XYZ prefix (such as Eng/XYZ/Schedule and Eng/XYZ/Budget).
To handle the security structure depicted above, you would create the following
accounts:
■Eng
■Eng/Acme
■Eng/XYZ
■Eng/Acme/Schedule
■Eng/Acme/Budget
■Eng/XYZ/Schedule
■Eng/XYZ/Budget
Important: The account prefix does not have to include slashes. For
example, if you have accounts called abc, abc_docs, and abcdefg, all
users who have access to the abc account will have access to the other
two accounts as well.

Accounts
5-46 Oracle Fusion Middleware System Administrator's Guide for Oracle Content Server
Figure 5–7 Example of a Security File Structure
5.5.1.3 Performance Considerations
Consider the following performance issues when using accounts in your security
model:
■Theoretically, you can create an unlimited number of accounts without affecting
Oracle Content Server performance. A system with over 100,000 pieces of content
has only limited administration performance problems at 200 accounts per person;
however, there is significant impact on search performance with over 100 accounts
per person. (Note that these are explicit accounts, not accounts that are implicitly
associated with a user through a hierarchical account prefix. A user can have
permission to thousands of implicit accounts through a single prefix.)
■For performance reasons, do not use more than approximately 50 security groups
if you enable accounts.
■Ensure that your security groups and accounts have relatively short names.
5.5.1.4 External Directory Server Considerations
Accounts are available whether or not your Oracle Content Server instance is
integrated with an external directory server (such as the default Oracle WebLogic

Accounts
Managing Security and User Access 5-47
Server). When you use accounts with an external directory, ensure that you follow
these guidelines:
■Set up a global group with the appropriate users in it to match the account.
■Associate group names to either a role or an account by configuring mapping
prefixes.
5.5.2 Managing Oracle Content Server Accounts
The following tasks are involved in managing accounts.
■Section 5.5.2.1, "Enabling Accounts on Oracle Content Server"
■Section 5.5.2.2, "Creating Predefined Accounts on Oracle Content Server"
■Section 5.5.2.3, "Creating Accounts When Checking In Content on Oracle Content
Server"
■Section 5.5.2.4, "Deleting Predefined Accounts on Oracle Content Server"
■Section 5.5.2.5, "Assigning Accounts to a User with Oracle WebLogic Server"
5.5.2.1 Enabling Accounts on Oracle Content Server
To enable accounts on the Oracle Content Server system:
1. On the Oracle Content Server portal, select Administration, then click Admin
Server.
2. On the Admin Server page, click General Configuration.
3. On the General Configuration page, select Enable Accounts to enable accounts.
4. Save the changes.
5. Restart the Oracle Content Server instance.
Alternately, you can access the General Configuration page from the Admin Server,
then add the following line to the Additional Configuration Variables field, which
shows the contents of the IntradocDir/config/config.cfg file:
UseAccounts=true
Save the changes, and restart the Oracle Content Server instance.
5.5.2.2 Creating Predefined Accounts on Oracle Content Server
To create a predefined account on the Oracle Content Server system:
1. From the User Admin screen, select Security, and then select Predefined
Accounts.
The Predefined Accounts Screen is displayed.
2. Click Add.
The Add New Predefined Account Screen is displayed.
Important: If you enable accounts and use them, then choose to
disable accounts, you can have the perception of losing data. The
repository remains intact. However, if you make certain changes to the
security model, then you also must update the security settings for
users so they can continue to access the content.

Accounts
5-48 Oracle Fusion Middleware System Administrator's Guide for Oracle Content Server
3. Add the name of the new account. Keep the names short and consistent. For
example, set up all of your accounts with a three-letter abbreviation by location or
department (MSP, NYC, etc.). Account names can be no longer than 30 characters,
and the following are not acceptable: spaces, tabs, line feeds, carriage returns, and
the symbols : ; ^ ? : & + " # % < > * ~.
4. Click OK.
5. If you already have content checked into the Oracle Content Server system and
you are using a database with full text indexing, rebuild your search index.
If you are using only the metadata database search indexer engine, you do not
need to rebuild your search index.
5.5.2.3 Creating Accounts When Checking In Content on Oracle Content Server
Generally, you should create predefined accounts rather than creating an account
during content checkin. See Section 5.5.2.2, "Creating Predefined Accounts on Oracle
Content Server."
To create an account at the time you check in a content item, you must have User
Admin rights, and perform these tasks:
1. Display the Content Check In Form page.
2. Enter all required and optional information.
3. Type an account name in the Account field.
4. Click Check In.
The new account is assigned to the content item.
5.5.2.4 Deleting Predefined Accounts on Oracle Content Server
To delete a predefined account on the Oracle Content Server system:
1. Select Security and then select Predefined Accounts.
The Predefined Accounts Screen is displayed.
2. Select the account to delete.
3. Click Delete.
The account is deleted immediately.
You can delete an account even if content with that account still exists. The account
value will remain assigned to the content item, but will be considered a user-defined
account.
5.5.2.5 Assigning Accounts to a User with Oracle WebLogic Server
To assign an account to a user, use the Oracle WebLogic Server Administration
Console to create a group and then assign it to one or more users. The group name
must start with the @ sign and end with permissions enclosed in parentheses. The
following example creates a group named testaccount and assigns it Read, Write, and
Delete permissions: @testaccount(RWD).
Note: Never delete an account if it is associated with a content item
stored in the Oracle Content Server repository.

Accounts
Managing Security and User Access 5-49
Accounts assigned to a user on Oracle WebLogic Server are mapped to the Oracle
Content Server instance. For more information, see Oracle Fusion Middleware Oracle
WebLogic Server Administration Console Online Help.
5.5.3 An Oracle Content Server Accounts Case Study
In this example, Xalco is a worldwide software company with offices in London, New
York, and Paris. They have an Oracle Content Server system hosted in the London
office, with access from the other offices through the corporate WAN. At the same
time, Xalco is replicating some files out to an area of their public web site. Initially, the
Sales and Finance departments at each location want to use their instance to publish
files. The New York office is small and has no Sales department.
The following sections provide sample information for the Xalco case study:
■Section 5.5.3.1, "Xalco Security"
■Section 5.5.3.2, "Xalco Accounts"
■Section 5.5.3.3, "Xalco Roles"
■Section 5.5.3.4, "Roles and Permissions Table"
■Section 5.5.3.5, "Roles and Users Table"
■Section 5.5.3.6, "Accounts and Users Table"
5.5.3.1 Xalco Security
■Xalco staff and security levels:
– London: David Smith, Worldwide CFO, and Jim McGuire, UK Sales Manager
–New York: Catherine Godfrey, Regional Finance Manager
–Paris: Helene Chirac, Finance Clerk (Europe)
■Xalco levels of security clearance (security groups) for Xalco content:
–Public: Files suitable for consumption by members of the public (public
content is replicated to the Xalco web site)
– Internal: Files which have unrestricted access internally, but are not suitable
for public consumption
–Sensitive: Files which are commercially sensitive, and restricted to middle
managers and above
– Classified: Highly-sensitive files, suitable only for board members
■Xalco staff access:
– David Smith: As Worldwide CFO, he requires full access to all files held in
the instance.
– Jim McGuire: As UK Sales Manager, he must have full control of Sales files in
London, and have visibility of sales activities in Paris. As a manager, he has
clearance to the Sensitive level.
– Helene Chirac: Based in the Paris office, she must view only files relating to
Finance in Europe, and she has clearance only to the Internal level.
– Catherine Godfrey: As a Regional Finance Manager based in New York, she
must contribute Finance files for New York and view all other Finance
documents. As a manager, she has clearance to Sensitive level.

Accounts
5-50 Oracle Fusion Middleware System Administrator's Guide for Oracle Content Server
5.5.3.2 Xalco Accounts
Access varies by location and job function, so this is reflected in the account structure:
■London has Finance and Sales departments, so it needs two accounts:
–London/Finance
–London/Sales
■New York has only a Finance department:
–NewYork/Finance
■Paris has both Finance and Sales departments:
–Paris/Finance
–Paris/Sales
This results in three top-level accounts (London, NewYork, Paris) and five lower-level
accounts.
5.5.3.3 Xalco Roles
Two roles must be created for each security group (one for Consumers and one for
Contributors)
■PublicConsumer
■PublicContributor
■InternalConsumer
■InternalContributor
■SensitiveConsumer
■SensitiveContributor
■ClassifiedConsumer
■ClassifiedContributor
5.5.3.4 Roles and Permissions Table
To give specific users the ability to start workflows, you would need to add Admin
permission and Workflow rights to the Contributor role.
Role Public Internal Sensitive Classified
PublicConsumer R
PublicContributor RWD
InternalConsumer R
InternalContributor RWD
SensitiveConsumer R
SensitiveContributor RWD
ClassifiedConsumer R
ClassifiedContributor RWD

Access Control List Security
Managing Security and User Access 5-51
5.5.3.5 Roles and Users Table
5.5.3.6 Accounts and Users Table
It would be sufficient to give David Smith RWDA permission on London, New York,
and Paris accounts.
5.6 Access Control List Security
In addition to the standard Oracle Content Server security roles, security groups, and
accounts, the Oracle Content Server system can be configured to support access
control lists (ACLs). An access control list is a list of users, groups, or enterprise roles
with permission to access or interact with a content item.
When access control list security is configured, three new fields are available for use in
several locations in the interface, including checking in content items, updating
content items, and searching for content items. The fields are:
■User Access List
■Group Access List
■Role Access List
After the access control list security feature is configured for the Oracle Content Server
system, you can use Oracle Platform Security Services (OPSS) to manage the access
control lists, including the Oracle Access Manager Authentication provider, which
works with the Oracle WebLogic Server domain. For information, see Oracle Fusion
Middleware Application Security Guide and Oracle Fusion Middleware Administrator's
Guide for Oracle Internet Directory.
Oracle Content Server access control lists are supported in Oracle Secure Enterprise
Search, and users can perform searches using access control list information. For more
information, see Section 7.2, "Oracle Secure Enterprise Search."
Role David Smith Helene Chirac Jim McGuire Catherine Godfrey
PublicConsumer X
PublicContributor X X X
InternalConsumer X
InternalContributor X X X
SensitiveConsumer
SensitiveContributor X X X
ClassifiedConsumer
ClassifiedContributor X X X
Account David Smith Helene Chirac Jim McGuire Catherine Godfrey
London/Finance RWDA R R
London/Sales RWDA RWDA
NewYork/Finance RWDA RW
Paris/Finance RWDA R
Paris/Sales RWDA R

Access Control List Security
5-52 Oracle Fusion Middleware System Administrator's Guide for Oracle Content Server
5.6.1 Configuring Access Control List Security
To set up access control lists, configure the following items on the Oracle Content
Server system:
■To support user and group access control lists, the configuration variable
UseEntitySecurity=true must be set in the Oracle Content Server config.cfg
file.
Enter the variable in the Additional Configuration Variables field of the General
Configuration screen for the Oracle Content ServerAdmin Server. For details, see
Section A.1.2.2.2, "Admin Server: General Configuration Page."
The configuration variable UseEntitySecurity=true sets Oracle Content
Server security to always evaluate the user and group access control lists for
content items. This parameter creates two metadata fields: xClbraUserList and
xClbraAliasList.
■To support the enterprise role access control list, the RoleEntityACL component
must be enabled in the Oracle Content Server system.
This component is installed (disabled) by default with the Oracle Content Server
system. Use the Oracle Content Server advanced component manager to enable
the component. For details, see Section A.3.6, "Advanced Component Manager
Page."
The RoleEntityACL component configures the Oracle Content Server system to
work with other applications to evaluate the enterprise role access control list. This
component turns on the UseRoleSecurity parameter, which sets Oracle
Content Server security to integrate enterprise role access list information for
content items. The UseRoleSecurity parameter creates the xClbraRoleList
metadata field.
■If you want non-administrator users to be able to use the Add User menu to select
users for the User Access List when checking in content items, set the
configuration variable AllowQuerySafeUserColumns=true. If this variable is
not set, no values are displayed in the menu for the User Access List field.
5.6.2 Metadata Fields
Access control lists are computed based on the values in three metadata fields:
xClbraUserList, xClbraAliasList, and xClbraRoleList. When the metadata
values are populated with user, group, or enterprise role names and permissions to a
content item, they affect which users, groups, and enterprise roles are allowed to
search or act on the content item.
These metadata fields are populated from the User Access List, Group Access List, and
Role Access List fields, which can be viewed or accessed when checking in a content
item, updating a content item, and performing a search using the expanded form.
Administrators can use scripts to specify values to populate the metadata fields for the
access lists.
Caution: The Need to Know (NtkDocDisclosure, or NTK)
component supports customization for Oracle Content Server
security; however, it may not work together with access control lists
because of conflicting security models.
For more information, see Appendix B, "Need to Know Component."

Access Control List Security
Managing Security and User Access 5-53
5.6.2.1 xClbraUserList Metadata Field
The xClbraUserList metadata field is used to specify users and their permissions
for a content item.
The following list describes requirements for administrators to specify
xClbraUserList values in scripts:
■Each user name is preceded by an ampersand (&) symbol.
■Each user's permissions follow the user name in parentheses.
■User names are separated by commas.
■Example: xClbraUserList=&sysadmin(RWDA),&user1(RW),&guest(R)
5.6.2.2 xClbraAliasList Metadata Field
The xClbraAliasList metadata field is used to specify groups and their
permissions for a content item.
The following list describes requirements for administrators to specify
xClbraAliasList values in scripts:
■Each group name is preceded by an "at" (@) symbol.
■Each group's permissions follow the group name in parentheses.
■Group names are separated by commas.
■Example: xClbraAliasList=@Mktg(RWDA),@Mktg_ext(RW)
5.6.2.3 xClbraRoleList Metadata Field
The xClbraRoleList metadata field is used to specify enterprise roles and their
permissions for a content item.
The following describes requirements for administrators to specify xClbraRoleList
values in scripts:
■Each role name is preceded by a colon (:) symbol.
■Each role's permissions follow the role name in parentheses.
■Role names are separated by commas.
■Example: xClbraRoleList=:role1(RWDA),:role2(RW)
5.6.3 Access Control List Permissions
Access control list permissions determine what type of access a user, group, or
enterprise role has to a content item. The following permissions can be granted:
Note: In the Oracle Content Server system, an alias could be used to
specify a group of users (which is not the same as an LDAP group).
For ACLs, instead of calling the implementation an alias access list, it
is called a group access list. However, the metadata field name still
uses the term alias.

Access Control List Security
5-54 Oracle Fusion Middleware System Administrator's Guide for Oracle Content Server
To associate access control lists with a content item, you add one or more users,
groups, or enterprise roles when checking in or updating a content item. For each user,
group, or role you add to an access list, you assign the appropriate permission: Read
(R), Write (W), Delete (D), or Admin (A). Access control list permission levels are the
same as defined for Oracle Content Server security groups and accounts. When users
are added to any one of the access lists, the users have the specified permissions to
access the content item.
At least one of the following must be true for a user to be granted a particular
permission:
■The user's name appears in the xClbraUserList metadata field with the
appropriate permission.
■The user belongs to a group that appears in the xClbraAliasList metadata
field with the appropriate permission.
■The user is part of an enterprise role that appears in the xClbraRoleList
metadata field with the appropriate permission.
Access control list permissions are cumulative. If you assign Write, you automatically
assign Read. If you assign Admin, you automatically assign Read, Write, and Delete.
However, users must also satisfy security criteria for access through the Oracle
Content Server security group and the account (if Accounts are enabled). If any of
these security criteria deny a certain permission, users will not have that permission to
the content item.
5.6.3.1 Empty Access Control List Fields
If all the User Access List, Group Access List, and Role Access List fields are empty,
then by default permission is granted to all users. If only the User Access List and
Group Access List fields are blank (and the RoleEntityACL component is not enabled
so there is no Role Access List), permission is granted to all users. This behavior is
configured with the AccessListPrivilegesGrantedWhenEmpty variable, which
is set to true by default. If this configuration variable is set to false, then when all
Permission Description
Read (R) Allowed to view the content item.
Write (W) Allowed to view, check in, check out, update, and get a copy of the
content item.
Delete (D) Allowed to view, check in, check out, update, get a copy, and
delete the content item.
Admin (A) Allowed to view, check in, check out, update, get a copy, and
delete the content item, and check in a content item with another
user specified as the Author.
Note: Access control list permissions do not apply to users with the
Oracle Content Server admin role.

Additional Oracle Content Server Security Connections
Managing Security and User Access 5-55
access control lists are blank, permission is denied to all users except those with the
admin role.
5.7 Oracle Content Server User Information Provider
JpsUserProvider is the default provider for the Oracle Content Server instance to
communicate user information and credentials managed through the Oracle WebLogic
Server Administration Console. For Oracle Universal Content Management (Oracle
UCM) and the Oracle Content Server instance, it is recommended that you use
JpsUserProvider. For details, see Section 4.5.1.2.6, "When to Edit JpsUserProvider."
If a site is upgrading from an earlier release of Oracle Content Server software and is
using Active Directory, LDAP, or Active Directory with LDAP, information about
those providers is available in the 10gR3 document Managing Security and User Access.
It is strongly recommended that sites upgrade to use JpsUserProvider.
5.8 Additional Oracle Content Server Security Connections
This section provides information about additional security communication
connection options for the Oracle Content Server system. It covers the following:
■Section 5.8.1, "About Proxy Connections"
■Section 5.8.2, "Credential Mapping"
■Section 5.8.3, "Secured Connections to Oracle Content Servers"
■Section 5.8.4, "Connections Using the HTTP Protocol"
5.8.1 About Proxy Connections
Proxy connections, or connections between Oracle Content Server instances, provide
additional levels of security for an Oracle Content Server system through the
following functions:
■Security credentials mapping from one Oracle Content Server instance to another
Oracle Content Server instance.
■Secured "named" password connections to Oracle Content Server instances
(password protected provider connections).
■HTTP protocol communication between Oracle Content Server instances.
While it is possible to use both named password connections and HTTP-based Oracle
Content Server communication, it is most likely that one type of connection will be
Note: If the Oracle Content Server instance has been upgraded from
release 10g, empty access control lists will behave differently in release
11g. Release 10g and earlier had the equivalent configuration of
AccessListPrivilegesGrantedWhenEmpty=false. The default
for release 11g is
AccessListPrivilegesGrantedWhenEmpty=false.

Additional Oracle Content Server Security Connections
5-56 Oracle Fusion Middleware System Administrator's Guide for Oracle Content Server
more useful. For both types of connections, credentials mapping can provide
additional security.
Typical uses of the ProxyConnections8 component include the following:
■To provide the capability to perform archive replication of content items over
HTTP or HTTPS. For example, a company has acquired another company, but
they do not a have common infrastructure for sharing information. Both
companies have a Secure Sockets Layer (SSL) connection to the Internet. The
company wants to share content between the two sites. ProxyConnections can be
used to set up a secure Internet connection between the companies' servers so that
content can be securely accessed from one site, replicated, and archived at the
other site.
■To better restrict access to Oracle Content Server instances by using named
passwords to target proxy connections. For example, a company wants to apply
additional security to connections coming from one Oracle Content Server
instance to another Oracle Content Server instance. Using named passwords, an
administrator can restrict access by incoming connections to those with preset
proxy connections and named passwords.
The ProxyConnections8 component is installed (enabled) by default with Content
Server software.
5.8.2 Credential Mapping
A credential map is a mapping of credentials used by an Oracle Content Server
instance to credentials used in a remote system, which tell the Oracle Content Server
instance how to connect to a given resource in that system. Administrators can create
multiple credential maps for users, roles, and accounts. Credential mapping can be
useful in a proxy scenario, for example, where credentials for users, roles, or accounts
created on one Content Server instance can be mapped to the users, roles, or accounts
on another Content Server instance, thus allowing users controlled access to
information on more than one Content Server instance.
This section covers the following topics:
■Section 5.8.2.1, "About Credential Mapping"
■Section 5.8.2.2, "Credential Values"
■Section 5.8.2.3, "Matching Accounts and Roles"
■Section 5.8.2.4, "Creating a Credential Map"
5.8.2.1 About Credential Mapping
When you create a credential map you enter a unique identifier for the map and
specific credential values for users, roles, and accounts. In a proxy connection, when
user credentials match an input value, then the user is granted the credentials
Note: A site can have multiple Content Server instances, but each
Content Server instance must be installed on its own Oracle WebLogic
Server domain.

Additional Oracle Content Server Security Connections
Managing Security and User Access 5-57
specified in the output value. The user credentials are evaluated in the following
order:
1. All the roles.
2. All the accounts.
3. The user name.
After the translation is performed, the user only has the attribute values that were
successfully mapped from input values.
When you have created credential maps, you can specify a credential map along with
a named password connection when configuring an outgoing provider. You also can
specify a credential map when configuring a user provider (such as LDAP).
The default behavior for an LDAP provider is that the guest role is not automatically
assigned to users.
Credential mapping implementation is duplicated in the web server plug-in and in
Oracle UCM. It is designed and implemented for optimal performance, so that any
changes in the mapping are applied immediately. (This can be compared to
performance in NT or ADSI user storage using the NT administrator interfaces, where
changes are cached and not reflected in the Oracle Content Server instance for up to a
couple of minutes.)
5.8.2.2 Credential Values
A credential input value is matched if there is an exact match in the case of a role or
user name. An input account value is matched if one of the user accounts has a prefix,
except for the case of a filter (see Section 5.8.2.3, "Matching Accounts and Roles"). For
example, the following credential values reduce all users who might otherwise have
the admin role to instead have the guest role:
admin, guest
The following table lists the basic syntax for credential values:
You can view which credentials are applied by default if no credential map is
assigned. Use the following mapping, which maps everything without change. This
Note: For information on credential mapping outside of an Oracle
Content Server instance, see "Credential Mapping Providers" in Oracle
Fusion Middleware Developing Security Providers for Oracle WebLogic
Server.
Value Prefix or Sequence Example
User name &
&name
Role
admin
Account @
@marketing
Empty account @#none
@#none
All accounts @#all
@#all
Ignore the value or "comment
out" the value #
#comment

Additional Oracle Content Server Security Connections
5-58 Oracle Fusion Middleware System Administrator's Guide for Oracle Content Server
mapping first filters all roles, then all accounts. For more information about mapping
syntax see Section 5.8.2.3, "Matching Accounts and Roles."
|#all|,%%
@|#all|,@%%
5.8.2.3 Matching Accounts and Roles
A special filter is available for matching accounts and roles. For example, the syntax
for an account filter is designated by starting the account value with specifying the
prefix @| and ending with a | (for example, @|accountname|). The pipe (|)
represents a command redirection operator that processes values through the filter.
For proxied connections a space-separated list of accounts is specified; each account
optionally starts with a dash (-) to denote a negative value. A filter is matched if any of
the specified account strings that do not start with a dash are a prefix for a user
account and all of the account strings that do start with a dash are not prefixes for that
user account.
Roles can be mapped (using the same rules) by removing the @ sign from the
beginning of the filter. For example, the following input value passes through all roles
except those that begin with the prefix visitor. Note that the expression #all
matches all roles.
|#all -visitor|, %%
5.8.2.3.1 Reference Input Value The special sequence %% in the output value can be
used to reference the input value. For example, given the following mapping, any
account that did not start with financial as a prefix would map to the same account
but with the prefix employee/ attached at the front:
@|#all -financial|, @employee/%%
If a user had the account marketing, then after the mapping the user would have the
account employee/marketing.
5.8.2.3.2 Privilege Levels A particular privilege level (read, write, delete, all) can be
granted to an account in the output value by following the account specification with
the letters "R", "W", "D", or "A" enclosed in parentheses. For example, all the privilege
Caution: If your credential map does not at least assign the
minimum set of privileges that an anonymous user gets when visiting
the Oracle Content Server web site, then logged in users may
experience unusual behavior. For example, a common reaction for a
browser that receives an ACCESS DENIED response is to revert back
to being an anonymous user. In particular, a user may experience
unpredictable moments when it is possible or not possible to access a
document (depending on whether at that moment the browser
chooses to send or not to send the user's authentication credentials).
This is particularly true of NTLM authentication because that
authentication has to be renewed periodically.
Caution: The filter will not map the account @#all. The all
accounts account value must be mapped explicitly by using @#all,
@#all mapping.

Additional Oracle Content Server Security Connections
Managing Security and User Access 5-59
levels for all the accounts could be reduced to having read privilege by the following
syntax:
@|#all -financial|, @employee/%%(R)
5.8.2.3.3 Substitution In certain cases it is useful to remove a prefix before the
substitution %% is applied. An offset for the substitution can be specified by using the
syntax %%[n] where n is the starting offset to use before mapping the input value into
the %% expression. The offset is zero based so that %%[1] removes the first character
from the input value. For example, to remove the prefix DOMAIN1\ from all roles, the
following expression can be used:
|domain1\|, %%[8]
Another use for this function might be to replace all accounts that begin with the
prefix marketing/ and replace it with the prefix org1/mkt. The expression for this
would look like the following:
@|marketing/|, @org1/mkt/%%[10]
5.8.2.3.4 Special Characters In certain cases roles have unusual characters that may be
hard to specify in the input values. The escape sequence %xx (where xx is the ASCII
hexadecimal value) can be used to specify characters in the input value. For example,
to pass through all roles that begin with #,& |@ (hash, comma, ampersand, space,
pipe, at) the following expression can be used:
|%35%2c%26%20%7c%40|, %%
5.8.2.4 Creating a Credential Map
To create a credential map, follow these steps:
1. Open a new browser window and log in to the Oracle Content Server instance as
the system administrator.
2. Select Administration and then select Credential Maps.
The Credential Maps Screen is displayed.
3. Enter the unique identifier for the credentials map you are creating.
More than one named password connection can be used to connect to an Oracle
Content Server instance. Each named password connection can have a different
credential map.
4. Enter values in two columns with a comma to separate the columns and a carriage
return between each row of values. The first column specifies input values and the
second column specifies output values.
5. Click Update.
To apply a credential map to roles and accounts retrieved using NT integration, set the
Oracle Content Server configuration entry ExternalCredentialsMap to the name
of the credential map of your choice.
5.8.3 Secured Connections to Oracle Content Servers
Secured connections to Oracle Content Server instances can be supported by creating
password protection on incoming requests. An Oracle Content Server instance can
communicate with another Oracle Content Server instance in a password protected
fashion.

Additional Oracle Content Server Security Connections
5-60 Oracle Fusion Middleware System Administrator's Guide for Oracle Content Server
This section covers the following topics:
■Section 5.8.3.1, "About Named Password Connections"
■Section 5.8.3.2, "Guidelines for Proxy Connections Data"
■Section 5.8.3.3, "Creating a Proxied Connection"
5.8.3.1 About Named Password Connections
Using the Proxied Connection Authentication/Authorization Information Screen you
can create named passwords, which are passwords that you assign to specific
connections by name. Each named password can be associated with a host and IP
address filter on both the direct socket communication to an Oracle Content Server
instance and on any communication performed through the controlling web server
(the HTTP filter) for an Oracle Content Server instance. When an outside agent (such
as a web server for another Oracle Content Server instance) wants to communicate
with the Oracle Content Server instance, it can use a named password connection. A
named password connection also can be associated with a credentials map so that the
privileges of users accessing the Oracle Content Server instance can be reduced or
changed.
Proxy connections entry fields are provided in the forms for configuring outgoing
socket providers and outgoing HTTP providers in which you can specify a named
password connection. (To view provider selections for your instance, select
Administration, Providers.)
Passwords are hashed (SHA1 message digest) with their allowed host and IP address
wildcard filter on the client side. If the copy of a stored password is exposed, it will
only allow access from clients that satisfy both the host and IP address filter.
The expiration implementation for passwords means that the various servers involved
must have their clocks reasonably synchronized (within a few minutes at least).
5.8.3.2 Guidelines for Proxy Connections Data
The data you enter in the Proxied Connection Authentication/Authorization
Information Screen defines different passwords that can be used by external agents to
connect to an Oracle Content Server instance. Instead of an external agent being forced
to provide a password for each user, which may be unavailable to the client for many
reasons (such as message digest algorithms that do not use clear text passwords),
proxy connections enable the agent to authenticate using a single named connection
password. Each named password connection can be linked to rules to restrict which
hosts can connect to the Oracle Content Server instance and to control the privileges
granted to users. Each named password connection is uniquely identified, and the
calling agent must supply the identifier along with the password.
Caution: All passwords are hashed by a time-out value before being
sent to a server. If a password value is exposed while in
communication to a server, the password will only be usable until the
expiration time (approximately fifteen minutes after the time the
request is issued). Also, the password will only be usable in a replay
attack from the same source host and IP address, as previously
described. If firewall-protected internal host and IP addresses are not
being used, a very committed attacker could spoof the host and IP
addresses by hijacking any of the major DNS servers, an event that
has occurred in at least a couple of cases.

Additional Oracle Content Server Security Connections
Managing Security and User Access 5-61
The host name and IP address filters are used to determine which host names or IP
addresses are allowed to use a named password connection when performing direct
socket connections to an Oracle Content Server instance. The rules for defining the
filters are identical to those defined in the System Properties editor (the wildcard
symbols * = match 0 or many and | = match either or can be used to create flexible rules).
If an entry is empty then it provides no restriction on its target attribute (either the
host name or IP address of the client depending on which of the following two fields is
involved).
Two options are implemented through the Providers page:
■Whenever you add an outgoing provider you have the option to use named
password connections and to choose whether the provider is a connecting server
(so that Web access and security is controlled through a remote server).
■Whenever you add a user provider (such as LDAP) you can choose to use an
available credentials map.
No credentials maps are defined in the Proxied Connection
Authentication/Authorization Information Screen. For information on creating a
credentials map, see Section 5.8.2, "Credential Mapping."
5.8.3.3 Creating a Proxied Connection
To create a proxied connection, follow these steps:
1. Open a new web browser window and log in to the Oracle Content Server
instance as the system administrator.
2. Click Administration.
3. Click Connection Passwords.
The Proxied Connection Authentication/Authorization Information Screen is
displayed.
4. Enter information for the fields in the Proxied Connections page.
If credentials maps exist, you can choose to use an existing credentials map, or you
can create one to be used for the proxied connection.
5. Click Update.
5.8.4 Connections Using the HTTP Protocol
Administrators can create a proxy connection between Oracle Content Server
instances using the HTTP protocol. For example, you could have two Oracle Content
Server instances where both have web servers for accessing their functionality. If you
have a large number of users who want to use Web browsers to access information on
one of the Oracle Content Server instances, but not all the users can access that server
directly, this feature can be useful.
The HTTP protocol can be useful for transferring Oracle Content Server archives. The
HTTP provider works with Secure Sockets Layer (SSL), the HTTPS protocol, which
enables secure communication between two Oracle Content Server instances.
This section covers the following topic:
■Section 5.8.4.1, "About Using HTTP Protocol for Content Server Connection"
■Section 5.8.4.2, "Configuring the HTTP Provider"

Oracle Content Server Communication Customization
5-62 Oracle Fusion Middleware System Administrator's Guide for Oracle Content Server
5.8.4.1 About Using HTTP Protocol for Content Server Connection
Administrators can implement an httpoutgoing provider, configurable through the
Providers page, which allows communication from one Oracle Content Server instance
to another Oracle Content Server instance.
If you choose to add an httpoutgoing HTTP provider, you have the following
additional options:
■Specify a CGI URL.
■Specify a named password connection and client IP filter.
To view the httpoutgoing HTTP provider selection, select Administration and then
Providers from the Oracle UCM navigation panel.
Creating a proxy connection between Oracle Content Server instances can take some
preparation. The Oracle Content Server instances must not use the same relative web
root for their weblayout directories. It may require some component architecture
changes to provide the extra navigation links between the servers.
If you set up one Oracle Content Server instance with its web server using SSL and the
other server's front end uses HTTP, then users who try to access the first server by
modifying the other server's URL in a Web browser can get an error because of the
differences between HTTPS (requiring a credential) and HTTP. To resolve this issue,
use the BrowserUrlPath component, available with Oracle Content Server. For more
information, see Section 5.9.2, "Browser URL Customization."
5.8.4.2 Configuring the HTTP Provider
To configure the HTTP provider, complete the following steps.
1. Add an httpoutgoing provider on the first Oracle Content Server instance.
a. In a browser, go to the Administration page and click Providers.
b. Click Add next to the httpoutgoing provider type.
c. Enter the necessary information for the httpoutgoing provider. For more
information see the table for the Outgoing Http Provider Page:
2. Create a proxy connection on the second Oracle Content Server instance that uses
the named password connection and connection password that you specified in
the previous step.
a. On this server, select Administration, then Connection Passwords.
b. Fill in the information for the connection. The IP address filter entry should
have the IP address of the first server.
5.9 Oracle Content Server Communication Customization
The following sections provide information on how to customize access to and
communication with Oracle Content Server instances. It includes the following:
■Section 5.9.1, "Login/Logout Customization"
■Section 5.9.2, "Browser URL Customization"
■Section 5.9.3, "Extended User Attributes"
■Section 5.9.4, "Filter Data Input"

Oracle Content Server Communication Customization
Managing Security and User Access 5-63
5.9.1 Login/Logout Customization
The ExtranetLook component can be used to customize user access by suppressing the
interface for users who are not authenticated by an Oracle WebLogic Server user store
through error and challenge pages issued by the web server. See Oracle Fusion
Middleware Developer's Guide for Oracle Universal Content Management for details about
changing the interface.
The ExtranetLook component is installed (disabled) by default with Oracle Content
Server system. To use the component you must enable it with the Advanced
Component Manager.
5.9.2 Browser URL Customization
The BrowserUrlPath component provides support for determining URL paths used in
certain configurations of the Oracle Content Server system and web servers. This
component is installed (disabled) by default with the Oracle Content Server system. To
use this component you must enable it with the Advanced Component Manager.
This component is valid for an Oracle Content Server instance deployed on an Oracle
WebLogic Server domain and located behind a load balancer.
The following topics are discussed in this section:
■Section 5.9.2.1, "About BrowserUrlPath Customization"
■Section 5.9.2.2, "Affected Idoc Script Variables and Functions"
■Section 5.9.2.3, "Determining the URL Path"
■Section 5.9.2.4, "Changing Absolute Full Path Computation"
■Section 5.9.2.5, "Changing Administration Path Computation"
5.9.2.1 About BrowserUrlPath Customization
The BrowserUrlPath component overrides certain Idoc Script variables and functions,
adds computation to certain variables, and provides additional configuration entries
for determining URL paths. The BrowserUrlPath component is only supported with
Trays and Top Menu layouts for the Oracle Content Server user interface.
■You can configure a system with different web server front ends. One front end
can use HTTP and the other can use HTTPS so that the Oracle Content Server
instance can be accessed simultaneously by web sites using HTTP and HTTPS.
You then must apply the BrowserUrlPath component to enable the Oracle Content
Server instance to handle both types of access.
■If you are using a load balancer that forwards itself as the HTTP host header, then
you must apply the BrowserUrlPath component.
BrowserUrlPath configuration variables are located in the UCM_ORACLE_
HOME/ucm/idc/components/ BrowserUrlPath/config.cfg file.
Caution: The BrowserUrlPath component requires extensive
configuration using the variables. You may want to back up your
configuration before modifying variables

Oracle Content Server Communication Customization
5-64 Oracle Fusion Middleware System Administrator's Guide for Oracle Content Server
In typical scenarios, the web server will forward to the Oracle Content Server instance
two critical pieces of information:
■HTTP_HOST: The host header that the browser sends, identifying the host as it
appears to the user in their browser address bar.
■SERVER_PORT: The port the browser uses in connecting to the Oracle Content
Server instance.
The browser-based full address is used for two critical pieces of functionality:
1. Automatic creation of URLs in the side frame of the Trays layout for the Oracle
Content Server instance. In particular, the side mini-search requires a prediction of
the full URL, not just the relative URL.
2. The secondary URL (the #xml-http... piece following the PDF URL) that does
highlighting for PDF documents.
Without any additional configuration, the BrowserUrlPath component augments the
functionality of certain variables, so if SERVER_PORT has the value 433, then the
component assumes the protocol is HTTPS instead of HTTP. Likewise, if SERVER_
PORT does not have the value 433, then the component assumes the browser issued
the request using HTTP and not HTTPS. This enhancement allows both a SSL (HTTPS)
and non-SSL web server (HTTP) to access the same Oracle Content Server instance.
This component also has special functionality for WebDAV access. The configuration
entry WebDavBaseUrl is augmented so that its usage is dynamic (its host and protocol
vary using the "absolute" path rules).
5.9.2.2 Affected Idoc Script Variables and Functions
The BrowserUrlPath component overrides the computation of the following Idoc
Script variables and functions:
■HttpBrowserFullCgiPath
■HttpWebRoot
■HttpCgiPath
■HttpAdminCgiPath
■HttpImagesRoot
The BrowserUrlPath component adds computation for the following variables:
■HttpBrowserFullWebRoot: Defines the full URL path to the web root of the
current Oracle Content Server instance using values supplied from the user's
current browser's address bar. This variable is similar to HttpBrowserFullCgiPath
except it is for the web root instead.
■HttpAbsoluteWebRoot: Defines the universal full URL path to the web root of the
current Oracle Content Server instance. It can have a different protocol or host
name than the path in HttpBrowerFullWebRoot. For example, if the user specifies
an IP address for the host name, the HttpBrowserFullWebRoot variable might pick
up the IP address, but the HttpAbsoluteWebRoot variable would ignore it and use
the appropriate internally configured host name.
Caution: The functionality for WebDAV access alters the behavior of
CHECKOUT and OPEN functions on some Oracle Content Server
pages, and alters some behavior in the Site Studio client.

Oracle Content Server Communication Customization
Managing Security and User Access 5-65
■HttpAbsoluteCgiPath: Defines the universal full dynamic root URL for the
current Oracle Content Server instance. This is the path that executes the plug-in
code in the web server that makes calls for dynamic content from the Oracle
Content Server instance. It can have a different protocol or host name than the
path in HttpBrowserFullCgiPath. For example, if the user specifies an IP address
for the host name, the HttpBrowserFullCgiPath variable might pick up the IP
address, but the HttpAbsoluteCgiPath variable would ignore it and use the
appropriately internally configured host name.
In the case of the browser path variables HttpBrowserFullCgiPath and
HttpBrowserFullWebRoot, the implementation code determines what the user is
currently using for protocol (HTTP versus HTTPS), port number, and host name in the
browser. It bases this determination on what the web server receives in its request.
5.9.2.3 Determining the URL Path
The BrowserUrlPath component supports the following configuration entries for
guessing the URL path as the browser determines it:
■HttpIgnoreWebServerInternalPortNumber: When set to true, this disables the
use of the SERVER_PORT parameter. This entry is useful in a load balancing
scenario where SERVER_PORT is not the port used by the browser, but is the port
used by the load balancer to communicate with the web server. Enabling this entry
will make it impossible (without the BrowserUrlPath component) for the Oracle
Content Server instance to determine which port the browser used to access the
web server. Without additional BrowserUrlPath configuration, this variable makes
it impossible to both support an SSL and non-SSL address to the same Oracle
Content Server instance. Using this variable prevents a load balancing
configuration problem in which the load balancing server is using a different port
number than the internal web server actually delivering the response to the
request.
■HttpIgnoreServerNameForHostName: When set to true, this disables the fallback
logic where if the HTTP_HOST parameter is missing, the Oracle Content Server
system will typically look for the parameter SERVER_NAME (the web server's self
identification).
■HttpBrowserSSLPort: Only use this configuration entry if the SERVER_PORT
entry is forwarded to the web server that communicates to the Oracle Content
Server instance. This entry is used to decide whether a request is HTTPS or HTTP
by comparing it with the SERVER_PORT parameter. The default SERVER_PORT
value is 443. If you use HTTPS, but use a port other than 443, you must use this
entry to set the expected HTTPS port number.
■HttpBrowserUseIsSslCookie: If you want to look in the cookie to see if it indicates
whether to use SSL or not, set this entry to true.
■HttpBrowserIsSslCookieName: Only use this entry if the
HttpBrowserUseIsSslCookie entry is enabled. Set the entry to the name of the
cookie used to determine whether the server believes the browser is using SSL or
not. The default is the cookie name UseSSL. The value of the cookie can be 1 or 0
(zero). If a cookie with this name is present, then it will supersede other rules for
determining whether to use SSL.
■HttpBrowserUseHostAddressCookie: When set to true, this specifies to use a
cookie to determine the full host name of the browser (the part between the
protocol and the relative web address).
■HttpBrowserHostAddressCookieName: This entry is enabled only if
HttpBrowserUseHostAddressCookie is enabled. Use this entry to specify the name

Oracle Content Server Communication Customization
5-66 Oracle Fusion Middleware System Administrator's Guide for Oracle Content Server
of the cookie used to determine what the server believes is the browser's current
host name. The host name part of the protocol can include the port number. For
example, HttpbrowserHostAddressCookieName=myhost:81 would specify the
host myhost using the webport 81. If you do use this cookie, then it is unlikely
that you need to enable HttpBrowserUseIsSslCookie, because if you use
myhost:433, that will translate to https://myhost/%rest-of-url%.
5.9.2.4 Changing Absolute Full Path Computation
The BrowserUrlPath component supports the following configuration entries for
changing how the absolute full path is computed. This is useful for e-mail, where it is
better to use a specific host name and protocol, even if the browser shows a different
URL. This path is considered the absolute or universal path.
■HttpBrowserAbsoluteUrlHasRelativeSSL: When set to true, this variable allows a
URL computed on the Content Info page to change from HTTP to HTTPS (or the
other way if UseSSL is enabled in the config.cfg file), depending on what the
Oracle Content Server system determines as the current use in the user's browser.
The change between HTTP and HTTPS also changes the computation of the URL
for creating the e-mail body for the "email to" links. This configuration has no
effect on automatically generated e-mail.
■HttpBrowserAlternateWebAddress: Specifies an alternate absolute host web
address (host name plus optional port number). For example,
HttpBrowserAlternateWebAddresss=host_name:447. This web address is used for
the absolute path computation if the current SSL choice is different from the
default for the Oracle Content Server instance. This configuration has no effect on
automatically generated e-mail.
■HttpBrowserAbsoluteUrlUsesBrowserPath: When set to true, if browser path
information can be computed, then the absolute path will use the browser path.
This essentially turns off the absolute path except for background activities (such
as sending notification e-mail).
5.9.2.5 Changing Administration Path Computation
The BrowserUrlPath component supports the following configuration entries for
changing how paths are computed for the Administration tray or top menu links. For
example, the variable HttpAdminCgiPath, which retrieves the Admin Server CGI as a
relative URL to the Admin Server, computes an administration path.
■HttpBrowserAdminUsesAbsolutePath: When set to true, instead of using the
browser-based path (which is the default with the BrowserUrlPath component),
the absolute path is used as the basis for computing administration paths, except
for the protocol that is dictated by the configuration variable
HttpBrowserUseAdminSSL.
■HttpBrowserUseAdminSSL: This configuration entry is only relevant if the
HttpBrowserAdminUsesAbsolutePath variable is set. When set to true, this
variable dictates the protocol in the administration paths (HTTP or HTTPS) even if
HttpBrowserAbsoluteUrlHasRelativeSSL is set. The default value of
HttpBrowserUseAdminSSL is the opposite of UseSSL. This allows the
administration path to be nonstandard from the default URL constructions for all
other paths. The variable HttpBrowserAlternateWebAddress, if set, can be used to
also give the administration path a different web address in the case that
HttpBrowserUseAdminSSL is set to the opposite of UseSSL.

Oracle Content Server Communication Customization
Managing Security and User Access 5-67
For further information on variables and enabling the BrowserUrlPath component, see
the Oracle Fusion Middleware Idoc Script Reference Guide and the Oracle Fusion
Middleware Installation Guide for Oracle Enterprise Content Management Suite.
5.9.3 Extended User Attributes
The ExtendedUserAttributes component enables administrators to add extended
security attributes to Oracle Content Server users. The extended security attributes are
merged into pre-existing user attributes and enable additional flexibility in managing
users. For example, roles and accounts attributes can be added to external LDAP users
without needing to perform internal setup. Also, roles and accounts attributes can be
added to users for a customized application separately from base user attributes.
The ExtendedUserAttributes component is installed (enabled) by default with the
Oracle Content Server system. Services installed for the ExtendedUserAttributes
component are described in the Oracle Fusion Middleware Services Reference Guide for
Universal Content Management.
This section covers the following ExtendedUserAttributes topics:
■Section 5.9.3.1, "ExtUserAttribInfo ResultSet"
■Section 5.9.3.2, "Configuration Variable for ExtendedUserAttributes"
In addition to these resources, there are added queries which can be used to gather
data for extended user attributes. The queries can be viewed in the Component
Wizard or by looking in the UCM_ORACLE_
HOME/ucm/idc/components/ExtendedUserAttributes/resources/extendeduserattri
butes_query.htm file.
5.9.3.1 ExtUserAttribInfo ResultSet
ExtUserAttribInfo is the ResultSet used by the Oracle Content Server system to handle
extended user attributes. It is similar to the UserAttribInfo ResultSet used for handling
regular user attributes, with some additional information.
This ResultSet has three columns. You can supply one attribute per row or multiple
attributes on a single row (per application). The following columns are included:
■dUserName: The user whose attributes are being described.
■dApplication: The application to which those attributes are linked.
■AttributeInfo: The attribute information. This is a comma-separated entry
consisting of three items:
– attribute type: usually either a role or account, depending on if a security
group or account is being defined for the user
– attribute name: the title of the role or account
– attribute privilege: a definition of rights given to the user. Rights are defined
according to UNIX conventions:
*1: read permission
*2: write permission
*4: delete permission
*8: admin
For example, the entry role,contributor,3 gives the user permission to
read and write in the contributor security group.

Oracle Content Server Communication Customization
5-68 Oracle Fusion Middleware System Administrator's Guide for Oracle Content Server
Multiple AttributeInfo entries can be added in a single row, separated by
commas. For example, this entry adds two attributes into the AttributeInfo
row: role,guest,15,account,\#all,15.
The following is an example of this ResultSet:
@ResultSet ExtUserAttribInfo
3
dUserName
dApplication
AttributeInfo
jsmith
appl
role,contributor,15
jsmith
app2
account,abc,15,account,xyz,15
@end
5.9.3.2 Configuration Variable for ExtendedUserAttributes
The following configuration variable can be set in the Oracle Content Server system
and is useful if you are working with default attributes:
■DefaultAttributesCacheTimeoutInSeconds: Defines how long the default attribute
cache remains active (default = 600).
5.9.4 Filter Data Input
The Oracle Content Server system can be customized to filter data input for illegal or
corruptive HTML constructs by using the encodeHtml Idoc Script function and a filter
hook to automatically scrub all input data for dangerous HTML constructions. The
encodeHtml function can be applied to a specific string. The
HtmlDataInputFilterLevel configuration variable can be used to apply a level of
encoding to filter all data input to the Oracle Content Server system.
This section covers the following topics:
■Section 5.9.4.1, "encodeHtml Function"
■Section 5.9.4.2, "HtmlDataInputFilterLevel Configuration Variable"
5.9.4.1 encodeHtml Function
The encodeHtml Idoc function can be used to filter data input for illegal or corrupted
HTML constructs. The output is an encoded string. The encodeHtml function is
applied by default to the discussions in the Threaded Discussions component.
The encodeHtml function is generally used at the exceptsafe or higher level of
encoding because the HtmlDataInputFilterLevel configuration variable will already
have been encoded as unsafe (assuming it uses the default configuration).
The encodeHtml function is defined as follows:
encodeHtml (string, rule, wordbreakrules)
■string: The string to encode.
■rule: The rule to apply when encoding HTML constructs. The following values are
allowed:
–none: No conversion is done to HTML constructs.

Oracle Content Server Communication Customization
Managing Security and User Access 5-69
–unsafe: Only well-known unsafe script tags are encoded. The list includes:
script, applet, object, html, body, head, form, input, select, option, textarea.
–exceptsafe: Only well-known safe script tags are not encoded. The list
includes: font, span, strong, p, b, i, br, a, img, hr, center, link, blockquote, bq,
fn, note, tab, code, credit, del, dfn, em, h1, h2, h3, h4, h5, blink, s, small, sub,
sup, tt, u, ins, kbd, q, person, samp, var, ul, li, math, over, left, right, text,
above, below, bar, dot, ddot, hat, tilde, vec, sqrt, root, of, array, row, item.
–lfexceptsafe: (Recommended where extended comments are entered by a
user and they want to preserve the line feed breaks of the original text.)
Similar to exceptsafe, however, line feed (ASCII 10) characters are turned into
HTML break tags (br). Line feeds inside of HTML tags are not turned into
break tags. The following script tags that are safe with exceptsafe are not safe
with lfexceptsafe: br, p, ul, li.
Except for the rule none, all the rules have special HTML comment handling. In
particular, all HTML comments are allowed through the filter. However, when
inside an HTML comment, all less than (<) and greater than (>) symbols are
encoded. This does not apply to the HTML closing signature (-->). Also, if there is
an unterminated comment, the encoding function appends the HTML comment
close signature (-->).
Additionally, except for the rule none, any attribute value located inside a tag has
any parenthesis encoded to %28 (for '(') or %29 (for ')'). Otherwise, if any character
is escaped it is escaped using the XML (&xxxx;) type encoding.
wordbreakrules: This is an optional parameter that specifies if long strings
without space characters are to be broken up and what maximum word size to
apply. Either the string wordbreak or nowordbreak can be specified. This
parameter can be used with any of the encodeHtml rules. The default is to turn on
wordbreak if the rule lfexceptsafe is specified, and to use a maxlinelength of 120
characters.
The additional parameter maxlinelength=xxx can be used with the wordbreak
parameter to specify a desired maximum line length. For example:
encodeHtml ("exceptsafe", "<bad> text", "wordbreak, maxlinelength=80")
The wordbreak functionality is only usable by the encodeHtml function because
the function is used for display and not applied before the data is stored.
For information about Idoc Script see the Oracle Fusion Middleware Idoc Script Reference
Guide.
5.9.4.2 HtmlDataInputFilterLevel Configuration Variable
The HtmlDataInputFilterLevel configuration variable can be used to apply a level of
encoding to filter all input data to the Oracle Content Server system for bad HTML
constructions. The HtmlDataInputEncodingRulesForSpecialFields table in the std_
resources.htm file is used for special case encoding rules and may override this
configuration entry for certain parameters.
Note that if you change the HtmlDataInputFilterLevel value, you must restart the
Oracle Content Server instance.
Using the HtmlDataInputFilterLevel variable has no effect on the behavior of the Idoc
Script encodeHtml function.
You can set the HtmlDataInputFilterLevel configuration variable to the following
values:

Oracle Content Server Communication Customization
5-70 Oracle Fusion Middleware System Administrator's Guide for Oracle Content Server
■none: (Not recommended.) All filtering is turned off.
■unsafe: (Default. Recommended.) Protects against bad HTML constructions.
Examples of bad constructions include: script, applet, object, html, body, head,
form, input, select, option, textarea.
■exceptsafe: (Not recommended.) Allows only well known safe constructions
through the filter. If exceptsafe is chosen, then the unsafe option will be
applied to requests using GET style requests. Doing a higher level of encoding on
GET requests breaks Oracle Content Server operation because <$...$> and other
tags are routinely passed in as part of the parameter data or URLs. The higher
level of filtering is only applied to non-scriptable services (those services that are
usually called with POST).
Examples of well known safe constructions include: font, span, strong, p, b, i, br, a,
img, hr, center, link, blockquote, bq, fn, note, tab, code, credit, del, dfn, em, h1, h2,
h3, h4, h5, blink, s, small, sub, sup, tt, u, ins, kbd, q, person, samp, var, ul, li, math,
over, left, right, text, above, below, bar, dot, ddot, hat, tilde, vec, sqrt, root, of,
array, row, item.
See the encodeHtml Function rule description for information about HTML comment
handling, which also applies to HtmlDataInputFilterLevel configuration values.
The value lfexceptsafe is not supported for the HtmlDataInputFilterLevel
configuration variable. It is only supported with the encodeHtml function.

6
Managing Components 6-1
6Managing Components
This chapter describes how to use the Component Wizard to create new Oracle
Content Server components, how to use the Component Manager to administer and
enable/disable system and custom Oracle Content Server components, and how to use
a command-line tool to install, enable, and disable Oracle Content Server components.
■Section 6.1, "About Components"
■Section 6.2, "Using the Component Manager"
■Section 6.3, "Using the Component Wizard"
■Section 6.4, "Using the Command Line"
6.1 About Components
A component is a functional unit that can be plugged into the Oracle Content Server
system to provide additional features or to modify existing functionality. The primary
use for components is to modify the user interface of existing pages and to alter
behavior of existing services. Standard components are provided with the Oracle
Content Server system, and additional components can be acquired from the Oracle
Technology Network. Administrators and developers can create their own custom
components for their sites.
Note: For detailed information on the structure and use of
components, see the Oracle Fusion Middleware Developer's Guide for
Oracle Universal Content Management.

About Components
6-2 Oracle Fusion Middleware System Administrator's Guide for Oracle Content Server
Table 6–1 lists most standard Oracle Content Server components. Not all components
are installed or enabled by default.
Table 6–1 Oracle Content Server Components
Component Description
ActiveDirectoryLdapComponent Enables the Oracle Content Server instance to authenticate users against an
Active Directory server via LDAP. The provider also pulls in all group
membership and specified user metadata from Active Directory.
AddCCToArchiveCheckin Adds Content Categorizer to the CHECKIN_NEW and CHECKIN_
UNIVERSAL services by overriding the standard Oracle Content Server
service scripts, such that Content Categorizer is called to provide values for
the various metadata fields before the actual checkin takes place.
AddCCToNewCheckin Adds Content Categorizer to the CHECKIN_NEW and CHECKIN_
UNIVERSAL services by overriding the standard Oracle Content Server
service scripts, such that Content Categorizer is called to provide values for
the various metadata fields before the actual checkin takes place.
BpelIntegration Adds the ability to interact with Business Process Execution Language
(BPEL) Process Manager from within Oracle Content Server workflows.
Administrators can configure Oracle Content Server workflows to initiate a
deployed process on the BPEL server.
BrowserUrlPath Changes the computation of the Oracle Content Server variable
HttpBrowserFullCgiPath and the function proxiedBrowserFullCgiWebUrl()
so that they are no longer hardwired to a particular protocol. If the request
comes in on port 443 (the SSL port), then the variable or function returns a
result with HTTPS as the protocol. Otherwise, the variable or function
returns a result with HTTP as the protocol.
CleanContent Contains clean content libraries and generates descriptions of the documents
for use by the DesktopTag component.
ContentFolios Provides a quick and effective way to assemble, track, and access logical
groupings of multiple content items from within the secure environment of
the Oracle Content Server instance. For example, this component can be
used to set up a new project that requires a virtual place to assemble all
relevant content items in a particular hierarchy, whenever they are checked
in, with restricted access to particular areas of the hierarchy.
ContentAccess Performs standard "in place" conversion and filtering for the Oracle Content
Server instance. It is used to create HTML renderings of native content,
extract text for full text indexing, and extract links for link reference
management.
ContentBasket Enables users to select renditions of content items and place them in a
personal storage space called the Content Basket. When this component is
installed independently, renditions can be selected and placed in the Content
Basket from either the Search Result or Content Information pages via the
Actions dropdown on either page. Users can choose either native file or
web-viewable renditions. When using Image Manager or Video Manager,
additional rendition types can be selected for the Content Basket via Actions
options on the Rendition Information page.
Note: the ContentBasket component is required when using either Image
Manager or Video Manager.
ContentCategorizer Suggests metadata values for documents being checked into the Oracle
Content Server instance, and it can be used to recategorize the metadata of
documents that are already in. Metadata values are determined according to
search rules provided by the administrator.
ContentTracker Monitors activity on an Oracle Content Server instance and records selected
details of those activities. It then generates reports that can help
administrators understand the ways in which the system is being used.
ContentTrackerReports Reports on the data generated by the Content Tracker component.

About Components
Managing Components 6-3
DAMConverter This Inbound Refinery component is the primary component for the Digital
Asset Management feature.
DBSearchContainsOpSupport Adds support of hasAsWord(Contains) operator to DATABASE and
DATABASEFULLTEXT on SQL Server, Oracle, and DB2 databases.
DamConverterSupport Enables Inbound Refinery to create multiple packaged (zipped) renditions of
a checked-in graphic file. The ZipRenditionManagement component can be
used to access the renditions created by the refinery.
DesktopIntegrationSuite Provides a set of embedded applications that help administrators seamlessly
integrate the desktop experience with the Oracle Content Server system. It
provides convenient access to the Oracle Content Server system from
Microsoft Windows Explorer, desktop applications like Microsoft Word and
Excel, and e-mail clients like Microsoft Outlook and Lotus Notes.
DesktopTag Modifies documents supported by the CleanContent component by
maintaining a set of custom properties in the documents. These properties
are used by the Desktop Integration Suite Microsoft Office integrations to aid
in using files with the Oracle Content Server system.
DigitalAssetManager Enables users to define and provide images and videos in specified formats
and sizes for download. The component creates multiple formats of digital
assets automatically when an image or video is checked into the Oracle
Content Server system, and lists the formats under one content ID.
DynamicConverter Converts a document into a Web page for everyone to see without use of the
application used to create that document.
ElectronicSignatures Enables and supports the creation and management of Electronic Signatures
for managed content objects.
EmailMetadata Extracts information from Microsoft Outlook messages (MSG) and Internet
Mail Messages (EML), and populates e-mail specific fields in the Oracle
Content Server system. This process occurs when users check in files using
the Oracle Content Server Folders functionality in Microsoft Outlook, Lotus
Notes, or Windows Explorer. This also occurs when checking in MSG or
EML files using the Web browser interface.
ExtranetLook Enables customization of the out-of-box Oracle Universal Content
Management (Oracle UCM) look and feel. This component has two parts:
one part enables customization of cookie-based login forms and pages; the
other part modifies the error and challenge pages issued by the web server.
FileStoreProvider Enables the Oracle Content Server system to have more control over how
files are stored. Files can either be stored in the database or on the file
system. The component has extension options where you can write
components that store files in other types of storage repositories. When files
are stored on the file system, the component allows additional flexibility in
path computations. For web-viewable paths, the types of paths allowed are
restricted.
FolderStructureArchive Enables administrators to configure an Oracle Content Server Archive to
archive the folder structure as well as its associated content. The structure of
the folders is archived using database table replication.
Folders_g Provides a hierarchical folder interface to content in the Oracle Content
Server system in the form of "virtual folders" (also called "hierarchical
folders").
FormEditor Provides the ability to use cross-platform browsers to create Oracle Content
Server hcsf forms.
HTMLConverter Enables Inbound Refinery to convert native Microsoft Office formats (Word,
Excel, PowerPoint and Visio) to HTML using the Office application.
Table 6–1 (Cont.) Oracle Content Server Components
Component Description

About Components
6-4 Oracle Fusion Middleware System Administrator's Guide for Oracle Content Server
HTMLConverterSupport Enables Inbound Refinery to convert native Microsoft Office formats (Word,
Excel, PowerPoint and Visio) to HTML using the Office application.
InboundRefinerySupport Enables the Oracle Content Server system to use Inbound Refinery for the
conversion of files. Without this component the Oracle Content Server
system cannot use Inbound Refinery.
LinkManager8 Extracts URL links of indexed documents, evaluates, filters and parses the
URLs according to a pattern engine, and then stores the results in a database
table. Because the link extraction occurs during the indexing cycle, only the
links of released documents are managed.
MSOfficeHtmlConverterSupport Enables the Oracle Content Server system and Inbound Refinery to convert
select Microsoft Office formats to HTML using the native application.
NativeOsUtils (Required) Provides the native JNI calls needed by the Oracle Content Server
instance. The Oracle Content Server system can run without this component
enabled, but it loses some functionality. The two noticeable degradations are
as follows:
■In schema publishing, all files are rewritten instead of using hard links
to have new files link back to existing files when the content does not
change.
■When a component is installed that has native executables, the
executable bit on the files is not toggled properly. This can affect
components such as ContentAccess.
OpenOfficeConversion Enables Inbound Refinery to integrate with OpenOffice.
OpssPolicyStore Integrates Oracle UCM with OPSS policy store.
OracleQueryOptimizer Aids in tuning queries against the Oracle database by allowing query hints
to be added to ensure that the best execution plan is used.
PDFExportConverter Enables Inbound Refinery to use Oracle OutsideIn PDF Export to convert
native formats directly to PDF without the use of any third-party tools.
PDFWatermark Enables watermarks to be applied to PDF files generated by the Inbound
Refinery PDFConverter component and returned to the Oracle Content
Server system. PDF files already residing on the Oracle Content Server
system also can be watermarked. Dynamic watermarks are generated
on-the-fly and can contain variable information.
RoleEntityACL Integrates Oracle UCM with OPSS access control list permissions.
SESCrawlerExport Adds functionality to allow the Oracle Content Server system to be searched
using Oracle Secure Enterprise Search. The service generates a snapshot of
content currently on the Oracle Content Server system and provides it to the
Oracle SES Crawler.
SiebelEcmIntegration Part of Siebel Adapter for Oracle UCM that enables Siebel CRM users to
store and retrieve attachments stored in an Oracle Content Server repository.
SiebelIntegrationSearchDisplay Displays Oracle UCM documents as managed attachments to Siebel entities
in an iFrame within the Siebel application.
SiteStudio A powerful, flexible Web development application suite that offers a
comprehensive approach to designing, building, and maintaining
enterprise-scale web sites. It offers both web site creation and content
management.
ThreadedDiscussions Enables the ability to create discussion documents about another document.
It takes any content item and adds "_d" to the document ID to create a new
hcsp style document that is focused on discussion about the originating
document.
Table 6–1 (Cont.) Oracle Content Server Components
Component Description

Using the Component Manager
Managing Components 6-5
6.2 Using the Component Manager
This section describes the following tasks you can perform with the Component
Manager to manage Oracle Content Server system and custom components:
■Section 6.2.1, "Viewing Information about a Component"
■Section 6.2.2, "Enabling and Disabling a Component"
■Section 6.2.3, "Uploading a Component"
■Section 6.2.4, "Downloading a Component"
■Section 6.2.5, "Modifying a Component Configuration"
6.2.1 Viewing Information about a Component
To view descriptive information about a component on your system using the
Component Manager:
1. Open the Admin Server Page.
The Component Manager Page is displayed. A brief description is provided for
each component displayed on the page.
2. Click advanced component manager to view the Advanced Component Manager
Page.
ThumbnailGenerator Enables the Oracle Content Server instance to create thumbnails of
checked-in content without having to set up a full Inbound Refinery. It can
only be used with content that is not sent to Inbound Refinery for
conversion.
TiffConverter Enables the Oracle Content Server system and Inbound Refinery to integrate
with CVista PDF Compressor. The component defines the TIFFConversion
conversion and steps that are required by the conversion.
TiffConverterSupport Enables the Oracle Content Server system and Inbound Refinery to convert
tiff files to searchable PDF files.
WinNativeConverter Extends the PDFConverter feature and requires the Refinery feature. It
enables Inbound Refinery to convert native files to a postscript with either
the native application or OutsideInX and convert postscript to PDF.
XMLConverter Enables Inbound Refinery to produce FlexionDoc and SearchML styled XML
as the primary Web viewable or as renditions.
XMLConverterSupport Enables the Oracle Content Server system and Inbound Refinery to convert
various formats to FlexionDoc or SearchML as either the primary Web
rendition or an additional rendition. It also enables the Oracle Content
Server system and Inbound Refinery to preform XSLT transformations.
YahooUserInterfaceLibrary (Required) Provides a wrapper for the Yahoo! User Interface Library (YUI)
available under the BSD license. The Oracle Content Server product adopted
the YUI library for its user interface implementation because of its ability to
implement folder move operations (move an item from one folder to
another) and for its support of Accessibility (specifically keyboard
operations). The YUI library is also used for its calendar control and its
ability to support popup choice lists in type-ahead fields.
ZipRenditionManagement Enables users to create and edit additional attachment files that are
maintained in a zip file. It does this by creating a new rendition type 'Z' with
description "Zipped Attachments". This component is used as part of Digital
Asset Management.
Table 6–1 (Cont.) Oracle Content Server Components
Component Description

Using the Component Manager
6-6 Oracle Fusion Middleware System Administrator's Guide for Oracle Content Server
3. Select a component name either in the list of Enabled or Disabled components.
Information about the component is displayed in a pane next to the list, including
component name, tags, location, feature extensions, class path, and so forth.
6.2.2 Enabling and Disabling a Component
To enable or disable a component using the Component Manager:
1. Open the Admin Server Page.
The Component Manager Page is displayed.
2. Click All Features.
All components from the Document Management, Folders, Inbound Refinery,
Integration, and Web Content Management categories are displayed.
3. Select the checkbox for each component you want to enable. Deselect the checkbox
for each component you want to disable. If you do not see the component, verify
that the appropriate filter checkboxes are selected so the components are
displayed.
If you do not want to make the changes you selected, click Reset.
4. Click Update.
5. Restart the Oracle Content Server instance. See Section 3.1.3, "Restarting Oracle
Content Server."
The Oracle Content Server instance restarts, and the component is now enabled or
disabled.
6. Navigate to the pages affected by the component to ensure that the addition or
removal of the customization is working as you expected.
6.2.3 Uploading a Component
To upload a component zip file using the Component Manager:
1. Open the Admin Server Page.
The Component Manager Page is displayed.
2. Click advanced component manager to view the Advanced Component Manager
Page.
3. Click the Browse button next to the Install New Component field.
4. Navigate to and select the component zip file.
5. Click Open.
The path and file name appears in the Install New Component field.
Note: When the Oracle Content Server instance is started, enabled
components are loaded in the order shown in the Components list.
Tip: Components can also be uploaded (unpackaged) using the
Component Wizard. For details, see Section 6.3, "Using the
Component Wizard."

Using the Component Manager
Managing Components 6-7
6. Click Upload.
The component files are unpackaged on the Oracle Content Server instance, and
the name of the component appears in the Disabled Components list.
7. If you are having difficulty uploading the component, check the Oracle Content
Server output messages by clicking the View Admin Output link in the sidebar
menu. The Admin Server Output Page is displayed where you can verify the
recent actions.
6.2.4 Downloading a Component
A component cannot be downloaded unless it meets these requirements:
■The component must exist outside of the ECM_ORACLE_
HOME/ucm/idc/system directory. This excludes all shipped components unless a
patch has been uploaded to a component.
■The component must have a zip file with the appropriate name, located inside the
component directory. Usually this occurs only when the component has been
uploaded or installed manually.
To package a component as a component zip file:
1. Open the Admin Server Page.
The Component Manager Page is displayed.
2. Click advanced component manager to view the Advanced Component Manager
Page.
3. Select the component to be packaged from the Download Component list.
4. Click Download.
The File Download screen is displayed.
5. Select the Save this file to disk option and click OK.
The Save As screen is displayed.
6. Navigate to the directory where you want to save the component zip file.
7. Change the name of the component zip file as necessary.
8. Click Save.
The component is saved as a component zip file.
6.2.5 Modifying a Component Configuration
Several methods are available for modifying a component configuration after
installation. Not all components can have their configuration changed.
6.2.5.1 Using the Advanced Component Manager
To modify the configuration settings for a component using the Advanced Component
Manager:
1. Open the Admin Server Page.
Note: Uploading a component does not enable it. For details, see
Section 6.2.2, "Enabling and Disabling a Component."

Using the Component Wizard
6-8 Oracle Fusion Middleware System Administrator's Guide for Oracle Content Server
The Component Manager Page is displayed.
2. Click advanced component manager to view the Advanced Component Manager
Page.
3. Select a component name from the Update Component Configuration menu, then
click Update.
The Update Component Configuration screen for the component is displayed. The
listed component parameters are those defined as being editable after the
component is installed.
4. When you have finished modifying the component configuration, click Update.
The Oracle Content Server instance does not need to be restarted.
6.2.5.2 Using the Configuration for Instance Screen
To modify the configuration settings for a component using the Configuration for
instance screen:
1. Select Administration.
2. Select Configuration for instance.
3. Click Enabled Components Details.
4. Click Configure next to the name of the component to be configured.
■If the component can be configured, the Update Component Configuration
screen for the component is displayed.
■If the component cannot be configured, a message is displayed.
5. When you have finished modifying the component configuration, click Update.
The Oracle Content Server instance does not need to be restarted.
6.3 Using the Component Wizard
This section describes how to use the Component Wizard to create components. It
contains the following major sections:
■Section 6.3.1, "Component Wizard Overview"
■Section 6.3.2, "Creating a Component"
■Section 6.3.3, "Additional Component Wizard Tasks"
6.3.1 Component Wizard Overview
The following steps provide an overview on using the Component Wizard to create a
custom component. The screens used to create this component are described in detail
in Appendix A, "User Interface" and are referenced throughout the text.
Note: When using the Component Wizard with Red Hat Linux ES 3,
set UseCustomModaling=FALSE in your
DomainHome/ucm/cs/bin/intradoc.cfg file. This variable allows a
modal dialog to lock only one frame, instead of all frames. Setting the
variable in the intradoc.cfg file ensures that other applets are
unaffected by this action. See the Oracle Fusion Middleware Idoc Script
Reference Guide for details on its usage.

Using the Component Wizard
Managing Components 6-9
1. Launch the Component Wizard.
The Component Wizard Main Screen is displayed, or the Component List Screen is
displayed if other components are already available.
2. If the Component List screen is displayed, select Add. Otherwise, select Options,
then Add on the Component Wizard Main Screen.
The Add Component Screen is displayed.
3. Make sure the Create New Component option is selected and enter the name of
the new component.
4. Click OK.
A confirmation screen is displayed.
5. Click OK.
The Component List screen closes, and the new component is opened in the
Component Wizard screen, as indicated by its name in the Location field.
6.3.1.1 Working with Java Code
If your new component includes Java code, you can use the Java Code tab of the
Component Wizard to view the contents of the ClassAliases table and the Filters table.
You can also remove classes and filters from the component glue file, although the file
that is associated with the class or filter will not be deleted from your system. Select
the class or filter and click the associated Remove button to remove it from the list.
6.3.1.2 Editing the Readme File
The Component Wizard provides a convenient way to create a Readme file for your
custom component. Use the following procedure to edit a Readme file:
1. Open the component in the Component Wizard.
2. Select Edit Readme File from Options.
The text editor opens a readme.txt file, with the name of the component entered
on the first line.
3. Enter text to document your component.
4. Save and close the file.
The readme.txt file is saved in the same directory as the component definition file,
and will be included as a ComponentExtra entry if you use the Component
Wizard to build a component zip file.
6.3.2 Creating a Component
Use the following procedure to create a component using the Component Wizard:
1. Launch the Component Wizard.
■(Windows) From the Start menu, click Programs, then Content Server, then
instance_name, then Tools , then Component Wizard.
■(UNIX/Linux) Navigate to the DomainHome/ucm/cs/bin/ directory and run
the ComponentWizard program.
For more information, see Section 3.4.2, "Running Administration Applications in
Standalone Mode."

Using the Component Wizard
6-10 Oracle Fusion Middleware System Administrator's Guide for Oracle Content Server
2. The Component Wizard Main Screen is displayed, or the Component List Screen is
displayed if other components are already available. The Component List screen
shows all components and their status (enabled or disabled).
3. If the Component List screen is displayed, select Add. Otherwise, select Options,
then Add on the Component Wizard Main Screen.
The Add Component screen is displayed.
4. Enter a name for the new component in the Name field.
5. Accept the default directory (custom), or enter a new location for the component.
This can be either an absolute path or can be a path relative to the Oracle Content
Server install directory.
6. To use an existing component as a starting point, select Copy Existing, click
Browse, and navigate to and select the definition (glue) file (component_name.hda)
for the component.
7. Click OK.
A new component definition (glue) file is created. If you copied an existing
component, the resource files are renamed with the new component name and
copied to the new component directory.
8. Add and edit custom resources and other files as necessary as described in these
sections:
■Section 6.3.2.1, "Creating an Environment Resource"
■Section 6.3.2.2, "Creating a Template Resource"
■Section 6.3.2.3, "Creating a Query Resource"
■Section 6.3.2.4, "Creating a Service Resource"
■Section 6.3.2.5, "Creating an HTML Include"
■Section 6.3.2.6, "Creating a String Resource"
■Section 6.3.2.7, "Creating a Dynamic Table Resource"
■Section 6.3.2.8, "Creating a Static Table Resource"
6.3.2.1 Creating an Environment Resource
An environment resource defines configuration variables, either by creating new
variables or replacing the value in existing variables.
Follow these steps to create an environment resource:
1. Make sure that the Resource Definition tab is selected on the Component Wizard
Main Screen. Click Add.
The Add Resource Screen is displayed.
2. Select the Environment option.
3. Enter the file name for the resource file. The default file name is
componentname_templates.hda.
Note: If no components are installed, the Component List screen
does not appear.

Using the Component Wizard
Managing Components 6-11
■If a resource file has been created, you can add to the file by selecting the file
name. Any changes you make to the load order now will apply to the entire
resource file.
■To create a new resource file with a different file name, enter the file name.
4. If you want the new resource file to be loaded in a particular order, enter the
number in the Load Order field.
5. Click Finish.
A dialog box asks if you want to launch the text editor to continue editing.
6. Click Yes to open the resource file in the text editor. Click No to return to the
Component Wizard.
The file now appears in the Custom Resource Definition list.
After saving, the new environment resource is displayed on the Component Wizard
screen.
6.3.2.2 Creating a Template Resource
A template resource file defines names, types, and locations of custom templates to be
loaded for the component. Follow these steps to add a template page:
1. Make sure that the Resource Definition tab is selected on the Component Wizard
Main Screen. Click Add.
The Add Resource Screen is displayed.
2. Select the Template option. The Add Template Table Information Screen is
displayed.
3. Enter the file name for the resource file. The default file name is componentname_
templates.hda.
■You can enter templates/ before the file name to create a new /templates
directory in your component directory.
■If a template resource file has been created, you can append a new template
table to the existing file by selecting the file name. Any changes you make to
the load order now will apply to the entire resource file.
■To create a new resource file with a different file name, enter the file name.
4. If you want the new resource file to be loaded in a particular order, enter the
number in the Load Order field.
Note: Unless you have a particular reason for the resource file to be
loaded after other resources, you should leave the load order set to 1.
Note: If an HTML editor is not defined, select Configuration from
Options in the Component Wizard main menu and enter the path and
file name of the desired editor, or click Browse and navigate to the
executable of the desired editor. For details, see Section 6.3.3.6,
"Configuring the Default HTML Editor."

Using the Component Wizard
6-12 Oracle Fusion Middleware System Administrator's Guide for Oracle Content Server
5. Click Next.
The Add Template Table Information Screen is displayed.
6. Enter a name for the template table.
■It is a good idea to leave the name of the component as a prefix.
■Each template table in a component must have a unique name, even if the
tables are in different resource files.
7. Select which standard table to merge the new template table into:
■IntradocTemplates
■SearchResultTemplates
8. Click Next.
The Add/Edit Intradoc Template Screen is displayed.
9. To start with an existing template definition:
a. Click Select.
A list of commonly used templates is displayed.
b. To show the entire list of predefined templates, select Show All.
c. Select a template from the list.
d. Click OK.
The template parameters are filled in.
10. Edit the template parameters as necessary.
11. Click Finish.
A dialog box asks if you want to launch the text editor to continue editing.
12. Click Yes to open the resource file in the text editor. Click No to return to the
Component Wizard.
The file now appears in the Custom Resource Definition list, and the template
table appears in the Table Name list in the right pane.
Note: Unless you have a particular reason for the resource file to be
loaded after other resources, you should leave the load order set to 1.
Note: You can also use an existing custom template file as a starting
point. Select Copy From, and navigate to and select the template file.
The template parameters will not be filled in automatically, but you
could select a standard template to fill in the fields before selecting the
template file.
Note: If you do not change the name of the template and this
component is loaded last, the custom template will override the
standard template and any other custom templates with the same
name.

Using the Component Wizard
Managing Components 6-13
6.3.2.3 Creating a Query Resource
A query resource defines SQL queries, which are used to manage information in the
database. Queries are used with services to perform tasks such as adding, deleting, or
retrieving data from the database.
Follow these steps to add a query:
1. On the Component Wizard Main Screen, click Add in the Resource Definition
pane.
The Add Resource Screen is displayed.
2. Select the Query option.
3. Enter the file name for the resource file. The default file name is
resources/componentname_query.htm.
■If a query resource file has been created with the default file name, the new
default file name will have a number (1, 2, and so on) appended to it. You
cannot append a query table to the existing default file unless you edit the
resource file manually.
■If a query resource file has been created with a file name other than the
default, you can append a new query table to the existing file.
■To create a new resource file with a different file name, enter the file name.
4. If you want the new resource file to be loaded in a particular order, enter the
number in the Load Order field.
5. Click Next.
The Add Query Table Information Screen is displayed.
6. Enter a name for the query table. It is a good idea to leave the name of the
component as a prefix.
■If you are appending to an existing query resource file, you must enter a new
table name. You cannot append a query definition to the existing table unless
you edit the resource file manually.
7. Click Next.
The Add/Edit Query Screen is displayed.
8. To start with an existing query definition:
a. Click Select.
A list of predefined queries is displayed.
b. Select a query from the list.
c. Click OK.
The query expression and parameters are displayed and the Name field is
filled in.
Note: Unless you have a particular reason for the resource file to be
loaded after other resources, you should leave the load order set to 1.

Using the Component Wizard
6-14 Oracle Fusion Middleware System Administrator's Guide for Oracle Content Server
9. Edit the query expression and parameters as necessary.
■Parameters must appear in the Parameters list in the order they appear in the
query expression. Use the Up and Down buttons to move the selected
parameter.
■To add a parameter, click Add. Enter a parameter Name, select the parameter
Type, and click OK.
■To edit a parameter type, select the parameter and click Edit. Select the
parameter Type, and click OK.
■To remove a parameter, select the parameter and click Delete.
10. Click Finish.
A dialog box asks if you want to launch the text editor to continue editing.
11. Click Yes to open the resource file in the text editor. Click No to return to the
Component Wizard.
The query resource file now appears in the Custom Resource Definition list, and
the query table appears in the Table Name list in the right pane.
6.3.2.4 Creating a Service Resource
A service resource defines a function or procedure that is performed by the Oracle
Content Server instance.
Use the following procedure to create a service resource using the Component Wizard.
1. In the Component Wizard, open the component the resource will be created for.
2. On the Resource Definition tab, click Add.
The Add Resource Screen is displayed.
3. Select the Service option.
4. Enter the file name for the resource file. The default file name is
resources/componentname_service.htm.
■If a resource file has been created for services, you can append the new service
table to the existing file by selecting the file name. Any changes you make to
the load order now will apply to the entire resource file.
■To create a new resource file with a different file name, enter the file name.
5. If you want the new resource file to be loaded in a particular order, enter the
number in the Load Order field.
6. Click Next.
The Add Service Table Information Screen is displayed.
Note: If you do not change the name of the query and this
component is loaded last, the custom query will override the standard
query and any other custom queries with the same name.
Note: Unless you have a particular reason for the resource file to be
loaded after other resources, you should leave the load order set to 1.

Using the Component Wizard
Managing Components 6-15
7. Enter a name for the service table.
■It is a good idea to leave the name of the component as a prefix.
■Each service table in a component must have a unique name, even if the tables
are in different resource files.
8. Click Next.
The Add/Edit Service Screen is displayed.
9. To start with an existing service definition:
a. Click Select.
A list of commonly used services is displayed.
b. To show the entire list of predefined services, select Show All.
c. Select a service from the list.
To view a service's details, click Preview. The Preview Information for Service
Screen is displayed. Use this screen to view information about the service and
the service actions.
d. Click OK.
The service attributes and actions are filled in.
10. Edit the service attributes and actions as necessary.
■Actions must appear in the Actions list in order of execution. Use the Up and
Down buttons to move the selected action.
■To add an action, click Add. The Add/Edit Action Screen is displayed. Enter
the action definition and click OK.
■To edit an action, select the action and click Edit. Modify the action definition
and click OK.
■To remove an action, select the action and click Delete.
11. Click Finish.
A dialog box asks if you want to launch the text editor to continue editing.
12. Click Yes to open the resource file in the text editor. Click No to return to the
Component Wizard.
The service resource file now appears in the Custom Resource Definition list, and
the service table appears in the Table Name list in the right pane.
6.3.2.5 Creating an HTML Include
An HTML include is a piece of reusable code that is referenced from a placeholder in
another file or from another location in the same file. An include resource defines
pieces of code that are used to build the Oracle Content Server web pages. Includes are
resolved by the Oracle Content Server instance each time a web page is assembled. For
this reason, includes are sometimes called dynamic content resources.
Follow these steps to add an HTML include resource:
Note: If you do not change the name of the service and this
component is loaded last, the custom service will override the
standard service and any other custom services with the same name.

Using the Component Wizard
6-16 Oracle Fusion Middleware System Administrator's Guide for Oracle Content Server
1. On the Component Wizard Main Screen in the Resource Definition section, click
Add.
The Add Resource Screen is displayed.
2. Select the Resource - HTML Include/String option.
3. Enter the file name for the resource file. The default file name is
componentname_resource.htm.
■If a resource file has been created for includes, strings, or static tables, or both,
you can append the include to the existing file by selecting the file name. Any
changes you make to the load order now will apply to the entire resource file.
■To create a new resource file with a different file name, enter the file name.
4. If you want the new resource file to be loaded in a particular order, enter the
number in the Load Order field.
5. Click Next.
The Add/Edit HTML Resource Include/String Screen screen is displayed.
6. Select the Include option.
7. To start with the code from an existing HTML include:
a. Click Select.
A list of commonly used includes is displayed.
b. To show the entire list of predefined includes, select Show All.
c. Select an include from the list.
d. Click OK.
The include code is displayed and the Name field is filled in.
8. Edit the include code as necessary.
9. Click Finish.
A dialog box asks if you want to launch the text editor to continue editing.
10. Click Yes to open the resource file in the text editor. Click No to return to the
Component Wizard.
The resource file now appears in the Custom Resource Definition list, and the
include appears in the Custom HTML Includes list.
6.3.2.6 Creating a String Resource
A string resource defines locale-sensitive text strings that are used in error messages
and on Oracle Content Server web pages and applets.
Note: Unless you have a particular reason for the resource file to be
loaded after other resources, you should leave the load order set to 1.
Note: If you do not change the name of the include and this
component is loaded last, the custom include will override the
standard include and any other custom includes with the same name.

Using the Component Wizard
Managing Components 6-17
Use the following procedure to create a string resource using the Component Wizard.
1. In the Component Wizard, open the component the resource will be created for.
2. On the Resource Definition tab, click Add.
The Add Resource Screen is displayed.
3. Select the Resource - HTML Include/String option.
4. Enter the file name for the resource file. The default file name is
componentname_resource.htm.
■If a resource file has been created for includes, strings, or static tables, or both, you
can append the include to the existing file by selecting the file name. Any changes
you make to the load order now will apply to the entire resource file.
■To create a new resource file with a different file name, enter the file name.
1. If you want the new resource file to be loaded in a particular order, enter the
number in the Load Order field.
2. Click Next.
The Add/Edit HTML Resource Include/String Screen is displayed.
3. Select the String option.
4. Enter the name of the string in the Name field (for example, myString.)
5. Edit the string code as necessary (for example, This is my string text.)
6. Click Finish.
A dialog box asks if you want to launch the text editor to continue editing.
7. Click Yes to open the resource file in the text editor. Click No to return to the
Component Wizard.
The resource file now appears in the Custom Resource Definition list, and the
string appears in the Custom Strings list.
6.3.2.7 Creating a Dynamic Table Resource
A dynamic table provides dynamic (often changed) content in table format to the
Oracle Content Server instance.
Use the following procedure to create a dynamic table resource using the Component
Wizard.
1. In the Component Wizard, open the component the resource will be created for.
2. On the Resource Definition tab, click Add.
The Add Resource Screen is displayed.
Note: Unless you have a particular reason for the resource file to be
loaded after other resources, you should leave the load order set to 1.
Note: If you enter the name of an existing string and this component
is loaded last, the custom string will override the standard string and
any other custom strings with the same name.

Using the Component Wizard
6-18 Oracle Fusion Middleware System Administrator's Guide for Oracle Content Server
3. Select the Resource - Dynamic Table (Hda Format) option.
4. Enter the file name for the resource file. The default path and file name is
resources/componentname_resource.hda.
■If a resource file has been created for dynamic tables, you can append the new
table code to the existing file by selecting the file name. Any changes you
make to the load order now will apply to the entire resource file.
■To create a new resource file with a different file name, enter the file name.
5. If you want the new resource file to be loaded in a particular order, enter the
number in the Load Order field.
6. Click Next.
The Add Dynamic Resource Table Information Screen is displayed.
7. Enter a name for the dynamic table. It is a good idea to leave the name of the
component as a prefix.
8. To merge the new table with an existing table, select Merge To, and select a table
from the list.
9. Click Finish.
■If you selected a table to merge to, a dialog box asks if you want to launch the
text editor to continue editing.
■If you did not select a table to merge to, the Column Information Screen is
displayed.
a. Enter a column name in the Column Name field.
b. Click Insert. Repeat these steps until all of the table columns have been
entered.
c. Click OK.
A dialog box asks if you want to launch the text editor to continue editing.
10. Click Yes to open the resource file in the text editor. Click No to return to the
Component Wizard.
The resource file now appears in the Custom Resource Definition list, and the table
appears in the right pane of the Resource Definition tab.
6.3.2.8 Creating a Static Table Resource
Use the following procedure to create a static table resource using the Component
Wizard.
1. In the Component Wizard, open the component for which the resource will be
created.
2. On the Resource Definition tab, click Add.
The Add Resource Screen is displayed.
3. Select the Resource - Static Table (HTML Format) option.
Note: Unless you have a particular reason for the resource file to be
loaded after other resources, you should leave the load order set to 1.

Using the Component Wizard
Managing Components 6-19
4. Enter the file name for the resource file. The default file name is
componentname_resource.htm.
■If a resource file has been created for static tables, includes, or strings, or both,
you can append the static table code to the existing file by selecting the file
name. Any changes you make to the load order now will apply to the entire
resource file.
■To create a new resource file with a different file name, enter the file name.
5. If you want the new resource file to be loaded in a particular order, enter the
number in the Load Order field.
6. Click Next.
The Add Static Resource Table Information Screen is displayed.
7. Enter a name for the static table. It is a good idea to leave the name of the
component as a prefix.
8. To merge the new table with an existing table, select Merge To, and select a table
from the list.
9. Click Finish.
■If you selected a table to merge to, a dialog box asks if you want to launch the
text editor to continue editing.
■If you did not select a table to merge to, the Column Information Screen is
displayed.
a. Enter a column name in the Column Name field.
b. Click Insert.
c. Repeat steps a and b until all of the table columns have been entered.
d. Click OK.
A dialog box asks if you want to launch the text editor to continue editing.
10. Click Yes to open the resource file in the text editor. Click No to return to the
Component Wizard.
The resource file now appears in the Custom Resource Definition list, and the table
appears in the Resource Tables list.
6.3.2.9 Enabling the Component
After creating a component, you should enable it and test it.
■In the Component Wizard Main Screen, from the Options menu, select Enable.
■Restart the Oracle Content Server instance.
■Test the newly created component.
6.3.3 Additional Component Wizard Tasks
In addition to creating custom components, you can use the Component Wizard to
build zip files of your components and create custom installation parameters.
Note: Unless you have a particular reason for the resource file to be
loaded after other resources, you should leave the load order set to 1.

Using the Component Wizard
6-20 Oracle Fusion Middleware System Administrator's Guide for Oracle Content Server
■Section 6.3.3.1, "Building a Component Zip File"
■Section 6.3.3.2, "Working With Installation Parameters"
■Section 6.3.3.3, "Enabling and Disabling a Component"
■Section 6.3.3.4, "Removing a Component"
■Section 6.3.3.5, "Opening a Component"
■Section 6.3.3.6, "Configuring the Default HTML Editor"
■Section 6.3.3.7, "Unpackaging a Component"
■Section 6.3.3.8, "Adding an Existing Component"
6.3.3.1 Building a Component Zip File
The Build function of the Component Wizard enables you to build a component zip
file (or package), which can then be saved as a backup or unpackaged to deploy the
component on other Oracle Content Server instances.
Use the following procedure to build a component zip file:
1. Open the component in the Component Wizard.
2. From the Build menu, select Build Settings.
The Build Settings Screen is displayed.
A Component entry for the definition (glue) file and a ComponentExtra entry for a
readme.txt file are created automatically. You should not remove the glue file
entry, but you can delete the readme.txt entry.
3. Click Add.
The Add screen is displayed (Add Screen).
4. Select an Entry Type.
5. In the Sub Directory or File field, enter the location of the files for the selected
entry type.
■For the Component entry type, this setting is the file name for the glue file.
■For other entry types, enter a path to select all files in a particular directory, or
enter a path and file name to select an individual file.
■The location should be a path relative to the DomainHome/custom/ directory.
You can use an absolute path (such as C:/oracle/custom/my_component/), but
then the component can only be installed on Oracle Content Server instances
with the same installation directory path.
6. Continue adding entry types and specifying the subdirectories until all of the files
of your component are included.
7. Click OK.
8. From the Build menu, select Build.
The Main Build Screen is displayed.
9. Click OK.
Note: Always use forward slashes in the path.

Using the Component Wizard
Managing Components 6-21
The Component Wizard builds the component zip file in the
DomainHome/custom/component_name directory.
6.3.3.2 Working With Installation Parameters
The Install/Uninstall Settings tab is used to create customized installation components
that can include preference data parameters. These parameters can be user prompts
and messages. Depending on how they are defined, the prompts and messages are
displayed during the installation processes. These custom installation parameters
allow the component author to ask for information from users before the component is
installed.
To define custom installation parameters for a component:
1. In the Component List Screen, select the component to have custom installation
parameters defined.
2. Click Open.
3. On the Add/Edit Preference Screen, select the Install/Uninstall Settings tab, then
select the appropriate checkboxes:
■Has Install/Uninstall Filter
■Has Install Strings
Generally, both options are used to create the desired installation parameters.
4. Click the Launch Editor for the Install/Uninstall Filter option to open a Java code
template file. Edit the existing code and include additional Java code to the
template as necessary to create the filter procedures.
Each filter procedure will run once during the component installation or uninstall
procedure. The values of user responses are saved in the installation configuration
(install.cfg and config.cfg) files. For more information, see the Oracle Fusion
Middleware Developer's Guide for Oracle Universal Content Management.
5. Save and close the Install/Uninstall Filter Java code file.
6. On the Preference Data Setup pane, click the Add button to open the Add/Edit
Preference Screen.
7. Click the Launch Editor for the Install Strings option to open a Java code template
file. Edit the existing code and include additional Java code to the template as
necessary to define the set up prompts or messages.
Keep both the Add Preference screen and the Install Strings HTML template open
to use simultaneously. Complete the fields on the Add Preference screen as
necessary. Add the actual message or prompt text to the Install Strings HTML.
8. Save and close the Install Strings Java code file.
9. Open the Build Settings Screen by selecting Build Settings from the Build menu.
10. Complete the fields on the Build Settings screen as necessary.
11. If components have been specified to be included in the component zip file, they
will need to be added as component extras using the Add Screen.
Click the Add button to open the Add screen. Add each component individually.
12. Click OK.
13. If necessary, add more components to the zip file as component extras.
14. On the Build Settings screen, click OK to create the component zip file.

Using the Component Wizard
6-22 Oracle Fusion Middleware System Administrator's Guide for Oracle Content Server
The zip file can be shipped to clients and can be installed using either the Component
Wizard or the Component Manager within the Oracle Content Server instance.
6.3.3.3 Enabling and Disabling a Component
Use one of the following procedures to enable or disable a component from the
Component Wizard:
6.3.3.3.1 Option 1 1.Open the component in the Component Wizard.
2. In the Component Wizard Main Screen, from the Options menu select Enable or
select Disable.
3. Restart the Oracle Content Server instance.
The component is now enabled or disabled.
4. Navigate to the pages affected by the component to ensure that the addition or
removal of the customization is working as you expected.
6.3.3.3.2 Option 2 1.Use either of the following methods to display the Component List
Screen:
■Start the Component Wizard.
■In the Component Wizard Main Screen, from the Options menu select Open.
2. Select the component to be enabled or disabled.
3. Click Enable or Disable for the condition you want to set the component.
4. Restart the Oracle Content Server instance.
The component is now enabled or disabled.
5. Navigate to the pages affected by the component to ensure that the addition or
removal of the customization is working as you expected.
6.3.3.4 Removing a Component
Use the following procedure to remove a component from the Oracle Content Server
instance:
1. Disable the component you want to remove.
2. If the component to be removed is open in the Component Wizard, open a
different component or close and restart the Component Wizard. (A component
cannot be removed if it is open.)
3. To display the Component List Screen:
■Start the Component Wizard
■Select Open from Options in the Component Wizard Main Screen
Tip: Components can also be enabled and disabled using the
Component Manager.
Note: Removing a component means that the Oracle Content Server
instance no longer recognizes the component, but the component files
are not deleted from the file system.

Using the Component Wizard
Managing Components 6-23
4. Select the component to be removed from the Component List Screen.
5. Click Remove.
A confirmation screen is displayed.
6. Click Yes.
The component no longer appears in the Component List.
6.3.3.5 Opening a Component
Use the following procedure to open a component that has already been added to the
Oracle Content Server instance:
1. To display the Component List Screen:
■Start the Component Wizard
■Select Open from Options in the Component Wizard Main Screen
2. Select the component to be opened from the Component List Screen.
3. Click Open.
The component resources are shown in the Custom Resource Definition list on the
Component Wizard Main Screen.
6.3.3.6 Configuring the Default HTML Editor
You can edit text-based component files directly from the Component Wizard by
launching the HTML editor.
■For the Windows operating system, Microsoft WordPad (wordpad.exe) is the
default.
■For the UNIX operating system, vi is the default.
Use the following procedure to define the default HTML editor:
1. Display the Component Wizard Main Screen.
2. From the Options menu, select Configuration.
The Component Configuration Screen is displayed.
3. Click Browse.
4. Navigate to and select the executable file for the HTML editor you want to use.
5. Click Open.
6. Click OK.
When you click any Launch Editor button in the Component Wizard, the file will
open in the selected program.
Important: Specify a text editor (such as WordPad) rather than a
graphical HTML editor (such as FrontPage). Graphical editors can
insert or change HTML tags and might cause Idoc Script tags to be
converted into a string of characters that will not be recognized by the
Oracle Content Server instance.

Using the Component Wizard
6-24 Oracle Fusion Middleware System Administrator's Guide for Oracle Content Server
6.3.3.7 Unpackaging a Component
Use the following procedure to unpackage a component Zip file:
1. Use either of the following methods to display the Install Screen:
■In the Component Wizard Main Screen, from the Options menu, select Install.
■From the Component List Screen, click Install.
2. Click Select.
The Zip File Path screen is displayed.
3. Navigate to and select the component zip file.
4. Click Open.
The contents of the component zip file are listed on the Unpackage screen.
5. Click OK.
The component files are copied to the correct locations (there might be a short
delay while the files are unzipped), the Unpackage screen closes, and the
component resources are shown in the Custom Resource Definition list on the
Component Wizard Main Screen. The component is also added to the Component
List.
6.3.3.8 Adding an Existing Component
Use the following procedure to add an existing unpackaged component to the Oracle
Content Server instance:
1. Use either of the following methods to display the Add Component Screen:
■In the Component Wizard Main Screen, from the Options menu, select Add.
■From the Component List Screen, click Add.
2. Select the Use Existing Component option.
3. Click Browse.
4. Navigate to and select the component definition (hda) file (components.hda).
5. Click Open.
The path and file name are displayed in the FilePath field.
6. Click OK.
The component resources are shown in the Custom Resource Definition list on the
Component Wizard Main Screen. The component is also added to the Component
List.
Note: If you unpackage a component with the same name as an
existing component on the Oracle Content Server instance, the older
component will be zipped and copied to the
DomainHome/ucm/cs/bin/ directory, with a filename beginning with
backup and ending with a time stamp (such as
backup1008968718221.zip).
Note: Unpackaging a component does not enable it. See
Section 6.3.3.3, "Enabling and Disabling a Component."

Using the Command Line
Managing Components 6-25
6.4 Using the Command Line
The ComponentTool component enables administrators to use a command line to
install, enable, and disable components in the Oracle Content Server system.
ComponentTool is installed (enabled) with the Oracle Content Server instance.
When Oracle UCM is deployed, the ComponentTool launcher is installed by default
for UNIX and Windows. The executable is located in the DomainHome/ucm/cs/bin/
directory.
UNIX
ComponentTool
Windows
ComponentTool.exe
Component Tool supports the commands listed in Table 6–2.
Note: Adding an existing component does not enable it.
Table 6–2 ComponentTool Commands
Task Command
Install a component (also
automatically enables the
component)
ComponentTool --install path/component_name
Enable a component ComponentTool --enable component_name
Enable a component ComponentTool --disable component_name
List enabled components ComponentTool --list-enabled
List disabled components ComponentTool --list-disabled
List all components ComponentTool --list
Access ComponentTool help ComponentTool --help

Using the Command Line
6-26 Oracle Fusion Middleware System Administrator's Guide for Oracle Content Server

7
Managing Search Tools 7-1
7Managing Search Tools
This chapter describes concepts and tasks for managing Oracle Content Server search
tools:
■Section 7.1, "OracleTextSearch"
■Section 7.2, "Oracle Secure Enterprise Search"
7.1 OracleTextSearch
If you have a license to use OracleTextSearch software (with Oracle Database 11g),
then you can configure the OracleTextSearch feature to use Oracle Text 11g as the
primary full-text search engine for Oracle Universal Content Management (Oracle
UCM). Oracle Text 11g offers state-of-the-art indexing capabilities and provides the
underlying search capabilities for Oracle Secure Enterprise Search (Oracle SES).
However, Oracle Text 11g has its own query syntax, which is intended more for use by
applications or information professionals rather than casual end-users.
OracleTextSearch enables administrators to specify certain metadata fields to be
optimized for the search index and to customize additional fields. This feature also
enables a fast index rebuild and index optimization.
This section covers the following topics:
■Section 7.1.1, "Considerations for Using OracleTextSearch"
■Section 7.1.2, "Configuring OracleTextSearch for Oracle Content Server"
■Section 7.1.3, "Oracle Text 11g Features and Benefits"
■Section 7.1.4, "Managing OracleTextSearch"
■Section 7.1.5, "Searching with OracleTextSearch"
■Section 7.1.6, "Metadata Wildcards"
■Section 7.1.7, "Search Results with OracleTextSearch"
7.1.1 Considerations for Using OracleTextSearch
The following items are important when considering use of OracleTextSearch:
■Oracle UCM version 11g Release 1 (11.1.1) supports all languages supported by
Oracle Text 11g. OracleTextSearch can filter and extract content from different
document formats in different languages. It supports a large number of document
formats, including Microsoft Office file formats, Adobe PDF, HTML, and XML. It
can render search results in various formats, including unformatted text, HTML
with term highlighting, and original document format.

OracleTextSearch
7-2 Oracle Fusion Middleware System Administrator's Guide for Oracle Content Server
■Oracle Text 11g runs on Oracle Database 11g. The Oracle Content Server system
database can be Oracle Database 11g, Microsoft SQL Server, or other databases as
listed in the UCM 11g Release 1 (11.1.1) Certification Matrix. However, if the
system database is not Oracle Database 11g, then an external provider for
OracleTextSearch must be configured. See Section 7.1.2, "Configuring
OracleTextSearch for Oracle Content Server."
■When using OracleTextSearch, Oracle Database version 11.1.0.7.0 or higher is
required, and any SDATA field is limited to a maximum of 249 characters. All
Optimized Fields are SDATA fields, which by default include dDocName,
dDocTitle, dDocType, and dSecurityGroup. The total number of sdata fields is
limited to thirty-two (32) fields. Note that without Folders_g enabled, the
dDocTitle field is limited to 80 characters by default.
■While Oracle UCM provides numerous search options using a variety of databases
(Oracle, Microsoft SQL Server, IBM DB2), by default the database that serves as the
search index is the same system database used by Oracle UCM to manage
metadata and other configuration information (users, security groups, and so on.).
The OracleTextSearch feature enables Oracle Text 11g as a separate search
collection instance on Oracle Database 11g for Oracle UCM, which allows the
search collection to reside on a separate computer and not compete with Oracle
UCM for processors and memory. This can improve indexing and search response
time.
■The OracleTextSearch collection instance can be installed on a different platform
than the Oracle UCM installation.
■If the OracleTextSearch feature is configured and running, and metadata fields are
pushed into the Oracle Content Server instance either by the administrator or by a
component (requiring that the Oracle Content Server instance be restarted), then
the OracleTextSearch index must be rebuilt before content using the new metadata
fields can be checked in to the Oracle Content Server instance.
7.1.2 Configuring OracleTextSearch for Oracle Content Server
1. Open the config.cfg file for the Oracle Content Server instance in a text editor.
2. Set the following property values:
Required:
SearchIndexerEngineName=OracleTextSearch
Optional:
IndexerDatabaseProviderName=SystemDatabase
Note: If the Oracle UCM system database used with
OracleTextSearch is not Oracle Database 11g, then an external
provider for OracleTextSearch must be configured. The driver jar
ojdbc6.jar is provided by Oracle in the MW_HOME/wlserver_
10.3/server/lib directory.
You can specify a separate Oracle Database as the value of
IndexerDatabaseProviderName, instead of SystemDatabase.

OracleTextSearch
Managing Search Tools 7-3
3. Save the file.
4. Restart the Oracle Content Server instance.
5. Rebuild the search index.
For more information on rebuilding the index, see Section 4.2.2, "Working with the
Search Index." For more information on configuring Oracle Content Server and
OracleTextSearch during installation, see Oracle Fusion Middleware Installation
Guide for Oracle Enterprise Content Management Suite.
7.1.3 Oracle Text 11g Features and Benefits
This section covers the following topics:
■Section 7.1.3.1, "Indexing and Query Speeds and Techniques"
■Section 7.1.3.2, "Fast Rebuild"
■Section 7.1.3.3, "Query Syntax"
■Section 7.1.3.4, "OracleTextSearch Operators"
■Section 7.1.3.5, "Case Sensitivity and Stemming Rules"
■Section 7.1.3.6, "Search Results Data Clustering"
■Section 7.1.3.7, "Snippets"
■Section 7.1.3.8, "Additional Changes"
7.1.3.1 Indexing and Query Speeds and Techniques
Using Oracle Text 11g, Oracle UCM offers a significant increase in index speeds. Oracle
Text indexing is transactional. The Oracle Content Server system sends a batch of
document to Oracle Text, commits the batch, then starts the Oracle Text indexer. The
Oracle Content Server system is notified of which documents failed to index and only
those documents are resubmitted to be indexed. Oracle Content Server software also
supports the use of parallel indexing with the database, which can leverage multiple
CPUs on the database server.
Search query response times are improved by increased indexing speeds and
additional capabilities in the Oracle Content Server system to optimize the search
collection. These capabilities include an automatic Fast Optimization for every 5,000
documents added to the Oracle Content Server instance, and a Full Optimization for
every 50,000 documents or 20% growth of the repository.
Oracle UCM uses some of the newest Oracle Text 11g features. For example, the Oracle
Content Server system automatically creates a new search index zone for each text
information field in order to provide better search speed. Using information zones
enables the Oracle Content Server system to query data as if it were full-text data. All
text-based information fields (text, long text, and memo) are automatically added to as
separate zones. In addition to the zones created for text information fields, the Oracle
Content Server system provides an extra zone named IdcContent, which enables
custom components, Inbound Refinery components, applications, or users to create
XML content with tags that will be indexed as full-text metadata fields.
Note: If UseEntitySecurity=true is set with OracleTextSearch
as the search engine, then the following must also be set in the
config.cfg file for the Oracle Content Server instance:
ZonedSecurityFields=xClbraUserList,xClbraAliasList

OracleTextSearch
7-4 Oracle Fusion Middleware System Administrator's Guide for Oracle Content Server
Oracle UCM uses the SDATA section feature in Oracle Text 11g to index important
text, date, and integer fields and define them as Optimized Fields. The SDATA section
is a separate XML structure managed by the Oracle Text engine that allows the engine
to respond rapidly to requests involving data and integer ranges. Oracle Content
Server system can have up to 32 Optimized Fields, which includes data, integer,
standard Oracle Content Server fields like dInDate, dOutDate, and fields selected to be
optimized. All Optimized Fields are SDATA fields, which by default include
dDocName, dDocTitle, dDocType, and dSecurityGroup.
7.1.3.2 Fast Rebuild
OracleTextSearch provides an Indexer Rebuild Screen when you use the Collection
Rebuild Cycle Screen on the Repository Manager: Indexer Tab. The Fast Rebuild
feature allows the search engine to add new information to the search collection
without requiring a full collection rebuild. A Fast Rebuild is required in the following
cases:
■Adding or removing information fields
■Changing any Optimized Field
■Changing an information field to be an Optimized Field
A Fast Rebuild does not cause all the information (metadata and full-text) to be
re-indexed. It adds the changes throughout the collection and updates it. Oracle
Content Server search functionality is not affected during a Fast Rebuild cycle.
7.1.3.3 Query Syntax
Queries defined in Universal Query Syntax are supported and generally do not need
any modification. This includes queries saved by users, queries defined in custom
components, and queries defined in Site Studio pages.
7.1.3.4 OracleTextSearch Operators
Oracle Text supports the following defaults:
■CONTAINS
■MATCHES
■Has Word Prefix
■Range searches for dates and integers
The Oracle Text 11g engine supports additional search operators and functions which
are not exposed in the user interface by default, but can be exposed through
customization that adds to the operator definition HDA table. For details and
examples of these operators see the Oracle Text Reference.
7.1.3.4.1 Search Thesaurus Certain queries, such as stem and Related Term, may be
more effective if you use an Oracle Text thesaurus. Oracle Text enables you to create
case-sensitive or case-insensitive thesauri which define synonym and hierarchical
relationships between words and phrases. You can then search and retrieve documents
that contains relevant text by expanding queries to include similar or related terms as
Note: If you want to change the set of Optimized Fields defined in
Oracle Text 11g, the maximum allowed number of Optimized Fields is
32.

OracleTextSearch
Managing Search Tools 7-5
defined in the thesaurus. For example, you can populate a thesaurus with specific
product names, associated models, associated features, and so forth.
■Default thesaurus: If you do not specify a thesaurus by name in a query, by
default, the thesaurus operators use a thesaurus named DEFAULT. However,
Oracle Text does not provide a DEFAULT thesaurus.
As a result, if you want to use a default thesaurus for the thesaurus operators, you
must create a thesaurus named DEFAULT. You can create the thesaurus through
any of the thesaurus creation methods supported by Oracle Text:
–CTX_THES.CREATE_THESAURUS (PL/SQL)
–ctxload utility
■Supplied thesaurus: Oracle Text does not provide a default thesaurus, but Oracle
Text does supply a thesaurus, in the form of a file that you load with ctxload,
that can be used to create a general-purpose, English-language thesaurus.
The thesaurus load file can be used to create a default thesaurus for Oracle Text, or
it can be used as the basis for creating thesauri tailored to a specific subject or
range of subjects.
7.1.3.5 Case Sensitivity and Stemming Rules
Oracle Content Server automatically ensures that queries are executed as
case-insensitive. By default, all full-text and text field search queries are
case-insensitive. Oracle Content Server also handles case-insensitive search queries for
information stored as Optimized Fields.
Oracle Content Server does not apply any stemming rules by default for Oracle Text
11g, but stemming rules can be applied by using the stem() function. Stemming rules
may be used to have searches account for plurals, verbs, and so forth. Other methods
for implementing stemming rules include modifying the standard query definition in
the searchindexerrules configuration file, and by making configuration changes
in the Oracle Text engine (Oracle Database).
Oracle Content Server handles content in non-English languages by using the
WORLD_LEXER feature in the Oracle Text engine. This enables Oracle Text to
automatically identify the language and apply the proper tokenization rules.
7.1.3.6 Search Results Data Clustering
With the OracleTextSearch feature, Oracle Content Server retrieves additional
information about a search result list and displays it in a new menu bar on the Search
Results page. This information summarizes how many documents are attached to
specific values in specific information fields. Oracle Content Server supports data
clustering for up to four information fields (the default fields are Security Group and
Document Type).
This can be useful if you have a query that returns many items. For example, a result
set could include 200 content items, including 100 documents that belong to the Public
security group, 75 that belong to the Sales group, and 25 that belong to the Marketing
group. The menu option for Security Group will show you the list of values and how
many documents belong to each value. You can select one of the values (Public, Sales,
Note: See the Oracle Text Reference to learn more about using
ctxload and the CTX_THES package, and see the chapter, "Working
With a Thesaurus in Oracle Text," in the Oracle Text Application
Developer's Guide.

OracleTextSearch
7-6 Oracle Fusion Middleware System Administrator's Guide for Oracle Content Server
Marketing) from the menu and it will list only those documents in the result set that
belong to that value.
7.1.3.7 Snippets
Oracle Content Server can retrieve document snippets as part of search results to show
the occurrence of search terms in context of their usage. This feature is disabled by
default. To enable this feature, although it can affect search query performance, set the
following configuration entry in the config.cfg file:
OracleTextDisableSearchSnippet=false
7.1.3.8 Additional Changes
Additional changes because of the use of Oracle Text 11g include:
■XML content is automatically indexed.
■There are no visible changes in the Search user interface other than removal of
Substring as a search operator option. The default search operators are
CONTAINS, MATCHES, and HAS WORD PREFIX. Substring-based queries still
work.
■Queries using the MATCHES operator on a non-optimized field behave like a
CONTAINS query. For example, if xDepartment is not optimized, then the query
xDepartment MATCHES 'Marketing' behaves like xDepartment CONTAINS
'Marketing' and returns hits on content items that have an xDepartment
value of 'Marketing Services' or 'Product Marketing'.
■Relevancy ranking can be changed in Oracle Text 11g through use of an operator
called DEFINESCORE. This operator can be added through a component to the
WhereClause value of OracleTextSearch in the SearchQueryDefinition
table (in the searchindexerrules configuration file). More information about
this operator is available in the Oracle Text Reference document.
■Complicated queries that previously could be placed into the full-text search box
should now be placed in the advanced options on the Query Builder Form. The
Query Builder Form is documented in the Oracle Fusion Middleware User's Guide for
Content Server.
■If you need to specify an escape character, use the configuration variable
AdditionalEscapeChars=. The default setting is:
AdditionalEscapeChars=_:#,-:#
The default sets an underscore (_) and a hyphen (-) as escape characters.
■The PDF Highlighting feature has been disabled.
■The Spell Checking feature can be enabled, but it requires a custom component
just as it did with Autonomy VDK.
7.1.4 Managing OracleTextSearch
This section covers the following topics:
■Section 7.1.4.1, "Determining Fields to Optimize"
■Section 7.1.4.2, "Assigning/Editing Optimized Fields"
■Section 7.1.4.3, "Performing a Fast Rebuild"
■Section 7.1.4.4, "Modifying the Fields Displayed on Search Results"

OracleTextSearch
Managing Search Tools 7-7
7.1.4.1 Determining Fields to Optimize
Consider the following when determining the fields to optimize:
■Do you want an exact match in a query?
■Do you want that match to work faster in a search?
■Do you want to sort search results by field?
By default the OracleTextSearch feature optimizes the Content ID and Document Title
metadata fields.
A maximum number of 32 fields can be defined as Optimized Fields with the
OracleTextSearch feature. The Oracle Content Server instance can have up to 32
Optimized Fields, which includes data, integer, standard Oracle Content Server fields
like dInDate, dOutDate, and fields selected to be optimized. All Optimized Fields are
SDATA fields, which by default include dDocName, dDocTitle, dDocType, and
dSecurityGroup.
The display of integer fields is dynamic and depends on the Oracle Content Server
system configuration.
7.1.4.2 Assigning/Editing Optimized Fields
You can select metadata Non-Optimized Fields and assign them to be Optimized
Fields for search purposes, or edit Optimized Fields and make them Non-Optimized.
To assign or edit Optimized fields:
1. Log in to the Oracle Content Server instance as system administrator.
2. Click Administration in the navigation bar.
3. Click Admin Applets.
4. Click Configuration Manager, then the Information Fields tab, then Advanced
Search Design.
For more information on the Configuration Manager applet, see Oracle Fusion
Middleware Application Administrator's Guide for Content Server.
5. To make a metadata field Optimized, click Edit Fields. In the Advanced Options
for "metadata_field" screen, select Is Optimized.
6. To edit an Optimized Field and make it Non-Optimized, click Edit Fields. In the
Advanced Options for "metadata_field" screen, deselect Is Optimized.
7. When you have completed moving fields, use Index Fast Rebuild in Repository
Manager to update the search collection to use the new and modified fields.
Note: The Fast Rebuild does not function if a search collection
rebuild is in progress.

OracleTextSearch
7-8 Oracle Fusion Middleware System Administrator's Guide for Oracle Content Server
7.1.4.3 Performing a Fast Rebuild
The Fast Rebuild feature allows the search engine to add new information to the
search collection without requiring a full collection rebuild. A Fast Rebuild is required
in the following cases:
■Adding or removing information fields
■Changing any Optimized Field
■Changing an information field to be an Optimized Field
To perform a Fast Rebuild:
1. Log in to the Oracle Content Server instance as system administrator.
2. Click Administration in the navigation bar.
3. Click Admin Applets, then Repository Manager, then the Indexer tab.
The Repository Manager: Indexer Tab is displayed.
4. On the Collection Rebuild Cycle Screen, click Start.
The Indexer Rebuild Screen is displayed with a warning that rebuilding the search
index is a time-consuming process. If you do not want to start a rebuild now, click
Cancel; otherwise, continue with this procedure.
5. On the Indexer Rebuild Screen, click OK.
A Fast Rebuild of the search collection is performed.
7.1.4.4 Modifying the Fields Displayed on Search Results
The OracleTextSearch feature provides default menu options on the Search Results
page (set by the Oracle Database configuration script):
DrillDownFields=dDocType, dSecurityGroup
Administrators can add one more option from the list of Optimized Fields to further
customize the search results. Edit the configuration to add the option to the list of
DrillDownFields.
Note: A Fast Rebuild is not performed if a rebuild of the search
collection is in progress.
Note: The Fast Rebuild process does not create indexer counter
values for Full Text, Meta Only, and Delete. To obtain indexer count
statistics, you must perform a full collection rebuild.
Note: This function does not support multi-value option lists.
Note: A Fast Rebuild must be performed after making any change
in the DrillDownfields setting.

OracleTextSearch
Managing Search Tools 7-9
7.1.5 Searching with OracleTextSearch
Performing a search with OracleTextSearch is generally the same except there are no
visible changes in the Search: Expanded Form other than removal of Substring as a
search operator option. The default search operator is CONTAINS. Substring-based
queries still work.
For details on performing searches, see Oracle Fusion Middleware User's Guide for Oracle
Content Server.
The following table describes the default search operators.
7.1.6 Metadata Wildcards
The following wildcards can be used in metadata search fields, even when using the
Quick Search field.
■An asterisk (*) indicates zero or many alphanumeric characters. For example:
–form* matches form and formula
–*orm matches form and reform
–*form* matches form, formula, reform, and performance
Operator Description Example
CONTAINS Finds content items with the
specified whole word or phrase in
the metadata field.
This is available only for
OracleTextSearch, or for Oracle
Database and Microsoft SQL
Server database with the optional
DBSearchContainsOpSupport
component enabled.
When form is entered in the Title
field, the search returns items with
the word form in their title, but
does not return items with the
word performance or reform.
MATCHES Finds items with the exact
specified value in the metadata
field.
When address change form is
entered in the Title field, the
search returns items with the exact
title of address change form.
A query that uses the MATCHES
operator on a nonoptimized field
behaves the same as a query that
uses the CONTAINS operator.
For example, if the xDepartment
field is not optimized, then the
query xDepartment MATCHES
'Marketing' behaves like
xDepartment CONTAINS
'Marketing', returning hits on
documents that have an
xDepartment value of
'Marketing Services' or
'Product Marketing'.
HAS WORD PREFIX Finds all content items with the
specified word at the beginning of
the metadata field. No wildcard
character is placed before or after
the specified value.
When form is entered in the Title
field, the search returns all items
with the word form at the
beginning of their title, but does
not return an item whose title
begins with the word
performance or reform.
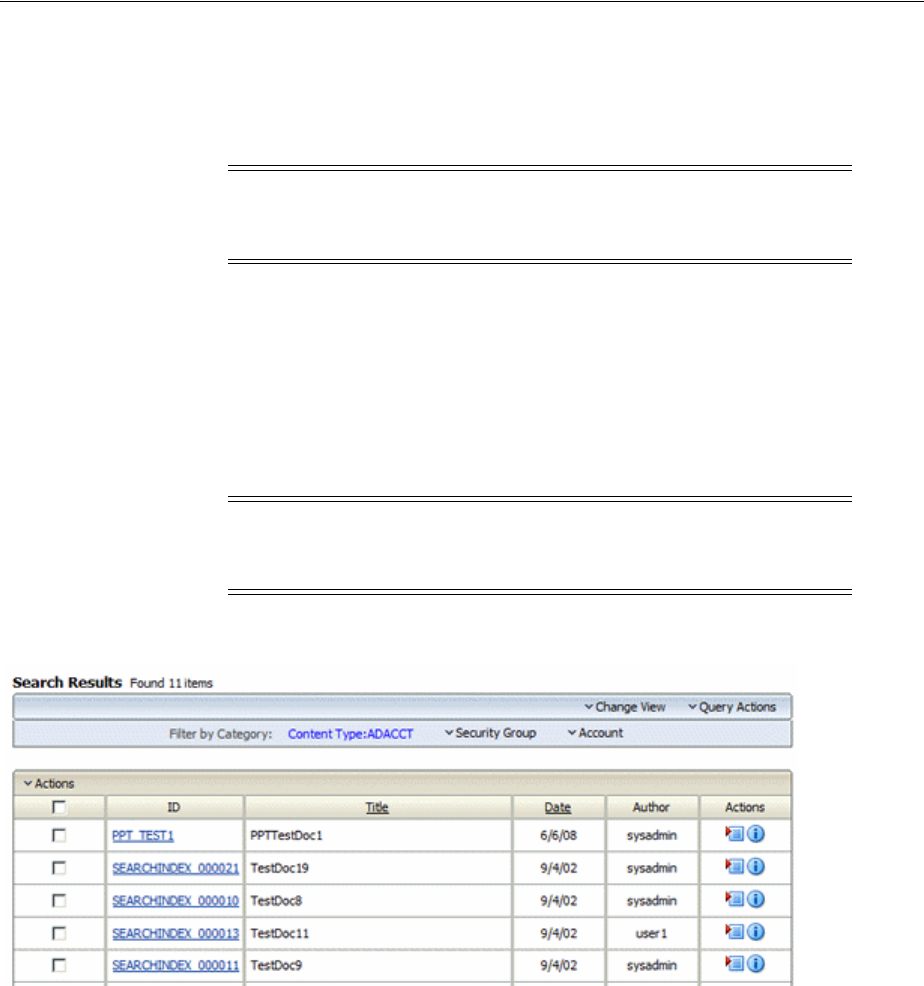
OracleTextSearch
7-10 Oracle Fusion Middleware System Administrator's Guide for Oracle Content Server
■A question mark (?) indicates one alphanumeric character. For example:
–form? matches forms and form1, but not form or formal
–??form matches reform but not perform
7.1.7 Search Results with OracleTextSearch
When users run a search using the Search: Expanded Form, the Search Results page
displays an additional menu bar with options that enable users to selectively view
search results. The options represent categories used to filter the search results. The
options can be context-sensitive, so if only one content item is returned for an option,
then it shows only the one result in the menu itself, as shown in Figure 7–1. The
default set of options include Content Type, Security Group, and Account.
Figure 7–1 Search results with OracleTextSearch default menu
If more than one content item is found for an option, an arrow is displayed next to the
option name. When you move your cursor over the option name, a menu displays the
list of the categories found in the search results for that option and the number of
content items for each of the categories. You can click any category name on the menu
to change the Search Results page to list only those items that match the category
Figure 7–2 shows a list of categories under Security Group and the number of items
found in each category.
Note: If you want to search for an asterisk (*) or a question mark (?)
without treating it as wildcard, you need to put quotation marks
around your search term; for example: "here*"
Note: Two default menu options on the OracleTextSearch menu for
Search Results can be replaced by customized menu options: Security
Group and Document Type.
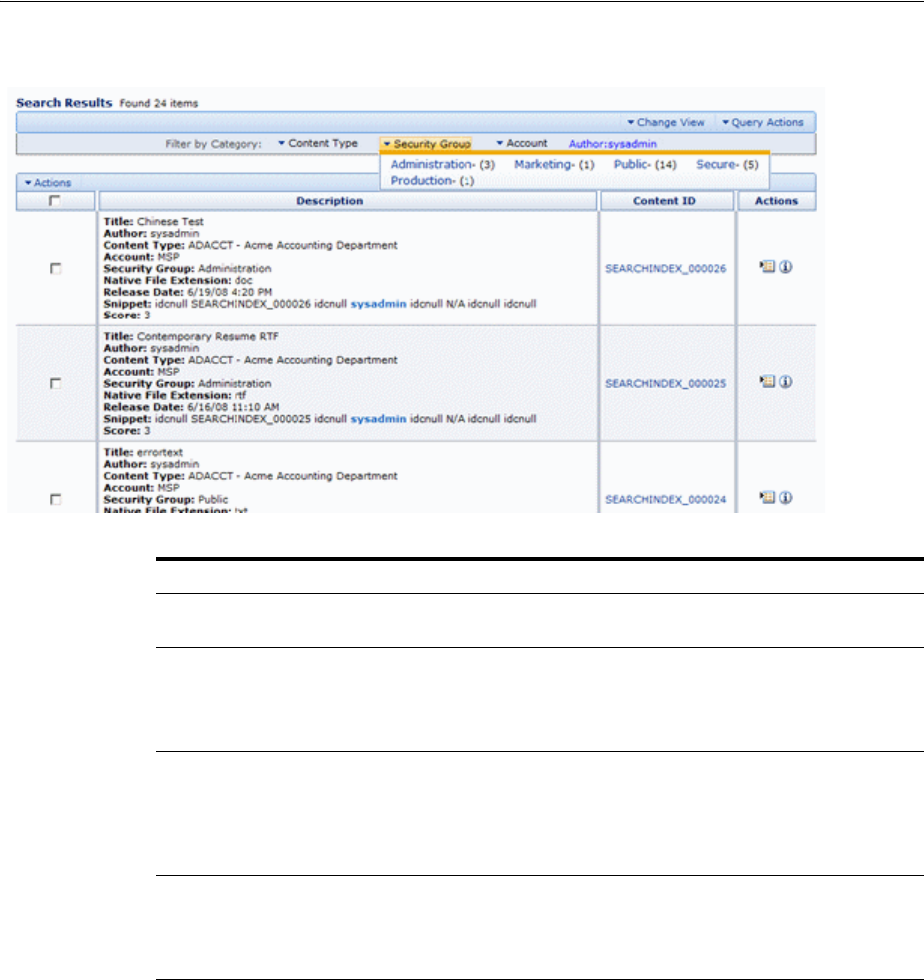
Oracle Secure Enterprise Search
Managing Search Tools 7-11
Figure 7–2 Search results with snippets display and expanded OracleTextSearch menu
7.2 Oracle Secure Enterprise Search
Oracle Secure Enterprise Search (Oracle SES) 11g enables a secure, high quality,
easy-to-use search across all enterprise information assets. If you have a license to use
Oracle SES 11g, then you can configure Oracle Universal Content Management
(Oracle UCM) to use Oracle SES as follows:
■The OracleTextSearch feature supports the use of Oracle SES as an external
full-text search engine for Oracle UCM. See Section 7.2.1, "Using Oracle SES as an
External Full-Text Search Engine."
■The SESCrawlerExport component enables Oracle SES to search content in an
Oracle Content Server instance without being the primary search engine. See
Section 7.2.2, "Using SESCrawlerExport for Oracle SES to Search Oracle Content
Server Content."
Element Description
Filter by Category Displays the categories used to filter the search results, for
example: Content Type, Security Group, Account.
Content Type (Default) Lists the types and the number of each type of content
items in the search results.
Clicking one of the content type names changes the Search
Results to show only those items that match the content type.
Security Group (Default) Lists the security groups and number of content items
assigned to each group in the search results. Security groups
include: Administration, Public, and Secure.
Clicking one of the security group names changes the Search
Results to show only those items that match the security group.
Account (Default) Lists the account types and number of items assigned
to each account in the search results.
Clicking one of the account types changes the Search Results to
show only those content items that match the account.

Oracle Secure Enterprise Search
7-12 Oracle Fusion Middleware System Administrator's Guide for Oracle Content Server
For more information about Oracle SES, see Oracle Secure Enterprise Search
Administrator's Guide.
7.2.1 Using Oracle SES as an External Full-Text Search Engine
Oracle UCM can be configured with the OracleTextSearch feature to use Oracle Secure
Enterprise Search (Oracle SES) 11g as its back-end search engine. With this
configuration, users can search multiple Oracle Content Server instances for a file.
7.2.1.1 Configuring Oracle SES for Use with OracleTextSearch
To configure Oracle SES for use with the OracleTextSearch option, complete the
following procedure.
1. After installing Oracle SES, edit the file ORACLE_
HOME/network/admin/sqlnet.ora to comment out the following two lines:
tcp.invited_nodes
tcp.validate_checking
2. If Oracle SES is running, shut it down (mid-tier and database):
ORACLE_HOME/bin/searchctl stopall
3. Start the database:
ORACLE_HOME/bin/searchctl start_backend
4. Find database connection information for later use in the following file:
ORACLE_HOME/search/webapp/config/search.properties
5. Run the Oracle Fusion Middleware Repository Creation Utility (RCU) against
Oracle SES and create the OCSEARCH schema. OCSEARCH sets only the search
portion of a database already set up by RCU with Oracle SES.
To create this schema, select Oracle Content Server 11g - Search Only on the RCU
Select Components screen. For more information about running RCU, see
"Creating Oracle Enterprise Content Management Suite Schemas" in Oracle Fusion
Middleware Installation Guide for Oracle Enterprise Content Management Suite.
Note: If you are already using a search engine other than Oracle SES
with Oracle UCM, such as the engine set up on the Oracle UCM Post
Configuration page, and you want to change the search engine to
Oracle SES, then you must create a new database provider and
configure Oracle SES for Oracle UCM using that provider. See
Section 7.2.1.2, "Reconfiguring the Search Engine to Use Oracle SES
with OracleTextSearch."

Oracle Secure Enterprise Search
Managing Search Tools 7-13
6. Perform a standard Oracle Enterprise Content Management Suite installation and
Oracle UCM installation.
7. Create a new Data Source (WLS DataSource) on the Oracle WebLogic Server
instance to connect to Oracle SES.
a. On the Oracle WebLogic Server Administration Console, use the Services
menu to select JDBC, then select Data Sources. A screen listing the Summary
of JDBC Data Sources is displayed.
b. Click New and enter values for the following items on the Create a New Data
Source screen:
Name: Enter the new Data Source name.
JNDI Name: Enter the new name again
Database Type: Enter Oracle.
Database Driver: Click *Oracle's Driver (Thin XA) for Instance Connection.
c. Click Next to see the Transaction Options.
d. Click Next to enter the database parameters. As mentioned in step 4, you can
find database connection information in the search.properties file.
Database Name: Enter the name of the database to connect to; for example,
ses.
Host Name: Enter the IP address of the database server.
Port: Enter the database server port number for the database connection.
Database User Name: Enter the database account user name. This is the
SchemaOwner name you specified in the RCU creation process.
Password: Enter the database account password to use to create database
connections. This is the password you specified in the RCU creation process.
Confirm Password: Enter the database account password again.
e. Click Next.
f. Click Test Configuration. Verify that the message "Connection test
succeeded" appears at the top of the page, then click Next.
g. From the list of available target servers, select the target Content Server
checkbox to deploy the new JDBC Data Source. For example, a target Content
Server might be named UCM_server1.
h. Click Finish.
8. On the Oracle UCM Post Configuration page, click Select External in Full Text
Search options, then enter the Data Source name.
9. Restart the Oracle UCM instance.
Note: Do not complete the post configuration steps on the Oracle
UCM Post Configuration page, because the page sets up a regular
database configuration. For instructions on performing the Oracle
Enterprise Content Management Suite installation and Oracle UCM
configuration, see Oracle Fusion Middleware Installation Guide for Oracle
Enterprise Content Management Suite.

Oracle Secure Enterprise Search
7-14 Oracle Fusion Middleware System Administrator's Guide for Oracle Content Server
7.2.1.2 Reconfiguring the Search Engine to Use Oracle SES with OracleTextSearch
If you are already using a search engine other than Oracle SES with Oracle UCM
(such as the engine set up on the Oracle UCM Post Configuration page), and you want
to change the search engine to Oracle SES, then you must create a new database
provider and configure Oracle SES for Oracle UCM using that provider.
1. After installing Oracle SES, edit the file ORACLE_
HOME/network/admin/sqlnet.ora to comment out the following two lines:
tcp.invited_nodes
tcp.validate_checking
2. If Oracle SES is running, shut it down (mid-tier and database):
ORACLE_HOME/bin/searchctl stopall
3. Start the database:
ORACLE_HOME/bin/searchctl start_backend
4. Find database connection information for later use in the following file:
ORACLE_HOME/search/webapp/config/search.properties
5. Run the Oracle Fusion Middleware Repository Creation Utility (RCU) against
Oracle SES and create the OCSEARCH schema. OCSEARCH sets only the search
portion of a database already set up by RCU with Oracle SES.
To create this schema, select Oracle Content Server 11g - Search Only on the RCU
Select Components screen. For more information about running RCU, see
"Creating Oracle Enterprise Content Management Suite Schemas" in Oracle Fusion
Middleware Installation Guide for Oracle Enterprise Content Management Suite.
6. Create a new Data Source (WLS DataSource) on the Oracle WebLogic Server
instance to connect to Oracle SES.
a. On the Oracle WebLogic Server Administration Console, use the Services
menu to select JDBC, then select Data Sources. A screen listing the Summary
of JDBC Data Sources is displayed.
b. Click New and enter values for the following items on the Create a New Data
Source screen:
Name: Enter the new Data Source name: ExternalSearchProvider
JNDI Name: Enter the new name again
Database Type: Enter Oracle.
Database Driver: Click *Oracle's Driver (Thin XA) for Instance Connection.
c. Click Next to see the Transaction Options.
d. Click Next and enter the database parameters. As mentioned in step 4, you
can find database connection information in the search.properties file.
Database Name: Enter the name of the database to connect to; for example,
SES.
Host Name: Enter the IP address of the database server.
Port: Enter the database server port number for the database connection.
Database User Name: Enter the database account user name. This is the
SchemaOwner name you specified in the RCU creation process.

Oracle Secure Enterprise Search
Managing Search Tools 7-15
Password: Enter the database account password to use to create database
connections. This is the password you specified in the RCU creation process.
Confirm Password: Enter the database account password again.
e. Click Next.
f. Click Test Configuration. Verify that the message "Connection test
succeeded" appears at the top of the page, then click Next.
g. From a list of available target servers, select the target Content Server
checkbox to deploy the new JDBC Data Source. For example, a target Content
Server might be named UCM_server1.
h. Click Finish.
7. Change the search (database) provider in Oracle UCM:
a. Log in to the Oracle UCM instance.
b. Select Administration, then Providers.
c. Click Add in the row to create a new database provider.
d. Enter or verify the new database provider settings.
Provider Name: ExternalSearchProvider.
Provider Description: External Database Provider
Provider Class: intradoc.jdbc.JdbcWorkspace
Connection Class: intradoc.jdbc.JdbcConnection
Database Type: Select ORACLE.
Use Data Source: Check this box.
data source: Enter the name of your Data Source; for example, SES.
Test Que r y : Enter a test query; for example, select * from SES.IDCTEXT
Number of Connections: By default, this is set to 5.
Extra Storage Keys: By default, this is set to system.
e. Click Add.
f. Restart the Oracle UCM instance. The new database provider name should be
included in the list displayed on the Providers screen.
8. On the Oracle UCM interface, select Administration, then Admin Server, then
General Configuration.
9. In the Additional Configuration Variables section for General Configuration ,
enter or verify the following settings:
SearchIndexerEngineName=OracleTextSearch
IndexerDatabaseProviderName=ExternalSearchProvider
10. Restart the Oracle UCM instance.
Note: You do not have to restart the Oracle WebLogic Server
instance.

Oracle Secure Enterprise Search
7-16 Oracle Fusion Middleware System Administrator's Guide for Oracle Content Server
11. Rebuild the search index using the Repository Manager applet.
For more information on the Repository Manager, see Oracle Fusion Middleware
Application Administrator's Guide for Content Server.
7.2.2 Using SESCrawlerExport for Oracle SES to Search Oracle Content Server Content
The Oracle UCM SESCrawlerExport component adds functionality as an RSS feed
generator to the Oracle Content Server instance and enables it to be searched by Oracle
Secure Enterprise Search (Oracle SES). The component generates a snapshot of content
currently on the Oracle Content Server instance and provides it to the Oracle SES
Crawler.
The SESCrawlerExport component generates RSS feeds as XML files from its internal
indexer, based on indexer activity. The component can access the original Oracle UCM
content (for example, a Microsoft Word document), the Web viewable rendition, and
all the metadata associated with each document. The component also has a template
containing an Idoc script that applies the metadata values from the indexer to generate
the XML document.
SESCrawlerExport generates RSS feeds for all documents for the initial crawl, as well
as feeds for updated and deleted documents for the incremental crawl. Each document
can be an item in the feed, together with the operation on the item (for example: insert,
delete, update), its metadata (for example: author, summary), URL links, and so on.
The indexer wakes up periodically (around 30 seconds) and creates a data feed for the
documents that were changed.
The Oracle Content Server connector for Oracle SES reads the feeds provided by
SESCrawlerExport according to the crawling schedule. Oracle SES parses, extracts the
metadata information, and fetches the document content using its generic RSS crawler
framework.
The YahooUserInterfaceLibrary component must be enabled on the Oracle Content
Server instance. This component has JavaScript libraries that SESCrawlerExport users
during the initial crawl to report the status of the feed generation
7.2.2.1 Accessing the SESCrawlerExport Component
To access the SESCrawlerExport component:
1. Log on on to the Oracle UCM Oracle Content Server instance.
2. Use the portal navigation tree or menu to select Administration, then Admin
Server.
3. On the Component Manager page, from the list of Integration components, select
SESCrawlerExport.
4. Click Update.
The SESCrawlerExport component is enabled.
5. From the navigation portal tree or menu, select Administration, then
SESCrawlerExport to display the SESCrawlerExport Administration page. Use
this page to take a snapshot of content to generate RSS feeds and to access the
Configure SESCrawlerExport page.
Note: The SESCrawlerExport component is not affected by what
search engine is used in the Oracle Content Server instance.
SESCrawlerExport does not affect how Oracle SES performs searches.

Oracle Secure Enterprise Search
Managing Search Tools 7-17
7.2.2.2 Taking a Snapshot of Oracle Content Server Content
Taking a snapshot of content on the Oracle Content Server instance generates feeds to
be provided to Oracle SES Crawler. The snapshot generates a configFile.xml at the
location specified by the SESCrawlerExport component FeedLoc parameter. XML
feeds are created in the subdirectory with the source name; for example, wikis.
Performing a snapshot can take some time depending on the number of items you
have stored on the Oracle Content Server instance and how many sources you are
generating.
To take a snapshot:
1. From the portal navigation tree or menu, select Administration, then click
SESCrawlerExport.
2. On the SES Crawler Export Administration page, select the source or sources you
want to capture in the snapshot from the available menu options.
If you select All Sources from the list of content sources, SESCrawlerExport
generates RSS feeds for all defined sources. You can also choose to select
individual sources or select a subset of sources to take a snapshot of just those
sources. Any update on the configFile.xml document that causes reindexing to
occur also generates the feeds in the same location.
3. Click Take Snapshot.
7.2.2.3 Configuring SESCrawlerExport Parameters
The SESCrawlerExport component has several parameters you can configure to
specify the data feed source, content, metadata, the number of items per data feed, and
so forth. Changes to parameters take effect immediately; however, you may need to
retake a new snapshot to propogate the changes.
To configure these parameters:
1. From the portal navigation tree or menu, select Administration, then
SESCrawlerExport.
2. On the SES Crawler Export Administration page, click Configure
SESCrawlerExport.
The configuration page is displayed.
3. Specify or confirm values for the following SESCrawlerExport parameter fields.
Note: The configFile.xml file is generated once for the same
configuration, either on the initial snapshot or on the first update of
any document, whichever occurs first.
Element Description
Hostname
(sceHostname)
The string for the hostname of the Oracle UCM instance that
hosts the content to be exported. If the value is blank, the
hostname is set to the host that performs the Oracle SES
export. This field is Idoc capable.
Feed Location
(sceFeedLoc)
Directory to which the configuration file and data feeds are
written. The configFile.xml file is generated at this location.
Data feeds and content are generated in the subdirectory with
the Source Name from this location.

Oracle Secure Enterprise Search
7-18 Oracle Fusion Middleware System Administrator's Guide for Oracle Content Server
Metadata List
(sceMetadataList)
A comma-delineated list of metadata values that are exported
to Oracle SES. If the value is blank, the list of metadata values
consists of the following fields:
dID,dDocName,dRevLabel,dDocType,dDocAccount,dSecurity
Group,dOriginalName,dReleaseDate,dOutDate and all
custom metadata fields (those beginning with the letter "x").
If this field is filled with a set of metadata fields, only those
fields are exported to Oracle SES. These fields can be standard
or custom metadata fields.
Admin Email(s)
(sceAdminEmail)
A comma-delineated list of email addresses, user names, and
user aliases that are notified by email when crawling errors
occur.
Custom Metadata Blacklist
(sceCustomMetadataBlacklist)
A comma-delineated list of metadata values that are not
exported to Oracle SES. These fields can be standard or
custom metadata fields.
Maximum Items Per Datafeed
(sceMaxItems)
The maximun number of content items for each data feed. (A
content item in the feed is an operation. For example: insert,
update, or delete a document.)
Core Filter
(sceCoreFilter)
Performs some pre-filtering on content to remove them from
being exported to Oracle SES. Oracle recommends that you
leave this value at the default setting.
Crawler Role
(sceCrawlerRole)
The Oracle UCM role required for the account that Oracle SES
uses to crawl the Oracle Content Server instance. By default,
the Oracle Content Server admin role is required.
Caution: Do not use the default Oracle WebLogic Server
administrator account to crawl from Oracle SES. Instead use
either an administrator account from an external source (such
as an LDAP provider) or the local Oracle Content Server
account. If necessary, you can change the required role admin
to another role, using this SESCrawlerExport field. For
example:
1. On the Oracle Content Server instance, create a new role
called scecrawlerrole.
2. Create a new local user account called sescrawler and
assign the role scecrawlerrole to this user account.
3. On Oracle SES, change your source definition to use the
sescrawler account to crawl the Oracle Content Server
instance.
4. On the Oracle Content Server instance, add
sceCrawlerRole=sescrawlerrole in the config.cfg
file.
Source Name(s)
(sceSourceName)
A comma-delineated list of all content sources created on the
Oracle Content Server instance. Each listed source is
completely identical (mirrored). By having multiple sources,
the content on this instance can be independently consumed
by multiple Oracle SES servers.
These source names are used as the subdirectory names for
the Feed Location directory to hold data feeds and contents.
Note: The name "ssSource" is a reserved source name and
must not be used in this field.
Element Description

Oracle Secure Enterprise Search
Managing Search Tools 7-19
7.2.2.3.1 Configuring an Oracle Content Server Source in Oracle SES The Oracle Content
Server connector enables Oracle SES to search the Oracle Content Server instance in
Oracle UCM. The connector reads the feeds provided by the Oracle Content Server
instance according to a crawling schedule. To crawl data from Oracle SES, you must
create a source of type Oracle Content Server. For detailed instructions on installing
the connector patch and creating the Oracle Content Server source, see "Setting Up
Oracle Content Server Sources" in Oracle Secure Enterprise Search Administrator's Guide.
The following parameters are used in setting up the Oracle Content Server source:
■Configuration URL:
http://host_name/instance_name/idcplg?IdcService=SES_CRAWLER_DOWNLOAD_
CONFIG&source=source_name
The parameter represented by source_name must be equal to one of the strings
used in SESCrawlerExport component Source Name (sceSourceName) parameter.
This parameter points to one of the content sources on the Oracle Content Server
instance. For example:
http://stahz16/ucm/idcplg?IdcService=SES_CRAWLER_DOWNLOAD_CONFIG&source=cs
■HTTP endpoint for authentication and authorization: You are prompted for the
HTTP endpoint values during the Oracle UCM identity plug-in activation and
authorization manager configuration. The two values are usually the same on the
same Oracle UCM instance and are usually in the form of http://host_
name/instance_name/idcplg. For example,
http://my.host.com/ucm/idcplg. This value is used as the endpoint for any
service call to Oracle Content Server instance. You can also find the value by using
the navigation portal to select Administration, then Admin Server, then Internet
Configuration. Use the current URL (without URL parameter) as the HTTP
endpoint.
7.2.2.3.2 Configuring an Oracle Content Server Source with Oracle Single Sign-On When the
Oracle Content Server instance is secured with Oracle single sign-on (OSSO), the
SESCrawlerExport component configuration must be changed to allow Oracle SES
access to the services provided by SESCrawlerExport. Go to the Configure
SESCrawlerExport page to disable the internal security mechanisms by setting the
Disable Secure APIs parameter to true.
7.2.2.3.3 Configuring an Oracle Content Server Source with Other Single Sign-On Solutions
When the Oracle Content Server instance is secured with a single sign-on solution
other than Oracle single sign-on (OSSO), some changes must be made to allow Oracle
SES access to the services provided by the SESCrawlerExport component.
■Configuration: When using a single sign-on solution other than Oracle single
sign-on, the security for the services provided by the SESCrawlerExport
component are provided by the component itself. Go to the Configure
SESCrawlerExport page to enable the internal SESCrawlerExport security
mechanisms by setting the Disable Secure APIs parameter to false.
Disable Secure APIs
(sceDisableSecureAPIs)
A Boolean flag that determines if the security for the services
provided by the SESCrawlerExport component are done
internally (false) or by the Oracle Content Server (true)
natively. For more information see "Section 7.2.2.3.2,
"Configuring an Oracle Content Server Source with Oracle
Single Sign-On."
Element Description

Oracle Secure Enterprise Search
7-20 Oracle Fusion Middleware System Administrator's Guide for Oracle Content Server
■Web Server: Access to the services provided by the SESCrawlerExport component
must bypass single sign-on because Oracle SES is not compatible with the single
sign-on solutions. Depending on the selected single sign-on solution, creating a
bypass might be as simple as configuring a web server module to allow access to a
subset of services.
If you set up an additional web server on the Oracle Content Server instance, the
web server must run on a different port than the standard Oracle Content Server
port (that is, something other than port 80). Configure this additional web server
to not have any single sign-on protection at all. Also, set up Access Control Lists to
allow only Oracle SES access to this web server. In the Oracle SES configuration,
use this additional web server port in the configuration URLs for the Oracle
Content Server source.
7.2.2.4 Configuring the Oracle Content Server Source Location Script
The Oracle Content Server source location script is a fully customizable Idoc script that
evaluates against a content item's metadata and returns the source(s) to which this
content item should be set.
To access the page where you can create or update the source location script:
1. From the portal navigation tree or menu, select Administration, then
SESCrawlerExport.
2. On the SES Crawler Export Administration page, click Configure
SESCrawlerExport.
The configuration page is displayed.
3. On the Configure SESCrawlerExport page, click Configure Source Location
Script.
The Configure Source Location Script page is displayed.
4. Enter the Idoc script in the provided area.
By default, the source location script is set to #all, which sends every content
item flagged as Latest Released to all sources (see the Source Name
parameter) configured on the Oracle Content Server instance. The #all source
name is a reserved keyword that indicates that all sources receive the content item.
Similarly, the #none source name is also a reserved keyword, but it indicates that
the content item should be sent to no sources (basically, the content item is not
exported to Oracle SES).
5. Click Update.
If you want to remove the source location script, then click Reset.
6. To test the source location script, enter a content item's Document Name
(dDocName) in the field provided, then click Tes t .
If there are syntax errors in the script, the errors are either displayed on the page
or in the server output, depending on the type of syntax error. Logic errors can be
corrected on the SESCrawlerExport Source Location Script page and the test can
be run again immediately.
If the script returns a source name that does not exist, an error is generated in the
server output. The invalid source name is removed and the item(s) continue to be
processed, but it is recorded in the logs. You can correct this problem by either
removing the source name from the script or adding a new Source Name
parameter value for your Oracle Content Server instance.

Oracle Secure Enterprise Search
Managing Search Tools 7-21
You can return multiple source names in the script by separating them with
commas.
In the following example, the source location script is set up to send all content items
that have a Document Type (dDocType) of ADACCT into a source named
accounting, and everything else falls into the source named default. The
accounting and default sources must be set up separately by adding those names
into the Source Name parameter on the Configure SESCrawlerExport page.
<$if dDocType like "ADACCT" $>
accounting
<$else$>
default
<$endif$>

Oracle Secure Enterprise Search
7-22 Oracle Fusion Middleware System Administrator's Guide for Oracle Content Server

8
Managing System Migration and Archiving 8-1
8Managing System Migration and Archiving
This chapter provides information about the tools and tasks for migrating structure
and metadata from one Oracle Content Server instance to another Oracle Content
Server instance, and for archiving information including content. Information also is
provided about migrating metadata from a Universal Online Archive to an Oracle
Content Server instance.
■Section 8.1, "Introduction to Migration Tools and Components"
■Section 8.2, "Migrating System Configurations"
■Section 8.3, "Archives, Collections and Batch Files"
■Section 8.4, "Exporting Data in Archives"
■Section 8.5, "Importing Data"
■Section 8.6, "Transferring Files"
■Section 8.7, "Replicating Files"
■Section 8.8, "Archive and Migration Strategies"
■Section 8.9, "Folder Archiving"
■Section 8.10, "Folder Structure Archiving"
■Section 8.11, "Archiver Replication Exceptions"
■Section 8.12, "Troubleshooting Archiving Issues"
8.1 Introduction to Migration Tools and Components
Several tools are available for archiving and migrating information from and to an
Oracle Content Server instance. Each tool serves a different purpose and most can be
used together.
■Configuration Migration Utility component: Use to select elements of your
Oracle Content Server instance to migrate to another instance.
■Archiver: A Java applet for transferring and reorganizing Oracle Content Server
files and information. You can use the archiver with the migration utility to
migrate a complete Oracle Content Server instance, including content, from one
system to another.
■Folder Archiving: Use to migrate the folder structure of your Oracle Content
Server instance from one location to another. Supports Folders and Folders_g.

Introduction to Migration Tools and Components
8-2 Oracle Fusion Middleware System Administrator's Guide for Oracle Content Server
■FolderStructureArchive component: Use to copy the folder structure (and its
content) and create an exact copy on another computer. It ensures that the folder
copies and respective contents remain synchronized across different systems.
■ArchiverReplicationExceptions component: Use to prevent failed imports from
stopping replication.
This section provides an introduction to these tools and their uses.
■Section 8.1.1, "Configuration Migration"
■Section 8.1.2, "Archiver"
■Section 8.1.3, "Folder Archiving"
■Section 8.1.4, "FolderStructureArchive Component"
■Section 8.1.5, "ArchiveReplicationExceptions Component"
■Section 8.1.6, "Archive Tool Summary and Comparison"
8.1.1 Configuration Migration
The Configuration Migration Utility component is used to select elements of your
Oracle Content Server instance to migrate to another instance. This component is
installed and enabled by default with the Oracle Content Server instance.
Overview
You can select individual elements (such as workflow tokens or content types) or
entire sections (such as all user-related metadata or all metadata related to workflows).
In addition, you can export and import an entire Oracle Content Server instance to
create a snapshot of the Oracle Content Server instance at a certain point in time. It can
be used to migrate a system from testing to production, or to provide an upgrade path
from older versions of the Oracle Content Server instance. By using the migration tool,
you can keep an older version of the Oracle Content Server software in production
while testing new functionality on a newer version.
Each export configuration is packaged as a bundle which contains the information
needed to re-create the configuration on another system. A bundle is a zip file that can
be easily shared with other systems.
Functions
The Configuration Migration Utility is used to configure migration bundles for
exporting to other systems. It is also used to upload and import bundles on an
importing system. There are four main functions:
■Upload Bundle: used to find a copy of an exported bundle and make it available
for use on a receiving system.
■Configuration Bundles: used to import the configuration from the uploaded
bundle. This function creates new metadata fields or overwrites current fields,
depending on options chosen during import.
■Configuration Templates: used to create export bundles, which can later be
uploaded and imported to another Oracle Content Server instance.
■Recent Actions: used to view recent activity such as imports and exports and to
view a log of those activities.
By using the Configuration Migration Utility with the Archiver, you can create a
snapshot in time of your existing Oracle Content Server instance or you can use it to

Introduction to Migration Tools and Components
Managing System Migration and Archiving 8-3
keep track of incremental updates to an existing system. The Configuration Migration
Utility captures configuration information while the Archiver captures content.
For details about using the Configuration Migration Utility, see Section 8.2, "Migrating
System Configurations."
8.1.2 Archiver
Archiver can be used with the Migration utility to migrate a complete Oracle Content
Server instance, including content, from one system to another.
Overview
Archiver can be run as an Admin Applet, accessed from the Admin menu, or as a
standalone version. The standalone version is required to:
■Create collections
■Create a new archive by copying from an existing archive
■Browse the local file system to connect to new collections
For details about using Archiver in standalone mode, see Section 8.3.2.5, "Running the
Archiver as a Standalone Application."
Functions
Archiver is a Java applet that is used to transfer and reorganize Oracle Content Server
files and information. Archiver has four main functions:
■Export: Used to copy native and web-viewable files out of the Oracle Content
Server instance for backup, storage, or import to another Oracle Content Server
instance. You can also export content types and user attributes. You export to an
archive, which contains the exported files and their metadata in the form of batch
files.
■Import: Used to retrieve files and Oracle Content Server information from an
exported archive. Importing is typically used to get a copy of content from another
Oracle Content Server instance or to restore data that has been in storage. You can
also change metadata values during an import.
■Tr an s fe r: Used to transfer content from one Oracle Content Server instance to
another over sockets. This is typically used to move or copy content across a
firewall or between two Oracle Content Server instances that do not have access to
the same file system. You can also use the Transfer function to transfer archive
files between Oracle Content Server systems that have access to the same file
system.
Note: Archiver does not include Digital Asset Management (DAM)
video and audio renditions in the archives it creates. The archives do
include the native file, thumbnail, the zip rendition that contains
storyboard thumbnails, and the web-viewable .hcsp file, but do not
include any additional video and audio renditions created by Inbound
Refinery.
This limitation is by design. Many video files would make the archive
too large, surpassing the 2GB limit on zip files. Also, in man
production instances the video renditions are likely to be stored on a
separate file system.
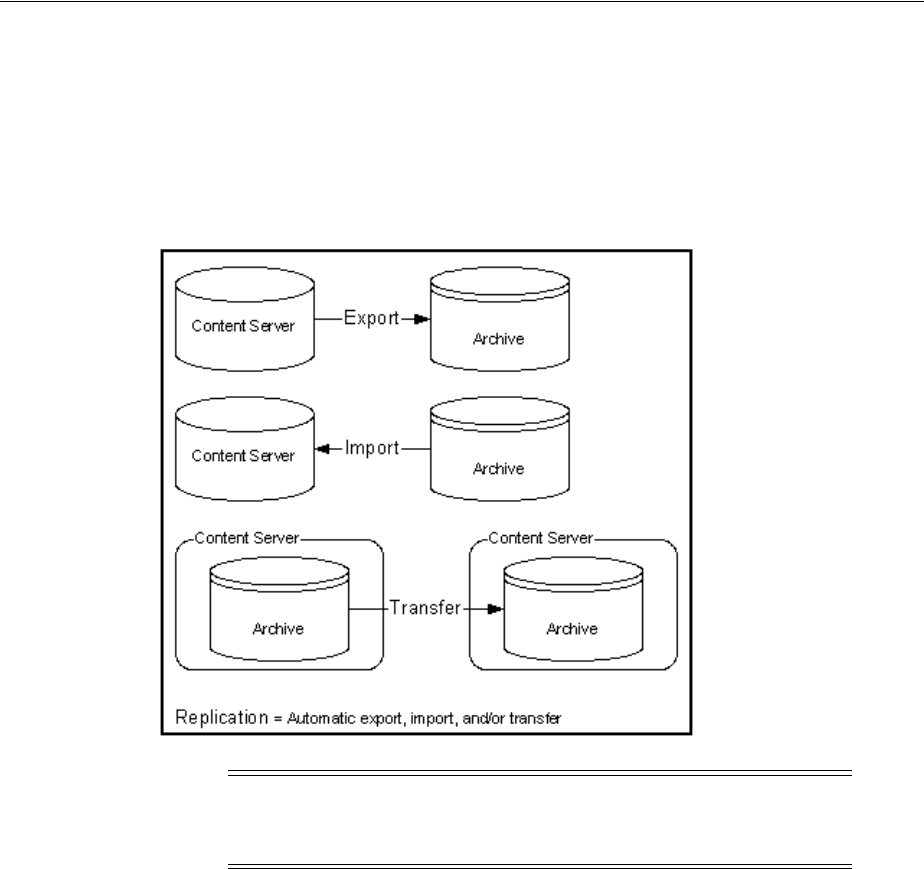
Introduction to Migration Tools and Components
8-4 Oracle Fusion Middleware System Administrator's Guide for Oracle Content Server
■Replicate: Used to automate the export, import, and transfer functions. For
example, you can use replication to automatically export from one Oracle Content
Server instance, transfer the archive to another computer, and import to another
Oracle Content Server instance.
The following illustration demonstrates these basic functions.
Figure 8–1 Archiver Functions
8.1.3 Folder Archiving
You cannot use the Archiver to move folder structure and content, but you can use
Folder Archiving to migrate the total folder structure of your Oracle Content Server
instance from one location to another. This does not archive the folder content, just the
folder structure.
Using Folder Archiving you can export and import the folder hierarchical structure
directly from the Folders administration interface. The entire folder hierarchy is
exported to a text file in HDA format, which can then be read by the Oracle Content
Server instance when it is imported.
8.1.4 FolderStructureArchive Component
The FolderStructureArchive component is a separate product from the Folders
component and must be installed separately.
Overview
The FolderStructureArchive component can be used with the archiving aspect of the
Folders component but its functionality differs in several ways:
Caution: Do not use Archiver as your primary method of disaster
recovery; use standard backup systems for the database and file
system.

Introduction to Migration Tools and Components
Managing System Migration and Archiving 8-5
■It can export selected portions of the folder structure. The Folders Archive
function can only export the entire folder structure.
■It can create incremental archives. These are archives that contain only changed
folders. The built-in Folder Archive function creates archives that contain all items.
■It can include both the folder structure and folder content in the archives. The
Folder Archive function can only export the folder structure and none of the
content.
Functions
This component can be used for three major purposes:
■As a backup tool. With this component you can copy the folder structure,
including its content.
■As a duplication tool. This component can be used to copy the folder structure
and content and create an exact copy on another computer, helping to simplify
multiserver setups.
■As a synchronization tool. With this component you can ensure that copies of
your folders and their contents are kept synchronized across different systems.
8.1.5 ArchiveReplicationExceptions Component
The ArchiverReplicationExceptions component is installed (enabled) by default with
the Oracle Content Server instance. It enables administrators to prevent failed imports
from stopping replication. It does this by capturing such failed imports and putting
them into an exceptions archive and sending out e-mail to the administrator that such a
failed import has occurred.
For content items to be processed by the ArchiverReplicationExceptions component,
the administrator must manually set configuration entries in the
IntradocDir/config/config.cfg file. The configuration variables customize the behavior
of the importing Oracle Content Server instance to allow for certain situations and to
distribute the error reporting based on the configured criteria.
8.1.6 Archive Tool Summary and Comparison
The tools that can be used to archive Oracle Content Server structure, content, and
folders all serve different purposes. All of the tools can be used together, but
sometimes one might be preferred over the other. The following table summarizes
each tool and its strengths and limitations.
Feature
Configuration
Migration Utility
(CMU) Archiver Folder Archiving
Folder Structure
Archive
Component
Primary
purpose A 'snapshot' tool,
used to migrate one
Oracle Content
Server instance to
another or to
migrate to an
upgraded instance.
Primarily used for
backup, storage, and
transfer of data over
sockets.
Used to export and
import a complete
folder structure or
hierarchy.
Used to backup and
duplicate a folder
structure to
synchronize the
contents with
another Oracle
Content Server
instance.

Migrating System Configurations
8-6 Oracle Fusion Middleware System Administrator's Guide for Oracle Content Server
8.2 Migrating System Configurations
Configuration migration is used with the Archiver to export one Oracle Content
Server instance configuration to another Oracle Content Server instance. Archiver is
used to migrate content and the Configuration Migration Utility exports the
configuration and customization of the Oracle Content Server instance.
■Section 8.2.1, "Configuration Migration Utility"
■Section 8.2.2, "Migration Tips"
■Section 8.2.3, "Managing Configuration Migration"
8.2.1 Configuration Migration Utility
This section describes the structure of the Configuration Migration Utility and how it
uses templates and bundles. For an overview of this utility and how it compares to
other archiving tools, see Section 8.1, "Introduction to Migration Tools and
Components."
Strengths Enables you to
choose specific parts
of the Oracle
Content Server
instance to migrate.
Provides logging
and trace files.
Works with older
content.
Provides logging
and trace files.
Ensures that the
collection IDs on the
target match those
on the source.
Can export selected
portions of the
folder structure.
Limitations Cannot be used on
pre-6.2 versions of
the Oracle Content
Server software.
Migration of
components can be
difficult.
The standalone
version is needed to
create collections.
Imported revisions
do not automatically
enter a workflow.
All current folders
and content items in
the folders are
removed from the
Oracle Content
Server instance and
replaced by the
imported folder
hierarchy.
Does not ensure that
the collection ID of
folders on the target
match those on the
source content.
What it archives ■Metadata
■Security (roles
and accounts)
■Profiles
■Schema
■Workflow
■Personalization
■Add-on
components
■
■Content
■Content types
■User attributes
■Subscriptions
■Security
groups
■File Formats
■Complete
folder
hierarchy (no
content)
■Complete or
partial folder
hierarchy and
content
■Only changed
content (if
desired)
What it does not
archive
■Content
■Publisher
projects
■Workflow state
■Does not
synchronize:
this is an
additive
archive
■Folder
structure
■Metadata,
security and
other features
which are
archived by
CMU
■Weblayout
structure
■Partial or
selected folder
hierarchy
■Collaboration
folders
■Content
■Metadata,
security (other
features which
are archived by
CMU)
Collaboration
folders
Feature
Configuration
Migration Utility
(CMU) Archiver Folder Archiving
Folder Structure
Archive
Component
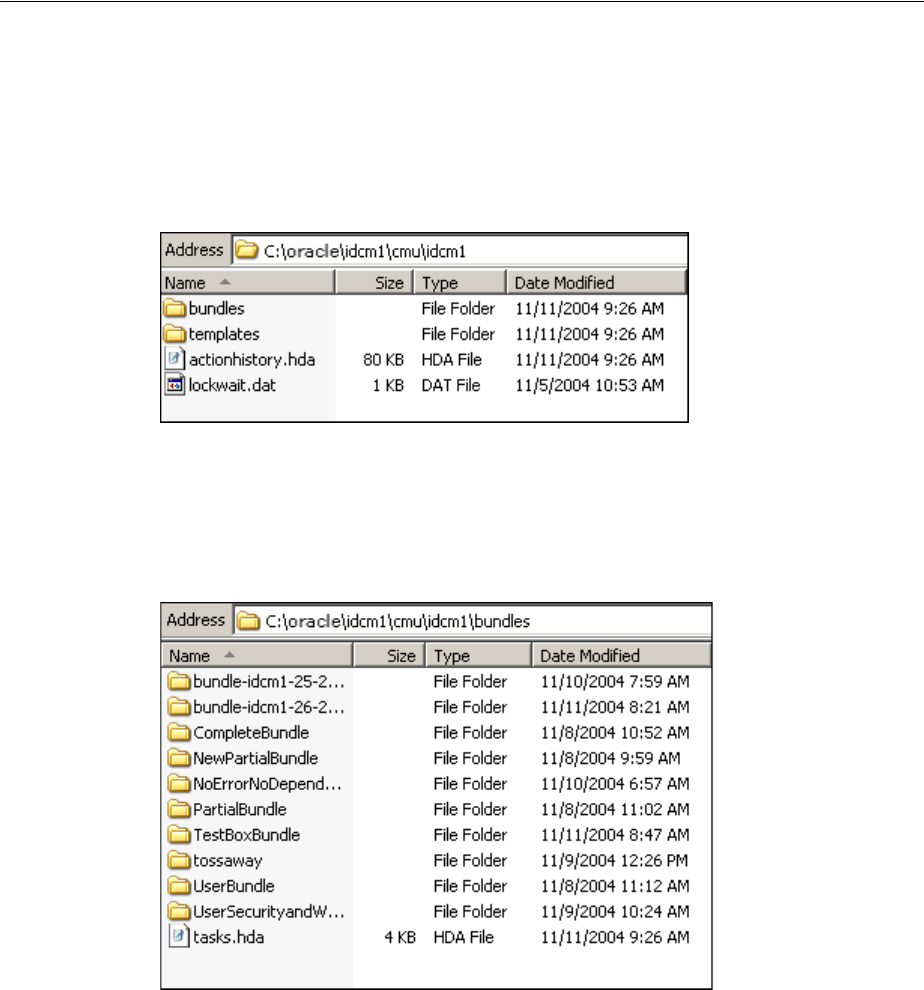
Migrating System Configurations
Managing System Migration and Archiving 8-7
8.2.1.1 Migration Structure
A bundle is a set of configuration information that is packaged into a single zipped file
and made ready for exporting to another Oracle Content Server instance.
Information is stored in the DomainHome/ucm/cs/cmu/instance/ directory.
Figure 8–2 Migration Directory Structure
The bundles subdirectory contains specific bundles and associated information. The
templates subdirectory contains configuration templates which can be used for new
export files.
Figure 8–3 The Bundles Subdirectory
Each configuration bundle is in a separate subdirectory and contains all the relevant
files needed to export that bundle.
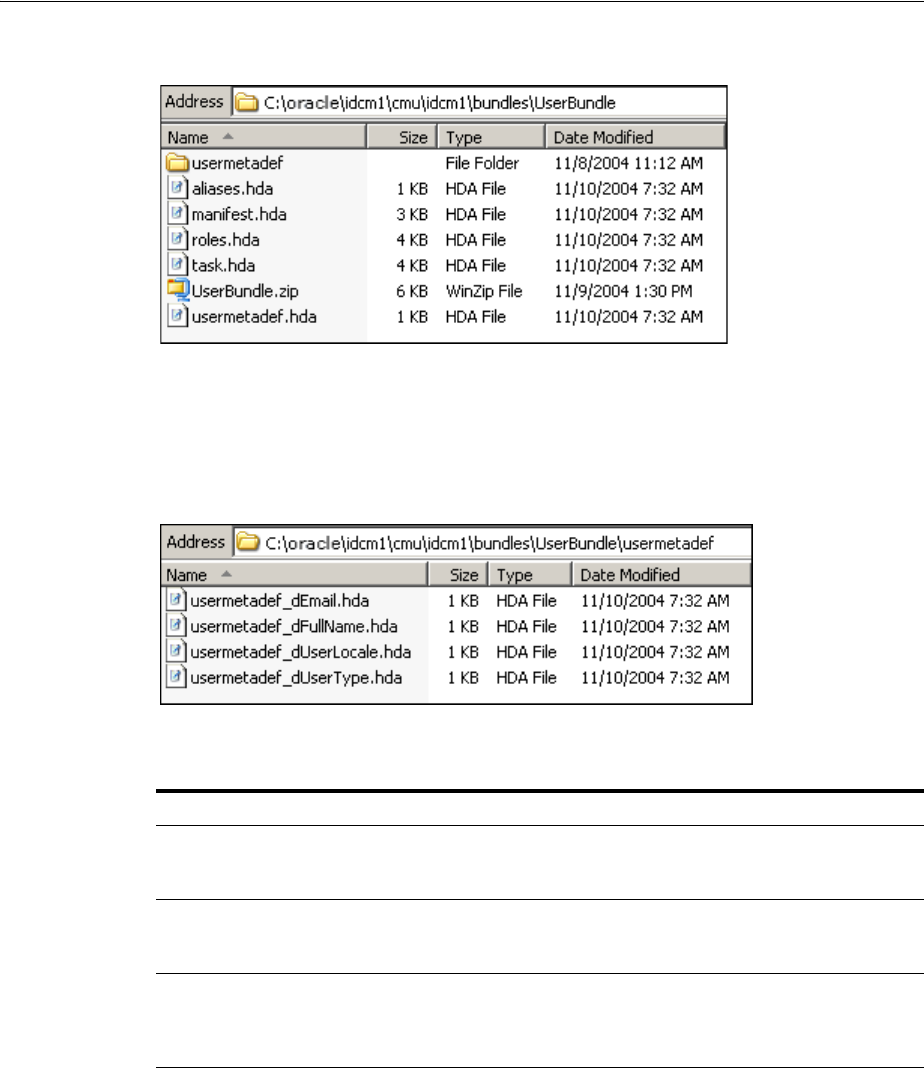
Migrating System Configurations
8-8 Oracle Fusion Middleware System Administrator's Guide for Oracle Content Server
Figure 8–4 Files in Configuration Bundle
Within the specific directories, any customization that is unique to the instance in that
export (such as customized metadata fields, schemas, and so on) are included in a
separate subdirectory.
Figure 8–5 Customization Stored in Directory
The following files are included in these different subdirectories:
8.2.1.2 About Migration Templates and Bundles
A migration template is a set of configuration options which specify what Oracle
Content Server items will be exported. For example, a template named FullCSExport
may contain all Oracle Content Server items (schema, custom metadata, workflows,
and so on). Another template named UserCSExport may only contain options that
pertain directly to users (security groups, roles, and so on).
These templates are used to create configuration bundles. A bundle uses the template
to determine what to export and to create the necessary definition files which will be
exported with the Oracle Content Server items. The bundle name is used to identify
the finished result of an import or an export. The bundled information is put into a
zipped file, containing all the necessary definition files.
File or Directory Description
bundle directory Each bundle has a subdirectory in the /bundles directory. The
subdirectory is given the name assigned to the bundle when the
configuration export was created.
templates directory Contains export rules created from bundles. When a configuration
export is created and saved, a name is given to that export and the
configuration is stored as a template in the templates directory
hda files Contains definitions and details of customization and other
elements of the exported instance. Depending on how the export
was defined, information can be bundled into one .hda file or into
several.

Migrating System Configurations
Managing System Migration and Archiving 8-9
8.2.2 Migration Tips
It is important to remember that migration entails the bundling and copying of
information about the Oracle Content Server instance. It does not include any of the
actual content that is in the Oracle Content Server instance. Archiver is used to export
content. You should take care that if you archive specific content and plan to export it
to another system, the metadata information for that content is also migrated using the
Configuration Migration Utility.
When migrating information from one Oracle Content Server instance to another,
there is not a merging of information. Migration is an additive process. The exporting
configuration bundle of metadata information is added to the metadata that currently
exists in the importing Oracle Content Server instance. If metadata information
currently exists that matches the metadata being imported, and if the Force Overwrite
rule has been selected during import, then duplicate bundles are replaced. For
information about the Force Overwrite option, see Section 8.2.3.6, "Uploading a
Bundle."
Configuration Migration Utility administration tasks must be performed using a
specific node of a cluster. If you do not use a specific node, then an error might occur
because the job number assigned to an action is known only to the node that started
the action.
You cannot import a configuration on a 6.2 version of the Oracle Content Server
instance. The Edit, Preview, and History options will not appear on the bundle's
options on the Configuration Bundles page on a 6.2 Oracle Content Server instance.
If you import a template to use on another Oracle Content Server instance and if the
importing system does not have the same metadata fields, you will not be able to use
that template for export later. You must upload the template, import the configuration,
and then use it for exporting. For details about the import process, see Section 8.2.3.3,
"Importing a Template."
8.2.2.1 Limitations
Keep the following limitations in mind when using the Configuration Migration
Utility:
■When exporting workflow configuration information, only the workflow
definition is exported. The state of the workflow is not exported.
■If importing and overwriting existing workflows, ensure that you have the same
step names for each workflow.
■If you import a workflow to a new Oracle Content Server instance, the workflow
will not retain the same state information as that of the exporting Oracle Content
Server instance. For this reason, you should not plan to export active workflows.
■This utility is not a cloner. It does not synchronize information with another
system, it only copies and moves information.
■This utility cannot be set up to migrate automatically.
■Errors may arise when migrating docmeta information from earlier versions of the
Oracle Content Server instance because of the use of schemas in later versions of
the Oracle Content Server instance.
■You cannot import users from a 6.2 or 7.0 version of the system to a later version
due to Archiver limitations.

Migrating System Configurations
8-10 Oracle Fusion Middleware System Administrator's Guide for Oracle Content Server
■Migrating the config.cfg file may have errors because some values are not
migrated for safety reasons (for example, IDC_Name). Others values, such as that
for AutoNumberPrefix, are migrated.
■Migrating components can be difficult because no preference prompts (for
example, in Folders or RMA) and no database tables can be migrated.
■No support is provided for Publisher projects or for bundles in components.
8.2.2.2 Migration Logs
You can enable migration trace logs to track activity during migration events. The logs
are enabled by clicking System Audit Information on the Admin Applets screen or
under the Administration tray. In the Tracing Section Information portion of the page,
select cmu from the Active Sections menu. Configuration Migration Utility logs will be
included in the trace files that are run.
To access the logs, click View Server Output from the Actions menu on the page. The
Configuration Migration Utility log information is included with other tracing logs
that are generated.
8.2.3 Managing Configuration Migration
Migration consists of several tasks such as creating migration templates, creating
migration bundles, and exporting or importing the configuration.
■Section 8.2.3.1, "Creating a Configuration Migration Template"
■Section 8.2.3.2, "Editing a Configuration Template"
■Section 8.2.3.3, "Importing a Template"
■Section 8.2.3.4, "Creating a One-Time Export"
■Section 8.2.3.5, "Exporting a Configuration"
■Section 8.2.3.6, "Uploading a Bundle"
■Section 8.2.3.7, "Importing a Bundle"
■Section 8.2.3.8, "Downloading a Bundle"
■Section 8.2.3.9, "Viewing Status Information"
8.2.3.1 Creating a Configuration Migration Template
1. Using a web browser, select Config Migration Admin from the Oracle Content
Server Administration menu.
2. Select Configuration Templates from the Config Migration Admin menu.
3. Select Create New Template from the Actions menu on the Configuration
Templates Page.
The Config Migration Admin Screen is displayed.
4. Choose the Action Options for the export.
■To create an export template that will continue the export process even if an
error is encountered, select Continue on Error. The export will proceed but
errors will be reported on the Action History Page.
■To have e-mail sent to the person initiating the export, select Email Results.
E-mail will be sent to the person who performs the export, not the person who
created the export template.

Migrating System Configurations
Managing System Migration and Archiving 8-11
■To have known dependencies added to the export or import bundle, leave the
Add Dependencies option selected. If this is unselected, dependencies are
checked and noted with an error flag in the log file but the bundle action
continues.
■To ignore all dependencies during export or import, select Ignore
Dependencies. Ignoring dependencies may avoid errors during the export
process, but may cause errors when an import is done. If you are certain that
all the necessary fields are present in the Oracle Content Server instance, you
can uncheck Add Dependencies and check Ignore Dependencies to import a
field without dependencies being added.
5. You can create a custom name for this bundle. Custom names should be used
sparingly to avoid possible name collisions. If a custom name is not selected, the
system creates a name based on the bundle name given when you save the
template. Custom names cannot contain spaces or special characters (#, $, % and
so on).
6. Choose the Oracle Content Server Sections to be included from the Content Server
Sections portion of the screen.
■To use all sections, click Select All on the page Action menu.
■To use only specific Oracle Content Server items, click Content Server
Sections then click the individual section name to include. To include all items
in that section, click Select All from the page Action menu. To use only a
subset, select the individual items by putting a check in the selection box on
the item's row. Some sections may have action options that are specific to that
section. Select the option for the section by checking the selection box.
7. Preview the selections you made by clicking Preview from the page Actions
menu. The Preview Screen is displayed.
8. Continue editing and adding selections by clicking Edit from the page Actions
menu. Click Preview to view your changes.
9. When the template is complete, click Save from the page Actions menu. If you do
not elect to save the template, your configuration changes will be lost.
The Edit Export Rule Screen is displayed.
10. Enter a name for the template. Names cannot contain spaces or special characters
(#, $, %, and so on). A name can include details of the date of the export (for
example, Nov10FullExport) or describe the contents (FullExportNoDependencies) or
can be meaningful in any way that is appropriate for your use. Click Save when
finished entering the name.
11. The Config Migration Admin Screen is re-displayed.
Note: Some Oracle Content Server sections are not displayed; not all
are supported on all versions of the Oracle Content Server software
and some cannot be safely migrated.
Tip: If you want to use the majority of the metadata, use the Select
All menu option. Then click the individual sections that you do not
want to use.

Migrating System Configurations
8-12 Oracle Fusion Middleware System Administrator's Guide for Oracle Content Server
■To create another template using the current template, select Save As from the
page Actions menu. The Edit Export Rule Screen is displayed again where you
can create a new name.
■To alter the selections for exporting, make any changes then select Save from
the page Actions menu to change the selections and retain the name entered in
step 10 or Save As from the page Actions menu to give it a new name on the
Edit Export Rule Screen.
■To export the configuration, select Export from the page Actions menu. For
details, see Section 8.2.3.5, "Exporting a Configuration."
After creating the configuration, you can export it and create a bundle for use on
another system. For details, see Section 8.2.3.5, "Exporting a Configuration."
8.2.3.2 Editing a Configuration Template
1. Using a web browser, select Config Migration Admin from the Oracle Content
Server Administration menu.
2. Select Configuration Templates from the Config Migration Admin menu.
3. Choose a template to be edited. Use one of the following methods to choose a
template from the Configuration Templates Page:
■Click the template name.
■Select Edit from the individual template Actions menu.
The Config Migration Admin Screen is displayed.
4. Follow the steps detailed in Section 8.2.3.1, "Creating a Configuration Migration
Template" to select the items you want in the revised template:
■Choose the Action Options for the template.
■Choose the Oracle Content Server Sections to be included from the Content
Server Sections portion of the screen.
5. Preview the selections you made by clicking Preview from the page Actions
menu. The Preview Screen is displayed.
6. Continue editing and adding selections by clicking Edit from the page Actions
menu. Click Preview to view your selections.
7. When the template is complete, click Save from the page Actions menu to save the
template under its current name or Save As to give it a new name. If you do not
elect to save the template, your configuration changes will be lost.
The Edit Export Rule Screen is displayed where you can enter a new template
name.
8.2.3.3 Importing a Template
Follow these steps to import a template from another system for use on the current
instance.
1. Select Upload Bundle from the Config Migration Admin menu.
The Upload Configuration Bundle Screen is displayed.
2. Use the Browse button to find the bundle that contains the template you want to
use.
3. Select Create Export Template.

Migrating System Configurations
Managing System Migration and Archiving 8-13
4. Click Upload.
The bundle appears on the Configuration Bundles Page. To use the template
associated with that bundle, see Section 8.2.3.2, "Editing a Configuration
Template."
If you import a template to use for exporting and if the importing system does not
have the same metadata fields, you must upload the template, import the
configuration then use it for exporting. You cannot use the template for exporting
unless the metadata fields are in place on the system that imported the template.
8.2.3.4 Creating a One-Time Export
Follow these steps to create an export template and immediately export the Oracle
Content Server configuration.
1. Using a web browser, select Config Migration Admin from the Oracle Content
Server Administration menu.
2. Select Configuration Templates from the Config Migration Admin menu.
3. Select Create New Template from the page Actions menu on the Configuration
Templates Page.
The Config Migration Admin Screen is displayed.
■Follow the steps detailed in Section 8.2.3.1, "Creating a Configuration
Migration Template" to select the items you want in the configuration:
■Choose the Action Options.
■Choose the Oracle Content Server Sections to be included from the Content
Server Sections portion of the screen.
4. Preview the selections you made by clicking Preview from the page Actions
menu. The Preview Screen is displayed.
5. Continue editing and adding selections by clicking Edit from the page Actions
menu. Click Preview to view your changes.
6. When the template is complete, click Export from the page Actions menu. The
configuration is immediately exported and the name of the exported bundle
appears in the Latest Action Screen with a unique identifier similar to the
following:
bundle-idcm1-25-20041110T135912
The initial portion of the name (bundle-idcm1) indicates the default bundle
name (bundle) and the instance name (idcm). The next portion indicates the
sequence number (25). The date follows (20041110 for November 11, 2004).
Finally a unique control number is used to identify the exported bundle.
8.2.3.5 Exporting a Configuration
1. Using a web browser, select Config Migration Admin from the Oracle Content
Server Administration menu.
2. Select Configuration Templates from the Config Migration Admin menu.
3. Use one of the following methods to choose an export configuration template from
the Configuration Templates Page.
■Click the configuration name.

Migrating System Configurations
8-14 Oracle Fusion Middleware System Administrator's Guide for Oracle Content Server
■Select Preview from the individual Actions menu if you want to view the
items that will be exported.
The Preview Screen is displayed.
4. Select Export from the page Actions menu. If you select Export without
previewing the bundle first, you are prompted to confirm that you want to
perform the export.
The Latest Action Screen is displayed.
5. This screen refreshes automatically to show the most recent activities and their
status.
To view details of the migration action, click the message in the Status column. For
more information, see Section 8.2.3.9, "Viewing Status Information."
After exporting, the bundle name appears on the Configuration Bundles page,
indicating that it has been bundled. A date and time indicator is appended to the
configuration name, as in the following example:
Nov23Bundle-idcm-1-20041123T122436
The initial portion of the name is the original bundle name. The instance name follows
(idcm), followed by the date (20041123 for November 23, 2004) and the time
(122436 to indicate 12:24:36). From this Import page, you can download the bundle to
a new location so it can be uploaded onto another system.
The original template name (Nov23Bundle) continues to appear on the Configuration
Templates page, where it can be re-exported at another time.
8.2.3.6 Uploading a Bundle
Before a configuration can be imported it must be first uploaded. Follow these steps to
upload a bundle from another Oracle Content Server instance:
1. Using a web browser, select Config Migration Admin from the Oracle Content
Server Administration menu.
2. Select Upload Bundle from the Config Migration Admin menu.
The Upload Configuration Bundle Screen is displayed.
3. Use the Browse button to find and select the zipped bundle file you want to use.
4. If you want to use the template included with the bundle, select Create Export
Temp l a t e.
5. If you want the new bundle information to overwrite existing Oracle Content
Server configuration information, select Force Overwrite.
6. Click Upload to load the bundle.
8.2.3.7 Importing a Bundle
After a bundle is uploaded and resides on the importing system, it can be imported for
use. Follow these steps to import the bundle:
Tip: If you are uncertain about the contents of a bundle, it is always
safe to upload the bundle and preview the configuration contents. The
bundle configuration is not applied to the importing system until you
choose to import it.

Migrating System Configurations
Managing System Migration and Archiving 8-15
1. Using a web browser, select Config Migration Admin from the Oracle Content
Server Administration menu.
2. Select Configuration Bundles from the Config Migration Admin menu.
The Configuration Bundles Page is displayed.
3. Select Configuration Bundles from the Migration Options or from the top menu
of any Migration screen.
4. Click the name of the bundle you want to import.
The Config Migration Admin Screen is displayed with Overwrite Duplicates in
place of the Custom Name field. Selecting this field will permit the importing
bundle to overwrite any duplicate fields. If not selected, the import will error on
duplicates and stop. It will continue if Continue on Error was checked but a status
of fail appears on the Latest Action Screen.
5. Select an action from the page Actions menu:
■To preview the import configuration, click Preview. The Preview Screen is
displayed where you can either select Edit from the page Actions menu to edit
the configuration options or you can select Import to import the selections as
is.
■To import the configuration without previewing, select Import from the
Configuration Bundles page Actions menu. You are prompted to confirm that
you want to import the configuration without previewing it first.
6. After selecting Import from either the Preview Screen or the Configuration
Bundles Screen, the Latest Action Screen is displayed showing the status of the
import.
7. This screen refreshes automatically to show the most recent history and status.
To view details of the action, click the message in the Status column. For more
information, see Section 8.2.3.9, "Viewing Status Information."
8.2.3.8 Downloading a Bundle
A bundle can be downloaded and stored in an easily accessible location for other
Oracle Content Server instances to use.
Follow these steps to download a bundle:
1. Using a web browser, select Config Migration Admin from the Oracle Content
Server Administration menu.
2. Select Configuration Bundles from the Config Migration Admin menu.
The Configuration Bundles Page is displayed.
3. Select Download from the bundle Actions menu of the bundle to be downloaded.
A prompt appears where you can enter the bundle location.
Important: You should verify that you want to import the settings in
the Server Config portion of the Oracle Content Server sections. These
settings determine configurations such as the type of web server used,
the mail server, and other system-specific items. You may not want to
import those configuration settings on a new Oracle Content Server
instance.

Archives, Collections and Batch Files
8-16 Oracle Fusion Middleware System Administrator's Guide for Oracle Content Server
4. Enter the appropriate location and click Save.
8.2.3.9 Viewing Status Information
Follow these steps to view status information for any import or export actions:
1. Using a web browser, select Config Migration Admin from the Oracle Content
Server Administration menu.
2. Select Recent Actions from the Config Migration Admin menu.
The Latest Action Screen is displayed.
3. To view details of the events, click a status in the message in the Status column.
The Action History Page is displayed.
8.3 Archives, Collections and Batch Files
Archiving your Oracle Content Server content consists of three elements: the archive
itself, a collection, and a batch file. This section covers the following topics:
■Section 8.3.1, "Archive Details"
■Section 8.3.2, "Managing Archives"
■Section 8.3.3, "Managing Collections"
■Section 8.3.4, "Managing Batch Files"
8.3.1 Archive Details
This section describes the structure of the Archiver and how it uses collections and
targets. For an overview of the Archiver and how it compares to other archiving tools,
see Section 8.1, "Introduction to Migration Tools and Components."
■Section 8.3.1.1, "Archive Structure"
■Section 8.3.1.2, "Collections"
■Section 8.3.1.3, "Batch Files"
■Section 8.3.1.4, "Archive Targets"
■Section 8.3.1.5, "Using Archive Logs"
8.3.1.1 Archive Structure
An archive is a set of exported content files and their associated batch files. Each
archive has its own subdirectory in the collection it belongs to.
Note: The Recent History screen automatically appears after an
export or an import.
Caution: Do not edit any of the files created by Archiver.

Archives, Collections and Batch Files
Managing System Migration and Archiving 8-17
Figure 8–6 Archive Directory Structure
An archive subdirectory includes the following:
Figure 8–7 Archive Subdirectory Structure
8.3.1.2 Collections
This section provides information about collections.
Summary
A collection is a set of archives on a particular Oracle Content Server instance.
■Each instance has a default collection, which is located in the
IntradocDir/archives/ directory. Additional collections can be created, but are
File or Directory Description
Batch file directories Each batch file has a subdirectory in the archive. The subdirectory
name reflects the date and time of the export, with a default format
of yy-MMM-dd_HH.mm.ss_SSS. For example, 03-feb-04_15.04.14_
174.
temp directory Contains transferred Zip files.
archive.hda file Specifies information about the archive, such as export and import
settings, the export query, field and value import maps, archiving
history, and so forth.
doctypes.hda file Lists the content types (DocTypes database table) in the source
Oracle Content Server instance. This file is present only if content
types were exported.
exports.hda file Specifies the batch files that are included in the archive.
users.hda file Lists the user attributes (Users database table) in the source Oracle
Content Server instance. This file is present only if user attributes
were exported.
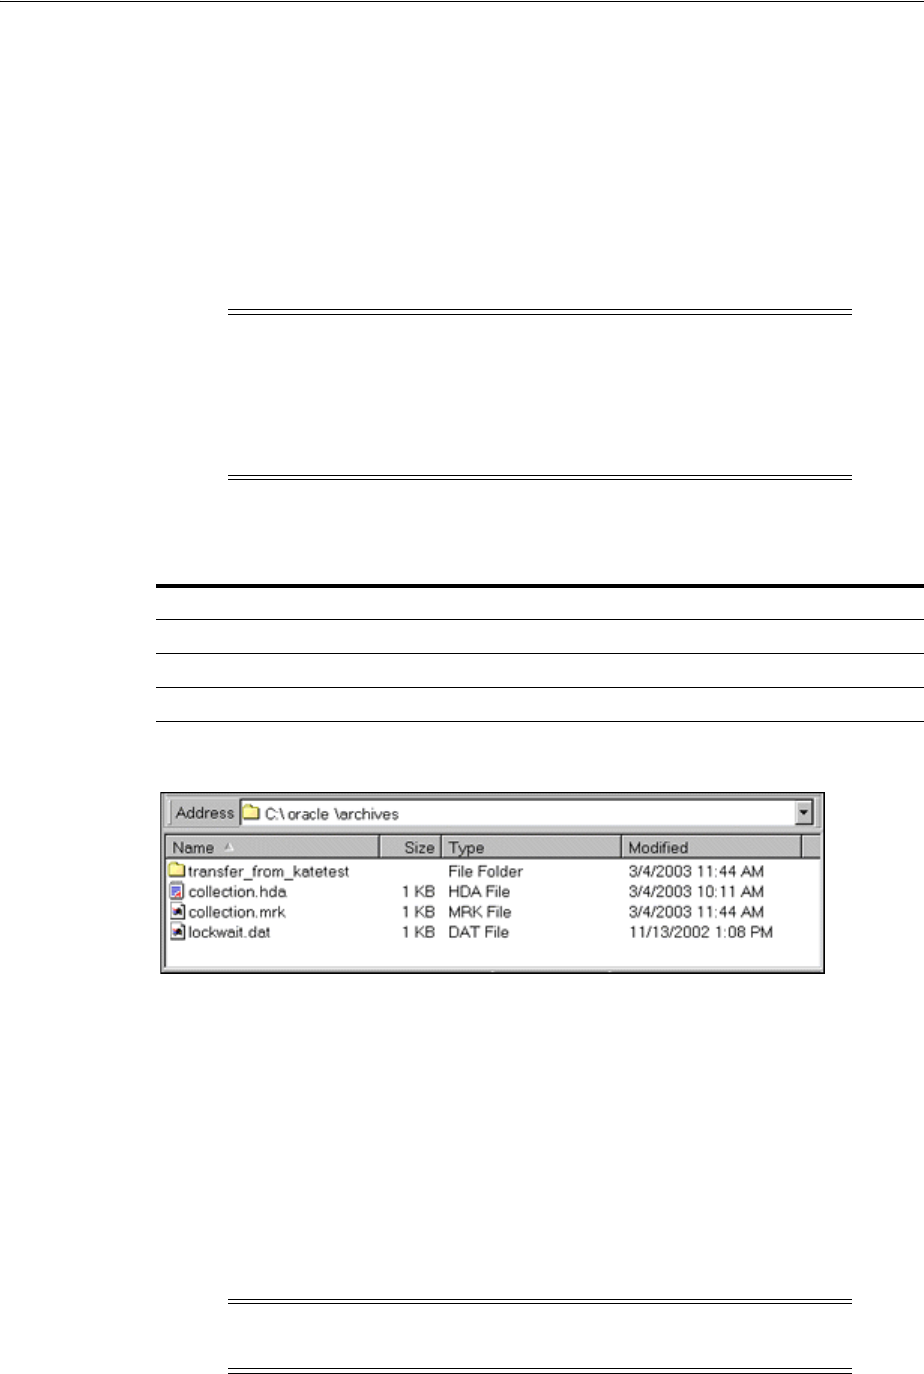
Archives, Collections and Batch Files
8-18 Oracle Fusion Middleware System Administrator's Guide for Oracle Content Server
necessary only in rare situations. For example, you could create a new collection if
you want to save disk space by archiving to another system that does not have
Oracle Content Server on it.
■Collections can be created only through the standalone Archiver. For details about
using the standalone Archiver, see Section 8.3.2.5, "Running the Archiver as a
Standalone Application."
■A collection can be removed from an Oracle Content Server instance, but this only
makes it unavailable from the Archiver application; the archive and batch files
remain until you delete them from the file system.
Structure
An archive collection includes the following:
Figure 8–8 Collection Structure
8.3.1.3 Batch Files
This section provides information about batch files.
Summary
A batch file is a text file that contains the file records for archived content items. Batch
files describe the metadata for each exported revision.
■A new batch file subdirectory is created each time an archive is exported.
■Each batch file contains up to 1000 file records. If an export contains more than
1000 revisions, a new batch file is created.
Tip: Archiver collections are normally compatible between different
versions of Oracle Content Server instances. One possible exception
would be User Configuration information that was archived from a
pre-3.0 Oracle Content Server instance. The format of the Users
database table changed in version 3.0, so this information might not be
compatible between pre- and post-3.0 Oracle Content Server instances.
File or Directory Description
collection.hda file Specifies the archives that are included in the collection.
collection.mrk file Internal file used by Archiver.
Archive directories Each archive has a subdirectory in the collection.
Note: Archiver batch files are not the same as the batch files that are
used with the Batch Loader application.
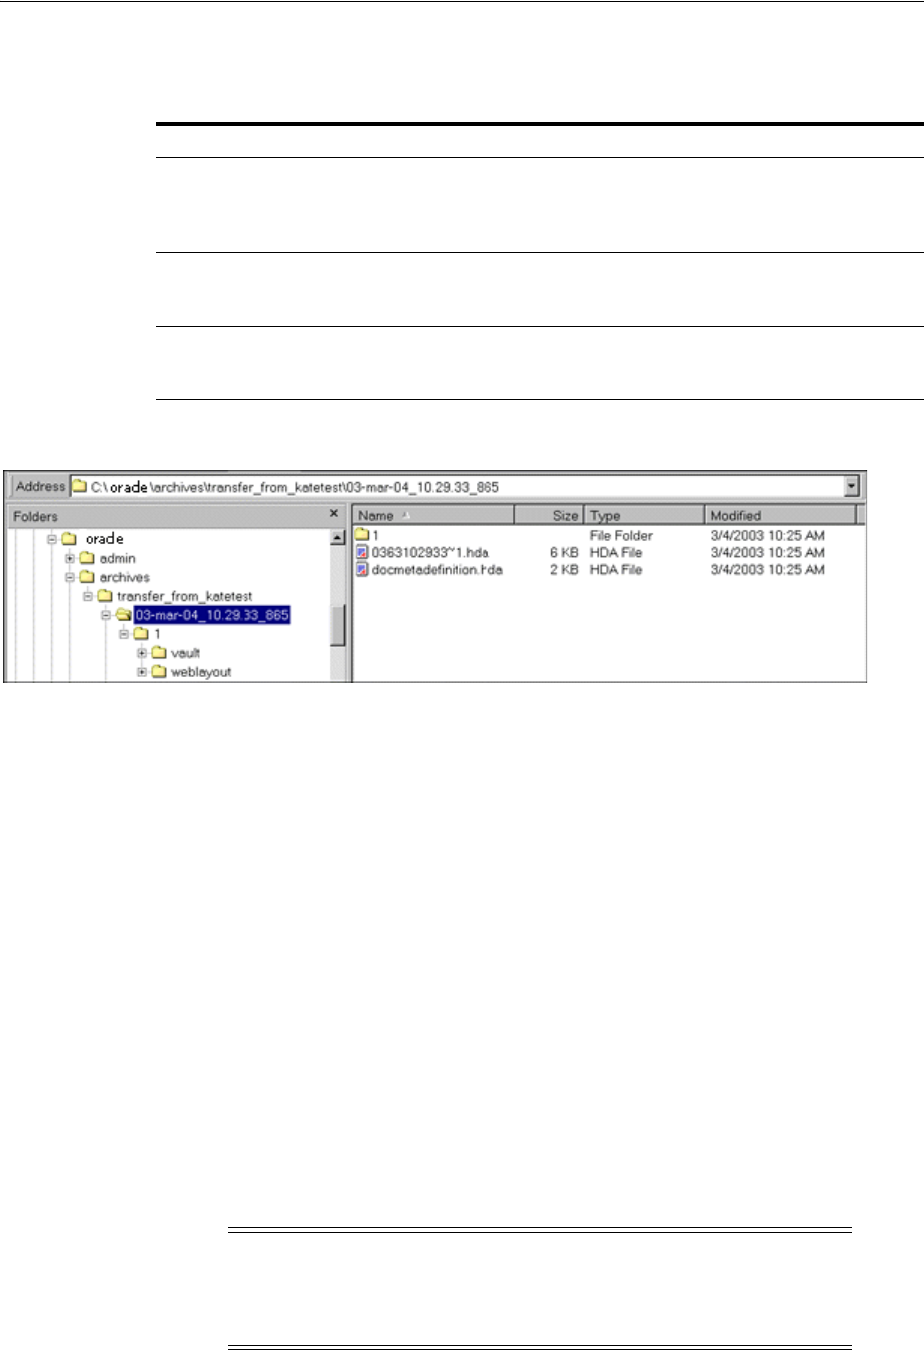
Archives, Collections and Batch Files
Managing System Migration and Archiving 8-19
Structure
A batch file subdirectory includes the following:
Figure 8–9 Batch File Structure
8.3.1.4 Archive Targets
You can use the archiver to archive the following content:
■Native files with associated standard metadata values
■Web-viewable files (.pdf, .html, and so forth)
■Metadata fields and changes
■User information fields
■Security groups (user attributes and settings)
■User updates
■Subscription types
■File formats
■Document types
■Content types
■User attributes (such as user login, full name, password, e-mail address, and so
forth)
File or Directory Description
Content files A subdirectory named '1' in the batch file directory contains a
vault structure that is copied from the source Oracle Content
Server instance. If web-viewable files are being archived, this
subdirectory also contains a weblayout structure.
Batch file Specifies the metadata for each revision that was exported.
Batch files are HDA files that are named with a unique number
generated by Archiver. For example, 0335150414~1.hda.
docmetadefinition.hda file Lists the custom metadata fields in the source Oracle Content
Server instance (DocMetaDefinition database table). This file is
used by Archiver to create import maps.
Note: Content types and user attributes can be exported and
imported manually, but cannot be transferred or archived
automatically through replication. Table replication can be used,
though, to replicate user information.
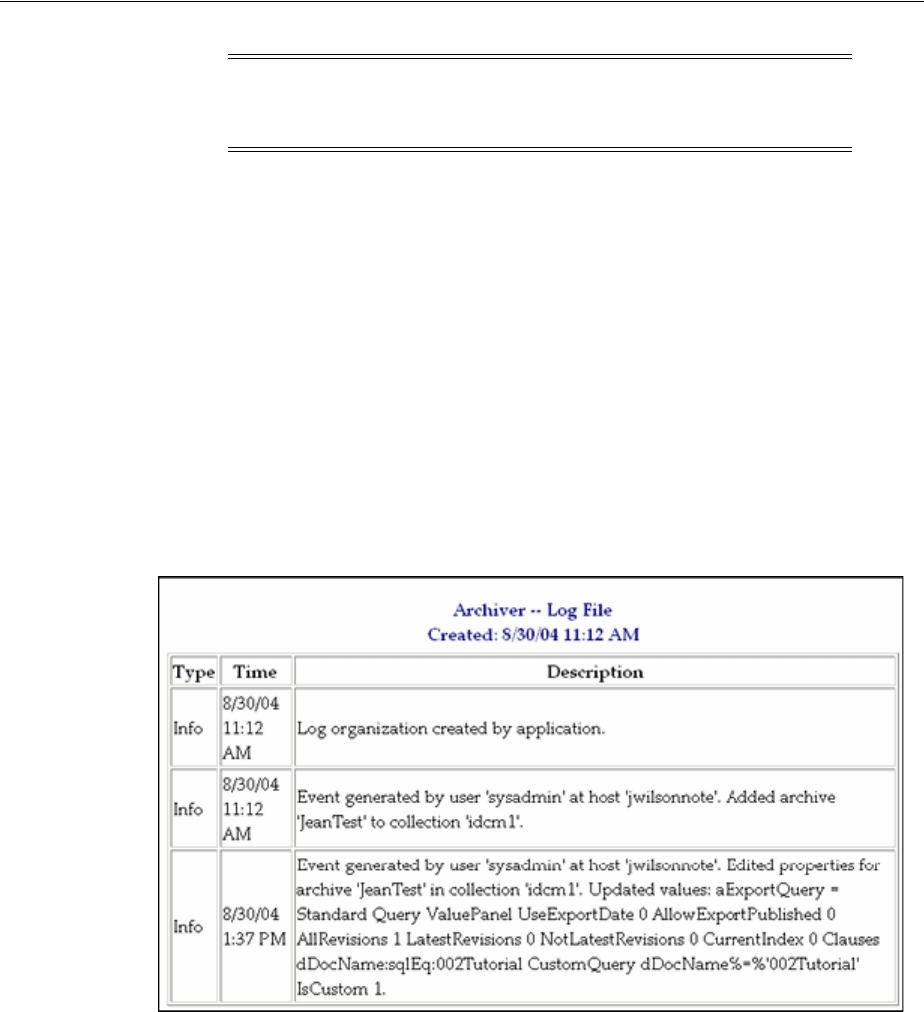
Archives, Collections and Batch Files
8-20 Oracle Fusion Middleware System Administrator's Guide for Oracle Content Server
8.3.1.5 Using Archive Logs
If you are experiencing Archiver problems, view the Archiver logs for more
information.
Summary
The Archiver logs are listed by date and time. They are generated once per day when
the first Archiver information status, irrecoverable error, or error occurs.
Click the Archiver Logs link on the Administration page to view information about
imports, exports, and replications.
Click the link that appears for the desired log file. A table showing the type, date and
time, and description of each action is displayed. It also includes the name of the
Oracle Content Server instance that created the archive.
Figure 8–10 Archive Log File
Log Entries
The following types of archiver log entries are generated:
■Info: Displays basic status information. For example, status information is logged
when an export and an import starts and finishes.
■Error: Displays user/administration errors that occur but do not stop the software
from functioning. For example, an error is logged if there is no file information for
a content item that you are trying to export.
■Fatal: Displays errors that stop the software from functioning. For example, an
irrecoverable error is logged if the Oracle Content Server instance cannot access
the database. Check the connection string, user name, and password.
Caution: Archiver cannot be used to move or copy data between two
instances that share the same Oracle Content Server instance name
(IDC_Name). To do so will corrupt the data on the target system.

Archives, Collections and Batch Files
Managing System Migration and Archiving 8-21
8.3.2 Managing Archives
After archives are created, they can be added to collections and manipulated as a
group.
■Section 8.3.2.1, "Creating a New Archive"
■Section 8.3.2.2, "Copying an Existing Archive"
■Section 8.3.2.3, "Creating a New Archive by Copying"
■Section 8.3.2.4, "Deleting an Archive"
8.3.2.1 Creating a New Archive
To create a new, undefined archive:
1. Display Main Archiver Screen in either standalone or browser mode.
2. If necessary, open the collection where you want to create the new archive. See
Section 8.3.3.1, "Opening a Collection."
3. From Edit, select Add.
The Add Archive Screen is displayed.
4. Enter the archive name and description. The archive name cannot contain spaces.
5. Click OK.
8.3.2.2 Copying an Existing Archive
To copy an existing archive to a different directory location:
1. Display the archiver in standalone mode.
2. If necessary, open the collection that contains the archive to be copied. See
Section 8.3.3.1, "Opening a Collection."
3. Select the archive to be copied.
4. From Edit, select Copy To.
The Copy Archive Screen is displayed.
5. Accept the original archive name, or change the name as necessary.
6. In the Copy Archive To Directory field, enter the directory path where the archive
will be copied.
7. Click OK.
The archive files are copied to the specified directory.
8.3.2.3 Creating a New Archive by Copying
You can copy archives from your system for storage or to your system from another
archive if you are using the Archiver standalone version.
To create a new archive in the current collection by copying an existing archive:
1. Display the archiver in standalone mode.
Note: This procedure copies the files in an archive. It does not create
a new collection or update the collection.hda file if the archive is copied
to a collection directory.

Archives, Collections and Batch Files
8-22 Oracle Fusion Middleware System Administrator's Guide for Oracle Content Server
2. If necessary, open the collection where you want to create the new archive. See
Section 8.3.3.1, "Opening a Collection."
3. From Edit, select Add.
The Add Archive Screen is displayed.
4. Enter the archive name and description. The archive name cannot contain spaces.
5. Select Copy From.
6. Click Browse.
7. Navigate to and select the desired archive file (archive.hda).
8. Click Open.
9. Click OK.
The archive files are copied to the default archive directory in the local Oracle
Content Server instance.
8.3.2.4 Deleting an Archive
To delete an archive from a collection:
1. Open the archive collection.
2. Select the archive to delete in the Current Archives list.
3. From Edit, select Delete.
You are prompted to confirm the action.
4. Click OK.
The archive is deleted from the collection.
8.3.2.5 Running the Archiver as a Standalone Application
The following information details how to run the Archiver as a standalone application,
which is required to create collections.
To run Archiver in Windows:
To run Archiver on a Windows operating system:
1. Select the application from the Windows Start menu:
Click Start, select Programs, Oracle Content Server, instance_name, and then
click Analzyer.
A login screen or application screen is displayed.
2. If required, enter the administrator login name and password, then click OK.
The Main Archiver Screen is displayed.
To run Archiver in UNIX:
To run Archiver on a UNIX operating system:
Tip: It may take several seconds for the login screen or the
application screen to appear, and the screen may be hidden by other
windows.

Archives, Collections and Batch Files
Managing System Migration and Archiving 8-23
1. Navigate to the DomainHome/ucm/cs/bin/ directory.
2. Enter ./archive
3. If required, enter the administrator login name and password.
The Main Archiver Screen of the application is displayed.
8.3.3 Managing Collections
Collections are a set of archives and are used to group archives for different archive
functions.
■Section 8.3.3.1, "Opening a Collection"
■Section 8.3.3.2, "Creating a Collection"
■Section 8.3.3.3, "Removing a Collection"
■Section 8.3.3.4, "Moving the Default Archive Collection"
8.3.3.1 Opening a Collection
To open an existing archive collection:
1. Display the Archiver in standalone mode.
2. From Options, select Open Archive Collection.
The Open Archive Collection Screen is displayed, with the default collection and
any other connected collections listed.
3. Select the collection from the list, or browse to a new collection as follows:
To select the collection from a shared file system location (standalone Archiver
only):
a. Click Browse Local. The Find Archive Collection Definition File Screen is
displayed.
b. Navigate to and select the collection HDA file.
c. Click Open.
To select the collection from a remote Oracle Content Server instance:
a. Click Browse Proxied.
The Browse for Proxied Collection Screen is displayed. The list includes all
Oracle Content Server instances to which an outgoing provider has been set
up.
b. Select the Oracle Content Server instance in the Proxied Servers list.
c. Select the collection in the Collections list.
d. Click OK.
4. Click Open.
The Browse To Archiver Collection Screen is displayed.
Note: The standalone version of the Archiver application is required
to create new collections or browse the local file system to connect to
new collections.

Archives, Collections and Batch Files
8-24 Oracle Fusion Middleware System Administrator's Guide for Oracle Content Server
8.3.3.2 Creating a Collection
To create a new archive collection:
1. Display the archiver interface in standalone mode.
2. From Options, select Open Archive Collection.
The Open Archive Collection Screen is displayed.
3. Click Browse Local.
The Find Archive Collection Definition File Screen is displayed.
4. Navigate to and select the directory where you want to create the new collection.
5. Enter a file name for the new collection (collection.hda is the default).
6. Click Open.
You are prompted to create a collection definition (HDA) file.
7. Click Yes.
The Browse To Archiver Collection Screen is displayed.
8. Enter a collection name in the Name field.
■Collection names cannot contain spaces.
■Use the same name for a collection and its directory to make navigation easier.
9. Enter the directory path for the weblayout and vault directories in the Web
Directory and Vaul t D irectory fields.
■Use the same path style as shown in the Location field.
■To find the directory paths, display the Configuration Information Page.
10. Click OK.
The new collection is shown in the Open Archive Collection screen.
11. Click Open to open the new collection.
8.3.3.3 Removing a Collection
To remove an archive collection:
1. Select Options, and then click Open Archive Collection.
The Open Archive Collection Screen is displayed.
2. Select the collection to be removed.
3. Click Remove.
You are prompted to confirm the action.
4. Click OK.
Note: You can create a new collection only on the local Oracle
Content Server instance using the standalone Archiver.
Note: You cannot remove the default collection.

Archives, Collections and Batch Files
Managing System Migration and Archiving 8-25
The collection is removed from the Oracle Content Server instance. (The collection and
archive files remain in the file system, and must be deleted manually.)
8.3.3.4 Moving the Default Archive Collection
You can change the file system location of the default archive collection by moving the
collection and pointing the Oracle Content Server instance to the new location. For
example, you might want to keep all of your archive data on a separate drive from the
program files for easier backup and expansion.
To move the default archive collection:
1. For data safety, close any standalone Archiver applications and stop the Oracle
Content Server instance.
2. Add the CollectionLocation configuration variable to the
DomainHome/ucm/cs/bin/intradoc.cfg file:
CollectionLocation=path
3. To maintain the previously created archives for the default collection, move the
contents of the /archives/ directory to the new location you specified in the
CollectionLocation setting.
If you do not move the contents, the system creates an empty collection.
4. Start the Oracle Content Server instance.
8.3.4 Managing Batch Files
A batch file describes the metadata for exported revisions. A batch file is created each
time the Archiver performs an export.
■Section 8.3.4.1, "Removing Revisions from a Batch File"
■Section 8.3.4.2, "Deleting a Batch File"
8.3.4.1 Removing Revisions from a Batch File
To remove individual revisions from a batch file:
1. Open the archive collection. See Section 8.3.3.1, "Opening a Collection."
2. Select the archive in the Current Archives list.
3. Click View Batch Files on the Main Archiver Screen.
The View Batch Files Screen is displayed.
4. Select the batch file.
5. Click Edit.
The View Exported Content Items Screen is displayed.
Note: The default collection is the /archives/ directory.
Note: The Oracle Content Server instance re-creates the default
Domain_home/ucm/cs/archives/ directory when it is restarted, but
the Archiver defaults to using the collection in the new location.

Exporting Data in Archives
8-26 Oracle Fusion Middleware System Administrator's Guide for Oracle Content Server
6. Use the Filter element and the navigation buttons to display the revision to be
deleted.
7. Select the revision to be deleted.
8. Click Delete.
The Status changes to Deleted for the selected revision.
9. Repeat steps 7 and 8 to delete additional revisions.
10. To undo the last deletion, click Undo. To return all deleted revisions to Archived
status, click Refresh.
11. Click Apply to delete the specified revisions.
12. Click Close.
8.3.4.2 Deleting a Batch File
To delete a batch file from an archive:
1. Open the archive collection. See Section 8.3.3.1, "Opening a Collection."
2. Select the archive in the Current Archives list.
3. Click View Batch Files on the Archiver (General Tab).
The View Batch Files Screen is displayed.
4. Select the batch file to delete.
5. Click Delete.
You are prompted to confirm the action.
6. Click OK.
The batch file is deleted from the archive.
7. Specify whether to replace existing batch files upon export:
■To delete all existing batch files when the next export is initiated, select
Replace Existing Export Files.
■To leave existing batch files in place when the next export is initiated, deselect
Replace Existing Export Files.
8. Specify which files to export:
■To export the native (vault) and web-viewable (weblayout) files, select Copy
Web Content.
■To export only the native (vault) files, deselect Copy Web Content.
9. Click OK.
The export options are displayed in the Export Options section of the General tab.
8.4 Exporting Data in Archives
The Export function is used to copy native and web-viewable files out of the Oracle
Content Server instance for backup, storage, or import to another Oracle Content
Server instance. You can also export content types and user attributes. Note that this is
a copy only; the original content remains.
■Section 8.4.1, "About Exporting Data"

Exporting Data in Archives
Managing System Migration and Archiving 8-27
■Section 8.4.2, "Managing Exports"
8.4.1 About Exporting Data
You can export revisions that are in RELEASED, DONE, EXPIRED, and GENWWW
status. You cannot export revisions that are in an active workflow (REVIEW, EDIT, or
PENDING status) or that are DELETED.
■Section 8.4.1.1, "Export Uses"
■Section 8.4.1.2, "Export Methods"
8.4.1.1 Export Uses
Typical uses for the Export function include:
■Copying files from an Intranet to make them available to an Extranet for vendor or
customer viewing.
■Creating an archive of content items that will then be imported back to the same
instance with different metadata.
■Removing content from the Oracle Content Server instance for permanent or
temporary storage. For example, if space becomes limited or performance drops,
you could remove all but the latest revision of each file.
■Copying files, content types, and user attributes from a development Oracle
Content Server instance for use in a production instance.
8.4.1.2 Export Methods
After you set up the export criteria, you can export archives in the following ways:
■Manual: A one-time export initiated from Archiver by an administrator. This
creates an archive on the local Oracle Content Server instance.
■Automatic (Replication): Export to a local archive is initiated automatically
whenever a content item that meets the export criteria is indexed.
Section 8.4.2.1, "Manually Exporting" and Section 8.7, "Replicating Files" discuss these
processes in more detail.
8.4.2 Managing Exports
This section provides information about typical tasks used in managing exports.
■Section 8.4.2.1, "Manually Exporting"
■Section 8.4.2.2, "Creating a Content Item Export Query"
■Section 8.4.2.3, "Exporting Configuration Information"
■Section 8.4.2.4, "Adding a Table to an Archive"
Caution: Do not use Archiver as your primary method of disaster
recovery; use standard backup systems for the database and file
system.
Note: You can export expired revisions manually, but expired
revisions do not get exported automatically.

Exporting Data in Archives
8-28 Oracle Fusion Middleware System Administrator's Guide for Oracle Content Server
■Section 8.4.2.5, "Editing the Archive Properties of a Table"
■Section 8.4.2.6, "Creating a Table Export Query"
■Section 8.4.2.7, "Setting Export Options"
■Section 8.4.2.8, "Initiating the Export"
8.4.2.1 Manually Exporting
To export content manually:
1. Create an archive where the exported Oracle Content Server data will be stored.
See Section 8.3.2.1, "Creating a New Archive."
2. In the Current Archives list, select the archive.
3. Create an export query. See Section 8.4.2.2, "Creating a Content Item Export
Query."
4. Set configuration information export options. See Section 8.4.2.3, "Exporting
Configuration Information."
5. Set the general export options. See Section 8.4.2.7, "Setting Export Options."
6. Initiate the export. See Section 8.4.2.8, "Initiating the Export."
8.4.2.2 Creating a Content Item Export Query
Export queries define which revisions will be exported. Follow these steps to create an
export query:
1. Open the archive collection. See Section 8.3.3.1, "Opening a Collection."
2. Select the archive in the Current Archives list.
3. Click the Main Archiver Export Screen.
4. Click Edit in the Export Query (Content) section.
The Edit Export Query (Content) Screen is displayed.
5. Select a metadata field from the Field list.
6. Select an Operator from the list.
■The available operators depend on which Field is selected.
■The available operators map to basic SQL query operators. To use other SQL
query operators, create a basic expression and then edit it in the Custom
Query Expression box (see step 10).
7. Enter the criteria in the Va l u e field.
Depending on the option selected in the Field list, you can enter text directly, click
the Select button and select from the available values, or select directly from a list
of the available values.
8. Click Add.
The query expression is added to the Query Expression box, and the SQL version
of the query expression is displayed in the Custom Query Expression box.
9. To add to the query expression, repeat steps 5 through 8. By default, each part of
the expression is added using an AND operator.

Exporting Data in Archives
Managing System Migration and Archiving 8-29
To update an existing query, select the line to be changed in the Query Expression
box and edit the Field, Operator, and Value fields as necessary. Click Update. The
specified query expression replaces the selected line.
To delete a line from the query expression, select the line to be deleted in the
Query Expression box. Click Delete. The selected line is deleted.
10. To edit the SQL expression directly:
a. Select Custom Query Expression.
b. Edit the text in the Custom Query Expression box.
You can use Idoc Script in the query expression. For example, to archive
content more than one year old, you could use <$dateCurrent(-365)$> as
the Release Date value. See the Oracle Fusion Middleware Idoc Script Reference
Guide for more information.
11. Specify whether to export revisions based on the last export date:
■To export only revisions that have been released since the last export, select
Export Revisions with Release Date later than most recent Export Date.
■To export all revisions, deselect Export Revisions with Release Date later
than most recent Export Date.
12. Specify whether to export revisions that were published to the Oracle Content
Server instance by Oracle Content Publisher:
■To export published revisions, select Allow Export of Published Revisions.
■To export only unpublished revisions, deselect Allow Export of Published
Revisions.
13. Specify which revisions to export:
■To export all revisions of each content item, select the All Selected Revisions
option.
■To export only the latest revision of each content item, select the Latest
Revisions option.
■To export all revisions except the most recent, select the Not Latest Revisions
option.
■To export the most recent revision that matches the query, select the Single
Revision Replication option. For details about how this option affects the
replication process, see Section 8.7.1.1, "Single Revision Replications."
14. Click OK.
The export query is displayed in the Export Query box on the Content tab.
Caution: If you deselect the Custom Query Expression checkbox, the
query expression reverts to its original definition; all modifications
will be lost.
Caution: Do not use the Latest Revision option and automatic
replication. These options, used in conjunction, can cause
unpredictable archive behavior. For more details about automatic
replication, see Section 8.7, "Replicating Files."

Exporting Data in Archives
8-30 Oracle Fusion Middleware System Administrator's Guide for Oracle Content Server
15. To see a list of revisions that will be included in the export, click Preview.
The Previewing Export Queries (Content) Screen is displayed.
16. Review the list to ensure that the export includes the intended revisions.
17. Click Close.
8.4.2.3 Exporting Configuration Information
To export content type and user attributes:
1. Open the archive collection. See Section 8.3.3.1, "Opening a Collection."
2. Select the archive in the Current Archives list.
3. Click the Main Archiver Export Screen.
4. Click Edit in the Additional Data section. The Edit Additional Data Screen is
displayed.
5. To export content types, select Export Content Configuration Information.
6. To export user data, select Export User Configuration Information.
7. Click OK.
The configuration information options are displayed in the Additional Data
section of the Export Data tab.
8.4.2.4 Adding a Table to an Archive
To add a table to an archive:
1. Click the Main Archiver Export Screen (Table).
2. Select an archive from the Current Archives list.
3. Click Add.
The Add New/Edit Table Screen is displayed.
4. Complete the fields as appropriate. These fields are used to export the
parent/child relationship in any tables used in schemas.
5. Click OK.
The table is added to the Table list on the Table tab.
8.4.2.5 Editing the Archive Properties of a Table
To edit the archive properties of a table:
Note: Although an unlimited number of revisions can be exported, a
maximum of 100 revisions can be displayed in the Content Satisfying
the Export Query screen. Use the Filter and Release Date since
features to display subsets of the list as necessary.
Caution: When exporting tables, ensure that the column names are
the same if you are creating a relationship between two tables. If
tables are imported individually, without assigning a relationship, it is
not essential to match the column names. But if tables are imported in
a relationship, the column names should be the same.

Exporting Data in Archives
Managing System Migration and Archiving 8-31
1. Click the Main Archiver Export Screen (Table).
2. Select an archive from the Current Archives list.
3. Select a table from the Table list.
4. Click Edit.
The Add New/Edit Table Screen is displayed.
5. Edit the fields as appropriate.
6. Click OK.
8.4.2.6 Creating a Table Export Query
To create a query that defines which tables will be exported:
1. Click the Main Archiver Export Screen (Table).
2. Select a table from the Table list.
3. Click Edit in the Export Query section.
The Edit Export Query (Table) Screen is displayed.
4. Select a metadata field from the Field list.
5. Select an Operator from the list.
■The available operators depend on which Field is selected.
■The available operators map to basic SQL query operators. To use other SQL
query operators, create a basic expression and then edit it in the Custom
Query Expression box (see step 11).
6. Enter the criteria in the Value field.
7. Click Add.
The query expression is added to the Query Expression box, and the SQL version
of the query expression is displayed in the Custom Query Expression box.
8. To add to the query expression, repeat steps 4 through 7. By default, each part of
the expression is added using an AND operator.
9. To update an existing query:
a. Select the line to be changed in the Query Expression box.
b. Edit the Field, Operator, and Value fields as necessary.
c. Click Update.
The specified query expression replaces the selected line.
10. To delete a line from the query expression:
a. Select the line to be deleted in the Query Expression box.
b. Click Delete.
The selected line is deleted.
11. To edit the SQL expression directly:
a. Select Custom Query Expression.
b. Edit the text in the Custom Query Expression box. You can use Idoc Script in
the query expression. See the Oracle Fusion Middleware Idoc Script Reference
Guide for more information.

Exporting Data in Archives
8-32 Oracle Fusion Middleware System Administrator's Guide for Oracle Content Server
12. Click OK.
The export query is displayed in the Export Query box on the Table tab.
13. To see a list of tables that will be included in the export, click Preview.
The Previewing Export Queries (Content) Screen is displayed.
14. Review the list to ensure that the export includes the intended revisions.
15. Click Close.
8.4.2.7 Setting Export Options
To set general export options:
1. Open the archive collection. See Section 8.3.3.1, "Opening a Collection."
2. Select the archive in the Current Archives list.
3. Click the Main Archiver Screen.
4. Click Edit in the Export Options section. The Edit Export Options Screen is
displayed.
5. Specify whether to replace existing batch files upon export:
■To delete all existing batch files when the next export is initiated, select
Replace Existing Export Files.
■To leave existing batch files in place when the next export is initiated, deselect
Replace Existing Export Files.
6. Specify which files to export:
■To export the native (vault) and web-viewable (weblayout) files, select Copy
Web Content.
■To export only the native (vault) files, deselect Copy Web Content.
7. Specify whether to export content or not:
■To export only tables, select Export Table Only.
■To export content items, deselect Export Table Only.
8. Click OK.
The export options are displayed in the Export Options section of the General tab.
8.4.2.8 Initiating the Export
To manually export content and configuration information:
Caution: If you deselect the Custom Query Expression checkbox, the
query expression reverts to its original definition; all modifications
will be lost.
Note: Although an unlimited number of tables can be exported, a
maximum of 100 tables can be displayed in the Content Satisfying the
Export Query screen. Use the Filter and Release Date since features
to display subsets of the list as necessary.

Importing Data
Managing System Migration and Archiving 8-33
1. Open Archiver for the Oracle Content Server instance that contains the files you
want to export.
2. Open the archive collection. See Section 8.3.3.1, "Opening a Collection."
3. Select the archive to export to in the Current Archives list.
4. From Actions, select Export.
The Export Archive Screen is displayed.
5. Specify whether to delete the revisions from the Oracle Content Server instance
after the export is successfully completed:
■To delete revisions after export, select Delete revisions after successful
archive.
■To leave revisions in the Oracle Content Server instance after export, deselect
Delete revisions after successful archive.
6. Click OK.
The export process is initiated, and the status bar at the bottom of the Archiver
screen displays progress messages.
8.5 Importing Data
Archives can be imported according to specified rules and at specified times. The data
in the files can be mapped to fields in the receiving Oracle Content Server instance, but
care should be taken that the correct rules are applied during import.
■Section 8.5.1, "Imported Files"
■Section 8.5.2, "Import Rules"
■Section 8.5.3, "Import Process"
8.5.1 Imported Files
The Import function is used to retrieve files and Oracle Content Server information
from an exported archive. Importing is typically used to obtain a copy of content from
another Oracle Content Server instance or to restore data that has been in storage.
The Oracle Content Server instance to which you are importing must have the same
metadata fields, security groups, and accounts as the instance that the archive was
exported from. Errors can result if there are mismatches.
Note: If the Export option is disabled, the archive is being exported
automatically. You must disable the automatic replication to perform
a manual export. For details, see Section 8.7, "Replicating Files."
Caution: Do not use Archiver as your primary method of disaster
recovery; use standard backup systems for the database and file
system.
Note: Imported revisions will not enter a workflow upon import,
even if they meet the criteria for an active workflow.

Importing Data
8-34 Oracle Fusion Middleware System Administrator's Guide for Oracle Content Server
Before beginning the import process, consider the following points:
■Determine the method to be used, either manual or automatic.
■Determine the rules to be used for updating.
■Determine the mapping and import options.
■Test your process by importing selected revisions.
This section covers these topics:
■Section 8.5.1.1, "Import Uses"
■Section 8.5.1.2, "Import Methods"
8.5.1.1 Import Uses
Typical uses for the Import function include:
■Placing data archived from an Intranet on an Extranet for vendor or customer
viewing.
■Changing metadata for a large number of content items. For example, if an
employee leaves the organization, you could export all of their content items and
then import them with another user specified as the Author.
■Restoring content that was inadvertently deleted or configuration information that
was inadvertently changed.
■Copying files, content types, and user attributes from a development Oracle
Content Server archive to a production instance.
8.5.1.2 Import Methods
You can import archives in the following ways:
■Manual: A one-time import initiated from Archiver by an administrator.
■Automatic (Replication): Import from a local archive is initiated automatically,
about once per minute.
For more information, see Section 8.5.3, "Import Process" and Section 8.7, "Replicating
Files."
8.5.2 Import Rules
An import rule defines how revisions are added, replaced, or deleted during import.
■During import, Archiver compares each revision being imported with the existing
revisions in the importing Oracle Content Server instance. The import rule
specifies which action to take (add, replace, delete, or ignore), depending on
comparison of the following information:
–Content ID
–Original Oracle Content Server
–Revision number
–Release date
■Only one import rule can be selected for each import of an archive.
This section covers these topics:
■Section 8.5.2.1, "Update Import Rule"
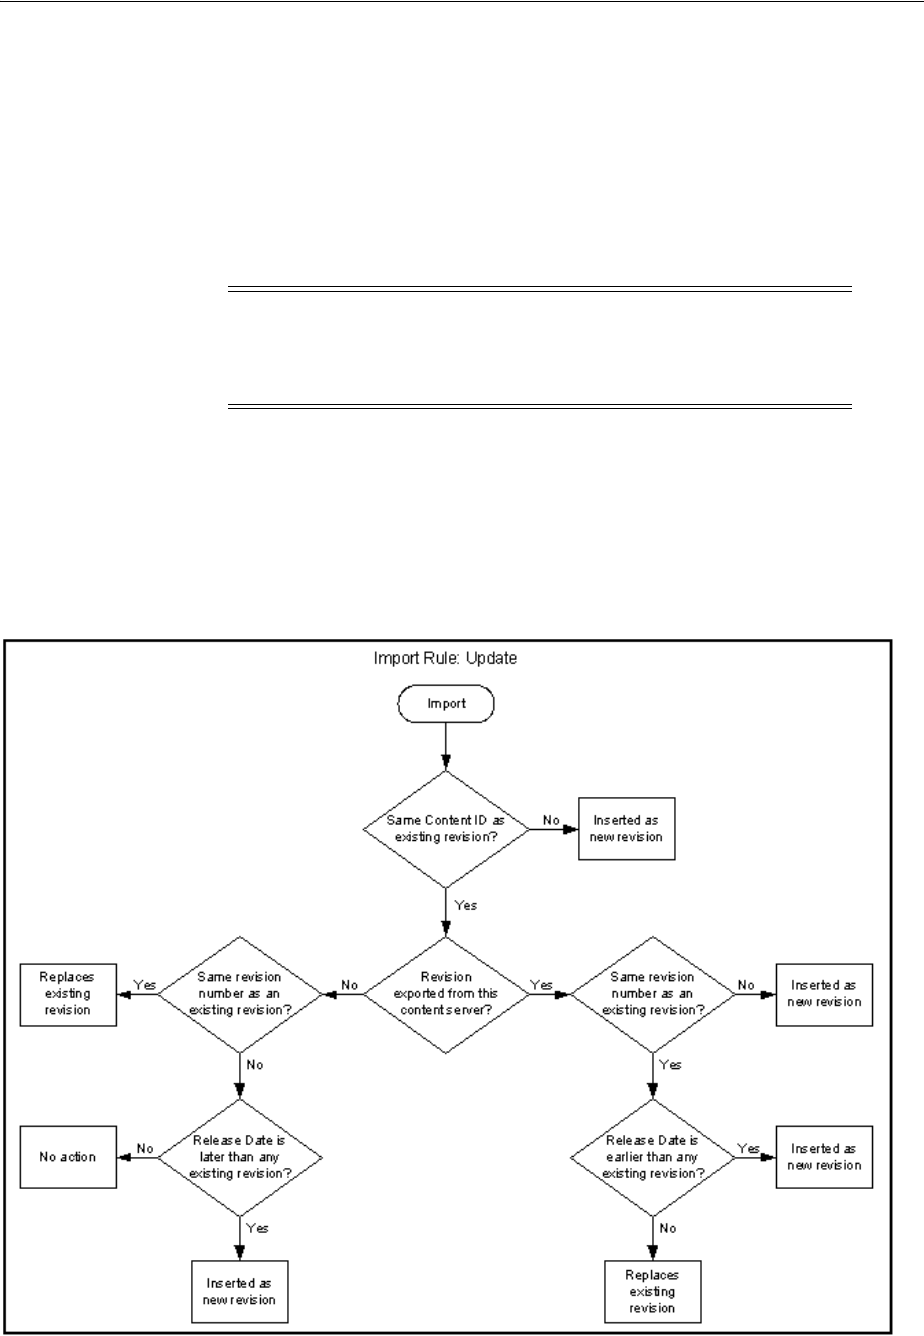
Importing Data
Managing System Migration and Archiving 8-35
■Section 8.5.2.2, "Insert Revision Import Rule"
■Section 8.5.2.3, "Insert Create Import Rule"
■Section 8.5.2.4, "Delete Revision Import Rule"
■Section 8.5.2.5, "Delete All Revisions Import Rule"
8.5.2.1 Update Import Rule
Use the Update import rule to replace existing revisions and insert new revisions.
■If an imported revision has a different Content ID (dDocName) than any existing
revision, the imported revision is inserted as a new revision.
■If an imported revision has the same Content ID (dDocName) as an existing
revision, the imported revision is inserted, ignored, or replaces the latest existing
revision.
Figure 8–11 Import Rules
Caution: The Update import rule will replace existing revisions
without saving the existing files. Be extremely careful when
importing so you do not accidentally replace content you meant to
keep.
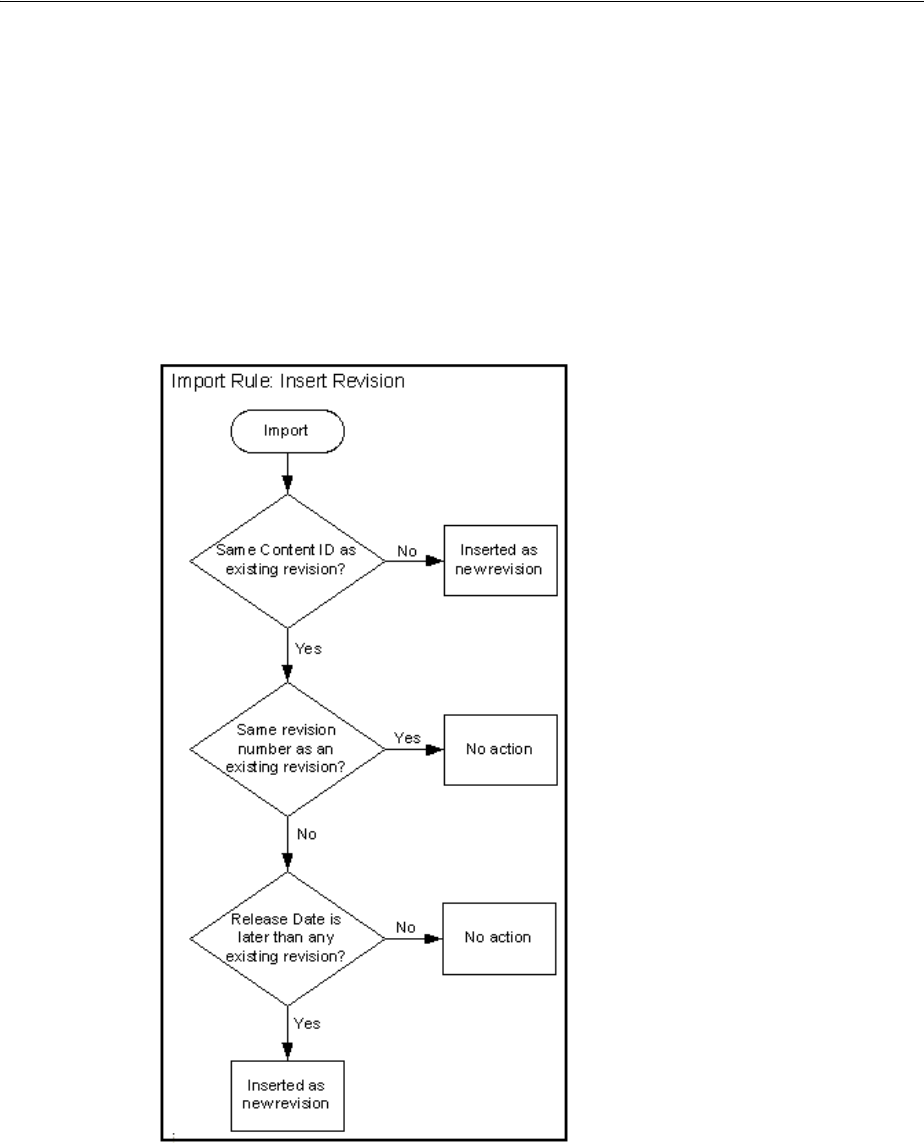
Importing Data
8-36 Oracle Fusion Middleware System Administrator's Guide for Oracle Content Server
8.5.2.2 Insert Revision Import Rule
The Insert Revision import rule imports only revisions that have both the most recent
revision number and the most recent release date.
■If an imported revision has a different Content ID (dDocName) than any existing
revision, the imported revision is inserted as a new revision.
■If an imported revision has the same Content ID (dDocName) as an existing
revision, but has a different Revision ID (dRevisionID) than any existing revision
and a later release date (dInDate) than that of the latest existing revision, the
imported revision is inserted as a new revision with a new revision label.
Figure 8–12 Import Rule: Insert Revision
8.5.2.3 Insert Create Import Rule
The Insert Create import rule imports only revisions that have the most recent release
date, regardless of the revision number.
■If an imported revision has a different Content ID (dDocName) than any existing
revision, the imported revision is inserted as a new revision.
■If an imported revision has the same Content ID (dDocName) as an existing
revision, and the release date (dInDate) of the imported revision is later than that

Importing Data
Managing System Migration and Archiving 8-37
of the latest existing revision, the imported revision is inserted as a new revision
with a new revision label.
Figure 8–13 Import Rule: Insert Create
8.5.2.4 Delete Revision Import Rule
Use the Delete Revision import rule to delete individual revisions.
■If an imported revision has the same Content ID (dDocName) and Revision ID
(dRevisionID) as an existing revision, the existing revision is deleted.
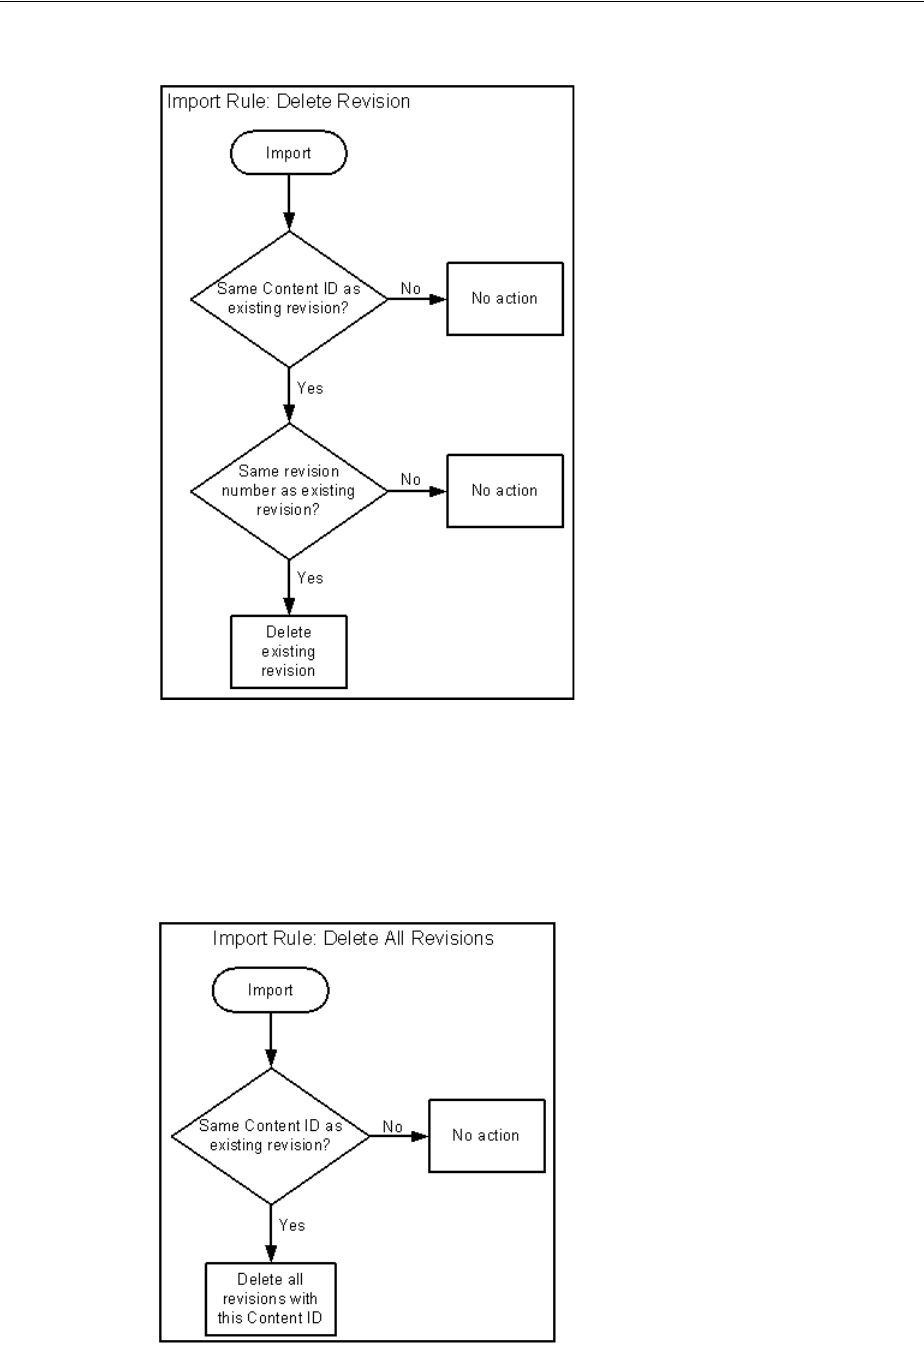
Importing Data
8-38 Oracle Fusion Middleware System Administrator's Guide for Oracle Content Server
Figure 8–14 Import Rule: Delete Revision
8.5.2.5 Delete All Revisions Import Rule
Use the Delete All Revisions import rule to delete all revisions of a content item.
■If an imported revision has the same Content ID (dDocName) as any existing
revision, all existing revisions with that Content ID are deleted.
Figure 8–15 Import Rule: Delete All Revisions

Importing Data
Managing System Migration and Archiving 8-39
8.5.3 Import Process
This section provides information about the import process and related tasks.
This section covers these topics:
■Section 8.5.3.1, "Importing Archived Data Manually"
■Section 8.5.3.2, "Setting Field Maps"
■Section 8.5.3.3, "Setting Value Maps"
■Section 8.5.3.4, "Setting Import Options"
■Section 8.5.3.5, "Importing an Individual Revision"
■Section 8.5.3.6, "Initiating the Import"
8.5.3.1 Importing Archived Data Manually
1. In the Current Archives list, select the archive from which to retrieve data.
2. Review the batch files in the archive. If necessary, remove revisions from the batch
files. See Section 8.3.4.1, "Removing Revisions from a Batch File."
3. If you want to change metadata fields or values during the import, set up the field
and value mappings. See Section 8.5.3.2, "Setting Field Maps" and Section 8.5.3.3,
"Setting Value Maps."
4. Set the general import options. See Section 8.5.3.4, "Setting Import Options."
5. Test the import mappings and rules on a few individual revisions. See
Section 8.5.3.5, "Importing an Individual Revision."
6. Initiate the import. See Section 8.5.3.6, "Initiating the Import."
Tip: To determine which archive contains the data you want to
retrieve, you can prepare an Archive History report using the Web
Layout Editor.
You can also examine the files generated by the archive at the file
system level, but preparing a report is more efficient if you frequently
need to find archived data.
Important: If you are using Sybase and you want to import an
archive, you must perform the following tasks:
1. Make sure you are logged into the Oracle Content Server instance as an
administrator.
2. Click Administration in the navigation menu.
3. On the Administration Applets page, click Repository Manager.
4. Open the Indexer tab.
5. In the Automatic Update Cycle section, click Configure.
6. Make sure Indexer Auto Updates is unselected.
7. Close Repository Manager.
8. Use Archiver to import the archive.
9. Open Repository Manager, and select Indexer Auto Updates again.

Importing Data
8-40 Oracle Fusion Middleware System Administrator's Guide for Oracle Content Server
8.5.3.2 Setting Field Maps
Field maps specify how metadata values are copied from one metadata field to
another during import. If you do not want to copy metadata values, do not specify any
field maps.
To set up field maps:
1. Open the archive collection. See Section 8.3.3.1, "Opening a Collection."
2. Select the archive in the Current Archives list.
3. Click the Import Maps Main Screen.
4. Click Edit in the Field Maps section.
The Edit Field Map/Edit Value Map Screen is displayed.
5. Click Browse For Fields.
The Browse for Fields/Value Screen is displayed.
6. Select a source for the list of available metadata fields:
■To retrieve the metadata fields from the local Oracle Content Server instance,
select Local System.
■To retrieve the metadata fields from a batch file, select Batch and select a batch
file from the list.
7. Click OK.
The Export Field option list is populated with the metadata fields that are
associated with the Oracle Content Server instance or the selected batch file.
8. In the Export Field list, select the metadata field from which you want to copy
metadata.
The selected metadata field is displayed in the Export Field. (You can also edit this
field directly. Make sure to use the internal field name, such as dDocAuthor or
xComments.)
9. In the Target Field list, select the metadata field you want the Export metadata to
be copied to.
10. Click Add.
The mapping expression is added to the Field Maps box.
11. To add to the mapping expression, repeat steps 8 through 10.
12. To update an existing mapping expression:
a. Select the line to be changed in the Field Maps box.
b. Edit the Export Field and Target Field as necessary.
c. Click Update.
The specified mapping expression replaces the selected line.
13. To delete a line from the mapping expression:
a. Select the line to be deleted in the Field Maps box.
b. Click Delete.
The selected line is deleted.
14. Click OK.

Importing Data
Managing System Migration and Archiving 8-41
During import, the values from the Export field replace any existing values in the
Target field.
15. To test the results of your field maps, import a few individual revisions from an
archive. See Section 8.5.3.5, "Importing an Individual Revision."
8.5.3.3 Setting Value Maps
Value maps specify how specific metadata values are to be changed during import. If
you do not want to change metadata values, do not specify any value maps.
To set up value maps:
1. Open the archive collection. See Section 8.3.3.1, "Opening a Collection."
2. Select the archive in the Current Archives list.
3. Click the Import Maps Main Screen.
4. Click Edit in the Value Maps section.
The Edit Field Map/Edit Value Map Screen is displayed.
5. To change all metadata values for a particular field, select All. Continue with step
11.
6. To change a specific metadata value, click Browse For Values.
The Browse for Fields/Value Screen is displayed.
7. Select a batch file from the From Batch File list.
8. Select a metadata field from the From Field list.
9. Click OK.
The Input Value option list is populated with the values that are associated with
the selected metadata field in the selected batch file.
10. In the Input Value list, select the metadata value to be changed.
11. In the Field list, select the metadata field to be changed.
12. In the Output Value field, enter the new metadata value.
■You can use Idoc Script in the output value. For example, to set the expiration
date one week in the future for all imported revisions, you could use
<dateCurrent(7)$>. See the Oracle Fusion Middleware Idoc Script Reference
Guide for more information.
■To delete all values from the input metadata field, leave the output value
blank.
13. Click Add.
The mapping expression is added to the Value Maps box.
14. To add to the mapping expression, repeat steps 5 through 13.
15. To update an existing mapping expression:
a. Select the line to be changed in the Value Maps box.
b. Edit the Input Value, Field, and Target Value as necessary.
c. Click Update.
The specified mapping expression replaces the selected line.
16. To delete a line from the mapping expression:

Importing Data
8-42 Oracle Fusion Middleware System Administrator's Guide for Oracle Content Server
a. Select the line to be deleted in the Value Maps box.
b. Click Delete.
The selected line is deleted.
17. Click OK.
During import, the specified Input Values in the specified metadata Fields will be
replaced with the Target Values.
18. To test the results of your value maps, import a few individual revisions from an
archive. See Section 8.5.3.5, "Importing an Individual Revision."
8.5.3.4 Setting Import Options
To set general import options:
1. Open the archive collection. See Section 8.3.3.1, "Opening a Collection."
2. Select the archive in the Current Archives list.
3. Click the Archiver (General Tab).
4. Click Edit in the Import Options section.
The Edit Import Options (Select Rules) Screen is displayed.
5. Select an option in the Override Import Rules list to specify how existing
revisions are added, replaced, or deleted during import. For detailed descriptions,
see Section 8.5.2, "Import Rules."
6. Specify whether option list values are validated during import:
■To import only revisions with valid option list values (validated option lists
only), select Import only revisions with valid option list values.
■To skip option list validation, deselect Import only revisions with valid
option list values.
7. Specify whether to recalculate times in metadata date fields to reflect the time zone
of the target Oracle Content Server instance:
■To recalculate times, select Translate the dates to the current system time
zone.
For example, if the time zone of the source (export) Oracle Content Server
instance is Central Standard Time and the time zone of the target (import)
Oracle Content Server instance is Eastern Standard Time, the release times,
Caution: The Update import rule will replace existing revisions
without saving the existing files. Be extremely careful when
importing so that you do not accidentally replace content you meant
to keep.
Tip: The Import only revisions with valid option list values
checkbox applies to all validated option lists. If you want to validate
some option list fields but not all of them, you can change the Option
List Type in the Configuration Manager. Use Select List Validated for
option lists you want to validate; use Select List Not Validated for
option lists you do not want to validate.

Importing Data
Managing System Migration and Archiving 8-43
create times, expiration times, and any custom times will be changed to one
hour later.
■To leave times unchanged, deselect Translate the dates to the current system
time zone.
8. Click OK.
9. To test the results of your import options, import a few individual revisions from
an archive. See Section 8.5.3.5, "Importing an Individual Revision."
8.5.3.5 Importing an Individual Revision
To import a specific revision:
1. Open the archive collection. See Section 8.3.3.1, "Opening a Collection."
2. Select the archive in the Current Archives list.
3. On the Archiver (General Tab), click View Batch Files.
The Removing Revisions from a Batch File is displayed.
4. Select the batch file that contains the file you want to import.
5. Click Edit.
The View Exported Content Items Screen is displayed.
6. Use the Filter feature and the navigation buttons to display the revision to be
imported.
7. Select the revision.
8. Click Import.
If the revision was imported successfully, a confirmation message is displayed.
8.5.3.6 Initiating the Import
To manually import content and configuration information:
1. Open Archiver for the Oracle Content Server instance that you want to import to.
2. Open the archive collection that you want to import from. (This collection must be
accessible through the file system.) See Section 8.3.3.1, "Opening a Collection."
3. Select the archive in the Current Archives list.
4. From Actions, select Import.
The Import Archive Screen is displayed.
5. Specify the information to be imported:
■To import content, select Import Batched Revisions.
■To import content and tables, select Import Tables.
Tip: Before importing an entire batch file, use this procedure to
import a few individual revisions to test the results of your import
maps and rules.

Transferring Files
8-44 Oracle Fusion Middleware System Administrator's Guide for Oracle Content Server
6. Click OK.
The import process is initiated, and the status bar at the bottom of the Archiver
screen displays progress messages.
8.6 Transferring Files
The Transfer function is used to move or copy content from one Oracle Content Server
instance to another over sockets.
■Section 8.6.1, "File Transfer Overview"
■Section 8.6.2, "Transfer Types"
■Section 8.6.3, "Transferring Batch Files"
■Section 8.6.4, "Managing Transfers"
8.6.1 File Transfer Overview
You can use the Transfer function to transfer files between Oracle Content Server
instances on a shared file system, but transfers do not require a shared file system.
Transferring files between non-shared file systems requires an outgoing provider on
the source Oracle Content Server instance.
Transfers will be successful only between Oracle Content Server 4.5 or newer systems.
This section covers these topics:
■Section 8.6.1.1, "Transfer Uses"
■Section 8.6.1.2, "Transfer Methods"
■Section 8.6.1.3, "Transfer Terms"
8.6.1.1 Transfer Uses
Typical uses for the Transfer function include:
■Exporting and importing over a firewall.
■Transferring content between Oracle Content Server instances in different physical
locations (buildings, cities, or countries).
Note: The User Configuration and Content Configuration options
are available only if the selected archive includes this information
(users.hda or doctypes.hda file).
Caution: Archiver cannot be used to move or copy data between two
instances that share the same Oracle Content Server instance name
(IDC_Name). To do so will corrupt the data on the target system.
Note: To transfer across a firewall, you might need to configure the
firewall to permit the outgoing provider's socket to pass through it.

Transferring Files
Managing System Migration and Archiving 8-45
■Transferring content between Oracle Content Server instances using a shared
drive. (A transfer over a file system share can handle large archives better than a
socket transfer.)
■Avoiding the need to build an FTP or HTTP interface to move files from one file
system to another.
■Combining the batch files from two archives into a single archive.
8.6.1.2 Transfer Methods
You can transfer files in the following ways:
■Manual Transfer: A one-time transfer initiated from Archiver by an administrator.
This copies an archive to another archive.
■Automatic Transfer: Moving archive files to another archive is initiated
automatically whenever the source archive is updated.
8.6.1.3 Transfer Terms
The following terms are related to the Transfer function:
■local archive: An archive that belongs to a local collection.
■local collection: A collection that the Oracle Content Server instance can reach by
file access using a mapped or mounted network share.
■local transfer: A transfer between local archives. Both the source archive and the
target archive are in a local collection.
■proxied: In Archiver, the term proxied refers to any Oracle Content Server
instance to which the local Oracle Content Server instance is connected through an
outgoing provider.
■proxied archive: An archive that belongs to a proxied collection.
■proxied collection: A collection on another Oracle Content Server instance that the
local Oracle Content Server instance can reach through an outgoing provider.
■pull transfer: A transfer over an outgoing provider that is owned by the proxied
(remote) Oracle Content Server instance.
■push transfer: A transfer over an outgoing provider that is owned by the local
Oracle Content Server instance.
■source archive: An archive that contains batch files to be transferred.
■target archive: An archive that receives transferred batch files.
■targetable archive: An archive that is enabled to be a target archive.
■ransferring: The process of copying or moving batch files and their associated
content files from one archive to another. There are three types of transfers: local,
push, and pull.
■transfer owner: The Oracle Content Server instance that performs and monitors a
transfer.
■transfer source: See source archive.
■transfer target: See target archive.
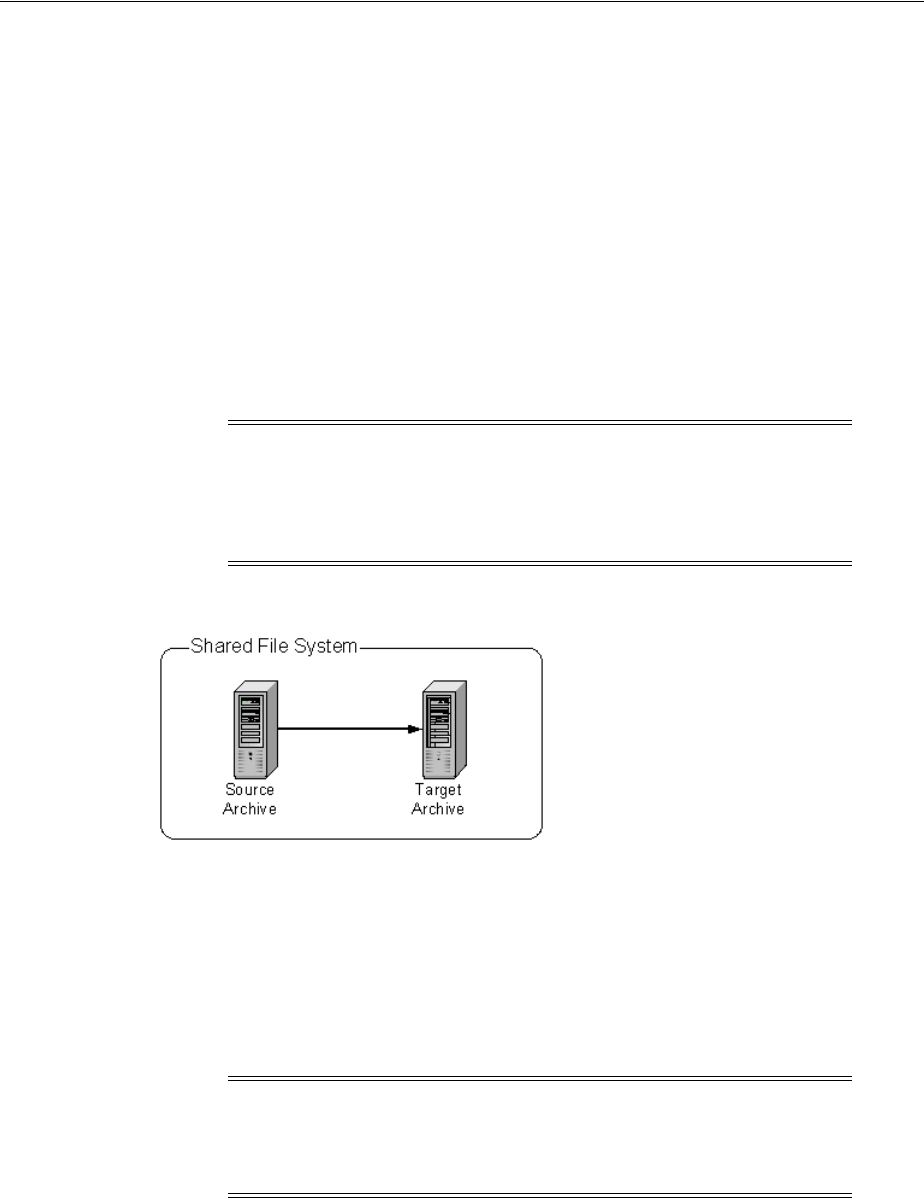
Transferring Files
8-46 Oracle Fusion Middleware System Administrator's Guide for Oracle Content Server
8.6.2 Transfer Types
This section provides information about the different transfer types, listed in order
from simplest to most complex.
■Section 8.6.2.1, "Local Transfer"
■Section 8.6.2.2, "Pull Transfer"
■Section 8.6.2.3, "Push Transfer"
8.6.2.1 Local Transfer
A local transfer is a transfer between local archives, which belong to collections that
both the source and target Oracle Content Server instances can reach through a
mapped or a mounted drive. An outgoing provider is not required. This type of
transfer is typically used to combine the batch files of two archives.
Figure 8–16 Local Transfer
8.6.2.2 Pull Transfer
A pull transfer is a transfer that is owned by the proxied (remote) Oracle Content
Server instance, which is the instance that is the target of the outgoing provider.
■Multiple pull transfers can be concurrent.
■If you are running a pull transfer across a firewall, you might need to configure
the firewall to permit the outgoing provider's socket to pass through it.
Note: If you are transferring between Oracle Content Server
instances on a shared file system, the mapped or mounted drive must
be available to both Oracle Content Server instances. The computers
must be on and logged in as a user who has system access to both
Oracle Content Server instances.
Note: In Archiver, the term proxied refers to any Oracle Content
Server instance to which the local instance is connected through an
outgoing provider. This does not have to be a proxied instance of the
master Oracle Content Server instance.
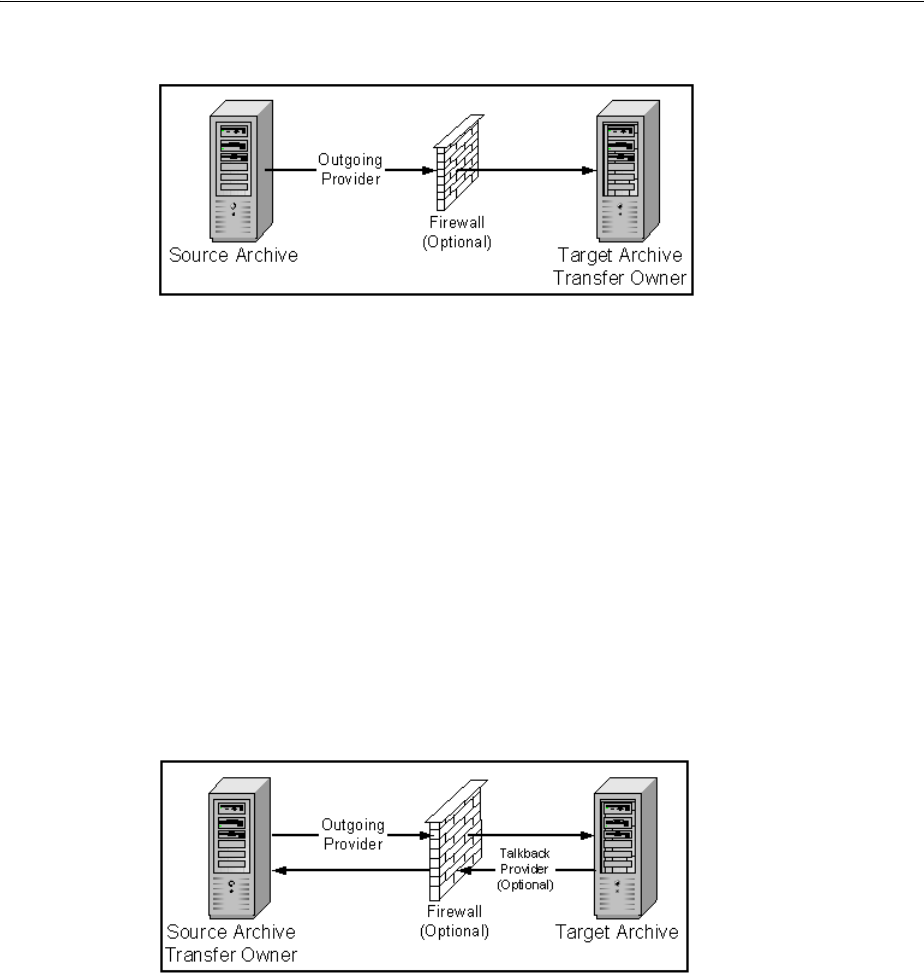
Transferring Files
Managing System Migration and Archiving 8-47
Figure 8–17 Pull Transfer
8.6.2.3 Push Transfer
A push transfer is a transfer that is owned by the local Oracle Content Server instance,
which is the instance on which the outgoing provider is set up.
■For performance monitoring of a push transfer, you also should set up an
outgoing provider from the target (proxied) Oracle Content Server instance back
to the source (local) Oracle Content Server instance. This 'talkback' provider can
then notify the source Oracle Content Server instance when each transfer is
complete. A push transfer will work without the talkback provider, but the source
Oracle Content Server instance would not be aware of transfer completion or
problems.
■Only one push transfer can be in progress at a time.
■If you are running a push transfer across a firewall, you might need to configure
the firewall to permit the both providers' sockets to pass through it.
Figure 8–18 Push Transfer
8.6.3 Transferring Batch Files
This section provides information about transferring batch files.
Transfer Process
When a transfer is initiated, the following actions occur:
1. Each batch file in the archive is zipped together with its associated content files.
2. The Zip files are transferred to the target Oracle Content Server instance by a local
file system move (local transfer) or by the outgoing provider (push or pull
transfer).
3. The Zip files are unzipped and placed in the appropriate file system locations.
4. For an automated transfer, the batch files and their associated content files are
removed from the source Oracle Content Server instance. For a manual transfer,
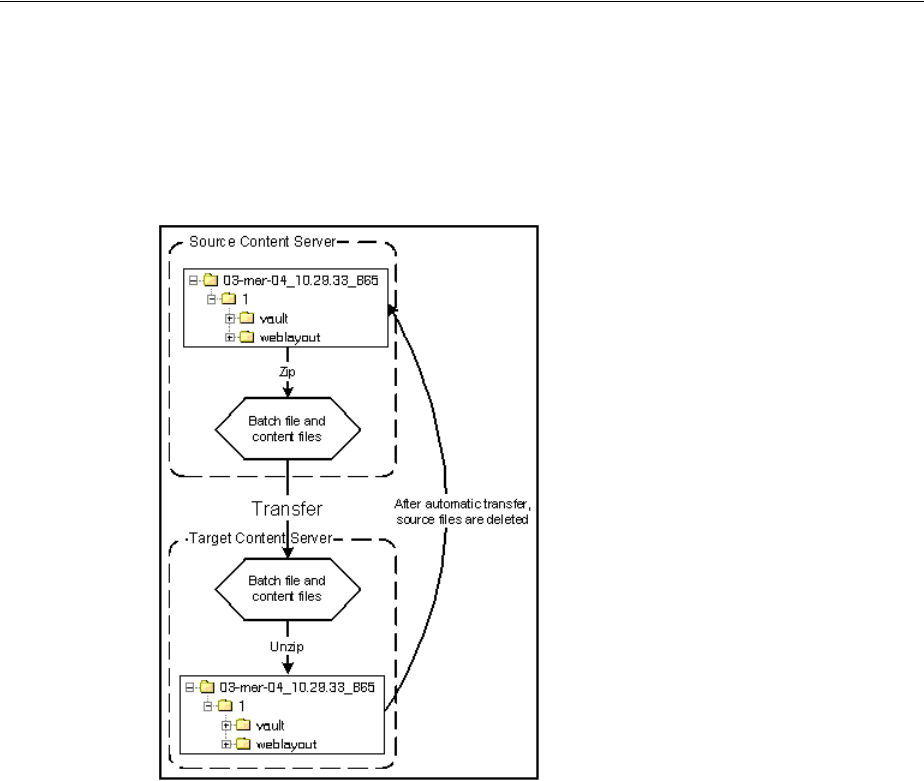
Transferring Files
8-48 Oracle Fusion Middleware System Administrator's Guide for Oracle Content Server
the batch files and associated content files remain in the source Oracle Content
Server instance.
The transferred archive is now available for import through the Archiver of the
target Oracle Content Server instance.
Figure 8–19 The Transfer Process
Transfer Rules
The following list provides applicable transfer rules:
■If you are transferring between Oracle Content Server instances on a shared file
system, the mapped or mounted drive must be available to both Oracle Content
Server instances. The computers must be on and logged in as a user who has
system access to both Oracle Content Server instances.
■The Oracle Content Server instance that has an outgoing provider set up is
considered the 'local' server, and the target Oracle Content Server instance for the
outgoing provider is considered the 'proxied' server. Files are always transferred
in the direction of the outgoing provider, from the local (source) instance to the
proxied (target) instance.
■To transfer multiple archives from an Oracle Content Server instance, you must set
up a separate outgoing provider from the local instance for each target instance.
■Only archives that are identified as 'targetable' can be transfer targets. When you
are selecting a transfer target, the 'targetable' attribute can help you find the target
archive quickly.
■At least one archive in the transfer must be local to the transfer owner. For
example, you cannot set up a transfer between two Oracle Content Server
instances that is owned by a third Oracle Content Server instance.

Transferring Files
Managing System Migration and Archiving 8-49
■An archive can contain only one copy of each batch file. Therefore, if a batch file
being transferred already exists in the target archive, the batch file and its
associated content files will be ignored.
8.6.4 Managing Transfers
This section provides information about tasks for managing transfers.
■Section 8.6.4.1, "Transfer Process"
■Section 8.6.4.2, "Making an Archive Targetable"
■Section 8.6.4.3, "Defining an Outgoing Transfer Provider"
■Section 8.6.4.4, "Setting a Transfer Destination (Target)"
■Section 8.6.4.5, "Initiating a Manual Transfer"
■Section 8.6.4.6, "Deleting a Transfer"
8.6.4.1 Transfer Process
To transfer content between Oracle Content Server instances:
1. In the source Oracle Content Server instance, create the archive to be transferred
and set up an export to this archive. See Section 8.4.2.1, "Manually Exporting."
2. In the target Oracle Content Server instance, create the archive to receive
transferred content and make the target archive 'targetable.' See Section 8.6.4.2,
"Making an Archive Targetable."
3. Set up communications between Oracle Content Server instances:
■If the source and target archives are on a shared file system, ensure that both
computers are on and logged in as a user who has system access to both
Oracle Content Server instances.
■If the source and target archives are not on a shared file system, create an
outgoing provider from the source Oracle Content Server instance to the
target Oracle Content Server instance. See Section 8.6.4.3, "Defining an
Outgoing Transfer Provider."
4. From the source archive, specify the target archive. See Section 8.6.4.4, "Setting a
Transfer Destination (Target)."
5. Initiate the transfer. See Section 8.6.4.5, "Initiating a Manual Transfer."
The batch files and content files are copied to the target archive.
8.6.4.2 Making an Archive Targetable
To indicate that an archive can receive transfers from other archives:
1. Open the archive collection that contains the target archive. See Section 8.3.3.1,
"Opening a Collection."
2. Select the target archive in the Current Archives list.
3. Click the Main Archiver Transfer Screen.
4. Click Edit in the Transfer Options section.
The Transfer Options Screen is displayed.
5. Select Is Targetable.
6. Click OK.

Transferring Files
8-50 Oracle Fusion Middleware System Administrator's Guide for Oracle Content Server
8.6.4.3 Defining an Outgoing Transfer Provider
To create an outgoing provider for transfer purposes:
1. On the source Oracle Content Server instance, create an outgoing provider. Enter
the following information:
2. In the System Properties utility of the target Oracle Content Server instance, set the
IP Address Filter or Hostname Filter to the IP address or host name of the source
Oracle Content Server instance. (The IP Address Filter setting is recommended.)
3. If you are setting up a push transfer (transfer owned by the local Oracle Content
Server instance), consider setting up a 'talkback' outgoing provider from the target
Oracle Content Server instance back to the source Oracle Content Server instance.
4. If you are transferring across a firewall, configure the firewall to permit the
outgoing providers' sockets to pass through it.
8.6.4.4 Setting a Transfer Destination (Target)
To specify the target archive to receive transferred content:
1. Open Archiver from the Oracle Content Server instance that will own the transfer.
■For a pull transfer, the transfer owner is the target (proxied) Oracle Content
Server instance.
■For a push transfer, the transfer owner is the source (local) Oracle Content
Server instance.
2. Open the archive collection that contains the source archive. See Section 8.3.3.1,
"Opening a Collection."
3. Select the source archive in the Current Archives list.
4. Click the Main Archiver Transfer Screen
Field Description
Provider Name Enter a name. This will become a subdirectory in the
DomainHome/ucm/cs/data/providers/ directory.
Provider Description Enter a user-friendly description, such as Transfer Provider.
Server Host Name Enter the server host name of the target Oracle Content
Server instance. For example, extranet_server.
Server Port Enter a unique port number on which the provider will
communicate with the target Oracle Content Server
instance.
Instance Name Enter the name of the target Oracle Content Server instance.
For example, Master_on_extranet.
Relative Web Root Enter the relative web root of the target Oracle Content
Server instance. For example, /stellent/.
Proxied checkbox Select this checkbox only if the target Oracle Content Server
instance was installed as a proxy of the local (master)
Oracle Content Server instance. See the Caution message
below.
Caution: Do not select this checkbox if the relative web root is the
same for both Oracle Content Server instances.

Transferring Files
Managing System Migration and Archiving 8-51
5. Click Edit in the Transfer Destination section.
The Archive Collections Screen is displayed.
6. Select the collection that contains the target archive.
7. Select the target archive.
8. Click OK.
8.6.4.5 Initiating a Manual Transfer
To transfer content manually:
1. Open Archiver on the source Oracle Content Server instance.
2. Open the archive collection that contains the source archive. See Section 8.3.3.1,
"Opening a Collection."
3. Select the source archive in the Current Archives list.
4. Select Actions, and then click Transfer.
The transfer process is initiated, and the status bar at the bottom of the Archiver
screen displays progress messages.
8.6.4.6 Deleting a Transfer
This section provides information about the methods to delete a transfer.
Deleting a Transfer from the Transfer To Tab:
1. Open the archive collection that contains the source archive. See Section 8.3.3.1,
"Opening a Collection."
2. Select the source archive in the Current Archives list.
3. Click the Main Archiver Transfer Screen.
4. Click Remove in the Transfer Destination section.
You are prompted to confirm the action.
5. Click Yes.
Deleting an Automated Transfer from the Automation for Instances Screen:
1. Open the archive collection. See Section 8.3.3.1, "Opening a Collection."
2. Select Options, and then click View Automation For Instance.
The Automation Screen is displayed.
3. Click the Transfers tab.
4. Select the automated transfer to delete.
5. Click Remove.
The automated transfer is removed from the list.
Note: The target archive must be identified as targetable. See
Section 8.6.4.2, "Making an Archive Targetable."

Replicating Files
8-52 Oracle Fusion Middleware System Administrator's Guide for Oracle Content Server
8.7 Replicating Files
The Replication function is used to automate the Archiver's export, import, and
transfer functions.
■Section 8.7.1, "Introduction to Replication"
■Section 8.7.2, "Managing Replication"
8.7.1 Introduction to Replication
If you are automating an import using replication, each batch file is removed as soon
as the automatic import is complete. However, you can view the archiving results by
preparing an Archive History report using the Web Layout Editor.
If you are replicating files to a contribution server, you should map the Security Group
and/or Account field so that users have only Read permission to the imported files.
Otherwise, changed files in the importing instance could be overwritten by exported
files during a later replication cycle.
For performance reasons, replication is not recommended for large archives
(approximately 20,000 files or more). Export and import of large archives should be
run manually, during periods of non-peak usage if possible.
This section covers these topics:
■Section 8.7.1.1, "Single Revision Replications"
■Section 8.7.1.2, "Replication Uses"
■Section 8.7.1.3, "Replication Methods"
8.7.1.1 Single Revision Replications
When using the Single Revision Replication option on the Edit Export Query (Content)
Screen, be aware of the following considerations:
■If the new document matches the archiver query on checkin, it is archived. If it
does not match the query, nothing happens.
■If a document has multiple revisions and the most recent matching revision is
deleted or updated so it no longer matches the query, the next most recent
matching revision of that document is replicated. If no revisions match the query,
that document is deleted through replication.
■If a system (A) is replicating to system (B) and the Single Revision Replication
option is used, system B will at any given time only have one revision of each
document. The revLabel of each revision is 1, no matter what the revLabel was on
the document that was replicated.
This archiving option allows an administrator to create a staging system and a
production system. The staging system can archive all documents that have a specific
metadata field set to 1. The production system will always have the most recent
revision of each document that has this metadata flag set. Setting this flag to 0 on the
staging system removes it from the production system and rolls it back to the next
most recent revision with that metadata field set to 1.
Caution: Archiver cannot be used to move or copy data between two
instances that share the same Oracle Content Server instance name
(IDC_Name). To do so corrupts the data on the target system.

Replicating Files
Managing System Migration and Archiving 8-53
8.7.1.2 Replication Uses
Typical uses for the Replication function include:
■Automatically exporting from one Oracle Content Server instance and importing
to another Oracle Content Server instance to synchronize two web sites.
■Copying content automatically between two contribution/consumption servers.
■Automatically moving certain documents from a contribution server to a
higher-security Oracle Content Server instance.
■Automatically moving old content to a storage location.
8.7.1.3 Replication Methods
You can automate Archiver functions in the following ways:
■Automatic Export: Export to a local archive is initiated automatically whenever a
content item that meets the export criteria is indexed.
■Automatic Import: Import from a local archive is initiated automatically, about
once per minute.
■Automatic Transfer: Moving archive files to a different Oracle Content Server
instance over sockets is initiated automatically whenever the source archive is
updated.
8.7.2 Managing Replication
Several tasks are involved in managing the replication process, including setting up
automatic exports, imports and transfers. This section provides information about
replication tasks.
■Section 8.7.2.1, "Setting Up Automatic Export"
■Section 8.7.2.2, "Setting Up Automatic Import"
■Section 8.7.2.3, "Setting Up Automatic Transfer"
■Section 8.7.2.4, "Disabling Automatic Import"
■Section 8.7.2.5, "Disabling Automatic Export"
■Section 8.7.2.6, "Disabling Automatic Transfer"
■Section 8.7.2.7, "Deleting a Registered Exporter"
8.7.2.1 Setting Up Automatic Export
To set up an automatic export:
1. Set up the export and run a manual export. See Section 8.4.2.1, "Manually
Exporting."
2. Open Archiver on the Oracle Content Server instance that content is to be
exported from.
3. Open the archive collection.
4. Select the archive to export to automatically in the Current Archives list.
5. Click the Replication tab.
Note: You can export expired revisions manually, but expired
revisions do not get exported automatically.

Replicating Files
8-54 Oracle Fusion Middleware System Administrator's Guide for Oracle Content Server
6. Click Edit.
The Registered Exporter Screen is displayed.
7. Select Enable Automated Export.
8. Click Register.
The current collection is added to the Registered Exporters box.
9. Click OK.
Each revision that meets the export criteria will be exported to this archive when it
is indexed. The batch file is removed as soon as each export is complete.
8.7.2.2 Setting Up Automatic Import
To set up an automatic import:
1. Set up the import and run a manual import. See Section 8.5.3, "Import Process."
2. Open Archiver on the Oracle Content Server instance that the archive is to be
imported to.
3. Open the archive collection.
4. Select the archive to import automatically in the Current Archives list.
5. Click the Replication tab.
6. Click Register Self.
You are prompted to confirm the action.
7. Click OK.
The selected archive will be imported automatically, about once per minute. All
source batch files are removed as soon as each import is complete.
8.7.2.3 Setting Up Automatic Transfer
To set up an automatic transfer:
1. Set up the transfer and run a manual transfer. See Section 8.6.1, "File Transfer
Overview."
2. Open Archiver on the source Oracle Content Server instance.
3. Open the archive collection.
4. Select the source archive in the Current Archives list.
5. Click the Transfer To tab.
6. Click Edit.
The Transfer Options Screen is displayed.
7. Select Is Transfer Automated.
Note: You can export expired revisions manually, but expired
revisions do not get exported automatically.
Note: The Replication function does not import content types and
user attributes.

Replicating Files
Managing System Migration and Archiving 8-55
8. Click OK.
9. Test the automatic transfer:
a. In the source Oracle Content Server instance, check in a new document that
meets the export criteria.
b. If the export is automated, wait until automated export occurs after indexing.
Otherwise, export the source archive manually.
The archive should be transferred to the target Oracle Content Server instance
within a few minutes.
8.7.2.4 Disabling Automatic Import
This section provides information about the methods to disable an automatic import.
Unregistering an Importer from the Replication Tab:
1. Open the archive collection. See Section 8.3.3.1, "Opening a Collection."
2. Select the archive in the Current Archives list.
3. Click the Replication tab.
4. Click Unregister.
Automatic importing from the selected archive is disabled.
Disabling a Registered Importer from the Automation for Instance Screen:
1. Open the archive collection. See Section 8.3.3.1, "Opening a Collection."
2. From Options, select View Automation For Instance.
The Automation for Instance Screen is displayed.
3. Click the Importers tab.
4. Select the registered importer to delete.
5. Click Remove.
The registered importer is removed from the list.
8.7.2.5 Disabling Automatic Export
To disable automatic export:
1. Open the archive collection. See Section 8.3.3.1, "Opening a Collection."
2. Select the archive in the Current Archives list.
3. Click the Replication tab.
4. Click Edit.
The Registered Exporter Screen is displayed.
5. Deselect Enable Automated Export.
6. Click OK.
Automatic exporting of the selected archive is disabled.
Note: The Replication function does not import content types and
user attributes.

Archive and Migration Strategies
8-56 Oracle Fusion Middleware System Administrator's Guide for Oracle Content Server
8.7.2.6 Disabling Automatic Transfer
To disable automatic transfer:
1. Open Archiver on the source Oracle Content Server instance.
2. Open the source archive collection. See Section 8.3.3.1, "Opening a Collection."
3. Select the source archive in the Current Archives list.
4. Click the Transfer To tab.
5. Click Edit.
The Transfer Options Screen is displayed.
6. Deselect Is Transfer Automated.
7. Click OK.
Automatic transfer of the selected archive is disabled.
8.7.2.7 Deleting a Registered Exporter
This section provides information about the methods to delete a registered exporter.
Deleting a Registered Exporter from the Replication Tab:
1. Open the archive collection. See Section 8.3.3.1, "Opening a Collection."
2. Select the archive in the Current Archives list.
3. Click the Replication tab.
4. Click Edit.
The Registered Exporter Screen is displayed.
5. Select Enable Automated Export.
6. Select the Oracle Content Server instance to delete in the Registered Exporters list.
7. Click Remove.
The registered exporter is removed from the list.
8. Click OK.
Deleting a Registered Exporter from the Automation for Instance Screen:
1. Open the archive collection. See Section 8.3.3.1, "Opening a Collection."
2. From Options, select View Automation For Instance.
The Automation for Instance Screen is displayed.
3. Select the registered exporter to delete.
4. Click Remove.
The registered exporter is removed from the list.
8.8 Archive and Migration Strategies
This section provides information about several typical archiving and migration
strategies.
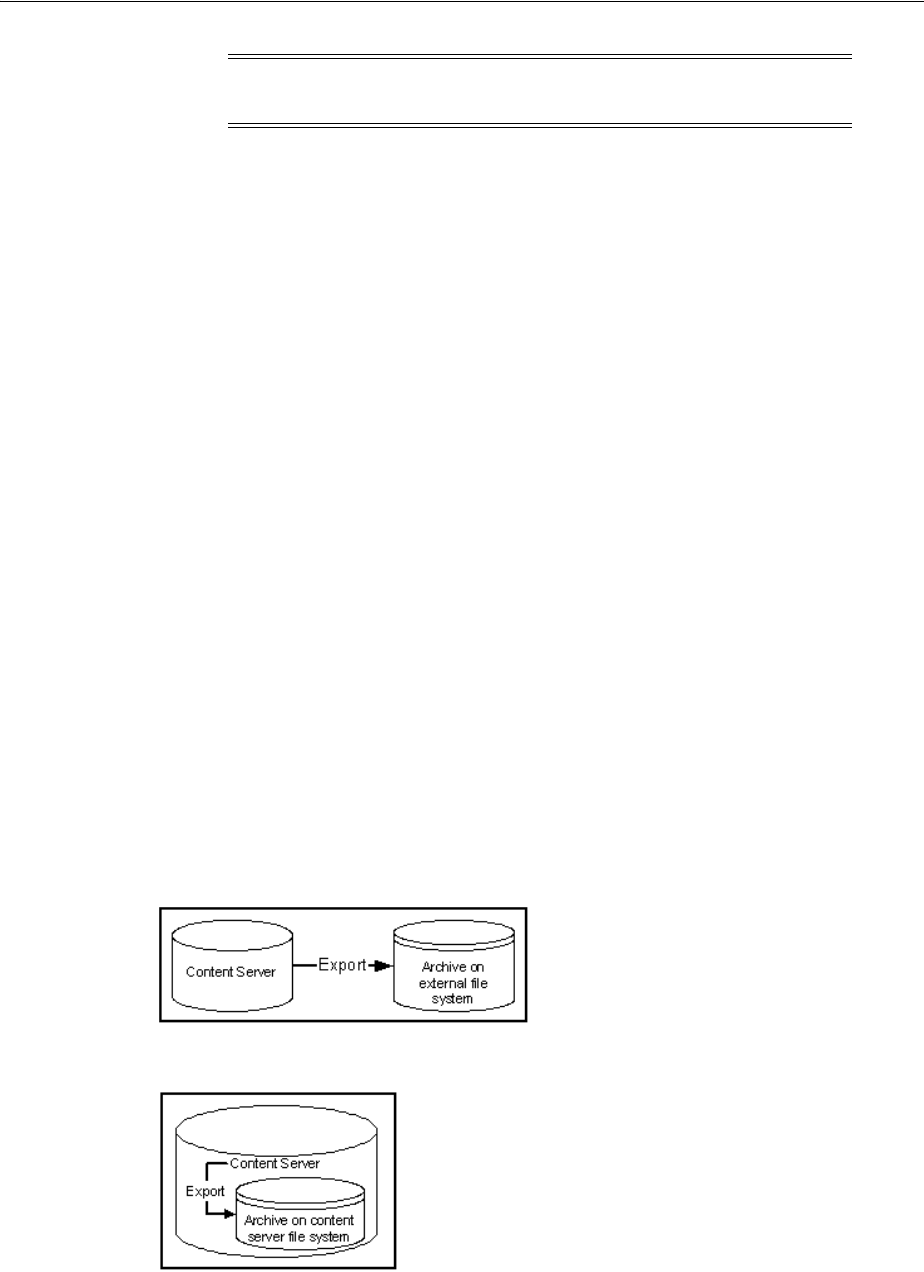
Archive and Migration Strategies
Managing System Migration and Archiving 8-57
This section covers these topics:
■Section 8.8.1, "Export"
■Section 8.8.2, "Import"
■Section 8.8.3, "Self Export/Import"
■Section 8.8.4, "One-to-One Archiving"
■Section 8.8.5, "One-to-Many Archiving"
■Section 8.8.6, "Many-to-One Archiving"
■Section 8.8.7, "Archiver Examples"
■Section 8.8.8, "Configuration Migration Tips"
8.8.1 Export
This section provides information about exporting.
Summary
A simple export is typically used to:
■Store and later remove outdated content on a file system.
■Store content on a file system for later retrieval.
■Retain a 'snapshot' of an Oracle Content Server instance at a certain date and time.
Configurations
The following are possible export-only configurations, shown in order from most to
least typical:
■Export to a collection on an external file system.
■Export to one of the Oracle Content Server instance's own collections.
8.8.2 Import
This section provides information about importing.
Note: All of the scenarios described in this section can be run
manually or automatically (through replication).
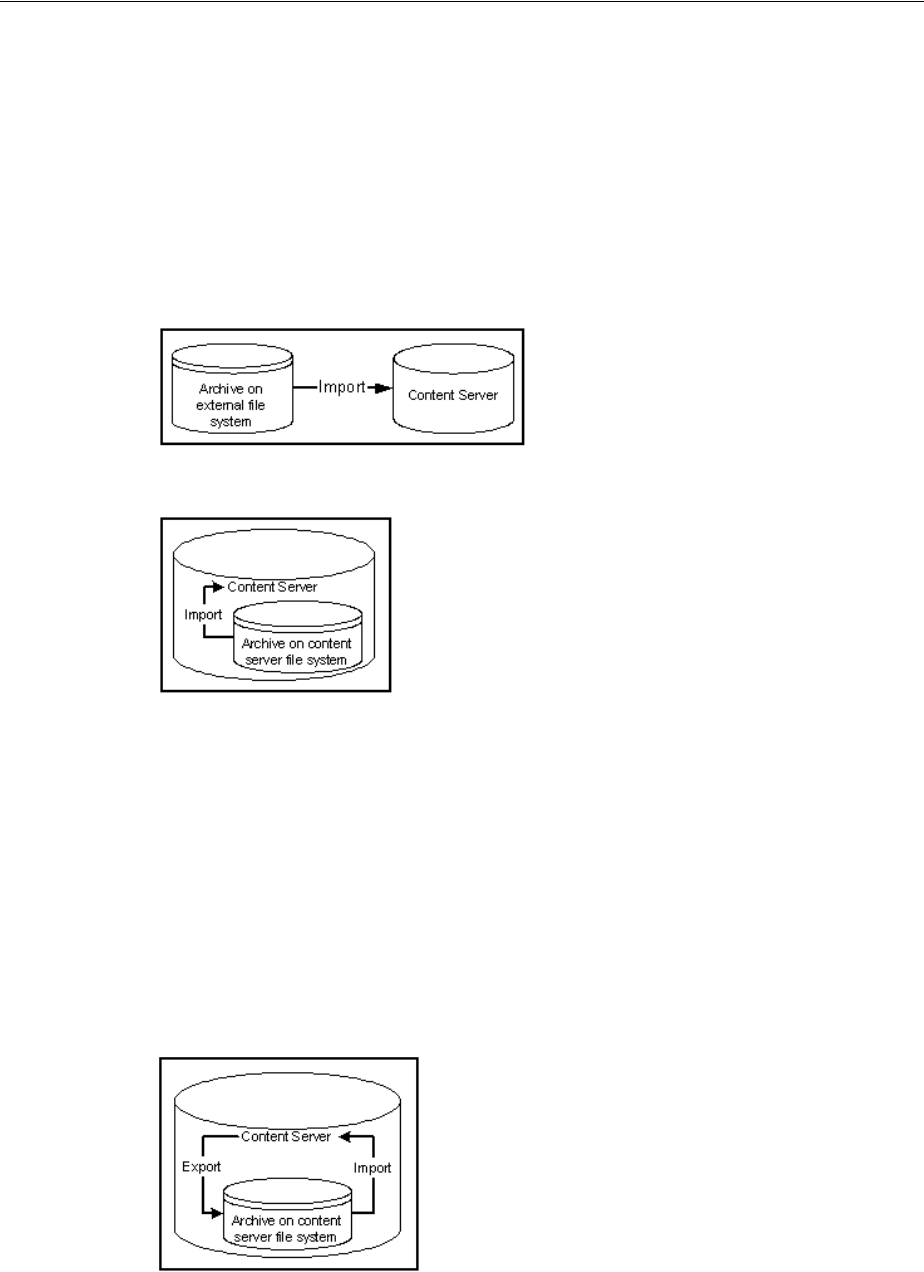
Archive and Migration Strategies
8-58 Oracle Fusion Middleware System Administrator's Guide for Oracle Content Server
Summary
A simple import is typically used to:
■Retrieve content from storage after an unintended deletion.
■Restore content from an archived 'snapshot' of a Oracle Content Server instance.
Configurations
The following are possible import-only configurations, shown in order from most to
least typical:
■Import from a collection on an external file system.
■Import from one of the Oracle Content Server instance's own collections.
8.8.3 Self Export/Import
This section provides information about self export.
Summary
Self export/import is typically used to change content metadata to new values.
Configurations
The following are possible self export/import configurations, shown in order from
most to least typical:
■Export to and import from one of the Oracle Content Server instance's own
collections.
■Export to and import from a collection on an external file system.
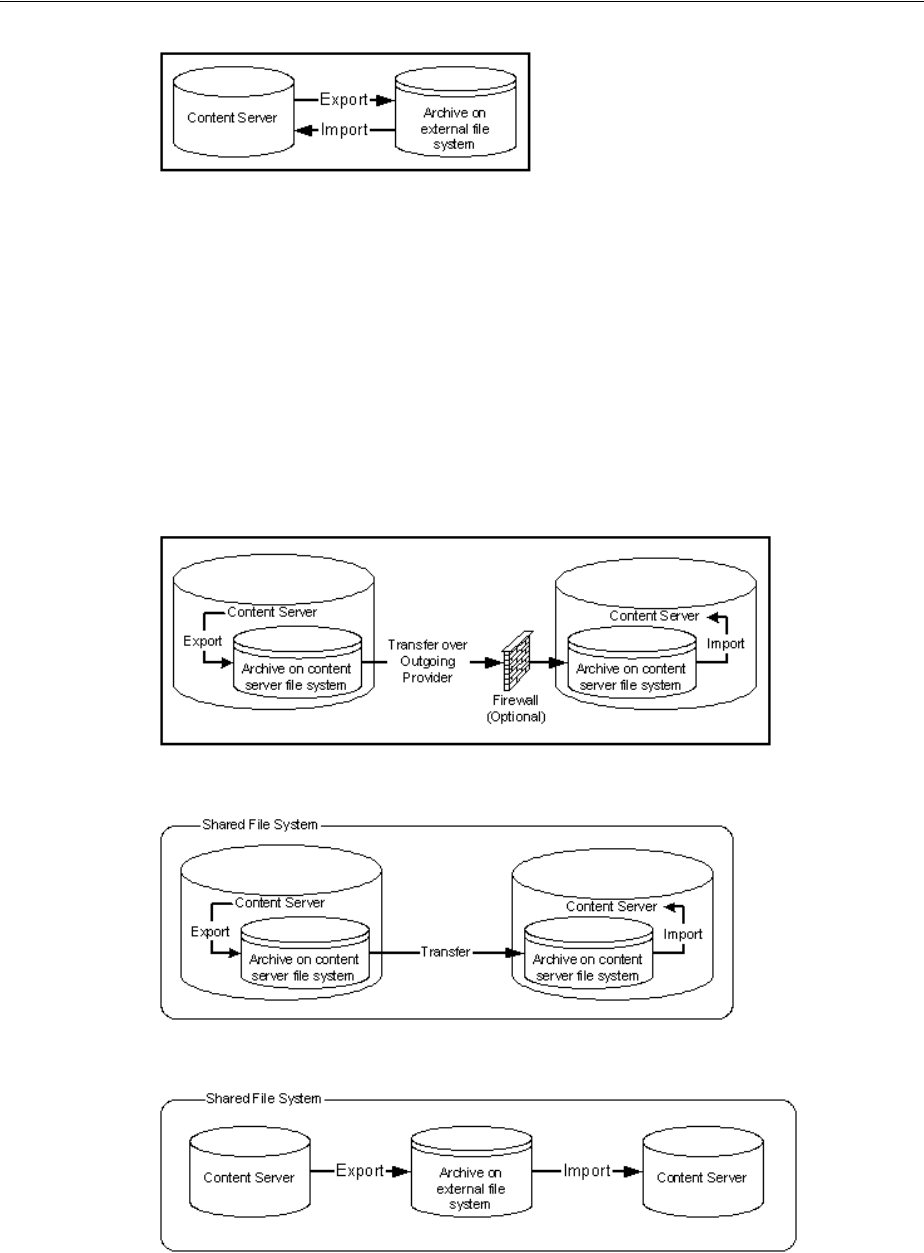
Archive and Migration Strategies
Managing System Migration and Archiving 8-59
8.8.4 One-to-One Archiving
This section provides information about one-to-one archiving.
Summary
One-to-one archiving is used to copy or move content from one Oracle Content Server
instance to another.
Configurations
The following are possible one-to-one archiving configurations, shown in order from
most to least typical:
■Export, transfer, and import over sockets.
■Export, transfer, and import on a shared file system.
■Export to and import from a collection on a shared external file system.
■Export to the source Oracle Content Server collection and import directly from
that collection on a shared file system.
Archive and Migration Strategies
8-60 Oracle Fusion Middleware System Administrator's Guide for Oracle Content Server
■Export from the source Oracle Content Server instance directly to a collection on
the target Oracle Content Server instance and import from that collection on a
shared file system.
8.8.5 One-to-Many Archiving
This section provides information about one-to-many archiving.
Summary
One-to-many archiving is typically used to copy or move content from a contribution
server to consumption servers.
Configurations
The following are possible one-to-many archiving configurations, shown in order from
most to least typical:
■Export, transfer, and import over sockets.
When this configuration is automated using replication, a separate export archive
is required for each target server because the source files are deleted upon transfer.
However, for manual transfer, you could transfer a single archive to multiple
targets.

Archive and Migration Strategies
Managing System Migration and Archiving 8-61
■Export, transfer, and import on a shared file system.
When this configuration is automated using replication, a separate export archive
is required for each target server because the source files are deleted upon transfer.
However, for manual transfer, you could transfer a single archive to multiple
targets.
■Export to and import from a collection on a shared external file system.
When this configuration is automated using replication, a separate export archive
is required for each target server because the source files are deleted upon import.
However, for manual import, you could import a single archive from multiple
targets.
Archive and Migration Strategies
8-62 Oracle Fusion Middleware System Administrator's Guide for Oracle Content Server
■Export to the source Oracle Content Server collection and import directly from
that collection on a shared file system.
When this configuration is automated using replication, a separate export archive
is required for each target server because the source files are deleted upon import.
However, for manual import, you could import a single archive from multiple
targets.
■Export from the source Oracle Content Server instance directly to collections on
the target Oracle Content Server instances and import from those collections on a
shared file system.
8.8.6 Many-to-One Archiving
This section provides information about many-to-one archiving.
Summary
Many-to-one archiving is typically used to:
■Copy or move content from several contribution servers to one consumption
server.
■Move sensitive content from several contribution servers to a more secure
contribution server.
Configurations
The following are possible many-to-one archiving configurations, shown in order from
most to least typical:
Archive and Migration Strategies
Managing System Migration and Archiving 8-63
■Export, transfer, and import over sockets.
■Export, transfer, and import on a shared file system.
■Export to and import from a collection on a shared external file system.
■Export to the source Oracle Content Server instances' collections and import
directly from those collections on a shared file system.

Archive and Migration Strategies
8-64 Oracle Fusion Middleware System Administrator's Guide for Oracle Content Server
■Export from the source Oracle Content Server instances directly to a collection on
the target Oracle Content Server instance and import from that collection on a
shared file system.
8.8.7 Archiver Examples
This section provides examples that illustrate how to use Archiver to solve common
business problems.
■Section 8.8.7.1, "Copying an Oracle Content Server Instance to a Laptop"
■Section 8.8.7.2, "Transferring by Content Type and Author"
■Section 8.8.7.3, "Changing Metadata Fields"
■Section 8.8.7.4, "Adding Content ID Prefixes"
■Section 8.8.7.5, "Changing Release Dates"
8.8.7.1 Copying an Oracle Content Server Instance to a Laptop
In this example, you need to set up a laptop computer with a copy of an Oracle
Content Server instance for a colleague who will be traveling.
This procedure assumes that the source Oracle Content Server instance and the laptop
computer have access to the same file system, and that the laptop computer has Oracle
Content Server installed.
1. Open Archiver on the source Oracle Content Server instance.
2. Create a new archive.

Archive and Migration Strategies
Managing System Migration and Archiving 8-65
3. Because you want to export all content, you do not need to create an export query.
4. To limit the file size of the archive, select the Latest Revisions option on the Edit
Export Query screen.
5. If content types and user attributes need to be copied to the laptop system, select
Content Configuration and User Configuration on the Export Data tab.
6. Set export options from the General tab:
■To save space on the local system, select Replace Existing Export Files.
■If your colleague needs web-viewable files, select Copy Web Content.
7. Initiate the export manually.
8. Open Archiver on the laptop Oracle Content Server instance.
9. Open the source collection and select the archive to import.
10. If content type and user attributes were exported, select these options on the
Import Archive screen.
11. Initiate the import manually.
8.8.7.2 Transferring by Content Type and Author
In this example, you have a contribution Oracle Content Server instance where users
submit content. You want to automatically archive HR content that is contributed by
JChang to an Oracle Content Server instance in another building that serves as a
Human Resources portal.
This procedure assumes that the two Oracle Content Server instances do not have
access to a shared file system, and that the Human Resources portal server should
contain only the latest revision of each content item.
Set up an automated export on the Contribution Oracle Content Server instance:
1. Create an archive.
2. Set these export queries for the archive:
3. On the Edit Export Query screen:
■Select Export Revisions with Release Date later than most recent Export
Date.
■Select the Latest Revisions option.
4. Set export options from the General tab:
■To save space on the local system, select Replace Existing Export Files.
■To include web-viewable files in the archive, select Copy Web Content.
5. Export the archive manually.
6. On the Replication tab, register the archive as an automated exporter.
Set up an automated import on the HR Portal Oracle Content Server instance:
1. Create a target archive.
Field Operator Value
Content Type Is HR
Author Is JChang

Archive and Migration Strategies
8-66 Oracle Fusion Middleware System Administrator's Guide for Oracle Content Server
2. Select the target archive and ensure that the Update Override Action is set on the
General tab.
3. Import the target archive manually.
4. On the Replication tab, register the archive as an automated importer.
Set up an automated pull transfer from the Contribution server to the HR Portal
server:
1. On the Contribution Oracle Content Server instance, create an outgoing provider
to the HR portal Oracle Content Server instance.
2. Open Archiver on the HR portal Oracle Content Server instance.
3. Open the target collection and make the target archive 'targetable.'
4. Open the source collection and select the source archive.
5. On the Transfer To tab, select the target archive as the target destination.
6. Run a manual transfer.
7. Set the transfer to be automated.
8.8.7.3 Changing Metadata Fields
In this example, you have a custom metadata field, ApprovedBy, which was used in one
Oracle Content Server instance, but the field name must be changed to Sponsor for
consistency with other Oracle Content Server instances.
1. Create the new Sponsor metadata field.
2. Create an archive.
3. Manually export all content to the archive. (You do not need to create an export
query.)
4. Set up the following import field map for the archive:
5. From the General tab, select Update as the Override Action.
6. Initiate the import manually.
7. Delete the ApprovedBy field from the Oracle Content Server instance.
8.8.7.4 Adding Content ID Prefixes
In this example, you have two Oracle Content Server instances that are used as
contribution servers, but you want to have all content available for consumption from
both servers. You can set up an automatic transfer in both directions. However, both
Oracle Content Server instances use automatic Content ID generation with similar
numbering schemes, which could result in errors or overwritten revisions if you
import files with Content IDs that already exist on the target Oracle Content Server
instance.
■One way to avoid conflicts is to add a unique prefix in the Auto Number Prefix
system property on both Oracle Content Server instances.
■Another way to accomplish this is to add a unique prefix during the import
process:
Export Field Target Field
xApprovedBy Sponsor

Archive and Migration Strategies
Managing System Migration and Archiving 8-67
To add content ID prefixes:
1. Set up the following value map on the first Oracle Content Server instance's
import archive:
2. Set up the following value map on the second Oracle Content Server instance's
import archive:
8.8.7.5 Changing Release Dates
In this example, you are copying archives to other Oracle Content Server instances
using replication or transfer, but you want the release date on the target Oracle
Content Server instance to be the date the content item was copied.
1. Set up an export and import for replication or transfer.
2. Select the archive to import in the target Oracle Content Server instance.
3. Set up the following import value map for the archive:
The release dates will reflect the local date and time of the target Oracle Content
Server instance.
8.8.8 Configuration Migration Tips
There are several points to keep in mind when using the Configuration Migration
Utility.
■If you use directory locations on the target system that differ from the standard
Oracle Content Server installation directories, you cannot use Configuration
Migration but must do a manual copy of the pertinent directories.
For example, if you use partitioned file systems and want to split Oracle Content
Server storage on the partitions, you must add configuration variables to the
DomainHome/ucm/cs/bin/intradoc.cfg file to point to the correct locations for the
directories that are stored elsewhere.
■If you are using different web servers for the source and the target systems, make
sure to exclude the web server information when using Configuration Migration
to prepare an export.
■Not all components can be exported using the Configuration Migration Utility. For
example, components that require an interactive installation cannot be exported.
They must be installed separately on the target system.
■Dynamic Converter rules are not transferred with the Configuration Migration
Utility. They must be manually added to the target system by copying the
data/conversion/cvtemplates.hda file from the source system to the target system.
Input Value Field Output Value
All checkbox Content ID server2_<$dDocName$>
Input Value Field Output Value
All checkbox Content ID server1_<$dDocName$>
Input Value Field Output Value
All checkbox Release Date <$dateCurrent()$>

Folder Archiving
8-68 Oracle Fusion Middleware System Administrator's Guide for Oracle Content Server
In addition, you should create an archive for dynamic converter templates and
transfer them to the target system before transferring other content. Otherwise an
error occurs when a document that is eligible for dynamic conversion is imported.
■The Configuration Migration Utility is particularly useful for propagating a part of
an instance to another. For example, some customization, such as workflows or
content profiles, may best be designed and tested on a development instance.
After they are tested they can be migrated to your production system. Other
development work, such as component development, is probably best done using
the Component Wizard and Component Manager for testing and deployment.
■Problems can occur when importing archives if required fields and validated
option lists are not considered. If metadata fields have been changed to be
required or if option lists have been altered between one migration and another, it
will be difficult to import content into another system with those same metadata
field definitions. To avoid this problem, temporarily change required fields to be
non-required and change option lists to be non-validated before importing data on
a target system.
■You can use the Configuration Migration Utility with the archiver to create a
regular 'snapshot' of your instance.You should also make sure to make
appropriate backups of your databases at the same time, to ensure that the entire
system stays synchronized.
■You should create a configuration migration package before creating an archive
package to ensure that the appropriate metadata information is available on the
importing Oracle Content Server instance.
■Remember that migration is an additive process. The exporting configuration
bundle of metadata information is added to the metadata that currently exists in
the importing Oracle Content Server instance. If metadata information currently
exists that matches the metadata being imported, and if the Force Overwrite rule
has been selected during import, then the metadata on the importing Oracle
Content Server instance is overwritten by the metadata from the exported bundle.
8.9 Folder Archiving
This section provides information about folder archiving.
■Section 8.9.1, "Folder Archive Functions"
■Section 8.9.2, "Exporting an Archived Folder Structure"
■Section 8.9.3, "Importing an Archived Folder Structure"
8.9.1 Folder Archive Functions
The Folder Archive is part of the Folders component and has the following
functionality:
■Export a folder hierarchy: Used to assign a filename to an exported archive file
and save it in a specified location.
■Import folder hierarchy: Used to specify the filename of an archive to import. The
imported folder structure removes all current folders and replaces them with the
folder hierarchy.
The Virtual Folder Administration Configuration page is used to export and import
folder archives.
Folder Archiving
Managing System Migration and Archiving 8-69
Figure 8–20 Virtual Folder Administration Configuration Page
8.9.2 Exporting an Archived Folder Structure
To export a folder hierarchy as an archive, use the following procedure:
1. Log in to the Oracle Content Server instance as an administrator.
2. Open the Administration tray.
3. Click the Folder Configuration link.
4. Click Export Archive.
A File Download window is displayed.
5. Click Save.
A Save As window is displayed.
6. Navigate to the directory where you want to save the folder archive file.
7. Specify a new file name so that you can easily identify the archive file (for
example, 041127_CollectionArchive).
8. Click Save.
The folder hierarchy is exported to the specified file.
Note: In Windows, if you leave the file type as Text Docume n t , a .txt
extension will be appended to the file name (for example,
CollectionArchive.hda.txt). To save the file with just the .hda extension,
select the All Files file type.

Folder Structure Archiving
8-70 Oracle Fusion Middleware System Administrator's Guide for Oracle Content Server
8.9.3 Importing an Archived Folder Structure
Use the following procedure to import an archived folder structure:
1. Log in to the Oracle Content Server instance as an administrator.
2. Open the Administration tray.
3. Click the Folder Configuration link.
4. Click Browse and navigate to the archive file you want to import.
5. Click Open.
The path and file name appear in the field.
6. Click Import Archive.
A confirmation prompt is displayed.
7. Click OK.
The archived folder is imported and re-created.
See the Oracle Fusion Middleware Application Administrator's Guide for Content Server for
details about exporting and importing folders.
8.10 Folder Structure Archiving
The FolderStructureArchive component enables you to archive the folder structure as
well as its associated content (if desired). The structure of the folders is archived
through database table replication. You can configure which folders (along with all
subfolders) should be archived. The folder archives can be accessed by the Oracle
Content Server Archiver utility for further processing (for example, replication or
transfer to a different Oracle Content Server instance). This component supports both
Folders and Folders_g.
The FolderStructureArchive component is installed, but disabled, by default with the
Oracle Content Server instance. To use the component you must enable it with the
Component Manager.
This section covers the following topics:
■Section 8.10.1, "Overview of FolderStructureArchive Component"
■Section 8.10.2, "Differences With Built-in Folders Archiving Features"
■Section 8.10.3, "Managing Folder Structure Archives"
■Section 8.10.4, "Important Implementation Considerations"
Note: Depending on the size of the folder hierarchy that is being
exported as an archive file, the default heap size value for the JVM
may not be adequate. If memory errors are issued during the export
procedure, the heap size may need to be increased.
Caution: This procedure removes all current folders and replaces
them with the imported folder hierarchy. Typically, you should
perform this procedure only on an Oracle Content Server instance that
has no content items in the repository.

Folder Structure Archiving
Managing System Migration and Archiving 8-71
8.10.1 Overview of FolderStructureArchive Component
The FolderStructureArchive component has several uses, including:
■As a backup tool: You can use this component to back up the folder structure
(including its content, if desired) and store it in a safe place to be restored in a
server malfunction or other calamity.
■As a duplication tool: You can use this component to copy the folder structure
(including its content, if desired) and create an exact copy on a different computer
to simplify multiserver setups.
■As a synchronization tool: You can use this component to keep the folders
environment between two systems synchronized (for example, a development
system and a production system, or two identical, redundant systems). Folder
archives created using the Folder Structure Archive component can be transferred
or replicated to another system.
8.10.2 Differences With Built-in Folders Archiving Features
The FoldersStructureArchive component has its own built-in archiving features, which
are accessed on the Virtual Folder Administration Configuration page.
Functionality Differences
The FolderStructureArchive component can be used alongside built-in archiving
features, but its functionality differs in several important ways:
■The component can export selected portions of the folder structure, whereas the
built-in Folders archiving features can only export the entire folder structure.
■The component can create incremental archives-that is, archives that contain only
changed folders compared to an earlier version- whereas the built-in Folders
archiving features can only create archives that contain all items, even unchanged
ones.
■The component can include both the folder structure and folder content in the
archives (depending on the value of a FolderStructureArchive Component
Variables), whereas the built-in Folders archiving features can only export the
folder structure and none of the content in the folders.
■Unlike the built-in Folders archiving features, the component allows the creation
of multiple source folder archives, which can all be imported, transferred, or
replicated to the same target Oracle Content Server instance using Oracle Content
Server's Archiver utility.
Processing Differences
If you export the complete folder structure using the built-in Folders archiving
features and you import it into another Oracle Content Server instance (using the
Folders user interface), then that server's existing folder structure is deleted entirely
and replaced with the imported structure.
If you create an archive using the FolderStructureArchive component and you import,
transfer, or replicate it to another Oracle Content Server instance (using the Archiver
utility), then the existing folder structure is not deleted, and the archived structure is
merged into the existing structure.
Important: Please ensure that you read the Section 8.10.4, "Important
Implementation Considerations."

Folder Structure Archiving
8-72 Oracle Fusion Middleware System Administrator's Guide for Oracle Content Server
8.10.3 Managing Folder Structure Archives
This section provides information about working with folder structure archives:
■Section 8.10.3.1, "Creating a Folder Structure Archive"
■Section 8.10.3.2, "Updating a Folder Structure Archive"
■Section 8.10.3.3, "Using a Folder Structure Archive"
■Section 8.10.3.4, "Configuration Variables"
8.10.3.1 Creating a Folder Structure Archive
To create a new folder structure archive, complete the following steps:
1. Log in to the Oracle Content Server instance as an administrator.
2. Select Administration, then click Folder Archive Configuration.
The Folder Archive Configuration Page is displayed.
3. In the Collection Name list, select the archive collection that the new folder
structure archive should be part of.
4. In the Archive Name field, specify the name of the new folder structure archive.
5. In the shaded area, select all folders to include in the folder structure archive.
If you click the checkbox of a parent folder, all its child folders are selected
automatically as well. You can also select and unselect any of the child folders
individually. A parent folder will only be selected if all of its subfolders are
selected as well. If you unselect any of the child folders, its parent folder is
automatically unselected, too. This does not affect the virtual folder path
properties of the child folder.
6. Click Add.
A message is displayed saying that the folder archive was added successfully. The
archive is now included in the Archive Name list, and also in the list of current
archives for the Oracle Content Server instance; see Section 8.10.3.3, "Using a
Folder Structure Archive."
8.10.3.2 Updating a Folder Structure Archive
You can use the definition of an existing folder structure archive, modify it, and create
an updated archive. Complete the following steps:
1. Log in to the Oracle Content Server instance as an administrator.
2. Go to the Administration page of the Oracle Content Server instance and select
Folder Archive Configuration.
The Folder Archive Configuration Page is displayed
3. If required, assign the archive to a different collection in the Collection Name list.
4. In the Archive Name list, select the name of the folder structure archive to update.
Important: Ensure that you provide an archive name before selecting
folders to be included in the archive. If you select folders first and
then specify an archive name, nothing happens when you click Add.
(The folder tree collapses completely and your folder selection is lost).
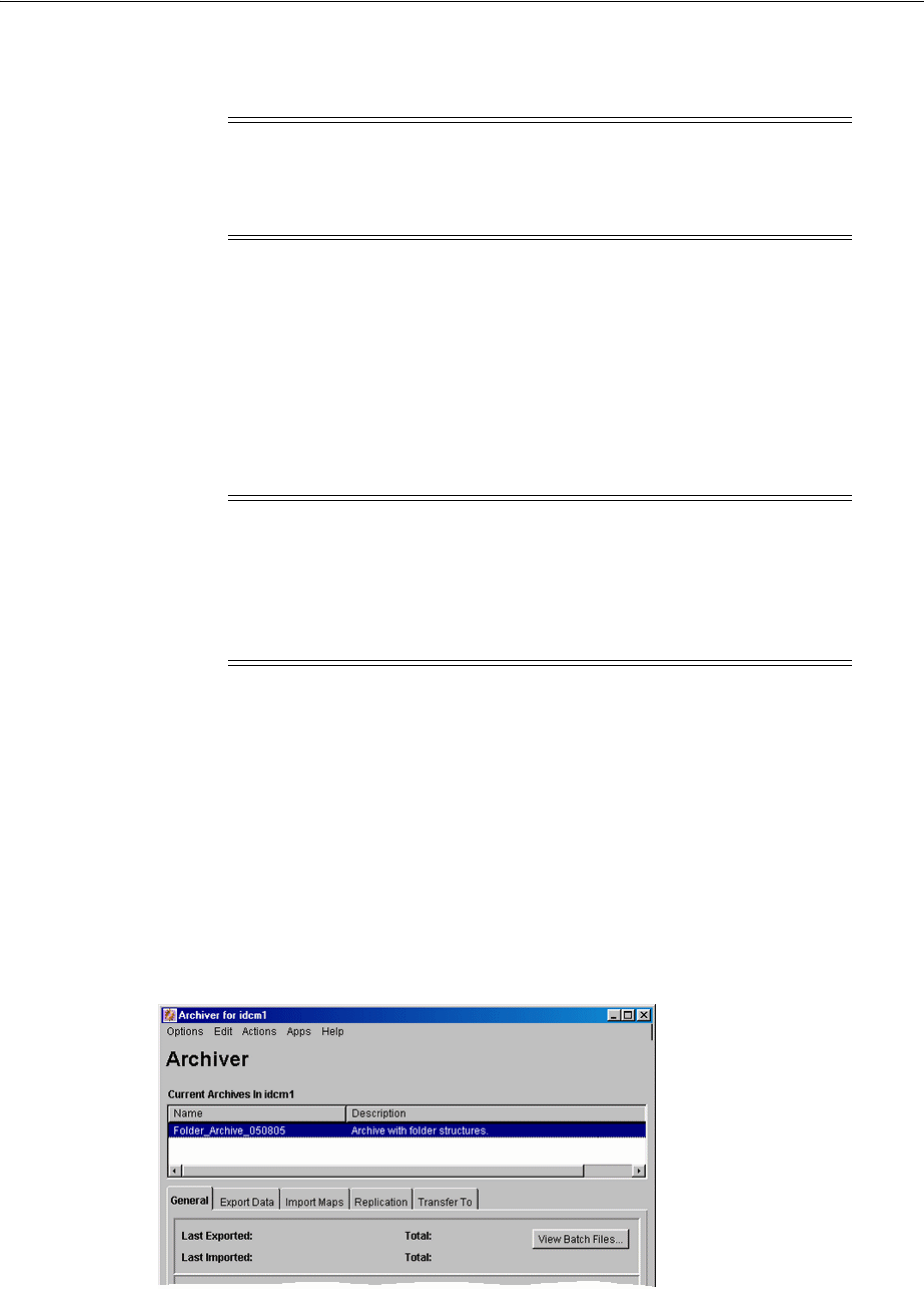
Folder Structure Archiving
Managing System Migration and Archiving 8-73
The folder archive tree in the shaded area is updated to reflect the current
selections for the archive.
5. When defining the folder structure archive on the Folder Archive Configuration
Page, you can select a folder without selecting its parent folder.
If you click the checkbox of a parent folder, all its child folders are selected
automatically as well. You can also select and unselect any of the child folders
individually. A parent folder will only be selected if all of its subfolders are
selected as well. If you unselect any of the child folders, its parent folder is
automatically unselected, too. This does not affect the virtual folder path
properties of the child folder.
6. Click Update.
A message is displayed saying that the folder archive was updated successfully.
To process this archive further, see Section 8.10.3.3, "Using a Folder Structure
Archive."
8.10.3.3 Using a Folder Structure Archive
After you create a new folder structure archive, its files are located in the Intradoc_
Dir/archives/Archive_Name directory, and it is included in the list of current archives
for the Oracle Content Server instance in the Archiver utility:
Figure 8–21 Folder structure archive in Archiver utility
The Name column contains the name that was given to the archive when it was
created. See Section 8.10.3.1, "Creating a Folder Structure Archive." The Description
Note: You cannot save the selected archive under a different name. If
you change the name in the Archive Name field and click Add, the
archive is considered a new archive and you must select the folders
again before clicking Add.
Note: By default, if a parent folder is not selected, its source
collection ID is not passed on to its child folders. If you want the
source collection ID of a folder to be retained even if its parent folder
is not selected, set the AllowMigrationOfParentFoldersMeta
variable to true (this is not the default). For details, see Section ,
"FolderStructureArchive Component Variables."

Folder Structure Archiving
8-74 Oracle Fusion Middleware System Administrator's Guide for Oracle Content Server
column will always say "Archive with folder structures" to indicate the archive's
purpose.
The folder structure archive can now be processed further. All normal Archiver
functions can be used. For example, the archive can be transferred or replicated to a
different Oracle Content Server instance.
8.10.3.4 Configuration Variables
There are several configuration variables that you can use to modify the behavior of
folder structure archiving. This section provides information about the types of such
variables.
FolderStructureArchive Component Variables
The variables for the FolderStructureArchive component are set in the following file:
IdcHomeDir/components/FolderStructureArchive/folderstructurearchive_
environment.cfg. This is a read-only file, so if you want to modify a setting, use the
Admin Server: General Configuration Page.
The following configuration parameters are supported:
■ArchiveFolderStructureOnly=true|false: If this variable is set to true, the archive
will only include the folder structure and none of the content items contained in
the structure. This variable enables you to create a copy of the folder structure for
backup purposes or identical multiserver setup. The default is false, which means
that content items are included in the folder archive.
■AllowArchiveNoneFolderItem=true|false: If this variable is set to true, the
archive will include content items, even if they are not in the folder structure. The
content that does not belong to any folder is included in the folder structure
archive. If it is set to false, only content items that are in the folder structure are
exported. You can use this configuration variable to set up replication for folders
and content at the same time; otherwise additional replication for folders and
normal content would be required. The default is true, which means that content
items outside of the folder structure are also included in the folder archive.
■AllowMigrationOfParentFoldersMeta=true|false: If this variable is set to true,
the source collection ID of a folder is retained (migrated from the parent folder),
even if the parent folder is not selected on the Folder Archive Configuration Page.
The default is false, which means that metadata of parent folders is not passed on
unless the parent folder is specifically selected.
Folders Component Variables
The variables for the Folders component are set in the following file:
IdcHomeDir/components/Folders_g/folders_environment.cfg. This is a read-only file,
so if you want to modify a setting, use the Admin Server: General Configuration Page.
The following Folders configuration variable is useful with the Folder Structure
Archive component:
Note: For several important considerations that should be taken into
account when implementing the Folder Structure Archive component,
see Section 8.10.4, "Important Implementation Considerations."
Important: After modifying a configuration parameter value, ensure
that you restart the Oracle Content Server instance.

Folder Structure Archiving
Managing System Migration and Archiving 8-75
■CollectionIsConsumptionOnly=true|false: If this variable is set to true, the
folders environment on the Oracle Content Server instance is locked, which means
the server is set to receive folder data only (hence consumption). Users with RWD
permissions are not allowed to create, move, modify, or delete folders. Users with
Admin permissions are not allowed to create folders, but they can move, modify,
and delete folders.
This setting should typically be set on an Oracle Content Server instance that is the
target of an archive transfer or replication. It prevents out-of-sync errors between
the source server and target server, which could arise if folders were manipulated
manually on the target server.
The default setting is false, which means the folders environment on the Oracle
Content Server instance is not locked.
In a replication setup, any deleted folders on the source system are not
automatically deleted on the target system. Even with the target system in
consumption-only mode, system administrators can manually delete the affected
folder on the target system. (Please note that they cannot create folders.)
8.10.4 Important Implementation Considerations
Please note the following important implementation considerations:
■The FolderStructureArchive component cannot be used to replicate Collaboration
Manager projects. The folder tree on the Folder Archive Configuration Page will
include all collaboration project folders, and you can archive and transfer them to
another system. However, a transfer will not carry over all required collaboration
project information (access control lists, and so on.) The collaboration projects will
not work on the target system.
■The FolderStructureArchive component cannot be used to replicate Site Studio
web sites. The folder tree on the Folder Archive Configuration Page will include
all Site Studio website folders, and you can archive and replicate them to another
system. However, the replicated website may not work correctly on the target
system. If you want to replicate a Site Studio website, use Site Studio's built-in
replication features.
■If you are using the FolderStructureArchive component as a duplication or
synchronization tool between two systems, it is recommended that you select
different initial collection IDs (InitialColID setting) for the source and target
system when installing the Folders component. If the initial collection IDs are the
same and users are allowed to manipulate folders on the target system, there may
be collection ID collision errors during the duplication or synchronization process.
■You can select a folder in the tree on the Folder Archive Configuration Page
without selecting its parent folder. This does not affect the folder's virtual folder
Caution: If users are allowed to manipulate folders on the target
server, ensure that you select a different initial collection ID
(InitialColID setting) for the target server than for the source server
during the Folders component installation. Otherwise there may be
collection ID collision errors.
Important: After modifying a configuration parameter value, ensure
that you restart the Oracle Content Server instance.

Archiver Replication Exceptions
8-76 Oracle Fusion Middleware System Administrator's Guide for Oracle Content Server
path-in other words, the virtual path will remain to be [Parent_Folder]/[Folder],
even if [Parent_Folder] is not selected. If you transfer or replicate the archive to
another Oracle Content Server instance and the parent folder does not exist on that
server, it is automatically created, but without the metadata of the corresponding
folder on the source server.
■If you want to transfer or replicate a folder structure archive between two Oracle
Content Server instances, it is recommended that you do not manually create the
folder structure on the target system. Folders that do not exist on the target system
are created automatically during the transfer or replication process. If you do
create folders manually, this may lead to out-of-sync errors during the process
since the folder names may match, but their underlying unique identifiers
(xCollectionID) do not. To help reduce mismatching folder issues, you can use
the CollectionIsConsumptionOnly configuration variable to lock the folders
environment on the target system.
■If you set up replication between two systems using the FoldersArchiveStructure
component, folders that are created or moved on the source system are
automatically created or moved on the target system as soon as content is added
to the source folder. Also, if you change the metadata of a folder on the source
system, these changes are automatically reflected on the target system as well (as
soon as content is added to the target folder). Any folders that are deleted on the
source system are automatically deleted on the target system. When a folder is
deleted, all its information is gone.
Similarly, if a folder move causes the folder to no longer reside in an archived
folder, this folder will not be archived and replicated. Consider a system with
folders /FolderA, /FolderA/SubfolderA, /FolderB, and /FolderB/SubfolderB. If /FolderA is
set up to be archived and /FolderB is not, moving SubfolderA to /FolderB means it
will not be replicated. However, if both /FolderA and /FolderB are archived, the
move of SubfolderA would be replicated.
■If you set up archiving or replication of folders and content items using the
FoldersArchiveStructure component, the shortcuts of the folders and content items
are not archived or replicated.
8.11 Archiver Replication Exceptions
The ArchiverReplicationExceptions component can be used to prevent failed imports
from stopping replication. This component is installed and enabled by default with the
Oracle Content Server instance.
This section covers the following topics:
■Section 8.11.1, "Overview of ArchiverReplicationExceptions"
■Section 8.11.2, "Administering and Using ArchiverReplicationExceptions"
8.11.1 Overview of ArchiverReplicationExceptions
The ArchiverReplicationExceptions component enables administrators to prevent
failed imports from stopping replication. It does this by capturing such failed imports
and putting them into an exceptions archive and sending e-mail to the administrator
that such a failed import has occurred.
■Section 8.11.1.1, "How ArchiverReplicationExceptions Works"
■Section 8.11.1.2, "Scenario 1"
■Section 8.11.1.3, "Scenario 2"

Archiver Replication Exceptions
Managing System Migration and Archiving 8-77
8.11.1.1 How ArchiverReplicationExceptions Works
Several configuration entries must be manually added to the
IntradocDir/config/config.cfg file to support ArchiverReplicationExeceptions. The
configuration entries define a variety of conditions to determine the level of error
reporting, to direct failed imports to an exceptions directory, and to ignore and handle
multiple failed imports when a systemic error is detected. Parameters for both
automatic and manual imports are provided.
8.11.1.2 Scenario 1
In this scenario an import of a document has failed because the content type "DOC"
does not exist in the importing server. The error reporting level
(ArchiverEmailErrorLevel) was set to collision, standard, severe, and the
ArchiverErrorNotifyUser was set to sysadmin. The following is an example of an
archiver import failure e-mail notification:
Archiver Import Failure
There was a serious error during the import of a document which may prevent that
document from being properly synchronized in state with the exporting content
server. Content item 'test1' was not successfully checked in. The content
type 'DOC' is not defined in the system.
Revision Being Imported
Collection: idc
Archive Name: ar1
Source Instance: idc
Batch Name: 07-sep-24_15.15.41_766/07267151541~1.hda
Content ID: test1
Title: test1
Author: sysadmin
Revision: 1
Release Date: 9/24/07 3:13 PM
Create Date: 9/24/07 3:14 PM
The Document Has Been Copied To An Exceptions Archive
Collection: idc
Archive Name: ImportExceptions
Batch Name: 07-sep-24_15.15.41_766/07267151541~1.hda
Total Captured In Archive: 1
8.11.1.3 Scenario 2
An import is being attempted but continually fails. The system administrator is aware
that there may be problems during the import, but does not want an e-mail
notification of every failure. By setting the ArchiverMaxConsecutiveImportErrors
(default is 10), the system administrator can set several failures that can occur before
the cessation of e-mail notification. E-mail is sent until this number of errors is
reached. If any import from the exporter should succeed before the set number is
reached, or if the Oracle Content Server instance is restarted, the counter is reset to 0.
Note that when the maximum number of errors is reached the automated import of
the archive is aborted.
8.11.2 Administering and Using ArchiverReplicationExceptions
The primary purpose for this component is to allow filtering of failed imports to
optimize the handling and notification of such failures. For content items to be
processed by ArchiverReplicationExceptions, the administrator must manually set
configuration entries in the IntradocDir/config/config.cfg file. The configuration

Archiver Replication Exceptions
8-78 Oracle Fusion Middleware System Administrator's Guide for Oracle Content Server
variables customize the behavior of the importing Oracle Content Server instance to
allow for certain situations and to distribute the error reporting based on the
configured criteria.
The following configuration variables can be used to customize behavior. These values
should be set in the IntradocDir/config/config.cfg file under #Additional
Variables.
By prepending any of the configuration entries with the name of an archive, with a
colon (:) as a separator, that configuration entry will only apply to that archive. For
example, to enable capturing exceptions for the archive MyRemoteImportArchive, use
the following entry in the config.cfg file:
MyRemoteImportArchive:IsArchiverCapturingExceptions=true
If an archive name prefix is not applied, then the value set is the global default for all
archives.
■IsArchiverCapturingExceptions: The primary functionality of this
component is not enabled unless this configuration entry is turned on.
Default is false.
■ArchiverImportExceptionsArchiveName: The name of the archive to hold
failed imports. The archive will be created in the same archive collection as the
archive that contained the document that failed an import.
The default is ImportExceptions.
■ArchiverMaxConsecutiveImportErrors: The maximum number of
consecutive import errors before the import of the archive is aborted.
The default is 10.
■ArchiverErrorNotifyUser: The user to notify when there is an import failure.
The default is sysadmin. The e-mail is generated only if the import error is at a
level that is configured to generate e-mail.
The entry can be a comma separated list of user names, but all the user names
have to be defined in the Oracle Content Server instance and have associated
e-mail addresses.
■ArchiverEmailErrorLevels: The error levels at which an import error should
generate e-mail during automated import. The possible levels are as follows:
–collision: The import failed because an existing revision of a document
blocked it. Usually this is caused by the importing revision having a release
date (or create date depending on configuration) that is earlier than the date of
the latest revision of an existing document.
– standard: The import failed because of a normal error. A typical such error
would be a metadata field that has an invalid value.
– severe: The import failed because of a severe unexpected error in the Oracle
Content Server instance. A typical reason for this might be a network failure to
either the file system or database.
The configuration entry is set to a comma separated list of any of the above values.
If an automated import error occurs, it is classified in one of the above levels and if
the level is in the list configured for this parameter then an e-mail is generated for
that error.
The default is collision,standard,severe (or all).

Archiver Replication Exceptions
Managing System Migration and Archiving 8-79
■ArchiverManualImportEmailErrorLevels: This is similar to
ArchiverEmailErrorLevels except it applies to manual archive imports. A
manual import is one directly driven by an end user or administrator and is not
part of an import done by a "registered automated importer".
The default is empty (or none).
■ArchiverCaptureExceptionErrorLevels: A list of error levels for which an
import error should capture a copy of the document and put it into the exceptions
archive (see ArchiverImportExceptionsArchiveName). If the document is
captured then the error will not stop an automated import. The automated import
will delete the document from the archive when the batch file containing the
document has been fully imported. See ArchiverEmailErrorLevels for a list
of error levels and how to configure the entry.
The default value is collision,standard.
■ArchiverManualImportCaptureExceptionErrorLevels: This is similar to
the ArchiverCaptureExceptionErrorLevels parameter except it applies to
manual archive imports (see ArchiverManualImportEmailErrorLevels for
more on manual imports). If an import error is captured it is copied into the
exceptions archive but it does not delete it from the originating archive. If the error
is captured it will not count against the maximum number of errors allowed
during a manual import (see the standard Oracle Content Server configuration
entry MaxArchiveErrorsAllowed which defaults to 50).
The default is empty (or none).
■ArchiveExceptionsMaxNumberDocuments: The maximum number of
documents that can be stored in the exceptions archive.
When this number is reached, then import failure will again prevent continued
automated import. However, e-mail is sent to ArchiverErrorNotifyUser
indicating that the import failed and that the exceptions archive is full. Unlike the
other configuration entries, if you use an archive prefix (separated by a colon) to
limit the configuration entry to a particular archive, the archive name must be the
name of the exceptions archive not the archive with the originating documents
being imported.
The default is 50.
The parameter ArchiverMaxConsecutiveImportErrors addresses the issue of
skipping over errors and sending e-mail notifications on the errors when the error is
caused by a systemic problem (such as all documents having the same wrong
metadata field on export). This results in numerous documents being unnecessarily
captured and generating the attendant volume of unwanted e-mail. This configuration
entry helps detect such scenarios. During an automated import, if too many
consecutive import errors are detected, then the current archive import is aborted.
Manual imports follow the standard rules for maximum errors (see
MaxarchiveErrorsAllowed).If any import (from any archive) is successful, then
the consecutive import failure count is reset to 0.
If the same document fails an import (twice or more) sequentially e-mail is sent out
only for the first failure. If the same document fails an import but is from a different
batch load file, the e-mail for it is not suppressed if e-mail for that document has
already been sent for a previous error.

Troubleshooting Archiving Issues
8-80 Oracle Fusion Middleware System Administrator's Guide for Oracle Content Server
8.12 Troubleshooting Archiving Issues
This section provides solutions to several common archiving issues.
■Section 8.12.1, "Importing Issues"
■Section 8.12.2, "Exporting Issues"
■Section 8.12.3, "Transfer Issues"
■Section 8.12.4, "WebDAV Issues"
■Section 8.12.5, "Replication Issues"
■Section 8.12.6, "Oracle-Specific Issues"
■Section 8.12.7, "Miscellaneous Issues"
8.12.1 Importing Issues
This section covers the following topics:
■Section 8.12.1.1, "File Extension Errors on Import System"
■Section 8.12.1.2, "Selecting Specific Batch Files for Import"
■Section 8.12.1.3, "Import Maps Do Not Work After Archive Import"
■Section 8.12.1.4, "Identifying Imported Content Items From Archive"
■Section 8.12.1.5, "Duplicate Content Items in Oracle Content Server"
■Section 8.12.1.6, "Importing Archived Content to Proxied Server Fails"
■Section 8.12.1.7, "No Importing Errors But Documents Are Missing"
■Section 8.12.1.8, "Errors About Invalid Choice List Values"
■Section 8.12.1.9, "Import Fails Due to Missing Required Field"
■Section 8.12.1.10, "Changed Metadata Field Makes the Archiver Freeze During an
Import"
8.12.1.1 File Extension Errors on Import System
Symptom
I am receiving errors on the importing system indicating that there are transfer and file
extension problems with the documents.
Problem
The following errors were issued to the Archiver log:
Error: Event generated by user <user_name> at host <host_name>. File I/O error.
Saving to file collection.hda. Write error.
Error: Import error for archive <archive_name> in collection <collection_name>:
Content item <item_name> was not successfully checked in. The primary and
alternate files must have different extensions.
Recommendation
The I/O error on the export side probably corrupted the batch file and is, in turn,
causing the file extension error on the import side. Possible solutions include:
■Open the batch file in a text editor and check for invalid data. Try deleting the
exported collection.hda file and manually re-run the export/import function.

Troubleshooting Archiving Issues
Managing System Migration and Archiving 8-81
■On the exporting server, open the applicable collection.hda file and look for the
lines associated with the content items that caused the file extension error. Some of
the revisions of these content items may have the native file in the vault location
listed in the alternate file location. There might also be a format entry for the
alternate file. Delete these lines and re-import the files.
■Add an alternate extensions configuration setting to the Oracle Content Server's
configuration config.cfg file (IntradocDir/config/config.cfg) on the importing
server:
1. Open the config.cfg file in a text editor:
IntradocDir/config/config.cfg
2. Locate the General Option Variables section
3. Enter the following configuration setting:
AllowSamePrimaryAlternateExtensions=true
This configuration setting allows checked in content items to use identical
document extensions for both the alternate and primary files.
4. Save and close the config.cfg file.
5. Restart the Oracle Content Server instance.
8.12.1.2 Selecting Specific Batch Files for Import
Question
How can I select and re-run specific batch files from the General tab of the Archiver
utility without deleting the remaining files that are required for backup purposes?
Recommendation
The most efficient method would be to create a new collection, copy the desired
archives to the new collection, and run the import from there.
8.12.1.3 Import Maps Do Not Work After Archive Import
Symptom
I configured a value map to change metadata values during the import on an archive
collection. But after the transfer, the import maps do not work.
Problem
The metadata values didn't reflect the configured metadata value changes.
Recommendation
To ensure that metadata value changes are retained when the files are exported into an
archive and then later imported from that archive, the value maps must be configured
on both sides of the transfer process. This means that the same value map must be
Note: Although it probably is not necessary to add this configuration
setting to the Oracle Content Server config.cfg file on the exporting
server, it may be worthwhile to do so for general preventative
measures.

Troubleshooting Archiving Issues
8-82 Oracle Fusion Middleware System Administrator's Guide for Oracle Content Server
configured on both the source (exporting) server as well as the target (importing)
server.
8.12.1.4 Identifying Imported Content Items From Archive
Question
Due to a system crash, I need to import content from the old archive into a new
archive without changing the content information (metadata) of the documents. How
can I preface each content item using a letter or number to indicate that all the
documents with this designation are new imports (but actually originated from the old
archive)?
Recommendation
The archived documents can be re-imported and appropriately marked to distinguish
them from other imported content items by applying an import map using the Content
ID metadata field. An import map allows you to configure how values are copied from
one metadata field to another during import. To set up the import mapm, complete the
following steps:
1. On the Import Maps tab of the Archiver utility, click Edit in the Field Maps
section.
The Edit Value Maps screen is displayed.
2. Select All (leave the Input Value field blank).
3. Select Content ID from the Field list.
4. Enter X<$dDocName$> in the Output Value field.
Where 'X' is the letter or number used to distinguish the re-imported content items
and 'dDocName' is the database table field value for the document Content ID.
5. Click OK.
After you re-import the archive, the letter or number used for 'X' should be added to
the content ID of each content item. Be sure to configure the same value map on both
the source (exporting) server and the target (importing) server. This ensures that the
metadata value changes are retained when the files are imported from the archive.
8.12.1.5 Duplicate Content Items in Oracle Content Server
Symptom
When I try to check in or import a content item, the following error message is issued:
Content item already exists.
Recommendation
This error is issued when archiving is done between contribution servers that are
using the same autonumbering scheme for content IDs. For example:
■'Content ID 003' is checked into Oracle Content Server instance A and later
archived to Oracle Content Server instance B. If a file is checked into Oracle
Content Server instance B and the next autogenerated number happens to be 003,
the error occurs.
■'Content ID 005' is checked into both Oracle Content Server instance A and Oracle
Content Server instance B. If this same content item is archived from Oracle
Content Server instance A to Oracle Content Server instance B, the error occurs.

Troubleshooting Archiving Issues
Managing System Migration and Archiving 8-83
Possible solutions include:
■Set up an import value map that will add a prefix to the content ID of the
imported files. For details, see Section 8.12.1.4, "Identifying Imported Content
Items From Archive."
■In each Oracle Content Server instance, use the System Properties utility to set up
an automatic numbering prefix for checked-in content items:
1. Start the System Properties utility.
2. Open the Options tab.
3. Select Automatically assign a Content ID on check in.
4. Enter the desired prefix in the Auto Name Prefix field.
5. Click OK.
6. Restart the Oracle Content Server.
8.12.1.6 Importing Archived Content to Proxied Server Fails
Symptom
I am trying to import content from an exported archive to my proxied Oracle Content
Server, but the import fails.
Recommendation
For more information about Archiver problems, open and view the Archiver logs
(accessible from the Oracle Content Server instance's Administration page). These logs
provide the type of message along with more descriptive information about the logged
messages.
For example, if the Archiver log indicates that an import problem involves a metadata
field option value that is unavailable, information about configured option lists for
metadata fields can be found on the Information Fields tab of the Configuration
Manager utility (accessible from the Administration page).
Using this information, compare the option list for the problem metadata field on both
the exporting and importing servers. If there are any differences, corrections in one of
the servers will make both option lists identical. This would resolve the unavailable
option discrepancy.
8.12.1.7 No Importing Errors But Documents Are Missing
Symptom
When I run the import function, no errors are issued, but not all of the documents are
being imported.
Problem
I exported 428 documents from the development server along with the configuration
information (the metadata fields). Then, I transferred the archive to the main
production server and ran the import. No errors were issued, so I thought everything
had gone well. Unfortunately, when I searched the documents, I discovered that only
198 of the original 428 were actually imported.
Recommendation
Suggestions to resolve this problem include:

Troubleshooting Archiving Issues
8-84 Oracle Fusion Middleware System Administrator's Guide for Oracle Content Server
■Make sure that all Microsoft Word documents are included in the search index.
Particular versions of the search component do not include Microsoft Word
documents with embedded links in the search index. Thus, these files will not be
found in search queries.
You can remove all embedded links from the affected documents or add the
following configuration setting to IntradocDir/config/config.cfg:
CheckMkvdkDocCount=true
This configuration setting ensures that all Word files are included in the search
index. However, only the metadata is included, not the full text.
■Try exporting the original set of documents and ensure that the source files are
deleted. Then re-import the archive that was just exported.
8.12.1.8 Errors About Invalid Choice List Values
Symptom
My imports are failing.
Problem
The system issues error messages indicating that there are invalid choice list values. I
am currently using an option list in the Dependent Choice List applet to configure and
control the values.
Recommendation
Apparently a specific metadata taxonomy has been established for your option lists
such that there are probably fields that are dependent on each other. In this case,
certain values in option lists are available based on what values have been selected in a
previous option list. Unfortunately, when using the Archiver, the dependencies in
your option lists are obviously conflicting with the Oracle Content Server instance's
capacity to work with custom metadata fields.
A workaround for the conflict involves using the Oracle Content Server instance's
Configuration Manager utility rather than the Dependent Choice List applet. This
necessitates that you enter the metadata fields and corresponding option list values on
the Information Fields tab of Configuration Manager:
1. Log in to the Oracle Content Server instance as an administrator.
2. Go to the Administration page and click the Configuration Manager link.
The Configuration Manager utility is started.
3. Open the Information Fields tab.
4. Click the Add button and enter one of your metadata field names in the Add
Custom Info Field dialog.
5. Click OK.
The Add Custom Info Field window is displayed.
6. Complete the fields as appropriate.
7. In the Option List Type field, choose the Select List Not Validated option.
8. This option ensures that content whose specified value does not match one
currently entered in the Use Option List are nevertheless checked in with the

Troubleshooting Archiving Issues
Managing System Migration and Archiving 8-85
specified value. The Use Option List field lists the name for the list of values a user
may choose from for the specified field.
9. Click OK.
10. Click the Update Database Design button.
11. Click the Rebuild Search Index button.
Use this method for the duration of your import process.
8.12.1.9 Import Fails Due to Missing Required Field
Symptom
I used the Archiver to export documents. Now, I'm trying to import them and the
process fails.
Problem
When I try to import the previously exported documents, the Oracle Content Server
issues an error indicating that the 'Company' metadata file is required.
Recommendation
You will need to use the Oracle Content Server instance's Configuration Manager
utility to edit the 'Company' field and make it a non-required field:
1. Log in to the Oracle Content Server instance as an administrator.
2. Go to the Administration page and click the Configuration Manager link.
The Configuration Manager utility is started.
3. Open the Information Fields tab.
4. Select the Company metadata field from the Field Info list.
5. Click Edit.
The Edit Custom Info Field window is displayed.
6. Deselect Require Value.
7. Click OK.
8. Click the Update Database Design button.
9. Click the Rebuild Search Index button.
You should now be able to successfully re-import the archive.
8.12.1.10 Changed Metadata Field Makes the Archiver Freeze During an Import
Symptom
Some of our product names have changed and we need to update one of the metadata
fields in the affected documents. After exporting all the documents with the old
product name metadata field, I then attempt to import the documents using the new
product name metadata field. But, every time I try this, the Archiver processes only a
portion of the total archiving task and then stops.
Problem
Once the Archiver freezes, I am unable to navigate the Oracle Content Server user
interface and I must shut down all of the open browsers. Also, during the next five

Troubleshooting Archiving Issues
8-86 Oracle Fusion Middleware System Administrator's Guide for Oracle Content Server
minutes after shutting down the browsers, I have no connectivity to the Oracle
Content Server at all. After this five-minute interval, I can access the Oracle Content
Server again.
In addition to this freezing problem, the following error message is issued:
Stream error (299) - SKIPPING
Recommendation
One or more processes seem to be interrupting the import. Some possible problem
solutions could be any of the following:
■Checking the Metadata Field Properties
■Checking the Indexing Automatic Update Cycle
8.12.1.10.1 Checking the Metadata Field Properties The product name metadata field may
not have been properly updated in Configuration Manager. Depending on the type of
metadata field that the 'product name' is, changing the value could be the reason for
the lock-up problem. Is the product name metadata field a (long) text field only or also
an option list? If it is an option list, make sure that the new name value is a selection
on the corresponding list.
1. Log in to the Oracle Content Server instance as an administrator.
2. Go to the Administration page and click the Configuration Manager link.
The Configuration Manager utility is started.
3. Open the Information Fields tab.
4. Select the product name metadata field from the Field Info list.
5. Click Edit.
6. The Edit Custom Info Field window is displayed.
7. If the Field Type value is Text or Long Text AND Enable Option List is
unselected, click OK or Cancel (this should not cause the lock-up problem).
Otherwise,
If Enable Option List is selected, then make sure that the new product name
metadata field value is included as a selection on the corresponding list:
a. Locate the Use Option List field and click Edit.
b. Enter the new product name metadata field value in the Option List dialog.
c. Click OK.
8. Click OK again (on the Edit Custom Info Field window).
9. Click the Update Database Design button.
10. Click the Rebuild Search Index button.
8.12.1.10.2 Checking the Indexing Automatic Update Cycle The lock-up problem may be
due to the indexer's automatic update cycle. The error message indicates that the
indexer is failing because it loses connectivity. Every five minutes, the indexer
executes an automatic update cycle and could somehow be grabbing the index file and
locking it. If so, it might be useful to disable the indexer's automatic update cycle while
you run the import.
1. Log in to the Oracle Content Server instance as an administrator.

Troubleshooting Archiving Issues
Managing System Migration and Archiving 8-87
2. Go to the Administration page and click the Repository Manager link.
The Repository Manager utility is started.
3. Open the Indexer tab.
4. Click the Configure button in the Automatic Update Cycle section.
The Automatic Update Cycle dialog is displayed.
5. Deselect Indexer Auto Updates.
6. Click OK.
8.12.2 Exporting Issues
This section covers the following topics:
■Section 8.12.2.1, "Total Export Possible with Blank Export Query"
■Section 8.12.2.2, "New Check-Ins and Batch File Transfers"
■Section 8.12.2.3, "Exporting User Attributes"
■Section 8.12.2.4, "Folder Archive Export Doesn't Work If Collections Table Has
Many Records"
8.12.2.1 Total Export Possible with Blank Export Query
Question
If I do not create an export query to define the content items to export, will the entire
contents of my Oracle Content Server be exported?
Recommendation
Yes, test exports have confirmed that leaving the Export Query section blank (not
defining an export query) will ensure that the Oracle Content Server contents are
completely exported.
8.12.2.2 New Check-Ins and Batch File Transfers
Question
If I check some documents into the Oracle Content Server after I have initiated a large
export (but before it completes), will these documents be included in the export? Or,
does the Archiver read the timestamp information and determine that the new files are
more recent than those originally allocated for the export and not include them? Also,
what happens to the archive export if the connection between the servers is
interrupted or lost during the export?
Recommendation
When the export is initiated, Archiver runs a query on the system to build a list of the
documents that are to be exported. This information is cached and used to build the
Note: Be sure to reactivate the automatic update cycle after
completing the import. Otherwise, the server will no longer
automatically update the index database, which could adversely
impact future search results.

Troubleshooting Archiving Issues
8-88 Oracle Fusion Middleware System Administrator's Guide for Oracle Content Server
export archive. Therefore, any new documents that are checked in during the export
process will not be included even if they match the export query definition.
If the connection between servers is disrupted, the export process on the source server
continues but the transfer to the target server stops. The source server accumulates a
number of batch files. While waiting to transfer these files, the source server continues
to ping the target server for a connection at regular interval. When the connection is
reestablished, the accumulated batch files are transferred to the target server.
If you have used an automated (replicated) transfer, the batch files and their associated
content files are removed from the source Oracle Content Server. If you have used a
manual transfer, the batch files and their associated content files remain in the source
Oracle Content Server.
8.12.2.3 Exporting User Attributes
Question
How can I export users in an archive?
Recommendation
You can export a users.hda file, which contains the user attributes from the Users
database table, as follows:
1. Log in to the Oracle Content Server instance as an administrator.
2. Go to the Administration page and click the Archiver link.
The Archiver utility is started.
3. Open the Export Data tab.
4. Click Edit in the Additional Data section.
The Edit Additional Data dialog is displayed.
5. Select Export User Configuration Information.
6. Click OK.
8.12.2.4 Folder Archive Export Doesn't Work If Collections Table Has Many
Records
Symptom
I use the folder archive export feature to move my website hierarchy created by Site
Studio. Initially, I can export folders by using the Virtual Folder Administration
Configuration page without any problem. However, as my web site grows, this
function does not work anymore. The following errors are issued during the export
procedure:
Error <timestamp> Event generated by user '<user>' at host '<host_name>'. Referred
to by http://<host>/intradoc-cgi/nph-idc_cgi.exe?IdcService= COLLECTION_GET_ADMIN_
CONFIG. Unable to retrieve content. Unable to execute service method
'loadCollectionArchive'. (System Error: Unknown error.)
Error <timestamp> IdcAdmin: Event generated by user '<user>' at host '<host>'.
Unable to obtain the console output. Unable to execute the service
'GET_SERVER_OUTPUT' on Content Server 'contribution'. Unable to receive request.
Response from host has been interrupted. Read timed out.
There is also an out-of-memory error in the Oracle Content Server output console:

Troubleshooting Archiving Issues
Managing System Migration and Archiving 8-89
<timestamp> SystemDatabase#Thread-13: SELECT * FROM Collections, ColMeta WHERE
Collections.dCollectionID=ColMeta.dCollectionID AND dParentCollectionID=564
java.lang.OutOfMemoryError
Reporting error on thread Thread-13 occurring at <timestamp>.
java.lang.OutOfMemoryError
java.lang.OutOfMemoryError
Problem
Depending on the size of the folder hierarchy that is being exported as an archive file,
the default heap size value for the Java Virtual Machine (JVM) may not be adequate.
Recommendation
In the Oracle Content Server's DomainHome/ucm/cs/bin/intradoc.cfg file, comment
out the JvmCommandLine setting and increase heap size to 512 M:
#JvmCommandLine=/home/contribution/shared/os/<os>/j2sdk1.4.1/bin/java -cp
$CLASSPATH $STARTUPCLASS
JAVA_OPTIONS= -Xmx512m
After restarting Oracle Content Server, the archive export function should work
correctly again.
8.12.3 Transfer Issues
This section covers the following topics:
■Section 8.12.3.1, "Transfer Stopped When Target Locked Up"
■Section 8.12.3.2, "Aborting/Deleting a Running Transfer"
■Section 8.12.3.3, "Verifying the Integrity of Transferred Files"
■Section 8.12.3.4, "Transfer Process Is Not Working"
8.12.3.1 Transfer Stopped When Target Locked Up
Symptom
The automated transfer function stopped when the target server locked up.
Problem
After restarting the target server, the log file listed an error message stating that there
was a problem with a security group and that this prevented the import on the target
server.
Recommendation
In this case, obviously the security group problem on the target server must be
corrected before the transfer can proceed. Two additional procedures to perform that
can help include:
■Verifying and Testing the Outgoing Provider
■Restarting the Oracle Content Server
8.12.3.1.1 Verifying and Testing the Outgoing Provider Verifying and testing the outgoing
provider ensures that it is set up and working properly:
1. Log in to the source Oracle Content Server instance as an administrator.
2. Go to the Administration page and click the Providers link.

Troubleshooting Archiving Issues
8-90 Oracle Fusion Middleware System Administrator's Guide for Oracle Content Server
The Providers page is displayed.
3. Click the Info link of the appropriate outgoing provider.
The Outgoing Provider Information page is displayed.
4. Verify the information.
5. Return to the Providers page and click the Test link corresponding to the outgoing
provider.
8.12.3.1.2 Restarting the Oracle Content Server In some cases, after problems have been
corrected on either the source or the target server, the source server may stop
transferring or possibly the automation function no longer works. In either case,
restarting Oracle Content Server should resolve the problem.
8.12.3.2 Aborting/Deleting a Running Transfer
Question
I accidentally started transferring an excessively large file to the production Oracle
Content Server instance. What is the most efficient way to stop the transfer process
while it is running?
Recommendation
There are several methods to abort or delete a transfer, including:
■Disabling the Outgoing Provider
■Deleting a Transfer from the Transfer To Tab
■Deleting an Automated Transfer
8.12.3.2.1 Disabling the Outgoing Provider The fastest method to abort a running transfer
is to disable the source server's outgoing provider:
1. Log in to the source Oracle Content Server instance as an administrator.
2. Go to the Administration page and click the Providers link.
The Providers page is displayed.
3. Click the Info link of the appropriate outgoing provider.
The Outgoing Provider Information page is displayed.
4. Click the Disable button.
8.12.3.2.2 Deleting a Transfer from the Transfer To Tab To delete a transfer from the
Transfer To tab, complete the following steps:
1. Log in to the source Oracle Content Server instance as an administrator.
2. Go to the Administration page and click the Archiver link.
The Archiver utility is started.
3. Select Options and then Open Archive Collection.
4. Select the applicable collection from the list.
5. Click Open.
6. On the Archiver window, select the source archive in the Current Archives list.
7. Open the Transfer To tab.

Troubleshooting Archiving Issues
Managing System Migration and Archiving 8-91
8. Click Remove in the Transfer Destination section.
9. You are prompted to confirm the action.
10. Click Yes.
8.12.3.2.3 Deleting an Automated Transfer To delete an automated transfer from the
Automation for Instance screen, complete the following steps:
1. Log in to the source Oracle Content Server instance as an administrator.
2. Go to the Administration page and click the Archiver link.
The Archiver utility is started.
3. Select Options and then View Automation For Instance.
The Automation For Instance window is displayed.
4. Open the Transfers tab.
5. Select the automated transfer to delete.
6. Click Remove.
The automated transfer is removed from the list.
8.12.3.3 Verifying the Integrity of Transferred Files
Question
What is the best approach to verify the integrity of the files that have been transferred
between two servers? Obviously, the documents in the target Oracle Content Server
instance should be identical to those in the source instance. I need to ensure that all
documents were in fact transferred and if some were not transferred, I must determine
which ones failed to transfer.
Recommendation
To ensure that the transferred documents are identical to those on the source server,
two items can easily be checked.
■The Revisions table:
Specifically, match the contents of the dDocName and dRevLabel columns on both
instances and verify the accuracy or discrepancies between them.
■The file system:
Check the native file repository:
(DomainHome/ucm/cs/vault/content_type)
and Web-viewable file repository:
(DomainHome/ucm/cs/weblayout/groups/public/documents/content_type)
on each server and verify the accuracy or discrepancies between them.
8.12.3.4 Transfer Process Is Not Working
Symptom
The transfer process is not setting up properly.

Troubleshooting Archiving Issues
8-92 Oracle Fusion Middleware System Administrator's Guide for Oracle Content Server
Recommendation
If the transfer process is not functioning correctly, check the outgoing provider on the
source server and ensure that the information is correct. In particular, make sure that
the server host name is correct and matches the HTTP server address.
To verify the server host name on the source server, complete the following steps:
1. Start the System Properties utility.
2. Open the Internet tab.
3. Note the HTTP server address setting.
4. Go to the Administration page and click Providers.
The Providers page is displayed.
5. Click the Info link for the appropriate outgoing provider.
The Outgoing Provider Information page is displayed.
6. Check the server host name and make sure it corresponds exactly to the HTTP
server address setting in System Properties.
7. If the server host name setting is different than the HTTP server address, click the
Edit button.
8. Modify the Server Host Name setting as necessary.
9. Click Update.
10. Restart the Oracle Content Server instance.
8.12.4 WebDAV Issues
This section covers the following topics:
■Section 8.12.4.1, "Archiver Error With WebDAV and Oracle Content Server"
8.12.4.1 Archiver Error With WebDAV and Oracle Content Server
Symptom
I am using both WebDav and the Oracle Content Server instance to check in
documents. I would like to be able to view all of the checked-in documents through
the WebDAV interface but I can see only the documents that were physically checked
in through WebDAV. Currently, I am using the Archiver utility to import the files and
have configured a value map using the xCollectionID field. This field is currently set to
zero or null and I'm trying to update the value to 182.
Problem
For each file that I try to import, the following error is logged in the Archiver log:
Unable to load collection mappings, too many items.
Recommendation
The error message indicates that you are exceeding the maximum number of items per
folder. There is a configurable limit to how many items a folder can hold. To check and
update your current limit settings, complete the following steps:
1. Log in to the source Oracle Content Server instance as an administrator.
2. Go to the Administration page and click the Folder Configuration link.

Troubleshooting Archiving Issues
Managing System Migration and Archiving 8-93
The Virtual Folder Administration Configuration page is displayed.
3. Check the following two limit settings:
■Maximum Folders Per Virtual Folder
■Maximum Content Per Virtual Folder
4. Increase both of these limit settings to accommodate your import requirements.
or,
Implement an 'infinite' limit setting by removing the limit setting.
5. Click Update.
6. Restart the Oracle Content Server instance.
8.12.5 Replication Issues
This section covers the following topic:
■Section 8.12.5.1, "Stopping the Automatic Import Function"
8.12.5.1 Stopping the Automatic Import Function
Question
How can I stop the automatic import function?
Recommendation
When content meets the specified criteria, the automatic importer is, by default,
configured to automatically perform an import every five minutes. However, there are
two ways to disable the automatic import function:
■Unregistering an Importer from the Replication Tab
■Deleting a Registered Importer from the Automation for Instance Screen
8.12.5.1.1 Unregistering an Importer from the Replication Tab To unregister an importer
from the Replication tab, complete the following steps:
1. Log in to the source Oracle Content Server instance as an administrator.
2. Go to the Administration page and click the Archiver link.
The Archiver utility is started.
3. Select the archive in the Current Archives list.
4. Open the Replication tab.
5. Click Unregister.
The automatic import function is disabled from the selected archive.
8.12.5.1.2 Deleting a Registered Importer from the Automation for Instance Screen To delete a
registered importer from the Automation for the Instance screen, complete the
following steps:
Note: You should be aware, however, that the system performance
will decrease with the increased number of items that you have in a
folder.

Troubleshooting Archiving Issues
8-94 Oracle Fusion Middleware System Administrator's Guide for Oracle Content Server
1. Log in to the source Oracle Content Server instance as an administrator.
2. Go to the Administration page and click the Archiver link.
The Archiver utility is started.
3. Select Options and then View Automation For Instance.
The Automation For Instance screen is displayed.
4. Open the Importers tab.
5. Select the registered importer to delete.
6. Click Remove.
The registered importer is removed from the list.
8.12.6 Oracle-Specific Issues
This section covers the following topic:
■Section 8.12.6.1, "Allotted Tablespace Exceeded"
8.12.6.1 Allotted Tablespace Exceeded
Symptom
I cannot transfer files. Every time I try to transfer files, I get 'max extents' error
messages.
Problem
The following error messages (or similar) are issued:
IdcApp: Unable to execute query '<query_name>'. Error: ORA-01631: max # extents
(50) reached in table <table_name>.
ORA-01631 max # extents (<text_string>) reached in table <table_name>.
Recommendation
When the Oracle Content Server instance creates its database tablespace, it only
allocates 50 extents. As the database grows and is re-indexed, it uses more space
(extents). Eventually, the 50 extents limit is exceeded. At some point in the transfer,
one of your files tried to extend past the 'max extents' limit. In this case, try
implementing one or more of the following solutions:
■Look for weblayout queries that are excessively large, eliminate them, and retry
your transfer.
■Perhaps a Oracle Content Server user does not have the right permission grants
(resource and connect) to the Oracle Content Server schema. That user must have
the temporary tablespace and default tablespace set to the Oracle Content Server
defaults.
■If the system 'max extents' limit is less than the system maximum, you must
increase the number of extents that are available. Refer to your Oracle
documentation or ask your database administrator for the appropriate Oracle SQL
command to increase the tablespace extents.
■You can optionally choose to re-create the database using larger initial, next or
percent to grow parameters for the tablespaces. In this case, it is advisable to set
the initial extents and next extents to 1Mb. Set the percent to grow parameter

Troubleshooting Archiving Issues
Managing System Migration and Archiving 8-95
(PCTINCREASE) to 0% to allow the tables to automatically grow on an as-needed
basis.
8.12.7 Miscellaneous Issues
This section covers the following topics:
■Section 8.12.7.1, "Archiving Does Not Work With Shared File System"
■Section 8.12.7.2, "Archiving Does Not Work Over Outgoing Provider"
8.12.7.1 Archiving Does Not Work With Shared File System
Symptom
I am trying to transfer between two Oracle Content Server instances with access to a
shared file system but it is not working.
Recommendation
When transferring between Oracle Content Server instances on a shared file system,
the mapped or mounted drive must be available to both Oracle Content Server
instances. This means that the computers must be on and logged in as a user who has
system access to both Oracle Content Server instances. Make sure that all of the
following conditions are met:
■Both computers are turned on.
■Both computers are logged in as a user with system access to both Oracle Content
Server file systems.
■The shared drive has been properly mapped or mounted so the Oracle Content
Server instance can 'see' it. Having network access to the computer is not
sufficient.
8.12.7.2 Archiving Does Not Work Over Outgoing Provider
Symptom
I am trying to transfer between two Oracle Content Server instances over an outgoing
provider but it is not working.
Recommendation
The Oracle Content Server instance that has an outgoing provider set up is considered
the 'local' server, and the target Oracle Content Server instance for the outgoing
provider is considered to 'proxied' server. Files are always transferred in the direction
of the outgoing provider, from the local (source) instance to the proxied (target)
instance.
It is possible that when the outgoing provider was added and defined for the source
Oracle Content Server instance, the Proxied checkbox was selected. However, because
the relative web root is the same for both Oracle Content Server instances, the
outgoing provider is confused. The Proxied checkbox should be selected only if the
target Oracle Content Server instance was installed as an actual proxy of the local
(master) Oracle Content Server instance. This server option should not be selected if
the relative web root is the same for both Oracle Content Server instances.

Troubleshooting Archiving Issues
8-96 Oracle Fusion Middleware System Administrator's Guide for Oracle Content Server

A
User Interface A-1
AUser Interface
This appendix contains the following topics about the Oracle Content Server
administration interface:
System Properties and Settings Interface
■Section A.1.1, "Admin Server Interface"
■Section A.1.2, "System Properties Configuration Interface"
■Section A.1.3, "Indexing and Search Content Interface"
■Section A.1.4, "File Store Administration Interface"
■Section A.1.5, "Web Server Interface"
■Section A.1.6, "Provider Interface"
■Section A.1.7, "Batch Loader Interface"
■Section A.1.8, "Content Server Analyzer Interface"
■Section A.1.9, "Error and Status Information Interface"
Security and User Access Interface
■Section A.2.1, "Security Administration Interface"
■Section A.2.2, "Groups, Roles, and Permissions Interface"
■Section A.2.3, "Accounts Interface"
■Section A.2.4, "User Login and Alias Interface"
■Section A.2.5, "Proxy Connections Interface"
Components Interface
■Section A.3, "Components Interface"
■Section A.3.1, "Component List Screen"
■Section A.3.2, "Component Wizard Main Screen"
■Section A.3.3, "Component Creation Screens"
■Section A.3.4, "Build Screens"
■Section A.3.5, "Component Manager Page"
■Section A.3.6, "Advanced Component Manager Page"
■Section A.3.7, "Update Component Configuration Interface"

System Properties and Settings Interface
A-2 Oracle Fusion Middleware System Administrator's Guide for Oracle Content Server
System Migration Interface
■Section A.4.1, "Configuration Migration Interface Screens"
■Section A.4.2, "Archive, Collection, and Batch Interface"
■Section A.4.3, "Export Interface Screens"
■Section A.4.4, "Import Interface Screens"
■Section A.4.5, "Replication Interface Screens"
■Section A.4.6, "Transfer Interface Screens"
■Section A.4.7, "Folder Archive Configuration Page"
A.1 System Properties and Settings Interface
The following interfaces are used to configure Oracle Content Server system
properties and settings:
■Section A.1.1, "Admin Server Interface"
■Section A.1.2, "System Properties Configuration Interface"
■Section A.1.3, "Indexing and Search Content Interface"
■Section A.1.4, "File Store Administration Interface"
■Section A.1.5, "Web Server Interface"
■Section A.1.6, "Provider Interface"
■Section A.1.7, "Batch Loader Interface"
■Section A.1.8, "Content Server Analyzer Interface"
■Section A.1.9, "Error and Status Information Interface"
A.1.1 Admin Server Interface
The following screens are available when using the Admin Server.
■Section A.1.1.1, "Admin Server Page"
■Section A.1.1.2, "Admin Server Status Page"
■Section A.1.1.3, "Admin Server Output Page"
■Section A.1.1.4, "Administration Page"
A.1.1.1 Admin Server Page
The Admin Server page is used to view server status, manage components, and to
access Oracle Content Server system properties, log, and audit information.
To access the Admin Server page:
1. From the portal navigation bar, select the Administration tray. The
Administration selections are displayed.
2. Select Admin Server. The Admin Server page is displayed.
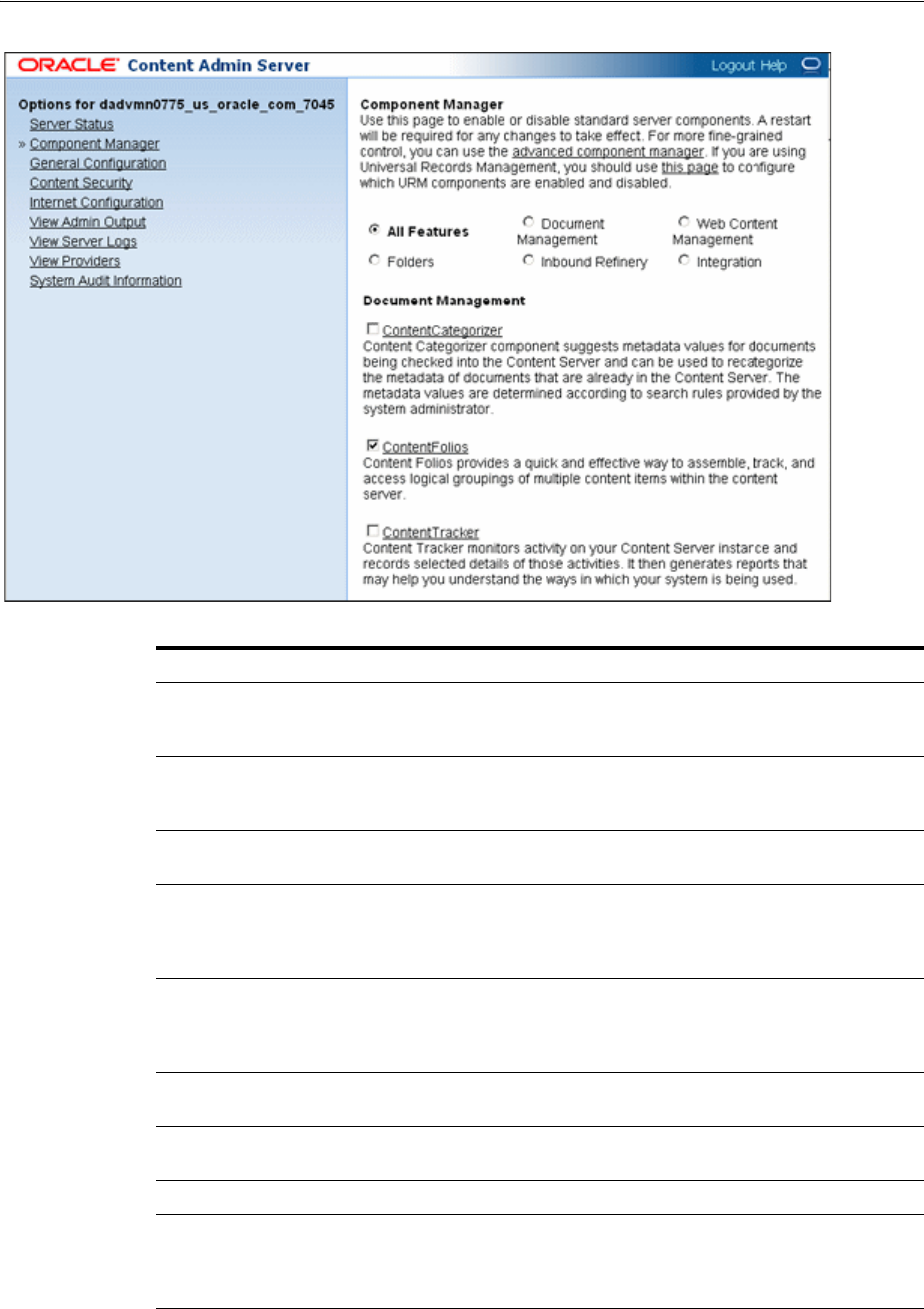
System Properties and Settings Interface
User Interface A-3
Element Description
Server Status link Displays the current Oracle Content Server status on the Admin Server
home page. Use the Oracle WebLogic Server Administration Console to
start, stop, or restart the Oracle Content Server instance.
Component
Manager link Displays the Component Manager Page. Use this page to view, enable,
and disable Oracle Content Server components. From this page you also
can access the Advanced Component Manager Page.
General
Configuration link Displays the Admin Server: General Configuration Page. Use this page
to view or modify general Oracle Content Server configuration.
Content Security
link Displays the Admin Server: Content Security Page, which contains the
same information as shown on the System Properties: Content Security
Tab. Use this page to view or modify Oracle Content Server security
configuration.
Internet
Configuration link Displays theAdmin Server: Internet Configuration Page, which contains
the same information as shown on the System Properties: Internet Tab.
Use this page to view or modify internet configuration for the Oracle
Content Server instance.
View Admin
Output link Displays the Admin Server Output Page. Use this page to view console
output.
View Server Logs
link Displays the list of Oracle Content Server log files.
View Providers link Displays the Providers Page.
System Audit
Information Displays the System Audit Information Page, which provides general
information about the Oracle Content Server instance, plus information
on localization, tracing sections, cache, configuration entry, and
component reports.
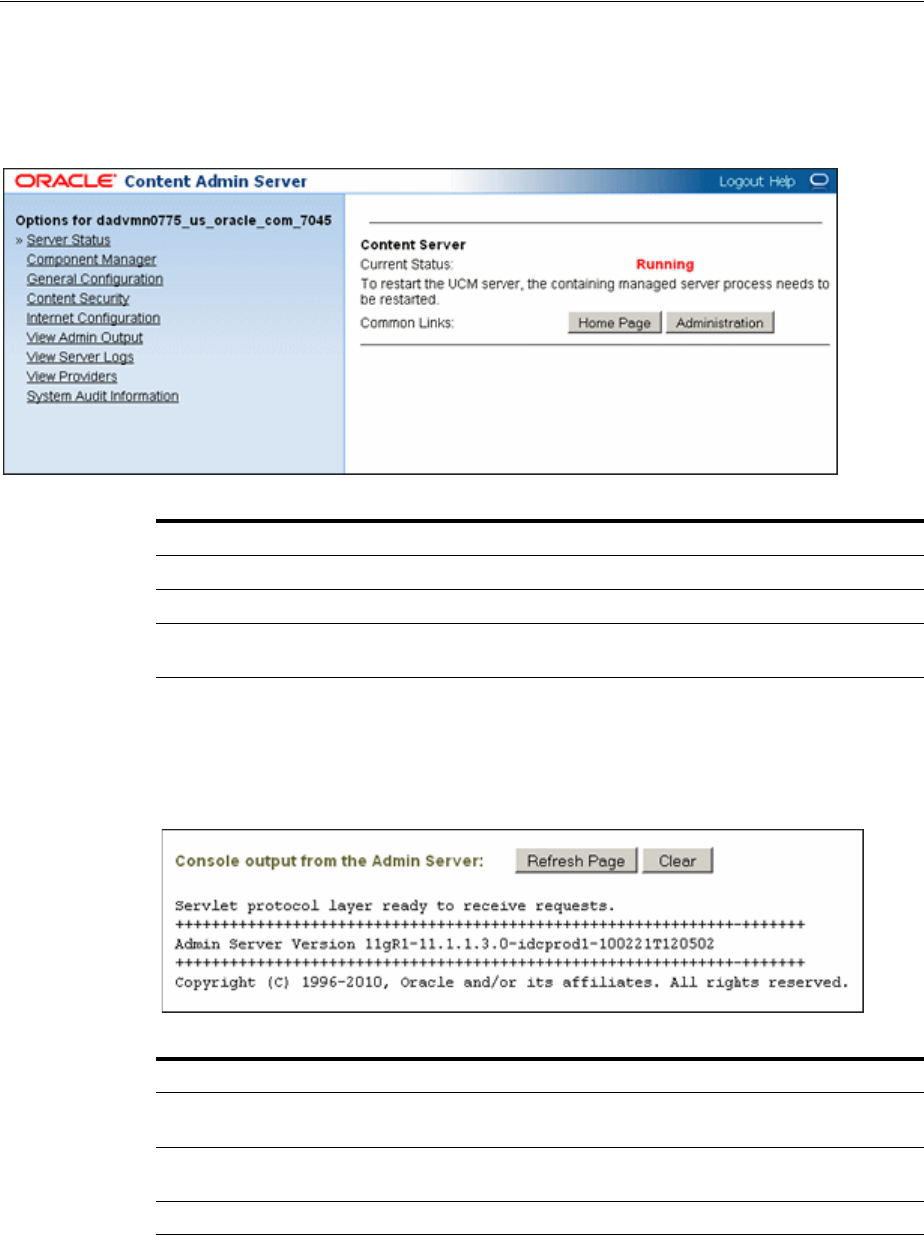
System Properties and Settings Interface
A-4 Oracle Fusion Middleware System Administrator's Guide for Oracle Content Server
A.1.1.2 Admin Server Status Page
The Server Status page displays the current status of the Oracle Content
Serverinstance; for example, Running. To access this page, click the Server Status link
on the Admin Server Page.
A.1.1.3 Admin Server Output Page
The Admin Server Output page displays the Java output of the Admin Server, which
includes status and error messages for troubleshooting. To access this page, click the
View Admin Output link on the Admin Server Page.
A.1.1.4 Administration Page
The Administration page displays icons and names which are links to Oracle Content
Server administration functions. To access this page, click Administration on the
Admin Server Status Page.
Element Description
Current Status Displays the current status of the Oracle Content Server instance.
Home Page button Displays the Oracle Content Server Home page.
Administration
button Displays the Oracle Content Server Administration page, which shows
icons and names for administrative functions.
Element Description
Refresh Page
button Refreshes the output messages.
Clear button Clears the output messages. The output will not be displayed until the
Content Admin service is restarted.
Output messages Shows status and error messages for the Admin Server.
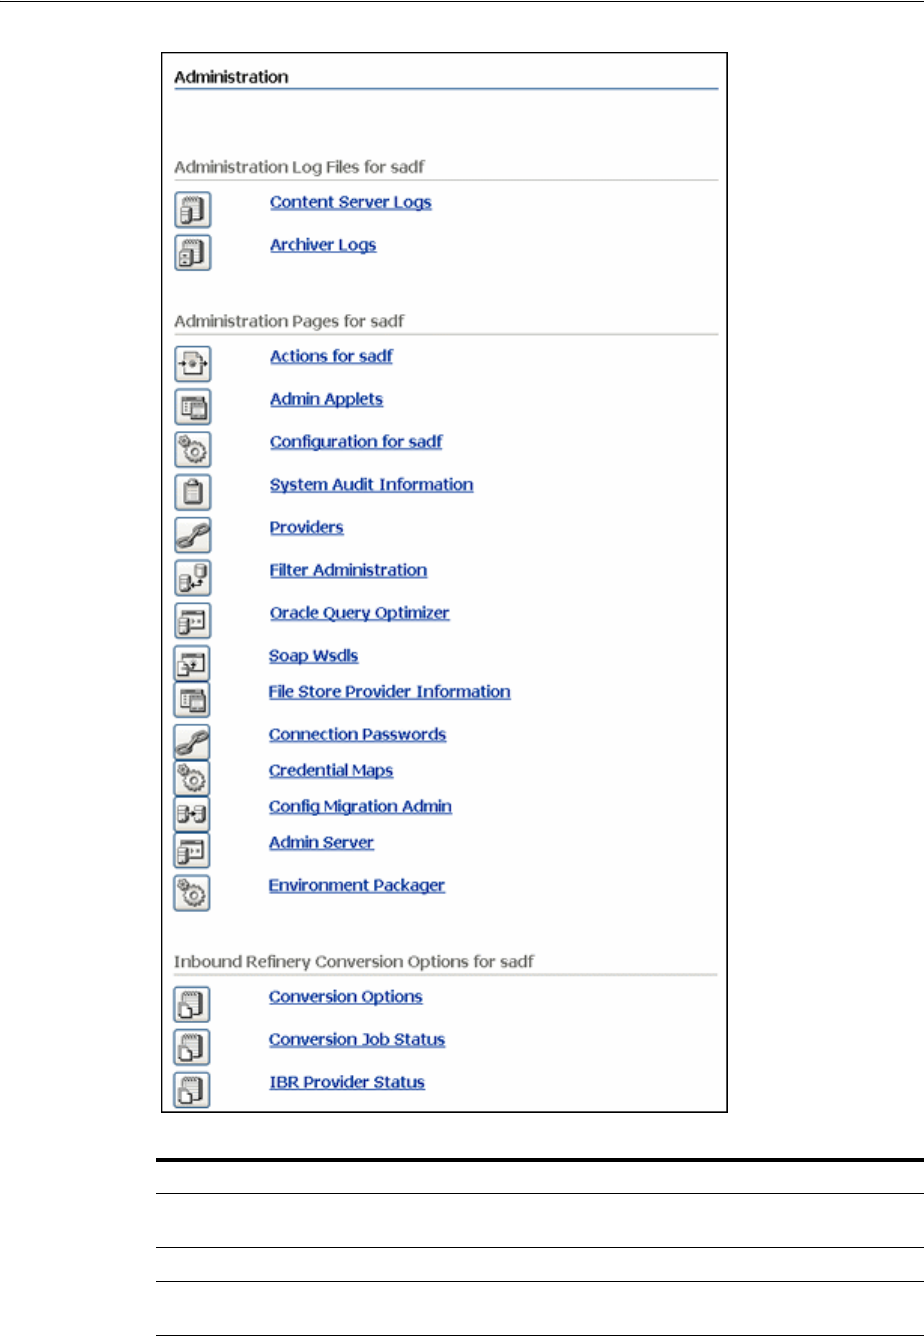

System Properties and Settings Interface
A-6 Oracle Fusion Middleware System Administrator's Guide for Oracle Content Server
A.1.2 System Properties Configuration Interface
The following screens are used to configure system properties for the Oracle Content
Server instance:
■Section A.1.2.1, "System Properties Page"
■Section A.1.2.2, "General Options Configuration"
■Section A.1.2.3, "Content Security Configuration"
■Section A.1.2.4, "Internet Information Configuration"
■Section A.1.2.5, "System Properties: Database Tab"
■Section A.1.2.6, "System Properties: Server Tab"
■Section A.1.2.7, "System Properties: Paths Tab"
A.1.2.1 System Properties Page
The System Properties utility can be used to configure the system options and
functionality of the Oracle Content Server instance. It can be started only as a
Admin Applets link Displays the Admin Applets screen, which provides links for several
administration applications.
Configuration for
Instance link Displays the Configuration Information Page.
System Audit
Information link Displays the System Audit Information Page.
Providers link Displays the Providers Page.
Filter
Administration link Displays the Configure Web Server Filter Page.
Oracle Query
Optimizer link Displays the Oracle Query Optimizer Page.
File Store Provider
link Displays the File Store Provider Information Page.
Connection
Passwords link Displays the Proxied Connection Authentication/Authorization
Information Screen.
Credential Maps
link Displays the Credential Maps Screen.
Config Migration
Admin link Displays the Config Migration Admin Screen.
Admin Server link Displays the Admin Server Page.
Environment
Packager link Displays the Environment Packager Page.
Conversion Options
link Displays Inbound Refinery conversion options. For details, see the Oracle
Fusion Middleware Administrator's Guide for Conversion.
Conversion Job
Status link Displays Inbound Refinery conversion job status information. For
details, see the Oracle Fusion Middleware Administrator's Guide for
Conversion.
IBR Provider Status
link Displays Inbound Refinery provider status information. For details, see
the Oracle Fusion Middleware Administrator's Guide for Conversion.
Element Description
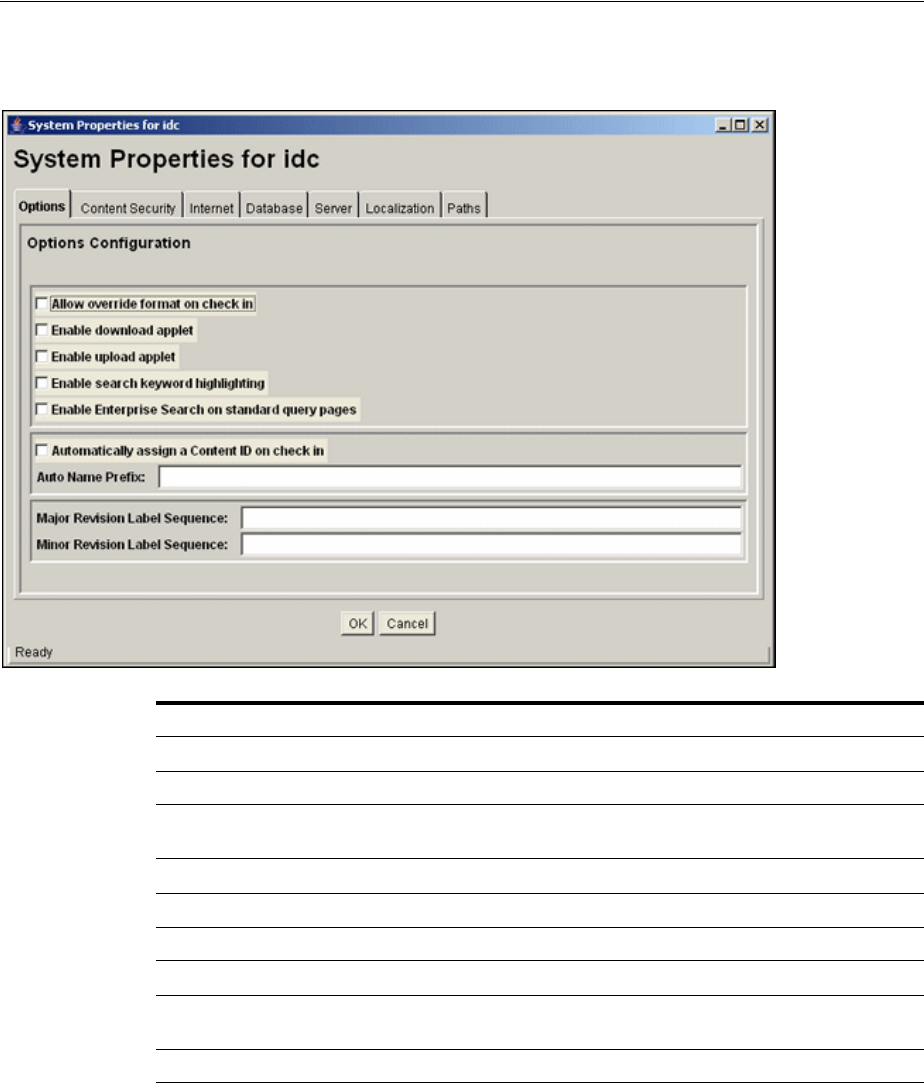
System Properties and Settings Interface
User Interface A-7
standalone application from the computer where the Oracle Content Server instance is
installed.
A.1.2.2 General Options Configuration
You can set general options on the System Properties: Options Tab or on the Admin
Server: General Configuration Page.
You must restart the Oracle Content Server instance for any configuration changes to
take effect.
A.1.2.2.1 System Properties: Options Tab You can set general options on the System
Properties: Options Tab. You can run this application in standalone mode from the
computer where the Oracle Content Server instance is installed. The method required
to start these programs differs slightly between Windows and UNIX installations.
Element Description
Options tab Used to set optional functionality for the Oracle Content Server instance.
Content Security tab Used to set options related to content item security.
Internet tab Used to set options related to Oracle Content Server interaction with
web entities
Database tab Used to set database options.
Server tab Used to set optional functionality for the Oracle Content Server instance.
Localization tab Used to set localization options.
Paths tab Used to set Oracle Content Server directory paths.
OK button Saves the changes and closes the System Properties screen. You must
restart the Oracle Content Server instance for any changes to take effect.
Cancel button Closes the System Properties screen without saving any changes.
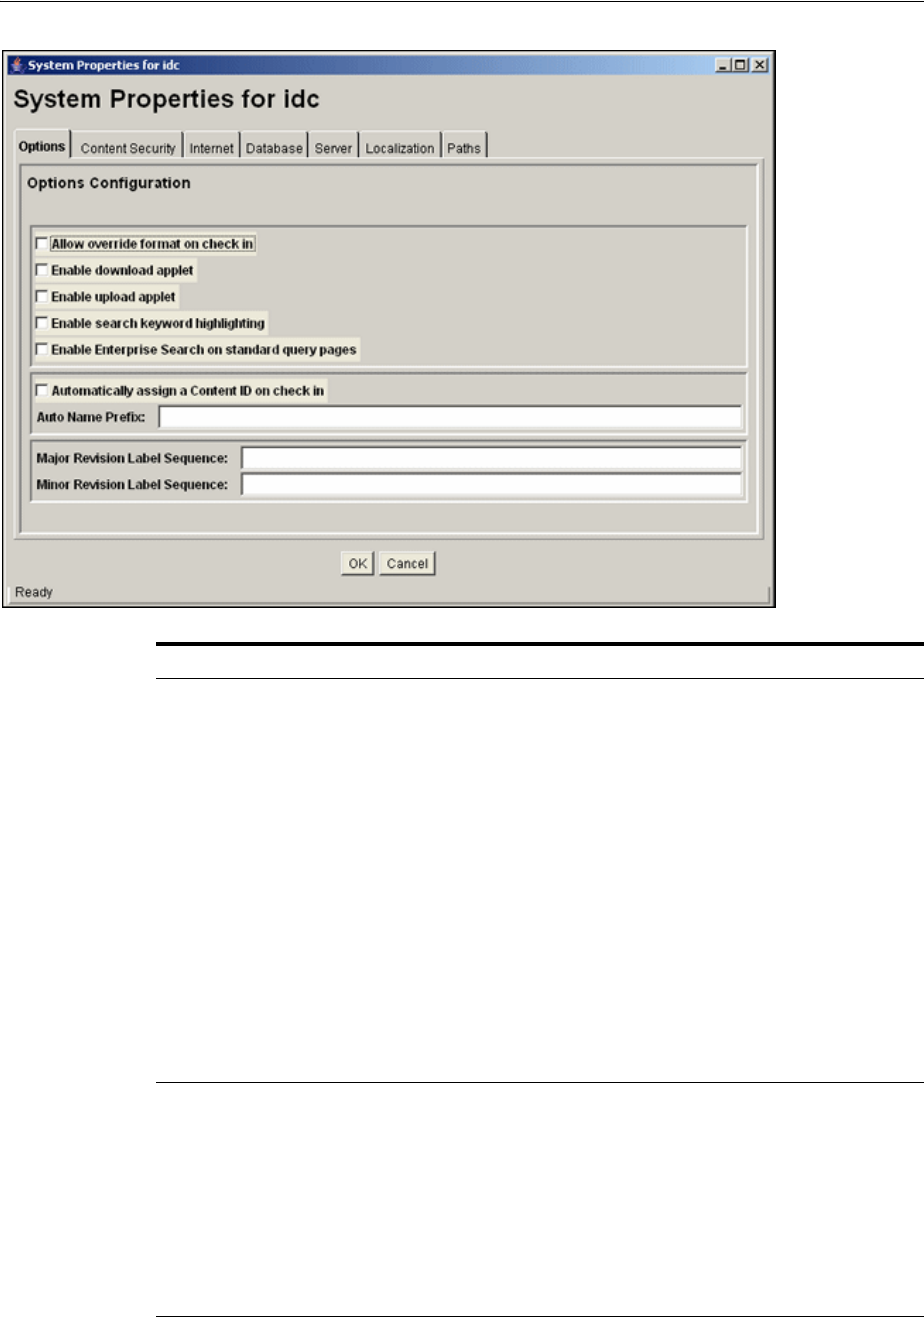
System Properties and Settings Interface
A-8 Oracle Fusion Middleware System Administrator's Guide for Oracle Content Server
Element Description
Allow override format on
check in checkbox
(IsOverrideFormat)
Unselected: Users cannot select the format of a document
during checkin. This is the default.
Selected: Users can select the format of a document during
checkin. This is useful in the following situations:
■When an application's default extension is not used for a file
name. For example, a Microsoft Word document named
customer.ltr does not have the default application extension
.doc, but a contributor could select Microsoft Word Document
from the Formats list on the checkin page to tell the Oracle
Content Server instance how to convert the file.
■When the user must decide how the file should be
converted and indexed. For example, say you have set Corel
WordPerfect documents to be passed through as text files. If
a contributor leaves the Format option on the checkin page
as use default, the file is converted to text and full-text
indexed automatically. If the contributor selects Corel
WordPerfect Document, the file is passed through in its
native format and is not full-text indexed.
Enable download applet
checkbox
(DownloadApplet)
Selected: Users can select multiple files to check out or
download at the same time. For details, see the Oracle Fusion
Middleware User's Guide for Oracle Content Server.
Unselected: Users cannot check out or download multiple files.
This is the default.
If the upload or download applet is enabled in the System
Properties application or Admin Server, users can enable and
disable the applet individually on their User Profile page. If an
applet is disabled at the system level, the applet field is not
displayed on User Profile pages.

System Properties and Settings Interface
User Interface A-9
Enable upload applet
checkbox
(MultiUpload)
Selected: Users can check in multiple files as a single Zip file.
For details, see the Oracle Fusion Middleware User's Guide for
Oracle Content Server.
Unselected: Users cannot check in multiple files. This is the
default.
Enable search keyword
highlighting checkbox
(EnableDocumentHighlight)
Selected: All full-text search terms are highlighted in returned
PDF, HTML, and text documents. This is the default.
Unselected: Full-text search terms are not highlighted. This can
shorten the time required to view a file from the Search Results
page.
Enable Enterprise Search on
Standard query pages
checkbox
(EnterpriseSearchAsDefault)
Selected: Enterprise Search fields are displayed on search pages.
The Enterprise Search add-on module must be purchased and
installed.
Unselected: Enterprise Search fields are not displayed on search
pages. This is the default.
Automatically assign a
Content ID on check in
checkbox
(IsAutoNumber)
Selected: Content IDs are generated automatically as six-digit,
sequential numbers.
Unselected: A Content ID must be entered by the user during
checkin. This is the default.
Auto Name/Number Prefix
field
(AutoNumberPrefix)
If automatic Content ID generation is enabled, the string
specified in this field is added as a prefix to the six-digit,
sequential number.
Major Revision Label
Sequence field
(MajorRevSeq)
Specifies how the first number or letter in a revision number is
incremented.
Minor Revision Label
Sequence field
(MinorRevSeq)
Specifies how the optional second number or letter in a revision
number is incremented.
Enable Java Server Page
(Jsp) checkbox
(IsJspServerEnabled)
Selected: Internal JSP support is enabled in the Oracle Content
Server instance.
Unselected: Internal JSP support is disabled.
For details, see the Java Server Page and JavaBean Guide.
This checkbox is displayed on the Admin Server General
Configuration page, but not on the System Properties Options
tab. See "System Properties: Server Tab" on page A-18.
Jsp Enabled Groups field
(JspEnabledGroups)
Specifies the security groups that are enabled for internal JSP
support.
For details, see the Java Server Page and JavaBean Guide.
This field is displayed on the Admin Server General
Configuration page, but not on the System Properties Options
tab. See "System Properties: Server Tab" on page A-18.
Additional Configuration
Variables field
(N/A)
Used to edit variables in the Oracle Content Server configuration
file.
■Changes you make in this field will be reflected in the
IntradocDir/config/config.cfg file when the Oracle Content
Server instance is restarted.
■Placing a # symbol at the beginning of a line comments out
that line.
Element Description
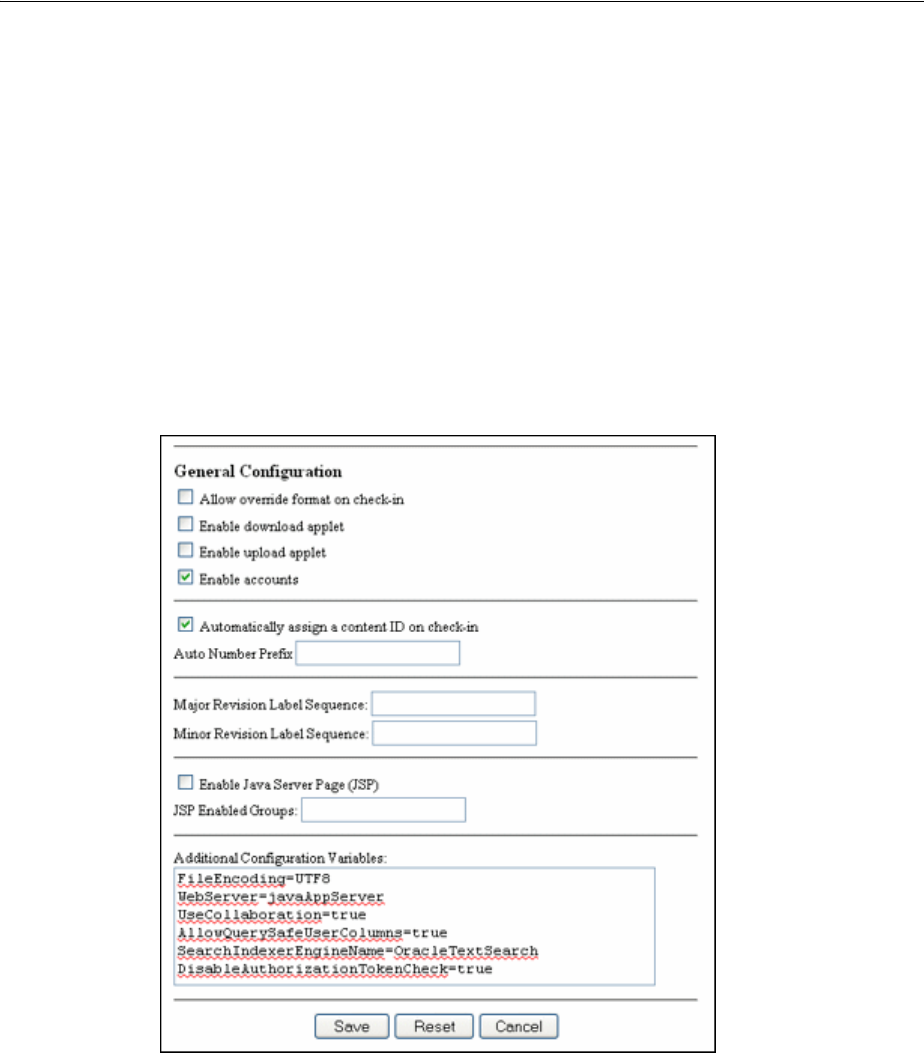
System Properties and Settings Interface
A-10 Oracle Fusion Middleware System Administrator's Guide for Oracle Content Server
A.1.2.2.2 Admin Server: General Configuration Page To access this page, click Admin
Server from the Administration tray in the portal navigation bar. Click the Oracle
Content Server instance you want to access and select General Configuration from the
Options for instance menu.
This page provides access to the same information as provided in the System
Properties: Options Tab.
In the following table, the term in parentheses is the corresponding configuration
setting defined in the IntradocDir/config/config.cfg file.
If you plan to use the Batch Loader to update and insert a large number of files on
your Oracle Content Server instance simultaneously, you must create a batch load file.
Two of the optional parameters that you can include in your batch load file are
primaryOverrideFormat and alternateOverrideFormat. However, these options will
only work as parameters in the batch load file if you enable the IsOverrideFormat
configuration variable. You can set this variable in the System Properties application.

System Properties and Settings Interface
User Interface A-11
Element Description
Allow override format on
check in checkbox
(IsOverrideFormat)
Unselected: Users cannot select the format of a document
during checkin. This is the default.
Selected: Users can select the format of a document during
checkin. This is useful in the following situations:
■When an application's default extension is not used for a file
name. For example, a Microsoft Word document named
customer.ltr does not have the default application extension
.doc, but a contributor could select Microsoft Word Document
from the Formats list on the checkin page to tell the Oracle
Content Server instance how to convert the file.
■When the user must decide how the file should be
converted and indexed. For example, say you have set Corel
WordPerfect documents to be passed through as text files. If
a contributor leaves the Format option on the checkin page
as use default, the file is converted to text and full-text
indexed automatically. If the contributor selects Corel
WordPerfect Document, the file is passed through in its
native format and is not full-text indexed.
Enable download applet
checkbox
(DownloadApplet)
Selected: Users can select multiple files to check out or
download at the same time. For details, see the Oracle Fusion
Middleware User's Guide for Oracle Content Server.
Unselected: Users cannot check out or download multiple files.
This is the default.
If the upload or download applet is enabled in the System
Properties application or Admin Server, users can enable and
disable the applet individually on their User Profile page. If an
applet is disabled at the system level, the applet field is not
displayed on User Profile pages.
Enable upload applet
checkbox
(MultiUpload)
Selected: Users can check in multiple files as a single Zip file.
See the Oracle Fusion Middleware User's Guide for Oracle Content
Server.
Unselected: Users cannot check in multiple files. This is the
default.
Enable Accounts checkbox Selected: Accounts are functional on the Oracle Content Server
instance.
Unselected: Accounts are not functional on the Oracle Content
Server instance.
Automatically assign a
document name on check in
checkbox
(IsAutoNumber)
Selected: Content IDs are generated automatically as six-digit,
sequential numbers.
Unselected: A Content ID must be entered by the user during
checkin. This is the default.
Auto Name/Number Prefix
field
(AutoNumberPrefix)
If automatic Content ID generation is enabled, the string
specified in this field is added as a prefix to the six-digit,
sequential number.
Major Revision Label
Sequence field
(MajorRevSeq)
Specifies how the first number or letter in a revision number is
incremented.
Minor Revision Label
Sequence field
(MinorRevSeq)
Specifies how the optional second number or letter in a revision
number is incremented.

System Properties and Settings Interface
A-12 Oracle Fusion Middleware System Administrator's Guide for Oracle Content Server
A.1.2.3 Content Security Configuration
You can set content security options on the System Properties: Content Security Tab or
on the Admin Server: Content Security Page.
You must restart the Oracle Content Server instance for any configuration changes to
take effect.
A.1.2.3.1 System Properties: Content Security Tab You can set content security options on
the System Properties: Content Security Tab. You can run this application in
standalone mode from the computer where the Oracle Content Server instance is
installed. The method required to start these programs differs slightly between
Windows and UNIX installations.
Enable Java Server Page
(Jsp) checkbox
(IsJspServerEnabled)
Selected: Internal JSP support is enabled in the Oracle Content
Server instance.
Unselected: Internal JSP support is disabled.
For details, see the Java Server Page and JavaBean Guide.
This checkbox is displayed on the Admin Server General
Configuration page, but not on the System Properties Options
tab. See "System Properties: Server Tab" on page A-18.
Jsp Enabled Groups field
(JspEnabledGroups)
Specifies the security groups that are enabled for internal JSP
support.
For details, see the Java Server Page and JavaBean Guide.
This field is displayed on the Admin Server General
Configuration page, but not on the System Properties Options
tab. See "System Properties: Server Tab" on page A-18.
Additional Configuration
Variables field
(N/A)
Used to edit variables in the Oracle Content Server configuration
file.
■Changes you make in this field will be reflected in the
IntradocDir/config/config.cfg file when the Oracle Content
Server instance is restarted.
■Placing a # symbol at the beginning of a line comments out
that line.
Element Description
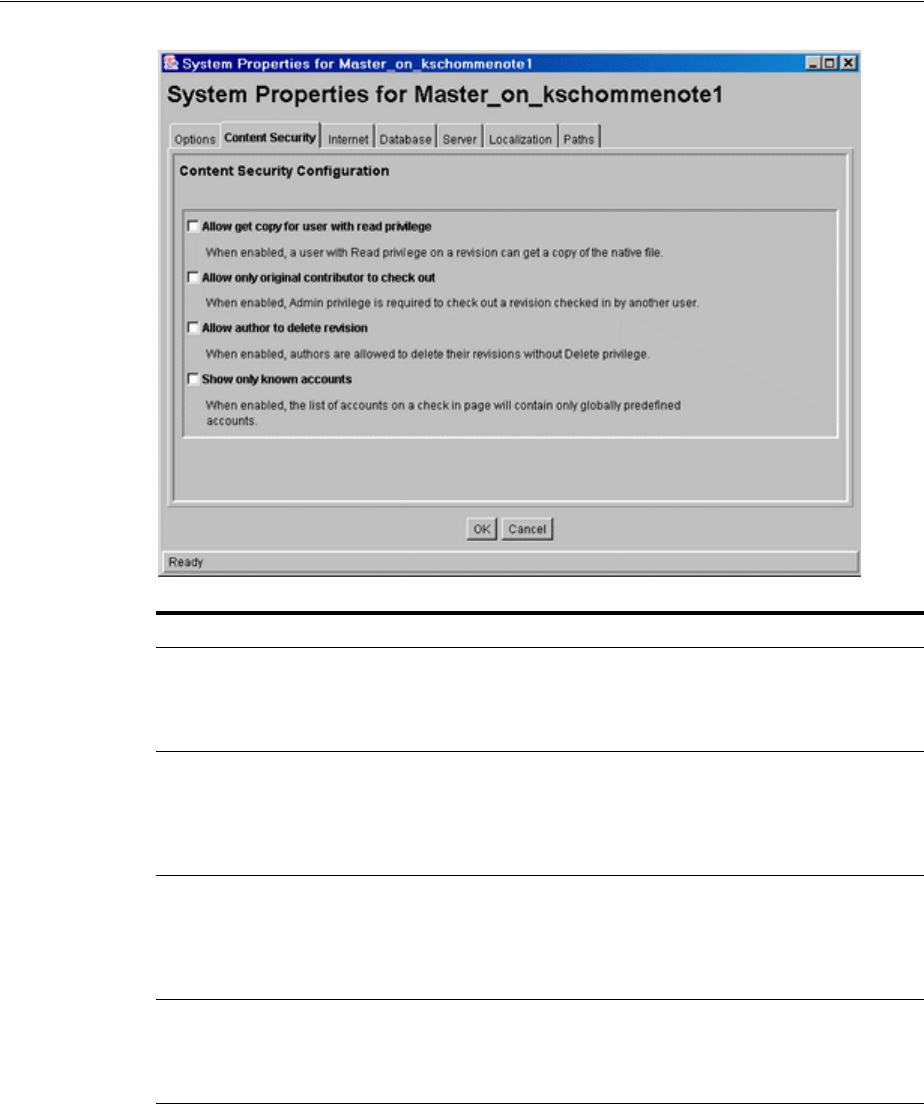
System Properties and Settings Interface
User Interface A-13
A.1.2.3.2 Admin Server: Content Security Page You can set content security options on the
Admin Server: Content Security Configuration Page.
To access this page, click Admin Server from the Administration tray in the portal
navigation bar. Select Content Security from the Options for instance menu.
This page provides access to the same information as provided on the System
Properties: Content Security Tab.
In the following table, the term in parentheses is the corresponding configuration
setting defined in the IntradocDir/config/config.cfg file.
Element Description
Allow get copy for
user with read
privilege checkbox
(GetCopyAccess)
Selected: Users with only Read permission to a content item's security
group can get a copy of the native file.
Unselected: Users with only Read permission to a content item's security
group cannot get a copy of the native file.
Allow only original
contributor to check
out checkbox
(ExclusiveCheckout
)
Selected: Only the Author or a user with Admin permission to a content
item's security group can check out the content item.
Unselected: Any user with Write permission to a content item's security
group can check out the content item.
Allow author to
delete revision
checkbox
(AuthorDelete)
Selected: The Author of a content item can delete the content item, even
if they do not have Delete permission to the content item's security
group.
Unselected: All users must have Delete permission to a content item's
security group to delete the content item.
Show only known
accounts checkbox
(ShowOnlyKnown
Accounts)
Selected: Only predefined accounts appear in the Accounts option list
on checkin and search pages.
Unselected: User-defined accounts and predefined accounts appear in
the Accounts option list on checkin and search pages.
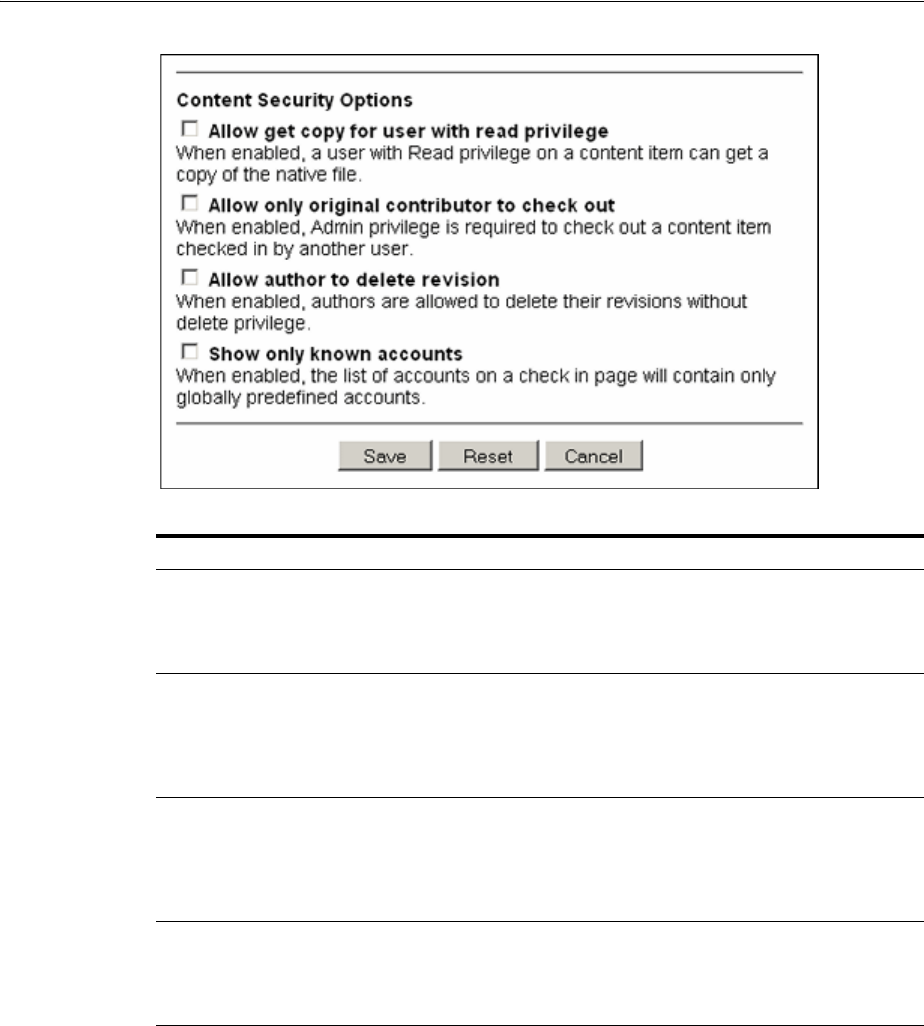
System Properties and Settings Interface
A-14 Oracle Fusion Middleware System Administrator's Guide for Oracle Content Server
A.1.2.4 Internet Information Configuration
You can set Internet options on the System Properties: Internet Tab or on the Admin
Server: Internet Configuration Page.
You must restart the Oracle Content Server instance for any configuration changes to
take effect.
A.1.2.4.1 System Properties: Internet Tab You can set Internet options on the System
Properties: Internet Tab. You can run this application in standalone mode from the
computer where the Oracle Content Server instance is installed. The method required
to start these programs differs slightly between Windows and UNIX installations.
Element Description
Allow get copy for
user with read
privilege checkbox
(GetCopyAccess)
Selected: Users with only Read permission to a content item's security
group can get a copy of the native file.
Unselected: Users with only Read permission to a content item's security
group cannot get a copy of the native file.
Allow only original
contributor to check
out checkbox
(ExclusiveCheckout
)
Selected: Only the Author or a user with Admin permission to a content
item's security group can check out the content item.
Unselected: EuAny user with Write permission to a content item's
security group can check out the content item.
Allow author to
delete revision
checkbox
(AuthorDelete)
Selected: The Author of a content item can delete the content item, even
if they do not have Delete permission to the content item's security
group.
Unselected: All users must have Delete permission to a content item's
security group to delete the content item.
Show only known
accounts checkbox
(ShowOnlyKnown
Accounts)
Selected: Only predefined accounts appear in the Accounts option list
on checkin and search pages.
Unselected: User-defined accounts and predefined accounts appear in
the Accounts option list on checkin and search pages.
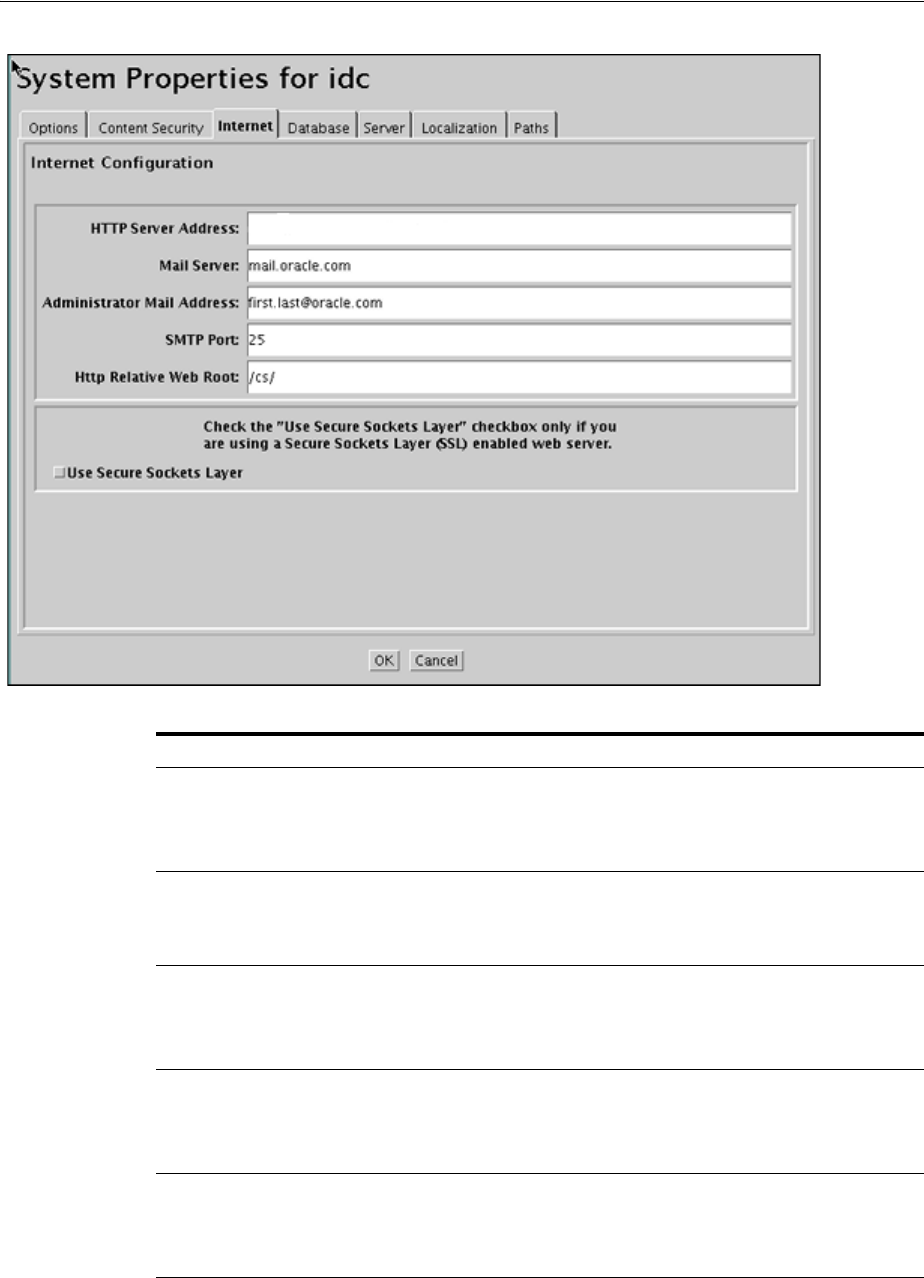
System Properties and Settings Interface
User Interface A-15
Element Description
HTTP Server
Address field*
(HttpServerAddres
s)
The name of the web server.
For security reasons, this field cannot be changed from the Admin Server.
You must change the field using the standalone application.
Mail Server field
(MailServer)
The e-mail server used to send e-mail notifications from the Oracle
Content Server instance. This generally takes the form of
mail.company.com. If applicable, make sure to allow for sending mail
through a firewall.
Administrator Mail
Address field
(SysAdminAddress
)
The e-mail address that the Oracle Content Server instance uses to send
e-mail notifications. This address will receive returned messages if
delivery failures occur.
SMTP Port field*
(SmtpPort)
The port used for SMTP communications. This is typically 25, but consult
your network system administrator for any changes.
For security reasons, this field cannot be changed from the Admin Server.
You must change the field using the standalone application.
Http Relative Web
Root field*
(HttpRelativeWebR
oot)
The relative web root that is used by the web server to resolve URLs to
files in the IntradocDir/weblayout/ directory.
For security reasons, this field cannot be changed from the Admin Server.
You must change the field using the standalone application.
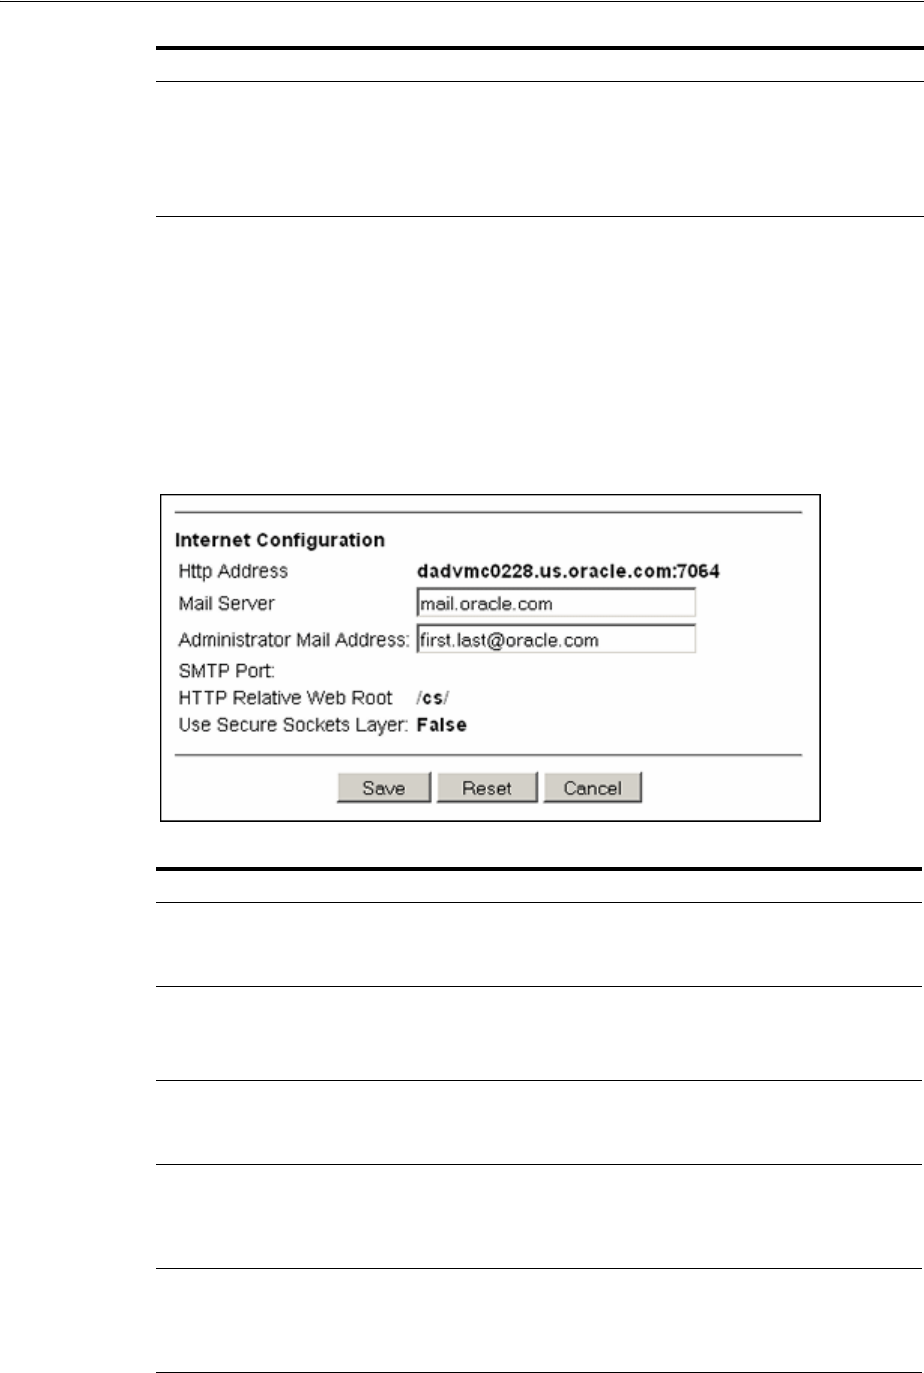
System Properties and Settings Interface
A-16 Oracle Fusion Middleware System Administrator's Guide for Oracle Content Server
A.1.2.4.2 Admin Server: Internet Configuration Page You can set Internet options from the
Admin Server: Internet Configuration page.
To access this page, click Admin Server from the Administration tray in the portal
navigation bar. Select Internet Configuration from the Options for instance menu.
This page provides access to the same information as provided on the System
Properties: Internet Tab.
In the following table, the term in parentheses is the corresponding configuration
setting defined in the IntradocDir/config/config.cfg file.
Use Secure Sockets
Layer checkbox*
(UseSSL)
Selected: A Secure Sockets Layer (SSL)-enabled web server is being used.
Unselected: A Secure Sockets Layer (SSL)-enabled web server is not
being used.
For security reasons, this field cannot be changed from the Admin Server.
You must change the field using the standalone application.
Element Description
HTTP Server Address
field*
(HttpServerAddress)
The hostname and port of the web server.
For security reasons, this field cannot be changed using the Admin
Server. You must change the field using the standalone application.
Mail Server field
(MailServer)
The e-mail server used to send e-mail notifications from the Oracle
Content Server instance. This generally takes the form of
mail.company.com. If applicable, make sure to allow for sending mail
through a firewall.
Administrator Mail
Address field
(SysAdminAddress)
The e-mail address that the Oracle Content Server instance uses to
send e-mail notifications. This address will receive returned
messages if delivery failures occur.
SMTP Port field*
(SmtpPort)
The port used for SMTP communications. This is typically 25, but
consult your network system administrator for any changes.
For security reasons, this field cannot be changed from the Admin
Server. You must change the field using the standalone application.
Http Relative Web Root
field*
(HttpRelativeWebRoot)
The relative web root that is used by the web server to resolve URLs
to files in the IntradocDir/weblayout/ directory.
For security reasons, this field cannot be changed from the Admin
Server. You must change the field using the standalone application.
Element Description
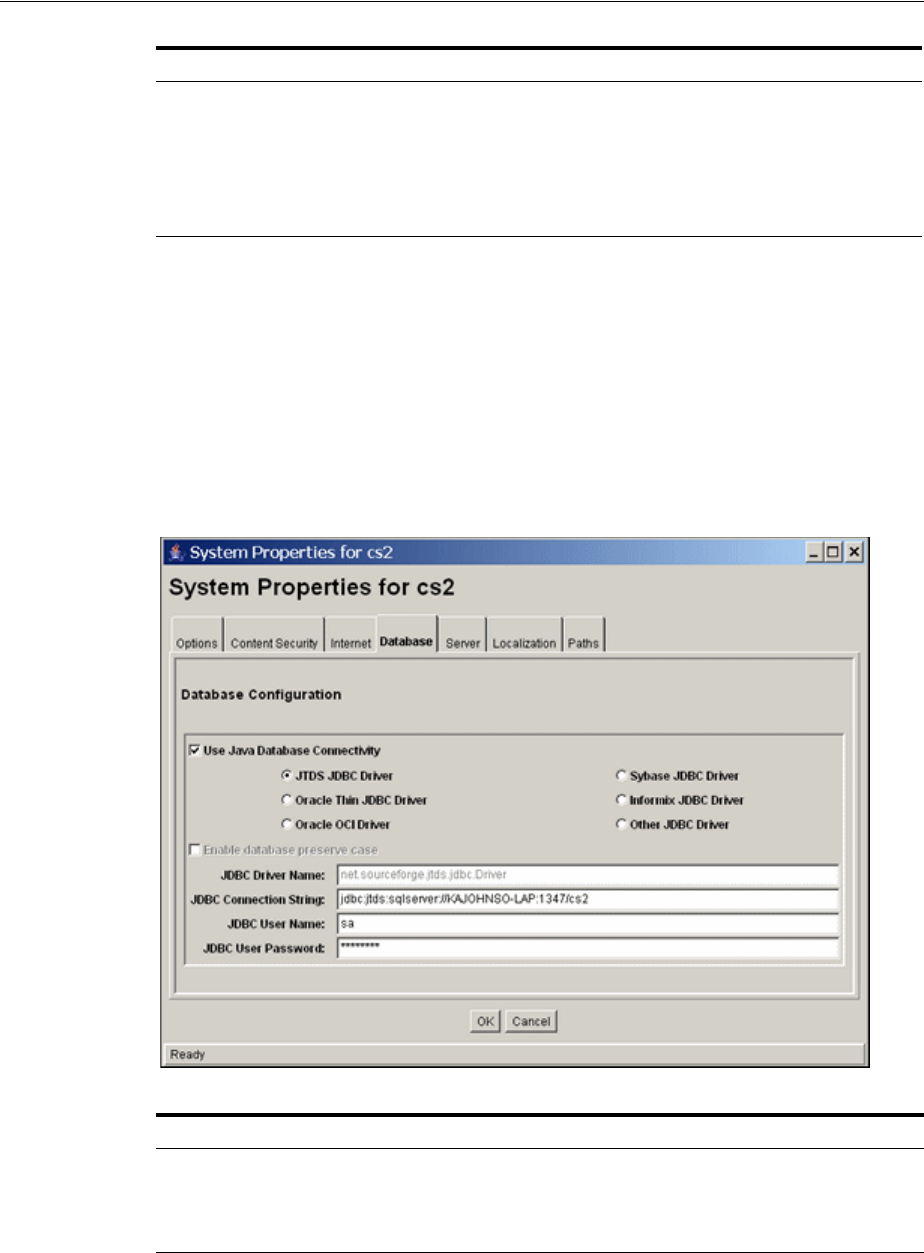
System Properties and Settings Interface
User Interface A-17
A.1.2.5 System Properties: Database Tab
You can set JDBC (Java Database Connectivity) configuration options on the System
Properties: Database Tab. For security reasons, the Admin Server cannot be used to
configure the database. You must use the standalone application to configure the
database.
You must restart the Oracle Content Server instance for any configuration changes to
take effect.
In the following table, the term in parentheses is the corresponding configuration
setting defined in the IntradocDir/config/config.cfg file.
Use Secure Sockets
Layer field*
(UseSSL)
Tr ue : A Secure Sockets Layer (SSL)-enabled web server is being
used.
False: A Secure Sockets Layer (SSL)-enabled web server is not being
used.
For security reasons, this field cannot be changed from the Admin
Server. You must change the field using the standalone application.
Element Description
Use Java Database
Connectivity
checkbox
(IsJdbc)
Selected: JDBC is enabled, and the options are active. This is the default.
Unselected: JDBC is disabled.
Element Description

System Properties and Settings Interface
A-18 Oracle Fusion Middleware System Administrator's Guide for Oracle Content Server
A.1.2.6 System Properties: Server Tab
You can set Oracle Content Server options on the System Properties: Server Tab. For
security reasons, the Admin Server cannot be used to configure these options. You
must use the standalone application to configure options.
You must restart the Oracle Content Server instance for any configuration changes to
take effect.
JDBC options
(N/A)
The type of database driver.
■For all options except Other JDBC Driver, the JDBC Driver Name
and JDBC Connection String are entered automatically.
■For the Other JDBC Driver option, you must enter the correct JDBC
Driver Name and JDBC Connection String.
Enable database
preserve case
checkbox
(DatabasePreserve
Case)
Selected: The database is case sensitive (such as Oracle or Informix).
Unselected: The database is not case sensitive.
Specify Database
Driver Classpath
checkbox
Selected: A database driver classpath must be specified in the Database
Driver Classpath field to support a database connection.
Unselected: No database driver classpath is required.
Database Driver
Classpath field The classpath for the database driver.
JDBC Driver Name
field
(JdbcDriver)
The name of the JDBC driver.
■For all options except Other JDBC Driver, the correct name is
entered automatically.
■For the Other JDBC Driver option, you must enter the correct driver
name.
JDBC Connection
String field
(JdbcConnectionStr
ing)
The connection string for the JDBC driver.
■For all options except Other JDBC Driver, the correct connection
string is entered automatically.
■For the Other JDBC Driver option, you must enter the correct
connection string.
The connection string format is JDBC:ODBC:name, where name is the
System Data Source Name. To find this name on a Windows system,
perform the following steps:
1. Click Programs in the Start menu
2. Click Administrative tools in the Programs menu
3. Click Data Sources in the Administrative tools, to open ODBC
screen.
4. Select the system DSN tab on the ODBC Data Source Administrator
screen. The System Data Source Names are displayed on this tab
JDBC User Name
field
(JdbcUser)
The user name that owns the tables inside the database.
JDBC User
Password field
(JdbcPassword)
The password for the user name that owns the tables inside the database.
Element Description
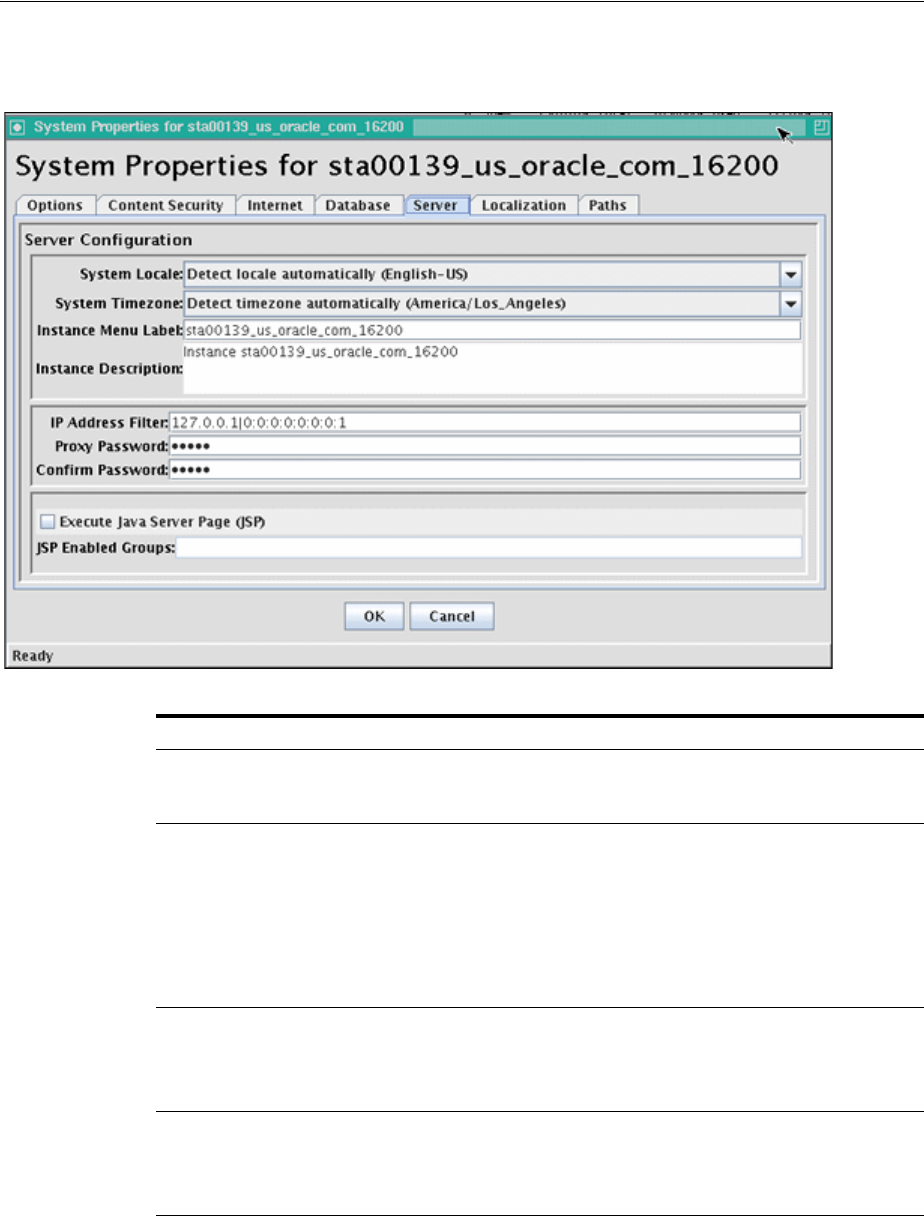
System Properties and Settings Interface
User Interface A-19
In the following tables, the term in parentheses is the corresponding configuration
setting defined in the IntradocDir/config/config.cfg file.
Element Description
System Locale list
(SystemLocale)
Specifies how the Oracle Content Server instance handles several
language-specific issues such as the language of the user interface,
stemming rules, sort order, and date/time format.
System Timezone
list
(SystemTimeZone)
The time zone in which the Oracle Content Server instance is located. The
specified time zone can be used to present times relative to other time
zones, such as correcting for Daylight Savings Time, or presenting the
date and time of a content item on a Oracle Content Server instance in
North America to users in Europe.
If the Detect timezone automatically option is selected, a time zone is
not specified in the configuration file, and the Oracle Content Server
instance uses the time zone set for the computer's operating system.
Instance Menu
Label field
(InstanceMenuLabe
l)
The instance name that is displayed in the Windows Start menu.
Instance
Description field
(InstanceDescriptio
n)
Not currently used.

System Properties and Settings Interface
A-20 Oracle Fusion Middleware System Administrator's Guide for Oracle Content Server
A.1.2.7 System Properties: Paths Tab
You can use the System Properties: Paths Tab to change the location of the help
browser, Java classpath, and the shared directory path. For security reasons, the
Admin Server cannot be used to configure the path options. You must use the
standalone application for this configuration.
You must restart the Oracle Content Server instance for any configuration changes to
take effect.
In the following table, the term in parentheses is the corresponding configuration
setting defined in the DomainHome/ucm/cs/bin/intradoc.cfg file.
IP Address Filter
field
(SocketHostAddres
sSecurity Filter)
Restricts access to the Oracle Content Server instance to computers with a
specified IP address.
■By default, this field is pre-filled with the IP address of the local host
(127.0.0.1).
■You can specify multiple IP addresses, separated by pipes ( | ).
Make sure that there are no spaces on either side of the pipe
character. (For example, 127.0.0.1|10.10.50.143)
■You can use wildcards in this field, * for zero or many characters,
and ? for any one character. (For example, 10.10.3.*)
■Generally, use only the IP Address Filter field or Hostname Filter
field, not both. (IP Address Filter is more commonly used.)
Proxy Password
field Specifies the password for the proxy.
Confirm Password
field Confirms the password.
Execute Java Server
Page (JSP)
checkbox
(IsJspServerEnable
d)
Selected: Internal JSP support is enabled in the Oracle Content Server
instance.
Unselected: Internal JSP support is disabled.
For details, see the Java Server Page and JavaBean Guide.
In the Admin Server, this checkbox is displayed on the Admin Server:
General Configuration Page.
JSP Enabled
Groups field
(JspEnabledGroups
)
Specifies the security groups that are enabled for internal JSP support.
For details, see the Java Server Page and JavaBean Guide.
In the Admin Server, this field is displayed on the Admin Server: General
Configuration Page.
Element Description

System Properties and Settings Interface
User Interface A-21
Element Description
Browser Executable
Path field
(WebBrowserPath)
The location of the browser executable that will be used to display the
online help from the standalone Overview of Administration Utilities
and Applets.
■For Windows 2000 systems, the default is c:/Program Files/Internet
Explorer/iexplore.exe.
■For UNIX systems, the path for the web browser is requested during
installation.
Browse button
(N/A)
Used to navigate to and select the executable file for the Help browser.
Custom Java
Classpath field
(BASE_JAVA_
CLASSPATH_
custom)
Specifies the path to the Java class files.
■By default, the CLASSPATH points at classes/, shared/classes/, and
shared/classes/server.zip.
■If an Oracle or Informix database is used, the CLASSPATH will
include a JDBC driver zip file, such as
shared/classes/classes111.zip.
Shared Directory
Path field
(IdcHomeDir)
Defines the path to the shared directory.
■This directory contains shared files for the Oracle Content Server
instance, such as resource files, template files, and binaries such as
mkvdk.
■If the Inbound Refinery is installed, this directory contains the
conversion engines, and all Inbound Refinery temp work is done in
this directory and its subdirectories.
■The default is IdcHomeDir/resources/.

System Properties and Settings Interface
A-22 Oracle Fusion Middleware System Administrator's Guide for Oracle Content Server
A.1.3 Indexing and Search Content Interface
The following screens are used when working with the search index, configuring zone
text fields, and searching content using the Oracle Query Optimizer component:
■Section A.1.3.1, "Repository Manager: Indexer Tab"
■Section A.1.3.2, "Automatic Update Cycle Screen"
■Section A.1.3.3, "Collection Rebuild Cycle Screen"
■Section A.1.3.4, "Indexer Rebuild Screen"
■Section A.1.3.5, "Admin Actions Page"
■Section A.1.3.6, "Zone Fields Configuration Page"
■Section A.1.3.7, "Oracle Query Optimizer Page"
■Section A.1.3.8, "Hint Rules Configuration Page"
■Section A.1.3.9, "Query Converter Page"
■Section A.1.3.10, "Hint Cache Updater Page"
A.1.3.1 Repository Manager: Indexer Tab
The Indexer tab of the Repository Manager application is used to monitor, run, and
configure Indexer update cycles and collection rebuild cycles. It also provides access to
the OracleTextSearch feature for fast rebuilds. To access the Repository Manager
application, select the Administration tray in the portal navigation bar, then select
Admin Applets, then select Repository Manager. To access the Indexer functions,
click the Indexer tab on the Repository Manager window.
For more information, see "Managing Repository Content" in Oracle Fusion Middleware
Application Administrator's Guide for Oracle Content Server.
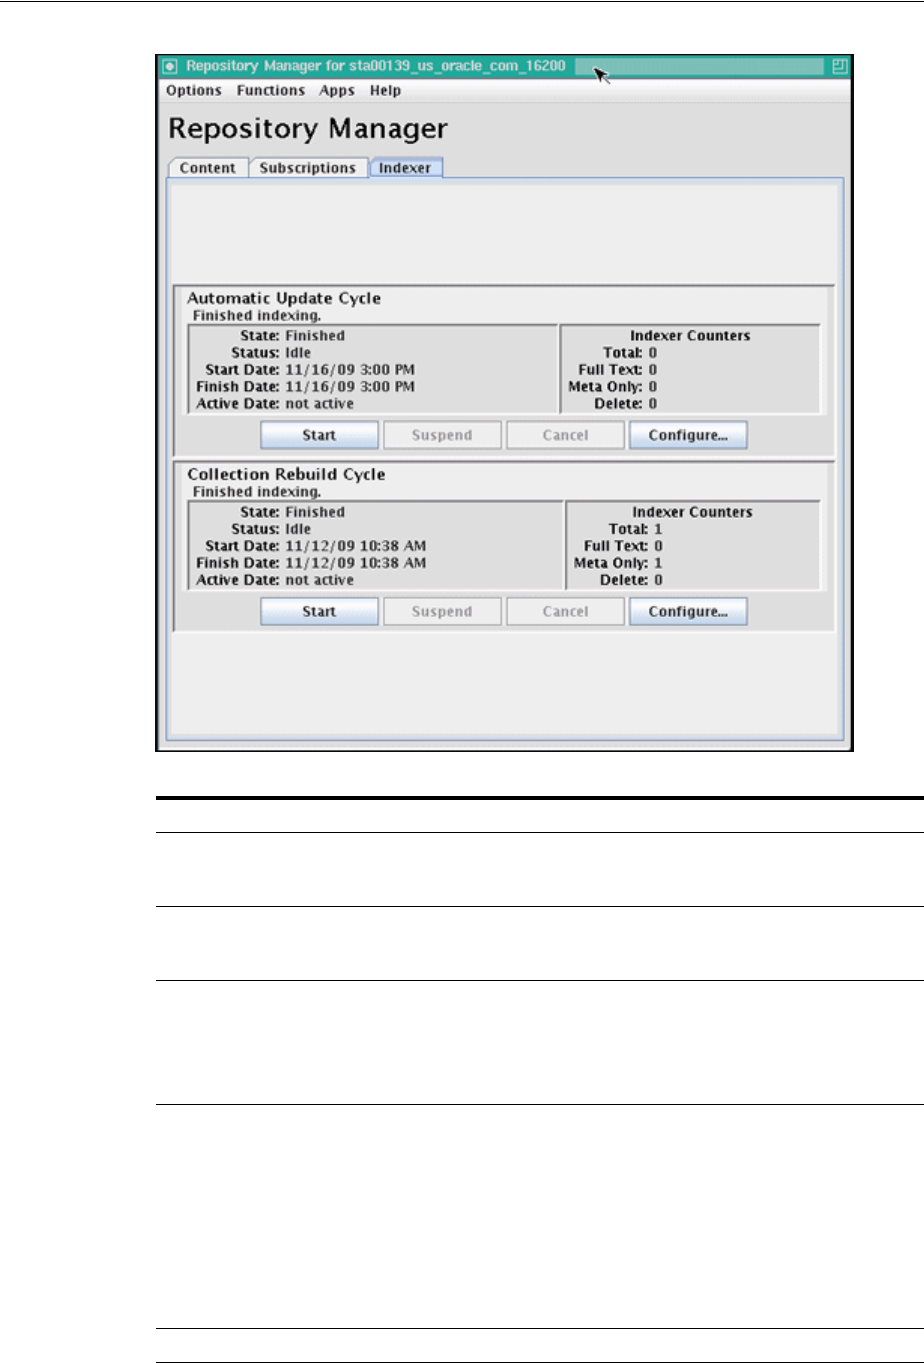
System Properties and Settings Interface
User Interface A-23
Element Description
Automatic Update Cycle
pane Incrementally updates the index database automatically
approximately every five minutes, regardless of whether an
event (such as file checkin) has triggered the Indexer.
Collection Rebuild Cycle
pane The search index is entirely rebuilt, and the old index collection is
replaced with a new index collection when the rebuild is
successfully completed.
State field The current place in the indexing cycle:
Initialization: The indexing cycle is being initialized.
Adding to collection...: Revisions are being indexed.
Finished: The indexing cycle is completed or has been canceled.
Status field The status of the indexing cycle:
Idle: No indexing cycles are in process.
Active: An indexing cycle is currently running.
Interrupted: The indexing cycle was interrupted, either by a
suspension or an unexpected event (such as a power, database,
or file system failure).
Suspending: The indexing cycle is being suspended.
Cancelling: The indexing cycle is being canceled.
Start Date field The date and time the last indexing cycle started.
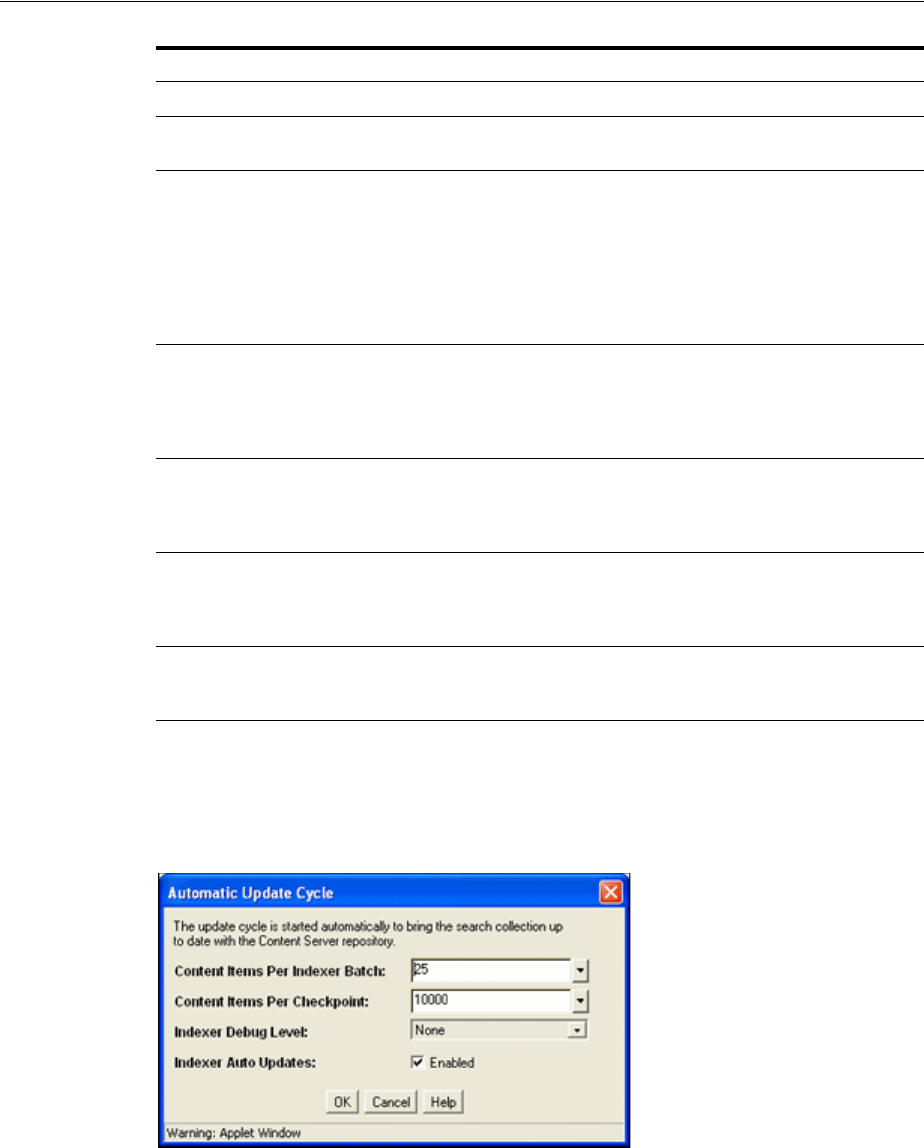
System Properties and Settings Interface
A-24 Oracle Fusion Middleware System Administrator's Guide for Oracle Content Server
A.1.3.2 Automatic Update Cycle Screen
The Automatic Update Cycle screen is used to configure how the Indexer
automatically indexes new files and revisions. To access this screen, click Configure in
the Automatic Update Cycle pane of the Repository Manager: Indexer Tab.
Finish Date field The date and time the last indexing cycle finished.
Active Date field If the indexing cycle is currently active, the date and time the
cycle became active.
Indexer Counters field Counter values for the current indexing cycle.
Tot al : The total number of documents indexed.
Full Text: The number of full-text indexed documents.
Meta Only: The number of documents for which only metadata
has been indexed.
Delete: The number of documents deleted from the search index.
Start/Restart button Begins the indexing cycle, or restarts a cycle that was suspended
or interrupted. Corresponds to the Start index update and Start
index rebuild links in the Actions section of the Administration
tray. These links enable you to remotely manage indexing
functions.
Suspend button Stops the indexing cycle and permits a restart. Corresponds to
the Suspend index update and Suspend index rebuild links in the
Actions section of the Administration tray. These links enable
you to remotely manage indexing functions.
Cancel button Stops the indexing cycle but does not permit a restart.
Corresponds to the Cancel index update and Cancel index
rebuild links in the Actions section of the Administration tray.
These links enable you to remotely manage indexing functions.
Configure button Displays either the Automatic Update Cycle Screen or the
Collection Rebuild Cycle Screen, which enable you to adjust the
files per batch, checkpoint, and debug level.
Element Description

System Properties and Settings Interface
User Interface A-25
A.1.3.3 Collection Rebuild Cycle Screen
The Collection Rebuild Cycle screen is used to configure how the Indexer rebuilds the
search collection. To access this screen, click Configure in the Collection Rebuild Cycle
pane of the Repository Manager: Indexer Tab.
Element Description
Content Items Per Indexer Batch
field The maximum number of files that the search index will
process simultaneously. The default is 25. For example,
25 files are indexed together, then the next 25 files are
indexed. However, if one item fails, then the batch is
processed again.
Thus, if you set this value to 2000 and a document fails,
the entire batch would be reprocessed. This would take
longer than if you use the default setting and an item
fails. But, if there are no failures in the batch, then setting
this value higher accelerates the process.
The only time you would change this setting to one (1) is
if you are experiencing problems with the search engine
indexing large and complicated files.
Content Items Per Checkpoint field The number of files that will go through all relevant
indexing states at a time. You can have multiple batches
of files indexed per checkpoint. After the checkpoint is
reached, some merging of the collection is done before
the next batch is processed.
If this is set to a high value and you try to cancel a
rebuild or an update cycle, the Repository Manager does
not stop processing until the checkpoint is reached.
However, setting the value too low slows down the
indexing process.
Indexer Debug Level list The Indexer debug level. The more debug information
listed in the server window, the slower the indexing
progresses. The following list shows the debug levels
from the least to the most debug information:
none: No information for each file access is displayed,
and no log will be generated.
verbose: Displays information for each file accessed.
Indicates indexed, ignored, or failed, and generates a full
report.
debug: Displays the medium level of information, which
is specifically functional.
trace: Displays the lowest level of information for each
activity performed.
all: Displays the highest level of debug information.
Indexer Auto Updates checkbox Selected: The index database is updated automatically.
Unselected: The index database is not updated
automatically.
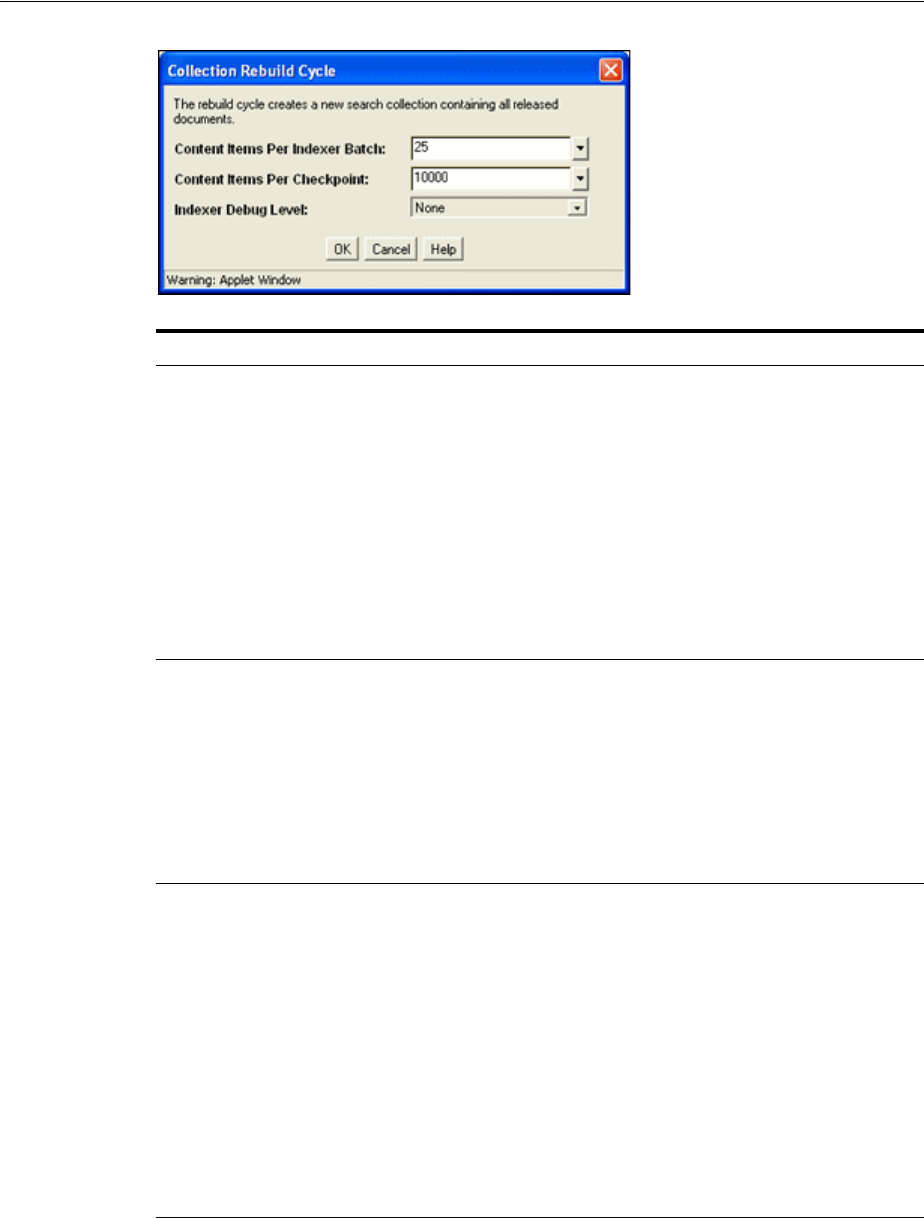
System Properties and Settings Interface
A-26 Oracle Fusion Middleware System Administrator's Guide for Oracle Content Server
A.1.3.4 Indexer Rebuild Screen
If you are using OracleTextSearch as your search and indexing engine, when you use
the Collection Rebuild Cycle Screen on the Repository Manager: Indexer Tab, you can
choose to use the Indexer Rebuild function. Using Indexer Rebuild causes the search
engine to add new information to the search collection without requiring a full
Element Description
Content Items Per Indexer Batch
field The maximum number of files that the search index will
process simultaneously. The default is 25. For example,
25 files are indexed together, then the next 25 files are
indexed. However, if one item fails, then the batch is
processed again.
Thus, if you set this value to 2000 and a document fails,
the entire batch would be reprocessed. This would take
longer than if you use the default setting and an item
fails. But, if there are no failures in the batch, then setting
this value higher accelerates the process.
The only time you would change this setting to one (1) is
if you are experiencing problems with the search engine
indexing large and complicated files.
Content Items Per Checkpoint field The number of files that will go through all relevant
indexing states at a time. You can have multiple batches
of files indexed per checkpoint. After the checkpoint is
reached, some merging of the collection is done before
the next batch is processed.
If this is set to a high value and you try to cancel a
rebuild or an update cycle, the Repository Manager will
not stop processing until the checkpoint is reached.
However, setting the value too low will slow down the
indexing process.
Indexer Debug Level list The Indexer debug level. The more debug information
listed in the server window, the slower the indexing
progresses. The following list shows the debug levels
from the least to the most debug information:
none: No information for each file accessed is displayed.
verbose: Displays information for each file accessed.
Indicates indexed, ignored, or failed.
debug: Displays the medium level of information.
trace: Displays the lowest level of information.
all: Displays the highest level of information.
Database and Database Full-Text Search do not support
indexer debug levels, so only the none option is
displayed if you use a database for search and index.
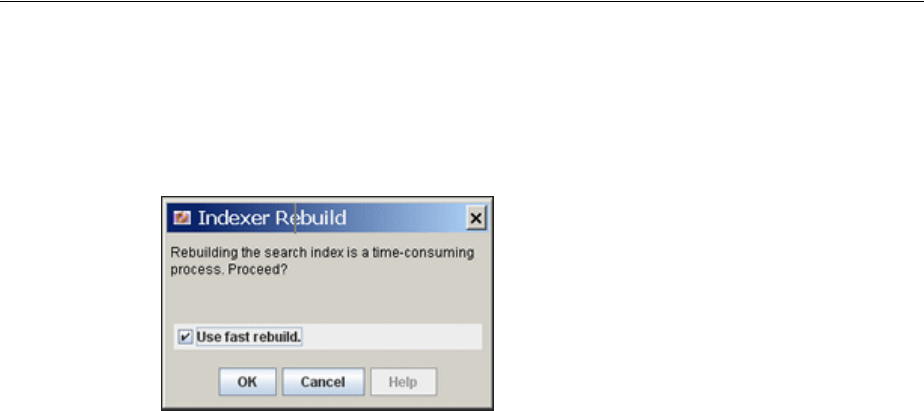
System Properties and Settings Interface
User Interface A-27
collection rebuild. It does not cause all the information (metadata and full-text) to be
re-indexed.
When you click Start on the Collection Rebuild Cycle Screen, the Indexer Rebuild
screen is displayed. To use this function, click OK. To not use this function, deselect
Use fast rebuild and click OK.
A.1.3.5 Admin Actions Page
You can use the Admin actions status page to remotely view the status and perform
basic administration tasks for localization indexing, automatic update cycle, and
collection rebuild cycle functions. To access this page, select the Administration tray
in the portal navigation bar, then click Admin Actions.
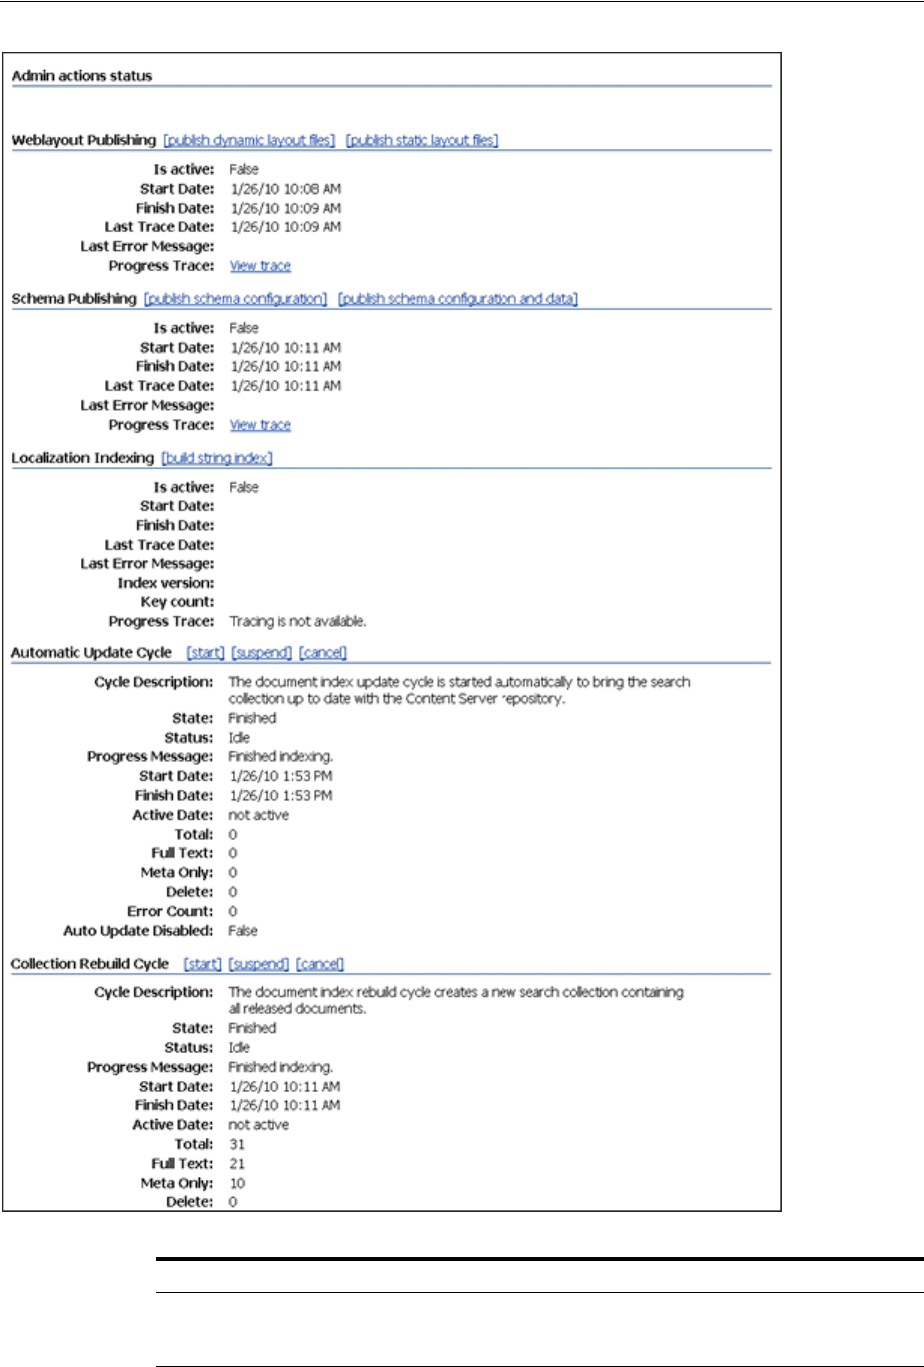
System Properties and Settings Interface
A-28 Oracle Fusion Middleware System Administrator's Guide for Oracle Content Server
Element Description
Weblayout
Publishing area Displays status information and actions for weblayout publishing. You
can click to publish dynamic layout files, to publish static layout files,
and to view a progress trace.

System Properties and Settings Interface
User Interface A-29
A.1.3.6 Zone Fields Configuration Page
Access the Zone Fields Configuration page by selecting Zone Fields Configuration
from the Administration tray in the portal navigation bar.
Schema Publishing
area Displays status information and actions for schema publishing. You can
click links to publish schema configuration, publish schema
configuration and data, and to view a progress trace.
Localization
Indexing area Displays status information and actions for localization indexing. You
can click links to build a string index.
Automatic Update
Cycle area Displays status information and actions for the document index update
cycle. You can click links to start, suspend, and cancel an update cycle.
Collection Rebuild
Cycle area Displays status information and actions for the document index rebuild
cycle. You can click links to start, suspend, and cancel a rebuild cycle.
Element Description
Search Engine drop-down list Select the search engine to be used to search the zone text
fields (either Database or DatabaseFullText).
Zone Text Fields list Lists the zone text fields for the selected search engine. You
can use the [Ctrl] and [Shift] keys on your keyboard to
select multiple fields.
Text Fields list Lists the available text fields for selected search engine.
By default, text fields with a field length of 20 or less
characters are not included in the Text Fields list. You can
change this setting by modifying the
MinFullTextFieldLength configuration variable.
Right and left arrow buttons Move selected fields between the Zone Text Fields and Text
Fields lists.
Element Description
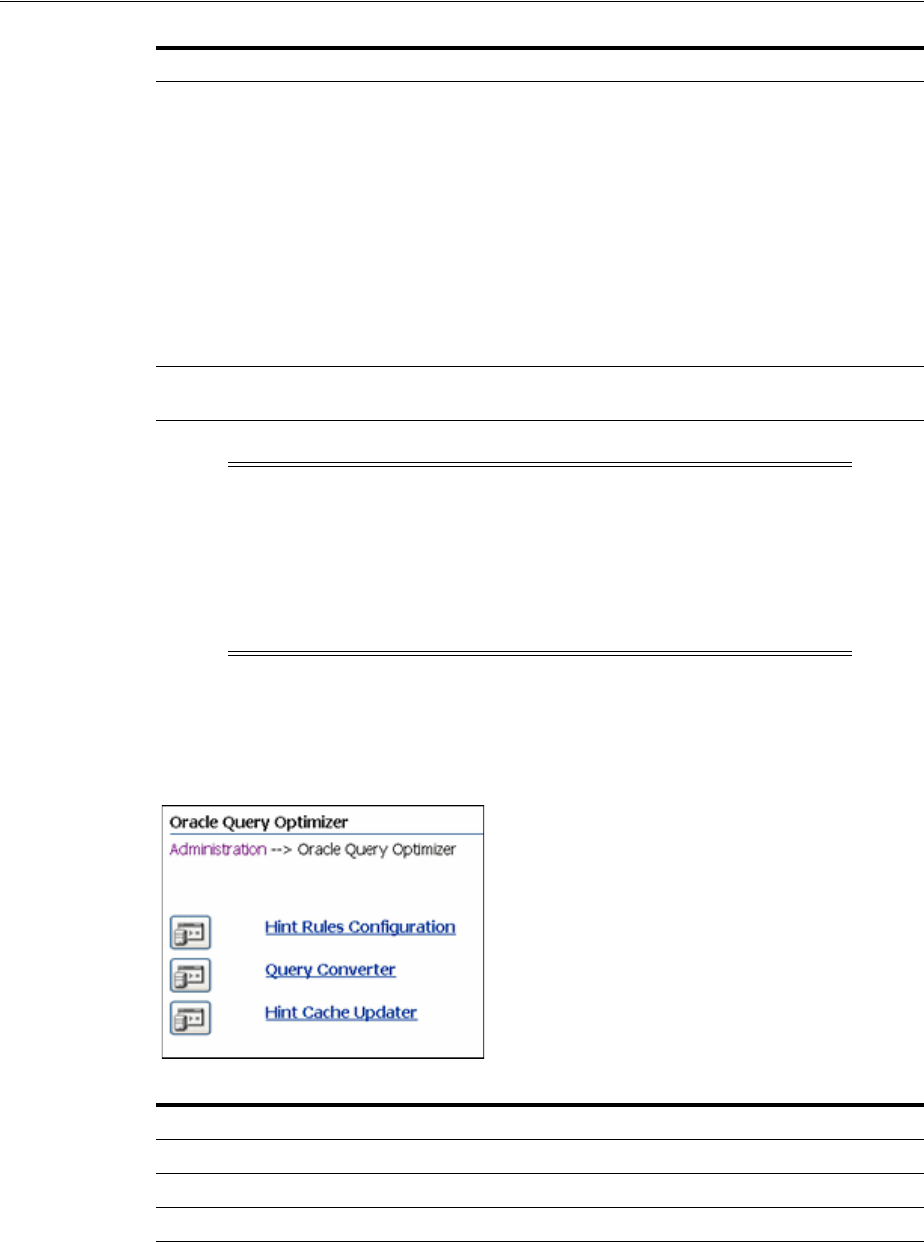
System Properties and Settings Interface
A-30 Oracle Fusion Middleware System Administrator's Guide for Oracle Content Server
A.1.3.7 Oracle Query Optimizer Page
The Oracle Query Optimizer utility provides several methods for optimizing queries.
To access the Oracle Query Optimizer page, on the Administration Page select Oracle
Query Optimizer.
A.1.3.8 Hint Rules Configuration Page
The Hint Rules Table contains the rules that the query optimizer uses to select hints
during the Query Optimization Process. The rules in this table are displayed on the
Update button Enables text fields in the Zone Text Fields list as zone text
fields, and disables text fields in the Text Field list. Parses
the text within all zone text fields and creates a full-text
index that can be queried using the Contains search
operator.
Changing a text field to a zone text field can be a very
time-consuming operation. The amount of time it takes to
parse the text and create the full-text index depends on the
number of content items in the Oracle Content Server
instance and the amount of text stored in the text field.
However, when the text field has been indexed, you should
not experience significant performance issues when
updating and adding content items.
Reset button Reverts the Zone Text Fields and Text Fields lists to the last
saved lists.
Note: Custom text fields (the Comments text field and any
customer-created text fields) are shared between the Database and
DatabaseFullText search engines, and therefore changing the status of
these text fields for one search engine also applies the changes to the
other search engine. Standard text fields (Author, Content ID, Content
Type, Title, and so no) can be enabled or disabled independently for
each search engine.
Element Description
Hint Rules Configuration link Displays the Hint Rules Configuration Page.
Query Converter link Displays the Query Converter Page.
Hint Cache Updater link Displays the Hint Cache Updater Page.
Element Description
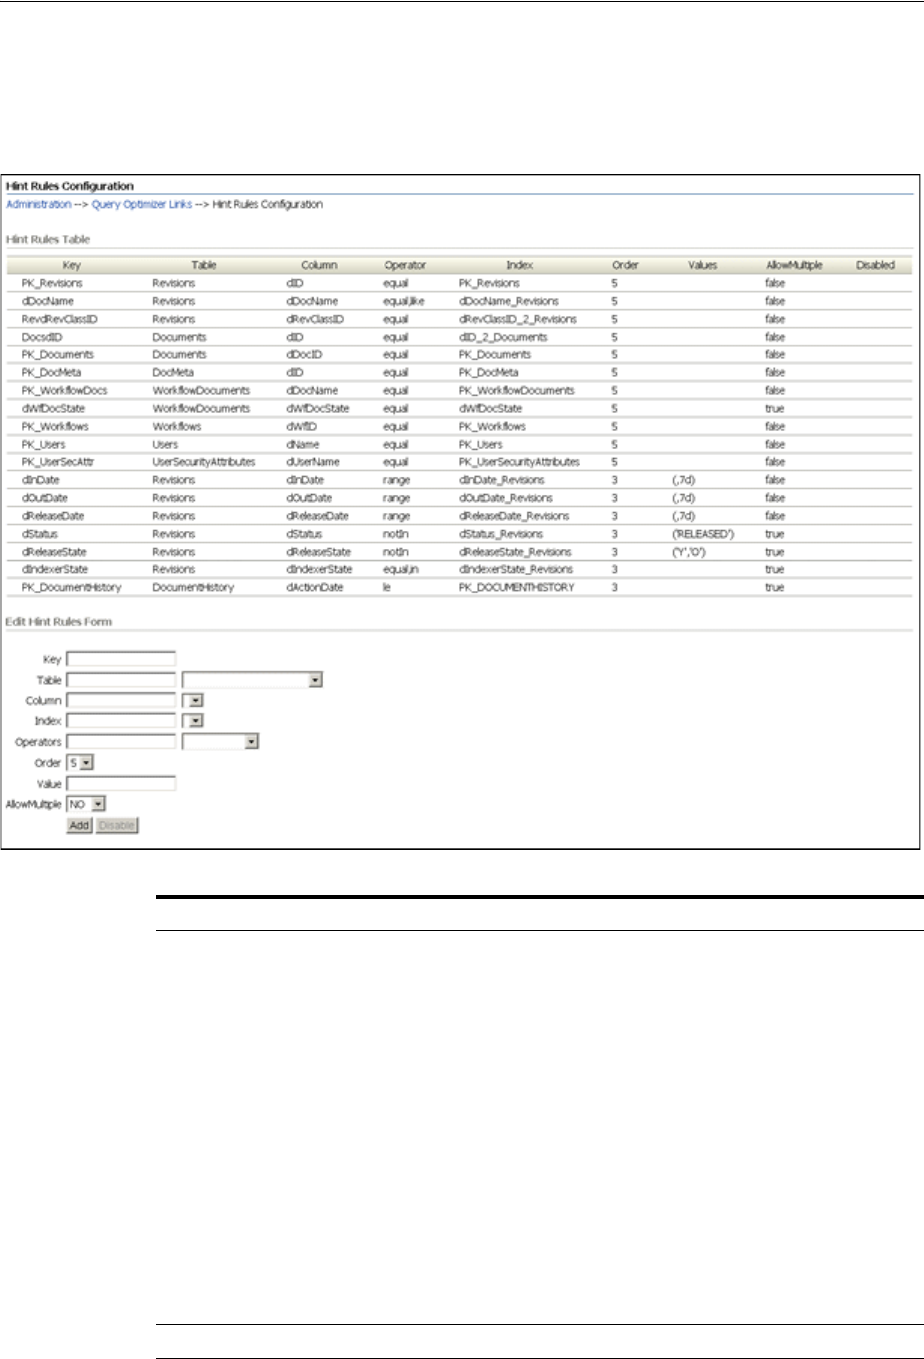
System Properties and Settings Interface
User Interface A-31
Hint Rules Configuration page. The Edit Hint Rules Form provides a way to add,
remove, enable, or disable rules for the Hint Rules Table.
To access this page, select the Administration tray in the portal navigation bar, then
Oracle Query Optimizer, then Hint Rules Configuration.
Element Description
Hint rules configuration
table columns Key: The unique name to identify the rule.
Tabl e : Identifies the specific database table.
Column: Identifies the specific column within the database
table listed in the Table column.
Operator: A comma-delimited list of allowable operators.
Index: Identifies the specific index to use in the optimized
queryif the condition meets the hint rule requirements.
Order: Contains the preferred order to use when the rule is
included in the Hint Rules Table.
Val u es: This column is Idoc scriptable. This column can only be
defined when the Operators column has one of two specific
values.
AllowMultiple: Indicates whether the defined index is used
with other indexes.
Disabled: Indicates whether a hint rule has been disabled.
Key field The unique name that identifies the hint rule.

System Properties and Settings Interface
A-32 Oracle Fusion Middleware System Administrator's Guide for Oracle Content Server
A.1.3.9 Query Converter Page
The Query Converter page displays the result of a converted query and enables you to
modify a converted query by adding, editing, or deleting conditions from the WHERE
Table field and menu Identifies the database table associated with the hint rule. The
menu lists the current database tables. Selecting a table from the
menu automatically populates the Column field, Column menu
options, Index field and Index menu options.
Column field and menu Identifies the database table column associated with the hint
rule. Selecting a column from the menu automatically populates
the Index field and Index menu options.
Index field and menu Identifies the index associated with the hint rule.
Operators field and menu Identifies the specific operator(s) associated with the hint rule.
Valid options include:
equal: Compares records to find equal values.
like: Compares records to find similar values.
in: Compares records to find values equal to any member of the
specified item(s). Using this operator enables you to define the
Values field.
greater: Compares records to find larger values on the left.
ge: (greater than or equal to) Compares records to find equal
values or larger values on the left.
le: (less than or equal to) Compares records to find equal values
or smaller values on the left.
less: Compares records to find larger values on the right.
notEqual: Compares records to find different values.
notIn: Compares records to find values that are not equal to any
member of the specified item(s). Using this operator enables
you to define the Values field.
notLike: Compares records to find dissimilar values.
generic: This operator is necessary if multiple operators are
used in the conditions and are connected by an OR conjunction.
For example: dIndexerState IS NULL OR
dIndexerState IN ('N', 'Y').
range: This operator can be applied to an Integer field or a Date
field. This operator is necessary when the Values field is defined
with a valid range of values that would cause the hint to be
applied. Using this operator enables you to define the Values
field.
Order menu In descending order from 5 to 1, indicates the preference value
of the hint rule. During the optimization process, the highest
ranked hint rule that meets the condition's requirements is
selected.
Values field Specifies applicable quantities when used with the operators in,
notIn, and range; see the Operators field.
AllowMultiple menu Available options include:
Yes: The defined index can be used with other indexes.
No: The defined index must be used alone.
Add button Used to add a hint rule or activate a disabled hint rule.
Disable button Deactivates the selected rule.
Element Description
System Properties and Settings Interface
User Interface A-33
clause. Modifying a converted query enables you to see exactly what will be executed
when the query is submitted. Converted queries can optionally include data sources.
The Query Converter page is accessed from the Hint Rules Configuration Page by
selecting the Administration tray in the portal navigation bar, then Oracle Query
Optimizer, then Query Converter.
The following figures show two types of query converter pages: a page that uses a
data source, and a page that does not use a data source.
Element Description
Use Data Source checkbox This checkbox acts as a toggle switch to display or hide the
fields related to converting a data source.
Selected: On the Query Converter page, displays all the fields.
Unselected: On the Query Converter page, hides the DS Name
menu and text area and the Additional Parameters field on the
Hint Cache Updater Page.
System Properties and Settings Interface
A-34 Oracle Fusion Middleware System Administrator's Guide for Oracle Content Server
A.1.3.10 Hint Cache Updater Page
The Hint Cache Updater Page enables you to add a new entry, edit an existing entry,
or remove an existing entry which enables you to fine tune query hints. Additionally,
you can monitor and edit entries in the hint cache at run time to customize them for
specific queries. The Hint Cache Updater page is accessed from the Hint Rules
Configuration Page by selecting the Administration tray in the portal navigation bar,
then Oracle Query Optimizer, then Hint Cache Updater.
The following figures show two types of query converter pages: a page that uses a
data source, and a page that does not use a data source.
DS Name menu and text
area The menu lists the available data source names and, when you
select one, the text area displays the current contents of the data
source query.
Additional Parameters field One or more variables that are evaluated for the data source
used to generate a query related to a specific environment.
Where Clause/Query field where Clause: This field is displayed when the Use Data Source
checkbox is selected. Enables you to enter additional conditions
that are appended to the existing WHERE clause in the data
source. You can copy and paste an existing WHERE clause or
enter it manually.
Query: This field displays when the Use Data Source checkbox
is unselected. Enables you to enter a full query to be evaluated.
You can copy and paste an existing query or enter it manually.
Convert Query button Submits the information for the data source or query to be
evaluated using the Query Optimization Process. The submitted
data source or query is converted from a standard query to an
optimized query that uses customized hints.
Element Description
System Properties and Settings Interface
User Interface A-35
Element Description
Use Data Source checkbox This checkbox acts as a toggle switch to display or hide the
fields related to managing the data source-based entries in the
hint cache.
Selected: On the Hint Cache Updater page, displays all the
fields.
Unselected: On the Hint Cache Updater page, hides the DS
Name menu and text area and the Additional Parameters field.
DS Name menu and text
area The menu lists the available data source names and, when you
select one, the text area displays the current contents of the data
source query.
Additional Parameters field One or more variables that are evaluated for the data source
used to generate a query related to a specific environment.
where Clause/Query field where Clause: This field is displayed when the Use Data Source
checkbox is selected. Enables you to enter additional conditions
that are appended to the existing WHERE clause in the data
source. You can copy and paste an existing WHERE clause or
enter it manually.
Query: This field displays when the Use Data Source checkbox
is unselected. Enables you to enter a full query to be evaluated.
You can copy and paste an existing query or enter it manually.
Hints field Enter any additional hints for the data source or query. If you
enter one or more Content Server Hints, the Oracle Query
Optimizer component will consider them as default hints and
they will not go through the Query Optimization Process. If you
enter multiple hints, the feature will look for the best hint and, if
possible, select multiple hints.
Check Cache button Evaluates the submitted query and checks the hint cache to
determine if matching hints already exist. If so, they are
returned. If not, the message, Hint does not exist in
cache is displayed.
With data source: Combines the WHERE clause and hints and
applies the additional parameters before submitting the query
for evaluation.
Without data source: Combines the query and hints before
submitting the query for evaluation.
System Properties and Settings Interface
A-36 Oracle Fusion Middleware System Administrator's Guide for Oracle Content Server
A.1.4 File Store Administration Interface
The FileStoreProvider component is installed and enabled by default to support the
file store system. This component adds the following pages to the Oracle Content
Server instance:
■"Partition Listing Page" on page A-36
■"Add/Edit Partition Page" on page A-37
■"File Store Provider Information Page" on page A-38
■"Edit File Store Provider Page" on page A-38
■"Storage Rule Name Dialog" on page A-39
■"Path Information Screen" on page A-41
A.1.4.1 Partition Listing Page
The Partition Listing page displays a list of all current partitions, indicating their root
and status. To access the Partition Listing page, select the Administration tray in the
portal navigation bar, then select File Store Administration. Elements of each
partition listed can be modified using the Add/Edit Partition Page, and their values
are stored in the PartitionList resource table in the fsconfig.hda file, located in the
IntradocDir/data/filestore/config directory.
Update Cache button Ensures that the data source or query will always use the
specified hints because the hint cache is updated. Thus, clicking
this button results in a manual overwrite of the previously
defined hint cache. From now on, the new hints will be used
with this particular query.
Remove button Removes the information entered into any of the fields for the
specified query.
Element Description
Partition Name Displays the name of the partition as defined when the partition was
created using the Add/Edit Partition Page. The partition name is part of
the path expression used by the Oracle Content Server instance when
storing content.
Partition Root Displays the root level to where content is being stored for this partition
and is one of the arguments passed to the algorithm used by the Oracle
Content Server instance to choose a storage location for content. This
value can be a static string, such as C:/vault, an expression, such as
$#env.VauldDir$, or an Idoc Script variable, such as $HttpWebRoot$.
Element Description
System Properties and Settings Interface
User Interface A-37
A.1.4.2 Add/Edit Partition Page
The Add/Edit Partition Page is used to create and modify partitions used by Oracle
Content Server instance to store content. To access the Add/Edit Partition page, click
Add Partition on the Partition Listing Page. Values entered here are stored in the
Partition List Table in the fsconfig.hda file, located in the
IntradocDir/data/filestore/config/ directory.
Is Active Displays whether a partition is active (TRUE) or not (FALSE). Active
partitions are available to store content.
Action Displays the item action menu for each partition, from which you can
choose to edit or delete the partition.
Add Partition Clicking Add Partition displays the Add/Edit Partition Page, which can
be used to add and activate a new partition for use by the Oracle Content
Server instance.
Element Description
Partition Name Defines the unique name of the partition. The partition name is displayed
on the Partition Listing Page and is part of the path expression used by
the Oracle Content Server instance to store content. As such, it must be
unique for each partition created, and has the same character limitations
as Idoc Script and HTML path expressions.
Partition Root Defines the root level of the path to where content is stored for this
partition and is one of the arguments passed to the algorithm used by the
Oracle Content Server instance to choose a storage location for content.
Capacity Check
Interval Specifies the interval used in determining the disk space available for use
by this partition. Expressed in seconds. This argument may not work on
all platforms.
Slack Bytes Specifies the point at which a partition is full and can no longer accept
content. If the available space on the partition is lower than the specified
number of slack bytes, the partition no longer accepts new content.
Duplication
Methods Specifies how native files are treated when not converted to a
web-viewable rendition. For example, many image files do not require a
rendition to be web-viewable. Linking to the native file instead of
copying them to the web path helps manage storage space.
copy (default): copies the native file to the web path.
link: Resolves the web path to the native file in the vault
Is Active Specifies whether the partition is active and available for new content.
Element Description

System Properties and Settings Interface
A-38 Oracle Fusion Middleware System Administrator's Guide for Oracle Content Server
A.1.4.3 File Store Provider Information Page
The File Store Provider Information page for a file store displays information about the
selected provider, including the connection state, last activity date, and the provider
type, class, and connection.
To display the File Store Provider Information page, click Info next to a File Store
provider on the Providers Page.
Click Edit on the File Store Provider Information page to display the Edit File Store
Provider Page, where details of the File Store Provider can be modified.
A.1.4.4 Edit File Store Provider Page
The Edit File Store Provider page is used to modify the existing file store
configuration. To access the Edit File Store page, click Edit on the File Store Provider
Information Page.
The information entered on this page is stored in the provider.hda file located in the
IntradocDir/data/providers/defaultfilestore directory. The default values will handle
most storage scenarios.
Update Submits the information specified creates or updates the partition.
Reset Resets the information to the previous state before updating the partition.
Element Description
System Properties and Settings Interface
User Interface A-39
A.1.4.5 Storage Rule Name Dialog
The Storage Rule Name dialog is used to configure how and where each provider
stores content checked into the Oracle Content Server instance. This dialog defines
whether content items are stored on a file system or within a database, if a web
rendition is created, and how the paths to the content are constructed.
Element Description
Provider Name Defines the name of the provider.
Provider Description A descriptive phrase displayed on the Providers Page identifying
the provider.
Provider Class The path to the Java class file governing provider functionality. The
default class file is BaseFileStore.
Connection Class This is a path to a Java class file that is not applicable to the Oracle
Content Server instance. Do not enter a value.
Configuration Class The path to the Java class file used to configure file store provider
functionality.
Access Implementor The path to the Java class file called to access content.
Descriptor Implementor The path to the Java class file called when describing content.
Event Implementor The path to the Java class file called when implementing an event,
such as indexing or searching.
Metadata Implementor The path to the Java class file called when needing information
about content.
Storage Rules Lists the storage rules used for the provider. Select the rule to edit,
or select Add rule to create additional rules.
Edit Rule Accesses the Storage Rule Name Dialog for adding or modifying
storage rules.
System Properties and Settings Interface
A-40 Oracle Fusion Middleware System Administrator's Guide for Oracle Content Server
To access the Storage Rule Name dialog, click Edit rule... next to the Storage Rules
drop-down list on the Edit File Store Provider Page.
Note: All the Path Information fields can be edited, but $dispersion$
and $endDispMarker$ should not be edited in the Web-viewable Path
or Web URL File Path fields. The dispersion rule expression can be
edited in the Dispersion Rule field, but $endDispMarker$ cannot be
changed.
Element Description
File system only Specifies that content checked into the Oracle Content Server instance
be stored only on a specified file system, and not in a database. This
includes both the native and web-viewable files unless the Is Webless
File Store option is enabled.
JDBC Storage Specifies that content checked into the Oracle Content Server instance
be stored only in a database, and not on a file system. This includes
both the native and web-viewable files unless an option is selected
from the Renditions choice list.

System Properties and Settings Interface
User Interface A-41
A.1.4.6 Path Information Screen
The Path Information screen displays information about the current configuration of
the path metadata that can be used in constructing paths for the file store provider. To
view the Path Information screen, click Show Path Metadata on the Storage Rule
Name Dialog.
Renditions Specifies a rendition to store on a file system when JDBC Storage is
enabled.
No selection (default): Both the native and web-viewable renditions
are stored in the database.
Web Files: Stores web-viewable renditions on a file system and native
files in the database.
Vault Files: Stores native files on a file system and web-viewable files
in the database.
Is Webless File Store Specifies that a web-viewable rendition content not be created.
Show Path Metadata Expands the screen to display detailed information about the
metadata used for constructing paths used by the provider.
Vault Path The expression defining the path to the vault location where native
content checked into the Oracle Content Server server is stored for the
provider using this rule.
Weblayout Directory The expression defining the path on the file system to the weblayout
directory.
Dispersion Rule The expression defining the dispersion of content on the file system.
$endDispMarker$ cannot be changed.
Note: If the file system has been upgraded from an earlier Oracle
Content Server release, this field is blank by default to support the
existing configuration. If the file system has any existing documents, it
will keep dispersion blank (empty).
Web-viewable Path The expression defining the path on the file system to the
web-viewable rendition. Do not edit $dispersion$ and
$endDispMarker$ in this path.
HttpWebRoot and
URL Prefix The expression defining the weblayout directory and URL prefix for
the root level to where content is being stored for the partition.
Web URL File Path The URL used to access the web-viewable rendition in a browser. Do
not edit $dispersion$ and $endDispMarker$ in this path.
Important: If the web root used in the web URL file path defined in
the storage rule is something other than the default weblayout
directory defined for the Oracle Content Server instance, you must
add an alias or virtual directory in your web server for the web root
used in the storage rule. Otherwise, the Oracle Content Server
instance does not know where to access the file. For information on
adding virtual directories to your web server, see the documentation
that came with your web server.
Element Description
System Properties and Settings Interface
A-42 Oracle Fusion Middleware System Administrator's Guide for Oracle Content Server
A.1.5 Web Server Interface
This section covers these topics:
■"Configure Web Server Filter Page" on page A-42
■"WebUrlMaps Screen" on page A-44
A.1.5.1 Configure Web Server Filter Page
The Configure Web Server Filter page is used to configure and troubleshoot web
server filter communication with the Oracle Content Server instance. Because an
Oracle WebLogic Server Administration Server handles web server communication,
most of the options on this page are not relevant except for the GZIP encoding option.
The settings can still be modified and can be relevant if a separate web server is used
as an access point for the this Oracle Content Server instance.
To access this page, click the Filter Administration link in the Administration tray in
the portal navigation menu.
Element Description
Field Name Name of a field in the current path metadata configuration.
Description Brief description of the function of a field.
Generation Algorithm Algorithm associated with a field.
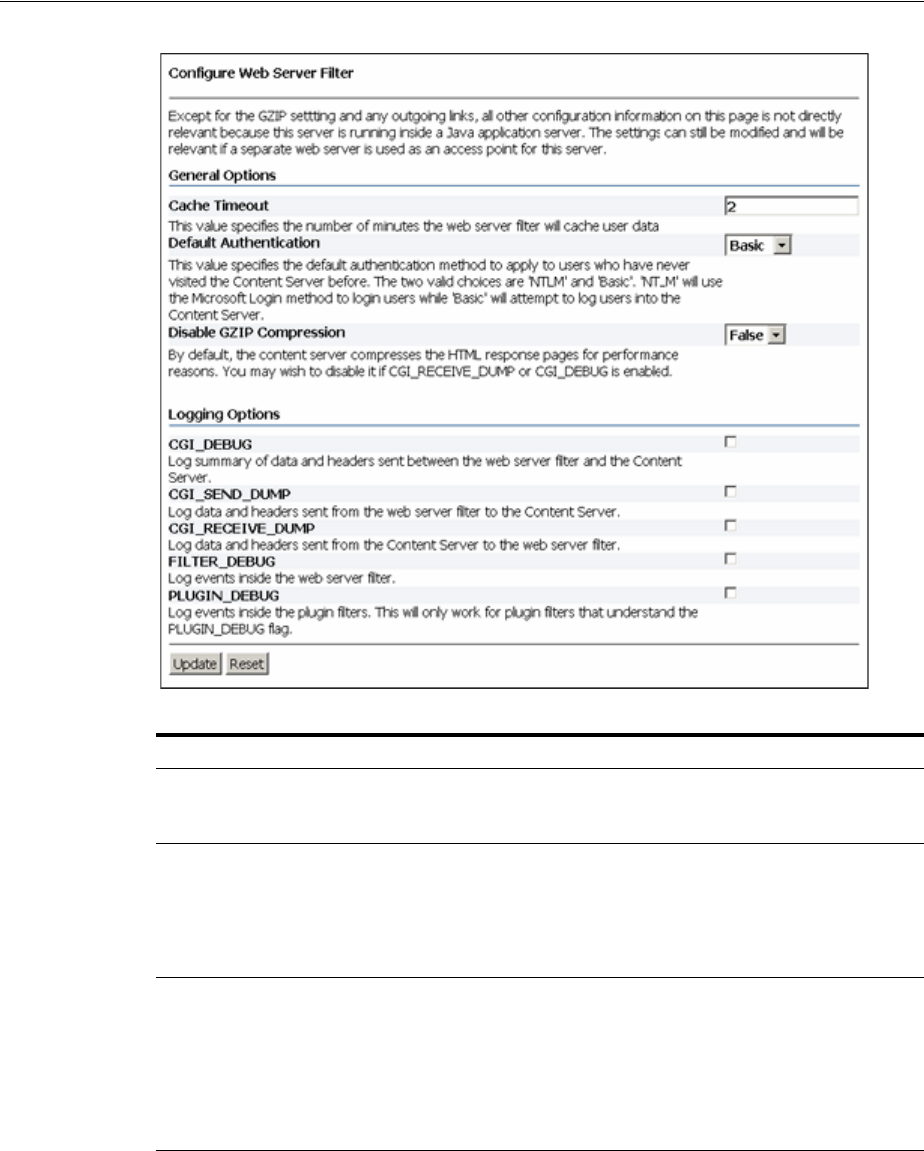
System Properties and Settings Interface
User Interface A-43
When you select any of the logging options, a web server filter log file is created as
follows:
■Apache: IntradocDir/data/users/authfilt.log
General Options Description
Cache Timeout field Sets the amount of time in minutes that the web server holds user
credentials. To maintain the Oracle Content Server user credentials,
you should select a finite time for the web server to cache user data.
Default Authentication
field The first time a user logs in to the Oracle Content Server instance, a
cookie is sent to the filter. If you change the default authentication
from the default Basic to NTLM, the first time a user logs in to the
Oracle Content Server instance the user will not be prompted to log
in again because their credentials will automatically be
authenticated.
Disable GZIP
Compression For optimal performance, the Oracle Content Server instance
compresses the HTML response pages. This option is useful for
debugging purposes.
TRUE = Prevents the Oracle Content Server instance from
compressing HTML response pages.
FALSE = Configures the Oracle Content Server instance to
compress HTML response pages. This is the default setting.
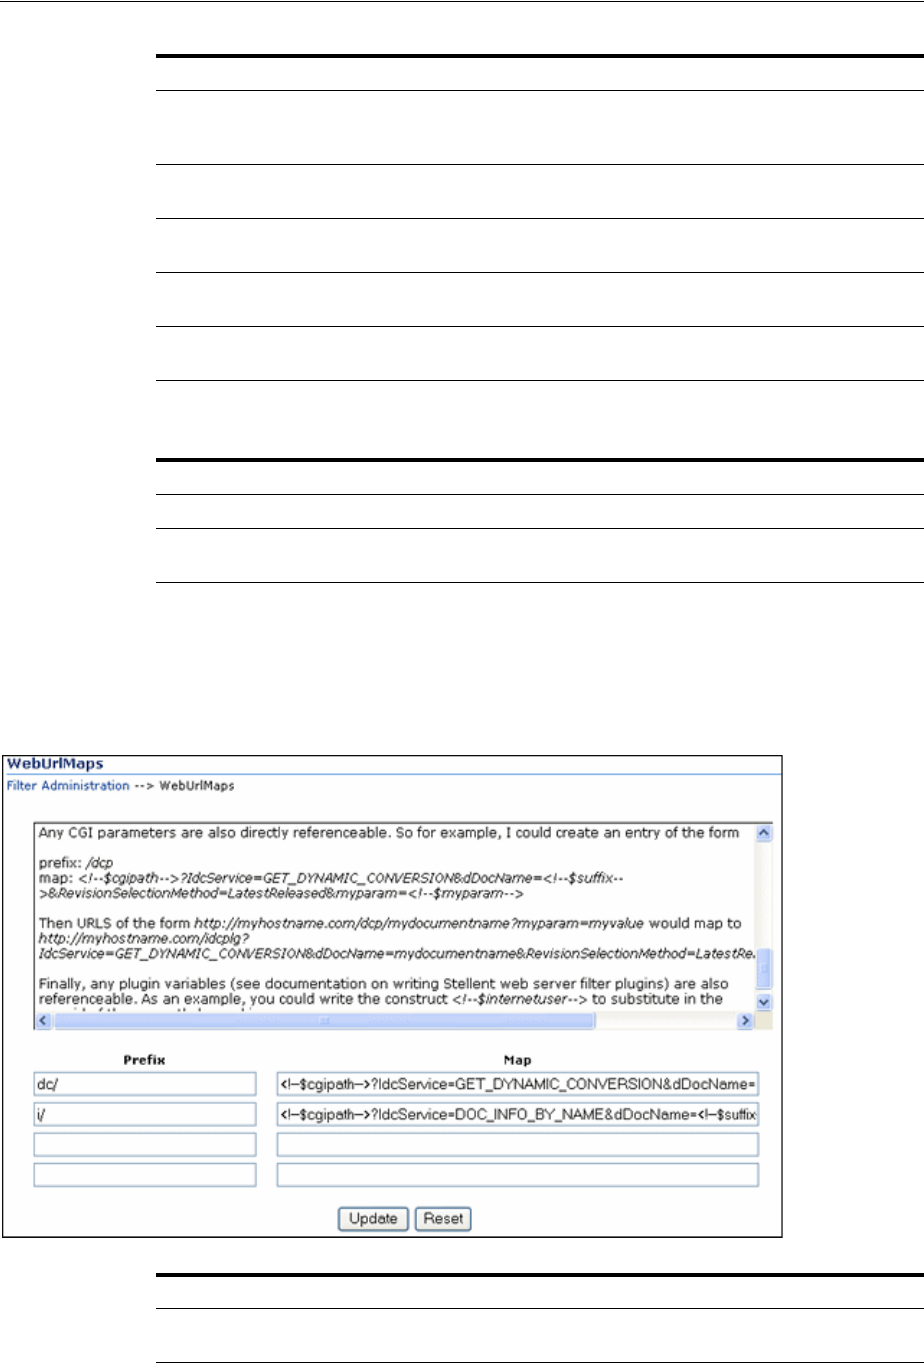
System Properties and Settings Interface
A-44 Oracle Fusion Middleware System Administrator's Guide for Oracle Content Server
The following buttons and other options are also available.
A.1.5.2 WebUrlMaps Screen
Use the WebUrlMaps screen to add or edit URL mapping entries. It does the mapping
inside the Oracle WebLogic Server domain. To access this screen, select
Administration, then select WebUrlMaps. This option is installed and enabled by
default with Oracle Content Server deployment.
Logging Options Description
CGI_DEBUG checkbox Enables logging of high-level information that is passed through the
web server filter. This is helpful in determining password and user
authentication problems.
CGI_SEND_DUMP
checkbox Enables logging of all incoming data that is passed through the web
server filter.
CGI_RECEIVE_DUMP
checkbox Enables logging of all outgoing data that is passed through the web
server filter.
FILTER_DEBUG
checkbox Enables logging of events that occur inside the web server filter.
PLUGIN_DEBUG
checkbox Enables logging of events that occur inside any web server plug-in
filters that understand this flag.
Other Options Description
Update button Saves any changes to the web filter configuration settings.
Reset button Returns the web filter configuration settings to their last saved
values.
Element Description
Text pane Provides an overview and general information about the
WebUrlMaps feature. Use the side scroll bar to view all the text.

System Properties and Settings Interface
User Interface A-45
A.1.6 Provider Interface
The following screens are used when managing Oracle Content Server providers:
■Section A.1.6.1, "Providers Page"
■Section A.1.6.2, "Provider Information Page"
■Section A.1.6.3, "Add/Edit Provider Page"
■Section A.1.6.4, "Outgoing Socket Provider Page"
■Section A.1.6.5, "Database Provider Page"
■Section A.1.6.6, "Incoming Provider Page"
■Section A.1.6.7, "Preview Provider Page"
■Section A.1.6.8, "LDAP Provider Page"
■Section A.1.6.9, "keepaliveincoming Provider Page"
■Section A.1.6.10, "keepaliveoutgoing Provider Page"
■Section A.1.6.11, "sslincoming Provider Page"
■Section A.1.6.12, "ssloutgoing Provider Page"
■Section A.1.6.13, "JPS User Provider Page"
■Section A.1.6.14, "Outgoing Http Provider Page"
A.1.6.1 Providers Page
The Providers page is used to find provider information, test providers, add and edit
providers. To access this page, do one of the following:
■Click the Providers link from the Administration tray in the portal navigation bar.
■Click the View Providers link in the side navigation bar on the Admin Server
Page.
Prefix field The abbreviation that is used as a filter to evaluate whether a URL
should be processed using a defined mapping script.
Map field The script used to process applicable URLs and map them to the
resulting URL.
Update button Saves the changes made in the Prefix and Map fields.
Reset button Reverts the values of the Prefix and Map fields to their previously
saved settings. Any values entered but not saved are removed from
the fields.
Element Description
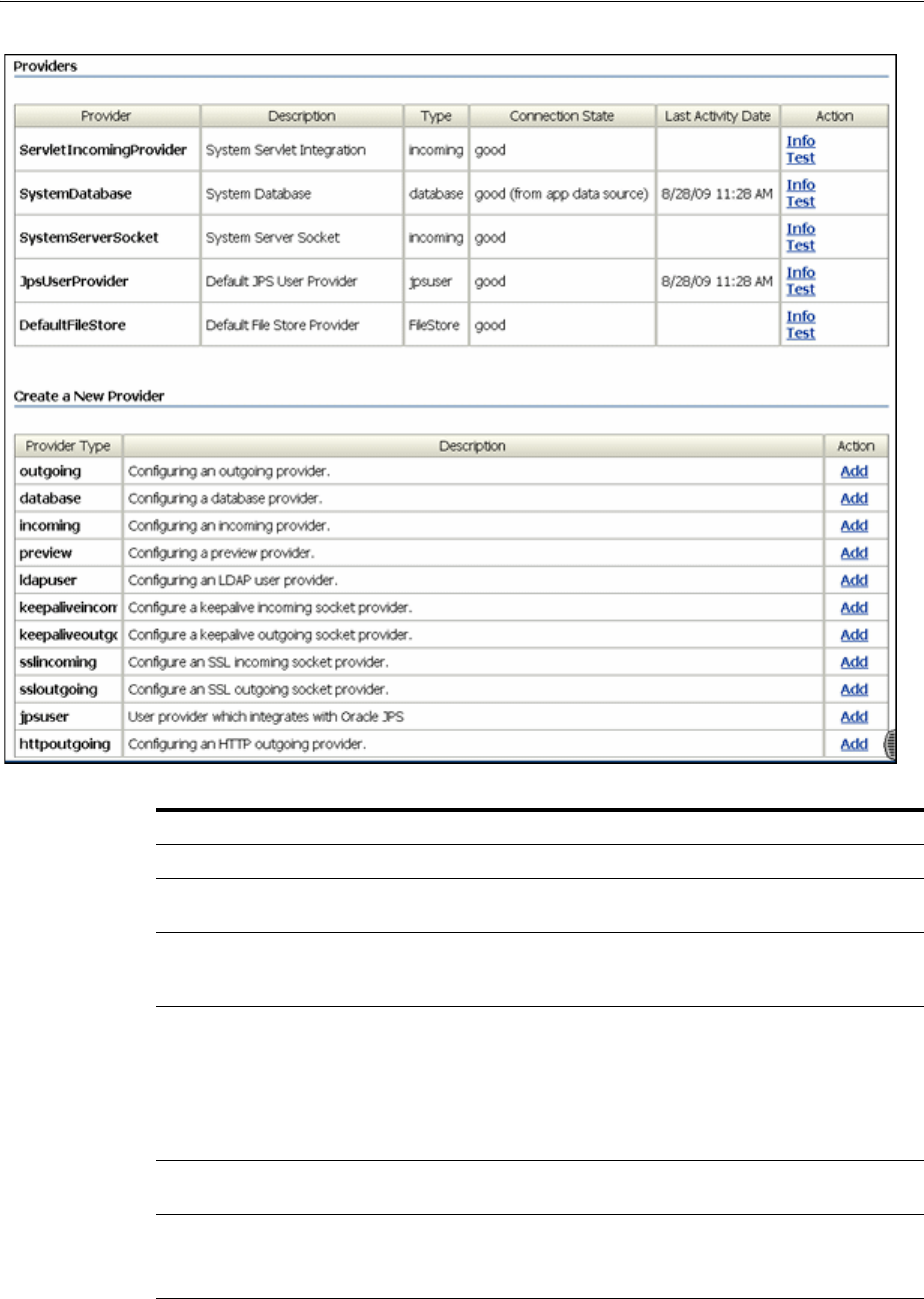
System Properties and Settings Interface
A-46 Oracle Fusion Middleware System Administrator's Guide for Oracle Content Server
Providers Table Description
Provider column Name of the provider that establishes connection to outside entities.
Description column Description of the provider that establishes connection to outside
entities.
Type column The type of provider. This can include incoming, outgoing, database,
preview, ldapuser, keepaliveincoming, keepaliveoutgoing, sslincoming,
ssloutgoing, jpsuser, httpoutgoing, FileStore.
Connection State
column Possible states are:
■misconfigured
■good
■down
■requires restart
Last Activity Date
column The last date and time that the provider was active.
Action column The Info link displays the Provider Information Page for the provider.
The Tes t link refreshes the Connection State and Last Activity Date
columns for the provider.

System Properties and Settings Interface
User Interface A-47
A.1.6.2 Provider Information Page
The Provider Information page is used to review, edit, disable, or delete existing
providers information. To access this page, click the Info link in the Action column for
the row that corresponds to a provider on the Providers Page.
New Provider
Table Description
Provider Type
column The type of provider.This can include:
■outgoing (see Outgoing Socket Provider Page)
■database (see Database Provider Page)
■incoming (see Incoming Provider Page)
■preview (see Preview Provider Page)
■ldapuser (see LDAP Provider Page)
■keepaliveincoming (see keepaliveincoming Provider Page)
■keepaliveoutgoing (see keepaliveoutgoing Provider Page)
■sslincoming (see sslincoming Provider Page)
■ssloutgoing (see ssloutgoing Provider Page)
■jpsuser (see JPS User Provider Page)
■httpoutgoing (see Outgoing Http Provider Page)
Description column Description of the provider type.
Action column Click the Add button to display the Add/Edit Provider Page for the
provider type listed in the row.
Note: You can only edit, disable, or delete providers that you have
created. You cannot edit, disable, or delete providers installed with
the Oracle Content Server instance.
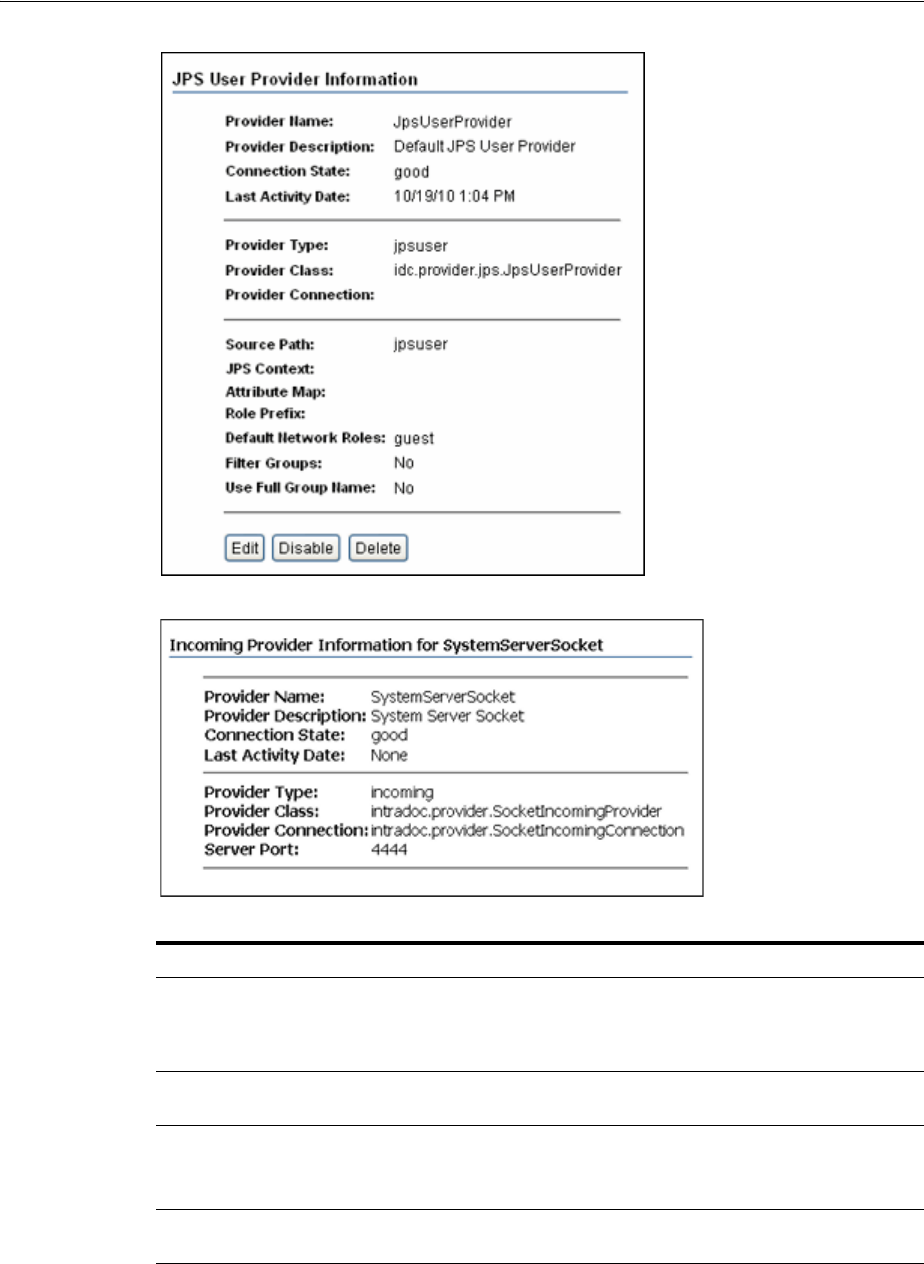
System Properties and Settings Interface
A-48 Oracle Fusion Middleware System Administrator's Guide for Oracle Content Server
A.1.6.3 Add/Edit Provider Page
The Add/Edit Provider page is used to create or edit a provider.
Element Description
Information fields Displays information about the provider. The information shown
depends on the type of provider and the Oracle Content Server
configuration. For a description of each field, see "Add/Edit
Provider Page" on page A-48.
Edit button Displays the Add/Edit Provider Page for the provider. This button is
not displayed for the default system providers.
Disable/Enable button Disables or enables the provider. The Oracle Content Server instance
must be restarted after a provider is disabled or enabled.
This button is not displayed for the default system providers.
Delete button Deletes the provider. This button is not displayed for the default
system providers.

System Properties and Settings Interface
User Interface A-49
■To access the Add Provider page, click the Add link in the row for the type of
provider you want to create on the Providers Page.
■To access the Edit Provider page, click Edit in the row for the provider type on the
Provider Information Page.
The fields on the Add/Edit Provider page depend on the type of provider being
created or edited:
■Outgoing Socket Provider Page
■Database Provider Page
■Incoming Provider Page
■Preview Provider Page
■JPS User Provider Page
Other providers may be listed depending on the Oracle Content Server configuration.
A.1.6.4 Outgoing Socket Provider Page
The Outgoing Socket Provider page is used to create or edit an outgoing socket
provider. To access this page, click the Add link in the row for the provider type on
the Providers Page, or click the Edit link in the row for the provider on the Provider
Information Page.
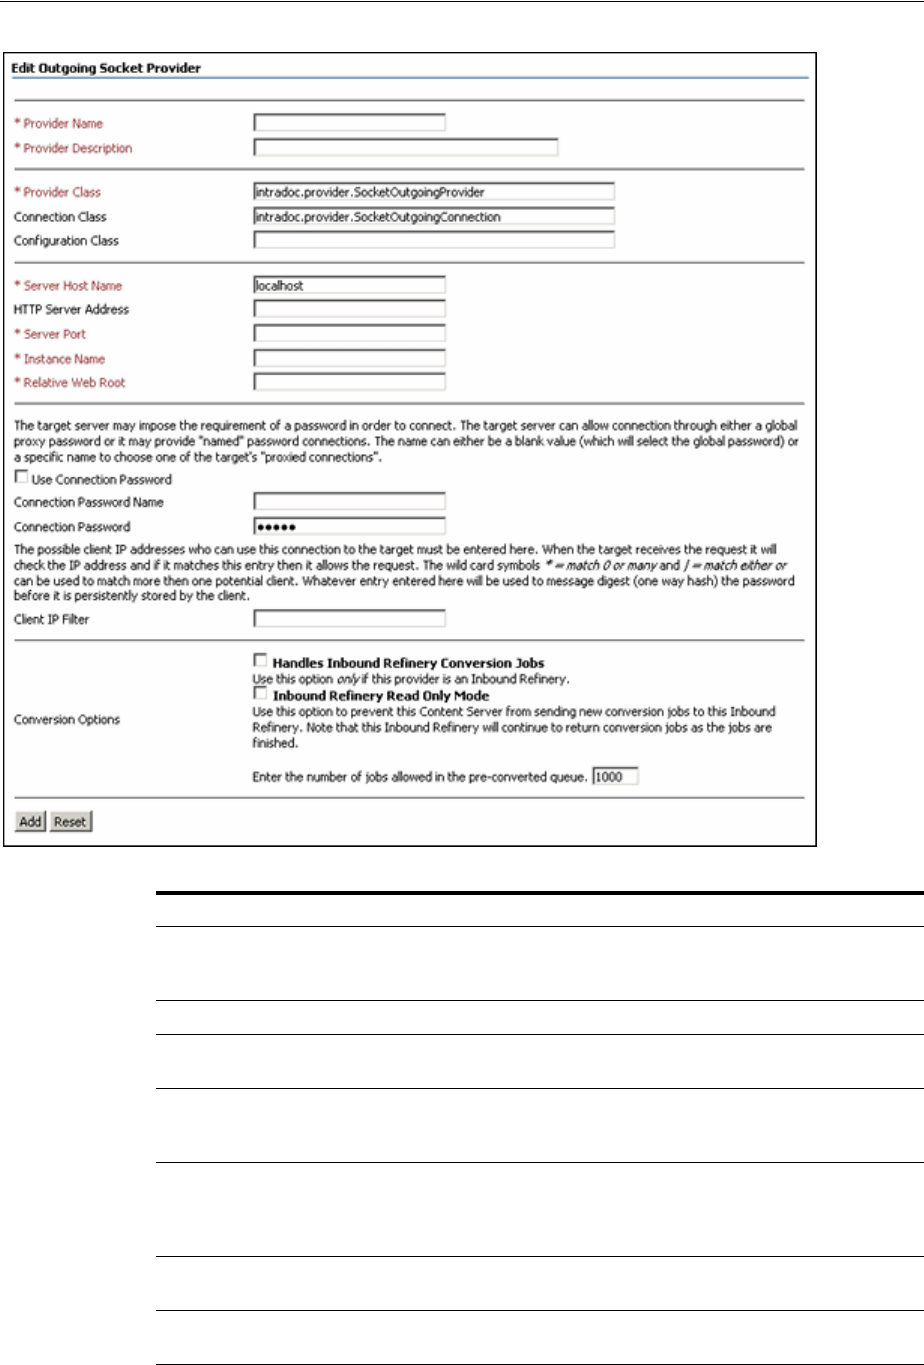
System Properties and Settings Interface
A-50 Oracle Fusion Middleware System Administrator's Guide for Oracle Content Server
Element Description
Provider Name field The name of the provider, which will become a
subdirectory in the IntradocDir/data/providers/
directory.
Provider Description field User-friendly description of the provider.
Provider Class field The name of the Java class for the provider. For example,
intradoc.provider.SocketOutgoingProvider.
Connection Class field The name of the Java class that implements the provider
connection. For example,
intradoc.provider.SocketOutgoingConnection.
Configuration Class field The name of a Java class that performs some extra
configuration. This class is very useful for database
providers, where the connection classes are already
providers.
Server Host Name field The server host name (IDC_Name) of the other Oracle
Content Server instance.
HTTP Server Address field The HTTP address of the other Oracle Content Server
instance. For example, intradoc:90.

System Properties and Settings Interface
User Interface A-51
A.1.6.5 Database Provider Page
The Add/Edit Database Provider page is used to create or edit a database provider.
To access this page, click the Add link in the row for the provider type on the
Providers Page, or click the Edit link in the row for the provider on the Provider
Information Page.
Server Port field The port on which the provider communicates with the
other Oracle Content Server instance.
Instance Name field The name of the other Oracle Content Server instance.
Relative Web Root field The relative web root of the other Oracle Content Server
instance. For example, /oracle_2/.
Use Connection Password
checkbox If selected, the target server can require a password in
order to connect. The target server can allow connection
through either a global proxy password or it can provide
"named" password connections
Connection Password Name field Name of the connection password. The name can either
be a blank value (which will select the global password)
or a specific name to choose one of the target's proxied
connections.
Connection Password field The connection password.
Client IP Filter field The client IP addresses that are allowed to use the
connection to the target server.
Handles Inbound Refinery
Conversion Jobs checkbox If selected, Inbound Refinery is used by this provider.
Inbound Refinery Read Only Mode
checkbox If selected, prevents the Oracle Content Server instance
from sending new conversion jobs to Inbound Refinery
with this provider.
Add/Update button Saves the provider information.
Reset button Resets the provider information to the last saved values.
Note: The SystemDatabase Provider uses the Oracle WebLogic
Server data source, which in turn handles the actual database
authentication and communication.
Element Description
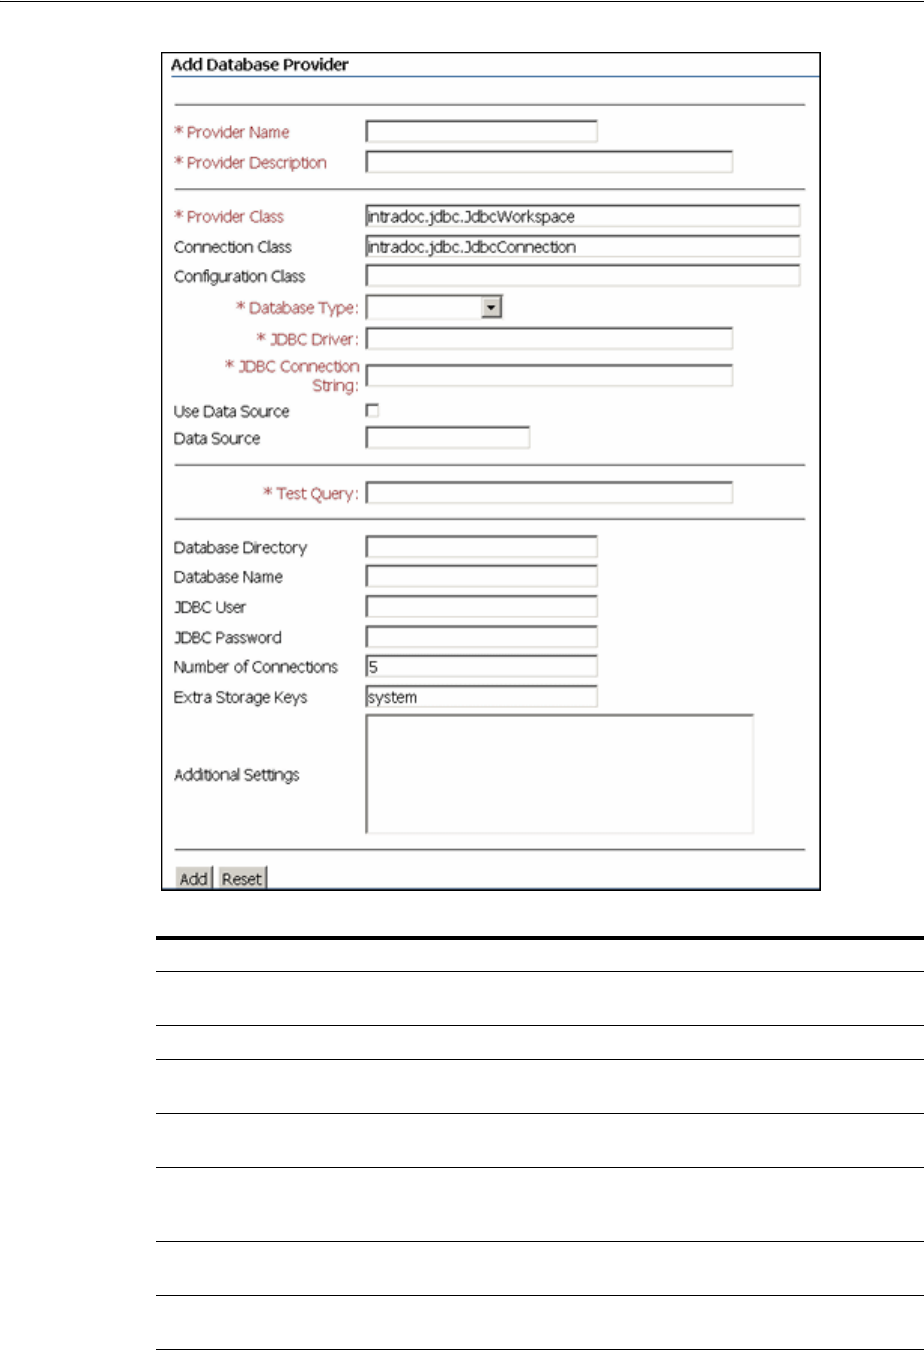
System Properties and Settings Interface
A-52 Oracle Fusion Middleware System Administrator's Guide for Oracle Content Server
Element Description
Provider Name field The name of the provider, which will become a subdirectory in
the IntradocDir/data/providers/ directory.
Provider Description field User-friendly description of the provider.
Provider Class field The name of the Java class for the provider. For example,
intradoc.jdbc.JdbcWorkspace.
Connection Class field The name of the Java class that implements the provider
connection. For example, intradoc.jdbc.JdbcConnection.
Configuration Class field The name of a Java class that performs some extra configuration.
This class is very useful for database providers, where the
connection classes are already providers.
Database Type menu The database type. Types include ORACLE, MSSQLSERVER,
DB2, SYBASE.
JDBC Driver field The JDBC driver name for the database type. When the database
type is selected, an appropriate driver is automatically filled.

System Properties and Settings Interface
User Interface A-53
A.1.6.6 Incoming Provider Page
The Add/Edit Incoming Provider page is used to create or edit an incoming provider.
To access this page, click the Add link in the row for the provider type on the
Providers Page, or click the Edit link in the row for the provider on the Provider
Information Page.
JDBC Connection String
field The JDBC connection string for the database type. When the
database type is selected, an appropriate string is automatically
filled.
Use Data Source checkbox When selected, this specifies that the provider use a data source.
Data Source field Specify the data source.
Test Query field The test query will be used to test the provider when the Test
link on the Providers page is clicked. When the database type is
selected, a test query is automatically filled. You can choose to
enter a different test query.
Database Directory field The directory that contains the Oracle Content Server database
information. For example, IntradocDir/database. Used only by
DAO databases.
Database Name field Used only by DAO databases.
JDBC User field Your JdbcUser.
JDBC Password field Your JdbcPassword.
Number of Connections
field The number of database connections the provider maintains.
This is used only by JDBC databases.
Extra Storage Keys field The extra storage keys required for the connection. A system
storage key is automatically filled.
Additional Settings field Any additional configuration settings for the database provider.
Add/Update button Saves the provider information.
Reset button Resets the provider information to the last saved values.
Element Description
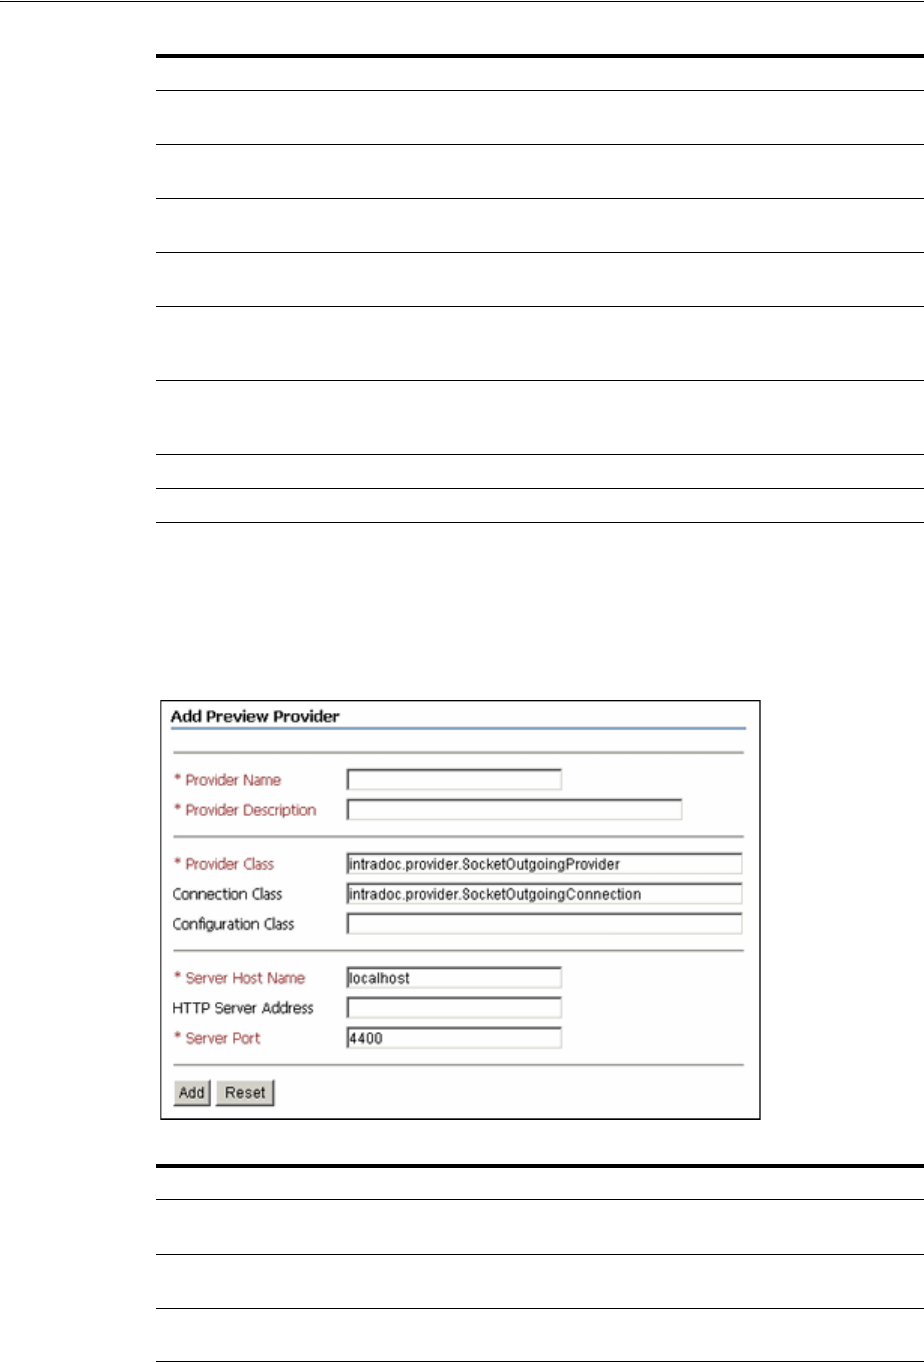
System Properties and Settings Interface
A-54 Oracle Fusion Middleware System Administrator's Guide for Oracle Content Server
A.1.6.7 Preview Provider Page
The Add/Edit Preview Provider page is used to create or edit a preview provider. To
access this page, click the Add link in the row for the provider type on the Providers
Page, or click the Edit link in the row for the provider on the Provider Information
Page.
Element Description
Provider Name field The name of the provider, which will become a subdirectory in the
IntradocDir/data/providers/ directory.
Provider Description
field User-friendly description of the provider.
Provider Class field The name of the Java class for the provider. For example,
intradoc.provider.SocketIncomingProvider.
Connection Class field The name of the Java class that implements the provider connection.
For example, idc.provider.SocketIncomingConnection.
Configuration Class
field The name of a Java class that performs some extra configuration. This
class is very useful for database providers, where the connection
classes are already providers.
Server Port field The port the provider listens on for incoming connections. For
example, the incoming system provider listens on port 4444 by
default.
Add/Update button Saves the provider information.
Reset button Resets the provider information to the last saved values.
Element Description
Provider Name field The name of the provider, which will become a subdirectory in the
IntradocDir/data/providers/ directory.
Provider Description
field User-friendly description of the provider.
Provider Class field The name of the Java class for the provider. For example,
intradoc.provider.SocketOutgoingProvider.

System Properties and Settings Interface
User Interface A-55
A.1.6.8 LDAP Provider Page
The Add LDAP Provider page is used to create or edit an LDAP provider and
configure Oracle Content Server integration with LDAP security. To access this page,
click the Add link in the row for the ldapuser provider type on the Providers Page, or
click the Edit link in the row for the ldapuser provider on the Provider Information
Page.
In the following tables, the term in parentheses in the first column is the
corresponding configuration setting in the IntradocDir/data/providers/provider_
name/provider.hda file.
Connection Class field The name of the Java class that implements the provider connection.
For example, intradoc.provider.SocketOutgoingConnection.
Configuration Class
field The name of a Java class that performs some extra configuration.
This class is very useful for database providers, where the
connection classes are already providers.
Server Host Name field The server host name of the other Oracle Content Server instance.
For example, localhost.
HTTP Server Address
field The HTTP address of the other Oracle Content Server instance. Use
the value listed for HTTP Server on the Configuration Information
page. For example, intradoc:90.
Server Port field The port on which the provider communicates with Oracle Content
Publisher. Typically, this is 4441.
Add/Update button Saves the provider information.
Reset button Resets the provider information to the last saved values.
Note: It is recommended that the JPS user provider be used with
Oracle WebLogic Server. See "JPS User Provider Page" on page A-67.
Element Description
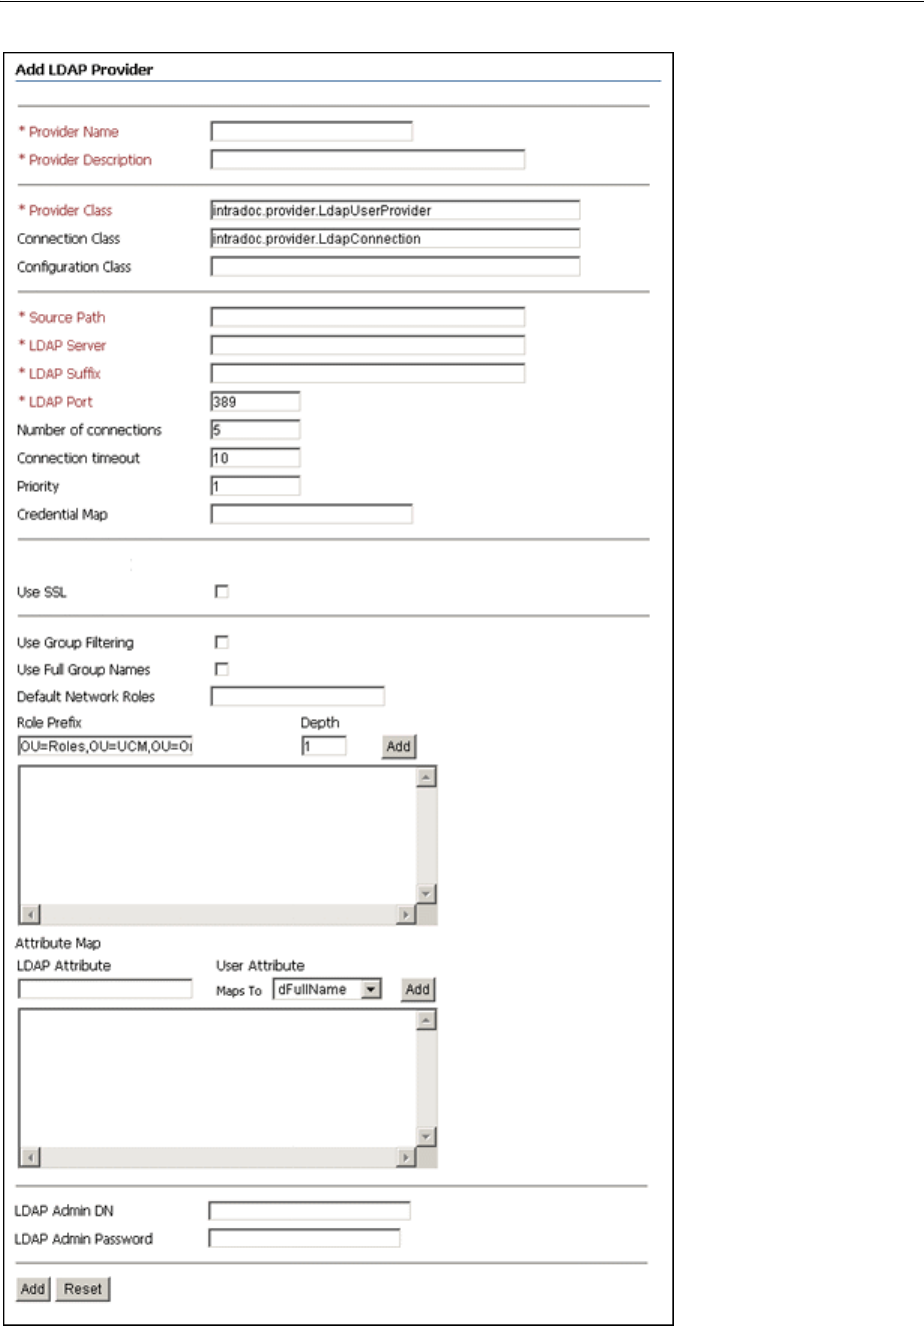
System Properties and Settings Interface
A-56 Oracle Fusion Middleware System Administrator's Guide for Oracle Content Server

System Properties and Settings Interface
User Interface A-57
Element Description
Provider Name field The name of the provider, which will become a subdirectory in the
IntradocDir/data/providers/ directory.
Provider Description field* A user-friendly description of the provider.
Provider Class field*
(ProviderClass)
The name of the Java class that implements the provider.
■Default is intradoc.provider.LdapUserProvider.
Connection Class field
(ProviderConnection)
The name of the Java class that implements the connection to the
LDAP server. Default is intradoc.provider.LdapConnection.
Configuration Class field
(ProviderConfig)
The name of a Java class that performs some extra configuration.
This class is useful for database providers, where the connection
classes are already providers.
Source Path field*
(SourcePath)
A unique string that identifies the LDAP provider. The first time a
user requests credentials through the provider, this string is stored
with the user information so it can be used to match the user with
the provider next time the user asks for credentials. Try using the
name of the provider as the Source Path.
LDAP Server field*
(LdapServer)
Host name of the LDAP server.
LDAP Suffix field*
(LdapSuffix)
The root suffix (naming context) to use for all LDAP operations
(such as o=company.com or dc=company,dc=com). All mapping of
LDAP groups to Oracle Content Server roles and accounts will
begin at this root.
Do not include spaces before or after commas.
LDAP Port field*
(LdapPort)
The port the LDAP server listens on. The default is 389. If you are
using SSL, you should set this to 636.
Number of connections field
(NumConnections)
The number of LDAP server connections the provider maintains.
Connection timeout field The amount of time (in minutes) that a provider connection to the
LDAP server is held open before the provider connection is closed
and reopened.
For best results, set the amount of time to less than 15 minutes. If
the amount of time is 15 minutes or greater, there could be a
problem with the JNDI layer not holding the connection open.
Priority field
(Priority)
Specifies the order in which LDAP providers will be checked for
the user credentials.
■This field is used only when a user has not previously logged
into the Oracle Content Server instance. If the user has
previously requested credentials, the Source Path will be
stored for that user, so the LDAP provider specified by the
Source Path will be used.
■Each LDAP provider in an Oracle Content Server instance
must have a unique Priority number.
Credential Map field Specifies a credential map.

System Properties and Settings Interface
A-58 Oracle Fusion Middleware System Administrator's Guide for Oracle Content Server
Use SSL checkbox
(UseSecureLdap)
If you select this checkbox, you must have the appropriate
certificates installed on the LDAP server. When SSL is initiated, the
certificates will secure communication between the LDAP server
and the Oracle Content Server instance.
If you use a self-signed certificate for your LDAP server and select
to use SSL, you may need to add the LDAP server's certificate to
the JVM trusted certificate keystore to avoid a connection error
with LDAP Port 636. The basic command for importing a certificate
into the JVM keystore is the following:
%JAVA_HOME%\bin\keytool -import -file
server certificate file -alias server alias -keypass
changeit -keystore
%JAVA_HOME%/jre/lib/security/cacerts
Use Group Filtering checkbox
(UseGroupFilter)
Selected: The Role Prefix and Account Prefix definitions will be
used to select the LDAP groups that will be mapped to Oracle
Content Server roles and accounts.
Unselected: All LDAP groups will be mapped to Oracle Content
Server roles and accounts. This is the default.
Use Full Group Names checkbox
(UseFullGroupName)
Selected: The entire hierarchy (up to the specified prefix or naming
context) for an LDAP group will be included in the mapping to a
Oracle Content Server role or account.
Unselected: Only the lowest level unit of an LDAP group will be
mapped to an Oracle Content Server role or account. This is the
default.
Account Permissions Delimiter field
(AcctPermDelim)
The string that separates the account names from the account
permissions in an LDAP group name.
■If an LDAP group name is mapped to an account and contains
this substring, the string to the left of this substring will be the
account name, and the string to the right of this substring will
be the account permissions.
■For example, if the delimiter is defined as a + (plus sign), the
group name Acct1+rw would map to an account named Acct1
with Read and Write permission. If the delimiter is defined as
an _ (underscore), the Acct1+rw group name would map to an
account named Acct1+rw, with RWDA permission by default.
■The default is _ (underscore).
■This field appears only if accounts are enabled in the Oracle
Content Server instance.
Default Network Roles field The default role or roles assigned to a user who enters through this
provider; for example, contributor.
Element Description

System Properties and Settings Interface
User Interface A-59
Default Network Accounts field
(DefaultNetworkAccounts)
Defines the default account permissions for users who log in to the
Oracle Content Server instance with LDAP credentials.
■This must be a comma-delimited list of accounts. Do not
include spaces before or after the commas that separate
accounts.
■Permissions for each account can be specified in parentheses
after the account name, such as account(RWDA). If no
permissions are specified, RWDA permission is granted by
default.
■The #none entry grants permission to documents that have no
account assigned.
■The #all entry grants permissions to all accounts.
■The default is #none(RWDA).
■This setting does not apply to anonymous users.
■This setting defines the minimum account permissions.
Account permissions defined by the external user base are
added to these permissions. For example, if the default is
#none(RW),Project(R), and a user's group maps to Project(RWD)
permission, the user's permissions are
#none(RW),Project(RWD).
■This field appears only if accounts are enabled in the Oracle
Content Server instance.
Role Prefix field The string that specifies where in the LDAP group name to start
matching an Oracle Content Server role name.
Role Prefix Depth field A number that specifies how many levels the LDAP group name
can contain after the Role Prefix for the group name to be
considered a valid role. Placing an asterisk (*) in the depth
parameter for a specific prefix ensures that the short name for any
group mapped through the prefix is used.
Role Prefix Add button Adds the Role Prefix string and Depth as a clause in the Role Prefix
box.
Role Prefix box
(RolePrefix)
Lists the Role Prefix clauses that will be used to select LDAP
groups when the Group Filtering checkbox is selected. This box can
be edited directly.
Do not include spaces before or after the commas that separate
units in a prefix.
Account Prefix field The string that specifies where in the LDAP group name to start
matching an Oracle Content Server account name.
This field appears only if accounts are enabled in the Oracle
Content Server instance.
Account Prefix Depth field A number that specifies how many levels the LDAP group name
can contain after the Account Prefix for the group name to be
considered a valid account.
This field appears only if accounts are enabled in the Oracle
Content Server instance.
Placing an asterisk (*) in the depth parameter for a specific prefix
ensures that the short name for any group mapped through the
prefix is used.
Account Prefix Add button Adds the Account Prefix string and Depth as a clause in the
Account Prefix box.
This button appears only if accounts are enabled in the Oracle
Content Server instance.
Element Description

System Properties and Settings Interface
A-60 Oracle Fusion Middleware System Administrator's Guide for Oracle Content Server
A.1.6.9 keepaliveincoming Provider Page
The Add/Edit Provider page for the keepaliveincoming function is used to create or
modify a keepalive socket incoming provider. To access this page, select the
Administration tray in the portal navigation bar, then select the Providers link to
display the Providers Page. To access this page, click the Add link in the row for the
provider type on the Providers Page, or click the Edit link in the row for the provider
on the Provider Information Page.
Account Prefix box
AcctPrefix()
Lists the Account Prefix clauses that will be used to select LDAP
groups when the Group Filtering checkbox is selected. This box can
be edited directly.
Do not include spaces before or after the commas that separate
units in a prefix.
This box appears only if accounts are enabled in the Oracle Content
Server instance.
LDAP Attribute field Enter an LDAP user attribute to be mapped to an Oracle Content
Server user information field.
User Attribute field Select an Oracle Content Server user information field to be
mapped from the LDAP Attribute field.
■All Oracle Content Server user information fields for which
you can change the value are listed.
■Standard user information fields begin with a "d".
■Custom user information fields begin with a "u".
User Attribute Add button Adds the LDAP Attribute and User Attribute as a colon-separated
clause in the Attribute Map box.
Attribute Map box
(AttributeMap)
Lists the Attribute Map clauses that will be used to map LDAP user
attributes to Oracle Content Server information fields.
■This box can be edited directly.
■If this field is left blank, the default is:
mail:dEmail
cn:dFullName
title:dUserType
LDAP Admin DN field
(LdapAdminDN)
The user name that will be making calls to the LDAP server.
■This user must have Read rights to the LDAP server.
■If the user name is left blank, the provider will connect to the
LDAP server anonymously.
Ldap Admin Password field
(LdapAdminPassword)
The password for the user that will be making calls to the LDAP
server.
Add/Update button Saves the provider information.
Reset button Resets the provider information to the last saved values.
Element Description
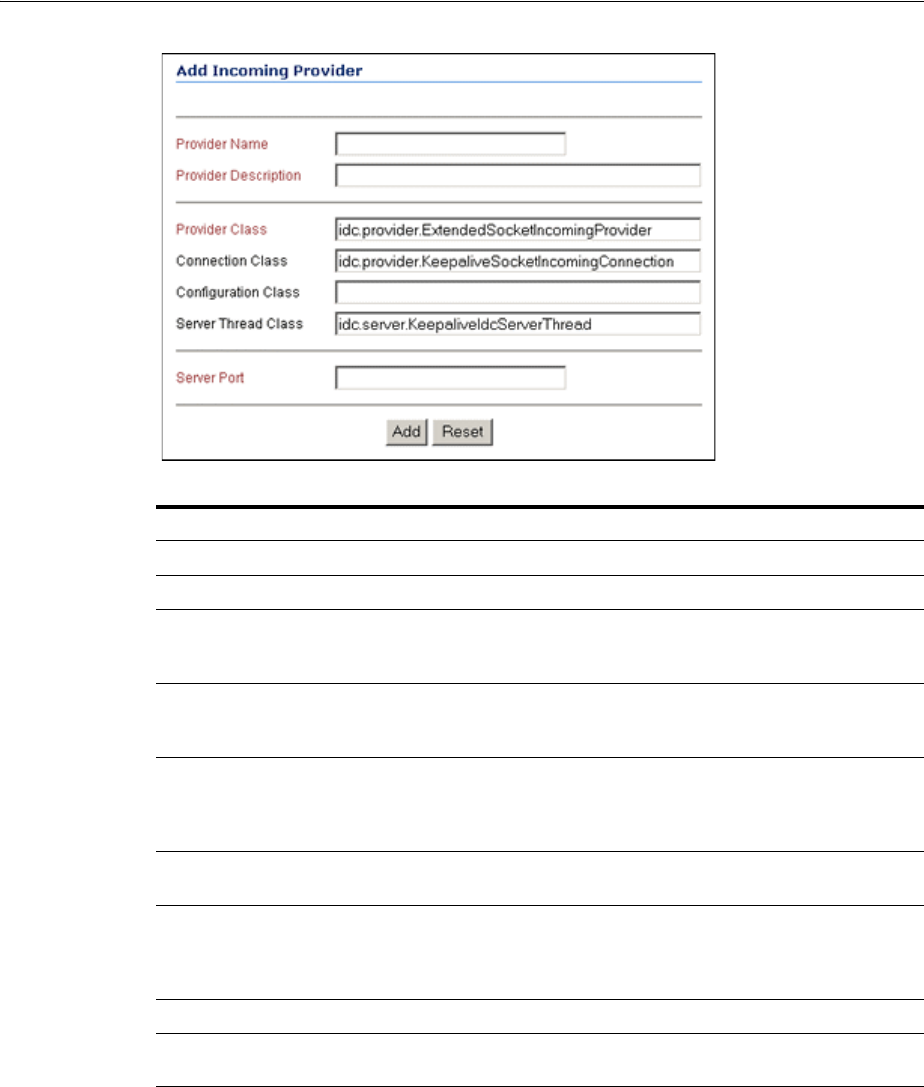
System Properties and Settings Interface
User Interface A-61
A.1.6.10 keepaliveoutgoing Provider Page
The Add/Edit Outgoing Socket Provider page for the keepaliveoutgoing function is
used to create or modify a keepalive socket outgoing provider. To access this page,
select the Administration tray in the portal navigation bar, then select the Providers
link to display the Providers Page. To access this page, click the Add link in the row for
the provider type on the Providers Page, or click the Edit link in the row for the
provider on the Provider Information Page. The Outgoing Socket Provider Page is
displayed. Use that page to specify the keepaliveoutgoing parameters.
The following two images show the entire keepaliveoutgoing provider page.
Element Description
Provider Name field (Required) Name of the provider.
Provider Description field (Required) Description of the provider.
Provider Class field (Required) Name of the Java class for the provider. For
example:
idc.provider.ExtendedSocketIncomingProvider
Connection Class field Name of the Java class that implements the provider
connection. For example:
idc.provider.KeepaliveSocketIncomingConnection
Configuration Class field Name of a Java class that performs some extra
configuration. This class is very useful for database
providers, where the connection classes are already
providers.
Server Thread Class field Name of the Java class for keepalive server threads. For
example: idc.provider.KeepaliveIdcServerThread
Server Port field (Required) Port the provider listens on for incoming
connections. For example, the incoming system
provider for Universal Content Management listens on
port 4444 by default.
Add/Update button Saves the provider information.
Reset button Resets the provider information to the last saved
valued.
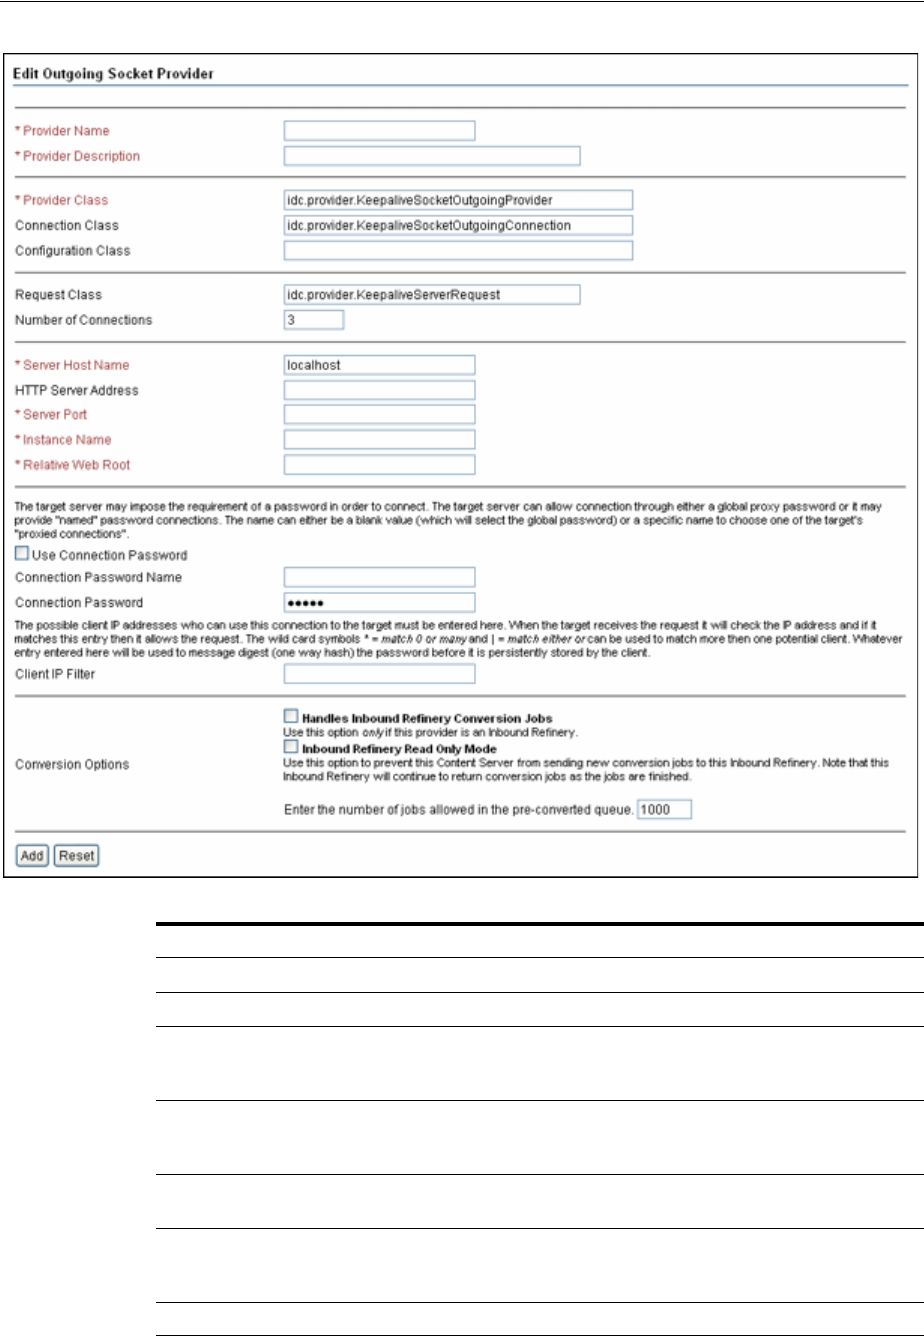
System Properties and Settings Interface
A-62 Oracle Fusion Middleware System Administrator's Guide for Oracle Content Server
Element Description
Provider Name field (Required) Name of the provider.
Provider Description field (Required) Description of the provider.
Provider Class field (Required) Name of the Java class for the provider. For
example:
idc.provider.KeepaliveSocketOutgoingProvider
Connection Class field Name of the Java class that implements the provider
connection. For example:
idc.provider.KeepaliveSocketOutgoingConnection
Configuration Class field Name of a Java class that performs some extra
configuration.
Request Class field Name of the Java class that implements the server
request. For example:
idc.provider.KeepaliveServerRequest
Number of Connections field Maximum number of connections. For example, 3.

System Properties and Settings Interface
User Interface A-63
A.1.6.11 sslincoming Provider Page
The Add/Edit Incoming Provider page for the sslincoming function enables
administrators to create or modify a SSL socket incoming provider. To access the page,
select the Administration tray in the portal navigation bar, then select the Providers
link to display the Providers Page. To access this page, click the Add link in the row for
the provider type on the Providers Page, or click the Edit link in the row for the
provider on the Provider Information Page.
Server Host Name field (Required) Server host name of the other Oracle
Content Server instance. For example, localhost.
HTTP Server Address field HTTP address of the other Oracle Content Server
instance.
Server Port field (Required) Port on which the provider communicates
with the other Oracle Content Server instance.
Instance Name field (Required) Name of the other Oracle Content Server
instance.
Relative Web Root field (Required) Relative web root of the other Oracle
Content Server instance.
Use Connection Password checkbox If selected, the target server can require a password in
order to connect. The target server allows connection
through either a global proxy password or it can
provide "named" password connections.
Connection Password Name field The connection password name. The name can either
be a blank value (which will select the global
password) or a specific name to choose one of the
target's proxied connections.
Connection Password field The connection password.
Client IP Filter field The possible client IP addresses who can use this
connection to the target.
Conversion options Select the appropriate options if the provider uses
Inbound Refinery.
Add button Saves the provider information.
Reset button Resets the provider information to the last saved
values.
Element Description
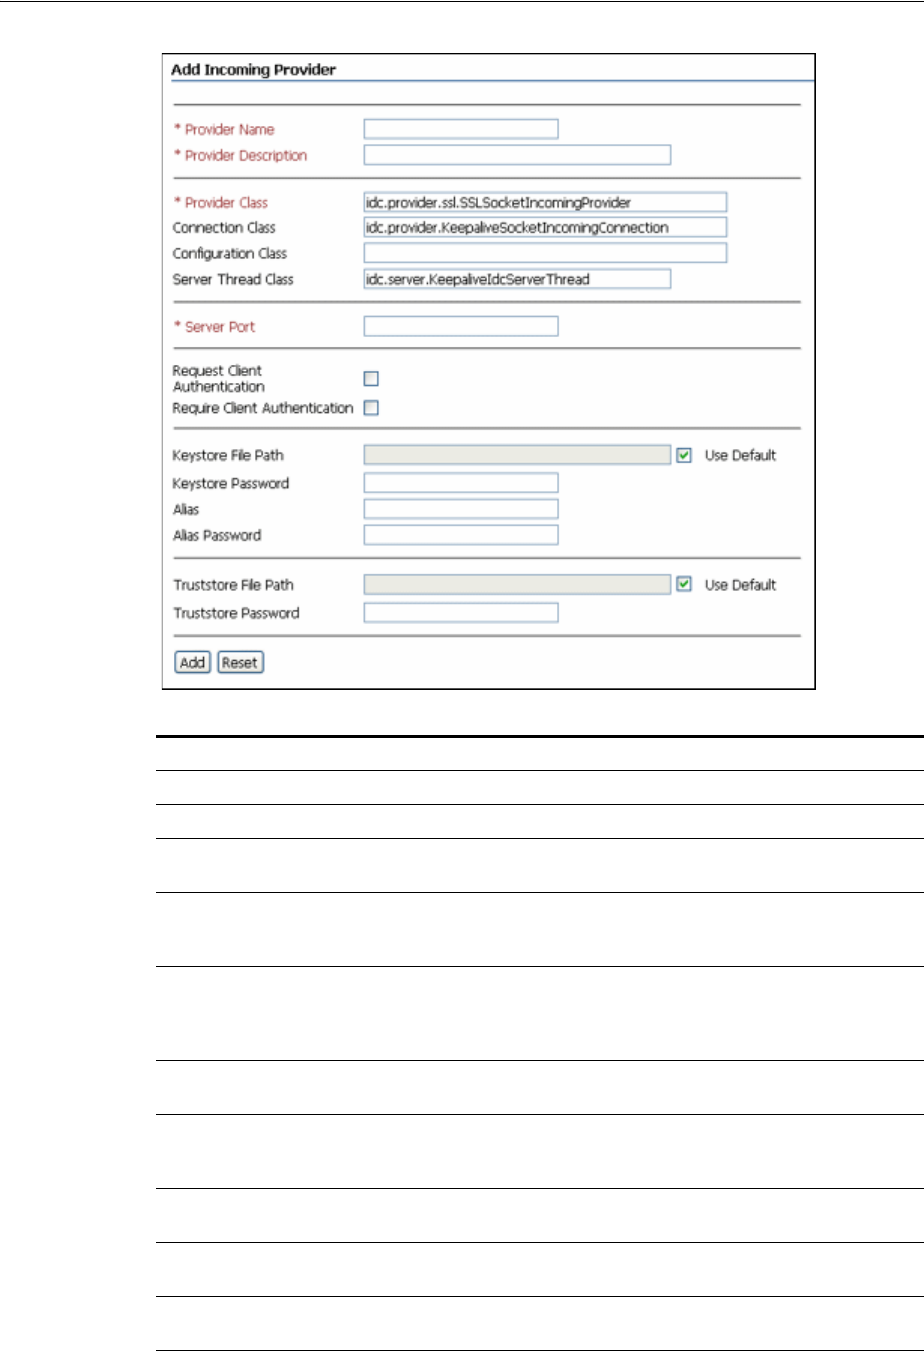
System Properties and Settings Interface
A-64 Oracle Fusion Middleware System Administrator's Guide for Oracle Content Server
Element Description
Provider Name field (Required) Name of the provider.
Provider Description field (Required) Description of the provider.
Provider Class field (Required) Name of the Java class for the provider. For
example: idc.provider.ssl.SSLSocketIncomingProvider
Connection Class field Name of the Java class that implements the provider
connection. For example:
idc.provider.KeepaliveSocketIncomingConnection
Configuration Class field Name of a Java class that performs some extra
configuration. This class is very useful for database
providers, where the connection classes are already
providers
Server Thread field Name of the server thread for incoming connections.
For example: idc.provider.KeepaliveIdcServerThread
Server Port field (Required) Port the provider listens on for incoming
connections. For example, the incoming system
provider listens on port 4444 by default.
Request Client Authentication
checkbox Enable this option if you want the provider to request
client authentication from the incoming connection.
Require Client Authentication
checkbox Enable this option if you want the provider to require
client authentication from the incoming connection.
Keystore File Path field and Use
Default checkbox The keystore file path. To use the default keystore file
path, select the Use Default checkbox.

System Properties and Settings Interface
User Interface A-65
A.1.6.12 ssloutgoing Provider Page
The Add/Edit Outgoing Socket Provider page for the ssloutgoing function enables
administrators to create or modify a SSL socket outgoing provider. To access the page,
select the Administration tray in the portal navigation bar, then select the Providers
link to display the Providers Page. To access this page, click the Add link in the row for
the provider type on the Providers Page, or click the Edit link in the row for the
provider on the Provider Information Page.
Keystore Password field The keystore password.
Alias field The alias name.
Alias Password field The alias password.
Truststore File Path field The truststore file path. To use the default truststore file
path, select the Use Default checkbox.
Truststore Password The truststore password.
Add button Saves the provider information.
Reset button Resets the provider information to the last saved
values.
Element Description
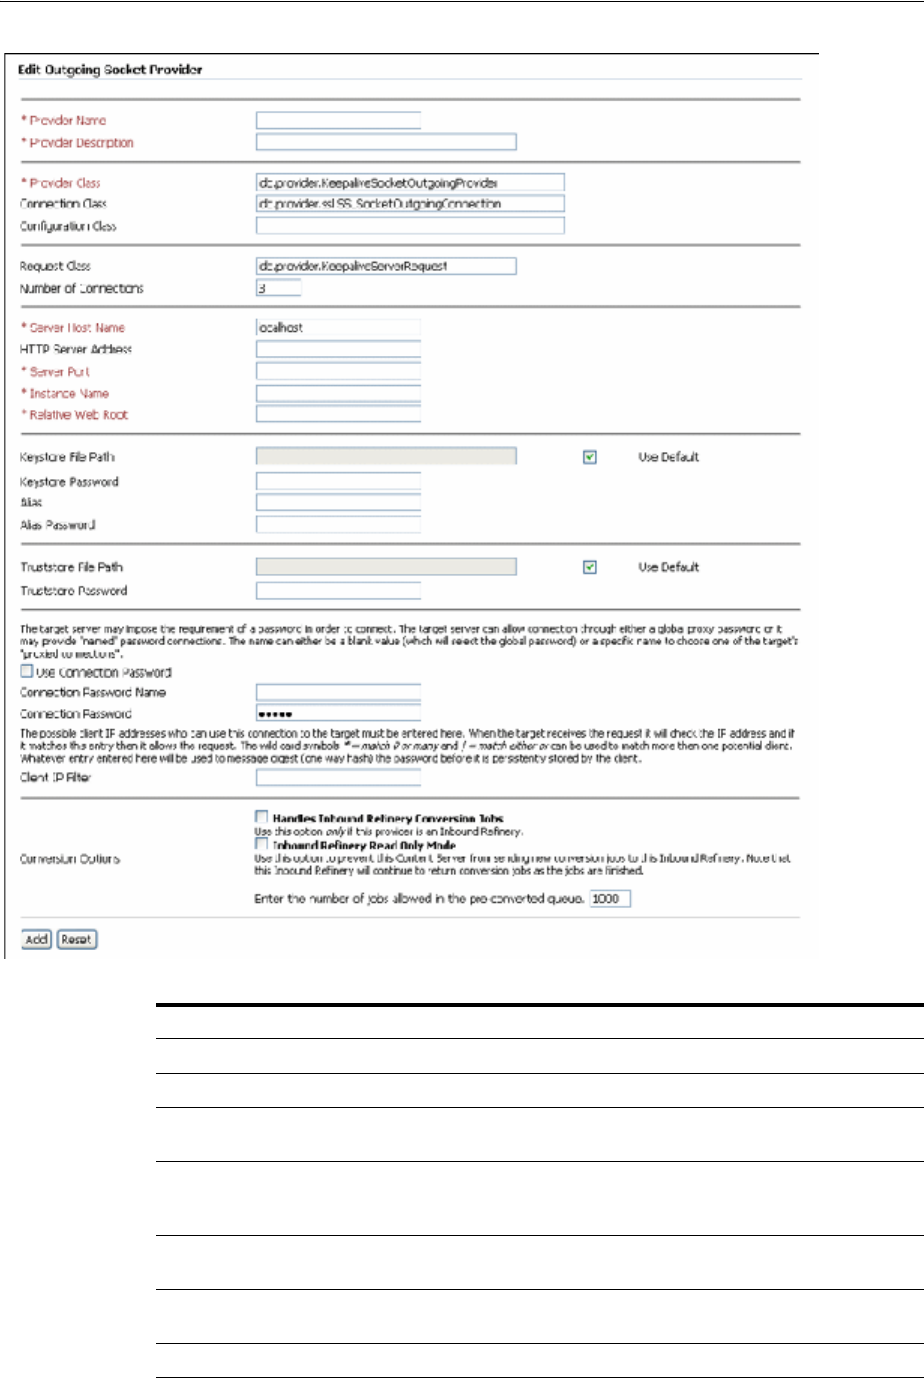
System Properties and Settings Interface
A-66 Oracle Fusion Middleware System Administrator's Guide for Oracle Content Server
Element Description
Provider Name field (Required) Name of the provider.
Provider Description field (Required) Description of the provider
Provider Class field (Required) Name of the Java class for the provider. For
example: idc.provider.KeepaliveSocketOutgoingProvider
Connection Class field Name of the Java class that implements the provider
connection. For example:
idc.provider.KeepaliveSocketOutgoingConnection
Configuration Class field Name of a Java class that performs some extra
configuration.
Request Class field Name of the Java class that implements the server
request. For example: idc.provider.KeepaliveServerRequest
Number of Connections field Maximum number of connections. For example, 3.

System Properties and Settings Interface
User Interface A-67
A.1.6.13 JPS User Provider Page
The Add/Edit JPS User Provider page is used to create or edit a user provider which
integrates with Oracle JPS. To access this page, click the Add link in the row for the
jpsuser type on the Providers Page, or click the Edit link in the row for the provider on
the Provider Information Page.
Server Host Name field (Required) Server host name of the other Oracle
Content Server instance. For example, localhost.
HTTP Server Address field HTTP address of the other Oracle Content Server
instance.
Server Port field (Required) Port on which the provider communicates
with the other Oracle Content Server instance.
Instance Name field (Required) Name of the other Oracle Content Server
instance.
Relative Web Root field (Required) Relative web root of the other Oracle
Content Server instance.
Keystore File Path field and Use
Default checkbox The keystore file path. To use the default keystore file
path, select the Use Default checkbox.
Keystore Password field The keystore password.
Alias field The alias name.
Alias Password field The alias password.
Truststore File Path field The truststore file path. To use the default truststore file
path, select the Use Default checkbox.
Truststore Password The truststore password.
Use Connection Password checkbox Select this checkbox if the target server requires a
password to allow the connection.
Connection Password Name field The target server may provide named password
connections. A blank value selects the global password.
A specific name chooses one of the target's proxied
connections.
Connection Password field The connection password.
Client IP Filter field Enter the possible client IP addresses who can use this
connection to the target. The wild card symbols * =
match 0 or many and | = match either or can
be used to match more then one potential client.
Conversion options Select the appropriate option to have the provider use
Inbound Refinery.
■Handles Inbound Refinery Conversion Jobs:
Select only if this provider is an Inbound Refinery.
■Inbound Refinery Read Only Mode: Select this
option to prevent this Oracle Content Server
instance from sending new conversion jobs to this
Inbound Refinery.
Add button Saves the provider information.
Reset button Resets the provider information to the last saved
values.
Element Description
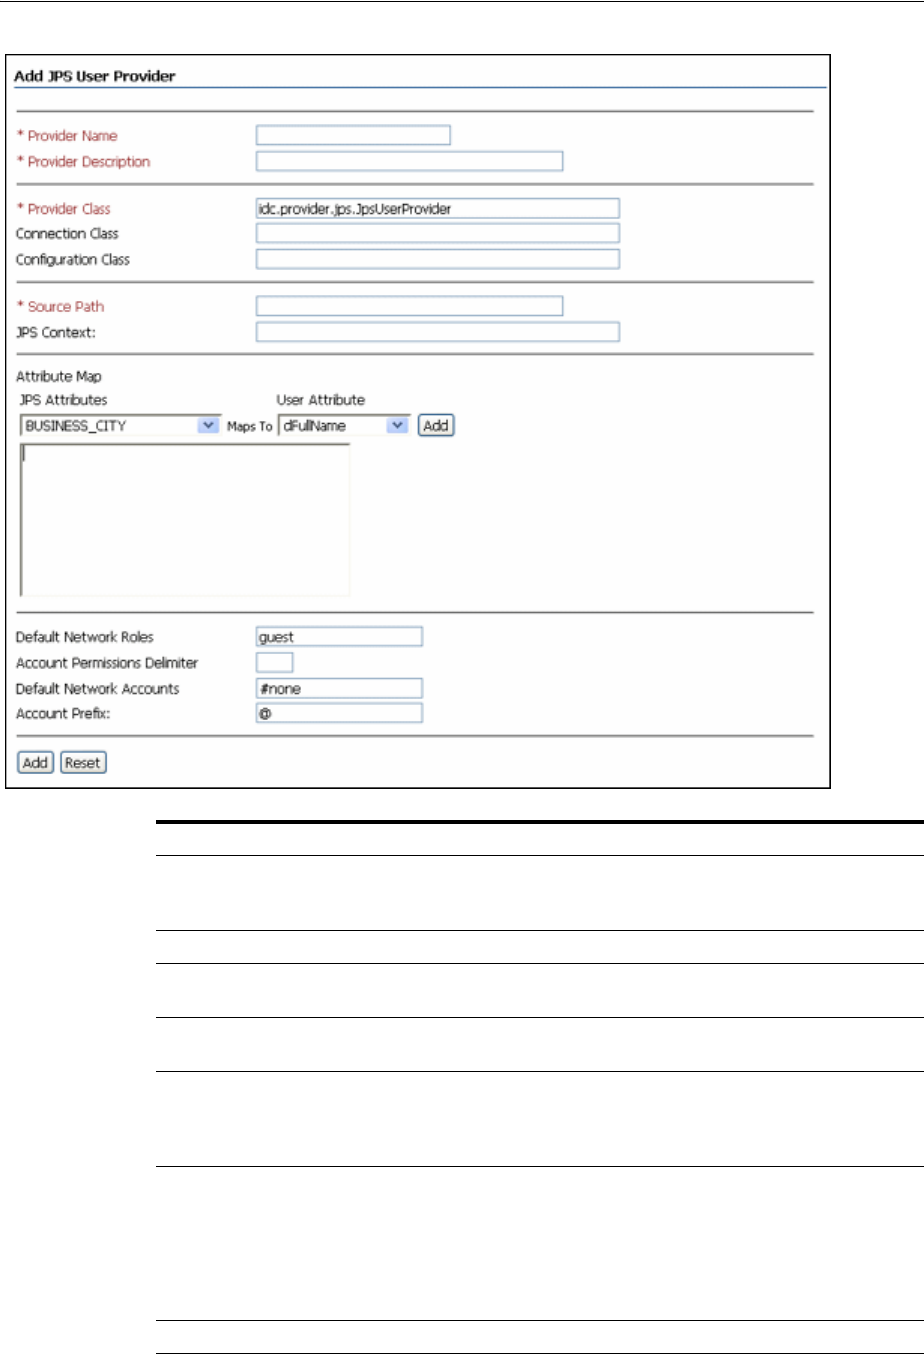
System Properties and Settings Interface
A-68 Oracle Fusion Middleware System Administrator's Guide for Oracle Content Server
Element Description
Provider Name field The name of the provider, which will become a
subdirectory in the IntradocDir/data/providers/
directory.
Provider Description field A user-friendly description of the provider.
Provider Class field The name of the Java class that implements the
provider.
Connection Class field The name of the Java class that implements the
connection to the LDAP server.
Configuration Class field The name of a Java class that performs some extra
configuration. This class is useful for database
providers, where the connection classes are already
providers.
Source Path field A unique string that identifies the provider. The
first time a user requests credentials through the
provider, this string is stored with the user
information so it can be used to match the user with
the provider the next time the user asks for
credentials. Try using the name of the provider as
the Source Path.
JPS Context field Host name of the Oracle JPS server.

System Properties and Settings Interface
User Interface A-69
A.1.6.14 Outgoing Http Provider Page
The Add/Edit Outgoing Http Provider page enables an administrator to add an
httpoutgoing provider on the master Oracle Content Server instance. To access this
page, select the Administration tray in the portal navigation bar, then click Providers.
On the Providers Page, click the Add link in the row for the provider type, or on the
Provider Information Page, click the Edit link in the row for the provider.
JPS Attributes list Select a JPS attribute to be mapped to an Oracle
Content Server user information field.
User Attribute list Select an Oracle Content Server user information
field to be mapped from the JPS attributes field.
■All Oracle Content Server user information
fields for which you can change the value are
listed.
■Standard user information fields begin with a
"d".
■Custom user information fields begin with a
"u".
User Attribute Add button Adds the JPS Attribute and User Attribute as a
colon-separated clause in the Attribute Map box.
Attribute Map box Lists the Attribute Map clauses that will be used to
map user attributes to Oracle Content Server
information fields.
■This box can be edited directly.
■If this field is left blank, the default is:
mail:dEmail
cn:dFullName
title:dUserType
Default Network Roles field The default role or roles assigned to a user who
enters through this provider. For example,
contributor or guest.
Account Permissions Delimiter field
Default Network Accounts field The default network accounts accessed through this
provider. The default value is #none
Account Prefix field The prefix used for accounts accessed through this
provider. The default is @ (the "at" sign).
Add/Update button Saves the provider information.
Reset button Resets the provider information to the last saved
values.
Element Description
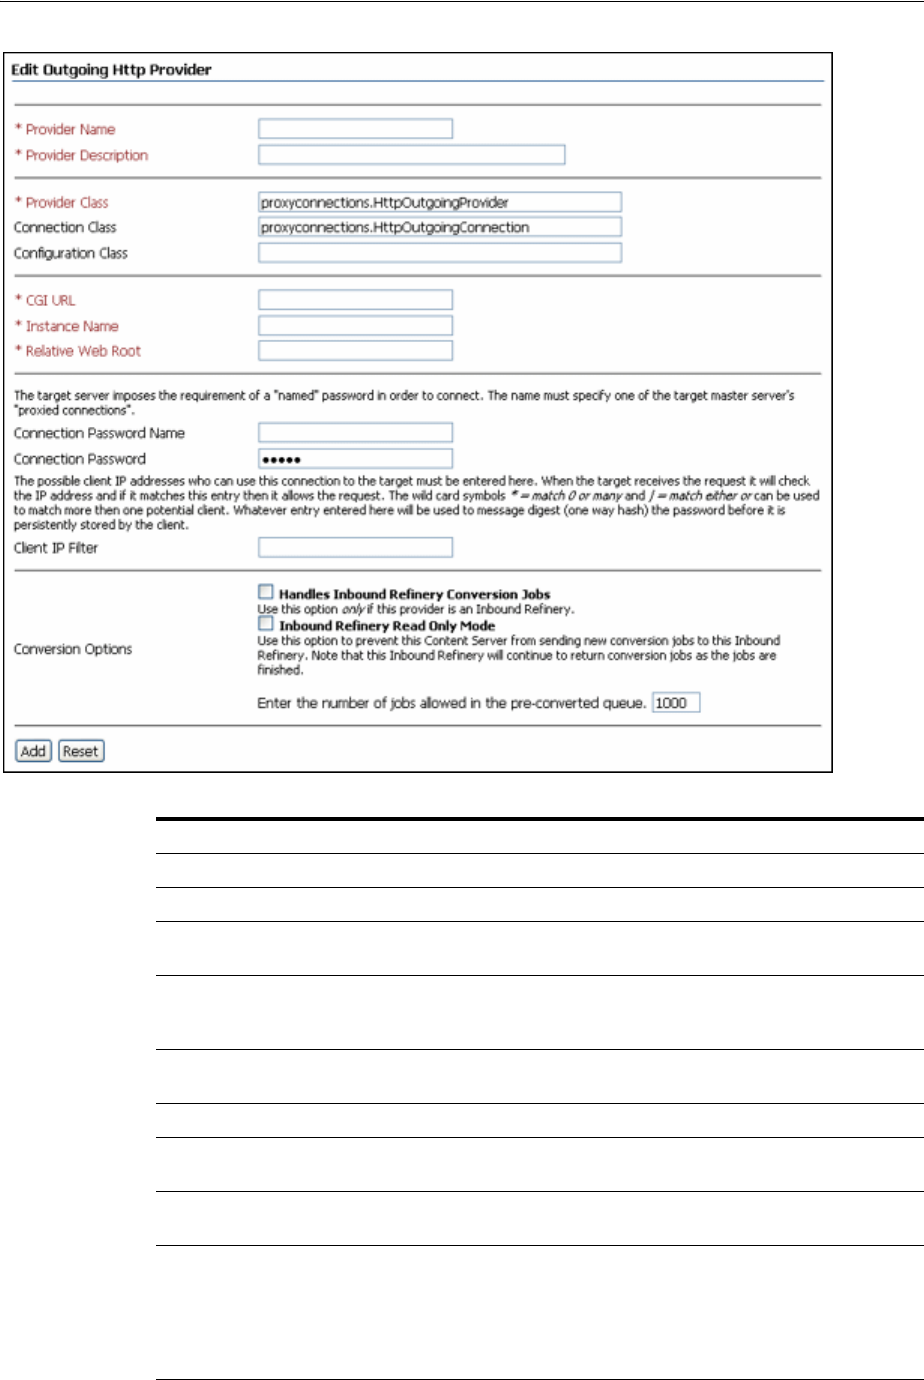
System Properties and Settings Interface
A-70 Oracle Fusion Middleware System Administrator's Guide for Oracle Content Server
Element Description
Provider Name field* The name of the provider.
Provider Description field* A user-friendly description of the provider.
Provider Class field* The name of the Java class for the provider. For
example: proxyconnections.HttpOutgoingProvider
Connection Class field The name of the Java class that implements the
provider connection. For example:
proxyconnections.HttpOutgoingConnection
Configuration Class field The name of a Java class that performs some extra
configuration. Leave this blank.
CGI URL field* The URL for the proxy server.
Instance Name field* The instance name of the proxy Oracle Content Server
instance.
Relative Web Root field* The relative web root of the Oracle Content Server
instance.
Connection Password Name field The name of a password connection (this can be an
existing name or a name for a password connection
that you will create on the proxy server). The name
must specify one of the target master server's proxied
connections. The target server requires a named
password.

System Properties and Settings Interface
User Interface A-71
A.1.7 Batch Loader Interface
The following screens are used in batch loading operations:
■Section A.1.7.1, "Batch Loader Screen"
■Section A.1.7.2, "BatchBuilder Screen"
■Section A.1.7.3, "BatchBuilder Mapping List Screen"
■Section A.1.7.4, "Add BatchBuilder Mapping Screen"
■Section A.1.7.5, "Edit BatchBuilder Mapping Screen"
■Section A.1.7.6, "Add/Edit BatchBuilder Mapping Field Screen"
A.1.7.1 Batch Loader Screen
The Batch Loader application is an administration application that is used to batch
load files in the Oracle Content Server instance. To access this screen, follow the
instructions for running administration applications in standalone mode.
Connection Password field The password for the named password connection.
Client IP Filter field The client IP address or addresses that can use this
connection to the target server.
Conversion Options Specify conversion options for Inbound Refinery. Enter
the number of jobs allowed in the pre-converted queue.
The default is 100.
■Handles Inbound Refinery Conversion Jobs:
Select this checkbox to prevent the Oracle Content
Server instance from sending new conversion jobs
to this Inbound Refinery. This Inbound Refinery
returns conversion jobs as the jobs are finished.
■Inbound Refinery Read Only Mode: Select this
checkbox to prevent this Oracle Content Server
instance from sending new conversion jobs to this
Inbound Refinery.
Add button Saves the provider information.
Reset button Resets the provider information to the last saved
values.
Element Description
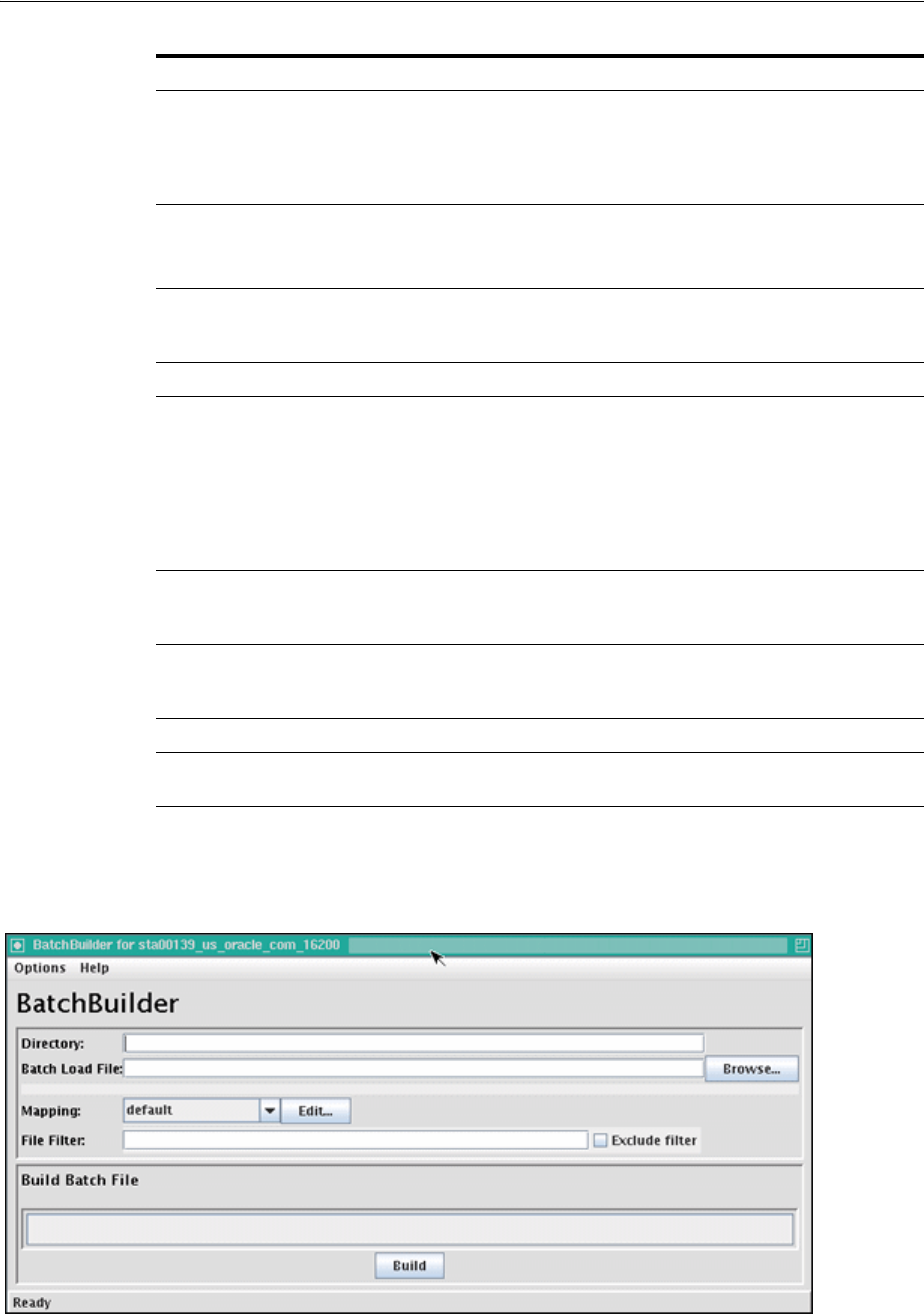
System Properties and Settings Interface
A-72 Oracle Fusion Middleware System Administrator's Guide for Oracle Content Server
A.1.7.2 BatchBuilder Screen
The BatchBuilder screen is used to create a batch load file. To access this screen, on the
Batch Loader Screen select the Options menu, then Build Batch File.
Element Description
Options menu Save Configuration: Saves the current Batch Loader settings in the
DomainHome/ucm/cs/bin/intradoc.cfg file.
Build Batch File: Displays the BatchBuilder Screen.
Exit: Closes the Batch Loader screen.
Help menu Contents: Displays the Oracle Content Server online help.
About Content Server: Displays version, build, and copyright
information for the Oracle Content Server instance.
Batch Load File field The path and file name of the batch load file. If settings have not been
saved to the intradoc.cfg file, the default is
IntradocDir/samples/Batchloader/batchinsert.txt.
Browse button Enables you to navigate to and select the batch load file.
Maximum errors
allowed field The number of errors after which the Batch Loader stops processing
records from the batch load file. The default is 50.
If you plan to run the Batch Loader with a large number of files
overnight, consider increasing this number so that the process does not
stop prematurely.
If you are monitoring the Batch Loader closely, consider decreasing this
number so you are notified of errors as they occur.
Clean up files after
successful check in
checkbox
Deletes each file from the hard drive after it is successfully checked in
or updated.
Enable error file for
failed revision classes
checkbox
Creates a text file containing the file records that failed during batch
loading. You can fix the errors in this content and rerun it as the batch
load file.
Progress bar Displays the progress of the batch loading process.
Load Batch File
button Starts the batch loading process.
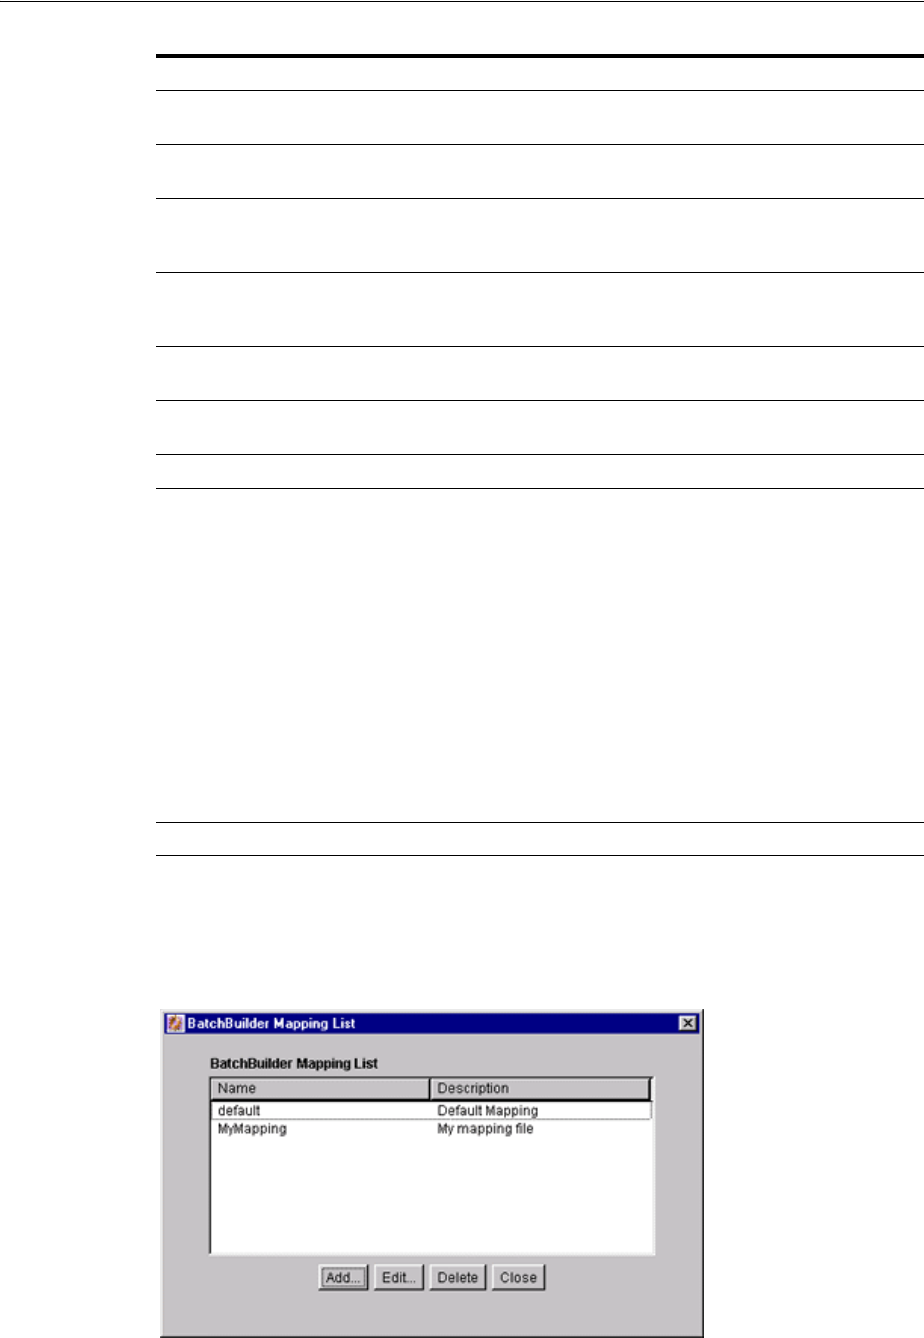
System Properties and Settings Interface
User Interface A-73
A.1.7.3 BatchBuilder Mapping List Screen
The BatchBuilder Mapping List screen is used to create a mapping list for the batch
load file. To access this screen, on the BatchBuilder Screen click Edit next to the
Mapping field.
Element Required? Description
Options: Save
Configuration N/A Saves the current BatchBuilder settings in the
DomainHome/ucm/cs/bin/intradoc.cfg file.
Options: Load
Batch Loader N/A Displays the Batch Loader Screen.
Directory field Yes Enter the directory that contains the content to be included
in the batch load file. All files in sub-directories of this
directory will also be included in the batch load file.
Batch Load File
field Yes Enter the path and file name of the batch load file to be
created. If you enter the name of an existing file, the file
will be replaced by the new batch load file.
Browse button N/A Enables you to navigate to and select the folder and enter
a file name for the batch load file.
Mapping list Yes Select the mapping file to be used to specify metadata
values.
Edit button N/A Displays the BatchBuilder Mapping List Screen.
File Filter field and
Exclude Filter
checkbox
No Enter files to be included or excluded from the batch load
file.
If this field is blank, all files in the specified directory and
sub-directories are included.
If files are specified in this field and the Exclude Filter
checkbox is unselected, only the specified files are
included in the batch load file.
If files are specified in this field and the Exclude Filter
checkbox is selected, all files except the specified files are
included in the batch load file.
Whole file names or file extensions can be specified.
Separate file names and extensions with a comma.
Extensions can be entered as *.ext, .ext, or ext.
Build button N/A Creates a batch load file using the specified parameters.
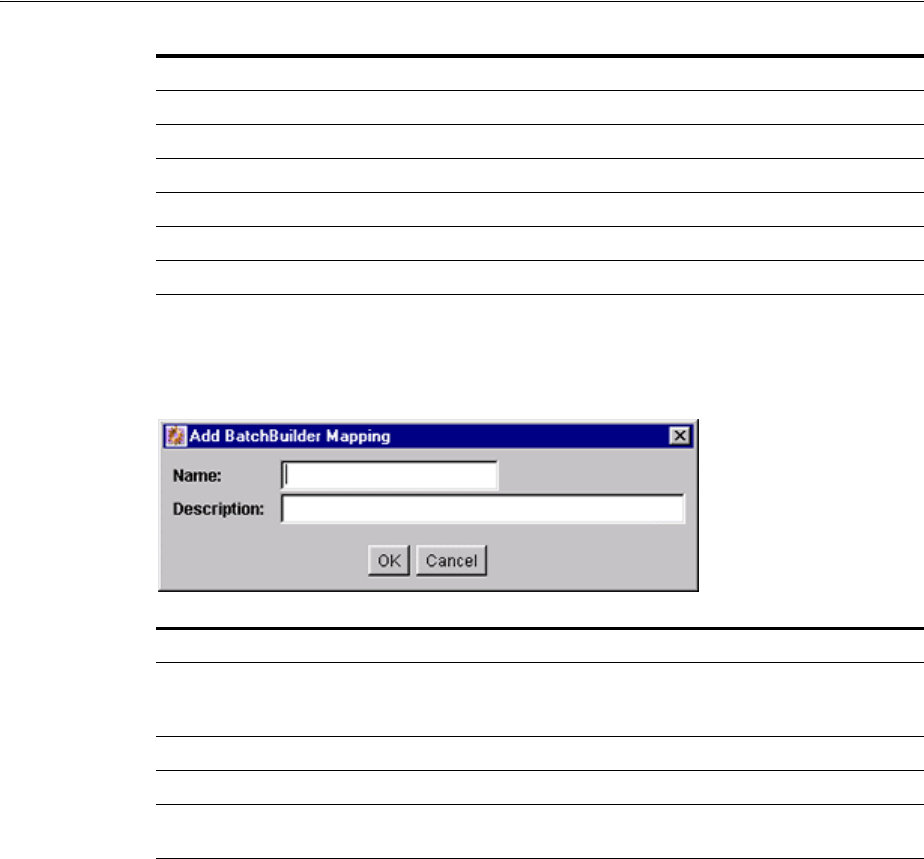
System Properties and Settings Interface
A-74 Oracle Fusion Middleware System Administrator's Guide for Oracle Content Server
A.1.7.4 Add BatchBuilder Mapping Screen
The Add BatchBuilder Mapping screen is used to name a new mapping file. To access
this screen, on the BatchBuilder Mapping List Screen click Add.
A.1.7.5 Edit BatchBuilder Mapping Screen
The Edit BatchBuilder Mapping screen is used to edit a mapping file. To access this
screen, do one of the following:
■Click OK on the Add BatchBuilder Mapping Screen.
■Click Edit on the BatchBuilder Mapping List Screen.
Element Description
Name column Lists the available mapping files.
Description column Short description of each mapping file.
Add button Displays the Add BatchBuilder Mapping Screen.
Edit button Displays the Edit BatchBuilder Mapping Screen.
Delete button Deletes the selected mapping file.
Close button Closes the BatchBuilder Mapping List screen.
Element Description
Name field Unique name for the mapping file. Maximum field length is
30 characters. The following are not acceptable: spaces, tabs,
linefeeds, carriage returns, and ; ^ ? : @ & + " # % < * ~ |
Description field Short description of the mapping file.
OK button Displays the Edit BatchBuilder Mapping Screen.
Cancel button Closes the Add BatchBuilder Mapping screen without
creating a new mapping file.
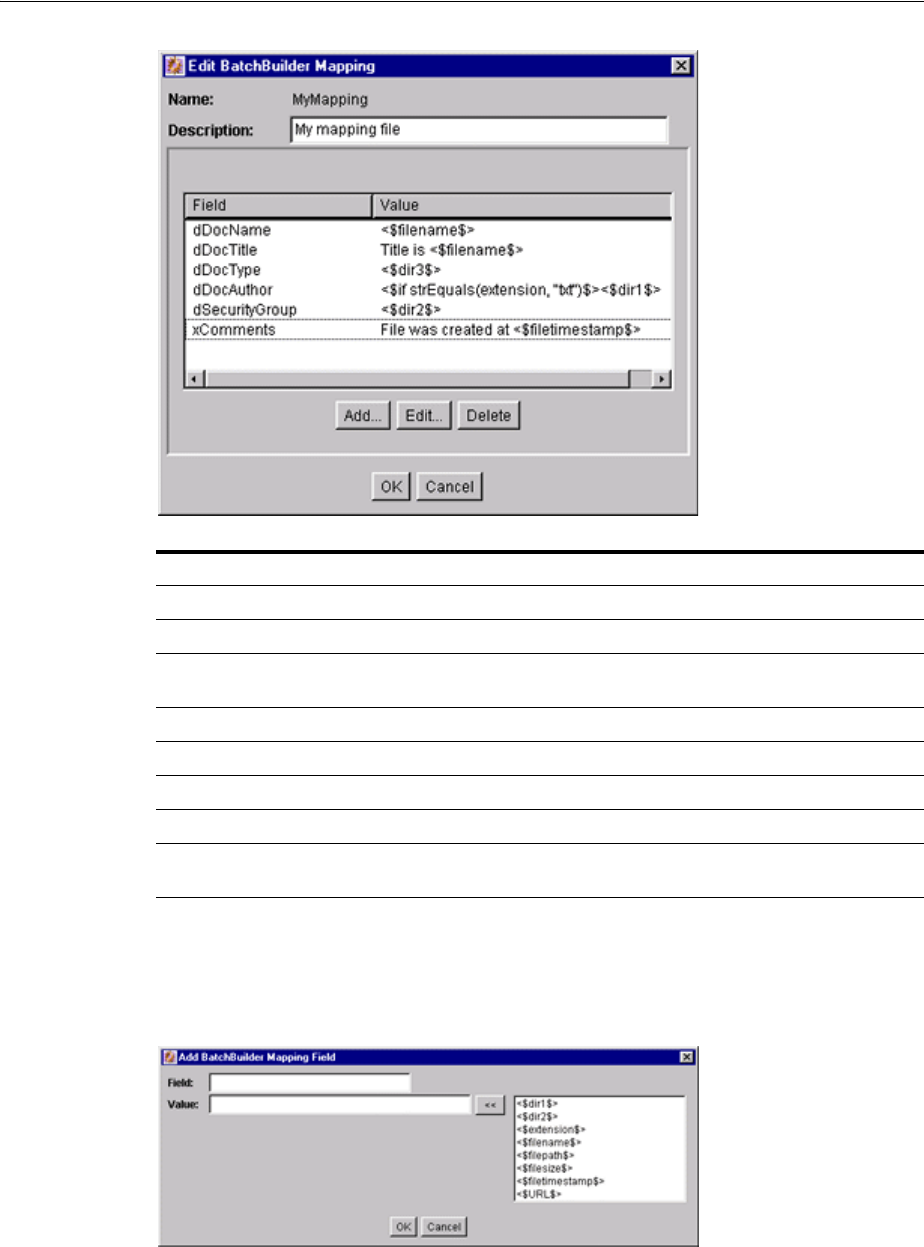
System Properties and Settings Interface
User Interface A-75
A.1.7.6 Add/Edit BatchBuilder Mapping Field Screen
The Add/Edit BatchBuilder Mapping Field screen is used to define the mapping value
for a metadata field. To access this screen, click Add or Edit on the Edit BatchBuilder
Mapping Screen.
Element Description
Description field Short description of the mapping file.
Field column Lists metadata fields that have values defined in the mapping file.
Value column Shows the values that will be assigned to the metadata fields in the batch
load file.
Add button Displays the Add/Edit BatchBuilder Mapping Field Screen.
Edit button Displays the Add/Edit BatchBuilder Mapping Field Screen.
Delete button Deletes the selected metadata field from the mapping file.
OK button Saves the current settings in the mapping file.
Cancel button Closes the Edit BatchBuilder Mapping screen without applying any
changes.

System Properties and Settings Interface
A-76 Oracle Fusion Middleware System Administrator's Guide for Oracle Content Server
A.1.8 Content Server Analyzer Interface
The following screens are used to confirm the integrity of the Oracle Content Server
repository components, including the file system, database, and search index. It can
also assist system administrators in repairing some problems that are detected in the
repository components.
The Content Server Analyzer contains two tabs:
■Section A.1.8.1, "Content Server Analyzer: Configuration Tab"
■Section A.1.8.2, "Content Server Analyzer: Progress Tab"
The method to start the Content Server Analyzer depends on the operating system:
■(Windows) Select Start, then Programs, then Oracle Content Server, then
instance_name, then Content Server Analyzer.
■(UNIX/Linux) Change to the DomainHome/ucm/cs/bin directory and run the
Content Server Analyzer program.
Element Description
Field field Enter the name of the metadata field to be defined, such as dDocType
or xComments.
Value Enter the value to be used in the batch load file. You can type
directly in this field or insert predefined variables from the column
to the right.
<< button Inserts the variable selected from the right column into the Value
field.
Variable column Lists predefined variables you can use as values in the batch load
file.
OK button Applies the field and value settings to the mapping file.
Cancel button Closes the Add/Edit BatchBuilder Mapping Field screen without
applying any changes.
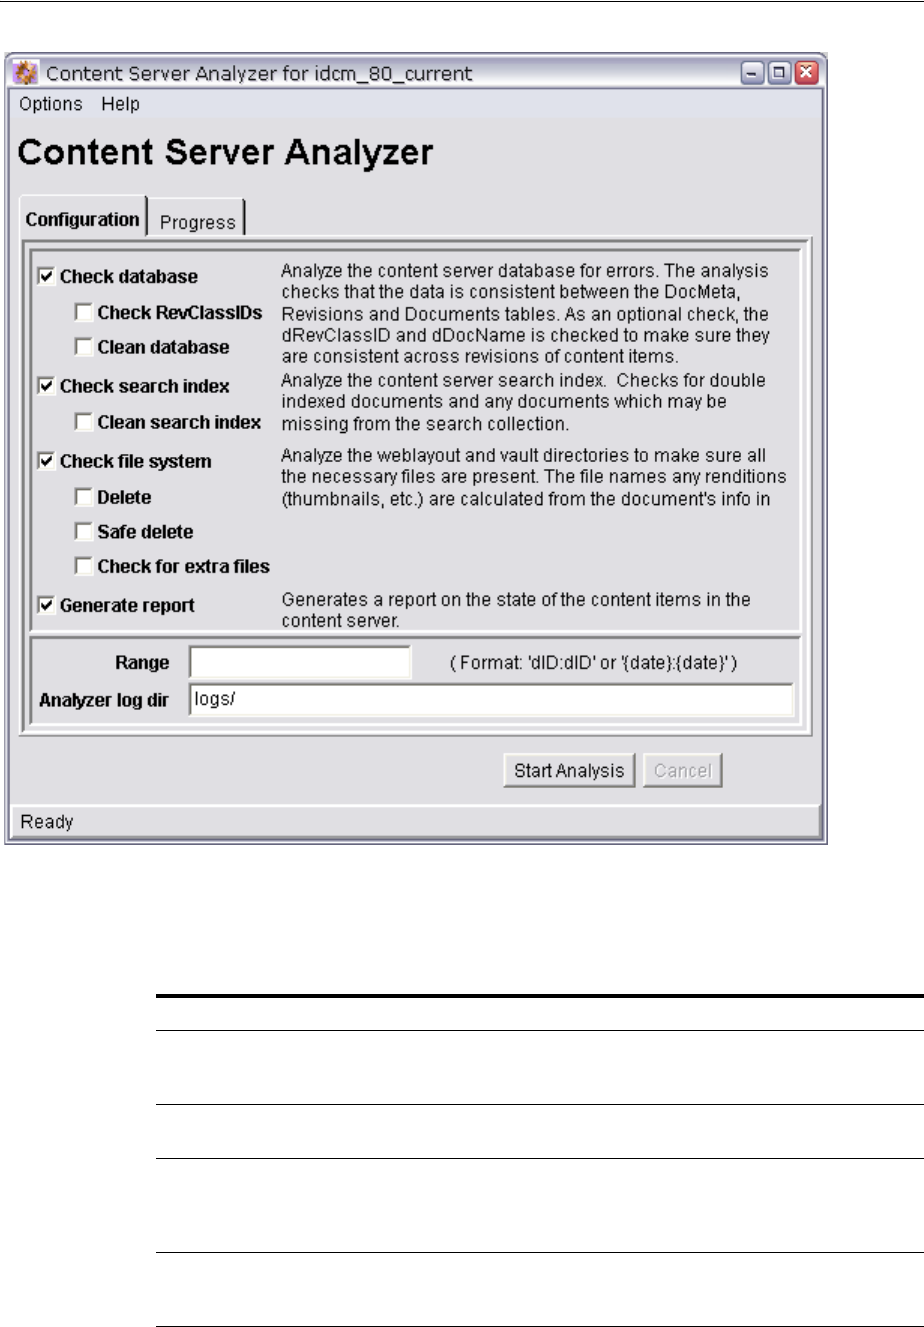
System Properties and Settings Interface
User Interface A-77
A.1.8.1 Content Server Analyzer: Configuration Tab
The Configuration tab of the Content Server Analyzer Configuration table is used to
configure analysis options and specify a customized logging directory structure:
Option Description
Check database Performs all checks on the database, ensures the integrity of the
database columns, and confirms the consistency of data between
the DocMeta, Revision, and Documents tables.
Check RevClassIDs Ensures the accurate data synchronization between the
dRevClassID and dDocName tables.
Clean database Removes inconsistent rows from the database. Extra entries in the
DocMeta table are deleted, inadequately defined entries in the
Document table are deleted, and entries without a corresponding
reference in the Revisions table are deleted.
Check search index Analyzes the search index to ensure its integrity and checks for
duplicate data records for indexed documents and any documents
that might be missing from the search collection.

System Properties and Settings Interface
A-78 Oracle Fusion Middleware System Administrator's Guide for Oracle Content Server
A.1.8.2 Content Server Analyzer: Progress Tab
The Progress tab of the Content Server Analyzer displays the progress of the analysis
processes and all generated information. To access this tab, click the tab on the Content
Server Analyzer application, or click Start Analysis on the Content Server Analyzer
application.
A.1.9 Error and Status Information Interface
This section includes user interface illustrations and reference descriptions for error
and status information.
■Section A.1.9.1, "Content Server Logs Screen"
■Section A.1.9.2, "Archiver Log Screen"
■Section A.1.9.3, "Database Log Screen"
■Section A.1.9.4, "Configuration Information Page"
■Section A.1.9.5, "System Audit Information Page"
■Section A.1.9.6, "Scheduled Jobs Administration Interface"
Clean search index Re-indexes the search index and replaces missing data records of
any omitted documents.
Check file system Analyzes the file system (weblayout and vault file repositories) to
ensure all necessary files are present.
Delete Permanently deletes extra files that were found during the file
system analysis.
Safe delete Creates a safe delete directory in the logs/ directory and copies
the extra files that were found during the file system analysis into
this directory.
Check for extra files Identifies any possible extra files that might be in the file system.
Generate report Uses the console window to report statistics about the content
items in the repository. It includes information pertaining to the
status, release and processing states of content items in the file
system and provides prior and current totals. Progress and error
messages are also logged to the console window.
Range Specifies the first and last of the criteria analyze.
Log Directory The default directory used by Content Server Analyzer is
DomainHome/ucm/cs/bin/logs/. Optionally, you can also enter a
custom directory name. If the Safe delete option is selected, the
files are moved to this directory.
Element Description
Task progress bar Displays the combined progress of the specific analysis tasks
selected on the Configuration tab.
Overall progress bar Displays the overall progress of the analysis process.
Console area Area that displays the information collected and summarized
during the analysis processes. Displays applicable information for
each selected option. Also displays progress and error messages
generated during the analysis processes.
Start Analysis button Starts the Oracle Content Server analysis.
Option Description
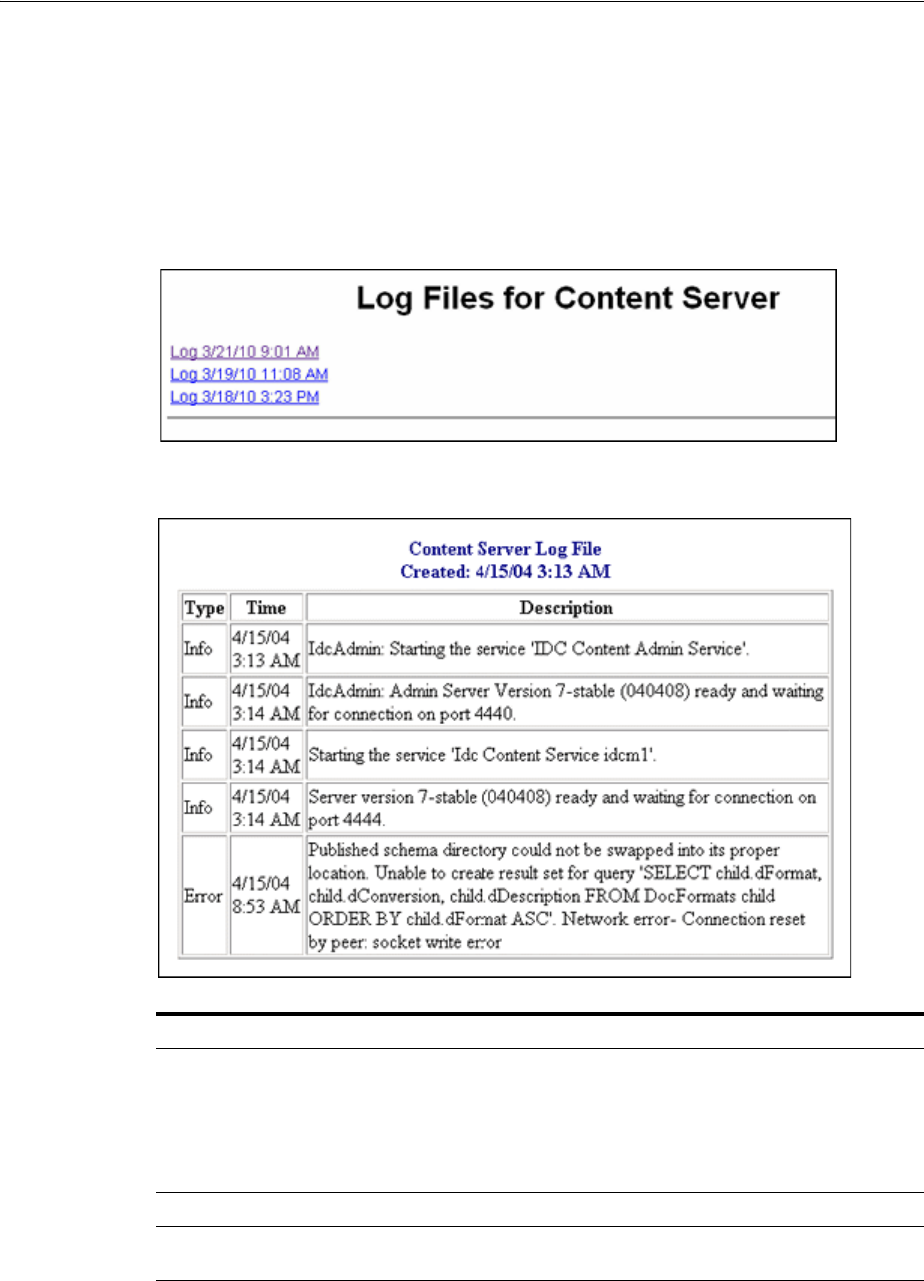
System Properties and Settings Interface
User Interface A-79
■Section A.1.9.7, "Environment Packager Page"
A.1.9.1 Content Server Logs Screen
Oracle Content Server log files are listed by date and time. One file is generated for
each day. Entries are added to the file throughout the day as events occur. To access
this screen, select Administration then Log Files from the portal navigation bar, then
select Content Server Logs. To access a specific log file, click a log date and time link
on the page.
Element Description
Type column Displays the type of log file entry:
■Info: Displays basic status information.
■Error: Displays errors that occur but do not stop the software
from functioning.
■Fatal: Displays errors that stop the software from functioning.
Time column Displays the date and time of the log file entry.
Description column Displays information about the log file entry. The level of detail
depends on the type of entry.
System Properties and Settings Interface
A-80 Oracle Fusion Middleware System Administrator's Guide for Oracle Content Server
A.1.9.2 Archiver Log Screen
Archiver log files show information about imports, exports, and replications. The log
files are listed by date and time. One file is generated for each day. Entries are added
to the file throughout the day as events occur To access this screen, select
Administration then Log Files from the portal navigation bar, then select Archiver
Logs.
A.1.9.3 Database Log Screen
Database log files are listed by date and time. One file is generated for each day.
Entries are added to the file throughout the day as events occur. To access this screen,
select Administration from the portal navigation bar, then Log Files, then Database
Logs. To access a specific log file, click a log date and time link on the page.
Element Description
Type column Displays the type of log file entry:
■Info: Displays basic status information.
■Error: Displays errors that occur but do not stop the software
from functioning.
■Fatal: Displays errors that stop the software from functioning.
Time column Displays the date and time of the log file entry.
Description column Displays information about the log file entry. The level of detail
depends on the type of entry.
System Properties and Settings Interface
User Interface A-81
A.1.9.4 Configuration Information Page
The Configuration Information Page provides configuration details for the Oracle
Content Server instance. To access this page, click Administration in the portal
navigation bar, then click Configuration for instance.
Element Description
Type column Displays the type of log file entry:
■Info: Displays basic status information.
■Error: Displays errors that occur but do not stop the software
from functioning.
■Fatal: Displays errors that stop the software from functioning.
Time column Displays the date and time of the log file entry.
Description column Displays information about the log file entry. For more information,
click Details.
System Properties and Settings Interface
A-82 Oracle Fusion Middleware System Administrator's Guide for Oracle Content Server
Element Description
Server Name Name of the server on which the Oracle Content Server instance is
deployed. Click Server Configurations to view Build, OS Name,
Instance Name, Server Port, HTTP Web Root, and other server
information.
Version Release and build numbers for the Oracle Content Server software.
ClassLoader Type of Classloader. Click Classpath Details to view load order and
classpath.
Instance Directory Path of the install directory for the Oracle Content Server instance.
For more information, click Directory Details.
Database Type Name of the type of database configured for use by the Oracle
Content Server instance. For more information, click Database
Connection Details.
Database Version Version number and type for the database configured for use by the
Oracle Content Server instance.
HTTP Server Address Address for the HTTP server for the Oracle Content Server
instance. For more information, click Internet Configurations.
Mail Server Specific name for the Oracle Content Server mail server
(router.name.suffix).

System Properties and Settings Interface
User Interface A-83
A.1.9.5 System Audit Information Page
The System Audit Information page provides audit details for the Oracle Content
Server instance. To access this page, click Administration in the portal navigation bar,
then click System Audit Information.
Search Engine Name Name of the search engine configured for use with the Oracle
Content Server instance.
Index Engine Name Name of the index engine configured for use with the Oracle
Content Server instance.
Number of Installed
Features Number of features installed on the Oracle Content Server instance.
Click Feature Details to view feature names, versions, levels, and
associated component names.
Number of Enabled
Components Number of components enabled on the Oracle Content Server
instance. Click Enabled Component Details to view component
names, versions, locations, featured extensions, additional
components, classpath, and libpath.
When details are displayed, click Configure for a specific
component to modify configuration settings (if supported).
Number of Disabled
Components Number of components disabled on the Oracle Content Server
instance. Click Disabled Component Details to view component
names, versions, locations, featured extensions, additional
components, classpath, and libpath.
Auto Number Prefix Automatically generated prefix number. For more information,
click Server Options.
Use Accounts If using accounts on the Oracle Content Server instance, then set to
True. If not using accounts, then set to False.
Ntlm Security Enabled If Ntlm security is enabled, then set to True. If Ntlm security is
disabled, then set to False.
Allow get copy for user
with read privilege If users with Read privilege can get a copy of a content item, then
set to True. If users with Read privilege can not get a copy of a
content item, then set to False. For more information, click Content
Security Details.
Allow only original
contribute to check out If only the original contributor (user) can check out a content item,
then set to True. If users besides the original contributor can check
out a content item, then set to False.
Java Version Number of the Java software version used with the Oracle Content
Server instance. For more information, click Java Properties.
Element Description
System Properties and Settings Interface
A-84 Oracle Fusion Middleware System Administrator's Guide for Oracle Content Server
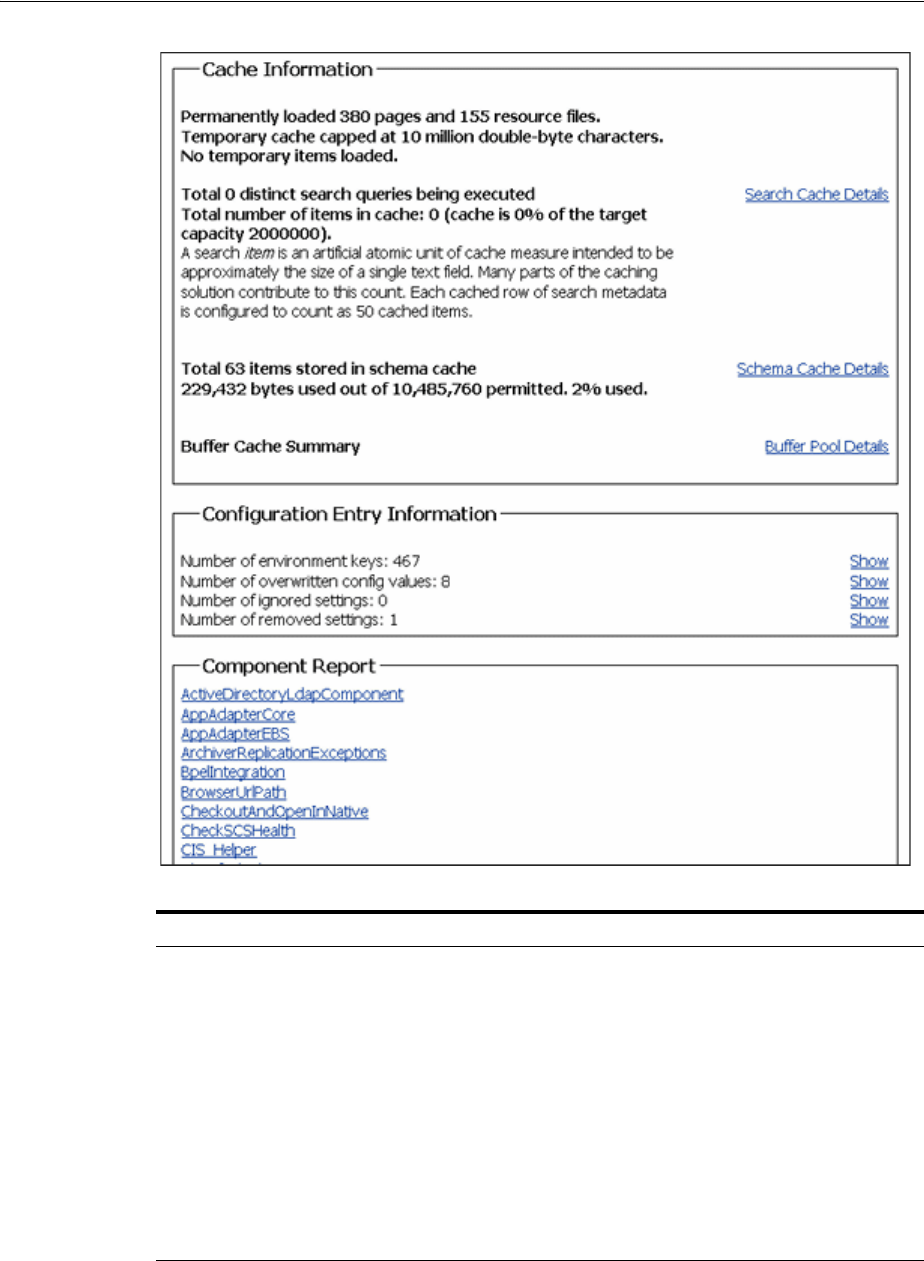
System Properties and Settings Interface
User Interface A-85
Element Description
General Information area Provides the following information:
■Amount of time the Oracle Content Server instance has been
up and running.
■Number of service requests processed, and whether the system
is handling services requests successfully.
■Total JVM memory capacity, and total JVM available memory.
For more information, click Memory Details.
■Total number of threads. For more information, click Thread
Details.
■Total number of active database connections. For more
information, click Database Connection Details.
■Total number of audit messages.

System Properties and Settings Interface
A-86 Oracle Fusion Middleware System Administrator's Guide for Oracle Content Server
A.1.9.6 Scheduled Jobs Administration Interface
The following screens are used in monitoring scheduled jobs run by system
components in the Oracle Content Server instance.
■Section A.1.9.6.1, "Active Scheduled Jobs Screen"
■Section A.1.9.6.2, "Scheduled Jobs History Screen"
■Section A.1.9.6.3, "Scheduled Jobs Information Screen"
Localization Information
area Provides the following information:
■Number for the string key count.
■Whether the localization system is using string index.
■Number for the localization test run time.
■Number for localization test lookups per second.
Tracing Sections
Information area Provides the following information and options:
■Full Verbose Tracing checkbox. Select to implement full
verbose tracing.
■Save checkbox. Select to save the tracing information.
■Active Sections field, in which to specify the active sections to
trace.
■Event Trap Text field, in which to specify what text to trap in
the trace.
■Add Thread Dump checkbox. Select to add a thread dump to
the trace.
■Update button to capture the selections made in this area.
■Reset button to clear the selections made in this area.
Cache Information area Provides the following information:
■Number of permanently loaded pages and resource files.
■Number at which cache is temporarily capped.
■Whether any temporary items are loaded.
■Total number of distinct search queries being executed. For
more information, click Search Cache Details.
■Total number of items in cache.
■Total number of items stored in schema cache. For more
information, click Schema Cache Details.
■Number of bytes used out of number permitted.
■Buffer Cache Summary. For more information, click Buffer
Pool Details.
Configuration Entry
Information area Provides the following information:
■Number of environment keys. For details, click Show.
■Number of overwritten config values. For details, click Show.
■Number of ignored settings. For details, click Show.
■Number of removed settings. For details, click Show.
Component Report area Lists server components by name. For details, click the name of a
component. Details include a component's location, version
number, and status.
Element Description
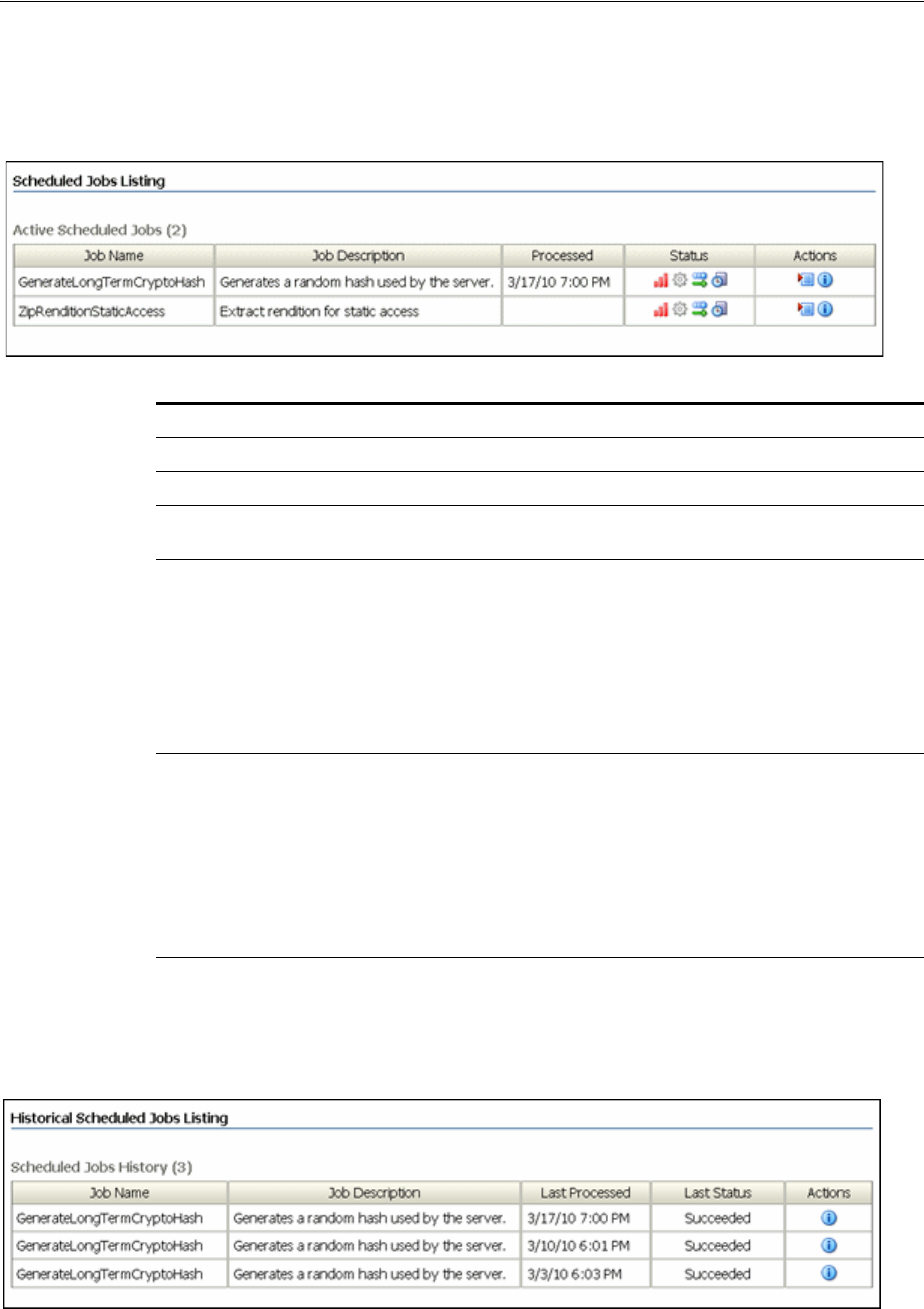
System Properties and Settings Interface
User Interface A-87
A.1.9.6.1 Active Scheduled Jobs Screen This screen enables administrators to view active
scheduled jobs run by system components in the Oracle Content Server instance. To
access this screen, select Administration from the portal navigation bar, then expand
Scheduled Jobs Administration, then click Active Scheduled Jobs.
A.1.9.6.2 Scheduled Jobs History Screen This screen enables administrators to view
scheduled jobs history run by system components in the Oracle Content Server
instance. To access this screen, select Administration from the portal navigation bar,
then expand Scheduled Jobs Administration, then click Scheduled Jobs History.
Element Description
Job Name column Name of the active job.
Job Description column Describes the purpose of the active job.
Processed column Date and time the job was processed or started
processing.
Status column Current status of a job. To display a brief description of
the status represented by each icon, move the cursor
over the icon.
■High priority
■Inactive
■Repeat
■Short
Actions column Use the Actions menu to perform the following actions
on a job:
■Info
■Edit
■Cancel
■Delete
Use the Info icon to display the Job Information page.
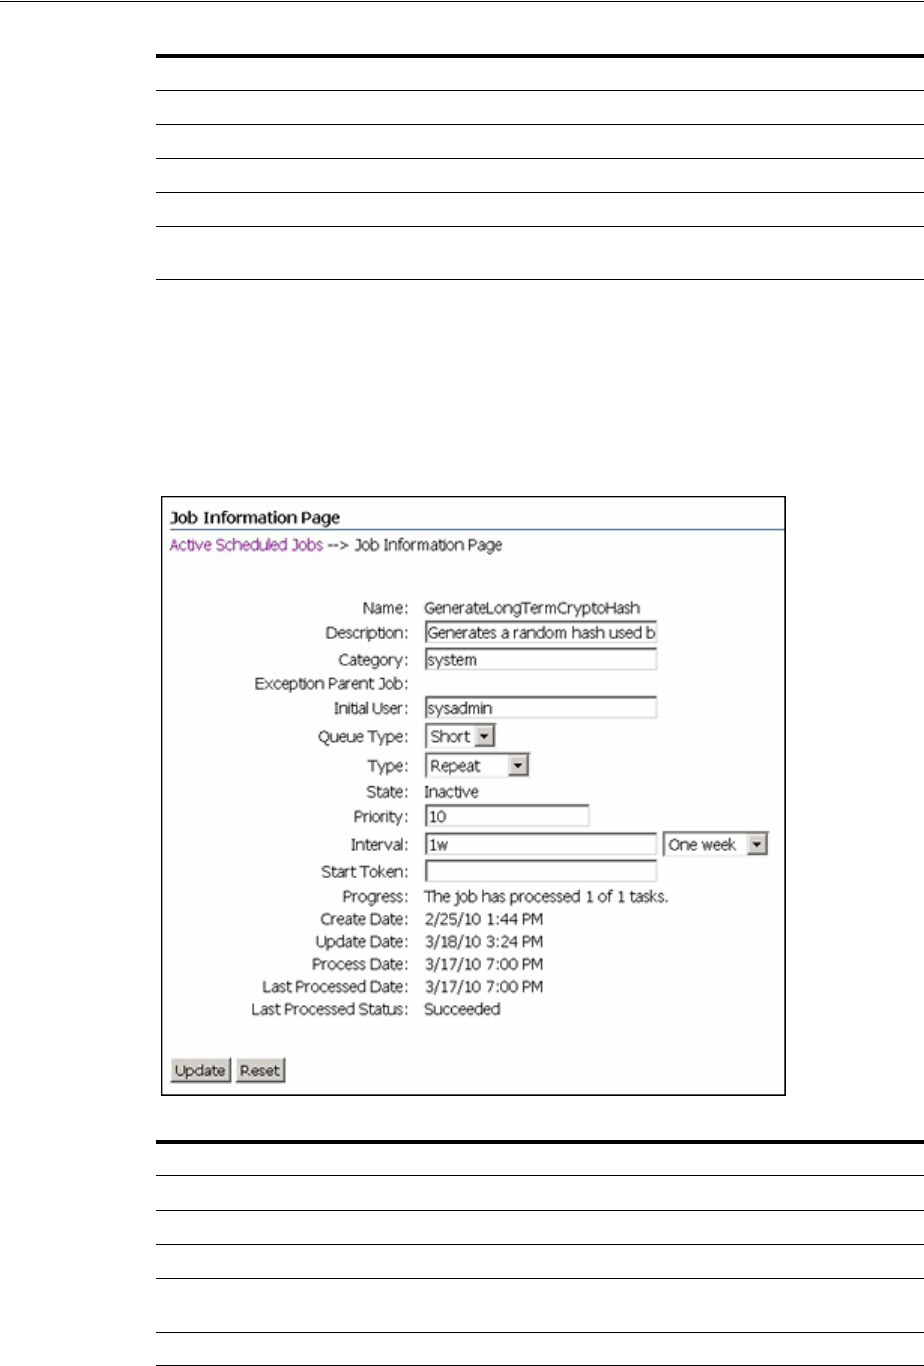
System Properties and Settings Interface
A-88 Oracle Fusion Middleware System Administrator's Guide for Oracle Content Server
A.1.9.6.3 Scheduled Jobs Information Screen This screen enables administrators to view
information about a scheduled job run by a system component in the Oracle Content
Server instance. To access this screen, select Administration from the portal navigation
bar, then expand Scheduled Jobs Administration. Select either the Active Scheduled
Jobs Screen or the Scheduled Jobs History Screen and click the Info Icon to view jobs
information. To display a Scheduled Jobs Information screen that can be edited, select
Edit from the Actions menu on the Active Scheduled Jobs Screen.
Element Description
Job Name column Name of the scheduled job.
Job Description column Description of the purpose of a job.
Last Processed column Date and time the job was last processed.
Last Status column Last status of a job: Succeeded, Failed.
Actions column Use the Info icon to display the Scheduled Jobs
Information page.
Element Description
Name field Name of the scheduled job.
Description field Description of the scheduled job.
Category field Category of the scheduled job.
Exception Parent Job field This field can not be edited. If there is no exception
parent job, nothing is displayed.
Initial User field Type of user that owns the scheduled job.

System Properties and Settings Interface
User Interface A-89
A.1.9.7 Environment Packager Page
The Environment Packager is a diagnostic tool that creates a zip file of the desired
state directories, log files, and other component and resource directories. To access this
page, click Administration on the portal navigation bar, then click Environment
Packager.
Queue Type field Type of queue: short, or long.
Type field Type of schedule: Immediate, Once, Repeat.
State field Current state of the scheduled job.
Priority field Priority number for the scheduled job.
Interval field Interval specified for the scheduled job to be processed:
one hour, two hours, one day, one week.
Start Token field Token that triggers the schedule job to start processing.
Progress field The progress of the scheduled job.
Create Date field Date and time the scheduled job was created.
Update Date field Date and time the scheduled job was updated.
Process Date field Date and time the scheduled job was processed.
Last Processed Date field Date and time the scheduled job was last processed.
Last Processed Status field Status when the scheduled job was last processed.
Update button Updates the screen settings with edited changes.
Reset button Resets the screen settings to the original display.
Element Description
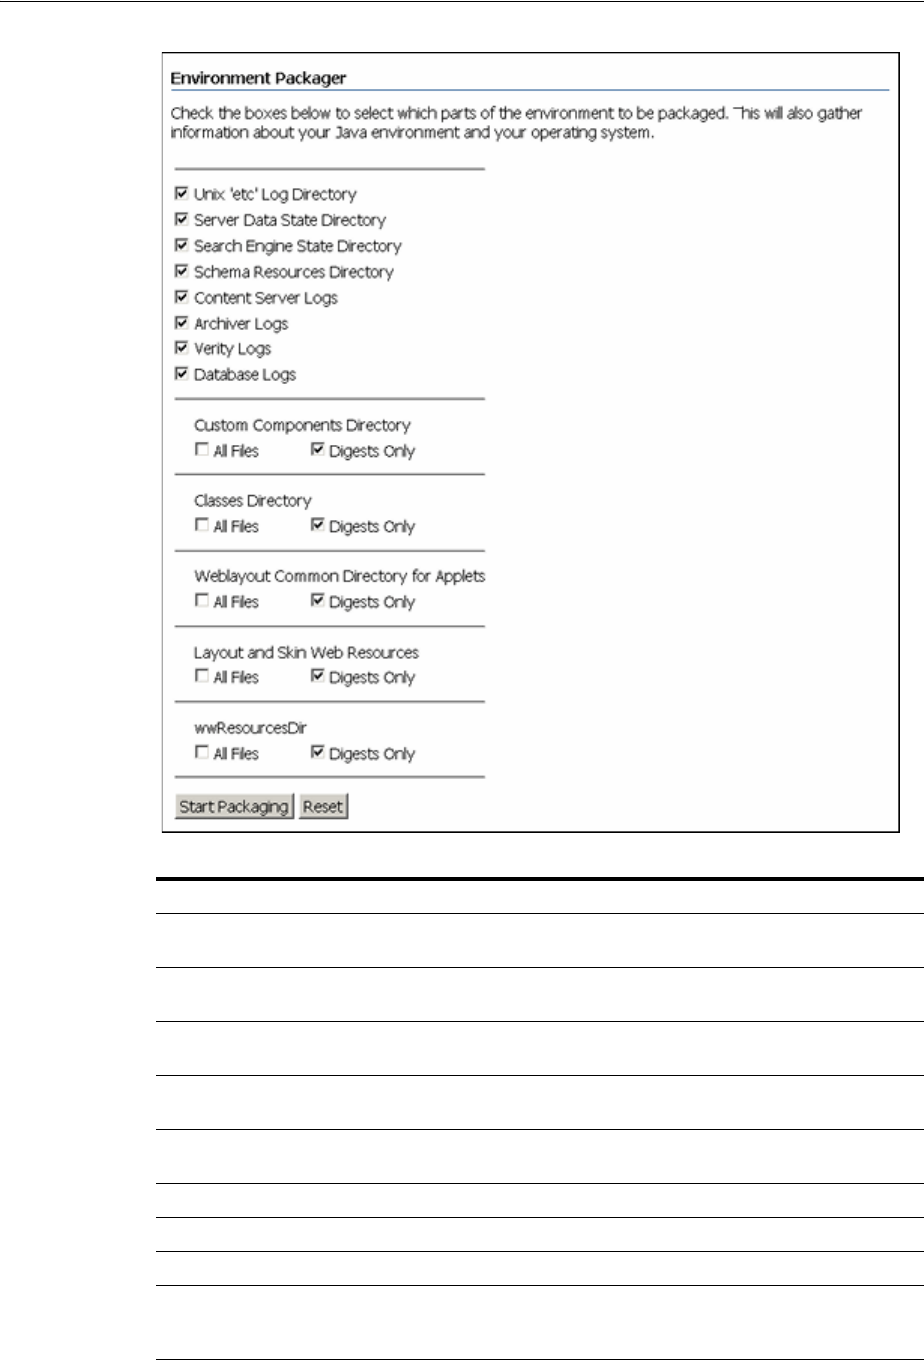
System Properties and Settings Interface
A-90 Oracle Fusion Middleware System Administrator's Guide for Oracle Content Server
Element Description
Unix 'etc' Log Directory
checkbox Select this box to include Unix 'etc' log directory information in the
zip file.
Server Data State
Directory checkbox Select this box to include the server data State directory information
in the zip file.
Search Engine State
Directory checkbox Select this box to include the search engine State directory
information in the zip file.
Schema Resources
Directory checkbox Select this box to include the schedule resources directory
information in the zip file.
Content Server Logs
checkbox Select this box to include Oracle Content Server log information in
the zip file.
Archiver Logs checkbox Select this box to include Archiver log information in the zip file.
Verity Logs checkbox Select this box to include Verity log information in the zip file.
Database Logs checkbox Select this box to include database log information in the zip file.
Custom Components
Directory checkboxes Select All Files to include the custom component directory in the
zip file. Select Digests Only to include just the digests for the
custom component directory in the zip file.

Security and User Access Interface
User Interface A-91
A.2 Security and User Access Interface
This section includes user interface illustrations and reference descriptions for
managing security and user access.
■Section A.2.1, "Security Administration Interface"
■Section A.2.2, "Groups, Roles, and Permissions Interface"
■Section A.2.3, "Accounts Interface"
■Section A.2.4, "User Login and Alias Interface"
■Section A.2.5, "Proxy Connections Interface"
A.2.1 Security Administration Interface
The following are the main screens used when managing security:
■Section A.2.1.1, "User Admin Screen"
■Section A.2.1.2, "Define Filter Screen"
■Section A.2.1.3, "Show Columns Screen"
A.2.1.1 User Admin Screen
The User Admin application is an administration application used to set up and
manage users, security groups, and accounts. You can run this application by
accessing it using the browser interface or in standalone mode.
To access this screen, click Administration, then Admin Applets, then User Admin.
If you run the User Admin application by accessing it in standalone mode, it might
cause ADSI authenticated users to lose their credentials.
Classes Directory
checkboxes Select All Files to include all Classes directory files in the zip file.
Select Digests Only to include just the digests for the classes
directory in the zip file.
Weblayout Common
Directory for Applets
checkboxes
Select All Files to include all weblayout common directory for
applets files in the zip file. Select Digests Only to include just the
digests for the weblayout common directory for apples files in the
zip file.
Layout and Skin Web
Resources checkboxes Select All Files to include Layout and Skin Web resources in the zip
file. Select Digests Only to include just the digests for layout and
skin Web resources in the zip file.
wwResourcesDir
checkboxes Select All Files to include wwResourcesDir in the zip file. Select
Digests Only to include just the digests for wwResourcesDir in the
zip file.
Start Packaging button Starts the environment packaging process for the selected items.
Reset button Resets the selected items to their default settings.
Element Description
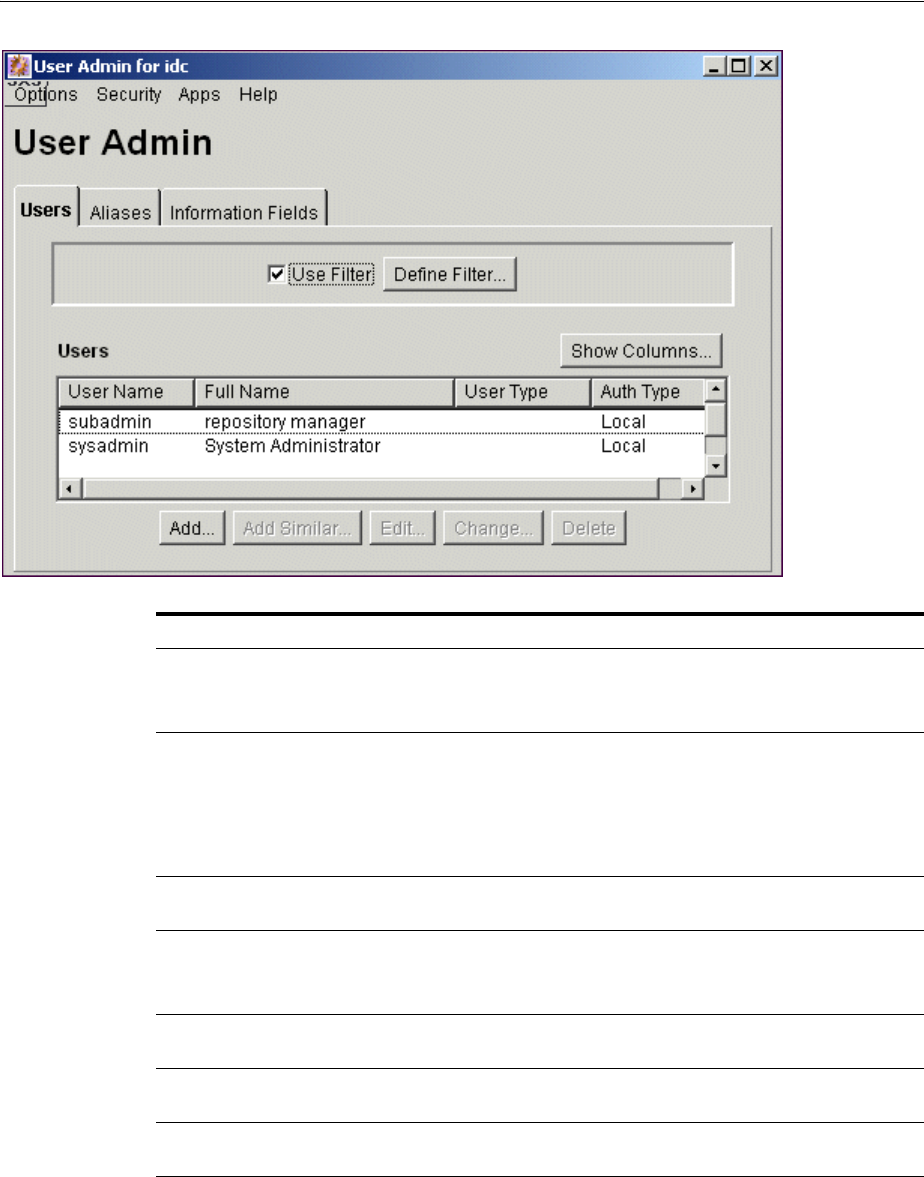
Security and User Access Interface
A-92 Oracle Fusion Middleware System Administrator's Guide for Oracle Content Server
A.2.1.2 Define Filter Screen
The Define Filter screen is used to narrow the list of information that is displayed on
several administration application screens. The Define Filter screen displays a series of
fields that are applicable to the administration application screen. Check the box next
to the field to activate that field as a filter.
Element Description
Options menu Tr ac in g : Opens the Tracing Configuration screen, from which you can
perform features related to system-wide tracing.
Exit: Closes the User Admin application.
Security menu Displays options to set:
Permissions by Group: Displays the Permissions By Group Screen.
Permissions by Role: Displays the Permissions By Role Screen.
Predefined Accounts: Displays the Predefined Accounts Screen. This
option is available only if accounts are enabled.
Apps menu Used to open other administration applications. The other applications
open in the same mode (applet or standalone) as the current application.
Help menu Contents: Displays the Oracle Content Server online help.
About Content Server: Displays version, build, and copyright
information for the Oracle Content Server instance.
Users tab Used to add, edit, and delete user logins. See User Admin Screen: Users
Tab.
Aliases tab Used to add, edit, and delete user aliases. See User Admin Screen: Aliases
Tab.
Information Fields
tab Used to add, edit, and delete user information fields. See User Admin
Screen: Information Fields Tab.

Security and User Access Interface
User Interface A-93
This screen can be accessed from a variety of other administration screens. For
example, a Define Filter button is displayed on the Users tab part of the User Admin
screen.
Element Description
checkboxes Select one or more checkboxes to activate the filter fields.
Fields The Users list on the original screen will be filtered based on the
criteria entered. The following wildcards can be used in these fields:
■With MS Access or MSDE:
* = one or more characters
? = single character
■With all other databases:
% = one or more characters
_ = single character
User Name field The user login.
Full Name field The full name that corresponds to the user login.
User Type field An attribute defined by the system administrator as a way to classify
users.
Auth Type field User authorization type, either Local, Global or External.
E-Mail Address field The e-mail address associated with the user. This is used for workflow
and subscription notifications.
User Locale field The user's locale, which specifies the language of the user interface
and date/time format.
Organization field The user's Organization Path value, which can be defined by the
system administrator as a way of classifying global users.
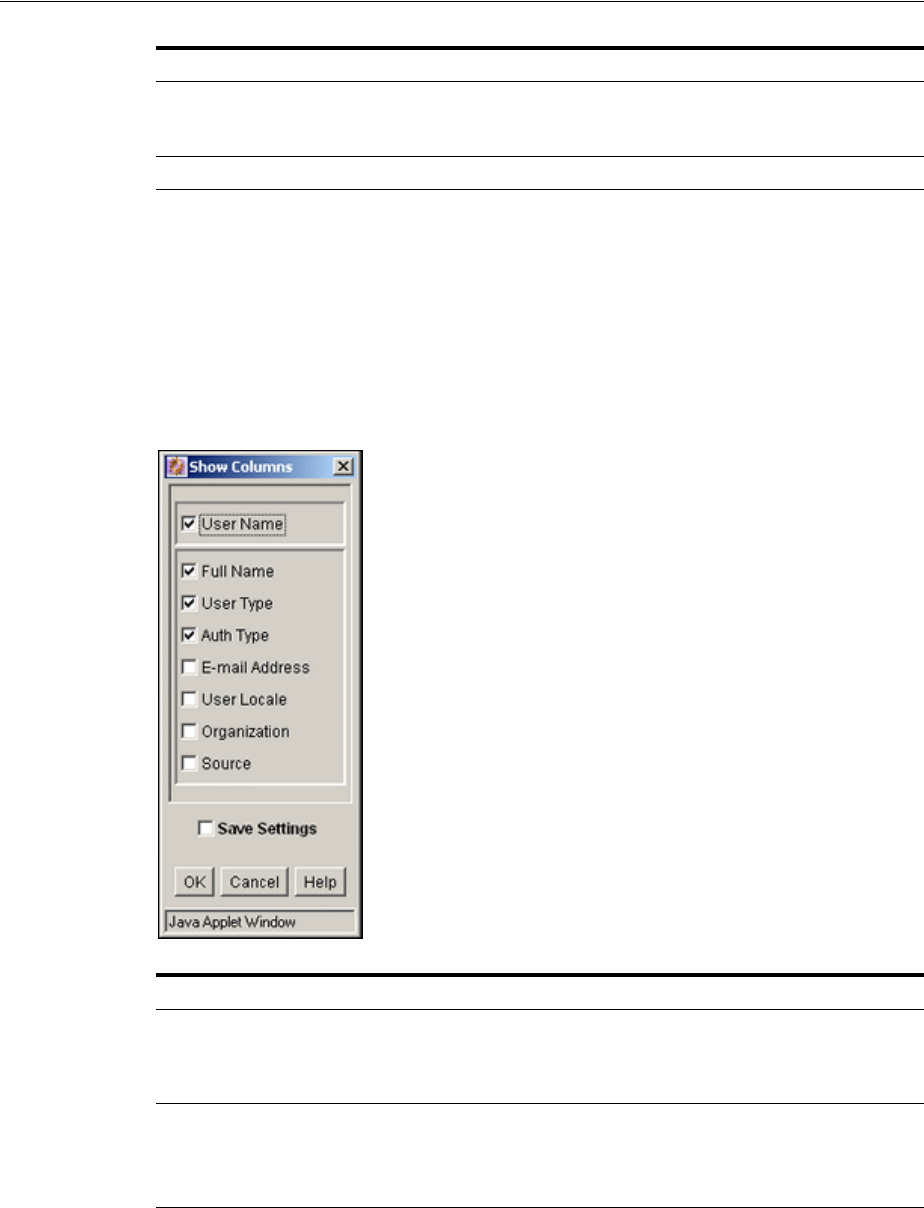
Security and User Access Interface
A-94 Oracle Fusion Middleware System Administrator's Guide for Oracle Content Server
A.2.1.3 Show Columns Screen
The Show Columns screen is used to specify the columns that are displayed on several
administration application screens. The Show Columns screen displays a series of
fields that are applicable to the administration application screens. Check the box next
to a field to have that field displayed as a column in the administration screens.
This screen can be accessed from a variety of other administration screens. For
example, a Show Columns button is displayed on the Users tab part of the User
Admin screen.
A.2.2 Groups, Roles, and Permissions Interface
The following screens are used when creating groups and roles and establishing
permissions:
■Section A.2.2.1, "Permissions By Group Screen"
Source field The LDAP user provider used to retrieve user information. Also, this
field specifies if the user came from an NTLM or ADSI integration
with the value: MSN.
Custom fields Any custom user information fields will be available as filter fields.
Element Description
Show Columns
checkboxes Selected: The field is displayed in the Users list on the original screen.
Unselected: The field is not displayed on the Users list.
For field descriptions, see the Define Filter Screen.
Save Settings
checkbox Selected: The column settings are applied every time the original screen is
displayed.
Unselected: The column settings apply only until the original screen is
closed.0
Element Description
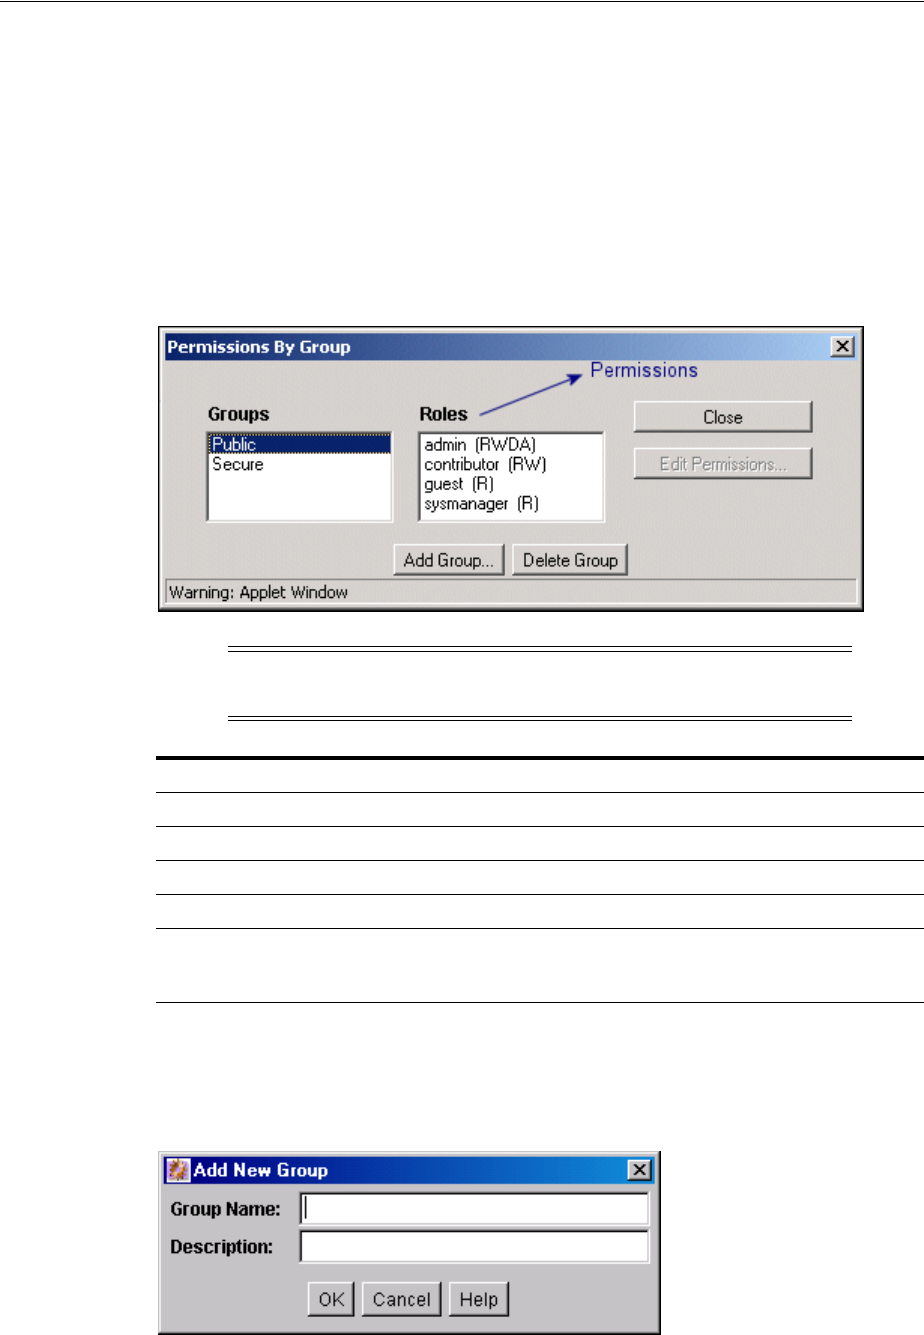
Security and User Access Interface
User Interface A-95
■Section A.2.2.2, "Add New Group Screen"
■Section A.2.2.3, "Permissions By Role Screen"
■Section A.2.2.4, "Add New Role Screen"
■Section A.2.2.5, "Edit Permissions Screen"
A.2.2.1 Permissions By Group Screen
The Permissions By Group screen is used to add security groups, delete security
groups, and edit permissions associated with existing security groups. To access this
screen, select Security, and then Permissions by Group in the User Admin Screen.
A.2.2.2 Add New Group Screen
The Add New Group screen is used to define the name and description for a new
security group. To access this screen, click Add Group on the Permissions By Group
Screen.
Caution: Security Group names cannot contain square brackets. This
is due to limitations in the search engine technology.
Element Description
Groups list Lists existing security groups
Roles list Lists the roles associated with existing security groups.
Edit Permissions button Enables you to edit permissions for the security group.
Add Group button Displays the Add New Group Screen.
Delete Group button Enables you to delete an existing security group. (You will not
be able to delete a security group if content still exists in that
security group.)
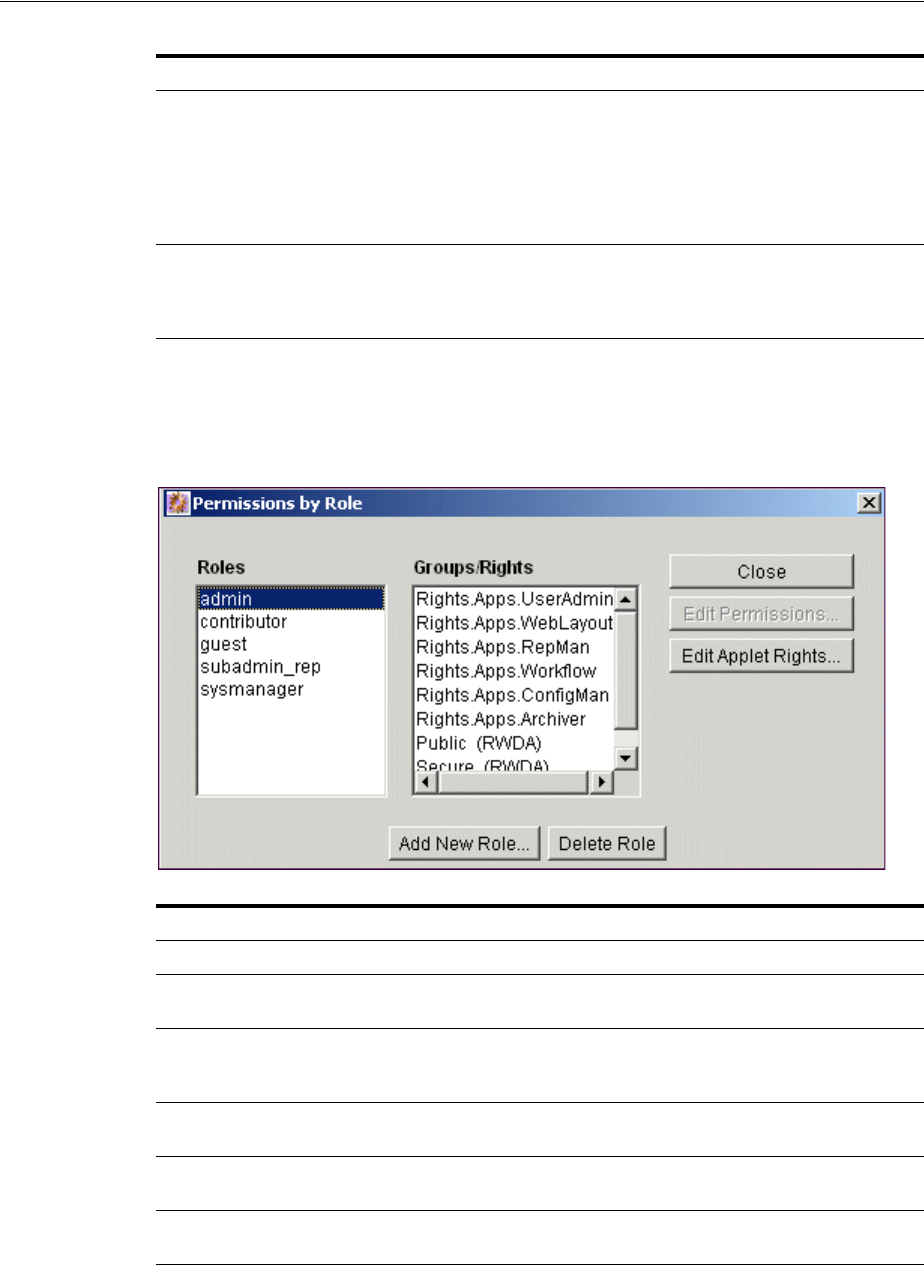
Security and User Access Interface
A-96 Oracle Fusion Middleware System Administrator's Guide for Oracle Content Server
A.2.2.3 Permissions By Role Screen
The Permissions By Role screen is used to add roles, delete roles, and edit rights and
permissions associated with roles. To access this screen, click Security then
Permissions by Role from the main menu on the User Admin Screen.
A.2.2.4 Add New Role Screen
The Add New Role screen is used to define the name of a new role. To access this
screen, click Add New Role on the Permissions By Role Screen.
Element Description
Group Name field ■The Group Name is limited to 30 characters.
■The following characters are not allowed: spaces, tabs, linefeeds,
returns, and ; : ^ ? & + " # % < * ~ |
■Uppercase accented letters are not allowed; lowercase accented
letters are acceptable. (For example, Älvdalsån will not work, but
älvdalsån will.)
Description field A brief description of the security group.
■The Description is limited to 80 characters.
■This field is displayed only in the User Admin Screen.
Element Description
Roles list Lists existing roles.
Groups/Rights list Lists the security groups and the rights associated with the
selected role.
Edit Permissions button Enables you to edit permissions for a security group and role.
This button is available when you select a role and a
group/right.
Edit Applet Rights button Enables you to edit rights for the role. This button is available
when you select a role.
Add New Role button Displays the Add New Role Screen, on which you can set up a
new role for users. Add the role name, and click OK.
Delete Role button Enables you to delete the selected role. (You will not be able to
delete a role if any users are assigned to that role.)
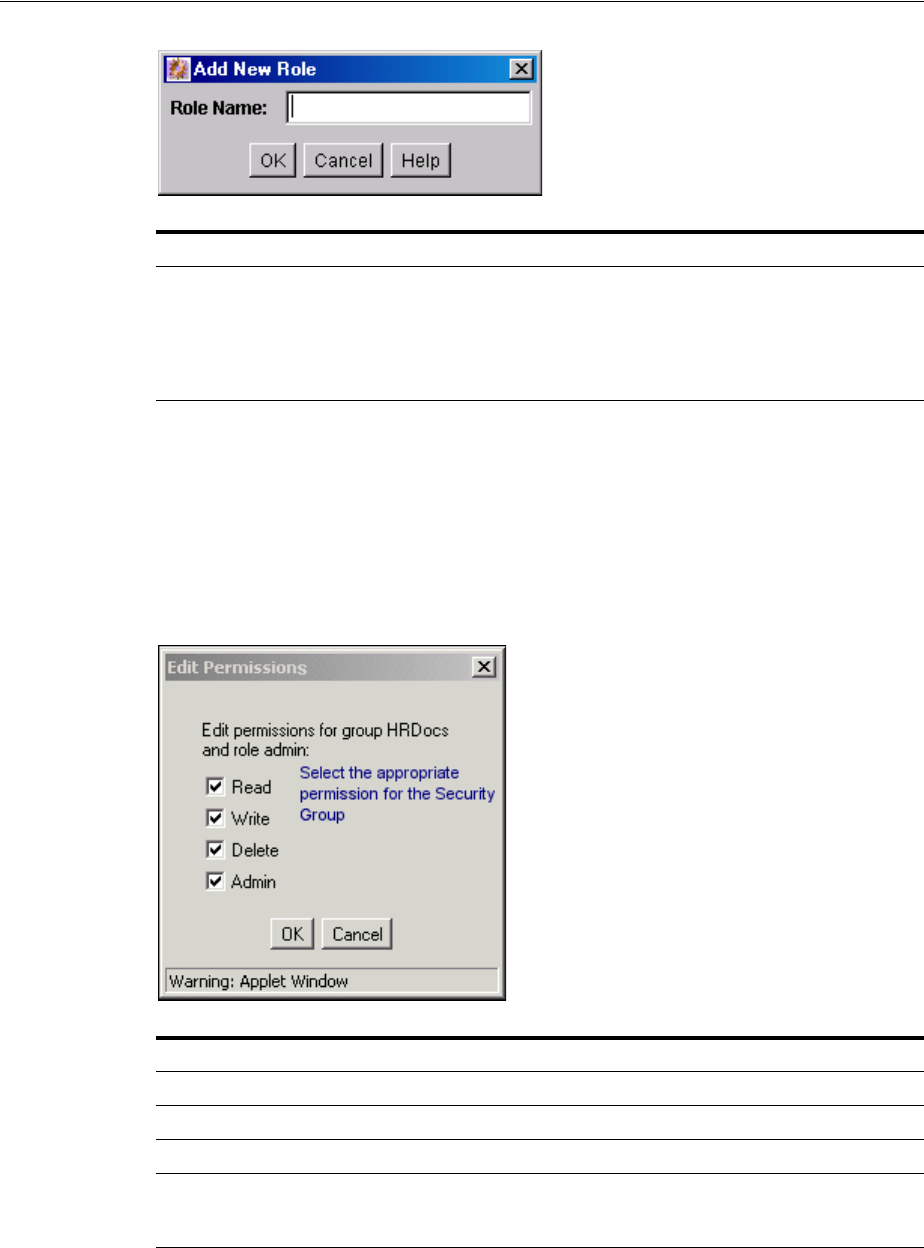
Security and User Access Interface
User Interface A-97
A.2.2.5 Edit Permissions Screen
The Edit Permission screen is used to change permissions to a specific security group
for a specific role. To access this screen, do one of the following:
■In the Permissions By Group Screen, select a security group, select a role, and click
Edit Permissions.
■In the Permissions By Role Screen, select a role, select a security group, and click
Edit Permissions.
A.2.3 Accounts Interface
The following screens are used when adding accounts.
■Section A.2.3.1, "Predefined Accounts Screen"
Element Description
Role Name field ■The Role Name is limited to 30 characters.
■The following characters are not allowed: spaces, tabs, linefeeds,
returns, and ; : ^ ? & + " # % < * ~ |
■Initially, a role is assigned Read (R) permission to the Public security
group and no permissions to any other security groups.
Element Description
Read checkbox Allows users to view files.
Write checkbox Allows users to view, check in, check out, and obtain a copy of files.
Delete checkbox Allows users to view, check in, check out, get a copy, and delete files.
Admin checkbox Allows users to view, check in, check out, get a copy, and delete files,
and check in files for other users. In addition, if the user has Workflow
rights, they can start or edit a workflow.
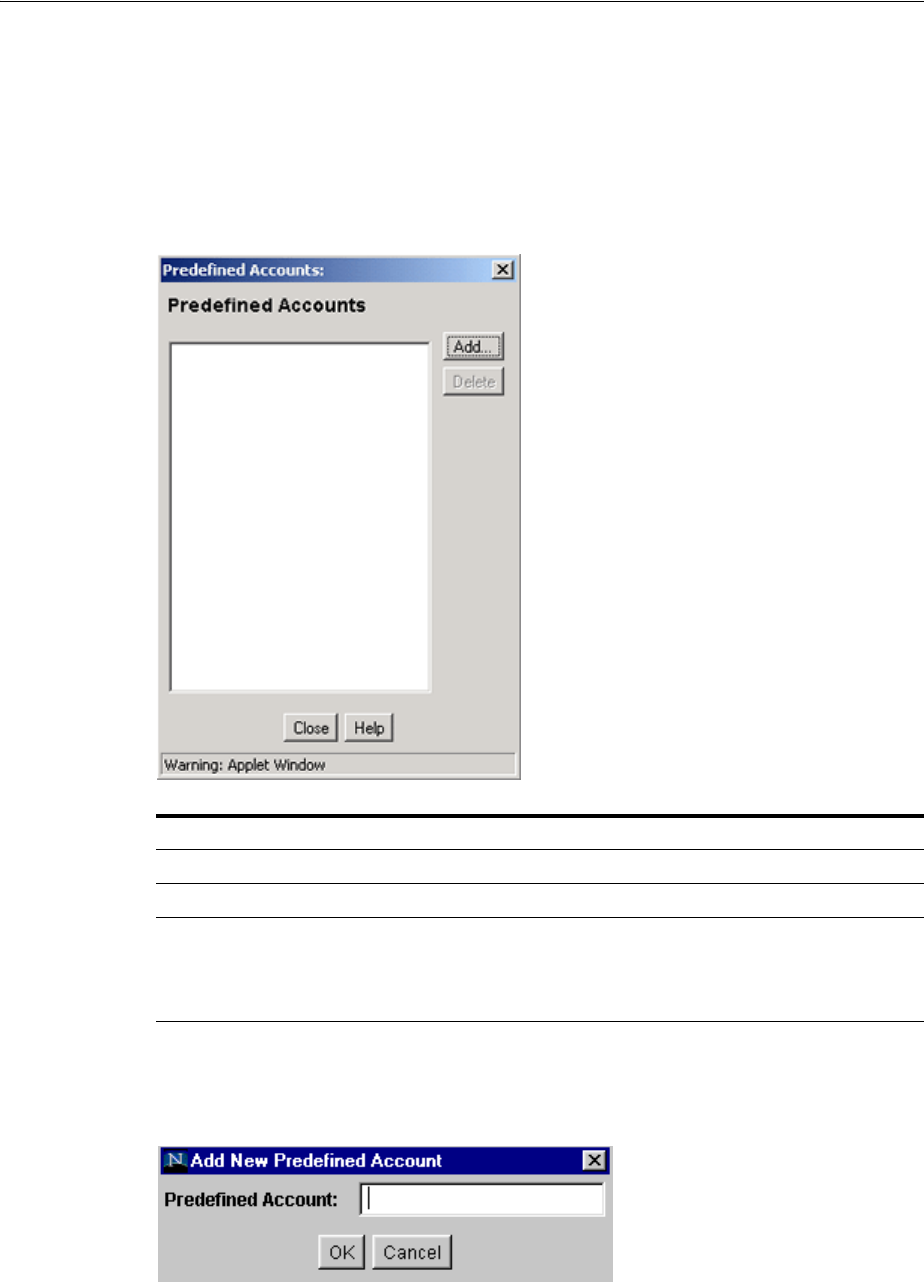
Security and User Access Interface
A-98 Oracle Fusion Middleware System Administrator's Guide for Oracle Content Server
■Section A.2.3.2, "Add New Predefined Account Screen"
■Section A.2.3.3, "Add/Edit Account Permissions Screen"
A.2.3.1 Predefined Accounts Screen
The Predefined Accounts screen is used to add and delete predefined accounts. This
screen is available only when Accounts are enabled on the system. To access this
screen, select Security, and then Predefined Accounts in the User Admin Screen.
A.2.3.2 Add New Predefined Account Screen
The Add New Predefined Account screen is used to name a new predefined account.
To access this screen, click Add on the Predefined Accounts Screen.
Element Description
Predefined Accounts list Shows the predefined accounts.
Add button Displays the Enabling Accounts.
Delete button Deletes the selected account.
You can delete an account even if content with that account still
exists. The account value will remain assigned to the content item,
but will be considered a user-defined account.
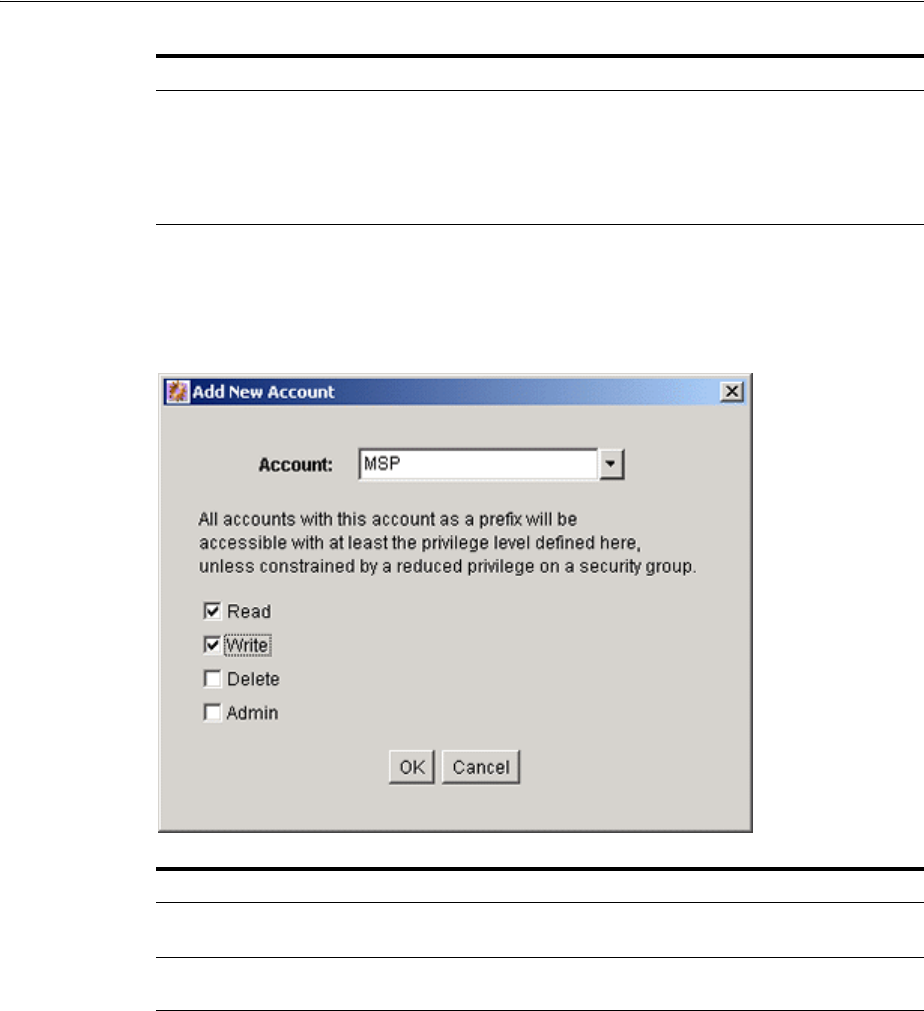
Security and User Access Interface
User Interface A-99
A.2.3.3 Add/Edit Account Permissions Screen
The Add New Account screen/Edit Permissions for Account screen is used to assign
account permissions to users. To access this screen, click Add or Edit on the Add/Edit
User Screen: Accounts Tab.
A.2.4 User Login and Alias Interface
The following screens are used when creating and editing user logins and aliases.
■Section A.2.4.1, "User Admin Screen: Users Tab"
■Section A.2.4.2, "Choose/Change the Authorization Type Screen"
■Section A.2.4.3, "Add/Edit User Screen"
■Section A.2.4.4, "Add/Edit User Screen: Info Tab (Local User)"
■Section A.2.4.5, "Add/Edit User Screen: Info Tab (Global User)"
■Section A.2.4.6, "Add/Edit User Screen: Roles Tab"
■Section A.2.4.7, "Add Role Screen"
Element Description
Predefined Account
field Enter the name of the account to be added. Keep the names short and
consistent. For example, set up all of your accounts with a three-letter
abbreviation by location or department (MSP, NYC, and so no).
Account names can be no longer than 30 characters, and the following
are not acceptable: spaces, tabs, linefeeds, carriage returns, and the
symbols: ; ^ ? : & + " # % < > * ~.
Element Description
Account list Select a predefined account from the list, or enter a user-defined
account.
Permissions
checkboxes Set the Predefined Permissions that the user will have access to the
account.
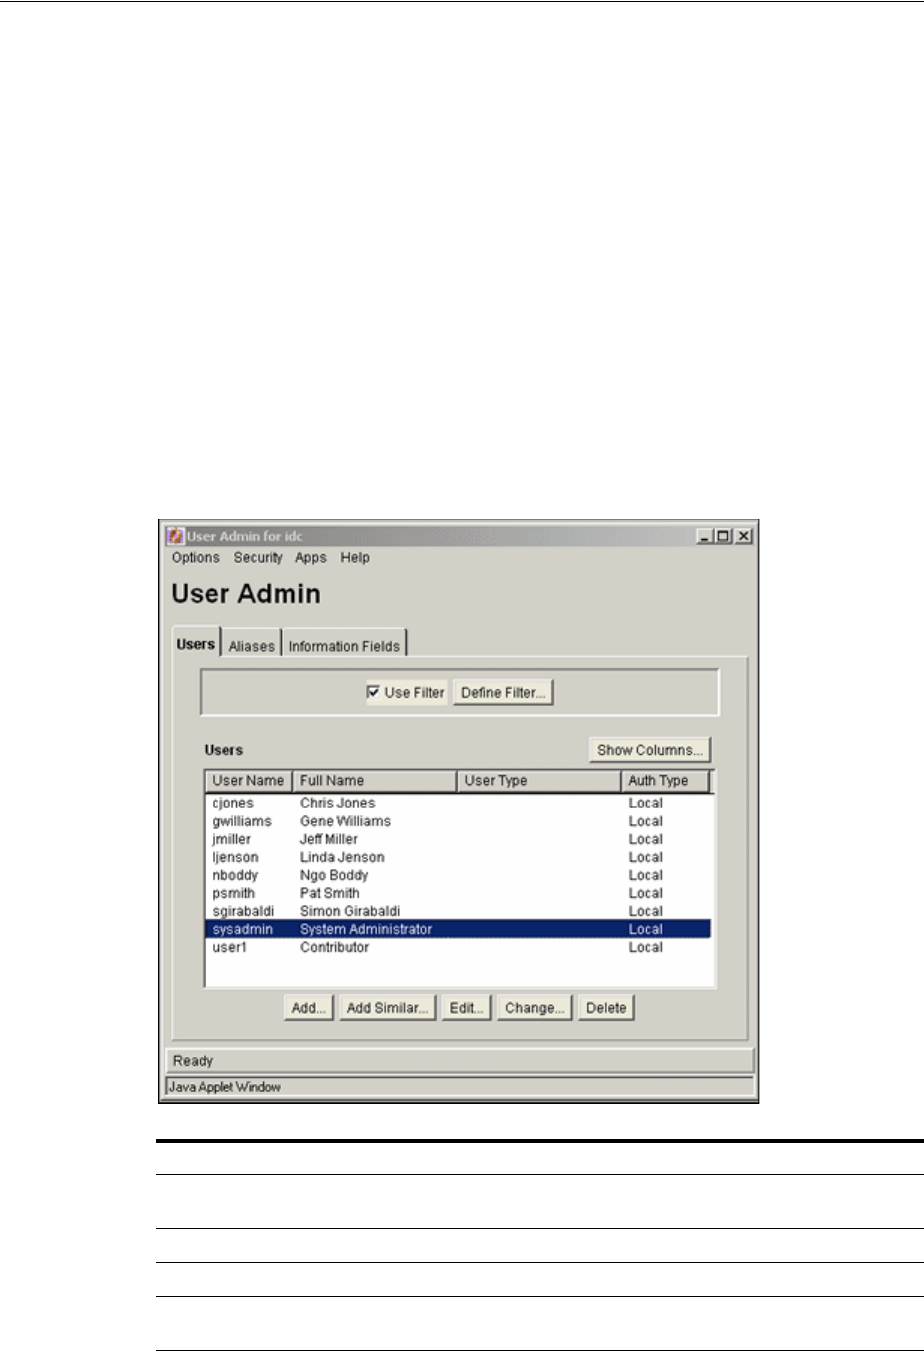
Security and User Access Interface
A-100 Oracle Fusion Middleware System Administrator's Guide for Oracle Content Server
■Section A.2.4.8, "Add/Edit User Screen: Accounts Tab"
■Section A.2.4.9, "Option List Screen"
■Section A.2.4.10, "User Admin Screen: Aliases Tab"
■Section A.2.4.11, "Add New Alias/Edit Alias Screen"
■Section A.2.4.12, "Select Users Screen"
■Section A.2.4.13, "Sub-Administration Interface: Edit Rights Screen"
■Section A.2.4.14, "User Admin Screen: Information Fields Tab"
■Section A.2.4.15, "Add Metadata Field Name Screen"
■Section A.2.4.16, "Edit Metadata Field Screen"
■Section A.2.4.17, "Update Database Design Screen"
A.2.4.1 User Admin Screen: Users Tab
The Users tab of the User Admin screen is used to add, edit, and delete user logins. To
access this tab, display the User Admin Screen.
Element Description
Use Filter checkbox Select this checkbox to narrow the Users list as defined by the Define
Filter Screen.
Define Filter button Displays the Define Filter Screen.
Show Columns button Displays the Show Columns Screen.
Users list Shows the users that match the filter settings. Double-clicking a user
displays the Add/Edit User Screen for that user.
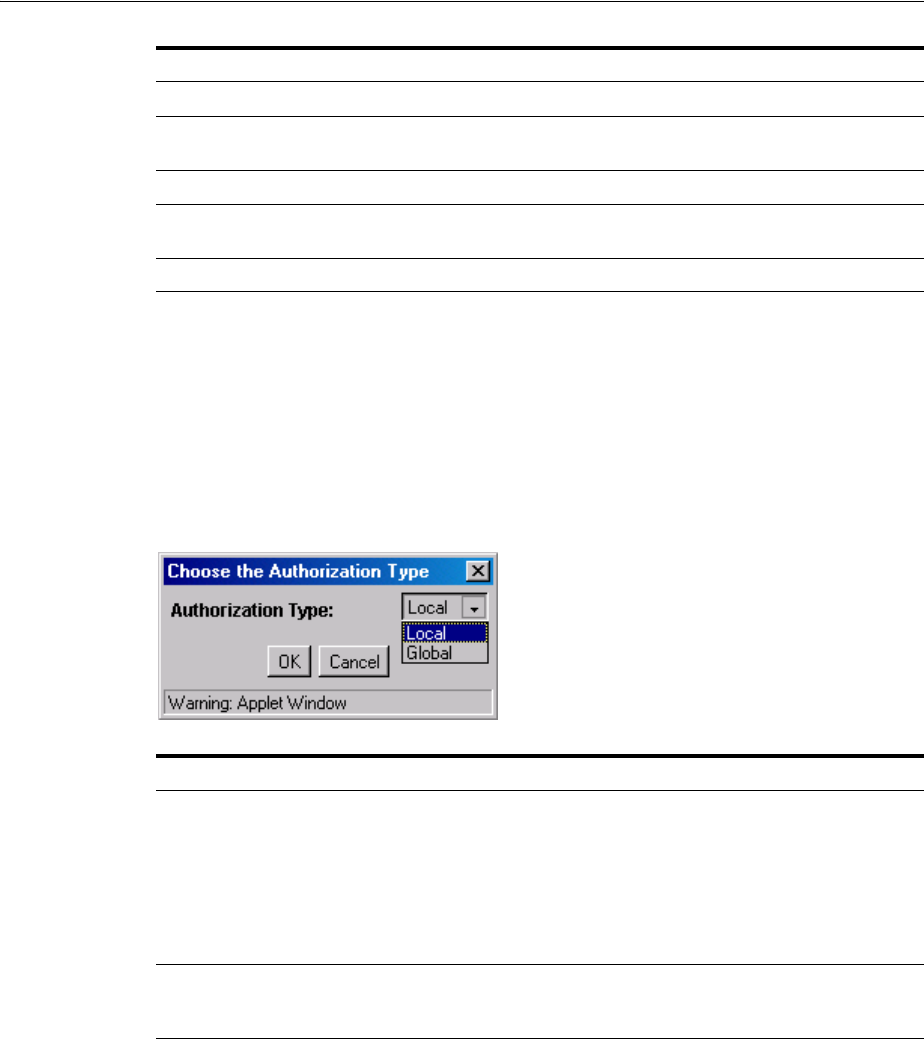
Security and User Access Interface
User Interface A-101
A.2.4.2 Choose/Change the Authorization Type Screen
The Choose/Change the Authorization Type screen is used to specify the user
authorization type when adding a new user or changing the authorization type for a
selected user. To access this screen, either click Add on the User Admin Screen: Users
Tab or select a user name in the User Admin screen Users tab and then click Change.
External users are created automatically when they are granted Oracle Content Server
access using an external user repository. User passwords for external users granted
Oracle Content Server access must be initially set by the administrator.
A.2.4.3 Add/Edit User Screen
The Add/Edit User screen is used to define user information, assign roles, and assign
account permissions for a user. To access this screen, do one of the following:
■On the User Admin Screen: Users Tab, click Add.
■Select a user authorization type and click OK on the Choose/Change the
Authorization Type Screen. The Add User screen is displayed.
■Select a user and click Edit on the User Admin Screen: Users Tab. The Edit User
screen is displayed.
Add button Displays the Choose/Change the Authorization Type Screen.
Add Similar button If you highlight a user and click Add Similar, the system displays
the Add/Edit User Screen with some fields already populated.
Edit button Displays the Add/Edit User Screen for the selected user.
Change button Displays the Choose/Change the Authorization Type Screen for the
selected user.
Delete button Enables you to delete a user login.
Element Description
Authorization Type
list The type of user.
Local: Users defined by an administrator within the Oracle Content
Server instance. Administrators assign these users one or more roles,
which provide the user with access to security groups. Undefined users
are assigned the guest role.
Global: Lightly-managed users. Both local and global user credentials
can extend to multiple Oracle Content Server instances.
OK button Displays the Add/Edit User Screen: Info Tab (Local User) or the
Add/Edit User Screen: Info Tab (Global User), depending on which
Authorization Type is selected.
Element Description

Security and User Access Interface
A-102 Oracle Fusion Middleware System Administrator's Guide for Oracle Content Server
The information that appears on this screen may be different than that on your system
if custom metadata fields have been added. The fields shown in this screen shot are
the defaults installed with the Oracle Content Server instance.
The tabs visible on this screen depend on which type of user is selected and whether
accounts are enabled:
■Add/Edit User Screen: Info Tab (Local User)
■Add/Edit User Screen: Info Tab (Global User)
■Add/Edit User Screen: Roles Tab
■Add/Edit User Screen: Accounts Tab
A.2.4.4 Add/Edit User Screen: Info Tab (Local User)
The Info tab of the Add/Edit User screen is used to add a user. To access this tab for a
local user, do one of the following:
■Select Local and click OK on the Choose/Change the Authorization Type Screen.
■Select a local user and click Edit on the User Admin Screen: Users Tab.
Element Description
Name field The name of the new user.
■This field has a 50-character limit.
■User names are case-sensitive.
Full Name field The entire name of the new user. This field has a 50-character limit.
Password field The password for the new user login.
■This field has a 50-character limit.
■Passwords are case-sensitive.
Confirm Password
field Reenter the password from the previous field to confirm the spelling.
E-mail Address field The e-mail address associated with the user. This is used for workflow
and subscription notifications.
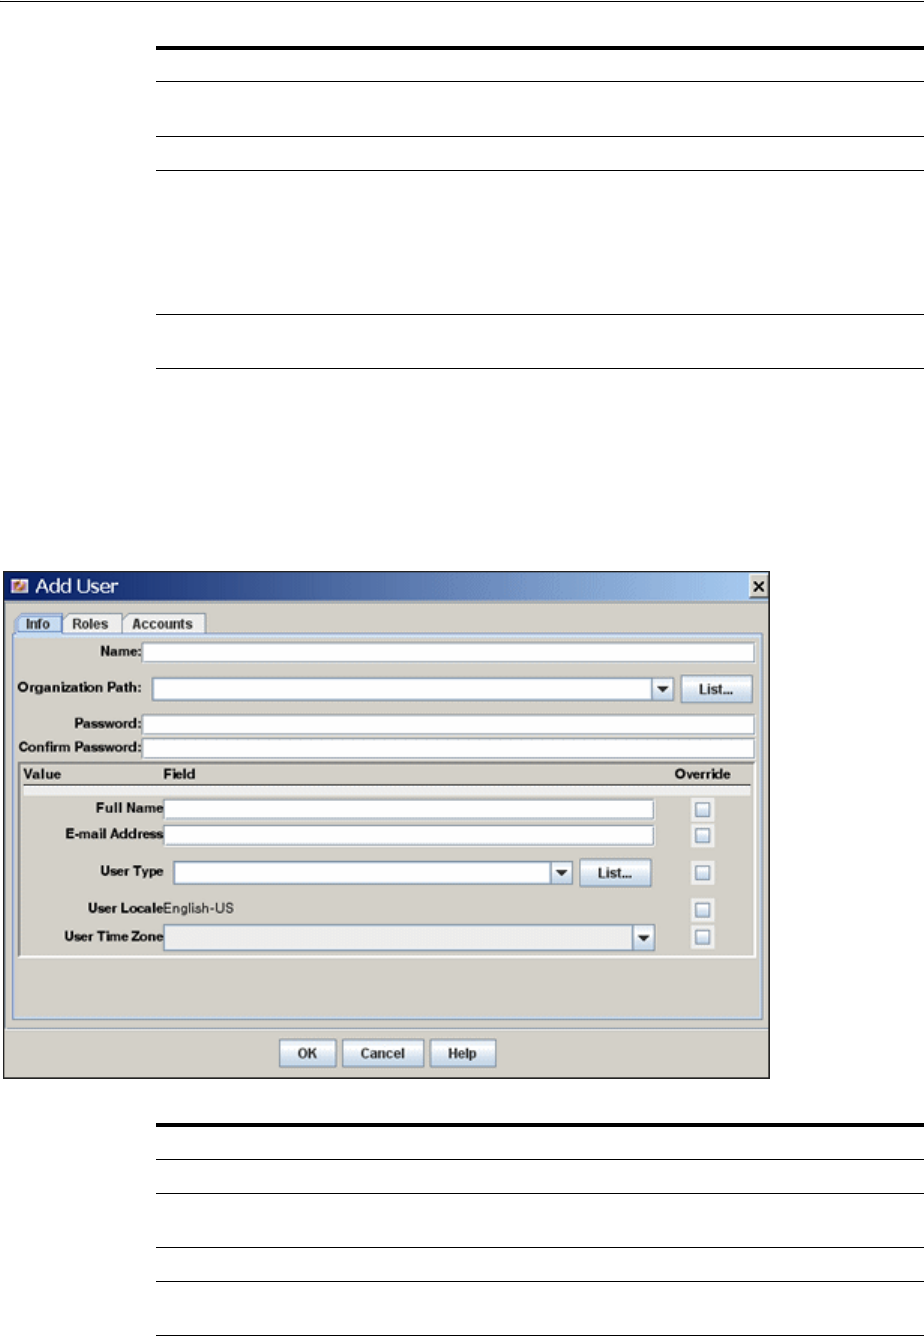
Security and User Access Interface
User Interface A-103
A.2.4.5 Add/Edit User Screen: Info Tab (Global User)
The Info tab of the Add/Edit User screen is used to add a user. To access this tab for a
global user, do one of the following:
■Select Global and click OK on the Choose/Change the Authorization Type Screen.
■Select a global user and click Edit on the User Admin Screen: Users Tab.
User Type list Select a user type from the list of attributes which can be defined by the
system administrator as a way to classify users.
List button Displays the Option List Screen.
User Locale field The user's locale, which specifies the language of the user interface and
date/time format. Locale options must be enabled by the system
administrator.
If you change the user locale for a user who has the sysmanager role, you
must restart the Admin Server service for the Admin Server interface to
appear in the user's locale language.
User Time Zone
field Select a user time zone from the menu.
Element Description
Name field The name of the new user. This field has a 50-character limit.
Organization Path list A list that can be defined by the system administrator as a way of
classifying users.
List button Displays the Option List Screen.
Password field The password for the new user login. This field has a 50-character
limit.
Element Description
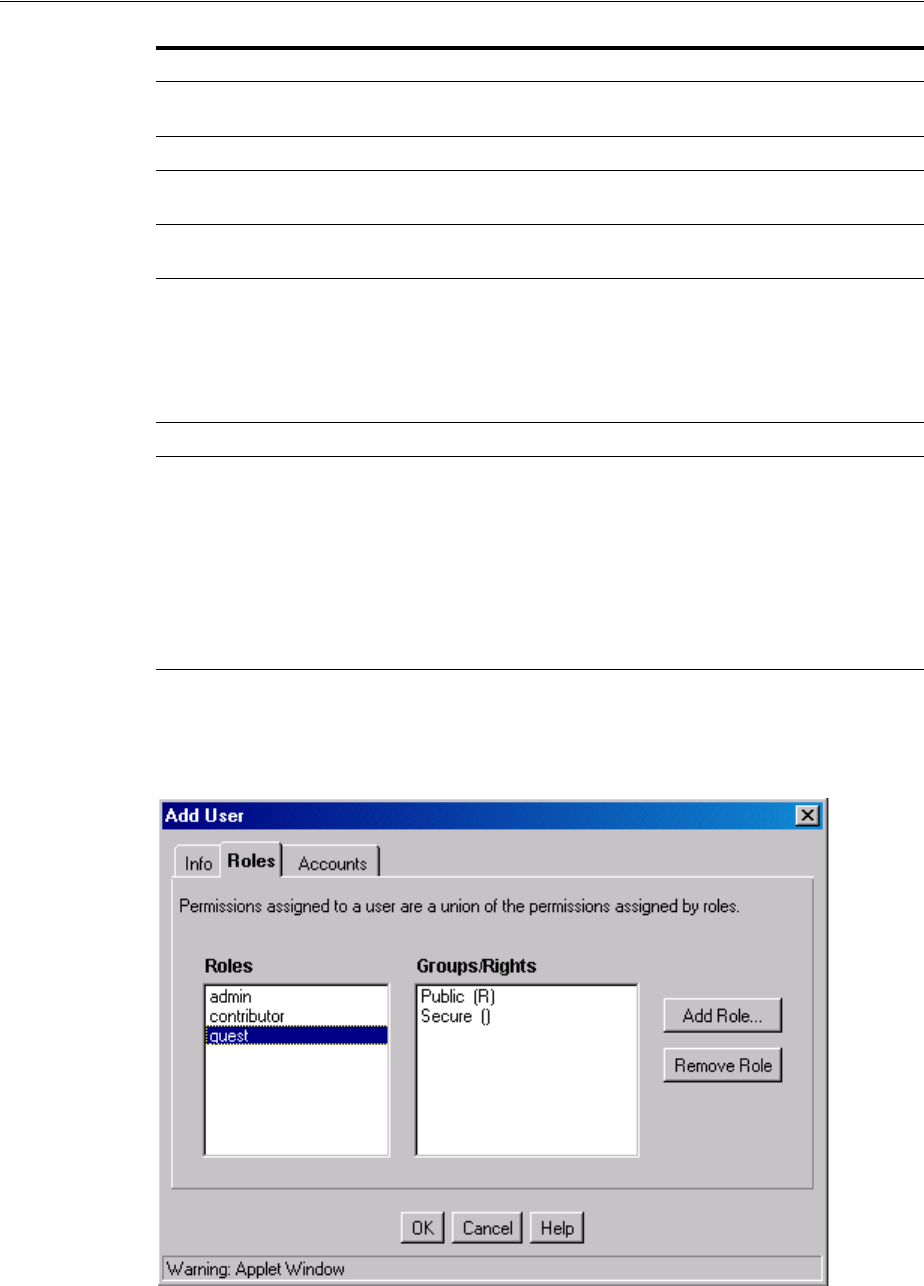
Security and User Access Interface
A-104 Oracle Fusion Middleware System Administrator's Guide for Oracle Content Server
A.2.4.6 Add/Edit User Screen: Roles Tab
The Roles tab of the Add/Edit User screen is used to assign roles to a user. To access
this tab, click Roles on the Add/Edit User Screen.
Confirm Password
field Reenter the password from the previous field to confirm the spelling.
The same limit applies.
Full Name field The entire name of the new user. This field has a 50-character limit.
E-mail Address field The e-mail address associated with the user. This is used for
workflows and subscriptions.
User Type field A list of attributes that can be defined by the system administrator as a
way to classify users.
User Locale field The user's locale, which specifies the language of the user interface
and date/time format. Locale options must be enabled by the system
administrator.
If you change the user locale for a user who has the sysmanager role,
you must restart the Admin Server service for the Admin Server
interface to appear in the user's locale language.
User Time Zone field Select a user time zone from the menu.
Override checkboxes These settings apply only if the user is changed from a global user to
an external user, or if user information is automatically assigned by a
custom plug-in to the Oracle Content Server instance.
Selected: The user information assigned in the Add/Edit User screen
overrides any externally assigned user information (such as user
attributes from an LDAP server).
Unselected: The user information assigned in the Oracle Content
Server instance is overridden by any externally assigned user
information.
Element Description

Security and User Access Interface
User Interface A-105
A.2.4.7 Add Role Screen
The Add Role screen is used to assign a role to a user. To access this screen, click Add
Role on the Add/Edit User Screen: Roles Tab.
A.2.4.8 Add/Edit User Screen: Accounts Tab
The Accounts tab of the Add/Edit User screen is used to assign accounts to a user. To
access this tab, click Accounts on the Add/Edit User Screen.
This tab is available only if accounts are enabled.
Element Description
Roles list These roles are displayed in the Roles field.
Groups/Rights
list Lists the security group permissions associated with the selected role.
Add Role
button Displays the Add Role Screen, on which you can select a role from a
drop-down list.
Remove Role
button Removes the selected role from the user login.
Element Description
Role Name field Select a role from the list to assign to the user.
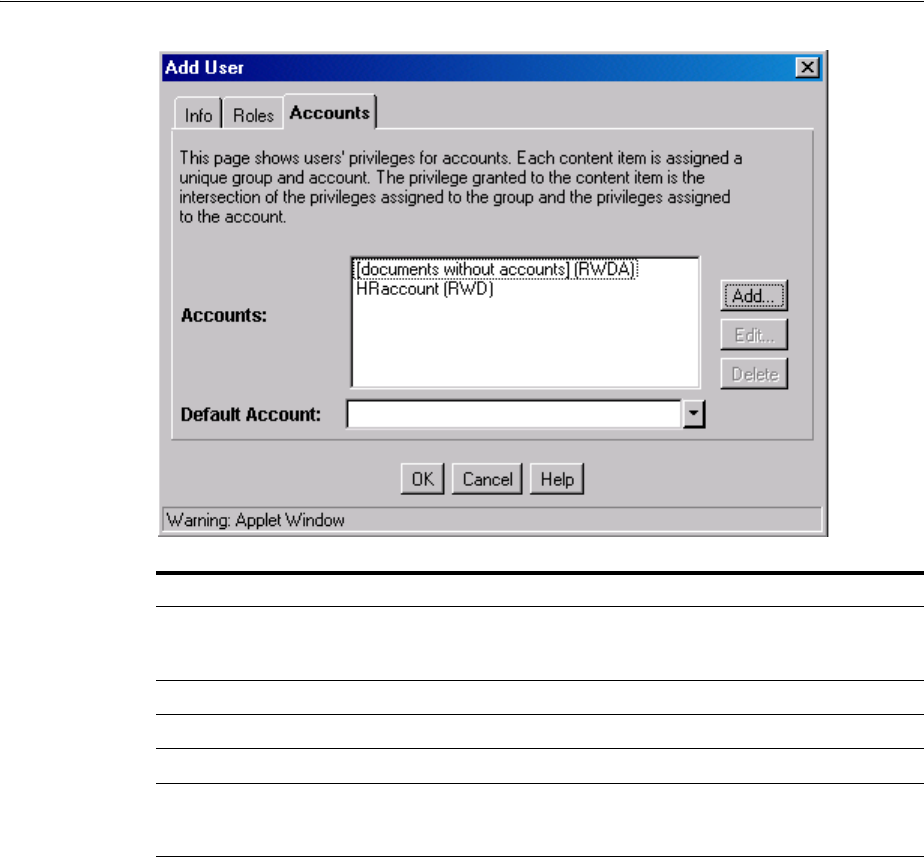
Security and User Access Interface
A-106 Oracle Fusion Middleware System Administrator's Guide for Oracle Content Server
A.2.4.9 Option List Screen
The Option List screen is used to create a list of options that can be used to group
users. This screen can be accessed from a variety of interface locations. For grouping
users, this screen is accessed by using the User Type menu on the Add/Edit User
Screen: Info Tab (Local User) and Add/Edit User Screen: Info Tab (Global User).
These option lists do not have any security functionality in the Oracle Content Server
instance; they are simply a means by which you can group users.
Element Description
Accounts list Lists the accounts that are assigned to this user login. By default, all new
users are assigned Read, Write, Delete, and Admin permission to
documents that are not in an account.
Add button Displays the Add/Edit Account Permissions Screen.
Edit button Displays the Accounts Case Study.
Delete button Enables you to delete a new account.
Default Account
list Select the account that will be entered as the default value on the Content
Check In Form page for this user. All accounts for which the user has at
least RW permission are listed.
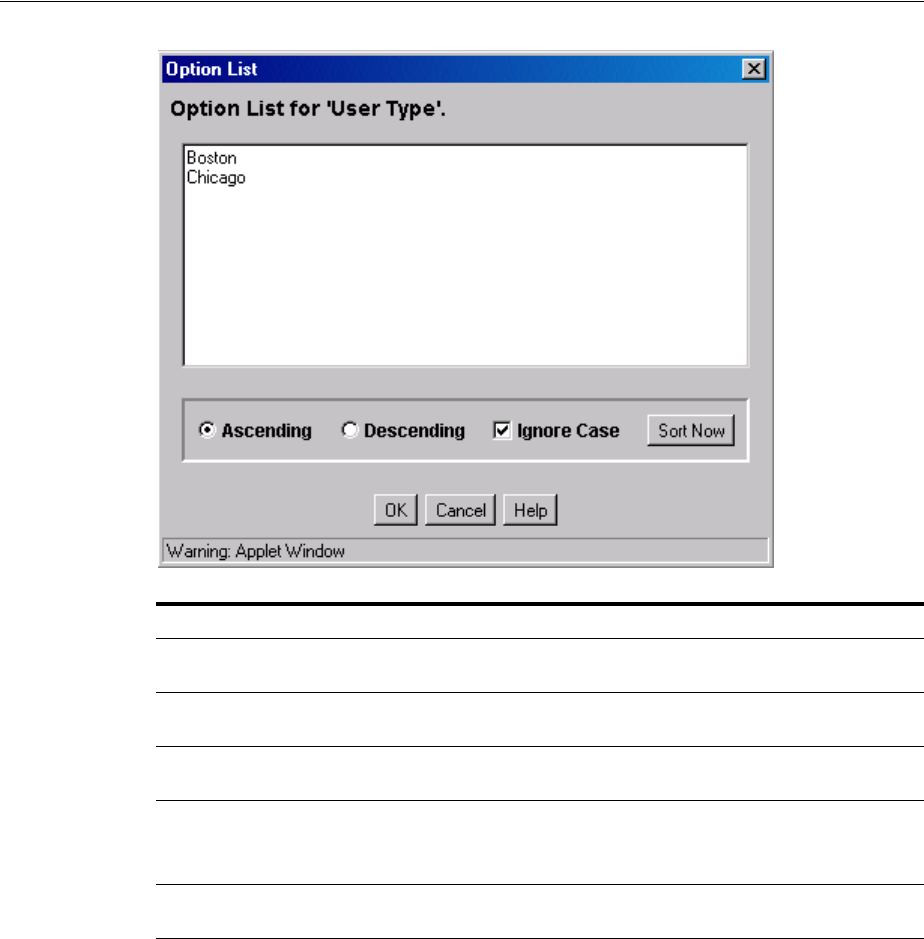
Security and User Access Interface
User Interface A-107
A.2.4.10 User Admin Screen: Aliases Tab
The Aliases tab of the User Admin screen is used to add, edit, and delete aliases. To
access this tab, display the User Admin Screen, and click Aliases.
Element Description
Option list Enter the values that can be selected for the User Type or Organization Path.
Each value must be on a separate line, with a carriage return between values.
Ascending
option Sorts the list in alphabetical order.
Descending
option Sorts the list in reverse alphabetical order.
Ignore Case
checkbox Selected: Sorts the list in alphabetical order, regardless of case.
Unselected: Values that start with uppercase letters are grouped separately
from values that start with lowercase letters.
Sort Now
button Sorts the list in the manner specified by the Ascending, Descending, and Ignore
Case options.
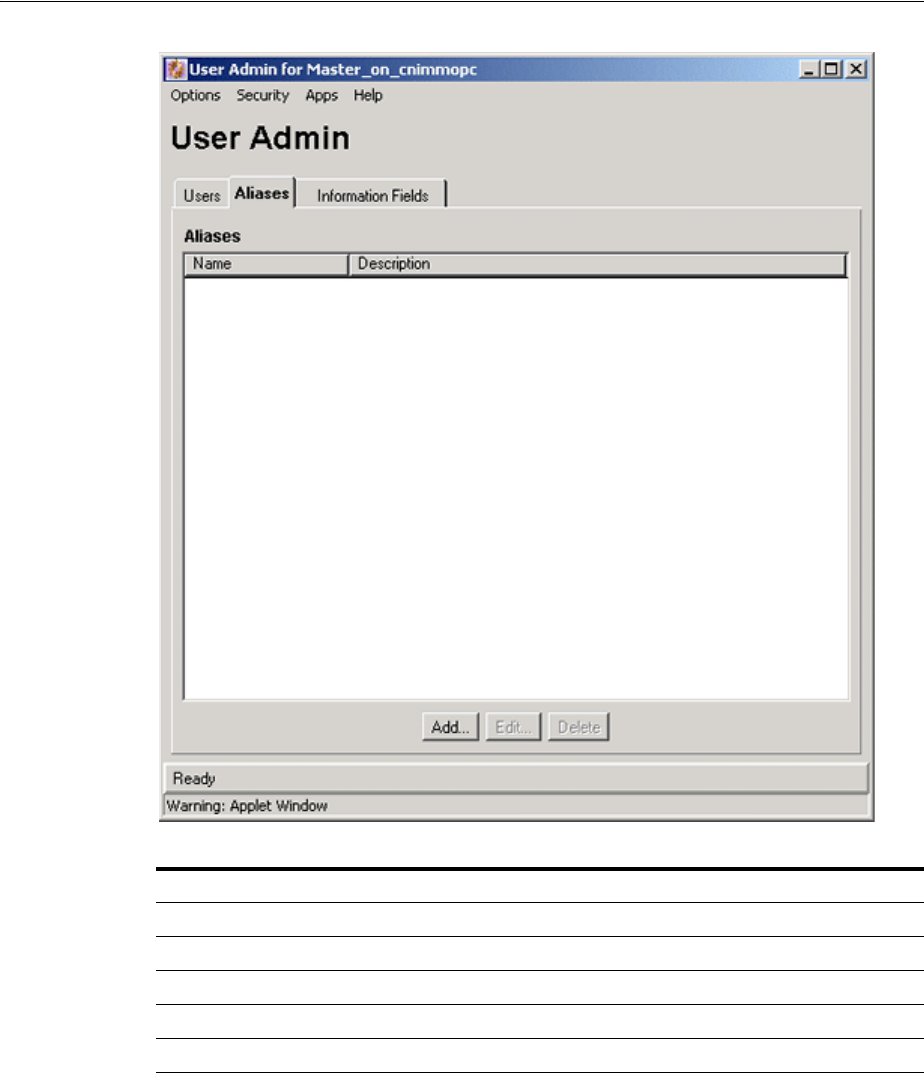
Security and User Access Interface
A-108 Oracle Fusion Middleware System Administrator's Guide for Oracle Content Server
A.2.4.11 Add New Alias/Edit Alias Screen
The Add New Alias/Edit Alias screen is used to add, edit, and delete user logins for
an alias. To access this screen, click Add or Edit on the User Admin Screen: Aliases
Tab.
Element Description
Name column Lists the alias names.
Description column Description of each alias.
Add button Displays the Add New Alias/Edit Alias Screen.
Edit button Displays the Add New Alias/Edit Alias Screen.
Delete button Enables you to delete the selected alias.
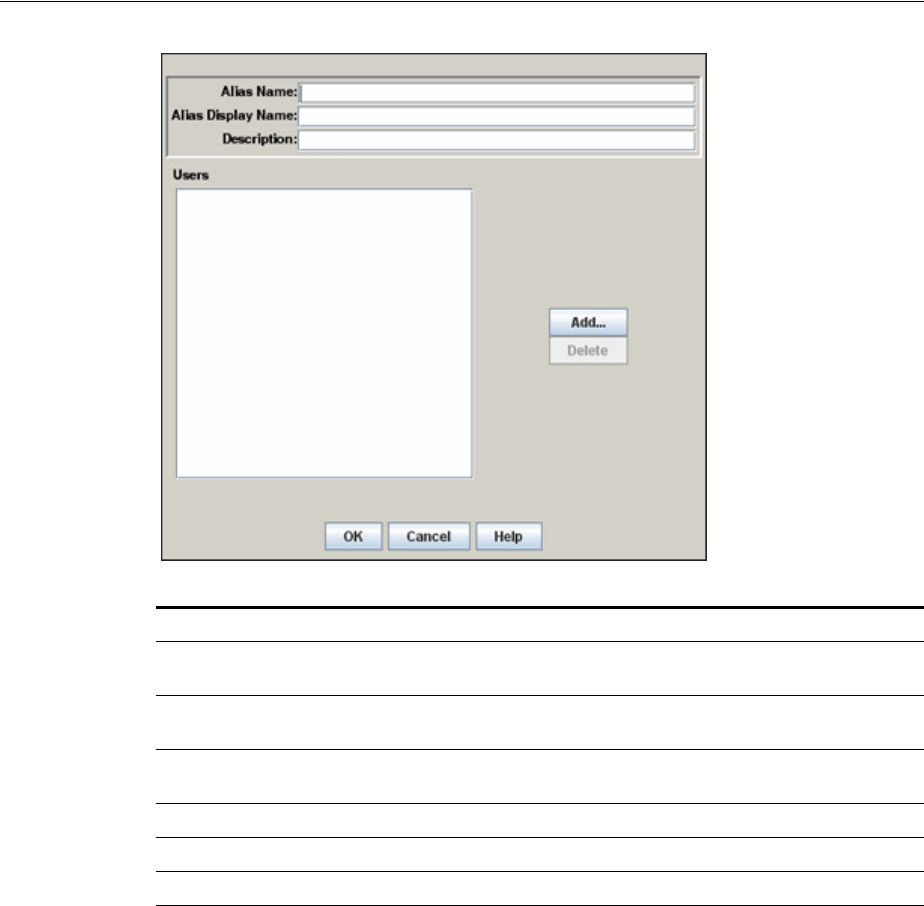
Security and User Access Interface
User Interface A-109
A.2.4.12 Select Users Screen
The Select Users screen is used to add user logins to an alias. To access this screen,
click Add on the Add New Alias/Edit Alias Screen.
Element Description
Alias Name
field The alias name is limited to 30 characters. The following are not allowed:
spaces, tabs, line feeds, returns and ; : ^ ? @ & + " # % < * ~ |
Alias Display
Name field Name of the alias that appears on a display.
Description
field Maximum 80 characters.
Users list Lists the user logins that are included in the alias.
Add button Displays the Select Users Screen.
Delete button Deletes the selected user login from the alias.
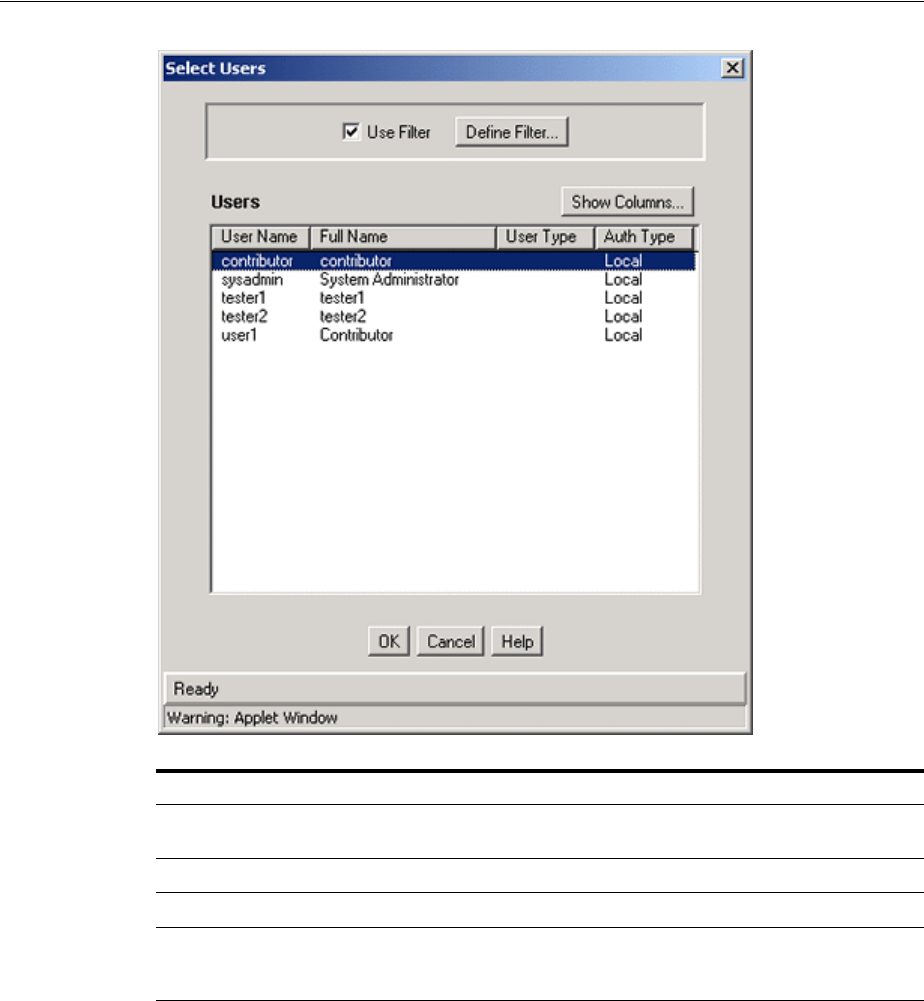
Security and User Access Interface
A-110 Oracle Fusion Middleware System Administrator's Guide for Oracle Content Server
A.2.4.13 Sub-Administration Interface: Edit Rights Screen
The Edit Rights screen is used to assign sub-administration rights to a role. To access
this screen, select a role and click Edit Applet Rights on the Permissions By Role
Screen.
Element Description
Use Filter checkbox Select this checkbox to narrow the Users list as defined by the
Choose/Change the Authorization Type Screen.
Define Filter button Displays the Choose/Change the Authorization Type Screen.
Show Columns button Displays the Show Columns Screen.
Users list Shows the users that match the filter settings. For column
descriptions, see the Choose/Change the Authorization Type
Screen.
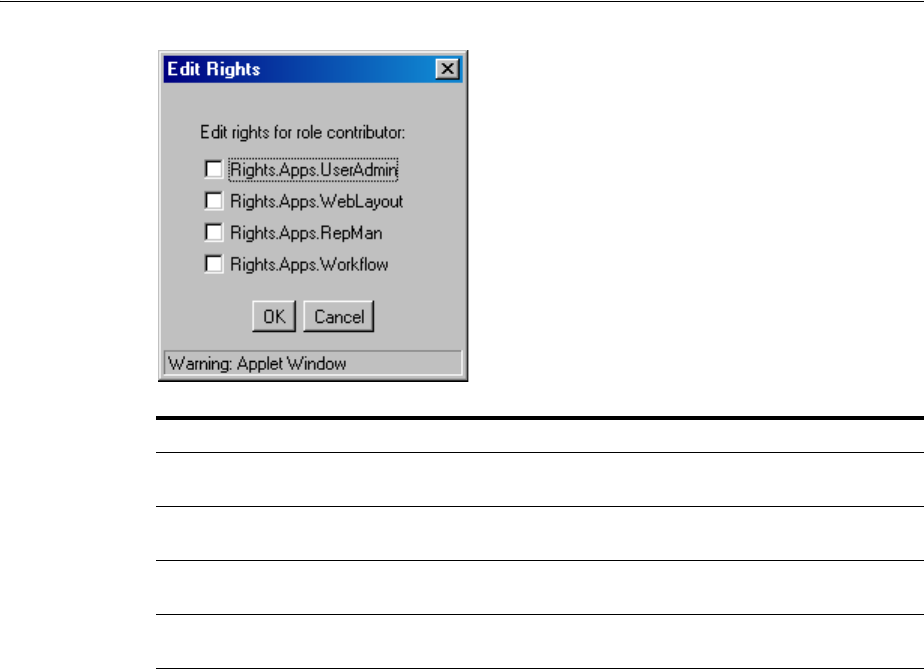
Security and User Access Interface
User Interface A-111
A.2.4.14 User Admin Screen: Information Fields Tab
The Information Fields tab of the User Admin screen is used to add, edit, and delete
user information fields. To access this tab, display the User Admin Screen and click
Information Fields.
■When a field is added in the Information Fields tab, it is also added to the user
information on the Users tab.
■You do not need to rebuild the search index after adding new user fields.
Element Description
Rights.Apps.UserAdmin
checkbox Assigns sub-administration rights to the User Admin
application.
Rights.Apps.WebLayout
checkbox Assigns sub-administration rights to the Web Layout Editor
application.
Rights.Apps.RepMan
checkbox Assigns sub-administration rights to the Repository Manager
application.
Rights.Apps.Workflow
checkbox Assigns sub-administration rights to the Workflow Admin
application.
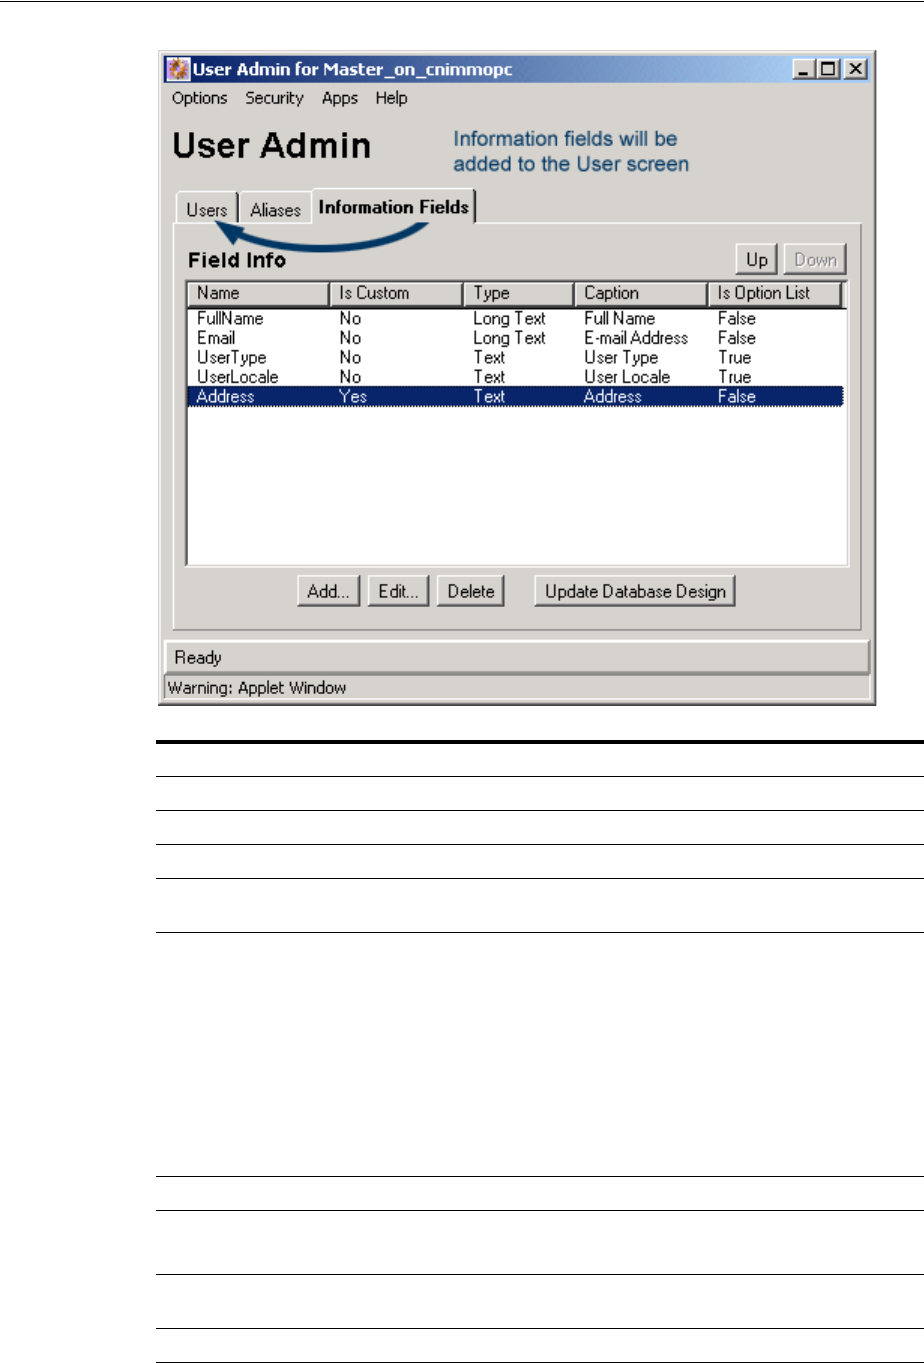
Security and User Access Interface
A-112 Oracle Fusion Middleware System Administrator's Guide for Oracle Content Server
Element Description
Up button Moves the selected user information field up in the list.
Down button Moves the selected user information field down in the list.
Name column The name of the user information field.
Is Custom column No: Indicates a system (predefined) user information field. Yes:
Indicates a custom user information field.
Type column The type of field:
Tex t: 30 characters.
Long Text: 200 characters.
Date: Date format (such as dd/mm/yyyy or dd/mm/yy for the
English-US locale).
Memo: 255 characters.
Integer: -231 to 2 31 (-2 billion to +2 billion). By definition, an
integer is a natural number, so decimal values and commas are not
permitted.
Caption column The field label that appears on Oracle Content Server pages.
Is Option List column False: The user information field does not have an option list.
Tru e: The user information field has an option list.
Add button Displays the Add Metadata Field Name Screen, on which you can
add a new field name.
Edit button Displays the Edit Metadata Field Screen.
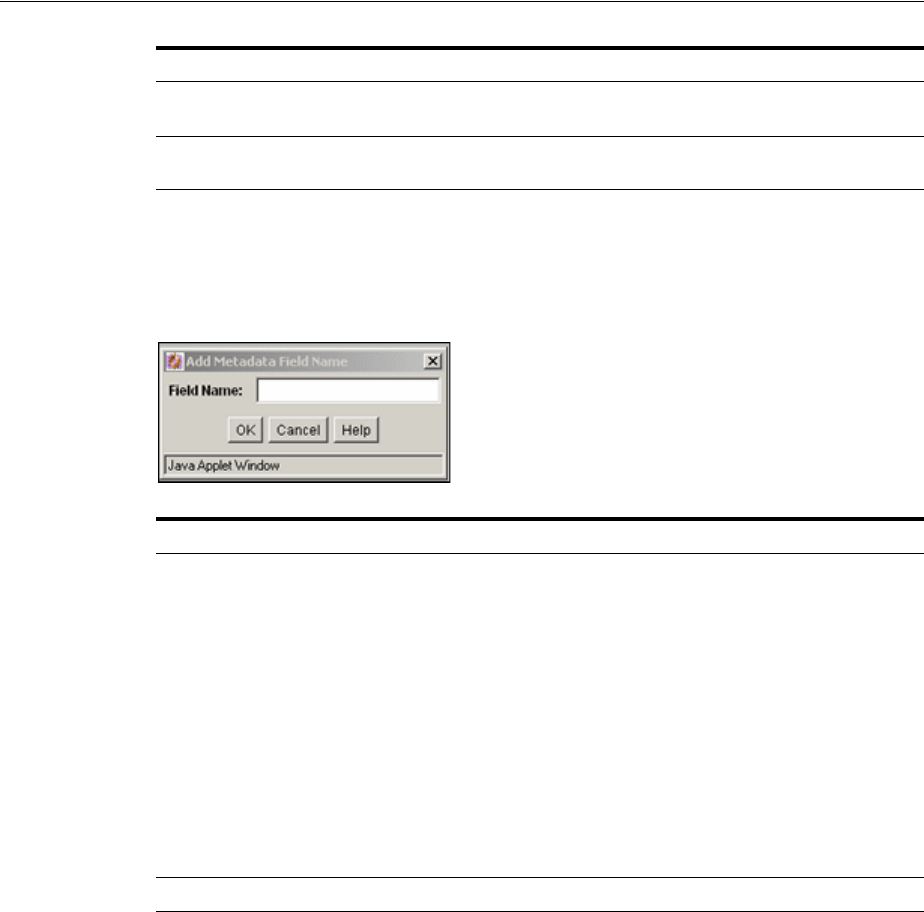
Security and User Access Interface
User Interface A-113
A.2.4.15 Add Metadata Field Name Screen
The Add Metadata Field screen is used to define the name of a custom user
information field. To access this screen, click Add on the User Admin Screen:
Information Fields Tab.
A.2.4.16 Edit Metadata Field Screen
The Edit Metadata Field screen is used to define a user information field. To access this
screen, do one of the following:
■Enter a field name and click OK on the Add Metadata Field Name Screen
■Select a user information field and click Edit on the User Admin Screen:
Information Fields Tab.
Delete button Deletes the selected custom user information field. (System user
information fields cannot be deleted.)
Update Database Design
button Displays the Update Database Design Screen.
Element Description
Field Name
field Duplicate names are not allowed. Maximum field length is 29 characters. The
following are not acceptable: spaces, tabs, line feeds, carriage returns and ; ^ ? :
@ & + " # % < * ~ |
When you add a custom user information field, the system automatically
prefixes the name with a "u" to ensure that it is unique and does not conflict
with any reserved names. However, you must be careful not to inadvertently
use restricted names for columns in the user logins table because they may
conflict with reserved names in databases.
For example, if you try to use "ID" to name a new custom user information field,
the result will be "UID" when the system adds the prefix. This causes an error
because UID is a reserved database name.
Similarly, when you define a custom metadata field, the system automatically
prefixes the name with an "x" to ensure that it is unique and does not conflict
with any reserved names.
OK button Displays the Edit Metadata Field Screen.
Element Description
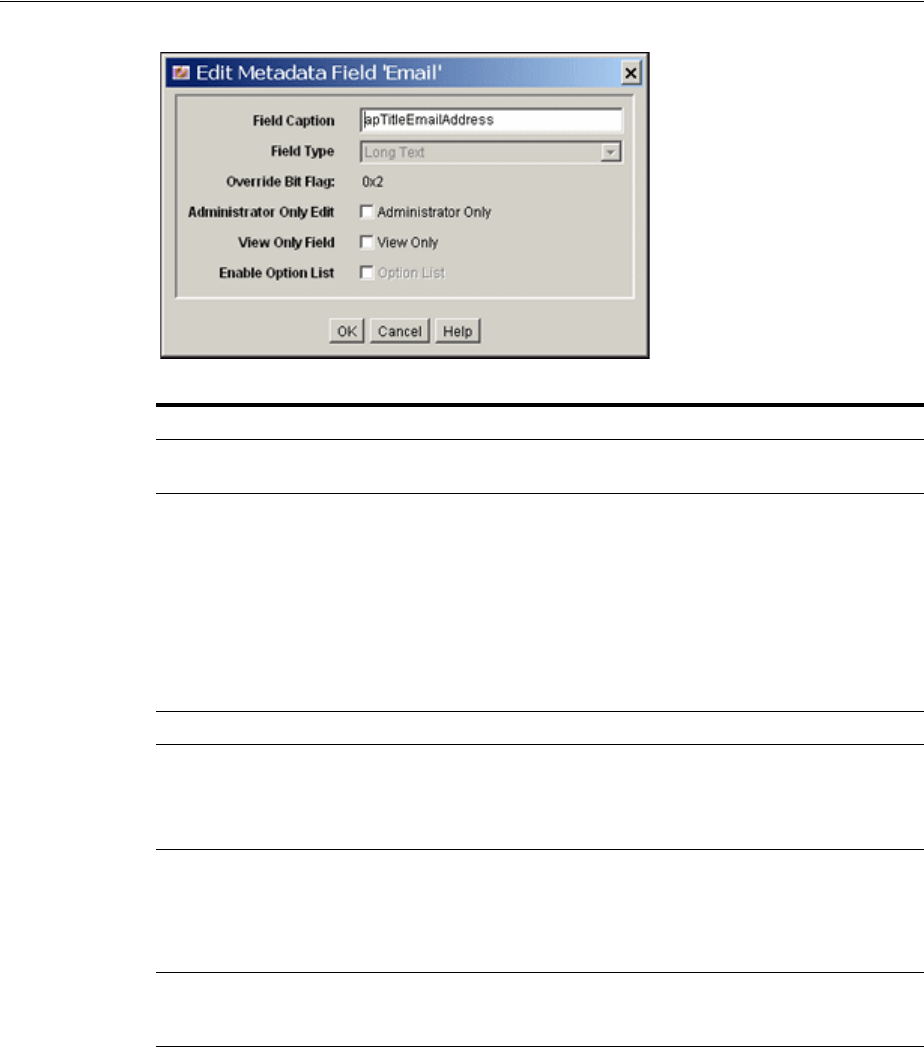
Security and User Access Interface
A-114 Oracle Fusion Middleware System Administrator's Guide for Oracle Content Server
A.2.4.17 Update Database Design Screen
The Update Database Design screen is used to add or delete user information fields in
the Oracle Content Server database. To access this screen, add or delete a user
information field and click Update Database Design on the Edit Metadata Field
Screen.
Element Description
Field Caption field Label for the field that is displayed on Oracle Content Server
pages.
Field Type Text : 30 characters.
Long Text: 100 characters.
Date: Date format (such as dd/mm/yyyy or dd/mm/yy for the
English-US locale).
Memo: 255 characters.
Integer: -231 to 231 (-2 billion to +2 billion). By definition, an
integer is a natural number, so decimal values and commas are
not permitted.
Override Bit Flag For internal use.
Administrator Only Edit
checkbox Selected: The field is not displayed on the User Profile pages.
However, the field is visible to an admin user through the User
Admin applet.
Unselected: The field is displayed on the User Profile page.
View Only Field checkbox Selected: The field is displayed on the User Profile page, but
cannot be edited by the user.
Unselected: If the Administrator Only Edit checkbox is
unselected, the View Only field can be edited by the user on the
User Profile page.
Enable Option List
checkbox If selected, the field has an option list that is defined by the Option
List Type and Option List Key. Values shown in the Information
Fields tab Is Option List are True or False.
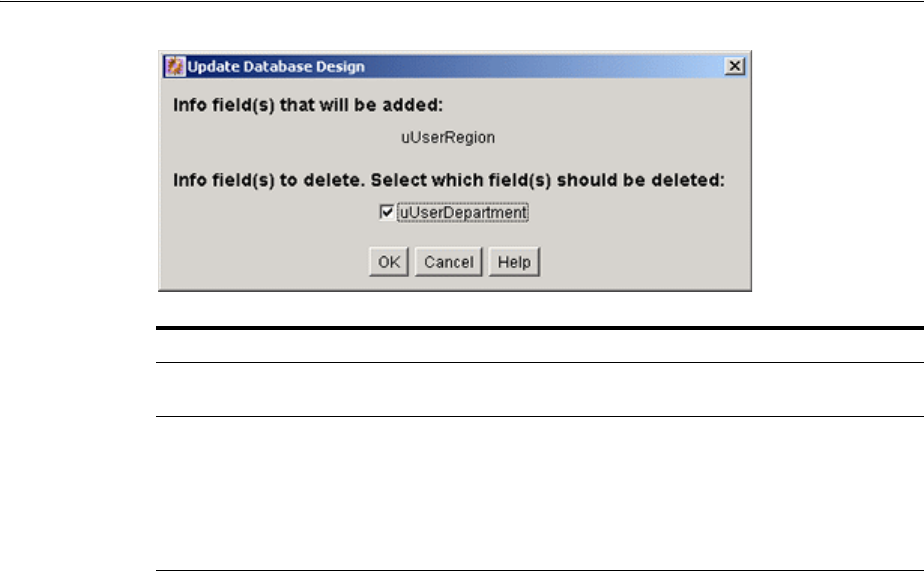
Security and User Access Interface
User Interface A-115
A.2.5 Proxy Connections Interface
The following screens are used when creating proxied connections:
■Section A.2.5.1, "Credential Maps Screen"
■Section A.2.5.2, "Proxied Connection Authentication/Authorization Information
Screen"
A.2.5.1 Credential Maps Screen
The Credential Maps enables administrators to create credentials for specific users that
can be mapped to allow users controlled access between a master Oracle Content
Server instance and a proxy Oracle Content Server instance. To access the page select
Administration in the portal navigation bar, then select Credential Maps.
Element Description
Info field(s) that will be
added Lists the user information fields that were added since the last time
the database was updated.
Info field(s) to delete
checkboxes Lists the user information fields that were deleted since the last time
the database was updated.
Selected: The user information field is deleted from the database.
Unselected: The user information field is not deleted from the
database. The field remains hidden on the User Admin screen and
User Profile pages, but it still exists in the database.
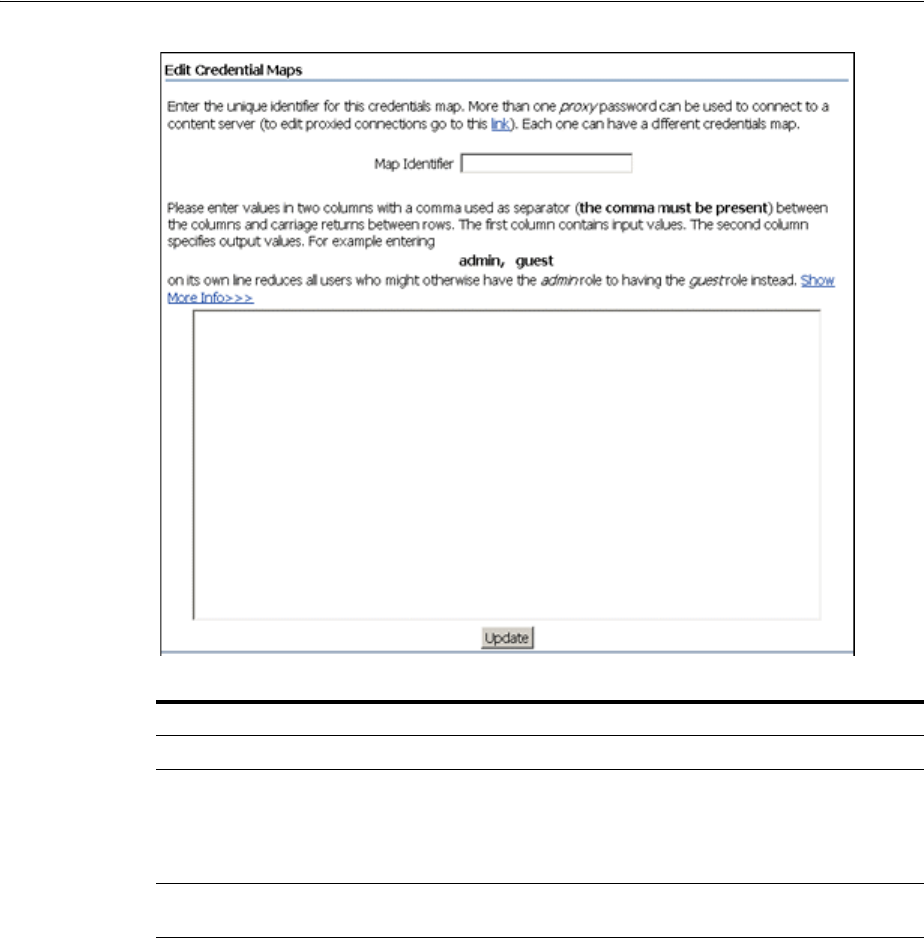
Security and User Access Interface
A-116 Oracle Fusion Middleware System Administrator's Guide for Oracle Content Server
A.2.5.2 Proxied Connection Authentication/Authorization Information Screen
This screen enables administrators to create named passwords, which are passwords
that are assigned to specific proxied connections by name. To access the page, select
the Administration tray in the portal navigation bar, then select Connection
Passwords.
Element Description
Map Identifier field Enter the unique identifier for the credentials map.
Values field Enter the credential values in two columns with a
comma used as a separator between the columns, and a
carriage return between rows. The first column
specifies input values. The second column specifies
output values.
Update button Inputs the credential values specified in the Credential
Maps page.
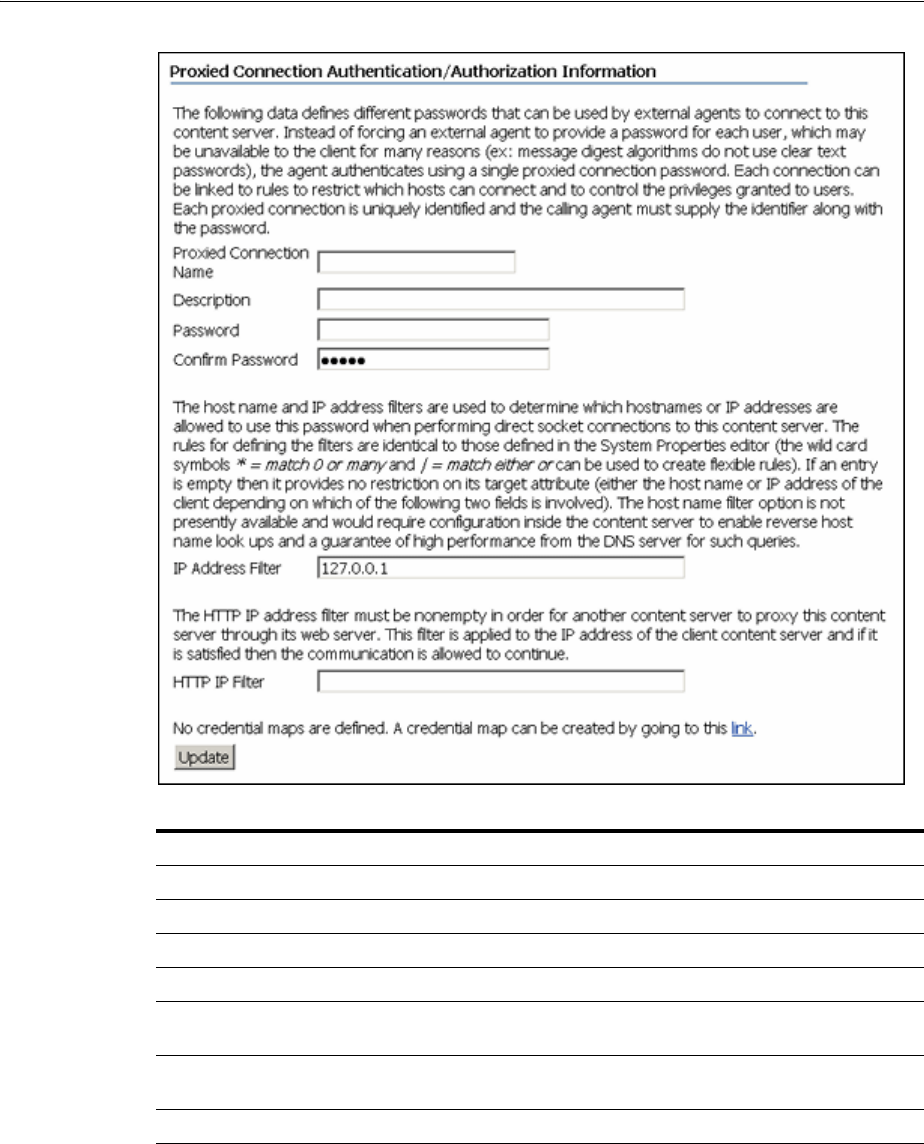
Components Interface
User Interface A-117
A.3 Components Interface
This section provides information about the interface used with Oracle Content Server
components and server features. It contains the following topics:
■Section A.3.1, "Component List Screen"
■Section A.3.2, "Component Wizard Main Screen"
■Section A.3.3, "Component Creation Screens"
Element Description
Proxied Connection Name field Name given to the proxied connection.
Description field Brief description of the proxied connection.
Password field Password assigned to the proxied connection.
Confirm Password field Password assigned to the proxied connection.
IP Address Filter field IP address number of the client Oracle Content Server
instance.
HTTP IP Filter field HTTP IP address filter, applied to the IP address of the
client Oracle Content Server instance.
Update button Updates the page with any modified information.

Components Interface
A-118 Oracle Fusion Middleware System Administrator's Guide for Oracle Content Server
■Section A.3.4, "Build Screens"
■Section A.3.6, "Advanced Component Manager Page"
■Section A.3.5, "Component Manager Page"
To display the Component Wizard:
■(Windows) From the Start menu, click Programs, then Content Server, then
instance_name, then Tools , then Component Wizard.
■(UNIX/Linux) Navigate to the DomainHome/ucm/cs/bin/ directory and run the
ComponentWizard program.
The Component List Screen and the Component Wizard Main Screen are displayed.
A.3.1 Component List Screen
The Component List appears when you first access the Component Wizard. It lists all
currently installed components. To access this screen, either start the Component
Wizard or select Open from Options in the Component Wizard Main Screen.
Element Function
Enable Tag Filtering
checkbox Enables tag filtering for custom components.
Update Filter
button Updates the filter used for tag filtering.
Inclusion Tag Filter
menu Provides a menu of available inclusion tag filters.
Exclusion Tag Filter
menu Provides a menu of available exclusion tag filters.
Custom
Components list Shows the name, status (enabled or disabled), location, and types of the
component definition file for each component that has been installed in
the Oracle Content Server instance.
Add button Displays the Add Component Screen.
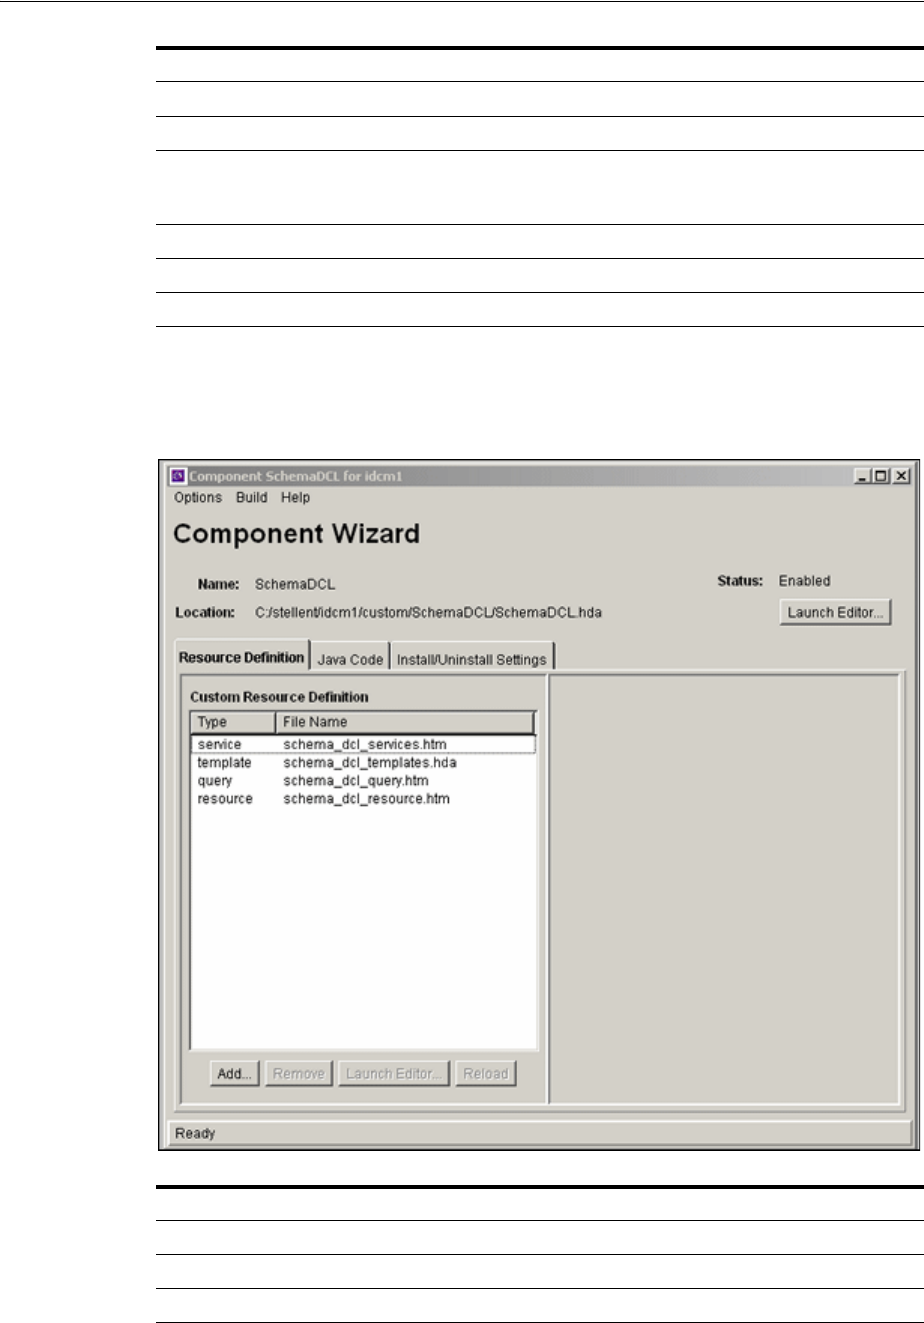
Components Interface
User Interface A-119
A.3.2 Component Wizard Main Screen
The Component Wizard main screen is used to manage Oracle Content Server
components.
Open button Opens the selected component in the Component Wizard.
Install button Displays the Install Screen.
Uninstall button Removes the selected component from the Oracle Content Server
instance. (The component files remain in the file system, but the
component no longer appears on the list of components.)
Enable button Enables the selected component.
Disable button Disables the selected component.
Help button Displays a help page for the Component List screen.
Element Description
Options Menu Provides options for working with components and settings.
Build Menu Used to package component files into a Zip file.
Help Menu Provides links to online documentation.
Element Function

Components Interface
A-120 Oracle Fusion Middleware System Administrator's Guide for Oracle Content Server
A.3.2.1 Options Menu
The Options menu provides options for working with components and settings.
Summary fields Show the name of the component, the location and file name of the
component definition file, and the status of the component (enabled or
disabled).
Launch Editor
button (top right) Displays the component definition file ("glue" file) in the default text
editor.
Resource
Definition tab Lists the custom resource definitions that have been defined for the
component. When a specific custom resource definition is selected, the tab
is extended to display custom HTML includes and custom data includes
for the definition.
Custom Resource
Definition list Lists the custom resource definitions that have been defined for the
component. Each definition is listed by type and file name.
Add button
(Custom Resource
Definition tab)
Displays the Add Resource screen, which is used to add a new resource
file to the component.
Remove button Removes the selected resource from the component.
Launch Editor
button
(Resource
Definition tab)
Displays the selected resource file in the default text editor.
Reload button Reloads the component definition file for the selected resource.
Custom resources
pane Lists the custom parameters for the resource selected in the Custom
Resource Definition list. This pane is different for each type of resource
and can display HTML Includes, Data Includes, custom strings, custom
environment parameters, and able names. Custom resources can be
added, edited, or deleted.
Java Code tab Displays any custom Java code that has been defined for the component.
Install/Uninstall
Settings tab Displays custom installation parameters, including whether the
component has an install or uninstall filter, whether the component has
preference resources, and preference prompts setup. Settings can be
added, edited, or deleted.
Menu Item Description
Add Displays the Add Component Screen.
Open Displays the Component List Screen.
Close Closes the open component.
Install Displays the Install Screen.
Enable Enables the component that is open in the Component Wizard.
Disable Disables the component that is open in the Component Wizard.
Configure Displays the Component Configuration Screen.
Edit Readme File Displays the readme.txt file for the open component in the default text
editor. If a readme.txt file does not exist for the component, a blank
readme.txt file is created.
Set HTML Editor Displays the HTML Editor Configuration screen, which is used to enter
an HTML editor path.
Element Description

Components Interface
User Interface A-121
A.3.2.2 Build Menu
The Build menu is used to package component files into a zip file.
A.3.2.3 Help Menu
This screen provides links to online documentation.
A.3.3 Component Creation Screens
The following screens are used to build custom components:
■Section A.3.3.1, "Add Component Screen"
■Section A.3.3.2, "Install Screen"
■Section A.3.3.3, "Component Configuration Screen"
■Section A.3.3.4, "Add/Edit Action Screen"
■Section A.3.3.5, "Add Screen"
■Section A.3.3.6, "Add Query Table Information Screen"
■Section A.3.3.7, "Add Service Table Information Screen"
■Section A.3.3.8, "Add Dynamic Resource Table Information Screen"
■Section A.3.3.9, "Add Static Resource Table Information Screen"
■Section A.3.3.10, "Add Template Table Information Screen"
■Section A.3.3.11, "Add/Edit HTML Resource Include/String Screen"
■Section A.3.3.12, "Add/Edit Parameter Screen"
■Section A.3.3.13, "Add/Edit Query Screen"
■Section A.3.3.14, "Add Resource Screen"
■Section A.3.3.15, "Resource Selection Dialog Screen"
■Section A.3.3.16, "Add/Edit Service Screen"
■Section A.3.3.17, "Preview Information for Service Screen"
■Section A.3.3.18, "Preview Action Information Screen"
■Section A.3.3.19, "Add/Edit SearchResults Template Screen"
Exit Closes the Component Wizard.
Menu Item Description
Build Settings Displays the Build Settings screen, which is used to specify the settings
used to build a component Zip file.
Build Displays the Build screen, which is used to build a component Zip file.
Menu Item Description
Contents Displays the online help for system administrators.
About Content
Server Displays version, build, and copyright information for the Oracle
Content Server instance.
Menu Item Description
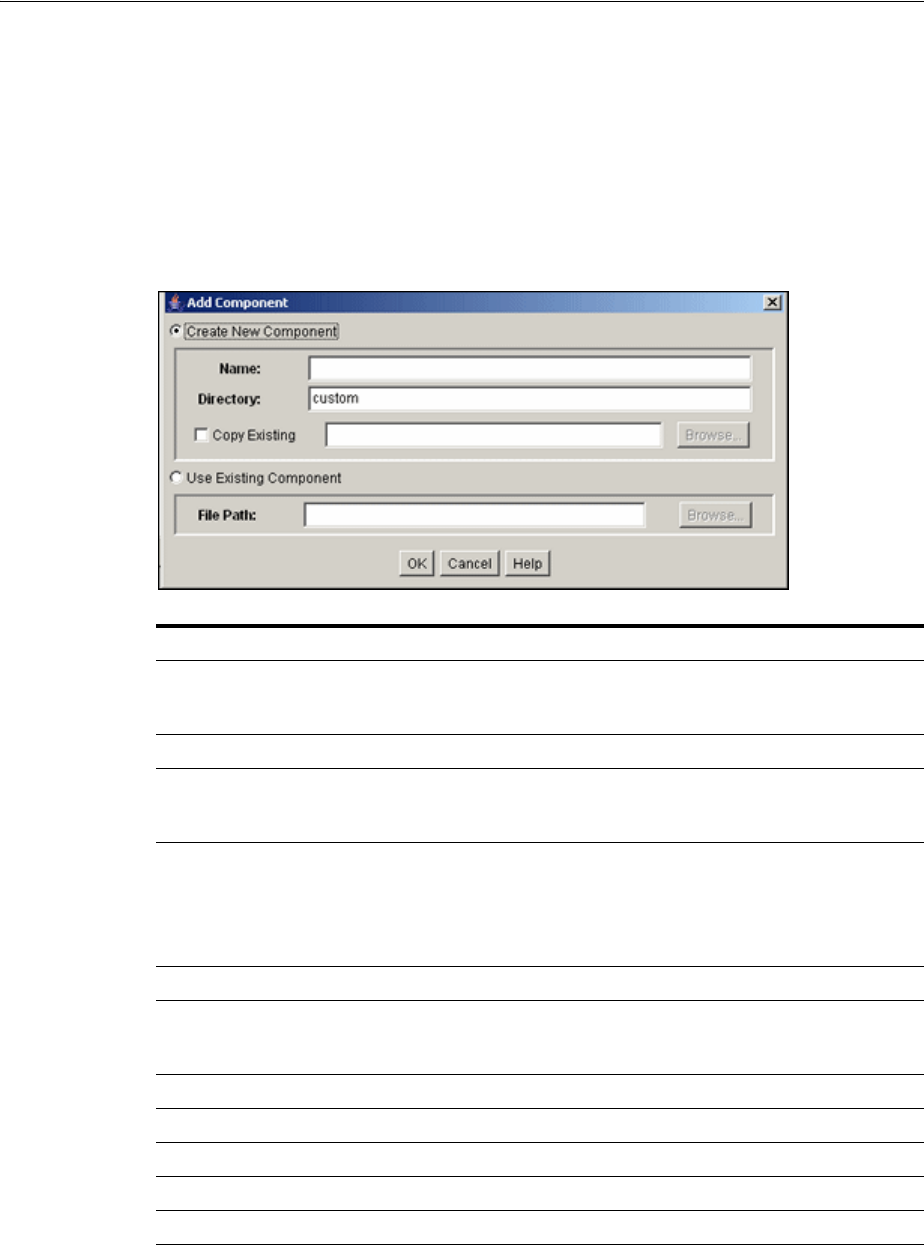
Components Interface
A-122 Oracle Fusion Middleware System Administrator's Guide for Oracle Content Server
■Section A.3.3.20, "Column Information Screen"
■Section A.3.3.21, "Add/Edit Intradoc Template Screen"
■Section A.3.3.22, "Add/Edit Preference Screen"
A.3.3.1 Add Component Screen
The Add Component screen is used to add a new component to the Oracle Content
Server instance. To access this screen, either select Add from Options in Component
Wizard Main Screen or click Add on the Component List Screen.
A.3.3.2 Install Screen
The Install screen is used to install a component zip file on the Oracle Content Server
instance. To access this screen, either select Install from Options in Component
Wizard Main Screen or click Install on the Component List Screen.
Element Function
Create New
Component
option
Select this option to create a custom component in the Oracle Content
Server instance.
Name field Assign a descriptive component name. The name cannot contain spaces.
Directory field Enter the directory where the component definition file will be located,
relative to the Oracle Content Server install directory. Typically, custom
components are located in the custom directory.
Copy Existing
checkbox Selected: The new component will be a copy of an existing component,
including all resources and other component files. Enter the path and file
name of an existing component definition file (.hda). The new component
must have a unique name.
Unselected: The new component will be created without any resource files.
Browse button Used to navigate to and select an existing component definition file.
Use Existing
Component
option
Select this option to add an existing component to the Oracle Content
Server instance.
File Path field The path and file name of the existing component.
Browse button Used to navigate to and select an existing component definition file.
OK button Adds the component to the Oracle Content Server instance.
Cancel button Closes the screen without adding a component.
Help button Displays a help page for the Add Component screen.
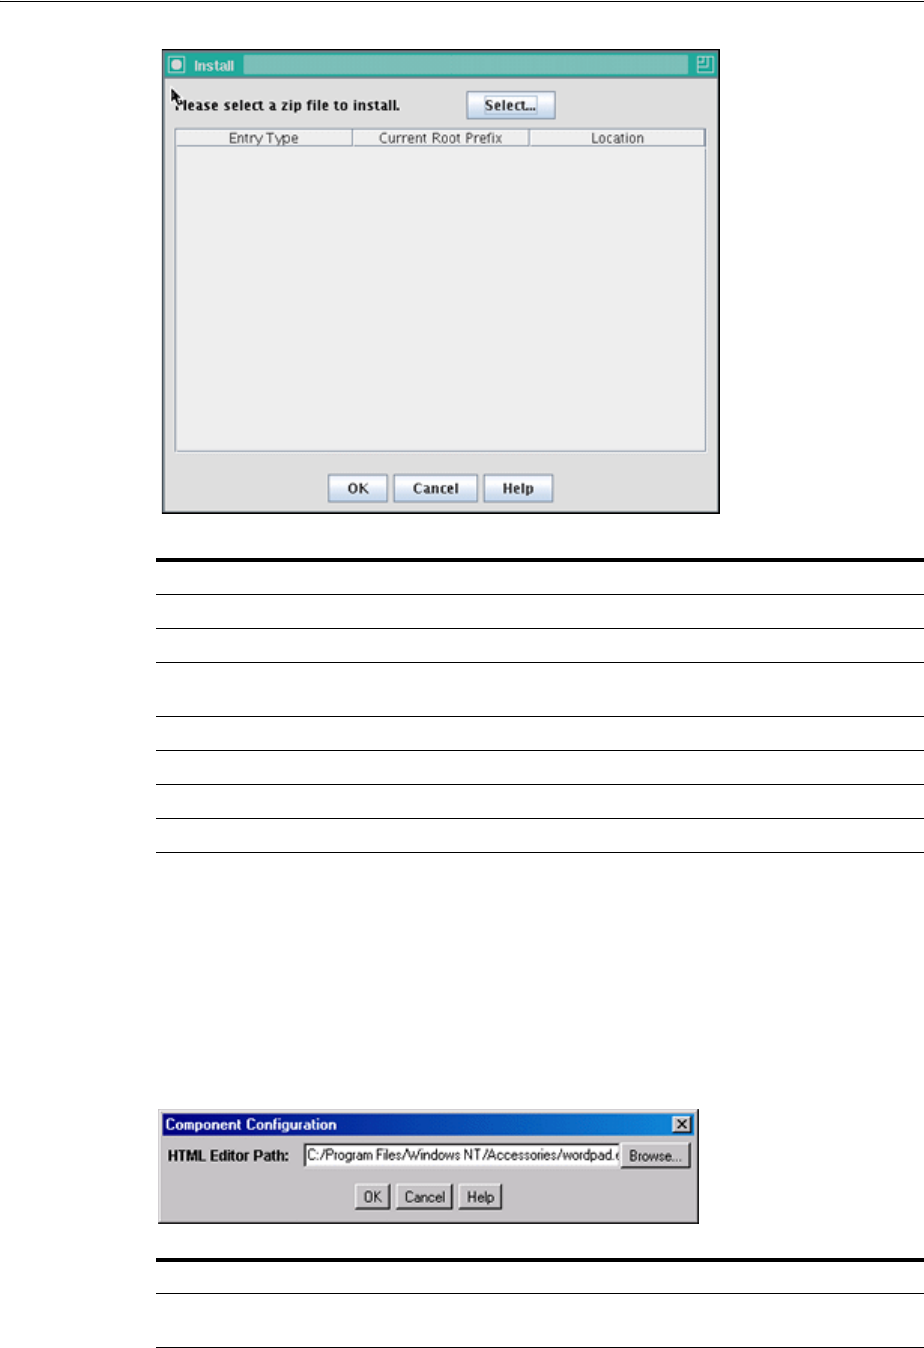
Components Interface
User Interface A-123
A.3.3.3 Component Configuration Screen
The Component Configuration screen is used to specify which program to use to edit
component files from within the Component Wizard. To access this screen, select
Configure from Options in Component Wizard application.
Specify a text editor (such as WordPad) rather than a graphical HTML editor (such as
FrontPage). Graphical editors can insert or change HTML tags and might cause Idoc
Script tags to be converted into a string of characters that are not recognized by the
Oracle Content Server instance.
Element Description
Select button Used to navigate to and select the Zip file to be unpackaged.
Entry Type column Lists the items that are included in the component Zip file.
Current Root Prefix
column The root directory where the related component files will be installed.
Location column The subdirectory or the file name of the component file.
OK button Unpackages the component onto the Oracle Content Server instance.
Cancel button Closes the screen without unpackaging the component.
Help button Displays a help page for the Unpackage screen.
Element Description
HTML Editor Path
field The path and file name of the executable file for the editing program. For
example, c:/Program Files/Windows NT/accessories/wordpad.exe.
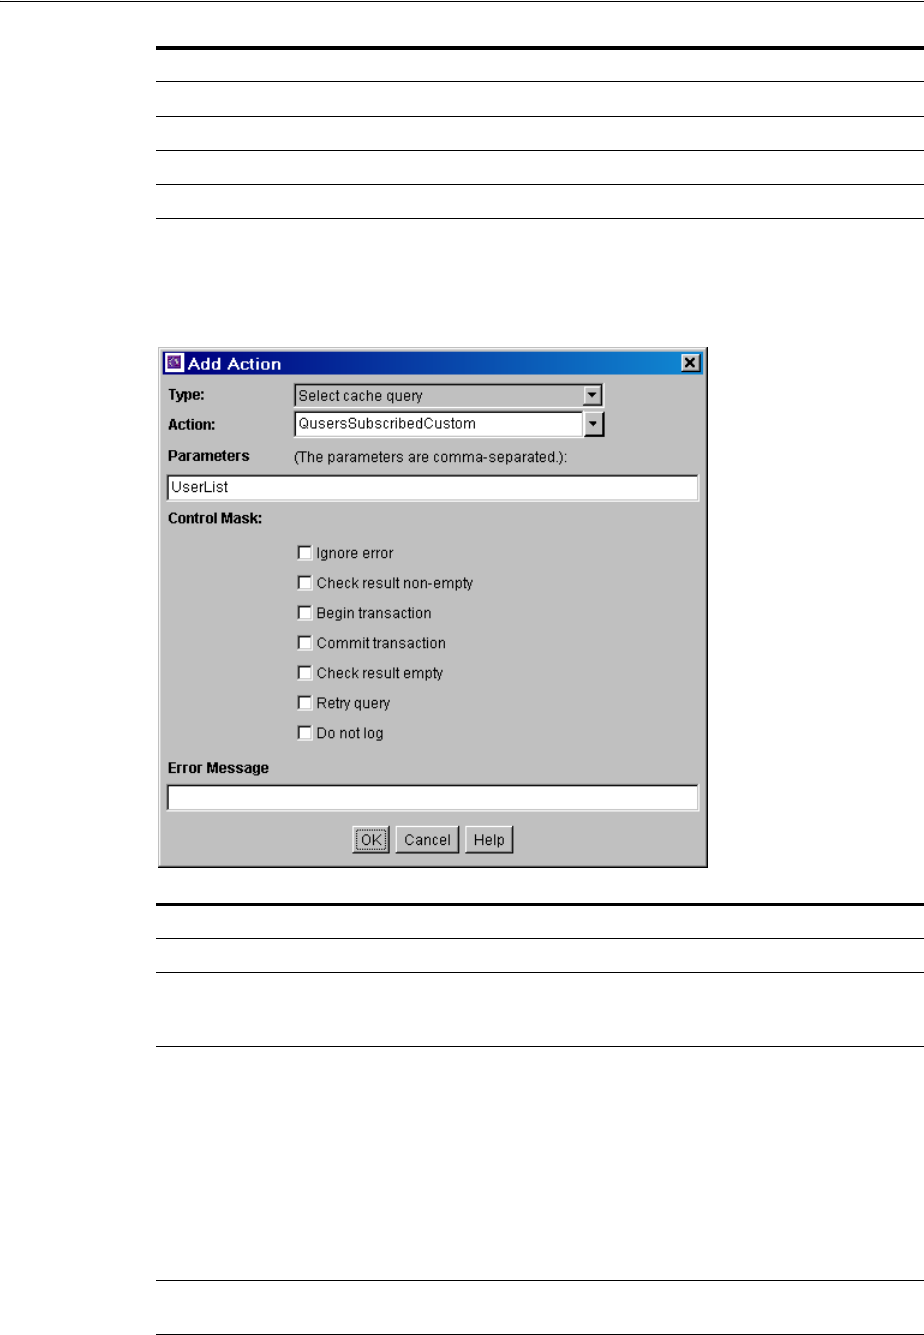
Components Interface
A-124 Oracle Fusion Middleware System Administrator's Guide for Oracle Content Server
A.3.3.4 Add/Edit Action Screen
The Add/Edit Action screen is used to specify the actions that are associated with a
newly defined component service.
Browse button Used to navigate to and select the file.
OK button Sets the specified file as the editing program.
Cancel button Closes the screen without changing the editing program.
Help button Displays a help page for the Component Configuration screen.
Element Description
Type list Select the type of action. See the Predefined Action Types.
Action list Select an action from the list or enter a custom action. The option list shows
the predefined actions that are associated with the option selected from the
Type list.
Parameters field If the action takes parameters, enter the parameters as a comma-delimited
list.
■For the Select Query and Select Cache Query action types, the first
parameter is the name that the action assigns to the ResultSet returned
from the query. This ResultSet can then be referenced in the template
page.
■For the Load Option List action type, the parameters are optional.
However, if parameters are given, the first parameter is the key under
which the option list is loaded, and the second parameter is the
selected value for display on an HTML page.
Control Mask
checkboxes The control mask controls the results of queries to the database.
Element Description

Components Interface
User Interface A-125
A.3.3.4.1 Predefined Action Types The following action types can be specified for a
service:
■Select Query: This action type is used to select a query and then discard it
immediately.
■Execute Query: This action type is used to execute a query.
■Java Method: This action type is used to apply a method that is part of the Java
class implementing the service. The following Java Method actions can be selected
from the Action list:
Error Message
field Enter the error message to be displayed by this action. This action error
message overrides the error message provided as an attribute of the
service.
■If the action error message is not empty, it becomes the active error
message.
■If the action error message is empty, the error message remains
unchanged from the previous action.
OK button Saves the action in the Actions list on the Add/Edit Service screen.
Cancel button Closes the Add/Edit Action screen without creating a service action.
Help button Displays this help page for the Add/Edit Action screen.
Note: For more information on predefined queries, see the query.htm,
workflow.htm, and indexer.htm files in the
IdcHomeDir/resources/core/tables directory.
Java Method Action Description
checkSecurity This method is used for validating security for actions on a
particular document, such as check in, check out, and delete. It
checks the logged in user's security group and account
permissions against the service's access level for performing the
specified action.
Takes zero or one parameter, which is the name of a ResultSet.
createResultSetSQL This method executes a query with parameters taken from the
Data Binder (dataSource and whereClause local data) rather than
from given parameters. It also places the results in the local data
using the ResultSet name found in the Data Binder (resultName).
Takes no parameters.
doSubService This method executes a subservice.
Takes one parameter, which is the name of a subservice.
loadDefaultInfo This method is used for creating checkin and update pages. It first
executes the loadDefaultInfo filter, and then loads environment
information, content types, formats, and accounts.
Takes no parameters.
loadMetaOptionsLists This method first executes the loadMetaOptionsLists filter, and the
loads all options lists referred to in the DocMetaDefinition table.
Takes no parameters.
Element Description

Components Interface
A-126 Oracle Fusion Middleware System Administrator's Guide for Oracle Content Server
■Load Option List: This action type is used to load an option list stored in the
system.
■Select Cache Query: This action type is used to select a query and then cache the
query results.
A.3.3.5 Add Screen
The Add Screen is used during the build process to specify what should be included in
the component zip file.
loadSharedTable This method is used to make a server-cached table available for a
template. Use this method instead of executing a query when the
data is already cached in the server.
Takes two parameters. The first parameter is the name of the table
to look up in the server's cached tables. The second is the name the
table is given when it is added to the data.
loadSharedTableRow This method is used to retrieve cached information, such as data
about a specific user. The value for the key in the request data is
used to find the row in the cached table. The values of the row are
mapped to the local data using the names of the columns as keys.
Takes two parameters. The first parameter is the name of the table
to look up in the server's cached tables. The second parameter is
an argument specifying a column in the database and a lookup
key into the request data.
mapResultSet This method is used to replace a Type 5 action when the service
requires only a part of the first row of a ResultSet to be stored. It
executes the specified query and maps the specified columns of
the first row of the ResultSet to the local data.
Takes at least three parameters. The first parameter is the name of
a select query; the parameters that follow must appear in
comma-delimited pairs. The first member of the pair is the column
name, and the second member is the key that is used to put the
row value into local data.
refreshCache This method performs a refresh on the specified Subjects.
Takes one or more parameters, as a comma-delimited list of
subjects.
renameValues This method assigns the value from one variable to another
variable.
Takes one or more sets of parameters that must appear in
comma-delimited pairs. The first member of a pair is the variable
name that is looked up in the Data Binder, and the second member
is the variable name that stores the found value in the local data.
setConditionVars This method sets condition variables to true (1) or false (0). These
values can be tested only in HTM template pages. They are not
put into local data.
Takes one or more sets of parameters that must appear in
comma-delimited pairs. The first member of a pair is the name of
the condition variable, and the second member is the value (1 or
0).
setLocalValues This method places name/value pairs into the local data.
Takes one or more sets of parameters that must appear in
comma-delimited pairs. The first member of a pair is the variable
name, and the second member is the value.
Java Method Action Description

Components Interface
User Interface A-127
A.3.3.6 Add Query Table Information Screen
The Add Query Table Information screen is used to specify the database table to be
used with a component's query.
Element Description
Entry Type list Select the type of item to be included in the component Zip file. Each
entry type has a default location (Current Root Prefix) that cannot be
changed. The Component Class option ensures that the components and
related files are placed in the 'component' directory.
If your component must work with earlier versions of Oracle Content
Server software (pre-7.0 release), the following Entry Type options are
not compatible: Component Class, Component Library, Bin, Data,
Weblayout, and Resources.
Current Root Prefix
field Shows the directory where the specified files are copied when the
component Zip file is unpackaged.
Sub Directory or
File field Enter the subdirectory that contains the component files of the selected
type, or enter an individual file name. If an individual file is contained in
a subdirectory of the current root prefix, enter the subdirectory along
with the file name. For example, new_custom/new_component.htm.
Make Jar checkbox Selected: A Jar file is created and included in the manifest file. Selecting
this option enables the Include Java Source option.
Unselected: A Jar file is not created.
Include Java Source
checkbox Selected: Source files are included which allows the Java source code to
be shipped with the component. This option is only available if the Make
Jar checkbox is selected.
Unselected: Source files are not included.
OK button Adds the specified item to the component Zip file list.
Cancel button Closes the Add screen without adding an item to the component Zip file
list.
Help button Displays this help page for the Add screen.
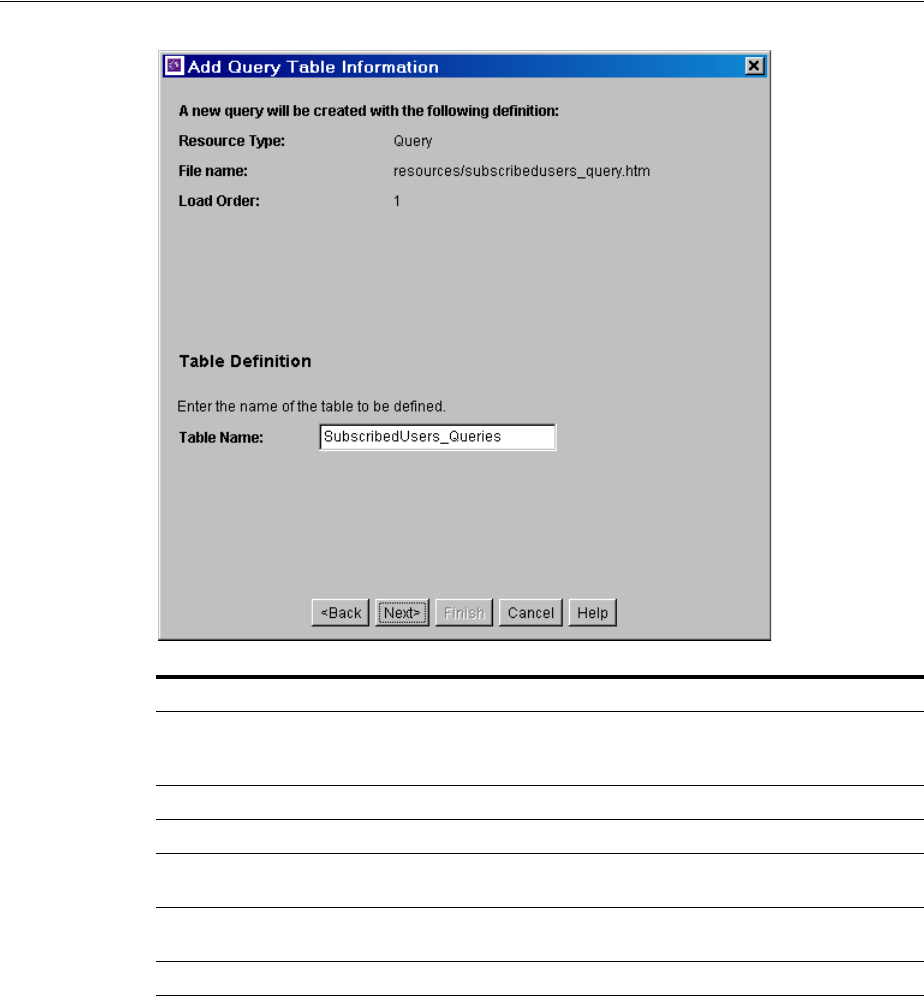
Components Interface
A-128 Oracle Fusion Middleware System Administrator's Guide for Oracle Content Server
A.3.3.7 Add Service Table Information Screen
The Add Service Table Information screen is used to specify the database to be used by
the service in the component.
Element Description
Table Name field Enter the name of the query table that is created for the new resource. The
default is the name of the component followed by an underscore and the
string Queries.
Back button Displays the Add Resource screen.
Next button Displays the Add Query screen.
Finish button Creates the new query resource. This button is unavailable if the minimum
specifications have not been defined for the resource.
Cancel button Closes the Add Query Table Information screen without creating a new
resource.
Help button Displays this help page for the Add Query Table Information screen.
Components Interface
User Interface A-129
A.3.3.8 Add Dynamic Resource Table Information Screen
The Add Dynamic Resource Table Information screen is used to create dynamic tables
to be used in a custom component.
Element Description
Table Name field Enter the name of the service table that is created for the new resource. The
default is the name of the component followed by an underscore and the
string Services.
Back button Displays the Add Resource screen.
Next button Displays the Add Service screen.
Finish button Creates the new service resource. This button is unavailable if the
minimum specifications have not been defined for the resource.
Cancel button Closes the Add Service Table Information screen without creating a new
resource.
Help button Displays this help page for the Add Service Table Information screen.
Components Interface
A-130 Oracle Fusion Middleware System Administrator's Guide for Oracle Content Server
A.3.3.8.1 Predefined Dynamic Tables The following dynamic resource table is predefined
in the Oracle Content Server instance:
A.3.3.9 Add Static Resource Table Information Screen
The Add Static Resource Table Information screen is used to specify a static resource
in your component.
Element Description
Table Name field Enter the name of the dynamic table that is created for the new resource.
The default is the name of the component followed by an underscore.
Merge To
checkbox and
field
Used to create a merge rule for the new dynamic table. Select this checkbox
and either select the target table from the list of Predefined Dynamic Tables
or enter the name of a custom table.
Back button Displays the Add Resource screen.
Next button Inactive (there are no more screens for defining a dynamic resource table).
Finish button Displays the Column Information screen. This button is unavailable if the
minimum specifications have not been defined for the resource.
Cancel button Closes the Add Dynamic Resource Table Information screen without
creating a new resource.
Help button Displays this help page for the Add Dynamic Resource Table Information
screen.
Table Name mergeColumns Description
IgnoredFlexFields templatename,
flexareaname, fields Used to exclude any custom metadata fields
from specific template pages. Wildcards are
supported for both the templatename and
flexareaname columns.
Components Interface
User Interface A-131
A.3.3.9.1 Predefined Static Tables The following static resource tables are predefined in
the Oracle Content Server instance:
Element Description
Table Name field Enter the name of the static table that is created for the new resource. The
default is the name of the component followed by an underscore.
Merge To
checkbox and
field
Creates a merge rule for the new static table. Select this checkbox and either
select the target table from the list of Predefined Static Tables or enter the
name of a custom table.
Back button Displays the Add Resource screen.
Next button Inactive (there are no more screens for defining a static resource table).
Finish button Displays the Column Information screen. This button is unavailable if the
minimum specifications have not been defined for the resource.
Cancel button Closes the Add Static Resource Table Information screen.
Help button Displays this help page for the Add Static Resource Table Information
screen.
Table Name mergeColumns
Table Location (in
IdcHomeDir/resources/
core/tables/) Description
ColumnTranslation column, alias upper_clmns_map.htm Contains uppercase database fields
with their translated field names.
This table is required for databases
that use all uppercase (such as
Oracle).
DataSources name, dataSource,
useMaxRows std_resources.htm Contains the queries that are
executed to create reports in the
Web Layout Editor.

Components Interface
A-132 Oracle Fusion Middleware System Administrator's Guide for Oracle Content Server
A.3.3.10 Add Template Table Information Screen
The Add Template Table Information screen is used to specify the table that will be
accessed for the template used in the component.
IdocScriptExtensions name, class, loadOrder std_resources.htm Contains specializations of the
ScriptExtensionsAdaptor. Used to
create new Idoc Script functions and
variables.
ServiceHandlers serviceName, handler,
searchOrder std_resources.htm Contains specializations of the
ServiceHandler base class. Defines
Java methods for handling service
script Java functions.
SubscriptionTypes type, fields, description std_resources.htm Contains document subscription
types. Default subscription is by
document name. Document criteria
subscriptions can be defined in this
table.
UserMetaDefinition umdName, umdType,
umdCaption,
umdIsOptionList,
umdOptionListType,
umdOptionListKey,
umdIsAdminEdit,
umdOverrideBitFlag
std_resources.htm Contains the definitions of the
auxiliary user metadata fields.
Values for umdOverrideBitFlag
should start at 16 (0x10) or higher.
For a description of the appropriate
contents of these fields, see the
design of the DocMetaDefinition
database table.
Table Name mergeColumns
Table Location (in
IdcHomeDir/resources/
core/tables/) Description
Components Interface
User Interface A-133
A.3.3.10.1 Predefined Template Tables The following template tables are predefined in
the Oracle Content Server instance:
A.3.3.11 Add/Edit HTML Resource Include/String Screen
The Add/Edit HTML Resource Include/String screen is used to specify a customized
HTML resource or a customized string resource in a component.
Element Description
Table Name field Enter the name of the template table that is created for the new resource.
The default is the name of the component followed by an underscore.
Merge Table list Creates a merge rule for the new dynamic table. Select a target table from
the list of Predefined Template Tables.
Back button Displays the Add Resource screen.
Next button Depending on which Merge Table is selected, displays the Add Intradoc
Template screen or Add SearchResults Template screen.
Finish button Creates the new template resource. This button is unavailable if the
minimum specifications have not been defined for the resource.
Cancel button Closes the Add Template Table Information screen without creating a new
resource.
Help button Displays this help page for the Add Template Table Information screen.
Table Name mergeColumns Description
IntradocTemplates name, class,
formtype, filename,
description
This is a ResultSet table that defines the
templates used in the Oracle Content
Server instance.
SearchResultTemplates name, formtype,
filename,
outfilename, flexdata,
description
This table is used to create result
templates in memory for use with results
that are returned from the search engine.
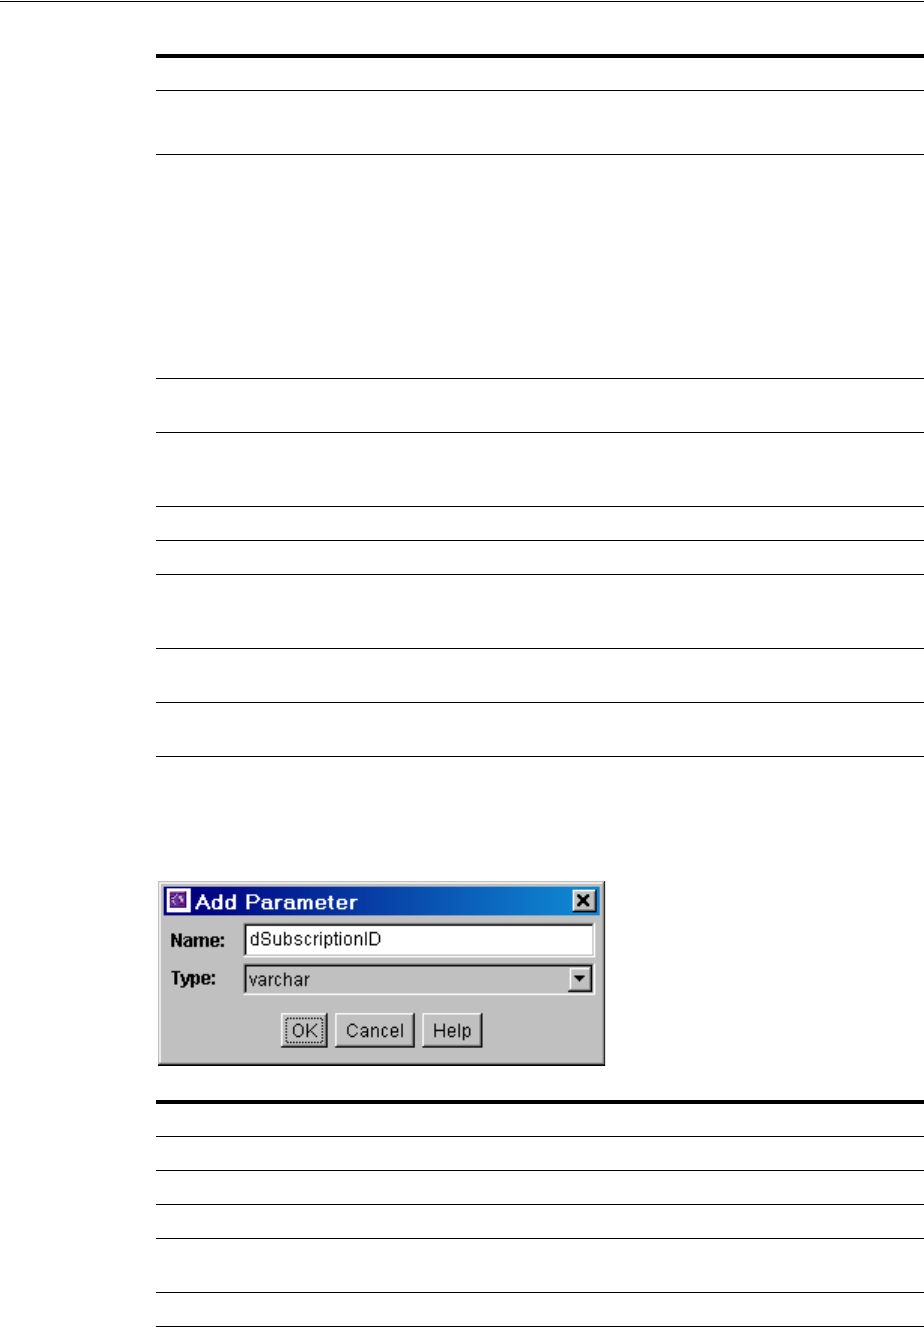
Components Interface
A-134 Oracle Fusion Middleware System Administrator's Guide for Oracle Content Server
A.3.3.12 Add/Edit Parameter Screen
The Add/Edit Parameter screen is used to define the parameters that will be passed to
your defined resources.
Element Description
Resource type
options Include = The resource defines an HTML include.
String = The resource defines a locale-sensitive string.
Name field Enter the name of the include or string that is created, or click Select to start
with a predefined include.
For string names, use the following prefix conventions:
syStringName: System-level messages and errors.
csStringName: Oracle Content Server messages and log messages (this is
the most common type of string).
wwStringName: Strings used on Web pages.
apStringName: Strings used in applets.
Select button Displays the Resource Selection Dialog screen, which lists the predefined
includes. This button is available only when the Include option is selected.
Code field Shows the code for the include or string, which can be edited directly in this
field. If a predefined include is selected, the code is automatically added to
this field.
Back button Displays the Add Resource screen.
Next button Inactive (there are no more screens for defining an include or string).
Finish
button/OK
button
Saves the include or string resource and asks to open the text file for editing.
Cancel button Closes the Add/Edit HTML Resource Include/String screen without saving
the include or string.
Help button Displays this help page for the Add/Edit HTML Resource Include/String
screen.
Element Description
Name field Enter a name for the parameter. A parameter name cannot contain spaces.
Type field Select the type of parameter:
OK button Saves the parameter in the query.
Cancel button Closes the Add/Edit Parameter screen without creating or changing the
parameter.
Help button Displays this help page for the Add/Edit Parameter screen.
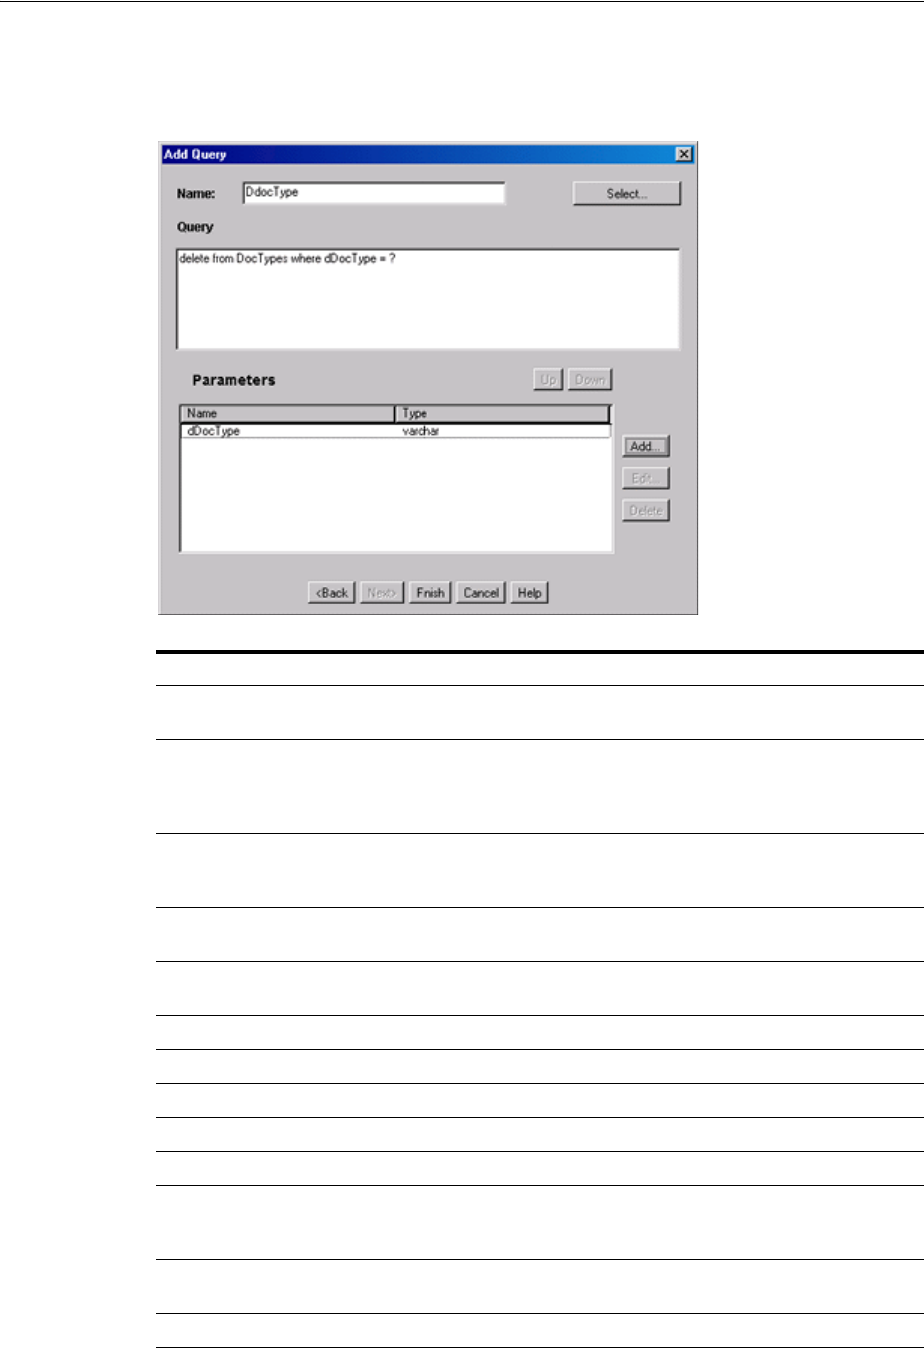
Components Interface
User Interface A-135
A.3.3.13 Add/Edit Query Screen
The Add/Edit Query screen is used to specify the SQL query for the query resource
defined in the component.
Element Description
Name field Enter the name of the query that is created for the resource, or click Select
to start with a predefined query.
Select button Displays the Resource Selection Dialog screen, which lists the predefined
queries. For more information on predefined queries, see the query.htm,
workflow.htm, and indexer.htm files in the
IdcHomeDir/resources/core/tables directory.
Query field Shows the SQL query expression, which can be edited directly in this field.
If an existing query is selected, the query expression is automatically added
to this field.
Parameters list Lists the name and type for each parameter defined for the query.
Parameters must be listed in the order they appear in the query expression.
Up and Down
buttons Move the selected parameter up or down in the Parameters list.
Add button Displays the Add Parameter screen.
Edit button Displays the Edit Parameter screen for the selected parameter.
Delete button Deletes the selected parameter from the Parameters list.
Back button Displays the Add Query Table Information screen.
Next button Inactive (there are no more screens for defining a query).
Finish
button/OK
button
Saves the query in the query resource. The Finish button is unavailable if
the minimum specifications have not been defined for the resource.
Cancel button Closes the Add/Edit Query screen without creating or changing the query
resource.
Help button Displays this help page for the Add/Edit Query screen.
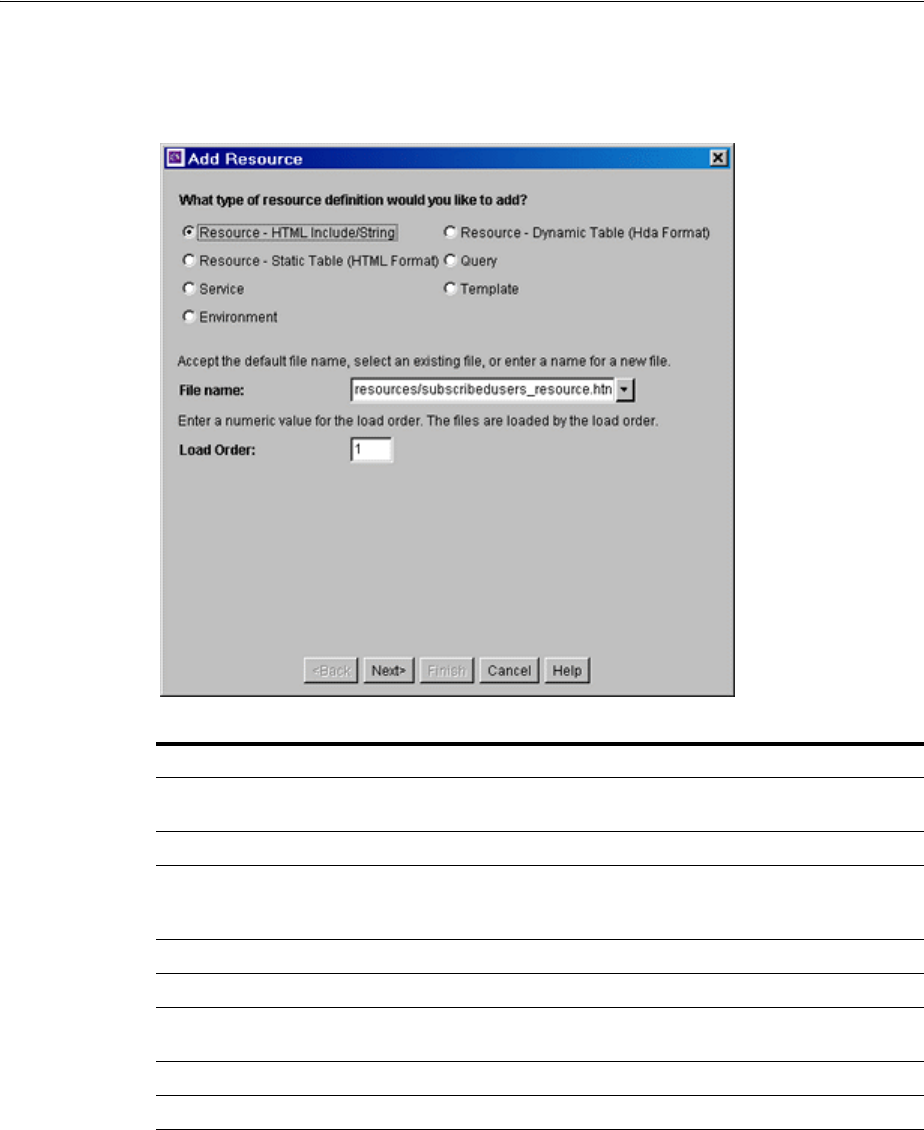
Components Interface
A-136 Oracle Fusion Middleware System Administrator's Guide for Oracle Content Server
A.3.3.14 Add Resource Screen
The Add Resource screen is used to select the type of resource you will use in your
component. It is used to select a variety of resources.
A.3.3.15 Resource Selection Dialog Screen
The Resource Selection Dialog screen is used to select an existing resource for use or to
edit for your component.
Element Description
Resource Type
options Select an option from the Resource Type list.
File Name field Select or enter the path and file name for the new resource.
Load Order field Enter a load order number for the resource. Lower values are loaded
first. Resources that have the same load order number are loaded in the
order they appear in the component definition ("glue") file.
Back button Displays the previous page of the resource definition screens (if any).
Next button Displays the next page of the resource definition screens (if any).
Finish button Creates the new resource. This button is unavailable if the minimum
specifications have not been defined for the resource.
Cancel button Closes the Add Resource screen without creating a new resource.
Help button Displays this help page for the Add Resource screen.
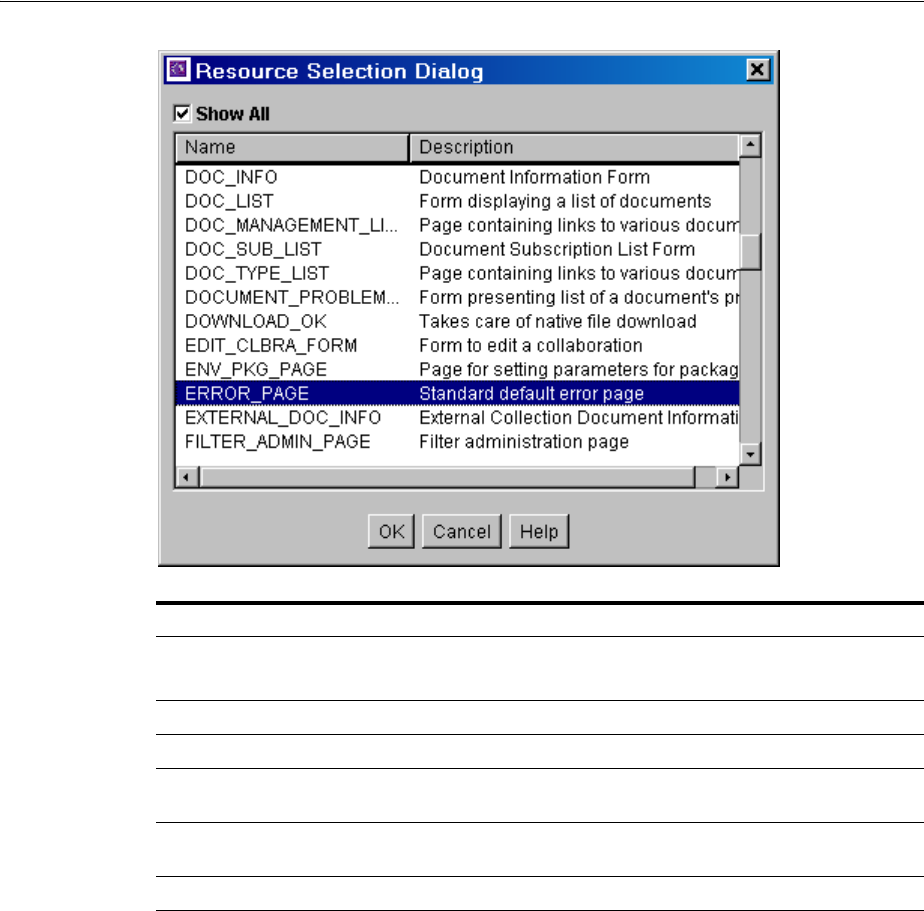
Components Interface
User Interface A-137
A.3.3.16 Add/Edit Service Screen
The Add/Edit Service screen is used to enter the information for the service being
created by the component.
Element Description
Show All checkbox Selected: All predefined items are displayed.
Unselected: The most commonly used predefined items are displayed.
Name column Lists the predefined items.
Description column Describes each predefined item.
OK button Selects the selected option and fills in fields on the associated "Add"
screen.
Cancel button Closes the Resource Selection Dialog screen without selecting a resource
item.
Help button Displays this help page for the Resource Selection Dialog screen.
Components Interface
A-138 Oracle Fusion Middleware System Administrator's Guide for Oracle Content Server
Element Description
Name field Enter the name of the service that is created, or click Select to start with a
predefined service.
Select button Displays the Resource Selection Dialog screen, which lists the predefined
services.
Service Class
field Select a service class from the list or enter a name for a custom service class.
The service class determines what actions can be performed by the service.
There are actions that all services share, while other actions are specific to
the service class.
Template field Select a template to present the results of service. If the results of the
service do not require page presentation, leave this field blank. For
example, the PageHandlerService, which is called from an applet, does not
specify a template page.
Service Type field If the service is to be executed inside another service, select SubService.
Access Level
checkboxes Select one or more checkboxes to assign a user access level to the service.
Subjects Notified
field Enter the Subjects (subsystems) to be notified by the service as a
comma-delimited string. If a service changes one or more subjects, it must
notify the affected subjects of changes. For example, the ADD_USER
service adds a new user to the system and informs the system that the
userlist subject has changed.
Error Message
field Enter the error message to be displayed by this service. This error message
is returned by the service if no action error message overrides it.
The error message can be a plain text string, or it can be a parameter to be
looked up in the language strings (for example,
!csUnableToBuildCheckInForm).
Actions list Lists the name and type for each action defined for the service. Actions are
used to execute an SQL statement, perform a query, run code, cache the
results of a query, or load an option list. The order of the list specifies the
order in which the actions are performed.
Up and Down
buttons Move the selected action up or down in the Actions list.
Add button Displays the Add Action screen.
Edit button Displays the Edit Action screen for the action selected in the Actions list.
Delete button Deletes the selected action from the Actions list.

Components Interface
User Interface A-139
A.3.3.16.1 Subjects Subjects are subsystems within the Oracle Content Server instance.
When a service makes a change (such as add, edit, or delete) to one of the following
subjects, the subject must be notified:
■accounts
■aliases
■collections
■docformats
■doctypes
■documents
■dynamicqueries
■indexerwork
■metadata
■metaoptlists
■subscriptiontypes
■templates
■userlist
■usermetaoptlists
■wfscripts
■wftemplates
■workflows
A.3.3.17 Preview Information for Service Screen
The Preview Information for Service screen is used to view details about a service
before selecting it for use as a service resource. To access this screen, highlight a
service on the Add/Edit Service Screen and click Preview.
To view details about the actions used in the service, highlight an action and click
Preview. The Preview Action Information Screen is displayed.
When you finish viewing service information, click Close.
For complete information about services and actions, see the Oracle Fusion Middleware
Services Reference Guide for Oracle Universal Content Management.
Back button Displays the Add Service Table Information screen.
Next button Inactive (there are no more screens for defining a service).
Finish
button/OK
button
Saves the service in the service resource. The Finish button is unavailable if
the minimum specifications have not been defined for the resource.
Cancel button Closes the Add/Edit Service screen without creating or changing the
service.
Help button Displays this help page for the Add/Edit Service screen.
Element Description

Components Interface
A-140 Oracle Fusion Middleware System Administrator's Guide for Oracle Content Server
A.3.3.18 Preview Action Information Screen
The Preview Action Information screen is used to view the details of service actions.
To access this screen, highlight an action on the Preview Information for Service Screen
and click Preview. When done viewing action details, click Close.
For complete information about services and actions, see the Oracle Fusion Middleware
Services Reference Guide for Oracle Universal Content Management.
A.3.3.19 Add/Edit SearchResults Template Screen
The Add/Edit SearchResults Template screen is used to find a template to use for your
component.
Components Interface
User Interface A-141
Element Description
Name field Enter the name of the template that is created for the resource, or click
Select to start with a predefined template.
Select button Displays the Resource Selection Dialog screen, which lists the predefined
StandardResults template.
Copy From
checkbox and
field
Selected: The new template resource will be a copy of an existing template.
Enter the complete path and file name of the existing template file (.htm).
Unselected: A new template resource file is created.
Browse button Used to navigate to and select the desired template file.
View button Displays the template file in a read-only text window.
Form Type field Select the template form type, which is the specific type of functionality the
page is trying to achieve.
File name field The file name of the template resource. This can be either an absolute path
or a relative path, relative to the location of the component_template.hda
resource file.
Out File Name
field For future use. Leave this field blank.
Flex Data field Defines the metadata to be displayed for each row on the search results
page.
Description field Enter a description of the template file.
Back button Displays the Add Template Table Information screen.
Next button Inactive (there are no more screens for defining a template).
Finish
button/OK
button
Saves the template file in the template resource. The Finish button is
unavailable if the minimum specifications have not been defined for the
resource.
Cancel button Closes the Add/Edit SearchResults Template screen without creating or
changing the template resource.
Help button Displays this help page for the Add/Edit SearchResults Template screen.
Components Interface
A-142 Oracle Fusion Middleware System Administrator's Guide for Oracle Content Server
A.3.3.20 Column Information Screen
The Column Information screen appears only when you create a new table. To edit the
table, you must open the file in a text editor.
A.3.3.21 Add/Edit Intradoc Template Screen
The Add/Edit Intradoc Template screen is used to begin building a template for your
component.
Element Description
Column Name
field Enter a column name to be added to the bottom of the Columns list.
Insert button Adds the Column Name entry to the bottom of the Columns list.
Delete button Deletes the column selected in the Columns list.
Columns list Lists the columns that are defined for the table.
OK button Saves the column list.
Cancel button Closes the Column Information screen without saving the column list.
Help button Displays this help page for the Column Information screen.

Components Interface
User Interface A-143
A.3.3.22 Add/Edit Preference Screen
The Add/Edit Preference screen is used to specify custom installation parameters.
Element Description
Name field Enter the name of the template that is created for the resource, or click
Select to start with a predefined template.
The unique template name is how the template is referenced in the Oracle
Content Server CGI URLs and in code. When merging custom template file
entries into the Templates table, the Name is used as the merge key.
Select button Displays the Resource Selection Dialog screen, which lists the predefined
templates.
Copy From
checkbox and
field
Selected: The new template resource will be a copy of an existing template.
Enter the complete path and file name of the existing template file (.htm).
Unselected: A new template resource file is created.
Browse button Used to navigate to and select the desired template file.
View button Displays the template file in a read-only text window.
Class field Select the template class type, which is the general category of the template.
The template class is not used for standard Oracle Content Server
functionality, but it can be used in a component to create functions specific
to a particular class of templates.
Form Type field Select the template form type, which is the specific type of functionality the
page is trying to achieve.
File name field The file name of the template resource. This can be either an absolute path
or a relative path, relative to the location of the component_template.hda
resource file.
Description field Enter a description of the template file.
Back button Displays the Add Template Table Information screen.
Next button Inactive (there are no more screens for defining a template).
Finish
button/OK
button
Saves the template file in the template resource. The Finish button is
unavailable if the minimum specifications have not been defined for the
resource.
Cancel button Closes the Add/Edit Intradoc Template screen without creating or
changing the template resource.
Help button Displays this help page for the Add/Edit Intradoc Template screen.
Components Interface
A-144 Oracle Fusion Middleware System Administrator's Guide for Oracle Content Server
Element Description
Name field Name of the custom installation parameter.
Label field Label for the parameter.
Message Type
field Select a message type.
Prompt Type
field Select the prompt type. This field is only enabled if Prompt is selected as
the Message Type.
Option List
Name field Enter the result set name from the Oracle Content Server instance. This
field is enabled when Option List is selected in the Prompt Type field.
Option List
Display Column
field
Enter the field name from the result set specified in the Option List Name
field. This field is used for building a choice list. This field is enabled when
Option List is selected in the Prompt Type field.
Message field Enter the prompt or message text or, preferably, enter the key associated
with the prompt or message (created using the code template file
corresponding to the Has Install Strings checkbox on the Install/Uninstall
Settings tab). Entering the key references the installation strings file to
obtain the actual text (which can be edited for localization requirements).
Default Value
field Enter the default value for the prompt.
Always Use
Default Value On
Install checkbox
Selected: Always uses the entered default value when component is
installed.
Unselected: Does not use the default value when component is installed.
Is Disabled
checkbox Selected: The installation parameter configuration is disabled.
Unselected: The installation parameter configuration is enabled.
OK button Adds the installation parameter to the component.
Cancel button Closes the screen without adding the installation parameter to the
component.
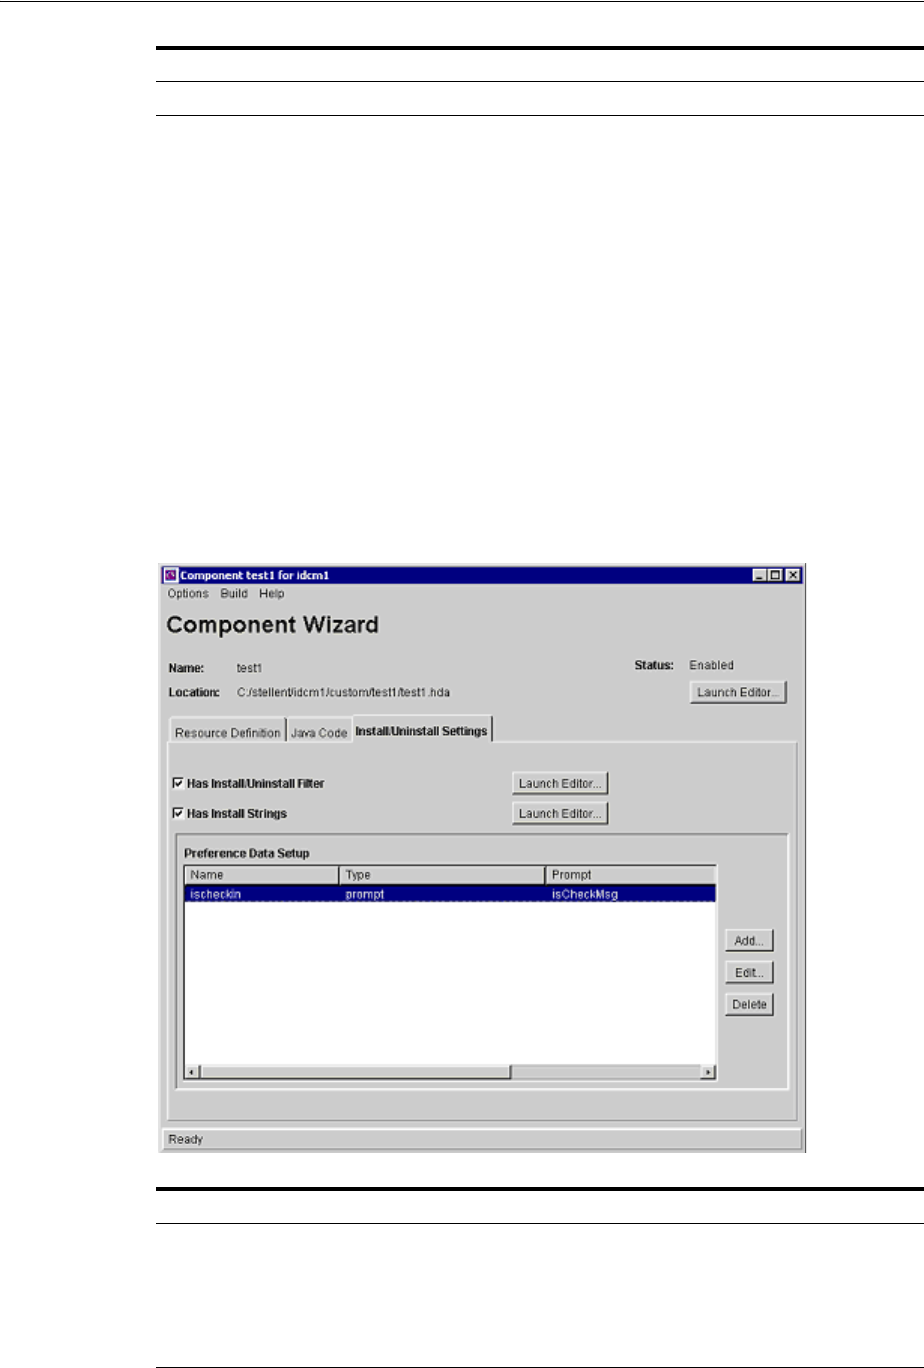
Components Interface
User Interface A-145
A.3.4 Build Screens
The following screens are used to package and build a custom component.
■Section A.3.4.1, "Install/Uninstall Settings Tab"
■Section A.3.4.2, "Main Build Screen"
■Section A.3.4.3, "Build Settings Screen"
■Section A.3.4.4, "Advanced Build Settings Screen"
■Section A.3.4.5, "Advanced Build Settings Review Screen"
A.3.4.1 Install/Uninstall Settings Tab
The Install/Uninstall Settings tab is used to create customized installation components
that can include preference data parameters. These parameters can be user prompts
and messages. The user prompts and messages created for specific components are
displayed to users only during the installation process.
Help button Displays a help page for the Add Preference screen.
Element Description
Has
Install/Uninstall
Filter checkbox
Selected: Includes additional custom installation or uninstall filters in the
component resource definition file. Checking this option also creates the
template java source if the file does not already exist. The component_
nameInstallFilter.java file is created in the component_
name/classes/component_name directory.
Unselected: Additional custom installation procedures are not included.
Element Description

Components Interface
A-146 Oracle Fusion Middleware System Administrator's Guide for Oracle Content Server
A.3.4.2 Main Build Screen
The Component Manager main Build screen is used during the build process, when
creating a zip file of a custom component. It shows the files that will be included in the
zip file.
Launch Editor
button Displays a code template file in the default text editor. Edit the template
Java source to define custom initialization or uninstall procedures for the
component (such as creating meta fields, executing service scripts, and so
no)
Has Install
Strings checkbox Selected: Includes prompts or messages during the component installation
process. These prompts or messages are stored in an installation strings file
and can be edited for localization requirements. Checking this option also
creates the install_strings.htm file if the file does not already exist in the
component_name directory.
Unselected: Prompts or messages are not included.
Launch Editor
button Displays a code template file in the default text editor. Edit the template to
define prompts or messages for the component.
Preference Data
Setup list Shows the name, type and prompt fields of the custom installation
parameters. If one or more custom installation parameters are defined and
included, the preference.hda file is created in the component directory.
Add button Displays the Add Preference screen, which is used to define the settings for
custom installation parameters.
Edit button Displays the Edit Preference screen, which is used to edit the settings for
custom installation parameters.
Delete button Removes the selected parameter from the component.
Element Description

Components Interface
User Interface A-147
Element Description
Manifest Path Shows the path and file name of the manifest.hda file, which contains the
instructions for how to unpackage the component zip file.
Version field Supports component versioning. By default, the date is listed with a
build number in parenthesis, but this value can be overridden. It is used
for reference purposes only, and it is not validated.
Include Preference
Prompts checkbox Selected: The parameter option settings (preference data) that were
established using the Install/Uninstall Settings tab are included in the
component manifest file. By selecting this option, the preference.hda file,
which holds preference data settings, is included.
Unselected: The preference data is not included in the component
manifest file.
View Advanced
Build Settings /
Advanced button
Displays the Advanced Build Settings Review Screen which lists the field
values configured using the Advanced Build Settings Screen.
Entry Type column Lists the items that are included in the component Zip file.
Current Root Prefix
column The root directory where the component files are located.
Location column The subdirectory or and the file name of the component file.
OK button Builds the component Zip file.
Cancel button Closes the screen without building the component Zip file.
Help button Displays the help page for this screen.
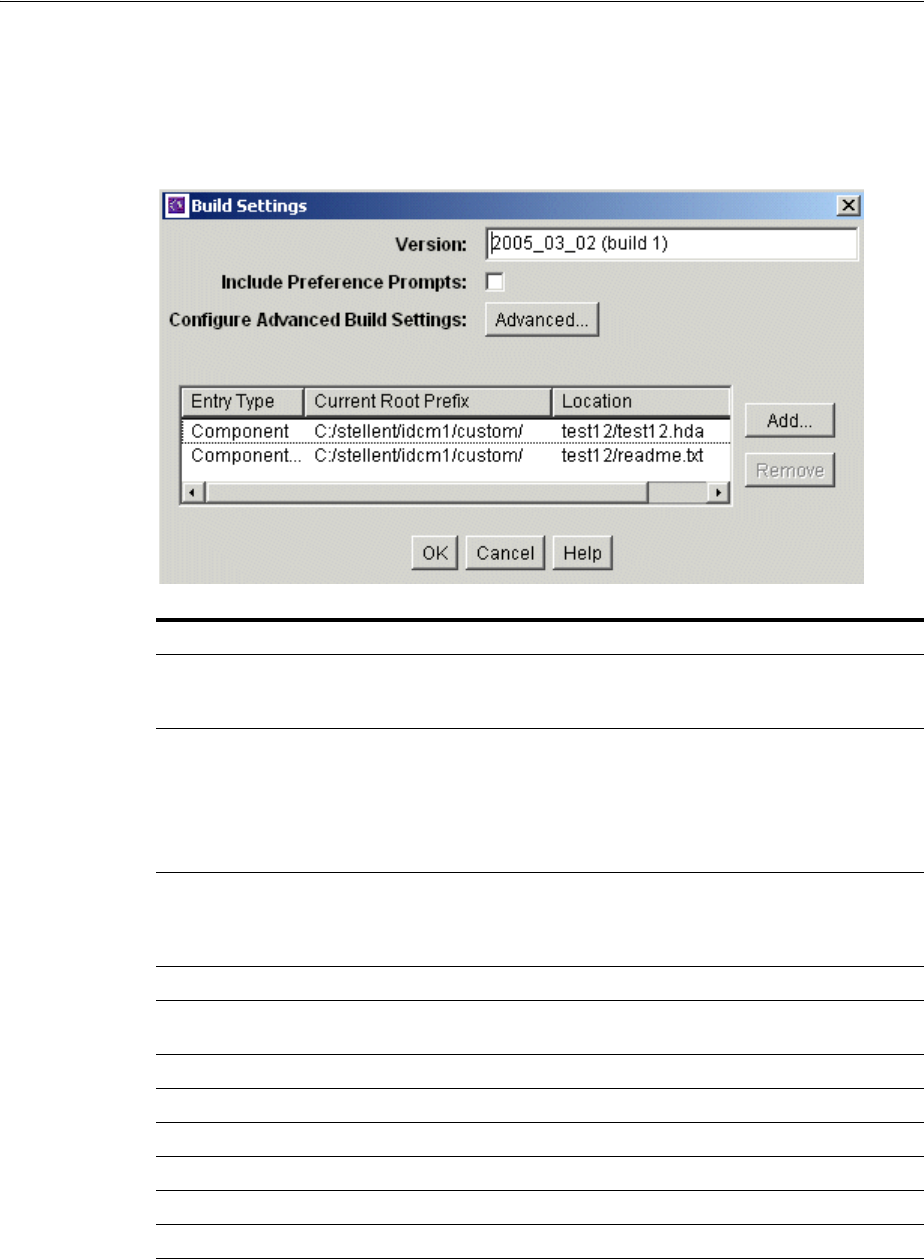
Components Interface
A-148 Oracle Fusion Middleware System Administrator's Guide for Oracle Content Server
A.3.4.3 Build Settings Screen
The Build Settings screen defines installation settings and what files to include in the
component Zip file. The list of files included in the component Zip file is saved in the
component build file (manifest.hda) and the installation settings are saved in the
component definition file (component_name.hda).
Element Description
Version field Supports component versioning. By default, the date is listed with a
build number in parenthesis, but this value can be overridden. It is used
for reference purposes only, and it is not validated.
Include Preference
Prompts checkbox Selected: The parameter option settings (preference data) that were
established using the Install/Uninstall Settings tab are included in the
component manifest file. By selecting this option, the preference.hda file,
which holds preference data settings, is included.
Unselected: The preference data is not included in the component
manifest file.
Configure
Advanced Build
Settings /
Advanced button
Displays the Advanced Build Settings Screen which is used to enter
values for the advanced build settings fields. The configured values are
viewed using the Advanced Build Settings Review Screen.
Entry Type column Lists the items that are included in the component Zip file.
Current Root Prefix
column The root directory where the component files are located.
Location column The subdirectory or and the file name of the component file.
Add button Displays the Add Screen.
Remove button Removes the selected item from the list.
OK button Saves the build settings.
Cancel button Closes the screen without changing the build settings.
Help button Displays the help page for this screen.

Components Interface
User Interface A-149
A.3.4.4 Advanced Build Settings Screen
The Advanced Build Settings screen is used to specify additional build settings for the
component zip file. It is accessed by selecting the Advanced button on the Main Build
Screen.
Element Description
Content Server
Compatible Build
field
The minimal build number of the Oracle Content Server instance, for
which the component must be compatible. Use this field if the
component is not compatible with other Oracle Content Server
versions.The build number is displayed on the application About screens
and on the Configuration Information page.
The component is not installed for an Oracle Content Server build
number that is older than the value specified in this field. If a build
number is not specified, then the component is installed without
checking the Oracle Content Server build number.
The build number is composed of four, decimal-separated numbers. If
you specify a build number, during validation, if a version is missing any
values, these values are padded with zeros. For example, 7.0 becomes
7.0.0.0. For example, if a component has the compatible build number set
to 7.0, and it is installed against a 7.5.1 release Oracle Content Server
instance, the server would check that 7.1.2.169 > 7.0.0.0, and load the
component without complaint.
Install ID field Required if preference data is defined using the Install/Uninstall Settings
tab. This field value is used during the component installation process to
access the preference data stored in configuration files. Two
configuration files hold the preference data: config.cfg (contains the
parameters that can be reconfigured after installation) and install.cfg
(contains the preference data definitions and prompt answers).
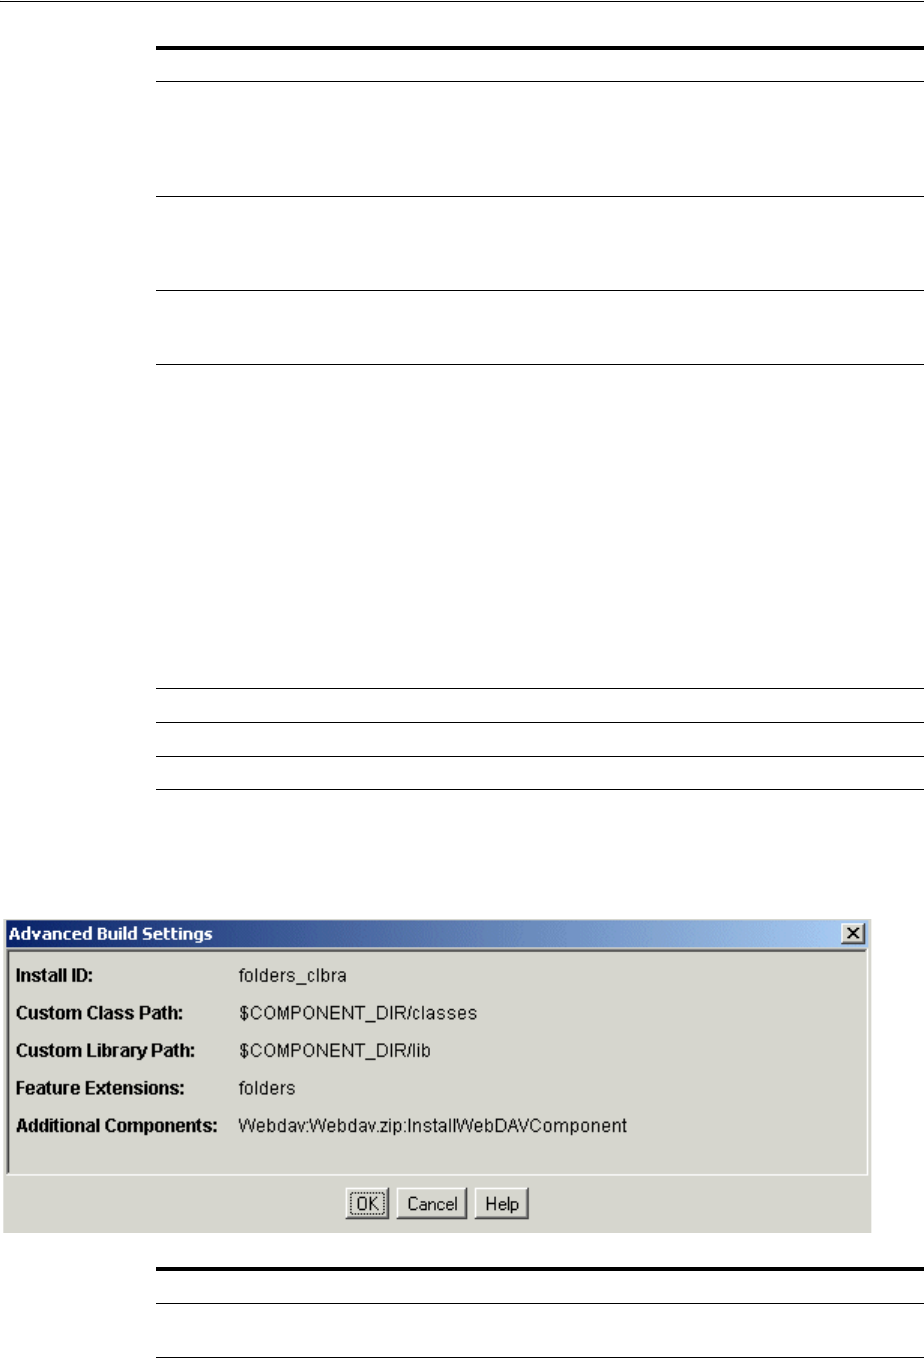
Components Interface
A-150 Oracle Fusion Middleware System Administrator's Guide for Oracle Content Server
A.3.4.5 Advanced Build Settings Review Screen
The Advanced Build Settings Review screen is accessed by clicking the OK button on
the Build Settings Screen. It shows those options which have been specified.
Custom Class Path
field Add class paths to additional classes or jar files that must be included in
the classpath that are required for the component to function. It is
recommended that you use the relative path to the Oracle Content Server
instance and place any component-related class files or jar files in the
component_name/classes directory.
Custom Library
Path field Enter the paths of library or other executable files required for the
component. It is recommended that you use the relative path to the
Oracle Content Server instance and place any component-related library
or executable files in the component_name/classes directory.
Feature Extensions
field Enter the specific types of features or functions that the component
provides. Separate multiple entries with commas. This field is optional
(not required).
Additional
Components field This field allows installation components to install individual add-on
components or to generate a grouping of multiple components into a
single installation package. Enter any additional components that must
be installed along with this component using the following format:
component_name:component.zip:preference_data_parameter_name
The preference_data_parameter_name is optional. If a parameter name is not
specified, the component is installed by default. The preference data
parameter must be defined in the Preference Data Setup section of the
Install/Uninstall Settings tab.
You must include a colon (:) after component.zip even if you are not
including a preference_data_parameter_name. If excluding preference_data_
parameter_name, the format is: component_name:component.zip: Separate
multiple entries with commas, as in the following: component_
name:component.zip:,component_name:component.zip:
OK button Returns to the previous screen.
Cancel button Closes the screen without building the component Zip file.
Help button Displays the help page for this screen.
Element Description
Install ID field Stores the user's preference settings that are specified during the
component installation.
Element Description

Components Interface
User Interface A-151
A.3.5 Component Manager Page
The Component Manager page is used to enable and disable server components. To
access the Component Manager page, select the Administration tray in the portal
navigation bar, then click Admin Server. Click Component Manager in the navigation
bar on the Admin Server Page.
Custom Class Path
field Lists the class paths of additional classes or jar files that are included in
the classpath that is required for the component to function.
Custom Library
Path field Lists the paths of library or other executable files required for the
component.
Feature Extensions
field Lists the specific types of features or functions that the component
provides.
Additional
Components field Lists the additional components that must be installed along with the
component.
OK button Accepts the field values and closes the screen.
Cancel button Closes the screen.
Help button Displays the help page for this screen.
Element Description
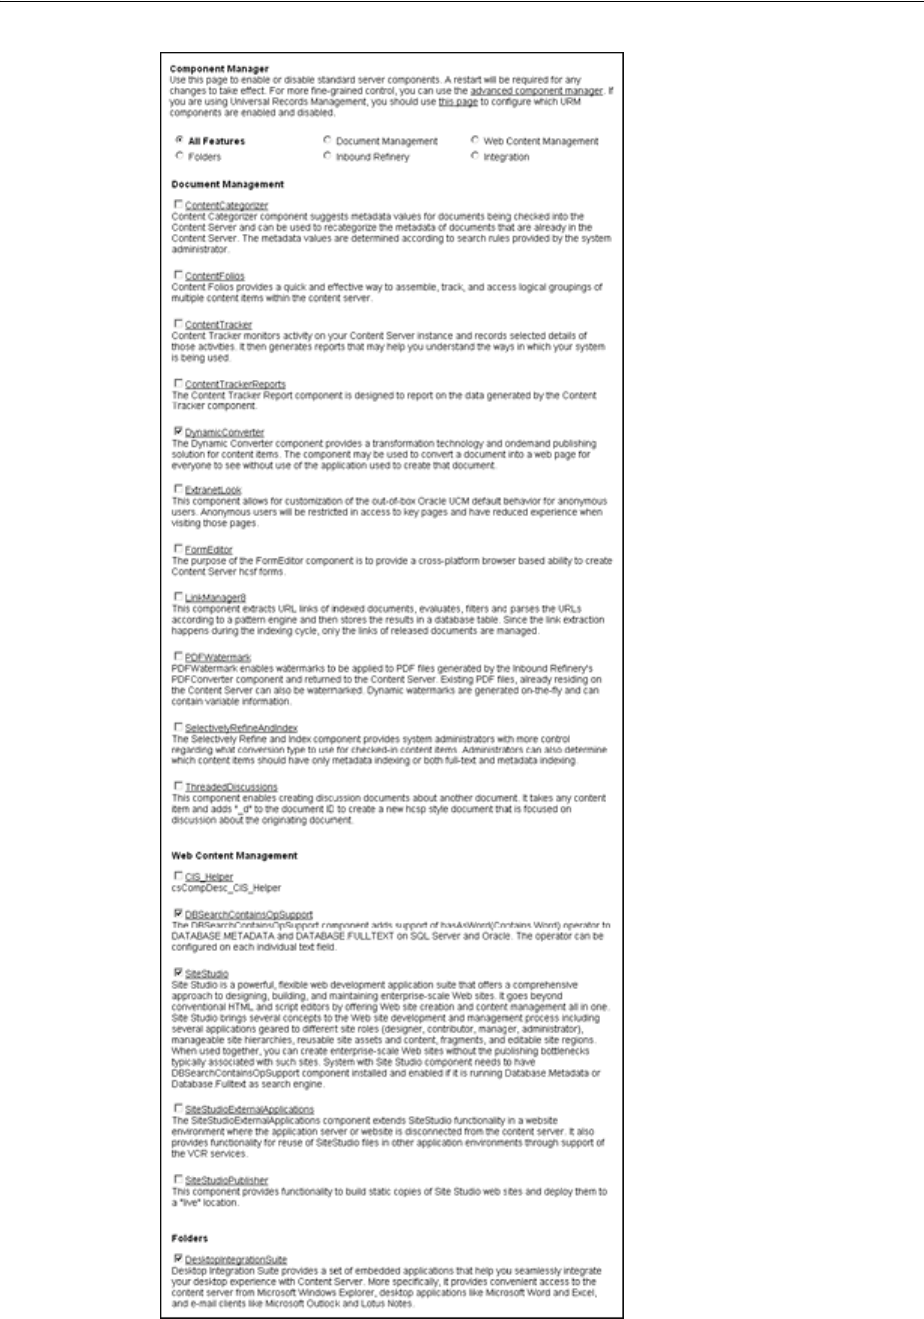
Components Interface
A-152 Oracle Fusion Middleware System Administrator's Guide for Oracle Content Server
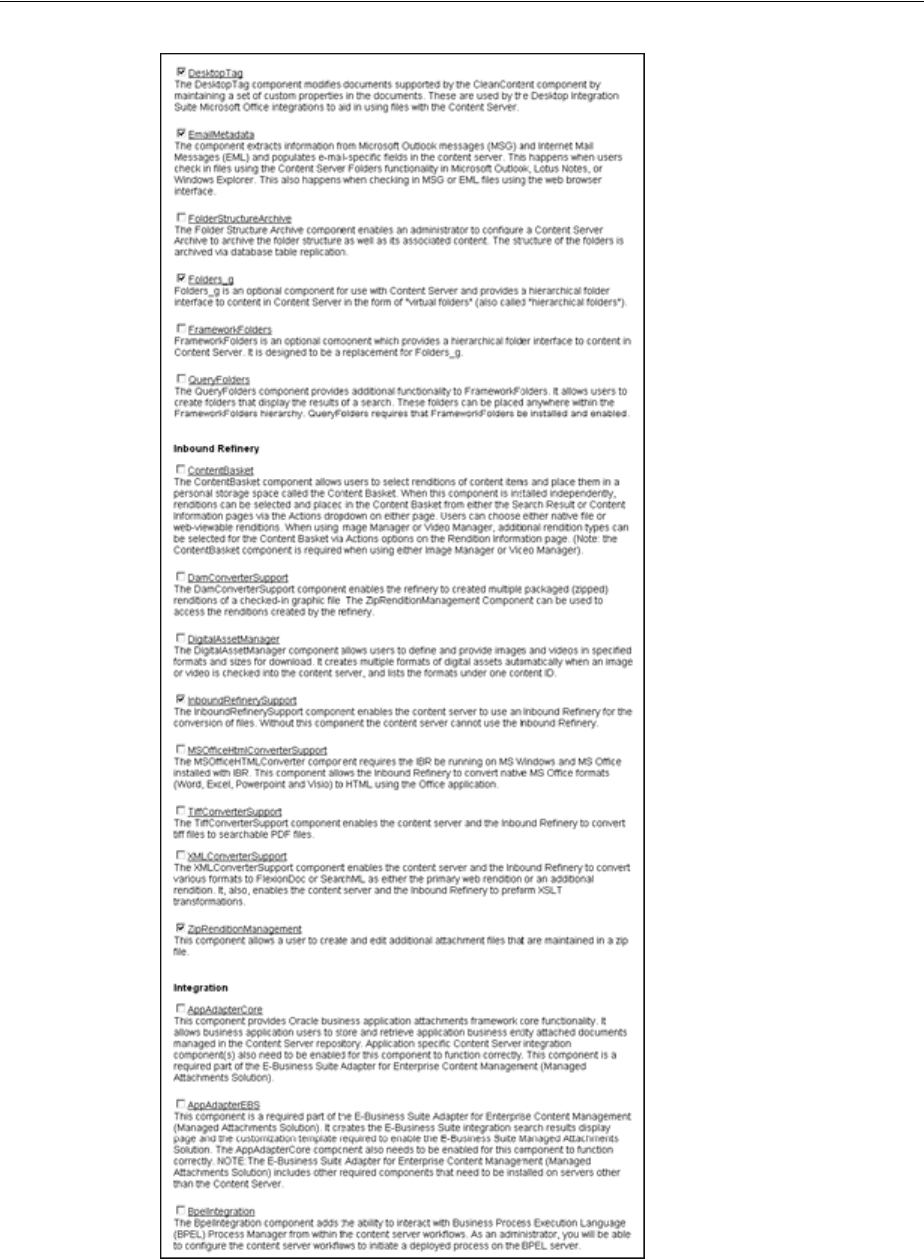
Components Interface
User Interface A-153
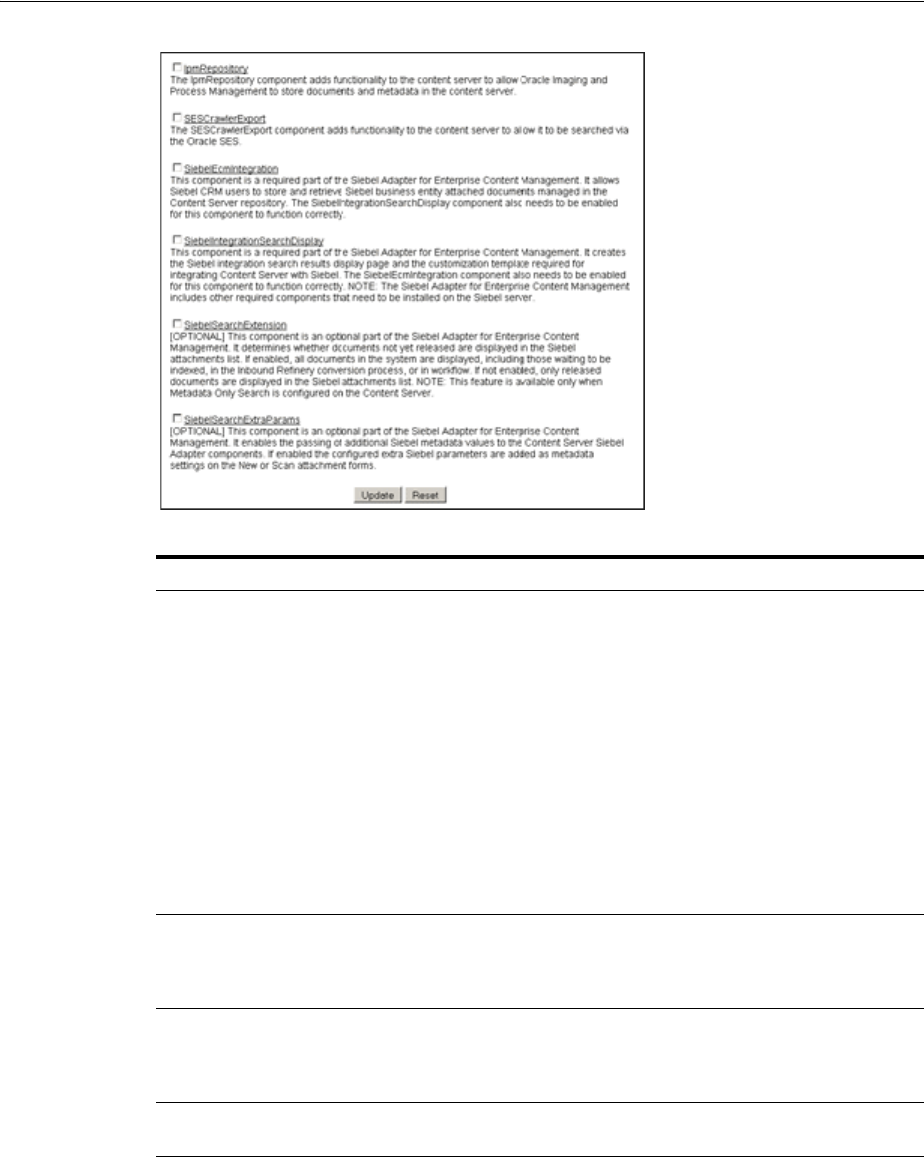
Components Interface
A-154 Oracle Fusion Middleware System Administrator's Guide for Oracle Content Server
A.3.6 Advanced Component Manager Page
The Advanced Component Manager page is used to enable, disable, install, uninstall,
and modify the configuration of server components. To access the Advanced
Component Manager page, select the Administration tray in the portal navigation bar,
then click Admin Server. Click advanced component manager in the introductory
paragraph of the Component Manager Page.
Element Description
Component
Manager
checkboxes
Select an item to display a specific set of server components grouped by
function. Options include:
■All Features
■Folders
■Document Management
■Inbound Refinery
■Web Content Management
■Integration
For more detailed control of components, click advanced component
manager in the first paragraph, which displays the Advanced Component
Manager Page. If Oracle URM is installed, click the provided link to
display and control Oracle URM components.
Components
checkboxes Lists available server components with short descriptions, grouped by
function. To enable a component, select the checkbox next to the
component name. To disable a component, deselect the checkbox next to
the component name.
Update button Updates the list of server components with the selected changes to enable
or disable one or multiple components. For changes to take effect, the
Oracle Content Server instance must be restarted (see the Admin Server
Page).
Reset button Resets the list of server components to their previous states (enabled or
disabled).
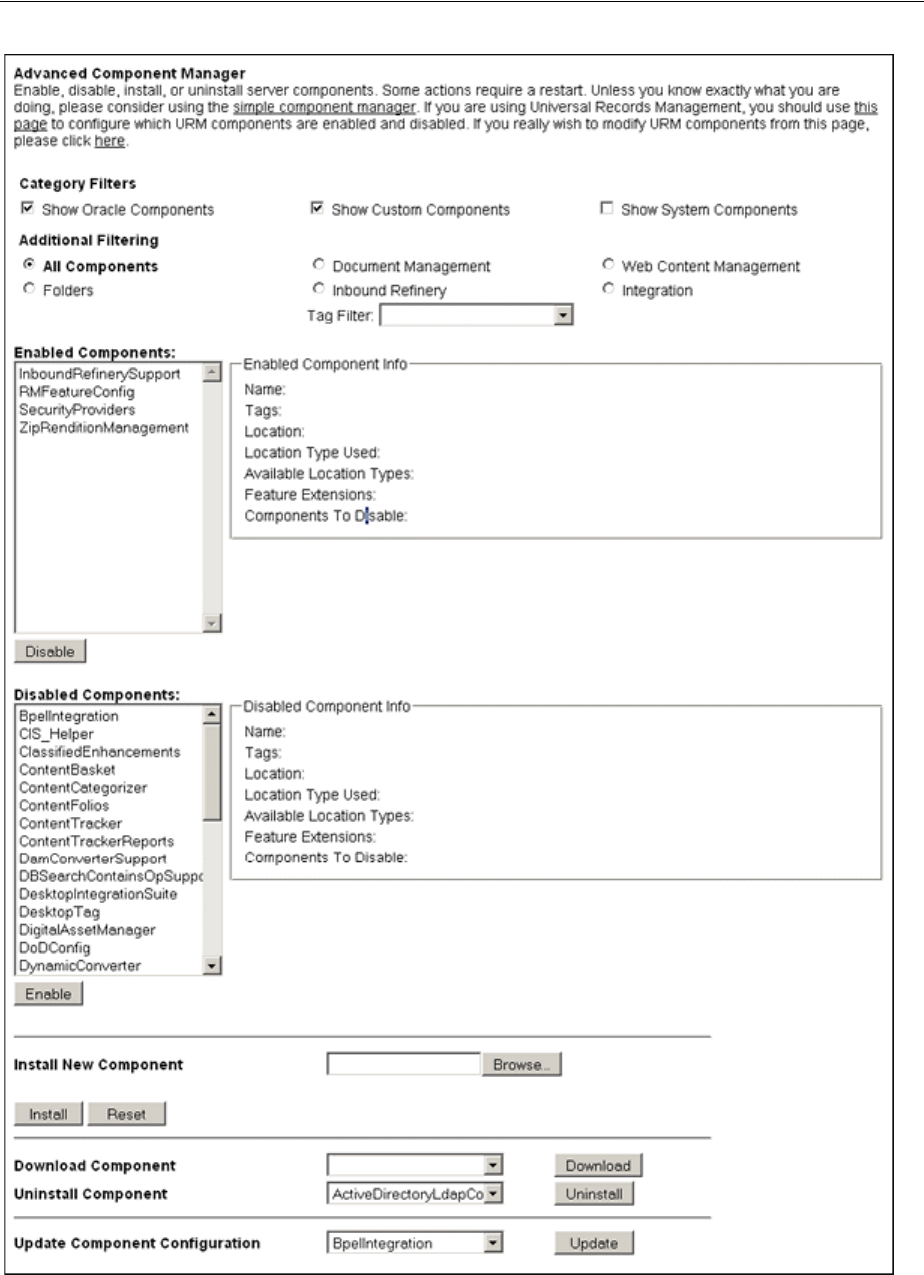
Components Interface
User Interface A-155

Components Interface
A-156 Oracle Fusion Middleware System Administrator's Guide for Oracle Content Server
Element Description
Additional
Components
checkboxes
Filters the components by category for the Enabled Components and
Disabled Components lists on the page. Options include:
■Show Oracle Components
■Show Custom Components
■Show System Components
Additional
Filtering radio
buttons
Performs additional filtering of the server components displayed on the
page. Options include:
■All Components
■Folders
■Document Management
■Inbound Refinery
■Web Content Management
■Integration
Tag Filter menu Select from the menu to filter the display of components to include
components according to the tag.
Enabled
Components list Shows the server components that are currently enabled. When a
component is selected, the Enabled Components Info pane displays the
component information.
Disable button Moves the selected component from the Enabled Components list to the
Disabled Components list.
Disabled
Components list Shows the components that are installed but currently disabled. When a
component is selected, the Disabled Components Info pane displays the
component information.
Enable button Moves the selected component from the Disabled Components list to the
Enabled Components list.
Install New
Component field Enter the path of the component Zip file to be installed to the Oracle
Content Server instance or use the corresponding Browse button.
Browse button Used to navigate to and select an existing component Zip file.
Install button Installs the component Zip file specified in the Install New Component
field.
Reset button Clears the Install New Component field.
Download
Component field Use the menu to select a component from the list to be downloaded to a
component Zip file.
Download button Displays a File Download screen, which is used to save the selected
component as a component Zip file.
Uninstall
Component field Use the menu to select a component to be uninstalled from the Oracle
Content Server instance. The listed components are derived from the
Disabled Components list.
Uninstall button Uninstalls the component selected from the list in the Uninstall
Component field.
Update
Component
Configuration field
Choose a component to update the component configuration parameters.
Making changes does not require a restart of the Oracle Content Server
instance.
Update button Displays the Update Component Configuration screen for the chosen
component. Use the screen to change the component configuration.

Components Interface
User Interface A-157
A.3.7 Update Component Configuration Interface
The Update Component Configuration interface is used to modify configuration
settings for Oracle Content Server components.
There are two ways to access a component Update Component Configuration screen:
■Open the Admin Server Page, select Component Manager, click advanced
component manager, select a component name from the Update Component
Configuration list, then click Update.
■In the portal navigation bar, select Administration, then Configuration for
instance. Click Enabled Component Details, then click Configure next to the
name of the component to be configured.
If the component is not enabled, click Disabled Component Details to find the
component to configure.
Not all components can have their configuration settings modified. If a component
does not support modifying configuration settings using this interface, a message is
displayed.
■Section A.3.7.1, "Folders_g Update Component Configuration Screen"
■Section A.3.7.2, "PDF Watermark Update Component Configuration Screen"
■Section A.3.7.3, "Content Tracker Update Component Configuration Screen"
■Section A.3.7.4, "Content Tracker Reports Update Component Configuration
Screen"
■Section A.3.7.5, "Site Studio Update Component Configuration Screen"
A.3.7.1 Folders_g Update Component Configuration Screen
The Update Component Configuration screen for the Folders_g component is used to
modify configuration settings for this Oracle Content Server component. The best
practice is to keep the default settings unless there is a good business case to make any
changes.
There are two ways to access the Update Component Configuration screen:
■Open the Admin Server Page, select Component Manager, click advanced
component manager, select Folders_g from the Update Component
Configuration list, then click Update.
■In the portal navigation bar, select Administration, then Configuration for
instance. Click Enabled Component Details, then click Configure next to the
Folders_g component name.
If the component is not enabled, click Disabled Component Details to find the
component to configure.
Note: You must restart the Oracle Content Server instance after
making any component configuration change.
Note: You must restart the Oracle Content Server instance after
making any component configuration change.
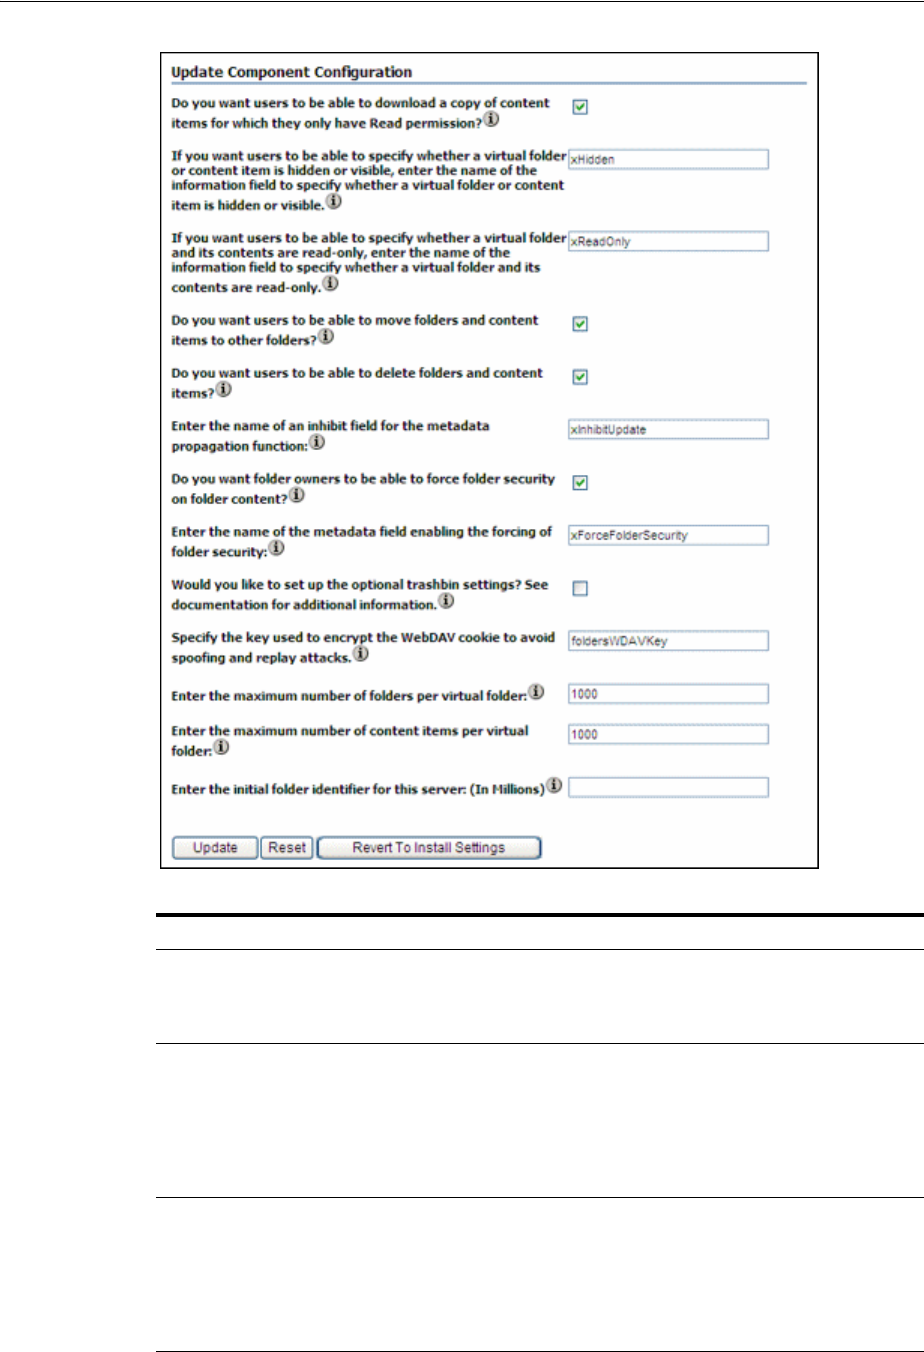
Components Interface
A-158 Oracle Fusion Middleware System Administrator's Guide for Oracle Content Server
Element Description
Do you want users to be able to
download a copy of content items
for which they only have Read
permission?
Sets environment variable GetCopyAccess. By default, the
checkbox is selected.
If you want users to be able to
specify whether a virtual folder or
content item is hidden or visible,
enter the name of the information
field to specify whether a virtual
folder or content item is hidden or
visible.
Sets environment variable CollectionHiddenMeta. The
default setting is xHidden.
If you want users to be able to
specify whether a virtual folder
and its contents are read-only,
enter the name of the information
field to specify whether a virtual
folder and its contents are
read-only.
Sets environment variable CollectionReadOnlyMeta. The
default setting is xReadOnly.

Components Interface
User Interface A-159
A.3.7.2 PDF Watermark Update Component Configuration Screen
The Update Component Configuration screen for the PDFWatermark component is
used to modify configuration settings for this Oracle Content Server component.
There are two ways to access the Update Component Configuration screen:
■Open the Admin Server Page, select Component Manager, click advanced
component manager, select PDFWatermark from the Update Component
Configuration list, then click Update.
■In the portal navigation bar, select Administration, then Configuration for
instance. Click Enabled Component Details, then click Configure next to the
PDFWatermark component name.
If the component is not enabled, click Disabled Component Details to find the
component to configure.
Do you want users to be able to
move folders and content items to
other folders?
Sets environment variable CollectionMoveEnabled. By
default, the checkbox is selected.
Do you want users to be able to
delete folders and content items? Sets environment variable CollectionDeleteEnabled. By
default, the checkbox is selected.
Enter the name of an inhibit field
for the metadata propagation
function.
Sets environment variable CollectionInhibitUpdateMeta.
The default setting is xInhibitUpdate.
Do you want folder owners to be
able to force folder security on
folder content?
Sets environment variable
CollectionForceFolderSecurityEnabled. By default, the
checkbox is selected.
Enter the name of the metadata
field enabling the forcing of folder
security:
Sets environment variable
CollectionForceFolderSecurityMeta. The default setting is
xForceFolderSecurity.
Would you like to set up the
optional trashbin settings? Sets environment variable SetupTrashBinSettings. By
default, the checkbox is not selected. For additional
information, see Oracle Fusion Middleware Application
Administrator's Guide for Oracle Content Server.
Specify the key used to encrypt
the WebDAV cookie to avoid
spoofing and reply attacks.
Sets environment variable WebDAVSecretKey. The
default setting is foldersWDAVKey. To make the
WebDAV cookie secure, the default setting should be
changed to something unique. If the field is not modified
there is a risk of spoofing and replay attacks.
Enter the maximum number of
folders per virtual folder: Sets environment variable MaxFolders. 1000 is the largest
allowed value. The default setting is 1000.
Enter the maximum number of
content items per virtual folder: Sets environment variable MaxContent. 1000 is the largest
allowed value. The default setting is 1000.
Enter the initial folder identifier
for this server (in millions): Sets environment variable InitialFolderID. The default
setting is blank.
Leaving this field blank will allow a random initial folder
ID to be selected. The best practice is to not set this field.
Update button Updates the component configuration with the modified
field settings.
Reset button Returns modified field settings to their previous values.
Revert To Install Settings button Changes component configuration field settings to their
install setting values.
Element Description

Components Interface
A-160 Oracle Fusion Middleware System Administrator's Guide for Oracle Content Server
A.3.7.3 Content Tracker Update Component Configuration Screen
The Update Component Configuration screen for the ContentTracker component is
used to modify configuration settings for this Oracle Content Server component.
There are two ways to access the Update Component Configuration screen:
■Open the Admin Server Page, select Component Manager, click advanced
component manager, select ContentTracker from the Update Component
Configuration list, then click Update.
■In the portal navigation bar, select Administration, then Configuration for
instance. Click Enabled Component Details, then click Configure next to the
ContentTracker component name.
If the component is not enabled, click Disabled Component Details to find the
component to configure.
Note: You must restart the Oracle Content Server instance after
making any component configuration change.
Element Description
Use PDF optimizer Specifies to use PDF optimizer. By default, the checkbox is
not selected.
Optimizer Command Line
Template Enter an optimizer command line template.
Update button Updates the component configuration with the modified
field settings.
Reset button Returns modified field settings to their previous values.
Revert To Install Settings button Changes component configuration field settings to their
install setting values.
Note: You must restart the Oracle Content Server instance after
making any component configuration change.

Components Interface
User Interface A-161
A.3.7.4 Content Tracker Reports Update Component Configuration Screen
The Update Component Configuration screen for the ContentTrackerReports
component is used to modify configuration settings for this Oracle Content Server
component.
There are two ways to access the Update Component Configuration screen:
Element Description
Track Content Access Only Specifies to track content access only. By default, the
checkbox is selected.
Do Not Populate Access Log
Columns Specifies the access log columns to not populate.
Simplify User Agent String Simplifies the user agent string. By default, the checkbox is
selected.
Maximum Days to Retain Data Specifies the maximum number of days that data is
retained. The default setting is 60.
Do Not Archive Expired Data Specifies to not archive expired data. By default, the
checkbox is selected.
Enter Maximum URL Length Enter the maximum number of characters for the length of
URLs. The default setting is 3000.
Enter Maximum Proxy Name
Length Enter the maximum number of characters for the length of
a proxy name. The default setting is 50.
Post Reduction Executable Specifies a post-reduction executable. There is no default.
Web Beacon ID List Specifies a list of web beacon IDs.
Update button Updates the component configuration with the modified
field settings.
Reset button Returns modified field settings to their previous values.
Revert To Install Settings button Changes component configuration field settings to their
install setting values.
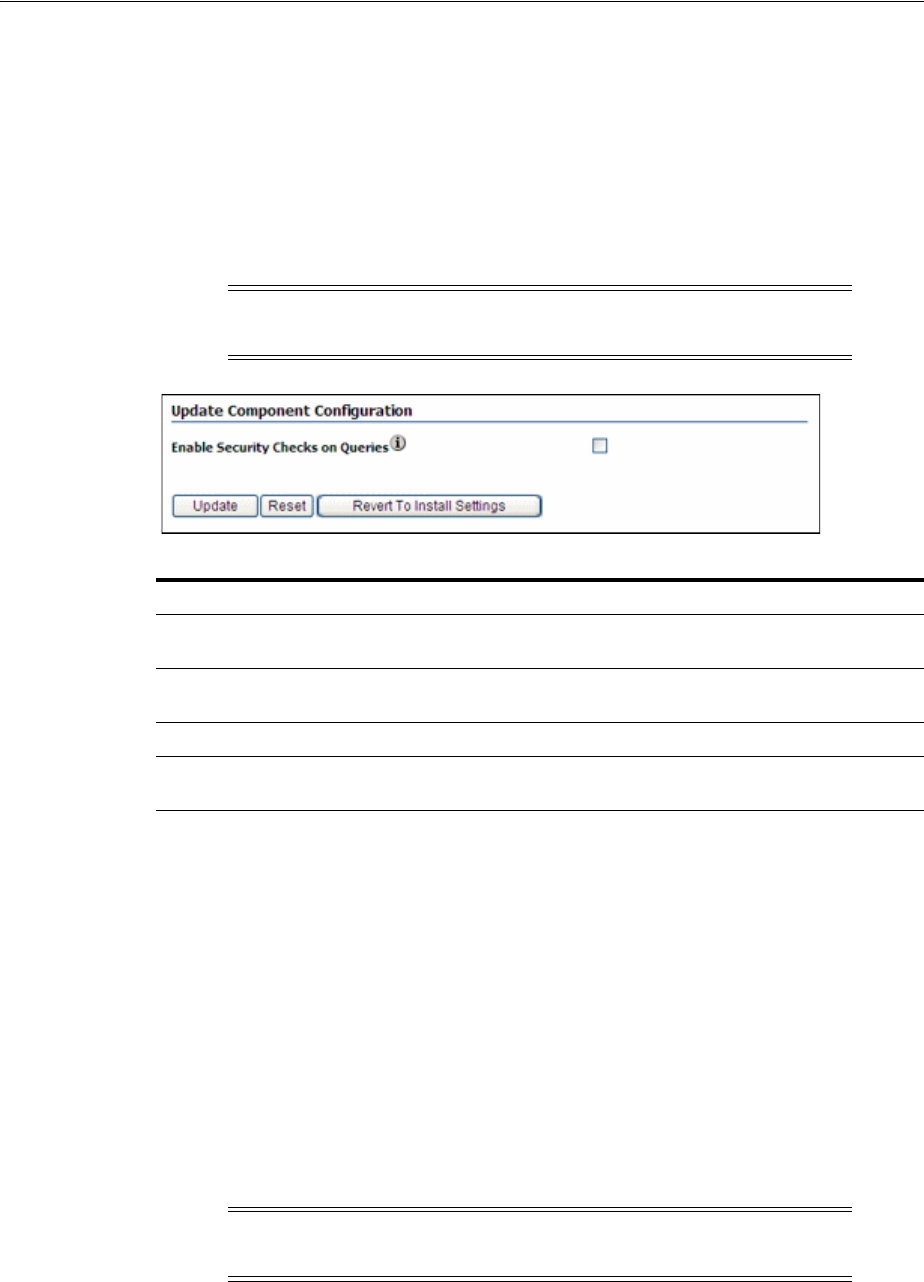
Components Interface
A-162 Oracle Fusion Middleware System Administrator's Guide for Oracle Content Server
■Open the Admin Server Page, select Component Manager, click advanced
component manager, select ContentTrackerReports from the Update Component
Configuration list, then click Update.
■In the portal navigation bar, select Administration, then Configuration for
instance. Click Enabled Component Details, then click Configure next to the
ContentTrackerReports component name.
If the component is not enabled, click Disabled Component Details to find the
component to configure.
A.3.7.5 Site Studio Update Component Configuration Screen
The Update Component Configuration screen for the SiteStudio component is used to
modify configuration settings for this Oracle Content Server component.
There are two ways to access the Update Component Configuration screen:
■Open the Admin Server Page, select Component Manager, click advanced
component manager, select SiteStudio from the Update Component
Configuration list, then click Update.
■In the portal navigation bar, select Administration, then Configuration for
instance. Click Enabled Component Details, then click Configure next to the
SiteStudio component name.
If the component is not enabled, click Disabled Component Details to find the
component to configure.
Note: You must restart the Oracle Content Server instance after
making any component configuration change.
Element Description
Enable Security Checks on
Queries Enables security checks on Content Tracker Report
queries. By default, the checkbox is not selected.
Update button Updates the component configuration with the modified
field settings.
Reset button Returns modified field settings to their previous values.
Revert To Install Settings button Changes component configuration field settings to their
install setting values.
Note: You must restart the Oracle Content Server instance after
making any component configuration change.
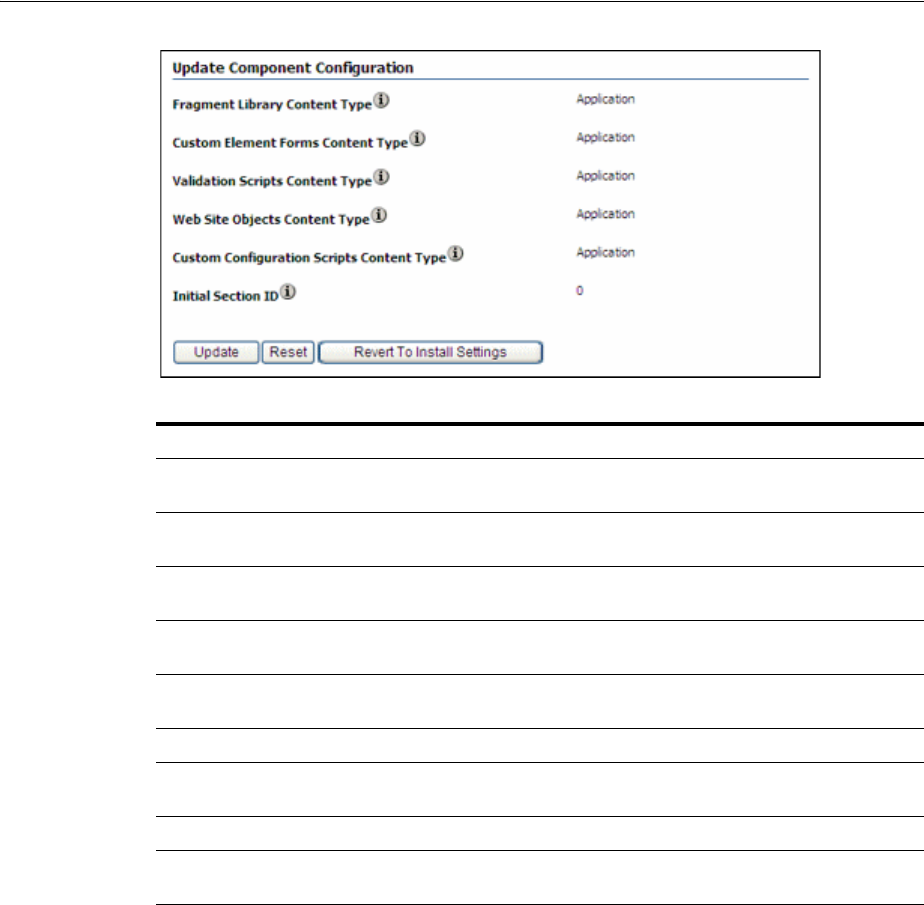
System Migration Interface
User Interface A-163
A.4 System Migration Interface
This section provides information about the interface screens used to manage system
migration.
■Section A.4.1, "Configuration Migration Interface Screens"
■Section A.4.2, "Archive, Collection, and Batch Interface"
■Section A.4.3, "Export Interface Screens"
■Section A.4.4, "Import Interface Screens"
■Section A.4.5, "Replication Interface Screens"
■Section A.4.6, "Transfer Interface Screens"
■Section A.4.7, "Folder Archive Configuration Page"
Element Description
Fragment Library Content Type The content type to be used for checking in the fragment
libraries.
Custom Element Forms Content
Type The content type to be used for checking in the custom
element forms.
Validation Scripts Content Type The content type to be used for checking in the validation
scripts.
Web Site Objects Content Type The content type to be used for checking in the sample
web site objects.
Custom Configuration Scripts
Content Type The content type to be used for checking inthe custom
configuration scripts.
Initial Section ID The initial value used to name web site sections.
Update button Updates the component configuration with the modified
field settings.
Reset button Returns modified field settings to their previous values.
Revert To Install Settings button Changes component configuration field settings to their
install setting values.
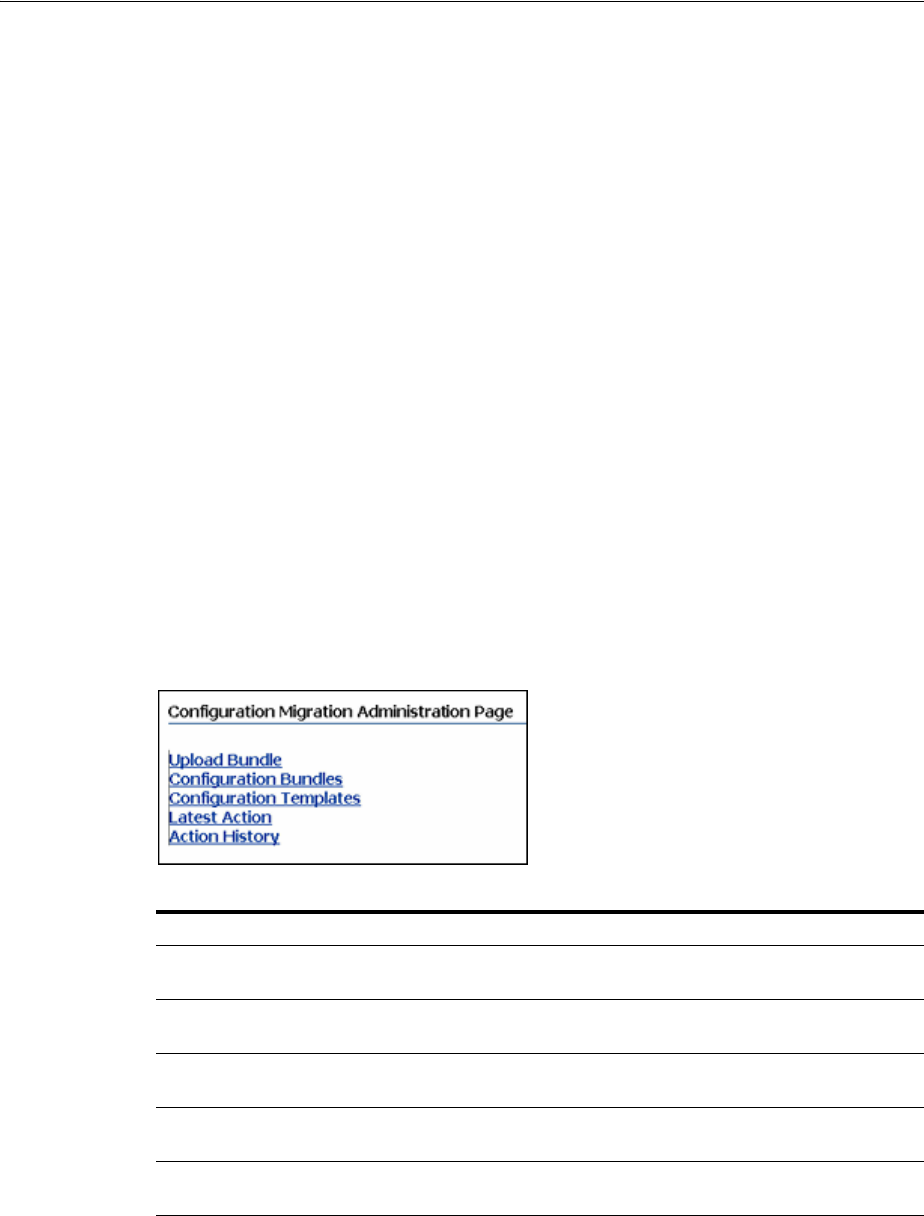
System Migration Interface
A-164 Oracle Fusion Middleware System Administrator's Guide for Oracle Content Server
A.4.1 Configuration Migration Interface Screens
This section provides information about the screens used to export and import
configuration migration bundles.
■Section A.4.1.1, "Migration Options"
■Section A.4.1.2, "Upload Configuration Bundle Screen"
■Section A.4.1.3, "Configuration Bundles Page"
■Section A.4.1.4, "Configuration Templates Page"
■Section A.4.1.5, "Config Migration Admin Screen"
■Section A.4.1.6, "Content Server Sections"
■Section A.4.1.7, "Preview Screen"
■Section A.4.1.8, "Edit Export Rule Screen"
■Section A.4.1.9, "Latest Action Screen"
■Section A.4.1.10, "Action History Page"
A.4.1.1 Migration Options
The migration options are used to access the basic functions of configuration
migration. To access these options, select the Administration tray in the portal
navigation bar, then click Config Migration Admin. You can also click the icon next to
the Config Migration Admin link to expand the menu in the portal navigation bar to
show links to the individual migration options.
A.4.1.2 Upload Configuration Bundle Screen
The Upload Bundle screen is used to acquire a zipped file for use in the import process
or to acquire a template file. To access this screen, select Upload Bundle from the list
of Migration Options.
Element Description
Upload Bundle link Displays the Upload Configuration Bundle Screen, used to
access configuration bundles.
Configuration Bundles link Displays the Configuration Bundles Page, used to import
information from the uploaded bundles.
Configuration Templates link Displays the Configuration Templates Page, used to access
templates.
Recent Actions link Displays the Latest Action Screen, where details about
imports and exports appears.
Action History link Displays the Action History Screen, where the history of
import and export actions appears.
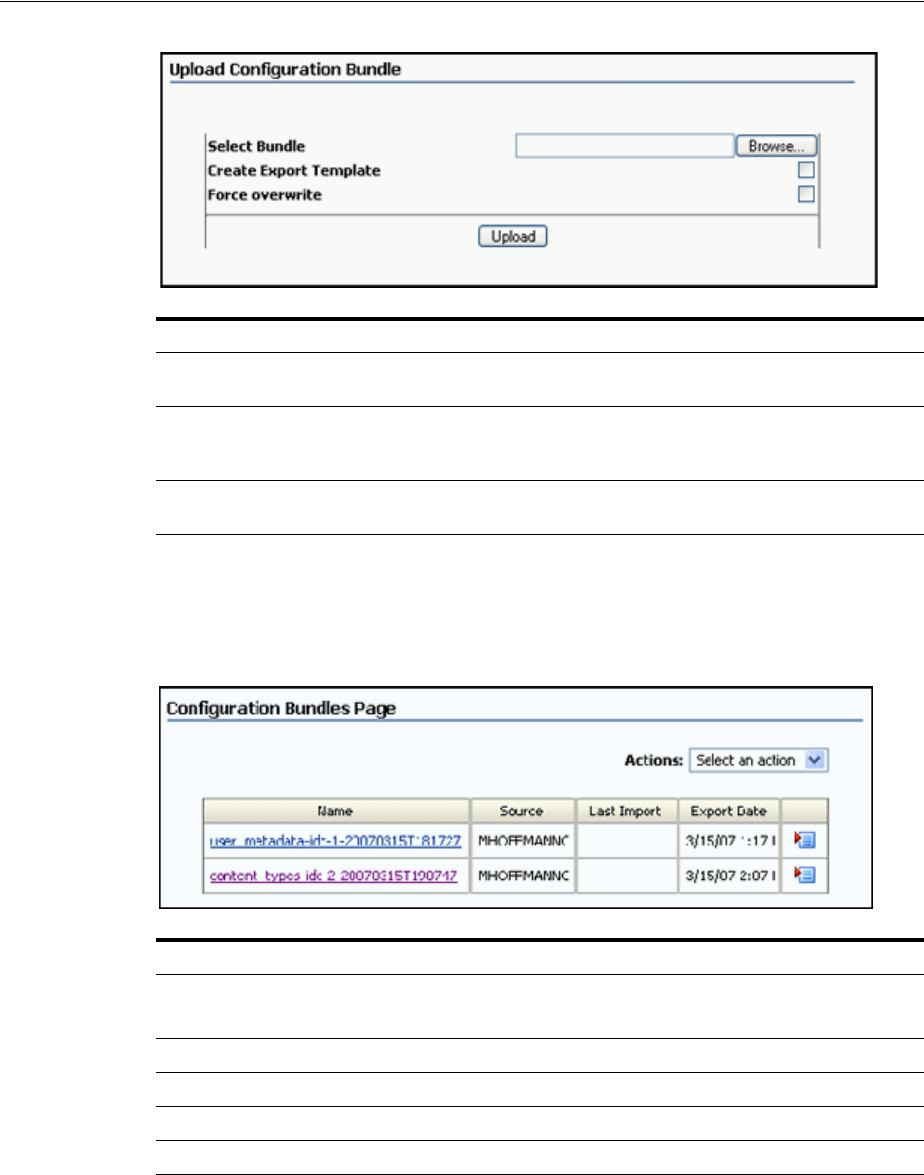
System Migration Interface
User Interface A-165
A.4.1.3 Configuration Bundles Page
The Configuration Bundles Page is used to select an existing bundle for use on the
current Oracle Content Server instance. To access this screen, select Configuration
Bundles from the list of Migration Options.
Element Description
Select Bundle/Browse Used to browse the contents of the file system to access the
zipped bundle.
Create Export Template Used to create a template based on the template that was used
to create the bundle. After uploading, the template name is
displayed on the Configuration Templates Page
Force Overwrite Specifies that any information that is imported can overwrite
existing Oracle Content Server configuration information.
Element Description
Page Actions Menu Displays the page Actions menu with the following option:
Delete All: Deletes all current configuration export bundles.
Name Displays the names of existing configuration bundles.
Source Displays the location where the bundle was obtained.
Last Import Displays the date and time of the last import of the bundle.
Export Date Displays the date and time of the last export of the bundle.
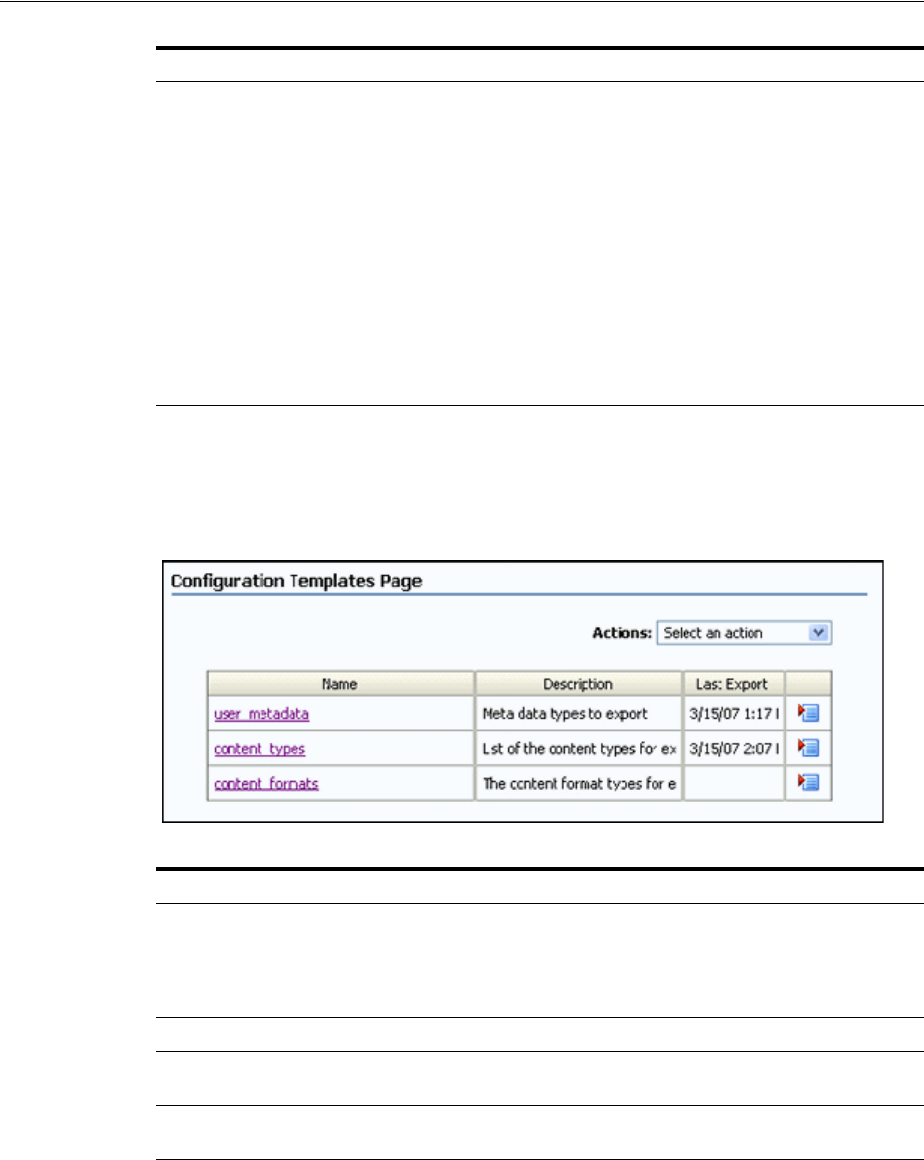
System Migration Interface
A-166 Oracle Fusion Middleware System Administrator's Guide for Oracle Content Server
A.4.1.4 Configuration Templates Page
The Configuration Templates Page lists previously defined templates and their export
history. To access this screen, select Configuration Templates from the list of
Migration Options.
Actions menu Each bundle contains a separate Actions menu with the
following options:
Edit: Displays the Config Migration Admin Screen where you
can alter the configuration information to be imported.
Preview: Displays the Preview Screen where you can view the
configuration information to be used.
Delete: Used to delete the bundle.
History: Displays the Action History Page where details about
the import process are displayed. The title of this screen is
changed to History when it is accessed from this Action
menu.
Download: Displays a dialog prompt, allowing you to save
the zipped version of the bundle in a specified location.
Element Description
Page Actions Menu Displays the page Actions menu with the following options:
Create New Export: Displays the Config Migration Admin
Screen.
Delete All: Deletes all current configuration export templates.
Name Displays the names of existing configuration templates.
Description Displays the description of the configuration templates. This
description was entered on the Edit Export Rule Screen.
Last Export Displays the date and time of the last export using this
template.
Element Description

System Migration Interface
User Interface A-167
A.4.1.5 Config Migration Admin Screen
The Config Migration Admin Screen is used to determine which sections of the Oracle
Content Server instance will be exported or imported, and which actions should occur
at the export or import action. There are several ways to access this screen:
■Select Create New Template from the page Actions menu on the Configuration
Templates Page.
■Select Edit from one of the template Actions menus on the Configuration
Templates Page or the Configuration Bundles Page.
■Click the template name on the Configuration Templates Page or the bundle name
on the Configuration Bundles Page.
Three main areas appear on this screen:
■Actions menu
■Action Options
■Child Sections
Actions menu Each template contains a separate Actions menu with the
following options:
Edit: Displays the Config Migration Admin Screen where you
can alter the configuration information for that template.
Preview: Displays the Preview Screen where you can view the
configuration information to be used.
Delete: Enables you to delete the template.
History: Displays the Action History Page, where details
about the export process are displayed (the title of this screen
is changed to History when it is accessed through this action
menu).
Note: You must select Save or Save As in order for the configuration
information to be saved. If you preview, edit, or re-select items, that
information is not saved until you select Save or Save As from the
Actions menu.
Element Description
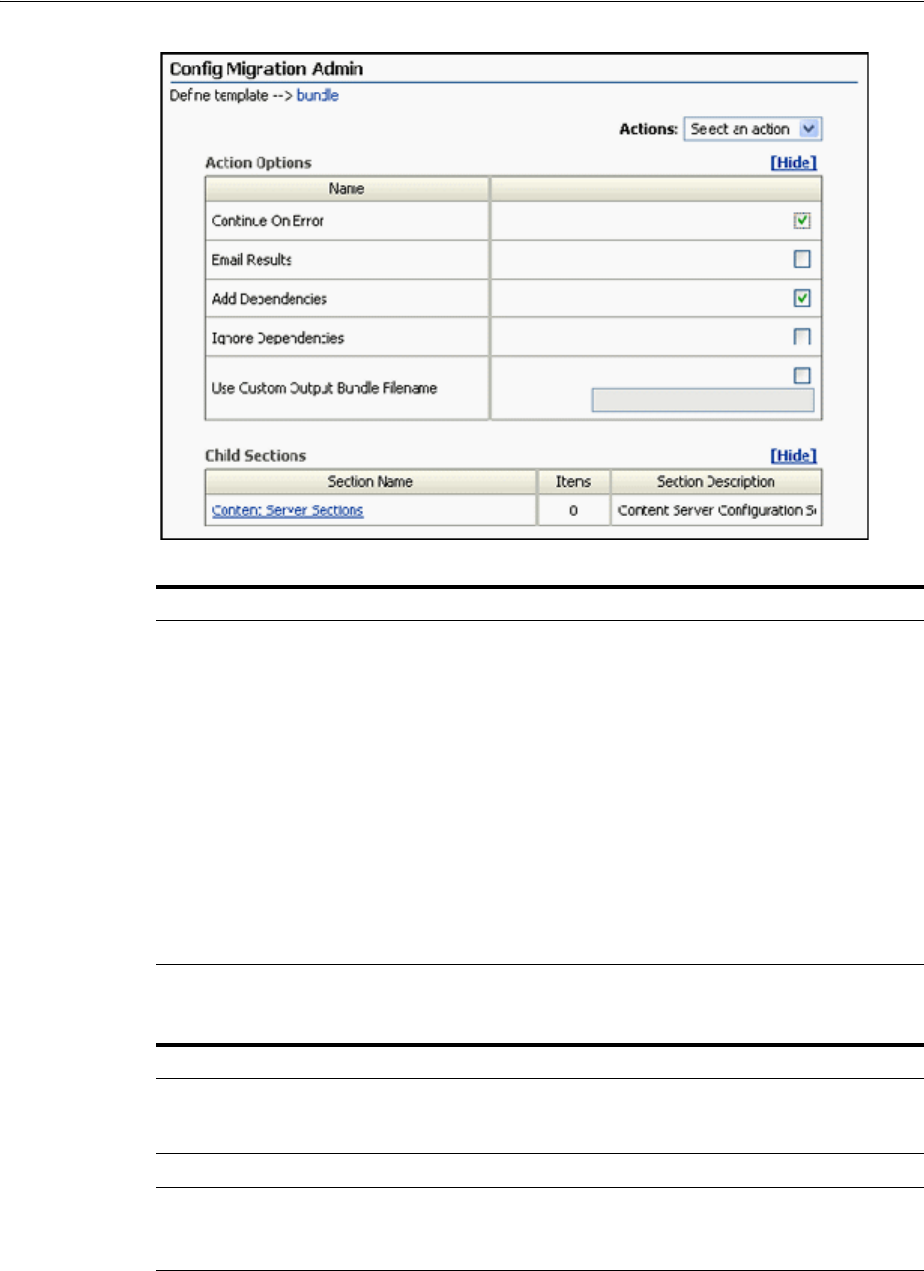
System Migration Interface
A-168 Oracle Fusion Middleware System Administrator's Guide for Oracle Content Server
The following Action Options appear on this screen.
Element Description
Actions menu Depending on which page accessed the Configuration
Migration Admin page, different menu options appear:
Save or Save As: Displays the Edit Export Rule Screen where
you can enter the name of the template. See the following
note.
Preview: Displays the Preview Screen where you can view the
configuration to be exported or imported.
Export or Import: Performs the action (Export or Import) then
displays the Latest Action Screen, showing the status of the
action.
Select All: Selects all Content Server Sections for inclusion in
the configuration.
Unselect All: Unselects all Content Server Sections from the
configuration.
Element Description
Continue on Error Specifies that the export or import continues even if errors are
encountered. Errors are reported in the status file in the entry
on the Latest Action Screen.
Email results Mails results to the user who initiated the export or import.
Add Dependencies Selected: Dependencies are added to the export or import
bundle.
Unselected: Dependencies are not added to the bundle.

System Migration Interface
User Interface A-169
The following Child Sections appear on this screen.
A.4.1.6 Content Server Sections
The Content Server Sections link is displayed in the Child Sections portion of the
Config Migration Admin Screen. This part of the Configuration Migration Admin
Screen is used to specify which aspects of the Oracle Content Server instance are
included in the export template.
Each section of this screen can be further expanded to show the specific metadata
fields associated with that section. The Content Server Sections link displays the
section names, descriptions, and how many items are within the section for the Oracle
Content Server instance. You can click a section name to view details for that section.
Ignore Dependencies Selected: If the checkbox is selected, dependencies are
ignored.
Unselected: Dependencies are not ignored. This may cause
the export or import to fail. For the action on the Latest Action
Screen, see the status file.
Custom Name/Overwrite
Duplicates When accessed from the Configuration Templates screen, the
Custom Name field appears where a unique name is
generated when a bundle is created using this template.
When accessed from the Configuration Bundles screen, the
Overwrite Duplicates name field appears. Selecting this
option allows the importing template to overwrite any
duplicate entries in the existing configuration.
Element Description
Content Server Sections Click a Child Sections name to display a list of Oracle Content
Server aspects that are included in the export template. For
details, see Content Server Sections.
Element Description
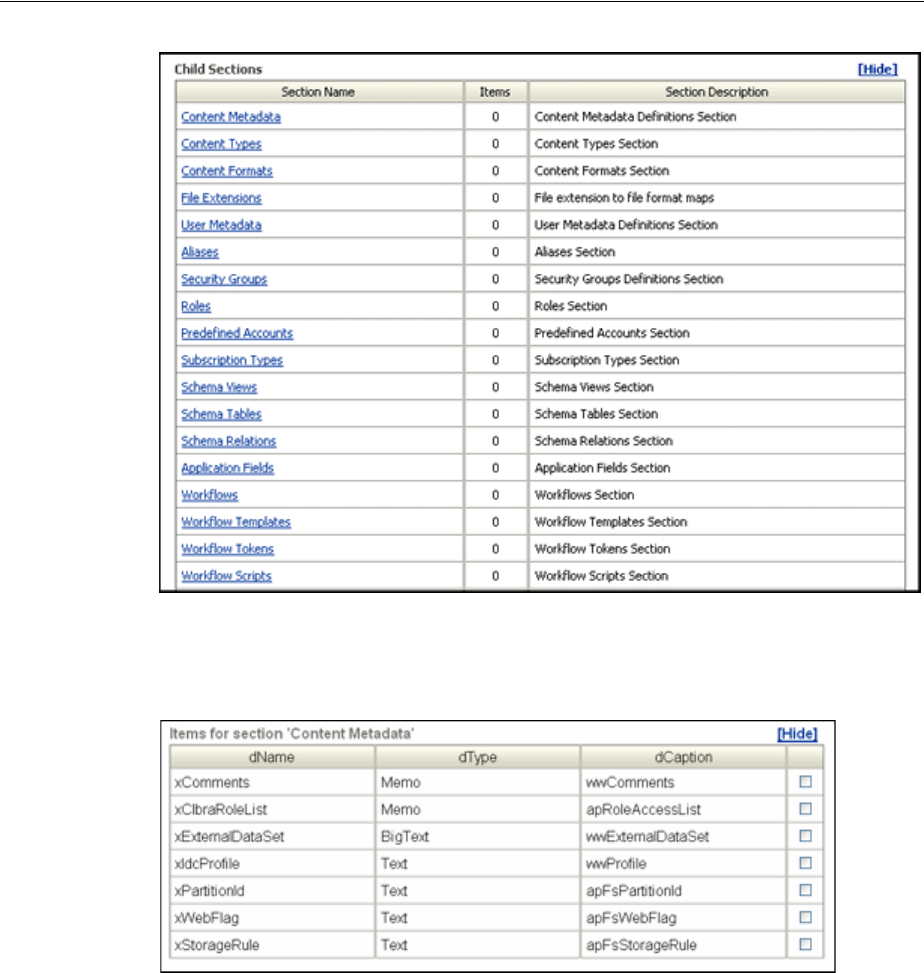
System Migration Interface
A-170 Oracle Fusion Middleware System Administrator's Guide for Oracle Content Server
Each section name of the Content Server Sections screen links to details of the specific
metadata fields associated with the section. To include a section metadata field in the
export template, select the checkbox.
A.4.1.7 Preview Screen
The Preview screen is used to view the Oracle Content Server items that will be
exported or imported. To access this screen, click Preview from any of the following
screens:
■The page Actions menu on the Config Migration Admin Screen
■Individual Actions menu from the Configuration Bundles Page
■Individual Actions menu from the Configuration Templates Page
The screen title changes depending on where the Preview is launched.
The other information on this screen was created using the Configuration Bundles
Page or the Configuration Templates Page.
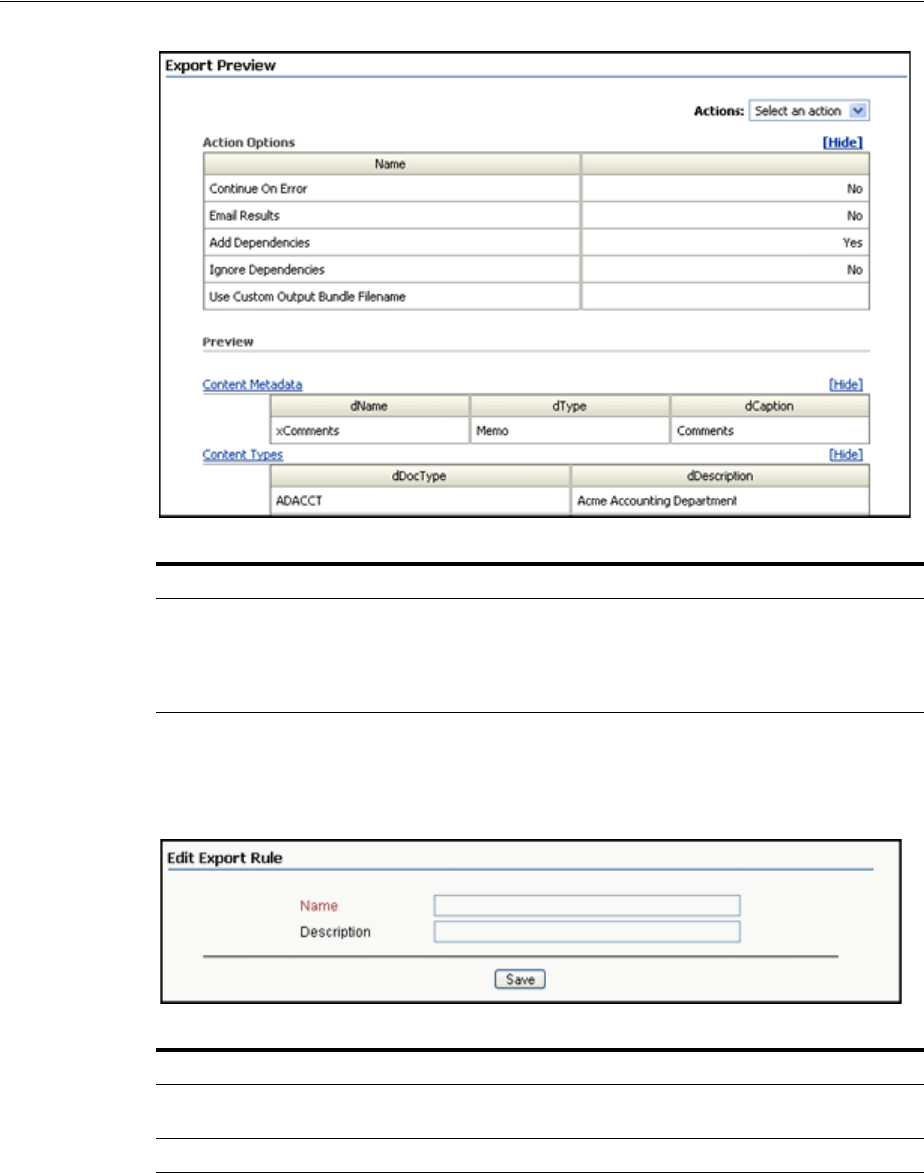
System Migration Interface
User Interface A-171
A.4.1.8 Edit Export Rule Screen
The Edit Export Rule screen is used to name a template for exporting. This screen is
displayed when a template is saved or edited.
A.4.1.9 Latest Action Screen
The Latest Action screen displays information about the latest action. This screen
refreshes automatically at a user-selectable time interval so the most recent action is
displayed. To access this screen, select the Administration tray from the portal
navigation bar, then click Config Migration Admin, then click Latest Action.
Element Description
Page Actions Menu Displays the page Actions menu with the following options:
Edit: displays the Config Migration Admin Screen where you
can edit the configuration information.
Export or Import: performs the selected action.
Element Description
Name The name of the new template. Names cannot contain spaces
or special characters (#, $, %, and so on).
Description Enter a description for the template.
System Migration Interface
A-172 Oracle Fusion Middleware System Administrator's Guide for Oracle Content Server
A.4.1.10 Action History Page
.The Action History screen displays the history of the latest actions, those that have
occurred since the last time the history file was cleared using the Clear History option
on the page Actions menu. You also can use the page Actions menu to select a specific
action and view its history. This screen refreshes automatically at a user-selectable
time interval so the most recent actions are displayed.
This screen appears after an import or export process, or you can access this screen by
selecting Action History from the top menu of any Migration screen. To directly
access this screen, select the Administration tray from the portal navigation bar, then
click Config Migration Admin, then click Action History.
Element Description
Page Refresh (In Seconds)
menu Specify the page refresh rate in seconds by selecting a time
from the menu.
Time column Displays the date and time when the action was initiated.
Section column Displays the Content Server Section used for the action.
Message column Displays information about the action.
Element Description
Page Actions menu Displays the page Actions menu with the following option:
Select an action: displays the history of the selected action.
Clear history: clears all history files that are displayed.
Name column Displays the name of the action.
Source column Displays the source of the action call.
Action column Displays the action taken.
Start column Displays the date and time when the action was initiated.
Status column Displays the latest status of the action.
System Migration Interface
User Interface A-173
A.4.2 Archive, Collection, and Batch Interface
This section provides information about the screens used to create and manage
archives, collections, and batch files.
■Section A.4.2.1, "Main Archiver Screen"
■Section A.4.2.2, "Archiver (General Tab)"
■Section A.4.2.3, "Add Archive Screen"
■Section A.4.2.4, "Copy Archive Screen"
■Section A.4.2.5, "Open Archive Collection Screen"
■Section A.4.2.6, "Find Archive Collection Definition File Screen"
■Section A.4.2.7, "Browse To Archiver Collection Screen"
■Section A.4.2.8, "Browse for Proxied Collection Screen"
■Section A.4.2.9, "View Batch Files Screen"
■Section A.4.2.10, "View Exported Content Items Screen"
A.4.2.1 Main Archiver Screen
This screen can be accessed either in standalone mode, or using a browser and clicking
the Administration tray in the portal navigation bar, then Admin Applets, then
Archiver.

System Migration Interface
A-174 Oracle Fusion Middleware System Administrator's Guide for Oracle Content Server
A.4.2.2 Archiver (General Tab)
The General tab is used to view archiving activity and set some export and import
options. To access this screen, click the General tab on the Main Archiver Screen.
Element Description
Options menu Open Archive Collection: Used to open collections.
View Automation For instance: used to display and remove
archives that are exported, imported, or transferred
automatically.
Tracing: Displays the Tracing Configuration menu. These
trace reports are available from the System Audit Information
page.
Edit menu Add: Displays the Add Archive Screen.
Delete: Deletes the selected archive.
Actions menu Export: Used to initiate an export or to delete revisions. If
automated export is enabled, this option is unavailable.
Import: Used to initiate an import and specify what data to
import.
Transfer: Manually transfers the selected archive to a target
archive. If a target archive is not specified or if automated
transfer out of an archive is enabled, this option is
unavailable.
Cancel: Cancels any active archiving process for the selected
archive.
Apps menu Used to open other administration applications. The other
applications open in the same mode (applet or standalone) as
the current application.
Help menu Contents: Displays the Oracle Content Server online help.
About Content Server: Displays version, build, and
copyright information for the Oracle Content Server instance.
Current Archives list Lists the archives in the open collection.
General tab Used to view archiving activity and set some export and
import options. For details, see Section A.4.2.2, "Archiver
(General Tab)."
Export Data Tab Used to configure exports. For details, see Section A.4.3.1,
"Main Archiver Export Screen."
Import Maps Tab Used to configure imports. For details, see Section A.4.4.1,
"Import Maps Main Screen."
Replication Tab Used to configure replication. For details, see Section A.4.5.1,
"Main Archiver Replication Screen."
Transfer To Tab Used to configure transfers. For details, see Section A.4.6.1,
"Main Archiver Transfer Screen."
Status bar Displays the status of the Archiver or the active archiving
process.
System Migration Interface
User Interface A-175
Export Options:
Import Options:
Element Description
Last Exported field Shows the date, time, and total number of files exported
during the last export.
Last Imported field Shows the date, time, and total number of files imported
during the last import.
View Batch Files button Displays the View Batch Files Screen, used to access batch
files.
Element Description
Replace Existing Export Files
field Shows if the existing export files will be replaced on the next
export.
Export Table Only field Shows if only tables are exported or if both content and tables
(if defined for export) are exported.
Copy Web Content field Shows if the native web-viewable (weblayout) files will be
included in the export.
Edit button Displays the Edit Export Options Screen, where you can
specify whether to replace existing exports, copy web
contents, or export tables only.
Element Description
Override Action field Shows the rule to be used to handle existing revisions during
import.
Import Valid Only field Shows if only files that have valid option list values will be
imported.
Translate Date field Shows if dates will be translated to the target Oracle Content
Server instance's time zone on import.
Edit button Displays the Edit Import Options (Select Rules) Screen, used
to specify how revisions are handled.
System Migration Interface
A-176 Oracle Fusion Middleware System Administrator's Guide for Oracle Content Server
A.4.2.3 Add Archive Screen
This screen is used to create an archive. To access this screen, on the Main Archiver
Screen click the Edit menu, then select Add.
A.4.2.4 Copy Archive Screen
This screen is used to copy an archive to a different directory or file system. To access
this screen, using the standalone mode for Archiver, highlight an archive name, select
Edit, then click Copy To.
Element Description
Archive Name field The name of the new archive. Archive names cannot contain
spaces.
Description field A description of the archive.
Copy From checkbox Selected: The new archive has the same export query and
additional data as the existing archive specified in the Copy From
field.
Unselected: The new archive is created without an export query or
additional data.
This checkbox appears only in the standalone Archiver.
Copy From field The directory path and file name of the existing archive to copy
from. For example, C:/oracle/archives/my_archive/archive.hda.
This field appears only in the standalone Archiver.
Browse button Used to navigate to and select an archive to copy from.
This button appears only in the standalone Archiver.
Element Description
Name field The name of the new archive. This defaults to the name of the archive
being copied.
Copy Archive To
Directory field The directory path where the new archive is created. This directory
must exist on the file system before copying.
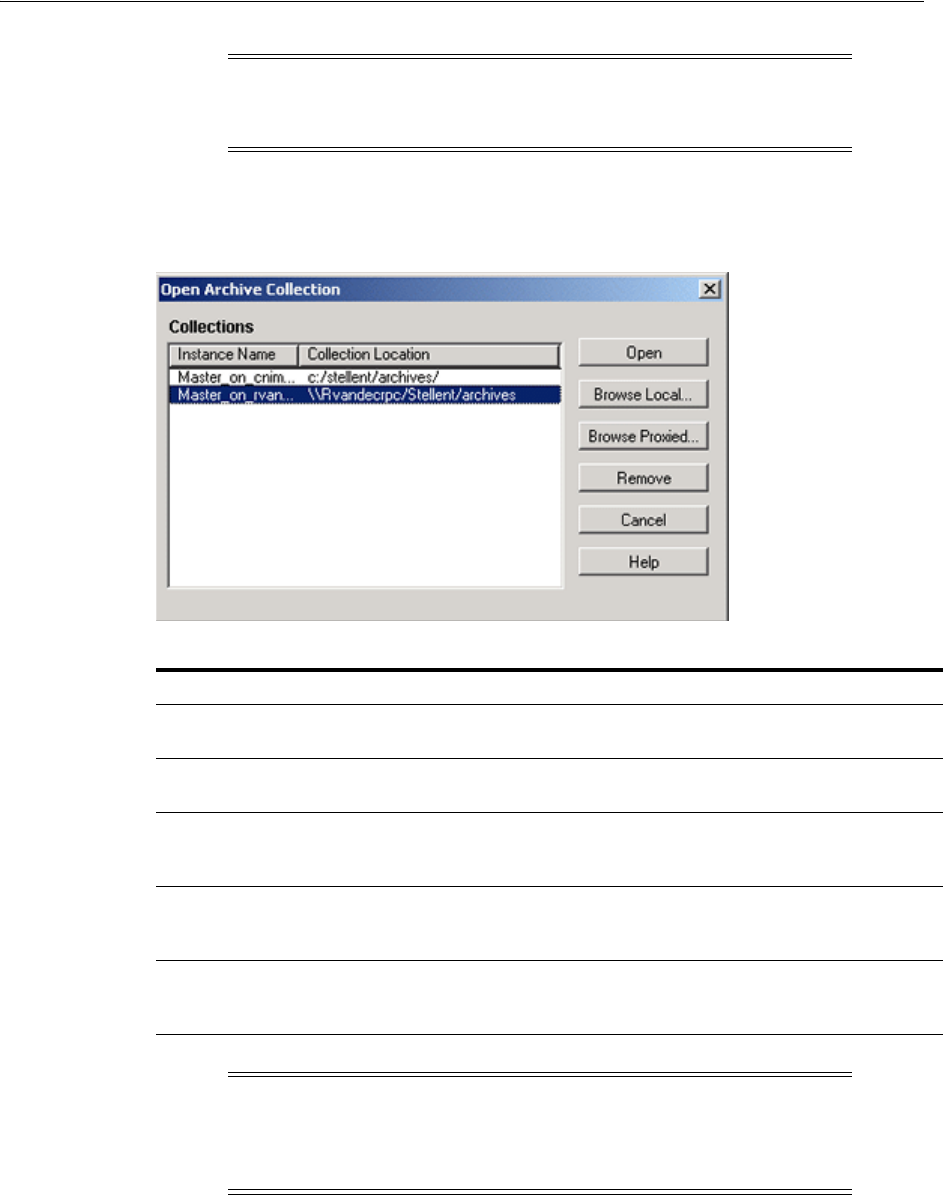
System Migration Interface
User Interface A-177
A.4.2.5 Open Archive Collection Screen
This screen is used to access sets of archives (collections). To access this screen, on the
Main Archiver Screen select Options, then click Open Archive Collection.
A.4.2.6 Find Archive Collection Definition File Screen
This screen is used to specify the directory and file name for a new archive collection
when in standalone mode. To access this screen, click Browse Local on the Open
Archive Collection Screen.
Note: This procedure copies the files in an archive. It does not create
a new collection or update the collection.hda file if the archive is copied
to a collection directory.
Element Description
Collections list Lists the archive collections that are available to the Oracle Content Server
instance.
Open button Opens the selected collection. When the selected collection is already open,
this button is unavailable.
Browse Local
button Displays the Find Archive Collection Definition File Screen, used to create a
collection on your local system. This button is available only in the
standalone Archiver.
Browse Proxied
button Displays the Browse for Proxied Collection Screen, which is used to open a
collection from another Oracle Content Server instance. See the following
note.
Remove button Removes the selected collection from the Oracle Content Server instance. (The
collection and archive files remain in the file system, and must be deleted
manually.)
Note: In Archiver, the term proxied refers to any Oracle Content
Server instance to which the local instance is connected through an
outgoing provider. This does not have to be a proxied instance of the
master Oracle Content Server instance.
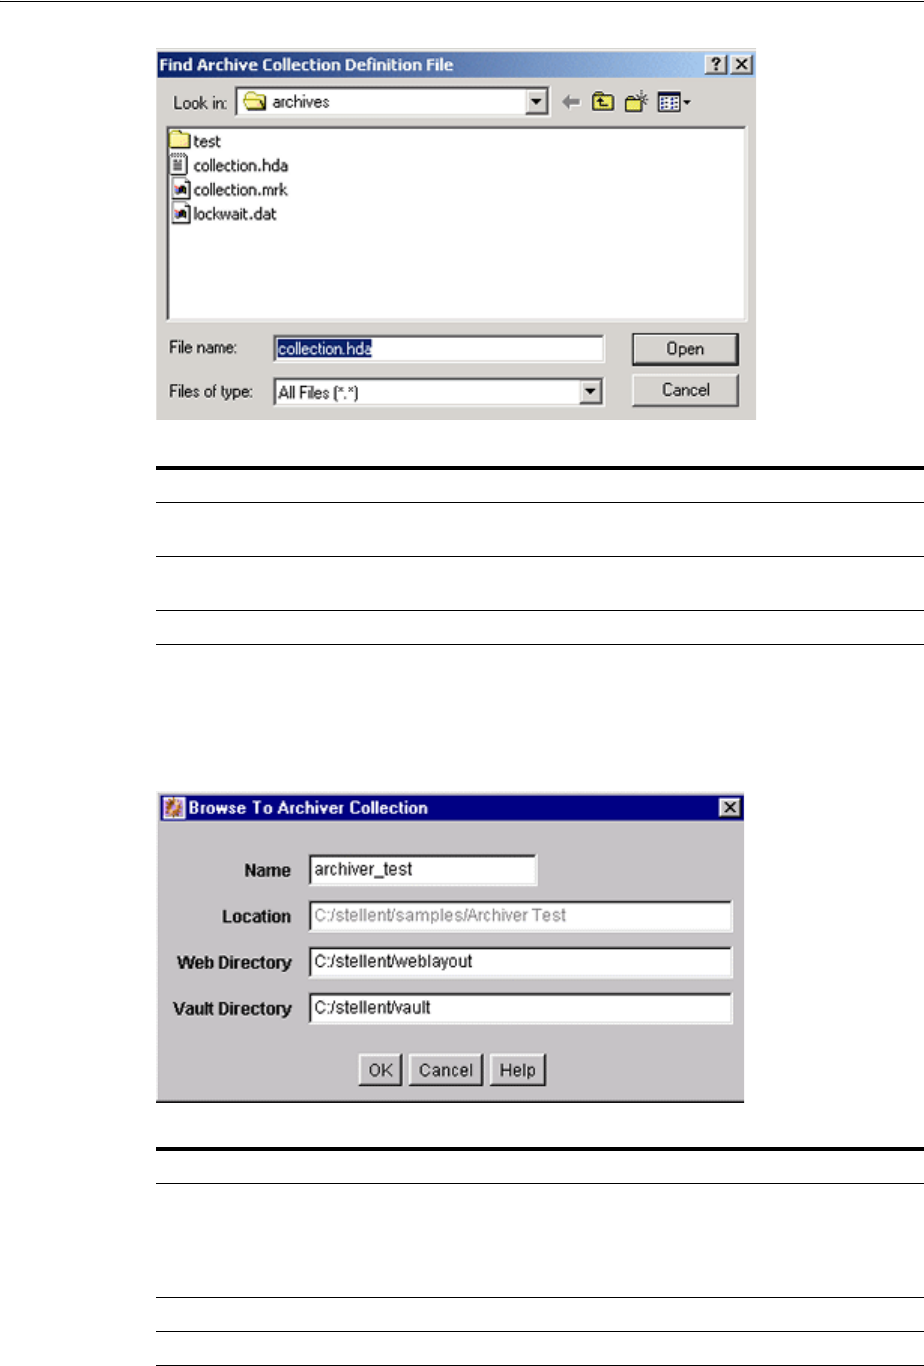
System Migration Interface
A-178 Oracle Fusion Middleware System Administrator's Guide for Oracle Content Server
A.4.2.7 Browse To Archiver Collection Screen
This screen is used to define a new archive collection while using the standalone
archiver. To access this screen, click Open on the Find Archive Collection Definition
File Screen.
Element Description
Look in list Used to navigate to the directory where the new archive
collection is created.
File name field The file name of the collection definition (HDA) file. The
default is collection.hda.
Open button Displays the Browse To Archiver Collection Screen.
Element Description
Name field The name of the archive collection.
Collection names cannot contain spaces.
Use the same name as the collection directory to make
navigation easier.
Location field The path to the new collection.
Web Directory field The path to the Oracle Content Server weblayout directory.
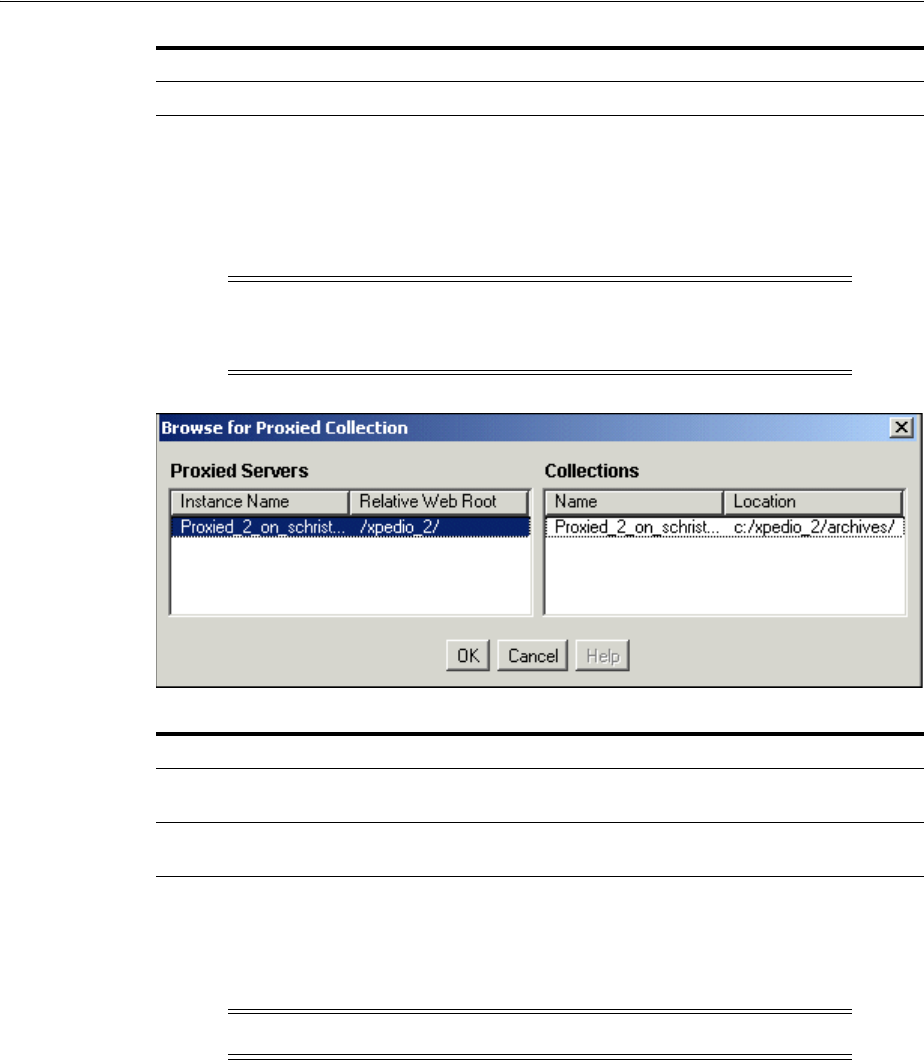
System Migration Interface
User Interface A-179
A.4.2.8 Browse for Proxied Collection Screen
This screen is used to select a collection to be opened from a remote Oracle Content
Server instance. To access this screen, click Browse Proxied on the Open Archive
Collection Screen.
A.4.2.9 View Batch Files Screen
This screen is used to view, edit, and delete batch files. To access this screen, on the
Archiver (General Tab) highlight an archive, then click View Batch Files.
Vault Directory field The path to the Oracle Content Server vault directory.
Note: In Archiver, the term proxied refers to any Oracle Content
Server instance to which the local instance is connected through an
outgoing provider.
Element Description
Proxied Servers list Lists the name and relative web root for each remote Oracle
Content Server instance.
Collections list Lists the name and directory path of each collection on the
selected remote server.
Note: This option is active only if batch files exist.
Element Description
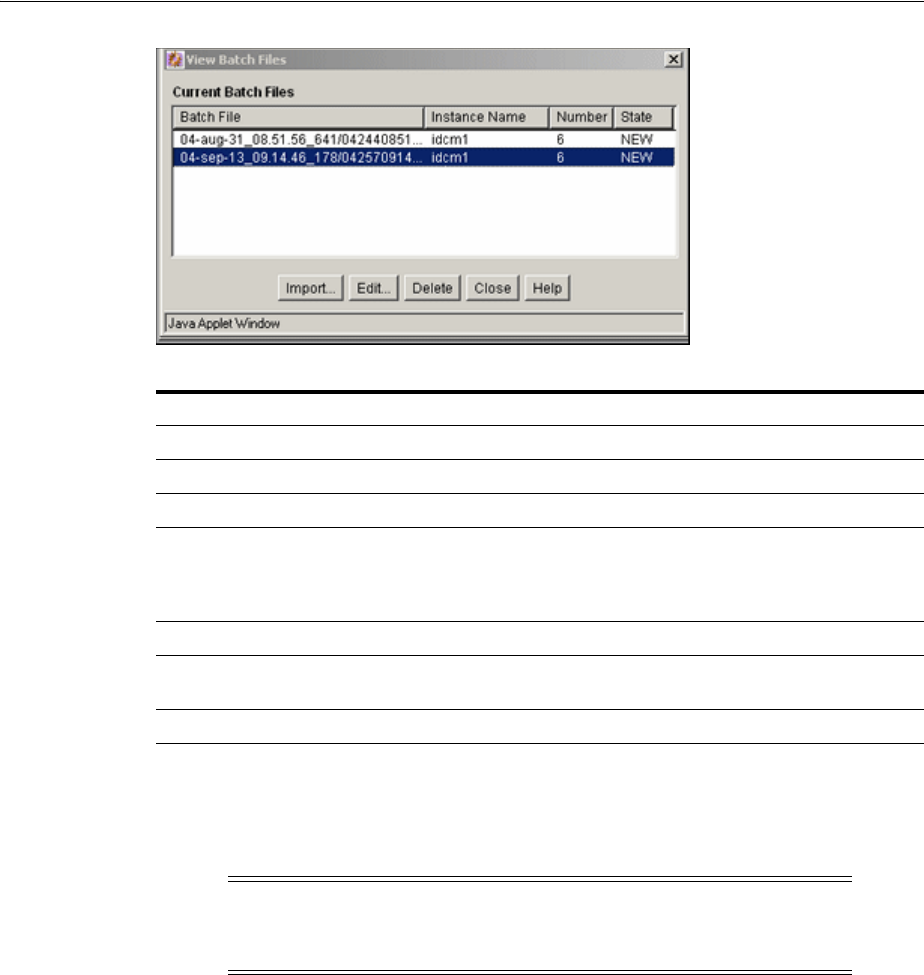
System Migration Interface
A-180 Oracle Fusion Middleware System Administrator's Guide for Oracle Content Server
A.4.2.10 View Exported Content Items Screen
This screen is used to import or delete specific revisions from a batch file. To access
this screen, on the View Batch Files Screen highlight a batch file name, then click Edit.
Element Description
Batch File column The directory and file name of each batch file in the selected archive.
Instance Name column The name of the Oracle Content Server instance.
Number column The number of content items in the batch file.
State column The state of the batch file.
NEW: The batch file was exported manually.
AutoInsert: The batch file was exported automatically.
Import button Imports the selected batch file.
Edit button Displays the View Exported Content Items Screen, which is used to
import or delete specific files in a batch file.
Delete button Deletes the selected batch file from the archive.
Tip: If you are importing multiple revisions of the same content
item, ensure that you import the revisions in the correct order.
Importing revisions out of order causes errors.
System Migration Interface
User Interface A-181
A.4.3 Export Interface Screens
This section provides information about the screens used to manage the export
process.
■Section A.4.3.1, "Main Archiver Export Screen"
■Section A.4.3.2, "Export Data (Content) Screen"
Element Description
Use Filter checkbox Select this checkbox to use a filter to narrow the Content list.
Define Filter button Displays the Define Filter Screen, where you can select items
for inclusion in the view.
Show Columns button Displays the Show Columns Screen, where you can select the
columns to be displayed.
Content list Shows the revisions in the batch file that match the filter
settings.
The list displays 50 revisions per page.
Double-clicking a revision displays the Information Page for
that revision.
Top of list button Displays the top of the Content list.
Previous page button Displays the previous page of the Content list.
Import button Imports the selected revision. See the following Tip.
Delete button Deletes the selected revisions from the batch file.
Undo button Returns the last deleted revision to Archived status.
Apply button Deletes any revisions that have Deleted status.
Refresh button Returns all deleted revisions to Archived status.
Close button Closes the screen.
Next page button Displays the next page of the Content list.
End of list button Displays the end of the Content list.
System Migration Interface
A-182 Oracle Fusion Middleware System Administrator's Guide for Oracle Content Server
■Section A.4.3.3, "Edit Export Query (Content) Screen"
■Section A.4.3.4, "Edit Export Options Screen"
■Section A.4.3.5, "Previewing Export Queries (Content) Screen"
■Section A.4.3.6, "Main Archiver Export Screen (Table)"
■Section A.4.3.7, "Add New/Edit Table Screen"
■Section A.4.3.8, "Edit Export Query (Table) Screen"
■Section A.4.3.9, "Previewing Export Queries (Table) Screen"
■Section A.4.3.10, "Export Archive Screen"
A.4.3.1 Main Archiver Export Screen
The Export Data tab of the Archiver application is used to set the export criteria for
content items and tables. To access this function, click the Export Data tab on the Main
Archiver Screen.
Two tabs appear on the Export Data screen:
A.4.3.2 Export Data (Content) Screen
The Content tab is used to set the export criteria for content items. To access this
screen, click the Content tab on the Main Archiver Export Screen.
Element Description
Content tab Displays the Export Data (Content) Screen.
Table tab Displays the Main Archiver Export Screen (Table).
System Migration Interface
User Interface A-183
Export Query pane:
Additional Data pane:
A.4.3.3 Edit Export Query (Content) Screen
The Edit Export Query screen is used to create an export query that defines which
content items to export. A similar screen is used to create queries for tables (Edit
Export Query (Table) Screen).
To access this screen:
1. Select an archive.
2. Click the Main Archiver Export Screen and the Content tab.
3. Click Edit in the Export Query section.
Element Description
Export Query field Shows the export criteria that is used to select which content
items will be exported.
Edit button Displays the Edit Export Query (Content) Screen, which is
used to change export criteria.
Preview button Displays the Previewing Export Queries (Content) Screen
screen, which shows what content will be exported.
Element Description
Content Configuration field Shows whether content types will be exported.
User Configuration field Shows whether user attributes will be exported.
Edit button Displays a screen where you can specify whether to export
content configuration information or user configuration
information.
System Migration Interface
A-184 Oracle Fusion Middleware System Administrator's Guide for Oracle Content Server
Query Definition pane:
Element Description
Field list The metadata field that is evaluated for each content item.
Items matching this field are exported.
Operator field Specifies how the Value is evaluated for each content item.
The available operators depend on the type of metadata field
selected:
Is exports content items with the exact value specified.
Is Not exports content items with a different value than the
specified value.
Begins With exports content items with the specified value at
the beginning of the field.
Contains Word exports content items with the specified value
anywhere in the field.
Is Date Before exports content items with dates before the
specified value.
Is Date After exports content items with dates after the
specified value.
Value field The value for the specified metadata field. Depending on the
option chosen in the Field list, this field can be a text entry
field, text entry field with Select button, or list of the available
options.
Select button Displays a list of existing items (such as content items or
users), from which you can select a value for the Value field.
This button appears only when certain metadata fields are
selected.

System Migration Interface
User Interface A-185
Query Options pane:
Add button Adds the specified export query as a new line in the Query
Expression box.
Update button Replaces the line selected in the Query Expression box with
the specified export query.
Query Expression box Shows the SQL export criteria as specified with the Add or
Update buttons.
Delete button Removes the selected line from the Query Expression box.
Custom Query Expression
checkbox Selected: The query expression can be edited directly.
Unselected: The query expression is limited to the criteria
specified in the Field, Operator, and Value fields (described
previously). See the following Caution and Note messages.
Custom Query Expression box The SQL expression that is evaluated for each content item
during export. By default, multiple criteria use the AND
operator.
Caution: If you clear the Custom Query Expression checkbox, the
expression reverts to its original definition; all modifications are lost.
Note: You can use Idoc Script in the query expression. For details,
see the Oracle Fusion Middleware Idoc Script Reference Guide.
Element Description
Export Revisions with Release
Date later than most recent
Export Date checkbox
Selected: Exports only the revisions that have released since
the last export and that meet the export criteria.
Unselected: Exports all revisions that meet the export criteria.
Allow Export of Published
Revisions checkbox This checkbox is for use with Oracle Content Publisher.
Selected: Exports all revisions that meet the export criteria.
Unselected: Does not export revisions that were published to
the Oracle Content Server instance by Oracle Content
Publisher.
All Selected Revisions option Exports all revisions of content items that meet the export
criteria.
Latest Revisions option Exports only the most recent revision of content items that
meet the export criteria.
If you are using replication, this option cannot be selected.
Not Latest Revisions option Exports all revisions except the most recent for content items
that meet the export criteria.
If you are using replication, this option cannot be selected.
Element Description
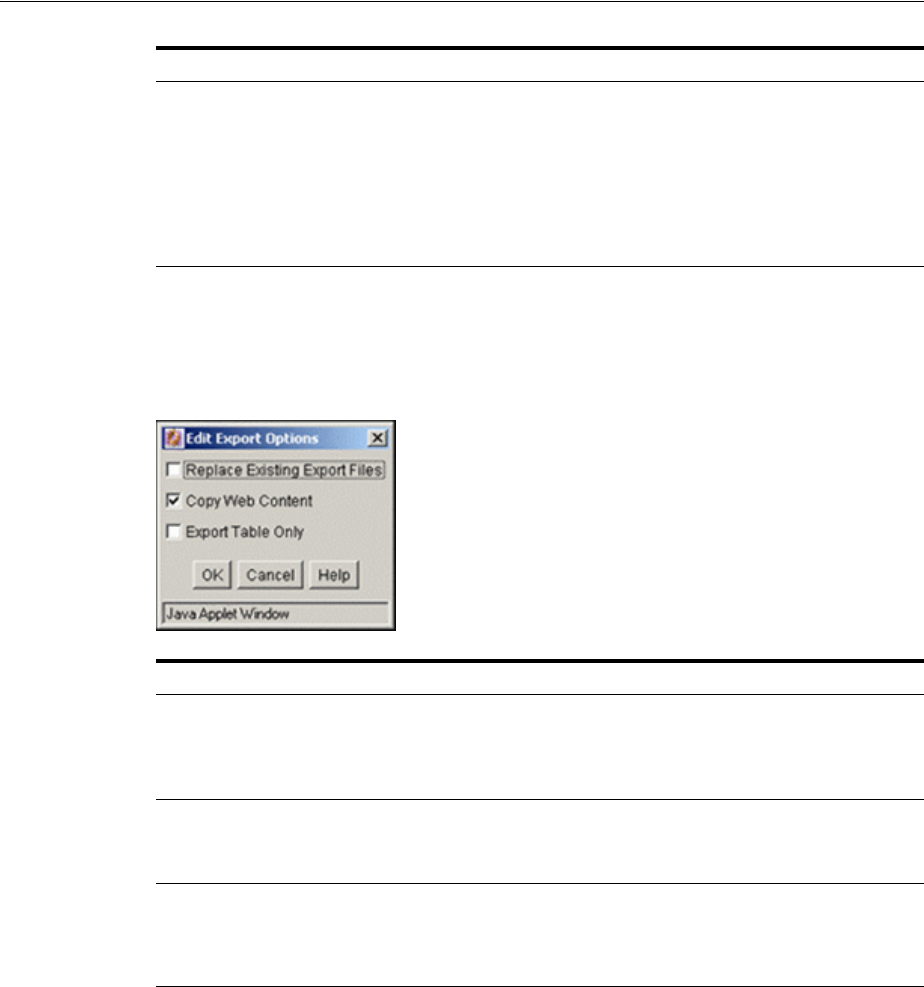
System Migration Interface
A-186 Oracle Fusion Middleware System Administrator's Guide for Oracle Content Server
A.4.3.4 Edit Export Options Screen
This screen is used to specify which copies of the files to export and to specify whether
to overwrite existing batch files. To access this screen, select an archive, click the
Archiver General tab, then click Edit in the Export Options section.
A.4.3.5 Previewing Export Queries (Content) Screen
The Content Satisfying the Export Query screen is used to view a list of revisions that
meet the export criteria.
To access this screen:
1. Select an archive.
2. Click the Main Archiver Export Screen and the Content tab.
3. Click Preview in the Export Query section.
Single Revision Replication
option Exports the most recent revision of each item that matches the
query. This option replicates the latest revision of an item, but
the replication is always renamed to revision 1 on the
destination server, no matter what revision number it was on
the source server.
Caution: Do not switch to Single Revision Replication if the
destination server already has multiple revisions for any
content item.
Element Description
Replace Existing Export Files
checkbox Selected: Any existing batch files are deleted from the archive
when an export is initiated.
Unselected: Initiating an export adds a new batch file but
does not delete the existing batch files.
Copy Web Content checkbox Selected: The native (vault) and web-viewable (weblayout) files
are exported.
Unselected: Only the native (vault) files are exported.
Export Table Only checkbox Selected: Only the tables are exported. Content items are not
exported.
Unselected: Content items are exported and tables that have
been defined to be exported.
Element Description

System Migration Interface
User Interface A-187
A.4.3.6 Main Archiver Export Screen (Table)
The Table tab on the Export Data tab of the Archiver application is used to add and
define the characteristics for new tables and edit existing tables in the selected archive.
To access this screen, click the Main Archiver Export Screen, and click the Table tab.
Element Description
Export Query field Shows the SQL query expression created using the Edit
Export Query (Content) Screen.
Use Filter checkbox Select this checkbox to use a filter to narrow the Content list.
Define Filter button Displays the Define Filter Screen, where you can select items
for inclusion in the view.
Show Columns button Displays the Show Columns Screen, where you can select the
columns to be displayed.
Release Date Since checkbox
and field Limits the revisions displayed in the Content list by their
release dates.
Content list Shows the revisions in the Oracle Content Server repository
that match the filter settings.
A maximum of 100 revisions can be displayed in this list;
however, all revisions that satisfy the export query will be
exported.
Double-clicking a revision displays the Information Screen for
that revision.
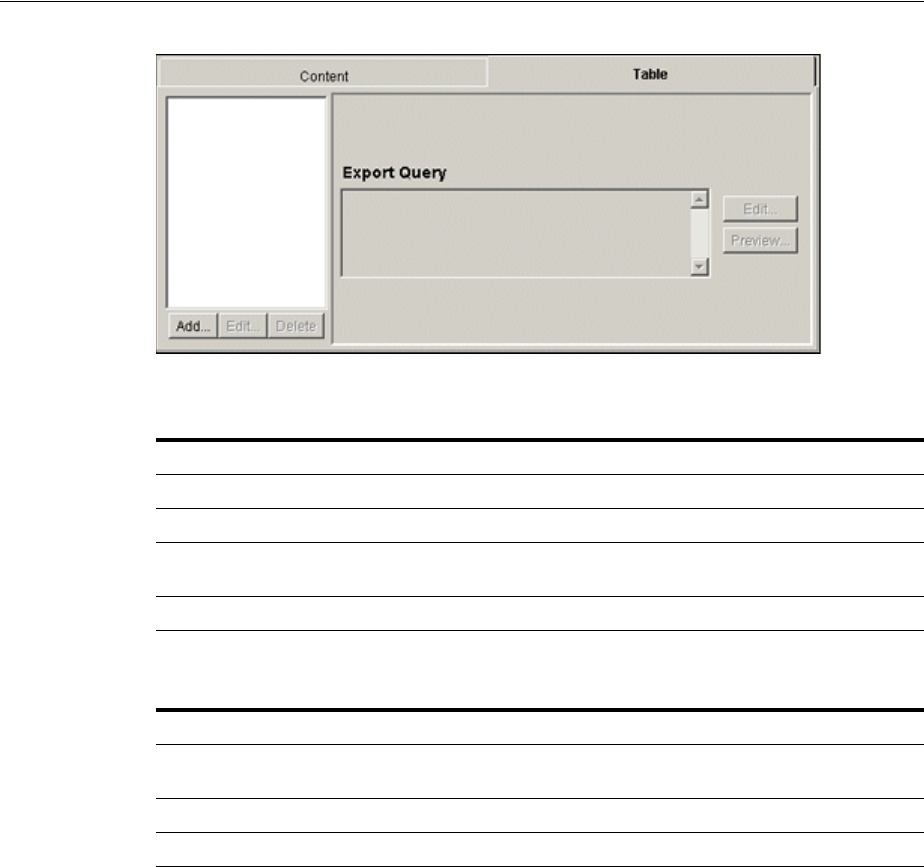
System Migration Interface
A-188 Oracle Fusion Middleware System Administrator's Guide for Oracle Content Server
Table pane:
Export Query pane:
A.4.3.7 Add New/Edit Table Screen
The Add New/Edit Table screen is used to define the export characteristics of a table
and add it to the selected export archive.
To access this screen:
1. Click the Main Archiver Export Screen.
2. Select an archive from the Current Archives list and click the Ta b l e s tab.
3. Click the Table list Add button.
Element Description
Table list Lists the tables in the selected archive.
Add button Displays the Add New/Edit Table Screen.
Edit button Displays the Edit Archive Properties screen. See the Add
New/Edit Table Screen.
Delete button Deletes the selected table from the archive.
Element Description
Export Query field Shows the export criteria that is used to select which tables
will be exported.
Edit button Displays the Edit Export Query (Table) Screen.
Preview button Displays the Previewing Export Queries (Table) Screen.

System Migration Interface
User Interface A-189
Element Description
Table Name list Lists the available database tables that can be added to the
selected archive.
Use Parent Timestamp
checkbox Selected: Use the parent table's timestamp to determine if this
table will be exported.
Unselected: Use the current timestamp to determine if this
table will be exported.
Create Timestamp list Lists the possible columns that store the creation timestamp
when the table row is created.
Modify Timestamp list Lists the possible columns that store the modification
timestamp when the table row is modified.
Parent Table list Lists parent table selections.
Table Relations field Used to specify the parent / child table relationship that
determines the information to be exported.
Create New Table or Field if
Not Exist checkbox Selected: Creates the specified table or field if it does not
currently exist.
Unselected: Does not create the table or field.
Use Source ID checkbox Selected: Only table rows that match in multiple instances are
exported.
Unselected: Table rows are exported regardless of their
matching status between instances.
Replicate Deleted Rows
checkbox Selected: The deleted source table rows are also deleted in the
target table.
Unselected: Rows are not deleted in the target table.
Delete before Importing All
Child Rows with Modified or
Deleted Parent checkbox
Selected: Delete the rows from the importing child table if the
corresponding rows in the parent table have been deleted or
modified.
Unselected: Rows are not deleted in the child table before
importing.

System Migration Interface
A-190 Oracle Fusion Middleware System Administrator's Guide for Oracle Content Server
A.4.3.8 Edit Export Query (Table) Screen
The Edit Export Query screen is used to create an export query that defines which
tables to export. This is similar to the screen used to create export queries for content
(Edit Export Query (Content) Screen).
To access this screen:
1. Select an archive
2. Click the Main Archiver Export Screen and the Table tab.
3. Click Edit in the Export Query section.
Allow Archiver to Delete Row
from Parent Table checkbox Selected: Delete the rows from the parent table if the
corresponding rows in the exported child table have been
deleted.
Unselected: Rows are not deleted from the parent table.
Delete Parent Row Only if No
Associate Child Exists
checkbox
Selected: Delete the rows from the parent table only if a child
row does not exist.
Unselected: Rows are not deleted from the parent table.
Element Description

System Migration Interface
User Interface A-191
A.4.3.9 Previewing Export Queries (Table) Screen
The Content Satisfying the Export Query screen is used to view a list of tables that
meet the export criteria. The fields, buttons, and checkboxes on this screen are
identical to those on the screen used to view a list of revisions meeting selected export
criteria.
To view and read the field descriptions, see the Previewing Export Queries (Content)
Screen.
Element Description
Field list The metadata field that will be evaluated for each table.
Operator field Specifies how the Value will be evaluated for each table. The
available operators depend on the type of metadata field
selected:
Is exports tables with the exact value specified.
Is Not exports tables with a different value than the specified
value.
Begins With exports tables with the specified value at the
beginning of the field.
Contains Word exports tables with the specified value
anywhere in the field.
Is Date Before exports tables with dates before the specified
value.
Is Date After exports tables with dates after the specified
value.
Value field The value for the specified metadata field.
Add button Adds the specified export query as a new line in the Query
Expression box.
Update button Replaces the line selected in the Query Expression box with
the specified export query.
Query Expression field Shows the export criteria.
Delete button Removes the selected line from the Query Expression box.
Custom Query Expression
checkbox Selected: The query expression can be edited directly.
Unselected: The query expression is limited to the criteria
specified in the Field, Operator, and Value fields. See the
following Caution and Note messages.
Custom Query Expression
field The SQL expression that will be evaluated for each table
during export. By default, multiple criteria use the AND
operator.
Caution: If you deselect the Custom Query Expression checkbox, the
expression reverts to its original definition; all modifications are lost.
Note: You can use Idoc Script in the query expression. For details,
see the Oracle Fusion Middleware Idoc Script Reference Guide.
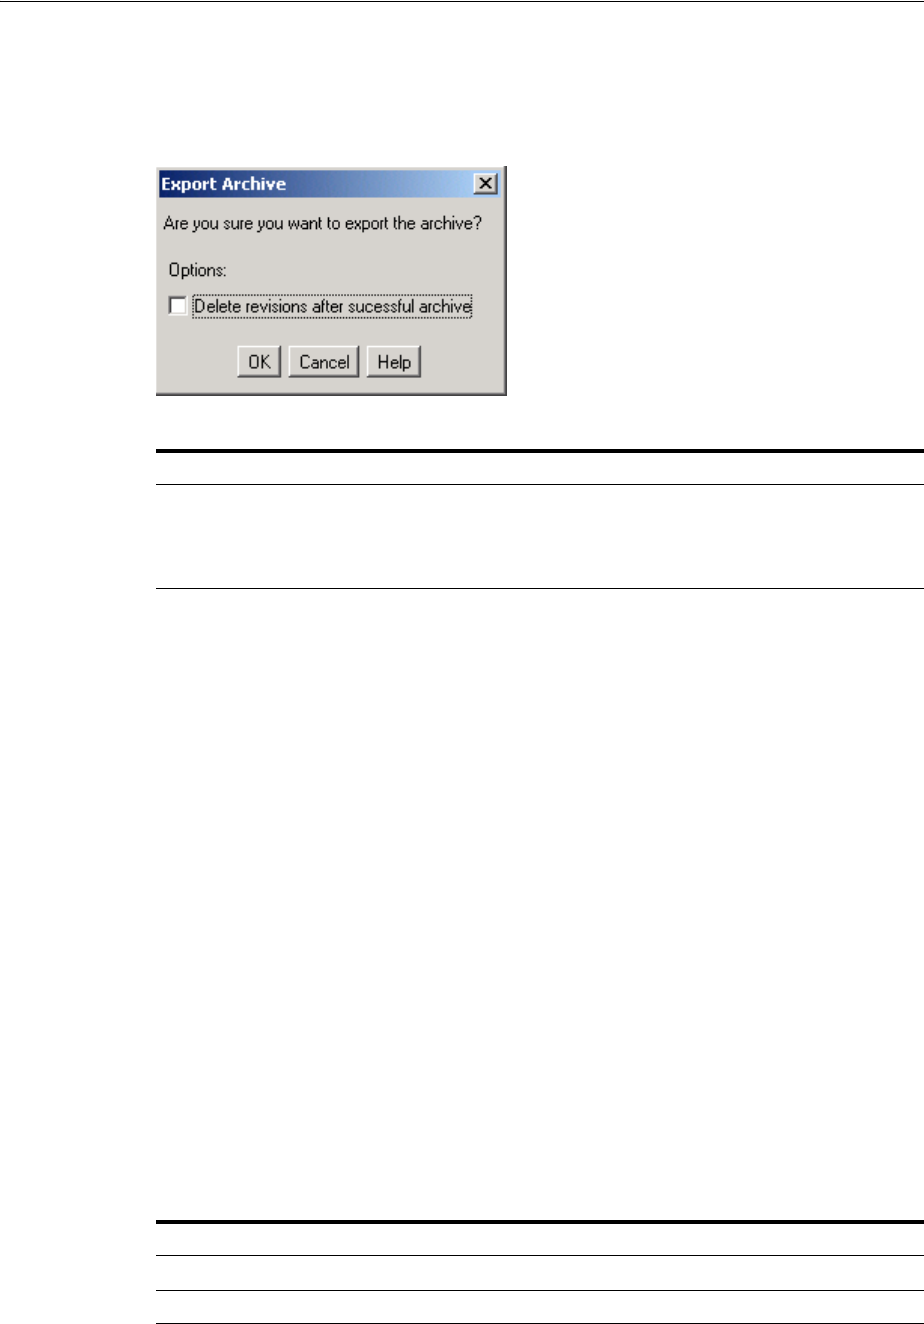
System Migration Interface
A-192 Oracle Fusion Middleware System Administrator's Guide for Oracle Content Server
A.4.3.10 Export Archive Screen
The Export Archive screen is used to initiate an export and specify whether to delete
the exported files. To access this screen, select Actions, then select Export from the
Archiver menu bar.
A.4.4 Import Interface Screens
This section provides information about the screens used during the import process.
■Section A.4.4.1, "Import Maps Main Screen"
■Section A.4.4.2, "Import Maps (Content) Screen"
■Section A.4.4.3, "Edit Field Map/Edit Value Map Screen"
■Section A.4.4.4, "Browse for Fields/Value Screen"
■Section A.4.4.5, "Import Maps (Table) Screen"
■Section A.4.4.6, "Edit Archive Properties on Table Screen"
■Section A.4.4.7, "Edit Import Options (Select Rules) Screen"
■Section A.4.4.8, "Import Archive Screen"
A.4.4.1 Import Maps Main Screen
Mapping determines how metadata fields on an exporting and importing Oracle
Content Server instance relate to each other.
The Import Maps tab of the Archiver application is used to configure metadata field
and value mappings to import content items and tables. To access this tab, click the
Import Maps tab on Main Archiver Screen.
Two tabs appear on the main mapping screen:
Element Description
Delete revisions after
successful archive checkbox Selected: Deletes exported revisions from the Oracle Content
Server instance upon successful export.
Unselected: Exported revisions are not deleted from the
Oracle Content Server instance.
Element Description
Content tab Displays the Import Maps (Content) Screen.
Table tab Displays the Import Maps (Table) Screen.

System Migration Interface
User Interface A-193
A.4.4.2 Import Maps (Content) Screen
The Content tab on the Import Maps screen is used to set the import criteria for
content items. To access this screen, click the Content tab on the Import Maps Main
Screen.
A.4.4.3 Edit Field Map/Edit Value Map Screen
The Edit Field Map/Edit Value Map screen is used to set how fields and values are
copied (mapped) from one metadata field to another during import.
Follow these steps to access this screen:
1. Click the Import Maps Main Screen
2. Select an archive from the Current Archives list
3. Click the Import Maps (Content) Screen and click Edit in the Field Maps section or
the Value Maps section.
Element Description
Field Maps box Shows the metadata field mapping expression.
Edit button Displays the Edit Field Map/Edit Value Map Screen.
Value Maps box Shows the metadata value mapping expression.
Edit button Displays the Edit Field Map/Edit Value Map Screen.
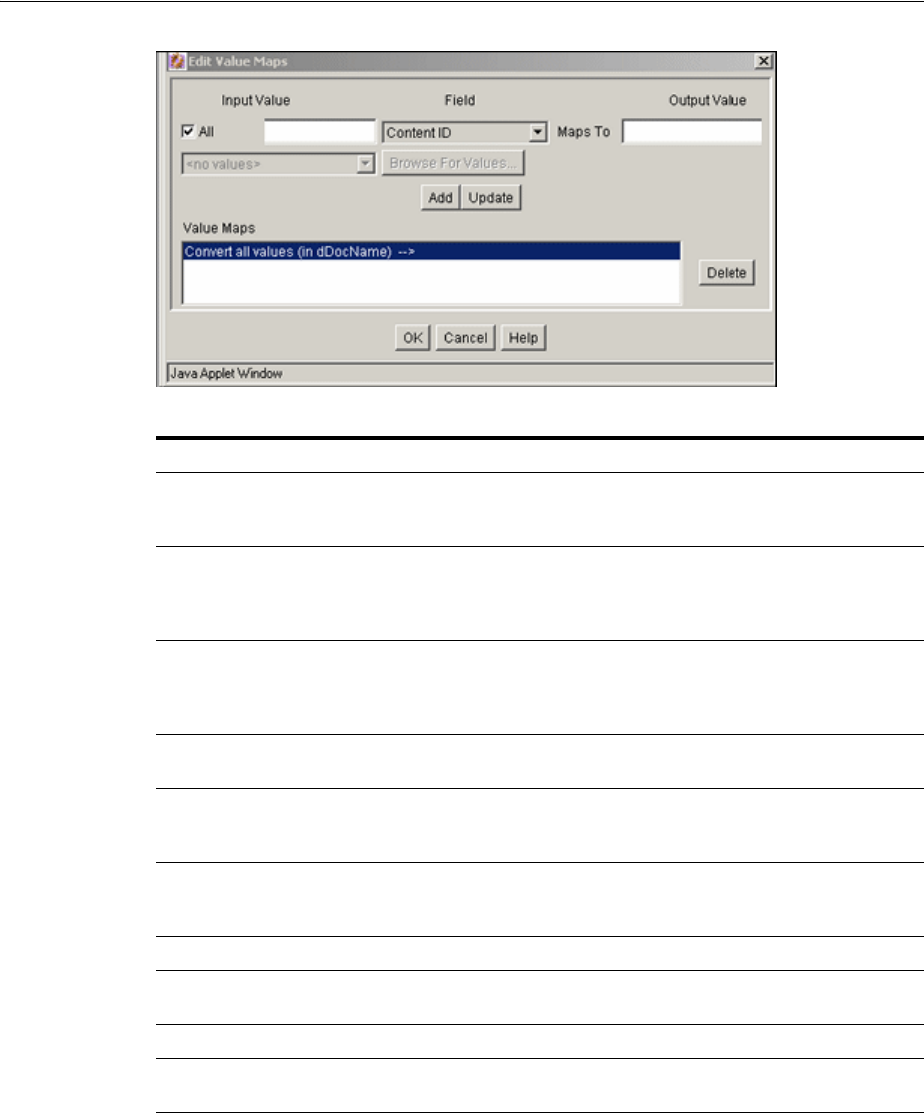
System Migration Interface
A-194 Oracle Fusion Middleware System Administrator's Guide for Oracle Content Server
A.4.4.4 Browse for Fields/Value Screen
The Browse for Fields/Value screen is used to specify whether to retrieve a list of
metadata fields from the local Oracle Content Server instance or from a specific batch
file. To access this screen, click Browse for Fields or Browse for Value on the Edit
Field Map/Edit Value Map Screen.
Element Description
'All' checkbox On the Edit Value Maps Screen, if the 'all' checkbox is
selected, the specified Field is changed to the Output Value
for all imported revisions.
Export Field/Input Value The metadata field that contains the data to be copied to a
different field during import or the metadata value to be
changed when mapping values. Use the internal field name,
such as dDocAuthor or xComments.
Export Field/Input Value list Enables you to select the Export Field or Input Value from a
list of existing metadata fields. A source must be selected from
the Browse for Fields/Value Screen for options to appear in
this list.
Browse For Fields/Browse for
Values button Displays the Browse for Fields/Value Screen.
'in' Field On the Edit Value Maps Screen, an additional field appears
between Input Value and Output Value. Select the field where
the metadata should be changed from the list.
Target Field/Output Value The metadata field that the archived metadata is copied to
during import. The list includes all metadata fields in the local
Oracle Content Server instance.
Add button Adds the specified mapping expression to the Field Maps box.
Update button Replaces the mapping expression selected in the Field Maps
box with the specified mapping expression.
Field MapsValue Maps box Shows the mapping expressions.
Delete button Deletes the selected mapping expression from the Field Maps
box.
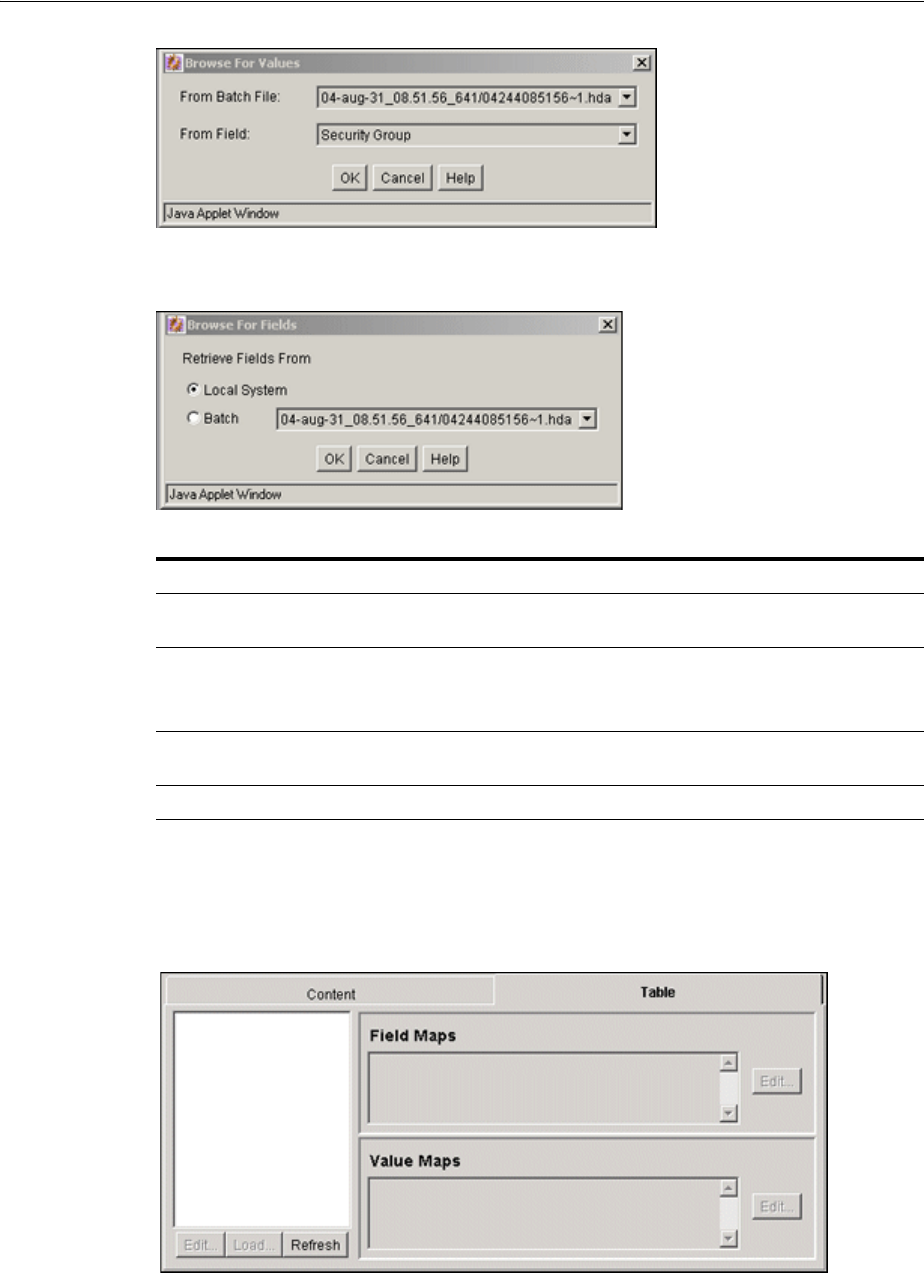
System Migration Interface
User Interface A-195
A.4.4.5 Import Maps (Table) Screen
The Table tab on the Import Maps screen is used to add and define the field and value
maps for importing tables. To access this screen, on the Import Maps Main Screen click
the Tabl e tab.
Element Description
From Batch File list On the Browse for Values screen, selecting a batch file
retrieves the list of metadata fields defined in that batch file.
From Field list On the Browse for Values screen, selecting a field retrieves a
list of metadata values defined for that field in the batch file.
Local System option Retrieves a list of metadata fields from the local Oracle
Content Server instance.
Batch option Retrieves a list of metadata fields from the selected batch file.

System Migration Interface
A-196 Oracle Fusion Middleware System Administrator's Guide for Oracle Content Server
A.4.4.6 Edit Archive Properties on Table Screen
The Edit Archive Properties screen is used to edit the original checkbox values
assigned to the table when it was created. The fields in the top section are no longer
editable. Only the configuration settings in the lower section can be changed. This
screen displays after clicking both the Edit and Load buttons associated with the
archive file list section on the Import Maps Table tab screen.
The configuration settings are different depending on which button was clicked to
display the screen. The settings that are displayed after clicking the Edit button are the
global configurations and the settings that display after clicking the Load button are
those that were defined when the archive was created. Changes made using the
Edit-generated screen can be overridden with changes made using the Load-generated
screen.
The fields and checkboxes on this screen are identical to those on the screen used to
add a table to an archive. To view field descriptions, see Section A.4.3.7, "Add
New/Edit Table Screen."
Follow these steps to access this screen:
1. Click the Import Maps Main Screen.
2. Select an archive from the Current Archives list.
3. Click the Import Maps (Table) Screen.
4. Click the Table list Edit button.
Screens similar to those used to edit content display:
■The Edit Field Maps screen is used to set up how values will be copied from one
metadata field to another during the import of tables. The fields and buttons on
this screen are identical to those on the screen used to set the metadata mapping
for imported content items. See Section A.4.4.3, "Edit Field Map/Edit Value Map
Screen."
Element Description
Archive file list Provides a tree-view list of archive files.
Edit button Displays the Edit Archive Properties on Table Screen. The
configuration settings on this screen that display after clicking
the Edit button are the global configurations. The settings on
the top section of the screen cannot be edited. Changes to the
global settings on the bottom section are implemented after
clicking OK. Changes made using the Load button can
override these changes.
Load button Displays the Edit Archive Properties on Table Screen. The
configuration settings on this screen that display after clicking
the Load button are the configuration settings defined when
the archive was created. The settings on the top section of the
screen cannot be edited. Changes to the settings on the bottom
section are implemented after clicking OK. These changes will
override the changes made using the Edit button.
Refresh button Used to update the current archive file list.
Field Maps box Shows the metadata field mapping expression.
Edit button Displays the Edit Field Map/Edit Value Map Screen.
Value Maps box Shows the metadata value mapping expression.
Edit button Displays the Edit Field Map/Edit Value Map Screen.
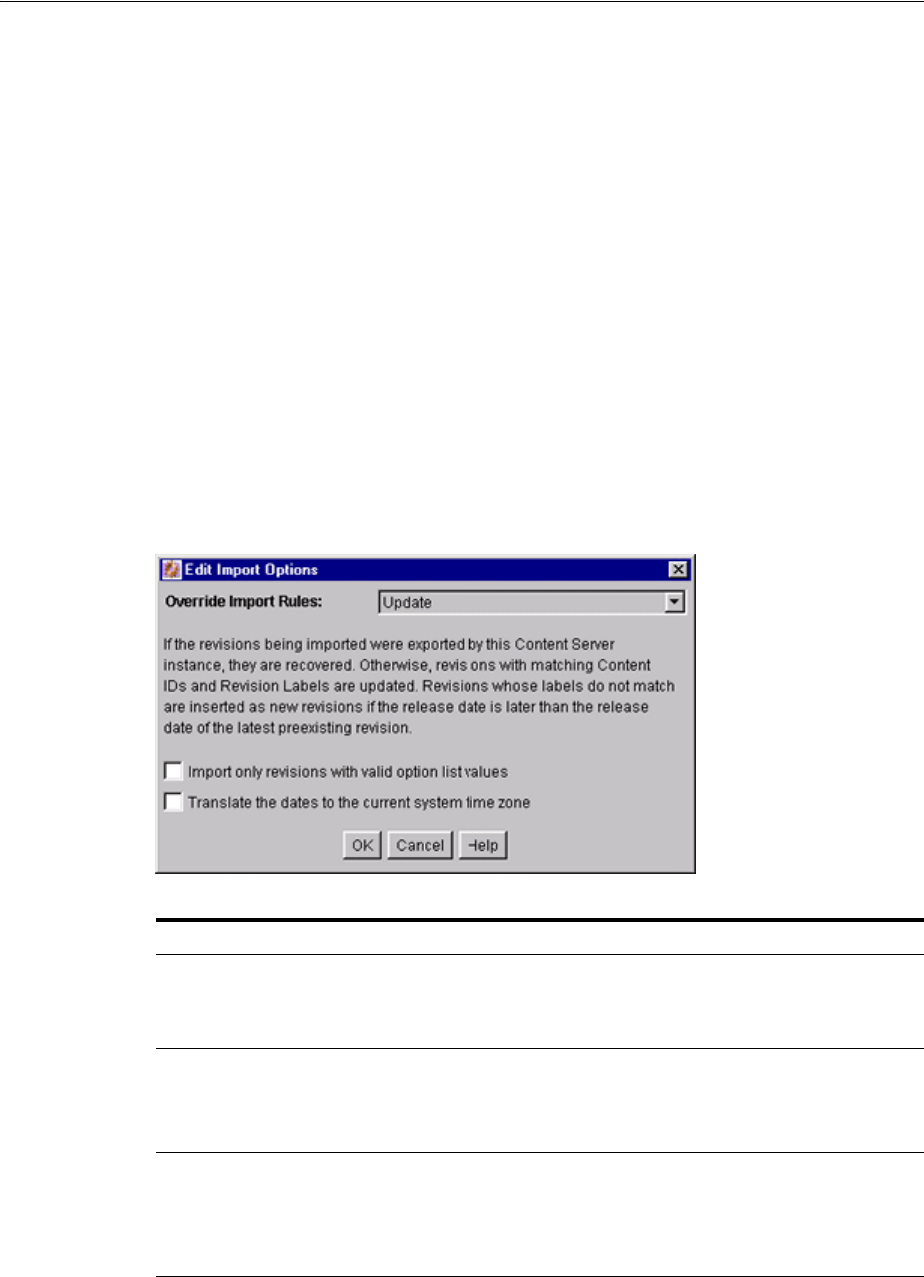
System Migration Interface
User Interface A-197
■The Browse for Fields screen is used to specify whether to retrieve a list of
metadata fields from the local Oracle Content Server instance or from a specific
batch file. The fields on this screen are identical to those on the same screen
associated with the Import Maps Content tab. See Section A.4.4.4, "Browse for
Fields/Value Screen."
■The Edit Value Maps screen is used to set up how metadata values will be
changed (mapped) during the import of tables. The fields and buttons on this
screen are identical to those on the screen used to set the metadata values for
imported content items. See Section A.4.4.3, "Edit Field Map/Edit Value Map
Screen."
■The Browse for Values screen is used to select metadata values to retrieve from a
batch file. The fields on this screen are identical to those on the same screen
associated with the Import Maps Content tab. See Section A.4.4.4, "Browse for
Fields/Value Screen."
A.4.4.7 Edit Import Options (Select Rules) Screen
The Edit Import Options screen is used to specify how revisions are replaced, added,
or deleted during import. To access this screen, click Edit in the Import Options
section of the Archiver (General Tab).
Element Description
Override Import Rules list Select the rule that defines how revisions are replaced, added,
or deleted during import. Selecting an option displays a
description of the import rule. See the following Caution
message.
Import only revisions with
valid option list values
checkbox
Selected: Values in validated option lists are checked, and
only revisions with valid option list values will be imported.
Unselected: Option list values are not validated during
import.
Translate the dates to the
current system time zone
checkbox
Selected: Times in metadata date fields are recalculated to
reflect the time zone of the target (import) Oracle Content
Server.
Unselected: Times in metadata date fields remain unchanged
during import.
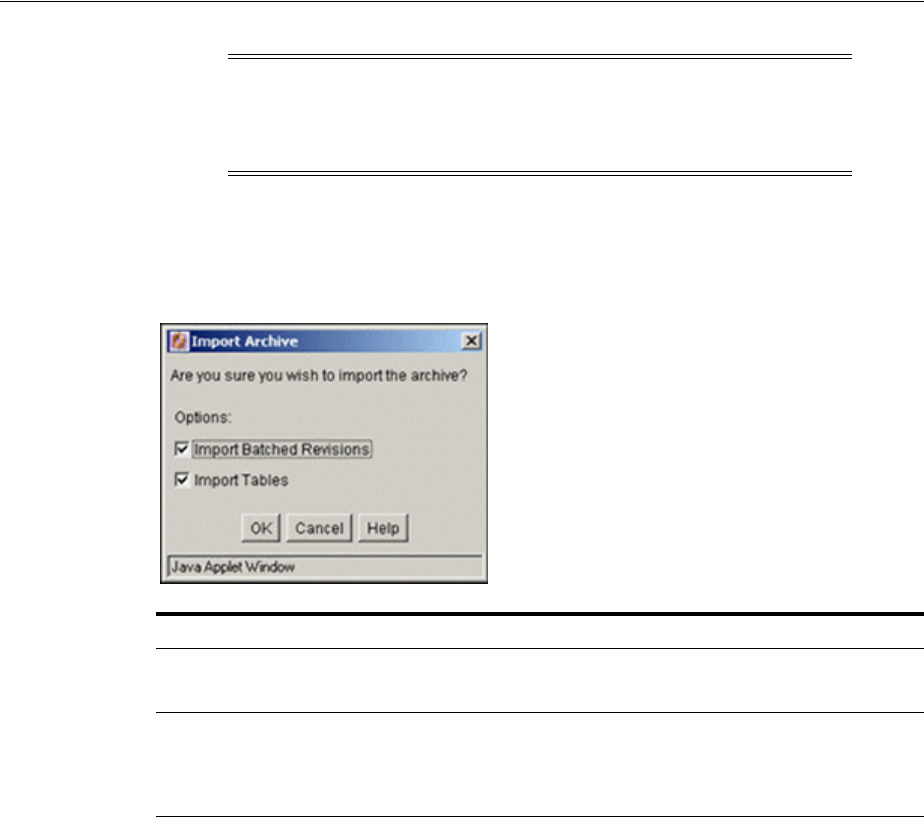
System Migration Interface
A-198 Oracle Fusion Middleware System Administrator's Guide for Oracle Content Server
A.4.4.8 Import Archive Screen
The Import Archive screen is used to initiate an import and to specify what
information to import. To access this screen, select Actions, and then click Import
from the Archiver menu bar.
A.4.5 Replication Interface Screens
This section provides information about the screens used to manage the replication
process.
■Section A.4.5.1, "Main Archiver Replication Screen"
■Section A.4.5.2, "Registered Exporter Screen"
■Section A.4.5.3, "Automation (Exporters) Screen"
■Section A.4.5.4, "Automation (Importers) Screen"
■Section A.4.5.5, "Automation (Transfers) Screen"
■Section A.4.5.6, "Automation (Queries) Screen"
A.4.5.1 Main Archiver Replication Screen
The Replication tab of the Archiver application is used to configure automated exports
and imports. To access this screen, click the tab on the Main Archiver Screen.
Caution: The Update import rule will replace existing revisions
without saving the existing files. Be extremely careful when
importing so that you do not accidentally replace content you meant
to keep.
Element Description
Import Batched Revisions
checkbox Selected: Imports content item revisions.
Unselected: Does not import content item revisions.
Import Tables checkbox Selected: Imports content item revisions and tables in an
archive that contains both.
Unselected: Does not import the tables in an archive that
contains both content item revisions and tables.
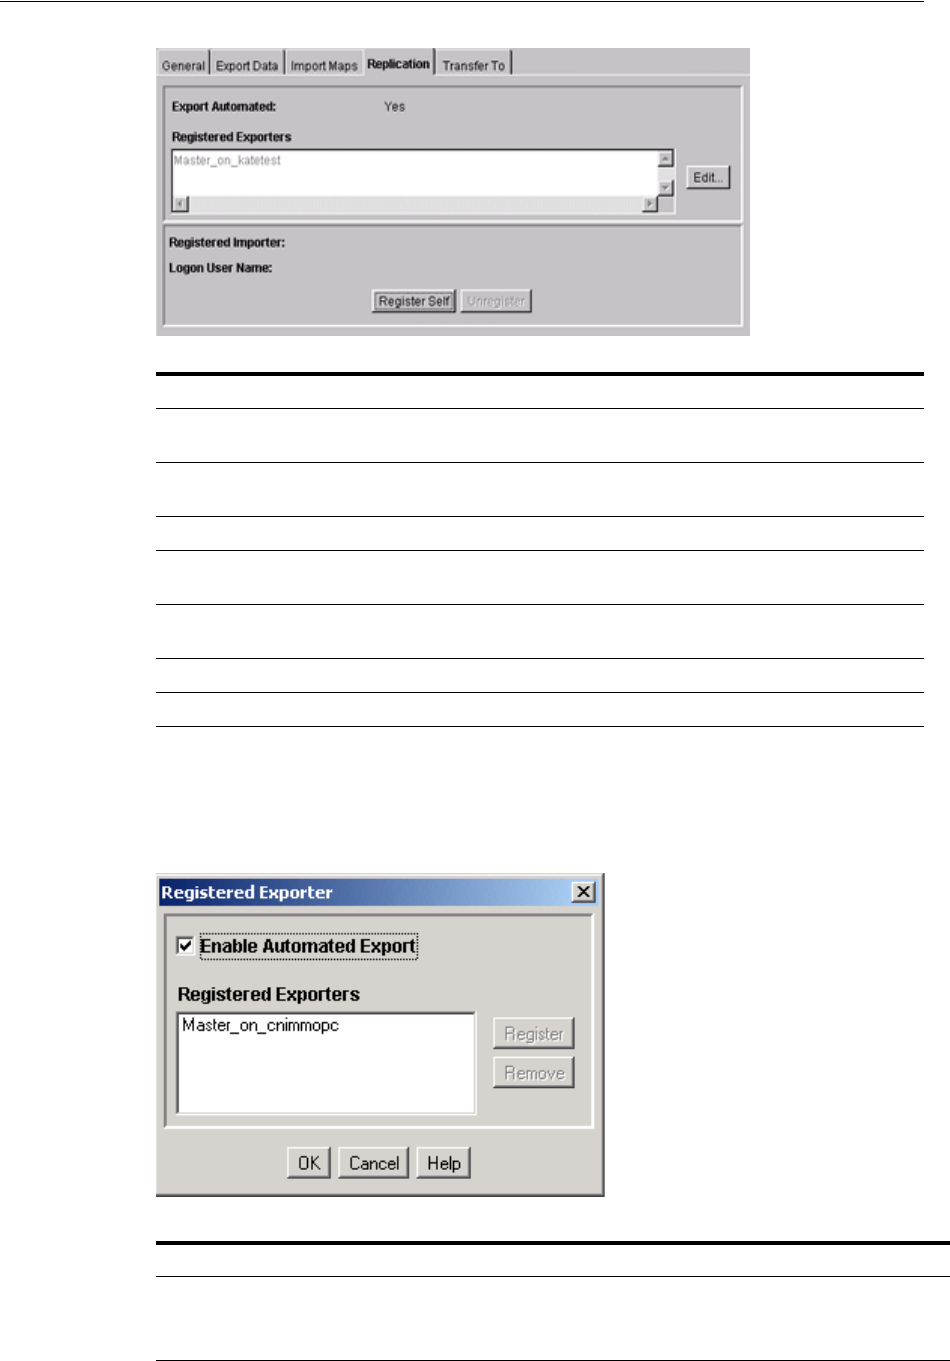
System Migration Interface
User Interface A-199
A.4.5.2 Registered Exporter Screen
The Registered Exporter screen is used to specify which collections automatically
export to the current archive, and to enable and disable automatic export. To access
this screen, click Edit on the Main Archiver Replication Screen.
Element Description
Export Automated field Shows whether automatic export is enabled for the selected
archive.
Registered Exporters box Lists the collections that are currently registered as automatic
exporters for the selected archive.
Edit button Displays the Registered Exporter Screen.
Registered Importer field Shows the collection that is currently registered as an
importer for the selected archive.
Logon User Name field Shows the user name of the user who was logged in when the
importer was registered.
Register Self button Registers the selected archive as an automatic importer.
Unregister button Unregisters the registered importer.
Element Description
Enable Automated Export
checkbox Selected: Export will occur automatically whenever a content
item that meets the export criteria is indexed.
Unselected: Automatic export is disabled.

System Migration Interface
A-200 Oracle Fusion Middleware System Administrator's Guide for Oracle Content Server
A.4.5.3 Automation (Exporters) Screen
The Automation Screen has three tabs: Exporters, Importers, and Transfers. To access
the Automation screen, highlight a collection and select View Automation for
instance from the Options menu on Main Archiver Screen
The Exporters tab of the Automation for Instance screen is used to view and remove
archives that are being exported automatically.
A.4.5.4 Automation (Importers) Screen
The Importers tab of the Automation screen is used to view and remove archives that
are being imported automatically.
Registered Exporters box Lists the collections that are registered as automatic exporters
for the selected archive.
Register button Adds the current collection to the list of registered exporters.
This button is not available if automatic export is disabled.
Remove button Removes the selected collection from the list of registered
exporters. This button is not available if automatic export is
disabled.
Element Description
Location column Lists the collection and archive for each archive that is being
exported automatically.
Status column Shows the status of the automatic export: connected or
disconnected.
Remove button Removes the selected archive as a registered exporter.
Element Description
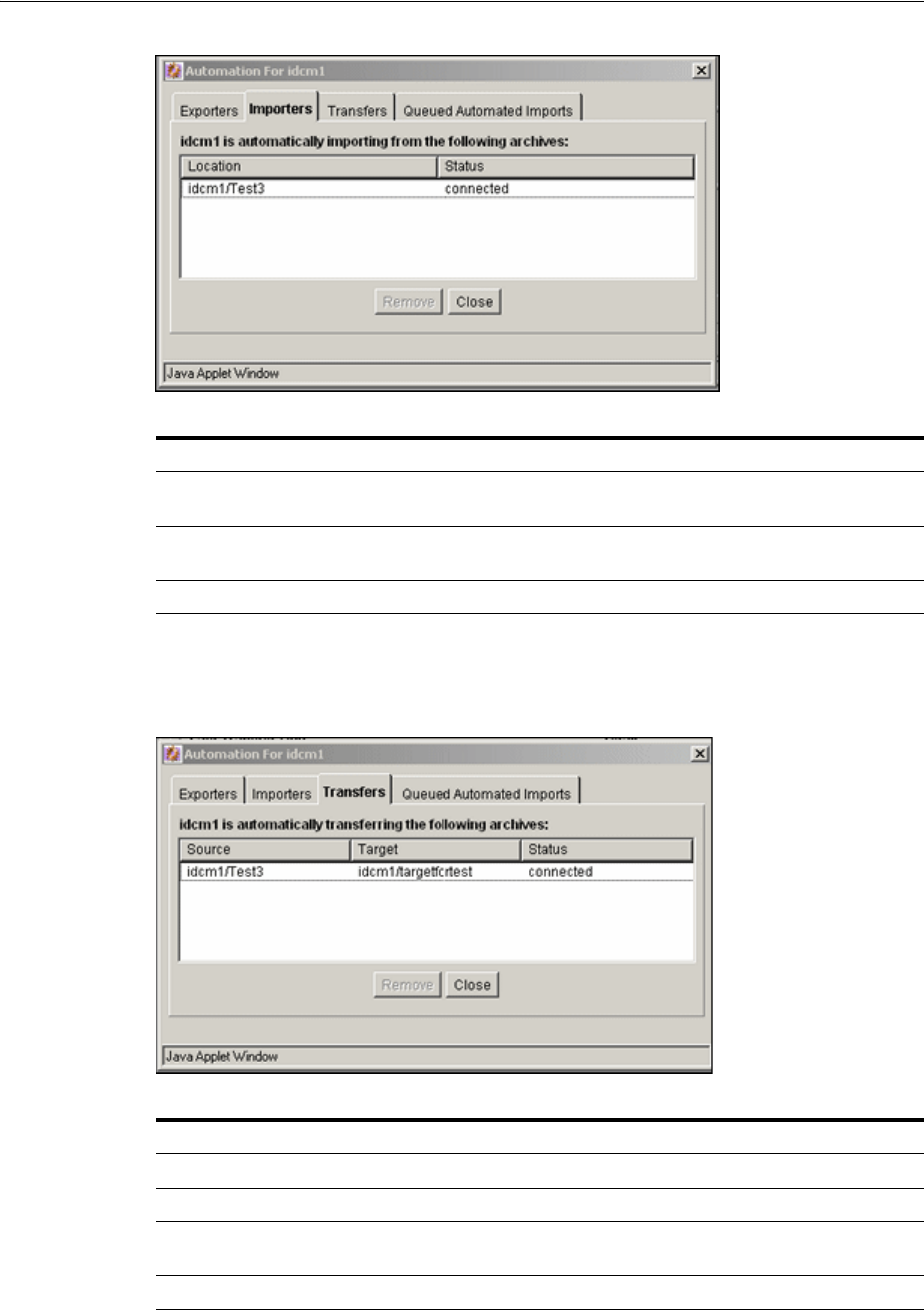
System Migration Interface
User Interface A-201
A.4.5.5 Automation (Transfers) Screen
The Transfers tab of the Automation screen is used to view and remove archives that
are being transferred automatically.
Element Description
Location column Lists the collection and archive for each archive that is being
imported automatically.
Status column Shows the status of the automatic import: connected or
disconnected.
Remove button Removes the selected archive as a registered importer.
Element Description
Source column Lists the collection and archive for the transfer source.
Target column Lists the collection and archive for the transfer target.
Status column Shows the status of the automatic transfer: connected or
disconnected.
Remove button Removes the selected transfer.
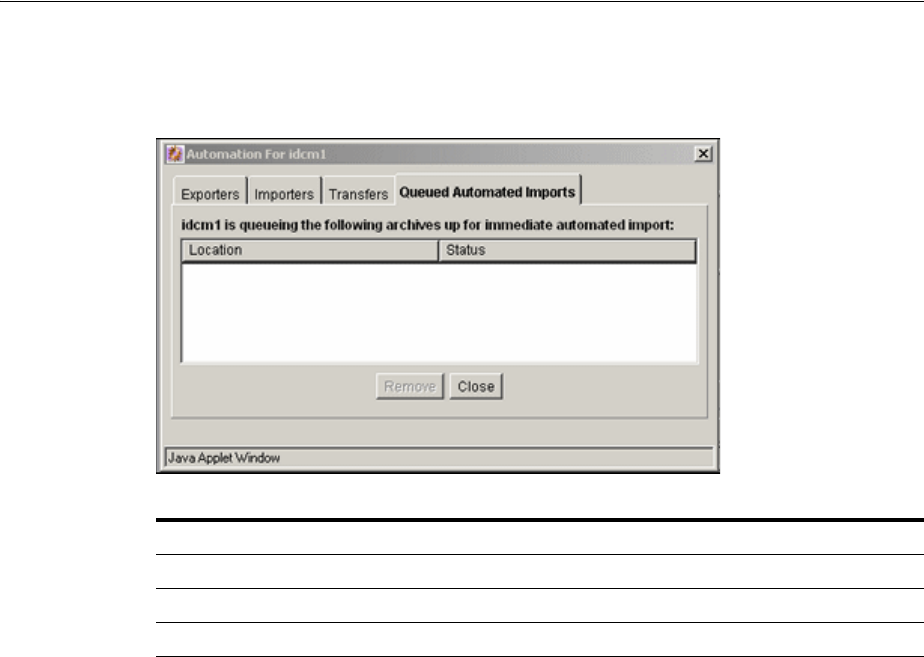
System Migration Interface
A-202 Oracle Fusion Middleware System Administrator's Guide for Oracle Content Server
A.4.5.6 Automation (Queries) Screen
The Queued Automated Imports screen is used to view those imports that are queued
to occur.
A.4.6 Transfer Interface Screens
This section provides information about the screens used to transfer archives.
■Section A.4.6.1, "Main Archiver Transfer Screen"
■Section A.4.6.2, "Transfer Options Screen"
■Section A.4.6.3, "Archive Collections Screen"
A.4.6.1 Main Archiver Transfer Screen
The Transfer To tab of the Archiver application is used to configure batch file transfers
from one archive to another. To access this tab, click the Transfer To tab on Main
Archiver Screen.
Element Description
Location column Lists the collection and archive for the transfer source.
Status column Shows the status of the automatic transfer.
Remove button Removes the selected transfer.
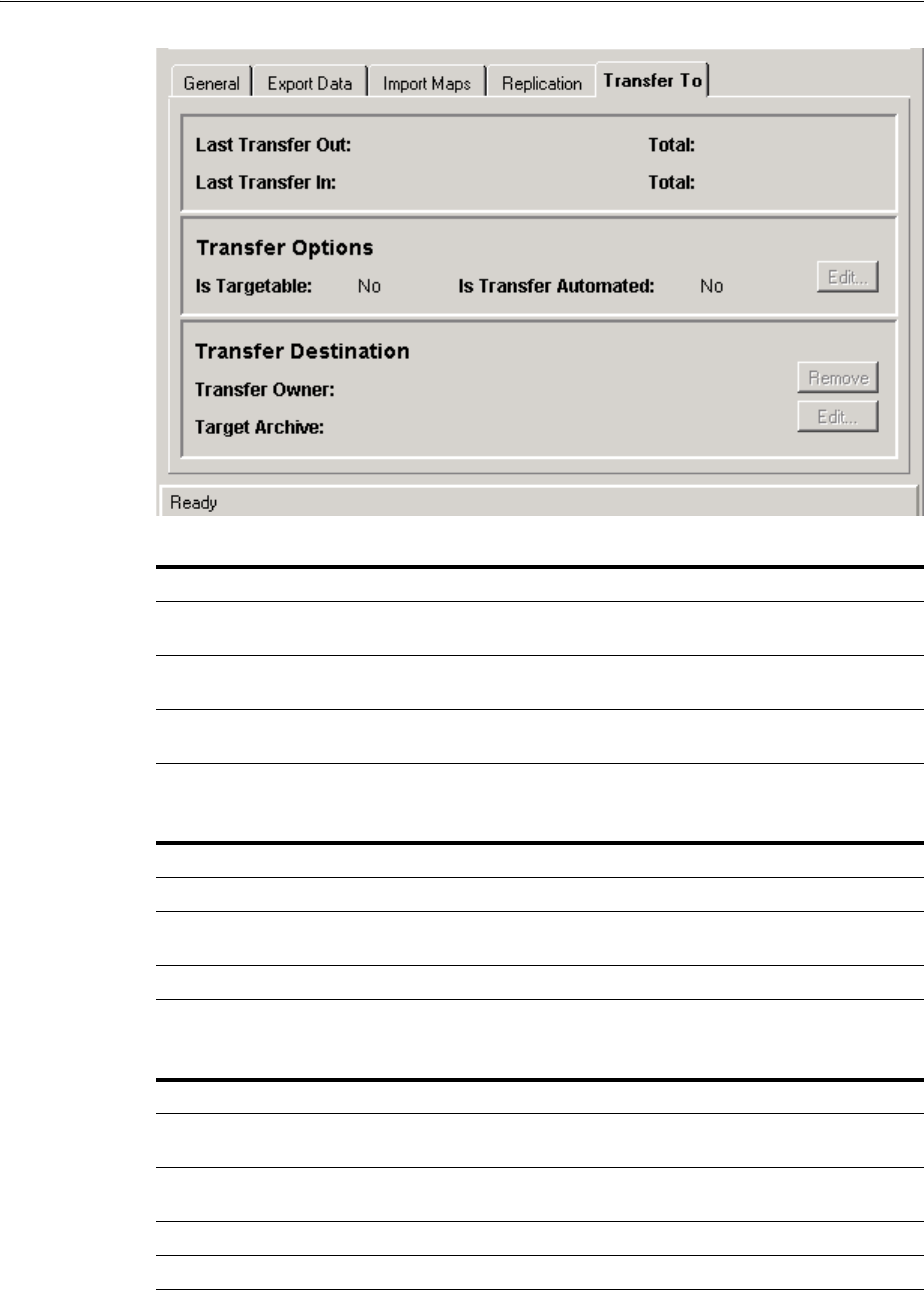
System Migration Interface
User Interface A-203
Transfer Options pane:
Transfer Destination pane:
Element Description
Last Transfer Out field The date and time that batch files were last transferred out of
the selected archive.
Last Transfer In field The date and time that batch files were last transferred into
the selected archive.
Total fields The number of batch files and content items that were
included in the last transfer.
Element Description
Is Targetable field Shows whether the selected archive can be a transfer target.
Is Transfer Automated field Shows whether the selected archive is transferred
automatically.
Edit button Displays the Transfer Options Screen.
Element Description
Transfer Owner field The Oracle Content Server instance that owns the transfer for
the selected archive.
Target Archive field The collection and archive that the selected archive will be
transferred to.
Remove button Deletes the transfer destination.
Edit button Displays the Archive Collections Screen.
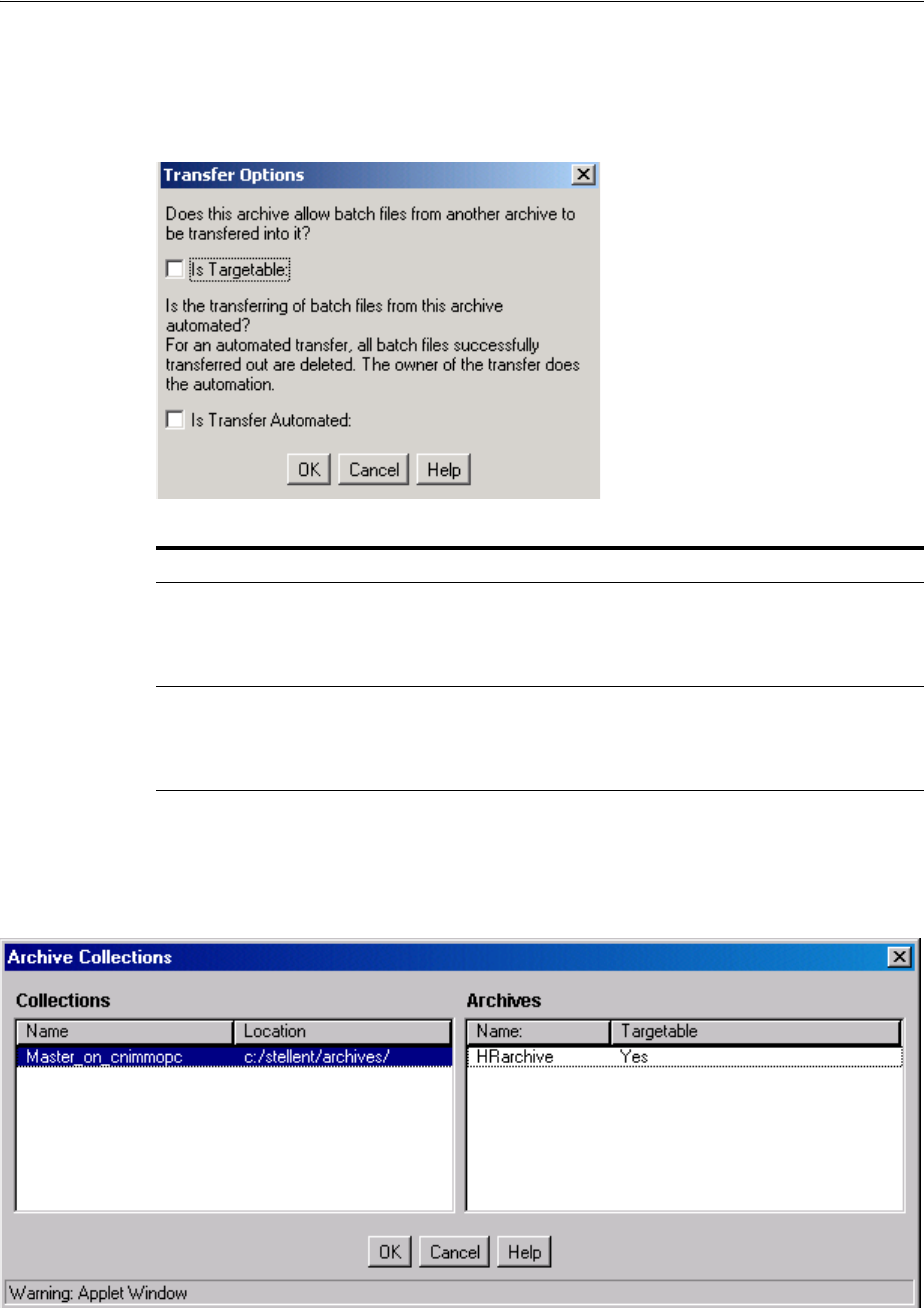
System Migration Interface
A-204 Oracle Fusion Middleware System Administrator's Guide for Oracle Content Server
A.4.6.2 Transfer Options Screen
The Transfer Options screen is used to enable an archive to receive a transfer and to
automate transfers out of an archive. To access this screen, click Edit in the Transfer
Options section of the Main Archiver Transfer Screen.
A.4.6.3 Archive Collections Screen
The Archive Collections screen is used to specify a targetable archive to receive a
transfer. To access this screen, click Edit in the Transfer Destination section of the Main
Archiver Transfer Screen.
Element Description
Is Targetable checkbox Selected: The selected archive can receive transfers from other
archives.
Unselected: The selected archive cannot receive transfers
from other archives.
Is Transfer Automated
checkbox Selected: Transfer of the selected archive occurs
automatically, whenever the archive is updated.
Unselected: Transfer of the selected archive must be initiated
manually.
System Migration Interface
User Interface A-205
A.4.7 Folder Archive Configuration Page
This page is used to manage and create folder archives. To access this page, log in to
the Oracle Content Server instance as an administrator, select Administration in the
portal navigation bar, then select Folder Archive Configuration.
Element Description
Collections list Lists the names and locations of archive collections that are
available to the local Oracle Content Server instance.
Archives list Lists the name and targetable status of the archives in the
selected collection. (Only targetable archives can be selected
from this list.)
Element Description
Collection Name list The list includes all detected archive collections on the
Oracle Content Server instance (that is, all collections that
are known or have been opened in the Content Server
Archiver utility).
Each Oracle Content Server instance will at least have one
archive collection, which has the same name as the Oracle
Content Server instance.
Archive Name field and list Here you can specify the name of the archive. The list
contains all known archives on the Oracle Content Server
instance that were created earlier.
Ensure that you provide an archive name before selecting
folders to be included in the archive. If you select folders
first and then specify an archive name, nothing happens
when you click Add. (The folder tree collapses completely
and your folder selection is lost).

System Migration Interface
A-206 Oracle Fusion Middleware System Administrator's Guide for Oracle Content Server
Folder tree This shaded area contains the folder structure that is
detected on the Oracle Content Server instance.
By default, the entire tree is collapsed (that is, none of the
folders are displayed).
Click the plus symbol to display all underlying subfolders
of a folder, and the minus symbol to hide them.
Select the checkboxes of all folders that you want to include
in the folder structure archive. If you click the checkbox of a
parent folder, all its child folders are selected automatically
as well. You can also select and unselect any of the child
folders individually. A parent folder will only be selected if
all of its subfolders are selected as well. If you unselect any
of the child folders, its parent folder is automatically
unselected, too. This does not affect the virtual folder path
properties of the child folder.
The folder tree will include any Collaboration Manager
project folders and Site Studio web site folders. The Folder
Structure Archive component is not intended to archive
these folders. You can archive them and also transfer them
to another system, but transferred collaboration projects
and Site Studio web sites will not work on the target
system.
Add button Click this button to create the specified folder archive and
make it available in the Oracle Content Server instance.
Ensure that you provide an archive name before selecting
folders to be included in the archive. If you select folders
first and then specify an archive name, nothing happens
when you click Add. (The folder tree collapses completely
and your folder selection is lost).
Remove button Click this button to remove the specified existing folder
archive, so it is no longer available in the Oracle Content
Server instance for processing.
Element Description

B
Need to Know Component B-1
BNeed to Know Component
This appendix provides information for installing and using the Need to Know
component, which cannot be installed or enabled using the Component Manager.
■Appendix B.1, "Introduction to Need to Know"
■Appendix B.2, "Installing the NTK Component"
■Appendix B.3, "Configuring the NTK Component"
■Appendix B.4, "Using the NTK Component"
■Appendix B.5, "NTK Administration Interface"
B.1 Introduction to Need to Know
The Need to Know (NtkDocDisclosure or NTK) component supports customization
for these Oracle Content Server security areas:
■Content security: Changing user access to content items.
■Search results: Modifying the display of search results.
■Hit list roles: Changing user credentials for query and check-in pages.
■Content metadata security: Altering the behavior of metadata changes for content
items.
■WHERE clause calculation: Modifying use of the WHERE clause in searches.
For example, with standard security, users can only view content for which they have
at least Read permission. The Need to Know component can change this in two ways:
■All users can be allowed to see content items from specified security groups in a
search results list, even though they may not be able to view the metadata or
document itself.
■Read and Write permission can be expanded or restricted within specified security
groups using a query against content metadata and user attributes.
The Need to Know component provides an HTML administration interface to display
security configuration status information, enable editing of security configuration
values, and enable viewing and testing of Idoc Script for security configuration values.

Introduction to Need to Know
B-2 Oracle Fusion Middleware System Administrator's Guide for Oracle Content Server
B.1.1 Features
The Need to Know function is implemented through the following features:
■The Need to Know component is applied by security group. You must identify
which security groups will use the component. All content in the specified security
groups will appear in the search results for all users.
■This component provides the option of making all accounts visible, so a user can
get a search hit on a content item regardless of its account.
■The Security Group list on the Search page will show all specified security groups.
If accounts are enabled, all accounts will appear in the Accounts list on the Search
page.
■A new DocDisclosureQuery metadata field and new hit list role must be created to
support the Need to Know function. The hit list role is given read access to all
specified security groups.
■You can create new user attribute fields or use existing ones in Need to Know
queries.
■When a document is checked in, a query can be defined in the
DocDisclosureQuery metadata field. The query conditions can include content
metadata and user attributes, and the query results determine access permission to
the document. Queries can be entered manually in Idoc Script, or the Disclosure
Query Security applet can be used to build the query.
■Whenever a user does a search, the hit list role is dynamically applied to the user,
giving them read access to all content in the specified security groups. Each
content item is then checked for a query in the DocDisclosureQuery field, which
determines the user's access to that content item.
■If the DocDisclosureQuery field is empty, standard security applies. Standard
security can also be explicitly specified in the query field, or it can be used in a
boolean combination with other document and user attributes to expand or refine
the read access.
■If a query is entered for a content item that is not in an NTK security group, the
query does not run, and standard security applies.
■If a user already has more than Write or higher access to the security group, the
query in the DocDisclosureQuery field does not run, and standard security
applies.
■A global query can be defined for all content, so individual queries do not have to
be specified for each content item. You can set up the system to allow the global
query to be overridden when a query is entered during check-in.
B.1.2 Applications
This component can be used as the starting point for a more complicated security
implementation, such as:
■Providing integrated tracking for downloads of sensitive documents.
■Controlling Write or higher privileges through custom logic.
■Implementing view limits and subscription control, where documents within a
certain security group may only be downloaded so many times.
■Controlling access by incorporating entries from a custom database table or results
from a custom API. This is a hook for externally controlled authorization.

Configuring the NTK Component
Need to Know Component B-3
B.2 Installing the NTK Component
Install the component using either the Component Wizard or the command-line
ComponentTool as follows:
Installing the NTK component with Component Wizard:
1. Launch the Component Wizard.
For information on using standalone applications, see Section 3.4.2, "Running
Administration Applications in Standalone Mode."
2. On the Component List screen, select Options, then Add.
The Appendix A.3.3.1, "Add Component Screen" displays.
3. Select the radio button for Use Existing Component.
4. Browse to the location where the Enterprise Content Management (ECM)
shiphome was installed and locate the Need to Know component directory. For
example:
ECM_HOME\ucm\cs\idc\components\NeedToKnow
5. Select the NeedToKnow.hda file and click OK.
6. Click Enable.
The NTK component is listed as enabled.
Installing the NTK component with ComponentTool:
Run the Component Tool and specify the NeedToKnow.hda file with the following
path, using your configuration name and path for ECM_HOME:
ECM_HOME\ucm\cs\idc\components\NeedToKnow\NeedToKnow.hda
B.3 Configuring the NTK Component
This section describes the procedure to set up a basic security configuration using the
Need to Know component. This procedure explains how to set up security
configuration variables, a custom metadata field, and a hit list role. After you have set
up the basic configuration, you can use the Need to Know component interface to edit,
test, and improve the security configuration.
1. Select the General Configuration link on the side bar in the Admin Server page.
2. Under the Additional Configuration Variables heading on the Admin Server:
General Configuration Page, scroll to the bottom of the text area, and add the
following text:
SpecialAuthGroups=group1,group2,...
■Replace group1,group2,... with the security groups that will use the Need to
Know component.
■Security groups must be entered in lowercase letters.
Note: You must open the Oracle Content Server Admin Server page
for the applicable Oracle Content Server instance before starting the
procedure.

Configuring the NTK Component
B-4 Oracle Fusion Middleware System Administrator's Guide for Oracle Content Server
■Any security groups not listed will have standard security applied.
3. If you want to specify content item-level queries, use the Configuration Manager
to add a new metadata field. (This is not necessary if you will be using only the
global query.) A new metadata field must be added by using the Configuration
Manager; it cannot be added from the Need to Know component interface.
■You can use any field name and title you wish, such as DocDisclosureQuery or
NeedToKnow.
■The field must be specified as a memo field.
■After adding the field, you will need to click Update Database Design, and
then click Rebuild Search Index.
4. Use the User Admin administration applet to add a hit list role.
■You can use any role name you wish, such as hitlist or NTKrole.
■Give Read access to all the security groups that were specified in the
SpecialAuthGroups configuration entry.
■If you want the security groups that were specified in the SpecialAuthGroups
configuration entry to be listed on the check-in page or update page, you will
need to give Write access to this role.
■You can create two different hit list roles with different names and
permissions. One role can be configured with the Need to Know component to
be a Query role in a content search, and the other role can be configured with
the Need to Know component to be an Update role in content check-ins and
updates.
■Do not assign this role to any users. If the hit list role is configured to be a
Query or Update role, it is automatically added to the user's attributes.
5. If you want to set user access permissions that extend the limits of Need to Know
security, use the General Configuration page to include extra security
configuration settings in the Additional Configuration Variables section. Scroll to
the bottom of the text area and enter the configuration settings as necessary.
6. If you want to add new user attribute fields for use in Need to Know queries, use
the User Admin tool to add user attribute fields.
7. Restart the Oracle Content Server instance.
Note: Other products such as Universal Records Management also
can use the SpecialAuthGroups configuration variable, so be careful to
use unique names for security groups that use the Need to Know
component.
Note: If your Oracle Content Server instance already has a large
amount of content, rebuilding the search index can take a long time
(up to a couple of days). Consider rebuilding during system
maintenance periods or at times of non-peak system usage.

Using the NTK Component
Need to Know Component B-5
B.4 Using the NTK Component
This section covers the following topics:
■Appendix B.4.1, "Security Configuration Customization"
■Appendix B.4.2, "Disclosure Query Security Applet"
■Appendix B.4.3, "Query Syntax"
■Appendix B.4.4, "Defining a Content-Level Query"
■Appendix B.5.1, "NTK Configuration Information Page"
B.4.1 Security Configuration Customization
The Need to Know component provides additional security configuration support
focused on the following areas:
■Content Security: Changing user access to content items.
■Search Results: Changing the display of search results.
■Hit List Roles: Changing user credentials for query and check-in pages.
■WHERE Clause Calculation: Changing use of the WHERE clause in searches.
■Content Metadata Security: Changing the behavior of metadata changes for
content items.
B.4.1.1 Content Security
Standard security uses security roles, groups, and accounts to determine if a user has
the appropriate privilege level to access a content item. The Need to Know component
enables you to customize the process of determining user privilege. You can use the
Need to Know component interface to set configuration fields and create Idoc Script to
specify Read, Write, and Delete privilege levels. The Idoc Script can also contain user
and content metadata values.
The Need to Know component computes content security using the following process:
1. A user clicks a link to view content information.
2. If the user has the admin role, standard security is used and the user can view the
content.
3. If the security group of the content item is not a Need to Know authorization
group, then standard security is used to evaluate the user's Read request.
4. If Need to Know security is not enabled at the Read privilege level, then standard
security is used to evaluate the user's Read request.
5. If Need to Know security is not limited at the Read privilege level, and the user
has standard security access to the content item, the user is given access to the
content.
Note: When the Need to Know component has been installed,
certain security configuration values are stored in the
IntradocDir/data/needtoknow/ntk_config.hda file. These values can
be edited by using the Need to Know administration interface,
described in Appendix B.5, "NTK Administration Interface", or by
directly editing the ntk_config.hda file.

Using the NTK Component
B-6 Oracle Fusion Middleware System Administrator's Guide for Oracle Content Server
6. The Need to Know security Idoc Script (in this case the Read security script) is
evaluated.
7. The Need to Know access flag (in this case, isNTKReadAccess) is evaluated to
determine if the user has access to the content. Access is allowed or denied based
on the Need to Know access flag.
The Need to Know component also enables you to test security configuration scripts
for each access level: Read, Write, and Delete. For a test you can specify a user and a
content ID, and you have the option of specifying roles and accounts. These attributes
are used in the test instead of the user's actual attributes. For example, you could test
Idoc Script using an external user whose attributes may not be accessible. After the test
is run, the component reports on whether the user has access to the content item,
whether Need to Know security was used, and if Need to Know security was not used
then the reason why.
For information on using the Need to Know component interface to configure content
security, see the Appendix B.5.1, "NTK Configuration Information Page" and the
Appendix B.5.2, "Content Security Configuration Information Page." For samples of
Idoc Script that can configure content security, see Appendix B.6, "Security
Customization Samples."
The following Idoc Script functions can be used in the Script fields to determine
content security. For more information on Idoc Script, see Idoc Script Reference Guidel.
Idoc Script Function Description
allStrIntersect Takes two required comma-delimited strings and
one optional Boolean flag as parameters. If all values
in the second string occur in the first string, the
function returns true. If the optional parameter is set
to true and the second value is an empty string, the
function returns true. By default, the optional
parameter is false. The comparison of values in the
comma-delimited strings are not case sensitive.
includeNTKDeleteSecurityScript Evaluates the Delete security script and makes the
isNTKDeleteAccess variable available for use in the
Read or Write security scripts. If this function is
used in the Delete security script, it is ignored.
includeNTKReadSecurityScript Evaluates the Read security script and makes the
isNTKReadAccess variable available for use in the
Write or Delete security scripts. If this function is
used in the Read security script, it is ignored.
includeNTKWriteSecurityScript Evaluates the Write security script and makes the
isNTKWriteAccess variable available for use in the
Read or Delete security scripts. If this function is
used in the Write security script, it is ignored.
isDisclosureQuery Evaluates the query for the disclosure field (if
specified) and returns true or false. An optional
parameter can be specified to determine if the
function should return true or false if the disclosure
query is empty. If the disclosure field has not been
specified or does not exist, this function always
returns false.
isMetaChange This variable is set if the content security call
involves a content update or a check in.

Using the NTK Component
Need to Know Component B-7
B.4.1.2 Search Results
The Need to Know component enables you to customize the presentation of the search
results that are returned from a search query. Two configuration values can be set
using the NTK interface: Hidden Fields, and Script.
The Hidden Fields value is a list of fields that can be hidden from view on the Search
Results page. The values are set to empty strings. To hide the fields, the field
hideFields must be set in the component search results Idoc Script.
Idoc Script controls the presentation of the search results. Idoc Script is evaluated for
each row in the search results. A number of fields can be set in script to alter the
presentation of search results. To see the list of fields and how to use the Need to
Know component interface to customize script for search results presentation, see
Appendix B.5.3, "Search Results Configuration Information Page."
The Need to Know component uses the securityCheck Idoc Script function to
determine search results presentation. The securityCheck function checks the
security against the current content item (standard security or Need to Know security),
depending on the configuration values. The function has an option parameter to
determine what access level to check:
■1 = Read
■2 = Write
■4 = Delete
■8 = Admin
If no parameter is used with securityCheck, by default it checks the Read access
level.
For examples of Idoc Script that can alter search results presentation, see
Appendix B.6, "Security Customization Samples."
B.4.1.3 Hit List Roles
Hit list roles enable you to change user credentials for using content Search, Content
Check In, and Update pages. Using the User Admin applet, you can add a hit list role
with any name you wish. You do not assign the role to a user; when the role is enabled
it is automatically added to a user's attributes when doing a search, check in, or
update. When creating a hit list role, you must give Read access to all the security
groups that you specify in the SpecialAuthGroups configuration entry. If you want
these security groups to be listed on the Content Check In page or Update page, you
also need to add Write access to the hit list role.
isStrIntersect Takes two required comma-delimited strings and
one optional Boolean flag as parameters. If at least
one value in the second string occurs in the first
string, the function returns true. If the optional
parameter is set to true and the second value is an
empty string, the function returns true. By default,
the optional parameter is false. The comparison of
values in the comma-delimited strings are not case
sensitive.
stdSecurityCheck Checks standard security for the current access level.
For example, if the function is in the Read security
script, it checks security at the Read access level.
Idoc Script Function Description
Using the NTK Component
B-8 Oracle Fusion Middleware System Administrator's Guide for Oracle Content Server
Using the Need to Know component Hit List Roles Configuration Information page,
you can implement hit list roles in two forms: Query and Update. A hit list role used in
a query is applied to content searches. A hit list role used in an update is applied to
content check-ins and updates.
For more information about how to use hit list roles, see Appendix B.5.1, "NTK
Configuration Information Page" and Appendix B.5.4, "Hit List Roles Configuration
Information Page." For samples of using hit list roles, see Appendix B.6, "Security
Customization Samples."
B.4.1.4 WHERE Clause Calculation
The Need to Know component provides two filters that enable you to customize the
query WHERE clause that is used to retrieve search results:
■preDetermineWhereClause: Overrides the entire WHERE clause.
■postDetermineWhereClause: Appends to the standard security WHERE
clause.
The code for these filters is located in the NTKFilter Java class. For samples of how
these filters work, see Appendix B.6, "Security Customization Samples."
B.4.1.5 Content Metadata Security
The Need to Know component provides a filter called checkMetaChangeSecurity
that enables you to alter the behavior of metadata changes when a content item is
checked in or updated.
The code for this filter is located in the NTKFilter Java class. For an example of how
the filter works, see Appendix B.6, "Security Customization Samples."
B.4.2 Disclosure Query Security Applet
The Disclosure Query Security applet is used to define a query for a particular content
item during check-in. To access the applet, click the Update button next to the
DocDisclosureQuery field on the Content Check In Form page.

Using the NTK Component
Need to Know Component B-9
Element Description
Field field Select a user attribute field to be specified in the query. This list
includes User Locale, User Name, User Role, and all of your
custom user attribute fields.
Operator field Select an operator to apply to the Field and Value. The following
operators are used for all fields except User Role:
Is: The value in the specified Field matches the specified Value.
Is Not: The value in the specified Field does not match the
specified Value.
Begins With: The value in the specified Field starts with the
specified Value.
Contains: The value in the specified Field contains the specified
Value.
The User Role field has only one operator, Has Member, and
displays a drop-down list of roles in the Value field.
Value field Enter the value to be specified in the query.
■If an option list was specified for the selected field, choose
the value from the drop-down list.
■If no option list was specified for the selected field, type the
value in the text box.
Add button Enters the query specified by the Field, Operator, and Value
fields into the Query Expression text box. Each click of the Add
button appends the current settings to the query as an AND
clause.
Update button Updates a selected query clause with the parameters specified in
the Field, Operator, and Value fields
Merge button Creates an OR clause (inserts a pipe character) for the selected
query clause. This button is enabled under the following
conditions:
■The Field in the drop-down list matches the Field specified
in the selected query clause.
■The Operator in the selected query clause cannot be "Is
Not".
■The Operator in the drop-down list cannot be "Is Not".
Note: The pipe character does not appear in the Query
Expression for a User Roles query clause, but it will appear
in the DocDisclosureQuery field.
Query Expression Displays each clause of the query as a single line.
Delete button Deletes the selected query clause.
Append button Appends the Query Expression to any existing query in the
DocDisclosureQuery field on the Content Check In Form page.
Replace button Replaces any existing query in the DocDisclosureQuery field on
the Content Check In Form page with the Query Expression.
Cancel button Closes the Disclosure Query Security applet without applying
any query changes.

Using the NTK Component
B-10 Oracle Fusion Middleware System Administrator's Guide for Oracle Content Server
B.4.3 Query Syntax
The Disclosure Security Query applet creates queries with the correct Idoc Script
syntax, but you can also enter your own queries directly in the DocDisclosureQuery
field. The following Idoc Script syntax is used in disclosure queries:
■Appendix B.4.3.1, "Like Operator"
■Appendix B.4.3.2, "Boolean Operators"
■Appendix B.4.3.3, "UserName Variable"
■Appendix B.4.3.4, "stdSecurity Variable"
■Appendix B.4.3.5, "User Attribute Fields"
■Appendix B.4.3.6, "User Roles"
B.4.3.1 Like Operator
The like operator matches substrings and wildcard strings. Enclose all strings in
single quotes.
B.4.3.1.1 Substrings Use the like operator to match substrings.
B.4.3.1.2 Wildcard Strings Use wildcard strings to match variable characters and
options. Wildcard strings use the syntax
* = Match 0 or more characters
? = Match exactly 1 character
| = Separates multiple options, only one of which needs to match
For example, the following code would match "MyClient", "3rd Quarter MyClient
Report", "MyClient Visit", "Meeting with MyClient", and "1996 Reports". This string
would not match "My Client", "All 1996 Reports", or "1996 Report".
dDocName like '*MyClient*|199? Reports'
B.4.3.2 Boolean Operators
Query clauses can be joined by and, or, and not Boolean operators.
■The Boolean operators must be lowercase letters.
■Each clause must be in parentheses. For example:
(uRoles like '*:contributor:*') and (uUserLocale like 'hq')
B.4.3.3 UserName Variable
The variable UserName is the name of the user who is currently logged in. For
example, the following code would grant privileges only to the users jgreen or hbrown.
UserName like 'jgreen|hbrown'
Note: You can learn how to correctly format query clauses for direct
entry in the DocDisclosureQuery field by experimenting with the
Disclosure Query Security Applet (page 3-6)

Using the NTK Component
Need to Know Component B-11
B.4.3.4 stdSecurity Variable
The variable stdSecurity specifies the standard security model; it is mapped to the
stdSecurityCheck Idoc Script function. This variable can be used in Boolean
combination with other query clauses to refine access (using the and operator) or
expand access (using the or operator). For example, the following code would grant
access to the document if the user would normally be able to access the document or
they are jgreen or hbrown.
stdSecurity or UserName like 'jgreen|hbrown'
B.4.3.5 User Attribute Fields
When specifying user attribute fields in a query, use the format uFieldName. For
example:
uMyUserField like 'Value'
B.4.3.6 User Roles
User roles require a special form because the UserRoles Idoc Script function returns all
the roles for the current user in comma delimited form. (In this example, a uRoles
shortcut has been defined for this function.) For example, the uRoles value could be:
role1,role2,...,role10
Therefore, to specify a query string that includes the value role1, wildcards must be
included so that the query will recognize the value regardless of its position in the role
list. For example:
uRoles like '*role1*'
However, this query string would also grant security access to a user with the role
role10, which might not be a role you want to include. To limit the uRoles value to only
those roles specified in the query, you need to use the DelimitedUserRoles function
and syntax, which includes single quotes and colons on each side of the role value as
follows:
uRoles like '*:role1:*'
To match either role1 or role2, use this syntax:
uRoles like '*:role1:*|*:role2:*'
B.4.4 Defining a Content-Level Query
Use the following procedure to define a query for an individual content item:
1. Display the Content Check In Form page (for a new content item) or the Info
Update Form page (for an existing content item).
2. Click the Update button next to the DocDisclosureQuery field (the name of this
field will be whatever you named it during installation).
The Disclosure Query Security Applet is displayed.
3. Choose a Field, an Operator, and a Value to create a query clause.
4. Click Add.
The query clause is added to the Query Expression text box.

NTK Administration Interface
B-12 Oracle Fusion Middleware System Administrator's Guide for Oracle Content Server
5. Continue building the query:
■To add another query clause with an and operator, enter the values and click
Add.
■To change an existing query clause, enter the new values, select the query line
you want to change, and click Update.
■To create an or clause, enter the new values, select the query line you want to
change, and click Merge.
■To delete a query clause, select the query line and click Delete.
6. Enter the query expression in the DocDisclosureQuery field.
■To replace the existing query in the DocDisclosureQuery field with the query
expression in the applet, click Replace.
■To append the query expression in the applet to the existing query in the
DocDisclosureQuery field, click Append.
The Disclosure Query Security applet converts the query clauses to the
appropriate syntax for the query and enters the query in the DocDisclosureQuery
field on the Content Check In Form or Info Update Form page.
7. After filling out the rest of the fields, click Check In or Update.
The disclosure query is validated, and if the query is ill-formed, an error message
tells you the specific problem with the query.
B.5 NTK Administration Interface
After the Need to Know component has been installed, the NTK Configuration
Information link is available through the Administration tray or menu. This link
provides access to the NTK Configuration Information page, which provides security
configuration status information and the capability to edit the security configuration.
The Need to Know component provides the following configuration pages:
■Appendix B.5.1, "NTK Configuration Information Page"
■Appendix B.5.2, "Content Security Configuration Information Page"
■Appendix B.5.3, "Search Results Configuration Information Page"
■Appendix B.5.4, "Hit List Roles Configuration Information Page"
■Appendix B.5.5, "Test NTK Content Security Page"
B.5.1 NTK Configuration Information Page
The NTK Configuration Information page provides information about Need to Know
content security configuration, search results configuration, and hit list roles
configuration. This page also enables you to edit the security configuration, edit the
search results configuration, edit the hit list roles configuration, view Idoc Script and
hidden fields for the configuration, and test Idoc Script. To access this page, from the
main menu select Administration, then NTK Configuration Information.
Note: You can learn how to correctly format query clauses for direct
entry in the DocDisclosureQuery field by experimenting with the
Disclosure Query Security applet.
NTK Administration Interface
Need to Know Component B-13
Element Description
Access Level column Displays the permission levels (Read, Write, Delete)
for access to content items.
Enabled column Indicates whether Need to Know security is enabled
for Read, Write, or Delete access.
No: Need to Know security is disabled for the access
level. This is the default.
Yes: Need to Know security is enabled for the access
level.
Limit Access column Specifies whether Read, Write, and Delete access is
limited by Need to Know security. If Need to Know
security is used to limit user access, it does so
regardless of whether the user has standard Read,
Write, or Delete access to a content item. If Need to
Know security is not used to limit user access, the
user has standard access to a content item. This
feature enables you to create a security model more
restrictive than the standard security model.
No: Access is not limited by Need to Know security.
This is the default
Yes: Access is limited by Need to Know security.

NTK Administration Interface
B-14 Oracle Fusion Middleware System Administrator's Guide for Oracle Content Server
Script column Provides links to view or test Idoc Script that is
evaluated to determine if a user has Read, Write, or
Delete access to a content item. The Need to Know
component uses one of three parameters as a flag to
determine if access is given:
Read access: isNTKReadAccess
Write access: isNTKWriteAccess
Delete access: isNTKDeleteAccess
Click View in the row for the access level for which
you want to view the Idoc Script that the Need to
Know component evaluates to determine if a user
has Read, Write, or Delete access.
Click Test in the row for the access level for which
you want to test the Need to Know security
configuration. The NTK Test Content Security page
is displayed. You can use this page to create and run
a test of Idoc Script for security configuration. For
more information, see Appendix B.5.5, "Test NTK
Content Security Page."
Disclosure Field option Displays the custom metadata field that is evaluated
for the Idoc Script function isDisclosureQuery. The
disclosure field can be used to create a
content-specific query. The default value is <none>.
Use the Configuration Manager to create this field,
and make it a memo field type. For more
information, see Appendix B.2, "Installing the NTK
Component" and Appendix B.3, "Configuring the
NTK Component."
When the disclosure field exists, an Update button is
displayed next to the field where it appears on the
Content Check In Form page. Click the button to
access the Disclosure Query Security Applet (see
Appendix B.4.2, "Disclosure Query Security
Applet"). The applet helps you create queries based
on the user metadata.
Security Auth Groups option Displays a list of security groups for which Need to
Know security is used. The groups must be a subset
of the SpecialAuthGroups configuration variable. If
no groups are selected, all SpecialAuthGroups are
used. The default value for SpecialAuthGroups is
<All Special Auth Groups>.
Use the Configuration Manager to specify a
SpecialAuthGroups value in the config.cfg file. For
more information, see Appendix B.2, "Installing the
NTK Component" and Appendix B.3, "Configuring
the NTK Component."
Debug option Displays the status of the debugging option.
Yes: Debugging information is written to a log file
for any security check that occurs for a content item.
Users with the administrator role are not logged
because they always receive access to the content
item.
No: Debugging information is not written to a log
file.
Element Description

NTK Administration Interface
Need to Know Component B-15
B.5.2 Content Security Configuration Information Page
The Content Security Configuration Information page enables you to change security
and access configuration for Read, Write, Delete, and other options for the Need to
Know component. To access this page, click Edit in the Content Security Configuration
Information area of the NTK Configuration Information page.
Edit button Displays the Content Security Configuration
Information page, where the content security
configuration can be changed
Hidden Fields field Click View to display a list of fields that can be
hidden on the Search Results page.
Script field Click View to display the Idoc Script that controls
the presentation of the Search Results page.
Edit button Displays the Search Results Configuration
Information page, where the search results security
configuration can be changed.
Query Role field Displays the name of the query role, or <none>. This
role is applied on the Search query page.
Update Role field Displays the name of the update role, or <none>.
This role is applied on a content check-in or update
page.
Allow Hit List Role for
Anonymous Users field Applies the hit list role for anonymous users.
No: The hit list role is not applied for anonymous
users. This is the default value.
Yes: The hit list role is applied for anonymous users.
Edit button Displays the Hit List Roles Configuration
Information page, where the hit list roles security
configuration can be changed.
Element Description
NTK Administration Interface
B-16 Oracle Fusion Middleware System Administrator's Guide for Oracle Content Server

NTK Administration Interface
Need to Know Component B-17
Element Description
Read Options: Use Security list Use security as specified in the Script field.
No: Do not use Need to Know content security. This
is the default value.
Yes: Use Need to Know content security.
Read Options: Limit Access list Limit access permissions as specified in the Script
field.
No: Do not limit access permissions. This is the
default value.
Yes: Limit access permissions.
Read Options: Script field Enter IdocScript in this field to specify the Need do
Know security configuration for Read permission.
Write Options: Use Security list Use security as specified in the Script field.
No: Do not use Need to Know content security. This
is the default value.
Yes: Use Need to Know content security.
Write Options: Limit Access list Limit access permissions as specified in the Script
field.
No: Do not limit access permissions. This is the
default value.
Yes: Limit access permissions.
Write Options: Script field Enter IdocScript in this field to specify the Need to
Know security configuration for Write permission.
Delete Options: Use Security list Use security as specified in the Script field.
No: Do not use Need to Know content security. This
is the default value.
Yes: Use Need to Know content security.
Delete Options: Limit Access list Limit access permissions as specified in the Script
field.
No: Do not limit access permissions. This is the
default value.
Yes: Limit access permissions.
Delet Options: Script field Enter IdocScript in this field to specify the Need to
Know security configuration for Delete permission.
Other Options: Disclosure Field
field Select the name of a disclosure field from the
list.This field is used to configure security in a
content-specific query.
Note: If you create a metadata field for content
item-level queries using the Configuration Manager,
that field will appear as an option in the list.
Other Options: Security Auth
Groups field Enter the SpecialAuthGroups to be used in
content-specific queries. If you use the General
Configuration page to create a specific security
group for the Need to Know component, you can
specify the group here. If you need to add a security
group, you can also edit the Additional
Configuration Variables SpecialAuthGroups value
in the config.cfg file.

NTK Administration Interface
B-18 Oracle Fusion Middleware System Administrator's Guide for Oracle Content Server
B.5.3 Search Results Configuration Information Page
The Search Results Configuration Information page enables you to customize the
search results that are returned from a search query. This does not affect what content
items are returned, just how the results are displayed. To access this page, click Edit in
the Search Results Configuration Information area of the NTK Configuration
Information page.
Other Options: All Auth Groups
checkbox Specifies that the Need to Know component use all
SpecialAuthGroups instead of a specific group listed
in the Security Auth Groups field. This checkbox is
selected by default.
Note: Other products such as Records Management
can also use the SpecialAuthGroups variable. Be
careful to specify only the security groups you want
to use the Need to Know security configuration.
Other Options: Debug list Select whether to use debugging to view security
checking for a content item.
Yes: Debugging information is written to a log file
for any security check that occurs for a content item.
Users with the administrator role are not logged
because they always receive access to the content
item.
When debugging is used, two additional options are
visible: View and Clear. Click View to view the log
file of debugging information. Click Clear to empty
the log file of information.
No: Debugging is not used and information is not
written to a log file. This is the default value.
Update button Updates the content security information to use the
new settings, restarts the Oracle Content Server
instance, and returns you to the NTK Configuration
Information page.
Reset button Returns the Content Security configuration settings
to their last saved values.
Element Description
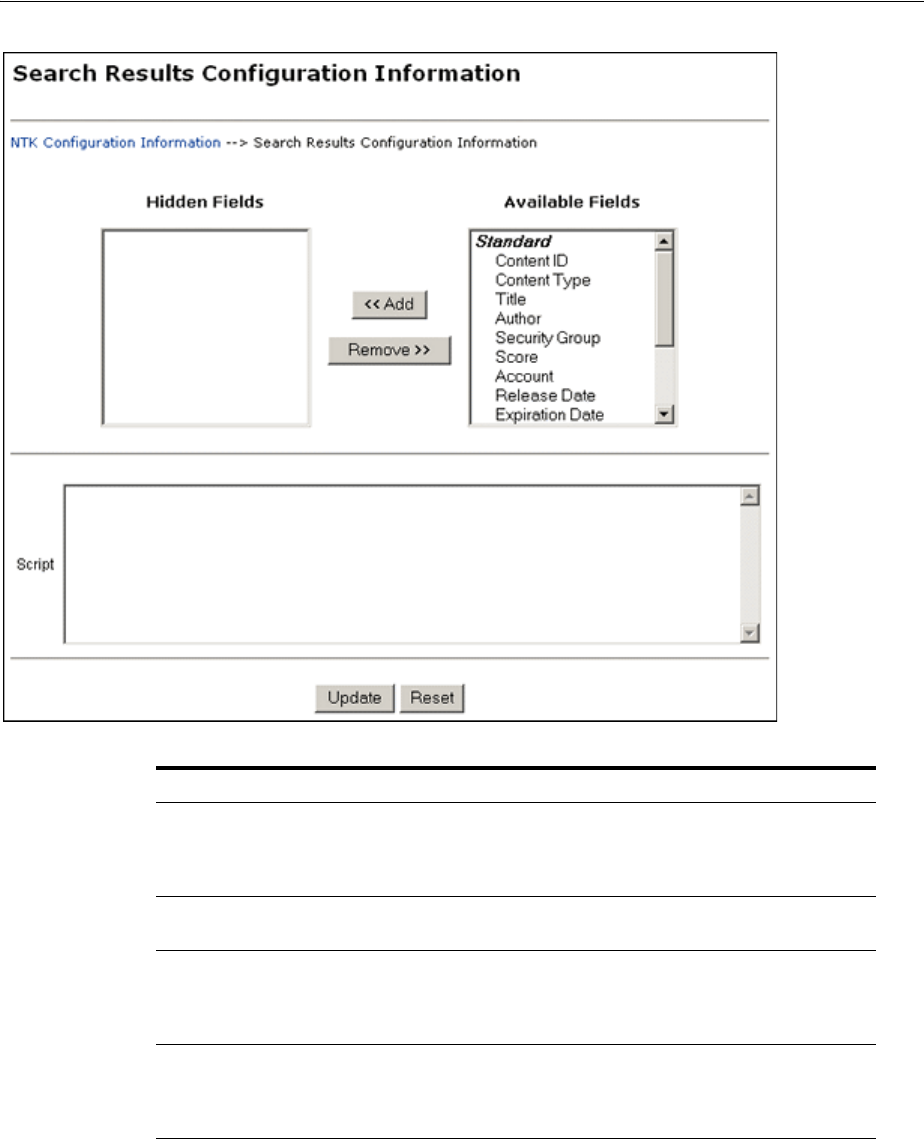
NTK Administration Interface
Need to Know Component B-19
Element Description
Hidden Fields box Displays the list of fields that are hidden from view
in a content search query result. The values are set to
empty strings. These fields are hidden if the field
hideFields is set in the search results script.
Available Fields box Displays the list of fields that are included in a
content search query result.
Add button Select a field name and click Add to move the field
from the Available Fields list to the Hidden Fields
list, making the field hidden in a content search
result.
Remove button Select a field name and click Remove to move the
field from the Hidden Fields list to the Available
Fields list, making the field visible in a content
search result

NTK Administration Interface
B-20 Oracle Fusion Middleware System Administrator's Guide for Oracle Content Server
Script field Enter Idoc Script in this field to control the
presentation of search results. The Idoc Script is
evaluated for each row in the search results. A
number of fields can be set to alter the presentation:
■docInfo:enabled: Set to 0 to disable the content
information link.
■docInfo:link: Set to alter the content
information page link.
■docInfo:image_small: Set to alter the small
image for the information link.
■docInfo:image_large: Set to alter the large
image for the information link.
■url:enabled: Set to 0 to disable the URL link.
■url:link: Set to alter the URL link.
■url:image: Set to alter the image for the URL
link.
■revHistory:enabled: Set to 0 to disable the
revision history link.
■revHistory:link: Set to alter the revision history
link.
■checkout:enabled: Set to 0 to disable to
checkout link.
■checkout:linkF: Set to alter the checkout link.
■actions:enabled: Set to 0 to disable the actions
popup link.
■checkInSimilar:enabled: Set to 0 to disable the
Check In Similar link.
■email:enabled: Set to 0 to disable the email link.
■dynConv:enabled: Set to 0 to disable the
Dynamic Converter link.
Update button Updates the configuration for search query results,
restarts the Oracle Content Server instance, and
returns you to the NTK Configuration Information
page.
Reset button Returns the Search Results configuration settings to
their last saved values.
Element Description
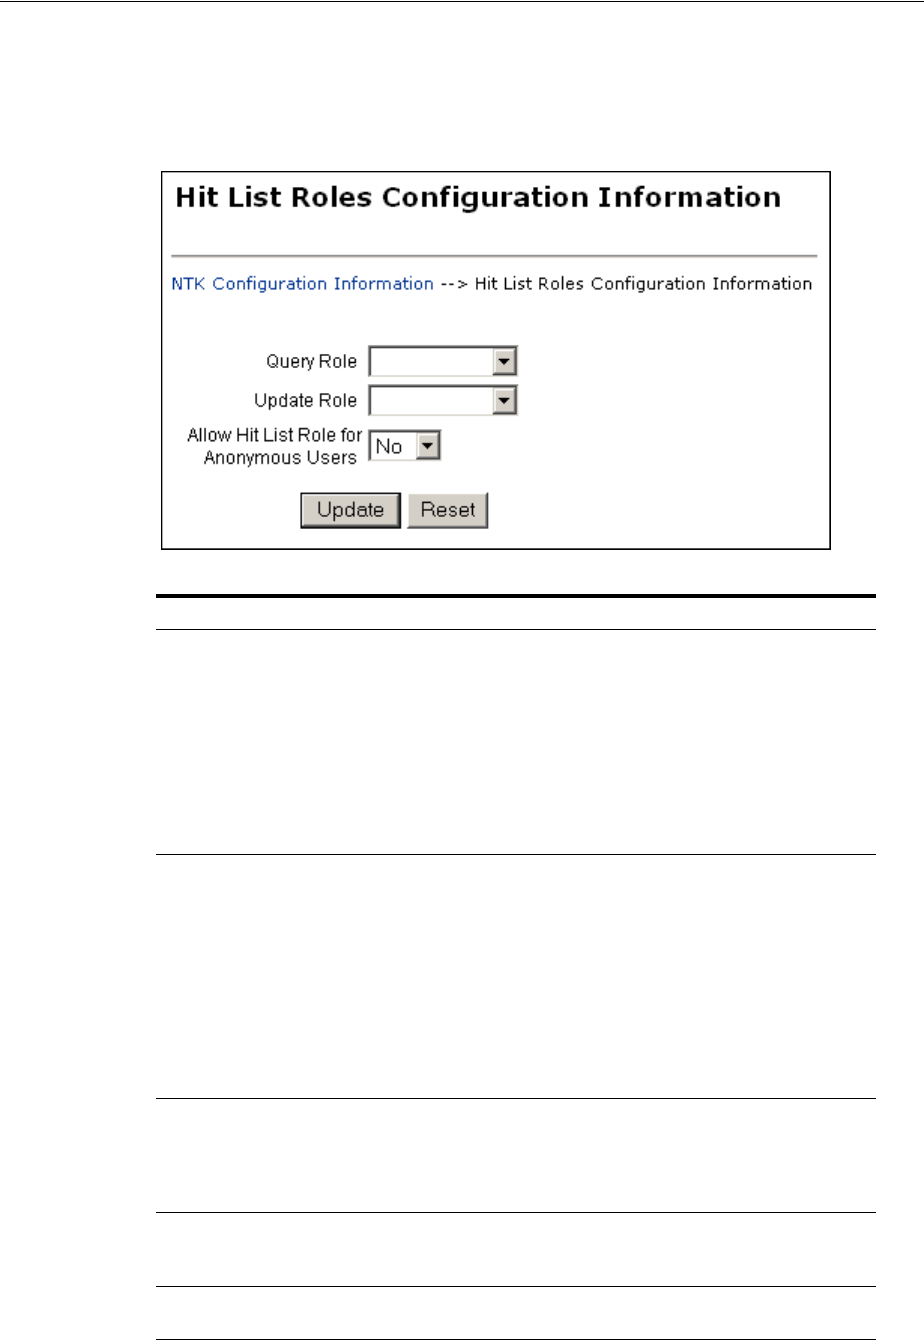
NTK Administration Interface
Need to Know Component B-21
B.5.4 Hit List Roles Configuration Information Page
The Hit List Roles Configuration Information page enables you to configure hit list
roles for users. To access this page, click Edit in the Hit List Roles Configuration
Information area of the NTK Configuration Information page.
Element Description
Query Role field Select the hit list role to be applied as the query role
when the Search page is used. Security group roles
with Read access are displayed in the list of
selections, including any security group roles for
which the user already has Read access.
This role is separate from content security. You could
have a content item appear in Search results
configured for content security, but the user would
not be able to view the Content Information page for
that item.
Update Role field Select the hit list role to be applied as the update role
when the Update page is used. Security group roles
with Write access are displayed in the list of
selections, including any security group roles for
which the user already has Write access. When the
content item is actually checked in or updated, this
role is not applied.
This field is probably most useful in conjunction
with content security. For examples of using this
field,see Appendix B.6, "Security Customization
Samples."
Allow Hit List Role for
Anonymous Users field Applies the hit list roles for anonymous users.
No: Do not apply the hit list roles for anonymous
users. This is the default value.
Yes: Apply the hit list roles for anonymous users.
Update button Updates the hit list configuration, restarts the Oracle
Content Server instance, and returns you to the NTK
Configuration Information page.
Reset button Returns the Hit List Roles configuration settings to
their last saved values.
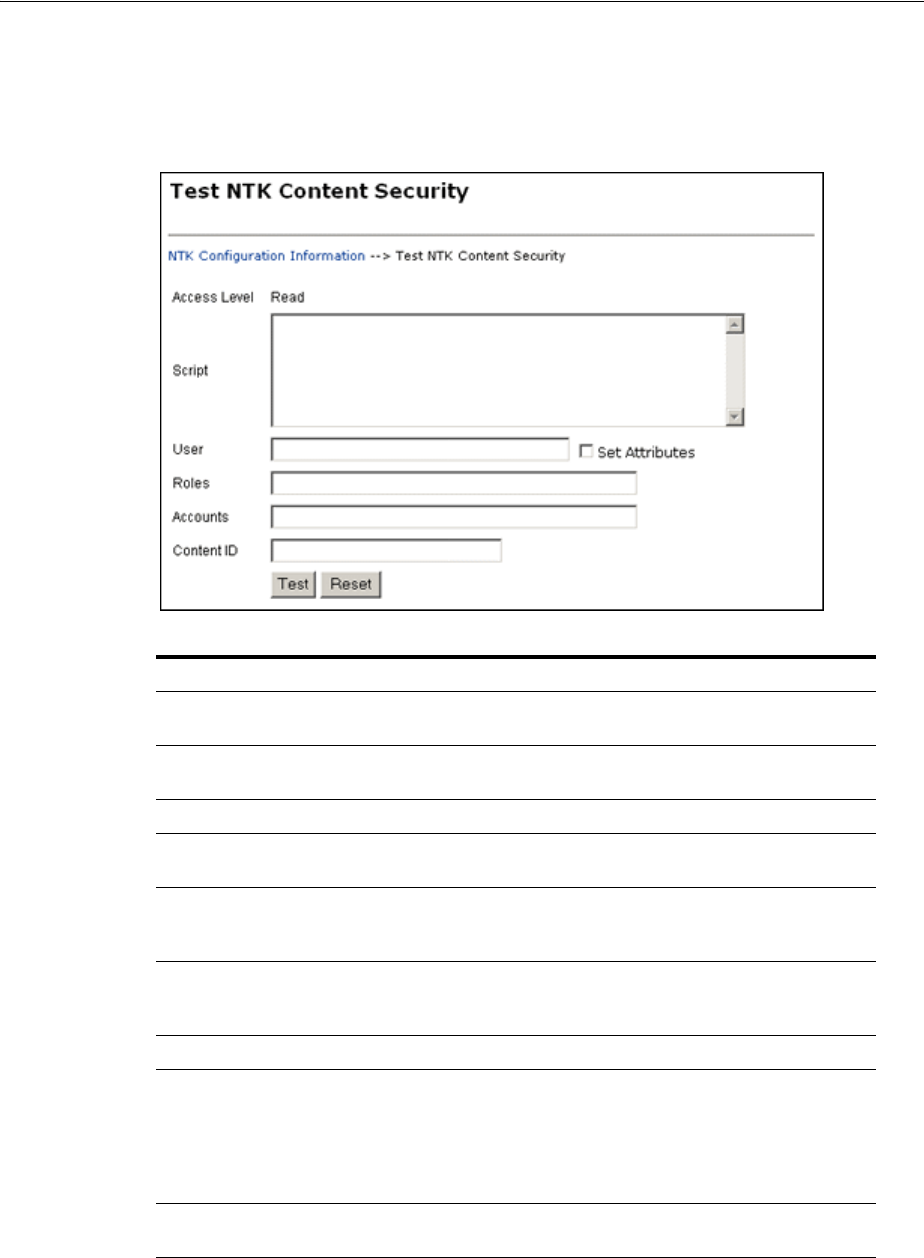
NTK Administration Interface
B-22 Oracle Fusion Middleware System Administrator's Guide for Oracle Content Server
B.5.5 Test NTK Content Security Page
The Test NTK Content Security page enables you to run a test security script for a user.
To access this page, click Te s t in the Script column for one of the access permission
levels displayed on the NTK Configuration Information page.
Element Description
Access Level field Displays the access level for the permissions level
you select to test: Read, Write, or Delete.
Script field Enter Idoc Script for the content security
configuration to be tested.
User field Enter the user ID for the test.
Set Attributes checkbox Select the checkbox to automatically set the user
attributes to match the user's existing attributes.
Roles field Enter the roles assigned to the user for the test. Use
this field if you are testing with external users where
attributes may not be accessible.
Accounts Enter the accounts assigned to the user for the test.
Use this field if you are testing with external users
where attributes may not be accessible.
Content ID Enter the content ID for the test.
Test button Click Tes t to test the configuration specified on the
Test NTK Content Security page. The Need to Know
component test returns results on whether the user
has the specified access, whether Need to Know
security was used, and if Need to Know security
was not used then the reason why.
Reset button Returns the Test NTK Content Security
configuration settings to their last saved values.

Security Customization Samples
Need to Know Component B-23
B.6 Security Customization Samples
This section contains samples of security model customization.
■Appendix B.6.1, "Content Security Samples"
■Appendix B.6.2, "Search Result Samples"
■Appendix B.6.3, "Hit List Roles Samples"
B.6.1 Content Security Samples
This section contains samples of content security customization:
■Appendix B.6.1.1, "Simple Idoc Script Function"
■Appendix B.6.1.2, "Using stdSecurityCheck"
■Appendix B.6.1.3, "Using isStrIntersect"
■Appendix B.6.1.4, "Using allStrIntersect"
■Appendix B.6.1.5, "Using includeNTKReadSecurityScript"
B.6.1.1 Simple Idoc Script Function
This sample allows Read access if the user Color custom field and the content Color
custom field match.
<$if strEquals(uColor, xColor)$>
<$isNTKReadAccess=1$>
<$endif$>
B.6.1.2 Using stdSecurityCheck
This sample allows Read access if the user Color is Blue and the user has standard
security to the content.
<$if stdSecurityCheck() and strEquals(uColor, "Blue")$>
<$isNTKReadAccess=1$>
<$endif$>
B.6.1.3 Using isStrIntersect
This sample returns true because 3 is a member of the first string.
<$if isStrIntersect("1,2,3,4", "5,3")$>
<$isNTKReadAccess=1$>
<$endif$>
This sample returns false because neither 5 or 6 is a member of the first string.
<$if isStrIntersect("1,2,3,4", "5,6")$>
<$isNTKReadAccess=1$>
<$endif$>
This sample returns false because the second string is empty and the third parameter
is not specified.
<$if isStrIntersect("1,2,3,4", "")$>
<$isNTKReadAccess=1$>
<$endif$>

Security Customization Samples
B-24 Oracle Fusion Middleware System Administrator's Guide for Oracle Content Server
This sample returns true because the second string is empty and the third parameter is
true.
<$if isStrIntersect("1,2,3,4", "", 1)$>
<$isNTKReadAccess=1$>
<$endif$>
This sample returns false because the second string is empty and the third parameter
is false. Note that the third parameter can be a string (for example, "True" or "T") or a
number (for example, 1, 0).
<$if isStrIntersect("1,2,3,4", "", 0)$>
<$isNTKReadAccess=1$>
<$endif$>
B.6.1.4 Using allStrIntersect
This sample returns false because 5 is not a member of the first string.
<$if allStrIntersect("1,2,3,4", "5,3")$>
<$isNTKReadAccess=1$>
<$endif$>
This sample returns true because 3 and 4 are members of the first string.
<$if allStrIntersect("1,2,3,4", "3,4")$>
<$isNTKReadAccess=1$>
<$endif$>
The samples in Using isStrIntersect (page 4-2) that use the third parameter would
work the same with allStrIntersect.
B.6.1.5 Using includeNTKReadSecurityScript
Read script:
<$if strEquals(dDocType, "Document")$>
<$isNTKReadAccess=1$>
<$endif$>
Write script:
<$includeNTKReadSecurityScript()$>
<$if isNTKReadAccess and strEquals(uColor, "Red")$>
<$isNTKWriteAccess=1$>
<$endif$>
The user has Write access to the content item if they have read access (type is
Document) and the user's Color is Red.
B.6.2 Search Result Samples
This section contains samples of search results customization:
■Appendix B.6.2.1, "Disabling Links"
■Appendix B.6.2.2, "Changing Links"
■Appendix B.6.2.3, "Changing Images"

Security Customization Samples
Need to Know Component B-25
B.6.2.1 Disabling Links
This sample disables the URL and Content Information link if the user does not have
Read access to the content item. This could be used if you set the query role to show
extra content items in the search results, but don't want users to see links to them.
<$if not securityCheck()$>
<$docInfo:enabled=0$>
<$url:enabled=0$>
<$endif$>
B.6.2.2 Changing Links
This sample alters the Content Information and URL link to another service if the Color
of the content is Red.
<$if strEquals(xColor, "Red")$>
<$docInfo:link=HttpCgiPath & "?IdcService=GET_USER_INFO"$>
<$url:link="javascript:alert('Cannot view content.')"$>
<$endif$>
B.6.2.3 Changing Images
This sample alters the Content Information link if the Color of the content item is Green.
<$if strEquals(xColor, "Green")$>
<$docInfo:image_small=HttpImagesRoot & "stellent/tree_icons/historical.gif"$>
<$endif$>
B.6.3 Hit List Roles Samples
This section contains samples of hit list roles customization:
■Appendix B.6.3.1, "Using the Query Hit List Role"
■Appendix B.6.3.2, "Creating a Black Hole Check In"
B.6.3.1 Using the Query Hit List Role
If you set the Query role to be queryRole, and queryRole has Write access to the security
group NTKGroup, then NTKGroup will appear in the security group option list. You
could then limit what content information appears by customizing the Search Results
configuration values
B.6.3.2 Creating a Black Hole Check In
By using the Update role, you could create a scenario where a user could check in a
content item and then not be able to view or edit it. You would need to do the
following:
1. Create a role called updateRole that has Read/Write access to the security group
NTKGroup.
2. Update the Write content security script so that if a meta change is occurring and
the security group is NTKGroup, allow access.
<$if isMetaChange and strEquals(dSecurityGroup, "NTKGroup")$>
<$isNTKWriteAccess=1$>
<$endif$>

Security Customization Samples
B-26 Oracle Fusion Middleware System Administrator's Guide for Oracle Content Server

Index-1
Index
Symbols
$dDocAccount$, 4-53
$dDocName$, 4-53
$dDocType$, 4-53
$dSecurityGroup$, 4-52
$dWebExtension$, 4-53
$ExtensionSeparator$, 4-53
$FsHttpWebRoot$, 4-52
$FsWeblayoutDir$, 4-52
$RenditionSpecifier$, 4-53
$RevisionLabel$, 4-53
@ symbol, for accounts, 5-45
A
access control lists
configuring, 5-52
introduction to, 5-51
permissions, 5-53
supported in Oracle Secure Enterprise
Search, 5-51
Access Implementor, A-39
AccessListPrivilegesGrantedWhenEmpty, 5-54
accounts
and users example, 5-51
assigning to users, 5-48
case study, 5-49
content server, 5-42
creating during checkin, 5-48
creating predefined, 5-47
enabling, 5-47
example structure, 5-45
external directory server, 5-46
hierarchical, 5-44
overview, 5-42
prefix, 5-45
show only known, A-13, A-14
use of @ symbol, 5-45
use of slashes in, 5-44
weblayout, 5-45
AcctPermDelim, A-58
AcctPrefix, A-60
Action History Screen, A-172
actions
predefined, A-125
service, A-124
actions, Batch Loader, 3-14
Active Directory LDAP provider
adding an, 4-76
Add Action screen, A-124
Add Archive screen, A-176
Add BatchBuilder Mapping Field screen, A-75
Add BatchBuilder Mapping screen, A-74
Add Component screen, A-122
Add Dynamic Resource Table Information
screen, A-129
Add HTML Resource Include/String screen, A-133
Add Intradoc Template screen, A-142
Add New Account screen, A-99
Add New Alias screen, A-108
Add New Group screen, A-95
Add New Role screen, A-96
Add Parameter screen, A-134
Add Partition page, A-37
Capacity Check Interval, A-37
Duplication Methods, A-37
Is Active, A-37
Partition Name, A-37
Partition Root, A-37
Reset, A-38
Slack Bytes, A-37
Add Provider page, A-48
Add Query screen, A-135
Add Query Table Information screen, A-127
Add Resource Definition screen, A-136
Add Role screen, A-105
Add screen
Component Wizard, A-126
Add SearchResults Template screen, A-140
Add Service screen, A-137
Add Service Table Information screen, A-128
Add Static Resource Table Information
screen, A-130
Add Template Table Information screen, A-132
Add User screen, A-101
Accounts tab, A-105
Info tab
global user, A-103
Roles tab, A-104
adding
database providers, 4-62
Index-2
existing components, 6-24
incoming providers, 4-63
LDAP providers, 4-64
outgoing providers, 4-62
preview providers, 4-63
provider
database, 4-72
incoming, 4-74
outgoing, 4-71
preview, 4-74
redirect in Batch Loader, 3-36
security groups, 5-37
users, 5-31
Additional Configuration Variables field, A-9, A-12
Admin Actions page, A-27
Admin Applets page, 1-6
Admin permission, 5-40, A-97
admin role, 5-39
Admin Server
Additional Configuration Variables field, A-9,
A-12
Content Security page, A-13
enabling and disabling components, 6-6
General Configuration page, A-10
home page, A-2
Internet Configuration page, A-16
introduction to, 3-7
Output page, A-4
Server Status page, A-4
uploading components, 6-6
Administration
tray, 1-6
administration
applications as applets, 3-8
applications in standalone mode, 3-8
interfaces, 1-4
management application, 1-3
management pages, 1-5
starting applications, 3-8
tools, 1-2
utilities, 1-5
administration applications
running as applets, 3-8
Administration page, A-4
administrator
responsibilities, 1-2
role, 1-2
tools, 1-2
user type, 1-2
Administrator Mail Address, A-15, A-16
Advanced Component Manager page, A-154
aliases
creating, 5-32
Allow author to delete revision, A-13, A-14
Allow get copy for user with read privilege, A-13,
A-14
Allow only original contributor to check out, A-13,
A-14
AllowArchiveNoneFolderItem variable, 8-74
AllowMigrationOfParentFoldersMeta variable, 8-74
AllowQuerySafeUserColumns, 5-52
analysis
Content Server Analyzer database, 3-50
Content Server Analyzer file system, 3-51
Content Server Analyzer search index, 3-51
starting Content Server Analyzer, 3-50
analyzer, see Content Server Analyzer, A-77
AppletChunkSize, 4-4
AppletChunkThreshold, 4-4
applets, running applications, 3-8
applet-specific tracing, 3-47
applications
lstarting administration, 3-8
running as applets, 3-8
running in standalone mode, 3-8
starting administration, 3-8
Archive Collections screen, A-204
archive replication, 5-56
ArchiveFolderStructureOnly variable, 8-74
Archiver, 8-52
adding tables to archives, 8-30
application, 1-5, 4-62, 4-63
automatic export, 8-53
automatic import, 8-54
automating export, 8-53
automation, 8-52
batch files, 8-18
collection structure, 8-17
copying archives, 8-21
creating collections, 8-24
creating export queries, 8-28
creating table export queries, 8-31
defining outgoing transfer provider, 8-50
defining sockets as providers, 8-50
Delete All Revisions import rule, 8-38
Delete Revision import rule, 8-37
deleting transfers, 8-51
editing table archive properties, 8-30
examples, 8-64, 8-65, 8-66
Export function, 8-3
exporting configuration information, 8-30
exporting content manually, 8-28
functions, 8-3
import rules, 8-34
importing archived data, 8-39
importing data, 8-33
importing specific revisions, 8-43
initiating exports, 8-32
Insert Create import rule, 8-36
Insert Revision import rule, 8-36
introduction, 8-3
log entry types, 8-20
log files, 3-40
making an archiver targetable, 8-49
manual content transfer, 8-51
manual import, 8-43
moving default collection, 8-25
opening archive collections, 8-23
opening collections, 8-23
removing collections, 8-24

Index-3
Configuration Migration
removing archive
collections,8-24
removing files from batch file, 8-25
replicate function, 8-4
replicating files, 8-52
replicating import on import machine, 8-54
replication, 8-52
Replication tab, A-198
rransfer rules, 8-48
running as standalone application, 8-22
setting a transfer target, 8-50
setting export options, 8-32
setting import options, 8-42
setting map fields, 8-40
setting transfer destination (target), 8-50
setting up automatic transfer, 8-54
setting value maps, 8-41
single revision replications, 8-52
specifying file to retrieve, 8-43
structure, 8-16
transfer function, 8-3
transfer process, 8-49
transfer rules, 8-48
Transfer types, 8-46
transferring batch files, 8-47
transferring batch files to different archive, 8-51
transferring content, 8-44
understanding components, 8-16
understanding how batch files are read, 8-47
understanding logs, 8-20
Update import rule, 8-35
what you can archive, 8-19
Archiver import function, 8-3
ArchiverReplicationExceptons
component, 8-5
ArchiverReplicationExceptons component
overview, 8-76
archives
copying, 8-21
import process, 8-39
making targetable, 8-49
moving default collection, 8-25
transferring batch files, 8-51
archives, see folder structure archives, 8-72
archiving, 8-52
folders, 8-4
tool comparision, 8-5
archiving differences between Folders and Folder
Structure Archive, 8-71
archiving folder content, 8-4
archiving issues
exporting issues, 8-87
importing issues, 8-80
miscellaneous issues, 8-95
Oracle-specific issues, 8-94
replication issues, 8-93
transfer issues, 8-89
WebDAV issues, 8-92
assigning
accounts, 5-48
roles, 5-41
assigning Optimized Fields, 7-7
AttributeMap, A-60
authentication
LDAP, 5-5
author, allowing delete, A-13, A-14
AuthorDelete, A-13, A-14
authorization type, 5-31
automated archiving, 8-52
automatic Content ID, A-9, A-11
automatic transfer of archives, 8-54
Automatic Update Cycle
screen, A-24
status and actions, A-29
automatic update cycle, A-23
AutoNumberPrefix, A-9, A-11
B
BASE_JAVA_CLASSPATH_custom, A-21
batch load files
Archiver, 8-18
case sensitivity, 3-13
creating from BatchBuilder screen, 3-25
creating from command line, 3-27
delete from an archive, 8-26
file records, 3-13
preparing, 3-23
removing archive files, 8-25
removing revisions, 8-25
samples, 3-23
transferring to different archive, 8-51
understanding Archiver, 8-47
Batch Loader
actions, 3-14
adding a redirect, 3-36
-console switch, 3-35
delete action, 3-16
file records, 3-13
insert action, 3-14
interface, A-71
mapping file, 3-24
optional parameters, 3-20
preparing batch load files, 3-23
running, 3-28, 3-29
screen, A-71
UNIX example, 3-30
update action, 3-17
utility, 1-5, 3-12
Win32 example, 3-30
Batch Loader screen
batch loading, 3-29
batch loading
correcting errors, 3-36
custom metadata fields, 3-23
from Batch Loader screen, 3-29
from command line, 3-29
introduction to, 3-12
BatchBuilder, 3-23

Index-4
Add BatchBuilder Mapping Field screen, A-75
Add BatchBuilder Mapping screen, A-74
creating mapping file, 3-26
Edit BatchBuilder Mapping Field screen, A-75
Edit BatchBuilder Mapping screen, A-74
Mapping List screen, A-73
screen, A-72
UNIX example, 3-28
Win32 example, 3-28
BatchBuilder Mapping List screen, A-73
BatchBuilder screen
creating batch load file, 3-25
Browse for Fields screen, A-194
Browse for Proxied Collection screen, A-179
Browse Local screen, A-177
Browser Executable Path, A-21
Build menu, A-121
Build screen, A-146
build settings, 6-20
Build Settings screen, A-148
build settings, component, A-121
building, A-146
component Zip file, 6-20
components, A-146, A-148
building installation settings, A-148
bundle, 8-2
bundle uploading, 8-2
bundles
downloading, 8-15
importing, 8-14
uploading, 8-14
C
canceling
Content Server Analyzer status report, 3-53
Capacity Check Interval, A-37
case study, accounts, 5-49
Change the Authorization Type screen, A-101
checkin
creating accounts, 5-48
checkout
only original contributor, A-13, A-14
Choose the Authorization Type screen, A-101
ChunkedRequestTrace, 4-4
Chunking function, 4-3
configuring, 4-4
CLASSPATH, A-21
collection
rebuilding search, 4-8
collection IDs, 8-75
collection rebuild
configuring, 4-9
collection rebuild cycle, A-23
Collection Rebuild Cycle screen, A-25
Collection Rebuild Cycle status and actions, A-29
CollectionIsConsumptionOnly variables, 8-75
collections
creating archive, 8-17, 8-24
moving default archive, 8-25
opening archive, 8-23
removing archive, 8-24
Column Information screen, A-142
ColumnTranslation table, A-131
command line
Batch Loader, 3-35
batch loading, 3-29
creating batch load file, 3-27
running Idoc Script, 1-5, 3-12
comparing archive types, 8-5
component
creating with Component Wizard, 6-9
Component Configuration screen, A-123
Component List screen, A-118
Component Manager, 6-5
using, 6-5
Component Manager page, A-151
Component Wizard, 6-5, 6-20
Add Action screen, A-124
Add Dynamic Resource Table Information
screen, A-129
Add HTML Resource Include/String
screen, A-133
Add Intradoc Template screen, A-142
Add Parameter screen, A-134
Add Query screen, A-135
Add Query Table Information screen, A-127
Add Resource Definition screen, A-136
Add screen, A-126
Add SearchResults Template screen, A-140
Add Service screen, A-137
Add Service Table Information screen, A-128
Add Static Resource Table Information
screen, A-130
Add Template Table Information screen, A-132
adding existing components, 6-24
Build menu, A-121
Build screen, A-146
Build Settings screen, A-148
Column Information screen, A-142
configuring default HTML editor, 6-23
creating a new component, 6-8
creating component example, 6-9
creating HTML includes, 6-17
creating static tables, 6-18
Edit Action screen, A-124
Edit HTML Resource Include/String
screen, A-133
Edit Intradoc Template screen, A-142
Edit Parameter screen, A-134
Edit Query screen, A-135
Edit SearchResults Template screen, A-140
Edit Service screen, A-137
editing the Readme file., 6-9
enabling and disabling components, 6-22
Help menu, A-121
Java code tab, 6-9
opening components, 6-23
Options menu, A-120
removing components, 6-22
Index-5
Resource Selection Dialog screens, A-136
unpackaging components, 6-24
using, 6-1, 6-8
working with resources, 6-9
component Zip file
building, 6-20
components, 6-5
adding existing, 6-24
build settings, A-121
building, A-146, A-148
creating, 6-8
disabling, 6-6, 6-22
enabling, 6-6, 6-22
opening, 6-23
removing, 6-22
unpackaging, 6-24
uploading, 6-6
ComponentTool
utility, 1-5
ComponentWizard
utility, 1-5
conffiguration templates, 8-12
Config Migration Admin screen, A-167
config.cfg file, A-9, A-12
Configuraiton Migration
FolderStructureArchive, 8-4
Configuraiton Migration Utility
migration templates, 8-8
configuration bundles, 8-2
Configuration Bundles page, A-165
Configuration Class, A-39
configuration export, 8-13
configuration information, 3-41
Configuration Manager
application, 1-5
batch files, 8-18
Configuration Migration, 8-25
adding tables to archives, 8-30
Admin Screen, A-167
administration interface, A-164
administration page, A-164
archive targets, 8-19
Archiver, 8-3
ArchiveReplicationExceptions, 8-5
bundle, 8-2
child sections, A-169
collection structure, 8-17
components, 8-1
Configuration Bundles page, A-165
configuration export, 8-13
Configuration Migration Utility, 8-2
Configuration Templates page, A-166
copying archives, 8-21
copyring an archive, 8-21
creating a new archive, 8-21
creating a one-time export, 8-13
creating archive collections, 8-24
creating configuration migration templates, 8-10
creating export queries, 8-28
creating table export queires, 8-31
creating templates, 8-10
deleting archives, 8-22
downloading bundles, 8-15
editing ctemplates, 8-12
editing table archive properties, 8-30
editing templates, 8-12
Export function, 8-27
export methods, 8-27
exporting archive data, 8-26
exporting configuration information, 8-30
exporting configurations, 8-13
exporting content manually, 8-28
Folder Archive, 8-68
Folder Archiving, 8-4
Import function, 8-33
import process, 8-39
import rules, 8-34
importing bundles, 8-14
importing data, 8-33
importing templates, 8-12
initiating exports, 8-32
introduction, 8-1
logs, 8-10
migrating system configurations, 8-6
migration process, 8-9
moving default collection, 8-25
one-time exports, 8-13
opening archive collections, 8-23
setting export options, 8-32
status information, 8-16
templates, 8-8, 8-10, 8-12
tips, 8-9
tools, 8-1
Transfer function
overview
file transfer,8-44
transfer rules, 8-48
Transfer terminology, 8-45
Transfer types, 8-46
transferrinig batch files, 8-47
Upload Configuration Bundle screen, A-164
uploading bundles, 8-14
Configuration Migration Utility
bundles directory, 8-7
component, 8-2
configuration bundle directory, 8-7
configuration bundles, 8-8
customization directory, 8-8
functions, 8-2
limitations, 8-9
migration directory, 8-7
migration structure, 8-7
configuration templates, 8-2, 8-10, 8-12
Configuration Templates screen, A-166
configuration variables, 3-53
AllowArchiveNoneFolderItem, 8-74
AllowMigrationOfParentFoldersMeta, 8-74
ArchiveFolderStructureOnly, 8-74
CollectionIsConsumptionOnly, 8-75
for Folder Structure Archive component, 8-74

Index-6
Configure Web Server Filter page, A-42
configuring
content security, 4-4
content server options, 4-5
database storage, 4-54
default HTML editor, 6-23
general options, 4-2
Internet information, 4-4
optional web store, 4-53
paths, 4-7
search collection rebuild, 4-9
search index update, 4-9
standard file paths, 4-51
webless store, 4-53
configuring OAM 11g with Oracle UCM, 5-13
Connection Class, A-39
connection string, JDBC, A-18
-console switch
Batch Loader, 3-35
consumers, 1-1
content
transferring, 8-44
Content Analzyer
utility, 1-5
Content Categorizer, 4-63
Content Publisher, 4-63
Content Satisfying the Export Query screen, A-186
content security
Idoc Script functions, B-6
Content Security Configuration Information
page, B-15
Content Server
log files, 3-40
content server
applications, 1-5
Chunking function
introduction, 4-3
configuring options, 4-5
configuring Oracle Access Manager 11g, 5-13
configuring with Oracle Access Manager
10g, 5-16
performance, 4-2
purpose, 1-1
restarting, 3-5
running applications, 3-8
running applications on Windows, 3-8
stopping, 3-3
user types, 1-1
using SSL, 5-6
viewing output, 3-8
Content Server Analyzer
accessing, 3-49
canceling status report, 3-53
Configuration tab, A-77
console display area, 3-52
database analysis, 3-50
description, 3-48
file system analysis, 3-51
interface, A-76
Progress tab, A-78
results, 3-52
search index analysis, 3-51
specifying log directory, 3-50
starting analysis, 3-50
status report, 3-53
Content Server Pages
Add Storage Rule page, A-39
Edit Partition page, A-37
Content Tracker, 4-65
Update Component Configuration screen, A-160
Content Tracker Reports
Update Component Configuration screen, A-161
contributor role, 5-39
contributors, 1-2
Copy Archive screen, A-176
correcting batch load errors, 3-36
creating
accounts during checkin, 5-48
archive collections, 8-17, 8-24
batch load files
from BatchBuilder screen, 3-25
from command line, 3-27
export queries, 8-28
folder structure archives, 8-72
mapping file, 3-26
new component, 6-8
predefined accounts, 5-47
providers
database, 4-72
incoming, 4-74
outgoing, 4-71
preview, 4-74
security groups, 5-37
static table, 6-18
creating migration templates, 8-10
credential maps
values, 5-57
Credential Maps page, A-115
credentials maps
account filter syntax, 5-58
creating, 5-59
matching accounts and roles, 5-58
overview, 5-56
privilege levels, 5-58
reference input value, 5-58
special characters, 5-59
substitution, 5-59
when to specify, 5-57
custom metadata fields, batch loading, 3-23
custom resources, 6-9
D
data input
filtering, 5-68
data management, 4-36
database, A-18
Content Server Analyzer analysis, 3-50
Database options
FsCacheThreshold, 4-40

Index-7
FsMaximumFileCacheAge, 4-40
FsMinimumFileCacheAge, 4-40
Database provider, 4-61
database provider
adding, 4-62, 4-72
Database Provider page, A-51
database tables
FileCache table, 4-50
DatabasePreserveCase, A-18
databases
IBM DB2, 4-5
used with Oracle Text, 7-2
DataSources table, A-131
debug level, Indexer, A-25, A-26
debugging, 3-45
IsDevelopmentEnvironment, 3-53
default archive collection, moving, 8-25
default capacity algorithm
characteristic of hint cache, 4-27
default HTML editor, configuring, 6-23
default optimized fields, 7-7
DefaultAttributesCacheTimeoutInSeconds
variable, 5-68
DefaultFileStore
default settings, 4-38
editing provider, 4-42
provider, 4-61
DefaultNetworkAccounts, A-59
defining
revision labels, A-9, A-11
sockets as providers, 8-50
delete
allowing authors permission, A-13, A-14
delete action, 3-16
example, 3-17
requirements, 3-17
Delete All Revisions import rule, 8-38
Delete permission, 5-40, A-97
Delete Revision import rule, 8-37
deleted folders, 8-75
deleting
providers, 4-78
roles, 5-41
security groups, 5-37
dEmail, 5-34
Descriptor Implementor, A-39
dFullName, 5-34
differences with Folders archiving features, 8-71
directory
specifying Content Server Analyzer log, 3-50
directory servers, external, 5-46
DisableHttpUploadChunking, 4-4
disabling
component, 6-6, 6-22
download applet, A-9, A-11
full-text indexing, 4-9
JSP support, A-9, A-12, A-20
keyword highlighting, A-9
Disclosure Query Security applet, B-8
dispersion, 4-46
displaying categories in search results, 7-10
DownloadApplet, A-8, A-11
driver, JDBC, A-18
Duplication Methods, A-37
dUserLocale, 5-34
dUserType, 5-34
dynamic resource tables, A-129, A-130, A-142
dynamic web URL, 4-44
E
Edit Action screen, A-124
Edit Alias screen, A-108
Edit BatchBuilder Mapping Field screen, A-75
Edit BatchBuilder Mapping screen, A-74
Edit Export Options screen, A-186
Edit Export Query screen, A-183
Edit Export Rule Screen, A-171
Edit Field Maps screen, A-193
Edit File Store Provider page, A-38
Access Implementor, A-39
Configuration Class, A-39
Connection Class, A-39
Descriptor Implementor, A-39
Edit Rule, A-39
Event Implementor, A-39
Metadata Implementor, A-39
Provider Class, A-39
Provider Description, A-39
Provider Name, A-39
Storage Rules, A-39
Edit Hint Rules Form, A-31
Edit HTML Resource Include/String screen, A-133
Edit Import Options screen, A-197
Edit Intradoc Template screen, A-142
Edit Parameter screen, A-134
Edit Partition page, A-37
Edit Permission screen, A-97
Edit Permissions for Account screen, 5-49, A-99
Edit Provider page, A-48
Edit Query Hint Rules Table, 4-25
Edit Query screen, A-135
Edit Rule, A-39
Edit SearchResults Template screen, A-140
Edit Service screen, A-137
Edit Storage Rule page, A-39
File system only, A-40
Is Webless File Store, A-41
JDBC Storage, A-40
Renditions, A-41
Show Path Metadata, A-41
Vault Path, A-41
Web URL File Path, A-41
Web-viewable Path, A-41
Edit User screen, A-101
Accounts tab, A-105
Roles tab, A-104
Edit User screenr
Info tab
global user, A-103

Index-8
editing
provider information, 4-77
Readme file, 6-9
editing Optimized Fields, 7-7
E-mail Address user field, 5-34
e-mail address, system administrator, A-15, A-16
e-mail port, A-16
EnableDocumentHighlight, A-9
enabling
accounts, 5-47
components, 6-6, 6-22
JSP support, A-9, A-12, A-20
keyword highlighting, A-9
encodeHtml, 5-68
environment packager, 3-48
error information, 3-38
error messages
content server, A-4
errors
correcting batch load, 3-36
Event Implementor, A-39
example
creating component, 6-9
examples
account structure, 5-45
accounts, 5-49
adding a partition to weblayout path, 4-56
Archiver, 8-64, 8-65, 8-66
batch load file record, 3-13
batch load files, 3-23
Batch Loader
delete action, 3-17
insert action, 3-15
on UNIX, 3-30
on Win32, 3-30
update action, 3-19, 3-20
BatchBuilder
on UNIX, 3-28
on Win32, 3-28
database storage, 4-54
mapping, 4-59
optional web store, 4-53
PathMetaData table, 4-50
standard file paths, 4-51
webless store, 4-53
ExceptionFormatMap, 4-15
ExclusiveCheckout, A-13, A-14
existing component, adding, 6-24
export
automatic, 8-53
creating queries, 8-28
initiating, 8-32
Preview screen, A-170
setting options, 8-32
Export Archive screen, A-192
exporting
folder hierarchies, 8-69
exporting configurations, 8-13
exporting issues (Archiver), 8-87
Extended User Attributes, 67
external authentication provider, 5-5
external collections, 3-24
read-only, 3-26
external directory server
considerations, 5-46
external users, 5-27
ExtranetLook, 5-63
ExtUserAttribInfo, 5-67
F
farm, 1-3
fast rebuild
Indexer Rebuild screen, A-26
overview, 7-8
when to perform, 7-8
features, 8-70
fields
adding user information fields, 5-34
Archiver mapping, 8-40
custom metadata, 3-23
editing, 5-35
user information, 5-34
file records, 3-13
file store system
administration interface, A-36
configuring, 4-39
content server options, 4-40
data management, 4-36
database options, 4-39
dispersion, 4-46
dynamic web URL, 4-44
file management, 4-36
FileStoreProvider component, 4-35
introduction to, 4-35
metadata, 4-37
partitions, 4-39
renditions, 4-44
static web URL, 4-44
storage class, 4-44
storage directory, 4-41
storage rules, 4-42
storage space, 4-37
web URL, 4-44
web URL file, 4-44
WebFlag, 4-40
xStorageRule, 4-40
file system
Content Server Analyzer analysis, 3-51
FileCache table, 4-50
files
managing, 4-36
Readme, 6-9
replication
files, 8-52
FileStorage table, 4-50
FileStoreProvider
component, 4-35, 4-37, A-36
configuring, 4-39
configuring no upgrade, 4-37

Index-9
editing, 4-42
empty storage rule, 4-38
FileCache table, 4-50
FileStorage table, 4-50
FileSystemFileStoreAlgorithmFilters table, 4-49
PartitionList table, 4-47
PathConstruction table, 4-48
PathMetaData table, 4-48
resource tables, 4-46
storage principles, 4-43
StorageRules table, 4-47
upgrade, 4-37
working with, 4-41
xPartitionId, 4-40
FileSystemFileStoreAlgorithmFilters table, 4-49
filter data input
encodeHtml, 5-68
HtmlDataInputFilterLevel variable, 5-69
introduction, 5-68
Folder Archive
exporting folder structure, 8-69
functions, 8-68
importing folder structure, 8-70
Folder Archiving, 8-4
folder archiving, 8-4
folder archiving component, 8-4
Folder Structure Archive component
differences with Folders archiving features, 8-71
features, 8-70
folder structure archives
creating, 8-72
location, 8-73
updating, 8-72
Folders component
configuration variables, 8-74
InitialColID setting, 8-75
Folders_g
Update Component Configuration screen, A-157
FoldersStructureArchive component
archiving features, 8-71
FolderStructureArchive
component, 8-4
FolderStructureArchive component
configuration variables, 8-74
implementation considerations, 8-75
uses, 8-71
FormatMap, 4-15
formats
mapping file, 3-24
FsCacheThreshold, 4-40
FsCleanUpCacheDuringIndix, 4-40
FsCleanUpCacheIndexingMax, 4-40
FsMaximumFileCacheAge, 4-40
FsMinimumFileCacheAge, 4-40
Full Name user field, 5-34
full-text indexing
disabling, 4-9
large documents, 4-9
Outside In Content Access conversion, 4-9
Fusion Middleware Control, 1-3
G
generating
Content Server Analyzer status report, 3-53
get copy permission, A-13, A-14
GetCopyAccess, A-13, A-14
group by
supported sort construct, 4-21
guest role, 5-39
H
Help menu, A-121
hierarchical accounts, 5-44
hint cache
default capacity algorithm, 4-27
managing entries, 4-27
origin of keys, 4-27
overview, 4-26
persistence, 4-28
reusing entries, 4-26
Hint Cache Updater page, A-34
accessing, 4-31
checking hint cache for hints
data source, 4-32
modifyng data source or query entry
data source, 4-33
removing data source or query entry
data source, 4-34
Hint Rule Editor, 4-25
hint rules
adding and enabling, 4-28
Hint Rules Configuration page, A-30
accessing, 4-28
adding and enabling new hint rules, 4-28
disabling hint rules
hint rules, 4-29
editing hint rules
hint rules, 4-28
enabling hint rules
hint rules, 4-29
removing hint rules
hint rules, 4-30
Hint Rules Table
editing, A-30
hint rules table
AllowMultiple - column description, 4-25
Column - column description, 4-23
Disabled - column description, 4-25
explanations of rules, 4-22
Index - column description, 4-24
Key - column description, 4-23
Operators - column description, 4-23
Order - column description, 4-24
overview, 4-21
Table - column description, 4-23
Values - column description, 4-24
Historical Scheduled Jobs Listing screen, A-87
Hit List Roles Configuration Information page, B-21
HTML
filtering data input, 5-68

Index-10
HTML editor, configuring default, 6-23
HTML Preview, 4-61, 4-63
HtmlDataInputEncodingRulesForSpecialFields
variable, 5-69
HtmlDataInputFilterLevel variable, 5-69
HTTP provider, 4-61
chunking, 4-3
Http Relative Web Root, A-15, A-16
HTTP Server Address, A-15, A-16
HttpRelativeWebRoot, A-15, A-16
HttpServerAddress, A-15, A-16
I
IBM DB2 database
configuring content server for searching, 4-5
IdcHomeDir, A-21
IdcShell tool, 1-5, 3-12
Idoc Script, 1-5, B-6
running from command line, 3-12
Idoc Script functions, B-6
IdocScriptExtensions table, A-132
IgnoredFlexFields table, A-130
implementation considerations, 8-75
import
initiating, 8-43
manual, 8-43
options, 8-42
Preview screen, A-170
setting options, 8-42
specific revisions, 8-43
Import Archive screen, A-198
Import function
Archiver
Import function, 8-33
import machine
replicating import, 8-54
import rules
Delete All Revisions, 8-38
Delete Revision, 8-37
Insert Create, 8-36
Insert Revision, 8-36
Update, 8-35
use of, 8-34
importing
archived data, 8-39
archived folder structure, 8-70
importing bundles, 8-14
importing issues (Archiver), 8-80
Inbound Refinery
log files, 3-40, 3-41
include resources
adding, A-133
editing, A-133
Incoming provider, 4-61
Incoming Provider page, A-53
incoming provider, adding, 4-63, 4-74
Index Fast Rebuild
performing, 7-8
index fast rebuild
when to perform, 7-8
Indexer
automatic update cycle, A-23
collection rebuild cycle, A-23
debug level, A-25, A-26
state, A-23
status, A-23
Indexer Rebuild screen, A-26
indexing
content, 4-7
disabling full-text, 4-9
native files, 4-10
information fields
user, 5-34
Informix, A-18
initial collection ID, 8-75
InitialColID setting for Folders, 8-75
inner join
supported sort construct, 4-21
insert action, 3-14
example, 3-15
requirements, 3-14
Insert Create import rule, 8-36
Insert Revision import rule, 8-36
Install screen (component), A-122
Instance Description, A-19
Instance Menu Label, A-19
InstanceDescription, A-19
InstanceMenuLabel, A-19
internal security, 5-3
Internet options
System Properties, 4-4
Intradoc template, A-142
IntradocTemplates table, A-133
IP Address Filter, A-20
Is Active, A-37
Is Webless File Store, A-41
IsAutoNumber, A-9, A-11
IsJdbc, A-17
IsJspServerEnabled, A-9, A-12, A-20
IsOverrideFormat, A-8, A-11
J
Java applets, 3-8
Java Classpath, A-21
Java code, 6-9
JDBC, A-17
JDBC Connection String, A-18
JDBC Driver Name, A-18
JDBC Storage, A-40
JDBC User Name, A-18
JDBC User Password, A-18
JdbcConnectionString, A-18
JdbcDriver, A-18
JdbcPassword, A-18
JdbcUser, A-18
JPS User Provider page, A-67
JpsUserProvider, 4-61
overview, 5-55

Index-11
JpsUserProvider component, 4-61
JSP
security groups enabled for, A-9, A-12, A-20
JSP support, enabling and disabling, A-9, A-12, A-20
JspEnabledGroups, A-9, A-12, A-20
K
keepaliveincoming Provider page, A-60
keepaliveoutgoing Provider page, A-61
Key
column description, 4-23
keys
origin of - characteristic of hint cache, 4-27
keyword highlighting, A-9
known accounts, A-13, A-14
L
label sequence, revision, 4-3
language settings
date format, 4-6
default interface language, 4-7
introduction, 4-6
Latest Action Screen, A-171
LDAP, 5-5
LDAP provider, 4-61
LDAP Provider page, A-55
LDAP provider, adding, 4-64
LdapAdminDN, A-60
LdapAdminPassword, A-60
LdapPort, A-57
LdapServer, A-57
LdapSuffix, A-57
list key
editing, 5-34
local transfer, 8-46
local users, 5-28
locale, system, A-19
localization
configuring, 4-6
date format, 4-6
default interface language, 4-7
Localization Indexing status and actions, A-29
log files
accessing --, 3-39
accessing Archiver, 3-41
accessing content server, 3-39
Archiver, 3-40
characteristics, 3-39
configuration migration, 8-10
Content Server, 3-40
folder, 3-39
Inbound Refinery, 3-40, 3-41
overview, 3-38
types of entries, 3-40
verbose logging, 3-39
logins
deleting user, 5-32
editing user, 5-31
logout
customizing, 5-63
logs
specifying directory for Content Server
Analyzer, 3-50
understanding Archiver, 8-20
M
Mail Server, A-15, A-16
MailServer, A-15, A-16
major revision label, A-9, A-11
major revision label sequence, 4-3
MajorRevSeq, A-9, A-11
making an archive targetable, 8-49
managing batch files, 8-25
managing hint cache entries
characteristic of hint cache, 4-27
manifest path, A-146
manifest.hda, A-146
map fields, 8-40
mapping
credentials, 5-56
URLs, 4-57
mapping files
Batch Loader, 3-24
creating, 3-26
formats, 3-24
values, 3-24
maximum number of fields to optimize, 7-7
metadata
storing, 4-37
metadata field
xPartitionId, 4-40
xStorageRule, 4-40
xWebFlag, 4-40
metadata fields
batch loading custom, 3-23
Metadata Implementor, A-39
migration (see also Configuration Migration), 8-1
Migration Main screen, A-164
migration status, 8-16
minor revision label, A-9, A-11
minor revision label sequence, 4-3
MinorRevSeq, A-9, A-11
moving
default archive collection, 8-25
MultiUpload, A-9, A-11
N
named password connections, 5-60
named passwords
uses for, 5-56
Need to Know
access control lists, 5-52
configuring, B-3
Content Security Configuration Information
page, B-15
customizing security configuration, B-5
defining a query, B-11
Disclosure Query Security applet, B-8

Index-12
features, B-2
Hit List Roles Configuration page, B-21
Idoc Script functions, B-6
installing, B-3
NTK Configuration Information page, B-12
overview, B-1
query syntax, B-10
Search Results Configuration Information
page, B-18
security customization samples, B-23
Test NTK Content Security page, B-22
new component
creating, 6-8
normalization
discarding WHERE clause conditions, 4-18
finding range queries, 4-18
qualify WHERE clause conditions, 4-17
reformatting WHERE clause conditions, 4-18
stage 3 of optimization process, 4-17
NTK. See Need to Know
NumConnections, A-57
O
OAM, see Oracle Access Manager, 5-13
one-time configuration export, 8-13
opening
component, 6-23
Optimized Fields
assigning, 7-7
editing, 7-7
optimizing queries
by reformatting, 4-19
example - adding multiple hints, 4-19
example - adding single hint, 4-19
option list keys
editing, 5-34
Option List screen, A-106
option lists
editing, 5-34
optional parameters, Batch Loader, 3-20
options
System Properties
content server, 4-5
general, 4-2
Internet, 4-4
Oracle, A-18
Archiver issues, 8-94
Oracle Access Manager, 5-13
configuring, 5-13
configuring 10g with Oracle UCM, 5-16
Oracle Access Manager Configuration tool, 5-18
Oracle Access Manager registration tool, 5-15
Oracle Enterprise Manager Fusion Middleware
Control Console, 1-3
Oracle Fusion Middleware
using single sign-on, 5-13
using web services, 5-26
Oracle Fusion Middleware application
using LDAP authentication provider, 5-5
Oracle Portlets, 4-64
Oracle Query Optimizer component
introduction to, 4-15
Oracle Secure Enterprise Search
access control lists, 5-51
as primary full-text search engine, 7-11
reconfiguing search engine to use, 7-14
RSS feeds from Oracle UCM, 7-16
SESCrawlerExport component, 7-16
Oracle Security Enterprise Search
configuring with Oracle Text Search, 7-12
Oracle Text Search
configuring with Oracle Security Enterprise
Search, 7-12
introduction, 7-1
Oracle Text Search component
requirements for, 7-1
search results menu options, 7-10
Oracle WebLogic Scripting Tool (WLST), 1-4
Oracle WebLogic Server Administration
Console, 1-3
order by
supported sort construct, 4-21
outer join
supported sort construct, 4-21
Outgoing Http Provider page, A-69
Outgoing provider, 4-61
outgoing provider
adding, 4-62, 4-71
Outgoing Socket Provider page, A-49
Output page, A-4
output, viewing content server, 3-8
P
package uploading, 8-2
packaging, A-146, A-148
parameters
adding, A-134, A-135
editing, A-134, A-135
parameters, optional Batch Loader, 3-20
parsing
stage 2 of optimization process, 4-17
Partition Listing page, A-36
Action, A-29
Add Partition, A-29
Is Active, A-29
Partition Root, A-29
Partition Name, A-37
Partition Root, A-37
partitioning
adding a partition to weblayout path, 4-56
file limits, 4-56
using, 4-55
PartitionList table, 4-47
CapacityCheckInterval, 4-47
DuplicationMethods, 4-47
IsActive, 4-47
PartitionName, 4-47
PartitionRoot, 4-47
Index-13
SlackBytes, 4-47
partitions
adding, 4-41
editing, 4-41
passthru, 4-15
password
JDBC, A-18
passwords
defining for proxy connections, 5-60
hashing, 5-60
named password connections, 5-60
protection, 5-59
path construction, 4-48, 4-55
path constructions, 4-45
path options, System Properties, 4-7
PathConstruction table, 4-48
AutoCreateLimit, 4-49
FileStore, 4-49
PathExpression, 4-49
StorageRule, 4-49
PathMetaData table, 4-48, 4-50
ArgumentFields, 4-48
Arguments, 4-48
FieldName, 4-48
GenerationAlgorithm, 4-48
RequiredForStorage, 4-48
PDF Watermark
Update Component Configuration screen, A-159
performance
optimizing, 4-2
search, 5-36
User Admin, 5-37
permissions
Admin, 5-40, A-97
and roles example, 5-50
Delete, 5-40, A-97
predefined, 5-40
Read, 5-40, A-97
Write, 5-40, A-97
Permissions By Role screen, A-96
Permissions by Role screen, A-96
persistence
characteristic of hint cache, 4-28
portlets, 4-64
predefined accounts
limiting display to, A-13, A-14
Predefined Accounts screen, A-98
predefined accounts, creating, 5-47
predefined dynamic tables, A-130
predefined resources, A-136
predefined roles, 5-39
predefined security groups, 5-35
predefined service actions, A-125
predefined static tables, A-131
predefined template tables, A-133
preparing
batch load file, 3-23
presentation, B-20
preserving case, A-18
Preview provider, 4-61
Preview Provider page, A-54
preview provider, adding, 4-63, 4-74
Preview screen, A-170
Priority, A-57
process
archiving, 8-28
migration, 8-9
Provider Class, A-39
Provider Description, A-39
Provider Information page, A-38, A-47
Provider Name, A-39
provider pages
Add Provider, A-48
Database, A-51
Edit Provider, A-48
Incoming, A-53
JPS User, A-67
keepaliveincoming, A-60
keepaliveoutgoing, A-61
LDAP, A-55
Outgoing Http, A-69
Outgoing Socket, A-49
Preview, A-54
Provider, A-45
Provider Information, A-47
sslincoming, A-63
ssloutgoing, A-65
ProviderClass, A-57
ProviderConfig, A-57
ProviderConnection, A-57
providers
Add Provider page, A-48
adding, 4-62
adding database, 4-62, 4-72
adding incoming, 4-63, 4-74
adding LDAP, 4-64
adding outgoing, 4-62, 4-71
adding preview, 4-63, 4-74
choosing appropropriate, 4-62
Database, 4-61
Database Provider page, A-51
DefaultFileStore, 4-61
defining sockets, 8-50
deleting, 4-78
Edit Provider page, A-48
editing information, 4-77
HTTP, 4-61
Incoming, 4-61
Incoming Provider page, A-53
introduction to, 4-61
JPS User Provider page, A-67
JpsUserProvider, 4-61
keepaliveincoming Provider page, A-60
keepaliveoutgoing Provider page, A-61
LDAP, 4-61
LDAP Provider page, A-55
outgoing, 4-61
Outgoing Http Provider page, A-69
Outgoing Socket Provider page, A-49
Preview, 4-61

Index-14
Preview Provider page, A-54
Provider Information page, A-47
Providers page, A-45
sslincoming Provider page, A-63
ssloutgoing Provider page, A-65
system, 4-61
SystemDatabase, 4-61
SystemServerSocket, 4-61
Providers page, A-45
proxied connections
creating, 5-61
Proxied Connections page, A-116
proxy connections
configuring HTTP provider, 5-62
data guidelines, 5-60
httpoutgoing provider, 5-62
options with Providers page, 5-61
overview, 5-55
typical uses, 5-56
using HTTP protocol, 5-61
ProxyConnections8, 5-56
Public security group, 5-35
pull transfer, 8-46
push transfer, 8-47
Q
queries
creating export, 8-28
query
checking hint cache for hints, 4-32
converting, 4-30
modifying, 4-31
modifying entry to hint cache, 4-33
removing entry to hint cache, 4-34
query analysis
stage 1 of optimization process, 4-17
Query Converter page, A-32
accessing, 4-30
converting data source or query
data source, 4-30
modifying data source or query
data source, 4-31
query hints
overview, 4-20
syntax, 4-20
query optimization process
reformatting queries to optimize searches, 4-19
stage 1 - query analysis, 4-17
stage 2 - parsing, 4-17
stage 3 - normalization, 4-17
stage 4 - select hint, 4-18
stage 5 - reformat query, 4-18
R
range queries
finding, 4-18
Read permission, 5-40, A-97
Readme file, 6-9
rebuilding
search collection, 4-8
records, file, 3-13
redirect, adding in Batch Loader, 3-36
reformat query
stage 5 of optimization process, 4-18
reformatting queries
adding multiple hints, 4-19
adding single hint, 4-19
to optimize searches, 4-19
Registered Exporter screen, A-199
relative web root, A-15, A-16
removing
archive files from batch file, 8-25
component, 6-22
Renditions, A-41
replication, 8-52
automatic export, 8-53
deleted folders, 8-75
import on import machine, 8-54
Replication function, 8-52
replication issues (Archiver), 8-93
repository content
security levels, 5-1
Repository Manager
accessing, 4-8
application, 1-5
Indexer tab, A-22
managing the search index, 4-8
requirements
Batch Loader delete action, 3-17
Batch Loader insert action, 3-14
Batch Loader update action, 3-18
resoruce tables
for FileStoreProvider, 4-46
Resource Selection Dialog screens, A-136
resource tables
FileCache table, 4-50
FileStorage table, 4-50
FileSystemFileStoreAlgorithmFilters table, 4-49
PartitionList table, 4-47
PathConstruction table, 4-48
PathMetaData table, 4-48
StorageRules table, 4-47
resources
component, A-136
custom, 6-9
predefined, A-136
restarting content server with Oracle WebLogic
Server Administration Console, 3-5
reusing hint cache entries
characteristic of hint cache, 4-26
revision label sequence, 4-3
revision label sequence examples, 4-3
revision label sequence ranges, 4-3
revision labels
defining, A-9, A-11
revisions
label sequence, 4-3
RoleEntityACL, 5-52
RolePrefix, A-59

Index-15
roles
admin, 5-39
administrator, 1-2
and permissions example, 5-50
assigning to users, 5-41
contributor, 5-39
deleting, 5-41
guest, 5-39
overview, 5-38
predefined, 5-39
sysmanager, 1-2, 5-39
RSS feeds, 7-16
rules
transfer, 8-48
running
applications as applets, 3-8
applications in standalone mode, 3-8
Batch Loader, 3-28, 3-29
content server applications on Windows, 3-8
S
samples
batch load files, 3-23
Scheduled Job Information screen, A-88
scheduled jobs
active jobs, A-87
administration interface, A-86
history, A-87
information page, A-88
Scheduled Jobs Listing screen, A-87
Schema Publishing status and actions, A-29
search collection
configuring rebuild, 4-9
rebuilding, 4-8
search collection instance, 7-2
platform, 7-2
search engine
reconfiguring for Oracle Secure Enterprise
Search, 7-14
search engines
Oracle Secure Enterprise Search, 7-11
search index
configuring update, 4-9
Content Server Analyzer analysis, 3-51
introduction to, 4-8
updating, 4-8
search results
displaying categories, 7-10
Search Results Configuration Information
page, B-18
Search Results page
Oracle Text Search fields, 7-8
with Oracle Text Search, 7-10
search results presentation
settings, B-20
searching
configuring content server for IBM DB2
database, 4-5
performance, 5-36
searching with Oracle Text Search component, 7-9
SearchResults template, A-140
SearchResultTemplates table, A-133
Secure security group, 5-35
Secure Sockets Layer
configuring Oracle UCM to use, 5-6
provider, 5-4
Secure Sockets Layer (SSL), A-16
secure sockets layer (SSL), A-16, A-17
secured connections
introduction, 5-59
security
access control lists, 5-51
adding extended attributes to users, 67
adding groups, 5-37
combining integration methods, 5-4
configuring for two-way SSL communication, 5-6
configuring Oracle SOA Suite and Oracle HTTP
Server for SSL communication, 5-9
configuring SSL between SOA composite
application instances and Oracle
WebCache, 5-10
configuring System Properties, 4-4
handling extended user attributes, 5-67
internal, 5-3
levels of, 5-1
listing Oracle Internet Directory as the first
authentication provider, 5-22
options, 5-3
performance considerations, 5-46
roles and permissions example, 5-50
security groups, 5-29
switching from non-SSL to SSL configurations with
Oracle BPM Worklist, 5-10
security groups
deleting, 5-37
introduction, 5-35
JSP enabled, A-9, A-12, A-20
predefined, 5-35
Public, 5-35
Secure, 5-35
tips, 5-36
SecurityProviders component, 5-4
select hint
hint cache, 4-26
hint rules table, 4-21
stage 4 of optimization process, 4-18
Select Users screen, A-109
sequence, revision label, 4-3
server output
viewing, 3-8
Server Status page, A-4
server-wide tracing, 3-45
service resources, A-124, A-128
action, A-124
adding, A-137
editing, A-137
subjects, A-139
ServiceHandlers table, A-132
SESCrawlerExport component, 7-16
Index-16
setting
transfer destination (target archive), 8-50
setup
automatic export, 8-53
Shared Directory Path, A-21
Show Columns screen, A-94
Show only known accounts, A-13, A-14
Show Path Metadata, A-41
ShowOnlyKnownAccounts, A-13, A-14
single sign-on
Authentication provider, 5-15, 5-19
choosing a solution, 5-13
Identify Asserter, 5-15
Identity Asserter, 5-18
Oracle Access Manager, 5-13
overview, 5-13
Site Studio
Update Component Configuration screen, A-162
Slack Bytes, A-37
slashes, in accounts, 5-44
SMTP Port, A-15, A-16
SmtpPort, A-15, A-16
SOA composite applications
configuring for two-way SSL communication, 5-6
configuring Oracle SOA Suite and Oracle HTTP
Server for SSL communication, 5-9
SocketHostAddressSecurityFilter, A-20
sockets, defining as providers, 8-50
sort constructs
group by, 4-21
inner join, 4-21
order by, 4-21
outer join, 4-21
supported, 4-21
SourcePath, A-57
specifying
Content Server Analyzer log directory, 3-50
SSL
configuring SOA composite applications for
two-way SSL communication, 5-6
SSL (Secure Sockets Layer), A-16
SSL, see Secure Sockets Layer, 5-4
sslingomcing Provider page, A-63
ssloutgoing Provider page, A-65
SSO, see single sign-on, 5-13
standalone mode
configuring external database provider, 3-11
configuring JDBC database drivers, 3-10
configuring system database provider, 3-9
running application on UNIX, 3-11
running application on Windows systems, 3-11
running applications in, 3-8
starting
administration applications, 3-8
Content Server Analyzer analysis, 3-50
content server applications, 3-8
content server applications on Windows, 3-8
starting content server with Oracle Enterprise
Manager Fusion Middleware Console, 3-3
starting content server with Oracle WebLogic Server
Administration Console, 3-2
starting content server with scripts, 3-2
state
Indexer, A-23
static resource tables, A-130, A-142
static tables
creating, 6-18
static web URL, 4-44
status
Indexer, A-23
status information, 3-38
status report
Content Server Analyzer, 3-53
stopping content server with Oracle Enterprise
Manager Fusion Middleware Console, 3-4
stopping content server with Oracle WebLogic Server
Administration Console, 3-3
storage class, 4-44
storage directory
default, 4-41
storage principles, 4-43
Storage Rule dialog, A-39
Storage Rule page, A-39
Storage Rule table
IsWeblessStore, 4-48
RenditionsOnFileSystem, 4-48
StorageRule, 4-47
StorageType, 4-47
Storage Rules, A-39
storage rules
adding, 4-42
editing, 4-42
renditions, 4-44
storage types
FileStorage, 4-47
JdbcStorage, 4-47
StorageDir, 4-41
StorageRules table, 4-47
string resources
adding, A-133
editing, A-133
subjects, A-139
SubscriptionTypes table, A-132
SysAdminAddress, A-15, A-16
sysmanager role, 5-39
system administrator
e-mail address, A-15, A-16
system audit information, 3-42
System Audit Information page, A-83
system configuration
migrating, 8-6
system database
configuring for standalone mode, 3-9
System Locale, A-19
System MBean Browser
KeystoreLocation property, 5-7
System Properties
application, 4-2
configuration files, 4-2
content security options, 4-4

Index-17
content server options, 4-5
database configuration, 4-4
date format, 4-6
general options, 4-2
Internet options, 4-4
introduction to, 4-1
path options, 4-7
paths, 4-7
utility, 1-5
System Properties page
about, A-6
Content Security tab, A-12
Database tab, A-17
Internet tab, A-14
Options tab, A-7
Paths tab, A-20
Server tab, A-18
System Timezone, A-19
SystemDatabase provider, 4-61
SystemLocale, A-19
SystemServerSocket provider, 4-61
SystemTimeZone, A-19
T
target, setting transfer, 8-50
targetable, making an archive, 8-49
tasks
archiving, 8-28
indexing, 4-8
template resources, A-132
adding, A-140, A-142
editing, A-140, A-142
template tables, A-133
Test NTK Content Security page, B-22
testing
configuration scripts, B-6
security script, B-22
The, A-101
timezone, system, A-19
tips
security groups, 5-36
tracing, 3-45
applet-specific, 3-47
server-wide, 3-45
tranferring content manually, 8-51
Transfer function
methods, 8-45
terms, 8-45
uses, 8-44
transfer issues (Archiver), 8-89
Transfer Options screen, A-204
Transfer To tab, A-202
Transfer types
local, 8-46
pull, 8-46
push, 8-47
transferring
content, 8-44
transfers
deleting, 8-51
local, 8-46
setting destination, 8-50
troubleshooting
configuration information, 3-41
configuration variables, 3-53
Content Server Analyzer, A-77
environment packager, 3-48
system audit information, 3-42
tracing, 3-45
tutorial
creating component, 6-9
types of users
administrator, 1-2
consumers, 1-1
contributors, 1-2
U
Uniform Resource Identifiers
to forward, 5-13, 5-17
to protect, 5-15, 5-18
UNIX
Batch Loader example, 3-30
BatchBuilder example, 3-28
running administration application on, 3-11
services, 3-11
unpackaging a component, 6-24
update
configuring search index, 4-9
update action, 3-17
example, 3-19, 3-20
requirements, 3-18
Update Component Configuration
Content Tracker, A-160
Content Tracker Reports, A-161
Folders_g, A-157
interface, A-157
PDF Watermark, A-159
Site Studio, A-162
Update import rule, 8-35
updating
folder structure archives, 8-72
search index, 4-8
upload applet
chunking, 4-3
Upload Configuration Bundle screen, A-164
uploading a component, 6-6
uploading bundles, 8-14
URI, see Uniform Resource Identifiers, 5-13
URL mapping entries, 4-58
URL parsing, 4-45
usage, 8-71
Use Java Database Connectivity, A-17
Use Secure Sockets Layer, A-16, A-17
UseAccounts variable, 5-47
UseEntitySecurity, 5-52
UseFullGroupName, A-58
UseGroupFilter, A-58
UseNativeFormatInIndex, 4-10

Index-18
user access
customizing, 5-63
User Admin
application, 1-5
editing user information fields, 5-35
performance, 5-37
User Admin screen
Aliases tab, A-107
Users tab, A-100
user credentials
order evaluated, 5-57
user information fields
adding, 5-34
editing, 5-35
E-mail Address, 5-34
Full Name, 5-34
overview, 5-34
User Locale, 5-34
User Type, 5-34
User Locale user field, 5-34
user name, JDBC, A-18
User Type user field, 5-34
UserMetaDefinition table, A-132
UseRoleSecurity, 5-52
users
adding, 5-31
administration interface, A-99
administrator, 1-2
aliases, A-99
and accounts example, 5-51
and roles example, 5-51
assigning accounts, 5-48
assigning roles, 5-41
consumers, 1-1
contributors, 1-2
deleting, 5-32
editing, 5-31
external, 5-27
local, 5-28
logins, A-99
types of, 1-1, 5-27
UseSecureLdap, A-58
UseSSL, A-16
using
accounts, 5-29
Component Manager, 6-5
Component Wizard, 6-1, 6-8
V
value maps, 8-41
values
Archiver mapping, 8-41
Batch Loader mapping file, 3-24
credentials input, 5-57
variables, see configuration variables, 8-74
Vault Path, A-41
verbose logging, 3-39
View Exported Content Items screen, A-180
virtual folder administration configuration, 8-68
W
web server
name, A-15, A-16
relative web root, A-15, A-16
web services, 5-26
web URL file, 4-44
Web URL File Path, A-41
webBrowserPath, A-21
WebCenter Applications
single sign-on, 5-13
WebDAV, 4-63
WebDAV issues (Archiver), 8-92
weblayout
accounts, 5-45
Weblayout Editor
application, 1-5
Weblayout Publishing status and actions, A-28
WebUrlMapPlugin
adding mapping entries, 4-58
component, 4-57
constructing a map entryWebUrlMapPlugin
script construction, 4-57
editing URL mapping entries, 4-58
examples of mapping, 4-59
mapping URLs, 4-57
variables, 4-58
WebUrlMaps screen, A-44
Web-viewable Path, A-41
WHERE clause conditions
discarding, 4-18
qualifying, 4-17
reformatting, 4-18
Win32
Batch Loader example, 3-30
BatchBuilder example, 3-28
Windows
running administraiton application on, 3-11
running content server applications on, 3-8
WLST, 1-4
Workflow Admin
application, 1-5
working with
components, 6-5
Java code, 6-9
resources, 6-9
security groups, 5-29
Write permission, 5-40, A-97
X
xClbraAliasList, 5-53
xClbraRoleList, 5-53
xClbraUserList, 5-53
xPartitionId, 4-40
xStorageRule, 4-40
xWebFlag, 4-40
Z
Zip file, 6-20
Index-20
