Oracle Solaris 11 Advanced System Administration Ed 3 (Activity Guide)
User Manual:
Open the PDF directly: View PDF ![]() .
.
Page Count: 306 [warning: Documents this large are best viewed by clicking the View PDF Link!]
- Oracle Solaris 11 AdvancedSystem Administration - Activity Guide
- Table of Contents
- Practices for Lesson 1: Introduction
- Practices for Lesson 2: Managing the Image Packaging System (IPS) and Packages
- Practices for Lesson 3: Installing Oracle Solaris 11 on Multiple Hosts
- Practices for Lesson 4: Managing Business Application Data
- Practices for Lesson 5: Configuring Network and Traffic Failover
- Practices for Lesson 6: Configuring Zones and the Virtual Network
- Practices for Lesson 7: Managing Services and Service Properties
- Practices for Lesson 8: Configuring Privileges and Role Based Access Control
- Practices for Lesson 9: Securing System Resources Using Solaris Auditing
- Practices for Lesson 10: Managing Processes and Priorities
- Practices for Lesson 11: Evaluating System Resources
- Practices for Lesson 12: Monitoring and Troubleshooting Software Failures

Oracle Solaris 11 Advanced
System Administration
Activity Guide
D72965GC30
Edition 3.0
March 2013
D81025
Cicero Ronaldo (ciceroฺronaldo@gmailฺcom) has a non-transferable
license to use this Student Guideฺ
Unauthorized reproduction or distribution prohibitedฺ Copyright© 2014, Oracle and/or its affiliatesฺ

Copyright © 2013, Oracle and/or its affiliates. All rights reserved.
Disclaimer
This document contains proprietary information and is protected by copyright and
other intellectual property laws. You may copy and print this document solely for your
own use in an Oracle training course. The document may not be modified or altered
in any way. Except where your use constitutes "fair use" under copyright law, you
may not use, share, download, upload, copy, print, display, perform, reproduce,
publish, license, post, transmit, or distribute this document in whole or in part without
the express authorization of Oracle.
The information contained in this document is subject to change without notice. If you
find any problems in the document, please report them in writing to: Oracle University,
500 Oracle Parkway, Redwood Shores, California 94065 USA. This document is not
warranted to be error-free.
Restricted Rights Notice
If this documentation is delivered to the United States Government or anyone using
the documentation on behalf of the United States Government, the following notice is
applicable:
U.S. GOVERNMENT RIGHTS
The U.S. Government’s rights to use, modify, reproduce, release, perform, display, or
disclose these training materials are restricted by the terms of the applicable Oracle
license agreement and/or the applicable U.S. Government contract.
Trademark Notice
Oracle and Java are registered trademarks of Oracle and/or its affiliates. Other names
may be trademarks of their respective owners.
Author
Vijetha M Malkai
Technical Contributors
and Reviewers
Tammy Shannon
Anies Rahman
Rosemary Martinak
Editors
Malavika Jinka
Aju Kumar
Smita Kommini
Graphic Designer
Seema Bopaiah
Publishers
Jayanthy Keshavamurthy
Veena Narasimhan
Cicero Ronaldo (ciceroฺronaldo@gmailฺcom) has a non-transferable
license to use this Student Guideฺ
Unauthorized reproduction or distribution prohibitedฺ Copyright© 2014, Oracle and/or its affiliatesฺ

Copyright © 2013, Oracle and/or its affiliates. All rights reserved.
Oracle Solaris 11 Advanced System Administration Table of Contents
iii
Table of Contents
Practices for Lesson 1: Introduction ..............................................................................................................1-1
Practices Overview for Lesson 1 ....................................................................................................................1-2
Practices for Lesson 2: Managing the Image Packaging System (IPS) and Packages ..............................2-1
Practice Overview for Lesson 2......................................................................................................................2-2
Practice 2-1: Configuring a Local IPS Package Repository ...........................................................................2-3
Practice 2-2: Configuring a Network Client to Access the Local IPS Server ..................................................2-7
Practice 2-3: Managing Multiple Boot Environments ......................................................................................2-10
Practices for Lesson 3: Installing Oracle Solaris 11 on Multiple Hosts ......................................................3-1
Practice Overview for Lesson 3......................................................................................................................3-2
Practice 3-1: Verifying the System AI Requirements (Optional) .....................................................................3-4
Practice 3-2: Configuring the AI Server ..........................................................................................................3-8
Practice 3-3: Deploying the OS on the Network Client ...................................................................................3-13
Practices for Lesson 4: Managing Business Application Data ....................................................................4-1
Practice Overview for Lesson 4......................................................................................................................4-2
Practice 4-1: Managing Data Redundancy with a ZFS Mirrored Pool ............................................................4-3
Practice 4-2: Using ZFS Snapshots for Backup and Recovery ......................................................................4-10
Practice 4-3: Using a ZFS Clone ....................................................................................................................4-18
Practice 4-4: Configuring ZFS Properties .......................................................................................................4-21
Practice 4-5: Troubleshooting ZFS Failures ...................................................................................................4-31
Practices for Lesson 5: Configuring Network and Traffic Failover .............................................................5-1
Practice Overview for Lesson 5......................................................................................................................5-2
Practice 5-1: Managing a Reactive Network Configuration ............................................................................5-3
Practice 5-2: Configuring the Network File System ........................................................................................5-11
Practice 5-3: Configuring a Link Aggregation .................................................................................................5-14
Practice 5-4: Configuring IPMP ......................................................................................................................5-16
Practices for Lesson 6: Configuring Zones and the Virtual Network ..........................................................6-1
Practice Overview for Lesson 6......................................................................................................................6-2
Practice 6-1: Creating an Oracle Solaris 11.1 Virtual Network .......................................................................6-5
Practice 6-2: Creating Two Zones by Using VNICs ........................................................................................6-6
Practice 6-3: Allocating Resources to Zones .................................................................................................6-14
Practice 6-4: Managing the Virtual Network Data Flow ..................................................................................6-25
Practice 6-5: Removing Part of the Virtual Network .......................................................................................6-27
Practices for Lesson 7: Managing Services and Service Properties ...........................................................7-1
Practice Overview for Lesson 7......................................................................................................................7-2
Practice 7-1: Configuring SMF Services ........................................................................................................7-3
Practice 7-2: Working with Service Profiles ....................................................................................................7-12
Practice 7-3: Restoring and Recovering a Service .........................................................................................7-14
Practices for Lesson 8: Configuring Privileges and Role Based Access Control ......................................8-1
Practice Overview for Lesson 8......................................................................................................................8-2
Practice 8-1: Delegating Privileges to Users and Processes .........................................................................8-3
Practice 8-2: Configuring Role-Based Access Control ...................................................................................8-14
Practices for Lesson 9: Securing System Resources Using Solaris Auditing ...........................................9-1
Practice Overview for Lesson 9......................................................................................................................9-2
Practice 9-1: Configuring and Administering Oracle Solaris Auditing .............................................................9-3
Practice 9-2: Managing Audit Records on Local Systems ..............................................................................9-19
Cicero Ronaldo (ciceroฺronaldo@gmailฺcom) has a non-transferable
license to use this Student Guideฺ
Unauthorized reproduction or distribution prohibitedฺ Copyright© 2014, Oracle and/or its affiliatesฺ

Copyright © 2013, Oracle and/or its affiliates. All rights reserved.
Oracle Solaris 11 Advanced System Administration Table of Contents
iv
Practices for Lesson 10: Managing Processes and Priorities .....................................................................10-1
Practice Overview for Lesson 10 ....................................................................................................................10-2
Practice 10-1: Modifying Process Scheduling Priority ....................................................................................10-3
Practice 10-2: Configuring the FSS in an Oracle Solaris Zone ......................................................................10-22
Practices for Lesson 11: Evaluating System Resources ..............................................................................11-1
Practice Overview for Lesson 11 ....................................................................................................................11-2
Practice 11-1: Managing Resource Controls in Global and Non-Global Zones ..............................................11-3
Practice 11-2: Evaluating System Performance Levels ..................................................................................11-14
Practices for Lesson 12: Monitoring and Troubleshooting Software Failures ...........................................12-1
Practice Overview for Lesson 12 ....................................................................................................................12-2
Practice 12-1: Setting Up System Messaging ................................................................................................12-3
Practice 12-2: Configuring System and Application Crash Facilities ..............................................................12-13
Cicero Ronaldo (ciceroฺronaldo@gmailฺcom) has a non-transferable
license to use this Student Guideฺ
Unauthorized reproduction or distribution prohibitedฺ Copyright© 2014, Oracle and/or its affiliatesฺ

Copyright © 2013, Oracle and/or its affiliates. All rights reserved.
Practices for Lesson 1: Introduction
Chapter 1 - Page 1
Practices for Lesson 1:
Introduction
Chapter 1
Cicero Ronaldo (ciceroฺronaldo@gmailฺcom) has a non-transferable
license to use this Student Guideฺ
Unauthorized reproduction or distribution prohibitedฺ Copyright© 2014, Oracle and/or its affiliatesฺ

Copyright © 2013, Oracle and/or its affiliates. All rights reserved.
Practices for Lesson 1: Introduction
Chapter 1 - Page 2
Practices Overview for Lesson 1
Practices Overview
This practice introduces you to the project assignment that you will be using throughout this
course and to your virtual lab environment. The project assignment is divided into multiple
phases, which are presented in the checklist in Figure 1. The checklist items are synchronized
with the lesson topics.
Project Assignment
Your organization, Delicious Treats Company, is in the business of selling chocolate products
online locally and globally. In the United States, the company’s order, product, and customer
information is stored on 350 servers that are strategically located in various states. Out of these
350 servers, 250 servers are Oracle Solaris x86/64 machines, for instance, Ultra 20s. Currently,
the Oracle Solaris servers are running Oracle Solaris 10 or Solaris 9. According to the service-
level agreements (SLAs), the business applications on these servers must be up 98% of the
time.
The company learned that Oracle has launched Oracle Solaris 11.1, which contains many
resource-saving features. The company is convinced that it can use Oracle Solaris 11.1 to its
benefit. Therefore, it has issued the directive to upgrade all Oracle Solaris machines to Oracle
Solaris 11.1.
As part of the Server Implementation team, you will install and configure Solaris 11.1 on 10
machines on a test basis. This will help you to explore Oracle Solaris 11.1 and prepare you to
administer business applications and the operating system. Your senior system administrator
has developed a predeployment test plan that consists of a checklist of tasks to be performed
(see Figure 1). As you progress through each lesson in the course, you will implement the
assigned tasks and report the results to your senior system administrator.
Cicero Ronaldo (ciceroฺronaldo@gmailฺcom) has a non-transferable
license to use this Student Guideฺ
Unauthorized reproduction or distribution prohibitedฺ Copyright© 2014, Oracle and/or its affiliatesฺ
Copyright © 2013, Oracle and/or its affiliates. All rights reserved.
Practices for Lesson 1: Introduction
Chapter 1 - Page 3
√ Oracle Solaris 11.1 Predeployment Checklist
Managing the Image Packaging System (IPS) and Packages
Installing Oracle Solaris 11.1 on Multiple Hosts
Managing the Business Application Data
Configuring Network and Traffic Failover
Configuring Zones and the Virtual Network
Managing Services and Service Properties
Configuring Privileges and Role-Based Access Control
Securing System Resources by Using Oracle Solaris Auditing
Managing Processes and Priorities
Evaluating the System Resources
Monitoring and Troubleshooting System Failures
Figure 1: Oracle Solaris 11.1 Predeployment Checklist
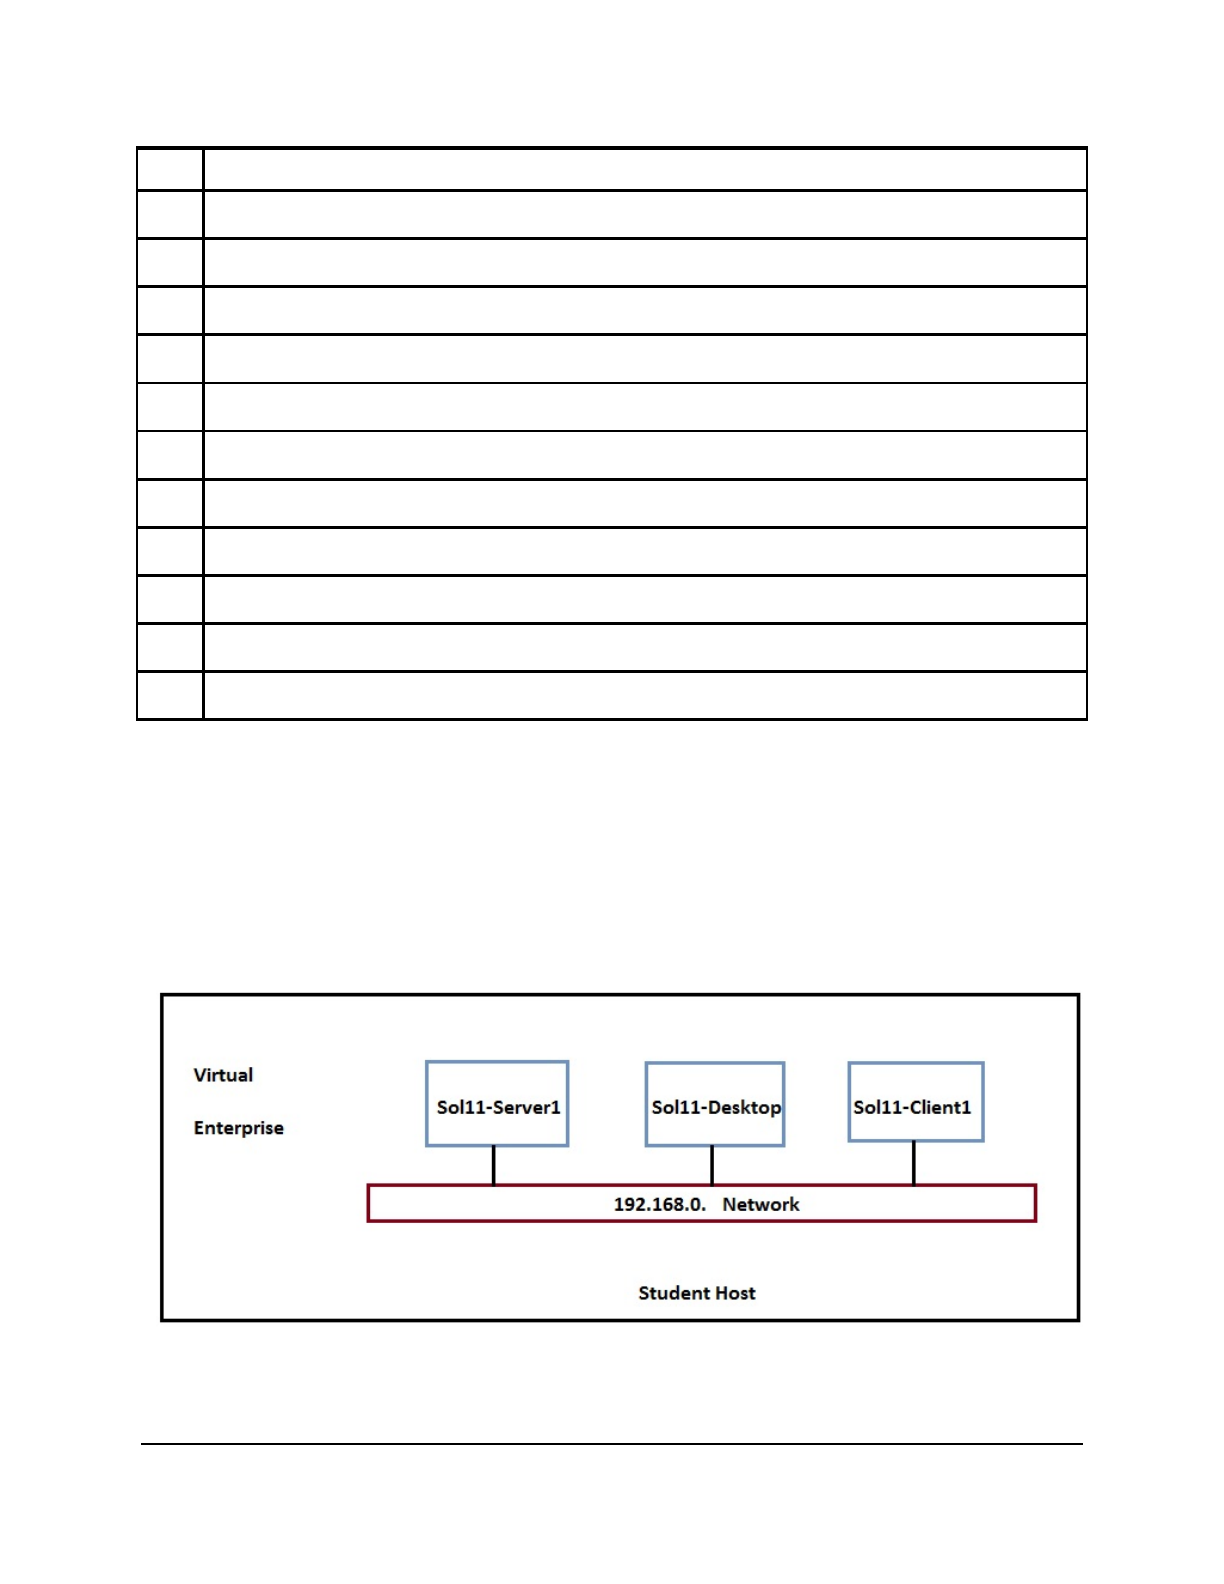
Practices Infrastructure
This section presents an architectural view of the equipment and the platforms for the practices.
Multiple virtual machines (VMs) are configured on a private internal network (192.168.0).
Each VM can communicate with other VMs only on the same private network (see Figure 2).
The VMs are configured to communicate with the host machine only through the share
directory. Internet access is not configured from these VMs.
Figure 2: Virtual Pod Network Schematic
Cicero Ronaldo (ciceroฺronaldo@gmailฺcom) has a non-transferable
license to use this Student Guideฺ
Unauthorized reproduction or distribution prohibitedฺ Copyright© 2014, Oracle and/or its affiliatesฺ
Copyright © 2013, Oracle and/or its affiliates. All rights reserved.
Practices for Lesson 1: Introduction
Chapter 1 - Page 4
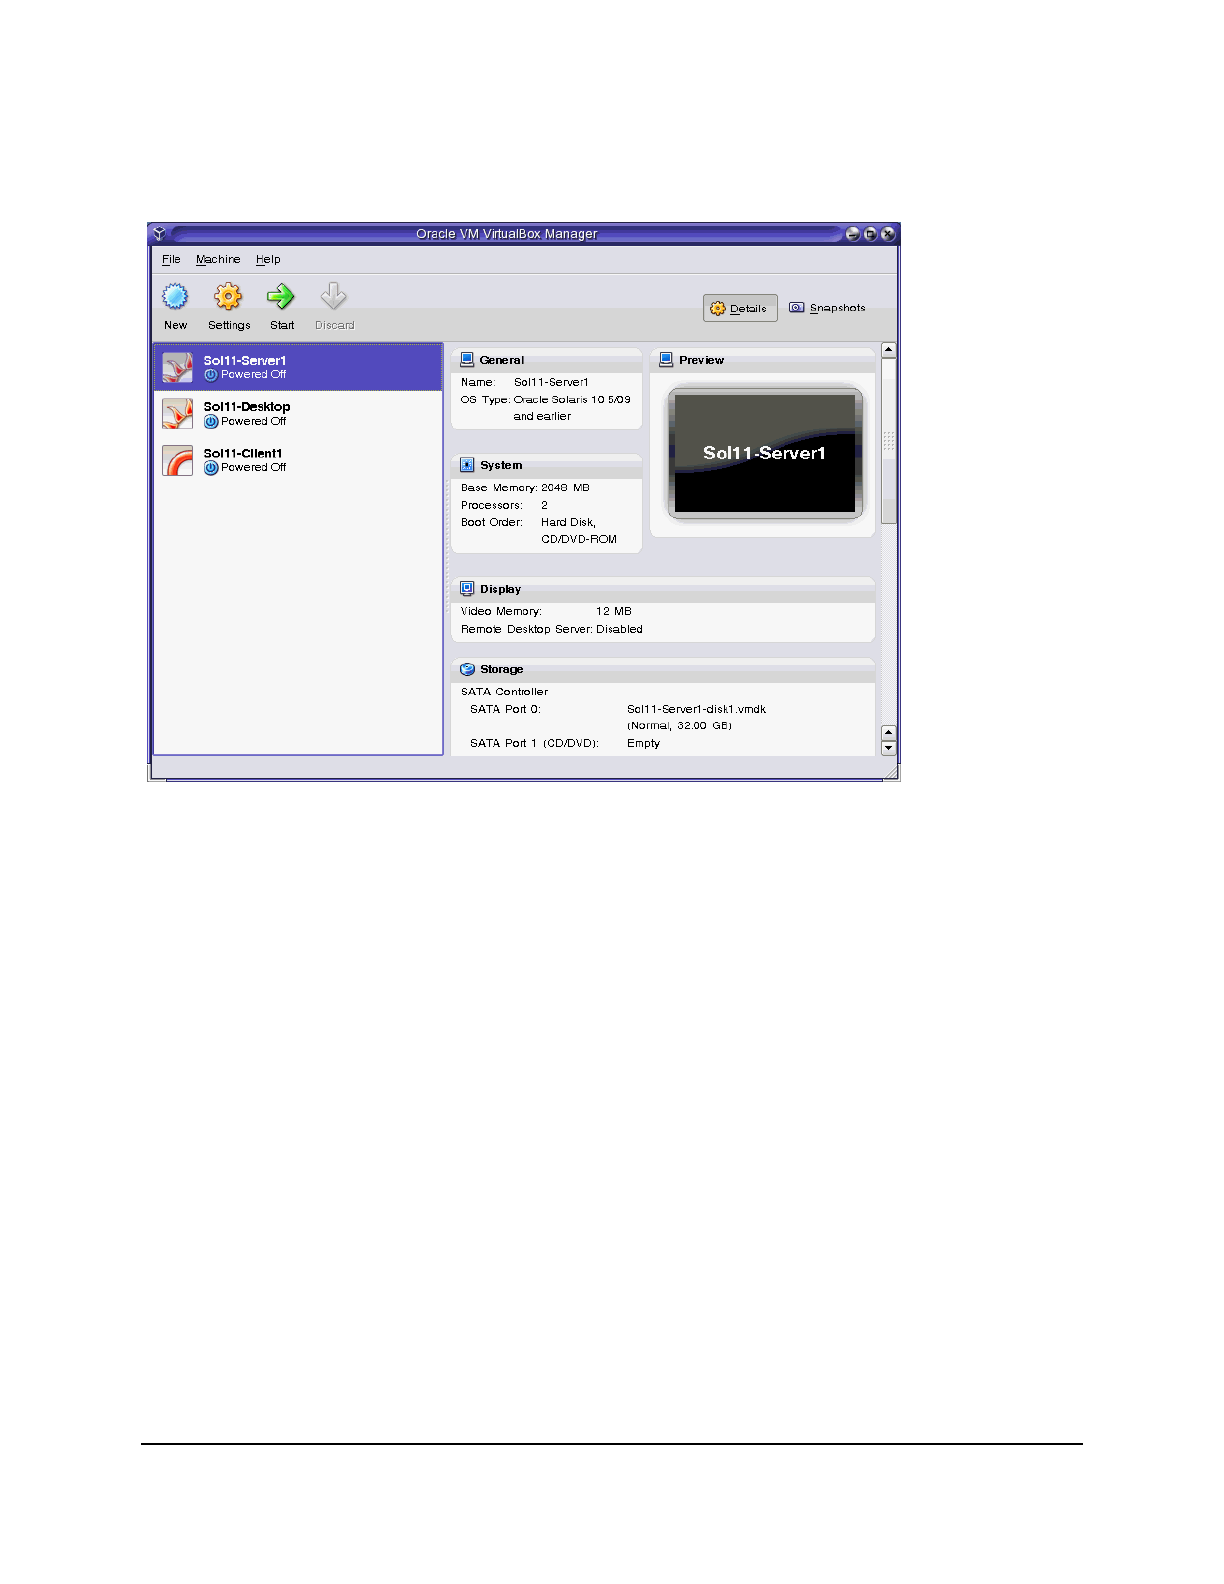
Your lab environment is based on the Oracle VM VirtualBox virtualization software. The
VirtualBox is a cross-platform virtualization application. Figure 3 shows the configured virtual
machines. The Oracle Solaris 11.1 OS is installed in the virtual machines with the exception of
Sol11-Client1, which is an empty VM.
Figure 3: Oracle VirtualBox Virtual Machines
All the VMs are configured with 2 GB of memory. Most of the host machines have a total of 8
GB to work with.
All the student files are located in /opt/ora/scripts. This directory contains mostly scripts
that you may be directed to use to establish the start or end state of a particular practice.
The following list briefly describes the virtual machines:
• Sol11-Server1: This VM provides network services, such as DNS, DHCP, and IPS that
are used by other VMs in this virtual network. This VM should always be up and
running. You use the command-line tools here.
• Sol11-Desktop: This is a general purpose user machine with the GUI and other
features normally available on a network client machine. Most of the facilities available
in Sol11-Server1 are available in this VM.
• Sol11-Client1: This is the VM for Oracle Solaris 11.1 installation that uses Automated
Install mode. After performing the practice, switch off this VM. It will not be needed for
any other practice.
Logging In to the Practice Environment
When you first log in to the practice environment, you are prompted to provide a login and
password for the host system:
• Userid: root
• Password: oracle
Cicero Ronaldo (ciceroฺronaldo@gmailฺcom) has a non-transferable
license to use this Student Guideฺ
Unauthorized reproduction or distribution prohibitedฺ Copyright© 2014, Oracle and/or its affiliatesฺ
Copyright © 2013, Oracle and/or its affiliates. All rights reserved.
Practices for Lesson 1: Introduction
Chapter 1 - Page 5
After you have gained access to the host system, the user account and password for each
virtual machine is:
• User account: oracle
• Password: oracle1
• Administrator privileges: As the oracle user, use su - to switch to the primary
administrator (root) role. The password is oracle1. The oracle user switches to
root because root is configured as a role by default. The first username created on the
system (during the OS installation) is the initial privileged user who can assume the
administrator role. This can be verified in the /etc/user_attr file.
Note: The Sol11-Server1 virtual machine must be started before any additional virtual
machines are started. The Sol11-Server1 must always be running to perform the practices
in this guide.
Task: Becoming Familiar with Your Practice Environment
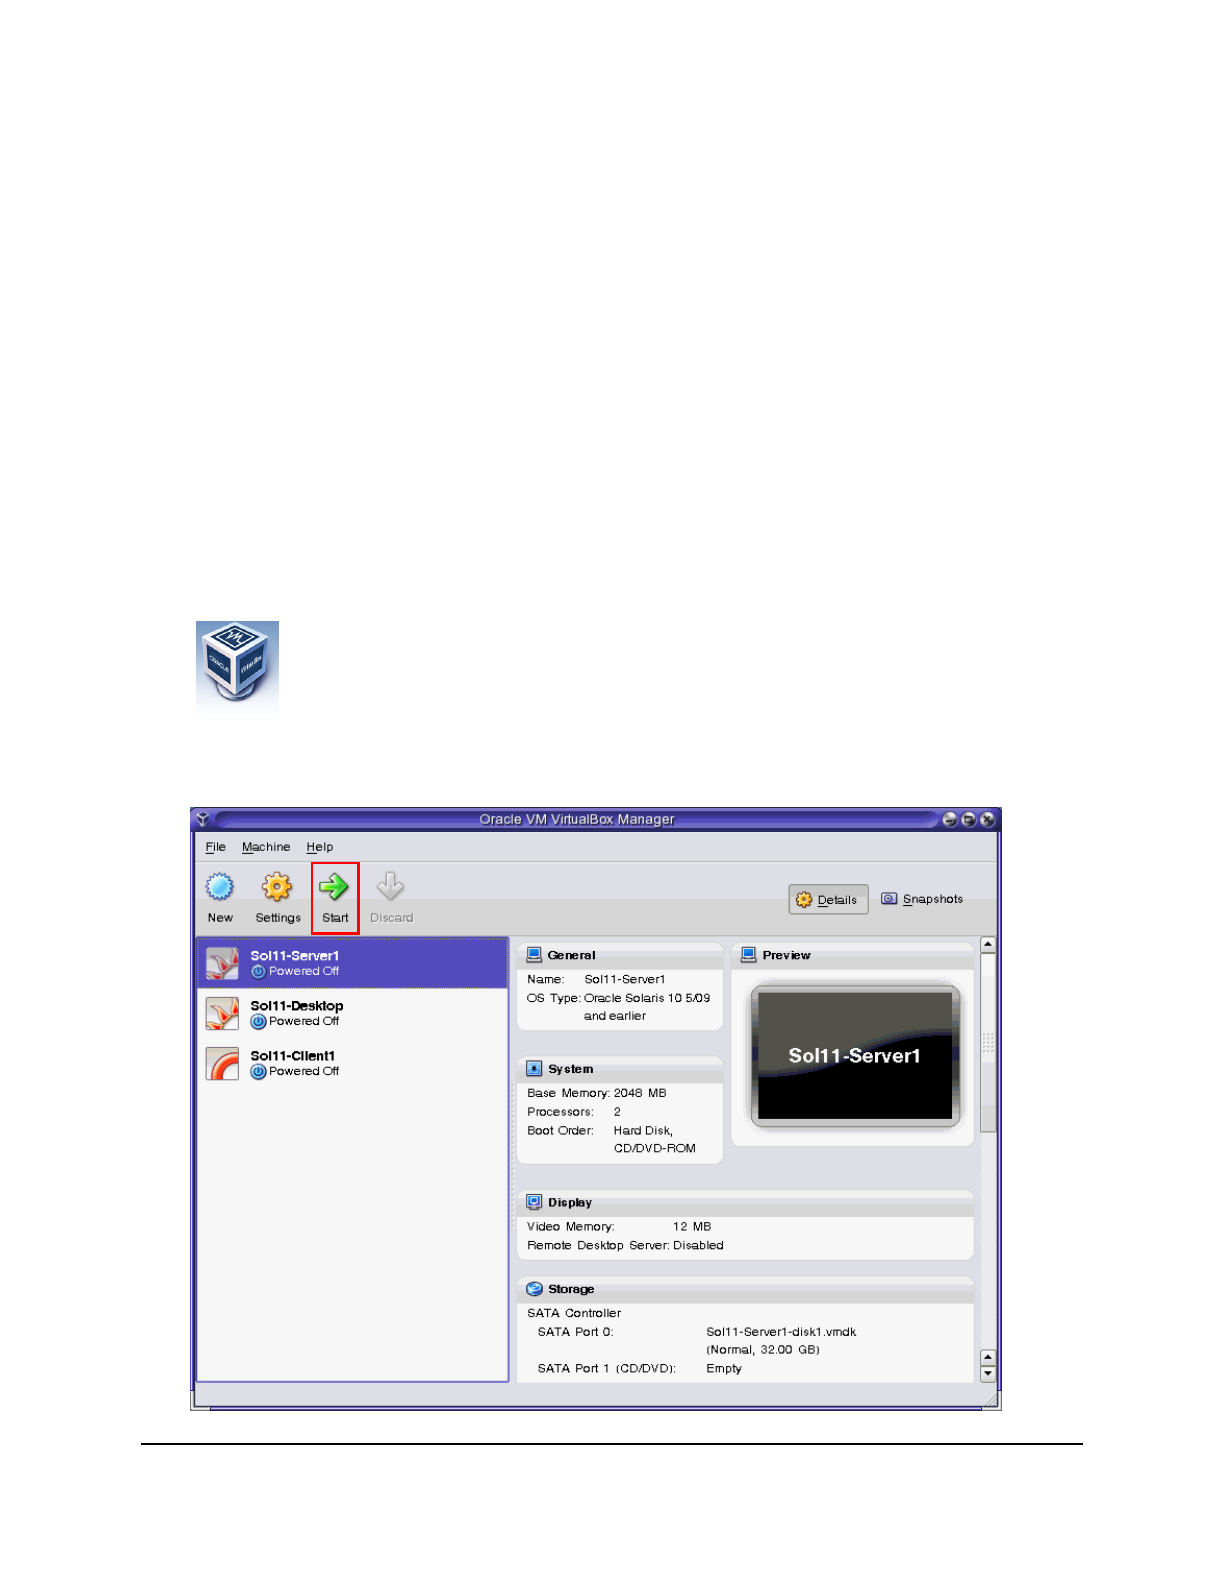
1. On your host system, start the Oracle VM VirtualBox Manager by double-clicking its icon on
your desktop.
2. In the Oracle VM VirtualBox Manager window, double-click the Sol11-Server1 virtual
machine to start it. Alternatively, you can simply select the Sol11-Server1 VM and click the
Start button.
Cicero Ronaldo (ciceroฺronaldo@gmailฺcom) has a non-transferable
license to use this Student Guideฺ
Unauthorized reproduction or distribution prohibitedฺ Copyright© 2014, Oracle and/or its affiliatesฺ
Copyright © 2013, Oracle and/or its affiliates. All rights reserved.
Practices for Lesson 1: Introduction
Chapter 1 - Page 6
3. After the Sol11-Server1 VM is powered on, at the command prompt, log in as the user
oracle with the password oracle1.
s11-server1 console login: oracle
Password: oracle1
Last Login: Mon Nov 12 03:59:49 on console
Oracle Corporation SunOS 5.11 11.1 September 2012
Or
oracle@s11-server1:~$
oracle@s11-server1:~$ su –
Password: oracle1
...
root@s11-server1:~#
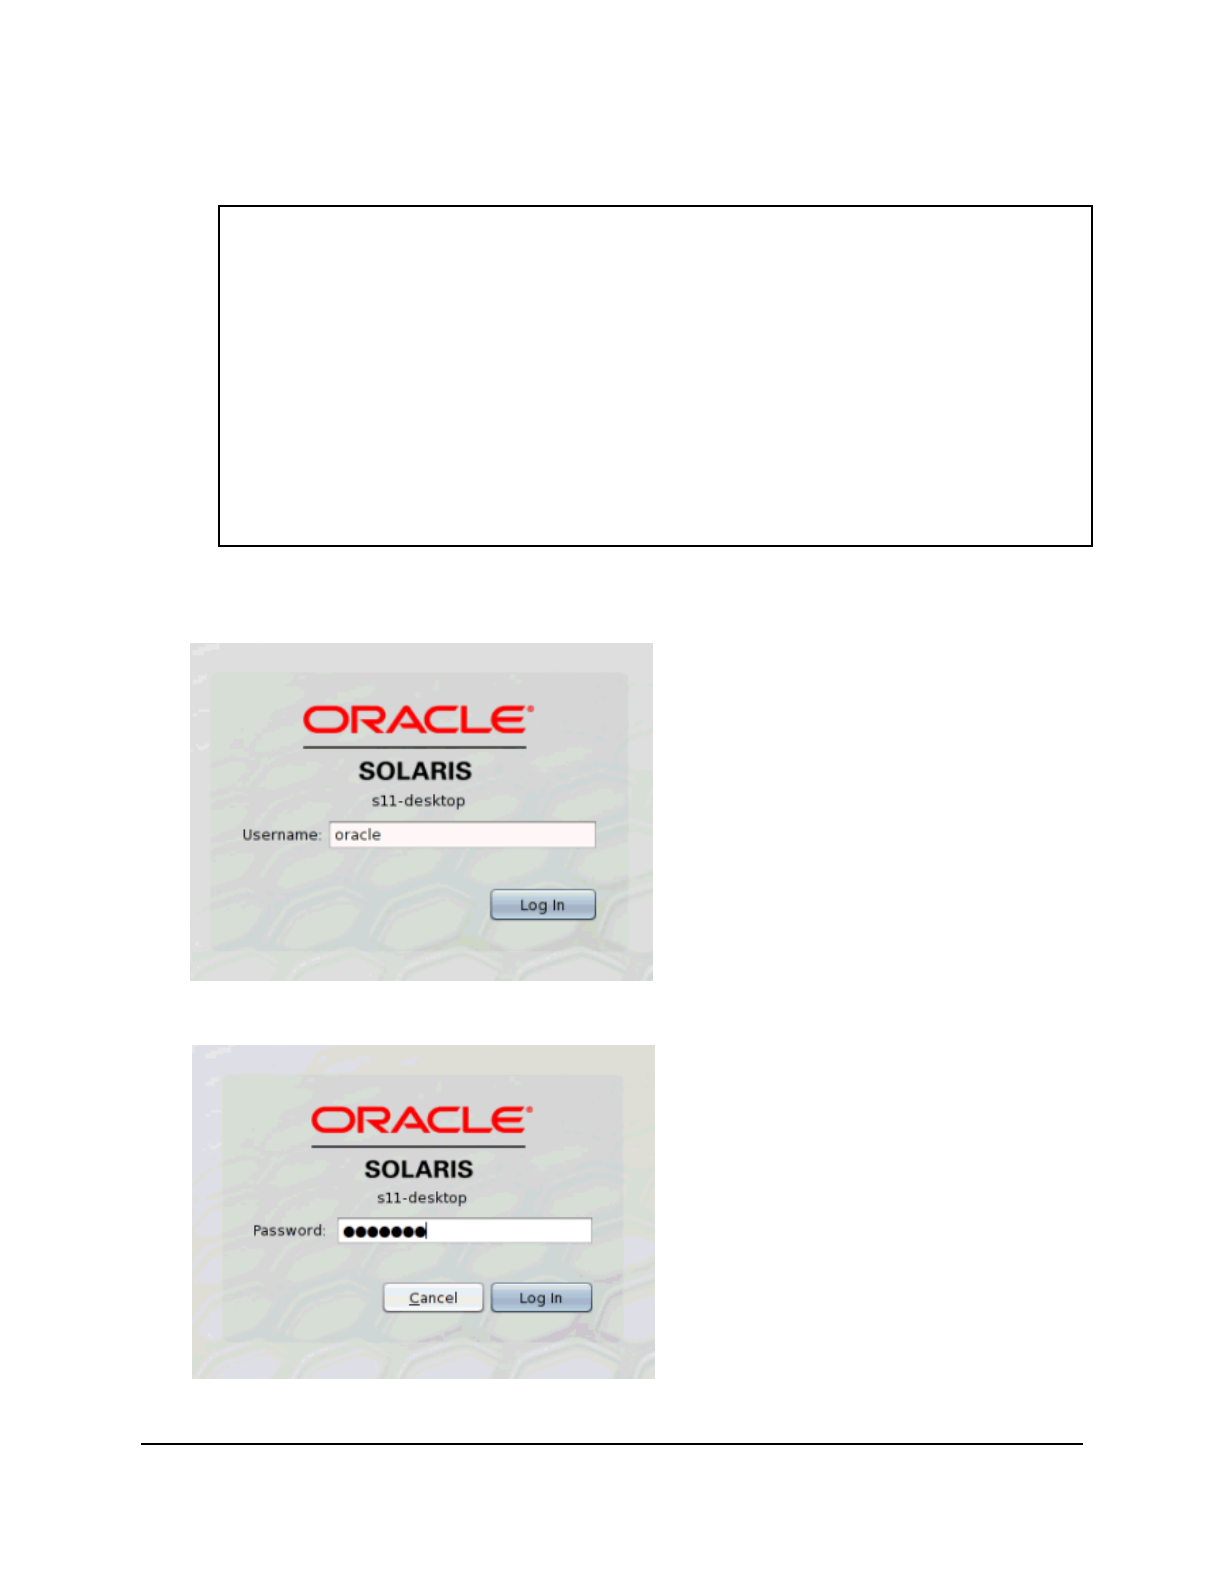
4. Start the Sol11-Desktop. When the Username login screen appears, enter oracle for the
username and click the Log In button.
Note: It might take a few minutes for the Username login screen to appear.
5. When the password login screen appears, enter the password oracle1 and click the Log
In button.
Cicero Ronaldo (ciceroฺronaldo@gmailฺcom) has a non-transferable
license to use this Student Guideฺ
Unauthorized reproduction or distribution prohibitedฺ Copyright© 2014, Oracle and/or its affiliatesฺ
Copyright © 2013, Oracle and/or its affiliates. All rights reserved.
Practices for Lesson 1: Introduction
Chapter 1 - Page 7
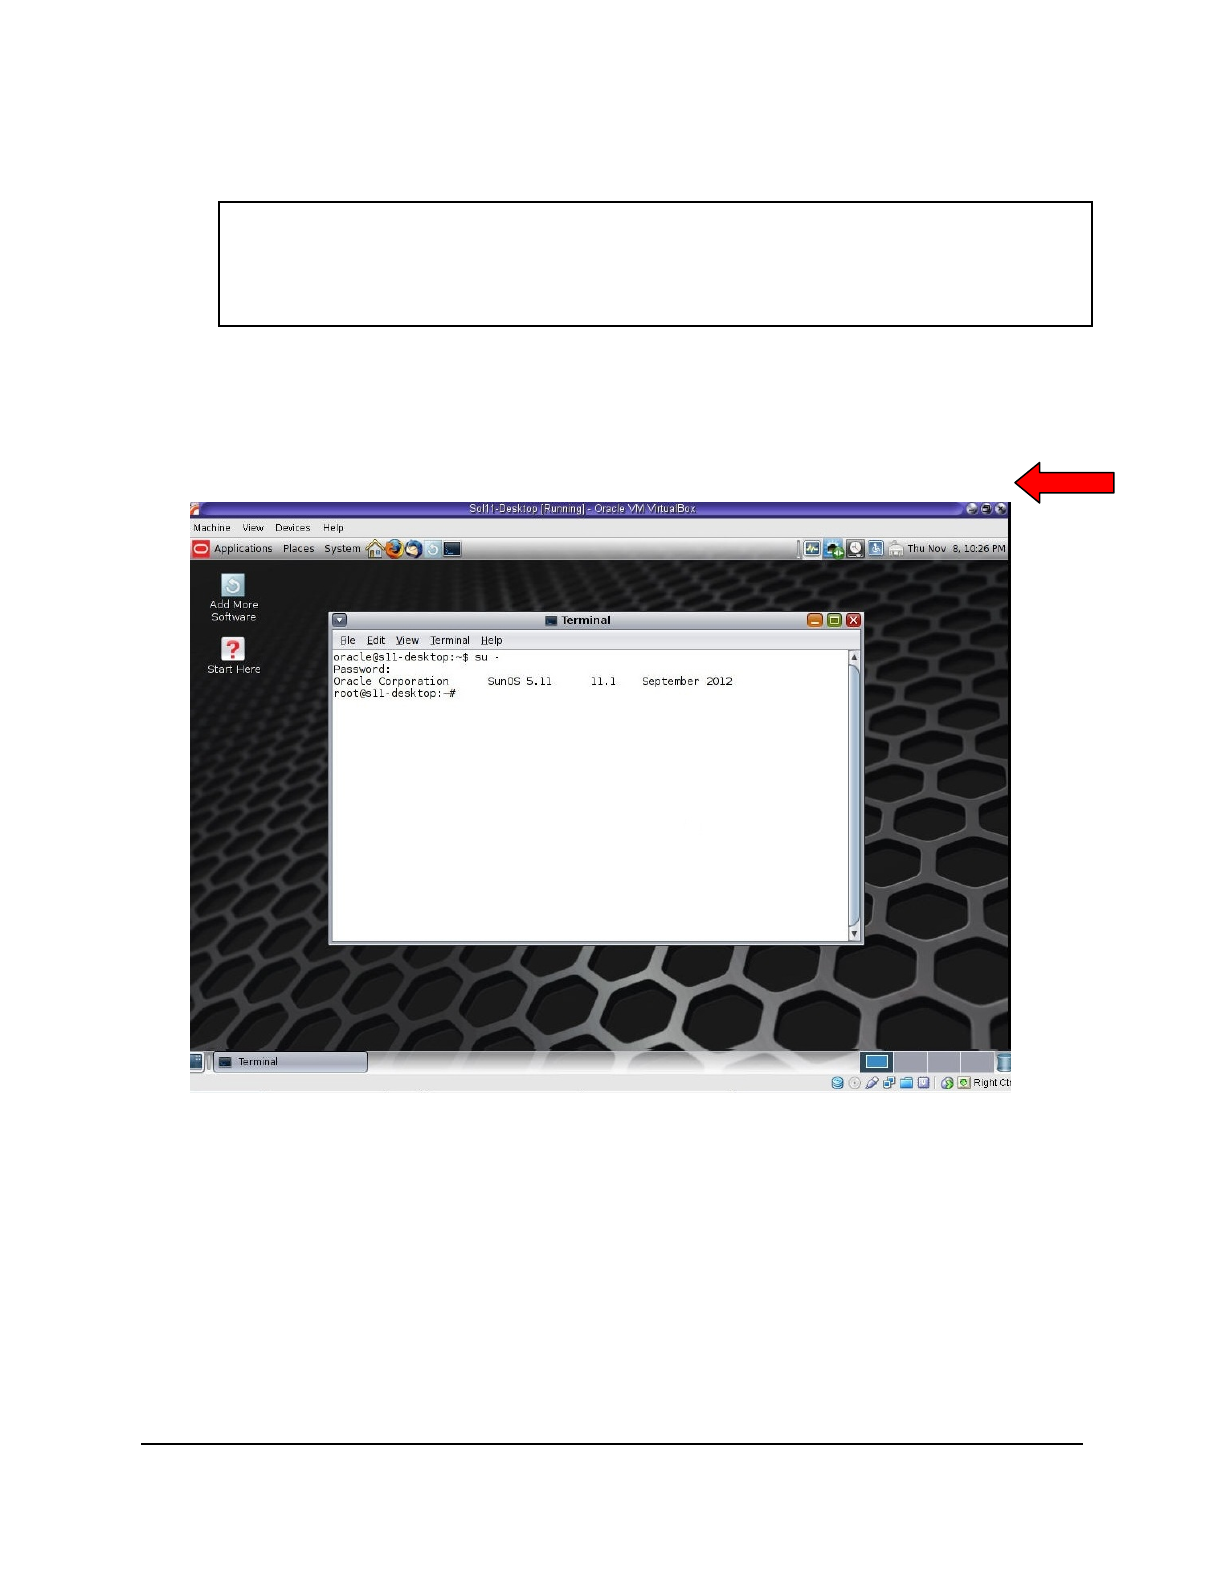
6. Open a terminal window by right-clicking on the desktop and selecting Open Terminal. In
the terminal window, run the su - command to assume the administrator privileges. The
password is oracle1.
oracle@s11-desktop:~$ su –
Password: oracle1
Oracle Corporation SunOS 5.11 11.1 September 2012
root@s11-desktop:~#
7. At times, you may need to power off a VM and close its window. You may also need to shut
down a VM to comply with the maximum recommended number of VMs running
simultaneously, which is currently limited to three VMs.
Now, practice shutting down a VM by using the Sol11-Desktop VM. To shut down the VM,
click the “close” button (x) in the top-right corner of the VM window.
Cicero Ronaldo (ciceroฺronaldo@gmailฺcom) has a non-transferable
license to use this Student Guideฺ
Unauthorized reproduction or distribution prohibitedฺ Copyright© 2014, Oracle and/or its affiliatesฺ
Copyright © 2013, Oracle and/or its affiliates. All rights reserved.
Practices for Lesson 1: Introduction
Chapter 1 - Page 8
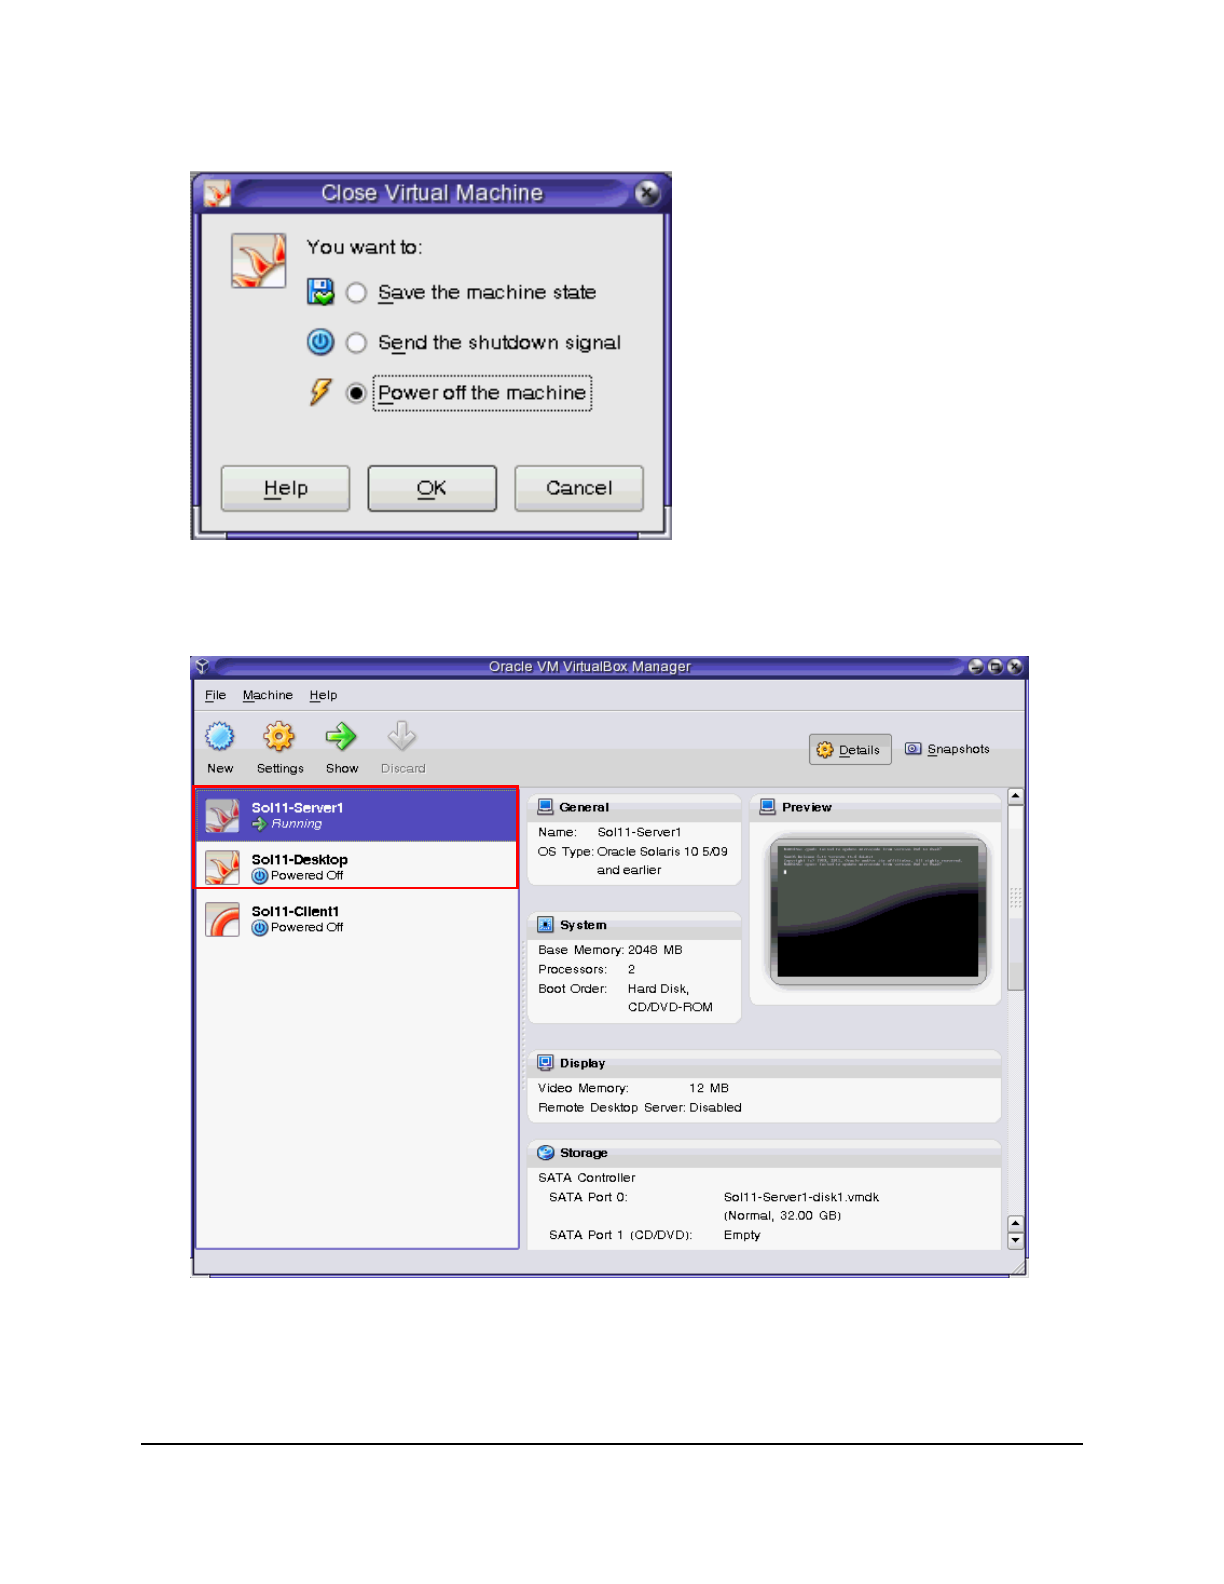
8. When the Close Virtual Machine dialog box appears, select “Power off the machine” and
click OK.
Note: You can verify that the VM is shut down by checking the status that appears under
the VM’s name in the Oracle VM VirtualBox Manager. The status for the Sol11-Desktop
should be “Powered Off.” The status for the Sol11-Server1 should be “Running.”
Cicero Ronaldo (ciceroฺronaldo@gmailฺcom) has a non-transferable
license to use this Student Guideฺ
Unauthorized reproduction or distribution prohibitedฺ Copyright© 2014, Oracle and/or its affiliatesฺ

Copyright © 2013, Oracle and/or its affiliates. All rights reserved.
Practices for Lesson 2: Managing the Image Packaging System (IPS) and Packages
Chapter 2 - Page 1
Practices for Lesson 2:
Managing the Image
Packaging System (IPS) and
Packages
Chapter 2
Cicero Ronaldo (ciceroฺronaldo@gmailฺcom) has a non-transferable
license to use this Student Guideฺ
Unauthorized reproduction or distribution prohibitedฺ Copyright© 2014, Oracle and/or its affiliatesฺ

Copyright © 2013, Oracle and/or its affiliates. All rights reserved.
Practices for Lesson 2: Managing the Image Packaging System (IPS) and Packages
Chapter 2 - Page 2
Practice Overview for Lesson 2
Practices Overview
After installing a new OS, it is a common practice to ensure that you have the IPS Package
Repository set up on a local server. In these practices, you will set up a local repository on S11-
Server1 and configure a network client to access the repository.
When you install critical software updates, for example, packages updating Solaris kernel
facilities, creating another boot environment (BE) is very useful. In case the new package
corrupts your system, you can revert to the previous boot environment. So, you can consider
the original BE to be more like a backup environment. In the following practices, you will create
a backup BE, install the diffstat package, and work with multiple BEs. The key areas
covered in this practice are:
• Configuring a local IPS package repository
• Configuring a network client to access IPS
• Managing boot environments
Note: Your command output displays may be different than the displays in the practices,
especially storage units, process IDs, and related content.
The following checklist shows your progress. Currently, you are about to look into the IPS
functionality.
√ Oracle Solaris 11.1 Predeployment Checklist
Managing the Image Packaging System (IPS) and Packages
Installing Oracle Solaris 11.1 on Multiple Hosts
Managing Business Application Data
Configuring Network and Traffic Failover
Configuring Zones and the Virtual Network
Managing Services and Service Properties
Configuring Privileges and Role-Based Access Control
Securing System Resources by Using Solaris Auditing
Managing Processes and Priorities
Evaluating System Resources
Monitoring and Troubleshooting System Failures
Cicero Ronaldo (ciceroฺronaldo@gmailฺcom) has a non-transferable
license to use this Student Guideฺ
Unauthorized reproduction or distribution prohibitedฺ Copyright© 2014, Oracle and/or its affiliatesฺ

Copyright © 2013, Oracle and/or its affiliates. All rights reserved.
Practices for Lesson 2: Managing the Image Packaging System (IPS) and Packages
Chapter 2 - Page 3
Practice 2-1: Configuring a Local IPS Package Repository
Overview
You will recall from the lecture that when you install or upgrade to the Oracle Solaris 11 release,
the system initially has one publisher configured: the solaris publisher.
In your lab environment, your virtual machine client cannot access the default publisher URL to
download the IPS package repository. So your first task is to create your local package
repository and make it the default so that the network client can be serviced by IPS.
Tasks
1. Verify that the Sol11-Server1 virtual machine is running.
2. Log in to the Sol11-Server1 virtual machine as the oracle user. Use the password
oracle1.
3. Run the su command to assume administrator privileges.
oracle@s11-server1:~$ su –
Password: oracle1
Oracle Corporation SunOS 5.11 11.1 September 2012
root@s11-server1:~#
4. Determine the host name and domain of this server.
root@s11-server1:~# hostname
s11-server1
root@s11-server1:~# domainname
mydomain.com
5. Verify that this server can access DNS services.
root@s11-server1:~# nslookup s11-server1
Server: 192.168.0.100
Address: 192.168.0.100#53
Name: s11-server1.mydomain.com
Address: 192.168.0.100
6. Verify that the /export/IPS file system has been configured on the system.
root@s11-server1:~# zpool list
NAME SIZE ALLOC FREE CAP DEDUP HEALTH ALTROOT
rpool 31.8G 9.87G 21.9G 31% 1.00x ONLINE -
root@s11-server1:~# zfs list
NAME USED AVAIL REFER MOUNTPOINT
rpool 9.94G 21.3G 39K /rpool
rpool/ROOT 2.13G 21.3G 31K legacy
rpool/ROOT/solaris 2.13G 21.3G 1.58G /
rpool/ROOT/solaris/var 507M 21.3G 505M /var
rpool/dump 1.03G 21.3G 1.00G -
rpool/export 5.74G 21.3G 33K /export
Cicero Ronaldo (ciceroฺronaldo@gmailฺcom) has a non-transferable
license to use this Student Guideฺ
Unauthorized reproduction or distribution prohibitedฺ Copyright© 2014, Oracle and/or its affiliatesฺ

Copyright © 2013, Oracle and/or its affiliates. All rights reserved.
Practices for Lesson 2: Managing the Image Packaging System (IPS) and Packages
Chapter 2 - Page 4
rpool/export/IPS 5.74G 21.3G 5.74G /export/IPS
rpool/export/home 212K 21.3G 37K /export/home
rpool/export/home/jholt 35.5K 21.3G 35.5K /export/home/jholt
rpool/export/home/jmoose 35.5K 21.3G 35.5K /export/home/jmoose
rpool/export/home/oracle 34K 21.3G 34K /export/home/oracle
rpool/export/home/panna 35K 21.3G 35K /export/home/panna
rpool/export/home/sstudent 35K 21.3G 35K /export/home/sstudent
rpool/swap 1.03G 21.3G 1.00G -
Note: Your display may be different for space allocation/usage.
Normally, a local IPS repository must be manually created on the local server. This
involves creating a ZFS file system on the local server for the IPS repository and copying
the repository files from the repository ISO image to the local repository.
The following example shows the steps used to copy the IPS repository from the ISO
image to a local ZFS file system. Do not run these commands in this practice. The
repository has already been installed on the local server for you.
# zfs create -o compression=on rpool/export/IPS
# lofiadm –a sol-11-1111-repo-full.iso
# mount –F hsfs /dev/lofi/1 /mnt
# rsync –aP /mnt/repo /export/IPS
The package repository is very large (approximately 4.4 gigabytes). Depending on the
speed of your host machine, the rsync command can take a couple of hours to
complete.
7. Assess the current IPS configuration on the Sol11-Server1 system:
root@s11-server1:~# svcs application/pkg/server
STATE STIME FMRI
disabled 17:00:56 svc:/application/pkg/server:default
root@s11-server1:~# svcprop -p pkg/inst_root application/pkg/server
/var/pkgrepo
This system is not currently configured as an IPS server (the service is disabled). Note
the default location of the IPS repository as determined by the pkg/inst_root
property. The /var/pkgrepo directory is not the correct location of your local
repository.
8. Determine whether the IPS service is currently available:
root@s11-server1:~# pkg search entire
pkg: Some repositories failed to respond appropriately:
solaris:
Unable to contact valid package repository
Encountered the following error(s):
Unable to contact any configured publishers.
This is likely a network configuration problem.
Framework error: code: 6 reason: Couldn't resolve host 'pkg.oracle.com'
Cicero Ronaldo (ciceroฺronaldo@gmailฺcom) has a non-transferable
license to use this Student Guideฺ
Unauthorized reproduction or distribution prohibitedฺ Copyright© 2014, Oracle and/or its affiliatesฺ

Copyright © 2013, Oracle and/or its affiliates. All rights reserved.
Practices for Lesson 2: Managing the Image Packaging System (IPS) and Packages
Chapter 2 - Page 5
URL: 'http://pkg.oracle.com/solaris/release' (happened 4 times)
Note: This step will be especially useful on the job because you can see the displayed
URL. In the training environment, your publisher URL will point to s11-server1.
Searching for a package is a quick way of determining whether the IPS service is
available. Based on the results shown here, this system has no access to the IPS
service.
9. Set the application/pkg/server service pkg/inst_root property to the repository
location (/export/IPS/repo).
root@s11-server1:~# svccfg –s application/pkg/server setprop \
pkg/inst_root=/export/IPS/repo
root@s11-server1:~#
10. Set the application/pkg/server service pkg/readonly property to true.
root@s11-server1:~# svccfg –s application/pkg/server setprop \
pkg/readonly=true
11. Verify the application/pkg/server service inst_root property.
root@s11-server1:~# svcprop -p pkg/inst_root \
application/pkg/server
/export/IPS/repo
12. Refresh the application/pkg/server service.
root@s11-server1:~# svcadm refresh application/pkg/server
13. Enable the application/pkg/server service.
root@s11-server1:~# svcadm enable application/pkg/server
14. Verify that the application/pkg/server service is enabled.
root@s11-server1:~# svcs application/pkg/server
STATE STIME FMRI
online 17:00:56 svc:/application/pkg/server:default
15. Use the pkgrepo refresh command to refresh the package repository.
root@s11-server1:~# pkgrepo refresh –s /export/IPS/repo
Initiating repository refresh.
When you create a new package repository, you must refresh the repository catalog so
that the package search operations will work correctly. This may take several minutes to
complete.
16. List the current package publishers.
root@s11-server1:~# pkg publisher
PUBLISHER TYPE STATUS P LOCATION
solaris origin online F http://pkg.oracle.com/solaris/release/
The command output shows the current publisher. A publisher is a forward domain
name that identifies a person, group of persons, or an organization that publishes one or
more packages. The repository type origin is the location of the package repository that
contains both package metadata (package manifests and catalogs) and package content
(package files). The default publisher URI is http://pkg.oracle.com/solaris/release/.
Cicero Ronaldo (ciceroฺronaldo@gmailฺcom) has a non-transferable
license to use this Student Guideฺ
Unauthorized reproduction or distribution prohibitedฺ Copyright© 2014, Oracle and/or its affiliatesฺ

Copyright © 2013, Oracle and/or its affiliates. All rights reserved.
Practices for Lesson 2: Managing the Image Packaging System (IPS) and Packages
Chapter 2 - Page 6
17. Remove the current publisher URI (http://pkg.oracle.com/solaris/release) and add a new
URI (http://s11-server1.mydomain.com) to the publisher name solaris. Show the results.
root@s11-server1:~# pkg set-publisher –G ‘*’ –g \
http://s11-server1.mydomain.com/ solaris
root@s11-server1:~# pkg publisher
PUBLISHER TYPE STATUS URI
solaris origin online http://s11-server1.mydomain.com
18. Test IPS on the local server by searching for the entire package.
root@s11-server1:~# pkg search entire
INDEX ACTION VALUE PACKAGE
pkg.fmri set solaris/entire pkg:/entire@0.5.11-0.175.0.0.0.2.0
Cicero Ronaldo (ciceroฺronaldo@gmailฺcom) has a non-transferable
license to use this Student Guideฺ
Unauthorized reproduction or distribution prohibitedฺ Copyright© 2014, Oracle and/or its affiliatesฺ

Copyright © 2013, Oracle and/or its affiliates. All rights reserved.
Practices for Lesson 2: Managing the Image Packaging System (IPS) and Packages
Chapter 2 - Page 7
Practice 2-2: Configuring a Network Client to Access the Local IPS
Server
Overview
Now that you have a local package repository set up, you must configure the network clients to
access the new repository. By default, clients are configured to use the publisher
http://pkg.oracle.com/solaris/release/. In this task, you reconfigure the client to access the
http://s11-server1.mydomain.com/ package publisher solaris.
Tasks
1. Double-click the Sol11-Desktop icon to launch the Sol11-Desktop virtual machine.
2. Log in to the Sol11-Desktop virtual machine as the oracle user. Use the password
oracle1.
3. Right-click the desktop background and open a terminal window.
4. In the terminal window, run the su command to assume primary administrator privileges.
oracle@s11-desktop:~$ su –
Password: oracle1
Oracle Corporation SunOS 5.11 11.1 September 2012
root@s11-desktop:~#
5. Verify that this client can access DNS services by resolving the IPS server host name.
root@s11-desktop:~# nslookup s11-server1
Server: 192.168.0.100
Address: 192.168.0.100#53
Name: s11-server1.mydomain.com
Address: 192.168.0.100
6. Verify that this client can ping the IPS server.
root@s11-desktop:~# ping s11-server1
s11-server1 is alive
7. List the current package publishers.
This is what you can expect to see on the job because this is the default origin URL.
root@s11-desktop:~# pkg publisher
PUBLISHER TYPE STATUS P LOCATION
solaris origin online F http://pkg.oracle.com/solaris/release/
8. Remove the current publisher URI (http://pkg.oracle.com/solaris/release) and add a new
URI (http://s11-server1.mydomain.com) to the publisher name solaris.
root@ s11-desktop:~# pkg set-publisher –G ‘*’ –g \
http://s11-server1.mydomain.com/ solaris
Cicero Ronaldo (ciceroฺronaldo@gmailฺcom) has a non-transferable
license to use this Student Guideฺ
Unauthorized reproduction or distribution prohibitedฺ Copyright© 2014, Oracle and/or its affiliatesฺ
Copyright © 2013, Oracle and/or its affiliates. All rights reserved.
Practices for Lesson 2: Managing the Image Packaging System (IPS) and Packages
Chapter 2 - Page 8
9. Verify that the publisher is set to http://s11-server1.mydomain.com/.
root@s11-desktop:~# pkg publisher
PUBLISHER TYPE STATUS P LOCATION
solaris origin online F http://s11-server1.mydomain.com/
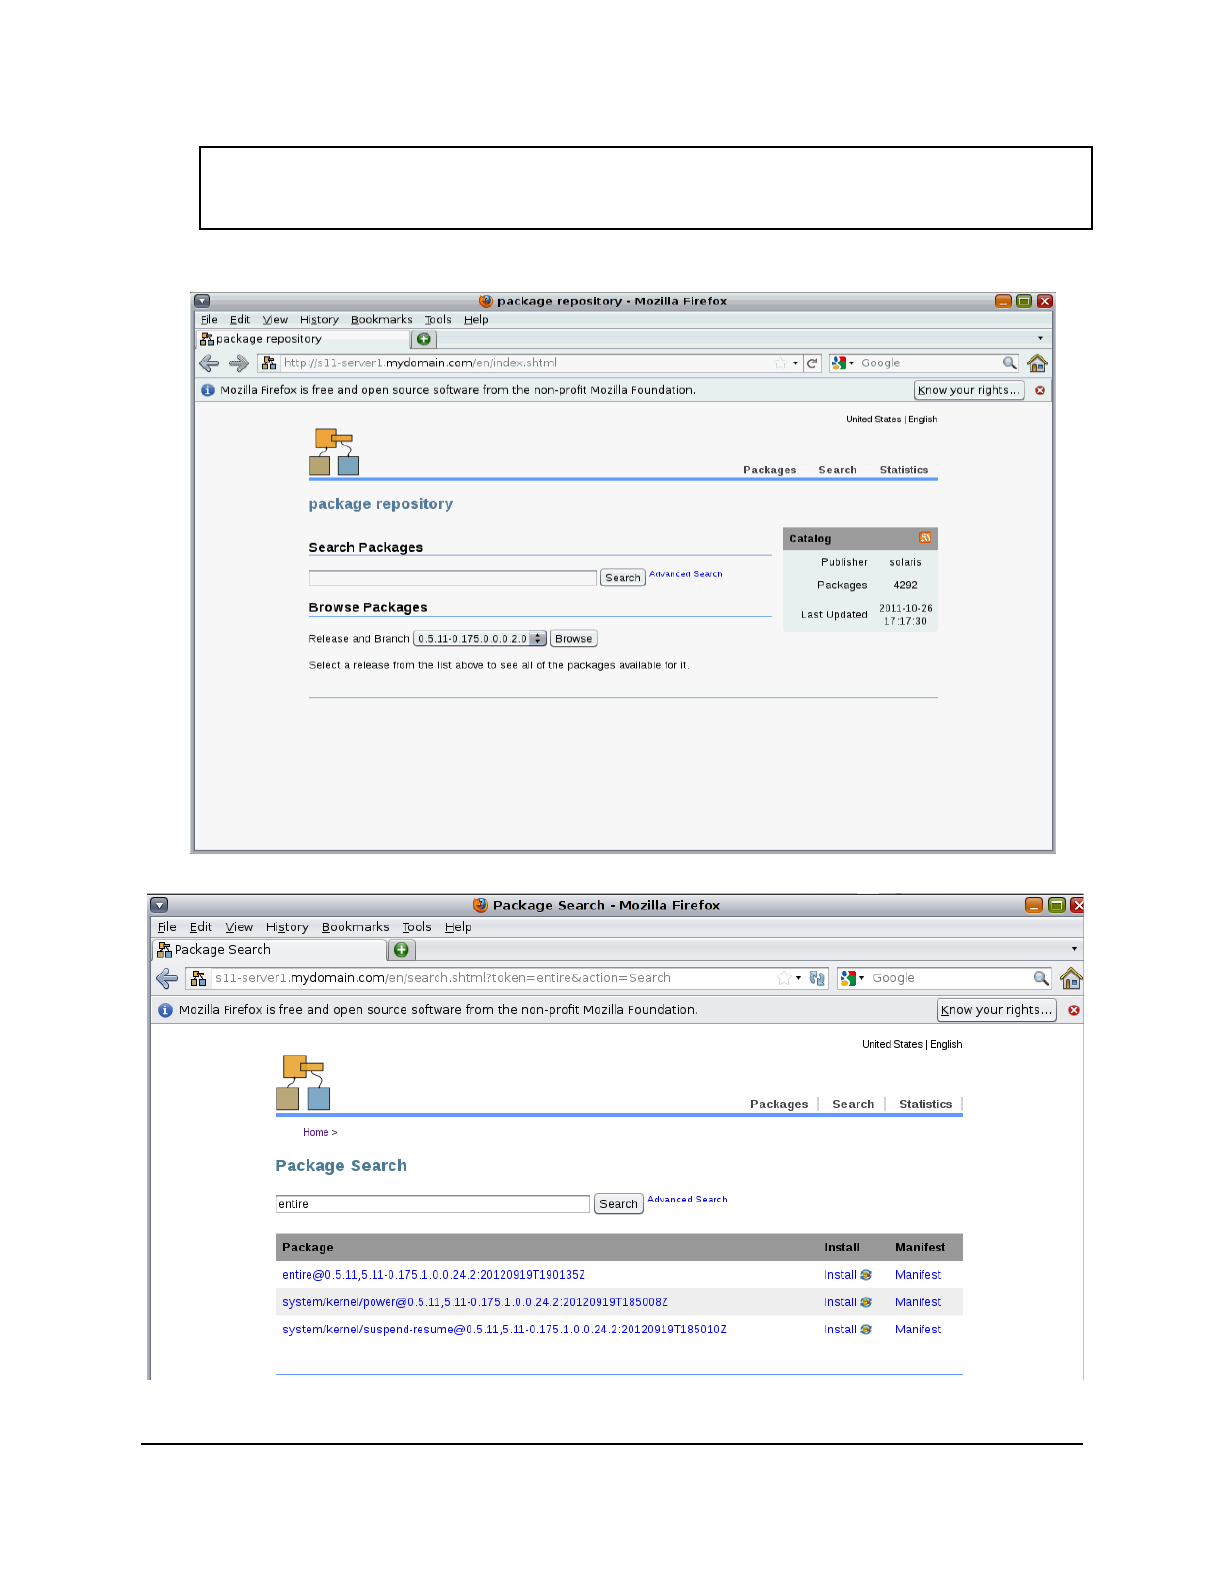
10. Test client access to the IPS server by opening the http://s11-server1.mydomain.com URL
in the Firefox browser.
11. Using the package repository browser, search for the entire package.
Cicero Ronaldo (ciceroฺronaldo@gmailฺcom) has a non-transferable
license to use this Student Guideฺ
Unauthorized reproduction or distribution prohibitedฺ Copyright© 2014, Oracle and/or its affiliatesฺ

Copyright © 2013, Oracle and/or its affiliates. All rights reserved.
Practices for Lesson 2: Managing the Image Packaging System (IPS) and Packages
Chapter 2 - Page 9
12. Close the Firefox browser.
13. Close the Sol11-Desktop VM.
Cicero Ronaldo (ciceroฺronaldo@gmailฺcom) has a non-transferable
license to use this Student Guideฺ
Unauthorized reproduction or distribution prohibitedฺ Copyright© 2014, Oracle and/or its affiliatesฺ

Copyright © 2013, Oracle and/or its affiliates. All rights reserved.
Practices for Lesson 2: Managing the Image Packaging System (IPS) and Packages
Chapter 2 - Page 10
Practice 2-3: Managing Multiple Boot Environments
Overview
In this practice, you create a new full BE based on the current BE. The current BE does not
have the diffstat package installed. You make the new BE the active boot environment and
you update it with the diffstat package. You reboot to the original boot environment to prove
that the two BEs are now logically separate. This action is also useful in case the diffstat
package is corrupted and you want to revert to the original environment.
As part of this practice, you also mount and update an inactive BE. In addition, you create
another BE (a copy of the current BE) and a backup copy. This will demonstrate to you how to
manage multiple BEs on the system.
To run this practice, you must be logged in to the Sol11-Server1 virtual machine as the oracle
user and have obtained primary administrator privileges. See Practice 2-2 if you need help.
Note: Your display outputs may differ slightly.
Tasks
1. In a terminal window on the Sol11-Server1 virtual machine, list the current BEs.
root@s11-server1:~# beadm list
BE Active Mountpoint Space Policy Created
-- ------ ---------- ----- ------ -------
solaris NR / 2.84G static 2012-11-30 08:47
The Active field indicates whether the boot environment is active now (N) and active on
reboot (R).
2. Clone the current active BE. Name the clone solaris-1.
root@s11-server1:~# beadm create solaris-1
3. List the current BEs.
root@s11-server1:~# beadm list
BE Active Mountpoint Space Policy Created
-- ------ ---------- ----- ------ -------
solaris NR / 2.84G static 2012-11-30 08:47
solaris-1 - - 164.0K static 2012-12-09 07:01
4. Activate the solaris-1 BE. Display the list of BEs. Note that solaris-1 is pending
activation on reboot.
root@s11-server1:~# beadm activate solaris-1
root@s11-server1:~# beadm list
BE Active Mountpoint Space Policy Created
-- ------ ---------- ----- ------ -------
solaris N / 469.0K static 2012-11-30 08:47
solaris-1 R - 2.84G static 2012-12-09 07:01
The activation process will take a short amount of time to store the data in the partition.
Cicero Ronaldo (ciceroฺronaldo@gmailฺcom) has a non-transferable
license to use this Student Guideฺ
Unauthorized reproduction or distribution prohibitedฺ Copyright© 2014, Oracle and/or its affiliatesฺ

Copyright © 2013, Oracle and/or its affiliates. All rights reserved.
Practices for Lesson 2: Managing the Image Packaging System (IPS) and Packages
Chapter 2 - Page 11
5. Reboot the Sol11-Server1 virtual machine.
root@s11-server1:~# init 6
Notice that solaris-1 is now the default boot entry in the GRUB menu.
6. After Sol11-Server1 has rebooted, log in as the oracle user and su to root.
7. In a terminal window, list the current BEs.
root@s11-server1:~# beadm list
BE Active Mountpoint Space Policy Created
-- ------ ---------- ----- ------ -------
solaris - - 4.60M static 2012-11-30 08:47
solaris-1 NR / 2.89G static 2012-12-09 07:01
Note that the solaris-1 image is now active.
8. Verify that the diffstat package is not currently installed on the new active BE.
root@s11-server1:~# pkg list diffstat
pkg list: no packages matching “diffstat’ installed
9. Install the diffstat package on the new active BE.
root@s11-server1:~# pkg install diffstat
Creating plan...
Packages to install: 1
Create boot environment: No
Create backup boot environment: No
DOWNLOAD PKGS FILES XFER (MB)
Completed 1/1 6/6 0.0/0.0
PHASE ACTIONS
Install Phase 24/24
Cicero Ronaldo (ciceroฺronaldo@gmailฺcom) has a non-transferable
license to use this Student Guideฺ
Unauthorized reproduction or distribution prohibitedฺ Copyright© 2014, Oracle and/or its affiliatesฺ

Copyright © 2013, Oracle and/or its affiliates. All rights reserved.
Practices for Lesson 2: Managing the Image Packaging System (IPS) and Packages
Chapter 2 - Page 12
PHASE ITEMS
Package State Update Phase 1/1
Image State Update Phase 2/2
10. Activate the solaris BE. Display the list of BEs. Note that solaris is pending activation
on reboot.
root@s11-server1:~# beadm activate solaris
root@s11-server1:~# beadm list
BE Active Mountpoint Space Policy Created
-- ------ ---------- ----- ------ -------
solaris R - 2.84G static 2012-11-30 08:47
solaris-1 N / 72.06M static 2012-12-09 07:01
11. Reboot the Sol11-Server1 virtual machine. After Sol11-Server1 has rebooted, log in as the
oracle user and su to root.
root@s11-server1:~# init 6
12. Verify that the solaris image is now active and that the diffstat package is not
installed.
root@s11-server1:~# beadm list
BE Active Mountpoint Space Policy Created
-- ------ ---------- ----- ------ -------
solaris NR / 2.89G static 2012-11-30 08:47
solaris-1 - - 76.03M static 2012-12-09 07:01
root@s11-server1:~# pkg list diffstat
pkg list: no packages matching “diffstat’ installed
13. Mount the inactive BE.
root@s11-server1:~# mkdir -p /solaris-1
root@s11-server1:~# beadm mount solaris-1 /solaris-1
root@s11-server1:~# beadm list
BE Active Mountpoint Space Policy Created
-- ------ ---------- ----- ------ -------
solaris NR / 2.89G static 2012-11-30 08:47
solaris-1 - /solaris-1 76.03M static 2012-12-09 07:01
14. Verify that the diffstat package is installed in the inactive BE:
root@s11-server1:~# pkg -R /solaris-1 verify -v diffstat
Verifying: PACKAGE STATUS
pkg://solaris/text/diffstat OK
15. Remove the diffstat package from the mounted inactive BE.
root@s11-server1:~# pkg -R /solaris-1 uninstall diffstat
Creating Plan…
Packages to remove: 1
Estimated space available: 28.45 GB
Cicero Ronaldo (ciceroฺronaldo@gmailฺcom) has a non-transferable
license to use this Student Guideฺ
Unauthorized reproduction or distribution prohibitedฺ Copyright© 2014, Oracle and/or its affiliatesฺ

Copyright © 2013, Oracle and/or its affiliates. All rights reserved.
Practices for Lesson 2: Managing the Image Packaging System (IPS) and Packages
Chapter 2 - Page 13
Estimated space to be consumed: 14.58 MB
Rebuild boot archive: No
Changed packages:
solaris
text/diffstat
1.51,5.11-0.175.1.0.0.9.0:20120207T035254Z -> None
PHASE ITEMS
Removing old actions 19/19
Updating package state database Done
Updating package cache 1/1
Updating image state Done
Creating fast lookup database Done
root@s11-server1:~# pkg -R /solaris-1 list diffstat
pkg list: no packages matching “diffstat’ installed
16. Unmount the inactive BE.
root@s11-server1:~# beadm unmount solaris-1
17. Create a snapshot of the solaris BE. Name the snapshot backup.
root@s11-server1:~# beadm create solaris@backup
18. Display the list of snapshots associated with the solaris BE.
root@s11-server1:~# beadm list -a solaris
BE/Dataset/Snapshot Active Mountpoint Space Policy Created
------------------- ------ ---------- ----- ------ -------
solaris
rpool/ROOT/solaris NR / 2.17G static 2012-11-30 08:47
rpool/ROOT/solaris/var - /var 518.90M static 2012-11-30 08:47
rpool/ROOT/solaris/var@2012... - - 1.22M static 2012-12-09 07:01
rpool/ROOT/solaris/var@backup - - 0 static 2012-12-09 07:18
rpool/ROOT/solaris@backup - - 0 static 2012-12-09 07:18
rpool/ROOT/solaris/var@install - - 144.54M static 2012-11-30 08:51
…
…
…
19. Create a new boot environment from the solaris@backup snapshot. Name this BE
solaris-2.
root@s11-server1:~# beadm create -e solaris@backup solaris-2
root@s11-server1:~# beadm list
BE Active Mountpoint Space Policy Created
-- ------ ---------- ----- ------ -------
solaris NR / 2.89G static 2012-11-30 08:47
solaris-1 - - 76.03M static 2012-12-09 07:01
solaris-2 - - 130.0K static 2012-12-09 07:26
Cicero Ronaldo (ciceroฺronaldo@gmailฺcom) has a non-transferable
license to use this Student Guideฺ
Unauthorized reproduction or distribution prohibitedฺ Copyright© 2014, Oracle and/or its affiliatesฺ

Copyright © 2013, Oracle and/or its affiliates. All rights reserved.
Practices for Lesson 2: Managing the Image Packaging System (IPS) and Packages
Chapter 2 - Page 14
20. Destroy the solaris-2 BE and show the results.
root@s11-server1:~# beadm destroy solaris-2
Are you sure you want to destroy solaris-2? This action cannot
be undone(y/[n]): y
root@s11-server1:~# beadm list
BE Active Mountpoint Space Policy Created
-- ------ ---------- ----- ------ -------
solaris NR / 2.89G static 2012-11-30 08:47
solaris-1 - - 76.23M static 2012-12-09 07:01
21. Rename the original solaris-1 BE to solaris-alt.
root@s11-server1:~# beadm rename solaris-1 solaris-alt
22. List the boot environments.
root@s11-server1:~# beadm list
BE Active Mountpoint Space Policy Created
-- ------ ---------- ----- ------ -------
solaris NR / 2.89G static 2012-11-30 08:47
solaris-alt - - 76.23M static 2012-12-09 07:01
23. Destroy the solaris-alt BE and then verify that it has been removed.
root@s11-server1:~# beadm destroy solaris-alt
Are you sure you want to destroy solaris-1? This action cannot be
undone(y/[n]): y
root@s11-server1:~# beadm list
BE Active Mountpoint Space Policy Created
-- ------ ---------- ----- ------ -------
solaris NR / 2.89G static 2012-11-30 08:47
The next time you reboot the system, you will see only the solaris BE present on the
GNU GRUB menu.
Cicero Ronaldo (ciceroฺronaldo@gmailฺcom) has a non-transferable
license to use this Student Guideฺ
Unauthorized reproduction or distribution prohibitedฺ Copyright© 2014, Oracle and/or its affiliatesฺ

Copyright © 2013, Oracle and/or its affiliates. All rights reserved.
Practices for Lesson 3: Installing Oracle Solaris 11 on Multiple Hosts
Chapter 3 - Page 1
Practices for Lesson 3:
Installing Oracle Solaris 11
on Multiple Hosts
Chapter 3
Cicero Ronaldo (ciceroฺronaldo@gmailฺcom) has a non-transferable
license to use this Student Guideฺ
Unauthorized reproduction or distribution prohibitedฺ Copyright© 2014, Oracle and/or its affiliatesฺ

Copyright © 2013, Oracle and/or its affiliates. All rights reserved.
Practices for Lesson 3: Installing Oracle Solaris 11 on Multiple Hosts
Chapter 3 - Page 2
Practice Overview for Lesson 3
Practices Overview
According to the predeployment plan and checklist, you will now start configuring the Automated
Installer (AI). The AI configuration practices help you to understand how you can save time and
resources while installing Oracle Solaris 11.1 on multiple client hosts individually.
√ Oracle Solaris 11.1 Predeployment Checklist
√ Managing the Image Packaging System (IPS) and Packages
Installing Oracle Solaris 11.1 on Multiple Hosts
Managing the Business Application Data
Configuring Network and Traffic Failover
Configuring Zones and the Virtual Network
Managing Services and Service Properties
Configuring Privileges and Role-Based Access Control
Securing System Resources by Using Solaris Auditing
Managing Processes and Priorities
Evaluating System Resources
Monitoring and Troubleshooting System Failures
In the following practices, you install Oracle Solaris 11.1 OS on an x86/64 machine in an
automated, unattended manner. Your first task is to verify that the system meets the AI
requirements. In the second task, you configure the AI on a server. Then as a final step, you
deploy the OS on a network client.
Cicero Ronaldo (ciceroฺronaldo@gmailฺcom) has a non-transferable
license to use this Student Guideฺ
Unauthorized reproduction or distribution prohibitedฺ Copyright© 2014, Oracle and/or its affiliatesฺ

Copyright © 2013, Oracle and/or its affiliates. All rights reserved.
Practices for Lesson 3: Installing Oracle Solaris 11 on Multiple Hosts
Chapter 3 - Page 3
Before you install the Oracle Solaris 11.1 OS by using AI, you must first download the Oracle
Solaris 11.1 AI install image from the following site:
http://www.oracle.com/technetwork/server-storage/solaris11/downloads/index.html.
The AI installation download is in an ISO image format that can be burned to a CD or DVD, or
used directly within Oracle VM Server or other virtualization software.
Note: For training purposes, the AI ISO has already been downloaded for you. The ISO
image file can be found in the /root directory of the Sol11-Server1 virtual machine.
Cicero Ronaldo (ciceroฺronaldo@gmailฺcom) has a non-transferable
license to use this Student Guideฺ
Unauthorized reproduction or distribution prohibitedฺ Copyright© 2014, Oracle and/or its affiliatesฺ

Copyright © 2013, Oracle and/or its affiliates. All rights reserved.
Practices for Lesson 3: Installing Oracle Solaris 11 on Multiple Hosts
Chapter 3 - Page 4
Practice 3-1: Verifying the System AI Requirements (Optional)
Overview
This practice takes you through the steps for checking the existing version of Oracle Solaris
11.1 to verify the system requirements for the AI installation. For the purposes of AI
configuration, you need to configure the IPS repository on the local VM (S11-Server1) so that
you can minimize the package deployment.
Note: If you have completed Practice 2 during Lesson 2, skip this practice. It is included
here as a checkpoint prerequisite because you need to ensure that the IPS repository is
properly configured before you configure AI.
Note: Your command output displays may be different than the displays in the practice,
especially allocation and utilization, process IDs, and similar information.
Tasks
1. Verify that the Sol11-Server1 virtual machine is running.
If the virtual machine is not running, start it at this time.
2. Log in to virtual machine Sol11-Server1 as the oracle user. Use the password oracle1.
3. Run the su command to assume primary administrator privileges.
oracle@s11-server1:~$ su –
Password: oracle1
Oracle Corporation SunOS 5.11 11.1 September 2012
root@s11-server1:~#
4. Verify that the operating system is Oracle Solaris 11 Build 173 release.
root@s11-server1:~# cat /etc/release
Oracle Solaris 11.1 X86
Copyright (c) 1983, 2012, Oracle and/or its affiliates. All
rights reserved.
Assembled 19 September 2012
5. Verify that the operating system is configured with a static IP address.
root@s11-server1:~# svcs network/physical:default
STATE STIME FMRI
online 0:24:39 svc:/network/physical:default
root@s11-server1:~# ipadm show-addr
ADDROBJ TYPE STATE ADDR
…
net0/v4 static ok 192.168.0.100/24
…
Cicero Ronaldo (ciceroฺronaldo@gmailฺcom) has a non-transferable
license to use this Student Guideฺ
Unauthorized reproduction or distribution prohibitedฺ Copyright© 2014, Oracle and/or its affiliatesฺ

Copyright © 2013, Oracle and/or its affiliates. All rights reserved.
Practices for Lesson 3: Installing Oracle Solaris 11 on Multiple Hosts
Chapter 3 - Page 5
6. Verify that DNS is operational.
root@s11-server1:~# nslookup s11-server1.mydomain.com
Server: 192.168.0.100
Address: 192.168.0.100#53
Name: s11-server1.mydomain.com
Address: 192.168.0.100
7. Verify that the /export/IPS file system has been configured in the rpool on the system.
root@s11-server1:~# zpool list
NAME SIZE ALLOC FREE CAP DEDUP HEALTH ALTROOT
rpool 31.8G 9.98G 21.9G 31% 1.00x ONLINE -
root@s11-server1:~# zfs list
NAME USED AVAIL REFER MOUNTPOINT
rpool 9.95G 21.3G 39K /rpool
rpool/ROOT 2.14G 21.3G 31K legacy
rpool/ROOT/solaris 2.14G 21.3G 1.58G /
rpool/ROOT/solaris/var 517M 21.3G 373M /var
rpool/dump 1.03G 21.3G 1.00G -
rpool/export 5.74G 21.3G 33K /export
rpool/export/IPS 5.74G 21.3G 5.74G /export/IPS
rpool/export/home 212K 21.3G 37K /export/home
rpool/swap 1.03G 21.3G 1.00G -
Note: Your display may be slightly different based on the type of disks and platform.
Normally, a local IPS repository must be manually created on the local server. This
involves creating a ZFS file system on the local server for the IPS repository and copying
the repository files from the repository ISO image to the local repository.
The following example shows you the steps to copy the IPS repository from the ISO
image to a local ZFS file system. Do not run these commands in this practice. The
repository has already been installed on the local server for you.
# zfs create -o compression=on rpool/export/IPS
# lofiadm –a sol-11-1111-repo-full.iso
# mount –F hsfs /dev/lofi/1 /mnt
# rsync –aP /mnt/repo /export/IPS
The package repository is very large (over 6 GB). Depending on the speed of your host
machine, the rsync command can take a couple of hours to complete.
8. Assess the current IPS configuration on the Sol11-Server1 system:
root@s11-server1:~# svcs application/pkg/server
STATE STIME FMRI
disabled 0:24:39 svc:/application/pkg/server:default
root@s11-server1:~# svcprop -p pkg/inst_root application/pkg/server
/var/pkgrepo
Cicero Ronaldo (ciceroฺronaldo@gmailฺcom) has a non-transferable
license to use this Student Guideฺ
Unauthorized reproduction or distribution prohibitedฺ Copyright© 2014, Oracle and/or its affiliatesฺ

Copyright © 2013, Oracle and/or its affiliates. All rights reserved.
Practices for Lesson 3: Installing Oracle Solaris 11 on Multiple Hosts
Chapter 3 - Page 6
This system is not currently configured as an IPS server (the service is disabled). Note
the default location of the IPS repository as determined by the pkg/inst_root
property. The /var/pkgrepo directory is not the correct location of your local
repository.
Note: When you configure IPS for the first time, you will see this default value. It is
shown here for that purpose. You will change it to the local ZFS file system.
9. Set the pkg/inst_root property of the application/pkg/server service to the local
repository location /export/IPS/repo.
root@s11-server1:~# svccfg –s application/pkg/server setprop \
pkg/inst_root=/export/IPS/repo
root@s11-server1:~#
10. Set the pkg/readonly property of the application/pkg/server service to true.
root@s11-server1:~# svccfg –s application/pkg/server setprop \
pkg/readonly=true
11. Verify the inst_root property of the application/pkg/server service.
root@s11-server1:~# svcprop -p pkg/inst_root \
application/pkg/server
/export/IPS/repo
12. Refresh the application/pkg/server service.
root@s11-server1:~# svcadm refresh application/pkg/server
13. Enable the application/pkg/server service.
root@s11-server1:~# svcadm enable application/pkg/server
14. Verify that the application/pkg/server service is enabled.
root@s11-server1:~# svcs application/pkg/server
STATE STIME FMRI
online 0:24:39 svc:/application/pkg/server:default
15. Use the pkgrepo refresh command to refresh the package repository.
root@s11-server1:~# pkgrepo refresh –s /export/IPS/repo
When you create a new package repository, you must refresh the repository catalog so
that the package search operations will work correctly. This may take several minutes to
complete.
16. List the current package publishers.
root@s11-server1:~# pkg publisher
PUBLISHER TYPE STATUS P LOCATION
solaris origin online F http://pkg.oracle.com/solaris/release/
The command output shows the current publisher. A publisher is a forward domain
name that identifies a person, group of persons, or an organization that publishes one or
more packages. The repository type origin is the location of a package repository that
contains both package metadata (package manifests and catalogs) and package content
(package files). The default publisher URI is http://pkg.oracle.com/solaris/release/.
Cicero Ronaldo (ciceroฺronaldo@gmailฺcom) has a non-transferable
license to use this Student Guideฺ
Unauthorized reproduction or distribution prohibitedฺ Copyright© 2014, Oracle and/or its affiliatesฺ

Copyright © 2013, Oracle and/or its affiliates. All rights reserved.
Practices for Lesson 3: Installing Oracle Solaris 11 on Multiple Hosts
Chapter 3 - Page 7
17. Remove the current publisher URI (http://pkg.oracle.com/solaris/release/) and add a new
URI (http://s11-server1.mydomain.com) to the publisher name solaris. Show the results.
root@s11-server1:~# pkg set-publisher -G \
http://pkg.oracle.com/solaris/release/ \
-g http://s11-server1.mydomain.com/ solaris
root@s11-server1:~# pkg publisher
PUBLISHER TYPE STATUS P LOCATION
solaris origin online F http://s11-server1.mydomain.com
Note: The value specified after the -G option is also mentioned here as the original
default that you will see while installing the repository for the first time. In the lab
environment, use the value displayed in the previous step.
Cicero Ronaldo (ciceroฺronaldo@gmailฺcom) has a non-transferable
license to use this Student Guideฺ
Unauthorized reproduction or distribution prohibitedฺ Copyright© 2014, Oracle and/or its affiliatesฺ

Copyright © 2013, Oracle and/or its affiliates. All rights reserved.
Practices for Lesson 3: Installing Oracle Solaris 11 on Multiple Hosts
Chapter 3 - Page 8
Practice 3-2: Configuring the AI Server
Overview
After you have verified that the server meets the AI requirements, you are ready to configure the
AI server. After the configuration is complete, you will be able to install the Oracle Solaris 11.1
OS on one or more client hosts. This practice will set up a DHCP server as part of the
configuration. This DHCP server allocates an IP address to the client host.
Tasks
Note: Because you are not using the default IPS service, you need to adjust the default AI
service accordingly.
1. On the Sol11-Server1 virtual machine, check whether the
svc:/network/dns/multicast service is online. If the service is not online, enable it.
root@s11-server1:~# svcs network/dns/multicast
STATE STIME FMRI
disabled 1:08:14 svc:/network/dns/multicast:default
root@s11-server1:~# svcadm enable network/dns/multicast
root@s11-server1:~# svcs network/dns/multicast
STATE STIME FMRI
online 1:32:27 svc:/network/dns/multicast:default
2. Verify that the netmasks file is configured appropriately for the DHCP service.
root@s11-server1:~# getent netmasks 192.168.0.0
Note that DHCP requires that the network mask for the local subnet is configured in the
/etc/netmasks file. If an entry does not exist, update the netmasks file now.
# vi /etc/netmasks
…
192.168.0.0 255.255.255.0
root@s11-server1:~# getent netmasks 192.168.0.0
192.168.0.0 255.255.255.0
3. Use the installadm create-service command to create an AI service based on the
following information:
- Service name: basic_ai
- DHCP base IP address: 192.168.0.130
- DHCP IP address range: 5
- AI ISO image location: /opt/ora/iso/sol-11_1-ai-x86.iso
- Target directory:
/export/ai/basic_ai
root@s11-server1:~# installadm create-service -n basic_ai \
-s /opt/ora/iso/sol-11_1-ai-x86.iso -i 192.168.0.130 \
-c 5 -d /export/ai/basic_ai
Cicero Ronaldo (ciceroฺronaldo@gmailฺcom) has a non-transferable
license to use this Student Guideฺ
Unauthorized reproduction or distribution prohibitedฺ Copyright© 2014, Oracle and/or its affiliatesฺ

Copyright © 2013, Oracle and/or its affiliates. All rights reserved.
Practices for Lesson 3: Installing Oracle Solaris 11 on Multiple Hosts
Chapter 3 - Page 9
Creating service from: /opt/ora/iso/sol-11_1-ai-x86.iso
Setting up the image ...
Creating i386 service: basic_ai
Image path: /export/ai/basic_ai
Starting DHCP server...
Adding IP range to local DHCP configuration
Unable to determine a route for network 192.168.0.0. Setting the
route
temporarily to 0.0.0.0; this should be changed to an appropriate
value
in the DHCP configuration file. Please see dhcpd(8) for further
information.
Refreshing install services
Creating default-i386 alias
Setting the default PXE bootfile(s) in the local DHCP
configuration
to:
bios clients (arch 00:00): default-i386/boot/grub/pxegrub2
uefi clients (arch 00:07): default-
i386/boot/grub/grub2netx64.efi
Refreshing install services
root@s11-server1:~#
Note: If a warning message “Unable to determine a route…” appears, ignore it because
it is caused by the virtual machine network configuration. The same is true for any other
warnings. These messages have no impact on this practice.
Note: If you need to, you can remove an AI service and its associated clients by using
the command installadm delete-service -r svcname.
Cicero Ronaldo (ciceroฺronaldo@gmailฺcom) has a non-transferable
license to use this Student Guideฺ
Unauthorized reproduction or distribution prohibitedฺ Copyright© 2014, Oracle and/or its affiliatesฺ

Copyright © 2013, Oracle and/or its affiliates. All rights reserved.
Practices for Lesson 3: Installing Oracle Solaris 11 on Multiple Hosts
Chapter 3 - Page 10
4. Use the installadm list command to verify that your AI service is installed.
root@s11-server1:~# installadm list
Service Name Alias Of Status Arch Image Path
------------ -------- ------ ---- ----------
basic_ai - on i386 /export/ai/basic_ai
default-i386 basic_ai on i386 /export/ai/basic_ai
5. Use the installadm create-client command to add the client MAC address for the
Sol11-Client1 virtual machines to the basic_ai service.
root@s11-server1:~# installadm create-client -e \
08:00:27:85:C7:D6 -n basic_ai
Adding host entry for 08:00:27:85:C7:D6 to local DHCP
configuration.
Note that, on the job, you will not encounter duplicate MAC addresses on your network.
You should verify carefully what your actual network client systems’ MAC addresses are
in order to properly install Oracle Solaris 11.1 on them.
Note: Use the MAC addresses observed on your system.
6. Use the installadm list –c command to verify that the client was added to the AI
server basic_ai.
root@s11-server1:~# installadm list -c
Service Name Client Address Arch Image Path
------------ -------------- ---- ----------
basic_ai 08:00:27:85:C7:D6 i386 /export/ai/basic_ai
7. Create the directory /var/tmp/manifests to store the AI manifest files.
root@s11-server1:~# mkdir -p /var/tmp/manifests
8. Copy the default manifest file to the /var/tmp/manifests/basic_ai.xml file so that
you can modify it for your configuration.
root@s11-server1:~# cp \
/export/ai/basic_ai/auto_install/manifest/default.xml \
/var/tmp/manifests/basic_ai.xml
Note: In the previous step, the /var/tmp/manifests/basic_ai.xml file is created
read only. Before editing, you can change the permissions to 755 (using the command
chmod 755 basic_ai.xml) or ignore the warning from the vi editor and save it with the
“wq!” command.
Cicero Ronaldo (ciceroฺronaldo@gmailฺcom) has a non-transferable
license to use this Student Guideฺ
Unauthorized reproduction or distribution prohibitedฺ Copyright© 2014, Oracle and/or its affiliatesฺ

Copyright © 2013, Oracle and/or its affiliates. All rights reserved.
Practices for Lesson 3: Installing Oracle Solaris 11 on Multiple Hosts
Chapter 3 - Page 11
9. Using the vi editor, modify the auto_install section of the
/var/tmp/manifests/basic_ai.xml file and use the following data.
auto_install manifest:
- AI instance name (ai_instance name): basic_ai and add auto_reboot="true"
- IPS origin URI: http://s11-server1.mydomain.com
- IPS package: entire (confirm that it uses the entire package)
- IPS package: solaris-large-server (confirm that it uses the solaris-large-
server package)
10. Use the diff command to view the differences between the basic_ai.xml file and the
default.xml file.
root@s11-server1:~# diff /var/tmp/manifests/basic_ai.xml \
/export/ai/basic_ai/auto_install/manifest/default.xml
27c27
< <ai_instance name="basic_ai" auto_reboot="true" >
---
> <ai_instance name="default">
40c40
< <origin name="http://s11-server1.mydomain.com"/>
---
> <origin name="http://pkg.oracle.com/solaris/release"/>
This output shows you the modifications that you made to the basic_ai.xml file.
11. Create a MAC address–based criteria file named criteria_ai.xml in the
/var/tmp/manifests directory. Use the MAC address of the network client Sol11-
Client1.
root@s11-server1:~# vi /var/tmp/manifests/criteria_ai.xml
<ai_criteria_manifest>
<ai_criteria name="mac">
<value>08:00:27:85:C7:D6</value>
</ai_criteria>
</ai_criteria_manifest>
Note: If the AI client does not match the criteria for a service (in this case, a specific
MAC address), the AI service will use the default manifest when installing the OS.
Cicero Ronaldo (ciceroฺronaldo@gmailฺcom) has a non-transferable
license to use this Student Guideฺ
Unauthorized reproduction or distribution prohibitedฺ Copyright© 2014, Oracle and/or its affiliatesฺ

Copyright © 2013, Oracle and/or its affiliates. All rights reserved.
Practices for Lesson 3: Installing Oracle Solaris 11 on Multiple Hosts
Chapter 3 - Page 12
12. Add the basic_ai manifest and criteria file to the basic_ai service.
root@s11-server1:~# installadm create-manifest –n basic_ai \
-f /var/tmp/manifests/basic_ai.xml \
-C /var/tmp/manifests/criteria_ai.xml
When a custom AI manifest (basic_ai.xml, in this example) is defined for this install
service and the client matches the criteria specified (in the criteria_ai.xml file) for
the custom AI manifest, the client will use that manifest. In cases where client
characteristics match multiple AI manifests, the client characteristics are evaluated in the
following order: mac, ipv4, platform, arch, cpu, and mem.
If the client does not match the criteria for any custom AI manifest, the client uses the
default AI manifest.
13. Use the installadm list –m command to verify that your manifest and the criteria have
been added to the basic_ai service.
root@s11-server1:~# installadm list -m
Service/Manifest Name Status Criteria
--------------------- -------- --------
basic_ai
basic_ai mac = 08:00:27:85:C7:D6
orig_default Default None
default-i386
orig_default Default None
root@s11-server1:~# installadm list -m -n basic_ai
Service/Manifest Name Status Criteria
--------------------- ------ --------
basic_ai
basic_ai mac = 08:00:27:85:C7:D6
orig_default Default None
Cicero Ronaldo (ciceroฺronaldo@gmailฺcom) has a non-transferable
license to use this Student Guideฺ
Unauthorized reproduction or distribution prohibitedฺ Copyright© 2014, Oracle and/or its affiliatesฺ
Copyright © 2013, Oracle and/or its affiliates. All rights reserved.
Practices for Lesson 3: Installing Oracle Solaris 11 on Multiple Hosts
Chapter 3 - Page 13
Practice 3-3: Deploying the OS on the Network Client
Overview
After you complete the AI server configuration, it is time to test your work by deploying the
Oracle Solaris 11.1 operating system on a network client. You will use the VM named Sol11-
Client1 as the client host. After the client is imaged from the AI server, you will verify that the
install was done completely and accurately.
Tasks
1. Verify that the Sol11-Server1 virtual machine is running. If it is not, start it now.
2. Click the Sol11-Client1 virtual machine icon.
3. Click the Start button. This will boot the Sol11-Client1 virtual machine. If the AI server is
configured correctly, you should see the OS installation begin.
Note
• If the Sol11-Client1 virtual machine fails to boot with a “No bootable medium
found” error, change the virtual machine adapter. To change the adapter type, open
the Oracle VM VirtualBox Manager, select the Sol11-Client1 virtual machine,
and click Settings. In the Settings dialog box, select Network and click Advanced
under Adapter 1. Select another adapter from the Adapter Type menu. Restart the
Sol11-Client1 virtual machine.
• Perform the next step as soon as possible.
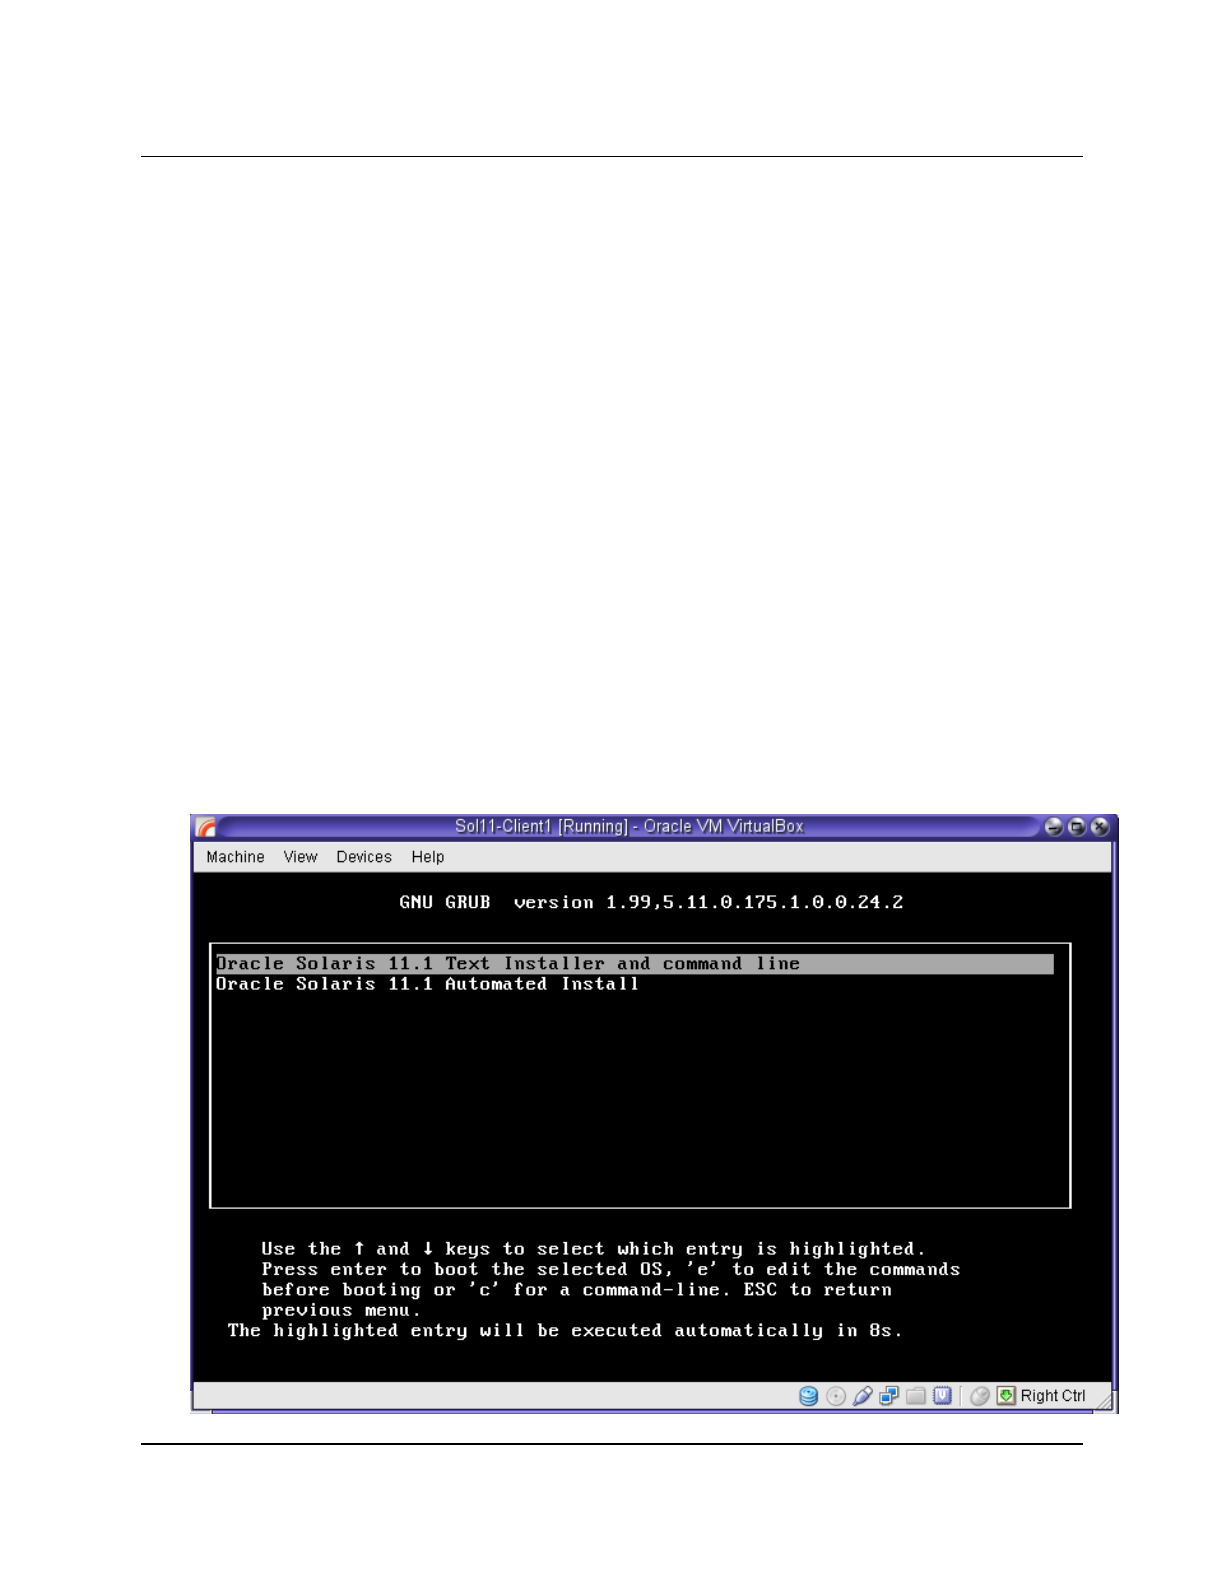
4. When the Sol11-Client1 system starts the GNU GRUB menu, select the Oracle Solaris
11.1 Text Installer and command line boot option.
Cicero Ronaldo (ciceroฺronaldo@gmailฺcom) has a non-transferable
license to use this Student Guideฺ
Unauthorized reproduction or distribution prohibitedฺ Copyright© 2014, Oracle and/or its affiliatesฺ
Copyright © 2013, Oracle and/or its affiliates. All rights reserved.
Practices for Lesson 3: Installing Oracle Solaris 11 on Multiple Hosts
Chapter 3 - Page 14
5. When the Oracle Solaris installation menu appears, type option 1 for “Install Oracle Solaris”
and press Enter as instructed. During the OS installation process, use the following
configuration data to complete the Text installation.
Note: The Text installer program directs you to use the F2 key to move to the next step in
the installation process.
- Installation menu: 1. Install Oracle Solaris
- Disks: Local Disks
- Fdisk Partitions: Use the entire disk.
- Computer name: s11-client1
- Ethernet network configuration: Automatically
- Time zone: Use your local region.
- Date and time: Set to current date and time.
- Root password: oracle1
- User account:
- Your real name: oracle
- Username: oracle
- Password: oracle1
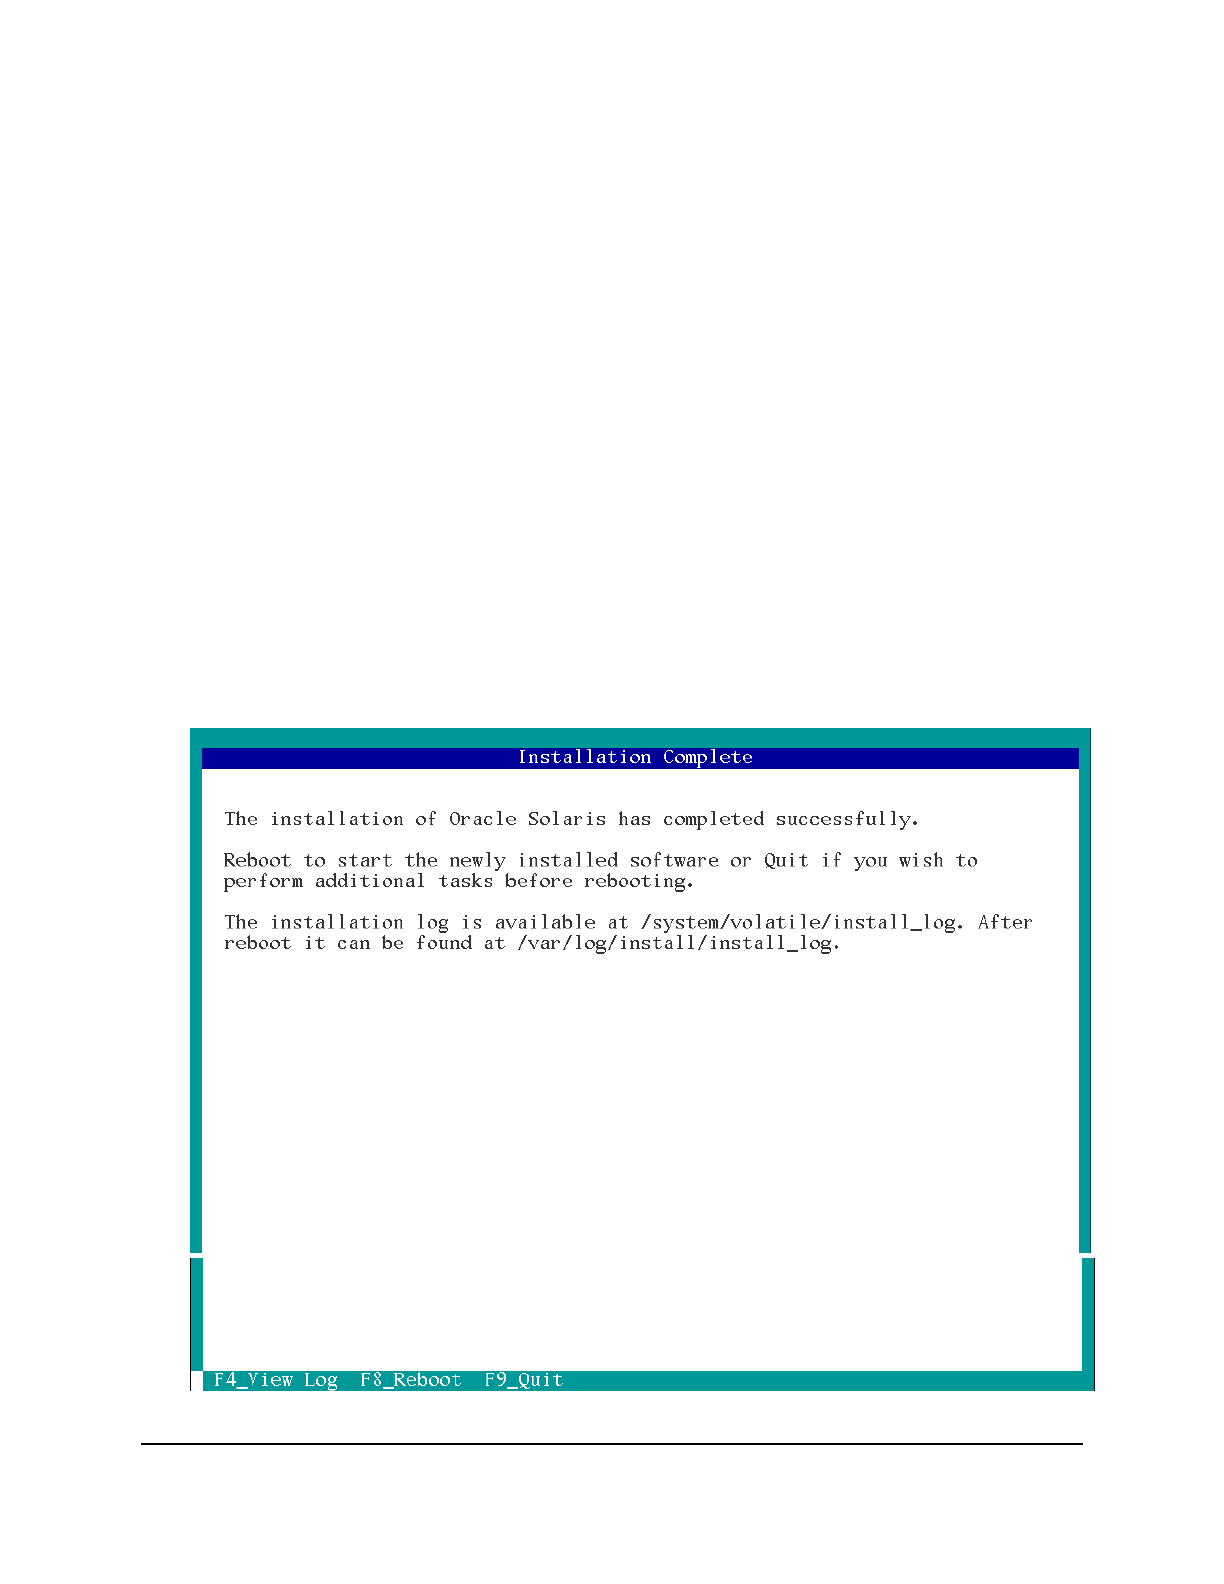
6. The installation should take around 10 minutes. You will see an “installation complete”
message displayed.
.
Cicero Ronaldo (ciceroฺronaldo@gmailฺcom) has a non-transferable
license to use this Student Guideฺ
Unauthorized reproduction or distribution prohibitedฺ Copyright© 2014, Oracle and/or its affiliatesฺ

Copyright © 2013, Oracle and/or its affiliates. All rights reserved.
Practices for Lesson 3: Installing Oracle Solaris 11 on Multiple Hosts
Chapter 3 - Page 15
7. After the installation has completed, reboot (F8) the Sol11-Client1 virtual machine.
Note: If the F8 key does not work, press the F9-Quit key. This returns you to the installation
menu. From the menu, select option 5 to reboot.
8. After Sol11-Client1 completes the initial boot and the solaris-client1 console
login prompt appears, power down the virtual machine.
Cicero Ronaldo (ciceroฺronaldo@gmailฺcom) has a non-transferable
license to use this Student Guideฺ
Unauthorized reproduction or distribution prohibitedฺ Copyright© 2014, Oracle and/or its affiliatesฺ

Copyright © 2013, Oracle and/or its affiliates. All rights reserved.
Practices for Lesson 3: Installing Oracle Solaris 11 on Multiple Hosts
Chapter 3 - Page 16
Cicero Ronaldo (ciceroฺronaldo@gmailฺcom) has a non-transferable
license to use this Student Guideฺ
Unauthorized reproduction or distribution prohibitedฺ Copyright© 2014, Oracle and/or its affiliatesฺ

Copyright © 2013, Oracle and/or its affiliates. All rights reserved.
Practices for Lesson 4: Managing Business Application Data
Chapter 4 - Page 1
Practices for Lesson 4:
Managing Business
Application Data
Chapter 4
Cicero Ronaldo (ciceroฺronaldo@gmailฺcom) has a non-transferable
license to use this Student Guideฺ
Unauthorized reproduction or distribution prohibitedฺ Copyright© 2014, Oracle and/or its affiliatesฺ

Copyright © 2013, Oracle and/or its affiliates. All rights reserved.
Practices for Lesson 4: Managing Business Application Data
Chapter 4 - Page 2
Practice Overview for Lesson 4
Practices Overview
Following the predeployment test plan, you now need to address the storage requirements of
the business applications. You need to configure multiple ZFS storage pools. In this case, your
organization is working with the Oracle CRM application. Then you need to create file systems
for storing business application data. For file system backup and recovery, you will create
snapshots and clones. Then you will need to explore ZFS property compression to minimize the
storage space.
The default file system for Oracle Solaris 11 is ZFS. ZFS is the root file system on Oracle
Solaris 11 that offers a superior experience in terms of manageability, scalability, and data
integrity. The key areas explored in this practice are:
• Managing data redundancy with a ZFS mirrored pool
• Using ZFS snapshots for backup and recovery
• Using a ZFS clone
• Configuring ZFS compression
• Troubleshooting ZFS failures
Note: Your command output displays may be different than the displays in the practice,
especially storage, process IDs, and other information.
Look at your checklist to see where you are.
√ Oracle Solaris 11.1 Predeployment Checklist
√ Managing the Image Packaging System (IPS) and Packages
√ Installing Oracle Solaris 11.1 on Multiple Hosts
Managing the Business Application Data
Configuring Network and Traffic Failover
Configuring Zones and the Virtual Network
Managing Services and Service Properties
Configuring Privileges and Role-Based Access Control
Securing System Resources by Using Oracle Solaris Auditing
Managing Processes and Priorities
Evaluating System Resources
Monitoring and Troubleshooting System Failures
Cicero Ronaldo (ciceroฺronaldo@gmailฺcom) has a non-transferable
license to use this Student Guideฺ
Unauthorized reproduction or distribution prohibitedฺ Copyright© 2014, Oracle and/or its affiliatesฺ

Copyright © 2013, Oracle and/or its affiliates. All rights reserved.
Practices for Lesson 4: Managing Business Application Data
Chapter 4 - Page 3
Practice 4-1: Managing Data Redundancy with a ZFS Mirrored Pool
Overview
In this practice, you test application data redundancy by using different scenarios. First you
create a ZFS mirrored pool that contains one mirror. To minimize the chances of losing data,
you distribute the data over two mirrors. At this time, to address a policy change, you
reconfigure the pool to keep three copies of data, which requires you to create a three-way
mirror.
Tasks
1. Verify that the Sol11-Server1 virtual machine is running. If it is not running, start it now.
2. Log in to the Sol11-Server1 virtual machine as the oracle user. Use the oracle1
password. Assume administrator privileges.
3. Execute the zpool list command to display the ZFS pools that are currently configured
in the system.
root@s11-server1:~# zpool list
NAME SIZE ALLOC FREE CAP DEDUP HEALTH ALTROOT
rpool 31.8G 9.90G 21.9G 31% 1.00x ONLINE -
Currently, the only ZFS pool that is available is the root pool, which is needed to make
the ZFS file system a root file system.
4. Use the zpool status command to determine the disks that are currently configured for
the ZFS rpool.
root@s11-server1:~# zpool status rpool
pool: rpool
state: ONLINE
scan: none requested
config:
NAME STATE READ WRITE CKSUM
rpool ONLINE 0 0 0
c7t0d0s0 ONLINE 0 0 0
errors: No known data errors
This display shows that rpool is using the local disk c7t0d0.
So while creating new pools, leave this disk untouched.
Cicero Ronaldo (ciceroฺronaldo@gmailฺcom) has a non-transferable
license to use this Student Guideฺ
Unauthorized reproduction or distribution prohibitedฺ Copyright© 2014, Oracle and/or its affiliatesฺ

Copyright © 2013, Oracle and/or its affiliates. All rights reserved.
Practices for Lesson 4: Managing Business Application Data
Chapter 4 - Page 4
5. Execute the format command to identify any additional disks configured in the system.
root@s11-server1:~# format
Searching for disks...done
AVAILABLE DISK SELECTIONS:
0. c7t0d0 <ATA-VBOX HARDDISK -1.0 cyl 4174 alt 2 hd 255 sec 63>
/pci@0,0/pci8086,2829@d/disk@0,0
1. c7t2d0 <ATA-VBOX HARDDISK -1.0 cyl 1022 alt 2 hd 64 sec 32>
/pci@0,0/pci8086,2829@d/disk@2,0
2. c7t3d0 <ATA-VBOX HARDDISK -1.0 cyl 1022 alt 2 hd 64 sec 32>
/pci@0,0/pci8086,2829@d/disk@3,0
3. c7t4d0 <ATA-VBOX HARDDISK -1.0 cyl 1022 alt 2 hd 64 sec 32>
/pci@0,0/pci8086,2829@d/disk@4,0
4. c7t5d0 <ATA-VBOX HARDDISK -1.0 cyl 1022 alt 2 hd 64 sec 32>
/pci@0,0/pci8086,2829@d/disk@5,0
5. c7t6d0 <ATA-VBOX HARDDISK -1.0 cyl 1022 alt 2 hd 64 sec 32>
/pci@0,0/pci8086,2829@d/disk@6,0
6. c7t7d0 <ATA-VBOX HARDDISK -1.0 cyl 1022 alt 2 hd 64 sec 32>
/pci@0,0/pci8086,2829@d/disk@7,0
7. c7t8d0 <ATA-VBOX HARDDISK -1.0 cyl 1022 alt 2 hd 64 sec 32>
/pci@0,0/pci8086,2829@d/disk@6,0
8. c7t9d0 <ATA-VBOX HARDDISK -1.0 cyl 1022 alt 2 hd 64 sec 32>
/pci@0,0/pci8086,2829@d/disk@7,0
^C
The display tells you that disks c7t2d0 to c7t9d0 are available for use.
To cancel the format command, press Ctrl + C or Ctrl + D.
6. Create a mirrored ZFS pool named oraclecrm by using the disks c7t2d0 and c7t3d0.
Show the results.
root@s11-server1:~# zpool create oraclecrm mirror c7t2d0 c7t3d0
root@s11-server1:~# zpool list
NAME SIZE ALLOC FREE CAP DEDUP HEALTH ALTROOT
oraclecrm 1008M 112K 1008M 0% 1.00x ONLINE -
rpool 31.8G 9.90G 21.9G 31% 1.00x ONLINE -
Here, you created a pool called oraclecrm with a mirror by using two free disks. The
purpose of this pool is to store the Oracle business application Customer Relationship
Management (CRM) components. Because your company required redundancy, you
have created a mirror, meaning that you have an online copy of the CRM data. This
online copy will come in handy in case one of the disks gets corrupted.
Cicero Ronaldo (ciceroฺronaldo@gmailฺcom) has a non-transferable
license to use this Student Guideฺ
Unauthorized reproduction or distribution prohibitedฺ Copyright© 2014, Oracle and/or its affiliatesฺ

Copyright © 2013, Oracle and/or its affiliates. All rights reserved.
Practices for Lesson 4: Managing Business Application Data
Chapter 4 - Page 5
7. Add another mirror in the oraclecrm pool by using disks c7t4d0 and c7t5d0.
root@s11-server1:~# zpool add oraclecrm mirror c7t4d0 c7t5d0
root@s11-server1:~# zpool status oraclecrm
pool: oraclecrm
state: ONLINE
scan: none requested
config:
NAME STATE READ WRITE CKSUM
oraclecrm ONLINE 0 0 0
mirror-0 ONLINE 0 0 0
c7t2d0 ONLINE - - -
c7t3d0 ONLINE - - -
mirror-1 ONLINE 0 0 0
c7t4d0 ONLINE - - -
c7t5d0 ONLINE - - -
errors: No known data errors
Your company is very concerned about losing data because of data or disk corruption.
You are asked to spread the data over multiple disks to mitigate the risk of data loss. To
satisfy this objective, you create another mirror by using two free disks. Now, the data is
distributed over the two mirrors and the respective disks. This means that 50% of the
data will be stored in the first mirror and 50% of the data in the second mirror. You will
see a demonstration subsequently.
8. Check the capacity of both the mirrors by issuing the zpool iostat -v oraclecrm
command.
root@s11-server1:~# zpool iostat -v oraclecrm
capacity operations bandwidth
pool alloc free read write read write
---------- ----- ----- ----- ----- ----- -----
oraclecrm 94K 1.97G 0 10 53 11.7K
mirror 71.5K 1008M 0 7 53 7.77K
c7t2d0 - - 0 7 5.18K 30.8K
c7t3d0 - - 0 7 5.13K 30.8K
mirror 33.5K 1.02G 0 7 0 9.31K
c7t4d0 - - 0 9 12.3K 65.8K
c7t5d0 - - 0 9 12.3K 65.8K
---------- ----- ----- ----- ----- ----- -----
Here you see the two mirrors listed with their details. Note that the total free space in the
pool, 1.97 GB, has been equally distributed between the two mirrors (1008 MB and 1.02
GB respectively). The alloc column shows the ZFS overhead.
Cicero Ronaldo (ciceroฺronaldo@gmailฺcom) has a non-transferable
license to use this Student Guideฺ
Unauthorized reproduction or distribution prohibitedฺ Copyright© 2014, Oracle and/or its affiliatesฺ

Copyright © 2013, Oracle and/or its affiliates. All rights reserved.
Practices for Lesson 4: Managing Business Application Data
Chapter 4 - Page 6
9. Determine the mount point of the top-level file system.
root@s11-server1:~# zfs list oraclecrm
NAME USED AVAIL REFER MOUNTPOINT
oraclecrm 94K 1.94G 31K /oraclecrm
The mount point of the pool or the top-level file system of oraclecrm is /oraclecrm.
This is the root of the pool; that is, all the file systems that are created will be within this
mount point.
10. Create a 2 MB file by using the mkfile command. Check the file storage allocation for the
mirrors by running the zpool iostat command.
root@s11-server1:~# mkfile 2m /oraclecrm/crmindex
root@s11-server1:~# zpool iostat -v oraclecrm
capacity operations bandwidth
pool alloc free read write read write
---------- ----- ----- ----- ----- ----- -----
oraclecrm 1.38M 1.97G 0 5 26 7.18K
mirror 856K 1007M 0 3 26 4.67K
c7t2d0 - - 0 3 2.51K 15.8K
c7t3d0 - - 0 3 2.49K 15.8K
mirror 558K 1007M 0 2 0 3.50K
c7t4d0 - - 0 2 3.47K 19.4K
c7t5d0 - - 0 2 3.47K 19.4K
---------- ----- ----- ----- ----- ----- -----
Note: Your display may show different numbers.
Your CRM analyst shared with you that a small file will be needed for storing the index of
the CRM application. You create a 2 MB file called crmindex in the pool.
Note how this 2 MB worth of storage has been roughly divided between the two mirrors.
This shows that all CRM data will be divided between the two mirrors.
Hint: In some cases, it may help to wait for some time before issuing the zpool
iostat command to allow ZFS to complete writing to the mirrors.
11. Use the zfs list oraclecrm command to list the capacity summary for the oraclecrm
pool.
root@s11-server1:~# zfs list oraclecrm
NAME USED AVAIL REFER MOUNTPOINT
oraclecrm 2.09M 1.94G 2.03M /oraclecrm
Note the space used now at the top-level file system. This reflects the 2 MB of storage
used by the crmindex file.
Cicero Ronaldo (ciceroฺronaldo@gmailฺcom) has a non-transferable
license to use this Student Guideฺ
Unauthorized reproduction or distribution prohibitedฺ Copyright© 2014, Oracle and/or its affiliatesฺ

Copyright © 2013, Oracle and/or its affiliates. All rights reserved.
Practices for Lesson 4: Managing Business Application Data
Chapter 4 - Page 7
12. Use the zpool destroy oraclecrm command to delete the pool. Confirm the deletion by
using the zpool list command.
root@s11-server1:~# zpool destroy oraclecrm
root@s11-server1:~# zpool list oraclecrm
cannot open 'oraclecrm': no such pool
Based on a review by the CRM analyst, there was a change in direction. It was agreed
that you keep three copies of data and not distribute it over two separate mirror sets.
To address this objective, you delete the current data redundancy configuration and
destroy the pool to create the new configuration.
13. Re-create the mirrored ZFS pool named oraclecrm by using the disks c7t2d0 and
c7t3d0. Show the results.
root@s11-server1:~# zpool create oraclecrm mirror c7t2d0 c7t3d0
root@s11-server1:~# zpool list
NAME SIZE ALLOC FREE CAP DEDUP HEALTH ALTROOT
oraclecrm 1008M 126K 1008M 0% 1.00x ONLINE -
rpool 31.8G 9.90G 21.9G 31% 1.00x ONLINE -
Note: The purpose of the reconfiguration is to create a three-way mirror now and reuse
the existing storage disks. This will also assist you in focusing on a cleaner setup, for
instance, having one mirror.
14. Use the zpool attach command to add another disk to the mirror to make it a three-way
mirror. Confirm this action by using the zpool status command.
root@s11-server1:~# zpool attach oraclecrm c7t2d0 c7t4d0
root@s11-server1:~# zpool status oraclecrm
pool: oraclecrm
state: ONLINE
scan: resilvered 86.5K in 0h0m with 0 errors on Mon Dec 12
07:51:21 2012
config:
NAME STATE READ WRITE CKSUM
oraclecrm ONLINE 0 0 0
mirror-0 ONLINE 0 0 0
c7t2d0 ONLINE - - -
c7t3d0 ONLINE - - -
c7t4d0 ONLINE - - -
errors: No known data errors
Cicero Ronaldo (ciceroฺronaldo@gmailฺcom) has a non-transferable
license to use this Student Guideฺ
Unauthorized reproduction or distribution prohibitedฺ Copyright© 2014, Oracle and/or its affiliatesฺ

Copyright © 2013, Oracle and/or its affiliates. All rights reserved.
Practices for Lesson 4: Managing Business Application Data
Chapter 4 - Page 8
Now this new configuration meets the objective of maintaining redundancy by keeping
three copies of data on three individual disks. The application data can be created as
shown earlier.
Notice that the attach command specifies an existing disk in the mirror and a free disk
to be included in the mirror. The result is displayed by the status command. The
status display also shows the resilvering action. The purpose of resilvering is to
replicate data on the newly added disk.
15. Use the zpool add command to add a cache device to the mirror to allow the cache
device to be used as local pool memory. Confirm this action by using the zpool status
command.
root@s11-server1:~# zpool add oraclecrm cache c7t5d0
root@s11-server1:~# zpool status oraclecrm
pool: oraclecrm
state: ONLINE
scan: resilvered 86.5K in 0h0m with 0 errors on Mon Dec 12
07:51:21 2012
config:
NAME STATE READ WRITE CKSUM
oraclecrm ONLINE 0 0 0
mirror-0 ONLINE 0 0 0
c7t2d0 ONLINE 0 0 0
c7t3d0 ONLINE 0 0 0
c7t4d0 ONLINE 0 0 0
cache
c7t5d0 ONLINE 0 0 0
errors: No known data errors
This added device will serve as local memory for the pool to boost the input/output
performance. Your business analyst had indicated that you may need to boost the I/O
performance of the pool.
Cicero Ronaldo (ciceroฺronaldo@gmailฺcom) has a non-transferable
license to use this Student Guideฺ
Unauthorized reproduction or distribution prohibitedฺ Copyright© 2014, Oracle and/or its affiliatesฺ

Copyright © 2013, Oracle and/or its affiliates. All rights reserved.
Practices for Lesson 4: Managing Business Application Data
Chapter 4 - Page 9
16. Your business analyst has now indicated that you do not need to boost pool performance
because of the low volume of data. Use the zpool remove command to delete the cache
device. Confirm this action by using the zpool status command.
root@s11-server1:~# zpool remove oraclecrm c7t5d0
root@s11-server1:~# zpool status oraclecrm
pool: oraclecrm
state: ONLINE
scan: resilvered 86.5K in 0h0m with 0 errors on Mon Dec 12
07:51:21 2012
config:
NAME STATE READ WRITE CKSUM
oraclecrm ONLINE 0 0 0
mirror-0 ONLINE 0 0 0
c7t2d0 ONLINE 0 0 0
c7t3d0 ONLINE 0 0 0
c7t4d0 ONLINE 0 0 0
errors: No known data errors
Note that the cache device does not appear in the display.
17. Use the zpool destroy command to delete the pool. Use the zpool list command to
confirm the deletion.
root@s11-server1:~# zpool list
NAME SIZE ALLOC FREE CAP DEDUP HEALTH ALTROOT
oraclecrm 1008M 126K 1008M 0% 1.00x ONLINE -
rpool 31.8G 9.90G 21.9G 31% 1.00x ONLINE -
root@s11-server1:~# zpool destroy oraclecrm
root@s11-server1:~# zpool list
NAME SIZE ALLOC FREE CAP DEDUP HEALTH ALTROOT
rpool 31.8G 9.90G 21.9G 31% 1.00x ONLINE -
The purpose of destroying this pool is to conclude working with the mirrors. In the next
practice, you will create a new pool with no mirrors to simplify working with ZFS backup
and recovery functions. In addition, you will create a pool with no mirrors.
Cicero Ronaldo (ciceroฺronaldo@gmailฺcom) has a non-transferable
license to use this Student Guideฺ
Unauthorized reproduction or distribution prohibitedฺ Copyright© 2014, Oracle and/or its affiliatesฺ

Copyright © 2013, Oracle and/or its affiliates. All rights reserved.
Practices for Lesson 4: Managing Business Application Data
Chapter 4 - Page 10
Practice 4-2: Using ZFS Snapshots for Backup and Recovery
Overview
According to your predeployment test plan, in this practice, you evaluate the data backup and
recovery mechanism in Oracle Solaris 11.1. For backing up the data, you create snapshots, as
well as use ZFS send/receive commands. The send/receive commands can be used to save the
backed up data (snapshots) on the local or remote machine. You use rollback commands to
recover the backed up or lost data.
Tasks
1. Verify that Sol11-Server1 virtual machine is running. If the virtual machine is not running,
start it now.
2. Log in to the Sol11-Server1 virtual machine as the oracle user. Use oracle1 as the
password. Assume administrator privileges.
3. Execute the zpool list command to display the ZFS pools that are currently configured
in the system.
root@s11-server1:~# zpool list
NAME SIZE ALLOC FREE CAP DEDUP HEALTH ALTROOT
rpool 31.8G 9.90G 21.9G 31% 1.00x ONLINE -
4. Run the zpool create command to create a pool with two top-level virtual devices. Check
the pool information by using zpool list and zpool status.
root@s11-server1:~# zpool create oraclecrm c7t3d0 c7t4d0
'oraclecrm' successfully created, but with no redundancy; failure
of one device will cause loss of the pool
root@s11-server1:~# zpool list
NAME SIZE ALLOC FREE CAP DEDUP HEALTH ALTROOT
oraclecrm 1.97G 123K 1.97G 0% 1.00x ONLINE -
rpool 31.8G 9.90G 21.9G 31% 1.00x ONLINE -
You now create a fresh pool by using two disks. This will give you experience in creating
a simple pool without any mirror. Because your configuration is simple, your displays will
be clean and easy to follow.
Confirm that the new pool has been created.
root@s11-server1:~# zpool status oraclecrm
pool: oraclecrm
state: ONLINE
scan: none requested
config:
NAME STATE READ WRITE CKSUM
oraclecrm ONLINE 0 0 0
c7t3d0 ONLINE 0 0 0
c7t4d0 ONLINE 0 0 0
errors: No known data errors
Cicero Ronaldo (ciceroฺronaldo@gmailฺcom) has a non-transferable
license to use this Student Guideฺ
Unauthorized reproduction or distribution prohibitedฺ Copyright© 2014, Oracle and/or its affiliatesฺ

Copyright © 2013, Oracle and/or its affiliates. All rights reserved.
Practices for Lesson 4: Managing Business Application Data
Chapter 4 - Page 11
5. Create a file system named oraclecrm/crmdata with a mount point of /crmdata.
Check the file system creation and the mount point by running the zfs list command.
root@s11-server1:~# zfs create -o mountpoint=/crmdata \
oraclecrm/crmdata
root@s11-server1:~# zfs list -r oraclecrm
NAME USED AVAIL REFER MOUNTPOINT
oraclecrm 137K 1.94G 31K /oraclecrm
oraclecrm/crmdata 31K 1.94G 31K /crmdata
You create a file system called crmdata in the oraclecrm pool. In this file system, you
plan to store data in various CRM applications, such as Order Management, Marketing,
and Customers.
Note that the mount point was specified to be /crmdata for oraclecrm/crmdata to
be able to access the crmdata file system directly.
6. Create new ZFS file systems named oraclecrm/crmdata/cust,
oraclecrm/crmdata/mktg, and oraclecrm/crmdata/om. List the descendants of the
oraclecrm file system.
root@s11-server1:~# zfs create oraclecrm/crmdata/cust
root@s11-server1:~# zfs create oraclecrm/crmdata/mktg
root@s11-server1:~# zfs create oraclecrm/crmdata/om
root@s11-server1:~# zfs list -r oraclecrm
NAME USED AVAIL REFER MOUNTPOINT
oraclecrm 252K 1.94G 31K /oraclecrm
oraclecrm/crmdata 127K 1.94G 34K /crmdata
oraclecrm/crmdata/cust 31K 1.94G 31K /crmdata/cust
oraclecrm/crmdata/mktg 31K 1.94G 31K /crmdata/mktg
oraclecrm/crmdata/om 31K 1.94G 31K /crmdata/om
Note: These file systems are created to demonstrate individual file systems for each
business application, as you will experience on the job.
Here, you create file systems to store data for the CRM application. The file systems are
cust, mktg, and om. Note the used column and the refer column for the new file
systems. The file systems are consuming an initial storage space of 31 KB.
Cicero Ronaldo (ciceroฺronaldo@gmailฺcom) has a non-transferable
license to use this Student Guideฺ
Unauthorized reproduction or distribution prohibitedฺ Copyright© 2014, Oracle and/or its affiliatesฺ

Copyright © 2013, Oracle and/or its affiliates. All rights reserved.
Practices for Lesson 4: Managing Business Application Data
Chapter 4 - Page 12
7. Using the tar command, create a tar bundle that will serve as an example of the business
application data. Copy custarchive.tar to each crmdata file system and the
/opt/ora/data directory for future use. Note the amount of data used and referenced by
these file systems.
root@s11-server1:~# tar cvf /crmdata/cust/custarchive.tar \
/usr/demo
...
a /usr/demo/expect/ 0K
a /usr/demo/expect/mkpasswd 6K
a /usr/demo/expect/ftp-rfc 1K
a /usr/demo/expect/rftp 9K
a /usr/demo/expect/weather 3K
…
…
…
root@s11-server1:~# cp /crmdata/cust/custarchive.tar \
/crmdata/mktg/custarchive.tar
root@s11-server1:~# cp /crmdata/cust/custarchive.tar \
/crmdata/om/custarchive.tar
You are saving the data in /opt/ora/data so that it will be available to you in the
subsequent steps.
root@s11-server1:~# cp /crmdata/cust/custarchive.tar \
/opt/ora/data/custarchive.tar
For training purposes, you are creating application data and placing it in the crmdata
file systems.
root@s11-server1:~# zfs list -r oraclecrm
NAME USED AVAIL REFER MOUNTPOINT
oraclecrm 2.88M 1.93G 31K /oraclecrm
oraclecrm/crmdata 2.75M 1.93G 35K /crmdata
oraclecrm/crmdata/cust 929K 1.93G 929K /crmdata/cust
oraclecrm/crmdata/mktg 929K 1.93G 929K /crmdata/mktg
oraclecrm/crmdata/om 929K 1.93G 929K /crmdata/om
After placing application data in each file system, you see that all the file systems
indicate 929 KB worth of storage. Your numbers may be different.
8. Create a recursive snapshot of oraclecrm/crmdata named
oraclecrm/crmdata@monday. List the file systems below oraclecrm. Note the amount
of space used and referenced by oraclecrm/crmdata@monday.
Cicero Ronaldo (ciceroฺronaldo@gmailฺcom) has a non-transferable
license to use this Student Guideฺ
Unauthorized reproduction or distribution prohibitedฺ Copyright© 2014, Oracle and/or its affiliatesฺ

Copyright © 2013, Oracle and/or its affiliates. All rights reserved.
Practices for Lesson 4: Managing Business Application Data
Chapter 4 - Page 13
root@s11-server1:~# zfs snapshot -r oraclecrm/crmdata@monday
Recursively create snapshots of every file system in crmdata. The purpose is to create
a backup of each file system—that is, cust, mktg, and om data.
root@s11-server1:~# zfs list -r oraclecrm
NAME USED AVAIL REFER MOUNTPOINT
oraclecrm 3.06M 1.93G 31K /oraclecrm
oraclecrm/crmdata 2.75M 1.93G 34K /crmdata
oraclecrm/crmdata/cust 929K 1.93G 929K /crmdata/cust
oraclecrm/crmdata/mktg 929K 1.93G 929K /crmdata/mktg
oraclecrm/crmdata/om 929K 1.93G 929K /crmdata/om
Now, when you try to display the children file systems of oraclecrm recursively, the
snapshots are not displayed. Take a look at this.
root@s11-server1:~# zpool get listsnapshots oraclecrm
NAME PROPERTY VALUE SOURCE
oraclecrm listsnapshots off default
As displayed here, the listsnapshots property is off by default. You now enable it.
root@s11-server1:~# zpool set listsnapshots=on oraclecrm
Now, when you display the descendant file systems of oraclecrm, they are displayed.
Note that there is one snapshot for each file system and they are all suffixed with @monday.
As you can see, this is a very easy way to create multiple data backups and identify all of
them with the same identifier.
root@s11-server1:~# zfs list -r oraclecrm
NAME USED AVAIL REFER MOUNTPOINT
oraclecrm 2.90M 1.93G 31K /oraclecrm
oraclecrm/crmdata 2.75M 1.93G 35K /crmdata
oraclecrm/crmdata@monday 0 - 35K -
oraclecrm/crmdata/cust 929K 1.93G 929K /crmdata/cust
oraclecrm/crmdata/cust@monday 0 - 929K -
oraclecrm/crmdata/mktg 929K 1.93G 929K /crmdata/mktg
oraclecrm/crmdata/mktg@monday 0 - 929K -
oraclecrm/crmdata/om 929K 1.93G 929K /crmdata/om
oraclecrm/crmdata/om@monday 0 - 929K -
Note that the newly created snapshots do not use any space (initially) but they do
indicate 929 KB worth of storage, which includes the data that you placed in each file
system. The snapshots initially do not take up any space because they are using the
existing file system data pointers.
Cicero Ronaldo (ciceroฺronaldo@gmailฺcom) has a non-transferable
license to use this Student Guideฺ
Unauthorized reproduction or distribution prohibitedฺ Copyright© 2014, Oracle and/or its affiliatesฺ

Copyright © 2013, Oracle and/or its affiliates. All rights reserved.
Practices for Lesson 4: Managing Business Application Data
Chapter 4 - Page 14
9. Create a file named /crmdata/cust/colochoc. Confirm that the file exists.
root@s11-server1:~# touch /crmdata/cust/colochoc
You create a file to store data on a customer colochoc (for Colorado Chocolate
Company).
root@s11-server1:~# ls /crmdata/cust/colochoc
/crmdata/cust/colochoc
Success! You confirmed that it exists. Note that this file was created after taking a
backup on Monday.
10. Create another recursive snapshot named oraclecrm/crmdata@tuesday.
root@s11-server1:~# zfs snapshot -r oraclecrm/crmdata@tuesday
Note that the colochoc file will be included in the Tuesday snapshot but not in the
Monday snapshot.
11. Attempt to roll back the oraclecrm/crmdata snapshot by using the
oraclecrm/crmdata@Monday snapshot. What happens?
root@s11-server1:~# zfs rollback oraclecrm/crmdata@monday
cannot rollback to 'oraclecrm/crmdata@monday': more recent
snapshots exist
use '-r' to force deletion of the following snapshots:
oraclecrm/crmdata@tuesday
Notice that more recent snapshots (crmdata@tuesday) exist; therefore, you cannot roll
back to an earlier snapshot unless you use the -r option that deletes the more recent
snapshots till the crmdata@monday snapshot becomes the most recent. Do not roll
back yet.
Question: If the oraclecrm/crmdata snapshot is rolled back to the Monday
snapshot, what data will be lost?
Answer: The file named /crmdata/cust/colochoc will be lost.
12. Delete the file named /crmdata/cust/colochoc.
root@s11-server1:~# rm /crmdata/cust/colochoc
Remove the customer colochoc to see if you can recover it.
13. List the descendant oraclecrm file systems. Roll back the
oraclecrm/crmdata/cust@tuesday snapshot.
root@s11-server1:~# zfs list -r oraclecrm
NAME USED AVAIL REFER MOUNTPOINT
oraclecrm 2.94M 1.93G 31K /oraclecrm
oraclecrm/crmdata 2.77M 1.93G 34K /crmdata
oraclecrm/crmdata@monday 0 - 34K -
oraclecrm/crmdata@tuesday 0 - 34K -
Cicero Ronaldo (ciceroฺronaldo@gmailฺcom) has a non-transferable
license to use this Student Guideฺ
Unauthorized reproduction or distribution prohibitedฺ Copyright© 2014, Oracle and/or its affiliatesฺ

Copyright © 2013, Oracle and/or its affiliates. All rights reserved.
Practices for Lesson 4: Managing Business Application Data
Chapter 4 - Page 15
oraclecrm/crmdata/cust 948K 1.93G 929K
/crmdata/cust
oraclecrm/crmdata/cust@monday 19K - 929K -
oraclecrm/crmdata/cust@tuesday 0 - 929K -
oraclecrm/crmdata/mktg 929K 1.93G 929K /crmdata/mktg
oraclecrm/crmdata/mktg@monday 0 - 929K -
oraclecrm/crmdata/mktg@tuesday 0 - 929K -
oraclecrm/crmdata/om 929K 1.93G 929K /crmdata/om
oraclecrm/crmdata/om@monday 0 - 929K -
oraclecrm/crmdata/om@tuesday 0 - 929K -
root@s11-server1:~# zfs rollback oraclecrm/crmdata/cust@tuesday
You rolled back (recovered) to the cust@tuesday backup. Does it include the
colochoc customer file? You will find out in the next step.
14. Confirm that /crmdata/cust/colochoc is restored.
root@s11-server1:~# ls /crmdata/cust/colochoc
/crmdata/cust/colochoc
Yes, your customer colochoc is restored. Because the Tuesday backup was taken
after you created this customer, it was in your cust@tuesday backup.
15. Create a directory named /backup.
root@s11-server1:~# mkdir /backup
Create a separate directory to store your Monday backups. Your company wants to save
these backups offsite because this is the end of the quarter for your company.
16. Use the zfs send command to recursively send the oraclecrm/crmdata@monday
snapshot. Save the copy in a file named /backup/oraclecrm.crmdata.monday.
root@s11-server1:~# zfs send -Rv oraclecrm/crmdata@monday > \
/backup/oraclecrm.crmdata.monday
sending from @ to oraclecrm/crmdata@monday
sending from @ to oraclecrm/crmdata/om@monday
sending from @ to oraclecrm/crmdata/mktg@monday
sending from @ to oraclecrm/crmdata/cust@monday
Now you have only one /backup directory, which contains all the Monday backups.
This directory can be archived on tape or sent to another machine on the network. See
how simple the command is. Use -R to send all the snapshots in crmdata@monday.
The backed up snapshot naming convention has changed slightly to enable
differentiation between the snapshots and the backed up data.
Cicero Ronaldo (ciceroฺronaldo@gmailฺcom) has a non-transferable
license to use this Student Guideฺ
Unauthorized reproduction or distribution prohibitedฺ Copyright© 2014, Oracle and/or its affiliatesฺ

Copyright © 2013, Oracle and/or its affiliates. All rights reserved.
Practices for Lesson 4: Managing Business Application Data
Chapter 4 - Page 16
17. Use the ls -lh command to list the size of the file in /backup. Verify that it approximately
matches the size of the space used by the oraclecrm/crmdata file systems.
root@s11-server1:~# ls -lh /backup
total 1
-rw-r--r-- 1 root root 2.8M Dec 12 08:07
oraclecrm.crmdata.monday
root@s11-server1:~# zfs list /crmdata
NAME USED AVAIL REFER MOUNTPOINT
oraclecrm/crmdata 2.77M 1.93G 34K /crmdata
Yes. It does match approximately.
18. Use the zfs send command to send the oraclecrm/crmdata/cust@monday snapshot
to the /backup directory. Then list the size of the snapshot stream.
root@s11-server1:~# zfs send oraclecrm/crmdata/cust@monday > \
/backup/oraclecrm.crmdata.cust.monday
root@s11-server1:~# ls -lh /backup/oraclecrm.crmdata.cust.monday
-rw-r--r-- 1 root root 946K Oct 15 08:08
/backup/oraclecrm.crmdata.cust.monday
root@s11-server1:~# zfs list -r oraclecrm
NAME USED AVAIL REFER MOUNTPOINT
oraclecrm 2.97M 1.93G 31K /oraclecrm
oraclecrm/crmdata 2.77M 1.93G 34K /crmdata
oraclecrm/crmdata@monday 0 - 34K -
oraclecrm/crmdata@tuesday 0 - 34K -
oraclecrm/crmdata/cust 929K 1.93G 929K
/crmdata/cust
oraclecrm/crmdata/cust@monday 19K - 929K -
oraclecrm/crmdata/cust@tuesday 1K - 929K -
oraclecrm/crmdata/mktg 929K 1.93G 929K
/crmdata/mktg
oraclecrm/crmdata/mktg@monday 0 - 929K -
oraclecrm/crmdata/mktg@tuesday 0 - 929K -
oraclecrm/crmdata/om 929K 1.93G 929K /crmdata/om
oraclecrm/crmdata/om@monday 0 - 929K -
oraclecrm/crmdata/om@tuesday 0 - 929K -
As you can see, the Monday snapshot for the cust file system and its Monday backup
file consume approximately the same amount of storage space.
Cicero Ronaldo (ciceroฺronaldo@gmailฺcom) has a non-transferable
license to use this Student Guideฺ
Unauthorized reproduction or distribution prohibitedฺ Copyright© 2014, Oracle and/or its affiliatesฺ

Copyright © 2013, Oracle and/or its affiliates. All rights reserved.
Practices for Lesson 4: Managing Business Application Data
Chapter 4 - Page 17
19. Destroy the oraclecrm/crmdata/cust file system. Confirm whether it is deleted.
root@s11-server1:~# zfs destroy -r oraclecrm/crmdata/cust
root@s11-server1:~# zfs list /crmdata/cust
/crmdata/cust: No such file or directory
You are destroying the cust file system so that you can test the recover (receive)
function.
20. Use the zfs receive command to re-create the oraclecrm/crmdata/cust file
system. Confirm the file system recovery by using the zfs list command.
root@s11-server1:~# zfs receive oraclecrm/crmdata/cust < \
/backup/oraclecrm.crmdata.cust.monday
root@s11-server1:~# zfs list /crmdata/cust
NAME USED AVAIL REFER MOUNTPOINT
oraclecrm/crmdata/cust 929K 1.93G 929K /crmdata/cust
This demonstrates that the recovery was successful.
21. Use the zfs list command to confirm the recovery of the full /crmdata/cust file
system.
root@s11-server1:~# zfs list -r oraclecrm
NAME USED AVAIL REFER MOUNTPOINT
oraclecrm 2.96M 1.93G 31K /oraclecrm
oraclecrm/crmdata 2.78M 1.93G 35K /crmdata
oraclecrm/crmdata@monday 0 - 34K -
oraclecrm/crmdata@tuesday 0 - 34K -
oraclecrm/crmdata/cust 929K 1.93G 929K /crmdata/cust
oraclecrm/crmdata/cust@monday 0 - 929K -
oraclecrm/crmdata/mktg 929K 1.93G 929K /crmdata/mktg
oraclecrm/crmdata/mktg@monday 0 - 929K -
oraclecrm/crmdata/mktg@tuesday 0 - 929K -
oraclecrm/crmdata/om 929K 1.93G 929K /crmdata/om
oraclecrm/crmdata/om@monday 0 - 929K -
oraclecrm/crmdata/om@tuesday 0 - 929K -
This concludes the backup and recovery exercise. Keep the pool and destroy crmdata
and its descendant file systems. You will create new file systems in the next practice.
Confirm whether it has been destroyed.
root@s11-server1:~# zfs destroy -R oraclecrm/crmdata
Cicero Ronaldo (ciceroฺronaldo@gmailฺcom) has a non-transferable
license to use this Student Guideฺ
Unauthorized reproduction or distribution prohibitedฺ Copyright© 2014, Oracle and/or its affiliatesฺ

Copyright © 2013, Oracle and/or its affiliates. All rights reserved.
Practices for Lesson 4: Managing Business Application Data
Chapter 4 - Page 18
Practice 4-3: Using a ZFS Clone
Overview
According to your predeployment test plan, in this practice, you continue to evaluate the data
backup and recovery mechanism in Oracle Solaris 11.1. In Practice 4-2, you worked with the
snapshots. In this practice, you work with the ZFS clone functionality. You have a test file
system called crmdata and you want to modify it, but you want to keep a version of the
unmodified file system.
Tasks
1. Verify that the Sol11-Server1 virtual machine is running. If the virtual machine is not
running, start it now.
2. Log in to the Sol11-Server1 virtual machine as the oracle user. Use oracle1 as the
password. Assume administrator privileges.
3. Execute the zfs list command to display the ZFS file systems that are currently
configured in the oraclecrm pool. Create the crmdata file system by using the zfs
create command.
root@s11-server1:~# zfs list -r oraclecrm
NAME USED AVAIL REFER MOUNTPOINT
oraclecrm 116K 2.01G 31K /oraclecrm
root@s11-server1:~# zfs create oraclecrm/crmdata
root@s11-server1:~# zfs list -r oraclecrm
NAME USED AVAIL REFER MOUNTPOINT
oraclecrm 158K 1.94G 32K /oraclecrm
oraclecrm/crmdata 31K 1.94G 31K /oraclecrm/crmdata
4. Create a snapshot of the crmdata file system. Display the results.
Check whether the listsnapshots property is enabled so that the snapshots can be
displayed.
root@s11-server1:~# zpool get listsnapshots oraclecrm
NAME PROPERTY VALUE SOURCE
oraclecrm listsnapshots on local
root@s11-server1:~# zfs snapshot oraclecrm/crmdata@Dec11
root@s11-server1:~# zfs list -r /oraclecrm
NAME USED AVAIL REFER MOUNTPOINT
oraclecrm 159K 1.94G 32K /oraclecrm
oraclecrm/crmdata 31K 1.94G 31K /oraclecrm/crmdata
oraclecrm/crmdata@Dec11 0 - 31K -
Cicero Ronaldo (ciceroฺronaldo@gmailฺcom) has a non-transferable
license to use this Student Guideฺ
Unauthorized reproduction or distribution prohibitedฺ Copyright© 2014, Oracle and/or its affiliatesฺ

Copyright © 2013, Oracle and/or its affiliates. All rights reserved.
Practices for Lesson 4: Managing Business Application Data
Chapter 4 - Page 19
5. Create a clone of the snapshot and confirm the creation.
root@s11-server1:~# zfs clone oraclecrm/crmdata@Dec11 \
oraclecrm/crmdata2
root@s11-server1:~# zfs list -r /oraclecrm
NAME USED AVAIL REFER MOUNTPOINT
oraclecrm 202K 1.94G 33K /oraclecrm
oraclecrm/crmdata 31K 1.94G 31K /oraclecrm/crmdata
oraclecrm/crmdata@Dec11 0 - 31K -
oraclecrm/crmdata2 18K 1.94G 31K /oraclecrm/crmdata2
Note that the snapshot is not mounted and the clone is. Remember from the previous
exercise that the snapshots (and clones for that matter) do not take up any storage
initially. Identify the snapshot and the clone in this display.
6. Compare the attributes of the snapshot and the clone.
root@s11-server1:~# ls -ld /oraclecrm/crmdata2
drwxr-xr-x 2 root root 2 Dec 13 08:14
/oraclecrm/crmdata2
root@s11-server1:~# ls -ld /oraclecrm/crmdata@Dec11
/oraclecrm/crmdata@Dec11: No such file or directory
root@s11-server1:~# cd /oraclecrm/crmdata2
root@s11-server1:/oraclecrm/crmdata2# touch newcust
root@s11-server1:/oraclecrm/crmdata2# ls
newcust
The preceding commands demonstrate the major difference between the snapshot and
the clone. The snapshot is not available and the clone is available, as well as modifiable.
7. Assuming that you have made the modifications in the clone, look at the space usage of the
clone.
root@s11-server1:/oraclecrm/crmdata2# cd
root@s11-server1:~# zfs list -r /oraclecrm
NAME USED AVAIL REFER MOUNTPOINT
oraclecrm 203K 1.94G 33K /oraclecrm
oraclecrm/crmdata 31K 1.94G 31K /oraclecrm/crmdata
oraclecrm/crmdata@Dec11 0 - 31K -
oraclecrm/crmdata2 19K 1.94G 31K /oraclecrm/crmdata2
Note the used column for the clone. The space utilization has gone up when compared
to the same column in step 5. Because you created a file in the clone, it will use more
storage to keep track of the new file.
Cicero Ronaldo (ciceroฺronaldo@gmailฺcom) has a non-transferable
license to use this Student Guideฺ
Unauthorized reproduction or distribution prohibitedฺ Copyright© 2014, Oracle and/or its affiliatesฺ

Copyright © 2013, Oracle and/or its affiliates. All rights reserved.
Practices for Lesson 4: Managing Business Application Data
Chapter 4 - Page 20
8. Now, you can proceed with replacing the main file system with the newly modified clone.
root@s11-server1:~# zfs promote oraclecrm/crmdata2
root@s11-server1:~# zfs list -r /oraclecrm
NAME USED AVAIL REFER MOUNTPOINT
oraclecrm 206K 1.94G 33K /oraclecrm
oraclecrm/crmdata 0 1.94G 31K /oraclecrm/crmdata
oraclecrm/crmdata2 50K 1.94G 31K /oraclecrm/crmdata2
oraclecrm/crmdata2@Dec11 19K - 31K -
If you do the math, the used space of the clone crmdata2 now reflects the total of the
main file system crmdata and the clone, that is, 31 KB + 19 KB = 50 KB. This means
that the new file newcust in the clone has been added to crmdata.
9. Rename the main file system as crmdatabackup and rename the clone to replace the
main file system. Display the results.
root@s11-server1:~# zfs rename oraclecrm/crmdata \
oraclecrm/crmdatabackup
root@s11-server1:~# zfs rename oraclecrm/crmdata2 oraclecrm/crmdata
root@s11-server1:~# zfs list -r oraclecrm
NAME USED AVAIL REFER MOUNTPOINT
oraclecrm 374K 1.94G 33K /oraclecrm
oraclecrm/crmdata 50K 1.94G 31K /oraclecrm/crmdata
oraclecrm/crmdata@Dec11 19K - 31K -
oraclecrm/crmdatabackup 0 1.94G 31K /oraclecrm/crmdatabackup
Now you have the datasets that reflect the modified picture. If you need to go back to the
previous version of crmdata, it is saved as crmdatabackup.
This method is useful when you want to maintain the previous version of the data or
overlay the production file system with modified data.
10. Destroy oraclecrm by using the zpool destroy command. Confirm the action.
root@s11-server1:~# zpool destroy oraclecrm
root@s11-server1:~# zpool list
NAME SIZE ALLOC FREE CAP DEDUP HEALTH ALTROOT
rpool 31.8G 9.90G 21.8G 31% 1.00x ONLINE -
You will start afresh in the next practice.
Cicero Ronaldo (ciceroฺronaldo@gmailฺcom) has a non-transferable
license to use this Student Guideฺ
Unauthorized reproduction or distribution prohibitedฺ Copyright© 2014, Oracle and/or its affiliatesฺ

Copyright © 2013, Oracle and/or its affiliates. All rights reserved.
Practices for Lesson 4: Managing Business Application Data
Chapter 4 - Page 21
Practice 4-4: Configuring ZFS Properties
Overview
According to your predeployment test plan, in this practice, you check to see how share, quotas,
and reservation and data compression techniques work in Oracle Solaris 11.1.
While working with the quota and reservation properties, you create a new user, make the home
directory a ZFS file system, and set the properties on the user’s file system.
Task 1: Configuring Quota and Reservation Properties
1. Verify that the Sol11-Server1 virtual machine is running. If it is not running, start it now.
2. Log in to the Sol11-Server1 virtual machine as the oracle user. Use oracle1 as the
password. Assume primary administrator privileges.
3. Run the zpool list command to check the pools available. Use zfs list to display the
file systems available.
root@s11-server1:~# zpool list
NAME SIZE ALLOC FREE CAP DEDUP HEALTH ALTROOT
rpool 31.8G 9.90G 21.8G 31% 1.00x ONLINE -
root@s11-server1:~# zfs list
NAME USED AVAIL REFER MOUNTPOINT
rpool 9.97G 21.3G 39K /rpool
rpool/ROOT 1.89G 21.3G 31K legacy
rpool/ROOT/solaris 1.89G 21.3G 1.61G /
rpool/ROOT/solaris/var 232M 21.3G 87.3M /var
rpool/dump 1.03G 21.3G 1.00G -
rpool/export 6.01G 21.3G 33K /export
rpool/export/IPS 5.74G 21.3G 5.74G /export/IPS
rpool/export/home 211K 21.3G 37K /export/home
rpool/swap 1.03G 21.3G 1.00G -
Note that the /export/home file system is designed to store the file systems that
become the home directories for users.
4. Now you can create the new user gail and use the ZFS file system as Gail’s home
directory.
root@s11-server1:~# useradd -u 60015 -g 10 -d /export/home/gail \
-m gail
80 blocks
root@s11-server1:~# ls -ld /export/home/gail
drwxr-xr-x 2 gail staff 7 Dec 13 08:22
/export/home/gail
5. Set a storage quota of 2 MB for Gail.
root@s11-server1:~# zfs set quota=2M rpool/export/home/gail
root@s11-server1:~# zfs get quota rpool/export/home/gail
NAME PROPERTY VALUE SOURCE
Cicero Ronaldo (ciceroฺronaldo@gmailฺcom) has a non-transferable
license to use this Student Guideฺ
Unauthorized reproduction or distribution prohibitedฺ Copyright© 2014, Oracle and/or its affiliatesฺ

Copyright © 2013, Oracle and/or its affiliates. All rights reserved.
Practices for Lesson 4: Managing Business Application Data
Chapter 4 - Page 22
rpool/export/home/gail quota 2M local
root@s11-server1:~# zfs list /export/home/gail
NAME USED AVAIL REFER MOUNTPOINT
rpool/export/home/gail 35K 1.97M 35K /export/home/gail
root@s11-server1:~# df -h /export/home/gail
Filesystem Size Used Available Capacity Mounted on
rpool/export/home/gail
2.0M 35K 2.0M 2% /export/home/gail
Note the available space for Gail as displayed by multiple commands.
6. Switch to Gail’s account and create a few files to test the storage limit.
root@s11-server1:~# su - gail
Oracle Corporation SunOS 5.11 11.1 November 2012
gail@s11-server1:~$ mkfile 1m /export/home/gail/crmindex
gail@s11-server1:~$ ls -l /export/home/gail/crmindex
-rw------- 1 gail staff 1048576 Dec 13 08:24
/export/home/gail/crmindex
You needed to create a 1-MB file to store the CRM index information. Because Gail is
within her storage quota, there are no issues.
7. Create more files in Gail’s account to test the storage limit.
gail@s11-server1:~$ mkfile 2m /export/home/gail/crmdoc
/export/home/gail/crmdoc: initialized 917504 of 2097152 bytes:
Disc quota exceeded
Here you have only 1 MB left in the quota. The system allocated the requested amount
but initialized only enough storage to meet the quota. It could spell potential problems if
you use up all the allocated space.
gail@s11-server1:~$ ls -l /export/home/gail
total 4112
-rw------- 1 gail staff 2097152 Dec 13 08:24 crmdoc
-rw------- 1 gail staff 1048576 Dec 13 08:24 crmindex
-rw-r--r-- 1 gail staff 165 Dec 13 08:22 local.cshrc
-rw-r--r-- 1 gail staff 170 Dec 13 08:22 local.login
-rw-r--r-- 1 gail staff 130 Dec 13 08:22
local.profile
gail@s11-server1:~$ mkfile 2m /export/home/gail/crmreq
Could not open /export/home/gail/crmreq: Disc quota exceeded
This is as expected.
gail@s11-server1:~$ ls -l /export/home/gail
total 4112
Cicero Ronaldo (ciceroฺronaldo@gmailฺcom) has a non-transferable
license to use this Student Guideฺ
Unauthorized reproduction or distribution prohibitedฺ Copyright© 2014, Oracle and/or its affiliatesฺ

Copyright © 2013, Oracle and/or its affiliates. All rights reserved.
Practices for Lesson 4: Managing Business Application Data
Chapter 4 - Page 23
-rw------- 1 gail staff 2097152 Dec 13 08:24 crmdoc
-rw------- 1 gail staff 1048576 Dec 13 08:24 crmindex
-rw-r--r-- 1 gail staff 165 Dec 13 08:22 local.cshrc
-rw-r--r-- 1 gail staff 170 Dec 13 08:22 local.login
-rw-r--r-- 1 gail staff 130 Dec 13 08:22
local.profile
8. Gail is now working on a different project and needs to reserve 10 MB of storage. So now,
as the administrator, you want to make a storage reservation for Gail.
gail@s11-server1:~$ exit
logout
root@s11-server1:~# zfs set reservation=10M \
rpool/export/home/gail
cannot set property for 'rpool/export/home/gail': size is greater
than available space
From the preceding steps, you know that Gail’s available space has been used up and
the quota limit is still in force; therefore, you cannot make the storage reservation.
9. Remove the quota and the data files, and check the space utilization of the file systems.
root@s11-server1:~# zfs set quota=none rpool/export/home/gail
This will clear the quota property. Gail can create datasets of any size that are not to
exceed the total pool storage available.
root@s11-server1:~# zfs get quota rpool/export/home/gail
NAME PROPERTY VALUE SOURCE
rpool/export/home/gail quota none local
root@s11-server1:~# rm /export/home/gail/*
root@s11-server1:~# zfs list /export/home/gail
NAME USED AVAIL REFER MOUNTPOINT
rpool/export/home/gail 2.04M 21.3G 2.04M /export/home/gail
The used column shows the current space usage since the files were deleted.
root@s11-server1:~# zfs list /export/home
NAME USED AVAIL REFER MOUNTPOINT
rpool/export/home 246K 21.3G 38K /export/home
Note that the used column currently shows 246 KB of storage used.
10. Reserve 10 MB of storage for Gail.
root@s11-server1:~# zfs set reservation=10M \
rpool/export/home/gail
root@s11-server1:~# zfs get reservation rpool/export/home/gail
NAME PROPERTY VALUE SOURCE
Cicero Ronaldo (ciceroฺronaldo@gmailฺcom) has a non-transferable
license to use this Student Guideฺ
Unauthorized reproduction or distribution prohibitedฺ Copyright© 2014, Oracle and/or its affiliatesฺ

Copyright © 2013, Oracle and/or its affiliates. All rights reserved.
Practices for Lesson 4: Managing Business Application Data
Chapter 4 - Page 24
rpool/export/home/gail reservation 10M local
Confirmed!
11. Now check the file systems.
root@s11-server1:~# zfs list /export/home/gail
NAME USED AVAIL REFER MOUNTPOINT
rpool/export/home/gail 33.5K 21.3G 33.5K /export/home/gail
Note that the reserved space has not been added to Gail’s home directory.
root@s11-server1:~# zfs list /export/home
NAME USED AVAIL REFER MOUNTPOINT
rpool/export/home 10.2M 21.3G 38K /export/home
However, note that space has been reserved in /export/home, which is the parent
dataset. This demonstrates that reservations are considered in the used disk space
calculation of the parent dataset.
Task 2: Configuring the Share Property
In this task, you share Gail’s home directory. In this situation, an assumption is made that her
home directory contains an application documentation that is required by other users in other
locations on the network. In the real world, you may have another application directory for this
purpose that may need to be shared.
1. Verify that the Sol11-Server1 virtual machine is running. If it is not, start it at this time.
Also start the Sol11-Desktop virtual machine.
2. Log in to the Sol11-Server1 virtual machine as the oracle user. Use oracle1 as the
password. Assume administrator privileges.
3. Run the zpool list command to check the pools that are available. Use zfs list to
display the file systems that are available. Create a file in Gail’s directory.
root@s11-server1:~# zfs list
NAME USED AVAIL REFER MOUNTPOINT
rpool 9.97G 21.3G 39K /rpool
rpool/ROOT 1.89G 21.3G 31K legacy
rpool/ROOT/solaris 1.89G 21.3G 1.61G /
rpool/ROOT/solaris/var 232M 21.3G 87.3M /var
rpool/dump 1.03G 21.3G 1.00G -
rpool/export 6.02G 21.3G 274M /export
rpool/export/IPS 5.74G 21.3G 5.74G /export/IPS
rpool/export/home 10.2M 21.3G 38K /export/home
rpool/export/home/gail 33.5K 21.3G 33.5K /export/home/gail
rpool/export/home/jholt 35K 21.3G 35K /export/home/jholt
rpool/export/home/jmoose 35K 21.3G 35K /export/home/jmoose
rpool/export/home/oracle 34K 21.3G 34K /export/home/oracle
Cicero Ronaldo (ciceroฺronaldo@gmailฺcom) has a non-transferable
license to use this Student Guideฺ
Unauthorized reproduction or distribution prohibitedฺ Copyright© 2014, Oracle and/or its affiliatesฺ

Copyright © 2013, Oracle and/or its affiliates. All rights reserved.
Practices for Lesson 4: Managing Business Application Data
Chapter 4 - Page 25
rpool/export/home/panna 35K 21.3G 35K /export/home/panna
rpool/export/home/sstudent 35K 21.3G 35K /export/home/sstudent
rpool/swap 1.03G 21.3G 1.00G -
root@s11-server1:~# cd /export/home/gail
root@s11-server1:/export/home/gail# touch crmreq
In Gail’s home directory, you created the crmreq file.
4. Using the chmod command, change the permissions on Gail’s home directory.
root@s11-server1:/export/home/gail# chmod 777 /export/home/gail
root@s11-server1:/export/home/gail# ls -ld /export/home/gail
drwxrwxrwx 2 gail staff 4 Dec 13 08:27 /export/home/gail
You are setting these permissions only for training purposes. In the real world, you will
use appropriate permissions as required by your business environment and the policies.
5. Share her home directory with other users on the network.
root@s11-server1:/export/home/gail# zfs set share=name=gail,\
path=/export/home/gail,prot=nfs rpool/export/home/gail
name=gail,path=/export/home/gail,prot=nfs
root@s11-server1:/export/home/gail# zfs set sharenfs=on \
rpool/export/home/gail
Enable the share property on /export/home/gail.
root@s11-server1:/export/home/gail# share
gail /export/home/gail nfs sec=sys,rw
export_home_gail /export/home/gail nfs sec=sys,rw
This confirms that the file system is being shared.
root@s11-serv1:/export/home/gail# svcs -a | grep nfs
disabled Dec_13 svc:/network/nfs/cbd:default
disabled Dec_13 svc:/network/nfs/client:default
online Dec_13 svc:/network/nfs/fedfs-client:default
online 8:31:55 svc:/network/nfs/status:default
online 8:31:56 svc:/network/nfs/rquota:default
online 8:31:56 svc:/network/nfs/mapid:default
online 8:31:56 svc:/network/nfs/nlockmgr:default
online 8:32:00 svc:/network/nfs/server:default
The system has brought the NFS server online. It is always a good idea to check this.
Note: You may need to manually share the NFS file system if it fails to do so
automatically.
If the NFS server is not enabled, issue this command:
# share -F nfs -o rw /export/home/gail
Cicero Ronaldo (ciceroฺronaldo@gmailฺcom) has a non-transferable
license to use this Student Guideฺ
Unauthorized reproduction or distribution prohibitedฺ Copyright© 2014, Oracle and/or its affiliatesฺ

Copyright © 2013, Oracle and/or its affiliates. All rights reserved.
Practices for Lesson 4: Managing Business Application Data
Chapter 4 - Page 26
6. Log in to the Sol11-Desktop virtual machine as the oracle user. Use oracle1 as the
password. Open a terminal window and assume administrator privileges. Check if you can
see the share.
root@s11-desktop:~# dfshares s11-server1
RESOURCE SERVER ACCESS TRANSPORT
s11-server1:/export/home/gail s11-server1 - -
s11-server1:/export/share s11-server1 - -
. . .
Yes, you can see the resource shared by the s11-server1 server.
7. Create the mount point and mount the shared resource.
root@s11-desktop:~# mkdir /gaildir
root@s11-desktop:~# mount -f nfs s11-server1:/export/home/gail /gaildir
root@s11-desktop:~# cd /gaildir
root@s11-desktop:/gaildir# ls
crmreq
You can see the shared file crmreq in Gail’s home directory.
root@s11-desktop:/gaildir# touch crmdata
root@s11-desktop:/gaildir# ls
crmdata crmreq
You can create another file in the shared directory, meaning you have read/write access.
8. Because you have finished working with Gail’s directory, you can unmount it.
root@s11-desktop:/gaildir# cd
root@s11-desktop:~# umount /gaildir
If you are unable to mount the /gaildir directory, use -f to unmount it.
root@s11-desktop:~# umount -f /gaildir
9. Return to the s11-server1 VM and stop sharing the directory.
root@s11-server1:~# zfs set sharenfs=off rpool/export/home/gail
Task 3: Configuring ZFS Compression
1. Verify that the Sol11-Server1 virtual machine is running.
2. Log in to the Sol11-Server1 virtual machine as the oracle user. Use oracle1 as the
password. Assume primary administrator privileges.
Cicero Ronaldo (ciceroฺronaldo@gmailฺcom) has a non-transferable
license to use this Student Guideฺ
Unauthorized reproduction or distribution prohibitedฺ Copyright© 2014, Oracle and/or its affiliatesฺ

Copyright © 2013, Oracle and/or its affiliates. All rights reserved.
Practices for Lesson 4: Managing Business Application Data
Chapter 4 - Page 27
3. Using the command zpool, create the oraclecrm pool using disks c7t2d0 and c7t3d0.
Run the zfs list command to list the space currently used by oraclecrm. Make a note
of the value indicated.
root@s11-server1:~# zpool list
NAME SIZE ALLOC FREE CAP DEDUP HEALTH ALTROOT
rpool 31.8G 9.90G 21.8G 31% 1.00x ONLINE -
root@s11-server1:~# zpool create oraclecrm c7t2d0 c7t3d0
'oraclecrm' successfully created, but with no redundancy; failure
of one device will cause loss of the pool
root@s11-server1:~# zfs list -r oraclecrm
NAME USED AVAIL REFER MOUNTPOINT
oraclecrm 88K 1.94G 31K /oraclecrm
Currently, you have the pool available to you with no other file systems, which you
confirm by using the -r option.
4. Use the ls command with the –lh options to list the size of the archive file in
/opt/ora/data. Make a note of it.
root@s11-server1:~# ls -lh /opt/ora/data/custarchive.tar
-rw-r—r-- 1 root root 786K Dec 13 09:09
/opt/ora/data/custarchive.tar
The new file takes up approximately 786 KB.
5. Create a directory named /oraclecrm/cmp to hold the files that you will copy to the file
system.
root@s11-server1:~# mkdir /oraclecrm/cmp
This directory will be used to store the compressed customer data.
6. Use the zfs get command to display the current settings of the compression and
compressratio properties for oraclecrm. Verify that compression is off and the
compression ratio is 1.00x.
root@s11-server1:~# zfs get compression,compressratio oraclecrm
NAME PROPERTY VALUE SOURCE
oraclecrm compression off default
oraclecrm compressratio 1.00x -
The compression property is set to off by default. Because compression is off, the
compressratio property is set to 1.00x. A ratio of 1-to-1 for data means no
compression.
Cicero Ronaldo (ciceroฺronaldo@gmailฺcom) has a non-transferable
license to use this Student Guideฺ
Unauthorized reproduction or distribution prohibitedฺ Copyright© 2014, Oracle and/or its affiliatesฺ

Copyright © 2013, Oracle and/or its affiliates. All rights reserved.
Practices for Lesson 4: Managing Business Application Data
Chapter 4 - Page 28
7. Copy /opt/ora/data/custarchive.tar to /oraclecrm/cmp/custarchive.tar.
List the file to display its size.
root@s11-server1:~# cp /opt/ora/data/custarchive.tar \
/oraclecrm/cmp/custarchive.tar
root@s11-server1:~# ls -lh /oraclecrm/cmp
total 1
-rw-r--r-- 1 root root 786K Dec 13 09:47 custarchive.tar
After copying the file into the pool, it consumes approximately the same space.
8. Use the zfs list command to list the space used by oraclecrm. Does the space used
match the size of /oraclecrm/cmp/custarchive.tar?
root@s11-server1:~# zfs list oraclecrm
NAME USED AVAIL REFER MOUNTPOINT
oraclecrm 992K 1.94G 931K /oraclecrm
Yes, the zfs list command also confirms the same space consumption.
9. Use zfs get to verify that the compression ratio for oraclecrm is still 1.00x.
root@s11-server1:~# zfs get compressratio oraclecrm
NAME PROPERTY VALUE SOURCE
oraclecrm compressratio 1.00x -
Yes, compressratio is still unchanged.
10. Set the compression property for oraclecrm to gzip and verify that the new value is
set.
root@s11-server1:~# zfs set compression=gzip oraclecrm
root@s11-server1:~# zfs get compression oraclecrm
NAME PROPERTY VALUE SOURCE
oraclecrm compression gzip local
You set the compression property on oraclecrm file system to gzip. Now notice the
space usage of the files, which get stored in the oraclecrm file system.
root@s11-server1:~# zfs set compression=ggg oraclecrm
cannot set property for 'oraclecrm': 'compression' must be one of
'on | off | lzjb | gzip | gzip-[1-9] | zle'
The purpose of this command is to demonstrate the different types of compression
property values that are available. You intentionally specify ggg so that you can see
valid property values.
Optionally, you can experiment with these compression types and compare the
compression ratio.
Cicero Ronaldo (ciceroฺronaldo@gmailฺcom) has a non-transferable
license to use this Student Guideฺ
Unauthorized reproduction or distribution prohibitedฺ Copyright© 2014, Oracle and/or its affiliatesฺ

Copyright © 2013, Oracle and/or its affiliates. All rights reserved.
Practices for Lesson 4: Managing Business Application Data
Chapter 4 - Page 29
11. Copy /opt/ora/data/custarchive.tar to /oraclecrm/cmp/archive2.tar. List
all the files in /oraclecrm/cmp to display their sizes. Are the files in /oraclecrm/cmp
the same size?
root@s11-server1:~# cp /opt/ora/data/custarchive.tar \
/oraclecrm/cmp/archive2.tar
root@s11-server1:~# ls -lh /oraclecrm/cmp
total 3529
-rw-r--r-- 1 root root 786K Dec 13 09:11 archive2.tar
-rw-r--r-- 1 root root 786K Dec 13 09:09 custarchive.tar
Yes, they are equal as displayed by the ls command.
12. Use the zfs list command to list the space used by oraclecrm. Does the space used
match the sum of the size of the two files? No, the output reports a smaller size than the
sum of the two files.
root@s11-server1:~# zfs list oraclecrm
NAME USED AVAIL REFER MOUNTPOINT
oraclecrm 1.12M 1.94G 1.06M /oraclecrm
With reference to the preceding step, the sum of the space utilized by the two files would
be 1572 KB as against 1.12 MB displayed by the zfs list command.
13. Use the zfs get command to display the current setting of the compressratio property
for oraclecrm. Notice that compressratio is now 1.55x.
root@s11-server1:~# zfs get compressratio oraclecrm
NAME PROPERTY VALUE SOURCE
oraclecrm compressratio 1.68x -
The ratio is 1.68x, which means that data is being compressed at a ratio of 1.68-1
(approximately 59%).
14. Copy /opt/ora/data/custarchive.tar to /oraclecrm/cmp/archive3.tar. List
all the files in /oraclecrm/cmp to display their sizes. Are the files in /oraclecrm/cmp
the same size?
root@s11-server1:~# cp /opt/ora/data/custarchive.tar \
/oraclecrm/cmp/archive3.tar
root@s11-server1:~# ls -lh /oraclecrm/cmp
total 2405
-rw-r--r-- 1 root root 786K Dec 13 09:11 archive2.tar
-rw-r--r-- 1 root root 786K Dec 13 09:12 archive3.tar
-rw-r--r-- 1 root root 786K Dec 13 09:09 custarchive.tar
Yes, they are.
15. Use the du –h command to display the space used by the files in /oraclecrm/cmp. How
does the amount of space used by these files compare?
root@s11-server1:~# du -h /oraclecrm/cmp/*
152K /oraclecrm/cmp/archive2.tar
152K /oraclecrm/cmp/archive3.tar
Cicero Ronaldo (ciceroฺronaldo@gmailฺcom) has a non-transferable
license to use this Student Guideฺ
Unauthorized reproduction or distribution prohibitedฺ Copyright© 2014, Oracle and/or its affiliatesฺ

Copyright © 2013, Oracle and/or its affiliates. All rights reserved.
Practices for Lesson 4: Managing Business Application Data
Chapter 4 - Page 30
898K /oraclecrm/cmp/custarchive.tar
The custarchive.tar file uses the same space as the ls -lh command indicates.
The other two files show a percentage of the original size of the files. The
custarchive.tar file was created in the cmp file system before enabling
compression. This was done intentionally, so that you can see the difference between
space usage by compressed and uncompressed files.
16. Use the zfs get command to display the current value of the compressratio property
for oraclecrm. What is the current compression ratio? How has it changed and why?
root@s11-server1:~# zfs get compressratio oraclecrm
NAME PROPERTY VALUE SOURCE
oraclecrm compressratio 2.20x -
The compression ratio is now 2.20x. It has increased with the addition of the second
compressed file. A larger portion of the data in the pool is now being compressed. This
demonstrates that as you add more data files in a ZFS file system with compression
enabled, compression further reduces space utilization.
17. Remove the /oraclecrm/cmp/custarchive.tar file.
root@s11-server1:~# rm /oraclecrm/cmp/custarchive.tar
18. Use the zfs get command to display the current value of the compressratio property
for oraclecrm. What is the current compression ratio? How has it changed and why?
root@s11-server1:~# zfs get compressratio oraclecrm
NAME PROPERTY VALUE SOURCE
oraclecrm compressratio 5.41x -
The compression ratio has increased again with the removal of the uncompressed file.
19. Use the zfs list command to list the space used by oraclecrm and du –h to list the
space used by the remaining two files in /oraclecrm/cmp. Does the refer value
reported by zfs list reflect the sum of the space used by the two files in
/oraclecrm/cmp?
root@s11-server1:~# zfs list oraclecrm
NAME USED AVAIL REFER MOUNTPOINT
oraclecrm 398K 1.94G 336K /oraclecrm
root@s11-server1:~# du -h /oraclecrm/cmp/*
152K /oraclecrm/cmp/archive2.tar
152K /oraclecrm/cmp/archive3.tar
Yes, the two values are correlated.
Cicero Ronaldo (ciceroฺronaldo@gmailฺcom) has a non-transferable
license to use this Student Guideฺ
Unauthorized reproduction or distribution prohibitedฺ Copyright© 2014, Oracle and/or its affiliatesฺ

Copyright © 2013, Oracle and/or its affiliates. All rights reserved.
Practices for Lesson 4: Managing Business Application Data
Chapter 4 - Page 31
20. Using the zpool destroy command, delete the oraclecrm pool. Confirm the action.
root@s11-server1:~# zpool destroy oraclecrm
root@s11-server1:~# zpool list
NAME SIZE ALLOC FREE CAP DEDUP HEALTH ALTROOT
rpool 31.8G 9.90G 21.8G 31% 1.00x ONLINE -
You have destroyed the pool because you have finished using it.
Cicero Ronaldo (ciceroฺronaldo@gmailฺcom) has a non-transferable
license to use this Student Guideฺ
Unauthorized reproduction or distribution prohibitedฺ Copyright© 2014, Oracle and/or its affiliatesฺ

Copyright © 2013, Oracle and/or its affiliates. All rights reserved.
Practices for Lesson 4: Managing Business Application Data
Chapter 4 - Page 32
Practice 4-5: Troubleshooting ZFS Failures
Overview
In this practice, you will work with ZFS device and data problems. For demonstration purposes,
you will simulate the problems and correct the problems. This practice includes the following
activities:
• Troubleshooting ZFS device issues
• Troubleshooting ZFS data errors
Task 1: Troubleshooting ZFS Device Issues
This task includes the following activities:
• Creating ZFS components
• Configuring syslog for Fault Manager Daemon (FMD) messages
• Troubleshooting a ZFS device error in a raidz pool
Task 1A: Creating the ZFS Components
1. Verify that the Sol11-Server1 virtual machine is running. If the virtual machine is not
running, start it now.
2. Log in to the Sol11-Server1 virtual machine as the oracle user. Use oracle1 as the
password. Assume primary administrator privileges.
oracle@s11-server1:~$ su -
Password: oracle1
Oracle Corporation SunOS 5.11 11.1 September 2012
root@s11-server1:~#
3. Using the zpool commands, create a raidz pool with three virtual devices. Verify the
results.
root@s11-server1:~# format
Searching for disks...done
AVAILABLE DISK SELECTIONS:
0. c7t0d0 <ATA-VBOX HARDDISK -1.0 cyl 4174 alt 2 hd 255 sec 63>
/pci@0,0/pci8086,2829@d/disk@0,0
1. c7t2d0 <ATA-VBOX HARDDISK -1.0 cyl 1022 alt 2 hd 64 sec 32>
/pci@0,0/pci8086,2829@d/disk@2,0
2. c7t3d0 <ATA-VBOX HARDDISK -1.0 cyl 1022 alt 2 hd 64 sec 32>
/pci@0,0/pci8086,2829@d/disk@3,0
3. c7t4d0 <ATA-VBOX HARDDISK -1.0 cyl 1022 alt 2 hd 64 sec 32>
/pci@0,0/pci8086,2829@d/disk@4,0
4. c7t5d0 <ATA-VBOX HARDDISK -1.0 cyl 1022 alt 2 hd 64 sec 32>
/pci@0,0/pci8086,2829@d/disk@5,0
5. c7t6d0 <ATA-VBOX HARDDISK -1.0 cyl 1022 alt 2 hd 64 sec 32>
/pci@0,0/pci8086,2829@d/disk@6,0
6. c7t7d0 <ATA-VBOX HARDDISK -1.0 cyl 1022 alt 2 hd 64 sec 32>
/pci@0,0/pci8086,2829@d/disk@7,0
7. c7t8d0 <ATA-VBOX HARDDISK -1.0 cyl 1022 alt 2 hd 64 sec 32>
Cicero Ronaldo (ciceroฺronaldo@gmailฺcom) has a non-transferable
license to use this Student Guideฺ
Unauthorized reproduction or distribution prohibitedฺ Copyright© 2014, Oracle and/or its affiliatesฺ

Copyright © 2013, Oracle and/or its affiliates. All rights reserved.
Practices for Lesson 4: Managing Business Application Data
Chapter 4 - Page 33
/pci@0,0/pci8086,2829@d/disk@6,0
8. c7t9d0 <ATA-VBOX HARDDISK -1.0 cyl 1022 alt 2 hd 64 sec 32>
/pci@0,0/pci8086,2829@d/disk@7,0
Specify disk (enter its number): ^C
root@s11-server1:~# zpool create assetpool raidz c7t3d0 c7t4d0 c7t5d0
root@s11-server1:~# zpool list
NAME SIZE ALLOC FREE CAP DEDUP HEALTH ALTROOT
assetpool 2.95G 241K 2.95G 0% 1.00x ONLINE -
rpool 31.8G 9.90G 21.8G 31% 1.00x ONLINE -
root@s11-server1:~# zpool status assetpool
pool: assetpool
state: ONLINE
scan: none requested
config:
NAME STATE READ WRITE CKSUM
assetpool ONLINE 0 0 0
raidz1-0 ONLINE 0 0 0
c7t3d0 ONLINE - - -
c7t4d0 ONLINE - - -
c7t5d0 ONLINE - - -
errors: No known data errors
root@s11-server1:~# zpool status -x
all pools are healthy
4. Use the zfs command to create an inventory file system in your assetpool.
root@s11-server1:~# zfs create assetpool/inventory
root@s11-server1:~# zfs mount | grep inventory
assetpool/inventory /assetpool/inventory
root@s11-server1:~# ls -lh /opt/ora/data/custarchive.tar
-rw-r—r-- 1 root root 786K Dec 13 09:09
/opt/ora/data/custarchive.tar
For training purposes, you use the custarchive.tar file to simulate business
application files.
5. Use the cp command to copy the custarchive file into the inventory file system.
root@s11-server1:~# cp /opt/ora/data/custarchive.tar \
/assetpool/inventory/custarchive.tar
Cicero Ronaldo (ciceroฺronaldo@gmailฺcom) has a non-transferable
license to use this Student Guideฺ
Unauthorized reproduction or distribution prohibitedฺ Copyright© 2014, Oracle and/or its affiliatesฺ

Copyright © 2013, Oracle and/or its affiliates. All rights reserved.
Practices for Lesson 4: Managing Business Application Data
Chapter 4 - Page 34
Task 1B: Configuring syslog for FMD Messages
1. Create a new file named /var/adm/messages.fmd for Fault Management Daemon to log
the device-related messages.
root@s11-server1:~# touch /var/adm/messages.fmd
2. Back up the current /etc/syslog.conf file.
root@s11-server1:~# cp /etc/syslog.conf /etc/syslog.conf.orig
3. Edit the /etc/syslog.conf file. Enter a new line below the existing line as shown.
root@s11-server1:~# vi /etc/syslog.conf
Existing line:
*.err;kern.debug;daemon.notice;mail.crit /var/adm/messages
New line:
daemon.err /var/adm/messages.fmd
Make it look similar to the following:
*.err;kern.debug;daemon.notice;mail.crit /var/adm/messages
daemon.err /var/adm/messages.fmd
Remember to separate the columns by using tabs.
What is the purpose of this entry in syslog? This step will ensure that all ZFS device-
related messages are logged in a separate file for this practice.
(Normally, FMD writes hardware-related messages to the /var/adm/messages file.)
4. Use the svcadm command to refresh the syslog service for the new configuration to take
effect.
root@s11-server1:~# svcadm refresh system-log
Task 1C: Troubleshooting a ZFS Device Error in a raid-z Pool
1. Verify that you can read the contents of your data file
/assetpool/inventory/custarchive.tar.
root@s11-server1:~# tar tvf /assetpool/inventory/custarchive.tar
…
-r--r--r-- root/bin 0 Oct 20 22:18 usr/share/common-
lisp/
-r--r--r-- root/bin 0 Oct 20 22:18 usr/share/common-
lisp/source/
-r--r--r-- root/bin 0 Oct 20 22:27 usr/share/common-
lisp/source/gpg
-error/
Cicero Ronaldo (ciceroฺronaldo@gmailฺcom) has a non-transferable
license to use this Student Guideฺ
Unauthorized reproduction or distribution prohibitedฺ Copyright© 2014, Oracle and/or its affiliatesฺ

Copyright © 2013, Oracle and/or its affiliates. All rights reserved.
Practices for Lesson 4: Managing Business Application Data
Chapter 4 - Page 35
-r--r--r-- root/bin 2206 Oct 20 09:01 usr/share/common-
lisp/source/gpg
-error/gpg-error-package.lisp
…
…
…
Can you access your data in the inventory file system? Yes
Note that the contents are irrelevant in this situation. The output of the file that you are
viewing was created to simulate a business application data file and is only for training
purposes.
2. Display the status of assetpool and verify that all devices are online.
root@s11-server1:~# zpool status assetpool
pool: assetpool
state: ONLINE
scan: none requested
config:
NAME STATE READ WRITE CKSUM
assetpool ONLINE 0 0 0
raidz1-0 ONLINE 0 0 0
c7t3d0 ONLINE - - -
c7t4d0 ONLINE - - -
c7t5d0 ONLINE - - -
errors: No known data errors
3. Using the prtvtoc command, display the current vtoc configuration of the c7t5d0 disk.
root@s11-desktop:~# prtvtoc /dev/rdsk/c7t5d0
* /dev/rdsk/c7t5d0 partition map
*
* Dimensions:
* 512 bytes/sector
* 2097152 sectors
* 2097085 accessible sectors
*
* Flags:
* 1: unmountable
* 10: read-only
*
* Unallocated space:
* First Sector Last
* Sector Count Sector
Cicero Ronaldo (ciceroฺronaldo@gmailฺcom) has a non-transferable
license to use this Student Guideฺ
Unauthorized reproduction or distribution prohibitedฺ Copyright© 2014, Oracle and/or its affiliatesฺ

Copyright © 2013, Oracle and/or its affiliates. All rights reserved.
Practices for Lesson 4: Managing Business Application Data
Chapter 4 - Page 36
* 34 222 255
*
* First Sector Last
* Partition Tag Flags Sector Count Sector Mount
Directory
0 4 00 256 2080479 2080734
8 11 00 2080735 16384 2097118
Note that you will be working with the highlighted slice 0 entry.
4. Save vtoc and cause the c7t5d0 disk to appear as failed. Use the /var/tmp/vtoc5 file
as indicated to make slice 0 disappear.
root@s11-server1:~# prtvtoc /dev/rdsk/c7t5d0 > /var/tmp/vtoc5.orig
root@s11-server1:~# prtvtoc /dev/rdsk/c7t5d0 > /var/tmp/vtoc5
Note that you have saved a copy of c7t5d0 vtoc to two files because you will modify
the /var/tmp/vtoc5 file and keep /var/tmp/vtoc5.orig as a copy of your original
vtoc configuration.
Delete the slice 0 configuration from vtoc (the highlighted entry in the preceding step).
root@s11-server1:~# vi /var/tmp/vtoc5
Verify that the slice 0 line is deleted.
root@s11-server1:~# tail /var/tmp/vtoc5
* 10: read-only
*
* Unallocated space:
* First Sector Last
* Sector Count Sector
* 34 222 255
*
* First Sector Last
* Partition Tag Flags Sector Count Sector Mount
Directory
8 11 00 2158559 16384 2174942
Is the slice 0 line available? No, it has been deleted.
What is the purpose of deleting this entry? So that you can simulate a device problem
The system will not be able to use this disk because its vtoc configuration is not
available, thus affecting the ZFS pool.
Cicero Ronaldo (ciceroฺronaldo@gmailฺcom) has a non-transferable
license to use this Student Guideฺ
Unauthorized reproduction or distribution prohibitedฺ Copyright© 2014, Oracle and/or its affiliatesฺ

Copyright © 2013, Oracle and/or its affiliates. All rights reserved.
Practices for Lesson 4: Managing Business Application Data
Chapter 4 - Page 37
5. Use the fmthard command to copy the modified vtoc to the disk.
root@s11-server1:~# fmthard -s /var/tmp/vtoc5 /dev/rdsk/c7t5d0s0
fmthard: New volume table of contents now in place.
What is the purpose of this command? To overlay the current c7t5d0 vtoc
6. Repeat steps 1 and 2 in the current task.
Question: Why is the system showing no errors with disk c7t5d0, whereas its vtoc is
corrupted?
Answer: Because the system is working with vtoc and its configuration from memory. You
need to recycle the disk.
7. Using the zpool command, take the disk offline and attempt to put it back online. Display
the status of the pool.
root@s11-server1:~# zpool offline assetpool c7t5d0
root@s11-server1:~# zpool online assetpool c7t5d0
warning: device 'c7t5d0' onlined, but remains in faulted state
use 'zpool clear' to restore a faulted device
root@s11-server1:~#
root@s11-server1:~# zpool status assetpool
pool: assetpool
state: DEGRADED
status: One or more devices are unavailable in response to persistent
errors. Sufficient replicas exist for the pool to continue
functioning in a degraded state.
action: Determine if the device needs to be replaced, and clear the
errors using 'zpool clear' or 'fmadm repaired', or replace the
device with 'zpool replace'.
Run 'zpool status -v' to see device specific details.
config:
NAME STATE READ WRITE CKSUM
assetpool DEGRADED 0 0 0
raidz1-0 DEGRADED 0 0 0
c7t3d0 ONLINE 0 0 0
c7t4d0 ONLINE 0 0 0
c7t5d0 UNAVAIL 0 0 0
errors: No known data errors
In your raidz pool, is disk c7t5d0 available? No, it cannot be opened.
Note that the message displayed on your system may be different.
Cicero Ronaldo (ciceroฺronaldo@gmailฺcom) has a non-transferable
license to use this Student Guideฺ
Unauthorized reproduction or distribution prohibitedฺ Copyright© 2014, Oracle and/or its affiliatesฺ

Copyright © 2013, Oracle and/or its affiliates. All rights reserved.
Practices for Lesson 4: Managing Business Application Data
Chapter 4 - Page 38
8. Using the more command, view the contents of your log file /var/adm/messages.fmd.
root@s11-server1:~# more /var/adm/messages.fmd
Dec 12 05:17:08 s11-server1 fmd: [ID 377184 daemon.error] SUNW-
MSG-ID: ZFS-8000-LR, TYPE: Fault, VER: 1, SEVERITY: Major
Dec 12 05:17:08 s11-server1 EVENT-TIME: Wed Dec 12 05:17:08 UTC
2012
Dec 12 05:17:08 s11-server1 PLATFORM: VirtualBox, CSN: 0,
HOSTNAME: s11-server1
Dec 12 05:17:08 s11-server1 SOURCE: zfs-diagnosis, REV: 1.0
Dec 12 05:17:08 s11-server1 EVENT-ID: fbe8ab80-a530-e5a3-bc1a-
a8709067f39e
Dec 12 05:17:08 s11-server1 DESC: ZFS device
'id1,sd@SATA_____VBOX_HARDDISK____VBc5298f81-7a69e7ac/a' in pool
'assetpool' failed to
open.
Dec 12 05:17:08 s11-server1 AUTO-RESPONSE: An attempt will be
made to activate a hot spare if available.
Dec 12 05:17:08 s11-server1 IMPACT: Fault tolerance of the pool
may be compromised.
Dec 12 05:17:08 s11-server1 REC-ACTION: Use 'fmadm faulty' to
provide a more detailed view of this event. Run 'zpool status -
lx' for
more information. Please refer to the associated reference
document at http://support.oracle.com/msg/ZFS-8000-LR for the
latest ser
vice procedures and policies regarding this diagnosis.
root@s11-server1:~#
The FMD facility logged the device corruption messages in the configured file.
9. Using the zpool command, replace the faulty disk with an available disk. Clear any pool-
level errors logged by ZFS. Verify the results.
root@s11-server1:~# zpool replace assetpool c7t5d0 c7t2d0
Which disk is replacing which disk? You are replacing c7t5d0 with c7t2d0.
root@s11-server1:~# zpool clear assetpool
root@s11-server1:~# zpool status assetpool
pool: assetpool
state: ONLINE
scan: resilvered 524K in 0h0m with 0 errors on Wed Dec 14
09:37:38 2012
config:
NAME STATE READ WRITE CKSUM
assetpool ONLINE 0 0 0
Cicero Ronaldo (ciceroฺronaldo@gmailฺcom) has a non-transferable
license to use this Student Guideฺ
Unauthorized reproduction or distribution prohibitedฺ Copyright© 2014, Oracle and/or its affiliatesฺ

Copyright © 2013, Oracle and/or its affiliates. All rights reserved.
Practices for Lesson 4: Managing Business Application Data
Chapter 4 - Page 39
raidz1-0 ONLINE 0 0 0
c7t3d0 ONLINE - - -
c7t4d0 ONLINE - - -
c7t2d0 ONLINE - - -
errors: No known data errors
Has the faulty disk been replaced? Yes
Is the pool healthy? Yes
10. Using the scrub command, have ZFS streamline the data in the raidz pool.
root@s11-server1:~# zpool scrub assetpool
root@s11-server1:~# zpool status assetpool
pool: assetpool
state: ONLINE
scan: scrub repaired 0 in 0h0m with 0 errors on Wed Dec 14
18:05:55 2012
config:
NAME STATE READ WRITE CKSUM
assetpool ONLINE 0 0 0
raidz1-0 ONLINE 0 0 0
c7t3d0 ONLINE - - -
c7t4d0 ONLINE - - -
c7t2d0 ONLINE - - -
errors: No known data errors
Your display may be a bit different.
What is the purpose of the scrub operation? To ensure data population on the new disk
11. Using the zpool command, destroy the pool assetpool.
root@s11-server1:~# zpool destroy assetpool
Task 2: Troubleshooting ZFS Data Errors in a Mirror Pool
In this task, you inject errors into your data file. Then you implement corrective measures to
make sure that the data is restored from the mirror copy.
The following activities are covered in this task:
• Running an explicit scrub
• Restoring data in the mirror pool
Cicero Ronaldo (ciceroฺronaldo@gmailฺcom) has a non-transferable
license to use this Student Guideฺ
Unauthorized reproduction or distribution prohibitedฺ Copyright© 2014, Oracle and/or its affiliatesฺ

Copyright © 2013, Oracle and/or its affiliates. All rights reserved.
Practices for Lesson 4: Managing Business Application Data
Chapter 4 - Page 40
Note: Your command output displays may be different than the displays in the practice. In
some cases, ZFS may indicate a different number of errors or no errors. It may show errors
at different points in the process based upon when it performs certain internal data integrity
processes, for example, the scrub operation. The steps in this task demonstrate multiple
possible scenarios to assist in understanding why your output would be unpredictable.
Some of the factors governing this unpredictability are:
• ZFS is monitoring the errors but can discover all the data errors only after a full
scrub. Based upon where it is in the scrub process, it will be able to display the so-
far discovered errors. So for this reason, the number can change in subsequent
status displays.
• Because ZFS is performing the scrub operation periodically, it depends when it
launches it. This will affect the timing of the results displayed to you.
• Based upon the volume of data generated, ZFS may be able to work with the same
disk or utilize the spare disk.
Based upon multiple variables in the situation, you will get different output every time you
perform this task.
The main objective of this task is to demonstrate a situation where the results can be different
with every iteration of the task, while at the same time showing you how ZFS discovers and
corrects the errors. This process of discovering and repairing is called self-healing, which is an
extremely useful function of ZFS.
1. Verify that the Sol11-Server1 virtual machine is running. If the virtual machine is not
running, start it now.
2. Log in to the Sol11-Server1 virtual machine as the oracle user. Use oracle1 as the
password. Assume administrator privileges.
oracle@S11-server1:~$ su -
Password: oracle1
Oracle Corporation SunOS 5.11 11.0 November 2012
root@s11-server1:~#
Cicero Ronaldo (ciceroฺronaldo@gmailฺcom) has a non-transferable
license to use this Student Guideฺ
Unauthorized reproduction or distribution prohibitedฺ Copyright© 2014, Oracle and/or its affiliatesฺ

Copyright © 2013, Oracle and/or its affiliates. All rights reserved.
Practices for Lesson 4: Managing Business Application Data
Chapter 4 - Page 41
3. Use the zpool command and create a mirror pool. Check the health of the pool.
root@s11-server1:~# zpool create assetpool mirror c7t3d0 c7t4d0
spare c7t5d0
root@s11-server1:~# zpool status assetpool
pool: assetpool
state: ONLINE
scan: none requested
config:
NAME STATE READ WRITE CKSUM
assetpool ONLINE 0 0 0
mirror-0 ONLINE 0 0 0
c7t3d0 ONLINE 0 0 0
c7t4d0 ONLINE 0 0 0
spares
c7t5d0 AVAIL
errors: No known data errors
4. Use the tar command to create a demonstration data file. Let it generate data for a minute
or more, and then break the command.
root@s11-server1:~# tar cvf /assetpool/data.tar /usr
…
…
/usr/bin/nvidia-xconfig
/usr/bin/alacarte
/usr/bin/iceauth
/usr/bin/ps2ascii
/usr/bin/gvfs-mount
/usr/bin/pmap
/usr/bin/smproxy
/usr/bin/pkglint
/usr/bin/nautilus-connect-server
…
<Ctrl+C>
root@s11-server1:~# zfs list /assetpool
NAME USED AVAIL REFER MOUNTPOINT
assetpool 154M 822M 154M /assetpool
For training purposes, you are creating a data file with a significant amount of data in it.
Your displays and data will be different.
Cicero Ronaldo (ciceroฺronaldo@gmailฺcom) has a non-transferable
license to use this Student Guideฺ
Unauthorized reproduction or distribution prohibitedฺ Copyright© 2014, Oracle and/or its affiliatesฺ

Copyright © 2013, Oracle and/or its affiliates. All rights reserved.
Practices for Lesson 4: Managing Business Application Data
Chapter 4 - Page 42
5. Using the dd command, corrupt the data on the first disk.
root@s11-server1:~# dd if=/dev/zero of=/dev/dsk/c7t3d0 oseek=100
bs=8192 count=10000 conv=notrunc
10000+0 records in
10000+0 records out
If you are not familiar with the dd command, refer to the man pages. Using full blocks,
you are overlaying 10,000 blocks of 8 kilobytes with zeros. Because you are using the
oseek option, you are bypassing the beginning data (VTOC and other system-reserved
sectors) on the disk.
6. Using the tar command, display your data.
root@s11-server1:~# tar tvf /assetpool/data.tar
…
…
…
drwxr-xr-x root/sys 0 Oct 20 17:34 usr/
lrwxrwxrwx root/root 0 Oct 20 17:34 usr/tmp -> ../var/tmp
lrwxrwxrwx root/root 0 Oct 20 17:34 usr/mail -> ../var/mail
drwxr-xr-x root/bin 0 Oct 20 17:34 usr/snadm/
…
…
…
Is your data still there? Yes
7. Using the zpool command, display the status of the pool.
root@s11-server1:~# zpool status assetpool
pool: assetpool
state: ONLINE
scan: none requested
config:
NAME STATE READ WRITE CKSUM
assetpool ONLINE 0 0 0
mirror-0 ONLINE 0 0 0
c7t3d0 ONLINE 0 0 15
c7t4d0 ONLINE 0 0 0
spares
c7t5d0 AVAIL
errors: No known data errors
Note the checksum errors on the disk c7t3d0. ZFS has discovered some data errors.
Cicero Ronaldo (ciceroฺronaldo@gmailฺcom) has a non-transferable
license to use this Student Guideฺ
Unauthorized reproduction or distribution prohibitedฺ Copyright© 2014, Oracle and/or its affiliatesฺ

Copyright © 2013, Oracle and/or its affiliates. All rights reserved.
Practices for Lesson 4: Managing Business Application Data
Chapter 4 - Page 43
Your display may not show these errors until the scrub is performed in step 11. ZFS
discovers the errors based upon multiple factors and one of them is when it performs the
scrub.
8. Using the zpool commands, take the corrupted disk offline and then bring it online to
refresh its status.
root@s11-server1:~# zpool offline assetpool c7t3d0
root@s11-server1:~# zpool online assetpool c7t3d0
warning: device 'c7t3d0' onlined, but remains in degraded state
9. Using the zpool command, display the pool’s status.
root@s11-server1:~# zpool status assetpool
pool: assetpool
state: ONLINE
config:
NAME STATE READ WRITE CKSUM
assetpool ONLINE 0 0 0
mirror-0 ONLINE 0 0 0
c7t3d0 ONLINE 0 0 19
c7t4d0 ONLINE 0 0 0
spares
c7t5d0 AVAIL
errors: No known data errors
Is the pool functional? Yes
What actions has ZFS taken? Due to data errors, it is trying to recover the data as
indicated by the resilvering status. By recycling the disk, it has discovered more data
errors.
Your display may not show these errors until the scrub is performed in step 11. ZFS
discovers the errors based upon multiple factors and one of them is when it performs the
scrub.
Note: Out varies from system to system.
Cicero Ronaldo (ciceroฺronaldo@gmailฺcom) has a non-transferable
license to use this Student Guideฺ
Unauthorized reproduction or distribution prohibitedฺ Copyright© 2014, Oracle and/or its affiliatesฺ

Copyright © 2013, Oracle and/or its affiliates. All rights reserved.
Practices for Lesson 4: Managing Business Application Data
Chapter 4 - Page 44
10. Using the zpool command, clear the errors and display the pool’s status.
root@s11-server1:~# zpool clear assetpool
root@s11-server1:~# zpool status assetpool
pool: assetpool
state: ONLINE
scan: resilvered 9K in 0h0m with 0 errors on Thu Dec 15 07:15:31 2012
config:
NAME STATE READ WRITE CKSUM
assetpool ONLINE 0 0 0
mirror-0 ONLINE 0 0 0
c7t3d0 ONLINE 0 0 0
c7t4d0 ONLINE 0 0 0
spares
c7t5d0 AVAIL
errors: No known data errors
By clearing the errors, now the corrupted disk seems to be operational and does not
report any errors.
11. Using the zpool command, scrub the data on the pool, and display the pool’s health.
root@s11-server1:~# zpool scrub assetpool
root@s11-server1:~# zpool status assetpool
pool: assetpool
state: ONLINE
status: One or more devices has been diagnosed as degraded. An attempt
was made to correct the error. Applications are unaffected.
action: Determine if the device needs to be replaced, and clear the
errors using 'zpool clear' or 'fmadm repaired', or replace the
device with 'zpool replace'.
Run 'zpool status -v' to see device specific details.
scan: scrub in progress since Wed Dec 12 05:59:16 2012
310M scanned out of 976M at 62.1M/s, 0h0m to go
2.01M repaired, 31.79% done
config:
NAME STATE READ WRITE CKSUM
assetpool ONLINE 0 0 0
mirror-0 ONLINE 0 0 0
c7t3d0 ONLINE 0 0 343 (repairing)
c7t4d0 ONLINE 0 0 0
spares
c7t5d0 AVAIL
Cicero Ronaldo (ciceroฺronaldo@gmailฺcom) has a non-transferable
license to use this Student Guideฺ
Unauthorized reproduction or distribution prohibitedฺ Copyright© 2014, Oracle and/or its affiliatesฺ

Copyright © 2013, Oracle and/or its affiliates. All rights reserved.
Practices for Lesson 4: Managing Business Application Data
Chapter 4 - Page 45
errors: No known data errors
Note that ZFS is in the process of scrubbing the data as reported in the scan progress.
You may see a completely different output display based upon when ZFS runs into data
errors. This display is included here as a possible outcome.
The following display is another possible outcome you may receive, once again based
upon when and how ZFS encounters the errors.
pool: assetpool
state: DEGRADED
status: One or more devices has been diagnosed as degraded. An attempt
was made to correct the error. Applications are unaffected.
action: Determine if the device needs to be replaced, and clear the
errors
using 'zpool clear' or 'fmadm repaired', or replace the device
with 'zpool replace'.
Run 'zpool status -v' to see device specific details.
scan: scrub in progress since Wed Dec 12 05:59:16 2012
310M scanned out of 976M at 62.1M/s, 0h0m to go
2.01M repaired, 31.79% done
config:
NAME STATE READ WRITE CKSUM
assetpool DEGRADED 0 0 0
mirror-0 DEGRADED 0 0 0
c7t3d0 DEGRADED 0 0 31 (repairing)
c7t4d0 ONLINE 0 0 0
c7t5d0 ONLINE 0 0 0
errors: No known data errors
Notice that in this example the pool is in the degraded state and that the spare disk
c7t5d0 you assigned in step 3 is now in use and has taken the place of the degraded
disk c7t3d0.
Now, attempt to clear these errors and then display the status of the pool.
root@s11-server1:~# zpool clear assetpool
root@s11-server1:~# zpool status assetpool
Note that the pool and all the disks are now back online, all the errors have been
corrected, and the spare disk c7t5d0 is still in use. The spare disk should become
available by the time you issue the next status command in the following step.
Cicero Ronaldo (ciceroฺronaldo@gmailฺcom) has a non-transferable
license to use this Student Guideฺ
Unauthorized reproduction or distribution prohibitedฺ Copyright© 2014, Oracle and/or its affiliatesฺ

Copyright © 2013, Oracle and/or its affiliates. All rights reserved.
Practices for Lesson 4: Managing Business Application Data
Chapter 4 - Page 46
12. Repeat the zpool status command to determine if the scrubbing is complete.
root@s11-server1:~# zpool status assetpool
In your case, if the scrub is completed before you issue the above command, your
results may be very different. The purpose of this step is to display the scrub progress.
13. Using the zpool commands, clear the errors and display status of the pool.
root@s11-server1:~# zpool clear assetpool
root@s11-server1:~# zpool status assetpool
pool: assetpool
state: ONLINE
scan: scrub repaired 47.9M in 0h0m with 0 errors on Thu Dec 15
07:17:26 2012
config:
NAME STATE READ WRITE CKSUM
assetpool ONLINE 0 0 0
mirror-0 ONLINE 0 0 0
c7t3d0 ONLINE 0 0 0
c7t4d0 ONLINE 0 0 0
errors: No known data errors
Now you know that the data corruption has been repaired after the scrub operation.
14. Using the tar command, display your data.
root@s11-server1:~# tar tvf /assetpool/data.tar
…
…
…
drwxr-xr-x root/sys 0 Oct 20 17:34 usr/
lrwxrwxrwx root/root 0 Oct 20 17:34 usr/tmp -> ../var/tmp
lrwxrwxrwx root/root 0 Oct 20 17:34 usr/mail -> ../var/mail
drwxr-xr-x root/bin 0 Oct 20 17:34 usr/snadm/
…
…
…
Is your data still there? Yes
Cicero Ronaldo (ciceroฺronaldo@gmailฺcom) has a non-transferable
license to use this Student Guideฺ
Unauthorized reproduction or distribution prohibitedฺ Copyright© 2014, Oracle and/or its affiliatesฺ

Copyright © 2013, Oracle and/or its affiliates. All rights reserved.
Practices for Lesson 4: Managing Business Application Data
Chapter 4 - Page 47
15. Using the zpool destroy command, delete the pool.
root@s11-server1:~# zpool destroy assetpool
root@s11-server1:~# zpool list
NAME SIZE ALLOC FREE CAP DEDUP HEALTH ALTROOT
rpool 31.8G 5.61G 26.1G 17% 1.00x ONLINE -
This concludes the ZFS troubleshooting topic.
Cicero Ronaldo (ciceroฺronaldo@gmailฺcom) has a non-transferable
license to use this Student Guideฺ
Unauthorized reproduction or distribution prohibitedฺ Copyright© 2014, Oracle and/or its affiliatesฺ

Copyright © 2013, Oracle and/or its affiliates. All rights reserved.
Practices for Lesson 4: Managing Business Application Data
Chapter 4 - Page 48
Cicero Ronaldo (ciceroฺronaldo@gmailฺcom) has a non-transferable
license to use this Student Guideฺ
Unauthorized reproduction or distribution prohibitedฺ Copyright© 2014, Oracle and/or its affiliatesฺ

Copyright © 2013, Oracle and/or its affiliates. All rights reserved.
Practices for Lesson 5: Configuring Network and Traffic Failover
Chapter 5 - Page 1
Practices for Lesson 5:
Configuring Network and
Traffic Failover
Chapter 5
Cicero Ronaldo (ciceroฺronaldo@gmailฺcom) has a non-transferable
license to use this Student Guideฺ
Unauthorized reproduction or distribution prohibitedฺ Copyright© 2014, Oracle and/or its affiliatesฺ

Copyright © 2013, Oracle and/or its affiliates. All rights reserved.
Practices for Lesson 5: Configuring Network and Traffic Failover
Chapter 5 - Page 2
Practice Overview for Lesson 5
Practices Overview
Following the predeployment test plan, it is now time to review the Oracle Solaris 11.1
networking functionality. Your company’s business applications, such as Oracle CRM, work with
the data that is being transmitted via the network interfaces configured on server and client
hosts. Because you will be monitoring the transaction traffic load and managing the network
interfaces, it is critical for you to know how the networking is configured. To provide you with an
orientation to the network, the following topics are covered in this practice:
• Modifying the Reactive Network configuration
• Configuring the Network File System
• Configuring link aggregation
• Implementing link failover by using IP multipathing
Note: Your command output displays may be different than the displays in the practice,
especially storage, processes, and other session-oriented content.
Look at your checklist to see where you are. You have just completed managing the business
application data and you are now ready to test the network configuration and network failover.
√ Oracle Solaris 11.1 Predeployment Checklist
√ Managing the Image Packaging System (IPS) and Packages
√ Installing Oracle Solaris 11.1 on Multiple Hosts
√ Managing the Business Application Data
Configuring Network and Traffic Failover
Configuring Zones and the Virtual Network
Managing Services and Service Properties
Configuring Privileges and Role-Based Access Control
Securing System Resources by Using Oracle Solaris Auditing
Managing Processes and Priorities
Evaluating System Resources
Monitoring and Troubleshooting Software Failures
Cicero Ronaldo (ciceroฺronaldo@gmailฺcom) has a non-transferable
license to use this Student Guideฺ
Unauthorized reproduction or distribution prohibitedฺ Copyright© 2014, Oracle and/or its affiliatesฺ
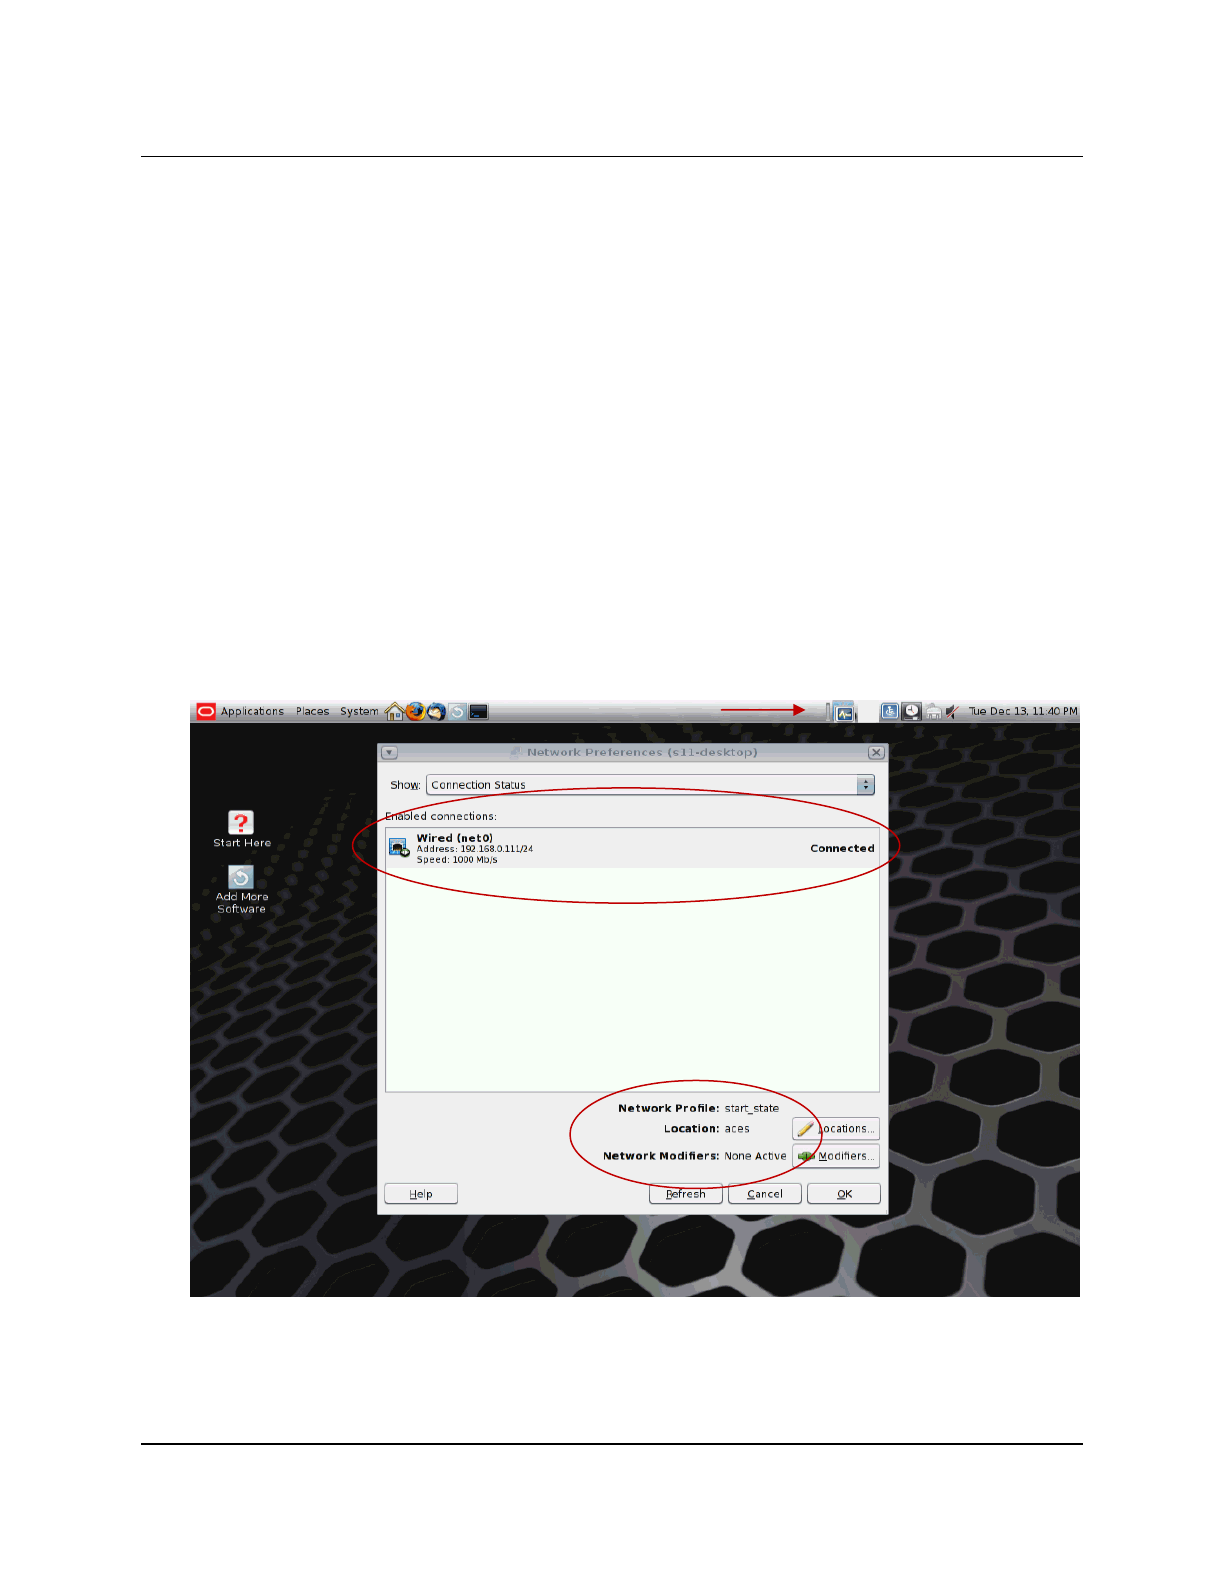
Copyright © 2013, Oracle and/or its affiliates. All rights reserved.
Practices for Lesson 5: Configuring Network and Traffic Failover
Chapter 5 - Page 3
Practice 5-1: Managing a Reactive Network Configuration
Overview
Reactive network is a technology that simplifies and automates network configuration on Oracle
Solaris 11.1. The key reactive network components are the network profiles, which allow you to
specify various network configurations to be created depending on the current network
conditions.
In this practice, you perform the following tasks:
• Assess the current Reactive Network configuration.
• Create and deploy a Reactive Network profile.
Task 1: Assessing the Current Reactive Network Configuration
Note: For Reactive Network to configure the host’s network interface “auto-magically,” the
DHCP service must be available.
1. Verify that the Sol11-Server1 and Sol11-Desktop virtual machines are running. If the
virtual machines are not running, start them now.
2. Log in to the Sol11-Desktop virtual machine as the oracle user with oracle1 as the
password.
3. Click the Network Preferences icon to determine the NCPs and network interfaces (NCUs)
that are currently enabled by Reactive Network. Click OK to continue.
4. Open a terminal window, and su to root.
Cicero Ronaldo (ciceroฺronaldo@gmailฺcom) has a non-transferable
license to use this Student Guideฺ
Unauthorized reproduction or distribution prohibitedฺ Copyright© 2014, Oracle and/or its affiliatesฺ

Copyright © 2013, Oracle and/or its affiliates. All rights reserved.
Practices for Lesson 5: Configuring Network and Traffic Failover
Chapter 5 - Page 4
5. Display the current network configuration for s11-desktop.
root@s11-desktop:~# ipadm show-addr
ADDROBJ TYPE STATE ADDR
lo0/v4 static ok 127.0.0.1/8
net0/v4 static ok 192.168.0.111/24
lo0/v6 static ok ::1/128
net0/v6 addrconf disabled ::
6. List all available Reactive Network profiles and their current state.
root@s11-desktop:~# netadm list
TYPE PROFILE STATE
ncp Automatic disabled
ncp start_state online
ncu:phys net0 online
ncu:ip net0 online
ncp DefaultFixed disabled
loc Automatic offline
loc NoNet offline
loc aces online
7. List the Reactive Network Automatic profile.
root@s11-desktop:~# netadm list Automatic
TYPE PROFILE STATE
ncp Automatic disabled
loc Automatic offline
8. List the Reactive Network start_state profile.
root@s11-desktop:~# netadm list start_state
TYPE PROFILE STATE
ncp start_state online
ncu:phys net0 online
ncu:ip net0 online
9. List the Reactive Network location profiles.
root@s11-desktop:~# netadm list -p loc
TYPE PROFILE STATE
loc Automatic offline
loc NoNet offline
loc aces online
Cicero Ronaldo (ciceroฺronaldo@gmailฺcom) has a non-transferable
license to use this Student Guideฺ
Unauthorized reproduction or distribution prohibitedฺ Copyright© 2014, Oracle and/or its affiliatesฺ

Copyright © 2013, Oracle and/or its affiliates. All rights reserved.
Practices for Lesson 5: Configuring Network and Traffic Failover
Chapter 5 - Page 5
10. List all the phys and ip network configuration units (NCUs) in the active network
configuration profiles (NCPs).
root@s11-desktop:~# netadm list -c phys
TYPE PROFILE STATE
ncu:phys net0 online
root@s11-desktop:~# netadm list -c ip
TYPE PROFILE STATE
ncu:ip net0 online
11. List all the Reactive Network profiles and their auxiliary state.
root@s11-desktop:~# netadm list -x
TYPE PROFILE STATE AUXILIARY STATE
ncp Automatic disabled disabled by administrator
ncp start_state online active
ncu:phys net0 online interface/link is up
ncu:ip net0 online interface/link is up
ncp DefaultFixed disabled disabled by administrator
loc Automatic offline conditions for activation are unmet
loc NoNet offline conditions for activation are unmet
loc aces online active
12. Use the netcfg export command to create backups of the start_state and aces profiles.
root@s11-desktop:~# netcfg export -f start_state_ncp_backup ncp \
start_state
root@s11-desktop:~# netcfg export -f aces_loc_backup loc aces
root@s11-desktop:~# ls *backup
aces_loc_backup start_state_ncp_backup
13. Use the netcfg utility to select the start_state profile and list its NCUs.
root@s11-desktop:~# netcfg
netcfg> select ncp start_state
netcfg:ncp:start_state> list
ncp:start_state
management-type reactive
NCUs:
phys net0
ip net0
Cicero Ronaldo (ciceroฺronaldo@gmailฺcom) has a non-transferable
license to use this Student Guideฺ
Unauthorized reproduction or distribution prohibitedฺ Copyright© 2014, Oracle and/or its affiliatesฺ

Copyright © 2013, Oracle and/or its affiliates. All rights reserved.
Practices for Lesson 5: Configuring Network and Traffic Failover
Chapter 5 - Page 6
14. Select the phys NCU and display its properties.
netcfg:ncp:start_state> select ncu phys net0
netcfg:ncp:start_state:ncu:net0> list
ncu:net0
type link
class phys
parent "start_state"
activation-mode manual
enabled true
netcfg:ncp:start_state:ncu:net0> end
15. Select the ip NCU and display its properties.
netcfg:ncp:start_state> select ncu ip net0
netcfg:ncp:start_state:ncu:net0> list
ncu:net0
type interface
class ip
parent "start_state"
enabled true
ip-version ipv4
ipv4-addrsrc static
ipv4-addr "192.168.0.111/24"
ipv6-addrsrc dhcp,autoconf
netcfg:ncp:start_state:ncu:net0> end
netcfg:ncp:start_state> end
netcfg>
16. Select the aces location profile and list its properties.
netcfg> select loc aces
netcfg:loc:aces> list
loc:aces
activation-mode conditional-all
conditions “system domain is mydomain.com”
enabled true
nameservices dns
nameservices-config-file "/etc/nsswitch.dns"
dns-nameservice-configsrc manual
dns-nameservice-domain "mydomain.com"
dns-nameservice-servers "192.168.0.100"
netcfg:loc:aces> end
netcfg> exit
root@s11-desktop:~#
Cicero Ronaldo (ciceroฺronaldo@gmailฺcom) has a non-transferable
license to use this Student Guideฺ
Unauthorized reproduction or distribution prohibitedฺ Copyright© 2014, Oracle and/or its affiliatesฺ

Copyright © 2013, Oracle and/or its affiliates. All rights reserved.
Practices for Lesson 5: Configuring Network and Traffic Failover
Chapter 5 - Page 7
Task 2: Creating and Deploying a Reactive Network Profile
1. Create an NCP named oracle_profile.
root@s11-desktop:~# netcfg
netcfg> create ncp oracle_profile
2. Create a phys NCU for the net1 data link.
netcfg:ncp:oracle_profile> create ncu phys net1
Created ncu 'net1'. Walking properties ...
activation-mode (manual) [manual|prioritized]> manual
mac-addr> <Press Return>
autopush> <Press Return>
mtu> <Press Return>
netcfg:ncp:oracle_profile:ncu:net1> list
ncu:net1
type link
class phys
parent "oracle_profile"
activation-mode manual
enabled true
netcfg:ncp:oracle_profile:ncu:net1> end
Committed changes
netcfg:ncp:oracle_profile> list
ncp:oracle_profile
management-type reactive
NCUs:
phys net1
3. Create an ip NCU for the net1 data link.
netcfg:ncp:oracle_profile> create ncu ip net1
Created ncu 'net1'. Walking properties ...
ip-version (ipv4,ipv6) [ipv4|ipv6]> ipv4
ipv4-addrsrc [dhcp|static]> static
ipv4-addr> 192.168.0.111
ipv4-default-route> <Press Return>
netcfg:ncp:oracle_profile:ncu:net1> list
ncu:net1
type interface
class ip
parent "oracle_profile"
enabled true
ip-version ipv4
ipv4-addrsrc static
ipv4-addr "192.168.0.111"
Cicero Ronaldo (ciceroฺronaldo@gmailฺcom) has a non-transferable
license to use this Student Guideฺ
Unauthorized reproduction or distribution prohibitedฺ Copyright© 2014, Oracle and/or its affiliatesฺ

Copyright © 2013, Oracle and/or its affiliates. All rights reserved.
Practices for Lesson 5: Configuring Network and Traffic Failover
Chapter 5 - Page 8
netcfg:ncp:oracle_profile:ncu:net1> verify
All properties verified
netcfg:ncp:oracle_profile:ncu:net1> commit
Committed changes
netcfg:ncp:oracle_profile:ncu:net1> end
netcfg:ncp:oracle_profile> list ncu ip net1
ncu:net1
type interface
class ip
parent "oracle_profile"
enabled true
ip-version ipv4
ipv4-addrsrc static
ipv4-addr "192.168.0.111"
netcfg:ncp:oracle_profile> end
netcfg>
4. Create a location (loc) NCP named classroom.
netcfg> create loc classroom
Created loc 'classroom'. Walking properties ...
activation-mode (manual) [manual|conditional-any|conditional-
all]> conditional-all
conditions> "system-domain is mydomain.com"
nameservices (dns) [dns|files|nis|ldap]> dns
nameservices-config-file ("/etc/nsswitch.dns")> <Press Return>
dns-nameservice-configsrc (dhcp) [manual|dhcp]> manual
dns-nameservice-domain> "mydomain.com"
dns-nameservice-servers> "192.168.0.100"
dns-nameservice-search> <Press Return>
dns-nameservice-sortlist> <Press Return>
dns-nameservice-options> <Press Return>
nfsv4-domain> <Press Return>
ipfilter-config-file> <Press Return>
ipfilter-v6-config-file> Press Return>
ipnat-config-file> <Press Return>
ippool-config-file> <Press Return>
ike-config-file> <Press Return>
ipsecpolicy-config-file> <Press Return>
netcfg:loc:classroom> list
loc:classroom
activation-mode conditional-all
conditions "system-domain is mydomain.com"
Cicero Ronaldo (ciceroฺronaldo@gmailฺcom) has a non-transferable
license to use this Student Guideฺ
Unauthorized reproduction or distribution prohibitedฺ Copyright© 2014, Oracle and/or its affiliatesฺ

Copyright © 2013, Oracle and/or its affiliates. All rights reserved.
Practices for Lesson 5: Configuring Network and Traffic Failover
Chapter 5 - Page 9
enabled false
nameservices dns
nameservices-config-file "/etc/nsswitch.dns"
dns-nameservice-configsrc manual
dns-nameservice-domain "mydomain.com"
dns-nameservice-servers "192.168.0.100"
netcfg:loc:classroom> verify
All properties verified
netcfg:loc:classroom> commit
Committed changes
netcfg:loc:classroom> end
netcfg> exit
5. Use the netcfg list command to display all the profiles that exist at the current scope.
root@s11-desktop:~# netcfg list
NCPs:
Automatic
start_state
DefaultFixed
oracle_profile
Locations:
Automatic
NoNet
aces
classroom
6. Use the netcfg export command to create backups of your oracle_profile and
classroom profiles.
root@s11-desktop:~# netcfg export -f oracle_ncp_backup ncp \
oracle_profile
root@s11-desktop:~# netcfg export -f classroom_loc_backup \
loc classroom
root@s11-desktop:~# ls *backup
aces_loc_backup oracle_ncp_backup
classroom_loc_backup start_state_ncp_backup
Cicero Ronaldo (ciceroฺronaldo@gmailฺcom) has a non-transferable
license to use this Student Guideฺ
Unauthorized reproduction or distribution prohibitedฺ Copyright© 2014, Oracle and/or its affiliatesฺ

Copyright © 2013, Oracle and/or its affiliates. All rights reserved.
Practices for Lesson 5: Configuring Network and Traffic Failover
Chapter 5 - Page 10
7. Destroy the classroom profile and show the results.
root@s11-desktop:~# netcfg destroy loc classroom
root@s11-desktop:~# netcfg list
NCPs:
Automatic
start_state
DefaultFixed
oracle_profile
Locations:
aces
Automatic
NoNet
8. Recover the classroom profile from your backup and show the results.
root@s11-desktop:~# netcfg -f classroom_loc_backup
Configuration read.
root@s11-desktop:~# netcfg list
NCPs:
Automatic
start_state
DefaultFixed
oracle_profile
Locations:
Automatic
NoNet
aces
classroom
9. Use the netadm enable command to enable the classroom and oracle_profile
profiles.
root@s11-desktop:~# netadm enable classroom
Enabling loc 'classroom'
root@s11-desktop:~# netadm enable oracle_profile
Enabling ncp 'oracle_profile'
10. Reboot the system to verify that oracle_profile and classroom are the default
Reactive Network profiles.
root@s11-desktop:~# init 6
11. After the system reboots, log in as oracle. Use oracle1 as the password.
Cicero Ronaldo (ciceroฺronaldo@gmailฺcom) has a non-transferable
license to use this Student Guideฺ
Unauthorized reproduction or distribution prohibitedฺ Copyright© 2014, Oracle and/or its affiliatesฺ
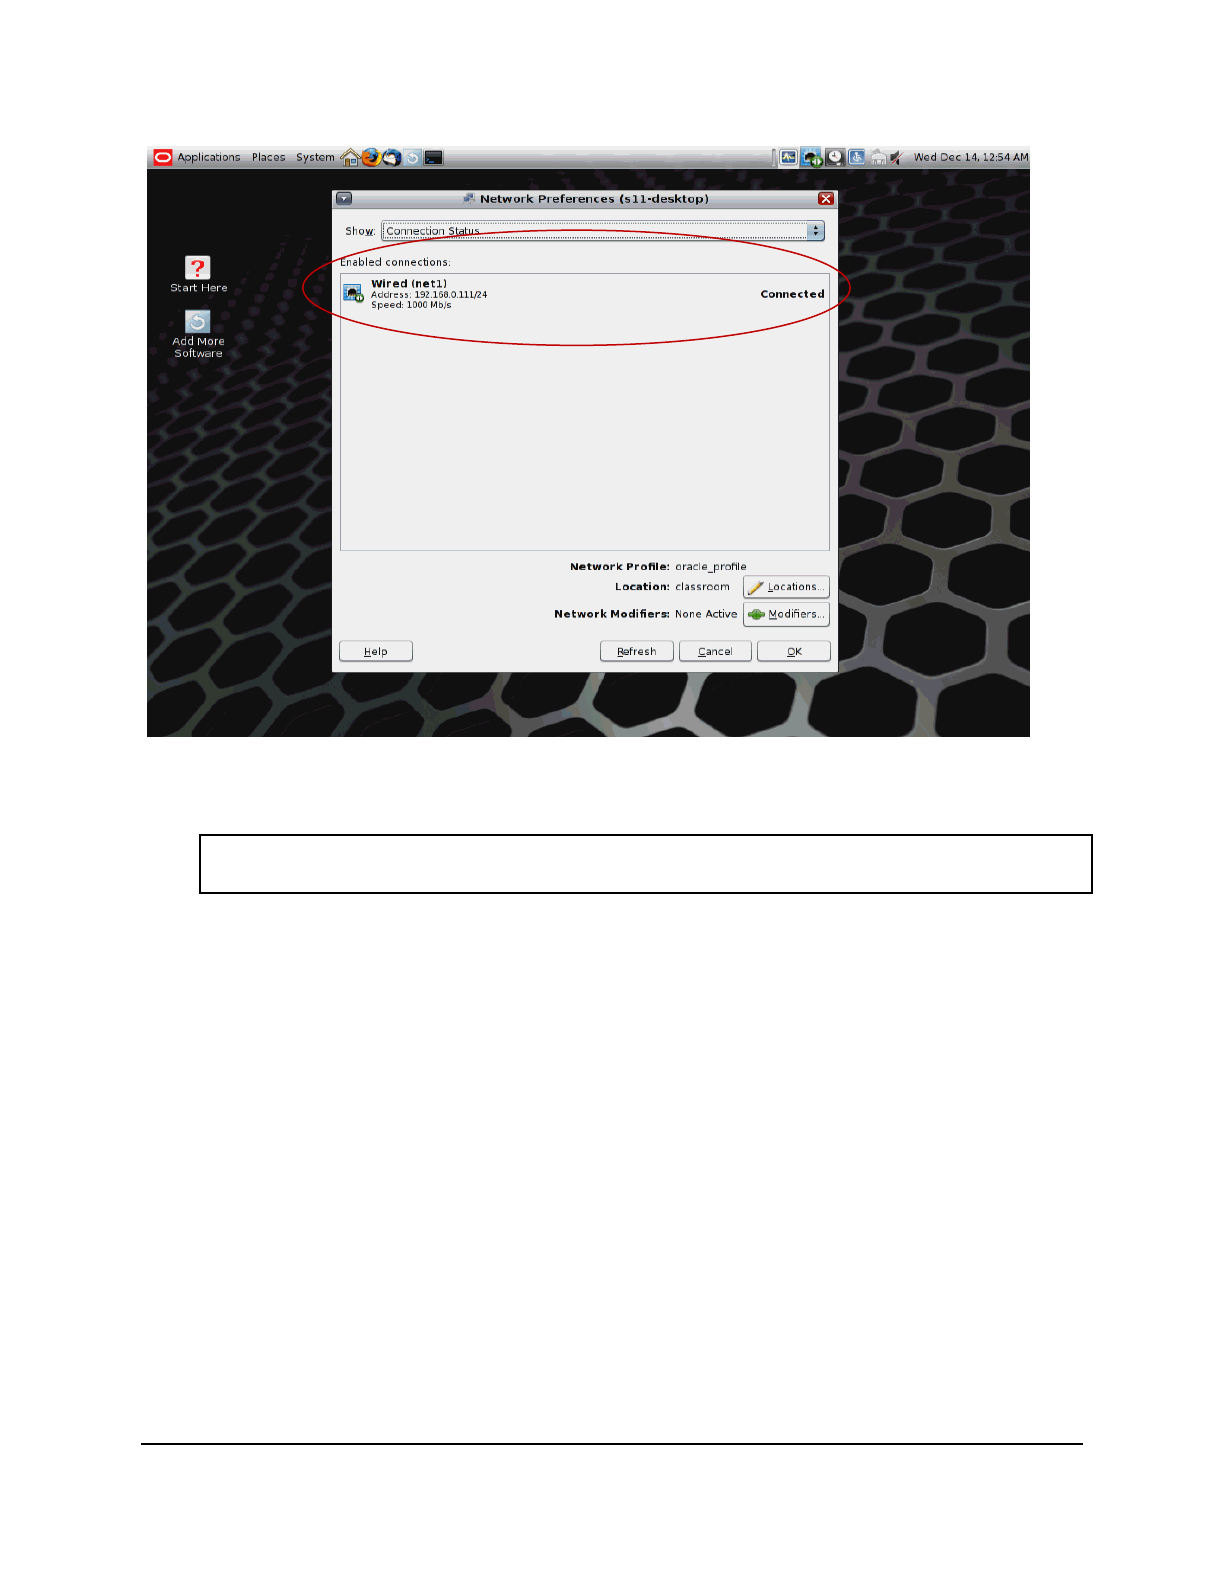
Copyright © 2013, Oracle and/or its affiliates. All rights reserved.
Practices for Lesson 5: Configuring Network and Traffic Failover
Chapter 5 - Page 11
12. Open the Network Preferences dialog box. Click OK to continue.
Note that the net1 network interface is now connected to the network.
13. Open a terminal window su to root. Use the ping command to verify communication with
a remote host.
root@s11-desktop:~# ping s11-server1
s11-server1 is alive.
14. Power-off the Sol11-Desktop virtual machine.
Cicero Ronaldo (ciceroฺronaldo@gmailฺcom) has a non-transferable
license to use this Student Guideฺ
Unauthorized reproduction or distribution prohibitedฺ Copyright© 2014, Oracle and/or its affiliatesฺ

Copyright © 2013, Oracle and/or its affiliates. All rights reserved.
Practices for Lesson 5: Configuring Network and Traffic Failover
Chapter 5 - Page 12
Practice 5-2: Configuring the Network File System
Overview
In this practice, you configure the NFS server as well as the NFS client. You share a
documentation folder from the server and access it on the client host. The following activities
are covered:
• Configuring the NFS server
• Configuring the NFS client
Task 1: Configuring the NFS Server
1. Verify that the Sol11-Server1 virtual machine is running.
2. Log in to the Sol11-Server1 virtual machine as the oracle user. Use oracle1 as the
password. Assume primary administrator privileges.
3. Display the current status of the ZFS pool and the file systems.
root@s11-server1:~# zpool list
NAME SIZE ALLOC FREE CAP DEDUP HEALTH ALTROOT
rpool 31.8G 9.90G 21.8G 31% 1.00x ONLINE -
root@s11-server1:~# zfs list -r /rpool
NAME USED AVAIL REFER MOUNTPOINT
rpool 9.98G 21.3G 39K /rpool
rpool/ROOT 1.89G 21.3G 31K legacy
rpool/ROOT/solaris 1.89G 21.3G 1.61G /
rpool/ROOT/solaris/var 235M 21.3G 90.2M /var
rpool/dump 1.03G 21.3G 1.00G -
rpool/export 6.02G 21.3G 274M /export
rpool/export/IPS 5.74G 21.3G 5.74G /export/IPS
rpool/export/home 10.2M 21.3G 38K /export/home
rpool/export/home/gail 33.5K 21.3G 33.5K /export/home/gail
rpool/swap 1.03G 21.3G 1.00G -
Your display may be different. Before you create the docs file system, you want to make
sure that it does not exist already.
4. Using the zfs create command, create a ZFS file system called
rpool/export/home/docs. Confirm the creation of the file system.
root@s11-server1:~# zfs create rpool/export/home/docs
root@s11-server1:~# zfs list /export/home/docs
NAME USED AVAIL REFER MOUNTPOINT
rpool/export/home/docs 31K 21.3G 31K /export/home/docs
What is the mount point of rpool/export/home/docs? /export/home/docs
5. Using the touch command, create a file called assetlist in /export/home/docs.
root@s11-server1:~# cd /export/home/docs
root@s11-server1:/export/home/docs# touch assetlist
root@s11-server1:/export/home/docs# cd
Cicero Ronaldo (ciceroฺronaldo@gmailฺcom) has a non-transferable
license to use this Student Guideฺ
Unauthorized reproduction or distribution prohibitedฺ Copyright© 2014, Oracle and/or its affiliatesฺ

Copyright © 2013, Oracle and/or its affiliates. All rights reserved.
Practices for Lesson 5: Configuring Network and Traffic Failover
Chapter 5 - Page 13
6. Use the zfs commands to share the ZFS file system.
root@s11-server1:~# zfs set \
share=name=docs,path=/export/home/docs,prot=nfs \
rpool/export/home/docs
name=docs,path=/export/home/docs,prot=nfs
root@s11-server1:~# zfs set sharenfs=on rpool/export/home/docs
root@s11-server1:~# zfs set compression=on rpool/export/home/docs
root@s11-server1:~# share
docs /export/home/docs nfs sec=sys,rw
shares /export/share nfs sec=sys,rw
This shows that the /export/home/docs resource is being shared.
7. Verify that the nfs services are up and running.
root@s11-server1:~# svcs -a | grep nfs
disabled 9:13:15 svc:/network/nfs/cbd:default
disabled 9:13:15 svc:/network/nfs/client:default
online 9:13:15 svc:/network/nfs/fedfs-client:default
online 9:13:15 svc:/network/nfs/status:default
online 9:13:15 svc:/network/nfs/mapid:default
online 9:13:18 svc:/network/nfs/rquota:default
online 9:13:36 svc:/network/nfs/nlockmgr:default
online 9:13:37 svc:/network/nfs/server:default
Is nfs/server up and running? Yes
Task 2: Configuring the NFS Client
1. Verify that Sol11-Server1 is still running. Start the Sol11-Desktop virtual machine and
log in as the oracle user. Use oracle1 as the password. Open a terminal window and
assume administrator privileges.
2. Use the dfshares command to confirm whether you can view the shared resource from
the s11-desktop virtual machine. Create a directory called /docs to use as the mount
point.
root@s11-desktop:~# dfshares s11-server1
RESOURCE SERVER ACCESS TRANSPORT
s11-server1:/export/home/docs s11-server1 - -
root@s11-desktop:~# mkdir /docs
Cicero Ronaldo (ciceroฺronaldo@gmailฺcom) has a non-transferable
license to use this Student Guideฺ
Unauthorized reproduction or distribution prohibitedฺ Copyright© 2014, Oracle and/or its affiliatesฺ

Copyright © 2013, Oracle and/or its affiliates. All rights reserved.
Practices for Lesson 5: Configuring Network and Traffic Failover
Chapter 5 - Page 14
3. Use the mount command to specify the resource to be mounted on the /docs directory.
root@s11-desktop:~# mount -F nfs -o ro s11-server1:/export/home/docs \
/docs
root@s11-desktop:~# cd /docs
root@s11-desktop:/docs# ls
assetlist
This demonstrates that the assetlist file in /export/home/docs can be shared on
s11-desktop from s11-server1.
4. Using the umount command, unmount the /docs directory.
root@s11-desktop:/docs# cd
root@s11-desktop:~# umount /docs
Note: If you are unable to unmount, then run the umount -f /docs command.
5. Return to s11-server1 and stop sharing the directory.
root@s11-server1:~# zfs set sharenfs=off rpool/export/home/docs
6. Using the share command, check whether any resource is being shared.
root@s11-server1:~# share
Cicero Ronaldo (ciceroฺronaldo@gmailฺcom) has a non-transferable
license to use this Student Guideฺ
Unauthorized reproduction or distribution prohibitedฺ Copyright© 2014, Oracle and/or its affiliatesฺ

Copyright © 2013, Oracle and/or its affiliates. All rights reserved.
Practices for Lesson 5: Configuring Network and Traffic Failover
Chapter 5 - Page 15
Practice 5-3: Configuring a Link Aggregation
Overview
Link aggregation requires at least two network interfaces. The network interfaces must be
unplumbed before they can be aggregated. In this practice, you combine four network interfaces
into one link aggregation called crmpipe0 to create a larger network pipe for the CRM
application. Then you manage the interfaces, which includes removing, adding, and eventually
deleting the crmpipe0 link aggregation. This portrays different network management situations
while working with the CRM application (for example, adjusting the bandwidth as needed).
Task 1: Configuring a Link Aggregation
1. Verify that the Sol11-Server1 is running and that you have assumed administrator
privileges. Disable IP filtering.
root@s11-server1:~# ipf -D
2. Delete the IP interface for the net0 data link.
root@s11-server1:~# ipadm delete-ip net0
3. List the network links that are currently configured in the system.
root@s11-server1:~# dladm show-link
LINK CLASS MTU STATE OVER
net1 phys 1500 unknown --
net2 phys 1500 unknown --
net0 phys 1500 unknown --
net3 phys 1500 unknown --
4. Create a link aggregation named crmpipe0 that consists of the net0, net1, net2, and
net3 network interfaces, and show the results.
root@s11-server1:~# dladm create-aggr -l net0 -l net1 \
-l net2 -l net3 crmpipe0
root@s11-server1:~# dladm show-link
LINK CLASS MTU STATE OVER
net1 phys 1500 up --
net2 phys 1500 up --
net0 phys 1500 up --
net3 phys 1500 up --
crmpipe0 aggr 1500 up -- net0 net1 net2 net3
root@s11-server1:~$ dladm show-aggr
LINK MODE POLICY ADDRPOLICY LACPACTIVITY LACPTIMER
crmpipe0 trunk L4 auto off short
root@s11-server1:~$
Cicero Ronaldo (ciceroฺronaldo@gmailฺcom) has a non-transferable
license to use this Student Guideฺ
Unauthorized reproduction or distribution prohibitedฺ Copyright© 2014, Oracle and/or its affiliatesฺ

Copyright © 2013, Oracle and/or its affiliates. All rights reserved.
Practices for Lesson 5: Configuring Network and Traffic Failover
Chapter 5 - Page 16
5. Create an IP interface for the crmpipe0 data link and show the results.
root@s11-server1:~# ipadm create-ip crmpipe0
root@s11-server1:~# ipadm show-if
IFNAME CLASS STATE ACTIVE OVER
lo0 loopback ok yes --
crmpipe0 ip down no --
6 Run the ipadm command to create the static IPv4 address for the s11-server1 system
on the crmpipe0 interface, and show the results.
root@s11-server1:~# ipadm create-addr -T static \
-a 192.168.0.100/24 crmpipe0/v4
root@s11-server1:~# ipadm show-addr
ADDROBJ TYPE STATE ADDR
lo0/v4 static ok 127.0.0.1/8
crmpipe0/v4 static ok 192.168.0.100/24
lo0/v6 static ok ::1/128
7. Log in to the Sol11-Desktop system and use the ping command to verify connectivity to
the s11-server1 server.
root@s11-desktop:~# ping s11-server1
s11-server1 is alive
Note: Reboot the system if the ping command does not work.
Task 2: Removing the Link Aggregation
1. From Sol11-Server1, delete the crmpipe0 IP interface by using the ipadm command
root@s11-server1:~# ipadm delete-ip crmpipe0
root@s11-server1:~# ipadm show-addr
ADDROBJ TYPE STATE ADDR
lo0/v4 static ok 127.0.0.1/8
lo0/v6 static ok ::1/128
root@s11-server1:~# dladm show-link
LINK CLASS MTU STATE OVER
net1 phys 1500 up --
net2 phys 1500 up --
net0 phys 1500 up --
net3 phys 1500 up --
crmpipe0 aggr 1500 up net0 net1 net2 net3
Cicero Ronaldo (ciceroฺronaldo@gmailฺcom) has a non-transferable
license to use this Student Guideฺ
Unauthorized reproduction or distribution prohibitedฺ Copyright© 2014, Oracle and/or its affiliatesฺ

Copyright © 2013, Oracle and/or its affiliates. All rights reserved.
Practices for Lesson 5: Configuring Network and Traffic Failover
Chapter 5 - Page 17
2. Using the dladm command, delete the crmpipe0 aggregation.
root@s11-server1:~# dladm delete-aggr crmpipe0
root@s11-server1:~# dladm show-link
LINK CLASS MTU STATE OVER
net1 phys 1500 unknown --
net2 phys 1500 unknown --
net0 phys 1500 unknown --
net3 phys 1500 unknown --
root@s11-server1:~# ipadm show-if
IFNAME CLASS STATE ACTIVE OVER
lo0 loopback ok yes --
Currently, the link aggregation has been removed.
Note: At this time, you want to keep these links unconfigured because they will be needed
in this state for the next practice.
Cicero Ronaldo (ciceroฺronaldo@gmailฺcom) has a non-transferable
license to use this Student Guideฺ
Unauthorized reproduction or distribution prohibitedฺ Copyright© 2014, Oracle and/or its affiliatesฺ

Copyright © 2013, Oracle and/or its affiliates. All rights reserved.
Practices for Lesson 5: Configuring Network and Traffic Failover
Chapter 5 - Page 18
Practice 5-4: Configuring IPMP
Overview
IP network multipathing (IPMP) provides physical interface failure detection, transparent
network access failover, and packet load balancing.
An IPMP configuration typically consists of two or more physical interfaces on the same system
that are attached to the same LAN. These interfaces can belong to an IPMP group in either of
the following configurations:
• Active-active configuration: In this configuration, all underlying interfaces are active. An
active interface is an IP interface that is currently available for use by the IPMP group.
By default, an underlying interface becomes active when you configure the interface to
become a part of an IPMP group.
• Active-standby configuration: In this configuration, at least one interface is
administratively configured as standby. If an active interface fails, the standby interface
is automatically deployed as needed. You can configure as many standby interfaces as
you want for an IPMP group.
In this practice, you configure both active-active and active-standby configurations.
Task 1: Creating an Active-Active IPMP Configuration
In this task, you configure an active-active IPMP group that consists of two network interfaces.
1. Verify that the Sol11-Server1 and Sol11-Desktop virtual machines are running. If any
virtual machine is not running, start it now.
2. Log in to the Sol11-Server1 virtual machine as the oracle user and su to root.
3. Use the ipadm command to display the IP network interfaces that are currently configured
in the system.
root@s11-server1:~# ipadm show-if
IFNAME CLASS STATE ACTIVE OVER
lo0 loopback ok yes --
net0 ip ok yes --
Note: If you performed the previous practice, you will not see net0 in this display. This
step is shown here in case you perform this practice independently.
4. If you did not delete the net0 network interface as part of Practice 5-3, delete it now and
display the results. If you have already deleted the network interface, go to step 5.
root@s11-server1:~# ipadm delete-ip net0
Note: If you performed the previous practice, you will not see net0 in this display. This
step is shown here in case you perform this practice independently.
.
root@s11-server1:~# ipadm show-if
IFNAME CLASS STATE ACTIVE OVER
lo0 loopback ok yes --
Cicero Ronaldo (ciceroฺronaldo@gmailฺcom) has a non-transferable
license to use this Student Guideฺ
Unauthorized reproduction or distribution prohibitedฺ Copyright© 2014, Oracle and/or its affiliatesฺ

Copyright © 2013, Oracle and/or its affiliates. All rights reserved.
Practices for Lesson 5: Configuring Network and Traffic Failover
Chapter 5 - Page 19
When configuring IPMP, you must assign all network interfaces that are attached to the
same LAN to an IPMP group. In this step, you deleted the net0 interface in preparation
for configuring it in an IPMP group.
5. Rename the net0 data link to link0_ipmp0 and the net1 data link to link1_ipmp0.
Show the results.
root@s11-server1:~# dladm rename-link net0 link0_ipmp0
root@s11-server1:~# dladm rename-link net1 link1_ipmp0
root@s11-server1:~# dladm show-link
LINK CLASS MTU STATE OVER
link1_ipmp0 phys 1500 unknown --
net2 phys 1500 unknown --
link0_ipmp0 phys 1500 unknown --
net3 phys 1500 unknown --
6. Create IP interfaces for the link0_ipmp0 and link1_ipmp0 data links. Show the results.
root@s11-server1:~# ipadm create-ip link0_ipmp0
root@s11-server1:~# ipadm create-ip link1_ipmp0
root@s11-server1:~# ipadm show-if
IFNAME CLASS STATE ACTIVE OVER
lo0 loopback ok yes --
link0_ipmp0 ip down no --
link1_ipmp0 ip down no --
7. Create an IPMP group named ipmp0.
root@s11-server1:~# ipadm create-ipmp ipmp0
8. Add the link0_ipmp0 and link1_ipmp0 IP interfaces to the ipmp0 IPMP group and
show the results.
root@s11-server1:~# ipadm add-ipmp –i link0_ipmp0 \
–i link1_ipmp0 ipmp0
root@s11-server1:~# ipmpstat –g
GROUP GROUPNAME STATE FDT INTERFACES
ipmp0 ipmp0 ok -- link0_ipmp0 link1_ipmp0
9. Assign two static IP addresses to the IPMP interface to be used for data access.
root@s11-server1:~# ipadm create-addr –T static \
–a 192.168.0.112/24 ipmp0/v4add1
root@s11-server1:~# ipadm create-addr –T static \
–a 192.168.0.113/24 ipmp0/v4add2
Cicero Ronaldo (ciceroฺronaldo@gmailฺcom) has a non-transferable
license to use this Student Guideฺ
Unauthorized reproduction or distribution prohibitedฺ Copyright© 2014, Oracle and/or its affiliatesฺ

Copyright © 2013, Oracle and/or its affiliates. All rights reserved.
Practices for Lesson 5: Configuring Network and Traffic Failover
Chapter 5 - Page 20
10. Assign a static IP address to each IPMP subinterface to be used for link testing.
root@s11-server1:~# ipadm create-addr –T static \
–a 192.168.0.142/24 link0_ipmp0/test
Dec 14 02:59:46 s11-server1 in.mpathd[113]: At least one
NOFAILOVER test address has been configured on group ‘ipmp0’;
link-state fault-detection setting will be ignored for the group
If you receive the above message, ignore it because link-state fault-detection is not your
objective
root@s11-server1:~# ipadm create-addr –T static \
–a 192.168.0.143/24 link1_ipmp0/test
11. Display the data and test the IP addresses.
root@s11-server1:~# ipadm show-addr
ADDROBJ TYPE STATE ADDR
lo0/v4 static ok 127.0.0.1/8
link0_ipmp0/test static ok 192.168.0.142/24
link1_ipmp0/test static ok 192.168.0.143/24
ipmp0/v4add1 static ok 192.168.0.112/24
ipmp0/v4add2 static ok 192.168.0.113/24
lo0/v6 static ok ::1/128
12. Use the ipmpstat command to display the IPMP address information.
root@s11-server1:~# ipmpstat -an
ADDRESS STATE GROUP INBOUND OUTBOUND
:: down ipmp0 -- --
192.168.0.113 up ipmp0 link0_ipmp0 link0_ipmp0 link1_ipmp0
192.168.0.112 up ipmp0 link1_ipmp0 link0_ipmp0 link1_ipmp0
Note: The INBOUND traffic is restricted to one interface depending on the IP address
that is used. The OUTBOUND traffic is spread across both interfaces.
Cicero Ronaldo (ciceroฺronaldo@gmailฺcom) has a non-transferable
license to use this Student Guideฺ
Unauthorized reproduction or distribution prohibitedฺ Copyright© 2014, Oracle and/or its affiliatesฺ

Copyright © 2013, Oracle and/or its affiliates. All rights reserved.
Practices for Lesson 5: Configuring Network and Traffic Failover
Chapter 5 - Page 21
13. Use the ipmpstat command to display the IP interface information.
root@s11-server1:~# ipmpstat -i
INTERFACE ACTIVE GROUP FLAGS LINK PROBE STATE
link0_ipmp0 yes ipmp0 --mbM-- up ok ok
link1_ipmp0 yes ipmp0 ------- up ok ok
The interface FLAGS are defined as:
i = Unusable due to being INACTIVE
s = Masked STANDBY
m = Nominated to send/receive IPv4 multicast for its IPMP group
b = Nominated to send/receive IPv4 broadcast for its IPMP group
M = Nominated to send/receive IPv6 multicast for its IPMP group
d = Unusable due to being down
h = Unusable due to being brought OFFLINE by in.mpathd (IPMP daemon) because
of a duplicate hardware address
14. Use the ipmpstat command to display information about test address targets.
root@s11-server1:~# ipmpstat -nt
INTERFACE MODE TESTADDR TARGETS
link0_ipmp0 multicast 192.168.0.142 192.168.0.111
link1_ipmp0 multicast 192.168.0.143 192.168.0.111
Note the Sol11-Desktop IP address 192.168.0.111 under the Targets column. This
VM should be up for you to receive this display.
15. Use the ipmpstat command to display the current probe information.
root@s11-server1:~# ipmpstat -pn
TIME INTERFACE PROBE NETRTT RTT RTTAVG TARGET
0.49s link0_ipmp0 i195 0.70ms 1.29ms 0.71ms 192.168.0.111
0.73s link1_ipmp0 i145 0.68ms 0.96ms 1.94ms 192.168.0.111
1.38s link0_ipmp0 i196 0.59ms 0.73ms 0.71ms 192.168.0.111
2.11s link1_ipmp0 i146 0.51ms 0.69ms 1.78ms 192.168.0.111
3.25s link0_ipmp0 i197 0.50ms 0.58ms 0.70ms 192.168.0.111
3.70s link1_ipmp0 i147 0.60ms 1.01ms 1.69ms 192.168.0.111
4.58s link0_ipmp0 i198 0.56ms 0.72ms 0.70ms 192.168.0.111
5.16s link1_ipmp0 i148 0.43ms 0.60ms 1.55ms 192.168.0.111
6.04s link0_ipmp0 i199 0.53ms 0.60ms 0.69ms 192.168.0.111
6.61s link1_ipmp0 i149 0.77ms 0.84ms 1.46ms 192.168.0.111
^C
Your display may be different.
Cicero Ronaldo (ciceroฺronaldo@gmailฺcom) has a non-transferable
license to use this Student Guideฺ
Unauthorized reproduction or distribution prohibitedฺ Copyright© 2014, Oracle and/or its affiliatesฺ

Copyright © 2013, Oracle and/or its affiliates. All rights reserved.
Practices for Lesson 5: Configuring Network and Traffic Failover
Chapter 5 - Page 22
Task 2: Testing the Active-Active IPMP Configuration
In this task, you test the active-active IPMP configuration by causing one of the subinterfaces to
fail. Then you verify that the system is still accessible by using the remaining interface.
1. Shut down the Sol11-Server1 virtual machine.
2. Open the VirtualBox Manager GUI and click the Settings utility for the Sol11-Server1
virtual machine.
Cicero Ronaldo (ciceroฺronaldo@gmailฺcom) has a non-transferable
license to use this Student Guideฺ
Unauthorized reproduction or distribution prohibitedฺ Copyright© 2014, Oracle and/or its affiliatesฺ
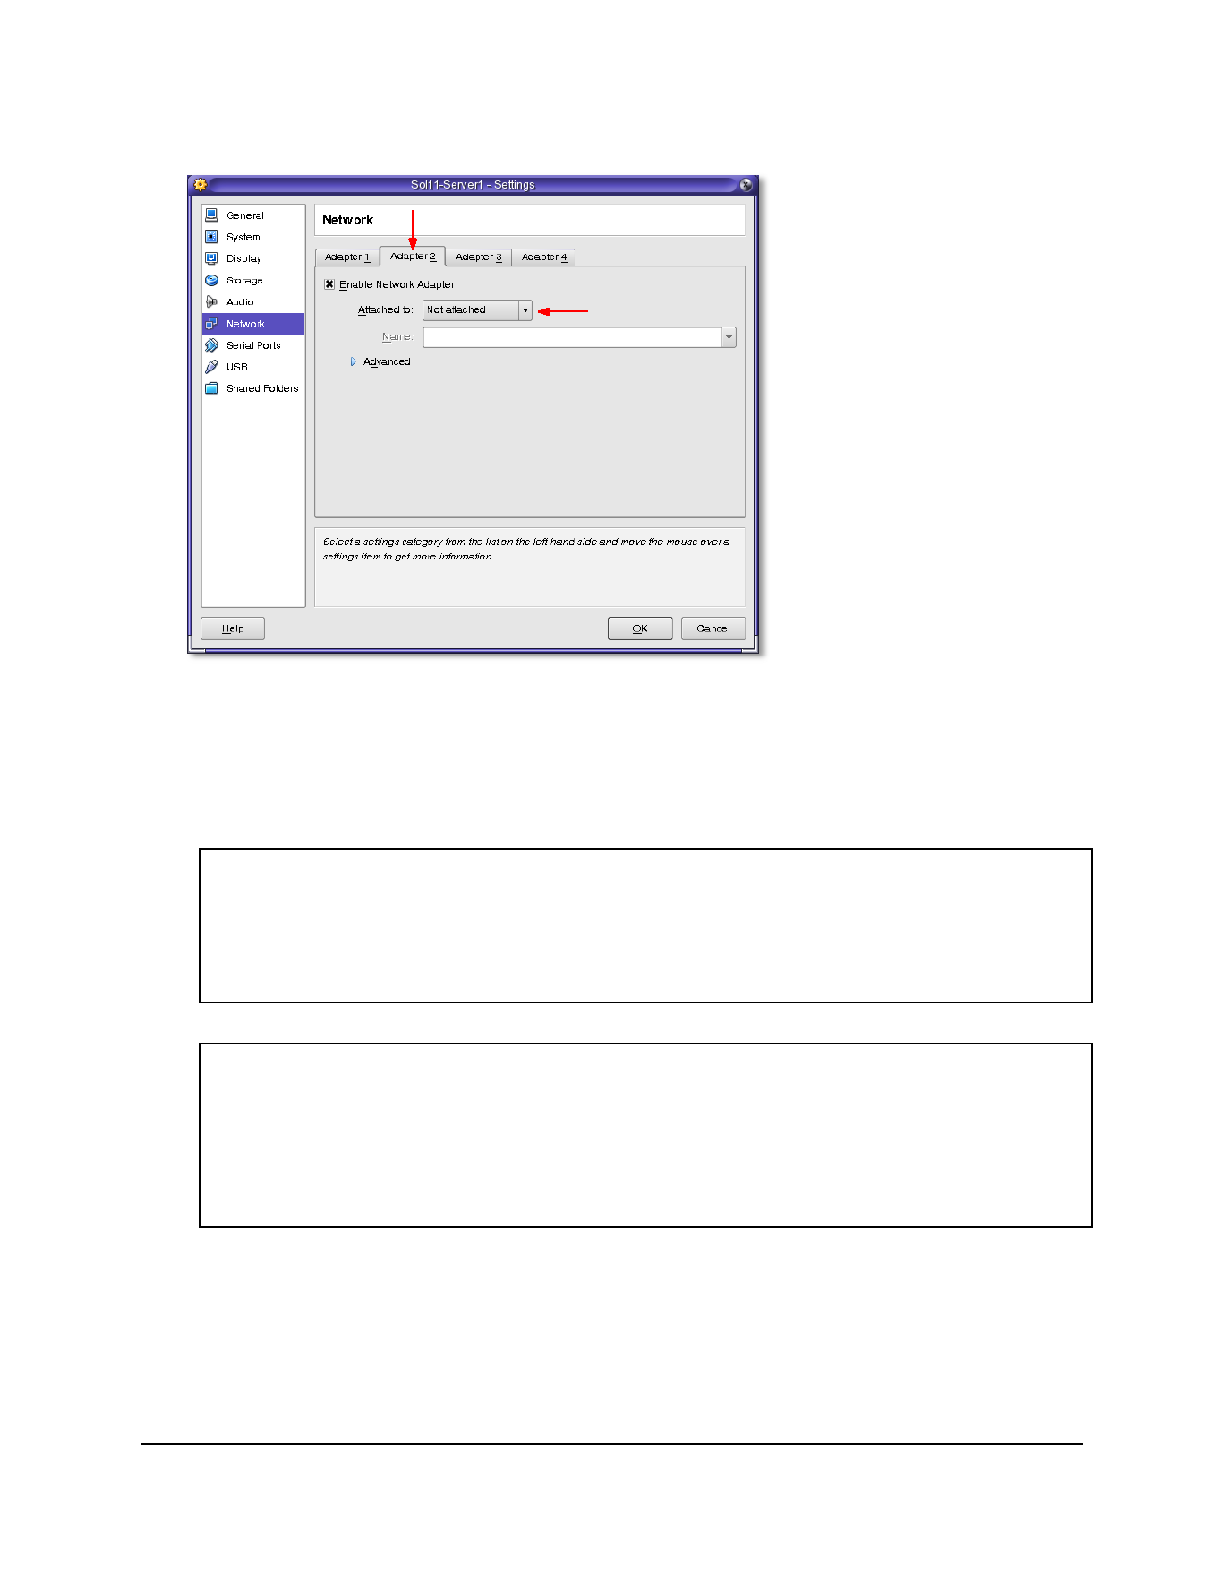
Copyright © 2013, Oracle and/or its affiliates. All rights reserved.
Practices for Lesson 5: Configuring Network and Traffic Failover
Chapter 5 - Page 23
3. Under Network settings, select Adapter 2 and set the “Attached to:” field to “Not attached.”
Click OK to continue.
4. Start the Sol11-Server1 virtual machine.
Note: You might see a series of error messages about the failed IPMP interface and other
services. You can ignore these messages and press Enter to continue to the console login
prompt.
5. Log in to the Sol11-Server1 virtual machine as the oracle user and su to root.
6. Use the ipmpstat command to display IPMP group information.
root@s11-server1:~# ipmpstat -g
GROUP GROUPNAME STATE FDT INTERFACES
ipmp0 ipmp0 degraded 10.00s link1_ipmp0 [link0_ipmp0]
Note that link0_ipmp0 has been boxed ([link0_ipmp0]) indicating that it has failed.
7. Use the ipmpstat command to display the IP interface information.
root@s11-server1:~# ipmpstat -i
INTERFACE ACTIVE GROUP FLAGS LINK PROBE STATE
link0_ipmp0 no ipmp0 ------- up failed failed
link1_ipmp0 yes ipmp0 --mbM-- up ok ok
The link0_ipmp0 interface is no longer active.
Cicero Ronaldo (ciceroฺronaldo@gmailฺcom) has a non-transferable
license to use this Student Guideฺ
Unauthorized reproduction or distribution prohibitedฺ Copyright© 2014, Oracle and/or its affiliatesฺ

Copyright © 2013, Oracle and/or its affiliates. All rights reserved.
Practices for Lesson 5: Configuring Network and Traffic Failover
Chapter 5 - Page 24
8. Use the ipmpstat command to display the current probe information.
root@s11-server1:~# ipmpstat -pn
TIME INTERFACE PROBE NETRTT RTT RTTAVG TARGET
0.21s link1_ipmp0 i505 0.62ms 1.11ms 0.70ms 192.168.0.111
-1.99s link0_ipmp0 i504 -- -- -- 192.168.0.111
1.15s link1_ipmp0 i506 0.51ms 0.65ms 0.70ms 192.168.0.111
0.25s link0_ipmp0 i506 -- -- -- 192.168.0.111
-1.02s link0_ipmp0 i505 -- -- -- 192.168.0.111
2.85s link1_ipmp0 i507 0.56ms 0.70m 0.70ms 192.168.0.111
4.25s link1_ipmp0 i508 0.41ms 0.55ms 0.68ms 192.168.0.111
^C
Note that link0_ipmp0 is failing probe tests.
Your display may be different.
9. Log in to the Sol11-Desktop virtual machine and ping the IPMP data IP addresses
configured on the Sol11-Server1.
root@s11-desktop:~# ping 192.168.0.112
192.168.0.112 is alive
root@s11-desktop:~# ping 192.168.0.113
192.168.0.113 is alive
10. Return to the Sol11-Server1 virtual machine and shut it down.
11. Open the VirtualBox Manager GUI and click the Settings utility for the Sol11-Server1
virtual machine.
Cicero Ronaldo (ciceroฺronaldo@gmailฺcom) has a non-transferable
license to use this Student Guideฺ
Unauthorized reproduction or distribution prohibitedฺ Copyright© 2014, Oracle and/or its affiliatesฺ
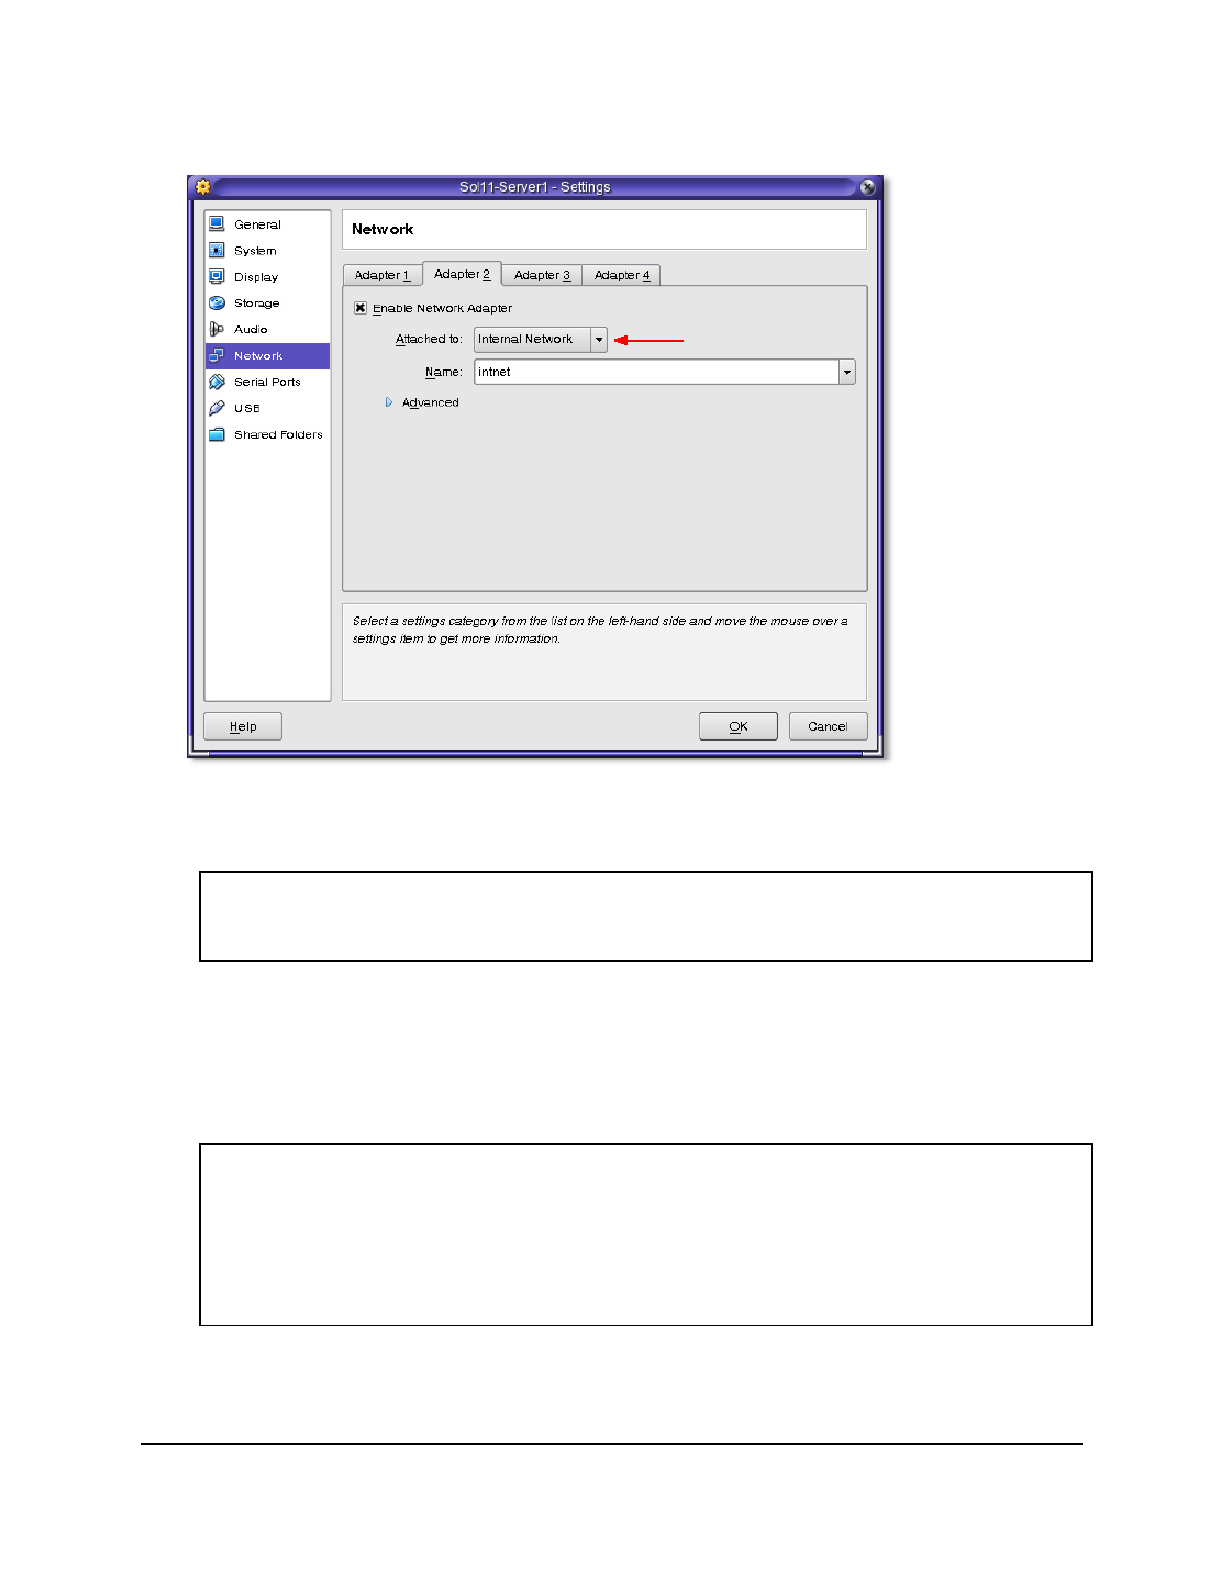
Copyright © 2013, Oracle and/or its affiliates. All rights reserved.
Practices for Lesson 5: Configuring Network and Traffic Failover
Chapter 5 - Page 25
12. Under Network settings, select Adapter 2 and set the “Attached to:” field to Internal
Network. Click OK to continue.
13. Start the Sol11-Server1 virtual machine.
14. Log in to the Sol11-Server1 virtual machine as the oracle user and su to root.
15. Use the ipmpstat command to verify that the IPMP group ipmp0 STATE is ok.
root@s11-server1:~# ipmpstat –g
GROUP GROUPNAME STATE FDT INTERFACES
ipmp0 ipmp0 ok 10.00s link0_ipmp0 link1_ipmp0
Task 3: Creating an Active-Standby IPMP Configuration
In this task, you reconfigure the ipmp0 IPMP group from an active-active configuration to an
active-standby configuration.
1. On the Sol11-Server1 virtual machine, display the data links.
root@s11-server1:~# dladm show-link
LINK CLASS MTU STATE OVER
link1_ipmp0 phys 1500 up --
net2 phys 1500 unknown --
link0_ipmp0 phys 1500 up --
net3 phys 1500 unknown --
Cicero Ronaldo (ciceroฺronaldo@gmailฺcom) has a non-transferable
license to use this Student Guideฺ
Unauthorized reproduction or distribution prohibitedฺ Copyright© 2014, Oracle and/or its affiliatesฺ

Copyright © 2013, Oracle and/or its affiliates. All rights reserved.
Practices for Lesson 5: Configuring Network and Traffic Failover
Chapter 5 - Page 26
2. Rename the net2 data link to link2_ipmp0 and show the results.
root@s11-server1:~# dladm rename-link net2 link2_ipmp0
root@s11-server1:~# dladm show-link
LINK CLASS MTU STATE OVER
link1_ipmp0 phys 1500 up --
link2_ipmp0 phys 1500 unknown --
link0_ipmp0 phys 1500 up --
net3 phys 1500 unknown --
3. Create IP interfaces for the link2_ipmp0 data links and show the results.
root@s11-server1:~# ipadm create-ip link2_ipmp0
root@s11-server1:~# ipadm show-if
IFNAME CLASS STATE ACTIVE OVER
lo0 loopback ok yes --
ipmp0 ipmp ok yes link1_ipmp0 link0_ipmp0
link1_ipmp0 ip ok yes --
link0_ipmp0 ip ok yes --
link2_ipmp0 ip down no --
4. Add the link2_ipmp0 IP interfaces to the ipmp0 IPMP group and show the results.
root@s11-server1:~# ipadm add-ipmp –i link2_ipmp0 ipmp0
root@s11-server1:~# ipmpstat –g
GROUP GROUPNAME STATE FDT INTERFACES
ipmp0 ipmp0 ok 10.00s link2_ipmp0 link0_ipmp0 link1_ipmp0
5. Assign a static IP address to the IPMP subinterface link2_ipmp0 to be used for link
testing and show the results.
root@s11-server1:~# ipadm create-addr –T static \
–a 192.168.0.144/24 link2_ipmp0/test
root@s11-server1:~# ipadm show-addr
ADDROBJ TYPE STATE ADDR
lo0/v4 static ok 127.0.0.1/8
ipmp0/v4add1 static ok 192.168.0.112/24
ipmp0/v4add2 static ok 192.168.0.113/24
link1_ipmp0/test static ok 192.168.0.143/24
link0_ipmp0/test static ok 192.168.0.142/24
link2_ipmp0/test static ok 192.168.0.144/24
lo0/v6 static ok ::1/128
Note: Your display may be different.
6. Show the current setting of the standby property for the link2_ipmp0 interface.
root@s11-server1:~# ipadm show-ifprop –p standby link2_ipmp0
IFNAME PROPERTY PROTO PERM CURRENT PERSISTENT DEFAULT POSSIBLE
link2_ipmp0 standby ip rw off -- off on,off
Note that standby is currently turned off.
Cicero Ronaldo (ciceroฺronaldo@gmailฺcom) has a non-transferable
license to use this Student Guideฺ
Unauthorized reproduction or distribution prohibitedฺ Copyright© 2014, Oracle and/or its affiliatesฺ

Copyright © 2013, Oracle and/or its affiliates. All rights reserved.
Practices for Lesson 5: Configuring Network and Traffic Failover
Chapter 5 - Page 27
7. Set the standby property for the link2_ipmp0 interface to on and show the results.
root@s11-server1:~# ipadm set-ifprop -p standby=on -m ip link2_ipmp0
root@s11-server1:~# ipadm show-ifprop -p standby link2_ipmp0
IFNAME PROPERTY PROTO PERM CURRENT PERSISTENT DEFAULT POSSIBLE
link2_ipmp0 standby ip rw on on off on,off
8. Use the ipmpstat command to display the IPMP group information.
root@s11-server1:~# ipmpstat -g
GROUP GROUPNAME STATE FDT INTERFACES
ipmp0 ipmp0 ok 10.00s link0_ipmp0 link1_ipmp0 (link2_ipmp0)
Note that the link2_ipmp0 interface is enclosed in parenthesis. This indicates that the
interface is set to standby.
9. Use the ipmpstat command to display the IPMP address information.
root@s11-server1:~# ipmpstat -an
ADDRESS STATE GROUP INBOUND OUTBOUND
:: down ipmp0 -- --
192.168.0.113 up ipmp0 link0_ipmp0 link0_ipmp0 link1_ipmp0
192.168.0.112 up ipmp0 link1_ipmp0 link0_ipmp0 link1_ipmp0
Note that the link2_ipmp0 interface is not actively used for INBOUND and OUTBOUND
traffic.
10. Use the ipmpstat command to display the IPMP interface information.
root@s11-server1:~# ipmpstat -i
INTERFACE ACTIVE GROUP FLAGS LINK PROBE STATE
link2_ipmp0 no ipmp0 is----- up ok ok
link0_ipmp0 yes ipmp0 ------- up ok ok
link1_ipmp0 yes ipmp0 --mbM-- up ok ok
Note the flags for the link2_ipmp0 interface. This indicates that the interface is
inactive and set to standby.
Task 4: Testing the Active-Standby IPMP Configuration
In this task, you test the active-standby IPMP configuration by causing one of the subinterfaces
to fail. Then you verify that the system is still accessible by using the remaining interface.
1. Shut down the Sol11-Server1 virtual machine.
Cicero Ronaldo (ciceroฺronaldo@gmailฺcom) has a non-transferable
license to use this Student Guideฺ
Unauthorized reproduction or distribution prohibitedฺ Copyright© 2014, Oracle and/or its affiliatesฺ
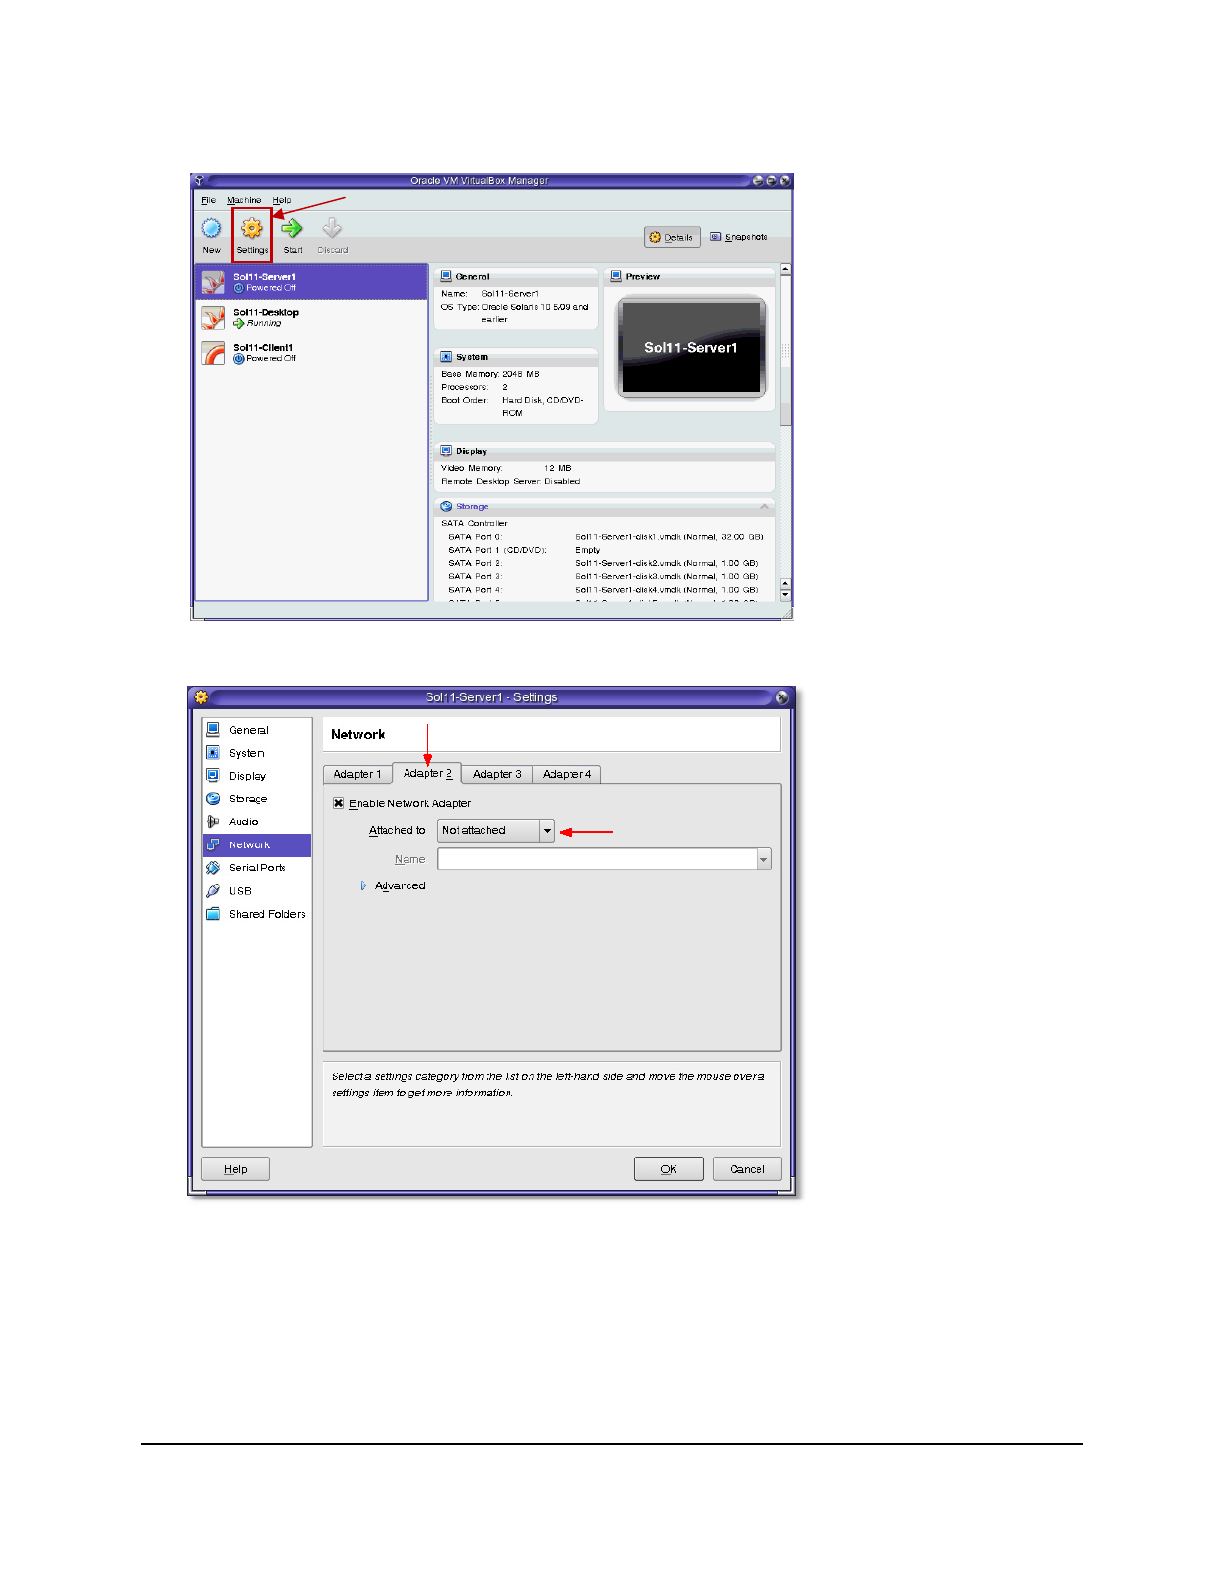
Copyright © 2013, Oracle and/or its affiliates. All rights reserved.
Practices for Lesson 5: Configuring Network and Traffic Failover
Chapter 5 - Page 28
2. Open the VirtualBox Manager GUI and click the Settings utility for the Sol11-Server1
virtual machine.
3. Under Network settings, select Adapter 2 and set the “Attached to:” field to “Not attached.”
Click OK to continue.
4. Start the Sol11-Server1 virtual machine.
5. Log in to the Sol11-Server1 virtual machine as the oracle user and su to root.
Note: You might see a series of error messages about the failed IPMP interface. You can
ignore these messages and press Enter to continue.
Cicero Ronaldo (ciceroฺronaldo@gmailฺcom) has a non-transferable
license to use this Student Guideฺ
Unauthorized reproduction or distribution prohibitedฺ Copyright© 2014, Oracle and/or its affiliatesฺ

Copyright © 2013, Oracle and/or its affiliates. All rights reserved.
Practices for Lesson 5: Configuring Network and Traffic Failover
Chapter 5 - Page 29
6. Use the ipmpstat command to display the IPMP group information.
root@s11-server1:~# ipmpstat -g
GROUP GROUPNAME STATE FDT INTERFACES
ipmp0 ipmp0 degraded 10.00s link2_ipmp0 link1_ipmp0 [link0_ipmp0]
Note that link1_ipmp0 has been boxed ([link1_ipmp0]), indicating that it has failed.
7. Use the ipmpstat command to display the IP interface information.
root@s11-server1:~# ipmpstat -i
INTERFACE ACTIVE GROUP FLAGS LINK PROBE STATE
link2_ipmp0 yes ipmp0 -s----- up ok ok
link0_ipmp0 no ipmp0 ------- up failed failed
link1_ipmp0 yes ipmp0 --mbM-- up ok ok
The link0_ipmp0 interface is no longer active but link2_ipmp0 is now active.
8. Use the ipmpstat command to display the IPMP address information.
root@s11-server1:~# ipmpstat -an
ADDRESS STATE GROUP INBOUND OUTBOUND
:: down ipmp0 -- --
192.168.0.113 up ipmp0 link2_ipmp0 link2_ipmp0 link1_ipmp0
192.168.0.112 up ipmp0 link1_ipmp0 link2_ipmp0 link1_ipmp0
Note that the link2_ipmp0 interface is being used for INBOUND and OUTBOUND traffic.
9. Use the ipmpstat command to display the current probe information.
root@s11-server1:~# ipmpstat -pn
TIME INTERFACE PROBE NETRTT RTT RTTAVG TARGET
0.06s link2_ipmp0 i163 0.26ms 0.49ms 0.33ms 192.168.0.111
0.90s link1_ipmp0 i162 0.26ms 0.39ms 0.31ms 192.168.0.111
0.92s link2_ipmp0 i164 0.19ms 0.36ms 0.34ms 192.168.0.111
0.49s link0_ipmp0 i161 -- -- -- 192.168.0.111
-0.49s link0_ipmp0 i160 -- -- -- 192.168.0.111
2.52s link2_ipmp0 i165 0.23ms 0.39ms 0.34ms 192.168.0.111
2.74s link1_ipmp0 i163 0.24ms 0.38ms 0.32ms 192.168.0.111
3.69s link1_ipmp0 i164 0.25ms 0.45ms 0.34ms 192.168.0.111
2.31s link0_ipmp0 i162 -- -- -- 192.168.0.111
…
…
…
<Ctrl+C>
Note that the link2_ipmp0 interface is actively probing targets.
10. Log in to the Sol11-Desktop virtual machine and ping the IPMP data IP addresses.
root@s11-desktop:~# ping 192.168.0.112
192.168.0.112 is alive
root@s11-desktop:~# ping 192.168.0.113
192.168.0.113 is alive
Cicero Ronaldo (ciceroฺronaldo@gmailฺcom) has a non-transferable
license to use this Student Guideฺ
Unauthorized reproduction or distribution prohibitedฺ Copyright© 2014, Oracle and/or its affiliatesฺ
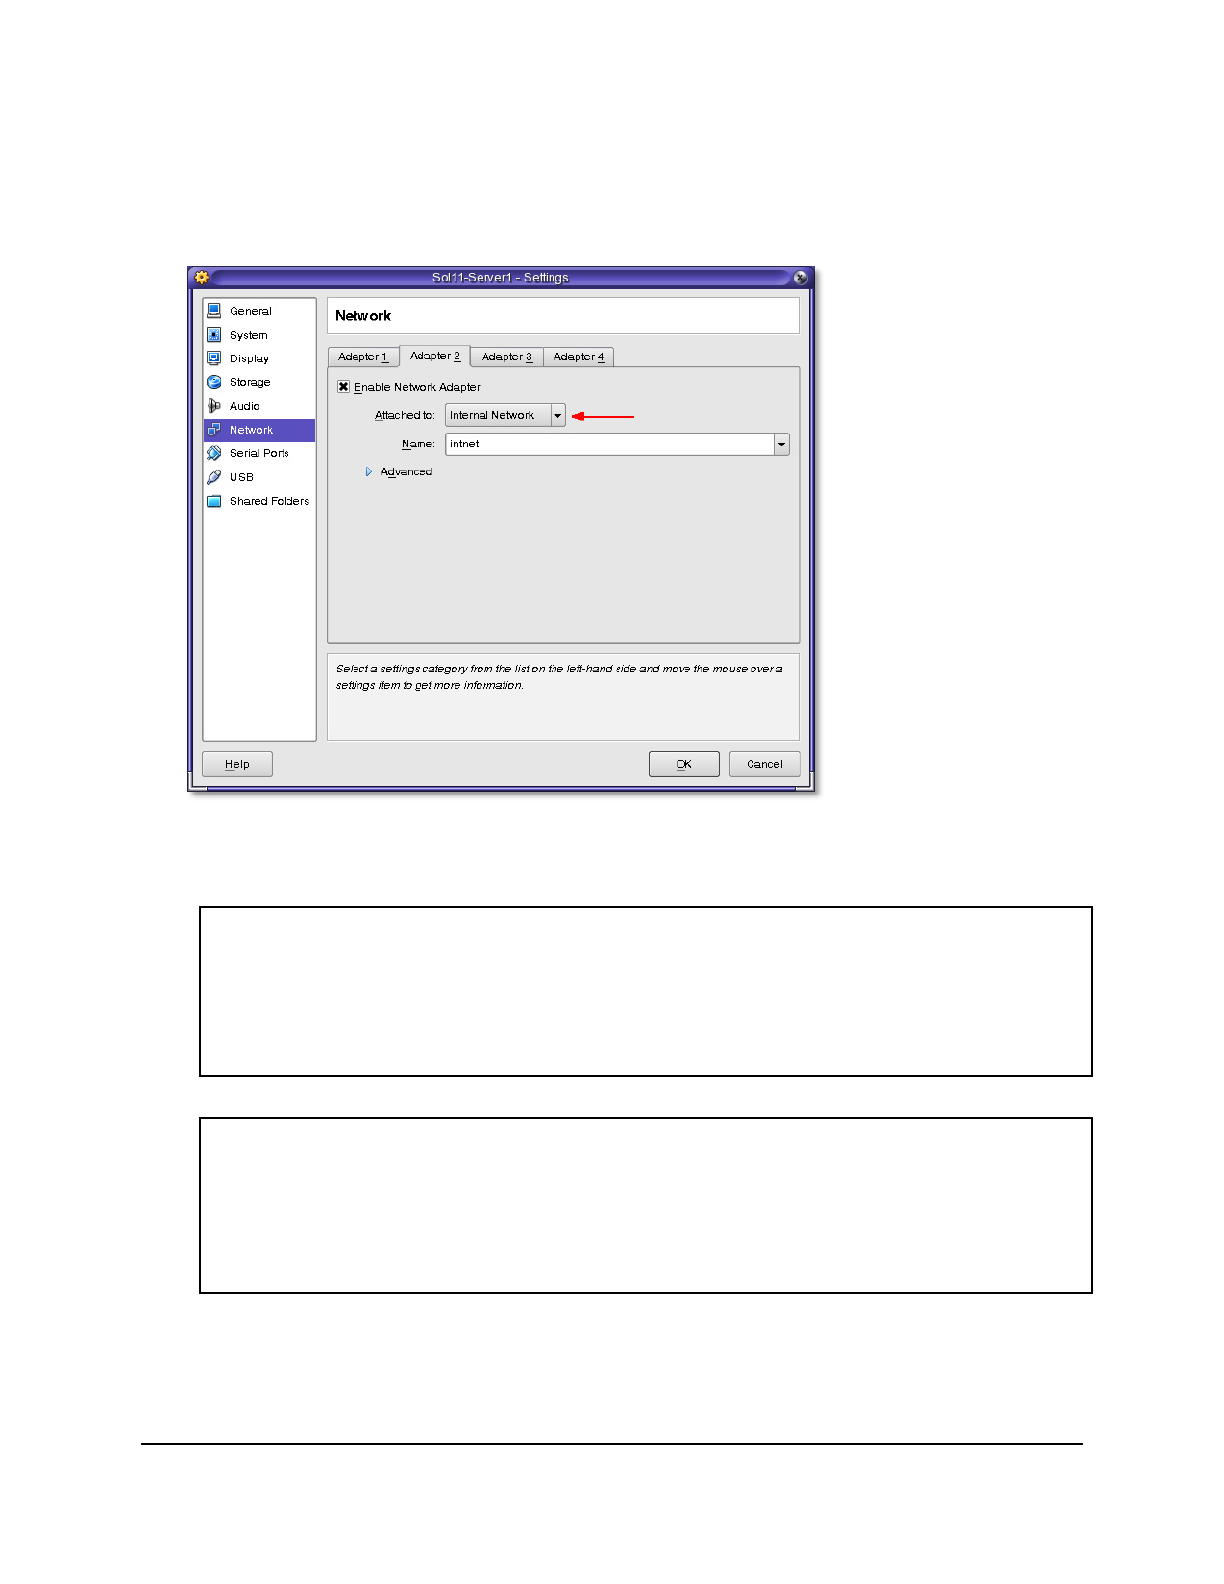
Copyright © 2013, Oracle and/or its affiliates. All rights reserved.
Practices for Lesson 5: Configuring Network and Traffic Failover
Chapter 5 - Page 30
11. Return to the Sol11-Server1 virtual machine and shut it down.
12. Open the VirtualBox Manager GUI and click the Settings utility for the Sol11-Server1
virtual machine.
13. Under Network settings, select Adapter 2 and set the “Attached to:” field to Internal
Network. Click OK to continue.
14. Start the Sol11-Server1 virtual machine.
15. Log in to the Sol11-Server1 virtual machine as the oracle user and su to root.
16. Use the ipmpstat command to display the IPMP group information.
root@s11-server1:~# ipmpstat -g
GROUP GROUPNAME STATE FDT INTERFACES
ipmp0 ipmp0 ok 10.00s link0_ipmp0 link1_ipmp0 (link2_ipmp0)
Note that the link2_ipmp0 interface has been placed back as standby and is inactive.
This indicates that the failed interface is repaired.
17. Use the ipmpstat command to display the IPMP interface information.
root@s11-server1:~# ipmpstat -i
INTERFACE ACTIVE GROUP FLAGS LINK PROBE STATE
link2_ipmp0 no ipmp0 is----- up ok ok
link0_ipmp0 yes ipmp0 ------- up ok ok
link1_ipmp0 yes ipmp0 --mbM-- up ok ok
Task 5: Removing the IPMP Configuration
In this task, you remove the ipmp0 IPMP group and return the network to its original
configuration.
Cicero Ronaldo (ciceroฺronaldo@gmailฺcom) has a non-transferable
license to use this Student Guideฺ
Unauthorized reproduction or distribution prohibitedฺ Copyright© 2014, Oracle and/or its affiliatesฺ

Copyright © 2013, Oracle and/or its affiliates. All rights reserved.
Practices for Lesson 5: Configuring Network and Traffic Failover
Chapter 5 - Page 31
1. Remove all the subinterfaces from the ipmp0 IPMP group and show the results.
root@s11-server1:~# ipadm remove-ipmp –i link0_ipmp0 \
–i link1_ipmp0 –i link2_ipmp0 ipmp0
Dec 14 04:17:43 s11-server1 in.mpathd[113]: All IP interfaces in
group ipmp0 are now unusable.
Note: You may see other error messages due to the system being in an unstable state.
You can ignore these messages.
root@s11-server1:~# ipmpstat -g
GROUP GROUPNAME STATE FDT INTERFACES
ipmp0 ipmp0 failed -- --
2. Delete the ipmp0 IPMP group.
root@s11-server1:~# ipadm delete-ipmp ipmp0
root@s11-server1:~# ipmpstat –g
root@s11-server1:~#
3. Display the IP address that is currently configured in the system.
root@s11-server1:~# ipadm show-addr
ADDROBJ TYPE STATE ADDR
lo0/v4 static ok 127.0.0.1/8
link1_ipmp0/test static ok 192.168.0.143/24
link0_ipmp0/test static ok 192.168.0.142/24
link2_ipmp0/test static ok 192.168.0.144/24
lo0/v6 static ok ::1/128
Your display may be different.
4. Delete the test IP addresses and show the results.
root@s11-server1:~# ipadm delete-addr link0_ipmp0/test
root@s11-server1:~# ipadm delete-addr link1_ipmp0/test
root@s11-server1:~# ipadm delete-addr link2_ipmp0/test
root@s11-server1:~# ipadm show-addr
ADDROBJ TYPE STATE ADDR
lo0/v4 static ok 127.0.0.1/8
lo0/v6 static ok ::1/128
Your display may be different.
Cicero Ronaldo (ciceroฺronaldo@gmailฺcom) has a non-transferable
license to use this Student Guideฺ
Unauthorized reproduction or distribution prohibitedฺ Copyright© 2014, Oracle and/or its affiliatesฺ

Copyright © 2013, Oracle and/or its affiliates. All rights reserved.
Practices for Lesson 5: Configuring Network and Traffic Failover
Chapter 5 - Page 32
5. Delete the link0_ipmp0, link1_ipmp0, and link2_ipmp0 IP interfaces. Show the
results.
root@s11-server1:~# ipadm delete-ip link0_ipmp0
root@s11-server1:~# ipadm delete-ip link1_ipmp0
root@s11-server1:~# ipadm delete-ip link2_ipmp0
root@s11-server1:~# ipadm show-if
IFNAME CLASS STATE ACTIVE OVER
lo0 loopback ok yes --
6. Rename the data links to their original names and show the results.
root@s11-server1:~# dladm rename-link link0_ipmp0 net0
root@s11-server1:~# dladm rename-link link1_ipmp0 net1
root@s11-server1:~# dladm rename-link link2_ipmp0 net2
root@s11-server1:~# dladm show-link
LINK CLASS MTU STATE OVER
net1 phys 1500 unknown --
net2 phys 1500 unknown --
net0 phys 1500 unknown --
net3 phys 1500 unknown --
7. Restart the svc:/network/physical:default service.
root@s11-server1:~# svcadm restart svc:/network/physical:default
8. Verify that the net0 network interface has been configured correctly.
root@s11-server1:~# ipadm show-addr
ADDROBJ TYPE STATE ADDR
lo0/v4 static ok 127.0.0.1/8
lo0/v6 static ok ::1/128
9. Reinstate the physical network interface.
root@s11-server1:~# ipadm create-ip net0
root@s11-server1:~# ipadm create-addr –T static \
-a 192.168.0.100/24 net0/v4add1
10. Test the network interface by using the ping command.
root@s11-server1:~# ping 192.168.0.111
192.168.0.111 is alive.
11. Power-off the Sol11-Desktop virtual machine.
Cicero Ronaldo (ciceroฺronaldo@gmailฺcom) has a non-transferable
license to use this Student Guideฺ
Unauthorized reproduction or distribution prohibitedฺ Copyright© 2014, Oracle and/or its affiliatesฺ

Copyright © 2013, Oracle and/or its affiliates. All rights reserved.
Practices for Lesson 6: Configuring Zones and the Virtual Network
Chapter 6 - Page 1
Practices for Lesson 6:
Configuring Zones and the
Virtual Network
Chapter 6
Cicero Ronaldo (ciceroฺronaldo@gmailฺcom) has a non-transferable
license to use this Student Guideฺ
Unauthorized reproduction or distribution prohibitedฺ Copyright© 2014, Oracle and/or its affiliatesฺ

Copyright © 2013, Oracle and/or its affiliates. All rights reserved.
Practices for Lesson 6: Configuring Zones and the Virtual Network
Chapter 6 - Page 2
Practice Overview for Lesson 6
Practices Overview
According to your predeployment plan, it is time to evaluate the business scenario. On one
company server, you are asked to create two independent virtual Oracle Solaris 11.1 systems
(zones) where the company can maintain two separate customers’ environments. Therefore,
you create a zone called grandmazone for the vendor Grandma’s Cookies and a zone called
choczone for Assorted Chocolates Inc. When these customers need assistance, you can re-
create their scenario in their respective zones and evaluate the issues.
Because you have only one physical interface on this server, you are asked to create two virtual
network interfaces and assign one to each zone on a dedicated basis.
The key areas explored in the practices are:
• Configuring an Oracle Solaris 11.1 virtual network
• Configuring two zones to use VNICs
• Allocating resources to Oracle Solaris zones
• Managing resources on the virtual network interface
• Removing part of the virtual network
Note: Your command output displays may be different from the displays in the practice, for
example, storage data, process IDs, and session-related and system-generated information.
√ Oracle Solaris 11.1 Predeployment Checklist
√ Managing the Image Packaging System (IPS) and Packages
√ Installing Oracle Solaris 11.1 on Multiple Hosts
√ Managing the Business Application Data
√ Configuring Network and Traffic Failover
Configuring Zones and the Virtual Network
Managing Services and Service Properties
Configuring Privileges and Role-Based Access Control
Securing System Resources by Using Oracle Solaris Auditing
Managing Processes and Priorities
Evaluating System Resources
Monitoring and Troubleshooting System Failures
Cicero Ronaldo (ciceroฺronaldo@gmailฺcom) has a non-transferable
license to use this Student Guideฺ
Unauthorized reproduction or distribution prohibitedฺ Copyright© 2014, Oracle and/or its affiliatesฺ

Copyright © 2013, Oracle and/or its affiliates. All rights reserved.
Practices for Lesson 6: Configuring Zones and the Virtual Network
Chapter 6 - Page 3
Preparation
This practice requires the Sol11-Server1 virtual machine to have two CPUs so that resource
pools can be configured accordingly. To ensure that the Sol11-Sever1 virtual machine has
two CPUs in place, follow these steps:
1. Shut down the Sol11-Server1 virtual machine.
2. Open the VirtualBox Manager GUI and click the Settings utility for the Sol11-Server1
virtual machine.
Cicero Ronaldo (ciceroฺronaldo@gmailฺcom) has a non-transferable
license to use this Student Guideฺ
Unauthorized reproduction or distribution prohibitedฺ Copyright© 2014, Oracle and/or its affiliatesฺ

Copyright © 2013, Oracle and/or its affiliates. All rights reserved.
Practices for Lesson 6: Configuring Zones and the Virtual Network
Chapter 6 - Page 4
3. Under the System settings, click the Processor tab and verify that the number of processors is
2. If not, change the number of processors to 2. Click OK to continue.
Cicero Ronaldo (ciceroฺronaldo@gmailฺcom) has a non-transferable
license to use this Student Guideฺ
Unauthorized reproduction or distribution prohibitedฺ Copyright© 2014, Oracle and/or its affiliatesฺ

Copyright © 2013, Oracle and/or its affiliates. All rights reserved.
Practices for Lesson 6: Configuring Zones and the Virtual Network
Chapter 6 - Page 5
Practice 6-1: Creating an Oracle Solaris 11.1 Virtual Network
Overview
In this practice, you configure an Oracle Solaris 11.1 virtual network. To do this, you perform the
following key tasks:
• Create a virtual network switch
• Create the virtual network interfaces
• Display the virtual network configuration
Task:
1. Verify that the Sol11-Server1 virtual machine is running. If the virtual machine is not
running, start it now.
2. Log in to the Sol11-Server1 virtual machine as the oracle user. Use oracle1 as the
password. Assume administrator privileges.
3. Run the dladm utility to create an etherstub named stub0. Confirm the creation of the
etherstub by using the show-link command.
root@s11-server1:~# dladm create-etherstub stub0
root@s11-server1:~$ dladm show-link
LINK CLASS MTU STATE OVER
net1 phys 1500 unknown --
net2 phys 1500 unknown --
net3 phys 1500 unknown --
net0 phys 1500 up --
stub0 etherstub 9000 unknown --
root@s11-server1:~#
Before you create the VNICs, you need to create a virtual network switch.
4. Use the dladm utility to create the vnic0, vnic1, and vnic2 VNICs. Attach these VNICs
to the etherstub stub0.
root@s11-server1:~# dladm create-vnic -l stub0 vnic0
root@s11-server1:~# dladm create-vnic -l stub0 vnic1
root@s11-server1:~# dladm create-vnic -l stub0 vnic2
Here vnic0 is required for the virtual switch stub0. The other VNICs are the virtual
network interfaces that would be available for your use.
5. Show the results of the preceding step.
root@s11-server1:~# dladm show-vnic
LINK OVER SPEED MACADDRESS MACADDRTYPE VID
vnic0 stub0 0 2:8:20:84:d:cb random 0
vnic1 stub0 0 2:8:20:a:97:10 random 0
vnic2 stub0 0 2:8:20:4:ee:9 random 0
All three VNICs have been created as displayed. Notice that each VNIC has a MAC
address created.
Now these VNICs are available for use as “physical” networks. You will use them in the
following practice for the zones.
Cicero Ronaldo (ciceroฺronaldo@gmailฺcom) has a non-transferable
license to use this Student Guideฺ
Unauthorized reproduction or distribution prohibitedฺ Copyright© 2014, Oracle and/or its affiliatesฺ

Copyright © 2013, Oracle and/or its affiliates. All rights reserved.
Practices for Lesson 6: Configuring Zones and the Virtual Network
Chapter 6 - Page 6
Practice 6-2: Creating Two Zones by Using VNICs
Overview
In this practice, you configure Oracle Solaris 11 zones and assign the virtual network interfaces
created in the previous exercise. To do this, you perform the following key tasks:
• Configure two zones to use VNICs
• Display the zone configuration, including the interfaces
Task:
Perform the following steps to configure the zone named grandmazone and the zone named
choczone:
1. Verify that the Sol11-Server1 virtual machine is running. If the virtual machine is not
running, start it now.
2. Log in to the Sol11-Server1 virtual machine as the oracle user. Use oracle1 as the
password. Assume administrator privileges.
3. Verify that the IPS publisher is configured correctly and is operational.
root@s11-server1:~# pkg publisher
PUBLISHER TYPE STATUS P LOCATION
solaris origin online F http://s11-server1.mydomain.com/
root@s11-server1:~# pkg search diffstat
INDEX ACTION VALUE
PACKAGE
pkg.description set The diff command compares files line by
line. Diffstat reads the output of the diff command and displays
a histogram of the insertions, deletions and modifications in
each file. Diffstat is commonly used to provide a summary of the
changes in large, complex patch files. Install diffstat if you
need a program which provides a summary of the diff command's
output. pkg:/text/diffstat@1.51-0.175.1.0.0.9.0
…
…
If the IPS publisher is configured incorrectly, change to an operational publisher. For
example, if your current publisher is http://pkg.oracle.com/solaris/release/,
you need to change it to http://s11-server1.mydomain.com. Run the following
command:
root@s11-server1:~# pkg set-publisher –G ‘*’ \
–g http://s11-server1.mydomain.com/ solaris
Cicero Ronaldo (ciceroฺronaldo@gmailฺcom) has a non-transferable
license to use this Student Guideฺ
Unauthorized reproduction or distribution prohibitedฺ Copyright© 2014, Oracle and/or its affiliatesฺ

Copyright © 2013, Oracle and/or its affiliates. All rights reserved.
Practices for Lesson 6: Configuring Zones and the Virtual Network
Chapter 6 - Page 7
Refer to Practice 2: Managing the Image Packing System (IPS) and Packages for
detailed IPS configuration.
The objective is to access the IPS repository on the local system to speed up package
transfer during the zone installation steps.
4. Verify that an rpool/zones ZFS file system exists and is mounted as /zones.
root@s11-server1:~# zfs list rpool/zones
NAME USED AVAIL REFER MOUNTPOINT
rpool/zones 31K 22.6G 31K /zones
If the rpool/zones ZFS file system does not exist, run the following command:
root@s11-server1:~# zfs create -o mountpoint=/zones rpool/zones
The root file systems for the zones will be stored in the rpool/zones file system.
5. Configure grandmazone and display the results.
root@s11-server1:~# zonecfg -z grandmazone
Use 'create' to begin configuring a new zone.
zonecfg:grandmazone> create
create: Using system default template ‘SYSdefault’
zonecfg:grandmazone> set zonepath=/zones/grandmazone
zonecfg:grandmazone> set autoboot=true
zonecfg:grandmazone> add net
zonecfg:grandmazone:net> set physical=vnic1
zonecfg:grandmazone:net> end
zonecfg:grandmazone> verify
zonecfg:grandmazone> commit
zonecfg:grandmazone> exit
root@s11-server1:~# zonecfg -z grandmazone info
zonename: grandmazone
zonepath: /zones/grandmazone
brand: solaris
autoboot: true
bootargs:
file-mac-profile:
pool:
limitpriv:
scheduling-class:
ip-type: exclusive
hostid:
fs-allowed:
net:
Cicero Ronaldo (ciceroฺronaldo@gmailฺcom) has a non-transferable
license to use this Student Guideฺ
Unauthorized reproduction or distribution prohibitedฺ Copyright© 2014, Oracle and/or its affiliatesฺ

Copyright © 2013, Oracle and/or its affiliates. All rights reserved.
Practices for Lesson 6: Configuring Zones and the Virtual Network
Chapter 6 - Page 8
address not specified
allowed-address not specified
configure-allowed-address: true
physical: vnic1
defrouter not specified
anet:
linkname: net0
lower-link: auto
allowed-address not specified
configure-allowed-address: true
defrouter not specified
allowed-dhcp-cids not specified
link-protection: mac-nospoof
mac-address: random
mac-prefix not specified
mac-slot not specified
vlan-id not specified
priority not specified
rxrings not specified
txrings not specified
mtu not specified
maxbw not specified
rxfanout not specified
vsi-typeid not specified
vsi-vers not specified
vsi-mgrid not specified
etsbw-lcl not specified
cos not specified
pkey not specified
linkmode not specified
6. Configure choczone and display the results.
root@s11-server1:~# zonecfg -z choczone
Use 'create' to begin configuring a new zone.
zonecfg:choczone> create
create: Using system default template ‘SYSdefault’
zonecfg:choczone> set zonepath=/zones/choczone
zonecfg:choczone> set autoboot=true
zonecfg:choczone> add net
zonecfg:choczone:net> set physical=vnic2
zonecfg:choczone:net> end
zonecfg:choczone> verify
zonecfg:choczone> commit
Cicero Ronaldo (ciceroฺronaldo@gmailฺcom) has a non-transferable
license to use this Student Guideฺ
Unauthorized reproduction or distribution prohibitedฺ Copyright© 2014, Oracle and/or its affiliatesฺ

Copyright © 2013, Oracle and/or its affiliates. All rights reserved.
Practices for Lesson 6: Configuring Zones and the Virtual Network
Chapter 6 - Page 9
zonecfg:choczone> exit
root@s11-server1:~# zonecfg -z choczone info
zonename: choczone
zonepath: /zones/choczone
brand: solaris
autoboot: true
bootargs:
file-mac-profile:
pool:
limitpriv:
scheduling-class:
ip-type: exclusive
hostid:
fs-allowed:
net:
address not specified
allowed-address not specified
physical: vnic2
defrouter not specified
anet:
linkname: net0
lower-link: auto
allowed-address not specified
configure-allowed-address: true
defrouter not specified
allowed-dhcp-cids not specified
link-protection: mac-nospoof
mac-address: random
mac-prefix not specified
mac-slot not specified
vlan-id not specified
priority not specified
rxrings not specified
txrings not specified
mtu not specified
maxbw not specified
rxfanout not specified
vsi-typeid not specified
vsi-vers not specified
vsi-mgrid not specified
etsbw-lcl not specified
cos not specified
Cicero Ronaldo (ciceroฺronaldo@gmailฺcom) has a non-transferable
license to use this Student Guideฺ
Unauthorized reproduction or distribution prohibitedฺ Copyright© 2014, Oracle and/or its affiliatesฺ

Copyright © 2013, Oracle and/or its affiliates. All rights reserved.
Practices for Lesson 6: Configuring Zones and the Virtual Network
Chapter 6 - Page 10
pkey not specified
linkmode not specified
7. Using the zoneadm command, display the configured zones.
root@s11-server1:~# zoneadm list -cv
ID NAME STATUS PATH BRAND IP
0 global running / solaris shared
- grandmazone configured /zones/grandmazone solaris excl
- choczone configured /zones/choczone solaris excl
Both zones are in configured state. They need to be installed.
8. Using the sysconfig command, create a system configuration profile for grandmazone.
root@s11-server1:~# sysconfig create-profile -o \
/opt/ora/data/gmconf.xml
When the system configuration tool appears, follow the directions on the screen and
provide appropriate information from the following:
• Computer name: grandmazone
• Ethernet network configuration: Manually
• Network Interface: vnic1
• IP Address: 192.168.1.100
• DNS: Do not configure DNS
• Alternate Name Service: None
• Time zone: Use your local region.
• Date and time: Set to current date and time.
• Root password: oracle1
• Your real name: oraclegm
• Username: oraclegm
• User password: oracle1
• Remove the Email address from the Support - Registration menu
After you have reviewed the information on the System Configuration Summary screen,
select F2_Apply.
Exiting System Configuration Tool. Log is available at:
/system/volatile/sysconfig/sysconfig.log.1999
root@s11-server1:~#
Display the SC profile that you just created for grandmazone.
root@s11-server1:~# more /opt/ora/data/gmconf.xml
<!DOCTYPE service_bundle SYSTEM
"/usr/share/lib/xml/dtd/service_bundle.dtd.1">
Cicero Ronaldo (ciceroฺronaldo@gmailฺcom) has a non-transferable
license to use this Student Guideฺ
Unauthorized reproduction or distribution prohibitedฺ Copyright© 2014, Oracle and/or its affiliatesฺ

Copyright © 2013, Oracle and/or its affiliates. All rights reserved.
Practices for Lesson 6: Configuring Zones and the Virtual Network
Chapter 6 - Page 11
<service_bundle type="profile" name="sysconfig">
<service version="1" type="service" name="system/config-user">
<instance enabled="true" name="default">
<property_group type="application" name="root_account">
<propval type="astring" name="login" value="root"/>
<propval type="astring" name="password"
value="$5$/55TsRAF$zAq0.5T4w0GYsybpCZJ6xsCRAowN/F33CgJj.1Pbw11"/>
<propval type="astring" name="type" value="role"/>
</property_group>
<property_group type="application" name="user_account">
<propval type="astring" name="login" value="oraclegm"/>
<propval type="astring" name="password"
value="$5$BQ8JDq4F$esjfDpd8CUtp627zOkRHbJD74W38Lo0F8aL/6v4sps1"/>
<propval type="astring" name="type" value="normal"/>
<propval type="astring" name="description"
value="grandma"/>
<propval type="count" name="gid" value="10"/>
<propval type="astring" name="shell"
value="/usr/bin/bash"/>
<propval type="astring" name="roles" value="root"/>
<propval type="astring" name="profiles" value="System
Administrator"/>
<propval type="astring" name="sudoers" value="ALL=(ALL)
ALL"/>
</property_group>
</instance>
</service>
<service version="1" type="service" name="system/timezone">
<instance enabled="true" name="default">
<property_group type="application" name="timezone">
<propval type="astring" name="localtime"
value="US/Mountain"/>
</property_group>
</instance>
</service>
<service version="1" type="service" name="system/environment">
…
…
root@s11-server1:~# zoneadm -z grandmazone install –c
/opt/ora/data/gmconf.xml
The zone installation should take approximately 15 minutes.
Cicero Ronaldo (ciceroฺronaldo@gmailฺcom) has a non-transferable
license to use this Student Guideฺ
Unauthorized reproduction or distribution prohibitedฺ Copyright© 2014, Oracle and/or its affiliatesฺ

Copyright © 2013, Oracle and/or its affiliates. All rights reserved.
Practices for Lesson 6: Configuring Zones and the Virtual Network
Chapter 6 - Page 12
9. Using the sysconfig command, create a system configuration profile for the choczone.
root@s11-server1:~# sysconfig create-profile –o \
/opt/ora/data/chocconf.xml
When the system configuration tool appears, follow the directions on the screen and
provide the appropriate information from the following:
• Computer name: choczone
• Ethernet network configuration: Manually
• Network Interface: vnic2
• IP Address: 192.168.1.200
• DNS: Do not configure DNS
• Alternate Name Service: None
• Time zone: Use your local region.
• Date and time: Set to current date and time.
• Root password: oracle1
• Your real name: oraclech
• Username: oraclech
• User password: oracle1
• Remove the Email address from the Support - Registration menu
After you have reviewed the information on the System Configuration Summary screen,
select F2_Apply.
Exiting System Configuration Tool. Log is available at:
/system/volatile/sysconfig/sysconfig.log.2987
root@s11-server1:~#
root@s11-server1:~# zoneadm -z choczone install –c \
/opt/ora/data/chocconf.xml
The zone installation should take approximately five minutes.
10. Show the results of the zone installations.
root@s11-server1:~# zoneadm list -iv
ID NAME STATUS PATH BRAND IP
0 global running / solaris shared
- grandmazone installed /zones/grandmazone solaris excl
- choczone installed /zones/choczone solaris excl
Both zones are in installed state.
11. Boot the grandmazone and choczone zones and show the results.
root@s11-server1:~# zoneadm -z grandmazone boot
root@s11-server1:~# zoneadm -z choczone boot
root@s11-server1:~# zoneadm list -v
ID NAME STATUS PATH BRAND IP
0 global running / solaris shared
Cicero Ronaldo (ciceroฺronaldo@gmailฺcom) has a non-transferable
license to use this Student Guideฺ
Unauthorized reproduction or distribution prohibitedฺ Copyright© 2014, Oracle and/or its affiliatesฺ

Copyright © 2013, Oracle and/or its affiliates. All rights reserved.
Practices for Lesson 6: Configuring Zones and the Virtual Network
Chapter 6 - Page 13
1 grandmazone running /zones/grandmazone solaris excl
2 choczone running /zones/choczone solaris excl
Both zones have an ID and are in the running state.
12. Check the virtual network configuration in the global zone.
root@s11-server1:~# ipadm show-addr
ADDROBJ TYPE STATE ADDR
lo0/v4 static ok 127.0.0.1/8
net0/v4add1 static ok 192.168.0.100/24
lo0/v6 static ok ::1/128
In the global zone, no information is displayed about the links that you created. Why?
Because the VNICs exist at the link level. They would be visible by using the dladm
commands that you used earlier.
13. Check the virtual network configuration in the grandmazone zone.
root@s11-server1:~# zlogin grandmazone
[Connected to zone 'grandmazone' pts/3]
Oracle Corporation SunOS 5.11 11.1 September 2012
root@grandmazone:~# ipadm show-addr
ADDROBJ TYPE STATE ADDR
lo0/v4 static ok 127.0.0.1/8
vnic1/v4 static ok 192.168.1.100/24
lo0/v6 static ok ::1/128
vnic1/v6 addrconf ok fe80::8:20ff:fe0a:9710/10
14. Check the virtual network configuration in the choczone zone. It should be similar to
grandmazone, except for the name of the network interface and the IP address.
15. From grandmazone, use the ping command to verify that the virtual network that
connects grandmazone and choczone is operational.
root@grandmazone:~# ping 192.168.1.200
192.168.1.200 is alive
This demonstrates that you have connectivity with choczone because both zones are
created on the same network.
16. Exit to the global zone.
Cicero Ronaldo (ciceroฺronaldo@gmailฺcom) has a non-transferable
license to use this Student Guideฺ
Unauthorized reproduction or distribution prohibitedฺ Copyright© 2014, Oracle and/or its affiliatesฺ

Copyright © 2013, Oracle and/or its affiliates. All rights reserved.
Practices for Lesson 6: Configuring Zones and the Virtual Network
Chapter 6 - Page 14
Practice 6-3: Allocating Resources to Zones
Overview
In this practice, you allocate resources to the zones that you created in the previous practice. To
accomplish this goal, you perform the following key tasks:
• Enable services for resource pools
• Configure a persistent resource pool
• Bind the zone to a persistent resource pool
• Remove the resource pool configuration
• Manage the virtual network data flow
Task 1: Enabling Resource Pool Services
1. Verify that the Sol11-Server1 virtual machine is running. If the virtual machine is not
running, start it now.
2. Log in to the Sol11-Server1 virtual machine as the oracle user. Use oracle1 as the
password. Assume administrator privileges.
3. Verify that the poold daemon and the pool services are running.
root@s11-server1:~# pgrep -lf poold
root@s11-server1:~# svcs *pools*
STATE STIME FMRI
disabled 16:06:10 svc:/system/pools:default
disabled 16:05:55 svc:/system/pools/dynamic:default
Currently, all the pool services are disabled.
4. Verify that the dynamic service is dependent on the default pool service.
root@s11-server1:~# svcs -d pools/dynamic
STATE STIME FMRI
disabled 16:06:10 svc:/system/pools:default
online 15:45:55 svc:/system/filesystem/local:default
5. Use the svcadm command to enable the pool services recursively. Confirm that the pool
services and the poold daemon are up.
root@s11-server1:~# svcadm enable -r pools/dynamic
root@s11-server1:~# svcs *pools*
STATE STIME FMRI
online 16:08:10 svc:/system/pools:default
online 16:08:11 svc:/system/pools/dynamic:default
root@s11-server1:~# pgrep -lf poold
8493 /usr/lib/pool/poold
Cicero Ronaldo (ciceroฺronaldo@gmailฺcom) has a non-transferable
license to use this Student Guideฺ
Unauthorized reproduction or distribution prohibitedฺ Copyright© 2014, Oracle and/or its affiliatesฺ

Copyright © 2013, Oracle and/or its affiliates. All rights reserved.
Practices for Lesson 6: Configuring Zones and the Virtual Network
Chapter 6 - Page 15
6. Use the pooladm command to display the default resource pool configuration that is
currently in use.
root@s11-server1:~# pooladm
system default
string system.comment
int system.version 1
boolean system.bind-default true
string system.poold.objectives wt-load
pool pool_default
int pool.sys_id 0
boolean pool.active true
boolean pool.default true
int pool.importance 1
string pool.comment
pset pset_default
pset pset_default
int pset.sys_id -1
boolean pset.default true
uint pset.min 1
uint pset.max 65536
string pset.units population
uint pset.load 164
uint pset.size 2
string pset.comment
cpu
int cpu.sys_id 1
string cpu.comment
string cpu.status on-line
cpu
int cpu.sys_id 0
string cpu.comment
string cpu.status on-line
root@s11-server1:~#
Examine the default pool and the pset (processer set) configuration. Also note the
number of CPUs available.
Cicero Ronaldo (ciceroฺronaldo@gmailฺcom) has a non-transferable
license to use this Student Guideฺ
Unauthorized reproduction or distribution prohibitedฺ Copyright© 2014, Oracle and/or its affiliatesฺ

Copyright © 2013, Oracle and/or its affiliates. All rights reserved.
Practices for Lesson 6: Configuring Zones and the Virtual Network
Chapter 6 - Page 16
Task 2: Configuring a Persistent Resource Pool
1. Log in to the Sol11-Server1 virtual machine as the oracle user. Use oracle1 as the
password. Assume administrator privileges.
2. Create the pool configuration file.
root@s11-server1:~# ls -l /etc/pool*
/etc/pool*: No such file or directory
Currently, the pooladm.conf file does not exist.
root@s11-server1:~# pooladm –s
Now you are saving the current pool configuration in the default file
/etc/pooladm.conf.
root@s11-server1:~# ls -l /etc/pool*
-rw-r--r-- 1 root root 1160 Dec 14 16:13 /etc/pooladm.conf
root@s11-server1:~# file /etc/pooladm.conf
/etc/pooladm.conf: XML document
The file has been created for you and it is of type XML.
3. Display the contents of the pool configuration file by using the more command, so that you
can examine its contents one page at a time.
root@s11-server1:~# more /etc/pooladm.conf
<?xml version="1.0"?>
<!DOCTYPE system PUBLIC "-//Sun Microsystems Inc//DTD Resource
Management All//EN"
"file:///usr/share/lib/xml/dtd/rm_pool.dtd.1">
<!--
Configuration for pools facility. Do NOT edit this file by hand -
use poolcfg(1) or libpool(3POOL) instead.
-->
<system ref_id="dummy" name="default" comment="" version="1"
bind-default="true">
<property name="system.poold.objectives" type="string">wt-
load</property>
<pool name="pool_default" active="true" default="true"
importance="1" comment="" res="pset_-1" ref_id="pool_0">
<property name="pool.sys_id" type="int">0</property>
</pool>
<res_comp type="pset" sys_id="-1" name="pset_default"
default="true" min="1" max="65536" units="population" comment=""
ref_id="pset_-1">
<property name="pset.load" type="uint">388</property>
<property name="pset.size" type="uint">2</property>
Cicero Ronaldo (ciceroฺronaldo@gmailฺcom) has a non-transferable
license to use this Student Guideฺ
Unauthorized reproduction or distribution prohibitedฺ Copyright© 2014, Oracle and/or its affiliatesฺ

Copyright © 2013, Oracle and/or its affiliates. All rights reserved.
Practices for Lesson 6: Configuring Zones and the Virtual Network
Chapter 6 - Page 17
<comp type="cpu" sys_id="1" comment="" ref_id="cpu_1">
<property name="cpu.status" type="string">on-
line</property>
…
…
The XML file contains the default pool configuration that you saved in step 2.
4. Use the poolcfg command to display the resource pool configuration from the config
file.
root@s11-server1:~# poolcfg -c info
system default
string system.comment
int system.version 1
boolean system.bind-default true
string system.poold.objectives wt-load
pool pool_default
int pool.sys_id 0
boolean pool.active true
boolean pool.default true
int pool.importance 1
string pool.comment
pset pset_default
…
…
You will find that this display is exactly the same as in step 6 of the previous task. The
purpose of displaying it again is that you can view it another time before you make
modifications.
5. Create a pset called pset_1to2 by using the poolcfg command.
root@s11-server1:~# poolcfg -c 'create pset pset_1to2 \
(uint pset.min=1; uint pset.max=2)'
The pset is defined with a range of two CPUs (1–2). For instance, the kernel can use
one or two CPUs based on the workload.
6. Use the poolcfg command to create a pool called pool_gmzone and associate it with the
pset_1to2 pset. Confirm whether the pool configuration file shows the current
modification stamp.
root@s11-server1:~# poolcfg -c 'create pool pool_gmzone \
(string pool.scheduler="FSS")'
While creating pool_gmzone, you also optionally indicate the Fair Share Scheduler
(FSS) as your default scheduling class.
Cicero Ronaldo (ciceroฺronaldo@gmailฺcom) has a non-transferable
license to use this Student Guideฺ
Unauthorized reproduction or distribution prohibitedฺ Copyright© 2014, Oracle and/or its affiliatesฺ

Copyright © 2013, Oracle and/or its affiliates. All rights reserved.
Practices for Lesson 6: Configuring Zones and the Virtual Network
Chapter 6 - Page 18
root@s11-server1:~# poolcfg -c 'associate pool pool_gmzone \
(pset pset_1to2)'
root@s11-server1:~# ls -l /etc/pool*
-rw-r--r-- 1 root root 1645 Dec 14 16:17 /etc/pooladm.conf
The pool configuration file has been modified as is evident from the time stamp.
7. Use the poolcfg –c info command to view the modified pool configuration.
root@s11-server1:~# poolcfg -c info | more
system default
string system.comment
int system.version 1
boolean system.bind-default true
string system.poold.objectives wt-load
pool pool_default
int pool.sys_id 0
boolean pool.active true
boolean pool.default true
int pool.importance 1
string pool.comment
pset pset_default
pool pool_gmzone
boolean pool.active true
boolean pool.default false
string pool.scheduler FSS
int pool.importance 1
string pool.comment
pset pset_1to2
pset pset_default
int pset.sys_id -1
boolean pset.default true
uint pset.min 1
uint pset.max 65536
string pset.units population
uint pset.load 42
uint pset.size 2
string pset.comment
Cicero Ronaldo (ciceroฺronaldo@gmailฺcom) has a non-transferable
license to use this Student Guideฺ
Unauthorized reproduction or distribution prohibitedฺ Copyright© 2014, Oracle and/or its affiliatesฺ

Copyright © 2013, Oracle and/or its affiliates. All rights reserved.
Practices for Lesson 6: Configuring Zones and the Virtual Network
Chapter 6 - Page 19
cpu
int cpu.sys_id 1
string cpu.comment
string cpu.status on-line
cpu
int cpu.sys_id 0
string cpu.comment
string cpu.status on-line
pset pset_1to2
int pset.sys_id -2
boolean pset.default false
uint pset.min 1
uint pset.max 2
string pset.units population
uint pset.load 0
uint pset.size 0
string pset.comment
root@s11-server1:~#
This is your new pool configuration. The pset, the pool, and the CPUs are all associated
and displayed as you had specified. Note that your pset_1to2 shows only one CPU
currently. This is the minimum CPU; maximum CPUs are used as needed. Output may
slightly differ.
8. Use the pooladm -n –c command to validate the configuration. Commit the changes by
using the -c option.
root@s11-server1:~# pooladm -n –c
root@s11-server1:~# pooladm -c
9. Using the poolcfg –dc info command, display the current pool configuration that is in
use.
root@s11-server1:~# poolcfg -dc info | more
system default
string system.comment
int system.version 1
boolean system.bind-default true
string system.poold.objectives wt-load
pool pool_gmzone
int pool.sys_id 1
boolean pool.active true
boolean pool.default false
Cicero Ronaldo (ciceroฺronaldo@gmailฺcom) has a non-transferable
license to use this Student Guideฺ
Unauthorized reproduction or distribution prohibitedฺ Copyright© 2014, Oracle and/or its affiliatesฺ

Copyright © 2013, Oracle and/or its affiliates. All rights reserved.
Practices for Lesson 6: Configuring Zones and the Virtual Network
Chapter 6 - Page 20
string pool.scheduler FSS
int pool.importance 1
string pool.comment
pset pset_1to2
pool pool_default
int pool.sys_id 0
boolean pool.active true
boolean pool.default true
int pool.importance 1
string pool.comment
…
…
This display should include your modifications; for instance, the pool_gmzone pool and
its pset pset_1to2 shown here.
10. Use the poolstat command to display all the active resource pools.
root@s11-server1:~# poolstat -r all
id pool type rid rset min max size used load
1 pool_gmzone pset 1 pset_1to2 1 2 1 0.00 0.00
0 pool_default pset -1 pset_default 1 66K 1 0.00 0.03
The output shows a default pool as well as your new pool.
Task 3: Binding the Zone to a Persistent Resource Pool
1. Log in to the Sol11-Server1 virtual machine as the oracle user. Use oracle1 as the
password. Assume administrator privileges.
2. Use the zoneadm command to list the current state of the zones.
root@s11-server1:~# zoneadm list -iv
ID NAME STATUS PATH BRAND IP
0 global running / solaris shared
1 grandmazone running /zones/grandmazone solaris excl
2 choczone running /zones/choczone solaris excl
The choczone and grandmazone zones are both up and running.
3. Because grandmazone needs the resource pool, allocate the pool to grandmazone.
root@s11-server1:~# zonecfg -z grandmazone set pool=pool_gmzone
Cicero Ronaldo (ciceroฺronaldo@gmailฺcom) has a non-transferable
license to use this Student Guideฺ
Unauthorized reproduction or distribution prohibitedฺ Copyright© 2014, Oracle and/or its affiliatesฺ

Copyright © 2013, Oracle and/or its affiliates. All rights reserved.
Practices for Lesson 6: Configuring Zones and the Virtual Network
Chapter 6 - Page 21
4. Confirm that the pool allocation is included in the zone configuration.
root@s11-server1:~# zonecfg -z grandmazone info | grep pool
pool: pool_gmzone
The info sub option displays the pool that is allocated to the grandmazone zone.
5. Reboot grandmazone to activate the resource pool binding. Check whether the zone has
rebooted and is currently running.
root@s11-server1:~# zlogin grandmazone init 6
root@s11-server1:~# zoneadm list -iv
ID NAME STATUS PATH BRAND IP
0 global running / solaris shared
1 grandmazone running /zones/grandmazone solaris excl
2 choczone running /zones/choczone solaris excl
Note that the reboot process might take a while to complete.
6. Log in to grandmazone to confirm the availability of the resource pool.
root@s11-server1:~# zlogin grandmazone
[Connected to zone 'grandmazone' pts/1]
Oracle Corporation SunOS 5.11 11.1 September 2012
7. Use the poolcfg –dc info command to view the modified pool configuration.
root@grandmazone:~# poolcfg -dc info
system default
string system.comment
int system.version 1
boolean system.bind-default true
string system.poold.objectives wt-load
pool pool_gmzone
int pool.sys_id 1
boolean pool.active true
boolean pool.default false
string pool.scheduler FSS
int pool.importance 1
string pool.comment
pset pset_1to2
pset pset_1to2
int pset.sys_id 1
boolean pset.default false
uint pset.min 1
Cicero Ronaldo (ciceroฺronaldo@gmailฺcom) has a non-transferable
license to use this Student Guideฺ
Unauthorized reproduction or distribution prohibitedฺ Copyright© 2014, Oracle and/or its affiliatesฺ

Copyright © 2013, Oracle and/or its affiliates. All rights reserved.
Practices for Lesson 6: Configuring Zones and the Virtual Network
Chapter 6 - Page 22
uint pset.max 2
string pset.units population
uint pset.load 1827
uint pset.size 1
string pset.comment
cpu
int cpu.sys_id 0
string cpu.comment
string cpu.status on-line
root@grandmazone:~#
This is your new pool configuration. The pset, the pool, and the CPUs are all associated
as you had specified.
8. Exit grandmazone. Log in to choczone.
root@grandmazone:~# exit
logout
[Connection to zone 'grandmazone' pts/1 closed]
root@s11-server1:~# zlogin choczone
[Connected to zone 'choczone' pts/1]
Oracle Corporation SunOS 5.11 11.1 September 2012
9. Using the poolcfg –dc info command, display the current pool configuration.
root@choczone:~# poolcfg -dc info
system default
string system.comment
int system.version 1
boolean system.bind-default true
string system.poold.objectives wt-load
pool pool_default
int pool.sys_id 0
boolean pool.active true
boolean pool.default true
int pool.importance 1
string pool.comment
pset pset_default
pset pset_default
int pset.sys_id -1
boolean pset.default true
Cicero Ronaldo (ciceroฺronaldo@gmailฺcom) has a non-transferable
license to use this Student Guideฺ
Unauthorized reproduction or distribution prohibitedฺ Copyright© 2014, Oracle and/or its affiliatesฺ

Copyright © 2013, Oracle and/or its affiliates. All rights reserved.
Practices for Lesson 6: Configuring Zones and the Virtual Network
Chapter 6 - Page 23
uint pset.min 1
uint pset.max 65536
string pset.units population
uint pset.load 149
uint pset.size 1
string pset.comment
cpu
int cpu.sys_id 1
string cpu.comment
string cpu.status on-line
root@choczone:~# exit
Because you have not modified any pool configuration here, you will see the default
resource pool configuration.
10. Exit the zone choczone.
Task 4: Removing the Resource Pool Configuration
1. Log in to the Sol11-Server1 virtual machine as the oracle user. Use oracle1 as the
password. Assume administrator privileges.
2. Remove the pool configuration from grandmazone by using the zonecfg command.
root@s11-server1:~# zonecfg -z grandmazone clear pool
3. Reboot grandmazone. Check the zone to see if it is up and running.
root@s11-server1:~# zlogin grandmazone init 6
root@s11-server1:~# zoneadm list -iv
ID NAME STATUS PATH BRAND IP
0 global running / solaris shared
2 choczone running /zones/choczone solaris excl
3 grandmazone running /zones/grandmazone solaris excl
4. Log in to grandmazone. Use the poolcfg –dc info command to check the resource
pool configuration.
root@s11-server1:~# zlogin grandmazone
[Connected to zone 'grandmazone' pts/1]
Oracle Corporation SunOS 5.11 11.1 September 2012
root@grandmazone:~# poolcfg -dc info
system default
string system.comment
int system.version 1
boolean system.bind-default true
Cicero Ronaldo (ciceroฺronaldo@gmailฺcom) has a non-transferable
license to use this Student Guideฺ
Unauthorized reproduction or distribution prohibitedฺ Copyright© 2014, Oracle and/or its affiliatesฺ

Copyright © 2013, Oracle and/or its affiliates. All rights reserved.
Practices for Lesson 6: Configuring Zones and the Virtual Network
Chapter 6 - Page 24
string system.poold.objectives wt-load
pool pool_default
int pool.sys_id 0
boolean pool.active true
boolean pool.default true
int pool.importance 1
string pool.comment
pset pset_default
pset pset_default
int pset.sys_id -1
boolean pset.default true
uint pset.min 1
uint pset.max 65536
string pset.units population
uint pset.load 1418
uint pset.size 1
string pset.comment
cpu
int cpu.sys_id 1
string cpu.comment
string cpu.status on-line
root@grandmazone:~#
Do you have any of the new resource pool information? No, only the default resource
pool configuration is available and displayed.
5. Exit the grandmazone zone to return to the global zone.
root@grandmazone:~# exit
logout
[Connection to zone ‘grandmazone’ pts/1 closed]
root@s11-server1:~#
Note that the resource pool configuration is kept because it will be used again in
subsequent practices.
Cicero Ronaldo (ciceroฺronaldo@gmailฺcom) has a non-transferable
license to use this Student Guideฺ
Unauthorized reproduction or distribution prohibitedฺ Copyright© 2014, Oracle and/or its affiliatesฺ

Copyright © 2013, Oracle and/or its affiliates. All rights reserved.
Practices for Lesson 6: Configuring Zones and the Virtual Network
Chapter 6 - Page 25
Practice 6-4: Managing the Virtual Network Data Flow
Overview
Now that you have configured the resources for the zone, in this task, you manage the
resources on the virtual network.
It was determined by the transaction load for the choczone zone that it requires up to 100MB/s
of network bandwidth to receive and process the transaction on time. To accomplish this
objective, you also increase the priority of transaction handling to high.
Tasks
1. Log in to the Sol11-Server1 virtual machine as the oracle user. Use oracle1 as the
password. Assume administrator privileges.
2. Use dladm show-link to determine the state of all the links that are currently configured
in the system.
root@s11-server1:~# dladm show-link
LINK CLASS MTU STATE OVER
net1 phys 1500 unknown --
net2 phys 1500 unknown --
net0 phys 1500 up --
net3 phys 1500 unknown --
stub0 etherstub 9000 unknown --
vnic0 vnic 9000 up stub0
vnic1 vnic 9000 up stub0
grandmazone/vnic1 vnic 9000 up stub0
vnic2 vnic 9000 up stub0
choczone/vnic2 vnic 9000 up stub0
choczone/net0 vnic 1500 up net0
grandmazone/net0 vnic 1500 up net0
The same VNICs are available that you created in Practice 6-1.
3. Use the flowadm command to create a flow called http1. Define this traffic to port 80.
Display the results.
First create a new VNIC called vnic3.
root@s11-server1:~# dladm create-vnic -l stub0 vnic3
root@s11-server1:~# flowadm add-flow -l vnic3 -a \
transport=tcp,local_port=80 http1
root@s11-server1:~# flowadm show-flow
FLOW LINK IPADDR PROTO LPORT RPORT DSFLD
http1 vnic3 -- tcp 80 -- --
In this case, the name of the new flow control is http1 and it controls the vnic3
configuration.
Cicero Ronaldo (ciceroฺronaldo@gmailฺcom) has a non-transferable
license to use this Student Guideฺ
Unauthorized reproduction or distribution prohibitedฺ Copyright© 2014, Oracle and/or its affiliatesฺ

Copyright © 2013, Oracle and/or its affiliates. All rights reserved.
Practices for Lesson 6: Configuring Zones and the Virtual Network
Chapter 6 - Page 26
4. Use the flowadm command to set the maximum bandwidth of the flow property to 100
Mbps on the http1 flow. Show the results.
root@s11-server1:~# flowadm set-flowprop -p maxbw=100M http1
root@s11-server1:~# flowadm show-flowprop http1
FLOW PROPERTY VALUE DEFAULT POSSIBLE
http1 maxbw 100 -- --
Note: The bandwidth capping is demonstrated here for training purposes only. On the
job, you may also have to manage the bandwidth by increasing or decreasing it. This
would be based on the transactions running for your business application.
5. Use the dladm command to set the link property priority to high on the vnic3 link.
Display the results.
root@s11-server1:~# dladm set-linkprop -p priority=high vnic3
root@s11-server1:~# dladm show-linkprop -p priority vnic3
LINK PROPERTY PERM VALUE DEFAULT POSSIBLE
vnic3 priority rw high high low,medium,high
Cicero Ronaldo (ciceroฺronaldo@gmailฺcom) has a non-transferable
license to use this Student Guideฺ
Unauthorized reproduction or distribution prohibitedฺ Copyright© 2014, Oracle and/or its affiliatesฺ

Copyright © 2013, Oracle and/or its affiliates. All rights reserved.
Practices for Lesson 6: Configuring Zones and the Virtual Network
Chapter 6 - Page 27
Practice 6-5: Removing Part of the Virtual Network
Overview
In this task, you delete the network flow. Other virtual network components and the zones are
not being deleted because they will be used in the subsequent practices.
Task
1. Log in to the Sol11-Server1 virtual machine as the oracle user. Use oracle1 as the
password. Assume administrator privileges.
2. Use the flowadm command to delete the flow. Display the results.
root@s11-server1:~# flowadm show-flow
FLOW LINK IPADDR PROTO LPORT RPORT
DSFLD
http1 vnic3 -- tcp 80 --
--
root@s11-server1:~# flowadm remove-flow -l vnic3
root@s11-server1:~# flowadm show-flow
3. Use the dladm command to display and delete the links. Display the results.
root@s11-server1:~# dladm show-link
LINK CLASS MTU STATE OVER
net1 phys 1500 unknown --
net2 phys 1500 unknown --
net0 phys 1500 up --
net3 phys 1500 unknown --
stub0 etherstub 9000 unknown --
vnic0 vnic 9000 up stub0
vnic1 vnic 9000 up stub0
grandmazone/vnic1 vnic 9000 up stub0
vnic2 vnic 9000 up stub0
choczone/vnic2 vnic 9000 up stub0
choczone/net0 vnic 1500 up net0
grandmazone/net0 vnic 1500 up net0
vnic3 vnic 9000 up stub0
4. Use the dladm command to delete the vnic3 link.
root@s11-server1:~# dladm delete-vnic vnic3
Cicero Ronaldo (ciceroฺronaldo@gmailฺcom) has a non-transferable
license to use this Student Guideฺ
Unauthorized reproduction or distribution prohibitedฺ Copyright© 2014, Oracle and/or its affiliatesฺ

Copyright © 2013, Oracle and/or its affiliates. All rights reserved.
Practices for Lesson 6: Configuring Zones and the Virtual Network
Chapter 6 - Page 28
5. Use the dladm command to display the links.
root@s11-server1:~# dladm show-link
LINK CLASS MTU STATE OVER
net1 phys 1500 unknown --
net2 phys 1500 unknown --
net0 phys 1500 up --
net3 phys 1500 unknown --
stub0 etherstub 9000 unknown --
vnic0 vnic 9000 up stub0
vnic1 vnic 9000 up stub0
grandmazone/vnic1 vnic 9000 up stub0
vnic2 vnic 9000 up stub0
choczone/vnic2 vnic 9000 up stub0
choczone/net0 vnic 1500 up net0
grandmazone/net0 vnic 1500 up net0
This configuration will be used in future practices.
Cicero Ronaldo (ciceroฺronaldo@gmailฺcom) has a non-transferable
license to use this Student Guideฺ
Unauthorized reproduction or distribution prohibitedฺ Copyright© 2014, Oracle and/or its affiliatesฺ

Copyright © 2013, Oracle and/or its affiliates. All rights reserved.
Practices for Lesson 7: Managing Services and Service Properties
Chapter 7 - Page 1
Practices for Lesson 7:
Managing Services and
Service Properties
Chapter 7
Cicero Ronaldo (ciceroฺronaldo@gmailฺcom) has a non-transferable
license to use this Student Guideฺ
Unauthorized reproduction or distribution prohibitedฺ Copyright© 2014, Oracle and/or its affiliatesฺ

Copyright © 2013, Oracle and/or its affiliates. All rights reserved.
Practices for Lesson 7: Managing Services and Service Properties
Chapter 7 - Page 2
Practice Overview for Lesson 7
Practices Overview
In these practices, you are given a plan for configuring, restoring, and maintaining the Oracle
Solaris 11.1 services and getting acquainted with various service profiles.
According to the predeployment plan, the time has come for you to evaluate the Service
Management Facility (SMF) services. You have been tasked with working with multiple
scenarios to test the SMF functionality. In support of your business applications, in certain
cases, you may have to create, troubleshoot, and modify the services and the service profiles.
The key areas explored in the practices are:
• Configuring SMF services
• Restoring and recovering a service
• Working with service profiles
Note: In many cases, your command output displays may be different from the displays in
the practice. Some examples would be storage, process IDs, and session-oriented and
system-generated information.
Check your progress. You just completed the zones lesson and now you are working with
Services.
√ Oracle Solaris 11.1 Predeployment Checklist
√ Managing the Image Packaging System (IPS) and Packages
√ Installing Oracle Solaris 11.1 on Multiple Hosts
√ Managing the Business Application Data
√ Configuring Network and Traffic Failover
√ Configuring Zones and the Virtual Network
Managing Services and Service Properties
Configuring Privileges and Role-Based Access Control
Securing System Resources by Using Oracle Solaris Auditing
Managing Processes and Priorities
Evaluating System Resources
Monitoring and Troubleshooting System Failures
Cicero Ronaldo (ciceroฺronaldo@gmailฺcom) has a non-transferable
license to use this Student Guideฺ
Unauthorized reproduction or distribution prohibitedฺ Copyright© 2014, Oracle and/or its affiliatesฺ

Copyright © 2013, Oracle and/or its affiliates. All rights reserved.
Practices for Lesson 7: Managing Services and Service Properties
Chapter 7 - Page 3
Practice 7-1: Configuring SMF Services
Overview
As part of the predeployment testing plan, you are given the task of creating a simple service
that can also assist you in modifying a service. You will call this new service crmsvc, which has
been designed to monitor the CRM processes. In addition, you will also modify environment
variables and properties of actively running services. For example, you will determine any
memory leaks caused by the running programs and turning on the TCP trace. In this practice,
you work with SMF services in the following areas:
• Creating and exporting a service
• Modifying a service
• Changing an environment variable for a service
• Changing a property for a service controlled by inetd
Task 1: Creating and Exporting a Service
1. Verify that the Sol11-Server1 virtual machine is running. If it is not running, start it now.
Double-click the Sol11-Desktop icon to launch the Sol11-Desktop virtual machine.
2. Log in to the Sol11-Desktop virtual machine as the user oracle. Use the password
oracle1.
3. Right-click the desktop background and open a terminal window.
4. In the terminal window, run the su - command to assume administrator privileges.
oracle@s11-desktop:~$ su -
Password:
Oracle Corporation SunOS 5.11 11.1 September 2012
root@s11-desktop:~#
5. Verify that the user sstudent exists. If not, create the user sstudent and then confirm
that the user has been created.
root@s11-desktop:~# tail /etc/passwd
nobody:x:60001:60001:NFS Anonymous Access User:/:
noaccess:x:60002:60002:No Access User:/:
nobody4:x:65534:65534:SunOS 4.x NFS Anonymous Access User:/:
aiuser:x:60003:60001:AI User:/:
pkg5srv:x:97:97:pkg(5) server UID:/:
oracle:x:60004:10:Oracle:/home/oracle:/usr/bin/bash
…
…
…
sstudent:x:60008:10:super student:/export/home/sstudent:/bin/sh
Cicero Ronaldo (ciceroฺronaldo@gmailฺcom) has a non-transferable
license to use this Student Guideฺ
Unauthorized reproduction or distribution prohibitedฺ Copyright© 2014, Oracle and/or its affiliatesฺ

Copyright © 2013, Oracle and/or its affiliates. All rights reserved.
Practices for Lesson 7: Managing Services and Service Properties
Chapter 7 - Page 4
Note: The user sstudent has been created so that you can create a new service as a
non-administrative user. Because you must have the appropriate privileges, you will
perform some steps as an administrative user.
If sstudent does not exist, run the following command:
root@s11-desktop:~# useradd -u 60008 -g 10 –d \
/export/home/sstudent -m -s /bin/bash -c "super student" sstudent
6. As the sstudent user, create the smf directory in your home directory. Create a file called
monitor.crm with the contents shown below. Finally, grant the execution permission on
the script.
root@s11-desktop:~# su - sstudent
Oracle Corporation SunOS 5.11 11.1 September 2012
sstudent@s11-desktop:~$ pwd
/export/home/sstudent
sstudent@s11-desktop:~$ mkdir smf
sstudent@s11-desktop:~$ ls
local.cshrc local.login local.profile smf
sstudent@s11-desktop:~$ cd smf
sstudent@s11-desktop:~/smf$ vi monitor.crm
sstudent@s11-desktop:~/smf$ cat monitor.crm
#!/bin/sh
echo "crm monitoring service" > /export/home/sstudent/smf/crmrep
sstudent@s11-desktop:~/smf$ chmod 774 monitor.crm
After creating the script, you granted the execute permission on the script so it can be
executed.
7. Exit the sstudent user account to return to the administrative user to configure the
service. Use the svccfg command to copy an existing service to serve as a template.
root@s11-desktop:~/smf$ exit
root@s11-desktop:~# svccfg export system/utmp > \
/var/svc/manifest/site/crmsvc.xml
Instead of starting the manifest file from scratch, you will have this template to work with.
8. Edit the crmsvc.xml file to match the contents displayed. Your file should match these
contents exactly, so make sure to delete all unnecessary tags from the template.
root@s11-desktop:~# vi /var/svc/manifest/site/crmsvc.xml
root@s11-desktop:~# more /var/svc/manifest/site/crmsvc.xml
<?xml version='1.0'?>
<!DOCTYPE service_bundle SYSTEM
'/usr/share/lib/xml/dtd/service_bundle.dtd.1'>
<service_bundle type='manifest' name='crmsvc'>
<service name='site/crmsvc' type='service' version='1'>
Cicero Ronaldo (ciceroฺronaldo@gmailฺcom) has a non-transferable
license to use this Student Guideฺ
Unauthorized reproduction or distribution prohibitedฺ Copyright© 2014, Oracle and/or its affiliatesฺ

Copyright © 2013, Oracle and/or its affiliates. All rights reserved.
Practices for Lesson 7: Managing Services and Service Properties
Chapter 7 - Page 5
<create_default_instance enabled='false'/>
<single_instance/>
[Make sure you delete the dependency and dependent tags.]
<exec_method name='start' type='method'
exec='/export/home/sstudent/smf/monitor.crm’
timeout_seconds='60'/>
<exec_method name='stop' type='method' exec=':true'
timeout_seconds='60'/>
[Make sure you delete the stability value and template tags and their associated
information]
<property_group name='startd' type='framework'>
<propval name='duration' type='astring'
value='transient'/>
</property_group>
</service>
</service_bundle>
After editing, the manifest for your test service should look like this. Review the contents
for any XML tags missing, and any typing errors. Notice that exec_method matches up
with your program.
9. Validate the manifest file by using the svccfg validate command.
root@s11-desktop:~# svccfg validate /var/svc/manifest/site/crmsvc.xml
Unless there are any spelling mistakes, the validate command should run fine.
10. By using the svcadm restart command, make the manifest available to SMF.
root@s11-desktop:~# svcadm restart system/manifest-import
Because the service you created is in an SMF standard manifest directory, you can just
restart the manifest service. This will import the newly created service. You don’t have to
import the service individually. This is the recommended practice.
Cicero Ronaldo (ciceroฺronaldo@gmailฺcom) has a non-transferable
license to use this Student Guideฺ
Unauthorized reproduction or distribution prohibitedฺ Copyright© 2014, Oracle and/or its affiliatesฺ

Copyright © 2013, Oracle and/or its affiliates. All rights reserved.
Practices for Lesson 7: Managing Services and Service Properties
Chapter 7 - Page 6
11. Display the service by using the svcs command. If it is disabled, enable it by using the
svcadm command.
root@s11-desktop:~# svcs crmsvc
disabled 13:14:07 svc:/site/crmsvc:default
root@s11-desktop:~# svcadm enable /site/crmsvc
root@s11-desktop:~# svcs crmsvc
STATE STIME FMRI
online 13:43:36 svc:/site/crmsvc:default
Is your service enabled and online? Yes.
12. Now verify that the command echo was executed by using the new service.
root@s11-desktop:~# cat /export/home/sstudent/smf/crmrep
crm monitoring service
The action you had specified in the monitor.crm was executed by bringing up the
service resulting in echoing the above string to the crmrep file. This is how you can
execute a program as a service.
Task 2: Modifying Service Configuration
Overview
The following tasks will introduce the various types of service modifications, for example, the
service environment variables, network service properties and process to service conversion.
In this practice, you will work with SMF services in the following areas:
• Changing an environment variable for a service
• Changing a property of a service controlled by inetd
Task 2A: Change an Environment Variable for a Service
1. Double-click the Sol11-Desktop icon to launch the Sol11-Desktop virtual machine.
2. Log in to the virtual machine Sol11-Desktop as the user oracle. Use the password
oracle1.
3. Right-click the desktop background and open a terminal window.
4. In the terminal window, run the su - command to assume administrator privileges.
oracle@s11-desktop:~$ su -
Password: oracle1
Oracle Corporation SunOS 5.11 11.1 September 2012
root@s11-desktop:~#
Cicero Ronaldo (ciceroฺronaldo@gmailฺcom) has a non-transferable
license to use this Student Guideฺ
Unauthorized reproduction or distribution prohibitedฺ Copyright© 2014, Oracle and/or its affiliatesฺ

Copyright © 2013, Oracle and/or its affiliates. All rights reserved.
Practices for Lesson 7: Managing Services and Service Properties
Chapter 7 - Page 7
5. By using the svcs command, check to see if the cron service is running.
root@s11-desktop:~# svcs system/cron
STATE STIME FMRI
online 6:52:52 svc:/system/cron:default
The cron service is up and running.
6. Use the svccfg command to modify the memory environment variables for the cron
service.
root@s11-desktop:~# svccfg -s system/cron:default setenv \
UMEM_DEBUG default
root@s11-desktop:~# svccfg -s system/cron:default setenv \
LD_PRELOAD libumem.so
The two environment variables are configured for the cron service for debugging the
memory leaks while the cron service is executing a program.
7. Refresh and restart the cron service by using the svcadm command to make the changes
effective.
root@s11-desktop:~# svcadm refresh system/cron
root@s11-desktop:~# svcadm restart system/cron
8. Verify that the environment variables have been modified.
Note: Use the back tick key on the keyboard to enclose the pgrep command. Look for the
back tick below the tilde (~) key on the keyboard.
root@s11-desktop:~# pargs -e `pgrep -f /usr/sbin/cron`
1593: /usr/sbin/cron
…
…
envp[10]: LD_PRELOAD=libumem.so
…
…
envp[19]: UMEM_DEBUG=default
envp[20]: A__z="*SHLVL
Your display may be slightly different.
Are the configured environment variables displayed in the output? Yes, envp[10] and
envp[19] show the new values.
This command is helpful when you need to debug or monitor programs for memory
leaks.
In order to find the memory leaks in the programs, you need knowledge of Oracle Solaris
debugging tools like mdb. The debugging topic is covered in more specialized course like
Oracle Solaris 11 Performance Management.
Cicero Ronaldo (ciceroฺronaldo@gmailฺcom) has a non-transferable
license to use this Student Guideฺ
Unauthorized reproduction or distribution prohibitedฺ Copyright© 2014, Oracle and/or its affiliatesฺ

Copyright © 2013, Oracle and/or its affiliates. All rights reserved.
Practices for Lesson 7: Managing Services and Service Properties
Chapter 7 - Page 8
Task 2B: Change a Property for an inetd-Controlled Service
1. Verify that the Sol11-Server1 virtual machine is running. If it is not, start it now.
2. Log in to the virtual machine Sol11-Server1 as the user oracle. Use the password
oracle1.
3. Assume administrator privileges.
oracle@s11-server1:~$ su -
Password: oracle1
Oracle Corporation SunOS 5.11 11.1 September 2012
root@s11-server1:~#
4. By using the inetadm command, list the properties of the telnet service.
root@s11-server1:~# inetadm -l svc:/network/telnet:default
SCOPE NAME=VALUE
name="telnet"
endpoint_type="stream"
proto="tcp6"
isrpc=FALSE
wait=FALSE
exec="/usr/sbin/in.telnetd"
user="root"
default bind_addr=""
default bind_fail_max=-1
default bind_fail_interval=-1
default max_con_rate=-1
default max_copies=-1
default con_rate_offline=-1
default failrate_cnt=40
default failrate_interval=60
default inherit_env=TRUE
default tcp_trace=FALSE
default tcp_wrappers=FALSE
default connection_backlog=10
default tcp_keepalive=FALSE
Is the tcp_trace property for telnet enabled? No, because it says false in the
entry.
5. Use the inetadm command to enable tcp_trace on the telnet service. Confirm the
action.
root@s11-server1:~# inetadm -m svc:/network/telnet:default tcp_trace=TRUE
root@s11-server1:~# inetadm -l svc:/network/telnet:default
SCOPE NAME=VALUE
name="telnet"
…
Cicero Ronaldo (ciceroฺronaldo@gmailฺcom) has a non-transferable
license to use this Student Guideฺ
Unauthorized reproduction or distribution prohibitedฺ Copyright© 2014, Oracle and/or its affiliatesฺ

Copyright © 2013, Oracle and/or its affiliates. All rights reserved.
Practices for Lesson 7: Managing Services and Service Properties
Chapter 7 - Page 9
…
…
default inherit_env=TRUE
tcp_trace=TRUE
default tcp_wrappers=FALSE
default connection_backlog=10
default tcp_keepalive=FALSE
Why do we need to turn on tcp_trace? So the telnet connections can be
monitored.
Is the tcp_trace enabled now for the telnet service? Yes.
6. Start verifying the tcp_trace by using the telnet command to connect to the
localhost and the exit command to log out.
Note: If you are unable to connect, the telnet service may be down. You can bring it up by
using the command:
# svcadm enable network/telnet
root@s11-server1:~# telnet localhost
Trying ::1…
Connected to s11-server1.
Escape character is '^]'.
login: oracle
Password: oracle1
Last login: Thu Dec 15 07:08:43 on s11-desktop
Oracle Corporation SunOS 5.11 11.1 September 2012
oracle@s11-server1:~# exit
logout
Connection to s11-server1 closed by foreign host.
Because you created the connection, you can check if the tcp_trace property is
logging the message.
7. Check whether any message was logged in the /var/adm/messages file.
root@s11-server1:~# tail -1 /var/adm/messages
Dec 15 08:27:57 s11-server1 inetd[787]: [ID 317013 daemon.notice]
telnet[13363] from 127:0:0:1 57330
Note: -1 in the command is the digit one.
By using the tail command with -1 option, you display the last or most current
message.
Is the telnet connection logged? Yes.
Cicero Ronaldo (ciceroฺronaldo@gmailฺcom) has a non-transferable
license to use this Student Guideฺ
Unauthorized reproduction or distribution prohibitedฺ Copyright© 2014, Oracle and/or its affiliatesฺ

Copyright © 2013, Oracle and/or its affiliates. All rights reserved.
Practices for Lesson 7: Managing Services and Service Properties
Chapter 7 - Page 10
8. Confirm the entry in /etc/syslog.conf, which is configured to log this message.
root@s11-server1:~# grep /var/adm/messages /etc/syslog.conf
*.err;kern.debug;daemon.notice;mail.crit /var/adm/messages
...
...
Notice that the daemon.notice facility messages are configured to be written to
/var/adm/messages. Who is writing the trace messages to /var/adm/messages?
The syslogd daemon.
Task 2C: Modify the Manifest for a Service
1. Double-click the Sol11-Desktop icon to launch the S11-Desktop virtual machine.
2. Log in to the virtual machine S11-Desktop as the user oracle. Use the password
oracle1.
3. Right-click the desktop background and open a terminal window.
4. In the terminal window, run the su - command to assume administrator privileges.
oracle@s11-desktop:~$ su -
Password: oracle1
Oracle Corporation SunOS 5.11 11.1 September 2012
root@s11-desktop:~#
5. By using the svcs command, check the status of the crmsvc service you created earlier
in Practice 7-1, Task 1. Disable the service and display the result.
Note: If the crmsvc service should appear in a maintenance state when you run the svcs
crmsvc command the first time, disable the service, refresh it, and then enable it to bring it
back into an online state.
root@s11-desktop~# svcs crmsvc
online 10:04:44 svc:/site/crmsvc:default
root@s11-desktop:~# svcadm disable crmsvc
root@s11-desktop:~# svcs crmsvc
STATE STIME FMRI
disabled 10:07:59 svc:/site/crmsvc:default
Notice that at this time crmsvc is disabled.
6. Use the cd command to switch to sstudent’s smf directory. Display the directory’s
contents.
root@s11-desktop~# cd /export/home/sstudent/smf;ls
crmrep monitor.crm
Cicero Ronaldo (ciceroฺronaldo@gmailฺcom) has a non-transferable
license to use this Student Guideฺ
Unauthorized reproduction or distribution prohibitedฺ Copyright© 2014, Oracle and/or its affiliatesฺ

Copyright © 2013, Oracle and/or its affiliates. All rights reserved.
Practices for Lesson 7: Managing Services and Service Properties
Chapter 7 - Page 11
7. By using the cp command, copy the file monitor.crm as monitor1.crm. By using the
vi editor, modify the contents of monitor1.crm as indicated below.
root@s11-desktop:/home/sstudent/smf# cp monitor.crm monitor1.crm
root@s11-desktop:/home/sstudent/smf# vi monitor1.crm
root@s11-desktop:/home/sstudent/smf# cat monitor1.crm
#!/bin/sh
echo "here is your modified crm monitoring service" >
/export/home/sstudent/smf/crmrep
Your modified service should record this new message in the crmrep file.
8. Use the cd command to switch to the manifest directory. Edit the crmsvc.xml to refer to
monitor1.crm instead of monitor.crm.
root@s11-desktop:/home/sstudent/smf# cd /var/svc/manifest/site
root@s11-desktop:/var/svc/manifest/site# ls
crmsvc.xml
root@s11-desktop:/var/svc/manifest/site# vi crmsvc.xml
root@s11-desktop:/var/svc/manifest/site# grep monitor crmsvc.xml
<exec_method name='start' type='method'
exec='/export/home/sstudent/smf/monitor1.crm'
timeout_seconds='60'/>
root@s11-desktop:/var/svc/manifest/site# cd
root@s11-desktop:~#
9. By using the svcadm command, restart the manifest-import service. Enable crmsvc
and confirm the service is online.
root@s11-desktop:~# svcadm restart manifest-import
root@s11-desktop:~# svcadm restart crmsvc
root@s11-desktop:~# svcadm enable crmsvc
root@s11-desktop:~# svcs crmsvc
online 10:27:25 svc:/site/crmsvc:default
The service is online.
10. By using the cat command, display the new contents of the report.
root@s11-desktop:~# cat /export/home/sstudent/smf/crmrep
here is your modified crm monitoring service
So what was the purpose of modifying the service manifest? To demonstrate that these
are the steps you take to modify an existing service. The modified service is executing a
different program monitor1.crm.
Cicero Ronaldo (ciceroฺronaldo@gmailฺcom) has a non-transferable
license to use this Student Guideฺ
Unauthorized reproduction or distribution prohibitedฺ Copyright© 2014, Oracle and/or its affiliatesฺ

Copyright © 2013, Oracle and/or its affiliates. All rights reserved.
Practices for Lesson 7: Managing Services and Service Properties
Chapter 7 - Page 12
Practice 7-2: Working with Service Profiles
Overview
In this practice, you evaluate the current service profile. Based on your business application
environment, you want to make sure that only the required services are enabled at the system
startup. In addition, you learn how to limit remote access to your host by using a network profile.
The following activities are addressed:
• Creating an SMF profile
• Applying an SMF profile
• Changing the services and their configuration by using the netservices command
Tasks
1. Double-click the Sol11-Desktop icon to launch the Sol11-Desktop virtual machine.
2. Log in to the Sol11-Desktop virtual machine as the user oracle. Use the password
oracle1.
3. Right-click the desktop background and open a terminal window.
4. In the terminal window, run the su - command to assume administrator privileges.
oracle@s11-desktop:~$ su -
Password: oracle1
Oracle Corporation SunOS 5.11 11.1 September 2012
root@s11-desktop:~#
5. Use the svcs command to check the current status of cups/scheduler service.
root@s11-desktop:~# svcs cups/scheduler
online 16:48:33 svc:/application/cups/scheduler:default
Currently, the service is enabled.
6. Use the command svccfg extract to copy the currently active SMF profile into a file
called profile.xml.
root@s11-desktop:~# svccfg extract > profile.xml
7. By using the vi editor, modify the extracted file profile.xml. Change the enabled
property of application/cups/scheduler service from true to false.
root@s11-desktop:~# vi profile.xml
root@s11-desktop:~# more profile.xml
<?xml version='1.0'?>
<!DOCTYPE service_bundle SYSTEM
'/usr/share/lib/xml/dtd/service_bundle.dtd.1'>
<service_bundle type='profile' name='profile'>
…
…
…
Cicero Ronaldo (ciceroฺronaldo@gmailฺcom) has a non-transferable
license to use this Student Guideฺ
Unauthorized reproduction or distribution prohibitedฺ Copyright© 2014, Oracle and/or its affiliatesฺ

Copyright © 2013, Oracle and/or its affiliates. All rights reserved.
Practices for Lesson 7: Managing Services and Service Properties
Chapter 7 - Page 13
<service name='application/cups/scheduler' type='service'
version='0'>
<create_default_instance enabled='false'/>
<single_instance/>
</service>
…
…
…
After you apply the configuration, this cups/scheduler service will be disabled.
8. Use the svccfg command to apply the modified profile.
root@s11-desktop:~# svccfg apply profile.xml
Note: Allow the OS to apply the changes. It will take a few minutes.
root@s11-desktop:~# svcs cups/scheduler
disabled 16:48:33 svc:/application/cups/scheduler:default
Notice the cups/scheduler service is disabled.
Refresh and then enable the service by using the svcadm enable command. As a last
step, verify that the service is now back online.
root@s11-desktop:~# svcadm refresh cups/scheduler
root@s11-desktop:~# svcadm enable cups/scheduler
root@s11-desktop:~# svcs cups/scheduler
online 16:50:15 svc:/application/cups/scheduler:default
The service is once again enabled.
Cicero Ronaldo (ciceroฺronaldo@gmailฺcom) has a non-transferable
license to use this Student Guideฺ
Unauthorized reproduction or distribution prohibitedฺ Copyright© 2014, Oracle and/or its affiliatesฺ

Copyright © 2013, Oracle and/or its affiliates. All rights reserved.
Practices for Lesson 7: Managing Services and Service Properties
Chapter 7 - Page 14
Practice 7-3: Restoring and Recovering a Service
Overview
Your predeployment test plan calls for various SMF service scenarios. This practice covers
most of the repair and restore scenarios when a service or the SMF repository has become
defective. The following areas will be addressed in this practice:
• Restoring a service in the maintenance state
• Reverting to a previous SMF snapshot
• Repairing a corrupt repository
• Debugging a service that is not starting
Task 1: Restore a Service in the maintenance State
Now you look at a service which will be in the maintenance state. In a training scenario like
this, you will make a spelling error in the service manifest file, and observe the service going
into the maintenance state and correct the problem.
1. Double-click the Sol11-Desktop icon to launch the Sol11-Desktop virtual machine.
2. Log in to the Sol11-Desktop virtual machine as the user oracle. Use the password
oracle1.
3. Right-click the desktop background and open a terminal window.
4. In the terminal window, run the su - command to assume administrator privileges.
oracle@s11-desktop:~$ su -
Password: oracle1
Oracle Corporation SunOS 5.11 11.1 September 2012
root@s11-desktop:~#
5. Use the command svcs to check if the crmsvc service is running.
root@s11-desktop:~# svcs crmsvc
STATE STIME FMRI
online 10:27:25 svc:/site/crmsvc:default
6. By using vi (or any other UNIX editor), delete the last letter ‘m’ from the file name
monitor1.crm in the method block as indicated. Save the changes.
root@s11-desktop:~# cd /var/svc/manifest/site
root@s11-desktop:/var/svc/manifest/site# vi crmsvc.xml
<?xml version='1.0' encoding='UTF-8' ?>
<!DOCTYPE service_bundle SYSTEM
'/usr/share/lib/xml/dtd/service_bundle.dtd.1'>
<service_bundle type='manifest' name='crmsvc'>
<service name='site/crmsvc' type='service' version='1'>
<create_default_instance enabled='false'/>
<single_instance/>
<exec_method name='start' type='method'
exec='/export/home/sstudent/smf/monitor1.cr’
…
Cicero Ronaldo (ciceroฺronaldo@gmailฺcom) has a non-transferable
license to use this Student Guideฺ
Unauthorized reproduction or distribution prohibitedฺ Copyright© 2014, Oracle and/or its affiliatesฺ

Copyright © 2013, Oracle and/or its affiliates. All rights reserved.
Practices for Lesson 7: Managing Services and Service Properties
Chapter 7 - Page 15
…
…
root@s11-desktop:/var/svc/manifest/site# cd
root@s11-desktop:~#
This will create a problem because the crmsvc program will not be able to process the
misspelled argument ‘monitor1.cr’. This scenario is realistic and representative of
real world because typing errors can happen.
7. See if you can bring this service up. Refresh the manifest-import service, which will
automatically refresh the crmsvc configuration.
root@s11-desktop:~# svcadm restart manifest-import
root@s11-desktop:~# svcs crmsvc
STATE STIME FMRI
online 10:27:25 svc:/site/crmsvc:default
root@s11-desktop:~# svcadm restart crmsvc
root@s11-desktop:~# svcs crmsvc
STATE STIME FMRI
maintenance 10:27:25 svc:/site/crmsvc:default
root@s11-desktop:~# svcadm clear crmsvc
root@s11-desktop:~# svcs crmsvc
STATE STIME FMRI
maintenance 10:27:25 svc:/site/crmsvc:default
When trying to clear the maintenance state, it still stays in the existing maintenance
state. When the Service Management Facility (SMF) places a service in the
maintenance mode, SMF is unable to bring it up. A system administrator has to debug
the problem.
8. Use the command svcs with the –xv option and that will give you some debugging details.
root@s11-desktop:~# svcs -xv crmsvc
svc:/ site/crmsvc:default (?)
State: maintenance since December 15, 2012 08:22:41 PM UTC
Reason: Start method failed repeatedly, last exited with status
127
See: http://support.oracle.com/msg/SMF-8000-KS
See: /var/svc/log/site-crmsvc:default.log
Impact: This service is not running
Here you see the details about the crmsvc service. The display tells you that there is a
problem with the start method as it exited with status 127. You can get more details in
the service log.
Cicero Ronaldo (ciceroฺronaldo@gmailฺcom) has a non-transferable
license to use this Student Guideฺ
Unauthorized reproduction or distribution prohibitedฺ Copyright© 2014, Oracle and/or its affiliatesฺ

Copyright © 2013, Oracle and/or its affiliates. All rights reserved.
Practices for Lesson 7: Managing Services and Service Properties
Chapter 7 - Page 16
root@s11-desktop:/var/svc/manifest/site# tail /var/svc/log/site-
crmsvc:default.log
/usr/sbin/sh[1:exec: /export/home/student/smf/monitor1.cr: not
found
Dec 15 08:22:41 Method “start” exited with status 127.
…
So now you can see the details in the log and it spells out that it cannot execute your
script monitor1.cr
9. Edit the crmsvc.xml file to correct the typing error. Refer to previous steps for editing
content.
root@s11-desktop:~# cd /var/svc/manifest/site
root@s11-desktop:/var/svc/manifest/site# vi crmsvc.xml
<?xml version='1.0' encoding='UTF-8' ?>
<!DOCTYPE service_bundle SYSTEM
'/usr/share/lib/xml/dtd/service_bundle.dtd.1'>
<service_bundle type='manifest' name='crmsvc'>
<service name='site/crmsvc' type='service' version='1'>
<create_default_instance enabled='false'/>
<single_instance/>
<exec_method name='start' type='method'
exec='/export/home/sstudent/smf/monitor1.crm’
…
…
…
root@s11-desktop:/var/svc/manifest/site# cd
root@s11-desktop:~#
Here you edit the crmsvc.xml file and correct the spelling error from ‘monitor1.cr’ to
‘monitor1.crm’ in the method block.
10. Now can you bring up the service? Look at what needs to be done.
root@s11-desktop:~# svcadm restart manifest-import
root@s11-desktop:~# svcs crmsvc
STATE STIME FMRI
maintenance 11:27:25 svc:/site/crmsvc:default
root@s11-desktop:~# svcadm clear crmsvc
root@s11-desktop:~# svcs crmsvc
STATE STIME FMRI
online 11:27:25 svc:/site/crmsvc:default
Now the crmsvc service is up and you are back in business.
This completes the steps for managing a service in the maintenance state.
Cicero Ronaldo (ciceroฺronaldo@gmailฺcom) has a non-transferable
license to use this Student Guideฺ
Unauthorized reproduction or distribution prohibitedฺ Copyright© 2014, Oracle and/or its affiliatesฺ

Copyright © 2013, Oracle and/or its affiliates. All rights reserved.
Practices for Lesson 7: Managing Services and Service Properties
Chapter 7 - Page 17
Task 2: Revert to a Previous SMF Snapshot
This task introduces you to multiple snapshots of a service. When a service is corrupted, it is
really the current instance of that service which is non-operational. In that case, one of the
options would be to revert to a previous functional snapshot and correcting the problem with that
instance of the service. Because you have seen multiple corrupted services, only the steps you
need to take to revert to a previous instance of a service are demonstrated to you here.
1. Double-click the Sol11-Desktop icon to launch the Sol11-Desktop virtual machine.
2. Log in to the Sol11-Desktop virtual machine as the user oracle. Use the password
oracle1.
3. Right-click the desktop background and open a terminal window.
4. In the terminal window, run the su - command to assume administrator privileges.
oracle@s11-desktop:~$ su -
Password: oracle1
Oracle Corporation SunOS 5.11 11.1 September 2012
root@s11-desktop:~#
5. Take a look at the console-login service. Assume it is in the maintenance state.
root@s11-desktop:~# svcs console-login:default
online 18:15:32 svc:/system/console-login:default
Currently, the service is running. You assume it is in the maintenance state and you
would like to revert to an earlier snapshot.
6. Use the svccfg utility to list the console-login service snapshots. Select the
previous snapshot.
root@s11-desktop:~# svccfg
svc:> select system/console-login:default
svc:/system/console-login:default> listsnap
previous
running
start
svc:/system/console-login:default> revert previous
svc:/system/console-login:default> quit
In this step you are reverting to the previous snapshot.
7. Use the svcadm commands to refresh and restart the service. Confirm it is up and
running.
root@s11-desktop:~# svcadm refresh system/console-login:default
root@s11-desktop:~# svcadm restart system/console-login:default
root@s11-desktop:~# svcs console-login:default
online 18:15:32 svc:/system/console-login:default
The refresh option will update the SMF repository with the configuration information
from the previous snapshot. After you do the refresh, you can start the service.
Cicero Ronaldo (ciceroฺronaldo@gmailฺcom) has a non-transferable
license to use this Student Guideฺ
Unauthorized reproduction or distribution prohibitedฺ Copyright© 2014, Oracle and/or its affiliatesฺ

Copyright © 2013, Oracle and/or its affiliates. All rights reserved.
Practices for Lesson 7: Managing Services and Service Properties
Chapter 7 - Page 18
Task 3: Repair a Corrupt Repository
This task introduces you to multiple versions of the SMF repository, which contains all of the
services. In Task 2, you reverted to a previous snapshot of one service. Here you are reverting
to a functional version of the whole repository. This procedure is useful if multiple services are
corrupted and it is deemed more efficient to revert to an earlier functional repository. Because
you have seen multiple corrupted services, here you are shown only the steps you need to take
to revert to a previous functional version of the repository.
1. Double-click the Sol11-Desktop icon to launch the Sol11-Desktop virtual machine.
2. Log in to the Sol11-Desktop virtual machine as the user oracle. Use the password
oracle1.
3. Right-click the desktop background and open a terminal window.
4. In the terminal window, run the su - command to assume administrator privileges.
oracle@s11-desktop:~$ su -
Password: oracle1
Oracle Corporation SunOS 5.11 11.1 September 2012
root@s11-desktop:~#
5. Take a look at the whole SMF service repository. If you have corrupted service/s, SMF
would not be able to bring them up and offer you the relevant functionality, for example, the
ssh and telnet services. In that case, you restore the SMF repository to an earlier
version. Take a look at the commands.
root@s11-desktop:~# cd /lib/svc/bin
root@s11-desktop:/lib/svc/bin# ./restore_repository
See http://support.oracle.com/msg/SMF-8000-MY for more
information on the use of
this script to restore backup copies of the smf(5) repository.
If there are any problems which need human intervention, this
script will
give instructions and then exit back to your shell.
./restore_repository[71]: [: /: arithmetic syntax error
The following backups of /etc/svc/repository.db exist, from
oldest to newest:
boot-20121219_030802
boot-20121220_035620
boot-20121220_213924
boot-20121221_073919
manifest_import-20121222_031207
manifest_import-20121222_041727
manifest_import-20121222_051215
manifest_import-20121222_051642
Cicero Ronaldo (ciceroฺronaldo@gmailฺcom) has a non-transferable
license to use this Student Guideฺ
Unauthorized reproduction or distribution prohibitedฺ Copyright© 2014, Oracle and/or its affiliatesฺ

Copyright © 2013, Oracle and/or its affiliates. All rights reserved.
Practices for Lesson 7: Managing Services and Service Properties
Chapter 7 - Page 19
The backups are named based on their type and the time what they
were taken.
Backups beginning with "boot" are made before the first change is
made to
the repository after system boot. Backups beginning with
"manifest_import"
are made after svc:/system/manifest-import:default finishes its
processing.
The time of backup is given in YYYYMMDD_HHMMSS format.
Please enter either a specific backup repository from the above
list to
restore it, or one of the following choices:
CHOICE ACTION
---------------- -----------------------------------------
-----
boot restore the most recent post-boot backup
manifest_import restore the most recent manifest_import
backup
-seed- restore the initial starting repository
(All
customizations will be lost, including those
made by the install/upgrade process.)
-quit- cancel script and quit
Enter response [boot]: boot-20121221_073919
Note: Your display may be different.
In this step you are reverting to the service repository version created on December 21,
2012. A new version is created by SMF after any service configuration.
6. The system will respond as follows. If you would like to revert to the specified version, enter
yes, otherwise no. In this training scenario, you enter no.
…
…
After confirmation, the following steps will be taken:
svc.startd(1M) and svc.configd(1M) will be quiesced, if running.
/etc/svc/repository.db
-- renamed --> /etc/svc/repository.db_old_20121222_052726
/etc/svc/repository-boot-20121221_073919
-- copied --> /etc/svc/repository.db
and the system will be rebooted with reboot(1M).
Proceed [yes/no]? no
Cicero Ronaldo (ciceroฺronaldo@gmailฺcom) has a non-transferable
license to use this Student Guideฺ
Unauthorized reproduction or distribution prohibitedฺ Copyright© 2014, Oracle and/or its affiliatesฺ

Copyright © 2013, Oracle and/or its affiliates. All rights reserved.
Practices for Lesson 7: Managing Services and Service Properties
Chapter 7 - Page 20
Exiting...
root@s11-desktop:/lib/svc/bin# cd
root@s11-desktop:~#
Now you should be able to reboot the system successfully and by default you will be in
multi-user mode.
Task 4: Debug a Service That Is Not Starting (Optional)
So far, you have seen multiple faces of service corruption. During debugging other issues
earlier, you have seen the command svcs –xv. However, it is demonstrated here more as a
commonly used reference tool even though it is a slight repetition. The purpose is two-fold: first
to demonstrate how to temporarily take a service out of operation; second to quickly view some
debugging information.
1. Double-click the Sol11-Desktop icon to launch the Sol11-Desktop virtual machine.
2. Log in to the Sol11-Desktop virtual machine as the user oracle. Use the password
oracle1.
3. Right-click the desktop background and open a terminal window.
4. In the terminal window, run the su - command to assume administrator privileges.
oracle@s11-desktop:~$ su -
Password: oracle1
Oracle Corporation SunOS 5.11 11.1 September 2012
root@s11-desktop:~#
5. Use the command svcs to check if the cron service is running.
root@s11-desktop:~# svcs cron
STATE STIME FMRI
online 7:35:56 svc:/system/cron:default
6. Now take a look at a service which will be in the disabled state. In a training scenario like
this, you will take the cron service offline temporarily and evaluate the debugging process.
root@s11-desktop:~# svcadm disable -t cron
root@s11-desktop:~# svcs cron
STATE STIME FMRI
disabled 11:04:39 svc:/system/cron:default
Can you guess what is the purpose of the -t option? It temporarily disables the
specified service.
Cicero Ronaldo (ciceroฺronaldo@gmailฺcom) has a non-transferable
license to use this Student Guideฺ
Unauthorized reproduction or distribution prohibitedฺ Copyright© 2014, Oracle and/or its affiliatesฺ

Copyright © 2013, Oracle and/or its affiliates. All rights reserved.
Practices for Lesson 7: Managing Services and Service Properties
Chapter 7 - Page 21
7. Use the svcs command to obtain details about the problems with the cron service.
root@s11-desktop:~# svcs -xv cron
svc:/system/cron:default (clock daemon (cron))
State: disabled since December 15, 2012 11:04:39 PM UTC
Reason: Temporarily disabled by an administrator.
See: http://Support.coracle.com/msg/SMF-8000-1S
See: man -M /usr/share/man -s 1M cron
See: man -M /usr/share/man -s 1 crontab
See: /var/svc/log/system-cron:default.log
Impact: This service is not running.
The -xv option gives sufficient details for you to be able to determine the problem. For
additional reference, a URL is listed for a knowledge article on this topic as well as the
service log. Because the details tell you the reason, in this case, you can try to enable
the service.
8. Enable the cron service by using the command svcadm. Confirm that the service is back
up online.
root@s11-desktop:~# svcadm enable cron
root@s11-desktop:~# svcs cron
STATE STIME FMRI
online 11:06:14 svc:/system/cron:default
Is the cron service online? Yes, it is.
Cicero Ronaldo (ciceroฺronaldo@gmailฺcom) has a non-transferable
license to use this Student Guideฺ
Unauthorized reproduction or distribution prohibitedฺ Copyright© 2014, Oracle and/or its affiliatesฺ

Copyright © 2013, Oracle and/or its affiliates. All rights reserved.
Practices for Lesson 7: Managing Services and Service Properties
Chapter 7 - Page 22
Cicero Ronaldo (ciceroฺronaldo@gmailฺcom) has a non-transferable
license to use this Student Guideฺ
Unauthorized reproduction or distribution prohibitedฺ Copyright© 2014, Oracle and/or its affiliatesฺ

Copyright © 2013, Oracle and/or its affiliates. All rights reserved.
Practices for Lesson 8: Configuring Privileges and Role Based Access Control
Chapter 8 - Page 1
Practices for Lesson 8:
Configuring Privileges and
Role Based Access Control
Chapter 8
Cicero Ronaldo (ciceroฺronaldo@gmailฺcom) has a non-transferable
license to use this Student Guideฺ
Unauthorized reproduction or distribution prohibitedฺ Copyright© 2014, Oracle and/or its affiliatesฺ

Copyright © 2013, Oracle and/or its affiliates. All rights reserved.
Practices for Lesson 8: Configuring Privileges and Role Based Access Control
Chapter 8 - Page 2
Practice Overview for Lesson 8
Practices Overview
In these practices, you will be presented with a plan for managing Oracle Solaris 11.1 privileges
and role-based access control.
According to the predeployment test plan, you are asked to assess the user, process, and
program privileges. First, you determine the available privileges and for various situations you
determine the required privileges. Similarly, you will create new roles and the rights profiles. In
addition, you will assign the roles, profiles, and authorizations to current and new users. You
also establish the RBAC policy. The key areas explored in the practices are:
• Delegating privileges to users and processes
• Configuring role-based access control (RBAC)
Note: Your command output displays may be different from the displays in the practice.
Some examples would be storage, process IDs, and session and system-generated
information.
Now you check your progress. You just completed the services lesson and are now working
with privileges and RBAC.
√ Oracle Solaris 11.1 Predeployment Checklist
√ Managing the Image Packaging System (IPS) and Packages
√ Installing Oracle Solaris 11.1 on Multiple Hosts
√ Managing the Business Application Data
√ Configuring Network and Traffic Failover
√ Configuring Zones and the Virtual Network
√ Managing Services and Service Properties
√ Configuring Privileges and Role-Based Access Control
Securing System Resources by Using Oracle Solaris Auditing
Managing Processes and Priorities
Evaluating System Resources
Monitoring and Troubleshooting Software Failures
Cicero Ronaldo (ciceroฺronaldo@gmailฺcom) has a non-transferable
license to use this Student Guideฺ
Unauthorized reproduction or distribution prohibitedฺ Copyright© 2014, Oracle and/or its affiliatesฺ

Copyright © 2013, Oracle and/or its affiliates. All rights reserved.
Practices for Lesson 8: Configuring Privileges and Role Based Access Control
Chapter 8 - Page 3
Practice 8-1: Delegating Privileges to Users and Processes
Overview
As part of the predeployment testing plan, you are tasked with managing privileges for users
and processes. In this practice, you work in the following areas:
• Examining the process privileges
• Managing user privileges
Task 1: Examining the Process Privileges
This task covers the following activities:
• Determining the privileges on a process
• Determining privileges needed by a program
• Displaying the description of a privilege
1. Verify that the Sol11-Server1 virtual machine is running. If it is not, start it now.
2. Log in to the Sol11-Server1 virtual machine as the user oracle. Use the password
oracle1.
3. Run the su - command to assume administrator privileges.
oracle@s11-server1:~$ su -
Password: oracle1
Oracle Corporation SunOS 5.11 11.1 September 2012
root@s11-server1:~#
4. Use the ppriv command to view the privileges for the current shell.
root@s11-server1:~# ps
PID TTY TIME CMD
13924 pts/1 0:00 ps
13919 pts/1 0:00 su
13920 pts/1 0:00 bash
root@s11-server1:~# ppriv $$
13920: -bash
flags = <none>
E: all
I: basic
P: all
L: all
What does the $$ symbol represent? It represents the current shell, which is bash.
Do you know what the E, I, P, and L privilege sets are? E for effective, I for inherited, P
for permitted, and L for limit sets.
Cicero Ronaldo (ciceroฺronaldo@gmailฺcom) has a non-transferable
license to use this Student Guideฺ
Unauthorized reproduction or distribution prohibitedฺ Copyright© 2014, Oracle and/or its affiliatesฺ

Copyright © 2013, Oracle and/or its affiliates. All rights reserved.
Practices for Lesson 8: Configuring Privileges and Role Based Access Control
Chapter 8 - Page 4
5. Use the ppriv –v command to view the privileges.
root@s11-server1:~# ppriv -v $$ | more
2411: -bash
flags = <none>
E:
contract_event,contract_identity,contract_observer,cpc_cpu,dtrace
_ker
nel,dtrace_proc,dtrace_user,file_chown,file_chown_self,file_dac_e
xecute,file_dac
_read,file_dac_search,file_dac_write,file_downgrade_sl,file_flag_
set,file_link_a
ny,file_owner,file_read,file_setid,file_upgrade_sl,file_write,gra
phics_access,gr
aphics_map,ipc_dac_read,ipc_dac_write,ipc_owner,net_access,net_bi
ndmlp,net_icmpa
ccess,net_mac_aware,net_mac_implicit,net_observability,net_privad
dr,net_rawacces
s,proc_audit,proc_chroot,proc_clock_highres,proc_exec,proc_fork,p
roc_info,proc_l
ock_memory,proc_owner,proc_priocntl,proc_session,proc_setid,proc_
taskid,proc_zon
e,sys_acct,sys_admin,sys_audit,sys_config,sys_devices,sys_dl_conf
ig,sys_flow_con
fig,sys_ip_config,sys_ipc_config,sys_iptun_config,sys_linkdir,sys
_mount,sys_net_
config,sys_nfs,sys_ppp_config,sys_res_bind,sys_res_config,sys_res
ource,sys_share
,sys_smb,sys_suser_compat,sys_time,sys_trans_label,win_colormap,w
in_config,win_d
ac_read,win_dac_write,win_devices,win_dga,win_downgrade_sl,win_fo
ntpath,win_mac_
read,win_mac_write,win_selection,win_upgrade_sl
I:
file_link_any,file_read,file_write,net_access,proc_exec,proc_fork
,pro
c_info,proc_session
…
…
…
Using the -v option, you get a wealth of information.
Cicero Ronaldo (ciceroฺronaldo@gmailฺcom) has a non-transferable
license to use this Student Guideฺ
Unauthorized reproduction or distribution prohibitedฺ Copyright© 2014, Oracle and/or its affiliatesฺ

Copyright © 2013, Oracle and/or its affiliates. All rights reserved.
Practices for Lesson 8: Configuring Privileges and Role Based Access Control
Chapter 8 - Page 5
6. Determine the process ID of the lockd daemon by using the pgrep command.
root@s11-server1:~# pgrep -fl lockd
12382 /usr/lib/nfs/lockd
12383 lockd_kproc
What is the PID of the lockd daemon? 12382
Do you know the function of lockd? It is one of the NFS daemons and manages NFS
share locking.
Note: If the above process is not available, use mapid instead of lockd. If lockd or
mapid do not display any output, run the following commands and then run the lockd
or mapid command again:
root@s11-server1:~# zfs set \
share=name=docs,path=/export/home/docs,prot=nfs \
rpool/export/home/docs
root@s11-server1:~# zfs set sharenfs=on rpool/export/home/docs
You will need to turn off sharing after you have completed the practice.
7. Use the ppriv command by using the PID.
root@s11-server1:~# ppriv -v 12382
12382: /usr/lib/nfs/lockd
flags = PRIV_AWARE
E: file_read,file_write,net_access,sys_nfs
I: none
P: file_read,file_write,net_access,sys_nfs
L: none
Notice that the lockd process is PRIV_AWARE.
What is the significance of the PRIV_AWARE flag? The process is able to reduce its
privileges.
8. Repeat step 8, this time without the –v option.
root@s11-server1:~# ppriv 12382
12382: /usr/lib/nfs/lockd
flags = PRIV_AWARE
E:
basic,!file_link_any,!proc_exec,!proc_fork,!proc_info,!proc_sessi
on,sys_nfs
I:
basic,!file_link_any,!file_read,!file_write,!net_access,!proc_exe
c,!proc_fork,!proc_info,!proc_session
P:
basic,!file_link_any,!proc_exec,!proc_fork,!proc_info,!proc_sessi
on,sys_nfs
Cicero Ronaldo (ciceroฺronaldo@gmailฺcom) has a non-transferable
license to use this Student Guideฺ
Unauthorized reproduction or distribution prohibitedฺ Copyright© 2014, Oracle and/or its affiliatesฺ

Copyright © 2013, Oracle and/or its affiliates. All rights reserved.
Practices for Lesson 8: Configuring Privileges and Role Based Access Control
Chapter 8 - Page 6
L:
basic,!file_link_any,!file_read,!file_write,!net_access,!proc_exe
c,!proc_fork,!proc_info,!proc_session
Determine the two differences between the outputs in the two steps.
a) The -v option displays summarized output (not verbose).
b) With no -v option, the ppriv command also displays the disallowed privileges.
9. Using the ppriv -vl command, display the privilege definition.
root@s11-server1:~# ppriv -vl file_link_any
file_link_any
Allows a process to create hardlinks to files owned by a
uid different from the process' effective uid.
Now you have it. Try to display the definition of another privilege. Would this command
work for any privileges? Yes.
Task 2: Managing User Privileges
This task covers the following activities:
• Determining the privilege needed by a user
• Debugging the privileges
• Assigning privileges to a user/role
• Limiting privileges of a user/role
• Determining the privileged commands you can use
Task 2A: Using the File Ownership Privilege
This task covers the following activities:
• Determining the privilege needed by a user
• Debugging the privileges
• Assigning privileges to a user/role
1. Verify that the Sol11-Server1 virtual machine is running. If it is not, start it now.
2. Log in to the Sol11-Server1 virtual machine as the oracle user. Use the password
oracle1.
3. Run the su - command to assume administrator privileges.
oracle@s11-server1:~$ su -
Password: oracle1
Oracle Corporation SunOS 5.11 11.1 September 2012
root@s11-server1:~#
Cicero Ronaldo (ciceroฺronaldo@gmailฺcom) has a non-transferable
license to use this Student Guideฺ
Unauthorized reproduction or distribution prohibitedฺ Copyright© 2014, Oracle and/or its affiliatesฺ

Copyright © 2013, Oracle and/or its affiliates. All rights reserved.
Practices for Lesson 8: Configuring Privileges and Role Based Access Control
Chapter 8 - Page 7
4. Verify that the users jholt and jmoose have user accounts. If they do not, create user
accounts and password for them as indicated below. These accounts will be used for
working with the privileges.
root@s11-server1:~# cat /etc/passwd
...
...
jholt:x:60005:10:john holt:/export/home/jholt:/bin/bash
jmoose:x:60006:10:jerry moose:/export/home/jmoose:/bin/bash
...
root@s11-server1:~#
If the user accounts to do not exist, run this series of commands:
root@s11-server1:~# useradd -u 60005 -g 10 -d /export/home/jholt
-m -c "john holt" -s /bin/bash jholt
80 blocks
root@s11-server1:~# passwd jholt
New Password: oracle1
Re-enter new Password: oracle1
passwd: password successfully changed for jholt
root@s11-server1:~# useradd -u 60006 -g 10 -d /export/home/jmoose
-m -c "jerry moose" -s /bin/bash jmoose
80 blocks
root@s11-server1:~# passwd jmoose
New Password: oracle1
Re-enter new Password: oracle1
passwd: password successfully changed for jmoose
Cicero Ronaldo (ciceroฺronaldo@gmailฺcom) has a non-transferable
license to use this Student Guideฺ
Unauthorized reproduction or distribution prohibitedฺ Copyright© 2014, Oracle and/or its affiliatesฺ

Copyright © 2013, Oracle and/or its affiliates. All rights reserved.
Practices for Lesson 8: Configuring Privileges and Role Based Access Control
Chapter 8 - Page 8
5. Use the su – jmoose command to switch to jmoose’s account. Create a directory called
docs. Then exit to the administrator account.
root@s11-server1:~# su - jmoose
Oracle Corporation SunOS 5.11 11.1 September 2012
jmoose@s11-server1:~$ pwd
/export/home/jmoose
jmoose@s11-server1:~$ mkdir docs
jmoose@s11-server1:~$ ls -ld /export/home/jmoose/docs
drwxr-xr-x 2 jmoose staff 2 Dec 15 03:00
/export/home/jmoose/docs
jmoose@s11-server1:~$ exit
logout
root@s11-server1:~#
Since jmoose created the docs directory, he is the owner.
6. Use the su – jholt command to switch to jholt’s account.
root@s11-server1:~# su - jholt
Oracle Corporation SunOS 5.11 11.1 September 2012
jholt@s11-server1:~$
The reasons for logging in as jholt are:
a) To determine the privileges needed by jholt
b) To grant him the privileges as the administrative user.
7. Check your privileges as the jholt account. Then use the ls –ld command to display
the owner of the docs directory in jmoose’s home directory.
jholt@s11-server1:~$ id
uid=60005(jholt) gid=10(staff)
jholt@s11-server1:~$ ppriv $$
12447: -bash
flags = <none>
E: basic
I: basic
P: basic
L: all
Because you are logged in as jholt, the current process shows your privileges, which
could be different for different accounts based on the privileges granted by the system
administrator.
Why would you want to use the -v option with this command? Issue the command and
analyze the difference. Refer to Task 1 if you need help.
Cicero Ronaldo (ciceroฺronaldo@gmailฺcom) has a non-transferable
license to use this Student Guideฺ
Unauthorized reproduction or distribution prohibitedฺ Copyright© 2014, Oracle and/or its affiliatesฺ

Copyright © 2013, Oracle and/or its affiliates. All rights reserved.
Practices for Lesson 8: Configuring Privileges and Role Based Access Control
Chapter 8 - Page 9
jholt@s11-server1:~$ ls -ld /export/home/jmoose/docs
drwxr-xr-x 2 jmoose staff 2 Dec 15 03:00
/export/home/jmoose/docs
jholt@s11-server1:~$
Before you change the ownership of the docs directory in jmoose’s home directory, you
want to make sure jmoose is (of course!) the owner.
8. As the jholt user, use the chown command to change the ownership of the docs
directory to jholt.
jholt@s11-server1:~$ chown jholt /export/home/jmoose/docs
chown: /export/home/jmoose/docs: Not owner
As expected, since jholt does not have the privilege to execute the chown command,
a message is displayed.
9. Use the ppriv command in debug mode to determine what privilege is missing.
jholt@s11-server1:~$ ppriv -eD chown jholt \
/export/home/jmoose/docs
chown[1737]: missing privilege "file_chown" (euid = 60005,
syscall = 56) for "/export/home/jmoose/docs" needed at
zfs_setattr+0xbb3
chown: /export/home/jmoose/docs: Not owner
Can you tell which privilege is needed by jholt? The file_chown privilege. The -D
option is for debugging.
10. Use the truss command to determine what privilege is missing.
jholt@s11-server1:~$ truss chown jholt /export/home/jmoose/docs
execve("/usr/bin/chown", 0x08047E58, 0x08047E68) argc = 3
sysinfo(SI_MACHINE, "i86pc", 257) = 6
mmap(0x00000000, 32, PROT_READ|PROT_WRITE, MAP_PRIVATE|MAP_ANON,
-1, 0) = 0xFEFB0000
mmap(0x00000000, 4096, PROT_READ|PROT_WRITE,
MAP_PRIVATE|MAP_ANON, -1, 0) = 0xFEFA0000…
…
…
lstat64("/export/home/jmoose/docs", 0x08064010) = 0
chown("/export/home/jmoose/docs", 60005, -1) Err#1 EPERM
[file_chown]
fstat64(2, 0x08046D90) = 0
chown: write(2, " c h o w n : ", 7) = 7
open("/usr/lib/locale/en_US.UTF-8/LC_MESSAGES/SUNW_OST_OSLIB.mo",
O_RDONLY) Err#2 ENOENT
/export/home/jmoose/docswrite(2, " / e x p o r t / h o m e"..,
24) = 24
Cicero Ronaldo (ciceroฺronaldo@gmailฺcom) has a non-transferable
license to use this Student Guideฺ
Unauthorized reproduction or distribution prohibitedฺ Copyright© 2014, Oracle and/or its affiliatesฺ

Copyright © 2013, Oracle and/or its affiliates. All rights reserved.
Practices for Lesson 8: Configuring Privileges and Role Based Access Control
Chapter 8 - Page 10
: write(2, " : ", 2) = 2
Not ownerwrite(2, " N o t o w n e r", 9) = 9
write(2, "\n", 1) = 1
_exit(1)
The truss utility is also used for debugging purposes. As you see this utility also
reports that the file_chown privilege is missing (although not in plain English text).
11. Exit the jholt account and as the administrator, use the usermod command to grant
jholt the file_chown privilege. Confirm the entry in the /etc/user_attr file.
jholt@s11-server1:~$ exit
logout
root@s11-server1:~# usermod –K defaultpriv=basic,file_chown jholt
root@s11-server1:~# grep jholt /etc/user_attr
jholt::::defaultpriv=basic,file_chown
Here you have granted jholt the file_chown privilege. Note that you are only
interested in granting him the file_chown privilege but you must include the basic
privilege also because the defaultpriv keyword will replace all his privileges with the
specified privileges. This file is used to record any special privileges to users or roles.
This facility is covered in detail in the next practice.
12. Log back in to jholt’s account. Now issue that chown command. Confirm the ownership
of the docs directory.
root@s11-server1:~# su - jholt
Oracle Corporation SunOS 5.11 11.1 September 2012
jholt@s11-server1:~$ chown jholt /export/home/jmoose/docs
jholt@s11-server1:~$ ls -ld /export/home/jmoose/docs
drwxr-xr-x 2 jholt staff 2 Dec 15 03:00
/export/home/jmoose/docs
Success! You were able to successfully change the ownership to jholt.
Return the ownership of the docs directory to jmoose, so that you can use this setup
again.
jholt@s11-server1:~$ chown jmoose /export/home/jmoose/docs
jholt@s11-server1:~$ ls -ld /export/home/jmoose/docs
drwxr-xr-x 2 jmoose staff 2 Dec 15 03:00
/export/home/jmoose/docs
Cicero Ronaldo (ciceroฺronaldo@gmailฺcom) has a non-transferable
license to use this Student Guideฺ
Unauthorized reproduction or distribution prohibitedฺ Copyright© 2014, Oracle and/or its affiliatesฺ

Copyright © 2013, Oracle and/or its affiliates. All rights reserved.
Practices for Lesson 8: Configuring Privileges and Role Based Access Control
Chapter 8 - Page 11
Task 2B: Limiting the Privileges of a User
The following activities are covered in this task:
• Limiting the privileges of a user
• Determining the privileged commands you can use
1. In the jholt account, use the ps –ef command to display the current processes.
jholt@s11-server1:~$ ps -ef | more
UID PID PPID C STIME TTY TIME CMD
root 0 0 0 01:07:24 ? 0:04 sched
root 5 0 0 01:07:22 ? 0:07 zpool-rpool
root 1 0 0 01:07:25 ? 0:00 /usr/sbin/init
root 2 0 0 01:07:25 ? 0:00 pageout
root 3 0 0 01:07:25 ? 0:05 fsflush
root 6 0 0 01:07:25 ? 0:00 intrd
root 7 0 0 01:07:25 ? 0:00 vmtasks
root 427 1 0 01:08:57 ? 0:00
/sbin/dhcpagent
root 10 1 0 01:07:27 ? 0:05
/lib/svc/bin/svc.startd
root 12 1 0 01:07:27 ? 0:36
/lib/svc/bin/svc.configd
daemon 75 1 0 01:07:52 ? 0:00
/lib/crypto/kcfd
netadm 96 1 0 01:07:57 ? 0:00
/lib/inet/ipmgmtd
root 114 1 0 01:08:07 ? 0:00
/lib/inet/in.mpathd
dladm 43 1 0 01:07:43 ? 0:00
/usr/sbin/dlmgmtd
netcfg 48 1 0 01:07:45 ? 0:00
/lib/inet/netcfgd
…
…
…
At this time, with the current privileges, are you able to view any processes started by
others? Yes.
2. Exit the jholt account and as the administrator, launch a Korn shell and use the usermod
command to limit jholt’s privileges.
jholt@s11-server1:~$ exit
logout
root@s11-server1:~# ps
PID TTY TIME CMD
14050 pts/1 0:00 ps
Cicero Ronaldo (ciceroฺronaldo@gmailฺcom) has a non-transferable
license to use this Student Guideฺ
Unauthorized reproduction or distribution prohibitedฺ Copyright© 2014, Oracle and/or its affiliatesฺ

Copyright © 2013, Oracle and/or its affiliates. All rights reserved.
Practices for Lesson 8: Configuring Privileges and Role Based Access Control
Chapter 8 - Page 12
13919 pts/1 0:00 su
13920 pts/1 0:00 bash
root@s11-server1:~# usermod -K defaultpriv=basic,!proc_info jholt
-bash: !proc_info: event not found
As the message says, the bash shell is not aware of the !proc_info event. Switch to
ksh.
root@s11-server1:~# ksh
root@s11-server1:~# ps
PID TTY TIME CMD
14051 pts/1 0:00 ksh
14056 pts/1 0:00 ps
13919 pts/1 0:00 su
13920 pts/1 0:00 bash
root@s11-server1:~# usermod -K defaultpriv=basic,!proc_info jholt
root@s11-server1:~# grep jholt /etc/user_attr
jholt::::defaultpriv=basic,!proc_info
Exit to Bash shell, which is your default shell.
root@s11-server1:~# exit
root@s11-server1:~# ps
PID TTY TIME CMD
14067 pts/1 0:00 ps
13919 pts/1 0:00 su
13920 pts/1 0:00 bash
You have taken away the process view privilege from jholt. Can you guess if he can
display the processes for other users? No.
3. Return to the jholt account and use the ps –ef command to display the current
processes.
root@s11-server1:~# su - jholt
Oracle Corporation SunOS 5.11 11.1 September 2012
jholt@s11-server1:~$ ps -ef
UID PID PPID C STIME TTY TIME CMD
jholt 12501 12500 0 04:34:45 pts/2 0:00 -bash
jholt 12505 12501 0 04:34:49 pts/2 0:00 ps -ef
jholt@s11-server1:~$
Cicero Ronaldo (ciceroฺronaldo@gmailฺcom) has a non-transferable
license to use this Student Guideฺ
Unauthorized reproduction or distribution prohibitedฺ Copyright© 2014, Oracle and/or its affiliatesฺ

Copyright © 2013, Oracle and/or its affiliates. All rights reserved.
Practices for Lesson 8: Configuring Privileges and Role Based Access Control
Chapter 8 - Page 13
Are you able to view processes for other users? No.
Why? Because the administrator has taken away the proc_info privilege.
Did you remember to log back in to jholt’s account? Yes.
Why? To make the new privileges effective.
How would you find out if jholt still has the privilege to execute the chown command?
a) issue the chown command on a file as demonstrated earlier
OR
b) check jholt’s privileges
4. Exit the jholt account and as the administrator, replace the original privileges for the
jholt account.
jholt@s11-server1:~$ exit
logout
root@s11-server1:~# usermod -K defaultpriv=basic jholt
root@s11-server1:~# grep jholt /etc/user_attr
jholt::::defaultpriv=basic
Now John Holt should be able to use all the privileges included in the basic rights profile.
You will learn more about profiles in the next practice.
Can you determine the privileges included in the basic privilege set? Yes, use the ppriv
command.
5. Now you are curious. You want to know what privileges John Holt has. As John Holt, use
the commands profiles, roles, and auths to view the privileges.
root@s11-server1:~# su - jholt
Oracle Corporation SunOS 5.11 11.1 September 2012
jholt@s11-server1:~$ profiles
Basic Solaris User
All
jholt@s11-server1:~$ roles
No roles
jholt@s11-server1:~$ auths
solaris.admin.wusb.read,solaris.mail.mailq,solaris.network.autoco
nf.read
If any special profiles, roles, or individual authorizations are assigned to John Holt, they
will be displayed here.
These facilities are part of Role-Based Access Control, which will be covered in the next
practice.
Cicero Ronaldo (ciceroฺronaldo@gmailฺcom) has a non-transferable
license to use this Student Guideฺ
Unauthorized reproduction or distribution prohibitedฺ Copyright© 2014, Oracle and/or its affiliatesฺ

Copyright © 2013, Oracle and/or its affiliates. All rights reserved.
Practices for Lesson 8: Configuring Privileges and Role Based Access Control
Chapter 8 - Page 14
6. Use the profiles –l command to see more details of the privileges assigned to John
Holt.
jholt@s11-server1:~$ profiles -l
Basic Solaris User
auths=solaris.mail.mailq,solaris.device.mount.removable,sol
aris.admin.wusb.read
profiles=All
/usr/bin/cdrecord.bin
privs=file_dac_read,sys_devices,proc_lock_memory,proc_priocntl,ne
t_privaddr
/usr/bin/readcd.bin
privs=file_dac_read,sys_devices,net_privaddr
/usr/bin/cdda2wav.bin
privs=file_dac_read,sys_devices,proc_priocntl,net_privaddr
All
*
These are the same profiles you displayed in the previous step. However, the privileges
connected to the profiles are also displayed.
Exit the jholt account.
jholt@s11-server1:~$ exit
logout
root@s11-server1:~#
Cicero Ronaldo (ciceroฺronaldo@gmailฺcom) has a non-transferable
license to use this Student Guideฺ
Unauthorized reproduction or distribution prohibitedฺ Copyright© 2014, Oracle and/or its affiliatesฺ

Copyright © 2013, Oracle and/or its affiliates. All rights reserved.
Practices for Lesson 8: Configuring Privileges and Role Based Access Control
Chapter 8 - Page 15
Practice 8-2: Configuring Role-Based Access Control
Overview
Your predeployment test plan calls for using the Role-Based Access Control (RBAC)
functionality of Oracle Solaris 11.1. By using RBAC, you can create the roles and assign them
specific privileges or authorizations. You can then assign these roles to the appropriate users.
This saves resources because you do not have to assign privileges to individual users. In this
practice, you will work with a role sdown and Shut profile with authorization to execute the
shutdown command. The following areas are covered in this practice:
• Managing roles and profiles
• Configuring a rights profile
• Working with individual authorizations
• Creating a system-wide RBAC policy
Task 1: Manage Roles and Profiles
This task covers the following activities:
• Creating a role
• Creating or changing a rights profile
• Assigning a rights profile to a role (added)
• Assigning a role to a user
• Assuming a role
• Restricting an administrator to explicitly assigned rights
1. Verify that the Sol11-Server1 virtual machine is running. If it is not, start it now.
2. Log in to the Sol11-Server1 virtual machine as the oracle user. Use the password
oracle1.
3. Run the su - command to assume privileges.
oracle@s11-server1:~$ su -
Password: oracle1
Oracle Corporation SunOS 5.11 11.1 September 2012
root@s11-server1:~#
4. Use the roleadd command to add a role called sdown for shutdown. Using the passwd
command, create a password for the sdown role.
root@s11-server1:~# roleadd -u 3000 -g 10 -m -d \
/export/home/sdown sdown
80 blocks
root@s11-server1:~# passwd sdown
New Password: sdown123
Re-enter new Password: sdown123
passwd: password successfully changed for sdown
A new role is added and the password created. Use the password sdown so it can be
remembered easily.
Cicero Ronaldo (ciceroฺronaldo@gmailฺcom) has a non-transferable
license to use this Student Guideฺ
Unauthorized reproduction or distribution prohibitedฺ Copyright© 2014, Oracle and/or its affiliatesฺ

Copyright © 2013, Oracle and/or its affiliates. All rights reserved.
Practices for Lesson 8: Configuring Privileges and Role Based Access Control
Chapter 8 - Page 16
5. Verify the entries created in various files.
root@s11-server1:~# grep sdown /etc/passwd
sdown:x:3000:10::/export/home/sdown:/usr/bin/pfbash
root@s11-server1:~# getent user_attr | grep sdown
sdown::::type=role;profiles=All;roleauth=role
As you can see, an entry in /etc/passwd was created very much like an entry for a
new user. Notice the default shell.
An entry was also made in /etc/user_attr for sdown, which is marked as a role.
6. Use the 'profiles' command to create a 'Shut' profile that, when assigned to user, could
shut down a system.
root@s11-server1:~# profiles -p Shut
profiles:Shut> set desc="Able to shutdown the system"
profiles:Shut> add cmd=/usr/sbin/shutdown
profiles:Shut:shutdown> set uid=0
profiles:Shut:shutdown> end
profiles:Shut> commit
profiles:Shut> exit
root@s11-server1:~# getent prof_attr | grep Shut
Shut:::Able to shutdown the system:
root@s11-server1:~# getent exec_attr | grep Shut
Shut:solaris:cmd:::/usr/sbin/shutdown:uid=0
Here you created a new rights profile called Shut.
7. Use the rolemod command to assign the profile Shut to the sdown role.
root@s11-server1:~# rolemod -P Shut sdown
root@s11-server1:~# getent user_attr | grep sdown
sdown::::type=role;profiles=Shut;roleauth=role
root@s11-server1:~#
Note the profiles entry in the /etc/user_attr file.
8. Create a user called abell and assign her the sdown role. Create a password. Confirm
that an entry is made in the /etc/user_attr file.
root@s11-server1:~# useradd -u 60020 -g 10 -m –d \
/export/home/abell -s /bin/bash -R sdown -c "anna bell" abell
80 blocks
root@s11-server1:~# passwd abell
New Password: oracle1
Re-enter new Password: oracle1
passwd: password successfully changed for abell
root@s11-server1:~# getent user_attr | grep abell
Cicero Ronaldo (ciceroฺronaldo@gmailฺcom) has a non-transferable
license to use this Student Guideฺ
Unauthorized reproduction or distribution prohibitedฺ Copyright© 2014, Oracle and/or its affiliatesฺ

Copyright © 2013, Oracle and/or its affiliates. All rights reserved.
Practices for Lesson 8: Configuring Privileges and Role Based Access Control
Chapter 8 - Page 17
abell:::: roles=sdown
Note the entry in /etc/user_attr for Anna Bell with the sdown role. Why? Because
you assigned her the role sdown.
9. Now, log in to the abell account and use the shutdown command to reboot the system.
root@s11-server1:~# su - abell
Oracle Corporation SunOS 5.11 11.1 September 2012
abell@s11-server1:~$ /usr/sbin/shutdown -i 6 -g 0
/usr/sbin/shutdown: Only root can run /usr/sbin/shutdown
As expected, Anna Bell does not have the privileges to shut down the system.
10. Execute the profiles and roles commands to determine Anna’s privileges.
abell@s11-server1:~$ profiles
Basic Solaris User
All
abell@s11-server1:~$ roles
sdown
Anna has been assigned the sdown role. When? When you created her account
11. Log in with the sdown role and use the init command to shut down the system.
abell@s11-server1:~$ su sdown
Password: sdown123
Oracle Corporation SunOS 5.11 11.0 November 2011
sdown@s11-server1:~$ id
uid=3000(sdown) gid=10(staff)
sdown@s11-server1:~$ /usr/sbin/init 6
init: unable to open /dev/fb to load the shutdown image
bootadm: you must be root to run this command
Must be super-user
Why can’t Anna reboot the system? She is not allowed the privilege of using the init
command.
12. Using the profiles –l command, obtain the privileged commands that Anna can use.
sdown@s11-server1:~$ profiles -l
Shut
/usr/sbin/shutdown uid=0
Basic Solaris User
auths=solaris.mail.mailq,solaris.network.autoconf.read,sola
ris.admin.wusb.read
profiles=All
Cicero Ronaldo (ciceroฺronaldo@gmailฺcom) has a non-transferable
license to use this Student Guideฺ
Unauthorized reproduction or distribution prohibitedฺ Copyright© 2014, Oracle and/or its affiliatesฺ

Copyright © 2013, Oracle and/or its affiliates. All rights reserved.
Practices for Lesson 8: Configuring Privileges and Role Based Access Control
Chapter 8 - Page 18
/usr/bin/cdrecord.bin
privs=file_dac_read,sys_devices,proc_lock_memory,proc_priocntl,ne
t_privaddr
/usr/bin/readcd.bin
privs=file_dac_read,sys_devices,net_privaddr
/usr/bin/cdda2wav.bin
privs=file_dac_read,sys_devices,proc_priocntl,net_privaddr
All
*
sdown@s11-server1:~$
Does the sdown role have the privilege to execute the init command? No.
Can this role execute the shutdown command? Yes, as part of the Shut profile.
13. Now use the shutdown command to attempt to bring down the system. To save time,
respond with n when prompted to continue shutting down.
sdown@s11-server1:~$ /usr/sbin/shutdown -i 6 -g 0
Shutdown started. Fri Dec 16 05:24:30 AM MDT
Do you want to continue? (y or n): n
Broadcast Message from root (pts/2) on s11-desktop Fri Dec 16 20
05:24:38...
False Alarm: The system s11-server1 will not be brought down.
Shutdown aborted.
sdown@s11-server1:~$
Were you able to execute the shutdown command? Yes.
14. Use the profiles command to display the profiles assigned to the sdown role.
sdown@s11-server1:~$ profiles
Shut
Basic Solaris User
All
The sdown profile has three profiles assigned: Shut, Basic Solaris User, and All.
15. Log out of the sdown role and Anna’s account.
sdown@s11-server1:~$ exit
exit
abell@s11-server1:~$ exit
logout
Cicero Ronaldo (ciceroฺronaldo@gmailฺcom) has a non-transferable
license to use this Student Guideฺ
Unauthorized reproduction or distribution prohibitedฺ Copyright© 2014, Oracle and/or its affiliatesฺ

Copyright © 2013, Oracle and/or its affiliates. All rights reserved.
Practices for Lesson 8: Configuring Privileges and Role Based Access Control
Chapter 8 - Page 19
16. Now you want to delete the Shut profile from the profiles assigned to the sdown role. Use
the rolemod command to delete the profile.
root@s11-server1:~# rolemod -P "Basic Solaris User,All,Stop" \
sdown
root@s11-server1:~#
Referring to the output in Step 15, by using the Stop profile, you are taking away the
Shut profile from sdown. This command is especially useful if you have many (for
example, 15) profiles assigned to a role and you want to limit the role to only a few
profiles.
17. Log in to Anna Bell’s account, assume the sdown role, and attempt to use the shutdown
command as before.
root@s11-server1:~# su - abell
Oracle Corporation SunOS 5.11 11.1 September 2012
abell@s11-server1:~$ su sdown
Password: sdown123
sdown@s11-server1:~$ /usr/sbin/shutdown -i 6 -g 0
/usr/sbin/shutdown: Only root can run /usr/sbin/shutdown
sdown@s11-server1:~$ exit
exit
You are back to where Anna Bell cannot issue the shutdown command by using the
sdown role. If you display the current profiles assigned to sdown, you see only the
remaining profiles.
abell@s11-server1:~$ profiles
Basic Solaris User
All
Exit Anna Bell’s user account.
abell@s11-server1:~$ exit
logout
root@s11-server1:~#
Task 2: Assign Profiles Directly to a User
1. Verify that the Sol11-Server1 virtual machine is running. If it is not, start it now.
2. Log in to the Sol11-Server1 virtual machine as the oracle user. Use the password
oracle1.
Cicero Ronaldo (ciceroฺronaldo@gmailฺcom) has a non-transferable
license to use this Student Guideฺ
Unauthorized reproduction or distribution prohibitedฺ Copyright© 2014, Oracle and/or its affiliatesฺ

Copyright © 2013, Oracle and/or its affiliates. All rights reserved.
Practices for Lesson 8: Configuring Privileges and Role Based Access Control
Chapter 8 - Page 20
3. Run the su - command to assume administrator privileges.
oracle@s11-server1:~$ su -
Password: oracle1
Oracle Corporation SunOS 5.11 11.1 September 2012
root@s11-server1:~#
4. Use the usermod command to assign the profile “File System Management” to an
existing user jholt. Verify the entry in the /etc/user_attr file.
root@s11-server1:~# usermod -P "File System Management" jholt
root@s11-server1:~# getent user_attr | grep jholt
jholt::::profiles=File System Management;defaultpriv=basic
Yes, it is there.
5. Log in to the jholt account. Use the profiles command to display the current profiles
assigned.
root@s11-server1:~# su - jholt
Oracle Corporation SunOS 5.11 11.1 September 2012
jholt@s11-server1:~$ profiles
File System Management
SMB Management
VSCAN Management
SMBFS Management
Shadow Migration Monitor
ZFS File System Management
Basic Solaris User
All
Along with the File System Management, other dependent profiles are also assigned as
default.
6. Using the mkdir command, attempt to create a directory in the root file system.
jholt@s11-server1:~$ mkdir /holtdir
mkdir: Failed to make directory “/holtdir”; Permission denied
Can jholt create a directory in the root file system? No.
Cicero Ronaldo (ciceroฺronaldo@gmailฺcom) has a non-transferable
license to use this Student Guideฺ
Unauthorized reproduction or distribution prohibitedฺ Copyright© 2014, Oracle and/or its affiliatesฺ

Copyright © 2013, Oracle and/or its affiliates. All rights reserved.
Practices for Lesson 8: Configuring Privileges and Role Based Access Control
Chapter 8 - Page 21
7. Use the pfexec command to execute the mkdir command. Confirm the directory creation.
jholt@s11-server1:~$ pfexec mkdir /holtdir
jholt@s11-server1:~$ cd /;ls -l | grep holt
drwxr-xr-x 2 root staff 2 Dec 16 15:20 holtdir
jholt@s11-desktop:/$ exit
logout
The pfexec command temporarily enables you to assume the privileges in the profile
assigned to you.
This demonstrates the direct assignment of a profile and usage of the profile privileges.
Task 3: Assign Authorization Directly to a User
1. Double-click the Sol11-Server1 icon to launch the Sol11-Server1 virtual machine.
2. Log in to the Sol11-Server1 virtual machine as the oracle user. Use the password
oracle1.
3. Run the su - command to assume administrator privileges.
oracle@s11-server1:~$ su -
Password: oracle1
Oracle Corporation SunOS 5.11 11.1 September 2012
root@s11-server1:~#
4. Temporarily log in to the jmoose account. Use the crontab command to determine if you
have the authorization to display the crontab contents for the superuser.
root@s11-server1:~# su - jmoose
Oracle Corporation SunOS 5.11 11.1 September 2012
jmoose@s11-server1:~$ crontab -l root
crontab: you must be super-user to access another user's crontab
file
jmoose@s11-server1:~$ exit
logout
root@s11-server1:~#
As expected, the jmoose account doesn’t have the authorization to list the root’s
crontab file.
Cicero Ronaldo (ciceroฺronaldo@gmailฺcom) has a non-transferable
license to use this Student Guideฺ
Unauthorized reproduction or distribution prohibitedฺ Copyright© 2014, Oracle and/or its affiliatesฺ

Copyright © 2013, Oracle and/or its affiliates. All rights reserved.
Practices for Lesson 8: Configuring Privileges and Role Based Access Control
Chapter 8 - Page 22
5. Using the usermod command, assign Jerry Moose the authorization for job administration.
root@s11-server1:~# usermod -A solaris.jobs.admin jmoose
root@s11-server1:~# getent user_attr |grep jmoose
jmoose::::auths=solaris.jobs.admin
root@s11-server1:~# auths jmoose | grep jobs
solaris.admin.wusb.read,solaris.jobs.admin,solaris.mail.mailq,sol
aris.network.autoconf.read
root@s11-server1:~#
Does Jerry Moose have the right authorizations now? Yes.
6. Log in as jmoose and issue the crontab command now.
root@s11-server1:~# su - jmoose
Oracle Corporation SunOS 5.11 11.1 September 2012
jmoose@s11-server1:~$ crontab -l root
#ident "%Z%%M% %I% %E% SMI"
#
# Copyright 2007 Sun Microsystems, Inc. All rights reserved.
# Use is subject to license terms.
#
#
# The root crontab should be used to perform accounting data
collection.
#
#
10 3 * * * /usr/sbin/logadm
15 3 * * 0 [ -x /usr/lib/fs/nfs/nfsfind ] &&
/usr/lib/fs/nfs/nfsfind
30 3 * * * [ -x /usr/lib/gss/gsscred_clean ] &&
/usr/lib/gss/gsscred_clean
jmoose@s11-desktop:~$
Can Jerry Moose access the crontab file for the root account now? Yes.
7. Log out of Jerry Moose’s account to return to the superuser account. Take away the
authorization from Jerry Moose. Confirm that he doesn’t have the authorization anymore.
jmoose@s11-server1:~$ exit
logout
root@s11-server1:~# usermod -A "" jmoose
root@s11-server1:~# getent user_attr | grep jmoose
jmoose::::auths=
root@s11-server1:~# su - jmoose
Oracle Corporation SunOS 5.11 11.1 September 2012
jmoose@s11-server1:~$ crontab -l root
Cicero Ronaldo (ciceroฺronaldo@gmailฺcom) has a non-transferable
license to use this Student Guideฺ
Unauthorized reproduction or distribution prohibitedฺ Copyright© 2014, Oracle and/or its affiliatesฺ

Copyright © 2013, Oracle and/or its affiliates. All rights reserved.
Practices for Lesson 8: Configuring Privileges and Role Based Access Control
Chapter 8 - Page 23
crontab: you must be super-user to access another user's crontab
file
jmoose@s11-server1:~$ exit
logout
Jerry Moose cannot access the superuser’s crontab file.
This task demonstrates the direct assignment of an authorization and usage of that
authorization.
Task 4: Create a System-wide RBAC Policy
1. Verify that the Sol11-Server1 virtual machine is running. If it is not, start it now.
2. Log in to the Sol11-Server1virtual machine as the oracle user. Use the password
oracle1.
3. Run the su - command to assume administrator privileges.
oracle@s11-server1:~$ su -
Password: oracle1
Oracle Corporation SunOS 5.11 11.1 September 2012
root@s11-server1:~#
4. Temporarily log in to the jmoose account. Use the ppriv command to display the privilege
sets.
root@s11-server1:~# su - jmoose
Oracle Corporation SunOS 5.11 11.1 September 2012
2011jmoose@s11-server1:~$ ppriv $$
12687: -bash
flags = <none>
E: basic
I: basic
P: basic
L: all
5. Use the ps command to display all the processes.
jmoose@s11-server1:~$ ps -A -o user -o pid -o comm | more
USER PID COMMAND
root 0 sched
root 5 zpool-rpool
root 1 /usr/sbin/init
root 2 pageout
root 3 fsflush
root 6 intrd
root 7 vmtasks
root 427 /sbin/dhcpagent
Cicero Ronaldo (ciceroฺronaldo@gmailฺcom) has a non-transferable
license to use this Student Guideฺ
Unauthorized reproduction or distribution prohibitedฺ Copyright© 2014, Oracle and/or its affiliatesฺ

Copyright © 2013, Oracle and/or its affiliates. All rights reserved.
Practices for Lesson 8: Configuring Privileges and Role Based Access Control
Chapter 8 - Page 24
root 10 /lib/svc/bin/svc.startd
root 12 /lib/svc/bin/svc.configd
daemon 75 /lib/crypto/kcfd
netadm 96 /lib/inet/ipmgmtd
root 114 /lib/inet/in.mpathd
dladm 43 /usr/sbin/dlmgmtd
netcfg 48 /lib/inet/netcfgd
root 2493 su
oracle 2356 /usr/lib/clock-applet
root 119 /usr/lib/pfexecd
daemon 1840 /usr/lib/nfs/nfs4cbd
root 756 lockd_kproc
oracle 2309 nautilus…
…
…
Can you display the processes for any user? Yes.
6. Exit the jmoose account and as the administrator, modify the
/etc/security/policy.conf file as indicated below.
jmoose@s11-server1:~$ exit
logout
root@s11-server1:~# vi /etc/security/policy.conf
root@s11-server1:~# grep PRIV_DEFAULT /etc/security/policy.conf
# There are two different settings; PRIV_DEFAULT determines the
default
# Similarly, PRIV_DEFAULT=basic,!file_link_any takes away only
the
#PRIV_DEFAULT=basic
PRIV_DEFAULT=basic,!proc_info,!proc_session
…
…
This file establishes a system-wide policy. You are denying a non-administrative user the
privilege to look at the processes of other users.
Now reboot the system to have the policy take effect.
root@s11-server1:~# init 6
Note: The reboot may take a few minutes to complete.
Log in and assume administrator privileges.
Cicero Ronaldo (ciceroฺronaldo@gmailฺcom) has a non-transferable
license to use this Student Guideฺ
Unauthorized reproduction or distribution prohibitedฺ Copyright© 2014, Oracle and/or its affiliatesฺ

Copyright © 2013, Oracle and/or its affiliates. All rights reserved.
Practices for Lesson 8: Configuring Privileges and Role Based Access Control
Chapter 8 - Page 25
7. Log in to the jmoose account and issue the same ps command to access the processes.
root@s11-server1:~# su - jmoose
Oracle Corporation SunOS 5.11 11.1 September 2012
jmoose@s11-server1:~$ ps -A -o user -o pid -o comm | more
USER PID COMMAND
jmoose 3691 ps
jmoose 3687 -bash
jmoose@s11-server1:~$
Now you are able to display only your own processes. Would that be true for any user?
Yes.
8. Exit the jmoose account and then issue the ps command.
jmoose@s11-server1:~$ exit
logout
root@s11-server1:~# ps -ef | more
UID PID PPID C STIME TTY TIME CMD
root 0 0 0 07:47:06 ? 0:01 sched
root 5 0 0 07:47:03 ? 0:12 zpool-rpool
root 1 0 0 07:47:08 ? 0:00 /sbin/init
root 2 0 0 07:47:08 ? 0:00 pageout
root 3 0 0 07:47:08 ? 0:18 fsflush
root 6 0 0 07:47:08 ? 0:00 vmtasks
root 135 1 0 07:47:48 ? 0:00
/usr/lib/pfexecd
root 9 1 0 07:47:13 ? 0:18
/lib/svc/bin/svc.startd
root 11 1 0 07:47:13 ? 0:58
/lib/svc/bin/svc.configd
root 374 366 0 07:48:02 ? 0:00 hald-runner
daemon 71 1 0 07:47:32 ? 0:00
/lib/crypto/kcfd
dladm 43 1 0 07:47:23 ? 0:02 /sbin/dlmgmtd
root 406 1 0 07:48:05 ? 0:00
/usr/sbin/cupsd -C /etc/cups/
cupsd.conf
…
…
…
The administrator account can still access all the processes.
Cicero Ronaldo (ciceroฺronaldo@gmailฺcom) has a non-transferable
license to use this Student Guideฺ
Unauthorized reproduction or distribution prohibitedฺ Copyright© 2014, Oracle and/or its affiliatesฺ

Copyright © 2013, Oracle and/or its affiliates. All rights reserved.
Practices for Lesson 8: Configuring Privileges and Role Based Access Control
Chapter 8 - Page 26
9. Reset the process parameters in /etc/security/policy.conf to the original value.
Display all the processes as Jerry Moose.
root@s11-server1:~# vi /etc/security/policy.conf
root@s11-server1:~# grep PRIV_DEFAULT /etc/security/policy.conf
# There are two different settings; PRIV_DEFAULT determines the
default
# Similarly, PRIV_DEFAULT=basic,!file_link_any takes away only
the
#PRIV_DEFAULT=basic
root@s11-server1:~#
Now reboot the system to have the policy take effect.
root@s11-server1:~# init 6
Note: The reboot may take a few minutes to complete.
Log in and assume administrator privileges. Then log in to the jmoose account.
root@s11-server1:~# su - jmoose
Oracle Corporation SunOS 5.11 11.1 September 2012
jmoose@s11-server1:~$ ps -ef | more
UID PID PPID C STIME TTY TIME CMD
root 0 0 0 07:47:06 ? 0:01 sched
root 5 0 0 07:47:03 ? 0:12 zpool-rpool
root 1 0 0 07:47:08 ? 0:00 /sbin/init
root 2 0 0 07:47:08 ? 0:00 pageout
root 3 0 0 07:47:08 ? 0:18 fsflush
root 6 0 0 07:47:08 ? 0:00 vmtasks
…
…
…
Now Jerry Moose can display the processes for any user.
This completes the system-wide policy configuration for RBAC.
Exit the jmoose account.
jmoose@s11-server1:~$ exit
logout
Now that you have completed this practice, turn off sharing.
root@s11-server1:~# zfs set sharenfs=off rpool/export/home/docs
root@s11-server1:~# exit
Cicero Ronaldo (ciceroฺronaldo@gmailฺcom) has a non-transferable
license to use this Student Guideฺ
Unauthorized reproduction or distribution prohibitedฺ Copyright© 2014, Oracle and/or its affiliatesฺ

Copyright © 2013, Oracle and/or its affiliates. All rights reserved.
Practices for Lesson 9: Securing System Resources Using Solaris Auditing
Chapter 9 - Page 1
Practices for Lesson 9:
Securing System Resources
Using Solaris Auditing
Chapter 9
Cicero Ronaldo (ciceroฺronaldo@gmailฺcom) has a non-transferable
license to use this Student Guideฺ
Unauthorized reproduction or distribution prohibitedฺ Copyright© 2014, Oracle and/or its affiliatesฺ

Copyright © 2013, Oracle and/or its affiliates. All rights reserved.
Practices for Lesson 9: Securing System Resources Using Solaris Auditing
Chapter 9 - Page 2
Practice Overview for Lesson 9
Practices Overview
In these practices, you will be presented with a plan for auditing various actions taken by users.
When special privileges are used, Oracle Solaris auditing can create complete records that can
be analyzed.
According to the predeployment test plan, you are asked to configure auditing for various
situations. You configure auditing for preselected classes as well as a customized class. You
modify the audit policy and configure the audit logs. The key areas explored in the practices are:
• Configuring the audit service
• Configuring audit logs
• Configuring the audit service per-zone
• Administering the audit service
• Managing audit records on local systems
Note: Your command output displays may be different than the displays in the practice.
Some examples are storage data, process IDs, session and system-generated content.
Check your progress. You just completed the lesson on privileges and RBAC and now you are
working with Oracle Solaris auditing.
√ Oracle Solaris 11.1 Predeployment Checklist
√ Managing the Image Packaging System (IPS) and Packages
√ Installing Oracle Solaris 11.1 on Multiple Hosts
√ Managing the Business Application Data
√ Configuring Network and Traffic Failover
√ Configuring Zones and the Virtual Network
√ Managing Services and Service Properties
√ Configuring Privileges and Role-Based Access Control
Securing System Resources by Using Oracle Solaris Auditing
Managing Processes and Priorities
Evaluating System Resources
Monitoring and Troubleshooting System Failures
Cicero Ronaldo (ciceroฺronaldo@gmailฺcom) has a non-transferable
license to use this Student Guideฺ
Unauthorized reproduction or distribution prohibitedฺ Copyright© 2014, Oracle and/or its affiliatesฺ

Copyright © 2013, Oracle and/or its affiliates. All rights reserved.
Practices for Lesson 9: Securing System Resources Using Solaris Auditing
Chapter 9 - Page 3
Practice 9-1: Configuring and Administering Oracle Solaris Auditing
Overview
As part of the predeployment testing plan, you are tasked with configuring and managing the
audit service. In this practice, you will work with the following activities:
• Configuring the audit service
• Configuring audit logs
• Configuring the audit service in zones
- Configure all zones identically for auditing.
• Administering the audit service
- Enable/disable the audit service.
- Refresh the audit service.
Note: In many cases, your displays will be different. The reason is that the content, such as
dates, session number, and ZFS overhead, will make your displays unique to you.
Task 1: Configuring the Audit Service
This task covers the following activities:
• Determining audit service defaults
• Preselecting audit classes
• Determining a user’s audit attributes
• Modifying a user’s audit attributes
• Modifying the audit policy
• Specifying the audit warning destination email alias
• Adding an audit class
• Changing an audit event’s class membership
• Using the newly configured class
1. Verify that the Sol11-Server1 virtual machine is running. If it is not running, start it now.
2. Log in to the Sol11-Server1 virtual machine as the oracle user. Use the password
oracle1.
3. Run the su - command to assume primary administrator privileges.
oracle@s11-server1:~$ su -
Password: oracle1
Oracle Corporation SunOS 5.11 11.1 September 2012
root@s11-server1:~#
Cicero Ronaldo (ciceroฺronaldo@gmailฺcom) has a non-transferable
license to use this Student Guideฺ
Unauthorized reproduction or distribution prohibitedฺ Copyright© 2014, Oracle and/or its affiliatesฺ

Copyright © 2013, Oracle and/or its affiliates. All rights reserved.
Practices for Lesson 9: Securing System Resources Using Solaris Auditing
Chapter 9 - Page 4
4. Use the auditconfig command to view the attributable classes configured by default.
root@s11-server1:~# auditconfig -getflags
active user default audit flags = lo(0x1000,0x1000)
configured user default audit flags = lo(0x1000,0x1000)
At this time, the audit service is configured for successful and failed login/logout
attempts. Where would you find the lo class? In the etc/security/audit_class
file
5. Use the auditconfig command to view the non-attributable classes configured by
default.
root@s11-server1:~# auditconfig -getnaflags
active non-attributable audit flags = lo(0x1000,0x1000)
configured non-attributable audit flags = lo(0x1000,0x1000)
How do you tell the system that you want to display non-attributable flags? By using the
command option getnaflags
6. Use the auditrecord command to determine the type of records included under the lo
class.
root@s11-server1:~# auditrecord -c lo
Admin Server Authentication
program admin (various) See SMC, WBEM, or AdminSuite
event ID 6213 AUE_admin_authenticate
class lo (0x0000000000001000)
header
subject
[text] error message
return
FTP server login
program proftpd See in.ftpd(1M)
event ID 6165 AUE_ftpd
class lo (0x0000000000001000)
header
subject
[text] error message
return
…
…
…
If you look at the full output display, you will see all the authentication facilities by using
the lo class.
Cicero Ronaldo (ciceroฺronaldo@gmailฺcom) has a non-transferable
license to use this Student Guideฺ
Unauthorized reproduction or distribution prohibitedฺ Copyright© 2014, Oracle and/or its affiliatesฺ

Copyright © 2013, Oracle and/or its affiliates. All rights reserved.
Practices for Lesson 9: Securing System Resources Using Solaris Auditing
Chapter 9 - Page 5
In addition, you can see the record format that will be used to record the auditing events
for respective authentication facilities.
7. Use the auditconfig -getplugin command to determine which plug-ins are active.
root@s11-server1:~# auditconfig -getplugin
Plugin: audit_binfile (active)
Attributes: p_dir=/var/audit;p_fsize=0;p_minfree=1;
Plugin: audit_syslog (inactive)
Attributes: p_flags=;
Plugin: audit_remote (inactive)
Attributes: p_hosts=;p_retries=3;p_timeout=5;
Which plug-ins are active at this time? Only the audit_binfile plug-in.
Where would the auditing records be stored by default? In the /var/audit directory
8. Use the userattr command to determine the default audit_flags for the oracle user.
root@s11-server1:~# who -q
oracle
# users=1
Here, the oracle user is logged in at one place. It is the only user logged in at this
time.
Your display may be different based on how many users or how many logins the
oracle account has.
root@s11-server1:~# userattr audit_flags oracle
root@s11-server1:~#
At this time, by default, the oracle user has no specific audit_flags set. This doesn’t
account for systemwide audit_flags.
Cicero Ronaldo (ciceroฺronaldo@gmailฺcom) has a non-transferable
license to use this Student Guideฺ
Unauthorized reproduction or distribution prohibitedฺ Copyright© 2014, Oracle and/or its affiliatesฺ

Copyright © 2013, Oracle and/or its affiliates. All rights reserved.
Practices for Lesson 9: Securing System Resources Using Solaris Auditing
Chapter 9 - Page 6
9. Using the auditconfig command, modify the systemwide attributable and non-
attributable flags.
root@s11-server1:~# auditconfig -setnaflags lo,na
non-attributable audit flags = lo,na(0x1400,0x1400)
root@s11-server1:~# auditconfig -setflags lo,ps,fw
user default audit flags = ps,lo,fw(0x101002,0x101002)
Where can you find more information about the na, ps, and fw flags? In the
audit_class file located in /etc/security directory (as demonstrated below)
root@s11-server1:~# cd /etc/security
root@s11-server1:/etc/security# ls
audit_class auth_attr.d exec_attr pam_policy prof_attr.d
audit_event crypt.conf exec_attr.d policy.conf tcsd.conf
audit_warn dev extra_privs priv_names
auth_attr device_policy kmfpolicy.xml prof_attr
root@s11-server1:/etc/security# grep na audit_class
# The "frcp" class is a reserved name. It will force
preselection of
# It must not be renamed. However, the "frcp" value may be
changed in a
# mask:class name:class description
# Length limits: class name up to 8, class description up to 72
and
0x0000000000000400:na:non-attributed
root@s11-server1:/etc/security# grep ps audit_class
0x0000000000100000:ps:process start/stop
root@s11-server1:/etc/security# grep fw audit_class
0x0000000000000002:fw:file write
root@s11-server1:/etc/security# cd
Now you have it. Try to display the definition of another flag.
Cicero Ronaldo (ciceroฺronaldo@gmailฺcom) has a non-transferable
license to use this Student Guideฺ
Unauthorized reproduction or distribution prohibitedฺ Copyright© 2014, Oracle and/or its affiliatesฺ

Copyright © 2013, Oracle and/or its affiliates. All rights reserved.
Practices for Lesson 9: Securing System Resources Using Solaris Auditing
Chapter 9 - Page 7
10. Using the usermod command, set the audit_flags for the user accounts jholt and
sstudent. Verify the results.
root@s11-server1:~# usermod -K audit_flags=lo,fr:no jholt
root@s11-server1:~# usermod -K audit_flags=lo,fw:no sstudent
root@s11-server1:~# userattr audit_flags jholt
lo,fr:no
root@s11-server1:~# userattr audit_flags sstudent
lo,fw:no
You set the audit_flags for the users not logged in at this time. When they log in, the
specified activities will be monitored and logged.
11. Use the auditconfig -lspolicy command to view the available policy options.
root@s11-server1:~# auditconfig -lspolicy
policy string description:
ahlt halt machine if it can not record an async event
all all policies
arge include exec environment args in audit recs
argv include exec command line args in audit recs
cnt when no more space, drop recs and keep a cnt
group include supplementary groups in audit recs
none no policies
path allow multiple paths per event
perzone use a separate queue and auditd per zone
public audit public files
seq include a sequence number in audit recs
trail include trailer token in audit recs
windata_down include downgraded window information in audit recs
windata_up include upgraded window information in audit recs
zonename include zonename token in audit recs
If you would like to record auditing the zones separately, which policy would be suitable?
The perzone policy
Cicero Ronaldo (ciceroฺronaldo@gmailฺcom) has a non-transferable
license to use this Student Guideฺ
Unauthorized reproduction or distribution prohibitedฺ Copyright© 2014, Oracle and/or its affiliatesฺ

Copyright © 2013, Oracle and/or its affiliates. All rights reserved.
Practices for Lesson 9: Securing System Resources Using Solaris Auditing
Chapter 9 - Page 8
12. Use the auditconfig –setpolicy command to modify the following policy options.
Display the results.
root@s11-server1:~# auditconfig -setpolicy -cnt
root@s11-server1:~# auditconfig -setpolicy +ahlt
root@s11-server1:~# auditconfig -setpolicy +arge
root@s11-server1:~# auditconfig -setpolicy +argv
root@s11-server1:~# auditconfig -getpolicy
configured audit policies = ahlt,arge,argv
active audit policies = ahlt,arge,argv
Which policy options are being deleted? The cnt policy
Which policy options are being added? ahlt, arge, argv
13. Use the vi editor to add a line to the aliases file. Add the oracle and root users to the
audit_warn mail alias at the end of the file. Use the grep command to confirm the
results.
root@s11-server1:~# vi /etc/mail/aliases
root@s11-server1:~# grep audit_warn /etc/mail/aliases
audit_warn: oracle,root
14. Save a copy of the audit_class file. Use the vi editor to add the pf class to the
audit_class file. Verify the results.
root@s11-server1:~# cd /etc/security
root@s11-server1:/etc/security# cp audit_class audit_class.orig
root@s11-server1:/etc/security# vi audit_class
root@s11-server1:/etc/security# tail audit_class
0x0000000000400000:xa:X - server access
0x0000000000800000:xp:X - privileged/administrative operations
0x0000000001000000:xc:X - object create/destroy
0x0000000002000000:xs:X - operations that always silently fail,
if bad
0x0000000003c00000:xx:X - all X events (meta-class)
0x0000000040000000:io:ioctl
0x0000000080000000:ex:exec
0x0000000100000000:ot:other
0x0010000000000000:pf:profiles command
0x0000000080475080:cusa:common user or role activity and sysadmin
actions (meta-class)
0xffffffffffffffff:all:all classes (meta-class)
What is the purpose of the profiles command? To display assigned profiles.
However, in this context, use pfexec.
Cicero Ronaldo (ciceroฺronaldo@gmailฺcom) has a non-transferable
license to use this Student Guideฺ
Unauthorized reproduction or distribution prohibitedฺ Copyright© 2014, Oracle and/or its affiliatesฺ

Copyright © 2013, Oracle and/or its affiliates. All rights reserved.
Practices for Lesson 9: Securing System Resources Using Solaris Auditing
Chapter 9 - Page 9
15. Save a copy of audit_event and edit the audit_event file as indicated.
root@s11-server1:/etc/security# cp audit_event audit_event.orig
root@s11-server1:/etc/security# vi audit_event
Add pf to the following event row:
root@s11-server1:/etc/security# grep pf audit_event
116:AUE_PFEXEC:execve(2) with pfexec enabled:ps,ex,ua,as,pf
What is the purpose of making this entry? Now the pf class is linked to the
AUE_PFEXEC event, which points to the execve system call.
Every time this system call is made, it is recorded with the pf class usage.
16. Now you can use the pf audit flag with the auditconfig command because the pf audit
flag is fully configured.
root@s11-server1:/etc/security# auditconfig -setflags lo,pf
user default audit flags =
pf,lo(0x10000000001000,0x10000000001000)
root@s11-server1:/etc/security# cd
root@s11-server1:~#
Is it successfully configured? Yes, it’s confirmed by the message.
Task 2: Configure Audit Logs
This task will cover the following activities:
• Create ZFS file systems for audit files.
• Allocate audit space for the audit trail.
• Configure system log as audit message destination.
• Configure all zones identically for auditing.
1. Verify that the Sol11-Server1 virtual machine is running. If it is not running, start it now.
2. Log in to the Sol11-Server1 virtual machine as the oracle user. Use the password
oracle1.
Cicero Ronaldo (ciceroฺronaldo@gmailฺcom) has a non-transferable
license to use this Student Guideฺ
Unauthorized reproduction or distribution prohibitedฺ Copyright© 2014, Oracle and/or its affiliatesฺ

Copyright © 2013, Oracle and/or its affiliates. All rights reserved.
Practices for Lesson 9: Securing System Resources Using Solaris Auditing
Chapter 9 - Page 10
3. Run the su - command to assume administrator privileges.
oracle@s11-server1:~$ su -
Password: oracle1
Oracle Corporation SunOS 5.11 11.1 September 2012
root@s11-server1:~#
4. Using the df –h command, determine which disks are mounted. This will help you
discover the available disks for creating a ZFS pool.
root@s11-server1:~# df -h
Filesystem Size Used Available Capacity Mounted on
rpool/ROOT/solaris 31G 1.6G 20G 8% /
/devices 0K 0K 0K 0% /devices
/dev 0K 0K 0K 0% /dev
ctfs 0K 0K 0K 0% /system/contract
proc 0K 0K 0K 0% /proc
mnttab 0K 0K 0K 0% /etc/mnttab
swap 1.3G 1.7M 1.3G 1% /system/volatile
objfs 0K 0K 0K 0% /system/object
sharefs 0K 0K 0K 0% /etc/dfs/sharetab
/usr/lib/libc/libc_hwcap1.so.1
22G 1.6G 20G 8% /lib/libc.so.1
fd 0K 0K 0K 0% /dev/fd
rpool/ROOT/solaris/var 31G 639M 20G 3% /var
swap 1.3G 32K 1.3G 1% /tmp
ora 426G 35G 391G 9% /opt/ora
rpool/export 31G 33K 20G 1% /export
rpool/export/IPS 31G 5.7G 20G 23% /export/IPS
rpool/export/home 31G 41K 20G 1% /export/home
rpool/export/home/jholt 31G 35K 20G 1% /export/home/jholt
rpool/export/home/jmoose
31G 36K 20G 1% /export/home/jmoose
rpool/export/home/oracle
31G 34K 20G 1% /export/home/oracle
Rpool/export/home/panna 31G 35K 20G 1% /export/home/panna
rpool/export/home/sstudent
31G 35K 20G 1% /export/home/sstudent
rpool 31G 39K 20G 1% /rpool
ora 426G 35G 391G 9% /mnt/sf_ora
…
…
…
You are looking for a disk address like c7t2d0 in the first column. There should be no
disks displayed.
Cicero Ronaldo (ciceroฺronaldo@gmailฺcom) has a non-transferable
license to use this Student Guideฺ
Unauthorized reproduction or distribution prohibitedฺ Copyright© 2014, Oracle and/or its affiliatesฺ

Copyright © 2013, Oracle and/or its affiliates. All rights reserved.
Practices for Lesson 9: Securing System Resources Using Solaris Auditing
Chapter 9 - Page 11
Your display will be different based on what file systems are mounted at the time of
display.
Note: If you see a disk on which the GuestAdditions package is mounted, ignore it.
5. Using the format command, determine the available disks. You will select disks c7t8d0
and c7t9d0.
root@s11-server1:~# format
Searching for disks...done
AVAILABLE DISK SELECTIONS:
0. c7t0d0 <ATA-VBOX HARDDISK -1.0 cyl 4174 alt 2 hd 255 sec 63>
/pci@0,0/pci8086,2829@d/disk@0,0
1. c7t2d0 <ATA-VBOX HARDDISK -1.0 cyl 1022 alt 2 hd 64 sec 32>
/pci@0,0/pci8086,2829@d/disk@2,0
2. c7t3d0 <ATA-VBOX HARDDISK -1.0 cyl 1022 alt 2 hd 64 sec 32>
/pci@0,0/pci8086,2829@d/disk@3,0
3. c7t4d0 <ATA-VBOX HARDDISK -1.0 cyl 1022 alt 2 hd 64 sec 32>
/pci@0,0/pci8086,2829@d/disk@4,0
4. c7t5d0 <ATA-VBOX HARDDISK -1.0 cyl 1022 alt 2 hd 64 sec 32>
/pci@0,0/pci8086,2829@d/disk@5,0
5. c7t6d0 <ATA-VBOX HARDDISK -1.0 cyl 1022 alt 2 hd 64 sec 32>
/pci@0,0/pci8086,2829@d/disk@6,0
6. c7t7d0 <ATA-VBOX HARDDISK -1.0 cyl 1022 alt 2 hd 64 sec 32>
/pci@0,0/pci8086,2829@d/disk@7,0
7. c7t8d0 <ATA-VBOX HARDDISK -1.0 cyl 1022 alt 2 hd 64 sec 32>
/pci@0,0/pci8086,2829@d/disk@6,0
8. c7t9d0 <ATA-VBOX HARDDISK -1.0 cyl 1022 alt 2 hd 64 sec 32>
/pci@0,0/pci8086,2829@d/disk@7,0
Specify disk (enter its number): 7
selecting c7t8d0
[disk formatted]
No Solaris fdisk partition found.
FORMAT MENU:
disk - select a disk
type - select (define) a disk type
partition - select (define) a partition table
current - describe the current disk
format - format and analyze the disk
fdisk - run the fdisk program
repair - repair a defective sector
label - write label to the disk
analyze - surface analysis
Cicero Ronaldo (ciceroฺronaldo@gmailฺcom) has a non-transferable
license to use this Student Guideฺ
Unauthorized reproduction or distribution prohibitedฺ Copyright© 2014, Oracle and/or its affiliatesฺ

Copyright © 2013, Oracle and/or its affiliates. All rights reserved.
Practices for Lesson 9: Securing System Resources Using Solaris Auditing
Chapter 9 - Page 12
defect - defect list management
backup - search for backup labels
verify - read and display labels
save - save new disk/partition definitions
inquiry - show disk ID
volname - set 8-character volume name
!<cmd> - execute <cmd>, then return
quit
format> p
WARNING - This disk may be in use by an application that has
modified the fdisk table. Ensure that this disk is
not currently in use before proceeding to use fdisk.
Please answer with “y” or “n”: y
format> fd
No fdisk table exists. The default partition for the disk is:
a 100% "SOLARIS System" partition
Type "y" to accept the default partition, otherwise type "n" to
edit the partition table.
y
format> p
PARTITION MENU:
0 - change `0' partition
1 - change `1' partition
2 - change `2' partition
3 - change `3' partition
4 - change `4' partition
5 - change `5' partition
6 - change `6' partition
7 - change `7' partition
select - select a predefined table
modify - modify a predefined partition table
name - name the current table
print - display the current table
label - write partition map and label to the disk
!<cmd> - execute <cmd>, then return
quit
partition> p
Current partition table (default):
Total disk cylinders available: 528 + 2 (reserved cylinders)
Cicero Ronaldo (ciceroฺronaldo@gmailฺcom) has a non-transferable
license to use this Student Guideฺ
Unauthorized reproduction or distribution prohibitedฺ Copyright© 2014, Oracle and/or its affiliatesฺ

Copyright © 2013, Oracle and/or its affiliates. All rights reserved.
Practices for Lesson 9: Securing System Resources Using Solaris Auditing
Chapter 9 - Page 13
Part Tag Flag Cylinders Size Blocks
0 unassigned wm 0 0 (0/0/0) 0
1 unassigned wm 0 0 (0/0/0) 0
2 backup wu 0 - 1020 1021.00MB (1021/0/0)2091008
3 unassigned wm 0 0 (0/0/0) 0
4 unassigned wm 0 0 (0/0/0) 0
5 unassigned wm 0 0 (0/0/0) 0
6 unassigned wm 0 0 (0/0/0) 0
7 unassigned wm 0 0 (0/0/0) 0
8 boot wu 0 - 0 1.00MB (1/0/0) 2048
9 unassigned wm 0 0 (0/0/0) 0
partition> q
FORMAT MENU:
disk - select a disk
type - select (define) a disk type
partition - select (define) a partition table
current - describe the current disk
format - format and analyze the disk
fdisk - run the fdisk program
repair - repair a defective sector
label - write label to the disk
analyze - surface analysis
defect - defect list management
backup - search for backup labels
verify - read and display labels
save - save new disk/partition definitions
inquiry - show disk ID
volname - set 8-character volume name
!<cmd> - execute <cmd>, then return
quit
format> q
root@s11-server1:~#
Assumption: You are familiar with the format command and know how to partition the
disk by using the fdisk option. If you are not familiar with this utility, the instructor will
walk you through the steps.
Repeat this step for the c7t9d0 disk.
The purpose of going into this utility is to select two empty disks. Make a note of these
two disks: c7t8d0 and c7t9d0.
Cicero Ronaldo (ciceroฺronaldo@gmailฺcom) has a non-transferable
license to use this Student Guideฺ
Unauthorized reproduction or distribution prohibitedฺ Copyright© 2014, Oracle and/or its affiliatesฺ

Copyright © 2013, Oracle and/or its affiliates. All rights reserved.
Practices for Lesson 9: Securing System Resources Using Solaris Auditing
Chapter 9 - Page 14
6. Create a ZFS pool called auditpool and the file systems as indicated. Because you have
created the ZFS pools and the file systems, you are taking quick steps to create the
configuration for auditing.
root@s11-server1:~# zpool create auditpool c7t8d0 c7t9d0
'auditpool' successfully created, but with no redundancy; failure
of one device will cause loss of the pool
You created the auditpool with two available disks as you determined earlier. In case
your business application auditing requires redundancy, you may want to create a mirror
pool. Refer to Lesson 4 for details.
root@s11-server1:~# zpool status auditpool
pool: auditpool
state: ONLINE
scan: none requested
config:
NAME STATE READ WRITE CKSUM
auditpool ONLINE 0 0 0
c7t8d0 ONLINE 0 0 0
c7t9d0 ONLINE 0 0 0
errors: No known data errors
root@s11-server1:~# zfs create -o mountpoint=/audit \
auditpool/auditdir
You created the file system with the /audit mount point so you can refer to the file
system by using the mount point. This will save you time. Based on the volume of
auditing records, you may consider storage saving and limiting actions, for example
configuring compression and quotas.
root@s11-server1:~# zfs create -p \
auditpool/auditdir/s11-server1/files
Why do you create these file systems? For storing auditing records for this host
root@s11-server1:~# zfs list -r /auditpool
NAME USED AVAIL REFER MOUNTPOINT
auditpool 218K 1.94G 32K /auditpool
auditpool/auditdir 31K 1.94G 31K /audit
auditpool/auditdir/s11-server1 63K 1.94G 32K /audit/s11-server1
auditpool/auditdir/s11-server1/files 31K 1.94G 31K /audit/s11-
server1/files
Does the display confirm creation of the files? Yes.
Cicero Ronaldo (ciceroฺronaldo@gmailฺcom) has a non-transferable
license to use this Student Guideฺ
Unauthorized reproduction or distribution prohibitedฺ Copyright© 2014, Oracle and/or its affiliatesฺ

Copyright © 2013, Oracle and/or its affiliates. All rights reserved.
Practices for Lesson 9: Securing System Resources Using Solaris Auditing
Chapter 9 - Page 15
7. Using the auditconfig command, set the p_dir parameter to the file systems.
root@s11-server1:~# auditconfig -setplugin audit_binfile active \
p_dir=/audit/s11-server1/files,/var/audit
You are activating auditing and setting the storage for auditing. What is the primary
storage location? The ZFS file systems you just created.
What is the secondary storage location? /var/audit
The secondary directory is also considered the “directory of last resort.” It means that
you really want the system to write to the primary directory. However, if the system has
to, it will use the secondary directory only when the primary directory is not available.
8. Using the command auditconfig, activate the syslog plug-in and indicate the audit
flags.
root@s11-server1:~# auditconfig -setplugin audit_syslog active \
p_flags=-lo,-ss,+pf
Where can you find the details about these flags? In the audit_class file
What does the pf flag represent? The pf class (profiles command)
What is the significance of the minus and plus signs? The minus sign represents the
failed attempt and the plus sign represents successful attempt.
9. Using the vi editor, make the following entry in the /etc/syslog.conf file.
root@s11-server1:~# vi /etc/syslog.conf
root@s11-server1:~# grep audit.notice /etc/syslog.conf
audit.notice /var/log/auditlog
root@s11-server1:~# touch /var/log/auditlog
What is the purpose of defining this entry in syslog? The file is defined so that the
configured auditing records will be sent to the /var/log/auditlog directory.
10. Refresh the system-log service and auditing for the new configuration to take effect.
root@s11-server1:~# svcadm refresh system-log
Cicero Ronaldo (ciceroฺronaldo@gmailฺcom) has a non-transferable
license to use this Student Guideฺ
Unauthorized reproduction or distribution prohibitedฺ Copyright© 2014, Oracle and/or its affiliatesฺ

Copyright © 2013, Oracle and/or its affiliates. All rights reserved.
Practices for Lesson 9: Securing System Resources Using Solaris Auditing
Chapter 9 - Page 16
11. Modify the audit policy to include zone auditing. Verify the results.
root@s11-server1:~# auditconfig -getpolicy
configured audit policies = ahlt,arge,argv
active audit policies = ahlt,arge,argv
At this time the zone auditing is not configured.
root@s11-server1:~# auditconfig -setpolicy +zonename
By adding the zonename policy, the audit records will be tagged with the zone name.
root@s11-server1:~# auditconfig -getpolicy
configured audit policies = ahlt,arge,argv,zonename
active audit policies = ahlt,arge,argv,zonename
Has the zonename policy been added? Yes.
12. Copy the modified audit files from the global zone to the zone named grandmazone. Verify
the results.
Determine the root directory for the zone grandmazone.
root@s11-server1:~# zonecfg -z grandmazone info | more
zonename: grandmazone
zonepath: /zones/grandmazone
brand: solaris
autoboot: true
bootargs:
file-mac-profile:
pool:
limitpriv:
scheduling-class:
ip-type: exclusive
…
…
…
root@s11-server1:~# cp /etc/security/audit_class \
/zones/grandmazone/root/etc/security/audit_class
root@s11-server1:~# cp /etc/security/audit_event \
/zones/grandmazone/root/etc/security/audit_event
Because you are configuring the global and grandmazone identically, you also need the
modified audit files in grandmazone.
root@s11-server1:~# ls -l \
/zones/grandmazone/root/etc/security/audit_*
Cicero Ronaldo (ciceroฺronaldo@gmailฺcom) has a non-transferable
license to use this Student Guideฺ
Unauthorized reproduction or distribution prohibitedฺ Copyright© 2014, Oracle and/or its affiliatesฺ

Copyright © 2013, Oracle and/or its affiliates. All rights reserved.
Practices for Lesson 9: Securing System Resources Using Solaris Auditing
Chapter 9 - Page 17
-rw-r--r-- 1 root sys 2437 Dec 16 07:59
/zones/grandmazone/root/etc/security/audit_class
-rw-r--r-- 1 root sys 30123 Dec 16 07:59
/zones/grandmazone/root/etc/security/audit_event
-rwxr--r-- 1 root sys 7024 Dec 14 07:59
/zones/grandmazone/root/etc/security/audit_warn
How can you tell that the copy action was successful? By the timestamp on the files
13. Use the audit -s command to start the audit service.
root@s11-server1:~# audit –s
Note: If you get an error solaris audit invalid audit flag pf:Invalid
argument, terminate the audit service by using audit –t command and start the service
by using audit –s command. To make sure you can gather records regarding the pf
class, John Holt will be using the pfexec command. You will extract these records from the
auditing log in the next practice.
14. As John Holt, try to access the crontab file of the superuser. Check John’s profiles.
root@s11-server1:~# su - jholt
Oracle Corporation SunOS 5.11 11.1 September 2012
jholt@s11-server1:~$ pfexec crontab -l root
crontab: you must be super-user to access another user's crontab
file
jholt@s11-server1:~$ profiles
File System Management
SMB Management
VSCAN Management
SMBFS Management
Shadow Migration Monitor
ZFS File System Management
Basic Solaris User
All
Because John does not have the Cron Management profile, he does not have the
privilege to look at the superuser’s crontab file.
Cicero Ronaldo (ciceroฺronaldo@gmailฺcom) has a non-transferable
license to use this Student Guideฺ
Unauthorized reproduction or distribution prohibitedฺ Copyright© 2014, Oracle and/or its affiliatesฺ

Copyright © 2013, Oracle and/or its affiliates. All rights reserved.
Practices for Lesson 9: Securing System Resources Using Solaris Auditing
Chapter 9 - Page 18
15. As the superuser, assign the Cron Management profile to John Holt. Verify the result.
jholt@s11-server1:~$ exit
logout
root@s11-server1:~# usermod -P "Cron Management" jholt
root@s11-server1:~# profiles jholt
jholt:
Cron Management
Basic Solaris User
All
Do you think John can display root’s crontab file now? Yes.
16. As John Holt, by using the pfexec command, attempt to display the contents of the
superuser’s crontab file.
root@s11-server1:~# su - jholt
Oracle Corporation SunOS 5.11 11.1 September 2012
jholt@s11-server1:~$ pfexec crontab -l root
#ident "%Z%%M% %I% %E% SMI"
#
# Copyright 2007 Sun Microsystems, Inc. All rights reserved.
# Use is subject to license terms.
#
#
# The root crontab should be used to perform accounting data
collection.
#
#
10 3 * * * /usr/sbin/logadm
15 3 * * 0 [ -x /usr/lib/fs/nfs/nfsfind ] &&
/usr/lib/fs/nfs/nfsfind
30 3 * * * [ -x /usr/lib/gss/gsscred_clean ] &&
/usr/lib/gss/gsscred_clean
jholt@s11-server1:~$ exit
Make a note of this command. You will be looking for pfexec command in the audit
logs.
17. Using the zoneadm command, verify that the two zones are up and running.
root@s11-server1:~# zoneadm list -civ
ID NAME STATUS PATH BRAND IP
0 global running / solaris shared
1 grandmazone running /zones/grandmazone solaris excl
2 choczone running /zones/choczone solaris excl
Are the zones up? Yes.
Cicero Ronaldo (ciceroฺronaldo@gmailฺcom) has a non-transferable
license to use this Student Guideฺ
Unauthorized reproduction or distribution prohibitedฺ Copyright© 2014, Oracle and/or its affiliatesฺ

Copyright © 2013, Oracle and/or its affiliates. All rights reserved.
Practices for Lesson 9: Securing System Resources Using Solaris Auditing
Chapter 9 - Page 19
18. Log in to both the zones to create some log in/out entries in the audit records.
root@s11-server1:~# zlogin grandmazone
[Connected to zone 'grandmazone' pts/1]
Oracle Corporation SunOS 5.11 11.1 September 2012
root@grandmazone:~# exit
logout
Repeat this step for the zone named choczone.
19. Check the current auditing configuration.
root@s11-server1:~# auditconfig -getcond
audit condition = auditing
root@s11-server1:~# auditconfig -getpolicy
configured audit policies = ahlt,arge,argv,zonename
active audit policies = ahlt,arge,argv,zonename
root@s11-server1:~# auditconfig -getflags
active user default audit flags =
pf,lo(0x10000000001000,0x10000000001000)
configured user default audit flags =
pf,lo(0x10000000001000,0x10000000001000)
root@s11-server1:~# auditconfig -getnaflags
active non-attributable audit flags = lo,na(0x1400,0x1400)
configured non-attributable audit flags = lo,na(0x1400,0x1400)
If your display does not match the current audit_flag values, modify them to match
this display. Refer to the auditconfig command used earlier.
Cicero Ronaldo (ciceroฺronaldo@gmailฺcom) has a non-transferable
license to use this Student Guideฺ
Unauthorized reproduction or distribution prohibitedฺ Copyright© 2014, Oracle and/or its affiliatesฺ

Copyright © 2013, Oracle and/or its affiliates. All rights reserved.
Practices for Lesson 9: Securing System Resources Using Solaris Auditing
Chapter 9 - Page 20
Practice 9-2: Managing Audit Records on Local Systems
Overview
Your predeployment test plan calls for managing the audit records and the audit trails. You need
to analyze the audit records for multiple events configured by you. In addition, you need to
terminate the audit file used currently.
The following areas will be addressed in this practice:
• Displaying audit record definitions
• Selecting audit events from the audit trail
• Viewing the contents of binary audit files
• Cleaning up an audit file currently in use (named not_terminated)
Task
1. Verify that the Sol11-Server1 virtual machine is running. If it is not running, start it now.
2. Log in to the Sol11-Server1 virtual machine as the oracle user. Use the password
oracle1.
3. Run the su - command to assume primary administrator privileges.
oracle@s11-server1:~$ su -
Password: oracle1
Oracle Corporation SunOS 5.11 11.1 September 2012
root@s11-server1:~#
4. Using the auditrecord command, create an HTML file containing the full set of all the
record formats available for the audit events. Using the more command, display the
contents of the file.
root@s11-server1:~# auditrecord -a -h > audit.recfmt.html
root@s11-server1:~# more audit.recfmt.html
<!doctype html PUBLIC "-//IETF//DTD HTML//EN">
<html>
<head>
<title>Audit Record Formats</title>
<META http-equiv="Content-Style-Type" content="text/css">
</head>
<body TEXT="#000000" BGCOLOR="#F0F0F0">
<table border=1>
<tr bgcolor="#C0C0C0">
<th>Event Name</th>
<th>Event ID</th>
<th>Event Class</th>
<th>Mask</th>
</tr>
Cicero Ronaldo (ciceroฺronaldo@gmailฺcom) has a non-transferable
license to use this Student Guideฺ
Unauthorized reproduction or distribution prohibitedฺ Copyright© 2014, Oracle and/or its affiliatesฺ

Copyright © 2013, Oracle and/or its affiliates. All rights reserved.
Practices for Lesson 9: Securing System Resources Using Solaris Auditing
Chapter 9 - Page 21
…
…
…
5. Change the permissions on the root directory to rwxr-xr-x so it is accessible by
anyone.
root@s11-server1:~# ls -ld /root
drwx------ 3 root root 10 Dec 16 11:24 /root
root@s11-server1:~# chmod 755 /root
root@s11-server1:~# ls -ld /root
drwxr-xr-x 3 root root 10 Dec 16 11:24 /root
The current permissions allow only the root user access to the directory. Why do you
have to change the permission to x (execute) for the browser? You need this
permission to cd into the directory.
6. Using the auditrecord command to display all the login formats in use.
root@s11-server1:~# auditrecord -p login | more
terminal login
program /usr/sbin/login See login(1)
/usr/dt/bin/dtlogin See dtlogin
event ID 6152 AUE_login
class lo (0x0000000000001000)
header
subject
[text] error message
return
login: logout
program various See login(1)
event ID 6153 AUE_logout
class lo (0x0000000000001000)
header
subject
[text] "logout" username
Return
…
…
…
How can you use these record formats? Based on the class, you can use this
information to expect the type of records included in the audit log.
Cicero Ronaldo (ciceroฺronaldo@gmailฺcom) has a non-transferable
license to use this Student Guideฺ
Unauthorized reproduction or distribution prohibitedฺ Copyright© 2014, Oracle and/or its affiliatesฺ

Copyright © 2013, Oracle and/or its affiliates. All rights reserved.
Practices for Lesson 9: Securing System Resources Using Solaris Auditing
Chapter 9 - Page 22
7. Using the auditrecord command, display the record format of the audit records in the pf
class.
root@s11-server1:~# auditrecord -c pf
pfexec
system call pfexec See execve(2) with pfexec enabled
event ID 116 AUE_PFEXEC
class ps,ex,ua,as,pf (0x0100000080160000)
header
path pathname of the executable
path pathname of working directory
[privilege] privileges if the limit or
inheritable set are changed
[privilege] privileges if the limit or
inheritable set are changed
[process] process if ruid, euid, rgid or egid
is changed
exec_arguments
[exec_environment] output if arge policy is set
subject
[use_of_privilege]
return
Do you remember where you used the AUE_PFEXEC audit event? In the audit_event
file while configuring the pf class
8. Use the cd command to go to /audit/s11-server1/files. Display the current audit
file.
root@s11-server1:~# cd /audit/s11-server1/files
root@s11-server1:/audit/s11-server1/files# ls
20111216140055.not_terminated.s11-server1
Why is this file labeled as not_terminated? Because it is the currently active audit file
Did you create this directory? Yes, in the auditpool.
9. Use the audit -n command to close out the current audit file. This will automatically start
a new “not_terminated” file.
root@s11-server1:/audit/s11-server1/files# audit -n
root@s11-server1:/audit/s11-server1/files# ls
20111216145549.20111216152447.s11-server1
20111216152447.not_terminated.s11-server1
You may get different output
Cicero Ronaldo (ciceroฺronaldo@gmailฺcom) has a non-transferable
license to use this Student Guideฺ
Unauthorized reproduction or distribution prohibitedฺ Copyright© 2014, Oracle and/or its affiliatesฺ

Copyright © 2013, Oracle and/or its affiliates. All rights reserved.
Practices for Lesson 9: Securing System Resources Using Solaris Auditing
Chapter 9 - Page 23
10. Using the auditreduce command, filter the records for the lo class.
Caution: Use the audit file (with timestamp) from your display instead of the file in the
following command.
root@s11-server1:/audit/s11-server1/files# auditreduce -c lo \
/audit/s11-server1/files/20111216145549.20111216152447.s11-
server1 > lofile
root@s11-server1:/audit/s11-server1/files# praudit lofile
file,2011-12-16 08:56:54.000 -06:00,
header,127,2,login - zlogin,,localhost,2011-12-16 08:56:54.832 -
06:00
subject,oracle,root,root,root,root,9186,3242122680,0 0 localhost
text,zone:global
return,success,0
zone,grandmazone
header,112,2,logout,,localhost,2011-12-16 08:56:56.942 -06:00
subject,oracle,root,root,root,root,9186,3242122680,0 0 localhost
return,success,0
zone,grandmazone
header,107,2,su,,localhost,2011-12-16 09:21:45.718 -06:00
subject,oracle,jholt,staff,jholt,staff,9233,3242122680,0 0
localhost
return,success,0
zone,global
header,107,2,su logout,,localhost,2011-12-16 09:22:01.284 -06:00
subject,oracle,jholt,staff,jholt,staff,9233,3242122680,0 0
localhost
return,success,0
zone,global
file,2011-12-16 09:22:01.000 -06:00,
The lo file displays the login/logout information as indicated in the audit flags.
You may get different output.
11. Using the auditreduce command, create a collection of pf class records. Use the
praudit command to display.
root@s11-server1:/audit/s11-server1/files# auditreduce -c pf \
/audit/s11-server1/files/20111216145549.20111216152447.s11-
server1 > pffile
root@s11-server1:/audit/s11-server1/files# praudit pffile
file,2011-12-16 09:21:57.000 -06:00,
Cicero Ronaldo (ciceroฺronaldo@gmailฺcom) has a non-transferable
license to use this Student Guideฺ
Unauthorized reproduction or distribution prohibitedฺ Copyright© 2014, Oracle and/or its affiliatesฺ

Copyright © 2013, Oracle and/or its affiliates. All rights reserved.
Practices for Lesson 9: Securing System Resources Using Solaris Auditing
Chapter 9 - Page 24
header,521,2,execve(2) with pfexec enabled,,localhost,2011-12-16
09:21:57.785 -06:00
path,/usr/bin/crontab
attribute,104555,root,bin,65538,59345,18446744073709551615
path,/home/jholt
process,oracle,jholt,staff,jholt,staff,9238,3242122680,0 0
localhost
exec_args,3,crontab,-l,root
exec_env,19,HZ=100,LC_MONETARY=C,SHELL=/bin/bash,TERM=sun-
color,LC_NUMERIC=C,LC_ALL=C,MAIL=/var/mail/jholt,PATH=/usr/bin:,L
C_MESSAGES=C,LC_COLLATE=C,PWD=/home/jholt,LANG=C,TZ=localtime,SHL
VL=1,HOME=/home/jholt,LOGNAME=jholt,LC_CTYPE=C,LC_TIME=C,_=/usr/b
in/pfexec
subject,oracle,root,staff,jholt,staff,9238,3242122680,0 0
localhost
return,success,0
zone,global
file,2011-12-16 09:21:57.000 -06:00,
Determine the fields of the header and the subject line by matching them up with the
man pages in the next step.
Review the records and attempt to find the crontab –l root command issued by
John Holt. Was it successful? Yes.
Why? Because he used the pfexec command to use the Cron Management profile
You may get different output
12. Use the man command to display the audit.log information. Use the find command to
display the header format.
root@s11-server1:/audit/s11-server1/files# man audit.log
…
…
…
/header
The expanded header token consists of:
token ID 1 byte
record byte count 4 bytes
version # 1 byte [2]
event type 2 bytes
event modifier 2 bytes
address type/length 4 bytes
machine address 4 bytes/16 bytes (IPv4/IPv6
address)
Cicero Ronaldo (ciceroฺronaldo@gmailฺcom) has a non-transferable
license to use this Student Guideฺ
Unauthorized reproduction or distribution prohibitedฺ Copyright© 2014, Oracle and/or its affiliatesฺ

Copyright © 2013, Oracle and/or its affiliates. All rights reserved.
Practices for Lesson 9: Securing System Resources Using Solaris Auditing
Chapter 9 - Page 25
seconds of time 4 bytes/8 bytes (32/64-bits)
nanoseconds of time 4 bytes/8 bytes (32/64-bits)
…
…
…
Match up the fields with the header line in the previous step. How long is the record?
480 bytes
What is the event type? execve(2) with pfexec enabled
What is execve? The system call to Solaris kernel
Repeat this step for the subject format. Similarly you can find the format of other records
such as the attribute record.
13. Use the auditreduce command to create a file for grandmazone. Verify the results.
root@s11-server1:/audit/s11-server1/files# auditreduce -z \
grandmazone \
/audit/s11-server1/files/20111216145549.20111216152447.s11-
server1 > gmfile
14. Using the praudit command, browse the gmfile you just created.
root@s11-server1:/audit/s11-server1/files# praudit gmfile
file,2011-12-16 08:56:54.000 -06:00,
header,127,2,login - zlogin,,s11-server1,2011-10-21 08:56:54.832
-06:00
subject,oracle,root,root,root,root,9186,3242122680,0 0 localhost
text,zone:global
return,success,0
zone,grandmazone
header,112,2,logout,,s11-server1,2011-12-16 08:56:56.942 -06:00
subject,oracle,root,root,root,root,9186,3242122680,0 0 s11-
server1
return,success,0
zone,grandmazone
file,2011-12-16 08:56:56.000 -06:00,
As a sample, go over the header for the login - zlogin class:
Refer to step 12 above or pull up the man pages for audit.log and do a find for
header.
header,127,2,login - zlogin,,s11-server1,2011-12-16 08:56:54.832
-06:00
Now you can match up the fields in this raw format with the previous display or with the
format below. You may get expect different output
Cicero Ronaldo (ciceroฺronaldo@gmailฺcom) has a non-transferable
license to use this Student Guideฺ
Unauthorized reproduction or distribution prohibitedฺ Copyright© 2014, Oracle and/or its affiliatesฺ

Copyright © 2013, Oracle and/or its affiliates. All rights reserved.
Practices for Lesson 9: Securing System Resources Using Solaris Auditing
Chapter 9 - Page 26
An example of matching would be:
Token ID: header
Record byte count: 127
Version #: 2
Event type: login - zlogin
Event Modifier: - (nothing)
Address Type/Length: none specified
Machine address: s11-server1
Remaining fields: 2011-12-16 08:56:54.832 -06:00 – date/timestamp
The expanded header token consists of:
token ID 1 byte
record byte count 4 bytes
version # 1 byte [2]
event type 2 bytes
event modifier 2 bytes
address type/length 4 bytes
machine address 4 bytes/16 bytes (IPv4/IPv6 address)
seconds of time 4 bytes/8 bytes (32/64-bits)
nanoseconds of time 4 bytes/8 bytes (32/64-bits)
You can display the audit records in three formats: text, raw, or XML format.
15. Use the auditreduce and praudit -x commands to display the output in XML format.
root@s11-server1:/audit/s11-server1/files# praudit -x gmfile
<?xml version='1.0' encoding='UTF-8' ?>
<?xml-stylesheet type='text/xsl'
href='file:///usr/share/lib/xml/style/adt_record.xsl.1' ?>
<!DOCTYPE audit PUBLIC '-//Sun Microsystems, Inc.//DTD Audit
V1//EN' 'file:///usr/share/lib/xml/dtd/adt_record.dtd.1'>
<audit>
<file iso8601="2011-12-16 08:56:54.000 -06:00"></file>
<record version="2" event="login - zlogin" host="s11-server1"
iso8601="2011-12-16
08:56:54.832 -06:00">
<subject audit-uid="oracle" uid="root" gid="root" ruid="root"
rgid="root" pid="9186" sid="3242122680" tid="0 0 s11-server1"/>
<text>zone:global</text>
<return errval="success" retval="0"/>
<zone name="grandmazone"/>
</record>
Cicero Ronaldo (ciceroฺronaldo@gmailฺcom) has a non-transferable
license to use this Student Guideฺ
Unauthorized reproduction or distribution prohibitedฺ Copyright© 2014, Oracle and/or its affiliatesฺ

Copyright © 2013, Oracle and/or its affiliates. All rights reserved.
Practices for Lesson 9: Securing System Resources Using Solaris Auditing
Chapter 9 - Page 27
<record version="2" event="logout" host="s11-server1"
iso8601="2011-12-16 08:56:56.942 -06:00">
…
…
Is there any benefit of using the XML format? Yes, all the fields have the respective tags
translated for me.
16. Use the ls command to confirm the contents of the audit file storage directory.
root@s11-server1:/audit/s11-server1/files# ls
20111216145549.20111216152447.s11-server1
20111216152447.not_terminated.s11-server1
gmfile
lofile
pffile
How can you tell that a new audit file has been started? The file has not_terminated
in the name. The previous file has the beginning and ending timestamp hence closed.
You may get expect different output
17. Use the command audit –t to terminate the audit service.
root@s11-server1:/audit/s11-server1/files# audit -t
root@s11-server1:/audit/s11-server1/files# auditconfig -getcond
audit condition = noaudit
How can you tell that the audit service is stopped? Because in the output, it says
noaudit
Cicero Ronaldo (ciceroฺronaldo@gmailฺcom) has a non-transferable
license to use this Student Guideฺ
Unauthorized reproduction or distribution prohibitedฺ Copyright© 2014, Oracle and/or its affiliatesฺ

Copyright © 2013, Oracle and/or its affiliates. All rights reserved.
Practices for Lesson 9: Securing System Resources Using Solaris Auditing
Chapter 9 - Page 28
18. Examine the /var/log/auditlog file for audit messages sent to syslog.
root@s11-server1:~# more /var/log/auditlog
…
…
…
Dec 16 09:44:05 s11-server1 audit: [ID 702911 audit.notice]
screenlock - unlock
failed session 810837356 by oracle as root:staff from s11-server1
Dec 16 10:41:21 s11-server1 audit: [ID 702911 audit.notice]
execve(2) with pfexec enabled ok session 3584330031 by oracle as
root:staff in global from s11-server1 proc_auid oracle proc_uid
jholt obj /home/jholt
Dec 16 10:58:52 s11-server1 last message repeated 1 time
…
…
…
Parts of this display, such as the session number, date, and time may be different for
you.
You had configured the syslog for the pf class. Here is the message recorded in the
audit.log file.
Cicero Ronaldo (ciceroฺronaldo@gmailฺcom) has a non-transferable
license to use this Student Guideฺ
Unauthorized reproduction or distribution prohibitedฺ Copyright© 2014, Oracle and/or its affiliatesฺ

Copyright © 2013, Oracle and/or its affiliates. All rights reserved.
Practices for Lesson 10: Managing Processes and Priorities
Chapter 10 - Page 1
Practices for Lesson 10:
Managing Processes and
Priorities
Chapter 10
Cicero Ronaldo (ciceroฺronaldo@gmailฺcom) has a non-transferable
license to use this Student Guideฺ
Unauthorized reproduction or distribution prohibitedฺ Copyright© 2014, Oracle and/or its affiliatesฺ

Copyright © 2013, Oracle and/or its affiliates. All rights reserved.
Practices for Lesson 10: Managing Processes and Priorities
Chapter 10 - Page 2
Practice Overview for Lesson 10
Practices Overview
In these practices, you are presented with a plan for managing the Oracle Solaris 11.1
processes, scheduling classes, and process priorities.
According to the predeployment test plan, you are going to evaluate various system processes.
Assume you are supporting Oracle CRM and Financial applications. These applications will
launch multiple processes and you will need to know which processes should run as high or low
priority. Therefore, you are asked to assess the processes, their priorities, and scheduling
classes. You are presented with various situations that will help you evaluate and configure the
facilities. The key areas explored in the practices are:
• Modifying process scheduling priority
• Configuring the fair share scheduler (FSS) in an Oracle Solaris Zone
Note: Your display outputs will be different due to the type of tasks, processes, and users.
Check your progress. You just completed the Oracle Solaris auditing lesson and are now
working with processes and priorities.
√ Oracle Solaris 11.1 Predeployment Checklist
√ Managing the Image Packaging System (IPS) and Packages
√ Installing Oracle Solaris 11.1 on Multiple Hosts
√ Managing the Business Application Data
√ Configuring Network and Traffic Failover
√ Configuring Zones and the Virtual Network
√ Managing Services and Service Properties
√ Configuring Privileges and Role-Based Access Control
√ Securing System Resources by Using Oracle Solaris Auditing
Managing Processes and Priorities
Evaluating System Resources
Monitoring and Troubleshooting System Failures
Cicero Ronaldo (ciceroฺronaldo@gmailฺcom) has a non-transferable
license to use this Student Guideฺ
Unauthorized reproduction or distribution prohibitedฺ Copyright© 2014, Oracle and/or its affiliatesฺ

Copyright © 2013, Oracle and/or its affiliates. All rights reserved.
Practices for Lesson 10: Managing Processes and Priorities
Chapter 10 - Page 3
Practice 10-1: Modifying Process Scheduling Priority
Overview
In this practice, you work with the processes in the following areas:
• Managing scheduling class and process priorities
• Configuring the fair share scheduler
Task 1: Manage Scheduling Class and Process Priorities
This task will cover the following activities:
• Listing the current processes
• Displaying process class information
• Determining the process global priority
• Designating a process priority
• Modifying process scheduling priority
• Changing the scheduling parameters of a timesharing process
1. Verify that the Sol11-Server1 virtual machine is running. If it is not, start it now.
2. Log in to the Sol11-Server1 virtual machine as the oracle user. Use the password
oracle1.
3. Make sure that all other virtual machines are shut down.
4. Run the su - command to assume administrator privileges.
oracle@s11-server1:~$ su -
Password:
Oracle Corporation SunOS 5.11 11.1 September 2012
root@s11-server1:~#
5. Use the top command to view the top 10 processes at a 10-second interval.
root@s11-server1:~# top 10 -s 10
last pid: 1121; load avg: 0.20, 0.14, 0.12; up 0+01:50:30
14:10:30
87 processes: 83 sleeping, 3 running, 1 on cpu
CPU states: 81.8% idle, 5.1% user, 13.1% kernel, 0.0% iowait,
0.0% swap
Kernel: 609 ctxsw, 9 trap, 327 intr, 1935 syscall, 4 flt
Memory: 1024M phys mem, 84M free mem, 977M total swap, 977M free
swap
PID USERNAME NLWP PRI NICE SIZE RES STATE TIME CPU COMMAND
991 oracle 2 59 0 87M 19M sleep 0:11 4.03% gnome-terminal
733 oracle 3 59 0 65M 53M run 0:23 3.82% Xorg
929 oracle 20 59 0 160M 140M run 2:01 1.75% java
934 oracle 1 56 0 12M 5552K run 0:06 1.46% xscreensaver
1120 root 1 59 0 4296K 2480K cpu 0:00 0.25% top
917 oracle 1 49 0 107M 36M sleep 0:01 0.22% nautilus
913 oracle 1 59 0 27M 15M sleep 0:01 0.08% metacity
966 oracle 2 59 0 26M 12M sleep 0:06 0.07% nwam-manager
Cicero Ronaldo (ciceroฺronaldo@gmailฺcom) has a non-transferable
license to use this Student Guideฺ
Unauthorized reproduction or distribution prohibitedฺ Copyright© 2014, Oracle and/or its affiliatesฺ

Copyright © 2013, Oracle and/or its affiliates. All rights reserved.
Practices for Lesson 10: Managing Processes and Priorities
Chapter 10 - Page 4
11 root 18 59 0 12M 11M sleep 0:41 0.06% svc.configd
536 root 7 59 0 9420K 1856K sleep 0:03 0.04% VBoxService
Enter ‘q’ to exit.
In what order is the CPU column sorted? Descending, so that the processes using high
CPU are displayed at the top
Remember: Your display output will differ from the output presented here.
6. Use the priocntl command to view the configured classes.
root@s11-server1:~# priocntl -l
CONFIGURED CLASSES
==================
SYS (System Class)
TS (Time Sharing)
Configured TS User Priority Range: -60 through 60
SDC (System Duty-Cycle Class)
FX (Fixed priority)
Configured FX User Priority Range: 0 through 60
These are all the classes currently being used at this time. For example, the Interactive
class (IA) is not shown. The configured IA user priority range is -60 through 60.
7. Using the ps command, display the scheduling class and the priority of the processes
currently running.
root@s11-server1:~# ps -ecl | more
F S UID PID PPID CLS PRI ADDR SZ WCHAN TTY TIME CMD
1 T 0 0 0 SYS 96 ? 0 ? 0:01 sched
1 S 0 5 0 SDC 99 ? 0 ? ? 0:03 zpool -rp
0 S 0 1 0 TS 59 ? 688 ? ? 0:00 init
1 S 0 2 0 SYS 98 ? 0 ? ? 0:00 page out
1 S 0 3 0 SYS 60 ? 0 ? ? 0:05 fsflush
1 S 0 6 0 SDC 99 ? 0 ? ? 0:00 vmtasks
0 S 16 52 1 TS 59 ? 991 ? ? 0:00 ipmgmtd
…
…
…
0 S 101 934 848 IA 59 ? 3180 ? ? 0:08 xscreens
0 S 101 928 1 IA 59 ? 2793 ? ? 0:00 gvfsd-tr
0 R 0 997 994 IA 19 ? 2163 pts/1 0:00 bash
0 S 101 973 1 IA 59 ? 3199 ? ? 0:00 VBoxClie
0 S 101 972 1 IA 59 ? 3248 ? ? 0:00 VBoxClie
…
…
Cicero Ronaldo (ciceroฺronaldo@gmailฺcom) has a non-transferable
license to use this Student Guideฺ
Unauthorized reproduction or distribution prohibitedฺ Copyright© 2014, Oracle and/or its affiliatesฺ

Copyright © 2013, Oracle and/or its affiliates. All rights reserved.
Practices for Lesson 10: Managing Processes and Priorities
Chapter 10 - Page 5
…
What is the highest priority in use? It is 99 for the zpool process.
What is the lowest priority in use? It is 19 for the bash shell.
Refer to the man pages for detailed explanation of the columns.
8. Use the priocntl command to generate a process in the TS scheduling class with a
specified priority of 60 by using the find command.
root@s11-server1:~# priocntl -e -c TS -m 60 -p 60 find / -name
core -exec ls {} \; > /var/tmp/find 2<>/dev/null&
[1] 1348
root@s11-server1:~#
Here you execute the find command with the priority of 60. What is the highest priority
a user can specify for a user-generated process? Refer to Step 6 to determine the
highest priority, which is 60. Refer to man pages for the command options used here.
Use the ps command to inspect the priority of the find command. Repeat the
command multiple times to check if the specified priority is being used at all times.
root@s11-server1:~# ps -ecl | grep find
0 S 0 2959 2771 TS 60 ? 1865 ? pts/1
0:01 find
root@s11-server1:~# ps -ecl | grep find
0 S 0 2959 2771 TS 59 ? 1961 ? pts/1
0:01 find
root@s11-server1:~# ps -ecl | grep find
0 R 0 2959 2771 TS 60 ? 1985 ? pts/1
0:02 find
Is the designated priority 60 being used at all times? No, but it is used most of the time.
The kernel determines the priority based on what other jobs are running on the CPU;
therefore, you might see a slight variance in the specified priority number.
9. Create a small program to run for a longer duration, so that you can change its priority. Use
the priocntl command to change the class and specify a time slice or the global priority
of the program modparm.
Create a small script called modparm. Grant the owner the execute permission.
root@s11-server1:~# vi modparm
root@s11-server1:~# cat modparm
#!/bin/bash
find / -name jholt -exec ls{} \; > /var/tmp/jholt 2<>/dev/null
find / -name jmoose -exec ls{} \; > /var/tmp/jmoose 2<>/dev/null
find / -name panna -exec ls{} \; > /var/tmp/panna 2<>/dev/null
Cicero Ronaldo (ciceroฺronaldo@gmailฺcom) has a non-transferable
license to use this Student Guideฺ
Unauthorized reproduction or distribution prohibitedฺ Copyright© 2014, Oracle and/or its affiliatesฺ

Copyright © 2013, Oracle and/or its affiliates. All rights reserved.
Practices for Lesson 10: Managing Processes and Priorities
Chapter 10 - Page 6
find / -name sstudent -exec ls{} \; > /var/tmp/sstudent
2<>/dev/null
find / -name oracle -exec ls{} \; > /var/tmp/oracle 2<>/dev/null
find / -name core -exec ls{} \; > /var/tmp/core 2<>/dev/null
root@s11-server1:~# ls -l modparm
-rw-r--r-- 1 root root 87 Dec 19 08:31 modparm
root@s11-server1:~# chmod 755 modparm
root@s11-server1:~# ls -l modparm
-rwxr-xr-x 1 root root 87 Dec 19 08:31 modparm
root@s11-server1:~# priocntl -e -c RT -t 500 -p 20 /root/modparm
&
[1] 5104
Here you execute your program in the RT class with a time slice of 500 milliseconds, a
priority of 20 in the RT class, and a global priority of 120.
10. Verify the designated scheduling class and the priority.
root@s11-server1:~# ps -ecf | grep find
root 10270 10269 RT 120 02:08:08 pts/1 0:05 find / -name jholt -exec
ls{}
root@s11-server1:~# ps -ecf | grep find
root 10270 10269 33 02:08:08 pts/1 0:25 find / -name jholt -exec ls{} ;
root 10281 1310 0 02:09:33 pts/1 0:00 grep find
Is your program running in the designated scheduling class? Yes.
Note: To see the continuation of the commands being run in the modparm script,
continue to run ps –ecf | grep find.
11. Use the priocntl command to change the priority of the running program modparm.
Verify the results.
Note: Make sure you use the process number that appears on your display. Your process
number will be different than the process number (5104) presented in the example.
root@s11-server1:~# priocntl -s -p 30 5104
root@s11-server1:~# ps -ecf | grep find
root 10293 10269 RT 120 02:11:43 pts/1 0:09 find / -name sstudent -exec ls{} ;
root 10299 1310 TS 29 02:12:04 pts/1 0:00 grep find
What are the new RT and the global priorities? They are 30 and 130.
Note that the system added 100 to 30 to come up with the global priority of 130.
Why would you need to change the priority? Based on your business process priority,
you needed to lower the priority of a long running transaction.
12. Copy the modparm program to John Holt’s home directory so that he can run the program
under his privileges. As the administrator, you will change the program’s scheduling class
by using John’s user ID.
Cicero Ronaldo (ciceroฺronaldo@gmailฺcom) has a non-transferable
license to use this Student Guideฺ
Unauthorized reproduction or distribution prohibitedฺ Copyright© 2014, Oracle and/or its affiliatesฺ

Copyright © 2013, Oracle and/or its affiliates. All rights reserved.
Practices for Lesson 10: Managing Processes and Priorities
Chapter 10 - Page 7
As the administrator, execute the following command.
root@s11-server1:~# cp modparm /export/home/jholt
As John Holt, execute the following commands.
root@s11-server1:~# su - jholt
Oracle Corporation SunOS 5.11 11.1 September 2012
jholt@s11-server1:~$ ls modparm
modparm
jholt@s11-server1:~$ cp modparm holtparm
jholt@s11-server1:~$ ls -l holtparm
-rwxr-xr-x 1 jholt staff 336 Dec 19 15:13 holtparm
Note that by copying, it changed the ownership.
Make sure that John has the execute permission on this program. If needed, use the
chmod command as you did before.
Before you run the program as jholt, you need to edit the /var/tmp file part of the
entry in the holtparm file for each user. The user jholt does not have the
authorization to overwrite the original files but he does have the authorization to
overwrite the files he himself has created.
jholt@s11-server1:~$ vi holtparm
jholt@s11-server1:~$ cat holtparm
#!/bin/bash
find / -name jholt -exec ls{} \; > /var/tmp/holt 2<>/dev/null
find / -name jmoose -exec ls{} \; > /var/tmp/moose 2<>/dev/null
find / -name panna -exec ls{} \; > /var/tmp/anna 2<>/dev/null
find / -name sstudent -exec ls{} \; > /var/tmp/student
2<>/dev/null
find / -name oracle -exec ls{} \; > /var/tmp/orcl 2<>/dev/null
find / -name core -exec ls{} \; > /var/tmp/cre 2<>/dev/null
As John Holt, run the program by using the following command:
jholt@s11-server1:~$ ./holtparm 2<>/dev/null&
[1] 5130
You will see some “permission denied” error messages, which you can ignore. The only
purpose of the program is to continue running for a while.
Cicero Ronaldo (ciceroฺronaldo@gmailฺcom) has a non-transferable
license to use this Student Guideฺ
Unauthorized reproduction or distribution prohibitedฺ Copyright© 2014, Oracle and/or its affiliatesฺ

Copyright © 2013, Oracle and/or its affiliates. All rights reserved.
Practices for Lesson 10: Managing Processes and Priorities
Chapter 10 - Page 8
13. Now, display the active program as the user John Holt. Next, change the program’s
scheduling class to IA and verify the results. Finally, use the pkill -9 command to
terminate the processes associated with the find command and modparm script. Verify
that all the processes have been terminated.
jholt@s11-server1:~$ ps -ef | grep holt
jholt 10328 10315 0 02:17:40 pts/1 0:00 /bin/bash ./holtparm
jholt 10329 10328 22 02:17:40 pts/1 0:10 find / -name jholt -
exec ls{} ;
jholt 10335 10315 0 02:18:11 pts/1 0:00 -bash
jholt 10315 1310 0 02:14:44 pts/1 0:00 -bash
jholt 10334 10315 1 02:18:11 pts/1 0:00 ps -ef … …
…
…
When John submitted his job, it ended up in the TS class. Why? The kernel made the
call based on the nature of the program and overall workload.
Determine John’s userid.
jholt@s11-server1:~$ exit
logout
root@s11-server1:~# grep holt /etc/passwd
jholt:x:60005:10:john holt:/export/home/jholt:/bin/bash
As the administrator, set the scheduling class to IA for all the processes running under
John’s userid (60005).
root@s11-server1:~# priocntl -s -c IA -i uid 60005
root@s11-server1:~# ps -ecf | grep holt
root@s11-server1:~# ps -ecf | grep holt
jholt 6244 6243 IA 50 22:13:06 pts/1 2:00 find / -name
jholt -exec ls{} ;
root 6251 6106 TS 49 22:16:10 pts/1 0:00 grep holt
jholt 6243 1 IA 59 22:13:06 pts/1 0:00 /bin/bash
./holtparm
Here you can see all the processes launched by John that are currently running in the IA
class.
Why would you need to make changes like this? You want to run the job interactively so
that you can get results more quickly.
root@s11-server1:~# pkill -9 find
root@s11-server1:~# ps -ef | grep find
jholt 5143 5130 1 15:18:47 pts/1 0:10 find / -name jmoose -
exec ls{} ;
jholt 5143 5130 1 15:18:47 pts/1 0:10 grep find
Cicero Ronaldo (ciceroฺronaldo@gmailฺcom) has a non-transferable
license to use this Student Guideฺ
Unauthorized reproduction or distribution prohibitedฺ Copyright© 2014, Oracle and/or its affiliatesฺ

Copyright © 2013, Oracle and/or its affiliates. All rights reserved.
Practices for Lesson 10: Managing Processes and Priorities
Chapter 10 - Page 9
root@s11-server1:~# pkill -9 modparm
root@s11-server1:~# ps -ef | grep find
root@s11-server1:~#
14. Use the ps command to display all the processes running in the TS class.
root@s11-server1:~# ps -ef -o class,zone,fname | grep TS | sort
-k2 | more
TS global asr-noti
TS global automoun
TS global automoun
TS global bash
TS global bash
TS global bash
TS global bash
TS global bash
TS global cron
TS global cupsd
TS global dbus-dae
TS global devchass
TS global devfsadm
TS global dhcpagen
TS global dlmgmtd
TS global fmd
TS global hald
TS global hald-add
TS global hald-add
TS global hald-add
TS global hald-run
TS global htcachec
TS global httpd.wo
TS global httpd.wo
TS global httpd.wo
TS global httpd.wo
TS global httpd.wo
TS global httpd.wo
TS global in.mpath
TS global in.ndpd
TS global in.route
TS global inetd
TS global init
TS global ipmgmtd
TS global iscsid
TS global kcfd
Cicero Ronaldo (ciceroฺronaldo@gmailฺcom) has a non-transferable
license to use this Student Guideฺ
Unauthorized reproduction or distribution prohibitedฺ Copyright© 2014, Oracle and/or its affiliatesฺ

Copyright © 2013, Oracle and/or its affiliates. All rights reserved.
Practices for Lesson 10: Managing Processes and Priorities
Chapter 10 - Page 10
TS global login
TS global mountd
TS global named
TS global netcfgd
TS global nfsmapid
TS global nscd
TS global nwamd
TS global pfexecd
TS global picld
TS global pkg.depo
TS global ps
TS global rad
TS global reparsed
TS global rmvolmgr
TS global rpcbind
TS global sshd
TS global sshd
TS global sshd
TS global statd
TS global su
TS global su
TS global svc.conf
TS global svc.star
TS global sysevent
TS global syslogd
TS global ttymon
TS global ttymon
TS global ttymon
TS global ttymon
TS global ttymon
TS global utmpd
TS global vbiosd
TS global VBoxServ
TS global vtdaemon
TS global zoneadmd
TS global zoneadmd
TS global zoneprox
TS choczone automoun
TS choczone automoun
TS choczone cron
TS choczone dhcpagen
TS choczone fmd
Cicero Ronaldo (ciceroฺronaldo@gmailฺcom) has a non-transferable
license to use this Student Guideฺ
Unauthorized reproduction or distribution prohibitedฺ Copyright© 2014, Oracle and/or its affiliatesฺ

Copyright © 2013, Oracle and/or its affiliates. All rights reserved.
Practices for Lesson 10: Managing Processes and Priorities
Chapter 10 - Page 11
TS choczone in.mpath
TS choczone in.ndpd
TS choczone in.route
TS choczone inetd
TS choczone init
TS choczone ipmgmtd
TS choczone kcfd
TS choczone netcfgd
TS choczone nscd
TS choczone nwamd
TS choczone pfexecd
TS choczone rpcbind
TS choczone sendmail
TS choczone sendmail
TS choczone smtp-not
TS choczone sshd
TS choczone svc.conf
TS choczone svc.star
TS choczone syslogd
TS choczone ttymon
TS choczone utmpd
TS choczone zoneprox
TS grandmazone automoun
TS grandmazone automoun
TS grandmazone cron
TS grandmazone dhcpagen
TS grandmazone fmd
TS grandmazone in.mpath
TS grandmazone in.ndpd
TS grandmazone in.route
TS grandmazone inetd
TS grandmazone init
TS grandmazone ipmgmtd
TS grandmazone kcfd
TS grandmazone netcfgd
TS grandmazone nscd
TS grandmazone nwamd
TS grandmazone pfexecd
TS grandmazone rpcbind
TS grandmazone sendmail
TS grandmazone sendmail
TS grandmazone smtp-not
Cicero Ronaldo (ciceroฺronaldo@gmailฺcom) has a non-transferable
license to use this Student Guideฺ
Unauthorized reproduction or distribution prohibitedฺ Copyright© 2014, Oracle and/or its affiliatesฺ

Copyright © 2013, Oracle and/or its affiliates. All rights reserved.
Practices for Lesson 10: Managing Processes and Priorities
Chapter 10 - Page 12
TS grandmazone sshd
TS grandmazone svc.conf
TS grandmazone svc.star
TS grandmazone syslogd
TS grandmazone ttymon
TS grandmazone utmpd
TS grandmazone zoneprox
root@s11-server1:~#
Here you display all the processes running on your system that are in the TS class.
Task 2: Configure the Fair Share Scheduler
This task will cover the following activities:
• Making FSS the default scheduling class
• Moving processes into the FSS class
• Moving a project’s processes into the FSS class
• Tuning scheduler parameters
1. Verify that the Sol11-Server1 virtual machine is running. If it is not running, start it now.
2. Log in to the Sol11-Server1 virtual machine as the oracle user. Use the password
oracle1.
3. Make sure that all other virtual machines are shut down.
4. Run the su - command to assume administrator privileges.
oracle@s11-server1:~$ su -
Password:
Oracle Corporation SunOS 5.11 11.1 September 2012
root@s11-server1:~#
5. Use the dispadmin command to view and change the default scheduling class to FSS.
Confirm the action.
root@s11-server1:~# dispadmin -d
dispadmin: Default scheduling class is not set
root@s11-server1:~# dispadmin -d FSS
root@s11-server1:~# dispadmin -d
FSS (Fair Share)
Is the default scheduling class changed for the global zone? Yes.
Does it mean that FSS has become the default scheduling class for all the processes
running on the system? Refer to the display in the next steps.
Cicero Ronaldo (ciceroฺronaldo@gmailฺcom) has a non-transferable
license to use this Student Guideฺ
Unauthorized reproduction or distribution prohibitedฺ Copyright© 2014, Oracle and/or its affiliatesฺ

Copyright © 2013, Oracle and/or its affiliates. All rights reserved.
Practices for Lesson 10: Managing Processes and Priorities
Chapter 10 - Page 13
6. Use the dispadmin command to view the current scheduling classes being used.
root@s11-server1:~# dispadmin -l
CONFIGURED CLASSES
==================
SYS (System Class)
TS (Time Sharing)
SDC (System Duty-Cycle Class)
FSS (Fair Share)
FX (Fixed Priority)
RT (Real Time)
IA (Interactive)
These are all the classes currently being used at this time.
7. Using the ps command, display the scheduling class of the currently running processes.
root@s11-server1:~# ps -ef -o class,zone,fname | grep -v CLS |
sort -k2 | more
TS global asr-noti
TS global automoun
TS global automoun
TS global bash
TS global bash
TS global bash
TS global bash
TS global bash
TS global cron
TS global cupsd
TS global dbus-dae
TS global devchass
TS global devfsadm
TS global dhcpagen
TS global dlmgmtd
IA global find
TS global fmd
SYS global fsflush
TS global hald
TS global hald-add
TS global hald-add
TS global hald-add
TS global hald-run
IA global holtparm
TS global htcachec
Cicero Ronaldo (ciceroฺronaldo@gmailฺcom) has a non-transferable
license to use this Student Guideฺ
Unauthorized reproduction or distribution prohibitedฺ Copyright© 2014, Oracle and/or its affiliatesฺ

Copyright © 2013, Oracle and/or its affiliates. All rights reserved.
Practices for Lesson 10: Managing Processes and Priorities
Chapter 10 - Page 14
TS global httpd.wo
TS global httpd.wo
TS global httpd.wo
TS global httpd.wo
TS global httpd.wo
TS global httpd.wo
TS global in.mpath
TS global in.ndpd
TS global in.route
TS global inetd
TS global init
SYS global intrd
TS global ipmgmtd
TS global iscsid
TS global kcfd
SDC global kmem_tas
FX global lockd
SYS global lockd_kp
TS global login
TS global mountd
TS global named
TS global netcfgd
FX global nfsd
SYS global nfsd_kpr
TS global nfsmapid
TS global nscd
TS global nwamd
SYS global pageout
TS global pfexecd
TS global picld
TS global pkg.depo
TS global ps
TS global rad
TS global reparsed
TS global rmvolmgr
TS global rpcbind
SYS global sched
TS global sshd
TS global sshd
TS global sshd
TS global statd
TS global su
Cicero Ronaldo (ciceroฺronaldo@gmailฺcom) has a non-transferable
license to use this Student Guideฺ
Unauthorized reproduction or distribution prohibitedฺ Copyright© 2014, Oracle and/or its affiliatesฺ

Copyright © 2013, Oracle and/or its affiliates. All rights reserved.
Practices for Lesson 10: Managing Processes and Priorities
Chapter 10 - Page 15
TS global su
TS global svc.conf
TS global svc.star
TS global sysevent
TS global syslogd
TS global ttymon
TS global ttymon
TS global ttymon
TS global ttymon
TS global ttymon
TS global utmpd
TS global vbiosd
TS global VBoxServ
SYS global vmtasks
TS global vtdaemon
TS global zoneadmd
TS global zoneadmd
TS global zoneprox
FX global zonestat
SDC global zpool-au
SDC global zpool-rp
TS choczone automoun
TS choczone automoun
TS choczone cron
TS choczone dhcpagen
TS choczone fmd
TS choczone in.mpath
TS choczone in.ndpd
TS choczone in.route
TS choczone inetd
TS choczone init
TS choczone ipmgmtd
TS choczone kcfd
TS choczone netcfgd
TS choczone nscd
TS choczone nwamd
TS choczone pfexecd
TS choczone rpcbind
TS choczone sendmail
TS choczone sendmail
TS choczone smtp-not
TS choczone sshd
Cicero Ronaldo (ciceroฺronaldo@gmailฺcom) has a non-transferable
license to use this Student Guideฺ
Unauthorized reproduction or distribution prohibitedฺ Copyright© 2014, Oracle and/or its affiliatesฺ

Copyright © 2013, Oracle and/or its affiliates. All rights reserved.
Practices for Lesson 10: Managing Processes and Priorities
Chapter 10 - Page 16
TS choczone svc.conf
TS choczone svc.star
TS choczone syslogd
TS choczone ttymon
TS choczone utmpd
TS choczone zoneprox
SYS choczone zsched
TS grandmazone automoun
TS grandmazone automoun
TS grandmazone cron
TS grandmazone dhcpagen
TS grandmazone fmd
TS grandmazone in.mpath
TS grandmazone in.ndpd
TS grandmazone in.route
TS grandmazone inetd
TS grandmazone init
TS grandmazone ipmgmtd
TS grandmazone kcfd
TS grandmazone netcfgd
TS grandmazone nscd
TS grandmazone nwamd
TS grandmazone pfexecd
TS grandmazone rpcbind
TS grandmazone sendmail
TS grandmazone sendmail
TS grandmazone smtp-not
TS grandmazone sshd
TS grandmazone svc.conf
TS grandmazone svc.star
TS grandmazone syslogd
TS grandmazone ttymon
TS grandmazone utmpd
TS grandmazone zoneprox
SYS grandmazone zsched
…
…
What are some of the classes being used at this time? TS, IA, and SYS
Cicero Ronaldo (ciceroฺronaldo@gmailฺcom) has a non-transferable
license to use this Student Guideฺ
Unauthorized reproduction or distribution prohibitedฺ Copyright© 2014, Oracle and/or its affiliatesฺ

Copyright © 2013, Oracle and/or its affiliates. All rights reserved.
Practices for Lesson 10: Managing Processes and Priorities
Chapter 10 - Page 17
8. Use the priocntl command to move all current processes into the FSS class.
root@s11-server1:~# priocntl -s -c FSS -i all
Why did you have to move all the current processes to the FSS class manually when
you already set the default class to FSS? Because the new default class is effective on
next reboot. It does not affect the currently active processes.
9. Using the ps command, display the modified scheduling class of the currently running
processes.
root@s11-server1:~# ps -ef -o class,zone,fname | grep -v CLS |
sort -k2 | more
FSS global asr-noti
FSS global automoun
FSS global automoun
FSS global bash
FSS global bash
FSS global bash
FSS global bash
FSS global cron
FSS global cupsd
FSS global dbus-dae
FSS global devchass
FSS global devfsadm
FSS global dhcpagen
FSS global dlmgmtd
FSS global find
FSS global fmd
SYS global fsflush
FSS global grep
FSS global hald
. . .
FSS global in.ndpd
FSS global in.route
FSS global inetd
TS global init
SYS global intrd
FSS global ipmgmtd
FSS global iscsid
FSS global kcfd
SDC global kmem_tas
FSS global lockd
SYS global lockd_kp
FSS global login
FSS global more
FSS global mountd
FSS global named
Cicero Ronaldo (ciceroฺronaldo@gmailฺcom) has a non-transferable
license to use this Student Guideฺ
Unauthorized reproduction or distribution prohibitedฺ Copyright© 2014, Oracle and/or its affiliatesฺ

Copyright © 2013, Oracle and/or its affiliates. All rights reserved.
Practices for Lesson 10: Managing Processes and Priorities
Chapter 10 - Page 18
FSS global netcfgd
FSS global nfsd
SYS global nfsd_kpr
FSS global nfsmapid
FSS global nscd.
FSS global nwamd
SYS global pageout
FSS global pfexecd
FSS global picld
FSS global pkg.depo
FSS global ps
FSS global rad
FSS global reparsed
FSS global rmvolmgr
FSS global rpcbind
SYS global sched
FSS global sort
FSS global sshd
FSS global sshd
FSS global sshd
FSS global statd
FSS global su
FSS global su
FSS global svc.conf
FSS global svc.star
FSS global sysevent
FSS global syslogd
FSS global ttymon
FSS global ttymon
FSS global ttymon
FSS global ttymon
FSS global ttymon
FSS global utmpd
FSS global vbiosd
FSS global VBoxServ
SYS global vmtasks
FSS global vtdaemon
FSS global zoneadmd
FSS global zoneadmd
FSS global zoneprox
FSS global zonestat
SDC global zpool-au
SDC global zpool-rp
FSS choczone automoun
FSS choczone automoun
Cicero Ronaldo (ciceroฺronaldo@gmailฺcom) has a non-transferable
license to use this Student Guideฺ
Unauthorized reproduction or distribution prohibitedฺ Copyright© 2014, Oracle and/or its affiliatesฺ

Copyright © 2013, Oracle and/or its affiliates. All rights reserved.
Practices for Lesson 10: Managing Processes and Priorities
Chapter 10 - Page 19
FSS choczone cron
FSS choczone dhcpagen
FSS choczone fmd
FSS choczone in.mpath
FSS choczone in.ndpd
FSS choczone in.route
FSS choczone inetd
FSS choczone init
FSS choczone ipmgmtd
FSS choczone kcfd
FSS choczone netcfgd
FSS choczone nscd
FSS choczone nwamd
FSS choczone pfexecd
FSS choczone rpcbind
FSS choczone sendmail
FSS choczone sendmail
FSS choczone smtp-not
FSS choczone sshd
FSS choczone svc.conf
FSS choczone svc.star
FSS choczone syslogd
FSS choczone ttymon
FSS choczone utmpd
FSS choczone zoneprox
SYS choczone zsched
FSS grandmazone automoun
FSS grandmazone automoun
FSS grandmazone cron
FSS grandmazone dhcpagen
FSS grandmazone fmd
FSS grandmazone in.mpath
FSS grandmazone in.ndpd
FSS grandmazone in.route
FSS grandmazone inetd
FSS grandmazone init
FSS grandmazone ipmgmtd
FSS grandmazone kcfd
FSS grandmazone netcfgd
FSS grandmazone nscd
FSS grandmazone nwamd
FSS grandmazone pfexecd
FSS grandmazone rpcbind
FSS grandmazone sendmail
FSS grandmazone sendmail
Cicero Ronaldo (ciceroฺronaldo@gmailฺcom) has a non-transferable
license to use this Student Guideฺ
Unauthorized reproduction or distribution prohibitedฺ Copyright© 2014, Oracle and/or its affiliatesฺ

Copyright © 2013, Oracle and/or its affiliates. All rights reserved.
Practices for Lesson 10: Managing Processes and Priorities
Chapter 10 - Page 20
FSS grandmazone smtp-not
FSS grandmazone sshd
FSS grandmazone svc.conf
FSS grandmazone svc.star
FSS grandmazone syslogd
FSS grandmazone ttymon
FSS grandmazone utmpd
FSS grandmazone zoneprox
SYS grandmazone zsched
root@s11-server1:~#
Are all the processes using FSS? No; however, most of the processes are using FSS.
Why are some of the processes in the TS,SDC and SYS classes? The classes remain
unchanged for these processes based on the nature of the processes. For example, the
zsched daemon normally runs in the SYS class because of its scope.
10. Using the ps command, display all the init processes.
root@s11-server1:~# ps -ecf | grep init
root 1 0 TS 59 10:54:11 ? 0:00 /usr/sbin/init
root 2487 1562 FSS 59 11:00:37 ? 0:00 /usr/sbin/init
root 2491 1406 FSS 59 11:00:37 ? 0:00 /usr/sbin/init
Why are there so many init processes? One for each zone. Refer to the display in
Step 9.
11. Using the priocntl command, change the class of the init process to the FSS
scheduling class. Display the classes of all the init processes to confirm the change.
root@s11-server1:~# priocntl -s -c FSS -i pid 1
root@s11-server1:~# ps -ef -o class,zone,fname | grep init
FSS global init
FSS choczone init
FSS grandmazone init
Did you change the classes for all the init processes? No, only for the global zone
because you specified the PID 1.
12. Now change a project’s scheduling class. First, by using the ps command, find the current
class for the current projects.
root@s11-server1:~# ps -o user,pid,uid,projid,project,class
USER PID PROJID PROJECT CLS
root 1309 1 user.root TS
root 1310 1 user.root TS
root 10415 1 user.root TS
Since you changed the scheduling class for all the processes, the user.root project
and its processes are running in the FSS class. So, where can you find the definition of
this project? The definition can be found in the /etc/project file.
Cicero Ronaldo (ciceroฺronaldo@gmailฺcom) has a non-transferable
license to use this Student Guideฺ
Unauthorized reproduction or distribution prohibitedฺ Copyright© 2014, Oracle and/or its affiliatesฺ

Copyright © 2013, Oracle and/or its affiliates. All rights reserved.
Practices for Lesson 10: Managing Processes and Priorities
Chapter 10 - Page 21
Note: The project topic is covered here only in the context of a scheduling class. This
topic will be covered in greater detail in Lesson 11: Evaluating System Resources.
root@s11-server1:~# grep user.root /etc/project
user.root:1::::
root@s11-server1:~# priocntl -s -c TS -i projid 1
root@s11-server1:~# ps -o user,pid,uid,projid,project,class
USER PID UID PROJID PROJECT CLS
root 5142 0 1 user.root TS
root 5189 0 1 user.root TS
Did you change the scheduling class for all the processes? No.
How would you confirm that? Refer to the commands in the previous steps.
What would prompt this action of changing the project class? You want to change the
scheduling class based on the importance of a project.
13. Using the dispadmin command, inspect the current scheduler parameter quantum value.
Modify the value and verify the change.
Refer to Task1, Step 9 where you used -t 500 to set a quantum value for the task. In
the following steps, you change the time quantum unit to, for example, one-tenth and
one-hundredth of a second.
root@s11-server1:~# dispadmin -c FSS -g
#
# Fair Share Scheduler Configuration
#
RES=1000
#
# Time Quantum
#
QUANTUM=110
Currently, the quantum values are specified in 1/1000th of a second. You can change it
to 1/100th of a second.
root@s11-server1:~# dispadmin -c FSS -g -r 100
#
# Fair Share Scheduler Configuration
#
RES=100
#
# Time Quantum
Cicero Ronaldo (ciceroฺronaldo@gmailฺcom) has a non-transferable
license to use this Student Guideฺ
Unauthorized reproduction or distribution prohibitedฺ Copyright© 2014, Oracle and/or its affiliatesฺ

Copyright © 2013, Oracle and/or its affiliates. All rights reserved.
Practices for Lesson 10: Managing Processes and Priorities
Chapter 10 - Page 22
#
QUANTUM=11
Why would you need to change these values? When you want to work with smaller digits
(specifying 10 is a lot easier than 100000 for quantum values).
Now reboot s11-server1 to make your changes effective.
root@s11-server1:~# init 6
Cicero Ronaldo (ciceroฺronaldo@gmailฺcom) has a non-transferable
license to use this Student Guideฺ
Unauthorized reproduction or distribution prohibitedฺ Copyright© 2014, Oracle and/or its affiliatesฺ

Copyright © 2013, Oracle and/or its affiliates. All rights reserved.
Practices for Lesson 10: Managing Processes and Priorities
Chapter 10 - Page 23
Practice 10-2: Configuring the FSS in an Oracle Solaris Zone
Overview
Your predeployment test plan calls for configuring the CPU shares and the scheduling class
FSS for the grandmazone and the choczone non-global zones. This practice will demonstrate
the effect of using CPU shares in an attempt to constrain the resources.
The tasks are covered in this practice:
• Configuring CPU shares and the FSS
• Monitoring the FSS in two zones
• Removing the CPU shares configuration
Task 1: Configure the CPU Shares and the FSS
1. Verify that the Sol11-Server1 virtual machine is running. If it is not running, start it now.
2. Log in to the Sol11-Server1 virtual machine as the oracle user. Use the password
oracle1.
3. Run the su - command to assume administrator privileges.
oracle@s11-server1:~$ su -
Password:
Oracle Corporation SunOS 5.11 11.1 September 2012
root@s11-server1:~#
4. Use the zoneadm list command to view the configured zones.
root@s11-server1:~# zoneadm list -civ
ID NAME STATUS PATH BRAND IP
0 global running / solaris shared
1 grandmazone running /zones/grandmazone solaris excl
2 choczone running /zones/choczone solaris excl
If you recall, you had configured these zones earlier in the class.
5. Use the zonecfg command to add the CPU shares to grandmazone. Display the results
to confirm the action.
root@s11-server1:~# zonecfg -z grandmazone
zonecfg:grandmazone> set cpu-shares=80
zonecfg:grandmazone> exit
root@s11-server1:~# zonecfg -z grandmazone info | more
zonename: grandmazone
zonepath: /zones/grandmazone
brand: solaris
autoboot: true
bootargs:
file-mac-profile:
pool:
limitpriv:
scheduling-class:
Cicero Ronaldo (ciceroฺronaldo@gmailฺcom) has a non-transferable
license to use this Student Guideฺ
Unauthorized reproduction or distribution prohibitedฺ Copyright© 2014, Oracle and/or its affiliatesฺ

Copyright © 2013, Oracle and/or its affiliates. All rights reserved.
Practices for Lesson 10: Managing Processes and Priorities
Chapter 10 - Page 24
ip-type: exclusive
hostid:
fs-allowed:
[cpu-shares: 80]
net:
address not specified
allowed-address not specified
configure-allowed-address: true
physical: vnic1
defrouter not specified
anet:
linkname: net0
lower-link: auto
allowed-address not specified
configure-allowed-address: true
defrouter not specified
allowed-dhcp-cids not specified
link-protection: mac-nospoof
mac-address: random
auto-mac-address: 2:8:20:7b:1a:a1
mac-prefix not specified
mac-slot not specified
vlan-id not specified
priority not specified
rxrings not specified
txrings not specified
mtu not specified
maxbw not specified
rxfanout not specified
rctl:
name: zone.cpu-shares
value: (priv=privileged,limit=80,action=none)
Notice the CPU shares–related entries.
6. Repeat step 6 for the second zone, namely, choczone.
root@s11-server1:~# zonecfg -z choczone
zonecfg:choczone> set cpu-shares=10
zonecfg:choczone> exit
root@s11-server1:~# zonecfg -z choczone info | more
zonename: choczone
zonepath: /zones/choczone
brand: solaris
Cicero Ronaldo (ciceroฺronaldo@gmailฺcom) has a non-transferable
license to use this Student Guideฺ
Unauthorized reproduction or distribution prohibitedฺ Copyright© 2014, Oracle and/or its affiliatesฺ

Copyright © 2013, Oracle and/or its affiliates. All rights reserved.
Practices for Lesson 10: Managing Processes and Priorities
Chapter 10 - Page 25
autoboot: true
bootargs:
file-mac-profile:
pool:
limitpriv:
scheduling-class:
ip-type: exclusive
hostid:
fs-allowed:
[cpu-shares: 10]
net:
address not specified
allowed-address not specified
configure-allowed-address: true
physical: vnic2
defrouter not specified
anet:
linkname: net0
lower-link: auto
allowed-address not specified
configure-allowed-address: true
defrouter not specified
allowed-dhcp-cids not specified
link-protection: mac-nospoof
mac-address: random
auto-mac-address: 2:8:20:56:b5:ad
mac-prefix not specified
mac-slot not specified
vlan-id not specified
priority not specified
rxrings not specified
txrings not specified
mtu not specified
maxbw not specified
rxfanout not specified
rctl:
name: zone.cpu-shares
value: (priv=privileged,limit=10,action=none)
Notice the number of CPU shares allocated to this zone.
Cicero Ronaldo (ciceroฺronaldo@gmailฺcom) has a non-transferable
license to use this Student Guideฺ
Unauthorized reproduction or distribution prohibitedฺ Copyright© 2014, Oracle and/or its affiliatesฺ

Copyright © 2013, Oracle and/or its affiliates. All rights reserved.
Practices for Lesson 10: Managing Processes and Priorities
Chapter 10 - Page 26
7. Use the zlogin command to cleanly reboot both the zones. Verify that they are back up
and running.
root@s11-server1:~# zlogin grandmazone init 6
root@s11-server1:~# zlogin choczone init 6
root@s11-server1:~# zoneadm list -civ
ID NAME STATUS PATH BRAND IP
0 global running / solaris shared
2 grandmazone running /zones/grandmazone solaris excl
3 choczone running /zones/choczone solaris excl
How can you tell they have been rebooted? The zone IDs are different.
8. Now examine the effect of CPU share assignment. Log in to each zone and create the
tasks as indicated.
root@s11-server1:~# zlogin grandmazone
[Connected to zone 'grandmazone' pts/1]
Oracle Corporation SunOS 5.11 11.1 September 2012
root@grandmazone:~# newtask dd if=/dev/zero of=/dev/null &
[1] 7949
root@grandmazone:~# ps -ef | grep 7949
root 7949 7945 34 03:12:42 pts/2 0:21 dd
if=/dev/zero of=/dev/null
root 7953 7945 0 03:13:55 pts/2 0:00 grep 7949
root@grandmazone:~# exit
logout
[Connection to zone 'grandmazone' pts/1 closed]
Start a similar task in choczone.
root@s11-server1:~# zlogin choczone
[Connected to zone 'choczone' pts/2]
Oracle Corporation SunOS 5.11 11.1 September 2012
root@choczone:~# newtask dd if=/dev/zero of=/dev/null &
[1] 7959
root@choczone:~# ps -ef | grep 7959
root 7959 7955 8 03:15:12 pts/2 0:08 dd
if=/dev/zero of=/dev/null
root 7961 7955 0 03:15:14 pts/2 0:00 grep 7959
root@choczone:~# exit
logout
[Connection to zone 'choczone' pts/2 closed]
Cicero Ronaldo (ciceroฺronaldo@gmailฺcom) has a non-transferable
license to use this Student Guideฺ
Unauthorized reproduction or distribution prohibitedฺ Copyright© 2014, Oracle and/or its affiliatesฺ

Copyright © 2013, Oracle and/or its affiliates. All rights reserved.
Practices for Lesson 10: Managing Processes and Priorities
Chapter 10 - Page 27
The newtask command starts a task that is an infinite loop. These tasks will be used to
demonstrate the CPU resource utilization by the Oracle Solaris kernel.
9. Use the ps command from the global zone to verify that the task from choczone is running
in the FSS class.
root@s11-server1:~# ps -ecf | grep 7949
root 7967 3467 FSS 59 03:16:04 console 0:00 grep 7949
root 7949 1 FSS 1 03:12:42 ? 2:31 dd
if=/dev/zero of=/dev/null
root@s11-server1:~# ps -ecf | grep 7959
root 8430 1 FSS 1 03:15:01 ? 0:11 dd
if=/dev/zero of=/dev/null
root@s11-server1:~# ps -ecf | grep 7959
root 8430 1 FSS 6 03:15:01 ? 0:13 dd
if=/dev/zero of=/dev/null
root@s11-server1:~# ps -ecf | grep 7959
root 8430 1 FSS 1 03:15:01 ? 0:16 dd
if=/dev/zero of=/dev/null
Is the task running in the FSS zone? Yes.
How and why? Because earlier you set the default class to FSS for the whole system
Check the scheduling class for the task running in grandmazone.
10. From the global zone, use the prstat -Z command to measure the CPU performance.
root@s11-server1:~# prstat –Z
PID USERNAME SIZE RSS STATE PRI NICE TIME CPU PROCESS/NLWP
8183 root 1700K 1036K run 15 0 0:03:12 37% dd/1
8430 root 1720K 836K run 1 0 0:00:14 4.1% dd/1
8130 root 12M 11M run 58 0 0:00:08 0.9% svc.configd/21
5 root 0K 0K sleep 99 -20 0:01:19 0.7% zpool-rpool/136
7188 root 13M 12M sleep 1 0 0:00:16 0.6% svc.configd/22
2384 pkg5srv 4496K 3200K sleep 60 0 0:00:10 0.4% htcacheclean/1
1121 root 31M 9036K run 59 0 0:00:07 0.2% pkg.depotd/64
8128 root 11M 8116K sleep 59 0 0:00:01 0.1% svc.startd/16
8705 root 4500K 3232K sleep 59 0 0:00:00 0.1% inetd/6
8780 root 2108K 1328K sleep 59 0 0:00:00 0.1% ttymon/1
517 root 46M 16M sleep 59 0 0:00:02 0.1% poold/9
8815 root 4224K 2380K sleep 60 0 0:00:00 0.0% configCCR.bin/1
8811 root 5560K 2504K sleep 59 0 0:00:00 0.0% svc-ocm/1
7186 root 11M 7884K sleep 59 0 0:00:01 0.0% svc.startd/14
8817 root 4428K 3396K cpu1 59 0 0:00:00 0.0% prstat/1
8505 root 5064K 3272K sleep 59 0 0:00:00 0.0% nscd/37
8803 root 4356K 2212K sleep 59 0 0:00:00 0.0% net-iptun/1
3466 root 1732K 1040K run 59 0 0:00:00 0.0% script/1
8618 root 17M 8880K sleep 59 0 0:00:00 0.0% fmd/11
8765 root 3948K 1788K sleep 59 0 0:00:00 0.0% syslogd/10
ZONEID NPROC SWAP RSS MEMORY TIME CPU ZONE
Cicero Ronaldo (ciceroฺronaldo@gmailฺcom) has a non-transferable
license to use this Student Guideฺ
Unauthorized reproduction or distribution prohibitedฺ Copyright© 2014, Oracle and/or its affiliatesฺ

Copyright © 2013, Oracle and/or its affiliates. All rights reserved.
Practices for Lesson 10: Managing Processes and Priorities
Chapter 10 - Page 28
3 32 132M 76M 7.4% 0:03:29 38% grandmazone
4 16 59M 37M 3.6% 0:00:23 5.2% choczone
0 80 438M 236M 23% 0:02:01 1.4% global
…
…
<Press q to quit>
In order to get a true picture, you need to watch the dynamic display for a few minutes.
You will see it getting close and closer to the ratio you specified. (Recall from the lecture
the difference between the CPU shares and the CPU percentage.)
Convert the CPU shares to percentages and compare with the average CPU utilization
here.
What column do we need to watch? The CPU column
Note that there’s more CPU utilization by grandmazone as compared to choczone.
Why? This is the effect of the CPU shares allocation.
11. Use the prctl command to assign 40 CPU shares to the global zone.
root@s11-server1:~# prctl -n zone.cpu-shares -v 40 -r -i zone global
Note that you can modify the attributes of the global zone too.
12. Refer to step 9 and start a new task from the global zone.
root@s11-server1:~# newtask dd if=/dev/zero of=/dev/null&
[1] 10444
13. Observe the results running the prstat command.
root@s11-server1:~# prstat -Z
PID USERNAME SIZE RSS STATE PRI NICE TIME CPU PROCESS/NLWP
8183 root 1700K 1036K run 1 0 0:07:22 33% dd/1
10444 root 1720K 1088K run 58 0 0:00:05 7.6% dd/1
8430 root 1720K 836K run 1 0 0:00:53 5.3% dd/1
2384 pkg5srv 4896K 3600K sleep 60 0 0:00:12 0.8% htcacheclean/1
5 root 0K 0K sleep 99 -20 0:01:29 0.4% zpool-rpool/136
1121 root 31M 9036K sleep 59 0 0:00:08 0.2% pkg.depotd/64
517 root 46M 17M sleep 59 0 0:00:02 0.0% poold/9
10445 root 4428K 3316K cpu1 59 0 0:00:00 0.0% prstat/1
3466 root 1732K 1040K run 59 0 0:00:00 0.0% script/1
8130 root 13M 12M sleep 59 0 0:00:11 0.0% svc.configd/21
9377 root 17M 8856K sleep 54 0 0:00:00 0.0% fmd/12
8418 daemon 7608K 4528K sleep 55 0 0:00:00 0.0% kcfd/3
3467 root 3388K 2720K sleep 59 0 0:00:00 0.0% bash/1
2399 root 11M 5920K sleep 59 0 0:00:00 0.0% httpd.worker/1
349 root 4420K 1592K sleep 53 0 0:00:00 0.0% net-physical/1
178 root 0K 0K sleep 99 -20 0:00:00 0.0% zpool-auditpool/136
112 root 2848K 1052K sleep 59 0 0:00:00 0.0% in.mpathd/1
159 root 7012K 3096K sleep 29 0 0:00:00 0.0% syseventd/18
47 netcfg 3780K 2588K sleep 29 0 0:00:00 0.0% netcfgd/4
Cicero Ronaldo (ciceroฺronaldo@gmailฺcom) has a non-transferable
license to use this Student Guideฺ
Unauthorized reproduction or distribution prohibitedฺ Copyright© 2014, Oracle and/or its affiliatesฺ

Copyright © 2013, Oracle and/or its affiliates. All rights reserved.
Practices for Lesson 10: Managing Processes and Priorities
Chapter 10 - Page 29
82 daemon 8000K 5048K sleep 29 0 0:00:00 0.0% kcfd/4
ZONEID NPROC SWAP RSS MEMORY TIME CPU ZONE
3 30 128M 74M 7.3% 0:07:39 33% grandmazone
0 81 440M 238M 23% 0:02:19 9.1% global
4 29 125M 70M 6.8% 0:01:05 5.3% choczone
…
…
<Press q to quit>
Repeat the analysis you did in Step 10, but this time pay attention to the global zone
CPU consumption. Remember to observe the changing CPU utilization for a few minutes
to obtain an approximate average.
Compare the shares allocation and the percentages.
14. Abort all the infinite processes.
root@s11-server1:~# pkill -9 dd
root@s11-server1:~# pkill -9 find
Task 2: Remove the CPU shares configuration
1. Verify that the Sol11-Server1 virtual machine is running. If it is not running, start it now.
2. Log in to the Sol11-Server1 virtual machine as the oracle user. Use the password
oracle1.
3. Run the su - command to assume administrator privileges.
oracle@s11-server1:~$ su -
Password:
Oracle Corporation SunOS 5.11 11.1 September 2012
root@s11-server1:~#
4. Use the zonecfg command to view the current CPU shares configuration of the zone
named grandmazone.
root@s11-server1:~# zonecfg -z grandmazone info
zonename: grandmazone
zonepath: /zones/grandmazone
brand: solaris
autoboot: true
bootargs:
file-mac-profile:
pool:
limitpriv:
scheduling-class:
ip-type: exclusive
hostid:
fs-allowed:
[cpu-shares: 80]
Cicero Ronaldo (ciceroฺronaldo@gmailฺcom) has a non-transferable
license to use this Student Guideฺ
Unauthorized reproduction or distribution prohibitedฺ Copyright© 2014, Oracle and/or its affiliatesฺ

Copyright © 2013, Oracle and/or its affiliates. All rights reserved.
Practices for Lesson 10: Managing Processes and Priorities
Chapter 10 - Page 30
net:
address not specified
allowed-address not specified
configure-allowed-address: true
physical: vnic1
defrouter not specified
anet:
linkname: net0
lower-link: auto
allowed-address not specified
configure-allowed-address: true
defrouter not specified
allowed-dhcp-cids not specified
link-protection: mac-nospoof
mac-address: random
auto-mac-address: 2:8:20:7b:1a:a1
mac-prefix not specified
mac-slot not specified
vlan-id not specified
priority not specified
rxrings not specified
txrings not specified
mtu not specified
maxbw not specified
rxfanout not specified
rctl:
name: zone.cpu-shares
value: (priv=privileged,limit=80,action=none)
Notice the CPU configuration.
5. Use the zonecfg command to delete the CPU configuration. Verify the action.
root@s11-server1:~# zonecfg -z grandmazone clear cpu-shares
root@s11-server1:~# zonecfg -z grandmazone info
zonename: grandmazone
zonepath: /zones/grandmazone
brand: solaris
autoboot: true
bootargs:
file-mac-profile:
pool:
limitpriv:
scheduling-class:
Cicero Ronaldo (ciceroฺronaldo@gmailฺcom) has a non-transferable
license to use this Student Guideฺ
Unauthorized reproduction or distribution prohibitedฺ Copyright© 2014, Oracle and/or its affiliatesฺ

Copyright © 2013, Oracle and/or its affiliates. All rights reserved.
Practices for Lesson 10: Managing Processes and Priorities
Chapter 10 - Page 31
ip-type: exclusive
hostid:
fs-allowed:
net:
address not specified
allowed-address not specified
configure-allowed-address: true
physical: vnic1
defrouter not specified
anet:
linkname: net0
lower-link: auto
allowed-address not specified
configure-allowed-address: true
defrouter not specified
allowed-dhcp-cids not specified
link-protection: mac-nospoof
mac-address: random
auto-mac-address: 2:8:20:34:6e:84
mac-prefix not specified
mac-slot not specified
vlan-id not specified
priority not specified
rxrings not specified
txrings not specified
mtu not specified
maxbw not specified
rxfanout not specified
vsi-typeid not specified
vsi-vers not specified
vsi-mgrid not specified
etsbw-lcl not specified
cos not specified
pkey not specified
linkmode not specified
Notice that the cpu-shares entry is deleted.
Cicero Ronaldo (ciceroฺronaldo@gmailฺcom) has a non-transferable
license to use this Student Guideฺ
Unauthorized reproduction or distribution prohibitedฺ Copyright© 2014, Oracle and/or its affiliatesฺ

Copyright © 2013, Oracle and/or its affiliates. All rights reserved.
Practices for Lesson 10: Managing Processes and Priorities
Chapter 10 - Page 32
6. Repeat Step 5 for the second zone, namely, choczone.
root@s11-server1:~# zonecfg -z choczone clear cpu-shares
root@s11-server1:~# zonecfg -z choczone info | grep cpu-shares
To make the configuration effective, do you need to reboot the zones? Yes.
The zones will be rebooted as part of step 8.
7. Reset the system default scheduling class by using the dispadmin command. Verify the
change.
root@s11-server1:~# dispadmin -d
FSS (Fair Share)
root@s11-server1:~# dispadmin -d TS
root@s11-server1:~# dispadmin -d
TS (Time Sharing)
root@s11-server1:~# priocntl -s -c TS -i all
Have you verified that all system processes have been moved to the TS class? Yes.
8. Reboot the system by using the init 6 command. By rebooting the entire system, the
global CPU share property is cleared. In addition, the global zone has the new default
scheduling class (TS). As part of the reboot, the zones are rebooted automatically so their
CPU share properties are also cleared. After the reboot is completed, the new configuration
will be in place.
Cicero Ronaldo (ciceroฺronaldo@gmailฺcom) has a non-transferable
license to use this Student Guideฺ
Unauthorized reproduction or distribution prohibitedฺ Copyright© 2014, Oracle and/or its affiliatesฺ

Copyright © 2013, Oracle and/or its affiliates. All rights reserved.
Practices for Lesson 11: Evaluating System Resources
Chapter 11 - Page 1
Practices for Lesson 11:
Evaluating System
Resources
Chapter 11
Cicero Ronaldo (ciceroฺronaldo@gmailฺcom) has a non-transferable
license to use this Student Guideฺ
Unauthorized reproduction or distribution prohibitedฺ Copyright© 2014, Oracle and/or its affiliatesฺ

Copyright © 2013, Oracle and/or its affiliates. All rights reserved.
Practices for Lesson 11: Evaluating System Resources
Chapter 11 - Page 2
Practice Overview for Lesson 11
Practices Overview
In these practices, you are presented with a plan for configuring resource controls and
assessing system performance.
According to the predeployment test plan, you need to evaluate various system resource
controls. As a standard practice, you will be required to conserve resources, such as system
memory, CPU time, and data storage. You are asked to control the CPU resource for your CRM
project with the objective that other projects should also be able to share the CPU resources.
Then you evaluate the memory, CPU, and disk usage by using many system utilities. Based on
your evaluation of the resources, you will be able to allocate appropriate resources to various
projects. The key areas explored in the practices are:
• Managing resource controls in global and non-global zones
• Evaluating system performance levels
Check your progress. You just completed Lesson 10: Managing Processes and Priorities and
are now working with system resource evaluation.
√ Oracle Solaris 11.1 Predeployment Checklist
√ Managing the Image Packaging System (IPS) and Packages
√ Installing Oracle Solaris 11.1 on Multiple Hosts
√ Managing the Business Application Data
√ Configuring Network and Traffic Failover
√ Configuring Zones and the Virtual Network
√ Managing Services and Service Properties
√ Configuring Privileges and Role-Based Access Control
√ Securing System Resources by Using Oracle Solaris Auditing
√ Managing Processes and Priorities
Monitoring the System Resources
Monitoring and Troubleshooting System Failures
Cicero Ronaldo (ciceroฺronaldo@gmailฺcom) has a non-transferable
license to use this Student Guideฺ
Unauthorized reproduction or distribution prohibitedฺ Copyright© 2014, Oracle and/or its affiliatesฺ

Copyright © 2013, Oracle and/or its affiliates. All rights reserved.
Practices for Lesson 11: Evaluating System Resources
Chapter 11 - Page 3
Practice 11-1: Managing Resource Controls in Global and Non-Global
Zones
Overview
In this practice, you will work with the resource controls in the following areas:
• Administering projects and tasks
• Configuring resource controls and attributes
Note: Your displays will be different from those presented in this guide due to the dynamic
nature of the contents displayed.
Task
This task will cover the following activities:
• Creating a resource pool
• Defining a project
• Obtaining project membership information
• Editing and validating project attributes
• Binding the resource pool to a project
• Creating a new task
• Moving a running process into a new task
• Monitoring resource control events globally
• Displaying information about a given resource control
• Setting resource controls
• Deleting a project
1. Verify that the Sol11-Server1 virtual machine is running. If it is not running, start it now.
2. Log in to the Sol11-Server1 virtual machine as the oracle user. Use oracle1 as the
password.
3. Run the su - command to assume administrator privileges.
oracle@s11-server1:~$ su -
Password:
Oracle Corporation SunOS 5.11 11.1 September 2012
root@s11-server1:~#
4. Use the projects command to view the default projects in the system.
root@s11-server1:~# projects -l
system
projid : 0
comment: ""
users : (none)
groups : (none)
attribs:
Cicero Ronaldo (ciceroฺronaldo@gmailฺcom) has a non-transferable
license to use this Student Guideฺ
Unauthorized reproduction or distribution prohibitedฺ Copyright© 2014, Oracle and/or its affiliatesฺ

Copyright © 2013, Oracle and/or its affiliates. All rights reserved.
Practices for Lesson 11: Evaluating System Resources
Chapter 11 - Page 4
user.root
projid : 1
comment: ""
users : (none)
groups : (none)
attribs:
noproject
projid : 2
comment: ""
users : (none)
groups : (none)
attribs:
default
projid : 3
comment: ""
users : (none)
groups : (none)
attribs:
group.staff
projid : 10
comment: ""
users : (none)
groups : (none)
attribs:
root@s11-server1:~# cat /etc/project
system:0::::
user.root:1::::
noproject:2::::
default:3::::
group.staff:10::::
You are viewing this default project information so that you are aware of the default
entries in the project file. In addition, when you make changes in the following steps, you
will be able to recognize the changes.
In this display (project context), what is 10 in the group.staff project? Project ID
Check in the /etc/group file if the staff group is defined. What is its numeric ID? It is
10.
Cicero Ronaldo (ciceroฺronaldo@gmailฺcom) has a non-transferable
license to use this Student Guideฺ
Unauthorized reproduction or distribution prohibitedฺ Copyright© 2014, Oracle and/or its affiliatesฺ

Copyright © 2013, Oracle and/or its affiliates. All rights reserved.
Practices for Lesson 11: Evaluating System Resources
Chapter 11 - Page 5
5. Use the projadd command to create a project and assign it to John Holt. Verify that an
entry has been made in /etc/project file by using the projects –l command.
root@s11-server1:~# projadd -U jholt -p 4000 s11deploy
root@s11-server1:~# /usr/bin/id -ap jholt
uid=60005(jholt) gid=10(staff) groups=10(staff)
projid=10(group.staff)
Verify John Holt’s group membership.
root@s11-server1:~# projects -l
system
projid : 0
comment: ""
users : (none)
groups : (none)
attribs:
user.root
projid : 1
comment: ""
users : (none)
groups : (none)
attribs:
noproject
projid : 2
comment: ""
users : (none)
groups : (none)
attribs:
default
projid : 3
comment: ""
users : (none)
groups : (none)
attribs:
group.staff
projid : 10
comment: ""
users : (none)
groups : (none)
attribs:
s11deploy
projid : 4000
comment: ""
users : jholt
groups : (none)
attribs:
Has the project been added? Yes
Cicero Ronaldo (ciceroฺronaldo@gmailฺcom) has a non-transferable
license to use this Student Guideฺ
Unauthorized reproduction or distribution prohibitedฺ Copyright© 2014, Oracle and/or its affiliatesฺ

Copyright © 2013, Oracle and/or its affiliates. All rights reserved.
Practices for Lesson 11: Evaluating System Resources
Chapter 11 - Page 6
6. Use the projmod command to add the staff group to the project membership.
root@s11-server1:~# projmod -G staff -c 'Oracle Solaris 11.1
deployment' s11deploy
root@s11-server1:~# projects -l | tail
comment: ""
users : (none)
groups : (none)
attribs:
s11deploy
projid : 4000
comment: "Oracle Solaris 11.1 deployment"
users : jholt
groups : staff
attribs:
What is the significance of group membership in the project? The staff group has an
entry in the project file for accounting purposes.
Note: You are going to bind the s11deploy project to the resource pool pool_gmzone
that you created in Practice 6: Configuring Zones and the Virtual Network.
7. Enable the pools service and create the default pool configuration file.
root@s11-server1:~# svcadm enable system/pools:default
root@s11-server1:~# poolcfg -c discover
8. Verify the pool and pset configuration.
root@s11-server1:~# poolcfg -c info | more
system default
string system.comment
int system.version 1
boolean system.bind-default true
string system.poold.objectives wt-load
…
…
…
pool pool_gmzone
int pool.sy_id1
boolean pool.active true
boolean pool.default false
string pool.scheduler FSS
int pool.importance 1
string pool.comment
Cicero Ronaldo (ciceroฺronaldo@gmailฺcom) has a non-transferable
license to use this Student Guideฺ
Unauthorized reproduction or distribution prohibitedฺ Copyright© 2014, Oracle and/or its affiliatesฺ

Copyright © 2013, Oracle and/or its affiliates. All rights reserved.
Practices for Lesson 11: Evaluating System Resources
Chapter 11 - Page 7
pset pset_1to2
…
…
…
pset pset_1to2
int pset.sys_id 1
boolean pset.default false
uint pset.min 1
uint pset.max 2
string pset.units population
uint pset.load 0
uint pset.size 0
string pset.comment
You have a pool with 1–2 CPUs.
Your output may differ.
9. Use the projmod command to assign the pool to the s11deploy project.
root@s11-server1:~# projmod -s -K project.pool=pool_gmzone \
s11deploy
Here you bind pool_gmzone to the s11deploy project.
What is the main purpose of this binding? So that you can allocate one to two CPUs to
the s11deploy project. An assumption was made that this project can possibly
consume up to two CPUs at times.
10. Verify the pool binding to your project.
root@s11-server1:~# projects -l | tail
comment: ""
users : (none)
groups : (none)
attribs:
s11deploy
projid : 4000
comment: "Oracle Solaris 11.1 deployment"
users : jholt
groups : staff
attribs: project.pool=pool_gmzone
As you can see, an attribute called project.pool has been added and it is pointing to
pool_gmzone.
Cicero Ronaldo (ciceroฺronaldo@gmailฺcom) has a non-transferable
license to use this Student Guideฺ
Unauthorized reproduction or distribution prohibitedฺ Copyright© 2014, Oracle and/or its affiliatesฺ

Copyright © 2013, Oracle and/or its affiliates. All rights reserved.
Practices for Lesson 11: Evaluating System Resources
Chapter 11 - Page 8
11. By using the newtask command, create a task under the s11deploy project.
root@s11-server1:~# newtask -p s11deploy dd if=/dev/zero \
of=/dev/null&
[1] 2954
root@s11-server1:~# newtask -p s11deploy dd if=/dev/zero
of=/dev/null&
[1] 2955
For training purposes, you are creating two infinite tasks. Note down the task numbers
displayed; you will need them subsequently. On your job, you may be running a different
program, such as a program to create reports.
12. Use the prstat command to display all currently running processes and projects. Let this
command run to view the dynamically changing CPU usage.
root@s11-server1:~# prstat -JR
…
…
…
PROJID NPROC SWAP RSS MEMORY TIME CPU PROJECT
4000 2 312K 7328K 0.7% 2:35:44 50% s11deploy
1 3 2912K 17M 1.6% 0:00:00 0.3% user.root
0 99 142M 170M 17% 0:00:47 0.0% system
10 1 10M 0K 0.0% 0:00:00 0.0% group.staff
3 2 10M 1164K 0.0% 0:00:14 0.0% default
Notice the value for your s11deploy project in the NPROC column. What is the project
ID displayed? It is 4000.
Is this ID the same as that defined in the /etc/project file? Yes
13. Create a new task and associate it with your project.
root@s11-server1:~# newtask dd if=/dev/zero of=/dev/null&
[1] 2980
For training purposes, you are creating an infinitely running job. On your job, it may be
related to the supported business application.
root@s11-server1:~# newtask -v -p s11deploy -c 2980
250
Here you associate the process ID 2980 with your s11deploy project. Did it create a
new task? Yes, 250
How many other processes are associated with process ID 250? Two processes
What are their process IDs? They are 2954 and 2955.
Your output may differ.
Example:
Cicero Ronaldo (ciceroฺronaldo@gmailฺcom) has a non-transferable
license to use this Student Guideฺ
Unauthorized reproduction or distribution prohibitedฺ Copyright© 2014, Oracle and/or its affiliatesฺ

Copyright © 2013, Oracle and/or its affiliates. All rights reserved.
Practices for Lesson 11: Evaluating System Resources
Chapter 11 - Page 9
root@s11-server1:~# prstat –JR | grep dd
PID USERNAME SIZE RSS STATE PRI NICE TIME CPU PROCESS/NLWP
2980 root 7156K 1316K cpu0 59 0 1:36:13 25% dd/1
2954 root 7156K 1316K cpu1 59 0 1:55:55 25% dd/1
Here you can associate the PIDs 2980 and 2954 with the dd programs that are running.
14. Associate another attribute with your project. Verify the result.
root@s11-server1:~# projmod -a -K "task.max-lwps=(priv,100,deny)"
s11deploy
For training purposes, you are configuring a ceiling for the maximum number of
lightweight processes (LWPs) to be 100. The assumption is that you determined that
your project can consume significant resources sometimes and you want to limit the
LWPs.
root@s11-server1:~# projects -l | tail
users : (none)
groups : (none)
attribs:
s11deploy
projid : 4000
comment: "Oracle Solaris 11.1 deployment"
users : jholt
groups : staff
attribs: project.pool=pool_gmzone
task.max-lwps=(priv,100,deny)
What will happen if the number of processes exceeds 100? The Oracle Solaris kernel
will not start the 101st task because the ceiling is defined as 100.
Cicero Ronaldo (ciceroฺronaldo@gmailฺcom) has a non-transferable
license to use this Student Guideฺ
Unauthorized reproduction or distribution prohibitedฺ Copyright© 2014, Oracle and/or its affiliatesฺ

Copyright © 2013, Oracle and/or its affiliates. All rights reserved.
Practices for Lesson 11: Evaluating System Resources
Chapter 11 - Page 10
15. Use the projmod command to remove the pool configuration from your project. Verify the
results.
root@s11-server1:~# projmod -r -K project.pool s11deploy
root@s11-server1:~# projects -l | tail
comment: ""
users : (none)
groups : (none)
attribs:
s11deploy
projid : 4000
comment: "Oracle Solaris 11 deployment"
users : jholt
groups : staff
attribs: task.max-lwps=(priv,100,deny)
Because you configured a limit of 100 for LWPs, it does not make sense to use one to
two CPUs. So assume that you determined that the CPU pool is not needed any more.
Is the pool showing up in the project file? No
Note: Test the LWPs limit in the next few steps.
16. Use the projmod command to modify the maximum LWPs to a more manageable three.
Verify the results.
root@s11-server1:~# projmod -K 'task.max-lwps=(priv,3,deny)' \
s11deploy
root@s11-server1:~# projects -l | tail
comment: ""
users : (none)
groups : (none)
attribs:
s11deploy
projid : 4000
comment: "Oracle Solaris 11.1 deployment"
users : jholt
groups : staff
attribs: task.max-lwps=(priv,3,deny)
What will happen if an attempt is made to start the fourth process? The Oracle Solaris
kernel will not start it.
How can you tell? The deny directive in the command
Cicero Ronaldo (ciceroฺronaldo@gmailฺcom) has a non-transferable
license to use this Student Guideฺ
Unauthorized reproduction or distribution prohibitedฺ Copyright© 2014, Oracle and/or its affiliatesฺ

Copyright © 2013, Oracle and/or its affiliates. All rights reserved.
Practices for Lesson 11: Evaluating System Resources
Chapter 11 - Page 11
17. Use the newtask command to create a task called bash for the project s11deploy.
root@s11-server1:~# newtask -p s11deploy bash
Because your default shell for launching processes is bash, you create a new task for
your s11deploy project.
root@s11-server1:~# prctl -n task.max-lwps $$
process: 3220: bash
NAME PRIVILEGE VALUE FLAG ACTION RECIPIENT
task.max-lwps
usage 3
privileged 3 - deny -
system 2.15G max deny -
This verifies the LWPs setting for your default shell.
root@s11-server1:~# id -p
uid=0(root) gid=0(root) projid=4000(s11deploy)
18. Using the rctladm command, enable global monitoring on the lightweight processes. Verify
the results.
root@s11-server1:~# rctladm -e syslog task.max-lwps
root@s11-server1:~# rctladm | grep max-lwps
task.max-lwps syslog=notice [ count ]
project.max-lwps syslog=off [ no-basic count ]
zone.max-lwps syslog=off [ no-basic count ]
Using this utility, you can globally monitor as well as log the tasks that cross the
threshold. In this case, you set the syslog priority level to notice so that a log entry
can be generated in the /var/adm/messages file. You will learn more about syslog
in Lesson 12: Monitoring and Troubleshooting Software Failures.
19. Create multiple bash processes and test the limit.
root@s11-server1:~# ps -o project,taskid -p $$
PROJECT TASKID
s11deploy 256
The current task ID of the bash process is 256.
root@s11-server1:~# bash
root@s11-server1:~# bash
root@s11-server1:~# bash
bash: fork: retry: Resource temporarily unavailable
…
…
…
You may see this message being displayed repetitively. Use Ctrl + C to stop the display.
Cicero Ronaldo (ciceroฺronaldo@gmailฺcom) has a non-transferable
license to use this Student Guideฺ
Unauthorized reproduction or distribution prohibitedฺ Copyright© 2014, Oracle and/or its affiliatesฺ

Copyright © 2013, Oracle and/or its affiliates. All rights reserved.
Practices for Lesson 11: Evaluating System Resources
Chapter 11 - Page 12
Press Enter and then exit from one of the bash processes in order to receive the
command prompt. Verify by using the ps command that you now have only three bash
processes running.
root@s11-server1:~# ps
PID TTY TIME CMD
3352 console 0:00 ps
2923 console 0:00 bash
2962 console 0:00 bash
2962 console 0:00 bash
How many bash processes are running currently? Three
Now exit two bash process.
root@s11-server1:~# exit
root@s11-server1:~# exit
20. Use the prctl command to display the current resource controls.
root@s11-server1:~# prctl $$
process: 2974: bash
NAME PRIVILEGE VALUE FLAG ACTION RECIPIENT
process.max-port-events
privileged 65.5K - deny -
system 2.15G max deny -
process.max-msg-messages
privileged 8.19K - deny -
system 4.29G max deny -
…
…
…
task.max-lwps
usage 3
system 2.15G max deny
…
…
…
project.max-tasks
usage 6
system 2.15G max deny -
project.max-processes
usage 39
system 2.15G max deny -
…
…
…
Cicero Ronaldo (ciceroฺronaldo@gmailฺcom) has a non-transferable
license to use this Student Guideฺ
Unauthorized reproduction or distribution prohibitedฺ Copyright© 2014, Oracle and/or its affiliatesฺ

Copyright © 2013, Oracle and/or its affiliates. All rights reserved.
Practices for Lesson 11: Evaluating System Resources
Chapter 11 - Page 13
zone.cpu-shares
usage 1
privileged 1 - none -
system 65.5K max none -
Notice the first column for various types of global resource controls. Some levels to note
are project, task, process, and zone.
21. Using the tail command, view the error messages in the /var/adm/messages file.
root@s11-server1:~# tail /var/adm/messages
Dec 19 13:39:17 s11-serv1 genunix: [ID 748619 kern.notice]
privileged rctl task.max-lwps (value 3) exceeded by process 3492
in task 256.
Dec 19 13:39:18 s11-serv1 genunix: [ID 748619 kern.notice]
privileged rctl task.max-lwps (value 3) exceeded by process 3494
in task 256.
Dec 19 13:39:18 s11-serv1 genunix: [ID 748619 kern.notice]
privileged rctl task.max-lwps (value 3) exceeded by process 3495
in task 256.ps
…
…
…
Can you match the task ID 256 that is reported here with the task ID in step 21? Yes
Note that the threshold of three and other related information are also listed.
Each time an attempt is made to cross the threshold, an entry is made in this log.
Kill the infinitely running processes.
root@s11-server1:~# pkill -9 dd
root@s11-server1:~#
22. Using the projdel command, delete the s11deploy project. Confirm the results.
root@s11-server1:~# projdel s11deploy
root@s11-server1:~# projects -l
system
projid : 0
comment: ""
users : (none)
groups : (none)
attribs:
user.root
projid : 1
comment: ""
Cicero Ronaldo (ciceroฺronaldo@gmailฺcom) has a non-transferable
license to use this Student Guideฺ
Unauthorized reproduction or distribution prohibitedฺ Copyright© 2014, Oracle and/or its affiliatesฺ

Copyright © 2013, Oracle and/or its affiliates. All rights reserved.
Practices for Lesson 11: Evaluating System Resources
Chapter 11 - Page 14
users : (none)
groups : (none)
attribs:
noproject
projid : 2
comment: ""
users : (none)
groups : (none)
attribs:
default
projid : 3
comment: ""
users : (none)
groups : (none)
attribs:
group.staff
projid : 10
comment: ""
users : (none)
groups : (none)
attribs:
You are deleting the project only for demonstration purposes. On the job, you will, of
course, delete a project only when the project is not needed anymore.
If this project is needed in subsequent practices, you will create it.
Cicero Ronaldo (ciceroฺronaldo@gmailฺcom) has a non-transferable
license to use this Student Guideฺ
Unauthorized reproduction or distribution prohibitedฺ Copyright© 2014, Oracle and/or its affiliatesฺ

Copyright © 2013, Oracle and/or its affiliates. All rights reserved.
Practices for Lesson 11: Evaluating System Resources
Chapter 11 - Page 15
Practice 11-2: Evaluating System Performance Levels
Overview
Your predeployment test plan calls for evaluating system performance. This practice will cover
monitoring the memory, CPU, and disk usage. Multiple system utilities will be used to assess
system performance. The following topics will be addressed in this practice:
• Displaying virtual memory statistics (vmstat)
• Displaying disk usage information
• Monitoring system activities
• Collecting system activity data automatically (sar)
• Setting up automatic data collection (sar)
Task 1: Displaying Virtual Memory Statistics
• Virtual memory statistics (vmstat)
• System event information (vmstat -s)
• Swapping statistics (vmstat -S)
1. Verify that the Sol11_Server1 virtual machine is running. If it is not running, start it now.
Double-click the Sol11-Desktop icon to launch the Sol11-Desktop virtual machine.
2. Log in to the Sol11-Desktop virtual machine as the oracle user. Use oracle1 as the
password.
3. Right-click the desktop background and open a terminal window.
4. In the terminal window, run the su - command to assume administrator privileges.
oracle@s11-desktop:~$ su -
Password:
Oracle Corporation SunOS 5.11 11.1 September 2012
root@s11-desktop:~#
5. Use the newtask command to create an infinitely running task.
root@s11-desktop:~# newtask dd if=/dev/zero of=/dev/null&
[1] 3462
This task is created to generate some workload for training purposes. On the job, you
will have your application and system processes. While these tasks are running, as a
system administrator, you would like to monitor their impact on system resources,
especially the memory and CPU.
root@s11-desktop:~# vmstat 5
kthr memory page disk faults cpu
r b w swap free re mf pi po fr de sr s0 s1 s2 s3 in sy cs us sy id
0 0 0 948016 53556 4 32 0 0 0 0 21 1 3 -1 -1 794 733327 451 5 15 80
0 0 0 930388 33940 3 12 0 0 0 0 0 9 0 0 0 683 87963 555 8 18 74
0 0 0 930284 33844 0 0 0 0 0 0 0 0 0 0 0 637 88670 461 8 18 74
0 0 0 930284 33856 0 0 0 0 0 0 0 0 0 0 0 663 89500 465 8 18 74
0 0 0 930284 33856 0 0 0 0 0 0 0 0 0 0 0 649 88298 466 8 18 74
Cicero Ronaldo (ciceroฺronaldo@gmailฺcom) has a non-transferable
license to use this Student Guideฺ
Unauthorized reproduction or distribution prohibitedฺ Copyright© 2014, Oracle and/or its affiliatesฺ

Copyright © 2013, Oracle and/or its affiliates. All rights reserved.
Practices for Lesson 11: Evaluating System Resources
Chapter 11 - Page 16
0 0 0 930284 33856 0 0 0 0 0 0 0 0 0 0 0 642 87486 465 8 18 74
0 0 0 930276 33844 0 1 0 0 0 0 0 0 0 0 0 638 87308 457 8 18 74
0 0 0 930276 33844 0 0 0 0 0 0 0 8 0 0 0 657 88708 500 8 18 74
0 0 0 930276 33844 0 0 0 0 0 0 0 0 0 0 0 635 88078 459 8 18 74
0 0 0 930276 33844 0 0 0 0 0 0 0 0 0 0 0 794 87826 461 8 18 74
0 0 0 930276 33844 0 0 0 0 0 0 0 0 0 0 0 646 87986 462 8 18 74
0 0 0 930276 33844 0 0 0 0 0 0 0 0 0 0 0 643 86883 463 8 19 73
11 0 0 932936 36496 0 0 0 0 0 0 0 0 0 0 0 2771 83461 450 8 20 72
0 0 0 961508 65076 0 0 0 0 0 0 0 3 0 0 0 656 88659 532 8 18 74
0 0 0 961508 65076 0 0 0 0 0 0 0 0 0 0 0 967 87164 503 8 18 74
Some points to note are:
a. For example, take the last two lines. When the system is consuming less CPU (sy
under the CPU column), more memory is available. In addition, the last column (id under
the CPU column) shows more idle time.
b. As another example, take the third line from the bottom. Currently, the system is not
using the CPU for a longer time (sy under the CPU column), so there is more CPU idle
time (id under the CPU column) and less memory available.
6. Use the vmstat -s command to display the system events since the last reboot.
root@s11-desktop:~# vmstat -s | more
0 swap ins
0 swap outs
0 pages swapped in
0 pages swapped out
875033 total address trans. faults taken
6 page ins
69 page outs
32 pages paged in
948 pages paged out
110830 total reclaims
110830 reclaims from free list
0 micro (hat) faults
875033 minor (as) faults
5 major faults
207486 copy-on-write faults
217129 zero fill page faults
464034 pages examined by the clock daemon
2 revolutions of the clock hand
3777 pages freed by the clock daemon
2356 forks
…
…
…
Cicero Ronaldo (ciceroฺronaldo@gmailฺcom) has a non-transferable
license to use this Student Guideฺ
Unauthorized reproduction or distribution prohibitedฺ Copyright© 2014, Oracle and/or its affiliatesฺ

Copyright © 2013, Oracle and/or its affiliates. All rights reserved.
Practices for Lesson 11: Evaluating System Resources
Chapter 11 - Page 17
So, what can you take away from here? Although some of the display items are common
with the previous display (pages swapped in and swapped out), consider the highlighted
items:
a. 110830 reclaims from free list: Displays how many free pages of memory
were reclaimed, which indicates how quickly the system was running out of memory.
Because the memory is used for programs, it explains the load on the system memory.
b. 2356 forks: Tells you how many processes are launching subprocesses. These
processes create the workload that requires memory and CPU resources.
7. Use the vmstat –S command to display system memory pages swapping in and swapping
out.
root@s11-desktop:~# vmstat -S
kthr memory page disk faults cpu
r b w swap free si so pi po fr de sr s0 s1 s2 s3 in sy cs us sy id
0 0 0 1024800 150444 0 0 0 1 6 0 298 8 0 -2 -2 719 7142 1157 1 2 97
Here you can check the swapping activity, for example, memory pages swapped in (pi)
and pages swapped out (po). This demonstrates the workload created by one job
running in the background.
Task 2: Displaying Disk Usage Information
This task covers the following activities:
• Displaying general disk usage data
• Extending disk statistics (iostat -xtc)
• Displaying disk space information (df -h)
1. Verify that the Sol11-Serve1 virtual machine is running. If it is not running, start it now.
Double-click the Sol11-Desktop icon to launch the Sol11-Desktop virtual machine.
2. Log in to the Sol11-Desktop virtual machine as the oracle user. Use oracle1 as the
password.
3. Right-click the desktop background and open a terminal window.
4. In the terminal window, run the su – command to assume administrator privileges.
oracle@s11-desktop:~$ su -
Password:
Oracle Corporation SunOS 5.11 11.1 September 2012
root@s11-desktop:~#
5. Use the iostat command to check the input/output activity on your disks and CPU.
root@s11-desktop:~# iostat 5
tty sd0 sd1 sd2 sd3 cpu
tin tout kps tps serv kps tps serv kps tps serv kps tps serv us sy wt id
0 3 138 4 51 1 0 7 0 0 0 0 0 0 4 10 0 86
0 47 0 0 0 0 0 0 0 0 0 0 0 0 8 18 0 74
0 16 50 18 3 0 0 0 0 0 0 0 0 0 8 18 0 74
0 16 0 0 0 0 0 0 0 0 0 0 0 0 8 18 0 74
Cicero Ronaldo (ciceroฺronaldo@gmailฺcom) has a non-transferable
license to use this Student Guideฺ
Unauthorized reproduction or distribution prohibitedฺ Copyright© 2014, Oracle and/or its affiliatesฺ

Copyright © 2013, Oracle and/or its affiliates. All rights reserved.
Practices for Lesson 11: Evaluating System Resources
Chapter 11 - Page 18
Here you can inspect the service time for transactions by using the sd1 disk, which is 7
milliseconds. Compare that to the 51 milliseconds service time for transactions on the
sd0 disk. Generally speaking, it shows you which disk is taking more time in servicing
your transaction. However, you need to keep in mind the nature of the transactions too.
6. Use the iostat –xtc command to obtain extended input/output statistics for the disks.
root@s11-desktop:~# iostat -xtc
extended device statistics
tty cpu
device r/s w/s kr/s kw/s wait actv svc_t %w %b tin tout us sy wt
id
sd0 2.4 1.4 92.9 21.9 0.1 0.0 48.6 3 4 0 9 5 11 0
84
sd1 0.1 0.0 0.4 0.0 0.0 0.0 6.9 0 0
sd2 0.0 0.0 0.0 0.0 0.0 0.0 0.0 0 0
sd3 0.0 0.0 0.0 0.0 0.0 0.0 0.0 0 0
sd4 0.0 0.0 0.0 0.0 0.0 0.0 0.0 0 0
sd5 0.0 0.0 0.0 0.0 0.0 0.0 0.0 0 0
This display can help you to understand I/O activity. For example, consider the reads
and writes of the sd0 disk: 92.9 kilobytes worth of data read per second; 21.9 kilobytes
worth of data written per second. The svc_t column shows the service time in
milliseconds. Look at 48.6 milliseconds of average service time for the sd0 disk.
Compare this disk to the other disks.
Why is its service time so high? The answer is because, in the current environment, you
have the default ZFS file system on this disk.
7. Use the df command to display system memory pages swapping in and swapping out.
root@s11-desktop:~# df -h | more
Filesystem Size Used Avail Use% Mounted on
rpool/ROOT/solaris 13G 4.5G 8.5G 35% /
swap 907M 460K 906M 1% /system/volatile
/usr/lib/libc/libc_hwcap1.so.1
13G 4.5G 8.5G 35% /lib/libc.so.1
swap 907M 56K 906M 1% /tmp
ora 209G 118G 92G 57% /opt/ora
rpool/export 8.5G 32K 8.5G 1% /export
rpool/export/home 8.5G 37K 8.5G 1% /export/home
rpool/export/home/jholt
8.5G 40K 8.5G 1% /export/home/jholt
rpool/export/home/oracle
8.5G 807K 8.5G 1% /export/home/oracle
…
…
This command is very useful because it presents the used and available storage
information for all mounted file systems. For example, here you can see that the ZFS
root file system has used up 4.5G out of 13G.
Cicero Ronaldo (ciceroฺronaldo@gmailฺcom) has a non-transferable
license to use this Student Guideฺ
Unauthorized reproduction or distribution prohibitedฺ Copyright© 2014, Oracle and/or its affiliatesฺ

Copyright © 2013, Oracle and/or its affiliates. All rights reserved.
Practices for Lesson 11: Evaluating System Resources
Chapter 11 - Page 19
Task 3: Monitoring System Activities
The following activities are covered in this task:
• Checking file access (sar –a)
• Checking buffer activity (sar –b)
• Checking system call statistics (sar –c)
• Checking disk activity (sar –d)
• Checking unused memory (sar –r)
• Setting up automatic data collection
1. Verify that the Sol11-Server1 virtual machine is running. If it is not running, start it now.
Double-click the Sol11-Desktop icon to launch the Sol11-Desktop virtual machine.
2. Log in to the Sol11-Desktop virtual machine as the oracle user. Use oracle1 as the
password.
3. Right-click the desktop background and open a terminal window.
4. In the terminal window, run the su – command to assume administrator privileges.
oracle@s11-desktop:~$ su -
Password:
Oracle Corporation SunOS 5.11 11.1 September 2012
root@s11-desktop:~#
5. In the terminal window, use the sar –a command to check on file access.
root@s11-desktop:~# sar -a 5 2
SunOS s11-desktop 5.11 11.1 i86pc 12/16/2012
16:07:28 iget/s namei/s dirbk/s
16:07:33 0 2 0
16:07:38 0 6 0
Average 0 4 0
You ran the command for two displays every 5 seconds. On an average, the system
could not find one file (under column namei/s). At the system level, if this number is
high, you need to be concerned.
6. Use the sar –b command to check on buffer activity.
root@s11-desktop:~# sar -b 2 2
SunOS s11-desktop 5.11 11.1 i86pc 12/16/2012
16:42:45 bread/s lread/s %rcache bwrit/s lwrit/s %wcache pread/s pwrit/s
16:42:47 0 0 100 0 0 100 0 0
16:42:49 0 0 100 0 0 100 0 0
Cicero Ronaldo (ciceroฺronaldo@gmailฺcom) has a non-transferable
license to use this Student Guideฺ
Unauthorized reproduction or distribution prohibitedฺ Copyright© 2014, Oracle and/or its affiliatesฺ

Copyright © 2013, Oracle and/or its affiliates. All rights reserved.
Practices for Lesson 11: Evaluating System Resources
Chapter 11 - Page 20
Average 0 0 100 0 0 100 0 0
This command displays the reads from the buffer and writes to the buffer. At a glance,
you can see 100% reads from the buffer and 100% writes to the buffer. You are looking
for any anomalies. Here things are running smoothly as far as buffer activity is
concerned.
7. Use the sar –c command to check on system call activity.
root@s11-desktop:~# sar -c 2 2
SunOS s11-desktop 5.11 11.1 i86pc 12/16/2012
16:50:29 scall/s sread/s swrit/s fork/s exec/s rchar/s wchar/s
16:50:31 1473382 736337 736318 0.00 0.00 376991964 376989750
16:50:33 1360794 680028 680012 0.00 0.00 348160177 348160229
Average 1417088 708182 708165 0.00 0.00 362576070 362574990
This command displays system calls for reads, writes, forks, and other system call
information. This information is useful when you are developing metrics or want to use
dtrace to track down a very high number of system calls.
8. Use the sar -d command to check on disk activity.
root@s11-desktop:~# sar -d 2 2
SunOS s11-desktop 5.11 11.1 i86pc 12/16/2012
16:56:15 device %busy avque r+w/s blks/s avwait avserv
16:56:17 sd0 0 0.0 0 0 0.0 0.0
sd0,a 0 0.0 0 0 0.0 0.0
sd0,c 0 0.0 0 0 0.0 0.0
sd0,i 0 0.0 0 0 0.0 0.0
sd0,q 0 0.0 0 0 0.0 0.0
…
…
…
Average sd0 2 0.0 19 79 0.0 1.3
sd0,a 2 0.0 19 79 0.0 1.3
sd0,c 0 0.0 0 0 0.0 0.0
sd0,i 0 0.0 0 0 0.0 0.0
sd0,q 0 0.0 0 0 0.0 0.0
…
…
…
This command displays disk-related activity, for example, reads and writes as shown in
the r+w/s column, average wait time, and average service time in milliseconds. How
can you use this information? If any of these numbers are too high for your application,
there may be a disk issue.
Cicero Ronaldo (ciceroฺronaldo@gmailฺcom) has a non-transferable
license to use this Student Guideฺ
Unauthorized reproduction or distribution prohibitedฺ Copyright© 2014, Oracle and/or its affiliatesฺ

Copyright © 2013, Oracle and/or its affiliates. All rights reserved.
Practices for Lesson 11: Evaluating System Resources
Chapter 11 - Page 21
9. Use the command sar –r to check on available physical and swap memory.
root@s11-desktop:~# sar -r 2 2
SunOS s11-desktop 5.11 11.1 i86pc 12/16/2012
17:07:08 freemem freeswap
17:07:10 8215 1853912
17:07:12 8222 1853912
Average 8218 1853912
This command displays the physical and swap memory available. The benefit of tracking
these numbers is that you will be able to take corrective action if you are running out of
memory. For example, if very little swap memory is left, you can increase the swap
memory allocation.
10. Use the crontab command to edit the system cron file. Uncomment the last entry to run
the system script sa2. Exit edit mode.
root@s11-desktop:/etc/cron.d# crontab -l sys
…
…
…
#0 * * * 0-6 /usr/lib/sa/sa1
#20,40 8-17 * * 1-5 /usr/lib/sa/sa1
#5 18 * * 1-5 /usr/lib/sa/sa2 -s 8:00 -e 18:01 -i 1200 -A
root@s11-desktop:/etc/cron.d# crontab -e sys
…
…
…
#0 * * * 0-6 /usr/lib/sa/sa1
#20,40 8-17 * * 1-5 /usr/lib/sa/sa1
5 18 * * 1-5 /usr/lib/sa/sa2 -s 8:00 -e 18:01 -i 1200 -A
This entry will run the sa2 script every day Monday through Friday at 6:05 PM. The
monitoring start time is at 8 AM and it ends at 6:01 PM. The performance data interval is
every 1200 seconds (every 20 minutes) and you are collecting all statistics, for example,
memory, CPU, and disk usage.
11. Shut down the Sol11-Desktop virtual machine.
Cicero Ronaldo (ciceroฺronaldo@gmailฺcom) has a non-transferable
license to use this Student Guideฺ
Unauthorized reproduction or distribution prohibitedฺ Copyright© 2014, Oracle and/or its affiliatesฺ

Copyright © 2013, Oracle and/or its affiliates. All rights reserved.
Practices for Lesson 11: Evaluating System Resources
Chapter 11 - Page 22
Cicero Ronaldo (ciceroฺronaldo@gmailฺcom) has a non-transferable
license to use this Student Guideฺ
Unauthorized reproduction or distribution prohibitedฺ Copyright© 2014, Oracle and/or its affiliatesฺ

Copyright © 2013, Oracle and/or its affiliates. All rights reserved.
Practices for Lesson 12: Monitoring and Troubleshooting Software Failures
Chapter 12 - Page 1
Practices for Lesson 12:
Monitoring and
Troubleshooting Software
Failures
Chapter 12
Cicero Ronaldo (ciceroฺronaldo@gmailฺcom) has a non-transferable
license to use this Student Guideฺ
Unauthorized reproduction or distribution prohibitedฺ Copyright© 2014, Oracle and/or its affiliatesฺ

Copyright © 2013, Oracle and/or its affiliates. All rights reserved.
Practices for Lesson 12: Monitoring and Troubleshooting Software Failures
Chapter 12 - Page 2
Practice Overview for Lesson 12
Practices Overview
In these practices, you will be presented with a plan for viewing and exploring various
configurations of system messaging. In addition, you will inspect the current system and
application dump facilities, which are beneficial when debugging system or application
problems. The following activities are covered:
• Setting up system messaging
• Configuring system and application crash facilities
Scenario
Your company would like to evaluate the system messaging and debugging facilities. Because
your company also plans to utilize ZFS, you are asked to create disk and data failures and
correct the problems.
Check your progress. You have completed evaluating system resources.
√ Oracle Solaris 11.1 Predeployment Checklist
√ Managing the Image Packaging System (IPS) and Packages
√ Installing Oracle Solaris 11.1 on Multiple Hosts
√ Managing the Business Application Data
√ Configuring Network and Traffic Failover
√ Configuring Zones and the Virtual Network
√ Managing Services and Service Properties
√ Configuring Privileges and Role-Based Access Control
√ Securing System Resources by Using Oracle Solaris Auditing
√ Managing Processes and Priorities
√ Evaluating System Resources
Monitoring and Troubleshooting System Failures
Cicero Ronaldo (ciceroฺronaldo@gmailฺcom) has a non-transferable
license to use this Student Guideฺ
Unauthorized reproduction or distribution prohibitedฺ Copyright© 2014, Oracle and/or its affiliatesฺ

Copyright © 2013, Oracle and/or its affiliates. All rights reserved.
Practices for Lesson 12: Monitoring and Troubleshooting Software Failures
Chapter 12 - Page 3
Practice 12-1: Setting Up System Messaging
Overview
In this practice, you work with system messaging facilities. You configure message routing on
Sol11-Desktop as well as on the message destination host Sol11-Server1. This practice will
include the following activities:
• Setting up message routing
• Using TCP trace to log a message
Note: The contents of your display may be different from the displays in this practice.
Task 1: Setting up message routing
The following activities are covered in this task:
• Determining the type and destination of messages
• Setting up message routing
• Restarting the message logging daemon (syslogd)
• Adding one-line entries to a system log file
• Monitoring the message logging in real time
1. Verify that the Sol11-Server1 and Sol11-Desktop virtual machines are running. If the virtual
machines are not running, start them now.
2. Log in to the Sol11-Desktop virtual machine as the oracle user. Use oracle1 as the
password. Right-click on the desktop and open a terminal window. Assume administrator
privileges.
oracle@s11-desktop:~$ su -
Password:
Oracle Corporation SunOS 5.11 11.1 September 2012
root@s11-desktop:~#
3. Copy the /etc/syslog.conf file and then use the more command to display the
contents of the file.
root@s11-desktop:~# cp /etc/syslog.conf /etc/syslog.conf.orig
root@s11-desktop:~# more /etc/syslog.conf
#
# syslog configuration file.
#
# This file is processed by m4 so be careful to quote (`') names
# that match m4 reserved words. Also, within ifdef's, arguments
# containing commas must be quoted.
#
*.err;kern.notice;auth.notice /dev/sysmsg
*.err;kern.debug;daemon.notice;mail.crit /var/adm/messages
Cicero Ronaldo (ciceroฺronaldo@gmailฺcom) has a non-transferable
license to use this Student Guideฺ
Unauthorized reproduction or distribution prohibitedฺ Copyright© 2014, Oracle and/or its affiliatesฺ

Copyright © 2013, Oracle and/or its affiliates. All rights reserved.
Practices for Lesson 12: Monitoring and Troubleshooting Software Failures
Chapter 12 - Page 4
*.alert;kern.err;daemon.err operator
*.alert root
What does the configuration kern.debug mean? It means that the message source
facility is defined as kernel and the severity as debug. Debug means that messages of
any severity should be recorded in the /var/adm/messages file.
Can you break down the configuration set daemon.err? Yes.
4. Using the vi editor, modify /etc/syslog.conf to add the local0.notice entry as
indicated.
root@s11-desktop:~# vi /etc/syslog.conf
Add the following entry at the end of the file.
root@s11-desktop:~# grep local0.notice /etc/syslog.conf
local0.notice @s11-server1
root@s11-desktop:~#
Caution: After local0.notice, you need to use (one or more) tabs. These are not
spaces.
What is the local0 facility? It is reserved for users to record messages.
5. Use the svcadm command to restart the syslogd daemon so that the new configuration is
activated.
root@s11-desktop:~# svcadm refresh system/system-log
Now your syslog configuration is in effect.
Cicero Ronaldo (ciceroฺronaldo@gmailฺcom) has a non-transferable
license to use this Student Guideฺ
Unauthorized reproduction or distribution prohibitedฺ Copyright© 2014, Oracle and/or its affiliatesฺ

Copyright © 2013, Oracle and/or its affiliates. All rights reserved.
Practices for Lesson 12: Monitoring and Troubleshooting Software Failures
Chapter 12 - Page 5
6. Display detailed information about the telnet service package, install the package, and then
verify that the telnet service is online.
root@s11-desktop:~# pkg info -r *telnet* | more
Name: network/telnet
Summary: Telnet client command
Description: The telnet(1) utility communicates with another
host using the
legacy Telnet protocol (RFCs 727, 854, 1073,
1096, 1408, 1510,
1571, 1572, 2941, 2942, 2946, and 2952).
Category: Applications/System Utilities
State: Installed
Publisher: solaris
Version: 0.5.11
Build Release: 5.11
Branch: 0.175.1.0.0.24.2
Packaging Date: September 19, 2012 06:44:32 PM
Size: 237.29 kB
FMRI: pkg://solaris/network/telnet@0.5.11,5.11-
0.175.1.0.0.24.2:20120
919T184432Z
Name: service/network/telnet
Summary: Telnet service
Description: Provides server support for the legacy Telnet
protocol (RFCs
727, 854, 1073, 1096, 1408, 1510, 1571, 1572,
2941, 2942, 2946,
and 2952).
Category: System/Services
State: Not installed
Publisher: solaris
Version: 0.5.11
Build Release: 5.11
Branch: 0.175.1.0.0.24.2
Packaging Date: September 19, 2012 06:45:51 PM
Size: 80.77 kB
FMRI:
pkg://solaris/service/network/telnet@0.5.11,5.11-0.175.1.0.0.24
.2:20120919T184551Z
root@s11-desktop:~#
Install the telnet package if, it’s not installed.
root@s11-desktop:~# pkg install service/network/telnet
Cicero Ronaldo (ciceroฺronaldo@gmailฺcom) has a non-transferable
license to use this Student Guideฺ
Unauthorized reproduction or distribution prohibitedฺ Copyright© 2014, Oracle and/or its affiliatesฺ

Copyright © 2013, Oracle and/or its affiliates. All rights reserved.
Practices for Lesson 12: Monitoring and Troubleshooting Software Failures
Chapter 12 - Page 6
Packages to install: 1
Create boot environment: No
Create backup boot environment: No
Services to change: 1
DOWNLOAD PKGS FILES
XFER (MB) SPEED
Completed 1/1 10/10
0.0/0.0 69.4k/s
PHASE ITEMS
Installing new actions 32/32
Updating package state database Done
Updating image state Done
Creating fast lookup database Done
root@s11-desktop:~#
root@s11-desktop:~# svcs –a | grep telnet
online 8:14:18 svc:/network/telnet:default
In case the telnet service is installed as disabled, use the command “svcadm enable
network/telnet” to bring it online.
7. Switch to the s11-server1. Use the netservices open command to ensure that all
services are open and the message can be received from s11-desktop.
root@s11-server1:~# netservices open
Ignore any error messages.
8. On s11-server1, by using the touch command, create the /var/log/local0.log
file.
root@s11-server1:~# touch /var/log/local0.log
9. On s11-server1, by using the vi editor, modify the /etc/syslog.conf file by adding
the entry as indicated.
root@s11-server1:~# vi /etc/syslog.conf
root@s11-server1:~# grep local0 /etc/syslog.conf
local0.notice /var/log/local0.log
On s11-server1, what is the destination file of the message? The
/var/log/local0.log file.
Cicero Ronaldo (ciceroฺronaldo@gmailฺcom) has a non-transferable
license to use this Student Guideฺ
Unauthorized reproduction or distribution prohibitedฺ Copyright© 2014, Oracle and/or its affiliatesฺ

Copyright © 2013, Oracle and/or its affiliates. All rights reserved.
Practices for Lesson 12: Monitoring and Troubleshooting Software Failures
Chapter 12 - Page 7
10. On the s11-server1 host, by using the svcadm command, restart the system-log
service. Use the tail command to monitor the messages being written to the log.
root@s11-server1:~# svcadm refresh system-log
root@s11-server1:~# tail -f /var/log/local0.log
Now if any message is written to this log, it will be displayed under the above command.
11. Switch to the s11-desktop host and by using the logger command, record a message
to the log.
root@s11-desktop:~# logger -p local0.notice hello from s11-
desktop
Where would this message be displayed? On the s11-server1 host.
Why? Because you configured the destination of local0.notice to s11-server1.
12. Switch to the s11-server1 host and view the message.
root@s11-server1:~# tail -f /var/log/local0.log
Dec 20 08:07:58 s11-desktop oracle: [ID 702911 local0.notice]
hello from s11-desktop
Use CTRL + C key to exit.
So here it is. Where did this message come from? From s11-desktop.
Task 2: Using TCP Trace to Log a Message
This task covers the following activity:
• Using TCP trace to log a message
• Verifying the message in the log
Note: In this task, you will be working with both the hosts: Sol11-Desktop and Sol11-
Server1. You can determine the host by the command prompt in the displays.
1. Verify that the Sol11-Server1 and Sol11-Desktop virtual machines are running. If the virtual
machines are not running, start them now.
2. Log in to both virtual machines as the oracle user. Use oracle1 as the password.
Assume administrator privileges.
oracle@s11-desktop:~$ su -
Password:
Oracle Corporation SunOS 5.11 11.1 September 2012
root@s11-desktop:~#
Cicero Ronaldo (ciceroฺronaldo@gmailฺcom) has a non-transferable
license to use this Student Guideฺ
Unauthorized reproduction or distribution prohibitedฺ Copyright© 2014, Oracle and/or its affiliatesฺ

Copyright © 2013, Oracle and/or its affiliates. All rights reserved.
Practices for Lesson 12: Monitoring and Troubleshooting Software Failures
Chapter 12 - Page 8
3. Use the man command to find the facility and the message severity level used by the
inetd daemon.
After the man pages are displayed, do a find on tcp_trace, which will take you to the
desired information directly.
root@s11-desktop:~# man inetd
…
…
…
/tcp_trace
…
…
…
tcp_trace
If true, and this is a nowait-type service, inetd logs
the client's IP address and TCP port number, along with
the name of the service, for each incoming connection,
using the syslog(3C) facility. inetd uses the syslog
facility code daemon and notice priority level. See
syslog.conf(4) for a description of syslog codes and
severity levels. This logging is separate from the log-
ging done by the TCP wrappers facility.
What facility code and severity level does inetd use? daemon.notice
4. Using the grep command, display the daemon.notice entry in syslog.
root@s11-desktop:~# grep daemon.notice /etc/syslog.conf
*.err;kern.debug;daemon.notice;mail.crit /var/adm/messages
When a daemon needs to send a notice, where would it send it? To the
/var/adm/messages file
5. Open another terminal window on S11-Desktop. In the new window, use the tail –f
command to monitor the messages file.
oracle@s11-desktop:~$ su -
Password:
Oracle Corporation SunOS 5.11 11.1 September 2012
root@s11-desktop:~# tail –f /var/adm/messages
…
…
…
Cicero Ronaldo (ciceroฺronaldo@gmailฺcom) has a non-transferable
license to use this Student Guideฺ
Unauthorized reproduction or distribution prohibitedฺ Copyright© 2014, Oracle and/or its affiliatesฺ

Copyright © 2013, Oracle and/or its affiliates. All rights reserved.
Practices for Lesson 12: Monitoring and Troubleshooting Software Failures
Chapter 12 - Page 9
Dec 20 02:48:40 s11-desktop gnome-session[2745]: [ID 702911
daemon.warning] WARNING: IceListenForConnections returned 2 non-
local listeners: inet/s11-desktop:47263,inet6/s11-desktop:33256
Dec 20 02:48:44 s11-desktop genunix: [ID 127566 kern.info] device
pciclass,030000@2(display#0) keeps up device
scsiclass,05@1,0(cdrom#1), but the former is not power managed
You will need to monitor this log for any new messages being written when you use the
telnet command.
Your output may differ.
6. Switch to the s11-server1 host and use the telnet command to connect to the s11-
desktop host.
Check to see if the telnet service is enabled. If it is not, enable it.
root@s11-server1:~# svcs telnet
STATE STIME FMRI
disabled 10:12:24 svc:/network/telnet:default
root@s11-server1:~# svcadm enable telnet
root@s11-server1:~# svcs telnet
STATE STIME FMRI
online 11:03:04 svc:/network/telnet:default
root@s11-server1:~# telnet s11-desktop
Trying 192.168.0.111...
Connected to s11-desktop.
Escape character is '^]'.
login: oracle
Password: oracle1
Last login: Sat Oct 22 10:48:48 on rad/0
Oracle Corporation SunOS 5.11 11.1 September 2012
oracle@s11-desktop:~$ ls
Desktop Documents Downloads Public
oracle@s11-desktop:~$ pwd
/home/oracle
oracle@s11-desktop:~$ exit
logout
Connection to s11-desktop closed by foreign host.
root@s11-server1:~#
What is the purpose of this telnet connection to the desktop? To verify that the system
writes the connection information in the log
Cicero Ronaldo (ciceroฺronaldo@gmailฺcom) has a non-transferable
license to use this Student Guideฺ
Unauthorized reproduction or distribution prohibitedฺ Copyright© 2014, Oracle and/or its affiliatesฺ

Copyright © 2013, Oracle and/or its affiliates. All rights reserved.
Practices for Lesson 12: Monitoring and Troubleshooting Software Failures
Chapter 12 - Page 10
7. Switch to the s11-desktop host and go to the window that is running the tail command.
root@s11-desktop:~# tail –f /var/adm/messages
…
…
…
Dec 13 22:14:32 s11-desktop pulseaudio[1695]: [ID 295310
user.error] [(null)] module.c: Failed to load module "module-oss"
(argument: "device="/dev/dsp" sink_name=output
source_name=input"): initialization failed.
Dec 13 22:14:32 s11-desktop pulseaudio[1695]: [ID 295310
user.error] [(null)] main.c: Module load failed.
Dec 13 22:14:32 s11-desktop pulseaudio[1695]: [ID 295310
user.error] [(null)] main.c: Failed to initialize daemon.
Dec 13 22:14:32 s11-desktop pulseaudio[1693]: [ID 295310
user.error] [(null)] main.c: Daemon startup failed.
…
root@s11-desktop:~#
Do you see any new entry being written for the telnet command? No.
8. On the s11-desktop host, in the other window, use the inetadm command to check
whether tracing is enabled.
root@s11-desktop:~# inetadm –l telnet
SCOPE NAME=VALUE
name=”telnet”
endpoint_type=”stream”
…
…
…
default bind_addr=""
default bind_fail_max=-1
default bind_fail_interval=-1
default max_con_rate=-1
default max_copies=-1
default con_rate_offline=-1
default failrate_cnt=40
default failrate_interval=60
default inherit_env=TRUE
default tcp_trace=FALSE
default tcp_wrappers=FALSE
default connection_backlog=10
default tcp_keepalive=FALSE
Is tcp_trace enabled? No
How can you tell? The tcp_trace is set to FALSE in the display.
Cicero Ronaldo (ciceroฺronaldo@gmailฺcom) has a non-transferable
license to use this Student Guideฺ
Unauthorized reproduction or distribution prohibitedฺ Copyright© 2014, Oracle and/or its affiliatesฺ

Copyright © 2013, Oracle and/or its affiliates. All rights reserved.
Practices for Lesson 12: Monitoring and Troubleshooting Software Failures
Chapter 12 - Page 11
9. On the s11-desktop host, use the inetadm command to enable tcp_trace.
root@s11-desktop:~# inetadm –m telnet tcp_trace=true
root@s11-desktop:~# inetadm –l telnet
SCOPE NAME=VALUE
name=”telnet”
endpoint_type=”stream”
…
…
…
default bind_addr=""
default bind_fail_max=-1
default bind_fail_interval=-1
default max_con_rate=-1
default max_copies=-1
default con_rate_offline=-1
default failrate_cnt=40
default failrate_interval=60
default inherit_env=TRUE
tcp_trace=TRUE
default tcp_wrappers=FALSE
default connection_backlog=10
default tcp_keepalive=FALSE
Is tcp_trace enabled now? Yes.
10. Switch to s11-server1 and telnet to s11-desktop. Then return to s11-desktop, in the
monitoring window, look for any new message written to the log.
root@s11-server1:~# telnet s11-desktop
Trying 192.168.0.111...
Connected to s11-desktop.
Escape character is '^]'.
login: oracle
Password: oracle1
Last login: Sat Oct 22 10:48:48 on s11-server1.myd
Oracle Corporation SunOS 5.11 11.1 September 2012
oracle@s11-desktop:~$ ls
Desktop Documents Downloads Public
oracle@s11-desktop:~$ pwd
/home/oracle
oracle@s11-desktop:~$ exit
logout
Connection to s11-desktop closed by foreign host. root@s11-
server1:~#
Cicero Ronaldo (ciceroฺronaldo@gmailฺcom) has a non-transferable
license to use this Student Guideฺ
Unauthorized reproduction or distribution prohibitedฺ Copyright© 2014, Oracle and/or its affiliatesฺ

Copyright © 2013, Oracle and/or its affiliates. All rights reserved.
Practices for Lesson 12: Monitoring and Troubleshooting Software Failures
Chapter 12 - Page 12
Now switch to s11-desktop and look for any new messages regarding telnet.
root@s11-desktop:~# tail –f /var/adm/messages
…
…
…
Dec 13 22:14:32 s11-desktop pulseaudio[1695]: [ID 295310
user.error] [(null)] module.c: Failed to load module "module-oss"
(argument: "device="/dev/dsp" sink_name=output
source_name=input"): initialization failed.
Dec 13 22:14:32 s11-desktop pulseaudio[1695]: [ID 295310
user.error] [(null)] main.c: Module load failed.
Dec 13 22:14:32 s11-desktop pulseaudio[1695]: [ID 295310
user.error] [(null)] main.c: Failed to initialize daemon.
Dec 13 22:14:32 s11-desktop pulseaudio[1693]: [ID 295310
user.error] [(null)] main.c: Daemon startup failed.
Dec 16 09:44:39 s11-desktop inetd[1018]: [ID 317013
daemon.notice] telnet[2726] from 192.168.0.100 54587
. . .
root@s11-desktop:~#
Do you see a new log entry? Yes.
Can you identify the fields in this message?
Date/time stamp, local host name, process name (PID), Message ID,
facility.level, incoming request, PPID, IP address of the source host, and port
number.
Cicero Ronaldo (ciceroฺronaldo@gmailฺcom) has a non-transferable
license to use this Student Guideฺ
Unauthorized reproduction or distribution prohibitedฺ Copyright© 2014, Oracle and/or its affiliatesฺ

Copyright © 2013, Oracle and/or its affiliates. All rights reserved.
Practices for Lesson 12: Monitoring and Troubleshooting Software Failures
Chapter 12 - Page 13
11. Return to the other s11-desktop terminal window and by using the inetadm command,
disable tcp_trace.
root@s11-desktop:~# inetadm -m telnet tcp_trace=FALSE
root@s11-desktop:~# inetadm –l telnet
SCOPE NAME=VALUE
name=”telnet”
endpoint_type=”stream”
…
…
…
default bind_addr=""
default bind_fail_max=-1
default bind_fail_interval=-1
default max_con_rate=-1
default max_copies=-1
default con_rate_offline=-1
default failrate_cnt=40
default failrate_interval=60
default inherit_env=TRUE
tcp_trace=FALSE
default tcp_wrappers=FALSE
default connection_backlog=10
default tcp_keepalive=FALSE
Is tcp_trace disabled? Yes.
12. Shut down the Sol11-Desktop virtual machine.
Cicero Ronaldo (ciceroฺronaldo@gmailฺcom) has a non-transferable
license to use this Student Guideฺ
Unauthorized reproduction or distribution prohibitedฺ Copyright© 2014, Oracle and/or its affiliatesฺ

Copyright © 2013, Oracle and/or its affiliates. All rights reserved.
Practices for Lesson 12: Monitoring and Troubleshooting Software Failures
Chapter 12 - Page 14
Practice 12-2: Configuring System and Application Crash Facilities
Overview
In this practice, you work with the configuration of dump facilities. In case of system failures, you
need to inspect the system facilities that are causing system crashes. Similarly, if your
supported business applications fail, you can check the process that is failing. This information
is helpful for an application analyst. This practice includes the following activities:
• Configuring system crash facilities
• Configuring dump facilities for business application failure
Note: The contents of your display may be different from the displays in this practice.
Task 1: Configuring System Crash Facilities
The following activities are included in this task:
• Displaying system dump configuration
• Determining the location of the dump device
• Changing the dump device
• Creating a system dump
• Analyzing and displaying the dump files
• Resetting the dump device to a ZFS device
1. Verify that the Sol11-Server1 virtual machine is running. If the virtual machine is not
running, start it now.
2. Log in to the Sol11-Server1 virtual machine as the oracle user. Use oracle1 as the
password. Assume administrator privileges.
oracle@s11-server1:~$ su -
Password:
Oracle Corporation SunOS 5.11 11.1 September 2012
root@s11-server1:~#
3. Use the dumpadm command to display the system dump configuration.
root@s11-server1:~# dumpadm
Dump content: kernel pages
Dump device: /dev/zvol/dsk/rpool/dump (dedicated)
Savecore directory: /var/crash
Savecore enabled: yes
Save compressed: on
Where is the dump device pointing to? The default rpool
Can you display the device? Yes, by using the zfs list command.
root@s11-server1:~# zfs list rpool/dump
NAME USED AVAIL REFER MOUNTPOINT
rpool/dump 1.03G 20.3G 1.00G -
Cicero Ronaldo (ciceroฺronaldo@gmailฺcom) has a non-transferable
license to use this Student Guideฺ
Unauthorized reproduction or distribution prohibitedฺ Copyright© 2014, Oracle and/or its affiliatesฺ

Copyright © 2013, Oracle and/or its affiliates. All rights reserved.
Practices for Lesson 12: Monitoring and Troubleshooting Software Failures
Chapter 12 - Page 15
Which pool does this dump device belong to? It belongs to rpool.
How much space is allocated to the dump device? 1.03 GB.
4. Use the format command to partition c7t5d0 and allocate 800 MB to slice 3.
root@s11-server1:~# format
Searching for disks...done
AVAILABLE DISK SELECTIONS:
0. c7t0d0 <ATA-VBOX HARDDISK -1.0 cyl 4174 alt 2 hd 255 sec 63>
/pci@0,0/pci8086,2829@d/disk@0,0
1. c7t2d0 <ATA-VBOX HARDDISK -1.0 cyl 1022 alt 2 hd 64 sec 32>
/pci@0,0/pci8086,2829@d/disk@2,0
2. c7t3d0 <ATA-VBOX HARDDISK -1.0 cyl 1022 alt 2 hd 64 sec 32>
/pci@0,0/pci8086,2829@d/disk@3,0
3. c7t4d0 <ATA-VBOX HARDDISK -1.0 cyl 1022 alt 2 hd 64 sec 32>
/pci@0,0/pci8086,2829@d/disk@4,0
4. c7t5d0 <ATA-VBOX HARDDISK -1.0 cyl 1022 alt 2 hd 64 sec 32>
/pci@0,0/pci8086,2829@d/disk@5,0
5. c7t6d0 <ATA-VBOX HARDDISK -1.0 cyl 1022 alt 2 hd 64 sec 32>
/pci@0,0/pci8086,2829@d/disk@6,0
6. c7t7d0 <ATA-VBOX HARDDISK -1.0 cyl 1022 alt 2 hd 64 sec 32>
/pci@0,0/pci8086,2829@d/disk@7,0
7. c7t8d0 <ATA-VBOX HARDDISK -1.0 cyl 1022 alt 2 hd 64 sec 32>
/pci@0,0/pci8086,2829@d/disk@6,0
8. c7t9d0 <ATA-VBOX HARDDISK -1.0 cyl 1022 alt 2 hd 64 sec 32>
/pci@0,0/pci8086,2829@d/disk@7,0
Specify disk (enter its number): 4
Consult your instructor if you need assistance in formatting the disk.
5. Use the dumpadm command to change the dump device to the /dev/dsk/c7t5d0s3 slice
that you just formatted.
root@s11-server1:~# dumpadm -d /dev/dsk/c7t5d0s3
Dump content: kernel pages
Dump device: /dev/dsk/c7t5d0s3 (dedicated)
Savecore directory: /var/crash
Savecore enabled: yes
Save compressed: on
What is the purpose of changing the dump device? Because you want to use another
location (in this case, slice 3 on the c7t5d0 disk) on a dedicated basis.
One reason can be that your existing dump device is running out of space and you have
storage space available on another disk or slice.
Cicero Ronaldo (ciceroฺronaldo@gmailฺcom) has a non-transferable
license to use this Student Guideฺ
Unauthorized reproduction or distribution prohibitedฺ Copyright© 2014, Oracle and/or its affiliatesฺ

Copyright © 2013, Oracle and/or its affiliates. All rights reserved.
Practices for Lesson 12: Monitoring and Troubleshooting Software Failures
Chapter 12 - Page 16
6. Check whether the specified savecore directory exists. If not, create it by using the mkdir
command.
root@s11-server1:~# ls /var/crash
7. Use the savecore command to dump the current system state, essentially the memory
contents.
root@s11-server1:~# savecore -L
dumping to /dev/dsk/c7t5d0s3, offset 65536, content: kernel
0:04 100% done
100% done: 103879 pages dumped, dump succeeded
savecore: System dump time: Tue Dec 20 10:23:31 2012
savecore: Saving compressed system crash dump in
/var/crash/vmdump.0
savecore: Decompress the crash dump with
'savecore -vf /var/crash/vmdump.0'
root@s11-server1:~# ls /var/crash
bounds vmdump.0
Note there are only two files in your directory.
What are the contents of the vmdump.0 file? It contains the recently created dump in
compressed format.
8. Uncompress the vmdump.0 file by using the savecore command.
root@s11-server1:~# savecore -vf /var/crash/vmdump.0
savecore: System dump time: Tue Dec 20 10:23:31 2012
savecore: saving system crash dump in /var/crash/{unix,vmcore}.0
Constructing namelist /var/crash/unix.0
Constructing corefile /var/crash/vmcore.0
0:24 100% done: 103879 of 103879 pages saved
2266 (2%) zero pages were not written
0:24 dump decompress is done
Cicero Ronaldo (ciceroฺronaldo@gmailฺcom) has a non-transferable
license to use this Student Guideฺ
Unauthorized reproduction or distribution prohibitedฺ Copyright© 2014, Oracle and/or its affiliatesฺ

Copyright © 2013, Oracle and/or its affiliates. All rights reserved.
Practices for Lesson 12: Monitoring and Troubleshooting Software Failures
Chapter 12 - Page 17
9. Use the cd command to switch to the crash directory. Analyze the newly created files.
root@s11-server1:~# cd /var/crash
root@s11-server1:/var/crash# ls
bounds unix.0 vmcore.0 vmdump.0
When vmdump.0 was uncompressed, it created the vmcore.0 file.
root@s11-server1:/var/crash# file bounds
bounds: ascii text
Because bounds is a text file, you can use the cat command to look at it.
root@s11-server1:/var/crash# cat bounds
1
Can you guess what 1 represents? Dump number 1.
root@s11-server1:/var/crash# file unix.0
unix.0: ELF 64-bit LSB executable AMD64 Version 1,
statically linked, not stripped, no debugging information
available
The executable and linking format (ELF) refers to this file as being an executable binary,
so you cannot open it with the cat or more commands.
Try the strings command. Sometimes, it can convert the encoding.
root@s11-server1:/var/crash# strings unix.0
No luck! The strings command cannot convert this binary executable.
10. Now analyze the vmcore dump file.
root@s11-server1:/var/crash# file vmcore.0
vmcore.0: SunOS 5.11 11.1 64-bit Intel live dump from 's11-
server1'
This is your uncompressed dump file. Use the strings command to display its
contents.
root@s11-server1:/var/crash# strings vmcore.0 | more
SunOS
s11-server1
5.11
Cicero Ronaldo (ciceroฺronaldo@gmailฺcom) has a non-transferable
license to use this Student Guideฺ
Unauthorized reproduction or distribution prohibitedฺ Copyright© 2014, Oracle and/or its affiliatesฺ

Copyright © 2013, Oracle and/or its affiliates. All rights reserved.
Practices for Lesson 12: Monitoring and Troubleshooting Software Failures
Chapter 12 - Page 18
11.1
i86pc
i86pc
aefffed4-f452-6dbc-f11e-cdb35c1bc0a2
.symtab
.strtab
.shstrtab
_END_
_START_
__return_from_main
__unsupported_cpu
.dtrace_induced
dtrace_badflags
dtrace_badtrap
_lwp_rtt
freq_tsc_loop
freq_tsc_perf_loop
freq_tsc_increase_count
freq_tsc_pit_did_not_wrap
…
…
…
What do the contents represent? The processes that are running in memory currently
11. Analyze the vmdump file.
root@s11-server1:/var/crash# file vmdump.0
vmdump.0: SunOS 5.11 11.1 64-bit Intel compressed live dump from
's11-server1'
root@s11-server1:/var/crash/s11-server1# strings vmdump.0 | more
SunOS
s11-server1
5.11
11.1
i86pc
i86pc
aefffed4-f452-6dbc-f11e-cdb35c1bc0a2
.symtab
.strtab
.shstrtab
_END_
_START_
__return_from_main
__unsupported_cpu
Cicero Ronaldo (ciceroฺronaldo@gmailฺcom) has a non-transferable
license to use this Student Guideฺ
Unauthorized reproduction or distribution prohibitedฺ Copyright© 2014, Oracle and/or its affiliatesฺ

Copyright © 2013, Oracle and/or its affiliates. All rights reserved.
Practices for Lesson 12: Monitoring and Troubleshooting Software Failures
Chapter 12 - Page 19
.dtrace_induced
dtrace_badflags
dtrace_badtrap
_lwp_rtt
freq_tsc_loop
freq_tsc_perf_loop
freq_tsc_increase_count
freq_tsc_pit_did_not_wrap
…
…
…
Does it look like a copy of the vmcore.0 file? Yes.
12. Now use the dumpadm command to set the dump device back to the ZFS volume.
root@s11-server1:/var/crash# dumpadm -d /dev/zvol/dsk/rpool/dump
Dump content: kernel pages
Dump device: /dev/zvol/dsk/rpool/dump (dedicated)
Savecore directory: /var/crash
Savecore enabled: yes
Save compressed: on
Recommended best practice: Always use the ZFS pool dump device. The reason is that
you will have all the system-critical files in one place, in rpool.
root@s11-server1:/var/crash# cd
root@s11-server1:~#
Task 2: Configuring Dump Facilities for Business Application Failure
Task 2A: Configuring the Global File Path Pattern
The following activities are covered in this task:
• Displaying the current dump configuration
• Specifying the global file path pattern
• Generating the core dump
• Displaying the core dump
1. Verify that the Sol11-Server1 virtual machine is running. If the virtual machine is not
running, start it now.
Cicero Ronaldo (ciceroฺronaldo@gmailฺcom) has a non-transferable
license to use this Student Guideฺ
Unauthorized reproduction or distribution prohibitedฺ Copyright© 2014, Oracle and/or its affiliatesฺ

Copyright © 2013, Oracle and/or its affiliates. All rights reserved.
Practices for Lesson 12: Monitoring and Troubleshooting Software Failures
Chapter 12 - Page 20
2. Log in to the Sol11-Server1 system as the oracle user. Use oracle1 as the password.
Assume administrator privileges.
oracle@s11-server1:~$ su -
Password:
Oracle Corporation SunOS 5.11 11.1 September 2012
root@s11-server1:~#
3. Use the coreadm command to display the current default dump configuration for the
applications.
root@s11-server1:~# coreadm
global core file pattern:
global core file content: default
init core file pattern: core
init core file content: default
global core dumps: disabled
per-process core dumps: enabled
global setid core dumps: disabled
per-process setid core dumps: disabled
global core dump logging: disabled
root@s11-server1:~#
Why is the per-process core dumps option enabled? For business application
processes. In case they terminate abnormally, you want to capture the critical
information in the core dump.
Why is the global core dumps option disabled? You do not want to create a global
dump every time an application process fails.
4. Using the mkdir command, create the /var/core directory.
root@s11-server1:~# mkdir /var/core
You are creating this directory for the global dump location.
5. Use the coreadm command to enable global logging and configure the global core file
pattern. Verify the results.
root@s11-server1:~# coreadm -e log
root@s11-server1:~# coreadm -e global -g /var/core/core.%f.%p
root@s11-server1:~# coreadm
global core file pattern: /var/core/core.%f.%p
global core file content: default
init core file pattern: core
init core file content: default
global core dumps: enabled
per-process core dumps: enabled
global setid core dumps: disabled
per-process setid core dumps: disabled
global core dump logging: enabled
Cicero Ronaldo (ciceroฺronaldo@gmailฺcom) has a non-transferable
license to use this Student Guideฺ
Unauthorized reproduction or distribution prohibitedฺ Copyright© 2014, Oracle and/or its affiliatesฺ

Copyright © 2013, Oracle and/or its affiliates. All rights reserved.
Practices for Lesson 12: Monitoring and Troubleshooting Software Failures
Chapter 12 - Page 21
You enabled global core dump logging to generate a message when the system creates
a global core file.
How would you interpret the global core file pattern? The directory is specified as
/var/core. The dump files will be named core.%f.%p (%f for the file or the program
being executed, %p for the process ID).
6. Create a dumpdir in the /var/tmp directory. Then cd to /var/tmp/dumpdir.
root@s11-server1:~# mkdir /var/tmp/dumpdir
root@s11-server1:~# cd /var/tmp/dumpdir
root@s11-server1:/var/tmp/dumpdir#
You are creating this directory for the system to create a core file in it.
7. Using the ps command, display the process ID of the current shell process. Use the kill
-8 command to kill the shell process.
root@s11-server1:/var/tmp/dumpdir# ps
PID TTY TIME CMD
3811 pts/1 0:00 bash
3833 pts/1 0:00 ps
root@s11-server1:/var/tmp/dumpdir# kill -8 3811
Arithmetic Exception (core dumped)
Normally, this would kill your shell process and your terminal window would disappear.
However, you are logged in to the root account by using the su command. Therefore,
your invoked shell process will be terminated and you will go back to the oracle user.
8. Verify that the system generated a core file in the dumpdir directory.
oracle@s11-server1:~$ su –
Password:
Oracle Corporation SunOS 5.11 11.1 September 2012
root@s11-server1:~#
Switch to /var/tmp/dumpdir if the system takes you out of this directory.
root@s11-server1:~# cd /var/tmp/dumpdir
root@s11-server1:/var/tmp/dumpdir# ls
core
root@s11-server1:/var/tmp/dumpdir# file core
core: ELF 32-bit LSB core file 80386 Version 1, from 'bash'
The system has created the core file in the “current directory,” meaning the current
directory at the time of dump creation.
Cicero Ronaldo (ciceroฺronaldo@gmailฺcom) has a non-transferable
license to use this Student Guideฺ
Unauthorized reproduction or distribution prohibitedฺ Copyright© 2014, Oracle and/or its affiliatesฺ

Copyright © 2013, Oracle and/or its affiliates. All rights reserved.
Practices for Lesson 12: Monitoring and Troubleshooting Software Failures
Chapter 12 - Page 22
9. Use the cd command to switch to the /var/core directory and examine the dump created
when you killed the bash process.
root@s11-server1:/var/tmp/dumpdir# cd /var/core
root@s11-server1:/var/core# ls
core.bash.3811
root@s11-server1:/var/core# file core*
core.bash.3811: ELF 32-bit LSB core file 80386 Version 1, from
'bash'
root@s11-server1:/var/core# strings core.bash.3811 | more
CORE
pMND-
bash
-bash
CORE
i86pc
CORE
CORE
CORE
CORE
pMND-
bash
-bash
CORE
CORE
i86pc
CORE
CORE
SunOS
s11-server1
5.11
11.1
The strings command was able to convert the encoded contents to some extent.
However, this file will be analyzed by the dump analyzing utilities. Dump analysis is
covered in courses such as Oracle Solaris 11 Workshop.
Cicero Ronaldo (ciceroฺronaldo@gmailฺcom) has a non-transferable
license to use this Student Guideฺ
Unauthorized reproduction or distribution prohibitedฺ Copyright© 2014, Oracle and/or its affiliatesฺ

Copyright © 2013, Oracle and/or its affiliates. All rights reserved.
Practices for Lesson 12: Monitoring and Troubleshooting Software Failures
Chapter 12 - Page 23
10. Use the tail command to view the dump creation message in syslog.
root@s11-server1:~# tail /var/adm/messages
Dec 20 09:46:56 s11-server1 genunix: [ID 665016 kern.notice]
^M100% done: 102515 pages dumped,
Dec 20 09:46:56 s11-server1 genunix: [ID 851671 kern.notice] dump
succeeded
Dec 20 09:59:58 s11-server1 genunix: [ID 603404 kern.notice]
NOTICE: core_log: bash[3275] core dumped:
/var/core/core.bash.3275
Dec 20 10:18:00 s11-server1 genunix: [ID 454863 kern.info] dump
on /dev/dsk/c7t5d0s3 size 800 MB
Dec 20 10:23:31 s11-server1 genunix: [ID 111219 kern.notice]
dumping to /dev/dsk/c7t5d0s3, offset 65536, content: kernel
Dec 20 10:23:36 s11-server1 genunix: [ID 100000 kern.notice]
Dec 20 10:23:36 s11-server1 genunix: [ID 665016 kern.notice]
^M100% done: 103879 pages dumped,
Dec 20 10:23:36 s11-server1 genunix: [ID 851671 kern.notice] dump
succeeded
Dec 20 10:49:28 s11-server1 genunix: [ID 454863 kern.info] dump
on /dev/zvol/dsk/rpool/dump size 511 MB
Dec 20 14:09:34 s11-server1 genunix: [ID 603404 kern.notice]
NOTICE: core_log: bash[3811] core dumped:
/var/core/core.bash.3811
Did you configure the dump facilities to include this message here? Yes, by using the
coreadm –e log command.
Cicero Ronaldo (ciceroฺronaldo@gmailฺcom) has a non-transferable
license to use this Student Guideฺ
Unauthorized reproduction or distribution prohibitedฺ Copyright© 2014, Oracle and/or its affiliatesฺ

Copyright © 2013, Oracle and/or its affiliates. All rights reserved.
Practices for Lesson 12: Monitoring and Troubleshooting Software Failures
Chapter 12 - Page 24
Task 2B: Configuring the Per-Process File Path Configuration
The following activities are covered in this task:
• Enabling per-process dump generation
• Specifying per-process generation
1. Verify that the Sol11-Server1 virtual machine is running. If the virtual machine is not
running, start it now.
2. Log in to the Sol11-Server1 virtual machine as the oracle user. Use oracle1 as the
password. Assume administrator privileges.
oracle@s11-server1:~$ su -
Password:
Oracle Corporation SunOS 5.11 11.1 September 2012
root@s11-server1:~#
3. Use the coreadm command to display the current dump configuration for the applications.
root@s11-server1:~# coreadm
global core file pattern: /var/core/core.%f.%p
global core file content: default
init core file pattern: core
init core file content: default
global core dumps: enabled
per-process core dumps: enabled
global setid core dumps: disabled
per-process setid core dumps: disabled
global core dump logging: enabled
If the per-process core dumps option is disabled, perform step 4 to enable it;
otherwise, skip step 4. The disable setting means that for individual processes, no
dumps will be generated.
Cicero Ronaldo (ciceroฺronaldo@gmailฺcom) has a non-transferable
license to use this Student Guideฺ
Unauthorized reproduction or distribution prohibitedฺ Copyright© 2014, Oracle and/or its affiliatesฺ

Copyright © 2013, Oracle and/or its affiliates. All rights reserved.
Practices for Lesson 12: Monitoring and Troubleshooting Software Failures
Chapter 12 - Page 25
4. Using the coreadm command, enable the per-process dump configuration. Verify the
results.
root@s11-server1:~# coreadm -e process
root@s11-server1:~# coreadm
global core file pattern: /var/core/core.%f.%p
global core file content: default
init core file pattern: core
init core file content: default
global core dumps: enabled
per-process core dumps: enabled
global setid core dumps: disabled
per-process setid core dumps: disabled
global core dump logging: enabled.
Is the per-process core dumps option enabled? Yes, it is.
5. Using the su command, log in to John Holt’s account.
root@s11-server1:~# su - jholt
Oracle Corporation SunOS 5.11 11.1 September 2012
jholt@s11-server1:~$
6. Create a directory called corefiles in your home directory.
jholt@s11-server1:~$ mkdir corefiles
You are creating this directory for the system to create a core file in it.
7. Using the ps command, display the process ID of the current shell process. Use the
coreadm command to display the per-process file for John.
jholt@s11-server1:~$ ps
PID TTY TIME CMD
3936 pts/1 0:00 bash
3950 pts/1 0:00 ps
jholt@s11-server1:~$ coreadm 3936
3936: core default
Currently, if any of the processes created by John are aborted, the default core file will
be created.
8. Use the coreadm command to configure the per-process file path.
jholt@s11-server1:~$ coreadm -p $HOME/corefiles/%f.%p $$
jholt@s11-server1:~$ coreadm 3936
3936: /export/home/jholt/corefiles/%f.%p default
Has the display changed? Yes, now the new per-process file path pattern has taken
effect.
Cicero Ronaldo (ciceroฺronaldo@gmailฺcom) has a non-transferable
license to use this Student Guideฺ
Unauthorized reproduction or distribution prohibitedฺ Copyright© 2014, Oracle and/or its affiliatesฺ

Copyright © 2013, Oracle and/or its affiliates. All rights reserved.
Practices for Lesson 12: Monitoring and Troubleshooting Software Failures
Chapter 12 - Page 26
9. Use the kill command to kill the bash process.
jholt@s11-server1:~$ kill -8 3936
Arithmetic Exception (core dumped)
root@s11-server1:/var/core#
Because John’s bash process is killed, you are back to the root role. Log in to John’s
account again.
root@s11-server1:~# su - jholt
Oracle Corporation SunOS 5.11 11.1 September 2012
jholt@s11-server1:~$
10. After switching to the corefiles directory, use the file command to display the type of
dump file created for John.
jholt@s11-server1:~$ cd corefiles
jholt@s11-server1:~/corefiles$ file bash*
bash.3936: ELF 32-bit LSB core file 80386 Version 1, from 'bash'
How can you display the contents of this dump file? By using the strings command as
in the previous task
11. Shut down the Sol11-Server1 virtual machine. You have completed this practice and thus
the final practice for this course. Congratulations!
Cicero Ronaldo (ciceroฺronaldo@gmailฺcom) has a non-transferable
license to use this Student Guideฺ
Unauthorized reproduction or distribution prohibitedฺ Copyright© 2014, Oracle and/or its affiliatesฺ
