Ozone Marketplace Administrator's Guide
User Manual:
Open the PDF directly: View PDF ![]() .
.
Page Count: 69

Ozone Marketplace Administrator's
Guide
DOD GOSS
Exported on May 23, 2018

DOD GOSS – Ozone Marketplace Administrator's Guide
Table of Contents – 2
Table of Contents
1 Introduction .......................................................................................................................... 4
1.1 Objectives ........................................................................................................................... 4
1.2 Document Scope ................................................................................................................ 4
1.3 Related Documents ............................................................................................................ 4
1.4 Dependencies ..................................................................................................................... 5
2 Store Overview ..................................................................................................................... 6
2.1 Purpose .............................................................................................................................. 6
2.2 Basic Architecture ............................................................................................................... 6
2.3 Workflows ........................................................................................................................... 7
2.3.1 Listing Workflow ............................................................................................................................ 7
2.3.2 Setting up Scorecard Questions ................................................................................................... 7
2.3.3 Connecting to Partner Stores ........................................................................................................ 8
3 Create Listings ..................................................................................................................... 9
4 Listing Management .......................................................................................................... 10
4.1 Approving and Rejecting Pending Listings ....................................................................... 10
4.1.1 Locating Pending Listings ........................................................................................................... 10
4.1.2 Approving a Listing...................................................................................................................... 11
4.1.3 Rejecting a Listing ....................................................................................................................... 12
4.1.4 Deleting a Listing......................................................................................................................... 13
4.2 Managing Listing Visibility ................................................................................................ 13
4.2.1 Setting a Listing to Inside ............................................................................................................ 14
4.2.2 Setting a Listing to Outside ......................................................................................................... 14
5 Listing Administration ....................................................................................................... 15
5.1 Overview tab ..................................................................................................................... 15
5.2 Reviews tab ...................................................................................................................... 16
5.3 Details tab ......................................................................................................................... 17
5.3.1 Changing fields on the Details tab............................................................................................... 18
5.4 Admin tab.......................................................................................................................... 20
5.4.1 Editing a Listing ........................................................................................................................... 23
5.4.2 Editing a Listing's Company ........................................................................................................ 23
5.5 Scorecards tab ................................................................................................................. 23
6 Managing Scorecard Questions ....................................................................................... 27
6.1 Accessing Scorecard Administration ................................................................................ 27
6.2 Add Scorecard Questions................................................................................................. 28
6.3 Editing Questions ............................................................................................................. 28
6.4 Deleting Questions ........................................................................................................... 28
7 Connecting to Partner Stores ........................................................................................... 30
7.1 Interface: Partner Store Servers ....................................................................................... 30
7.2 Adding Partner Stores ...................................................................................................... 30
7.3 Editing Partner Stores ...................................................................................................... 31
7.4 Deactivating Partner Stores.............................................................................................. 32
7.5 Deleting Partner Store ...................................................................................................... 32
8 Deleting Tags ...................................................................................................................... 33
9 Overview ............................................................................................................................. 34
9.1 Recent Activity .................................................................................................................. 35
9.2 Items Pending Approval ................................................................................................... 35
10 Configuring Help Files ................................................................................................... 36
11 Store Configuration ........................................................................................................ 37
11.1 Administration Interface ................................................................................................ 37
11.1.1 Listing Management .................................................................................................................... 39
11.1.2 Types .......................................................................................................................................... 39
11.1.3 State ............................................................................................................................................ 42
11.1.4 Category ..................................................................................................................................... 44

DOD GOSS – Ozone Marketplace Administrator's Guide
Table of Contents – 3
11.1.5 Company ..................................................................................................................................... 45
11.1.6 Contact Types ............................................................................................................................. 46
11.1.7 Custom Field Definition ............................................................................................................... 47
11.1.8 Rejection Justification ................................................................................................................. 50
11.1.9 Profile .......................................................................................................................................... 52
11.1.10 User Account .......................................................................................................................... 53
11.1.11 Intent Action ............................................................................................................................ 53
11.1.12 Intent DataType ...................................................................................................................... 54
11.1.13 Data Exchange ....................................................................................................................... 54
11.1.14 Application Configuration Interface ......................................................................................... 59
12 Application Configuration ............................................................................................. 60
12.1 Branding Configuration ................................................................................................. 61
12.2 Scorecard Configuration ............................................................................................... 62
12.3 Additional Configurations .............................................................................................. 63
12.4 User Account Settings .................................................................................................. 64
12.5 Auditing ......................................................................................................................... 64
12.6 Notifications .................................................................................................................. 65
13 The Store in OWF ........................................................................................................... 66
13.1 Configuring Listings to Appear in OWF ........................................................................ 66
13.1.1 Creating OWF Compatible Types and States ............................................................................. 66
13.1.2 Creating OWF Compatible Listings ............................................................................................. 68
13.2 Synchronizing Listings with OWF ................................................................................. 68
13.2.1 Universal Name .......................................................................................................................... 69

DOD GOSS – Ozone Marketplace Administrator's Guide
Introduction – 4
1 Introduction
1.1 Objectives
This guide provides an introduction as well as instructions and reference material on how to
administer an OZONE Store. Similar to a commercial application store like Apple's App Store or
Google Play, an OZONE Store operates as a thin-client registry of applications and services. It
enables users to submit, browse, download and use a variety of applications or software
components that are known as "listings." Like commercial software stores, the Store offers
quick, easy access to a variety of listings including—but not limited to— plugins, REST & SOAP
services, Web Apps, OZONE Apps, App Components and desktop applications. When
configured to do so, the Store can share information with other Stores as well as with the
OZONE Widget Framework (OWF).
1.2 Document Scope
This guide is intended for Store users with administrator privileges, specifically addressing the
Store owner. It describes the administrator tasks and workflows necessary to ensure that users
can discover listings in this Store and Partner Stores.
The Store owner (or designated administrator) is responsible for the following tasks:
Approving, rejecting and deleting listings.
Managing the visibility of individual listings to other Stores.
Branding the Store with store-specific logos and titles.
Connecting to other Stores in order to make their listings discoverable via local searches.
Managing Scorecard questions by adding/editing/deleting questions local to this Store, and
by allocating the contribution of each question to Scorecard calculations.
Importing and exporting Store listings.
Managing configurable aspects of the store, including addition/modification/deletion of new
fields, rejection justifications, and configurable text.
This guide provides instructions for performing these tasks, as well as reference sections which
describe Store functions which are of interest to an administrator.
1.3 Related Documents
Table 1: Related Documents
Document
Purpose
Store User's Guide
Searching, Creating and Editing Listings, Adding Comments, Ratings,
Navigating an OZONE Store, using Scorecards, Explanation of Elements
Store Configuration
Guide
Modifying Default Settings, Security, Database Settings, Upgrading
Store Quick Start
Guide
Setting Up and Integrating the Store into OWF
OZONE Release
Notes
Epic Stories and Bug Fixes for the Current Build

DOD GOSS – Ozone Marketplace Administrator's Guide
Introduction – 5
1.4 Dependencies
The Store is tested against the following browsers:
Table 2: Tested Browsers
Browsers
Versions
Internet Explorer
11
Firefox
57
Chrome
43
Edge
38
DOD GOSS – Ozone Marketplace Administrator's Guide
Store Overview – 6
2 Store Overview
2.1 Purpose
The Store is a thin-client registry of applications and services akin to a commercial application
store where users can submit and interact with Web components that are called listings.
Listings can be App Components, OZONE Apps, plugins, REST & SOAP services, Web apps,
and more.
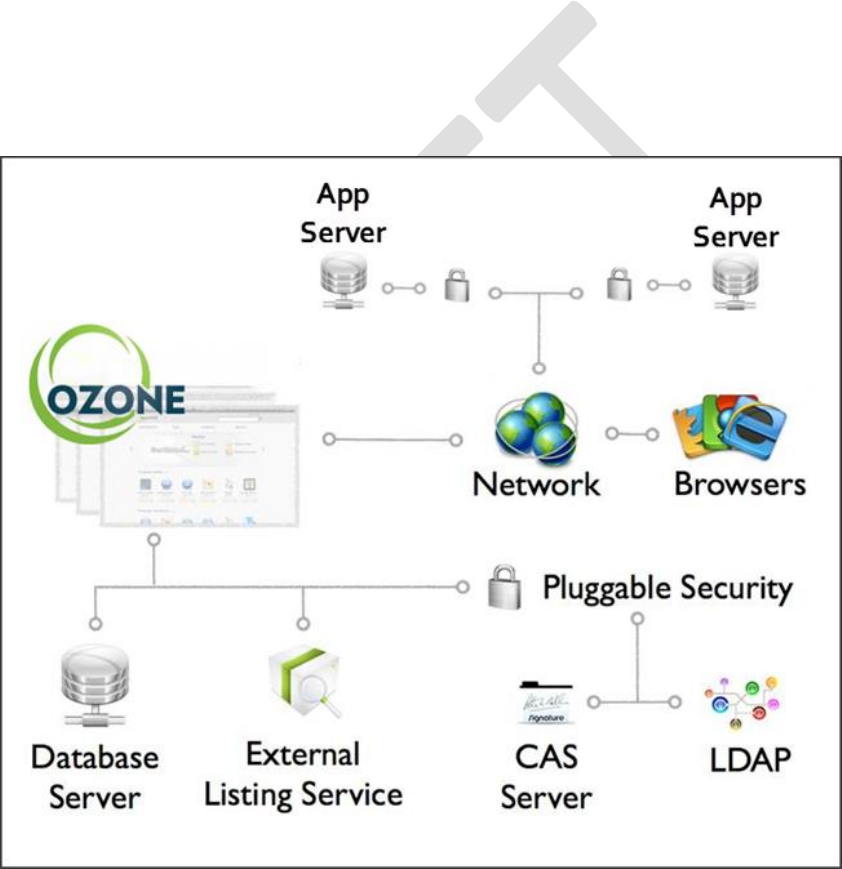
2.2 Basic Architecture
The Store consists of a number of components that were designed to be independently
deployed or located on the same server. The simplest deployment scenario places them all on
the same physical machine. These components are shown in detail in Figure 1: Basic System
Architecture Diagram.
Figure 1: Basic System Architecture Diagram
Note: Any Java Servlet-compliant application server can host the application. Additionally, the
CAS Server and LDAP component are examples of possible security integrations - the
Marketplace Pluggable Security' component acts as an adapter to integrate with many different
enterprise security solutions.

DOD GOSS – Ozone Marketplace Administrator's Guide
Store Overview – 7
2.3 Workflows
The following workflows illustrate the major tasks of the Store owner.
2.3.1 Listing Workflow
The Store owner plays an important role in making listings available to be discovered by users.
The following is a general workflow from listing creation to approval.
Table 3: Workflow to Create and Approve a Listing
Stepddd
Originator
Go to
1. Create a listing.
Listing owner
OZONE Store User's Guide
1. Edit listing Scorecard
(optional).
Listing owner
OZONE Store User's Guide
1. Submit the listing.
Listing owner
OZONE Store User's Guide
1. Review listing for
approval.
OZONE Store
owner/Administrator
OZONE Store Administrator's Guide,
section 4.1: Approving and Rejecting
Pending Listings
1. Edit listing Scorecard
(optional).
OZONE Store
owner/Administrator
OZONE Store Administrator's Guide,
section 6: Managing Scorecard
Questions
1. Set the listing to Inside
or Outside.
OZONE Store
owner/Administrator
OZONE Store Administrator's Guide,
section 4.1: Approving and Rejecting
Pending Listings
1. Approve the listing.
OZONE Store
owner/Administrator
See above
1. Change the
Inside/Outside Listing
Designation
OZONE Store
Administrator
See above
1. Create Scorecard
Questions and
Descriptions
OZONE Store
Administrator
OZONE Store Administrator's Guide,
section 6.2: Add Scorecard Questions
2.3.2 Setting up Scorecard Questions
The Store owner creates, describes and determines the contribution (weighting) of each
Scorecard question in the Store to be applied when the system calculates Scorecards for
listings. This should be performed at least once when setting up the application and then as
needed when new local questions need to be added.
Table 4: Workflow for Scorecard Questions and Weights

DOD GOSS – Ozone Marketplace Administrator's Guide
Store Overview – 8
Step
Originator
Go to
1. Determine if local Scorecard
questions are needed. If so,
add them.
OZONE Store
owner/administrator
OZONE Store Administrator's
Guide, section 6.2: Add Scorecard
Questions
2.3.3 Connecting to Partner Stores
Administrators can connect a local Store to one or more Partner Stores. When connected, users
can easily search for listings in multiple Stores. Any listings in the Partner Stores that match the
search criteria appear with the Search Results from the local Store. An administrator should
perform this workflow every time they want to create a relationship with a Partner Store.
Table 5: Workflow for Adding a Partner Store
Step
Originator
Go to
1. Determine which Partner Store to add
OZONE Store
owner/Administrator
OZONE Store
Administrator's Guide
1. For each store, add it to the Partner
Store Servers list
OZONE Store
owner/Administrator
OZONE Store
Administrator's Guide,
section 7: Connecting to
Partner Stores
1. (Optional) To allow users to import
listings from a Partner Store into
OWF, and OWF administrator must
add the Partner Store to OWF.
OWF Administrator
OWF Administrator's Guide

DOD GOSS – Ozone Marketplace Administrator's Guide
Create Listings – 9
3 Create Listings
Instructions for how to create a listing in the Store has been outlined in the Store User's Guide
(Create Listings section). Both users and administrators can create new Store listings. To create
a new listing:
1. Open the Store User Menu and click Create Listing.
2. This opens the New Listing form. Fill out all mandatory fields identified with a red asterisk.
And provide any other information your organization requires.
3. When finished, click the Save button at the bottom of the form.
DOD GOSS – Ozone Marketplace Administrator's Guide
Listing Management – 10
4 Listing Management
Store owners are responsible for managing the availability of listings in the application store.
Those listings are available to all users browsing the Store, including users searching your
listings via a Partner Store. The following sections describe how to perform these listing
management tasks.
4.1 Approving and Rejecting Pending Listings
Listings that have been submitted to the store by a user (referred to as the listing owner) but
have not been approved by an administrator are called Pending Listings. A pending listing must
be approved before it is returned in search results. If the listing type is an OZONE App,
approving it automatically approves all of its App Components. The components appear as
Required on the OZONE App's Details tab.
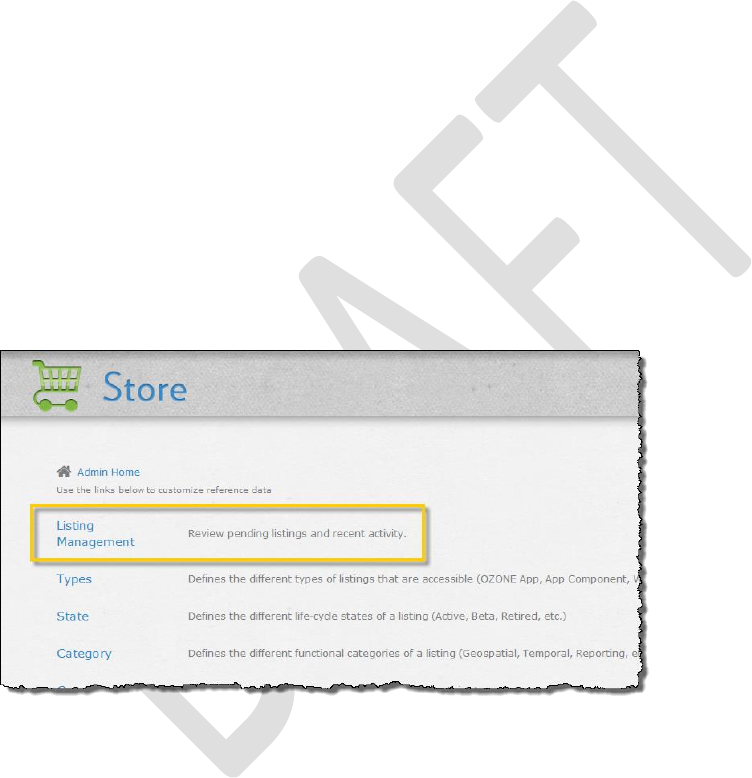
4.1.1 Locating Pending Listings
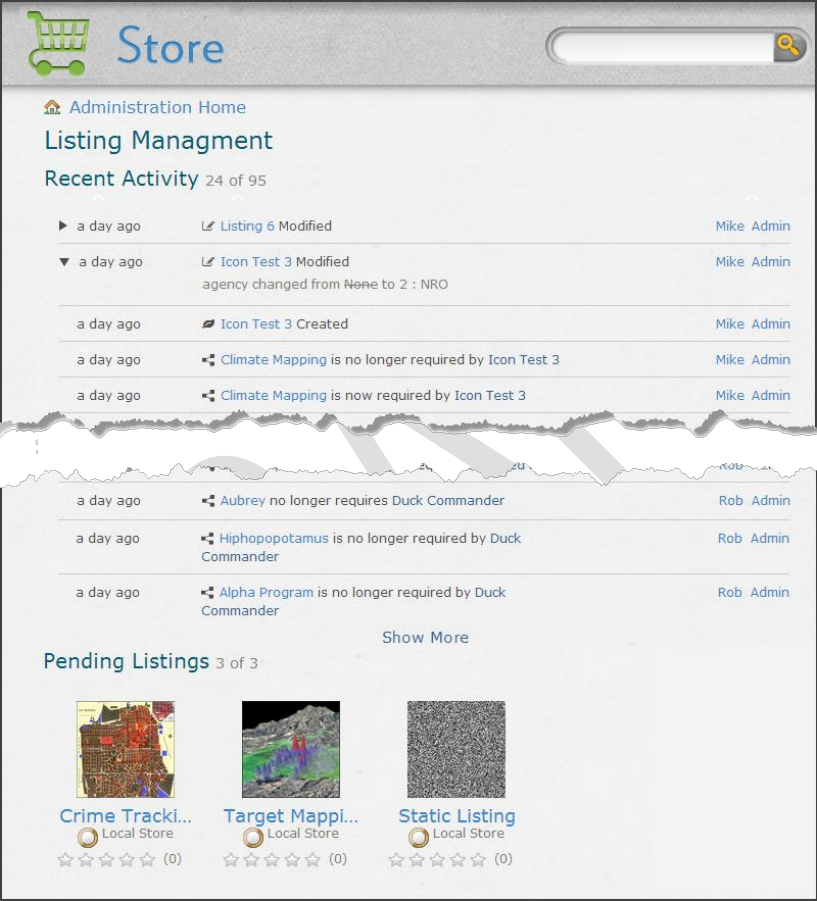
Locate all pending listings by navigating to the Listing Management page using the steps below.
Alternatively, you can search for a specific pending listing by typing the listing name in the
search bar at the top right of the page and clicking the Search button (magnifying glass).
To see a list of all pending listings:
1. Click the drop-down [Store] User Menu at the top right of the page.
2. Click Configuration Pages
3. Click Listing Management (Figure 2).
Figure 2: Listing Management
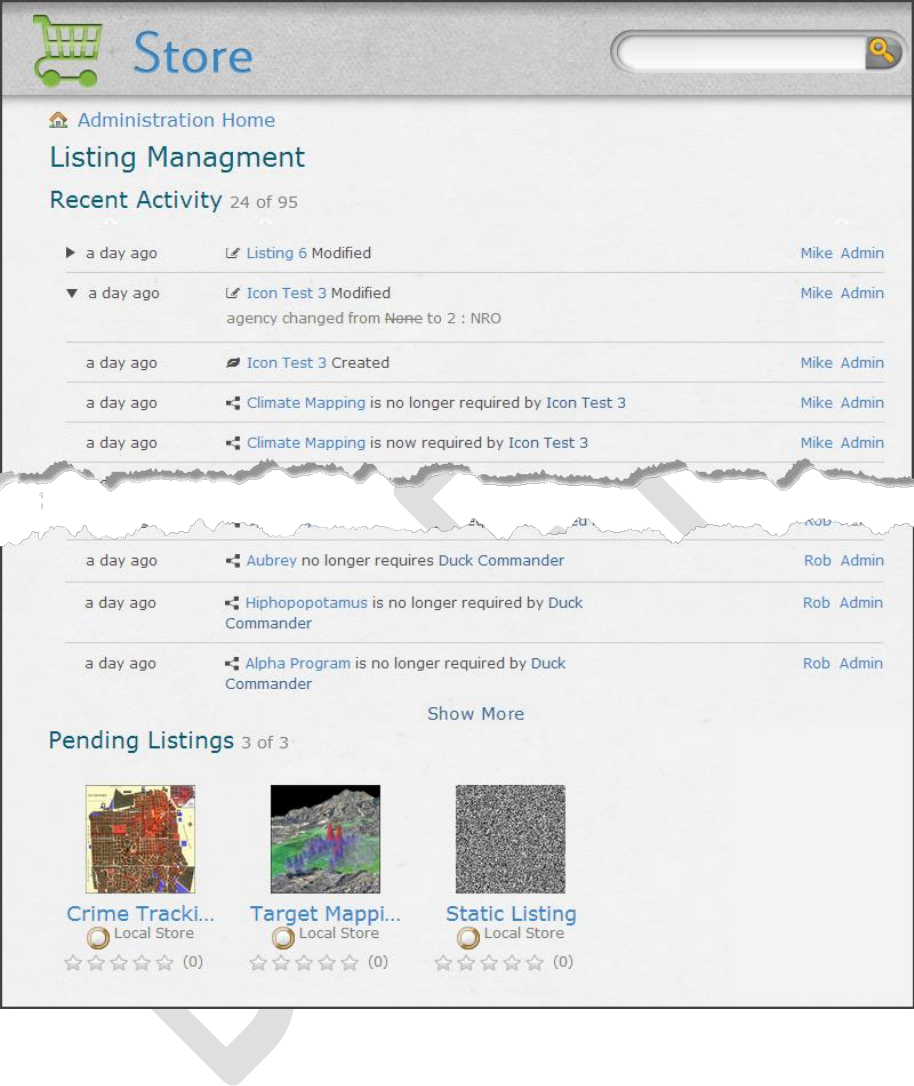
You will see up to 24 items in Recent Activity, followed by at most 24 listings waiting for
approval. If there are more than 24 activity items or Pending Listings, click Show More to see
them:
DOD GOSS – Ozone Marketplace Administrator's Guide
Listing Management – 11
Figure 3: Listing Management Page
4.1.2 Approving a Listing
After an owner submits a listing for approval, administrators can search for it or see it on the
Listing Management Page, see section 4.1.1: Locating Pending Listings. Before approving a
listing, check the listing to make sure it meets whatever criteria your system mandates for
listings to be accessible to users visiting the local Store. This includes answering compliance
questions on the Scorecard tab, although this can be done after listing approval as well.
DOD GOSS – Ozone Marketplace Administrator's Guide
Listing Management – 12
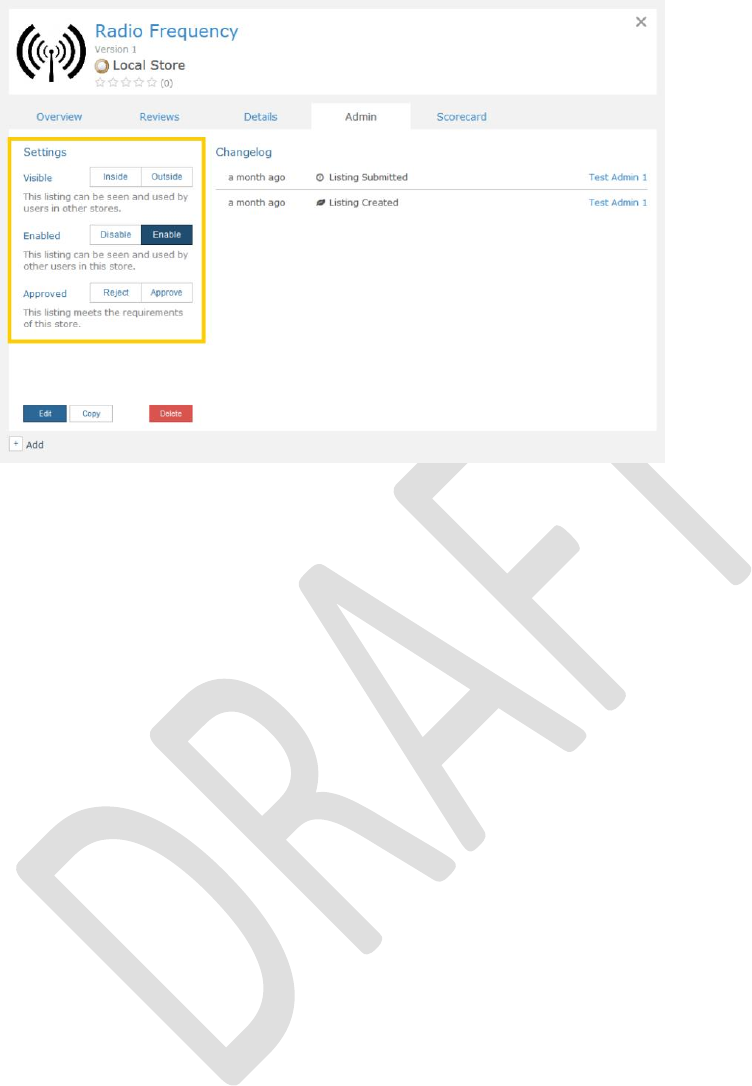
Figure 4: Listing Quick View - Settings on Admin Tab
To approve a listing, perform the following steps:
1. Click the listing name or icon to display the Listing Quick View.
2. Click the Admin tab; from there, locate the Settings heading on the left (Figure 4). There
are three choices under the Settings heading that you must select to approve a listing and
make it available to all users.
3. In the Visible field: select Inside or Outside:
o Inside listings are only visible to authenticated users (users whose PKI certificate
grants them access to the local Store).
o Outside listings are visible to all users.
For more information regarding setting a listing to inside or outside, see section 4.1.4: Deleting
a Listing.
1. A confirmation box appears when you select Inside or Outside; click OK to confirm your
choice.
2. In the next field, Enable is selected by default. You'll probably want to leave it this way.
However, if you only want administrators and the listing owner to see this listing, click
Disable.
3. In the Approved Field: select Approve or Reject:
o Selecting the Approve button indicates the listing is approved.
o Selecting the Reject button indicates the listing is rejected. It will not be seen by
users in the Store. More information on rejecting a listing is found in the next
section, 4.1.3: Rejecting a Listing.
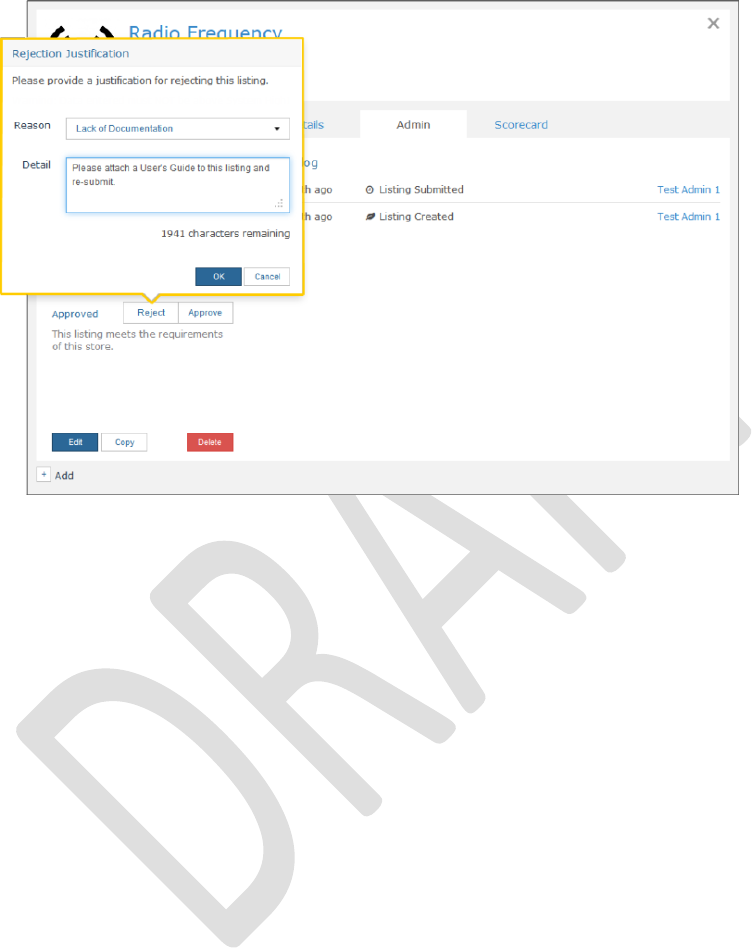
4.1.3 Rejecting a Listing
To reject a listing, perform the following steps:
1. Click the listing name or icon to display the Listing's Quick View.
2. Click the Admin tab; from there locate the Approved setting.
3. Click the Reject button.
4. In the Rejection Justification Form,
DOD GOSS – Ozone Marketplace Administrator's Guide
Listing Management – 13
a. Pick a reason for rejection from the choices in the Reason drop-down list.
Administrators can add rejection justifications to the list, see section 11.1.8:
Rejection Justification.
b. In the Detail box, enter details regarding the rejection. This can include features the
listing owner must change or improve in order to receive listing approval.
Figure 5: Rejection Justification
1. Click OK to complete the rejection of the listing.
a. If you decide not to reject the listing, click Cancel. The approval status of the listing
will be unchanged.
To re-submit a rejected listing for administrator approval, apply your changes to the listing (see
section 5.4.1: Editing a Listing) and then click the Submit button found at the top of the listing's
Quick View.
4.1.4 Deleting a Listing
To delete a listing, perform the following steps:
1. Click the listing name or icon to display the Listing Quick View.
2. Click the Admin tab.
3. Click the Delete button.
4. Click OK on the warning message to remove the listing from the system.
4.2 Managing Listing Visibility
The Store introduced the idea of "inside" or "outside" listings. Whether a listing is "inside" or
"outside" speaks to its visibility to the users of the Store. It is up to the approving administrator
to determine a listing's visibility.
1. Inside listings are those that are only available to the Store hosting the listing.
2. Outside listings are available to users in all Partner Stores.

DOD GOSS – Ozone Marketplace Administrator's Guide
Listing Management – 14
You can set a listing to inside or outside via the Visible setting on the Admin tab in the Listing
Quick View. If the listing has not been submitted for approval, this control is not visible.
4.2.1 Setting a Listing to Inside
"Inside" listings are only visible to authenticated users for this Store. To make a listing inside:
1. Click the listing name or icon to display the Listing Quick View.
2. Click the Admin tab, the Visible setting is on the left.
3. Click the Inside button.
4. A confirmation message box will display. Click OK to complete the change to Inside.
Note: If the listing was previously an outside listing, the message box will notify you that, since
the listing was formerly outside, the listing still may be available to users who have already
imported it. If this is the first time the listing has been set to inside, the box will simply state that
the listing will not be visible to Partner Stores.
4.2.2 Setting a Listing to Outside
To make a listing "Outside" – visible to Partner Stores and users across all companies –
perform the following steps:
1. Click the listing name or icon to display the Listing Quick View.
2. Click the Admin tab, the Visible setting is on the left.
3. Click the Outside button.
4. A confirmation message box alerts users that the listing will be available to Partner Stores
and users across all stores. Click OK to complete the change to Outside.
Note: There is a global setting that can switch all imported listings to inside or outside. If
configured, this setting will overrides the inside/outside setting on individual listings.
DOD GOSS – Ozone Marketplace Administrator's Guide
Listing Administration – 15
5 Listing Administration
Many of the listing details are visible to all users on the Quick View and explained thoroughly in
the User's Guide. In this section, you'll learn about resources that are only available to listing
owners and administrators. To get started, click on a listing name to open the Quick View.
Note: The Store provides links to identified applications. Access controls and application
operation are the responsibility of the application owner.
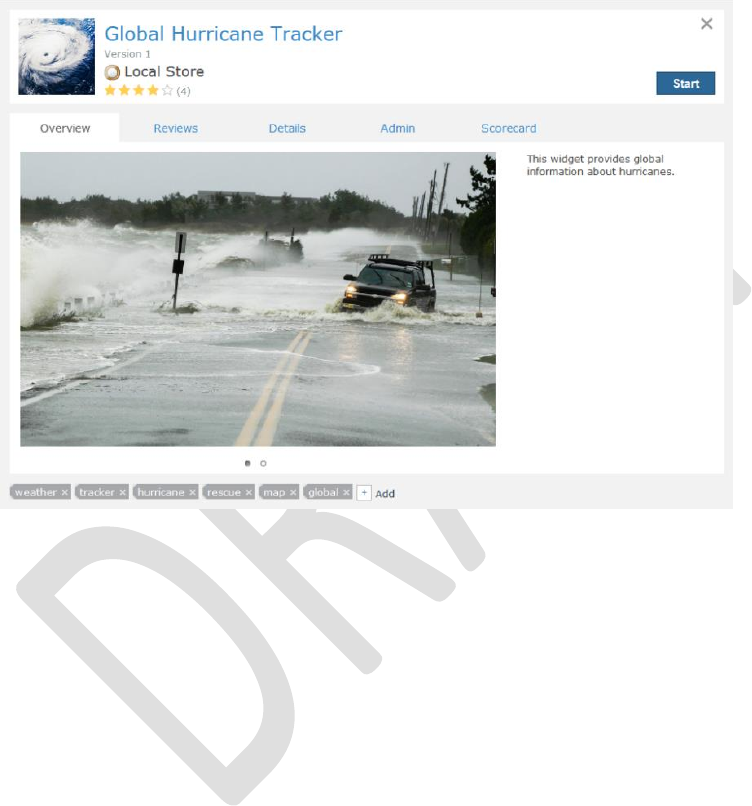
5.1 Overview tab
Figure 6: Overview tab
The Overview tab displays any information the listing owner or an administrator included as a
description of the listing. Useful descriptions provide an understanding of what the listing
intends to do, its limitations and advice about its interaction with other listings.
To change any of the information or screenshots on the Overview tab:
1. Click the Admin tab.
2. Click Edit in the lower-left corner of the screen.
3. Type an updated description in the Create/Edit Listing Form.
4. Click Save.
5. The change will automatically update in the listing.
DOD GOSS – Ozone Marketplace Administrator's Guide
Listing Administration – 16
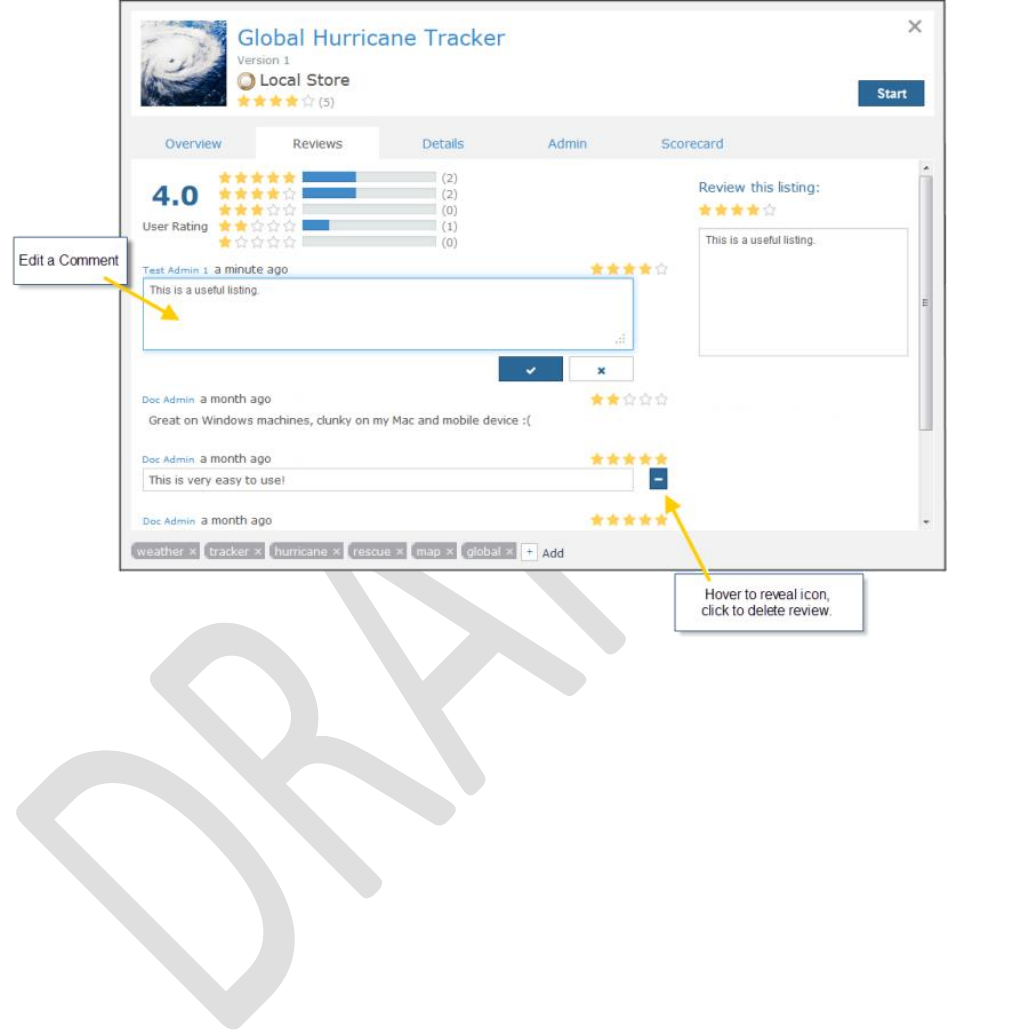
5.2 Reviews tab
Figure 7: Feedback tab
The Reviews tab shows the listing's average star rating and provides a mechanism for leaving
user feedback. It also displays a list of every comment and rating for the listing. Users have the
ability to edit their own comments by clicking inside the text box under the "Review this listing"
heading and changing their review. After making a change, users must click Publish or Cancel.
Administrators have edit/delete privileges for all comments:
To edit a comment: Click it and type the respective change. Then, click the checkmark to
confirm the change or the X to cancel it.
To delete a comment: Hover over the comment. Then, click the - button that appears to
the right of the comment. Click OK on the Remove Comment pop-up window to delete the
comment or cancel to discard the change.
DOD GOSS – Ozone Marketplace Administrator's Guide
Listing Administration – 17
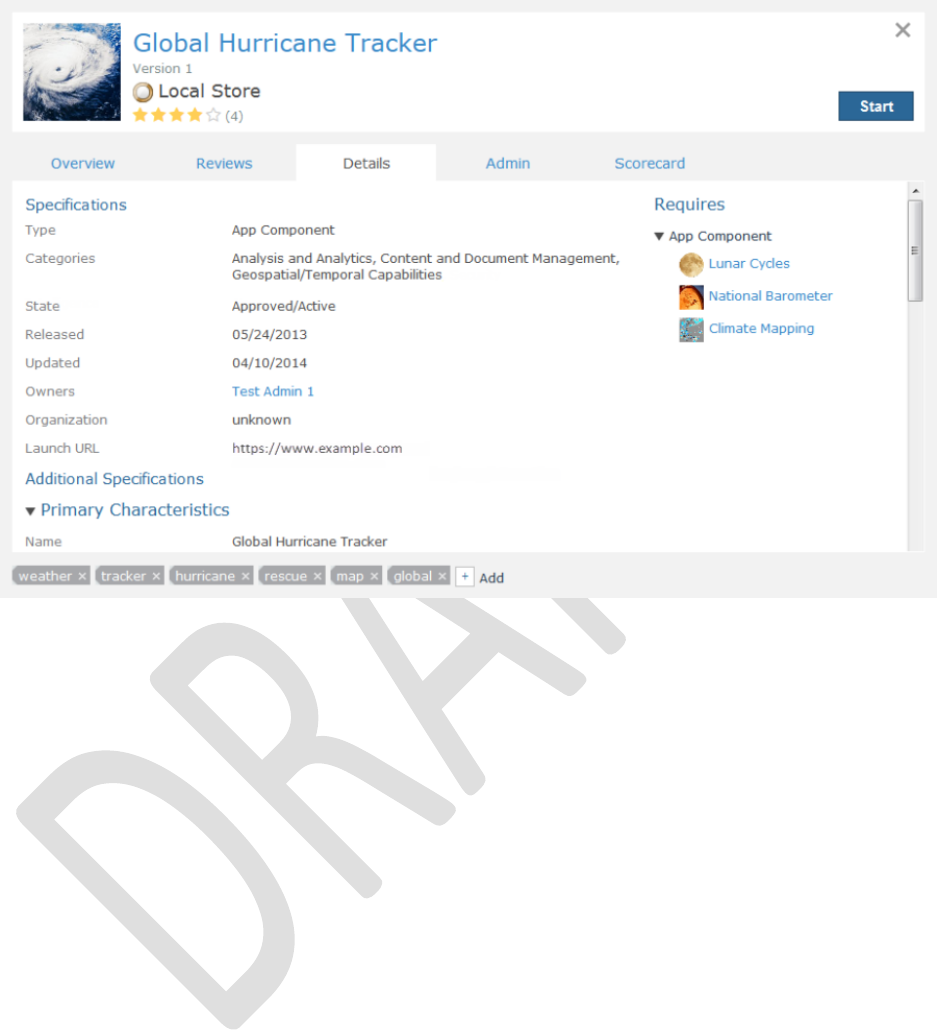
5.3 Details tab
Figure 8: Details tab
The Details tab shows the specifications of the listing entered by the owner during its creation.
Users only see the fields under the Specifications heading. Administrators see much more
information that is separated into several headings listed below:
Note: Custom fields will appear under the heading with which they were associated at creation.
To change any of the information on the Details tab:
1. Click the Admin tab
2. Click Edit in the lower-left corner of the screen.
3. The Create/Edit Listing Form will open, make your change.
4. Click Save. The listing will automatically update.
Administrators decide which field(s) the users will see on the Details tab. To reorder or
show/hide information on the Details tab, following the instructions in section 5.3.1: Changing
fields on the Details tab.
The following lists the default locations for fields that appear on the Details tab:
Specifications – Displays listing data in a customizable order. The default list is Types,
Categories, State, Released date, Updated date, Owners, Organization and Launch URL.
This is the only Listing information users see. If you want to change or add fields to this
section, see section 5.3.1: Changing fields on the Details tab.
Additional Specifications
o Primary Characteristics
Name
Type
State

DOD GOSS – Ozone Marketplace Administrator's Guide
Listing Administration – 18
Company
Version
Categories
Release Date
Updated Date
GUID
o Technical Properties
Installation URL
Documentation
Screenshots
o OWF Properties
Singleton
Visible
Mobile Ready
Run in Background
Recommended Layouts
Approximate Size
Universal Name
o App Component/Web App Properties
Large Icon
Medium Icon
Small Icon
Launch URL
Opens in a new browser tab (Web App only)
o Store References
Owners
Organization
Requirements
Dependencies
Required By
o Intents – Displays the listing's intents.
Note: All additional fields are described in the Create Listing section of the User's Guide.
5.3.1 Changing fields on the Details tab
Administrators can add, remove and reorder the fields that appear under the Specifications
heading on the Details tab (Figure 8). Owners and administrators will see all of the listing's
details which are separated by headings on the Details tab.
However, users will only see the listing information that appears under the Specifications
heading (and Intents if the listing has them). The default information includes: Types,
Categories, State, Released date, Updated date, Owners, Organization and Launch URL.
Administrators can add, remove and reorder fields that appear under the Specifications
heading.
To add, remove or reorder that information, an administrator must:
DOD GOSS – Ozone Marketplace Administrator's Guide
Listing Administration – 19
1. Click Configuration Pages from the drop-down User's Menu.
2. Click Application Configuration.
3. From the left-navigation panel, click Additional Configurations.
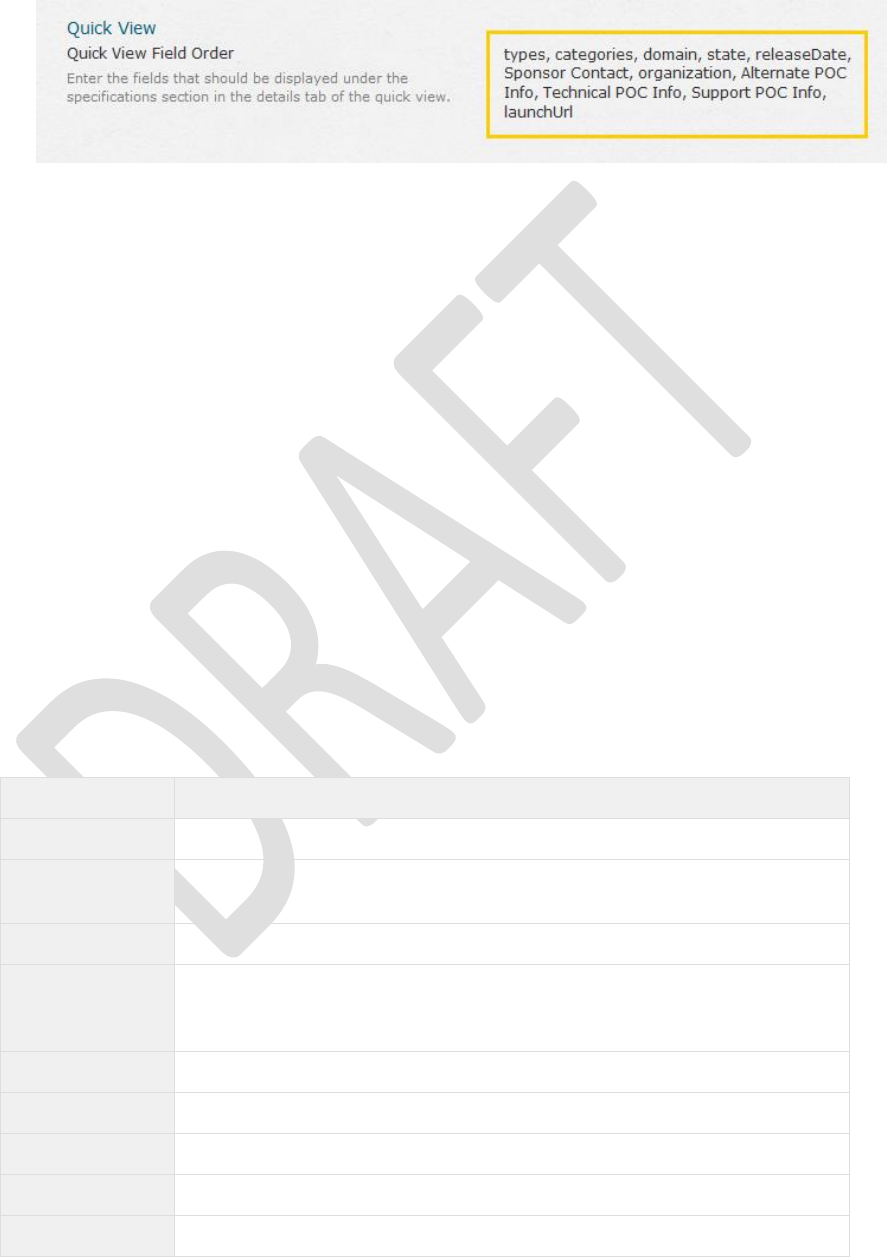
4. Scroll to the bottom of the page. Under Quick View, edit the Quick View field order:
Figure 9: Quick View Customization Setting
To do this, you must enter the field name, not the title shown on the Details tab, see the list in
Table 6: Specifications.
1. Make any of the following changes:
o Add fields: Enter the field name in the order you want it to appear on the Details
tab. Separate each field by a comma.
o Remove fields: Delete their field name from the list.
o Reorder fields: Retype them in the order you want them to appear on the Details
tab.
Note: Custom fields use the field Name not their corresponding Label that appears in the user
interface. You'll find a list of custom field Names on the Custom Field Definition List. To get
there, click Configuration Pages from the drop-down User Menu, then select Custom Field
Definition.
1. Click away from the box to save the change. The updated fields under Specifications will
automatically appear in the Details tab on the listing Quick View.
To reorder or add fields to the Specification section of the Details tab, you must enter the Field
name in the Quick View field order section of the configuration pages. It is case sensitive. After
entering the correct field name in the configuration page, the field Label will appear under
Specifications on the Details tab in the Listing Quick View. Definitions of the field titles are found
in the User's Guide.
Table 6: Specifications on the Details tab
Field Label
Field Name
Company
Company
Approximate
Size
Size
Categories
Categories
Contact Type
Admins must create a unique Contact Type using the Configuration Pages.
Then, for the type to appear under the Specifications heading, enter its
exact Title from the Contact Type List.
Compliance
scorecard
Dependencies
Dependencies
GUID
Guid
Installation URL
installationURL
Large Icon
largeIcon
DOD GOSS – Ozone Marketplace Administrator's Guide
Listing Administration – 20
Field Label
Field Name
Launch URL
launchUrl
Medium Icon
mediumIcon
Mobile Ready
mobileReady
Organization
Organization
Owners
Owners
Recommended
Layouts
recommendedLayouts
Released
releaseDate
Required By
requiredBy
Requirements
Requirements
Resources
Resources
Run in
Background
Background
Screenshots
screenShots
Singleton
Singleton
Small Icon
smallIcon
State
State
Technical POC
techPocs
Title
Title
Types
Types
Note: If the Type opens in a new browser tab, that information only appears
in parentheses in the Type field.' Opens in a new browser tab' will not
appear on its own line in the Details tab like the other fields.
Updated
lastActivity
Universal Name
universalName
Visible
Visible
Version
Version
5.4 Admin tab
For administrators familiar with older versions of the Store, the Admin tab replaces the Actions
drop-down menu that was located on the deprecated Detailed Listing page. Use this tab to
manage various controls including approve/reject listings and accessing the Create/Edit Form.
You'll find instructions for approving and rejecting listings in section 4.1: Approving and
Rejecting Pending Listings.
DOD GOSS – Ozone Marketplace Administrator's Guide
Listing Administration – 21
Figure 10: Admin tab
From this menu, administrators have access to the following Settings:
Visible – Decides if the listing is only visible to Local Store users or if Partner Store users
can see it too.
o Inside – Makes the listing available to the local store. Users in Partner Stores will
not see it.
o Outside – Makes the listing visible to all users across all participating stores.
Enabled
o Disable – Remove the listing from Store circulation. Only the listing owner(s) and
administrators will still see the listing when browsing or searching. Other users will
not see the listing at all. Consider using the disable function when newer versions of
a listing have been adopted and older versions are causing confusion or simply
deemed unnecessary or you want to remove the listing from circulation for a period
of time.
o Enable – An enabled listing is visible and searchable by all users.
Note: Once a listing has been disabled, an administrator or owner can later enable it and make
it available to users. This is done by clicking Enable on the Admin tab. Disabling a listing will not
disable it for the users that have already added it to an OWF instance and it will not disable it
from Partner Stores that it has already been pulled into. Furthermore, disabling a listing does
NOT prevent its use, nor does it prevent it from being exported. It merely prevents the listing
from being discovered.
Approved
o Reject – Clicking the Reject button for a pending listing displays the rejection
justification form. Using this form, the administrator can specify the reason and a
detailed explanation why a listing was rejected. This does not remove the listing
from the store, and an administrator or its owner may resubmit it for approval
consideration.
DOD GOSS – Ozone Marketplace Administrator's Guide
Listing Administration – 22
o Approve – Once a pending listing has been designated as inside or outside, an
administrator can approve the listing by clicking the Approve button. The associated
listing immediately becomes available to all users based on their credentials. This is
the key step in making the listing available to users.
Note: If an administrator changes an outside listing to inside, it will still be accessible to users
who had previously imported the listing.
Note: The Store does not dictate or ensure the functionality of a listing. Proper functionality of a
particular listing is the sole responsibility of the approving administrator.
From this menu, administrators have access to the following functions:
Edit – Clicking edit opens the Listing's Create/Edit Form. Use it to change any of the listing
details including name. Edit the data fields and click Save at the bottom to apply the
changes.
Copy – Allows the listing to be copied. Clicking this opens a new Create/Edit Form; each
field on the form is populated with the data from this listing. Modifying the listing name is
often the first step in avoiding confusion between listings.
Delete – Deletes the listing from the Store and removes it from the system. See section
4.1.4: Deleting a Listing for more information.
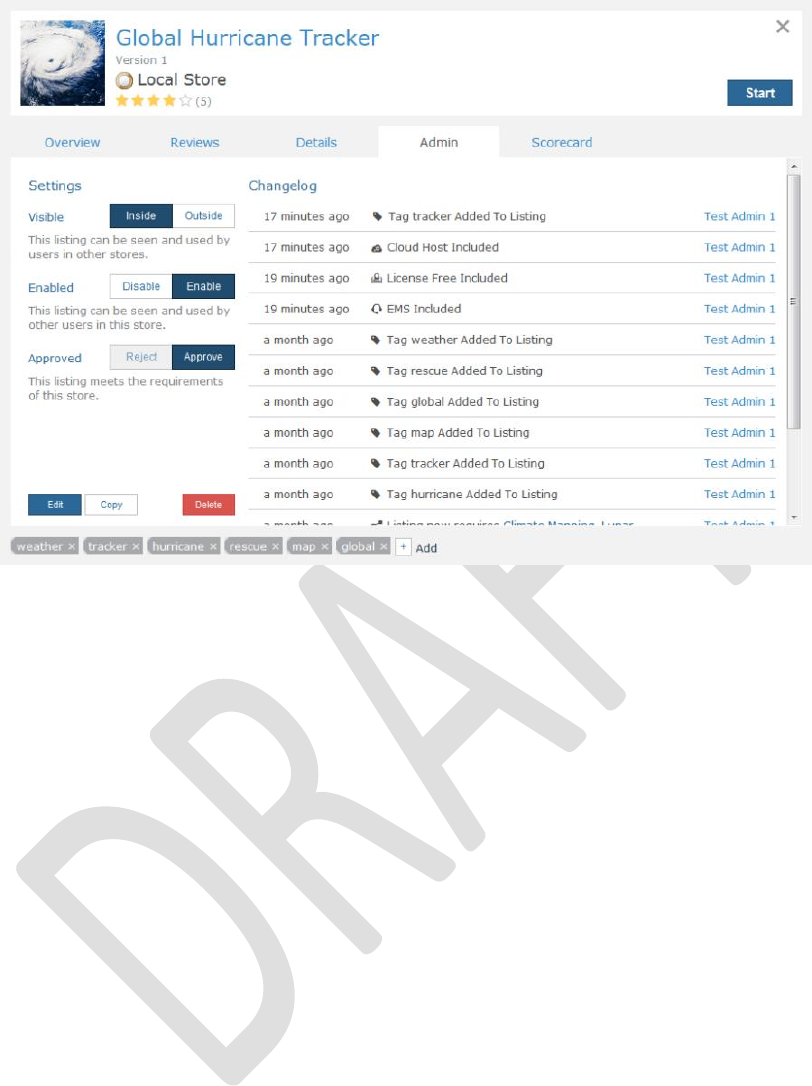
The Admin tab also includes the listing's Changelog. Administrators cannot edit the Changelog.
Figure 11: Changelog on the Admin Tab
Changelog – Displays a history of every change for a listing. Information in the Changelog
includes a timestamp of the event, a brief description and who performed the event. When a
triangle appears next to an entry, a user can click the row to see more details about the change
(Figure 12). To collapse the information, click the triangle icon again.
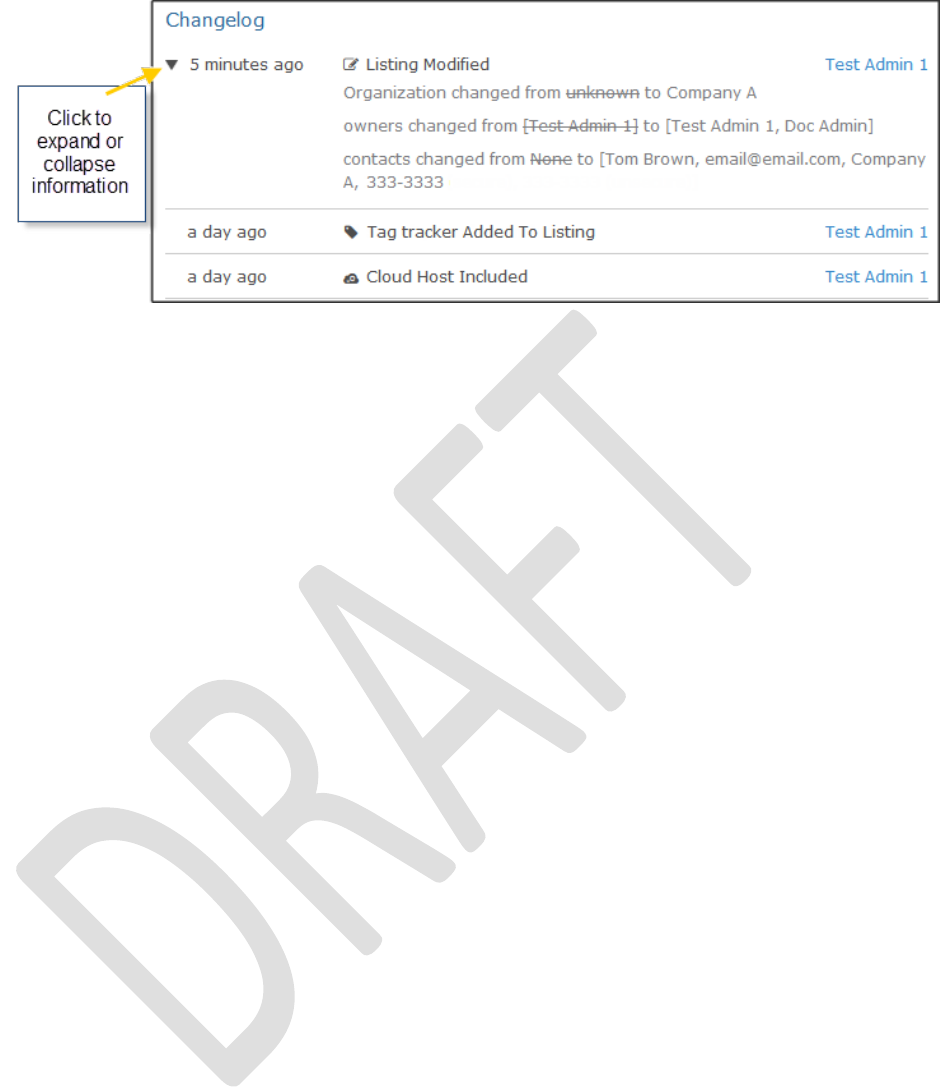
DOD GOSS – Ozone Marketplace Administrator's Guide
Listing Administration – 23
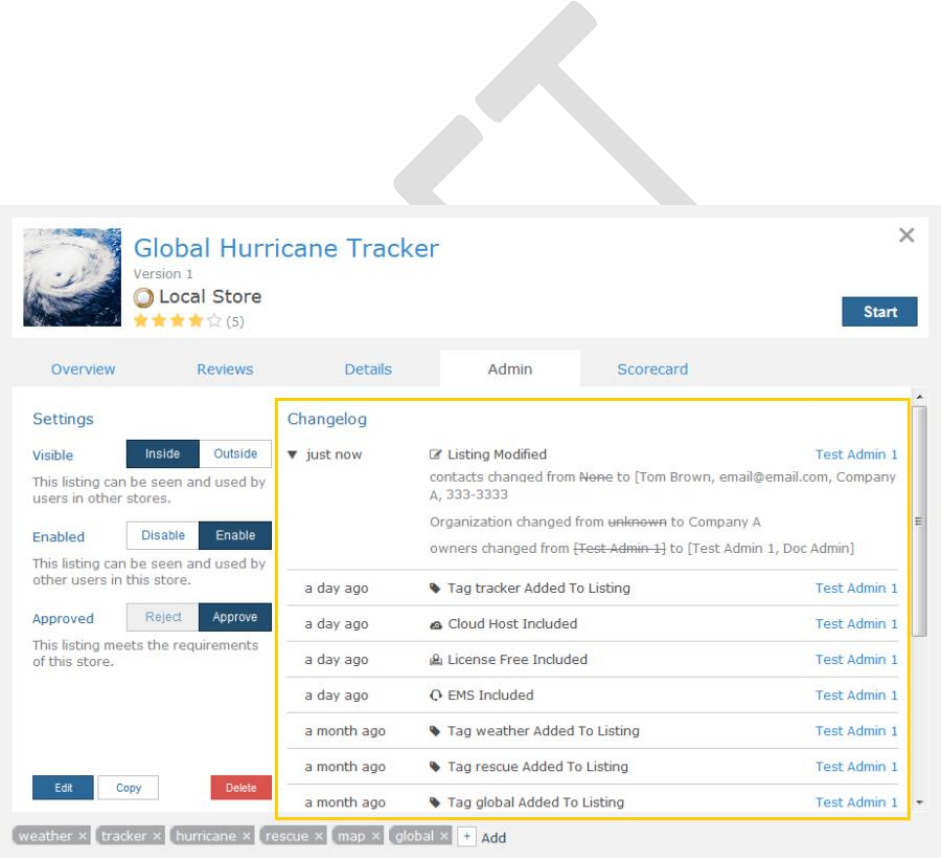
Figure 12: Changelog - Expanded Information Triangle
View user profile information by clicking a user name in the Changelog (e.g., Test Admin 1 in
Figure 12). This opens the user's My Account window. To return to the listing Quick View, click
"Back to Listing" in the upper left corner of the window.
5.4.1 Editing a Listing
Administrators can edit any listing. Use the following instructions to edit a listing:
1. From the Store Discovery or Search Results Page, click on a listing icon to open the Listing
Quick View.
2. Click the Admin tab (Figure 10) to see administrative options and the Changelog (see
section 5.4: Admin tab).
a. From this tab, administrators can approve/reject a listing and change the listing's
visibility and access to other users.
b. After changing any of the Settings fields (Visible, Approved, Enabled), the change
automatically populates through the system.
3. Click Edit in the lower-left corner to open the Create/Edit Listing Form and change other
information including name, description, version, etc.
a. To apply changes on the Create/Edit Listing Form, click Save. The changes are
automatically applied to the listing.
5.4.2 Editing a Listing's Company
The Store allows administrators to edit the company name of an approved listing. To change a
listing's company, first open the listing Quick View and click the Admin tab. Click Edit from the
drop-down menu on the left. Once the listing form is open, find the Company field, click the
drop-down menu and select a new company or select "None" to signify no company
association. Once finished, click the Save button at the bottom of the form. This change is
automatically applied to the listing. If the listing does not have a company, then this field will
default to "None." If the listing belongs to a company, associated or not associated with the
Store, the company name will occupy the Company field seen on the Details tab of a listing
Quick View.
5.5 Scorecards tab
If enabled, Scorecards offer the user a view of how well a particular listing meets a system's
overall acceptance criteria. Only the listing owner and administrators can answer the Yes/No
questions on the Scorecard. An example of the Scorecard tab is shown below. If the answer is
Yes, the slider to the right of the question will turn green. If the answer is No or the question has
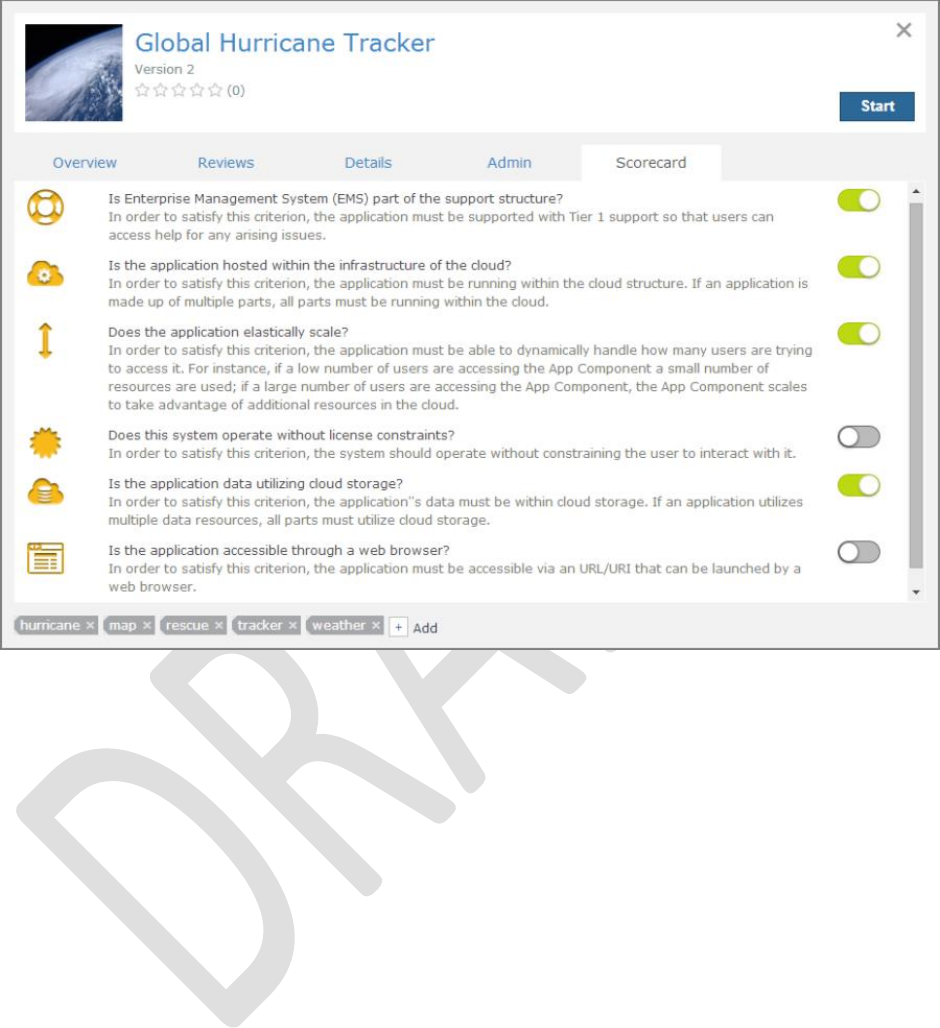
DOD GOSS – Ozone Marketplace Administrator's Guide
Listing Administration – 24
not been answered, the slider will be gray.
Figure 13: Scorecard tab with Scorecard Questions
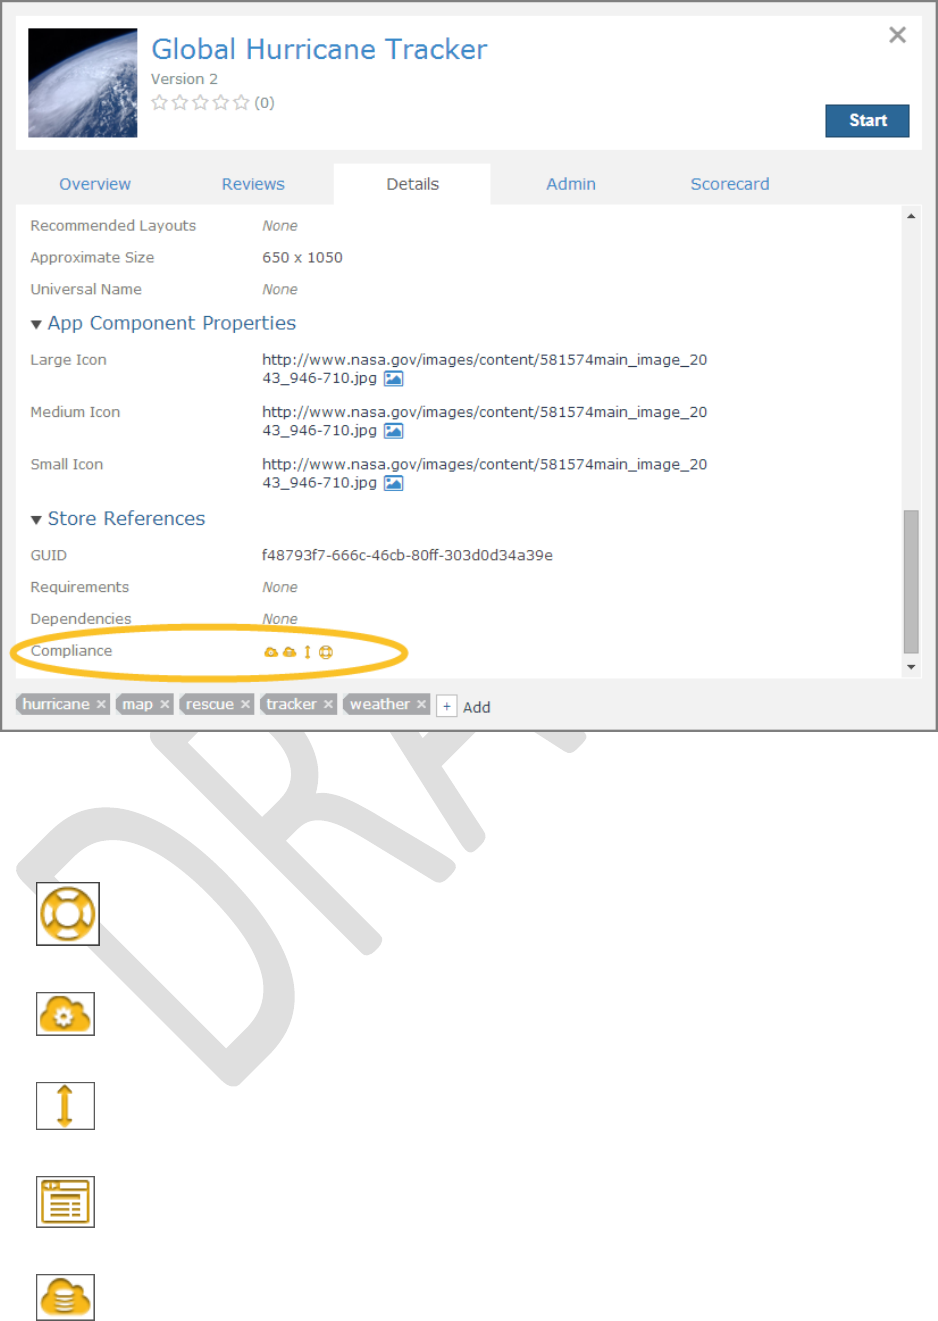
Figure 14 shows another visual representation of the Scorecard answers. If a listing owner turns
a Scorecard question "on," users will see its icon on the Details tab in the Compliance field of
the listing Quick View. If the Scorecard question does not have an icon associated with it only
owners and administrators will see the relationship.
DOD GOSS – Ozone Marketplace Administrator's Guide
Listing Administration – 25
Figure 14: Details Tab - Visible Scorecard Icons
The default Scorecard icons and their respective questions are listed below. Scorecard question
descriptions are found in a listing's Scorecard tab as seen in Figure 13. Editing instructions are
found in
- Is Enterprise Management System (EMS) part of the support structure?
- Is the application hosted within the infrastructure of the cloud?
- Does the application elastically scale?
- Is the application accessible through a web browser?
- Is the application data utilizing cloud storage?

DOD GOSS – Ozone Marketplace Administrator's Guide
Listing Administration – 26
- Does the system operate without license constraints?
DOD GOSS – Ozone Marketplace Administrator's Guide
Managing Scorecard Questions – 27
6 Managing Scorecard Questions
Scorecards identify how well listings meet assessment criteria as defined in each Store. Listings
are assessed by the listing owner or an administrator who answer the Scorecard questions. The
more Scorecard questions the listing answers "yes" to, the more the listing meets the Store's
assessment criteria; a higher "score" does not necessarily indicate a "better" listing. The Store
populates the Scorecard with six general questions; however, administrators can edit or delete
the general questions as well as add new ones.
To use the Scorecard feature, an administrator must enable the Scorecard on the Application
Configuration Page (12.2: Scorecard Configuration). The following sections describe how a
Store administrator can manage the Scorecard questions. See sections 6.3: Editing Questions
and 6.4: Deleting Questions describe how to add, edit and delete questions.
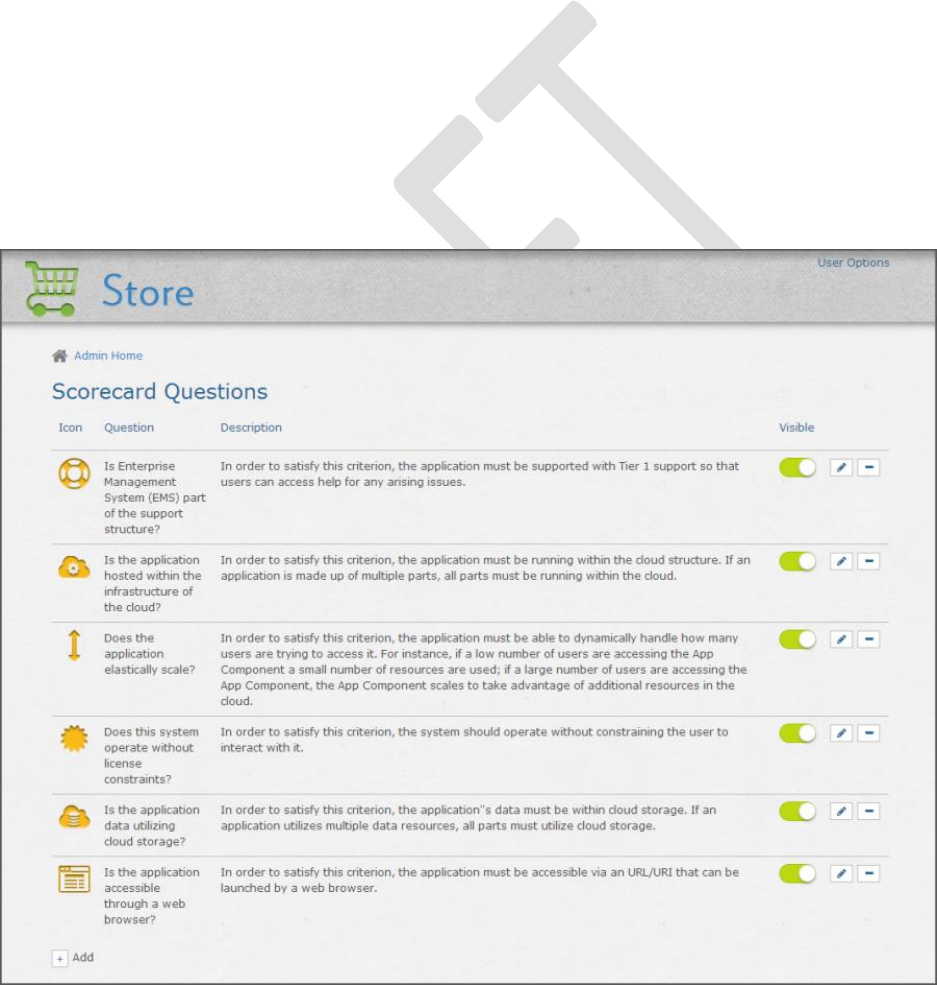
6.1 Accessing Scorecard Administration
To access the Scorecard Administration page, perform the following steps:
1. Open the drop-down User Menu, click Configuration Pages.
2. On the Configuration Page, click Application Configuration.
3. From the left-navigation click Scorecard, then click the "Manage Questions by clicking here"
link. Note: The "Manage Questions" link will only appear when the Scorecard Switch is On.
Figure 15: Scorecard Administration Page
From this page you can add, edit or delete questions.
DOD GOSS – Ozone Marketplace Administrator's Guide
Managing Scorecard Questions – 28
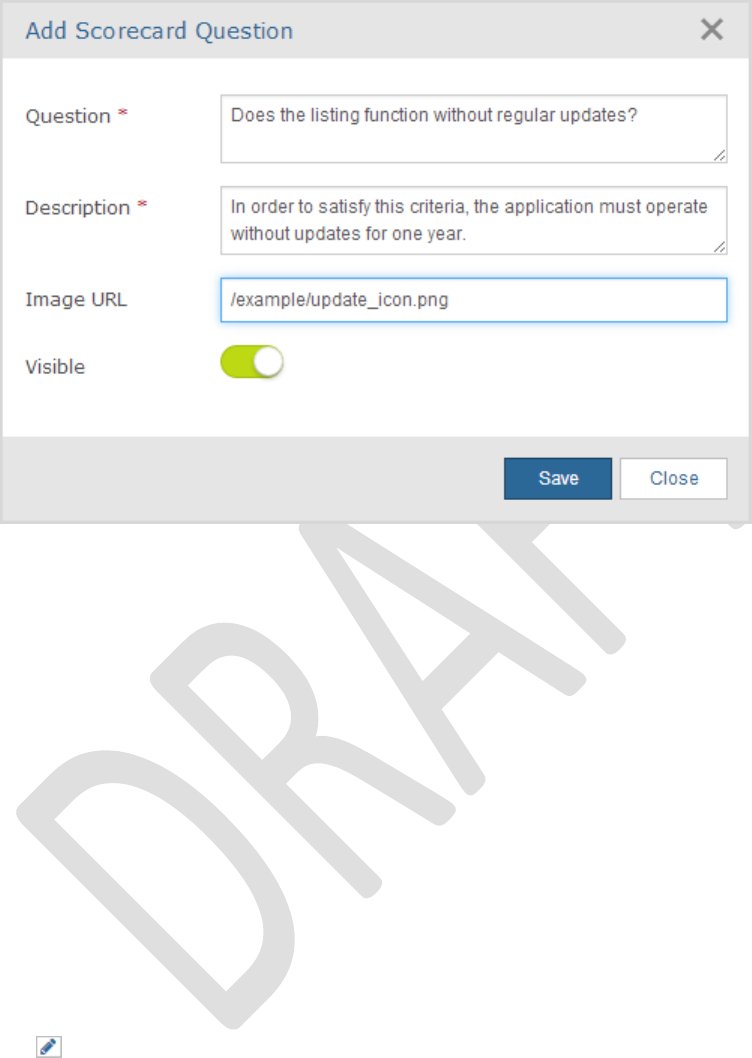
6.2 Add Scorecard Questions
Figure 16: Scorecard Question Edit Dialog Window
To add a question:
1. From the Scorecard Administration page, click Add at the bottom of the screen, this opens
the Scorecard question Edit dialog window.
2. Type the new question in the Question field. Note: Write the question in a way that queries
a yes or no response.
3. In the Description field, type a description that will appear under the question.
4. Add the address for an icon in the Image URL field if you want an icon to be associated with
the question.
5. Click Save. The question will appear below the standard questions.
6.3 Editing Questions
To edit a question:
1. From the Scorecard Administration page, click
to change a question. The Scorecard question Edit dialog window will open.
2. Modify any of the fields.
3. Click Save (or Close to cancel).
6.4 Deleting Questions
To delete a question:
1. From the Scorecard Administration page, click

DOD GOSS – Ozone Marketplace Administrator's Guide
Managing Scorecard Questions – 29
to delete a question.
2. A confirmation window appears, click OK to delete the question. It will be removed from the
database permanently.
DOD GOSS – Ozone Marketplace Administrator's Guide
Connecting to Partner Stores – 30
7 Connecting to Partner Stores
Stores can be configured to connect to other Stores and see listing results from those stores in
their search results. To connect to Partner Stores, add them to the local Store's Partner Store
Servers list. When a user performs a search in the local Store, "outside" listings from Partner
Stores will appear below search results from the local Store. Find information about using
Partner Stores in the User's Guide.
7.1 Interface: Partner Store Servers
The Partner Store Server Interface includes the following fields:
Name – A required field used to identify the Partner Store.
URL – A required field that displays the Web address used to locate the Partner Store. Use
the following format: *https://localhost:8080/context_name*
Timeout – A required field that limits the time a system will wait for connectivity to the
Partner Store before timing out.
Active – A slider that identifies if the Partner Store is accessible to users. To activate or
deactivate a store, you must edit it.
Icon – This field displays the icon associated with the Partner Store. It defaults to a generic
icon. To change the icon, click Browse and enter a different icon. Note: The Browse button
appears when the "Allow Image Upload" configuration is enabled. To enable/disable this
feature or to adjust the allowable size of the image, see Image Configurations (12.3:
Additional Configurations) accessible through the Application Configuration Interface
(11.1.14: Application Configuration Interface).
– Edits any of the fields listed in this section.
– Deletes the store.
If there is an error searching the Store, a red error message will appear in the search results
window.
7.2 Adding Partner Stores
To add an Partner Store connection:
1. Expand the drop-down [Store] User Menu.
2. On the menu, click Configuration Pages.
3. Click Partner Stores.
4. A list of Partner Stores will appear. Click
to add a store.
5. Enter a name to identify the store in the Name field.
6. Enter the Store server's URL.
7. Enter a timeout value in milliseconds in the Timeout field, the field defaults to 30000 ms (5
seconds). Note: If the Store does not contact a Partner Store within this amount of time, it
will cancel the search request.
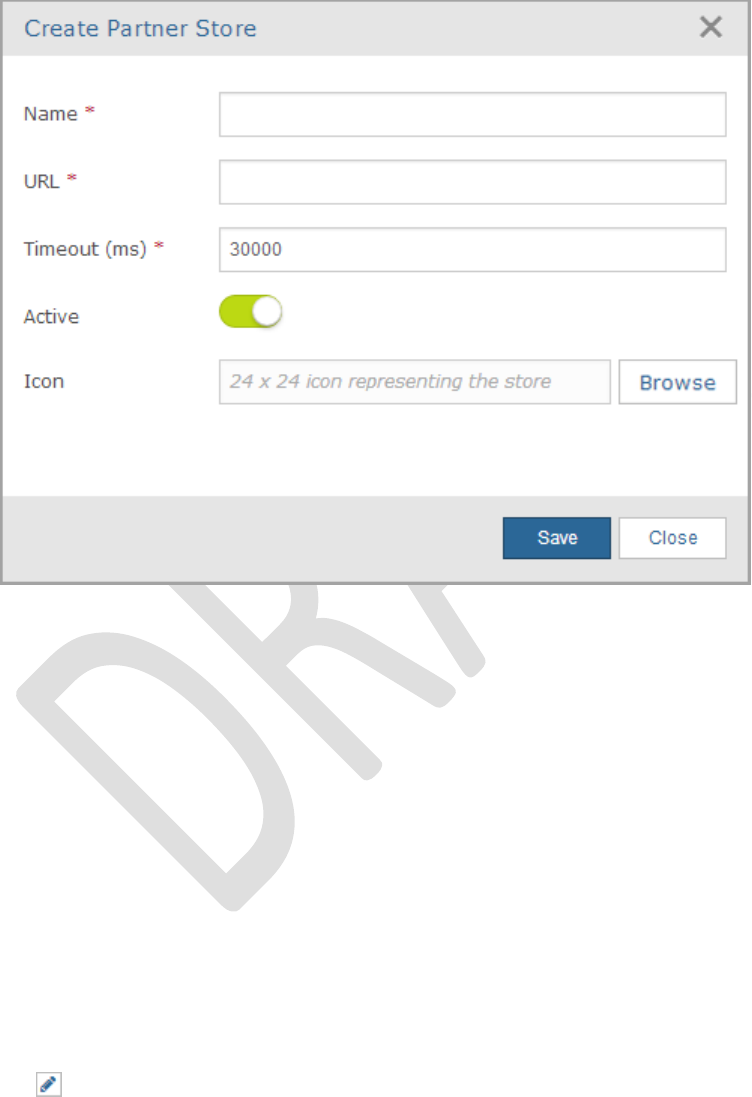
DOD GOSS – Ozone Marketplace Administrator's Guide
Connecting to Partner Stores – 31
8. Activate the store to include its listings in the search results, see section 7.1: Interface:
Partner Store Server for an explanation of the Active field.
9. To add an icon, click the Browse button and upload a new image. If you do not add an icon,
a default one will appear after saving. Note: It the store does not allow image uploads, this
field will be deactivated.
10. Click Save to add the connection to the Partner Store.
Figure 17: Entering Partner Store Information
The newly added Partner Stores will appear in the list of servers. This creates a relationship
between the Partner Store and the local store. However, it does not create a relationship
between the Partner Store and OWF. To add listings from a Partner Store to your local OWF,
an OWF administrator must add the Partner Store as an App Component in OWF. To add the
Partner Store as an app component in OWF, see the instructions about adding app components
in the OWF User's Guide.
7.3 Editing Partner Stores
To edit a Partner Store:
1. Expand the drop-down [Store] User Menu.
2. On the menu, click Configuration Pages.
3. Click Partner Stores.
4. A list of Partner Stores will appear. Click
to change a store's information.
5. Change the values of the field(s).
6. Click Save. The list of Partner Stores will again display.

DOD GOSS – Ozone Marketplace Administrator's Guide
Connecting to Partner Stores – 32
7.4 Deactivating Partner Stores
To deactivate the inclusion of listings from a Partner Store without deleting it from the server list
by marking the Partner Store as inactive:
1. Expand the drop-down [Store] User Menu.
2. On the menu, click Configuration Pages.
3. Click Partner Stores.
4. A list of Partner Stores will appear. Click
to change a store's information.
5. Deactivate the Partner Store by clicking the Active slider. It will change from green to gray.
6. Click Save. Listings from this deactivated Partner Store will not display in users' search
results.
7.5 Deleting Partner Store
To permanently remove access to listings from Partner Stores, delete the Partner Store from
the servers list:
1. Expand the drop-down [Store] User Menu.
2. On the menu, click Configuration Pages.
3. Click Partner Stores.
4. A list of Partner Stores will appear. Click
to permanently remove the store's information.
5. Click Save. The list of Partner Stores will again display.
DOD GOSS – Ozone Marketplace Administrator's Guide
Deleting Tags – 33
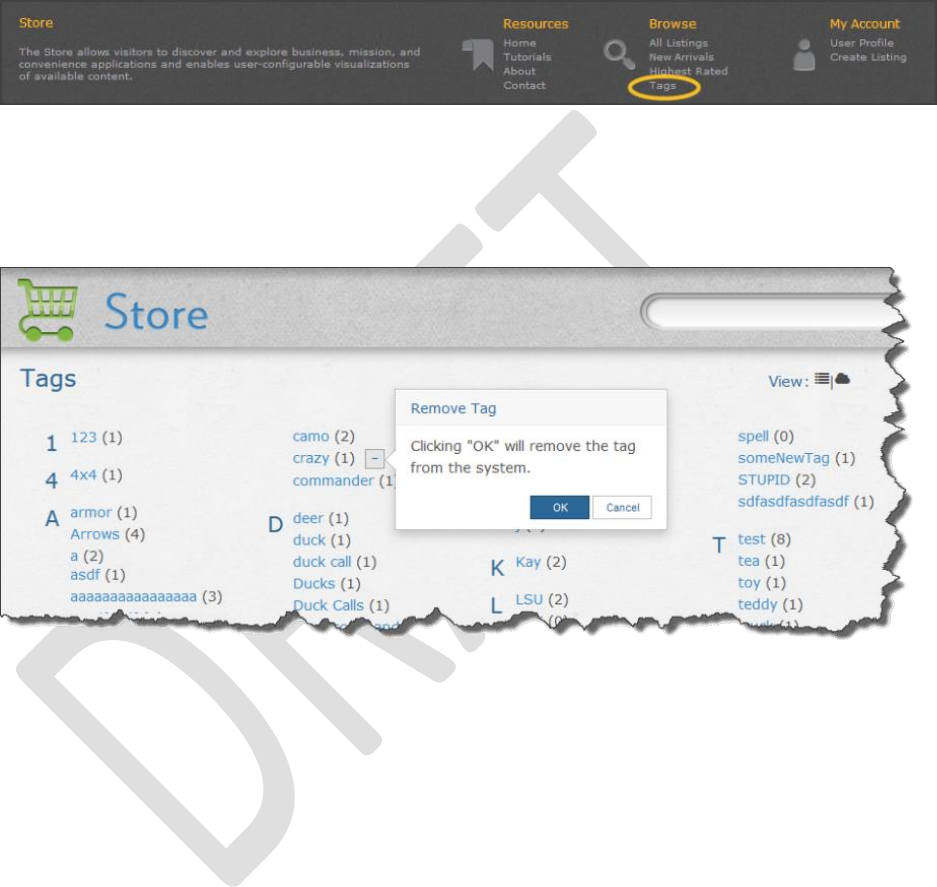
8 Deleting Tags
Users can add tags to any listing in the Store. Tags are user generated words that describe the
listing. From the Store footer, administrators can delete tags from the system. When an
administrator deletes a tag, it is removed from every listing that uses it.
To delete a tag:
1. Click Tags in the Browse section of the Store Footer:
Figure 18: Link to Tags Catalog Page
1. From the Tags catalog page, hover over the tag you plan to delete. A minus sign appears to
the right of the tag. Click the minus sign.
2. A warning message appears, click OK to remove the tag:
Figure 19: Tag deletion Warning Message
DOD GOSS – Ozone Marketplace Administrator's Guide
Overview – 34
9 Overview
The Listing Management Page displays the last 24 changes to listings and up to 24 listings
waiting for approval. To locate the page:
1. Expand the drop-down [Store] User Menu.
2. On the menu, click Configuration Pages.
3. Click Listing Management.
Figure 20: Listing Management Page
Note: Administrators who enter the Store directly instead of signing in through OWF will see the
Listing Management Page first. To return to the Discover Page, click the Store logo in the
upper-left corner.

DOD GOSS – Ozone Marketplace Administrator's Guide
Overview – 35
9.1 Recent Activity
The Recent Activity pane occupies the top portion of the screen and presents the administrator
with the last 24 changes to listings. To see older changes, click Show More.
The pane contains a timestamp identifying elapsed time since the change, the name of the
listing, the action taken and the name of the user who changed the listing. The Store records
the following actions:
Submitted - The administrator or the author of a listing completed the listing page and
clicked submit.
Rejected – An administrator rejected a listing.
Modified – The administrator or the author of a saved listing modified the listing.
Created – A contributor created a listing.
Approved – An administrator approved a listing.
Enabled – An administrator or owner enables a listing.
Disabled – An administrator or owner disables a listing.
Outside – An administrator set a listing to Outside.
Inside – An administrator set a listing to Inside.
Required and Required by listings cause four notifications:
o no longer requires
o no longer required by
o now requires
o now required by
Tag – When someone adds a tag or an administrator deletes a tag from a listing.
Review – An administrator can edit or delete a review.
9.2 Items Pending Approval
The pending approval pane occupies the lower portion of the screen and presents the
administrator with all the pending listings in their Store. These listings are sorted by their last
updated date. The last 24 appear on the screen. If there are more than 24 Pending Listings,
click Show More to see them.
To approve a listing, click it. The Listing's Quick View will open to the Admin tab. From there, an
administrator can edit, copy, delete or disable (or enable) pending listings. For more information
about approving a listing, see section 4.1: Approving and Rejecting Pending Listings.

DOD GOSS – Ozone Marketplace Administrator's Guide
Configuring Help Files – 36
10 Configuring Help Files
Administrators can house tutorial videos within their Store.
The page where videos are displayed uses HTML 5 video capabilities with a flash fall back and
uses the browser's .pdf functionality to open PDFs in a new window.
To add a video, PDF or slideshow like a PowerPoint to the resources page, you'll need to do the
following for each type of item:
Video:
o videoName A directory containing the following:
videoName.png (A poster or icon that will be shown in the player. The size
of the .png should be 120 x 90 pixels.)
videoName_Large.png (A larger format poster or icon that will be shown
when the video is queued. The size of the png should be 456 x 319 pixels.)
videoName.mp4
videoName.ogg
Note: Make sure there are no spaces in filenames or folder names. To make spacing appear in
the user interface, use underscores in place of spaces in actual file names. For example,
Video_Name.mp4 will appear as Video Name in the interface.
Note: While not required, .webm, .ogv and .swf versions of the videoName can be included in
the directory.
PDF
o pdfName A directory containing the following:
pdfName.pdf
Slideshows
o slideshowName A directory containing the following:
slideshowName.ppt
The main directory (videoName) should be placed in the exploded
\webapps\marketplace\media media folder.
Once that has been done, the MediaDescriptor.txt file needs to have an entry made for each
video, PDF or slideshow. It's critical to use the following format:
mediaName;mediaType(Novice, Expert, Guide or Slideshow); mediaLength(pages or time);
mediaDescription
mediaName - The file name of your choosing: sampleVideo
mediaType – The level of the video: Novice
mediaLength – The duration of the video 3:09
mediaDescription – A written description: This is a tutorial video.
The resulting addition to the MediaDescriptor.txt file would read as follows:
sampleVideo; Novice; 3:09; This is a tutorial video.
Note: File and folder names cannot contain spaces. To make spacing appear in the user
interface, use underscores in place of spaces in actual file names. None of the media items
should contain a semi-colon ( . This will cause issues as it is being used as the delimiter.
DOD GOSS – Ozone Marketplace Administrator's Guide
Store Configuration – 37
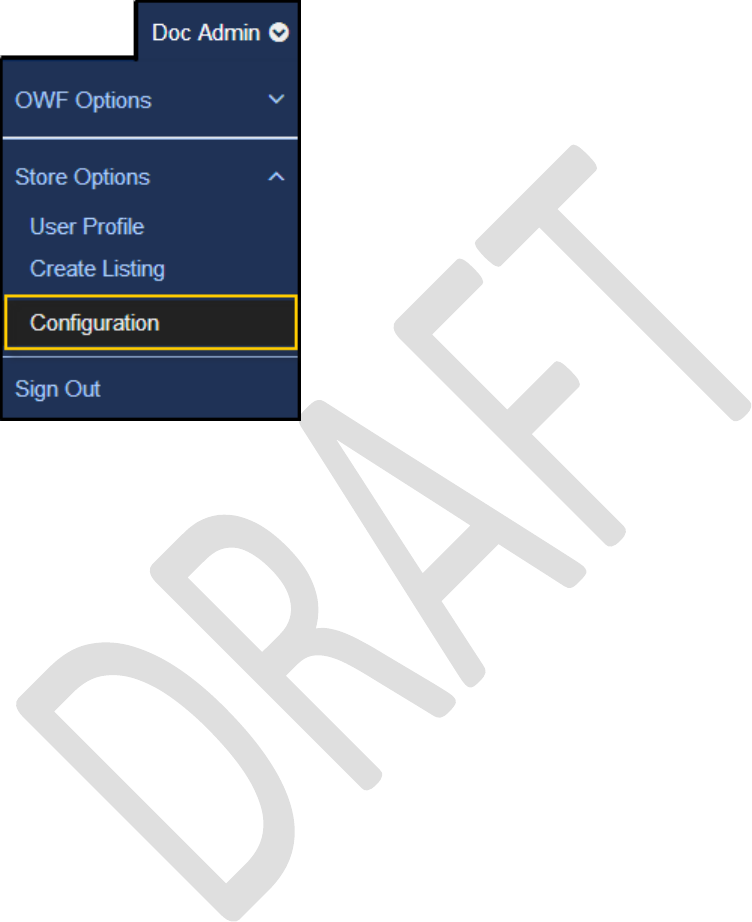
11 Store Configuration
To configure a Store's reference data, click the configuration link which is located in the drop-
down user menu on the right side of the banner. The configuration link takes you to the starting
page where an administrator can customize the reference data used in the local Store.
Figure 21: Drop-down User Menu - Configuration
11.1 Administration Interface
The administrative interface provides persistent storage for the information inside the Store,
such as listing types, states, categories and custom field definition. The complete list can be
seen below in Figure 22: Administration Configuration Interface. Detailed information about this
interface can be found in subsequent sections.
DOD GOSS – Ozone Marketplace Administrator's Guide
Store Configuration – 38
Figure 22: Administration Configuration Interface
Listing Management—Displays a list of recent changes to all listings and items waiting for
approval.
Types—Defines the technological classes that are available to create listings (OZONE
Apps, App Components, Web Apps, plugins, desktop applications, etc.). This section allows
an administrator to view, create, update, and delete listing types.
State—Defines the different life-cycle options available for a particular listing (active, beta,
etc.). This section allows an administrator to view, create, update, and delete listing states.
Category—Defines the different functional classes of a listing (geospatial, temporal,
reporting, etc.). This section allows an administrator to view, create, update, and delete
listing categories.
Company– Allows an administrator to view and add company names and icons available in
the Store.
Contact Types—Allows administrators to identify a designated person or organization and
provide an e-mail and phone number for them.
DOD GOSS – Ozone Marketplace Administrator's Guide
Store Configuration – 39
Custom Field Definition—Allows an administrator to define additional fields to a particular
listing type. Additionally, if present, the filled-in custom field definition will be visible to all
viewers of a listing. From the administrative interface, an administrator can view, create,
update, and delete custom fields.
Rejection Justification—Allows an administrator to view, create, update, and delete
rejection justifications, which appear in a drop-down when an administrator rejects a listing.
Profile—Defines the profile data which is associated with individual users.
User Account—A constantly updating field that displays user name and last sign-in date.
Intent Action—Defines the intent actions that are available in the store.
Intent DataType—Defines the intent data types that are available in the store.
Data Exchange—Add listings from other stores or locations to this store or download listing
from this store to the computer's downloads folder or a predetermined location.
Application Configuration—Customizable fields including icons, banner text and run time
parameters.
Partner Stores—A list of other stores. When connected, users can search and add listings
from Partner Stores.
Each category of reference data on the administration interface (types, categories, states, etc.,)
has four types of auditing criteria that are always recorded:
Created – Shows the date when the information was created.
Created By – Shows the user (or defaults to "System") who created the information.
Last Edited – Shows the date when the information was last edited.
Last Edited By – Shows the user (or defaults to "System") who updated the information.
You can always return to the Administration Configuration Interface by clicking the Admin Home
link that appears at the top of every Administration Configuration page.
11.1.1 Listing Management
Listing Management displays the last 24 changes to all listings displays at the top of the page.
The lower portion of the page displays the most recent 24 listings pending approval. To see
additional Pending Listings or Recent Activity, click Show More. For more information on each
section see 9.1.1: Recent Activity and 9.1.2: Items Pending Approval .
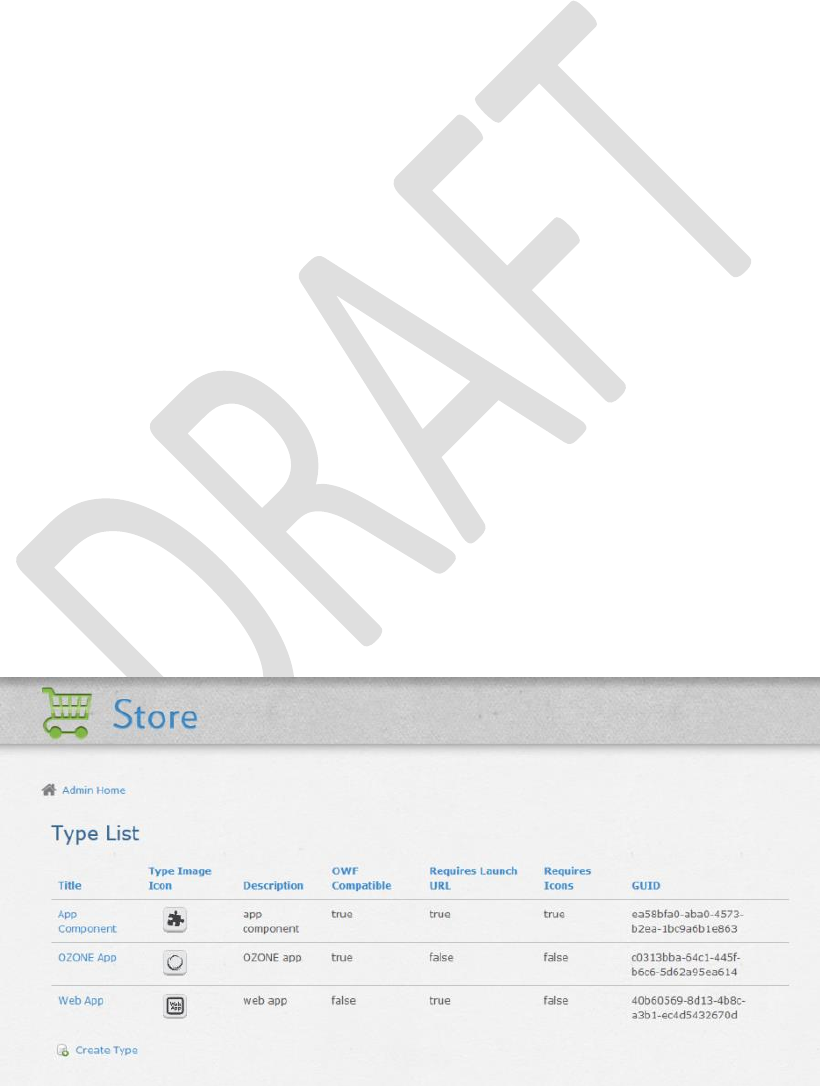
11.1.2 Types
DOD GOSS – Ozone Marketplace Administrator's Guide
Store Configuration – 40
Figure 23: Type List
The type list allows an administrator to create, edit or delete any Store type. A type can best be
considered the technological class of a listing, such as plugin, desktop app, etc. By default, the
Store includes the following types: OZONE App, App Component and Web App. Administrators
cannot edit or delete OZONE Apps or App Components. Administrators can create, edit or
delete other types. Once created, the type will be immediately assigned a GUID and be made
available for any new listing that gets created or edited.
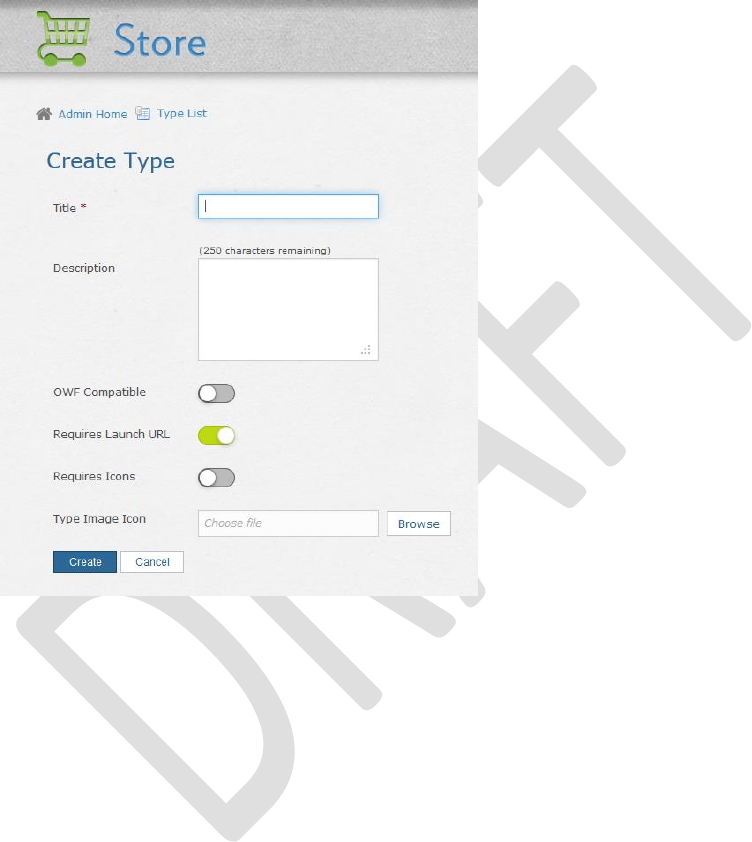
Create Type — Allows an administrator to create new types by using the dialog box below:
Figure 24: Create Type Dialog
Type List – Returns to the Type list (Figure 23).
Title – The common name of the type (e.g., OZONE App, App Component, plugin, Web
App,) as it will appear for selection when a new listing is being entered.
Description – Allows an administrator to use up to 250 characters to describe the newly
created type.
OWF Compatible – Defines whether the type is compatible with the OZONE. To add a
listing to OWF, it must be approved, enabled and the listing Type must be OWF compatible.
To make an item compatible with OWF, check the OWF compatible box.
Requires Launch URL – Dictates whether the listing will require a launch URL during its
creation.
Requires Icons –When viewing a listing in either the short or quick view, the large icon
(where applicable) will be used as the listing image.
Type Image Icon – If the system allows image uploads, use this button to associate a
specific image with the type. For more information, see section 11.1.2.2: Applying Type
Image Icons. If the system does not allow image uploads, the Browse button will not
appear. To change this setting, use the Allow Image Upload setting described in section
12.3: Additional Configurations.

DOD GOSS – Ozone Marketplace Administrator's Guide
Store Configuration – 41
Note: Maximum image size is dictated by the value set by an administrator in the Additional
Configuration setting (section 12.3: Additional Configurations). If an uploaded image exceeds
that file size, a generic "Failed to update" error will be returned.
– Allows a user to create and add the type, or to cancel it. Creating the type will save it to
the database and make it available immediately. Clicking cancel will void the type which
was being created.
Clicking one of the hyperlinked titles in the type list will open the view type page, shown below.
The dialog contains all the details entered when the type was created. From the dialog, an
administrator can edit the type details, delete the type entirely, or create a new type.
Note: If an administrator attempts to delete a type using the delete button, the Store will block
the deletion if the type is used in any listing, regardless of its approval status. For example, all
plugin listingsin the Store must be deleted before the overall type can be deleted. Also,
administrators cannot edit or delete OZONE App or App Component types.
Delete – Deletes the selected type - see the note above for important details about type
deletion.
Edit type – Launches the edit type dialog shown below:
The edit type dialog allows an administrator to change every element of a particular type. Every
field that was present during type creation is available during type editing.
11.1.2.1 Distinctions Between Types
When creating a new Type, the OWF Compatible and Requires Launch URL fields will cause
listings to function differently from the Listing Quick View. This section explains those
differences:
If the Type enables OWF Compatible and Requires Launch URL, the Listing Quick View will
have an Add button. When a user clicks Add, a copy of these types of listings will be added
to their OWF App Components window.
If the Type enables OWF Compatible and disables Requires Launch URL, the Listing Quick
View will NOT have a Start or Add button.
If the Type disables OWF Compatible and enables Requires Launch URL, the Listing Quick
View will have a Start button. When a user clicks Start, these types of listing can open in a
new browser tab.
11.1.2.2 Applying Type Image Icons
In the Type Image Icon field, click the Browse button to select the specific image that will be
associated with the type.
Once selected, the path and name of the image will appear in the type image icon page. Once
saved, the image will be associated with the type. When editing a previously saved type image
icon, there are three options available to the administrator:
Preview – When clicked, a preview window will spawn showing a large-scale version of the
image.
Note: Because images scale down significantly better than they scale up, the Store
development team recommends image sizes of approximately 240 x 240 pixels. This will help
ensure that when previewing images, they maintain their visual integrity.
Change – Allows the administrator to return to the browse dialog, where they can upload a
different image. In the event that the icon isn't going to be changed, click the "no change"
button.
DOD GOSS – Ozone Marketplace Administrator's Guide
Store Configuration – 42
Delete – Allows an administrator to remove an associated type image icon without having
to replace it with another image.
11.1.2.2.1 Image Hierarchy
The images which show up in a particular listing (on the Quick View, for example) are based on
an image hierarchy:
When creating or editing a listing, a user may have the option of entering URLs for a large
or small icon. If entered, the large image will accompany the listing.
If a user chooses not to enter a URL for a large or small icon and an administrator has
added a type image icon for that type of listing being entered, as mentioned in section
11.1.2.2: Applying Type Image Icons, the type image icon will accompany the listing.
If a user chooses not to enter a URL for a large or small icon and no type image icon is
uploaded for that type of listing being entered, the default type image icon will accompany
the listing.
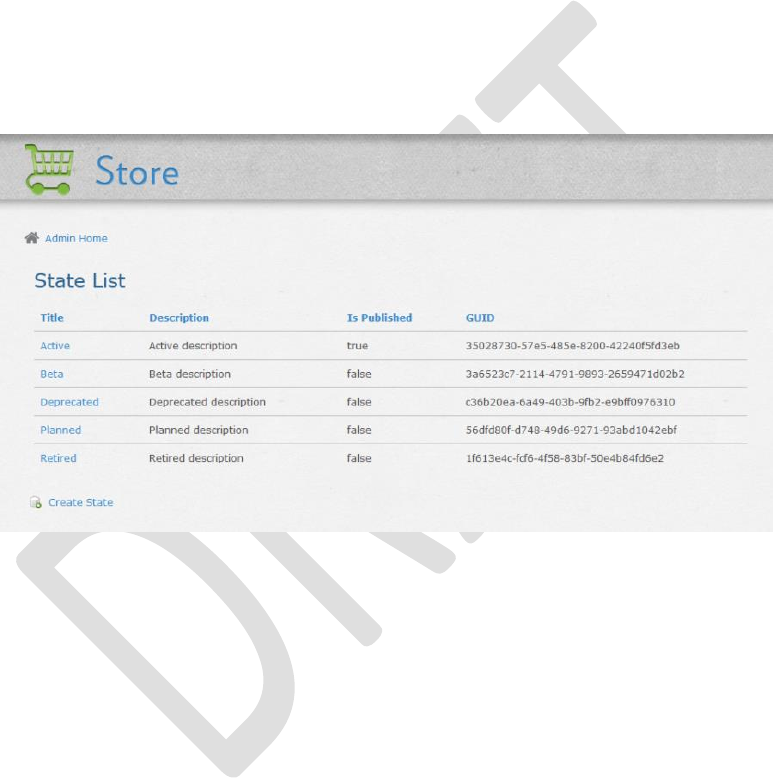
11.1.3 State
Figure 25: State List
The state list contains a summary of all possible listing states, their description, and whether or
not the state allows for interactive functionality (the launch button that appears when viewing a
listing). The state can best be described as the lifecycle of the software which is being listed.
Once created and saved, a state will be assigned a GUID and be immediately available for
listings.
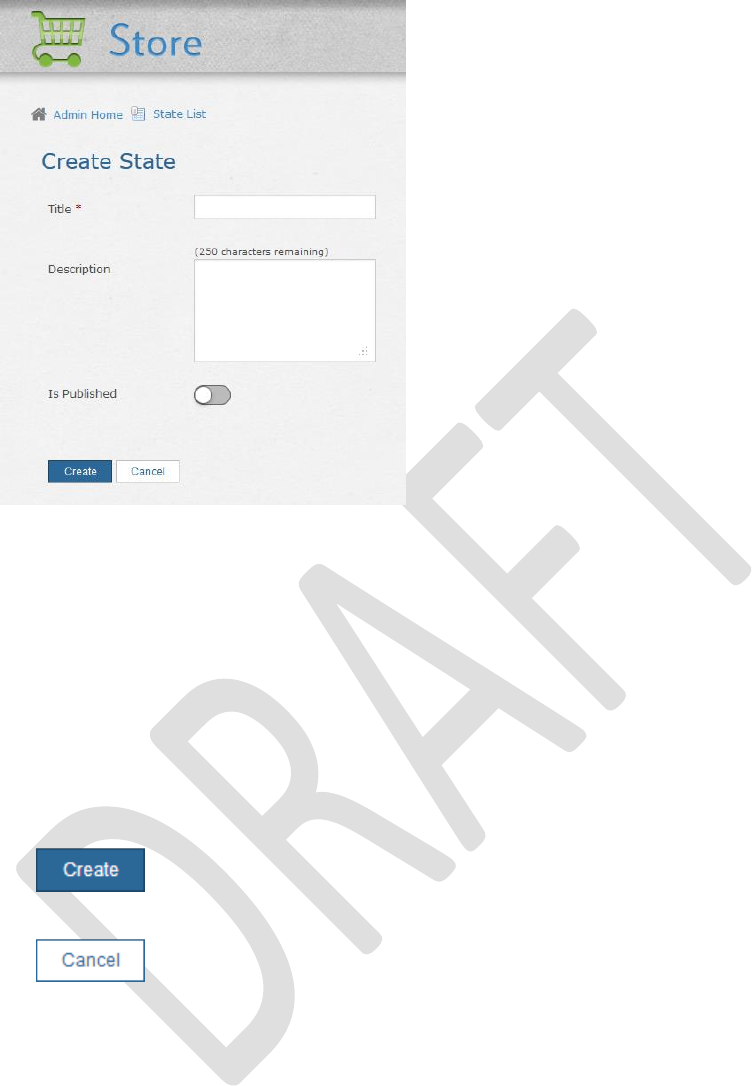
Create State – Allows an administrator to create a new state by using the dialog box below:
DOD GOSS – Ozone Marketplace Administrator's Guide
Store Configuration – 43
Figure 26: Create State Dialog
Admin Home – Returns to the list of Configuration Pages.
State List – Returns the user to overall state list.
Title – Names and defines the different lifecycle statuses of a particular listing.
Description – Allows an administrator to use up to 250 characters to describe the new
state.
Is Published – Designates that an approved listing will appear in the Store with a launch
button. If left disabled, an administrator will still be able to approve a listing, however, it will
not be able to be launched. This flag needs to be checked in order for the listings assigned
to the state to appear in OWF.
– Allows a user to create and add the state, or to cancel the create operation. Creating the
state will save it to the database and make it immediately available for use.
Clicking on one of the titles in the state list will open the view state window. From here, an
administrator can edit the state details or delete the state entirely.
Note: When deleting a state via the delete button, the Store will block the deletion if the state is
used in any listing, regardless of its approval status. For example, all Beta listings in the store
must be deleted before the overall state can be deleted.
Edit State – Launches the edit state dialog.
The edit state dialog allows an administrator to change every element of a particular state.
Every field that was present during state creation is available during state editing.
Note: When a change is made to any field in the state dialog, those fields instantly change for
all store listings. Accordingly, be mindful of times when a new state rather than an edit to a
current state is in order.
Delete – Will delete the state in question. See the note above for important information on
state deletion.
DOD GOSS – Ozone Marketplace Administrator's Guide
Store Configuration – 44
11.1.4 Category
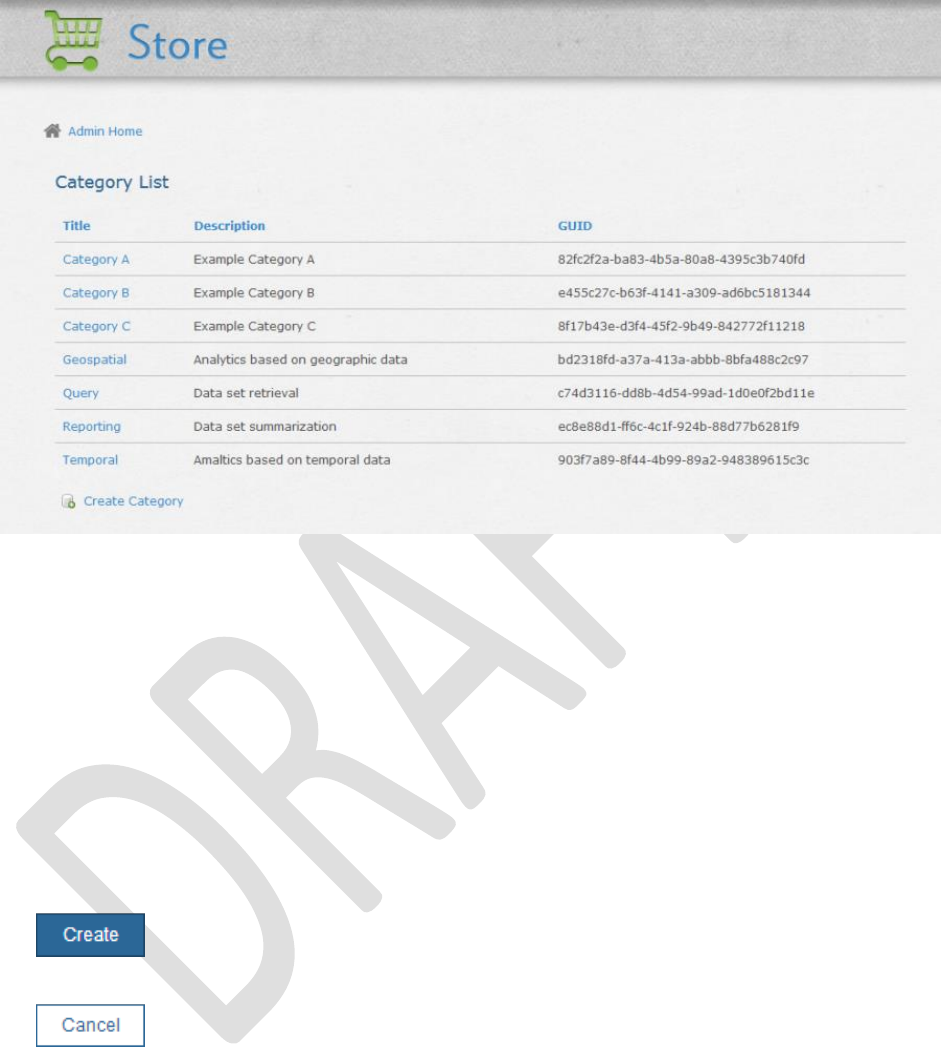
Figure 27: Category List
The category list contains all the information and tools to create, edit or delete Store categories.
A category helps to define an overall aspect or specialty of a set of listings, such as geospatial,
reporting, temporal, etc. It can be used to filter. Once created, the category will be assigned a
GUID (not shown in image) and be available for both new and existing listings.
Create Category – Allows an administrator to create new categories.
Admin Home – Returns to the list of Configuration Pages.
Category List – Returns the user to the main category list.
Title – The value (geospatial, query, reporting, etc.) that will appear for selection when a
user is entering or editing a new listing.
Description – Allows an administrator to use up to 250 characters to describe the category.
– Allows a user to create a category, or to cancel out of the creation. Creating the category
will save it to the database and make it immediately available for use.
Clicking on a hyperlinked title in the category list will open the view category dialog, shown
below. From the dialog, an administrator can edit the category or delete the category entirely.
Note: Refer to the bullet about deletion for a further explanation about deleting categories that
are in use.
Edit Category – Launches the edit category page. The edit category page allows an
administrator to change every element of a particular category. Every field that was present
during category creation is available during category editing.
DOD GOSS – Ozone Marketplace Administrator's Guide
Store Configuration – 45
NOTE: When a change is made to any field in the category page, those fields instantly change
in all listings. Accordingly, be mindful of times when a new category rather than an edit to a
current category is in order.
Delete – Will delete the category in question. Please note, when deleting a category via the
delete button, the Store will block the deletion if the category is used in any listing,
regardless of its approval status. For example, all geospatial listings in the Store must be
deleted before the geospatial category can be deleted.
11.1.4.1 Editing a Category
Use the following instructions to change the title or description of a category:
1. From the drop-down User Menu, click Configuration Pages.
2. Click Category.
3. Click the Title of the category you want to change.
4. Click Edit Category and then change the text.
5. Click Save, the change will propagate through the system.
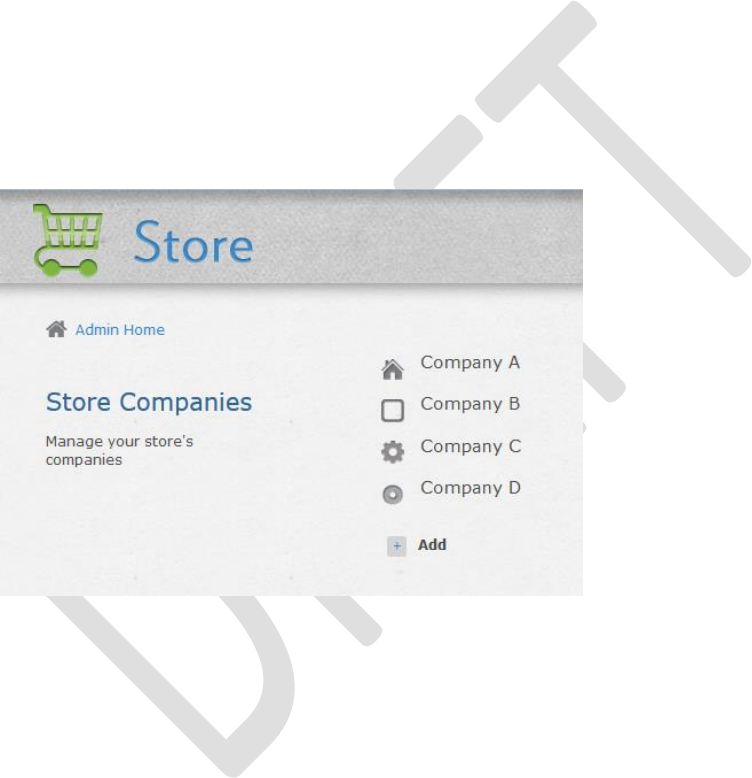
11.1.5 Company
Figure 28: Company List
The Company List allows administrators to add or view company associations that are available
in the Store. These associations can be used to identify from where listings in the Store came
and which organization is responsible for them. The company icon and name appear under
each listing title in the Short Listing View on the Discovery and Search Results pages.
To edit a company name or its icon URL, click on it.
Click the Add button to add another company association.
DOD GOSS – Ozone Marketplace Administrator's Guide
Store Configuration – 46
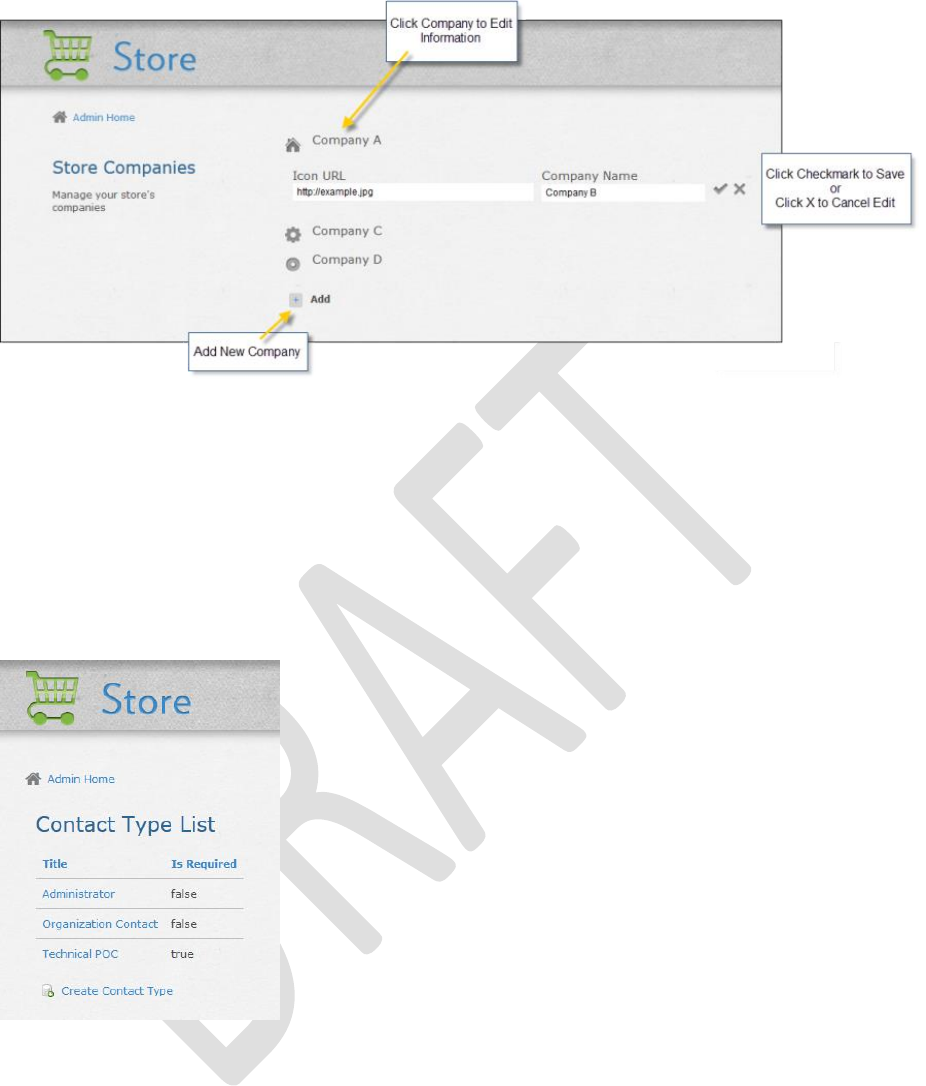
Figure 29: Editing Icon URL and Company Name
After clicking Add or clicking an existing company, the following fields are editable:
Icon URL: The address for the icon associated with the company. The icon will identify the
company when it is associated with a listing.
Company Name: The title of the company as it will appear in a listing. The name must be
unique.
Note: There is no way to remove a company after adding it to the system.
11.1.6 Contact Types
Figure 30: Contact Type List
The Contact Type allows administrators to create, edit or delete fields that identify designated
contact people or organizations and their emails or phone numbers. If the field is required, it will
automatically appear on the Create/Edit Form. If it is optional, users click the + sign to add it on
the Create/Edit Form.
If a Contact Type is deleted from the Contact Type List, it and its contents will be removed
from every listing in the system.
All Contact Type titles must be unique and NOT include commas. If you create a Contact Type
field that uses the same name as another field, these rules apply on the Listing Quick View
Details tab:
The system recognizes Custom Field contactPoc and ignores Contact Type contactPoc.
The system recognizes Contact Type Field Name owners and ignores Default Field
Name owners.
DOD GOSS – Ozone Marketplace Administrator's Guide
Store Configuration – 47
Contact Types appear on the Quick View Details tab under the Store References heading
where only administrators see it. If an administrator moves the field under the Specifications
heading it becomes visible to all users. To make a Contact Type visible to all users, add its
exact Title to the Quick view field order field on the Additional Configurations page in the
Configuration Pages as described in section 5.3.1: Changing fields on the Details tab.
Contact Type List – Returns the user to the list of all Contact Types in the system.
Title – The value (Optional POC, internal contact, etc.) that appears on the Listing
Create/Edit Form. Do not use commas.
Create Contact Type – Allows an administrator to create new Contact Types.
Is Required – Toggle switch that appears on the Create Contact Type form. Enabling this
feature makes this Contact Type required for all listing types.
– Allows a user to create a Contact Type, or to cancel the creation. Creating the category
will save it to the database and make it immediately available for use.
11.1.7 Custom Field Definition
Figure 31: Custom Field Definition List
The custom field definition list contains the tools and information needed to create, edit, or
delete custom fields. A custom field can be used for any additional information that an
administrator may want to include as a standard field on the create listings form. Each listing
can have multiple custom fields and each custom field can be assigned to multiple listing types.
Once saved, a GUID will be assigned to the custom field definition and it will be available for
use.
The following section describes each field in the custom field entry form:
Admin Home – Returns to the list of Configuration Pages.

DOD GOSS – Ozone Marketplace Administrator's Guide
Store Configuration – 48
Create Custom Field Definition – Allows an administrator to create new custom field
definition.
Custom Field Definition List – Returns the user to the main custom field definition list.
Name – The simple name of the custom field definition. While the label appears in
individual listings of the associated type, the name does not appear in a listing, or during
listing creation. It only serves as a naming convention on the custom field definition list.
Label – The name of custom field as shown to the user.
Tooltip – The text the user will see when the cursor hovers over the label of the custom
field.
All Types – If checked, the custom field will appear in the listing form for every listing type,
this includes any future type that may be created.
Types – Defines the types that will be associated with the custom field. Multiple types can
be selected by holding down the CTRL key while selecting individual types with the mouse.
Placement – Defines where on the create/edit listing page the custom field will appear,
choices include:
o Primary Characteristics – Basic (usually mandatory) information such as name,
type, description, etc.
o Technical Properties – URLs that point to installation, documentation and
screenshots.
o Type Properties – Fields that only appear on the create/edit listing page for
specific types.
o Store References – If an OWF or a Store instance is being paired with a Partner
Store, ownership information including owner name, technical POC, organization,
and explanations of requirements and dependencies can be provided.
Field Type – Determines if data will be entered/displayed as text, a drop-down choice, an
image URL or a checkbox.
o Text – When selected, the custom field will appear as a standard text field. It allows
a user to enter one line of text (about 250-characters).
o Text area – When selected, the custom field will appear as a standard text field that
allows a user to enter several lines of text (about 4,000-characters).
o Image URL – When selected, the custom field will appear as a URL with a preview
link that allows users to review an attached image.
o Checkbox – When selected, the custom field appears as a checkbox.
o Drop-down – When selected, a drop-down interface will appear and allow for the
creation of options for a drop-down custom field definition.
Allow Multiple Selections – Check this box to allow the user to select
more than one option for the custom field. If left unchecked, the custom
field drop-down will only allow one options to be selected.
Add Option – Adds text from the options field to the overall list of drop-
down options. For example, in the image above, when add option is
clicked, the variable "Peach" will be added to the list containing "Apple" and
"Lemon."
Edit – Allows an administrator to change text in a drop-down item.
Up and Down – Allow an administrator to re-order the list of drop-down
items.
Delete – Allows an administrator to delete an item from the drop-down list.
Description – Allows an administrator to use up to 250 characters to describe the custom
field.

DOD GOSS – Ozone Marketplace Administrator's Guide
Store Configuration – 49
Is Required – Allows an administrator to mandate an entry in the field. If a required custom
field is added to an existing listing, entries made before that listing required the custom field
will continue to function without the required custom field data. However, if the pre-existing
entry is edited, it will then require the inclusion of data in the new custom field.
– Create allows the user to save the creation of the custom field definition and cancel allows
the user to cancel the operation.
Clicking on a hyperlinked title in the custom field definition list will open the view custom field
definition page, shown below. From this page, an administrator can edit, disable or delete the
custom field definition.
Delete – Will delete the custom field in question. However if the custom field is associated
with any listings, it cannot be deleted. Please note, when deleting a custom field via the
delete button, the Store will block the deletion if the custom field is used in any listing,
regardless of its approval status.
Edit Custom Field Definition – Launches the edit custom field definition.
The edit custom field definition page allows an administrator to edit a particular custom field
definition. In addition to every field that was present during custom field definition creation, the
following is available during editing:
Disable – Allows an administrator to disable or enable an entry from a drop-down list.
Disabling a drop-down option does not remove it from custom fields which are already in
place nor does it delete or transfer existing data. It does, however, make the disabled
option(s) unavailable for new listings. Once an item is disabled, its appearance will change
dependent on your browser, as shown below:
Enable – Allows an administrator to reactivate a disabled list item which includes it as a
selection option for future entries in the drop-down list. To enable a disabled list item,
highlight the disabled item, then click enable. The item's appearance will change to active,
as shown below.
NOTE: When a change is made to any field in the custom field definition dialog, those fields
instantly change in all listings where the fields are present.
Save or Cancel – Allows an administrator to save any changes made to custom field
definitions. Once saved, custom fields become available for all listings. Any previously
approved listing will have the custom field added but it will be empty until an administrator
edits the listing to enter data into the custom field. If cancelled, the page will close and no
changes will be saved.
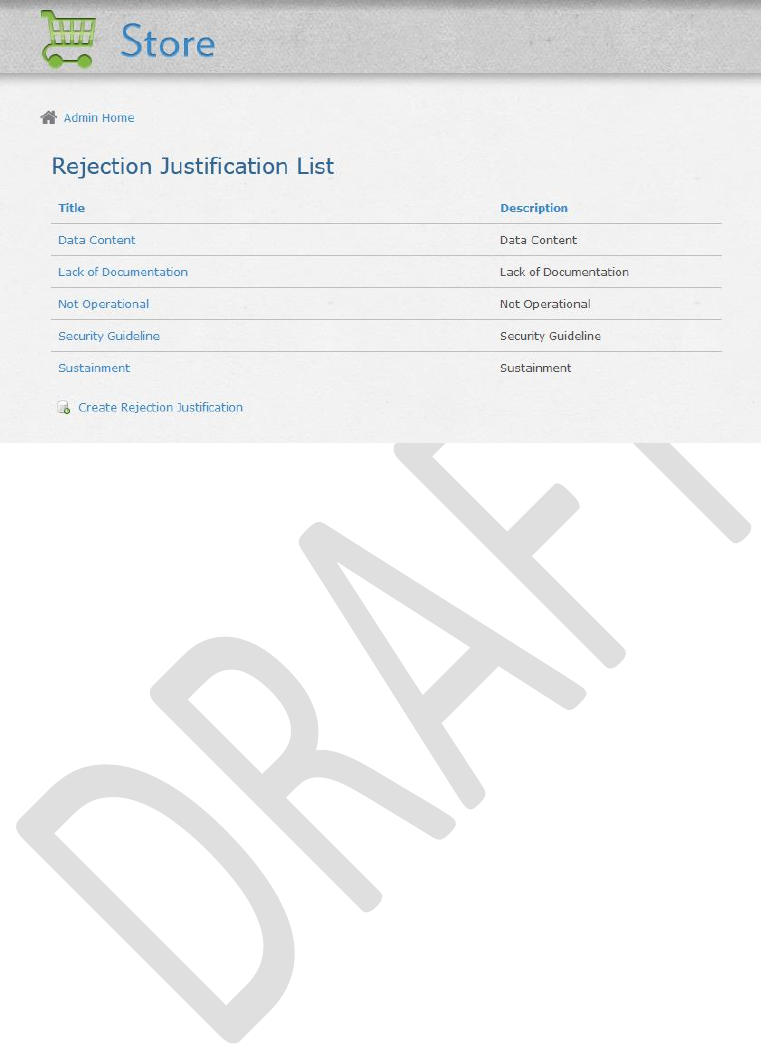
DOD GOSS – Ozone Marketplace Administrator's Guide
Store Configuration – 50
11.1.8 Rejection Justification
Figure 32: Rejection Justification Dialog
One can easily view, create, update, and delete rejection justifications, which will appear in a
page when an administrator rejects a listing. The Store ships with the following default rejection
justifications:
Data Content
Lack of Documentation
Not Operational
Security Guideline
Sustainment
The create rejection justification link takes an administrator to the create rejection justification
dialog.
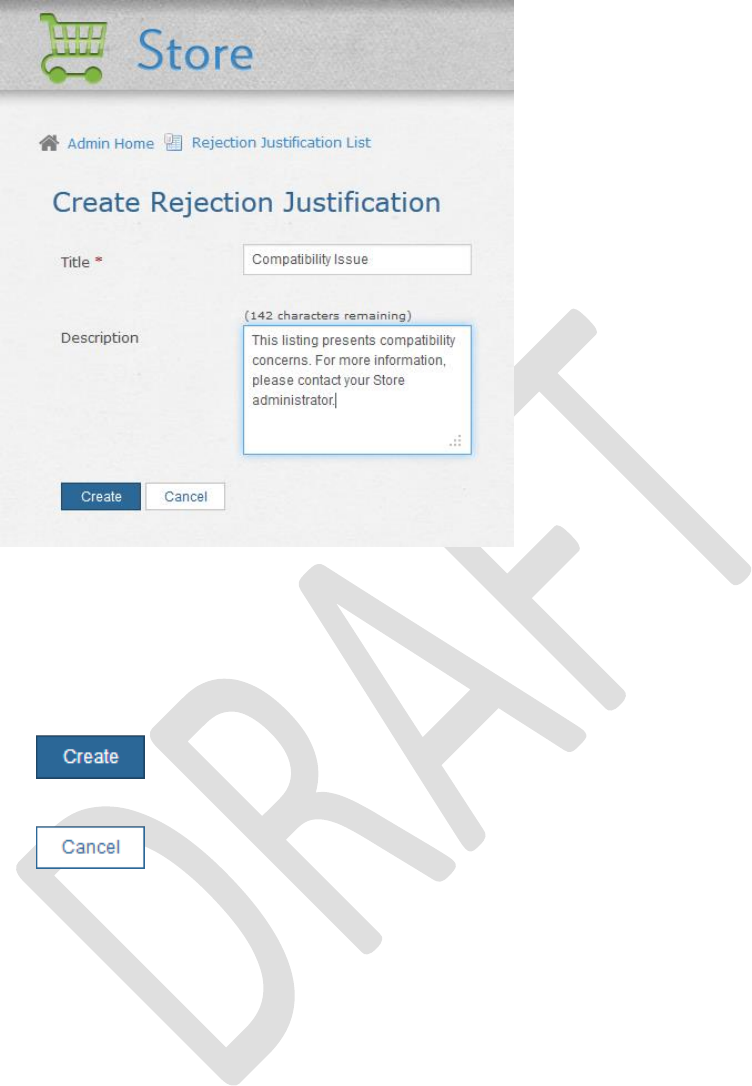
DOD GOSS – Ozone Marketplace Administrator's Guide
Store Configuration – 51
Figure 33: Create Rejection Justification Dialog
Title – The simple name of the rejection justification. The name will appear in the drop-
down list when an administrator chooses a rejection justification.
Description – Allows an administrator to use up to 250 characters to describe the rejection
justification.
– Create allows the user to save the creation of the rejection justification and cancel allows
the user to cancel out of the operation.
Clicking on a hyperlinked title in the rejection justification list will open the view rejection
justification page.
Clicking on any of the rejection justifications will show all the details for that particular
justification. From the page, an administrator can delete the rejection justification by clicking the
delete button, or edit it by clicking edit rejection justification.
Note: When deleting a rejection justification, the Store will block the deletion if the justification is
currently in use. All listings which contain the justification that is to be deleted must be removed
from the Store before the rejection justification can be deleted.
Edit Rejection Justification – Launches the edit rejection justification page.
The edit rejection justification page allows an administrator to edit a particular rejection
justification's title and description.
Save and Cancel – Allow an administrator to save any changes made to rejection
justification. Once saved, the rejection justification becomes available for use. If cancelled,
the dialog will close and no changes will be saved.
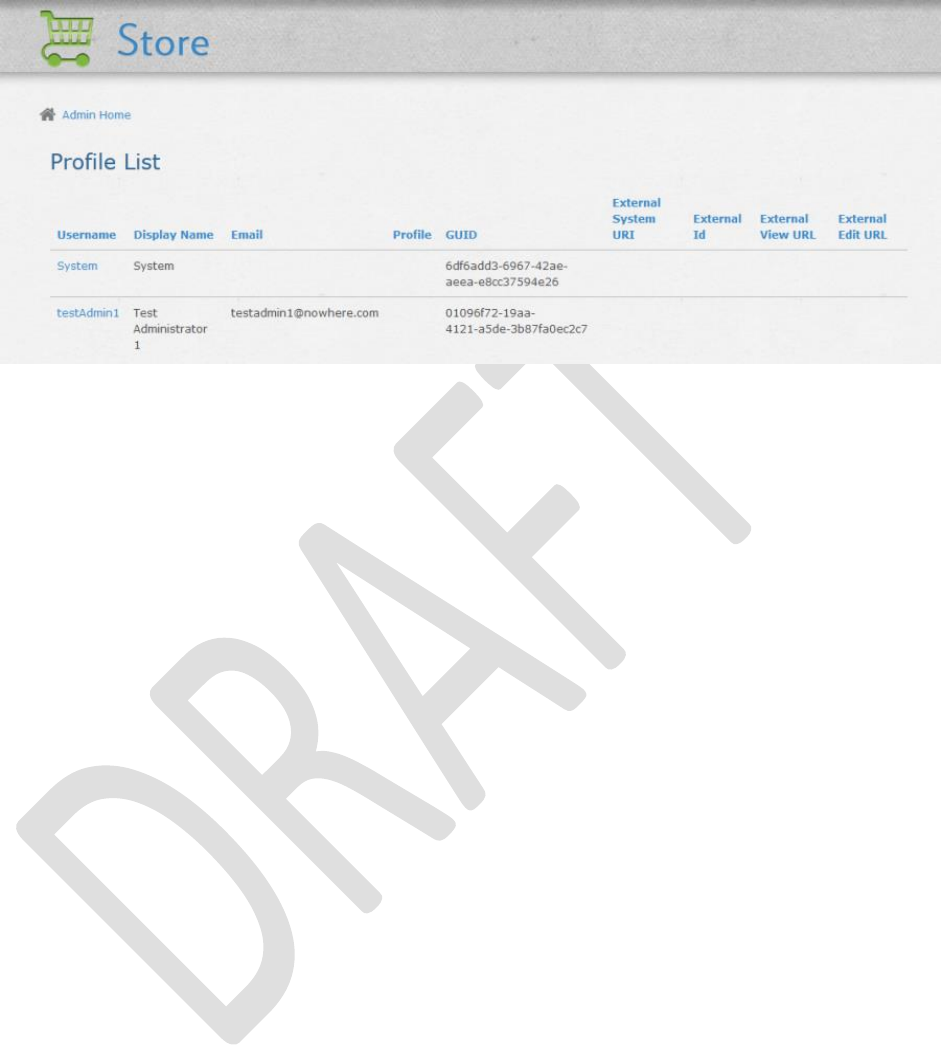
DOD GOSS – Ozone Marketplace Administrator's Guide
Store Configuration – 52
11.1.9 Profile
Figure 34: Profile List
The profile list contains a list of all the user profiles within a specific Store. In addition to a GUID
which is added when the profile is saved, the profile contains the following data which also
appears to users viewing either contributor profiles, or listings:
Username – The unique identifier of a specific user, for example a user named "John
Smith" may have the username "jsmith1".
Created – The date when the profile was created on the system.
Created By – Identifies who created the profile.
Last Edited – The date of the most recent changes to the profile.
Last Edited By – Identifies who last modified the profile.
Display Name – The name of the user as it appears throughout the store.
Email – The email address of a user.
Profile – A description that is entered by the user or administrator.
External System URI – the Store has the ability to incorporate data from external systems.
If the profile was entered from an external system, this field tells the name of the system
where the profile was created.
External ID* – The unique identifier from the external system for the user who owns this
profile.
External View URL* – The link to the page for the external system that provided the
information about this user.
External Edit URL* – The location from where the profile can be edited.
* These fields are only populated when the profile is an external profile.
Note: Administrators cannot change external data.
When a hyperlinked name is clicked from the profile list, the view profile page will launch.
Profile List – Returns the user to the profile list.
Edit Profile – Launches the edit profile page.
The edit profile page allows an administrator to change the display name, email address, and
contributor profile information for any user. In addition to using the edit profile page, an
administrator can edit a contributor profile from the user profile page. An administrator can
navigate to a user's profile page by clicking on the username anywhere it appears as a
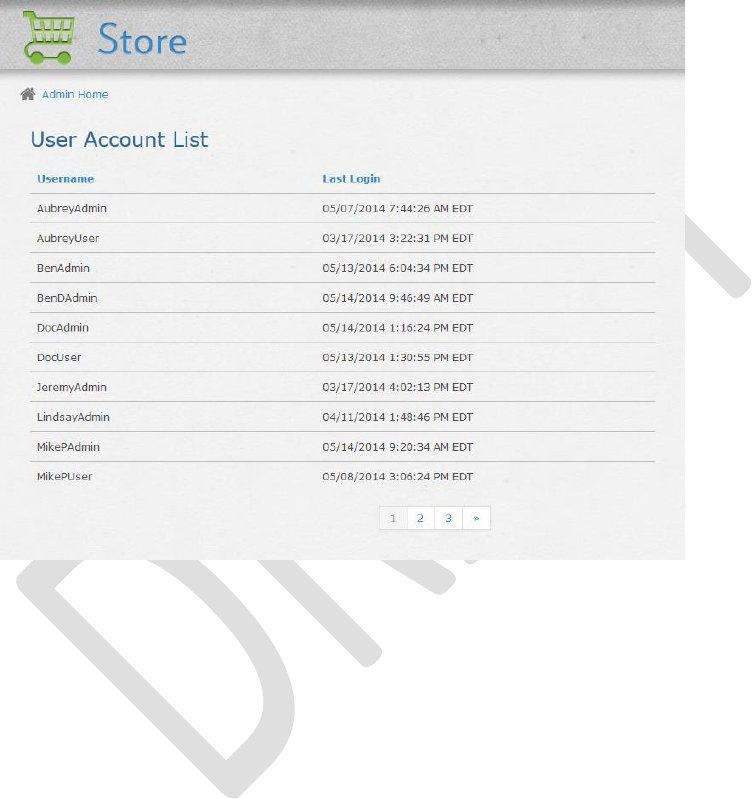
DOD GOSS – Ozone Marketplace Administrator's Guide
Store Configuration – 53
hyperlink. To edit a profile from the profile page, click the Edit Profile button at the bottom of the
page.
Save and Cancel – allows an administrator to save any changes made to the edit profile
page. Once saved, the details associated with that user become the display information
which will be associated with listings, comments and other activities. If cancelled, the page
will close and no changes will be saved.
Note: A security plug-in may override contributor profile data. For more information, see the
Configuration Guide.
11.1.10 User Account
Figure 35: User Account List
The user account list contains a list of usernames and their respective sign-in dates and times
along with the time zone in the location of the server. This list cannot be edited or customized.
11.1.11 Intent Action
Intents are the instructions for carrying out an App Component's intentions. Intents comprise an
Action (graph, view, edit, etc.), a Data Type (html, text, image, etc.) and a Send/Receive
request. App Component-type listings include intents by default. This information is only
metadata used as a placeholder. For any intent to function in OWF, a developer has to code
the actual function into an app component. Instructions for doing this are found in the OWF
Developer's Guide.
From the Configuration pages, administrators can add/edit/delete Intent Actions that will appear
on the drop-down menu users see when adding an intent to a listing. The Intent Action includes
a title, description and GUID.
Title – The simple name of the action. The title will appear in the drop-down list when a
user chooses an intent action.
Description – Allows an administrator to describe the intent action.
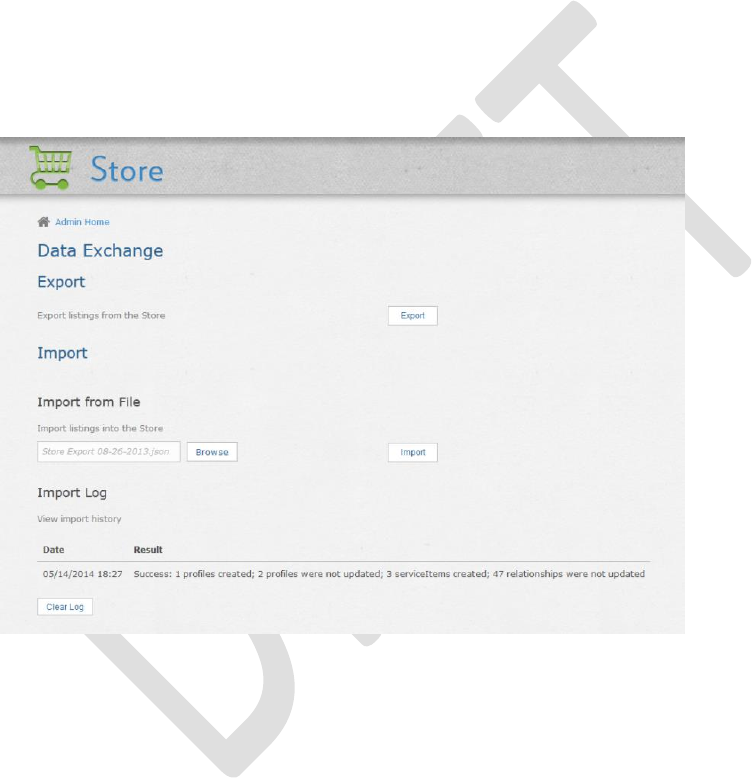
DOD GOSS – Ozone Marketplace Administrator's Guide
Store Configuration – 54
11.1.12 Intent DataType
Intents are the instructions for carrying out an App Component's intentions. Intents comprise an
Action (graph, view, edit, etc.), a data type (html, text, image, etc.) and a Send/Receive request.
App Component-type listings include intents by default. This information is only metadata
used as a placeholder. For any intent to function in OWF, a developer has to code the actual
function into an app component. Instructions for doing this are found in the OWF Developer's
Guide.
From the Configuration pages, administrators can add/edit/delete Intent DataTypes that will
appear on the drop-down menu users see when adding an intent to a listing. The Intent
DataType includes a title, description and GUID.
Title – The simple name of the DataType. The title will appear in the drop-down list when a
user chooses an intent data type.
Description – Allows an administrator to describe or provide examples of the intent data
type.
11.1.13 Data Exchange
Figure 36: Data Exchange Configuration Page
The Data Exchange page is a configuration page accessible through the User Menu by clicking
Configuration Pages (see section 11: Store Configuration). From the Data Exchange page,
administrators can export or import Store listings from a JSON file.
The following sections give the basic steps needed to export and import listings.
11.1.13.1 Exporting Data
A Store allows administrators to export listings and their meta-data to a .JSON file. This
provides a way to backup or share listings.
Note: Exporting a listing includes data for all Store listing Types and Categories in the JSON,
even if the data is not directly associated with the exported listing.
To export the local Store's listings:
1. Open the User Menu, click Configuration Pages.
2. On the Configuration Page, click Data Exchange.
3. Click the Export button, this opens the Export Wizard.
4. Select Listings – Click Export all or Select individual listings to export.

DOD GOSS – Ozone Marketplace Administrator's Guide
Store Configuration – 55
o Export all – exports all the listings in the Store.
o Select individual listings to export – Expands a list of potential exports. To
export, check the box next to the listing(s), then click Next at the bottom of the
screen. Instructions for filtering listings are found in section 11.1.13.4: Filtering
Listings.
5. Export Options – Select the export options for:
o Reviews – Click "Yes" to export the star-ratings and reviews for the selected
listings. Click "No" to not include these items in the export.
o Profiles – Click "All Store Profiles" to export all Store user profiles. Click "Listing
Owners & Reviewers" to only export the user profiles associated with the selected
listings.
6. Review – Evaluate the listings that will be exported. Then, click Export.
Note: The Review page shows the number of listings planned for export. This does not include
any required listings that may be included in the export. If a selected listing requires other
listings, then the required listings are automatically included in the export. However, the
required listings are not seen on the Review page.
1. Export Complete – The JSON file is saved in either a specified location or in a default
download location (specified in the browser settings).
2. Click Finish to return to the Data Exchange page.
A progress bar (bottom-left of the wizard) will update to indicate when each step of the export
process is complete.
11.1.13.2 Importing Data
The Store allows administrators to import data from a JSON file. The data may originate from
any source: a local Store instance or another Store. It is important to note that listing meta-data,
including a listing's company (Store) name, is case-sensitive (e.g. "Store ABC" and "Store abc"
are different). If the Store imports a listing that originates from a company not in the Store, then
the Store prompts the administrator to choose an action: keep the imported listing's field,
remove the field or change the field to an existing Store field. The Store saves the listing's meta-
data based on the administrator's choice. This is the import's "Resolve Differences" step, which
occurs when the imported listing's company, type, category or custom field does not match
those existing in the Store. More information on the "Resolve Differences" feature is found in
11.1.13.3: Importing Listings from a JSON File.
Imported listing visibility (whether the listing is Inside or Outside) is not stored in the meta-data.
Listing visibility is determined by the importing Store's "Listing Visibility Attribute" configuration.
For example, if the importing Store has this configuration set to "Inside", then all imported
listings are automatically set to Inside even if they are set to Outside in the exporting Store. For
more information, see section 12.3: Additional Configurations.
The following section describes how to import listings from a JSON file.
Known Issue: Most web servers enforce a maximum file upload size. Importing a file larger than
this may cause the import to fail. The OZONE Team is working to fix the problem. As a
workaround, consider importing smaller amounts of data.
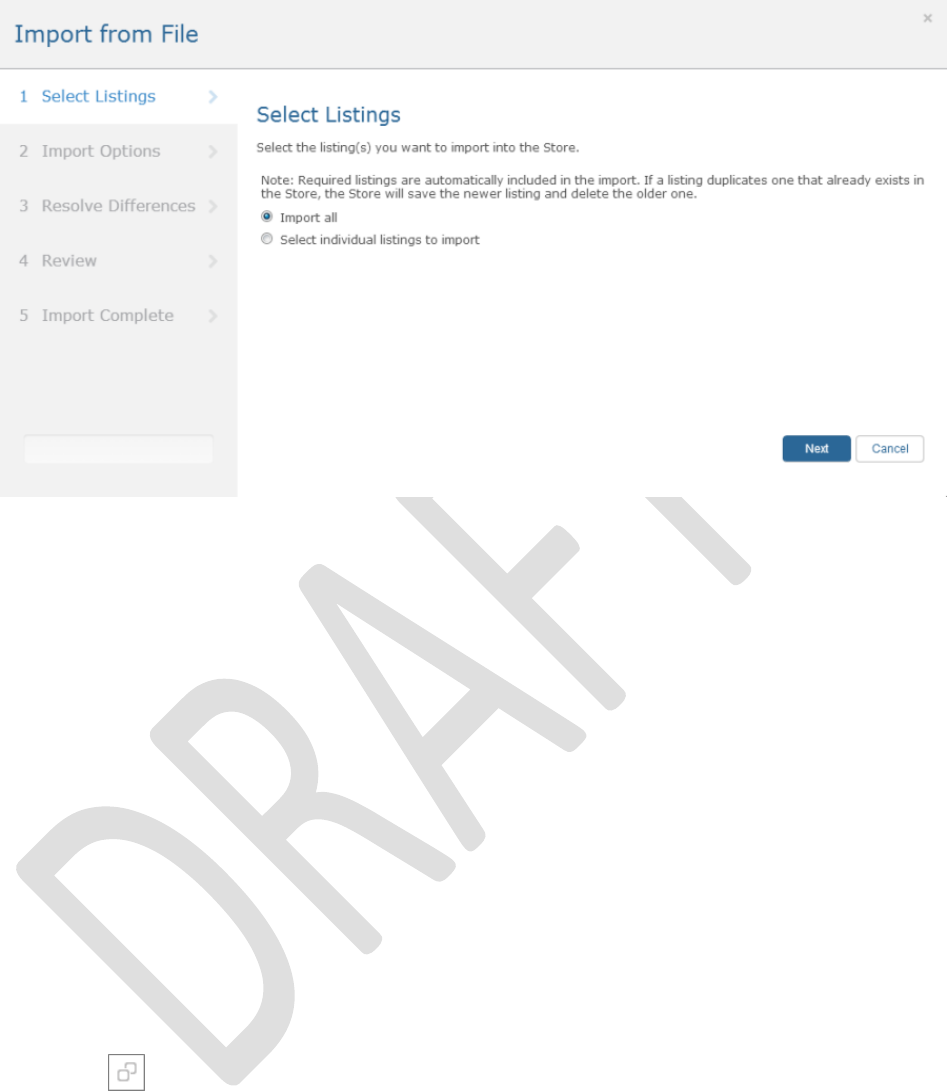
DOD GOSS – Ozone Marketplace Administrator's Guide
Store Configuration – 56
Figure 37: File Import
11.1.13.3 Importing Listings from a JSON File
To import listings from a JSON file that was exported from a Store:
1. Open the User Menu, click Configuration Pages.
2. On the Configuration Page, click Data Exchange.
3. Under the Import from File heading, click the Browse button.
4. In the Open dialog box, locate the JSON file containing the data you wish to import, and
click Open.
5. Click the Import button to open the Import Wizard.
6. Select Listings – Click Import all or Select individual listings to import.
o Import all – adds all the listings in the JSON file to the Store.
o Select individual listings to import – expands a list of potential imports. To
import, check the box next to listings, then click Next at the bottom of the screen.
Instructions for filtering listings are found in section 11.1.13.4: Filtering Listings. It is
possible to import listings that are duplicated in the Store. If this occurs, the Store
saves the newer listing data and deletes the older listing based on the last activity
date in the listing's change log. Duplicated listings are indicated by a
icon.
7. Import Options – Select the import options for:
o Reviews – Click "Yes" to import the star-ratings and reviews for the selected
listings. Click "No" to exclude these items from the import.
o Profiles – Click "All Store Profiles" to import all the user profiles from the selected
JSON file. Click "Listing Owners & Reviewers" to only import the user profiles
associated with the selected listings.
8. Resolve Differences — This feature appears when imported listings have Types,
Companies, Categories or Custom Fields that do not exist in the Store. Use the drop-down

DOD GOSS – Ozone Marketplace Administrator's Guide
Store Configuration – 57
to add the fields or change them to fields that already exist in the Store. When finished, click
Next.
9. Review – Evaluate the listings planned for import. Then, click Import. If an imported listing
requires another listing, the required listing is included in the import. Required listings are
indicated on the Review page with a
icon.
10. Import Complete – The listings have been added to the Store. Click Finish to return to the
Data Exchange page.
The Import Wizard includes a progress bar (bottom-left of the wizard) that updates to indicate
completion of each step of the process. When the system finishes importing the file contents, it
adds a message to the Import Log (on the Data Exchange configuration page) indicating the
success or failure of the import. The logs remain available until an administrator clicks the Clear
Log button, shown in the image below. Use standard pagination and sorting to navigate any
saved list of log statements.
Note: If the Import Log on the Data Exchange page does not show a history of the import,
refresh the browser.
11.1.13.4 Filtering Listings in the Import/Export Wizards
Use the filter feature to narrow the choice of individual listings displayed in the Import and
Export Wizards. Filters are important for ensuring only the correct listings are exported from or
imported into a system. For example: an administrator wants to export a Store's outside listings
to give to another Store. The administrator can:
o Open the Export Wizard and enable the Available Outside filter to display listings
that fit this type.
o With the filter enabled, the administrator is only able to select outside listings and
therefore will not accidently select and export an inside listing.
o For security reasons, filters are beneficial because they can prevent a Store from
exporting inside listings that are meant exclusively for that Store's users.
This same principle applies for the Company filters. Use the Company filter to import or export
listings from a specific company.
The following describes how to access and use the listing filters in the Import Wizard. These
steps are also applicable for filtering listings in the Export Wizard.
To begin, open the Import Wizard and click the Select individual listings to import (step 6b in
11.1.13.3: Importing Listings from a JSON File) radio button. Click on the
drop-down menu to reveal the filters (Figure 38).
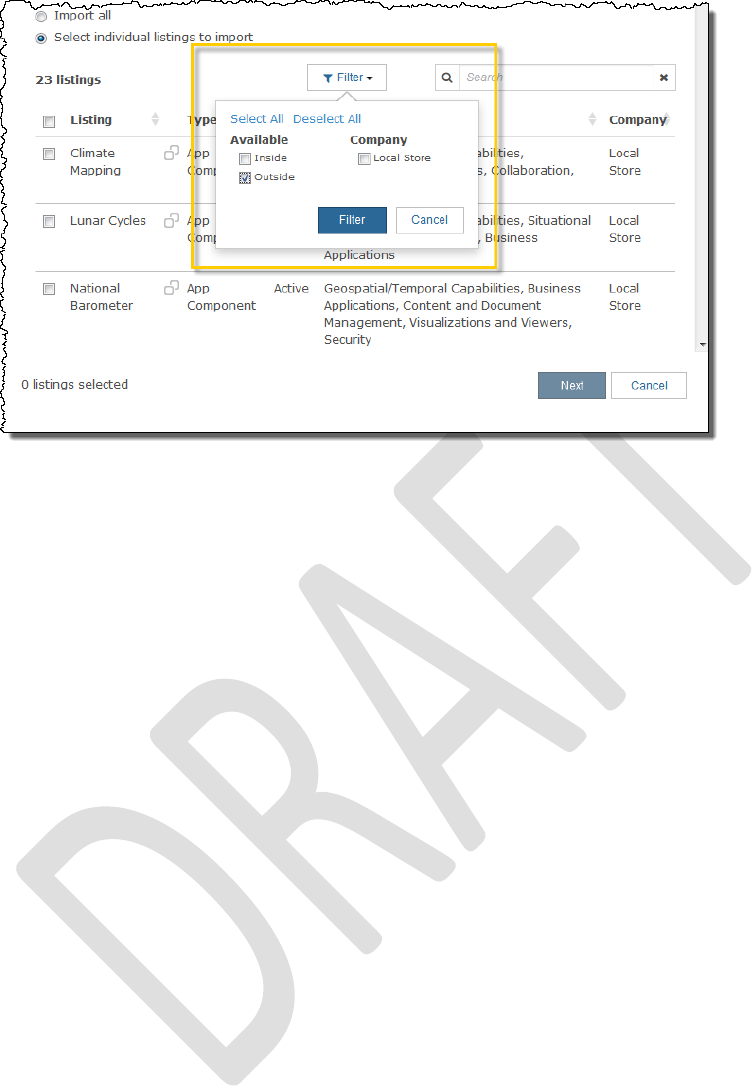
DOD GOSS – Ozone Marketplace Administrator's Guide
Store Configuration – 58
Figure 38: Filters in Import Wizard
The filters in the Import and Export Wizard are:
o Available – Filters listings based on availablilty to users Inside the current Store
only or Outside the Store.
o Company – Filters listings based on the associated Company/Store.
Click the checkbox next to a filter to enable it. When finished, click the blue "Filter" button. The
Wizard will automatically update showing the listings that meet the filter criteria. Another
indicator of this change is the number of listings (located above the Listing column, Figure 39).

DOD GOSS – Ozone Marketplace Administrator's Guide
Store Configuration – 59
Figure 39: Parts of the Import Wizard Window
To clear filters:
Open the filter drop-down menu and click the box next to the filter to un-check it and then
click the blue Filter button.
Click the "clear filters" link (Figure 39).
If no filters are enabled, the "clear filters" link is not displayed. Clearing any filter clears all
selected listing checkbox(es). Use the filters first to narrow the listing choices and then select
listings for import or export.
11.1.14 Application Configuration Interface
The Application Configuration Interface serves as the portal for numerous tools and information
administrators need to customize the system to meet their organization's specific needs.
Section 12: Application Configuration will explain each function in detail.
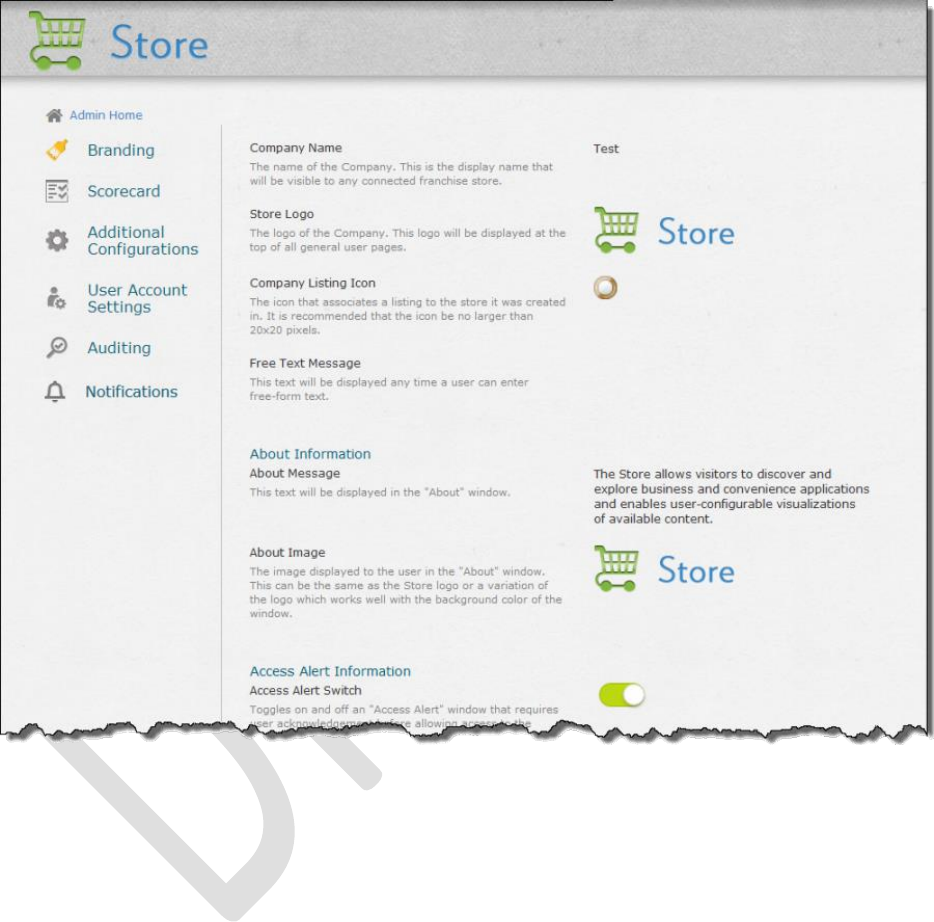
DOD GOSS – Ozone Marketplace Administrator's Guide
Application Configuration – 60
12 Application Configuration
From the drop-down [Store] User Menu, administrators should click the Configuration Pages link
to open the Administration Configuration Interface (Figure 22). Click Application Configuration at
the bottom of this page to customize reference data explained in this section.
Figure 40: Application Configuration Pages
The Application Configuration settings contain infrequently changed logos, verbiage and system
settings that apply to the entire store. The application configurations are categorized into three
common types of settings:
Radio Toggles – To change an On/Off toggle, click it. When it appears green and the
button slides to the right, the setting is on. When it appears gray and the button slides to the
left, the setting is off.
Text settings – To change a text setting, click the existing text to activate the field (as
shown below). Edit the text, then click outside the box to save.
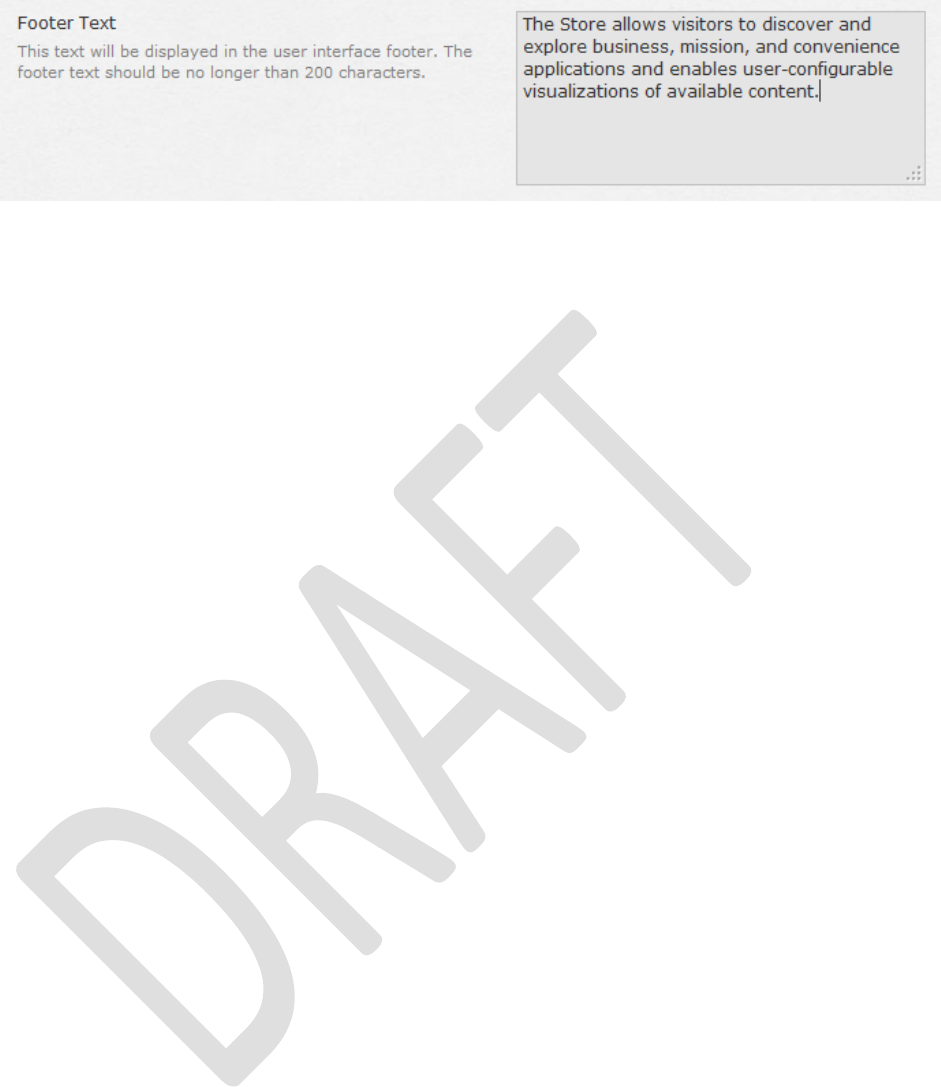
DOD GOSS – Ozone Marketplace Administrator's Guide
Application Configuration – 61
Figure 41: Example of Text Settings
Image settings – To change an image; click the image and edit the image's URL. Click
outside the URL editing area to save the change; a placeholder image is shown if the URL
is not resolvable as an image.
In all cases, the changes take effect on the application immediately after clicking outside the
edited box.
There are eight configuration settings pages as seen listed in Figure 40 (Branding, Scorecard,
Listing Management, Franchise Administration, Additional Configurations, User Account
Settings and Auditing).
12.1 Branding Configuration
These settings control text and images that are shown to the user on various pages in the
application including the header, footer and About window.
Store Name – The name of the Store. This is the display name that is visible to any
connected store.
Store Logo –This logo is displayed at the top of all general user pages.
Company/Store's Listing Icon – The icon that associates a listing to the Company/Store
where it was created. It is recommended that the icon is no larger than 20x20 pixels.
Free Text Message – This text is displayed any time a user can enter free-form text.
About Information
o About Message – This text is displayed in the "About" window. This window is
accessible in the footer by clicking the "About" link under the Resources header.
o About Image – The image displayed to the user in the "About" window. This can be
the same as the Store logo or a variation of the logo which works well with the
background color of the window.
Access Alert Information
o Access Alert Switch – Toggles on and off an "Access Alert" window that requires
user acknowledgement before allowing access to the system.
o Access Alert Message – This text is displayed in the "Access Alert" window.
Footer Information
o Footer Title – This text is displayed as the title within the text box of the user
interface footer. The footer title should be no longer than 24 characters.
o Footer Text – This text is displayed in the user interface footer. The footer text
should be no longer than 200 characters.
OpenSearch
o Browser Search Title – The name of the OpenSearch engine as it will appear in
the browser search box.
o Browser Search Description – The description of the OpenSearch engine.
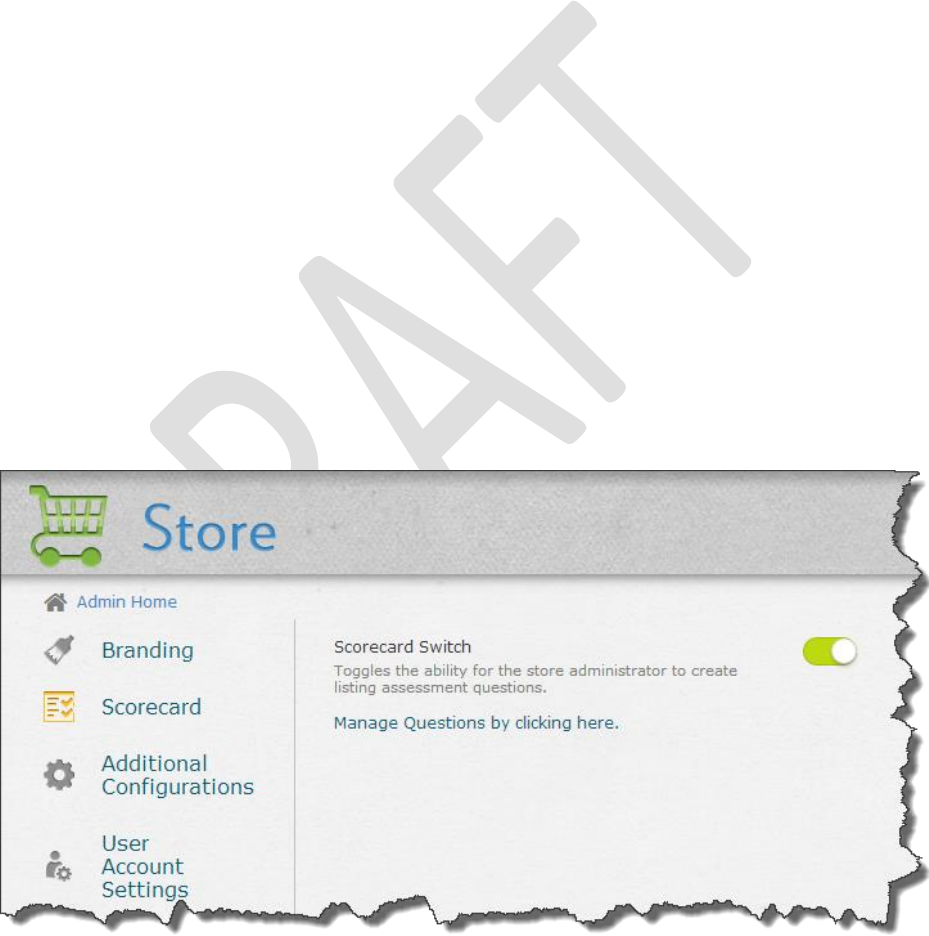
DOD GOSS – Ozone Marketplace Administrator's Guide
Application Configuration – 62
o Browser Search Icon – The path of the 16x16 icon used to identify the store's
OpenSearch engine.
o Browser Search Results Page Icon – The path of the 64x64 icon used to identify
the store's OpenSearch engine.
Custom Header and Footer
o Custom Header URL – File name (including extension and location in the system)
for the header that will replace the default OWF header; the URL must be valid for it
to appear. If it is not, a black box displays in its place.
o Custom Header Height –Height of the custom header (the height must be greater
than zero and less than 150 pixels)
o Custom Footer URL – File name (including extension and location in the system)
for the footer that will replace the default footer; the URL must be valid for it to
appear. If it is not, a black box displays in its place.
o Custom Footer Height – Height of the custom footer (the height must be greater
than zero and less than 150 pixels)
o Custom Header/Footer CSS Imports – Location(s) of CSS files needed by the
custom header and footer
o Custom Header/Footer JavaScript Imports – Location(s) of JavaScript files
needed by the custom header and footer
12.2 Scorecard Configuration
This page is used to enable or disable the Scorecard feature. To access it:
1. Click Configuration Pages from the drop-down User Menu
2. Click Additional Configurations
3. Click Scorecard from the left panel:
Figure 42: Scorecard Radio Toggle
To use scorecards, click the Radio toggle to push the button to the right. The color changes to
green. This enables scorecards, allowing administers to score the compliance of a listing. If a
listing complies with a scorecard question, an icon that corresponds to that question will appear
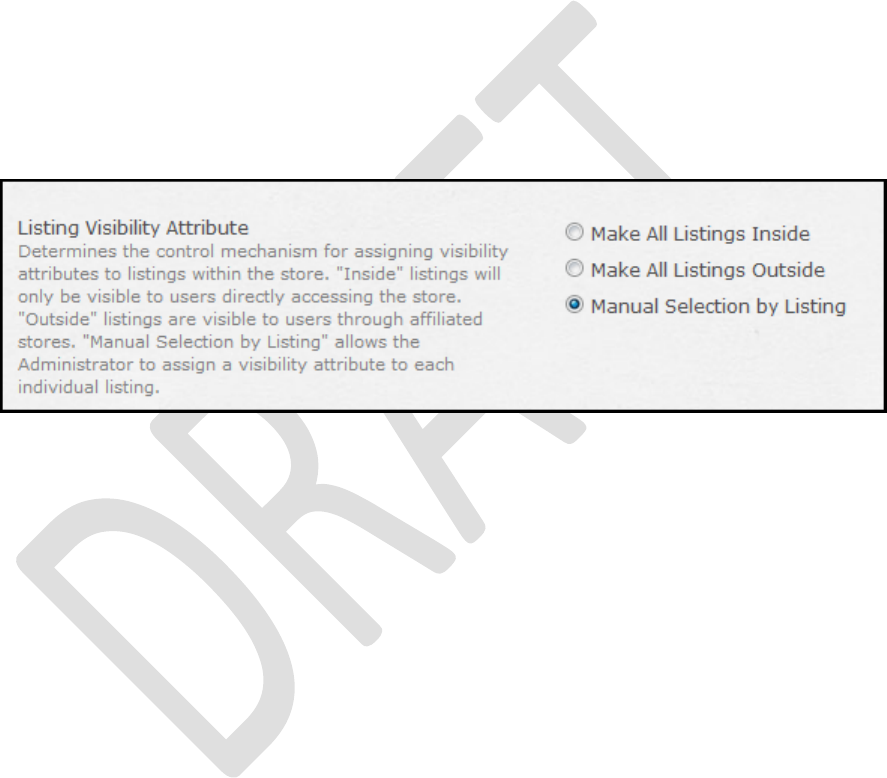
DOD GOSS – Ozone Marketplace Administrator's Guide
Application Configuration – 63
on the listing's Quick View Details tab (if the question has a corresponding icon).
Click the radio toggle again to move the button to the left. The color changes to gray. This turns
off the scorecard and hides its information.
See section 6: Managing Scorecard Questions for editing instructions.
12.3 Additional Configurations
This page of configuration items contains settings that don't fit into the previous categories.
Listing Visibility Attribute – (local Store only) Determines the control mechanism for
assigning visibility attributes to listings within the Store. This feature also affects the
Inside/Outside assignment for imported listings.
o "Inside" listings are only visible to users directly accessing the Store. During import,
listings are automatically set to Inside.
o "Outside" listings are visible to users through Partner Stores. During import, listings
are automatically set to Outside.
o "Manual Selection by Listing" allows the Administrator to assign a visibility attribute
to each individual listing. During import, listings are automatically set to Inside.
Figure 43: Listing Visibility Attribute Selector
External Service Items – Determines whether or not remote systems are able to create
and update External Service Items via the External Service Items REST interface.
Listing Approval – Allows owners to edit their listings after approval.
Partner Store Search
o "Number of Partner Store Search Results Returned"
o "Timeout" – The number of milliseconds that should elapse before rejecting a
request to connect to another store.
Partner Store Image Configurations
o "Allow Image Upload" – Allows administrators to upload images.
o "Maximum Size for Types Images" – The maximum upload size for the icon
associated with Types icons.
o "Maximum Size for Partner Store Server Images" – The maximum upload size for
the icon associated with a Partner Store.
OWF Sync
o "OWF Sync Servers" – A list of URLs of the OZONE servers with which this store
will synchronize.
Store Contact Information
o "E-mail" – The contact e-mail address for the store.
Quick View

DOD GOSS – Ozone Marketplace Administrator's Guide
Application Configuration – 64
o "Quick view field order" – Only fields listed here will appear on the Detailed Listings
tab in the Listing Quick View. You must enter the field name, not the title used in the
system. Find a complete list of default field names in section 5.3.1: Changing fields
on the Details tab.
12.4 User Account Settings
These configuration settings are used to control a user's account.
Session Control
o "Session Control" – When set to ON, allows the administrator to set a maximum
number of concurrent, active Store sessions a user can have.
o "Maximum Store Sessions Per User" – Click on the text field and type in the
maximum number of active Store sessions a user is permitted at one time.
If the Session Control function is turned On and the user exceeds the number of maximum open
Store sessions, the oldest Store session is disabled. For example, if the maximum number of
active Store sessions is three and a user opens up four sessions of the Store, the first Store
session the user opened is no longer active.
Inactive Accounts
o "Disable Inactive Accounts" – A toggle switch to enable user accounts to be
disabled after a period of inactivity.
o "Set Inactivity Period" – Click on the text field and type in the number of days that
need to elapse since a user last signed in before the account is disabled. The
default value is 90 days, however, this value can range from one day to 366 days.
When a user's account is disabled:
Listing ownership of a disabled account is transition to the "System" user.
Any listing comments, reviews and ratings made by the disabled user account are removed.
The listing's ratings are adjusted to reflect this change.
Any actions the disabled user account took on a listing (create, edit, submit, reject, approve,
etc.) are transitions to the "System" user.
Any types, states, custom field, etc. that have been "created by" and "edited by" the
disabled user account are transitioned to the "System" user.
The disabled user's "last login" is removed. Also removed are the user's preferences
(including theme preference).
12.5 Auditing
Like the other Store configurations, to access the auditing files: open the Store's drop-down
User Menu, click Configuration Pages, click Application Configurations and then, click Auditing
on the left-side navigation. Each option is described below:
Common Event Format (CEF) Auditing – Enabled by default, this records users actions
such as sign in/out, create, edit, delete, search, import and export. Click the radio toggle to
disable. Note: For more information about CEF Auditing, see the OZONE Store
Configuration Guide.
Object Access Auditing – Click the radio toggle to enable, this records most user actions
such as viewing a listing, clicking a button, etc. Note: Object Access Auditing records an
abundance of information whereas CEF Auditing records less information.
Relocate CEF Logs – Enabled by default, this feature allows the system to relocate the
CEF logs from their original location to a different location. Click the radio toggle to disable.

DOD GOSS – Ozone Marketplace Administrator's Guide
Application Configuration – 65
CEF Log Source Location – The directory location where the CEF logs are generated.
The default location is the Tomcat directory: /usr/share/tomcat6
CEF Log Destination Location – The directory location where the CEF logs are relocated.
Note: Developers may need to grant permission for the software container to write to this
location.
Application Security Level – The maximum security level permitted in the logs.
12.6 Notifications
The OWF Notifications system can connect an OWF and Store to an XMPP server through
which it can receive information about app components. This feature was originally designed to
be used by administrators to monitor the Changelogs of Store listings, but may be used to allow
any app components to communicate with OWF users.
If notifications are enabled to monitor Changelog changes, you will see a notification bell icon to
the left of the drop-down user menu. Click this icon to see alerts about listing changes that
occurred since the administrator last viewed the system. Those changes include when a listing
is: submitted, rejected, modified, created, approved, enabled, disabled, required and set to
inside/outside as well as scorecard changes. To close the alert list, click the notification bell
icon.
To use Notifications, your system administrator must make several configurations outside OWF
and the Store. You'll find instructions for configuring Notifications in the OWF and Store
Configuration Guides.
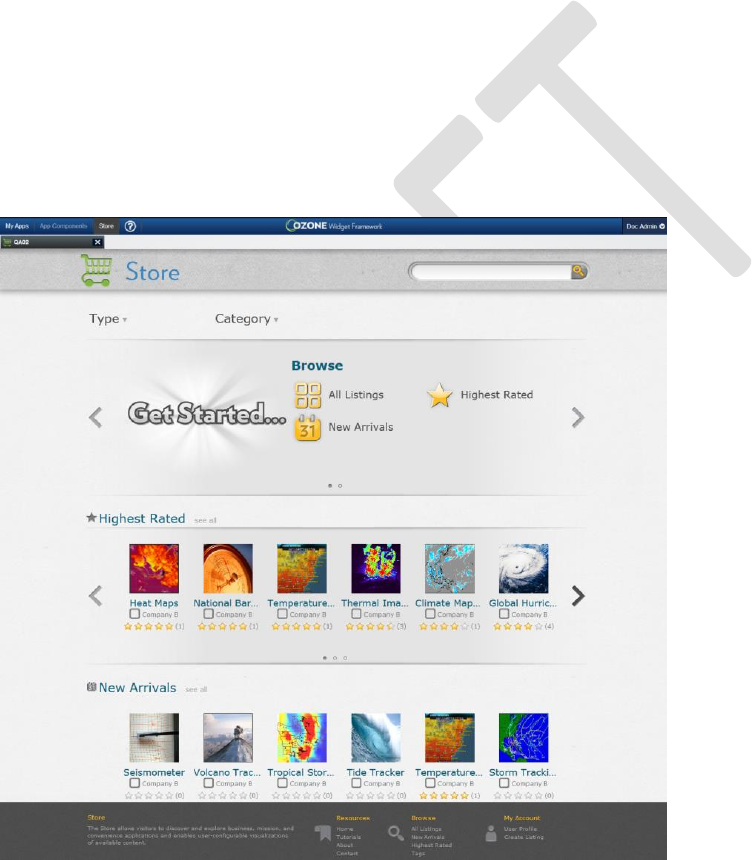
DOD GOSS – Ozone Marketplace Administrator's Guide
The Store in OWF – 66
13 The Store in OWF
Store listings can function as part of other software programs, such as on the Ozone Widget
Framework (OWF). Instructions that refer to accessing Store listings from a Webtop are
referring to accessing the Store within OWF:
For listings to appear in OWF, the listings require specific configurations (as described in
section 13.1) when they are created in the Store.
Administrators can configure the programs so that Store listings automatically sync with
their OWF counterparts. Synchronizing listings with their OWF counterparts, requires
specific configurations (as described in section 13.2: Synchronizing Listings with OWF and
in the OWF Configuration Guide).
13.1 Configuring Listings to Appear in OWF
The following section explains how to configure listings to make them accessible in OWF. When
listings are accessible in OWF, they appear by clicking on the Store option in the OWF Toolbar,
as shown below, and in the Administrative Managers (for App Components and OZONE Apps
depending on the listing type).
Figure 44: The Store in OWF
13.1.1 Creating OWF Compatible Types and States
Creating an OWF compatible listing starts by ensuring the Store-based reference data that is
used to make the listing meets specific OWF requirements. To do this, open the Store
homepage by clicking Store in the OWF Toolbar. From the drop-down [Store] User Menu, click
Configuration Pages to customize Store reference data (for more information see 11.1:
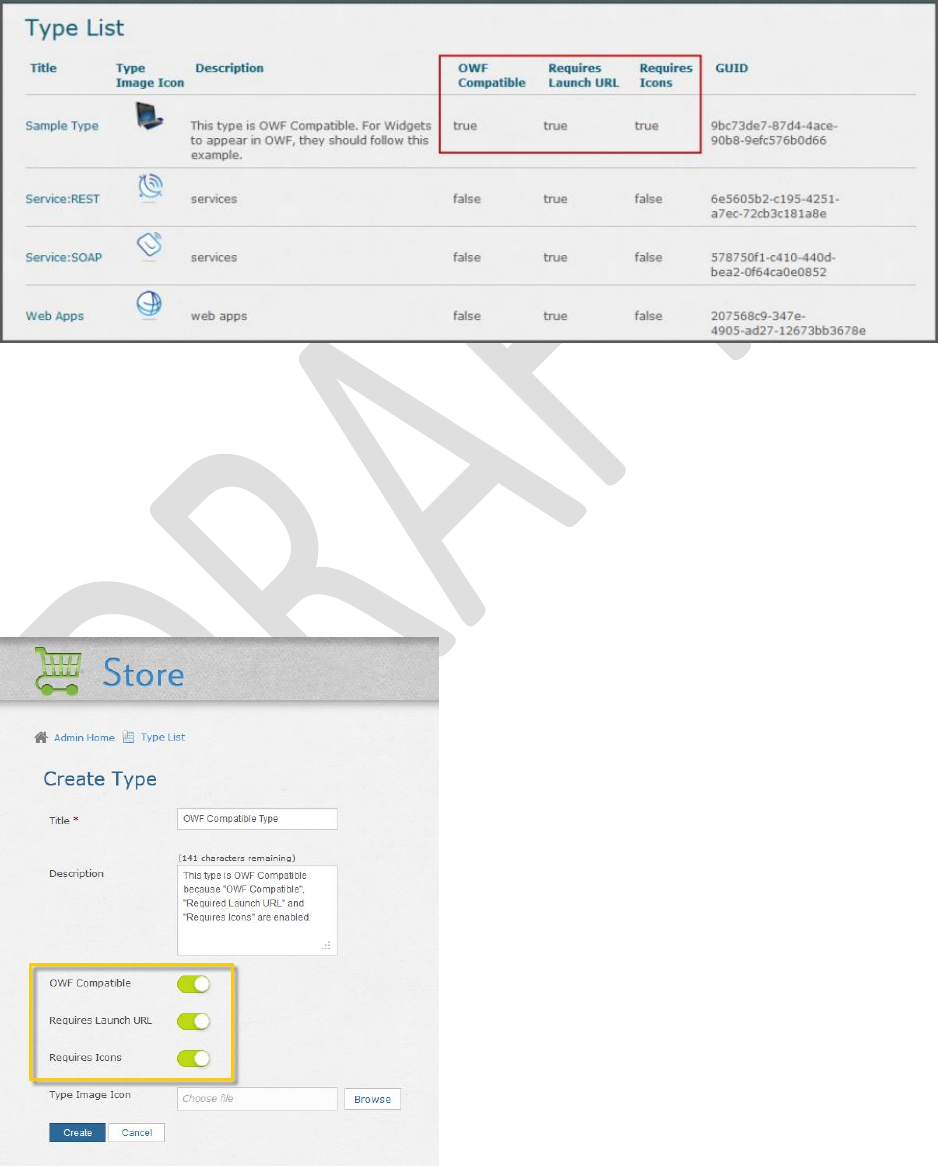
DOD GOSS – Ozone Marketplace Administrator's Guide
The Store in OWF – 67
Administration Interface). Next, click Types which will display a table of all existing listing Types.
For listings to appear in OWF, their type must have the following parameters set to true:
OWF Compatible
Requires Launch URL
Requires Icons
See the following example:
Figure 45: Example of Listing Type Requirements for OWF
To make a type OWF compatible, click the type title, then the edit type button. Ensure the
following boxes are checked:
OWF Compatible
Requires Launch URL
Requires Icons
This is illustrated in the following:
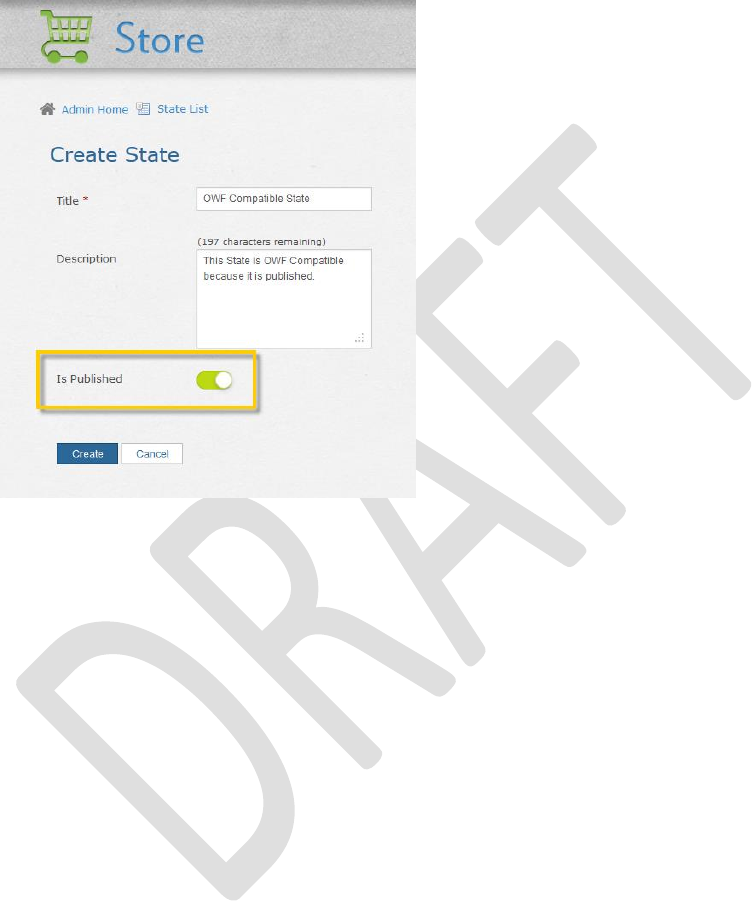
DOD GOSS – Ozone Marketplace Administrator's Guide
The Store in OWF – 68
Figure 46: Configuration Screen of an OWF Compatible Type
Next, return to the Administrator Configuration homepage (click the Admin Home link) and click
the State title from the list of reference data. A list of existing states will display. To make a
State OWF compatible, its Is Published value must equal true. To do this, click the State title,
choose Edit State, then check the Is Published box, as shown in the following example:
Figure 47: Configuration Screen of an OWF Compatible State
13.1.2 Creating OWF Compatible Listings
After reviewing Store-based reference data explained in section 13.1.1: Creating OWF
Compatible , create the listing. To use a Store listing in OWF, the listing must be enabled,
approved and include all the mandatory listing fields described in the previous section (see
sections 4: Listing for instructions approving and enabling listings).
All enabled and approved listings will display in the Store when it launches in OWF (even if the
listings are not OWF compatible types and states). However, users can only download Store
listings that are OWF compatible. If problems occurs downloading a listing, review the listing's
Type and State reference data in the Store to ensure compatibility. Lastly, listings are added to
OWF from the Store when both systems are setup to synchronize with each other (see section
13.2: Synchronizing Listings with OWF and the OWF Administrator's Guide). Store listings
added to OWF automatically appear as one of the user's OZONE Apps or App Components.
13.2 Synchronizing Listings with OWF
The synchronization feature allows the Store to automatically send app components and their
subsequent updates to OWF. Synchronization is also necessary to push OWF applications to
the Store. To use this feature, developers must do the following:
Configure OwfConfig.groovy to accept synchronization messages from the Store.
Configure OWFsecurityContext.xml and MPSecurityContext.xml (see below).
Synchronize the OWF server with the Store through the Store's Administration
Configuration pages.
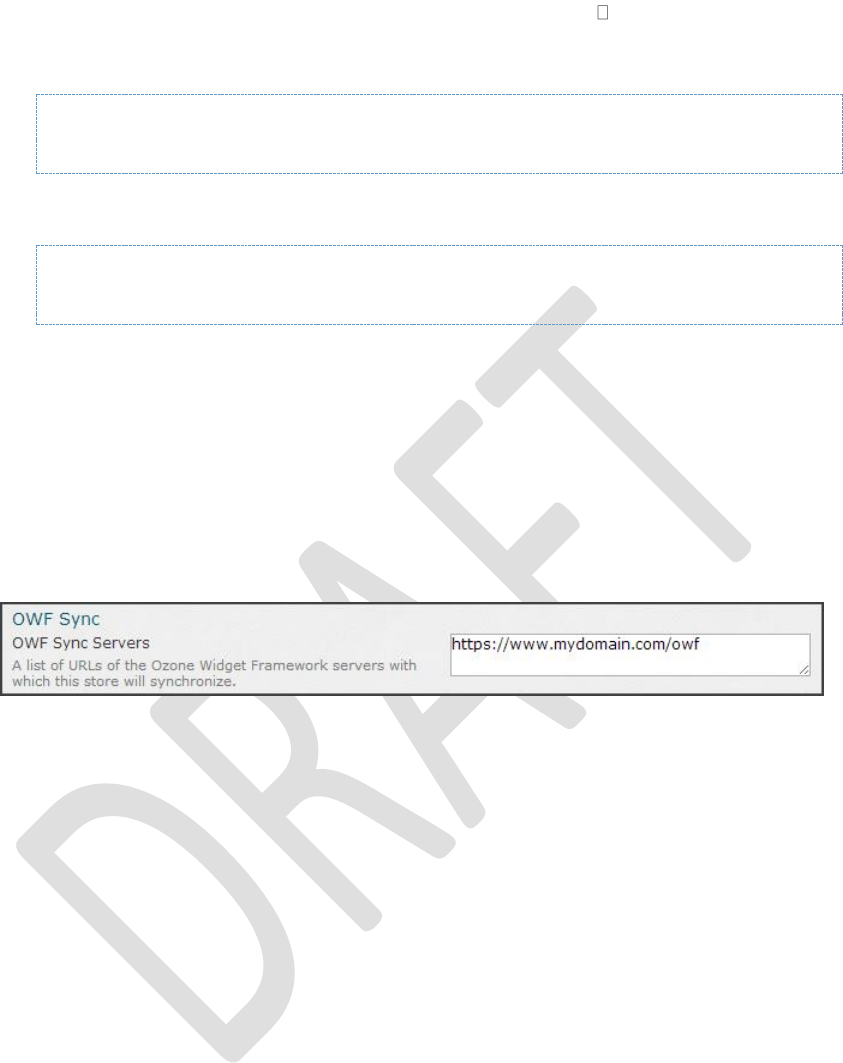
DOD GOSS – Ozone Marketplace Administrator's Guide
The Store in OWF – 69
To implement the synchronization feature with the OWF sample security plugin, configure the
following OWF and Store files (found in the apache-tomcat-7.0.21 lib directory):
In OWF:
OWFsecurityContext.xml must include the following in the top-level <beans> element:
<sec:http pattern="/marketplace/sync/" security="none" />
In the Store:
MPSecurityContext.xml must include the following in the top-level <beans> element:
<sec:http pattern="/public/descriptor/" security="none" />
The Store will only synchronize with OWF servers linked to that Store. The Store will not
synchronize with unspecified OWF systems or offline OWF systems. Synchronize OWF servers
with the Store through the Store Administration Configuration pages. For more information, see
the OZONE Store Administrator's Guide.
To use this feature:
1. From the drop-down User Menu, click Configuration Pages.
2. Links to reference data will appear, click Application Configuration.
3. In the left-panel, click Additional Configurations. To synchronize with an OWF instance, add
its URL in the OWF Sync Servers section: Note: To connect to multiple OWFs, uses
commas to separate their URLS.
Figure 48: OWF Sync Field
1. Listings that meet the OWF criteria described in section 13.1: Configuring Listings to
Appear in OWF will appear in the Store in OWF (if listing approval is enabled in OWF) or
directly in the administrator's App Component Manager in OWF if auto-approved is enabled.
13.2.1 Universal Name
When OWF sends listings to the Store, an issue may occur with Universal Name. OWF App
Components include a Universal Name field. This is not a mandatory field. However, if OWF
sends an App Component to the Store without a Universal Name, the Store changes the
Universal Name to "null." If someone then adds a Universal Name to the OWF App Component
and resends it to the Store, the Store considers that App Component a new listing, not an
updated one.
If the App Component's Universal Name field is identical in OWF and the Store, the App
Component in the Store will update when an administrator pushes changes to the Store from
OWF.
