PETRO TCS Ops Manual 700 20 25
User Manual: manual pdf -FilePursuit
Open the PDF directly: View PDF ![]() .
.
Page Count: 56
Catalog Title
Catalog Subtitle
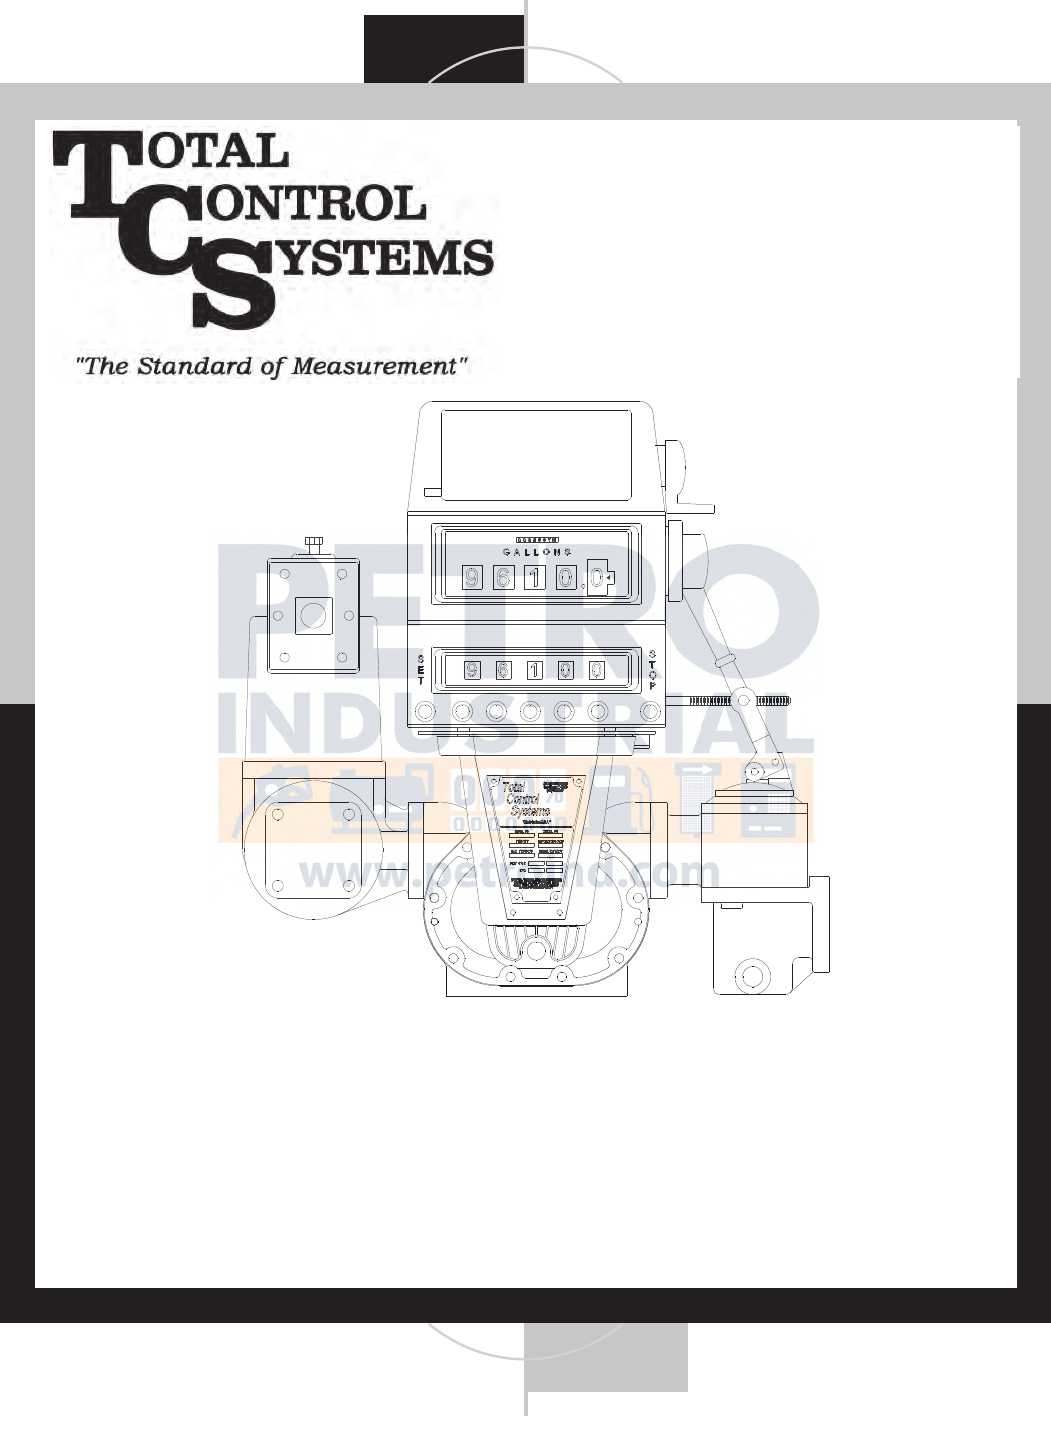
Installation, Operation &
Maintenance Manual
700-20/25
Rotary Meter
Page 2
Safety Warning Symbols 2
Receipt & Inspection 3
Notice 3
Meter Overview 4
Meter Specifications 5
Meter Types 5
Material of Construction 6
System Recommendations 6
System Recommendations (Continued) 7
System Recommendations (Continued) 8
Above Ground Storage System 9
Mobile Fueling System 10
Start Up Recommendations 11
Start Up Recommendations (Continued) 12
Direction of Flow 12
Meter Calibration 13
Meter Calibration (Continued) 14
Meter Calibration (Continued) 15
Calibration Adjustment 15
Split Compartment Testing 16
Split Compartment Testing (Continued) 17
Split Compartment Testing (Continued) 18
Maintenance 19
Maintenance (Continued) 20
Storage Instructions 20
Dimensions 21
Meter Assembly 22
Meter Assembly (Continued) 23
Air Eliminator Assembly 24
Air Eliminator Assembly (Continued) 25
Table of Contents
Strainer Assembly 26
Strainer Assembly (Continued) 27
Hydraulic Preset Valve Assembly 28
Hydraulic Preset Valve Assembly (Continued) 29
Air Check Valve Assembly 30
Torque Specifications 31
Drive Components 32
Disassembly of Meter 33
Disassembly of Meter (Continued) 34
Disassembly of Meter (Continued) 35
Inspection of Parts 36
Assembly of Meter 37
Assembly of Meter (Continued) 38
Assembly of Meter (Continued) 39
Assembly of Meter (Continued) 40
Assembly of Strainer 41
Assembly of Air Eliminator 42
Disassembly of Hydraulic Preset Valve 43
Assembly of Hydraulic Preset Valve 44
Assembly of Air Check Valve 45
Meter Trouble Shooting 46
Air Eliminator Trouble Shooting 47
Hydraulic Preset Valve Trouble Shooting 48
Air Check Valve Trouble Shooting 48
Material Safety Data Sheet 49
MSDS (Continued) 50
MSDS (Continued) 51
MSDS (Continued) 52
Notes 53
Notes 54
Warranty 55
Warning Symbols
CAUTION
Follow the warning instructions within the fol-
lowing information to avoid equipment failure,
personal injury or death.
TURN POWER OFF
Before performing any maintenance, be sure to
turn system power off to avoid any potential
electric spark
FLAMMABLE
Flammable liquids and their vapors may cause a
fire or explosion if ignited.
EYE PROTECTION
Pressurized systems may cause hazardous leaks
and spray that may be dangerous for your eyes.
Always wear eye protection around pressurized
systems and its hazardous liquids.
INJURY
Wear gloves for protection from hazardous liq-
uids that may cause irritation or burns.
READ
Read and understand all related manuals thor-
oughly. The Engineering and OIM manuals will
provide the knowledge for all systems, mainte-
nance and operation procedures. If you have any
questions, please consult the factory.
Page 3
Receipt & Inspection
Upon receipt of meter shipment, be sure to inspect the packaging and the flow meter assembly for any damage
before signing the receipt of the shipment. Notify the delivery company about possible damage and refuse re-
ceipt of the shipment.
Meters are individually boxed and are protected with packing material. Each package
is identified with the flow meter assembly part number, description, direction of flow
and serial number. Verify the meter model is the correct model, size, and configuration
as ordered. Contact your distributor if there is any discrepancy or question.
Meter assemblies should be handled with appropriate methods for the awkwardness of
size and weight involved. Appropriate clothing and shoes need to be utilized.
Transport the meter package to the installation site with appropriate transportation
methods, careful not to damage the flow meter.
Be careful of any loose or protruding staples from the packaging, as they can be very
sharp and may potentially cause injury.
If foam has been used to protect meter, carefully remove top foam layer before attempting to remove meter as-
sembly from box. Foam packaging maybe formed around the meter assembly making it difficult to remove. If
meter is bolted upon a wood pallet remove bolts while being careful not to let the meter tip over when the sup-
port has been removed. Do not lift the meter assembly by flex hoses, thermowells, wires, pulsers, or put objects
through meter. Removing meter assembly from packaging without adhering these warnings may cause serious
injury.
The wooden pallets and bases meet the ISPM 15; Guidelines for Regulating Wood Packaging Material in Inter-
national Trade through the Timber Products Inspection Company (TP #2134).
Every effort has been made to remove the calibration fluid before shipment. All TCS flow meters are plugged
and enclosed in a plastic bag. A Material Safety Data Sheet (MSDS) can be reviewed on PAGE 49. Appropriate
precautions should be taken regarding any personal, environmental and material compatibility with the end use
system.
Notice
Total Control Systems (TCS) shall not be liable for technical or editorial errors in this manual or omissions from
this manual. TCS makes no warranties, express or implied, including the implied warranties of merchantability and
fitness for a particular purpose with respect to this manual and, in no event, shall TCS be liable for special or conse-
quential damages including, but not limited to, loss of production, loss of profits, etc.
The contents of this publication are presented for informational purposes only, and while every effort has been
made to ensure their accuracy, they are not to be construed as warranties or guarantees, expressed or implied, re-
garding the products or services described herein or their use or applicability. We reserve the right to modify or
improve the designs or specifications of such products at any time.
TCS does not assume responsibility for the selection, use or maintenance of any product. Responsibility for proper
selection, use and maintenance of any TCS product remains solely with the purchaser and end-user.
All rights reserved. No part of this work may be reproduced or copied in any form or by any means – graphic,
electronic or mechanical – without first receiving the written permission of Total Control Systems, Fort Wayne,
Indiana USA.
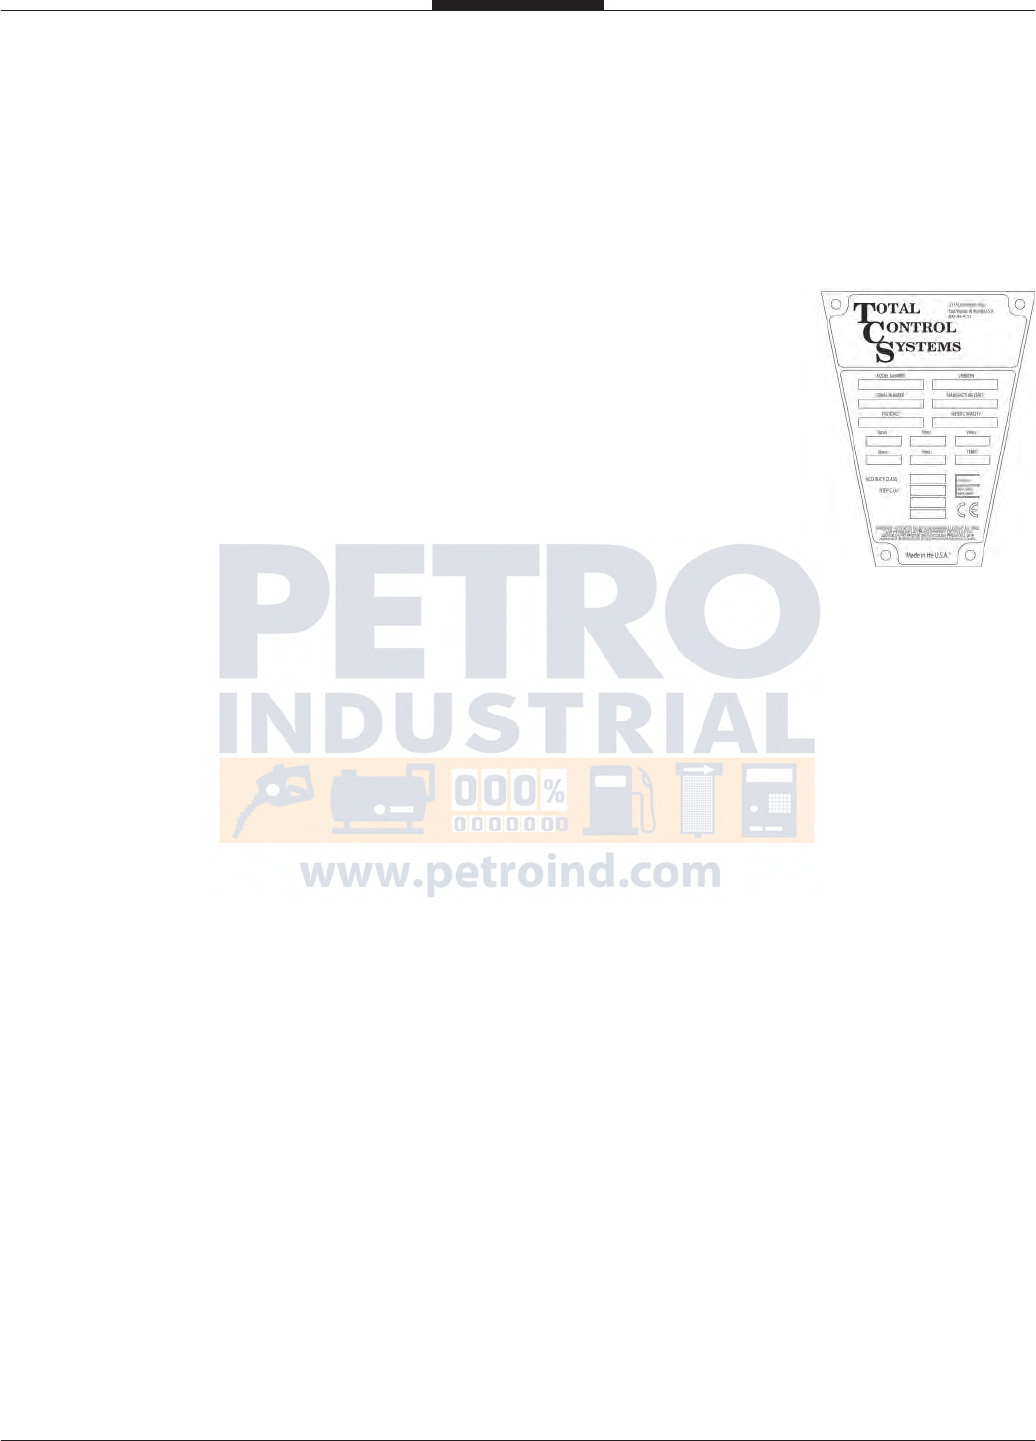
Flow Meter Identification Plate
Page 4
Meter Overview
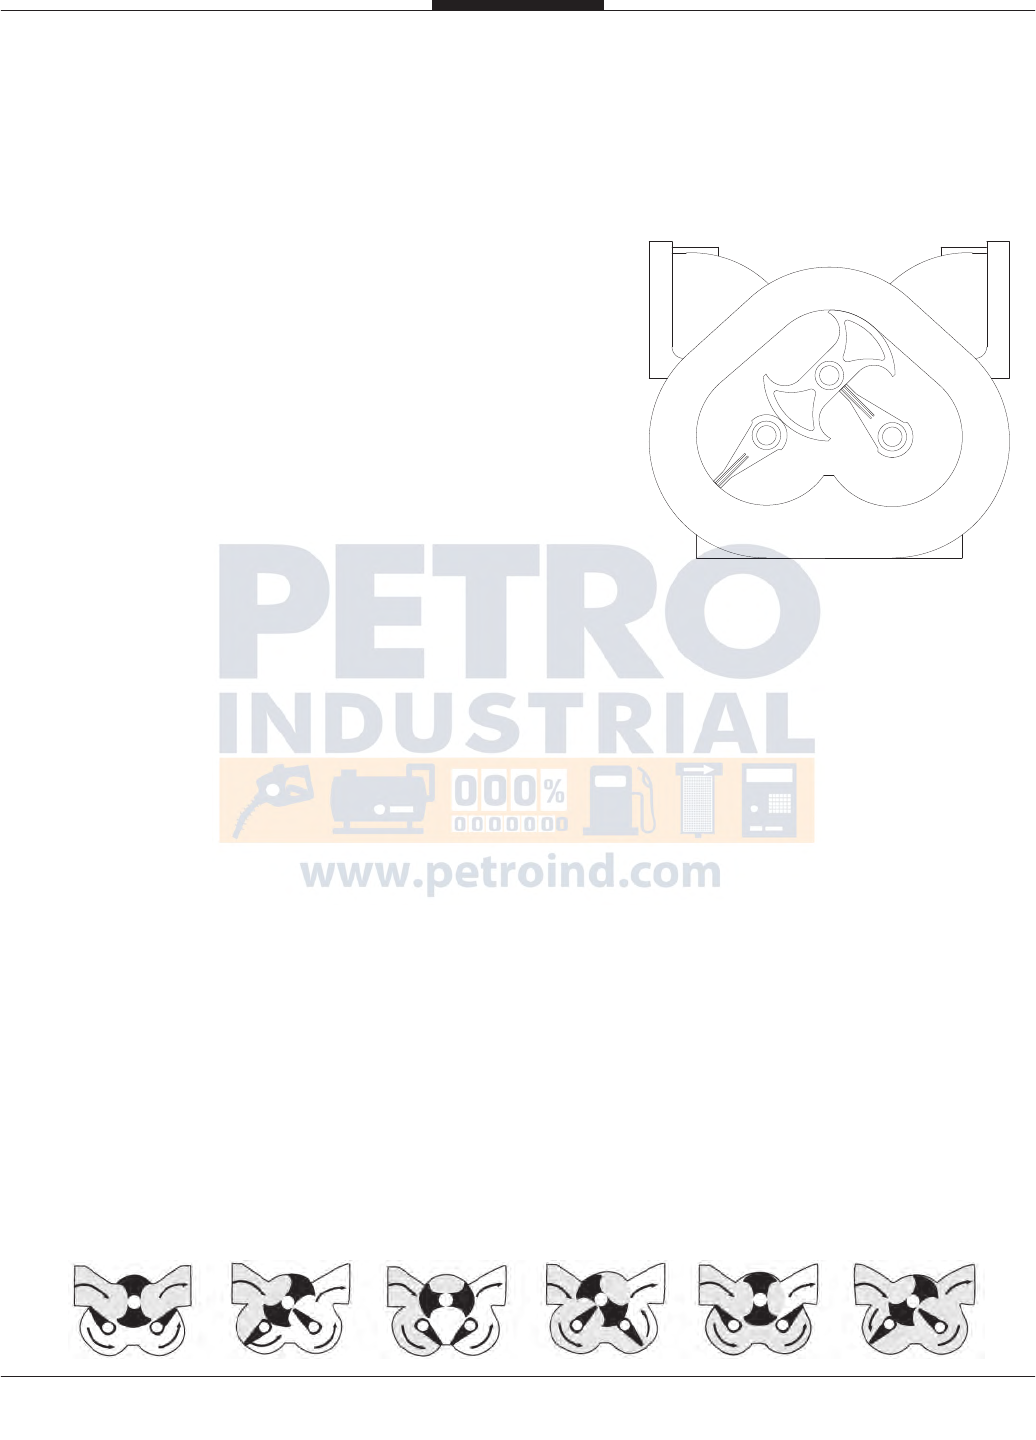
The TCS Model 700 series flow meter is a simple and
efficient design. The meter consists of a single fluid
chamber that contains a single blocking rotor and two
displacement rotors whose rotation is synchronized
with mating gears. As the fluid enters the fluid cham-
ber, the blocking rotor is forced to rotate. The dis-
placement rotors, also rotating in conjunction with the
blocking rotor help direct the fluid flow through the
chamber and to the outlet. The linear flow of the fluid
is thus translated into rotary motion in the meter. The
output of the meter is picked up from the rotation of
the blocking rotor and transmitted to a register or
pulse transmitter.
The rotors in the meter are designed to operate at close tolerances to one another and the
wall of the fluid chamber. There are slight clearances between the rotors and the chamber
wall. Because of this, it is important that the meter be properly applied for the flow rate
and operating pressure of the system.
Because the fluid flowing through the meter is redirected only slightly from its natural
flow, there is very little pressure drop across the meter, unlike other meters that use multi-
ple measuring chambers.
The meter design uses high performance materials for the rotor bearings and journals.
Since there is no contact between the rotors and the fluid chamber wall, these critical com-
ponents have a long life expectancy.
Calibration of the meter involves adjusting the rotation of the output shaft relative to the
rotation of the internal rotors of the meter. This is accomplished by changing the settings
on an adjuster device. Calibration of the meter is discussed in detail in the section Meter
Calibration.
FLOW ILLUSTRATION

Page 5
Meter Specifications
Flange Connection: 2” NPT Flange Connection, 1-1/2” NPT Flange. Optional BSPT,
Slip Weld or ANSI flanges available upon request.
Flow Rate: 700-20 up to 100 GPM (380 LPM)
700-25 up to 150 GPM (567 LPM); only for fluids under 225 SSU
Maximum Pressure: 150 PSI (10.5 BAR)
Working Temperature: -20 F to 160 F (-28.9 C to 71 C)
Meter Types
SP - Standard Petroleum
For metering refined petroleum products such as
Leaded and Unleaded Gasoline, Fuel Oils, Diesel, Bio
-Diesel, Kerosene, Jet Fuels, Vegetable Oils, Motor
Oils, Ethylene Glycol (Antifreeze), etc.
SPA - Standard Petroleum (Aviation)
For metering refined petroleum products such as Avi-
ation Gasoline, Fuel Oils, Jet Fuels, Gasoline, Diesel,
Bio-Diesel, Kerosene, etc.
SPD - Standard Petroleum (Ductile Iron)
For metering refined petroleum products such as
Aviation Gasoline, Ethanol Blends, Methanol Blends,
Gasoline, Fuels Oils, Diesel, Bio-Diesel, Kerosene,
etc.
IC - Industrial Products (Carbon Bearings)
For metering Industrial Chemicals, General Solvents,
Water and other Non-lubricating Liquids, such as Al-
cohol, Acetones, Ethanol, Naptha, Xylene, MEK, Tol-
uene, Deionized Water, Demineralized Water, Potable
Water, etc.
IP - Industrial Products
For metering Industrial Chemicals, General
Solvents and many other liquids; such as Liquid
Sugars, Corn Syrup, Soy Bean Oil, Shortenings,
Latex Products, Adhesives, etc.
AF - All Ferrous
For metering Pesticides, Nitrogen Solutions,
Fertilizer, Chlorinated Solvents, Paints, Inks,
Alcohols, Adhesives, Motor Oils, Molasses,
Corn Syrup, Liquid Sugars, etc.
SS - Stainless Steel
For metering the same liquids as the SP, SPA,
SPD, IP, IC and AF flow meters, but includes
food processing and special handling fluids such
as Nitric, Phosphorus and Glacial Acetic Acids,
Anti-Icing Fluids, Vinegar, Fruit Juices, etc.
SSD - Stainless Steel (DEF)
For metering Diesel Exhaust Fluid (DEF), Ad-
Blue, ARLA and AUS32.
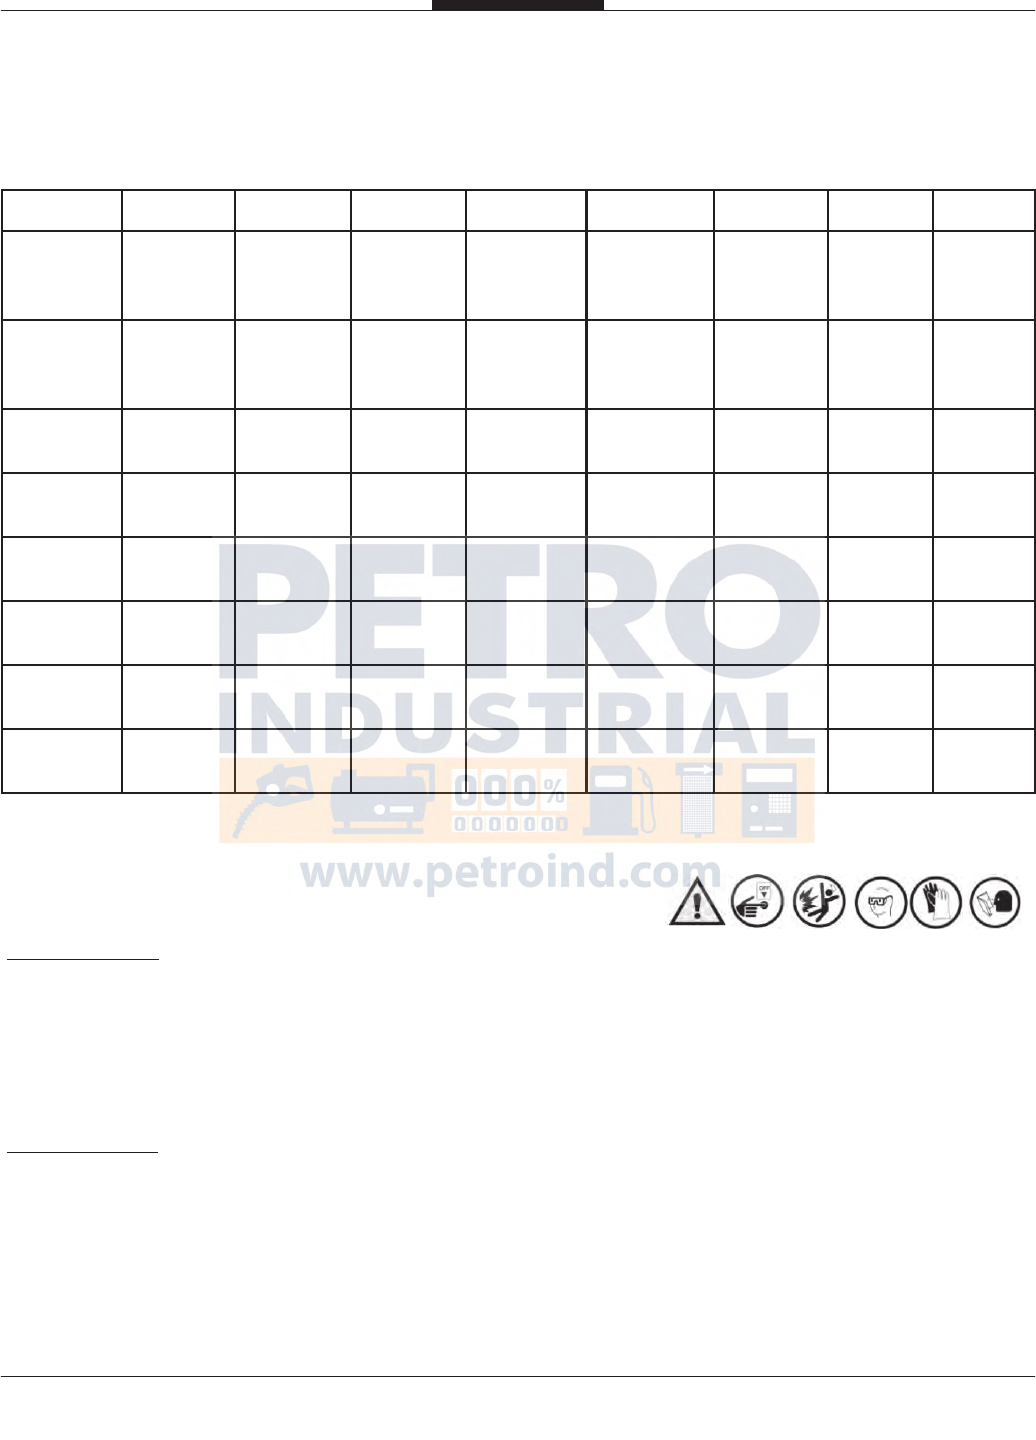
Page 6
Material of Construction
Meter Selection
The flow meter must be carefully chosen from the Meter Selection factors in the Engineering Manual.
The meter must be selected based on the operating system and product characteristics. System variables
include flow rate, temperature and pressure. The product characteristics include the material compatibil-
ity, lubricity, viscosity, suspensions, pH, and whether the product can congeal, crystallize or leave a dry
film. Failure to select the correct flow meter may result in system failure or serious injury.
Air Elimination
In any system that the tank may be completely drained or multiple products manifold into one metering
system, the possibility of air being present increases. The solution is an air or vapor eliminator located
before the flow meter to vent the air or vapor from the system before it can be measured. Air or vapor
elimination is required for all weights and measures regulatory approvals in custody transfer applications.
Meter Application
Description SP SPA SPD IP IC AF SS SSD
Housing
Hardcoat
Anodized
Aluminum
Hardcoat
Anodized
Aluminum
Ductile
Iron
Hardcoat
Anodized
Aluminum
Hardcoat
Anodized
Aluminum
Ductile
Iron
Stainless
Steel
Stainless
Steel
Rotors
Hardcoat
Anodized
Aluminum
Hardcoat
Anodized
Aluminum
Ni-Resist
Hardcoat
Anodized
Aluminum
Hardcoat
Anodized
Aluminum
Ni-Resist Stainless
Steel
Stainless
Steel
Rotor
Journals Plated SS Plated SS Plated SS Plated SS Plated SS Plated SS Plated SS Plated SS
Bearing
Plates Ni-Resist Ni-Resist Ni-Resist Ni-Resist Ni-Resist Ni-Resist Stainless
Steel Ryton
Bearing
Sleeves Ni-Resist Carbon
Graphite
Carbon
Graphite Ni-Resist Carbon
Graphite
Carbon
Graphite
Carbon
Graphite Ryton
Timing
Gears
Stainless
Steel
Stainless
Steel
Stainless
Steel
Stainless
Steel
Stainless
Steel
Stainless
Steel
Stainless
Steel
Stainless
Steel
Packing
Seal Viton® Viton® Simriz® Simriz® Simriz® Simriz® Simriz® EPDM
Body
O-rings FKM FKM PTFE PTFE PTFE PTFE PTFE EPDM
Simriz® is a registered trademark of Freudenberg-NOK.
System Recommendations

Page 7
Control Valves
Safety and isolation valves should be used throughout the metering system. In any pumping system where
there is one (1) pump and multiple flow meters, a digital or hydro-mechanical Rate-of-Flow control valve
must be used at each flow meter to prevent over speeding of the flow meters.
Best Plumbing Configuration
1). Flow meter must have secure mounting to a riser or foundation
2). The inlet and outlet piping must be securely supported, in a manner of not to allow pipe stress on flow
meter.
3). System should be designed to keep the flow meter full of liquid at all times.
4). System piping should have full 2” pipe diameter throughout the metering system to allow for minimal
pressure loss.
5). The pipe should be laid out as straight as possible to reduce pressure loss from flow restriction.
6). The meter and piping must be installed in such as way as to avoid accidental draining of the meter.
Meter inlet and outlet should be lower than the associated system plumbing (sump position).
7). It is not necessary for the air eliminator to be installed bolted directly to the meter. It can be installed
upstream from the meter. For effective operation of the air eliminator, it should be mounted between
the meter and any valves, tees or any other potential places where air may enter the system.
8). The metering system should include a means for calibration.
Protection From Debris
On new installations, care must be taken to protect the meter from damage during start-up. It is recom-
mended to put a strainer before the meter. Damage may result from the passage through the meter of dirt,
sand, welding slag or spatter, thread cuttings, rust, etc. The insertion of a spool (a flanged length of pipe
equal in length to the meter and accessories attached to the meter) in place of the meter until the system is
flushed, temporarily bypassing the plumbing around the meter, will also protect the meter from debris.
Once the system has run “clean” for a period of time the meter may be reinstalled or protective devices
removed.
Thermal Expansion
As with most liquids, they will expand and contract with temperature. In any system where there is a
chance for liquid to be captured between closed valves without relief, thermal expansion will likely occur
and create dangerously high pressures within the system. Care should be taken in designing the system in
which thermal shock may occur by implementing Pressure Relief Valves or Thermal Expansion Joints in
the system design.
When product is trapped within the system, the pressure will increase by 126 PSI (8.69 BAR) for every
one (1) temperature degree increase.
System Recommendations (Continued)

Page 8
Thermal Shock
The system operating temperature will expand or contract the metals within the flow meter. For systems that have
sudden or immediate temperature increases of 68 F (20 C) degrees or more, will require clearance rotors.
Clearance rotors will be necessary to eliminate the effect of immediate expansion of the rotors vs. meter
body, caused by thermal shock.
Hydraulic Shock (Water Hammer)
Hydraulic shock is a rise in pressure, which happens when an operating system has immediate change in
direction of flow such as a fast valve closure at a high operating flow rate. Hydraulic shock can damage
any item in the way of the product flow such as internal parts of the meter, valves, and pump. System de-
sign and improper operating procedures will elevate this problem. The use of 2-stage preset control
valves or surge suppressing bladders or risers will help reduce or eliminate this problem.
To compute the shock pressure when a valve is closed quickly (recommended to be less than 6 PSI):
Shock Pressure (PSI) = 63 x Velocity (FPS)
In order to eliminate hydraulic shock, you need to slow down the valve closure rate. The time required to
close the valve so that the line pressure will not exceed the normal pressure at no flow is:
Time (seconds) = 0.027 x L x V
N – F
V = Velocity in Feet/Seconds
L = Length of pipe before the valve in feet
N = Line pressure at no flow
F = Line pressure at full flow
Products that Dry/Congeal/Crystallize
There are many liquids that crystallize, harden and/or solidify on contact with air or with an increase in
temperature. A proper system design and a good understanding of the product being measured will help
to avoid the possibility of air entering into the system and the product being affected.
Calibration
The meter shall be tested and calibrated with the product it is intended to measure when installed. Total
Control Systems shall not be responsible for loss of product or any damages resulting from the end user’s
failure to test this meter to insure proper calibration. Every 700 series meter is tested and calibrated at the
factory to prove it is calibratable in your system. It is the owner’s responsibility to report this device to
the local Weights and Measures officials for their inspection before the meter is put to use.
System Recommendations (Continued)
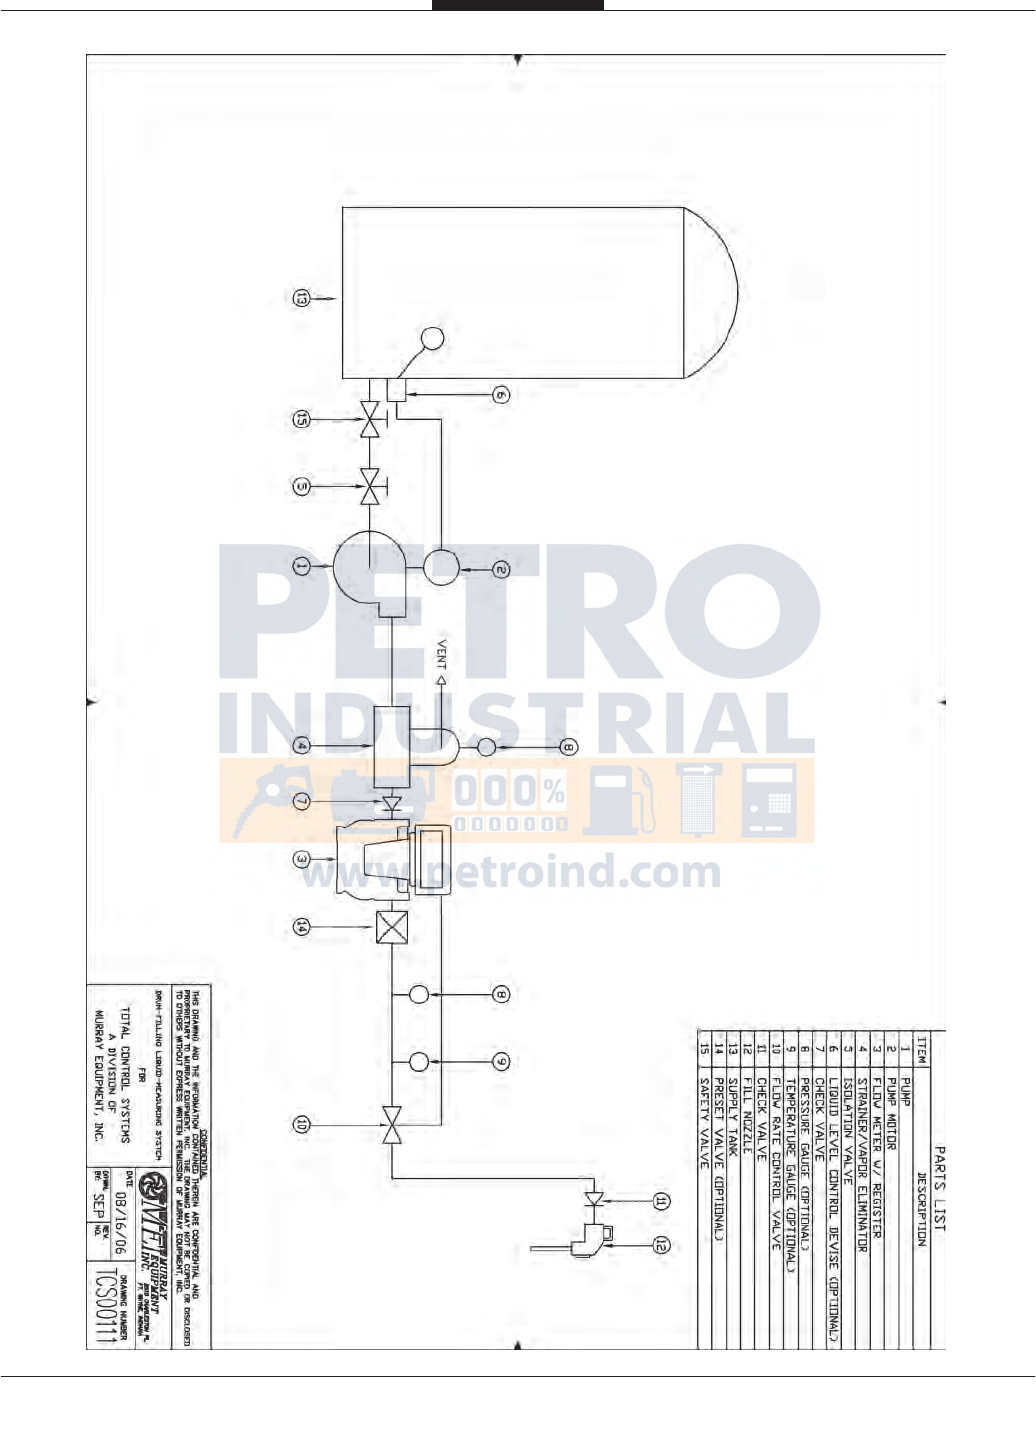
Page 9

Page 10
Page 11
Start up Recommendations
Start-up instruction for new installations or after maintenance and repairs:
1). Only properly trained personal should design, install, or operate metering system.
2). Remove plastic threaded plugs placed in meter for shipping protection. They are not to be used in
meter system because of the PVC plugs low rated pressure, compatibility, and sealing issues.
3). Place the meter in an area with ample workspace, secure from vibration, and pipe line stress. Mount
and bolt down on to a fixed stand or platform. This prevents meter stress, which will cause leakage
and metal fatigue.
4). Apply thread sealing compound and gasket materials that are compatible with product.
5). Do not weld to meter or accessories. This will weaken housings and cause o-ring and casting leaks
and potentially distort the critical tolerances within the flow meter.
6). Always wear personal safety protection equipment such as goggles, steel toed shoes, gloves and full
body clothing.
7). Be sure to install a pressure relief valve or expansion joint in the system to protect against thermal
expansion.
8). Make sure all system components are properly secured and tightened.
9). All meter assembly bolts and connections are tight.
10). Air eliminator vapor release is properly vented and piped into a reservoir container or back to the
supply tank.
11). Electrical connections are properly installed and start/stop switches are off and locked-out.
12). Flooded suction to the Pump. Fluid is available to system and will not starve or cavitate pump.
13). Slow flooding of system
Start up system with all shut off valves in the closed position. When a pump is turned on and a
valve opened in a new, dry system, tremendous liquid and air pressure can be built up in the piping
and forced through the meter. The high pressure and volume of air causes the meter to operate more
quickly than normal. When product reaches the meter, there is an abrupt slowing of the meter rotors,
which could cause damage to the register, rotor shafts, packing gear and/or blade, timing gears and
other components. The recommended method of starting any system is to flood the piping gradually.
This allows product to slowly force the air from the entire system.
¡WARNING!
Test equipment should be grounded to prevent a possible spark. Test area should have no ignition source. Operators should
wear personal protection and prevent any product exposure and environmental issues.
Page 12
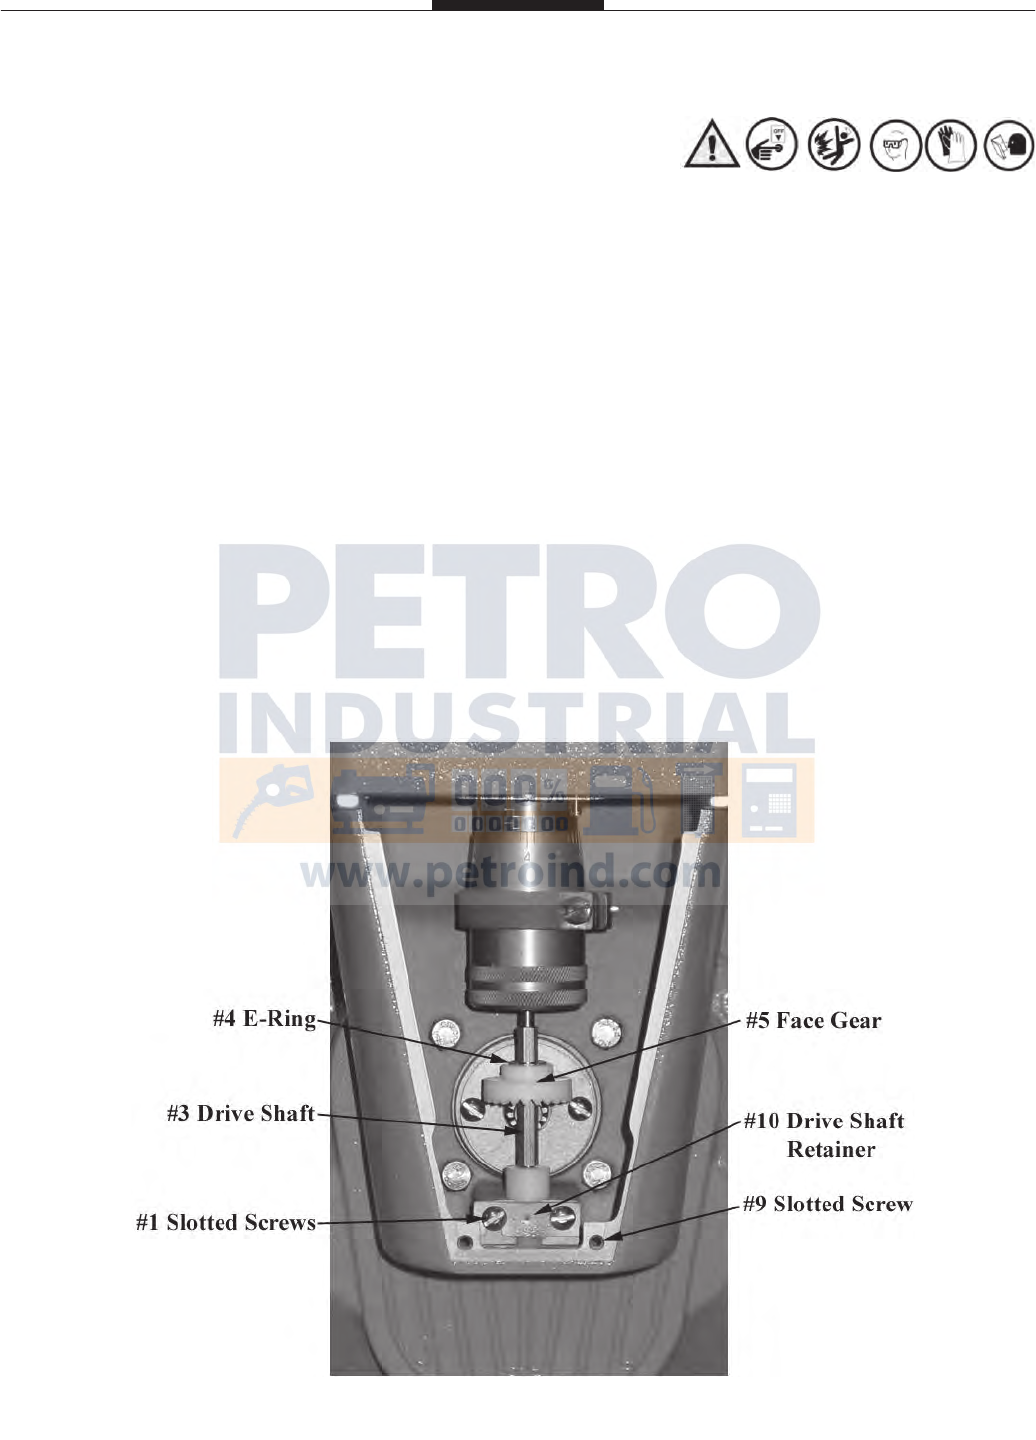
Direction of Flow
The meter is set up at the factory for left to right flow. To change the meter to right to left flow, begin
by removing the screws (#9 on the Meter Assembly Breakdown) and the adjuster cover plate (#7) on the
front of the meter. Remove both the screws (#1), the drive shaft retainer (#10), the drive shaft (#3), the e
-ring (#4) and the face gear (#5). Reinstall the gear on the shaft with the gear teeth facing up. Snap the
e-ring back into place to hold the gear in place. Reinstall the shaft, mating the face gear with the drive
gear of the packing capsule assembly. Reinstall the screw and cover plate. The meter will now be set
up for right to left flow. See Page for a parts breakdown of entire meter assembly.
Start-Up Recommendations (CONTINUED)
15). When operating the meter with accessories, valves should be opened slowly to avoid a pressure
surge that can damage the meter or air eliminator. System pressures should be maintained below
70 PSI (4.9 BAR).
16). Custody transfer metering systems must be calibrated by a regulatory agency before product can
be sold off the meter. Contact your local authorities for proper calibration.
17). Strainers should be cleaned frequently or have a maintenance schedule. This will ensure a clean
system and long service life.

Page 13
The method of proving should be selected, and necessary provisions made, during the design stage of the
installation. Of the most common used systems, portable provers have the advantage of more closely re-
producing the condition under which the product is normally delivered.
Use Accurate Prover
Scientifically designed provers are commercially available for proving meters, and no other kind should
be used. Even scientifically designed provers should be checked periodically for accuracy. Weights and
Measures officials have been very cooperative in giving assistance to checking privately owned volumet-
ric provers.
Recommended size of test measure:
The prover capacity should be equal to at least one minute’s flow through the meter at its maximum rate.
These provers are not merely truck compartments or drums, but are scientifically designed test measures,
having proper drainage means built into them, a calibration gauge glass neck, and protection against de-
formation (which causes volume changes).
A “homemade” prover, whether a drum or a tank is not likely to be satisfactory, and may cause expensive
errors due to inaccurate meter calibration.
Setting a Prover
The prover should be set level, using the levels provided on the prover, or separate ones. This insures con-
sistent results when moving the prover from meter to meter.
Where to Test a Meter
The best place to test is in its normal operating position, instead of a test stand. In this way, the correct-
ness of the installation and of the operation conditions will be verified by the test. Always test a meter
with the same liquid it is to measure, because a difference in viscosity, temperature and system plumbing
slightly affects meter accuracy.
Discharge Line from Meter
Where a portable prover is used, the liquid is generally discharged in to the prover in the same manner, as
a normal delivery would be made. Where a special test connection is used, the discharge line must be ar-
ranged to drain to the same point on each test. The meter flow rate and off/on is controlled at the end of
the discharge line.
Wetting the Prover
Reset the meter register to zero, and fill the prover to the zero or 100% marking of the scale. Disregard
the meter reading. Drain the prover, and reset the register. The reason for disregarding the first meter
reading is that the prover must be wetted, as its calibrated capacity is determined on its wet measure ca-
pacity by its manufacturer, and because the prover will be wet for the subsequent tests to be run.
Meter Calibration
Page 14
After the prover has drained, allow a definitive time of a few minutes for drainage from the sides of the
tank. Total drainage time should be the same between all tests to insure uniform results. If a considerable
length of time is to elapse between tests, the wetting operation can be eliminated by allowing the prover to
remain full until the next test is to be run.
Making the Tests
The setup is now ready for accuracy the test. Reset the register to zero, and run the required test through
the meter. Do not exceed the maximum recommended rate of flow for the meter. Maximum and minimum
recommended rates of flow for various sizes and types of 700 series meters are marked on their identifica-
tion plates and maintenance manuals.
Determining Test Results
Run the meter to the mark on the dial corresponding to the prover capacity, and read the over or under
delivery in cubic inches or percent on the calibrated plate on the neck of the prover. If the plate is calibrat-
ed in cubic inches, the percentage error can readily be computed on the following basis:
(a) One gallon equals 231cu.in.
(b) A 100-gallon prover holds 23,100cu.in. Therefore, 23.1cu.in. represents 0.1% error.
The National Institute of Standards and Technology, in its NIST Handbook 44 specifies a tolerance of
plus or minus the following:
METER TOLERANCE
Acceptance tolerances apply to new meters and repaired meters after reconditioning.
Repeatability
When multiple tests are conducted at approximately the same flow rate and draft size, the range of test
results for the flow rate shall not exceed 40% of the absolute value of the maintenance/normal tolerance
and the results of each test shall be within the applicable tolerance.
Changing Meter Calibration
Refer to meter literature for method of changing meter calibration. Any change in the meter calibration
adjustment will change the delivery in the same amount for all rates of flow. That is, the calibration curve
retains its shape, but is moved up or down. Therefore, if a meter tests satisfactorily at full flow, but drops
off too much at low flow, changing the calibration will not remedy this condition; it will bring the low
flow test to 100%, but it will also bring the full flow above 100% by the same amount that the low flow
was raised. A condition of this kind is caused either by the metering system, need for meter cleaning or
repairs, or because of an attempt to retain accuracy below the minimum recommended rate of flow for the
meter.
Tolerance
Indication of Device Acceptance Test Maintenance Test Special Test
Wholesale 0.2% 0.3% 0.5%
Vehicle 0.15% 0.3% 0.45%
Meter Calibration (Continued)
Temperature Correction
If the conditions of testing are such that there will be a change of more than a few degrees in the tempera-
ture of the liquids between the time it passes through the meter and the time the prover is read, it will be
advisable to make a temperature correction to the prover readings. To do this, it is necessary to install
thermowells; to take readings of the temperature of the liquids in the meter and in the prover; and to take
the degrees API of the liquid. Corrections can then be easily made by the use of the National Standard
API Tables.
Meter Calibration (Continued)
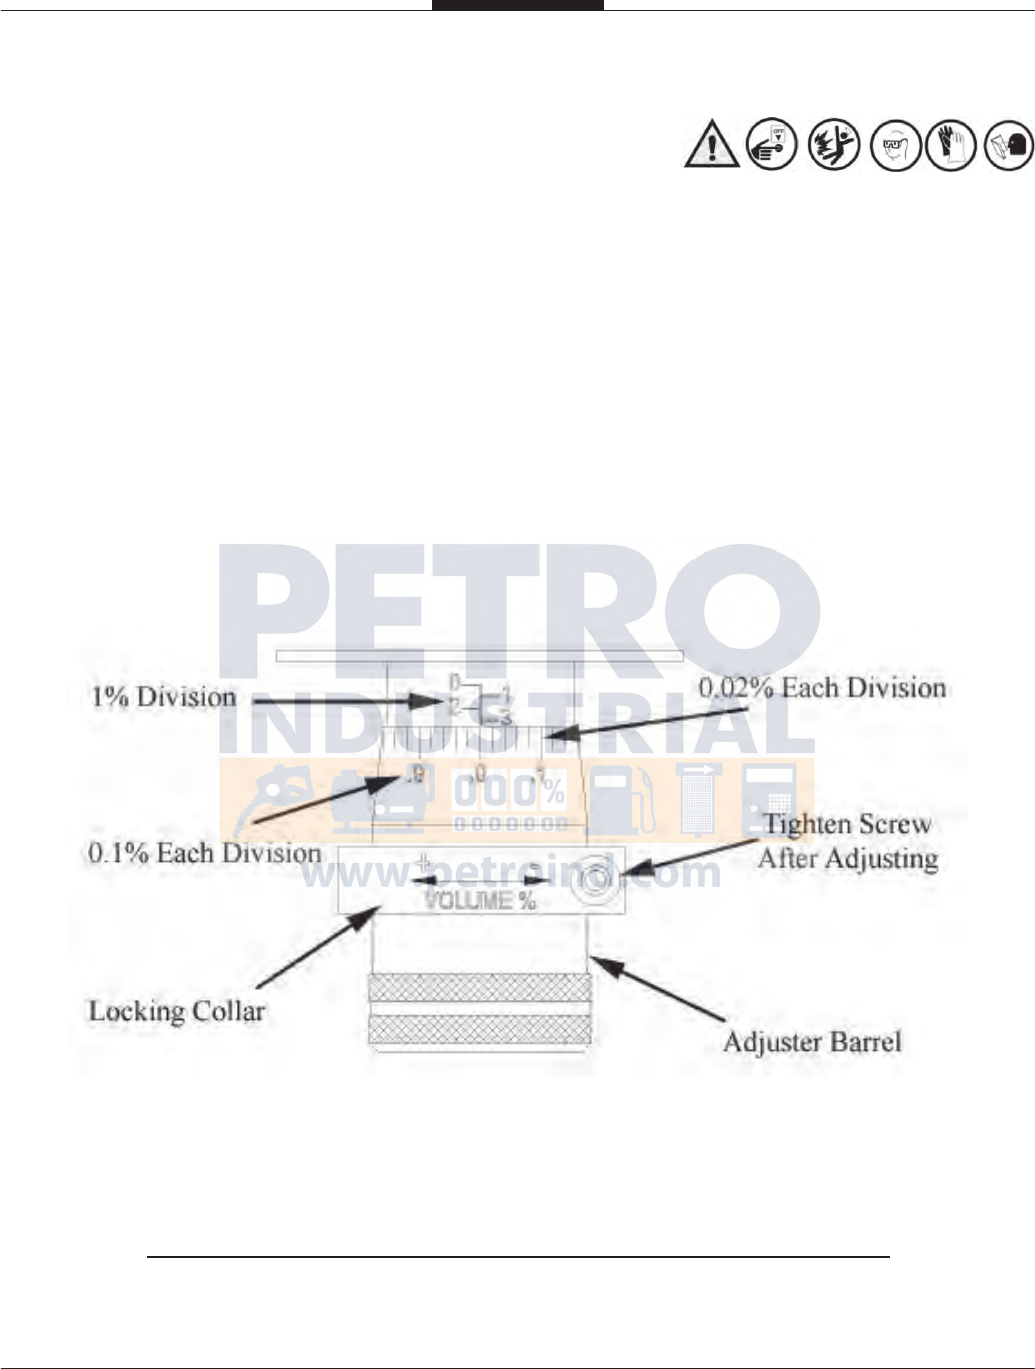
One complete turn of the adjuster barrel is equal to 1 gallon in 100 gallons or 1% of de-
livered volume. The adjuster body will show divisions of 1%, while the adjuster barrel
has divisions of 0.02%.
For volumes other than 100 gallons, the following formula may be used to calculate the
Adjuster percent to increase or decrease prover volume.
Volume on Prover minus Volume on Meter Counter
Volume on Meter Counter
Page 15
Calibration Adjustment

Page 16
Purpose: A product depletion test verifies the proper operation of air elimination when the storage tank for
the product being measured is pumped dry. This test is necessary for meters that may drain a tank com-
pletely, such as a vehicle tank meter.
Multiple-Compartment Test Procedure:
1). Begin the test from a compartment (ideally the largest compartment) containing an amount of fuel
equal to or less than one-half the nominal capacity of the prover being used. Operate the meter at the
normal full flow rate until the compartment is empty. There are several methods for determining that
the compartment is empty. There may be a significant change in the sound of the pump. There may
be visual evidence that the compartment has run dry. The meter may stop entirely or may begin to
move in jumps (pause, resume running, then pause, then run again.)
2). Continue the test until the meter indication stops entirely for at least 10 seconds. If the meter stops
for 10 seconds or more, proceed to step 3. If the meter indication fails to stop entirely for a period of
10 seconds, continue to operate the system for 3 minutes.
3). Close the valve from the empty compartment, and if top filling, then close the nozzle or valve at the
end of the delivery hose. Open the valve from another compartment containing the same product.
Carefully open the valve at the end of the delivery hose. Pockets of vapor or air may cause product to
splash out of the prover. The test results may not be valid if product is splashed out of prover.
Appropriate attire and protection is required, but caution is still necessary.
4). Continue delivering product at the normal full flow rate until the liquid level in the power reaches the
nominal capacity of the prover.
5). Close the delivery nozzle or valve, stop the meter. Allow any foam to settle, then read the prover
sight gauge.
6). Compare the meter indication with the actual delivered volume in the prover.
7). Calculate the meter error, apply Product Depletion test tolerance, and determine whether or not the
meter error is acceptable. Reference the NIST Handbook 44 for further information.
Split Compartment Test

Page 17
Single Compartment Test Procedure:
The test of single-compartment tanks is easier to accomplish if there is a quick-connect hose coupling be-
tween the compartment valve and the pump that supplies product to the meter. If the system does not have
quick-connect couplings between the compartment and the meter, an additional source of sufficient prod-
uct at the test site is required.
Without a quick-connect coupling:
1). Begin the tests with the compartment containing an amount of fuel equal to or less than one-half the
nominal capacity of the prover being used. Operate the meter at the normal full flow rate until the
supply tank is empty. There are several methods for determining that the tank is empty. There may
be significant change in the sound of the pump. Someone may visually watch for the tank to run dry.
The meter may stop entirely or may begin to move in jumps (pause, resume running, the pause, then
run again).
2). Continue the test until the meter indication stop entirely for at east 10 seconds. If the meter stops for
at least 10 seconds, proceed to step 3. If the meter indication fails to stop entirely for at least 10
seconds, continue to operate the system for 3 minutes.
3). Close the compartment valve and the delivery nozzle or valve if top filling. Stop the pump and load
sufficient product from the alternate source into the supply compartment for the meter being tested.
Allow the product to stand in the compartment for a brief time to allow entrained vapor or air to
escape.
4). Open the compartment valve and restart the pump without pump resetting the meter to zero. Care
fully open the nozzle of valve at the end of the delivery hose. Pockets of vapor or air may cause
product to splash out of the prover. The test results may not be valid if product is splashed out of the
prover. Appropriate attire and protection is required, but caution is still necessary.
5). Continue delivery of product at the normal full flow rate until the liquid level in the prover reached
the nominal capacity of the prover.
6). Close the delivery nozzle or valve, stop the meter, and allow any foam to settle, then read prover
sight gauge.
7). Compare the meter indication with the actual delivered volume in the prover.
8). Calculate the meter error, apply Product Depletion test tolerance, and determine whether or not the
meter error is acceptable. Reference the NIST Handbook 44 for further information.
Split Compartment Test (Continued)

Page 18
With a quick-connect coupling:
1). During a normal full flow test run; close the compartment valve at approximately one-half of the
nominal prover capacity. Then slowly and carefully disconnect the quick-connect coupling,
allowing the pump to drain the supply line.
2). Continue the test until the meter indication stops entirely for at least 10 seconds. If the meter fails
to stop entirely for at least 10 seconds, continue to operate the system for 3 minutes.
3). If the meter stops for at least 10 second or after 3 minutes, close the delivery nozzle or valve at the
end of the delivery hose if top filling.
4). Disconnect and reconnect the quick-connect coupling and open the compartment valve.
5). Carefully open the nozzle or valve at the end of the delivery hose. Pockets of vapor or air may
cause product to splash out of the prover. The test results may not be valid if product is splashed
out of the prover. Appropriate attire and protection is required, but caution is still necessary.
6). Continue the delivery of product at the normal full flow rate until the liquid level in the prover
reaches the prover’s nominal capacity.
7). Close the delivery nozzle or valve, stop the meter, allow any foam to settle, then read the prover
sight gauge.
8). Compare the meter indication with the actual delivered volume in the prover.
9). Calculate the meter error, apply Product Depletion test tolerance, and determine whether or not the
meter error is acceptable.
Tolerance for Vehicle-Tank Meters
Meter size Maintenance and Acceptance
2” (50 mm) 137 cubic inches
3” (75 mm) and larger 229 cubic inches
The results of the product depletion test may fall outside of the applicable test tolerance as this is a
stand-alone test.
The test draft should be equal to at least the amount delivered by the device in 1 minute at its maxi
mum discharge rate, and in no case should it be less than 50 gallons.
Split Compartment Test (Continued)
Page 19
Maintenance
¡WARNING!
Test equipment should be grounded to prevent a possible spark. Test area should have no ignition source. Operators should
wear personal protection and prevent any product exposure and environmental issues.
1). Keeping accurate maintenance and calibration records can be an excellent tool in determining the
frequency of inspection or maintenance for a system. As the meter wears, the calibration will be af-
fected and require adjustment. A personality profile can be created for each meter to help guide in a
maintenance schedule.
2). Great care should be utilized in the maintenance of the metering system. Personal safety protection,
environmental hazards, and government regulations need to be the foremost priority. Only fully
trained personnel should be involved in maintenance. Failure to use original TCS replacement parts
will void any Weights & Measures approvals and risk damage to the meter system.
3). ALWAYS RELIEVE INTERNAL SYSTEM PRESSURE TO ZERO BEFORE DISASSEMBLY
OR INSPECTION.
4). SERIOUS INJURY OR DEATH FROM FIRE OR EXPLOSION COULD RESULT FROM
MAINTENANCE OF AN IMPROPERLY DEPRESSURIZED AND EVACUATED SYSTEM.
5). Total Control Systems flow meters and accessories are often used with petroleum, solvents, chemi-
cals, and other liquids that may be explosive, extremely flammable, very toxic, oxidizing, and corro-
sive. Severe injury or fatalities may arise if appropriate safety precautions are not followed.
6). Before replacing or cleaning filter/strainer screen, the electrical system must be turned off. Product
needs to be drained from system. Collect all product and return to storage or dispose of properly.
Replace all drain plugs that were removed. Personal safety protection must be warn at this time.
Make sure there is adequate ventilation in the area. The metering system will not completely drain
so make sure you collect extra product when you remove the strainer cover. Clean the screen once a
week, or more often if there is a lot of sediment in the system. Make sure there is no ignition source
and the system is grounded. Replace all plugs that were removed for drainage.
7). The metering system is heavy and awkward so take precaution to handle it properly.
8). Do not use force to disassemble or use a screwdriver to pry open any part of the metering system.
Have the proper tools available before trying to repair the meter system. Be careful of the parts as
they can be sharp and heavy. Do not drop housing or rotors as they can cause injury and can destroy
the parts. Be careful when inspecting and turning the timing gears and rotors as they can pinch
fingers, turn slowly to verify smooth operation.
9). When inspecting the spring loaded preset valves do not place anything inside the housing, as the
action of the valve will pinch this object when the valve closes.
Page 20
Maintenance (CONTINUED)
¡WARNING!
Test equipment should be grounded to prevent a possible spark. Test area should have no ignition source. Operators should
wear personal protection and prevent any product exposure and environmental issues.
10). When removing gaskets or o-rings, carefully check for damage or corrosion. Any cracked, rough,
worn, elongated or swollen o-rings need to be replaced. When replacing the o-rings, place grease
along the inside of the o-ring groove or completely around the o-ring to help the o-ring stay in the
o-ring groove during assembly. If o-ring is pinched or not in the o-ring groove, the meter system
will leak and cause serious problems to the environment and equipment. Collect all replaced parts
and dispose of properly. Do not weld any part of the meter system or accessories as this will
weaken the part and allow for leaks
11). All bolts and screws need to be coated with anti-seize. Then follow the torque specifications for
each flow meter.
12). Recommended levels of maintenance and inspection will depend upon the system variables, such as
the products being measured, their corrosiveness, system pressure requirements, government or
company regulations, and age of metering system. If hydrostatic testing is required, the system pres
sure should not exceed 1.5 times the marked meter pressure. It is not recommended to pneumatically
test the meter system at anytime.
13). If any component of the meter system is removed from the system, it should be thoroughly flushed
with a compatible liquid. After this is done, immediately refill the meter or accessory with a
compatible liquid to prevent corrosion and water build up.
Storage Instructions
Short periods of non-use of the meter (a week or less) should present no problem, provided that the meter
remains full of product. For long periods of non-use, such as winter storage, the following procedure is
recommended. Before long-term storage, a good practice is calibration of the meter to determine that it is
functioning properly.
1). To store the meter when it is left in line, flush the system with clean water until 70-80 gallons of
water have gone through the meter.
2) Pump a 50% anti-freeze / 50% water solution through the entire system (100% RV antifreeze may
be used instead). With the pump running, shut off a valve downstream from the meter, making
sure that anti-freeze solution is present at that point. Then close an upstream valve, such that the
meter remains full of anti-freeze solution.
3) Remove the register from the meter, and lubricate the drive coupling shaft. After lubrication,
reassemble the register onto the meter.
When starting the system after a period of storage, check the meter's calibration as detailed earlier in the
service manual.
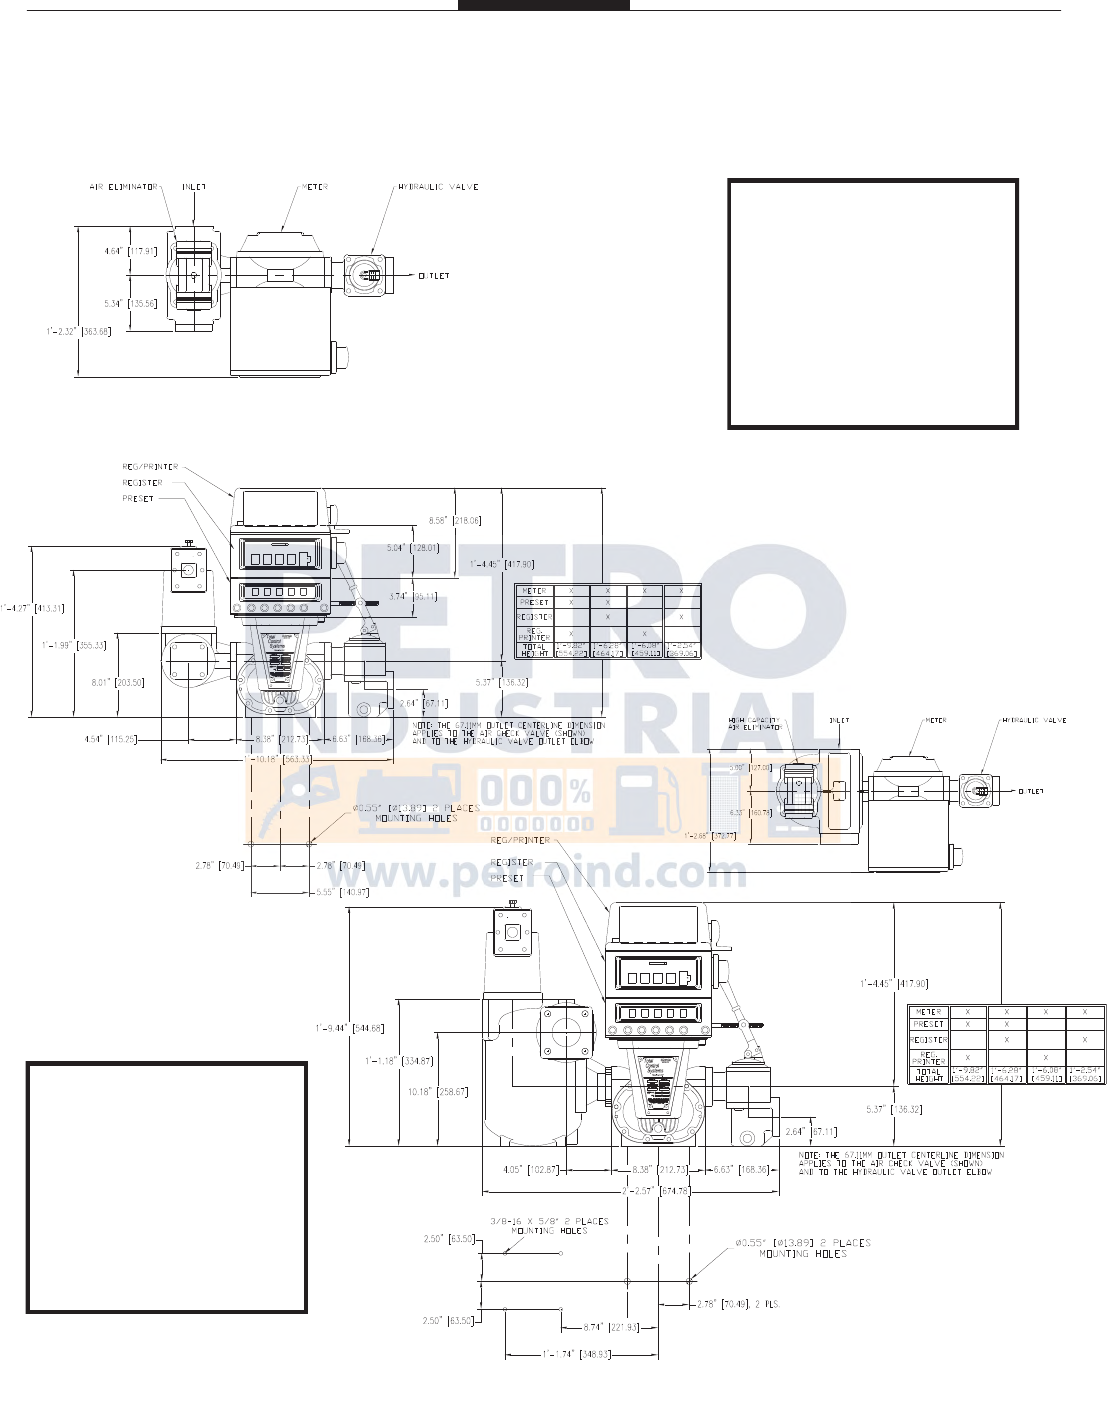
Page 21
700-20 / 700-25 Dimensions
Meter shown with these options:
· Meter
· Air Eliminator
· Strainer
· Hydraulic Valve
· Air Check Valve
· Register
· Preset
· Printer
Meter shown with these options:
· Meter
· Air Eliminator
· High Capacity Strainer
· Hydraulic Valve
· Air Check Valve
· Register
· Preset
· Printer
All measurements are in inches (millimeter)
S
E
T9 16 0
S
0T
O
P
69 01 0
0 0 0 5 0 9 7 0
G A L L O N S
S
E
T9 16 0
S
0T
O
P
69 01 0
0 0 0 5 0 9 7 0
G A L L O N S
S
E
T9 16 0
S
0T
O
P
69 01 0
0 0 0 5 0 9 7 0
G A L L O N S
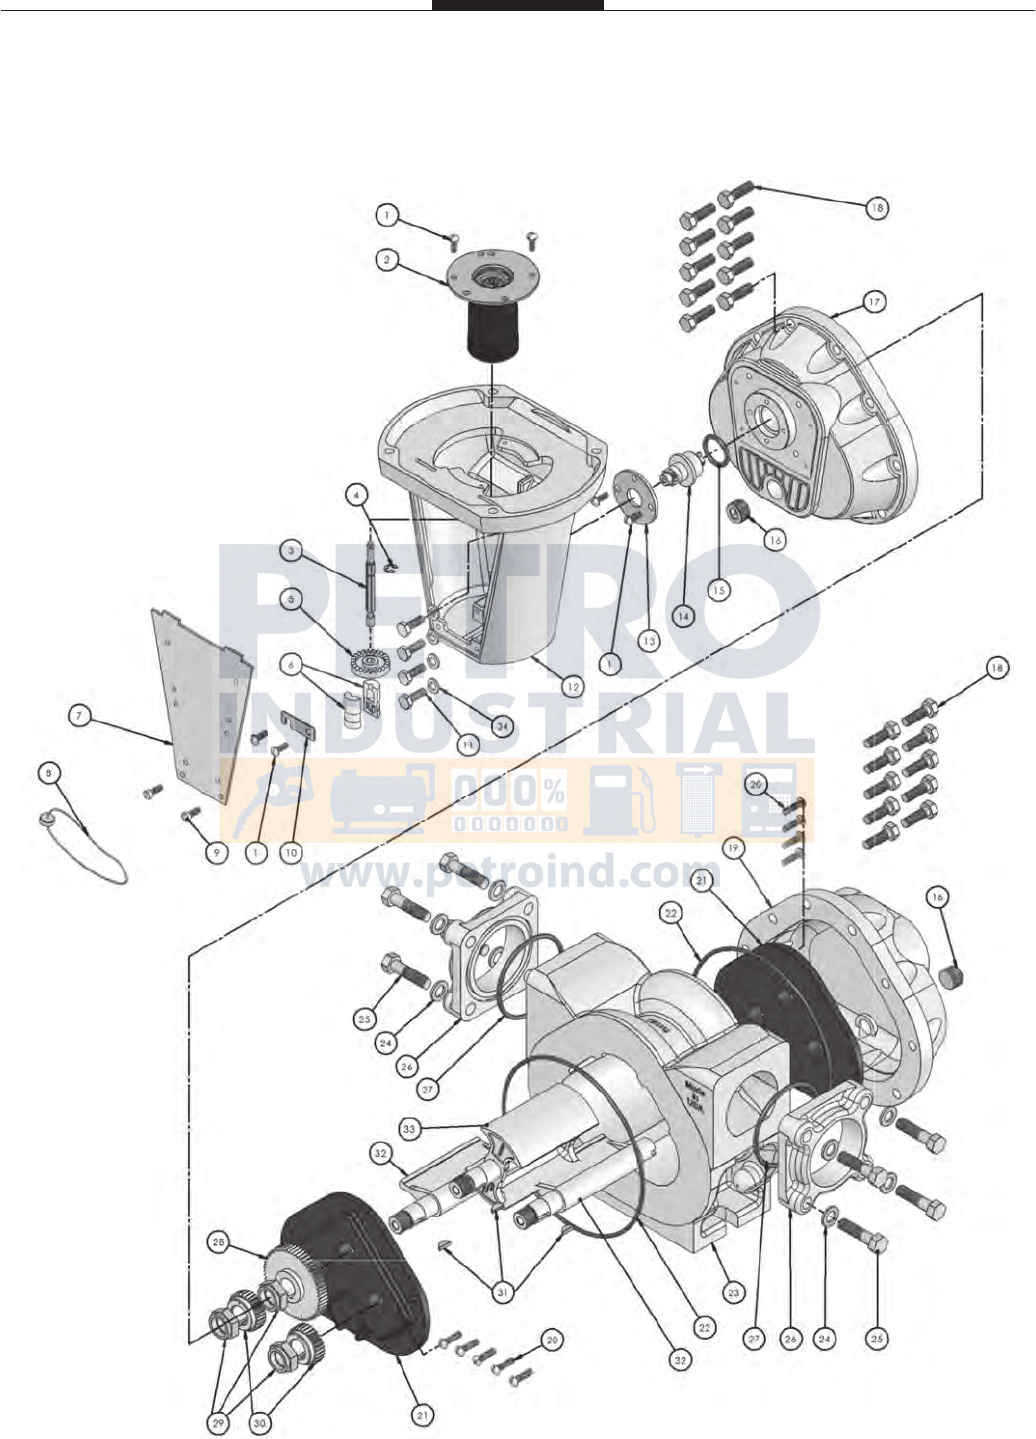
Page 22
700-20 / 700-25 Meter Assembly
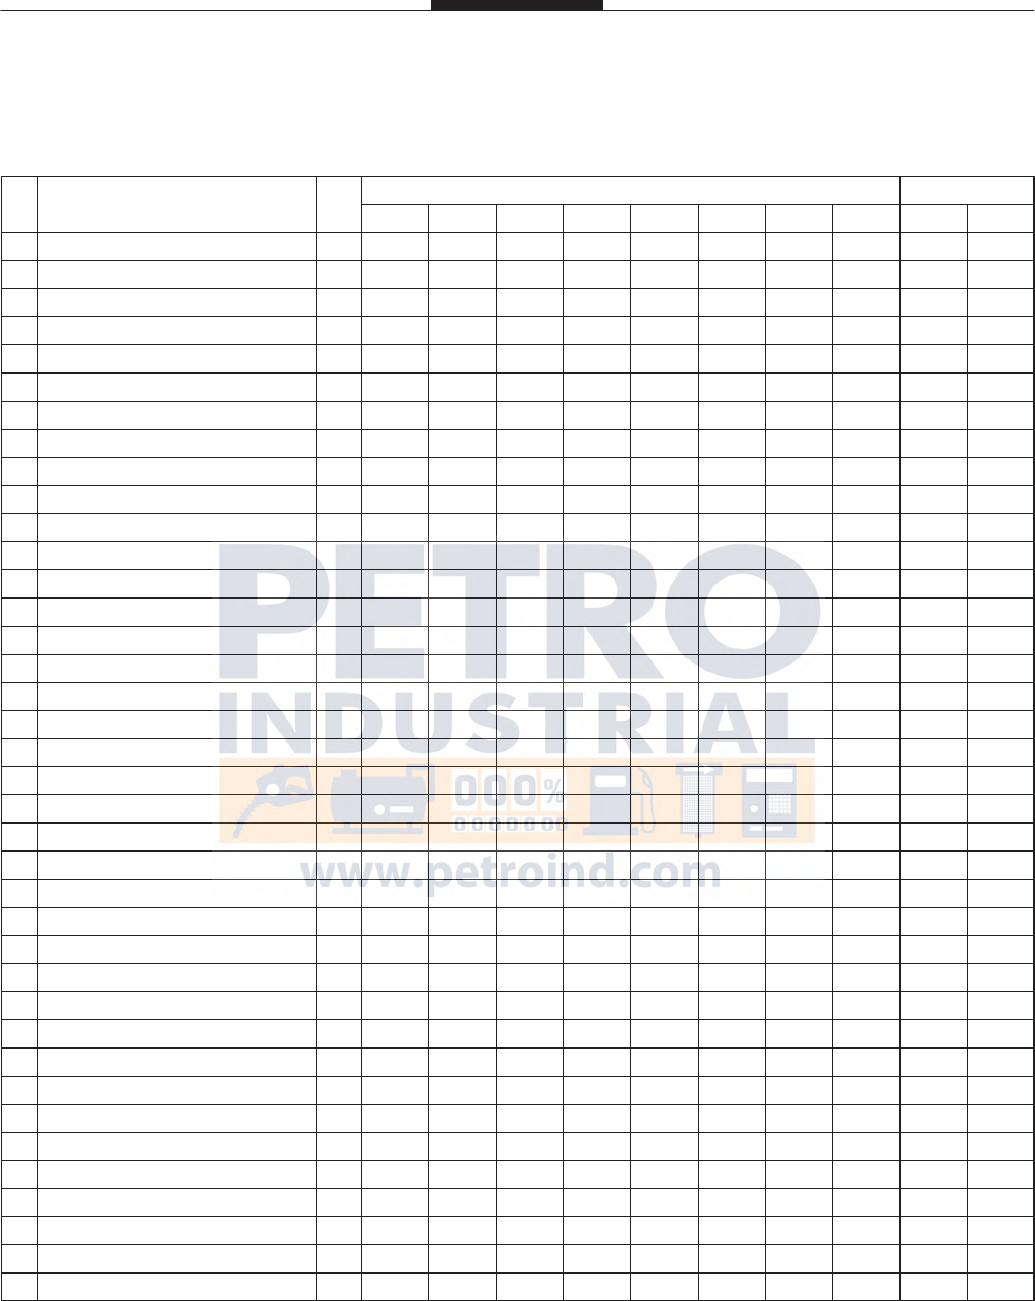
Page 23
Item
Description Qty
700-20 700-25
SP SPA SPD IP IC AF SS SSD SPA SPD
1 Round Head Screw 6 1-128279 1-128279 1-128279 1-128279 1-128279 1-128279 1-128279 1-128279 1-128279 1-128279
2 Adjuster Assembly 1 700100 700100 700100 700100 700100 700100 700100 700100 700100 700100
3 Drive Shaft 1 700019 700019 700019 700019 700019 700019 700019 700019 700019 700019
4 E-Ring 1 700016 700016 700016 700016 700016 700016 700016 700016 700016 700016
5 Acetal Face Gear 1 700018 700018 700018 700018 700018 700018 700018 700018 700018 700018
6 Acetal Bushing 2 700020 700020 700020 700020 700020 700020 700020 700020 700020 700020
7 Adjuster Cover Plate 1 700017 700017 700017 700017 700017 700017 700017 700017 700017 700017
8 Seal Wire 1 1-118849 1-118849 1-118849 1-118849 1-118849 1-118849 1-118849 1-118849 1-118849 1-118849
9 Drilled Head Screw 2 700042 700042 700042 700042 700042 700042 700042 700042 700042 700042
10 Drive Shaft Retainer 1 700022 700022 700022 700022 700022 700022 700022 700022 700022 700022
11 Head Mount Screw 4 700040 700040 700040 700040 700040 700040 700040 700040 700040 700040
12 Register Support 1 700200 700200 700200 700200 700200 700200 700200 700200 700200 700200
13 Packing Retaining Plate 1 700015 700015 700015 700015 700015 700015 700015 700015 700015 700015
14A 2:1 Packing Capsule Assy., STD 1 700150 700150 700155 700155 700155 700155 700155 700350 700150 700155
14B 1:1 Packing Capsule Assy. 1 700170 700170 700175 700175 700175 700175 700175 - 700170 700175
15 Packing O-ring 1 700009 700009 700010 700010 700010 700010 700010 700809 700009 700010
16 Plug 2 700024 700024 700024 700024 700024 700024 700024 700024 700024 700024
17 Front Cover 1 702500 702500 702503 702500 702500 702503 702502 702524 702500 702503
18A Cap Screw 16 700026 700026 700026 700026 700026 700026 700026 700026 700026 700026
18B Drilled Cap Screw 4 D700026 D700026 D700026 D700026 D700026 D700026 D700026 D700026 D700026 D700026
19 Rear Cover 1 702550 702550 702553 702550 702550 702553 702552 702572 702550 702553
20 Round Head Screw 10 702014 702014 702014 702014 702014 702014 702014 702014 702014 702014
21 Bearing Plate 2 702230 702235 702235 702230 702225 702225 702225 702231 702225 702225
22 Cover O-ring 2 702001 702001 702002 702002 702002 702002 702002 702801 702001 702002
23 Housing 1 702110 702110 702120 702110 702110 702120 702125 702114 702110 702120
24 Flat Washer 8 702018 702018 702018 702018 702018 702018 702018 702018 702018 702018
25A Cap Screw 4 702017 702017 702017 702017 702017 702017 702017 702017 702017 702017
25B Drilled Cap Screw 4 702017D 702017D 702017D 702017D 702017D 702017D 702017D 702017D 702017D 702017D
26A Flange, 2” NPT 2 702600 702600 702601 702600 702600 702601 702602 702602P 702600 702601
26B Flange, 2” BSPT 2 702603 702603 702611 702603 702603 702611 702612 702612P 702603 702611
27 Flange O-ring 2 702012 702012 702013 702013 702013 702013 702013 702812 702012 702013
28 Blocking Gear 1 702351 702351 702351 702351 702351 702351 702350 702353 702351 702351
29 Rotor Lock Nut 3 702010 702010 702010 702010 702010 702010 702020 702020 702010 702010
30 Displacement Gear 2 702451 702451 702451 702451 702451 702451 702450 702453 702451 702451
31 Rotor Key 3 702008 702008 702008 702008 702008 702008 702008 702008 702008 702008
32 Displacement Rotor 2 702405 702405 702422 702410 702410 702415 702415 702424 702405 702422
33 Blocking Rotor 1 702305 702305 702322 702310 702310 702315 702315 702324 702305 702322
34 Lock Washer 4 700071 700071 700071 700071 700071 700071 700071 700071 700071 700071
700-20 / 700-25 Meter Assembly
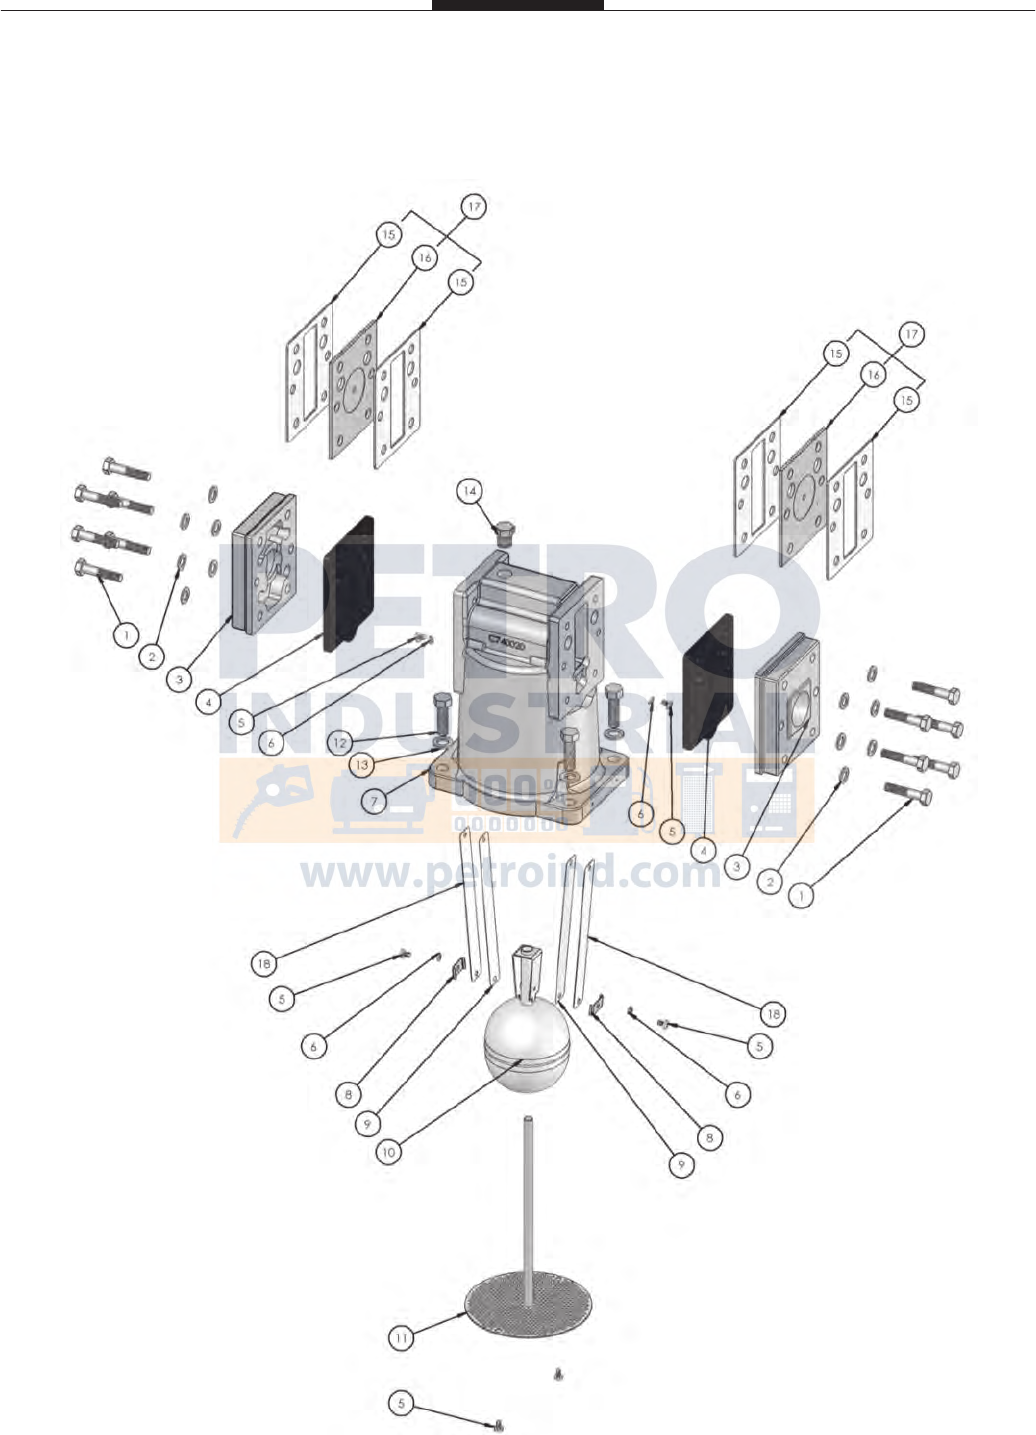
Page 24
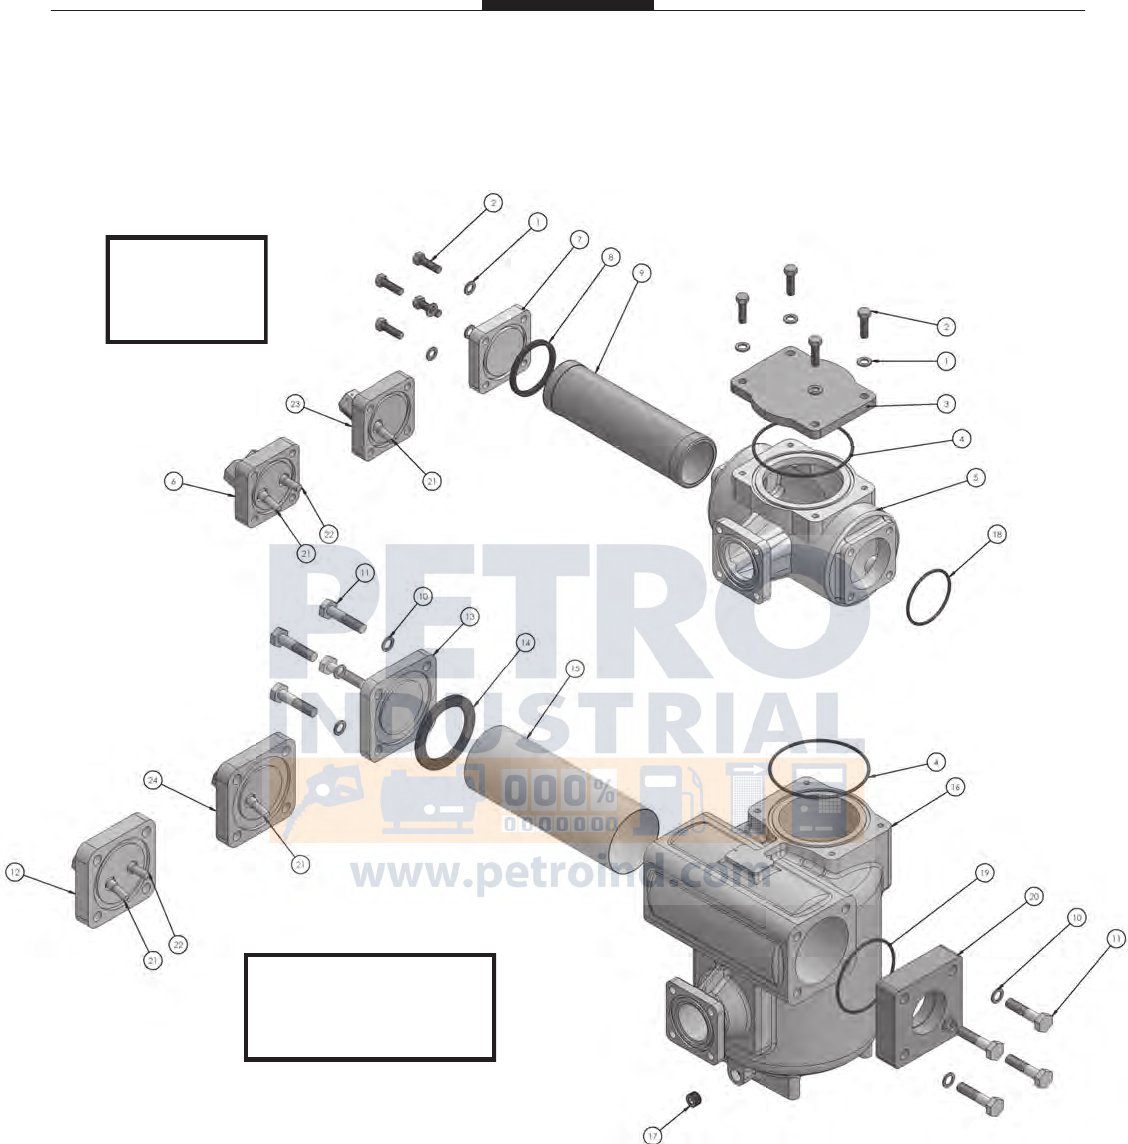
730-20 Air Eliminator Assembly
Page 25
730-20 Air Eliminator Assembly
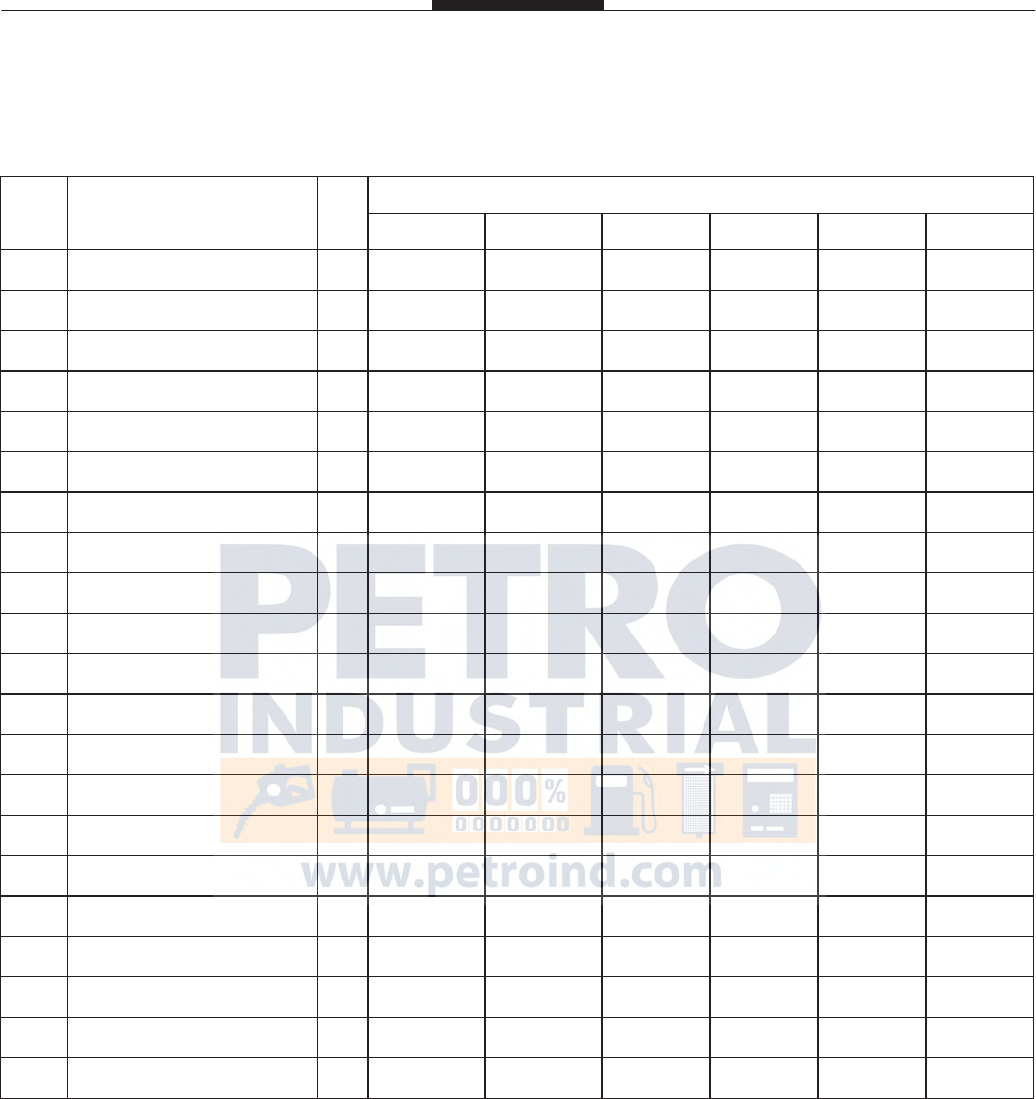
Item Description Qty 730-20
SP SPD IP AF SS SSD
1A Cap Screw 8 740050 740050 740050 740050 740050 740050
1B Drilled Cap Screw 4 740050D 740050D 740050D 740050D 740050D 740050D
2 Ring Washer 12 740051 740051 740051 740051 740051 740051
3A Outlet Cover, NPT 2 740010 740016 740010 740016 740018 P740018
3B Outlet Cover, BSPT 2 740710 740716 740710 740716 740718 P740718
4 Encapsulated Valve Plate 2 740205 740215 740215 740215 740215 740205
5 Screw 4 740030 740030 740030 740030 740030 740030
6 Split Lock Washer 2 740017 740017 740017 740017 740017 740017
7 Air Eliminator Housing 1 740020 740022 740020 740022 740024 P740024
8 Retaining Clip 2 740012 740012 740012 740012 740012 740012
9 PTFE Reed Strip 2 - 740077 740077 740077 740077 740077
10 Float Assembly 1 740013 740013 740013 740013 740013 740013
11 Diffuser & Shaft Assy. 1 740035 740035 740035 740035 740035 740035
12A Cap Screw 2 700054 700054 700054 700054 700054 700054
12B Drilled Cap Screw 2 700054D 700054D 700054D 700054D 700054D 700054D
13 Flat Washer 4 702018 702018 702018 702018 702018 702018
14 Plug 1 2-126146 2-126146 2-126146 2-126146 2-126146 2-126146
15 Plate Seal 4 740005 740004 740004 740004 740004 -
16 Valve Plate 2 740038 740006 740006 740006 740006 -
17 Valve Plate Kit 2 740138 740106 740106 740106 740106 -
18 Reed Valve 2 740007 740007 740007 740007 740007 740007
Page 26
720-20 Strainer / 725-20 High Capacity Strainer Assembly
725-20 High
Capacity Strainer
720-20
Strainer
Page 27
720-20 Strainer / 725-20 High Capacity Strainer Assembly
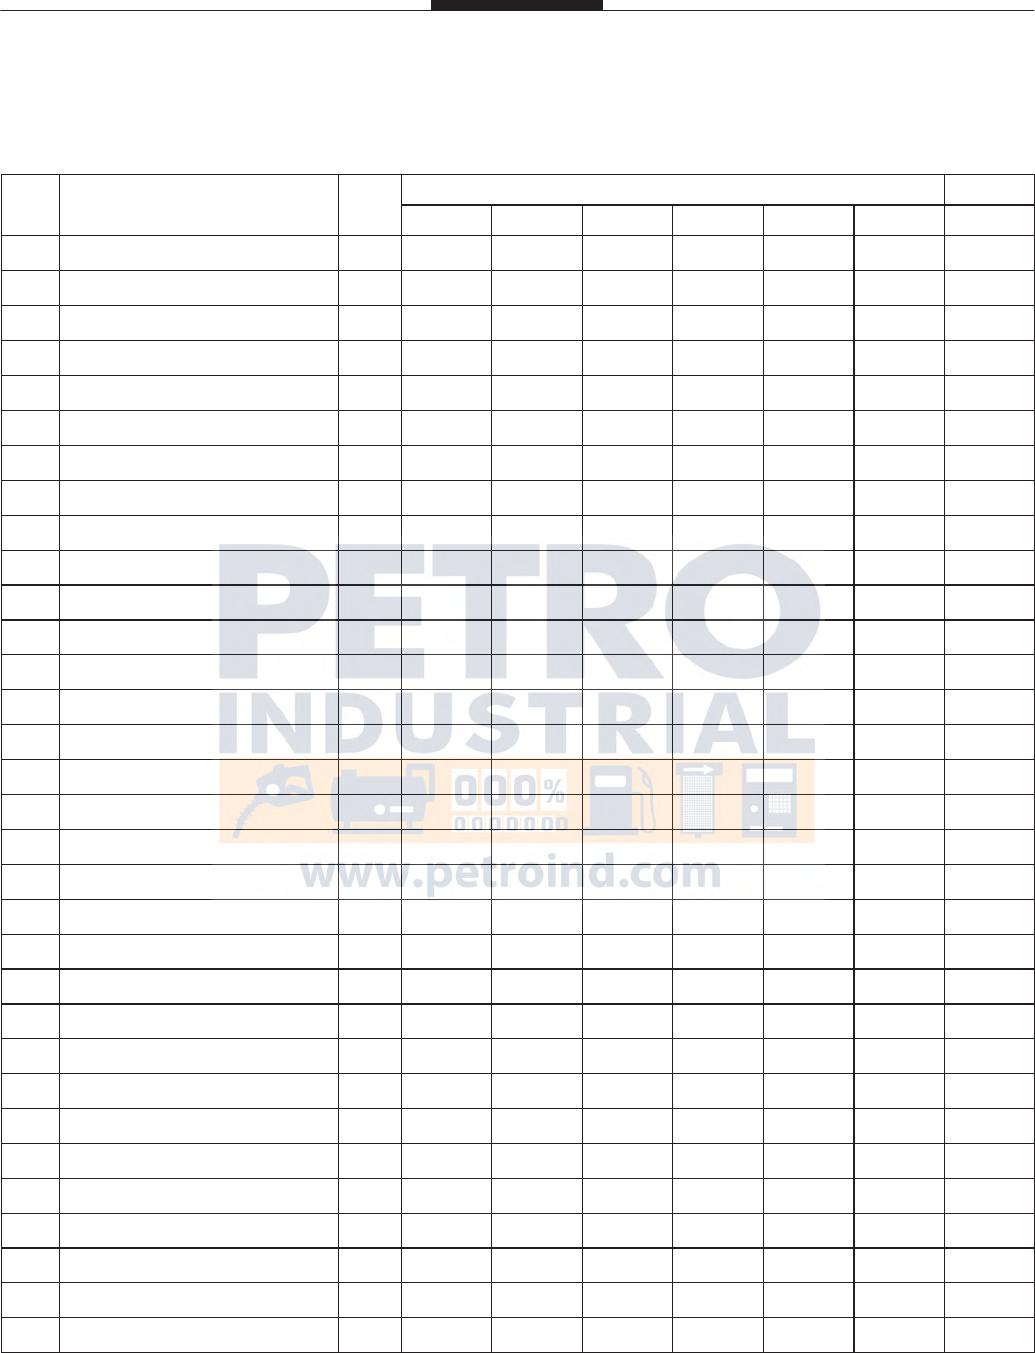
Item Description Qty
720-20 725-20
SP SPD IP AF SS SP SSD
1 Flat Washer 8 702018 702018 702018 702018 702018 702018 702018
2A Cap Screw 6 700054 700054 700054 700054 700054 700054 700054
2B Drilled Cap Screw 2 700054D 700054D 700054D 700054D 700054D 700054D 700054D
3 Strainer Cover, Optional 1 740041 740042 740041 740042 740042 740041 -
4 Top Seal O-ring 1 740009 740019 740019 740019 740019 740009 740809
5 Strainer Housing 1 742021 742022 742021 742022 742023 - P742023
6 Basket Cover, Two 1/2” NPT Ports 1 742055 742056 742055 742056 742057 - -
7 Basket Cover, STD 1 742050 742052 742050 742052 742053 - P742053
8 Seal Ring 1 742003 742004 742004 742004 742004 - 742803
9A 0.050 Strainer Basket, STD 1 - - 742005 742005 742005 - -
9B 40M Strainer Basket, STD 1 742010 742010 - - - - P742010
9C 80M Strainer Basket 1 742015 742015 - - - - -
9D 100M Strainer Basket 1 742025 742025 - - - - -
10 Flat Washer 8 - - - - - 703018 -
11A Cap Screw 4 - - - - - 703017 -
11B Drilled Cap Screw 4 - - - - - - 703017D
12 Basket Cover, Two 1/2” NPT Ports 1 - - - - - 743055 -
13 Basket Cover. STD 1 - - - - - 743050 -
14 Seal Ring 1 - - - - - 743003 -
15A 40M Strainer Basket, STD 1 - - - - - 743010 -
15B 80M Strainer Basket 1 - - - - - 743015 -
15C 100M Strainer Basket 1 - - - - - 743025 -
16 High Capacity Strainer Housing 1 - - - - - 745021 -
17 Plug 1 - - - - - 700024 -
18 Flange O-ring 1 702012 702072 702013 702013 702013 - 702812
19 Flange O-ring 1 - - - - - 703012 -
20A Flange; 3” x 2” NPT 1 - - - - - 703615 -
20B Flange; 3” x 2” BSPT 1 - - - - - - 703616
21 3/8” x 1/2” NPT Thermowell 1 740300 740400 740300 740400 740400 - 740300
22 1/2” x 1/2” NPT Thermowell 1 740305 740405 740305 740405 740405 - 740305
23 Basket Cover, One 1/2” NPT Port 1 742155 742156 742155 742156 742157 - -
24 Basket Cover, One 1/2” NPT Port 1 - - - - - - 743155
Page 28
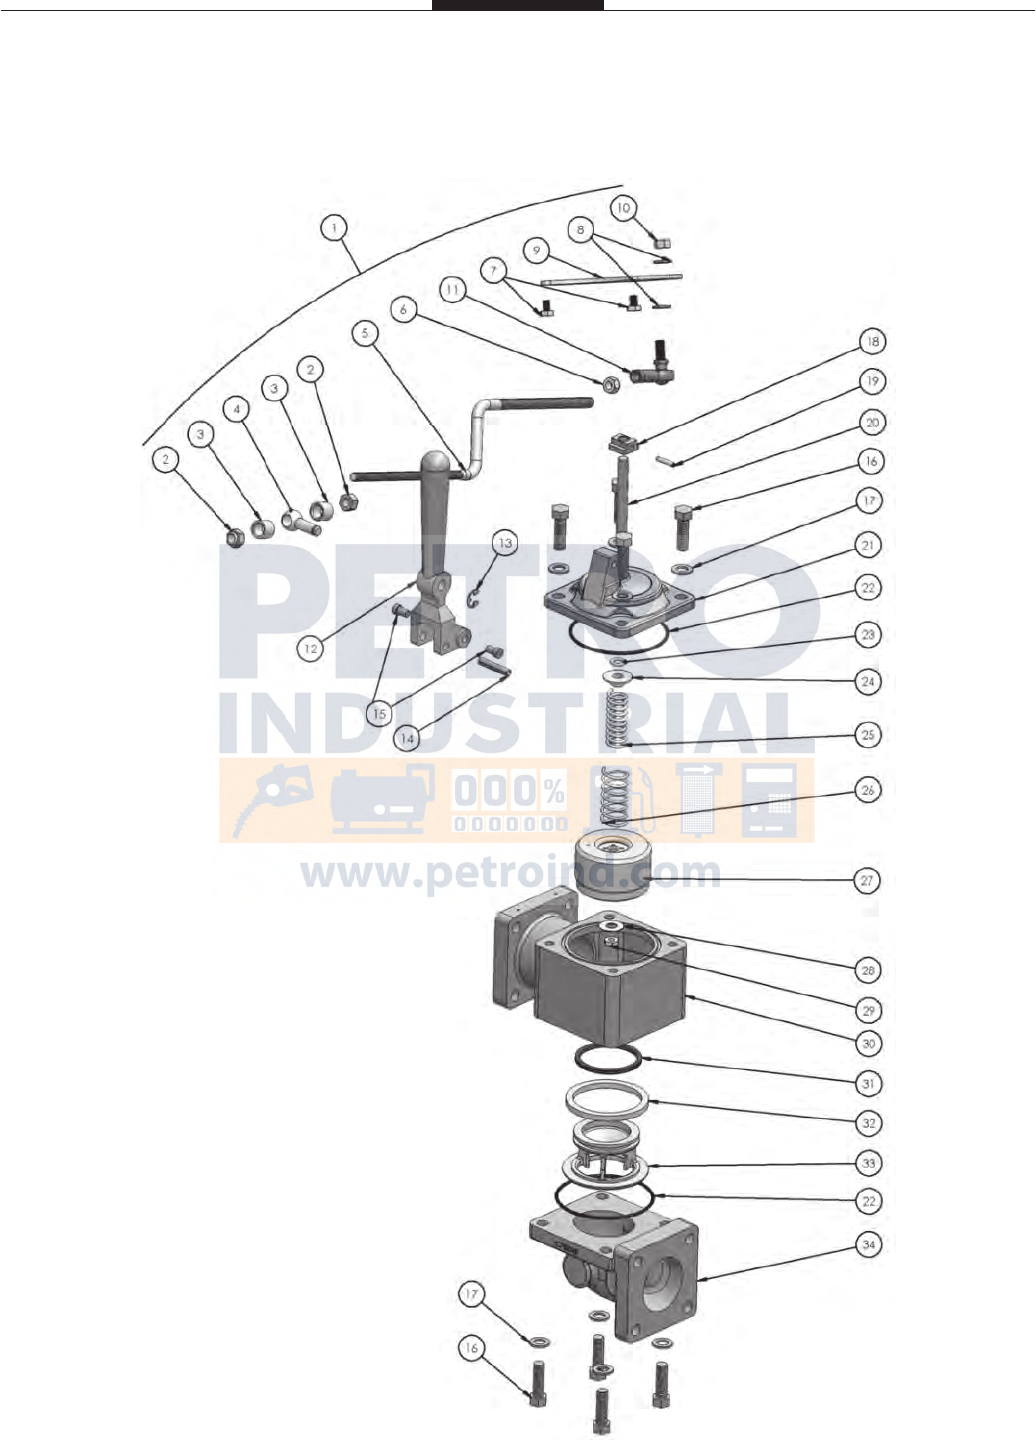
750-20 Hydraulic Preset Valve Assembly
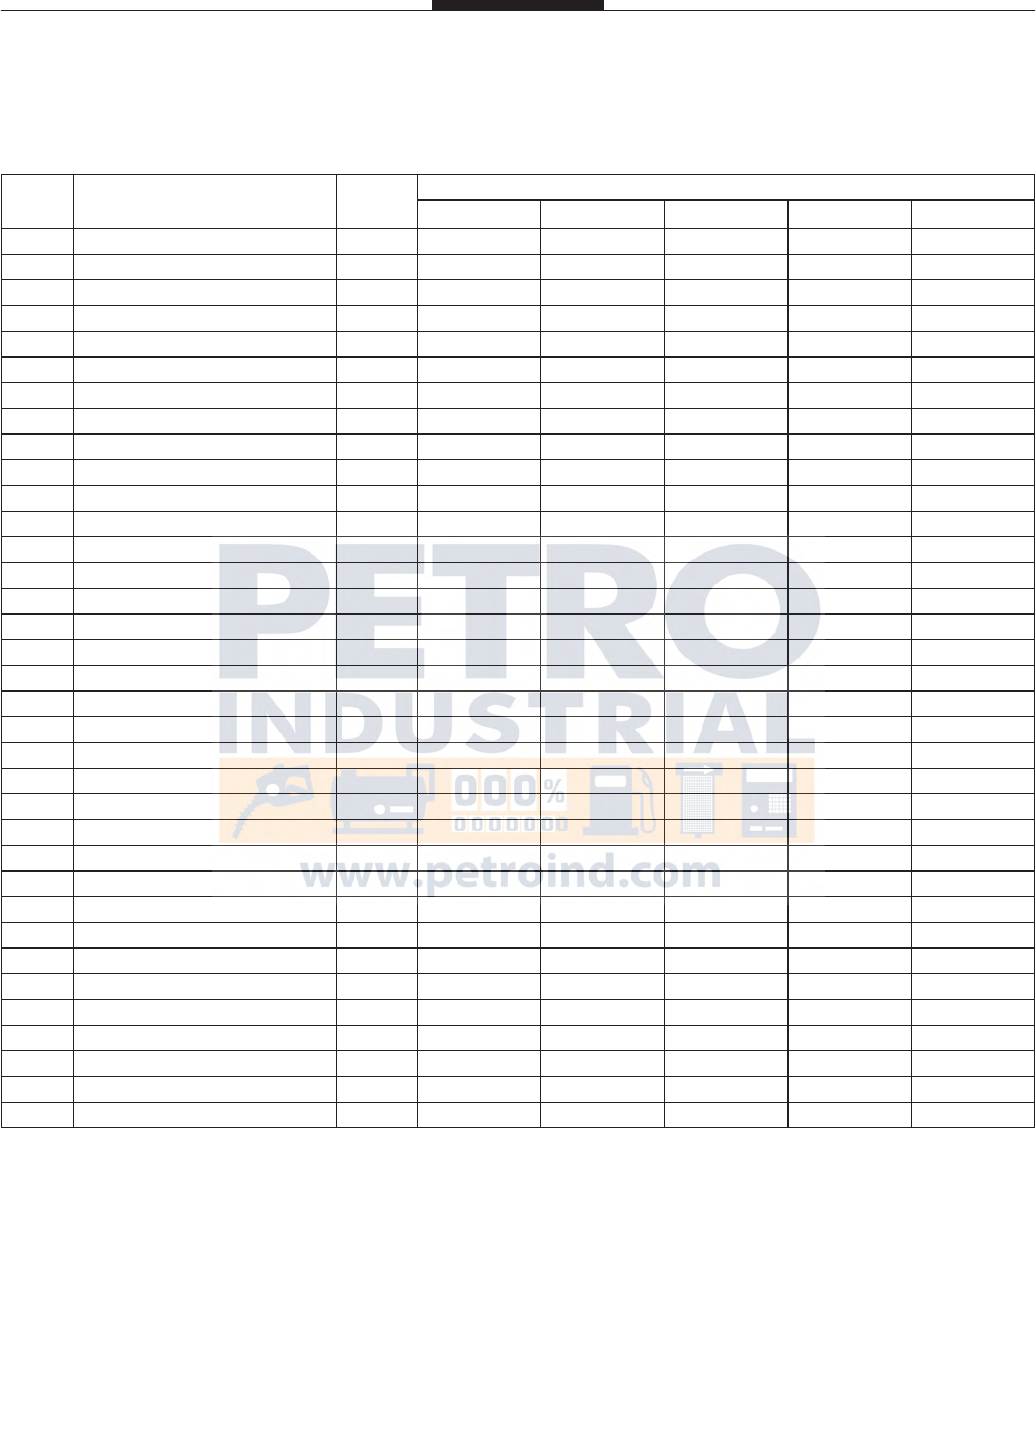
Page 29
Item
Description Qty 750-20
SP IP AF SS SSD
1 Linkage Assembly Kit 1 752002KT 752002KT 752002KT 752002KT 752002KT
2 Linkage Lock Nut 2 750001 750001 750001 750001 750001
3 Linkage Sleeve 2 750002 750002 750002 750002 750002
4 Linkage Spherical Pivot 1 750003 750003 750003 750003 750003
5 Linkage Arm 1 752001 752001 752001 752001 752001
6 Hex Nut 1 750010 750010 750010 750010 750010
7 Linkage Screw 2 750011 750011 750011 750011 750011
8 Flat Washer 2 68001 68001 68001 68001 68001
9 Preset Bracket 1 752099 752099 752099 752099 752099
10 Locking Nut 1 750012 750012 750012 750012 750012
11 Ball & Stud 1 753053 753053 753053 753053 753053
12 Operating Lever 1 752010 752010 752010 752010 752010
13 Linkage E-Ring 1 750004 750004 750004 750004 750004
14 Roll Pin 1 752004 752004 752004 752004 752004
15 Step Pin 2 752005 752005 752005 752005 752005
16A Cap Screw 4 700054 700054 700054 700054 700054
16B Drilled Cap Screw 4 700054D 700054D 700054D 700054D 700054D
17 Flat Washer 8 702018 702018 702018 702018 702018
18 Bushing 1 752006 752006 752006 752006 752006
19 Roll Pin 1 752007 752007 752007 752007 752007
20 Valve Shaft 1 752008 752008 752008 752008 752008
21 Valve Cap 1 752015 752015 752017 752018 752018
22 Body O-ring 2 752044 752045 752045 752045 752045
23 O-ring 1 752011 752012 752012 752012 752012
24 O-ring Retainer 1 752013 752013 752013 752013 752013
25 Internal Spring 1 752019 752019 752019 752019 752019
26 External Spring 1 752014 752014 752014 752014 752014
27 Piston 1 752020 752020 752022 752022 752022
28 Washer 1 752023 752023 752023 752023 752023
29 Lock Nut 1 752024 752024 752024 752024 752024
30 Valve Body 1 752040 752040 752042 752043 752043
31 Upper Seal 1 752035 752036 752036 752036 752036
32 Lower Seal 1 752033 752034 752034 752034 752034
33 Piston Guide 1 752030 752031 752032 752032 752032
34 Elbow 1 752041 752041 752027 752028 752028
750-20 Hydraulic Preset Valve Assembly
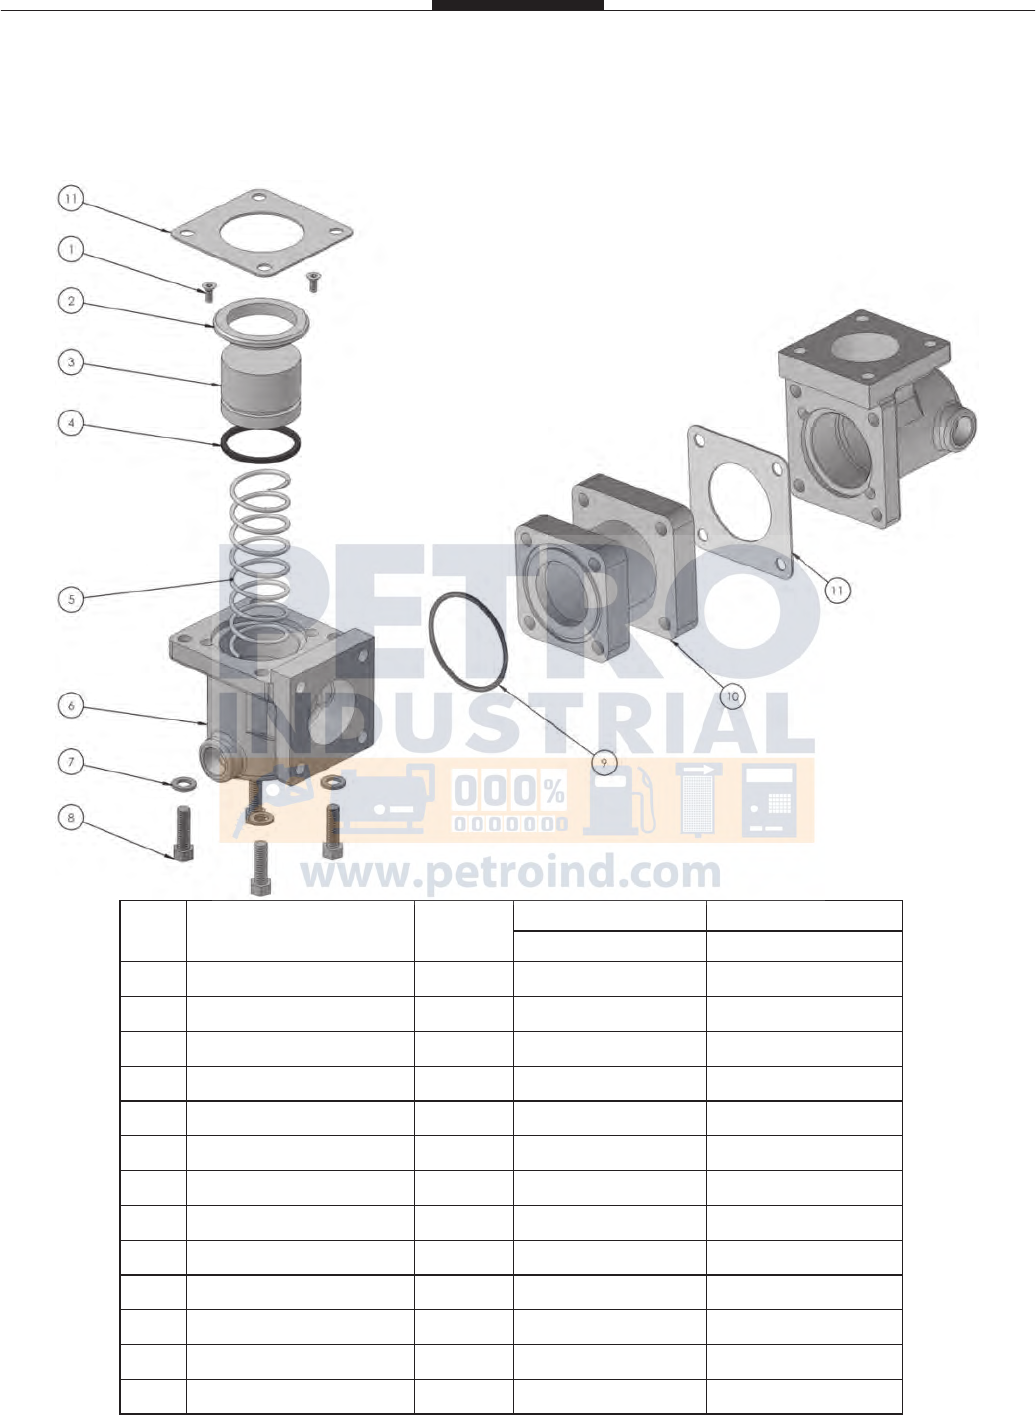
Page 30
760-20SP / 765-20SP Air Check Valve Assembly
Item Description Quantity
760-20 765-20
SP SP
1 Screw 2 792004 792004
2 Ring 1 792003 792003
3 Poppet 1 792002 792002
4 Gasket 1 792005 792005
5 Compression Spring 1 792001 792001
6A Housing; 1/2” NPT 1 792011 792011
6B Housing, 1/2” BSPT 1 792711 792711
7 Flat Washer 4 702018 702018
8A Cap Screw 2 792015 792015
8B Drilled Cap Screw 2 792015D 792015D
9 Adapter O-ring; 765 Air Check 1 - 702012
10 Adaptor; 765 Air Check 1 - 702665
11 Valve Gasket 1 752039 752039

Page 31
This Torque Chart is for 18-8 Stainless Steel Bolts
**Values can be +/- 10% of value listed**
Torque Specifications
700-20/25 METER ASSEMBLY
Part Number
& Description Tool Bolt/Nut Size
Foot Lbs. Newton Meter
Unlubricated Lubricated Unlubricated Lubricated
TCS 740050
Cover Plate
1/2” hex screw
wrench/socket 5/16-18 UNC 2B 11 6.6 14.9 8.9
TCS 701017
Cap Screws
9/16” hex screw
wrench/socket 3/8-16 UNC 2B 19.7 11.8 26.7 16.0
TCS 740030
Reed & Diffuser
slotted
screwdriver 8-32 UNC 2B 1.65 1.0 2.2 1.4
740-20 AIR ELIMINATOR/STRAINER ASSEMBLY
Part Number
& Description Tool
Foot Lbs. Newton Meter
Bolt/Nut Size
Unlubricated Unlubricated Lubricated Lubricated
TCS 700026
Cover Screws
1/2” hex
wrench/socket 5/16-18 UNC 2B 11 6.6 14.9 8.9
TCS 700040
Counter Support
7/16” hex
wrench/socket 1/4-20 UNC 2B 6.3 3.8 8.5 5.2
TCS 702014
Bearing Plate
slotted
screwdriver 10-24 UNC 2B 1.9 1.1 2.6 1.5
TCS 1-128279
Dust Cover
slotted
screwdriver 10-24 UNC-2B 1.9 1.1 2.6 1.5
TCS 702010
Rotor Gear
15/16” hex
wrench/socket 5/8-18 40 28 54 38
Part Number
& Description Tool Bolt/Nut Size Foot Lbs. Newton Meter
Unlubricated Lubricated Unlubricated Lubricated
TCS 701017
Cover & Elbow
9/16” hex screw
wrench/socket 3/8-16 UNC 2B 19.7 11.8 26.7 16.0
TCS 752024
Piston Lock
7/16” hex nut
Wrench/socket 1/4-20 UNF 3B 6.3 3.8 8.5 5.2
750-20 HYDRAULIC PRESET VALVE ASSEMBLY
Page 32
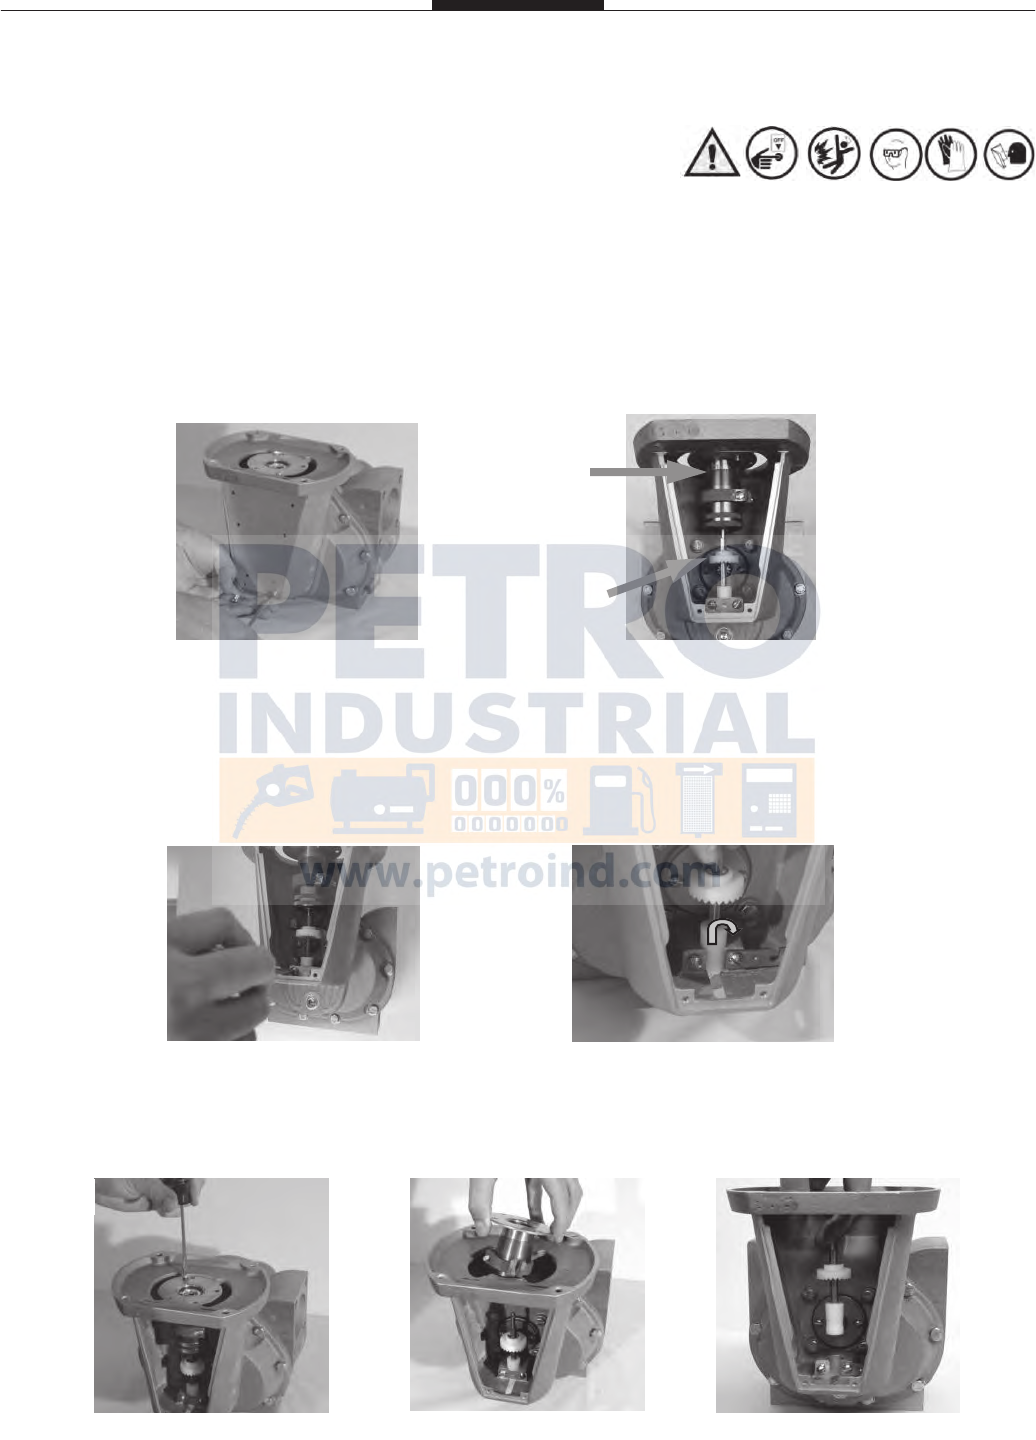
Drive Components
Removing the Dust Cover
1) Cut dust cover seal. Remove the dust cover screws with a standard flathead screwdriver.
2) Note the setting on micrometer.
3) Note the position of the drive gear (either above or below the packing gland pinion).
Removing the Adjuster
1) Loosen the retaining screws using a standard flathead screwdriver.
2) Slide the retaining clip up and over to the left side.
3) From the top, remove the screws to adjustor plate.
4) Lift adjustor out of the counter adapter.
5) Remove the adjustor drive assembly.
2
3
1
1 2
3 4 5
Page 33
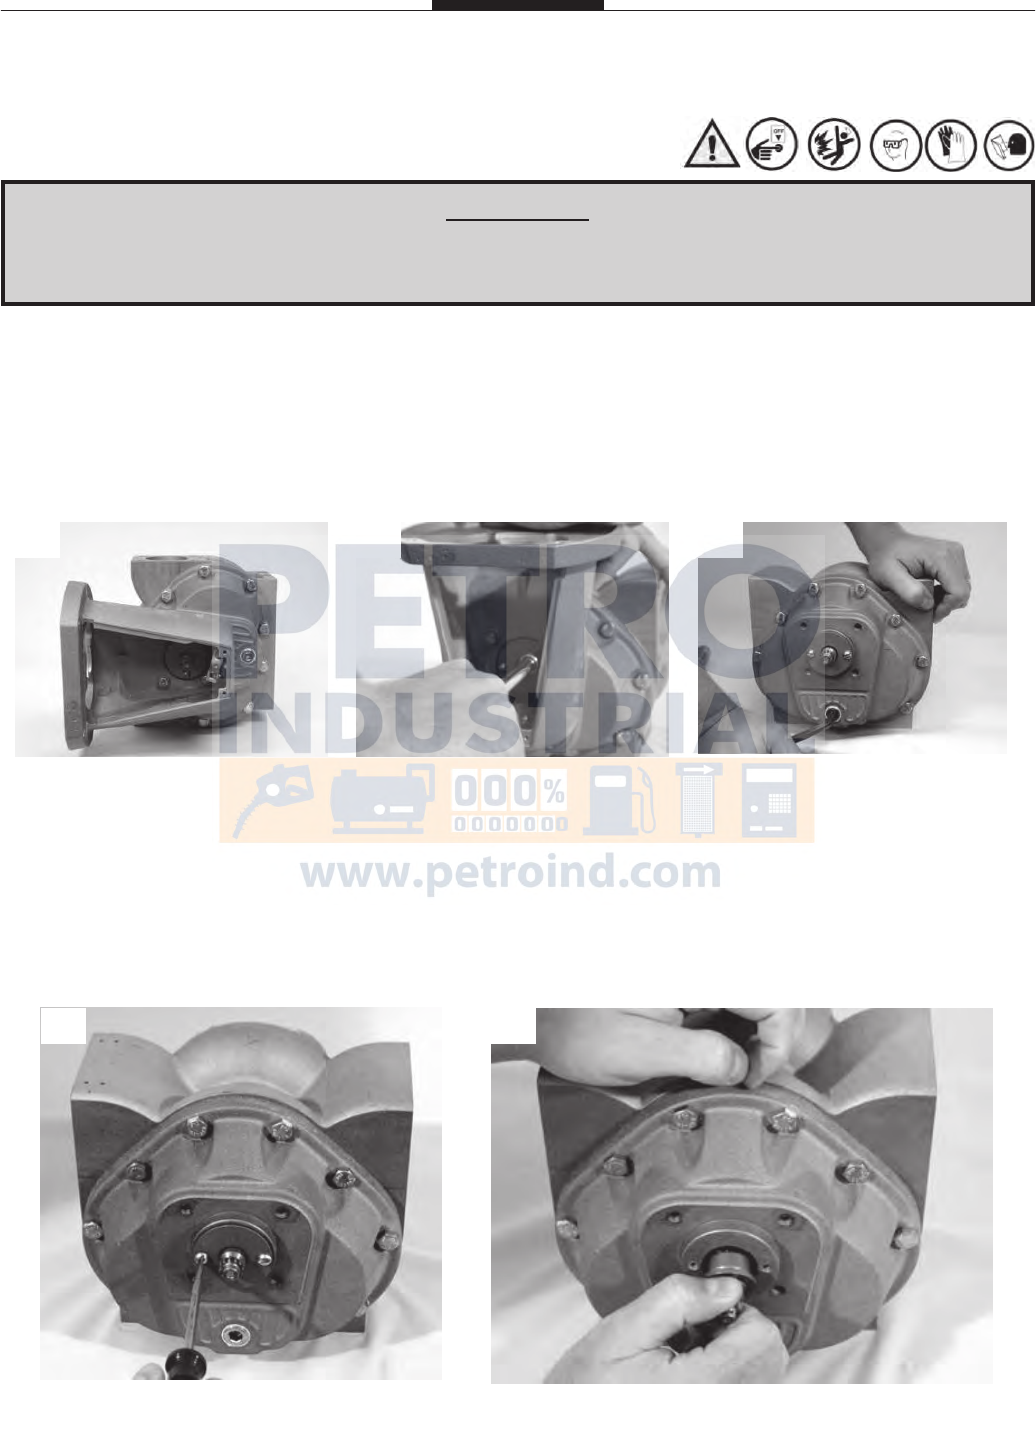
Disassembly of Meter (Continued)
Draining Meter & Removing Counter Support
1) Drain the meter by turning it on either the inlet or outlet side.
2) Remove the counter bracket screws with a hex wrench or socket driver.
3) Remove the drain plugs on the front and rear covers using an allen wrench. Allow more fluid to
drain from the meter.
Removing Packing Capsule
1) Remove the retaining plate using a standard flathead screwdriver.
2) Pull out the packing gland from the meter.
¡WARNING!
All internal pressure must be relieved to ZERO (0) pressure before beginning disassembly
of meter or components
1 2 3
1 2
Page 34
Disassembly of Meter (Continued)
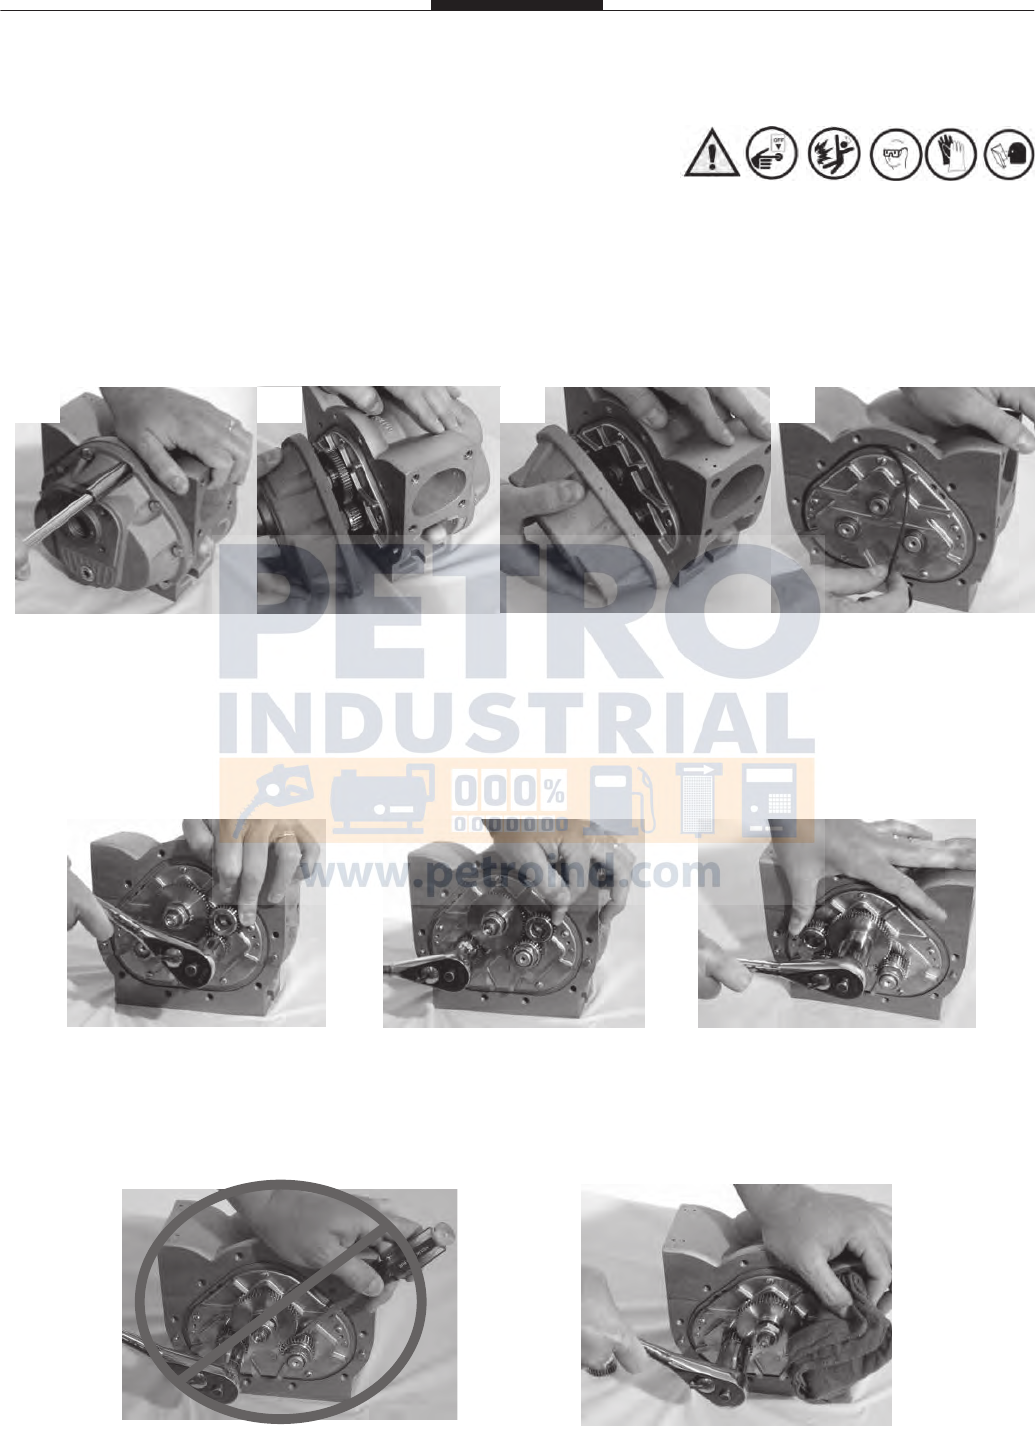
Front & Rear Cover
1) Remove the screws on the front cover using a socket or box wrench.
2) Remove front cover.
3) Remove the screws on the back and remove rear cover.
4) Remove the O-ring from both sides of the housing
Rotor Gears
1) Using a spare displacement rotor gear, place it between the rotor and blocking gear on the meter.
2) Use the socket or box wrench to loosen the right rotor gear lock nut. Repeat for the left rotor gear
lock nut.
3) Move the spare displacement rotor gear to the other side and loosen the blocking rotor lock nut.
Special Notes
1) DO NOT remove rotor gears using a screwdriver! This could damage the rotor gear and create
potential wear problems within the measuring chamber.
2) If a spare rotor gear is not available, then use shop rag between gear teeth.
1 2 3 4
1 2 3
1 2
Page 35
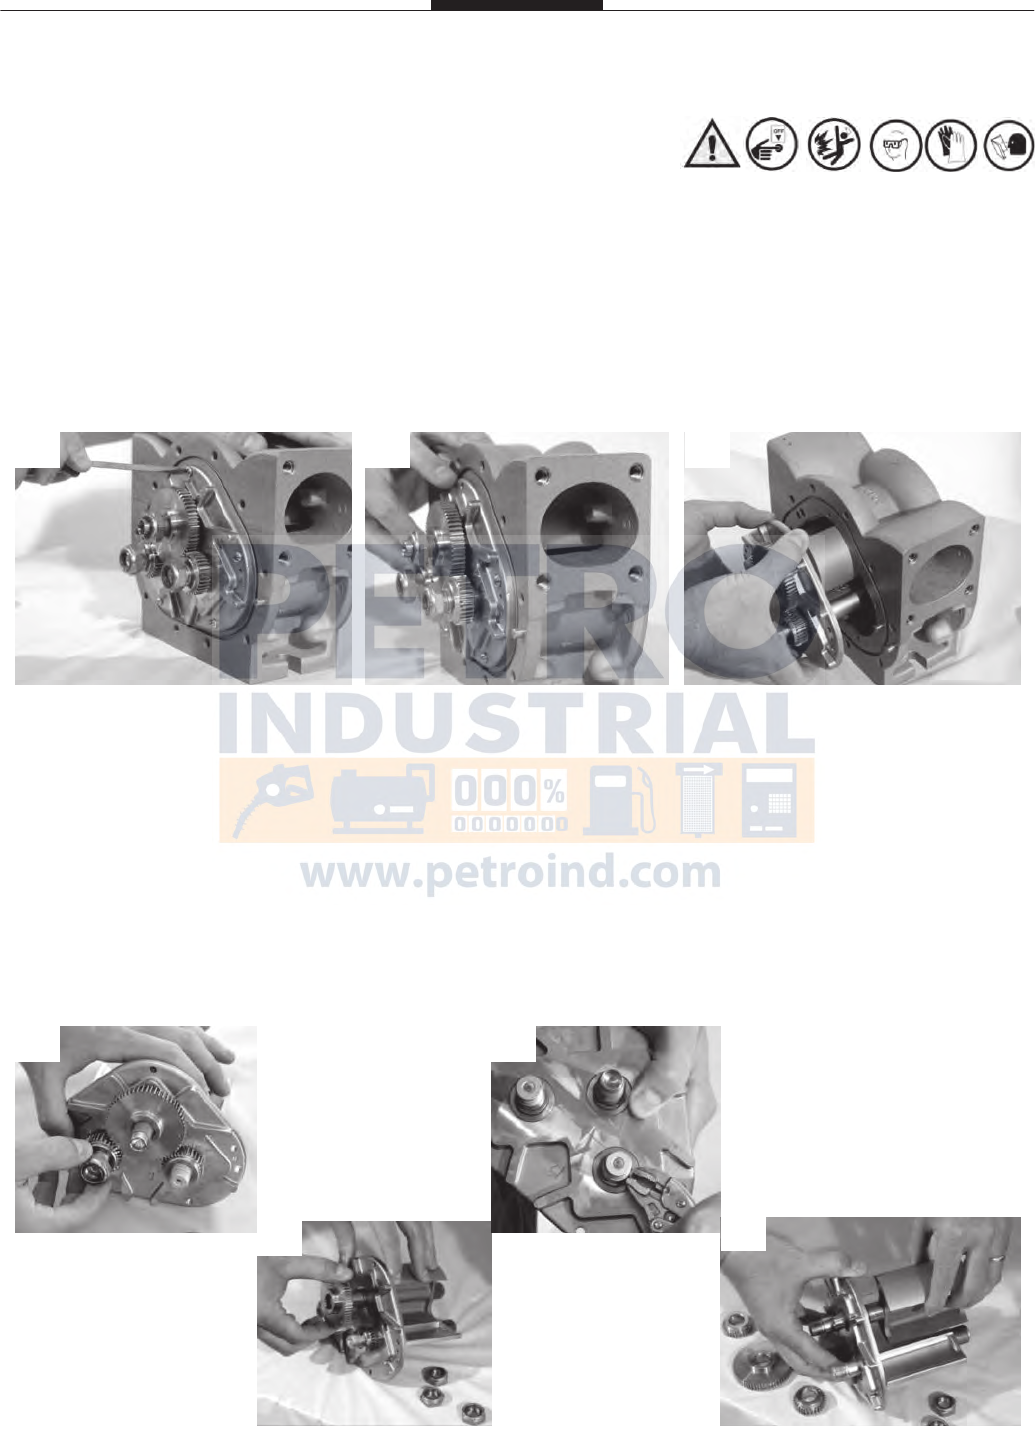
Disassembly of Meter (Continued)
Removing Bearing Plate
1) Remove the bearing plate retaining screws with a standard flathead screwdriver.
2) To remove bearing plate & rotors, insert a screwdriver into the notches near the dowel pins.
3) Gently pry the bearing plate off the dowel pins and slide out the bearing plate and rotors from the
housing.
Removing Lock Nuts & Rotors
4) Remove rotor lock nuts from each gear.
5) Pull gears off of rotor shaft.
6) Remove rotor key using pliers (this might not be necessary as rotor may slide right out of bearing
plate).
7) Remove rotors from bearing plate.
1 2 3
4
5
6
7
Page 36
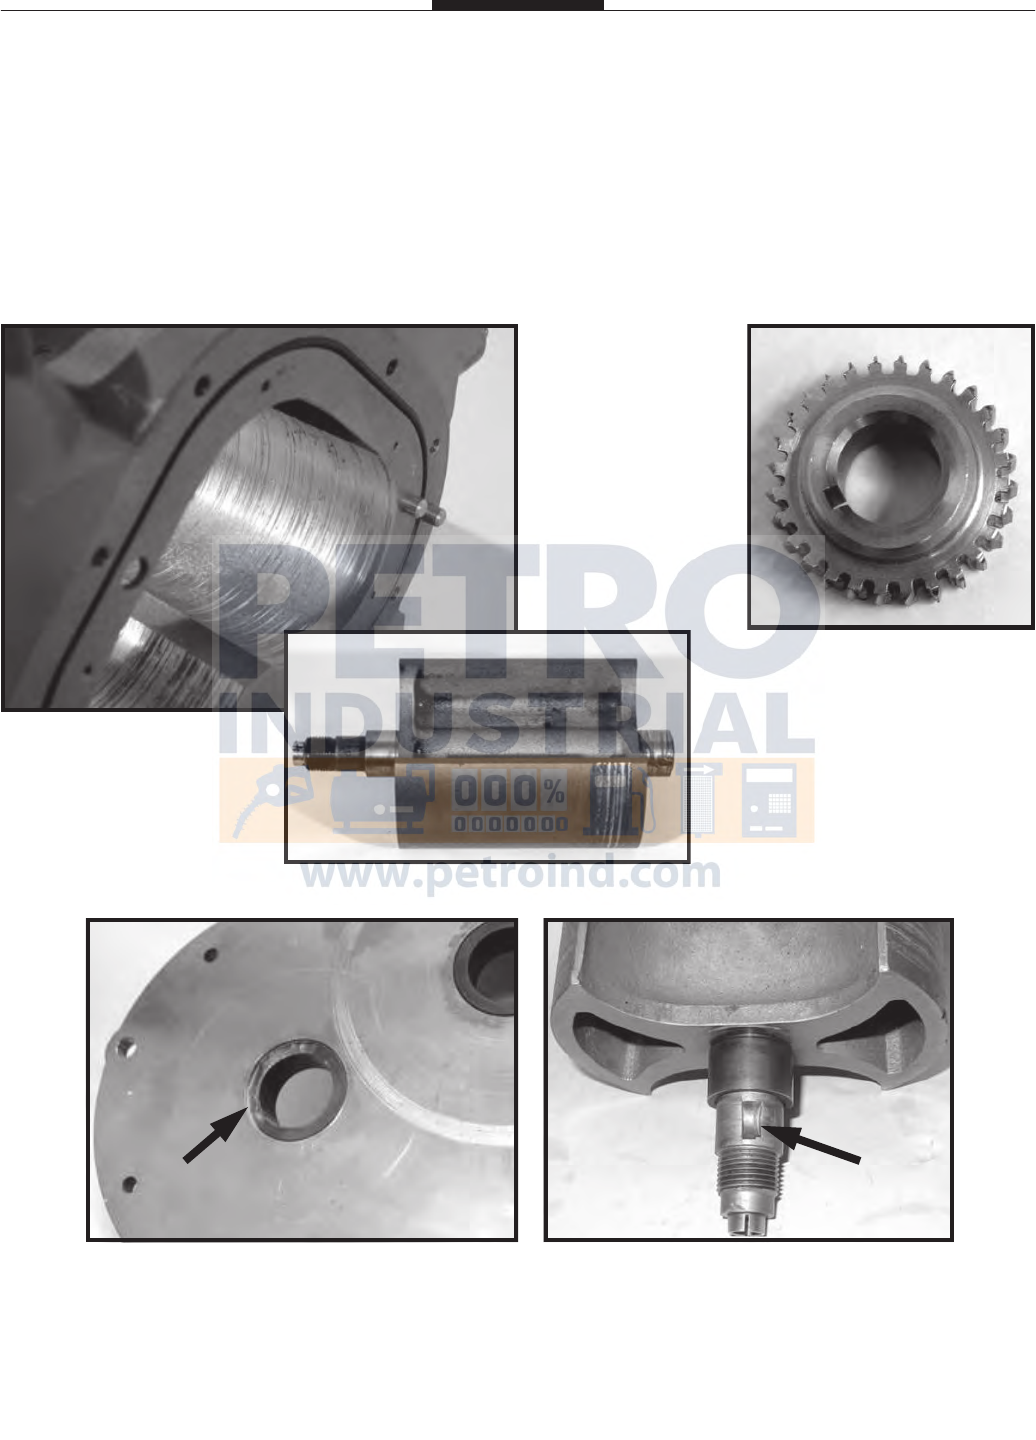
Inspection of Parts
1) Inspect the surfaces of rotors, bearing plates, meter housing and gear teeth for any damage or
wear.
2) Replace parts as needed.
GEAR WEAR
A) Meter has been run on air.
B) Meter has been operated at a higher
volume capacity than what is rated.
CHAMBER WEAR
A) Foreign debris, similar to sand or
sludge, has run through the meter.
B) Meter has been operated at a higher
capacity and has worn the bearings
out, allowing rotors to drop into the
chamber.
HYDRAULIC SHOCK
A) A valve downstream of the flow meter has abruptly shut off, creating hydraulic shock.
B) Flow meter potentially had large volume of free air flowing within the system, followed by fluid.
Hogged-Out
Keyway
Fractured
Bearing
Page 37
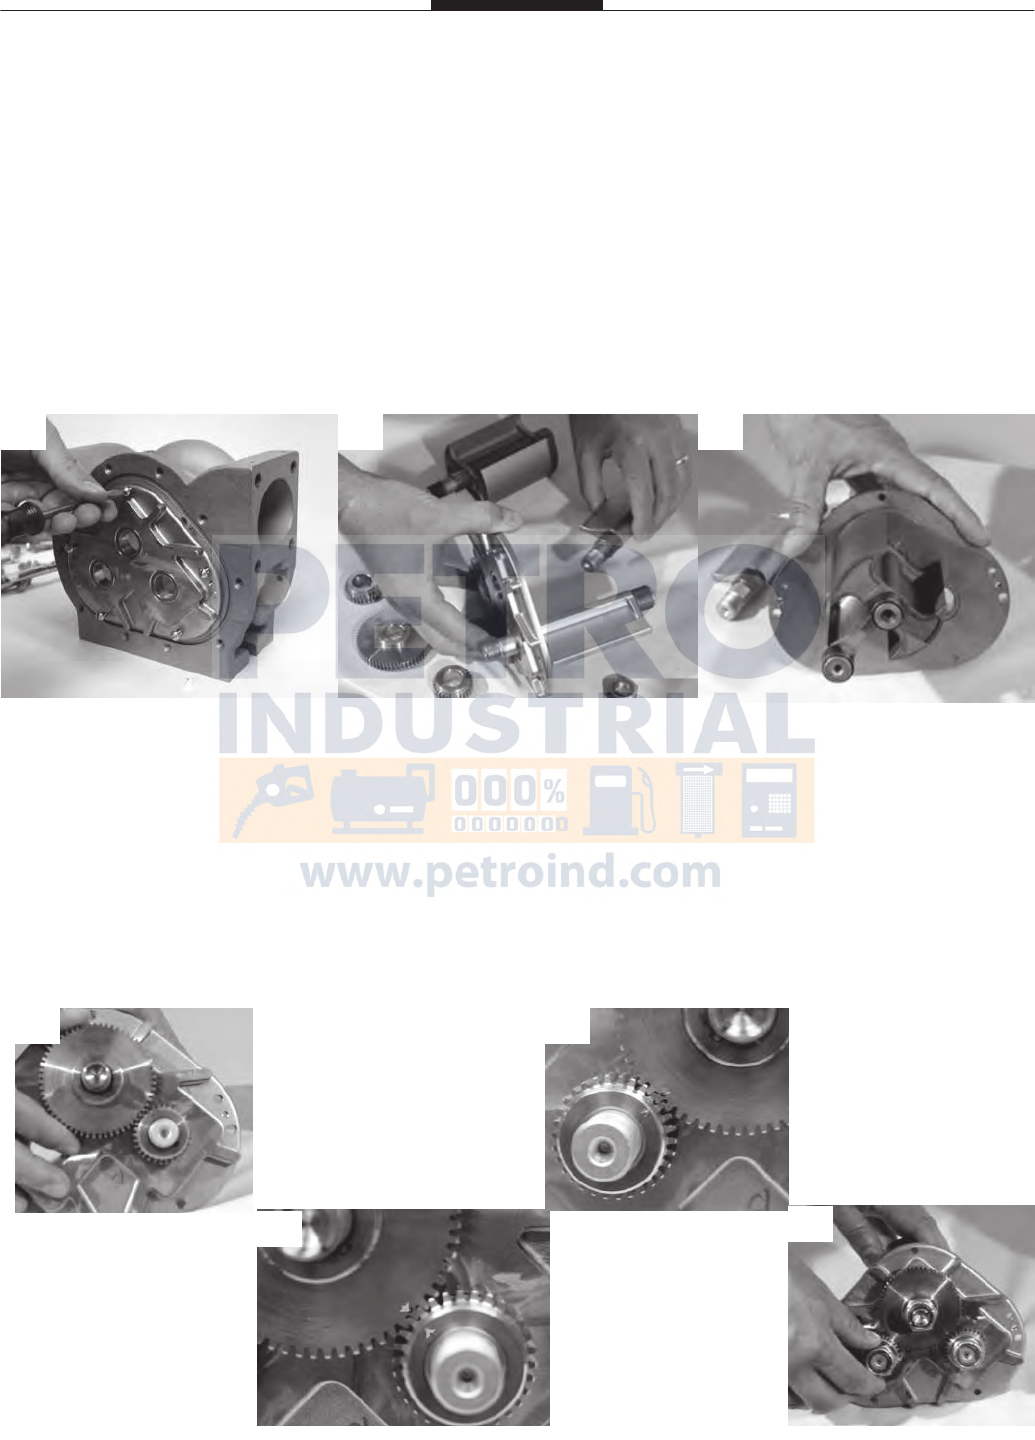
Reassembly of Meter
Reinstalling Rotors
1) Install rear bearing plate on meter.
2) Insert threaded end of blocking rotor and the right displacement rotor into front gear plate (reinsert
rotor keys if necessary).
3) Align the two rotors (see picture 3) before applying gears.
Rotor Gear Timing
1) Slide on blocking rotor gear and position the ‘arrow’ that it is pointing toward the right
displacement gear.
2) Align ‘arrow’ on displacement gear with the ‘arrow’ on the blocking gear and slide on right
displacement gear.
3) Rotate the blocking rotor gear toward the left displacement gear and again align ‘arrows’ and slide
on left displacement gear.
4) Gears and rotors should rotate freely if gears have been installed properly. If so, proceed with
starting on the lock nuts until finger tight.
1 2 3
1 3
2 4
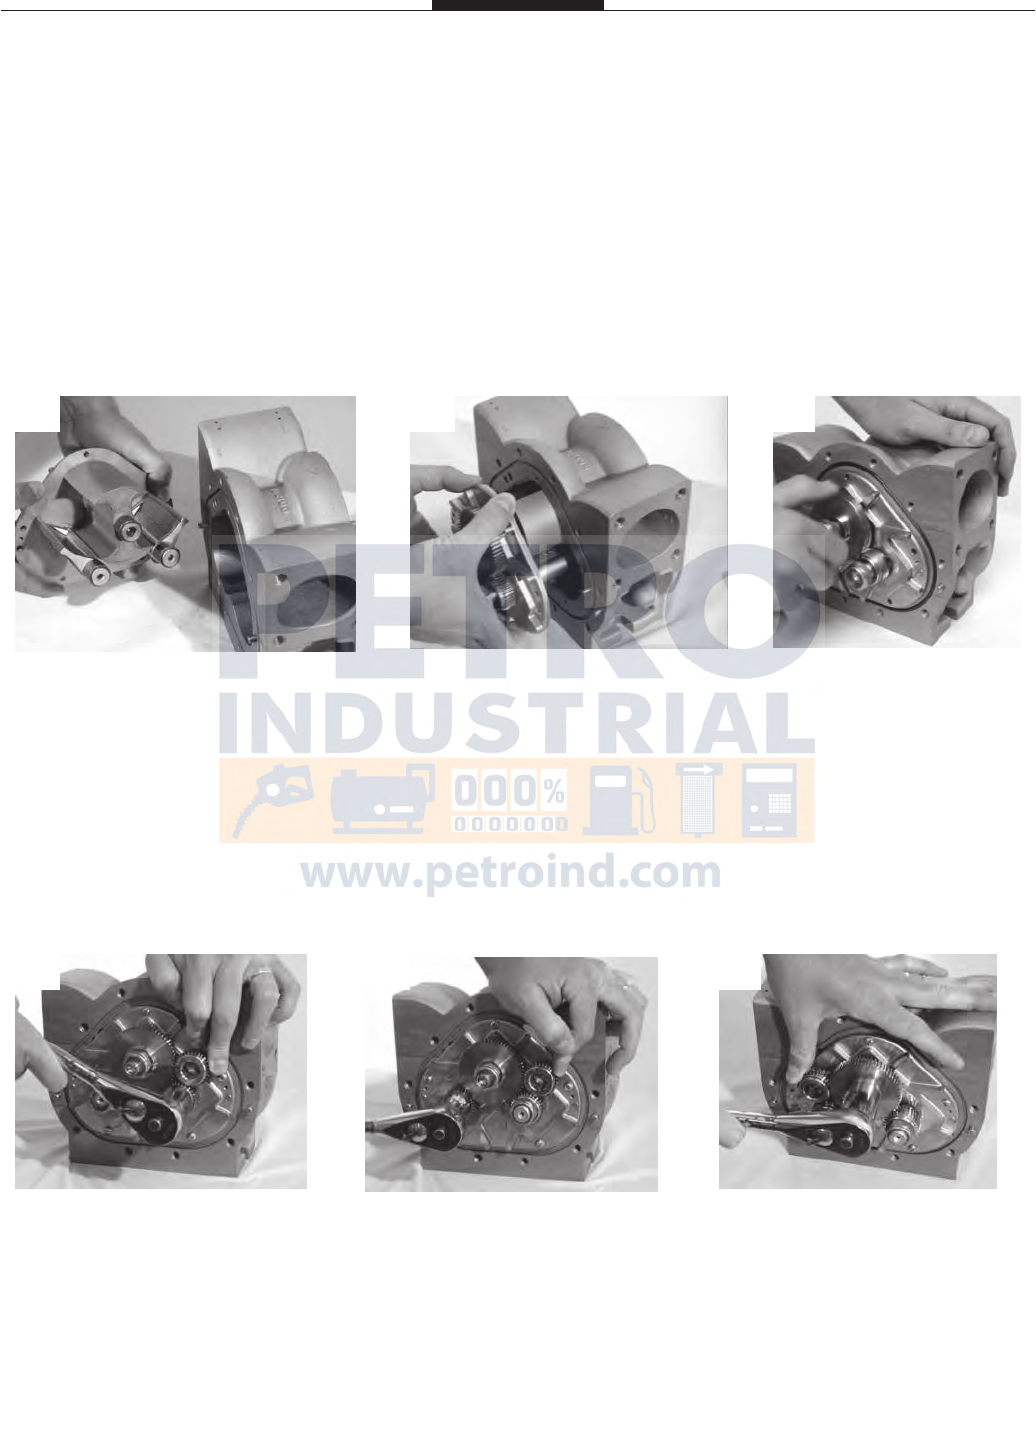
Page 38
Reassembly of Meter
Reinstalling Bearing Plate
1) Align rotors on bearing plate (see picture) before inserting into meter.
2) Slide front bearing plate with rotors into meter housing and rear bearing plate.
3) Again, rotate gears to make sure they turn freely within the housing before proceeding.
Reinstalling Rotor Gears & Lock Nuts
1) Using the spare displacement gear (or shop rag), position between right displacement gear and
blocking rotor gear.
2) Using the torque specifications, apply and tighten the lock nut on the right and left displacement
gears.
3) Move the spare gear between the left displacement and blocking rotor gears and then tighten the
lock nut on the blocking rotor gear.
1 2 3
1 2 3
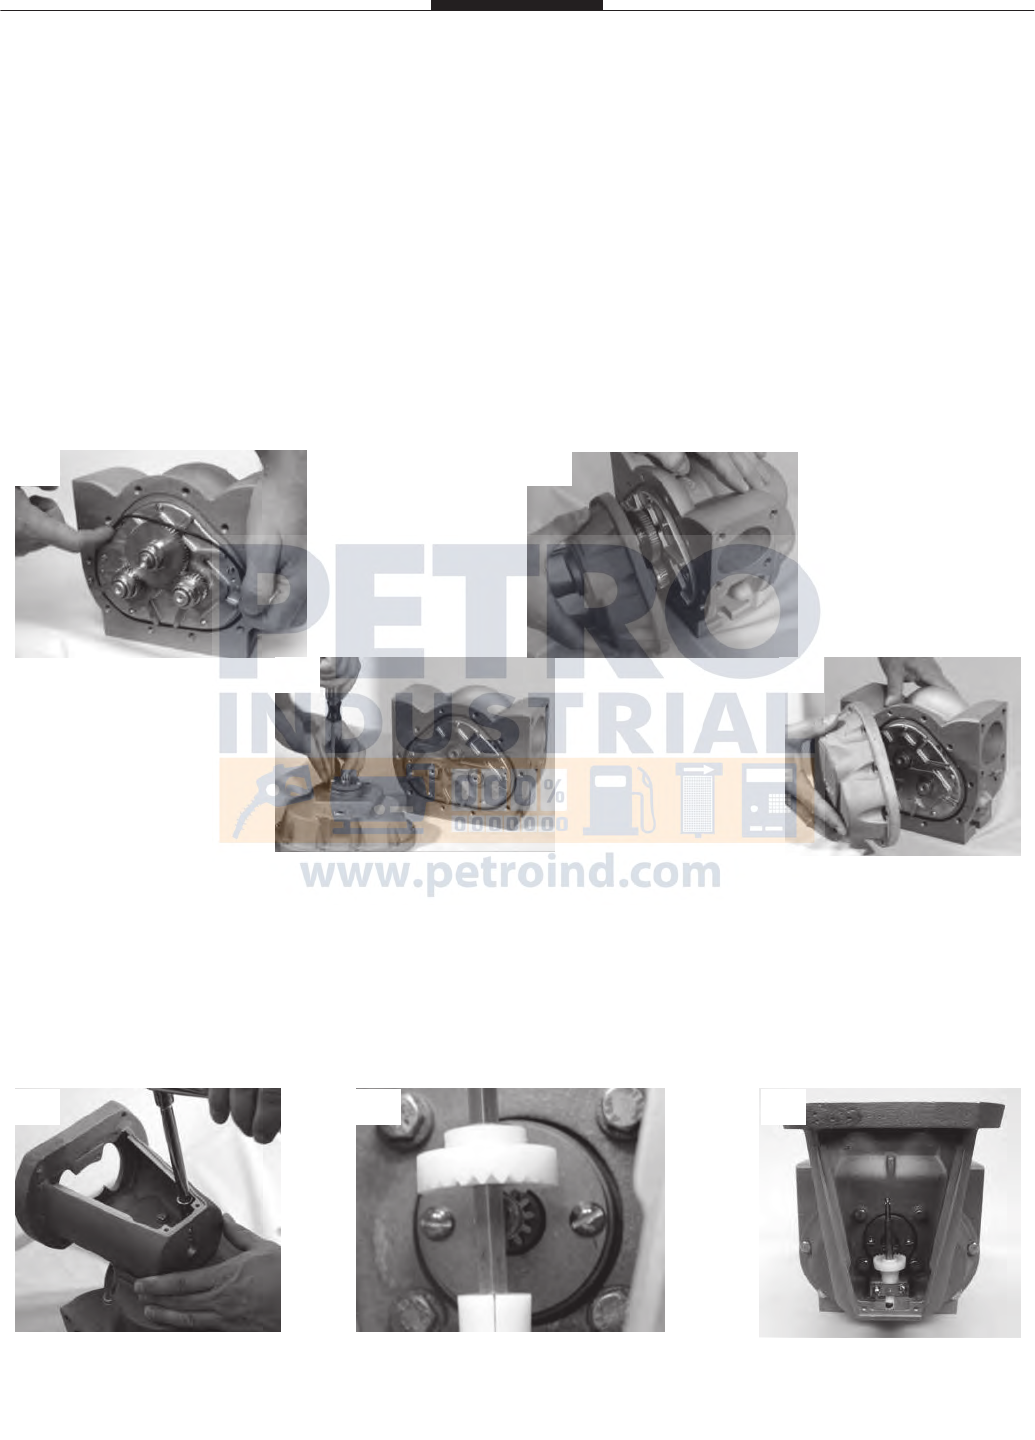
Page 39
Reassembly of Meter
Reinstalling Packing Capsule & Front/Rear Covers
1) Reinstall cover O-rings on the front and rear of meter housing.
2) Reinsert packing capsule into front cover of meter with retaining plate and tighten screws.
3) When attaching front cover, align packing capsule blade with the slot on the blocking rotor sleeve.
Tighten all front cover screws.
4) Attach rear cover and tighten all screws.
Reinstalling Counter Support & Adjustor Drive Shaft
1) Position the counter support on the front side of meter and tighten all screws.
2) Reinsert adjustor drive shaft into the support housing and assure that adjustor face gear teeth
meshes with the packing capsule gear. Do not fit the face gear and packing gear to tight!
3) Slide down the adjustor mounting bracket and tighten the screws.
1
2
3
4
1 2 3
Page 40
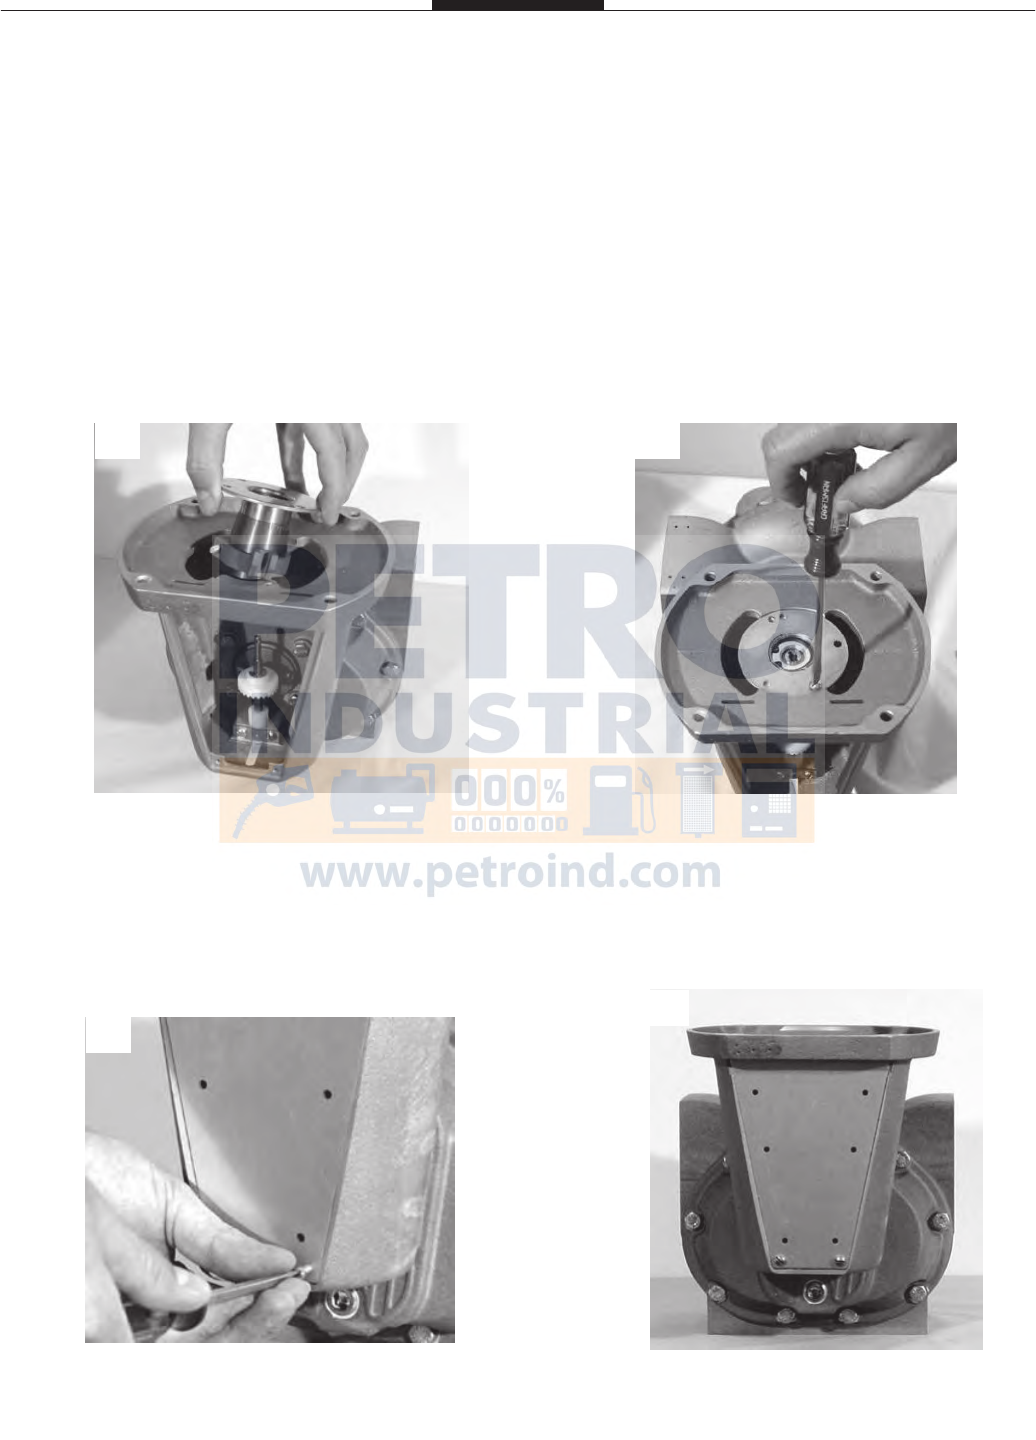
Reassembly of Meter (Continued)
Reinstalling Adjustor
1) Reinsert the adjustor into the top of the counter support and assuring that it mates with the drive
shaft.
2) Tighten the screws that secure the adjustor plate to the counter support.
Reinstalling Dust Cover
1) Reattach dust cover and tighten the screws.
2) Back where we started.
1 2
1
2
Page 41
Page 41
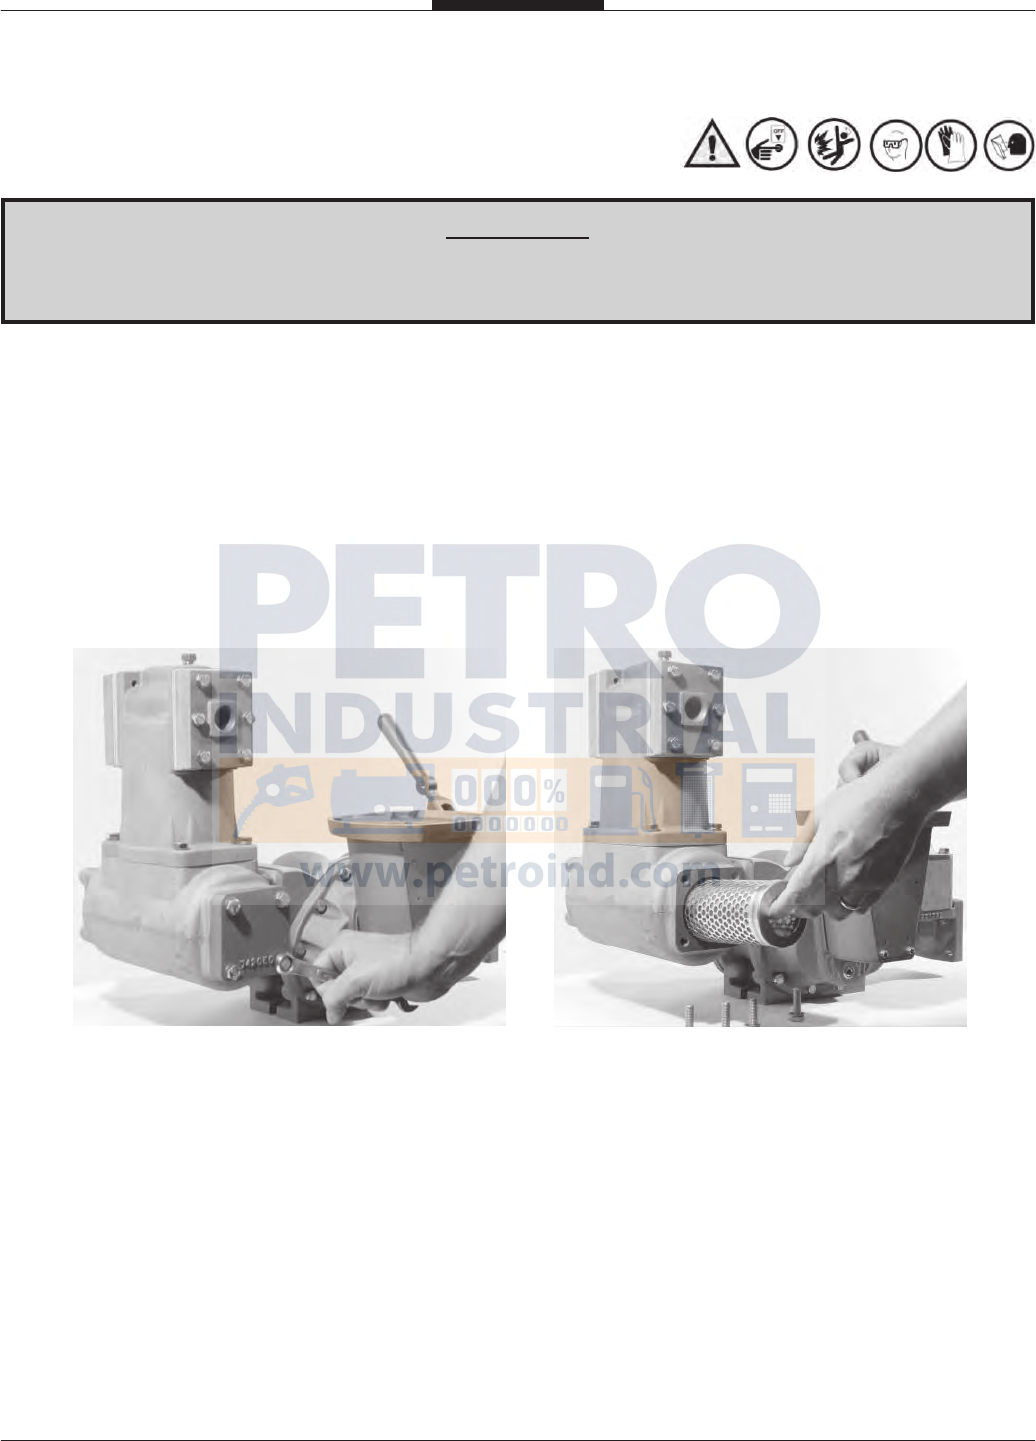
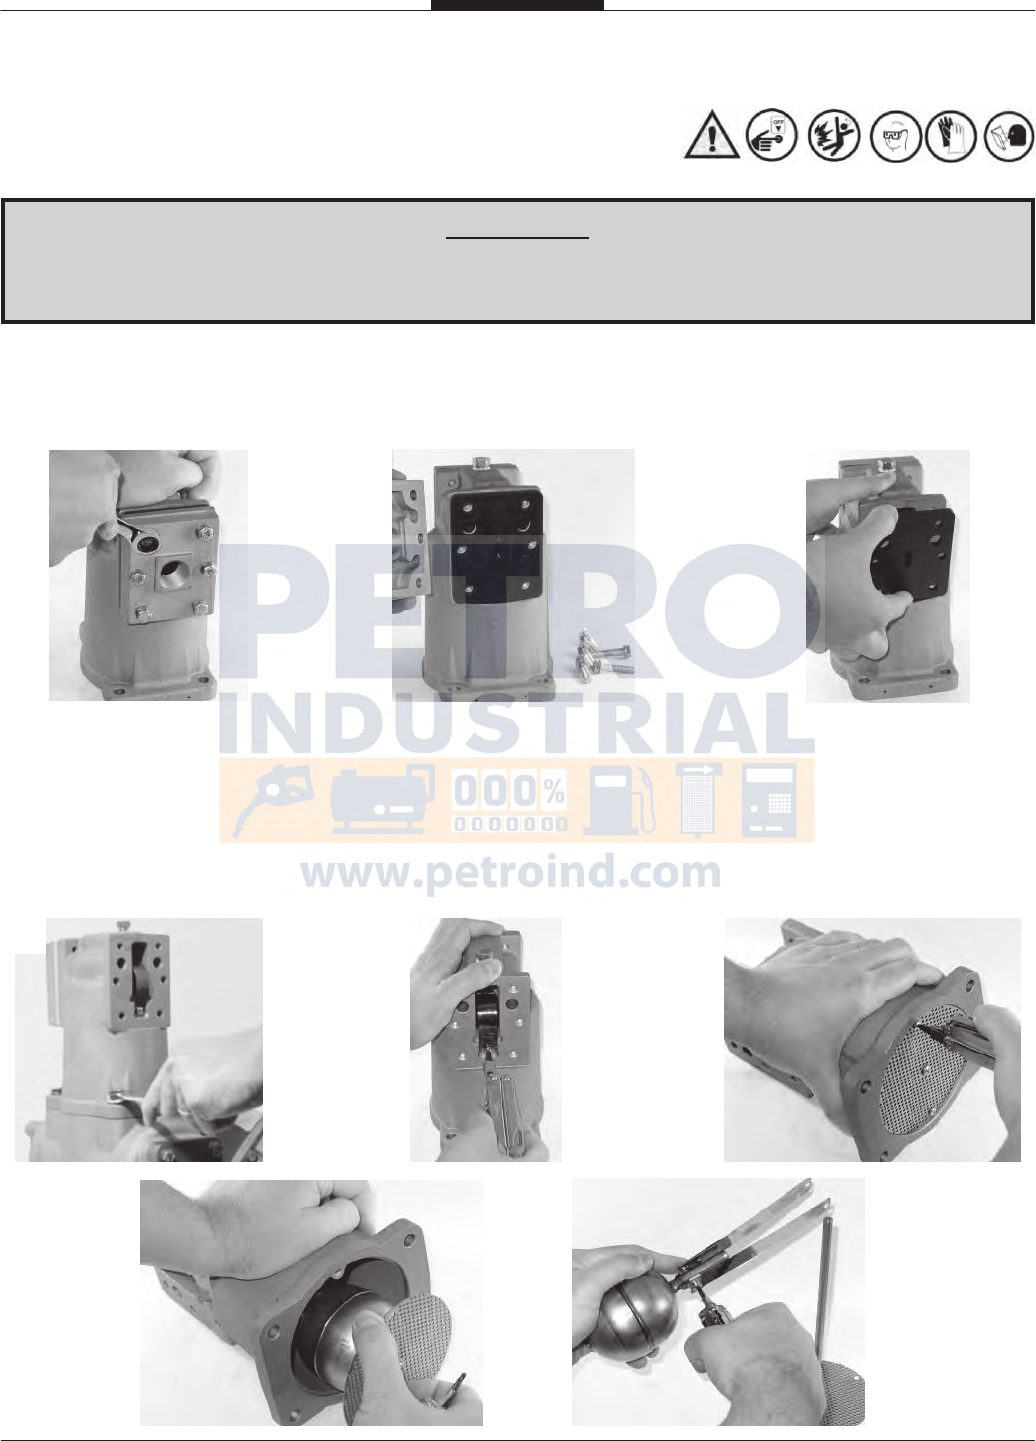
Disassembly of 720 Strainer Assembly
1) Using a hex or socket wrench, remove the four screws and washers from the cover plate.
2) Remove the cover plate and o-ring from the housing.
3) Remove the strainer screen.
4) Check inside housing for any debris and remove using a clean cloth.
5) Clean strainer screen by rinsing with a liquid cleaning agent compatible to your product
application. A brush may be used to remove imbedded particles. If screen is too dirty to clean,
then replace the screen.
1) Wipe clean the face of the cover plate and seal ring. Check o-rings for damage and replace as
needed.
Reassembly of 720 Strainer Assembly
1) Replace the strainer screen into the housing.
2) Place the end cover o-ring in the groove of the end cover.
3) Put the end cover with o-ring installed on the strainer housing.
Replace and fasten end cover with the 4 screws and washers. Tighten the screws according to the
torque chart.
¡WARNING!
All internal pressure must be relieved to ZERO (0) pressure before beginning disassembly
of meter or components
Page 42
Page 42
Disassembly of 730 Air Eliminator Assembly
¡WARNING!
All internal pressure must be relieved to ZERO (0) pressure before beginning disassembly
of meter or components
1) Using a 1/2” wrench or socket, remove the cover screws from air eliminator cover plate.
2) Remove cover plate.
3) Remove valve plate, inspect and replace as needed.
1) To remove the air eliminator assembly, remove the four screws and washers attaching it to the
strainer assembly.
2) Using a flathead screwdriver, remove the screws attaching reed valves to air eliminator housing.
3) Remove the two screws on the diffuser screen.
4) Slide out diffuser shaft assembly.
5) Remove the two screws attaching reed valve to the float assembly. Inspect and replace reed valves
as needed.
1 2 3
1 2 3
4 5
Page 43
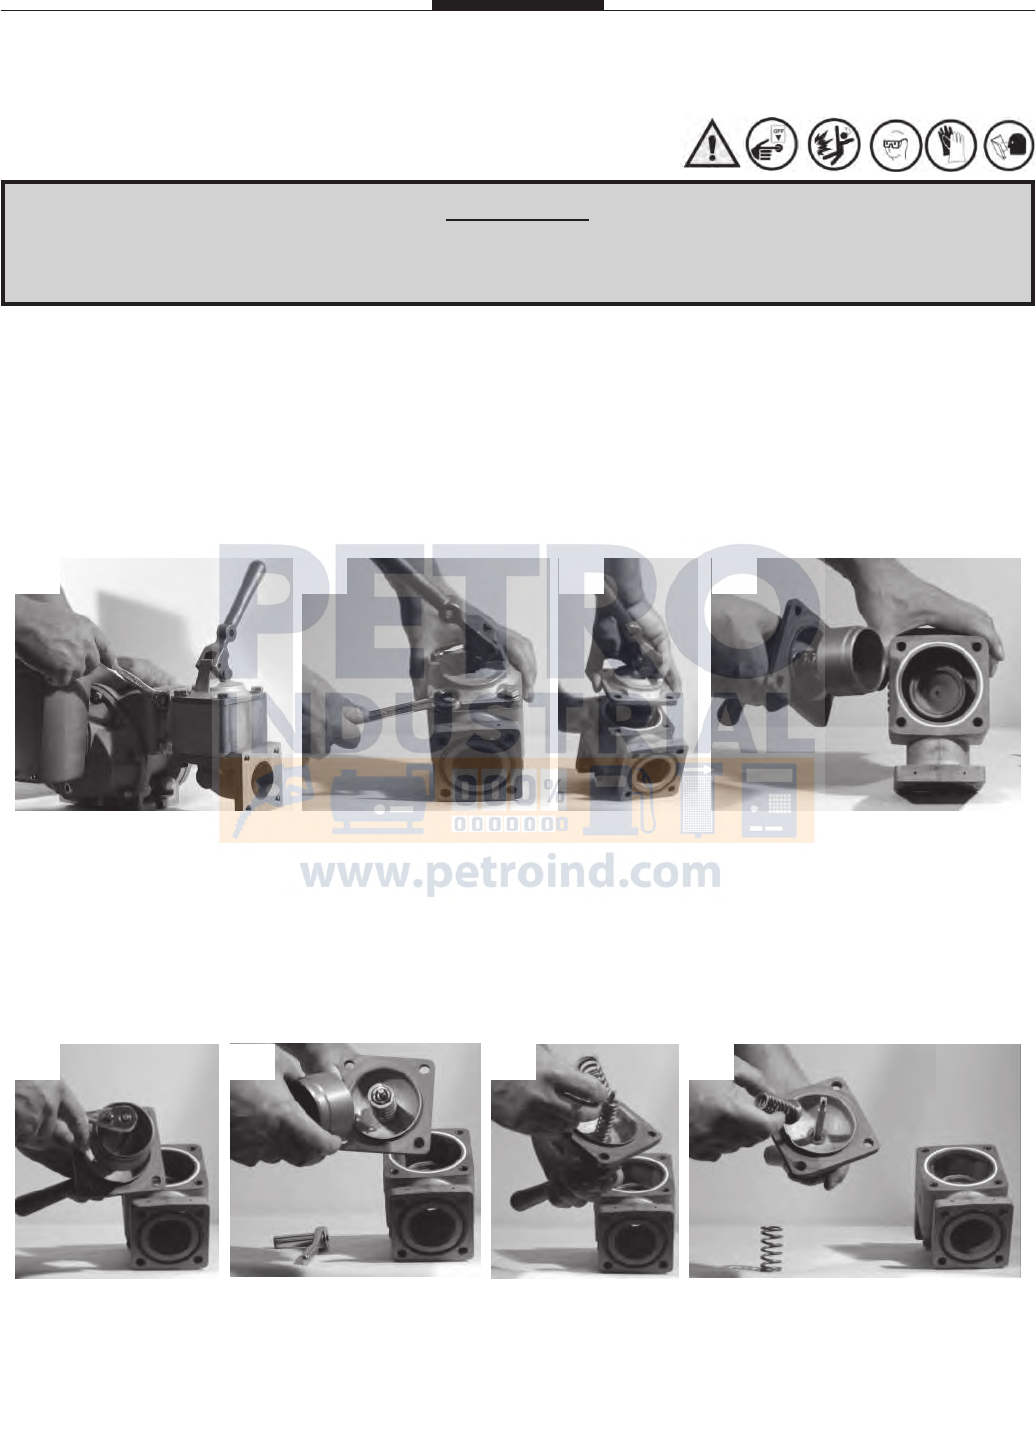
Disassembly of 750-20 Hydraulic Valve
1) Drain all fluid from metering system prior to valve removal.
2) Using a 9/16” hex or socket wrench, remove the four screws connecting the valve to the meter.
Remove valve from meter and piping.
3) Place valve on flat surface and remove the four screws on the valve cover.
4) Pull the handle and spring assembly out of the valve housing.
5) Using a socket wrench, remove the nut and washer from the valve shaft of piston assembly.
6) Remove piston housing.
7) Remove external piston spring and then the internal piston spring..
8) Inspect piston springs and seals, clean and replace as needed.
¡WARNING!
All internal pressure must be relieved to ZERO (0) pressure before beginning disassembly
of meter or components
1 2 3 4
5 6 7 8
Page 44
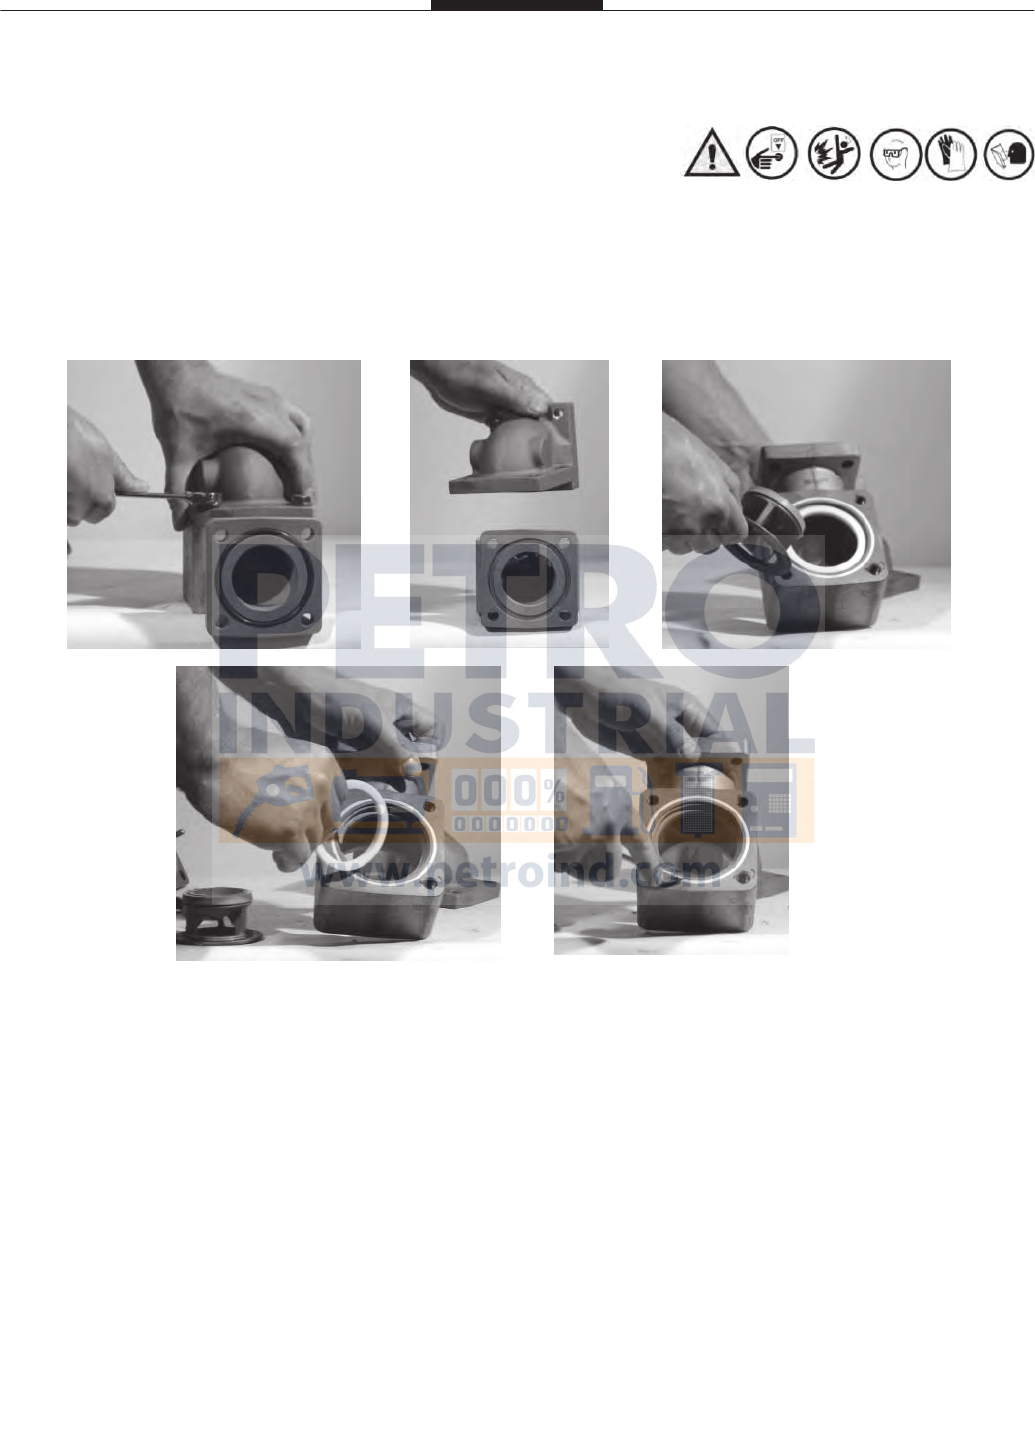
Disassembly of 750-20 Hydraulic Valve
1) Using a 9/16” hex or socket wrench, remove the screws attaching the elbow to the valve body.
2) Remove the piston guide from the valve body.
3) Remove and inspect the upper and lower seals and replace as needed.
4) Using a flathead screwdriver, gently remove the valve body o-ring, inspect and replace if needed.
Reassembly of 750-20 Valve
1) After seals have been cleaned or replaced, reinsert lower, upper and valve body seals into place.
2) Place the piston guide back into valve body.
3) Place the internal and external springs into the valve housing and reattach valve elbow to body.
4) Insert the piston guide assembly into valve housing.
5) Replace internal and external springs onto valve shaft and reattach the piston assembly with nut
and washer.
6) Reinsert valve cover and piston assembly into valve body and press down to compress the springs.
7) While keeping pressure on the valve assembly, insert the four screws and washers into valve cover
and tighten down.
Page 45
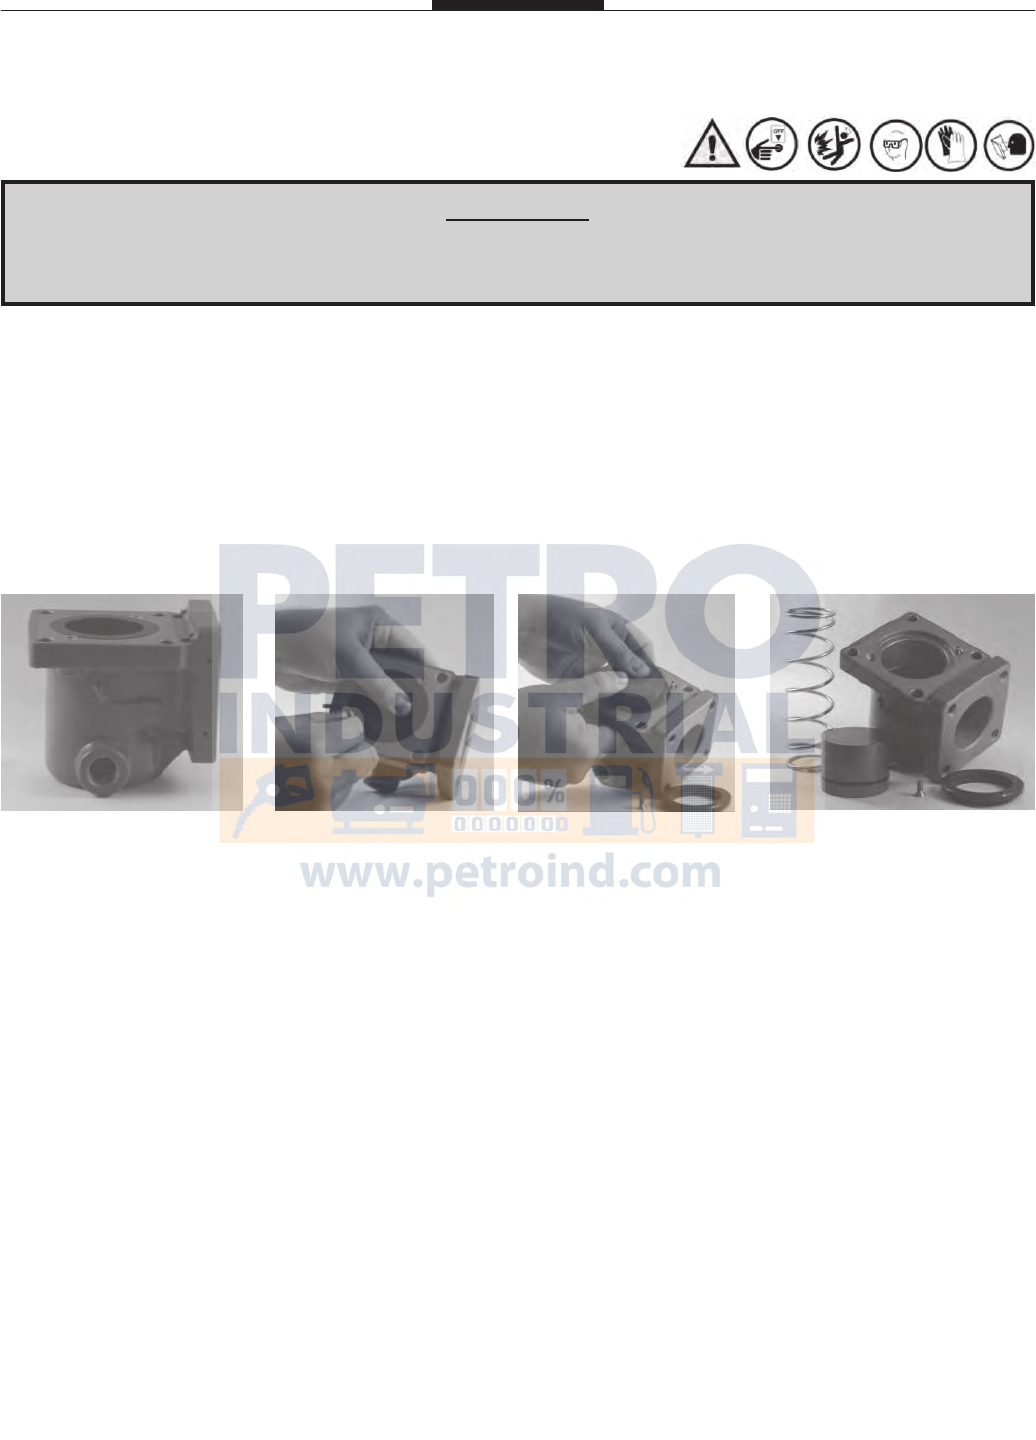
Disassembly of 760 Air Check Valve
1) You may want to use a fixture or vice to compress and hold the poppet in place before loosening
any screws.
2) Using a hex or socket wrench, loosen and remove the two screws and seal ring.
3) Slowly release the poppet from the housing until the spring exerts no more pressure.
4) Remove the poppet, and spring from the housing .
5) Check inside housing for any debris and remove using a clean cloth.
6) Inspect and replace poppet gasket if needed.
Reassembly of 760 Air Check Valve
1) Replace poppet over the spring.
2) Compress poppet and spring into the valve housing.
3) With poppet and spring completey compressed, place the seal ring in housing.
4) Replace and fasten the two retaining ring screws.
¡WARNING!
All internal pressure must be relieved to ZERO (0) pressure before beginning disassembly
of meter or components

Page 46
Meter Trouble Shooting
PROBLEM: Leaking packing gland and/or housing
Two common causes of packing gland leakage are thermal expansion and hydraulic shock. If two valves in a piping system
(on either side of the meter) are closed at one time, and if the temperature rises as little as 1ºF in the system, it could result in a
rise in pressure within the system that would exceed the working pressure rating of the meter. To avoid this hazard caused by
thermal expansion, a pressure-relief valve of some kind must be installed in the system.
Hydraulic shock occurs when a large volume (mass) of liquid is moving through a pipe line at some flow rate and a valve is
suddenly closed. When the flow is so stopped, the entire mass of the liquid in the piping system acts as a battering ram, caus-
ing a shock effect within the meter. The greater the mass, length of line and/or velocity, the greater the hydraulic shock. Since
the valve is usually located at the meter outlet, the meter housing, packing gland and the meter internal members receive the
full impact of such hydraulic shock. To prevent this hazard a slow closing two-stage valve should be used with the meter. On
those systems where mass, length of line, etc. are of such magnitude as to preclude the elimination of hydraulic shock with the
use of a two-stage slow closing valve an impact-absorbing air cushioning device should be used.
O-Ring has been damaged or cover bolts have not been tightened enough.
PROBLEM: Product flows through meter but register does not operate.
A) Gear train motion interrupted by non-functioning gear due to broken pin or key. Replace pin or key where required.
B) If all meter parts are moving then problem is in register.
C) Remove register from meter. If all meter parts are moving but output shaft of adjuster assembly is not, adjuster is
worn and must be replaced.
D) If totalizer numerals (small numbers) on register are recording, but the big numerals are not moving, register needs
repair.
PROBLEM: Product flows through meter but register does not record correctly.
A) Adjuster assembly not properly calibrated, See METER CALIBRATION on page 13 for more instructions.
B) The factory installed gear train may have incorrect gearing ratio.
C) Check register for defects.
PROBLEM: No flow through meter.
A) Faulty non-functioning pump.
B) Foreign matter within the system, meter or components.
C) Meter has a broken rotor or rotor shaft.
D) Excessive wear on timing gears or bearings.
E) Meter “frozen” due to build-up of chemical “salts” inside metering chamber, sufficient to stop rotation or rotors.
F) Valve not open or not functioning.
PROBLEM: Meter runs too slow.
A) There is a flow restriction within the system. (i.e.: tees, elbows, valves, etc.)
B) Foreign matter in system, meter or components.
C) Product viscosity is different or has changed from what was originally known.
D) Meter gears or rotors partially “salted” enough to slow up rotation of parts.
E) Valve internal mechanism faulty. Valve does not open fully or the linkage is not properly adjusted.

Page 47 Page 47
Air Eliminator Trouble Shooting
PROBLEM: Product is flowing from the Air Eliminators vents
A) Foreign matter located in between seal plate orings and metal reeds.
B) The seal plate oring may be worn through service life.
C) The seal plate oring may be cut or dislodged and requires replacement.
D) The float may have been punctured, containing liquid, not allowing the float to rise and seal the air
vents.
E) The float may have been ruptured from a surge of pressure within the system.
F) The metal reeds may be fatigued and requires replacement.
G) The metal reeds may be out of alignment with the seal plate.
PROBLEM: The meter is still registering air within the system
There can be numerous reasons why the meter may still register air. First look at the system configuration
and see where air is being introduced into the system. Then determine if the meter is registering “free air”
or “entrained air”. Free Air is much easier to remove from the metering system and may require the use
of the Spring Loaded Back Check Valve and/or the Differential Air Check Valve and/or High Volume
Strainer to help the air eliminator operate more effectively. Entrained Air is much more difficult to re-
move. Typically the best way to eliminate Entrained Air will be to remove the air source of entry into
the system. Some examples are from cavitating pumps and leaking pump/valve seals. A High Volume
Strainer may help accumulate the liquid long enough to disperse the Entrained Air from the system. See
Air Elimination in the Service Manual for more information.
A) The air return line is not the required minimum of 1/2” ID.
B) The metering system has no sufficient way of eliminating the air to atmosphere. Example:
Incorrectly installed “Catch Can” reservoir (lower than the air eliminator itself), or the reservoir is
allowed to become full, incorrectly sized vent, etc…)

Page 48
Preset Valve Trouble Shooting
PROBLEM: The valve will not close completely.
A) The shaft of the piston may be bent from excessive force.
B) Debris may be between the piston and piston guide.
C) The upper or lower seals may be worn, swollen from incompatibility or cut from debris.
D) The mechanical linkage to the Veeder Root 7889 preset counter may be tight. The linkage must
be loose for the preset to operate correctly.
E) The Veeder Root preset may have a worn or bent trip mechanism that is not allowing the preset to
function.
PROBLEM: The valve shuts immediately upon first stage trip, bypassing the second stage
closure.
A) The mechanical linkage might need to be adjusted, moving the Nylon locking nuts forward or
backwards to change the closing of the preset valve.
B) The Veeder Root preset may need to be “raked” or adjusted for the correct shut-off volume. See
Veeder Root 7889 preset service manual for further instructions.
C) The Veeder Root preset may have a worn or bent trip mechanism that is not allowing the preset to
function.
PROBLEM: The preset batch over or under registers correct volume.
A) The mechanical linkage might need to be adjusted, moving the Nylon locking nuts forward or
backwards to change the closing of the preset valve.
B) The Veeder Root preset may need to be “raked” or adjusted for the correct shut-off volume. See
Veeder Root 7889 preset service manual for further instructions.
C) The Veeder Root preset may have a worn or bent trip mechanism that is not allowing the preset to
function.
760 Air Check Valve Trouble Shooting
PROBLEM: Product will not be pumped through the meter.
Pressure has increased behind the air check piston and will not open the valve. Make sure the NOTCH
for the minimum bleed on the valve plate is in the top position to ensure the release of pressure.

Page 49
Material Safety Data Sheet
24 HOUR EMERGENCY ASSISTANCE GENERAL MSDS ASSISTANCE
(260) 833-3173 (260) 484-0301
CODE: RPS
==========================================================================================
HAZARD RATING> LEAST-0 SLIGHT-1 MODERATE-2 HIGH-3 EXTREME-4
==========================================================================================
DR LUBRICANTS, INC. DATE: 01/21/06
4611 NEWAYGO ROAD, SUITE D
FORT WAYNE, IN 46808 TELEPHONE NUMBER: (260 484-0301
==========================================================================================
SECTION I - PRODUCT IDENTIFICATION
==========================================================================================
PRODUCT: RP 1039
==========================================================================================
SECTION II - COMPOSITION AND HAZARDOUS INFORMATION*
==========================================================================================
OCCUPATIONAL
WT. PERCENT EXPOSURE LIMITS
CHEMICAL NAME CAS NUMBER IS LESS THAN (TLV-TWA) (TLV-STEL)
——————————————————————————————————————————————————–-
PETROLEUM 64741-65-7 90.0 100MG/M3
HYDROCARBON
PETROLEUM 64742-53-6 10.0 5MG/M3
HYDROCARBON
*ITEMS NOT SHOWN ARE NOT LISTED IN THE OSHA - T.S.C.A. HAZARDOUS CHEMICALS LISTING.
==========================================================================================
SECTION III - PHYSICAL DATA
==========================================================================================
BOILING RANGE: NA VAPOR DENSITY: NA
ODOR: PETROLEUM ODOR EVAPORATION RATE: NA
APPEARANCE AMBER LIQUID SOLUBILITY: INSOLUBLE
VOLATILE BY WEIGHT: NA PRODUCT DENSITY: 0.790
VOLATILE BY VOLUME: NA
==========================================================================================
SECTION IV - FIRE AND EXPLOSION HAZARD DATA
==========================================================================================
FLAMMABILITY CLASSIFICATION: COMBUSTIBLE FLASH POINT: 150 F LEL: NA
(CLEVELAND OPEN CUP) UEL: NA
DOT: COMBUSTIBLE LIQUID
EXTINGUISHING MEDIA: CARBON DIOXIDE, DRY CHEMICAL, FOAM

Page 50
PRODUCT: RP 1039
PAGE - 2
==========================================================================================
SECTION IV - FIRE AND EXPLOSION HAZARD DATA
==========================================================================================
UNUSUAL FIRE AND EXPLOSION HAZARDS : DO NOT DIRECT A SOLID STREAM OF WATER ONTO BURNING
PRODUCT. THIS MAY CAUSE SPREADING AND INCREASE THE FIRES INTENSITY. COMBUSTION MAY PRO-
DUCE: OXIDES OF CARBON, AND INCOMPLETELY BURNED HYDROCARBONS IN THE FORM OF FUMES AND
SMOKE.
SPECIAL FIREFIGHTING PROCEDURES: WEAR A SELF-CONTAINED BREATHING APPARATUS WITH FULL
FACEPIECE.
==========================================================================================
SECTION V - HEALTH HAZARD DATA
==========================================================================================
EFFECTS OF OVER EXPOSURE: MAY CAUSE MILD EYE IRRITATION AND REDNESS. PROLONGED OR RE-
PEATED EXPOSURE TO THE SKIN MAY RESULT IN LOSS OF NATURAL OILS ACCOMPANIED BY DRYNESS,
CRACKING AND DERMATITIS. INGESTION MAY RESULT IN NAUSEA, DIARRHEA AND GASTRO INTESTINAL
IRRITATION. OVEREXPOSURE TO MIST MAY CAUSE UPPER RESPIRATORY TRACT IRRITATION AND DIFFI-
CULTY BREATHING.
MEDICAL CONDITIONS PRONE TO AGGRAVATION BY EXPOSURE: NONE KNOWN.
PRIMARY ROUTE(S) OF ENTRY: DERMAL INHALATION INGESTION.
EMERGENCY AND FIRST AID PROCEDURES: IN CASE OF EYE CONTACT, IMMEDIATELY FLUSH EYES WITH
CLEAN WATER FOR AT LEAST 15 MINUTES. IF EYE IRRITATION PERSISTS, CONTACT A PHYSICIAN. IN
CASE OF SKIN CONTACT, REMOVE ANY CONTAMINATED CLOTHING AND RINSE SKIN THOROUGHLY WITH
WATER FOR AT LEAST 15 MINUTES. IF SKIN IRRITATION PERSISTS, CONTACT A PHYSICIAN. IN CASE OF
OVEREXPOSURE TO MIST, REMOVE VICTIM TO FRESH AIR: IF BREATHING IS DIFFICULT ADMINISTER OXY-
GEN: AND CONTACT A PHYSICIAN IMMEDIATELY. IF PRODUCT IS INGESTED DO NOT INDUCE VOMITING:
CONTACT A PHYSICIAN.
==========================================================================================
SECTION VI - REACTIVITY DATA
==========================================================================================
STABILITY: THIS PRODUCT IS STABLE UNDER NORMAL STORAGE CONDITIONS.
HAZARDOUS POLYMERIZATION: WILL NOT OCCUR UNDER NORMAL CONDITIONS.
HAZARDOUS DECOMPOSITION PRODUCTS: THERMAL DECOMPOSITION MAY RESULT IN THE FORMATION
OF: OXIDES OF CARBON, AND INCOMPLETELY BURNED HYDROCARBONS IN THE FORM OF FUMES AND
SMOKE.
CONDITIONS TO AVOID: AVOID CONTACT WITH OPEN FLAME, STORE IN ROOM TEMPERATURE AREA.
Page 50
Material Safety Data Sheet (Continued)

Page 51
Material Safety Data Sheet (Continued)
PRODUCT: RP 1039
PAGE - 3
INCOMPATIBILITY: AVOID CONTACT WITH STRONG OXIDIZING AND REDUCING AGENTS AND STRONG
ALKLI.
==========================================================================================
SECTION VII - SPILL OR LEAK PROCEDURES
==========================================================================================
STEPS TO BE TAKEN IN CASE MATERIAL IS RELEASED OR SPILLED: FOR SMALL SPILLS: SOAK UP SPILL
WITH ABSORBENT MATERIAL. FOR LARGE SPILLS: DIKE SPILL AND PUMP INTO DRUMS FOR PROPER DIS-
POSAL.
WASTE DISPOSAL METHOD: DISPOSE OF IN ACCORDANCE WITH ALL LOCAL STATE AND FEDERAL REGU-
LATIONS.
==========================================================================================
SECTION VIII - SAFE HANDLING AND USE INFORMATION
==========================================================================================
RESPIRATORY PROTECTION: NORMALLY NOT REQUIRED, HOWEVER, WHEN THE TLV IS EXCEEDED WEAR
THE APPROPRICATE MSHA/NIOSH APPROVED RESPIRATOR.
VENTILATION: PROVIDE ADEQUATE VENTILATION (SUCH AS MECHANICAL OR LOCAL) TO ASSURE TLV IS
NOT EXCEEDED.
PROTECTIVE GLOVES: NORMALLY NOT REQUIRED, HOWEVER, IF HANDS ARE FREQUENTLY IN FLUID
WEAR OIL AND CHEMICAL IMPERVIOUS GLOVES.
EYE PROTECTION: SAFETY GLASSES REQUIRED FOR NORMAL USAGE, WEAR CHEMICAL GOGGLES WHEN
EXCESSIVE SPLASHING MAY OCCUR.
OTHER PROTECTIVE EQUIPMENT: NORMALLY NOT REQUIRED, HOWEVER, WHERE REPEATED CONTACT
OCCURS, WEAR IMPERVIOUS CLOTHING AND BOOTS.
HYGIENIC PRACTICES: FOLLOW STANDARD INDUSTRIAL HYGIENE PRACTICES. LAUNDER ANY CONTAMI-
NATED CLOTHING BEFORE RE-USE.
==========================================================================================
SECTION IX - SPECIAL PRECAUTIONS
==========================================================================================
PRECAUTIONS TO BE TAKEN IN HANDLING AND STORAGE: DO NOT STORE IN THE PRESENCE OF HEAT,
SPARKS, FLAME OR ANY OTHER SOURCES OF IGNITION. STORE AWAY FROM STRONG OXIDIZING AGENTS.
EMPTY DRUMS MAY CONTAIN PRODUCT RESIDUES. ALL SAFETY PRECAUTIONS TAKEN WHEN HANDLING
THIS PRODUCT SHOULD ALSO BE TAKEN WHEN HANDLING EMPTY DRUMS AND CONTAINERS.
OTHER PRECAUTIONS: NONE

Page 52
Material Safety Data Sheet (Continued)
PRODUCT: RP 1039
PAGE - 4
==========================================================================================
SECTION X - HMIS/NFPA RATINGS
==========================================================================================
HMIS:HEALTH:1 FLAMMABILITY:2 REACTIVITY:0 PERSONAL PROTECTION:C
NFPA:HEALTH:1 FLAMMABILITY:2 REACTIVITY:0 SPECIFIC HAZARD:
==========================================================================================
SECTION XI - OTHER REGULATORY INFORMATION
==========================================================================================
DOT HAZARDOUS: NATURAL DESCRIPTION:
==========================================================================================
THE INFORMATION CONTAINED HEREIN IS, TO THE BEST OF OUR KNOWLEDGE AND BELIEF, ACCURATE.
HOWEVER, SINCE THE CONDITIONS OF HANDLING AND USE ARE BEYOND OUR CONTROL, WE MAKE NO
GUARANTEE OF RESULTS, AND ASSUME NO LIABILITY FOR DAMAGES INCURRED BY USE OF THIS MATERI-
AL. IT IS THE RESPONSIBILITY OF THE USER TO COMPLY WITH ALL APPLICABLE FEDERAL, STATE AND
LOCAL LAWS AND REGULATIONS.
==========================================================================================

Page 53
Notes

Page 54
Notes

Page 55
Warranty Information
New 700 rotary meters, equipment or components manufactured by Total Control Systems, a division of
Murray Equipment, Inc. (TCS) with which this warranty is enclosed, are warranted by TCS to the original
purchaser only for a period of TWELVE (12) months from installation or eighteen (18) months from the
date of shipment, to be free, under normal use and service, from defects in material and workmanship.
Defects occurring within the stated warranty period, TCS will repair or replace, at TCS’s option; provided
that part or parts are returned to TCS transportation charges prepaid, and TCS’s examination discloses the
parts or workmanship to have been defective upon delivery to the purchaser.
EXCLUSIONS: Warranty does not cover any parts and equipment not manufactured by TCS, but these
items may be covered by separate warranties of their respective manufacturers. This warranty does not
extend to any equipment that has been subjected to misuse, negligence or accident or if operated in any
manner other than in accordance with TCS’s operating instructions and specifications.
CLAIM PROCEDURES: In order to obtain performance by TCS of its obligations under this warranty,
the original purchaser must obtain a Return Goods Authorization (RGA) number from TCS’s customer
service department within 30 days of discovery of a purported breach of warranty, but not later than the
expiration of the warranty period. Once authorization is received, return the RGA and defective meter,
piece of equipment, or component covered by this warranty, with transportation charges prepaid, to TCS
together with a written RGA form, MSDS sheet and packaging clearly marked with the RGA number. All
RGA procedures must strictly be followed for safety and quick resolve. TCS reserves the right of refusal
for shipments sent back freight collect and/or without proper paperwork.
LIMITATIONS: There are no other warranties of any kind, expressed or implied. TCS specifically dis-
claims any warranty of merchantability or of fitness for any particular purpose. TCS will determine if all
parts or meter defect falls within the warranty guidelines and will repair or replace within a reasonable
time span. TCS is not responsible for any in or out bound freight. TCS's sole obligation shall represent
the buyer's sole and exclusive remedy shall be to repair or at TCS's option to replace any product or part
determined to be defective. In no event shall TCS be liable for any special, direct, indirect, incident, con-
sequential or other damages of similar nature, including without limitation, loss of profits, products, pro-
duction time, or loss of expenses of any nature incurred by the buyer or any third party. TCS has not au-
thorized on its behalf any representation or warranties to be made, nor any liability to be assumed except
as expressly provided herein; there is no other express or implied warranty.
REPAIR WARRANTY: All repair work is warranted for ninety (90) days from the date of shipment to
customer. Some parts may be warranted for longer periods by the Original Equipment Manufacturer.
DESIGN AND EQUIPMENT CHANGES: Any changes in design or improvements added shall not cre-
ate any obligation to install same on equipment previously sold or ordered.
TOTAL CONTROL SYSTEMS
2515 Charleston Place • Fort Wayne, Indiana 46808 U.S.A.
Tel: (260) 484-0382 • Toll Free: (800) 348-4753 • Fax: (260) 484-9230
sales@tcsmeters.com • www.tcsmeters.com

2515 Charleston Place
Fort Wayne, IN 46808
Toll Free: (800) 348-4753
Phone: (260) 484-0382
Fax: (260) 484-9230
Email: sales@tcsmeters.com
TCS900002 REV. 2