PGP 6.5 For Windows 95 98 NT Instruction Manual PGP6.5 Win Users
User Manual: PGP - 6.5 for Windows 95 98 NT - Instruction Manual User Guide for PGP Software, Free Instruction Manual
Open the PDF directly: View PDF ![]() .
.
Page Count: 250 [warning: Documents this large are best viewed by clicking the View PDF Link!]
- PGP Freeware
- for Windows 95, Windows 98, and Windows NT
- User’s Guide
- Version 6.5
- Table of Contents
- Preface 11
- Chapter 1. Installing PGP 15
- Chapter 2. Using PGP 23
- Chapter 3. Making and Exchanging Keys 35
- Chapter 4. Sending and Receiving Secure Email 71
- Chapter 5. Using PGP for Secure File Storage 83
- Chapter 6. Managing Keys and Setting PGP Options 99
- Chapter 7. PGPnet Virtual Private Networking 129
- Appendix A. Troubleshooting PGP 177
- Appendix B. Transferring Files Between the Mac OS and Windows 181
- Appendix C. Phil Zimmermann on PGP 187
- Appendix D. Biometric Word Lists 215
- Preface 11
- Table of Contents
- Preface
- 1 Installing PGP
- 2 Using PGP
- 3 Making and Exchanging Keys
- 4 Sending and Receiving Secure Email
- 5 Using PGP for Secure File Storage
- 6 Managing Keys and Setting PGP Options
- 7 PGPnet Virtual Private Networking
- What is a VPN?
- How does a VPN work?
- What do you need to protect?
- PGPnet features
- What is PGPnet?
- What is a Security Association?
- PGPnet’s two modes: tunnel and transport
- How does PGPnet communicate with secure and insecure hosts?
- How do you use PGPnet?
- Starting the PGPnet program
- Using PGPnet from PGPtray
- Turning PGPnet off
- Turning PGPnet on
- Exiting PGPnet
- Using PGPnet
- Set Adapter: Changing your secure network interface
- A Troubleshooting PGP
- B Transferring Files Between the Mac OS and Windows
- C Phil Zimmermann on PGP
- D Biometric Word Lists
- Glossary
- Index

PGP Freeware
for Windows 95, Windows 98,
and Windows NT
User’s Guide
Version 6.5

Copyright © 1990-1999 Network Associates, Inc. and its Affiliated Companies. All Rights
Reserved.
PGP*, Version 6.5.1
06-99. Printed in the United States of America.
PGP, Pretty Good, and Pretty Good Privacy are registered trademarks of Network Associates,
Inc. and/or its Affiliated Companies in the US and other countries. All other registered and
unregistered trademarks in this document are the sole property of their respective owners.
Portions of this software may use public key algorithms described in U.S. Patent numbers
4,200,770, 4,218,582, 4,405,829, and 4,424,414, licensed exclusively by Public Key Partners; the
IDEA(tm) cryptographic cipher described in U.S. patent number 5,214,703, licensed from
Ascom Tech AG; and the Northern Telecom Ltd., CAST Encryption Algorithm, licensed from
Northern Telecom, Ltd. IDEA is a trademark of Ascom Tech AG. Network Associates Inc. may
have patents and/or pending patent applications covering subject matter in this software or
its documentation; the furnishing of this software or documentation does not give you any
license to these patents. The compression code in PGP is by Mark Adler and Jean-Loup Gailly,
used with permission from the free Info-ZIP implementation. LDAP software provided
courtesy University of Michigan at Ann Arbor, Copyright © 1992-1996 Regents of the
University of Michigan. All rights reserved. This product includes software developed by the
Apache Group for use in the Apache HTTP server project (http://www.apache.org/).
Copyright © 1995-1999 The Apache Group. All rights reserved. See text files included with the
software or the PGP web site for further information. This software is based in part on the
work of the Independent JPEG Group. Soft TEMPEST font courtesy of Ross Anderson and
Marcus Kuhn. Biometric word list for fingerprint verification courtesy of Patrick Juola.
The software provided with this documentation is licensed to you for your individual use
under the terms of the End User License Agreement and Limited Warranty provided with the
software. The information in this document is subject to change without notice. Network
Associates Inc. does not warrant that the information meets you requirements or that the
information is free of errors. The information may include technical inaccuracies or
typographical errors. Changes may be made to the information and incorporated in new
editions of this document, if and when made available by Network Associates Inc.
Export of this software and documentation may be subject to compliance with the rules and
regulations promulgated from time to time by the Bureau of Export Administration, United
States Department of Commerce, which restrict the export and re-export of certain products
and technical data.
Network Associates, Inc. (408) 988-3832 main
3965 Freedom Circle (408) 970-9727 fax
Santa Clara, CA 95054 http://www.nai.com
info@nai.com
* is sometimes used instead of the ® for registered trademarks to protect marks registered outside of the
U.S.

LIMITED WARRANTY
Limited Warranty. Network Associates Inc. warrants that the Software Product will perform
substantially in accordance with the accompanying written materials for a period of sixty (60)
days from the date of original purchase. To the extent allowed by applicable law, implied
warranties on the Software Product, if any, are limited to such sixty (60) day period. Some
jurisdictions do not allow limitations on duration of an implied warranty, so the above
limitation may not apply to you.
Customer Remedies. Network Associates Inc’s and its suppliers’ entire liability and your
exclusive remedy shall be, at Network Associates Inc’s option, either (a) return of the purchase
price paid for the license, if any or (b) repair or replacement of the Software Product that does
not meet Network Associates Inc’s limited warranty and which is returned at your expense to
Network Associates Inc. with a copy of your receipt. This limited warranty is void if failure of
the Software Product has resulted from accident, abuse, or misapplication. Any repaired or
replacement Software Product will be warranted for the remainder of the original warranty
period or thirty (30) days, whichever is longer. Outside the United States, neither these
remedies nor any product support services offered by Network Associates Inc. are available
without proof of purchase from an authorized international source and may not be available
from Network Associates Inc. to the extent they subject to restrictions under U.S. export control
laws and regulations.
NO OTHER WARRANTIES. TO THE MAXIMUM EXTENT PERMITTED BY APPLICABLE
LAW, AND EXCEPT FOR THE LIMITED WARRANTIES SET FORTH HEREIN, THE
SOFTWARE AND DOCUMENTATION ARE PROVIDED “AS IS” AND NETWORK
ASSOCIATES, INC. AND ITS SUPPLIERS DISCLAIM ALL OTHER WARRANTIES AND
CONDITIONS, EITHER EXPRESS OR IMPLIED, INCLUDING, BUT NOT LIMITED TO,
IMPLIED WARRANTIES OF MERCHANTABILITY, FITNESS FOR A PARTICULAR
PURPOSE, CONFORMANCE WITH DESCRIPTION, TITLE AND NON-INFRINGEMENT OF
THIRD PARTY RIGHTS, AND THE PROVISION OF OR FAILURE TO PROVIDE SUPPORT
SERVICES. THIS LIMITED WARRANTY GIVES YOU SPECIFIC LEGAL RIGHTS. YOU MAY
HAVE OTHERS, WHICH VARY FROM JURISDICTION TO JURISDICTION.
LIMITATION OF LIABILITY. TO THE MAXIMUM EXTENT PERMITTED BY APPLICABLE
LAW, IN NO EVENT SHALL NETWORK ASSOCIATES, INC. OR ITS SUPPLIERS BE LIABLE
FOR ANY INDIRECT, INCIDENTAL, CONSEQUENTIAL, SPECIAL OR EXEMPLARY
DAMAGES OR LOST PROFITS WHATSOEVER (INCLUDING, WITHOUT LIMITATION,
DAMAGES FOR LOSS OF BUSINESS PROFITS, BUSINESS INTERRUPTION, LOSS OF
BUSINESS INFORMATION, OR ANY OTHER PECUNIARY LOSS) ARISING OUT OF THE
USE OR INABILITY TO USE THE SOFTWARE PRODUCT OR THE FAILURE TO PROVIDE
SUPPORT SERVICES, EVEN IF NETWORK ASSOCIATES, INC. HAS BEEN ADVISED OF
THE POSSIBILITY OF SUCH DAMAGES. IN ANY CASE, NETWORK ASSOCIATES, INC’S
CUMULATIVE AND ENTIRE LIABILITY TO YOU OR ANY OTHER PARTY FOR ANY LOSS
OR DAMAGES RESULTING FROM ANY CLAIMS, DEMANDS OR ACTIONS ARISING OUT
OF OR RELATING TO THIS AGREEMENT SHALL NOT EXCEED THE PURCHASE PRICE
PAID FOR THIS LICENSE. BECAUSE SOME JURISDICTIONS DO NOT ALLOW THE
EXCLUSION OR LIMITATION OF LIABILITY, THE ABOVE LIMITATIONS MAY NOT
APPLY TO YOU.

User’s Guide v
Table of Contents
Preface . . . . . . . . . . . . . . . . . . . . . . . . . . . . . . . . . . . . . . . . . . . . . . . . . . . . . 11
What’s new in PGP version 6.5.1 . . . . . . . . . . . . . . . . . . . . . . . . . . . . . . . . . . . .12
How to contact Network Associates . . . . . . . . . . . . . . . . . . . . . . . . . . . . . . . . .12
Customer service . . . . . . . . . . . . . . . . . . . . . . . . . . . . . . . . . . . . . . . . . . . .12
Comments and feedback . . . . . . . . . . . . . . . . . . . . . . . . . . . . . . . . . . . . . .13
Year 2000 compliance . . . . . . . . . . . . . . . . . . . . . . . . . . . . . . . . . . . . . . . .13
Recommended Readings . . . . . . . . . . . . . . . . . . . . . . . . . . . . . . . . . . . . .13
Chapter 1. Installing PGP . . . . . . . . . . . . . . . . . . . . . . . . . . . . . . . . . . . . .15
System requirements . . . . . . . . . . . . . . . . . . . . . . . . . . . . . . . . . . . . . . . . . . . . .15
Compatibility with other versions . . . . . . . . . . . . . . . . . . . . . . . . . . . . . . . . . . .16
Upgrading from a previous version . . . . . . . . . . . . . . . . . . . . . . . . .16
Installing PGP . . . . . . . . . . . . . . . . . . . . . . . . . . . . . . . . . . . . . . . . . . . . . . . . . . .18
Chapter 2. Using PGP . . . . . . . . . . . . . . . . . . . . . . . . . . . . . . . . . . . . . . . .23
Basic steps for using PGP . . . . . . . . . . . . . . . . . . . . . . . . . . . . . . . . . . . . . . . . .23
Using PGPkeys . . . . . . . . . . . . . . . . . . . . . . . . . . . . . . . . . . . . . . . . . . . . . . . . . .26
PGPkeys icon definitions . . . . . . . . . . . . . . . . . . . . . . . . . . . . . . . . .27
Using PGPtray . . . . . . . . . . . . . . . . . . . . . . . . . . . . . . . . . . . . . . . . . . . . . . . . . . .29
Performing PGP functions from the Clipboard or Current Window . . .30
Using PGP from Windows Explorer . . . . . . . . . . . . . . . . . . . . . . . . . . . . . . . . .31
Using PGPtools . . . . . . . . . . . . . . . . . . . . . . . . . . . . . . . . . . . . . . . . . . . . . . . . . .31
Using PGP within supported email applications . . . . . . . . . . . . . . . . . . . . . . .32
Using PGP/MIME . . . . . . . . . . . . . . . . . . . . . . . . . . . . . . . . . . . . . . . .33
Selecting recipients for encrypted files or email . . . . . . . . . . . . . .33
Taking shortcuts . . . . . . . . . . . . . . . . . . . . . . . . . . . . . . . . . . . . . . . . . . . . . . . . .33
Getting Help . . . . . . . . . . . . . . . . . . . . . . . . . . . . . . . . . . . . . . . . . . . . . . . . . . . . .34
Chapter 3. Making and Exchanging Keys . . . . . . . . . . . . . . . . . . . . . . . . 35
Key concepts . . . . . . . . . . . . . . . . . . . . . . . . . . . . . . . . . . . . . . . . . . . . . . . . . . . .35
Making a key pair . . . . . . . . . . . . . . . . . . . . . . . . . . . . . . . . . . . . . . . . . . . . . . . .36
Creating a passphrase that you will remember . . . . . . . . . . . . . . . . . . . . . . . .40

Table of Contents
vi PGP Freeware
Backing up your keys . . . . . . . . . . . . . . . . . . . . . . . . . . . . . . . . . . . . . . . . . . . . .41
Protecting your keys . . . . . . . . . . . . . . . . . . . . . . . . . . . . . . . . . . . . . . . . . . . . .41
Adding and removing information in your key pair . . . . . . . . . . . . . . . . . . . . .42
Adding a photographic ID to your key . . . . . . . . . . . . . . . . . . . . . . . . . . .42
Creating new subkeys . . . . . . . . . . . . . . . . . . . . . . . . . . . . . . . . . . . . . . . .44
Adding a new user name or address to your key pair . . . . . . . . . . . . . .46
Adding a designated revoker . . . . . . . . . . . . . . . . . . . . . . . . . . . . . .47
Adding an X.509 certificate to your PGP key . . . . . . . . . . . . . . . . . . . . . .48
Changing your passphrase . . . . . . . . . . . . . . . . . . . . . . . . . . . . . . .51
Deleting a key or signature on your PGP keyring . . . . . . . . . . . . . . . . . .53
Splitting and rejoining keys . . . . . . . . . . . . . . . . . . . . . . . . . . . . . . . . . . . . . . . .53
Creating a split key . . . . . . . . . . . . . . . . . . . . . . . . . . . . . . . . . . . . . . . . . .53
Rejoining split keys . . . . . . . . . . . . . . . . . . . . . . . . . . . . . . . . . . . . . . . . . .56
Distributing your public key . . . . . . . . . . . . . . . . . . . . . . . . . . . . . . . . . . . . . . .60
Making your public key available through a certificate server . . . . . . .61
Updating your key on a certificate server . . . . . . . . . . . . . . . . . . . .62
Including your public key in an email message . . . . . . . . . . . . . . . . . . .63
Exporting your public key to a file . . . . . . . . . . . . . . . . . . . . . . . . . . . . . .64
Obtaining the public keys of others . . . . . . . . . . . . . . . . . . . . . . . . . . . . . . . . .64
Getting public keys from a certificate server . . . . . . . . . . . . . . . . . . . . .65
Adding public keys from email messages . . . . . . . . . . . . . . . . . . . . . . . .67
Importing keys . . . . . . . . . . . . . . . . . . . . . . . . . . . . . . . . . . . . . . . . . . . . . .68
Verifying the authenticity of a key . . . . . . . . . . . . . . . . . . . . . . . . . . . . . .68
Why verify the authenticity of a key? . . . . . . . . . . . . . . . . . . . . . . .68
Verify with a digital fingerprint . . . . . . . . . . . . . . . . . . . . . . . . . . . . .69
Validating the public key . . . . . . . . . . . . . . . . . . . . . . . . . . . . . . . . . . . . . .69
Working with trusted introducers . . . . . . . . . . . . . . . . . . . . . . . . . . . . . . .69
What is a trusted introducer? . . . . . . . . . . . . . . . . . . . . . . . . . . . . . .70
What is a meta-introducer . . . . . . . . . . . . . . . . . . . . . . . . . . . . . . . . .70
Chapter 4. Sending and Receiving Secure Email . . . . . . . . . . . . . . . . . . 71
Encrypting and signing email . . . . . . . . . . . . . . . . . . . . . . . . . . . . . . . . . . . . . .71
Encrypting and signing with supported email applications . . . . . . . . .72
Encrypting email to groups of recipients . . . . . . . . . . . . . . . . . . . . . . . .77
Working with distribution lists . . . . . . . . . . . . . . . . . . . . . . . . . . . . .78

User’s Guide vii
Table of Contents
Sending encrypted and signed email to distribution lists . . . . . . .79
Decrypting and verifying email . . . . . . . . . . . . . . . . . . . . . . . . . . . . . . . . . . . . .79
Chapter 5. Using PGP for Secure File Storage . . . . . . . . . . . . . . . . . . . . 83
Using PGP to encrypt and decrypt files . . . . . . . . . . . . . . . . . . . . . . . . . . . . . .83
Using the PGP right-click menu to encrypt and sign . . . . . . . . . . .83
Using PGPtools to encrypt and sign . . . . . . . . . . . . . . . . . . . . . . . .85
Using PGPtray to decrypt and verify . . . . . . . . . . . . . . . . . . . . . . . .87
Using PGPtools to decrypt and verify . . . . . . . . . . . . . . . . . . . . . . .88
Signing and decrypting files with a split key . . . . . . . . . . . . . . . . . . . . . . . . . .88
Using PGP Wipe to delete files . . . . . . . . . . . . . . . . . . . . . . . . . . . . . . . . . . . . .93
Using the PGP Free Space Wiper to clean free space on your disks . . . . . .94
Scheduling Free Space Wiper . . . . . . . . . . . . . . . . . . . . . . . . . . . . . . . . . .96
Chapter 6. Managing Keys and Setting PGP Options . . . . . . . . . . . . . .99
Managing your keys . . . . . . . . . . . . . . . . . . . . . . . . . . . . . . . . . . . . . . . . . . . . . .99
The PGPkeys window . . . . . . . . . . . . . . . . . . . . . . . . . . . . . . . . . . . . . . .100
PGPkeys attribute definitions . . . . . . . . . . . . . . . . . . . . . . . . . . . . .101
Examining a key’s properties . . . . . . . . . . . . . . . . . . . . . . . . . . . . . . . . .103
General Key Properties panel . . . . . . . . . . . . . . . . . . . . . . . . . . . . .103
Subkey properties window . . . . . . . . . . . . . . . . . . . . . . . . . . . . . . .105
Designated revoker window . . . . . . . . . . . . . . . . . . . . . . . . . . . . . .106
Specifying a default key pair . . . . . . . . . . . . . . . . . . . . . . . . . . . . . . . . . .107
Verifying someone’s public key . . . . . . . . . . . . . . . . . . . . . . . . . . . . . . .108
Signing someone’s public key . . . . . . . . . . . . . . . . . . . . . . . . . . . .110
Granting trust for key validations . . . . . . . . . . . . . . . . . . . . . . . . . . . . . .112
Disabling and enabling keys . . . . . . . . . . . . . . . . . . . . . . . . . . . . . . . . . .113
Importing and Exporting Keys . . . . . . . . . . . . . . . . . . . . . . . . . . . . . . . .114
Revoking a key . . . . . . . . . . . . . . . . . . . . . . . . . . . . . . . . . . . . . . . . . . . . .115
Appointing a designated revoker . . . . . . . . . . . . . . . . . . . . . . . . . .116
Setting PGP options . . . . . . . . . . . . . . . . . . . . . . . . . . . . . . . . . . . . . . . . . . . . .116
Setting general options . . . . . . . . . . . . . . . . . . . . . . . . . . . . . . . . . . . . . .117
Setting file options . . . . . . . . . . . . . . . . . . . . . . . . . . . . . . . . . . . . . . . . . .119
Setting emailoptions . . . . . . . . . . . . . . . . . . . . . . . . . . . . . . . . . . . . . . . .120
Setting HotKey preferences . . . . . . . . . . . . . . . . . . . . . . . . . . . . . . . . . .122

Table of Contents
viii PGP Freeware
Setting server options . . . . . . . . . . . . . . . . . . . . . . . . . . . . . . . . . . . . . . .124
Setting CA options . . . . . . . . . . . . . . . . . . . . . . . . . . . . . . . . . . . . . . . . . .127
Setting advanced options . . . . . . . . . . . . . . . . . . . . . . . . . . . . . . . . . . . .127
Chapter 7. PGPnet Virtual Private Networking . . . . . . . . . . . . . . . . . . . 129
What is a VPN? . . . . . . . . . . . . . . . . . . . . . . . . . . . . . . . . . . . . . . . . . . . . . . . . .129
How does a VPN work? . . . . . . . . . . . . . . . . . . . . . . . . . . . . . . . . . . . . . . . . . .130
What do you need to protect? . . . . . . . . . . . . . . . . . . . . . . . . . . . . . . . . . . . . .130
PGPnet features . . . . . . . . . . . . . . . . . . . . . . . . . . . . . . . . . . . . . . . . . . . . . . . .131
What is PGPnet? . . . . . . . . . . . . . . . . . . . . . . . . . . . . . . . . . . . . . . . . . . . . . . . .132
What is a Security Association? . . . . . . . . . . . . . . . . . . . . . . . . . . . . . . . . . . .132
PGPnet’s two modes: tunnel and transport . . . . . . . . . . . . . . . . . . . . . . . . . .133
What is tunnel mode? . . . . . . . . . . . . . . . . . . . . . . . . . . . . . . . . . . . . . . .133
What is transport mode? . . . . . . . . . . . . . . . . . . . . . . . . . . . . . . . . . . . . .133
How does PGPnet communicate with secure and insecure hosts? . . . . . .133
How do you use PGPnet? . . . . . . . . . . . . . . . . . . . . . . . . . . . . . . . . . . . . . . . .134
Changing Network Control Panel Settings . . . . . . . . . . . . . . . . . . . . . .135
Starting the PGPnet program . . . . . . . . . . . . . . . . . . . . . . . . . . . . . . . . . . . . .135
Selecting your authentication key or certificate . . . . . . . . . . . . . . . . . .136
The PGPnet window at a glance . . . . . . . . . . . . . . . . . . . . . . . . . . . . . . .137
Using PGPnet from PGPtray . . . . . . . . . . . . . . . . . . . . . . . . . . . . . . . . . . . . . .139
PGPtray’s icon . . . . . . . . . . . . . . . . . . . . . . . . . . . . . . . . . . . . . . . . . . . . .139
Turning PGPnet off . . . . . . . . . . . . . . . . . . . . . . . . . . . . . . . . . . . . . . . . . . . . . .139
Turning PGPnet on . . . . . . . . . . . . . . . . . . . . . . . . . . . . . . . . . . . . . . . . . . . . . .140
Exiting PGPnet . . . . . . . . . . . . . . . . . . . . . . . . . . . . . . . . . . . . . . . . . . . . . . . . .140
Using PGPnet . . . . . . . . . . . . . . . . . . . . . . . . . . . . . . . . . . . . . . . . . . . . . . . . . .140
Viewing the Status Panel . . . . . . . . . . . . . . . . . . . . . . . . . . . . . . . . . . . . .141
Viewing the Log Panel . . . . . . . . . . . . . . . . . . . . . . . . . . . . . . . . . . . . . . .142
Using the Hosts Panel . . . . . . . . . . . . . . . . . . . . . . . . . . . . . . . . . . . . . . .144
The Connect and Disconnect buttons . . . . . . . . . . . . . . . . . . . . . .145
Establishing an SA . . . . . . . . . . . . . . . . . . . . . . . . . . . . . . . . . . . . .145
Adding a host, subnet, or gateway . . . . . . . . . . . . . . . . . . . . . . . .148
Modifying a host, subnet, or gateway entry . . . . . . . . . . . . . . . . .155
Removing a host, subnet, or gateway entry . . . . . . . . . . . . . . . . .155
Requiring a host to present a specific key or certificate . . . . . . . . . . .155

User’s Guide ix
Table of Contents
Viewing the General Panel . . . . . . . . . . . . . . . . . . . . . . . . . . . . . . . . . . .156
Expert Mode: Bypassing the wizard to add hosts, gateways, and subnets
157
Cache passphrases between logins . . . . . . . . . . . . . . . . . . . . . . .162
Setting key expiration values . . . . . . . . . . . . . . . . . . . . . . . . . . . . .162
Authenticating a connection . . . . . . . . . . . . . . . . . . . . . . . . . . . . . . . . . .164
Advanced Panel . . . . . . . . . . . . . . . . . . . . . . . . . . . . . . . . . . . . . . . . . . . .166
Allowed Remote Proposals . . . . . . . . . . . . . . . . . . . . . . . . . . . . . .166
Proposals . . . . . . . . . . . . . . . . . . . . . . . . . . . . . . . . . . . . . . . . . . . . .169
Set Adapter: Changing your secure network interface . . . . . . . . . . . . . . . . .173
Appendix A. Troubleshooting PGP . . . . . . . . . . . . . . . . . . . . . . . . . . . . 177
Appendix B. Transferring Files Between the Mac OS and Windows . 181
Sending from the Mac OS to Windows . . . . . . . . . . . . . . . . . . . . . . . . . . . . . .182
Receiving Windows files on the Mac OS . . . . . . . . . . . . . . . . . . . . . . . . . . . .183
Supported Applications . . . . . . . . . . . . . . . . . . . . . . . . . . . . . . . . . . . . . .184
Appendix C. Phil Zimmermann on PGP . . . . . . . . . . . . . . . . . . . . . . . . .187
Why I wrote PGP . . . . . . . . . . . . . . . . . . . . . . . . . . . . . . . . . . . . . . . . . . . . . . . .187
The PGP symmetric algorithms . . . . . . . . . . . . . . . . . . . . . . . . . . . . . . . . . . . .191
About PGP data compression routines . . . . . . . . . . . . . . . . . . . . . . . . .193
About the random numbers used as session keys . . . . . . . . . . . . . . .193
About the message digest . . . . . . . . . . . . . . . . . . . . . . . . . . . . . . . . . . . .194
How to protect public keys from tampering . . . . . . . . . . . . . . . . . . . . .195
How does PGP keep track of which keys are valid? . . . . . . . . . . . . . . .198
How to protect private keys from disclosure . . . . . . . . . . . . . . . . . . . .200
What if you lose your private key? . . . . . . . . . . . . . . . . . . . . . . . .201
Beware of snake oil . . . . . . . . . . . . . . . . . . . . . . . . . . . . . . . . . . . . . . . . . . . . .201
Vulnerabilities . . . . . . . . . . . . . . . . . . . . . . . . . . . . . . . . . . . . . . . . . . . . . . . . . .206
Compromised passphrase and private key . . . . . . . . . . . . . . . . . . . . . .206
Public key tampering . . . . . . . . . . . . . . . . . . . . . . . . . . . . . . . . . . . . . . . .206
Not quite deleted files . . . . . . . . . . . . . . . . . . . . . . . . . . . . . . . . . . . . . . .207
Viruses and Trojan horses . . . . . . . . . . . . . . . . . . . . . . . . . . . . . . . . . . .208
Swap files or virtual memory . . . . . . . . . . . . . . . . . . . . . . . . . . . . .209
Physical security breach . . . . . . . . . . . . . . . . . . . . . . . . . . . . . . . . . . . . .210

Table of Contents
x PGP Freeware
Tempest attacks . . . . . . . . . . . . . . . . . . . . . . . . . . . . . . . . . . . . . . . . . . . .210
Protecting against bogus timestamps . . . . . . . . . . . . . . . . . . . . . . . . . .210
Exposure on multi-user systems . . . . . . . . . . . . . . . . . . . . . . . . . . . . . .212
Traffic analysis . . . . . . . . . . . . . . . . . . . . . . . . . . . . . . . . . . . . . . . . . . . . .212
Cryptanalysis . . . . . . . . . . . . . . . . . . . . . . . . . . . . . . . . . . . . . . . . . . . . . .212
Appendix D. Biometric Word Lists . . . . . . . . . . . . . . . . . . . . . . . . . . . . . 215
Biometric Word Lists . . . . . . . . . . . . . . . . . . . . . . . . . . . . . . . . . . . . . . . . . . . .215
Glossary . . . . . . . . . . . . . . . . . . . . . . . . . . . . . . . . . . . . . . . . . . . . . . . . . . .221
Index . . . . . . . . . . . . . . . . . . . . . . . . . . . . . . . . . . . . . . . . . . . . . . . . . . . . . .233

User’s Guide 11
Preface
Welcome to PGP! With PGP for Freeware, you can easily and securely protect
the privacy of your email messages and file attachments by encrypting them
so that only the intended recipients can read them. You can also digitally sign
messages and files, which ensures their authenticity. A signed messages
verifies that the information in it has not been tampered with in any way.
This guide describes how to use PGP® Freeware for Windows 95, Windows 98,
and Windows NT. PGP Freeware has many new features, which are described
in “What’s new in PGP version 6.5.1” on page 12.
If you are new to cryptography and would like an overview of the terminology
and concepts you will encounter while using PGP, see An Introduction to
Cryptography.

Preface
12 PGP Freeware
What’s new in PGP version 6.5.1
This version of PGP includes these new features:
•PGPnet. PGPnet is a landmark product in the history of PGP. PGPnet
secures all TCP/IP communications between itself and any other machine
running PGPnet. It is also fully interoperable with the Gauntlet GVPN
firewall/gateway providing a complete solution for corporate remote
access VPNs using the industry standard IPSec (Internet Protocol Security)
and IKE (Internet Key Exchange) protocols. PGPnet has also been
successfully tested with Cisco routers (requires Cisco IOS 12.0(5) or later
with IPSec TripleDes Feature Pack), Linux FreeS/WAN 1.0, and many
others. Refer to Chapter 7, “PGPnet Virtual Private Networking,” for more
information and instructions on using PGPnet.
•Self-Decrypting Archives. PGP can now encrypt files or folders into
Self-Decrypting Archives (SDA) which can be sent to users who do not
even have PGP. The archives are completely independent of any
application, and are compressed and protected by PGP's strong
cryptography. Automated Freespace Wiping. PGP's Freespace Wipe
feature now allows you to use the Windows Task Scheduler to schedule
periodic secure wiping of the freespace on your disk. This ensures that
previously deleted files are securely wiped.
•Hotkeys. The Use Current Window feature is significantly enhanced by the
addition of Hotkeys. You can now set hotkey combinations for the
Encrypt/Decrypt/Sign functions.
•Fingerprint word list. When verifying a PGP public key fingerprint, you
can now choose to view the fingerprint as a word list instead of
hexadecimal characters. The word list in the fingerprint text box is made up
of special authentication words that PGP uses and are carefully selected to
be phonetically distinct and easy to understand without phonetic
ambiguity.
• Smart Word Wrapping. The word wrapping in PGP now automatically
rewraps paragraphs and even quoted paragraphs resulting in much
cleaner signed messages.
How to contact Network Associates
Customer service
To order products or obtain product information, contact the Network
Associates Customer Care department at (408) 988-3832 or write to the
following address:

User’s Guide 13
Preface
Network Associates, Inc.
McCandless Towers
3965 Freedom Circle
Santa Clara, CA 95054-1203
U.S.A.
Comments and feedback
Network Associates appreciates your comments and feedback, but incurs no
obligation to you for information you submit. Please address your comments
about PGP product documentation to: Network Associates, Inc., 3965
Freedom Circle Santa Clara, CA 95054-1203 U.S.A.. You can also e-mail
comments to tns_documentation@nai.com.
Year 2000 compliance
Information regarding NAI products that are Year 2000 compliant and its Year
2000 standards and testing models may be obtained from NAI’s Web site at
http://www.nai.com/y2k.
For further information, email y2k@nai.com.
Recommended Readings
Non-Technical and beginning technical books
• Whitfield Diffie and Susan Eva Landau, “Privacy on the Line,” MIT Press;
ISBN: 0262041677
This book is a discussion of the history and policy surrounding
cryptography and communications security. It is an excellent read, even for
beginners and non-technical people, but with information that even a lot of
experts don't know.
• David Kahn, “The Codebreakers” Scribner; ISBN: 0684831309
This book is a history of codes and code breakers from the time of the
Egyptians to the end of WWII. Kahn first wrote it in the sixties, and there is
a revised edition published in 1996. This book won't teach you anything
about how cryptography is done, but it has been the inspiration of the
whole modern generation of cryptographers.

Preface
14 PGP Freeware
• Charlie Kaufman, Radia Perlman, and Mike Spencer, “Network Security:
Private Communication in a Public World,” Prentice Hall; ISBN:
0-13-061466-1
This is a good description of network security systems and protocols,
including descriptions of what works, what doesn't work, and why.
Published in 1995, so it doesn't have many of the latest advances, but is still
a good book. It also contains one of the most clear descriptions of how DES
works of any book written.
Intermediate books
• Bruce Schneier, “Applied Cryptography: Protocols, Algorithms, and
Source Code in C,” John Wiley & Sons; ISBN: 0-471-12845-7
This is a good beginning technical book on how a lot of cryptography
works. If you want to become an expert, this is the place to start.
• Alfred J. Menezes, Paul C. van Oorschot, and Scott Vanstone,
“Handbook of Applied Cryptography,” CRC Press; ISBN: 0-8493-8523-7
This is the technical book you should get after Schneier. There is a lot of
heavy-duty math in this book, but it is nonetheless usable for those who do
not understand the math.
• Richard E. Smith, “Internet Cryptography,” Addison-Wesley Pub Co;
ISBN: 020192480
This book describes how many Internet security protocols. Most
importantly, it describes how systems that are designed well nonetheless
end up with flaws through careless operation. This book is light on math,
and heavy on practical information.
• William R. Cheswick and Steven M. Bellovin, “Firewalls and Internet
Security: Repelling the Wily Hacker” Addison-Wesley Pub Co;
ISBN: 0201633574
This book is written by two senior researcher at AT&T Bell Labs, about
their experiences maintaining and redesigning AT&T's Internet
connection. Very readable.
Advanced books
• Neal Koblitz, “A Course in Number Theory and Cryptography”
Springer-Verlag; ISBN: 0-387-94293-9
An excellent graduate-level mathematics textbook on number theory and
cryptography.
• Eli Biham and Adi Shamir, “Differential Cryptanalysis of the Data
Encryption Standard,” Springer-Verlag; ISBN: 0-387-97930-1
This book describes the technique of differential cryptanalysis as applied to
DES. It is an excellent book for learning about this technique.

1
User’s Guide 15
1Installing PGP
This chapter describes how to install and run PGP Freeware Windows
software. This chapter also provides a quick overview of the procedures you
will normally follow in using the product.
Before you begin installing PGP be sure to review the system requirements
outlined below.
System requirements
To install PGP on a Windows 95, Widows 98, or Windows NT system, you
must have:
• Windows 95, Windows 98, or Windows NT 4.0 (Service Pack 3 or later)
•32 MB RAM
•16 MB Hard Disk Space
If you plan to run PGPnet on the system, you must also have:
•Microsoft TCP/IP
• A compatible LAN/WAN network adapter
• Windows 95b (OSR2) if you are installing on a Windows 95 system

Installing PGP
16 PGP Freeware
Compatibility with other versions
PGP has gone through many revisions since it was released by Phil
Zimmermann as a freeware product in 1991. Although this version of PGP
represents a significant rewrite of the original program and incorporates a
completely new user interface, it has been designed to be compatible with
earlier versions of PGP. This means that you can exchange secure email with
people who are still using these older versions of the product:
• PGP 2.6 (Distributed by MIT)
• PGP for Personal Privacy, Version 5.0 - 5.5
• PGP for Business Security or PGP for Email and Files Version 5.5
• PGP Desktop Security or PGP for Personal Privacy Version 6.0
NOTE: PGP desktop products that are version 5.0 and later may require
the RSA add-on for backward compatibility.
Upgrading from a previous version
If you are upgrading from a previous version of PGP (from PGP, Inc.,
Network Associates, Inc. or ViaCrypt), you may want to remove the old
program files before installing PGP to free up some disk space. However, you
should be careful not to delete the private and public keyring files used to store
any keys you have created or collected while using the previous version.
When you install PGP, you are given the option of retaining your existing
private and public keyrings, so you don’t have to go to the trouble of
importing all of your old keys. To upgrade from a previous version, follow the
appropriate steps listed next.
To upgrade from PGP Version 2.6.2 or 2.7.1
1. Exit all programs or open applications.
2. Make backups of your old PGP keyrings on another volume. In PGP for
Windows versions 2.6.2 and 2.7.1, your public keys are stored in
“pubring.pgp” and your private keys are stored in “secring.pgp”. In
versions 5.x - 6.5, your public keys are stored in “pubring.pkr” and your
private keys are stored in “secring.skr”.

User’s Guide 17
Installing PGP
ÐTIP: Make two separate backups of your keyrings onto two
different floppy disks just to be safe. Be especially careful not to lose
your private keyring; otherwise you will never be able to decrypt
any email messages or file attachments encrypted with the lost keys.
Store the keyrings in a secure place where only you have access to
them.
3. When you have successfully backed up your old keyrings, remove or
archive the (old) PGP software. You have two options here:
• Manually delete the entire old PGP folder and all of its contents; or
• Manually delete the old PGP program and archive the remaining
files, especially the configuration and keyring files.
4. Install PGP version 6.5.1 using the provided installer.
5. Restart your computer.
To upgrade from PGP Version 5.x
If you are upgrading from PGP version 4.x or 5.x, follow the installation
instructions outlined in “Installing PGP” below.

Installing PGP
18 PGP Freeware
Installing PGP
You can install the PGP Freeware software from a CD-ROM or from
downloaded files. The self-extracting file, Setup.exe, automatically extracts
and steps you through the installation.After you install the software, you can
create your private and public key pair and begin using PGP. Refer to the
PGPWinUsersGuide.pdf file included with the program for instructions on
using PGP.
To install PGP Freeware for Windows systems, carefully follow the steps
outlined below.
To install PGP
1. Exit all programs currently running on your computer, then do one of the
following:
•To install from a CD-ROM, insert it into the CD-ROM drive.
The Setup program automatically starts. If, however, the Setup
program does not initiate, double-click Setup.exe in the PGP folder
on the CD-ROM.
•To install from downloaded files, extract the compressed
installation files onto your computer.
Double-click on Setup.exe to start the installer.
2. The Setup program searches for open programs and prompts you to
close them.
If you have PGP version 4.x - 6.x currently installed, the PGP setup
program prompts you to uninstall the old PGP files. Click Yes to
automatically uninstall the old version. Your keyring files are saved in a
file named Old Keyrings.
You must reboot your computer after uninstalling the files. Once your
computer reboots, the installer continues.
The PGP Installation screen appears.
3. Review the instructions in the PGP Welcome dialog box, then click Next.
The Network Associates license agreement appears.
4. Review the license agreement information, then click Yes to accept the
licensing terms.
User’s Guide 19
Installing PGP
The Whatsnew.txt file appears listing the new features and other
important information regarding PGP version 6.5.1.
5. Review the Whatsnew.txt file, then click Next.
6. Register your product by entering your name and in the User
Information dialog box.
7. Click Next.
8. Click Browse to navigate to a destination directory for your PGP files or
accept the default directory. Click Next to continue.
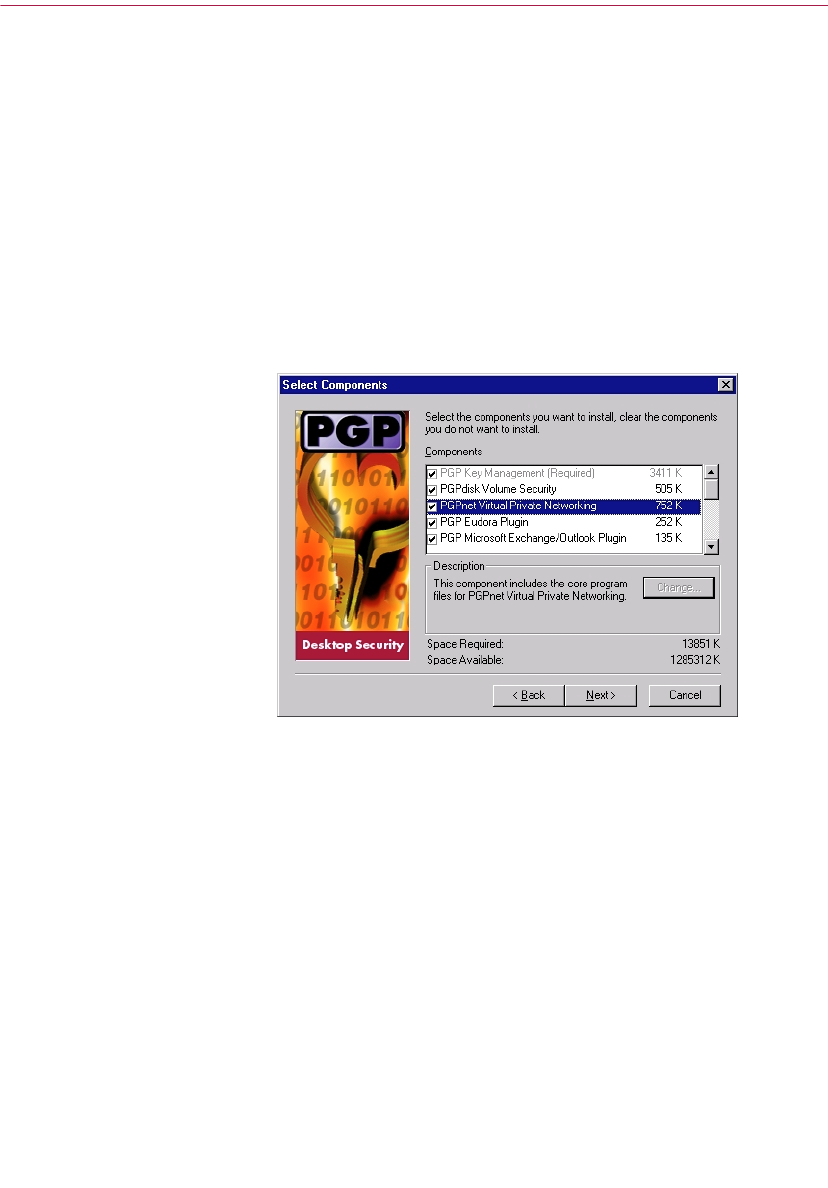
The Select Components dialog box appears, as shown in Figure 1-1.
Figure 1-1. PGP Select Components dialog box
9. Clear the components that you do not want to install. By default, each
option is selected. Your installation options are:
•PGP Key Management (required). This item installs the PGP
program. You must install the Key Management utilities.
•PGPnet. Select this option to install the PGPnet program. PGPnet, a
Virtual Private Network (VPN), is an easy-to-use encryption
application that allows you to communicate securely and
economically with other PGPnet users throughout the world.
•PGP Eudora Plug-in. Select this option if you want to integrate PGP
functionality with your Qualcomm Eudora email program. PGP
version 6.5.1 supports Eudora versions 3.05 and later.

Installing PGP
20 PGP Freeware
•PGP Microsoft Exchange/Outlook Plug-in. Select this option if you
want to integrate PGP functionality with your Microsoft
Exchange/Outlook email program. PGP version 6.5.1 supports
Outlook 97 and 98.
•PGP Microsoft Outlook Express Plug-in. Select this option if you
want to integrate PGP functionality with your Microsoft Outlook
Express email program. PGP version 6.5.1 supports the version that
is included with Internet Explorer versions 4.x.
•PGP User’s Manual (Adobe Acrobat format). Select this option to
install the PGP User’s Guide.
•PGP CommandLine. Select this option if you want to install the
command line version of PGP for Windows NT systems. This is for
use as a client only. Batch server processes require additional licensing.
10. Click Next.
A dialog box appears, alerting you that the installer is ready to copy files.
11. Review the installation settings, then click Next.
The PGP files are copied to the computer.
12. If you have keyrings on your computer from a previous version of PGP,
click Yes to use your existing keyrings.
A browse dialog box appears. Browse to locate your public keyring,
Pubring.pkr, and your private keyring, Secring.skr.
If you do not have keyrings on your computer, click No. When you first
open the PGPkeys application, you are prompted to create a keypair.
13. If you chose to install the PGPnet application, the PGPnet Network
Adapter List appears listing the network adapters found on your system,
as shown in Figure 1-2.
Figure 1-2. PGPnet Network Adapter List

User’s Guide 21
Installing PGP
If you want to communicate securely over a modem, select your WAN
adapter (for example, Remote Access WAN Wrapper or dialup adapter).
If you want to communicate securely over an Ethernet connection, select
your LAN adapter (for example, 3COM Megahertz LAN PC Card).
When you have made your selection, click OK.
NOTE: On Windows 98 computers, WAN is listed as “Dialup
Adapter” instead of “Remote WAN Wrapper.”
The installation program binds the PGPnet driver to the adapter you
selected and configures your computer to use the PGPnet application.
14. If you want to restart your computer automatically, select Yes, I want to
restart my computer now.
15. Click Finish to complete the PGP installation and reboot your computer.
NOTE: You must reboot your computer if you install PGPnet.
That’s it! PGP is installed on your computer.

Installing PGP
22 PGP Freeware

2
User’s Guide 23
2Using PGP
PGP is based on a widely accepted encryption technology known as public key
cryptography in which two complementary keys, called a key pair, are used to
maintain secure communications. One of the keys is designated as a private key
to which only you have access and the other is a public key which you freely
exchange with other PGP users. Both your private and your public keys are
stored in keyring files, which are accessible from the PGPkeys window. It is
from this window that you perform all your key management functions.
This section takes a quick look at the procedures you normally follow in the
course of using PGP. For details concerning any of these procedures, refer to
the appropriate chapters in this book. For a comprehensive overview of PGP
encryption technology, refer to “An Introduction to Cryptography,” which is
included with the product.
Basic steps for using PGP
1. Install PGP on your computer. Refer to Chapter 1, “Installing PGP” for
complete installation instructions.
2. Create a private and public key pair.
Before you can begin using PGP, you need to generate a key pair. A PGP
key pair is composed of a private key to which only you have access and a
public key that you can copy and make freely available to everyone with
whom you exchange information.
You have the option of creating a new key pair immediately after you have
finished the PGP installation procedure, or you can do so at any time by
opening the PGPkeys application.
For more information about creating a private and public key pair, refer to
“Making a key pair” on page 36.
3. Exchange public keys with others.
After you have created a key pair, you can begin corresponding with other
PGP users. You will need a copy of their public key and they will need
yours. Your public key is just a block of text, so it’s quite easy to trade keys
with someone. You can include your public key in an email message, copy
it to a file, or post it on a public or corporate key server where anyone can
get a copy when they need it.

Using PGP
24 PGP Freeware
For more information about exchanging public keys, refer to “Distributing
your public key” on page 60 and “Obtaining the public keys of others” on
page 64.
4. Validate public keys.
Once you have a copy of someone’s public key, you can add it to your
public keyring. You should then check to make sure that the key has not
been tampered with and that it really belongs to the purported owner. You
do this by comparing the unique fingerprint on your copy of someone’s
public key to the fingerprint on that person’s original key. When you are
sure that you have a valid public key, you sign it to indicate that you feel
the key is safe to use. In addition, you can grant the owner of the key a level
of trust indicating how much confidence you have in that person to vouch
for the authenticity of someone else’s public key.
For more information about validating your keys, refer to “Verifying the
authenticity of a key” on page 68.
5. Encrypt and sign your email and files.
After you have generated your key pair and have exchanged public keys,
you can begin encrypting and signing email messages and files.
PGP works on the data generated by other applications. Therefore the
appropriate PGP functions are designed to be immediately available to you
based on the task you are performing at any given moment. There are
several ways to encrypt and sign with PGP:
•From the System tray (PGPtray). PGPtray includes utilities to
perform cryptographic tasks on data on the Clipboard or in the
current window. See “Using PGPtray” on page 29.
•From within supported email applications (PGP email plug-ins).
The plug-ins enable you to secure your email from within the
supported email application. See “Using PGP within supported
email applications” on page 32.
•From PGPtools. PGPtools enables you to perform cryptographic
tasks within applications not supported by plug-ins, plus other
security tasks, such as wiping files from your disk. See “Using
PGPtools” on page 31.
•From the Windows Explorer File menu. You can encrypt and sign
or decrypt and verify files such as word processing documents,
spreadsheets and video clips directly from the Windows Explorer.
See “Using PGP from Windows Explorer” on page 31.

User’s Guide 25
Using PGP
For more information about encrypting email, refer to “Encrypting and
signing email” on page 71. For more information about decrypting files,
refer to “Using PGP to encrypt and decrypt files” on page 83.
6. Decrypt and verify your email and files.
When someone sends you encrypted data, you can unscramble the
contents and verify any appended signature to make sure that the data
originated with the alleged sender and that it has not been altered.
• If you are using an email application that is supported by the
plug-ins, you can decrypt and verify your messages by selecting the
appropriate options from your application’s tool bar.
• If your email application is not supported by the plug-ins, you can
copy the message to the clipboard and perform the appropriate
functions from there. If you want to decrypt and verify files, you can
do so from the Clipboard, Windows Explorer, or by using PGPtools.
You can also decrypt encrypted files stored on your computer, and
verify signed files to ensure that they have not been tampered with.
For more information about securing email, refer to “Decrypting and
verifying email” on page 79. For more information about securing files,
refer to “Using PGP to encrypt and decrypt files” on page 83.
7. Wipe files.
When you need to permanently delete a file, you can use the Wipe feature
to ensure that the file is unrecoverable. The file is immediately overwritten
so that it cannot be retrieved using disk recovery software.
For more information about wiping files, refer to “Using PGP Wipe to
delete files” on page 93.
Using PGP
26 PGP Freeware
Using PGPkeys
When you choose PGPkeys from PGPtray, the PGPkeys window opens
(Figure 2-1) showing the private and public key pairs you have created for
yourself as well as any public keys of other users that you have added to your
public keyring.
Figure 2-1. PGPkeys
(If you have not already created a new key pair, the PGP Key Generation
Wizard leads you through the necessary steps. However, before going
through the process of creating a new key pair, you should see Chapter 3,
“Making and Exchanging Keys,” for complete details about the various
options.)
From the PGPkeys window you can create new key pairs and manage all of
your other keys. For instance, this is where you examine the attributes
associated with a particular key, specify how confident you are that the key
actually belongs to the alleged owner, and indicate how well you trust the
owner of the key to vouch for the authenticity of other users’ keys. For a
complete explanation of the key management functions you perform from the
PGPkeys window, see Chapter 6.
User’s Guide 27
Using PGP
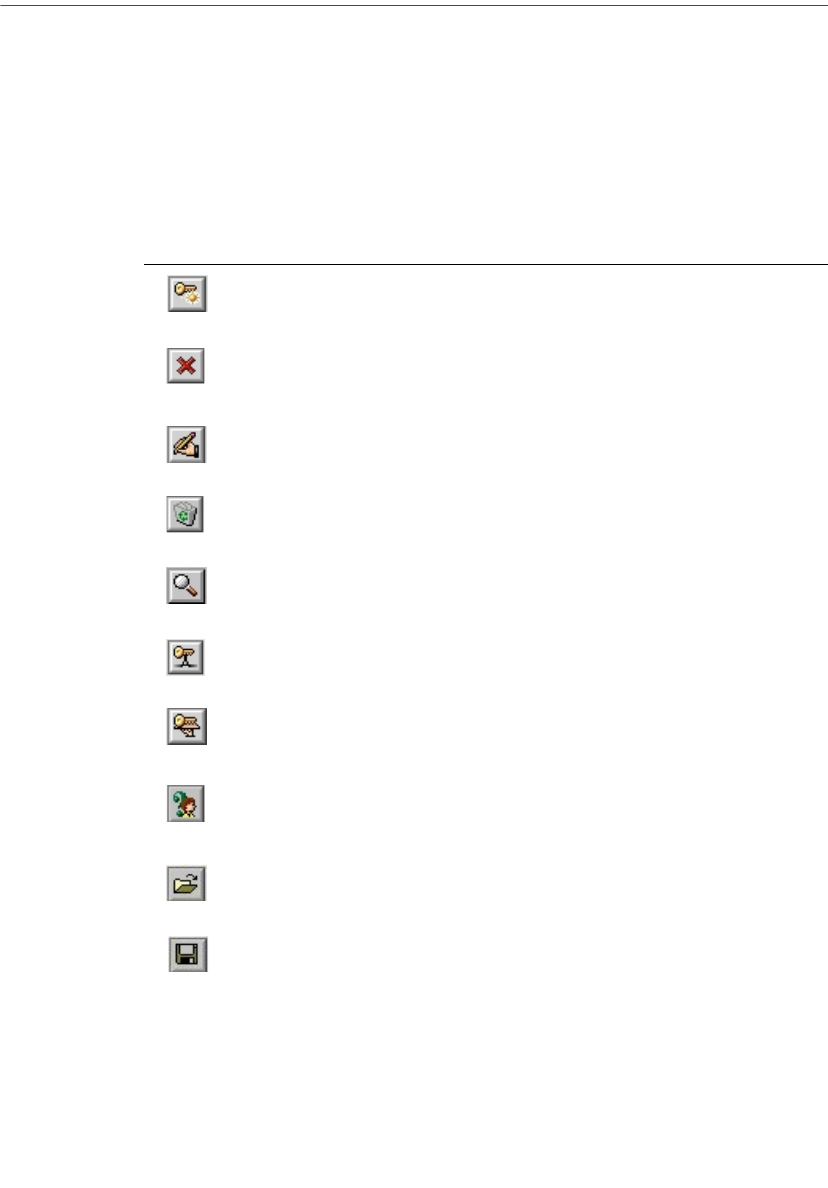
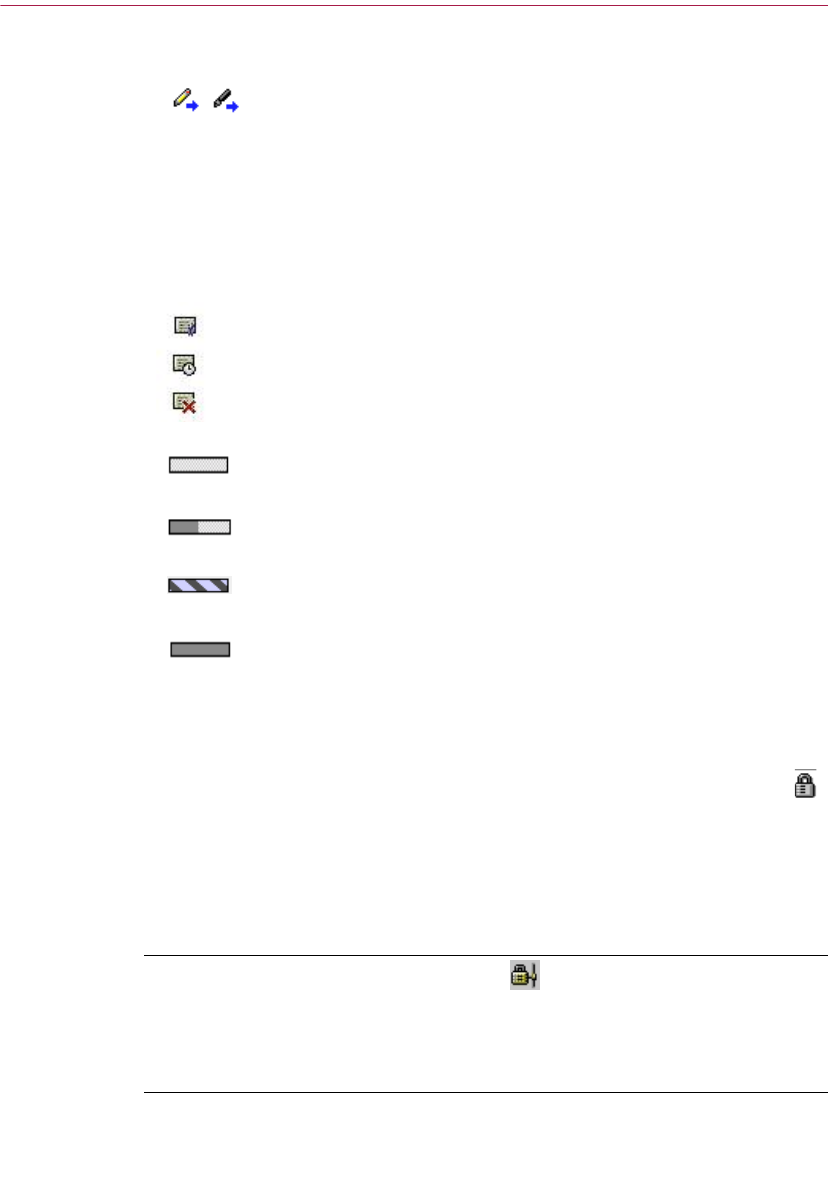
PGPkeys icon definitions
PGPkeys menu bar icons
The following table shows all of the icons used in the PGPkeys menu bar,
along with a description of their functions.
Table 2-1. PGPkeys menu bar icons
Icon Function
Launches the Key Generation Wizard. Click this button to create a
new key pair.
Revokes the currently selected key or signature. Click this button to
disable a key or revoke a signature. Revoking a key will prevent
anyone from encrypting data to it.
Allows you to sign the currently selected key. By signing the key, you
are certifying that the key and user ID belong to the identified user.
Deletes the currently selected item. Click this button to remove a
key, signature, or photographic ID.
Opens the Key Search window which allows you to search for keys
on local keyrings and remote servers.
Sends the currently selected key to the server. Click this button to
upload your key to the Certificate or domain server.
Updates the currently selected key from a Certificate or domain
server. Click this button to import keys from a Certificate or domain
server to your keyring.
Displays the Properties dialog box for the currently selected key.
Click this button to view the General and Subkey properties for a
key.
Allows you to import keys from file on to your keyring.
Allows you to export the selected key to a file.
Using PGP
28 PGP Freeware
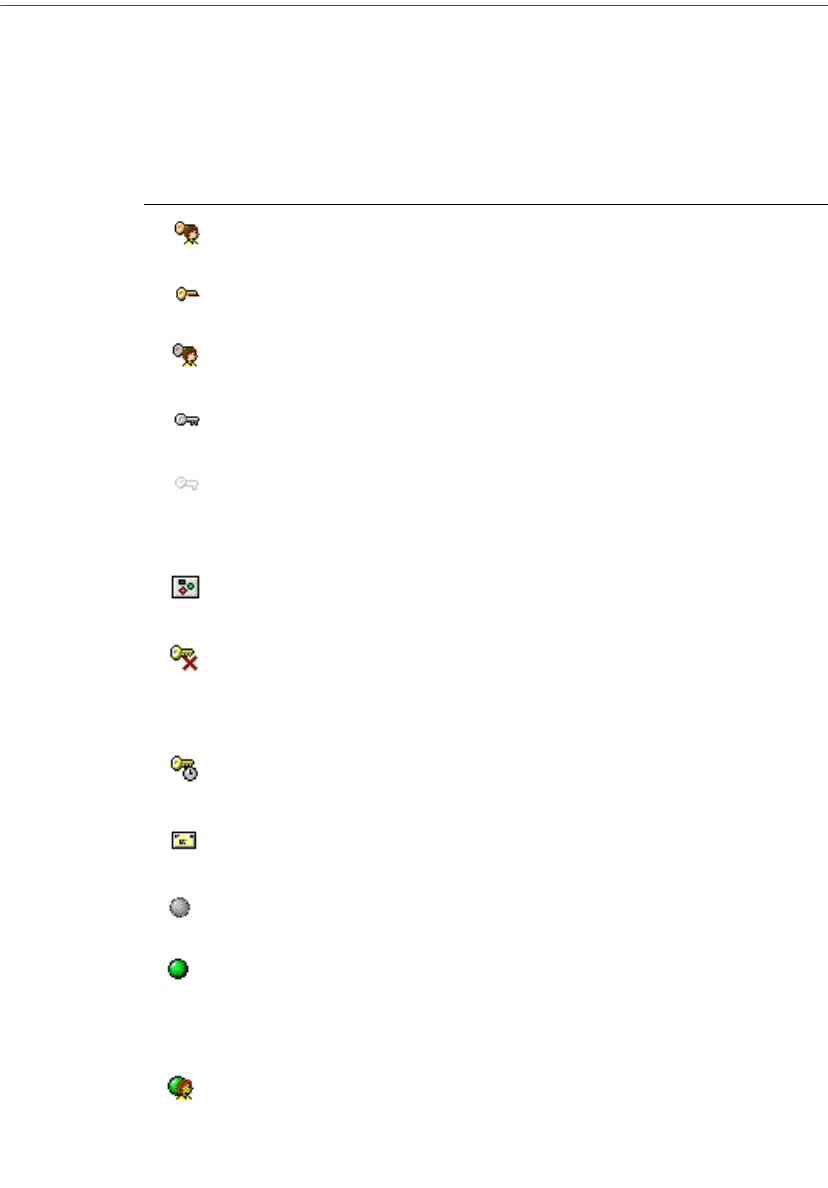
PGPkeys window icons
The following table shows all of the mini-icons used in the PGPkeys window,
along with a description of what they represent.
Table 2-2. PGPkeys window icons
Icon Description
A gold key and user represents your Diffie-Hellman/DSS key pair,
which consists of your private key and your public key.
A single gold key represents a Diffie-Hellman/DSS public key.
A gray key and user represents your RSA key pair, which consists of
your private key and your public key.
A single gray key represents an RSA public key.
When a key or key pair is dimmed, the keys are temporarily
unavailable for encrypting and signing. You can disable a key from
the PGPkeys window, which prevents seldom-used keys from
cluttering up the Key Selection dialog box.
This icon indicates that a photographic user ID accompanies the
public key.
A key with a red X indicates that the key has been revoked. Users
revoke their keys when they are no longer valid or have been
compromised in some way.
A key with a clock indicates that the key has expired. A key’s
expiration date is established when the key is created.
An envelope represents the owner of the key and lists the user
names and email addresses associated with the key.
A gray circle indicates that the key is invalid.
A green circle indicates that they key is valid. An additional red circle
in the ADK column indicates that the key has an associated
Additional Decryption Key; an additional gray circle in the ADK
column indicates that the key does not have an associated Additional
Decryption Key.
A green circle and user indicates that you own the key, and that it is
implicitly trusted.
User’s Guide 29
Using PGP
Using PGPtray
You can access many of the main PGP functions by clicking the lock icon ( )
which is normally located in the System tray, and then choosing the
appropriate menu item. (If you can’t find this icon in your System tray, run
PGPtray from the Start menu.)This feature provides immediate access to the
PGP functions regardless of which application you are using and is especially
useful if you are using an email application that is not supported by the PGP
plug-ins.
NOTE: If you installed PGPnet, this icon will appear in your System
tray instead of the lock icon. The look of the PGPtray icon tells you if
PGPnet is off or not installed (gray lock), installed (yellow lock on a
network), or installed but not working (yellow lock on a network with a
red X).
A pencil or fountain pen indicates the signatures of the PGP users
who have vouched for the authenticity of the key.
- A signature with a red X through it indicates a revoked signature.
- A signature with a dimmed pencil icon indicates a bad or invalid
signature.
- A signature with a blue arrow next to it indicates that it is
exportable.
A certificate represents an X.509 certificate, a recognized electronic
document used to prove identity and public key ownership over a
communication network.
A clock indicates an expired X.509 certificate.
A red X indicates a revoked X.509 certificate.
An empty bar indicates an invalid key or an untrusted user.
A half-filled bar indicates a marginally valid key or marginally trusted
user.
A striped bar indicates a valid key that you own and is implicitly
trusted, regardless of the signatures on the key.
A full bar indicates a completely valid key or a completely trusted
user.
Table 2-2. PGPkeys window icons
Using PGP
30 PGP Freeware
Performing PGP functions from the Clipboard or Current
Window
If you are using an email application that is not supported by the PGP
plug-ins, or if you are working with text generated by some other application,
you can perform your encryption/decryption and signature/verification
functions via the Windows Clipboard or within the current application
window.
Via the Windows Clipboard
For instance, to encrypt or sign text, you copy it from your application to the
Clipboard (CTRL +C), encrypt and sign it using the appropriate PGP functions,
then paste (CTRL +V) it back into your application before sending it to the
intended recipients. When you receive an encrypted or signed email message,
you simply reverse the process and copy the encrypted text, known as
ciphertext from your application to the Clipboard, decrypt and verify the
information, and then view the contents. After you view the decrypted
message, you can decide whether to save the information or retain it in its
encrypted form.
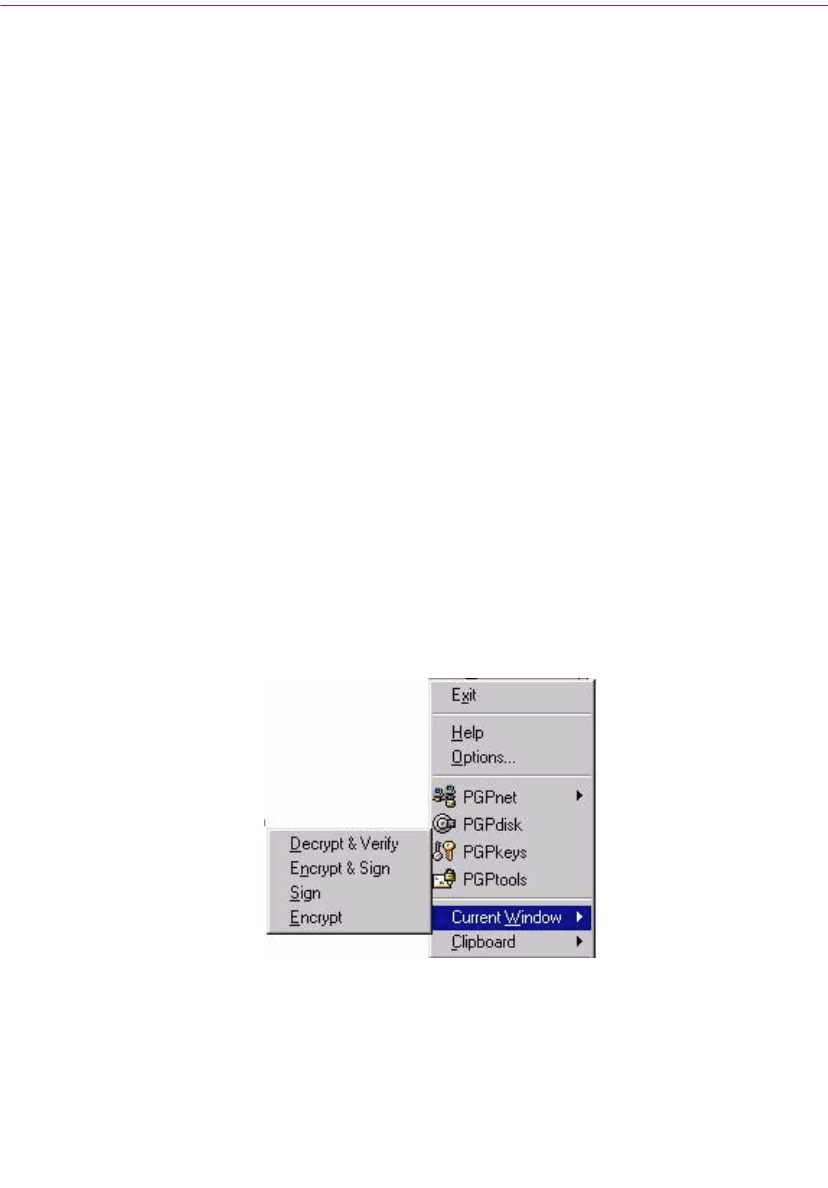
Within the Current Window
You can perform the same cryptographic tasks using the Current Window
menu item, which copies the text in the current window to the Clipboard and
then performs the selected task.
Figure 2-2. PGPtray’s Current Window feature
User’s Guide 31
Using PGP
Using PGP from Windows Explorer
You can encrypt and sign or decrypt and verify files such as word processing
documents, spreadsheets and video clips directly from Windows Explorer. If
you are not using an email application such as Qualcomm Eudora, which
supports the PGP/MIME standard, or an application such as Exchange or
Outlook that doesn’t require PGP to encrypt or sign files, you must use this
method to attach files that you want to send along with your email messages.
You might also want to encrypt and decrypt files that you store on your own
computer to prevent others from accessing them.
To access PGP functions from Windows Explorer, choose the appropriate
option from the PGP submenu of the File menu. The options that appear
depend on the current state of the file you have selected. If the file has not yet
been encrypted or signed, then the options for performing these functions
appear on the menu. If the file is already encrypted or signed, then options for
decrypting and verifying the contents of the file are displayed.
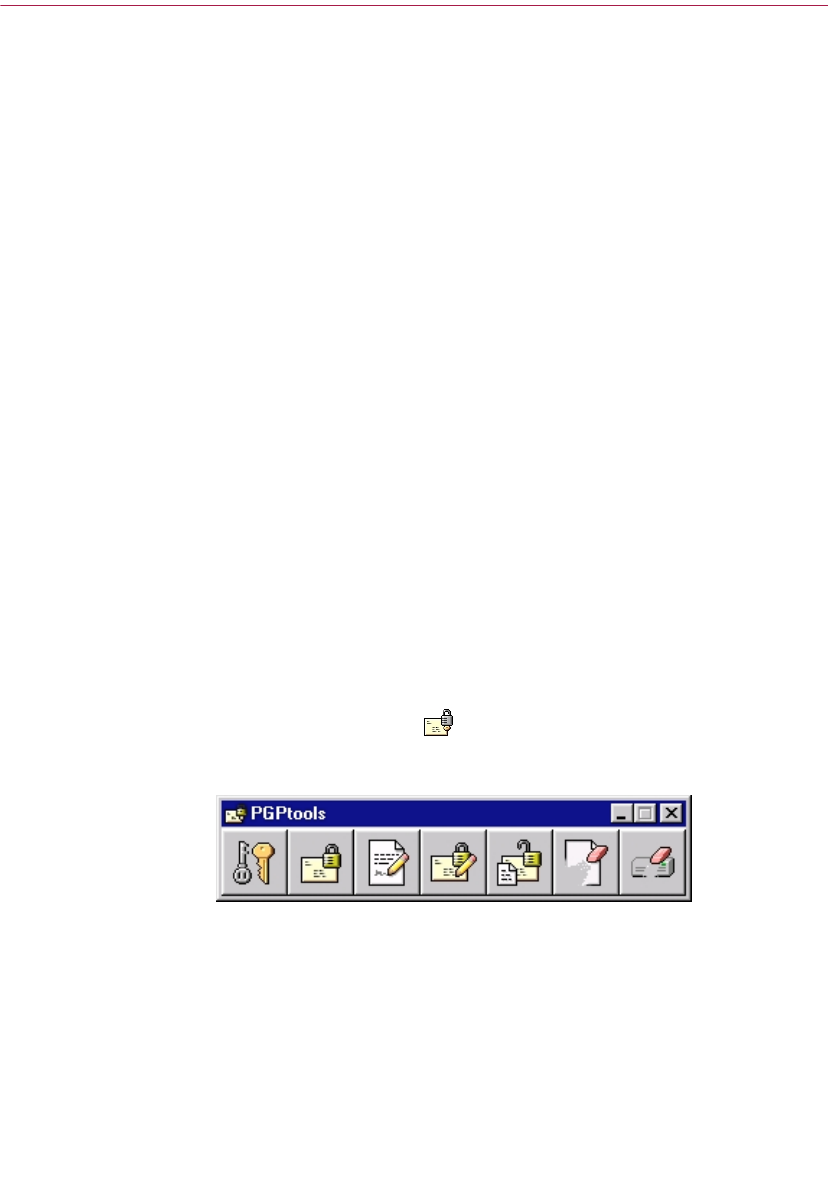
Using PGPtools
If you are using an email application that is not supported by the plug-ins, or
if you want to perform PGP functions from within other applications, you can
encrypt and sign, decrypt and verify, or securely wipe messages and files
directly from PGPtools. You can open PGPtools by:
• Clicking Start-->Programs-->PGP-->PGPtools,
Or
• Clicking the PGPtools icon ( ) on the System tray
When PGPtools (Figure 2-3) opens, you can begin your encryption tasks.
Figure 2-3. PGPtools
If you are working with text or files, you can encrypt, decrypt, sign, and verify
by selecting the text or file and then dragging it onto the appropriate button in
PGPtools.
If you are working with files, click on the appropriate button in PGPtools to
choose a file or select the Clipboard.

Using PGP
32 PGP Freeware
When you decrypt a file, a Save As dialog box appears and PGP creates a new
plaintext file with a .txt suffix; the decrypted file has a .txt.pgp suffix.
Using PGP within supported email applications
One of the most convenient ways to use PGP is through one of the popular
email applications supported by the PGP plug-ins. With these plug-ins, you
can encrypt and sign if your version of PGP supports the PGP email plug-ins,
as well as decrypt and verify your messages while you are composing and
reading your mail with a simple click of a button.
If you are using an email application that is not supported by the plug-ins, you
can easily encrypt the text of the message using PGPtray. In addition, if you
need to encrypt or decrypt files, you can do so directly from the Windows
Clipboard or by choosing the appropriate PGP menu option in Windows
Explorer. You can also use PGP to encrypt and sign files on the hard disk of
your computer for secure storage, to securely wipe files from your hard disk
and to wipe free disk space so that sensitive data can’t be retrieved with disk
recovery software.
If you have one of these popular email application supported by the PGP
plug-ins, you can access the necessary PGP functions by clicking the
appropriate buttons in your application’s toolbar:
• Qualcomm Eudora
• Microsoft Exchange
•Microsoft Outlook
• Microsoft Outlook Express
• Lotus Notes (available separately)
• Novell Groupwise (available separately)
For example, you click the envelope and lock icon ( ) to indicate that you
want to encrypt your message and the pen and paper ( ) to indicate that you
want to sign your message. Some applications also have an icon of both a lock
and quill, which lets you do both at once.
When you receive email from another PGP user, you decrypt the message and
verify the person’s digital signature by clicking the opened lock and envelope,
or by selecting Decrypt/Verify ( ) from PGPtools.
You can also access the PGPkeys window at any time while composing or
retrieving your mail by clicking the PGPkeys button ( ) in some plug-ins.

User’s Guide 33
Using PGP
Using PGP/MIME
If you are using an email application with one of the plug-ins that supports the
PGP/MIME standard, and you are communicating with another user whose
email application also supports this standard, both of you can automatically
encrypt and decrypt your email messages and any attached files when you
send or retrieve your email. All you have to do is turn on the PGP/MIME
encryption and signing functions from the PGP Options dialog box.
When you receive email from someone who uses the PGP/MIME feature, the
mail arrives with an attached icon in the message window indicating that it is
PGP/MIME encoded.
To decrypt the text and file attachments in PGP/MIME encapsulated email
and to verify any digital signatures, you simply double-click the lock and quill
( ) icon. Attachments are still encrypted if PGP/MIME is not used, but the
decryption process is usually more involved for the recipient.
Selecting recipients for encrypted files or email
When you send email to someone whose email application is supported by the
PGP plug-ins, the recipient’s email address determines which keys to use
when encrypting the contents. However, if you enter a user name or email
address that does not correspond to any of the keys on your public keyring, or
if you are encrypting from PGPtray or from PGPtools, you must manually
select the recipient’s public key from the PGP Key Selection dialog box.
To select a recipient’s public key, drag the icon representing the key into the
Recipients list box and then click OK.
For complete instructions on how to encrypt, sign, decrypt, and verify email,
see Chapter 4, “Sending and Receiving Secure Email.” For complete
instructions on how to encrypt files to store on your hard disk or to send as
attachments, see Chapter 5, “Using PGP for Secure File Storage.”
Taking shortcuts
Although you will find that PGP is quite easy to use, a number of shortcuts are
available to help you accomplish your encryption tasks even quicker. For
example, you while you are managing your keys in the PGPkeys window, you
can press the right mouse button to perform all the necessary PGP functions
rather than accessing them from the menu bar. You can also drag a file
containing a key into the PGPkeys window to add it to your keyring.
Keyboard shortcuts are also available for most menu operations. These
keyboard shortcuts are shown on all the PGP menus, and other shortcuts are
described in context throughout this manual.

Using PGP
34 PGP Freeware
Getting Help
When you choose Help from PGPtray or from the Help menu within
PGPkeys, you access the PGP Help system, which provides a general
overview and instructions for all of the procedures you are likely to perform.
Many of the dialog boxes also have context-sensitive help, which you access
by clicking the question mark in the right corner of the window and then
pointing to the area of interest on the screen. A short explanation appears.
3
User’s Guide 35
3Making and Exchanging
Keys
This chapter describes how to generate the public and private key pairs that
you need to correspond with other PGP users. It also explains how to
distribute your public key and obtain the public keys of others so that you can
begin exchanging private and authenticated email.
Key concepts
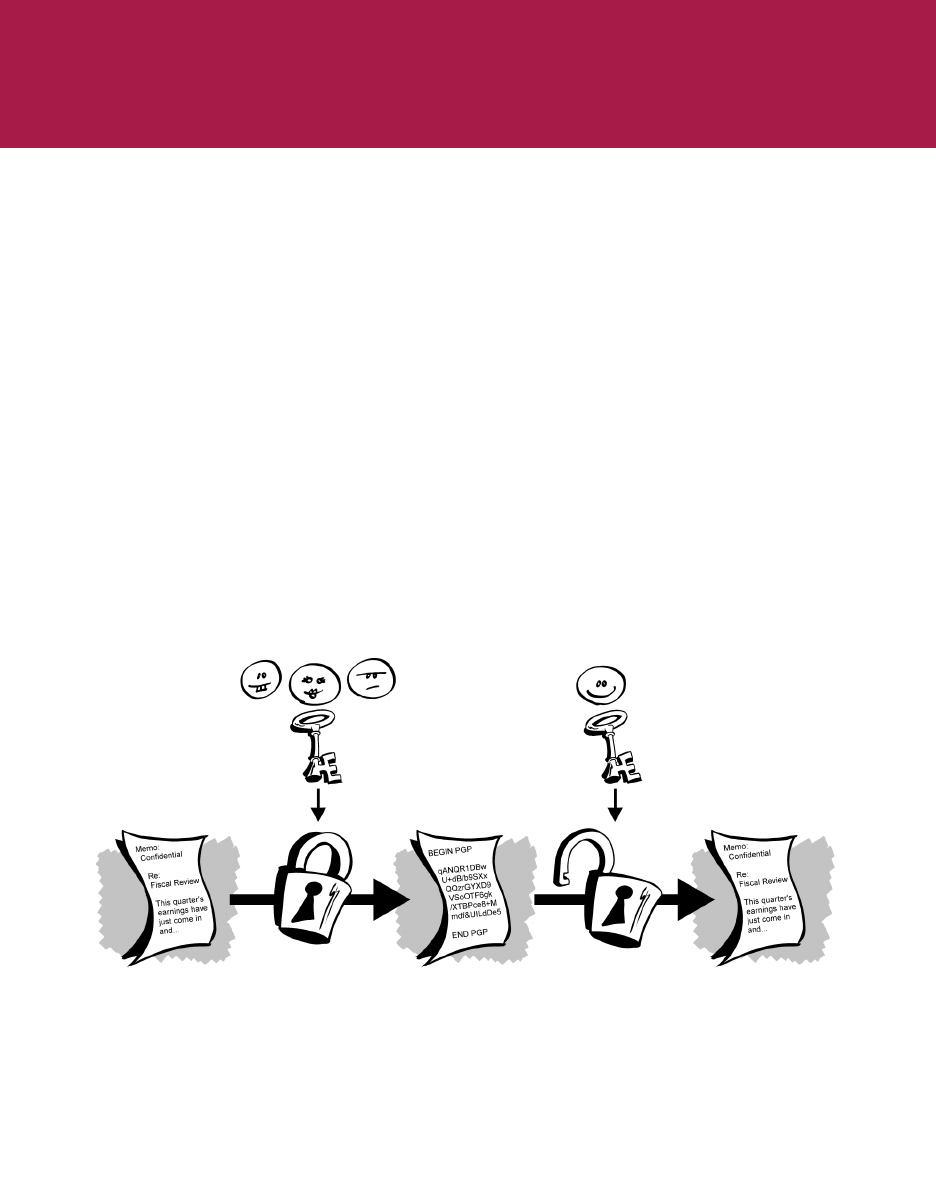
PGP is based on a widely accepted and highly trusted public key encryption
system, as shown in Figure 3-1, by which you and other PGP users generate a
key pair consisting of a private key and a public key. As its name implies, only
you have access to your private key, but in order to correspond with other PGP
users you need a copy of their public key and they need a copy of yours. You
use your private key to sign the email messages and file attachments you send
to others and to decrypt the messages and files they send to you. Conversely,
you use the public keys of others to send them encrypted email and to verify
their digital signatures.
Figure 3-1. Public Key Cryptography diagram
public key private key
plaintext ciphertext plaintext
decryptionencryption
Making and Exchanging Keys
36 PGP Freeware
Making a key pair
Unless you have already done so while using another version of PGP, the first
thing you need to do before sending or receiving encrypted and signed email
is create a new key pair. A key pair consists of two keys: a private key that only
you possess and a public key that you freely distribute to those with whom
you correspond. You generate a new key pair from PGPkeys using the PGP
Key Generation Wizard, which guides you through the process.
NOTE: If you are upgrading from an earlier version of PGP, you have
probably already generated a private key and have distributed its
matching public key to those with whom you correspond. In this case
you don’t have to make a new key pair (as described in the next section).
Instead, you specify the location of your keys when you run the PGPkeys
application. You can go to the Files panel of the Options dialog box and
locate your keyring files at any time.
To create a new key pair
1. Open PGPkeys.
You can open PGPkeys by:
• clicking Start-->Programs-->PGP-->PGPkeys
• clicking the PGPtray icon ( ) in the System tray, then clicking
PGPkeys
Or
• clicking in your email application’s toolbar
PGPkeys appears, as shown in Figure 3-2.
Figure 3-2. PGPkeys
2. Click in the PGPkeys menu bar.
The PGP Key Generation Wizard provides some introductory
information on the first screen.
3. When you are finished reading this information, click Next to advance to
the next pane.
The PGP Key Generation Wizard asks you to enter your name and email
address.

User’s Guide 37
Making and Exchanging Keys
4. Enter your name on the first line and your email address on the second
line.
It’s not absolutely necessary to enter your real name or even your email
address. However, using your real name makes it easier for others to
identify you as the owner of your public key. Also, by using your correct
email address, you and others can take advantage of the plug-in feature
that automatically looks up the appropriate key on your current keyring
when you address mail to a particular recipient.
5. Click Next to advance to the next dialog box.
The Key Generation Wizard asks you to select a key type.
6. Select a key type, either Diffie-Hellman/DSS or RSA and then click Next.
NOTE: If your version of PGP does not support RSA, this step may
not be available to you. For more information about RSA support,
see the WhatsNew file that accompanies the product.
Earlier versions of PGP use an older technology referred to as RSA to
generate keys. With PGP Version 5.0 and above, you have the option of
creating a new type of key based on the improved Elgamal variant of
Diffie-Hellman technology.
• If you plan to correspond with people who are still using RSA keys,
you might want to generate an RSA key pair that is compatible with
older versions of the program.
• If you plan to correspond with people who have PGP Version 5.0 or
later, you can take advantage of the new technology and generate a
pair of Diffie-Hellman/DSS keys.
• If you want to exchange email with all PGP users, make an RSA key
pair and a Diffie-Hellman/DSS key pair, then use the appropriate
pair depending on the version of PGP used by the recipient. You
must create a separate key pair for each type of key that you need.
7. The PGP Key Generation Wizard asks you to specify a size for your new
keys.
Select a key size from 1024 to 3072 bits, or enter a custom key size from
1024 to 4096 bits.
NOTE: A custom key size may take a long time to generate,
depending on the speed of the computer you are using.

Making and Exchanging Keys
38 PGP Freeware
The key size corresponds to the number of bits used to construct your
digital key. The larger the key, the less chance that someone will be able
to crack it, but the longer it takes to perform the decryption and
encryption process. You need to strike a balance between the
convenience of performing PGP functions quickly with a smaller key and
the increased level of security provided by a larger key. Unless you are
exchanging extremely sensitive information that is of enough interest
that someone would be willing to mount an expensive and
time-consuming cryptographic attack in order to read it, you are safe
using a key composed of 1024 bits.
NOTE: When creating a Diffie-Hellman/DSS key pair, the size of
the DSS portion of the key is less than or equal to the size of the
Diffie-Hellman portion of the key, and is limited to a maximum size
of 1024 bits.
8. Click Next to advance to the next pane.
The PGP Key Generation Wizard asks you to indicate when the key pair
will expire.
9. Indicate when you want your keys to expire. You can either use the
default selection, which is Never, or you can enter a specific date after
which the keys will expire.
Once you create a key pair and have distributed your public key to the
world, you will probably continue to use the same keys from that point
on. However, under certain conditions you may want to create a special
key pair that you plan to use for only a limited period of time. In this case,
when the public key expires, it can no longer be used by someone to
encrypt mail for you but it can still be used to verify your digital
signature. Similarly, when your private key expires, it can still be used to
decrypt mail that was sent to you before your public key expired but can
no longer be used to sign mail for others.
10. Click Next to advance to the next pane.
The PGP Key Generation Wizard asks you to enter a passphrase.
11. In the Passphrase dialog box, enter the string of characters or words you
want to use to maintain exclusive access to your private key. To confirm
your entry, press the TAB key to advance to the next line, then enter the
same passphrase again.
Normally, as an added level of security, the characters you enter for the
passphrase do not appear on the screen. However, if you are sure that no
one is watching, and you would like to see the characters of your
passphrase as you type, clear the Hide Typing checkbox.

User’s Guide 39
Making and Exchanging Keys
NOTE: Your passphrase should contain multiple words and may
include spaces, numbers, and punctuation characters. Choose
something that you can remember easily but that others won’t be
able to guess. The passphrase is case sensitive, meaning that it
distinguishes between uppercase and lowercase letters. The longer
your passphrase, and the greater the variety of characters it
contains, the more secure it is. Strong passphrases include upper
and lowercase letters, numbers, punctuation, and spaces but are
more likely forgotten. See “Creating a passphrase that you will
remember” on page 40, for more information about choosing a
passphrase.
+WARNING: No one, including Network Associates, can recover a
forgotten passphrase.
12. Click Next to begin the key generation process.
The PGP Key Generation Wizard indicates that it is busy generating your
key.
If you have entered an inadequate passphrase, a warning message
appears before the keys are generated and you have the choice of
accepting the bad passphrase or entering a more secure one before
continuing. For more information about passphrases, see “Creating a
passphrase that you will remember” on page 40.
If there is not enough random information upon which to build the key,
the PGP Random Data dialog box appears. As instructed in the dialog
box, move your mouse around and enter a series of random keystrokes
until the progress bar is completely filled in. Your mouse movements
and keystrokes generate random information that is needed to create a
unique key pair.
NOTE: PGPkeys continually gathers random data from many
sources on the system, including mouse positions, timings, and
keystrokes. If the Random Data dialog box does not appear, it
indicates that PGP has already collected all the random data that it
needs to create the key pair.
After the key generation process begins, it may take a while to generate
the keys. In fact, if you specify a size other than the default values for a
Diffie-Hellman/DSS key, the fast key generation option is not used and
it may take hours to generate your key at larger sizes. Eventually the PGP
Key Generation Wizard indicates that the key generation process is
complete.

Making and Exchanging Keys
40 PGP Freeware
13. Click Next to advance to the next pane.
The PGP Key Generation Wizard indicates that you have successfully
generated a new key pair and asks if you want to send your public key
to a certificate server.
14. Specify whether you want your new public key to be sent to the server,
and then click Next (the default server is specified in the Server Options
dialog box).
When you send your public key to the certificate server, anyone who has
access to that certificate server can get a copy of your key when they need
it. For complete details, see “Distributing your public key” on page 60.
When the key generation process is complete, the final panel appears.
15. Click Finish.
A key pair representing your newly created keys appears in the PGPkeys
window. At this point you can examine your keys by checking their
properties and the attributes associated with the keys; you may also want
to add other email addresses that belong to you. See “Adding and
removing information in your key pair” on page 42, for details about
modifying the information in your keypair.
Creating a passphrase that you will remember
Encrypting a file and then finding yourself unable to decrypt it is a painful
lesson in learning how to choose a passphrase you will remember. Most
applications require a password between three and eight letters. A single word
password is vulnerable to a dictionary attack, which consists of having a
computer try all the words in the dictionary until it finds your password. To
protect against this manner of attack, it is widely recommended that you
create a word that includes a combination of upper and lowercase alphabetic
letters, numbers, punctuation marks, and spaces. This results in a stronger
password, but an obscure one that you are unlikely to remember easily. We do
not recommend that you use a single-word passphrase.
A passphrase is less vulnerable to a dictionary attack. This is accomplished
easily by using multiple words in your passphrase, rather than trying to
thwart a dictionary attack by arbitrarily inserting a lot of funny non-alphabetic
characters, which has the effect of making your passphrase too easy to forget
and could lead to a disastrous loss of information because you can’t decrypt
your own files. However, unless the passphrase you choose is something that
is easily committed to long-term memory, you are unlikely to remember it
verbatim. Picking a phrase on the spur of the moment is likely to result in
forgetting it entirely. Choose something that is already residing in your

User’s Guide 41
Making and Exchanging Keys
long-term memory. Perhaps a silly saying you heard years ago that has
somehow stuck in your mind all this time. It should not be something that you
have repeated to others recently, nor a famous quotation, because you want it
to be hard for a sophisticated attacker to guess. If it’s already deeply
embedded in your long-term memory, you probably won’t forget it.
Of course, if you are reckless enough to write your passphrase down and tape
it to your monitor or to the inside of your desk drawer, it won't matter what
you choose.
Backing up your keys
Once you have generated a key pair, it is wise to put a copy of it in a safe place
in case something happens to the original. PGP prompts you to save a backup
copy when you close the PGPkeys application after creating a new key pair.
Your private keys and your public keys are stored in separate keyring files,
which you can copy just like any other files to another location on your hard
drive or to a floppy disk. By default, the private keyring (secring.skr) and the
public keyring (pubring.pkr) are stored along with the other program files in
the “PGP Keyrings” folder in your PGP folder, but you can save your backups
in any location you like.
PGP periodically prompts you to backup your keys. When you specify that
you want to save a backup copy of your keys, the Save As dialog box appears,
asking you to specify the location of the backup private and public keyring
files that are to be created.
Protecting your keys
Besides making backup copies of your keys, you should be especially careful
about where you store your private key. Even though your private key is
protected by a passphrase that only you should know, it is possible that
someone could discover your passphrase and then use your private key to
decipher your email or forge your digital signature. For instance, somebody
could look over your shoulder and watch the keystrokes you enter or intercept
them on the network or even over the airwaves.

Making and Exchanging Keys
42 PGP Freeware
To prevent anyone who might happen to intercept your passphrase from
being able to use your private key, you should store your private key only on
your own computer. If your computer is attached to a network, you should
also make sure that your files are not automatically included in a system-wide
backup where others might gain access to your private key. Given the ease
with which computers are accessible over networks, if you are working with
extremely sensitive information, you may want to keep your private key on a
floppy disk, which you can insert like an old-fashioned key whenever you
want to read or sign private information.
As another security precaution, consider assigning a different name to your
private keyring file and then storing it somewhere other than in the default
PGP folder where it will not be so easy to locate. Use the Files panel of the
PGPkeys Options dialog box to specify a name and location for your private
and public keyring files.
Adding and removing information in your key pair
At any time you can add, change, or remove these items in your key pair:
• a photographic ID
• additional subkeys
• a user name and address
• designated revokers
• an X.509 certificate
• your passphrase
Adding a photographic ID to your key
You can include a photographic user ID with your Diffie-Hellman/DSS key.
+WARNING: Although you can view the photographic ID accompanied
with someone’s key for verification, you should always check and
compare the digital fingerprints. See “Verifying someone’s public key”
on page 108 for more information about authentication.
To add your photograph to your key
1. Open PGPkeys.
2. Select your key pair and then click Add Photo on the Keys menu.
User’s Guide 43
Making and Exchanging Keys
The Add Photo dialog box opens, as shown in Figure 3-3.
Figure 3-3. Add Photo dialog box
3. Drag or paste your photograph onto the Add Photo dialog box or browse
to it by clicking Select File.
NOTE: The photograph must be a.JPG or.BMP file. For maximum
picture quality, crop the picture to 120x144 pixels before adding it to
the Add Photo dialog box. If you do not do this, PGP will scale the
picture for you.
4. Click OK.
The Passphrase dialog box opens, as shown in Figure 3-4.
Figure 3-4. Passphrase dialog box
5. Enter your passphrase in the space provided, then click OK.
Your photographic user ID is added to your public key and is listed in the
PGPkeys window. You can now send your key to the server. See “To
send your public key to a certificate server” on page 61, for additional
instructions.

Making and Exchanging Keys
44 PGP Freeware
To replace your photographic ID
1. Open PGPkeys.
2. Select your key.
3. Select the photograph that you want to replace.
4. Choose Delete from the Edit menu.
5. Add your new photographic ID using the instructions outlined in “To
add your photograph to your key” on page 42.
Creating new subkeys
Every Diffie-Hellman/DSS key is actually two keys: a DSS signing key and a
Diffie-Hellman encryption subkey. PGP Version 6.5 provides the ability to
create and revoke new encryption keys without sacrificing your master
signing key and the signatures collected on it. One of the most common uses
for this feature is to create multiple subkeys that are set to be used during
different periods of the key's lifetime. For example, if you create a key that will
expire in three years, you might also create 3 subkeys and use each of them for
one of the years in the lifetime of the key. This can be a useful security measure
and provides an automatic way to periodically switch to a new encryption key
without having to recreate and distribute a new public key.
To create new subkeys
1. Open PGPkeys.
2. Select your key pair and then click Properties on the Keys menu, or
click .
The Properties dialog box opens.
3. Click the Subkeys tab.
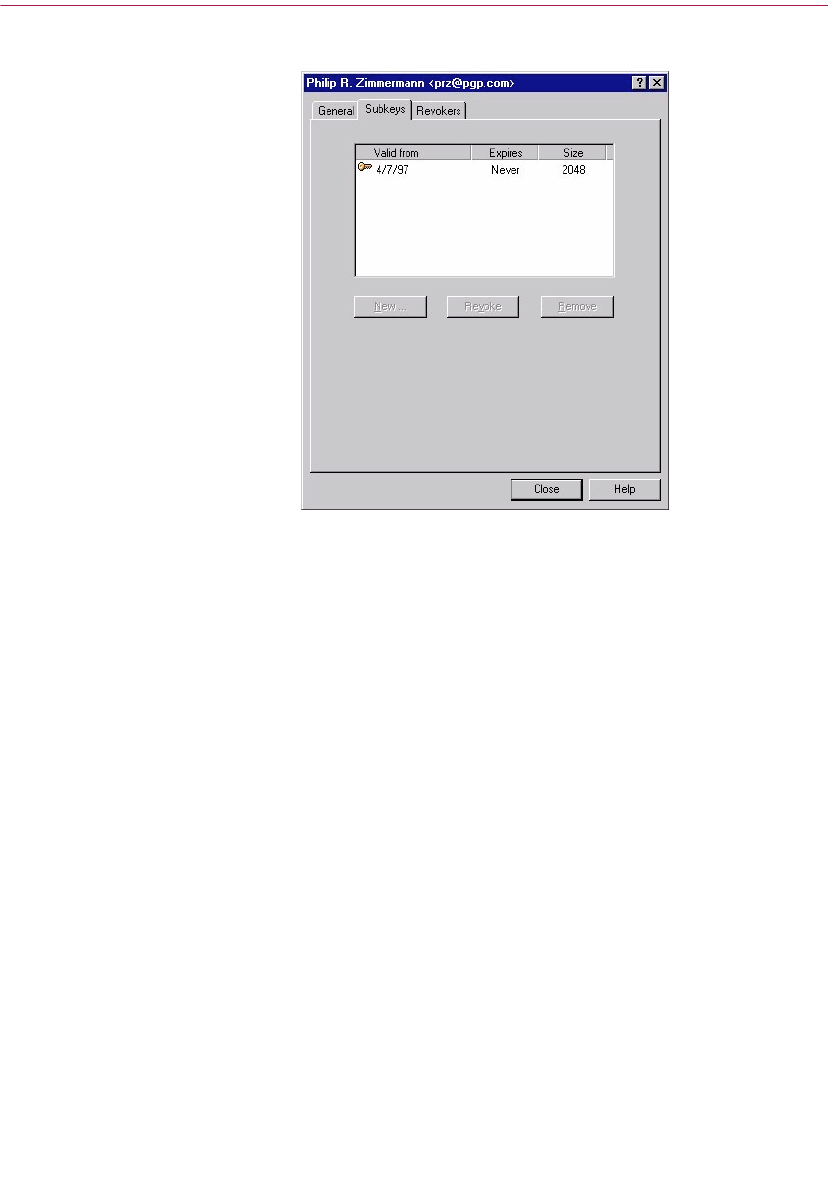
User’s Guide 45
Making and Exchanging Keys
The Subkeys dialog box opens, as shown in Figure 3-5.
Figure 3-5. PGP key property page
(Subkeys dialog box)
4. To create a new subkey, click New.
The New Subkey dialog box opens.
5. Enter a key size from 1024 to 3072 bits, or enter a custom key size from
1024 to 4096 bits.
6. Indicate the start date on which you want your subkey to activate.
7. Indicate when you want your subkey to expire. You can either use the
default selection, which is Never, or you can enter a specific date after
which the subkey will expire.
8. Click OK.
The Passphrase dialog box appears.
9. Enter your passphrase and then click OK.
Your new subkey is listed in the Subkey window.
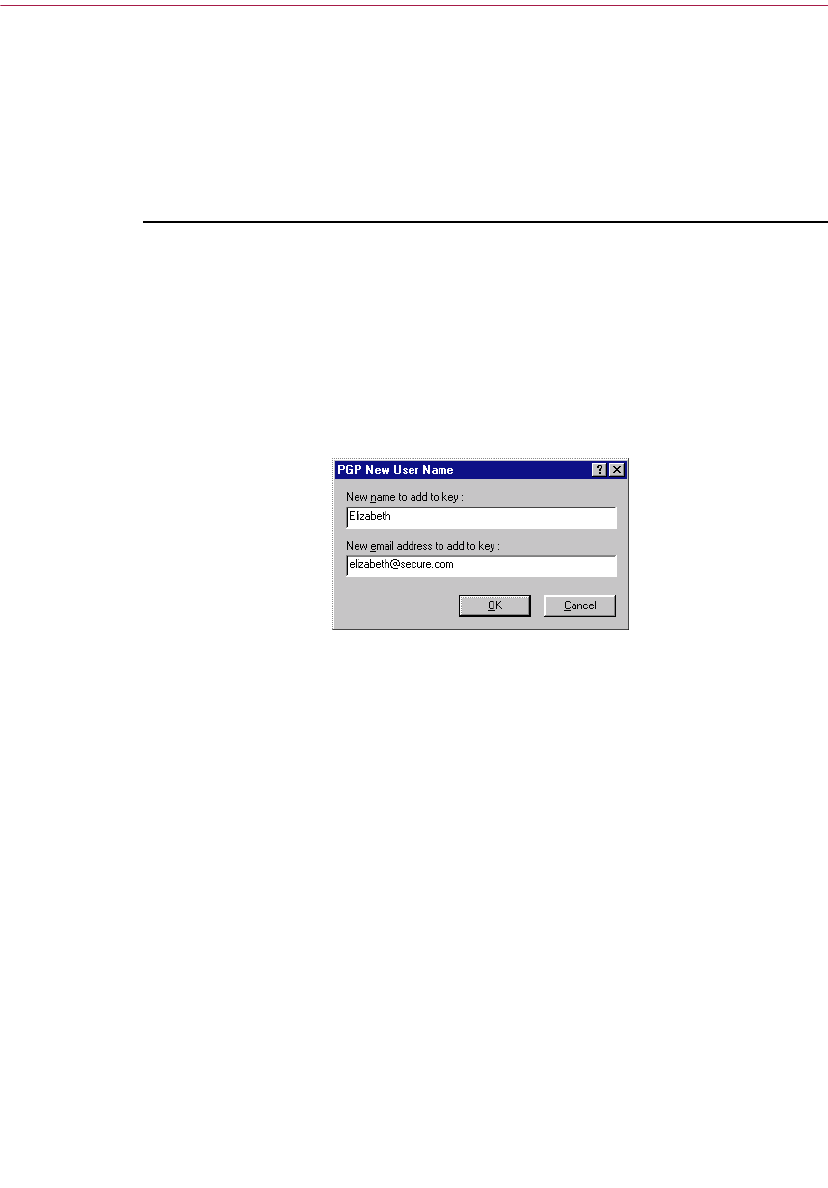
Making and Exchanging Keys
46 PGP Freeware
Adding a new user name or address to your key pair
You may have more than one user name or email address for which you want
to use the same key pair. After creating a new key pair, you can add alternate
names and addresses to the keys. You can only add a new user name or email
address if you have both the private and public keys.
To add a new user name or address to your key
1. Open PGPkeys.
2. Select the key pair for which you want to add another user name or
address.
3. Choose Add/Name from the Keys menu.
The PGP New User Name dialog box appears (Figure 3-6).
Figure 3-6. PGP New User Name dialog box
4. Enter the new name and email address in the appropriate fields, and then
click OK.
The PGP Enter Passphrase dialog box appears.
5. Enter your passphrase, then click OK.
The new name is added to the end of the user name list associated with
the key. If you want to set the new user name and address as the primary
identifier for your key, select the name and address and then choose Set
as Primary Name from the Keys menu.

User’s Guide 47
Making and Exchanging Keys
Adding a designated revoker
It is possible that you might forget your passphrase someday or lose your
private key. In this case, you would never be able to use your key again, and
you would have no way of revoking your old key when you create a new one.
To safeguard against this possibility, you can appoint a third-party key
revoker on your public keyring to revoke your key. The third-party you
designate will be able to revoke your DH/DSS key, send it to the server and it
will be just as if you had revoked it yourself.
To add a designated revoker to your key
1. Open PGPkeys.
2. Select the key pair for which you want to designate a revoker.
3. Select Add/Revoker from the Keys menu.
A dialog box opens and displays a list of keys.
4. Select the key(s) in the User ID list that you want to appoint as a
designated revoker.
5. Click OK.
A confirmation dialog box appears.
6. Click OK to continue.
The Passphrase dialog box appears.
7. Enter your passphrase, then click OK.
8. The selected key(s) is now authorized to revoke your key. For effective
key management, distribute a current copy of your key to the revoker(s)
or upload your key to the server. See “Distributing your public key” on
page 60 for instructions.

Making and Exchanging Keys
48 PGP Freeware
Adding an X.509 certificate to your PGP key
NOTE: The instructions in this section describe how to add an X.509
certificate to your keypair if you are using the Net Tools PKI Server.
An X.509 digital certificate is a recognized electronic document used to prove
identity and public key ownership over a communication network.
You can request an X.509 digital certificate and add it to your keypair using
PGP menu and Certificate Authority (CA) or a public CA (for example,
VeriSign).
There are four main steps to adding an X.509 certificate to your keypair. First,
retrieve the Root CA certificate from the CA and add it to your PGP keyring.
Next, enter information about the CA in the CA Options panel. Request a
certificate from the CA. Your X.509 certificate request is verified and signed by
the CA. (The CA’s signature on the certificate makes it possible to detect any
subsequent tampering with the identifying information or the public key, and
it implies that the CA considers the information in the certificate valid.)
Finally, retrieve the certificate issued by the CA and add it to your keypair.
To add an X.509 certificate to your PGP keypair
1. Obtain and add the Root CA certificate to your PGP keyring.
To do this, follow these steps:
1. Open your Web browser and connect to the CA’s enrollment site.
2. Click the Download a CA Certificate link. From the drop-down list,
select a certificate authority and the appropriate certificate.
3. Click Examine this Certificate and copy the key block for the Root
CA certificate and paste it into PGPkeys.
The Import Key dialog box appears and imports the Root CA
certificate into your keyring.
4. Sign the Root CA certificate with your key to make it valid, then
open the Key Properties and set the trust level. Trust must be set on
the Root CA.
2. Configure CA Options panel.
To do this, follow these steps:
5. Select from the PGPkeys Edit menu, then click on the CA tab.
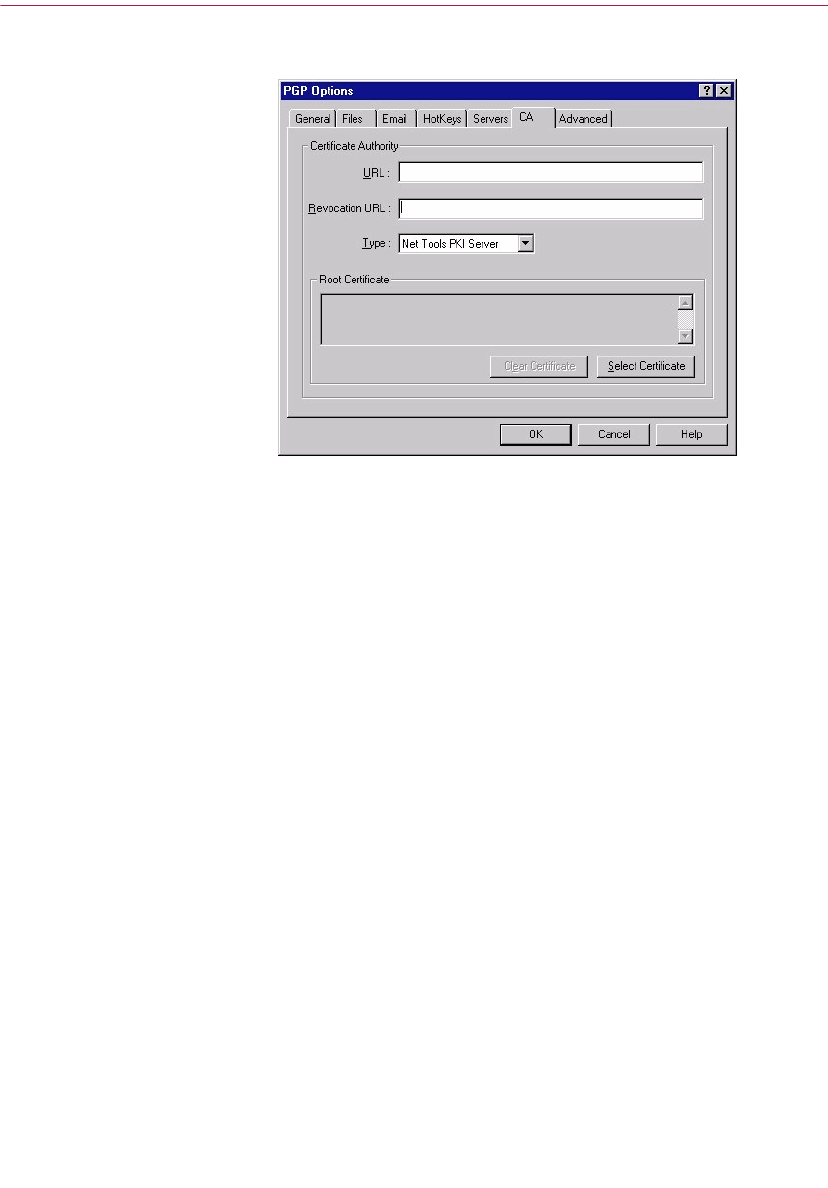
User’s Guide 49
Making and Exchanging Keys
The CA panel appears, as shown in Figure 3-7.
Figure 3-7. PGP dialog box
(CA Panel)
6. Enter the CA’s URL in the Certificate Authority URL text box, for
example, https://nnn.nnn.nnn.nnn:nnnnn (this is the same URL
you used to retrieve the Root CA).
7. If there is a separate URL for retrieving certificate revocation lists
(CRLs), enter it in the corresponding text box.
If you do not know the URL for Revocation, leave this field blank .
8. In the Type box, specify the name of certificate authority you are
using. Your options are:
• Net Tools PKI Server
• VeriSign OnSite
•Entrust
9. Click the Select Certificate button, then select the Root CA
certificate you just retrieved.
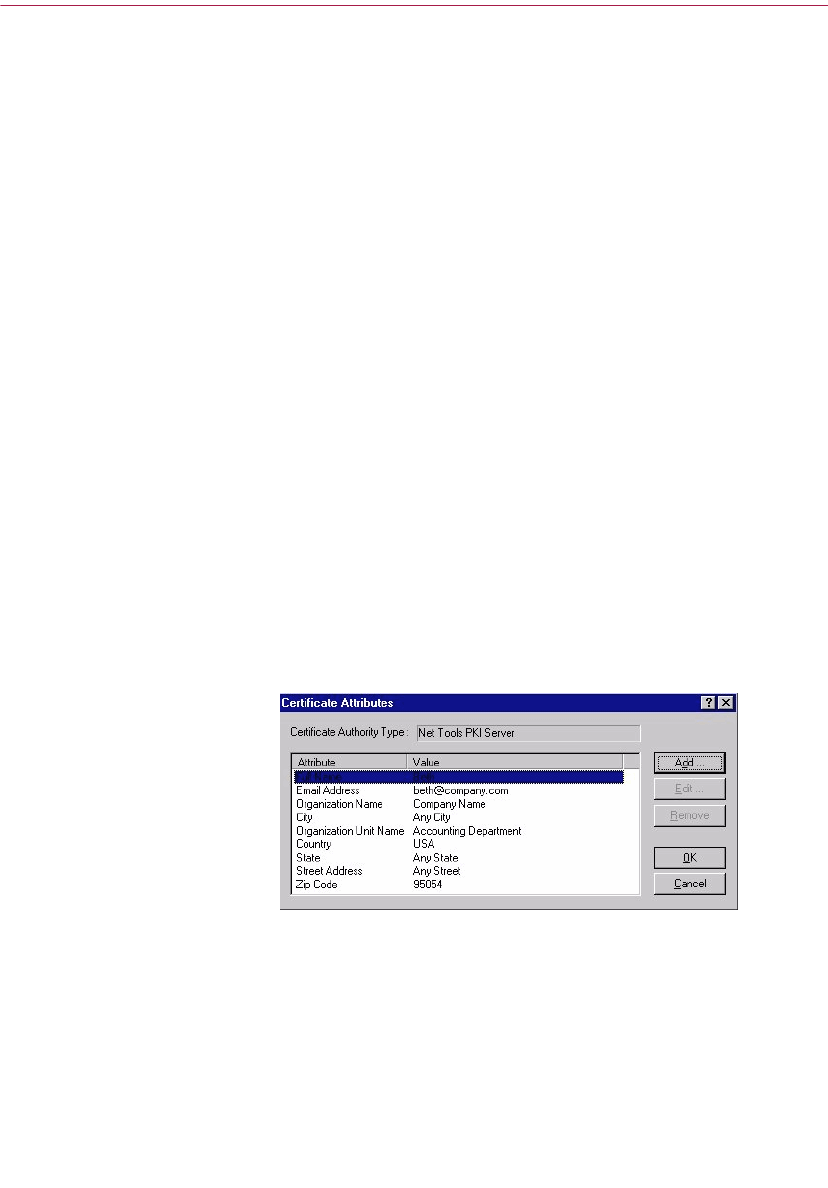
Making and Exchanging Keys
50 PGP Freeware
The Root Certificate text box displays information on the selected root
CA certificate. The terminology for the certificate is a policy decision.
Typically, the following terminology is true for X.509 certificates:
10. Click OK.
3. Make a certificate request.
To do this, follow these steps:
1. Right-click on your PGP keypair and select Keys -->Add/Certificate
from the Keys menu.
The Certificate Attributes dialog box appears, as shown in Figure
3-8.
Figure 3-8. Certificate Attributes Dialog Box
2. Verify the certificate attributes; use the Add, Edit, and Remove
buttons to make any required changes, and click OK. The PGP
Enter Passphrase dialog box appears.
3. Enter the passphrase for your keypair, then click OK.
CN
(Common Name) Often a description of the type of certificate
(e.g., “Root”).
EMAIL The email address for the certificate holder.
OU
(Organizational
Unit)
The organization to which the certificate
belongs (e.g.,“Accounting”).
O
(Organization) Typically the name of the company to which
the certificate belongs (e.g.,“Secure
Company”).
L
(Locality) The location of the holder of the certificate
(e.g., “Santa Clara”).
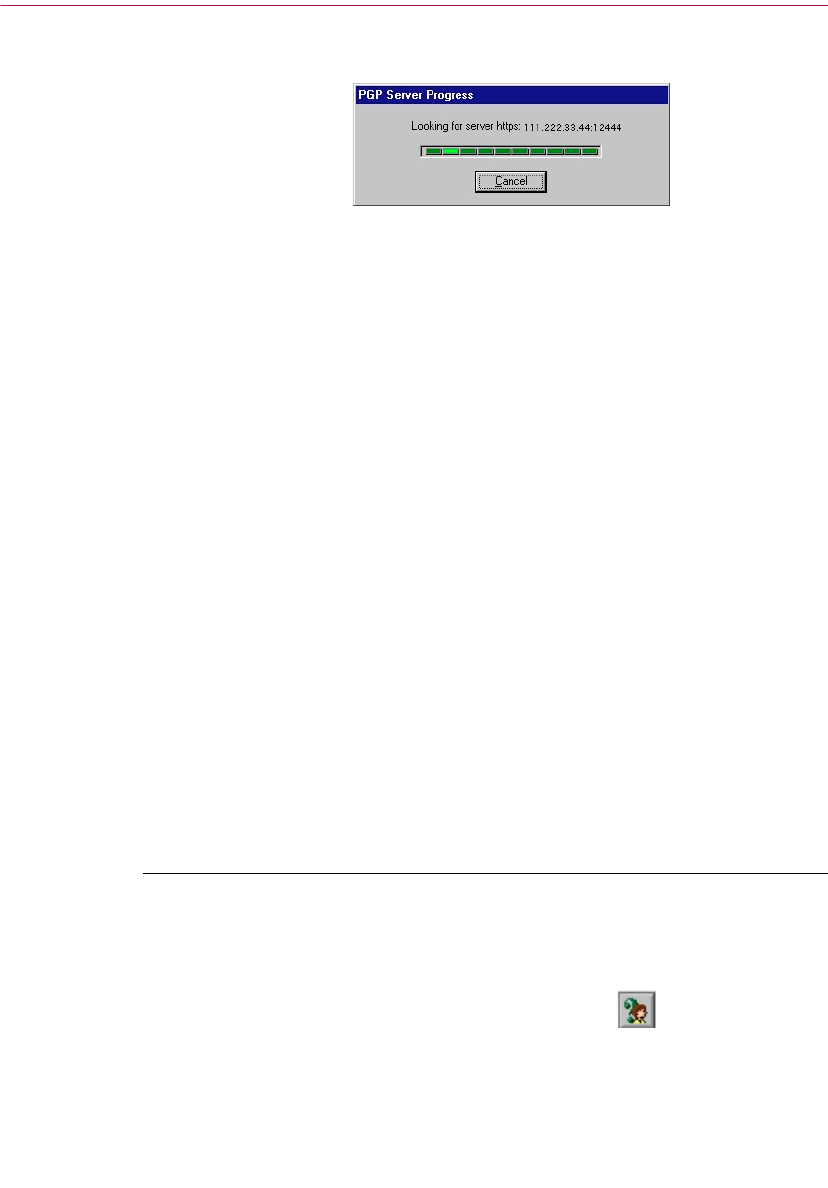
User’s Guide 51
Making and Exchanging Keys
The PGP Server Progress bar appears, as shown in (Figure 3-9).
Figure 3-9. PGP Server Progress Bar
The certificate request is sent to the CA server. The server
authenticates itself to your computer and accepts your request.
4. Once you receive a message stating that your certificate is ready for
retrieval, you can download it and add it to your keypair.
To do this, follow these steps:
1. In PGPkeys, select the PGPkey for which you made the certificate
request.
2. On the Server menu, select Retrieve Certificate.
PGP contacts the CA server and automatically retrieves your new
X.509 certificate and adds it to your PGPkey.
3. If you are running PGPnet, set this certificate as your X.509
authentication key in PGPnet (View ->Options -> Authentication).
Changing your passphrase
It’s a good practice to change your passphrase at regular intervals, perhaps
every three months. More importantly, you should change your passphrase
the moment you think it has been compromised, for example, by someone
looking over your shoulder as you typed it in.
To change your passphrase
1. Open PGPkeys.
2. Select the key for which you want to change the passphrase.
3. Choose Properties from the Keys menu or click to open the
Properties dialog box.
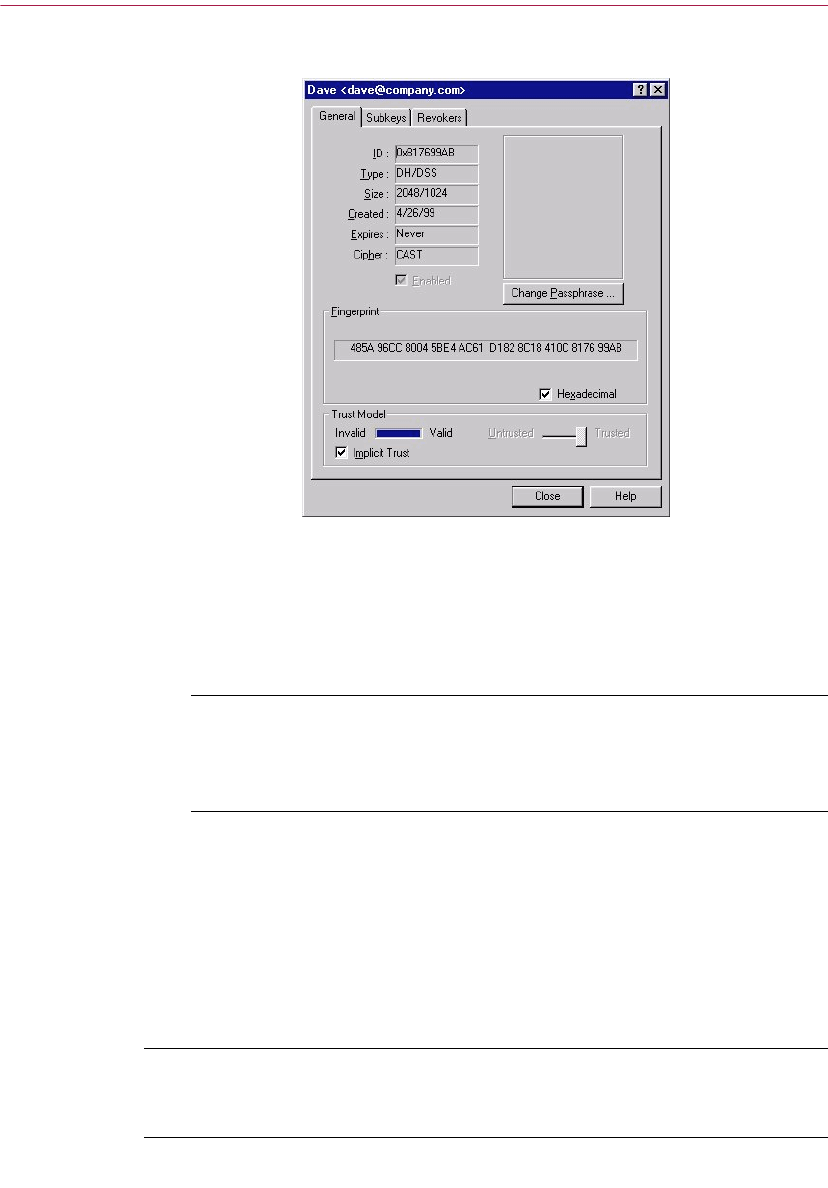
Making and Exchanging Keys
52 PGP Freeware
The Properties dialog box appears, as shown in Figure 3-10.
Figure 3-10. Properties dialog box
(General panel)
4. Click Change Passphrase.
The Passphrase dialog box appears.
NOTE: If you want to change the passphrase for a split key, you
must first rejoin the key shares. Click Join to collect the key shares.
See “Signing and decrypting files with a split key” on page 88 for
information about collecting key shares.
5. Enter your current passphrase in the space provided, then click OK.
The Change Passphrase dialog box appears.
6. Enter your new passphrase in the first text box. Press the TAB key to
advance to the next text box and confirm your entry by entering your
new passphrase again.
7. Click OK.
+WARNING: If you are changing your passphrase because you feel that
your passphrase has been compromised, you should wipe all backup
keyrings and wipe your freespace.

User’s Guide 53
Making and Exchanging Keys
Deleting a key or signature on your PGP keyring
At some point you may want to remove a key or a signature from your PGP
keyring. When you delete a key or signature from a key, it is removed and not
recoverable. Signatures and user IDs can be re-added to a key, and an
imported public key can be re-imported to your keyring. However, a private
key that exists only on that keyring cannot be recreated, and all messages
encrypted to its public key copies can no longer be decrypted.
NOTE: If you want to delete a signature or user ID associated with your
public key on a certificate server, see “Updating your key on a certificate
server” on page 62 for instructions.
To delete a key or signature from your PGP keyring
1. Open PGPkeys.
2. Select the key or signature you want to delete.
3. Choose Delete from the Edit menu or click in the PGPkeys toolbar.
The Confirmation dialog box appears.
4. Click the OK button.
Splitting and rejoining keys
Any private key can be split into shares among multiple “shareholders” using
a cryptographic process known as Blakely-Shamir key splitting. This
technique is recommended for extremely high security keys. For example,
Network Associates keeps a corporate key split between multiple individuals.
Whenever we need to sign with that key, the shares of the key are rejoined
temporarily.
Creating a split key
To split a key, select the key pair to be split and choose Share Split from the
Keys menu. You are then asked to set up how many different shares will be
required to rejoin the key. The shares are saved as files either encrypted to the
public key of a shareholder or encrypted conventionally if the shareholder has
no public key. After the key has been split, attempting to sign with it or
decrypt with it will automatically attempt to rejoin the key. For information
about rejoining a split key, see “Signing and decrypting files with a split key”
on page 88.
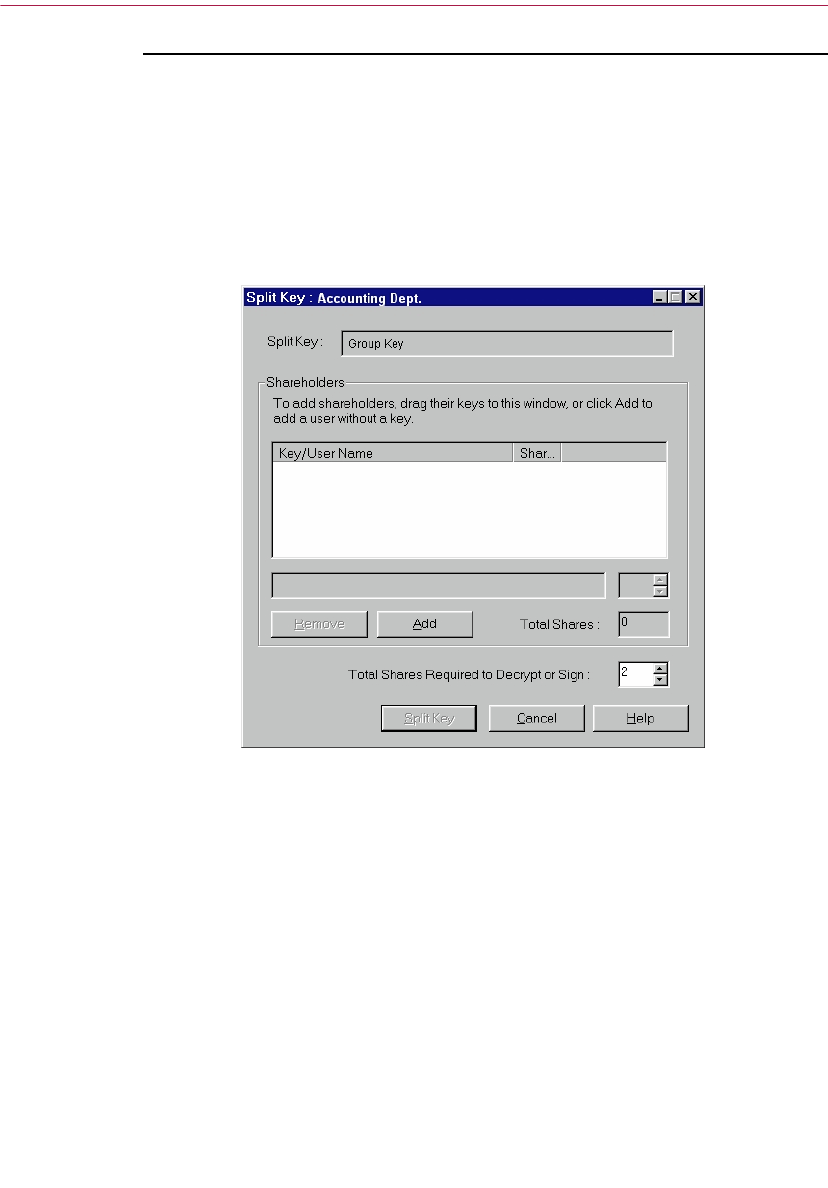
Making and Exchanging Keys
54 PGP Freeware
To create a split key with multiple shares
1. Open PGPkeys.
2. In PGPkeys, create a new key pair or select an existing key pair that you
want to split.
3. On the Keys menu, click Share Split.
The Share Split dialog box opens (Figure 3-11) on top of PGPkeys.
Figure 3-11. Share Split dialog box
4. Add shareholders to the key pair by dragging their keys from PGPkeys
to the Shareholder list in the Share Split dialog box.
To add a shareholder that does not have a public key, click Add in the
Share Split dialog box, enter the persons name and then allow the person
to type in their passphrase.
5. When all of the shareholders are listed, you can specify the number of
key shares that are necessary to decrypt or sign with this key.
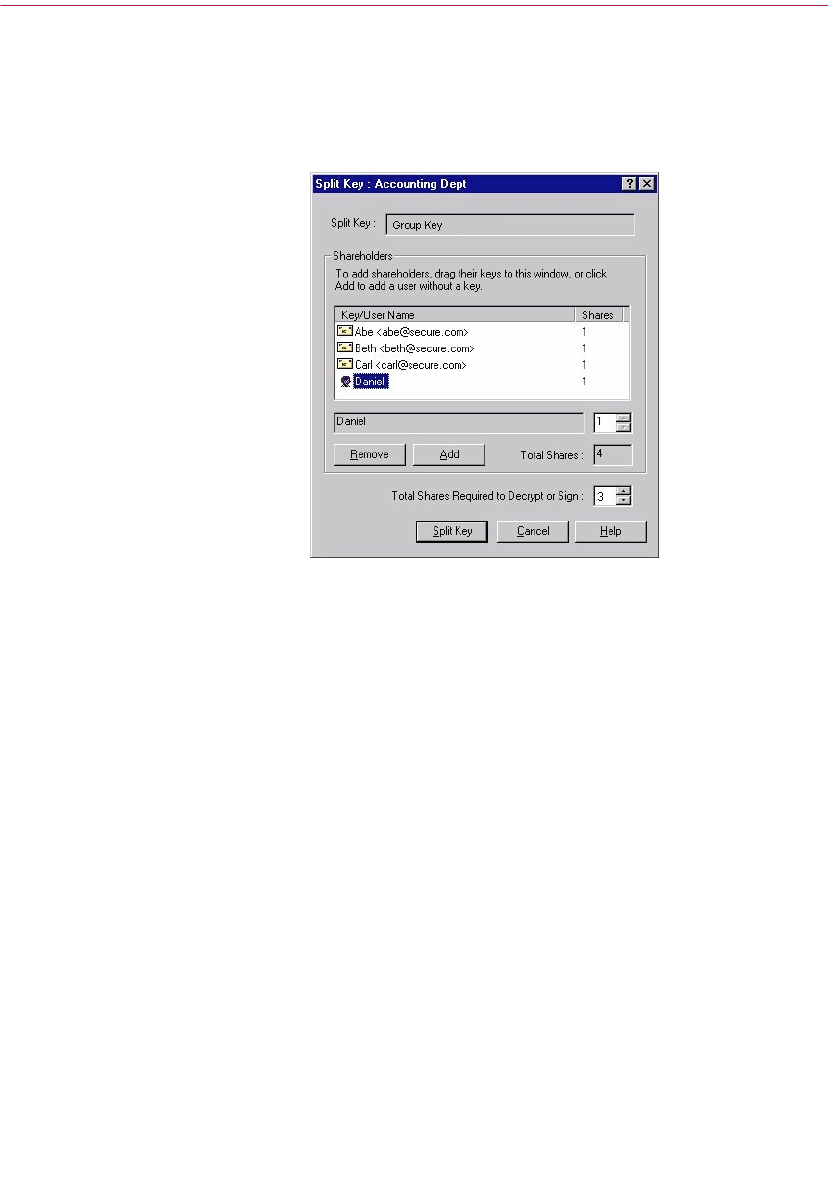
User’s Guide 55
Making and Exchanging Keys
In Figure 3-12, for example, the total number of shares that make up the
Group Key is four and the total number of shares required to decrypt or
sign is three. This provides a buffer in the event that one of the
shareholders is unable to provide their key share or forgets the
passphrase.
Figure 3-12. Share Split dialog box
(Example)
By default, each shareholder is responsible for one share. To increase the
number of shares a shareholder possesses, click the name in the
shareholder’s list to display it in the text field below. Type the new
number of key shares or use the arrows to select a new amount.
6. Click Split Key.
A dialog box opens and prompts you to select a directory in which to
store the shares.
7. Select a location to store the key shares.
The Passphrase dialog box appears.
8. Enter the passphrase for the key you want to split and then click OK.
A confirmation dialog box opens.
9. Click Yes to split the key.

Making and Exchanging Keys
56 PGP Freeware
The key is split and the shares are saved in the location you specified.
Each key share is saved with the shareholder’s name as the file name and
a .shf extension, as shown in the example below:
10. Distribute the key shares to the owners, then delete the local copies.
Once a key is split among multiple shareholders, attempting to sign or
decrypt with it will cause PGP to automatically attempt to rejoin the key.
To learn how to rejoin a split key to sign or decrypt files, “Signing and
decrypting files with a split key” on page 88.
Rejoining split keys
Once a key is split among multiple shareholders, attempting to sign or decrypt
with it will cause PGP to automatically attempt to rejoin the key. There are two
ways to rejoin the key, locally and remotely.
Rejoining key shares locally requires the shareholders presence at the
rejoining computer. Each shareholder is required to enter the passphrase for
their key share.
Rejoining key shares remotely requires the remote shareholders to
authenticate and decrypt their keys before sending them over the network.
PGP's Transport Layer Security (TLS) provides a secure link to transmit key
shares which allows multiple individuals in distant locations to securely sign
or decrypt with their key share.
ËIMPORTANT: Before receiving key shares over the network, you
should verify each shareholder’s fingerprint and sign their public key to
ensure that their authenticating key is legitimate. To learn how to verify
a keypair, see “Verify with a digital fingerprint” on page 69.
To rejoin a split key
1. Contact each shareholder of the split key. To rejoin key shares locally, the
shareholders of the key must be present.
To collect key shares over the network, ensure that the remote
shareholders are prepared to send their key share file. Remote
shareholders must have:
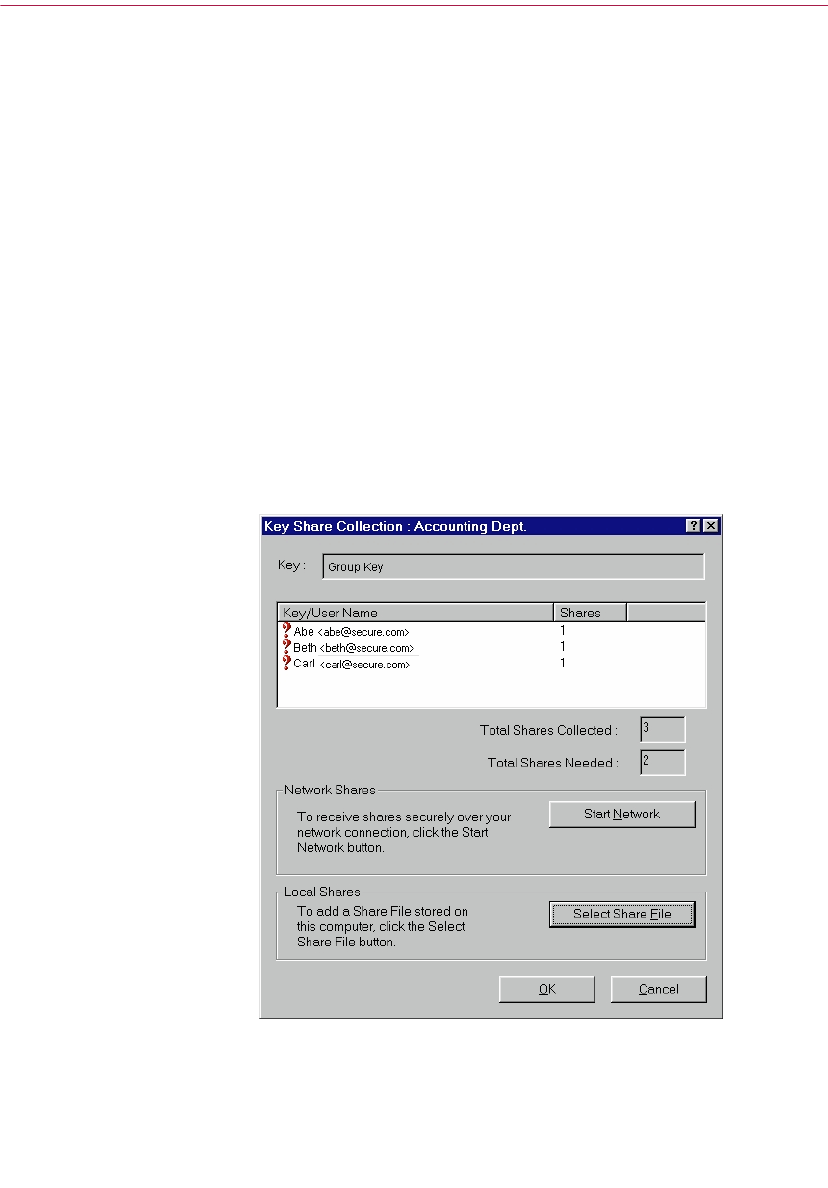
User’s Guide 57
Making and Exchanging Keys
– their key share file and password
– a keypair (for authentication to the computer that is collecting the
key shares)
– a network connection
– the IP address or Domain Name of the computer that is collecting
the key shares
2. At the rejoining computer, use Windows Explorer to select the file(s) that
you want to sign or decrypt with the split key.
3. Right-click on the file(s) and select Sign or Decrypt from the PGP menu.
The PGP Enter Passphrase for Selected Key dialog box appears with the
split key selected.
4. Click OK to reconstitute the selected key.
The Key Share Collection dialog box appears, as shown in Figure 3-13.
Figure 3-13. Key Share Collection dialog box
5. Do one of the following:
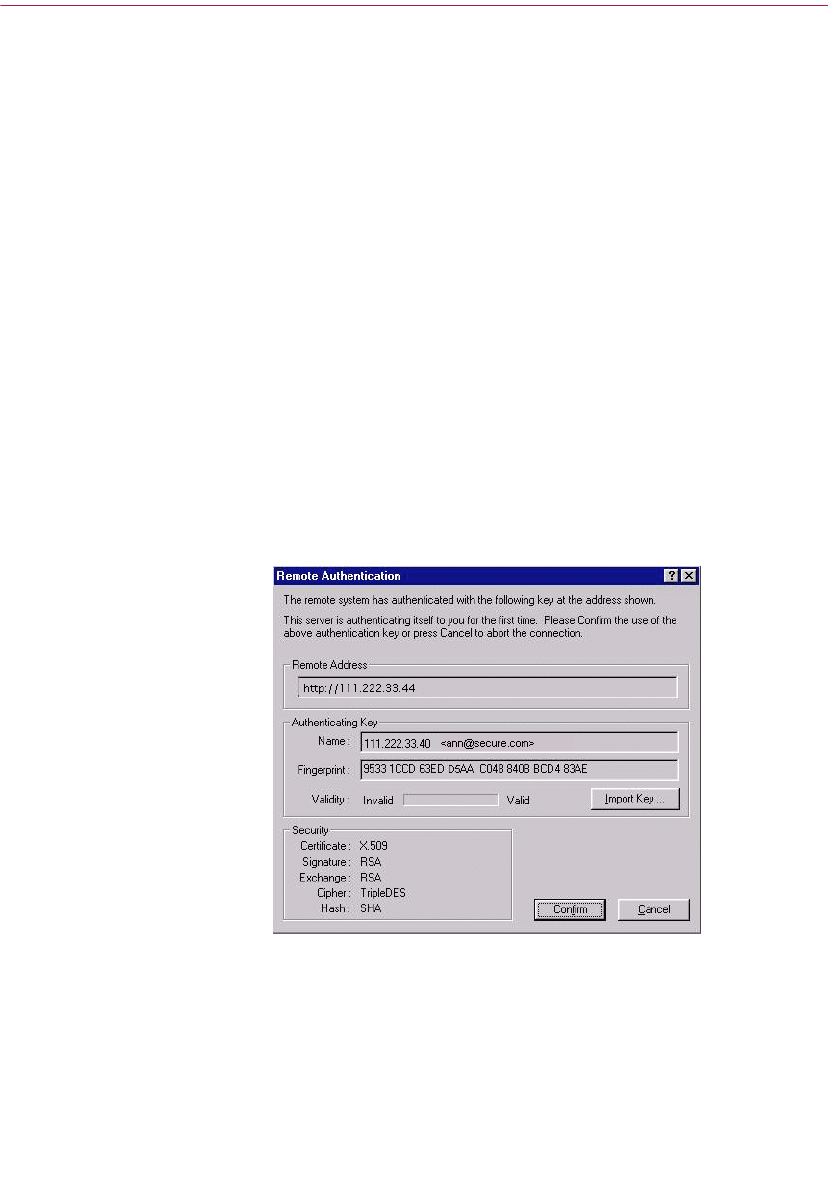
Making and Exchanging Keys
58 PGP Freeware
•If you are collecting the key shares locally, click Select Share File
and then locate the share files associated with the split key. The
share files can be collected from the hard drive, a floppy disk, or a
mounted drive. Continue with Step 6.
•If you are collecting key shares over the network, click Start
Network.
The Passphrase dialog box opens. In the Signing Key box, select the
keypair that you want to use for authentication to the remote system
and enter the passphrase. Click OK to prepare the computer to
receive the key shares.
The status of the transaction is displayed in the Network Shares
box. When the status changes to “Listening,” the PGP application is
ready to receive the key shares.
At this time, the shareholders must send their key shares. To learn
how to send key shares to the rejoining computer, see “To send your
key share over the network” on page 59.
When a share is received, the Remote Authentication dialog box
appears, as shown in Figure 3-14.
Figure 3-14. Remote Authentication dialog box
If you have not signed the key that is being used to authenticate the
remote system, the key will be considered invalid. Although you can
rejoin the split key with an invalid authenticating key, it is not
recommended. You should verify each shareholder’s fingerprint and
sign their public key to ensure that the authenticating key is legitimate.

User’s Guide 59
Making and Exchanging Keys
Click Confirm to accept the share file.
6. Continue collecting key shares until the value for Total Shares Collected
matches the value for Total Shares Needed in the Key Shares Collection
dialog box.
7. Click OK.
The file is signed or decrypted with the split key.
To send your key share over the network
1. When you are contacted by the person who is rejoining the split key,
make sure that you have these items:
– your key share file and password
– your keypair (for authentication to the computer that is collecting
the key shares)
– a network connection
– the IP address or Domain Name of the rejoining computer collecting
the key shares
2. Select Send Key Shares on the PGPkeys File menu.
The Select Share File dialog box appears.
3. Locate your key share and then click Open.
The PGP Enter Passphrase dialog box appears.
4. Enter your passphrase and then click OK.
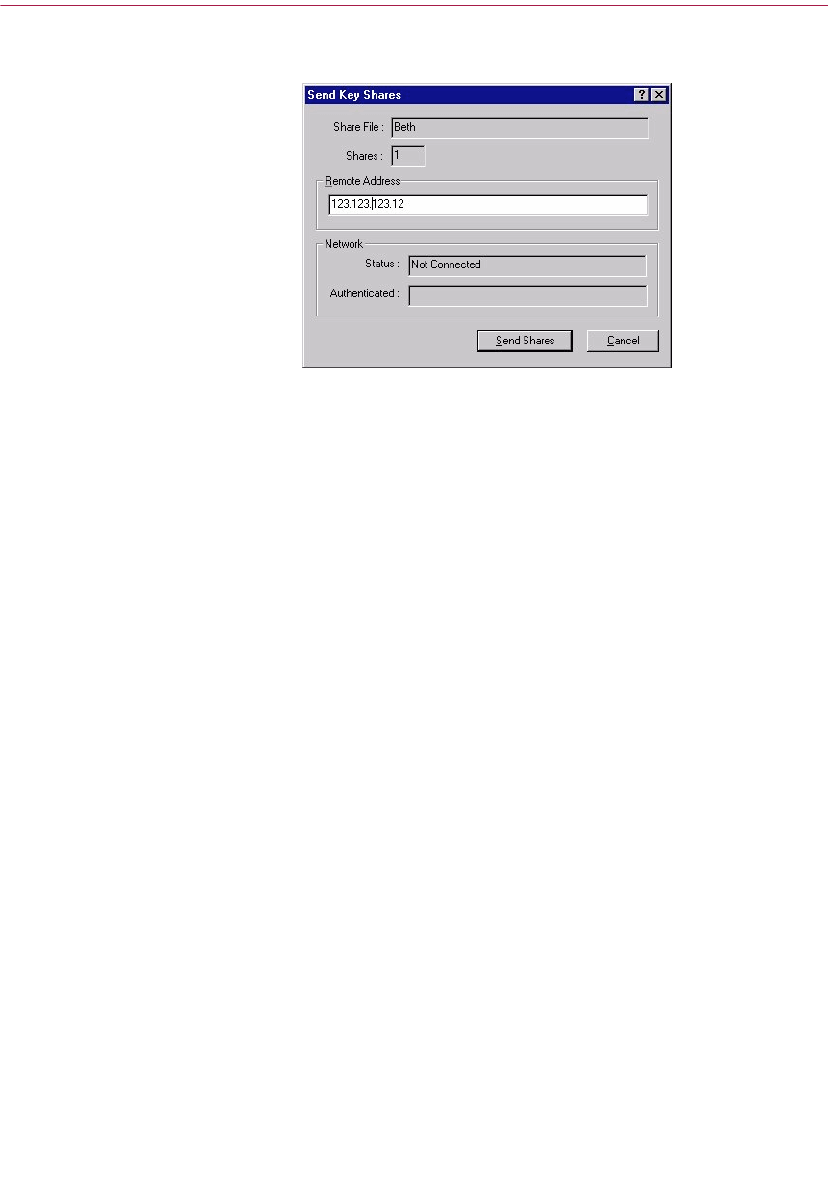
Making and Exchanging Keys
60 PGP Freeware
The Send Key Shares dialog box appears, as shown in Figure 3-15.
Figure 3-15. Send Key Shares dialog box
5. Enter the IP address or the Domain Name of the rejoining computer in
the Remote Address text box, then click Send Shares.
The status of the transaction is displayed in the Network Status box.
When the status changes to “Connected,” you are asked to authenticate
yourself to the rejoining computer.
The Remote Authentication dialog box appears asking you to confirm
that the remote computer is the one to whom you want to send your key
share.
6. Click Confirm to complete the transaction.
After the remote computer receives your key shares and confirms the
transaction, a message box appears stating that the shares were
successfully sent.
7. Click OK.
8. Click Done in the Key Shares window when you have completed
sending your key share.
Distributing your public key
After you create your keys, you need to make them available to others so that
they can send you encrypted information and verify your digital signature.
There are three ways in which you can distribute your public key:
• Make your public key available through a public certificate server,
• Include your public key in an email message,
Or

User’s Guide 61
Making and Exchanging Keys
• Export your public key or copy it to a text file.
Your public key is basically composed of a block of text, so it is quite easy to
make it available through a public certificate server, include it in an email
message, or export or copy it to a file. The recipient can then use whatever
method is most convenient to add your public key to their public keyring.
Making your public key available through a certificate
server
The best method for making your public key available is to place it on a public
certificate server where anyone can access it. That way, people can send you
email without having to explicitly request a copy of your key. It also relieves
you and others from having to maintain a large number of public keys that you
rarely use. There are a number of certificate servers worldwide, including
those offered by Network Associates, Inc., where you can make your key
available for anyone to access.
To send your public key to a certificate server
1. Connect to the Internet.
2. Open PGPkeys.
3. Select the icon that represents the public key you want to post on the
certificate server.
4. Open the Server menu, then select the certificate server you want to post
on from the Send To submenu. PGP lets you know that the keys are
successfully uploaded to the server.
Once you place a copy of your public key on a certificate server, you can tell
people who want to send you encrypted data or to verify your digital
signature to get a copy of your key from the server. Even if you don’t explicitly
point them to your public key, they can get a copy by searching the certificate
server for your name or email address. Many people include the Web address
for their public key at the end of their email messages; in most cases the
recipient can just double-click the address to access a copy of your key on the
server. Some people even put their PGP fingerprint on their business cards for
easier verification.

Making and Exchanging Keys
62 PGP Freeware
Updating your key on a certificate server
If you ever need to change your email address, or if you acquire new
signatures, all you have to do to replace your old key is send a new copy to the
server; the information is automatically updated. However, you should keep
in mind that public certificate servers are only capable of updating new
information and will not allow removal of user names or signatures from your
key. To remove signatures or user names from your key, see “Removing
signatures or user names associated with your key” for instructions. If your
key is ever compromised, you can revoke it, which tells the world to no longer
trust that version of your key. See Chapter 6, “Managing Keys and Setting PGP
Options” for more details on how to revoke a key.
Removing signatures or user names associated with your key
At some point you may want to remove a key, a signature, or a user ID
associated with a particular key.
Public certificate servers are only capable of updating new information and
will not allow removal of user names or signatures from your key. To remove
signatures or user names associated with your public key, you must first
remove your key from the server, make the required change, then post your
key back on the server.
If your PGP Server settings are configured to synchronize keys with the server
upon adding names/photos/revokers to your key, your key is automatically
updated on the server. If, however, your keys do not automatically
synchronized with the server, follow the instructions outlined below to
manually update your key on the certificate server.
NOTE: When you delete a key, signature, or user ID from a key, it is
removed and not recoverable. Signatures and user IDs can be re-added
to a key, and an imported public key can be re-imported to your keyring.
However, a private key that exists only on that keyring cannot be
recreated, and all messages encrypted to its public key copies can no
longer be decrypted.
To remove signatures or user names associated with your key on a certificate
server
ËIMPORTANT: This procedure is for removing signatures or user names
associated with your key on LDAP certificate servers only. Additionally,
the certificate server must be configured to allow this action.
1. Open PGPkeys.

User’s Guide 63
Making and Exchanging Keys
2. Choose Search from the Server menu or click in the PGPkeys menu.
The PGPkeys Search window appears.
3. Choose the server you want to search from the Search for Keys On
menu.
4. Specify your search criteria to locate your public key:
The default is User ID, but you can click the arrows to select Key ID, Key
Status, Key Type, Key Size, Creation Date, or Expiration Date. For
example, you might search for all keys with the User ID of Fred.
5. To begin the search, click Search.
The results of the search appear in the window.
6. Right-click on the key that you want to remove from the server, then
select Delete from the right-click menu.
The Passphrase dialog box appears.
7. Enter the passphrase for the key you want to remove from the server and
then click OK.
Confirmation dialog appears and the key is removed.
8. Update your key (remove the unwanted signatures or user names).
9. Copy the updated key to the server (see “Making your public key
available through a certificate server” on page 61 for instructions).
If the server on which you are updating your public key is configured to
synchronize keys with other public certificate servers, your key will be
updated on the other servers automatically upon synchronization.
+IMPORTANT: If you delete your key from a certificate server, you
should be aware that someone who has your public key on their keyring
can upload it to the server again. You should check the server
periodically to see if the key has reappeared - you may have to delete
your key from the server more than once.
Including your public key in an email message
Another convenient method of delivering your public key to someone is to
include it along with an email message.
To include your public key in an email message
1. Open PGPkeys.

Making and Exchanging Keys
64 PGP Freeware
2. Select your key pair and then click Copy on the Edit menu.
3. Open the editor you use to compose your email messages, place the
cursor in the desired area, and then click Paste on the Edit menu. In
newer email applications, you can simply drag your key from PGPkeys
into the text of your email message to transfer the key information.
When you send someone your public key, be sure to sign the email. That way,
the recipient can verify your signature and be sure that no one has tampered
with the information along the way. Of course, if your key has not yet been
signed by any trusted introducers, recipients of your signature can only truly
be sure the signature is from you by verifying the fingerprint on your key.
Exporting your public key to a file
Another method of distributing your public key is to copy it to a file and then
make this file available to the person with whom you want to communicate.
To export your public key to a file
There are three ways to export or save your public key to a file:
• Select the icon representing your key pair from PGPkeys, then click
Export on the Keys menu and enter the name of the file where you
want the key to be saved,
• Drag the icon representing your key pair from PGPkeys to the folder
that you want the key to be saved,
Or
• Select the icon representing your key pair in PGPkeys, click Copy on
the Edit menu, then choose Paste to insert the key information into
a text document.
NOTE: If you are sending your key to colleagues who are using
PCs, enter a name of up to eight initial characters and three
additional characters for the file type extension (for example,
MyKey.txt).
Obtaining the public keys of others
Just as you need to distribute your public key to those who want to send you
encrypted mail or to verify your digital signature, you need to obtain the
public keys of others so you can send them encrypted mail or verify their
digital signatures.

User’s Guide 65
Making and Exchanging Keys
To obtain someone’s public key
There are three ways you can obtain someone’s public key:
• Get the key from a public certificate server,
• Add the public key to your keyring directly from an email message,
Or
• Import the public key from an exported file.
Public keys are just blocks of text, so they are easy to add to your keyring
by importing them from a file or by copying them from an email message
and then pasting them into your public keyring.
Getting public keys from a certificate server
If the person to whom you want to send encrypted mail is an experienced PGP
user, chances are that they have placed a copy of their public key on a
certificate server. This makes it very convenient for you to get a copy of their
most up-to-date key whenever you want to send them mail and also relieves
you from having to store a lot of keys on your public keyring.
There are a number of public certificate servers, such as the one maintained by
Network Associates, Inc., where you can locate the keys of most PGP users. If
the recipient has not pointed you to the Web address where his or her public
key is stored, you can access any certificate server and do a search for the
user’s name or email address, because all certificate servers are regularly
updated to include the keys stored on all the other servers.
To get someone’s public key from a certificate server
1. Open PGPkeys.
2. Choose Search from the Server menu or click the Search button ( ) in
PGPkeys.
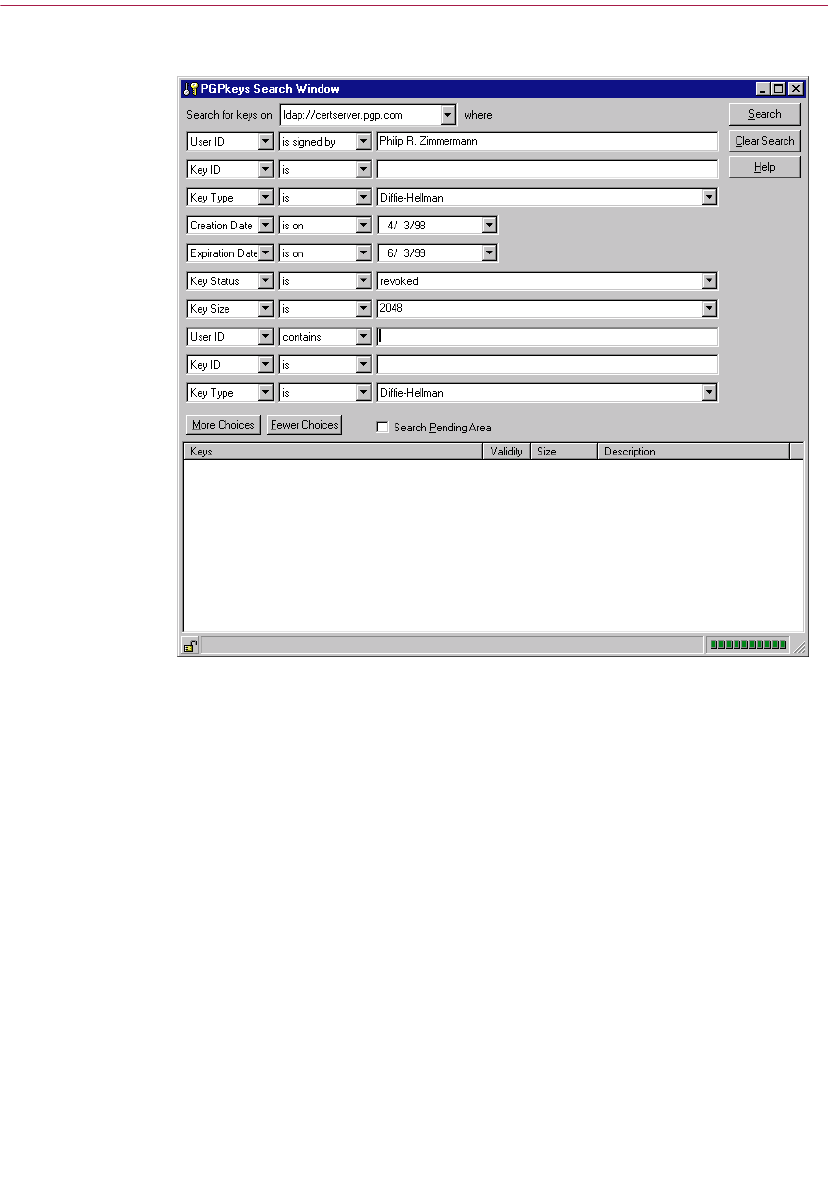
Making and Exchanging Keys
66 PGP Freeware
The PGPkeys Search window appears as in Figure 3-16.
Figure 3-16. PGPkeys Search window
(
More Choices view
)
3. Choose the server you wish to search from the Search for Keys On menu.
4. Specify your search criteria.
You can search for keys on a certificate server by specifying values for
these key characteristics:
•User ID
• Key ID
• Key Status (Revoked or Disabled)
• Key Type (Diffie-Hellman or RSA)
•Creation date
• Expiration date

User’s Guide 67
Making and Exchanging Keys
• Revoked keys
• Disabled keys
• Key size
• Keys signed by a particular key
The inverse of most of these operations is also available. For example,
you may search using “User ID is not Bob” as your criteria.
5. Enter the value you want to search for.
6. Click More Choices to add additional criteria to your search; for
example, Key IDs with the name Fred created on or before October 6,
1998.
7. To begin the search, click Search.
A progress bar appears displaying the status of the search.
NOTE: To cancel a search in progress, click Stop Search.
The results of the search appear in the window.
8. To import the keys, drag them to the PGPkeys main window.
9. Click Clear Search to clear your search criteria.
Adding public keys from email messages
A convenient way to get a copy of someone’s public key is to have that person
include it in an email message. When a public key is sent through email, it
appears as a block of text in the body of the message.
To add a public key from an email message
If you have an email application that is supported by the PGP plug-ins,
then click in your email application to extract the sender’s public key
from the email and add it to your public keyring.
If you are using an email application that is not supported by the
plug-ins, you can add the public key to the keyring by copying the block
of text that represents the public key and pasting it into PGPkeys.

Making and Exchanging Keys
68 PGP Freeware
Importing keys
To import from your browser by copying and pasting into your public
keyring.
Another method for obtaining someone’s public key is to have that person
save it to a file from which you can import, or it or copy and paste it into your
public keyring.
To import a public key from a file
There are three methods of extracting someone’s public key and adding
it to your public keyring:
•Click on Import from the Keys menu and then navigate to the file
where the public key is stored,
• Drag the file containing the public key onto the main PGPkeys
window,
Or
• Open the text document where the public key is stored, select the
block of text representing the key, and then click on the Edit menu.
Go to PGPkeys and choose Paste from the Edit menu to copy the
key. The key then shows up as an icon in PGPkeys.
Verifying the authenticity of a key
When you exchange keys with someone, it is sometimes hard to tell if the key
really belongs to that person. PGP software provides a number of safeguards
that allow you to check a key’s authenticity and to certify that the key belongs
to a particular owner (that is, to validate it). The PGP program also warns you
if you attempt to use a key that is not valid and also defaults to warn you when
you are about to use a marginally valid key.
Why verify the authenticity of a key?
One of the major vulnerabilities of public key encryption systems is the ability
of sophisticated eavesdroppers to mount a “man-in-the-middle” attack by
replacing someone’s public key with one of their own. In this way they can
intercept any encrypted email intended for that person, decrypt it using their
own key, then encrypt it again with the person’s real key and send it on to
them as if nothing had ever happened. In fact, this could all be done
automatically through a sophisticated computer program that stands in the
middle and deciphers all of your correspondence.

User’s Guide 69
Making and Exchanging Keys
Based on this scenario, you and those with whom you exchange email need a
way to determine whether you do indeed have legitimate copies of each
others’ keys. The best way to be completely sure that a public key actually
belongs to a particular person is to have the owner copy it to a floppy disk and
then physically hand it to you. However, you are seldom close enough to
personally hand a disk to someone; you generally exchange public keys via
email or get them from a public certificate server.
Verify with a digital fingerprint
You can determine if a key really belongs to a particular person by checking
its digital fingerprint, a unique series of numbers or words generated when the
key is created. By comparing the fingerprint on your copy of someone’s public
key to the fingerprint on their original key, you can be absolutely sure that you
do in fact have a valid copy of their key. To learn how to verify with a digital
fingerprint, see “Verifying someone’s public key” on page 108.
Validating the public key
Once you are absolutely convinced that you have a legitimate copy of
someone’s public key, you can then sign that person’s key. By signing
someone’s public key with your private key, you are certifying that you are
sure the key belongs to the alleged user. For instance, when you create a new
key, it is automatically certified with your own digital signature. By default,
signatures you make on other keys are not exportable, which means they
apply only to the key when it is on your local keyring. For detailed instructions
on signing a key, see “Signing someone’s public key” on page 110.
Working with trusted introducers
PGP users often have other trusted users sign their public keys to further attest
to their authenticity. For instance, you might send a trusted colleague a copy
of your public key with a request that he or she certify and return it so you can
include the signature when you post your key on a public certificate server.
Using PGP, when someone gets a copy of your public key, they don’t have to
check the key’s authenticity themselves, but can instead rely on how well they
trust the person(s) who signed your key. PGP provides the means for
establishing this level of validity for each of the public keys you add to your
public keyring and shows the level of trust and validity associated with each
key PGPkeys. This means that when you get a key from someone whose key
is signed by a trusted introducer, you can be fairly sure that the key belongs to
the purported user. For details on how to sign keys and validate users, see
“Signing someone’s public key” on page 110.

Making and Exchanging Keys
70 PGP Freeware
What is a trusted introducer?
PGP uses the concept of a trusted introducer, someone who you trust to
provide you with keys that are valid. This concept may be familiar to you from
Victorian novels, in which people gave letters of introduction to one another.
For example, if your uncle knew someone in a faraway city with whom you
might want to do business, he might write a letter of introduction to his
acquaintance. With PGP, users can sign one another’s keys to validate them.
You sign someone’s key to indicate that you are sure that their key is valid,
which means that it truly is their key. There are several ways to do this. When
a trusted introducer signs another person’s key, you trust that the keys they
sign are valid, and you do not feel that you must verify their keys before using
them.
What is a meta-introducer
PGP also supports the concept of a meta-introducer--a trusted introducer of
trusted introducers. If you work in a very large company, you might have a
regional security officer, a trusted introducer, who would sign users’ keys.
You could trust that these keys were valid because the regional security officer
had performed the actions to ensure validity. The organization may also have
a head security officer who works with the local security officers, so that a
person in a West Coast office could trust a person in an East Coast office,
because both their keys had been signed by their respective regional security
officers, who in turn had their keys signed by the head security officer, who is
a meta-introducer. This allows the establishment of a trust hierarchy in the
organization.

4
User’s Guide 71
4Sending and Receiving
Secure Email
This chapter explains how to encrypt and sign the email you send to others
and decrypt and verify the email others send to you.
Encrypting and signing email
There are three ways to encrypt and sign email messages. The quickest and
easiest way to encrypt and sign email is with an application supported by the
PGP email plug-ins. Although the procedure varies slightly between different
email applications, you perform the encryption and signing process by
clicking the appropriate buttons in the application’s toolbar.
If you are using an email application that is not supported by the PGP
plug-ins, you can encrypt and sign your email messages via Windows
clipboard by selecting the appropriate option from the lock icon in the System
tray. To include file attachments, you encrypt the files from Windows Explorer
before attaching them.
ÐTIP: If you are sending sensitive email, consider leaving your subject line
blank or creating a subject line that does not reveal the contents of your
encrypted message.
If you do not have one of the email applications that is supported by PGP, see
Chapter 5 for information about how to encrypt files.
As an alternative to using the plug-ins, you can use PGPtools to encrypt and
sign your email text and attachments before sending them, see “To encrypt
and sign text using PGPtools” on page 75.

Sending and Receiving Secure Email
72 PGP Freeware
Encrypting and signing with supported email applications
When you encrypt and sign with an email application that is supported by the
PGP plug-ins, you have two choices, depending on what type of email
application the recipient is using. If you are communicating with other PGP
users who have an email application that supports the PGP/MIME standard,
you can take advantage of a PGP/MIME feature to encrypt and sign your
email messages and any file attachments automatically when you send them.
If you are communicating with someone who does not have a
PGP/MIME-compliant email application, you should encrypt your email with
PGP/MIME turned off to avoid any compatibility problems. Refer to Table
4-1, “PGP Plug-in Features,” for a list of plug-ins and their features.
Table 4-1. PGP Plug-in Features
To encrypt and sign with supported email applications
1. Use your email application to compose your email message as you
normally would.
2. When you have finished composing the text of your email message,
click to encrypt the text of your message, then click to sign the
message.
Eudora
3.0.x Eudora
4.0.x Exchange/
Outlook Lotus
Notes Outlook
Express
PGP/MIME Yes Yes No No No
Auto-decrypt Yes No Yes Yes Yes
Encrypt HTML N/A Yes converts to plain
text before
encrypting
Yes No
View decrypted
HTML as an HTML
document
No Yes No Yes No
Encrypt
attachments
Yes Yes Yes Yes No
Encrypt/Sign
defaults
Yes Yes Yes Yes Yes
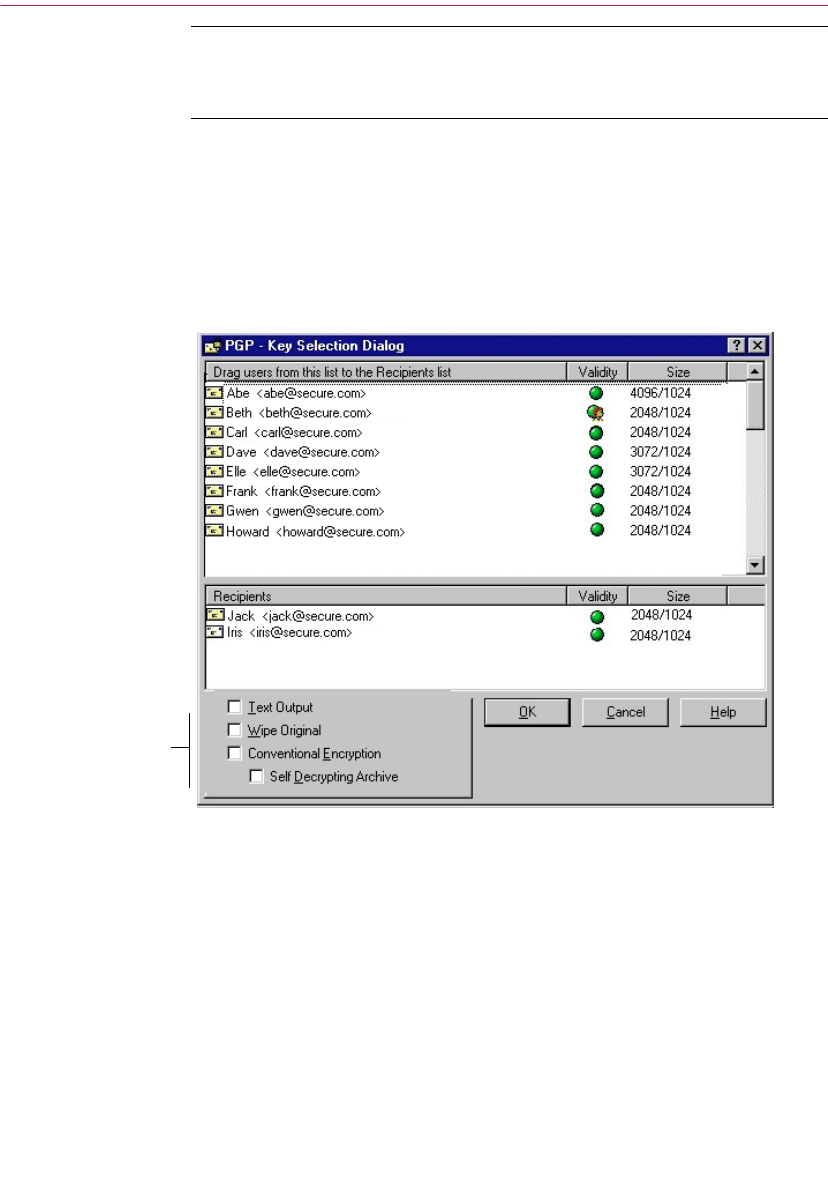
User’s Guide 73
Sending and Receiving Secure Email
NOTE: If you know that you are going to use PGP/MIME regularly,
you can leave this turned on by selecting the appropriate settings in
the Email panel of the Options dialog box.
3. Send your message as you normally do.
If you have a copy of the public keys for every one of the recipients, the
appropriate keys are used. However, if you specify a recipient for whom
there is no corresponding public key or one or more of the keys have
insufficient validity, the PGP Key Selection dialog box appears (Figure
4-1) so that you can specify the correct key.
Figure 4-1. PGP Recipient Selection window
Encryption
options

Sending and Receiving Secure Email
74 PGP Freeware
4. Drag the public keys for those who are to receive a copy of the encrypted
email message into the Recipients list box. You can also double-click any
of the keys to move them from one area of the screen to the other.
The Validity icon indicates the minimum level of confidence that the
public keys in the Recipient list are valid. This validity is based on the
signatures associated with the key. See Chapter 6, “Managing Keys and
Setting PGP Options,” for details.
5. You can choose from the following encryption options depending on the
type of data you are encrypting:
•Secure Viewer. Select this option to protect the data from TEMPEST
attacks upon decryption. If you select this option, the decrypted
data is displayed in a special TEMPEST attack prevention font that
is unreadable to radiation capturing equipment. For more
information about TEMPEST attacks, see “Vulnerabilities” on page
206.
NOTE: The Secure Viewer option may not be compatible with
previous versions of PGP. Files encrypted with this option
enabled can be decrypted by previous versions of PGP,
however this feature may be ignored.
•Conventional Encrypt. Select this option to use a common
passphrase instead of public key encryption. If you select this
option, the file is encrypted using a session key, which encrypts
(and decrypts) using a passphrase that you will be asked to choose.
•Self Decrypting Archive. Select this option to create a self
decrypting executable file. If you select this option, the file is
encrypted using a session key, which encrypts (and decrypts) using
a passphrase that you are asked to choose. The resulting executable
file can be decrypted by simply double-clicking on it and entering
the appropriate passphrase. This option is especially convenient for
users who are sending encrypted files to people who do not have
PGP software installed. Note that sender and recipient must be on
the same platform.
6. Click OK to encrypt and sign your mail.
If you have elected to sign the encrypted data, the Signing Key
Passphrase dialog box appears, as shown in Figure 4-2, requesting your
passphrase before the mail is sent.

User’s Guide 75
Sending and Receiving Secure Email
Figure 4-2. Signing Key Passphrase dialog box
7. Enter your passphrase and then click OK.
+WARNING: If you do not send your email immediately but instead store
it in your outbox, you should be aware that when using some email
applications the information is not encrypted until the email is actually
transmitted. Before queuing encrypted messages you should check to see
if your application does in fact encrypt the messages in your outbox. If it
does not, you can use PGPmenu’s Encrypt Now option to encrypt your
messages before queuing them in the outbox.
To encrypt and sign text using PGPtools
1. Copy the text that you want to encrypt and sign to the clipboard.
2. Click on the Encrypt, Sign, or Encrypt and Sign button in PGPtools.
Figure 4-3. PGPtools window
The PGP Key Select File(s) dialog box appears.
3. Click the Clipboard button.
The PGP Key Recipients dialog box appears (Figure 4-1).
PGPkeys encrypt sign encrypt
and sign
decrypt/
verify
wipe
wipe
Freespace

Sending and Receiving Secure Email
76 PGP Freeware
4. Drag the public keys for those who are to receive a copy of the encrypted
email message into the Recipients list box. You can also double-click any
of the keys to move them from one area of the screen to the other.
The Validity icon indicates the minimum level of confidence that the
public keys in the Recipient list are valid. This validity is based on the
signatures associated with the key. See Chapter 6, “Managing Keys and
Setting PGP Options,” for details.
5. You can choose from the following encryption options depending on the
type of data you are encrypting:
•Secure Viewer. Select this option to protect the data from TEMPEST
attacks upon decryption. If you select this option, the decrypted
data is displayed in a special TEMPEST attack prevention font that
is unreadable to radiation capturing equipment. For more
information about TEMPEST attacks, see “Vulnerabilities” on page
206.
NOTE: The Secure Viewer option may not be compatible with
previous versions of PGP. Files encrypted with this option
enabled can be decrypted by previous versions of PGP,
however this feature may be ignored.
•Conventional Encrypt. Select this option to use a common
passphrase instead of public key encryption. If you select this
option, the file is encrypted using a session key, which encrypts
(and decrypts) using a passphrase that you will be asked to choose.
•Self Decrypting Archive. Select this option to create a self
decrypting executable file. If you select this option, the file is
encrypted using a session key, which encrypts (and decrypts) using
a passphrase that you are asked to choose. The resulting executable
file can be decrypted by simply double-clicking on it and entering
the appropriate passphrase. This option is especially convenient for
users who are sending encrypted files to people who do not have
PGP software installed. Note that sender and recipient must be on
the same platform.
6. Click OK to encrypt and sign your mail.
If you have elected to sign the encrypted data, the Signing Key
Passphrase dialog box appears, as shown in Figure 4-2, requesting your
passphrase before the mail is sent.
7. Enter your passphrase and then click OK.
8. Paste the text into your email message, then send the message.
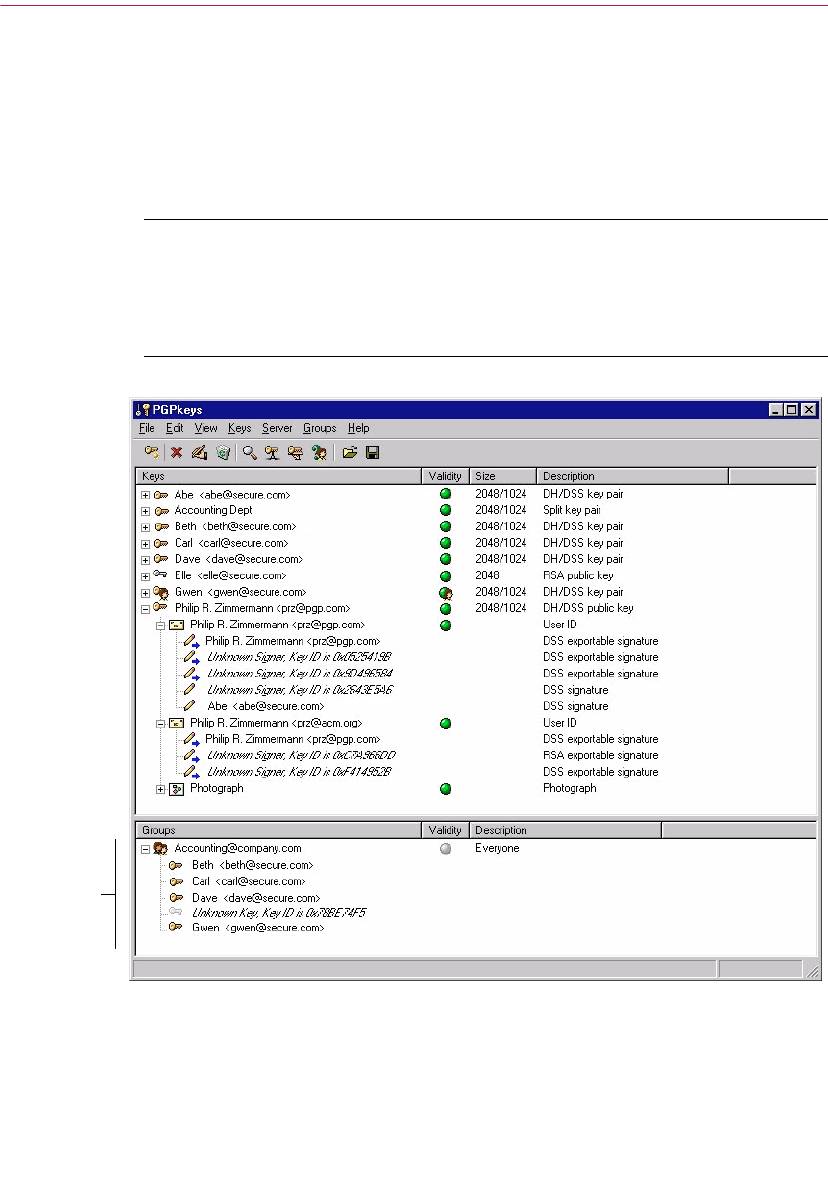
User’s Guide 77
Sending and Receiving Secure Email
Encrypting email to groups of recipients
You can use PGP to create group distribution lists. For example, if you want to
send encrypted mail to 10 people at usergroup@secure.com, you could create
a distribution list with that name. The Groups menu in PGPkeys contains the
Show Groups option that toggles the display of the Groups window in
PGPkeys. The Groups List window is displayed as in Figure 4-4.
NOTE: If you intend to encrypt information to all members of an existing
email distribution list, you must create a PGP group by the same name
as, and including the same members as, the email distribution list. For
example, if there is a usergroup@secure.com list set up in your email
application, you must create a usergroup@secure.com group in PGP.
Figure 4-4. PGPkeys with Groups window
Groups
window

Sending and Receiving Secure Email
78 PGP Freeware
Working with distribution lists
Use the Groups feature to create distribution lists and to edit the list of people
to whom you want to send encrypted email.
To create a group (distribution list)
1. Choose New Group from the Groups menu.
2. Enter a name for the group distribution list. Optionally, enter a group
description.
3. Click OK to create the distribution list.
The group distribution list is added to your keyring and can be viewed
in the Groups window.
To add members to a distribution list
1. In the PGPkeys window, select the users or lists you want to add to your
distribution list.
2. Drag the users from the PGPkeys window to the desired distribution list
in the Groups window.
NOTE: Members in a distribution list can be added to other
distribution lists.
To delete members from a distribution list
1. Within the distribution list, select the member to be deleted.
2. Press the DELETE key.
PGP asks you to confirm your choice.
To delete a distribution list
1. Select the distribution list to be deleted from the Groups window.
2. Press the DELETE key.
User’s Guide 79
Sending and Receiving Secure Email
To add a distribution list to another distribution list
1. Select the distribution list that you want to add to another list.
2. Drag the selected list into the list to which it will be added.
Sending encrypted and signed email to distribution lists
You can send encrypted email to groups of recipients once your PGP
distribution lists are created. See “Working with distribution lists” on page 78
for more information about creating and editing distribution lists.
To send encrypted and signed email to a distribution list
1. Address the mail to your mail distribution list.
The name of your encryption distribution list must correspond to the
name of the email distribution list.
2. Use your email application to compose your email message just as you
normally would.
3. When you have finished composing the text of your email message,
click to encrypt the text of your message, then click to sign the
message.
The PGP Key Recipients dialog box appears (Figure 4-1). You can select
the recipient’s public keys for the text you are encrypting or signing. The
options available are described in “To encrypt and sign with supported
email applications” on page 72.
4. Send the message.
Decrypting and verifying email
The quickest and easiest way to decrypt and verify the email sent to you is
with an application supported by the PGP plug-ins. Although the procedure
varies slightly between different email applications, when you are using an
email application supported by the plug-ins, you can perform the decryption
and verification operations by clicking the envelope icon in the message or
your application’s toolbar. In some cases you may need to select
Decrypt/Verify from the menu in your email application. In addition, if you
are using an application that supports the PGP/MIME standard, you can
decrypt and verify your email messages as well as any file attachments by
clicking an icon attached to your message.
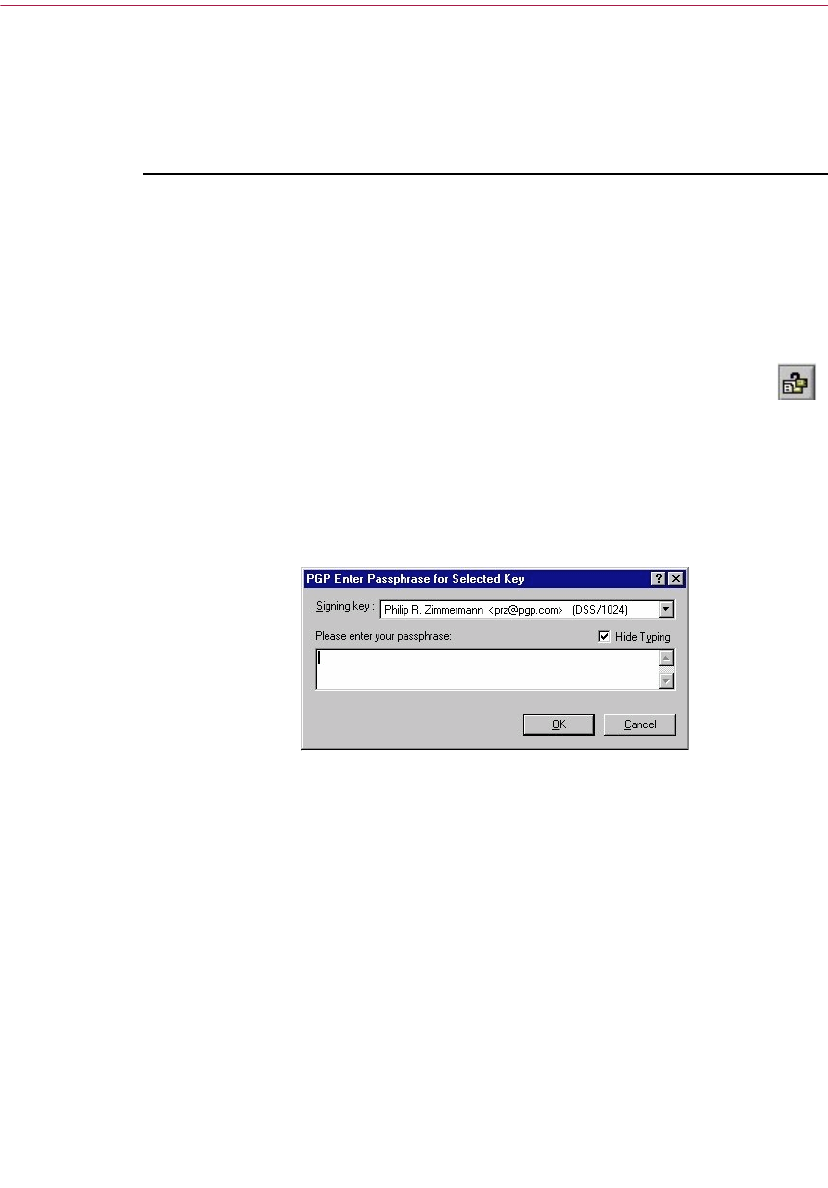
Sending and Receiving Secure Email
80 PGP Freeware
If you are using an email application that is not supported by the PGP
plug-ins, you will decrypt and verify your email messages via PGPtray. In
addition, if your email includes encrypted file attachments, you must decrypt
them separately via PGPtools or PGPtray.
To decrypt and verify from supported email applications
1. Open your email message just as you normally do.
You will see a block of unintelligible ciphertext in the body of your email
message.
2. Copy the cipher text to the Clipboard.
3. To decrypt and verify the message, click the locked envelope icon ( ).
To decrypt and verify attached files, decrypt them separately using
PGPtools or PGPtray.
The PGP Enter Passphrase dialog box appears, as shown in Figure 4-5,
asking you to enter your passphrase.
Figure 4-5. Signing Key Passphrase dialog box
4. Enter your passphrase, then click OK.
The message is decrypted. If it has been signed and you have the senders
public key, a message appears indicating whether the signature is valid.
If the message is encrypted with the Secure Viewer option enabled, an
advisory message appears. Click OK to continue. The decrypted
message appears on a secure PGP screen in a special TEMPEST attack
prevention font.
5. You can save the message in its decrypted state, or you can save the
original encrypted version so that it remains secure.

User’s Guide 81
Sending and Receiving Secure Email
NOTE: Messages encrypted with the Secure Viewer option enabled
cannot be saved in their decrypted state.
To decrypt and verify from non-supported email applications
1. Open your email message just as you normally do.
You will see a block of unintelligible ciphertext in the body of your email
message.
2. In PGPtray, select Decrypt/Verify.
If the email message includes encrypted file attachments, decrypt them
separately with PGPtools or PGPtray.
The PGP Enter Passphrase dialog box appears, as shown in Figure 4-5,
asking you to enter your passphrase.
3. Enter your passphrase, then click OK.
The message is decrypted. If it has been signed, a message appears
indicating whether the signature is valid.
If the message is encrypted with Secure Viewer enabled, an advisory
message appears. Click OK to continue. The decrypted message appears
on a secure PGP screen in a special TEMPEST attack prevention font.
4. You can save the message in its decrypted state, or you can save the
original encrypted version so that it remains secure.
NOTE: Messages encrypted with the Secure Viewer option enabled
cannot be saved in their decrypted state.

Sending and Receiving Secure Email
82 PGP Freeware

5
User’s Guide 83
5Using PGP for Secure File
Storage
This chapter describes how to use PGP to securely maintain files. It describes
how to use PGP to encrypt, decrypt, sign and verify files either for email or for
secure storage on your computer. It also describes the PGP Wipe and Free
Space Wiper functions, which delete files by erasing their contents completely
from your computer.
Using PGP to encrypt and decrypt files
You can use PGP to encrypt and sign files to use as email attachments. You can
also use the techniques described in this chapter to encrypt and sign files so
that you can store them securely on your computer.
Using the PGP right-click menu to encrypt and sign
Use the PGP right-click menu to send an encrypted file as an attachment with
your email message, or to encrypt a file to protect it on your computer.
To encrypt and sign using the right-click menu
1. In Windows Explorer, right-click on the file or files that you want to
encrypt.
2. Choose one of the following options from the PGP right-click menu:
•Encrypt. Select this option to only encrypt the file or files you
selected.
•Sign. Select this option to only sign the file or files you selected.
•Encrypt and Sign. Select this option to both encrypt and sign the file
or files you selected.
The PGP Key Selection dialog box appears, as shown in Figure 5-1.
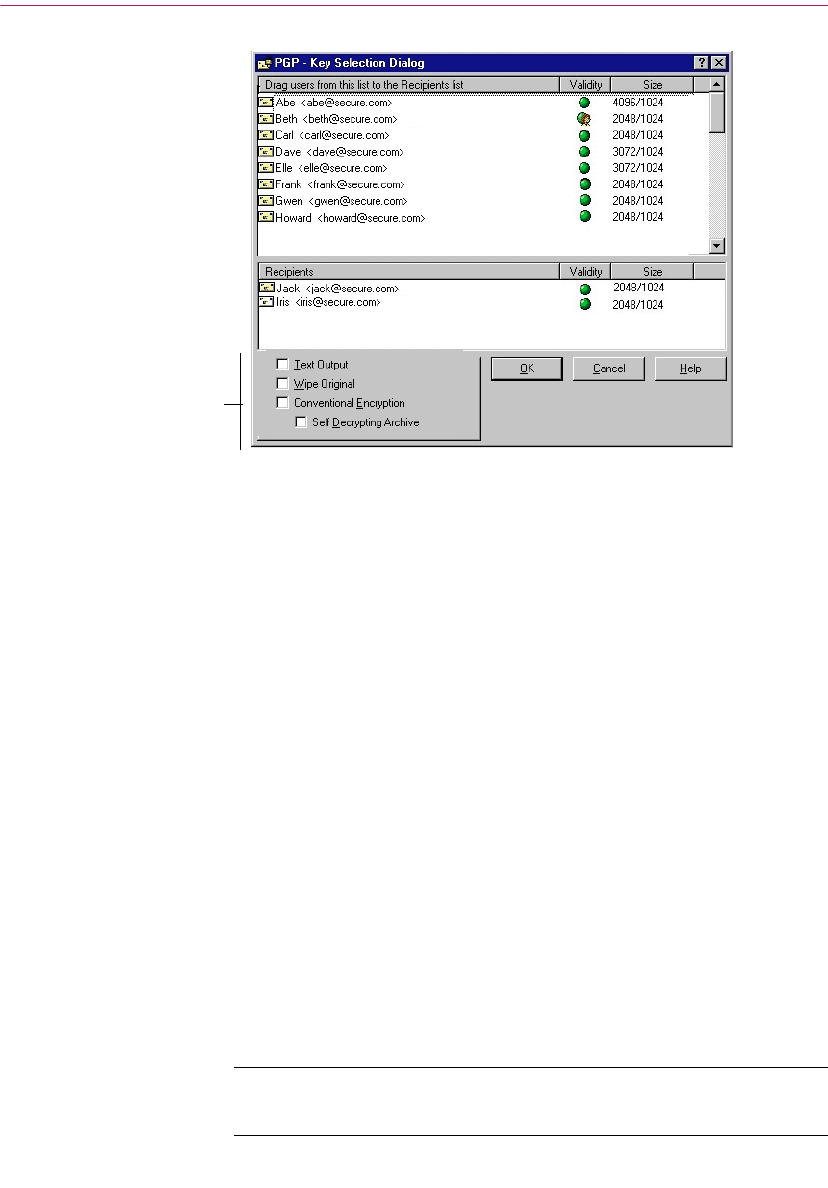
Using PGP for Secure File Storage
84 PGP Freeware
Figure 5-1. PGP Recipients dialog box
You can select the recipient’s public keys for the file you are encrypting
or signing.
3. Select the public keys by dragging them to the Recipients list.
You can choose from the following encryption options depending on the
type of data you are encrypting:
•Text Output. When sending files as attachments with some email
applications, you may need to select the Text Output checkbox to
save the file as ASCII text. This is sometimes necessary in order to
send a binary file using older email applications. Selecting this
option increases the size of the encrypted file by about 30 percent.
•Wipe Original. Select this checkbox to overwrite the original
document that you are encrypting, so that your sensitive
information is not readable by anyone who can access your hard
disk.
•Secure Viewer. Select this checkbox to protect text from TEMPEST
attacks upon decryption. If you select this option, the data is
displayed in a special TEMPEST attack prevention font that is
unreadable to radiation capturing equipment upon decrypting. For
more information about TEMPEST attacks, see “Vulnerabilities” on
page 206.
NOTE: This option is only available when encrypting text or
text files.
Encryption options

User’s Guide 85
Using PGP for Secure File Storage
•Conventional Encrypt. Select this checkbox to rely on a common
passphrase rather than on public key cryptography. The file is
encrypted using a session key, which encrypts (and decrypts) using
a passphrase that you are asked to choose.
•Self Decrypting Archive. Select this checkbox to create a self
decrypting executable file. If you select this option, the file is
encrypted using a session key, which encrypts (and decrypts) using
a passphrase that you are asked to choose. The resulting executable
file can be decrypted by simply double-clicking on it and entering
the appropriate passphrase. This option is especially convenient for
users who are sending encrypted files to people who do not have
PGP software installed. Note that sender and recipient must be on
the same platform.
If you are signing the files, you are asked to supply your passphrase.
After encryption, if you look in the folder where the original file was
located, you will find a file with the specified name represented by one
of four icons:
If you are encrypting or signing a folder, the output may be in a new
folder, depending on the options you selected.
Using PGPtools to encrypt and sign
To encrypt and sign using PGPtools
1. Open PGPtools.
2. In Windows Explorer, select the file or files that you want to encrypt.
You can select multiple files, but you must encrypt and sign each of them
individually.
3. Drag the file(s) onto the Encrypt, Sign, or Encrypt and Sign button
PGPtools.
The PGP Recipients dialog box appears, as shown in Figure 5-1.
4. Select the public keys by dragging them to the Recipients list.
encrypted with
encrypted with
standard output text output self decrypting
archive output self extracting
archive output

Using PGP for Secure File Storage
86 PGP Freeware
5. You can choose from the following encryption options depending on the
type of data you are encrypting:
•Text Output. When sending files as attachments with some email
applications, you may need to select the Text Output checkbox to
save the file as ASCII text. This is sometimes necessary in order to
send a binary file using older email applications. Selecting this
option increases the size of the encrypted file by about 30 percent.
•Wipe Original. Select this checkbox to overwrite the original
document that you are encrypting, so that your sensitive
information is not readable by anyone who can access your hard
disk.
•Secure Viewer. Select this checkbox to protect text from TEMPEST
attacks upon decryption. If you select this option, the data is
displayed in a special TEMPEST attack prevention font that is
unreadable to radiation capturing equipment upon decrypting. For
more information about TEMPEST attacks, see “Vulnerabilities” on
page 206.
NOTE: This option is only available when encrypting text or
text files.
•Conventional Encrypt. Select this checkbox to rely on a common
passphrase rather than on public key cryptography. The file is
encrypted using a session key, which encrypts (and decrypts) using
a passphrase that you will be asked to choose.
•Self Decrypting Archive. Select this checkbox to create a self
decrypting executable file. If you select this option, the file is
encrypted using a session key, which encrypts (and decrypts) using
a passphrase that you are asked to choose. The resulting executable
file can be decrypted by simply double-clicking on it and entering
the appropriate passphrase. This option is especially convenient for
users who are sending encrypted files to people who do not have
PGP software installed. Note that sender and recipient must be on
the same platform.
6. Click OK.
If you are signing the files, you are asked to supply your passphrase.
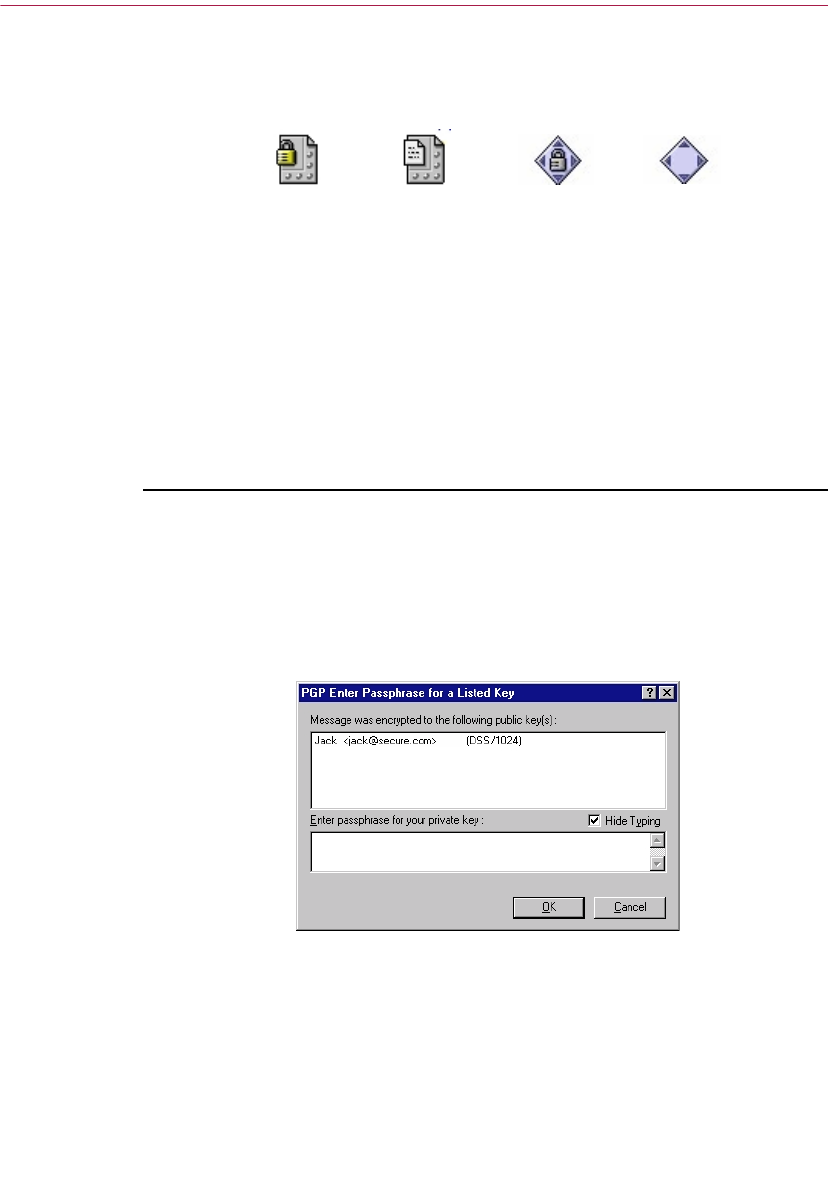
User’s Guide 87
Using PGP for Secure File Storage
After encryption, if you look in the folder where the original file was
located, you will find a file with the specified name represented by one
of four icons:
If you are encrypting or signing a folder, the output may be in a new
folder, depending on the options you selected.
Using PGPtray to decrypt and verify
If the email you receive has file attachments, and you are not using a
PGP/MIME-compliant email application, you must decrypt them from the
Windows clipboard.
To decrypt and verify files using PGPtray
1. In Windows Explorer, select the file or files that you want to decrypt and
verify.
2. Choose Decrypt/Verify from PGPtray.
The passphrase dialog box appears, as shown in Figure 5-2.
Figure 5-2. Passphrase dialog box
3. Enter your passphrase and then click OK.
The file is decrypted. If it has been signed, a message appears indicating
whether the signature is valid.
encrypted with
encrypted with
standard output text output self decrypting
archive output self extracting
archive output

Using PGP for Secure File Storage
88 PGP Freeware
If the text file is encrypted with Secure Viewer enabled, an advisory
message appears. Click OK to continue. The decrypted text appears on a
secure PGP screen in a special TEMPEST attack prevention font.
4. You can save the message in its decrypted state, or you can save the
original encrypted version so that it remains secure.
NOTE: Messages encrypted with the Secure Viewer option enabled
cannot be saved in their decrypted state. They are only viewable on
the secure PGP screen after decryption.
Using PGPtools to decrypt and verify
To decrypt and verify using PGPtools
1. In Windows Explorer, select the file or files that you want to decrypt.
2. Drag the file onto the Decrypt/Verify button in PGPtools.
The PGP Enter Passphrase dialog box appears, as shown in Figure 5-2,
asking you to enter your passphrase.
3. Enter your passphrase and then click OK.
If the file is signed, a message appears indicating whether the signature
is valid.
If the text file is encrypted with Secure Viewer enabled, an advisory
message appears. Click OK to continue. The decrypted text appears on a
secure PGP screen in a special TEMPEST attack prevention font.
4. You can save the message in its decrypted state, or you can save the
original encrypted version so that it remains secure.
NOTE: Messages encrypted with the Secure Viewer option enabled
cannot be saved in their decrypted state. They are only viewable on
the secure PGP screen after decryption.
Signing and decrypting files with a split key
Once a key is split among multiple shareholders, attempting to sign or decrypt
with it will cause PGP to automatically attempt to rejoin the key. There are two
ways to rejoin the key, locally and remotely.

User’s Guide 89
Using PGP for Secure File Storage
To rejoin key shares locally requires the shareholders presence at the rejoining
computer. Each shareholder is required to enter the passphrase for their key
share.
To rejoin key shares remotely requires the remote shareholders to authenticate
and decrypt their keys before sending them over the network. PGP’s
Transport Layer Security (TLS) provides a secure link to transmit key shares
which allows multiple individuals in distant locations to securely sign or
decrypt with their key share.
ËIMPORTANT: Before receiving key shares over the network, you
should verify each shareholder’s fingerprint and sign their public key to
ensure that their authenticating key is legitimate. To learn how to verify
a keypair, see “Verify with a digital fingerprint” on page 69.
To rejoin a split key
1. Contact each shareholder of the split key. To rejoin a key shares locally,
the shareholders of the key must be present.
To collect key shares over the network, ensure that the remote
shareholders are prepared to send their key share file. Remote
shareholders must have:
– their key share file and password
– a public key (for authentication to the computer that is collecting the
key shares)
– a network connection
– the IP address or Domain Name of the computer that is collecting
the key shares
2. At the rejoining computer, use Windows Explorer to select the file(s) that
you want to sign or decrypt with the split key.
3. Right-click on the file(s) and select Sign or Decrypt from the PGP menu.
The PGP Enter Passphrase for Selected Key dialog box appears with the
split key selected.
4. Click OK to reconstitute the selected key.
The Key Share Collection dialog box appears, as shown in Figure 5-3.
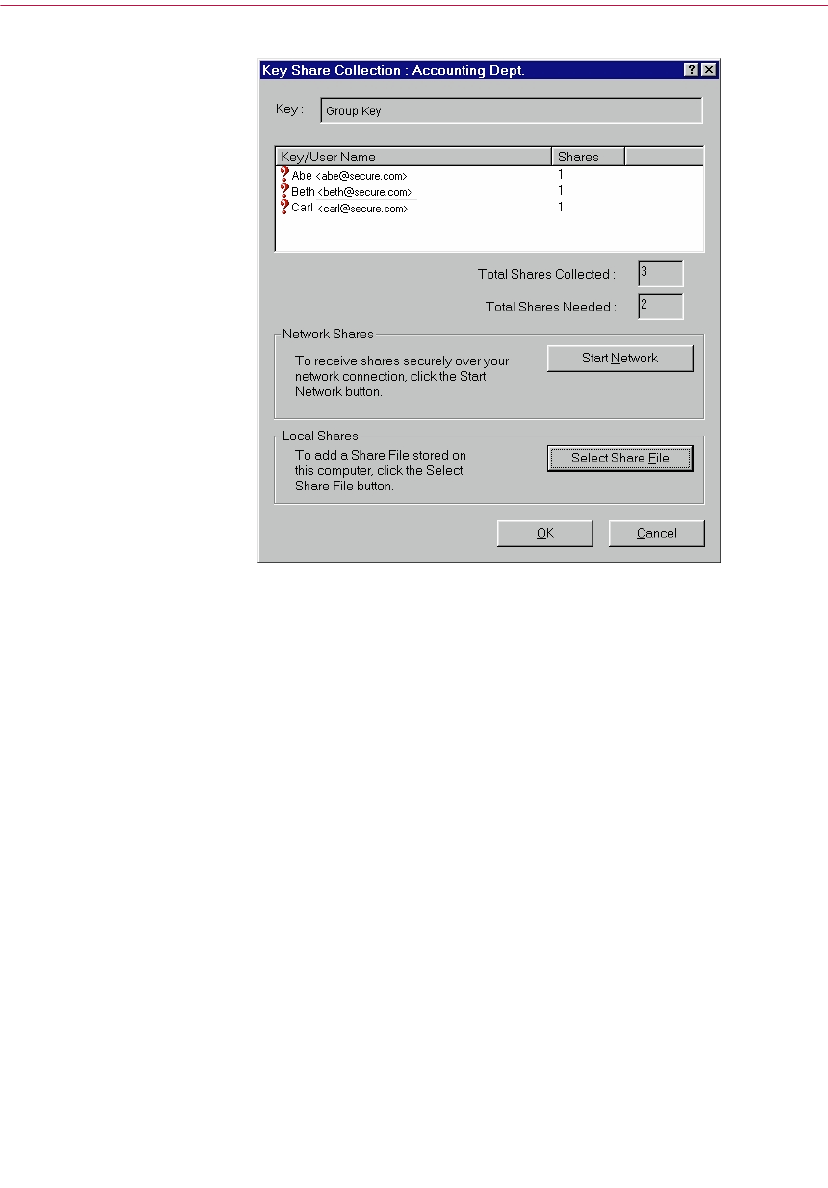
Using PGP for Secure File Storage
90 PGP Freeware
Figure 5-3. Key Share Collection dialog box
5. Do one of the following:
•If you are collecting the key shares locally, click Select Share File
and then locate the share files associated with the split key. The
share files can be collected from the hard drive, a floppy disk, or a
mounted drive. Continue with Step 6.
•If you are collecting key shares over the network, click Start
Network.
The Passphrase dialog box opens. In the Signing Key box, select the
keypair that you want to use for authentication to the remote system
and enter the passphrase. Click OK to prepare the computer to
receive the key shares.
The status of the transaction is displayed in the Network Shares
box. When the status changes to “Listening,” the PGP application is
ready to receive the key shares.
At this time, the shareholders must send their key shares. To learn
how to send key shares to the rejoining computer, see “To send your
key share over the network” on page 91.
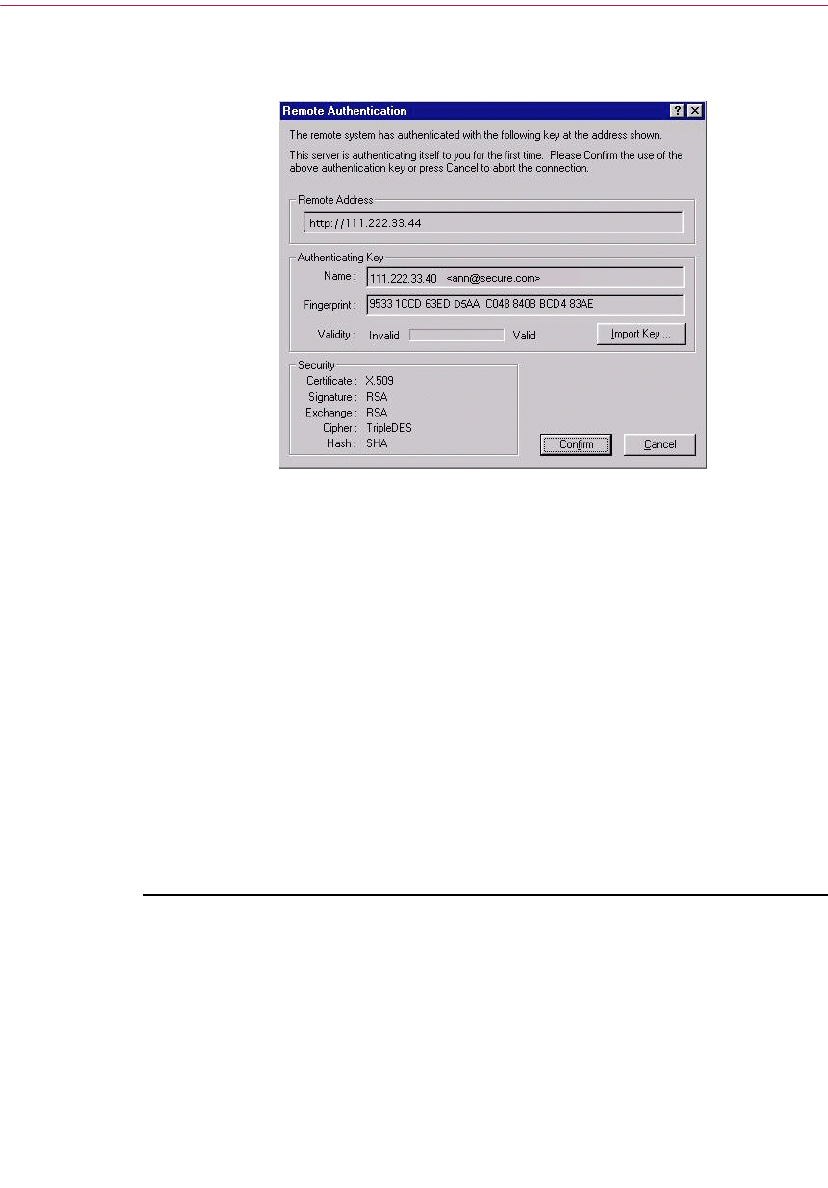
User’s Guide 91
Using PGP for Secure File Storage
When a key is received, the Remote Authentication dialog box
appears, as shown in Figure 5-4.
Figure 5-4. Remote Authentication dialog box
If you have not signed the key that is being used to authenticate the
remote system, the key will be considered invalid. Although you can
rejoin the split key with an invalid authenticating key, it is not
recommended. You should verify each shareholder’s fingerprint and
sign their public key to ensure that the authenticating key is legitimate.
Click Confirm to accept the share file.
6. Continue collecting key shares until the value for Total Shares Collected
matches the value for Total Shares Needed in the Key Shares Collection
dialog box.
7. Click OK.
The file is signed or decrypted with the split key.
To send your key share over the network
1. When you are contacted by the person who is rejoining the split key,
make sure that you have these items:
– your key share file and password
– your keypair (for authentication to the computer that is collecting
the key shares)
– a network connection
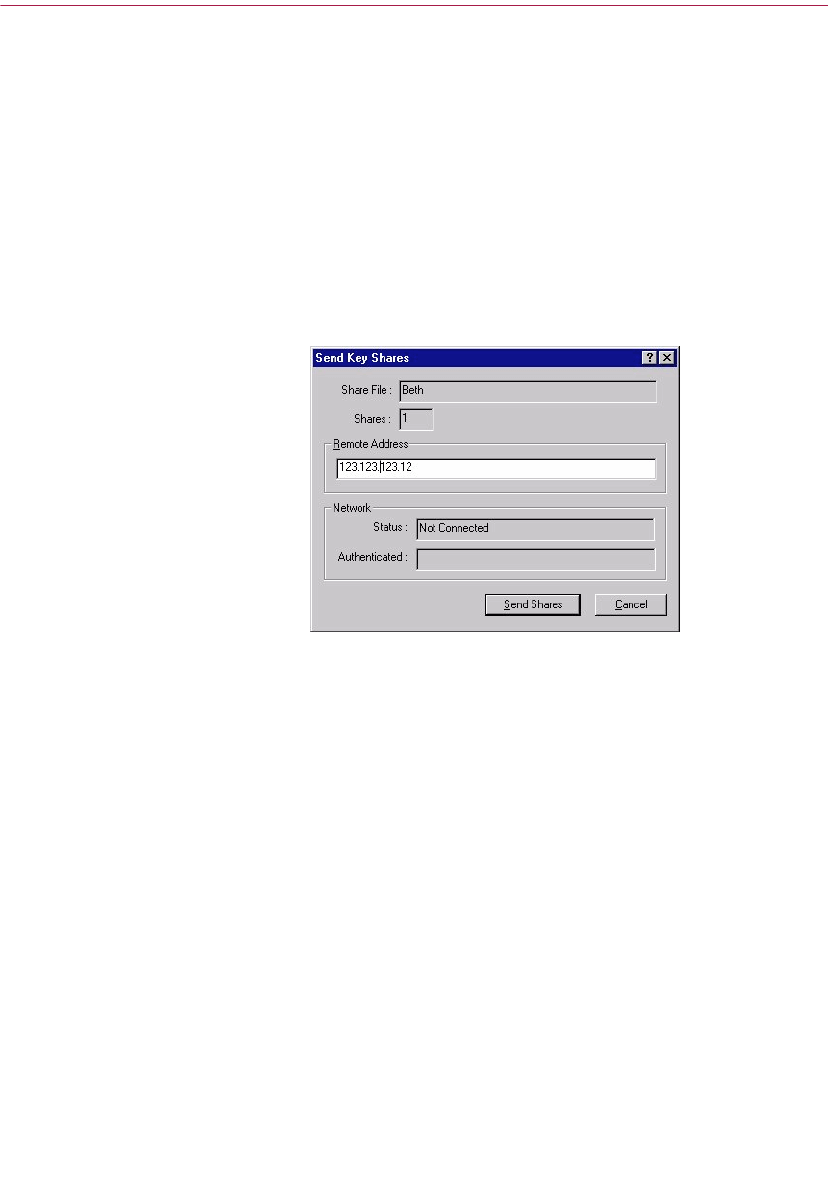
Using PGP for Secure File Storage
92 PGP Freeware
– the IP address or Domain Name of the rejoining computer collecting
the key shares
2. Select Send Key Shares on the PGPkeys File menu.
The Select Share File dialog box appears.
3. Locate your key share and then click Open.
The PGP Enter Passphrase dialog box appears.
4. Enter your passphrase and then click OK.
The Send Key Shares dialog box appears, as shown in Figure 5-5.
Figure 5-5. Send Key Shares dialog box
5. Enter the IP address or the Domain Name of the rejoining computer in
the Remote Address text box, then click Send Shares.
The status of the transaction is displayed in the Network Status box.
When the status changes to “Connected,” you are asked to authenticate
yourself to the rejoining computer.
The Remote Authentication dialog box appears asking you to confirm
that the remote computer is the one to whom you want to send your key
share.
6. Click Confirm to complete the transaction.
After the remote computer receives your key shares and confirms the
transaction, a message box appears stating that the shares were
successfully sent.
7. Click OK.
8. Click Done in the Key Shares window when you have completed
sending your key share.

User’s Guide 93
Using PGP for Secure File Storage
Using PGP Wipe to delete files
The Wipe option on PGPtools deletes files and their contents. The Wipe
feature is a secure way of permanently removing a file and its contents from
the hard drive of your computer. When you delete a file normally by placing
it in the Trash, the name of the file is removed from the file directory, but the
data in the file stays on the disk. Wipe removes all traces of a file’s data so that
no one can use a software tool to recover the file.
To permanently delete a file using the PGP right-click menu
1. In Windows Explorer, select the file or files that you want to wipe.
2. Right-click on the file and then choose Wipe from the menu.
A confirmation dialog box appears.
3. Click OK to permanently erase the file.
To stop wiping the file before the task is completed, click Cancel.
NOTE: Clicking Cancel during file wipe can leave remnants of the
file behind.
To permanently delete a file using PGPtools
1. In Windows Explorer, select the file or files that you want to wipe.
2. Drag the file onto the Wipe button ( ) in PGPtools.
A confirmation dialog box appears.
3. Click OK to permanently erase the file.
To stop wiping the file before the task is completed, click Cancel.
NOTE: Clicking Cancel during file wipe can leave remnants of the
file behind.

Using PGP for Secure File Storage
94 PGP Freeware
Even on systems with virtual memory, PGP correctly writes over all the
contents of the file. It is worth noting that some application programs save the
file prior to encrypting it and may have leave fragments of the file on your disk
in locations which are no longer considered part of the file. For more
information, see “Swap files or virtual memory” on page 209. You can use PGP
Free Space Wiper to wipe all free space on your disk to solve this problem. See
the next section for information about Free Space Wiper. Also, be aware that
many programs automatically save files in progress, so there may be back-up
copies of the file that you want to delete.
Using the PGP Free Space Wiper to clean free
space on your disks
As you create and delete files on your computer, the data contained in those
files remains on the drive. PGPtools can be used to securely wipe the data in a
file before it is deleted to negate the possibility of the data ever being
recovered.
Many programs create temporary files while you edit the contents of the
documents. These files are deleted when you close the documents but the
actual document data is left scattered about your drive. To help reduce the
chance that your document’s data can later be recovered, Network Associates
recommends that you securely wipe the free space on your drives as well as
securely deleting sensitive documents.
To wipe free space on your disks
+WARNING: Before running the PGP Free Space Wiper, file sharing must
be turned off and all applications on the volume or disk that you want to
wipe must be closed.
1. Open PGPtools.
2. Click the Wipe Free Space button ( ) in PGPtools.
The PGP Free Space Wiper Welcome screen appears.
3. Read the information carefully, then click Next to advance to the next
dialog box.
The PGP Free Space Wiper prompts you to select the volume you want
to wipe and the number of passes you want to perform.
4. In the Volume box, select the disk or volume that you want PGP to wipe.
Then, select the number of passes that you want PGP to perform. The
recommended guidelines are:
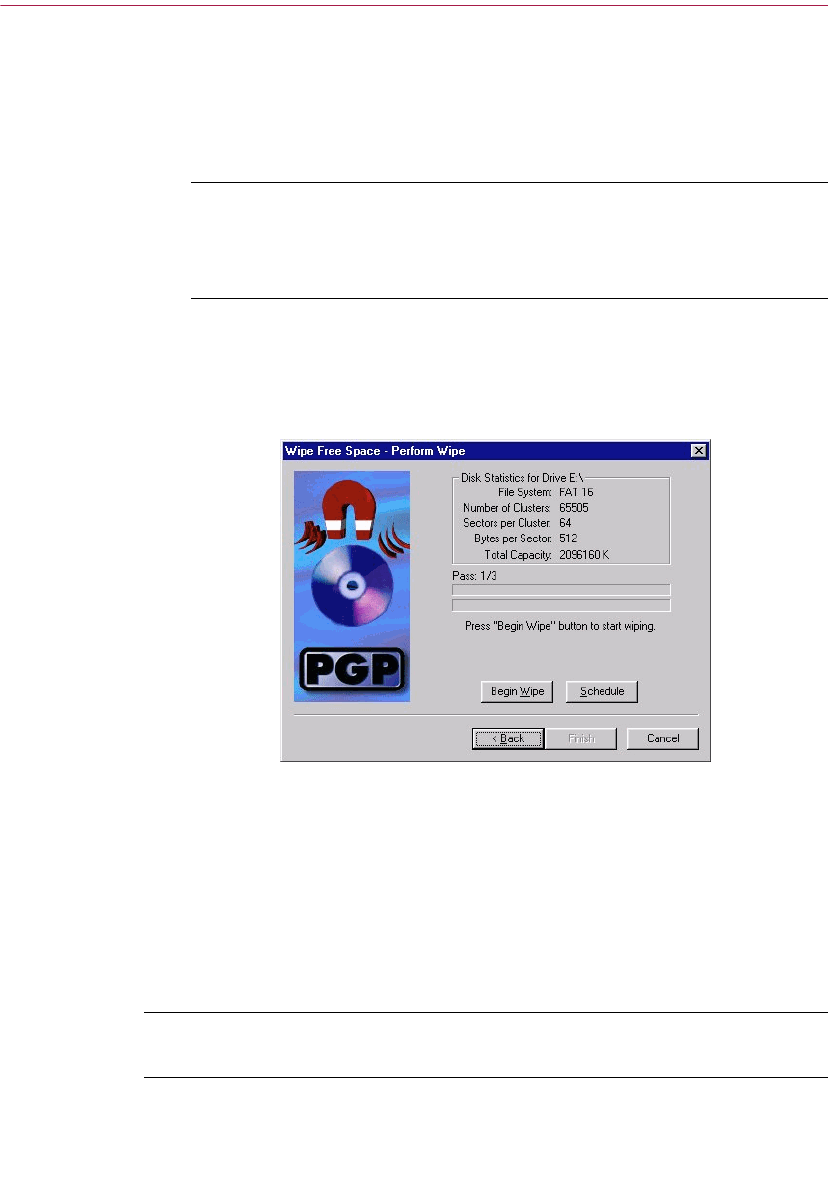
User’s Guide 95
Using PGP for Secure File Storage
• 3 passes for personal use.
• 10 passes for commercial use.
• 18 passes for military use.
• 26 passes for maximum security.
NOTE: Commercial data recovery companies have been known to
recover data that has been over written up to 9 times. PGP uses
highly sophisticated patterns during each wipe to ensure that your
sensitive data cannot be recovered.
5. Click Next to continue.
The Perform Wipe dialog box opens, as shown in Figure 5-6, and
displays statistical information about the drive or volume you selected.
Figure 5-6. Free Space Wiper
(Perform Wipe dialog box)
6. Click the Begin Wipe button to start freespace wiping your disk or
volume.
The PGP Free Space Wiper scans and then wipes leftover fragments from
your disk or volume.
7. When the wipe session ends, click Finish.
+WARNING: Clicking Cancel during file wipe can leave remains of the
file on your computer.
Using PGP for Secure File Storage
96 PGP Freeware
Scheduling Free Space Wiper
You can use the Windows Task Scheduler to schedule periodic secure wiping
of freespace on your disks.
ËIMPORTANT: To use this scheduling feature, you must have the
Windows Task Scheduler installed on your system. If you do not have
the Task Scheduler installed on your system, you can download it from
the Microsoft website (http://www.microsoft.com).
To schedule freespace wiping
1. Follow steps 1 - 5 in “To wipe free space on your disks” on page 94.
The Perform Wipe dialog box opens, as shown in Figure 5-6, and
displays statistical information about the drive or volume you selected.
Figure 5-7. Free Space Wiper
(Perform Wipe dialog box)
2. Click the Schedule button to start freespace wiping your disk or volume.
The Schedule Free Space Wipe dialog box appears.
3. Click OK to continue.
If you are running Windows NT, the Windows NT Confirm Password
dialog box appears.
User’s Guide 97
Using PGP for Secure File Storage
Enter your Windows NT login password in the first text box. Press the
TAB key to advance to the next text box and confirm your entry by
entering your password again. Click OK.
The Windows Task Schedule dialog box appears, as shown in Figure
5-8.
Figure 5-8. Windows Task Schedule dialog box
4. Choose how often you want the task to run from the Schedule Task area.
Your choices are:
•Daily. This runs your task once at the time you specify on the days
you indicate. Click OK to close the dialog box, then enter in the Start
Time text box the time each day when the task will run.
•Weekly. This runs your task on a weekly basis at the date and time
you specify. Specify how many weeks between disk wipes in the
text box provided, then choose a day from the Schedule Task
Weekly list.
•Monthly. This runs your task once each month on the day and at the
time you specify. Enter the time text box provided, then enter the
day of the month on which you want the task to run. Click Select
Months to specify which months the task will run.

Using PGP for Secure File Storage
98 PGP Freeware
•Once. This runs your task exactly once on the date and at the time
you specify. Enter the time in the text box provided, then select a
month and a date from the lists Run On text box.
•At System Start up. This runs your task only upon system start up.
• At Logon. This runs your task when you log on to your computer.
• When Idle. This runs your task when your system is idle for the
amount of time you specify in the minutes text box.
5. Click Advanced to open a dialog box where you can select additional
scheduling options, such as the start date, the end date, and the duration
of the task.
6. Click OK.
A confirmation dialog box appears. Your freespace wiping task is now
scheduled.

6
User’s Guide 99
6Managing Keys and Setting
PGP Options
This chapter explains how to examine and manage the keys stored on your
keyrings. It also describes how to set your options to suit your particular
computing environment.
Managing your keys
The keys you create, as well as those you collect from others, are stored on
keyrings, which are essentially files stored on your hard drive or on a floppy
disk. Normally your private keys are stored in a file named Secring.skr and
your public keys are stored in another file named Pubring.pkr. These files are
usually located in the PGP Keyrings folder.
NOTE: As a result of your private key being encrypted automatically
and your passphrase being uncompromised, there is no danger in
leaving your keyrings on your computer. However, if you are not
comfortable storing your keys in the default location, you can choose a
different filename or location. For details, see “Setting PGP options,”
later in this chapter.
Occasionally, you may want to examine or change the attributes associated
with your keys. For instance, when you obtain someone’s public key, you
might want to identify its type (either RSA or Diffie-Hellman/DSS), check its
fingerprint, or determine its validity based on any digital signatures included
with the key. You may also want to sign someone’s public key to indicate that
you believe it is valid, assign a level of trust to the key’s owner, or change a
passphrase for your private key. You may even want to search a key server for
someone’s key. You perform all of these key-management functions from
PGPkeys.
Managing Keys and Setting PGP Options
100 PGP Freeware
The PGPkeys window
To open the PGPkeys window, open the Start menu, click
Programs-->PGP-->PGPkeys, or click the PGPtray icon ( ) in the System
tray and then click Launch PGPkeys.
The PGPkeys window, as shown in Figure 6-1, displays the keys you have
created for yourself, as well as any public keys you have added to your public
keyring.
Figure 6-1. PGPkeys window
A key and user icon ( ) represent the private and public key pairs you have
created for yourself, and single keys ( ) represent the public keys you have
collected from others. If you have more than one type of key, you will notice
that RSA-type keys are silver keys and Diffie-Hellman/DSS keys are gold
keys.
By clicking on the plus sign at the left side of the key icon, you can expand the
entries to reveal the user ID and email address for the owner of the key as
represented by the envelope icons ( ). By clicking the plus sign next to an
envelope icon, you can see the signatures of any users who have certified the
user ID. If you don’t want to expand each key individually, simply select the
keys of interest and then choose Expand Selection from the Edit menu.

User’s Guide 101
Managing Keys and Setting PGP Options
PGPkeys attribute definitions
Some of the attributes associated with keys can be displayed in the main
PGPkeys window. You can choose which attributes you want to make visible
by selecting them in the View menu. For each selected item in the View menu,
PGPkeys displays a column in the main window. If you want to change the
order of these columns, click and drag the header of the column you want to
move.
Table 6-1. PGPkeys attribute overview
Keys Shows an iconic representation of the key along with the user name and email address
of the owner, and the names of the key’s signers.
Validity Indicates the level of confidence that the key actually belongs to the alleged owner.
The validity is based on who has signed the key and how well you trust the signer(s) to
vouch for the authenticity of a key. The public keys you sign yourself have the highest
level of validity, based on the assumption that you only sign someone’s key if you are
totally convinced that it is valid. The validity of any other keys, which you have not
personally signed, depends on the level of trust you have granted to any other users
who have signed the key. If there are no signatures associated with the key, then it is
not considered valid, and a message indicating this fact appears whenever you encrypt
to the key.
Validity is indicated by either circle or bar icons, depending upon your Advanced
Options “Display marginal validity level” setting (see “Setting advanced options” later
in this chapter). If set, then validity appears as:
, an empty bar for invalid keys
, a half-filled bar for marginally valid keys
, a filled bar for valid keys that you do not own
, a striped bar for valid keys that you do own
If not set, then validity appears as:
, a gray circle for invalid keys and marginally valid keys if the Advanced
Options “Treat marginally valid keys as invalid” is set
, a green circle for valid keys that you do not own
In a corporate environment, your security officer may sign users’ keys with the
Corporate Signing Key. Keys signed with the Corporate Signing Key are usually
assumed to be completely valid. See Chapter 2, “Using PGP,” for more information.
Size Shows the number of bits used to construct the key. Generally, the larger the key, the
less chance that it will ever be compromised. However, larger keys require slightly
more time to encrypt and decrypt data than do smaller keys. When you create a
Diffie-Hellman/DSS key, there is one number for the Diffie-Hellman portion and
another number for the DSS portion. The DSS portion is used for signing, and the
Diffie-Hellman portion for encryption.

Managing Keys and Setting PGP Options
102 PGP Freeware
Description Describes the type of information displayed in the Keys column: key type, type of ID, or
signature type.
Additional
Decryption
Key
Shows whether the key has an associated Additional Decryption Key.
Key ID A unique identifying number associated with each key. This identification number is
useful for distinguishing between two keys that share the same user name and email
address.
Trust Indicates the level of trust you have granted to the owner of the key to serve as an
introducer for the public keys of others. This trust comes into play when you are unable
to verify the validity of someone’s public key for yourself and instead rely on the
judgment of other users who have signed the key. When you create a key pair, they are
considered implicitly trustworthy, as shown by the striping in the trust and validity bars,
or by a green dot and user icon.
When you receive a public key that has been signed by another of the user’s keys on
your public keyring, the level of authenticity is based on the trust you have granted to
the signer of that key. You assign a level of trust, either Trusted, Marginal, or Untrusted,
in the Key Properties dialog box.
Expiration Shows the date when the key will expire. Most keys are set to Never; however, there
may be instances when the owner of a key wants it to be used for only a fixed period of
time.
Creation Shows the date when the key was originally created. You can sometimes make an
assumption about the validity of a key based on how long it has been in circulation. If
the key has been in use for a while, it is less likely that someone will try to replace it
because there are many other copies in circulation. Never rely on creation dates as the
sole indicator of validity.
User’s Guide 103
Managing Keys and Setting PGP Options
Examining a key’s properties
In addition to the general attributes shown in the PGPkeys window, you can
also examine and change other key and subkey properties.
The Key Properties window includes the General panel, Subkey panel, and
Revokers panel, each of which gives you necessary information about a
person’s public key, or the ability to create, configure, edit, or delete attributes
in your own public key. The following sections describe each element in more
detail.
To access the properties for a particular key, select the desired key and then
choose Properties from the Keys menu. The Key Property dialog box appears
as shown in Figure 6-2.
Figure 6-2. Key Property dialog box
(General panel)
General Key Properties panel
To access the General Key Properties panel for a particular key, select the
desired key and then choose Properties from the Keys menu.
Refer to Table 6-2, “General Key Properties panel attributes,”for a description
of each attribute available in the General Key Properties panel.

Managing Keys and Setting PGP Options
104 PGP Freeware
Table 6-2. General Key Properties panel attributes
Key ID A unique identifying number associated with each key. This identification number
is useful for distinguishing between two keys that share the same user name and
email address.
Key Type The key type, either RSA or Diffie-Hellman/DSS.
Key Size The size of the key.
Created The date when the key was created.
Expires The date when the key expires. Owners specify this date when they create their
keys, and the value is usually set to Never. However, some keys are set to expire
on a particular date if the owner wants them to be used for a limited period of time.
Cipher CAST, Triple DES, or IDEA. This is the “preferred” encryption algorithm by which
the owner of the key requests that you encrypt to his public key. If this algorithm is
allowed in your Advanced Options, it will be used whenever encrypting to this
key.
Join Key Opens the Key Share Collection dialog box. Available for split keys only. See
“Signing and decrypting files with a split key” on page 88 for information about
rejoining split keys.
Enabled Indicates whether the key is currently enabled. When a key is disabled, it is
dimmed in the PGPkeys window and is not available for performing any PGP
functions except Decrypt and Verify. However, the key remains on your keyring
and you can enable it again at any time. To enable or disable a key, select or clear
the Enabled checkbox. (The checkbox is not visible for implicitly trusted keys.)
This feature is useful for preventing seldom-used keys from cluttering up the Key
Selection dialog box when you are sending encrypted email.
Change
Passphrase Changes the passphrase for a private key. If you ever think that your passphrase is
no longer a secret, click this button to enter a new passphrase.
It is a good idea to change your passphrase every 6 months or so. For instructions
on changing your passphrase, see “Changing your Passphrase” later in this
chapter.
Fingerprint A unique identification number that is generated when the key is created. This is
the primary means by which you can check the authenticity of a key. The best way
to check a fingerprint is to have the owner read their fingerprint to you over the
phone so that you can compare it with the fingerprint shown for your copy of their
public key. The fingerprint can be viewed in two ways, in a unique list of words or in
its hexadecimal format.
Hexadecimal Displays the fingerprint as a unique series of hexadecimal numbers. By default,
this option is disabled and the fingerprint is displayed as a unique series of words.
Trust Model Indicates the validity of the key based on its certification and the level of trust you
have in the owner to vouch for the authenticity of someone else’s public key. You
set the trust level by sliding the bar to the appropriate level (Trusted, Marginal, or
Untrusted). The bar is disabled for revoked, expired, and implicitly trusted keys.
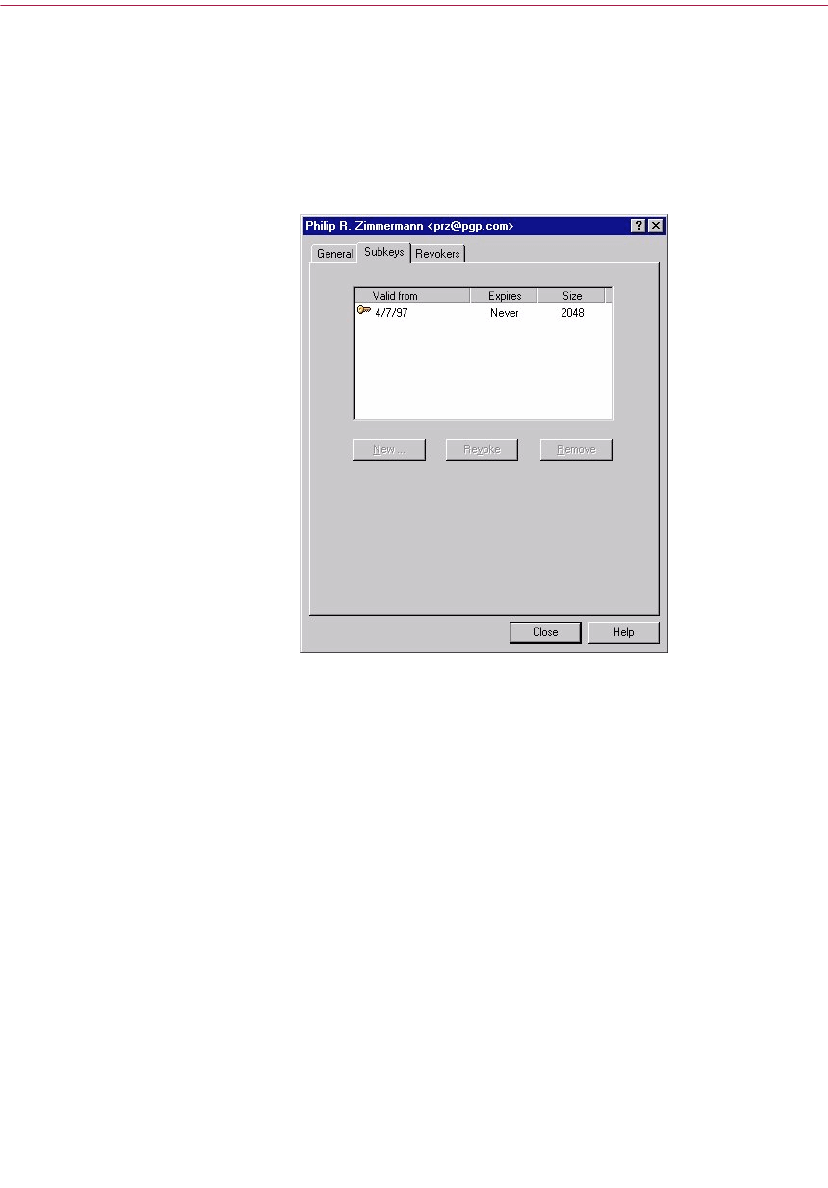
User’s Guide 105
Managing Keys and Setting PGP Options
Subkey properties window
To access the Subkey Properties panel for a particular key, select the desired
key and then choose Properties from the Keys menu. The Key Properties
dialog box appears, as shown in Figure 6-2 on page 103. Click the Subkey tab.
The Subkey panel appears as shown in Figure 6-3.
Figure 6-3. Key Property dialog box
(Subkey panel)
Refer to Table 6-2, “General Key Properties panel attributes,” for a description
of each attribute and task available in the Subkey panel.

Managing Keys and Setting PGP Options
106 PGP Freeware
Table 6-3. Subkey properties panel
Designated revoker window
To access the Revokers panel for a particular key, select the desired key and
then choose Properties from the Keys menu. The Key Properties dialog box
appears, as shown in Figure 6-2 on page 103. Click the Revokers tab. The
Revokers panel appears as shown in Figure 6-3.
Valid From The date when the subkey becomes active.
Expires The date when the subkey expires. Owners specify this date when they create their
subkeys. Subkeys are usually active for a limited period of time.
Key Size The size of the subkey.
New Creates a new subkey. For information about creating a new subkey, see “Creating
new subkeys” on page 44.
Revoke Revokes the currently selected encryption subkey. After you revoke the subkey and
redistribute your key, others will no longer be able to encrypt data to this subkey.
Remove Permanently removes the currently selected encryption subkey. This procedure
cannot be undone. Any data that is encrypted to the selected subkey can longer be
decrypted.
TIP: Use the Revoke option (described above) if you want to disable the subkey and
update the key server. Once a subkey has been sent to the server, it cannot be
removed.
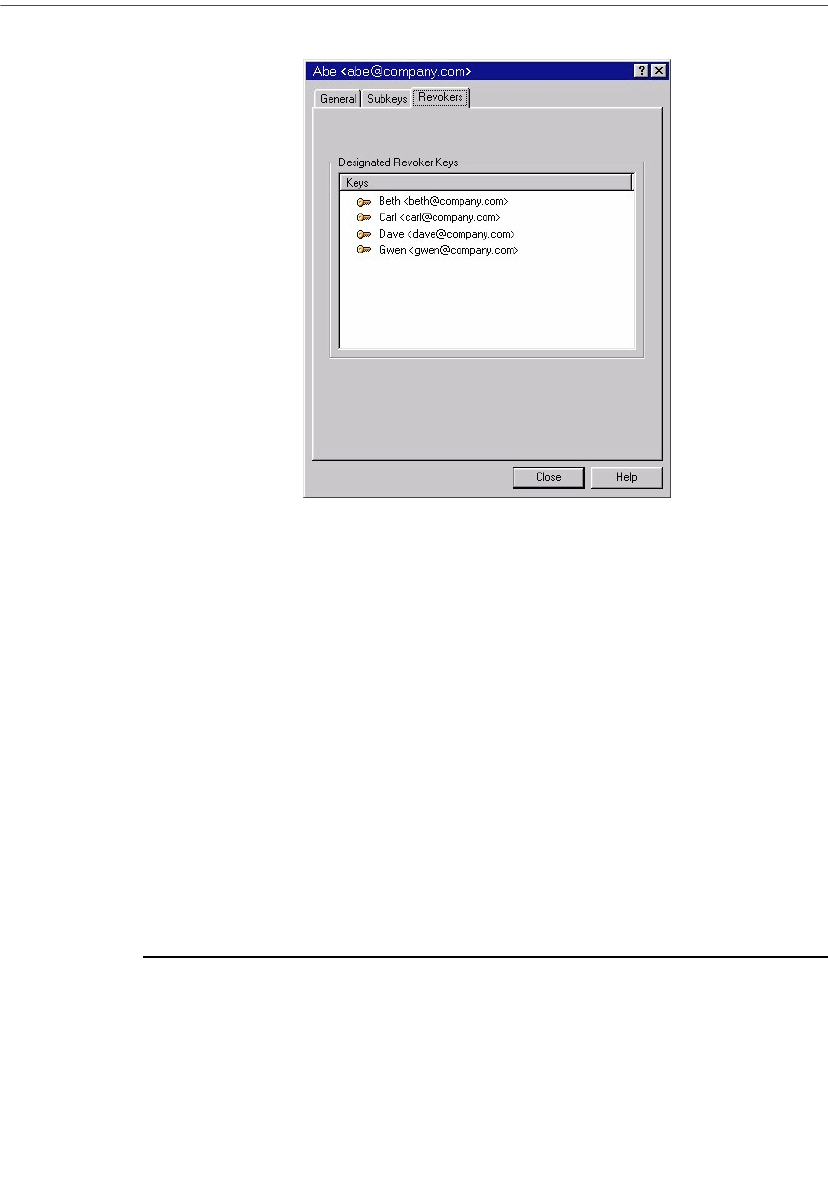
User’s Guide 107
Managing Keys and Setting PGP Options
Figure 6-4. Key Property dialog box
(Revokers panel)
The Revokers panel lists any keys that have the ability to revoke your PGP key.
For instructions on adding a revoker to your key, “Adding a designated
revoker” on page 47.
Specifying a default key pair
When encrypting messages or files, PGP gives you the option to additionally
encrypt to a key pair that you specify as your default key pair. When you sign
a message or someone’s public key, PGP will use this key pair by default. Your
default key pair is displayed in bold type to distinguish them from your other
keys. If you have only one key pair on your keyring, it is automatically
designated as your default key pair. If you have more than one key pair, you
may want to specifically designate one pair as your default pair.
To specify your default key pair
1. Open PGPkeys.
2. Highlight the key pair you want to designate as your default key.
3. Choose Set Default from the Keys menu.

Managing Keys and Setting PGP Options
108 PGP Freeware
The selected key pair is displayed in bold type, indicating that it is now
designated as your default key pair.
Verifying someone’s public key
In the past it was difficult to know for certain whether a key belonged to a
particular individual unless that person physically handed the key to you on
a floppy disk. Exchanging keys in this manner is not usually practical,
especially for users who are located many miles apart.
There are several ways to check a key’s fingerprint, but the safest is to call the
person and have them read the fingerprint to you over the phone. Unless the
person is the target of an attack, it is highly unlikely that someone would be
able to intercept this random call and imitate the person you expect to hear on
the other end. You can also compare the fingerprint on your copy of someone’s
public key to the fingerprint on their original key on a public server.
The fingerprint can be viewed in two ways, in a unique list of words or in its
hexadecimal format
To check a public key with its digital fingerprint
1. Open PGPkeys.
2. Highlight the public key that you want to verify.
3. Choose Properties from the Keys menu or click to open the
Properties dialog box.
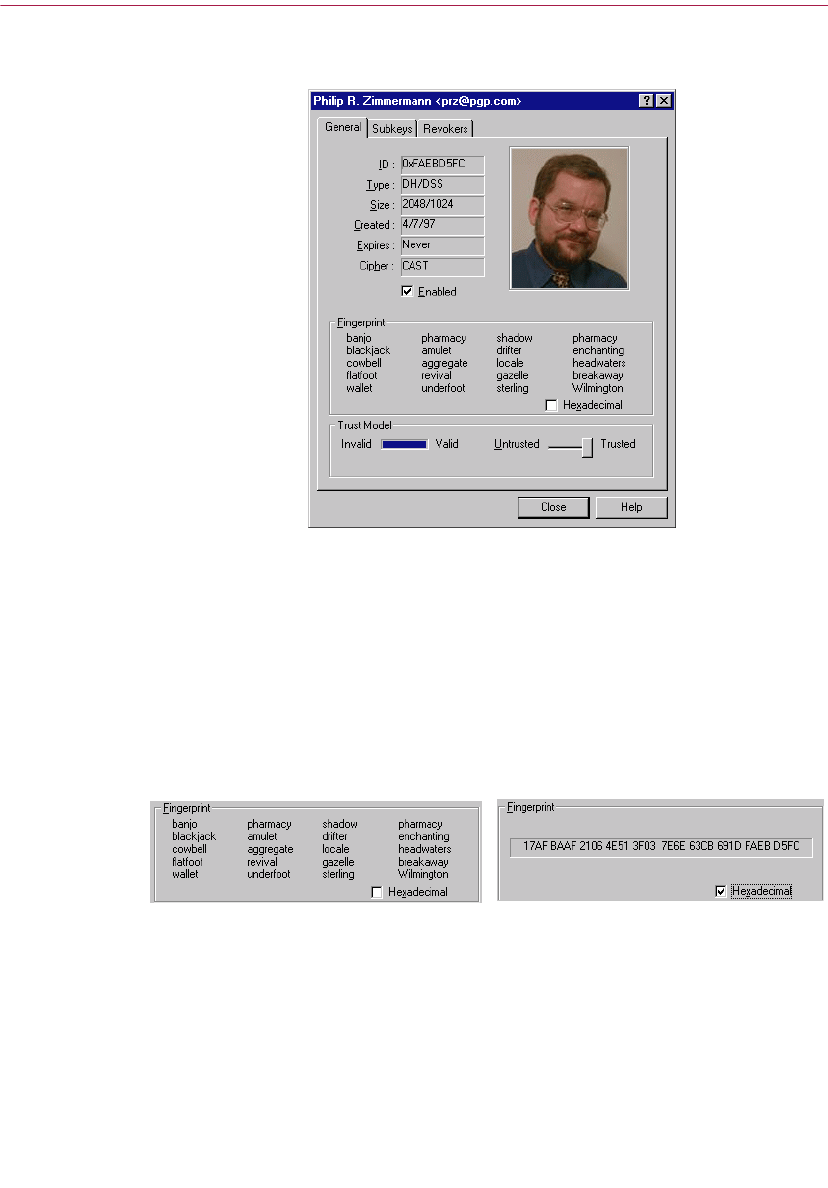
User’s Guide 109
Managing Keys and Setting PGP Options
The Properties dialog box opens, as shown in Figure 6-5.
Figure 6-5. PGP Properties dialog box
4. Use the series words or characters displayed in the Fingerprint text box
to compare with the original fingerprint.
By default, a word list is displayed in the Fingerprint text box (example
shown in Figure 6-6). However, you can select the Hexadecimal
checkbox to view the fingerprint in 20 hexadecimal characters (example
shown in Figure 6-6).
Figure 6-6. Fingerprint text box
The word list in the fingerprint text box is made up of special
authentication words that PGP uses and are carefully selected to be
phonetically distinct and easy to understand without phonetic
ambiguity.
Word list view Hexadecimal view
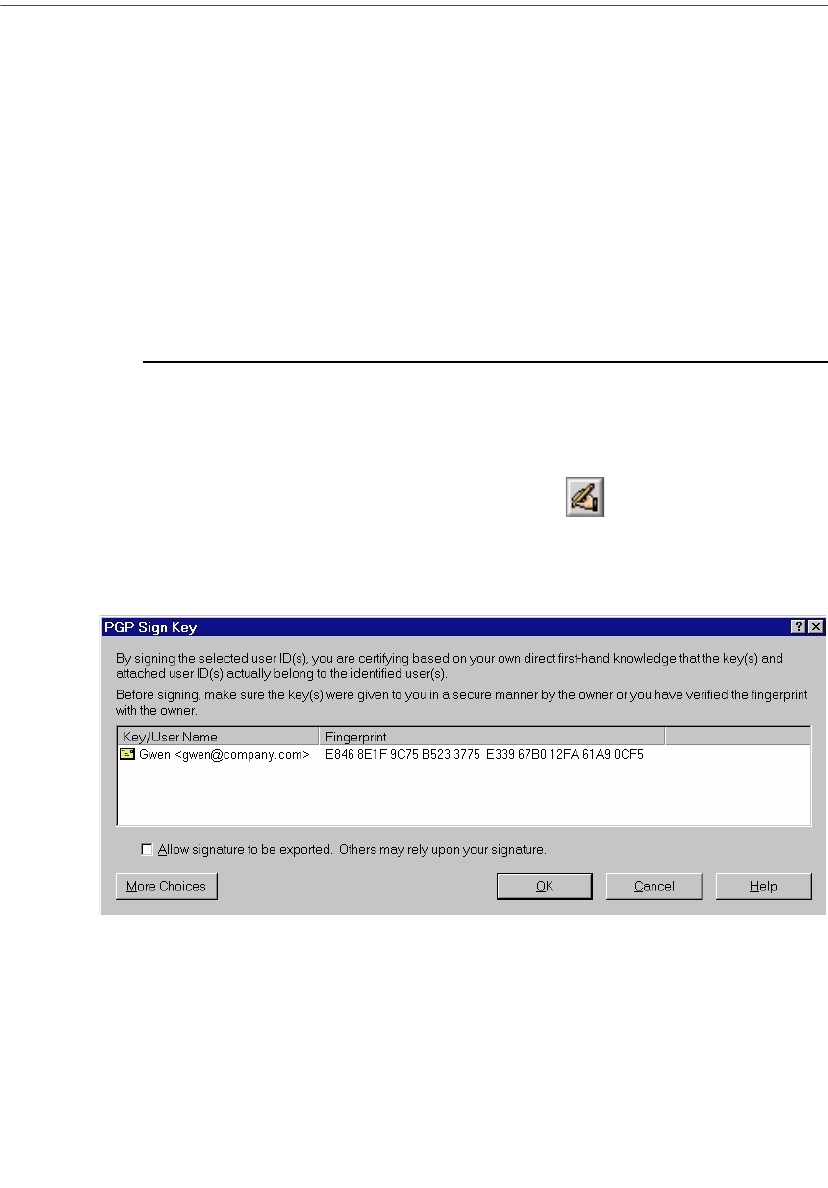
Managing Keys and Setting PGP Options
110 PGP Freeware
The word list serves a similar purpose as the military alphabet, which
allows pilots to convey information distinctly over a noisy radio channel.
If you’d like to know more about the word hash technique and view the
word list, see Appendix D, “Biometric Word Lists.”
Signing someone’s public key
When you create a set of keys, the keys are automatically signed using your
public key. Similarly, once you are sure that a key belongs to the proper
individual, you can sign that person’s public key, indicating that you are sure
it is a valid key. When you sign someone’s public key, an icon associated with
your user name is shown for that key.
To sign someone’s public key
1. Open the PGPkeys window.
2. Highlight the public key that you want to sign.
3. Choose Sign from the Keys menu or click to open the Sign Keys
dialog box.
The Sign Keys dialog box appears (Figure 6-5) with the public key and
fingerprint displayed in the text box.
Figure 6-7. PGP Sign Keys dialog box
(Fewer Choices)
4. Click the Allow signature to be Exported checkbox, to allow your
signature to be exported with this key.
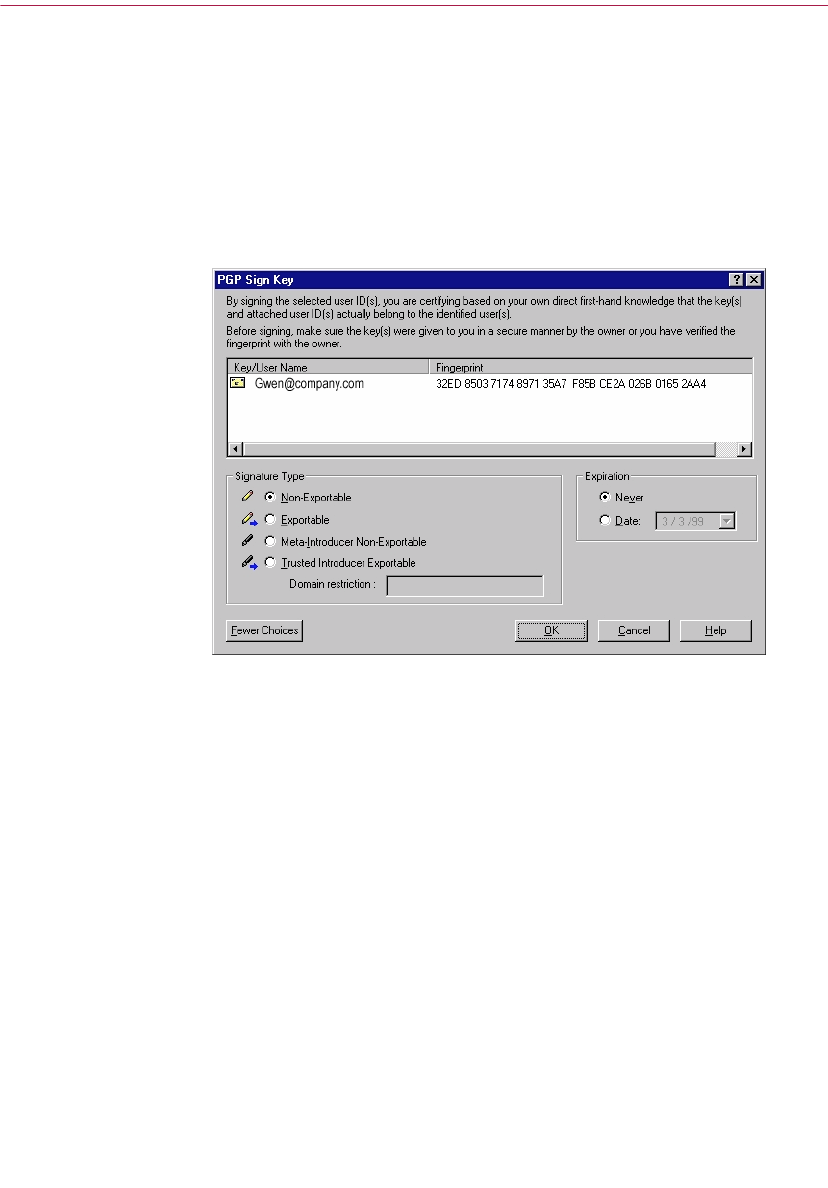
User’s Guide 111
Managing Keys and Setting PGP Options
An exportable signature is one that is allowed to be sent to servers and
travels with the key whenever it is exported, such as by dragging it to an
email message. The checkbox provides a shorthand means of indicating
that you wish to export your signature.
Or
Click the More Choices button to configure options, such as signature
type and signature expiration (Figure 6-8).
Figure 6-8. PGP Sign Keys dialog box
(More Choices)
Choose a signature type to sign the public key with. Your options are:
•Non-exportable. Use this signature when you believe the key is
valid but you don’t want others to rely on your certification. This
signature type cannot be sent with the associated key to a key
server, or exported in any way.
•Exportable. Use exportable signatures in situations where your
signature is sent with the key to the key server so that others can rely
on your signature and trust your keys as a result. This is equivalent
to checking the Allow signature to be exported checkbox on the
Sign Keys menu.
•Meta-Introducer Non-Exportable. Certifies that this key and any
keys signed by this key with a Trusted Introducer Validity
Assertion are fully trusted introducers to you. This signature type is
non-exportable.

Managing Keys and Setting PGP Options
112 PGP Freeware
•Trusted Introducer Exportable. Use this signature in situations
where you certify that this key is valid, and that the owner of the key
should be completely trusted to vouch for other keys. This signature
type is exportable. You can restrict the validation capabilities of the
trusted introducer to a particular email domain.
5. If you want to limit the Trusted Introducer’s certificate validation
capabilities to a single domain, enter the domain name in the Domain
text box.
6. If you want to assign an expiration date to this signature, enter the date
on which you want this signature to expire in the Date text box.
Otherwise, the signature will never expire.
7. Click OK.
The Passphrase dialog box appears.
8. Enter your passphrase, then click OK.
An icon associated with your user name is now included with the public
key that you just signed.
Granting trust for key validations
Besides certifying that a key belongs to someone, you can assign a level of trust
to the user of the keys indicating how well you trust them to act as an
introducer to others whose keys you may get in the future. This means that if
you ever get a key from someone that has been signed by an individual whom
you have designated as trustworthy, the key is considered valid even though
you have not done the check yourself.
To grant trust for a key
1. Open PGPkeys.
2. Select the key for which you want to change the trust level.
NOTE: You must sign the key before you can set the trust level for
it. If you have not already signed the key, see “Validating the public
key” on page 69 for instructions.
3. Choose Properties from the Keys menu or click to open the
Properties dialog box, as shown in Figure 6-5.

User’s Guide 113
Managing Keys and Setting PGP Options
4. Use the Trust Level sliding bar to choose the appropriate level of trust for
the key pair.
Figure 6-9. Trust Level dialog box
5. Close the dialog box to accept the new setting.
If you give a key with a photo a high level of trust, PGP removes the red
question mark from the photograph.
Disabling and enabling keys
Sometimes you may want to temporarily disable a key. The ability to disable
keys is useful when you want to retain a public key for future use, but you
don’t want it cluttering up your recipient list every time you send mail.
To disable a key
1. Open PGPkeys.
2. Select the key you want to disable.
3. Select Disable in the Keys menu.
The key is dimmed and is temporarily unavailable for use.
To enable a key
1. Open PGPkeys.
2. Select the key you want to enable.
3. Select Enable in the Keys menu.
The key becomes visible and can be used as before.

Managing Keys and Setting PGP Options
114 PGP Freeware
Importing and Exporting Keys
Although you often distribute your public key and obtain the public keys of
others by cutting and pasting the raw text from a public or corporate key
server, you can also exchange keys by importing and exporting them as
separate text files. For instance, someone could hand you a disk containing
their public key, or you might want to make your public key available over an
FTP server.
To import a key from a file
1. Open PGPkeys.
2. Choose Import from the Keys menu.
The Import dialog box appears.
3. Select the file that contains the key you want to import, then click Open.
The Import Selection dialog box appears.
4. Select the key(s) that you want to import to your keyring, then click the
Import button.
5. The imported key(s) appears in PGPkeys, where you can use it to encrypt
data or to verify someone’s digital signature.
To add a key from an email message
If a colleague sends you an email message with their key enclosed (as a block
of text) you can add it to your keyring.
1. While the email message window is open, open PGPkeys.
2. Tile the two windows so that you can see part of PGPkeys behind the
message window.
3. Select the key text, including the BEGIN PGP PUBLIC KEY BLOCK and
END PGP PUBLIC KEY BLOCK text, and drag the text onto the PGPkeys
window.
The Import Selection dialog box appears.
4. Select the key(s) that you want to import to your keyring, then click the
Import button.
5. The imported key(s) appears in PGPkeys, where you can use it to encrypt
data or to verify someone’s digital signature.

User’s Guide 115
Managing Keys and Setting PGP Options
To export a key to a file
1. Open the PGPkeys window.
2. Select the key you want to export to a file.
3. Choose Export from the Keys menu.
The Export dialog box appears.
4. Enter the name of the file or navigate to the file which you want the key
to be exported and then click Save.
The exported key is saved to the named file in the specified folder
location.
You can also obtain your Pkcs-12 X.509 private keys by exporting them from
your browser and dropping them into PGPkeys, or by choosing Import from
the Keys menu.
Revoking a key
If the situation ever arises that you no longer trust your personal key pair, you
can issue a revocation to the world telling everyone to stop using your public
key. The best way to circulate a revoked key is to place it on a public key
server.
To revoke a key
1. Open PGPkeys.
2. Select the key pair you want to revoke.
3. Choose Revoke from the Keys menu.
The Revocation Confirmation dialog box appears.
4. Click OK to confirm your intent to revoke the selected key.
The PGP Enter Passphrase dialog box appears.
5. Enter your passphrase, then click OK.
When you revoke a key, it is crossed out with a red line to indicate that it
is no longer valid.
6. Send the revoked key to the server so everyone will know not to use your
old key.

Managing Keys and Setting PGP Options
116 PGP Freeware
Appointing a designated revoker
It is possible that you might forget your passphrase someday or lose your
private key. In which case, you would never be able to use your key again, and
you would have no way of revoking your old key when you create a new one.
To safeguard against this possibility, you can appoint a third-party key
revoker on your public keyring to revoke your key. The third-party you
designate will be able to revoke your DH/DSS key, send it to the server and it
will be just as if you had revoked it yourself.
To appoint a designated revoker
1. Open PGPkeys.
2. Select the key pair for which you want to designate a revoker.
3. Select Add/Revoker from the Keys menu.
A dialog box opens and displays a list of keys.
4. Select the key(s) in the User ID list that you want to appoint as a
designated revoker.
5. Click OK.
A confirmation dialog box appears.
6. Click OK to continue.
The Passphrase dialog box appears.
7. Enter your passphrase, then click OK.
8. The selected key(s) is now authorized to revoke your key. For effective
key management, distribute a current copy of your key to the revoker(s)
or upload your key to the server. See “Distributing your public key” on
page 60 for instructions.
Setting PGP options
PGP is configured to accommodate the needs of most users, but you have the
option of adjusting some of the settings to suit your particular computing
environment. You specify these settings through the Options dialog box,
which you can access by choosing Options from the PGPkeys Edit menu.
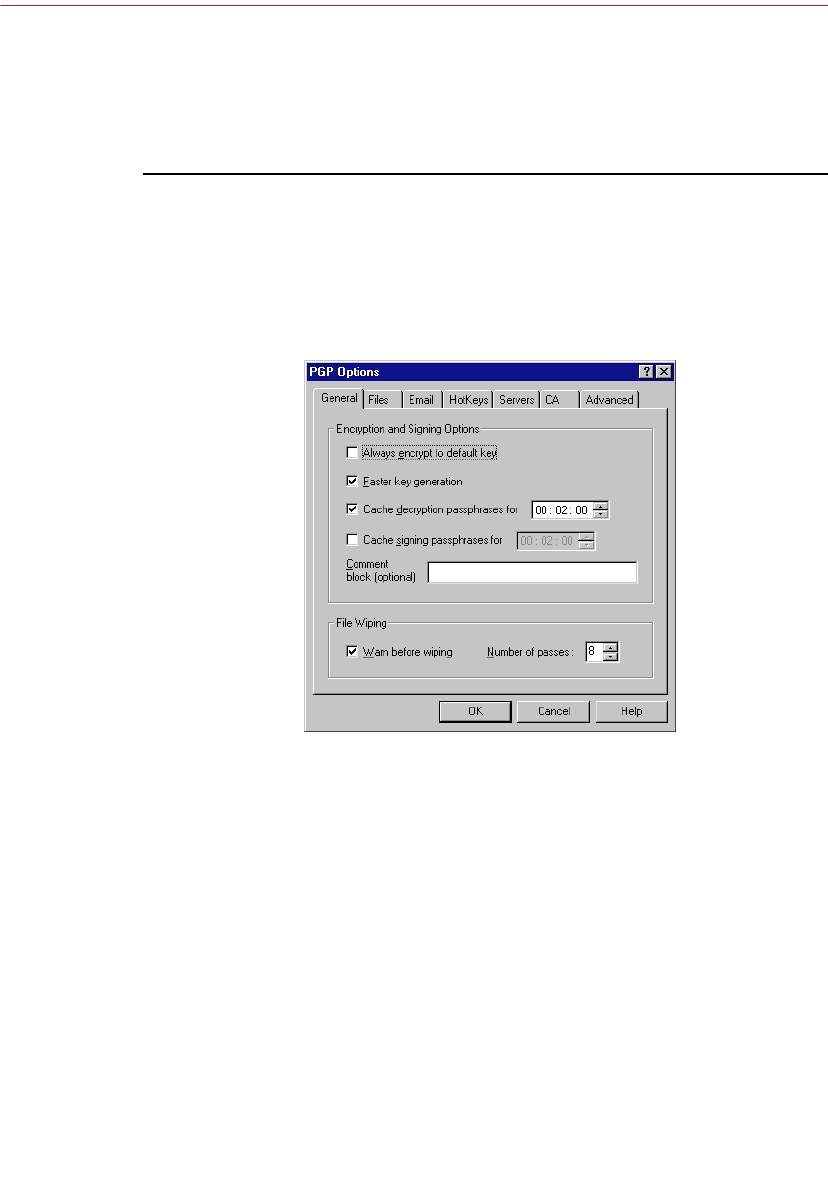
User’s Guide 117
Managing Keys and Setting PGP Options
Setting general options
Use the General panel to specify your encrypting, signing, and file wiping
preferences.
To set general PGP options
1. Open PGPkeys.
2. In the PGPkeys Edit menu, select Options.
The Options menu opens with the General panel showing (Figure 6-10).
Figure 6-10. PGP Options dialog box
(General panel)
3. Select general encryption settings from the General panel. Your options
are:
•Always Encrypt to Default Key. When this setting is selected, all
the email messages and file attachments you encrypt with a
recipient’s public key are also encrypted to you using your default
public key. It is useful to leave this setting turned on so that you
have the option of decrypting the contents of any email or files you
have previously encrypted.

Managing Keys and Setting PGP Options
118 PGP Freeware
•Faster Key Generation. When this setting is selected, less time is
required to generate a new Diffie-Hellman/DSS key pair. This
process is speeded up by using a previously calculated set of prime
numbers rather than going through the time-consuming process of
creating them from scratch each time a new key is generated.
However, remember that fast key generation is only implemented
for the fixed key sizes above 1024 and below 4096 provided as
options when you create a key, and is not used if you enter some
other value. Although it would be unlikely for anyone to crack your
key based on their knowledge of these canned prime numbers,
some may want to spend the extra time to create a key pair with the
maximum level of security.
The general belief in the cryptographic community is that using
canned primes provides no decrease in security for the
Diffie-Hellman/DSS algorithms. If this feature makes you
uncomfortable, you may turn it off.
•Cache Decryption Passphrases for... When this setting is selected,
your decryption passphrase is automatically stored in your
computer's memory. Specify the frequency (in hours: minutes:
seconds) in which you want to save your passphrase. The default
setting is 2 minutes.
•Cache Signing Passphrases for... When this setting is selected, your
signing passphrase is automatically stored in your computer's
memory. Specify the frequency (in hours: minutes: seconds) in
which you want to save your signing passphrase. The default
setting is 2 minutes.
•Comment Block. You can add your comment text in this area. The
text you enter hear is always included in messages and files that you
encrypt or sign. Comments entered in this field appear below the
--BEGIN PGP MESSAGE BLOCK-- text header and PGP version
number of each message.
•Warn Before Wiping. When this setting is selected, a dialog box
appears before you wipe a file to give you one last chance to change
your mind before PGP securely overwrites the contents of the file
and deletes it from your computer.
•Number of Passes. This setting controls how many times the wipe
utilities pass over the disk.
4. Click OK to save your changes and return to the PGPkeys main window
or choose another tab to continue configuring your PGP options.
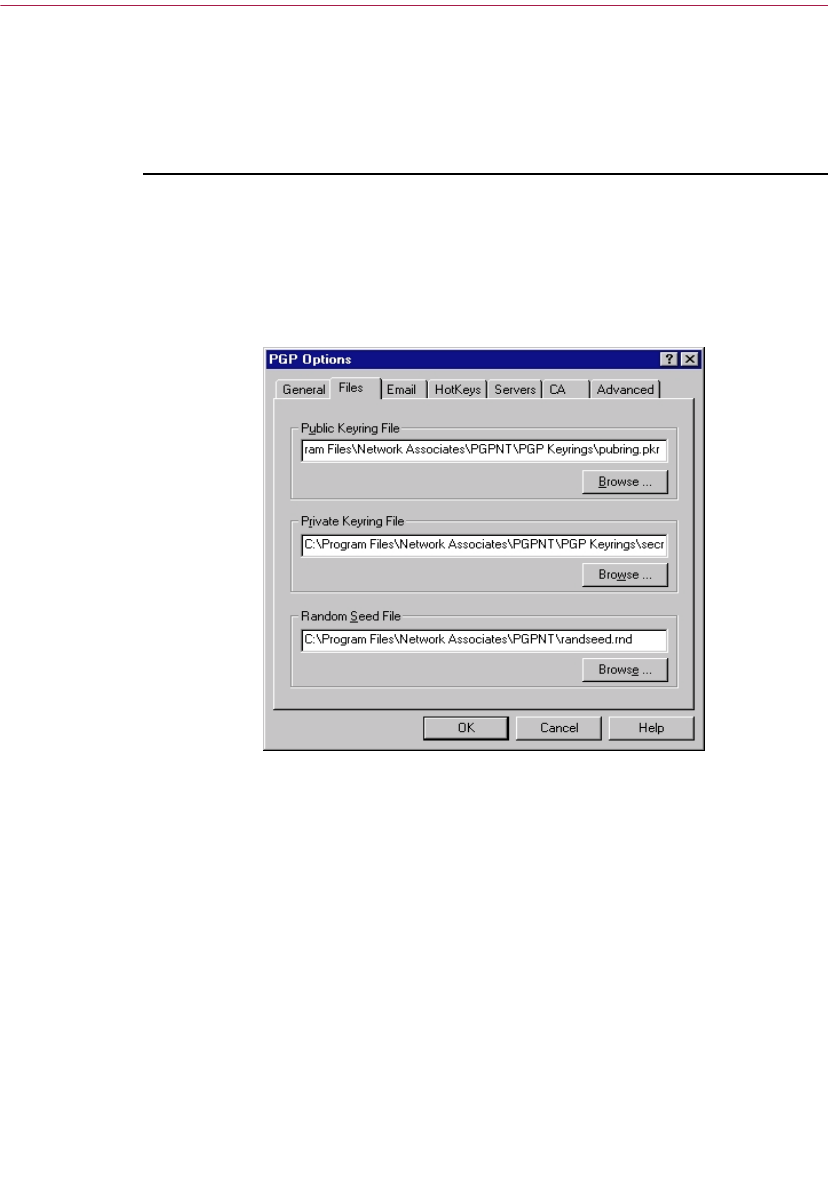
User’s Guide 119
Managing Keys and Setting PGP Options
Setting file options
Use the Files panel to specify the location of the keyrings used to store your
private and public keys.
To set PGP file options
1. Open PGPkeys.
2. Select Options from the PGPkeys Edit menu, then click the Files tab.
The Options menu opens with the Files panel showing (Figure 6-11).
Figure 6-11. PGP Options dialog box
(Files panel)
3. Use the buttons listed in the Files panel to set the appropriate location for
your public and private keyrings, and/or random seed file:
•Public Keyring File. Shows the current location and name of the file
where the PGP program expects to find your public keyring file. If
you plan to store your public keys in a file with a different name or
in some other location, you specify this information here. The
location you specify will also be used to store all automatic backups
of the public keyring.

Managing Keys and Setting PGP Options
120 PGP Freeware
•Private Keyring File. Shows the current location and name of the
file where the PGP program expects to find your private keyring
file. If you plan to store your private keys in a file with a different
name or in some other location, you specify this information here.
Some users like to keep their private keyring on a floppy disk, which
they insert like a key whenever they need to sign or decrypt mail.
The location you specify will also be used to store all automatic
backups of the public keyring.
•Set Random Seed Location. Shows the location of the Random Seed
file. Some users may wish to keep their Random Seed file in a secure
location to prevent tampering. Given that this method of attack is
very difficult, and has been anticipated by PGP, moving the
Random Seed file from its default location is of marginal benefit.
4. Click OK to save your changes and return to the PGPkeys main window
or choose another tab to continue configuring your PGP Options.
Setting emailoptions
Use the Email panel to specify the options that affect the way PGP functions
are implemented for your particular email application. Remember that not all
of the selections may apply to your particular email application.
To set email options
1. Open PGPkeys.
2. Select Options from the PGPkeys Edit menu, then click the Email tab.
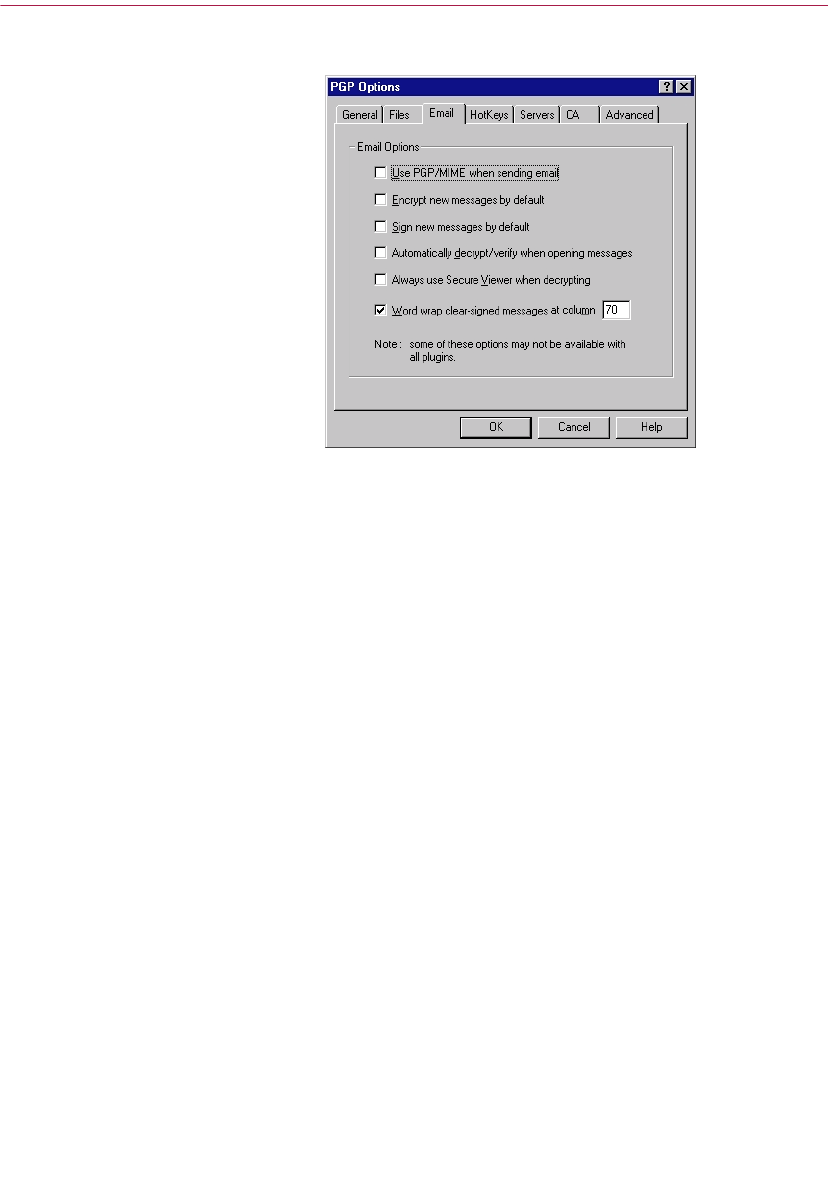
User’s Guide 121
Managing Keys and Setting PGP Options
The Options menu opens with the Email panel showing (Figure 6-12).
Figure 6-12. PGP Options dialog box
(Email panel)
3. Select your email encryption options from the Email panel. Your options
are:
•Use PGP/MIME when sending mail. If you are using Eudora and
you enable this setting, all of your email messages and file
attachments are automatically encrypted to the intended recipient.
This setting has no effect on other encryptions you perform from the
clipboard or with Windows Explorer and should not be used if you
plan to send email to recipients who use email applications that are
not supported by the PGP/MIME standard. Using Eudora,
attachments will always be encrypted regardless of this setting, but
if the recipient does not have PGP/MIME, the decryption process
will be more manual.
•Encrypt new messages by default. If you enable this setting, all of
your email messages and file attachments are automatically
encrypted. Some email applications cannot support this feature.
•Sign new messages by default. If you enable this setting, all of your
email messages and file attachments are automatically signed. Some
email applications cannot support this feature. This setting has no
effect on other signatures you add from the clipboard or with
Windows Explorer.

Managing Keys and Setting PGP Options
122 PGP Freeware
•Automatically decrypt/verify when opening messages. If you
enable this setting, all of your email messages and file attachments
that are encrypted and/or signed are automatically decrypted and
verified. Some email applications cannot support this feature.
•Always use Secure Viewer when decrypting. If you enable this
setting, all of your decrypted email messages are displayed in the
Secure Viewer window with a special TEMPEST attack prevention
font. For more information about TEMPEST attacks, see
“Vulnerabilities” on page 206.
•Word wrap clear-signed messages at column [ ]. This setting
specifies the column number where a hard carriage return is used to
wrap the text in your digital signature to the next line. This feature
is necessary because not all applications handle word wrapping in
the same way, which could cause the lines in your digitally signed
messages to be broken up in a way that cannot be easily read. The
default setting is 70, which prevents problems with most
applications.
+WARNING: If you change the word-wrap setting in PGP,
make sure that it is less than the word-wrap settings in your
email application. If you set it to be the same or a greater
length, carriage returns may be added that invalidate your
PGP signature.
4. Click OK to save your changes and return to the PGPkeys window or
choose another tab to continue configuring your PGP options.
Setting HotKey preferences
Use the HotKeys panel to specify keystroke shortcuts for PGP functions.
To set HotKey preferences
1. Open PGPkeys.
2. Choose Options from the PGPkeys Edit menu, then click the HotKeys
tab.
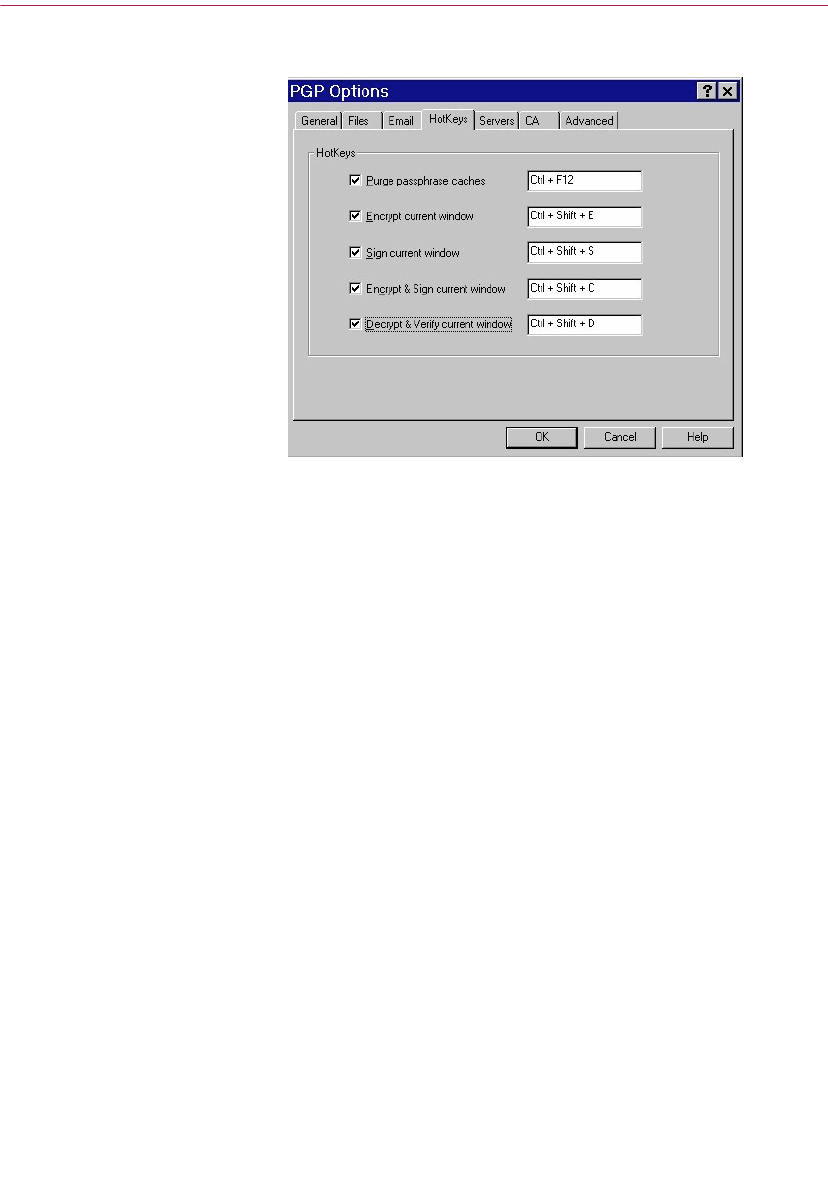
User’s Guide 123
Managing Keys and Setting PGP Options
The Options menu opens with the HotKeys panel showing (Figure 6-13).
Figure 6-13. PGP Options dialog box
(HotKeys panel)
3. Select the hot-key options that you want to use from the HotKey pane.
Your options are:
•Purge Passphrase Caches. Select this option to create a hot-key that
allows you to delete the cache which contains your PGP decryption
passphrase with a key stroke or series of key strokes. The default
hot-key for this function is CTRL +F12.
•Encrypt Current Window. Select this option to create a hot-key that
allows you to encrypt all data in the current window with a key
stroke or series of key. The default hot-key strokes for this operation
is CTRL + SHFT + E.
•Sign Current Window. Select this option to create a hot-key that
allows you to sign the data in the current window with a key stroke
or series of key strokes. The default hot-key for this operation is
CTRL + SHFT + S.
•Encrypt and Sign Current Window. Select this option to create a
hot-key that allows you to both encrypt and sign the data in the
current window with a key stroke or series of key strokes. The
default hot-key for this operation is CTRL + SHFT + C.
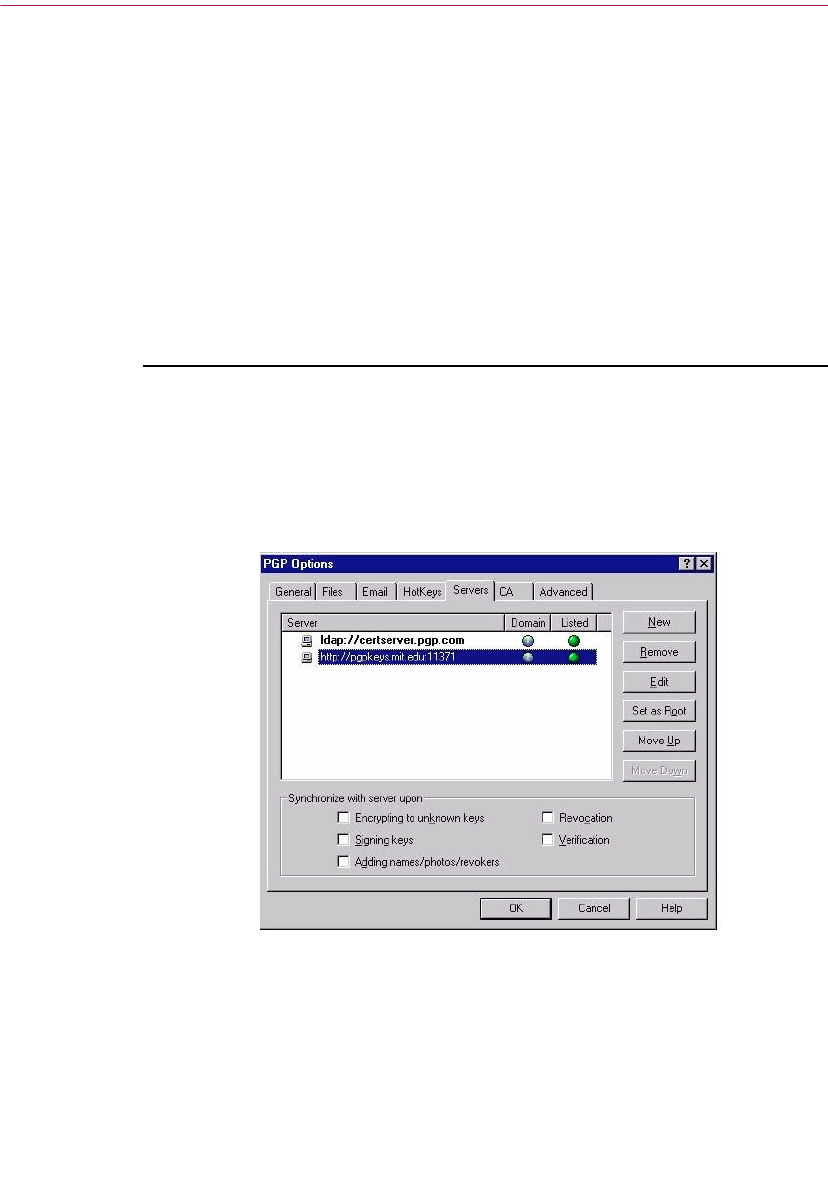
Managing Keys and Setting PGP Options
124 PGP Freeware
•Decrypt and Verify Current Window. Select this option to create a
hot-key that allows you to both decrypt and verify the secure data
in the current window with a key or series of key strokes. The
default hot-key strokes for this operation is CTRL + SHFT + D.
4. Click OK or select another Options tab to continue configuring PGP.
Setting server options
Use the Server panel to specify settings for the public key servers that you are
using to send and retrieve public keys, and with which you will automatically
synchronize keys.
To set key server options
1. Open PGPkeys.
2. Select Options from the PGPkeys Edit menu, then click the Server tab.
3. The Options menu opens with the Server panel showing (Figure 6-14).
Figure 6-14. PGP Options dialog box
(Server panel)

User’s Guide 125
Managing Keys and Setting PGP Options
The Domain column lists the Internet domain (such as “secure.com”) of
the available key server(s). When sending keys to a server, PGP attempts
to find the key’s domain in this list, and thus find the appropriate server
entry. If the domain is not found, a server for the first world domain
server which serves all keys will be used, and other world domain
servers down the list may be searched if the first search is unsuccessful.
4. To set your server options, use these buttons:
•New. Adds a new server to your list.
•Remove. Removes the currently selected server from your list.
•Edit. Allows you to edit server information for the currently
selected server.
•Set as root. Identifies the root server that is used for specific
corporate operations, such as updating group lists, sending group
lists, updating introducers, etc. In corporate settings, your security
officer will have already configured this.
•Move Up and Move Down. Use these buttons to arrange the servers
in order of preference.
5. In the Synchronize with server upon area, select the options to use when
synchronizing your private keyring with your certificate server(s). Your
options are:
•Encrypting to unknown keys. Select this option to have PGP
automatically look up unknown recipients on the server to locate
users that are not on your keyring when encrypting email.
•Signing keys. Select this option to allow keys to which you’re
adding your signature first to be updated from the server and then
your changes sent to the server upon completion of the update.
•Adding names/photos/revokers. Select this option to allow keys to
which you’ve added names, photographs, or revokers first to be
updated from the server and then your changes sent to the server
upon completion of the update. Updating the key beforehand
ensures that, for example, the key has not been revoked since you
last updated it.
•Revocations. Select this option to allow keys you revoke first to be
updated from the server and then your changes sent to the server
upon completion of the update.
•Verification. Select this option to have PGP automatically search
and import from the key server when verifying a signed email
message or file for which you do not have the sender’s public key.
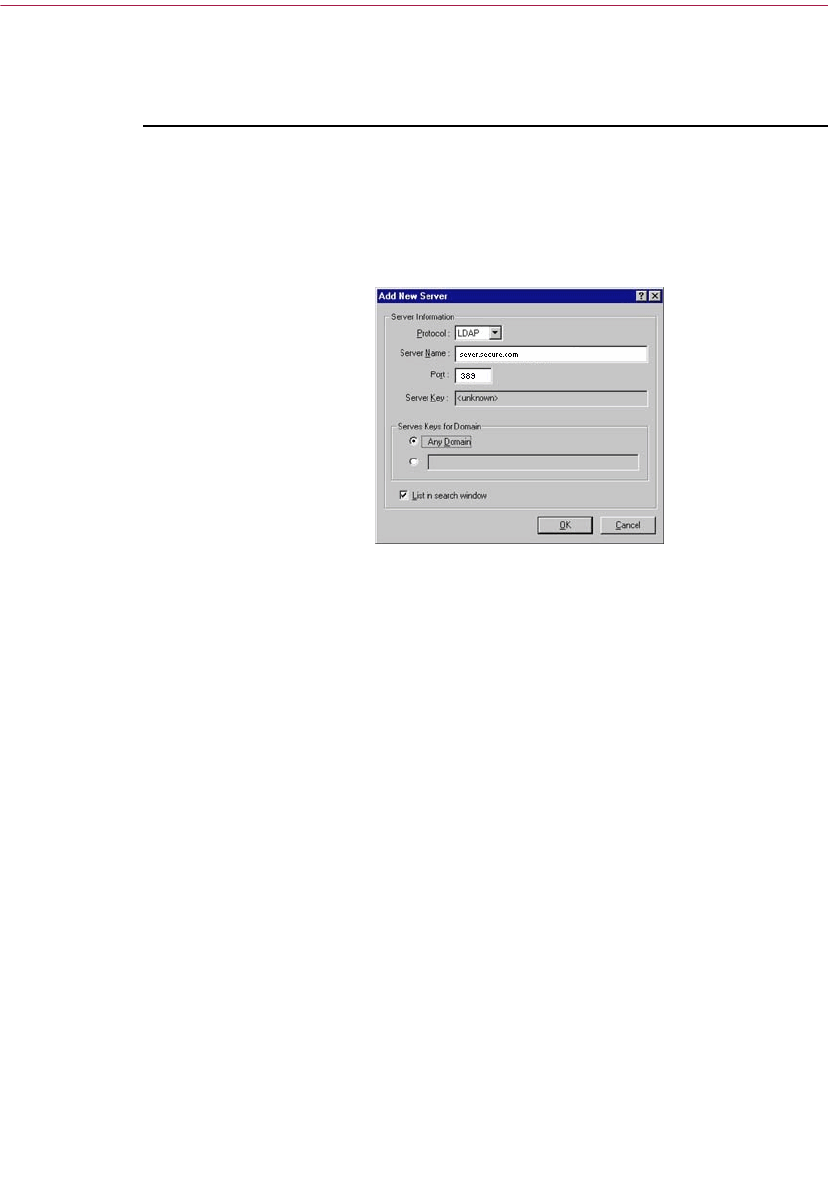
Managing Keys and Setting PGP Options
126 PGP Freeware
6. Click OK to save your changes and return to the PGPkeys main window
or choose another tab to continue configuring your PGP Options.
To add a key server to the server list
1. Open PGP Options, then click the Servers tab.
2. Click the New button.
The Add New Server dialog box appears, as shown in Figure 6-15.
Figure 6-15. Add New Server dialog box
3. In the Protocol box, select a protocol to use to access the server. Your
options are LDAP, LDAPS, and HTTP.
4. In the Server Name box, enter the domain name or IP address of the
server. For example, server.secure.com or 123.445.67.
5. Type the port number of the server in the Port box. For example
11371 is used for old-style HTTP certificate server, 389 is commonly
used for LDAP certificate servers.
6. The Server Key box is for LDAPS servers. The server key is used by
the server to authenticate the connection. (Key information is not
displayed until you connect to the server.)
7. Select the Any Domain option to allow PGP to send keys from any
domain to this key server. This option is enabled by default.
If you want PGP to send only keys from a specific domain to this key
server, select the option below Any Domain. Then, enter the
domain name in the space provided. For example, if you specify the
domain secure.com, only those keys whose email address ends in
secure.com will be sent to this server.
8. Select the List in Search Window checkbox if you want this key
server listed in the PGPkeys Search window.

User’s Guide 127
Managing Keys and Setting PGP Options
Setting CA options
Use the CA panel to add your X.509 certificate to your PGP key. Before you can
add your X.509 certificate however, you must first obtain the Root CA
certificate from your company’s certificate server. For instructions on
obtaining the Root CA Server certificate, see “Obtain and add the Root CA
certificate to your PGP keyring.” on page 53. For detailed instructions about
setting CA options and adding your X.509 certificate to your key, see “Adding
an X.509 certificate to your PGP key” on page 53.
Setting advanced options
Use the Advanced panel to select key encryption algorithms and key trust
options.
PGP gives you the option to select and/or change key encryption algorithms.
You can select the encryption algorithm for your PGP keys: CAST (the
default), IDEA, or Triple-DES. If you want to use IDEA or Triple-DES you
must make the selection before you generate your keys. CAST is a new
algorithm in which PGP and other cryptographers have very high confidence,
and Triple-DES is a U.S. Government algorithm that has withstood the test of
time. IDEA is the algorithm used for all RSA keys generated by PGP. For more
information about these algorithms, see “The PGP symmetric algorithms” on
page 191.
The Preferred Algorithm choice affects the following:
• When using conventional encryption, the preferred cipher is used to
encrypt.
• When creating a key, the preferred cipher is recorded as part of the key
so that other people will use that algorithm when encrypting to you.
The Allowed Algorithm choice affects the following:
• When creating a key, the allowed ciphers are recorded as part of the key
so that other people will use one of those algorithms when encrypting to
you if the preferred algorithm is not available to them.
NOTE: Encrypting to a public key will fail if neither the Preferred
Algorithm nor any of the Allowed Algorithms are available to the
person encrypting the message.

Managing Keys and Setting PGP Options
128 PGP Freeware
+WARNING: Use the CAST, IDEA, and Triple-DES checkboxes only
if you have suddenly learned that a particular algorithm is insecure.
For example, if you become aware that Triple-DES has been broken,
you can deselect that checkbox and all new keys you generate will
have a record that Triple-DES may not be used when encrypting to
you.
PGP gives you the option to select and/or change how key trust is displayed,
and whether or not you wish to be warned whenever you encrypt a message
to a public key that has an associated Additional Decryption Key. In the Trust
Model section, choose from these options:
•Display marginal validity level. Use this checkbox to specify whether to
display marginally valid keys as such, or simply to show validity as on
or off. Marginal validity appears as bar icons having differing shading
patterns. On/off validity appears as circle icons; green for valid, gray for
invalid (the key has not been validated; it has not been signed by either a
trusted introducer or by you).
•Treat marginally valid keys as invalid. Use this checkbox to specify
whether to treat all marginally valid keys as invalid. Selecting this option
causes the Key Selection dialog box to appear whenever you encrypt to
marginally valid keys.
•Warn when encrypting to an ADK. Use this checkbox to specify whether
to issue a warning whenever an encrypt-to key has an associated
Additional Decryption Key.
• Export format.
–Compatible: Exports keys in a format compatible with previous
versions of PGP.
–Complete: Exports the new key format, which includes
photographic IDs and X.509 certificates.

7
User’s Guide 129
7PGPnet Virtual Private
Networking
NOTE: Three PGPnet features, tunnel mode, secure gateways, and X.509
certificates are not supported in freeware.
This chapter describes PGPnet, its features, and provides instructions on how
to use it. This chapter also introduces you to the concept of Virtual Private
Networks.
The technology of today has brought many changes to the workplace. The
bulk of interoffice memos and reports traditionally placed in a mailbox and
received in a few days is now sent electronically and received in a matter of
seconds. Employees who work at home or travel can now make a phone call
to transfer data to and from their local or home office.
Two by-products of these advances are an increased security threat to data
transmitted over phone lines, and a significant rise in the cost of phone
services. Companies saw the Internet as an answer to rising costs, but security
remained an issue.
Fortunately, even newer technology provides a solution to both of these
problems. Virtual Private Networks (VPNs) allow corporations to transmit data
securely over the Internet, reducing the security threat to transmitted data and
sharply reducing the cost of phone services.
What is a VPN?
A VPN allows individuals to communicate securely with companies and other
individuals anywhere in the world, as long as both parties have access to the
Internet. A VPN allows secure connections between two machines, a machine
and a subnet, or between two subnets.
Let’s look at an example. Company A, located in Boston, has sales associates
in California, Texas, and Florida. Each of the sales associates send weekly sales
reports to the home office. Before Company A installed a VPN, each of the
sales associates dialed a corporate phone number to transmit the sales report
to the home office. After Company A installed their VPN, the associates could
connect to the Internet via their local Internet Service Provider (ISP), connect to
the home office’s intranet via the Internet, and use the VPN to transmit the

PGPnet Virtual Private Networking
130 PGP Freeware
data. What was previously a costly long-distance call is now a local call. And
there is a big bonus — an increased level of security and privacy. Data is
protected as it travels from sender to receiver — through the ISP, Internet, and
any routers and gateways on its path. A VPN gives users data privacy, data
integrity, and data origin authentication.
Companies that install VPNs can also use them to make their internal data
available to trusted companies and individuals (for example, suppliers and
consultants). This arrangement can save all parties time, money, and other
resources. In addition to letting legitimate users send and receive data
securely, a VPN used in conjunction with a firewall keeps unwanted users off
your intranet. (A firewall controls the machines that an external host can see on
a company’s intranet, and the services that the host can access. A firewall also
controls the machines that a host on a company’s intranet can see on the
internet, and the services that the host can access.)
In addition to the advantages of increased security and reduced costs, VPNs
also prevent Internet Service Providers (ISPs) from reading any cleartext
messages (that is, unencrypted messages), and provide corporations with an
additional level of security against internal attacks.
How does a VPN work?
A VPN extends a company’s intranet (that is, its internal network) or an
individual’s machine across the Internet, creating a secure private tunnel. How
does this work? A VPN uses a tunneling protocol (for example, Internet
Protocol Security (IPSec)) and encryption to protect data from the time it
leaves the sender to the time it reaches the designated recipient.
What do you need to protect?
It is critical that you protect a wide variety of information stored on your
machines or transmitted to other entities (for example, banks, clients, business
partners, and state and federal tax agencies):
• Customer sales records
• Product research and development files
•Source code files
• Your personal financial records
• Employee records (if applicable)
• Payroll records (if applicable)
• User passwords and accounts (if applicable)

User’s Guide 131
PGPnet Virtual Private Networking
Other security concerns include attackers gaining access to a corporation’s
intranet or an individual’s machine and performing a variety of attacks:
• Deleting or downloading important files
• Reading email
• Crashing machines
• Prevent authorized users from accessing machines (denial of service
attack)
• Sniffing packets off the wire to obtain user passwords and other
information
The security of your data, machines, and networks is very important, and
PGPnet is designed to eliminate many of the threats that continue to plague
networks.
PGPnet features
The PGPnet program includes the following features:
• A configuration wizard that allows you to configure hosts, gateways, and
subnets that you can communicate with securely.
• Secure peer-to-peer communication — no intermediary gateway is
required.
• Simple user interface.
• A list of all active PGPnet Security Associations at a glance. (A Security
Association (SA) contains information that identifies how two machines
communicate with each other.)
• Automatic re-key (that is, initialization and negotiation) of expiring
Security Associations.
• An Expert Mode that allows experienced users to bypass the configuration
wizard.
• Log information, used for diagnostics, is displayed in easy-to-read format
— no need to search through log files.

PGPnet Virtual Private Networking
132 PGP Freeware
What is PGPnet?
PGPnet, a Virtual Private Network (VPN), is an easy-to-use encryption
application that allows you to communicate securely and economically with
other PGPnet users. PGPnet, a standards-based product based upon the IETF
IPSec and IETF IKE (Internet Key Exchange) protocols, extends the IKE
protocol to add support for PGP key authentication.
PGPnet maintains the privacy, integrity, and authenticity of information sent
from a PGPnet host to a secure host, gateway, or subnet.
•A secure host is a machine running PGPnet or another IPSec-compatible
peer-to-peer capable client software (that is, software that allows hosts to
communicate directly with each other).
•A secure gateway is a firewall or other gateway machine that tunnels packets
through it for authorized parties. In this case, authorized means the
certificate or shared passphrase of the client software is configured as
acceptable on the gateway. (When you use PGPnet, you can elect to
communicate with a host using your PGP key, an X.509 certificate, or a
shared passphrase.)
•A secure subnet is one that has up to 254 machines behind it that are
generally running PGPnet or a compatible client software. The secure
subnet designation allows you (or your administrator, if applicable) to
identify a number of machines in the same IP address range that are known
to be IPSec compatible. Note that secure subnets do not have to be behind
gateways.
ÐTIP: If a subnet has many secure hosts but a small number of insecure
hosts, setup the subnet as a secure subnet and then add insecure hosts for
each exception.
You can communicate securely with PGPnet users throughout the world. You
can communicate with gateways, subnets, and hosts that you have identified
as secure. PGPnet gives you the ability to send data securely across the
Internet and other untrusted networks.
What is a Security Association?
The first time a local machine communicates with a remote machine, PGPnet
performs an Internet Key Exchange (IKE) negotiation and creates a Security
Association.

User’s Guide 133
PGPnet Virtual Private Networking
•During the IKE negotiation, the two machines establish how they will
communicate with each other (for example, type of encryption, duration of
Security Association, and authentication method).
• The resulting Security Association (SA) contains information that identifies
how the two machines are communicating.
PGPnet records and monitors all SAs that your machine initiates and that
other machines initiate with your machine. When an SA that your machine
initiated is close to expiration, PGPnet initiates another SA with the remote
host. You can view all active SAs on PGPnet’s Status panel. For more
information on the Status panel, see “Viewing the Status Panel” on page 141.
PGPnet’s two modes: tunnel and transport
PGPnet uses tunnel mode to communicate with hosts or subnets behind a
secure gateway, and transport mode for peer-to-peer communications
between two secure hosts that do not have a gateway between them.
What is tunnel mode?
Tunneling occurs when the machine running PGPnet sends packets through a
secure gateway to a host or subnet behind the gateway. (In the PGPnet Hosts
window, the destination host or subnet is indented beneath the gateway.)
Packets sent to such hosts are tunneled. That is, the entire packet sent to the
destination is physically placed inside another packet, encrypted, and then
sent to the gateway.
What is transport mode?
PGPnet is fully capable of peer-to-peer secure communications. Two machines
running PGPnet can communicate securely—no matter where they are on the
internet. A secure gateway is not necessary. This type of communication is
called transport mode. There is no secure gateway or firewall, and packets are
transmitted securely from the source machine to the destination machine. In
this mode, packets are encrypted and authenticated.
How does PGPnet communicate with secure and
insecure hosts?
The following paragraphs describe how PGPnet communicates with hosts:
Secure host with no secure gateway between hosts — PGPnet packets are
encrypted and authenticated to their destination (transport mode).

PGPnet Virtual Private Networking
134 PGP Freeware
Secure host behind secure gateway — PGPnet encrypts each packet to its final
destination and then tunnels each packet to the gateway. This feature
eliminates the possibility of someone using the gateway as an eavesdropping
point (tunnel mode).
Insecure host behind secure gateway — PGPnet tunnels packets to the
gateway, and the gateway forwards the packets to the final destination (tunnel
mode).
How do you use PGPnet?
If you have a PGPnet administrator, PGPnet may be configured when you
install the software.
If you do not have a PGPnet administrator or if PGPnet is not preconfigured,
you must install PGPnet, select your authentication key or certificate (or both),
and configure hosts, gateways, and subnets to PGPnet via the Add Host
wizard box.
When PGPnet is configured, the software runs in the background. Any time
you attempt to communicate with another machine (for example, via email or
web browser), PGPnet checks to see if there is an active SA for the machine.
• If there is an SA for the target machine, PGPnet transmits your
communication according to the terms of the existing SA.
• If there is no SA for the target machine and the machine is secure, PGPnet
initiates an IKE negotiation which establishes an SA, and transmits your
communication.
• If there is no SA for the target machine and the machine is not secure,
PGPnet handles the communication according to the Security settings on
the General panel (View—>Options—>General). That is, if both Require
secure communications with all hosts and Allow communications with
unconfigured hosts are checked, PGPnet only allows the machine to
communicate securely.
NOTE: This is potentially dangerous as you will not be able to talk to
DNS, DHCP, or WINS servers unless they are running PGPnet or are
explicitly designated as insecure hosts.
Please note the following:
• All SAs are terminated when you reboot your machine or put it in sleep
mode. As a result, any machine that you have not communicated with
since the last time you rebooted requires a new IKE negotiation.
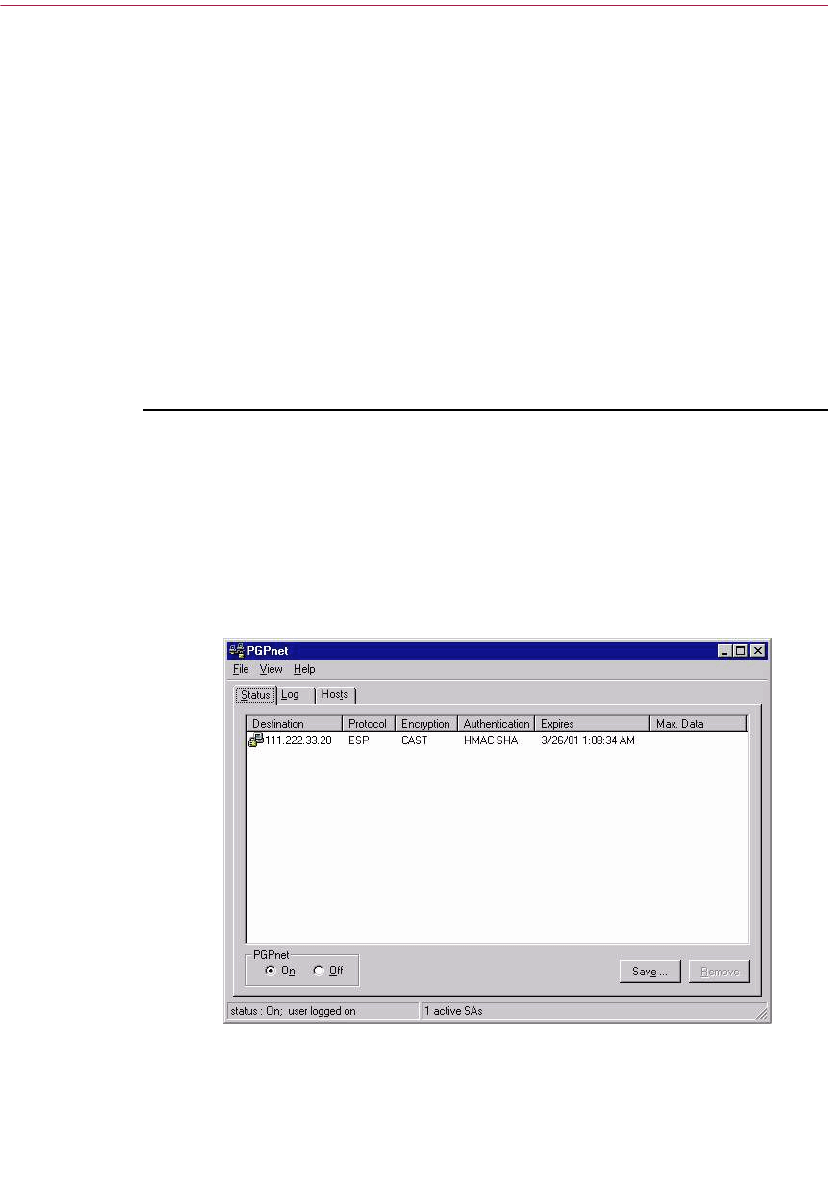
User’s Guide 135
PGPnet Virtual Private Networking
• If you Logoff PGPnet, SAs may expire and it may be impossible for PGPnet
to generate a new one until you log on to PGPnet.
• PGPnet is always listening for SA requests from other machines.
Changing Network Control Panel Settings
PGPnet is bound to and secures a specific network adapter. As a result, if you
change the Network control panel settings, PGPnet automatically performs a
bindings review and tells you to reboot your system. You must reboot the
system for PGPnet to work properly.
Starting the PGPnet program
To start PGPnet
1. Select Start—>Programs—>PGP—>PGPnet.
Or
Start from the PGPtray in the Windows system tray (PGPtray—>
PGPnet—>Status, Log, or Hosts.
Either of these actions open the PGPnet window (see Figure 7-1).
Figure 7-1. The PGPnet window

PGPnet Virtual Private Networking
136 PGP Freeware
The default setting for PGPnet is on. Use the radio buttons in the lower left
corner of the window to turn PGPnet on and off. If however, PGPnet is turned
off and the machine is rebooted, PGPnet will be off at reboot. For more
information, see “Turning PGPnet off” on page 139 and “Turning PGPnet on”
on page 140.
Selecting your authentication key or certificate
The first step that you must take before you use PGPnet is to select the key
and/or X.509 certificate that you will use for authentication purposes. If you
do not have an existing key or X.509 certificate, see “Making and Exchanging
Keys” on page 35.
To select your authenticating key and/or certificate:
1. Click the View menu on the PGPnet window, and select Options (or
select PGPnet from PGPtray and select Options).
2. Click the Authentication tab (see Figure 7-2 on page 137).
3. Select the key and/or the certificate that you will use to authenticate
(click Select Key, or Select Certificate). Note that the key or certificate
must be part of a key pair; you must have the private key. PGPnet
displays the selected key or certificate in the PGP Authentication or
X.509 Authentication box.
4. Click OK. A dialog box prompts you for the passphrase for the selected
key.
5. Enter the passphrase for the key and click OK.
ËIMPORTANT: If you are creating a VPN connection with another
PGPnet host, and using PGPkeys for authentication, you must both use
the same type of PGP key. You cannot negotiate an SA if one side of the
connection uses an RSA key and the other side uses a Diffie-Hellman key.
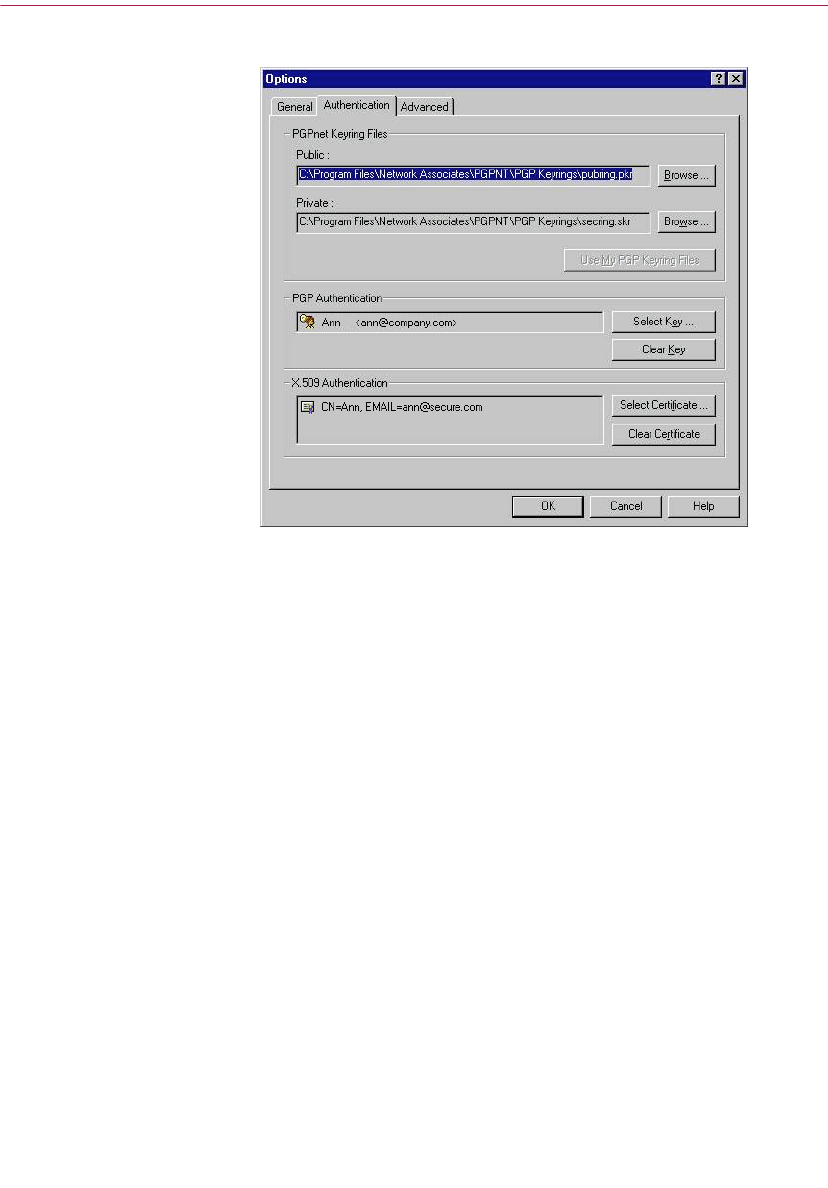
User’s Guide 137
PGPnet Virtual Private Networking
Figure 7-2. The Authentication Panel
The PGPnet window at a glance
There are three Menus on the PGPnet window:
•File (Exit)
•View (Status, Log, Hosts, and Options)
•Help (Contents and About)
There are three panels on the PGPnet window:
•Status Panel — Use to review the status of existing SAs (see “Viewing the
Status Panel” on page 141).
•Log Panel — Use to review log entries for diagnostic purposes (see
“Viewing the Log Panel” on page 142).
•Hosts Panel — Use to add, edit, or remove entries to PGPnet’s host list and
to establish and terminate SAs (see “Using the Hosts Panel” on page 144).
The default setting for PGPnet is on. Use the radio buttons in the lower left
corner of the window to turn PGPnet on and off.

PGPnet Virtual Private Networking
138 PGP Freeware
The bottom line of the PGPnet window, the Status bar, displays messages that
relate to PGPnet’s status on the left and the number of active SAs on the right.
The following messages may appear in the Status bar:
Table 7-1. Status Messages
Message Description
status: On; user logged on PGPnet is on, user is logged on
status: On; user logged off PGPnet is on, user is logged off
status: no logon required Occurs when no authentication key is set
status: Off User turned PGPnet off
driver not installed The PGPnet driver is not responding to
the service. Reboot your system. If the
driver still does not respond, reinstall
PGPnet.
service not running The PGPnet service is not running.
Reboot your system. If PGPnet
continues to display this message,
reinstall PGPnet.
service not responding The PGPnet service is running but it is
not responding to messages from the
application. Reboot your system. If
PGPnet continues to display this
message, reinstall PGPnet.

User’s Guide 139
PGPnet Virtual Private Networking
Using PGPnet from PGPtray
Use PGPnet’s submenu in PGPtray in the Windows system tray to perform the
following tasks:
PGPtray’s icon
Note that the look of the PGPtray icon tells you if PGPnet is off or not installed
(gray lock), installed and on (yellow lock on a network), or installed but not
working (yellow lock on a network with a yellow circle and exclamation
mark). Placing the mouse pointer over the PGPtray icon invokes tool tips that
display the status of PGPnet including descriptions of error messages, such as
“service not installed.”
Turning PGPnet off
There may be times when you want to turn PGPnet off. For example, for
diagnostic purposes. Turning PGPnet off allows all communication with all
machines to pass through unmodified and unsecured.
To turn PGPnet off, click Off on the PGPnet window (see Figure 7-3 on page
140).
To... Do this...
Display the Log panel Click on the PGPtray icon, select PGPnet, and
click on Log.
Display the Status panel Click on the PGPtray icon, select PGPnet, and
click on Status.
Display the Hosts panel Click on the PGPtray icon, select PGPnet, and
click on Hosts.
Display the Options window Click on the PGPtray icon, select PGPnet, and
click on Options.
Logon to PGPnet Click on the PGPtray icon, select PGPnet, and
click Logon. Dimmed if no authentication key
is selected.
Logoff from PGPnet Click on the PGPtray icon, select PGPnet, and
click Logoff. Dimmed if no authentication key
is selected.
Exit Click on the PGPtray icon and click on Exit.
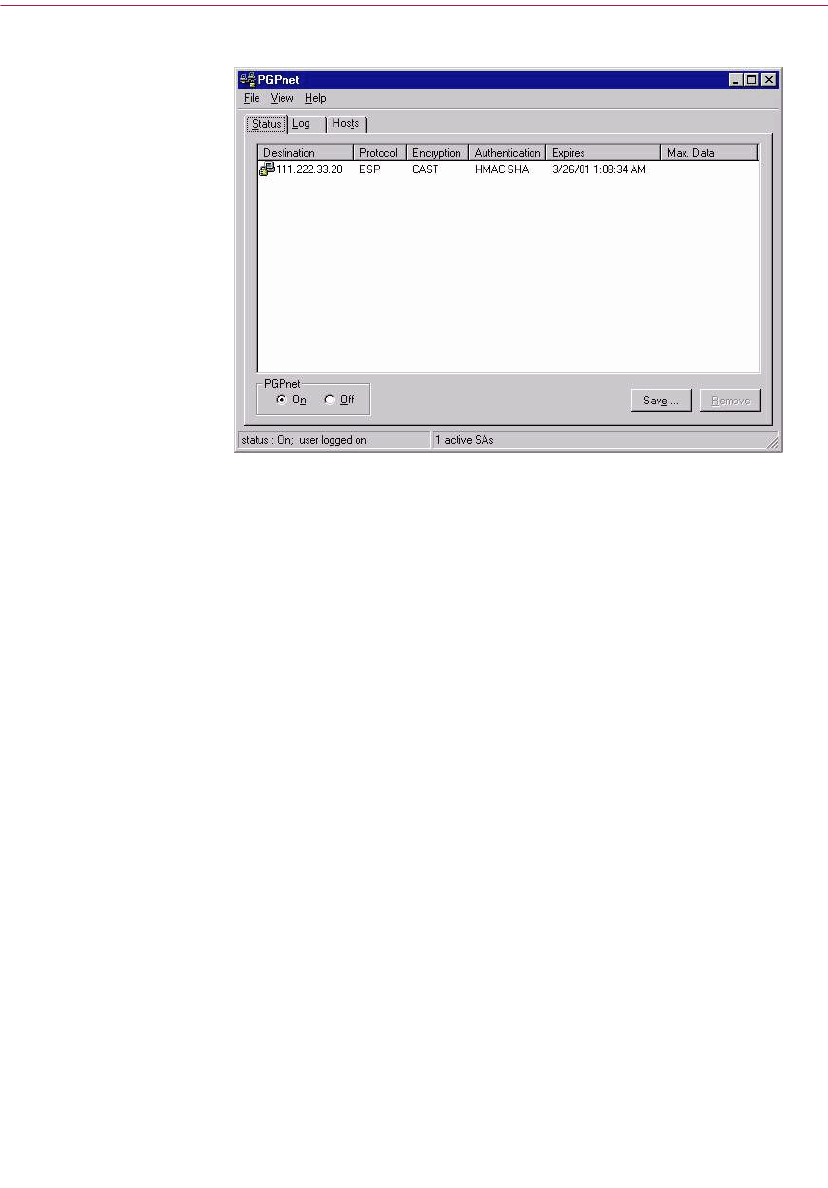
PGPnet Virtual Private Networking
140 PGP Freeware
Figure 7-3. PGPnet window
Turning PGPnet on
To turn PGPnet on, click On on the PGPnet window (see Figure 7-3 on page
140).
Exiting PGPnet
Select Exit from the File menu on the PGPnet window, or click the X in the
upper-right corner of the PGPnet window, or click the tray icon and click Exit.
Note that exiting PGPnet does not disable the PGPnet service or terminate
SAs.
Using PGPnet
When PGPnet is on, it is running in the background. To communicate with a
machine, use your software (for example, email or web browser) as you
normally would. PGPnet evaluates each communication and encrypts and
tunnels as required.

User’s Guide 141
PGPnet Virtual Private Networking
Viewing the Status Panel
The Status panel in the PGPnet window lists active PGPnet SAs and, if
applicable, tells you when they expire (see Figure 7-4 on page 142). An SA may
be terminated when it reaches a certain byte limit (for example, 4 MB of data
is transmitted over the SA), or after a specific amount of time. The length of an
SA is negotiated when it is initiated. When PGPnet negotiates the SA, it sets an
expiration value and automatically creates a new SA when the SA reaches that
expiration value and expires. (The SA expiration value is user-configurable;
for more information, see “Setting key expiration values” on page 162.)
• If your machine initiated an SA and the SA is about to expire, PGPnet
automatically initiates the negotiation of a new SA to replace the expiring
SA. As a result, there may be times when the Status panel displays two SAs
for the same machine.
• When you establish an SA with another host, PGPnet uses the most
restrictive expiration values set by either of the two hosts. As a result, you
may see an SA expire before your maximum expiration value is met.
The following table describes the information that PGPnet’s Status panel
displays for each SA:
Column Description
Destination IP address of target host or gateway.
Protocol Type of protocol negotiated, for example, AH, ESP, or
IPCOMP.
Encryption Type of encryption algorithm negotiated. If it is an
authentication-only SA, this column can be empty. Types of
encryption include TripleDES or CAST.
Authentication Type of authentication algorithm negotiated. This column
can be empty or contain one of the following: HMAC MD5 or
HMAC SHA. If both ESP and AH protocols are used, this
column can contain two entries.
Expires Date and time that the SA expires (mm/dd/yy hh:mm:ss AM
or PM), or displays “Never” if the SA’s expiration is based
only on MB rather than time.
Max. Data Maximum number of MB that the SA will transport before
expiring.
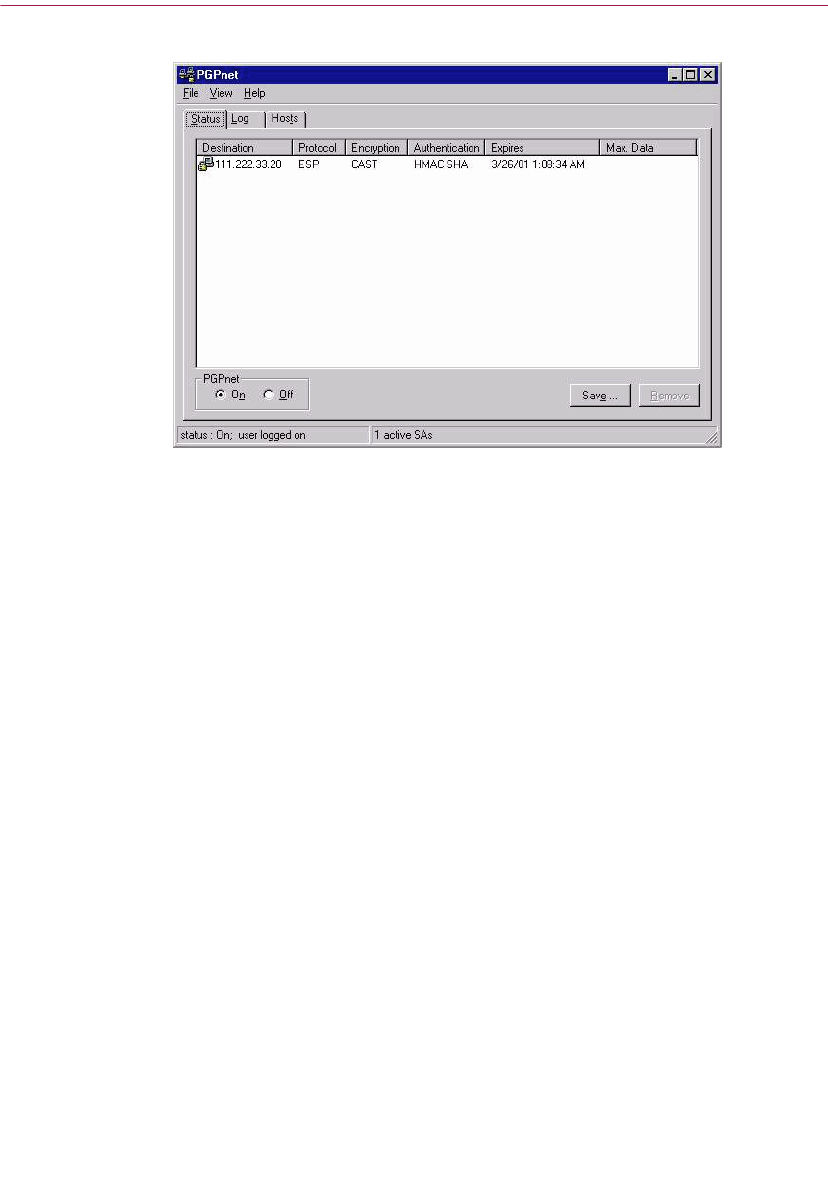
PGPnet Virtual Private Networking
142 PGP Freeware
Figure 7-4. The Status Panel
Use the Save feature to save a list of active SAs for diagnostic purposes. To
save the list of SAs to a tab-delimited text file, click Save.
Use the Remove feature to remove an SA. Remove an SA when you think that
it has been compromised, if you know that the target host is down, or for any
reason that you think the connection should be terminated.
Use On and Off to turn PGPnet on or off.
You can also click the Log tab to view recent log entries.
Viewing the Log Panel
The Log panel shows system and service errors, when they occurred (date and
time), and a description of the error. Use this information to help resolve
problems that occur (see Figure 7-5 on page 143).
Use the Show Events check boxes to select the types of events that you want
to view: Service, IKE, IPSec, PGP, and/or System. To instruct PGPnet to
display a specific kind of event, click the checkbox next to the event type.
Use Save to save current log information to a text file.
Use Clear to clear current log information from the log file and screen.
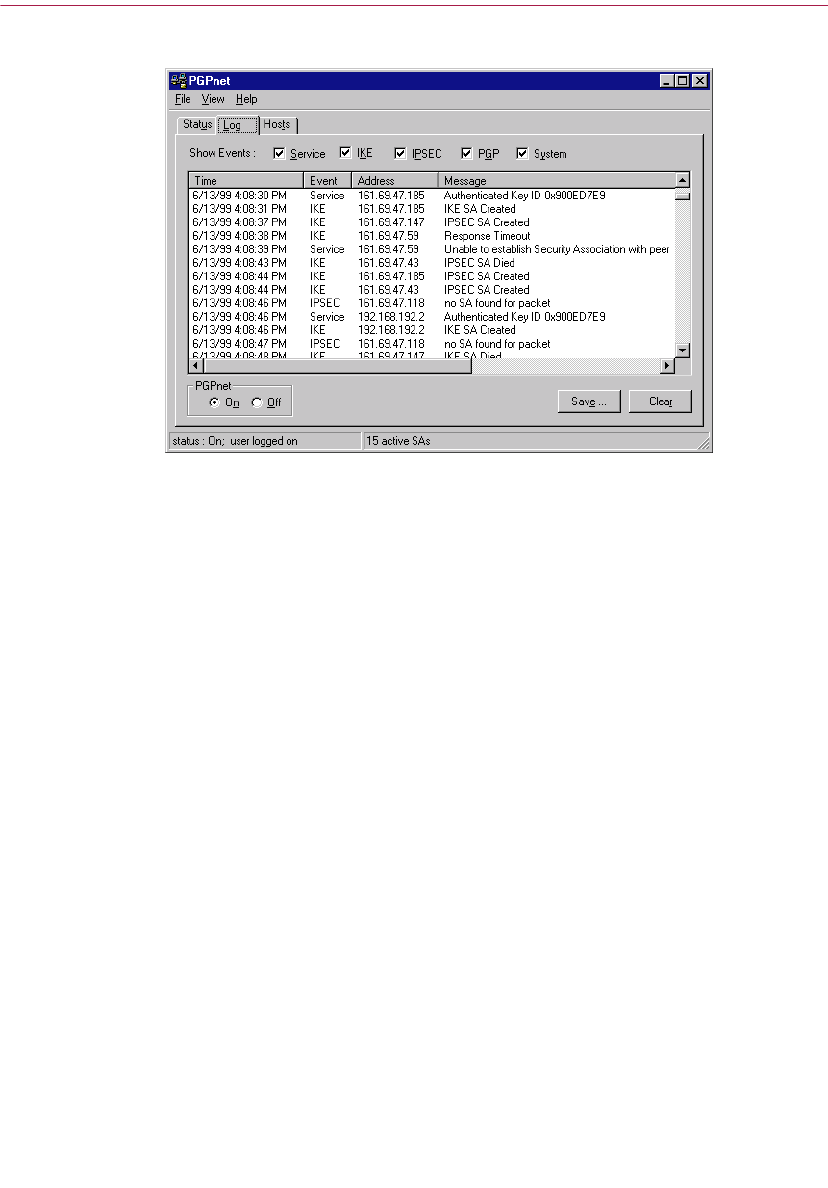
User’s Guide 143
PGPnet Virtual Private Networking
Figure 7-5. The Log Panel
The following table describes the information that PGPnet displays for each
log entry:
Column Description
Time Date and time error occurred in format mm/dd/yy hh:mm:ss
AM or PM
Event Type of event, Service, IKE, IPSec, PGP, or System error.
Address IP address of the remote host.
Message Text that describes the type of error (for example, Unable to
establish Security Association with peer).
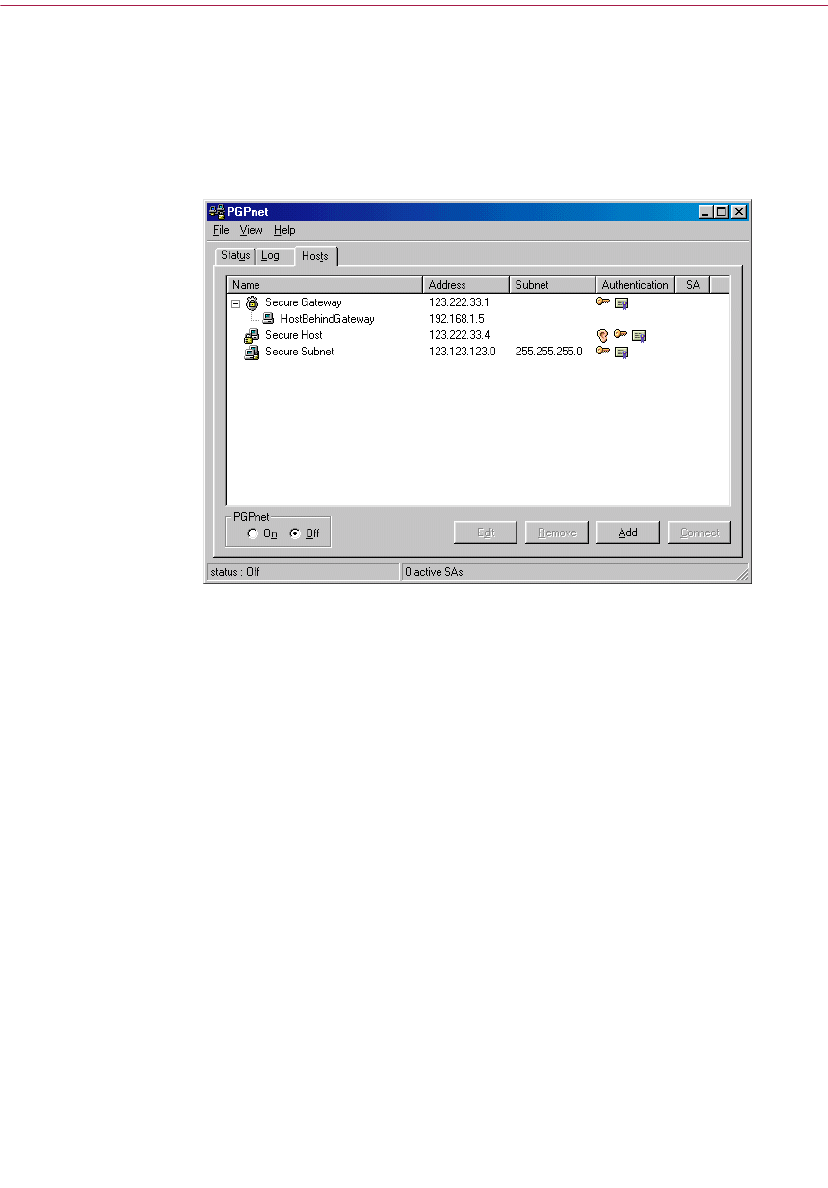
PGPnet Virtual Private Networking
144 PGP Freeware
Using the Hosts Panel
The Hosts panel displays secure gateways, subnets, and hosts. If a plus sign
(+) appears to the left of an item, click on the plus sign to expand the display
and view other entries associated with that item (see Figure 7-7 on page 148).
Figure 7-6. The Hosts Panel
The following table describes the information displayed for each entity.
Column Description
Name Descriptive name of host, subnet, or gateway entry.
Address IP address of host, subnet, or gateway.
Subnet If the host entry is a subnet, this field displays the subnet mask.
Otherwise, this field is blank.
Authentication An icon appears, indicating the type of authentication used for
the host entry.
• A key icon indicates public-key cryptography authentication.
• A certificate icon indicates X.509 certificate authentication.
• An ear icon indicates shared secret authentication.
• No icon indicates that the configured host entry is insecure.
SA Displays a green dot when there is an SA with the host. If there is
no SA with the host, the column is blank.

User’s Guide 145
PGPnet Virtual Private Networking
The following table describes the buttons on the Hosts panel.
The Connect and Disconnect buttons
Use the Connect button to establish an SA with a configured host. Select the
host, then click Connect. The Connect button is disabled when an
inappropriate host entry is selected (for example, when you select a secure
subnet or insecure host that is not behind a gateway).
Use the Disconnect button to terminate an SA with a configured host. Select
the host, then click Disconnect.
For more information about establishing an SA, please see “Establishing an
SA” on page 145.
Establishing an SA
Establish an SA using PGP keys authentication
Follow the steps below to establish an SA with another host using PGP keys
for authentication.
To establish an SA with another host using PGP keys for authentication:
1. Verify that each system has a network connection.
2. Install PGPnet on both systems.
During installation you must select the appropriate network adapter for
PGPnet. For example, if the network connection is via ethernet, PGPnet
must be bound to the ethernet adapter; if the network connection is via
modem, then PGPnet must be bound to the modem adapter (also known
as the Remote Access WAN Wrapper or Dialup Adapter).
Button Description
Edit Displays the values for the selected item in the Edit
Host/Gateway dialog box.
Remove Removes selected host entry.
Add Activates the Add New Host/Gateway Wizard (if you are in Expert
Mode, activates the Edit Host/Gateway dialog).
Connect /
Disconnect
Connect establishes an SA; Disconnect terminates an SA.

PGPnet Virtual Private Networking
146 PGP Freeware
3. After installing PGPnet, reboot both systems.
4. Verify that each system has an authentication key set in the PGP
Authentication section of the Authentication panel
(View—>Options—>Authentication).
5. Exchange, sign, and validate the public keys that each system is using for
authentication. For more information, see Chapter 2, “Using PGP.”
ÐTIP: For scalability, use a trusted third-party or CA for this.
6. At least one user must create an entry in PGPnet’s host list for the other
system. You must know the other system’s host name or IP address.
Verify that the entry identifies the host as a secure host (if the host is
secure, the icon next to the host entry on the Hosts panel displays a
computer with a lock).
7. Select the host’s entry on the Hosts panel and click Connect. If the
connection is successful, a green dot appears in the SA column.
Establish an SA using X.509 certificates authentication
Follow the steps below to establish an SA with another host using an X.509
certificate for authentication.
To establish an SA with another host using an X.509 certificate for
authentication:
1. Verify that each system has a network connection.
2. Install PGPnet on both systems.
During installation you must select the appropriate network adapter for
PGPnet. For example, if the network connection is via ethernet, PGPnet
must be bound to the ethernet adapter; if the network connection is via
modem, then PGPnet must be bound to the modem adapter (also known
as the Remote Access WAN Wrapper or Dialup Adapter).
3. After installing PGPnet, reboot both systems.
4. Verify that each system has an authentication certificate in the X.509
Authentication section of the Authentication panel
(View—>Options—>Authentication).
5. Ensure that the root CA for the X.509 certificate exists and is signed and
fully trusted on both systems. Both systems must have the same Root CA.

User’s Guide 147
PGPnet Virtual Private Networking
6. At least one user must create an entry in PGPnet’s host list for the other
system. You must know the other system’s host name or IP address.
Verify that the entry identifies the host as a secure host. (If the host is
secure, the icon next to the host entry on the Hosts panel displays a
computer with a lock.)
7. Click on the host’s entry on the Hosts panel and click Connect. If the
connection is successful, a green dot appears in the SA column.
Establish an SA using shared secret passphrase authentication
Follow the steps below to establish an SA with another host using a shared
secret passphrase for authentication.
To establish an SA with another host using shared secret for authentication:
+WARNING: Unlike traditional PGP passphrases, Shared Secret
passphrases are stored on your computer unencrypted. This
presents a potential security risk. To avoid this risk, use keys or
certificates.
1. Verify that each system has a network connection.
2. Install PGPnet on both systems.
During installation you must select the appropriate network adapter for
PGPnet. For example, if the network connection is via ethernet, PGPnet
must be bound to the ethernet adapter; if the network connection is via
modem, then PGPnet must be bound to the modem adapter (also known
as the Remote Access WAN Wrapper or Dialup Adapter).
3. After installing PGPnet, reboot both systems.
4. Both users must create an entry in PGPnet’s host list for the other system.
You must know the other system’s host name or IP address, and agree on
a shared secret passphrase.
For more information on configuring a secure host, see “Adding a host,
subnet, or gateway” on page 148.
5. Click on the host’s entry on the Hosts panel and click Connect. If the
connection is successful, a green dot appears in the SA column.
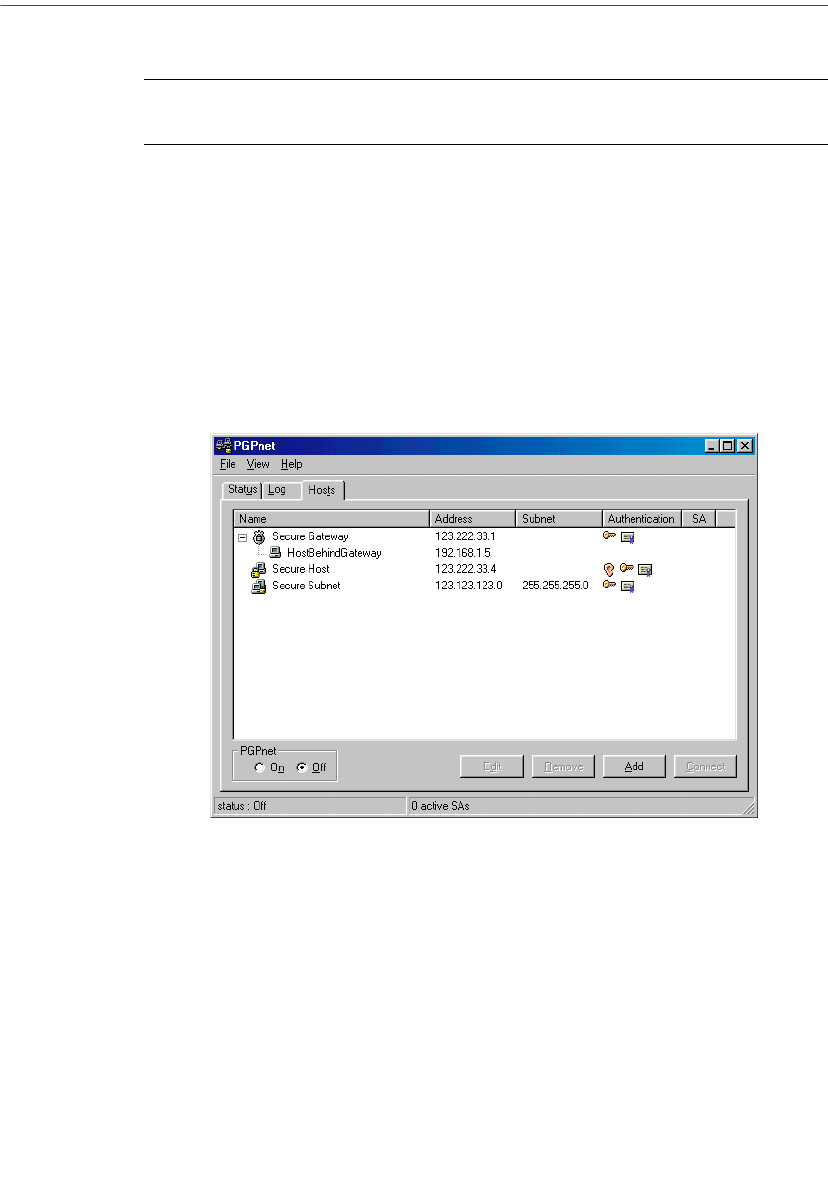
PGPnet Virtual Private Networking
148 PGP Freeware
Adding a host, subnet, or gateway
NOTE: If you are an experienced user, please see “Expert Mode:
Bypassing the wizard to add hosts, gateways, and subnets” on page 157.
If you are in a corporate environment with a PGPnet administrator, many of
the hosts, subnets, and gateways that you communicate with may have been
preconfigured by your administrator. Each preconfigured host, subnet, and
gateway is an entry in PGPnet’s host list. You can use PGPnet’s Add Host
wizard or Host/Gateway dialog to add additional entries to the host list.
If you do not have a PGPnet administrator or hosts, subnets, or gateways are
not configured when you install PGPnet, the Add Host wizard starts
automatically the first time you start PGPnet. Use the wizard to add the
necessary hosts, subnets, and gateways.
Figure 7-7. The Hosts Panel

User’s Guide 149
PGPnet Virtual Private Networking
What you need to know
The following paragraphs identify information that you need to add a host,
subnet, or gateway.
Adding a host
NOTE: To add a host behind an existing configured gateway, see
“Adding a host behind a configured gateway” on page 153.
Use PGPnet’s Add Host wizard to add a host entry to the host list.
1. In the PGPnet main window, click the Hosts tab.
2. Click Add (or Alt-A). PGPnet displays the Add Host wizard. Read the
first screen and click Next.
Table 7-1. What you must know to add hosts, gateways, and subnets
To: You must know:
Add a secure host Host domain name or IP address
Add a subnet IP address and subnet mask
Add a gateway Host domain name or IP address
Add a host behind a configured
gateway
Host domain name or IP address
Add a subnet behind a configured
gateway
IP address and subnet mask
Table 7-2. Where to go to add hosts, subnets, and gateways
To... See page...
Add a host page 149
Add a subnet page 151
Add a gateway page 152
Add a host behind a configured gateway page 153
Add a subnet behind a configured gateway page 154

PGPnet Virtual Private Networking
150 PGP Freeware
3. The wizard asks if you want to add a host, subnet, or gateway. Click Host
and click Next.
4. You can elect to enforce secure communications or allow insecure
communications. Click the radio button next to your selection and click
Next.
5. Enter a descriptive name for the computer with which you want to
communicate. Click Next.
6. Enter either the host domain name or the IP address for the host. Click
Next. The wizard searches for your entry. If the wizard is unable to locate
your entry, you must click Back, return to the previous screen, and
re-enter the name or IP address.
The following steps apply if you elected to enforce secure communications.
7. Select the communication method that you want to use when you
communicate with this machine: public-key cryptographic security or
shared secret (passphrase-based) security. Click Next. If you selected
shared secret security, enter the passphrase. Note that both hosts must
configure the same shared secret passphrase. Click Next.
+WARNING: Unlike traditional PGP passphrases, Shared Secret
passphrases are stored on your computer unencrypted. This
presents a potential security risk.
If you have not selected an authentication key or certificate, the wizard
asks you to select one now.
• If you selected shared secret security, go to Step 8.
• If you selected public-key cryptographic security, go to Step 9.
8. Select how you want to identify yourself to the remote computer (applies
only if shared secret authentication is used): IP Address, Host Domain
Name, User Domain Name, or Distinguished Name.
IP Address — by the IP address of this computer [nnn.nnn.nnn.nnn]
Host Domain Name — by the host domain name of this computer
[computerName.nameOfNetwork]
User Domain Name — by a user and host domain name which you
specify [for example, username@computerName.nameOfNetwork]
Distinguished Name — by a text string which you specify, such as
“CN=”Bob Jones”,_C=US,_O=”Acme,_Inc.””

User’s Guide 151
PGPnet Virtual Private Networking
Click Next. If you select User Domain Name or Distinguished Name,
enter the name. Click Next.
9. The wizard adds the entry to your host list. Click Finish to close the
wizard.
Adding a subnet
NOTE: To add a subnet behind an existing configured gateway, see
“Adding a subnet behind a configured gateway” on page 154.
Use PGPnet’s Add Host wizard to add subnet entries to the host list.
1. In the PGPnet main window, click the Hosts tab.
2. Click Add (or Alt-A). PGPnet displays the Add Host wizard. Read the
first screen and click Next.
3. The wizard asks you if you want to add a host, subnet, or gateway. Click
Subnet and click Next.
4. You can elect to enforce secure communications or allow insecure
communications. Click the radio button next to your selection and click
Next.
5. Enter a descriptive name for the subnet with which you want to
communicate. Click Next.
6. Enter the IP address and subnet mask for the subnet. Click Next.
NOTE: If you configure a subnet with shared secret passphrase, all
machines in that subnet must be configured with the same shared
secret passphrase.
The following steps apply if you elected to enforce secure communications.
7. Select the communication method that you want to use when you
communicate with this subnet: public-key cryptographic security or
shared secret (passphrase-based) security. Click Next. If you selected
shared secret security, enter the passphrase. If you select shared secret,
each computer on that subnet must also be configured with the same
shared secret passphrase. Click Next.
+WARNING: Unlike traditional PGP passphrases, Shared Secret
passphrases are stored on your computer unencrypted. This
presents a potential security risk.

PGPnet Virtual Private Networking
152 PGP Freeware
8. Select how you want to identify yourself to the remote computer (applies
only if shared secret authentication is used): IP Address, Host Domain
Name, User Domain Name, or Distinguished Name.
IP Address — by the IP address of this computer [nnn.nnn.nnn.nnn]
Host Domain Name — by the host domain name of this computer
[computerName.nameOfNetwork]
User Domain Name — by a user and host domain name which you
specify [for example, username@computerName.nameOfNetwork]
Distinguished Name — by a text string which you specify, such as
“CN=”Bob Jones”,_C=US,_O=”Acme,_Inc.””
Click Next. If you select User Domain Name or Distinguished Name,
enter the name. Click Next.
9. The wizard adds the entry to your hosts list. Click Finish.
Adding a gateway
Use PGPnet’s Add Host wizard to add a secure gateway entry to the host list.
1. In the PGPnet main window, click the Hosts tab.
2. Click Add (or Alt-A). PGPnet displays the Add Host wizard. Read the
first screen and click Next.
3. The wizard asks you if you want to add a host, subnet, or gateway. Click
the radio button next to Gateway and Click Next.
4. Enter a descriptive name for the gateway with which you want to
communicate securely. Click Next.
5. Enter either the host domain name or the IP Address for the gateway.
Click Next. The wizard searches for your entry. If the wizard is unable to
locate your entry, click Back, return to the previous screen, and re-enter
the name or IP address. Click Next when the appropriate IP address is
entered.
6. Select the communication method that you want to use when you
communicate with this machine: public-key cryptographic security or
shared secret (passphrase-based) security. Click Next. If you selected
shared secret security, enter the passphrase. Click Next.
+WARNING: Unlike traditional PGP passphrases, Shared Secret
passphrases are stored on your computer unencrypted. This
presents a potential security risk.

User’s Guide 153
PGPnet Virtual Private Networking
• If you selected shared secret security, go to Step 7.
• If you selected public-key cryptographic security, go to Step 8.
7. Select how you want to identify yourself to the remote computer (applies
only if shared secret authentication is used): IP Address, Host Domain
Name, User Domain Name, or Distinguished Name.
IP Address — by the IP address of this computer [nnn.nnn.nnn.nnn]
Host Domain Name — by the host domain name of this computer
[computerName.nameOfNetwork]
User Domain Name — by a user and host domain name which you
specify [for example, username@computerName.nameOfNetwork]
Distinguished Name — by a text string which you specify, such as
“CN=”Bob Jones”,_C=US,_O=”Acme,_Inc.””
Click Next. If you select User Domain Name or Distinguished Name,
enter the name. Click Next.
8. The wizard adds the entry for the secure gateway to your host list.
At this point you can elect to create a new host or subnet associated with
this gateway. To do so, click the radio button next to Yes. If you do not
want to create a new host or subnet, click the radio button next to No.
Click Next.
– To create a new host, go to Step 2 on page 149.
– To create a new subnet, go to Step 2 on page 151.
– If you elected not to create a host or subnet at this time, click Finish.
Adding a host behind a configured gateway
Use PGPnet’s Add Host wizard to add a secure host behind a configured
gateway to the host list.
1. In the PGPnet main window, click the Hosts tab.
2. Select the configured gateway and click Add. PGPnet displays the Add
Host wizard. Read the first screen and click Next.
3. The wizard asks if you want to create a new host entry for a computer or
subnet accessed through the selected gateway. To do so, select Yes and
then click Next.
4. The wizard asks you to select the type of communication you want to
configure. Select Host and then click Next. To add a secure host, see
“Adding a host” on page 149. To add an insecure host, go to Step 5.

PGPnet Virtual Private Networking
154 PGP Freeware
5. The wizard asks if you want to add a secure or insecure host. Select
Allow insecure communications and click Next.
6. Enter a descriptive name for the computer with which you want to
communicate. Click Next.
7. Enter either the host domain name or the IP address for the host. Click
Next. The wizard searches for your entry. If the wizard is unable to locate
your entry, you must click Back, return to the previous screen, and
re-enter the name or IP address.
8. The wizard adds the entry to your hosts list. Click Finish to close the
wizard.
Adding a subnet behind a configured gateway
NOTE: To add a subnet that is not behind an existing configured
gateway, see “Adding a subnet” on page 151.
Use PGPnet’s Add Host wizard to add a subnet behind a configured gateway
to the host list.
1. In the PGPnet main window, click the Hosts tab.
2. Select the configured gateway and click Add. PGPnet displays the Add
Host wizard. Read the first screen and click Next.
3. The wizard asks if you want to create a new host entry for a computer or
subnet accessed through the selected gateway. To do so, select Yes and
then click Next.
4. The wizard asks you to select the type of communication you want to
configure. Select Subnet and then click Next. To add a secure subnet, see
“Adding a subnet” on page 151. To add an insecure subnet, go to Step 5.
5. The wizard asks you if you want to add a secure or insecure subnet.
Select Allow insecure communications and click Next.
6. Enter a descriptive name for the subnet with which you want to
communicate. Click Next.
7. Enter the IP address and subnet mask for the subnet with which you
want to communicate. Click Next.
8. The wizard adds the entry for the subnet to your host list. Click Finish to
close the wizard.

User’s Guide 155
PGPnet Virtual Private Networking
Modifying a host, subnet, or gateway entry
There may be times when you need to modify the configuration of a host,
subnet, or gateway. For example, when a IP address, subnet mask, or host
domain name changes. To modify a configuration, follow these instructions:
1. Click the Hosts tab.
2. Select the host, subnet, or gateway that you want to modify.
3. Click Edit.
Shortcut: Instead of selecting the host and clicking Edit, double-click the
host in the host list.
4. Make the required edits.
5. Click OK.
The PGPnet database is updated immediately. However, if the PGPnet service
or driver are not operating normally, the PGPnet database is not updated until
they are working properly. This may require a computer reboot.
Removing a host, subnet, or gateway entry
There may be times when you want to remove a configured host, subnet, or
gateway. For example, when you feel that any entity is no longer secure. To
remove a host, subnet, or gateway, follow these instructions:
1. Click the Hosts tab.
2. Select the host, subnet, or gateway that you want to remove.
3. Click Remove.
Requiring a host to present a specific key or certificate
You may want to require a host to present a specific key or certificate when the
host attempts to establish an SA. If the host does not present the appropriate
key or certificate, your system will refuse to communicate with the host.
To require a host to present a specific key or certificate:
1. If you have not already done so, add the host, subnet, or gateway to
PGPnet (for instructions, see “Adding a host, subnet, or gateway” on
page 148). PGPnet adds an entry to the host list on the Hosts panel.
2. Select the entry on the Hosts panel and click Edit. PGPnet displays the
Host/Gateway dialog. The Remote Authentication section is at the
bottom of the dialog.
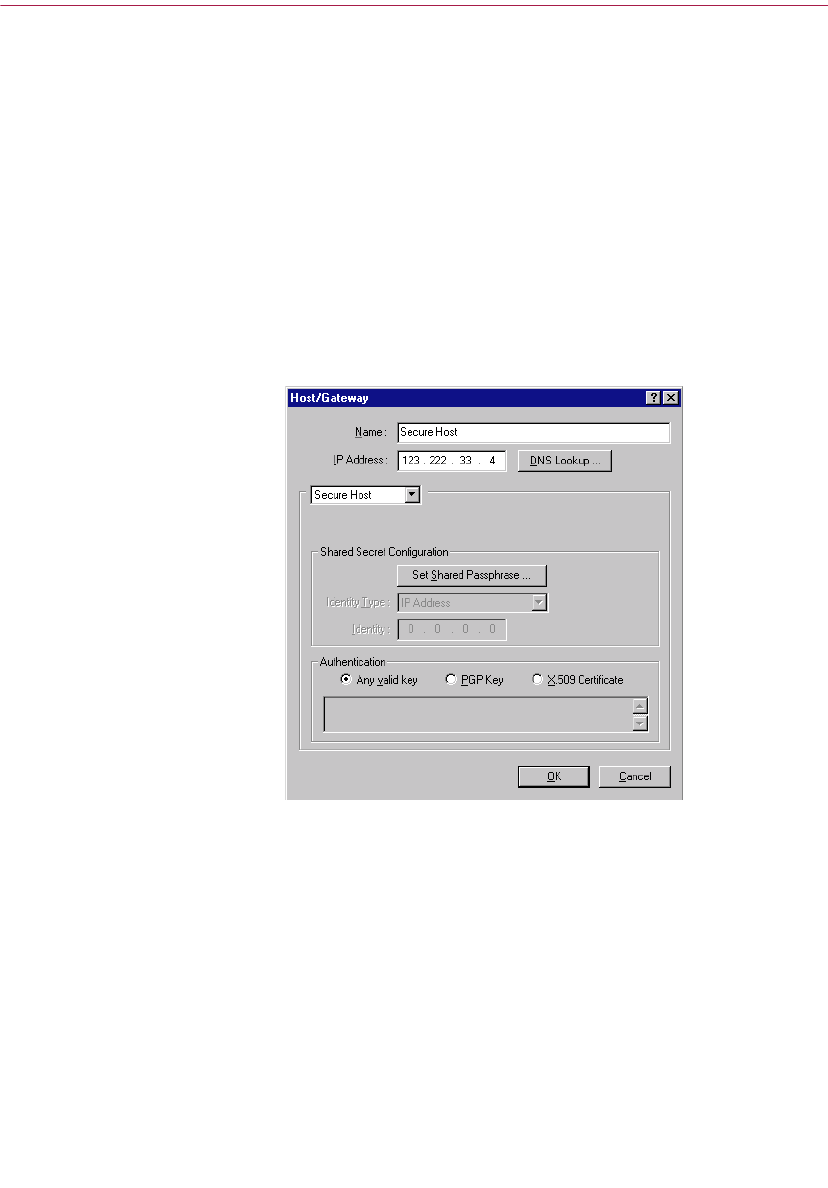
PGPnet Virtual Private Networking
156 PGP Freeware
3. You can require the host, subnet, or gateway to present a specific PGP
key or X.509 certificate to authenticate itself.
• To require a specific PGP key, click the radio button next to PGP
Key. PGPnet displays the Select Key dialog. Click the appropriate
key and click OK. PGPnet displays the key in the Remote
Authentication box. Click OK to close the Host/Gateway dialog.
• To require a specific X.509 certificate, click the radio button next to
X.509 Certificate. PGPnet displays the Select X.509 Certificate
dialog. Click the appropriate certificate and click OK. PGPnet
displays the certificate in the Remote Authentication box. Click OK
to close the Host/Gateway dialog.
Figure 7-8. Host/Gateway dialog
Viewing the General Panel
To view the General panel, select Options from the View menu on PGPnet’s
window.
Use the General panel to perform the following tasks:
• Turn Expert Mode on or off
• Control the security level of communications with hosts

User’s Guide 157
PGPnet Virtual Private Networking
• Control the caching of passphrases between logins
• Require valid authentication keys from all hosts
• Set expiration values for Setup Keys (IKE) and Primary Keys (IPSec) which
create Security Associations with other configured hosts
Expert Mode: Bypassing the wizard to add hosts, gateways, and
subnets
When you become familiar with PGPnet, you can use Expert Mode
(View—>Options—>General) to add and edit hosts, gateways, and subnets
quickly. In contrast to the wizard, which walks you through the add process
step by step, when PGPnet is in Expert Mode, it presents a single form when
you want to add a new entry.
NOTE: If you use Expert Mode, remember to select an authentication key
or certificate if you have not already done so (View—>Options—>
Authentication).
To turn on and use Expert Mode:
1. Select Options from the View menu to display the General panel.
2. Click Expert Mode (a checkmark appears).
3. Click OK.
4. Click the Hosts tab. Click Add to display the Host/Gateway dialog.
DNS Lookup: Finding a host’s IP address
PGPnet’s Expert Mode includes a DNS Lookup feature. Use this feature to
identify a host’s IP address.
To use the DNS Lookup feature, follow these steps:
1. Click DNS Lookup. PGPnet displays the DNS Lookup dialog box.
2. Enter the host name of the system in the Host name to lookup field and
click Lookup. PGPnet searches for the IP address for the host name that
you entered.
• If PGPnet finds the IP address, it displays the IP address; click Use
to use the IP address in the Edit Host/Gateway form.
• If PGPnet does not find an IP address for the host, it advises you.
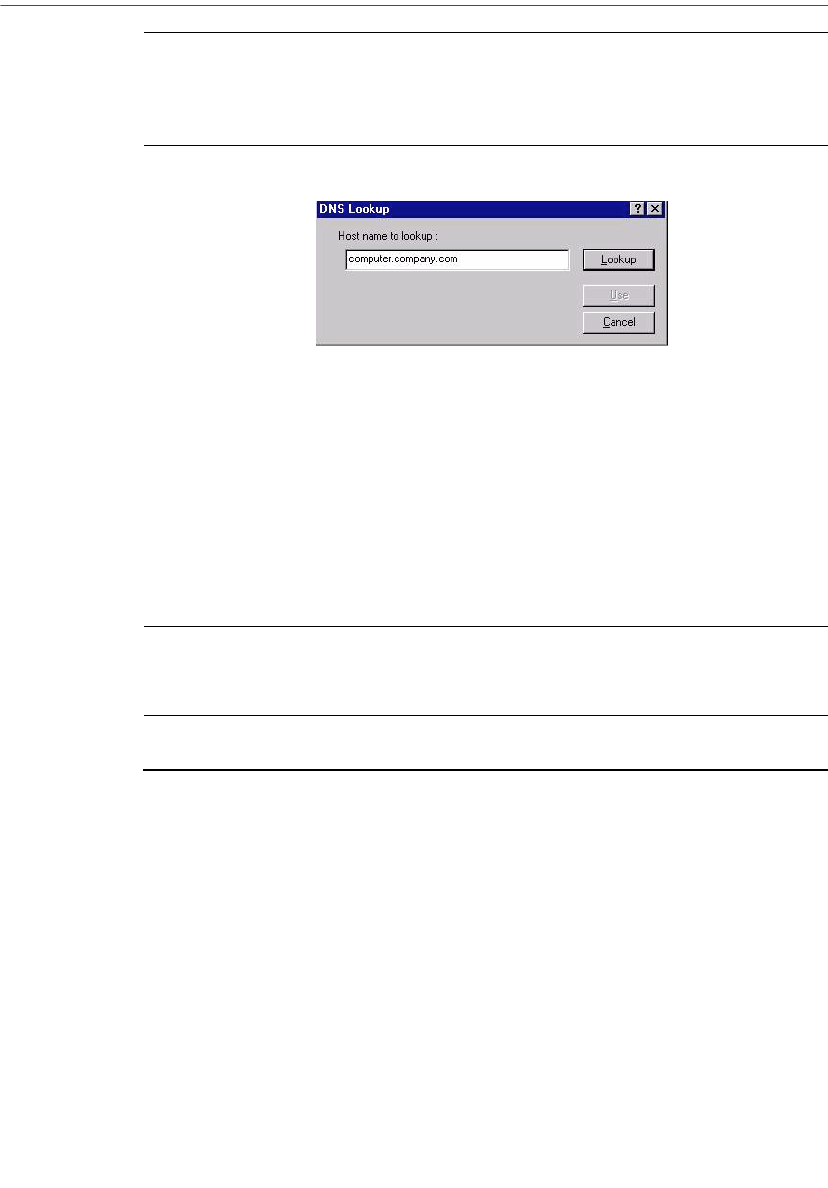
PGPnet Virtual Private Networking
158 PGP Freeware
ÐTIP: You can enter the host name of the system in the name field of the
Host/Gateway dialog and click DNS Lookup. The Lookup window
appears; click Lookup to look up the IP address of the host name you
entered.
Figure 7-9. The DNS Lookup Dialog
Remote Authentication
The controls in the Remote Authentication section of the Host/Gateway
dialog allow you to require the remote host to present a specific PGP key or
X.509 certificate each time the host attempts to establish an SA with your host.
If the host attempts to establish a connection and does not present the specified
key or certificate, your machine will refuse the connection. The default setting
is Any valid key.
ËIMPORTANT: If you select a specific PGP key or X.509 certificate for a
secure subnet entry, all users within that subnet must use the same key
to authenticate themselves.
To identify a specific PGP key that the remote host must present for
authentication:
1. Click PGP Key.
2. Select the key from the keys displayed in the pop-up dialog, and click
OK. The key is displayed in the Remote Authentication section of the
Host/Gateway dialog.
3. Click OK.

User’s Guide 159
PGPnet Virtual Private Networking
To identify a specific X.509 certificate that the remote host must present for
authentication:
1. Click X.509 Certificate.
2. Select the certificate from the certificates displayed in the pop-up dialog,
and click OK. The key is displayed in the Remote Authentication section
of the Host/Gateway dialog.
3. Click OK.
Turning Expert Mode off
To turn Expert Mode off:
1. Select Options from the View menu to display the General panel.
2. Click Expert Mode (the checkmark disappears).
3. Click OK.
Controlling the security level of communications with
hosts
Communicating securely with other hosts is one of the primary reasons to use
PGPnet. PGPnet’s security features (encryption, authentication, and
tunneling) allow you to transmit your data over the Internet or other public or
private networks securely. Your data is protected as it travels over networks
and machines that are not under corporate control. Any attempts by attackers
to intercept, decipher, or alter the data are eliminated. Your data reaches its
final destination intact.
PGPnet includes features that allow you to communicate with unconfigured
hosts (that is, hosts that have not been added to the PGPnet host list), and also
to require secure communications with all hosts.

PGPnet Virtual Private Networking
160 PGP Freeware
Allow communications with unconfigured hosts and Require
secure communications with all hosts
Use these two settings to control who you communicate with and to minimize
the number of systems that you are required to add to the hosts list.
If most of the systems that you communicate with are not running PGPnet, use
the wizard to add the few secure hosts to the hosts list and check the Allow
communications with unconfigured hosts setting. This will allow you to
communicate with both the secure hosts that you have identified in the hosts
list and all other hosts.
If most of the systems that you communicate with are running PGPnet, use the
wizard to add the few insecure hosts to the hosts list as insecure hosts and
check the Require secure communications with all hosts setting. This will
allow you to communicate with both the insecure hosts that you have
identified in the hosts list and all other IPSec-compliant hosts.
Allow communications with unconfigured hosts
Use this feature (View—>Options—>General), to send and receive data that
is not confidential or sensitive to and from hosts that are not configured in
PGPnet. For example, you might want to use this feature if you routinely
browse the web. This setting is enabled by default.
• To allow communications with unconfigured hosts, check this box.
• To disallow communications with unconfigured hosts, leave this box
blank.
Require secure communications with all hosts
Use this feature (View—>Options—>General) to require secure
communications with all hosts. For example, if you are in a corporation and all
of your company’s systems are configured with PGPnet, use this feature to
eliminate the need to identify each host.
When this box is checked, PGPnet negotiates an SA with each target machine
before it allows communication. The default for this setting is off (unchecked).
• To require PGPnet to negotiate secure communications with all hosts,
check this box.
• To allow insecure communications with all hosts, uncheck this box.
NOTE: If this feature is on, two machines configured as insecure hosts
can still communicate with each other.

User’s Guide 161
PGPnet Virtual Private Networking
+WARNING: This security feature is designed for environments where
all machines are configured with PGPnet. When this feature is active
(checked), it blocks communication from any machine that is not
configured with PGPnet. As a result, if you are not in a PGPnet
configured environment and you activate this feature, you may lose the
bulk of your network traffic.
Require valid authentication key
Use this feature (View—>Options—>General), to control whether PGPnet
verifies that the keys presented by remote hosts are valid on the local keyring.
• To require PGPnet to verify that the keys presented by remote hosts are
valid on the local keyring, make this setting active (checked). Use this
setting if you only communicate with hosts who will use keys and
certificates that are valid on your keyring.
• To instruct PGPnet to accept any key regardless of validity, make this
setting inactive (unchecked). Use this setting when you are running
PGPnet on servers (for example, mail or web servers) that allow
connectivity with any client host. The server uses the appropriate key to
authenticate itself to the client host, but the server accepts any key the client
host presents. (In this case this setting is inactive (unchecked) for the server,
and active (checked) for the client host.) The client host must have the
server’s trusted authentication key for this scenario to work.
ËIMPORTANT: When this box is inactive (unchecked), it overrides the
Any valid key setting in the Authentication section of the Host/Gateway
dialog. When this occurs, the server accepts any key rather than any valid
key. However, you can still use the Host/Gateway dialog to require a
specific key or certificate for each host. For more information, see
“Requiring a host to present a specific key or certificate” on page 155.
NOTE: All key authentications appear on the Log panel, and each entry
displays the key ID.
NOTE: When this box is active (checked), and a PGP Key is selected as
the Remote Authentication method (Host/Gateway dialog), both
requirements apply (the machine must present the correct key, and the
key must also be valid).

PGPnet Virtual Private Networking
162 PGP Freeware
Cache passphrases between logins
Use this feature (View—>Options—>General), to request PGPnet to cache
passphrases between machine logins.
• When this feature is active (checked), PGPnet retains passphrases that you
enter; if you log off of Windows and then log on again, you are not required
to re-enter passphrases.
• When this feature is inactive (not checked), passphrases are dumped when
you log off of Windows. When you log on again, you must re-enter
passphrases.
NOTE: This applies only when logging on and logging off of Windows.
When this feature is active and you logoff Windows and logon as a
different user, you do not have to re-enter passphrases. This does not
apply to PGPnet logins and logoffs.
Note that the use of a key with no passphrase eliminates the need to cache
passphrases. You might use a key with no passphrase if you have a machine
which is automated, for example, a server.
• If you want PGPnet to cache passphrases between machine logins, check
this box.
• If you do not want PGPnet to cache passphrases between machine logins,
leave this box blank.
Setting key expiration values
You can set expiration values for Setup Keys (IKE) and Primary Keys (IPSec).
These keys are responsible for creating your Security Associations. Values can
be set in time (Duration) or data size (Megabytes).
Duration is displayed in the following manner:
2d, 08h, 04m (key expires in 2 days, 8 hours, and 4 minutes)
Megabytes is displayed in the following manner:
99 (key expires after 99 megabytes of data are transferred)
Note that when you establish an SA with another host, PGPnet uses the most
restrictive expiration values set by either of the two hosts. As a result, you may
see an SA expire before your maximum expiration value is met.
+WARNING: Lowering the default value for Megabytes may result in
multiple rekeyings when transmitting large files, which may, in turn,
cause temporary interruption of normal network function.
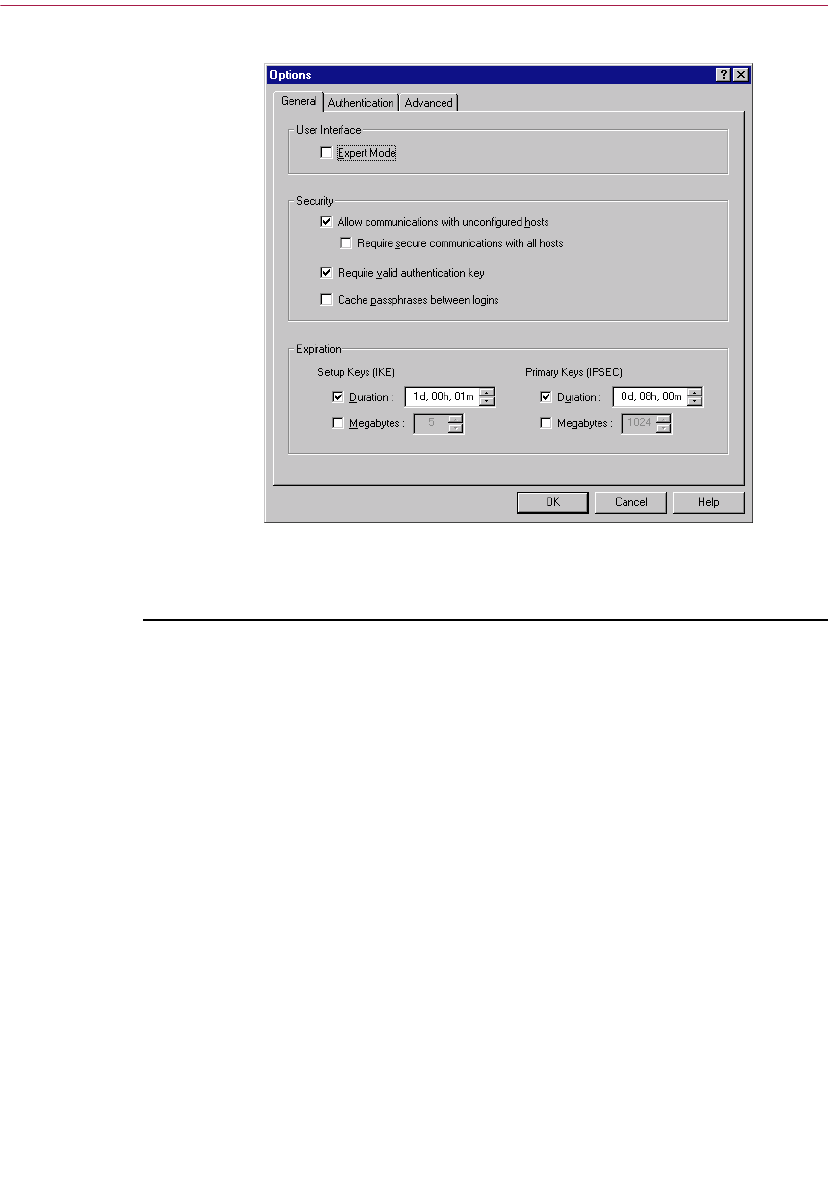
User’s Guide 163
PGPnet Virtual Private Networking
Figure 7-10. The General Panel
To set expiration values for Setup Keys (IKE):
1. Display the General panel (View—>Options). The Expiration
information appears in the bottom section of the General tab.
2. To set a duration for Setup Keys, click the box next to Duration. Use the
up and down arrows next to the duration field to set the appropriate time
limit or enter a numeric value in each field: d, h, m.
3. To set a data value in Megabytes for Setup Keys, click Megabytes. Use
the up and down arrows to set the appropriate megabyte limit or enter a
numeric value.
4. Click OK.

PGPnet Virtual Private Networking
164 PGP Freeware
To set expiration values for Primary Keys (IPSec):
1. Display the General panel (View—>Options). The Expiration
information appears in the bottom section of the General tab.
2. To set a duration for Primary Keys, click Duration. Use the up and down
arrows next to the Duration field to set the appropriate time limit or
enter a numeric value in each field: d, h, m.
3. To set a data value in Megabytes for Primary Keys, click the box next to
Megabytes. Use the up and down arrows to set the appropriate
megabyte limit or enter a numeric value.
4. Click OK.
Authenticating a connection
The controls on the Authentication panel allow you to perform the following
tasks:
• Select your public and private PGPnet keyring files as your active
authentication keyrings (PGPnet Keyring Files). This feature allows you to
set independent PGPnet keyring files.
Select your PGPnet keyring files in the Public and Private boxes (click
Browse).
If you do not have PGPnet keyring files, click Use My PGP Keyring Files
to tell PGPnet to use your PGP keyring files. Note that when you click this
button, PGPnet uses the PGP keyring files of the user currently logged in
to the system. When you click Use My PGP Keyring Files, both the public
and private keyring files are reset to your PGP keyrings.
• Select a PGP key to authenticate your local machine (PGP Authentication).
• Select an X.509 certificate to authenticate your local machine (X.509
Authentication).
• When you click OK, you are asked to enter the passphrase for the selected
authentication key or certificate. Enter the passphrase and click OK. You
are asked to enter this passphrase each time you login to PGPnet. The
exception to this is if Cache passphrase between logins on the General
panel is active (checked).
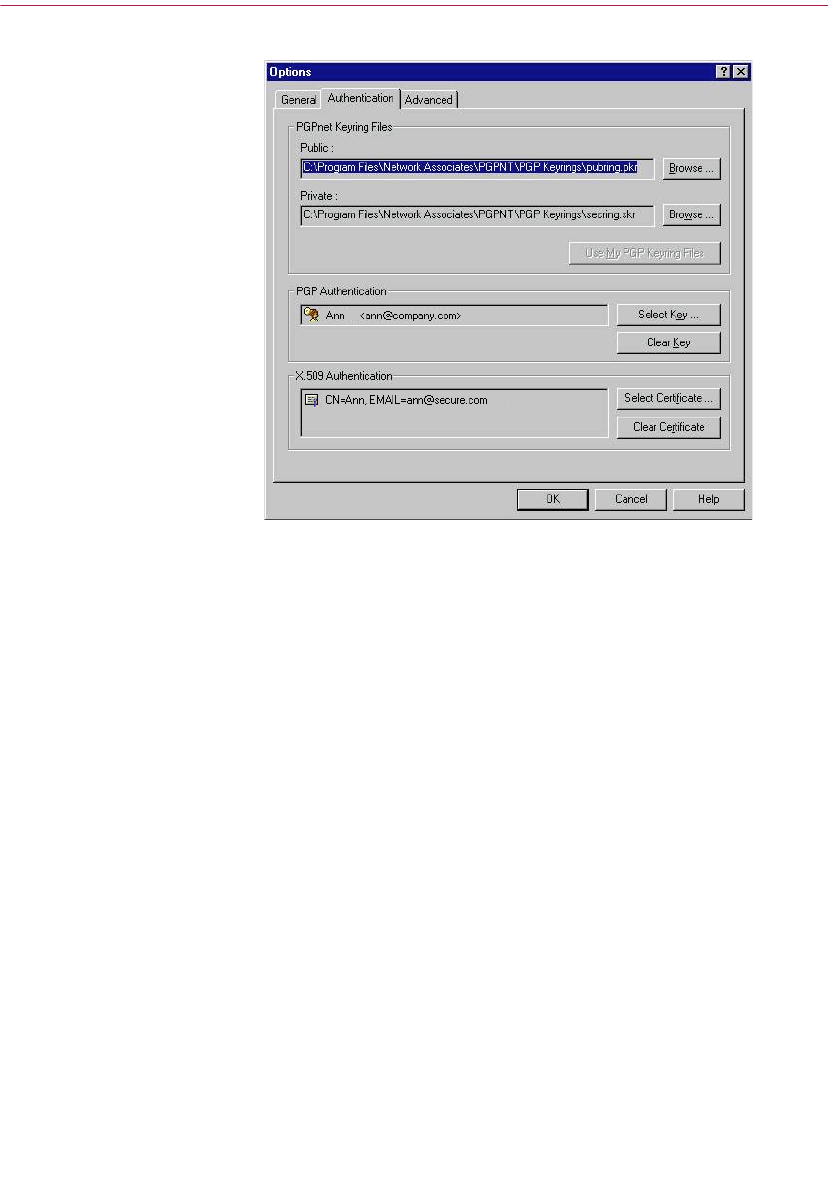
User’s Guide 165
PGPnet Virtual Private Networking
Figure 7-11. The Authentication Panel
The following table describes the buttons on the Authentication panel.
Button Description
Browse
buttons
Displays Select Public Keyring File dialog and Select Private
Keyring File dialog. Use these dialog boxes to select your public
and private PGPnet keyring files as your active authentication
keyring.
Use My PGP
Keyring Files
Instructs PGPnet to use your PGP Keyring files as your active
authentication keyring.
Select Key Displays the PGP Key Selection dialog. Use this dialog box to
select a key pair with which to authenticate your machine. You
must then enter the passphrase for the selected key.
Clear Key Clears the selected PGP key.
Select
Certificate
Displays the Certificate Selection dialog. Use this dialog box to
select an X.509 certificate with which to authenticate your
machine. You must then enter the passphrase for the key to
which the certificate is attached.
Clear
Certificate
Clears the selected X.509 certificate.

PGPnet Virtual Private Networking
166 PGP Freeware
Advanced Panel
+WARNING: The default settings on this panel allow you to
communicate with PGPnet or strong-crypto GVPN users. Do not change
the settings unless you are an experienced IPSec user.
The Advanced Panel (View—>Options) displays the Allowed Remote
Proposals and IKE and IPSec Proposals.
•The Allowed Remote Proposals section tells PGPnet to accept any
proposal from other users that includes any item checked (allowed) in
these boxes. The exceptions to this are the None items for Cipher and
Hashes. Use the None items with extreme caution or not at all. If you check
None for Ciphers (encryption), PGPnet accepts proposals that do not
include encryption. If you check None for Hashes (authentication), PGPnet
accepts proposals that do not include authentication.
• The IKE and IPSec Proposals sections identify the proposals that you make
to others. Other users must accept exactly what is specified in at least one
of your proposals for IKE and for IPSec.
Allowed Remote Proposals
The Allowed Remote Proposals portion of this panel identifies the types of
ciphers, hashes, compression, and Diffie-Hellman keys that PGPnet allows.
Only experienced IPSec users should make any changes to the settings on this
panel:
Ciphers are algorithms used to encrypt and decrypt. To allow a specific type of
cipher (CAST or TripleDES), place a check in the box to the left of the cipher.
Check None with extreme caution or not at all, as it tells PGPnet to accept
proposals that do not include encryption from other users.
A hash function takes a variable-sized input string and converts it to a
fixed-sized output string. To allow a specific type of hash (SHA-1 or MD5),
place a check in the box to the left of the hash function. Check None with
extreme caution or not at all, as it tells PGPnet to accept proposals that do not
include authentication from other users.
A compression function takes a fixed-sized input and returns a shorter, fixed
sized output. There are two types of compression: LZS and Deflate. To allow
a specific type of compression, place a check in the box to the left of the
compression type.

User’s Guide 167
PGPnet Virtual Private Networking
NOTE: LZS and Deflate increase performance for low-speed
communications such as modems and ISDN. LZS and Deflate decrease
performance for fast-speed communications (for example, cable modem,
DSL, T-1, and T-3). This is due to the overhead of the compression
routines.
Diffie-Hellman is a key agreement protocol. To allow a specific key size (1024 or
1536), place a check in the box to the left of the key size.
Term Description
Ciphers An algorithm used to encrypt and decrypt.
Types:
CAST
TripleDES
When None is checked, PGPnet accepts proposals that
do not include authentication from other users.
Hashes A hash function takes a variable-sized input string and
converts it to a fixed-sized output string.
Types:
SHA-1 (Secure Hash Algorithm)
MD5 (Message Digest Algorithm).
When None is checked, PGPnet accepts proposals that
do not include authentication from other users.
Diffie-Hellman Key agreement protocol.
Sizes:
1024 bits
1536 bits
Compression Takes a fixed-sized input and creates a smaller
fixed-sized output.
Types:
LZS
Deflate
NOTE: LZS and Deflate increase performance for
low-speed communications such as modems and ISDN.
LZS and Deflate decrease performance for fast-speed
communications (for example, cable modem, DSL, T-1,
and T-3). This is due to the overhead of the
compression routines.
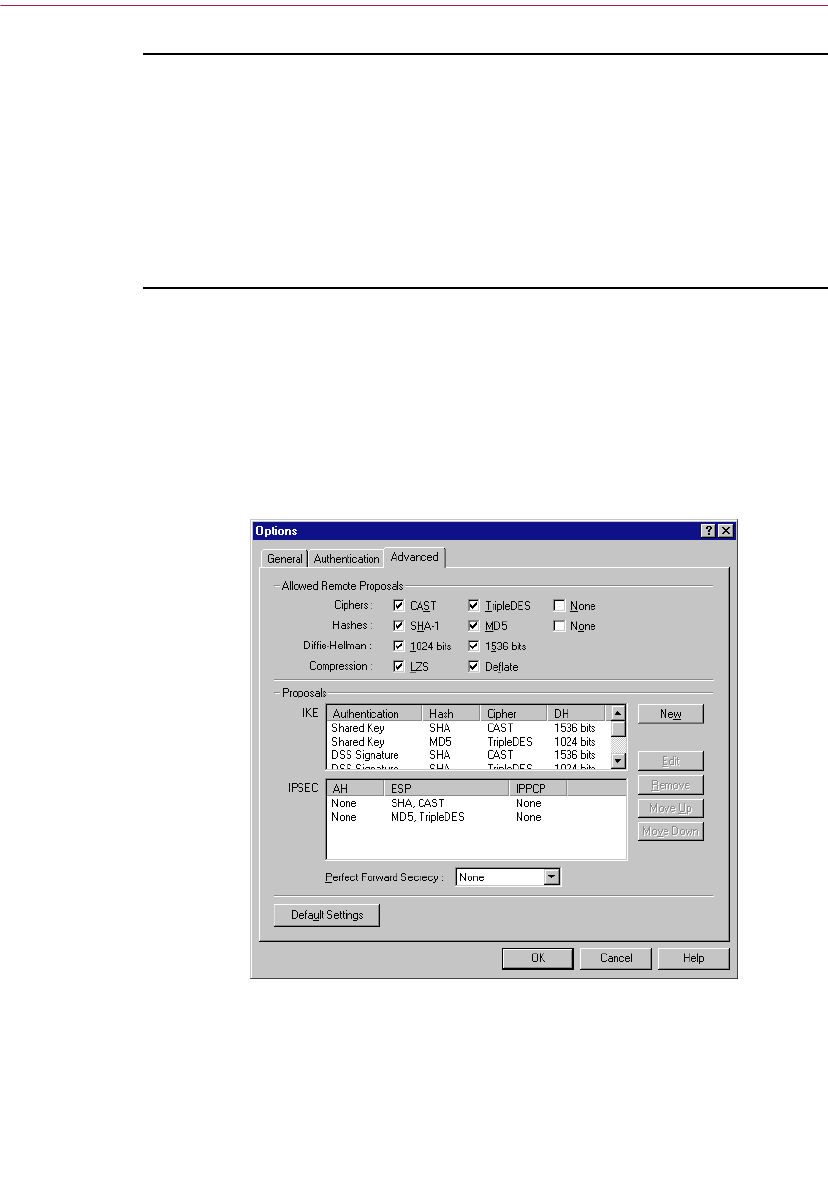
PGPnet Virtual Private Networking
168 PGP Freeware
To add an item to the Allowed Remote Proposals:
1. Display the Options window (View—>Options).
2. Click the Advanced tab.
3. Click the box to the left of the item; a checkmark appears.
4. Click OK.
To remove an item from the Allowed Remote Proposals:
1. Display the Options window (View—>Options).
1. Click the Advanced tab.
2. Click the box to the left of the item; the checkmark is removed.
3. Click OK.
Figure 7-12. The Advanced Panel

User’s Guide 169
PGPnet Virtual Private Networking
Proposals
Use the Proposals portion of the Advanced panel to add, edit, remove, or
reorder your existing proposals. Again, only experienced IPSec users should
make any edits to this panel. The IKE and IPSec proposals tell PGPnet what
proposals to make to other users; proposals must be accepted exactly as
specified. Note that PGPnet allows a minimum of one and maximum of 16
proposals for both IKE and IPSec proposals.
NOTE: LZS and Deflate increase performance for low-speed
communications such as modems and ISDN. LZS and Deflate decrease
performance for fast-speed communications (for example, cable modem,
DSL, T-1, and T-3). This is due to the overhead of the compression
routines.
The following table identifies the types of Authentication, Hash, Ciphers, and
Diffie-Hellman used in IKE proposals.
Term Description
Authentication Means of verifying information such as identity.
Types:
Shared Key (a secret key is shared by two or more
users)
DSS Signature (a Digital Signature Standard signature)
RSA Signature
Hash A hash function takes a variable size input string and
converts it to a fixed size output string.
Types:
SHA (Secure Hash Algorithm)
MD5 (Message-Digest Algorithm).
Cipher An algorithm used to encrypt and decrypt.
Types:
CAST
TripleDES
DH (Diffie-Hellman) A key agreement protocol.
Sizes:
1024 bits
1536 bits.

PGPnet Virtual Private Networking
170 PGP Freeware
The following table identifies the types of AH, ESP, and IPPCP used in IPSec
Proposals.
Perfect Forward Secrecy
All IPSec proposals use the same Diffie-Hellman setting: None, 1024, or 1536
bits.
Adding an IKE or IPSec proposal
To add an IKE or IPSec proposal:
1. Display the Options window (View—>Options).
2. Click the Advanced tab.
3. Click New, and select IKE or IPSec.
4. Make the appropriate selections in the IKE or IPSec Proposal popup
window.
Term Description
AH Authentication Header, a sub-protocol of IPSec that
handles authentication only. In addition, authenticates
various pieces of the IP header. Useful when encryption
is unnecessary, for example, when an ESP
communication is tunneled through a gateway with AH.
Types: SHA and MD5.
ESP Encapsulating Security Payload, a sub-protocol of
IPSec that handles both encryption and authentication.
Hash types: None, SHA, and MD5.
Cipher types: None, CAST, and TripleDES.
IPPCP IP Payload Compression Protocol.
Types: Deflate and LZS.
NOTE: LZS and Deflate increase performance for
low-speed communications such as modems and ISDN.
LZS and Deflate decrease performance for fast-speed
communications (for example, cable modem, DSL, T-1,
and T-3). This is due to the overhead of the
compression routines.
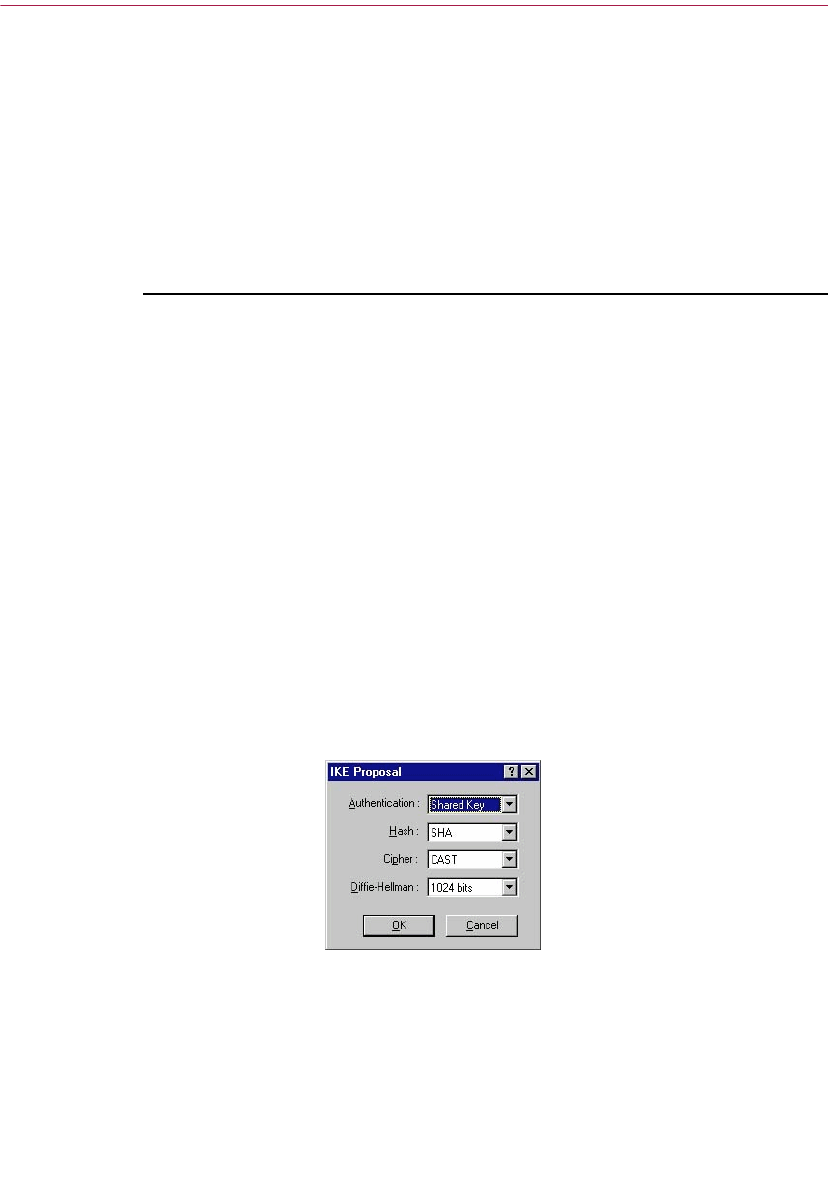
User’s Guide 171
PGPnet Virtual Private Networking
5. Click OK.
6. If you are adding an IPSec proposal, select the appropriate
Diffie-Hellman setting (None, 1024, and 1536) in the Perfect Forward
Secrecy setting. All IPSec proposals use the same Diffie-Hellman setting.
7. Click OK.
Editing an IKE or IPSec proposal
To edit an IKE or IPSec proposal:
1. Display the Options window (View—>Options).
2. Click the Advanced tab.
3. Select the Proposal.
4. Click Edit.
5. Make the appropriate changes in the IKE or IPSec Proposal popup
window.
6. Click OK on the popup window.
7. Review the setting displayed in the Perfect Forward Secrecy box. Note
that all IPSec proposals use the same Diffie-Hellman setting. Change the
setting if required.
8. Click OK on the Advanced panel.
Figure 7-13. IKE Proposal Dialog

PGPnet Virtual Private Networking
172 PGP Freeware
Figure 7-14. IPSec Dialog
Removing an IKE or IPSec proposal
To remove an IKE or IPSec proposal:
1. Display the Options window (View—>Options).
2. Click the Advanced tab.
3. Click the proposal.
4. Click Remove.
5. Click OK.
Reordering IKE or IPSec proposals
To reorder IKE or IPSec proposals:
1. Display the Options window (View—>Options).
2. Click the Advanced tab.
3. Select the proposal.
4. To move the proposal up, click Move Up. To move the proposal down,
click Move Down.
5. Click OK.
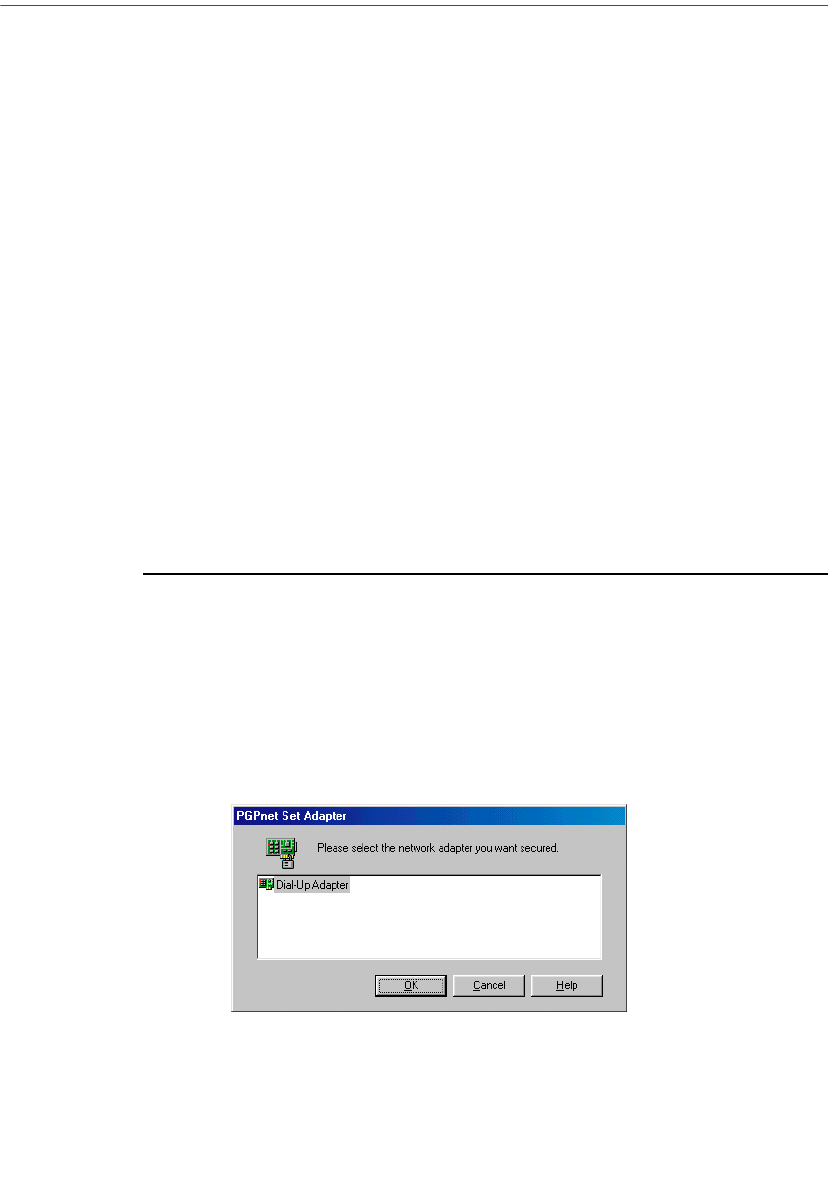
User’s Guide 173
PGPnet Virtual Private Networking
Default Settings button
Use this button to restore the default settings for all fields on this screen. In
most cases, the default settings will be sufficient to establish SAs and use
PGPnet.
Set Adapter: Changing your secure network
interface
When you install PGPnet, you select the network interface on your computer
that you want to secure. Your network interface is usually an Ethernet card or
a Dialup or Remote Access WAN adapter (representing your modem).
Use PGPnet’s Set Adapter function (Start—>Programs—>PGP—>Set
Adapter) in the following circumstances:
• When you want to secure a different network interface.
• When your machine reviews your network protocol and adapter bindings.
When this occurs, PGPnet advises you to reboot your system and run
PGPnet’s Set Adapter function to resecure a network interface.
To secure a different network interface (Windows 95/98):
1. Select Set Adapter from the Start menu (Start—>Programs—>
PGP—>Set Adapter). The PGPnet Set Adapter dialog is displayed on
your screen listing all other adapters.
2. Select the appropriate network interface and click OK. PGP prompts you
to reboot your machine.
Figure 7-15. Set Adapter Selection Dialog
3. Reboot your machine (this is mandatory for any network functionality to
occur).
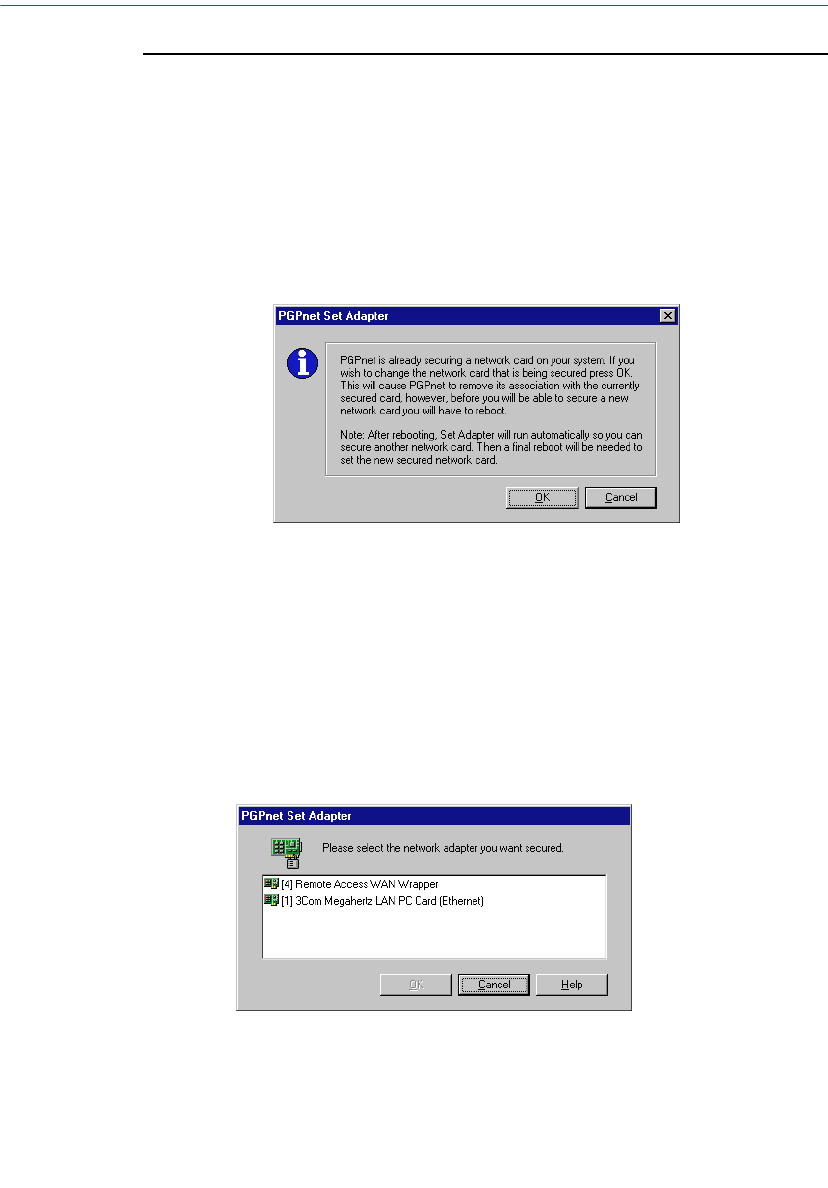
PGPnet Virtual Private Networking
174 PGP Freeware
To secure a different network interface (Windows NT):
1. Select Set Adapter from the Start menu
(Start—>Programs—>PGP—>Set Adapter). The PGPnet Set Adapter
dialog is displayed on your screen. Read the text in the dialog.
2. To secure a different network interface, click OK. PGP reviews your
machine’s bindings and unbinds itself from the adapter it is currently
bound to.
Figure 7-16. Set Adapter Dialog
3. Reboot your machine when prompted.
4. On reboot, Set Adapter will automatically start up again and ask you to
select an adapter for PGPnet to bind to.
5. Select the appropriate network interface. PGP review’s your machine’s
bindings and prompts you to reboot your machine.
Figure 7-17. Set Adapter Selection Dialog
6. Reboot your machine (this is mandatory for any network functionality to
occur).

User’s Guide 175
PGPnet Virtual Private Networking
To resecure a network interface after a bindings review (Windows NT):
1. Reboot your machine when prompted.
2. On reboot, Set Adapter will automatically start up and ask you to select
an adapter for PGPnet to bind to.
3. Select the appropriate network interface. PGP review’s your machine’s
bindings and prompts you to reboot your machine.
Reboot your machine (this is mandatory for any network functionality to occur).

PGPnet Virtual Private Networking
176 PGP Freeware

A
User’s Guide 177
ATroubleshooting PGP
This appendix presents information about problems you may encounter while
using PGP and suggests solutions.
Error Cause Solution
Administrative preferences
file not found
The preference file
containing the
configuration set up by
your PGP administrator,
usually IS/IT personnel, is
missing.
Re-install PGP onto your machine. If
the message continues to appear after
re-installing, contact your PGP
administrator and report this message.
They will need to generate a new PGP
installer for you.
Authentication rejected by
remote SKEP connection
The user on the remote
side of the network share
file connection rejected
the key that you provided
for authentication.
Use a different key to authenticate the
network share file connection, or
contact the remote user to assure them
that the key you’re using is valid.
Cannot perform the
requested operation
because the output buffer
is too small.
The output is larger than
the internal buffers can
handle.
If you are encrypting or signing, you
may have to break up the message
and encrypt/sign smaller pieces at a
time. If you are decrypting or verifying,
ask the sender to encrypt/sign smaller
pieces and re-send them to you.
Could not encrypt to
specified key because it is
a sign-only key.
The selected key can only
be used for signing. Choose a different key, or generate a
new key that can encrypt data.
Could not sign with
specified key because it is
an encrypt-only key.
The selected key can only
be used for encrypting. Choose a different key, or generate a
new key that can sign data.
Error in domain name
systemic
The destination address
you provided is incorrect,
or your network
connection is
misconfigured.
Check to make sure that the
destination address you provided is the
correct one. If you are sure of this,
check your connection to the network.
Identical shares cannot be
combined
You attempted to
combine the same share
twice.
If you received the shares from a share
file, try choosing a different share file. If
you received the shares from the
network, you may need to contact the
user at the remote location and tell
them to send a different set of shares

Troubleshooting PGP
PGP Freeware
No secret keys could be
found on your keyring.
There are no private keys
on your keyring. Generate your own pair of keys in
PGPkeys.
Socket is not connected
The network connection
to the PGP cert server or
to the network share file
connection has been
broken.
Try re-establishing the connection by
repeating the procedure you used to
start the connection. If that fails, check
your connection to the network.
The action could not be
completed due to an invalid
file operation.
The program failed to
read or write data in a
certain file.
The file is probably corrupt. Try altering
your PGP Preferences to use a
different file, if possible.
The evaluation time for PGP
encrypting and signing has
passed. Operation aborted.
The product evaluation
time has expired. Download the freeware version or buy
the commercial version of the product.
The keyring contains a bad
(corrupted) PGP packet.
The PGP message that
you are working with has
been corrupted, or your
keyring has been
corrupted.
Ask the sender to re-send the message
if it’s a message that you’re working
with. If it’s your keyring, try restoring
from your backup keyring.
The keyring file is corrupt.
The program failed to
read or write data in a
certain file.
There is a file that is probably corrupt
or missing. It may or may not be the
keyring file. Try using a different file
name or path, if possible.
The message/data contains
a detached signature.
The signature for the
message/file is located in
a separate file.
Double-click on the detached signature
file first.
The passphrase you
entered does not match the
passphrase on the key.
The passphrase you
entered is incorrect. You may have the CAPS LOCK on, or
you simply may have mis-typed the
passphrase. Try again.
The PGP library has run out
of memory.
The operating system has
run out of memory. Close other running programs. If that
doesn’t work, you may need more
memory in your machine.
The specified user ID was
not added because it
already exists on the
selected key.
You can’t add a User ID to
a key if there is one just
like it already on the key.
Try adding a different user ID, or delete
the matching one first.
Error Cause Solution

User’s Guide 179
Troubleshooting PGP
The specified key could not
be found on your keyring.
The key needed to
decrypt the current
message is not on your
keyring.
Ask the sender of the message to
re-send the message and make sure
they encrypt the message to your
public key.
The specified input file
does not exist.
The file name typed in
does not exist. Browse to find the exact name and
path of the file you want.
There is not enough
random data currently
available.
The random number
generator needs more
input in order to generate
good random numbers.
When prompted, move the mouse
around, or press random keys, in order
to generate input.
There was an error during
the writing of the keyring or
the exported file.
The program failed to
write data to a certain file. Your hard drive may be full, or if the file
is on a floppy, the floppy is not present
in the floppy drive.
There was an error opening
or writing the keyring or the
output file.
A file that was needed
couldn’t be opened. Make sure the settings in your PGP
Preferences is correct. If you’ve
recently deleted files in the directory
that you installed PGP, you may need
to re-install the product.
This key is already signed
by the specified signing
key.
You can’t sign a key that
you have already signed. You may have accidentally picked the
wrong key. If so, choose a different key
to sign.
Unable to perform
operation because this file
is read-only or otherwise
protected. If you store your
keyring files on removable
media the media may not
be inserted.
A file that was needed is
set to read-only or is
being used by another
program.
Close other programs that may be
accessing the same files as the
program you are running. If you keep
your keyring files on a floppy disk,
make sure that the floppy disk is in the
floppy drive.
Error Cause Solution

Troubleshooting PGP
PGP Freeware

B
User’s Guide 181
BTransferring Files Between
the Mac OS and Windows
Transferring files to and from Mac OS is a classic problem in using almost any
kind of data exchange software, such as email applications, FTP, compression
utilities, and PGP. This appendix is intended to document how this problem is
finally solved by PGP version 5.5.x, and to discuss how to communicate with
previous versions of PGP.
The Mac OS stores files differently from other operating systems. Even the text
file format of the Mac OS is different. Mac OS files are really two files
consisting of a Data segment and a Resource segment. In order to send a file
from Mac OS to Windows without losing data, the two segments must be
merged into one. The standard method by which a Mac OS file is converted
into a single file so that it can be transferred to another Macintosh or PC
without losing either of its halves is called MacBinary.
The problem is that, without special software, Windows and other platforms
cannot inherently understand the MacBinary format. If a situation occurs
where the receiving software fails to convert a MacBinary format file into a
Windows file, the resulting file is unusable. Third-party utilities exist on
Windows to convert it after the fact into a usable file, but that can be rather
inconvenient.
Previous versions of PGP and most utilities available on the market today
generally try to ignore this problem as much as possible and leave all decisions
up to the user as to whether or not to encode a file with MacBinary when
sending from Mac OS. This places the burden of deciding to send with
MacBinary, and not risk losing any data, or send without MacBinary, with
hope that no important data will be lost on the user, who often has no idea
what the correct decision is. The decision should generally be based on
whether the file is being sent to Windows or Mac OS. But what about if you’re
sending to both at the same time? There is no good solution to that problem
with older versions of PGP and many other utilities. This has resulted in great
confusion and inconvenience for users.
The reverse, sending a file from Windows to the Mac OS, has also been a major
problem. Windows uses filename extensions, such as .doc, to identify the type
of a file. This is meaningless to the Mac OS. These files are sent to a Macintosh
computer without any file type or creator information. The process of making
them readable after receipt generally involves various arcane motions in the
Open dialog of the creator application, or in many cases requires the user to
understand Mac OS lore of creator and type codes by setting them manually
in a third-party utility.

Transferring Files Between the Mac OS and Windows
182 PGP Freeware
Fortunately, the latest version of PGP (versions 5.5 through 6.5) leads the way
out of this confusion. If all PGP users were to use the latest versions, no one
would have to think about how to send files from Mac OS to Windows and
vice versa.
Sending from the Mac OS to Windows
On the Mac OS, there are three options when encrypting or signing a file:
•MacBinary: Yes. This is the recommended option for all encryptions when
sending to another user of PGP Version 5.5 or above on any platform. This
means that Mac OS users will receive the exact file that was intended, and
the Windows version will automatically decode the MacBinary and even
append the appropriate file extension, such as .doc for Microsoft Word or
.ppt for Microsoft PowerPoint. PGP includes information on most popular
application filename extensions and Macintosh-creator codes. In cases
where the type is unknown or known to be a Mac OS-only file such as a
Mac OS application, the file remains in MacBinary format so that it can later
be forwarded to a Macintosh fully intact.
•MacBinary: No. If you are communicating with users who have an older
version of PGP, the decision of whether to send with MacBinary generally
ends up in the sender's hands as in most other programs and in previous
versions of PGP for Mac OS. When sending to a PC using an older version,
if you know that the file you are sending can be read by Windows
applications when no MacBinary is used, select this option. This includes
most files that are generally cross-platform such as those created by the
Microsoft Office applications, graphics files, compressed files, and many
others. The sender or the recipient will have to manually rename the file to
have the correct filename extension on Windows. This is required because
the Windows recipient does not have the creator information normally
encoded with MacBinary.
•MacBinary: Smart. There are some very limited cases where this option
can be useful when communicating with users who are not using later
versions of PGP. This option makes a decision as to whether to encode with
MacBinary based on an analysis of the actual data in the file. If the file is
one of the following types, it will not be encoded with MacBinary, thereby
making it readable on a PC with any version of PGP:
– PKzip compressed file
– Lempel-Ziv compressed file
– MIDI music format file
– PackIt compressed file

User’s Guide 183
Transferring Files Between the Mac OS and Windows
– GIF graphics file
– StuffIt compressed file
– Compactor compressed file
– Arc compressed file
– JPEG graphics file
As shown, only a limited selection of files will result in a readable file by old
versions of PGP on other platforms using the Smart option. Any other file
received on a PC with an older version of PGP will be unreadable without
stripping the MacBinary encoding with a third-party utility. Also, the file will
not have the correct filename extension on the PC unless that extension was
manually added by the user on the sending side. Using Smart mode, the
resulting file may not be the same as the original when sent to a Macintosh,
because it may lose its creator and type codes. This mode remains in the
product mostly due to the fact that it was in PGP Version 5.0 and some users
may only have a need to send the above file types. This option is not
recommended in most cases.
In summary, if you are sending only to versions 6.x, always select MacBinary:
Yes (the default). Thus, no thought is required if your environment is using
PGP version 6.x exclusively. When sending to users with older versions, you
should select MacBinary: No for cross-platform file types and MacBinary: Yes
for files which simply wouldn't be readable to PC users anyway (such as a Mac
OS application).
NOTE: PGP Version 5.0 did not have a MacBinary: No option. In order
to send file types without MacBinary, which are not included in the
MacBinary: Smart list to a PC using 5.0, the file must be manually set to
one of the creator and type codes on the Smart list before sending.
Receiving Windows files on the Mac OS
When decrypting, PGP version 5.5.x and later automatically attempts to
translate filename extensions for non-MacBinary files into Mac OS creator and
type information. For example, if you receive a file from Windows with an
extension of .doc, the file will be saved as a Microsoft Word document. The
same list of applications used when adding filename extensions upon receipt
of a MacBinary file on Windows is used to translate filename extensions back
into the Mac OS equivalent when received on a Macintosh computer. In almost
all cases, this results in files which are immediately readable and
double-clickable on Mac OS.

Transferring Files Between the Mac OS and Windows
184 PGP Freeware
Previous versions of PGP for Mac OS do not have this feature. The user will
have to manually determine that a file named “report.doc” is a Microsoft
Word file. After determining the creator application, in the case of Microsoft
Word, one can simply use the Open dialog to open the file by selecting Show
All Files from the popup menu. Many other applications also have this feature,
but some don't. If the document cannot be opened from within the application,
the user must find out what the appropriate Macintosh creator and type codes
are for the file and manually set them with a third-party utility. There are
many free utilities to do this. Upgrading to version 6.x is probably the easiest
option in this case, as it eliminates this problem.
Supported Applications
The following list of major applications produce documents which are
automatically translated by PGP when sent from Windows to Mac OS and vice
versa. You can add items to this list by editing the
PGPMacBinaryMappings.txt file in the \WINDOWS directory. On the Mac
side, remove the .txt suffix on the filename—PGPMacBinaryMappings is
located in System Folder/Preferences/Pretty Good Preferences.
• PhotoShop (GIF, native Photoshop documents, TGA, JPEG)
• PageMaker (Versions 3.X, 4.X, 5.X, 6.X)
• Microsoft Project (project and template files)
• FileMaker Pro
• Adobe Acrobat
•Lotus 123
• Microsoft Word (text, RTF, templates)
•PGP
• Microsoft PowerPoint
• StuffIt
•QuickTime
• Corel WordPerfect
• Microsoft Excel (many different types of files)
•Quark XPress

User’s Guide 185
Transferring Files Between the Mac OS and Windows
The following general filename extensions are also converted:
.cvs .arj .ima .eps .mac .cgm
.dl .fli .ico .iff .img .lbm
.msp .pac .pbm .pcs .pcx .pgm
.plt .pm .ppm .rif .rle .shp
.spc .sr .sun .sup .wmf .flc
.gz .vga .hal.lzh .Z .exe
.mpg .dvi .tex .aif .zip .au
.mod .svx .wav .tar .pct .pic
.pit .txt .mdi .pak .tif .eps

Transferring Files Between the Mac OS and Windows
186 PGP Freeware

C
User’s Guide 187
CPhil Zimmermann on PGP
This chapter contains introductory and background information about
cryptography and PGP as written by Phil Zimmermann.
Why I wrote PGP
“Whatever you do will be insignificant, but it is very important that you do it.”
—Mahatma Gandhi.
It’s personal. It’s private. And it’s no one’s business but yours. You may be
planning a political campaign, discussing your taxes, or having a secret
romance. Or you may be communicating with a political dissident in a
repressive country. Whatever it is, you don’t want your private electronic mail
(email) or confidential documents read by anyone else. There’s nothing wrong
with asserting your privacy. Privacy is as apple-pie as the Constitution.
The right to privacy is spread implicitly throughout the Bill of Rights. But
when the United States Constitution was framed, the Founding Fathers saw
no need to explicitly spell out the right to a private conversation. That would
have been silly. Two hundred years ago, all conversations were private. If
someone else was within earshot, you could just go out behind the barn and
have your conversation there. No one could listen in without your knowledge.
The right to a private conversation was a natural right, not just in a
philosophical sense, but in a law-of-physics sense, given the technology of the
time.
But with the coming of the information age, starting with the invention of the
telephone, all that has changed. Now most of our conversations are conducted
electronically. This allows our most intimate conversations to be exposed
without our knowledge. Cellular phone calls may be monitored by anyone
with a radio. Electronic mail, sent across the Internet, is no more secure than
cellular phone calls. Email is rapidly replacing postal mail, becoming the norm
for everyone, not the novelty it was in the past. And email can be routinely and
automatically scanned for interesting keywords, on a large scale, without
detection. This is like driftnet fishing.

Phil Zimmermann on PGP
188 PGP Freeware
Perhaps you think your email is legitimate enough that encryption is
unwarranted. If you really are a law-abiding citizen with nothing to hide, then
why don’t you always send your paper mail on postcards? Why not submit to
drug testing on demand? Why require a warrant for police searches of your
house? Are you trying to hide something? If you hide your mail inside
envelopes, does that mean you must be a subversive or a drug dealer, or
maybe a paranoid nut? Do law-abiding citizens have any need to encrypt their
email?
What if everyone believed that law-abiding citizens should use postcards for
their mail? If a nonconformist tried to assert his privacy by using an envelope
for his mail, it would draw suspicion. Perhaps the authorities would open his
mail to see what he’s hiding. Fortunately, we don’t live in that kind of world,
because everyone protects most of their mail with envelopes. So no one draws
suspicion by asserting their privacy with an envelope. There’s safety in
numbers. Analogously, it would be nice if everyone routinely used encryption
for all their email, innocent or not, so that no one drew suspicion by asserting
their email privacy with encryption. Think of it as a form of solidarity.
Until now, if the government wanted to violate the privacy of ordinary
citizens, they had to expend a certain amount of expense and labor to intercept
and steam open and read paper mail. Or they had to listen to and possibly
transcribe spoken telephone conversation, at least before automatic voice
recognition technology became available. This kind of labor-intensive
monitoring was not practical on a large scale. It was only done in important
cases when it seemed worthwhile.
Senate Bill 266, a 1991 omnibus anticrime bill, had an unsettling measure
buried in it. If this non-binding resolution had become real law, it would have
forced manufacturers of secure communications equipment to insert special
“trap doors” in their products, so that the government could read anyone’s
encrypted messages. It reads, “It is the sense of Congress that providers of
electronic communications services and manufacturers of electronic
communications service equipment shall ensure that communications systems
permit the government to obtain the plain text contents of voice, data, and
other communications when appropriately authorized by law.” It was this bill
that led me to publish PGP electronically for free that year, shortly before the
measure was defeated after vigorous protest by civil libertarians and industry
groups.
The 1994 Digital Telephony bill mandated that phone companies install
remote wiretapping ports into their central office digital switches, creating a
new technology infrastructure for “point-and-click” wiretapping, so that
federal agents no longer have to go out and attach alligator clips to phone
lines. Now they will be able to sit in their headquarters in Washington and
listen in on your phone calls. Of course, the law still requires a court order for
a wiretap. But while technology infrastructures can persist for generations,

User’s Guide 189
Phil Zimmermann on PGP
laws and policies can change overnight. Once a communications
infrastructure optimized for surveillance becomes entrenched, a shift in
political conditions may lead to abuse of this new-found power. Political
conditions may shift with the election of a new government, or perhaps more
abruptly from the bombing of a federal building.
A year after the 1994 Digital Telephony bill passed, the FBI disclosed plans to
require the phone companies to build into their infrastructure the capacity to
simultaneously wiretap 1 percent of all phone calls in all major U.S. cities. This
would represent more than a thousandfold increase over previous levels in the
number of phones that could be wiretapped. In previous years, there were
only about a thousand court-ordered wiretaps in the United States per year, at
the federal, state, and local levels combined. It’s hard to see how the
government could even employ enough judges to sign enough wiretap orders
to wiretap 1 percent of all our phone calls, much less hire enough federal
agents to sit and listen to all that traffic in real time. The only plausible way of
processing that amount of traffic is a massive Orwellian application of
automated voice recognition technology to sift through it all, searching for
interesting keywords or searching for a particular speaker’s voice. If the
government doesn’t find the target in the first 1 percent sample, the wiretaps
can be shifted over to a different 1 percent until the target is found, or until
everyone’s phone line has been checked for subversive traffic. The FBI says
they need this capacity to plan for the future. This plan sparked such outrage
that it was defeated in Congress, at least this time around, in 1995. But the
mere fact that the FBI even asked for these broad powers is revealing of their
agenda. And the defeat of this plan isn’t so reassuring when you consider that
the 1994 Digital Telephony bill was also defeated the first time it was
introduced, in 1993.
Advances in technology will not permit the maintenance of the status quo, as
far as privacy is concerned. The status quo is unstable. If we do nothing, new
technologies will give the government new automatic surveillance capabilities
that Stalin could never have dreamed of. The only way to hold the line on
privacy in the information age is strong cryptography.
You don’t have to distrust the government to want to use cryptography. Your
business can be wiretapped by business rivals, organized crime, or foreign
governments. Several foreign governments, for example, admit to using their
signals intelligence against companies from other countries to give their own
corporations a competitive edge. Ironically, the United States government’s
restrictions on cryptography have weakened U.S. corporate defenses against
foreign intelligence and organized crime.

Phil Zimmermann on PGP
190 PGP Freeware
The government knows what a pivotal role cryptography is destined to play
in the power relationship with its people. In April 1993, the Clinton
administration unveiled a bold new encryption policy initiative, which had
been under development at the National Security Agency (NSA) since the start
of the Bush administration. The centerpiece of this initiative was a
government-built encryption device, called the Clipper chip, containing a new
classified NSA encryption algorithm. The government tried to encourage
private industry to design it into all their secure communication products,
such as secure phones, secure faxes, and so on. AT&T put Clipper into its
secure voice products. The catch: At the time of manufacture, each Clipper
chip is loaded with its own unique key, and the government gets to keep a
copy, placed in escrow. Not to worry, though—the government promises that
they will use these keys to read your traffic only “when duly authorized by
law.” Of course, to make Clipper completely effective, the next logical step
would be to outlaw other forms of cryptography.
The government initially claimed that using Clipper would be voluntary, that
no one would be forced to use it instead of other types of cryptography. But
the public reaction against the Clipper chip has been strong, stronger than the
government anticipated. The computer industry has monolithically
proclaimed its opposition to using Clipper. FBI director Louis Freeh
responded to a question in a press conference in 1994 by saying that if Clipper
failed to gain public support, and FBI wiretaps were shut out by
non-government-controlled cryptography, his office would have no choice
but to seek legislative relief. Later, in the aftermath of the Oklahoma City
tragedy, Mr. Freeh testified before the Senate Judiciary Committee that public
availability of strong cryptography must be curtailed by the government
(although no one had suggested that cryptography was used by the bombers).
The Electronic Privacy Information Center (EPIC) obtained some revealing
documents under the Freedom of Information Act. In a briefing document
titled “Encryption: The Threat, Applications and Potential Solutions,” and
sent to the National Security Council in February 1993, the FBI, NSA, and
Department of Justice (DOJ) concluded that “Technical solutions, such as they
are, will only work if they are incorporated into all encryption products. To
ensure that this occurs, legislation mandating the use of
Government-approved encryption products or adherence to Government
encryption criteria is required.”

User’s Guide 191
Phil Zimmermann on PGP
The government has a track record that does not inspire confidence that they
will never abuse our civil liberties. The FBI’s COINTELPRO program targeted
groups that opposed government policies. They spied on the antiwar
movement and the civil rights movement. They wiretapped the phone of
Martin Luther King Jr. Nixon had his enemies list. And then there was the
Watergate mess. Congress now seems intent on passing laws curtailing our
civil liberties on the Internet. At no time in the past century has public distrust
of the government been so broadly distributed across the political spectrum,
as it is today.
If we want to resist this unsettling trend in the government to outlaw
cryptography, one measure we can apply is to use cryptography as much as
we can now while it’s still legal. When use of strong cryptography becomes
popular, it’s harder for the government to criminalize it. Therefore, using PGP
is good for preserving democracy.
If privacy is outlawed, only outlaws will have privacy. Intelligence agencies
have access to good cryptographic technology. So do the big arms and drug
traffickers. But ordinary people and grassroots political organizations mostly
have not had access to affordable “military grade” public-key cryptographic
technology. Until now.
PGP empowers people to take their privacy into their own hands. There’s a
growing social need for it. That’s why I created it.
The PGP symmetric algorithms
PGP offers a selection of different secret key algorithms to encrypt the actual
message. By secret key algorithm, we mean a conventional, or symmetric,
block cipher that uses the same key to both encrypt and decrypt. The three
symmetric block ciphers offered by PGP are CAST, Triple-DES, and IDEA.
They are not “home-grown” algorithms. They were all developed by teams of
cryptographers with distinguished reputations.
For the cryptographically curious, all three ciphers operate on 64-bit blocks of
plaintext and ciphertext. CAST and IDEA have key sizes of 128 bits, while
Triple-DES uses a 168-bit key. Like Data Encryption Standard (DES), any of
these ciphers can be used in cipher feedback (CFB) and cipher block chaining
(CBC) modes. PGP uses them in 64-bit CFB mode.
I included the CAST encryption algorithm in PGP because it shows promise as
a good block cipher with a 128-bit key size, it’s very fast, and it’s free. Its name
is derived from the initials of its designers, Carlisle Adams and Stafford
Tavares of Northern Telecom (Nortel). Nortel has applied for a patent for
CAST, but they have made a commitment in writing to make CAST available
to anyone on a royalty-free basis. CAST appears to be exceptionally well
designed, by people with good reputations in the field. The design is based on

Phil Zimmermann on PGP
192 PGP Freeware
a very formal approach, with a number of formally provable assertions that
give good reasons to believe that it probably requires key exhaustion to break
its 128-bit key. CAST has no weak or semiweak keys. There are strong
arguments that CAST is completely immune to both linear and differential
cryptanalysis, the two most powerful forms of cryptanalysis in the published
literature, both of which have been effective in cracking DES. CAST is too new
to have developed a long track record, but its formal design and the good
reputations of its designers will undoubtedly attract the attentions and
attempted cryptanalytic attacks of the rest of the academic cryptographic
community. I’m getting nearly the same preliminary gut feeling of confidence
from CAST that I got years ago from IDEA, the cipher I selected for use in
earlier versions of PGP. At that time, IDEA was also too new to have a track
record, but it has held up well.
The IDEA (International Data Encryption Algorithm) block cipher is based on
the design concept of “mixing operations from different algebraic groups.” It
was developed at ETH in Zurich by James L. Massey and Xuejia Lai, and
published in 1990. Early published papers on the algorithm called it IPES
(Improved Proposed Encryption Standard), but they later changed the name
to IDEA. So far, IDEA has resisted attack much better than other ciphers such
as FEAL, REDOC-II, LOKI, Snefru and Khafre. And IDEA is more resistant
than DES to Biham and Shamir’s highly successful differential cryptanalysis
attack, as well as attacks from linear cryptanalysis. As this cipher continues to
attract attack efforts from the most formidable quarters of the cryptanalytic
world, confidence in IDEA is growing with the passage of time. Sadly, the
biggest obstacle to IDEA’s acceptance as a standard has been the fact that
Ascom Systec holds a patent on its design, and unlike DES and CAST, IDEA
has not been made available to everyone on a royalty-free basis.
As a hedge, PGP includes three-key Triple-DES in its repertoire of available
block ciphers. The DES was developed by IBM in the mid-1970s. While it has
a good design, its 56-bit key size is too small by today’s standards. Triple-DES
is very strong, and has been well studied for many years, so it might be a safer
bet than the newer ciphers such as CAST and IDEA. Triple-DES is the DES
applied three times to the same block of data, using three different keys, except
that the second DES operation is run backwards, in decrypt mode. While
Triple-DES is much slower than either CAST or IDEA, speed is usually not
critical for email applications. Although Triple-DES uses a key size of 168 bits,
it appears to have an effective key strength of at least 112 bits against an
attacker with impossibly immense data storage capacity to use in the attack.
According to a paper presented by Michael Weiner at Crypto96, any remotely
plausible amount of data storage available to the attacker would enable an
attack that would require about as much work as breaking a 129-bit key.
Triple-DES is not encumbered by any patents.

User’s Guide 193
Phil Zimmermann on PGP
PGP public keys that were generated by PGP Version 5.0 or later have
information embedded in them that tells a sender what block ciphers are
understood by the recipient’s software, so that the sender’s software knows
which ciphers can be used to encrypt. Diffie-Hellman/DSS public keys accept
CAST, IDEA, or Triple-DES as the block cipher, with CAST as the default
selection. At present, for compatibility reasons, RSA keys do not provide this
feature. Only the IDEA cipher is used by PGP to send messages to RSA keys,
because older versions of PGP only supported RSA and IDEA.
About PGP data compression routines
PGP normally compresses the plaintext before encrypting it, because it’s too
late to compress the plaintext after it has been encrypted; encrypted data is not
compressible. Data compression saves modem transmission time and disk
space and, more importantly, strengthens cryptographic security. Most
cryptanalysis techniques exploit redundancies found in the plaintext to crack
the cipher. Data compression reduces this redundancy in the plaintext,
thereby greatly enhancing resistance to cryptanalysis. It takes extra time to
compress the plaintext, but from a security point of view it’s worth it.
Files that are too short to compress, or that just don’t compress well, are not
compressed by PGP. In addition, the program recognizes files produced by
most popular compression programs, such as PKZIP, and does not try to
compress a file that has already been compressed.
For the technically curious, the program uses the freeware ZIP compression
routines written by Jean-Loup Gailly, Mark Adler, and Richard B. Wales. This
ZIP software uses compression algorithms that are functionally equivalent to
those used by PKWare’s PKZIP 2.x. This ZIP compression software was
selected for PGP mainly because it has a really good compression ratio and
because it’s fast.
About the random numbers used as session keys
PGP uses a cryptographically strong pseudo-random-number generator for
creating temporary session keys. If this random seed file does not exist, it is
automatically created and seeded with truly random numbers derived from
your random events gathered by the PGP program from the timing of your
keystroke and mouse movements.
This generator reseeds the seed file each time it is used, by mixing in new
material partially derived from the time of day and other truly random
sources. It uses the conventional encryption algorithm as an engine for the
random number generator. The seed file contains both random seed material
and random key material used to key the conventional encryption engine for
the random generator.

Phil Zimmermann on PGP
194 PGP Freeware
This random seed file should be protected from disclosure, to reduce the risk
of an attacker deriving your next or previous session keys. The attacker would
have a very hard time getting anything useful from capturing this random
seed file, because the file is cryptographically laundered before and after each
use. Nonetheless, it seems prudent to try to keep it from falling into the wrong
hands. If possible, make the file readable only by you. If this is not possible,
don’t let other people indiscriminately copy disks from your computer.
About the message digest
The message digest is a compact (160-bit or 128-bit) “distillate” of your
message or file checksum. You can also think of it as a “fingerprint” of the
message or file. The message digest “represents” your message, in such a way
that if the message were altered in any way, a different message digest would
be computed from it. This makes it possible to detect any changes made to the
message by a forger. A message digest is computed using a cryptographically
strong one-way hash function of the message. It should be computationally
infeasible for an attacker to devise a substitute message that would produce an
identical message digest. In that respect, a message digest is much better than
a checksum, because it is easy to devise a different message that would
produce the same checksum. But like a checksum, you can’t derive the original
message from its message digest.
The message digest algorithm now used in PGP (Version 5.0 and later) is
called SHA, which stands for Secure Hash Algorithm, designed by the NSA
for the National Institute of Standards and Technology (NIST). SHA is a
160-bit hash algorithm. Some people might regard anything from the NSA
with suspicion, because the NSA is in charge of intercepting communications
and breaking codes. But keep in mind that the NSA has no interest in forging
signatures, and the government would benefit from a good unforgeable
digital signature standard that would preclude anyone from repudiating their
signatures. That has distinct benefits for law enforcement and intelligence
gathering. Also, SHA has been published in the open literature and has been
extensively peer-reviewed by most of the best cryptographers in the world
who specialize in hash functions, and the unanimous opinion is that SHA is
extremely well designed. It has some design innovations that overcome all the
observed weaknesses in message digest algorithms previously published by
academic cryptographers. All new versions of PGP use SHA as the message
digest algorithm for creating signatures with the new DSS keys that comply
with the NIST Digital Signature Standard. For compatibility reasons, new
versions of PGP still use MD5 for RSA signatures, because older versions of
PGP used MD5 for RSA signatures.

User’s Guide 195
Phil Zimmermann on PGP
The message digest algorithm used by older versions of PGP is the MD5
Message Digest Algorithm, placed in the public domain by RSA Data Security,
Inc. MD5 is a 128-bit hash algorithm. In 1996, MD5 was all but broken by a
German cryptographer, Hans Dobbertin. Although MD5 was not completely
broken at that time, it was discovered to have such serious weaknesses that no
one should keep using it to generate signatures. Further work in this area
might completely break it, allowing signatures to be forged. If you don’t want
to someday find your PGP digital signature on a forged confession, you might
be well advised to migrate to the new PGP DSS keys as your preferred method
for making digital signatures, because DSS uses SHA as its secure hash
algorithm.
How to protect public keys from tampering
In a public key cryptosystem, you don’t have to protect public keys from
exposure. In fact, it’s better if they are widely disseminated. But it’s important
to protect public keys from tampering, to make sure that a public key really
belongs to the person to whom it appears to belong. This may be the most
important vulnerability of a public key cryptosystem. Let’s first look at a
potential disaster, then describe how to safely avoid it with PGP.
Suppose you want to send a private message to Alice. You download Alice’s
public key certificate from an electronic bulletin board system (BBS). You
encrypt your letter to Alice with this public key and send it to her through the
BBS’s email facility.
Unfortunately, unbeknownst to you or Alice, another user named Charlie has
infiltrated the BBS and generated a public key of his own with Alice’s user ID
attached to it. He covertly substitutes his bogus key in place of Alice’s real
public key. You unwittingly use this bogus key belonging to Charlie instead of
Alice’s public key. All looks normal because this bogus key has Alice’s user ID.
Now Charlie can decipher the message intended for Alice because he has the
matching private key. He may even reencrypt the deciphered message with
Alice’s real public key and send it on to her so that no one suspects any
wrongdoing. Furthermore, he can even make apparently good signatures
from Alice with this private key because everyone will use the bogus public
key to check Alice’s signatures.
The only way to prevent this disaster is to prevent anyone from tampering
with public keys. If you got Alice’s public key directly from Alice, this is no
problem. But that may be difficult if Alice is a thousand miles away or is
currently unreachable.
Perhaps you could get Alice’s public key from a mutually trusted friend,
David, who knows he has a good copy of Alice’s public key. David could sign
Alice’s public key, vouching for the integrity of Alice’s public key. David
would create this signature with his own private key.

Phil Zimmermann on PGP
196 PGP Freeware
This would create a signed public key certificate, and would show that Alice’s
key had not been tampered with. This requires that you have a known good
copy of David’s public key to check his signature. Perhaps David could
provide Alice with a signed copy of your public key also. David is thus serving
as an “Introducer” between you and Alice.
This signed public key certificate for Alice could be uploaded by David or
Alice to the BBS, and you could download it later. You could then check the
signature via David’s public key and thus be assured that this is really Alice’s
public key. No impostor can fool you into accepting his own bogus key as
Alice’s because no one else can forge signatures made by David.
A widely trusted person could even specialize in providing this service of
“introducing” users to each other by providing signatures for their public key
certificates. This trusted person could be regarded as a “Certificate Authority.”
Any public key certificates bearing the Certificate Authority’s signature could
be trusted as truly belonging to the person to whom they appear to belong to.
All users who wanted to participate would need a known good copy of just the
Certificate Authority’s public key, so that the Certificate Authority’s
signatures could be verified. In some cases, the Certificate Authority may also
act as a key server, allowing users on a network to look up public keys by
asking the key server, but there is no reason why a key server must also certify
keys.
A trusted centralized Certificate Authority is especially appropriate for large
impersonal centrally-controlled corporate or government institutions. Some
institutional environments use hierarchies of Certificate Authorities.
For more decentralized environments, allowing all users to act as trusted
introducers for their friends would probably work better than a centralized
key certification authority.
One of the attractive features of PGP is that it can operate equally well in a
centralized environment with a Certificate Authority or in a more
decentralized environment where individuals exchange personal keys.
This whole business of protecting public keys from tampering is the single
most difficult problem in practical public key applications. It is the “Achilles
heel” of public key cryptography, and a lot of software complexity is tied up
in solving this one problem.
You should use a public key only after you are sure that it is a good public key
that has not been tampered with, and that it actually belongs to the person
with whom it purports to be associated. You can be sure of this if you got this
public key certificate directly from its owner, or if it bears the signature of
someone else that you trust, from whom you already have a good public key.
Also, the user ID should have the full name of the key’s owner, not just her first
name.

User’s Guide 197
Phil Zimmermann on PGP
No matter how tempted you are, you should never give in to expediency and
trust a public key you downloaded from a bulletin board, unless it is signed
by someone you trust. That uncertified public key could have been tampered
with by anyone, maybe even by the system administrator of the bulletin board.
If you are asked to sign someone else’s public key certificate, make certain that
it really belongs to the person named in the user ID of that public key
certificate. This is because your signature on her public key certificate is a
promise by you that this public key really belongs to her. Other people who
trust you will accept her public key because it bears your signature. It can be
ill-advised to rely on hearsay—don’t sign her public key unless you have
independent first-hand knowledge that it really belongs to her. Preferably you
should sign it only if you got it directly from her.
In order to sign a public key, you must be far more certain of that key’s
ownership than if you merely want to use that key to encrypt a message. To be
convinced of a key’s validity enough to use it, certifying signatures from
trusted introducers should suffice. But to sign a key yourself, you should
require your own independent first-hand knowledge of who owns that key.
Perhaps you could call the key’s owner on the phone and read the key
fingerprint to her, to confirm that the key you have is really her key—and
make sure you really are talking to the right person.
Bear in mind that your signature on a public key certificate does not vouch for
the integrity of that person, but only vouches for the integrity (the ownership)
of that person’s public key. You aren’t risking your credibility by signing the
public key of a sociopath, if you are completely confident that the key really
belongs to him. Other people would accept that key as belonging to him
because you signed it (assuming they trust you), but they wouldn’t trust that
key’s owner. Trusting a key is not the same as trusting the key’s owner.
It would be a good idea to keep your own public key on hand with a collection
of certifying signatures attached from a variety of “introducers,” in the hope
that most people will trust at least one of the introducers who vouch for the
validity of your public key. You could post your key with its attached
collection of certifying signatures on various electronic bulletin boards. If you
sign someone else’s public key, return it to them with your signature so that
they can add it to their own collection of credentials for their own public key.
Make sure that no one else can tamper with your own public keyring.
Checking a newly signed public key certificate must ultimately depend on the
integrity of the trusted public keys that are already on your own public
keyring. Maintain physical control of your public keyring, preferably on your
own personal computer rather than on a remote time-sharing system, just as
you would do for your private key. This is to protect it from tampering, not
from disclosure. Keep a trusted backup copy of your public keyring and your
private key on write-protected media.

Phil Zimmermann on PGP
198 PGP Freeware
Since your own trusted public key is used as a final authority to directly or
indirectly certify all the other keys on your keyring, it is the most important
key to protect from tampering. You may want to keep a backup copy on a
write-protected floppy disk.
PGP generally assumes that you will maintain physical security over your
system and your keyrings, as well as your copy of PGP itself. If an intruder can
tamper with your disk, then in theory he can tamper with the program itself,
rendering moot the safeguards the program may have to detect tampering
with keys.
One somewhat complicated way to protect your own whole public keyring
from tampering is to sign the whole ring with your own private key. You could
do this by making a detached signature certificate of the public keyring.
How does PGP keep track of which keys are valid?
Before you read this section, you should read the previous section, “How to
protect public keys from tampering”
PGP keeps track of which keys on your public keyring are properly certified
with signatures from introducers that you trust. All you have to do is tell PGP
which people you trust as introducers, and certify their keys yourself with
your own ultimately trusted key. PGP can take it from there, automatically
validating any other keys that have been signed by your designated
introducers. And of course you can directly sign more keys yourself.
There are two entirely separate criteria that PGP uses to judge a public key’s
usefulness—don’t get them confused:
1. Does the key actually belong to the person to whom it appears to belong?
In other words, has it been certified with a trusted signature?
2. Does it belong to someone you can trust to certify other keys?
PGP can calculate the answer to the first question. To answer the second
question, you must tell PGP explicitly. When you supply the answer to
question 2, PGP can then calculate the answer to question 1 for other keys
signed by the introducer you designated as trusted.
Keys that have been certified by a trusted introducer are deemed valid by PGP.
The keys belonging to trusted introducers must themselves be certified either
by you or by other trusted introducers.
PGP also allows for the possibility of your having several shades of trust for
people to act as introducers. Your trust for a key’s owner to act as an
introducer does not just reflect your estimation of their personal integrity—it
should also reflect how competent you think they are at understanding key
management and using good judgment in signing keys. You can designate a

User’s Guide 199
Phil Zimmermann on PGP
person as untrusted, marginally trusted, or completely trusted to certify other
public keys. This trust information is stored on your keyring with their key,
but when you tell PGP to copy a key off your keyring, PGP does not copy the
trust information along with the key, because your private opinions on trust
are regarded as confidential.
When PGP is calculating the validity of a public key, it examines the trust level
of all the attached certifying signatures. It computes a weighted score of
validity—for example, two marginally trusted signatures are deemed to be as
credible as one fully trusted signature. The program’s skepticism is
adjustable—for example, you can tune PGP to require two fully trusted
signatures or three marginally trusted signatures to judge a key as valid.
Your own key is “axiomatically” valid to PGP, needing no introducer’s
signature to prove its validity. PGP knows which public keys are yours by
looking for the corresponding private keys on the private key. PGP also
assumes that you completely trust yourself to certify other keys.
As time goes on, you will accumulate keys from other people whom you may
want to designate as trusted introducers. Everyone else will choose their own
trusted introducers. And everyone will gradually accumulate and distribute
with their key a collection of certifying signatures from other people, with the
expectation that anyone receiving it will trust at least one or two of the
signatures. This will cause the emergence of a decentralized fault-tolerant web
of confidence for all public keys.
This unique grass-roots approach contrasts sharply with standard public key
management schemes developed by government and other monolithic
institutions, such as Internet Privacy Enhanced Mail (PEM), which are based
on centralized control and mandatory centralized trust. The standard schemes
rely on a hierarchy of Certifying Authorities who dictate who you must trust.
The program’s decentralized probabilistic method for determining public key
legitimacy is the centerpiece of its key management architecture. PGP lets you
alone choose who you trust, putting you at the top of your own private
certification pyramid. PGP is for people who prefer to pack their own
parachutes.
Note that while this decentralized, grass-roots approach is emphasized here,
it does not mean that PGP does not perform equally well in the more
hierarchical, centralized public key management schemes. Large corporate
users, for example, will probably want a central figure or person who signs all
the employees’ keys. PGP handles that centralized scenario as a special
degenerate case of PGP’s more generalized trust model.

Phil Zimmermann on PGP
200 PGP Freeware
How to protect private keys from disclosure
Protect your own private key and your passphrase very carefully. If your
private key is ever compromised, you’d better get the word out quickly to all
interested parties before someone else uses it to make signatures in your name.
For example, someone could use it to sign bogus public key certificates, which
could create problems for many people, especially if your signature is widely
trusted. And of course, a compromise of your own private key could expose
all messages sent to you.
To protect your private key, you can start by always keeping physical control
of it. Keeping it on your personal computer at home is OK, or keep it in your
notebook computer that you can carry with you. If you must use an office
computer that you don’t always have physical control of, then keep your
public and private keyrings on a write-protected removable floppy disk, and
don’t leave it behind when you leave the office. It wouldn’t be a good idea to
allow your private key to reside on a remote timesharing computer, such as a
remote dial-in UNIX system. Someone could eavesdrop on your modem line
and capture your passphrase and then obtain your actual private key from the
remote system. You should only use your private key on a machine that is
under your physical control.
Don’t store your passphrase anywhere on the computer that has your private
key file. Storing both the private key and the passphrase on the same computer
is as dangerous as keeping your PIN in the same wallet as your Automatic
Teller Machine bank card. You don’t want somebody to get their hands on
your disk containing both the passphrase and the private key file. It would be
most secure if you just memorize your passphrase and don’t store it anywhere
but your brain. If you feel you must write down your passphrase, keep it well
protected, perhaps even better protected than the private key file.
And keep backup copies of your private key—remember, you have the only
copy of your private key, and losing it will render useless all the copies of your
public key that you have spread throughout the world.
The decentralized noninstitutional approach that PGP supports for
management of public keys has its benefits, but unfortunately it also means
that you can’t rely on a single centralized list of which keys have been
compromised. This makes it a bit harder to contain the damage of a private key
compromise. You just have to spread the word and hope that everyone hears
about it.
If the worst case happens—your private key and passphrase are both
compromised (hopefully you will find this out somehow)—you will have to
issue a “key revocation” certificate. This kind of certificate is used to warn
other people to stop using your public key. You can use PGP to create such a
certificate by using the Revoke command from the PGPkeys menu or by
having your Designated Revoker do it for you. Then you must send this to a

User’s Guide 201
Phil Zimmermann on PGP
certificate server so others can find it. Their own PGP software installs this key
revocation certificate on their public keyrings and automatically prevents
them from accidentally using your public key ever again. You can then
generate a new private/public key pair and publish the new public key. You
could send out one package containing both your new public key and the key
revocation certificate for your old key.
What if you lose your private key?
Normally, if you want to revoke your own private key, you can use the Revoke
command from the PGPkeys menu to issue a revocation certificate, signed
with your own private key.
But what can you do if you lose your private key, or if your private key is
destroyed? You can’t revoke it yourself, because you must use your own
private key to revoke it, and you don’t have it anymore. If you do not have a
designated revoker for your key, someone specified in PGP who can revoke
the key on your behalf, you must ask each person who signed your key to
retire his or her certification. Then anyone attempting to use your key based
on the trust of one of your introducers will know not to trust your public key.
For more information on designated revokers, see the section “To appoint a
designated revoker” in Chapter 6.
Beware of snake oil
When examining a cryptographic software package, the question always
remains, why should you trust this product? Even if you examined the source
code yourself, not everyone has the cryptographic experience to judge the
security. Even if you are an experienced cryptographer, subtle weaknesses in
the algorithms could still elude you.
When I was in college in the early seventies, I devised what I believed was a
brilliant encryption scheme. A simple pseudorandom number stream was
added to the plaintext stream to create ciphertext. This would seemingly
thwart any frequency analysis of the ciphertext, and would be uncrackable
even to the most resourceful government intelligence agencies. I felt so smug
about my achievement.
Years later, I discovered this same scheme in several introductory
cryptography texts and tutorial papers. How nice. Other cryptographers had
thought of the same scheme. Unfortunately, the scheme was presented as a
simple homework assignment on how to use elementary cryptanalytic
techniques to trivially crack it. So much for my brilliant scheme.

Phil Zimmermann on PGP
202 PGP Freeware
From this humbling experience I learned how easy it is to fall into a false sense
of security when devising an encryption algorithm. Most people don’t realize
how fiendishly difficult it is to devise an encryption algorithm that can
withstand a prolonged and determined attack by a resourceful opponent.
Many mainstream software engineers have developed equally naive
encryption schemes (often even the very same encryption scheme), and some
of them have been incorporated into commercial encryption software
packages and sold for good money to thousands of unsuspecting users.
This is like selling automotive seat belts that look good and feel good, but snap
open in the slowest crash test. Depending on them may be worse than not
wearing seat belts at all. No one suspects they are bad until a real crash.
Depending on weak cryptographic software may cause you to unknowingly
place sensitive information at risk when you might not otherwise have done
so if you had no cryptographic software at all. Perhaps you may never even
discover that your data has been compromised.
Sometimes commercial packages use the Federal Data Encryption Standard
(DES), a fairly good conventional algorithm recommended by the government
for commercial use (but not for classified information, oddly
enough—Hmmm). There are several “modes of operation” that DES can use,
some of them better than others. The government specifically recommends not
using the weakest simplest mode for messages, the Electronic Codebook
(ECB) mode. But they do recommend the stronger and more complex Cipher
Feedback (CFB) and Cipher Block Chaining (CBC) modes.
Unfortunately, most of the commercial encryption packages I’ve looked at use
ECB mode. When I’ve talked to the authors of a number of these
implementations, they say they’ve never heard of CBC or CFB modes, and
don’t know anything about the weaknesses of ECB mode. The very fact that
they haven’t even learned enough cryptography to know these elementary
concepts is not reassuring. And they sometimes manage their DES keys in
inappropriate or insecure ways. Also, these same software packages often
include a second faster encryption algorithm that can be used instead of the
slower DES. The author of the package often thinks his proprietary faster
algorithm is as secure as DES, but after questioning him I usually discover that
it’s just a variation of my own brilliant scheme from college days. Or maybe he
won’t even reveal how his proprietary encryption scheme works, but assures
me it’s a brilliant scheme and I should trust it. I’m sure he believes that his
algorithm is brilliant, but how can I know that without seeing it?
In fairness I must point out that in most cases these terribly weak products do
not come from companies that specialize in cryptographic technology.

User’s Guide 203
Phil Zimmermann on PGP
Even the really good software packages, that use DES in the correct modes of
operation, still have problems. Standard DES uses a 56-bit key, which is too
small by today’s standards, and can now be easily broken by exhaustive key
searches on special high-speed machines. The DES has reached the end of its
useful life, and so has any software package that relies on it.
There is a company called AccessData (http://www.accessdata.com) that
sells a very low-cost package that cracks the built-in encryption schemes used
by WordPerfect, Lotus 1-2-3, MS Excel, Symphony, Quattro Pro, Paradox, MS
Word, and PKZIP. It doesn’t simply guess passwords—it does real
cryptanalysis. Some people buy it when they forget their password for their
own files. Law enforcement agencies buy it too, so they can read files they
seize. I talked to Eric Thompson, the author, and he said his program only
takes a split second to crack them, but he put in some delay loops to slow it
down so it doesn’t look so easy to the customer.
In the secure telephone arena, your choices look bleak. The leading contender
is the STU-III (Secure Telephone Unit), made by Motorola and AT&T for
$2,000 to $3,000, and used by the government for classified applications. It has
strong cryptography, but requires some sort of special license from the
government to buy this strong version. A commercial version of the STU-III is
available that is watered down for NSA’s convenience, and an export version
is available that is even more severely weakened. Then there is the $1,200
AT&T Surity 3600, which uses the government’s famous Clipper chip for
encryption, with keys escrowed with the government for the convenience of
wiretappers. Then, of course, there are the analog (nondigital) voice
scramblers that you can buy from the spy-wannabe catalogs, that are really
useless toys as far as cryptography is concerned, but are sold as “secure”
communications products to customers who just don’t know any better.
In some ways, cryptography is like pharmaceuticals. Its integrity may be
absolutely crucial. Bad penicillin looks the same as good penicillin. You can
tell if your spreadsheet software is wrong, but how do you tell if your
cryptography package is weak? The ciphertext produced by a weak
encryption algorithm looks as good as ciphertext produced by a strong
encryption algorithm. There’s a lot of snake oil out there. A lot of quack cures.
Unlike the patent medicine hucksters of old, these software implementors
usually don’t even know their stuff is snake oil. They may be good software
engineers, but they usually haven’t even read any of the academic literature in
cryptography. But they think they can write good cryptographic software.
And why not? After all, it seems intuitively easy to do so. And their software
seems to work OK.

Phil Zimmermann on PGP
204 PGP Freeware
Anyone who thinks they have devised an unbreakable encryption scheme
either is an incredibly rare genius or is naive and inexperienced.
Unfortunately, I sometimes have to deal with would-be cryptographers who
want to make “improvements” to PGP by adding encryption algorithms of
their own design.
I remember a conversation with Brian Snow, a highly placed senior
cryptographer with the NSA. He said he would never trust an encryption
algorithm designed by someone who had not “earned their bones” by first
spending a lot of time cracking codes. That made a lot of sense. I observed that
practically no one in the commercial world of cryptography qualifies under
this criterion. “Yes,” he said with a self-assured smile, “And that makes our job
at NSA so much easier.” A chilling thought. I didn’t qualify either.
The government has peddled snake oil too. After World War II, the United
States sold German Enigma ciphering machines to third-world governments.
But they didn’t tell them that the Allies cracked the Enigma code during the
war, a fact that remained classified for many years. Even today many UNIX
systems worldwide use the Enigma cipher for file encryption, in part because
the government has created legal obstacles against using better algorithms.
They even tried to prevent the initial publication of the RSA algorithm in 1977.
And they have for many years squashed essentially all commercial efforts to
develop effective secure telephones for the general public.
The principal job of the United States government’s National Security Agency
is to gather intelligence, principally by covertly tapping into people’s private
communications (see James Bamford’s book, The Puzzle Palace). The NSA has
amassed considerable skill and resources for cracking codes. When people
can’t get good cryptography to protect themselves, it makes NSA’s job much
easier. NSA also has the responsibility of approving and recommending
encryption algorithms. Some critics charge that this is a conflict of interest, like
putting the fox in charge of guarding the hen house. In the 1980s, NSA had
been pushing a conventional encryption algorithm that they designed (the
COMSEC Endorsement Program), and they won’t tell anybody how it works
because that’s classified. They wanted others to trust it and use it. But any
cryptographer can tell you that a well-designed encryption algorithm does not
have to be classified to remain secure. Only the keys should need protection.
How does anyone else really know if NSA’s classified algorithm is secure? It’s
not that hard for NSA to design an encryption algorithm that only they can
crack, if no one else can review the algorithm.
There are three main factors that have undermined the quality of commercial
cryptographic software in the United States.

User’s Guide 205
Phil Zimmermann on PGP
• The first is the virtually universal lack of competence of implementors of
commercial encryption software (although this is starting to change since
the publication of PGP). Every software engineer fancies himself a
cryptographer, which has led to the proliferation of really bad crypto
software.
• The second is the NSA deliberately and systematically suppressing all the
good commercial encryption technology, by legal intimidation and
economic pressure. Part of this pressure is brought to bear by stringent
export controls on encryption software which, by the economics of
software marketing, has the net effect of suppressing domestic encryption
software.
• The third principle method of suppression comes from the granting of all
the software patents for all the public key encryption algorithms to a single
company, affording a single choke point to suppress the spread of this
technology (although this crypto patent cartel broke up in the fall of 1995).
The net effect of all this is that before PGP was published, there was almost no
highly secure general purpose encryption software available in the United
States.
I’m not as certain about the security of PGP as I once was about my brilliant
encryption software from college. If I were, that would be a bad sign. But I
don’t think PGP contains any glaring weaknesses (although I’m pretty sure it
contains bugs). I have selected the best algorithms from the published
literature of civilian cryptologic academia. For the most part, these algorithms
have been individually subject to extensive peer review. I know many of the
world’s leading cryptographers, and have discussed with some of them many
of the cryptographic algorithms and protocols used in PGP. It’s well
researched, and has been years in the making. And I don’t work for the NSA.
But you don’t have to trust my word on the cryptographic integrity of PGP,
because source code is available to facilitate peer review.
One more point about my commitment to cryptographic quality in PGP: Since
I first developed and released PGP for free in 1991, I spent three years under
criminal investigation by U.S. Customs for PGP’s spread overseas, with risk of
criminal prosecution and years of imprisonment. By the way, you didn’t see
the government getting upset about other cryptographic software—it’s PGP
that really set them off. What does that tell you about the strength of PGP? I
have earned my reputation on the cryptographic integrity of my products. I
will not betray my commitment to our right to privacy, for which I have risked
my freedom. I’m not about to allow a product with my name on it to have any
secret back doors.

Phil Zimmermann on PGP
206 PGP Freeware
Vulnerabilities
“If all the personal computers in the world—260 million—were put to work on a
single PGP-encrypted message, it would still take an estimated 12 million times the
age of the universe, on average, to break a single message.”
--William Crowell, Deputy Director, National Security Agency, March 20,
1997.
No data security system is impenetrable. PGP can be circumvented in a variety
of ways. In any data security system, you have to ask yourself if the
information you are trying to protect is more valuable to your attacker than the
cost of the attack. This should lead you to protect yourself from the cheapest
attacks, while not worrying about the more expensive attacks.
Some of the discussion that follows may seem unduly paranoid, but such an
attitude is appropriate for a reasonable discussion of vulnerability issues.
Compromised passphrase and private key
Probably the simplest attack comes if you leave the passphrase for your
private key written down somewhere. If someone gets it and also gets your
private key file, they can read your messages and make signatures in your
name.
Here are some recommendations for protecting your passphrase:
1. Don’t use obvious passphrases that can be easily guessed, such as the
names of your kids or spouse.
2. Use spaces and a combination of numbers and letters in your passphrase.
If you make your passphrase a single word, it can be easily guessed by
having a computer try all the words in the dictionary until it finds your
password. That’s why a passphrase is so much better than a password. A
more sophisticated attacker may have his computer scan a book of
famous quotations to find your passphrase.
3. Be creative. Use an easy to remember but hard to guess passphrase; you
can easily construct one by using some creatively nonsensical sayings or
obscure literary quotes.
Public key tampering
A major vulnerability exists if public keys are tampered with. This may be the
most crucially important vulnerability of a public key cryptosystem, in part
because most novices don’t immediately recognize it.

User’s Guide 207
Phil Zimmermann on PGP
To summarize: When you use someone’s public key, make certain it has not
been tampered with. A new public key from someone else should be trusted
only if you got it directly from its owner, or if it has been signed by someone
you trust. Make sure no one else can tamper with your own public keyring.
Maintain physical control of both your public keyring and your private key,
preferably on your own personal computer rather than on a remote
timesharing system. Keep a backup copy of both keyrings.
Not quite deleted files
Another potential security problem is caused by how most operating systems
delete files. When you encrypt a file and then delete the original plaintext file,
the operating system doesn’t actually physically erase the data. It merely
marks those disk blocks as deleted, allowing the space to be reused later. It’s
sort of like discarding sensitive paper documents in the paper recycling bin
instead of the paper shredder. The disk blocks still contain the original
sensitive data you wanted to erase, and will probably be overwritten by new
data at some point in the future. If an attacker reads these deleted disk blocks
soon after they have been deallocated, he could recover your plaintext.
In fact, this could even happen accidentally, if something went wrong with the
disk and some files were accidentally deleted or corrupted. A disk recovery
program may be run to recover the damaged files, but this often means that
some previously deleted files are resurrected along with everything else. Your
confidential files that you thought were gone forever could then reappear and
be inspected by whoever is attempting to recover your damaged disk. Even
while you are creating the original message with a word processor or text
editor, the editor may be creating multiple temporary copies of your text on
the disk, just because of its internal workings. These temporary copies of your
text are deleted by the word processor when it’s done, but these sensitive
fragments are still on your disk somewhere.
The only way to prevent the plaintext from reappearing is to somehow cause
the deleted plaintext files to be overwritten. Unless you know for sure that all
the deleted disk blocks will soon be reused, you must take positive steps to
overwrite the plaintext file, and also any fragments of it on the disk left by your
word processor. You can take care of any fragments of the plaintext left on the
disk by using PGP’s Secure Wipe and Freespace Wipe features.

Phil Zimmermann on PGP
208 PGP Freeware
Viruses and Trojan horses
Another attack could involve a specially tailored hostile computer virus or
worm that might infect PGP or your operating system. This hypothetical virus
could be designed to capture your passphrase or private key or deciphered
messages and to covertly write the captured information to a file or send it
through a network to the virus’s owner. Or it might alter PGP’s behavior so
that signatures are not properly checked. This attack is cheaper than
cryptanalytic attacks.
Defending against this kind of attack falls into the category of defending
against viral infection generally. There are some moderately capable antiviral
products commercially available, and there are hygienic procedures to follow
that can greatly reduce the chances of viral infection. A complete treatment of
antiviral and antiworm countermeasures is beyond the scope of this
document. PGP has no defenses against viruses, and assumes that your own
personal computer is a trustworthy execution environment. If such a virus or
worm actually appeared, hopefully word would soon get around warning
everyone.
A similar attack involves someone creating a clever imitation of PGP that
behaves like PGP in most respects, but that doesn’t work the way it’s supposed
to. For example, it might be deliberately crippled to not check signatures
properly, allowing bogus key certificates to be accepted. This Trojan horse
version of PGP is not hard for an attacker to create, because PGP source code
is widely available, so anyone could modify the source code and produce a
lobotomized zombie imitation PGP that looks real but does the bidding of its
diabolical master. This Trojan horse version of PGP could then be widely
circulated, claiming to be from a legitimate source. How insidious.
You should make an effort to get your copy of PGP directly from Network
Associates, Inc.
There are other ways to check PGP for tampering, using digital signatures.
You could use another trusted version of PGP to check the signature on a
suspect version of PGP. But this won’t help at all if your operating system is
infected, nor will it detect if your original copy of pgp.exe has been maliciously
altered in such a way as to compromise its own ability to check signatures.
This test also assumes that you have a good trusted copy of the public key that
you use to check the signature on the PGP executable.

User’s Guide 209
Phil Zimmermann on PGP
Swap files or virtual memory
PGP was originally developed for MS-DOS, a primitive operating system by
today’s standards. But as it was ported to other more complex operating
systems, such as Microsoft Windows and the Macintosh OS, a new
vulnerability emerged. This vulnerability stems from the fact that these fancier
operating systems use a technique called virtual memory.
Virtual memory allows you to run huge programs on your computer that are
bigger than the space available in your computer’s semiconductor memory
chips. This is handy because software has become more and more bloated
since graphical user interfaces became the norm and users started running
several large applications at the same time. The operating system uses the hard
disk to store portions of your software that aren’t being used at the moment.
This means that the operating system might, without your knowledge, write
out to disk some things that you thought were kept only in main
memory—-things like keys, passphrases, and decrypted plaintext. PGP does
not keep that kind of sensitive data lying around in memory for longer than
necessary, but there is some chance that the operating system could write it
out to disk anyway.
The data is written out to some scratchpad area of the disk, known as a swap
file. Data is read back in from the swap file as needed, so that only part of your
program or data is in physical memory at any one time. All this activity is
invisible to the user, who just sees the disk chattering away. Microsoft
Windows swaps chunks of memory, called pages, using a Least Recently Used
(LRU) page-replacement algorithm. This means pages that have not been
accessed for the longest period of time are the first ones to be swapped to the
disk. This approach suggests that in most cases the risk is fairly low that
sensitive data will be swapped out to disk, because PGP doesn’t leave it in
memory for very long. But we don’t make any guarantees.
This swap file can be accessed by anyone who can get physical access to your
computer. If you are concerned about this problem, you may be able to solve
it by obtaining special software that overwrites your swap file. Another
possible cure is to turn off your operating system’s virtual memory feature.
Microsoft Windows allows this, and so does the Mac OS. Turning off virtual
memory may mean that you need to have more physical RAM chips installed
in order to fit everything in RAM.

Phil Zimmermann on PGP
210 PGP Freeware
Physical security breach
A physical security breach may allow someone to physically acquire your
plaintext files or printed messages. A determined opponent might accomplish
this through burglary, trash-picking, unreasonable search and seizure, or
bribery, blackmail, or infiltration of your staff. Some of these attacks may be
especially feasible against grass-roots political organizations that depend on a
largely volunteer staff.
Don’t be lulled into a false sense of security just because you have a
cryptographic tool. Cryptographic techniques protect data only while it’s
encrypted—direct physical security violations can still compromise plaintext
data or written or spoken information.
This kind of attack is cheaper than cryptanalytic attacks on PGP.
Tempest attacks
Another kind of attack that has been used by well-equipped opponents
involves the remote detection of the electromagnetic signals from your
computer. This expensive and somewhat labor-intensive attack is probably
still cheaper than direct cryptanalytic attacks. An appropriately instrumented
van can park near your office and remotely pick up all of your keystrokes and
messages displayed on your computer video screen. This would compromise
all of your passwords, messages, and so on. This attack can be thwarted by
properly shielding all of your computer equipment and network cabling so
that it does not emit these signals. This shielding technology, known as
"Tempest," is used by some government agencies and defense contractors.
There are hardware vendors who supply Tempest shielding commercially.
Some newer versions of PGP (after version 6.0) can display decrypted
plaintext using a specially designed font that may have reduced levels of radio
frequency emissions from your computer's video screen. This may make it
harder for the signals to be remotely detected. This special font is available in
some versions of PGP that support the "Secure Viewer" feature.
Protecting against bogus timestamps
A somewhat obscure vulnerability of PGP involves dishonest users creating
bogus timestamps on their own public key certificates and signatures. You can
skip over this section if you are a casual user and aren’t deeply into obscure
public-key protocols.

User’s Guide 211
Phil Zimmermann on PGP
There’s nothing to stop a dishonest user from altering the date and time setting
of his own system’s clock, and generating his own public key certificates and
signatures that appear to have been created at a different time. He can make it
appear that he signed something earlier or later than he actually did, or that
his public/private key pair was created earlier or later. This may have some
legal or financial benefit to him, for example by creating some kind of loophole
that might allow him to repudiate a signature.
I think this problem of falsified timestamps in digital signatures is no worse
than it is already in handwritten signatures. Anyone can write any date next
to their handwritten signature on a contract, but no one seems to be alarmed
about this state of affairs. In some cases, an “incorrect” date on a handwritten
signature might not be associated with actual fraud. The timestamp might be
when the signator asserts that he signed a document, or maybe when he wants
the signature to go into effect.
In situations where it is critical that a signature be trusted to have the actual
correct date, people can simply use notaries to witness and date a handwritten
signature. The analog to this in digital signatures is to get a trusted third party
to sign a signature certificate, applying a trusted timestamp. No exotic or
overly formal protocols are needed for this. Witnessed signatures have long
been recognized as a legitimate way of determining when a document was
signed.
A trustworthy Certifying Authority or notary could create notarized
signatures with a trustworthy timestamp. This would not necessarily require
a centralized authority. Perhaps any trusted introducer or disinterested party
could serve this function, the same way real notary publics do now. When a
notary signs other people’s signatures, it creates a signature certificate of a
signature certificate. This would serve as a witness to the signature in the same
way that real notaries now witness handwritten signatures. The notary could
enter the detached signature certificate (without the actual whole document
that was signed) into a special log controlled by the notary. Anyone could read
this log. The notary’s signature would have a trusted timestamp, which might
have greater credibility or more legal significance than the timestamp in the
original signature.
There is a good treatment of this topic in Denning’s 1983 article in IEEE
Computer. Future enhancements to PGP might have features to easily manage
notarized signatures of signatures, with trusted timestamps.

Phil Zimmermann on PGP
212 PGP Freeware
Exposure on multi-user systems
PGP was originally designed for a single-user PC under your direct physical
control. If you run PGP at home on your own PC, your encrypted files are
generally safe, unless someone breaks into your house, steals your PC and
persuades you to give them your passphrase (or your passphrase is simple
enough to guess).
PGP is not designed to protect your data while it is in plaintext form on a
compromised system. Nor can it prevent an intruder from using sophisticated
measures to read your private key while it is being used. You will just have to
recognize these risks on multiuser systems, and adjust your expectations and
behavior accordingly. Perhaps your situation is such that you should consider
only running PGP on an isolated single-user system under your direct
physical control.
Traffic analysis
Even if the attacker cannot read the contents of your encrypted messages, he
may be able to infer at least some useful information by observing where the
messages come from and where they are going, the size of the messages, and
the time of day the messages are sent. This is analogous to the attacker looking
at your long-distance phone bill to see who you called and when and for how
long, even though the actual content of your calls is unknown to the attacker.
This is called traffic analysis. PGP alone does not protect against traffic
analysis. Solving this problem would require specialized communication
protocols designed to reduce exposure to traffic analysis in your
communication environment, possibly with some cryptographic assistance.
Cryptanalysis
An expensive and formidable cryptanalytic attack could possibly be mounted
by someone with vast supercomputer resources, such as a government
intelligence agency. They might crack your public key by using some new
secret mathematical breakthrough. But civilian academia has been intensively
attacking public key cryptography without success since 1978.
Perhaps the government has some classified methods of cracking the
conventional encryption algorithms used in PGP. This is every
cryptographer’s worst nightmare. There can be no absolute security
guarantees in practical cryptographic implementations.

User’s Guide 213
Phil Zimmermann on PGP
Still, some optimism seems justified. The public key algorithms, message
digest algorithms, and block ciphers used in PGP were designed by some of
the best cryptographers in the world. PGP’s algorithms has had extensive
security analysis and peer review from some of the best cryptanalysts in the
unclassified world.
Besides, even if the block ciphers used in PGP have some subtle unknown
weaknesses, PGP compresses the plaintext before encryption, which should
greatly reduce those weaknesses. The computational workload to crack it is
likely to be much more expensive than the value of the message.
If your situation justifies worrying about very formidable attacks of this
caliber, then perhaps you should contact a data security consultant for some
customized data security approaches tailored to your special needs.
In summary, without good cryptographic protection of your data
communications, it may be practically effortless and perhaps even routine for
an opponent to intercept your messages, especially those sent through a
modem or email system. If you use PGP and follow reasonable precautions,
the attacker will have to expend far more effort and expense to violate your
privacy.
If you protect yourself against the simplest attacks, and you feel confident that
your privacy is not going to be violated by a determined and highly
resourceful attacker, then you’ll probably be safe using PGP. PGP gives you
Pretty Good Privacy.

Phil Zimmermann on PGP
214 PGP Freeware

D
User’s Guide 215
DBiometric Word Lists
Biometric Word Lists
By Philip Zimmermann and Patrick Juola
PGP uses a special list of words to convey binary information in an
authenticated manner over a voice channel, such as a telephone, via biometric
signatures. The human voice that speaks the words, if recognized by the
listener, serves as a means of biometric authentication of the data carried by
the words. The word list serves the same purpose as the military alphabet,
which is used to transmit letters over a noisy radio voice channel. But the
military alphabet has 26 words, each word representing one letter. For our
purposes, our list has 256 carefully selected phonetically distinct words to
represent the 256 possible byte values of 0 to 255.
We created a word list for reading binary information over the phone, with
each word representing a different byte value. We tried to design the word list
to be useful for a variety of applications. The first application we had
envisioned was to read PGP public key fingerprints over the phone to
authenticate the public key. In that case, the fingerprint is 20 bytes long,
requiring 20 words to be read aloud. Experience has shown it to be fairly
tedious and error prone to read that many bytes in hexadecimal, so it seems
worth using a word list to represent each byte by a word.
Some applications may require transmitting even lengthier byte sequences
over the phone, for example, entire keys or signatures. This may entail reading
more than a hundred bytes. Using words instead of hex bytes seems even
more justified in that case.
When reading long sequences of bytes aloud, errors may creep in. The kinds
of error syndromes you get on human-spoken data are different than they are
for transmitting data through a modem. Modem errors usually involve
flipped bits from line noise. Error detection methods for modems usually
involve CRCs to be added, which are optimized for detecting line noise bursts.
However, random sequences of spoken human words usually involves one of
three kinds of errors: 1) transposition of two consecutive words, 2) duplicate
words, or 3) omitted words. If we are to design an error detection scheme for
this kind of data transmission channel, we should make one that is optimized
for these three kinds of errors. Zhahai Stewart suggested a good scheme (in
personal conversation with me in 1991) for error detection of these errors.

Biometric Word Lists
216 PGP Freeware
Stewart’s scheme for error detection while reading aloud long sequences of
bytes via a word list entails using not one, but two lists of words. Each list
contains 256 phonetically distinct words, each word representing a different
byte value between 0 and 255. The two lists are used alternately for the
even-offset bytes and the odd-offset bytes in the byte sequence.
For example, the first byte (offset 0 in the sequence) is used to select a word
from the even list. The byte at offset 1 is used to select a byte from the odd list.
The byte at offset 2 selects a word from the even list again, and the byte at
offset 3 selects from the odd list again. Each byte value is actually represented
by two different words, depending on whether that byte appears at an even or
an odd offset from the beginning of the byte sequence. For example, suppose
the word “adult” and the word “amulet” each appears in the same
corresponding position in the two word lists, position 5. That means that the
repeating 3-byte sequence 05 05 05 is represented by the 3-word sequence
“adult, amulet, adult.”
This approach makes it easy to detect all three kinds of common errors in
spoken data streams: transposition, duplication, and omission. A
transposition will result in two consecutive words from the even list followed
by two consecutive words from the odd list (or the other way around). A
duplication will be detected by two consecutive duplicate words, a condition
that cannot occur in a normal sequence. An omission will be detected by two
consecutive words drawn from the same list.
To facilitate the immediate and obvious detection by a human of any of the
three error syndromes described above, without computer assistance, we
made the two lists have one obviously different property: The even list
contains only two-syllable words, while the odd list contains only
three-syllable words. That suggestion came from Patrick Juola, a
computational linguist.
PGPfone was the application that precipitated the actual development of the
word list by Juola and Zimmermann. PGPfone is an application that turns
your computer into a secure telephone. We used it to authenticate PGPfone's
initial Diffie-Hellman key exchange without using digital signatures and
public key infrastructures. We knew we would end up using it for
authenticating PGP key fingerprints when we applied it to PGP later.
The idea behind building the word lists was to develop a metric to measure the
phonetic distance between two words, then use that as a goodness measure to
develop a full list. Grady Ward provided us with a large collection of words
and their pronunciations, and Patrick Juola used genetic algorithms to evolve
the best subset of Ward's list. To briefly summarize what he did, he made a

User’s Guide 217
Biometric Word Lists
large population of guesses and let the population “sexually reproduce” by
exchanging words with other guesses -- and, like biological evolution, the
better guesses survived into the next generation. After about 200 generations,
the list had mostly stabilized into a best guess, with far greater phonetic
distance between the words than what we started with in the initial guess lists.
The first major hurdle was the development of the metric. Linguists have
studied sound production and perception for decades, and there is a standard
feature set used to describe sounds in English. For example, say the words
“pun,” “fun,” “dun,” and “gun” (go ahead, try it), and notice how your tongue
keeps moving back in your mouth on each word. Linguists call this the “place
of articulation,” and noises that are very different in this feature sound
different to English speakers. Combining the features of all the sounds in a
word gives us a representation of the sound of the entire word -- and we can
compute the phonetic distance between a pair of words.
Actually, it wasn't that simple. We didn't know how to weight the various
features, certain word-level features like accents were hard to represent, and
the feature-based analysis simply fails for certain sounds. There were also a
few other more subtle criteria; for example, we wanted the words to be
common enough to be universally recognizable, but not so common as to be
boring --and we didn't want confusing words like “repeat” or “begin” or
“error”. Some sound features are less perceptible to non-native-English
speakers, for example, some Japanese speakers might hear and pronounce “r”
and “l” the same way. It would be nice if the words were short enough that
you could fit enough of them on a small LCD display. Large consonant clusters
(“corkscrew” has five pronounced consonants in a row) are sometimes hard to
say, especially to non-English speakers. One way or another, we tried to
incorporate all these criteria into a filter on the initial dictionary list or into the
distance metric itself.
After the computer evolved the winning list, we looked at it. Yes, the words
were phonetically distinct. But many of them looked like a computer picked
them, not a human. A lot of them were just ugly and dumb. Some were
repugnant, and some were bland and wimpy. So we applied some “wetware”
augmentation to the list. Some words were deleted, and replaced by some
human-chosen words. We had the computer check the new words against the
list to see if they were phonetically distant from the rest of the list. We also
tried to make the words not come too close to colliding phonetically with the
other words in the larger dictionary, just so that they would not be mistaken
for other words not on the list.
There were a variety of selection criteria that Juola used in his algorithms. He
published a paper on it that goes into more detail. This document is just a brief
overview of how we built the list.

Biometric Word Lists
218 PGP Freeware
I’m not entirely happy with the word list. I wish it had more cool words in it,
and less bland words. I like words like “Aztec” and “Capricorn”, and the
words in the standard military alphabet. While we'd like to reserve the right
to revise the list at some future time, it's not likely, due to the legacy problems
that this initial version will create. This version of the list was last modified in
September 1998.
If you have any suggested words you'd like to see added or deleted, send them
in to pgpfone-bugs@mit.edu, and while you're at it, send a copy to Patrick
Juola at juola@mathcs.duq.edu. Here are the full word lists, both odd and
even.

User’s Guide 219
Biometric Word Lists
Two Syllable Word List
aardvark absurd accrue acme adrift
adult afflict ahead aimless Algol
allow alone ammo ancient apple
artist assume Athens atlas Aztec
baboon backfield backward banjo beaming
bedlamp beehive beeswax befriend Belfast
berserk billiard bison blackjack blockade
blowtorch bluebird bombast bookshelf brackish
breadline breakup brickyard briefcase Burbank
button buzzard cement chairlift chatter
checkup chisel choking chopper Christmas
clamshell classic classroom cleanup clockwork
cobra commence concert cowbell crackdown
cranky crowfoot crucial crumpled crusade
cubic dashboard deadbolt deckhand dogsled
dragnet drainage dreadful drifter dropper
drumbeat drunken Dupont dwelling eating
edict egghead eightball endorse endow
enlist erase escape exceed eyeglass
eyetooth facial fallout flagpole flatfoot
flytrap fracture framework freedom frighten
gazelle Geiger glitter glucose goggles
goldfish gremlin guidance hamlet highchair
hockey indoors indulge inverse involve
island jawbone keyboard kickoff kiwi
klaxon locale lockup merit minnow
miser Mohawk mural music necklace
Neptune newborn nightbird Oakland obtuse
offload optic orca payday peachy
pheasant physique playhouse Pluto preclude
prefer preshrunk printer prowler pupil
puppy python quadrant quiver quota
ragtime ratchet rebirth reform regain
reindeer rematch repay retouch revenge
reward rhythm ribcage ringbolt robust
rocker ruffled sailboat sawdust scallion
scenic scorecard Scotland seabird select
sentence shadow shamrock showgirl skullcap
skydive slingshot slowdown snapline snapshot
snowcap snowslide solo southward soybean
spaniel spearhead spellbind spheroid spigot
spindle spyglass stagehand stagnate stairway
standard stapler steamship sterling stockman
stopwatch stormy sugar surmount suspense
sweatband swelter tactics talon tapeworm
tempest tiger tissue tonic topmost
tracker transit trauma treadmill Trojan
trouble tumor tunnel tycoon uncut
unearth unwind uproot upset upshot
vapor village virus Vulcan waffle
wallet watchword wayside willow woodlark
Zulu

Biometric Word Lists
220 PGP Freeware
Three Syllable Word List
adroitness adviser aftermath aggregate alkali
almighty amulet amusement antenna applicant
Apollo armistice article asteroid Atlantic
atmosphere autopsy Babylon backwater barbecue
belowground bifocals bodyguard bookseller borderline
bottomless Bradbury bravado Brazilian breakaway
Burlington businessman butterfat Camelot candidate
cannonball Capricorn caravan caretaker celebrate
cellulose certify chambermaid Cherokee Chicago
clergyman coherence combustion commando company
component concurrent confidence conformist congregate
consensus consulting corporate corrosion councilman
crossover crucifix cumbersome customer Dakota
decadence December decimal designing detector
detergent determine dictator dinosaur direction
disable disbelief disruptive distortion document
embezzle enchanting enrollment enterprise equation
equipment escapade Eskimo everyday examine
existence exodus fascinate filament finicky
forever fortitude frequency gadgetry Galveston
getaway glossary gossamer graduate gravity
guitarist hamburger Hamilton handiwork hazardous
headwaters hemisphere hesitate hideaway holiness
hurricane hydraulic impartial impetus inception
indigo inertia infancy inferno informant
insincere insurgent integrate intention inventive
Istanbul Jamaica Jupiter leprosy letterhead
liberty maritime matchmaker maverick Medusa
megaton microscope microwave midsummer millionaire
miracle misnomer molasses molecule Montana
monument mosquito narrative nebula newsletter
Norwegian October Ohio onlooker opulent
Orlando outfielder Pacific pandemic Pandora
paperweight paragon paragraph paramount passenger
pedigree Pegasus penetrate perceptive performance
pharmacy phonetic photograph pioneer pocketful
politeness positive potato processor provincial
proximate puberty publisher pyramid quantity
racketeer rebellion recipe recover repellent
replica reproduce resistor responsive retraction
retrieval retrospect revenue revival revolver
sandalwood sardonic Saturday savagery scavenger
sensation sociable souvenir specialist speculate
stethoscope stupendous supportive surrender suspicious
sympathy tambourine telephone therapist tobacco
tolerance tomorrow torpedo tradition travesty
trombonist truncated typewriter ultimate undaunted
underfoot unicorn unify universe unravel
upcoming vacancy vagabond vertigo Virginia
visitor vocalist voyager warranty Waterloo
whimsical Wichita Wilmington Wyoming yesteryear
Yucatan

User’s Guide 221
Glossary
AES (Advanced
Encryption Standard) NIST approved standards, usually used for the next 20 - 30
years.
Algorithm (encryption) a set of mathematical rules (logic) used in the processes of
encryption and decryption.
Algorithm (hash) a set of mathematical rules (logic) used in the processes of
message digest creation and key/signature generation.
Anonymity of unknown or undeclared origin or authorship, concealing an
entity’s identification.
ANSI (American National
Standards Institute) develops standards through various Accredited Standards
Committees (ASC). The X9 committee focuses on security
standards for the financial services industry.
ASCII-armored text binary information that has been encoded using a standard,
printable, 7-bit ASCII character set, for convenience in
transporting the information through communication systems.
In the PGP program, ASCII armored text files are given the
default filename extension, and they are encoded and decoded
in the ASCII radix-64 format.
Asymmetric keys a separate but integrated user key-pair, comprised of one
public key and one private key. Each key is one way, meaning
that a key used to encrypt information can not be used to
decrypt the same data.
Authentication the determination of the origin of encrypted information
through the verification of someone’s digital signature or
someone’s public key by checking its unique fingerprint.
Authorization certificate an electronic document to prove one’s access or privilege
rights, also to prove one is who they say they are.
Authorization to convey official sanction, access or legal power to an entity.

Glossary
222 PGP Freeware
Blind signature ability to sign documents without knowledge of content,
similar to a notary public.
Block cipher a symmetric cipher operating on blocks of plain text and cipher
text, usually 64 bits.
CA (Certificate Authority) a trusted third party (TTP) who creates certificates that consist
of assertions on various attributes and binds them to an entity
and/or to their public key.
CAPI (Crypto API) Microsoft’s crypto API for Windows-based operating systems
and applications.
CAST a 64-bit block cipher using 64-bit key, six S-boxes with 8-bit
input and 32-bit output, developed in Canada by Carlisle
Adams and Stafford Tavares.
Certificate (digital
certificate) an electronic document attached to a public key by a trusted
third party, which provides proof that the public key belongs to
a legitimate owner and has not been compromised.
Certification endorsement of information by a trusted entity.
Certify to sign another person's public key.
Certifying authority one or more trusted individuals who are assigned the
responsibility of certifying the origin of keys and adding them
to a common database.
Ciphertext plaintext converted into a secretive format through the use
of an encryption algorithm. An encryption key can unlock
the original plaintext from ciphertext.
Clear text characters in a human readable form or bits in a
machine-readable form (also called plain text).
Corporate signing key a public key that is designated by the security officer of a
corporation as the system-wide key that all corporate users
trust to sign other keys.

User’s Guide 223
Glossary
Conventional encryption encryption that relies on a common passphrase instead of
public key cryptography. The file is encrypted using a session
key, which encrypts using a passphrase that you will be asked
to choose
Cryptanalysis the art or science of transferring cipher text into plain text
without initial knowledge of the key used to encrypt the plain
text.
CRYPTOKI same as PKCS #11.
Cryptography the art and science of creating messages that have some
combination of being private, signed, unmodified with
non-repudiation.
Cryptosystem a system comprised of cryptographic algorithms, all possible
plain text, cipher text, and keys.
Data integrity a method of ensuring information has not been altered by
unauthorized or unknown means.
Decryption a method of unscrambling encrypted information so that it
becomes legible again. The recipient’s private key is used for
decryption.
DES (Data Encryption
Standard) a 64-bit block cipher, symmetric algorithm also known as Data
Encryption Algorithm (DEA) by ANSI and DEA-1 by ISO.
Widely used for over 20 years, adopted in 1976 as FIPS 46.
Dictionary attack a calculated brute force attack to reveal a password by trying
obvious and logical combinations of words.
Diffie-Hellman the first public key algorithm, invented in 1976, using discrete
logarithms in a finite field.
Digital cash electronic money that is stored and transferred through a
variety of complex protocols.
Direct trust an establishment of peer-to-peer confidence.
Digital signature see signature.

Glossary
224 PGP Freeware
DSA (Digital Signature
Algorithm) a public key digital signature algorithm proposed by NIST for
use in DSS.
DSS (Digital Signature
Standard) a NIST proposed standard (FIPS) for digital signatures using
DSA.
ECC (Elliptic Curve
Cryptosystem) a unique method for creating public key algorithms based on
mathematical curves over finite fields or with large prime
numbers.
EES (Escrowed
Encryption Standard) a proposed U.S. government standard for escrowing private
keys.
Elgamal scheme used for both digital signatures and encryption based on
discrete logarithms in a finite field; can be used with the DSA
function.
Encryption a method of scrambling information to render it unreadable to
anyone except the intended recipient, who must decrypt it to
read it.
Fingerprint a uniquely identifying string of numbers and characters used to
authenticate public keys. This is the primary means for
checking the authenticity of a key. See Key Fingerprint.
FIPS (Federal Information
Processing Standard) a U.S. government standard published by NIST.
Firewall a combination of hardware and software that protects the
perimeter of the public/private network against certain attacks
to ensure some degree of security.
Hash function a one-way hash function - a function that produces a message
digest that cannot be reversed to produced the original.
Hierarchical trust a graded series of entities that distribute trust in an organized
fashion, commonly used in ANSI X.509 issuing certifying
authorities.
HTTP (HyperText
Transfer Protocol) a common protocol used to transfer documents between
servers or from a server to a client.

User’s Guide 225
Glossary
Hexadecimal hexadecimal describes a base-16 number system. That is, it
describes a numbering system containing 16 sequential
numbers as base units (including 0) before adding a new
position for the next number. (Note that we’re using "16" here
as a decimal number to explain a number that would be "10" in
hexadecimal.) The hexadecimal numbers are 0-9 and then
use the letters A-F.
IDEA (International Data
Encryption Standard) a 64-bit block symmetric cipher using 128-bit keys based on
mixing operations from different algebraic groups. Considered
one of the strongest algorithms.
IKE (Internet Key
Exchange) provides a secure means of key exchange over the Internet. IKE
is also a candidate for IPSec security archetecture.
Implicit trust Implicit trust is reserved for key pairs located on your local
keyring. If the private portion of a key pair is found on your
keyring, PGP assumes that you are the owner of the key pair
and that you implicity trust yourself.
Integrity assurance that data is not modified (by unauthorized persons)
during storage or transmittal.
Introducer a person or organization who is allowed to vouch for the
authenticity of someone’s public key. You designate an
introducer by signing their public key.
IPSec a TCP/IP layer encryption scheme under consideration within
the IETF.
ISO (International
Organization for
Standardization)
responsible for a wide range of standards, like the OSI model
and international relationship with ANSI on X.509.
Key a digital code used to encrypt and sign and decrypt and verify
messages and files. Keys come in key pairs and are stored on
keyrings.
Key escrow/recovery a practice where a user of a public key encryption system
surrenders their private key to a third party thus permitting
them to monitor encrypted communications.

Glossary
226 PGP Freeware
Key exchange a scheme for two or more nodes to transfer a secret session key
across an unsecured channel.
Key fingerprint a uniquely identifying string of numbers and characters used to
authenticate public keys. For example, you can telephone the
owner of a public key and have him or her read the fingerprint
associated with their key so you can compare it with the
fingerprint on your copy of their public key to see if they
match. If the fingerprint does not match, then you know you
have a bogus key.
Key ID a legible code that uniquely identifies a key pair. Two key pairs
may have the same user ID, but they will have different Key
IDs.
Key length the number of bits representing the key size; the longer the key,
the stronger it is.
Key management the process and procedure for safely storing and distributing
accurate cryptographic keys; the overall process of generating
and distributing cryptographic key to authorized recipients in a
secure manner.
Key pair a public key and its complimentary private key. In public-key
cryptosystems, like the PGP program, each user has at least one
key pair.
Keyring a set of keys. Each user has two types of keyrings: a private
keyring and a public keyring.
Key splitting or "secret
sharing" the process of dividing up a private key into multiple pieces,
and share those pieces among a group of people. A designated
number of those people must bring their shares of the key
together to use the key.
LDAP (Lightweight
Directory Access Protocol) a simple protocol that supports access and search operations on
directories containing information such as names, phone
numbers, and addresses across otherwise incompatible systems
over the Internet.

User’s Guide 227
Glossary
Message digest a compact “distillate” of your message or file checksum. It
represents your message, such that if the message were altered
in any way, a different message digest would be computed
from it.
Meta-introducer a trusted introducer of trusted introducers.
MIC (Message Integrity
Check) originally defined in PEM for authentication using MD2 or
MD5. Micalg (message integrity calculation) is used in secure
MIME implementations.
MIME (Multipurpose
Internet Mail Extensions) a freely available set of specifications that offers a way to
interchange text in languages with different character sets, and
multimedia email among many different computer systems
that use Internet mail standards.
Non-repudiation preventing the denial of previous commitments or actions.
One-way hash a function of a variable string to create a fixed length value
representing the original pre-image, also called message digest,
fingerprint, message integrity check (MIC).
Passphrase an easy-to-remember phrase used for better security than a
single password; key crunching converts it into a random key.
Password a sequence of characters or a word that a subject submits to a
system for purposes of authentication, validation, or
verification.
PGP/MIME an IETF standard (RFC 2015) that provides privacy and
authentication using the Multipurpose Internet Mail
Extensions (MIME) security content types described in
RFC1847, currently deployed in PGP 5.0 and later versions.
PKCS (Public Key Crypto
Standards) a set of de facto standards for public key cryptography
developed in cooperation with an informal consortium (Apple,
DEC, Lotus, Microsoft, MIT, RSA, and Sun) that includes
algorithm-specific and algorithm-independent implementation
standards. Specifications defining message syntax and other
protocols controlled by RSA Data Security Inc.

Glossary
228 PGP Freeware
PKI (Public Key
Infrastructure) a widely available and accessible certificate system for
obtaining an entity’s public key with some degree of certainty
that you have the “right” key and that it has not been revoked.
Plaintext normal, legible, un-encrypted, unsigned text.
Private key the secret portion of a key pair-used to sign and decrypt
information. A user's private key should be kept secret, known
only to the user.
Private keyring a set of one or more private keys, all of which belong to the
owner of the private keyring.
Public key one of two keys in a key pair-used to encrypt information and
verify signatures. A user's public key can be widely
disseminated to colleagues or strangers. Knowing a person's
public key does not help anyone discover the corresponding
private key.
Public keyring a set of public keys. Your public keyring includes your own
public key(s).
Public-key cryptography cryptography in which a public and private key pair is used, and
no security is needed in the channel itself.
Random number an important aspect to many cryptosystems, and a necessary
element in generating a unique key(s) that are unpredictable to
an adversary. True random numbers are usually derived from
analog sources, and usually involve the use of special
hardware.
Revocation retraction of certification or authorization.
RFC (Request for
Comment) an IETF document, either FYI (For Your Information) RFC
sub-series that are overviews and introductory or STD RFC
sub-series that identify specify Internet standards. Each RFC
has an RFC number by which it is indexed and by which it can
be retrieved (www.ietf.org).

User’s Guide 229
Glossary
RSA short for RSA Data Security, Inc.; or referring to the principals -
Ron Rivest, Adi Shamir, and Len Adleman; or referring to the
algorithm they invented. The RSA algorithm is used in public
key cryptography and is based on the fact that it is easy to
multiply two large prime numbers together, but hard to factor
them out of the product.
secret sharing see Key Splitting.
secure channel a means of conveying information from one entity to another
such that an adversary does not have the ability to reorder,
delete, insert, or read (SSL, IPSec, whispering in someone’s
ear).
self-signed key a public key that has been signed by the corresponding private
key for proof of ownership.
session key the secret (symmetric) key used to encrypt each set of data on a
transaction basis. A different session key is used for each
communication session.
sign to apply a signature.
signature a digital code created with a private key. Signatures allow
authentication of information by the process of signature
verification. When you sign a message or file, the PGP program
uses your private key to create a digital code that is unique to
both the contents of the message and your private key. Anyone
can use your public key to verify your signature.
S/MIME (Secure
Multipurpose Mail
Extension)
a proposed standard developed by Deming software and RSA
Data Security for encrypting and/or authenticating MIME
data. S/MIME defines a format for the MIME data, the
algorithms that must be used for interoperability (RSA, RC2,
SHA-1), and the additional operational concerns such as ANSI
X.509 certificates and transport over the Internet.

Glossary
230 PGP Freeware
SSL (Secure Socket Layer) developed by Netscape to provide security and privacy over
the Internet. Supports server and client authentication and
maintains the security and integrity of the transmission
channel. Operates at the transport layer and mimics the
“sockets library,” allowing it to be application independent.
Encrypts the entire communication channel and does not
support digital signatures at the message level.
symmetric algorithm a.k.a., conventional, secret key, and single key algorithms; the
encryption and decryption key are either the same or can be
calculated from one another. Two sub-categories exist - Block
and Stream.
subkey a subkey is a Diffie-Hellman encryption key that is added as a
subset to your master key. Once a subkey is created, you can
expire or revoke it without affecting your master key or the
signatures collected on it.
Text standard, printable, 7-bit ASCII text.
Timestamping recording the time of creation or existence of information.
TLS (Transport Layer
Security) an IETF draft, version 1 is based on the Secure Sockets Layer
(SSL) version 3.0 protocol, and provides communications
privacy over the Internet.
TLSP (Transport Layer
Security Protocol) ISO 10736, draft international standard.
Triple DES an encryption configuration in which the DES algorithm is
used three times with three different keys.
Trusted a public key is said to be trusted by you if it has been validated
by you or by someone you have designated as an introducer.
Trusted introducer someone whom you trust to provide you with keys that are
valid. When a trusted introducer signs another person’s key,
you trust that the person’s key is valid, and you do not need to
verify the key before using it.

User’s Guide 231
Glossary
User ID a text phrase that identifies a key pair. For example, one
common format for a user ID is the owner’s name and email
address. The user ID helps users (both the owner and
colleagues) identify the owner of the key pair.
Validity indicates the level of confidence that the key actually belongs to
the alleged owner.
Verification the act of comparing a signature created with a private key to
its public key. Verification proves that the information was
actually sent by the signer, and that the message has not been
subsequently altered by anyone else.
VPN (Virtual Private
Network) allows private networks to span from the end-user, across a
public network (Internet) directly to the Home Gateway of
choice, such as your company’s Intranet.
Web of trust a distributed trust model used by PGP to validate the
ownership of a public key where the level of trust is
cumulative, based on the individuals’ knowledge of the
introducers.
X.509 an ITU-T digital certificate that is an internationally recognized
electronic document used to prove identity and public key
ownership over a communication network. It contains the
issuer’s name, the user’s identifying information, and the
issuer’s digital signature, as well as other possible extensions.

Glossary
232 PGP Freeware

User’s Guide 233
Index
A
adapter bindings
setting,173
adding
a host,148 to 149, 157
a photo ID to a key,42
a secure gateway,148, 152, 157
a secure host
behind a configured gateway,153
a secure subnet
behind a configured gateway,154
a subnet,148, 151, 157
an IKE or IPSEC proposal,170
an X.509 cert
combining groups,79
adding a Root CA cert,48
AES (Advanced Encryption Standard)
definition,221
algorithm
CAST,127
IDEA,127
Triple-DES,127
Algorithm (encryption)
definition,221
Algorithm (hash)
definition,221
Allow communications with unconfigured
hosts,160
Allowed Algorithm,127
Anonymity
definition,221
ANSI (American National Standards Institute)
definition,221
Any valid key,158
ASCII-armored text
definition,221
Asymmetric keys
definition,221
attackers
protecting against,48, 195
attacks
cryptanalysis,212
man-in-the-middle,68
on swap files,209
on virtual memory,209
physical security breach,210
TEMPEST,210
traffic analysis,212
trojan horses,208
viruses,208
attributes
changing your keyrings’,100 to 104
viewing your keyrings’,100 to 104
authenticating
a connection,164
using PGP keys,164
using PGPnet keyring files,164
using X.509 certificates,164
Authentication
definition,221
Authorization
definition,221

Index
234 PGP Freeware
Authorization certificate
definition,221
automated freespace wiping
What’s New in PGP,12
B
bindings review,135
Blind signature
definition,222
Block cipher
definition,222
block ciphers,193
C
CA (Certificate Authority)
definition,222
CA options,127
caching
passphrases,162
CAPI (Crypto API)
definition,222
CAST
definition,222
CAST algorithm,127, 191
key size,191
CBC
cipher block chaining,191
Certificate (digital certificate)
definition,222
Certificate Authority
description,196
setting options,127
See also CA
Certificate server. See key server
certificates
X.509,48
Certification
definition,222
certify
definition,222
certifying
public keys,24, 196
certifying authority
definition,222
CFBcipher feedback,191
changing
your passphrase,51, 104
changing Network control panel
settings,135
checking
authenticity of a key,68
fingerprints,108
checksum,194
cipher block chaining,191
cipher feedback,191
ciphers
allowing specific within PGPnet,166
ciphertext
definition,222
Clear text
definition,222
clearing
log information,142
Clipboard
using PGP from the,30
Clipper chip,190
CommandLine,20
communicating
with insecure hosts,134

Index
User’s Guide 235
with secure hosts,133
with secure hosts behind secure
gateway,134
with unconfigured hosts,159
communication
allowing with unconfigured hosts,160
comparing
key fingerprints,69
compatibility
among versions of PGP,16
compression
used in PGP,193
compression functions
allowed within PGPnet,166
connections
authenticating,164
conventional encryption,74, 76, 85 to 86
definition,223
Corporate signing key,222
creating
key pairs,36
private and public key pairs,26
recipient groups,78
subkeys,44
Cryptanalysis
definition,223
Cryptography
definition,223
CRYPTOKI
definition,223
Cryptosystem
definition,223
Customer Care
contacting,12
D
data compression
routines,193
Data integrity
definition,223
decrypting
email,25, 79
files,87
from the Clipboard,30
using PGP menu,87
using PGPmenu,85, 87
using PGPtray,85, 87
with split keys,88
decryption
definition,223
default key pair
specifying,107
default settings
for PGPnet,173
definition,225
Deflate compression
and PGPnet,166
deleting
digital signatures,114
files,93
keys,114
keys from the server,60
recipient groups,78
SAs,142
signatures from server,60
user IDs,114
using Secure Wipe,93
DES (Data Encryption Standard)
definition,223

Index
236 PGP Freeware
DES algorithm,191
Dictionary attack
definition,223
Diffie-Hellman
definition,223
Digital cash
definition,223
digital signature
definition,223
digital signatures
and authenticity,69
deleting,114
Direct trust
definition,223
disabling keys,113
disclosure
protecting private keys against,200
disks
deleting free space,94
scheduled wiping,96
wiping,94
wiping files from,93
displaying
the PGPnet Hosts panel,139
the PGPnet Log panel,139
the PGPnet Options window,139
the PGPnet Status panel,139
distributing
public keys,23
your public keys,60
distribution lists
adding mermbers to a group list,78
combining groups,79
creating a group,78
deleting a group,78
deleting a member,78
DNS Lookup
finding a host’s IP Address,157
using,157
DSA (Digital Signature Algorithm)
definition,224
DSS (Digital Signature Standard)
definition,224
DSS/Diffie-Hellman technology
keys
creating,37
E
ECC (Elliptic Curve Cryptosystem)
definition,224
editing
a host, subnet, or gateway,155
and IKE or IPSEC proposal,171
EES (Escrowed Encryption Standard)
definition,224
Elgamal scheme
definition,224
email
combining recipient groups,79
copying public keys from,67
creating recipient groups,78
decrypting,25, 79 to 81
deleting recipient groups,78
encrypting,24, 71 to 76
to groups of people,77
with Eudora,71
including your public key in,63
receiving private,71
selecting recipients,33
sending private,71

Index
User’s Guide 237
signing,24, 71 to 76
with Eudora,71
using PGP with,32
verifying,25, 79 to 81
email plug-ins
using,71
Enabled property,104
enabling keys,113
encrypting
email,24, 71 to 76, 80 to 81
to groups of people,77
from the Clipboard,30
using Eudora,71
encryption
definition,224
encryption options
email
conventional,74, 76
Secure Viewer,74, 76
self decrypting archive,74, 76
files
conventional,85 to 86
Secure Viewer,84, 86
self decrypting archive,85 to 86
text output,84, 86
wipe original,84, 86
setting,117
Enigma,204
establishing
an SA,145
ethernet,145
Eudora,80
with PGP/MIME,80
without PGP/MIME,81
exchanging
public keys,23
obtaining others’,64 to 68
exiting
PGPnet,139 to 140
expert mode
using to add hosts, gateways, and
subnets,157
expiration
setting for key pairs,38
setting key expiration values,162
Expire property,104, 106
expiring
SAs,133
Explorer
using PGP with,31
export format
for exporting keys,128
exporting
keys, to files,64, 115
F
features
automated freespace wiping,12
finger print word list,12
HotKeys,12
new in PGP,12
of PGPnet,131
PGPnet,12
self-decrypting archive,12
files,87
deleting,93
exporting keys to,115
exporting public keys to,64
importing public keys from,68
wiping,93

Index
238 PGP Freeware
Finder
using PGP from,29
finding
keys,128
finger print word list
What’s New in PGP,12
fingerprint
definition,224
hexidecimal,104
fingerprints,104
checking,108
comparing,69
description,194
word list,12
FIPS (Federal Information Processing
Standard)
definition,224
Firewall
definition,224
Free Space Wipe,94
automatic wiping,12
scheduling tasks,96
G
gateways
adding,152
removing,155
generating
key pairs,36
setting options,118
granting
trust for key validations,112
group lists,125
groups
adding members,78
combining groups,79
creating,78
deleting,78
H
Hash function
definition,224
hash functions
allowing withing PGPnet,166
description,194
helpgetting,30
Hexadecimal
definition,225
hexidecimal,104
Hierarchical trust
definition,224
hosts
adding,148to 149
communicating with unconfigured,159
establishing an SA,145
finding IP Address of,157
modifying,155
removing,155
requiring secure communication
with,160
terminating an SA,145
HotKey
setting options,122
HotKeys
What’s New in PGP,12
HTTP (HyperText Transfer Protocol)
definition,224

Index
User’s Guide 239
I
icons
description of,27
IDEA (International Data Encryption
Standard)
definition,225
IDEA algorithm,127, 191 to 192
key size,191
IETF IKE (Internet Key Exchange)
protocol,132
IETF IPsec protocol,132
IKE,225
IKE negotiation
description,133
IKE proposal
adding,170
editing,171
removing,172
reordering,172
implicit trust
definition,225
importing
Pkcs-12 X.509,115
public keys, from files,68
importing private keys,115
initiating
an SA,133
insecure hosts
communicating with,134
installing
PGPnet,19
Integrity
definition,225
Internet Key Exchange
definition,225
Internet Service Providers (ISPs)
and VPNs,130
intranet
using VPNs to expand,130
introducer
definition,225
introducers,196
and digital signatures,197, 211
description,197
trusted,196, 199
IP Address
finding with DNS lookup,157
IPSEC,130
IPSec
definition,225
IPSEC proposal
adding,170
editing,171
removing,172
reordering,172
ISO (International Organization for
Standardization)
definition,225
K
key definition,225
key compromise certificate
issuing,200
key escrow/recovery
definition,225
key exchange
definition,226
key expiration values
setting,162

Index
240 PGP Freeware
key fingerprint
definition,226
key ID
definition,226
Key ID property,104 to 105
key length
definition,226
key management
definition,226
key pair
definition,226
key pairs
creating,23, 36 to 40
creating with PGP Key Wizard,26
description of,36
examining,26
generating,36
making,36
setting expiration of,38
specifying default,107
splitting,46
viewing your,30
key server
adding a key server,126
deleting keys,60
getting someone’s public key from,65
searching,65, 128
sending your public key to,40, 61 to 62
setting options,124
using to circulate revoke keys,115
key size
Diffie-Hellman portion,37 to 38
DSS portion,37 to 38
setting,37, 45
trade-offs,37, 45
key splitting or "secret sharing"
definition,226
Key Type property,104
keyboard shortcuts,33
keyring
definition,226
keyrings
changing attributes of,100to 104
description of,99
location of,99
overview of,23
searching,128
storing elsewhere,99
viewing attributes of,100 to 104
keys
adding a photo ID,42
backing up,48
checking fingerprints,108
deleting,114
deleting from server,60
disabling,113
distributing,60
enabling,113
examining,26
exporting to files,115
finding,128
generating,36
granting trust for validations,112
locating,128
managing,99
overview of,35
protecting,48, 200
reappearing on server,63
rejoining a split key,56, 88
revoked,47, 116

Index
User’s Guide 241
revoking,115
saving,48
searching for,128
setting size of,37, 45
signing,110
splitting,46
verifying authenticity of,68
L
LDAP (Lightweight Directory Access
Protocol)
definition,226
legitimacy
determining a key’s,68
locating
keys,128
log information
clearing,142
saving,142
logging off
effect on SAs,135
of PGPnet,139
logging on
to PGPnet,139
LZS compression
and PGPnet,166
M
making
key pairs,36
managing
keys,99
man-in-the-middle attack,68
MD5 hash
and PGPnet,166
menu bar
icon description,27
message digest
definition,227
description,194
meta-introducer,70
definition,227
MIC (Message Integrity Check)
definition,227
Microsoft Outlook Express,20
MIME (Multipurpose Internet Mail
Extensions)
definition,227
MIME standard
using to decrypt email,80 to 81
using to encrypt email,71 to 76
modem adapter,145
modes
expert,157
transport,133
tunnel,133
modifying
a host,155
a secure gateway,155
a subnet,155
N
Net Tools PKI Server,49
network adapter,145
network adapters,135
Network Associates
contacting
Customer Care,12
network card
securing,173 to 174

Index
242 PGP Freeware
setting for PGPnet,173
Network control panel settings,135
network interface card
changing your,173
new features in PGP,12
NIC,173
non-repudiation
definition,227
NSA,190
O
obtaining
others’ public keys,64 to 68
one-way hash
definition,227
online help
getting,30
opening
PGPkeys window,30
options,127
advanced,127
CA,127
encryption,117
HotKey,122
key generation,118
key server,124
setting,116
overviews
key concepts,35
keyrings,23
private keys,23
P
passphrase
definition,227
passphrases
caching between logins,162
Change Passphrase,104
changing,51
compromised,206
forgotten,47, 116
setting,38
suggestions for,39, 71
password
definition,227
peer-to-peer communication
transport mode,133
PGPsetting preferences,30
symmetric algorithms,191
troubleshooting,177
using from PGPtools window,31
using from the Clipboard,30
using from the Finder,29
using from the System tray,30
using with supported email
applications,32
vulnerabilities,206
PGP algorithms
CAST,191
IDEA,191
Triple-DES,191
PGP CommandLine,20
PGP compression,193
PGP Eudora,19
PGP Free Space Wiper
using,94
PGP Freeware
compatibility,16
platforms supported,15

Index
User’s Guide 243
system requirements,15
upgrading from a previous version,16
upgrading from Network,16
upgrading from ViaCrypt,16
versions of Freeware, compatible,16
PGP Key Wizard
creating key pairs,26
using to create key pairs,36
PGP keys
using to authenticate a connection,164
using to establish an SA,145
PGP menu
decrypting files,87
using Secure Wipe,93
PGP Microsoft Exchange/Outlook,20
PGP/MIME
definition,227
PGP/MIME standard
overview,33
using to decrypt email,80 to 81
using to encrypt email,71 to 76
PGPkeys window
creating key pairs with,36 to 40
Creation label,102
examining keys’ properties,103
Change Passphrase,104
Enabled,104
Expire,104, 106
Fingerprint,104
hexidecimal,104
Key ID,104 to 105
Key Type,104
Trust Model,104
icons in,27
opening,30
Size label,101
Trust label,102
uses,99
Validity label,101
PGPmenu
using,85, 87
using Free Space Wipe,94
PGPnet,129
adding
a host, subnet, or gateway,148
Allowed Remote Proposals,166
description,132
exiting,140
features of,131
how to set up,134
installing,19
logging off of,139
logging on to,139
modes,133
setting an adapter for,173
setting proposals,169
starting,135, 140
stopping,139
turning off,139
turning on,140
using,140
using PGP keys with,145
using shared secret with,147
using to protect data,130
using X.509 certificates with,146
viewing the Hosts Panel,144
viewing the Log Panel,142
viewing the Status Panel,141
What’s New in PGP,12
X.509,51

Index
244 PGP Freeware
PGPnet keyring files
using to authenticate a connection,164
PGPnet window
Advanced Panel,166
description,135
features of,137
File menu,137
Help menu,137
Hosts panel,137
Log panel,137
Status panel,137, 141
View menu,137
PGPtools window
using PGP from,31
PGPtray
starting,29
using,85, 87
Phil Zimmermann,187
photo ID
adding to a key,42
PKCS (Public Key Crypto Standards)
definition,227
Pkcs-12,115
PKI (Public Key Infrastructure)
definition,228
PKZIP compression,193
plaintext
definition,228
plug-ins
using PGP with,71
plugins
Eudora,19
Microsoft Outlook Express,20
PGP Microsoft Exchange/Outlook,20
preferences
Advanced,127
Certificate Authority (CA)
Email,120
File,119
General,117
Server,124
setting,30
Preferred Algorithm,127
primary keys (IKE),163
Privacy Enhanced Mail,199
private and public key pairs
creating,23
creating with PGP Key Wizard,26
viewing your,30
private key
definition,228
private keyring
definition,228
private keys
compromised,206
creating,23
key pairs,23
creating with PGP Key Wizard,26
importing Pkcs-12 X.509,115
location of,99
overview,23
protecting,48
protecting against,200
storing,48
viewing your,30
proposals
setting,169
protecting
against bogus timestamps,210
your keys,48

Index
User’s Guide 245
public key
definition,228
public key tampering,206
public keyring
definition,228
public keys
advantages of sending to key server,61
certifying,24, 196
consequences of sending to key
server,40
copying from email messages,67
creating,23
key pairs,23
creating with PGP Key Wizard,26
distributing your,60
exchanging with other users,23
exporting to files,64
getting from a key server,65
giving to other users,23
importing from files,68
including in an email message,63
location of,99
obtaining others’,64 to 68
protecting,48
protecting against tampering,195
searching key server,65
sending to key server,40, 61 to 62
signing,110, 196
storing,48
trading with other users,23
validating,24
viewing your,30
public-key cryptography
definition,228
Q
quitting
PGPnet,139 to 140
R
random number
definition,228
random numbers
their use as session keys,193
random seed file,194
rebooting
effect on SAs,134
receiving
private email,71
recipient groups
combining groups,79
creating,78
deleting,78
deleting a group,78
recipients
groups of,77
selecting,33
rejoining a split key,56, 88 to 89
Remote Access WAN Wrapper,145
remote authentication,158
removing
an IKE or IPSEC proposal,172
gateways,155
hosts,155
key from server,60
SAs,142
subnets,155
removing files
using Secure Wipe,93
reordering

Index
246 PGP Freeware
IKE or IPSEC proposals,172
Require secure communications with all
hosts,160
requiring
secure communications with
unconfigured hosts,160
residual data,207
restoring
default settings for PGPnet,173
revocation
definition,228
revoking
keys,115
RFC (Request for Comment)
definition,228
Root CA,48
RSAdefinition,229
RSA technology
keys
creating,37
running
PGP,29 to 30
S
S/MIME (Secure Multipurpose Mail
Extension)
definition,229
SA description,133
effect of logoff on,135
effect of rebooting on,134
establishing
with PGP keys,145
with shared secret,147
with X.509 certificates,146
establishing an,145
establishing with a host,145
expiring,133
initiating,133
removing SAs,142
saving active SAs,142
terminating with a host,145
viewing active SAs,141
viewing expired SAs,141
saving
active SAs,142
keys,48
log information,142
scheduling,96
scheduling Free Space Wiper,96
using Free Space Wipe,96
searching
for keys,128
searching key server,65
secret sharing
definition,229
secure channel
definition,229
secure gateway
definition,132
secure hosts
adding,149
communicating with,133 to 134
definition,132
secure subnet
definition,132
Secure Viewer
email encryption option,72
with previous versions,74, 76

Index
User’s Guide 247
Secure Wipe
using,93
securing
a network card,173 to 174
Security Association
definition,131
how an SA is created,132
See also SA
security breach
description,210
selecting
email recipients,33
self decrypting archive,74, 76, 85 to 86
self-decrypting archive
What’s New in PGP,12
self-signed key
definition,229
sending
private email,71
servers
options,124
set as root,125
synchronizing,125
session key
definition,229
set adapter function,173
setting
key expiration values,162
options,116
passphrase for a key,38
setting up
PGPnet,134
setup.exe, installing PGP Desktop
Security,18
SHA-1 hash
and PGPnet,166
shared secret
using to establish an SA,147
shortcuts,33
shortcuts, HotKeys,122
Show Events,142
signdefinition,229
signature
definition,229
signing
deleting signatures,114
email,24, 71 to 76
keys,110
public keys,69, 110, 196
using Eudora,71
with split keys,88
signing keys
meta-introducer,70
trusted introducer,70
snake oil,201
splitting, keys,46
SSL (Secure Socket Layer)
definition,230
starting
Expert mode,157
PGPnet,135, 140
PGPtray,29
stopping
PGPnet,139
storing
keys,48
Subkey,105
subkey
creating new,44

Index
248 PGP Freeware
definition,230
expiration,105
properties,105
remove,105
revoke,105
size,105
validity,105
subnets
adding,151
gateways
adding,148
modifying
gateways
modifying,155
removing,155
symmetric algorithm
definition,230
system requirements
for Freeware,15
System tray
using PGP from,30
T
tampering
protecting your keys against,48, 195
tasks
scheduled freespace wiping,96
TCP/IP configurations,145
TEMPEST attacks,210
see also Secure Viewer
terminating
an SA,134
textdefinition,230
text output,84, 86
timestamping
definition,230
TLS (Transport Layer Security)
definition,230
TLSP (Transport Layer Security Protocol)
definition,230
traffic analysis
as an attack,212
transport mode
description,133
Triple DES
definition,230
Triple-DES algorithm,127, 191 to 192
key size,191
trojan horses,208
troubleshooting PGP,177
trust,195
granting for key validations,112
Trust Model property,104
trusted
definition,230
trusted introducer,70
definition,230
trusted introducers
description,196, 199
tunnel mode
description,133
turning on
Expert mode,157
U
user ID
checking a public key’s,196
definition,231
using

Index
User’s Guide 249
PGP
from the Clipboard,30
from the Finder,29
from the System tray,30
PGPnet,140
using Free Space Wipe,94
V
validating
keys
granting trust for,112
public keys,24, 69
validating keys
meta-introducer,70
trusted introducers,70
validity,195
checking a key’s,68
definition,231
validity level
invalid,128
marginal,128
verification
definition,231
verifying
authenticity of a key,68
email,25, 79 to 81
ViaCrypt
upgrading from,16
viewing
active SAs,141
attributes of keyrings,100 to 104
expired SAs,141
key attributes,26
PGPnet Hosts Panel,144
PGPnet Log Panel,142
PGPnet Status Panel,141
private and public key pairs,30
Virtual Private Networks (VPNs),19
definition,129
See also VPNs
virus
as attacker,208
VPN (Virtual Private Network)
definition,231
VPNs
description,129
how VPNs work,130
tunneling protocol,130
using to protect data,130
vulnerabilities,206
W
web of trust
definition,231
Windows Explorer
using PGP with,31
wiping
disks,94
files,93
using Free Space Wipe,94
wiping disks,96
word wrap,122
worm
as attacker,208
X
X.509,115
X.509 certificates
adding
root CA certificates,48

