PHP & MySQL: The Missing Manual, Second Edition My SQL (The Manual 2nd Edition) Brett Mc Laughin O'Reilly
User Manual:
Open the PDF directly: View PDF ![]() .
.
Page Count: 548 [warning: Documents this large are best viewed by clicking the View PDF Link!]
- The Missing Credits
- Introduction
- Part One: PHP and MySQL Basics
- Part Two: Dynamic Web Pages
- Part Three: From Web Pages to Web Applications
- Part Four: Security and the Real World
- Part Five: Appendixes
- Index

PHP & MySQL
Second Edition
Brett McLaughlin
Beijing | Cambridge | Farnham | Köln | Sebastopol | Tokyo
The book that should have been in the box®
PHP & MySQL: The Missing Manual, Second Edition
by Brett McLaughlin
Copyright © 2013 Brett McLaughlin. All rights reserved.
Printed in the United States of America.
Published by O’Reilly Media, Inc.,
1005 Gravenstein Highway North, Sebastopol, CA 95472.
O’Reilly books may be purchased for educational, business, or sales promotional use.
Online editions are also available for most titles (
http://my.safaribooksonline.com
).
For more information, contact our corporate/institutional sales department: (800)
998-9938 or
corporate@oreilly.com
.
November 2011: First Edition.
November 2012: Second Edition.
Revision History for the Second Edition:
2012-11-5 First release
See
http://oreilly.com/catalog/errata.csp?isbn=0636920024927
for release details.
The Missing Manual is a registered trademark of O’Reilly Media, Inc. The Missing
Manual logo, and “The book that should have been in the box” are trademarks of
O’Reilly Media, Inc. Many of the designations used by manufacturers and sellers to
distinguish their products are claimed as trademarks. Where those designations
appear in this book, and O’Reilly Media is aware of a trademark claim, the
designations are capitalized.
While every precaution has been taken in the preparation of this book, the publisher
assumes no responsibility for errors or omissions, or for damages resulting from the
use of the information contained in it.
[LSI]
ISBN: 978-1-449-32557-2

III
Contents
The Missing Credits ....................................... vii
Introduction ................................................ 1
Part One: PHP and MySQL Basics
CHAPTER 1:
PHP: What, Why, and Where? ..............................15
PHP Comes in Two Flavors: Local and Remote. . . . . . . . . . . . . . . . . . . . . . . . . 15
PHP: Going Local ..................................................21
Write Your First Program ...........................................38
Run Your First Program ............................................ 40
But Where’s That Web Server? ......................................42
CHAPTER2:
PHP Meets HTML .......................................... 45
Script or HTML? ....................................................46
PHP Talks Back ....................................................51
Run PHP Scripts Remotely ..........................................54
CHAPTER 3:
PHP Syntax: Weird and Wonderful ........................ 61
Get Information from a Web Form ...................................62
Working with Text in PHP ...........................................69
The $_REQUEST Variable Is an Array ..................................83
What Do You Do with User Information? ..............................90
CHAPTER 4:
MySQL and SQL: Database and Language................. 91
What Is a Database?. . . . . . . . . . . . . . . . . . . . . . . . . . . . . . . . . . . . . . . . . . . . . . . . 91
Installing MySQL ...................................................95
SQL Is a Language for Talking to Databases ..........................104
Part Two: Dynamic Web Pages
CHAPTER 5:
Connecting PHP to MySQL ................................119
Writing a Simple PHP Connection Script .............................120
Cleaning Up Your Code with Multiple Files ...........................132
Building a Basic SQL Query Runner .................................138

CONTENTS
IV
CHAPTER 6:
Regular Expressions ..................................... 155
String Matching, Double-Time ......................................156
CHAPTER 7:
Generating Dynamic Web Pages ......................... 173
Revisiting a User’s Information .....................................174
Planning Your Database Tables .....................................175
Saving a User’s Information ........................................182
Show Me the User .................................................190
Revisiting (and Redirecting) the Create User Script .................. 208
Part Three: From Web Pages to Web Applications
CHAPTER 8:
When Things Go Wrong (and They Will) ................. 221
Planning Your Error Pages .........................................223
Finding a Middle Ground for Error Pages with PHP ....................229
Add Debugging to Your Application ................................237
Redirecting On Error ..............................................242
CHAPTER 9:
Handling Images and Complexity ........................ 253
Images Are Just Files ..............................................254
Images Are for Viewing ............................................279
And Now for Something Completely Dierent ........................288
CHAPTER 10:
Binary Objects and Image Loading ......................289
Storing Dierent Objects in Dierent Tables ........................ 290
Inserting a Raw Image into a Table ..................................292
Your Binary Data Isn’t Safe to Insert...Yet ........................... 296
Connecting Users and Images ......................................303
Show Me the Image! ...............................................313
Embedding an Image Is Just Viewing an Image. . . . . . . . . . . . . . . . . . . . . . .324
So, Which Approach Is Best? ...................................... 330
CHAPTER 11:
Listing, Iterating, and Administrating .................... 333
Thinking about What You Need as an Admin .........................334
Listing All Your Users ..............................................337
Deleting a User ...................................................345
Talking Back to Your Users .........................................351
Standardizing on Messaging .......................................362
Integrating Utilities, Views, and Messages ...........................369

CONTENTS V
Part Four: Security and the Real World
CHAPTER 12:
Authentication and Authorization ....................... 385
Basic Authentication ..............................................386
Abstracting What’s the Same ......................................395
Passwords Don’t Belong in PHP Scripts ..............................399
Passwords Create Security, But Should Be Secure ....................413
CHAPTER 13:
Cookies, Sign-Ins, and Ditching Crummy Pop-Ups ....... 419
Moving Beyond Basic Authentication ............................... 420
Logging In with Cookies ...........................................426
Adding Context-Specific Menus ................................... 443
CHAPTER 14:
Authorization and Sessions ..............................455
Modeling Groups in Your Database ..................................455
Checking for Group Membership ...................................461
Group-Specific Menus .............................................471
Entering Browser Sessions .........................................475
Memory Lane: Remember That Phishing Problem? ................... 486
Why Would You Ever Use Cookies? ................................ 489
Part Five: Appendixes
APPENDIX A:
Installing PHP on Windows Without WAMP .............. 493
APPENDIX B:
Installing MySQL Without MAMP or WAMP ..............499
Index..................................................... 513

VII
The Missing Credits
ABOUT THE AUTHOR
Brett McLaughlin is a senior-level technologist and strategist,
active especially in web programming and data-driven, custom-
er-facing systems. Rarely focused on only one component of a
system, he architects, designs, manages, and implements large-
scale applications from start to finish with mission-critical imple-
mentations and deadlines.
Of course, that’s all fancy-talk for saying that Brett’s a geek,
spending most of his day in front of a computer with his hands
flying across a keyboard. Currently, he spends most of his time
working on NASA projects, which sounds much cooler than it actually is. But hey,
maybe that satellite overhead really is controlled by PHP and MySQL...
ABOUT THE CREATIVE TEAM
Nan Barber (editor) has been working on the Missing Manual series since its incep-
tion. She lives in Boston with her husband and various electronic devices. Email:
nanbarber@oreilly.com
.
Holly Bauer (production editor) lives in Ye Olde Cambridge, Massachusetts, where
she is an avid home cook, prolific DIYer, and mid-century modern furniture design
enthusiast. Email:
holly@oreilly.com
.
Bob Russell (copyeditor) is a documentation specialist and President of Octal Pub-
lishing, Inc., in Salem, New Hampshire (
www.octalpub.com
). Email:
bob.russell@
octalpub.com
.
Bob Pfahler (indexer) is a freelance indexer. For the past five years, he has indexed
many computer books as well as biographies, history, and business books. When
he is not working, he likes to take bike rides in the foothills outside of Denver. He in-
dexed this book as an associate for Potomac Indexing (
www.potomacindexing.com
).
Roger House (technical reviewer) is a freelance software developer living in northern
California. He has written code in many languages for various kinds of applications.
He enjoys algorithm design, use of data structures, and applications of mathematics.
Web:
www.rogerfhouse.com
. Email:
rhouse@sonic.net
.
Steve Suehring (technical reviewer) is a technical architect with an extensive back-
ground finding simple solutions to complex problems. Steve plays several musical
instruments (not at the same time) and can be reached through his website
www
. braingia.org
.

THE MISSING CREDITS
VIII
ACKNOWLEDGMENTS
Acknowledgments are nearly impossible to do well. Before you can thank anyone
of substance, the music swells and they’re shuing you o stage. Seriously, apart
from the writing, there’s my wife, Leigh, and my kids, Dean, Robbie, and Addie.
Any energy or joy or relaxation that happens during the long writing process filters
through those four, and there are never enough royalties to cover the time lost with
them. I suppose it’s a reflection of their love and support for me that they’re OK
with me writing anyway.
There’s certainly the writing. Brian Sawyer was the first guy to call me when I became
available to write, and he called when I was really in need of just what he gave me:
excitement about me writing and encouragement that I could write for the Missing
Manual series. I won’t forget that call anytime soon. And, there’s Nan Barber, who
IM’ed and emailed me throughout the entire process. She showed a really unhealthy
level of trust that wasn’t earned, and I’m quite thankful...especially in the dark days of
early August, when I had hundreds of pages left to write, in just a few short weeks.
Roger House and Steve Suehring, my technical reviewers, were both picky and
gentle. That’s about all you can ask. And Steve filled out my PHP holes. He caught
one particularly nasty issue that I think vastly improved the book. You don’t realize
this, but you owe him a real debt of thanks if this book helps you.
—
Brett McLaughlin
THE MISSING MANUAL SERIES
Missing Manuals are witty, superbly written guides to computer products that don’t
come with printed manuals (which is just about all of them). Each book features a
handcrafted index and cross-references to specific pages (not just chapters).
Recent and upcoming titles include:
Access 2010: The Missing Manual
by Matthew MacDonald
Adobe Edge Animate: The Missing Manual
by Chris Grover
Buying a Home: The Missing Manual
by Nancy Conner
CSS3: The Missing Manual, Third Edition,
by David Sawyer McFarland
Creating a Website: The Missing Manual, Third Edition,
by Matthew MacDonald
David Pogue’s Digital Photography: The Missing Manual
by David Pogue
Dreamweaver CS5.5: The Missing Manual
by David Sawyer McFarland
Droid 2: The Missing Manual
by Preston Gralla
Droid X2: The Missing Manual
by Preston Gralla
Excel 2010: The Missing Manual
by Matthew MacDonald
Facebook: The Missing Manual, Third Edition
by E.A. Vander Veer

THE MISSING CREDITS IX
FileMaker Pro 12: The Missing Manual
by Susan Prosser and Stuart Gripman
Flash CS5.5: The Missing Manual
by Chris Grover
Galaxy S II: The Missing Manual
by Preston Gralla
Galaxy Tab: The Missing Manual
by Preston Gralla
Google Apps: The Missing Manual
by Nancy Conner
Google SketchUp: The Missing Manual
by Chris Grover
HTML5: The Missing Manual
by Matthew MacDonald
iMovie ’11 & iDVD: The Missing Manual
by David Pogue and Aaron Miller
iPad: The Missing Manual,
Fifth Edition
by J.D. Biersdorfer
iPhone: The Missing Manual, Sixth Edition
by David Pogue
iPhone App Development: The Missing Manual
by Craig Hockenberry
iPhoto ’11: The Missing Manual
by David Pogue and Lesa Snider
iPod: The Missing Manual, Eleventh Edition
by J.D. Biersdorfer and David Pogue
JavaScript & jQuery: The Missing Manual
by David Sawyer McFarland
Kindle Fire: The Missing Manual, Second Edition
by Peter Meyers
Living Green: The Missing Manual
by Nancy Conner
Mac OS X Snow Leopard: The Missing Manual
by David Pogue
Mac OS X Lion: The Missing Manual
by David Pogue
Microsoft Project 2010: The Missing Manual
by Bonnie Biafore
Motorola Xoom: The Missing Manual
by Preston Gralla
Netbooks: The Missing Manual
by J.D. Biersdorfer
NOOK Tablet: The Missing Manual
by Preston Gralla
Oce 2010: The Missing Manual
by Nancy Connor, Chris Grover, and Matthew
MacDonald
Oce 2011 for Macintosh: The Missing Manual by Chris Grover
Palm Pre: The Missing Manual by Ed Baig
Personal Investing: The Missing Manual
by Bonnie Biafore
Photoshop CS6: The Missing Manual
by Lesa Snider
Photoshop Elements 11: The Missing Manual
by Barbara Brundage
PowerPoint 2007: The Missing Manual
by E.A. Vander Veer
Premiere Elements 8: The Missing Manual
by Chris Grover

THE MISSING CREDITS
X
QuickBase: The Missing Manual
by Nancy Conner
QuickBooks 2013: The Missing Manual
by Bonnie Biafore
Quicken 2009: The Missing Manual
by Bonnie Biafore
Switching to the Mac: The Missing Manual, Snow Leopard Edition
by David Pogue
Switching to the Mac: The Missing Manual, Lion Edition
by David Pogue
Wikipedia: The Missing Manual
by John Broughton
Windows Vista: The Missing Manual
by David Pogue
Windows 7: The Missing Manual
by David Pogue
Windows 8: The Missing Manual
by David Pogue
Word 2007: The Missing Manual
by Chris Grover
WordPress: The Missing Manual
by Matthew MacDonald
Your Body: The Missing Manual
by Matthew MacDonald
Your Brain: The Missing Manual
by Matthew MacDonald
Your Money: The Missing Manual
by J.D. Roth

1
Given that you’re reading this book, the chances are good that you’ve built a
web page in HTML. You’ve styled it by using Cascading Style Sheets (CSS)
and maybe written a little JavaScript to validate your custom-built web
forms. If that wasn’t enough, you’ve learned a lot more JavaScript, threw in some
jQuery, and constructed a whole lot of web pages. Maybe you’ve even moved your
JavaScript into external files, shared your CSS across your entire site, and validated
your HTML with the latest standards.
But now you want more.
Perhaps you’ve become frustrated with your website’s inability to store user informa-
tion in anything beyond cookies. Maybe you want a full-blown online store, complete
with PayPal integration and details about what items are in stock. Or maybe you’ve
simply caught the programming bug and want to go beyond what HTML, CSS, and
JavaScript can easily give you.
If any of these are the case—and you may find that
all
of these are the case—learn-
ing PHP and MySQL is a great way to take a giant programming step forward. Even
if you’ve never heard of PHP, you’ll find it’s the best way to go from building web
pages to creating full-fledged web applications that store all sorts of information in
databases. This book shows you how to do just that.
Introduction

PHP & MYSQL: THE MISSING MANUAL
2
WHAT PHP AND
MYSQL CAN DO
What PHP and MySQL Can Do
PHP can handle payment processing on its own, and it can connect with services
like PayPal and Google Checkout. PHP can store and load images from a database
or a file system and give you the ability to log users in and out as well as control
what they see throughout your application.
Add in MySQL, and you can store your users’ names, addresses, billing data, and even
their preferences regarding the color of their own personal landing page. MySQL
can store just a few bits of data, a few thousand lines of data, or every page access
by every user who ever logs into your application.
And, of course, PHP can easily connect to MySQL. PHP can do everything from
grabbing a user name based on a user ID to storing the details about financial
transactions to actually creating tables and updating their structures, and MySQL
can back-end all that work and store that data. Ultimately, this is the stu of web
applications; it’s what a web application
is
.
Obviously, web applications like this aren’t simple. They have a lot of complexity, and
that complexity has to be managed and ultimately tamed into a usable, sensible web
application that you can maintain and your users can enjoy. That’s what this book is
about: building web applications, and doing it with an understanding of what you’re
doing, and why you’re doing it.
What Is PHP?
PHP started out as a set of tools for doing simple web-related tasks. It appeared
on the Web scene way back in 1994. Initially, PHP did nothing more than just track
visits to a particular web page (the online resume of Rasmus Lerdorf—the inventor
of PHP). It was then expanded to interact with databases, as well as provide a tool
set for online guest books and HTML form processing. The next thing you know, it
was hugely popular as an alternative to less web-friendly languages like C.
New versions of PHP started coming out, and an increasing number of web pro-
grammers adopted it as their scripting language of choice for web tasks. PHP 3, 4,
and now 5 are now mainstays on the Web. PHP has become fast while remaining
lightweight. And, of course, its ability to easily interact with databases such as MySQL
remains one of its most attractive features.
What Is PHP Like?
PHP is a programming language. It’s like JavaScript in that you spend most of your
time dealing with values and making decisions about which path through your
code should be followed at any given time. But it’s like HTML in that you deal with
output—tags that your users view through the lens of their web browsers. In fact,
PHP in the context of web programming is a bit of a mutt; it does lots of things
pretty well, rather than just doing one single thing. (And, if you’ve ever wondered
why
it’s called PHP, see the box on the following page.)
INTRODUCTION 3
WHAT IS PHP?
FREQUENTLY ASKED QUESTION
Personal Home Page, Indeed
What does PHP stand for?
PHP is an acronym. Originally, it stood for
Personal Home Page
Construction Kit
, because lots of programmers used it to build
their websites, going much further than what was possible with
HTML, CSS, and JavaScript. But in the last few years, “personal
home page” tends to sound more like something that happens
on one of those really cheap hosting sites, rather than a high-
powered programming language.
So now, PHP stands for
PHP: Hypertext Preprocessor
. If that
sounds geeky, it is. In fact, it’s a bit of a programmer joke: PHP
stands for something that actually contains PHP within itself.
That makes it a
recursive
acronym, meaning that it references
itself. You don’t have to know what a recursive acronym is;
that won’t be on the quiz. Just be warned that PHP’s recursive
acronym won’t be the last weird and slightly funny thing you’ll
run across in the PHP language.
PHP Is All About the Web
If you came here for web programming, you’re in the right place. Although you can
write PHP programs that run from a command line (check out Figure I-1 for an ex-
ample), that’s not really where it excels. The PHP programs you write run within your
website, part and parcel with your HTML forms, web sessions, and browser cookies.
For example, PHP is great at integrating with your website’s existing authentication
system, or letting you create one of your own.
FIGURE I-1
Sure, you can run PHP programs from a Terminal
window or a command shell in Windows. But most
of the time, you won’t. PHP is perfectly suited to the
Web, and that’s where you’ll spend most of your time.
You’ll spend a lot of time not just handing o control to an HTML page, but actually
writing the HTML you’re already familiar with right into your PHP scripts. Lots of
times, you’ll actually write some PHP and then write some HTML, all in the same
PHP file, as in the following example:
<?php
require '../../scripts/database_connection.php';
// Get the user ID of the user to show
$user_id = $_REQUEST['user_id'];
// Build the SELECT statement
$select_query = "SELECT * FROM users WHERE user_id = " . $user_id;
PHP & MYSQL: THE MISSING MANUAL
4
WHAT IS PHP?
// Run the query
$result = mysql_query($select_query);
// Assign values to variables
?>
<html>
<head>
<link href="../css/phpMM.css" rel="stylesheet" type="text/css" />
</head>
<body>
<div id="header"><h1>PHP & MySQL: The Missing Manual</h1></div>
<div id="example">User Profile</div>
<div id="content">
<div class="user_profile">
<h1><?php echo "{$first_name} {$last_name}"; ?></h1>
<p><img src="show_image.php?image_id=<?php echo $image_id; ?>"
class="user_pic" />
<?php echo $bio; ?></p>
<p class="contact_info">Get in touch with <?php echo $first_name; ?>:</
p>
<ul>
<!-- And so on... lots more HTML here. -->
</html>
This script references another script,
database_connection.php,
and then extracts
a user’s ID from the request parameters sent by a web browser. The script uses that
ID to search a database for the rest of the user’s information. Then, it builds the data
into a web page that’s created on the fly.
The result? Pages that are both full of HTML and have dynamic content, like Figure I-2.
FIGURE I-2
This page is as much PHP as HTML. It looks up your visitor’s
name in the database and displays it dynamically. The menu
creates a Show Profile option specific to this user. But there’s
still lots and lots of HTML. This is PHP at its best: combining
the HTML (and even JavaScript) that you know with the PHP
you’re about to learn.

INTRODUCTION 5
WHAT IS PHP?
JavaScript Is Loose, PHP Is…Less So
If you’ve written some JavaScript—and if you’re checking out this book, that’s prob-
ably the case—you know that JavaScript lets you get away with just about anything.
You can occasionally leave out semicolons; you can use brackets, or not; you can use
the
var
keyword, or not. That sort of looseness is great for getting things working
quickly, but at the same time, it’s frustrating. It makes finding bugs tricky at times,
and working across browsers can be a nightmare.
PHP is not quite as loose as JavaScript, so it makes you learn a little more structure
and tighten up your understanding of what’s going on as your program is constructed
and then run. That’s a good thing, because it will end up making you tighten up your
JavaScript skills, too. And, perhaps best of all, PHP’s stodgy consistency makes it
easier to learn. It gives you firm rules to hang on to, rather than lots of “You can do
this…or this…or this…”
So get ready. There is a lot to learn, but everything you learn gives you something
on which to build. And PHP, lets you know right away when there’s a problem. You
won’t need to pop open an error console or keep an eye out for the tiny yellow
warning triangle in Internet Explorer as you do with JavaScript. More often, you’ll
get a nasty error that stops you in your tracks and screams, “Fix me!” And, over
the next couple of hundred pages, you’ll be able to do just that: fix the problems
you’ll run across in typical PHP programs, whether you’ve written those programs
or someone else has.
PHP Is Interpreted
PHP code comes in the form of
scripts
, which are plain-text files that you create and
fill with code. Whereas HTML uses lots of angle brackets and keywords like html,
head, and ul, PHP uses lots of dollar signs ($) and keywords like mysql_query and
echo. So, HTML and PHP don’t look at all alike. But where they are alike is in the
basic underlying format: they’re both just text. You can open up an HTML document
not just in a web browser, but in Notepad or an integrated development environ-
ment (IDE) like Eclipse or even a command-line editor like vi or emacs. The same
is true for PHP: it’s just text. So, get ready; throughout this book, you’ll be typing
words—albeit strange ones, with lots of underscores—and saving those words into
text files called scripts.
Once you’ve got a script, you let a PHP program interpret that script. The PHP
inter-
preter
is a piece of software on your web server that reads your script and makes
sense of it, giving the web server output and directions about where to go next or
how to handle a user’s form field entries. Your script—remember, just a text file—is
interpreted, one line at a time, every time it is accessed.
This is a bit dierent from languages like Java or C++, which are
compiled
. In those
languages, you also write your code in text files, but then run a command that turns
those text files into something else: class files, binary files, pieces of unreadable
code that your computer uses.

PHP & MYSQL: THE MISSING MANUAL
6
WHAT IS PHP?
The beauty of an interpreted language like PHP—and JavaScript, for that matter—is
that you write your code and go. You don’t need a bunch of tools or subsequent
steps. You write PHP, test it out in the browser, and then write some more. It’s fast,
and that usually means it’s pretty fun.
PHP Doesn’t Run in the Browser
There’s one other big dierence between PHP and what you may be used to with
HTML, CSS, and JavaScript. It’s a big dierence, too; in fact, this dierence is such
a big deal that it’s going to aect everything you do when it comes to writing PHP
scripts, getting those PHP scripts to run, and checking them out in a web browser.
So what’s the dierence? It’s this: PHP, unlike HTML or CSS or JavaScript, doesn’t
run entirely in a browser.
What does that mean? Chapter 1 begins to get into the details, but for now, you
just need to know that HTML, JavaScript, and CSS are entirely handled by your web
browser software. Whether you use Internet Explorer, Apple Safari, Google Chrome,
Mozilla Firefox, or Opera, once you have a browser, you have everything you need.
That’s why you can write an HTML document, save it with an extension like .html,
double-click that file, and voilà: your browser opens (assuming you’ve got things set
up on your computer the right way) and you’re looking at HTML. You can reference
CSS in that HTML file as well as JavaScript, and the same thing happens. Write code,
save, and open. Pretty easy stu.
With PHP, you’ll need a bit more than that. The PHP interpreter interacts with your
browser but doesn’t run in the browser automatically. In other words, you cannot
simply double-click a PHP script and expect a browser to pop up and handle things.
HTML forms that submit to a PHP script won’t “just work” the way that HTML and
JavaScript do.
Right now, then, you just need to know two things:
• It’s going to take a little more work to get your PHP programs working. You
can’t just write and save a script and then open it the way you can HTML.
Don’t worry; you’ll learn exactly how to get PHP working both locally—on your
computer—and remotely—on a web hosting company’s servers. But it’s going
to take a little more eort.
• It’s not trivial to set up everything you need to run PHP programs on your own
computer—especially once you involve MySQL, too (more on this in just a mo-
ment). That’s why Internet Service Providers (ISPs) and web hosting companies
exist! They take care of that sort of thing. So, although it’s possible to do all
your PHP coding on your own machine, it’s a lot more common to write your
scripts and then send them to a remote web server. Sound scary? It’s not…but
it’s important. You’ll spend a good bit of time in this book writing code and
uploading it to a server.

INTRODUCTION 7
ABOUT THIS
BOOK
PHP is dierent from JavaScript and HTML in some important ways. You’ll get used
to those dierences, but you’ll be a lot less frustrated and confused if you go in
knowing that you’ll have to do some things dierently when it comes to PHP.
What Is MySQL?
MySQL is a database. It stores your information, your users’ information, and anything
else you want to stu into it. But, beyond its ability to store information, MySQL is
popular. In fact, it’s the most popular open-source database system in the world. It
has literally millions of users working with it, finding and reporting problems, and
testing its limits. And, it has thousands of developers that at some point have helped
improved its code base.
MySQL is essentially a warehouse in which you can store things to be looked up
later. Not only that, MySQL provides you with a really fast mechanism to find all that
stu you stuck in the warehouse whenever it’s needed. By the time you’re through
this book, you’ll love MySQL. It will do work that you could never do on your own,
and it will do that work tirelessly and quickly.
It’s also the perfect companion to PHP. It’s easy to install on any system; it doesn’t
take up huge resources like larger commercial oerings such as Oracle’s or IBM’s
products; and its easy to connect to. In fact, you’ll find that PHP and MySQL are
perfectly matched, with a ton of easy-to-use functions that let PHP scripts to do
just about anything you can imagine with a MySQL database.
NOTE There’s actually a lot more nuance to MySQL—and SQL, the language in which you’ll interact with
MySQL—but it’s better to save that for Chapter 4, when you’ve got a little PHP under your belt.
About This Book
PHP is a web-based language, not a program that comes in a box. Tens of thousands
(maybe even hundreds of thousands) of websites have bits of PHP tutorial or instruc-
tion on them. That’s great, right? Well, not so much. Those websites aren’t all current.
Some are full of bugs. Some have more information in the comment trails—scattered
amongst gripes, complaints, and lambasting from other programmers—as they do
in the main page. It’s no easy matter to find what you’re looking for.
The purpose of this book, therefore, is to serve as the manual that should have been
included when you download PHP. It’s the missing PDF, if you will (or maybe the
missing eBook, if you’re a Kindle or Nook or iPad person). In this book’s pages, you’ll
find step-by-step instructions for getting PHP running, writing your first program…
and your second program…and eventually building a web application from scratch.
In addition, you’ll find clear evaluations of the absolutely critical parts of PHP that
you’ll use every day, whether you’re building a personal blog or a corporate intranet.

PHP & MYSQL: THE MISSING MANUAL
8
ABOUT THIS
BOOK
NOTE This book periodically recommends
other
books, covering topics that are too specialized or tangential
for a manual about PHP and MySQL. Careful readers may notice that not every one of these titles is published
by Missing Manual parent company O’Reilly Media. If there’s a great book out there that doesn’t happen to be
published by O’Reilly, this book will still let you know about it.
PHP & MySQL: The Missing Manual
is designed to accommodate readers at every
technical level. The primary discussions are written for advanced-beginner or inter-
mediate web authors and programmers. Hopefully, you’re comfortable with HTML
and CSS, and maybe even know a bit of JavaScript. But, if you’re new to all this
Web stu, take heart: special boxes called “Up to Speed” provide the introductory
information you need to understand the topic at hand. If you’re an advanced user,
on the other hand, keep your eye out for similar boxes called “Power Users’ Clinic.”
They oer more technical tips, tricks, and shortcuts for the experienced computer fan.
Macintosh and Windows
PHP and MySQL work almost precisely the same in their Macintosh and Windows
versions. Even more important, you’ll do most of your work by uploading your
scripts and running your database code against a web server. That means that your
hosting provider has to deal with operating system issues; you get to focus on your
code and information.
In the first few chapters, you get your system set up to write code and deal with
PHP scripts. Thereafter, you will soon forget about whether you’re on a Macintosh
or using a Windows-based computer. You’ll just be writing code, the same way you
write HTML and CSS. And remember, you’ll soon be uploading your scripts to remote
web servers, so your own computer is only part of the solution.
FTP: It’s Critical
One piece of software that’s absolutely critical is a good FTP client. No matter how
awesome your scripting skills become—and they’re gonna be formidable!—you have
to actually get your scripts to your web hosting server. That’s where FTP comes in:
it’s the means by which a file on your computer gets placed in just the right location
on a remote server.
NOTE From the author: Typing in a command-line editor is actually exactly how I work. But then, I’m a
dinosaur, a throwback to days when you had to watch commercials to see primetime TV, and you’d miss emails
because your pocket didn’t buzz every time your boss whisked you a command through the ether.
Today, for most of you, a good text editor and a good graphical FTP client are much better choices. Seriously, my
addiction owns me, and I so badly want to
:wq!
it.
Chapter 1 points you to several great editors, and the fancier ones will have FTP
built right in. If you don’t opt for an integrated solution, a dedicated FTP program
like Cyberduck (
www.cyberduck.ch
) is great, too. You can write a script, throw it
online, and test it all with a few mouse clicks. So, go ahead and get that FTP program
downloaded, configured for your web hosting service (which might also be called
your ISP), and fired up. You’re gonna need it.

INTRODUCTION 9
ABOUT THE
ONLINE
RESOURCES
About the Outline
PHP & MySQL: The Missing Manual
is divided into five parts, each containing several
chapters:
• Part 1: PHP and MySQL Basics. In the first four chapters, you install PHP, get
it running on your computer, write your first few PHP programs, and learn to
do a few basic things like collect user information via a web form and work
with text. You also install MySQL and become thoroughly acquainted with the
structure of a database.
• Part 2: Dynamic Web Pages. These are the chapters in which you start to build
the basics of a solid web application. You add a table in which you can store
users and their information, and get a grasp of how easily you can manipulate
text. From URLs and emails to Twitter handles, you use regular expressions and
string handling to bend letters, numbers, and slashes to your will.
• Part 3: From Web Pages to Web Applications. With a solid foundation, you’re
ready to connect your web pages into a more cohesive unit. You add custom
error handling so that your users won’t become confused when things go
wrong. You also add your own debugging to help you find problems. You also
learn how to store references to users’ images of themselves, store the images
themselves in a database, and learn which approach is best in which situations.
• Part 4: Security and the Real World. In even the simplest of applications, log-
ging in and logging out is critical. In this section, you build an authentication
system and then deal with passwords (which are important, but a bit of a pain).
You then work with cookies and sessions, and use both to create a group-based
authorization system for your web application.
• Part 5: Appendixes. Although the first several chapters show you how to get
PHP and MySQL onto your own Macintosh or Windows-based computer the
easy way, using the WampServer software package or the Mac’s built-in instal-
lation, the two appendixes in this section show you how to install the software
manually for full control of all the details.
At the Missing Manual website (
www.missingmanuals.com/cds/phpmysqlmm2e
),
you can find every single code example, from every chapter, in the state it is shown
for that chapter.
About the Online Resources
As the owner of a Missing Manual, you’ve got more than just a book to read. Online,
you can find example files so that you can get some hands-on experience, as well
as tips, articles, and maybe even a video or two. You can also communicate with
the Missing Manual team and tell us what you love (or hate) about the book. Head
over to
www .missingmanuals.com
, or go directly to one of the following sections.

PHP & MYSQL: THE MISSING MANUAL
10
ABOUT THE
ONLINE
RESOURCES
Missing CD
This book doesn’t have a CD pasted inside the back cover, but you’re not missing
out on anything. Go to
www.missingmanuals.com/cds/phpmysqlmm2e
to download
code samples, code samples, and also, some code samples. Yup, there are a lot of
them. Every chapter has a section of code for that chapter. And, you don’t just get
completed versions of the book’s scripts: You get a version that matches up with
each chapter, so you’ll never get too confused about exactly how your version of a
script or web page should look.
And so you don’t wear down your fingers typing long web addresses, the Missing
CD page also oers a list of links that you can click to bring you to the websites
mentioned in this book.
Registration
If you register this book at Oreilly.com (
http://oreilly.com
), you’ll be eligible for spe-
cial oers—like discounts on future editions of
PHP & MySQL: The Missing Manual
.
Registering takes only a few clicks. To get started, type
www.oreilly.com/register
into your browser to hop directly to the Registration page.
Feedback
Got questions? Need more information? Fancy yourself a book reviewer? On the
Feedback page, you can get expert answers to questions that come to you while
reading, share your thoughts on this Missing Manual, and find groups for folks who
share your interest in PHP, MySQL, and web applications in general. To have your
say, go to
www.missingmanuals.com/feedback
.
Errata
In an eort to keep this book as up-to-date and accurate as possible, each time we
print more copies, we’ll make any confirmed corrections you’ve suggested. We also
note such changes on the book’s website, so you can mark important corrections
into your own copy of the book, if you like. Go to
http://tinyurl.com/phpmysql2e-mm
to report an error and view existing corrections.

INTRODUCTION 11
SAFARI®
BOOKS ONLINE
Safari® Books Online
Safari® Books Online is an on-demand digital library that lets you
easily search over 24,000 technology and creative reference books
and videos to find the answers you need quickly.
With a subscription, you can read any page and watch any video from the library
online. You can read books on your cell phone and mobile devices; access new titles
before they are available for print; and get exclusive access to manuscripts in devel-
opment and post feedback for the authors. You can copy and paste code samples,
organize your favorites, download chapters, bookmark key sections, create notes,
print out pages, and benefit from tons of other time-saving features.
O’Reilly Media has uploaded this book to the Safari Books Online service. To have
full digital access to this book and others on similar topics from O’Reilly and other
publishers, sign up for free at
http://my.safaribooksonline.com
.


15
CHAPTER
1
PHP is ultimately just text that is taken by your web server and turned into a
set of commands and information for your web browser. And because you’re
just working in text, there’s not a lot you have to do to get going as a PHP
programmer. You need to become familiar with PHP itself, and the best way to do
that is to install PHP on your own computer as well as becoming familiar with how
PHP runs on a remote web server.
Then, you need to run an actual script. Don’t worry; it’s amazingly easy to write your
first program in PHP. Not only that, you’ll run your script, upload it to your web server,
and access your script with a web browser…and that’s all in the first two chapters!
Throughout the process, you’ll begin taking control. With PHP, you become an active
participant in your web pages. PHP lets you listen carefully to your users and say
something back. So get going; there’s no reason to leave your users with passive
HTML pages any longer.
PHP Comes in Two Flavors: Local
and Remote
One of the most dicult things to get a handle on when it comes to PHP programming
doesn’t have much to do with programming at all. It’s figuring out just how PHP runs,
how it interacts with your web browser and web server, and why it’s not possible
to just double-click a PHP file on your hard drive and see the script in that file run.
PHP: What, Why,
and Where?
PHP & MYSQL: THE MISSING MANUAL
16
PHP COMES IN
TWO FLAVORS:
LOCAL AND
REMOTE
HTML and CSS Run Within a Web Browser
First, it’s worth thinking back to when you were a wee programmer, writing your first
HTML page. You could save that page in a file, name that file with a
.html
extension,
and boom—you had a web page. Double-click that file, and on most computers, you
see that page open up in a web browser. That’s because just as a
.doc
file is con-
nected to the Microsoft Word program, a
.html
file is connected to a web browser
(specifically, the browser you’ve chosen as the default on your computer). Figure
1-1 should give you an idea.
Web Browser
HTML
renderer
HTML Files
FIGURE 1-1
Web browsers know all they
need to know in order to load
and display an HTML page. No
extra software or configuration
is necessary.
If you keep thinking back, you probably added some styling to your HTML pages.
Using the style attribute and <style></style> tags in your HTML document, you
could change fonts, add striping to your table rows, and generally spice up other-
wise boring text.
Then, at some point, some well-meaning web designer slapped your hand and
insisted that you start writing all your CSS in external style sheets, and referencing
those files in the head of your HTML, like this:
<link rel="stylesheet" href="styles/mysite.css" type="text/css" />
You might even have a few style sheets for the benefit of people viewing your website
on mobile devices or printing out a page:
<link rel="stylesheet" href="styles/mysite.css" type="text/css" media="all" />
<link rel="stylesheet" href="styles/print.css" type="text/css" media="print"
/>
But you can still double-click that HTML file, and your browser knows what to do (see
Figure 1-2). That’s because, once again, the web browser is completely capable of
not just rendering HTML, but applying all those CSS styles to the page, too. Again,
no extra software needed.
CHAPTER 1: PHP: WHAT, WHY, AND WHERE? 17
PHP COMES IN
TWO FLAVORS:
LOCAL AND
REMOTE
At this point, even though you’re using only two technologies—HTML and CSS—you
need only a single program to handle those technologies: the web browser.
Web Browser
HTML
renderer
HTML Files
CSS
renderer
CSS Files
<head>
</head>
<p></p>
body{
...
}
FIGURE 1-2
As was the case with HTML, web
browsers don’t need any extra help
or plug-ins to turn your textual CSS
descriptions into styles and apply
those styles to your HTML elements.
JavaScript Adds Complexity, but Not Software
Next up in the pantheon of web technologies that every designer and fledgling
programmer needs to learn: JavaScript. Suddenly, you weren’t limited to elements
that never moved and text that never changed. Whether it was simple phone num-
ber validation, more advanced jQuery functions that turned boring gray boxes into
animated buttons and <div> elements into tabs, or even the new HTML5 canvas
object, within which you could build entire JavaScript-based 3D games, your pages
suddenly had new life with JavaScript.
But just as with HTML and CSS, JavaScript is at heart a web technology, and even
more specifically, a
browser-based technology
. In other words, support for JavaScript
is part and parcel of your web browser. In fact, if a new version of JavaScript were to
appear—something that rarely happens these days—you’d need to download a new
version of your
browser
to get that version of JavaScript. Just as you can’t upgrade
your HTML installation outside of your browser, you can’t upgrade your JavaScript
installation outside of your browser.
PHP & MYSQL: THE MISSING MANUAL
18
PHP COMES IN
TWO FLAVORS:
LOCAL AND
REMOTE
UNDER THE HOOD
You Probably Have Multiple Versions of JavaScript Already!
Think about it: if JavaScript is built in to your browser, and
you have more than one browser, you actually have multiple
installations of JavaScript on your computer. Suppose that you
have Internet Explorer and Firefox; you’ve got the JavaScript
installation that came with Internet Explorer
and
the one
that came with Firefox. Add Chrome or Opera to the mix, and
you’ve got a few more installations. And, if you have multiple
versions of a single browser—like Firefox 3.6.3 for testing
with older Linux-based systems and the most current version
(14something-or-other as of late), they each have a different
JavaScript installation.
Even though JavaScript doesn’t get updated very often, those
multiple installations usually translate into multiple versions of
JavaScript, because JavaScript isn’t a product that is distributed
by a central organization to browser developers. Rather, it’s a
specification
: a document that defines how things should work
to be considered as JavaScript. That means that each browser
has to write code that matches that specification so that they
can say, “Yes, you can run JavaScript in our browser!”
Furthermore, each browser does things a bit differently, and
that’s why a website feature that works perfectly in Firefox
might not quite work perfectly in Internet Explorer, and vice
versa. So, even if you have two browsers that implement the
same version of the JavaScript specification, the code in that
implementation isn’t identical; there are usually differences.
What does all this mean to you? Test your code—JavaScript, PHP,
or otherwise—in as many browsers as you can. Things aren’t
always the same in every browser, and it’s up to you—not your
users—to handle inconsistencies.
Figure 1-3 shows you how JavaScript fits in (hint: just as HTML and CSS do).
Web Browser
HTML
renderer
HTML Files
CSS
renderer CSS Files
JavaScript
interpreter
<head>
</head>
<p></p>
body{
...
}
JavaScript Files
function{
}
FIGURE 1-3
The web browser can
handle your JavaScript,
too. That browser is doing
a lot behind the scenes.

CHAPTER 1: PHP: WHAT, WHY, AND WHERE? 19
PHP COMES IN
TWO FLAVORS:
LOCAL AND
REMOTE
NOTE The code that handles your HTML and CSS isn’t quite as disconnected as it might appear from Figure
1-2 and Figure 1-3. In other words, there are no individual components in your web browser that render HTML or
CSS. But you get the idea; your browser can handle all these different tasks and technologies and turn them into
a web page.
PHP Is Not Part of Your Browser
And here’s where things change from the easy, browser-centric view of the world.
When you download a web browser, you get HTML, CSS, and JavaScript, but you do
not
get PHP. PHP scripts—which you’ll soon be writing—have to be interpreted by
the PHP interpreter program, called
php
. And, you can’t just add a PHP interpreter to
your browser. It doesn’t know what to do with scripts and isn’t built to interpret PHP.
Instead, you need PHP on a web server. It’s the web
server
—not the web
browser
—
that can interact with a PHP interpreter. Your browser can handle HTML on its own,
but it has to make a request to a web server to deal with PHP scripts. That server
can take your PHP scripts and run them, and then take the response and send it
back to your browser. Your browser can then understand and handle the response.
So, Figure 1-4 adds a couple of new wrinkles: the PHP interpreter, the magical thing
that takes the PHP scripts you’ll be writing and does something useful with them;
and a web server to communicate with that interpreter. These both live outside of
your web browser. In this scenario, the browser now makes a request to the server
and then takes the response and shows it to you.
Web Browser
HTML
renderer
HTML
Web
Server
Response is not PHP,
but the result of
interpreting PHP, usually
more HTML and CSS.
Could be for HTML, CSS,
PHP or a combination.
Request
Response
CSS
JavaScript
PHP
Scripts
CSS
renderer
JavaScript
interpreter
PHP
interpreter
FIGURE 1-4
Web browsers handle
HTML, CSS, and JavaScript
using the browser’s own
code. But PHP scripts
have to be handed off to
another program, and that
program deals with the
scripts, returning some-
thing useful (hopefully!) to
a web server, which then
can pass a response back
to the web browser. (As
was the case with earlier
diagrams, this is a bit of
an over-simplification. The
PHP interpreter interacts
closely with your web
server, and so doesn’t
stand quite so far outside
the server as it might
appear.)

PHP & MYSQL: THE MISSING MANUAL
20
PHP COMES IN
TWO FLAVORS:
LOCAL AND
REMOTE
Here’s the basic process:
1. A web browser makes a request for some page. That page might be a URL
on a remote web server, or a local file on your computer.
WARNING Right away, there’s potential for trouble here. If the browser requests a local HTML, CSS, or
JavaScript file, there’s no problem. That’s because, as you now know, browsers can handle those file types. But
if it requests a PHP file without going through a web server you’re not going to get a response that the browser
can handle on its own.
2. Assuming that the request goes to a web server, the web server returns HTML
(and CSS and JavaScript) or, in the case of PHP, passes the PHP request on
to the PHP interpreter.
3. The PHP interpreter does what it’s supposed to: it interprets, or runs, the
PHP. The result of that should be something that a browser
can
understand, like
HTML. It passes this result, or response, back to the web server.
4. The web server gives the browser back something that the browser can un-
derstand: the HTML result of interpreting a PHP script, or CSS, or JavaScript,
or a combination of all of the above.
Understanding this dierence in how PHP works, as opposed to HTML, CSS, and
JavaScript, is important because it determines the approach you’ll take to writing
PHP scripts and getting those scripts to run.
Write Anywhere, Run Where There’s PHP
The cool thing about HTML, CSS, and JavaScript is that because they’re built in to
browsers and you can download browsers so easily, those technologies become
instantly available. It’s tough to even find a computer
without
a browser preinstalled.
So, you turn on your computer for the first time, and boom, you can start creating
web pages immediately. Double-click the HTML file, your browser fires up, and
you’re good to go.
But PHP
isn’t
part of that browser. It’s
not
always preinstalled. If you write a PHP
script and then double-click it, you’ll probably see a code editor launch, but not
something that will actually run that script. Even worse, if your browser does open
up your PHP script, it’s not a web server. It doesn’t have a PHP interpreter. It will just
show you your code, rather than run it, and what good is that to anyone?
This long prelude is just a big warning: although it’s easy enough to start writing
PHP scripts, you can’t just open them in Dreamweaver or Firefox and expect them
to run. You’ll end up frustrated and annoyed, and that’s no good for anyone.

CHAPTER 1: PHP: WHAT, WHY, AND WHERE? 21
PHP: GOING
LOCAL
The bottom line is this: You can write PHP on your own local computer, but you’ve
got two choices for actually
running
that PHP:
1. You can go through the lengthy process detailed in the next section and
install PHP on your local computer. This process will take some time, and
you’ll have to monkey around a bit with your computer at a system and network
level. You’ll also need a local web server to handle the PHP interpreting part of
the gig. This way, you’ll not only have a browser that can handle HTML, CSS,
and JavaScript, but a complete setup that can take on PHP without a problem,
too—right on your own computer.
2. You can write your scripts locally and always upload them to an Internet
Service Provider (ISP) or web hosting company. Every ISP and web hosting
company supports PHP, and you usually don’t have to do anything more than
name your scripts with a
.php
extension. This option involves less initial setup,
but it means that every time you edit your script, you need to upload it again to
your ISP. It also means that double-clicking your PHP script won’t do anything
more than, at best, open your editor. You can’t test your scripts on your own
computer.
Both choices are equally good, and which one you choose depends largely on your
circumstances. Even though it might seem perfectly natural to jump right into up-
loading your scripts, you aren’t always going to have a network connection. (The
sound you just heard was the cheering of all the programmers who have an hour-long
commute into work on their local metro or subway!) For those unwired situations,
it’s nice to be able to keep developing on your own computer without the need to
access your hosting provider. Note only that, installing PHP on your own computer
is great for understanding what the PHP interpreter actually does.
So, before you start writing scripts that you can’t even run, it’s time to get PHP
working on your own computer (if you want to), and then talk about getting scripts
running out there in the wild, as well.
NOTE In the long run, you probably want to have both a way to use of PHP and MySQL without an Internet
connection and a hosting provider or ISP set up. That way, you can work on your own computer whenever you
want, and then upload your scripts when they’re ready to see the light of day.
PHP: Going Local
It’s not dicult to install PHP on your own computer. This is typically called a
local
installation
, which just means that all your programs are running on your own local
machine. (For more detail on how the whole thing works, see the box on page 22.)
PHP & MYSQL: THE MISSING MANUAL
22
PHP: GOING
LOCAL
Although PHP isn’t preloaded on every computer like web browsers are, it’s still easy
to download PHP from the Internet, get it working on your computer, and get up and
running fast…all without spending a dime. On top of that, most of the easiest and best
tools for writing PHP code are also free. You just have to know where to find them.
POWER USERS’ CLINIC
Local Software Runs on
localhost
The term
local
has a lot of meanings in computer programming,
especially when you start interacting with networks. Every
computer is capable of sending information to itself, through
a
loopback
network interface. This interface usually has the IP
address 127.0.0.1 and a hostname of
localhost
.
This scenario becomes pretty handy when you want to run a
web server on your own computer, and that’s what you’ll be
doing later when you get a local installation of PHP up and
going. When you want to access that web server, you need to
type something into your browser, and that’s where
localhost
comes in. You can enter either the IP address
http://127.0.0.1
,
or
http://localhost
, and your computer will send your request
to itself…and any software you’ve got installed and running
that’s capable of receiving that request.
NOTE The next section explains how to install PHP on computers running Microsoft Windows. If you have
a Macintosh, flip to page 28.
PHP on the Windows-Based Computers (WampServer
Installation)
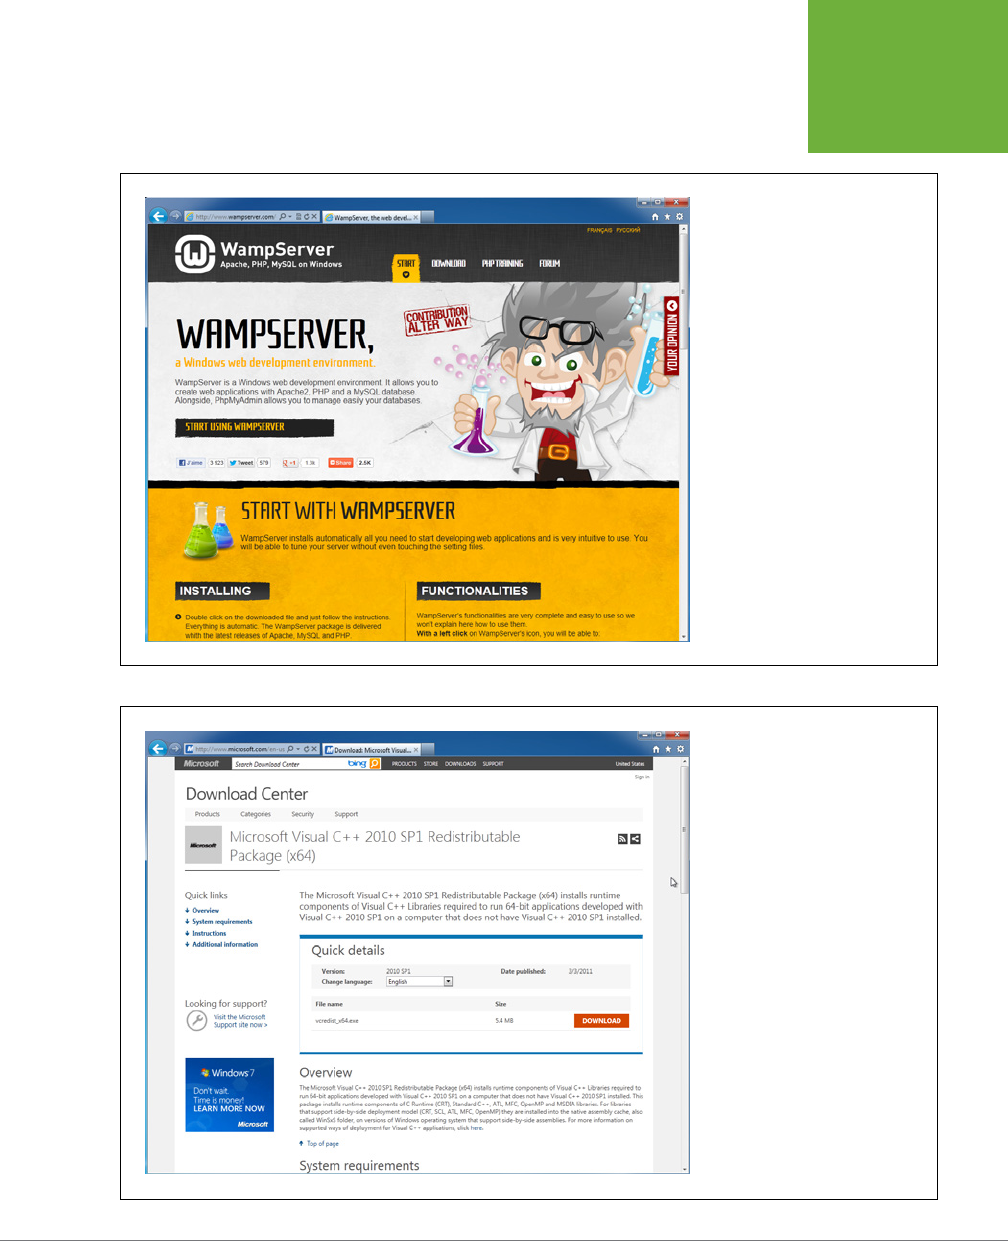
Open your favorite web browser and head to
www.wampserver.com
. This is the
online home of WAMP, which stands for Windows, Apache, MySQL, PHP. The site
is shown in Figure 1-5.
NOTE Although the website is called WampServer—and describes the grouping of software “Apache, PHP,
MySQL on Windows”—the WAMP acronym lives on.
Select the relevant Download link for your version of Windows. If you’re not sure, you
can go to your Control Panel, select System, and then poke around. You’ll see either
“32-bit Operating System” or “64-bit Operating System,” and that tells you what you
want. Just select the first link on the top-left of the page that matches your system.
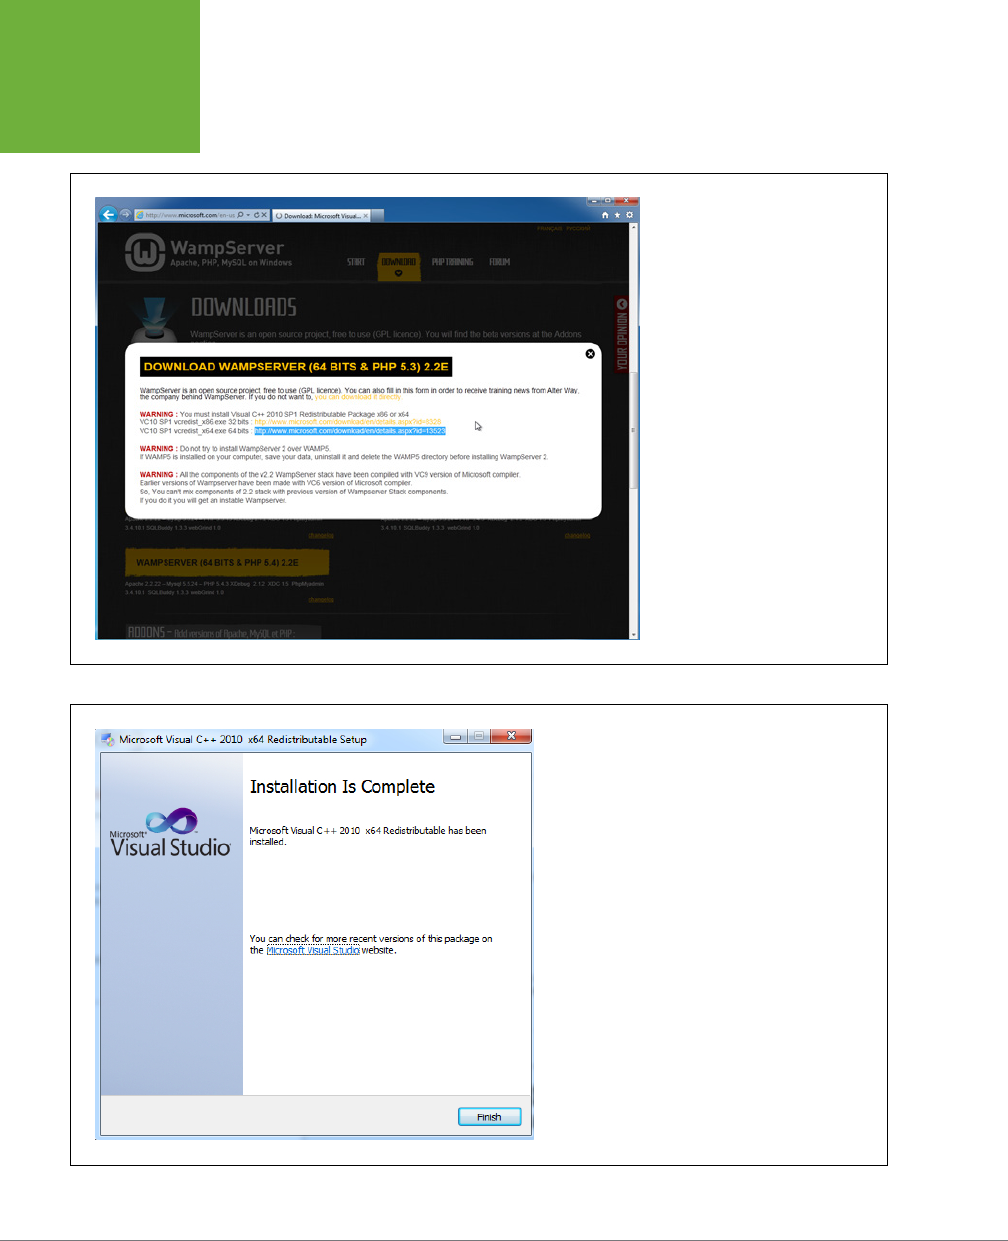
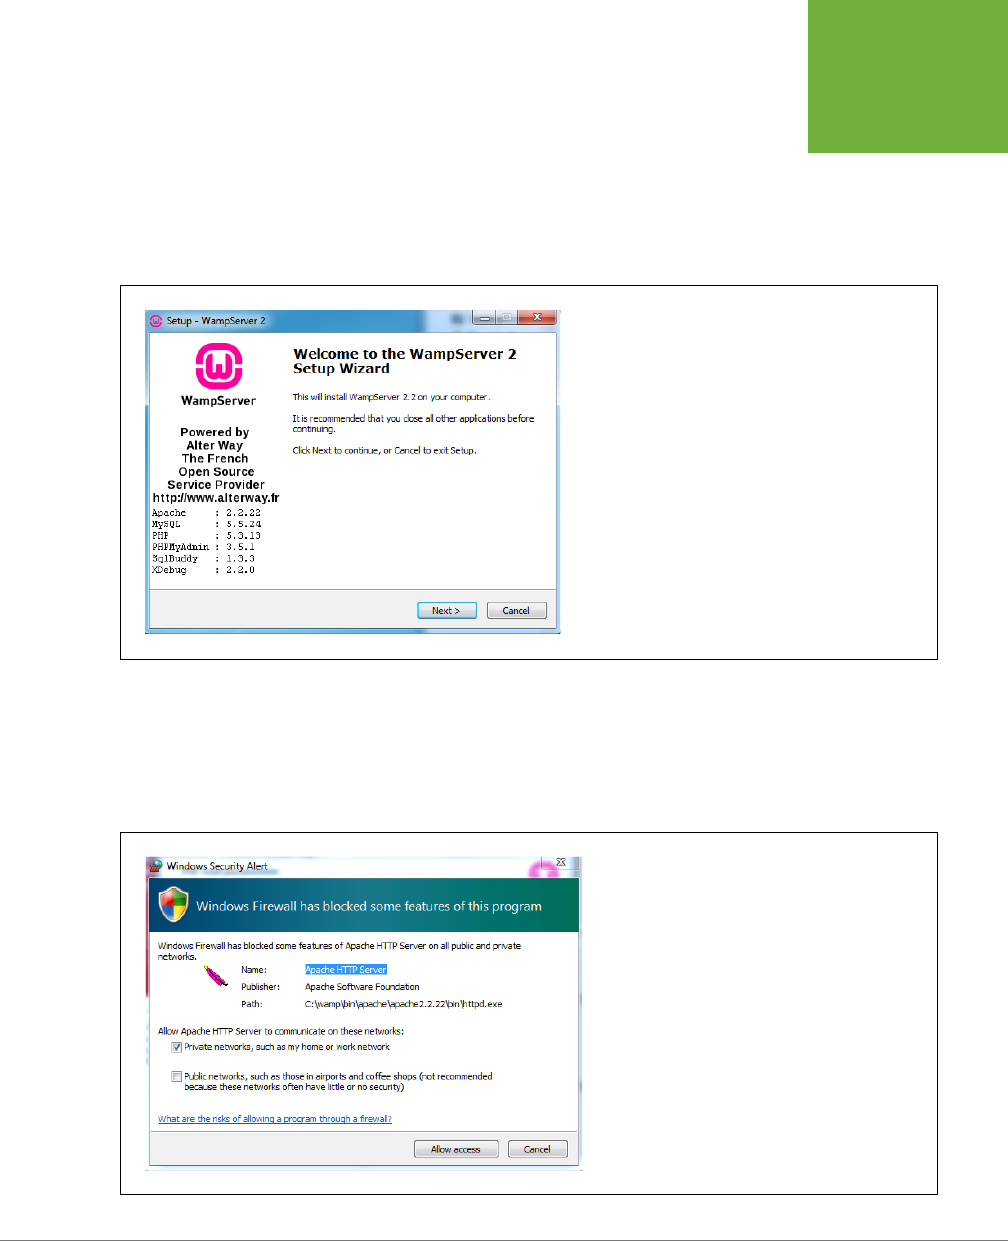
When downloading starts, you see a warning—actually, a couple of them—about
needing some C++ extensions. Click the link for your system (see Figure 1-6),
download the extensions (see Figure 1-7), and then run the downloaded file. You’ll
need to allow the downloaded program to update your system, accept a license
agreement, and install the extensions. When that’s complete, a screen appears like
the one in Figure 1-8.
CHAPTER 1: PHP: WHAT, WHY, AND WHERE? 23
PHP: GOING
LOCAL
FIGURE 1-5
Wampserver.com brings together
everything you need for getting PHP
and MySQL going and behaving on
your Windows PC.
FIGURE 1-6
WampServer requires some extra
work on your part before it can
install, most notably, you need to
download some C++ extensions to
get everything in the PHP interpreter
behaving.
PHP & MYSQL: THE MISSING MANUAL
24
PHP: GOING
LOCAL
FIGURE 1-7
Microsoft hosts the C++ libraries that
WampServer depends on to install.
FIGURE 1-8
Finally! The C++ extensions are installed. Now you can get
back to actually installing WampServer.
CHAPTER 1: PHP: WHAT, WHY, AND WHERE? 25
PHP: GOING
LOCAL
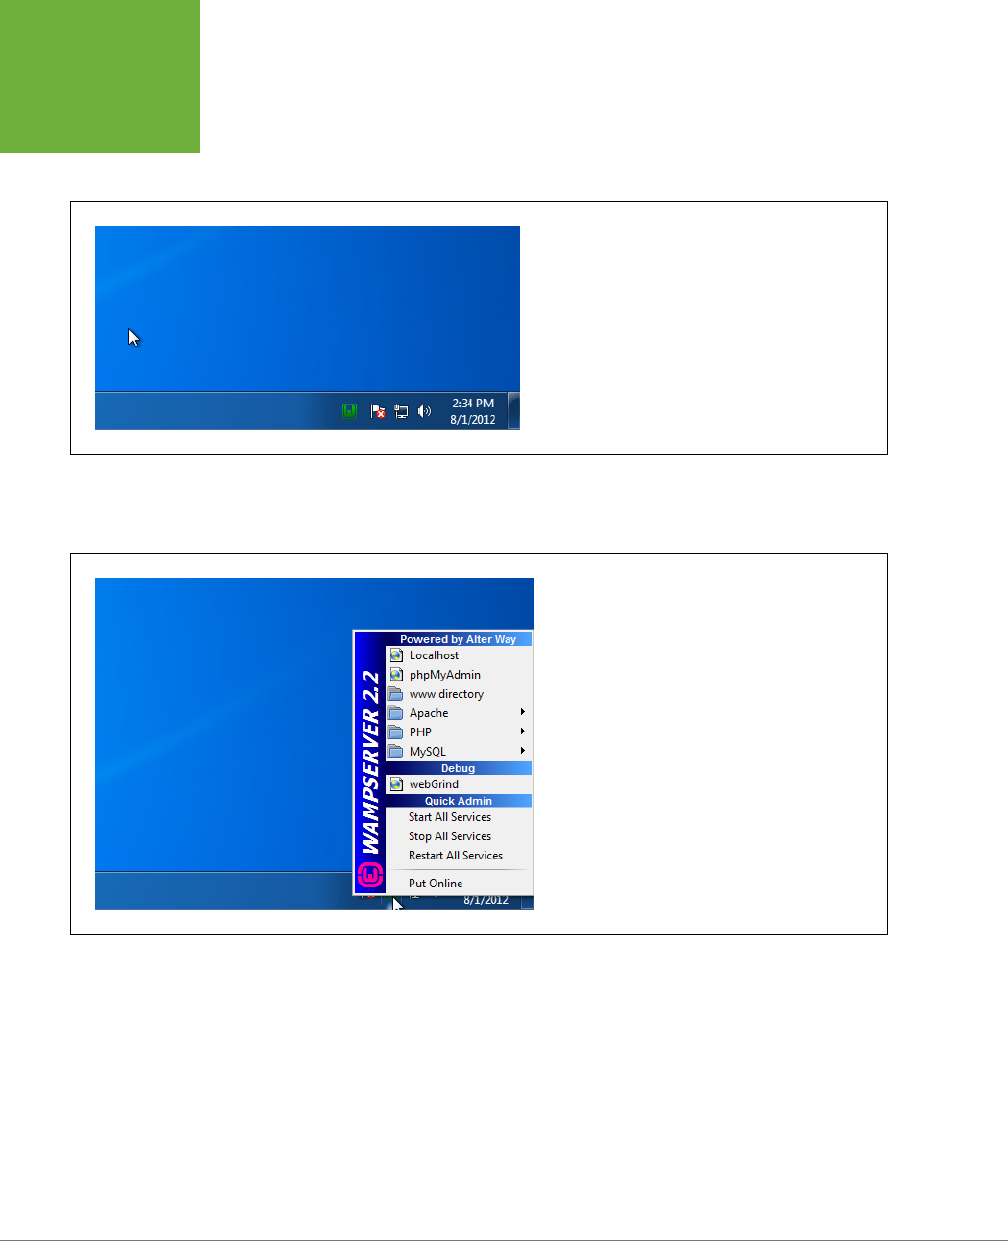
Once you’ve installed the C++ extensions, go back to Wampserver.com, select
Downloads again, and then click the download link. This time, you can ignore the
warning. Click the words “you can download it directly.”
The ad-heavy site you’re taken to will trigger a download in a few seconds. Then,
save and run that file; you’re
finally
installing WampServer. Figure 1-9 is what you’re
aiming for.
FIGURE 1-9
All that work for the little pink “W” logo. It’s worth it, though.
Installing PHP manually (as detailed in the appendixes)
makes this look like a walk in the park.
Accept the license and default installation directory (typically
C:\wamp
). You might
want to create a quick link icon, or at least a desktop shortcut, and then let installation
take o. Select your default browser. You’ll then be asked about allowing Apache
to access public networks (Figure 1-10). The best option here is usually the default
supplied by the WampServer installer.
FIGURE 1-10
Unless your computer is directly connected to the
Internet and has its own dedicated, publicly available IP
address, the default options are just fine here.
PHP & MYSQL: THE MISSING MANUAL
26
PHP: GOING
LOCAL
You then have a few other options for PHP mail, and then you’re finished. Launch
WampServer, and you should see…nothing! Well, almost nothing. On the right side
of the taskbar, notice there is now a little green “W” (check out Figure 1-11).
FIGURE 1-11
Now you’ve got WampServer running happily in the
background. For your troubles, though, it appears you’ve
only got this little green “W” icon.
Click the green W icon to see all of the things you’ve been reading about, like PHP,
MySQL, and Localhost, as shown in Figure 1-12.
FIGURE 1-12
You can do a lot from the WampServer icon: start and
stop the new programs you’ve installed, use the handy-
dandy phpMyAdmin tool (which you’ll see more of in
Chapter 7), and more. You’ll use almost everything here
before you’re done.
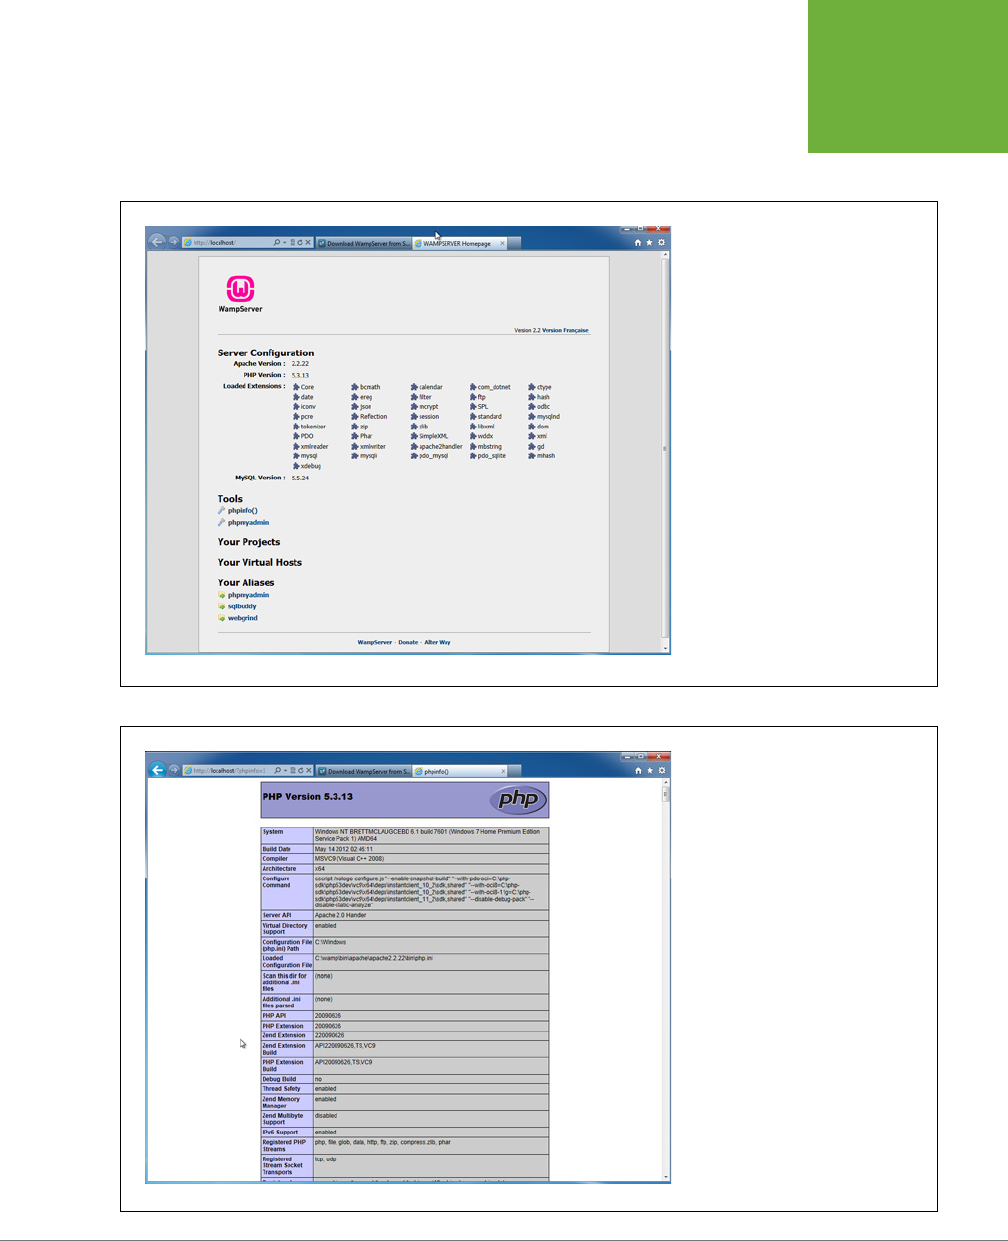
You’re almost done. Select the top option, Localhost. (If you don’t remember what
localhost means, see the box on page 22.) A new web browser window or tab
opens with an address that references your own locally installed web server. This
Server Configuration page presents information about your own web server setup
(see Figure 1-13). It isn’t particularly impressive to look at, but it’s proof that your
Windows computer can now serve up web pages.
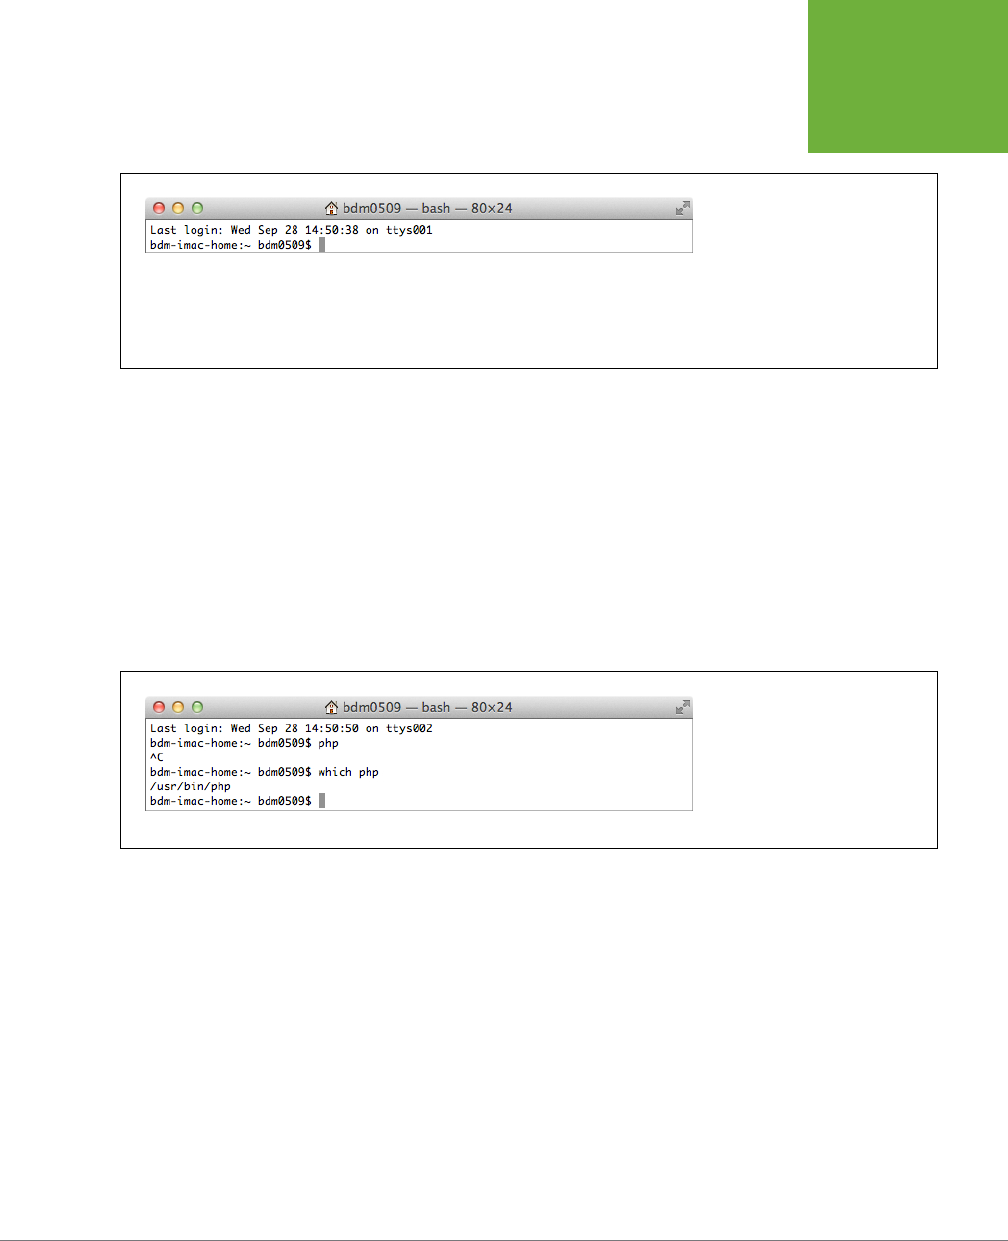
While on the Server Configuration page, in the Tools section (about halfway down
the page), click the
phpinfo()
link. A page opens that looks something like Figure
1-14, which is everything you’ll ever need to know about your local PHP installation.
CHAPTER 1: PHP: WHAT, WHY, AND WHERE? 27
PHP: GOING
LOCAL
More important, it means that your browser made a request to a web server, and
that web server processed some PHP (the phpinfo function) and handed back a
response to your browser. Not only
can
you run PHP on your computer, you just did.
FIGURE 1-13
Having a web server running on your
local computer isn’t necessary for
developing HTML, CSS, or most JavaScript
applications. But because a browser
can’t interpret PHP, a local web server is
essential if you want to write PHP scripts
on that computer and run them without
uploading them to a server somewhere.
FIGURE 1-14
And the big win: PHP is running! Actu-
ally, your browser made a request to
your local web server, your local web
server executed some PHP, and then
it responded to your browser with the
response from that PHP command.

PHP & MYSQL: THE MISSING MANUAL
28
PHP: GOING
LOCAL
You’ve got PHP! Now it’s time to get scripting.
PHP on the Mac (Default Installation)
If you’ve got a Mac, you’ve got more than just a sleek, shiny machine and way too
many ways to spend even more money with Apple, you’ve already got PHP installed.
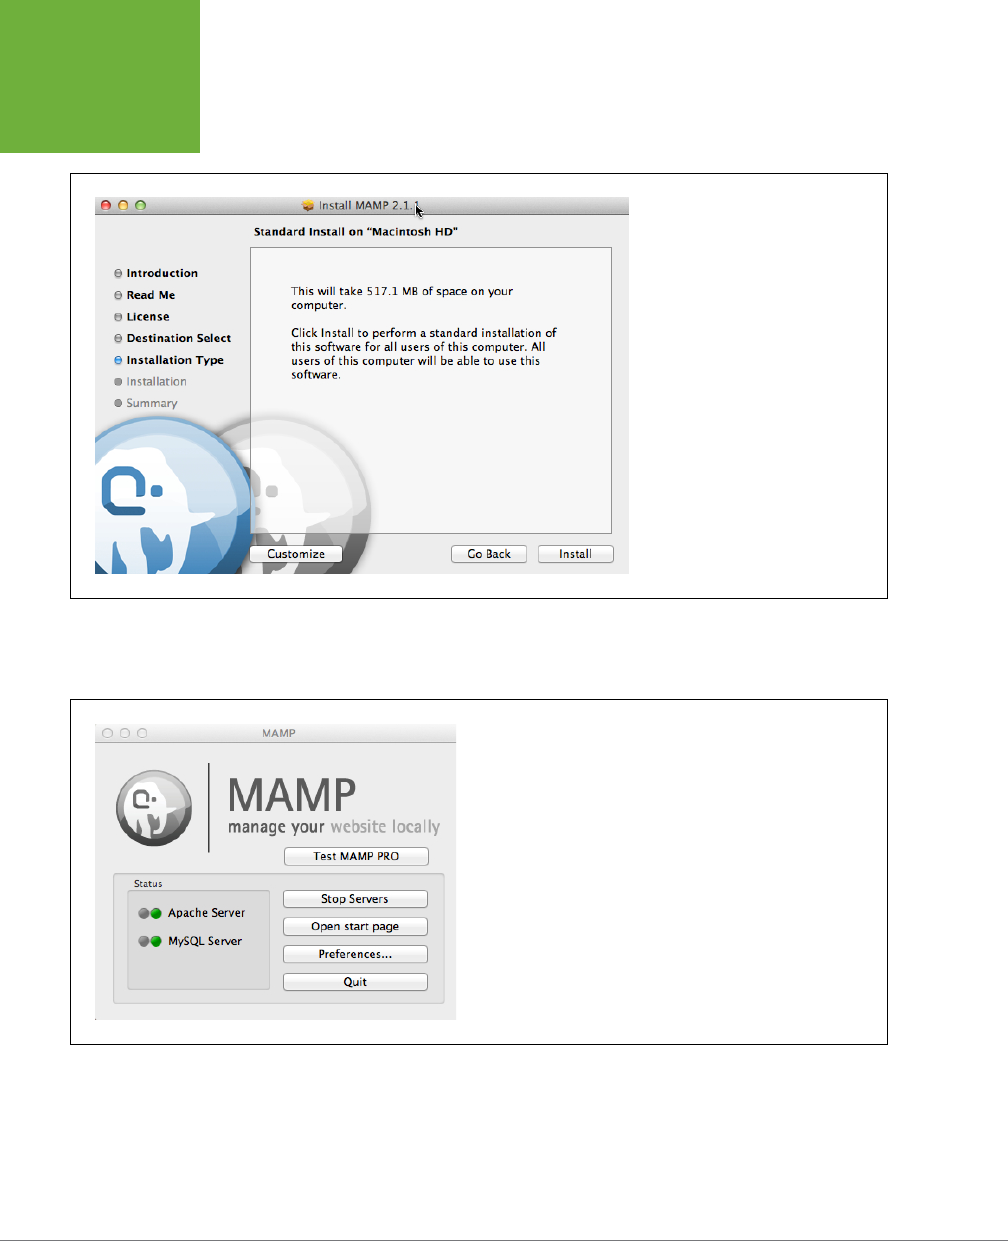
To prove it, open the Terminal application on your Mac. If you’ve never used Terminal,
don’t worry; you’ll get used to it quickly and find it’s one of your best friends for
working with PHP. Go to Applications→Utilities→Terminal.
NOTE You can also get to the Applications folder in a flash by pressing Shift--A. However, this keyboard
shortcut works only in the Finder. If you’re currently viewing this book in an e-reader or online, for example, click
your desktop and
then
press Shift--A. Shift--A is a little-known shortcut, but if you’re the programming
type, you’re probably all about keyboard shortcuts.
Once you’ve found the Applications folder, open it and find the Terminal applica-
tion. It looks like a computer monitor with a black screen and a little white arrow,
as shown in Figure 1-15.
FIGURE 1-15
The Terminal program lets
you use a command line
on Macintosh computers. A
lot of your PHP coding will
be done by using Terminal,
so you’ll get used to this
application quickly.
Open it, and you see a
barebones screen like the
one in Figure 1-16.
TIP You’ll often use Terminal for testing your PHP programs before you upload them to your server. To make
it easier to launch Terminal, drag the icon onto your dock.
CHAPTER 1: PHP: WHAT, WHY, AND WHERE? 29
PHP: GOING
LOCAL
FIGURE 1-16
When you first open Terminal, you
won’t be too impressed. You’ll get
a line that probably matches your
computer’s name and then a weird
dollar sign. Don’t worry…this will all
soon be old hat.
To ensure that PHP is installed on your system, type php (all in lowercase letters)
and press Enter. Unfortunately, the way to know things are working is if you
don’t
see anything but that blank cursor, a little further down in Terminal. It won’t even
blink at you anymore; it’s just a boring, dark gray square.
Press Control-C to stop that single eye from hanging around and to display the
blinking cursor again. This time, type which php. The which command lets you know
where on your computer the program you type is located. In this case, you’re asking
where the php program is located. You’ll probably get something back that looks like
Figure 1-17; for the computer in this example, php is in the
/usr/bin
directory. You’ll
probably get a similar result.
FIGURE 1-17
Lots of the programs you’ll use in
Terminal are scattered around your
Mac’s hard drive. The
which
com-
mand lets you know exactly where a
program resides on your machine.
Once you’ve seen where php is, you’re ready to go. It was installed all along.

PHP & MYSQL: THE MISSING MANUAL
30
PHP: GOING
LOCAL
POWER USERS’ CLINIC
Take Control of Your PHP Installation
Like most of the programs on your computer, the PHP software
package (which includes the
php
program you’ve been run-
ning) is updated fairly often. Most of the time, if you’re keeping
your computer updated with Apple’s Software Update, this
isn’t something to worry about. But if you want to see what
version of PHP you’re running, you can type
php –version
into your Terminal window. You’ll get back something like this:
Bretts-MacBook-Pro:~ bdm0509$ php -version
PHP 5.3.4 (cli) (built: Dec 15 2010
12:15:07)
Copyright (c) 1997-2010 The PHP Group
Zend Engine v2.3.0, Copyright (c) 1998-
2010 Zend Technologies
Look at the very first line that PHP displays: this tells you that
you’re running version 5.3.4.
If you want to get the very latest version of PHP, you can visit
www.php.net
and download the PHP source code. That’s a little
trickier than just using the preinstalled version on your Mac,
though, so unless you’re into commands like
unzip
and
tar
,
you can stick with what’s already on your computer.
By the way, this is a great time to remind you that if you’re
not
using your Mac’s Software Update frequently, you might want
to do that now. It keeps your software current without all the
hassle of downloading programs on your own.
PHP on the Mac (MAMP Installation)
Although it’s nice that Macs come with PHP already installed, there might just be
a better option—one worth doing a bit of downloading and installing for yourself.
That better option is MAMP, which stands for Mac, Apache, MySQL, PHP. This is the
Mac counterpart to WAMP, the easy Windows PHP installation (page 22) that you,
as a Mac user, probably skipped.
MAMP doesn’t improve on the PHP installation that came on your Macs; it does
integrate MySQL—which you’ll need before you know it—as well as the Apache web
server and several helpful tools for working with PHP scripts and MySQL databases.
You even get a simple control panel for starting up your local web server and MySQL
database. Those additions are a nice perk, and coupled with how easy it is to install
MAMP, you might just want to ditch the default PHP installation and get MAMP going.
First, using your favorite web browser, visit
www.mamp.info
. A site like the one
shown in Figure 1-18.

CHAPTER 1: PHP: WHAT, WHY, AND WHERE? 31
PHP: GOING
LOCAL
FIGURE 1-18
The MAMP site is a PHP de-
veloper’s best friend. The
free MAMP download gives
you almost everything you
could want for developing
great PHP scripts and the
databases with which they
work.
Simply click the “Download now” button under MAMP and then grab a coee and
wait for the installer to download.
Now, launch the installer. Click Next a few times to select your hard drive and agree
to the license. Keep going until the installer informs you that MAMP is ready to install,
as shown in Figure 1-19.
NOTE Some versions of MAMP don’t have a correctly signed security certificate. This results in a nasty
message popping up when you try to launch the installer: “MAMP_2.1.1.pkg can’t be opened because it is from
an unidentified developer.”
Fortunately, you can safely ignore this for MAMP. Just Control-click the installer, and then in the popup menu that
appears, you can click “Open.” This will in turn give you a dialog box, and you can click “Open” yet again. Finally,
you’ll have your program ready to run. Fortunately, you should only have to do this once.
PHP & MYSQL: THE MISSING MANUAL
32
PHP: GOING
LOCAL
FIGURE 1-19
MAMP is simple to install but it eats up
about half a gigabyte of disk space.
That’s ok; you’re getting a full-blown
web server, PHP interpreter, MySQL
database, and a suite of tools.
Once the installation is complete, go to Applications→MAMP. You’ll see a nifty
control panel, a la Figure 1-20.
FIGURE 1-20
This control panel is MAMP’s home base. You can start and stop soft-
ware components and make all your configuration changes here. While
you’re getting your PHP feet wet, you may want to move the MAMP
icon into your dock; you’ll be using it a ton.
Your installation might try to automatically start both an Apache server and the
database. Still, you can configure these easily by clicking the Preferences button.
You should probably check the Ports tab and ensure that there aren’t any issues
with any other software on your computer. You can do this all within MAMP, as
shown in Figure 1-21.
CHAPTER 1: PHP: WHAT, WHY, AND WHERE? 33
PHP: GOING
LOCAL
FIGURE 1-21
MAMP lets you change both the port that Apache (the web server)
runs on, as well as the port that MySQL runs on. Be especially
careful with the MySQL port. Most programs that use MySQL will
need to be updated to the value you use here.
NOTE If all this talk of ports is starting to give you a headache, that’s okay. It probably just means that your
machine is set up without any software running on weird ports, and that makes things easy here: just accept the
defaults. These are pretty standard ports, and will almost always work perfectly with a system.
You can also click the PHP Preferences option and see a few things that, honestly,
probably don’t matter much to you (see Figure 1-22). Just leave these alone. In fact,
there’s almost never a reason to mess with these selections. Mostly, it’s good to
know that yes, MAMP did indeed install PHP (along with a web server and MySQL)
with just a few mouse clicks.
FIGURE 1-22
There are some reasons you might one day want to jump back from
PHP 5.3 to 5.2, but that’s far down the line. For now, just accept
these options as they are and get ready to start scripting.
PHP & MYSQL: THE MISSING MANUAL
34
PHP: GOING
LOCAL
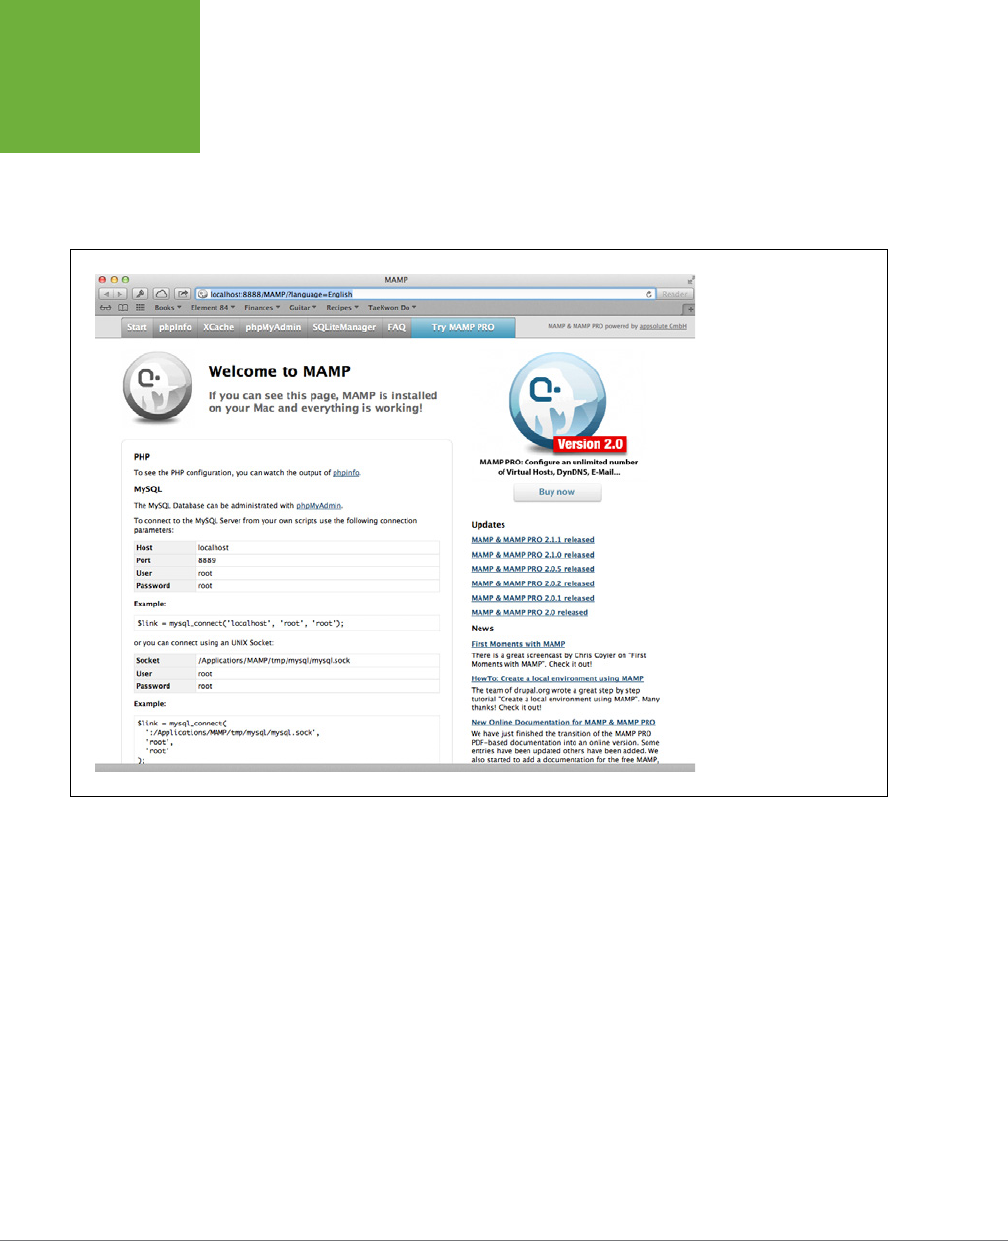
There’s not much else to do now, so you can close Preferences and click the “Open
start page” option to get a nice browser page like the one shown in Figure 1-23.
Here’s where you’ll spend lots of your troubleshooting time as well as digging into
databases once you’ve mastered the command line tools for MySQL that you’ll learn
about in Chapter 4.
FIGURE 1-23
Here’s where you’ll do
most of the work once
you have your MAMP
software running. Think
of the MAMP control
panel as the place you’ll
control the programs, and
this start page as where
you’ll interact with those
programs.
Before moving on, you can verify that this is all doing what it should. At the top
of the MAMP start page, click the “phpInfo” tab. A screen appears, similar to that
in Figure 1-24. What’s significant here isn’t all the information listed; you needn’t
concern yourself with that just yet. What
is
cool, though, is that you’re looking at a
PHP script that’s been interpreted by a PHP interpreter (installed as part of MAMP).
The interpreter then fed the output of that script to your new MAMP-installed web
server, which in turn handed that response to your web browser. Proof that you’re
already running PHP.

CHAPTER 1: PHP: WHAT, WHY, AND WHERE? 35
PHP: GOING
LOCAL
FIGURE 1-24
This page is actually the
output of the
phpinfo
function in PHP. Here’s
the proof that you’ve got
what you need to run
PHP scripts on your local
machine. In fact, you just
ran one.
Get Out Your Text Editor
All the programs you’re going to write in PHP are plain, old text files. Writing PHP isn’t
a lot dierent than writing HTML or CSS or JavaScript. You’ll type dierent things,
of course, but these are all just text files saved with a special extension. You use
.html
for HTML,
.css
for CSS,
.js
for JavaScript, and now you’ll use
.php
for PHP files.
Because PHP is just text, you’ll want a good text editor in which to work. If you’re
in Windows, you can use Notepad. As simple as that program is, it’s perfect for
coding in PHP. If you’re on a Mac, TextEdit is a great choice. The good news is that
each of these programs comes preinstalled on your computer, so you don’t have
to download or buy anything. The bad news is that none of these programs
know
you’re writing PHP, so you don’t get much help if you type something wrong or want
to organize your files without resorting to Windows Explorer or the Finder. These
programs are simple, but limited.
On the other hand, there are quite a few editors out there that are built specifically
to handle PHP. For instance, for Windows, you can download NuSphere PhpED
(
nusphere.com/products/phped.htm
), which is shown in Figure 1-25. You’ll pay a bit
for a program like NuSphere—usually between $50 and $100—but you’ll get fancy
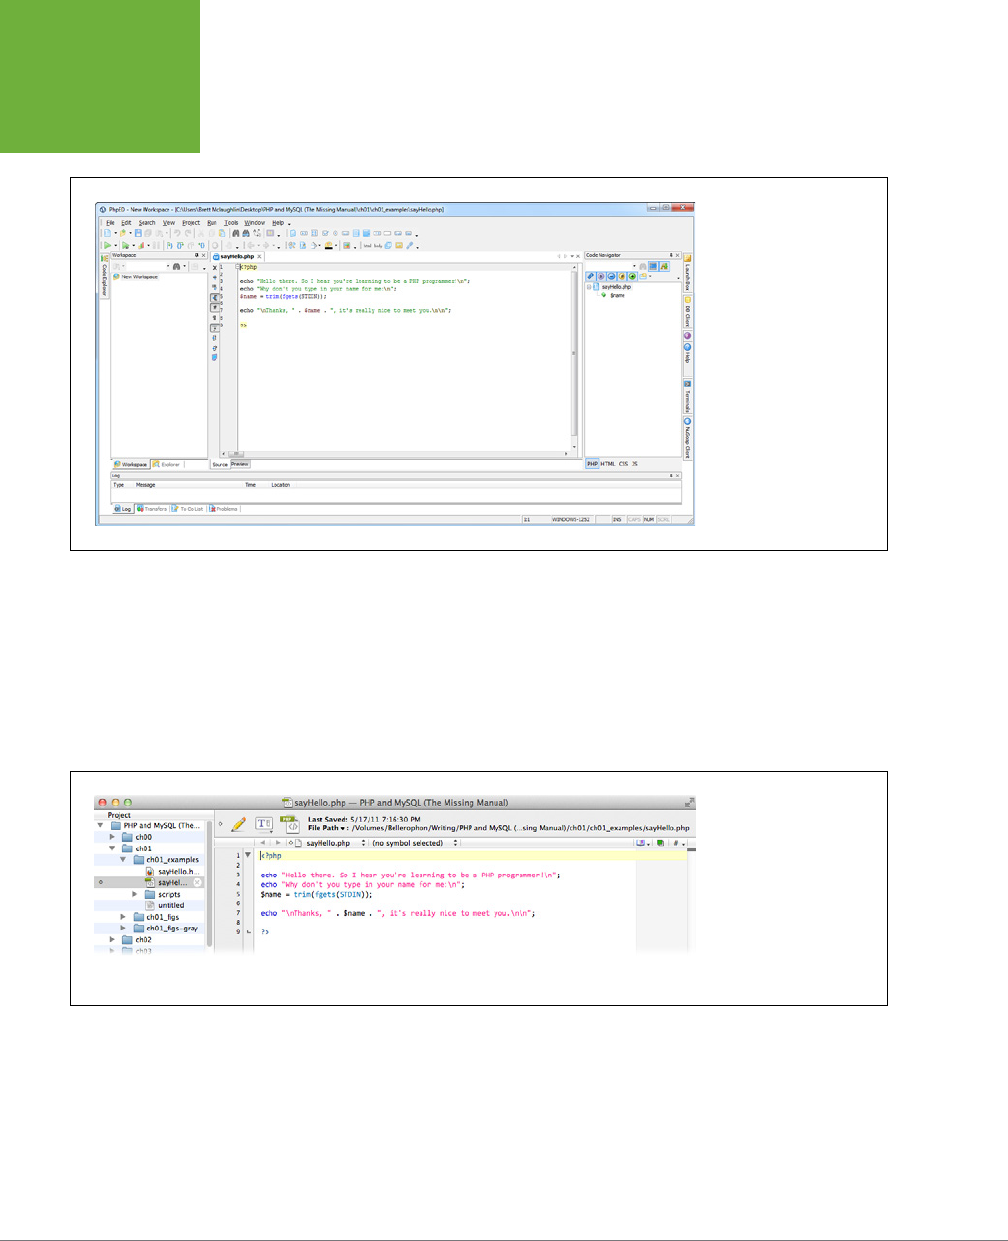
PHP & MYSQL: THE MISSING MANUAL
36
PHP: GOING
LOCAL
color coding, help with special language features, and in a lot of cases, some nifty file
organization features and the ability to upload your PHP directly to your web server.
FIGURE 1-25
NuSphere PhpED gives
you a ton of features and
supports JavaScript, CSS,
and HTML, as well as PHP. It
also has great documenta-
tion for most of the PHP
functions and libraries.
If you’re on a Mac, the two leading candidates for editors that do text plus lots of
other cool things are BBEdit (
www.barebones.com/products/bbedit/index.html
)
and TextMate (
www.macromates.com
). Both are Mac-only programs, and both
oer similar features on the Mac as does PhpED for Windows: color-coding, file
management, help documentation, and support for HTML, CSS, JavaScript, and a
lot more. You can see BBEdit in action in Figure 1-26; you’ll need to drop $100 to
get your own copy, though.
FIGURE 1-26
BBEdit is supposed to be
bare bones, but you’ll find
it has more than adequate
PHP support. It’s tuned
primarily for HTML, so
there are a few oddities,
but it’s a great choice for
PHP work on the Mac.
You can see what TextMate looks like in Figure 1-27. It’s a little simpler than BBEdit,
so if you’ve never used a programming editor, this might be easier to begin with.
TextMate costs around $60, slightly less than BBEdit.
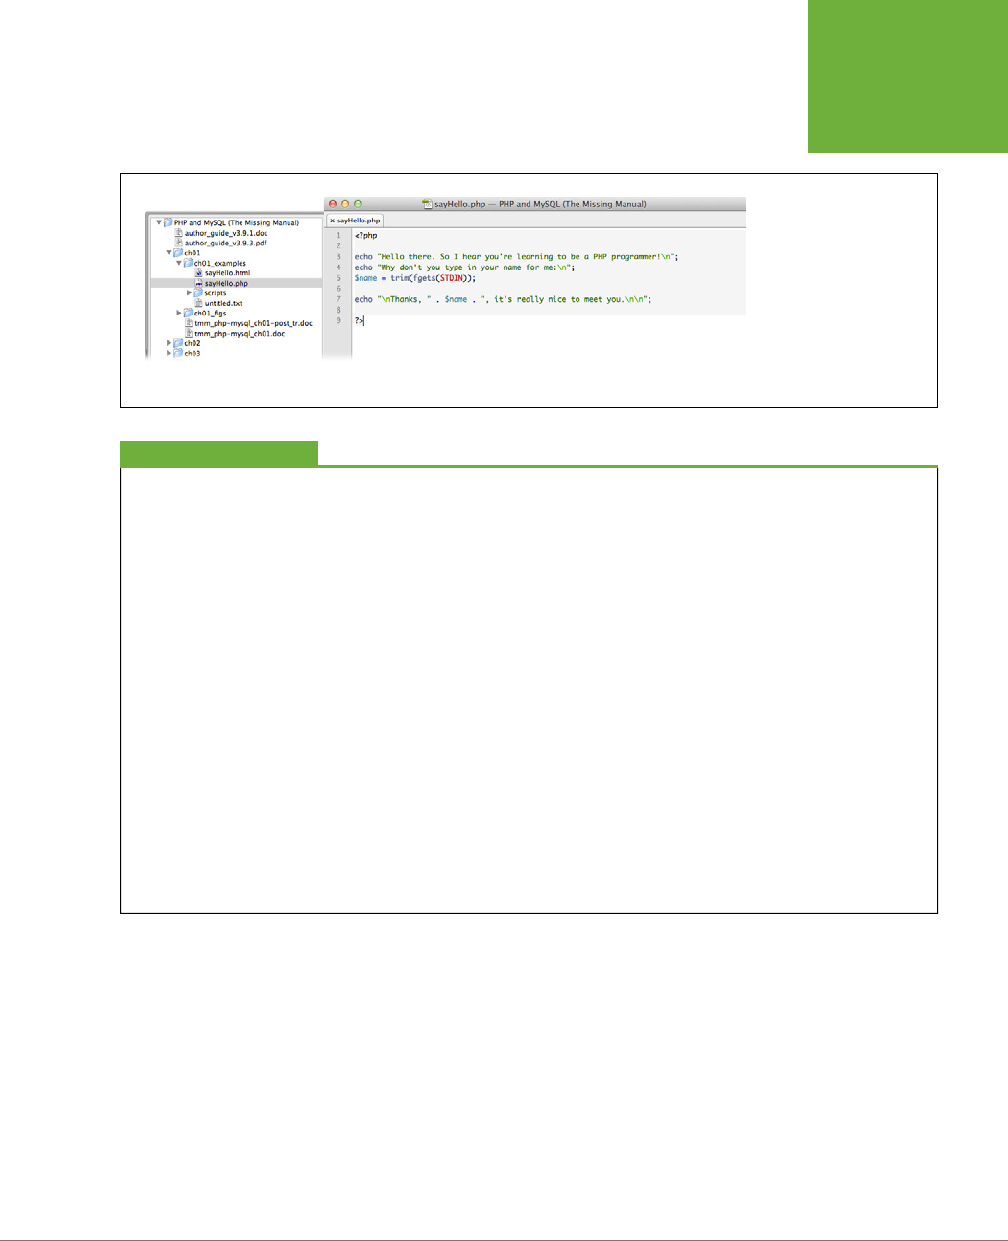
CHAPTER 1: PHP: WHAT, WHY, AND WHERE? 37
PHP: GOING
LOCAL
FIGURE 1-27
TextMate is an editor that
seeks to provide color-
coded editing and not
much else. It does offer
file management and FTP
support, but it’s best at
letting you type code and
staying out of the way.
UNDER THE HOOD
Text Editors: Mashing Up Programs
Although programs like PhpED, BBEdit, and TextMate are billed
as text editors, they’re actually lots of programs rolled into
one. Imagine having a text editor, a file management tool
like Windows Explorer or Finder, a telnet or terminal program,
an FTP client, and some glue to hold them all together. That’s
more or less what these programs give you: a bunch of things
all rolled into one single software package.
What’s great about these “text editors plus” is that they offer
you all sorts of features, and you don’t need five or six icons
in your Mac’s Dock or shortcuts on your Windows desktop.
You have access to almost everything you’ll typically need to
build web pages or program in PHP, right at your fingertips.
What’s not so great, though, is that generalized tools aren’t
often as fully featured as specific tools. In other words, a
program that tries to do everything usually does lots of things
decently, as opposed to lots of programs that only do one thing,
but do that one thing really well.
Much of the time, you’re making a choice between convenience
and features. If you only use FTP to upload files to a server
on occasion, you almost never work with your computer’s
command line, and you get a kick out of colored editors, the
bundled text editors with lots of extra features might be a
good fit.
Whether you use a more full-featured text editor or not,
though, at some point you might need to ditch the editor and
use an actual FTP or telnet program. As long as you’re comfort-
able diving into those programs
without
the use of an editor
from time to time, by all means, go forth in code in TextMate
or PhpED without worry.
Once you’re comfortable writing PHP code, you can spend some time playing with
all these dierent enhanced editors. You can see what you like, discover whether
an editor is perfect for you, or realize you’re a Notepad or TextEdit programmer at
heart. There’s no one right option for PHP; all of these choices work just fine.
If you’re just starting out, though, try to use a simple text editor—Notepad on Win-
dows or TextEdit on the Mac. You’ll learn a lot more about PHP this way, even if you
don’t get all the bells and whistles of one of the full-featured editors. Besides, once
you understand PHP and have learned to work with it manually, you’ll appreciate
and be able to use the features of the other editors a lot more eectively.
PHP & MYSQL: THE MISSING MANUAL
38
WRITE
YOUR FIRST
PROGRAM
NOTE Once you’ve become familiar with PHP, you can also check out Eclipse PHP (
www.eclipse.org
). The
Eclipse IDE has long been a favorite for Java developers, and there are now enough plug-ins for PHP that it’s a
legitimate option for PHP programmers, too. However, there’s a lot going on in Eclipse—tons of tools and gad-
gets—so you might want to wait a bit before you dive head first into it. Come back to it later, though; it’s well
worth checking out.
Write Your First Program
You’ve got PHP installed locally and you’ve got a text editor. Now all you need is
an actual program. Start your text editor and type the following code, exactly as
shown here:
<?php
echo "Hello there. So I hear you're learning to be a PHP programmer!\n";
echo "Why don't you type in your name for me:\n";
$name = trim(fgets(STDIN));
echo "\nThanks, " . $name . ", it's really nice to meet you.\n\n";
?>
NOTE You can find a copy of this script on this book’s Missing CD page at
www.missingmanuals.com/cds/
phpmysqlmm2e
.
A lot of this probably looks weird, and that’s OK. You’ll soon understand every bit of
this code. Right now, just get used to looking at PHP, which is quite dierent from
HTML or JavaScript.
WARNING Some of the editors you might use, like TextEdit, will try to save the document as
rich text
.
Rich text lets you use formatting, like bolding and underlining. You don’t want that in your PHP code, so look for
the option to use
plain text
, which doesn’t provide formatting.
If you’re using TextEdit, choose Format→Make Plain Text. (You won’t see that option if you’re already working in
plain text.) If you’re using Notepad, rich text isn’t an option, so you’ve got nothing to worry about.
Once you’re done, your editor should look similar to Figure 1-28.
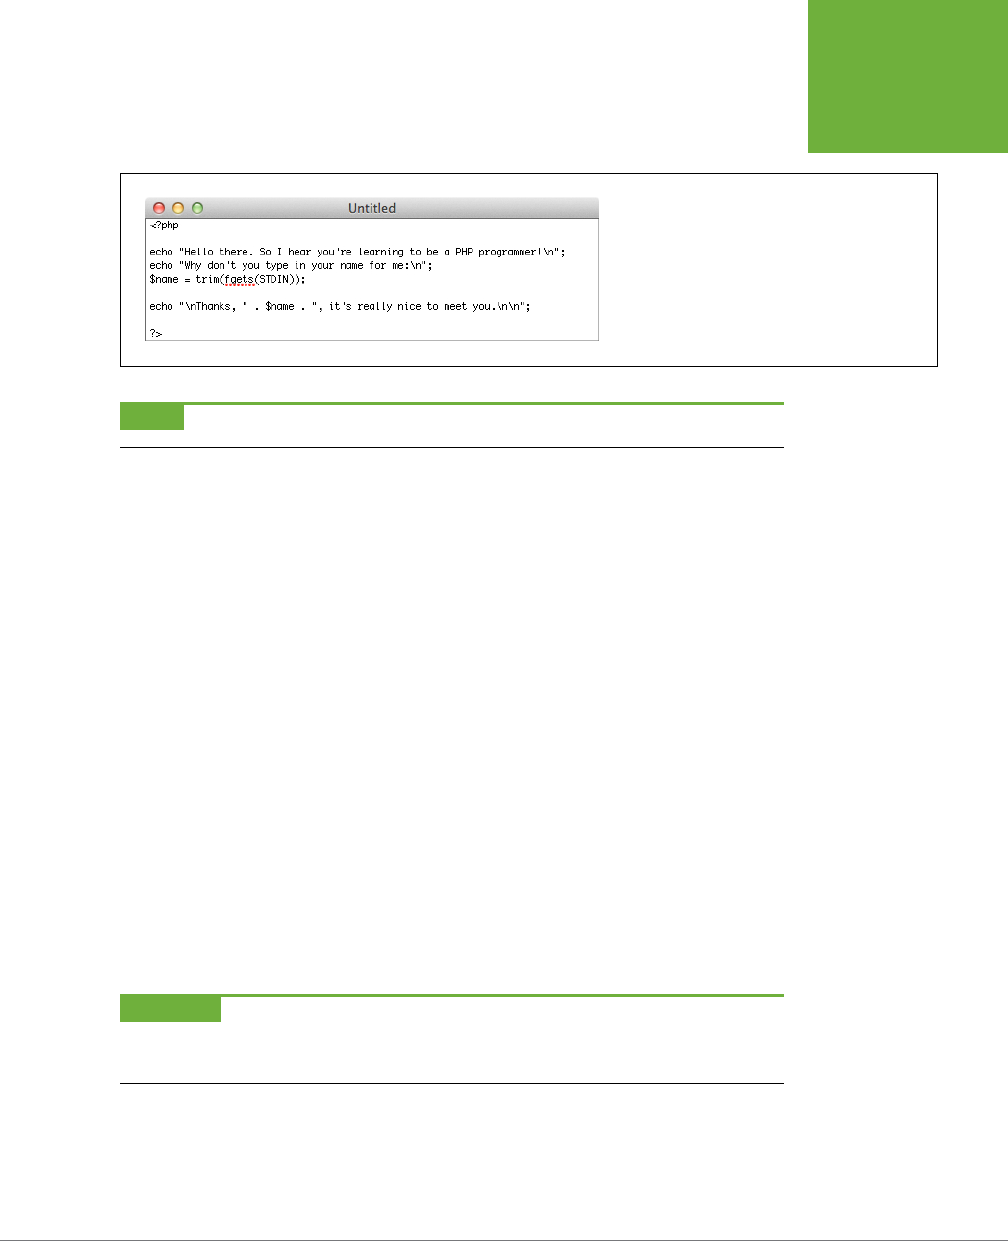
CHAPTER 1: PHP: WHAT, WHY, AND WHERE? 39
WRITE
YOUR FIRST
PROGRAM
FIGURE 1-28
PHP is just text, but it uses several weird characters.
Start getting used to typing the dollar sign ($), angle
brackets (< and >, just like in HTML), and the backslash
(\). You’ll be using those characters a lot.
NOTE You won’t see the nice color-highlighted syntax until you save your file with a
.php
extension.
This program does just a few simple things:
• Identifies itself as PHP by using <?php.
• Prints out a welcome message by using the echo command.
• Asks the user for her name, again by using echo.
• Gets the user’s name and stores it in something called $name.
• Says hello to the user by printing out a message that includes the information
stored in $name.
• Finishes up with the ?> characters.
It’s okay if not much on this list makes sense yet, especially the weird line beginning
with $name =. There are also some strange characters like \n and STDIN that you’ll
learn about soon. But see if you can follow the plain-English words through the basic
path: the opening <?php, the printing, the request for the user’s name, another bit
of printing, and the closing ?>.
Now, save this program. Name it
sayHello.php
, and ensure that you add that
.php
extension! Otherwise, you’ll have a lot of problems down the line. Save the file some
place handy, like on your desktop, your home directory, or a folder you’re using to
keep all your PHP programs in as you’re learning.
WARNING Most programs in Windows and on the Mac append a default extension, like
.txt
. Make sure you
replace this with
.php
. Windows especially tends to hide extensions, so verify that your full filename is
sayHello.
php
, not something like
sayHello.php.txt
.
That’s it; you’ve written your first PHP program!
PHP & MYSQL: THE MISSING MANUAL
40
RUN YOUR
FIRST
PROGRAM
POWER USERS’ CLINIC
Default to Plain Text
Most of the popular text editors let you change from rich text
to plain text on a per-file basis, but they automatically start
out in rich text mode. That can become a pain, so you might
want to change the setup of your editor to always start out
in plain-text mode.
For TextEdit on the Mac, open the Preferences menu. At the very
top, under Format, select “Plain text” (as shown in Figure 1-29).
In Windows, if you use Notepad, you avoid this entire issue, so
you’ve got nothing to worry about.
FIGURE 1-29
You can get to the TextEdit preferences via the Preferences
menu, or by using the shortcut combination -period. In the
Preferences box, you’ve got lots of options, but the text format
and font used for plain text are the most important for now.
Run Your First Program
What good is it to get all this code typed in if you can’t see if it works? This particular
program isn’t ready to run on the Web yet; first you need to add something to it in
your command-line terminal program, so go ahead and fire that up. If you’re on the
Mac, you should open up Terminal. In Windows 7 or earlier, go to Windows Start→Run
and then run command or cmd from the menu to get a command line. In Windows 8, at
the start screen, press Windows key + R and then type cmd (as shown in Figure 1-30
)
.
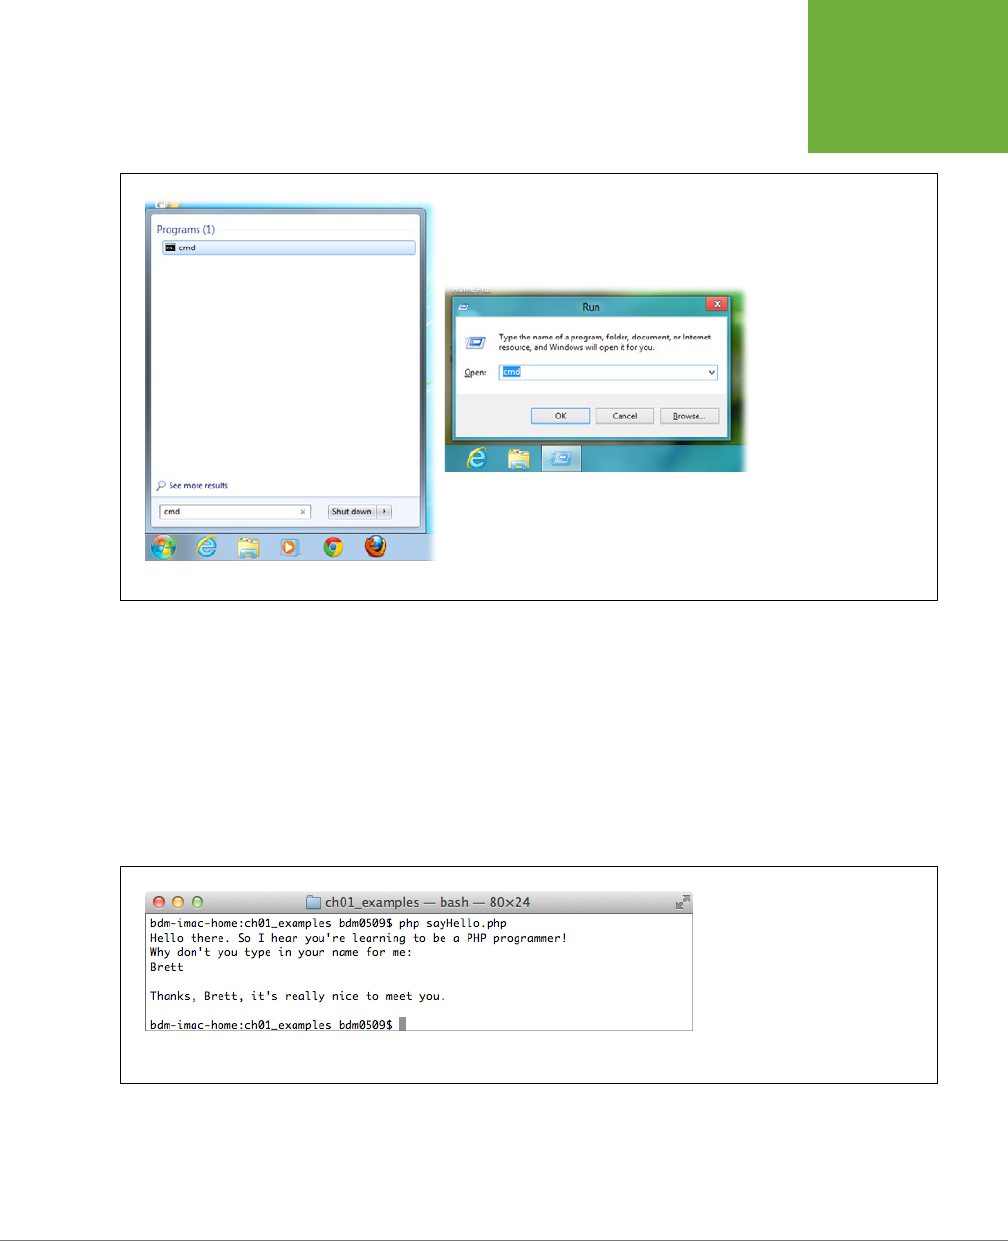
CHAPTER 1: PHP: WHAT, WHY, AND WHERE? 41
RUN YOUR
FIRST
PROGRAM
FIGURE 1-30
In Windows 7 (left) and
earlier, you can get to
the command line via
the Start menu. Since
Windows 8 doesn’t have
a Start menu, just go to
the Start screen and press
Windows key+R. That
opens the Run box where
you can type cmd.
Now, go to the directory in which you saved your program,
sayHello.php
. You can do a
directory listing with dir (in Windows) or ls (on the Mac) to ensure that you’re in the
right directory. Once you’re in the right directory, type this into your command line:
php sayHello.php
This instructs the php program to run and gives it your program,
sayHello.php
, as
the script to run. In short order, you should see the welcome message you typed,
and then the program asks you for your name. Type your name and press Enter. The
program should then greet you, just as shown in Figure 1-31.
FIGURE 1-31
Eventually, you’ll run most of your
PHP scripts through a web browser.
For now, though, the command line
lets you take control of the php com-
mand and give it a particular script
to run so that you can see the output
on the command line.
That’s it! Your first program works, and you’re ready to go deeper into PHP.
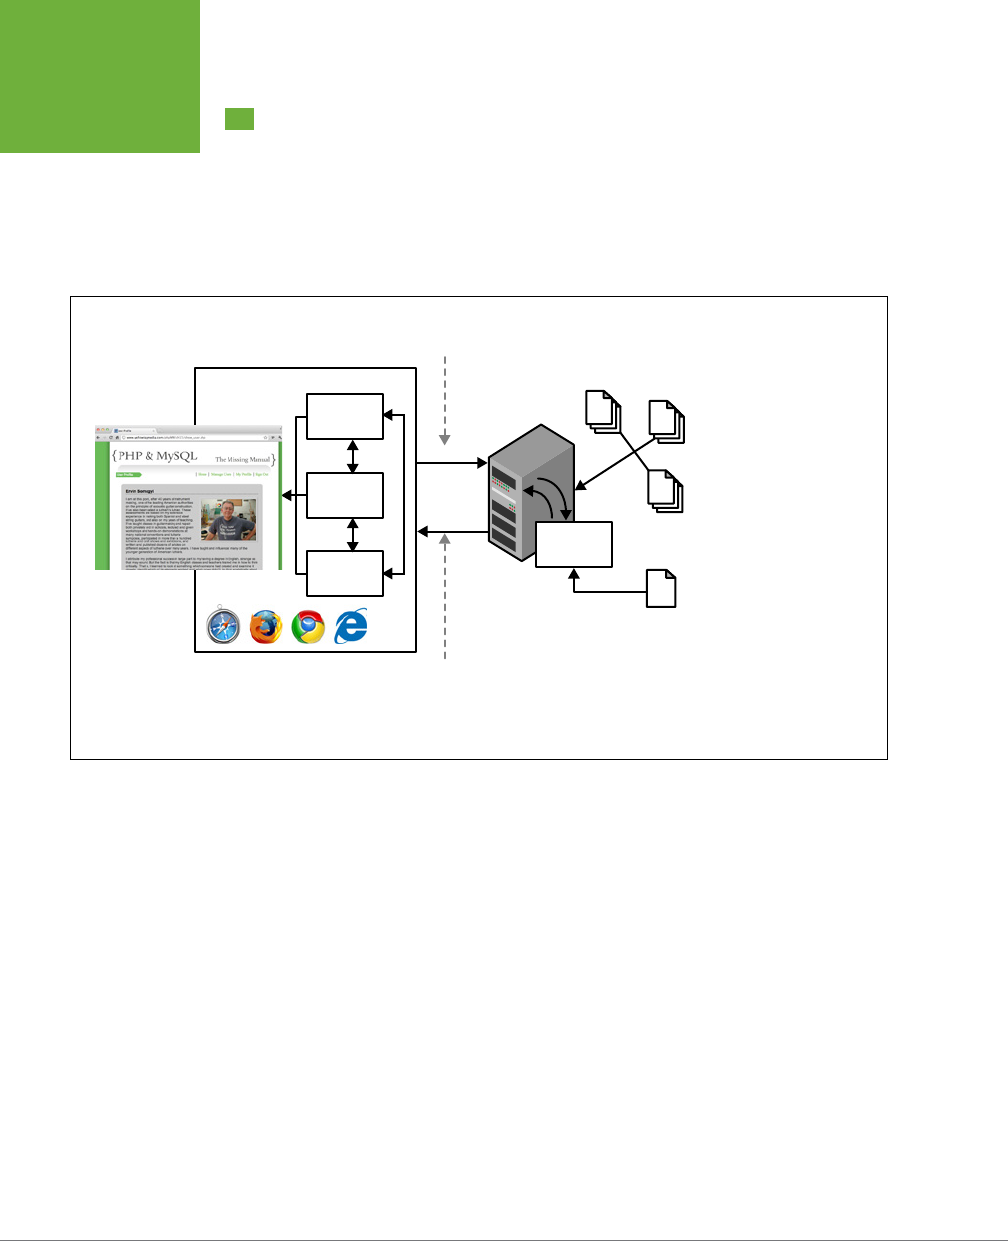
PHP & MYSQL: THE MISSING MANUAL
42
BUT WHERE’S
THAT WEB
SERVER?
But Where’s That Web Server?
Before you take that well-deserved break, there’s one question left to answer. Re-
member way back to the discussion about a PHP interpreter interacting with a web
server? All that business about PHP running locally or running remotely? Uploading
files, web hosting providers; remember all that stu? If not, Figure 1-32 should be a
helpful refresher as to how PHP usually functions.
Web Browser
HTML
renderer
HTML
Web
Server
Response is not PHP,
but the result of
interpreting PHP, usually
more HTML and CSS.
Could be for HTML, CSS,
PHP or a combination.
Request
Response
CSS
JavaScript
PHP
Scripts
CSS
renderer
JavaScript
interpreter
PHP
interpreter
FIGURE 1-32
Remember this diagram
from earlier? Even though
it hasn’t applied to your
first PHP program, it still
holds true. As soon as you
start writing scripts that
interact with web pages,
you’re going to need a
web server.
So what gives? You installed PHP locally and ran your script without problem, but
a web browser wasn’t involved
The PHP Interpreter Is a Program You Can Run
The PHP interpreter that’s shown in Figure 1-32 is just a program, like dir or ls
or which or anything else you can type into a command-line or terminal window.
And just like those other programs, you can run it on your scripts manually. In fact,
that’s just what you did. You ran the PHP interpreter (php) on your script, because
you installed WampServer or, if you’re on a Mac, because php is already installed.
But, this sort of script—where all it does is output some text—is not the typical PHP
script. It’s more of a “blow bubbles in the kiddie pool” script: helpful to get started,
but just the tiniest taste of what’s coming.

CHAPTER 1: PHP: WHAT, WHY, AND WHERE? 43
BUT WHERE’S
THAT WEB
SERVER?
So, you don’t need a web browser or a web server. You just needed the PHP inter-
preter. Because of that, there’s no sense uploading your script and trying to find the
PHP interpreter on your hosting provider, which requires shell access, which in turn
might require calling up tech support and spending 20 minutes on the phone giving
out maiden names and birthdates…in other words, it’s just not worth it.
But, the HTML Is Coming…
Keep those credentials handy, though, because in the next chapter, you
will
start
uploading your scripts. You’ll move beyond simply outputting text and begin to
output HTML. You’ll take input from an HTML form and churn back out styled,
web-friendly responses. And, you’ll move from using just a local PHP installation to
using a remote one.
Buckle up, take that break, and head on over to Chapter 2.

45
CHAPTER
2
With your first PHP script under your belt, you’ve made some real progress.
But that PHP script might not have been what you expected. Most web
developers don’t fall asleep at night dreaming of seeing this in a terminal
window:
Hello there. So I hear you're learning to be a PHP programmer!
Why don't you type in your name for me:
Brett
Thanks, Brett, it's really nice to meet you.
Even less impressive than its complexity (or lack thereof) is the script’s format. It’s
just plain text. There’s no formatting; in other words, no HTML.
In this chapter, you’re going to inject HTML into your scripts. No command-line
prompts and boring text. By the time you’re through, your script will be speaking
the language of the Web—HTML. In addition, you’ll see how PHP does one of its
core tasks: respond to an HTML form.
PHP Meets HTML
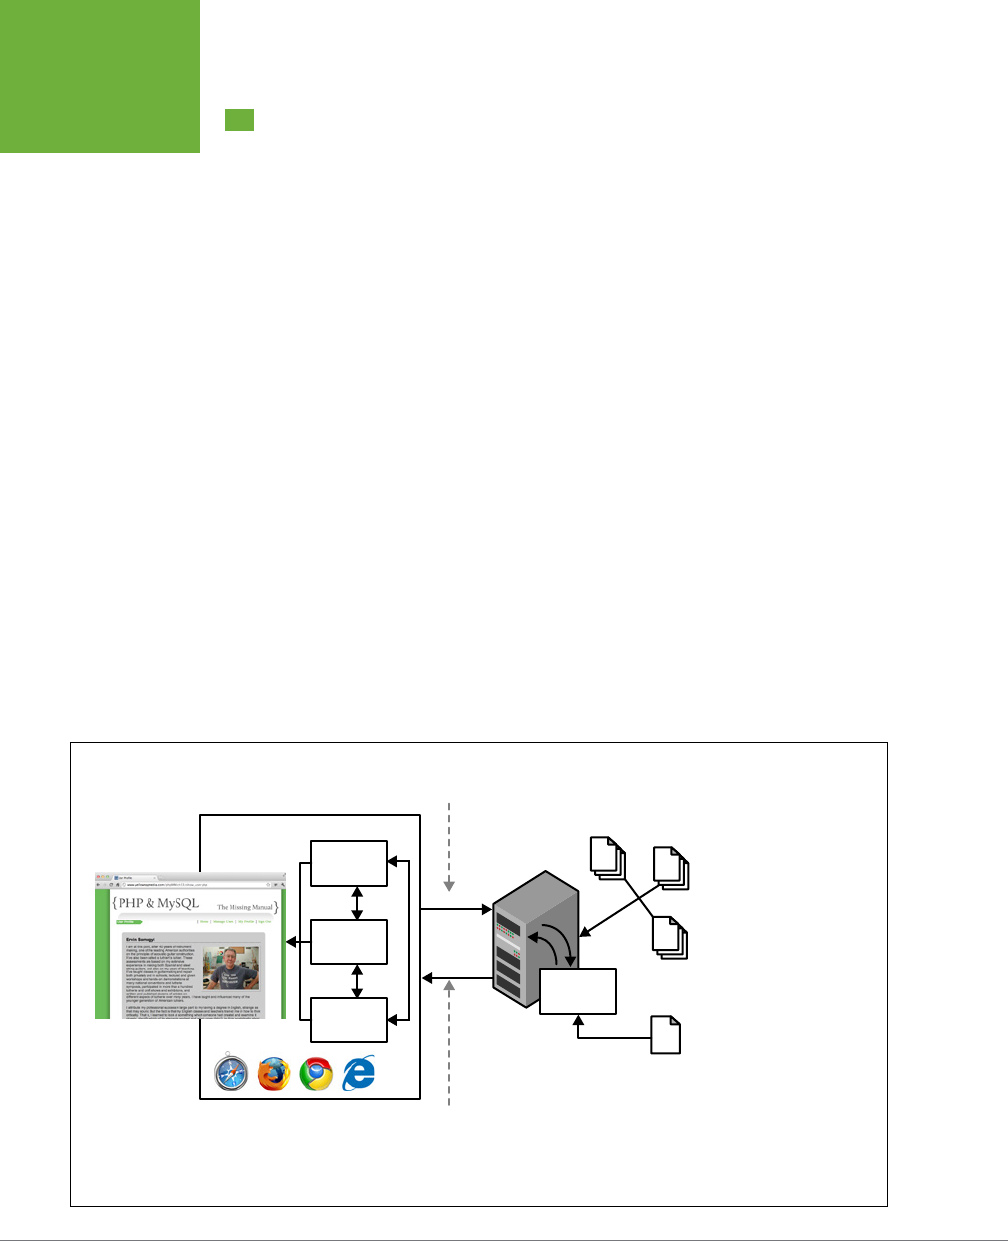
PHP & MYSQL: THE MISSING MANUAL
46
SCRIPT OR
HTML?
Script or HTML?
Before you can start doing fancy party tricks with PHP, you’ve got to get over a bit
of a conceptual hurdle. So far in your web programming journey, you’re probably
used to thinking about the technologies you’ve learned in strict categories: HTML
is markup, the structure of your page; CSS applies style to that structure; and
JavaScript adds some interaction, with everything from alert boxes to validation,
redirection, and widgets.
In the process, you probably also built some syntax categories. Your HTML is angle
brackets, <title> and <head> and <ul>, and the like. CSS is curly braces and style
keywords like p.warning and { } and border-style: dotted. The same is true with
JavaScript: you’ve got alert and strings in quotes like "Please enter a valid phone
number." And those categories are distinct. Your HTML is separate from your CSS,
which is separate from your JavaScript, even though they all interact with one another.
But with PHP, you’re going to have to abandon some of those categories. PHP
happily—and sometimes confusingly—mixes these categories. You can write a
PHP script that does programming tasks and then outputs HTML, CSS, and even
JavaScript.
Determination by Extension
PHP scripts are identified by the extension
.php
. Accordingly, web servers that sup-
ports PHP see a file with a
.php
extension and hand that file o to the PHP interpreter
for processing. The interpreter does its thing and hands the result of the interpreted
script back to the web server, which in turn passes that response along to a user’s
web browser. Another look at this process, which is shown in Figure 2-1, might help.
Web Browser
HTML
renderer
HTML
Web
Server
Response is not PHP,
but the result of
interpreting PHP, usually
more HTML and CSS.
Could be for HTML, CSS,
PHP or a combination.
Request
Response
CSS
JavaScript
PHP
Scripts
CSS
renderer
JavaScript
interpreter
PHP
interpreter
FIGURE 2-1
Unlike HTML, CSS, and
JavaScript, which are
handled by the browser
using the browser’s own
code, PHP scripts must
be handed off to another
program—the PHP inter-
preter. As discussed on
page 19, that program
deals with the scripts,
returning the results to a
web server, which then
can pass a response back
to your web browser.

CHAPTER2: PHP MEETS HTML 47
SCRIPT OR
HTML?
But what’s inside that script can be…well, all sorts of things. Remember, it’s the output
of a PHP script that is ultimately handed o to a browser, so that response
can’t
be
PHP. It must be some combination of HTML, CSS, and JavaScript—the things that a
web browser knows how to handle.
In other words, a PHP script might be made up of PHP commands, but it also must
be able to output more than just text, like
sayHello.php
from Chapter 1 does. It must
be able to output HTML, CSS, and JavaScript. Fortunately, this isn’t as dicult or
tricky as it might sound.
HTML Is Treated as HTML
You might be thinking, “Ok, I get it. I can use that echo command from Chapter 1
to output HTML, right?” Or maybe if you’ve used jQuery, you’re already a step be-
yond that: “Maybe there’s some cool PHP toolkit that makes building up an HTML
and CSS response easy.” Although both of those thoughts are true, as you’ll see in
this section, they’re actually not the simplest way to have a PHP script generate an
HTML response.
For example, here’s some HTML for a simple web form, sort of like the program you
already built in Chapter 1.
<html>
<head>
<link href="css/phpMM.css" rel="stylesheet" type="text/css" />
</head>
<body>
<div id="header"><h1>PHP & MySQL: The Missing Manual</h1></div>
<div id="example">Example 2-1</div>
<div id="content">
<h1>Welcome!</h1>
<p>Hello there. So I hear you're learning to be a PHP programmer!</p>
<p>Why don't you type in your name for me:</p>
<form action="scripts/sayHelloWeb.php" method="POST">
<p><i>Enter your name:</i> <input type="text" name="name" size="20" /></p>
<p><input type="submit" value="Say Hello" /></p>
</form>
</div>
<div id="footer"></div>
</body>
</html>

PHP & MYSQL: THE MISSING MANUAL
48
SCRIPT OR
HTML?
Type this code into a text editor (for a refresher on text editors, see page 35) and save
it as
sayHelloWeb.html
. For advice on where to save your files, see the box below.
UP TO SPEED
Directory Assistance
If you open
sayHelloWeb.html
locally, you should also put the
CSS and images referenced in the page alongside the file in the
correct directory structure. So, if your HTML is in
phpMM/
, you
should have
scripts/
,
css/
, and
images/
subdirectories inside
phpMM/
. Your HTML files go directly in
phpMM/
,
sayHelloWeb.
php
goes in
scripts/
, and your CSS and images go in
css/
and
images/
, respectively.
If you download the book’s examples, things are organized
even a little more tightly. You have a core folder like
ch01/
, and
then subdirectories for each chapter’s major headings:
01/
,
02/
,
and so on. Then, in each of those directories, you see the HTML
alongside
scripts/
,
css/
, and
images/
. You can use that layout, or
just drop all the downloaded files as-is into your own location,
and things should work just fine.
Or, you can put those files somewhere else and update the
paths in the HTML and CSS to point to that location. Either way,
you need to realize that if you just double-click this file on your
desktop, you might not see the correct images and styles.
NOTE You can download this HTML, along with the rest of the book’s sample files, from
www.missing
manuals.com/cds/phpmysqlmm2e
. Along with the HTML, you also get the CSS and images used by the samples,
which will give your programs a little extra visual pizzazz. Still, especially as you’re just getting started, you’ll
learn a lot more if you’ll type the PHP code for these programs yourself.
Nothing new here other than the form’s target:
scripts/sayHelloWeb.php
. Don’t
worry about that for now, though; you’ll deal with that shortly.
Open the page locally on your own computer. (Check out the box on page 22 for
more on getting your local web server going.)
If you get things in the right place, you’ll see something like Figure 2-2.
Your web browser sees all the HTML here and knows what to do: show a web page.
FREQUENTLY ASKED QUESTION
How do I access my local web server?
Even though you can count on your computer’s web browser
to know what to do with an HTML file, like
sayHelloWeb.html
,
you’ll want more than that before you go much further. If
you’ve followed along from Chapter 1, you should have MAMP
or WampServer installed. That means you’ve got a web server
ready to go on your local machine.
In Windows, WampServer serves HTML by default out of
C:\
wamp\www\
. You can also click the small, green “W” icon
in the taskbar at the bottom right of your screen and select
“www directory” to go directly to this location. Then, you can
access your files in a web browser by visiting
http://localhost
.
In Mac OS X, the default directory for your web files
is
/Applications/MAMP/htdocs
. You can drop
sayHelloWeb.html
in that directory and access it through
http://localhost:8888/
sayHelloWeb.html
. That also gives you a place to drop in the
downloaded CSS and images you should have by now.
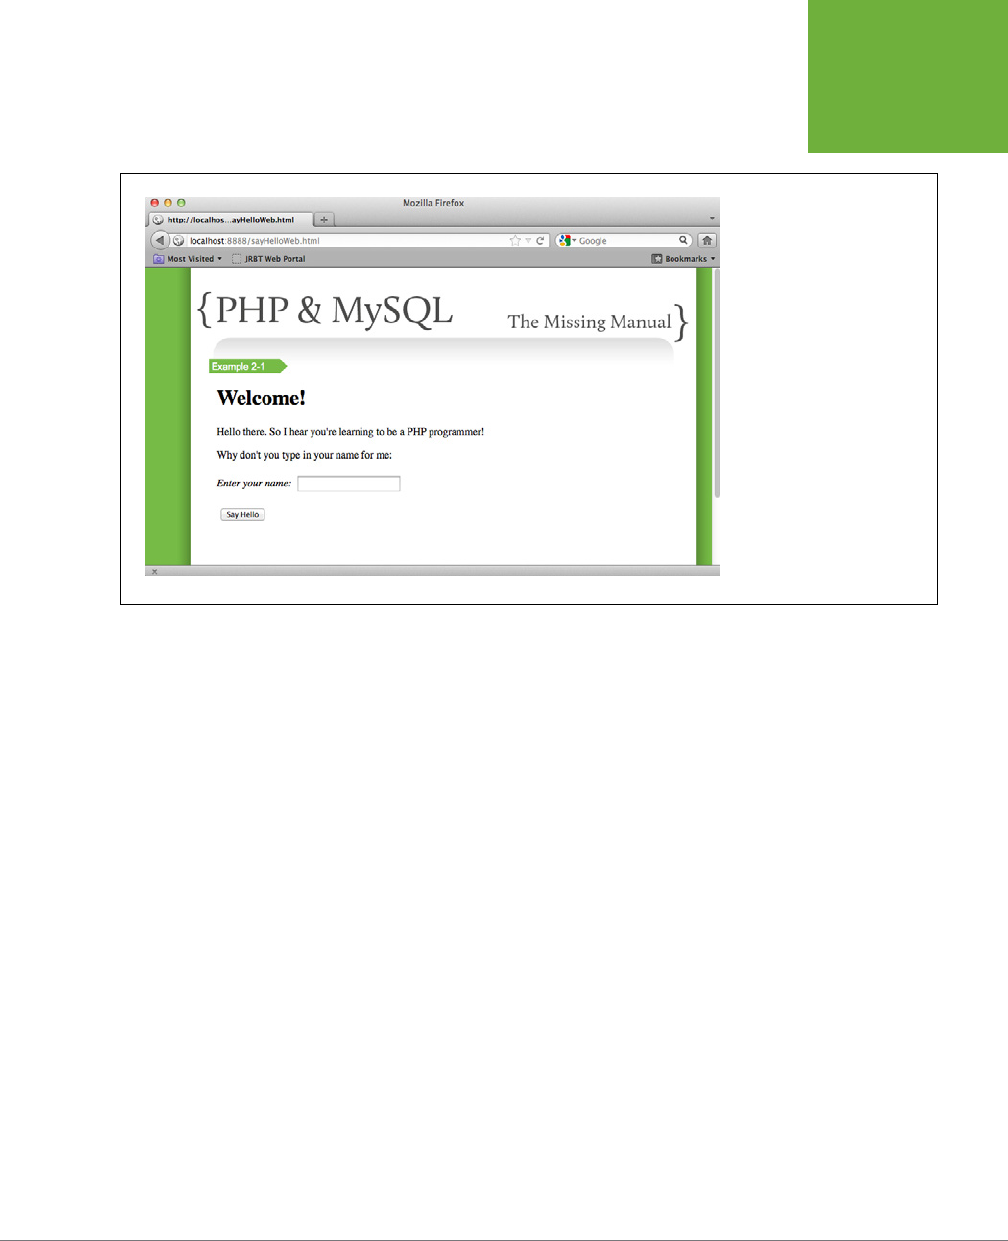
CHAPTER2: PHP MEETS HTML 49
SCRIPT OR
HTML?
FIGURE 2-2
If there’s anything confusing
here, you might want to take
a look
at HTML5: The Missing
Manual
by Matthew MacDonald
(O’Reilly) to regain your
bearings. Hopefully, though,
this HTML is straightforward for
you, and the biggest challenge
is making sure that it’s in your
working directory alongside
css/
,
images/
, and so on, or
that your path in your HTML
matches your own directory
structure choices.
PHP Is Not HTML (by Extension)
Just for the sake of experience, do something that might seem utterly bizarre to you:
rename
sayHelloWeb.html
with a
.php
extension, to
sayHelloWeb.php
. If you then
double-click this file, a number of things might happen—none of which you want.
If you have a code editor like Dreamweaver, XCode, or Eclipse, those editors might
launch and show you your file. Or, you might get an error because your computer
doesn’t know how to open the file.
Even worse, if you open the file in your web browser (using the browser’s Open
command, for example), the browser won’t know what to do with it. It will probably
ask you if you want to save the file (as demonstrated in Figure 2-3).
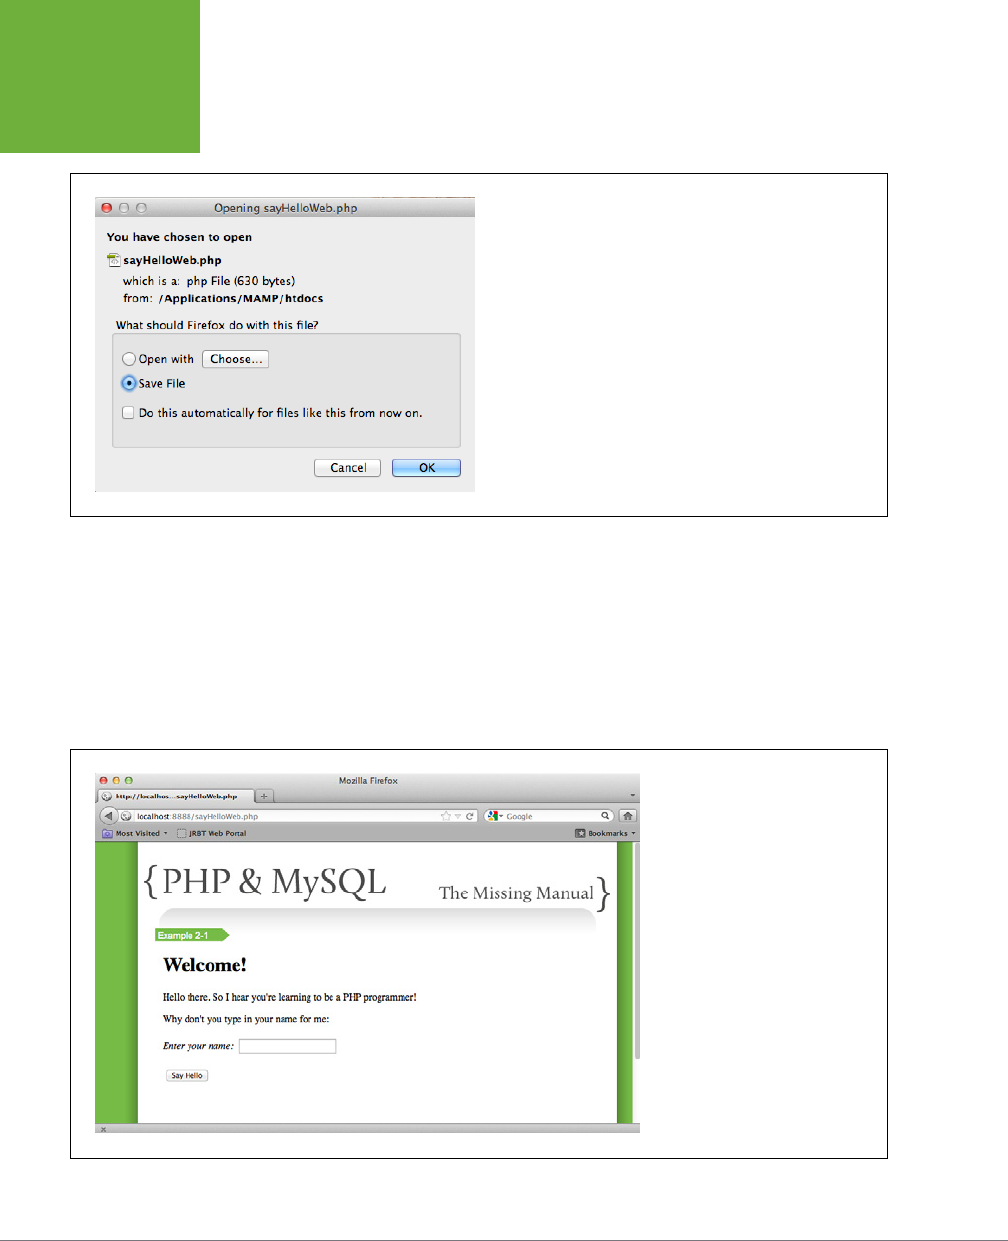
PHP & MYSQL: THE MISSING MANUAL
50
SCRIPT OR
HTML?
FIGURE 2-3
Web browsers don’t know what to do with files ending in
.php
. A
web server could hand that file off to a PHP interpreter, but your
browser? No clue. It just dumbly suggests you save the file.
The
sayHelloWeb.php
file is definitely not HTML in terms of the file type. But the file
contains HTML, so there must be some way to display that HTML. This time, instead
of double-clicking the file or opening it with the browser’s Open command, type
the file’s URL directly into the browser’s address bar. (If you’re not sure what this
URL is, refer back to the box on page 48.)
This time, you should see something that might surprise you; check out Figure 2-4
for the details.
FIGURE 2-4
Your web browser couldn’t open
sayHelloWeb.php
, and you know
it’s not an HTML file, based on the
.php extension. But this sure looks
like HTML. In fact, it looks exactly
like the HTML file
sayHelloWeb.html
from Figure 2-2, as it well should: it
contains the exact same HTML.

CHAPTER2: PHP MEETS HTML 51
PHP TALKS
BACK
PHP Can Be HTML—by Response
As you learned in the previous section, the browser can’t handle reading a PHP
script, but when you access the page through a locally running web server, things
just work. That’s because the PHP interpreter is perfectly happy to take the HTML
in the PHP script and push that HTML out as a response. The web server sends that
HTML on to a browser, and this time—because the browser is getting HTML, not a
file with a
.php
extension—it displays the HTML as a web page.
Now you’ve seen how a PHP script can return a full-blown HTML web page that any
browser can display. Well, that’s actually what you’re going to be doing a lot in this
book, starting in the next section: you’ll do some programming in your scripts, and
return HTML as a response.
But first, rename
sayHelloWeb.php
back to
sayHelloWeb.html
. Then, look back at
the form line in the HTML file:
<form action="scripts/sayHelloWeb.php" method="POST">
This means that your form is going to submit its information to a program called
sayHelloWeb.php
, a new PHP program you’re just about to write. (This time it will
do more than just crank out HTML without any programming at all!) Once the form
is submitted,
sayHelloWeb.php
takes over, the PHP interpreter runs the code, sends
out the response from
sayHelloWeb.php
, and hopefully that response is something
a user’s web browser can understand and display.
PHP Talks Back
Now that you have an HTML page sending information to
sayHelloWeb.php
, you
need to write some PHP. The PHP that you’re about to write to run on the Web is
not that much dierent than the program from Chapter 1 that you’ve already writ-
ten. You have to get information a little dierently because there’s no command
line that a user can use to enter information. But other than that, things stay pretty
much the same.
Write Another PHP Script
Open a new text editor and type the PHP shown here; it should look sort of like an
HTML-ized version of the
sayHello.php
program you’ve already written:
<html>
<head>
<link href="../css/phpMM.css" rel="stylesheet" type="text/css" />
</head>
<body>
<div id="header"><h1>PHP & MySQL: The Missing Manual</h1></div>
<div id="example">Example 2-1</div>

PHP & MYSQL: THE MISSING MANUAL
52
PHP TALKS
BACK
<div id="content">
<h1>Hello, <?php echo $_REQUEST['name']; ?></h1>
<p>Great to meet you. Welcome to the beginning of your
PHP programming odyssey.</p>
</div>
<div id="footer"></div>
</body>
</html>
Save this program as
sayHelloWeb.php
within the
scripts/
subdirectory, and be sure
that your file is in plain text and is using the right extension,
.php
.
NOTE You can download the example files for this section from this book’s Missing CD page at
www.
missingmanuals.com/cds/phpmysqlmm2e
.
Once you realize that a lot of this script is just HTML, you can probably already guess
what most of this program does. Here’s a section-by-section breakdown:
• The page starts out with a normal <html> element and head section.
• The body section begins and sets up the page heading and example number,
just like the regular HTML page,
sayHelloWeb.html
.
• The page defines a heading with <h1> and prints “Hello,”.
• The <?php tells the browser some PHP code is coming. Then, the $_REQUEST
variable is accessed, and a property called name within that variable is printed
by using echo.
• The end of the PHP code is indicated with ?>.
• The rest of the HTML is output, just as in
sayHelloWeb.html
.
WARNING To be extra clear, you should now have
sayHelloWeb.html
, an HTML page with a form, and
sayHelloWeb.php
, a PHP script that outputs HTML.
This program, like most PHP programs you’ll write, accepts its input from a web
page, either from one built in HTML like the pages you’ve created before, or from
another PHP program. It’s the job of that web page—
sayHelloWeb.html
in your
case—to let the user enter information, and then send that information on to this
program. The information from that HTML page is stored in $_REQUEST, which is a
special variable in PHP.
Variables Vary
A
variable
in PHP (or any other programming language) is simply a piece of code
that stores a value. Variables have names, and in PHP, those names can be almost
anything you want. You can tell that something is a variable in PHP because its name

CHAPTER2: PHP MEETS HTML 53
PHP TALKS
BACK
begins with a $. So, $myHeight is a variable called “myHeight,” and $_REQUEST is a
variable called “_REQUEST.”
NOTE Technically, the name of a PHP variable does not include the
$
, but most PHP programmers consider
that
$
a part of the variable itself. Therefore, you’ll hear PHP programmers say things like “dollar-sign my height”
instead of just “myHeight” to refer to the variable
$myHeight
.
Variables are not just names, either. They also have a value. So the value of $myHeight
might be the number 68 (for 68 inches) or the text “68 inches.” In PHP, though, you’re
not stuck with that value forever. You can change the value of a variable, which is
where the word “variables” comes from: a variable
varies
, or changes.
In
sayHelloWeb.php
, you’re using the special PHP variable $_REQUEST to get the user’s
name, which she entered into the form you built in
sayHelloWeb.html
. PHP gives you
the ability to get to anything a user entered into a form by using $_REQUEST and the
name of the form entry field—in this case, “name.” So, $_REQUEST['name'] returns
the information a user put into a web form, specifically into an input field called
“name.” If the user also entered in her phone number, say into a form field called
“phoneNumber,” you could get that value in PHP with $_REQUEST['phoneNumber'].
NOTE It’s okay if you’re still a little fuzzy on the details of how variables and
$_REQUEST
work. You’ll learn
a lot more about variables and, in particular, special variables in PHP like
$_REQUEST
in the next few chapters.
Once your PHP program grabs the value from the “name” form field, it prints out
that value by using echo, something you’ve already used in your first PHP program
(page 38). That value is dropped right into the HTML that’s sent back to the brows-
er—something you’ll want to check out for yourself by running your new program.
Check Things Out Locally
Because you should have MAMP or WampServer installed, you can check the files
you’ve created so far on your own computer, although you’ll need to go through your
local web server. Start a browser and visit
sayHelloWeb.html
on
http://localhost:8888
(in Mac OS X, using the default MAMP Apache port) or
localhost
(in Windows, using
the default installation).
WARNING
Do not
just double-click
sayHelloWeb.html
. As discussed in the box on page 48, even though
your browser will open up the HTML file, it won’t know what to do when that file submits to a PHP script.
Enter a name, click Say Hello, and you should get a response similar to that shown
in Figure 2-5.
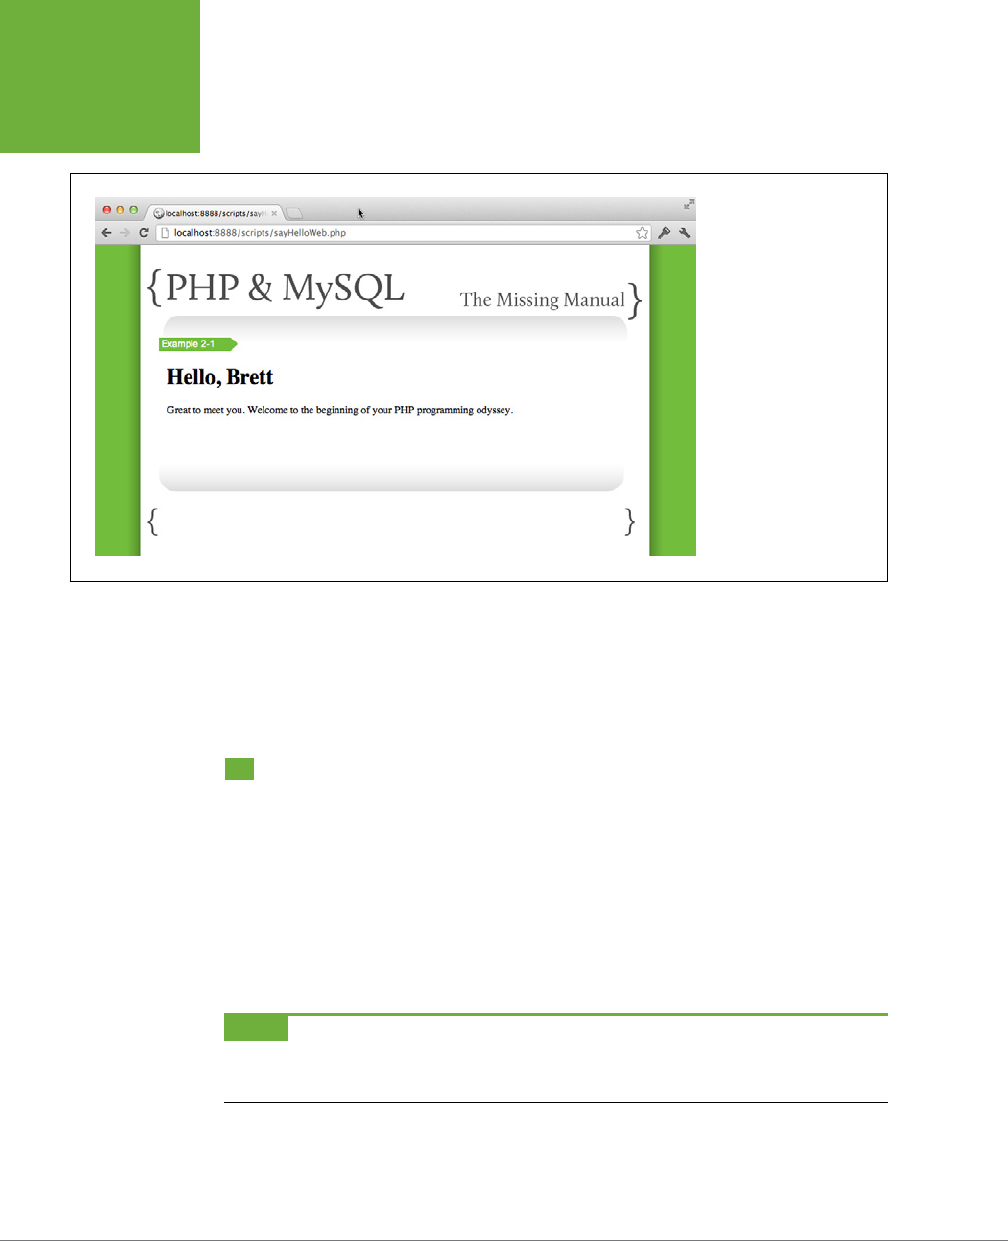
PHP & MYSQL: THE MISSING MANUAL
54
RUN PHP
SCRIPTS
REMOTELY
FIGURE 2-5
Now this looks more
like web programming.
Your PHP script output
some HTML, inserted the
the name that the user
entered into an HTML form,
and then output some
more HTML.
So far, you’ve got an HTML page, a PHP script, and some CSS and images that are
used by both. But, unless you plan on parading your user base through your oce
or den and letting them use your computer, things are pretty limited. This script
only works on your local machine, and that’s got to change.
Run PHP Scripts Remotely
It’s time to get your programs out to the masses (or at least your buddy a few cubes
down who doesn’t believe you’re a real programmer). That means you need a
hosting
provider,
often called an
Internet Service Provider
(ISP) or web hosting company.
All a hosting provider does is provide you with server space to house your web sites
and applications; software to serve up your HTML and CSS and JavaScript—and now
your PHP and MySQL; and some connection with the domain name service (DNS)
so that people can access your site with a name like
coolPhpSites.com
instead of
98.234.1.23.
NOTE You don’t need to understand everything you just read to keep going. The basic idea is what’s
important: you need a place to put your files that makes them available on the Internet rather than just on your
local computer.
Once you’ve got a hosting provider, it’s just a matter of getting the right connection
information, and getting your files online. Finding a hosting provider that fits what

CHAPTER2: PHP MEETS HTML 55
RUN PHP
SCRIPTS
REMOTELY
you’re looking for is probably the hardest task; for some help on that tricky problem,
check out the box below.
Once you’ve selected a provider, there are a couple of key bits of information that
you’ll need: the hostname to which you can FTP (page 8) and connect via SSH or
telnet, and the directories into which your web files should go. If you’re unfamiliar
with connecting by using FTP or SSH, your hosting provider probably has some
helpful tutorials on how to do all of this.
FREQUENTLY ASKED QUESTION
The Host with the Most
How do I choose a good hosting provider?
This is one of the toughest questions in the entire book. There
are so many factors to consider, and everyone reading this
has different priorities. Are you looking for an inexpensive
solution or is stability and support at the top of your wish list?
Will you use a gamut of technologies from PHP to Ruby on Rails
to MySQL and PostgreSQL to WordPress to CoffeeScript—or is
HTML, CSS, JavaScript, and PHP and MySQL enough? Do you
want upgradeable server software and mailed-out logs and
the ability to configure CPUs and online backups, or is a simple
SSH/telnet session enough for you?
In the long run, only
you
know the answers to those questions.
But, to work through this book, here’s what you absolutely
will
need:
• PHP support (version 5 or higher)
• MySQL support (version 5 or higher, preferably 5.5 or
higher)
• Some type of terminal access to your account, like telnet
or SSH.
• Some type of FTP access to your account.
These are going to be the bare minimum. And if you can, you’d
probably also like a few other things, too:
• The ability to drop a PHP script anywhere in your
web directories and have them be treated as PHP (no
configuration or special directories).
• phpMyAdmin setup to access your MySQL databases and
tables.
• Email support (often better than phone support, because
you have a record of communications!) that gets a
response with 24 hours.
Now, that might seem like a lot, but you can find a ton of hosting
providers that give you all this for a reasonable price. You could
check out Bluehost (
www.bluehost.com
) or Kattare (
www.
kattare.com
), or if you want to get a littler higher-end, try Engine
Yard (
www. engineyard.com
) or Heroku (
www.heroku.com
).
Once have your hosting provider set up, it’s time to upload some files.
Upload your HTML, CSS, and PHP
When you’re building a web page, you have to upload your HTML, CSS, and any
JavaScript you’ve written to your own web server. Then, you access those files with
a browser, through a web address like
yellowtagmedia.com/phpMM/sayHello.html
.
Typing that web address into your browser causes your server to supply your HTML
to whatever web browser requested the page.

PHP & MYSQL: THE MISSING MANUAL
56
RUN PHP
SCRIPTS
REMOTELY
PHP works the same way. Once you’ve written your PHP programs, you upload them
to your web server along with your HTML and CSS. Typically, you’ll end up with files
and directories like this:
• Root or Home Directory (/). This is your web root in which you put all of your
HTML. This usually is the location referenced by a URL like
yellowtagmedia.
co m/,
without any specific file after the web server name.
• CSS Directory (css/). This is the directory in which all of your site’s CSS is stored.
• JavaScript Directory (js/). Your JavaScript files go here. You’ll often see this
directory also called
scripts/
, but because PHP programs are also called scripts,
it’s a good idea to be more explicit in your naming.
• PHP Directory (scripts/). Here’s where you’ll put all of your PHP programs.
Again, you could call this something more specific like
php/
or
phpScripts/
, but
more often than not, websites use
scripts/
for this directory, so following that
lead is a good habit to get into.
• Examples Directory (ch01/, ch02/, and so forth). As you’re working through
the examples, you’re going to end up with a lot of PHP programs, and fast.
To keep everything organized, you should have a separate directory for each
chapter. For example, when you upload
sayHello.html
and
sayHelloWeb.php
,
upload them into
ch02/sayHello.html
and
ch02/scripts/sayHelloWeb.php
.
NOTE You don’t have to organize things this way, but if you do, all the examples you download for this book
will work without any changes. If you do change this directory structure, you’ll need to change all the references
in your HTML and PHP to CSS, JavaScript, and other PHP programs to reflect that change.
Now that you have your HTML and PHP ready, you need to upload those files to the
appropriate directories on your web server. You should also download
phpMM.css
as
well as the accompanying images from the book’s website at
www.missingmanuals
.com/cds/phpmysqlmm2e
.
Once you have everything in place, your web server directory structure should look
something like Figure 2-6.
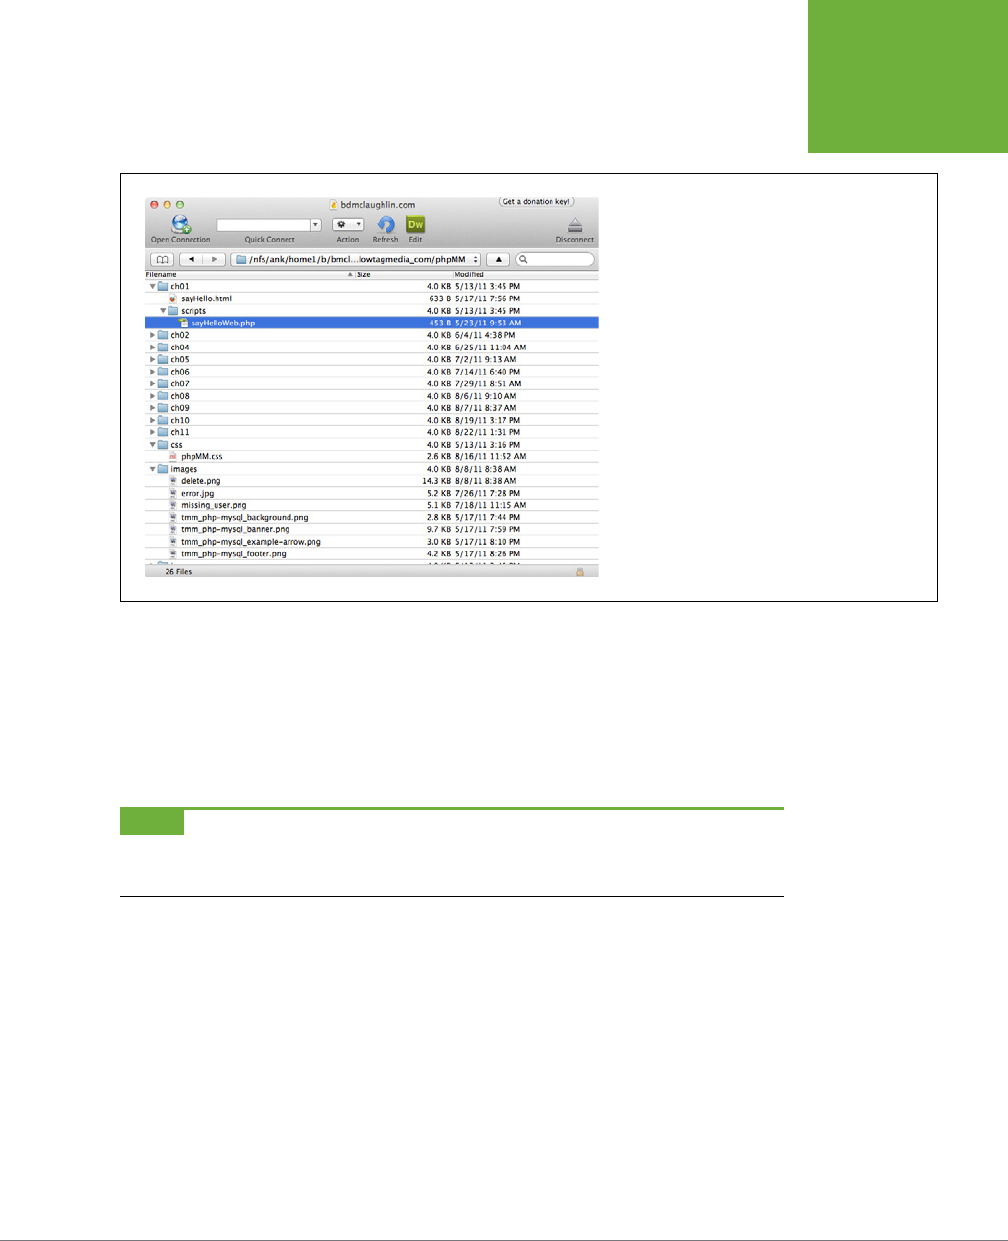
CHAPTER2: PHP MEETS HTML 57
RUN PHP
SCRIPTS
REMOTELY
FIGURE 2-6
The HTML and PHP files you created are specific to this
chapter, so they belong in
ch02/
. But
phpMM.css
is for
all the book’s examples you’ll be building, so put it in
css/
under the root of your web server.
Run Your Second Program
If you followed along in the previous section, you’ve got your HTML and CSS in their
proper places, and your HTML form has your PHP program set as its action. You
also should have
sayHelloWeb.php
in your
ch02/scripts/
directory. All that’s left is
to take your PHP for a spin. Start a web browser, go to your web server, and then
add
ch02/sayHelloWeb.html
to your server name.
NOTE You might need to add a prefix, like
phpMM/
, if you added a subdirectory under your web root. So,
if your examples are in
[WEB ROOT]/phpMM/ch02/
, your URL would be
http://[your-host-name]/phpMM/ch02/
sayHelloWeb.html
.
You should see the HTML you created in
sayHelloWeb.html
, just like in Figure 2-7.
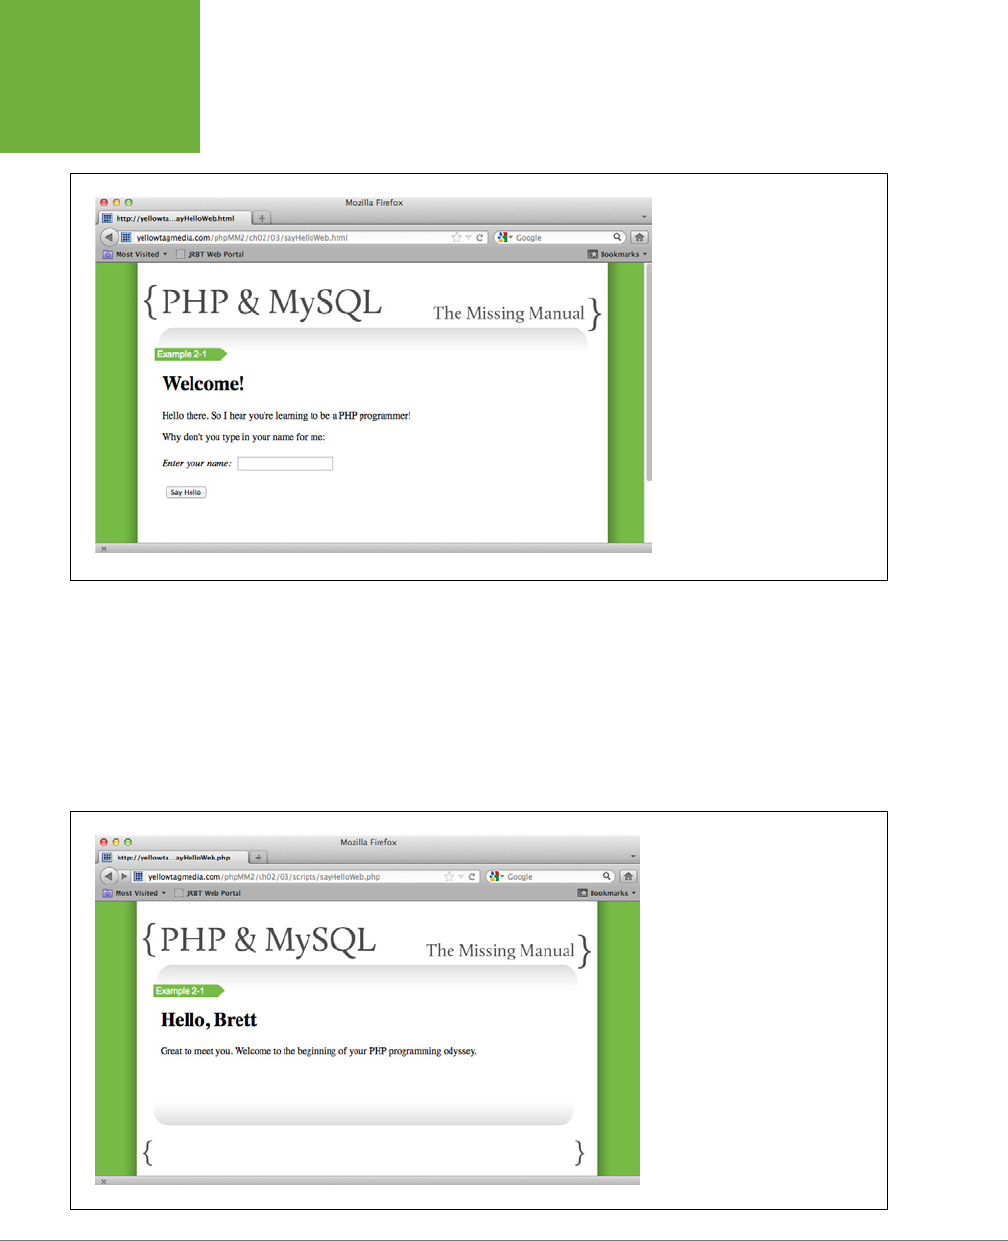
PHP & MYSQL: THE MISSING MANUAL
58
RUN PHP
SCRIPTS
REMOTELY
FIGURE 2-7
More often than not, you’ll access
an HTML page rather than a PHP
program directly. But those HTML
pages will use your PHP programs
to generate responses to your
users’ requests.
Type your name and then click the Say Hello button. This cleverly labeled submit
button sends your name as part of the form to the form’s action, which is your
sayHelloWeb.php
program. That program then runs on your web server. You should
get a response back, similar to Figure 2-8.
This is the same form and response you saw back in Figure 2-5. Whether it’s on your
own computer or a remote server, the web page looks the same.
FIGURE 2-8
The web browser doesn’t actually
run your program. Instead, it asks
your server to run the program, and
that server then gives the result
of running
sayHelloWeb.php
back
to the browser, which shows you a
personalized welcome message.

CHAPTER2: PHP MEETS HTML 59
RUN PHP
SCRIPTS
REMOTELY
Welcome to Programming!
It might seem like you’ve done a lot of work just to have a web browser tell you
your name. In fact, you could probably write the same program in JavaScript if you
wanted. But now that you’ve created a few PHP programs, you can see how easy
it is to write this sort of code.
And before you know it, you’ll be doing a lot more than telling users their names.
You’ll be talking to a database, doing advanced calculations, making decisions based
on information the user gave you and what you have stored in a database, and more.
But it all begins with a little HTML, a PHP program like the ones you’ve just written,
and the directory structure you’ve put in place.
FREQUENTLY ASKED QUESTION
PHP and Your Provider
Where do all my files go?
As you’ve probably already realized, when it comes to running
your scripts, the hardest part often isn’t the PHP. Instead,
it’s figuring out where things go for your particular hosting
provider.
Where do your web files go? A
public_html/
directory, or
somewhere else altogether? Usually, you’ll see either a
www/
or
public_html/
directory. Or, to be even safer, just call or
email your hosting provider and ask them. They’ll have an
easy, definitive answer to this question.
Where do scripts go? In a special directory, or anywhere, as
long as they have a
.php
extension? Most hosting providers let
you drop PHP scripts anywhere you want, and the host’s web
server will serve anything with a
.php
extension via the PHP
interpreter. But this is another question for which your hosting
provider should supply a clear answer.
How can you organize things on your local computer so that it’s
easy to upload your HTML and images and scripts directly to
your hosting provider? This one is up to you. You should spend
some time coming up with your own ideas and preferences,
and then just try your best to be consistent.
Fortunately, these are all issues that once you figure them
out the first time, you usually don’t have to figure them out
again. So, take the time now to ensure that you can run your
PHP on your hosting provider. Even though it’s nice to have
PHP running locally, it’s online that PHP really shines, and the
same will be true for MySQL soon.
Going forward, it will be assumed you’re running things online,
as well. So, although you can use a tool like Dreamweaver,
NuSphere, or Eclipse to edit your scripts locally, all the examples
and instructions expect that you’re uploading and running
things remotely, on a hosting provider.

61
CHAPTER
3
You’ve got a couple of PHP programs running, and have a handle on how PHP
can interact with an HTML form. Still, although you’re a little more comfort-
able with how PHP as a whole interacts with web servers and web browsers,
what’s actually going on
in
those PHP scripts? It’s time to dig a good deal deeper
and start to
understand
what’s going on in the code you’re writing. In this chapter,
you’re going to get comfortable with a lot of the PHP syntax. That means learning
what special words—usually called
keywords
—you type into your programs and
what each one of those keywords instructs PHP to do.
Fortunately, this learning doesn’t mean you can’t still build interesting programs
that run in a web browser. In fact, because almost everything that’s done with PHP
involves web pages, all of your scripts in this chapter will accept information from
a web form and work with that information. So, you’re not just learning PHP; you’re
learning to write web applications.
PHP Syntax: Weird
and Wonderful

PHP & MYSQL: THE MISSING MANUAL
62
GET
INFORMATION
FROM A WEB
FORM
Get Information from a Web Form
In
sayHelloWeb.php
, you used the following line to get the value of a variable called
“name” from the
sayHello.html
web form:
echo $_REQUEST['name'];
You might remember that $_REQUEST is a special PHP variable that lets you get
information from a web request (page 53). You used it to get one particular piece
of information—the user’s name—but it can do a lot more.
NOTE You can find the finished example code for this section on this book’s Missing CD page at
www
.missingmanuals.com/cds/phpmysqlmm2e
.
Accessing Request Parameters Directly
In fact, to see just how handy $_REQUEST really is, go ahead and start your text edi-
tor. Enter the code that follows, which lets your user enter in his name and several
other important bits of contact information, like his Twitter handle, Facebook page
URL, and email address.
<html>
<head>
<link href="../css/phpMM.css" rel="stylesheet" type="text/css" />
</head>
<body>
<div id="header"><h1>PHP & MySQL: The Missing Manual</h1></div>
<div id="example">Example -1</div>
<div id="content">
<h1>Join the Missing Manual (Digital) Social Club</h1>
<p>Please enter your online connections below:</p>
<form action="scripts/getFormInfo.php" method="POST">
<fieldset>
<label for="first_name">First Name:</label>
<input type="text" name="first_name" size="20" /><br />
<label for="last_name">Last Name:</label>
<input type="text" name="last_name" size="20" /><br />
<label for="email">E-Mail Address:</label>
<input type="text" name="email" size="50" /><br />
<label for="facebook_url">Facebook URL:</label>
<input type="text" name="facebook_url" size="50" /><br />
<label for="twitter_handle">Twitter Handle:</label>
<input type="text" name="twitter_handle" size="20" /><br />
</fieldset>
<br />

CHAPTER 3: PHP SYNTAX: WEIRD AND WONDERFUL 63
GET
INFORMATION
FROM A WEB
FORM
<fieldset class="center">
<input type="submit" value="Join the Club" />
<input type="reset" value="Clear and Restart" />
</fieldset>
</form>
</div>
<div id="footer"></div>
</body>
</html>
POWER USERS’ CLINIC
HTML Should Be Semantically Meaningful
You might have noticed some pretty big changes in this HTML
from the simple form in Chapter 2. In that chapter, the form
used
<p>
tags to break up the form labels and input boxes,
and manually formatted the form labels with
<i>
tags. That
got the job done, but it’s not a good use of HTML.
Whenever you’re writing HTML, you’re actually structuring
your page. So a form tag doesn’t really do anything visually;
it just lets a browser know, “Hey, here’s a form.” When you use
tags like
<i>
, though, you’re not describing structure; you’re
telling the browser how something should
look
. That’s really
not what HTML is for, though—it’s a job for CSS.
In this form, however, all the formatting has been pulled
out. Instead, all the labels are identified with the
<label>
element and a
for
attribute. That identifies the labels
as
labels—regardless of how those labels end up looking—and
also connects each label with the specific input field to which
it matches. There’s also a
<fieldset>
element that surrounds
the different blocks within the form: one for the labels and text
fields, and a second for the form buttons. This also provides
semantic information
; in other words, it provides information
that has meaning.
By making the HTML mean something, a browser (and other
HTML authors) knows what things actually
are
in your form:
labels are meant for…well…labeling things. Fields are grouped
together with
<fieldset>
. And italic and boldface formatting
are left to your CSS, as they should be.
What’s really cool here is that now your CSS can do an even
better
job of styling your form. Because you’ve eliminated
formatting in the HTML itself, you can style all your form labels
the same way—perhaps by bolding them, right-aligning them,
and adding a right margin of 5 pixels. The same is true of your
sets of fields; you might put a border around related fields,
which is exactly what’s going on in the CSS applied to this
form. In fact, to see how the CSS affects these HTML elements,
check out Figure 3-1.
In truth, if you’re new to making your pages semantically
meaningful, it might take time to get used to using HTML just
for structure and keeping all your style in CSS. But, stick with
it; your pages will look better, and anyone who has to update
your pages down the line will thank you.
Save this file as
socialEntryForm.html
. To ensure that your HTML is just the way
you want, go ahead and upload it to your server, in the
ch03/
directory. Make sure
you’ve got the book’s CSS in the right place—under
css/
in your server’s root—and
then open a browser and head over to your HTML form. You should see something
like Figure 3-1.
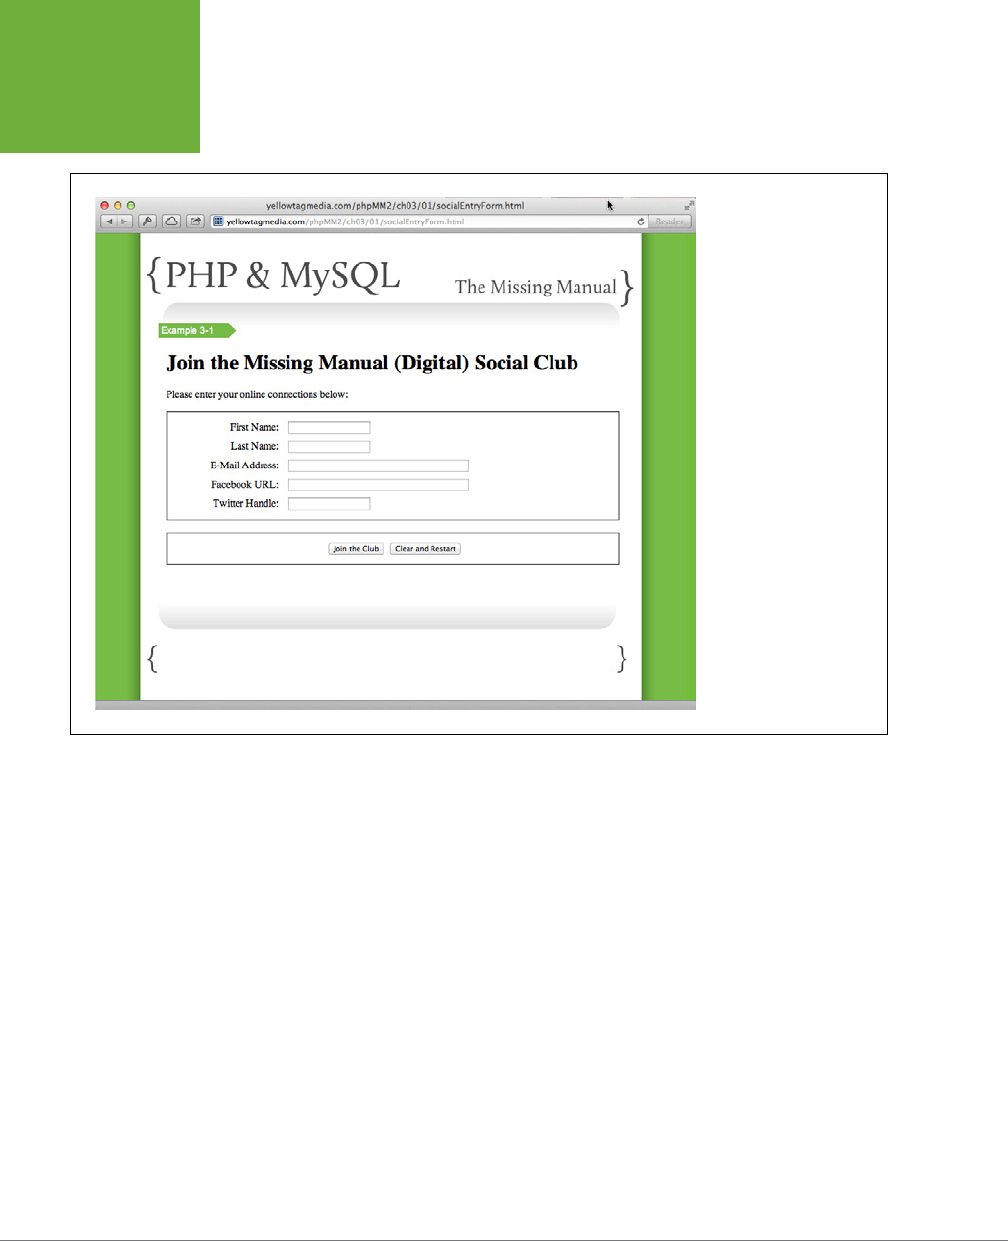
PHP & MYSQL: THE MISSING MANUAL
64
GET
INFORMATION
FROM A WEB
FORM
FIGURE 3-1
This web form is a typical
entry page for a user to
fill in. But, what happens
when this form is submit-
ted? You’re about to find
out (see page 65), and, in
fact, take control of all this
entered information.
In
sayHelloWeb.php
, you used $_REQUEST to extract submitted form information and
asked specifically for the “name” value. With this new form, however, there’s a lot
more information contained in the form.
To get all that information, you need to create a new script called
getFormInfo.php
,
and enter the following code:
<html>
<head>
<link href="../../css/phpMM.css" rel="stylesheet" type="text/css" />
</head>
<body>
<div id="header"><h1>PHP & MySQL: The Missing Manual</h1></div>
<div id="example">Example 3-1</div>
<div id="content">
<p>Here's a record of what information you submitted:</p>
<p>
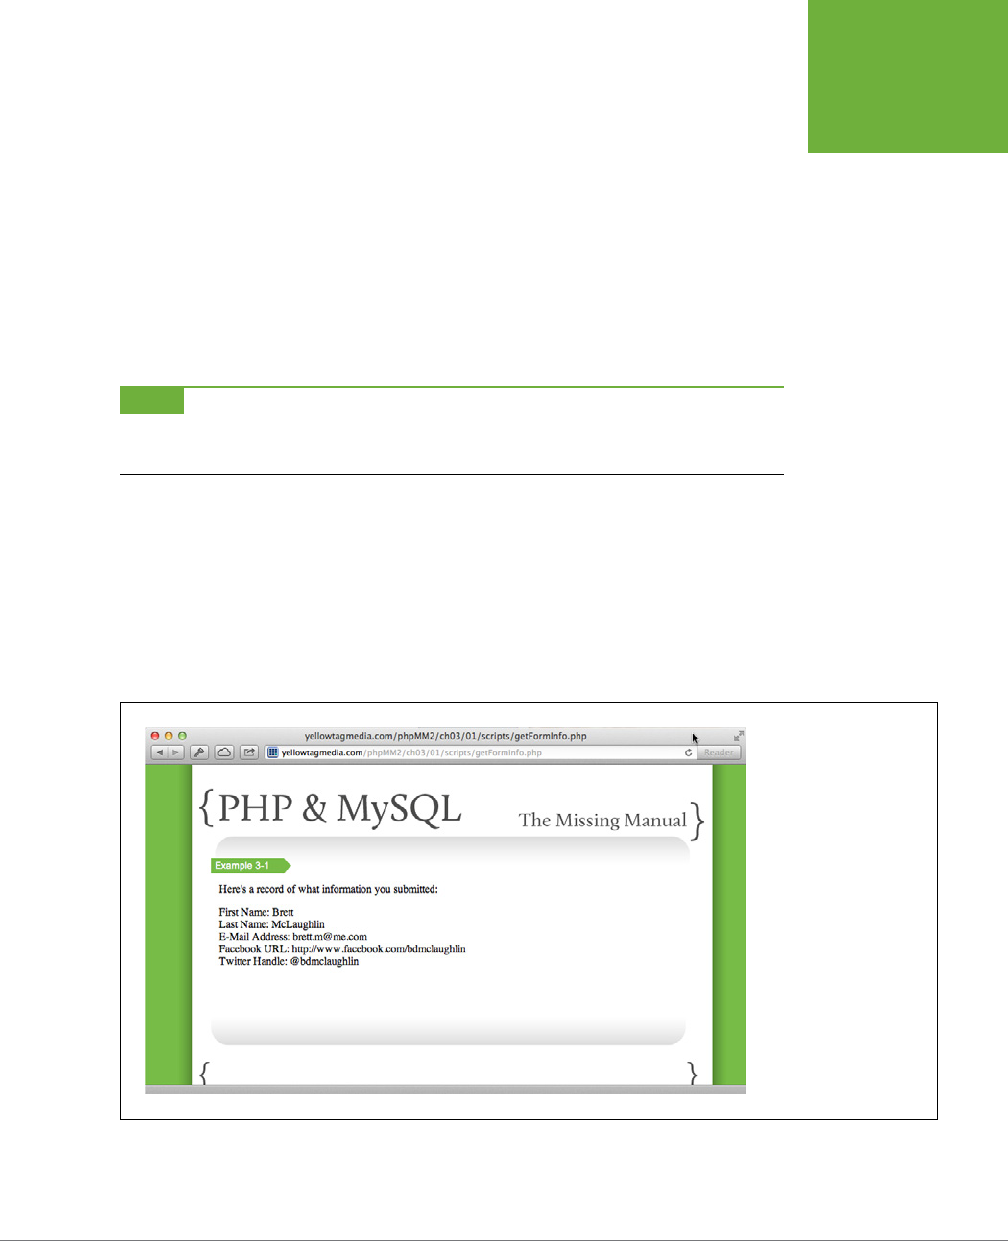
CHAPTER 3: PHP SYNTAX: WEIRD AND WONDERFUL 65
GET
INFORMATION
FROM A WEB
FORM
First Name: <?php echo $_REQUEST['first_name']; ?><br />
Last Name: <?php echo $_REQUEST['last_name']; ?><br />
E-Mail Address: <?php echo $_REQUEST['email']; ?><br />
Facebook URL: <?php echo $_REQUEST['facebook_url']; ?><br />
Twitter Handle: <?php echo $_REQUEST['twitter_handle']; ?><br />
</p>
</div>
<div id="footer"></div>
</body>
</html>
NOTE If you want to start taking a little more control of your scripts, you can name this program something
other than
getFormInfo.php
. Just be sure that you also update
socialEntryForm.html
and change the form’s
action
attribute value to match that custom script name.
By examining this code, you can already see what’s going on here. In addition to
grabbing the value of the “first_name” and “last_name” fields—similar to getting the
value of the “name” field in
sayHelloWeb.php
(page 53)—the code uses $_REQUEST
to pull in the values the user entered into the other form fields.
Go back to your
socialEntryForm.html
web form, enter your information, and then
submit the form. You should see the result of
getFormInfo.php
running, and your
browser should show you something similar to Figure 3-2.
FIGURE 3-2
Almost everything in PHP
begins with some piece of
information submitted via
either an HTML web form
or another PHP script.

PHP & MYSQL: THE MISSING MANUAL
66
GET
INFORMATION
FROM A WEB
FORM
In fact, the following line is the way you’ll use the $_REQUEST variable in most of
your PHP programs:
echo $_REQUEST['FORM_INPUT_FIELD_NAME'];
Create Your Own Variables
Of course, there might be times when you don’t want to just display out the value
of a field. Think back to your first program,
sayHello.php
(the version from page 48
that didn’t run on the web). In that program, you created your own variable:
$name = trim(fgets(STDIN));
PHP lets you create all the variables you want. Just give each one a descriptive name
(as described in the box below) and put a dollar sign before that name, like this:
$numberSix = 6;
$thisIsMyName = "Brett";
$carMake = "Honda";
WORD TO THE WISE
What’s in a Name? A Whole Lot!
PHP doesn’t actually require you to use descriptive names. In
fact, there are thousands of PHP programs on the Web with
code that looks like this:
$x = $_REQUEST['username'];
$y = $_REQUEST['password'];
This code runs just as well as similar code that uses much more
descriptive names:
$username = $_REQUEST['username'];
$password = $_REQUEST['password'];
So, what’s the big deal? Many programmers will try to convince
you that it’s a lot of extra work to type in these longer descrip-
tive names. That’s true, too.
Then again, how much work is it when you’ve got to track down
the username variable in a piece of code you didn’t write, or
code that you did write, but many months ago? Suppose you’ve
got a line much later in a script like this:
echo "Welcome back to the site, " . $y;
Suddenly, it’s not so clear what
$x
is and what
$y
is. Was
$x
the user name? Or was it
$y
? Be careful: Nobody wants his
password printed out instead of his user name!
Using descriptive names, even if they’re longer and take a little
extra time to type, will make your code easier to read, for you
and anyone else who might need to look at it down the road.
Now that you know the basic code for creating a variable, go back to your new
program,
getFormInfo.php
. Instead of just using echo to print out the submitted
information, store each piece of information in a variable. By doing so, you can use
that information however you want, and as many times as you want. Here’s what
your variables might look like:
<?php
$first_name = $_REQUEST['first_name'];
$last_name = $_REQUEST['last_name'];
$email = $_REQUEST['email'];

CHAPTER 3: PHP SYNTAX: WEIRD AND WONDERFUL 67
GET
INFORMATION
FROM A WEB
FORM
$facebook_url = $_REQUEST['facebook_url'];
$twitter_handle = $_REQUEST['twitter_handle'];
?>
<html>
<head>
<link href="../../css/phpMM.css" rel="stylesheet" type="text/css" />
</head>
<body>
<!-- Existing HTML code -->
</body>
</html>
Notice that you can create blocks of PHP code—beginning with <?php and ending
with ?>—anywhere you want. In this script, there’s now a block of PHP before any
HTML and then several small blocks of PHP within the big chunk of HTML. It’s up
to you when and where your PHP goes, as long as it gets the job done. You could
have put this block of PHP between the page’s opening html and head element or
between the head and the body elements; that choice is up to you.
WARNING Sometimes, just because you
can
do something doesn’t mean you should. It’s usually best to
do as much of your PHP work as you can before you output any HTML and then output as much of your HTML as
you can in a single place. That keeps most of your code in one place and most of your HTML in another place.
Of course, you’ll still have lots of times when you insert PHP into your HTML, as in
getFormInfo.php
, and that’s
okay. Those little bits of PHP fit into the HTML, and they certainly don’t mix things up as much as 20 or 30 lines
of PHP stuck in the middle of your HTML.
You can check out your form in a browser, but you shouldn’t see anything dierent
from what you already saw (take a look back to Figure 3-2). That’s because your
HTML—the part of the script that the browser displays to a user—hasn’t changed at all.
But now there’s a little bit of wasteful programming going on. You’re getting the
value of each form field through the $_REQUEST variable once, in the PHP block
before all your HTML, and then you’re getting all those variable values again in the
HTML itself. Anytime you’re doing something twice, you’re wasting valuable web
server resources.
Fortunately, it’s easy to do away with this redundancy. That’s because you have all the
values you want, stored in your variables, $first_name, $last_name, and so on. So, in
the HTML part of
getFormInfo.php
, you can just
echo out
those variables; you don’t
need to deal with $_REQUEST anymore. Here’s how to update the “content” <div>:
<div id="content">
<p>Here's a record of what information you submitted:</p>
<p>

PHP & MYSQL: THE MISSING MANUAL
68
GET
INFORMATION
FROM A WEB
FORM
First Name: <?php echo $first_name; ?><br />
Last Name: <?php echo $last_name; ?><br />
E-Mail Address: <?php echo $email; ?><br />
Facebook URL: <?php echo $facebook_url; ?><br />
Twitter Handle: <?php echo $twitter_handle; ?><br />
</p>
</div>
Take a moment to submit values into your
socialEntryForm.html
again to ensure that
your updated script works. You should see the exact same result as before (compare
your results to Figure 3-2 again). It might surprise you that you’ve done all this work
just to get the same result, but that’s actually a big part of good programming. To
learn more about this approach to programming, see the box that follows. This ver-
sion has all the submitted values in variables, though, and that’s an improvement.
WORD TO THE WISE
Refactor as You Go
Whenever you rearrange code, especially to organize it better
or to divide your code’s behavior into separate chunks, you’re
refactoring
. For example, when you created a PHP block at the
beginning of
getFormInfo.php
to grab all the information from
the submitted form and then just echoed out each variable
within the HTML, you actually were refactoring your script.
When you’re writing code, you want to refactor constantly.
Anytime you can better organize your script—or, as you’ll do
later, better organize lots of scripts that all work together—you
should do it. Even if you’re not sure how your better organi-
zation might help your program, it’s worth the effort. When
you come back to your code a week from now, a month from
now, or even a year from now, it’s going to be a lot harder to
remember what everything does. Even worse, it’s going to
be tough to remember
where
things are in your script. (Your
scripts are going to get a lot longer soon, too.)
By refactoring as you go, you’re ensuring that it’s easy to see
what a script does from a quick look. It also means that when
you need to make changes, you can jump right to the spot
within your script where those changes need to be made, get
your work done, and go back to living the high life of a PHP
programmer.
But be warned: refactoring isn’t usually the most fun way to
spend a Friday night. A lot of the time, the goal in refactoring
is to
not
change how your code works, and especially to not
change what it outputs in a browser. Because you’re rearrang-
ing—and sometimes optimizing, which is just making things
run as smoothly as possible—your goal is keep things looking
just the same.
That’s the case with your refactoring of
getFormInfo.php
. You
added some PHP, created a bunch of variables, and then used
those variables in your HTML. The result? Exactly the same
as your original version. But now your code is a lot easier to
understand, and you’re actually going to get some nice benefits
by having those variables available shortly.
But, why put values into a variable? Right now, it’s a little silly: all you’re doing is
changing the place within your script where you grab information from the $_RE-
QUEST variable. That’s not doing you any real good. So, what can you do with these
variables once you’ve placed information in them? PHP gives you a lot of options,
particularly when you have variables that contain text.

CHAPTER 3: PHP SYNTAX: WEIRD AND WONDERFUL 69
WORKING
WITH TEXT IN
PHP
Working with Text in PHP
PHP sees all text the same: a meaningless collection of characters. Those characters
can be letters, numbers, spaces, punctuation marks, or just about anything else. In
PHP, an English word like “caterpillar” is just as ordinary a piece of text as is some-
thing nonsensical like “!(gUHa8@m.@.” To you, “caterpillar” looks like a word. That
second group of letters, however, looks like something QBert might have said. To
PHP, though, both of them are just text. In fact, because it’s such an important part
of the language, PHP and most programming languages have a special word to refer
to text: a string. So, a piece of text can also be referred to as a
string
; thus instead
of text searching or text matching, you’ll often hear programmers talk about
string
searching
or
string matching
.
NOTE If you have no idea what QBert is, take a moment to Google it. Then take another moment to weep
for your lost youth.
Combine Text
The good thing about PHP seeing all text the same way is that you can do all sorts
of interesting things with it, regardless of what that text is. So, going back to your
script,
getFormInfo.php
you have five variables, all of which contain text:
$first_name = $_REQUEST['first_name'];
$last_name = $_REQUEST['last_name'];
$email = $_REQUEST['email'];
$facebook_url = $_REQUEST['facebook_url'];
$twitter_handle = $_REQUEST['twitter_handle'];
Two of these are related: $first_name and $last_name. It’s pretty common to take
in information this way—with the names separated—but it’s just as
uncommon
to
print them out separately. Imagine walking into your local Pier 1 Imports and being
greeted by an old friend like this: “Hey there, First Name Brett, Last Name McLaugh-
lin!” That’s pretty awkward; and it’s just as awkward on the Web.
NOTE You can find the finished example code for this section on this book’s Missing CD page at
www.
missingmanuals.com/cds/phpmysqlmm2e
.
There’s no reason to settle for this separation, though. You can easily combine these
two strings by using a technique called
concatenation
. That’s a fancy word that just
means “combine,” and in the case of strings in particular, combining two pieces of
text end-to-end. So, if you concatenate “my” and “girl,” you get a new string, “mygirl.”
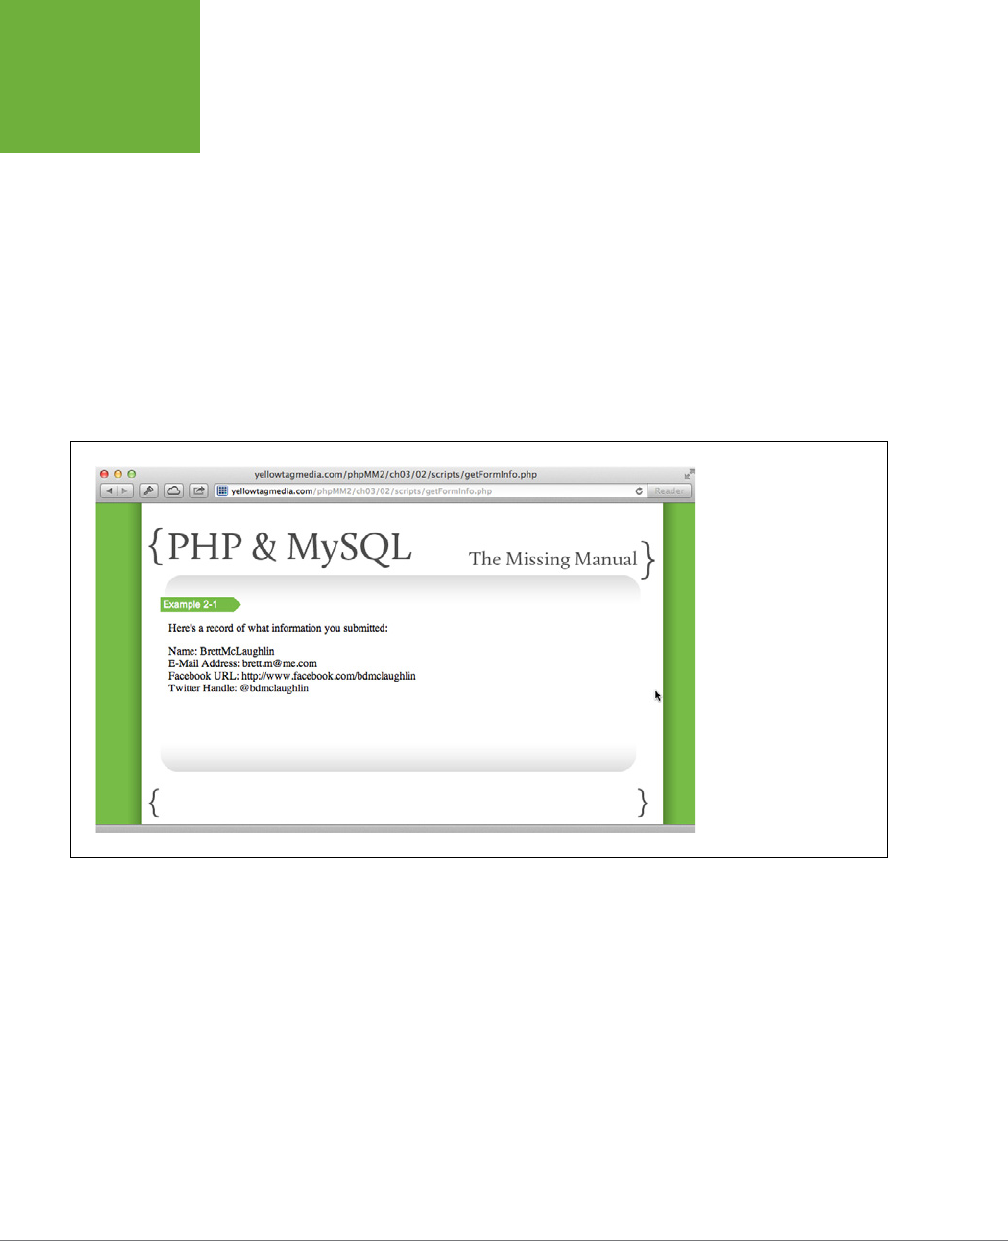
PHP & MYSQL: THE MISSING MANUAL
70
WORKING
WITH TEXT IN
PHP
In PHP, you concatenate with the period (.). For
getFormInfo.php
, therefore, find the
two lines of HTML that print out the first and last name:
First Name: <?php echo $first_name; ?><br />
Last Name: <?php echo $last_name; ?><br />
Now, change these to a single line, and concatenate the first and last names:
Name: <?php echo $first_name . $last_name; ?><br />
Go back to
socialEntryForm.html
, enter some information, and then submit your
form. You should see something like Figure 3-3: the first name Brett and last name
McLaughlin are successfully concatenated. However, if you look closely, you’ll see
that the first name and last name are smashed together. What you need is a space
between those two bits of text.
FIGURE 3-3
One of the easiest ways to
get your users comfortable
with your web applications
is to use plain English
whenever possible. Even
something as simple
as combining first and
last names adds a lot of
familiarity to an otherwise
cold, impersonal web
form. All that’s missing
in this example is a space
between the first and
last names, which you’ll
learn how to do in just a
moment.
This is a situation for which PHP treating all text the same really helps. To add a
space, all you have to do is put it in quotes, like this: " ". PHP doesn’t see that
text as any dierent from the text in your variables. You can just concatenate that
string—the empty space—to $first_name, and then concatenate $last_name to the
space, like this:
Name: <?php echo $first_name . " " . $last_name; ?><br />
Try your form out again, and you should see a proper space between the first and
last names. Check out Figure 3-4, which should match what your page now looks like.
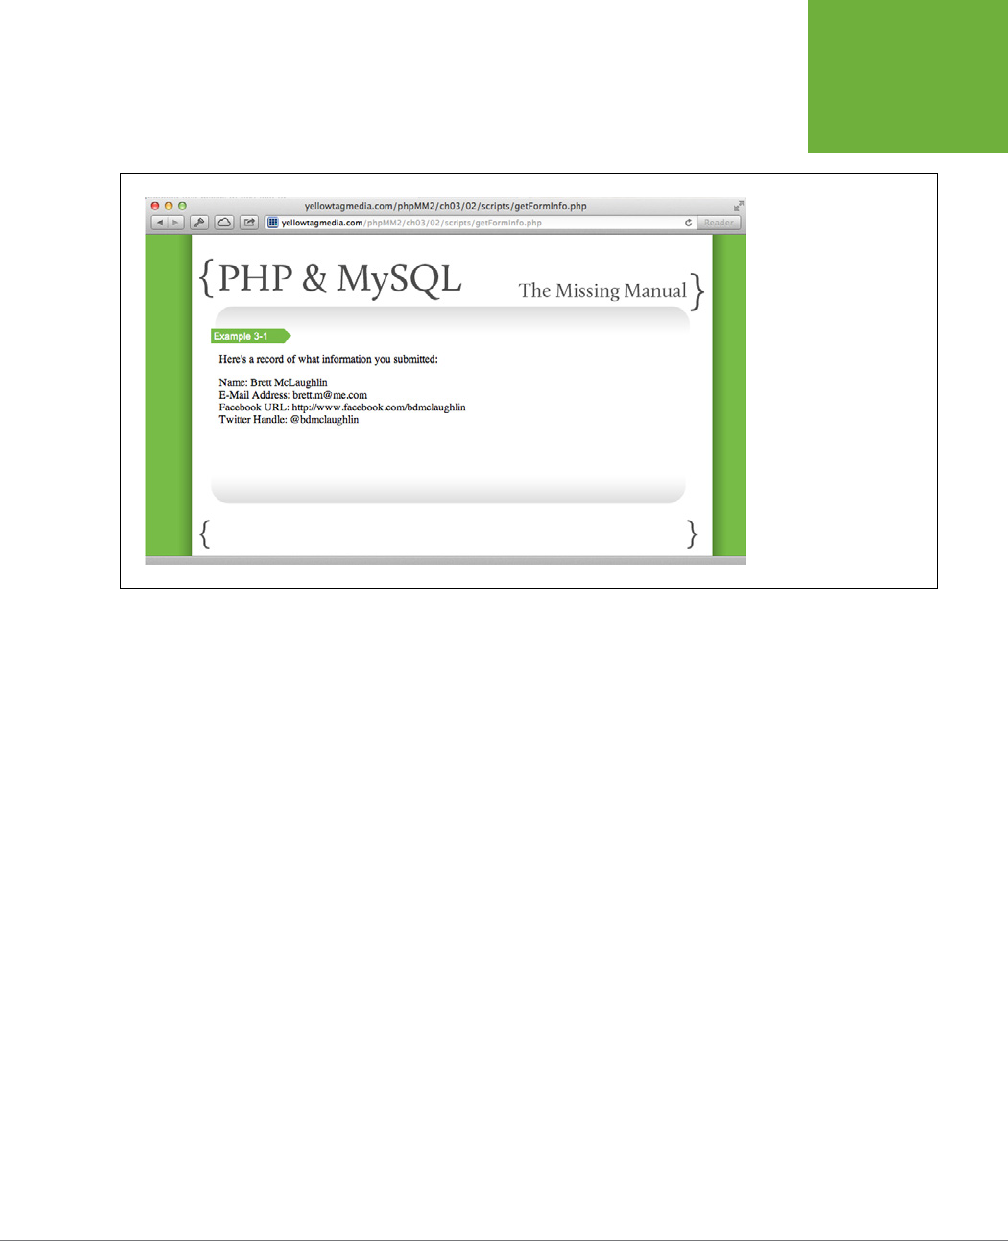
CHAPTER 3: PHP SYNTAX: WEIRD AND WONDERFUL 71
WORKING
WITH TEXT IN
PHP
FIGURE 3-4
PHP doesn’t care if
text is in a variable like
$_REQUEST
, a variable
you’ve created yourself, or
in quotes. It treats all text
exactly the same. So, to
add a blank space to your
text, just surround the
space with quotes.
Searching Within Text
Of course, if all you could do with strings was smash them together, that would be
pretty boring. Thankfully, PHP oers a lot more options. One of the most common
things you’ll do with PHP text is search it. For example, take the $facebook_url
variable in
getFormInfo.php
. Suppose you want to turn that into a live, clickable
link. First, add the HTML <a> tag, like so:
<p>
Name: <?php echo $first_name . " " . $last_name; ?><br />
E-Mail Address: <?php echo $email; ?><br />
<a href="<?php echo $facebook_url; ?>">Your Facebook page</a><br />
Twitter Handle: <?php echo $twitter_handle; ?><br />
</p>
Now, instead of just showing the text of the URL, your web page shows a link that
people can click, as demonstrated in Figure 3-5.
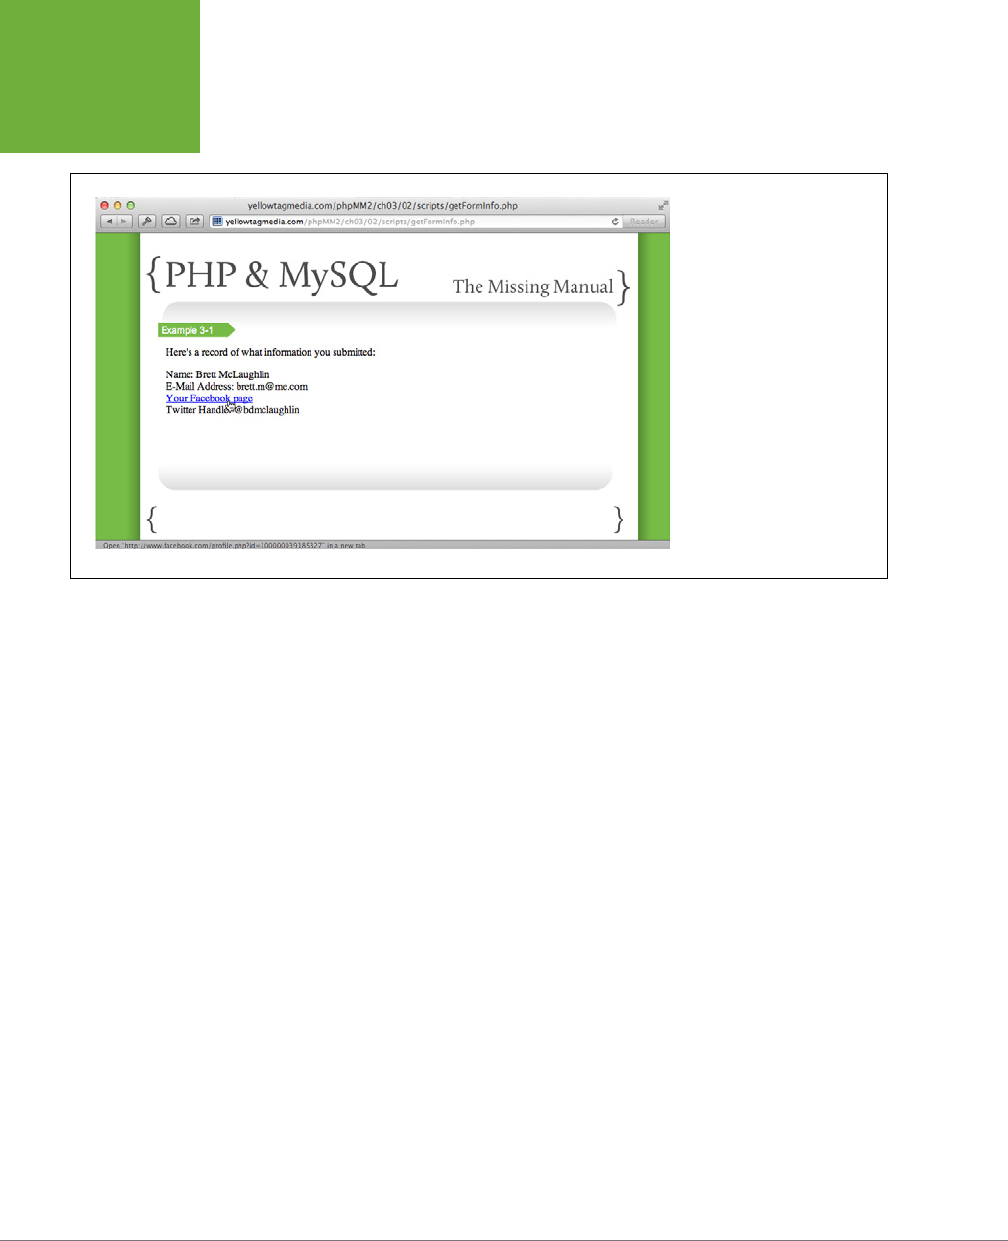
PHP & MYSQL: THE MISSING MANUAL
72
WORKING
WITH TEXT IN
PHP
FIGURE 3-5
Remember that your PHP is not
just a place for programming.
It’s also a place to create parts
of web pages. So, when you
get a URL or an email link, try
and turn those into HTML links
whenever possible, like the
“Your Facebook page” link in
this example.
But, what happens if someone forgets to put the
facebook.com
part of the URL
in? Maybe he didn’t read carefully, and he just threw in the part of the URL
after
facebook.com
, like
ryan.geyer
or
profile.php?id=699186223
. In this case, the link
you create won’t be of any use.
What you need, then, is a way to see whether the text that was entered in your
$facebook_url variable contains “facebook.com”. If so, it’s probably safe to turn the
text into a URL link. If not, the link probably needs to have “http://www.facebook
.com” added to the beginning of the variable’s value. In other words, your PHP needs
to search for the text “facebook.com”.
The easiest way to do this in PHP is to look for the position of a piece of text inside
a bigger piece of text to determine what the position of “facebook.com” is inside
of $facebook_url, like this:
$first_name = $_REQUEST['first_name'];
$last_name = $_REQUEST['last_name'];
$email = $_REQUEST['email'];
$facebook_url = $_REQUEST['facebook_url'];
$position = strpos($facebook_url, "facebook.com");
$twitter_handle = $_REQUEST['twitter_handle'];
The strpos() function, which just stands for “string position,” returns a number that
indicates where in the string the searched-for text exists. So, if $position was 5, that
would mean that “facebook.com” appeared at position 5 within $facebook_url. (For
more information on how these position numbers work, see the box on page 74.)

CHAPTER 3: PHP SYNTAX: WEIRD AND WONDERFUL 73
WORKING
WITH TEXT IN
PHP
However, it’s not enough to just determine a position. You need to do something
with it. Better still, you need to figure out whether it indicates a position within
$facebook_url—which would mean that $facebook_url contains “facebook.com”—or
if $facebook_url doesn’t have “facebook.com” within it at all. You can do this by
seeing if $position is false, something PHP defines for you by using the keyword
false. Otherwise, strpos() returns the position within $facebook_url at which the
searched-for string appears.
NOTE The
strpos()
function, like most functions in PHP, can return two totally different things: a number
indicating a position within the search string, or the value
false
.
$first_name = $_REQUEST['first_name'];
$last_name = $_REQUEST['last_name'];
$email = $_REQUEST['email'];
$facebook_url = $_REQUEST['facebook_url'];
$position = strpos($facebook_url, "facebook.com");
if ($position === false) {
$facebook_url = "http://www.facebook.com/". $facebook_url;
}
$twitter_handle = $_REQUEST['twitter_handle'];
At first glance, it probably looks like there’s a lot of new stu going on here, but
don’t sweat it. You already understand almost all of this code.
1. First, strpos() checks to see if $facebook_url has the text “facebook.com”
within it. The value returned from strpos() is stued into a new variable,
$position.
2. $position is compared to the special PHP value false by using an if state-
ment. You’ll learn a lot more about if statements soon, but it does just what it
looks like: if $position is false, then execute the code within the curly brackets,
{ and }.
3. The code that’s within { and } only runs if the statement above is true—in this
case, if $position === false. If that’s true, then “http://www.facebook.com”
is inserted before the string in $facebook_url, to make a real link to Facebook.
4. There’s also a hidden step in this if statement: if $position is not false, then
nothing happens. The line of code within { and } is completely skipped over.
Now that you’ve made these changes to your script, save it and go back to your web
form,
socialEntryForm.html
. This time, enter a Facebook link without the “facebook.
com” part of the URL; for example, profile.php?id=100000039185327. Then, submit
your form and see what your result looks like.
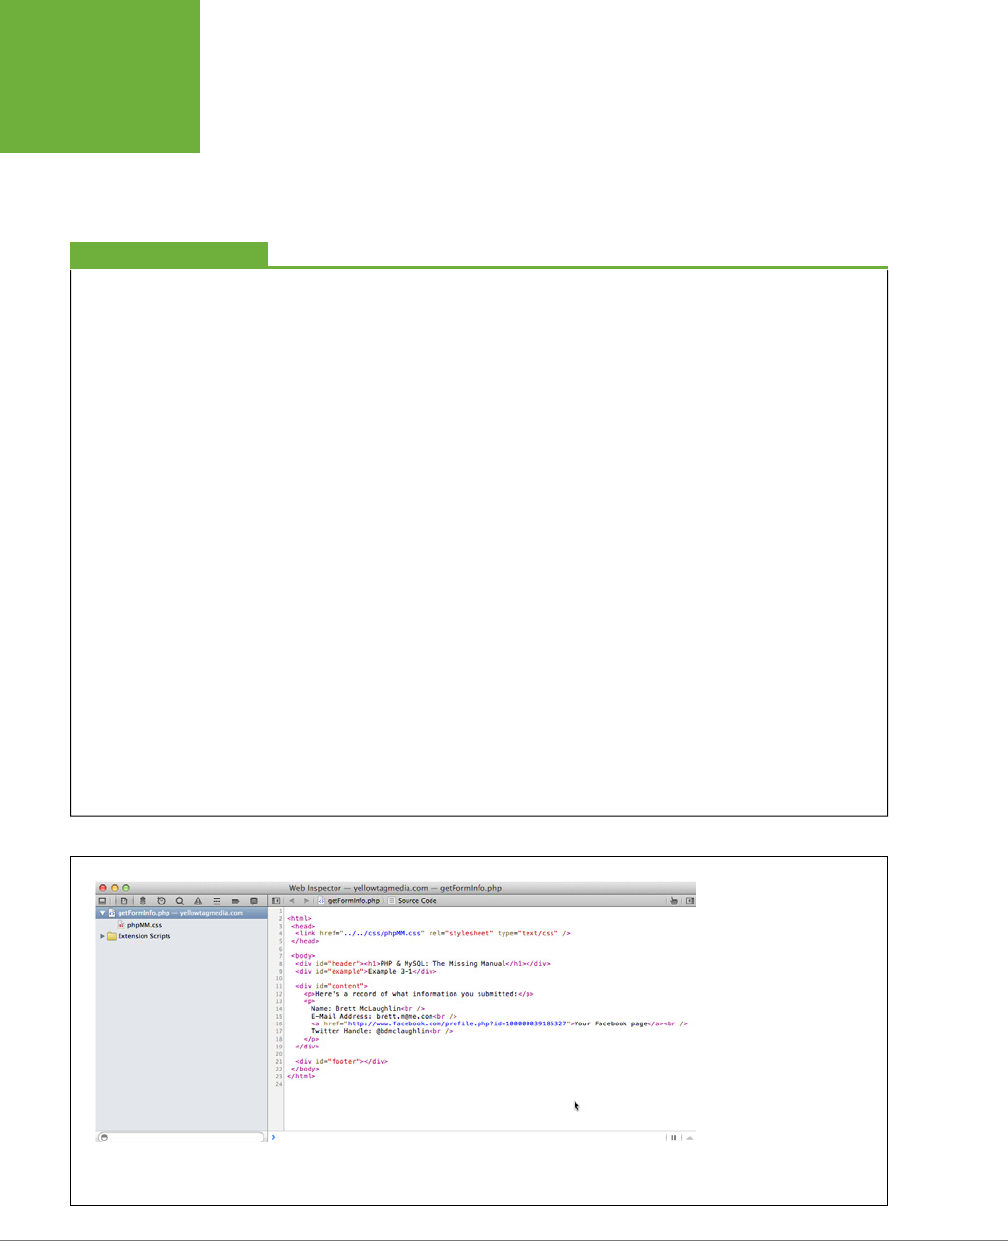
PHP & MYSQL: THE MISSING MANUAL
74
WORKING
WITH TEXT IN
PHP
At first glance, nothing might look dierent. The web page generated from your PHP
probably still resembles Figure 3-5. But, look at the source of your page (see Figure
3-6) or click the link itself (see Figure 3-7). In both cases, you can see that
profile.
php?id=100000039185327
was turned into an actual URL,
http://www.facebook
.com/profile.php?id=100000039185327
.
UNDER THE HOOD
Programming Languages Like Zeroes
The more you program in languages like PHP, Java, C, or Perl,
the more you’ll see some unusual uses of the number 0. In
almost all of these languages—and certainly in PHP—counting
begins at 0, rather than 1. So, if you were counting the length of
the text “That’s weird,” the first letter—the capital “T”—would
be at position 0, not position 1.
This gets particularly tricky when you’re searching for text
within text, such as in
getFormInfo.php
. Suppose that someone
typed “facebook.com/michael.greenfield” into the Facebook
URL text box. Then, in your code, you did something like this
to see if the form value was a real URL:
if (strpos($facebook_url, "facebook.com")
> 0) {
$facebook_url = "http://www.facebook.
com/" .
$facebook_url;
}
On the surface, this statement looks good: if “facebook.com”
doesn’t appear in the first position or greater of $facebook_url,
add “http://www.facebook.com/” to the beginning of
$face-
book_url
.
However, the result would not be good. You’d actually have a
value like this in
$facebook_url
: “http://www.facebook
.com/facebook.com/michael.greenfield.” So, what happened?
Remember, PHP starts counting at 0, not 1. Therefore, position
0 is actually the first position in
$facebook_url
. And that
position has an “f” in it. Position 1 has an “a,” position 2 a “c,”
and so on. It turns out that the entire first part of
$face-
book_url
is actually “facebook.com,” the string for which
your code is searching. As a result,
strpos()
returns a 0 to
indicate that the searched-for string is in the first position of
$facebook_url
.
What this all means—besides the fact that programming
languages count differently than humans—is that you need
to be a zero-based thinker when you’re writing code. So, if
you’re searching for something within a string, a position of 0
or greater means the string was found, rather than 1 or greater.
Remember that, and you’ll save yourself a ton of bug hunting.
FIGURE 3-6
If you’ve not done a lot
of web development,
you might not be used to
looking at your web page’s
source code. But you’ll
want to get comfortable
viewing the source; it’s
one of your best ways
to see what’s really in
the HTML your scripts
generate. This code creates
the web page you see in
Figure 3-5.
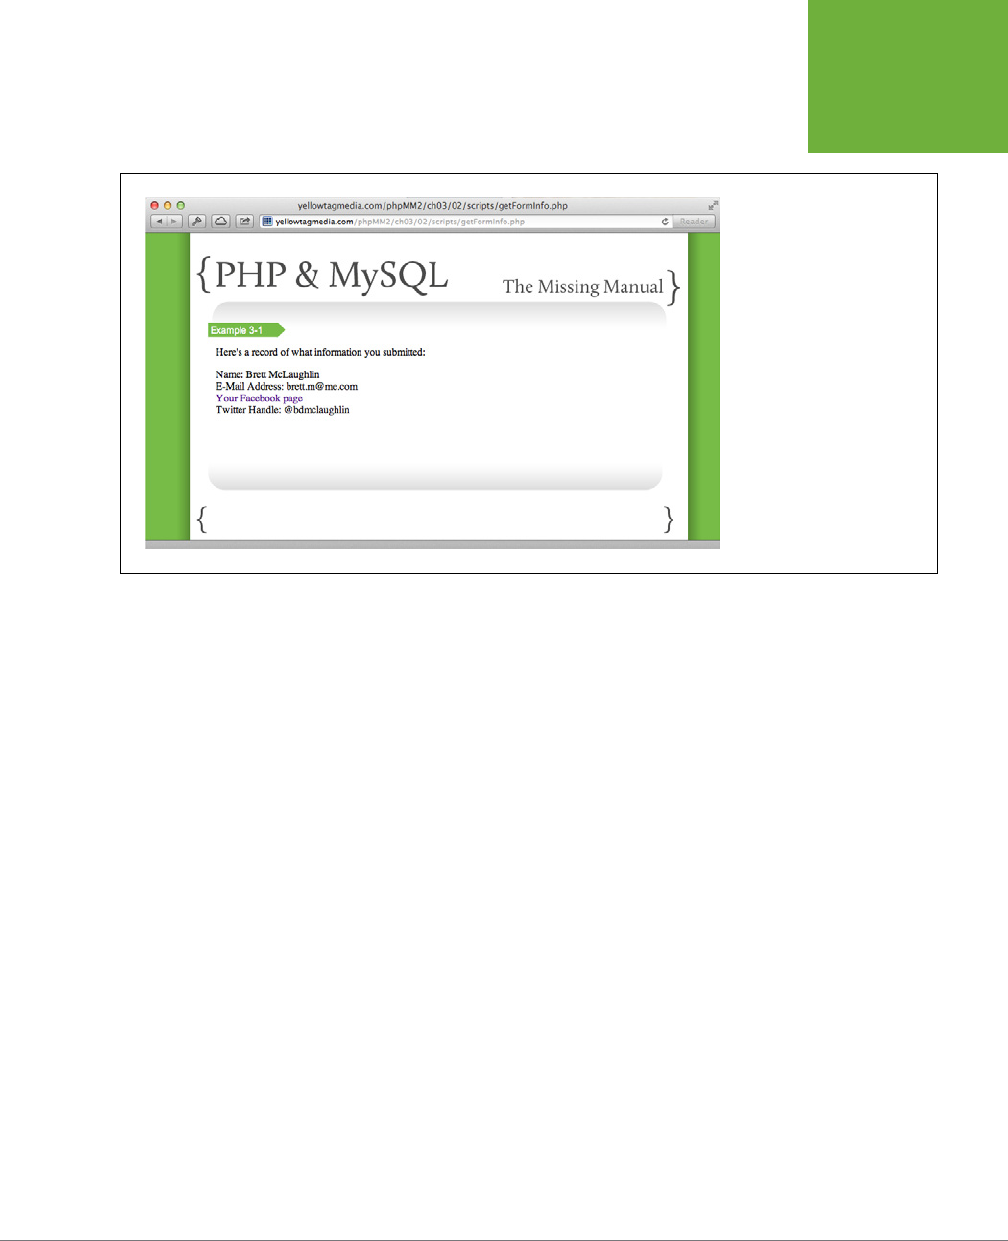
CHAPTER 3: PHP SYNTAX: WEIRD AND WONDERFUL 75
WORKING
WITH TEXT IN
PHP
FIGURE 3-7
Taking a partial URL and mak-
ing it into a clickable link might
seem like a lot of work for
such a minor feature, as in the
Facebook link example (page
71). But users are forgetful, and
the more you can protect them
from making a mistake without
telling them about their
problems, the better it is.
Changing Text
You’ve combined two pieces of text, you’ve searched within text, so what’s left?
Well, changing text, of course. And it turns out that you’ve already got a lot of the
information you need to do it.
Consider the Twitter handle people are entering into your web form. Most people
put an @ before their Twitter handle, like so: @bdmclaughlin. But to see someone’s
Twitter profile on the twitter.com website, you actually don’t want that @. So if
theTwitter handle is @phpGuy, the Twitter URL to see that profile would be
http://
www.twitter.com/phpGuy
.
Turning a Twitter handle into an active link requires a few steps. Here they are in
plain English:
1. Create a new variable, $twitter_url, and start by giving it a value of “http://
www.twitter.com/”.
2. Determine if the Twitter handle has an @ sign in it.
3. If there’s no @ in $twitter_handle, add the handle to the beginning of
$twitter_url.
4. If there
is
an @ in $twitter_handle, remove the @ from the handle and add
the handle to the end of $twitter_url.
5. Display the Twitter handle as part of an <a> link element in your script’s
HTML output.

PHP & MYSQL: THE MISSING MANUAL
76
WORKING
WITH TEXT IN
PHP
You’ve done something similar to all of these steps except for step 4, so this shouldn’t
be a big problem for you.
First, create a new variable to hold the Twitter URL that you’re building, and give it
the first part of the Twitter URL:
$twitter_handle = $_REQUEST['twitter_handle'];
$twitter_url = "http://www.twitter.com/";
Then, you need to determine whether the Twitter handle—which you’ve got in the
$twitter_handle variable—has the @ character anywhere in it. You can use strpos()
again for this step:
$twitter_handle = $_REQUEST['twitter_handle'];
$twitter_url = "http://www.twitter.com/";
$position = strpos($twitter_handle, "@");
In this example, you need to do something whether there’s an @ in $twitter_handle
or not. So you’ll have an if, but you'll also have an else:
$twitter_handle = $_REQUEST['twitter_handle'];
$twitter_url = "http://www.twitter.com/";
$position = strpos($twitter_handle, "@");
if ($position === false) {
$twitter_url = $twitter_url . $twitter_handle;
} else {
// Do something to remove the @ from the Twitter handle
}
If there’s no @, this code simply adds the handle to the end of $twitter_url. If there
is an @, you have more work to do to get rid of it and create the URL.
You’ve already seen that strpos() takes a string as a target in which to look, and
then it takes another string, which is the item for which you’re searching. PHP has
a similar way to get just part of a string: the substr() function. substr() is short
for for “substring,” which, as its name implies, means a part of a string. You provide
substr() with a string to search for and then a position at which to begin gathering
the substring of the search text.
For example, substr("Hello", 2) would give you “llo”. That’s because the “H” is
at position 0, the “e” is at position 1, and the first “l” is at position 2. Because you
instructed substr() to start at position 2, you get the letters from that position to
the end of the string, in this example, “llo”.
WARNING Remember, most PHP functions like
substr()
and
strpos()
start counting at zero. If
you’re still unsure about how that works, check out the box on page 74.
In the case of the Twitter handle, you can use substr() in a similar way. But you
want to cut o everything up to and
including
the @ sign, which you already know is
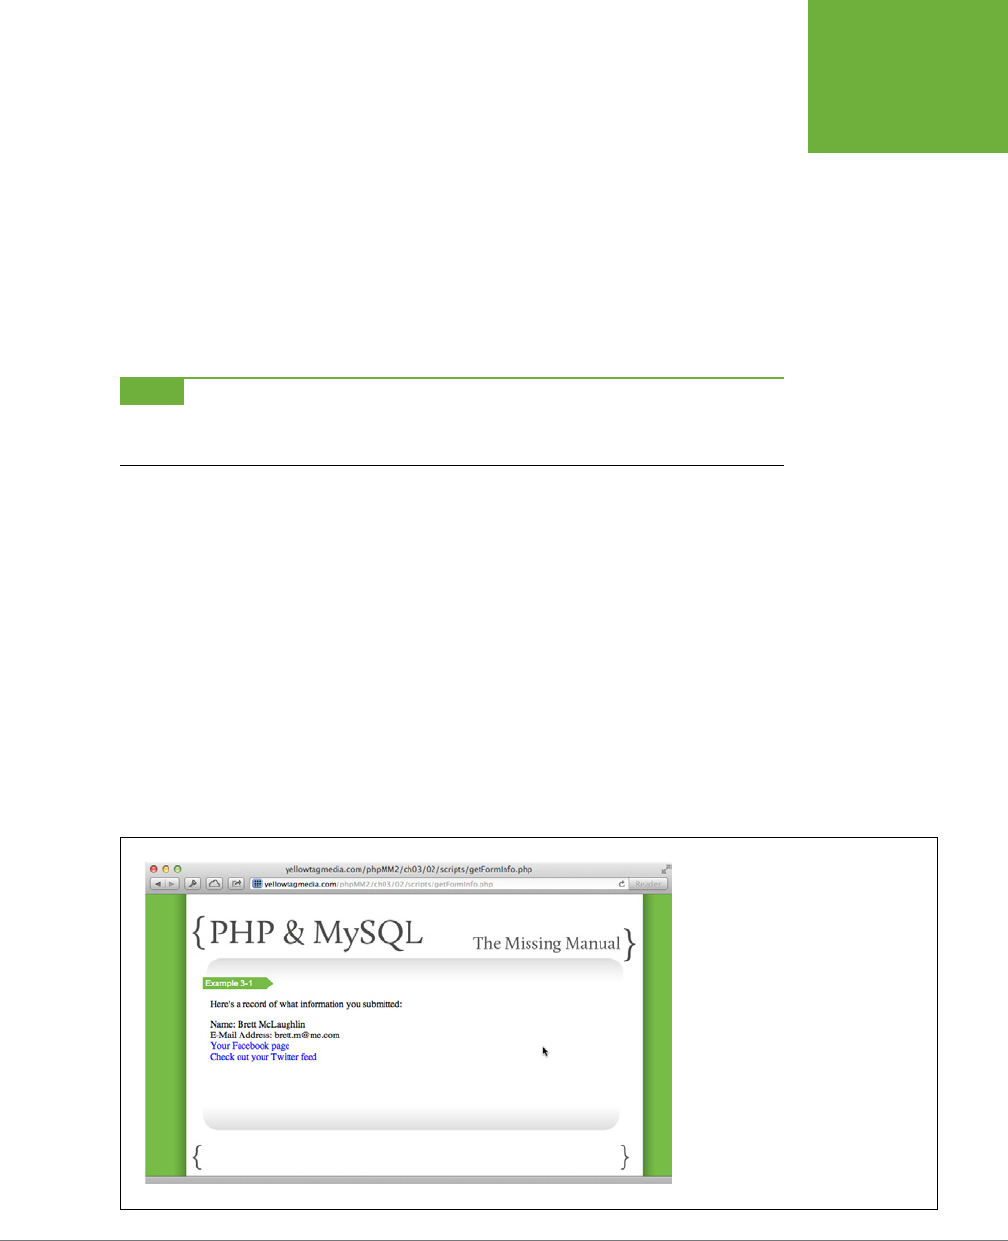
CHAPTER 3: PHP SYNTAX: WEIRD AND WONDERFUL 77
WORKING
WITH TEXT IN
PHP
at the position stored in the $position variable. So, you can use substr() and start
your new string at the position after $position, or $position + 1.
$twitter_handle = $_REQUEST['twitter_handle'];
$twitter_url = "http://www.twitter.com/";
$position = strpos($twitter_handle, "@");
if ($position === false) {
$twitter_url = $twitter_url . $twitter_handle;
} else {
$twitter_url = $twitter_url . substr($twitter_handle, $position + 1);
}
NOTE You’re starting to see a lot of new code quickly, but don’t worry if something confuses you at first
glance. Just take a moment and look at each piece of the new code, bit by bit. As you understand each individual
piece, you’ll find the overall picture quickly becomes clear.
All that’s left to do at this point is to update the part of your script that outputs HTML:
<p>
Name: <?php echo $first_name . " " . $last_name; ?><br />
E-Mail Address: <?php echo $email; ?><br />
<a href="<?php echo $facebook_url; ?>">Your Facebook page</a><br />
<a href="<?php echo $twitter_url; ?>">Check out your Twitter feed</a><br
/>
</p>
Hop back to your entry page, fill it up with information, and then submit the form to
your updated script. Try it with and without an @ character in your Twitter handle,
and the results should be the same: an output page with links to your Facebook and
Twitter page, with the @ correctly removed, as illustrated in Figure 3-8.
FIGURE 3-8
You might want to update your PHP
script even further to add some ad-
ditional style and formatting. You might
want to change things to read from your
user’s perspective, such as “My name,”
and “Check out my Twitter page.” Don’t
be afraid to experiment, particularly
now that you’re getting comfortable
with your PHP script.

PHP & MYSQL: THE MISSING MANUAL
78
WORKING
WITH TEXT IN
PHP
FREQUENTLY ASKED QUESTION
PHP’s Angle on Brackets
What’s with all the angle brackets?
When you’re using PHP to show a lot of HTML and then dropping
little bits of PHP into that HTML, things can get pretty confus-
ing. Take a look at one of the lines that’s in
getFormInfo.php
:
<a href="<?php echo $facebook_url; ?>">
Your Facebook page
</a><br />
Some of this code looks strange, to say the least: there are
two opening brackets before a single closing bracket, and then
there’s
another
closing bracket at the end of that first line. On
top of that, you’ve got all the PHP within quotation marks.
Unfortunately, this is one of the downsides to inserting PHP
into HTML. It’s a necessary evil, and it’s something you’ll get
used to, but it can still trip you up. Anytime you have PHP
code, you
really
should surround it in
<?php
and
?>
. (You
don’t have to, though; you can leave off
?>
if you’re ending
your script with PHP, but that’s generally considered a pretty
lazy practice.) If you’re using PHP to insert something into
an element that’s already in brackets, you’ll get this strange
double-bracketed code.
It’s also pretty common to use PHP to generate a link, which in
the case of an
<a>
element becomes the value of an attribute.
That means your entire PHP block will be surrounded by
quotation marks. That’s okay—as long as your PHP doesn’t
also
have quotation marks. If you have a case for which you
need quotation marks within your PHP, and that PHP is
already
within quotes, you can alternate single- and double-quote
marks, like this:
<a href="<?php echo 'http://www.twitter.
com/' .$twitter_handle; ?>">
Your Twitter page
</a><br />
You can flip these around without a problem, too:
<a href='<?php echo "http://www.twitter.
com/" .$twitter_handle; ?>'>
Your Twitter page
</a><br />
Just be sure you don’t open something with single quotes and
then close it with double quotes, or vice versa. Mismatching
quotes cause things to break, and nobody wants that.
There actually are some differences in how PHP handles
double-quoted strings and single-quoted strings, but it’s
nothing you need to worry about right now.
Trim and Replace Text
Once you start trying to help your users by correcting possible errors in their form
entry, the world of PHP strings becomes a big toolkit at your disposal. Take two other
common problems in web forms, especially web forms in which users enter URLs:
• Users enter extra spaces around words, like “ http://www.facebook.com/ryan
.geyer ” instead of “http://www.facebook.com/ryan.geyer” (note the spaces
between the quotes and the text).
• Users mix up .com and .org URLs by putting in something like “http://www
.facebook.org/profile.php?id=534643138” instead of “http://www.facebook
.com/profile.php?id=534643138”.
CHAPTER 3: PHP SYNTAX: WEIRD AND WONDERFUL 79
WORKING
WITH TEXT IN
PHP
NOTE You’d be surprised how often people mix up .com and .org. In fact, lots of companies that own
domain-
name.com
will also buy
domain-name.org
and redirect anyone that goes to
domain-name.org
to
domain-name
.com
for that very reason.
You know how PHP strings work, and you’ve already used several PHP functions.
You just need to learn two more functions to handle these common problems.
REMOVING EXTRA WHITESPACE BY USING
TRIM
PHP has a trim() function that eliminates any empty characters—what PHP calls
whitespace
—around a string. For example, trimming “ I love my space bar. ” gives
you “I love my space bar.” So, with just a couple of simple additions to your script,
you can make sure that extra spaces around your users’ entries is a thing of the past:
NOTE PHP also gives you
rtrim()
, which trims just whitespace after a string (on its right side), and
ltrim()
,
which trims whitespace before a string (on its left side).
$first_name = trim($_REQUEST['first_name']);
$last_name = trim($_REQUEST['last_name']);
$email = trim($_REQUEST['email']);
$facebook_url = trim($_REQUEST['facebook_url']);
$position = strpos($facebook_url, "facebook.com");
if ($position === false) {
$facebook_url = "http://www.facebook.com/" . $facebook_url;
}
$twitter_handle = trim($_REQUEST['twitter_handle']);
$twitter_url = "http://www.twitter.com/";
$position = strpos($twitter_handle, "@");
if ($position === false) {
$twitter_url = $twitter_url . $twitter_handle;
} else {
$twitter_url = $twitter_url . substr($twitter_handle, $position + 1);
}
This change is simple to implement: every time you get a value from $_REQUEST,
just wrap the value in trim(). You’ll never have to worry about whitespace around
your text again.
WARNING
trim()
(as well as
rtrim()
and
ltrim()
) only remove whitespace on the
outside
of
your text. Thus,
trim()
is great for dealing with something like “ Way too much whitespace. ” but won’t help
you at all with “Way too much whitespace.”
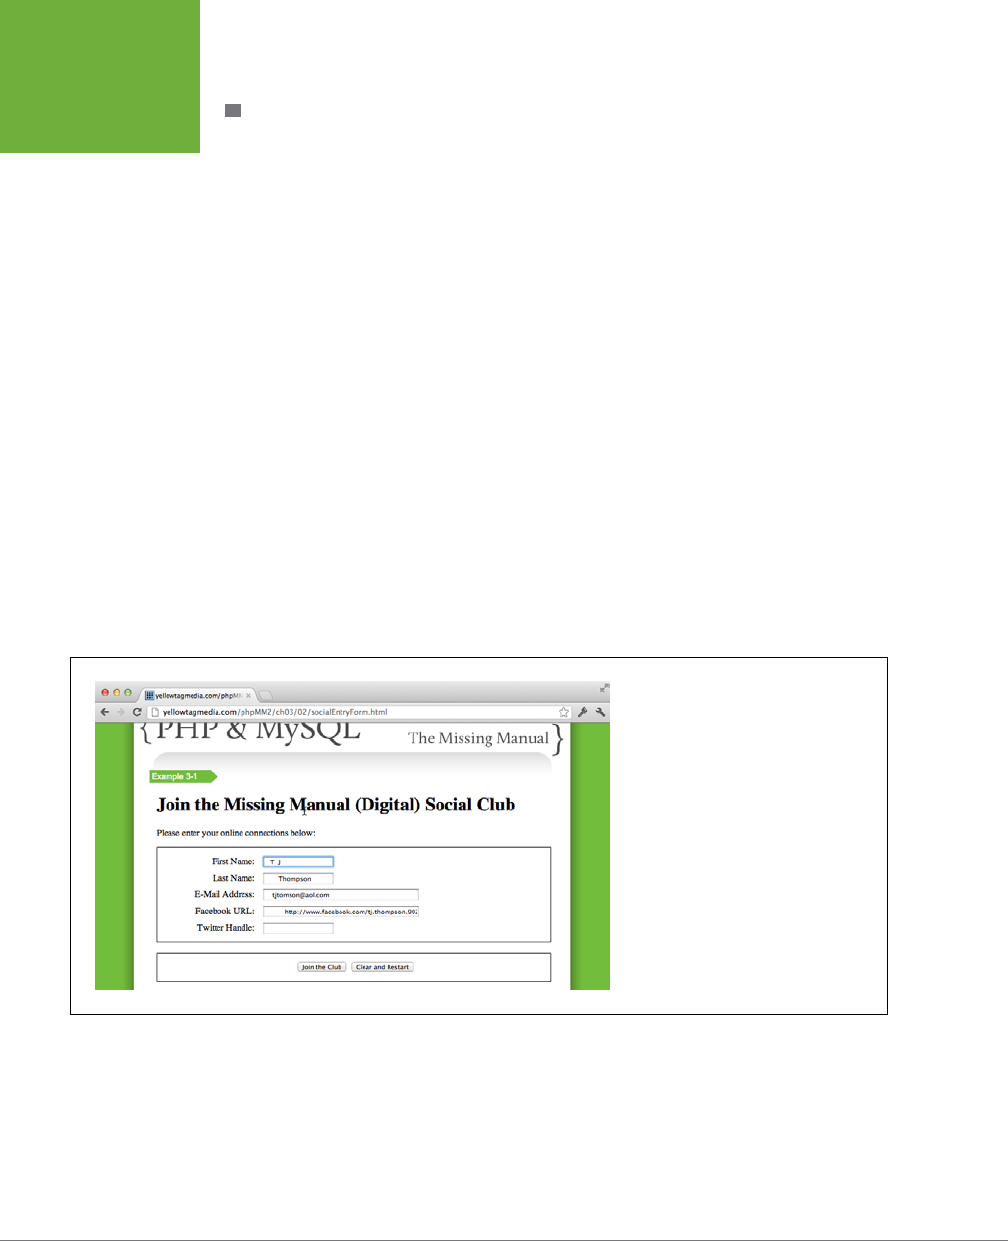
PHP & MYSQL: THE MISSING MANUAL
80
WORKING
WITH TEXT IN
PHP
REPLACING CHARACTERS IN TEXT BY USING
STR_REPLACE
It’s also easy to replace text in a string. You use str_replace(), and give it three
things:
1. The text to search for, in quotes. For example, “facebook.org”.
2. The replacement text. If you want to replace every occurrence of facebook.org
with facebook.com, your replacement text would be “facebook.com”.
3. The string in which to search; that is the value that the user typed into your
web form.
In PHP, you can put all this together on one line (see the box on page 81). You get
something like this:
$facebook_url = str_replace("facebook.org", "facebook.com",
trim($_REQUEST['facebook_url']));
$position = strpos($facebook_url, "facebook.com");
if ($position === false) {
$facebook_url = "http://www.facebook.com/" . $facebook_url;
}
Make these changes, and then visit your web form again. Enter some information
that might have been a problem for a less-skilled PHP programmer, with lots of
spaces and a bad facebook.org URL, as shown in Figure 3-9.
FIGURE 3-9
You’d be amazed at how often people fill
out forms in a hurry. That usually means
one of two things will happen: either all
that problematic information will cause
errors in a server-side script, or—if the
programmer is a little more advanced—the
script happily fixes those errors and keeps
on chugging. It’s good to be in the second
category!
Submit this data. As you can see in Figure 3-10,
getFormInfo.php
doesn’t miss a
beat. It gets rid of all that extra space, and it even fixes the bad Facebook URL (see
Figure 3-11).
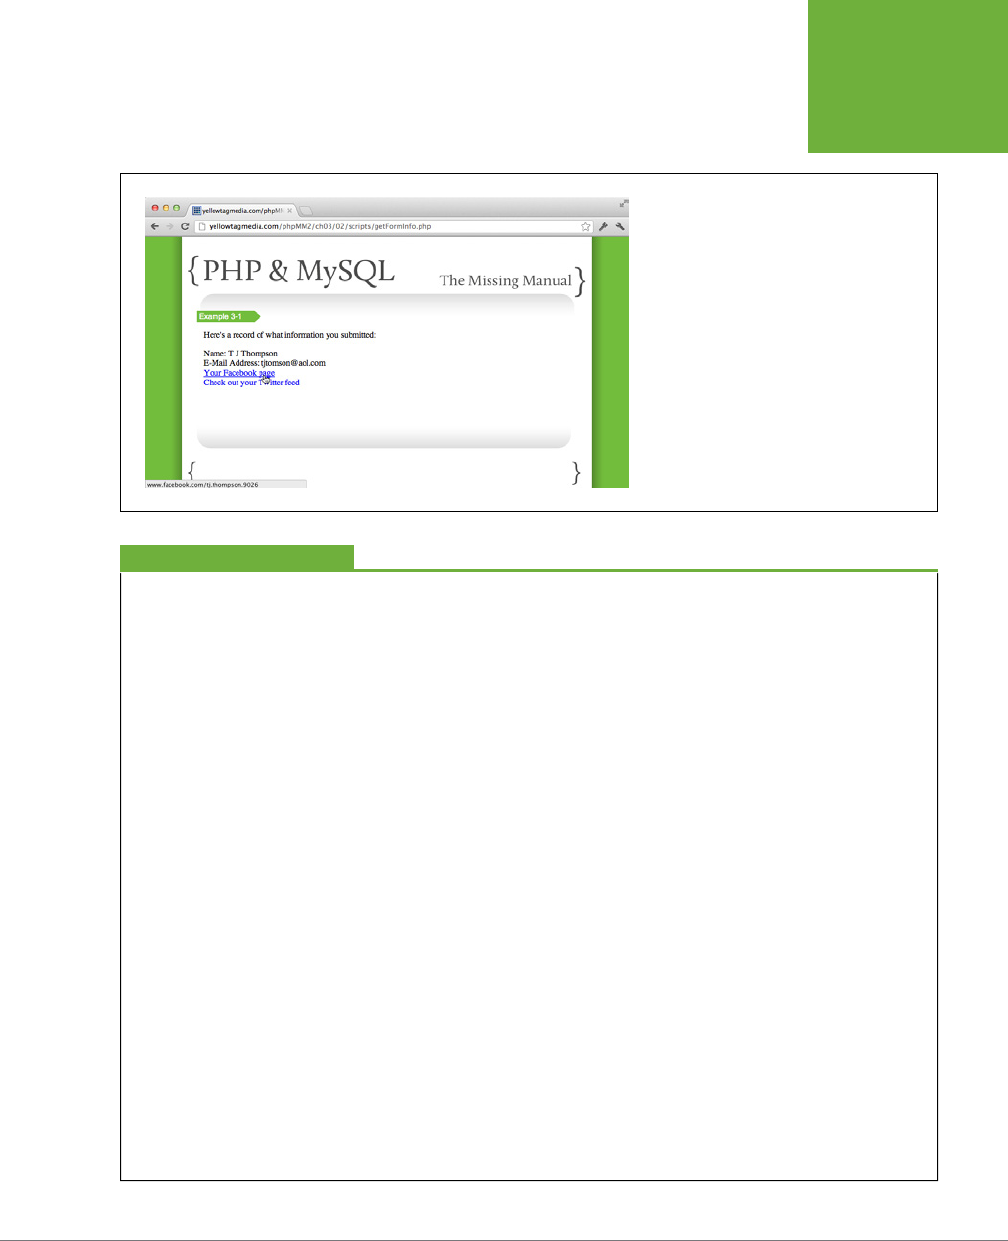
CHAPTER 3: PHP SYNTAX: WEIRD AND WONDERFUL 81
WORKING
WITH TEXT IN
PHP
FIGURE 3-10
Using
trim()
and
str_replace()
and
even
strpos()
is part of being a responsible
PHP programmer. In fact, you might eventually
build your own standard blocks of code through
which you run all your web form entries, just to
ensure that they’re formatted exactly the way
you like.
POWER USERS’ CLINIC
Chain Your Methods (Or Not!)
You might have noticed that PHP lets you do in a single step
what might otherwise take several steps. For example, look
at this line in your PHP script:
$facebook_url = str_replace("facebook.
org", "facebook.com", trim($_
REQUEST['facebook_url']));
This code actually combines several different things. You could
rewrite this code like the following example, to make all those
separate things a little clearer:
$facebook_url = $_REQUEST['facebook_url'];
$facebook_url = trim($facebook_url);
$facebook_url = str_replace("facebook.
org", "facebook.com", $facebook_url);
Both of these code examples carry out the same task, and from
a performance and technical point of view, one isn’t better than
the other. That means it’s up to you which version you prefer.
So, how do you decide?
There are two basic schools of thought here. The first is com-
mon in programmer circles. It’s the “brevity is the soul of
wit” approach to programming. The concept is pretty simple:
“Why do in multiple lines what you can get done in one line?”
Using this approach, anytime you can combine steps, you
should. The code is a lot shorter, and you don’t have a lot of
those in-between steps. The result is called
method chaining
:
you do one thing to a piece of text, for example, and then the
result of that one thing is sent to another thing. In other words,
each step is a link in a chain, and the entire line is the chain,
complete and ready to use.
The other school of thought is a little less popular among
programmers...unless those programmers have to teach what
they’re doing to someone else. This school of thought tries to
make code really easy to understand. Of course, the more you
can break down that chain of actions, the easier it is to quickly
figure out what’s going on. This takes a lot more code, but all
that extra code is easier to understand, and (at least in theory)
to fix if something goes wrong.
Realistically, you’ll probably want to end up somewhere in
the middle of these two approaches. For instance, your code
in
getFormInfo.php
is nice and clear, even though a few things
are chained together. But if you end up with lines that have 6,
7, or even 10 things attached to one another, it might be time
to split things up (and lay off the triple ventis from Starbucks!).
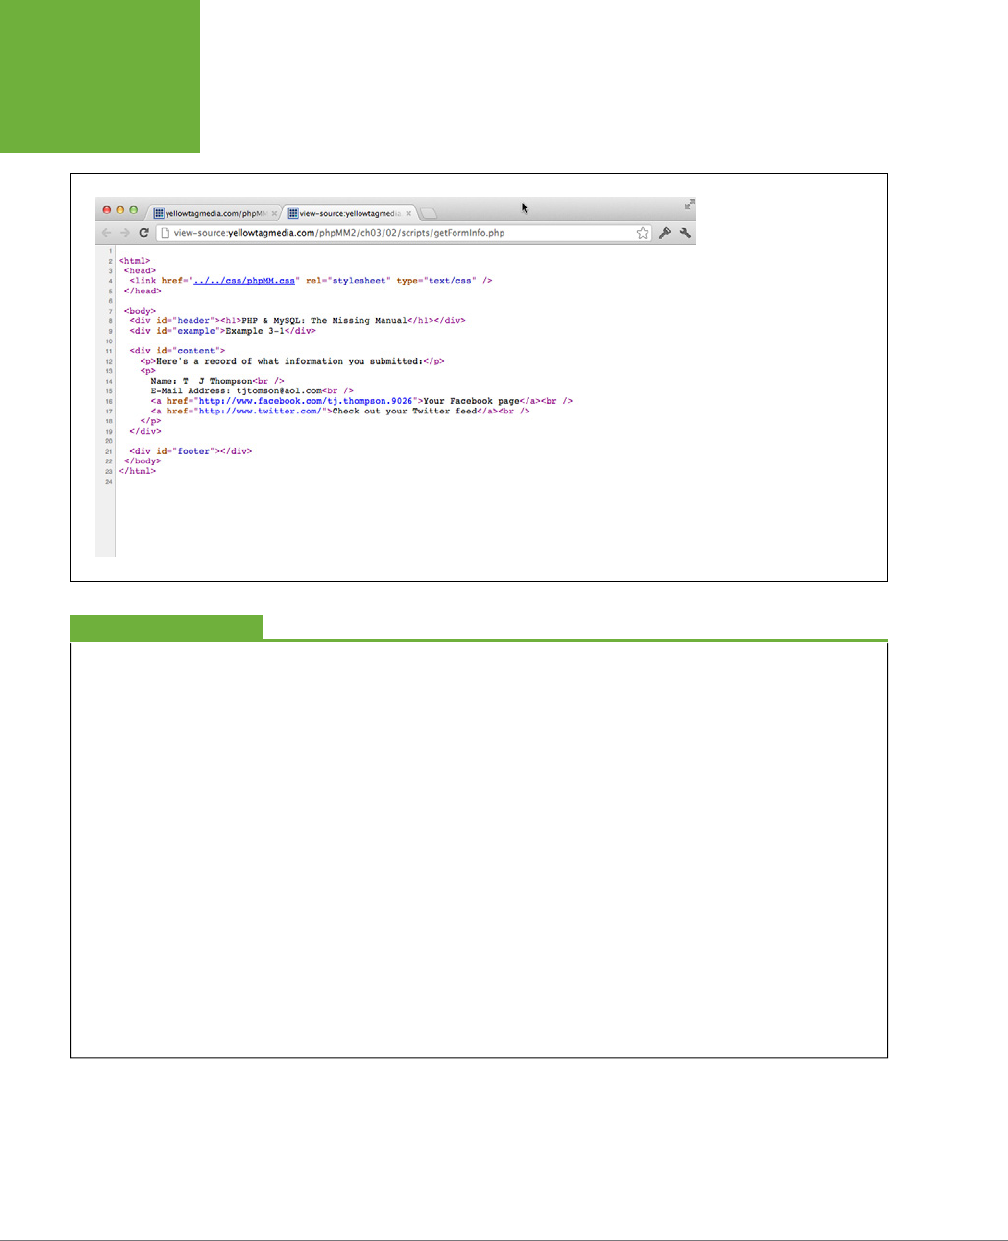
PHP & MYSQL: THE MISSING MANUAL
82
WORKING
WITH TEXT IN
PHP
FIGURE 3-11
Once again, View Source
is your friend. In most
browsers, this option is
under the View menu, the
Page menu, or available
by right-clicking the page.
Be sure to view your
page’s source; it’s what’s
really getting sent to the
browser, no matter how
things actually look on
your screen.
TAKE IT FURTHER
PHP Oers a Slew of String Functions
Believe it or not, you’ve only just scratched the surface of what
PHP has to offer in dealing with strings and text. Visit
php.net/
manual/en/ref.strings.php
to see a complete list of what you
can do with text in PHP. But get your high-resolution monitor
out; this is a long list that won’t even fit on a single screen for
most web browsers.
So, what do you do? Freak out about how much you
don’t
yet know? Print out this web page and start memorizing a
few functions every night? No, not at all. Just bookmark the
page—and while you’re at it, the PHP manual at
php.net/
manual
—and know that it’s there when you need it. If you
run across a string you need to manipulate, just pull up your
bookmarked PHP manual and search through it until you find
what you want.
The real surprise here is that
everyone
does it. Sure, there might
be some Dustin Hoffman lookalike out there rattling off all the
PHP numerical functions in a monotone voice, all Rain-Manned
up in his gray suit. But that guy is the exception. Refer often
to the online PHP manual—and books like this one—and when
you forget something, just look it up.
Instead of worrying about memorizing the odds and ends of
every function in the PHP language, work on understanding
the
patterns
of PHP and how those patterns work. For instance,
you now know that most string manipulation involves calling
some function, passing it a few pieces of information, and as-
signing the result to a variable.
That’s
what’s important, and
now, every time you do look up a string function in the PHP
manual, you know exactly how to use that function correctly.

CHAPTER 3: PHP SYNTAX: WEIRD AND WONDERFUL 83
THE $
REQUEST
VARIABLE IS
AN ARRAY
The
$_REQUEST
Variable Is an Array
It’s probably no surprise to you that PHP is a lot more than a tool to work with
text. You’ve been working with strings non-stop, but there are a lot more types
of information you’ll need to work with in your PHP scripts. As you might expect,
there are all kinds of ways to work with numbers, and you’ll work with them quite
a bit before long.
But there’s another important type of information you need to understand. In fact,
you’ve already been working with this type as much as you’ve worked with text. This
mystery type is an
array
, which is a sort of container that holds other values within it.
NOTE You can find the finished example code for this section on this book’s Missing CD page at
www
.missingmanuals.com/cds/phpmysqlmm2e
.
Arrays Can Hold Multiple Values
An array is a
data structure
, which is an organization of data that can be referenced
all at once. It’s another one of those terms that will gain you respect at a local
Google get together (but might get you some odd looks if you’re having cocktails
at a political fundraiser). But, arrays aren’t hard to understand. Think of an array as
a file cabinet of information, and you’ve got the idea.
As an example, if you have a variable called $file_cabinet that’s an array, it can
store other information within it. You might stu URLs, and first names, and last
names, and emails into that $file_cabinet. You can fill up the file cabinet by tell-
ing PHP where you want your information by using numbers surrounded by square
brackets, right after the array variable name, like this:
<?php
$file_cabinet[0] = "Derek";
$file_cabinet[1] = "Trucks";
$file_cabinet[2] = "derek@DerekTrucks.com";
$file_cabinet[3] = "http://www.facebook.com/DerekTrucks";
$file_cabinet[4] = "@derekandsusan";
?>
Think of these numbers as drawers in the file cabinet, or if you like things a little
more compact, labels on file folders within the cabinet.
NOTE Anytime you see a code example like this, you can type it, save it (using a name like
file_cabinet
.php
), and run it with the
php
command. Go ahead and try it; you’ll be changing things and making up your
own programs in no time.

PHP & MYSQL: THE MISSING MANUAL
84
THE $
REQUEST
VARIABLE IS
AN ARRAY
Then, you can get information out of $file_cabinet by using those same numbers
within brackets:
$first_name = $file_cabinet[0];
$last_name = $file_cabinet[1];
$email = $file_cabinet[2];
$facebook_url = $file_cabinet[3];
$twitter_handle = $file_cabinet[4];
WARNING It’s probably old hat to you by now, but remember from the box on page 74 that most things
in PHP start counting at 0. Arrays are no different. This means that the first item in
$file_cabinet
is
$file_cabinet[0]
, not
$file_cabinet[1]
.
From this point, you can do whatever you want with those values, including print
them out. Here’s a complete program that isn’t very useful, but certainly puts an
array through its paces. It fills an array, pulls information out of the array, and then
does a little printing.
<?php
$file_cabinet[0] = "Derek";
$file_cabinet[1] = "Trucks";
$file_cabinet[2] = "derek@DerekTrucks.com";
$file_cabinet[3] = "http://www.facebook.com/DerekTrucks";
$file_cabinet[4] = "@derekandsusan";
$first_name = $file_cabinet[0];
$last_name = $file_cabinet[1];
$email = $file_cabinet[2];
$facebook_url = $file_cabinet[3];
$twitter_handle = $file_cabinet[4];
echo $first_name . " " . $last_name;
echo "\nEmail: " . $email;
echo "\nFacebook URL: " . $facebook_url;
echo "\nTwitter Handle: " . $twitter_handle;
?>
This program does a fine job filing pieces of information away for use later—but
there’s a bit of a problem here. Are you really going to remember that you have a
last name at position 2, and at position 4, you stored the Facebook URL? That’s a
disaster waiting to happen.
Fortunately, the wise folks that came up with PHP thought this through. PHP arrays
are
associative
, which means simply that you can associate labels with each item in

CHAPTER 3: PHP SYNTAX: WEIRD AND WONDERFUL 85
THE $
REQUEST
VARIABLE IS
AN ARRAY
the array. Going back to the idea of each number being a folder in a file cabinet, you
can use an actual label on the folder. Better yet, that label can be anything you want.
Following is that same simple program; this time it uses associative labels. You
should make these changes to your own copy of this script if you’re following along.
<?php
$file_cabinet['first_name'] = "Derek";
$file_cabinet['last_name'] = "Trucks";
$file_cabinet['email'] = "derek@DerekTrucks.com";
$file_cabinet['facebook_url'] = "http://www.facebook.com/DerekTrucks";
$file_cabinet['twitter_handle'] = "@derekandsusan";
$first_name = $file_cabinet['first_name'];
$last_name = $file_cabinet['last_name'];
$email = $file_cabinet['email'];
$facebook_url = $file_cabinet['facebook_url'];
$twitter_handle = $file_cabinet['twitter_handle'];
echo $first_name . " " . $last_name;
echo "\nEmail: " . $email;
echo "\nFacebook URL: " . $facebook_url;
echo "\nTwitter Handle: " . $twitter_handle;
?>
By now, though, this $file_cabinet should be looking a bit familiar. You’ve seen
something that looks awfully similar...read on for the full story.
PHP Gives You An Array of Request Information
Yes, you guessed it: $_REQUEST—that special variable PHP gave you to gather all
the information from a web form—is an array! And when you’ve written code like
$_REQUEST['first_name'], you’ve been grabbing a particular piece of information
out of that array.
In fact, you’ve already seen that the most powerful way you use arrays is really behind
the scenes. You (or a web browser) stick information into the array and then pull it
back out and work with that information. The array just serves as a convenient way
to hold things, like when a browser is sending a request to your PHP script.
You’ve seen that not only can you retrieve information in an array by a name—
the label on a file folder—but also by number. This means that you can use
$file_cabinet['first_name'], but you can also use $file_cabinet[0]. The same
is true of $_REQUEST; it’s just an array, therefore, using $_REQUEST[0] is perfectly
fine with PHP.

PHP & MYSQL: THE MISSING MANUAL
86
THE $
REQUEST
VARIABLE IS
AN ARRAY
What exactly is in $_REQUEST? Go ahead and create the following new program, and
you can see for yourself.
<html>
<head>
<link href="../../css/phpMM.css" rel="stylesheet" type="text/css" />
</head>
<body>
<div id="header"><h1>PHP & MySQL: The Missing Manual</h1></div>
<div id="example">Example 3-2</div>
<div id="content">
<p>Here's a record of everything in the $_REQUEST array:</p>
<?php
foreach($_REQUEST as $value) {
echo "<p>" . $value . "</p>";
}
?>
</div>
<div id="footer"></div>
</body>
</html>
This is another one of those scripts that can look intimidating at first, but it’s really not
bad at all. In fact, the only thing you’ve not seen before is the line with the foreach
construct. Take a closer look at this line, which begins a PHP loop:
foreach($_REQUEST as $value) {
The foreach construct is a nifty PHP element that lets you quickly get at the values
of an array (you’ll learn a lot more later, on page 466). In this case, foreach takes
an array ($_REQUEST) and then pulls each value out of that array, one at a time. Each
time it pulls out a single value, it assigns that value to a new variable called $value;
that’s the as $value part of the foreach line. Inside the foreach loop, a $value vari-
able is assigned a single value from within the array. This is repeated until there are
no more values from left in the array.
Just as with the if statement you’ve used a few times, the curly braces ({ and }) tell
PHP where the beginning and the end of this loop are:
foreach($_REQUEST as $value) {
echo "<p>" . $value . "</p>";
}
Everything between the { and } runs once for each time through the loop. This means
that for every item in $_REQUEST, this line is going to run one time:

CHAPTER 3: PHP SYNTAX: WEIRD AND WONDERFUL 87
THE $
REQUEST
VARIABLE IS
AN ARRAY
echo "<p>" . $value . "</p>";
This echo line prints out $value with some HTML formatting. Every time foreach
loops around, $value picks up the next value from $_REQUEST, which makes this
statement is a quick way to print out every value in $_REQUEST.
Now, suppose that $_REQUEST has values within it like “Derek”, “Trucks”, and “@
DerekAndSusan”. When PHP runs your code, it does something like this:
echo "<p>" . "Derek" . "</p>";
echo "<p>" . "Trucks" . "</p>";
echo "<p>" . "@DerekAndSusan" . "</p>";
Save this script as
showRequestInfo.php
. You’ll also need to change where your
socialEntryForm.php
web form submits its information to the following:
<form action="scripts/showRequestInfo.php" method="POST">
<fieldset>
<label for="first_name">First Name:</label>
<input type="text" name="first_name" size="20" /><br />
<label for="last_name">Last Name:</label>
<input type="text" name="last_name" size="20" /><br />
<label for="email">E-Mail Address:</label>
<input type="text" name="email" size="50" /><br />
<label for="facebook_url">Facebook URL:</label>
<input type="text" name="facebook_url" size="50" /><br />
<label for="twitter_handle">Twitter Handle:</label>
<input type="text" name="twitter_handle" size="20" /><br />
</fieldset>
<br />
<fieldset class="center">
<input type="submit" value="Join the Club" />
<input type="reset" value="Clear and Restart" />
</fieldset>
</form>
NOTE You may want to create a copy of
socialEntryForm.html
, and call it something else, like
socialEntryForm-2.html
or
enterInformation.html
. This will give you two versions: one that sends information to
showRequestInfo.php
, and one that sends information to
getFormInfo.php
.
Visit your new web form, fill it out, and then submit it. The web form you get back is
the result of running your new
showRequestInfo.php
script. This form finally gives
you an idea of what’s being sent between your web browser and a web server, and
you can see it all in Figure 3-12.
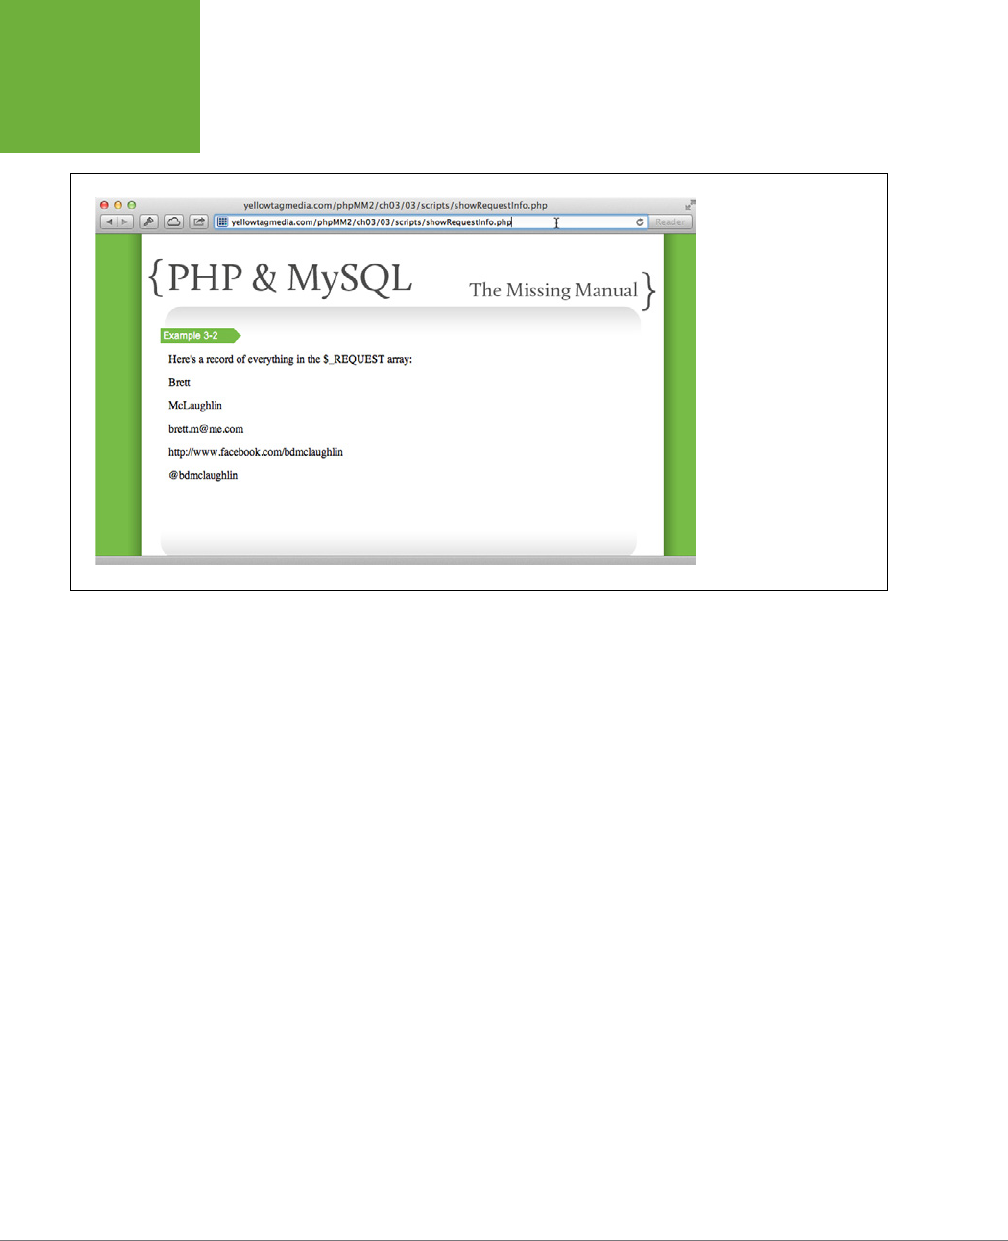
PHP & MYSQL: THE MISSING MANUAL
88
THE $
REQUEST
VARIABLE IS
AN ARRAY
FIGURE 3-12
The
showRequestInfo.php
script shows you some
things you expected
here, like the information
entered into your web
form.
At this point, you have the raw information, but what does it all mean? The web page
in Figure 3-12 is like seeing all the files on a computer, but having none of the names
of those files. Or, if you like the file cabinet analogy, imagine having a cabinet of
folders with all the labels torn o. It makes knowing what’s going on a little trickier.
With the form data, you already know the labels: “first_name”, and “last_name”,
“email”, and so on. In an associative array such as what PHP uses, these are called
the
keys
. You can get the value of a particular “folder” in an array with code like this:
$value = $file_cabinet[$key];
This line of code gets the value from the array that’s attached to whatever label
the $key variable holds. Thus, if $key were “first_name”, the code would basically
be the same as this:
$value = $file_cabinet['first_name'];
Therefore, in
showRequestInfo.php
, you just need to also get the keys from the
$_REQUEST array, instead of just the values. Then, you can print out both the key
and
the value. And, wouldn’t you know it, PHP makes that easy, again by using foreach:
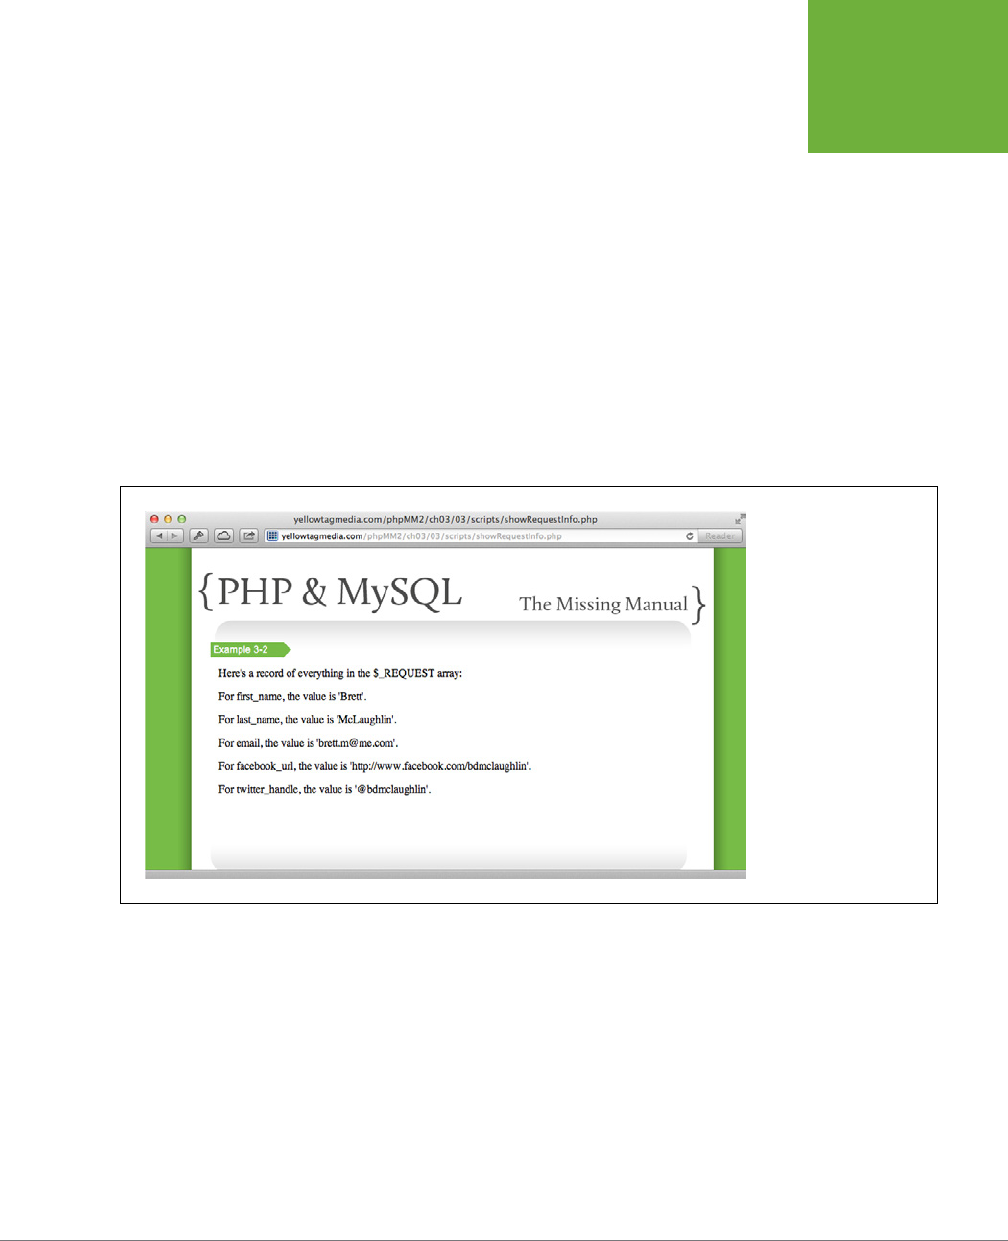
CHAPTER 3: PHP SYNTAX: WEIRD AND WONDERFUL 89
THE $
REQUEST
VARIABLE IS
AN ARRAY
<div id="content">
<p>Here's a record of everything in the $_REQUEST array:</p>
<?php
foreach($_REQUEST as $key => $value) {
echo "<p>For " . $key . ", the value is '" . $value . "'.</p>";
}
?>
</div>
This time, you’re instructing foreach to get both the key, as $key, and the value, as
$value. That special => sign tells PHP you want the $key and then the $value at-
tached to the key. In other words, you’re grabbing a label and the folder that label
is attached to, which is just what you want.
Fill out your form again and check out the results of your updated PHP script, as
shown in Figure 3-13.
FIGURE 3-13
Now that you’ve added
the explanatory text and
the
foreach
statement
shown in the code above,
you can see not just the
values for each key, but
the key name itself. These
names are none other than
the form input names from
your HTML.

PHP & MYSQL: THE MISSING MANUAL
90
WHAT DO YOU
DO WITH USER
INFORMATION?
What Do You Do with User Information?
At this point, you’ve got a lot of information stued into a lot of variables. In fact,
your earlier web form,
socialEntryForm.html
, looks a lot like the signup forms you’ve
probably filled out hundreds (or thousands) of times online. But there’s a problem,
isn’t there? In fact, you might have already run across it as you worked through
all the changes to your
getFormInfo.php
script: none of that information was ever
saved! You had to enter in your name and social information, over and over and over.
Good PHP programmers are able to solve just about any technical problem you throw
at them. They know all the PHP string functions, arrays, and a lot more, to boot. But
great
PHP programmers can solve a whole set of problems that those good PHP
programmers never think about: user expectation problems. These are problems
that really aren’t technical—although you might need to be a good programmer to
work around users.
Here’s the million-dollar question: What does your user
expect
your pages and
scripts to do? For instance, does your user expect to have to come back to your page
and enter in the same information, each time? Absolutely not. You’d probably stop
visiting a site like that yourself. What you have is a user expectation problem—and
if you want users to hang around and use your site, you’d better solve this problem.
In fact, one of the best things you can do is actually
use
your own pages and pro-
grams. Get a cup of coee, a notepad, and just sit down at your computer. Close all
your text editors and programming tools, and think, “I’m a user!” Then, try out your
web form, submit the form, enter weird information in it, and just see what happens.
Take a few notes about things that bug you, but remember: you’re just a user here.
WARNING You might be tempted to make all your notes in a text editor, or just start fixing things. Resist
this urge! As soon as you start fixing things, or even getting immersed in your computer, you’re not thinking like
a user anymore, and you’ll miss things.
You’ll probably find all sorts of things you didn’t even think about. So, now what?
Well, you’ve got to start fixing those things. And first up is this pesky issue of having
to enter the same information into your page, over and over.

91
CHAPTER
4
Where is this supposed to go?
It’s a question you ask every day. Where do these shoes go? Where does
this new box of books go? Where do these receipts go? Because that’s such
a common question, it shouldn’t surprise you too much that when you’re building
web applications, you need to ask the same thing:
Where does my information go?
For the kinds of web applications you’ve been building with web pages and PHP,
the answer to this question is simple: in a database. But what do you get out of a
database that makes it worth the eort of installing another tool and learning an-
other language? And, why does everyone seem to agree that if you’re writing PHP
code, you need a database, too? Sit tight, because this chapter is about to reveal all.
What Is a Database?
A database is just a repository in which you can store information, add some layer of
organization to the stored information, and grab that information when it’s needed.
In a literal sense, a file cabinet is a database. You can throw things into it, pull those
things back out, and even use files and labels to keep your files organized.
Databases Are Persistent
You’ve already seen that PHP gives you arrays (page 83) that serve as a sort of pro-
grammer’s file cabinet. An array might function as a database in a simplistic sense,
MySQL and SQL:
Database and Language

PHP & MYSQL: THE MISSING MANUAL
92
WHAT IS A
DATABASE?
but it won’t serve your needs for long. For one thing, arrays and their contents in
PHP are lost every time your program stops and starts again. That’s not very helpful.
A good database provides long-term storage for your information. If your program
stops running, or your entire web server has to be restarted, a database doesn’t lose
your information. Imagine if every time your web server had to be shut down for an
upgrade, your database lost every user’s first name, last name, and email address.
Do you think your users would come back to your site if they repeatedly had to type
everything in again? Not a chance.
Therefore, a good database needs to store information more permanently. In pro-
grammer jargon, this is called
persisting
your information. (At times, though, even
permanent information can be lost; see the box that follows for advice on backing
up your information in such cases.)
UNDER THE HOOD
Permanent Data Is Really Semi-Permanent
Even though databases store your information, and that stor-
age lasts beyond your computer or even a database starting
up and shutting down, your information is still not really
permanent. Think about it: even if you write in ink instead of
pencil, you can still throw away the piece of paper you wrote
on. That’s how databases work: they store information in a
form that’s harder to destroy, but that information still
can
be destroyed.
At some point, databases have to store information some-
where, usually on hard drives. If one of those hard drives
crashes or becomes defective, your information is lost, no
matter how good your database is. Additionally, threats to
computers like overheating or natural disasters can wipe out
your data by destroying the hard drives on which it exists.
That’s why most databases offer some form of backup and
replication.
Backup
is just creating a copy of your database so
that if something goes wrong, you can restore the database
from the backup and recover all (or at least most) of the
information that’s been lost.
Replication
is when an entire database is duplicated (the
duplicated version might be running simultaneously). This
means that in addition to having the main database and
possibly a backup, you have an entirely different copy of the
database running, as well. With replication, an entire database
could fail, but all your applications keep running because they
can switch to the replicated version.
Replication is expensive because you basically need another
server with another copy of your database software running.
Still, if you use an application extensively and it earns money
as long as it’s running, replication is a really important way to
ensure that information isn’t lost in a disaster.
If you think about it, you’re constantly working with something like this on your
computer: a system that stores your information over a long term. It’s your hard drive
and file system. The files on your computer are basically pieces of information; such
as addresses, emails, your finances, or maybe what level you’ve made it to in Angry
Birds. You can shut down your computer and start it back up, or even upgrade to a
new computer, and all those files with all your information will still load up.
In other words, a file system is really a sort of database. In fact, lots of databases
actually use files much like your computer does to persist information. So, why
doesn’t PHP just store information in files? It actually has an entire set of tools for
working with files, including creating, writing, and reading files. Isn’t that enough?
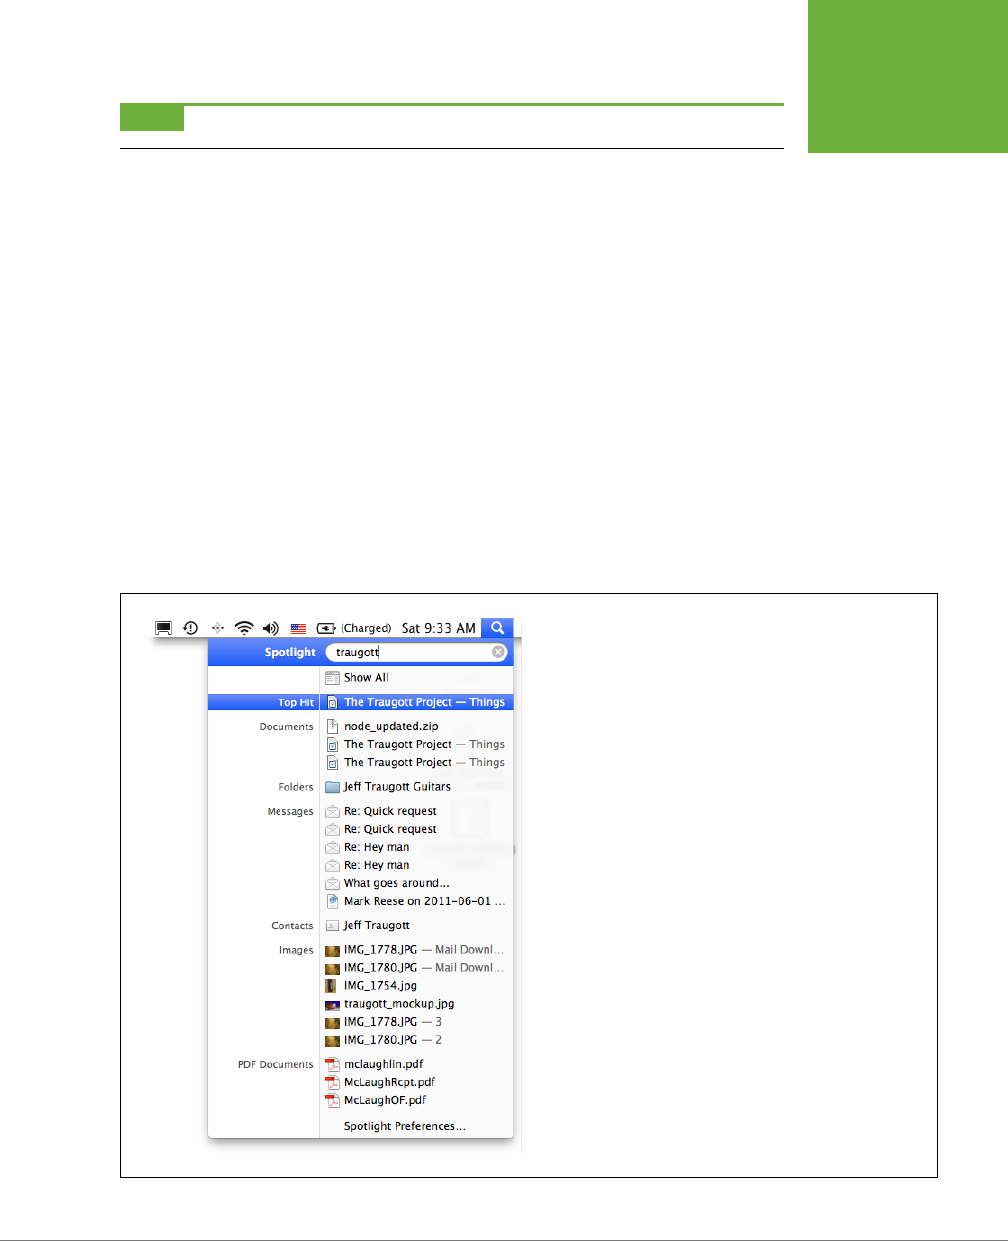
CHAPTER 4: MYSQL AND SQL: DATABASE AND LANGUAGE 93
WHAT IS A
DATABASE?
NOTE You learn about how to use PHP to work with files in Chapter 5.
Databases Are All about Structure
If you think about it, there’s something pretty clunky about your computer’s file sys-
tem. Have you ever tried to remember the last time you sent an email to someone?
Your email program might not know that person’s email address. And, if you go to
that person’s card in your address book program, that address book program might
not be connected to your email program.
Even if you actually find the email address, you might need to reference some
documents related to the email message. Where are those documents? In another
folder somewhere, probably in some highly-organized structure about which you’ve
long forgotten.
That’s why your computer gives you one or more ways to search for information. In
Mac OS X, you can use Spotlight (see Figure 4-1) or a program like Quicksilver (
http://
quicksilver.en.softonic.com/mac
). If you have Windows, you can download Google’s
Desktop Search (
http://www.google.com/quicksearchbox
, see Figure 4-2). These
programs find all occurrences of a certain word or topic across your entire system.
FIGURE 4-1
Spotlight in Mac OS X tries to relate files in different places by
their name, the folder they’re in, or their content. In other words,
Spotlight tries to determine the relationships between different files
and folders.
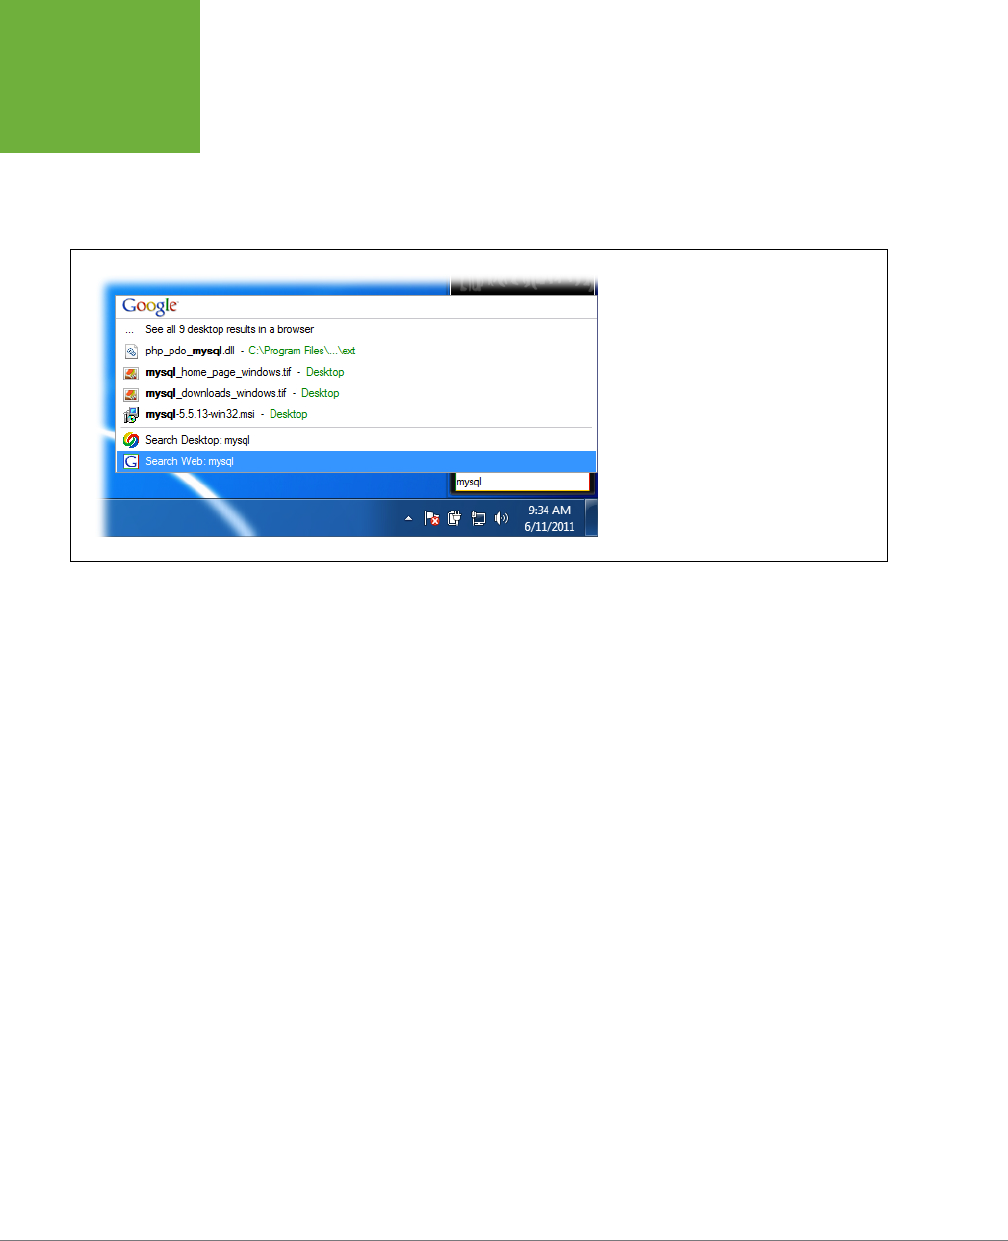
PHP & MYSQL: THE MISSING MANUAL
94
WHAT IS A
DATABASE?
In fact, these search programs attempt to do what databases do by nature: locate
and organize information. If you’ve ever tried to make these sort of connections
on your computer—whether you’re using Spotlight or Google Search or doing it by
hand—you know it’s a hassle and inconsistent, at best. What you need is a better
way to connect two, three, or ten pieces of information together.
FIGURE 4-2
Google Desktop Search works in both
Windows and Mac OS. It indexes and connects
files on both your computer and in the
cloud in Google Documents and Gmail. It
actually builds its own database to make and
remember these connections.
Good Databases Are Relational
There is one task for which a file system and your hard drive are lacking, but a da-
tabase excels: creating
relationships
between dierent pieces of information. For
example, you might have a person, and that person has several email addresses,
phone numbers, and mailing addresses. This isn’t anything new; your address book
program already handles these sorts of relationships.
But a good database goes further. An email message is related to the email address
of the sender, and that email is related back to the person’s name and phone numbers
and mailing address. A map with streets connects those streets to the streets used
in a person’s mailing address. The creator’s name in a file description relates to that
person, and their email, and their phone, and so on.
In a lot of ways, these relationships are really a giant web of connections. A good
database both creates and manages all these relationships. In fact, relationships are
so integral to MySQL, FileMaker, Oracle, and other big-time databases that they’re
called
relational databases
. (For a technical journey into how these databases oper-
ate, see the box on page 95.)
This means that in addition to instructing a database what information you want it to
store for you and your programs, you also define how that information is
connected
to other pieces of information. Not only do you get to use this web of connections,
but you specify to the database exactly how the web should be constructed. That’s
a lot of power, which is why you’ll have to learn an entirely new language to work
with these relational databases.

CHAPTER 4: MYSQL AND SQL: DATABASE AND LANGUAGE 95
INSTALLING
MYSQL
ALTERNATE REALITIES
Objects and Relations in Databases, Oh My!
For decades, the relational database has been the de facto stan-
dard for high-end applications, whether those applications run
on the Web or on an internal company network. These database
programs—often called an RDBMS, which stands for
relational
database management system
—are the best understood, and
most data naturally fits into an RDBMS model. Not only that,
but there are more stable and professional RDBMS’s than any
other type of database.
However, there are some competitors to the RDBMS model
these days. Most of these are
object-oriented database man-
agement systems
, or OODBMS for short. Although the OODBMS
has been around since the 1970s, it’s really just in the past 10
years that these have gained popularity.
An RDBMS stores information in tables, rows, and columns. For
example, you might have a table of users that has columns for
their first name, last name, and email. This means that anything
that’s stored in the RDBMS involves some kind of mapping. This
means that the information in your PHP script has to be mapped
to particular tables and columns. You’d say, for example, the
information in
$_REQUEST['first_name']
needs to
be stored in the
Users
table, and then in the
first_name
column. This isn’t a big deal, but it is an extra step in working
with relational databases.
In an OODBMS, you’d create an
object
in your code. (You don’t
need to worry about the details of objects and how they work
for now.) So, you might create a new
User
object, and assign
it’s first name the value in
$_REQUEST['first_name']
.
Then, when you want to store that user’s information, you just
hand the OODBMS your entire
User
object. In other words, the
database figures out how to deal with an object instead of you
specifying where individual pieces of information go.
Of course, with an OODBMS, this means you have to have lots
of objects in your code, so you’re going to end up writing some
code whether you’re working with an RDBMS or an OODBMS.
Still, the RDBMS is far, far more common in web applications
than the OODBMS, which is why it’s definitely the one you want
to focus on learning.
Installing MySQL
Before you can tackle the new language of databases, you’ve got to get a database
installed on your computer. In this book, you’ll be working with the MySQL database,
which is one of the most common databases used in web applications. The reason
for this is because it’s easy to get, easy to install, and easy to use.
NOTE Like most things in life, ease-of-use comes with some tradeoffs. There are some database programs
that cost a lot of money and are really complicated to use, such as Oracle. But these programs typically offer
features that programs like MySQL don’t: higher-end tools for maintenance, and a whole slew of professional
support options that go beyond what you can get with MySQL.
Don’t worry, though. Almost every single command, technique, and tool you’ll learn for working with MySQL will
work with
any
relational database, so even if you end up at a company or in a situation where Oracle (or an IBM
product, or PostgreSQL, or something else entirely) is in use, you’ll have no problems getting your PHP working
with a database other than MySQL.

PHP & MYSQL: THE MISSING MANUAL
96
INSTALLING
MYSQL
If you installed MAMP on your Mac or WampServer on your Windows-based PC (see
Chapter 1 , page 22), then you already have a local installation of MySQL. Pretty sweet,
right? (And, if you didn’t—you masochist, you!—check out Appendix B for detailed,
step-by-step instructions on installing MySQL
without
MAMP or WampServer.)
Just as Chapter 1 deals with a local installation of PHP, this chapter starts out by fo-
cusing on a local installation of MySQL. Of course, just as your PHP work in Chapter1
progressed into working with a remote installation of PHP in Chapter 2, the same
applies here, so if you don’t want to mess with WampServer or MAMP, you can jump
on your hosting provider, fire up the mysql program, and get to typing. Of course,
this assumes that your hosting provider lets you have shell access and lets you run
the mysql console program—neither of which is a sure thing. If those become an
issue, you can always resort to the already-installed MAMP/WampServer version
on your local computer.
The
mysql
Console Program: Your New Best Friend
Regardless of how you install MySQL, your first step toward database mastery is to
begin using the mysql console program. Although MySQL is a database, mysql is a
program that lets you interact with that database from a command line. Every instal-
lation of MySQL comes with the mysql tool; you just have to know how to get at it.
But first you have to
start
the MySQL service. Otherwise, you’ll get errors because
the mysql program has nothing to which it can connect. For WampServer, on the
right side of the taskbar, click the green “W” icon and choose Put Online or Start
All Services and read on. For MAMP, start the program, select Start Servers, and
then go to page 98.
WARNING Many budding web developers have had their careers crashed against the rocks of their MySQL
server not being started. You can bang your head against the MySQL console all day and get nowhere if you don’t
have MySQL started up on your computer.
Run the
mysql
Tool on WampServer
WampServer installs mysql along with the MySQL database. However, it doesn’t set
up your PATH to access that program, so you’ll have to do a little digging around.
FIND THE MYSQL COMMAND-LINE PROGRAM
Once you’ve started up MySQL, change into the
wamp/
directory on the drive on
which you installed WampServer. For example, if you put WampServer on the
c:\
drive, go to a command prompt (Start→Run and then type command on Windows 7
and earlier; Windows key+R on Windows 8) and then type the following:
C:\Users\bdm0509> cd c:\wamp\bin\mysql\
Now, you’ll have to do a little investigation, because things change based upon the
version of MySQL your copy of WampServer installed. Do a directory listing:

CHAPTER 4: MYSQL AND SQL: DATABASE AND LANGUAGE 97
INSTALLING
MYSQL
C:\wamp\bin\mysql>dir
Volume in drive C has no label.
Volume Serial Number is 7C78-FE01
Directory of C:\wamp\bin\mysql
08/01/2012 02:32 PM <DIR> .
08/01/2012 02:32 PM <DIR> ..
08/01/2012 02:32 PM <DIR> mysql5.5.24
0 File(s) 0 bytes
3 Dir(s) 52,739,547,136 bytes free
You should see just one directory, specific to the version of MySQL installed by
WampServer. Change into that directory. For MySQL 5.5.24, use the following:
C:\wamp\bin\mysql> cd mysql5.5.24
Now, you can go into yet another
bin
directory and finally run the mysql command:
C:\wamp\bin\mysql\mysql5.5.24> cd bin
C:\wamp\bin\mysql\mysql5.5.24\bin>mysql
ERROR 2003 (HY000): Can't connect to MySQL server on 'localhost' (10061)
GIVE
MYSQL
THE RIGHT USER AND PASSWORD
You have the right program, but the error message tells you that things aren’t work-
ing yet. That’s because you haven’t told mysql what user to use for logging in. You
must specify the user with the -u option and then tell it to log in as “root”. Here’s
how it looks:
C:\wamp\bin\mysql\mysql5.5.24\bin>mysql -u root
Welcome to the MySQL monitor. Commands end with ; or \g.
Your MySQL connection id is 2
Server version: 5.5.24-log MySQL Community Server (GPL)
Copyright (c) 2000, 2011, Oracle and/or its affiliates. All rights reserved.
Oracle is a registered trademark of Oracle Corporation and/or its
affiliates. Other names may be trademarks of their respective
owners.
Type 'help;' or '\h' for help. Type '\c' to clear the current input statement.
mysql>
And there you have it! Somewhat surprising, you don’t need to provide a password
to WampServer. Of course, because this is all running on your own local installation,
security isn’t the concern it will be when you start connecting to a MySQL database

PHP & MYSQL: THE MISSING MANUAL
98
INSTALLING
MYSQL
on your web host out on the Internet. For now, you’re ready to start interacting with
your database.
Run the
mysql
Tool on MAMP
If you’re on Mac OS X, MAMP came with a mysql tool, available through the Terminal.
It’s stored in
/Applications/MAMP/Library/bin
, so you can run it like this:
$ /Applications/MAMP/Library/bin/mysql
SET UP
MYSQL
FOR YOUR USER PROFILE
You can make this easier with a few quick edits to your profile and setup:
1. Create a directory called
bin
in your home directory:
mkdir ~/bin
2. Go to that directory:
cd ~/bin
3. Create a symbolic link to the mysql program in that directory:
ln -s /Applications/MAMP/Library/bin/mysql mysql
4. Add your new
~/bin
directory to your path. Edit your
~/.bash_profile
:
vi ~/.bash_profile
5. Find or add a line to update your PATH variable. For example:
export PATH=$PATH:~/bin
6. Now save your
.bash_profile
, and restart Terminal.
NOTE If you’re comfortable with the Mac OS X command line and see things here that don’t apply to your
system—such as
bash
needing to be replaced by a custom shell you’ve installed—then feel free to make those
changes. You’re probably a few steps ahead already, anyway, so if you know what to do, go on and make the
changes for your system.
If you can power through this setup, all you have to do in the future is start a new
Terminal and type the following:
$ mysql
If you don’t want to go through that rigamarole, just type the full path to mysql
every time:
$ /Applications/MAMP/Library/bin/mysql
GIVE
MYSQL
THE RIGHT USER AND PASSWORD
For MAMP installations, just as with WampServer installations, using the mysql tool
log in to MySQL as the root user. You specify that by using the -u option and then
the username root, like this:
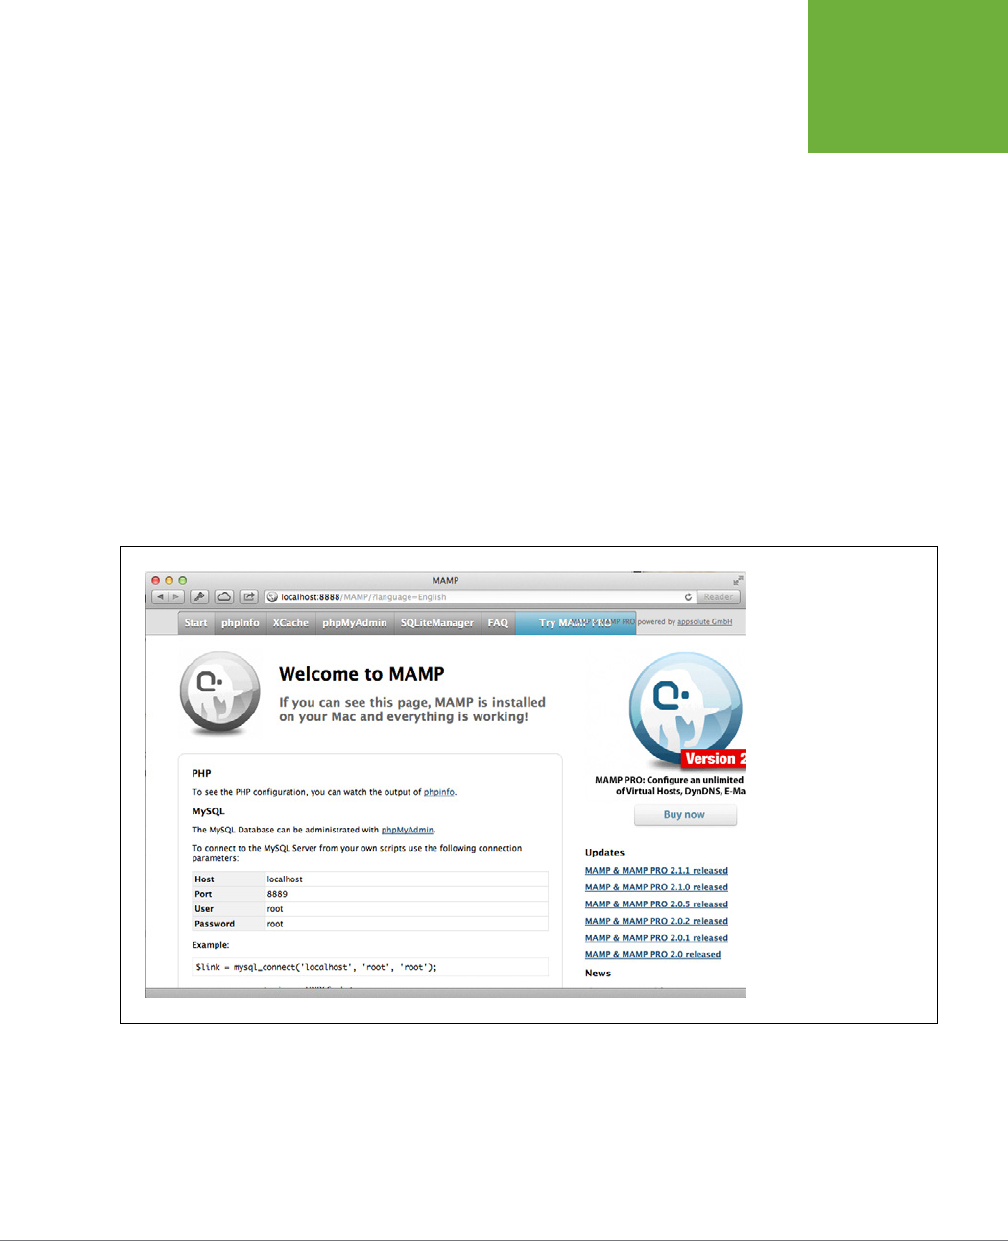
CHAPTER 4: MYSQL AND SQL: DATABASE AND LANGUAGE 99
INSTALLING
MYSQL
$ mysql -u root
Running this command as is doesn’t quite give you what you were hoping for. In
fact, you’ll probably see an error similar to this:
$ /Applications/MAMP/Library/bin/mysql -uroot
ERROR 1045 (28000): Access denied for user 'root'@'localhost' (using password:
NO)
That’s because users have passwords, and you haven’t supplied one. On top of that, for
reasons too confusing to mention, the mysql program doesn’t ask you for a password,
unless you instruct it to. Add the -p option, and you’ll be prompted for a password:
$ /Applications/MAMP/Library/bin/mysql -uroot -p
Enter password:
To find your root user password, go to the MAMP start page. That’s the web page
that fires up every time you start MAMP. If MAMP is already running, you can click
“Open start page.” You’ll see something like Figure 4-3, and there, clear as can be,
is your password.
FIGURE 4-3
The MAMP start page is
your first and best source
for all things PHP, MySQL,
and web server on your
local installation of these
programs. In this case, it
displays the MySQL root
password, which you’ll
need…a lot!
A root user password of “root” isn’t particularly secure, but again, you’re on your
local computer, not the NASA user store. Now, you can give that password to the
mysql prompt. You should see something like this in return:
$ /Applications/MAMP/Library/bin/mysql -uroot -p
Enter password:
Welcome to the MySQL monitor. Commands end with ; or \g.

PHP & MYSQL: THE MISSING MANUAL
100
INSTALLING
MYSQL
Your MySQL connection id is 6
Server version: 5.5.9 Source distribution
Copyright (c) 2000, 2010, Oracle and/or its affiliates. All rights reserved.
Oracle is a registered trademark of Oracle Corporation and/or its
affiliates. Other names may be trademarks of their respective
owners.
Type 'help;' or '\h' for help. Type '\c' to clear the current input statement.
Once you’re logged in, you can type exit to quit:
mysql> exit
Bye
$
That’s all there is to it! Now you’re ready to start talking to MySQL.
Run Your First SQL Query
MySQL has installed a number of pre-created databases on your system. To see
them, all you have to do is ask. Fire up the mysql command line tool again, and
type this command:
show databases;
WARNING Be sure you end your line with a semicolon, or you’ll get unexpected results. All your MySQL
commands must end with a semicolon, just like most of your PHP commands.
You should get a text response from MySQL that looks a bit like this:
mysql> show databases;
+--------------------+
| Database |
+--------------------+
| information_schema |
| development |
| eiat_testbed |
| mysql |
| nagios |
| ops_dashboard |
| performance_schema |
| test |
+--------------------+
8 rows in set (0.25 sec)
You might not have as many databases that come back, or you might have dierent
databases. That’s OK.

CHAPTER 4: MYSQL AND SQL: DATABASE AND LANGUAGE 101
INSTALLING
MYSQL
The show command does just what you might expect: it shows you everything for
a particular keyword; in this case, databases. To sum it up, show databases is just a
way you can ask MySQL to show you all the databases installed on your machine.
On top of that, now you know something really important: MySQL really isn’t so
much a database, but a piece of software that can store and create databases. In
this example, there are eight rows returned as a result of running the show databases
command, which means there are eight databases on the system, not just one. Be-
fore you’re done, you’ll have created several databases, all running within MySQL.
For now, tell MySQL you want to work with the mysql database, which you have
on your system even if you’ve only installed MySQL. You do that with the use com-
mand, like so:
use mysql;
Now, you’re
in
the mysql database. This means that any commands you give to
MySQL are run against just the mysql database.
At the beginning of this section, you asked MySQL to show you all the databases
it has; now tell it to show you all the tables in the database you’re currently using:
show tables;
You should get a nice long list, as illustrated here:
mysql> show tables;
+---------------------------+
| Tables_in_mysql |
+---------------------------+
| columns_priv |
| db |
| event |
| func |
| general_log |
| help_category |
| help_keyword |
| help_relation |
| help_topic |
| host |
| ndb_binlog_index |
| plugin |
| proc |
| procs_priv |
| proxies_priv |
| servers |
| slow_log |
| tables_priv |
| time_zone |
| time_zone_leap_second |
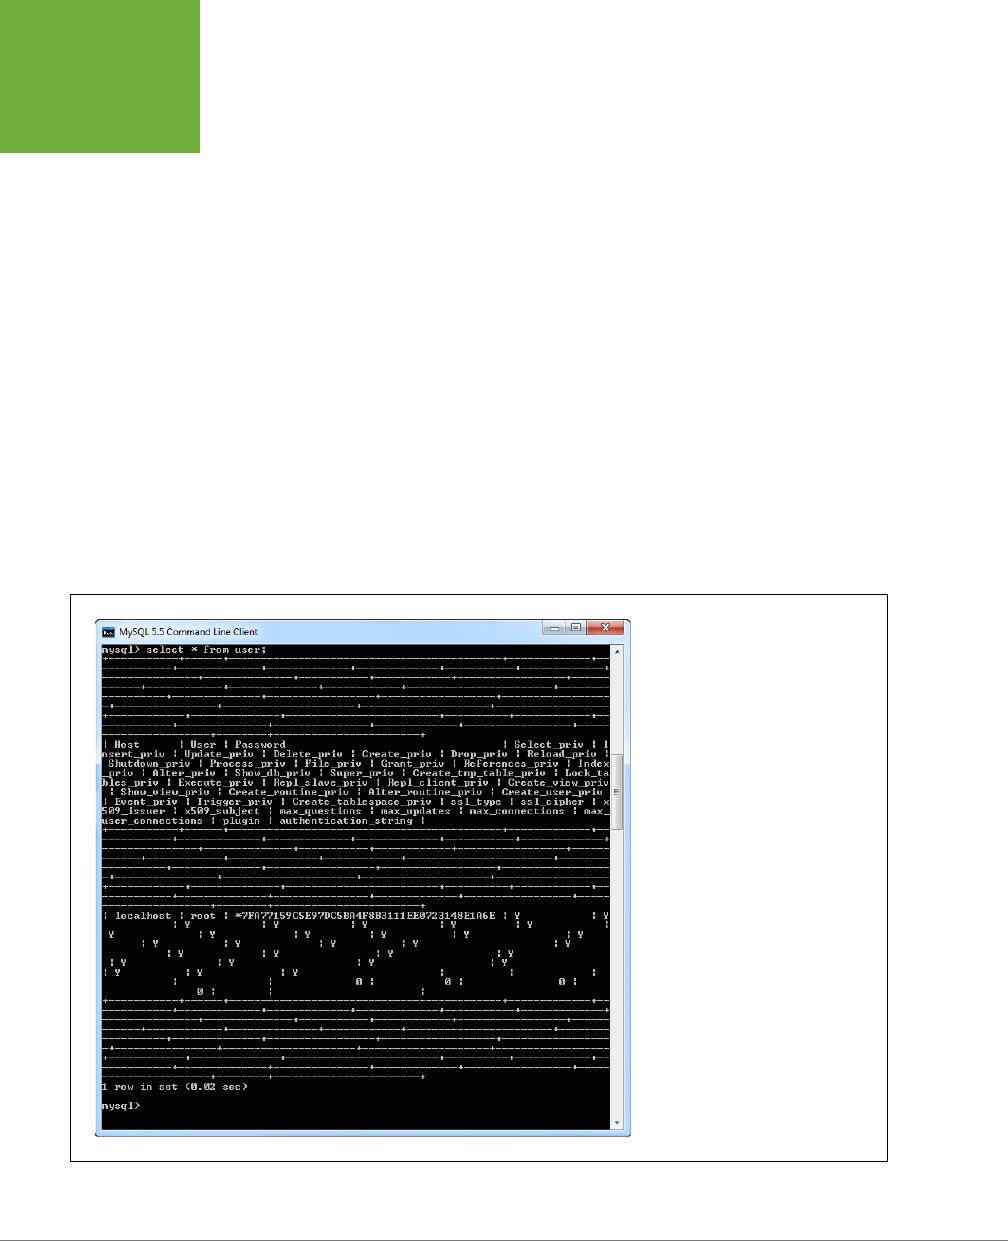
PHP & MYSQL: THE MISSING MANUAL
102
INSTALLING
MYSQL
| time_zone_name |
| time_zone_transition |
| time_zone_transition_type |
| user |
+---------------------------+
24 rows in set (0.00 sec)
A lot of these table names appear odd, but that’s mostly because these are internal
tables used by MySQL. As you create new tables and users and set up your data-
base, all of that information is stored within another database: the mysql database.
To see some of this information, you must use the select command to access infor-
mation from a specific table—for example, the
user
table. Type this command at
your MySQL command prompt:
mysql> select * from user;
The asterisk (*) means “select everything.” Then, from specifies to MySQL where to
get the information: in this example,
user
, which is a table in your database.
Don’t be surprised when you get a confusing stream of information back. In fact, it
might look like something out of the Matrix; check out Figure 4-4 for an example.
FIGURE 4-4
As you become more comfortable with
MySQL and PHP, you’ll learn to select
just the information you want and
clean up this messy response, which
was the result of using the
from
user
command. There are also ways
to format the response from MySQL,
although you won’t need to worry
about formatting much, because you’ll
mostly be grabbing information from
MySQL in a PHP script, where format-
ting isn’t a big deal.

CHAPTER 4: MYSQL AND SQL: DATABASE AND LANGUAGE 103
INSTALLING
MYSQL
The problem here isn’t in anything you typed. It’s just that you instructed MySQL to
select
everything
from the
user
table, and in this case, everything is a
lot
of informa-
tion. In fact, it’s so much information that it won’t all nicely fit into your command-line
client, which is why you got all the strange looking lines in your response.
To tame this beast a bit, you can select just a little information from a table. You do
this be replacing the * in the command with the specific column names you want,
separated by commas:
mysql> select Host, User, Password from user;
You get back just the three columns for which you asked:
mysql> select Host, User, Password from user;
+--------------------------+-------+-----------------------------------------
--+
| Host | User | Password
|
+--------------------------+-------+-----------------------------------------
--+
| localhost | root | *62425DC34224DAABF6995B46CDCC63D92B03D7E9
|
+--------------------------+-------+-----------------------------------------
--+
1 row in set (0.00 sec)
This example shows that for your local computer (
localhost
), you have a single user
named “root.” The password is encrypted, so it isn’t very helpful, but you can see that
MySQL definitely has an entry for you. Because you only asked for three columns,
this response is a lot more readable and actually makes a little sense.
So, what’s a column? A column is a
single category of information
in your table. For
example, in a table that stores users, you might have a first_name and a last_name
column.
NOTE If you’re starting to get a little dizzy or your nose is bleeding from the rush of new terms, don’t
worry. You’ll be working with tables, columns, and these MySQL statements over and over and over again as you
build your PHP programs. Just get what you can now, and you’ll have all this new MySQL lingo under control in
no time.
Now that you’ve dipped your feet into the MySQL pool, it’s time to start to create your
own tables and columns, and fill those tables and columns with your own information.

PHP & MYSQL: THE MISSING MANUAL
104
SQL IS A
LANGUAGE
FOR TALKING
TO DATABASES
FREQUENTLY ASKED QUESTION
Going Local
My website is going to run on a server out there on the Internet.
Why should I install MySQL on my own desktop?
You saw it already in the first few chapters on PHP, and now
you’re about to see it again: most of your programming is
meant to be run on a web server. You might pay a monthly fee
for hosting to a service like
kattare.com
for your own domain,
you might own your own server that is connected to the Inter-
net, or you might deploy your code to your company’s servers,
housed in a room that’s kept too cold for normal human beings
and requires a key card to even make it through the door. In
all these cases, though, your code ends up somewhere other
than your own desktop or laptop.
But, if that’s the case, why go through the trouble of installing
PHP and MySQL on your own computer? Truth be told, you could
ask a lot of PHP developers and they’d admit that they don’t
even have PHP (let alone MySQL) on their own devices. Their
programming lives are lived through
telnet
and
ssh
sessions,
writing code on a distant server, somewhere out on the Web.
Although your code rarely will ultimately run from your own
computer, there are some really good reasons to install your
entire development setup on it. First, you’re not always in a
place where you can connect to the Internet. You might be on
a plane, in the back of a taxi, or lost in West Texas with nothing
but an old leather-covered compass and a MacBook Pro. In all
these cases, if you’ve got PHP and MySQL on your laptop, you
can code away, testing your code against a real database, and
never miss a beat.
Second, it’s common to write a lot of code, run it, find out you
messed up something (or a lot of somethings), rewrite code,
try again, and again, and again. The same is true when you
start accessing a database. Although you could do this on the
server on which your code will ultimately reside, that’s a lot
of time spent on a network connection, using that machine’s
resources, and potentially adding and deleting and adding data
to a database. It’s a lot simpler to work on your own computer,
and then at certain milestones, upload all your working code
to your server.
And finally, you learn a ton by installing these programs from
scratch. You get a better handle not just on your own device, but
how these programs work. If someone is getting a particular
error, you might recognize that same error as something you
got when a Windows service wasn’t running, or the MySQL
instance on a Mac OS X computer didn’t have the right table
permissions set up. Your installation is a way to learn more
about the tools you use, and that’s always a good thing.
You can run the examples in this book on your own computer
and on your web server. Just make sure that if you’re working
on your own machine you can either get to its code with a web
browser or you upload your code every time you’re ready to
make sure things are working correctly. That way, you can
follow along with all the examples. Beyond that, it’s up to you
where you develop your code, test it, and run it.
SQL Is a Language for Talking to Databases
So far you’ve been using a program called MySQL, and you’ve been talking to that
program using SQL, the
Structured Query Language
. And you’ve already written a
couple of SQL queries:

CHAPTER 4: MYSQL AND SQL: DATABASE AND LANGUAGE 105
SQL IS A
LANGUAGE
FOR TALKING
TO DATABASES
mysql> select * from user;
...
mysql> select Host, User, Password from user;
...
Both of those commands are SQL queries, or expressed more accurately, SQL. The
Structured in SQL comes from the idea that you’re accessing a relational database,
something with a lot of structure, and you’re using a language that itself is very
structured. You’ll soon see that SQL is very easy to learn, mostly because it’s very
predictable. That’s why you can look at a command like the following and probably
figure out what it does:
mysql> select User, Password
from users
where first_name = 'Dirk'
and country = 'Germany';
Even though you’ve never seen the where keyword, it’s obvious what it does: this
returns only the User and Password column from the
users
table, where the user’s
first_name field is “Dirk” and the country field is “Germany.”
WARNING The pronunciation of SQL is more hotly contested than most presidential elections. Some folks
say “sequel” while others insist on “S-Q-L,” saying each letter individually. Although you probably want to stick
what with the folks around you are using, both are perfectly fine. (By the way, this book goes with the “sequel”
pronunciation.)
You could buy a SQL book and start memorizing all the keywords, but it’s a much
better idea to simply begin building your own tables and learn as you go. To do
that, though, you need to get connected to the database with which all your PHP
programs will talk to.
Logging In to Your Web Server’s Database
Now that you’ve got a basic lay of the land for how MySQL behaves, it’s time to get
things set up on the database your web server uses. You’ll probably need to use a
tool like telnet or ssh to log in to your web server.
NOTE If you’ve never used
telnet
or
ssh
before, you should Google either program’s name; you’ll find a
ton of resources. You might also want to call whoever hosts your domain and ask how you can best access your
server. Many web providers now have a graphical version of
SSH
that you can use right from their control panel.
Most good hosting providers also have detailed online instructions to help you get logged in and started, usually
applicable to both Windows and Mac OS X.
Once you’re logged in, you should be able to use the MySQL command-line client,
mysql. Almost every hosting provider that supports PHP also supports MySQL, which
means that just typing mysql is usually the way to get started.

PHP & MYSQL: THE MISSING MANUAL
106
SQL IS A
LANGUAGE
FOR TALKING
TO DATABASES
Unfortunately, you’re likely to get an error like the following, right out of the gate:
bmclaugh@akila:~$ mysql
ERROR 2002 (HY000): Can't connect to local MySQL server through socket '/tmp/
mysql.sock' (2)
This usually means that MySQL isn’t installed on your server, or at least that it’s not
been configured correctly. But that’s probably by intention: most hosting providers
keep their MySQL installation either on a dierent machine, or they at least limit
accessibility by using a dierent domain name, like
mysql.kattare.com
. That adds
some protection, isolation, and security to the MySQL databases they host, all of
which are good things.
NOTE If running
mysql
doesn’t work, you might also try
mysql
--host=localhost
. Some MySQL
installations are configured to only answer to
localhost
rather than what’s called the
local socket
. That adds a bit
of security to a MySQL installation, but isn’t something you need to worry much about at this point. Just ensure
that you can get
mysql
running, one way or another.
No matter where MySQL is installed, your task is simple. Run mysql and instruct it
exactly where to connect. The --host= option lets you give mysql the hostname
of your MySQL database server, and --user= lets you give it your own user name.
NOTE You’ll almost certainly have a user name other than “admin” or “root” for your domain provider’s
MySQL installation. You can ask what it is when you ask about
telnet
or
ssh
access. Or, if you want to try
something out on your own, start with the user name and password you use for logging in to your web server
itself. Be cautious, though: good database systems will have different user names and passwords than the web
servers that talk to them.
Put all this together on the command line, and you’ get something like this:
bmclaugh@akila:~$ mysql --host=dc2-mysql-02.kattare.com
--user=bmclaugh --password
Enter password:
That last option, --password, instructs MySQL to ask you for a password. You could
put your password on the command itself, like --password=this_is_not_very_
secure, but then that slightly nosy cube-mate would be able to log in to your MySQL
server. And, if you’re wondering what happened to the -u and -p options for mysql,
you might want to check out the box that follows.
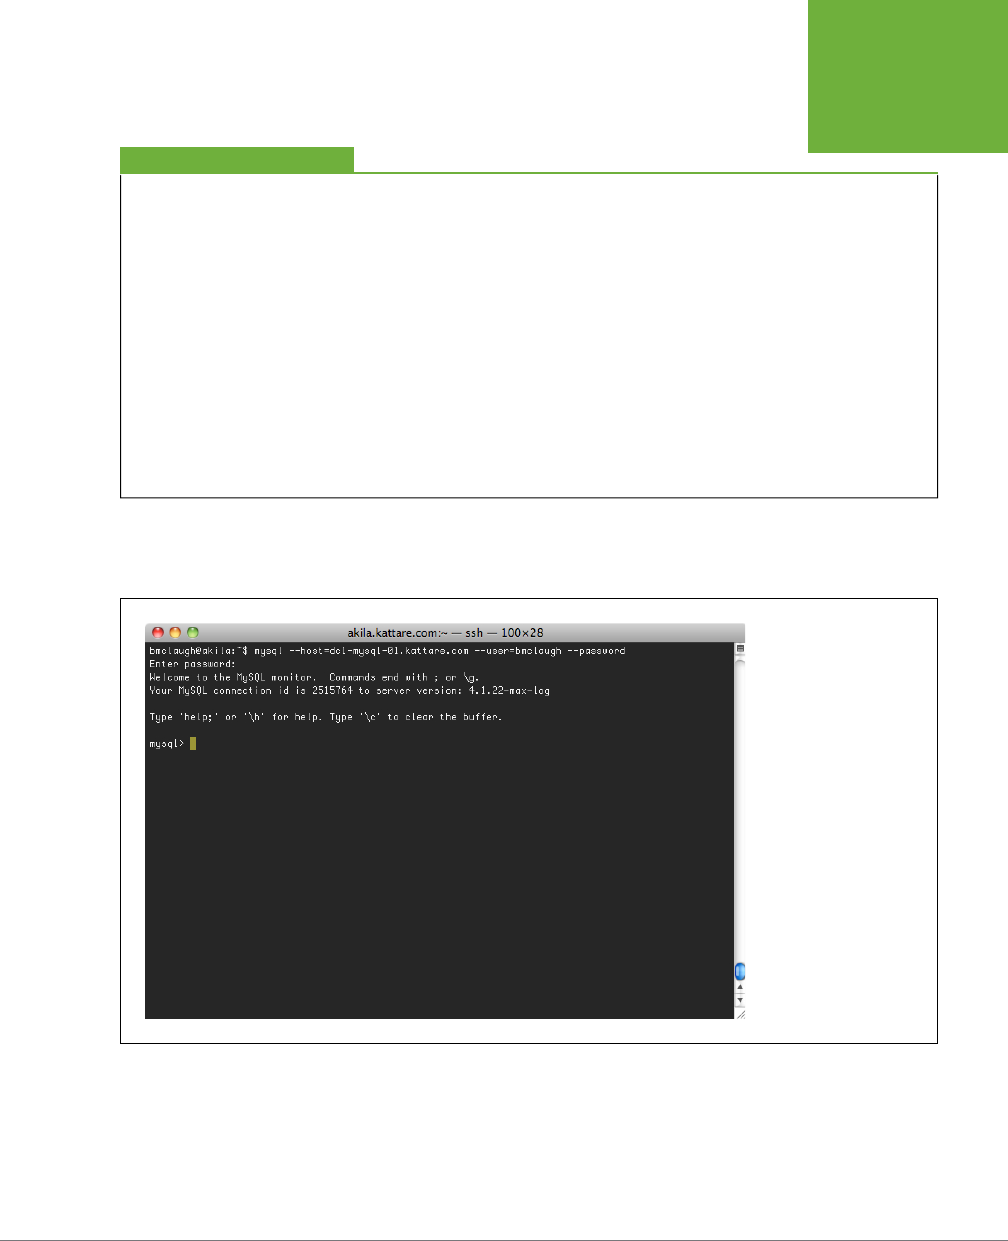
CHAPTER 4: MYSQL AND SQL: DATABASE AND LANGUAGE 107
SQL IS A
LANGUAGE
FOR TALKING
TO DATABASES
POWER USERS’ CLINIC
You Say Potato, I Say P
Back on page 98, you used the
-u
option for a username, and
the
-p
option to instruct MySQL to prompt you for a password.
And, as you might guess, there’s a
-h
option you can use for
specifying the host; it works like
--host
.
In fact, there’s
no difference
between using
-u brett
and
--user=brett
. The same is true for
--password
and
-p
, and
--host
and
-h
. There’s no subtle variation; each
pair is identical.
Why two options?
Well, it’s really about brevity and convenience. You’ve prob-
ably heard it before, and it remains true: programmers are
lazy typists. Given the choice between typing six characters
(
--user
) and two (
-u
), programmers will choose the smaller
amount every time. So the
-p
and
-u
and
-h
options are sort
of a programmer-friendly shorthand.
There’s no right or wrong way to do it, which is a good thing.
For clarity, this book uses the longer, easier-to-read versions
most of the time. But now that you know the shortcuts, feel
free to use them anytime you like.
Once you type your password, you should see the standard MySQL welcome screen,
as demonstrated in Figure 4-5.
FIGURE 4-5
Once you’re logged in to
MySQL, it really doesn’t
matter whether you’re
in Windows, Mac OS X, or
a Linux or Unix machine
on a hosting provider’s
network. It’s all the same:
you just enter SQL and get
back responses.
Now, you’re ready to actually do something with this new SQL you’ve been learning.

PHP & MYSQL: THE MISSING MANUAL
108
SQL IS A
LANGUAGE
FOR TALKING
TO DATABASES
Selecting a Database with USE
On most MySQL installations that hosting providers give you, you don’t have nearly as
much freedom as you do on your own installation. For example, on a remote server,
suppose that you type the SQL show command you used on page 100:
myqsl> show databases;
If you ran this earlier on your own computer, you probably saw a lot of databases
listed here. But now, on your hosting provider, you’ll probably only see one:
myqsl> show databases;
+----------+
| Database |
+----------+
| bmclaugh |
+----------+
1 row in set (0.09 sec)
That’s because your privileges on your hosting provider’s server are limited, and as
such, the company certainly isn’t going to let you log in to the mysql system data-
bases and see what users are in the system’s
user
table. What you probably see is
a single entry: a database named something similar to your login name. So, if you
log in to your system with the user name “ljuber”, you might see a database named
ljuber or perhaps db-ljuber or something similar.
In fact, you’re probably already set up within the database that’s named after you.
Go ahead and inform MySQL that’s the database in which you want to work:
mysql> use bmclaugh;
Database changed
WARNING On some systems, you’re automatically set up to use your user’s database when you log in to
MySQL. Still, the
use
command won’t give you any problems if you point it to the current database, so it’s always
a good idea to begin your MySQL sessions with
use
[your-database-name].
While you’re acclimating yourself to your new MySQL environment, you also want
to get used to seeing and typing SQL commands in all capital letters. So if you get
an email from your database buddy and she suggests that you use a WHERE clause
or tells you that your SELECT query is goofy, she’s not actually yelling at you. She’s
saying (or more accurately, writing) SQL commands in all uppercase letters, which
is the way most database jockeys do it.
In fact, the commands you’ve seen thus far are more commonly written and typed
like this:
mysql> SELECT * FROM user;
...
mysql> SELECT Host, User, Password FROM user;
...

CHAPTER 4: MYSQL AND SQL: DATABASE AND LANGUAGE 109
SQL IS A
LANGUAGE
FOR TALKING
TO DATABASES
mysql> SELECT User, Password
FROM users
WHERE first_name = 'Dirk'
AND country = 'Germany';
This creates a nice clear distinction between the SQL keywords like SELECT, FROM,
WHERE, and AND, and the column and table names. As you’ve guessed, though,
MySQL accepts keywords in either uppercase or lowercase letters. They all work
the same way.
NOTE In this book, an all-capitals word like SELECT means the same thing as
select
written in code font.
Again, though, you don’t
have
to use capital letters in MySQL for keywords like SELECT and WHERE. Although it makes
the code easier to decipher, lots of programmers get tired of all-caps and just go straight for the lowercase letters.
Using CREATE to Make Tables
When you could get to and USE the mysql database, you had some tables ready
for you to SELECT from: the
users
table, for example. However, now you’re on a
database server from which you can’t get to those tables. So, before you can get
back to working on your SELECT skills, you need to create a table.
As you might have already guessed, you can do that with another handy-dandy SQL
keyword: CREATE. The objective is to create a table, put data in it, get data out, and
generally have all kinds of database fun.
Type this command into your MySQL command line:
CREATE TABLE users (
This time, don’t add the usual semicolon at the end. When you press Enter, you’ll
see something a little weird:
mysql> CREATE TABLE users (
->
As you know, MySQL commands should end in a semicolon, so when you leave it o,
you’re telling MySQL, “Hey, I’m writing a command, but I’m not done yet.” What this
demonstrates is that, you don’t have to jam a lot of SQL onto one line; you can split
it up over several lines by pressing Enter. As long as you don’t type that semicolon,
MySQL won’t try to do anything with your command. And that little arrow, ->, lets
you know that MySQL is waiting for you to continue typing.
So be obliging! Keep typing the following lines, each of which sets up a dierent
column of information in your table:
mysql> CREATE TABLE users (
-> user_id int,
-> first_name varchar(20),
-> last_name varchar(30),

PHP & MYSQL: THE MISSING MANUAL
110
SQL IS A
LANGUAGE
FOR TALKING
TO DATABASES
-> email varchar(50),
-> facebook_url varchar(100),
-> twitter_handle varchar(20)
-> );
Press Enter after this last semicolon, and you get a very unimpressive response:
mysql> CREATE TABLE users (
-> user_id int,
-> first_name varchar(20),
-> last_name varchar(30),
-> email varchar(50),
-> facebook_url varchar(100),
-> twitter_handle varchar(20)
-> );
Query OK, 0 rows affected (0.18 sec)
This last line is MySQL’s very modest way of saying, “I did what you asked.” If you
get an error message instead, see the following box for advice on handling typos.
FREQUENTLY ASKED QUESTION
How to Fix a SQL Typo
I got an error message because I mistyped something in one
line of my command. Now what do I do?
Even for PHP and MySQL wizards, typos are a problem. In fact,
because programmers tend to type way too fast, typos are a
real source of frustration in MySQL.
In some cases, MySQL will simply display an error and let you
try again:
mysql> use
ERROR:
USE must be followed by a database name
mysql>
No big deal. Other times, though, you’ll make a mistake in the
middle of a command, and even worse, press Enter:
mysql> SELECT *,
-> FROM
->
->
There’s an extraneous comma after the * in your SELECT line
here. But MySQL is just giving you extra
->
prompts every time
you press Enter. What do you do?
The problem is that from the perspective of MySQL, you
haven’t ended the SQL command. So, it isn’t processing your
command—including your mistake—and isn’t giving you a
chance to start over.
When you get into a situation like this, your best bet is to enter
a semicolon, and then press Enter. This ends your current com-
mand—however broken that command might be—and instructs
MySQL to process that command. This will usually cause an
error, but then you’re back in control and can make fixes.
Without even thinking very hard, you probably know at least a bit about what’s
going on in your CREATE command:
1. CREATE informs MySQL you want to create a new structure in the database.
2. TABLE specifies to MySQL what kind of structure. In this case, you want a table.
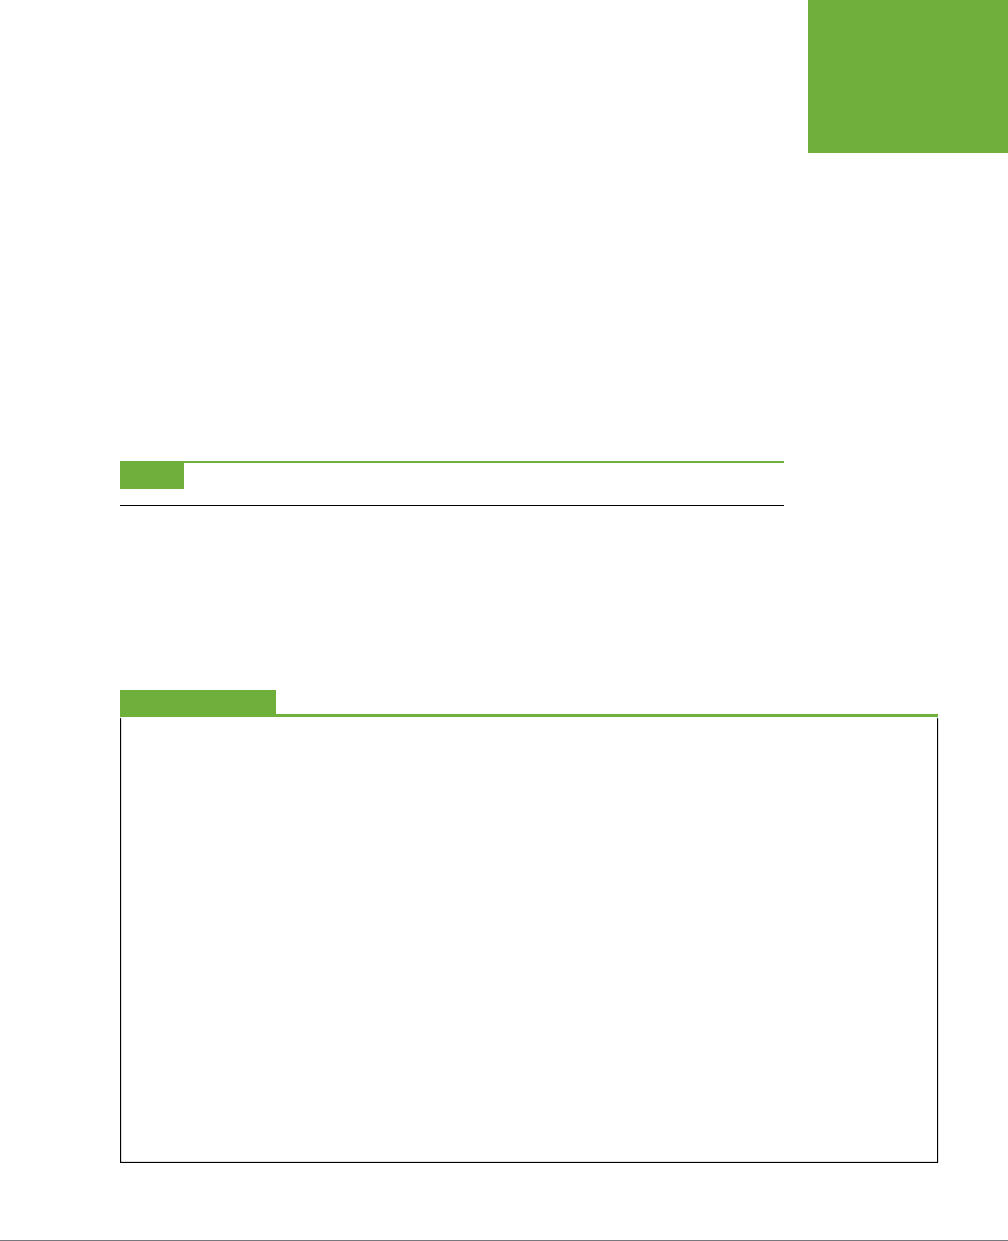
CHAPTER 4: MYSQL AND SQL: DATABASE AND LANGUAGE 111
SQL IS A
LANGUAGE
FOR TALKING
TO DATABASES
3. “users” is the name of the table you’re creating.
4. The opening parenthesis (() indicates to MySQL that you’re about to describe
the table to create, one line at a time.
5. Each line has a column name, such as user_id, and a type, such as int or
varchar(20).
6. When you’re done describing the table, you use a closing parenthesis ()) to
let MySQL know you’re done describing the table, and then end the whole
enchilada with a semicolon.
You’ll learn a ton more about all the dierent types of columns as you go, but for
now, there are just two to worry about. The first is int, which is short for integer.
An integer, as you recall from math class, is any whole number; 1, 890, and 239402
are ints, but 1.293 and 3.1456 are not.
NOTE MySQL is just as happy to accept
integer
as
int
. In fact, ’it considers them identical.
The second type to which you need to pay some attention is a little less obvious:
varchar. The varchar type stands for
variable character
, which means that it holds
character data—strings—of variable lengths. Referring back to our example, a var-
char(20) can hold a string as short as the length of 0 all the way up to a length of
20 characters. For advice on deciding on how big to make your columns, see the
box below.
DESIGN TIME
The Size of Your Columns Really Does Matter
When most people are creating their tables, they spend a lot of
time thinking about what they want to store in their database,
and very little time thinking about things like how big the
maximum length of a
varchar
field can get. So you’ll see lots of
tables that have 10 or 20
varchar(100)
columns, even though
those columns hold totally different pieces of information.
But it’s better to stop and think about these things when you’re
designing your tables. Make your columns as long as they need
to be—but not longer. Yes, it may seem “safe” to just come
up with crazy, overly long lengths, but then you’re not really
doing a very good job of making your database really look like
the information it’s going to store.
If you’re storing a first name, there’s really no way the maxi-
mum length of that first name is as long as, for example, a
Facebook URL. A really, really long first name might be 15
characters (and that would be
really
long!). But you can barely
fit “www.facebook.com” into a 20-character column. So your
columns should have different maximum lengths.
But this is about good design, not making your database hum.
Your database only uses space for the information it holds; you
don’t get penalized by wasted disk space or bad performance
if all your
varchar
fields are super-long. What you do get,
though, is a database that looks sloppy, making
you
look like
you didn’t spend much time thinking about your information.
Take the time to do good design now, and it will pay off later.
Make your
varchar
columns as long as they need to be, and
maybe even a
little
bit longer, but always remember what
information will go in those columns.

PHP & MYSQL: THE MISSING MANUAL
112
SQL IS A
LANGUAGE
FOR TALKING
TO DATABASES
The upshot of all these new terms is you’ve directed MySQL to create a table compris-
ing several new columns, one that’s an int (user_id), and several that are varchars
of various maximum lengths.
Did this command work? Well, look for yourself by using the SHOW command:
mysql> SHOW tables;
+------------------------------------+
| Tables_in_bmclaugh |
+------------------------------------+
| users |
+------------------------------------+
1 row in set (0.06 sec)
No doubt about it, you definitely created a table. But, what’s actually in the table?
For that, you need a new command: DESCRIBE. Try it out on your
users
table:
mysql> DESCRIBE users;
+----------------+--------------+------+-----+---------+-------+
| Field | Type | Null | Key | Default | Extra |
+----------------+--------------+------+-----+---------+-------+
| user_id | int(11) | YES | | NULL | |
| first_name | varchar(20) | YES | | NULL | |
| last_name | varchar(30) | YES | | NULL | |
| email | varchar(50) | YES | | NULL | |
| facebook_url | varchar(100) | YES | | NULL | |
| twitter_handle | varchar(20) | YES | | NULL | |
+----------------+--------------+------+-----+---------+-------+
6 rows in set (0.04 sec)
NOTE You can also use DESC (or
desc
) for DESCRIBE. Thus,
DESC
users;
is a perfectly acceptable SQL
command, too.
Now, you can see that MySQL did what you commanded it to: It created a table
called
users
with all the columns you specified, using the types you gave it. There’s
a lot more information there, too, but you don’t need to worry about that just yet.
Using DROP to Delete Tables
What goes up must come down, or so the saying goes. For everything MySQL and
SQL let you do, there’s a way to undo those things. You’ve created a table, but
now you need to delete that table. However, DELETE isn’t the command you want;
instead, it’s DROP.
Suppose that you decide you no longer like that
users
table, or you want to practice
that fancy CREATE command again, you can ditch
users
with a simple line of SQL:
mysql> DROP TABLE users;
Query OK, 0 rows affected (0.10 sec)

CHAPTER 4: MYSQL AND SQL: DATABASE AND LANGUAGE 113
SQL IS A
LANGUAGE
FOR TALKING
TO DATABASES
Boom! It’s gone. But, just to be sure, confirm it:.
mysql> SHOW tables;
+------------------------------------+
| Tables_in_bmclaugh |
+------------------------------------+
0 rows in set (0.06 sec)
How simple is that? But wait...now you have no tables again, and nothing from which
to SELECT. It’s back to creating tables again. Type that CREATE SQL statement into
your MySQL tool one more time and create the
users
table again.
NOTE On many systems, you can press the up arrow key and you’ll see the last command you ran. Press
the up arrow key a few times, and it will cycle back through your command history. This is a great way to quickly
reuse a command you’ve already run.
INSERT a Few Rows
At this point, you’ve created and dropped, and created the
users
table. But it’s still
empty, and that’s no good. What do you do? Easy: INSERT some data.
Try entering this command into your command-line tool:
mysql> INSERT INTO users
-> VALUES (1, "Mike", "Greenfield", "mike@greenfieldguitars.com",
-> "http://www.facebook.com/profile.php?id=699186223",
-> "@greenfieldguitars");
Query OK, 1 row affected (0.00 sec)
What a mouthful! Still, you can probably just look at this SQL and figure out what’s
going on. You’re inserting information into the
users
table and then you’re giving it
that information (VALUES), piece by piece.
You can actually trace each value and connect it to a column in your table. You might
want to DESCRIBE your table again:
mysql> DESCRIBE users;
+----------------+--------------+------+-----+---------+-------+
| Field | Type | Null | Key | Default | Extra |
+----------------+--------------+------+-----+---------+-------+
| user_id | int(11) | YES | | NULL | |
| first_name | varchar(20) | YES | | NULL | |
| last_name | varchar(30) | YES | | NULL | |
| email | varchar(50) | YES | | NULL | |
| facebook_url | varchar(100) | YES | | NULL | |
| twitter_handle | varchar(20) | YES | | NULL | |
+----------------+--------------+------+-----+---------+-------+
6 rows in set (0.29 sec)

PHP & MYSQL: THE MISSING MANUAL
114
SQL IS A
LANGUAGE
FOR TALKING
TO DATABASES
The first value, 1, is assigned to user_id; the second, “Mike”, to first_name; and so on.
And really, that’s all there is to it. You can insert as much into your table as you want,
anytime you want. There are lots of ways to fancy up INSERT, and you’ll learn about
most of them as you start to work with INSERT in PHP.
Using SELECT for the Grand Finale
Finally, you’re back to where you can use good-old SELECT. By now, that command
should seem like ancient history, given that you’ve used DROP and CREATE and
INSERT and a few others since that first SELECT * FROM users. But, now you’ve got
your own
users
table, so try it out again:
mysql> SELECT * FROM users;
+---------+------------+------------+----------------------------+--
------------------------------------------------+-------------------
-+
| user_Id | first_name | last_name | email |
facebook_url | twitter_handle
|
+---------+------------+------------+----------------------------+--
------------------------------------------------+-------------------
-+
| 1 | Mike | Greenfield | mike@greenfieldguitars.com |
http://www.facebook.com/profile.php?id=699186223 | @greenfieldguitars
|
+---------+------------+------------+----------------------------+-
-------------------------------------------------+-----------------
---+
1 row in set (0.00 sec)
No big surprises here; you got back the row you just inserted. However, just like
earlier, the screen is a bit of a mess. Too many columns make the results hard to read.
To simplify things, grab just a few columns. For example, let’s assume that you don’t
really need to see Mike’s entire Facebook page URL right now. From the code on
page 103, you know how to select specific columns of information:
mysql> SELECT first_name, last_name, twitter_handle FROM users;
+------------+------------+--------------------+
| first_name | last_name | twitter_handle |
+------------+------------+--------------------+
| Mike | Greenfield | @greenfieldguitars |
+------------+------------+--------------------+
1 row in set (0.00 sec)
That’s a lot more readable. And once you’re writing PHP to talk to MySQL, this
formatting won’t be such a problem. PHP doesn’t care about fitting everything into
a nice line or two. It’s happy to take a big messy set of results and handle them.

CHAPTER 4: MYSQL AND SQL: DATABASE AND LANGUAGE 115
SQL IS A
LANGUAGE
FOR TALKING
TO DATABASES
If you’d like, take some time to insert a few more rows of users and then play with
SELECT. If you want to get really fancy, try using a WHERE clause, like this:
mysql> SELECT facebook_url
-> FROM users
-> WHERE first_name = 'Mike';
+--------------------------------------------------+
| facebook_url |
+--------------------------------------------------+
| http://www.facebook.com/profile.php?id=699186223 |
+--------------------------------------------------+
1 row in set (0.00 sec)
As you can see, WHERE lets you choose a specific person or record of information.
You’ll see that again on page 152. Try creating tables with more columns, selecting
dierent columns, choosing records with WHERE, and see how far you can get with
all the SQL you’ve already picked up.
POWER USERS’ CLINIC
SQL or MySQL? They’re Not the Same
It’s one thing to know what SQL stands for, and how to install
MySQL. But it’s something else altogether to know what the
difference is between SQL and MySQL. In fact, ask around at
your local water cooler. You’d be surprised how many novice
programmers are not sure what the difference is between SQL
the language and MySQL the database program.
SQL is in fact a language. It’s something that exists separately
from MySQL or any other database program, like PostgreSQL or
Oracle. That means that SQL can change, or be updated, without
your database automatically changing. In fact, the way it usu-
ally works is that SQL gets a new keyword or instruction, and
then all the database programs release new versions to support
that new keyword. Of course, SQL has been around for a long
time, so this sort of thing doesn’t happen very often anymore.
MySQL is a database program. It lets you work with and
administrate databases, and you do that with SQL. In other
words, MySQL is really just a tool that lets you use SQL. That
makes the name—MySQL—either terribly helpful or terribly
confusing. Either way, in this book, you’ll be executing SQL
commands against your MySQL database.
If you can keep the difference between SQL and MySQL in your
mind, you’re going to be ahead of the game. That’s because
when you work with your PHP, you’ll be connecting to a MySQL
database, but you’ll be writing SQL commands and queries.
Why does that matter? Because you can change to another
database, and almost all of your SQL will work, as long as your
new database accepts SQL. That’s the beauty of separating SQL
from the database that you use, in this case MySQL. You can
change one—moving to PostgreSQL or Oracle—without having
to rewrite all your code.
Now, notice that
almost
all of your SQL will keep working. Each
database adds its own twists to how it implements the SQL
standard. And most databases add some database-specific
features to “add value.” (You can read that as “to sell their
product over another product.”) So, you can run into some
problems moving from one database to another. But, your
understanding of SQL helps there, too, because you’ll be able
to diagnose any issues and quickly solve them.
The takeaway here is to learn SQL, use MySQL, and end up with
code that works on just about any SQL database.


119
CHAPTER
5
Now that you’ve seen a bit of the power of PHP and MySQL, it’s time to bring
these two juggernauts together. With many programming languages, any
time you want to interact with a database, you have to download and install
extra code or small plug-ins. PHP isn’t like that, though; it comes ready to connect
to MySQL from the moment you run the php command.
Even though you’ve only recently begun your journey to PHP mastery, you’re ready
to use a database from within your scripts. You’ll just need to learn a few new com-
mands and how to deal with the problems that can come up when you’re working
with a database. In fact, you’re going to build a simple form with which you can enter
SQL and run it against your MySQL database. Who needs the mysql command-line
tool when you’re a PHP programmer?
Then, to put a cherry on top of your towering sundae of PHP and MySQL goodness,
you’ll write another script. This one takes all the information from the forms you’ve
already been building, adds that information into a database, and then adds one
more form to with which your users can search for another user by name. All that
in one chapter? Yes indeed.
Connecting PHP
to MySQL

PHP & MYSQL: THE MISSING MANUAL
120
WRITING A
SIMPLE PHP
CONNECTION
SCRIPT
Writing a Simple PHP Connection Script
No matter how simple or advanced your PHP scripts, if they communicate with a
database, they’ll begin with the same few steps:
1. Connect to a MySQL installation.
2. USE the correct MySQL database.
3. Send SQL to the database.
4. Get the results back.
5. Do something with the results.
Depending on the application you’re writing, steps 3, 4, and 5 will change a bit based
on what you’re doing. A script that creates tables looks dierent than a script that
searches through existing tables.
But, those first couple of steps—connecting to MySQL and using the right database—
are always the same, no matter how fancy your script is. Just think, then: the code
you’re about to write is the same code that programmers making $150 or $200 an
hour are writing somewhere. (They’re just writing that code in expensive houses
with robots serving them ice tea as they lounge by the pool.)
NOTE You can find the finished example code for this section on this book’s Missing CD page at
www.
missingmanuals.com/cds/phpmysqlmm2e
.
Connect to a MySQL Database
Because your form is going to take in SQL and run it against your MySQL database,
first you’ve got to instruct your PHP script how to connect to a database. Essen-
tially, you’re directing PHP to do the same thing you did when you started up your
MySQL command-line client (page 105). When you connected to your web server’s
database, you probably used a command like this:
bmclaugh@akila:~$ mysql --host=dc2-mysql-02.kattare.com
--user=bmclaugh --password
You’ll need to give PHP the same pieces of information (database host, your user
name, and a password) so that it can connect.
Fire up your text editor and create a new script. Call it
connect.php
. This script is
going to be as simple as you’ll ever see because all you need it to do is connect to
your database, USE the right database, and then run a sample SQL query to ensure
that things are working correctly.
In your script, type the following lines:
<?php
mysql_connect("your.database.host",
"your-username", "your-password")

CHAPTER 5: CONNECTING PHP TO MYSQL 121
WRITING A
SIMPLE PHP
CONNECTION
SCRIPT
or die("<p>Error connecting to database: " .
mysql_error() . "</p>");
echo "<p>Connected to MySQL!</p>";
?>
NOTE Be sure to change “your.database.host”, “your-username”, and “your-password” to the values for
your own database.
If you’re running your database on the same computer as your PHP and web-serving files, your database host
name is usually
localhost
. Remember,
localhost
is just a way to say “the local machine.”
Yes, it’s really that simple! And, like most of the other PHP scripts you’ve been writ-
ing, although there are some new commands, you probably already know almost
exactly what’s going on here.
First, there’s a new command: mysql_connect. No surprises here; this just takes in a
database host, a user name, and a password, and makes a connection. It’s just as if
you’re running your mysql tool and connecting to a remote database.
That’s pretty self-explanatory. But what about the die bit? Sounds a little gruesome
(like
Lord of the Flies
gruesome, not
Twilight
teen-angst gruesome). In fact, it is a
bit nasty: you use die when something might go wrong in your script. Think about
die as saying, “If my code dies, then do something less nasty than throwing an error
code on my user.” In this case, die prints out an error message that won’t scare o
your users. (If you’re not sure why that’s so important, see the box on page 124.)
But before you can understand die, you need know a little bit about the inner
workings of mysql_connect. When mysql_connect runs, it either creates or reuses
an existing connection to your database. It then returns that connection to your
PHP program and makes all the other PHP-to-MySQL commands you’ll learn about
soon available. But, if mysql_connect can’t create that connection—for example, if
your database isn’t running or you have a bad host or user name—mysql_connect
returns a very dierent value: false.
What’s really happening in your script is something like this:
<?php
// This isn't working code, but you get the idea
if (i_can_connect_to_mysql_with("my.database.host",
"my-username", "my-password"))
go_do_cool_database_stuff();
else
send_error_to_user_using_die
?>

PHP & MYSQL: THE MISSING MANUAL
122
WRITING A
SIMPLE PHP
CONNECTION
SCRIPT
That’s a lot of typing, though, so PHP lets you shorten it to this:
<?php
mysql_connect("your.database.host",
"your-username", "your-password")
or die("<p>Error connecting to database: " .
mysql_error() . "</p>");
echo "<p>Connected to MySQL!</p>";
?>
Not only is this shorter, but it flips things around a bit. It’s saying, “try to connect
(using mysql_connect), and if the result isn’t true (the or part of the code), imple-
ment die.” Now, die prints out an error message, but it also “dies.” In other words,
it ends your script. So, if mysql_connect returns false, and die runs, your script will
exit. Your users won’t ever see the “Connected to MySQL!” line because the script
will have stopped running. It’s dead on the server room floor, in search of a working
database connection.
Not only that, but mysql_connect sets up another function when it can’t connect. It
makes available the errors it ran into while trying to connect by using another com-
mand, mysql_error. Thus, you can call mysql_error as part of your die statement
to show what really happened.
NOTE Technically,
mysql_connect
,
mysql_error
, and
die
are all examples of
functions
. A function
is a block of code, usually with a name assigned to it, that you can call from your own code anytime you need
to carry out the task that the block of is designed to do. It’s a lot quicker and neater to call a function by name
than rewrite the block of code that function represents, over and over again.
Don’t worry about functions for now, though. Just use them like any old PHP command. Before long, not only
will you understand functions better, but you’ll be writing your own.
If mysql_connect does connect without any problems, it will return that connection.
That means the die line is skipped, and the next thing PHP does is execute this line:
echo "<p>Connected to MySQL!</p>";
To see this script in action, create a simple HTML form and call it
connect.html
. You
can use this HTML to get started:
<html>
<head>
<link href="../css/phpMM.css" rel="stylesheet" type="text/css" />
</head>
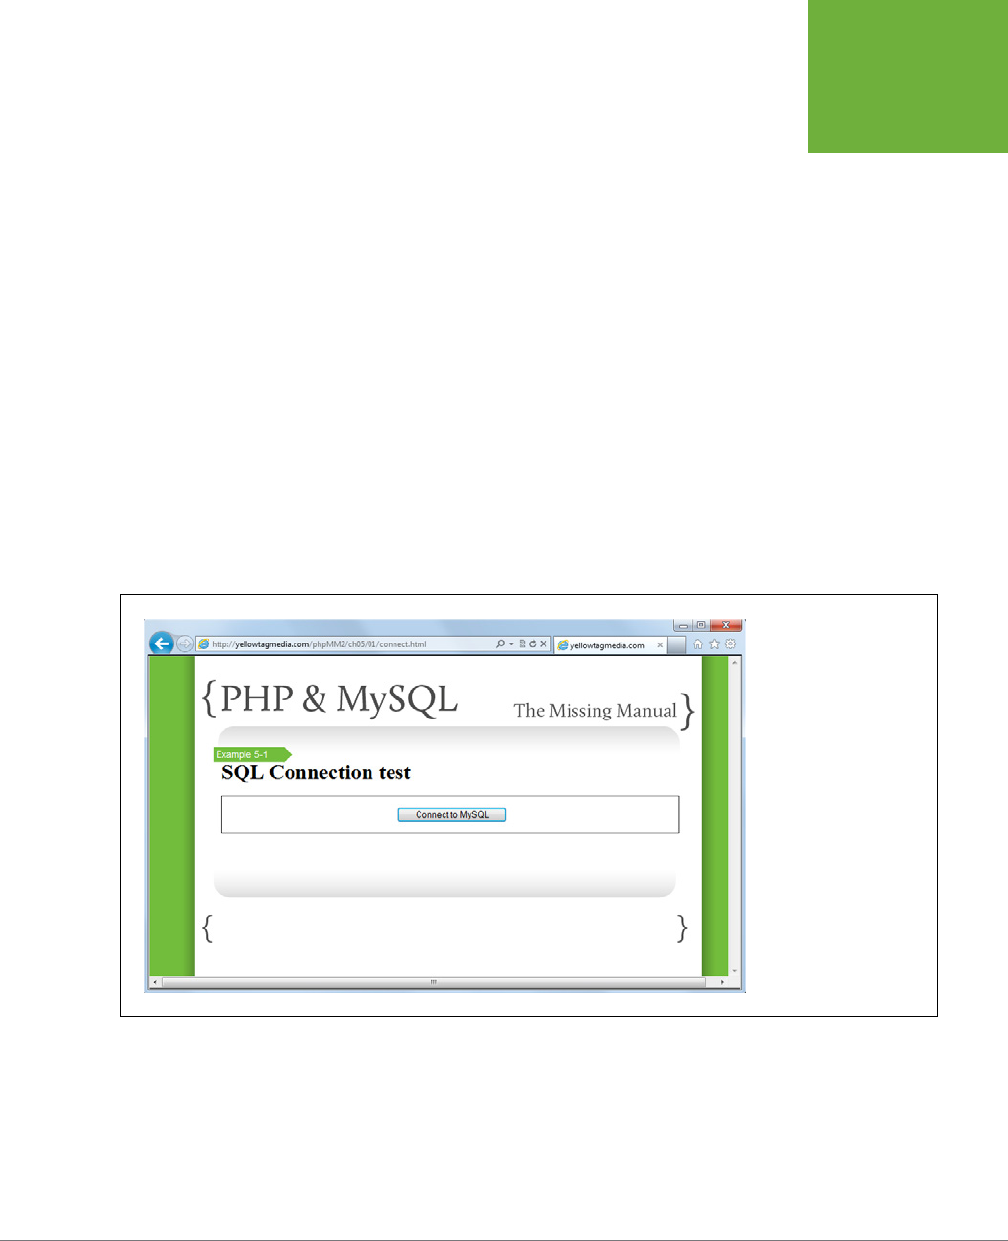
CHAPTER 5: CONNECTING PHP TO MYSQL 123
WRITING A
SIMPLE PHP
CONNECTION
SCRIPT
<body>
<div id="header"><h1>PHP & MySQL: The Missing Manual</h1></div>
<div id="example">Example 5-1</div>
<div id="content">
<h1>SQL Connection test</h1>
<form action="scripts/connect.php" method="POST">
<fieldset class="center">
<input type="submit" value="Connect to MySQL" />
</fieldset>
</form>
</div>
<div id="footer"></div>
</body>
</html>
This form is about as simple as it gets: build the form, drop a single button into
place, and attach that button to your new
connect.php
script. Load up your form in
a browser (see Figure 5-1), and click “Connect to MySQL.”
FIGURE 5-1
Sure, you could have made
connect.html
even simpler.
You could have ditched all
the structure and CSS ref-
erencing. But who wants
to connect to a database
without showing off a
little? Besides, customers
like a nice, clean site. You
don’t have to spend hours
on CSS, but if you make
even your most basic
demos look professional,
your clients will love you
for it.
Hopefully, you see one of the simplest, happiest messages of your burgeoning PHP
and MySQL programming career: you’re connected! Check out Figure 5-2 to see
the triumphant, if simple, result.
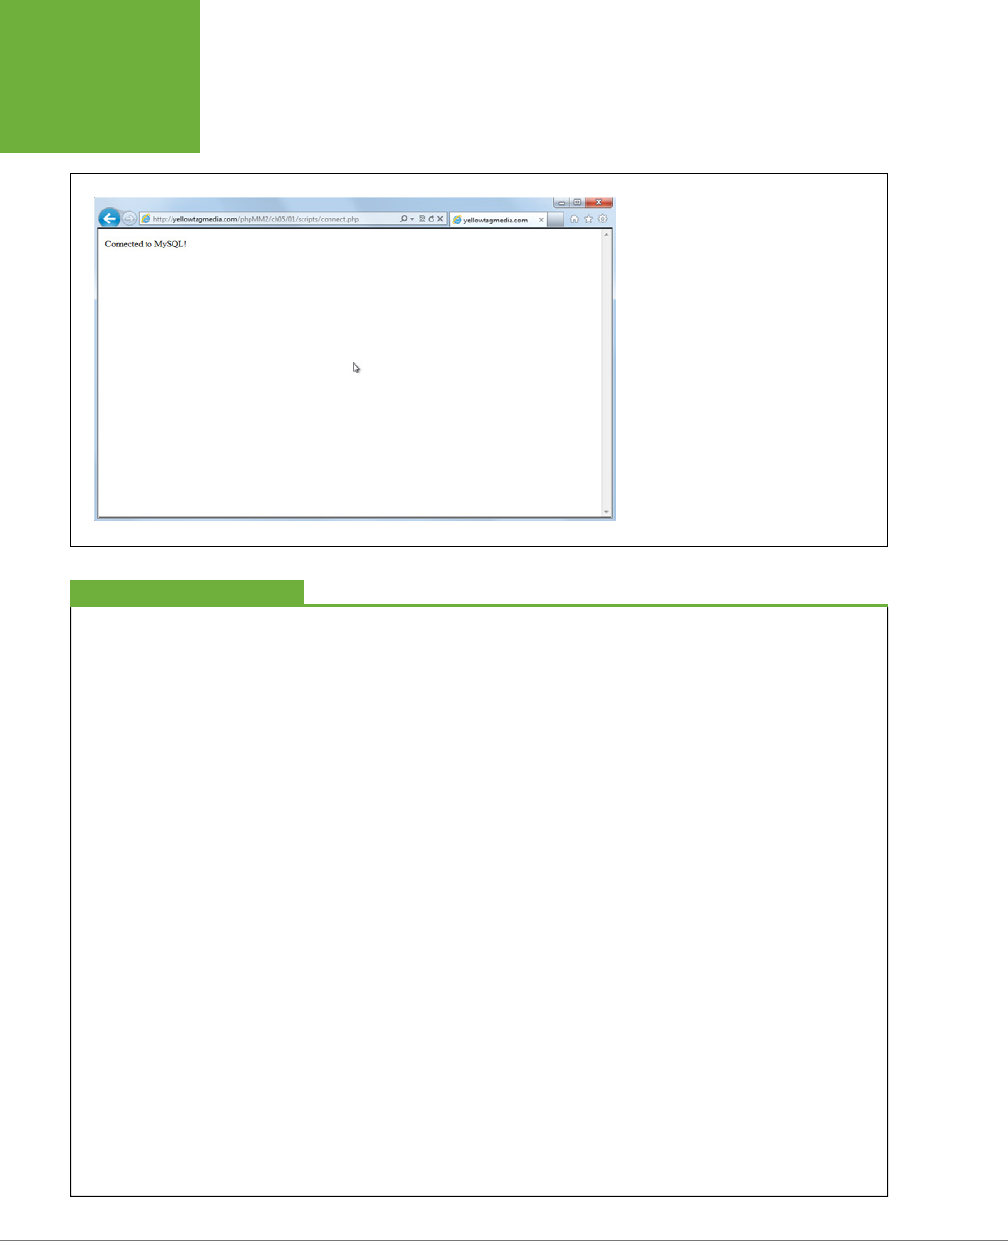
PHP & MYSQL: THE MISSING MANUAL
124
WRITING A
SIMPLE PHP
CONNECTION
SCRIPT
FIGURE 5-2
These three words mean that your PHP
script now can do virtually anything you
can imagine with your database. But
there’s something missing: how does
MySQL know which database is yours?
You still need to direct PHP toward which
database to USE.
POWER USERS’ CLINIC
Everybody Dies at Some Point
It’s really, really, really easy to forget to add those
die
state-
ments to your PHP scripts. PHP doesn’t require them, so it’s
perfectly happy to take in something like this:
mysql_connect("database.host.com", "user-
name", "password");
That’s the same code you’ve already written, except it leaves
off the
die
part.
But, here’s the thing: leave off that
die
, and when something
goes wrong, your script is going to crash and provide something
that’s either a really useless error or something so cryptic that
you can’t even tell
what
it is. For example, drop off your
die
and enter in a wrong password, run your script, and you’ll get
something like this as an error:
Can't connect to local MySQL server
through socket '/tmp/mysql.sock' (2)
Believe it or not, this is actually a pretty good error message, as
messages go when you don’t use
die
statements. So, adding
that one line of error handling can make a huge difference for
a user when things go wrong.
In fact, as you begin to build much bigger, full-blown web
applications, you might redirect your user to a nicely format-
ted error page, complete with contact information for an
administrator and a CSS-styled error report. Of course, none
of that is possible without
die
.
Now, at this point, some of you—already flush with PHP
power—are already thinking about how few errors you’re mak-
ing. You’re thinking that
die
is for rank amateurs who don’t
write flawless code. Unfortunately, when you’re up at 2a.m.
trying to hit a deadline so that you can get paid, your brain
starts to resemble a rank amateur. Everyone makes mistakes,
and
die
(and other error handling techniques) is one of those
lifesavers that helps you look prepared and professional when
those inevitable mistakes do occur.
In fact, the slickest, highest-paid programmers in the world
are error-handling gurus. At the same time, they’re probably
not
using
die
. They’re more likely to use a more robust
error-handling system; something like the error handling in
Chapter8. For now, though, a healthy and liberal use of
die
will get you used to adding in a form of error handling. You
can come back and improve upon it later.
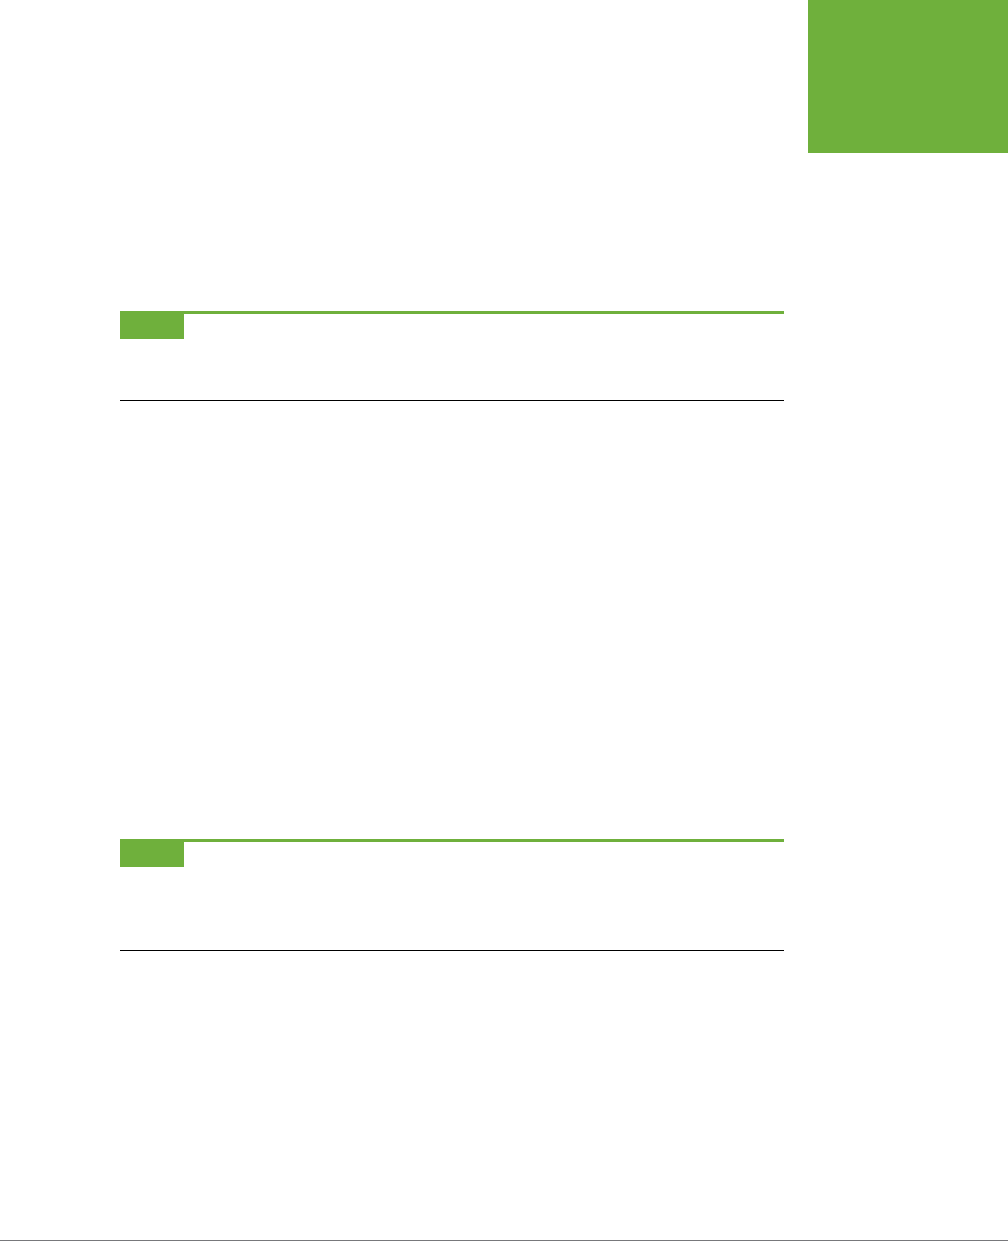
CHAPTER 5: CONNECTING PHP TO MYSQL 125
WRITING A
SIMPLE PHP
CONNECTION
SCRIPT
Select the Database with PHP
There’s something wonderful waiting around the programming corner now. Almost
all of the mysql_ family of functions works the same: you give them some values, and
they give back something useful. If something bad happens, you usually get back
either false or a non-existent object (something most programmers call
null
or
nil
).
Now, you need to instruct MySQL which database your PHP script wants to use.
There’s a function for that: mysql_select_db.
NOTE The family of
mysql_
functions is quite extensive. You might want to bookmark this documentation
page:
www.php.net/manual/en/ref.mysql.php
. If you ever get stuck, head over there and see if a function might
do what you need.
You give mysql_select_db a database name, and it uses that database—or returns
false. Update
connect.php
to use the right database:
<?php
mysql_connect("your.database.host",
"your-username", "your-password")
or die("<p>Error connecting to database: " .
mysql_error() . "</p>");
echo "<p>Connected to MySQL!</p>";
mysql_select_db("your-database-name")
or die("<p>Error selecting the database your-database-name: " .
mysql_error() . "</p>");
echo "<p>Connected to MySQL, using database your-database-name.</p>";
?>
NOTE If you’re unsure of what database name to use, flip back to page 100 in Chapter 4. You can use SHOW
DATABASES; in a MySQL terminal to see what databases you have available on your hosting provider. Failing that,
you could also just call up your hosting provider, and they should be able to help you out with the name of the
database you can use.
You should already see the pattern. The die command ensures that if bad things
happen, an error displays, your users can actually read that error, and then the script
exits. If things do go well, another happy message should print.
Try this new version out. Visit
connect.html
again and try to connect (and now USE)
your database. You should see something similar to Figure 5-3.
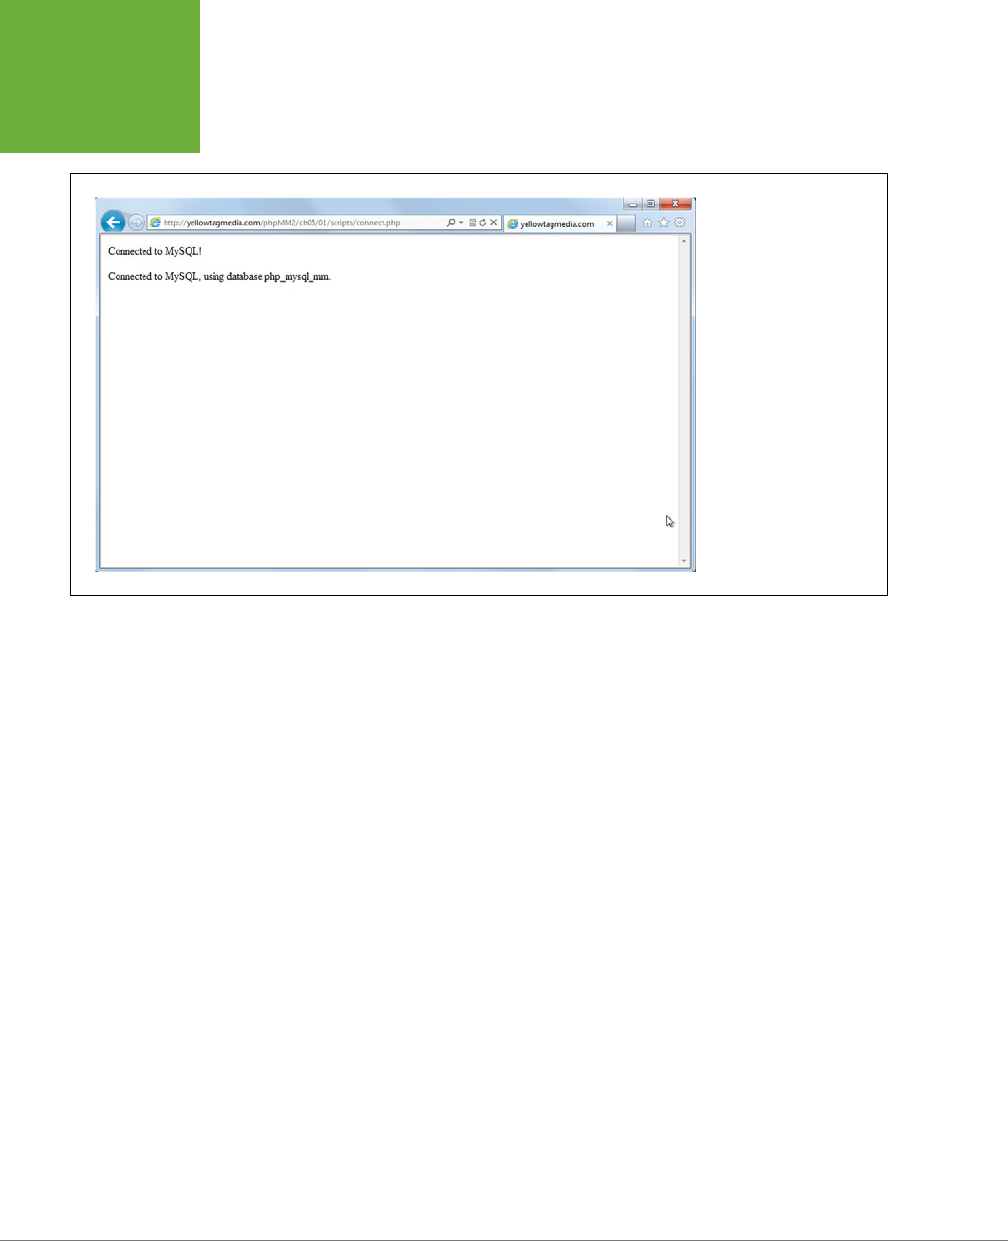
PHP & MYSQL: THE MISSING MANUAL
126
WRITING A
SIMPLE PHP
CONNECTION
SCRIPT
FIGURE 5-3
Once again, a few simple
words, and major things
are going on behind the
scenes. Your script (shown
on page 125) now has
a connection to MySQL,
and is USEing the correct
database. Next up: talking
SQL to your database.
Viewing Your Database’s Tables by Using SHOW
Now that you have a connection, and you’re tied in to the right database, you need
to see which tables are available on your hosting provider. When you were work-
ing directly with the MySQL command-line tool, one of the first things you did was
to see what tables existed and then start creating tables of your own (page 100).
You can do that same thing now with a PHP script and a little bit of simple output.
But before diving into that, you can easily have your script reveal which tables are
available in your database. Open
connect.php
again, and add in this line:
<?php
// All your existing database connection code
$result = mysql_query("SHOW TABLES;");
?>
Here’s another new PHP-to-MySQL function: mysql_query. You’ll become very
familiar and friendly with this one; it’s the key to passing SQL in to your database.
This function takes in SQL, and you’ve given it some really simple SQL:
SHOW TABLES;
This command does
exactly
the same thing as when you type the SQL SHOW TABLES
command into your command-line tool.

CHAPTER 5: CONNECTING PHP TO MYSQL 127
WRITING A
SIMPLE PHP
CONNECTION
SCRIPT
HANDLING ERRORS BY DETERMINING IF YOUR RESULTS ARE NOT
But what about die? What about error handling? There’s none of that yet, and by
now, you know there should be. But there’s something dierent about this line:
whatever comes back from mysql_query is stued into a variable called $result.
It’s really $result that you want to examine. The result should either have a list of
tables, from SHOW TABLES, or report an error of some sort. If it’s reporting an error,
$result is false because the mysql_ functions return false when there’s a problem.
You know how to check for a false value, though (page 73), so you can add the fol-
lowing code to handle problems:
<?php
// All your existing database connection code
$result = mysql_query("SHOW TABLES;");
if ($result === false) {
die("<p>Error in listing tables: " . mysql_error() . "</p>");
}
?>
This code works, but it’s really not how most PHP programmers do things. The
three equal signs (===) is an unusual thing to use in PHP, at least for checking to
see whether a variable is false. What’s a lot more common—and the way it’s usually
done in PHP—is to use the
bang
or
negation
operator, which is an exclamation mark
(!). So, if you want to see whether a variable called $some-variable is false, you
could say if (!$some-variable). By adding that exclamation mark, you’re saying
something like, “see if $some-variable is false.”
Even better, think of ! as meaning
not
. So, what you really want to say in your code
is, “If
not
$result, then die.” That means you could rewrite your code to look like this:
<?php
// All your existing database connection code
$result = mysql_query("SHOW TABLES;");
if (!$result) {
die("<p>Error in listing tables: " . mysql_error() . "</p>");
}
?>
This example shows much better PHP, and now you have any problems covered.
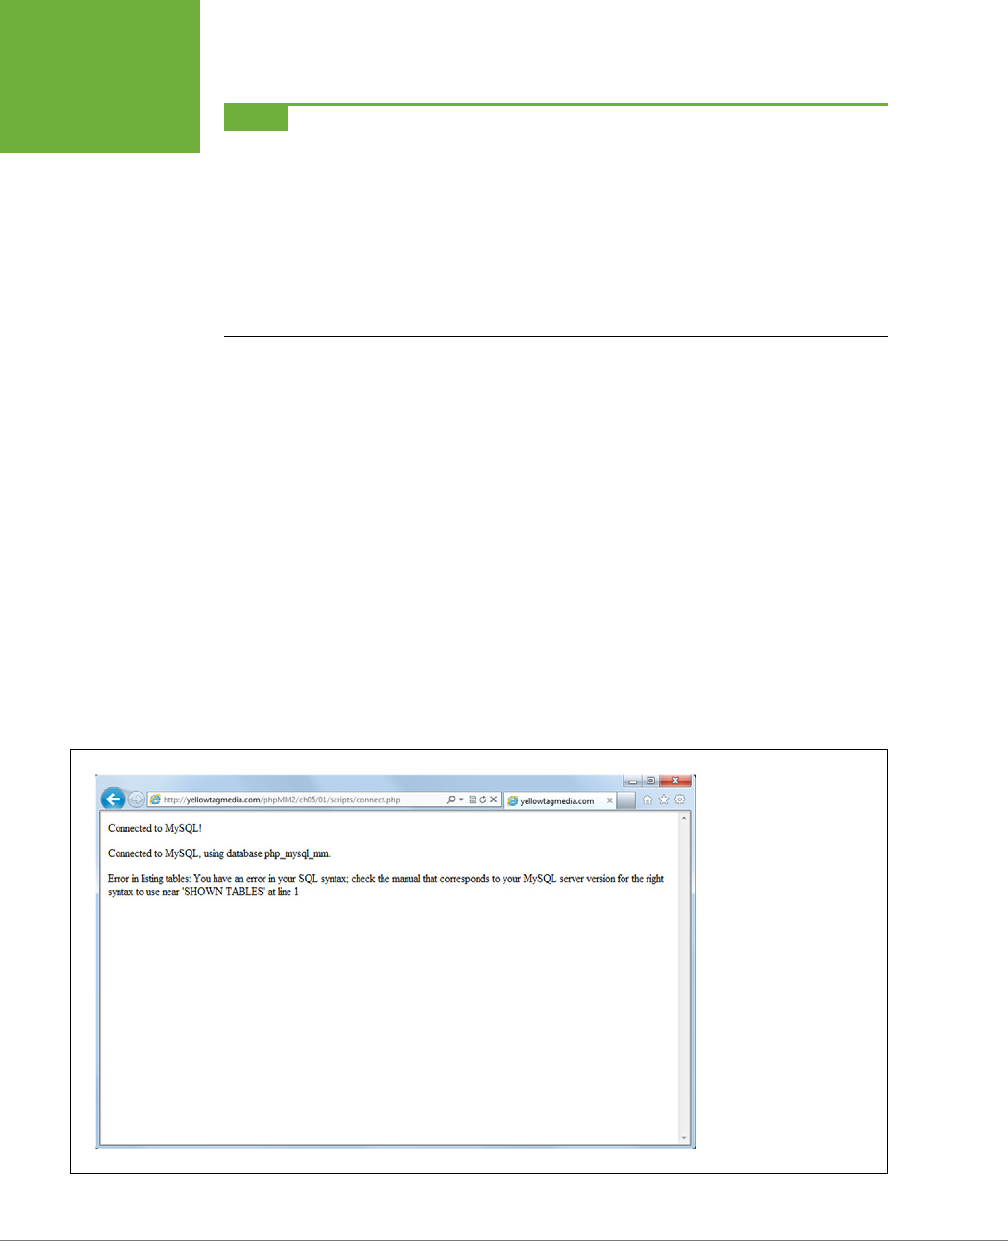
PHP & MYSQL: THE MISSING MANUAL
128
WRITING A
SIMPLE PHP
CONNECTION
SCRIPT
NOTE It might seem weird to hear about “the way it’s done in PHP.” If code works, then it works, right?
Well, yes...but have you ever heard someone who’s just learning English speak? Often, the words are correct, but
the order, usage, and idiom are all wrong. It sounds awkward, and you can have trouble figuring out what the
person means.
Programming languages are the same. There’s writing code that works, and there’s writing code in a way that
shows you really know the language. Sometimes, this is called being
eloquent
. It’s worth learning not just how
to write working PHP, but to write PHP that looks natural. (There are even books devoted to “speaking properly”
in JavaScript and Ruby called
Eloquent JavaScript
by Marijn Haverbeke [No Starch Press] and
Eloquent Ruby
by
Russ Olsen [Addison-Wesley].)
In fact, to ensure that your code deals with errors, change your SQL query to include
a typo:
<?php
// All your existing database connection code
$result = mysql_query("SHOWN TABLES;");
if (!$result) {
die("<p>Error in listing tables: " . mysql_error() . "</p>");
}
?>
Load
connect.html
in a browser and run your connection test. Figure 5-4 is similar
to what you should see: still a little cryptic, but clearly your code realized there was
a problem and handled it with an error message rather than a massive meltdown.
FIGURE 5-4
Every step along the way,
deal with errors, as in this
example from the code
on page above. The better
you handle errors and the
more specific your mes-
sages are, the easier it is
to figure out what’s gone
wrong with your code.
That results in code that
your users enjoy and that
you can easily fix when
bugs crop up.

CHAPTER 5: CONNECTING PHP TO MYSQL 129
WRITING A
SIMPLE PHP
CONNECTION
SCRIPT
PRINT OUT YOUR SQL RESULTS
So far, the PHP script you’ve created in this chapter handles errors, reports problems,
and lets you deal with what’s in $result when things don’t go wrong. Unfortunately,
that’s where things get trickier. $result is actually not a PHP type that you’ve used,
or even one that you’ll need to learn how to work with directly. It’s something called
a
resource
, which is PHP-speak for a special variable that’s related to something
outside of PHP.
Think about it this way: In the case of mysql_query, you’ve asked for the SQL results
from running the query SHOW TABLES. But, although PHP can talk to MySQL, it
doesn’t know how to interpret SQL. Therefore, it can’t know that $result should
hold a list of rows, each of which containing one value: a table name. All it knows
is that something else—your MySQL database—is getting a query through the
mysql_query function. Think about it for a moment. Depending on what query you
pass mysql_query, $result might hold rows with multiple pieces of information, like
a first name and Facebook URL, or just an indication of whether a CREATE TABLE
statement worked or not.
In these cases, you usually end up with a PHP resource. That resource means some-
thing; it’s just that PHP doesn’t really know what that something is. So, your PHP
needs help. What it needs is something that knows about MySQL and can figure out
how to work with $result. That’s exactly what you get with another MySQL function,
mysql_fetch_row. You pass this function in a resource returned from mysql_query,
and it lets you cycle through each row in the results returned from your SQL query.
Here’s the basic pattern:
1. Write your SQL query and store it in a string or a variable.
2. Pass your query into mysql_query and get back a PHP resource.
3. Pass that resource into mysql_fetch_row to get back rows of results, one
at a time.
4. Cycle through those rows and pull out the information you need.
5. Buy a really nice musical instrument with all the cash you’re making.
NOTE That last step is optional, but highly recommended.
You’ve got a resource in $result, now pass it in to mysql_fetch_row, like this:
<?php
// All your existing database connection code
$result = mysql_query("SHOW TABLES;");
if (!$result) {
die("<p>Error in listing tables: " . mysql_error() . "</p>");
}

PHP & MYSQL: THE MISSING MANUAL
130
WRITING A
SIMPLE PHP
CONNECTION
SCRIPT
echo "<p>Tables in database:</p>";
echo "<ul>";
while ($row = mysql_fetch_row($result)) {
// Do something with $row
}
echo "</ul>";
?>
WARNING If you changed your SQL to SHOWN TABLES to produce an error earlier, be sure to change it
back to SHOW TABLES.
Even though PHP doesn’t know what to do with the resource returned from mysql_
query, mysql_fetch_row does. It takes in your $result resource and starts creating
rows, one at a time, in an array.
And then there’s that while loop, something else that’s new, but not tough to grasp.
A while loop continues to loop for as long as a specified test condition is true. In
this case, it keeps looping while $row—which is the next row of results from your
SQL query—is getting a value from mysql_fetch_row($result). When there are no
more result rows, mysql_fetch_row doesn’t return anything, so $row is empty, and
the while loop says, “Ok, I’m done. I’ll stop looping now.”
Finally, you’ve got a nice unordered list (<ul>) ready to emerge from each row.
There’s just one thing left to add:
<?php
// All your existing database connection code
$result = mysql_query("SHOW TABLES;");
if (!$result) {
die("<p>Error in listing tables: " . mysql_error() . "</p>");
}
echo "<p>Tables in database:</p>";
echo "<ul>";
while ($row = mysql_fetch_row($result)) {
echo "<li>Table: {$row[0]}</li>";
}
echo "</ul>";
?>
Each time mysql_fetch_row returns $row, it’s actually returning an array, something
with which you’ve already worked (page 83). That array has all the dierent pieces
of information from your SQL query. For SHOW TABLES, that’s just one thing, at
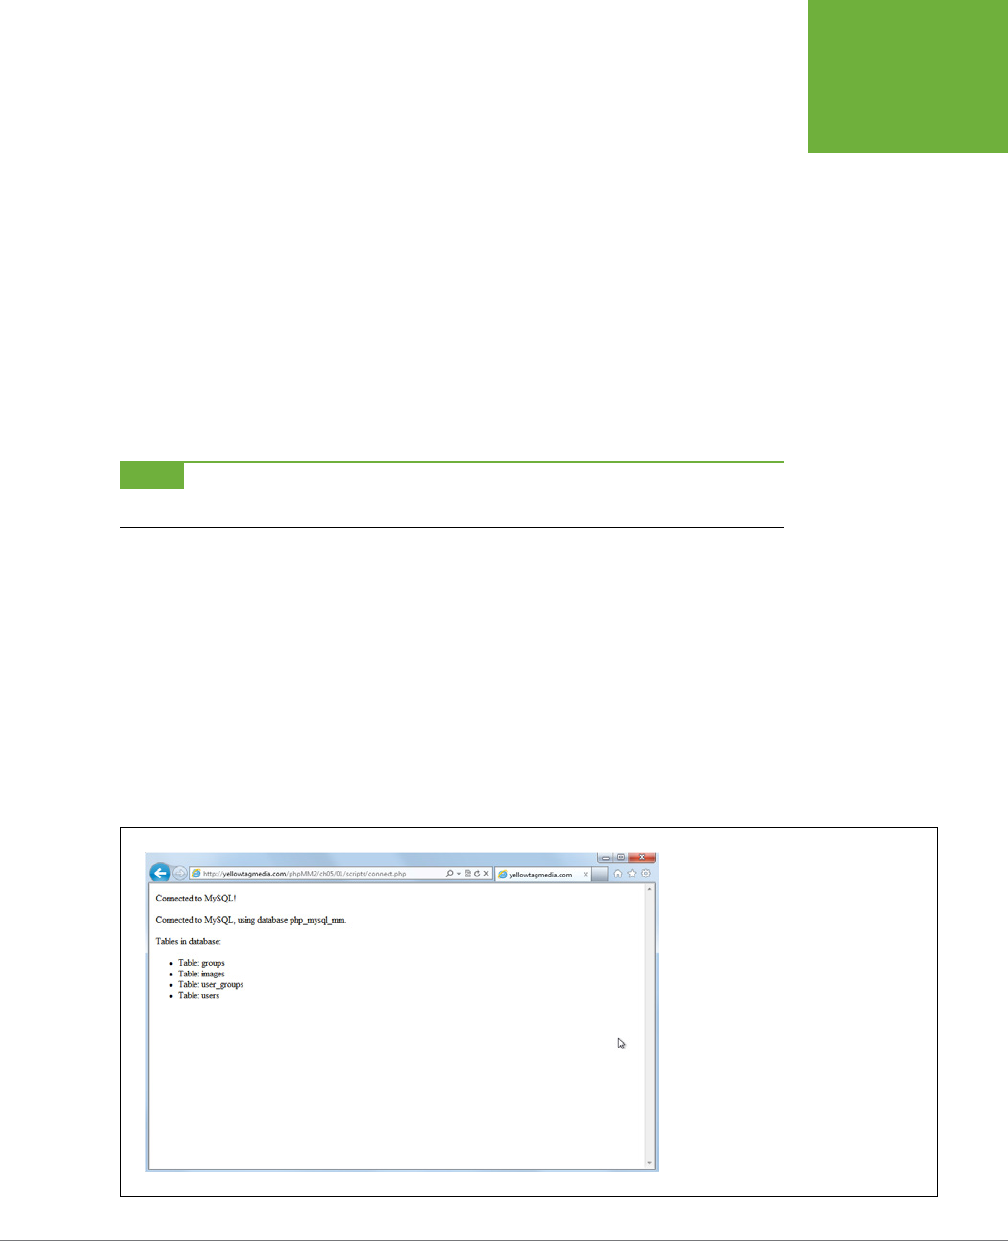
CHAPTER 5: CONNECTING PHP TO MYSQL 131
WRITING A
SIMPLE PHP
CONNECTION
SCRIPT
$row[0]: the table name. Pretty soon, you’ll write some more complex queries, and
you might need to grab the value in $row[1], $row[2], or even $row[10].
In this case, you get back $row, you grab the table name by getting the first item in
the array (index 0), and then you print that out by using echo. There’s just one other
wrinkle here: those curly braces inside the string that’s passed to echo. What’s up
with those?
Well, you could rewrite this line like this:
while ($row = mysql_fetch_row($result)) {
echo "<li>Table: " . $row[0] . "</li>";
}
Nothing wrong there, except for all the extra quotation marks and periods to stick
strings together.
NOTE Major bonus points if you nerded out and remembered that mashing strings together is called
concatenation
.
But PHP is pretty savvy, and the folks that wrote the language are programmers,
too. They realized, like you do, that you constantly need to drop variables into the
middle of strings. So, instead of constantly ending a string and adding a variable,
you can just wrap a variable inside of { and }, and PHP will print the value of that
variable instead of “$row[0]”. It makes for a lot simpler code, and that’s a good thing.
At this point, save
connect.php
, revisit
connect.html
in your browser, and see what
tables are in your database. Figure 5-5 shows
connect.php
running against a database
with a lot of tables. You might have only one or two, or none at all, and that’s fine.
Just so long as you get a list of the tables that you do have or an empty response.
What you
don’t
want here is an error.
FIGURE 5-5
The SHOW TABLES command, as used in
the
connect.php
script on page 130, is a
bit clunky, and took quite a few lines to
do something relatively simple. And, you
might not even see any tables! Still, now
you know how to run a SQL query. And for
now, this kind of code is a really easy way
to ensure that your PHP scripts are talking
to your MySQL databases.

PHP & MYSQL: THE MISSING MANUAL
132
CLEANING UP
YOUR CODE
WITH MULTIPLE
FILES
Cleaning Up Your Code with Multiple Files
Even if you don’t realize it yet, there’s something problematic about the
connect.php
script you created in the previous section. Look at the first few MySQL calls you make:
<?php
mysql_connect("your.database.host",
"your-username", "your-password")
or die("<p>Error connecting to database: " .
mysql_error() . "</p>");
echo "<p>Connected to MySQL!</p>";
mysql_select_db("your-database-name")
or die("<p>Error selecting the database your-database-name: " .
mysql_error() . "</p>");
echo "<p>Connected to MySQL, using database your-database-name.</p>";
// And so on...
?>
You’re manually typing your database host, your user name, your password, and
your database name into your script. Suppose that you have 10 scripts; you’re typing
that 10 times. The chances for misspelling something are pretty high.
Not only that, what happens when you change your password? Or if you upgrade
to a better hosting plan to handle all the web trac your apps are generating and
need to change your database host? You’ve got to track down every place you used
that information, in every PHP script. That’s not only a nightmare, it also keeps you
from writing new code and making more cash. Not good.
What you need is a way to store those pieces of information where you can keep
them up to date, and where your code can refer to them correctly every time.
Programmers call that
abstracting out
the information.
Abstraction
is a way of hid-
ing the implementation—the way something works—from programs that use that
something. You basically have a symbol, or a name, and that name refers to some
bit of information with a lot more detail. And even if that detail changes, the name
still points to the right information.
It’s like saying “Bob” and meaning your friend, instead of calling him “that 29-year-
old guy with the full head of hair.” That way, every year you can call the same friend
“Bob,” without changing your (and his) description.
In PHP, abstraction uses variables, and you’ll see how that works in the next section.

CHAPTER 5: CONNECTING PHP TO MYSQL 133
CLEANING UP
YOUR CODE
WITH MULTIPLE
FILES
NOTE You can find the finished example code for this section on this book’s Missing CD page at
www
.missingmanuals.com/cds/phpmysqlmm2e
.
Replacing Hand-Typed Values with Variables
Instead of including your actual host name, user name, and password as in the code
on page 132, you want your code to look more like the following:
<?php
mysql_connect($database_host, $username, $password)
or die("<p>Error connecting to database: " .
mysql_error() . "</p>");
echo "<p>Connected to MySQL!</p>";
mysql_select_db($database_name)
or die("<p>Error selecting the database your-database-name: " .
mysql_error() . "</p>");
echo "<p>Connected to MySQL, using database your-database-name.</p>";
// And so on...
?>
You’re really just writing something that looks a bit like a variable in place of hand-
typing the user name or database name. Now, you can define those variables above
your connection code:
<?php
$database_host = "your.database.host";
$username = "your-username";
$password = "your-password";
$database_name = "your-database-name";
// Database connection code
?>
But is this really that much better? You’re still entering these hand-typed values into
your script. You haven’t solved the problem; you’ve just moved it to a dierent part
of the script. What you need to do is to store your values in a separate file.
Abstracting Important Values into a Separate File
To avoid typing values such as your database name and user name into every
script—and keep them up to date—you need to put them some place where all your
PHP scripts, including
connect.php
, can access them. Open a new file, and call it
app_config.php
. Now, drop your variables into this new file:
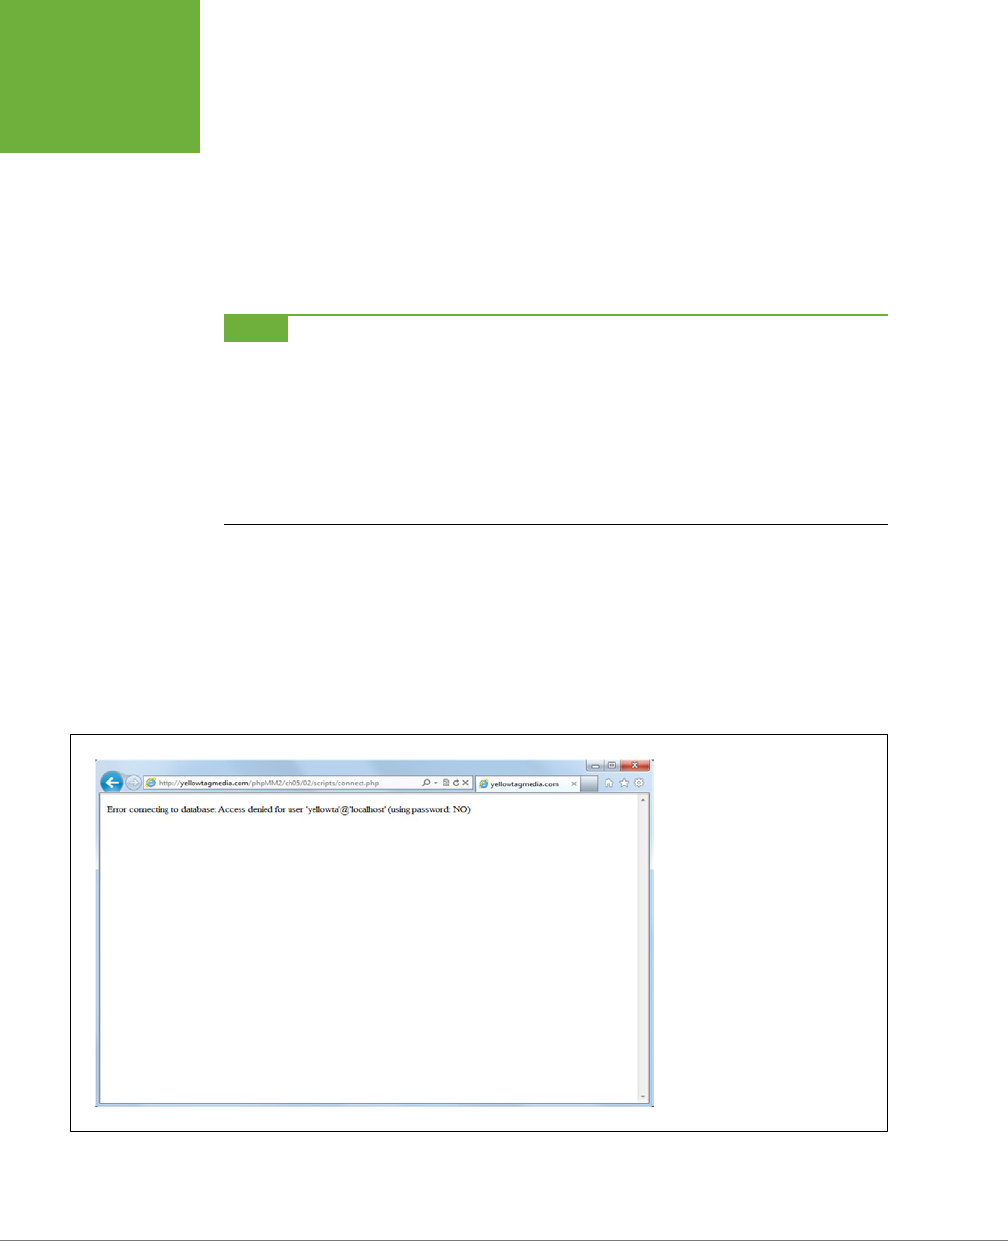
PHP & MYSQL: THE MISSING MANUAL
134
CLEANING UP
YOUR CODE
WITH MULTIPLE
FILES
<?php
// Database connection constants
$database_host = "your.database.host";
$username = "your-username";
$password = "your-password";
$database_name = "your-database-name";
?>
NOTE Be sure to save
app_config.php
somewhere that makes sense for all your application’s scripts to access
it. In this book’s examples,
app_config.php
is in the root of the site, under
scripts/
. So, if you’re in the
ch05/02/
scripts/
directory, you’d access this file at
../../../scripts/app_config.php
or
[site_root]/scripts/app_config.php
.
You can save the file wherever you want, as long as you get the path right in your PHP scripts that reference it.
When you move to a production version of your application, you definitely want to place this file
outside
of the
site root. That way, hackers can’t simply type the path to your configuration script and gain access to all your
passwords. Alternatively, you could add security to this directory; however, simply getting it out of the web
serving directories altogether is usually easiest.
Now, you can have all your dierent PHP scripts use these shared variables. If you
change a variable here, in
app_config.php
, that change aects all your PHP scripts
that use these shared variables.
But how do you actually access these variables? Go back to
connect.php
and remove
where you defined these variables manually. If you try to access
connect.php
through
connect.html
now, though, you’ll get a nasty error, as demonstrated in Figure 5-6.
FIGURE 5-6
You defined your variables in
app_config.php
, but
connect.php
doesn’t know that; that’s why it
can’t connect to your database and
you get the error shown here. You
need to instruct your connection
script to not run until it loads
app_config.php
. Then, things will
behave because the variables
connect.php
uses will be set
properly.
CHAPTER 5: CONNECTING PHP TO MYSQL 135
CLEANING UP
YOUR CODE
WITH MULTIPLE
FILES
NOTE You can see the user name
yellowta
in screenshot in Figure 5-6. That user name will be different for
you, and that’s good! You’ll see your own user name, rather than
yellowta
.
This error is thrown because
connect.php
now has no idea what $username or $pass-
word refer to. You need to instruct PHP that before it tries to do anything in
connect.
php
, it needs to load
app_config.php
. In fact, this is a requirement for
connect.php
.
That’s (almost) exactly what you type in your script:
<?php
require '../../scripts/app_config.php';
// Database connection code
?>
Now, PHP loads
../../scripts/app_config.php
before
it runs your mysql_connect
function. In fact, require says, “Hey PHP, if you can’t load the file I’m telling you to
load, throw a nasty error, because nothing else is going to work.”
WARNING Ensure that the path and file name that you give to
require
matches where you actually
put
app_config.php
, or you’ll get to see the error that
require
produces, up close and personal.
Try to run your connection script again; you should see your table listing, exactly as
in Figure 5-5, which means things are working again.
UNDER THE HOOD
Require or Include?
There’s another command in PHP that’s very similar to
re-
quire
:
include
.
include
does exactly what
require
does in that it says to PHP to load another file. The difference is
that if that file can’t be loaded,
include
just issues a warning,
and lets PHP continue to run the later commands in your script.
require
completely shuts things down, but
include
allows
your script to keep going.
But here’s the thing. Are you
really
going to bother including
a file if you don’t need that file? In most cases, probably not.
You’re including that file because you need it; you really
require
that file to run. So, in almost every situation, you should use
require
to grab another file, not
include
. If something
goes wrong, you want to know about it. You don’t want the
rest of your code running, because it’s probably going to error
out anyway.
Variables Vary, but Constants Stay Constant
There’s just one more nagging little problem with your code: you’re still using vari-
ables for your user name and password, along with the database host and database
name. And what’s a variable? Something that
varies
or
changes
. So, PHP will happily
let you do this in
connect.php
:

PHP & MYSQL: THE MISSING MANUAL
136
CLEANING UP
YOUR CODE
WITH MULTIPLE
FILES
mysql_connect($database_host, $username, $password)
or die("<p>Error connecting to database: " . mysql_error() . "</p>");
// This is allowed, but some bad mojo
$password = "hijinks"
What happens when some other script—one which also requires
app_config.php
—
tries to connect with mysql_connect? It’s going to use $password, but now $password
is no longer correct. It’s set to “hijinks,” and chaos ensues.
What you really want is for those values in
app_config.php
to be constant and never
change. You can do this with the special define function. Open up
app_config.php
and change your code:
<?php
// Database connection constants
define("DATABASE_HOST", "your.database.host");
define("DATABASE_USERNAME", "your-username");
define("DATABASE_PASSWORD", "your-password");
define("DATABASE_NAME", "your-database-name");
?>
You define the name of a constant and the value for that constant, and PHP creates
a new constant. Now, you can type DATABASE_HOST into your code, and PHP
really
sees your.database.host, which is the name of your database’s host server. Perfect!
In addition, because this is a constant, not a variable, your scripts can’t change it
anywhere along the line.
Note that the constants are also in all-uppercase letters. That’s not required, but
it’s another one of those “speak like a PHP programmer” things, as described in the
note on page 128. You want constants to look dierent than variables, and using all
uppercase names is one way to do that. Constants also don’t have the $ character
before their names.
At this point, you need to make some quick changes to
connect.php
to use these
new capitalized constant names:
<?php
require '../../scripts/app_config.php';
mysql_connect(DATABASE_HOST, DATABASE_USERNAME, DATABASE_PASSWORD)
or die("<p>Error connecting to database: " .
mysql_error() . "</p>");
echo "<p>Connected to MySQL!</p>";
mysql_select_db(DATABASE_NAME)
or die("<p>Error selecting the database " . DATABASE_NAME .
mysql_error() . "</p>");
CHAPTER 5: CONNECTING PHP TO MYSQL 137
CLEANING UP
YOUR CODE
WITH MULTIPLE
FILES
echo "<p>Connected to MySQL, using database " . DATABASE_NAME . "</p>";
// SQL query-running goodness proceeds...
?>
WARNING You can’t use the
{
and
}
inside your quotes to print out constants. It’s only when you surround
a variable (which starts with
$
) with
{
and
}
that PHP will print out the value of that variable. Instead, use the
normal string concatenation approach by which you end your string and add the constants using the dot (
.
).
Go ahead and try out
connect.php
again. You should get a perfectly good list of
table names. But this time, you have constants for your important information, safely
tucked away in a file separated out of
connect.php
.
NOTE It’s also a good idea to add some additional security to
app_config.php
, and any other scripts that
contain special values like this. You can set the permissions on the file to be more restrictive or move the file to
some place your PHP script can access, but your web users can’t. Ask your web or server administrator for help
if you’re not sure how to do that.
DESIGN TIME
Start Small, Add Small, Finish Small
You might be wondering why you couldn’t have just started
with
app_config.php
and the completed, working version of
connect.php
. Or, at a minimum, you could have just dropped
all the database connection code into
connect.php
at once and
then handled the printing code all at once. Isn’t that how real
developers write code?
Well, yes and no. Lots of developers do write code like that.
They type anywhere from 10 to 50 lines of code into their
script and then try it out. Lots of things will break because
developers type too fast and make mistakes. But then, they’ll
fix each problem, one by one by one. And for lots of develop-
ers, that’s just fine.
But, that’s not very efficient. On top of that, you’re usually
focused on the last step (like printing out the tables), and so
you might not spend much time figuring out the best way to
handle the in-between steps. You might not use
{
and
}
to
simplify the statement that prints
$row[0]
, or you might
skip a
die
because you’re thinking about HTML output, not
handling the case in which the database password isn’t right.
The reality is that the best developers work on really, really
small chunks of code at a time. They test that code, and then
they move on to something else. In fact—and this goes a bit
beyond this book, but it’s still important—a lot of really elite
developers actually write tests
before
they write anything else.
They write those tests, and the tests obviously fail, because
they haven’t written any code. Then they write just enough
code to pass their test, and then they write another test.
Now, this rigmarole probably sounds insane. Write tests for
code that doesn’t exist? Here’s what’s really nuts: often, this
approach results in more test code than actual application code!
It’s a lot of work, and it’s all based on the idea that you should
write just enough code to get one thing working at a time.
But, here’s the big reveal, and why these elite developers are
elite: this results in better code. Working small, from start to
finish, means that you’re focusing on one thing and doing that
one thing really well. You aren’t rushing to something else. And
that means what you’re working on is solid and works. This
approach does take more time in the beginning, but results
in rock-solid code that breaks far less often.
So take your time, and work small. Your code will be better,
and your customers will love you because your code is still
running while they’re on the phone trying to get help with a
broken app from “the other guys.”

PHP & MYSQL: THE MISSING MANUAL
138
BUILDING
A BASIC
SQL QUERY
RUNNER
Building a Basic SQL Query Runner
Now that you can connect to SQL, you’re ready to take on something more ambi-
tious: building your own version of a MySQL command-line tool. Of course, you’re
a PHP developer and programmer now, so mentally scratch out “command-line”
and replace it with “web-based.”
It turns out that you already have most of the tools you need. You can easily build an
HTML form with which you and your users can enter in a SQL query; you know how
to connect to MySQL and select a database; and you can run a query. All that’s left
is to figure out how to interpret that PHP resource that mysql_query returns when
it’s not a list of table names.
NOTE You can find the finished example code for this section on this book’s Missing CD page at
www.
missingmanuals.com/cds/phpmysqlmm2e
.
Creating an HTML Form with a Big Empty Box
Before getting to mysql_query and its results, though, start with what you know: an
HTML form. Keep things simple for now by creating a form with a few basic buttons
and a single text area into which you can type queries.
Start your text editor and create
queryRunner.html
with the following code:
<html>
<head>
<link href="../css/phpMM.css" rel="stylesheet" type="text/css" />
</head>
<body>
<div id="header"><h1>PHP & MySQL: The Missing Manual</h1></div>
<div id="example">Example 5-2</div>
<div id="content">
<h1>SQL Query Runner</h1>
<p>Enter your SQL query in the box below:</p>
<form action="scripts/run_query.php" method="POST">
<fieldset>
<textarea id="query_text" name="query"
cols="65" rows="8"></textarea>
</fieldset>
<br />
<fieldset class="center">
<input type="submit" value="Run Query" />
<input type="reset" value="Clear and Restart" />
</fieldset>
</form>

CHAPTER 5: CONNECTING PHP TO MYSQL 139
BUILDING
A BASIC
SQL QUERY
RUNNER
</div>
<div id="footer"></div>
</body>
</html>
Fire up your favorite browser and ensure that things look like Figure 5-7.
FIGURE 5-7
Whoever said you
wouldn’t spend plenty of
time writing HTML and
CSS when you became
a full-fledged web
programmer? Even with
a basic SQL query runner,
good structure and style
make a huge difference in
presentation and how easy
your code is to update.
Connecting to Your Database (Again)
Now that you have your HTML form, exactly as with the
connect.html
page you
created on page 122, you need to write a script that connects to MySQL and then
USEs your database. This code should be pretty familiar by now; create a new script
in your
scripts/
directory called
run_query.php
and go to work:
<?php
require '../../scripts/app_config.php';
mysql_connect(DATABASE_HOST, DATABASE_USERNAME, DATABASE_PASSWORD)
or die("<p>Error connecting to database: " .
mysql_error() . "</p>");
echo "<p>Connected to MySQL!</p>";
mysql_select_db(DATABASE_NAME)
or die("<p>Error selecting the database " . DATABASE_NAME .

PHP & MYSQL: THE MISSING MANUAL
140
BUILDING
A BASIC
SQL QUERY
RUNNER
mysql_error() . "</p>");
echo "<p>Connected to MySQL, using database " . DATABASE_NAME . "</p>";
?>
You’ve already written this code before (page 133), and in fact, you have to write
it every single time you connect to MySQL. That sort of duplication isn’t good for
the same reason why you moved your database constants into
app_config.php
:
you wanted to be able to keep code that’s always the same in a single place rather
than ten or a hundred.
You’ve seen how easy it is to require a file, and pull in some constant values. And
you can do the same thing with your database connection code. Open a new file
and call it
database_connection.php
. Save this new script right alongside
app_con-
fig.php
(in your entire site’s
scripts/
directory, not alongside your chapter-specific
examples) and enter the following code:
<?php
require 'app_config.php';
mysql_connect(DATABASE_HOST, DATABASE_USERNAME, DATABASE_PASSWORD)
or die("<p>Error connecting to database: " .
mysql_error() . "</p>");
echo "<p>Connected to MySQL!</p>";
mysql_select_db(DATABASE_NAME)
or die("<p>Error selecting the database " .
DATABASE_NAME . mysql_error() . "</p>");
echo "<p>Connected to MySQL, using database " .
DATABASE_NAME . ".</p>";
?>
NOTE Ensure that your path to
app_config.php
matches where you stored that file. If you’re saving
database_connection.php
in the same directory as
app_config.php
, you just need the file name, without any
directory paths.
You now have all your database code tucked nicely away, so you can radically
overhaul
run_query.php.
Instead of all the code at the top of this section, you just
need the following:
<?php
require '../../scripts/database_connection.php';
?>
How’s that for short code? More important, notice that there’s no longer a reason
to require
app_config.php
. Your script requires
database_connection.php
, and it’s
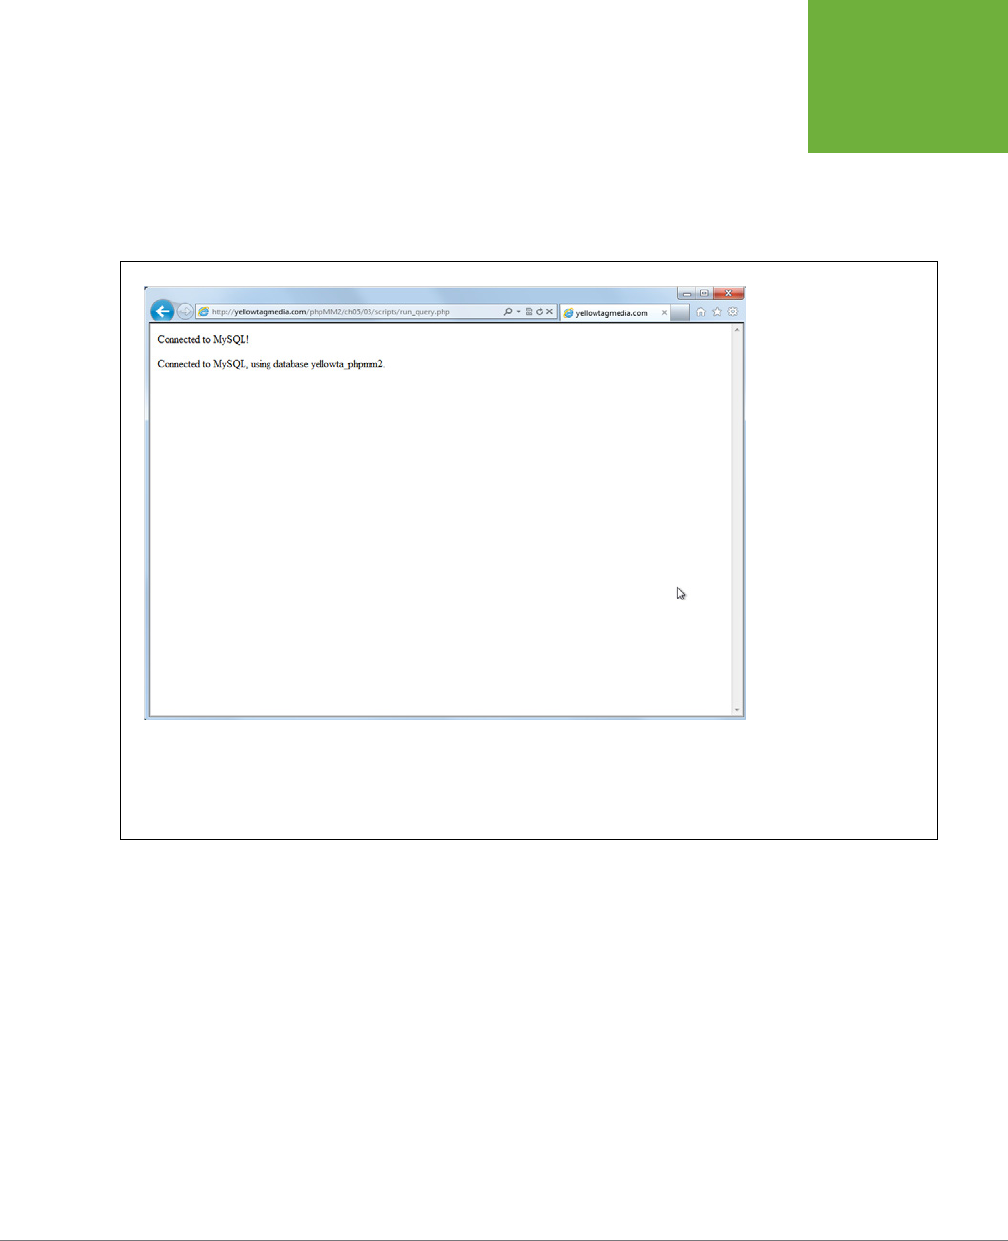
CHAPTER 5: CONNECTING PHP TO MYSQL 141
BUILDING
A BASIC
SQL QUERY
RUNNER
database_connection.php
that handles bringing in
app_config.php
. Things are
much neater now.
To verify that this works, visit your
queryRunner.html
page and click the “Run Query”
button. You should see something like Figure 5-8, all without anything but a single
require in your main script.
FIGURE 5-8
In
queryRunner.html
, click-
ing “Run Query” produces
this page. The script
run_query.php
requires
database_connection.php
(which connects to the
server and selects the
database), which in turn
requires
app_config.
php
(which contains
your password and other
constants you need to
connect). It might seem
strange to write a script
that appears to do nothing
more than require another
script. Actually, the more
comfortable you get cod-
ing, the more you’ll favor
this sort of reuse. You want
to write just enough new
code to get the job done.
If you can reuse lines of
existing code, you should
do so.
Running Your User’s SQL Query (Again)
You’re finally ready to combine what you know about PHP and what you know about
SQL. You’ve already captured anything the user puts into the big text area on your
form through the $REQUEST variable (which, as explained on page 83 in Chapter 3,
is an array), and you also can use mysql_query to run a query.
In
run_query.php
, here’s how you put those two things together:
<?php
require '../../scripts/database_connection.php';
$query_text = $_REQUEST['query'];
$result = mysql_query($query_text);

PHP & MYSQL: THE MISSING MANUAL
142
BUILDING
A BASIC
SQL QUERY
RUNNER
if (!$result) {
die("<p>Error in executing the SQL query " . $query_text . ": " .
mysql_error() . "</p>");
}
echo "<p>Results from your query:</p>";
echo "<ul>";
while ($row = mysql_fetch_row($result)) {
echo "<li>{$row[0]}</li>";
}
echo "</ul>";
?>
In other words, grab the correct field from the input from your HTML form, pass
it to mysql_query, and you’re good to go. You can then pass in the returned PHP
resource, $result, to an error-handling if statement, and finally to mysql_fetch_row
to print out the results from the query.
This looks pretty good, so now you’re ready to actually try things out.
FREQUENTLY ASKED QUESTION
When Not to Abstract Out
The
mysql_query
function seems like something I’m going
to be using a lot. Why not just abstract it out in the same
manner as
mysql_select_db
and the defined constants?
Good question! You’ve correctly noticed that just as you’re
constantly connecting to MySQL—with the same user name and
password, repeatedly—and selecting a database—often the
same database, repeatedly—you’ll be calling
mysql_query
,
over and over and over. At first glance, it seems to make sense
to place that in another file and then
require
that file.
Well, the reason is actually in the code you wrote on page 141:
what you pass to
mysql_query
is going to change almost
every time you call it. Earlier, in
connect.php
, you passed the
SHOW TABLES query to it; now you’re passing it a query from
the form field in
queryRunner.html
. So, even though you’re
calling
mysql_query
over and over, what you’re giving that
function is changing. It’s not going to help you to pull out that
function from your main scripts.
You could move
mysql_query
out of your main script, and
pass to it the part of the statement that keeps changing: the
SQL query. You’d need to create a custom function that takes
in your query from your main script and hand that query to
mysql_query
. Then, when
mysql_query
finished run-
ning, the custom function would need to pass back anything
it returned to your main script.
That might sound like a mouthful, and a lot of work. It’s actually
pretty easy, though, and once you start writing your own func-
tions—something you’ll be doing in Chapter 8 quite a bit—you’ll
have no problem doing just this. But, what would you gain?
You’d still have to pass in a query and get back a response.
you wouldn’t actually gain anything from building your own
function; it would basically replace
mysql_query
, but you
wouldn’t get any extra functionality, and it wouldn’t add any
protection from changes or anything like that to your code.
However, before you go thinking that you shouldn’t worry
about this sort of thing, take a minute. Asking yourself, “Could
I pull this code out into another general file? Should I make this
a custom function?” is a very good thing! You want to think
like that, even if you decide—as is the case here—that it’s
not
a good thing. The more you roll around new ideas and ways
to approach your code, the better a programmer you’ll be. So,
keep asking yourself these questions; just don’t be afraid to
answer your own questions with “No, that’s not such a great
idea...in
this
case.”
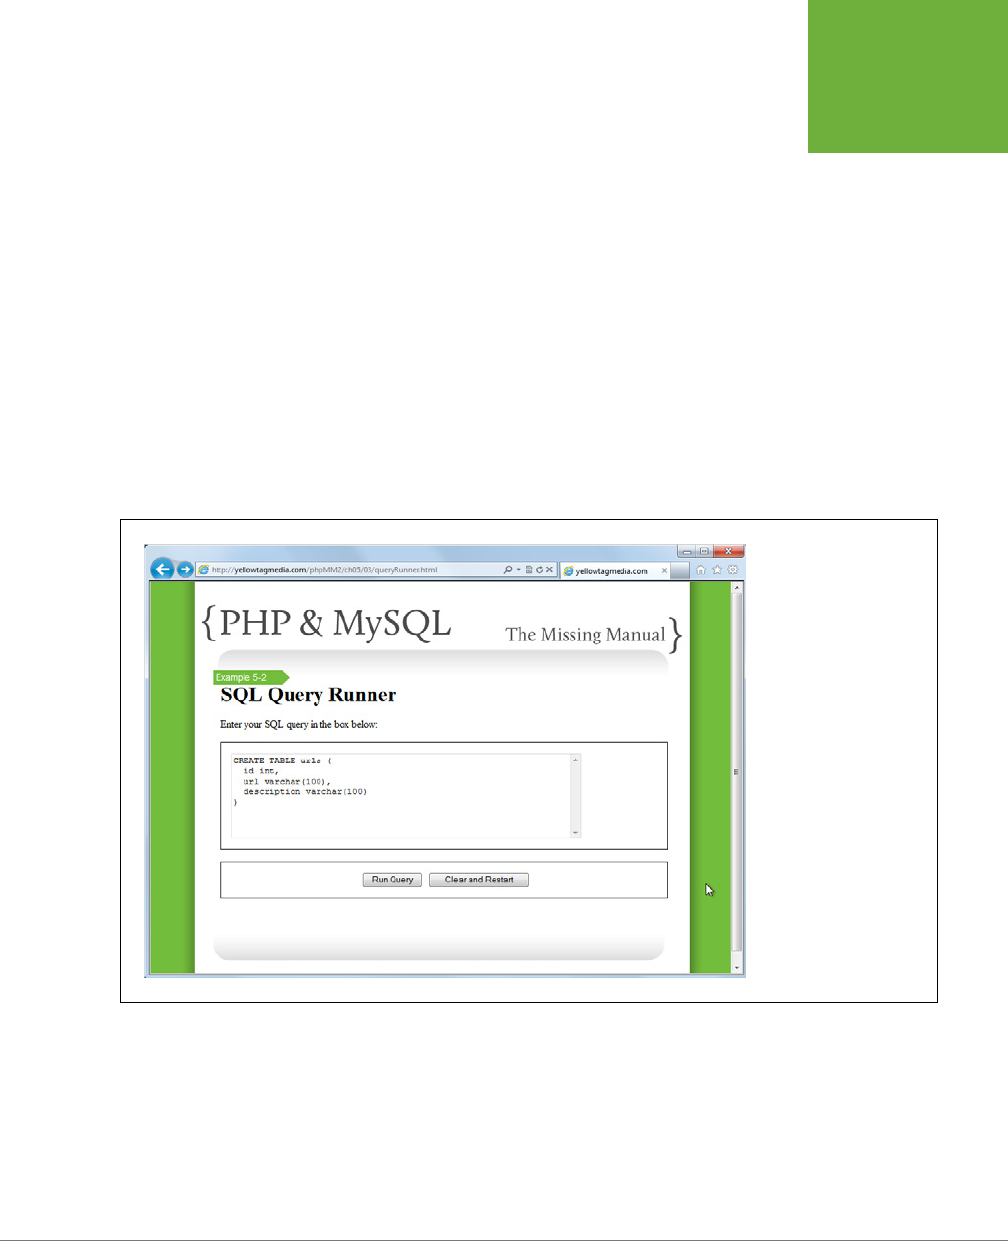
CHAPTER 5: CONNECTING PHP TO MYSQL 143
BUILDING
A BASIC
SQL QUERY
RUNNER
Entering Your First Web-Based Query
In
run_query.php
, you’re connecting to a database and you have a way to run a
query, but you probably don’t have much
in
your database yet, so start by creat-
ing a new table. Call the table
urls
(it’s going to contain web addresses). Here’s the
SQL you’ll need:
CREATE TABLE urls (id int, url varchar(100), description varchar(100));
Of course, because you have a nice big text area on
queryRunner.html
, you could
also spread that out:
CREATE TABLE urls (
id int,
url varchar(100),
description varchar(100)
);
Either way, you want a form that looks something like Figure 5-9.
FIGURE 5-9
Using a
<textarea>
tag in
queryRunner.html
lets your users enter SQL
however they like. It’s
a small thing, but these
little bits of flexibility and
user-centric design make
your web forms a lot more
enjoyable to use. You
wouldn’t want to write
a long SQL statement in
a giant input box on one
line, so why would your
users?
Go ahead and click Run Query. What did you get?
Not so good, right? You’re probably staring at a surprising screen, sort of like the
one shown in Figure 5-10.
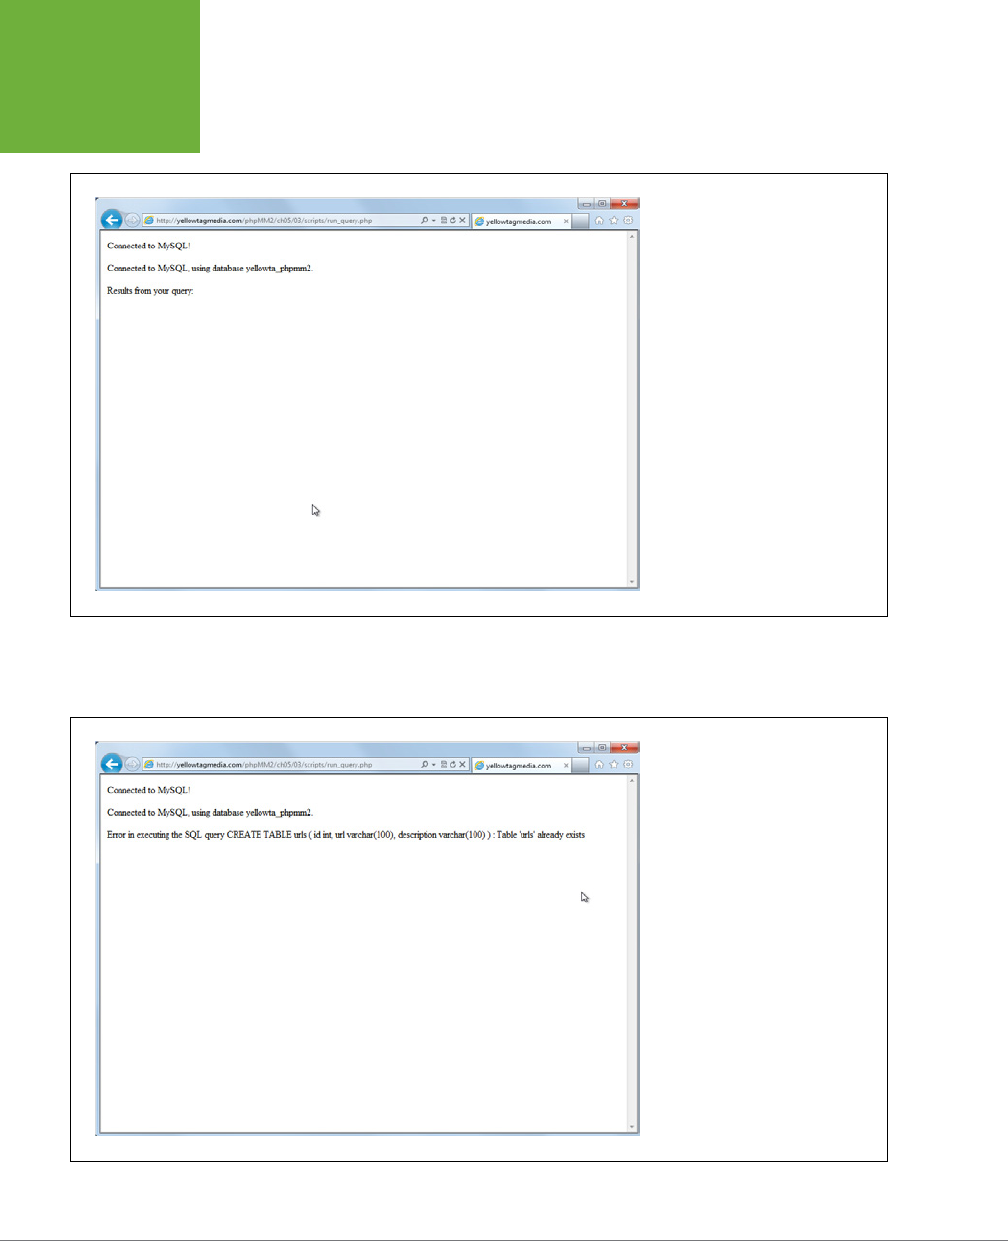
PHP & MYSQL: THE MISSING MANUAL
144
BUILDING
A BASIC
SQL QUERY
RUNNER
FIGURE 5-10
Here’s what you get when you run
the query shown in Figure 5-9.
Sometimes the worst possible error
message is not an error message.
You’ve got nothing apparently wrong
in your script, so what happened?
In cases like this, an error message
would help to avoid frustration.
If you want to really become confused, press the Back button on your browser and
run your CREATE query again. You’ll see a message like the one shown in Figure 5-11.
FIGURE 5-11
Huh? First, you got nothing (Figure
5-10). But now, you’re being told that
something did happen, and trying to
make that (invisible) thing happen
again has caused an error. Your
script couldn’t create the
urls
table,
because you already created it the
first time you ran the query.

CHAPTER 5: CONNECTING PHP TO MYSQL 145
BUILDING
A BASIC
SQL QUERY
RUNNER
First, nothing happened—no results at all (Figure 5-10). Now, MySQL is reporting that
the
urls
table already exists (Figure 5-11). In fact, if you hop out to your command-
line tool, you’d see that, yes, the table
does
exist in your database:
mysql> describe urls;
+-------------+--------------+------+-----+---------+-------+
| Field | Type | Null | Key | Default | Extra |
+-------------+--------------+------+-----+---------+-------+
| id | int(11) | YES | | NULL | |
| url | varchar(100) | YES | | NULL | |
| description | varchar(100) | YES | | NULL | |
+-------------+--------------+------+-----+---------+-------+
3 rows in set (0.00 sec)
Look carefully at your code again:
<?php
require '../../scripts/database_connection.php';
$query_text = $_REQUEST['query'];
$result = mysql_query($query_text);
if (!$result) {
die("<p>Error in executing the SQL query " . $query_text . ": " .
mysql_error() . "</p>");
}
echo "<p>Results from your query:</p>";
echo "<ul>";
while ($row = mysql_fetch_row($result)) {
echo "<li>{$row[0]}</li>";
}
echo "</ul>";
?>
The if (!$result) code block is not running; clearly $result came back as something
other than false. However, the while loop never ran, so you never saw any results.
Wait a second, though. Your query was a CREATE query. What rows would be re-
turned from that sort of query? There wouldn’t be any rows, because you weren’t
asking for rows. You were just asking MySQL to create a table; in fact, a place to
put
rows.
Handling Queries That Don’t SELECT Information
The important point demonstrated in the previous section is that mysql_query is
happy to take in a CREATE statement. It even did what you asked, which is why the
second time you entered that query in Figure 5-11, MySQL returned an error, saying

PHP & MYSQL: THE MISSING MANUAL
146
BUILDING
A BASIC
SQL QUERY
RUNNER
that the
urls
table was already created. When mysql_query receives a CREATE state-
ment, it returns false if there was an error—which your script handles—but true if
there’s not an error. If there’s not an error,
it will not return any rows
. You get a true
value in $result, but nothing else. And that’s where things went wrong.
In fact, that’s what mysql_query does when it gets most of the SQL statements
that don’t select data, such as CREATE, INSERT, UPDATE, DELETE, DROP, and a
few others. For each of these, you just get back true (if things worked) or false
(if they didn’t).
NOTE A few of those SQL commands (for example, UPDATE and DELETE) might look new to you. Don’t
worry, though. First, they do just what it appears they do: UPDATE updates information in a table, and DELETE
removes it. Second, when you need to use those functions, you’ll get a lot more detail about exactly how to
use each of them.
Fortunately, now that you know this is going on, it’s not too hard to deal with the
problem. You just need to see whether the SQL query string that the user supplied
has one of these special words. If so, it must be handled dierently. But, it just so
happens you’re plenty comfortable with searching through strings (page 73).
Take a moment to think this through; what you really want is something like this:
1. Grab the user’s query from the HTML form.
2. Pass the query into mysql_query and store the result in a variable.
3. See if the result is false, which is bad no matter what type of SQL was passed in.
4. If the result is not false, see if the query has one of the special keywords in
it: CREATE, INSERT, UPDATE, DELETE, or DROP. (There are others, but this
covers the most common ones.)
5. If the query has one of these special words, just see whether the result of
running the query was true, and let the user know that things went well.
6. If the query does not have one of these words, try to print out the result
rows as you’ve already been doing.
You know how to do all of these things individually; all you need to do is put them
together. Start out with a variable that indicates whether the user’s SQL will return
anything and set it to false:
$return_rows = false;
Now you can search the user’s query by using strpos, looking for one of the SQL
keywords that tells you, “No, rows will not be returned by this query.”
$return_rows = false;
$location = strpos($query_text, "CREATE");

CHAPTER 5: CONNECTING PHP TO MYSQL 147
BUILDING
A BASIC
SQL QUERY
RUNNER
If nothing was found, check the next keyword…and the next…and so on:
$return_rows = false;
$location = strpos($query_text, "CREATE");
if ($location === false) {
$location = strpos($query_text, "INSERT");
if ($location === false) {
$location = strpos($query_text, "UPDATE");
if ($location === false) {
$location = strpos($query_text, "DELETE");
if ($location === false) {
$location = strpos($query_text, "DROP");
if ($location === false) {
// If we got here, it's not a CREATE, INSERT, UPDATE,
// DELETE, or DROP query. It should return rows.
$return_rows = true;
}
}
}
}
}
WARNING Be sure to use that
triple
-equal sign (
===
) in your
if
statements to check whether
$location
is
false
.
That code might look complicated, but it’s clear when you walk through it, line by
line. Basically, you have the same if statement, repeated over and over, with each
of those statements containing another nested if statement:
$location = strpos($query_text, "SEARCH_STRING");
if ($location === false) {
// Try again with another SEARCH_STRING
}
Finally, if all of the if statements fail, CREATE, INSERT, UPDATE, DELETE, or DROP
are not in the query string:
// This is the innermost if statement
if ($location === false) {
// If we got here, it's not a CREATE, INSERT, UPDATE,
// DELETE, or DROP query. It should return rows.
$return_rows = true;
}
The challenge here is that you really want to search the user’s query string not just
for a single matching word, like CREATE or INSERT, but for several matching words.
That’s a little tricky, so you’ve got to do it with one call to strpos at a time.

PHP & MYSQL: THE MISSING MANUAL
148
BUILDING
A BASIC
SQL QUERY
RUNNER
NOTE Make sure that you understand this code, but don’t get too attached to it. It’s really ugly, and in the
next chapter, you’re going to add an extremely new tool to your PHP programming kit and rework this code to
be a
lot
slimmer and sleeker.
At each step, if the search string is found, it means that the user has entered one of
those special SQL keywords that does not return rows, so the variable $return_rows
is set to false, which is dierent from its original value, true.
Finally, at the end of this curly-brace love fest, the if statements unwind back to
the main program, and either $returns_rows has a value of true because none of
the searches matched, or it’s false because one of them did.
You’re ready to use $returns_rows to print out a result:
<?php
// require and database connection code
// run the query
// handle errors in the result
$return_rows = false;
$location = strpos($query_text, "CREATE");
if ($location === false) {
$location = strpos($query_text, "INSERT");
if ($location === false) {
$location = strpos($query_text, "UPDATE");
if ($location === false) {
$location = strpos($query_text, "DELETE");
if ($location === false) {
$location = strpos($query_text, "DROP");
if ($location === false) {
// If we got here, it's not a CREATE, INSERT, UPDATE,
// DELETE, or DROP query. It should return rows.
$return_rows = true;
}
}
}
}
}
if ($return_rows) {
// We have rows to show from the query
echo "<p>Results from your query:</p>";
echo "<ul>";
while ($row = mysql_fetch_row($result)) {
echo "<li>{$row[0]}</li>";

CHAPTER 5: CONNECTING PHP TO MYSQL 149
BUILDING
A BASIC
SQL QUERY
RUNNER
}
echo "</ul>";
} else {
// No rows. Just report if the query ran or not
if ($result) {
echo "<p>Your query was processed successfully.</p>"
echo "<p>{$query_text}</p>";
}
}
?>
NOTE Remember that
if
($return_rows)
is the same as
if
($return_rows === true)
. The
same goes for
if
($result)
.
Most of this is familiar. All of the code you’ve been using to print out rows stays the
same. That code just moves inside the if ($return_rows) block, because it only
applies if the user entered something like a SELECT that returns (potentially) lots
of results.
Then, in the else branch of that if, your script reports whether things went OK. As
an additional aid, this branch of the if statement prints out the original query so
that the user can know what was executed.
Technically, you don’t really need that if ($result). Because you tested earlier to
see if $result is false, if your script gets to this last bit, you know that $result is
true, so you can simplify things at the end a bit:
if ($return_rows) {
// We have rows to show from the query
echo "<p>Results from your query:</p>";
echo "<ul>";
while ($row = mysql_fetch_row($result)) {
echo "<li>{$row[0]}</li>";
}
echo "</ul>";
} else {
// No rows. Just report if the query ran or not
echo "<p>Your query was processed successfully.</p>";
echo "<p>{$query_text}</p>";
}
This script is getting to be long, but you now know what every single line is doing
at this point. Go ahead and try it out.
You probably created the
urls
table earlier—even though your PHP script didn’t
let you know that. Try entering DROP TABLE urls; as your SQL query. Then, run
yourquery, and this time, you should get a helpful message back, specific to your
rowless query, as you can see in Figure 5-12.
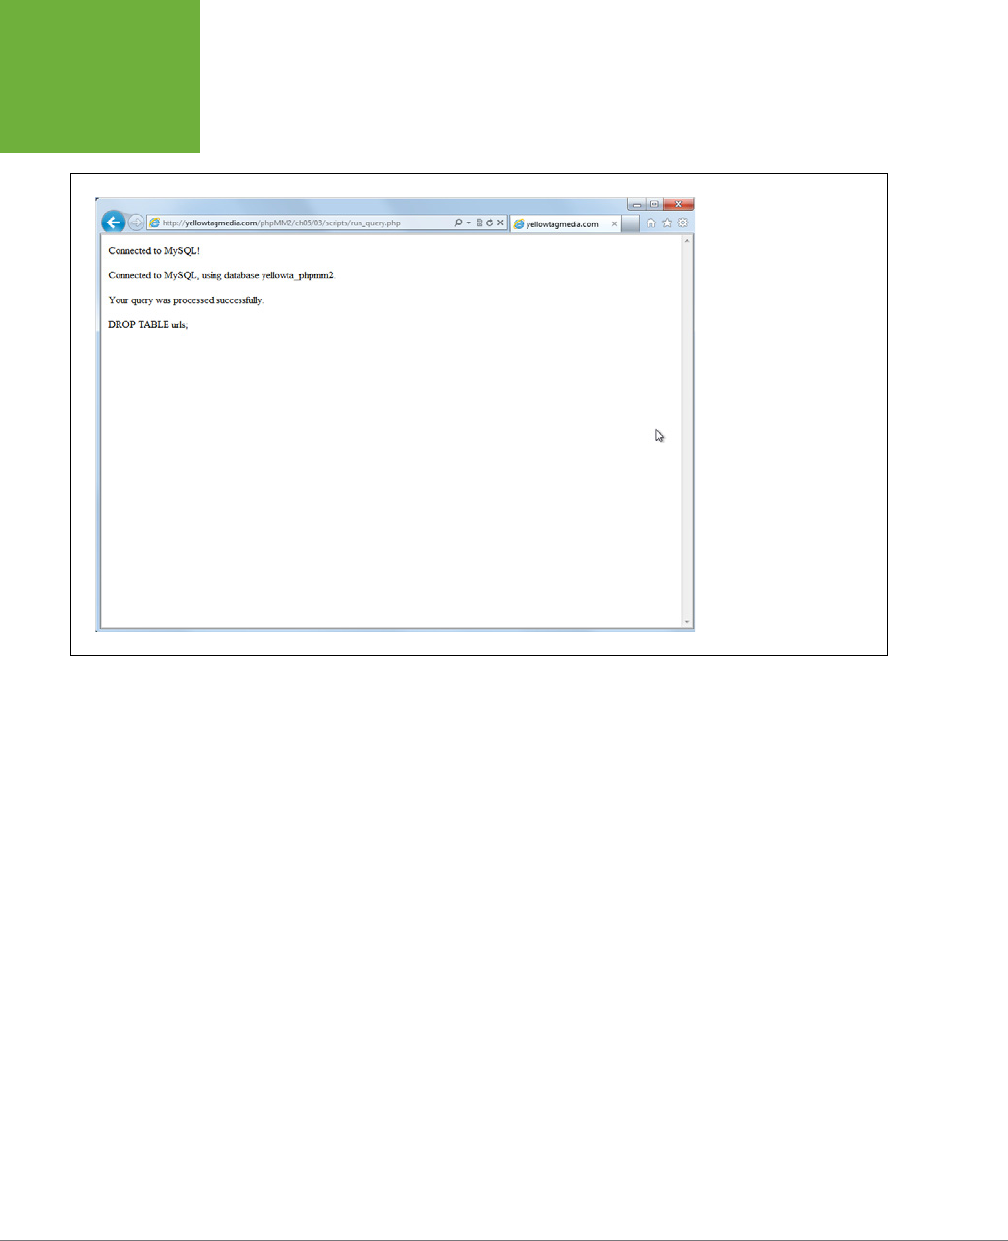
PHP & MYSQL: THE MISSING MANUAL
150
BUILDING
A BASIC
SQL QUERY
RUNNER
FIGURE 5-12
Now,
run_query.php
determines whether it’s
been passed a query with
one of the keywords that
indicates there aren’t any
return rows. The message
when things go well is still
a little terse, but at least
there’s no blank space
from trying to show result
rows when there aren’t
any result rows to show.
Dealing with Humans
Unfortunately, there’s still a problem in one of those lines. Right now, if your user
types the query DROP TABLE urls;, your set of if statements catches that DROP
is part of the query, realizes it has no return rows, and does the right thing: reports
that the query either ran without problems or that an error occurred.
But what about this query?
drop table urls;
Do you see a problem? Here’s the if statement that should indicate a match:
$location = strpos($query_text, "DROP");
if ($location === false) {
// this should return true, and so there are no return rows
}
But that line searches for “DROP”, which will not match “drop” at all. strpos searches
for strings, but it sees a lowercase letter, like “d,” as a dierent letter than an up-
percase “D.” Thus, that search will find “DROP” but not “drop” or “dRoP.”

CHAPTER 5: CONNECTING PHP TO MYSQL 151
BUILDING
A BASIC
SQL QUERY
RUNNER
And, as always, it’s humans who are using your app, not robots. You can’t simply
assume that those humans will be good SQL citizens and always use capital letters.
You could even put a little message on the form:
Please type your SQL in all capital
letters.
But, humans will be humans, and they tend to ignore instructions like that.
In fact, you’ll spend
at least
as much of your time dealing with the human factor in
your code as writing code that handles the normal flow of operation. In fact, once
you add real people to your line of thinking, you’ll realize that “normal” isn’t a useful
term. Instead, your code simply has to deal with what’s
possible
.
So, how do you fix the issue of lowercase and uppercase? It turns out to be fairly
simple: you convert $query_string to all CAPITAL letters before starting to search
through it:
$return_rows = false;
$query_text = strtoupper($query_text);
$location = strpos($query_text, "CREATE");
// All the nested if blocks.
Now, if a user enters “drop table urls” or “DROP table UrLS,” the search string be-
comes “DROP TABLE URLS,” and searching for “DROP” will return a match.
But there’s another problem! Do you see what it is?
NOTE Yes, there really are this many wrinkles and problems with just a single simple program. That’s why
there are lots of programmers, but so few really great programmers: the difference is handling all these little
details without throwing your iPhone through a nearby wall.
Avoid Changing User Input Whenever Possible
This one is a bit trickier, and it really is a potential problem, as opposed to something
creates havoc right now. Here’s the last bit of your code that’s run if the user enters
a rowless query like DROP or INSERT:
// No rows. Just report if the query ran or not
echo "<p>Your query was processed successfully.</p>"
echo "<p>{$query_text}</p>";
To see this in action, again, load
queryRunner.html
and then enter DROP TABLE urls;
again. You’ll get something like Figure 5-13.
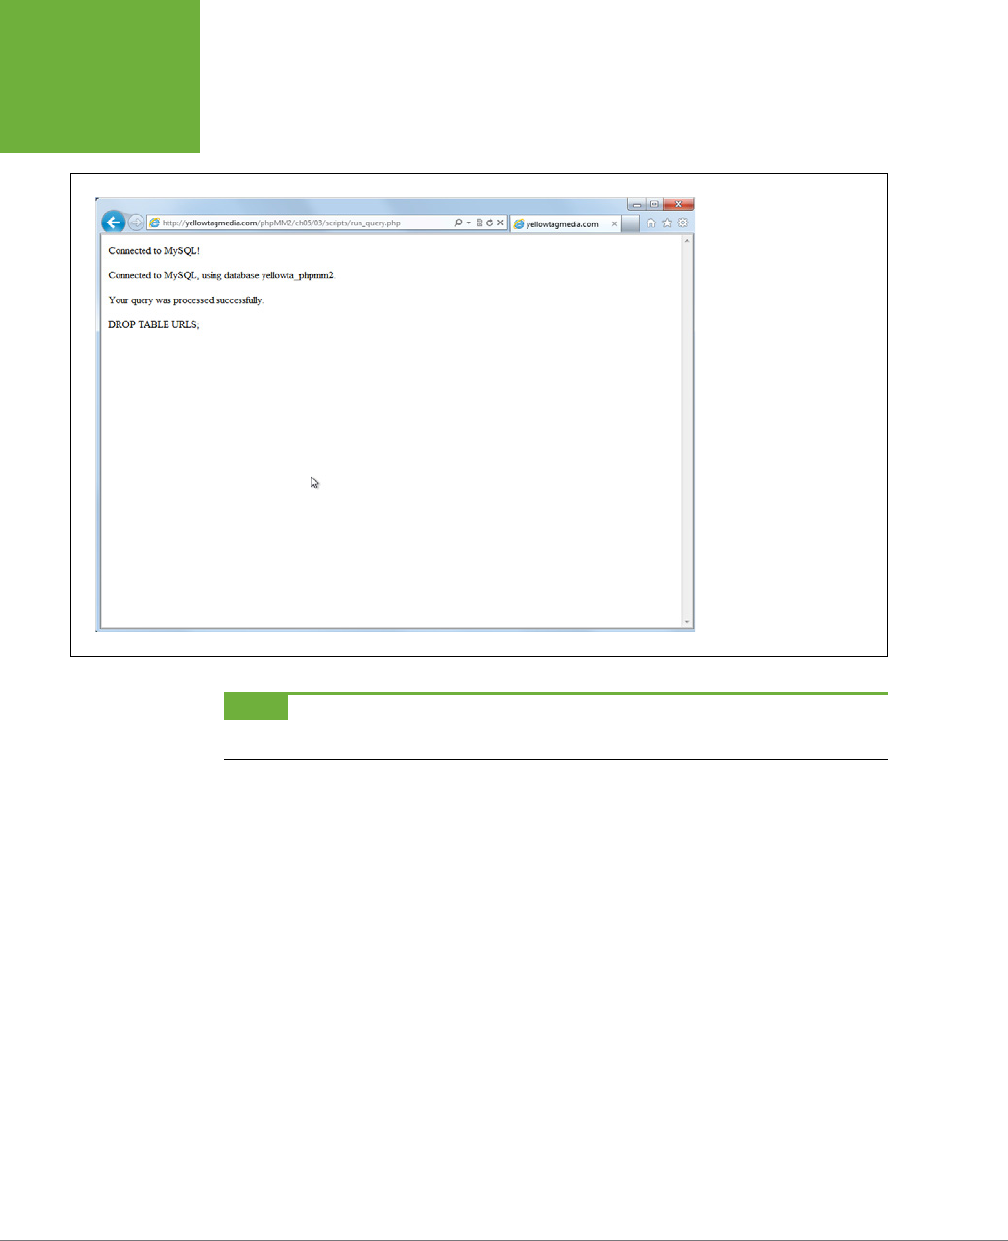
PHP & MYSQL: THE MISSING MANUAL
152
BUILDING
A BASIC
SQL QUERY
RUNNER
FIGURE 5-13
Sometimes, the best
problem you can solve is
the problem that hasn’t
yet occurred. Look closely
at the SQL query here and
compare it to the query
in Figure 5-12. The code
on page 151 processed
the query successfully (it
deleted the
urls
table),
but it also changed the
original capitalization of
your user’s query, which
is not always what you
want to do.
NOTE If you’re following along, you might need to CREATE the
urls
table before you can DROP it. You can
flip back to Figure 5-9 for that SQL if you don’t recall it off the top of your head.
What’s the big deal? Look closely, and then flip back to Figure 5-12. Do you see
the problem? In the latter version, in Figure 5-13, everything is in uppercase. That
makes sense, because to make searching easier, you added this line to your script:
$query_text = strtoupper($query_text);
Then, when you output $query_text at the end, the output is shown in all uppercase
letters. Is this a big deal? Well, it doesn’t seem to be, at least not here. However, it
does reveal something: after that $query_text string is converted to uppercase, any
time it’s used, it’s coming back with all uppercase letters.
Suppose that the original query was something like this:
SELECT *
FROM users
WHERE last_name = "MacLachlan";

CHAPTER 5: CONNECTING PHP TO MYSQL 153
BUILDING
A BASIC
SQL QUERY
RUNNER
Now, consider this same query, converted to all uppercase letters:
SELECT *
FROM USERS
WHERE LAST_NAME = "MACLACHLAN";
Believe it or not, these are
not
the same query. SELECT—and most of the other SQL
queries—are going to treat a last name of “MacLachlan” as totally dierent than
“MACLACHLAN”. As a result, those two queries are not identical at all.
Right at this juncture, this doesn’t create any trouble. Your script never reruns the
query, and mysql_query runs with $query_text before its turned into its uppercase
version. But, this is a problem waiting to happen.
In general, you want to try and avoid directly changing input from a user to steer
clear of exactly this sort of problem: you might need to use that input again, and
once you’ve changed it, you can’t go back.
Luckily, this is a really easy fix: you just don’t change the user’s input. Instead, you
use a new variable to store the uppercase version of the query:
$return_rows = false;
$uppercase_query_text = strtoupper($query_text);
$location = strpos($query_text, "CREATE");
Now, you should use this new variable in all your string comparisons:
$return_rows = false;
$uppercase_query_text = strtoupper($query_text);
$location = strpos($uppercase_query_text, "CREATE");
if ($location === false) {
$location = strpos($uppercase_query_text, "INSERT");
if ($location === false) {
$location = strpos($uppercase_query_text, "UPDATE");
if ($location === false) {
$location = strpos($uppercase_query_text, "DELETE");
if ($location === false) {
$location = strpos($uppercase_query_text, "DROP");
if ($location === false) {
// If we got here, it's not a CREATE, INSERT, UPDATE,
// DELETE, or DROP query. It should return rows.
$return_rows = true;
}
}
}
}
}
As small a change as that is, it protects you in case you ever need to use that query
string again.

PHP & MYSQL: THE MISSING MANUAL
154
BUILDING
A BASIC
SQL QUERY
RUNNER
And just like that, you’ve got a tool that will execute any SQL query you throw at it.
But there’s work still to do. All that search code clutters up your script, and there’s
just no getting around it: your script is pretty hard to understand at first glance (and
even at second glance). In the next chapter, you’ll tackle all of this, transforming your
handy little form to a really nice exercise of your PHP muscle.
POWER USERS’ CLINIC
Get Specific with Position and Whitespace Trimming
You’re definitely making
run_query.php
a lot better, but there
are still problems. Suppose that someone wrote SQL like this:
SELECT *
FROM registrar_activities
WHERE name = 'Update GPA'
OR name = 'Drop a class'
This is a SELECT statement, so
run_query.php
should run the
SQL and print out all the rows returned from this query. But
there’s a nasty little problem, isn’t there?
Yup. Your code that searches for “update” and “drop” will
report that this query has both words in it, and simply return
“Your SQL was run without any problems.” But that
is
a
problem!
What can you do? Well, think about the structure of SQL. Those
special keywords—CREATE, INSERT, and their friends—all are
the
first
word in the query. Thus, you’d need to get the posi-
tion of the match and check whether that position is position
0. You can do that by adding to your
if
conditions and using
the logical or
||
operator in PHP:
if ($location === false || $location > 0)
{
The double-pipe (
||
) means “or” to PHP. So, this line says if
there’s no match at all (
$location === false
) or the
match isn’t starting at the first position (position 0), then
look for the next keyword. Of course, you’d have to change
all your
if
statements, which is even messier. Clearly, this is
an improvement, although it’s one that clutters up your code
even further.
Wait; it gets worse! You’re dealing with real humans, and
humans do funny things. Suppose that someone enters this
SQL into your form:
CREATE TABLE urls (id int, url var-
char(100),
description var-
char(100));
Here, you have a new problem: this isn’t a SELECT, but your
search code won’t find one of those special words at the
beginning. The first character is just a space: " ".
You can solve this problem, too, by using another familiar
function:
trim
.
trim
gets rid of whitespace, and if you do
that before you search, you should be in good shape:
$uppercase_query_text =
trim(strtoupper($query_text))
That probably seems like a ton of work for a really simple form
with one text area. But, when you’re working with user input,
this is exactly how you want to think: what would users do?
What might they type to screw things up, and can I help keep
them from seeing something weird or making a mistake? Think
like that, and you’re going to build better, more stable, more
enjoyable web applications.
And, as something to look forward to, you’re just about to
learn some handy techniques to make all this messy code a lot
simpler. So keep going, dealing with human-type input, and
know that your code is only going to get cleaner and simpler.

155
CHAPTER
6
In the example in the last chapter example—a web form that lets users run SQL
against a MySQL database—you did one of the most common things programmers
do. You wrote code that solves a problem, but it’s ugly, messy, and a little hard
to understand. Unfortunately, most programmers
leave
code in that state. That’s
something you want to avoid.
Bad code is like sloppy plumbing or a poorly constructed house frame. At some
point, things are going to go bad, and someone is going to have to fix problems.
And, if you’ve ever had an electrician tell you what he has to charge you because
the guy who did the work initially did it wrong
before
, you know how expensive it
is to fix someone else’s mistakes.
But here’s the thing: Even good code is going to fail at some point. Any time you
have a system that involves humans, at some point, someone will do something
unexpected, or maybe just something you never thought about dealing with when
you wrote your code. And that’s when
you’re
the electrician, trying to fix things
when the customer’s unhappy—but in this scenario, there’s nobody else to blame.
So, writing ugly code that works really isn’t an option. At the moment, the code in
run_query.php
right now is very ugly. It’s all those if statements that are trying
to figure out whether the user entered a CREATE or an UPDATE or an INSERT, or
maybe a SELECT...or who knows what else? What you really need is a way to search
the incoming query for all those keywords
all
at once
. And then there’s converting
text to uppercase, and dealing with whitespace, and making sure the SQL keyword
you want is at the beginning of the query.
Unfortunately, there’s no way to solve this problem elegantly by using strpos and
the string manipulation you’ve done so far. Fortunately, though, you have another
Regular Expressions
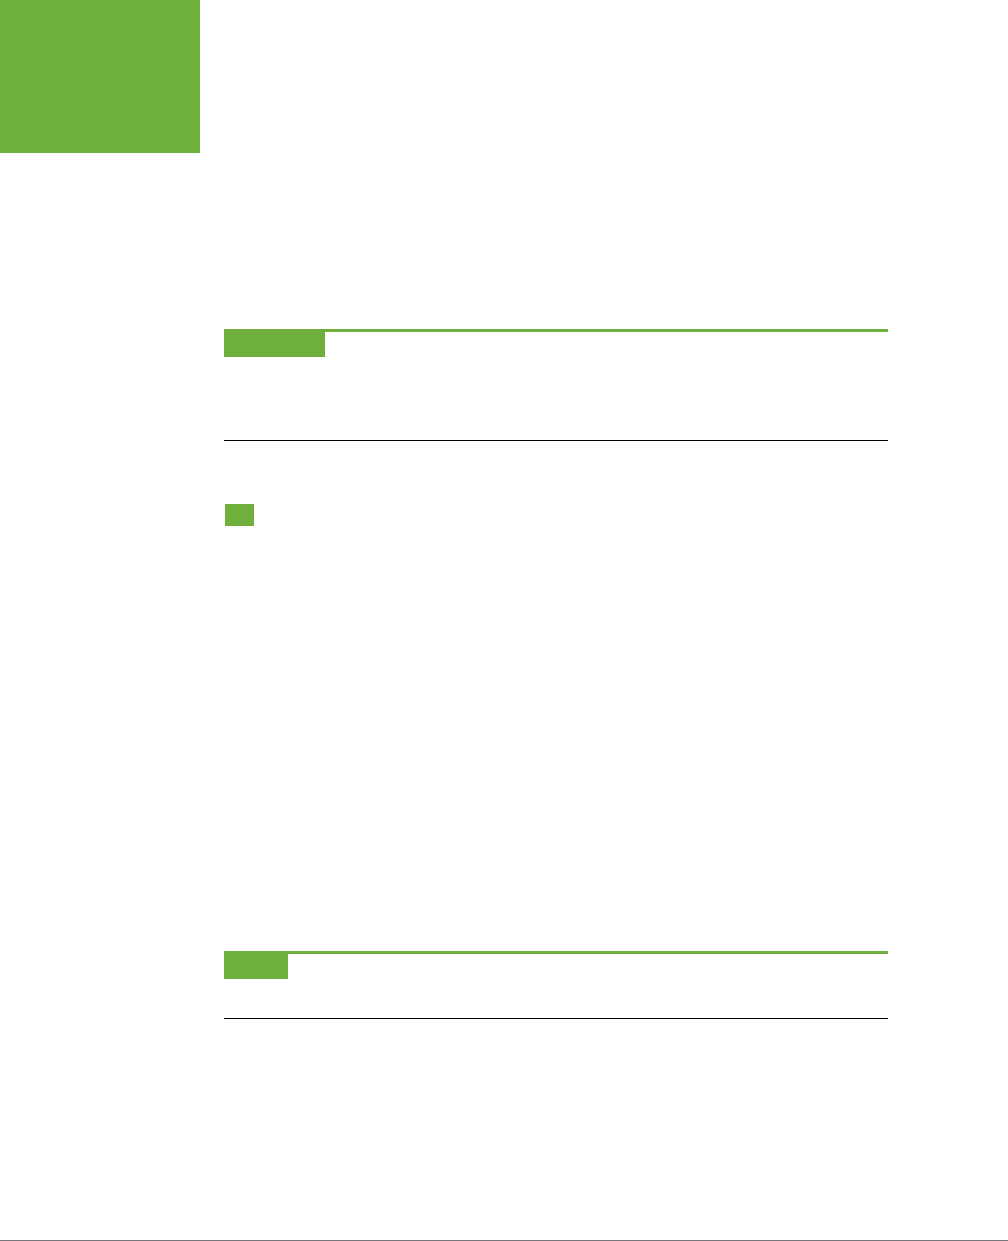
PHP & MYSQL: THE MISSING MANUAL
156
STRING
MATCHING,
DOUBLE-TIME
option:
regular expressions
. Regular expressions (also know in programmer-ese as
regexes
) are like a keg of gunpowder: extremely powerful, but perfectly capable
of blowing up your program and creating hours of frustration. That’s okay, though,
because you’re not running o to battle just yet.
Before you’re done with
run_query.php
, you’ll have learned how to use regular ex-
pressions, cut out all but one of those annoying if statements for searching through
$query_text, and made your program easier to troubleshoot when problems occur
down the line.
WARNING It’s pretty common knowledge that most people—and even most programmers—see regular
expressions in particular as a complicated, difficult programming art. That’s okay; you’re more than ready to tackle
them. Once you understand how they work, you’ll wonder why anyone wouldn’t want to use them all over the
place.
String Matching, Double-Time
So far, you’ve been using strpos to perform string searching, and you’ve been pass-
ing into that function your string and then some additional characters ora string
for which to look. The problem is that using strpos in this way limits you to a single
search string at a time; you can search for UPDATE and you can search for DROP,
but not at the same time.
Here’s where regular expressions come into the picture. A regular expression is just
what it sounds like: a regular sequence of characters or numbers or some other pat-
tern—an expression—for which you want to search. If you had a string like “abcde-
fghijklmnopqrstuvwxyz,” you could search for the pattern, or regular expression,
“abc”. It would show up once, of course, which isn’t very “regular.”
However, suppose that you had an entire web page, and you wanted to search for
links. You might use an expression like “<a” to find all the link elements. You might
find none, or one, or ten; with a regular expression, you can search for practically
anything you want. It does get a bit murky though, so the best place to start is at
the beginning.
NOTE You can find the finished example code for this section on this book’s Missing CD page at
www.
missingmanuals.com/cds/phpmysqlmm2e
.
A Simple String Searcher
Just about the simplest regular expression you can come up with is a single simple
letter, like “a” or “m”. Thus, the regular expression “a” will match any “a”. Simple, right?
In PHP, if you want to search by using regular expressions, you use the preg_match
function. Even though that sounds like something related to childbirth, it actually

CHAPTER 6: REGULAR EXPRESSIONS 157
STRING
MATCHING,
DOUBLE-TIME
stands for “p-reg,” as in “PHP regular (expressions).” However, no matter how you
say it (and what thoughts it conjures up), it’s used like this:
<?php
$string_to_search = "Martin OMC-28LJ";
$regex = "/OM/";
$num_matches = preg_match($regex, $string_to_search);
if ($num_matches > 0) {
echo "Found a match!";
} else {
echo "No match. Sorry.";
}
?>
WARNING Be sure that the first thing you give to
preg_match
is the regular expression,
not
the string
in which you want to search. This might seem backward compared to how you’ve been working, but you’ll soon
be using the
preg_match
and related functions so often, putting the search string first will feel odd.
Save that program as
regex.php
and run it from the command line. You should get
a result like this:
--(08:25 $)-> php regex.php
Found a match!
Admittedly, this isn’t very exciting. Before you can walk, though, you gotta crawl.
And part of crawling is understanding just how you write a regular expression.
First, regular expressions are just strings, so you wrap them in quotes. You’ll typi-
cally use double quotes (") rather than single quotes (') because PHP doesn’t do
as much helpful processing on single-quoted strings as double-quoted ones. (For
more advice on how to use quotes in PHP, see the box on page 158.)
Additionally, regular expressions begin and end with a forward slash. It’s everything
between those slashes that makes up the meat of the expression. For example,
"/OM/" is a regular expression that searches for OM.
More specifically, "/OM/" searches for exactly OM; it won’t match “om” or “Om” or
“OhM”. It has to be an uppercase O followed by an uppercase M. So far, this is just
like the string matching you’ve already done.
Of course, preg_match has some wrinkles, too. First, as you’ve seen, it takes a regu-
lar expression as the first argument, and then the string in which to search as the
second. Then, it returns the number of matches, rather than the position at which a
match was found. Here’s the first real wrinkle: preg_match will
never return anything
other than 0 or 1
. It returns 0 if there are no matches, and 1 upon the first match,
and then it simply stops searching.

PHP & MYSQL: THE MISSING MANUAL
158
STRING
MATCHING,
DOUBLE-TIME
If you want to find all the matches, you can use preg_match_all. Thus, preg_match("/
Mr/", "Mr. Mranity") will return 1, but preg_match_all("/Mr/", "Mr. Mranity")
will return 2.
UNDER THE HOOD
Which Quote Is the Best Quote?
Almost every programming language seemingly treats single-
quoted strings (‘My name is Bob’) and double-quoted strings
(“I am a carpenter.”) the same way. However, also in almost
every programming language, there’s a lot more going on
than you might realize, all based upon which quotation mark
you use.
In general, there is
less
processing performed on single-quoted
strings. But, what processing occurs in the first place? Take
the statement
I'm
going
to
the
bank.
If you put that in
a single-quoted string, you get ‘I’m going to the bank.’ But
PHP is going to bark at you, because the single-quote in I’m
looks like it’s ending the simple string
'I'
, and all the rest—
m
going
to
the
bank
—must just be something else. Of course,
that’s not what you mean, so you do one of two things: you
either switch to double quotes and move on, or you
escape
the single quote.
Escaping a character is when you instruct the programming
language to
not treat this as part of the language; it’s just
part of my string
. Typically, you escape characters by typing a
backslash (
\
) in front of the potentially problematic character.
In the string
I'm
going
to
the
bank.
, you’d write it in
single quotes like this:
'I\'m
going
to
the
bank.'
That
backslash directs PHP to ignore both the backslash and the
character that follows it.
Now, what if you want to actually write a backslash? Suppose
you’re writing a program for your great-great-great granddad,
the one that still runs DOS on his PC/AT? You might want to say,
'Never,
ever,
ever
type
\'del
C:\*.*\'
and
hit
Return!'
Well, you handled the single-quotes handily, but
now PHP is trying to escape the character following that in-
string backslash:
\*
. That just confuses PHP.
*
isn’t a special
character, so what is going on? Well, in this case, you need
to escape the backslash itself. To do that, you just put in the
escape character—the backslash—and then the character to be
escaped; in this case, another backslash. The result is
'Never,
ever,
ever
type
in
\'del C:\\*.*\'
So, what does all this have to do with single and double-
quotes? Well, other than the single quote (
'
) and the backslash
(
\
), PHP doesn’t do any other processing to your single-quoted
strings. But there are lots of other things you might need
processing for: a new line (
\n
), a tab (
\t
), or that slick way
of inserting variables right into a string with
{$variable}
or just using
$variable
.
With a single-quoted string, you get very little. With a double-
quoted string, you get all the extra processing. As a result, most
programmers tend to use double quotes. That way, they don’t
have to stop to think, “Now do I need extra processing on this
string? Or can I use single quotes?”
One last note: in 99 percent of the applications you write, the
type of quotes you use doesn’t matter. The processing involved
in handling those extra escape characters and variables isn’t
going to frustrate your customers or send server hard drives
or RAM chips into a frenzy. You can happily use double-quoted
strings all the time, and you’ll probably never notice any
issues at all.
NOTE There are also several additional things you can pass into—and get out of—
preg_match
and
preg_match_all
. You can find out about all of this online at
php.net/manual/en/function.preg-match.php
.
For now, though, just get comfortable with regular expressions.

CHAPTER 6: REGULAR EXPRESSIONS 159
STRING
MATCHING,
DOUBLE-TIME
Search for One String...Or Another
So far, there’s not a lot that preg_match seems to oer that you don’t already have
with strpos. But there’s a lot more that you can do, and one of the coolest is search-
ing for one string
or
another. To do this, you use a special character called the
pipe
.
The pipe looks like a vertical line: |. It’s usually above the backslash character, over
on the right side of your keyboard.
Anytime you want to search for one string or another, you put those two strings
together surrounded by parentheses, separated by the pipe, as shown here:
/(Mr|Dr)\. Smith/
First, though, notice the wrinkle: the backslash (\). This is escaping the period, be-
cause that period usually means in a regular expression, “match any single character.”
But in this case, you want to match an actual period. So, \. will match a period, and
nothing but a period.
NOTE You can read more about back slashes and the escape character in the box on page 158.
/Mr\. Smith/ matches “Mr. Smith” but will skip right over “Dr. Smith.” However,
/(Mr|Dr)\. Smith/ matches either “Mr. Smith” or “Dr. Smith.”
That means that this little code snippet would find a match in both cases:
// This will match
echo "Matches: " . preg_match("/(Mr|Dr)\. Smith/", "Mr. Smith");
// So will this
echo "Matches: " . preg_match("/(Mr|Dr)\. Smith/", "Dr. Smith");
With this new wrinkle, you should be able to make some pretty massive changes to
run_query.php
from the last chapter. Open that file and take a look. As a reminder,
here’s the old version:
<?php
require '../../scripts/database_connection.php';
$query_text = $_REQUEST['query'];
$result = mysql_query($query_text);
if (!$result) {
die("<p>Error in executing the SQL query " . $query_text . ": " .
mysql_error() . "</p>");
}
$return_rows = false;
$uppercase_query_text = strtoupper($query_text);
$location = strpos($uppercase_query_text, "CREATE");
if ($location === false) {

PHP & MYSQL: THE MISSING MANUAL
160
STRING
MATCHING,
DOUBLE-TIME
$location = strpos($uppercase_query_text, "INSERT");
if ($location === false) {
$location = strpos($uppercase_query_text, "UPDATE");
if ($location === false) {
$location = strpos($uppercase_query_text, "DELETE");
if ($location === false) {
$location = strpos($uppercase_query_text, "DROP");
if ($location === false) {
// If we got here, it's not a CREATE, INSERT, UPDATE,
// DELETE, or DROP query. It should return rows.
$return_rows = true;
}
}
}
}
}
if ($return_rows) {
// We have rows to show from the query
echo "<p>Results from your query:</p>";
echo "<ul>";
while ($row = mysql_fetch_row($result)) {
echo "<li>{$row[0]}</li>";
}
echo "</ul>";
} else {
// No rows. Just report if the query ran or not
echo "<p>Your query was processed successfully.</p>";
echo "<p>{$query_text}</p>";
}
?>
It’s all that if stu that really is messy. But with regular expressions, you can make
some pretty spectacular changes:
<?php
// require and database connection code
$return_rows = true;
if (preg_match("/(CREATE|INSERT|UPDATE|DELETE|DROP)/",
strtoupper($query_text))) {
$return_rows = false;
}
if ($return_rows) {
// display code
}
?>

CHAPTER 6: REGULAR EXPRESSIONS 161
STRING
MATCHING,
DOUBLE-TIME
NOTE You might want to save this version as another file, or in another directory, so you can always see what
you started with. In the book’s examples, you’ll find the original version of
run_query.php
in the example
scripts/
directory as
run_query.orig.php
, and this new version in the example
scripts/
directory as simply
run_query.php
.
Take a close look here, especially at the fairly long condition for the if statement.
Here’s the breakdown of what’s going on:
1. You start by setting $return_rows to true, instead of false.
This is because your regular expression search is determining whether you have
return rows. This is easier to read than the older version, in which you’re con-
stantly doing a comparison, and then if there’s
not
a match, setting $return_rows
to true.
2. Then, the if condition: it begins with preg_match.
There’s no need to use preg_match_all, because you only care if the search
strings are found at all, not if they’re found more than once.
3. The regular expression is actually pretty simple: it’s each keyword for a SQL
statement that doesn’t return any rows, all separated by that pipe symbol.
So, it’s basically an expression for matching a string that contains CREATE
or
INSERT
or
UPDATE
or
DELETE
or
DROP.
4. This expression is evaluated against the uppercase version of $query_text.
Not only do you not change the value of $query_text, but you don’t even really
need to save the uppercase version. If you need an uppercase version again
later, you can call strtoupper again.
5. You know that preg_match returns 0 if there’s no match, and PHP sees 0 as
false. preg_match returns 1 if there’s a match, which PHP sees as true. There-
fore, you can drop the whole preg_match in as your if statement’s condition
and know that if there’s a match, the if statement code will run; if there’s not
a match, it won’t.
6. Inside the if, $return_rows is set to false, because a match means this is a
query that doesn’t have return rows.
Not only is this code easier to read and makes more sense to a human brain, but
you cut 20 lines of code down to 4.
WARNING It’s not
always
good to have less lines of code. Sometimes you can sacrifice readability and
clarity to save a few lines, and that’s not helpful. But, if you can condense four or five conditions into one or two,
that usually
is
a good thing.
Getting into Position
One of the problems with even this streamlined version of
run_query.php
is that
it looks for a match anywhere within the input query. If you read the box about

PHP & MYSQL: THE MISSING MANUAL
162
STRING
MATCHING,
DOUBLE-TIME
whitespace trimming on page 154, you know there are still problems. You need to
trim your user’s query string, which is pretty simple:
if (preg_match("/(CREATE|INSERT|UPDATE|DELETE|DROP)/",
trim(strtoupper($query_text)))) {
$return_rows = false;
}
But there’s another, trickier problem: you really only want to search for those special
keywords at the beginning of the query string. That prevents a query like the fol-
lowing from being mistaken as an UPDATE or DROP query:
SELECT *
FROM registrar_activities
WHERE name = 'Update GPA'
OR name = 'Drop a class'
This query, a SELECT, returns rows, but if it’s interpreted as an UPDATE or DROP,
your script will not show return rows.
It took some additional if conditions to get this to work before, but that was be-
fore you were taking over the world one regular expression at a time. With regular
expressions, it’s easy to tell PHP, “I want this expression, but only at the
beginning
of the search string.”
To accomplish this feat of wizardry, just add the carat (^) to the beginning of your
search string, which basically says, “at the beginning.”
// Matches
echo "Matches: " . preg_match("/^(Mr|Dr). Smith/",
"Dr. Smith") . "\n";
// Does NOT match
echo "Matches: " . preg_match("/^(Mr|Dr). Smith/",
" Dr. Smith") . "\n";
Looking back in the first case, /^(Mr|Dr). Smith/ matches “Dr. Smith” because
the string begins with “Dr. Smith” (“Mr. Smith” would be okay, too). But the second
string does not match, because the ^ rejects the leading spaces.
Taking this back to your query runner, you’d do something like this:
if (preg_match("/^(CREATE|INSERT|UPDATE|DELETE|DROP)/",
trim(strtoupper($query_text)))) {
$return_rows = false;
}
That one little carat character makes all the dierence. You can do the same thing
at the end of the search string by using the $ character, as demonstrated here:
// Does NOT match
echo "Matches: " . preg_match("/^(Mr|Dr). Smith$/",
"Dr. Smith ") . "\n";

CHAPTER 6: REGULAR EXPRESSIONS 163
STRING
MATCHING,
DOUBLE-TIME
// Matches
echo "Matches: " . preg_match("/^(Mr|Dr). Smith$/",
"Dr. Smith") . "\n";
WARNING Ensure that your
^
and
$
are inside the opening
/
and closing
/
. If you were to put, for example,
/^(Mr|Dr). Smith/$
, PHP would complain about that last
$
, alerting you that
$
is an unknown modifier.
This is an easy error to make, and it can be pretty frustrating to track down.
In the first case, there’s no match because the regular expression, which uses $,
doesn’t allow for the trailing spaces in “Dr. Smith ”. The second check does match,
though, because there’s no leading space (which matches the ^(Mr|Dr) part) and
no trailing space (which matches the Smith$ part).
In fact, when you have a ^ at the beginning of your expression and a $ at the end,
you’re requiring an exact match not just within the search string but to the string
itself. It’s like you’re saying that the search string should equal the regular expres-
sion. Of course if you were doing a real equivalency in PHP (with == or ===), you
couldn’t have those nifty or statements with |, or any of the other cool things regular
expressions oer.
Ditch
trim
and
strtoupper
As long as you’re simplifying your code with some regular expression goodness,
try taking things further. Right now, you’re converting $query_text to all uppercase
characters by using strtoupper and then searching for “CREATE”, “INSERT”, and
the like within that uppercase version of the query.
But, regular expressions are happy to be case-insensitive, meaning that they don’t
care whether they match uppercase or lowercase versions of a word. Just add an
“i” to the end of your expression,
after
the closing forward slash:
// Matches
echo "Matches: " . preg_match("/^(MR|DR). sMiTH$/i",
"Dr. Smith") . "\n";
This expression produces a match, irrespective of the case of the expression and
the search string not matching. You can change your search in
run_query.php
to
take advantage of that fact:
$return_rows = true;
if (preg_match("/^(CREATE|INSERT|UPDATE|DELETE|DROP)/i",
trim($query_text))) {
$return_rows = false;
}
No more strtoupper, and a new “i” at the end of the expression. With this change,
the sort of query shown in Figure 6-1 will still happily be recognized as DROP, which
returns no result rows.
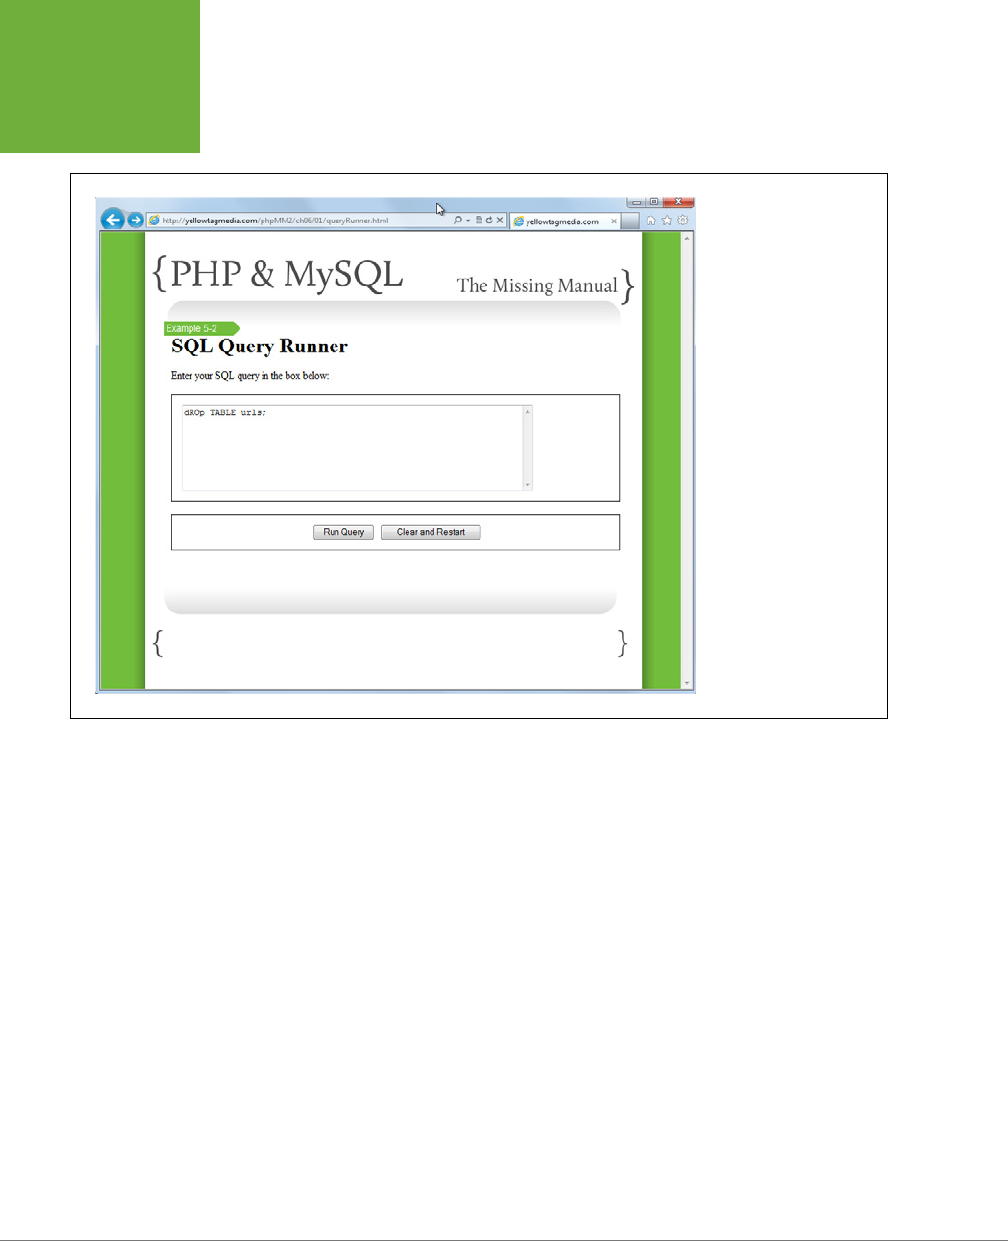
PHP & MYSQL: THE MISSING MANUAL
164
STRING
MATCHING,
DOUBLE-TIME
FIGURE 6-1
Even though you’re not
really adding functionality
with these regular expres-
sions, you’re definitely
improving your code.
You’re searching for what
you want in the original
$query_text
, instead
of changing
$query_
text
to work with your
search. That’s the way it
should be: Always search
an unchanged input string
whenever possible.
What about trimming whitespace? Well, you really don’t need to trim $query_string;
instead, in your regular expression, you just want to ignore leading spaces. At least,
that’s the result you want. In PHP, you have to think of it this way:
1. Begin by matching any number of spaces—including when there are no
spaces.
2. Then, after some indeterminate number of spaces, look for (CREATE|INSERT
|UPDATE|DELETE|DROP).
This means that while you’re ignoring those spaces in your particular situation—figur-
ing out whether the query is a CREATE, or UPDATE, or whatever—you’re really just
doing another type of matching.
Now, you know how to match a space: you just include it in your regular expres-
sion. For example, /^ Mr. Smith/ requires an opening space. “Mr. Smith” would not
match, but “ Mr. Smith” would.

CHAPTER 6: REGULAR EXPRESSIONS 165
STRING
MATCHING,
DOUBLE-TIME
WARNING Ebook readers beware: line breaks can occur in odd places. In the preceding example, be sure
to notice that the first “Mr. Smith” has no leading space, the second “ Mr. Smith” did have a space; and the regular
expression,
/^ Mr. Smith/
also had a space after the
^
.
But, that requires a space. How can you say that more than one space is okay? That’s
when you need + (plus) character. The + character says, “The thing that came just
before me can appear any number of times.”
// Matches
echo "Matches: " . preg_match("/^ (MR|DR). sMiTH$/i",
" Dr. Smith") . "\n";
// Does NOT match
echo "Matches: " . preg_match("/^ (MR|DR). sMiTH$/i",
" Dr. Smith") . "\n";
// Matches
echo "Matches: " . preg_match("/^ +(MR|DR). sMiTH$/i",
" Dr. Smith") . "\n";
The first and second expressions look for exactly one space, and so the first entry
matches, but the second—with multiple leading spaces—doesn’t. However, the third
expression accepts any number of spaces, so once again, it matches.
Wait, though, try this:
// Does NOT match
echo "Matches: " . preg_match("/^ +(MR|DR). sMiTH$/i",
"Dr. Smith") . "\n";
Uh oh! Apparently “any number of spaces” for + really means “any non-zero number
of spaces.” If you are okay with nothing
or
any number of characters, use *.
// Matches
echo "Matches: " . preg_match("/^ *(MR|DR). sMiTH$/i",
"Dr. Smith") . "\n";
Now you can look for spaces within your $query_text in
run_query.php
and avoid
touching the input string at all, even temporarily:
$return_rows = true;
if (preg_match("/^ *(CREATE|INSERT|UPDATE|DELETE|DROP)/i",
$query_text)) {
$return_rows = false;
}

PHP & MYSQL: THE MISSING MANUAL
166
STRING
MATCHING,
DOUBLE-TIME
FREQUENTLY ASKED QUESTION
Back to Square One?
If I’m ignoring all the leading spaces, isn’t that just the same as
$location = strpos($query_text,
"CREATE");
and all its if-based brethren?
It might seem like all this regular expression work has brought
you back to where you began: a search for CREATE or INSERT or
UPDATE anywhere within
$query_text
, but you’re worlds
away from all those
if
statements. First, to restate the obvi-
ous, you have a script that you should be happy to show any
of your programmer friends. You’ve used regular expressions,
and used them well, so you don’t have a shoebox of conditions
to sort through.
Second, your code is more sensible. It starts with the presump-
tion that you’ll return rows. Then, based on a condition, it might
change that presumption. This is natural human logic: start one
way, if something else is going on, go another way. That’s a lot
better than the sort of backward-logic of your earlier version
of
run_query.php
.
Most important, you’re still not searching anywhere within
$query_text
for those SQL keywords. You’re searching
anywhere within the string beginning with
the first non-space
character
. For example, the following query still comes across
as a SELECT and isn’t mistaken for a DROP:
SELECT *
FROM registrar_activities
WHERE name = 'Update GPA'
OR name = 'Drop a class'
And you did it without a lot of messy and obscure hard-to-read
code. (Well, it might be a little tricky for your friends still scared
off by regular expressions. But, now you can teach them what’s
up, and that’s a good thing, too.)
Searching for Sets of Characters
Now that you’ve taken care of leading spaces, you need to handle what your user
types regardless of case and extra line breaks, like the example in Figure 6-2. Not
only is there questionable use of the Shift key, there might also be leading spaces.
But even if there isn’t leading space, there’s something else here: a return. Your
clever, endearing users have done something you’d probably never think about:
They pressed Enter a few times before typing in their SQL.
Your regular expression might not handle the query in Figure 6-2 as a DROP, despite
you handling leading spaces and issues with capitalization. That’s because Enter
produces some special characters, usually either \n, or in some situations, \r\n, or,
just to keep things interesting, occasionally just \r.
NOTE These are all just varying flavors of new lines.
\n
is called the
line feed character
, and
\r
is called
a
carriage return
. In general, Windows uses
\r\n
, Unix and Linux use
\n
, and Macs (in particular, older, pre-OS
X Macs) use
\r
.
Fortunately, there aren’t nearly as many cross-system problems with these characters as there were just a few
years ago. You can pretty safely use
\n
to create a new line, but when you search, you need to account for all
the variations.
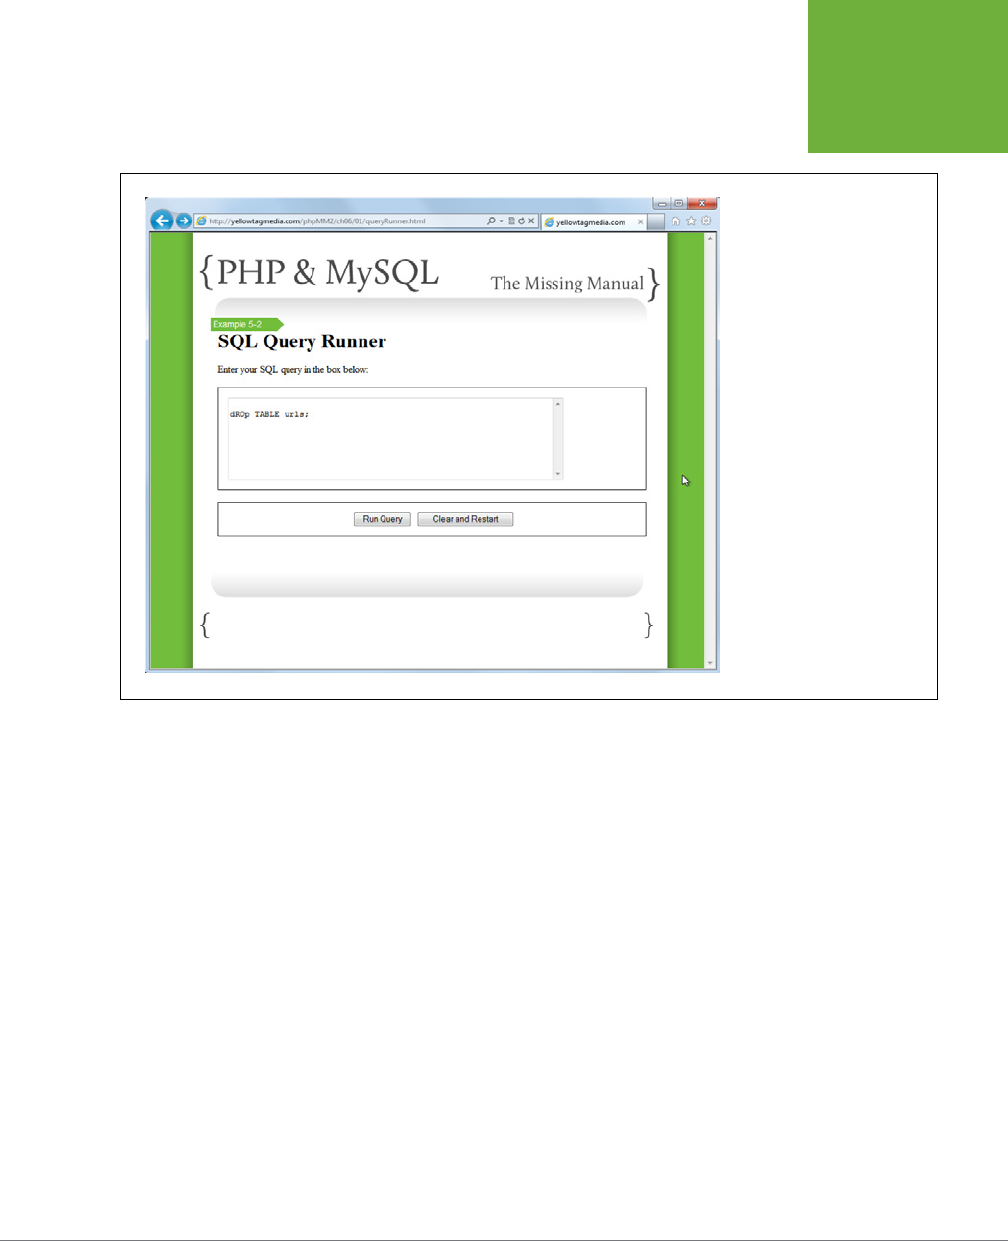
CHAPTER 6: REGULAR EXPRESSIONS 167
STRING
MATCHING,
DOUBLE-TIME
FIGURE 6-2
This innocent-looking query has
some lurking problems, at least
with your regular expression as
it currently stands. Can you see
what they are? There might be
leading spaces—you can’t tell
by looking at this screen image,
or even if you were looking at
an actual browser. There also
might be leading line breaks,
as with this case in which the
SQL starts below the top of the
text field.
So, what can you do? Well, it’s easy to account for multiple characters like this: the
regular expression \n* will match any number of new lines, and \r* will match any
number of carriage returns. But what about \r\n? \r*\n* would match that, but
what about spaces? You could do \r*\n* * and match Enter followed by spaces,
but if you start to think about spaces and then Enters and then more spaces...and
more Enters...(you get the idea).
Of course, the whole point of regular expressions is to get away from that sort of
thing. To do so, you search for
any
of a set of characters. That’s really what you
want: accept any number (including zero) of any of a set of characters, a \r, a \n, or
a space. You don’t care how many appear, or in what order, either.
You could do something like (\r|\n| )*, which is using the | to represent “or” again,
and then the * applies to the entire group. But when you’re dealing with just single
characters, you can skip the | and just put all the allowed characters into a set, which
is indicated by square brackets ([ and ]), as demonstrated here:
$return_rows = true;
if (preg_match("/^[ \t\r\n]*(CREATE|INSERT|UPDATE|DELETE|DROP)/i",
$query_text)) {
$return_rows = false;
}

PHP & MYSQL: THE MISSING MANUAL
168
STRING
MATCHING,
DOUBLE-TIME
This code handles spaces, the two flavors of new lines, and tosses in \t for tab
characters. No matter how many leading spaces, tabs, or new lines there are, your
regular expression is happy to handle them. In fact, this sort of whitespace matching
is so common that regular expressions can use \s as an abbreviation for [ \t\r\n].
And, you can simplify things even further:
$return_rows = true;
if (preg_match("/^\s*(CREATE|INSERT|UPDATE|DELETE|DROP)/i",
$query_text)) {
$return_rows = false;
}
Try this out. Enter the SQL shown back in Figure 6-2 and submit your query. You’ll
probably get something similar to Figure 6-3, which means you’re not done yet. The
problem here isn’t your regular expression. It’s really that you’re trying to pass into
mysql_query some queries that haven’t been screened much for problems—like all
those extra \r\ns at the beginning.
FIGURE 6-3
Just as you’re getting your
regular expression and
search code bulletproof,
there’s a new error to deal
with. This error occurs be-
fore your search ever runs.
But it definitely shows a
problem:
mysql_query
did not seem to like those
leading
\r\n
sequences.
In fact, there are
lots
of queries that will create problems for
run_query.php
, regard-
less of how clean your regular expression code is. Try entering this query:
SELECT *
FROM urls
WHERE description = 'home page'
That might seem simple enough, but it’s still going to break your script. It doesn’t
matter whether you have anything in the
urls
table; you’ll still get an error, as shown
in Figure 6-4.
CHAPTER 6: REGULAR EXPRESSIONS 169
STRING
MATCHING,
DOUBLE-TIME
FIGURE 6-4
Don’t be misled by this
error. You do not have an
error in your SQL; you have
some overly-simplistic
code in your script. No
worries, though, with
a good base of regular
expressions under your
belt, you’re ready to tackle
more robust PHP and
MySQL integration.
Frankly, you could spend weeks writing all the code required to handle every pos-
sible SQL query, make sure the right things are accepted and the wrong ones aren’t,
and to handle all the various types of queries.
But that’s not a good idea. Just taking in any old SQL query is, in fact, a
very
bad
idea. What’s a much better idea is to take a step back and think about what your
users really need. It’s probably not a blank form, and so in the next chapter, you’ll
give them what they need: a normal web form that just happens to talk to MySQL
on the back end.
Regular Expressions: To Infinity and Beyond
It’s not an over-exaggeration to say you’ve just barely scratched the surface of
regular expressions. Although you have a strong grasp of the basics—from matching
to ^ and $ and the various flavors of preg_match, from position and whitespace to +
and * and sets—there are more than a few trees that have sacrificed themselves to
produce all the paper out there with text on regular expressions.
But don’t be freaked out or daunted, and don’t think you have to stop working your
PHP and MySQL skills until you’ve mastered regular expressions. First, mastery is
elusive, and even the best regular expression programmers use Google to refresh
their memories on how to get just the right sequence of characters within their
slashes. Just be on the lookout for chances to use regular expressions. And, as you
get better at PHP, you’ll use them more often, and they’ll slowly become as familiar
to you as PHP, or HTML, or any of the other things you’ve been doing over and over.

PHP & MYSQL: THE MISSING MANUAL
170
STRING
MATCHING,
DOUBLE-TIME
POWER USERS’ CLINIC
Regular Expressions Aren’t Just for PHP
As you’re probably seeing, it does take some work to get
very far with regular expressions. There are lots of weird
characters both to find on your keyboard, and to work into
your expressions. Without a doubt, it doesn’t take long for a
regular expression to start to look like something QBert might
say: *SD)!!@8#.
But, the work rewards you in more ways than you might real-
ize. For instance, JavaScript has complete support for regular
expressions, too. Methods like
replace()
in JavaScript take
in regular expressions, as do the
match()
methods on strings.
So, everything you’ve learned in PHP translates over, perfectly.
You also get some nice benefits in HTML5. You can use regular
expressions in an HTML5 form to provide patterns against which
data is validated. Take heart; this work in PHP is helping you
out in almost every aspect of web programming.
In fact, there’s hardly a serious programming language that
doesn’t support regular expressions. If you decide to learn
Ruby and Ruby on Rails, you’ll be swimming in regular expres-
sions, and they’re also hugely helpful as you move into using
testing frameworks like Cucumber or Capybara or TestUnit.
If all that sounds intimidating, relax! You’ve got regular
expressions down, even before you’ve learned what lots of
these languages are.
The moral of this story? What you’re learning about SQL ap-
plies to more than MySQL, and what you’re learning about
regular expressions applies to more than PHP. Your skills are
growing; use them!
A Little Cleanup: Remove the
echo
Statements
Before moving on, there’s just one last thing you need to take care of. Right now,
your
database_connection.php
script should look like this:
<?php
require 'app_config.php';
mysql_connect(DATABASE_HOST, DATABASE_USERNAME, DATABASE_PASSWORD)
or die("<p>Error connecting to database: " .
mysql_error() . "</p>");
echo "<p>Connected to MySQL!</p>";
mysql_select_db(DATABASE_NAME)
or die("<p>Error selecting the database " .
DATABASE_NAME . mysql_error() . "</p>");
echo "<p>Connected to MySQL, using database " .
DATABASE_NAME . ".</p>";
?>

CHAPTER 6: REGULAR EXPRESSIONS 171
STRING
MATCHING,
DOUBLE-TIME
There’s nothing wrong here, and it’s quite informative with those echo statements.
But, in the next chapter and beyond, you’re going to start responding in your PHP
scripts by using HTML rather than plain old text. As you’ll soon see, your PHP will
usually
send back HTML when its called and interpreted.
Now, when your scripts respond with HTML, and they require or include
data-
base_connection.php
, you really don’t want those echo statements. They’ll show
up before your script’s HTML, and generally look like either debugging information
or a programming error. So, go ahead and get rid of those. When you’re done,
database_connection.php
should look like this:
<?php
require 'app_config.php';
mysql_connect(DATABASE_HOST, DATABASE_USERNAME, DATABASE_PASSWORD)
or die("<p>Error connecting to database: " .
mysql_error() . "</p>");
mysql_select_db(DATABASE_NAME)
or die("<p>Error selecting the database " .
DATABASE_NAME . mysql_error() . "</p>");
?>
NOTE To keep things clear, the examples for this chapter use the older version of
database_connection.
php
, which has all the
echo
statements. That way, if you’re following along, your response will look like the
figures in this chapter.
Beginning in Chapter 7, though, these changes will be in
database_connection.php
, both within the chapter
and in the downloadable examples. You’ll need to make these changes in your own version so that your output
matches the book’s going forward.

173
CHAPTER
7
You’ve been building up quite a robust set of tools. You have PHP scripts to
receive requests from your HTML forms. You have MySQL to store information
from your users. You have regular expressions to massage information into
just the formats you need, and some basic flow controls in PHP like if and for to let
you build scripts that make decisions based on what information your users give you.
But, at the end of the day, your goal in learning PHP and MySQL was probably to
make dynamic and interesting web applications. Unfortunately, you’ve not done
much of that yet. You do have a few interesting forms, but even those are simple:
take in some information; print it back out; accept a SQL query (and do that quite
imperfectly). So, where are the web applications? Heck, where are the pages that
are built dynamically using your user’s information?
Thankfully, you have everything you need to start building these kinds of web pages.
You can get information from your users, store it in a database, and even do some
basic data manipulation. All you need to do now is put it all together and create
the basic web pages that most users expect: a place to enter their information, a
place to look at their information, and in most cases, a place to look at all the related
user’s information.
Generating Dynamic
Web Pages
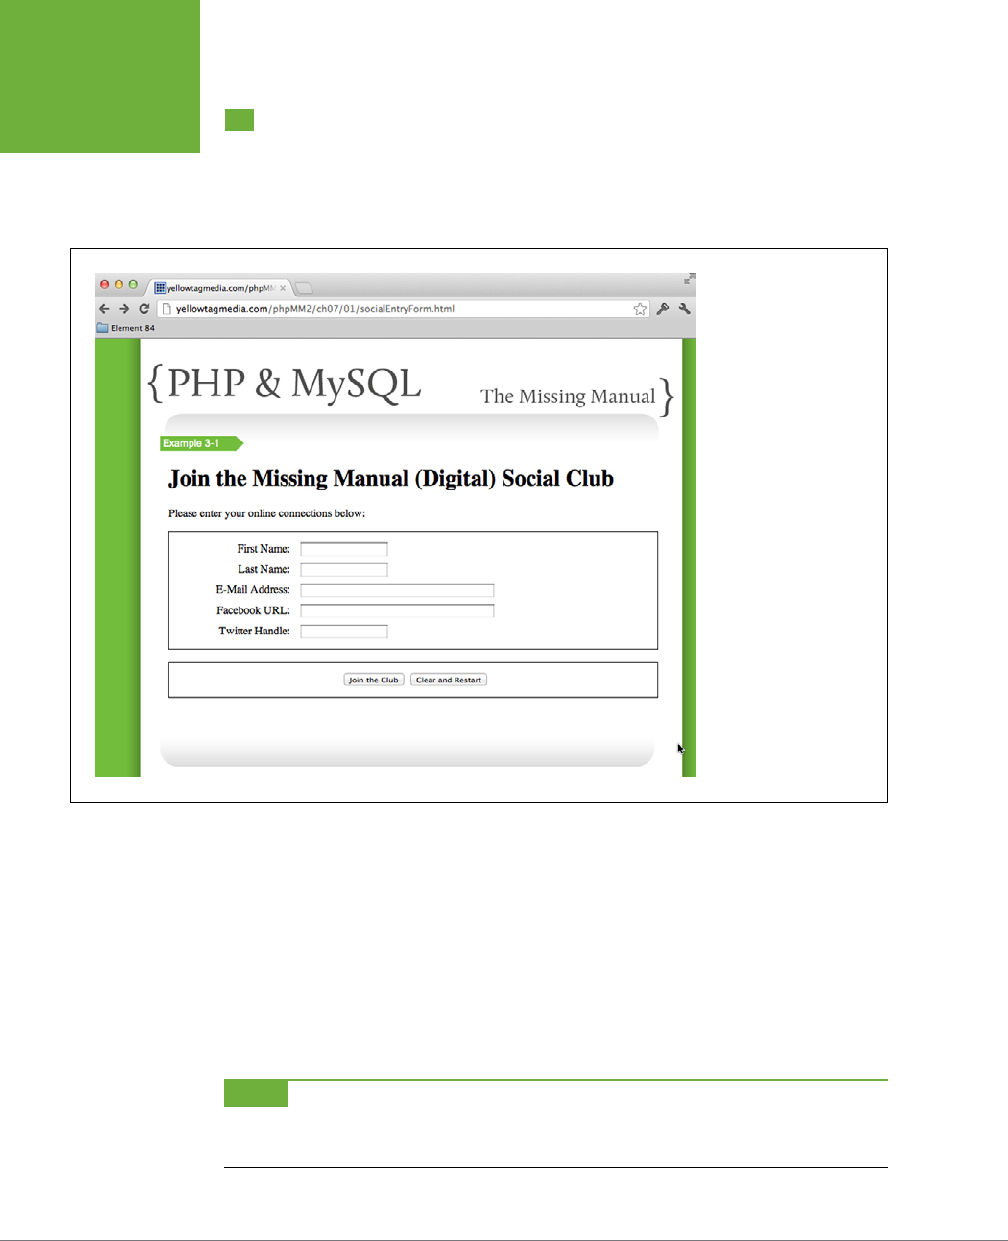
PHP & MYSQL: THE MISSING MANUAL
174
REVISITING
A USER’S
INFORMATION
Revisiting a User’s Information
In Chapter 3, on page 62, you built a form in which users can enter their basic social
media profile: a Twitter handle, a Facebook URL, and some basic contact information.
As shown in Figure 7-1, it’s a perfectly good form: simple and easy to use.
FIGURE 7-1
You can design forms
that interact and submit
to PHP scripts the same
way you create any other
web page: you use HTML
and CSS to create a clean,
easy-to-understand page.
Then, get users to visit
your page, fill out fields,
and click buttons. It’s the
behind-the-scenes work
that brings PHP and MySQL
into the picture.
There’s really no reason to change this form. However, the script that accepts its
information is pretty lame. It does nothing more than manipulate some text and
then send that text back (see Figure 7-2). It doesn’t even save the form’s informa-
tion for later use. That’s where the work is: making the script
do something
with
the user’s information.
Getting from a simple form on the Web to a script that interacts with a database
involves a surprising amount of work. You need to figure out, design, and create
tables, interact with those tables, potentially deal with errors from your database,
and so on.
NOTE If you haven’t done so already, copy the HTML web form (page 62) to the directory in which you’re
working. You can leave the file named as it is, but you might want to rename it as
create_user.html
. For reasons
you’ll see soon, this little change can really pay off as your site grows more complex.
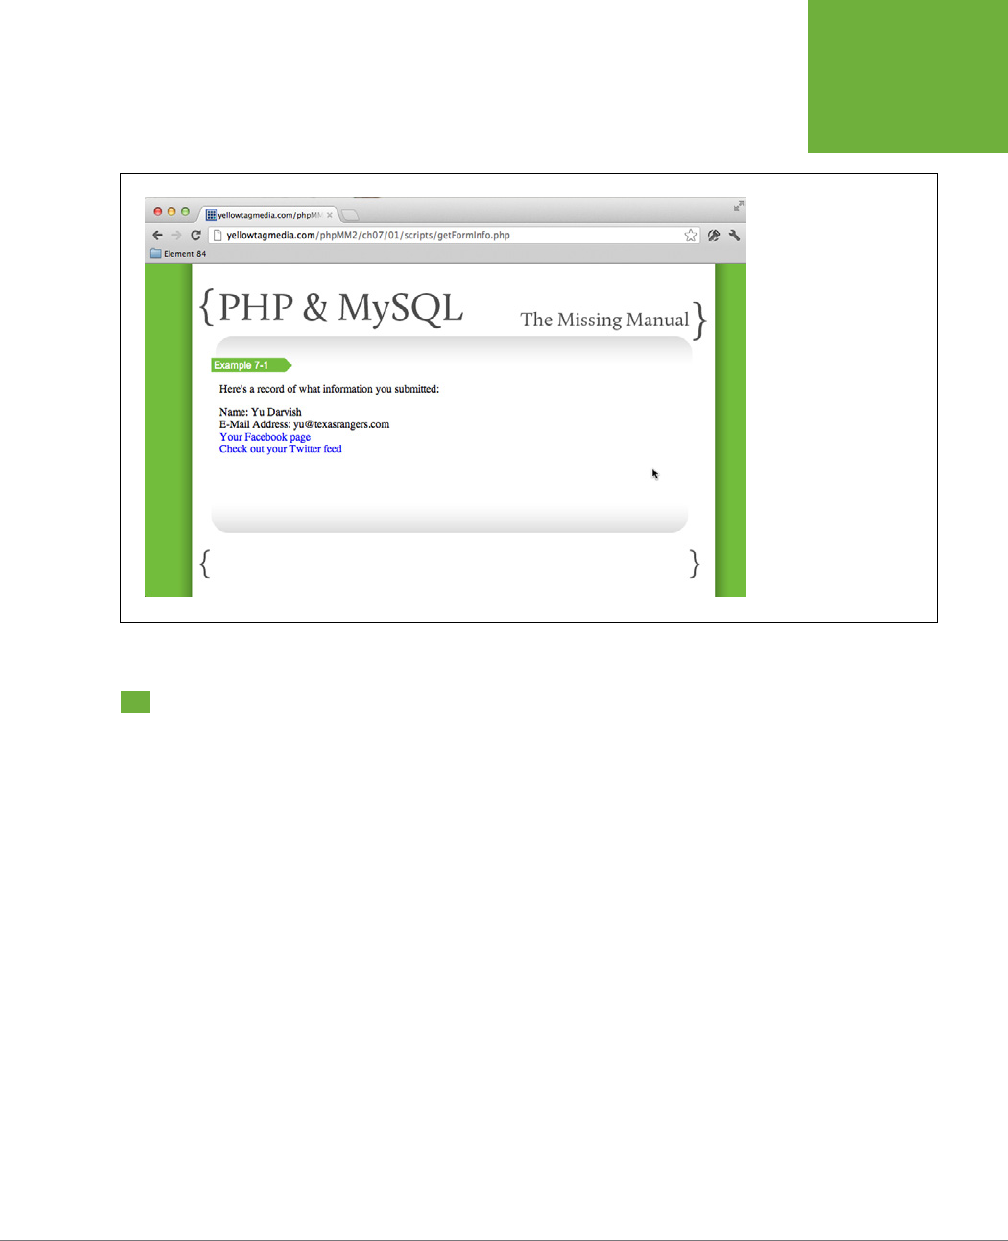
CHAPTER 7: GENERATING DYNAMIC WEB PAGES 175
PLANNING
YOUR
DATABASE
TABLES
FIGURE 7-2
This HTML is generated
by your old
getFormInfo.
php
script (page 64).
It’s uninspiring, and you
can do a lot better. Even
more frustrating, this
information is never stored
anywhere. Once your user
moves on, his information
is lost.
Planning Your Database Tables
Building web applications is a lot like working a tricky maze: Sometimes the hardest
part is figuring out where to start. Usually a web form needs a script to which it can
submit data. That script needs a table into which it can insert and store information.
But, where’s the table? In a MySQL database, you need to create or set up tables for
web access. Of course, the table itself needs structure. That's the way almost every
form of every application goes: What starts out as a page that users see often ends
up at a back-end structure that’s invisible to everyone but you, the programmer.
It’s always easiest to start with the information you want to store. You’ve actually
already done some of this when you created your entry form (look back at Figure
7-1). Here’s basically what you’re collecting from your users right now:
• First name
• Last name
• Email address
• Facebook URL
• Twitter handle
Each of these items are individual components that when combined describe a
single “entity”—a user. What you need, therefore, is a table to store users, and for
each user, you need to store a first name, last name, e-mail address, a Facebook
URL, and a Twitter handle.
PHP & MYSQL: THE MISSING MANUAL
176
PLANNING
YOUR
DATABASE
TABLES
All you need to do now is to translate this into a SQL CREATE statement:
CREATE TABLE users (
user_id int,
first_name varchar(20),
last_name varchar(30),
email varchar(50),
facebook_url varchar(100),
twitter_handle varchar(20)
);
WARNING You might not want to dive into your MySQL command-line tool or your web form and run this
command just yet. There are some important additions still to be made before it’s ready for prime time.
You might remember this SQL from Chapter 4, but that was ages ago, when you
had but a fragile understanding of databases. Now, you know exactly what is going
to be dropped into this table: information from the web form that you already have.
UP TO SPEED
One of These Things
Is
Like the Other
You’ll quickly find that when you start talking with database
people, there are a lot of interchangeable terms.
A table has rows, and each entry in that table is a row. But
you’ll also hear a row called an
entry
in the table as well as a
record
. These are really all the same thing, and even though
it might be technically better to say a table has rows rather
than entries or records, you can’t guarantee that people will
actually use those terms.
In the same vein, the
fields
in a table, like
first_name
or
last_name
, are also called
columns
. In those fields (or col-
umns), you have
values
, or information, or for the technically
stodgy,
data
. Lots of different terms, all with identical meaning.
Although you’ll have to identify all these different terms, you
can help matters a bit by not mixing and matching if you don’t
have to. Thus, a table that has rows usually has columns; a table
with records usually has fields. Rows and columns go together;
so do records and fields.
That said, even though you might want to try to be completely
consistent—always using rows instead of records, and columns
instead of fields—you’ll invariably find yourself using all these
same terms yourself.
Perhaps the best thing to remember here is that like any other
bit of language, context is king. It’s more important that you
know what’s an
int
and what’s not than to be sure you say
row instead of record. And, you need to not get mixed up on
a complete entry (see; there’s another term for record or row)
and the individual
parts
of that entry. Just remember that a
single entry, record, or row in the users table has multiple
fields, columns, or pieces of information. Get that right, and
you can solve the rest by listening carefully and asking the
occasional question to clarify.
Good Database Tables Have ID Columns
Take a look at the first column created for this table: the user_id field. What exactly
is that? Well, think about the most common thing you’ll do with databases. Is it cre-
ating new entries in the table? Probably not. Honestly, if you think about how often
you create a user ID or profile on the Web versus the number of times you log in to
a site, you log in many, many more times.

CHAPTER 7: GENERATING DYNAMIC WEB PAGES 177
PLANNING
YOUR
DATABASE
TABLES
In other words, you’re creating information once for every ten, or twenty, or maybe
one hundred times that you’re
accessing
that information. That’s a case where you’re
looking up information; you’re searching for a user (usually yourself).
Of course, that then begs the question: How do you search for something? You can
look things up by a last name and then find matching entries. Or, you can search by
an email address or Twitter handle, which are supposed to be unique for each user.
In fact, you’ve probably often had to create a user name that is unique (typically at
great pain; who really takes all those normal user names and leaves you stuck with
m97f-ss0
, anyhow?).
Databases are no dierent in that they need something for which to look. Moreover,
databases work best when they can identify every individual row in a table by a
unique piece of information. Putting it more accurately still, databases function better
with numbers than with text. The absolute preferred type of unique identifier—or
ID—for a row in a table is a unique number.
That, then, is what user_id is about. It’s a numerical value for each row that uniquely,
identifies that row. It identifies each user as separate from all others, so your data-
base can locate it, every time.
Auto Increment Is Your Friend
There’s a bit of a problem lurking in the SQL bushes here, though. If the point of the
user_id field is to provide a unique identifier for each user, whose job is it to keep
up with that unique ID? How do all the scripts (and there will be more than one or
two before you’re done with any large web application) ensure that no two users
are entered into the
users
table with the same user_id? Do you need yet another
table just to keep up with the current count of users?
This isn’t a trivial problem, because if you lose the ability to uniquely identify a user,
things can go south from there quickly. On the other hand, nobody wants to spend
hours writing number generators for every table or every web application.
The solution is not in your code, but in your database. Most databases, MySQL
included, give you the ability to use an attribute called AUTO_INCREMENT. You
specify this on a field in a table, and every time you add a row to that table, the
field automatically creates a new number, incremented from the last row that was
added to the table. For example, if one script adds a new user and MySQL sets the
user_id to 1029, and another script later adds a new user, MySQL increments the
previous number and assigns 1030 as the ID of the new user.
You can add this to your table CREATE statement like this:
CREATE TABLE users (
user_id int AUTO_INCREMENT,
first_name varchar(20),
last_name varchar(30),
email varchar(50),

PHP & MYSQL: THE MISSING MANUAL
178
PLANNING
YOUR
DATABASE
TABLES
facebook_url varchar(100),
twitter_handle varchar(20)
);
Much better. Now, you don’t have to worry about IDs. In fact, you don’t have to do
anything special to let MySQL know to fill in the user_id column. Every time you
add a new row, just trust that MySQL will also add a new value to user_id.
IDS AND PRIMARY KEYS ARE GOOD BEDFELLOWS
In addition to setting user_id to increment automatically, you’ve actually done
something else subtly in MySQL: you’ve basically defined user_id as the
primary
key
in the users table. The primary key is a database term for that special, unique
value assigned to a particular row in a table.
NOTE In some rather special cases, you might create a primary key out of multiple columns instead of just
one. That’s somewhat unusual, though, and it’s not covered in this book.
Primary keys are important because databases typically create an
index
using a
table’s primary key. An index is a database-level mechanism by which a database
can find rows based on that index quickly. With the user_id column indexed, you
can find a row with a user_id of 2048 much faster than looking for a row with that
same user_id, but on a table where user_id is
not
indexed.
Basically, an indexed field is like having a highly organized set of values. An unindexed
field can still be searched, but in that case your database has to go through each
value, one by one, until it finds the exact value for which you’re searching. It’s the
dierence between looking for a book in a well-organized library and looking for
one in your great-great-grandfather’s deserted attic.
When you instruct MySQL to automatically increment user_id, you identify that
field as special. In fact, MySQL won’t let you set more than one field to AUTO_
INCREMENT, because it assumes that you put that on a field to use as a primary key.
There’s just a little hitch, though: you have to instruct MySQL that you want user_id
to be the primary key, by including the following:
CREATE TABLE users (
user_id int AUTO_INCREMENT PRIMARY KEY,
first_name varchar(20),
last_name varchar(30),
email varchar(50),
facebook_url varchar(100),
twitter_handle varchar(20)
);
This makes explicit what is implicit with AUTO_INCREMENT: user_id uniquely
identifies each user entry in your table. In fact, if you don’t do this, MySQL gives
you an error. As an example, suppose that you have the following SQL, without the
PRIMARY KEY keyword:
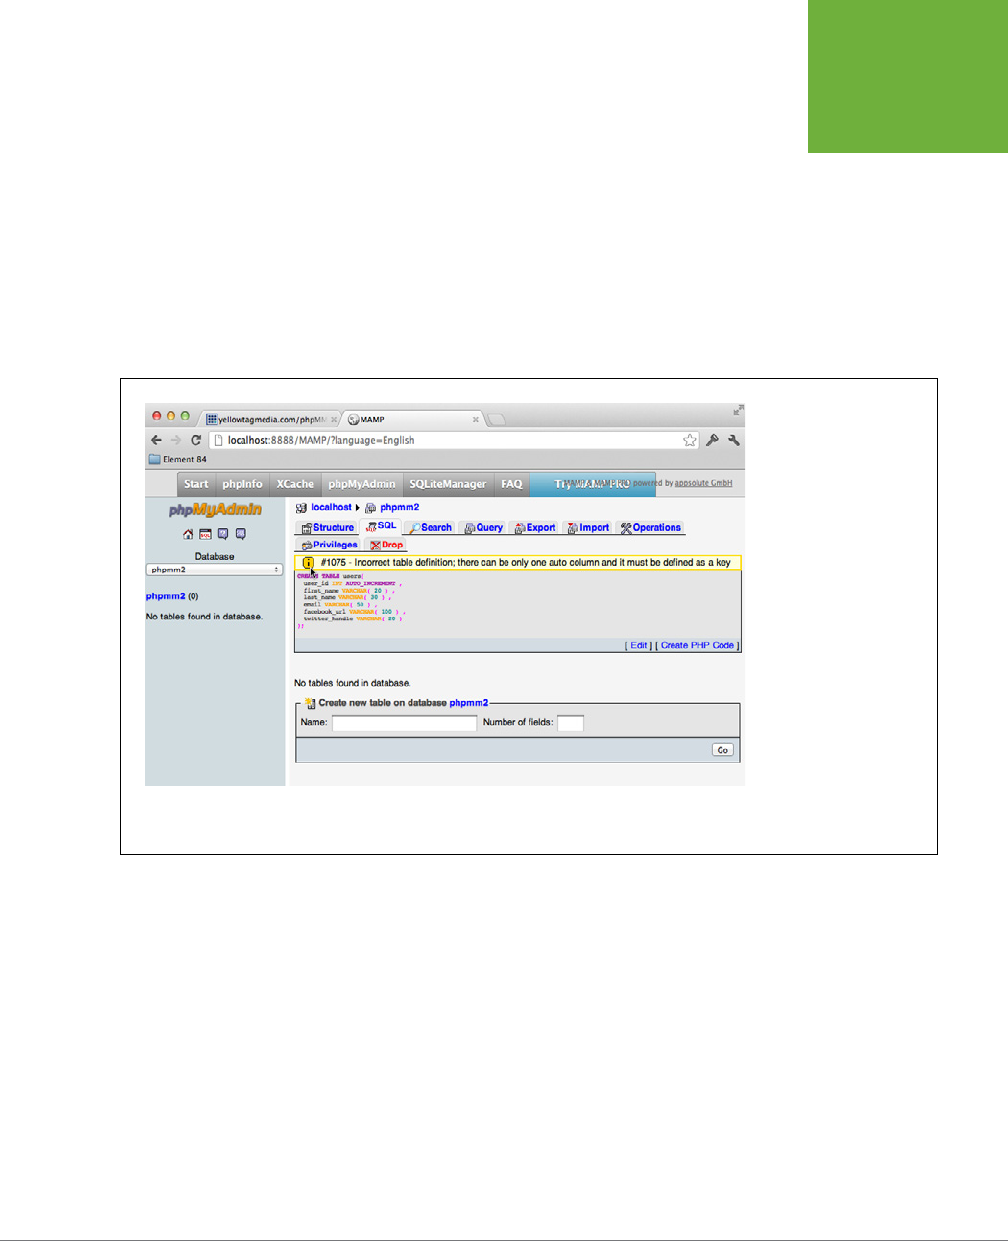
CHAPTER 7: GENERATING DYNAMIC WEB PAGES 179
PLANNING
YOUR
DATABASE
TABLES
CREATE TABLE users (
user_id int AUTO_INCREMENT,
first_name varchar(20),
last_name varchar(30),
email varchar(50),
facebook_url varchar(100),
twitter_handle varchar(20)
);
If you were to run this query, MySQL would give you a bit of a weird error in the
phpMyAdmin console, as illustrated in; Figure 7-3.
FIGURE 7-3
phpMyAdmin is a great
tool for running queries.
It clearly indicates where
you’re going wrong, as
with this example, in
which you left out the
primary key in your CREATE
statement. You can avoid
spending lots of time in a
text-based tool, you can
browse your tables visu-
ally, and best of all, most
web hosting companies
that provide MySQL and
database services offer
phpMyAdmin. That means
if you learn it on one host,
you’ll still (most likely) be
able to use the same tool
on another host.
This error—the infamous #1075 if you’ve been around MySQL for long—informs
you that since you have an AUTO_INCREMENT column that you need to mark as
PRIMARY KEY. It would be nice if MySQL would take care of that for you, but alas,
it’s up to you, so be sure to include PRIMARY KEY. At this point, you’re
almost
ready
to create this table for real.
Adding Constraints to Your Database
Remember that the purpose of a field like user_id is to facilitate easy searching.
Adding AUTO_INCREMENT (and setting the field as a primary key) helps in that,
but there’s something subtle that also happens behind the scenes when you create
an AUTO_INCREMENT column. You are also saying, “No matter what, this column
will have a value.” That’s because MySQL is filling in that value.

PHP & MYSQL: THE MISSING MANUAL
180
PLANNING
YOUR
DATABASE
TABLES
More than likely, there are additional fields that you almost always want to be filled
in. For example, there’s really never a good time to let a user not put in her first or
last name. And you should probably require an email address, too. Twitter handles
and Facebook URLs are not always going to be attached to a user, so those can be
left o, but the rest is mandatory.
Of course, could just decide to have your PHP scripts and web pages deal with re-
quiring this information. But is that really safe? What if someone else forgets to add
validation on a web page? What if
you
forget, writing code on a coee-high one day,
typing away at 2 a.m.? It’s never a good idea to
not
validate when you
can
validate.
Again, MySQL has what you need. You can require a value on a field by instructing
MySQL that field can’t be
null
(which is programmer-talk for “not a value”):
CREATE TABLE users (
user_id int NOT NULL AUTO_INCREMENT PRIMARY KEY,
first_name varchar(20) NOT NULL,
last_name varchar(30) NOT NULL,
email varchar(50) NOT NULL,
facebook_url varchar(100),
twitter_handle varchar(20)
);
DESIGN TIME
To Null or Not to Null
Although the
users
table makes figuring out which columns
should be NOT NULL fairly easy, that’s not always (or often)
the case. In fact, even with
users
, there’s ambiguity: are you
sure you want to require an email address? It is possible that
someone might not have one (it still happens, although why
email-less folks would be surfing the Internet might be quite
a mystery), or you might have users concerned with you spam-
ming them, and they don’t want to enter an email. Are you
sure
that you want to require that as part of a user’s information?
It might surprise you, but making a column NOT NULL is one
of the most important decisions you make with regard to an
individual table. This is particularly true if you decide
not
to
make a column
NOT NULL
. Every record added might have a null
value there, and if you decide down the line, “Oops, I really
did need that value,” you’re stuck for all the old entries that
don’t have it. You can’t ever un-ring that bell.
However, don’t get too trigger-happy with NOT NULL, think-
ing that it’s just safer to use it frequently and grab more data
rather than less. Users can become upset if they’re forced to
fill out 28 fields just to use your site. Even mega-sites like
Facebook and Twitter require only minimal information: usually
a name, email, user name, and password. Everything else can
be added later.
In general, the rule of thumb is to require only what you
absolutely need; but to absolutely require that information.
That’s a tongue-twister, but a useful one. Think carefully, make
a decision, and then realize that you’ll always upset someone.
Your goal is to please most of your users, most of the time; if
you can pull that off while still getting the information from
them that you need, you’re well on your way to Web stardom
and Internet fame.
And one last subtle bit of advice: you’re working at the table
level with NOT NULL, not the application level. In other words,
you’re essentially saying, “This column can’t be null
if (and only
if) there’s an entry in this table.
” You might decide that users
don’t have to enter an address (so it’s not required they have
an entry in a mythical addresses table), but
if
they enter an ad-
dress, it should also be required that they enter the street, city,
and country. Thinking along these lines—what data is essential
for this particular table, rather than your entire app—will help
you lock down your database with good, useful data, and still
not go crazy with NOT NULL.
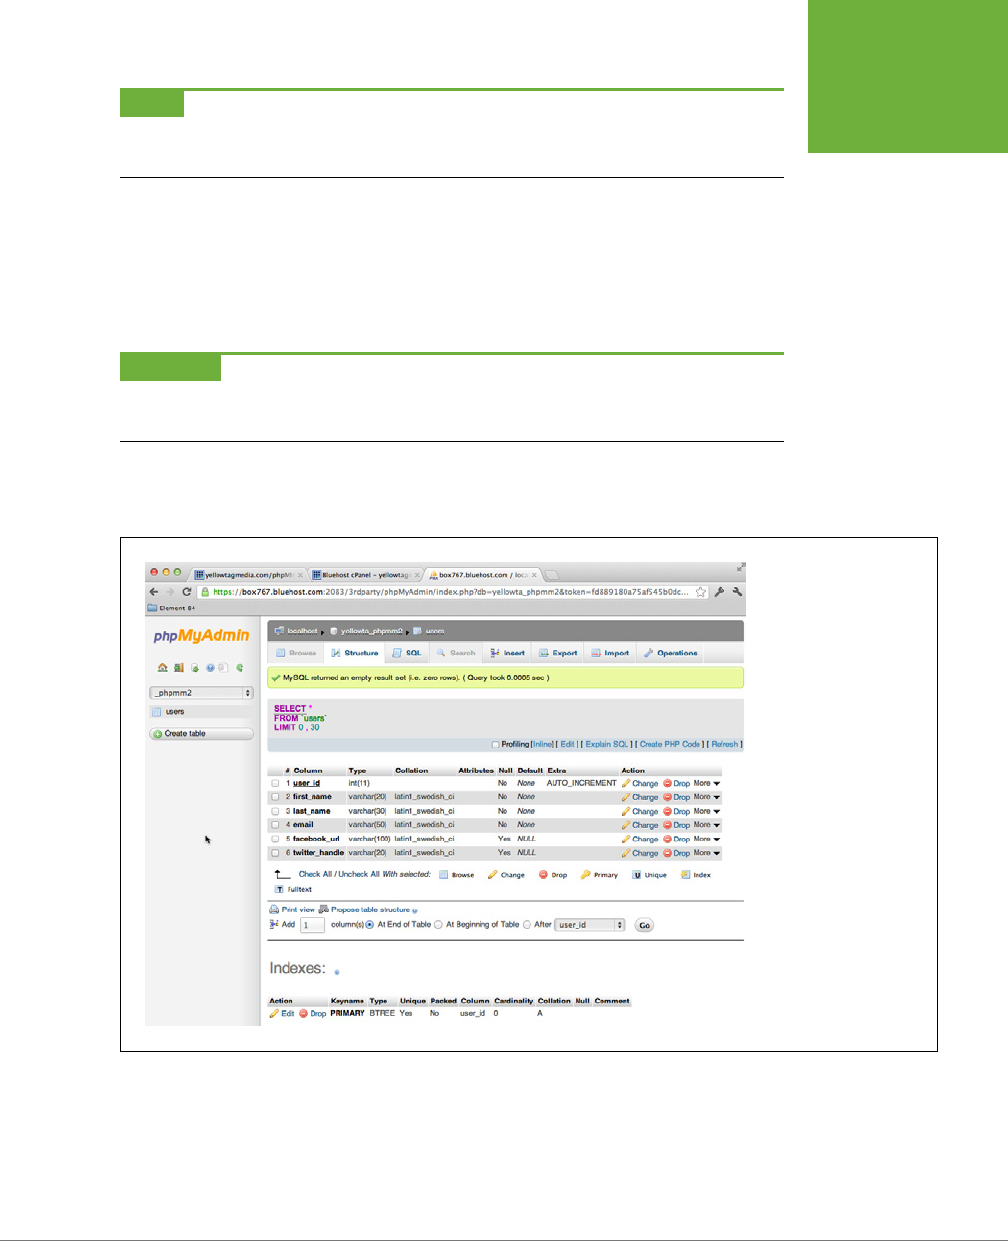
CHAPTER 7: GENERATING DYNAMIC WEB PAGES 181
PLANNING
YOUR
DATABASE
TABLES
NOTE Even though MySQL handles auto incrementing and inserting values into
user_id
, it’s still a good
idea to make it NOT NULL. That makes it clear that the value in that column is required, regardless of how MySQL
or any other code actually fills that value. For more detail, see the box on page 180.
Like AUTO_INCREMENT, this change is quick, easy, and goes a long way toward protect-
ing the integrity of your information (or, to be more accurate, your user’s information).
You should have a useful SQL statement, so go ahead and create your
users
table.
Log in to MySQL by using your command-line tool, the web form you built earlier,
or another web tool like phpMyAdmin, and create the table. You’re about to need it.
WARNING You might need to DROP a previous version of the table. You can simply use DROP TABLE users;
if you get an error trying to create the table. That should clear out any existing version of the table that might
exist. Also, remember to ensure that you’re in the right database when you run your CREATE statement!
If you’re using a tool like phpMyAdmin, you can now view your created table. It
should look something like Figure 7-4.
FIGURE 7-4
Ask your web hosting pro-
vider if it provides access
to phpMyAdmin. Its GUI
is a lot friendlier than the
mysql
console tool, and
it lets you view tables, like
the
users
table you should
by now have created.

PHP & MYSQL: THE MISSING MANUAL
182
SAVING
A USER’S
INFORMATION
Saving a User’s Information
You’ve had a table before, and now you’ve got a version of the
users
table that’s a
little sturdier, with AUTO_INCREMENT and validation of values in a few key fields.
Plus, your web form grabs just the information you need to stu into that table.
All that’s left is tying these things together via PHP, and you actually have almost
everything you need for that, too.
You can start with a new script or use your old version of
getFormInfo.php
as a
starting point. Either way, your first task is to capture the user’s entered informa-
tion and do a little text manipulation to get the values just the way you want them:
<?php
$first_name = trim($_REQUEST['first_name']);
$last_name = trim($_REQUEST['last_name']);
$email = trim($_REQUEST['email']);
$facebook_url = str_replace("facebook.org", "facebook.com", trim($_
REQUEST['facebook_url']));
$position = strpos($facebook_url, "facebook.com");
if ($position === false) {
$facebook_url = "http://www.facebook.com/" . $facebook_url;
}
$twitter_handle = trim($_REQUEST['twitter_handle']);
$twitter_url = "http://www.twitter.com/";
$position = strpos($twitter_handle, "@");
if ($position === false) {
$twitter_url = $twitter_url . $twitter_handle;
} else {
$twitter_url = $twitter_url . substr($twitter_handle, $position + 1);
}
?>
Call this script
create_user.php
and save it in your
scripts/
directory, either in your
site root or under your
ch07/
examples directory. You should also update the action
the form for
create_user.html
form to submit this newly named script. (For more
information on naming, see the box on page 183.)
This is the kind of code you’ve written before, and because you haven’t changed
your form, it still works perfectly well. Now, you just need to update it so it stores
this information in your new
users
table.
NOTE For some extra credit, see if you can convert
create_user.php
to use regular expressions instead of
the
strpos
function to update these variables. If you think you’ve whipped things into great shape, tweet a
link to your code to
@missingmanuals
and see what cool swag you might win.

CHAPTER 7: GENERATING DYNAMIC WEB PAGES 183
SAVING
A USER’S
INFORMATION
POWER USERS’ CLINIC
Name Follows Function
When you have a few web pages here and there, names are
really not that big of a deal. Whether you name a page
get-
FormInfo.html
or
create_user.html
is almost irrelevant; you
can see all your files in a single directory listing or window
of your FTP client.
But, even with medium-sized web apps, you’ll have a lot more
files than that. In fact, if you start to do the testing that you
absolutely should be doing, you can easily have hundreds of
files. At that point, your names really need to be meaningful.
But there’s more to meaning than just description. Many of
your forms and scripts are going to map and work directly with
a single table in your database, and do one particular thing
with regard to that table, such as creating a user via the
users
table. In these cases, you make it really easy on yourself and
others who’ll work on your code by naming your files after that
functionality. This means that even though your form might get
a user’s social information, it ultimately creates a user; thus,
create_user.php
is a descriptive, simple, clear name.
On top of all that, you’ll soon be learning about the three basic
actions you can take on information: create it, update it, and
delete it. Mapping your HTML pages and scripts to those basic
actions (
create_user
,
update_user
, and so on) really helps you
see what you have and what you don’t.
Building Your SQL Query
Your goal with the
create_user.php
script for it to collect contact information from
visitors to your site and store that information in the
users
table. First, you can use
your existing database connection script to make connecting easy:
<?php
require '../../scripts/database_connection.php';
// Get the user's information from the request into variables
?>
WARNING You might have some
echo
statements left in
database_connection.php
from an earlier version
of the examples. If you do, go ahead and remove those now so that they won’t disrupt the seamless experience
you’ll be giving your users.
With a database connection ready for use, you need to turn all that information
into the INSERT statement so that you can drop the information into your database.
Rather than just diving into your code, though, start with a sample statement. For
example, pick a set of random values (maybe your own), and build up the SQL
you want.
PHP & MYSQL: THE MISSING MANUAL
184
SAVING
A USER’S
INFORMATION
INSERT INTO users (first_name,
last_name,
email,
facebook_url,
twitter_handle)
VALUES ("Brett",
"McLaughlin",
"brett.m@me.com",
"http://www.facebook.com/bdmclaughlin",
"@bdmclaughlin");
NOTE You can even use your MySQL tools (page 179) to test this SQL out until it works and is formatted just
as you need it.
This statement now becomes sort of a template in the respect that you want to use
this statement, but you need to replace your sample values with your user’s request
information. Given that you already have those values, this actually isn’t too hard:
$insert_sql = "INSERT INTO users (first_name, last_name, " .
"email, facebook_url, twitter_handle) " .
"VALUES ('{$first_name}', '{$last_name}', '{$email}', " .
"'{$facebook_url}', '{$twitter_handle}');";
WARNING There is some real danger in your code at this point. The data you’re sending in your INSERT
statement is not being escaped. (For a refresher on what escape characters are and how to use them see the
box on page 158.) This means that some nasty things could get into your database. You’ll clean that up in a few
chapters using
mysql_real_escape_string
, but for now, it’s not the greatest and most secure code.
Getting into
mysql_real_escape_string
at this point is just going to cloud things up. So, use this code,
but don’t go putting it into your million-user ordering system just yet. Just keep working through the chapters,
and you’ll lock this code down a lot better really soon.
The one gotcha here is that you must ensure that each value you’re sending to the
database—which will eventually go into a text field in the
users
table—must be
surrounded by quotes. Using single quotes lets you use double quotes around the
entire query. It also lets you use curly braces ({ and }) to drop your variables right
into the query string.
Inserting a User
In the previous section, you created a new string that includes the SQL query. Now,
you can pass the $insert_sql query to mysql_query and run it against your database.
This is the easiest (and often the most fun) line of SQL-invoking PHP to write:

CHAPTER 7: GENERATING DYNAMIC WEB PAGES 185
SAVING
A USER’S
INFORMATION
<?php
// Handle user request
$insert_sql = "INSERT INTO users (first_name, last_name, email, " .
"facebook_url, twitter_handle) " .
"VALUES ('{$first_name}', '{$last_name}', '{$email}', " .
"'{$facebook_url}', '{$twitter_handle}');";
// Insert the user into the database
mysql_query($insert_sql);
?>
Unfortunately, this code doesn’t do anything in the event of an error—and there are
a lot of things that can go wrong. What if the database reports an error? What if
you forgot to add the
users
table first? What if you have a
users
table, but without
a facebook_url column, or it has a misnamed or misspelled column?
There’s really a lot of work to do when it comes to error reporting, but for now, take
a really simple (and probably way too simple) approach. Add a die statement, like
the one you saw in Chapter 5, on page 125:
<?php
// Handle user request
$insert_sql = "INSERT INTO users (first_name, last_name, email, facebook_url,
twitter_handle) " .
"VALUES ('{$first_name}', '{$last_name}', '{$email}', " .
"'{$facebook_url}', '{$twitter_handle}');";
// Insert the user into the database
mysql_query($insert_sql)
or die(mysql_error());
?>
WARNING Don’t forget to remove the semicolon at the end of the
mysql_query
line when you add
your
die
statement.
This solution is far from perfect, but it works, and it gives you some kind of report
in case of error.
At this point, you can actually try out your page, albeit a little clumsily. Go ahead
and visit your web page and fill out some sample values, as in Figure 7-5.
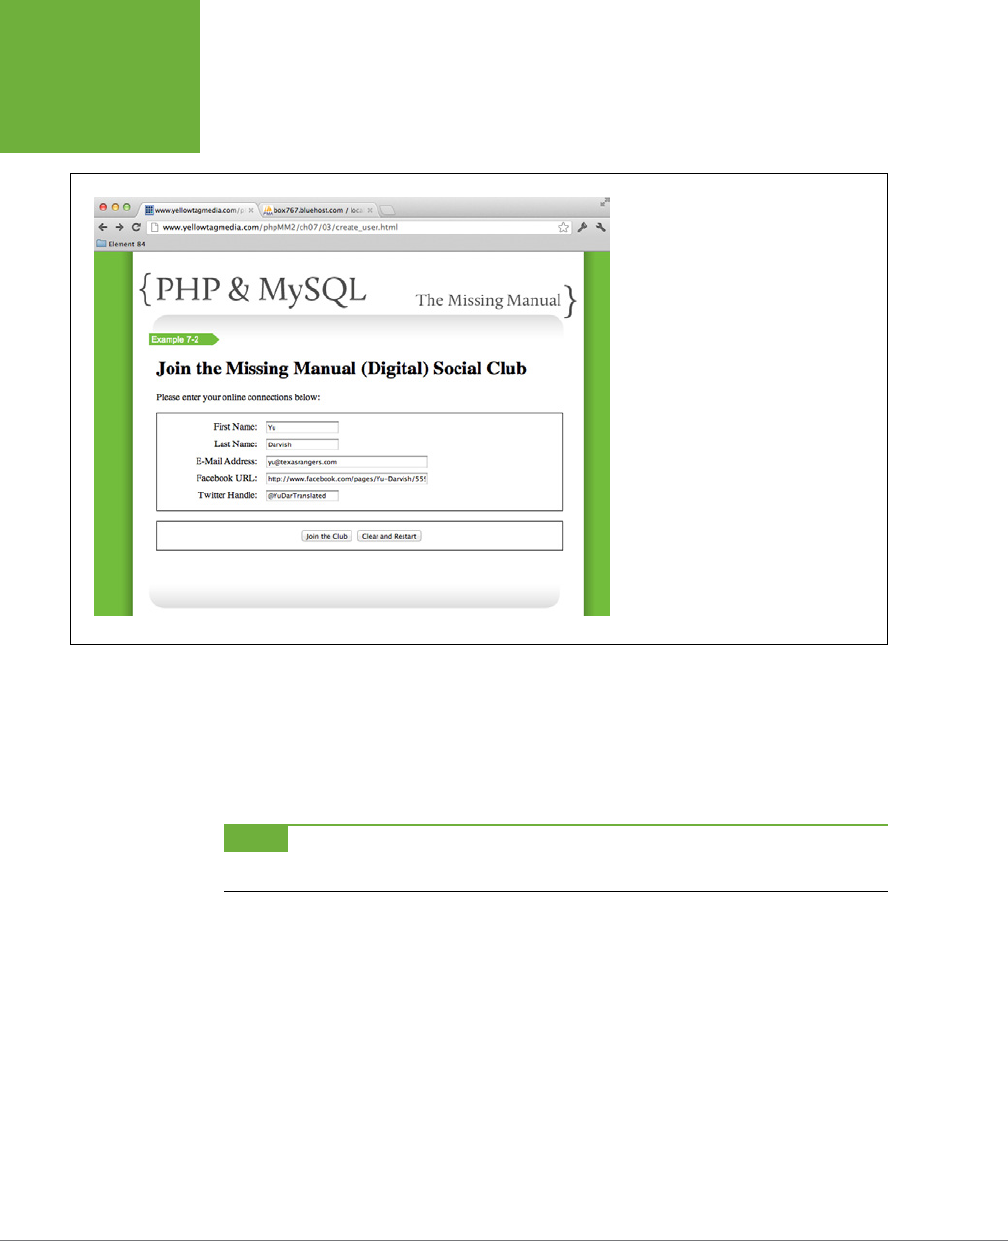
PHP & MYSQL: THE MISSING MANUAL
186
SAVING
A USER’S
INFORMATION
FIGURE 7-5
By now, you’re probably getting tired
of entering users. That’s good—your
create_user.html
form is finally almost to
the point where once you enter a user, that
user is saved in the database. In fact, that
happens here; now you just need a way to
show that something happened, and deal
with errors when they occur.
Submit your page to run the new code. It constructs a SQL statement using your
values, connects to the database, and inserts the data by using mysql_query. Hope-
fully, your die statement
won’t
run.
Assuming that you don’t get an error, you’ll get almost nothing back. That’s rather dis-
appointing, but something did happen—especially if you
didn’t
get an error message.
NOTE If you still have the HTML section of
getFormInfo.php
copied into
create_user.php
, you might get
back some output from your form submission.
The interest here is in what happened in your database. So, fire up a SQL tool and
enter this query:
SELECT user_id, first_name, last_name
FROM users;
Hopefully you get back something like this:
+---------+------------+-----------+
| user_id | first_name | last_name |
+---------+------------+-----------+
| 1 | Yu | Darvish |
+---------+------------+-----------+
1 row in set (0.00 sec)
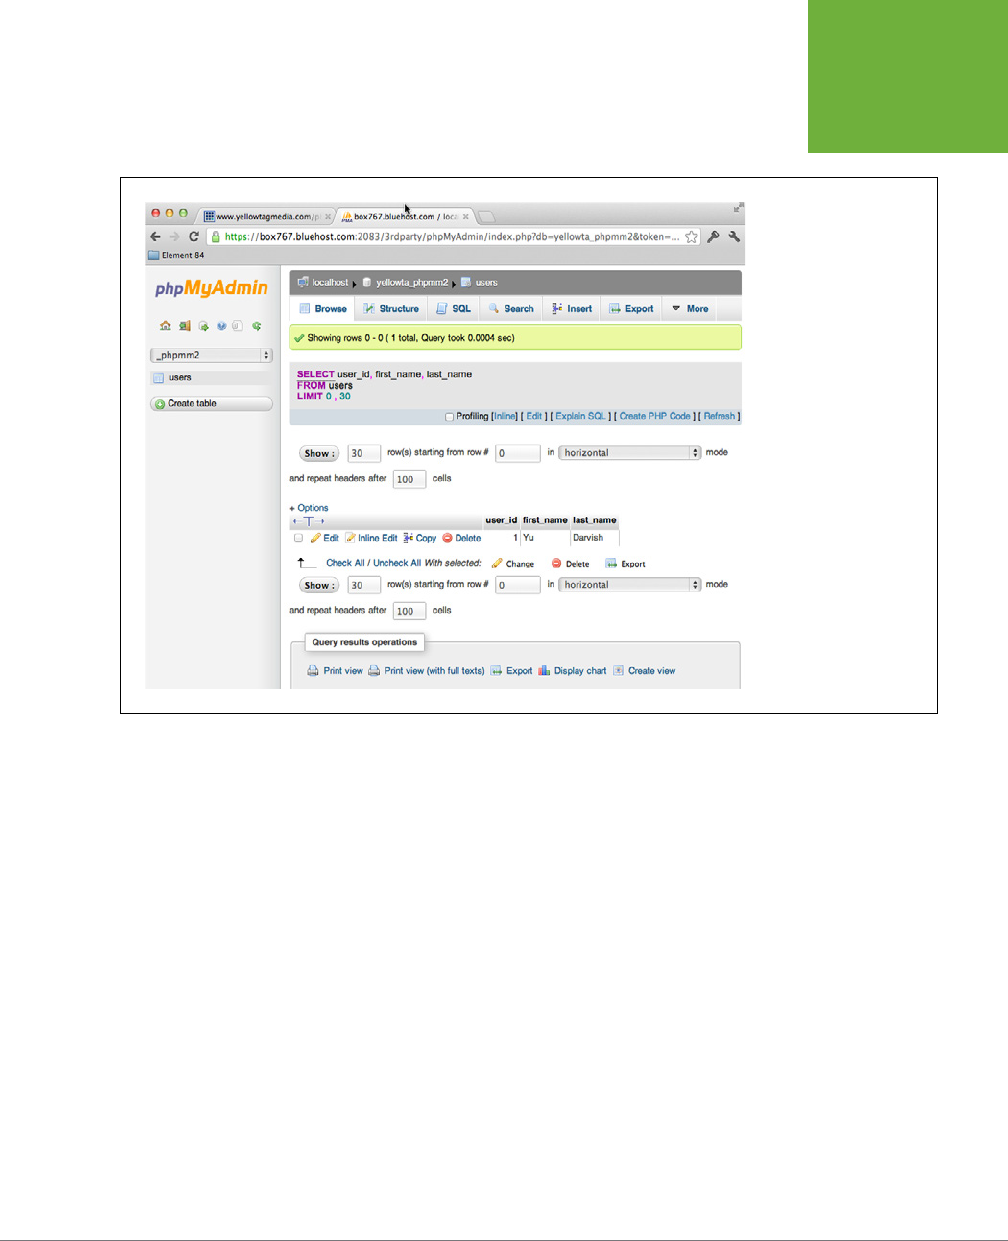
CHAPTER 7: GENERATING DYNAMIC WEB PAGES 187
SAVING
A USER’S
INFORMATION
If you want to use phpMyAdmin (page 55), you can browse to your
users
table and
check out any data that might be inside of it, as shown in Figure 7-6.
FIGURE 7-6
Checking phpMyAdmin,
you can see that the entry
in the
users
table contains
not only the data pulled
from the web form, but
also an auto-generated
(and auto incremented) ID:
in this case, it’s 1. As you
have more and more users,
that number will continue
to increase incrementally,
although you can’t count
on it being sequential.
A First Pass at Confirmation
So far, you’ve got your
create_user.html
page and a user (or many of them if you
get cranking on your web form and enter more users) in your database, but your
user—the person using your web application—sees nothing but a blank screen.
That’s not very helpful.
As a starting point, you can go back to the code from your older script,
get
FormInfo.php
:
<?php
// Get the user's information from the request array
// Connect to the database and insert the user
?>
<html>
<head>
<link href="../../css/phpMM.css" rel="stylesheet" type="text/css" />

PHP & MYSQL: THE MISSING MANUAL
188
SAVING
A USER’S
INFORMATION
</head>
<body>
<div id="header"><h1>PHP & MySQL: The Missing Manual</h1></div>
<div id="example">Example 6-1</div>
<div id="content">
<p>Here's a record of what information you submitted:</p>
<p>
Name: <?php echo $first_name . " " . $last_name; ?><br />
E-Mail Address: <?php echo $email; ?><br />
<a href="<?php echo $facebook_url; ?>">Your Facebook page</a>
<br />
<a href="<?php echo $twitter_url; ?>">Check out your Twitter feed</a>
<br />
</p>
</div>
<div id="footer"></div>
</body>
</html>
This is better than nothing, but there are some things you need to fix right o the bat.
First, you’re not printing out the user’s Twitter handle; you’re printing out the URL
to his handle. Although that’s probably more usable for clicking, it doesn’t actually
represent what was entered into the database. That leaves you with a tough choice:
• You can print out what was entered into the database, which is the value in
$twitter_handle. That’s what was actually inserted, but it doesn’t have as
much value in a web page, and it really is letting your users know what’s in your
database. But, is that what your users care about? Your database structure?
• You can print out the actual URL, which is better for clicking, but doesn’t directly
connect to what’s in the database. It’s a modification of the database value,
which is OK, but might not be appropriate right on the heels of a form that is
explicitly focused upon adding a user to the database.
All this may seem like a lot of fuss just for a Twitter handle. But the same issue
comes up whether you show the first and last names or combine them together as
this code does now:
Name: <?php echo $first_name . " " . $last_name; ?><br />
There’s a deeper, bigger issue here: what exactly do you show your users with regard
to data entered in the database? Do you show them the literal values as they’re
stored in the database, or do you show them values that are a little more massaged,
a little more human-readable?

CHAPTER 7: GENERATING DYNAMIC WEB PAGES 189
SAVING
A USER’S
INFORMATION
Users are Users, Not Programmers
The answer to that question is fairly simple: you
always
want to show your users
things that make sense to them. Very rarely will someone care about the columns
in your database, or what value is a primary key, or whether you store their Twitter
handle with the @ sign, or without it. Therefore, you should
always
focus on what
your users want to see, not what’s literally and technically in your database. (Yes,
that’s two always-es in one paragraph.)
But, there’s something else going on here: what is the
source
of the information you’re
showing? Implied in this idea of showing a user what makes sense to him is the idea
that you, the wise programmer, take information from the database, work with it to
get it into the right format, and then show that massaged information to the user.
In this first pass at a confirmation, are you showing what’s in the database? Not
at all; you’re just sending back out what the user gave you. What if something did
happen when that information was inserted into your database table? You’d never
know it. By showing the user his own information, you could be masking what really
was dropped into the database.
So, what do you do? You want to show users something that makes sense to them
(there’s that double-always again), but you also want to show those values based
on the database, rather than just repeating a form, because that doesn’t show any
problems in the database.
Hopefully, you do both! How, though? Well, suppose you had a way to pull the user’s
information from the database, perhaps by using a SQL SELECT, and then based
upon that information—information from the database, problems or not—construct
something the user can see and read and that makes sense.
Here’s one solution: After inserting the user, reload that same information, a bit
like this:
<?php
// Get the user's information from the request array
// Connect to the database and insert the user
$get_user_query = "SELECT * FROM USERS WHERE ..."
mysql_query($get_user_query)
or die(mysql_error());
// Load this information and ready it for display in the HTML output
?>
<!-- HTML output -->

PHP & MYSQL: THE MISSING MANUAL
190
SHOW ME THE
USER
WARNING In the preceding example,
$get_user_query
is intentionally incomplete. Those three dots
won’t really work; you’d need to put a WHERE piece in that locates the user who was just inserted.
That query gets you the user from the database and it still lets you modify those
values as needed for good, human-readable display. You’d have to figure out how
to find the particular user who was just inserted, but that’s something you’ll soon
be able to handle.
The issue is that you’re doing a bunch of text manipulation on the request information,
and then you need to do some of that again with the response from the database.
Think about your application as a whole: Is there anywhere else you might want to
display a user? Yes, absolutely. Every good application has a place where you can
check out your own profile. If that’s the case, you’d need to take the code in the
back part of
create_user.php
and then copy it into a
show_user.php
script later.
That’s not good; remember, you really,
really
don’t want the same code in more
than one place. That’s why you have the
database_connection.php
script that you
can use over and over.
What you need is another script, one that shows user information. Then, you can
simply throw users from
create_user.php
, which creates users, to this new script,
and let it figure out what to do in terms of a response. So, leave
create_user.php
somewhat incomplete for now; you can come back and fix it later.
Show Me the User
You need a page that shows a user’s information in a way that makes sense to the
user. This means that this page is going to pull information from the
users
table,
but it’s not a form; there’s no need (at least, not yet) to do anything but display
information. Most of the work here isn’t code; it’s getting a good user profile page
built. You’ll want to start with HTML.
Luckily, most web servers are configured to take a request for a file ending in
.php
and create HTML output, which is handed to a user’s browser. As a result, you can
create HTML, drop it into a file ending in
.php
, and when you start adding actual PHP,
you’re ready to go. Your web server will send the HTML in that file to a requesting
web browser, and your user’s (or you) see HTML output.
Creating a Mockup of a User Profile Page
Figure 7-7 shows a solid-looking profile page. It shows the basics of each user’s
contact information as well as a short bio and a picture of the user.
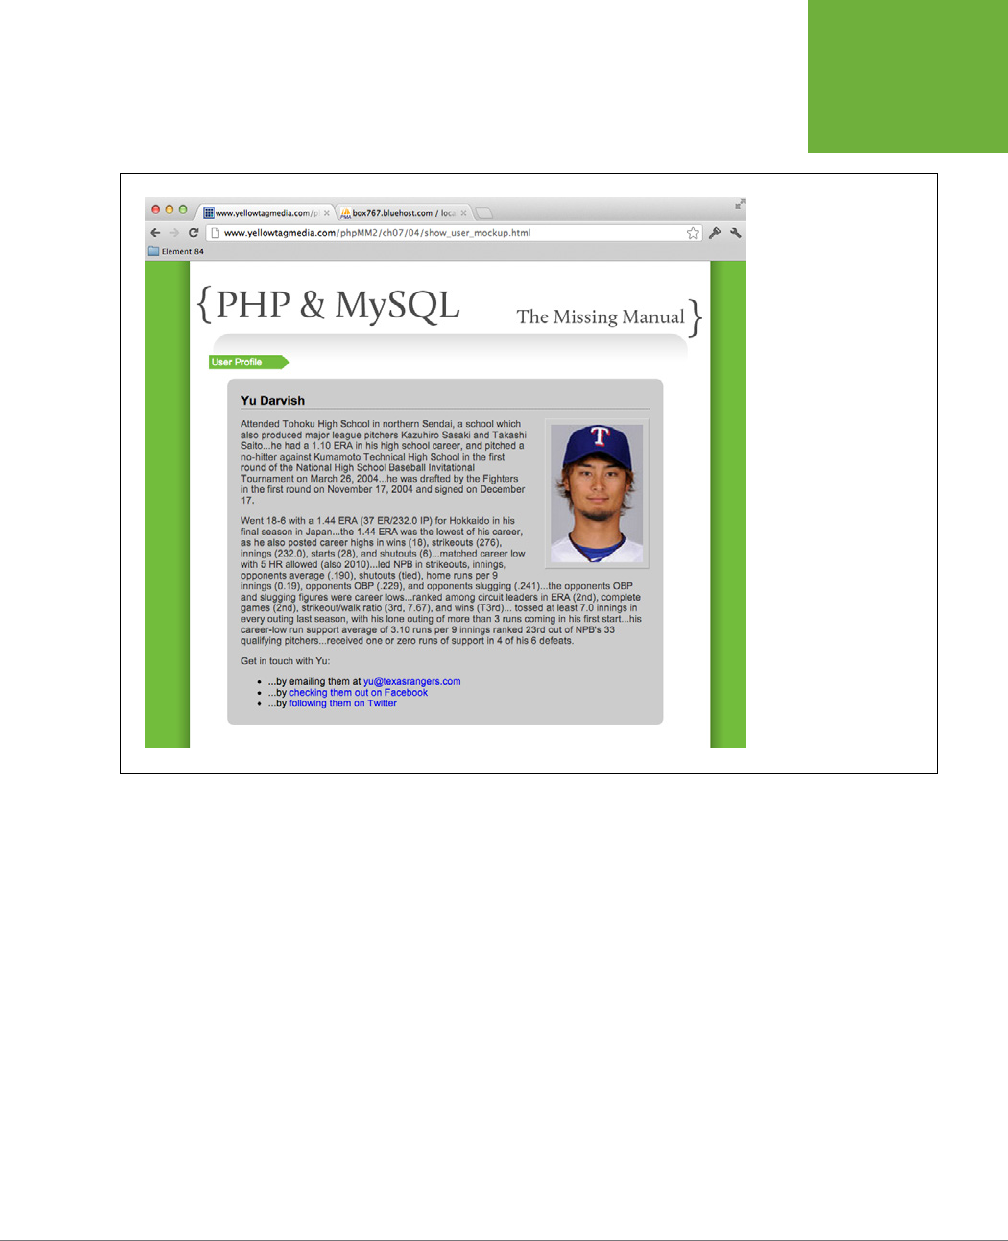
CHAPTER 7: GENERATING DYNAMIC WEB PAGES 191
SHOW ME THE
USER
FIGURE 7-7
Sometimes, the best PHP
doesn’t begin with PHP at
all. Creating HTML pages is
work, and it often involves
lots of tweaking, not to
mention all the rules in
your CSS that you need to
create. By starting with a
plain, old HTML page, like
this one, you can get the
look and feel of things just
right. Then, when you’re
ready to start writing your
PHP, you don’t have much
HTML work left; you can
just drop your database
values in the right spots,
knowing your page will
turn out great.
Here’s the HTML for the page in Figure 7-7. Because of CSS, it stays pretty simple.
<html>
<head>
<link href="../css/phpMM.css" rel="stylesheet" type="text/css" />
</head>
<body>
<div id="header"><h1>PHP & MySQL: The Missing Manual</h1></div>
<div id="example">User Profile</div>
<div id="content">
<div class="user_profile">
<h1>Yu Darvish</h1>
<p>
<img src="../images/darvish.jpg" class="user_pic" />

PHP & MYSQL: THE MISSING MANUAL
192
SHOW ME THE
USER
Attended Tohoku High School in northern Sendai, a school
which also produced major league pitchers Kazuhiro Sasaki and Takashi
Saito...he had a 1.10 ERA in his high school career, and pitched a
no-hitter against Kumamoto Technical High School in the first round
of the National High School Baseball Invitational Tournament on
March 26, 2004...he was drafted by the Fighters in the first round
on November 17, 2004 and signed on December 17.</p>
<p>Went 18-6 with a 1.44 ERA (37 ER/232.0 IP) for Hokkaido
in his final season in Japan...the 1.44 ERA was the lowest of his
career, as he also posted career highs in wins (18), strikeouts (276),
innings (232.0), starts (28), and shutouts (6)...matched career
low with 5 HR allowed (also 2010)...led NPB in strikeouts, innings,
opponents average (.190), shutouts (tied), home runs per 9
innings (0.19), opponents OBP (.229), and opponents
slugging (.241)...the opponents OBP and slugging figures were
career lows...ranked among circuit leaders in ERA (2nd), complete
games (2nd), strikeout/walk ratio (3rd, 7.67), and wins (T3rd)...
tossed at least 7.0 innings in every outing last season, with his
lone outing of more than 3 runs coming in his first start...his
career-low run support average of 3.10 runs per 9 innings ranked
23rd out of NPB's 33 qualifying pitchers...received one or zero
runs of support in 4 of his 6 defeats.</p>
<p class="contact_info">Get in touch with Yu:</p>
<ul>
<li>...by emailing them at <a href="yu@texasrangers.com">yu@texasrang-
ers.com</a></li>
<li>...by <a href="http://www.facebook.com/pages/Yu-
Darvish/55933782070">checking them out on Facebook</a></li>
<li>...by <a href="http://www.twitter.com/YuDarTranslated">following
them on Twitter</a></li>
</ul>
</div>
</div>
<div id="footer"></div>
</body>
</html>
NOTE The bio and picture here are new, and not things that you would already have in your
users
table.
They’re just examples of what you might see on a user’s profile page. Just a name and a few links for email and
Twitter for this example was rather sparse.
Don’t worry, though. You’ll be adding a profile picture and bio to your database soon, and then this page really
will be something your app can display.

CHAPTER 7: GENERATING DYNAMIC WEB PAGES 193
SHOW ME THE
USER
Even though this example is straightforward, what you need is really even simpler.
Imagine (or type) this page without the placeholder text, but instead with variables
in the place of the dummy text. For example, wherever the user’s first name goes,
envision $first_name, and then $last_name, $email, and so on. The result is clean:
WARNING The HTML that follows is helpful to think through, but
it’s not valid HTML or PHP
. Therefore,
don’t try to view this in a browser. Still, this example lets you see that almost everything on the page really just
represents information in the database, all in a user-friendly format.
<html>
<head>
<link href="../css/phpMM.css" rel="stylesheet" type="text/css" />
</head>
<body>
<div id="header"><h1>PHP & MySQL: The Missing Manual</h1></div>
<div id="example">User Profile</div>
<div id="content">
<div class="user_profile">
<h1>$first_name $last_name</h1>
<p><img src="$user_image" class="user_pic" />
$bio</p>
<p class="contact_info">Get in touch with $first_name:</p>
<ul>
<li>...by emailing them at
<a href="$email">$email</a></li>
<li>...by
<a href="$facebook_url">checking them out on Facebook</a></li>
<li>...by <a href="$twitter_url">following them on Twitter</a></li>
</ul>
</div>
</div>
<div id="footer"></div>
</body>
</html>
But, wait a second...your
users
table doesn’t have a bio ($bio), or a picture ($user_
image)! In fact, that’s exactly why it’s a good idea to focus on your HTML first, rather
than diving right into PHP. When you begin designing your page, you think about
what you need.

PHP & MYSQL: THE MISSING MANUAL
194
SHOW ME THE
USER
Imagine this page with nothing more than a name and some contact links. What
a bore for your users, as well as you. With this simple mockup, you’ve figured out
several important things:
1. You’re missing some key information in your
users
table. You’d like to have
a bio, which is just a long chunk of text, and a way to load an image of the user.
2. Once you update your table, you need to update your
create_user.html
and
create_user.php
form and code to let users enter that information, and then
save the new information to your database.
3. Finally—and this is great news—with those changes, you can build a pretty
nice-looking user profile page.
The question now is, what do you do first? Well, the database is usually the center-
piece of things, so you have to update your
users
table.
Changing a Table’s Structure by Using ALTER
There are two pieces of information missing from
users
: a bio and an image. For
now, leave the image thing alone. That takes a little bit of work, and you can always
drop a placeholder in and come back to that. The bio, however, is easy.
First, you need to change your table’s structure by adding a new column. That’s not
hard at all; the SQL ALTER command lets you do just that:
ALTER TABLE users
ADD bio varchar(1000);
WARNING Be sure you type ALTER and not ALTAR; the first is a SQL command, and the second is where you
sacrifice things, if you’re so inclined. Either way, ALTAR will definitely not get your table in the shape you want.
This statement is as simple as it looks. You provide SQL with the name of the table
to ALTER, and then specify how you want to alter it. In this case, you want to add a
column, so you use ADD to give it the new column name and a type.
Of course, there are implications here:
• Is it okay for a user to leave a biography blank, or should the bio column be
NOT NULL? It’s probably okay if it’s left blank, so NOT NULL really isn’t required.
• How in the world does information get into this column for new users? For
that, you need to update your
create_user
HTML web form as well as the script
that does the database work. That’s up next.
• Can you alter a table any time you want? Yes! That’s the beauty of databases.
They’re pretty flexible.

CHAPTER 7: GENERATING DYNAMIC WEB PAGES 195
SHOW ME THE
USER
FREQUENTLY ASKED QUESTION
Slugging in a Column
What happens to the old rows in a table when a new column
is added?
Although it’s easy to add a column to a database by using
ALTER, and it’s simple to update your forms to let your users get
information into those columns (and show the results, if you’ve
got a
show_user
script), there’s something left that can be a
pain: dealing with old data that suddenly has a new column.
Consider the
users
table. Imagine that it didn’t have just one or
two recent entries, but thousands of users from the past five
years. As a result of your alteration, every one of those users
has a glaring empty spot: the bio. Most databases happily leave
the column blank, meaning you’ll get NULL every time you try
and pull something out of the new
bio
column.
In this case, adding the bio column isn’t a big deal. In fact, you
could probably call user bios a “new feature,” throw together a
press release, and tout the oversight as a brand new version,
improved and usable by a whole new generation of bio-loving
potential users. Existing users can log in and add a bio; this
is exciting stuff!
What’s not exciting is when you’re adding a column that’s
required. Remember when your favorite site realized that
using an email address as a user name wasn’t always a great
idea? They probably altered their tables, adding a user name
column, but had to make it NOT NULL. After all, the whole point
of a user name is that each user has one.
In that case, you really do have a legitimate problem: you now
have tons of rows that are missing required data. What do you
do? Well, you can simply lock those users out, and the next
time they try to access your site, build a mechanism that forces
them to select a user name. That’s typical, and even expected
in these security-conscious days of the Web. But, what if that’s
not tenable? You’re letting all those rows be in an invalid state
until a user logs in.
If that’s a problem—and it often is—you might need to insert
some sort of placeholder data into your table, like “NEEDS_
USERNAME”, and then query the user to check whether that’s
her user name value when she does come back to your site.
It’s not the most elegant solution, but it keeps your data valid.
Ultimately, the big issue with using ALTER is that you potentially
end up with data in an invalid state for some amount of time,
or you have to insert placeholder data to keep things running,
although you know that data can’t ultimately stay put. Neither
solution is perfect, so you have to choose the lesser of these
two evils. (Or, come up with something else altogether, and
let us know by tweeting us at
@missingmanuals
. We’d love to
hear what you come up with.)
NOTE You’ll deal with the user image later in this chapter. There’s a lot to be said about image handling,
and where to store images, so for now you can plan on having an image—and leave a spot for it in your web
page and script—and just know that you’ll add that later.
Building Your Script: First Pass
With the bio column in
users
, and an HTML mockup complete, you’re ready to get
down to the business of PHP. Create a new script and call it
show_user.php
. This
goes along nicely with
create_user.php
, and you can probably already imagine you’ll
later add scripts like
delete_user.php
and
update_user.php
to complete the package.
At the outset, you don’t need any PHP in this script at all. Instead, just drop in your
HTML. Then, as you did earlier, you can replace all the instances where there will be
information from the database with PHP variable names. What you end up with is
shown in the code that follows.

PHP & MYSQL: THE MISSING MANUAL
196
SHOW ME THE
USER
<html>
<head>
<link href="../../css/phpMM.css" rel="stylesheet" type="text/css" />
</head>
<body>
<div id="header"><h1>PHP & MySQL: The Missing Manual</h1></div>
<div id="example">User Profile</div>
<div id="content">
<div class="user_profile">
<h1>$first_name $last_name</h1>
<p><img src="$user_image" class="user_pic" />
$bio</p>
<p class="contact_info">Get in touch with $first_name:</p>
<ul>
<li>...by emailing them at
<a href="$email">$email</a></li>
<li>...by
<a href="$facebook_url">checking them out on Facebook</a></li>
<li>...by <a href="$twitter_url">following them on Twitter</a></li>
</ul>
</div>
</div>
<div id="footer"></div>
</body>
</html>
NOTE Remember, save this with a
.php
extension in your
scripts/
directory. That might be
ch07/scripts/
if
you’re using the book’s structure, or just your website’s
scripts/
directory if you’re putting all your PHP from all
the chapters in a single place.
Some things here are a bit odd:
• Where’s the PHP? There’s no <?php or ?> yet, and certainly no code.
• Those variables are PHP, not HTML. An HTML page won’t know what to do
with them.
• Where does the database interaction occur? There’s no SQL, no SELECT from
the database, or anything like that.
• How does the script know which user to load?
These are all the right questions to be asking. If you came up with a few of these,
you’re really getting your head around the big issues in PHP and web programming.
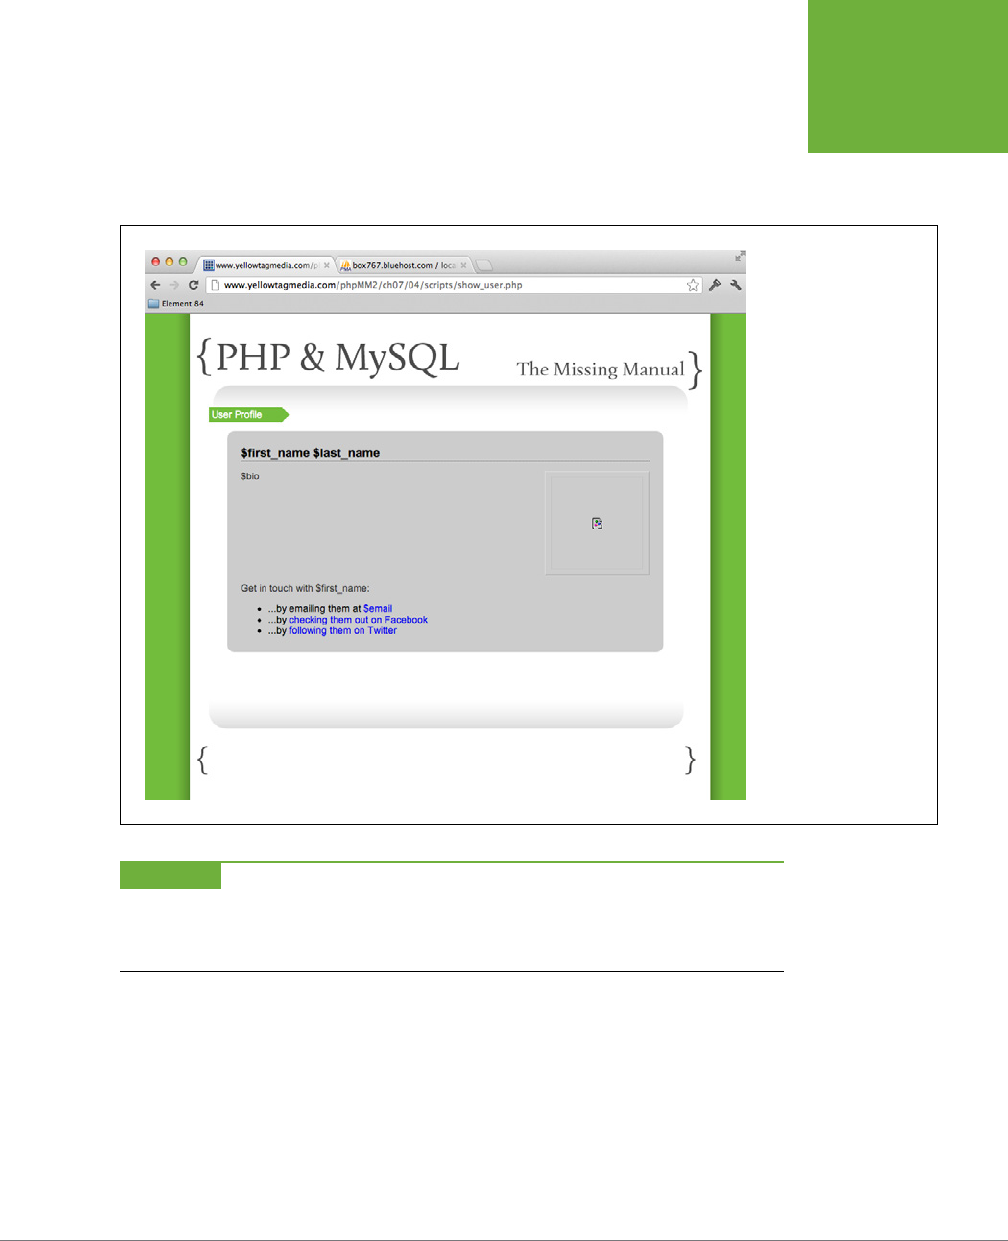
CHAPTER 7: GENERATING DYNAMIC WEB PAGES 197
SHOW ME THE
USER
First, as to where the <?php and ?> tags are: they’re coming later, but that’s really
incidental. You can give a file the
.php
extension and still put nothing but HTML
within that file. Type the URL to your script into your browser and see what happens;
Figure 7-8 is about right.
FIGURE 7-8
Looking at your HTML
separately is another good
testing technique. At this
stage, you don’t have any
values, so you can focus
on how your page looks.
Once you add in PHP code,
it’s easy to get focused on
your database interaction
and formatting the actual
strings and values in your
variables. When you do a
prototype before you get
to your database interac-
tion, you can verify that
things look right and then
tweak things after more
once you drop in a real
value for each variable.
WARNING If you get a page without any styling when you view your HTML, you might need to update
the
link
element in your page’s
head
section. Because you moved this page into your
scripts/
directory, the
CSS is in a different relative location than when this was just an HTML page under your web root, or your
ch07/
examples.
There’s nothing but HTML in
show_user.php
, so your web server supplies that HTML
to a user’s web browser. The result is a nice-looking web page. Of course, there’s still
a handful of issues to deal with, like those variable names that are coming across
as plain, old text.

PHP & MYSQL: THE MISSING MANUAL
198
SHOW ME THE
USER
That’s easy, though. Simply surround each variable with <?php and ?>, which signals
to the browser, “Hey, treat this little bit as PHP.” Then, you’ll have to add an echo
because you want to output the value of the variable:
<html>
<head>
<link href="../../css/phpMM.css" rel="stylesheet" type="text/css" />
</head>
<body>
<div id="header"><h1>PHP & MySQL: The Missing Manual</h1></div>
<div id="example">User Profile</div>
<div id="content">
<div class="user_profile">
<h1><?php echo "{$first_name} {$last_name}"; ?></h1>
<p><img src="<?php echo $user_image; ?>" class="user_pic" />
<?php echo $bio; ?></p>
<p class="contact_info">Get in touch with <?php echo $first_name; ?>:</
p>
<ul>
<li>...by emailing them at
<a href="<?php echo $email; ?>"><?php echo $email; ?></a></li>
<li>...by
<a href="<?php echo $facebook_url; ?>">checking them out
on Facebook</a></li>
<li>...by <a href="<?php echo $twitter_url; ?>">following them
on Twitter</a></li>
</ul>
</div>
</div>
<div id="footer"></div>
</body>
</html>
There’s still an obvious issue here: These variables have no values. You haven’t
defined them, and if you try to access this page now, you’re going to get some
strange results (see Figure 7-9). But you’re slowly moving toward a useful script,
and that’s a good thing.
The biggest problem here is that you don’t know if this code works. For example, are
there typos? Are there problems in the minimal PHP you have? It’s a pain to move
on to your database code when you’re not sure that they’ll work properly, even if
you have the right values from the database.
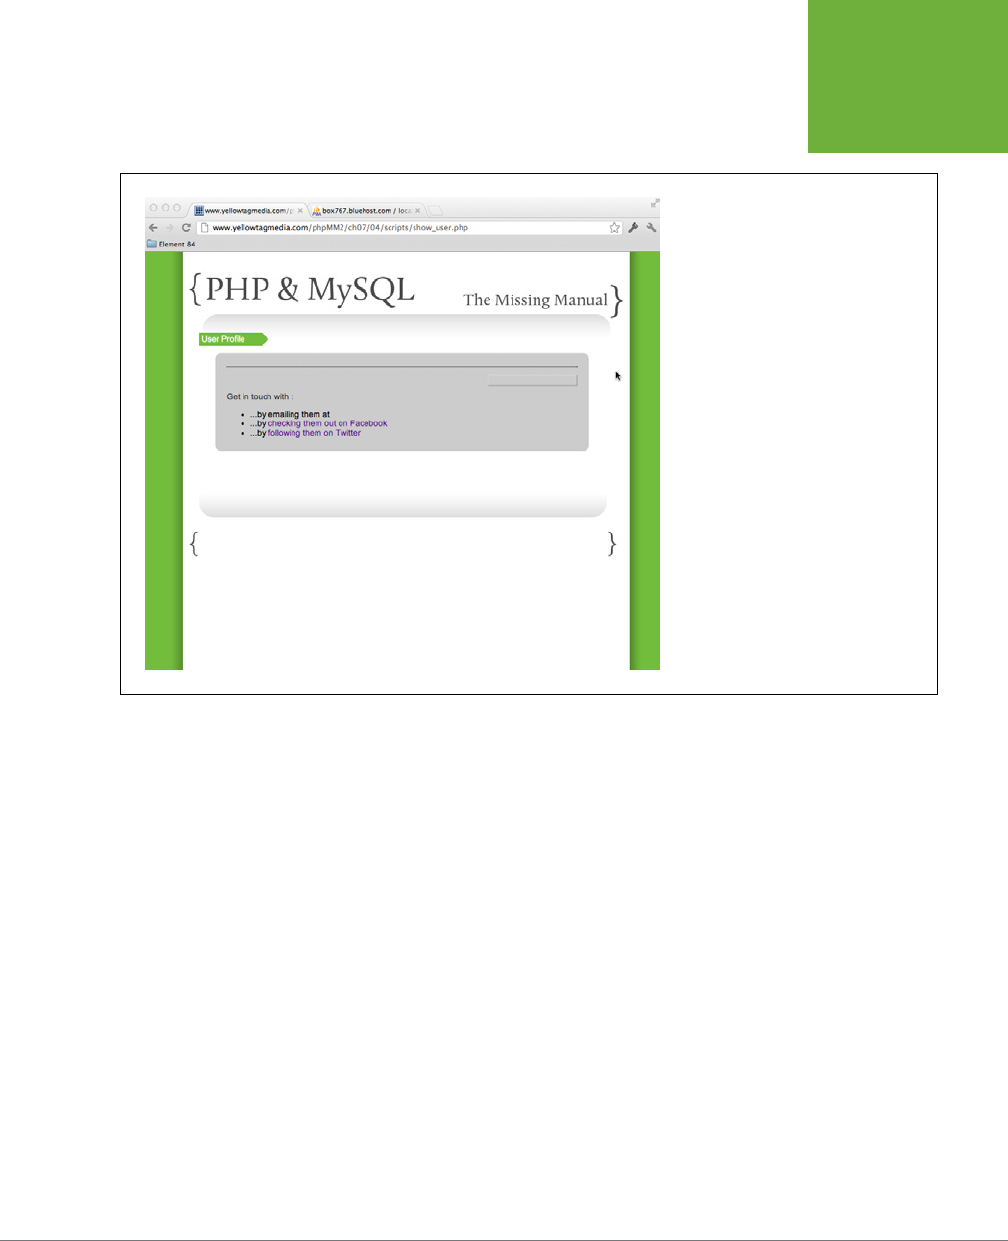
CHAPTER 7: GENERATING DYNAMIC WEB PAGES 199
SHOW ME THE
USER
FIGURE 7-9
The state of
show_user.php
as shown
on page 198 is one of those situations in
which it’s a little hard to tell what’s going
on. Look closely, though: Every time your
PHP ran, it echoed out the value of a
variable that didn’t exist. The PHP is a little
loose here, and simply throws out nothing.
In other words, PHP does echo a
nothing
string
, which is just whitespace. Once you
put values in those variables, things will
look much better.
One easy way to test before getting much further is to create a small section of PHP
before the HTML. In that section, assign to each variable the sort of value you’d get
from the database:
<?php
$first_name = "Yu";
$last_name = "Darvish";
$user_image = "/not/yet/implemented.jpg";
$email = "yu@texasrangers.com";
$bio = "Attended Tohoku High School in northern Sendai, a school
which also produced major league pitchers Kazuhiro Sasaki and Takashi
Saito...he had a 1.10 ERA in his high school career, and pitched a
no-hitter against Kumamoto Technical High School in the first round
of the National High School Baseball Invitational Tournament on
March 26, 2004...he was drafted by the Fighters in the first round
on November 17, 2004 and signed on December 17.</p>
<p>Went 18-6 with a 1.44 ERA (37 ER/232.0 IP) for Hokkaido
in his final season in Japan...the 1.44 ERA was the lowest of his
career, as he also posted career highs in wins (18), strikeouts (276),
innings (232.0), starts (28), and shutouts (6)...matched career
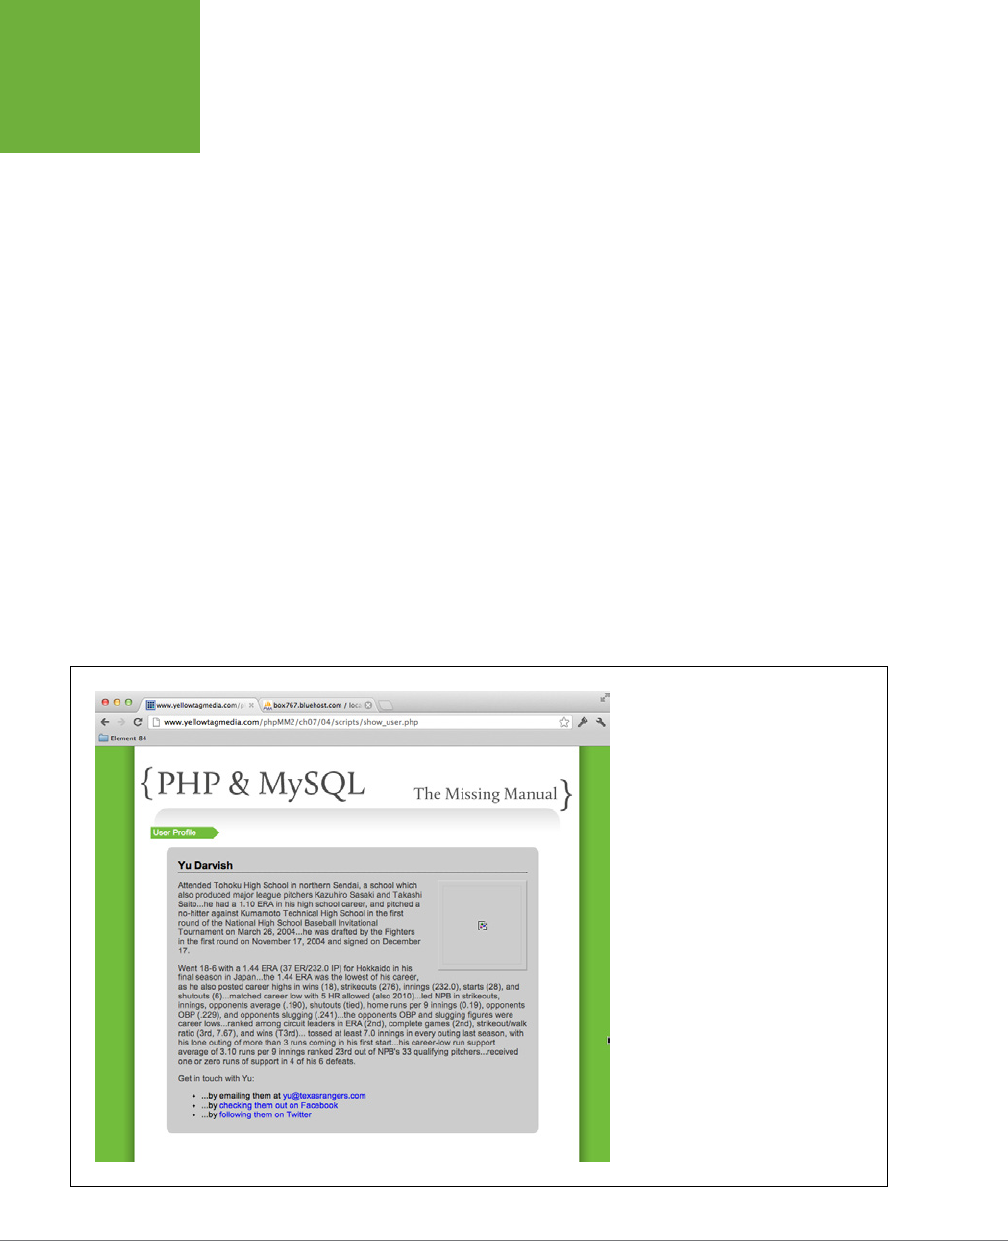
PHP & MYSQL: THE MISSING MANUAL
200
SHOW ME THE
USER
low with 5 HR allowed (also 2010)...led NPB in strikeouts, innings,
opponents average (.190), shutouts (tied), home runs per 9
innings (0.19), opponents OBP (.229), and opponents
slugging (.241)...the opponents OBP and slugging figures were
career lows...ranked among circuit leaders in ERA (2nd), complete
games (2nd), strikeout/walk ratio (3rd, 7.67), and wins (T3rd)...
tossed at least 7.0 innings in every outing last season, with his
lone outing of more than 3 runs coming in his first start...his
career-low run support average of 3.10 runs per 9 innings ranked
23rd out of NPB's 33 qualifying pitchers...received one or zero
runs of support in 4 of his 6 defeats. ";
$facebook_url = "http://www.facebook.com/pages/Yu-Darvish/55933782070";
$twitter_url = "http://www.twitter.com/YuDarTranslated";
?>
<html>
<!-- All your HTML and inline PHP -->
</html>
Now, you can view your page in a browser and get some useful results, like you see
in Figure 7-10. This way, you can verify that your code is actually working; all that’s
left is to fill those variables with real values, and then figure out which user to look
up in the first place.
FIGURE 7-10
Your user profile page is still as much
prototype and mockup as it is working
code. All the same, testing a little PHP at
a time is a good way to work up to a full
script, piece by piece, making sure each
step works independently of everything
else that is going to be added later.

CHAPTER 7: GENERATING DYNAMIC WEB PAGES 201
SHOW ME THE
USER
Using SELECT to Retrieve a User from Your Database
You’ve got your variables, and you’ve got your HTML. Now, you need to get your
user. But, you know just what to do because you’ve already used SELECT a few times:
SELECT *
FROM users;
In fact, you can run that command now on your database. What you get back are
all the rows you have:
+---------+------------+-----------+----------------+--------------
-------------------------------------------+----------------+------+
| user_id | first_name | last_name | email | facebook_url
| twitter_handle | bio |
+---------+------------+-----------+----------------+--------------
-------------------------------------------+----------------+------+
| 1 | Yu | Darvish | yu@texasrangers.com | http://www.face-
book.com/pages/Yu-Darvish/55933782070 | @ YuDarTranslated
| NULL |
+---------+------------+-----------+----------------+-------------------
--------------------------------------+----------------+------+
1 row in set (0.03 sec)
NOTE This output is intentionally left as a bit of a mess because it’s probably just what you see in your
console window, too. The output of your SELECT is all the rows in the table, which won’t fit in a normal command-
line prompt, let alone the limited width of a book page.
In this case, there’s just a single user. Once you retrieve this user, you can pull out the
values for first_name and last_name, email, and so on and stu them in $first_name,
$last_name, and the rest of your variables.
There’s still one big question lurking about: how do you know
which
user to get?
Obviously, in the table output here, there’s only one user. But, what about when
your new app is a hit and you have hundreds, or thousands, or even hundreds
of thousands of users? You need to be able to select just one of those users for
show_user.php
to display.
Think about the ways that users will end up at
show_user.php
. Here are a few:
• They are sent to this page after they’ve created a new user with
create_user
.html
and
create_user.php
.
• They log in to your application and click a link such as My Profile or Update My
Information.
• They select a particular user from a list of users, maybe all the users in the system,
or all their friends, or all the users they’re watching or following.

PHP & MYSQL: THE MISSING MANUAL
202
SHOW ME THE
USER
These situations all have one thing in common: Nobody ever goes to
show_user.php
directly by typing in a URL. In each case, someone selects a user, or creates a user,
or logs in as a user, and then some link takes her to
show_user.php
.
The point is that in every reasonable situation, your code sends the user to
show_user
.php
; therefore, so your code is really in control. If, for example, you need to send
some information to
show_user.php
, that’s possible. What might your code want to
send to
show_user.php
? You want to send the unique ID of the user that
show_user
.php
should load from the database and display.
Take a moment to revisit those same scenarios again:
• The
create_user.php
script creates a user, and the ID of that new user is handed
o, along with your application user, to
show_user.php
.
• Clicking My Profile or Update My Information passes along the current logged-in
user’s ID to
show_user.php
.
• Selecting a user from a list—regardless of what’s in that list—results in a link
to
show_user.php
being followed, and the selected user’s ID being passed to
show_user.php
at the same time.
In each case, your
show_user.php
script can use the ID that it received to look up
the user and then display that user.
The beauty of this solution is not just that it’s possible, because you have control over
all the ways your users might get to
show_user.php
, but it’s also perfect because
you can pass in the ID of the user to show as part of the request, and you’ve already
pulled information out of the request before, by using $_REQUEST.
Add the code highlighted in bold to
show_user.php
:
<?php
$user_id = $_REQUEST['user_id'];
// Code to assign values to the page variables
?>
<html>
<!-- All your HTML and inline PHP -->
</html>
Nothing new here; the only thing that’s dierent from what you’ve done before is
that you’re pulling a request parameter with a new name: user_id.
Now, you can add a WHERE clause to your SELECT:
SELECT *
FROM users
WHERE user_id = $user_id;

CHAPTER 7: GENERATING DYNAMIC WEB PAGES 203
SHOW ME THE
USER
So far, you’ve seen a few WHERE clauses (like the one on page 115), and they do just
what you might expect. The WHERE clause narrows a set of results by applying an
additional condition or restriction to the item you’re looking for. In this case, you’re
saying, “Give me everything (*) from the
users
table, but only for the records (rows)
that have a user_id of the value in $user_id.”
Thus, if your sample user has a user_id of 1, and $user_id is 1, you’ll get that sample
user. If you don’t have any rows that have a user_id of 1, you’ll get nothing back
from the SELECT. Here’s what’s really cool: you made user_id a primary key (with
PRIMARY KEY), which means that you’ll never have more than one result returned.
This means that you don’t have to see how many values are returned, or do anything
special to handle one row or multiple rows. You’ll either get nothing back because
there was no match, or you’ll get just a single row back.
When you put all this together, you can make some really important additions to
show_user.php
:
<?php
require '../../scripts/database_connection.php';
// Get the user ID of the user to show
$user_id = $_REQUEST['user_id'];
// Build the SELECT statement
$select_query = "SELECT * FROM users WHERE user_id = " . $user_id;
// Run the query
$result = mysql_query($select_query);
// Assign values to variables
?>
<html>
<!-- All your HTML and inline PHP -->
</html>
This script now connects to your database, builds the SELECT statement from the
user_id request parameter that was passed to it, and then runs the query. All that’s
left is the one entirely new piece to this script: running through the actual result
from a query, and pulling information from that result.
Pulling Values from a SQL Query Result
The $result variable is a resource, a special type of variable that holds a reference to
more information, as explained in Chapter 5, on page 127. You can pass that resource
to other PHP functions, and use it to get more information.

PHP & MYSQL: THE MISSING MANUAL
204
SHOW ME THE
USER
In the case of a SELECT query, what you really want is all the actual rows that the
query returned, and then for each row, you want the dierent values. That’s exactly
what you can use a resource for, so you’re all set to finish o
show_user.php
and
start accepting requests.
You begin by ensuring that $result has a value. That’s equivalent to ensuring that
$result is not false, which is returned when there’s a problem with your SQL:
// Run the query
$result = mysql_query($select_query);
if ($result) {
// Get the query result rows using $result
} else {
die("Error locating user with ID {$user_id}");
}
This if statement also (marginally) handles errors. If $result is false, something went
wrong, which presumably means the user for whom you were searching by using
$user_id doesn’t exist, or there was a problem finding that user. So far, it doesn’t
format the error nicely, providing you with little information about what actually
happened that caused the problem. For the time being that’s OK; you’ll beef up
your error handling soon, so this if is a decent short-term solution.
Now, you need a new PHP function: mysql_fetch_array. This function takes a re-
source from a previously run SQL query. That’s exactly what you have in $result:
if ($result) {
$row = mysql_fetch_array($result);
// Break up the row into its different fields and assign to variables
} else {
die("Error locating user with ID {$user_id}");
}
Here’s where things get a little odd. Take note of how the preceding script stores
the result from mysql_fetch_array in $row. This implies that mysql_fetch_
array returns a single row from your SQL query—and that’s correct.
But, the function’s name suggests something else: It leads you to believe that an
array
is returned—mysql_fetch_array, not mysql_fetch_row. So, is it a row or is it an array?
Well, it’s both. The mysql_fetch_array function does return an array, but it returns
an array for a single
row
of the query associated with the result you pass into it.
This means that for mysql_fetch_array($result), you’re going to get back a single
row of results, but that the
way
that row is returned is in the form of an array.

CHAPTER 7: GENERATING DYNAMIC WEB PAGES 205
SHOW ME THE
USER
NOTE If you’re already wondering, you can certainly get
every
row of results returned from a query, not
just the first result row. You just keep calling
mysql_fetch_array
, over and over, and it keeps returning the
next row from the results. Eventually,
mysql_fetch_array
will return
false
, which means there are no
more results.
Don’t worry if this seems a little sketchy. Before long, you’ll use
mysql_fetch_array
like this yourself, and it
will all make perfect sense. For now, be aware that every time you call this function, you’ll get one row of results
(or
false
if there are no rows left to return), and that row is an array of values.
Because you know how to work with arrays, getting back an array in $row is good
news. In fact, $row is just like another array you know, the $_REQUEST array. And just
like $_REQUEST, you have not only a list of values, but values that are keyed based
on a name.
When a request came in with a parameter named “first_name,” you pulled the value
for that parameter with $_REQUEST['first_name']. The same principle applies to
$row. You can give it the name of a column returned in your SQL query, and you’ll
get the value for that column, in the specific row you’re examining.
Once you have $row, you can just grab all the columns you want, and then stu
them into some variables:
// Run the query
$result = mysql_query($select_query);
if ($result) {
$row = mysql_fetch_array($result);
$first_name = $row['first_name'];
$last_name = $row['last_name'];
$bio = $row['bio'];
$email = $row['email'];
$facebook_url = $row['facebook_url'];
$twitter_handle = $row['twitter_handle'];
// Turn $twitter_handle into a URL
$twitter_url = "http://www.twitter.com/" .
substr($twitter_handle, $position + 1);
// To be added later
$user_image = "/not/yet/implemented.jpg";
} else {
die("Error locating user with ID {$user_id}");
}

PHP & MYSQL: THE MISSING MANUAL
206
SHOW ME THE
USER
NOTE At the end of this
if
statement, you should add the code preceding that creates a URL for the Twitter
handle. You’ll probably remember this code, because it’s the same code you used in earlier chapters to build this
URL, although back then you weren’t getting the user’s Twitter handle from a database.
Also add the code that fills in
$user_image
with a dummy value until you come back later to fix the user’s
image for real. You could also use a stock image for when there’s no picture, like this:
$user_image = "../../images/missing_user.png";
There’s a sample of an image like this in the downloadable examples at
www.missingmanuals.com/cds/php-
mysqlmm2e
if you want to go this route for now.
At this point, you have a fully functional script! In fact, other than figuring out how to
use the $result resource with mysql_fetch_array, all of this should be no problem
for you.
Passing a User ID into
show_user.php
At this point, you need to get a user ID into your script so that it can use that ID to
look up a user, get her information, and display it. But, before you spend a bunch of
time on other scripts, it’s a good idea to ensure that
show_user.php
works.
Fortunately, there’s a very easy way to test your script. The $_REQUEST array has all
the information passed into your script through its request, including extra informa-
tion passed through the request URL itself. Remember, this isn’t the ordinary way
you’d either pass information into
show_user.php
or even access
show_user.php
in
the first place. Instead, scripts like
create_user.php,
or maybe a My Profile button,
would direct your users to this script.
But for now, you’re just testing. So, go directly to the page by using a URL like
yellowtagmedia.com/phpMM/ch07/scripts/show_user.php
. As long as you’re there,
you can feed that script request data with request parameters on the URL itself.
You can simply add these to the URL, after a ? (question mark) character. (For more
information on using a
/scripts
directory, see the box on page 208.)
The format is basically as follows:
[scheme]://[domain-name]/[location-of-file]?[request-paramaters]
For example, you might use
mysite.com/scripts/show_user.php?first_name=Mario
.
Now, you could grab $_REQUEST['first_name'], and you’d get back “Lance.”
You can stack these up, too; just separate the parameters with an & (ampersand)
character. You could go further and do
mysite.com/scripts/show_user.php?first_
name=Mario&last_name=Beauregard
.
NOTE More formally, the file name (
show_user.php
) is the
path
. The information after that (
?first_
name=Mario&last_name=Beauregard
) is the
query string
.
To do so, add the user ID of the user you created much earlier (or one of the us-
ers, if you inserted more than one) and try out
show_user.php
, with a URL like
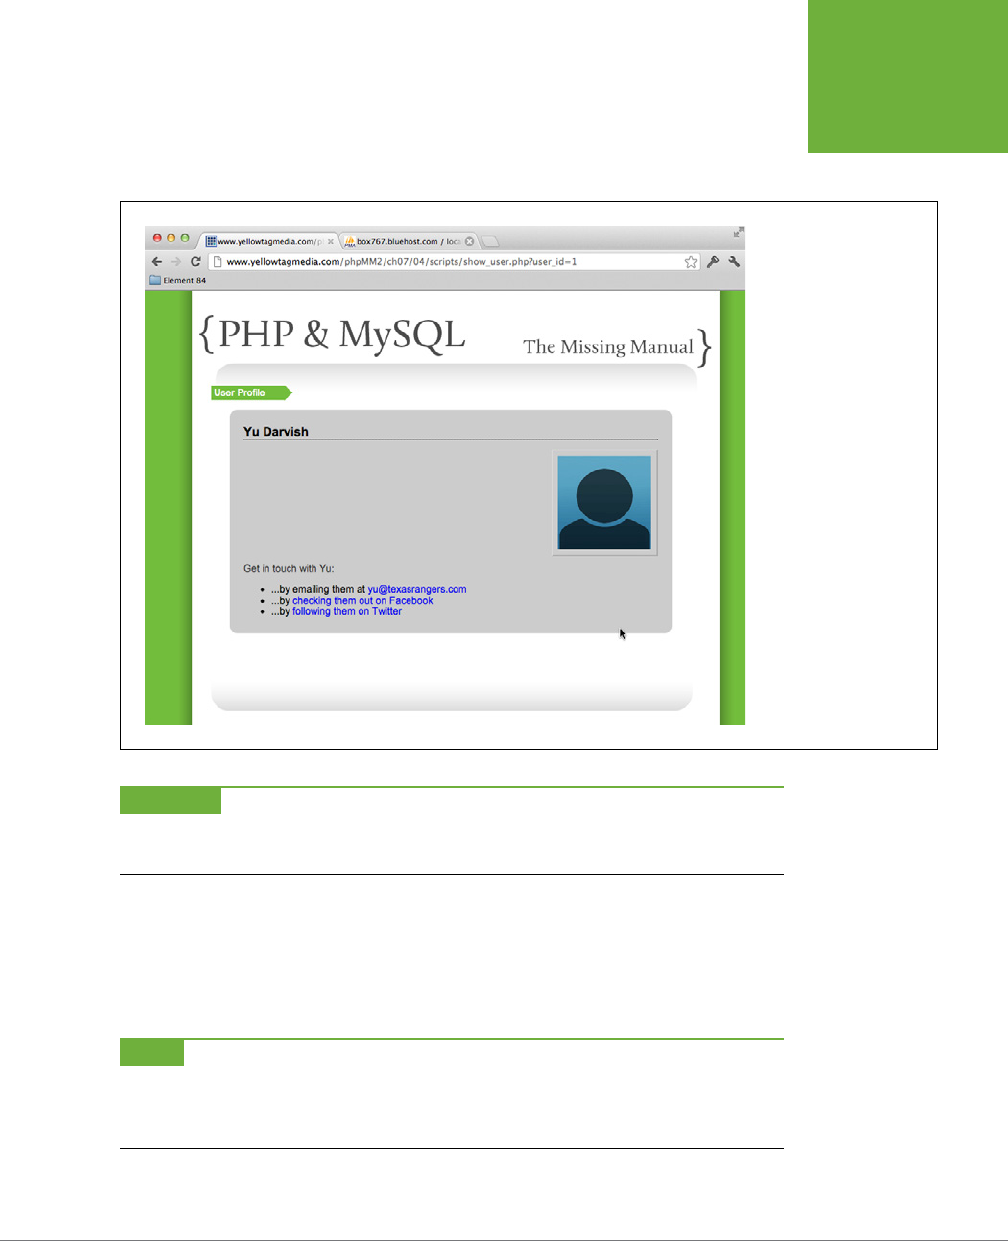
CHAPTER 7: GENERATING DYNAMIC WEB PAGES 207
SHOW ME THE
USER
yellowtagmedia.com/phpMM/ch07/scripts/show_user.php?user_id=1
. You’ll get
something back similar to Figure 7-11, which is a validation of all the work you’ve
been putting into SQL and
show_user.php
.
FIGURE 7-11
There’s always room for
error when a form or web
page sends information to
another page or a script.
Anytime you can test just
a single script in isolation,
you’re going a long way
toward removing potential
errors and hard-to-find
bugs that only pop up
when two web pages
talk to one another, as
compared to when each is
operating in isolation.
WARNING Request parameters are case-sensitive, as is PHP. Therefore, asking for
$_REQUEST['user_
id']
won’t match a request parameter named
USER_ID
or
user_Id
. Be careful to ensure that your uppercase
and lowercase letters all match up.
At this point, you’ve done just about everything you can to ensure that
show_user
.php
is going to behave. It’s missing some information, like the user’s pic and bio,
but you can deal with the picture later, and you can take care of the bio by updating
create_user.php
. Other than that, it’s time to leave
show_user.php
alone and revisit
the script that actually gets users to
show_user.php
in the first place.
NOTE There is probably one more thing you could do: manually INSERT a user with a bio into your users
table and then try out
show_user.php
again. You might want to do that now and verify that
show_user.php
is
just as you want it. You’ll test that same bit of functionality in a little while once you update
create_user.php
,
but there’s no such thing as too much testing.

PHP & MYSQL: THE MISSING MANUAL
208
REVISITING
(AND
REDIRECTING)
THE CREATE
USER SCRIPT
DESIGN TIME
Is a
scripts/
Directory a Good Idea?
Storing all your scripts in a directory (or, technically, a sub-
directory) called
scripts/
is a practice that largely dates back
to older programming languages like Perl and CGI (
Common
Gateway Interface
, a way of calling external programs like
server-side scripts). In those days, programmers maintained
a really firm separation between client-side programs, or
views, and server-side programs. Thus, a script never really did
anything that resulted directly in a web page being displayed;
they were just programs called by other processes.
But PHP really blurs the line between what’s a script, and
what’s a viewable page. The
show_user.php
script is actually
a lot more HTML than it is PHP, and it’s going to be common
for a user to actually go to
show_user.php
directly. In other
words, PHP is more than just a way to write scripts to which
your forms submit behind the scenes. There will be lots of
times when users click a link to a PHP page rather than an HTML
page, or even type in a URL for the PHP script in his browser.
In fact, there are some popular pieces of software that essen-
tially handle
all
HTML within PHP. WordPress (
www.wordpress
.org
) is a hugely popular blogging and content management
system that’s built on PHP. In that system, your site’s home
page is actually
index.php
, not
index.html
.
At that point, a
scripts/
directory doesn’t make sense. Your
users don’t care whether they’re getting a page from an HTML
file or a PHP script, as long as it looks and acts the way they
expect. And adding a
scripts/
directory actually increases what
your users have to know about your system rather than making
things more transparent.
Therefore, beginning in Chapter 8, this change will kick into
gear. It’s good that you’ve been thinking about the difference
between what you’ve been doing as a web page creator with
HTML, CSS, and JavaScript, and your new PHP skills. But, now
that you’ve moved beyond just submitting forms to PHP, it’s
time to blur the lines even further and let your PHP scripts live
alongside your HTML.
Revisiting (and Redirecting) the
Create User Script
The changes you made in the previous section are great, but there’s more to do.
For example, you have a new bio column, but no place to enter that information
when users sign up. You need
create_user.php
to deal with that information when
it comes in from your signup form. And then there’s getting a user from the signup
form to
show_user.php
—and passing along the newly created user’s ID, as well. It
seems like a lot, but with what you know, this change will be a breeze.
Updating Your User Signup Form
The first change—the bio—is one of the easiest. Open your
create_user.html
page
and add a new form field so that your users can enter a biography. Leave plenty
of space: Have you seen how much information people write about themselves on
Facebook these days? Here’s the updated version of
create_user.html
:

CHAPTER 7: GENERATING DYNAMIC WEB PAGES 209
REVISITING
(AND
REDIRECTING)
THE CREATE
USER SCRIPT
<html>
<head>
<link href="../css/phpMM.css" rel="stylesheet" type="text/css" />
</head>
<body>
<div id="header"><h1>PHP & MySQL: The Missing Manual</h1></div>
<div id="example">User Signup</div>
<div id="content">
<h1>Join the Missing Manual (Digital) Social Club</h1>
<p>Please enter your online connections below:</p>
<form action="scripts/create_user.php" method="POST">
<fieldset>
<label for="first_name">First Name:</label>
<input type="text" name="first_name" size="20" /><br />
<label for="last_name">Last Name:</label>
<input type="text" name="last_name" size="20" /><br />
<label for="email">E-Mail Address:</label>
<input type="text" name="email" size="50" /><br />
<label for="facebook_url">Facebook URL:</label>
<input type="text" name="facebook_url" size="50" /><br />
<label for="twitter_handle">Twitter Handle:</label>
<input type="text" name="twitter_handle" size="20" /><br />
<label for="bio">Bio:</label>
<textarea name="bio" cols="40" rows="10"></textarea>
</fieldset>
<br />
<fieldset class="center">
<input type="submit" value="Join the Club" />
<input type="reset" value="Clear and Restart" />
</fieldset>
</form>
</div>
<div id="footer"></div>
</body>
</html>
While you’re at it, you might as well let your users pick an image for their profile.
You won’t write any code in
create_user.php
to handle this, but it’s coming soon,
and you’ll save a trip back to
create_user.html
when you’re ready to add images.
<html>
<!-- head section -->

PHP & MYSQL: THE MISSING MANUAL
210
REVISITING
(AND
REDIRECTING)
THE CREATE
USER SCRIPT
<body>
<div id="header"><h1>PHP & MySQL: The Missing Manual</h1></div>
<div id="example">User Signup</div>
<div id="content">
<h1>Join the Missing Manual (Digital) Social Club</h1>
<p>Please enter your online connections below:</p>
<form action="scripts/create_user.php" method="POST"
enctype="multipart/form-data">
<fieldset>
<label for="first_name">First Name:</label>
<input type="text" name="first_name" size="20" /><br />
<label for="last_name">Last Name:</label>
<input type="text" name="last_name" size="20" /><br />
<label for="email">E-Mail Address:</label>
<input type="text" name="email" size="50" /><br />
<label for="facebook_url">Facebook URL:</label>
<input type="text" name="facebook_url" size="50" /><br />
<label for="twitter_handle">Twitter Handle:</label>
<input type="text" name="twitter_handle" size="20" /><br />
<label for="user_pic">Upload a picture:</label>
<input type="file" name="user_pic" size="30" />
<label for="bio">Bio:</label>
<textarea name="bio" cols="40" rows="10"></textarea>
</fieldset>
<!-- Buttons for submission and resetting the form -->
</body>
</html>
You need to change the form tag a bit, because now you’re actually uploading a
file to a server from your user’s machine. To do this, add the new enctype attribute
with the value "multipart/form-data". That alerts any scripts receiving this form’s
input to expect more than just the values in the input fields, like the name of the
file. A form like this also submits the data associated with those fields; in this case,
that’s the actual file that the user selects to upload.
Then, you add a new input of type “file” which lets the user browse his hard drive,
select a file, and upload that file. By the way, this code is almost boilerplate. Every
time you give your users the opportunity to upload a file, this is the set of changes
you’ll need to make.
NOTE If you want to start thinking ahead, the million-dollar question is, “Where do you store this image?”
You have to set up to let the user upload the image; that’s required for your scripts and code to work with it.
However, do you save the image on your server’s file system and reference it by using a field in your
users
table?
Or, do you actually store it in your database? You’ll develop your own answer to this question in just a few chapters.
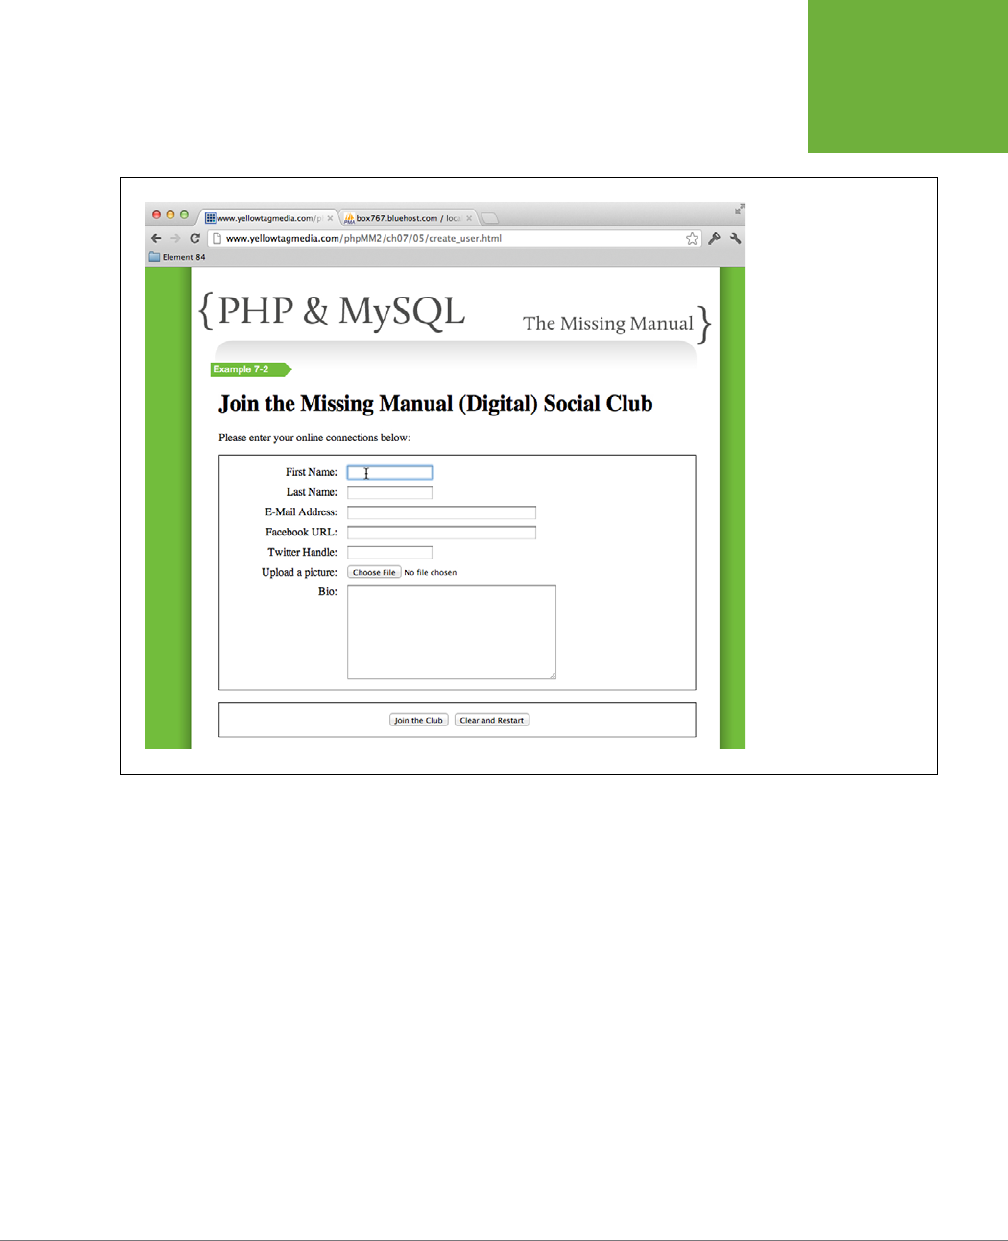
CHAPTER 7: GENERATING DYNAMIC WEB PAGES 211
REVISITING
(AND
REDIRECTING)
THE CREATE
USER SCRIPT
Save your changes here and then open your form in a browser. You should see your
updated form, similar to Figure 7-12.
FIGURE 7-12
Except for the new
Choose File button, your
form doesn’t look much
different when you add
a new file input element
or change your form to
submit multipart data.
Behind the scenes, though,
your form is sending not
just the name that ends
up in each form field, but
anything that’s connected
to that name—like the
file that your user selects
when he clicks that button.
If you fill in some values now, without changes to
create_user.php
, you’ll create a
new user without a bio.
Updating Your User Creation Script
The next change to
create_user.php
grabs the new bio request variable and adds
it to your INSERT statement:
<?php
require '../../scripts/database_connection.php';
$first_name = trim($_REQUEST['first_name']);
$last_name = trim($_REQUEST['last_name']);
$email = trim($_REQUEST['email']);
$bio = trim($_REQUEST['bio']);
// And other request variables follow...

PHP & MYSQL: THE MISSING MANUAL
212
REVISITING
(AND
REDIRECTING)
THE CREATE
USER SCRIPT
$insert_sql = "INSERT INTO users (first_name, last_name, email, bio," .
"facebook_url, twitter_handle) " .
"VALUES ('{$first_name}', '{$last_name}', '{$email}', '{$bio}' "
.
"'{$facebook_url}', '{$twitter_handle}');";
// Insert the user into the database
mysql_query($insert_sql);
?>
Submit your new form. Notice that there’s a new column—bio—with values happily
dropped into your database.
WARNING Be sure you’ve run the ALTER TABLE statement that adds the
bio
column to your
users
table
(page 194) before trying this out.
In fact, you can try this out by filling out
create_user.html
and clicking Submit. Then,
try this SELECT statement:
SELECT first_name, last_name, bio
FROM users;
Your result should speak for itself:
| first_name | last_name | bio
| Yu | Darvish |NULL |
| David | Ramirez |By breaking through heartache,
David Ramirez has gone on a search for understanding. The
Austin resident and frequent traveler to clubs, theaters
and listening rooms all over the country, has come to a
phase in his creative life where the tears have dried and
moving on looks like the best option.
You can also see that old users—in this case, the Yu Darvish entry—shows NULL for
the bio, because that user was created before a bio column existed.
Next, you need to redirect your user over to the
show_user.php
script and then get
the ID of the user you just created into that script, as well.
The first of these is easy:
<?php
// Everything else you've already done
// Insert the user into the database
mysql_query($insert_sql);

CHAPTER 7: GENERATING DYNAMIC WEB PAGES 213
REVISITING
(AND
REDIRECTING)
THE CREATE
USER SCRIPT
// Redirect the user to the page that displays user information
header("Location: show_user.php");
exit();
?>
The header function sends a raw hypertext transfer protocol (HTTP) header to your
user’s browser. (HTTP is the language of web trac. It’s the same
http://
you put
at the beginning of most of your URLs in your browser’s address bar.) This function
directly manipulates the location of your user’s page.
In this case, you’re changing the location from the current one to a new one: the
show_user.php
script. There are a couple things that are critical to get this working
correctly, though:
1. The header must be called
before
any other output in your script. You can’t
echo out anything. Nor can you print out an <html> tag or anything else. The
header is first, or problems arise.
2. The location reference must be a URL, either relative or absolute. This means
that you could put
http://www.google.com
as the location, or
../../scripts/
database_connection.php
, or in this case, a script in the same directory as this
one,
show_user.php
.
These are simple rules but they’re also really important ones. Get them right, or
expect header to fail miserably.
All that’s left now is getting that pesky user ID. To do that, you need something
that’s one step removed from your current PHP knowledge: an incredibly handy
PHP function called mysql_insert_id. This isn’t the sort of function you’ll easily find
unless you’re looking for, say, a function to get the ID of the last row INSERTed into
a database table with an AUTO_INCREMENT column.
Yes, that’s the exact definition of mysql_insert_id! It’s built exactly to do what you
want to do: get an ID without any additional SELECTs or work.
NOTE To be fair,
mysql_insert_id
was always there, and it’s a certain way of coding that makes it so
useful. But, because you’re coding that way—using tried-and-true PHP best practices—you get to use a function
like
mysql_insert_id
just as it was intended, which makes your life a lot easier.
Even though you can pass a resource into mysql_insert_id, it will automatically use
the last opened resource, which is perfect. Just add this after your INSERT is called via
mysql_query, and it will automatically reference the resource returned from that call.
What does it return for a value? Just the ID of the user you want. You can actually
tag that onto the URL, just as when you were typing in your URL manually:
<?php
// Everything else you've already done
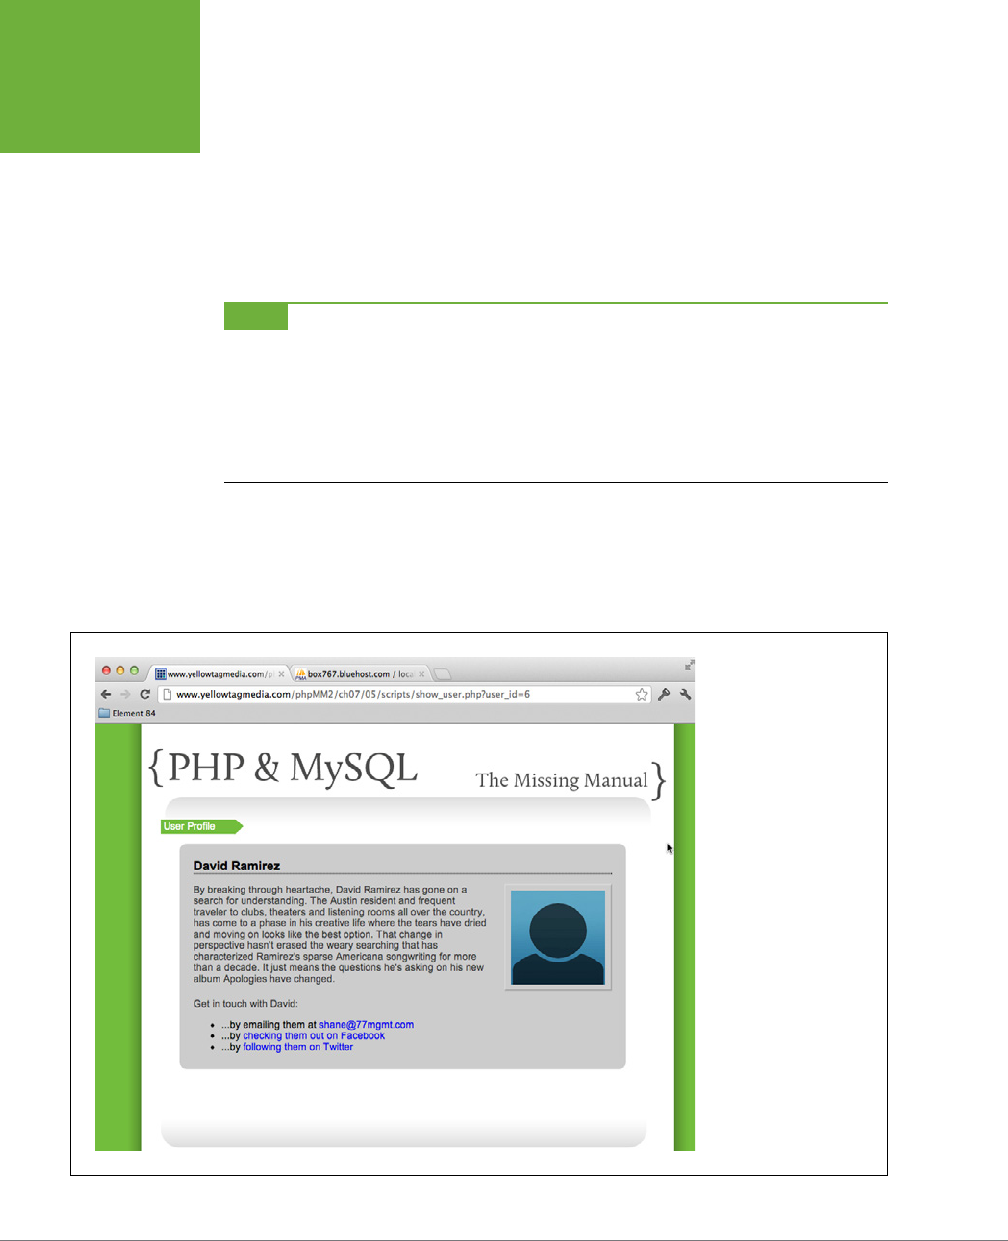
PHP & MYSQL: THE MISSING MANUAL
214
REVISITING
(AND
REDIRECTING)
THE CREATE
USER SCRIPT
// Insert the user into the database
mysql_query($insert_sql);
// Redirect the user to the page that displays user information
header("Location: show_user.php?user_id=" . mysql_insert_id());
?>
That’s it. Add this to
create_user.php
, and you’re ready to try things out.
NOTE You might be tempted to try something like this:
("Location: show_user.php?user_id={mysql_insert_id()}");
Unfortunately, it won’t work. PHP is happy to insert variable values for variable names in curly braces, such as this:
("Location: show_user.php?user_id={$user_id}");
However, it won’t do the same for function calls.
Go ahead and visit your user creation form, fill out some data, and then submit it.
You should be rewarded not by the output of
create_user.php
, but by
show_user
.php
, loading the user that was just created. Figure 7-13 shows why this should be
a fist-pumping moment.
FIGURE 7-13
Think about all that’s
going on here. Your user
enters data and clicks, but
behind the scenes, that
form is submitted to your
script on the server. That
script inserts data into a
database. Then, it directs
the user’s browser to go
visit another script, which
asks the database for ev-
erything about a particular
user. Finally, your user
gets to see all this, mere
instants later. This is a far
cry from just HTML, CSS,
and JavaScript. Welcome
to web programming!

CHAPTER 7: GENERATING DYNAMIC WEB PAGES 215
REVISITING
(AND
REDIRECTING)
THE CREATE
USER SCRIPT
NOTE Here’s something to look forward to. It’s really not great that you’re dropping the user’s ID right
into the browser bar (see Figure 7-13). Any mildly inventive hacker would see that and start trying different IDs
to see what they get. Never fear, though; before long, you’ll not only remove that user ID from the URL, but also
use sessions to enhance security, along with requiring passwords for seeing this sort of data.
Rounding Things Out by Using Regular Expressions (Again)
Your profile page (Figure 7-13) is
almost
perfect. But, that output looks awful with
all that text run together. The user probably pressed Enter a few times to separate
the bio into neat-looking paragraphs, but those paragraphs don’t show up in HTML.
What you really need is a quick and easy way to replace those Enter key presses
with <p></p> tags.
You need a way to find certain specific characters and replace them with other
characters. You know that each occurrence of Enter is represented by \r or \n or
some combination of the two (Chapter 6, page 166), which means that you can use
regular expressions to find them and then replace them.
Using preg_match, update show_user.php to change occurrences of Enter into HTML
<p> tags:
<?php
// Database connection code
// SELECT the correct user
if ($result) {
$row = mysql_fetch_array($result);
$first_name = $row['first_name'];
$last_name = $row['last_name'];
$bio = preg_replace("/[\r\n]+/", "</p><p>", $row['bio']);
$email = $row['email'];
$facebook_url = $row['facebook_url'];
$twitter_handle = $row['twitter_handle'];
// Build the Twitter URL
}
?>
// HTML output
NOTE Be sure you use
[\r\n]+
, and not
[\r\n]*
. The
*
would match
no
occurrence, and you’d end up
with
</p><p>
between every character in the user’s bio. Not so good! The
+
ensures that
\r
or
\n
(or both)
appear
at least
once before replacing them with
</p><p>
.

PHP & MYSQL: THE MISSING MANUAL
216
REVISITING
(AND
REDIRECTING)
THE CREATE
USER SCRIPT
Clearly, you can see why regular expressions are so powerful. You didn’t need lots
of looping and searching, and you don’t have to figure out whether the user entered
\r or \n or \r\n based on her platform. You just plug in the right regular expression,
and you’re o to the races.
All of this put together should give you a version of
show_user.php
like the following:
<?php
require '../../scripts/app_config.php';
require '../../scripts/database_connection.php';
// Get the user ID of the user to show
$user_id = $_REQUEST['user_id'];
// Build the SELECT statement
$select_query = "SELECT * FROM users WHERE user_id = " . $user_id;
// Run the query
$result = mysql_query($select_query);
if ($result) {
$row = mysql_fetch_array($result);
$first_name = $row['first_name'];
$last_name = $row['last_name'];
$bio = preg_replace("/[\r\n]+/", "</p><p>", $row['bio']);
$email = $row['email'];
$facebook_url = $row['facebook_url'];
$twitter_handle = $row['twitter_handle'];
// Turn $twitter_handle into a URL
$twitter_url = "http://www.twitter.com/" .
substr($twitter_handle, $position + 1);
// To be added later
$user_image = "../../images/missing_user.png";
} else {
die("Error locating user with ID {$user_id}");
}
?>
<html>
<head>
<link href="../../css/phpMM.css" rel="stylesheet" type="text/css" />
</head>
<body>
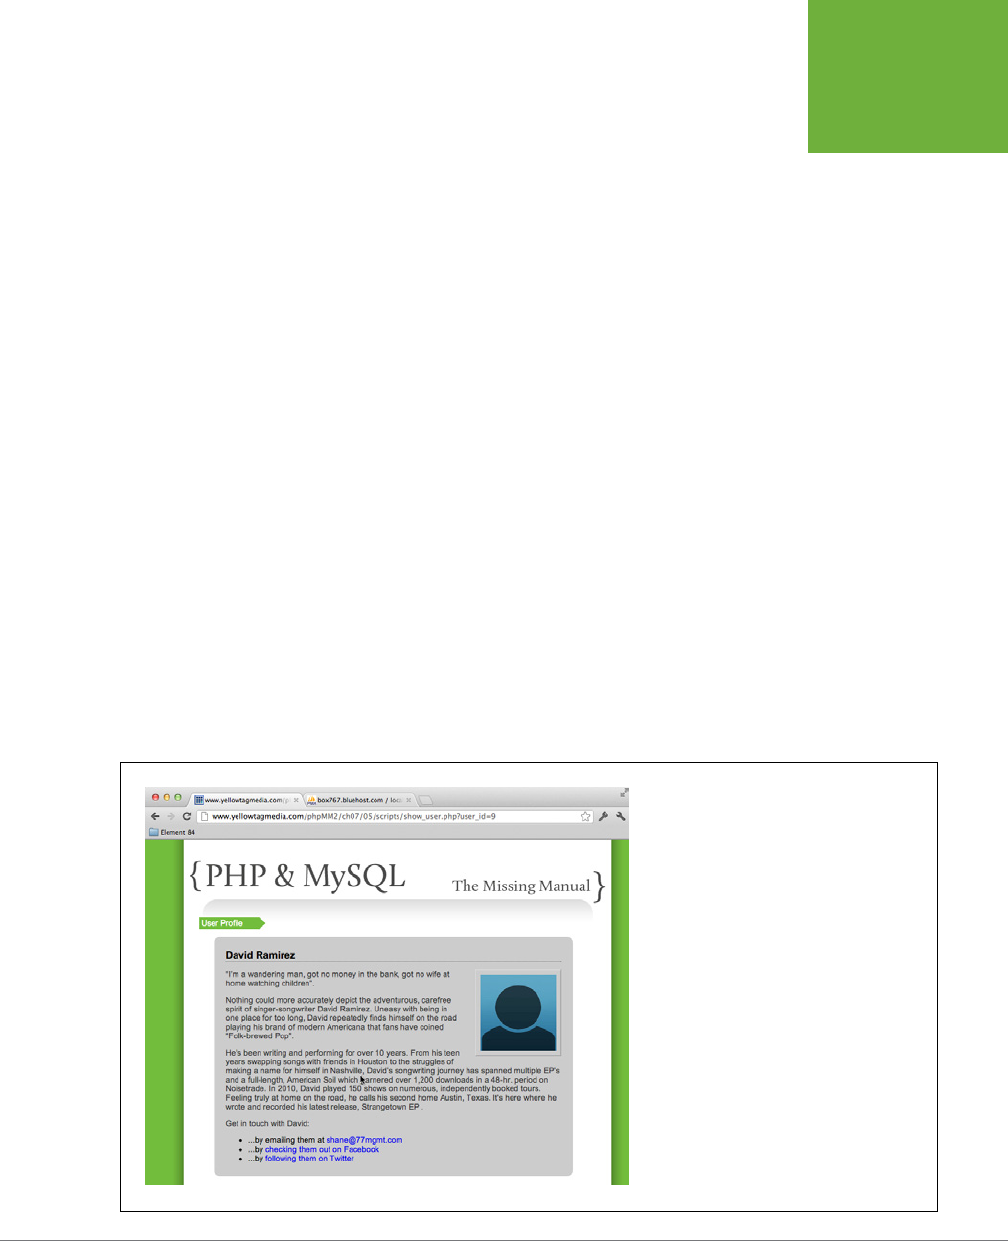
CHAPTER 7: GENERATING DYNAMIC WEB PAGES 217
REVISITING
(AND
REDIRECTING)
THE CREATE
USER SCRIPT
<div id="header"><h1>PHP & MySQL: The Missing Manual</h1></div>
<div id="example">User Profile</div>
<div id="content">
<div class="user_profile">
<h1><?php echo "{$first_name} {$last_name}"; ?></h1>
<p><img src="<?php echo $user_image; ?>" class="user_pic" />
<?php echo $bio; ?></p>
<p class="contact_info">Get in touch with <?php echo $first_name; ?>:</
p>
<ul>
<li>...by emailing them at
<a href="<?php echo $email; ?>"><?php echo $email; ?></a></li>
<li>...by
<a href="<?php echo $facebook_url; ?>">checking them out
on Facebook</a></li>
<li>...by <a href="<?php echo $twitter_url; ?>">following them
on Twitter</a></li>
</ul>
</div>
</div>
<div id="footer"></div>
</body>
</html>
When you take this for a test spin, you’ll finally see not just your user’s information,
but a nicely formatted biography, as presented in Figure 7-14.
FIGURE 7-14
Ensuring that your user’s paragraph breaks are
maintained is another classic case of thinking
about your user. Is it functionally correct to pull
the user’s bio from the database and show it?
Sure. Is it functionally correct to not insert weird
HTML into his bio when you store it? Again, sure.
But when you actually display that value to the
user, he doesn't care what’s in your database. He
only cares that it looks good.

PHP & MYSQL: THE MISSING MANUAL
218
REVISITING
(AND
REDIRECTING)
THE CREATE
USER SCRIPT
FREQUENTLY ASKED QUESTION
The Match Name
Do my field names, variable names, and table column names
have to match?
You may have noticed that there’s a continuous line from
the name of a field in your HTML in
create_user.html
to your
create_user.php
script, into other scripts like
show_user.php
,
and then into your database table itself.
first_name
is
consistent in your HTML, PHP, and MySQL (and therefore your
SQL, too). That’s not required; you can call a field
firstName
and call a variable
user_firstName
and call a column
first_name
, and as long as you keep things straight, all
your code will work just fine. So no, your names don’t all
have to match.
But being consistent in your naming makes your life easier.
You never have to think, “I know what I called that variable
in my PHP, but what was the database column name again?”
Here’s the flipside, though: There are some standard con-
ventions for naming variables in different programming
languages and database structures. The Java language favors
less underscores, and more capitalization. Thus,
firstName
would be preferred over
first_name
; the same is true in C++,
although PHP and languages like Ruby prefer underscores over
capitalization. SQL definitely favors underscores.
What this boils down to is a sort of conditional rule of thumb:
if
you can be consistent without messing up the conventions
of the language within which you’re programing, do it! Your
code is easier to read, from the outermost HTML page to the
innermost database table. Because PHP is one of the languages
that likes underscores, use them, and keep things simple and
consistent across your different pieces of your application.


221
CHAPTER
8
You have a growing set of functional scripts. You have some web pages that
interact with them, CSS to style both your HTML static pages and the HTML
that your scripts dish out, and you could (and should) go in and add some
client-side JavaScript validation. Things are looking pretty good.
But there’s a monster lurking in the deep. Even though you’ve occasionally added
a die or a conditional to ensure that your queries return a result row, your code
really assumes the perfect user: one who always types exactly what you expect,
never enters a phone number in the email field or spaces in the Facebook URL field;
someone who never needs to go back—and in fact never clicks her browser’s Back
button at an inopportune time—and never enters her information into the same
form twice by furiously clicking “Add my information” instead of waiting on her
lousy Internet connection.
Of course, if you start thinking about your friends and family, you probably don’t
know a lot of those types of users. And that’s a problem...a
big
problem. The reality
of web software—and in fact any type of software—is that people will always find
ways to break your best-intended pages, forms, and scripts. They’ll supply you bad
information, leave out required fields, and make a general mess of anything and
everything.
When Things Go Wrong
(and They Will)
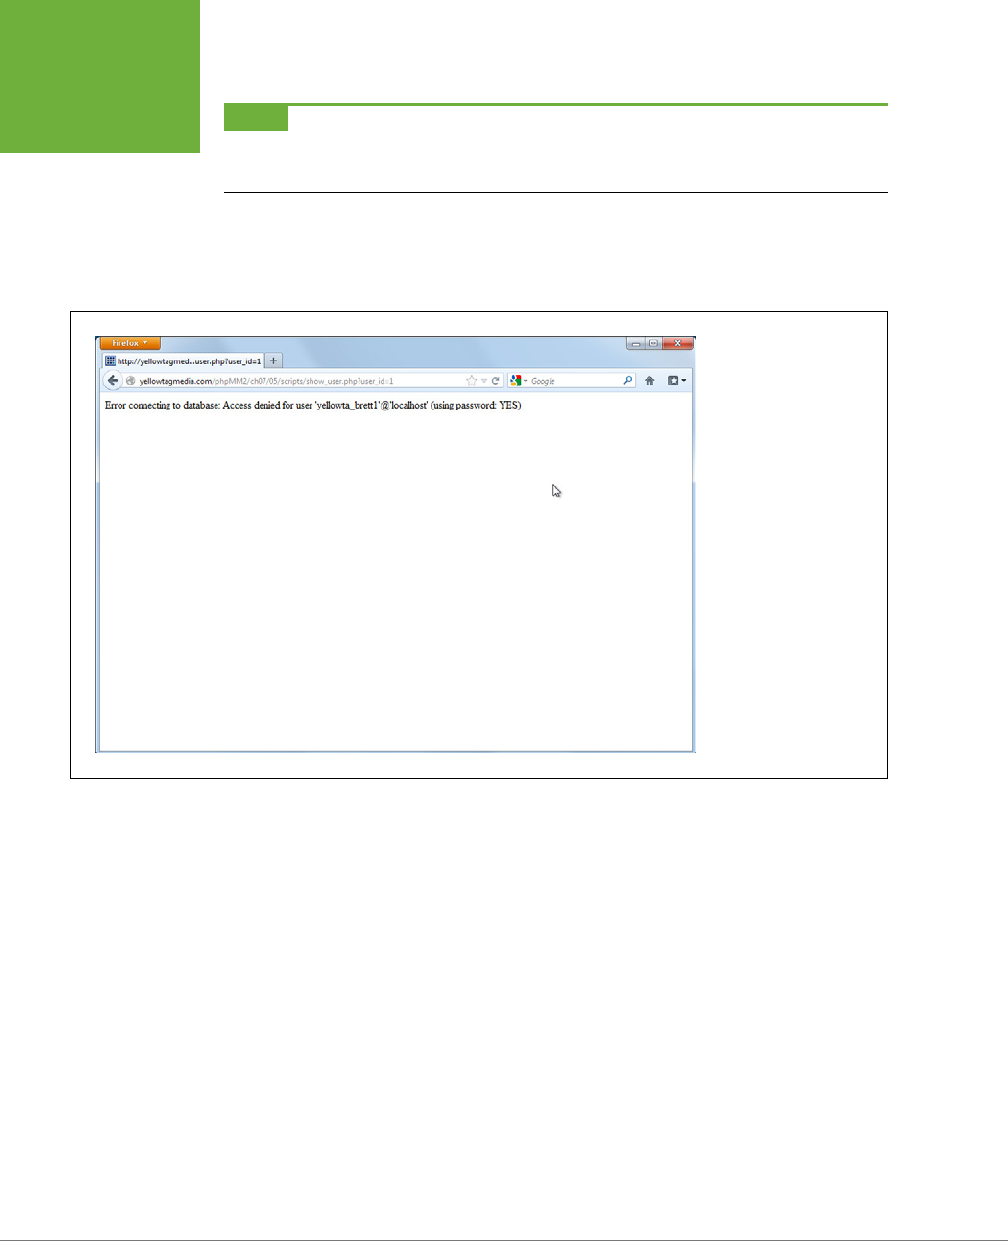
PHP & MYSQL: THE MISSING MANUAL
222
PLANNING
YOUR ERROR
PAGES
NOTE Again, client-side JavaScript is worth a strong mention here. You can reduce a lot of this sort of
problem by validating your user’s information
before
it’s sent to your scripts. For a lot more on how to do that,
check out
JavaScript: The Missing Manual
by David Sawyer McFarland (O’Reilly).
Suppose you’ve typed something wrong in your database connection script. Will
your users see a helpful error message? Or even an email to which they can report
the problem? No, they’ll get the rather disappointing screen shown in Figure 8-1.
FIGURE 8-1
There’s very little that
turns a user off more than
an error message like
this. It’s cryptic, it reveals
information about your
system that it shouldn’t,
and perhaps worst of all
to your user, it’s ugly! As
silly as that sounds, looks
matter on the Web, and
consistent looks matter
a lot. Your errors should
be reported as cleanly as
possible, and in a format
that’s consistent with the
look and feel of the rest of
your site.
A cryptic error message might be fine when it’s only you using your system, testing
things out, making sure your code is right. But this is a poor excuse for handling errors
in any kind of system that’s going to make it out there in the wilds of the Internet.
It gets even worse; try to visit the
show_user.php
URL again and supply a user ID
that you know doesn’t exist. Figure 8-2 shows that, instead of generating an error,
the invalid user ID is being swallowed up by your script. You get an “empty” user
profile, but otherwise it looks like nothing’s wrong.
There’s a lot of work to do here. First things first, though: What exactly should an
error page have on it?
CHAPTER 8: WHEN THINGS GO WRONG (AND THEY WILL) 223
PLANNING
YOUR ERROR
PAGES
FIGURE 8-2
The problem with this web
form is that it looks like
there’s no problem when
in fact there’s actually a
big problem—someone
entered an invalid user ID.
The
show_user.php
script
loads up its HTML, regard-
less of whether a SQL error
occurred. Because PHP is
happy to simply echo out
empty strings for variables
without values, this page
looks almost normal...
except for all the missing
information.
Planning Your Error Pages
When you were creating the page that shows user profiles (page 196), you began
with HTML. You created a mock-up of a simple page and then added PHP as you
needed it. There’s no reason to abandon that approach here, because you’re basically
trying to do the same thing. You want a nice-looking page for displaying errors, so
before you start digging into PHP, get the page looking just right.
NOTE You can find the finished example code for this section on this book’s Missing CD page at
www
.missingmanuals.com/cds/phpmysqlmm2e
.
Create a new HTML page and call it
show_error.html
. You can begin with the same
structure you’ve been using for all your other pages:
<html>
<head>
<link href="../css/phpMM.css" rel="stylesheet" type="text/css" />
</head>
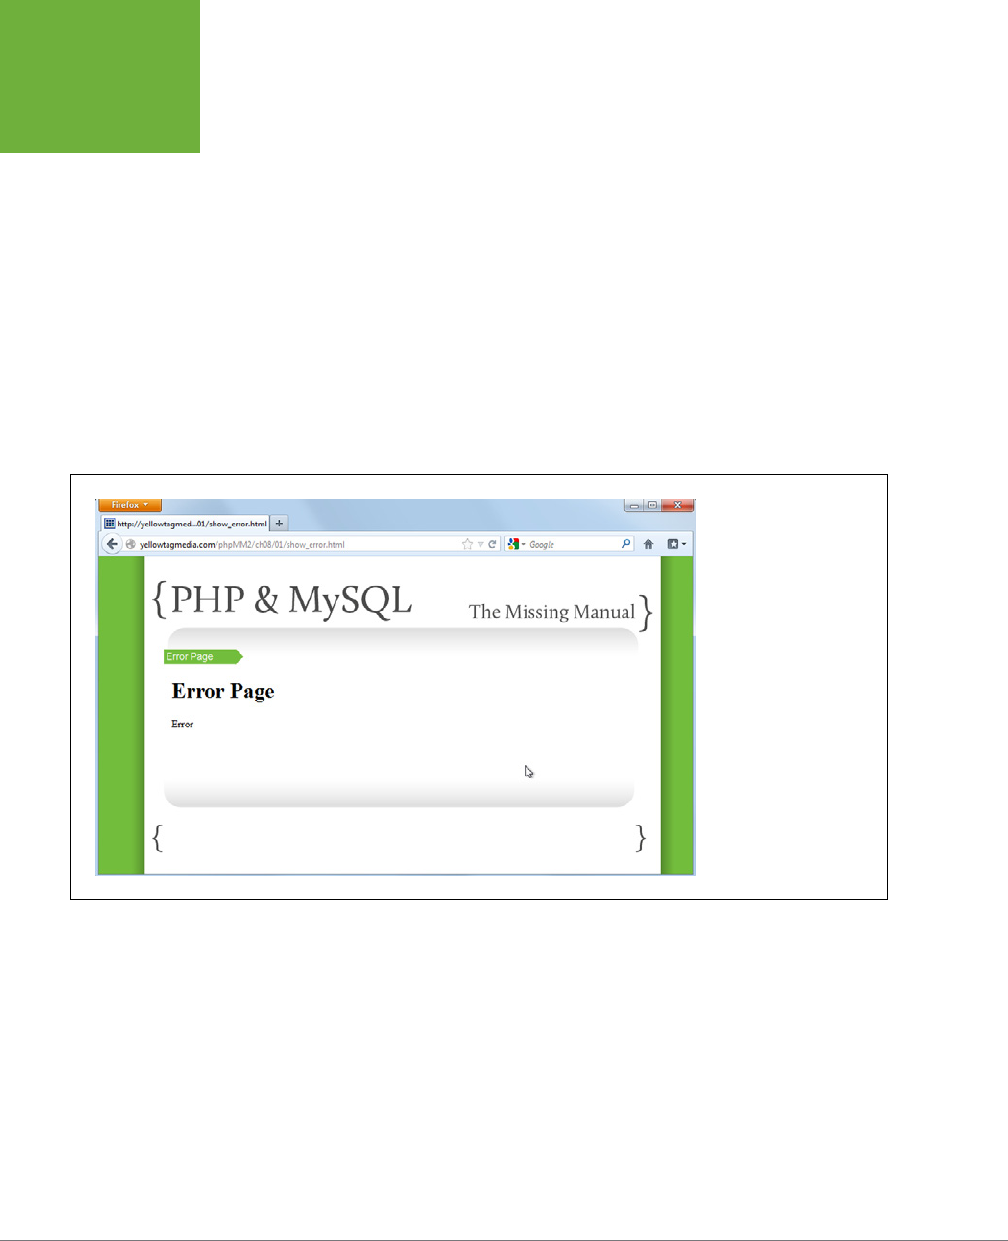
PHP & MYSQL: THE MISSING MANUAL
224
PLANNING
YOUR ERROR
PAGES
<body>
<div id="header"><h1>PHP & MySQL: The Missing Manual</h1></div>
<div id="example">Error Page</div>
<div id="content">
<h1>Error Page</h1>
<p>Error</p>
</div>
<div id="footer"></div>
</body>
</html>
At this point, you have an empty shell (see Figure 8-3), and it’s time to get to work.
FIGURE 8-3
No matter how good a
designer and coder you
are, it’s almost impossible
to do good design and
good coding simultane-
ously. By working on a
mock-up, and then dealing
with code, you can focus
on one concern at a time.
And once you’ve made
that adjustment, it’s
almost always easier to
mock up at least a general
idea of your front-end
before digging into code.
What Should Users See?
Here’s your first question: what goes on this page that helps your users? To answer
that, you really need to think about two things:
1. What information does your user need when an error has occurred?
2. In what tone does that information need to be communicated?

CHAPTER 8: WHEN THINGS GO WRONG (AND THEY WILL) 225
PLANNING
YOUR ERROR
PAGES
TELL YOUR USERS THAT A PROBLEM HAS OCCURRED
The should be pretty obvious. Something has gone wrong; your user needs an expla-
nation. But even in that, there’s nuance. Should you print out an error that looks like
the one here (which is the sort of thing MySQL might kick back to one of your scripts)?
#1054 - Unknown column 'firstname' in 'field list'
Certainly not. Unless the user is a MySQL or PHP programmer, this isn’t helpful at all.
Ideally, you want to translate that into normal human language, like the following:
We're sorry, we couldn't locate the user's first name.
That’s much more readable, although it still doesn’t give the user much to go on.
“Why couldn’t they fine me?” he might ask. “Is my record missing? Is my first name
in the system? Uh oh, has my record been deleted? What’s going on?!?”
NOTE Does that seem overly dramatic? Watch users who aren’t particularly comfortable with computers
and the Internet use a web application, especially if that application contains any of their personal information.
It doesn’t take much to create a lot of worry.
Maybe that error needs to be just as readable, but a lot less specific:
We're sorry! There's been an error processing your request.
Now, that’s something most people can understand. Things can go wrong, and
something has. The details aren’t really relevant for your users; your job is simply
to communicate a problem.
BRING DOWN THE PANIC LEVEL IN THE PROCESS
By now, you’ve figured out that, in terms of information, your user really just needs
to know that a problem has occurred. Details are probably irrelevant and could even
potentially create more worry rather than less. But what about that second item:
In what tone does that information need to be communicated? This sounds pretty
touchy-feely, and in fact, it is. You’re dealing with human users, and that means
human emotions. People become annoyed when the web application they’re using
throws up errors, and although you can reduce the stress and frustration, you can’t
get rid of it altogether.
Regardless of what you say when problems occur, you need to think about
how
you
say it. A stern, bland error message isn’t as comforting as a casual, conversational
one. Sometimes you can even add in a little humor. Take a look at Figure 8-4 for one
way to turn a problem into a conversation point. You can almost bet that a user who
lands on this page—error or not—is going to come back to the site.
PHP & MYSQL: THE MISSING MANUAL
226
PLANNING
YOUR ERROR
PAGES
FIGURE 8-4
This page is worth a few
laughs. Unfortunately, it
has some problems, too: it
assumes that a “404 error”
makes sense to a common
user. Some geekier folks
might get it, but even
when using humor, always
try to be accessible to your
users.
Going full on with humor might be a little strong for your example site, but at least
ensure that you use conversational language. Just getting away from the stern-
sounding, “Error 1282: An exception has occurred” goes a long way.
For example, make a few conversational improvements to your error page mockup,
as in the following example, and notice how quickly this becomes a little more palat-
able when the inevitable error occurs:
<html>
<head>
<link href="../css/phpMM.css" rel="stylesheet" type="text/css" />
</head>
<body>
<div id="header"><h1>PHP & MySQL: The Missing Manual</h1></div>
<div id="example">Uh oh... sorry!</div>
<div id="content">
<h1>We're really sorry...</h1>
<p><img src="../images/error.jpg" class="error" />...but something's
gone wrong. Don't worry, though, we've been notified that there's a
problem, and we take these things seriously. In fact, if you want to
contact us to find out more about what's happened, or you have any
concerns, just <a href="mailto:info@yellowtagmedia.com">email us</a>

CHAPTER 8: WHEN THINGS GO WRONG (AND THEY WILL) 227
PLANNING
YOUR ERROR
PAGES
and we'll be happy to get right back to you.</p>
<p>In the meantime, if you want to go back to the page that caused
the problem, you can do that <a href="javascript:history.go(-1);">by
clicking here.</a> If the same problem occurs, though, you may
want to come back a bit later. We bet we'll have things figured
out by then. Thanks again... we'll see you soon. And again, we're
really sorry for the inconvenience.</p>
</div>
<div id="footer"></div>
</body>
</html>
This text doesn’t say much more than “Yes, we know a problem has occurred, and
we’re working on it.” Everything else is about presentation: conversational words,
an image to break up the cold page (which at the end of the day still
does
say, “Hey,
sorry, something’s broken”), a contact link for email, and another link to revisit the
oending page. (If you do invite users to contact you with problems, be sure to
follow through. See the box on page 228.)
The error page in Figure 8-5 is a heck of a lot less annoying than that in Figure 8-3,
and it took no more work to produce.
FIGURE 8-5
Simple things like error pages and
testing are often what separate
casual and mid-level programmers
from high-end consultants and
senior-level developers. Small things
like this helpful error page keep
systems running and users happy,
which ultimately keeps the lights on
and the bills paid.

PHP & MYSQL: THE MISSING MANUAL
228
PLANNING
YOUR ERROR
PAGES
POWER USERS’ CLINIC
Over-Promise at Your Own Risk
Nowhere other than error pages is it easier to over-promise
and under-deliver. If you tell a user that you’re looking into
his problem, you’d better be looking into it. If you’re going
to supply a contact email address, ensure that it’s real (yes,
lots of times error pages have old, outdated addresses) and
that the email actually gets to someone who will take care of
the problem.
If your user thinks you’re dealing with her issue, and she comes
back in a few hours only to get the same error, all the clever
images and language in the world won’t keep her invested
in your site. On top of that, she’ll be annoyed not just that
something went wrong, but that you lied (well, at least in her
eyes) about working on her issue.
If you’re just getting started or have limited resources, you
might do well to simply state that you get notified when errors
occur, and you usually fix problems within, say, 24 or 36 hours,
or within some time period to which you can really commit.
You might also give him an email address to use if things are
urgent—but only if you watch your email! Another option is to
preformat the email with something in the subject line to look
for, like “URGENT” or “ERROR.” You could even set a rule up on
your email client to highlight such messages.
Whatever you do, make sure that your responsiveness matches
what your error page promises, or you’re going to have a lot
more than a programming problem from which you’ll need
to recover.
One more bit of advice as you begin working in large compa-
nies: never let the marketing team write the error page text
without supervision. The job of marketing people is to sell
and promote, and if error pages are the easiest place to over-
promise, marketing is the easiest place to over-sell capability.
Get someone who is good with words to help you in crafting
your error page, but ultimately, you’re probably the person
fixing problems; be certain that you can back up what ends
up on your error pages.
Know When to Say When
You are now a capable PHP programmer, and you might have some other clever
ideas as to what could go on this error page. You could grab the user’s information
from the database and personalize the page. You could set up a table that contains
error codes, and associated with each error code, a helpful error message that’s easy
to read. Then when an error occurs, you could look up the error code and print out
the corresponding error message from the database.
It’s true that all this (and anything else you might come up with) would make for a
pretty slick error page. But these are ideas that require fairly complex programming
in and of themselves. There’s a database to connect to and queries to execute. And
every time you write a query, or connect to a database, you introduce the possibil-
ity of another error. Where do your users go when your error pages have errors?
As a rule of thumb, you want your error pages free from as much programming as
possible; they shouldn’t interact with databases, and they shouldn’t be fancy. To put
it simply; if your error page can cause an error, you’re in trouble.

CHAPTER 8: WHEN THINGS GO WRONG (AND THEY WILL) 229
FINDING
A MIDDLE
GROUND FOR
ERROR PAGES
WITH PHP
Finding a Middle Ground for Error
Pages with PHP
On one hand, you want pages that are dead simple: some text, an image or two,
and static content. Nothing can go wrong, which means your users get some level
of reassurance and comfort. On the other hand, the error page in Figure 8-5 is aw-
fully generic. It just doesn’t
say
very much. It would be nice to see something about
what actually went wrong, maybe like the following:
<html>
<head>
<link href="../css/phpMM.css" rel="stylesheet" type="text/css" />
</head>
<body>
<div id="header"><h1>PHP & MySQL: The Missing Manual</h1></div>
<div id="example">Uh oh... sorry!</div>
<div id="content">
<h1>We're really sorry...</h1>
<p><img src="../images/error.jpg" class="error" />...but something's
gone wrong. <span class="error_message">the username you entered couldn't
be found in our database.</span></p>
<p>Don't worry, though, we've been notified that there's a
problem, and we take these things seriously. In fact, if you want to
contact us to find out more about what's happened, or you have any
concerns, just <a href="mailto:info@yellowtagmedia.com">email us</a>
and we'll be happy to get right back to you.</p>
<p>In the meantime, if you want to go back to the page that caused
the problem, you can do that <a href="javascript:history.go(-1);">by
clicking here.</a> If the same problem occurs, though, you may
want to come back a bit later. We bet we'll have things figured
out by then. Thanks again... we'll see you soon. And again, we're
really sorry for the inconvenience.</p>
</div>
<div id="footer"></div>
</body>
</html>
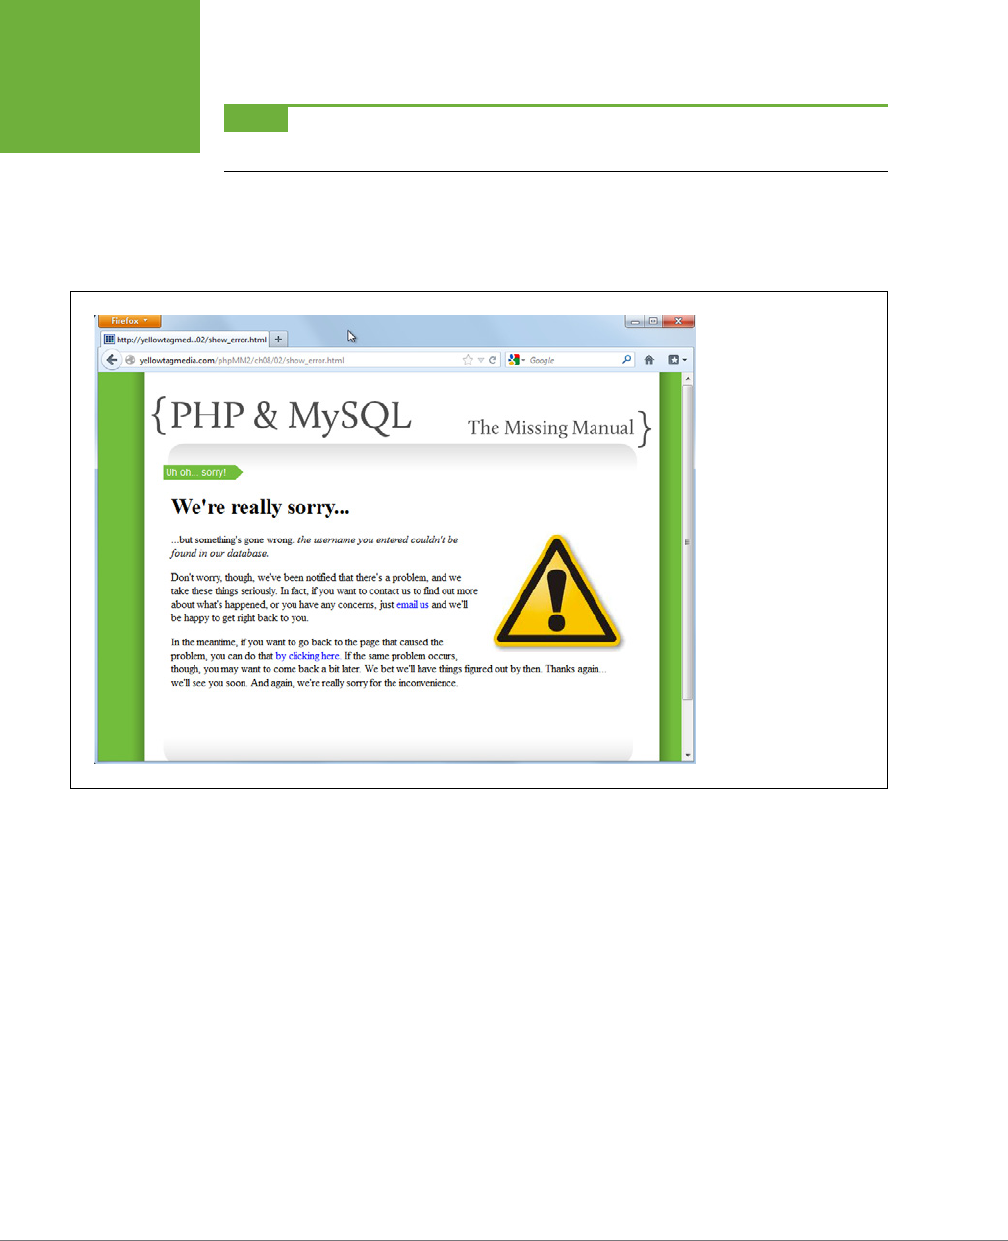
PHP & MYSQL: THE MISSING MANUAL
230
FINDING
A MIDDLE
GROUND FOR
ERROR PAGES
WITH PHP
NOTE You can find the finished example code for this section on this book’s Missing CD page at
www.
missingmanuals.com/cds/phpmysqlmm2e
.
The result, Figure 8-6 seems to be a good compromise between a truly generic error
page and one that is so tricked-out with user-specific information that it becomes
prone to error itself.
FIGURE 8-6
You get two benefits from
this minor change. First,
you’re now showing the
user a message related to
her actual problem. That
little bit of personalization
gives her hope you know
what’s going on. Second,
by attaching a CSS class
to this message, you can
easily change and update
how this message looks.
In the next section, you’ll put this personalized error message in place and still keep
the programming minimal.
Creating a PHP Error Page
Almost everything on your template is straight HTML. The only thing that’s dynamic—
that would change from request to request—is the error message, so your task is
relatively simple from a programming standpoint. Begin by putting in a variable for
the error message; you’ll come back and assign a value to that variable a little later.
<html>
<head>
<link href="../css/phpMM.css" rel="stylesheet" type="text/css" />
</head>
<body>
<div id="header"><h1>PHP & MySQL: The Missing Manual</h1></div>

CHAPTER 8: WHEN THINGS GO WRONG (AND THEY WILL) 231
FINDING
A MIDDLE
GROUND FOR
ERROR PAGES
WITH PHP
<div id="example">Uh oh... sorry!</div>
<div id="content">
<h1>We're really sorry...</h1>
<p><img src="../images/error.jpg" class="error" />
<?php echo $error_message; ?>
<span></p>
<p>Don't worry, though, we've been notified that there's a
problem, and we take these things seriously. In fact, if you want to
contact us to find out more about what's happened, or you have any
concerns, just <a href="mailto:info@yellowtagmedia.com">email us</a>
and we'll be happy to get right back to you.</p>
<p>In the meantime, if you want to go back to the page that caused
the problem, you can do that <a href="javascript:history.go(-1);">by
clicking here.</a> If the same problem occurs, though, you may
want to come back a bit later. We bet we'll have things figured
out by then. Thanks again... we'll see you soon. And again, we're
really sorry for the inconvenience.</p>
</div>
<div id="footer"></div>
</body>
</html>
Save this file as
show_error.php
. But, before you do, keep in mind that this error page
is for all your scripts and HTML pages. So, don’t save it in a
chapter08/
directory;
put it in a
scripts/
directory in your site’s root to ensure that it’s easily accessible.
NOTE If you want to follow along exactly with the book’s structure, save this file in
phpMM2/scripts/
(where
phpMM/
is the root directory in the examples you can download from online) or
phpMM2/ch08/scripts/
, depending
on your directory structure.
Next, you need to get the error message. The least error-prone way to do that is by
using request parameters and the $_REQUEST array.
<?php
$error_message = $_REQUEST['error_message'];
?>
<html>
<!-- Existing HTML and PHP -->
</html>

PHP & MYSQL: THE MISSING MANUAL
232
FINDING
A MIDDLE
GROUND FOR
ERROR PAGES
WITH PHP
What’s so good about this approach? First, it’s about as basic as your PHP program-
ming can be. You’re not using a calculation, per se, you’re just pulling a value out
of an array, instead. Better still, it’s not your own custom array, but one that PHP
provides for you, and even fills for you, using information supplied in the request
to
show_error.php
.
FREQUENTLY ASKED QUESTION
There’s That
scripts/
Directory Again
I thought
scripts/
directories were an outdated practice. Why
is
show_error.php
still in a
scripts/
directory?
In Chapter 7—specifically in the box on page 208—you learned
about the benefits of moving your scripts from nested
scripts/
directories into the main parts of your site. This means that
you probably started placing web forms like
create_user.html
directly alongside
create_user.php
and
show_user.php
. That’s
because your HTML pages and your PHP pages are starting to
be a lot more alike than they are different.
However,
show_error.php
isn’t just another HTML page. It’s
something special—something used across your application. In
fact, it’s just like
database_connection.php
, which you should
also
keep in your main
scripts/
directory. These scripts are really
utilities, not pages that should live alongside other HTML pages.
The best practice is to move to organizing your files by function.
Thus, you might have a directory called
users/
that contains all
your user-related files:
show_user.php
,
create_user.php
, and
create_user.html
. You might have other similar directories, like
groups/
and
social/
and the like.
When you begin to organize by function, your organization
system becomes meaningful. It tells you what things do,
rather than what they are (HTML, CSS, PHP, or whatever). Your
PHP scripts live alongside your HTML pages because they
work
together. In fact, down the line, you might even break things
up further, separating code that’s for creating and displaying
a web page from code that interacts with your database. That
will come later, but for now, keep thinking
function over format
.
It’s more important to group user-related files together than
to have all your PHP scripts together.
So, store your utility scripts in
scripts/
for now. And yes, you
could look at renaming
scripts/
to something like
utilities/
, if
you like. Organize wisely now; when you have 20, 50, or 100
files, you’ll be grateful for the structure.
Testing Your Solution
With your request parameter now in place, it’s time to test it out in a browser. Visit
your script’s URL and add a request parameter. For example, you might use some-
thing like this in your URL:
http://www.yellowtagmedia.com/phpMM2/ch08/scripts/show_error.php
?error_message=There%27s%20been%20a%20problem%20connecting%20to
%20the%20database.
NOTE That URL should all be on one line in your browser bar. Additionally, many browsers will convert
spaces to the web-safe equivalent, that strange
%20
. That’s a way of telling a browser “insert a space.”
You should see something like Figure 8-7, which is a nice-looking error page that
didn’t take lot of work to produce.
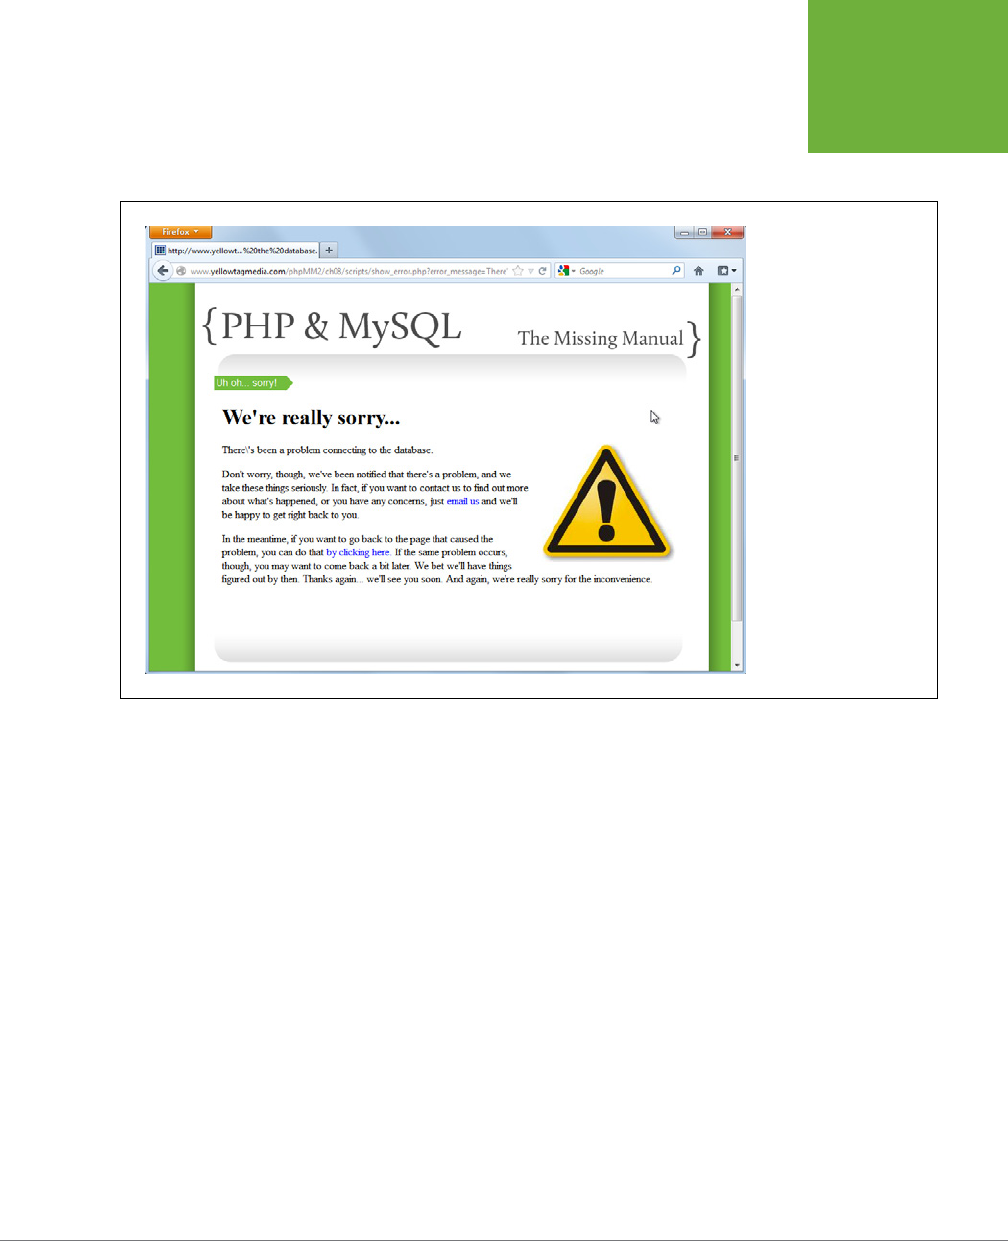
CHAPTER 8: WHEN THINGS GO WRONG (AND THEY WILL) 233
FINDING
A MIDDLE
GROUND FOR
ERROR PAGES
WITH PHP
This simplicity—using request parameters that are just plain text, passed from one
page or script to another—is the beauty of
show_error.php
. There’s very little that
can go wrong. That’s what you want in an error page: elegance and simplicity.
FIGURE 8-7
One of the nicest things
about any script that
uses request parameters
and
$_REQUEST
is
that you can easily test
these scripts with a little
command-line magic. Just
name your parameters
on the command line,
separate the first one from
your script with
?
, and
then separate multiple
request parameters from
one another with
&
.
You do need to make one fix, though: that backslash showing up before a single
apostrophe ("There\'s" in the first sentence) is no good. You can get rid of that with
a little regular expression magic. Replace all occurrences of a backslash with...well,
with nothing:
$error_message = preg_replace("/\\\\/", '',
$_REQUEST['error_message']);
PHP has an oddity in that you need to actually use four back slashes to match a
single backslash. So, \\\\ matches \, oddly enough. That’s because you’re sort of
“fighting” the PHP escape mechanism—which uses a backslash (For a refresher see
the box on page 158).
Expect the Unexpected
Things are looking good. But once again, you’re assuming that things go just the
way you want. In fact, that’s exactly the sort of thinking that leads people to ignore
error pages. If you need to deal with problems to the point that you’re
creating
an
error page, you’d better believe that problems can also occur when you’re actually
on
the error page.
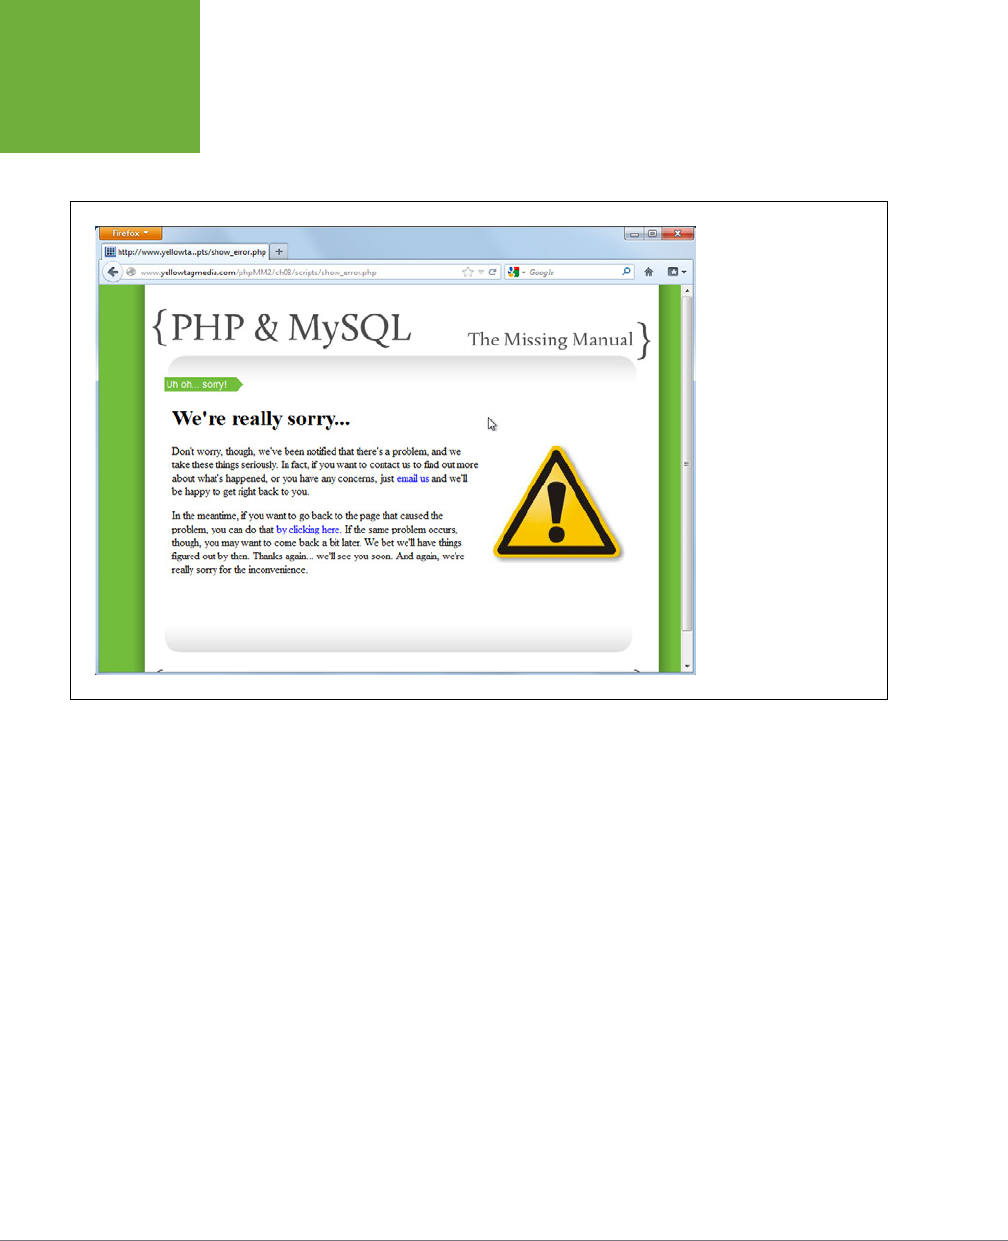
PHP & MYSQL: THE MISSING MANUAL
234
FINDING
A MIDDLE
GROUND FOR
ERROR PAGES
WITH PHP
Thankfully, you’ve cut down on most of that by keeping your error page simple (read:
less error prone). But what if there’s no error_message request parameter? In that
case, you get something like Figure 8-8.
FIGURE 8-8
The kind of error page
you’ve created in the
previous section is still a
bit incomplete. There’s no
information about what
went wrong, and not even
an acknowledgement that
there’s been an error; look
at Figure 8-6 for a com-
parison. Thankfully, that’s
easy enough to fix.
You’re back to instilling your visitors with possible confusion, and that’s no good.
There’s an easy solution, though: just deal with the situation when there’s no request
parameter:
<?php
if (isset($_REQUEST['error_message'])) {
$error_message = preg_replace("/\\\\/", '',
$_REQUEST['error_message']);
} else {
$error_message = "Something went wrong, and that's " .
"how you ended up here.";
}
?>
<html>
<!-- Existing HTML and PHP -->
</html>
You haven’t seen isset before, but here’s how it works: if the error_message
$_REQUEST parameter is set—which just means that it has a value—things are fine.
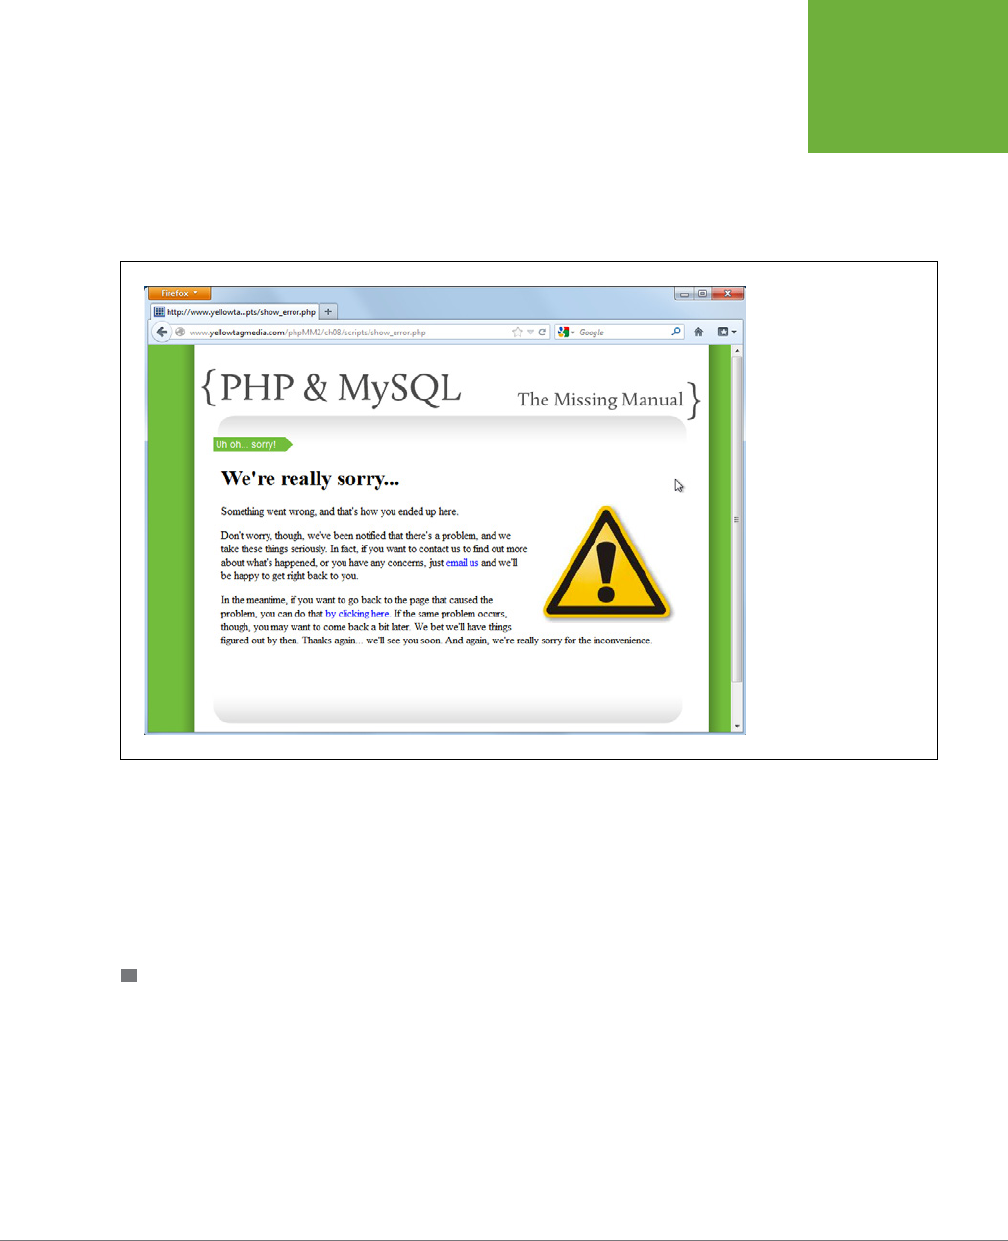
CHAPTER 8: WHEN THINGS GO WRONG (AND THEY WILL) 235
FINDING
A MIDDLE
GROUND FOR
ERROR PAGES
WITH PHP
Go ahead and set the $error_message variable. If there’s not a request parameter for
error_message, set the $error_message variable to a conversational, albeit generic,
message. isset returns true if a variable has been assigned something and is not null.
Go to your error page again, without anything on the URL, and you’ll get a nice-
looking page once again. Check out Figure 8-9 for what you should expect.
FIGURE 8-9
You could probably
tweak the style on this
page a bit. Although the
italics worked well for the
explicit error message in
Figure 8-6, it’s not quite
effective here. If you want
to get a little more fancy,
you could set the CSS class
on the span within which
the error message prints,
based on whether you
have a generic error mes-
sage, like the one shown
here, or a specific one.
Welcome to Security and Phishing
And now, welcome to a big, fat, ugly problem. The way your page is set up at this
juncture, anyone with a bit of programming prowess could supply his own error
message toyour web page, simply by adding it to any URL that points to your ap-
plication:
?error_message=your custom error message
. That’s one way to employ
a technique of Internet vandalism called
phishing
.
PHISHING AND SUBTLE REDIRECTION
Phishing is a technique by which someone receives what
appears
to be a trusted
URL that in fact sends that user to an untrusted website. Suppose you get an email
with a link to a site that looks like this:
http://yellowtagmedia.com/phpMM2/ch08/scripts/show_error.php?error_
message=%3Ca%20href=%22http://www.amctv.com/shows/breaking-
bad%22%3EClick%20Here%20To%20Report%20Your%20Error%3C/a%3E
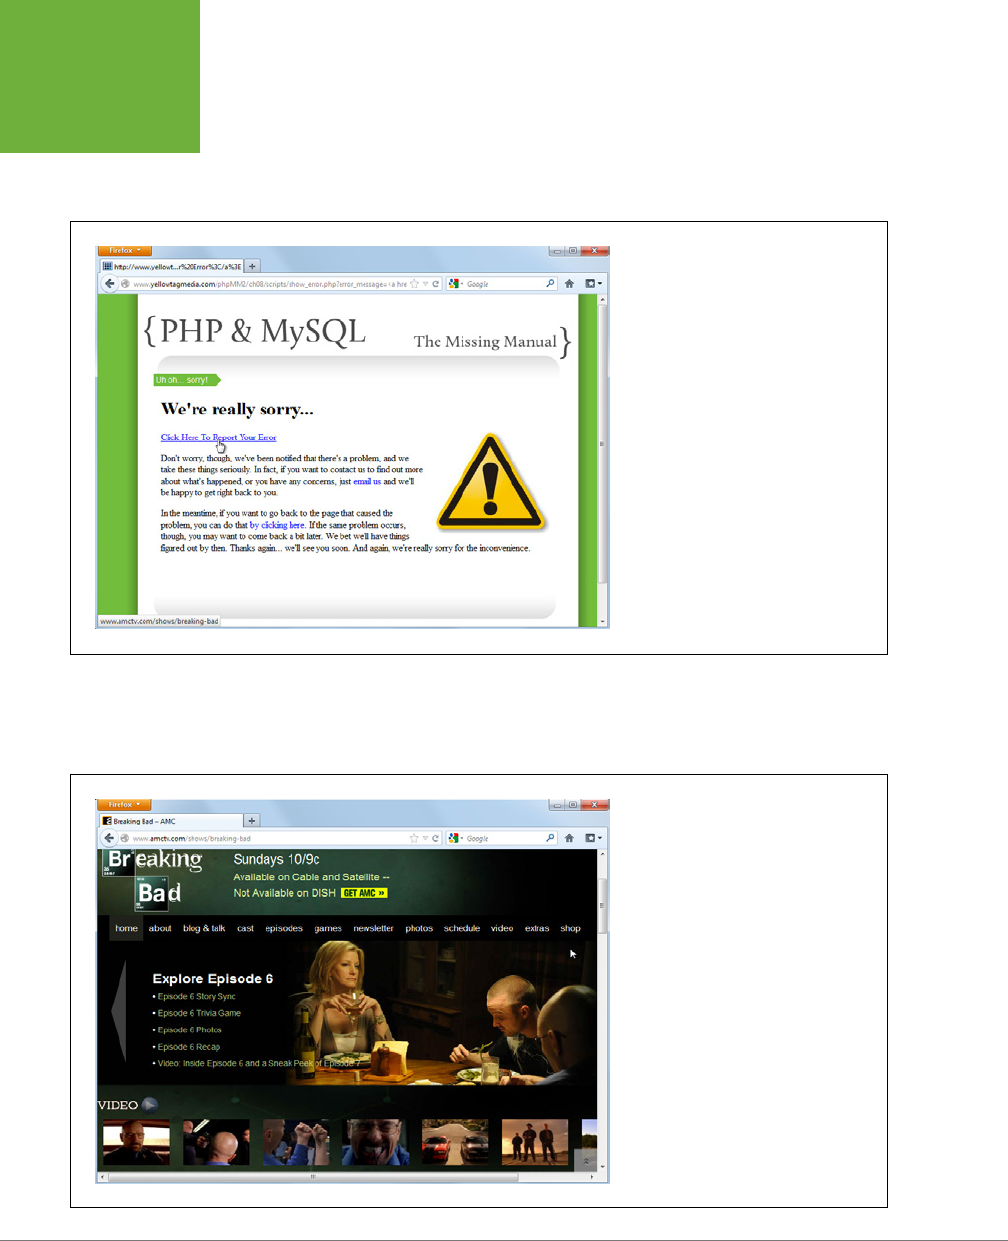
PHP & MYSQL: THE MISSING MANUAL
236
FINDING
A MIDDLE
GROUND FOR
ERROR PAGES
WITH PHP
It has lots of gibberish at the end, but you recognize the important part, the host name:
yellowtagmedia.com
. Throughout this book, you’ve been seeing
yellowtagmedia.com
as a domain name. (It’s the author’s domain, so this is a perfectly fine site to visit.) So,
you go ahead and click the link, and you see something like Figure 8-10.
FIGURE 8-10
The long, tortured URL on page 235 brings
up a customized error page, just like the
one you’ve built yourself. It has an error
message, and you can even apparently
click through to report details about your
problem. Looks like great customer service,
right? But click that link and see what
happens.
It’s an error page, just like the one you’ve been creating. And, look, it has a link on it.
Might as well trust the link, too. It appears on a trusted page. You click the link…and you
end up on a completely dierent site—probably one you didn’t expect (see Figure 8-11).
FIGURE 8-11
Inserting a variable into a vulnerable URL
is classic phishing: you visit a site you trust
and end up on a site that you don’t trust.

CHAPTER 8: WHEN THINGS GO WRONG (AND THEY WILL) 237
ADD
DEBUGGING
TO YOUR
APPLICATION
Now, the AMC page for
Breaking Bad
is hardly anything to lose sleep over…and
let’s face it,
Breaking Bad
really is a great show. Suppose, though, that same link
took you to a site that asks for your credit card or that is full of illicit material that
could get you fired when you accidentally land on that site at work, or even just a
simple site that asks you to “reconfirm” your user name and password: these are
potential disasters.
A clever and not-so-well-meaning coder could easily use the same CSS that’s used
on
yellowtagmedia.com
to ensure that site looks just like the initial error page, and
most users would never know the dierence.
THE DANGERS OF REQUEST PARAMETERS
The problem is that anyone can actually type a request parameter in a URL. Look
back at the URL that started all of this:
http://yellowtagmedia.com/phpMM2/ch08/scripts/show_error.php?error_
message=%3Ca%20href=%22http://www.amctv.com/shows/breaking-
bad%22%3EClick%20Here%20To%20Report%20Your%20Error%3C/a%3E
It’s the error_message parameter that creates all the trouble, because it accepts
just about anything as a value. When you take away all the escaping, the URL really
amounts to this:
http://yellowtagmedia.com/phpMM/ch07/show_error.php?error_message=<a
href=“http://www.amctv.com/shows/breaking-bad”>Click Here To Report Your
Error</a>
Suddenly, a link to a non-trusted site is dropped right into your trusted page. That’s
a big problem, and it can create massive headaches for your users.
Unfortunately, fixing this is going to take a lot of PHP wizardry that you don’t have
quite yet. Fortunately, it’s coming…in about six chapters. For now, use this method
of passing an error along via request parameters, but know that it’s not quite ready
for primetime. You’ll need to use something called
sessions
, which is detailed in
Chapter 14, to avoid ever becoming part of a phishing scam.
NOTE Just so you know, this is a pretty subtle problem. It took a clever tech reviewer pointing it out to ever
make it into print. But this is the price of coding on the big bad Internet: you always need to be aware of what a
malicious, bored teenager can do to your site if you’re not careful. Thankfully, though, you’re learning everything
you need to combat and prevent those attacks. Just hang tight until Chapter 14 on error handling, and then you
can make some small changes that completely shut down any phishing attempts.
Add Debugging to Your Application
You’ve got some error pages that are very helpful to your readers. But what about
you? Certainly, you’re going to need to use your system, too. Although you want to
have error pages that don’t scare o your users, there are times when
you
need to
figure out what’s going on, not just in your code, but also on your front end. But,

PHP & MYSQL: THE MISSING MANUAL
238
ADD
DEBUGGING
TO YOUR
APPLICATION
the error pages you’ve put in place are designed to
shield
users from seeing what’s
going on at the script level. What you need is to figure out a way to show the real
errors that occurred—in a way that only you can see.
NOTE You can find the finished example code for this section on this book’s Missing CD page at
www.
missingmanuals.com/cds/phpmysqlmm2e
.
Who’s Using This App, Anyway?
Remember that this chapter started out by talking about the kinds of errors that
your users see. The idea was to avoid unappealing, cryptic-looking errors like this:
#1054 - Unknown column 'firstname' in 'field list'
Sounds good…except when you’re developing the application. In fact, if you’re writing
code, that’s
exactly
the type of error you want to see. It’s specific, helpful, and un-
like your users, you aren’t intimated (certainly not any more) by some techy details.
Put another way, you need a method to distinguish between debugging—when
you’re writing and fixing code—and production. You could have a way to set your
application’s mode. You could run in debug mode and see all the errors your script
puts out, or you could run in production mode, in which error reporting isn’t turned
on. Then, you could simply run in debug mode until it’s time to go live.
NOTE You might even take this further: You could copy your code to a server, switch it to run in production
mode, and then still run another copy in debug mode that you are working on and improving.
This arrangement is easy to set up; with
app_config.php
, you already have a nice
central place to configure this sort of thing:
<?php
// Set up debug mode
define("DEBUG_MODE", true);
// Database connection constants
?>
This gives you the ability to make a single change to DEBUG_MODE, and you get (or
don’t get) error reporting across your application. Now that you have a way to set
your mode, it’s time to make this new mode work.
Now You See Me, Now You Don’t
Unfortunately, you’ve done a lot of work, but you still haven’t solved one core prob-
lem: You need a way to display more information about an error to you and your
programmer buddies without terrifying your users. Fortunately, you’ve laid some

CHAPTER 8: WHEN THINGS GO WRONG (AND THEY WILL) 239
ADD
DEBUGGING
TO YOUR
APPLICATION
groundwork; the
app_config.php
file you created has a DEBUG_MODE, and that’s the
key ingredient.
What you need is a way to print out additional error information if you’re in debug
mode. To do this, you need to define a new function—call it debug_print—that
only prints information if you’re in debugging mode. Add the following code to
app_config.php
:
<?php
// Set up debug mode
define("DEBUG_MODE", true);
// Database connection constants
function debug_print($message) {
if (DEBUG_MODE) {
echo $message;
}
}
?>
With this function in
app_config.php
, it’s available anywhere in your own code. All
it does is selectively print a message; if debugging is enabled, it prints, and if it’s
not, $message never sees the light of day.
NOTE You’ve just created your first custom function! Nice work. Although there’s much more to learn about
custom functions, notice how easy it is to create your own customized behavior for the rest of your application
to use.
Next, you can add some additional information to your
show_error.php
page:
<?php
require 'app_config.php';
if (isset($_REQUEST['error_message'])) {
$error_message = preg_replace("/\\\\/", '',
$_REQUEST['error_message']);
} else {
$error_message = "something went wrong, and that's how you ended up
here.";
}
if (isset($_REQUEST['system_error_message'])) {
$system_error_message = preg_replace("/\\\\/", '',
$_REQUEST['system_error_message']);

PHP & MYSQL: THE MISSING MANUAL
240
ADD
DEBUGGING
TO YOUR
APPLICATION
} else {
$system_error_message = "No system-level error message was reported.";
}
?>
NOTE There are other ways to obtain this same result, but this one will avoid setting off any errors if you
have
error_reporting
turned on.
Then, down in your HTML, selectively print out this additional information:
<html>
<head>
<link href="../css/phpMM.css" rel="stylesheet" type="text/css" />
</head>
<body>
<div id="header"><h1>PHP & MySQL: The Missing Manual</h1></div>
<div id="example">Uh oh... sorry!</div>
<div id="content">
<h1>We're really sorry...</h1>
<p><img src="../images/error.jpg" class="error" />
<?php echo $error_message; ?>
<span></p>
<p>Don't worry, though, we've been notified that there's a
problem, and we take these things seriously. In fact, if you want to
contact us to find out more about what's happened, or you have any
concerns, just <a href="mailto:info@yellowtagmedia.com">email us</a>
and we'll be happy to get right back to you.</p>
<p>In the meantime, if you want to go back to the page that caused
the problem, you can do that <a href="javascript:history.go(-1);">by
clicking here.</a> If the same problem occurs, though, you may
want to come back a bit later. We bet we'll have things figured
out by then. Thanks again... we'll see you soon. And again, we're
really sorry for the inconvenience.</p>
<?php
debug_print("<hr />");
debug_print("<p>The following system-level message was received:
<b>{$system_error_message}</b></p>");
?>
</div>
<div id="footer"></div>
</body>
</html>

CHAPTER 8: WHEN THINGS GO WRONG (AND THEY WILL) 241
ADD
DEBUGGING
TO YOUR
APPLICATION
Finally, you can put all this together: You have an error page, you have a means of
printing information only if debugging is enabled, and you have
app_config.php
to
tie everything together.
Before you’re ready to conquer and selectively debug the world, though, there’s
something else to take care of. It’s not quite error handling, but just plain, good coding.
Moving from
require
to
require_once
If you look carefully at
database_connection.php,
you’ll see this line at the top:
require 'app_config.php';
This means that any script such as the one that follows here, in turn requires
app_config.php
, as well.
require '../../scripts/database_connection.php';
So, if you wanted to get the setup from
app_config.php
in a script that already
requires
database_connection.php
, you technically don’t need to explicitly require
app_config.php
.
But—and this a big but—you’ve now hidden what’s called a
dependency
in your
code. Even though you’re not requiring
app_config.php
explicitly, you’re writing
code assuming that
app_config.php
has been loaded. Suppose that you change a
script to not use a database; the natural next step would be to remove the require for
database_connection.php
. Because your script no longer uses a database, requiring
database_connection.php
wouldn’t make sense. With that removal, however, you
also lose
app_config.php,
which causes a hidden problem that wouldn’t show up
until you realized none of your helpful constants and error messages are defined.
For this reason alone, it’s a good idea to always be explicit in your requirements.
To be sure, there’s an obvious concern here:
app_config.php
will end up being
required
twice
in database-driven scripts. You’ll require
app_config.php
as well as
database_connection.php
, which in turn requires
app_config.php
again.
To get around this, you can use require_once instead of require in all your utility
scripts. Therefore, in your main script—in whatever script your main code exists—use
the normal require:
// main script you're writing code
require '../scripts/app_config.php';
Then, in any utility scripts that also need
app_config.php
, you would use
require_once:
// database_connection.php and any other utility scripts
require_once '../scripts/app_config.php';
The require_once line checks whether the specified script has already been included
(through include or require). It only includes the script if hasn’t already been loaded.
This ensures that
app_config.php
is only loaded once.

PHP & MYSQL: THE MISSING MANUAL
242
REDIRECTING
ON ERROR
But, there’s yet another problem: sometimes you have one script—like
create_user.
php
—call another script—like
show_user.php
. In this case, you have two scripts
that probably both use require, which will result in errors about constants being
redefined. Is this a problem? Should you rethink and refactor
app_config.php
?
Should you abstract out those constants into another file or move them into
data-
base_connection.php
?
Honestly, you can just get around all of this by using require_once in
all
of your
scripts. This rule of thumb is a good way to ensure that
app_config.php
is never
loaded more than once. It also has another side eect: you’re no longer trying to
figure out which version of require to use. Just use require_once, unless you have
a specific need to require something multiple times. That’s something that rarely
happens, so going with require_once as your standard is a good idea.
NOTE In fact, you could have just started by using
require_once
right from the beginning. But, then
you’d have no real idea
why
you’re using that over
require
. By running through this process of actually seeing
how some of your scripts call some of your other scripts multiple times (like the example on page 171), you can
now explain to your coworkers why they too should almost always use
require_once
in their PHP scripts.
Redirecting On Error
You now have a complex mechanism in place to deal with error messages as they
crop up, and you even have a way of printing out errors for your programming edi-
fication (with debug_print). Now, it’s time to see how to use the error information.
Take a look at one of your simplest page/script combinations:
connect.html
and
connect.php
, from Chapter 5.
NOTE For this exercise, copy these scripts into a new directory so that you can make changes to them. You
should then change
connect.html
to submit to
connect.php
, without using a
scripts/
directory, and ensure that
connect.php
resides directly alongside
connect.html
. You should also be sure to
require_once
app_config
.php
, and ensure that your path to
app_config.php
reflects the new location of
connect.php
.
Also, you can find the finished example code for this section on this book’s Missing CD page at
www.missing
manuals.com/cds/phpmysqlmm2e
.
Update connect.php to show_user.php
Right now,
connect.php
just uses die to report problems in connecting to your
database:
<?php
require_once '../scripts/app_config.php';

CHAPTER 8: WHEN THINGS GO WRONG (AND THEY WILL) 243
REDIRECTING
ON ERROR
mysql_connect(DATABASE_HOST, DATABASE_USERNAME, DATABASE_PASSWORD)
or die("<p>Error connecting to database: " .
mysql_error() . "</p>");
// And so on...
?>
Right now, if mysql_connect fails, the entire script just goes down in a ball of flames.
Not so great. One way you could fix the problem would be to do something like this:
if (!mysql_connect(DATABASE_HOST,
DATABASE_USERNAME, DATABASE_PASSWORD)) {
$user_error_message = "there was a problem connecting to the " .
"database that holds the information we need " .
"to get you connected.";
$system_error_message = mysql_error();
header("Location: ../scripts/show_error.php?" .
"error_message={$user_error_message}&" .
"system_error_message={$system_error_message}");
exit();
}
NOTE This is one of those sections of code that involves long lines that are ill-suited for print. You certainly
don’t need to break up these lines into multiple lines, although you can if you like. The downloadable code uses
a single line for defining
$user_error_message
as well as for passing a URL to
header
.
This example uses your new error page in conjunction with PHP’s redirect. In addi-
tion, it supplies both a friendly and system-level error, so it should work pretty well.
For the sake of testing, type in a bad database host, like this one:
if (!mysql_connect(DATABASE_HOST, DATABASE_USERNAME, "foo")) {
// handle error
}
Next, go to
connect.html
in your browser, submit the form to
connect.php
, and you
should be rewarded with your error page, as in Figure 8-12. In terms of seeing errors,
you have your users—and yourself—covered.
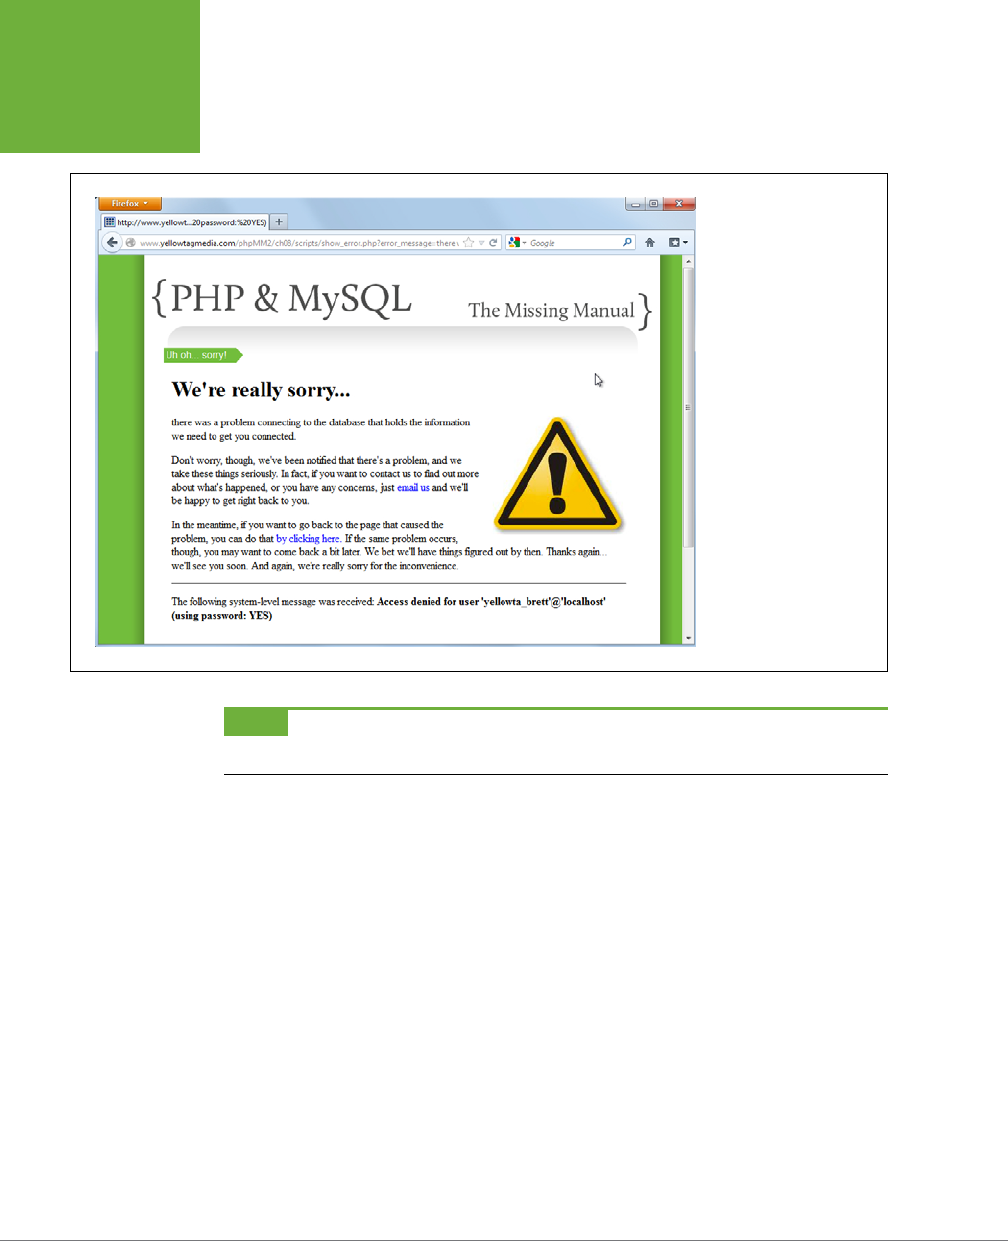
PHP & MYSQL: THE MISSING MANUAL
244
REDIRECTING
ON ERROR
FIGURE 8-12
This page has just about
all you could ask for in
terms of handling errors.
You get to see exactly
what the user sees, plus
you get error reporting
at a programming level.
Now you can say goodbye
to
die
—
show_error.
php
is a much better
solution.
NOTE Ensure that you have
DEBUG_MODE
set to
true
in
app_config.php
before you try this out (page
238) so that you’ll see both the user-friendly and developer-friendly errors.
Now, set DEBUG_MODE to false in
app_config.php
:
// Set up debug mode
define("DEBUG_MODE", false);
Try going to
connect.html
and
connect.php
again; this time, you should only see the
user-facing error (check out Figure 8-13).
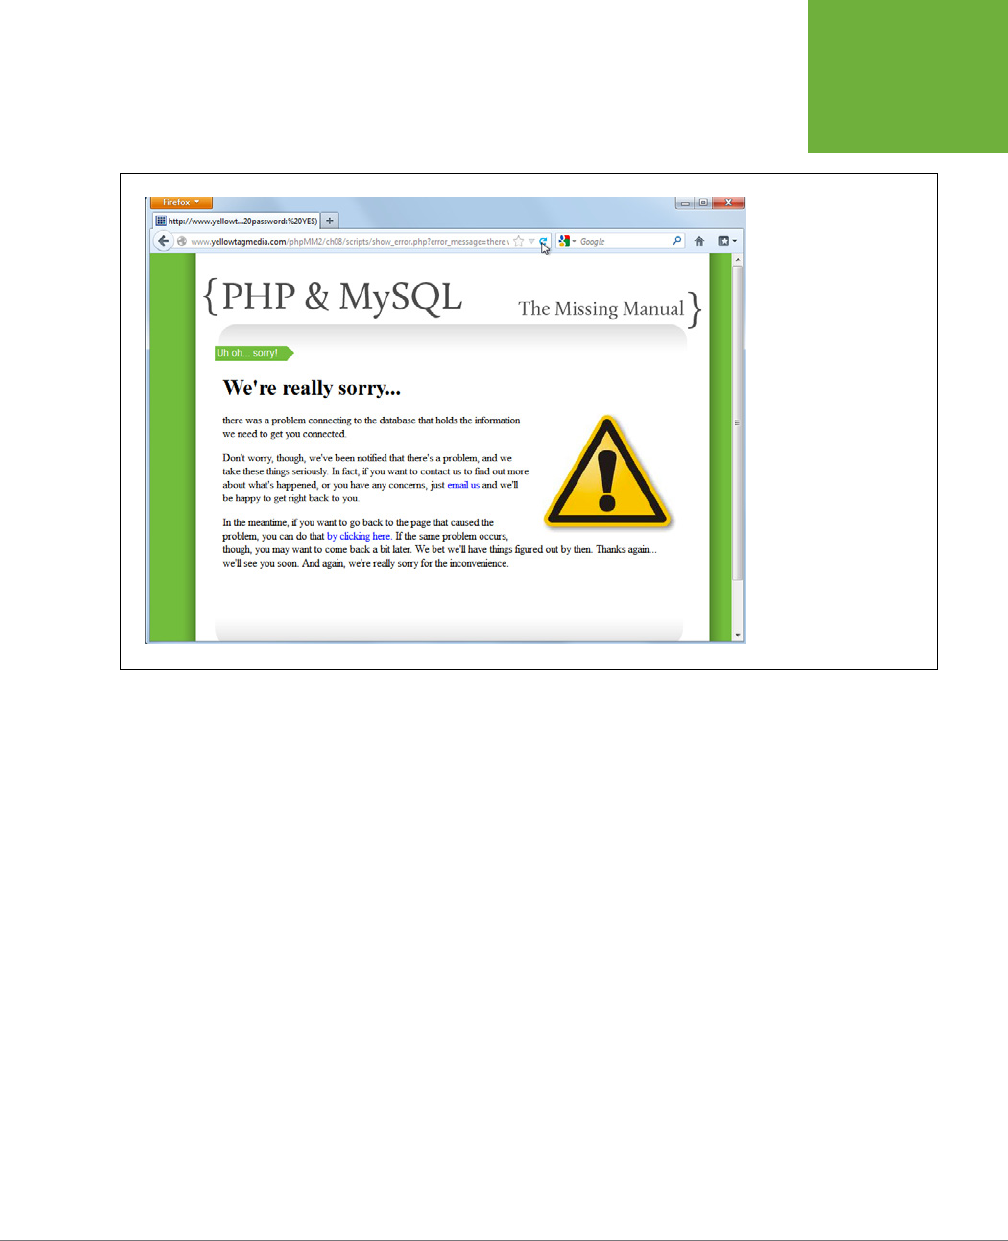
CHAPTER 8: WHEN THINGS GO WRONG (AND THEY WILL) 245
REDIRECTING
ON ERROR
FIGURE 8-13
What a difference some
error-handling work
makes. Remember back
in the old days when a
database error resulted
in a blank page with a
cryptic error message?
This is a pretty massive
upgrade. By now, you
know that errors are going
to happen, but now they
happen in style, and that
counts for quite a bit with
the typical user.
Simplifying and Abstracting Your Code
Are you done yet? Well, almost. The error printing is great, but take another look at
the code in your main script,
connect.php
:
if (!mysql_connect(DATABASE_HOST,
DATABASE_USERNAME, DATABASE_PASSWORD)) {
$user_error_message = "there was a problem connecting to the " .
"database that holds the information we need " .
"to get you connected.";
$system_error_message = mysql_error();
header("Location: ../scripts/show_error.php?" .
"error_message={$user_error_message}&" .
"system_error_message={$system_error_message}");
exit();
}
That’s a lot of code to handle the problem. In fact, you have a good bit more code
dealing with the error than you do dealing with things that go right. That’s not
always a bad thing, but in this case, it’s just not necessary. Do you remember how
this code originally looked?

PHP & MYSQL: THE MISSING MANUAL
246
REDIRECTING
ON ERROR
mysql_connect(DATABASE_HOST, DATABASE_USERNAME, DATABASE_PASSWORD)
or die("<p>Error connecting to database: " . mysql_error() . "</p>");
This code has a line that does what you want. It also has a line if there are problems.
Now multiply that by all the dierent places your code can fail; that’s a lot of error
handling code.
So, can you get your error handling to be that elegant? It’s worth at try. Look closely
at the code again and notice how regardless of what the error is, parts of the code
will always be the same:
if (!mysql_connect(DATABASE_HOST,
DATABASE_USERNAME, DATABASE_PASSWORD)) {
$user_error_message = "there was a problem connecting to the " .
"database that holds the information we need " .
"to get you connected.";
$system_error_message = mysql_error();
header("Location: ../scripts/show_error.php?" .
"error_message={$user_error_message}&" .
"system_error_message={$system_error_message}");
exit();
}
The only things that ever change here are the actual error messages. The rest—the
variable names, the header call, and the building of the URL—are always the same.
This seems like it would be a good time create another function, a lot like debug_print,
to handle the messages.
Add this function to
app_config.php
, further expanding your utility script:
<?php
// Set up debug mode
define("DEBUG_MODE", true);
// Database connection constants
function debug_print($message) {
if (DEBUG_MODE) {
echo $message;
}
}
function handle_error($user_error_message, $system_error_message) {
header("Location: show_error.php?" .
"error_message={$user_error_message}&" .
"system_error_message={$system_error_message}");
exit();
}
?>

CHAPTER 8: WHEN THINGS GO WRONG (AND THEY WILL) 247
REDIRECTING
ON ERROR
This bit of code is really just a variation on what you did with debug_print (page 239).
You’ve taken something that’s essentially the same code, over and over, and put it
into a nice, handy, easy-to-reference custom function. The only change is the addi-
tion of exit. This line ensures that regardless of how the calling script is structured,
once the header redirects the browser to your error page, nothing else happens.
The error page displays, and PHP stops whatever else it might have planned to do.
Now, you can simplify
connect.php
by quite a bit:
if (!mysql_connect(DATABASE_HOST, DATABASE_USERNAME, "foo")) {
handle_error("There was a problem connecting to the database " .
"that holds the information we need to get you connected.",
mysql_error());
}
This code is a
lot
neater, especially when you realize that it can fit into a single line
in a terminal or editor. But, you can take this yet further:
mysql_connect(DATABASE_HOST, DATABASE_USERNAME, "foo")
or handle_error("There was a problem connecting to the database " .
"that holds the information we need to get you connected.",
mysql_error());
Here, you’ve dropped the if statement and returned to the simple elegance of the
or die you used to have, but with a much nicer function: your own handle_error.
redirect
Is Path-Insensitive
There’s just one problem with the current incarnation of
connect_php
, and it looks
like Figure 8-14. You might see just this when you try out
connect.php
for yourself.
You see a page indicating that something has gone wrong, but it’s sure not the
show_error.php
page you were expecting.
This error is well known in PHP. Most web servers are set to treat any URL request
that ends in
.php
as a PHP request. That’s good, because it means that you don’t
have to stash all your PHP scripts in one directory. But it’s bad, because the web
server doesn’t see whether the URL that ends in .php matches an actual file. It just
hands the URL over to the PHP program. But if that URL isn’t a pointer to a real
file, PHP says, “I don’t have anything to run.” Or, more accurately, it says “no input
file specified.”
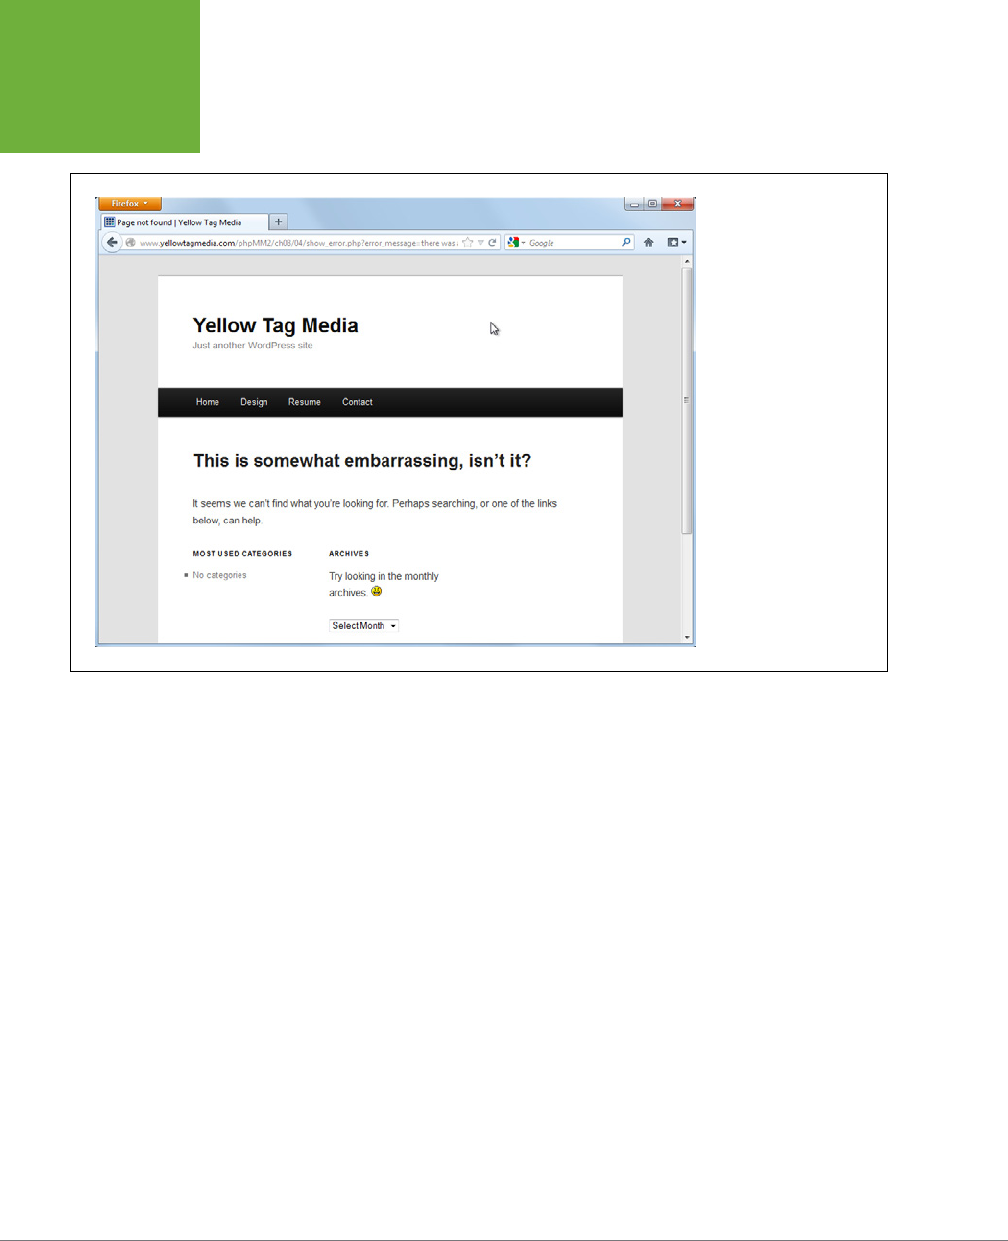
PHP & MYSQL: THE MISSING MANUAL
248
REDIRECTING
ON ERROR
FIGURE 8-14
Sometimes PHP is its own
worst enemy. Here, your
script somehow made
a request for a file that
isn’t there. In this case,
the web server (running
WordPress) responded
with a standard “page
missing” error. You might
see something different,
but the basic idea is the
same: no file was found
where it was expected.
Yet the question remains:
Why
are you getting this? It has to do with this little bit
of code in
app_config.php
:
function handle_error($user_error_message, $system_error_message) {
header("Location: show_error.php?" .
"error_message={$user_error_message}&" .
"system_error_message={$system_error_message}");
}
In this code, the path to
show_error.php
is relative to
app_config.php
. Because
app_config.php
is in the same directory as
show_error.php
, there’s nothing before
the file name.
But this code is executed from your
connect.php
script, in (at least in the examples
in this book)
ch07/
. Therefore, the path from
that
location to
show_error.php
is
../
scripts/show_error.php
. Even though the handle_error function is defined in
app_
config.php
, it’s run from the
connect.php
script’s context. The result? You’re looking
for
show_error.php
in the wrong place.
But, if you change the path in
app_config.php
to work with
connect.php
, and you
later have a dierent script in a dierent location, you’re going to get this same issue
all over again. This begs the question: How is handle_error very useful anymore?

CHAPTER 8: WHEN THINGS GO WRONG (AND THEY WILL) 249
REDIRECTING
ON ERROR
What you need, once again, is a way to indicate a common property—the root of
your site—and then relate the path of
show_error.php
to that with an absolute path
rather than using a relative path. (And if you need a refresher on the dierence
between the two, see the box below.)
UP TO SPEED
Relative and Absolute Paths
A
relative path
is a path that references a file relative to the
location of the current file. This usually means that the path
begins with either the file itself, like
show_error.php
, or it
moves back a directory using the
..
indicator. So, relative paths
look like
show_error.php
or
../scripts/show_error.php
. In both
cases, your starting point is the current file indicating the path.
An
absolute path
is one that is not related to the current file;
instead, it’s related to the root of your site. You can always
spot absolute paths because they start with a
/
, meaning
that they begin looking for the file at the root, or “base,” of
your website. Thus, an absolute path would be something like
/scripts/show_error.php
.
You can define your site root in
app_config.php
with a new constant:
// Site root
define("SITE_ROOT", "/phpMM2/");
Now, you can use that constant in handle_error. Here’s the final version of
app_
config.php
, with all of the new constants, the completed handle_error function,
and debug_print function:
<?php
// Set up debug mode
define("DEBUG_MODE", false);
// Site root
define("SITE_ROOT", "/phpMM/");
// Database connection constants
define("DATABASE_HOST", "database.host.com");
define("DATABASE_USERNAME", "username");
define("DATABASE_PASSWORD", "super.secret.password");
define("DATABASE_NAME", "database-name");
function debug_print($message) {
if (DEBUG_MODE) {
echo $message;
}
}
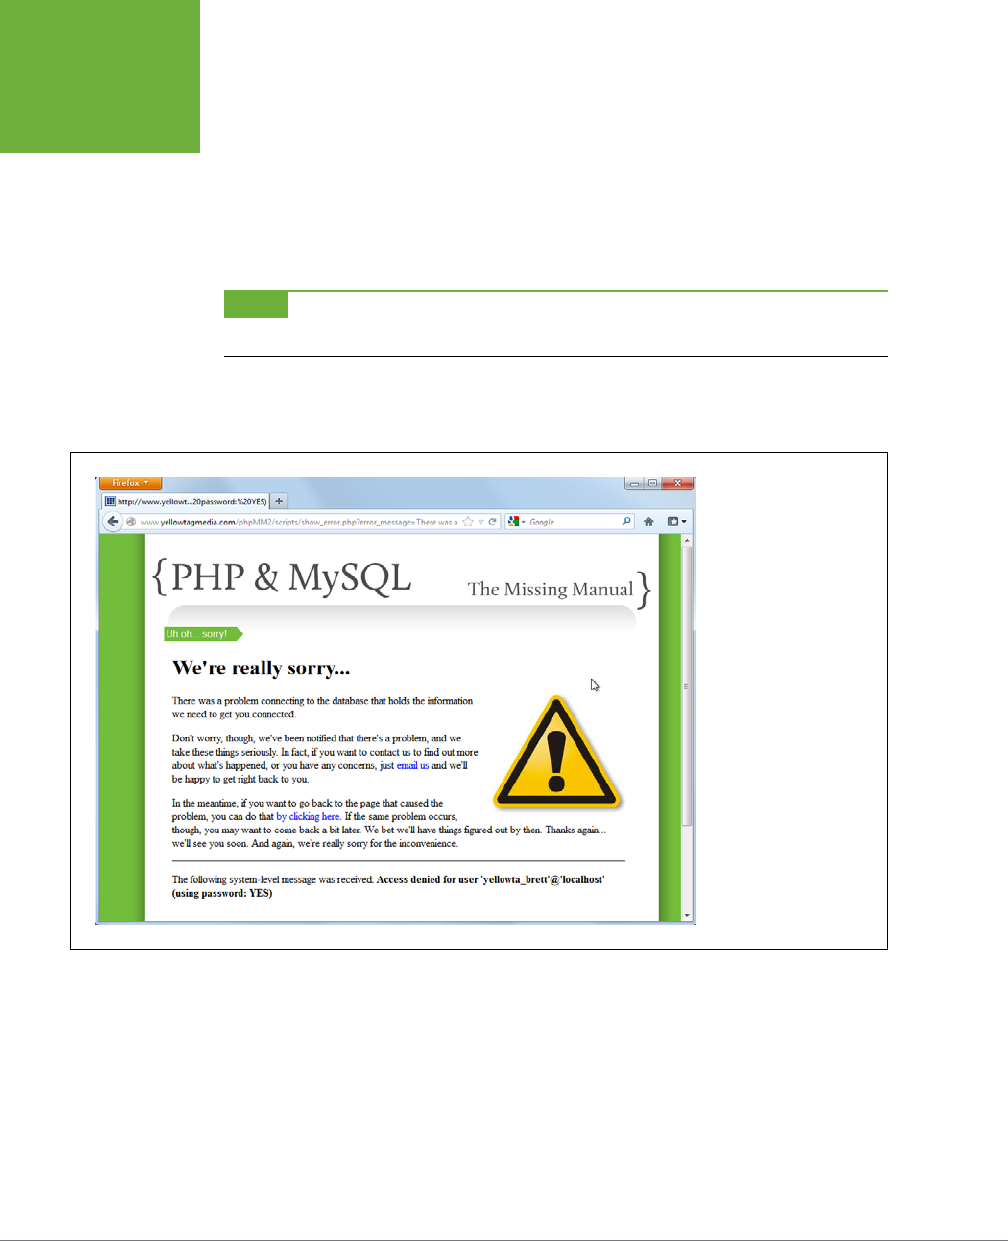
PHP & MYSQL: THE MISSING MANUAL
250
REDIRECTING
ON ERROR
function handle_error($user_error_message, $system_error_message) {
header("Location: " . SITE_ROOT . "scripts/show_error.php?" .
"error_message={$user_error_message}&" .
"system_error_message={$system_error_message}");
}
?>
NOTE You can’t use the curly braces trick to insert constants into a string; instead, you need to concatenate
SITE_ROOT
to your URL string in the call to header by using the dot (
.
) operator.
Now, you should finally be able to see
show_error.php
via an error in
connect.php
,
in all its glory. Check out Figure 8-15 for the result of all this work.
FIGURE 8-15
Who said error handling
was easy? But now, it’s
done, and you and your
users get to reap the
benefits.

CHAPTER 8: WHEN THINGS GO WRONG (AND THEY WILL) 251
REDIRECTING
ON ERROR
To finish up, take a blazing trip through all of your scripts and replace every bit of
die and other error handling with calls to handle_error. Don’t forget to update
database_connection.php
to use handle_error, too:
<?php
require 'app_config.php';
mysql_connect(DATABASE_HOST, DATABASE_USERNAME, DATABASE_PASSWORD)
or handle_error("There was a problem connecting to the database " .
"that holds the information we need to get you connected.",
mysql_error());
mysql_select_db(DATABASE_NAME)
or handle_error("There's a configuration problem with our database.",
mysql_error());
?>
FREQUENTLY ASKED QUESTION
To Err Is PHP
A 20-plus–page chapter on error handling? Seriously?
It seems hard to believe, doesn’t it? You’ve not added any real
new functionality to your web app. Of course, you’ve learned a
bit more about constants, you’ve defined two custom functions,
you’ve added a utility class, and you’ve even managed to get
a handle on
require
and
require_once
.
Still, error handling is usually something that books stick in the
last chapter, figuring people won’t mind if it’s near the end
where it can be ignored. Why spend all this time on something
that (hopefully) your users never see? Well, mostly because an
application that doesn’t handle errors simply isn’t complete.
And, like it or not, when you’re just starting out programming,
or programming in a new language, you’re going to make
more mistakes.
Tests and error handling are absolutely the best two ways
to catch mistakes early and then provide the simplest path
toward fixing those mistakes. Now that you have robust error
handling, you’ll be surprised how often a big problem is turned
into a small problem because you spotted an error right away
and could track it down without wading through all your code,
hopelessly wondering what really went wrong.

253
CHAPTER
9
You’ve come to a watershed moment in your programming career, however
brief you feel that career has been. Up until this point in the book, you’ve been
using a lot of PHP constructs—from if statements to some basic functions
to constants and even error handling. You’ve also become familiar with the basic
MySQL interactions you’ll need in most PHP scripts. With what you already know,
you’re ready to take on most of the basic programming problems you’ll run across
in a typical web application—as long as you’re thinking on a single-page level.
In other words, if you have a form that gathers information, you can handle that.
You can grab information from a table, and you can put information into a table.
You can respond to errors, redirect users, and even distinguish between a good user
experience and a bad one.
In spite of all that, you know that web applications are greater than the sum of
their single-page interactions. Ten dierent pages that interact with ten dierent
tables is a much simpler situation than a complete web application that has ten
pages, particularly when those ten tables connect and interact with one another,
and even relate information in one table to information in another. Add to that im-
age handling (something you started to dig into in order to finish your user form),
some interaction with Facebook and Twitter, and allowing users to actually log in,
and things get a lot trickier.
And that’s what’s next: the jump from thinking about single forms and single scripts
to thinking about entire systems. You’re ready to begin interacting with the file
system—the place where your scripts, files, and images live. You’re ready to start
thinking not just about a single table like
users
but working with multiple tables. And,
custom functions? You’ve already built two—debug_print and handle_error—so
you’ve got a foundation upon which to build.
Handling Images
and Complexity
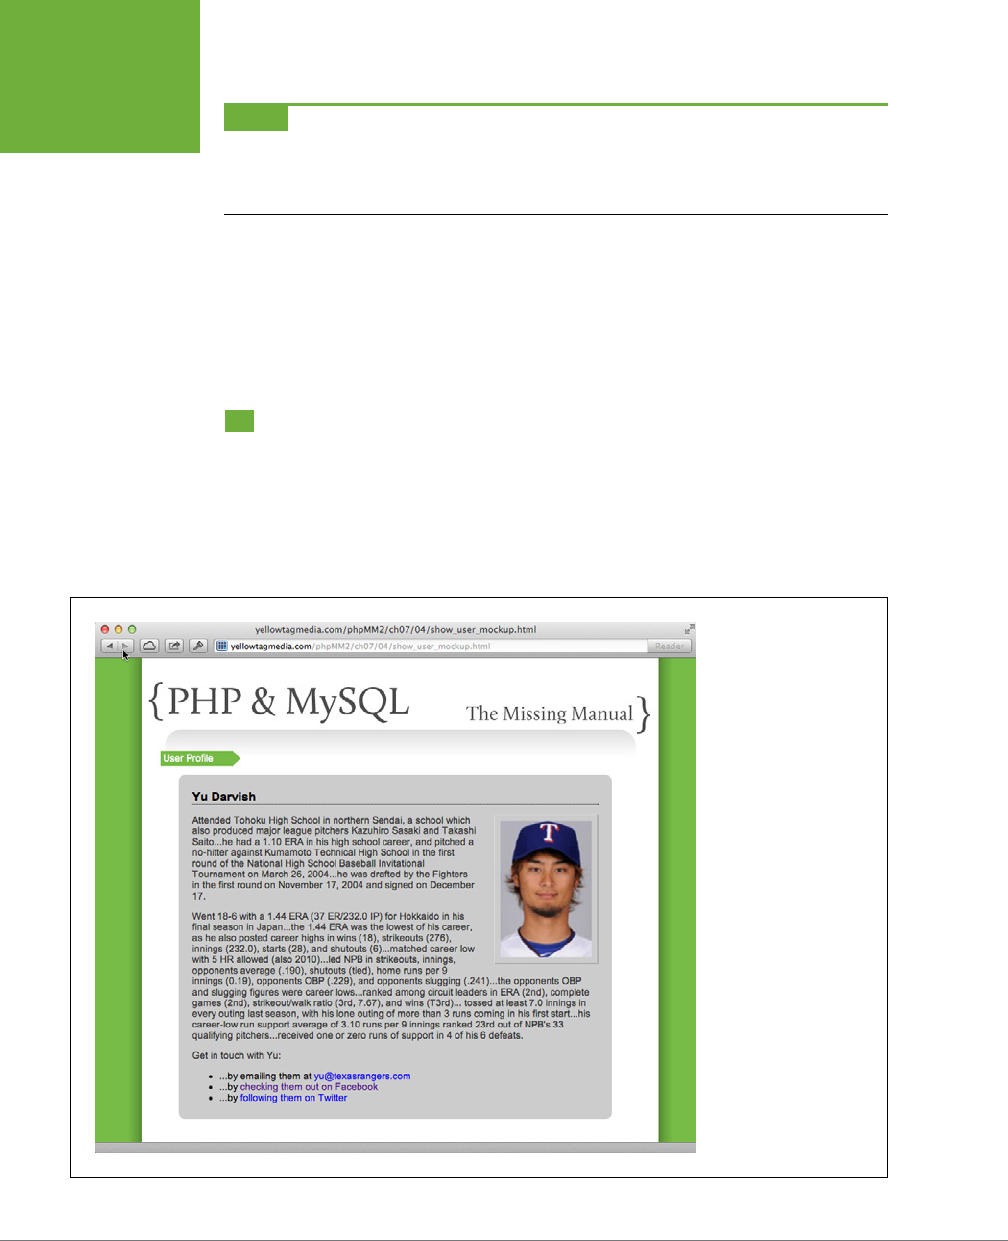
PHP & MYSQL: THE MISSING MANUAL
254
IMAGES ARE
JUST FILES
NOTE At this point, the changes to your code are coming fast and furious. In fact, you might be a little
unsure as to whether you have everything right. If that’s the case, you can always hop online and visit
www
.missingmanuals.com/cds/phpmysqlmm2e
to get the chapter-by-chapter examples and make sure you’re caught
up and ready to keep programming.
Along the way, though, the decisions become trickier. Complexity brings with it not
just the question, “What do I do next?” but also, “Of the two or three ways I
could
solve this problem, which one is the
best
way?” So, get ready: you’re diving into
deeper programming waters, which tend to comprise as much critical thinking and
philosophy as they do new PHP and MySQL language features.
Images Are Just Files
The big glaring omission in your work with users is that pesky profile image that
you worked with in Chapter 7 on page 208. You probably remember that the user’s
profile is pretty incomplete right now. The dierence between your mock-up from
that chapter (shown in Figure 9-1) and where your actual code is (shown in Figure
9-2) is easy to spot: it’s all in that image.
FIGURE 9-1
Here’s where a mock-up
comes in handy. You’ve
got a visual example of
exactly what you want
and it’s easy to compare
your goal to your current
progress. In this mock-up
the user image is the most
important design feature.
It’s also the area where
users can truly personalize
their profile page. (Have
you seen some of the
nutty avatar images on
Facebook and Twitter?)
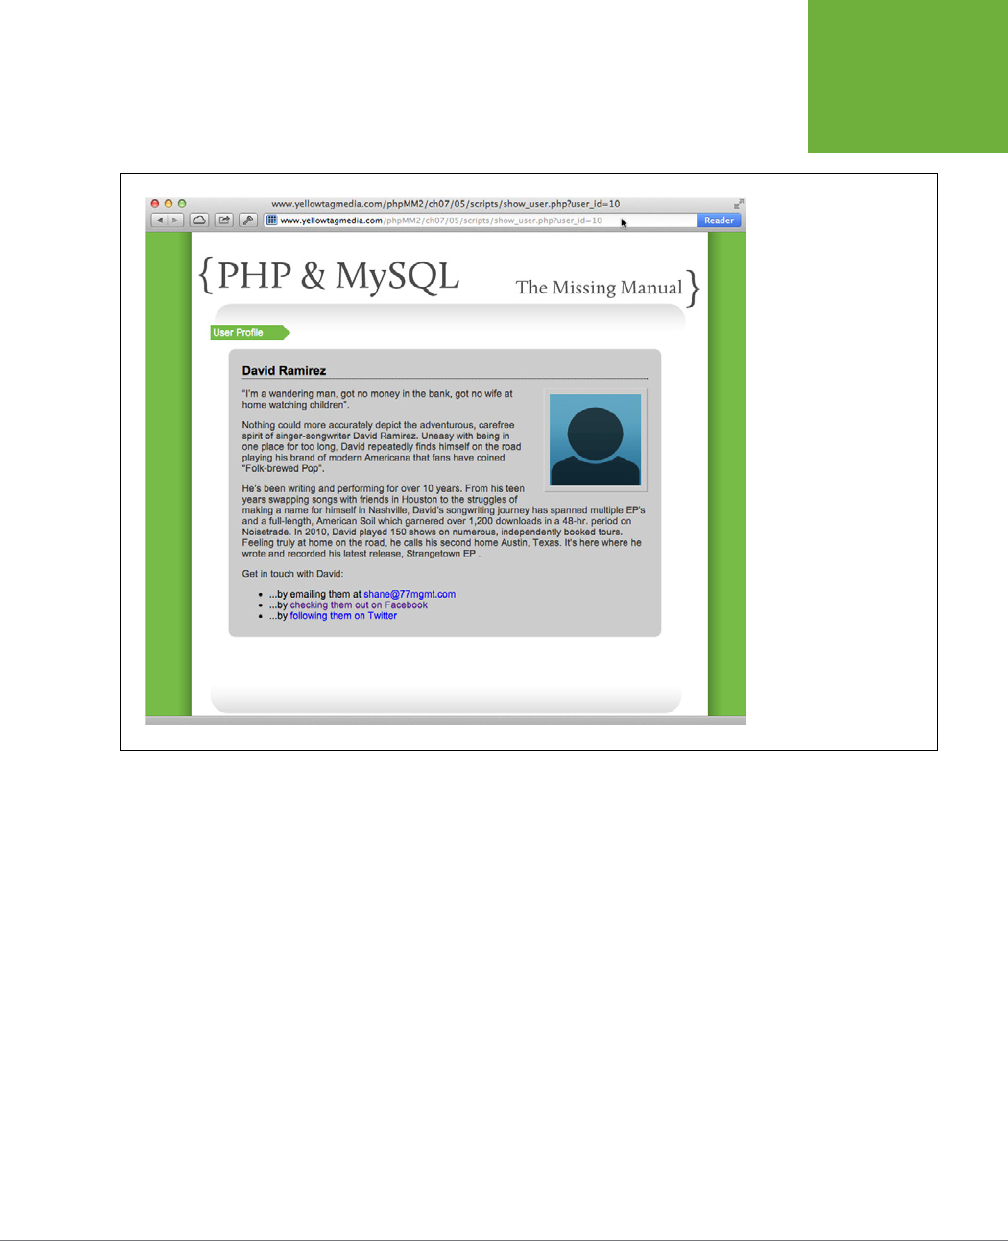
CHAPTER 9: HANDLING IMAGES AND COMPLEXITY 255
IMAGES ARE
JUST FILES
FIGURE 9-2
Take away the image,
and what a change. Now,
that long bio looks even
more boring, making the
absence of any imagery
more noticeable.
To place a user image on the page, turn to the good old HTML <img> tag:
<img src="images/darvish.jpg" class="user_pic" />
The value of the src attribute is a reference to a file, although you don’t have any
image files yet. You have the user’s name and information in your
users
table, but
there’s no image on your web server to which you can point. You need both a file
and then a reference to that file.
It’s a new PHP challenge: how do you get something other than text information
from a user, and then what do you do with that information once you have it? (For
more information on how files appear to PHP, see the box on page 256.)
IMAGES ARE
JUST FILES

PHP & MYSQL: THE MISSING MANUAL
256
IMAGES ARE
JUST FILES
UP TO SPEED
Files, File Systems, and Client Versus Server
This might be the first time you’ve needed to get a clear
understanding of the difference between what’s on your
user’s computer and what’s on the web server. You know
what a file is: it’s just a collection of bits and bytes that your
computer knows how to handle. Your scripts, HTML, CSS, and
JavaScript are ultimately just text: characters strung together
and interpreted by a web browser or the PHP program. In
the case of PHP, your web server (and specifically, the PHP
interpreter interacting with your web server) interprets that
PHP, turns it into HTML, CSS, and JavaScript for your browser,
and then lets the browser take over. For the browser, it takes
HTML, CSS, and JavaScript—whether in a static file or returned
by a web server that’s processed a PHP script—and renders
those to your user’s screen.
Images, on the other hand, are binary data. The same bits and
bytes that make up your text files are used to indicate location
and color of pixels. You need a different type of interpreter to
read a binary file. Fortunately, web browsers are perfectly
capable of taking an image file—be it a JPEG (
.jpg
), GIF (
.gif
),
or PNG (
.png
)—and displaying it. Still, the process of getting
a binary file is a bit different.
When users type the URL of your web application into their
browser, they’re running your program, which resides on a web
server, somewhere, and is available via the Internet. They’re
running that program by using their web browser, which is a
program that resides on
their
computer. There’s a big difference
between what’s on their computer, and what’s on your web
server. Your web server can’t reach into their computer and
grab images, for example. The users—if they want to see one
of their images in your program—have to upload that image
to your web server. Your web server stores that image and can
display it to whomever needs to see it.
Of course, most users don’t know how to upload a file by using
a program like FTP. It’s up to you to get their file from their
computer onto your file system. A
file system
is just a fancy
word for the collection of files on your web server. It can also
refer to the files on a user’s computer.
Put another way, the user’s computer is a
client
—a computer
that’s accessing your program. Your program runs on the
server
. This relationship is called a
client-server
interaction.
Your job is to get an image file from the client to the server.
Then, your server can give your PHP scripts access to that im-
age file to be used in your programs (and, most important, in
the user profile page).
HTML Forms Can Set the Stage
In this situation, your HTML is critically important to your PHP program. You need to
ensure that the HTML form with which your user is working is set up correctly. Not
only does that form need to give the user a place to select an image, but it needs
to set up the process by which that image is uploaded correctly.
Copy your
create_user.html
page from your Chapter 8 examples into the directory
in which you’re working now. Here’s where you left things; several steps are in place
for uploading an image:
<html>
<head>
<link href="../css/phpMM.css" rel="stylesheet" type="text/css" />
</head>

CHAPTER 9: HANDLING IMAGES AND COMPLEXITY 257
IMAGES ARE
JUST FILES
<body>
<div id="header"><h1>PHP & MySQL: The Missing Manual</h1></div>
<div id="example">User Signup</div>
<div id="content">
<h1>Join the Missing Manual (Digital) Social Club</h1>
<p>Please enter your online connections below:</p>
<form action="create_user.php" method="POST"
enctype="multipart/form-data">
<fieldset>
<label for="first_name">First Name:</label>
<input type="text" name="first_name" size="20" /><br />
<label for="last_name">Last Name:</label>
<input type="text" name="last_name" size="20" /><br />
<label for="email">E-Mail Address:</label>
<input type="text" name="email" size="50" /><br />
<label for="facebook_url">Facebook URL:</label>
<input type="text" name="facebook_url" size="50" /><br />
<label for="twitter_handle">Twitter Handle:</label>
<input type="text" name="twitter_handle" size="20" /><br />
<label for="user_pic">Upload a picture:</label>
<input type="file" name="user_pic" size="30" />
<label for="bio">Bio:</label>
<textarea name="bio" cols="40" rows="10"></textarea>
</fieldset>
<br />
<fieldset class="center">
<input type="submit" value="Join the Club" />
<input type="reset" value="Clear and Restart" />
</fieldset>
</form>
</div>
<div id="footer"></div>
</body>
</html>
IMAGES ARE
JUST FILES
PHP & MYSQL: THE MISSING MANUAL
258
IMAGES ARE
JUST FILES
NOTE You also should change the action of the form to reflect that you’re no longer using a
scripts/
directory.
This HTML is in the
ch09/
example directory in this chapter’s downloadable examples (
www.missingmanuals.com/
cds/phpmysqlmm2e
).
The key parts here are the enctype attribute on the <form> tag, and input
type="file" for the user_pic. This code configures the form to upload not just text
but also a binary image file.
Figure 9-3 shows that the user can already select an image now. But, there’s some-
thing else this HTML needs: a size limit on the image. At one time or another, you’ve
probably received that email from a friend that has a 22 MB picture of a cat blown up
to 100 times its normal size, right? You want to avoid that in your forms. No 22MB
cat images; a single MB or two is plenty for any reasonable profile picture.
NOTE MB stands for
megabyte
, which is one million bytes. That’s what the
mega
prefix represents: 1,000,000
of something. To get an idea of sizes, a Microsoft Word document of 20 or 30 pages is only about 1 MB. So, a 20MB
image is a
large
image.
In general, the only reason you’d want image files that big is for high-end photography sites or image-sharing
sites like Flickr (
www.flickr.com
) for which detail is important. You don’t need anything like that for a simple
profile picture.
You can limit the size of an uploaded file by adding a hidden input element, and
give it the name “MAX_FILE_SIZE.” For the value, set it to the maximum size of
the uploaded image you’ll allow, in bytes. If you want to allow a 1 MB image, that’s
1,000,000 bytes. Here’s the HTML to permit a 2 MB image:
<input type="hidden" name="MAX_FILE_SIZE" value="2000000" />
<label for="user_pic">Upload a picture:</label>
<input type="file" name="user_pic" size="30" />
WARNING Ensure that you put this
input
before
the
"file"
type
input
. You should also avoid any
comments in the
value
attribute. Count those zeroes carefully, or you’ll be back to shockingly large cats again.
And no, for those concerned, no felines were harmed in the making of this book. Shrunk down to manageable
sizes? Perhaps.
The form doesn’t look any dierent with this input element, but now you’re ready
to let users upload an image, and do something with it (see Figure 9-3).

CHAPTER 9: HANDLING IMAGES AND COMPLEXITY 259
IMAGES ARE
JUST FILES
FIGURE 9-3
With much of your HTML
in place, many of the
changes you’re starting to
make are not noticeable
when you look at the
web page. Nothing looks
different about this form,
but with the addition of
the code on page 258, it
imposes limits on what
your users can do—limits
that
you’ve
set.
Try this out: select an image and then click Join the Club. Even though there’s no PHP
script waiting to receive this information, you’ll see your browser slowly uploading
something. Take a look at Figure 9-4 to see how Google’s Chrome responds: a bit-
by-bit indication of how the upload is progressing.
FIGURE 9-4
Sometimes, it’s difficult to appreciate how much the web browser does
for you. Just by using the
input
file type, you get a progress indicator,
network connections, and an image upload, all for free. Now you’ve
got time to write great PHP.
IMAGES ARE
JUST FILES

PHP & MYSQL: THE MISSING MANUAL
260
IMAGES ARE
JUST FILES
Uploading a User’s Image to Your Server
It’s time to grab that image and do something with it. Start by copying your old ver-
sion of
create_user.php
into your current directory. Your script should look like this:
<?php
require_once '../scripts/app_config.php';
require_once '../scripts/database_connection.php';
$first_name = trim($_REQUEST['first_name']);
$last_name = trim($_REQUEST['last_name']);
$email = trim($_REQUEST['email']);
$bio = trim($_REQUEST['bio']);
$facebook_url = str_replace("facebook.org", "facebook.com",
trim($_REQUEST['facebook_url']));
$position = strpos($facebook_url, "facebook.com");
if ($position === false) {
$facebook_url = "http://www.facebook.com/" . $facebook_url;
}
$twitter_handle = trim($_REQUEST['twitter_handle']);
$twitter_url = "http://www.twitter.com/";
$position = strpos($twitter_handle, "@");
if ($position === false) {
$twitter_url = $twitter_url . $twitter_handle;
} else {
$twitter_url = $twitter_url . substr($twitter_handle, $position + 1);
}
$insert_sql = "INSERT INTO users (first_name, last_name, email, bio," .
"facebook_url, twitter_handle) " .
"VALUES ('{$first_name}', '{$last_name}', '{$email}', '{$bio}',
" .
"'{$facebook_url}', '{$twitter_handle}');";
// Insert the user into the database
mysql_query($insert_sql)
or die(mysql_error());
// Redirect the user to the page that displays user information
header("Location: show_user.php?user_id=" . mysql_insert_id());
exit();
?>

CHAPTER 9: HANDLING IMAGES AND COMPLEXITY 261
IMAGES ARE
JUST FILES
NOTE You need to make a few changes to get your script to this point. Update the path to
app_config
.php
and
database_connection.php
if you need to, and ensure that you’re using
require_once
instead of
require
.
SET UP SOME HELPER VARIABLES
First, you need to add some basic information that you’ll use for getting at the file,
and for storing it. Add these variables to the top of your page:
<?php
require_once '../scripts/app_config.php';
require_once '../scripts/database_connection.php';
$upload_dir = HOST_WWW_ROOT . "uploads/profile_pics/";
$image_fieldname = "user_pic";
$first_name = trim($_REQUEST['first_name']);
// Other variables
// Get request information
// Insert into MySQL
?>
One new element is HOST_WWW_ROOT. It looks a bit like the SITE_ROOT you defined in
app_config.php
in Chapter 8, on page 249:
// Site root
define("SITE_ROOT", "/phpMM2/");
HOST_WWW_ROOT hasn’t been defined yet. Right now, you have a SITE_ROOT, which
is the web-specific path to your site’s root, so if your website is hosted without
any directory prefix, your SITE_ROOT is probably just
/
. If you’re running within a
phpMM2/
directory, for example, your site root might be
/phpMM/
. The takeaway
here is that the SITE_ROOT is defined in terms of what a web server and a browser
connected to that server see.
But what the browser sees isn’t the complete (or absolute) path to that file on your
host’s server. A hosting server has tons of directories and subdirectories. Your direc-
tory, for example, might be
/home/username
, and then within there, you might have
a
www/
or
public_html/
directory. It’s in that directory that your web files reside.
What this means is that your SITE_ROOT maps to a dierent path—one in terms of
what your host’s file server looks like—that represents the absolute path of a file. Here,
you’re calling this new constant HOST_WWW_ROOT. Add that path to
app_config.php
:
IMAGES ARE
JUST FILES

PHP & MYSQL: THE MISSING MANUAL
262
IMAGES ARE
JUST FILES
<?php
// Set up debug mode
define("DEBUG_MODE", true);
// Site root
define("SITE_ROOT", "/phpMM2/");
// Location of web files on host
define("HOST_WWW_ROOT", "/home/bdmclaughlin/public_html/phpMM2/");
// Database connection constants
// Custom functions
?>
Of course, your HOST_WWW_ROOT will look dierent than the one in this example.
If you’re unsure how to get this path, see the box on page 263. You’re using this
root—and not SITE_ROOT—because the process of uploading and moving around
files is going to involve your host’s file server, not the browser. The uploaded user
file is going to be stored on the host’s file system, so you must deal with paths with
respect to your host’s file system. The browser will eventually show the file, at which
point SITE_ROOT will come back into play. However, the upload process has nothing
to do with what the browser sees. You need to look at things from the file system’s
perspective, which is just the sort of base path that HOST_WWW_ROOT provides.
Create that directory on your web server by using a terminal shell, command-line
tool, or your FTP client. If your HOST_WWW_ROOT is
/home/bdmclaughlin/public_html/
phpMM2/
, you need to create
/home/bdmclaughlin/public_html/phpMM2/uploads/
profile_pics
.
Just as users can type the wrong information into your text fields, they can mess
things up when uploading an image. Time for some error handling. The next variable—
$php_errors—adds an array of potential errors:
$upload_dir = HOST_WWW_ROOT . "uploads/";
$image_fieldname = "user_pic";
// Potential PHP upload errors
$php_errors = array(1 => 'Maximum file size in php.ini exceeded',
2 => 'Maximum file size in HTML form exceeded',
3 => 'Only part of the file was uploaded',
4 => 'No file was selected to upload.');
You’ve used arrays before, but there’s something new about this one. You’re creat-
ing a new array by using the array keyword and then defining the values that go in
that array.

CHAPTER 9: HANDLING IMAGES AND COMPLEXITY 263
IMAGES ARE
JUST FILES
UNDER THE HOOD
What’s my Host WWW Root?
It’s not always easy to figure out the root of your website on
your hosting provider’s server, especially if you’re not familiar
with lots of Unix commands. The easiest approach here would
be to telnet or SSH in to your hosting provider. (That’s opening
a command-line or terminal shell on your hosting provider’s
system.)
If you can do that—and lots of times, all you have to do is ask
your hosting provider for access—you can determine your site’s
absolute path from the perspective of the file system by using
the
pwd
command:
bdmclaughlin@yellowtagmedia.com [~]# pwd
/home/bdmclaughlin
Now, before you turn this into
HOST_WWW_ROOT
, realize that
you might not actually be in your web root. Much of the time,
when you telnet or SSH in to a web host, you’re in your account’s
home directory. It’s within that account that you’ll find the web
directory. In the following example, the
public_html/
directory
is the one you want:
bdmclaughlin@yellowtagmedia.com [~]# ls
-d */
access-logs/
BackupNow/
etc/
mail/
perl5/
public_ftp/
public_html/
tmp/
www/
You can either tack that on to what you saw from the
pwd
command or change into that directory and run
pwd
again:
bdmclaughlin@yellowtagmedia.com [~]# cd
public_html/
bdmclaughlin@yellowtagmedia.com [~/pub-
lic_html]# pwd
/home/bdmclaughlin/public_html
Then, you can take the result of that
pwd
command and drop
it right in as your
HOST_WWW_ROOT
:
// Location of web files on host
define("HOST_WWW_ROOT",
"/home/bdmclaughlin/public_html/
phpMM2/");
In this case, the site files are within a subdirectory of the
web root, called
phpMM2/
, so you append that to the result
of running
pwd
.
Failing all of this, you could just call your hosting provider and
explain that you need the actual path on its file system for your
web files. That might seem easier, but if you can get into your
system via SSH or telnet, you might find it fun to find it yourself.
Because an array is basically a list of values, you could do something like this just
as easily:
// Potential PHP upload errors
$php_errors = array('Maximum file size in php.ini exceeded',
'Maximum file size in HTML form exceeded',
'Only part of the file was uploaded',
'No file was selected to upload.');
IMAGES ARE
JUST FILES

PHP & MYSQL: THE MISSING MANUAL
264
IMAGES ARE
JUST FILES
In this array, each value is automatically numbered, starting at 0. Thus, $php_
errors[0] has the value “Maximum file size in php.ini exceeded”, for instance.
NOTE Remember from the box in Chapter 3, on page 74, PHP, like most every programming language, starts
counting at 0, rather than 1.
So, what are those numbers and funny arrows (=>)? They’re there because PHP arrays
are
associative arrays
. That’s why you can say, for example, $_REQUEST['user_pic'].
The $_REQUEST array doesn’t just have values, it also has an
association
between
those values (the information in an HTML form, usually) and the name of the fields
in which those values appeared.
You can think of the mapping between the field name user_pic and the value of
that field—something like
profile_pic.jpg
, for example—as being defined like this:
$_REQUEST = array('user_pic' => 'profile_pic.jpg');
NOTE PHP is actually doing things in a much trickier way—that’s how it lets you define any form field you
want, of any type you want, with any name you want, and PHP handles it. Still, it all boils down to the creation
of an associative array, with field names associated with, or
mapped to
, field values.
Going back to your array of PHP errors:
// Potential PHP upload errors
$php_errors = array(1 => 'Maximum file size in php.ini exceeded',
2 => 'Maximum file size in HTML form exceeded',
3 => 'Only part of the file was uploaded',
4 => 'No file was selected to upload.');
In this case, you’re taking numbering into your own hands, rather than letting PHP
define its own numbers. As such, $php_errors[1] is now “‘Maximum file size in
php.ini exceeded'," rather than letting PHP’s zero-based numbering assign that
string’s value to $php_errors[0].
Tampering with PHP’s numbering is generally a bad idea because you’re changing
behavior that all PHP programmers expect. In this case, though, it’s for a worthy cause.
That’s because PHP does more than give you a $_REQUEST array. When there are
files involved, it gives you a $_FILES array. That array, just like $_REQUEST, is keyed to
your field. Thus, $_FILES[$image_fieldname] is associated with the image uploaded
(hopefully) from your form. (Remember, you defined $image_fieldname nearer the
top of
create_user.php
.)
Furthermore, $_FILES[$image_fieldname] is itself an array, with information about
the uploaded file, and any errors that might have occurred in the process. One of
those pieces of information is $_FILES[$image_fieldname]['error']. This field
returns a number: 0 for “Everything went OK,” and non-zero for problems. Those
non-zero numbers are none other than:

CHAPTER 9: HANDLING IMAGES AND COMPLEXITY 265
IMAGES ARE
JUST FILES
1 => 'Maximum file size in php.ini exceeded'
2 => 'Maximum file size in HTML form exceeded'
3 => 'Only part of the file was uploaded'
4 => 'No file was selected to upload.'
You can see why renumbering the $php_errors array makes sense: you’ve got a
map of error codes that $_FILES[$image_fieldname]['error'] might return, and
the human-readable errors that go with them.
At this juncture, you’ve got all the information you need; time to start using it.
DID THE FILE UPLOAD WITH ANY ERRORS?
Next, you need to check that $_FILES[$image_fieldname]['error'] piece of
the $_FILES array and see whether any errors occurred. If the value is non-zero,
something went wrong, and you need to handle the problem. Luckily, you have a
handy-dandy function for just that: handle_error.
<?php
// Require utility scripts
// Set up variables
// Get everything from the form aside from the image... down to...
if ($position === false) {
$twitter_url = $twitter_url . $twitter_handle;
} else {
$twitter_url = $twitter_url . substr($twitter_handle, $position + 1);
}
// Make sure we didn't have an error uploading the image
($_FILES[$image_fieldname]['error'] == 0)
or handle_error("the server couldn't upload the image you selected.",
$php_errors[$_FILES[$image_fieldname]['error']]);
$insert_sql = "INSERT INTO users (first_name, last_name, email, bio," .
"facebook_url, twitter_handle) " .
"VALUES ('{$first_name}', '{$last_name}', '{$email}', '{$bio}',
" .
"'{$facebook_url}', '{$twitter_handle}');";
// Insert the user into the database
mysql_query($insert_sql)
or die(mysql_error());
// Redirect the user to the page that displays user information
header("Location: show_user.php?user_id=" . mysql_insert_id());
exit();
?>
IMAGES ARE
JUST FILES
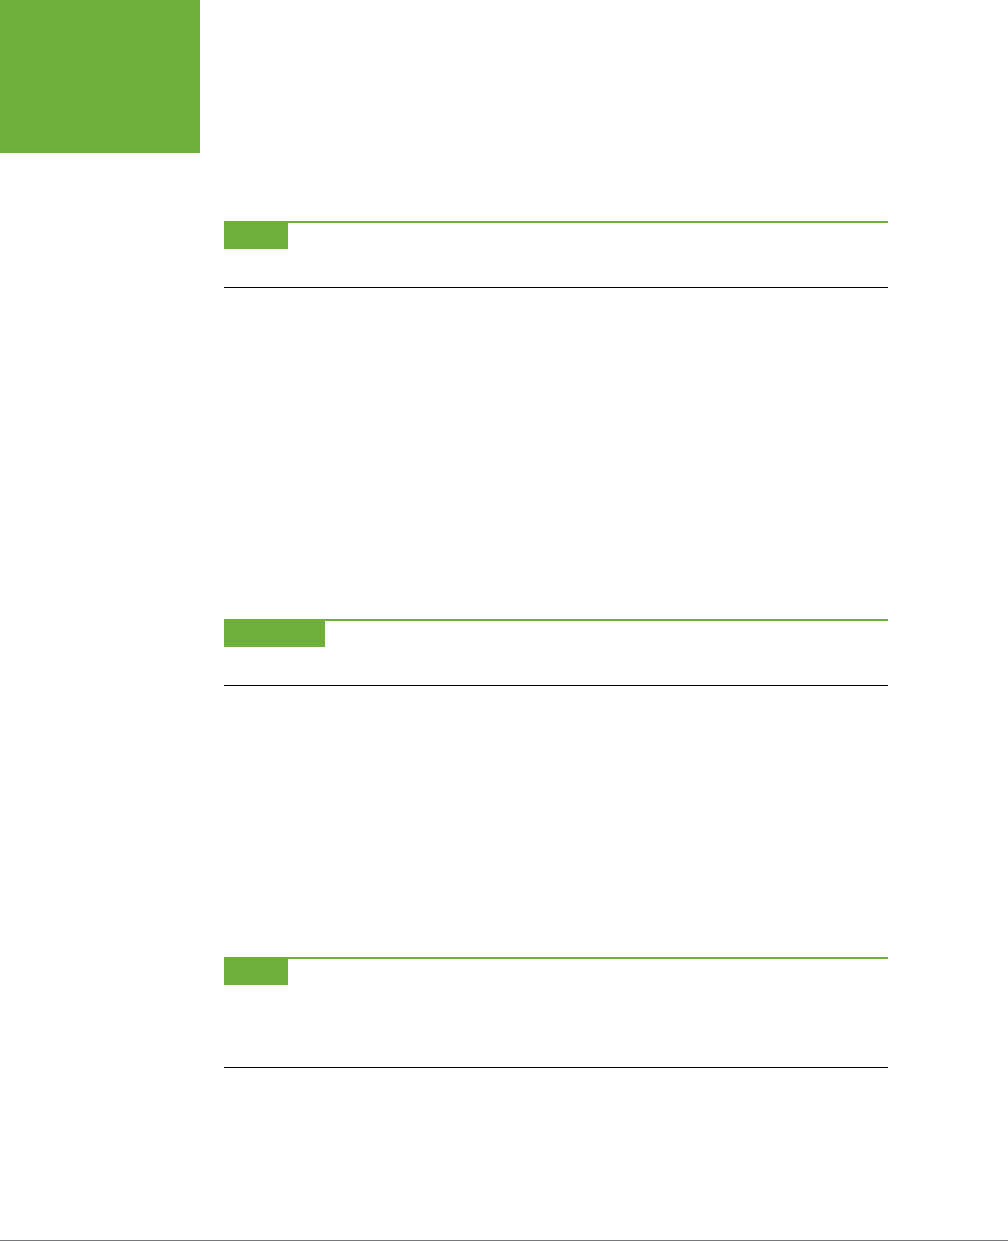
PHP & MYSQL: THE MISSING MANUAL
266
IMAGES ARE
JUST FILES
If the error field ($_FILES[$image_fieldname]['error']) is zero, things are great;
just keep going. If it’s non-zero, you want to show your user an error, using the er-
ror code to look up the exact problem in your $php_errors associative array—and
display that, too, if debugging is on (page 238).
NOTE Now would be a good time to check
app_config.php
, and verify that you have
DEBUG_MODE
set to
true.
There’s also a new wrinkle in here that you might have just skipped right over: This
line is basically an if statement without the if. PHP will evaluate the following line:
($_FILES[$image_fieldname]['error'] == 0)
If that line is true, it will continue. If the line isn’t true, it runs the or part of the code
on the next line; in this case, that’s handle_error.
Essentially, the preceding example does the same thing as the following code:
if ($_FILES[$image_fieldname]['error'] != 0) {
handle_error("the server couldn't upload the image you selected.",
$php_errors[$_FILES[$image_fieldname]['error']]);
}
WARNING Watch your square brackets (
[
and
]
) and parentheses carefully here; it’s easy to get them
mixed up and cause a hard-to-find error.
But the code without the if is shorter and cleaner. Every bit helps. This is a nice trick
to add to your growing PHP toolkit.
You can check your code out in action at this point. Visit
create_user.html
and find an
image file that’s bigger than 2 MB. Photos that come straight from your camera are
likely to be large. (If you’re on a Mac, you can export a full-size photo from iPhoto.)
Select that image and then try and submit your form. You should see something
like Figure 9-5. This page is the result of your code finding an error code, and that
error code being matched up to an error in $php_errors—in this case, your image
was larger than your HTML file allowed.
NOTE You might have noticed that even though the image was rejected, your browser still uploads the
image—regardless of how big the image is, or what your maximum file size is. That’s because it’s only
after
the
image is uploaded that the size comparison is made. That’s sort of a bummer, but it’s a browser thing, and not
something you can fix with PHP.
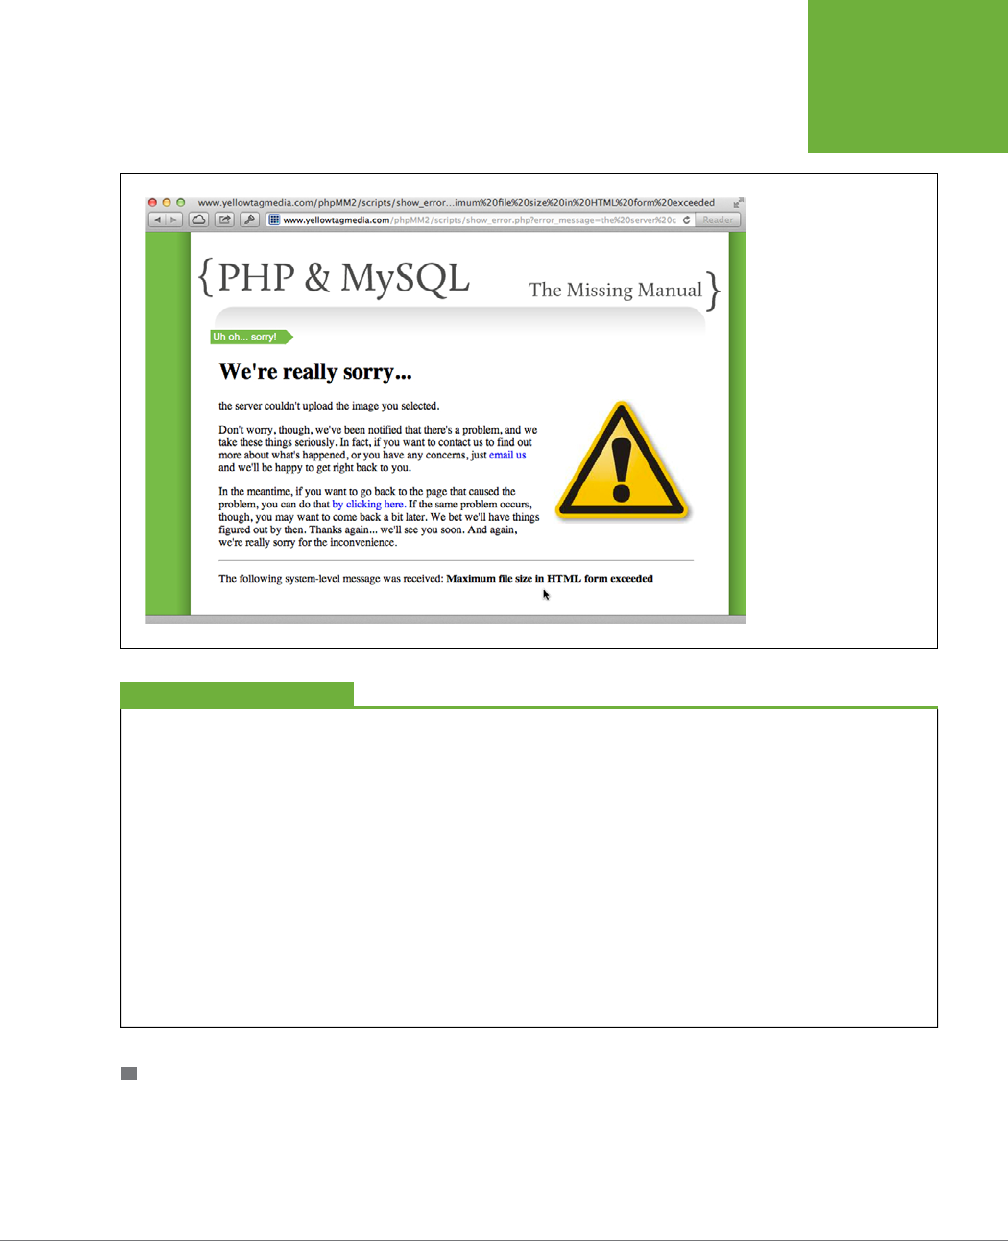
CHAPTER 9: HANDLING IMAGES AND COMPLEXITY 267
IMAGES ARE
JUST FILES
FIGURE 9-5
Here’s one of those
beautiful situations where
the hard work you did
earlier pays off. Rather
than wading through your
code or even writing cus-
tom PHP, you can quickly
hand off an error to your
handle_error
function
and get a nice response.
Now multiply that by the
hundreds (thousands?) of
times you’ll use
handle_
error
, and you’ll start to
see the value of learning
that utility function early
in your PHP life (Chapter 8,
page 246).
POWER USERS’ CLINIC
Breathing and Sleeping Matter
Any good programmer will tell you stories of at least a few
all-night hacking sessions. And odds are, those stories will
be tinged rosy, full of victories and excitement. But the truth
of the matter is that fatigue slows the brain down, and no
programmer is as effective on two hours of sleep as he is on six.
Why is this relevant? Because a tired brain isn’t as useful as
a rested one. And, because if you’ve been swimming in the
pool of PHP programming for eight chapters before this one,
by now you’re well into the deep end. Chances are that you’re
having to read at least a few things twice, and some of this
new code introduces not just one or two new things, but three,
or four, or five.
There’s nothing at all wrong with this, but if you’re getting worn
out, nobody wins by you plowing ahead. Take a few hours off,
ride your bike, jog a mile, or just set PHP aside for the night.
You’ll be stunned at how much clearer things seem after a bit
of rest from programming. Don’t think that rest and taking a
few moments to breathe out of sight of the keyboard are a
sign of weakness; in fact, it’s just the opposite.
IS THIS REALLY AN UPLOADED FILE?
At this point, despite whether you have a real file, what your program needs to work
with is a file
name
. That name is controlled entirely by what your users put into their
file input box. This means that if a user is tricky, malicious, and thoroughly dishon-
est, he might try to put in a file name that does upload a file on the host provider’s
system, but also just so happens to match one of the special files on web servers
IMAGES ARE
JUST FILES

PHP & MYSQL: THE MISSING MANUAL
268
IMAGES ARE
JUST FILES
that control things like, say, the user passwords (that file is usually
/etc/passwd
).
You need a way to stop that from happening. (More PHP books and tutorials than
you can imagine leave this step out, but it’s critical.)
You might think you’re about to use regular expressions and check for all kinds of
fancy file name characters, but there’s an easier way. PHP gives you a function called
is_uploaded_file whose purpose it is to ensure that for a given name, that name
references a file uploaded with HTTP (the language of web browsers and HTML
forms). In other words, if the supplied name targets a file on your web server, this
function will return false, and you know that something’s fishy.
Here’s what you want to do:
// Make sure we didn't have an error uploading the image
($_FILES[$image_fieldname]['error'] == 0)
or handle_error("the server couldn't upload the image you selected.",
$php_errors[$_FILES[$image_fieldname]['error']]);
// Is this file the result of a valid upload?
is_uploaded_file($_FILES[$image_fieldname]['tmp_name'])
or handle_error("you were trying to do something naughty. Shame on you!",
"Uploaded request: file named " .
"'{$_FILES[$image_fieldname]['tmp_name']}'");
// Interact with MySQL
This code uses another property of $_FILES[$image_fieldname]: the temporary
name of the file. This gives you the name of the file as it currently stands and lets
you make sure it’s an uploaded file.
But, there’s a problem here: is_uploaded_file fires o an error if the file isn’t up-
loaded. That sounds good, except that you’ve done a lot of work to handle errors
your own way. You don’t want is_uploaded_file to generate an error; you just want
its return value, even if there’s a problem.
You can instruct PHP to run a function but suppress errors by inserting the @ char-
acter directly before the function, and that’s exactly what you need here:
// Is this file the result of a valid upload?
@is_uploaded_file($_FILES[$image_fieldname]['tmp_name'])
or handle_error("you were trying to do something naughty. Shame on you!",
"Uploaded request: file named " .
"'{$_FILES[$image_fieldname]['tmp_name']}'");
If there’s a problem when the function runs, handle_error takes over, rather than
your script throwing out some unintelligible error of its own. You’ve avoided a nasty
security hole. One more hacker thwarted. (For more on that @ character, see the
box on page 269.)

CHAPTER 9: HANDLING IMAGES AND COMPLEXITY 269
IMAGES ARE
JUST FILES
POWER USERS’ CLINIC
Suppress Errors at Your Own Peril
There’s perhaps no more intriguing operator in PHP than
@
.
With one keystroke, all the problems that might come about
from a user entering invalid data, or a SQL query having an
incorrect column, or even just a poorly formed URL can be
banished. Your code can continue without having to check for
every possible mistake your users, you, and your code might
make...and that’s a lot of potential mistakes.
But
@
is an atomic bomb waiting to turn your code into a
smoldering slag heap. Use it frequently, and you’ll quickly find
that your code is riddled with potential problems. You’ll never
be sure if your problem is something your user did, something
you did, or a legitimate bug you need to fix.
Regardless of what’s causing the error, if you snuck around it
with
@
, you have a legitimate bug. Make a rule for yourself:
when you use
@
(as in the very next line), pair it with an
or
and explicit error handling. You’ll be much better off for the
discipline.
But—there’s always a but, isn’t there?—high-volume, produc-
tion websites often use
@
because they simply
can’t
crash or
stop working. In those cases, you should usually go with some
sort of hybrid solution. On the one hand, use
@
, but then pair it
with
or
that is triggered by a flag, like your debugging mode
flag (page 238). Thus, in “normal” mode, things run without
spewing tons of errors (or perhaps by only logging those
errors). Then, by flipping on debugging mode, you can see
what’s really going on and track down problems and fix them.
IS THE UPLOADED FILE REALLY AN IMAGE?
You have a file uploaded, and you know it’s not some fake file that has a name that
points at a protected file on your server’s file system. It’s finally time to move on
and show the image, right? Well, unfortunately, not quite. You have a file, but is it
an image? There’s nothing preventing a user from accidentally uploading a Word
document, or a malicious user uploading some JavaScript or an executable file.
Remember, you can’t assume that your users are going to do the right thing. Thank-
fully, PHP oers the getimagesize function, which checks the size of a given image
file. And, best of all, this function kicks out an error if what it’s evaluating is a non-
image file. Add the following function to your script:
// Make sure we didn't have an error uploading the image
($_FILES[$image_fieldname]['error'] == 0)
or handle_error("the server couldn't upload the image you selected.",
$php_errors[$_FILES[$image_fieldname]['error']]);
// Is this file the result of a valid upload?
@is_uploaded_file($_FILES[$image_fieldname]['tmp_name'])
or handle_error("you were trying to do something naughty. Shame on you!",
"Uploaded request: file named " .
"'{$_FILES[$image_fieldname]['tmp_name']}'");
IMAGES ARE
JUST FILES

PHP & MYSQL: THE MISSING MANUAL
270
IMAGES ARE
JUST FILES
// Is this actually an image?
@getimagesize($_FILES[$image_fieldname]['tmp_name'])
or handle_error("you selected a file for your picture " .
"that isn't an image.",
"{$_FILES[$image_fieldname]['tmp_name']} " .
"isn't a valid image file.");
// Interact with MySQL
MOVE THE FILE TO A PERMANENT LOCATION
You’re almost to the big finish. You have a valid HTTP upload that’s an image. All
that’s left is to move this image from the temporary location that browsers use for
uploaded files to someplace permanent. Here’s where your image_fieldname vari-
able from page 261 comes into use; remember this?
<?php
require_once '../scripts/app_config.php';
require_once '../scripts/database_connection.php';
$upload_dir = HOST_WWW_ROOT . "uploads/profile_pics/";
$image_fieldname = "user_pic";
// and so on…
NOTE Create the
uploads/profile_pics/
directory if you haven’t done so already.
At this point, it’s important to understand what’s happened to your user’s uploaded
file. When the server uploads this file, it uses a preconfigured location. It’s also
likely to use a name that isn’t identical to what the user’s file was originally called.
Sometimes the name is completely changed; other times something is prepended
(added before it) or appended to it.
Additionally, the file isn’t in a place you want to leave it. It’ll often be stuck into some
sort of temporary storage, and that storage is probably cleared out every so often.
You need to not only assign the file a name, but you also need to move it somewhere
more permanent—for that, you can use $upload_dir.
There are lots of dierent approaches to naming a file. You could come up with
something related to the user who uploaded the file, but often, it’s just easiest to give
the file a unique numeric name. And the easiest way to do this is to create the name
based on the current time—a near surefire way to end up with a unique file name.
NOTE Take a look at the image names on a site like Flickr or Facebook. Unless users have renamed their
images, the names are often just a string of letters and numbers—often indicating a time.

CHAPTER 9: HANDLING IMAGES AND COMPLEXITY 271
IMAGES ARE
JUST FILES
Once you create a unique name, you can finally move the file from its current
location to a permanent one.
First, figure out a name for the soon-to-be permanent image:
// Is this actually an image?
@getimagesize($_FILES[$image_fieldname]['tmp_name'])
or handle_error("you selected a file for your picture " .
"that isn't an image.",
"{$_FILES[$image_fieldname]['tmp_name']} " .
"isn't a valid image file.");
// Name the file uniquely
$now = time();
while (file_exists($upload_filename = $upload_dir . $now .
'-' .
$_FILES[$image_fieldname]['name'])) {
$now++;
}
Here’s the step-by-step breakdown:
1. Create a new variable called $now and assign it the current time by using
PHP’s time function.
2. Start a loop by using while. This instructs PHP that while a certain condition
is true, keep doing the loop. As soon as that condition
isn’t
true, stop looping.
3. As part of the while condition, assign a value to $upload_filename: the
$upload_dir plus the current time, a dash (-), and then finally the name of
the original file. This is a combination of a part that will be unique (the time)
and the original name of the user’s file (which is in $_FILES[$image_fieldname]
['name']).
4. Complete the while condition by passing that calculated filename to
file_exists. If that file exists, the while loop runs. If not, you have a unique
file name, so the loop will not run (or, run anymore, if it’s already been looping).
5. Within the loop, you need to change the filename. Because the while loop is
only going to run if you have a filename that’s already in use, just add to $now
and try again.
Here’s the beauty of PHP: you can do all of that in just a few lines of code, and when
this code completes, you’ll have a unique file name for the user’s file.
Now, move the file from its old temporary location to the permanent one:
// Is this actually an image?
@getimagesize($_FILES[$image_fieldname]['tmp_name'])
or handle_error("you selected a file for your picture " .
"that isn't an image.",
IMAGES ARE
JUST FILES

PHP & MYSQL: THE MISSING MANUAL
272
IMAGES ARE
JUST FILES
"{$_FILES[$image_fieldname]['tmp_name']} " .
"isn't a valid image file.");
// Name the file uniquely
$now = time();
while (file_exists($upload_filename = $upload_dir . $now .
'-' .
$_FILES[$image_fieldname]['name'])) {
$now++;
}
// Finally, move the file to its permanent location
@move_uploaded_file($_FILES[$image_fieldname]['tmp_name'], $upload_filename)
or handle_error("we had a problem saving your image to " .
"its permanent location.",
"permissions or related error moving " .
"file to {$upload_filename}");
// Interact with MySQL
It’s been a lot of work, but you should finally have your file in a permanent location—
and you know that the file is a valid image. Your code should look something like this:
<?php
require_once '../scripts/app_config.php';
require_once '../scripts/database_connection.php';
$upload_dir = HOST_WWW_ROOT . "uploads/profile_pics/";
$image_fieldname = "user_pic";
// Potential PHP upload errors
$php_errors = array(1 => 'Maximum file size in php.ini exceeded',
2 => 'Maximum file size in HTML form exceeded',
3 => 'Only part of the file was uploaded',
4 => 'No file was selected to upload.');
$first_name = trim($_REQUEST['first_name']);
$last_name = trim($_REQUEST['last_name']);
$email = trim($_REQUEST['email']);
$bio = trim($_REQUEST['bio']);
$facebook_url = str_replace("facebook.org", "facebook.com",
trim($_REQUEST['facebook_url']));
$position = strpos($facebook_url, "facebook.com");
if ($position === false) {
$facebook_url = "http://www.facebook.com/" . $facebook_url;
}

CHAPTER 9: HANDLING IMAGES AND COMPLEXITY 273
IMAGES ARE
JUST FILES
$twitter_handle = trim($_REQUEST['twitter_handle']);
$twitter_url = "http://www.twitter.com/";
$position = strpos($twitter_handle, "@");
if ($position === false) {
$twitter_url = $twitter_url . $twitter_handle;
} else {
$twitter_url = $twitter_url . substr($twitter_handle, $position + 1);
}
// Make sure we didn't have an error uploading the image
($_FILES[$image_fieldname]['error'] == 0)
or handle_error("the server couldn't upload the image you selected.",
$php_errors[$_FILES[$image_fieldname]['error']]);
// Is this file the result of a valid upload?
@is_uploaded_file($_FILES[$image_fieldname]['tmp_name'])
or handle_error("you were trying to do something naughty. Shame on you!",
"Uploaded request: file named " .
"'{$_FILES[$image_fieldname]['tmp_name']}'");
// Is this actually an image?
@getimagesize($_FILES[$image_fieldname]['tmp_name'])
or handle_error("you selected a file for your picture " .
"that isn't an image.",
"{$_FILES[$image_fieldname]['tmp_name']} " .
"isn't a valid image file.");
// Name the file uniquely
$now = time();
while (file_exists($upload_filename = $upload_dir . $now .
'-' .
$_FILES[$image_fieldname]['name'])) {
$now++;
}
// Finally, move the file to its permanent location
@move_uploaded_file($_FILES[$image_fieldname]['tmp_name'], $upload_filename)
or handle_error("we had a problem saving your image to " .
"its permanent location.",
"permissions or related error moving " .
"file to {$upload_filename}");
$insert_sql = "INSERT INTO users (first_name, last_name, email, bio," .
"facebook_url, twitter_handle) " .
"VALUES ('{$first_name}', '{$last_name}', '{$email}', '{$bio}', " .
"'{$facebook_url}', '{$twitter_handle}');";
IMAGES ARE
JUST FILES
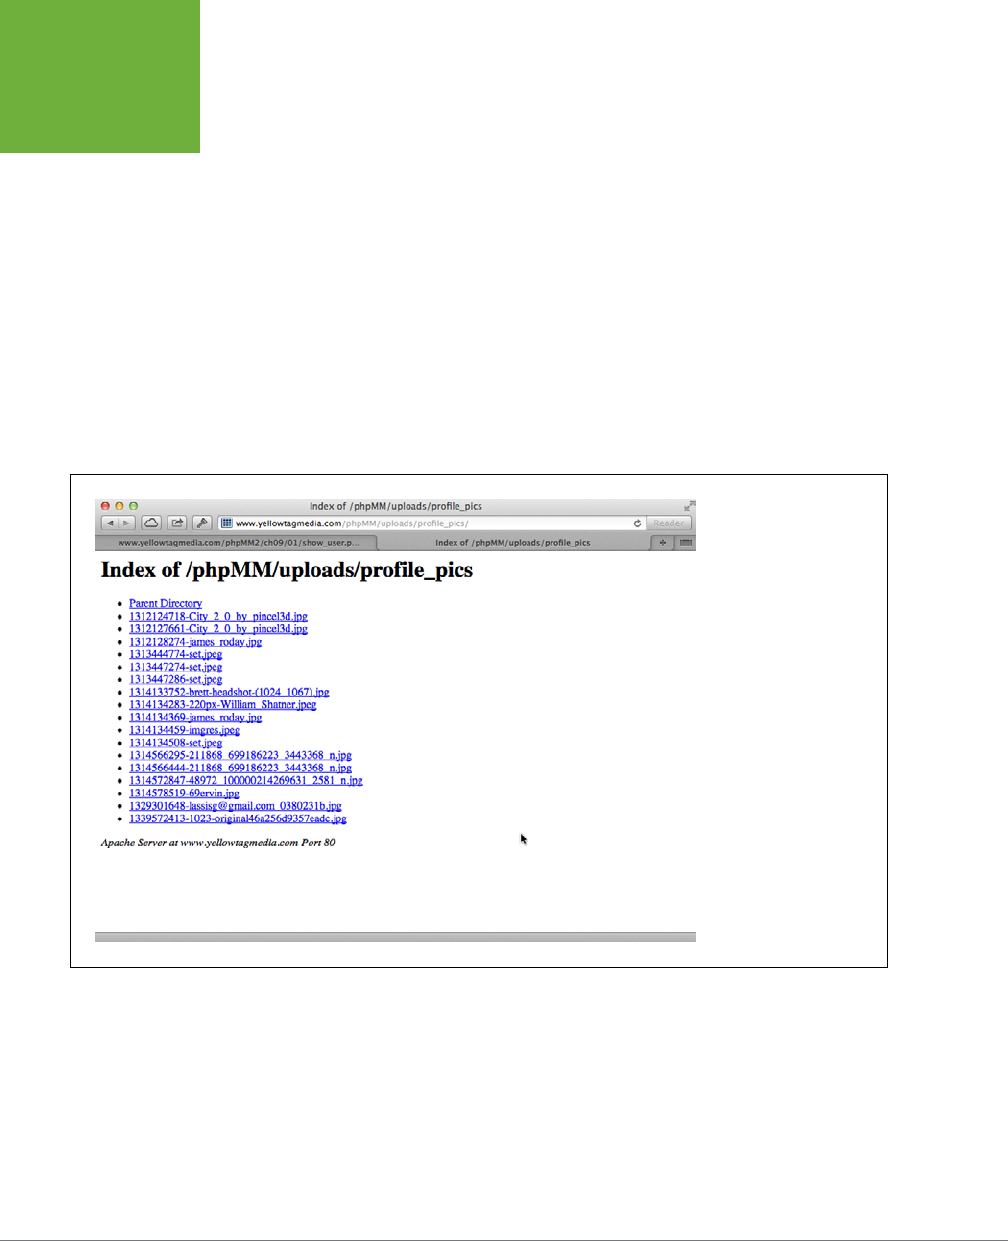
PHP & MYSQL: THE MISSING MANUAL
274
IMAGES ARE
JUST FILES
// Insert the user into the database
mysql_query($insert_sql)
or die(mysql_error());
// Redirect the user to the page that displays user information
header("Location: show_user.php?user_id=" . mysql_insert_id());
exit();
?>
But, don’t trust flawless coding. Try things out for yourself. Visit
create_user.php
,
select an image from your hard drive (one that’s within your size limit), and then
upload it. Next, navigate to the
uploads/profile_pics/
directory in your web browser.
If you have permissions set to view directories on your server, you’ll see something
like Figure 9-6.
FIGURE 9-6
If you don’t see a listing
like this, or you get a mes-
sage indicating that direc-
tory listings are denied,
you can contact your web
server provider or hosting
company and ask it to
turn on directory listings
through the Internet. It’s
handy to be able to type a
URL and look at a directory
listing in your browser, but
it’s not the safest setup. It
means that anyone with a
web browser can navigate
your site’s directory
structure. So although it’s
great for debugging, it’s
not something you want to
leave on forever.
Now (finally!), you can click one of those file names, and you should get a glorious im-
age uploaded from your computer to your web server, as demonstrated in Figure 9-7.
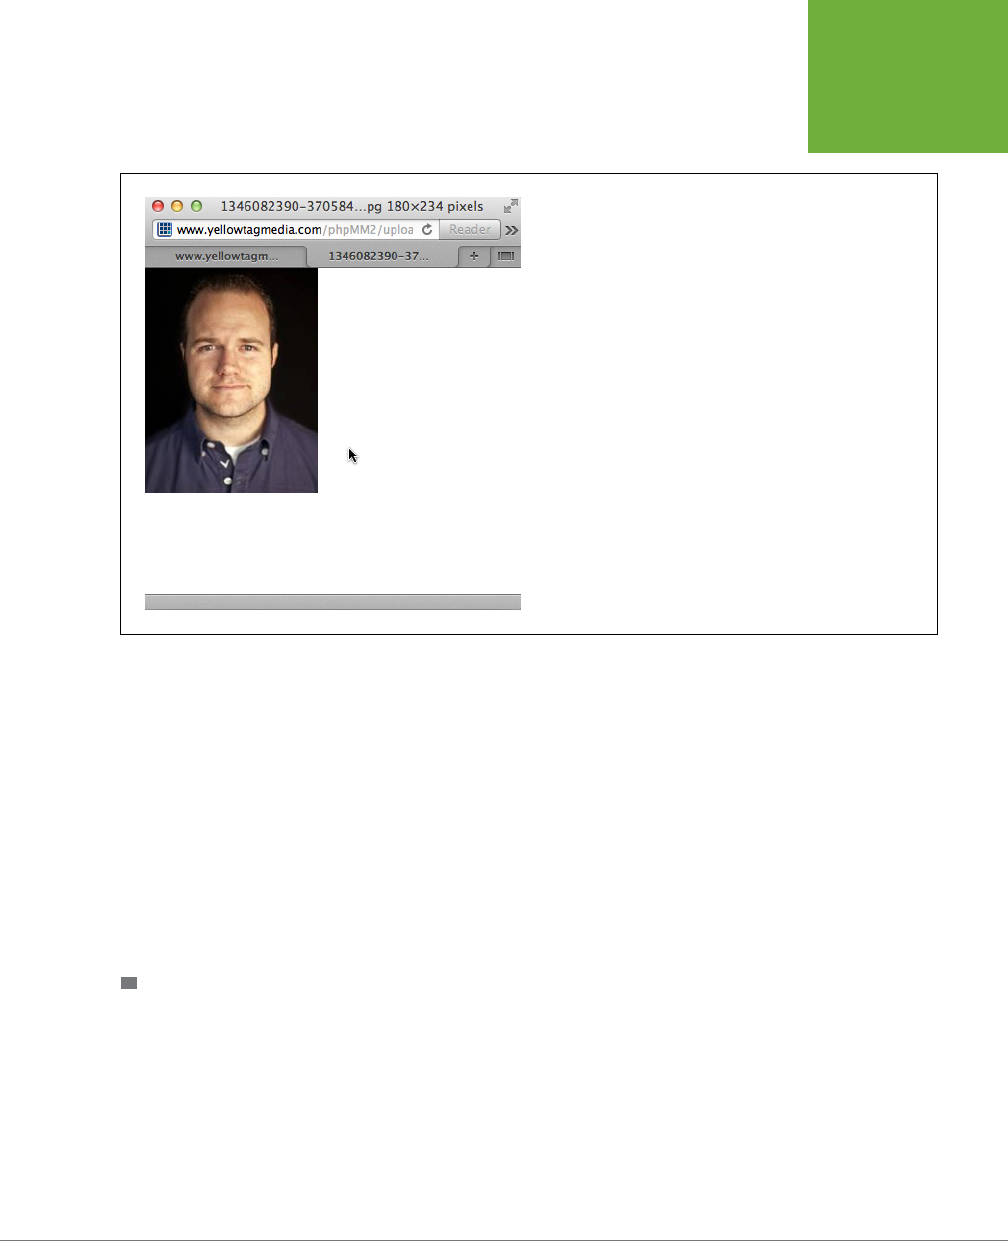
CHAPTER 9: HANDLING IMAGES AND COMPLEXITY 275
IMAGES ARE
JUST FILES
FIGURE 9-7
The image has landed! It’s taken some work, but think about the
best web applications out there: they all let users upload custom
images. This is core functionality these days, and now you can do it,
too. Nice work.
Storing the Image Location in the Database
It’s taken some time, but you’re finally ready to save this image—or at least its loca-
tion—in your database table. You already have a query built:
$insert_sql = "INSERT INTO users (first_name, last_name, email, " .
"bio, facebook_url, twitter_handle) " .
"VALUES ('{$first_name}', '{$last_name}', '{$email}', " .
" '{$bio}', " . '{$facebook_url}', " .
"'{$twitter_handle}');";
// Insert the user into the database
mysql_query($insert_sql);
CREATE A NEW DATABASE COLUMN
All you need to do, then, is add a column in which you can store the image location.
This is a matter of using the ALTER command (Chapter 7, page 194), something with
which you’re already comfortable:
ALTER TABLE users
ADD user_pic_path varchar(200);
IMAGES ARE
JUST FILES

PHP & MYSQL: THE MISSING MANUAL
276
IMAGES ARE
JUST FILES
Run this statement to test it, and then DESCRIBE your users table (Chapter 4, page
113) just to make sure the change was applied:
mysql> describe users;
+----------------+---------------+------+-----+---------+----------------+
| Field | Type | Null | Key | Default | Extra |
+----------------+---------------+------+-----+---------+----------------+
| user_id | int(11) | NO | PRI | NULL | auto_increment |
| first_name | varchar(20) | NO | | NULL | |
| last_name | varchar(30) | NO | | NULL | |
| email | varchar(50) | NO | | NULL | |
| facebook_url | varchar(100) | YES | | NULL | |
| twitter_handle | varchar(20) | YES | | NULL | |
| bio | varchar(1000) | YES | | NULL | |
| user_pic_path | varchar(200) | YES | | NULL | |
+----------------+---------------+------+-----+---------+----------------+
8 rows in set (0.00 sec)
This user_pic_path field is just a text column. This is because all you’re storing is
the path to the image rather than the image itself.
NOTE If you’re starting to become curious about what it would look like to store the actual image in your
database rather than just the path, sit tight. In the next section, that’s exactly what you’ll do.
INSERT THE IMAGE PATH INTO YOUR TABLE
The update to the INSERT query isn’t dicult at all, now:
$insert_sql = "INSERT INTO users (first_name, last_name, email, bio," .
"facebook_url, twitter_handle," .
"user_pic_path) " .
"VALUES ('{$first_name}', '{$last_name}', '{$email}', '{$bio}', " .
"'{$facebook_url}', '{$twitter_handle}', " .
"'{$upload_filename}');";
// Insert the user into the database
mysql_query($insert_sql);
Things are definitely starting to flow quickly. With all your existing work already in
place, adding a new column is simple. But, before you dive back into your HTML,
there’s one more thing that remains to be done.
CHECK YOUR WORK
Before you go any further, verify that things work. If you were just a PHP program-
mer, you’d have to try this code out and then either write a new script to select data
from the
users
table, or jump right back into
show_user.php
. But why go to all that
trouble? You know SQL and how to interact with MySQL.

CHAPTER 9: HANDLING IMAGES AND COMPLEXITY 277
IMAGES ARE
JUST FILES
First, create a new user, and use a name you haven’t used before. Then, jump back
into your SQL command-line tool and check the results of your work for yourself.
Just SELECT the user you just inserted, focusing on the picture path:
SELECT user_pic_path
FROM users
WHERE last_name = 'Geyer';
You should see something like this:
mysql> select user_pic_path from users where last_name = 'Geyer';
+------------------------------------+
| user_pic_path |
+------------------------------------+
| /home/bdmclaughlin/public_html/phpMM2/uploads/profile_pics/1346084332-
370584_8323673_927214073_n.jpg |
+------------------------------------+
1 row in set (0.00 sec)
As you can see, the image is on your server, and now you’ve got the path to that image
stored in your database.
Now
, you’re ready to show your users their glorious images.
If you’ve had any issues, you might want to check out the completed version of
create_user.php
that follows. There have been a ton of additions, so check that
everything is right where it belongs:
<?php
require_once '../scripts/app_config.php';
require_once '../scripts/database_connection.php';
$upload_dir = HOST_WWW_ROOT . "uploads/profile_pics/";
$image_fieldname = "user_pic";
// Potential PHP upload errors
$php_errors = array(1 => 'Maximum file size in php.ini exceeded',
2 => 'Maximum file size in HTML form exceeded',
3 => 'Only part of the file was uploaded',
4 => 'No file was selected to upload.');
$first_name = trim($_REQUEST['first_name']);
$last_name = trim($_REQUEST['last_name']);
$email = trim($_REQUEST['email']);
$bio = trim($_REQUEST['bio']);
$facebook_url = str_replace("facebook.org", "facebook.com",
trim($_REQUEST['facebook_url']));
$position = strpos($facebook_url, "facebook.com");
if ($position === false) {
$facebook_url = "http://www.facebook.com/" . $facebook_url;
IMAGES ARE
JUST FILES

PHP & MYSQL: THE MISSING MANUAL
278
IMAGES ARE
JUST FILES
}
$twitter_handle = trim($_REQUEST['twitter_handle']);
$twitter_url = "http://www.twitter.com/";
$position = strpos($twitter_handle, "@");
if ($position === false) {
$twitter_url = $twitter_url . $twitter_handle;
} else {
$twitter_url = $twitter_url . substr($twitter_handle, $position + 1);
}
// Make sure we didn't have an error uploading the image
($_FILES[$image_fieldname]['error'] == 0)
or handle_error("the server couldn't upload the image you selected.",
$php_errors[$_FILES[$image_fieldname]['error']]);
// Is this file the result of a valid upload?
@is_uploaded_file($_FILES[$image_fieldname]['tmp_name'])
or handle_error("you were trying to do something naughty. Shame on you!",
"Uploaded request: file named " .
"'{$_FILES[$image_fieldname]['tmp_name']}'");
// Is this actually an image?
@getimagesize($_FILES[$image_fieldname]['tmp_name'])
or handle_error("you selected a file for your picture " .
"that isn't an image.",
"{$_FILES[$image_fieldname]['tmp_name']} " .
"isn't a valid image file.");
// Name the file uniquely
$now = time();
while (file_exists($upload_filename = $upload_dir . $now .
'-' .
$_FILES[$image_fieldname]['name'])) {
$now++;
}
// Finally, move the file to its permanent location
@move_uploaded_file($_FILES[$image_fieldname]['tmp_name'], $upload_filename)
or handle_error("we had a problem saving your image to " .
"its permanent location.",
"permissions or related error moving " .
"file to {$upload_filename}");
$insert_sql = "INSERT INTO users (first_name, last_name, email, bio," .
"facebook_url, twitter_handle," .
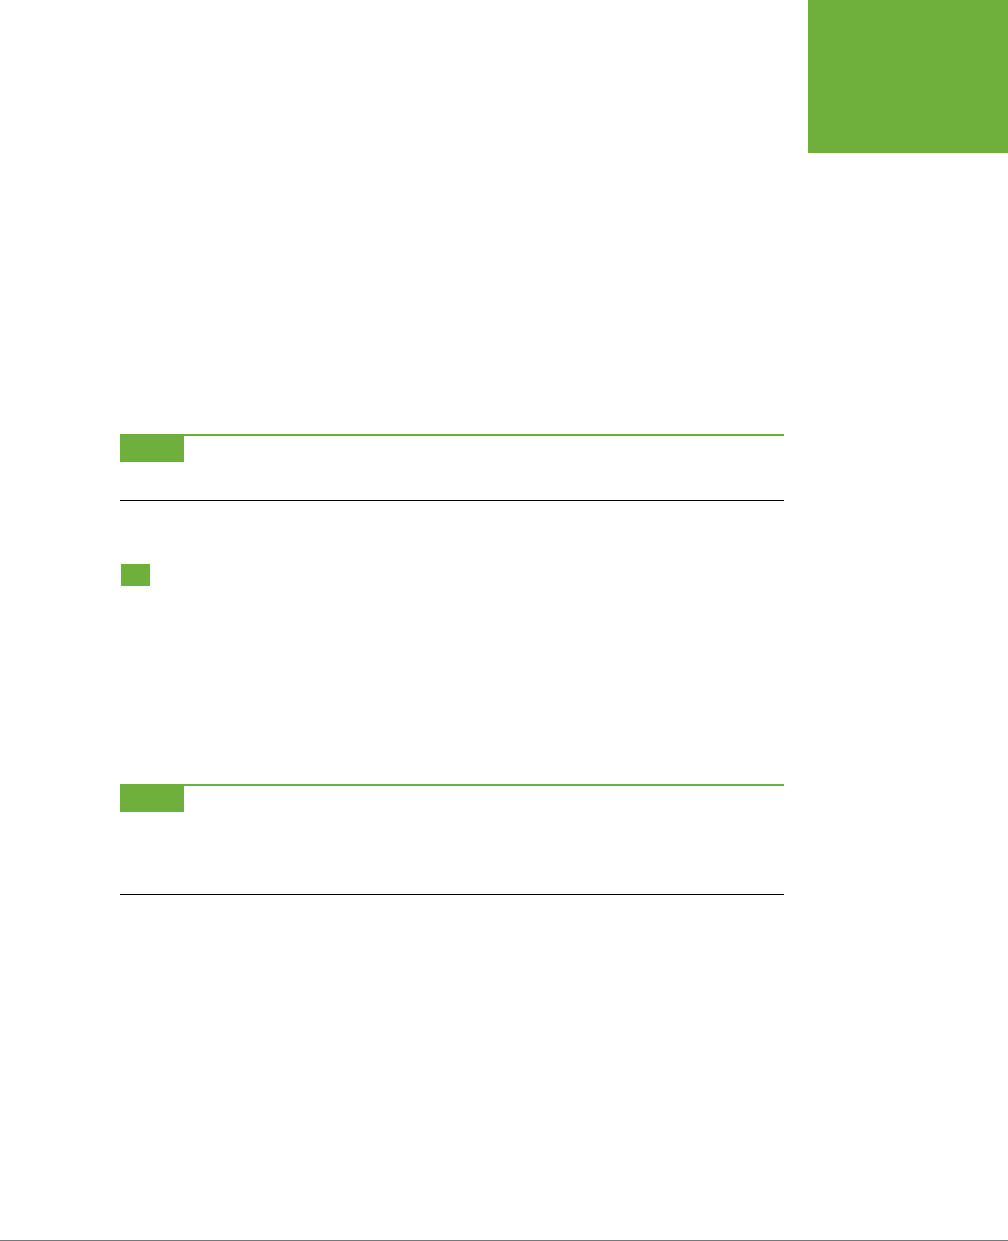
CHAPTER 9: HANDLING IMAGES AND COMPLEXITY 279
IMAGES ARE
FOR VIEWING
"user_pic_path) " .
"VALUES ('{$first_name}', '{$last_name}', '{$email}', '{$bio}', " .
"'{$facebook_url}', '{$twitter_handle}', " .
"'{$upload_filename}');";
// Insert the user into the database
mysql_query($insert_sql)
or die(mysql_error());
// Redirect the user to the page that displays user information
header("Location: show_user.php?user_id=" . mysql_insert_id());
exit();
?>
NOTE You can find this chapter’s finished example code on this book’s Missing CD page at
www.
missingmanuals.com/cds/phpmysqlmm2e
.
Images Are for Viewing
Finally! It’s time to show your users the fruits of all your hard work. They’ll probably
never realize how long you slaved to get one single image showing up—and protect-
ing all their other information in the process.
Ensure that you have a copy of
show_user.php
alongside
create_user.html
and
create_user.php
. You need to update
show_user.php
to select the user’s picture
path from the
users
table and then display that picture.
NOTE As with all scripts that you’re updating, be sure to change
require
to
require_once
, include a
reference to
app_config.php
, and update your paths such that you’re not using chapter-specific
scripts/
directories.
In any scripts that have HTML—like
show_user.php
—you should also check paths for things like the CSS files and
external JavaScript references.
SELECTing the Image and Displaying It
This step turns out to be easy. First, you already have a SELECT that grabs every-
thing for a particular user:
// Build the SELECT statement
$select_query = "SELECT * FROM users WHERE user_id = " . $user_id;
Next, you can just add a line that grabs the image path in the code that you already
have pulling information out of the result of running this SQL INSERT:
IMAGES ARE
FOR VIEWING

PHP & MYSQL: THE MISSING MANUAL
280
IMAGES ARE
FOR VIEWING
if ($result) {
$row = mysql_fetch_array($result);
$first_name = $row['first_name'];
$last_name = $row['last_name'];
$bio = preg_replace("/[\r\n]+/", "</p><p>", $row['bio']);
$email = $row['email'];
$facebook_url = $row['facebook_url'];
$twitter_handle = $row['twitter_handle'];
$user_image = $row['user_pic_path'];
// Turn $twitter_handle into a URL
$twitter_url = "http://www.twitter.com/" .
substr($twitter_handle, $position + 1);
} else {
handle_error("There was a problem finding your " .
"information in our system.",
"Error locating user with ID {$user_id}");
}
NOTE Take this opportunity to move from using
die
in the
else
block of your
if
statement to the much
cooler
handle_error
function (page 247).
Be sure to remove this old code entirely:
// To be added later
$user_image = "../../images/missing_user.png";
Finally, you already have a place in this script’s HTML that references the $user_
image variable:
<div id="content">
<div class="user_profile">
<h1><?php echo "{$first_name} {$last_name}"; ?></h1>
<p><img src="<?php echo $user_image; ?>" class="user_pic" />
<!-- and so on... -->
Time to try things out again. Go to your
show_user.php
page with an existing
user’s ID in the URL bar of your browser, or create a new user with a picture and
let
create_user.php
redirect you. You should see something similar to Figure 9-8.
To figure out why you can’t see the image you uploaded, view the source for this
page, and see what path was used for the image. You’ll probably see something
like Figure 9-9.
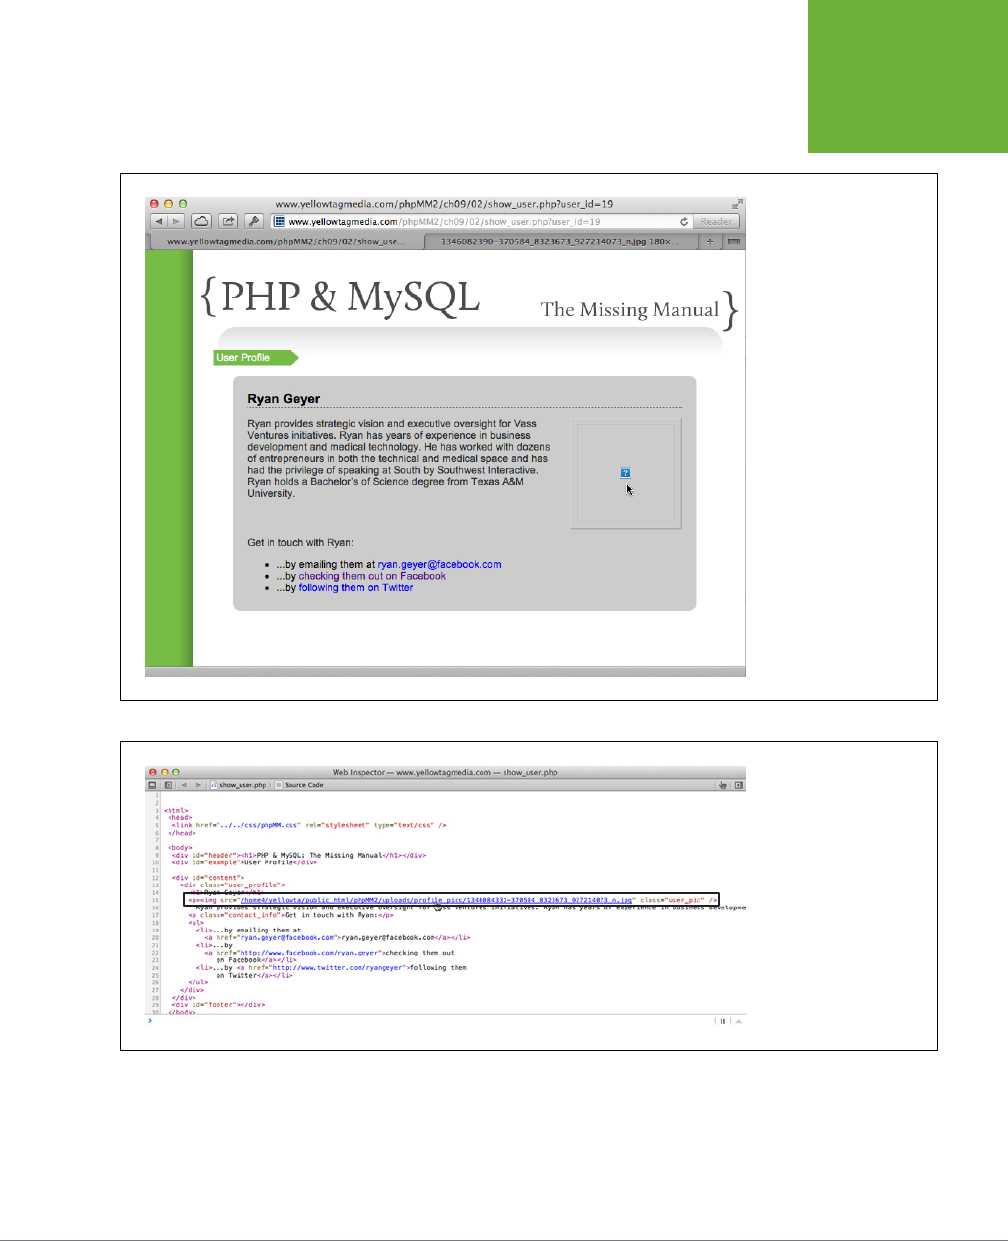
CHAPTER 9: HANDLING IMAGES AND COMPLEXITY 281
IMAGES ARE
FOR VIEWING
FIGURE 9-8
What happened to the pic-
ture you uploaded? When
you get an unexpected
result like this, start out by
either viewing the source
(under the View menu, or
by right-clicking the page
and selecting View Source)
or use a plug-in like the
Firebug debugger tool
(
www.getfirebug.com
)
to inspect the offending
element. That’s always
a good first step toward
tracking down a problem.
FIGURE 9-9
According to this HTML
source code, the
<img>
element has the correct
absolute path to the
image. But, is that what a
path in HTML pages should
look like? How does the
absolute path on a file
system relate to the path
on a web server?
You checked earlier to ensure that this is a valid image (page 269). This time, check
to see if the path to the image is causing the problem.
IMAGES ARE
FOR VIEWING
PHP & MYSQL: THE MISSING MANUAL
282
IMAGES ARE
FOR VIEWING
Converting File System Paths to URLs
Currently, you have a path on your web server’s file system (page 277) but what
you need is a path that a web server recognizes. Remember the dierence between
SITE_ROOT—which is a path from a web server’s perspective—and HOST_WWW_ROOT—
which is from the perspective of a server’s file system. That’s exactly the issue here:
your script provides a path on the file system to the web server.
Every web server has something called a
document root
. That’s the directory into
which you place files so that a web server and a browser can see them. That’s also the
directory you’ve already identified in
app_config.php
with HOST_WWW_ROOT (page 263).
NOTE Old school programmers and HTML geeks will remember that
public_html/
used to be the almost
universal standard for a document root. You’ll still often see that, along with the newer
www/
.
To establish what your document root is, close
show_user.php
and create a new script
called
test.php
. Type a single command between the opening and closing PHP syntax:
<?php
echo "DOCUMENT ROOT: {$_SERVER['DOCUMENT_ROOT']}";
?>
$_SERVER is another one of those helpful associative arrays that PHP provides. The
DOCUMENT_ROOT key reveals your web server’s document root.
NOTE Visit
www.php.net/manual/en/reserved.variables.server.php
to see all the various things you can
discover by using
$_SERVER
.
Using a browser, go to this script. You’ll get something like Figure 9-10: that’s your doc-
ument root. In this example, the root is
/home1/b/bmclaugh/yellowtagmedia_com
.
Therefore, the web path
/
is mapping to the file system path
/home1/b/bmclaugh/
yellowtagmedia_com
.
FIGURE 9-10
When you run your
test.php
script
above, you should see the path on
your hosting provider’s file system.
That’s where your web files are
located.

CHAPTER 9: HANDLING IMAGES AND COMPLEXITY 283
IMAGES ARE
FOR VIEWING
Now, you have the sort of hook you need: a mapping that relates a file system
path to an actual web path. It’s a pretty easy mapping, too. For any file path, you
want to strip away everything from the beginning of the path up to and including
yellowtagmedia_com
(or whatever the end of your document root is).
To put that into action, start by adding a sample image path that you’re currently
storing in your database to your
test.php
script:
<?php
echo "DOCUMENT ROOT: {$_SERVER['DOCUMENT_ROOT']}";
$image_sample_path =
"/home1/b/bmclaugh/yellowtagmedia_com/phpMM2/" .
"uploads/profile_pics/1346084332-370584_8323673_927214073_n.jpg";
?>
Next, use str_replace, a handy function you know quite well by now. You simply
want to replace the file path equivalent of the document root with...well, nothing.
You want to remove it:
<?php
echo "DOCUMENT ROOT: {$_SERVER['DOCUMENT_ROOT']}";
$image_sample_path =
"/home1/b/bmclaugh/yellowtagmedia_com/phpMM2/" .
"uploads/profile_pics/1312128274-james_roday.jpg";
$web_image_path = str_replace($_SERVER['DOCUMENT_ROOT'],
'', $image_sample_path);
?>
Finally, echo the result back out:
<?php
echo "DOCUMENT ROOT: {$_SERVER['DOCUMENT_ROOT']}";
$image_sample_path =
"/home1/b/bmclaugh/yellowtagmedia_com/phpMMs/" .
"uploads/profile_pics/1312128274-james_roday.jpg";
$web_image_path = str_replace($_SERVER['DOCUMENT_ROOT'],
'', $image_sample_path);
echo "<br /><br />CONVERTED PATH: {$web_image_path}";
?>
Go to your
test.php
again. Hopefully it will look like Figure 9-11.
NOTE As the name suggests, this script is for nothing other than testing purposes. For more on test scripts
in PHP, see the box on page 285.
IMAGES ARE
FOR VIEWING
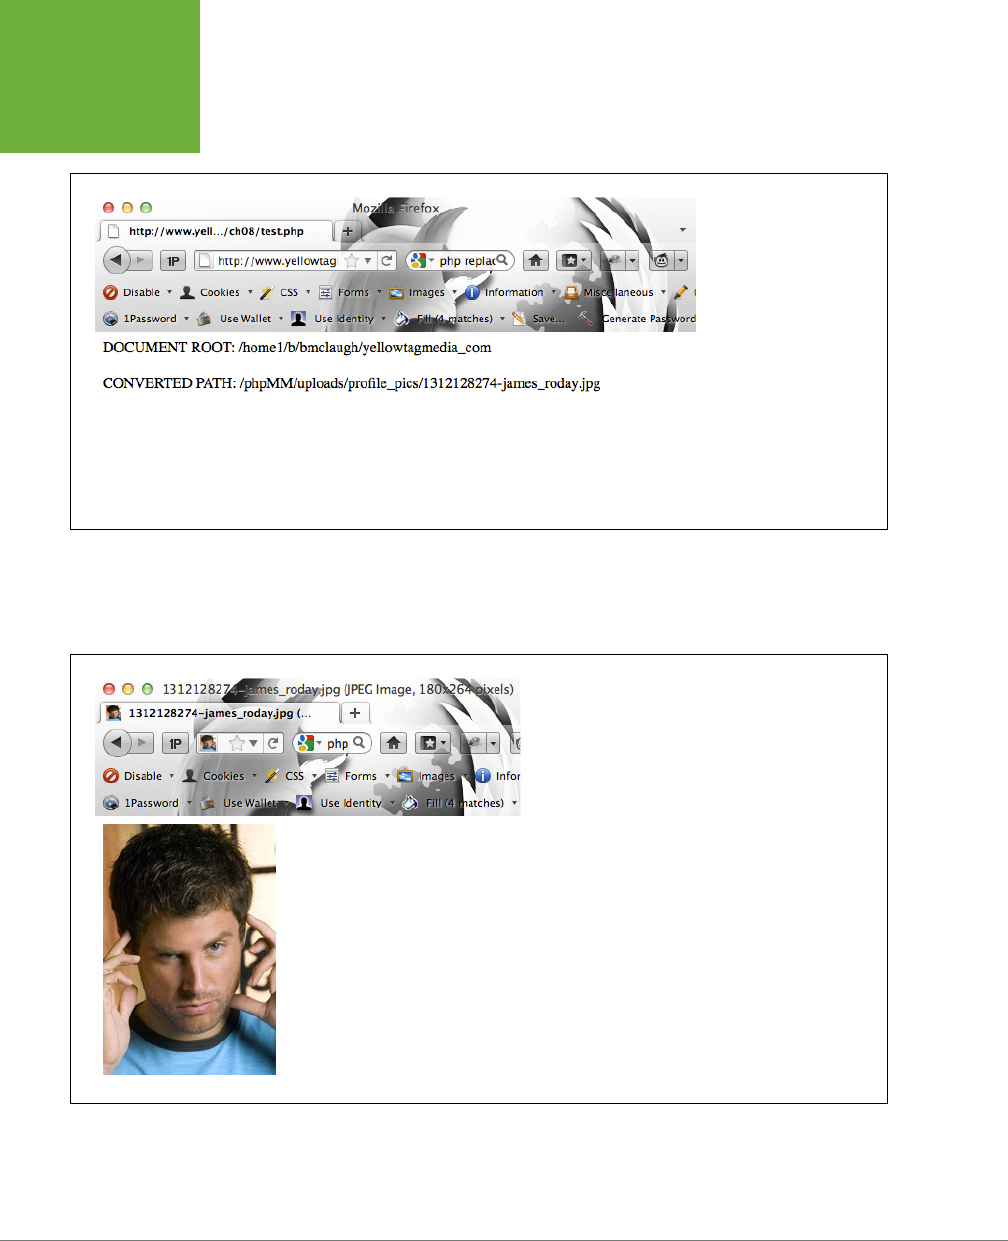
PHP & MYSQL: THE MISSING MANUAL
284
IMAGES ARE
FOR VIEWING
FIGURE 9-11
Adding the code on page
283 does exactly the
conversion you want.
It changes the image’s
path from the file system
path that you need when
working with the image
directly, to the web path
that your user’s browser
needs. In real life, though,
don’t display your file
system path where every-
body can see it (like, say,
publishing it in a book?).
Take this path and drop it directly into your browser, following the slash after your
domain name, and then press Enter. If all is well, you’ll see that image you’ve been
after for so long. Figure 9-12 shows the magic in action.
FIGURE 9-12
Finally! Just as it took a lot of work to get robust error han-
dling in place, image uploading is a common but ultimately
tricky exercise. Just think how much has to go on to get
one image into the right place and easily viewable by your
thousands (millions?) of users.

CHAPTER 9: HANDLING IMAGES AND COMPLEXITY 285
IMAGES ARE
FOR VIEWING
At this stage, you can turn the code in
test.php
into yet another helpful utility func-
tion. Open up your old friend
app_config.php
and create a generic version of the
code from
test.php
:
function get_web_path($file_system_path) {
return str_replace($_SERVER[‘DOCUMENT_ROOT’], ‘’, $file_system_path);
}
Pretty streamlined, isn’t it? Here’s what this short bit of code does:
1. Defines a new function by using function that you can call from any script
that requires or includes
app_config.php
.
2. Names the function get_web_path.
3. Defines a single piece of information that the function gets from whatever
script calls it: $file_system_path. This will be the complete path on the web
server’s file system to the file that needs to be converted into a web-accessible
path.
4. Takes $file_system_path and replaces the document root in the path with
nothing (' ').
5. Returns the result of running str_replace by using return.
The only thing new here is return. return is a part of the PHP language, and it does
just what you’d expect: it returns something to the program or script that called this
function. So, if you passed in /usr/bbentley/web/images/profile.jpg, and your
document root was
/usr/bbentley/web
, the string /images/profile.jpg would be
returned from a call to get_web_path.
POWER USERS’ CLINIC
Prototype with Simple Scripts
Some languages and frameworks—Ruby on Rails, in par-
ticular—offer a means to run commands within the context of
your programming or web environment. This is sort of like a
command-line-plus, where you get all the benefits of a run-
ning web server, logging, your scripts loaded, and even a few
additional bells and whistles.
Unfortunately, PHP isn’t one of those languages. When it
comes to testing out a bit of new functionality, your choices
are typically to either just start coding in one of your existing
scripts or to create a simple script like
test.php
and work with
it until you get your functionality figured out.
Although using a simple command-line script can seem like
a bit of a drag compared to a nice CSS-styled web environ-
ment, it’s often the better choice. You can test things and get
your code just right without having to worry about HTML or
interactions across scripts. Then, once you have your code the
way you want it, it’s an easy drop-in to your full-blown web
scripting environment.
IMAGES ARE
FOR VIEWING

PHP & MYSQL: THE MISSING MANUAL
286
IMAGES ARE
FOR VIEWING
WARNING There is one gotcha to this function: it assumes that you’re sending it an absolute path, not
a relative path. Thus,
../../../web/images/profile.jpg
won’t match your document root in any form or fashion.
Fortunately, your code that actually generates the path to an image uses absolute paths. This means that at least
for your particular needs, this function works just fine.
Displaying Your User’s Image: Take Two
It’s time to turn back to
show_user.php
. This time, though, you’re armed with a util-
ity function. Use that function to convert the absolute path stored in your database
into a web-safe path for viewing:
if ($result) {
$row = mysql_fetch_array($result);
$first_name = $row['first_name'];
$last_name = $row['last_name'];
$bio = preg_replace("/[\r\n]+/", "</p><p>", $row['bio']);
$email = $row['email'];
$facebook_url = $row['facebook_url'];
$twitter_handle = $row['twitter_handle'];
$user_image = get_web_path($row['user_pic_path']);
// Turn $twitter_handle into a URL
$twitter_url = "http://www.twitter.com/" .
substr($twitter_handle, $position + 1);
} else {
handle_error("there was a problem finding your " .
"information in our system.",
"Error locating user with ID {$user_id}");
}
It doesn’t get much easier than that. Fire up your browser and try either creating a
user again (with
create_user.php
) or visiting
show_user.php
and supplying a user_id
parameter as part of the URL string. You should see
show_user.php
the way it’s
always been intended: resplendent with imagery, as shown in Figure 9-13.
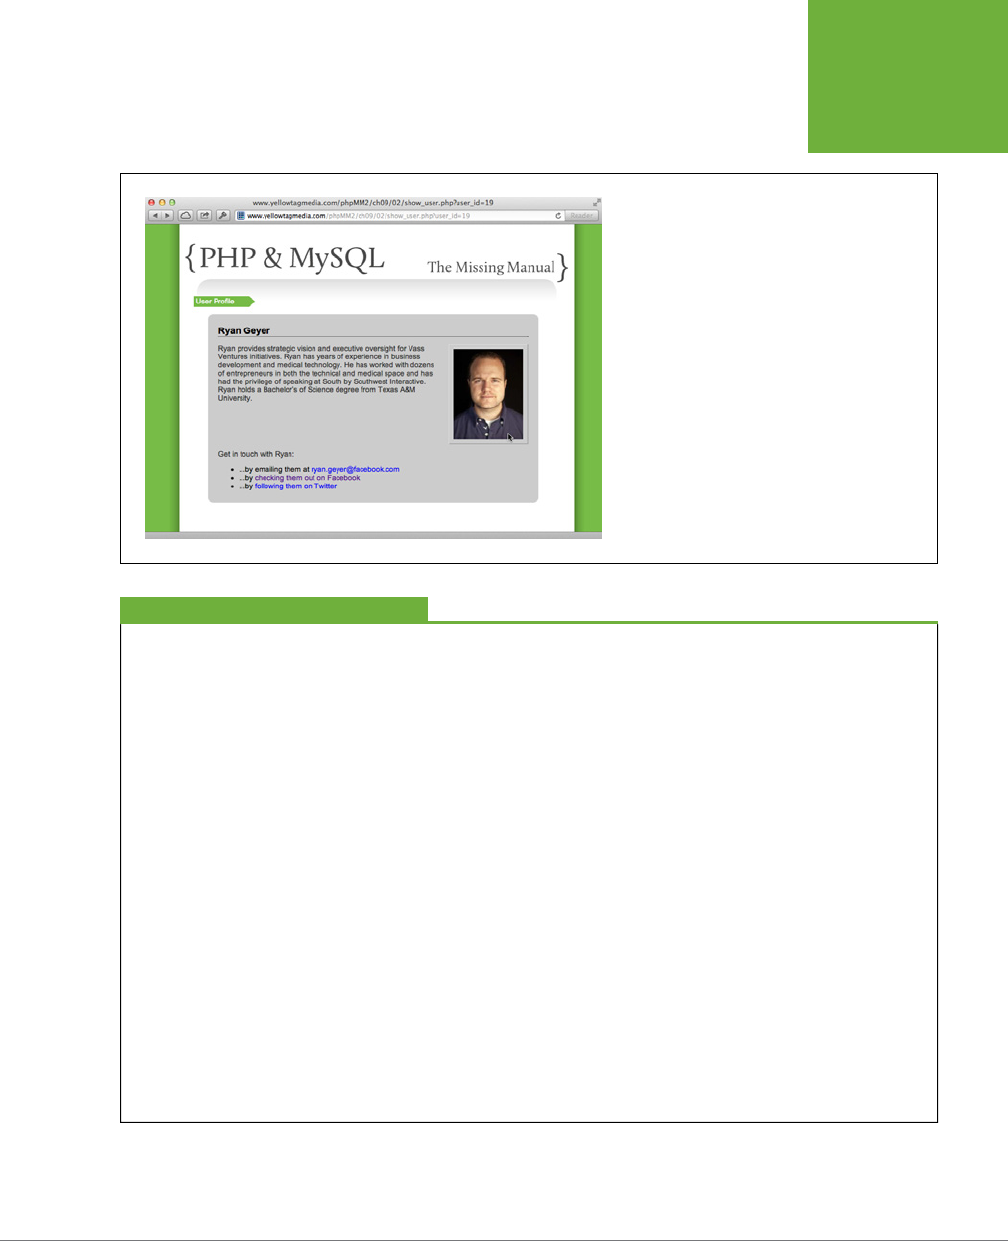
CHAPTER 9: HANDLING IMAGES AND COMPLEXITY 287
IMAGES ARE
FOR VIEWING
FIGURE 9-13
This chapter has been a bit of a never-ending story,
hasn’t it? Still, there’s simply no doubt that you’ve
got the most secure, well-built image-handling script
around. (Well, okay, those guys from Facebook and
Google+ might have a few additional tricks, but you’re
close.) Enjoy profile pictures for a moment, and then
get ready for the next stage in your evolution.
FREQUENTLY ASKED QUESTION
Don’t Store Paths in Your Database
Why not store a web path in the database?
Every single time you load an image from the database, you’ll
have to call
get_web_path
on that image path—at least if
you want to show the image on the Web. Given that you’re
writing web applications, isn’t that sort of the point? It might
seem as though you could just cut that conversion step out
and simply store the image in the database as a web path
from the beginning.
There are a couple of reasons that’s not a great idea, though.
First, an absolute path is just that: it’s absolute. Your web server
software can change; your home directory can change; you can
switch from PHP to Ruby to Perl and back to PHP; but short
of you actually moving an image, its absolute path remains
unchanged. Most importantly, you can change the entire docu-
ment root of your site, and an absolute path will still work.
Why is that so significant? Because you might need to change
the document root of your site at some point. If you stored a
web path in the database—a path related to your document
root—and then your document root changed, all of your image
paths would be invalid. You’d have to change every single one
of them from being relative to your old document root to rela-
tive to your new document root. What a mess.
On top of that, a web path is a relative path, even if it begins
with a
/
. That’s because it’s relative to your document root.
An absolute path is fixed in relation to a specific computer,
regardless of that computer’s software. And as a general rule,
you want to store things in a database that are as absolute
and fixed as possible. Given the choice between a piece of
information in an absolute form and one in a relative form,
always go for the absolute form. It’s usually easy to change
from one form to the other, so store the more “reliable” one.
You won’t regret it.
IMAGES ARE
FOR VIEWING

PHP & MYSQL: THE MISSING MANUAL
288
AND NOW FOR
SOMETHING
COMPLETELY
DIFFERENT
And Now for Something Completely
Dierent
Everything works now. Your users can upload images. You can get those images
securely into a permanent location of your choice. You have a way to store the
location in a database and to convert that location into a URL that works with your
website and your personal document root. And then, to top it all o, you can show
your users their images when they visit
show_user.php
.
So, what’s next?
Suppose that you’re using multiple web servers that share a single database. Are
you really going to store the same image on each of those web servers?
Or suppose you’re using a temporary computer for a web server, or think you might
change to a higher-end hosting solution as your business expands. Do you want to
have to copy not just your site—which might only be 10 or 20 MB zipped up—but all
of your user’s images, each one perhaps 1 or 2 MB in size?
These are just a few reasons why the solution you have in place might not be the
best one for your particular web application. And there is another option, equally
complex, but just as useful: you can store images not on the file system, but directly
in your database.
This is one of the most common things you’ll encounter in programming: you’ve got
a solution that works, but there might be a better solution around the corner. In this
case, there’s a dierent solution, and it’s in the next chapter. So turn the page, and
see why you might just want your entire image stored in the database rather than
just the path to that image.

289
CHAPTER
10
At this point, you have images on a file system, and the paths to those images
stored in a database. In your PHP scripts, you convert that file system path
to a web path, and then display the image. This works, and it works pretty
well. In fact, you could run with that solution and likely never have any issues...but,
then again, you might have a huge issue that crops up next week.
The downside of this approach is that you don’t have a self-contained solution.
Images are on the file system, paths are in the database, and then you need some
PHP to convert from the location of the image on your server to a path that users’
browsers can interpret correctly. To put it all together, you’ve created a real con-
nection—sometimes called a
tight coupling
—between your file system, your PHP,
and your database.
Taking all this into consideration, how do you make things more self-contained? You’d
have to take these pieces of information and put them all in one place. Obviously,
you’re committed to a database, so that becomes the logical place to consolidate
your information. Instead of
some
of your information going into your database, it
all
goes into your database.
In this approach, you take a user’s uploaded image and put it in your database
rather than just storing a reference to your image. Unfortunately, to do that, there’s
a lot more work to be done: you need not just a new column in your
users
table,
but an entirely new table; you need a new data type; and you need more than just
the SELECT and INSERT queries you’ve been using so far. If you need this type of
solution, this chapter will show you how to do it.
Binary Objects and
Image Loading

PHP & MYSQL: THE MISSING MANUAL
290
Storing Dierent Objects in Dierent Tables
Up until now, you’ve been working with one table:
users
. That’s because you’ve been
working with a single entity: a representation of one of your users. Everything in
that table—the first and last name, the email address, and the Facebook URL and
Twitter handle—are parts of that user. Put another way, everything in the
users
table
describes
a user.
But, when you store an entire image within the database, you’re no longer deal-
ing with something that describes a user. In fact, although an image is
related
to
a user—it’s the image that a user wants to display when his profile is viewed—it’s
an object in its own right. Just like a user, it’s a unique entity that might have other
information describing it. And also like a user, an image should go into its own table.
NOTE You can find the finished example code for this section on this book’s Missing CD page at
www
.missingmanuals.com/cds/phpmysqlmm2e
.
You’re going to create a new table called
images
that’s going to store not only a
user’s image, but several key details about that image:
• An image IDThis will uniquely identify the image, similar to a user_id in the
users
table. It will also let you associate an image to the
users
table a bit later.
• The image nameEven though you’re storing the image’s data, you still need
a name by which you can refer to that image.
• The image’s MIME typeThis information is important for instructing a web
server whether it needs to display a JPG, GIF, PNG, or something else entirely.
• The file sizeThis is more information that you supply to the browser for
displaying the image.
• The image data itselfThe raw bits and bytes that are turned into pixels and
colors.
Translate this into SQL and you get a new CREATE statement:
CREATE TABLE images (
image_id int AUTO_INCREMENT PRIMARY KEY,
filename varchar(200) NOT NULL,
mime_type varchar(50) NOT NULL,
file_size int NOT NULL,
image_data mediumblob NOT NULL
);
STORING
DIFFERENT
OBJECTS IN
DIFFERENT
TABLES

CHAPTER 10: BINARY OBJECTS AND IMAGE LOADING 291
STORING
DIFFERENT
OBJECTS IN
DIFFERENT
TABLES
You’ve seen all of this before, with the exception of a new column type: mediumblob.
As you might expect, this implies there are a few other blob types, which are:
• tinyblobThis type stores objects up to 256 bytes.
• blobYou can store objects up to 65 KB (kilobytes) in a blob column.
• mediumblobThis has a capacity for up to 16 MB of data.
• longblobThis is the big one. You can store 4 GB of data in a longblob column.
The term
blob
stands for
binary large object
. It’s a column designed for the very type
of information that makes up an image; in other words, information that’s neither a
number nor a string, but is instead binary data. (For more detail on which type of
blob to use and when, see the box that follows.)
DESIGN TIME
Planning for Growth and Describing Your Data
In the PHP world, there’s a fair bit of disagreement about which
blob
type you should use for a given column. Some argue that
you should always use
longblob
, whereas others argue that
you should know exactly what size file you’re dealing with, and
use the
blob
that covers that size, and nothing more.
With those who argue for always using
longblob
, the
thinking is that you’re planning ahead. Because your database
uses space as your actual data needs—and not the column’s
maximum size—a
longblob
holding a 2 MB image takes up
just as much space, or more accurately, no more space than
a
mediumblob
holding a 2 MB image. Then, why not use
longblob
all the time, and never have to change your column
type as your storage needs change?
On the other hand, if you’re allowing only images that are 2MB
or smaller,
mediumblob
best describes your data. You’re do-
ing more than just choosing an arbitrary type; you’re providing
information about what goes in the column.
For example, it’s not a good idea to make everything a
varchar(255)
if you are only storing a first name because
there’s no first name that long (see the box on page 111). You
lose a chance to say something about your data with that
approach. The same is true for using a
longblob
if
(and this
is an important if) you’ve clearly decided that you’re only ac-
cepting images up to a size that would fit in a
mediumblob
.
Go ahead and create this table. Ensure that it’s in the same database as
users
. You
should now be able to see both of these tables in your database:
mysql> USE phpmm2;
Database changed
mysql> SHOW tables;
+------------------------------------+
| Tables_in_phpmm2 |
+------------------------------------+
| images |
| users |
+------------------------------------+
2 rows in set (0.00 sec)
PHP & MYSQL: THE MISSING MANUAL
292
Inserting a Raw Image into a Table
It’s time to revisit
create_user.php
. You’re going to use a lot of your existing code,
but there are also some changes to make. All of the checks you’ve put in place to
ensure that your user uploaded a valid image, that no errors were generated by the
server or PHP, and that the file is an image via getimagesize are just fine.
NOTE Make a backup of
create_user.php
before you start making changes. Consider copying it to
create_user
.php.bak
or something similar so that if you want to go back to storing just an image’s path, you can.
Where things change is in the section of code that you used to move the temporary
image into a final location (page 286). In this approach, the final location is the
im-
ages
table, so you must replace that code.
NOTE You can find the finished example code for this section on this book’s Missing CD page at
www
.missingmanuals.com/cds/phpmysqlmm2e
.
Here’s the
create_user.php
script with the path code removed.
<?php
require_once '../scripts/app_config.php';
require_once '../scripts/database_connection.php';
// The errors array and variables related to images stay the same
$upload_dir = HOST_WWW_ROOT . "uploads/profile_pics/";
$image_fieldname = "user_pic";
// Potential PHP upload errors
$php_errors = array(1 => 'Maximum file size in php.ini exceeded',
2 => 'Maximum file size in HTML form exceeded',
3 => 'Only part of the file was uploaded',
4 => 'No file was selected to upload.');
$first_name = trim($_REQUEST['first_name']);
$last_name = trim($_REQUEST['last_name']);
$email = trim($_REQUEST['email']);
$bio = trim($_REQUEST['bio']);
$facebook_url = str_replace("facebook.org", "facebook.com", trim($_
REQUEST['facebook_url']));
$position = strpos($facebook_url, "facebook.com");
if ($position === false) {
$facebook_url = "http://www.facebook.com/" . $facebook_url;
}
INSERTING A
RAW IMAGE
INTO A TABLE

CHAPTER 10: BINARY OBJECTS AND IMAGE LOADING 293
INSERTING A
RAW IMAGE
INTO A TABLE
$twitter_handle = trim($_REQUEST['twitter_handle']);
$twitter_url = "http://www.twitter.com/";
$position = strpos($twitter_handle, "@");
if ($position === false) {
$twitter_url = $twitter_url . $twitter_handle;
} else {
$twitter_url = $twitter_url .
substr($twitter_handle, $position + 1);
}
// Make sure we didn't have an error uploading the image
($_FILES[$image_fieldname]['error'] == 0)
or handle_error("the server couldn't upload the image you selected.",
$php_errors[$_FILES[$image_fieldname]['error']]);
// Is this file the result of a valid upload?
@is_uploaded_file($_FILES[$image_fieldname]['tmp_name'])
or handle_error("you were trying to do something naughty. " .
"Shame on you!",
"Uploaded request: file named " .
"'{$_FILES[$image_fieldname]['tmp_name']}'");
// Is this actually an image?
@getimagesize($_FILES[$image_fieldname]['tmp_name'])
or handle_error("you selected a file for your picture that " .
"isn't an image.",
"{$_FILES[$image_fieldname]['tmp_name']} " .
"isn't a valid image file.");
// Name the file uniquely
$now = time();
while (file_exists($upload_filename = $upload_dir . $now .
'-' .
$_FILES[$image_fieldname]['name'])) {
$now++;
}
// Remove the code that used move_uploaded_file to move the temporary image
// Remove the column name and value for user pics.
$insert_sql = "INSERT INTO users (first_name, last_name, email, bio," .
"facebook_url, twitter_handle)" .
"VALUES ('{$first_name}', '{$last_name}', '{$email}', '{$bio}', " .
"'{$facebook_url}', '{$twitter_handle}');";

PHP & MYSQL: THE MISSING MANUAL
294
// Insert the user into the database
mysql_query($insert_sql)
or die(mysql_error());
// Redirect the user to the page that displays user information
header("Location: show_user.php?user_id=" . mysql_insert_id());
exit();
?>
Your code remains substantially the same. The big change is that now you need a
new INSERT statement, and this statement doesn’t insert into
users
, but into
images
.
Here’s the beauty of this solution, though: you can get every bit of the information you
need to put into images from the $_FILES array (which is actually an array of arrays):
$insert_sql = "INSERT INTO users (first_name, last_name, email, " .
"bio, facebook_url, twitter_handle) " .
"VALUES ('{$first_name}', '{$last_name}', '{$email}', " .
"'{$bio}', '{$facebook_url}', '{$twitter_handle}');";
// Insert the user into the database
mysql_query($insert_sql)
or die(mysql_error());
// Insert the image into the images table
$image = $_FILES[$image_fieldname];
$image_filename = $image['name'];
$image_info = getimagesize($image['tmp_name']);
$image_mime_type = $image_info['mime'];
$image_size = $image['size'];
$image_data = file_get_contents($image['tmp_name']);
$insert_image_sql = "INSERT INTO images " .
"(filename, mime_type, file_size, image_data) " .
"VALUES ('{$image_filename}', '{$image_mime_type}', " .
"'{$image_size}', '{$image_data}');";
mysql_query($insert_image_sql);
// Redirect the user to the page that displays user information
header("Location: show_user.php?user_id=" . mysql_insert_id());
exit();
?>
There’s a lot going on here, and some of it is flat-out confusing, so take this code
piece by piece.
First, this code creates a new $image variable that’s actually just for convenience:
INSERTING A
RAW IMAGE
INTO A TABLE

CHAPTER 10: BINARY OBJECTS AND IMAGE LOADING 295
INSERTING A
RAW IMAGE
INTO A TABLE
$image = $_FILES[$image_fieldname];
This variable makes it easier to deal with all the properties of an image at once. You
don’t have to continually type $_FILES[$image_fieldname], over and over. This step
isn’t necessary, but it does make things much more convenient.
Next, you can get the name of the image from this array:
$image_filename = $image['name'];
Beware:
getimagesize
Doesn’t Return a File Size
Here’s where things start to get a little weird. Despite its name, getimagesize does
not
return a numeric file size of the uploaded image. Rather, it returns an array of
information about the image such as its MIME type (which you need) and the height
and width of the image that you might use to display the image in an HTML page
(which you don’t currently need).
This might lead you to believe that you should do something like this:
$image_size = getimagesize($image['tmp_name']);
In fact, that’s a problem on two counts: getimagesize returns an array, not a size, and
the sizes that getimagesize returns in that array are height and width, not file size.
What you do need from the returned array, though, is the MIME type:
$image_info = getimagesize($image['tmp_name']);
$image_mime_type = $image_info['mime'];
You also still need the actual file size of the uploaded image. You can get that from
a property on the original image-related array:
$image_size = $image['size'];
The
file_get_contents
Function Does
What You Think It Does
Sometimes a function’s name is a bit misleading, such as you just learned with
getimagesize. Other times, a function is perfectly named; that’s the case with
file_get_contents. This function retrieves an object’s data in binary form, which
is just what you want for the image_data column in your
images
table:
$image_data = file_get_contents($image['tmp_name']);
INSERTing the Image
Last but not least, you need to build the INSERT query and run it:
$insert_image_sql = "INSERT INTO images " .
"(filename, mime_type, file_size, image_data) " .
"VALUES ('{$image_filename}', '{$image_mime_type}', " .
"'{$image_size}', '{$image_data}');";
mysql_query($insert_image_sql);
PHP & MYSQL: THE MISSING MANUAL
296
WARNING Hold off on running this code! Or, if you do, get ready for some weird errors. There are problems
here, lurking in the dark corners of how MySQL handles data. So, get your code to this point, but keep reading
before you end up assuming you’ve done something wrong.
Your Binary Data Isn’t Safe to Insert...Yet
The code you built in the previous section looks good, but if you run this code, you’re
likely to see some errors. First, that binary data has all sorts of weird characters on
which PHP and MySQL are going to choke. There’s always the possibility of running
into characters that are a problem, but it’s especially true when you’re dealing with
binary data.
NOTE You can find the finished example code for this section on this book’s Missing CD page at
www.
missingmanuals.com/cds/phpmysqlmm2e
.
Once again, though, there’s a utility function for that.
NOTE You’ve probably noticed that at nearly every turn, there’s a PHP utility function. That’s one of the
advantages of a language that’s fairly mature. Well into versions 4 and 5, PHP has settled, and a robust library
exists that contains handy functions like
getimagesize
and the one you’re about to use:
mysql_real_
escape_string
.
The mysql_real_escape_string function escapes any special characters in the string
you hand it. This means that you can pass in your $image_data, and then pass the
result of mysql_real_escape_string to mysql_query through your INSERT statement.
In fact, it’s not a bad idea to use this function on any string data you pass in to MySQL:
$insert_sql = "INSERT INTO users (first_name, last_name, email, " .
"bio, facebook_url, twitter_handle) " .
"VALUES ('{mysql_real_escape_string($first_name)}', " .
"'{mysql_real_escape_string($last_name)}', " .
"'{mysql_real_escape_string($email)}', " .
"'{mysql_real_escape_string($bio)}', " .
"'{mysql_real_escape_string($facebook_url)}', " .
"'{mysql_real_escape_string($twitter_handle)}');";
// Insert the user into the database
mysql_query($insert_sql);
// Insert the image into the images table
$image = $_FILES[$image_fieldname];
$image_filename = $image['name'];
$image_info = getimagesize($image['tmp_name']);
YOUR BINARY
DATA ISN’T
SAFE TO
INSERT...YET

CHAPTER 10: BINARY OBJECTS AND IMAGE LOADING 297
YOUR BINARY
DATA ISN’T
SAFE TO
INSERT...YET
$image_mime_type = $image_info['mime'];
$image_size = $image['size'];
$image_data = file_get_contents($image['tmp_name']);
$insert_image_sql = "INSERT INTO images " .
"(filename, mime_type, file_size, image_data) " .
"VALUES ('{mysql_real_escape_string($image_filename)}', ".
"'{mysql_real_escape_string($image_mime_type)}', " .
"'{mysql_real_escape_string($image_size)}', " .
"'{mysql_real_escape_string($image_data)}');";
mysql_query($insert_image_sql);
NOTE You don’t need
mysql_real_escape_string
for the
$image_size
, because it’s a numeric
value. However, if you’re constantly trying to remember whether input data is a string or a number, you’re
eventually going to make a mistake and not escape something you should.
To be safe, just escape everything. It’s more consistent, and it’s another layer of protection. The time it takes PHP
to escape that one bit of data is trivial compared to the problems if malicious data goes unescaped.
Printing a String to a Variable
As natural as this code looks, it’s got a serious problem. Even though the curly
braces surrounding a variable will allow that variable to be printed inside a string
(for example, "{$variable}" prints the value of $variable), PHP draws the line
at doing actual work inside the curly braces. As such, it won’t interpret the call to
mysql_real_escape_string.
You have two ways to get around this. The first is the easiest: you could just move the
calls to mysql_real_escape_string up into the variable assignments, sort of like this:
// Insert the image into the images table
$image = $_FILES[$image_fieldname];
$image_filename = mysql_real_escape_string($image['name']);
$image_info = getimagesize($image['tmp_name']);
$image_mime_type = mysql_real_escape_string($image_info['mime']);
// and so on...
This also looks OK, but it’s not a good idea. Do you see why?
Think about the function you’re calling: it’s specifically for getting values set up to
work with MySQL. However, what if you want to use $image_filename somewhere
else in your script? You’ve turned this variable into a MySQL-specific version of the
file name.
It seems like the original approach—converting the variable by using mysql_real_
escape_string as it’s going into the actual SQL INSERT statement—is the right one.
It allows the variable to just be the image file name, or the image MIME type, and
then you convert that into a MySQL-friendly value when that’s required.

PHP & MYSQL: THE MISSING MANUAL
298
That seems to indicate there’s a need for a way to perform calculations or run func-
tions on values when you’re constructing your SQL string—and there is. You usually
do so by using sprintf, which is a PHP function that prints to a string. In other words,
you construct a string by using any calculations you need and pass all the required
information to sprintf. The sprintf function puts everything together and returns
a string, which you can then assign to your variable, and boom, you’re then ready
to pass that variable in to mysql_query.
How does this work? Well, it’s a little dierent than anything you’ve done so far.
Instead of just building the string up via concatenation, you indicate the entire string
that you want to create, but every time you come to a spot in the string where you
want to include the value of a variable, you put in a special
type specifier
. For ex-
ample, you use %s for a string type:
$hello = sprintf("Hello there, %s %s", $first_name, $last_name);
echo $hello;
Suppose $first_name is “John” and $last_name is “Wayne.” Running a script with
these two lines would give you:
Hello there, John Wayne
The sprintf function replaces the first %s with the first value after the string, which
is $first_name. Then, it replaces the second %s with the second value after the string,
$last_name. Finally, the entire string with the values inserted—is assigned to $hello.
What’s great about sprintf is that you can perform calculations on variables
before
you pass them to sprintf. The following example might be a bit silly, but the code
is perfectly legal:
$hello = sprintf("Hello there, %s", $first_name . ' ' . $last_name);
echo $hello;
Of course, there are much better ways to use sprintf, like creating a query string
and using mysql_real_escape_string in the process:
// This replaces the older assignment to $insert_sql
$insert_sql = sprintf("INSERT INTO users " .
"(first_name, last_name, email, " .
"bio, facebook_url, twitter_handle) " .
"VALUES ('%s', '%s', '%s', '%s', '%s', '%s');",
mysql_real_escape_string($first_name),
mysql_real_escape_string($last_name),
mysql_real_escape_string($email),
mysql_real_escape_string($bio),
mysql_real_escape_string($facebook_url),
mysql_real_escape_string($twitter_handle));
YOUR BINARY
DATA ISN’T
SAFE TO
INSERT...YET

CHAPTER 10: BINARY OBJECTS AND IMAGE LOADING 299
YOUR BINARY
DATA ISN’T
SAFE TO
INSERT...YET
// Insert the user into the database
mysql_query($insert_sql)
or die(mysql_error());
This code doesn’t do anything noticeably dierent than your older version. This is
because the data being inserted into
users
was probably not a problem in the first
place. But now, you can take this same approach and apply it to your insertion into
images
.
$insert_image_sql = sprintf("INSERT INTO images " .
"(filename, mime_type, " .
"file_size, image_data) " .
"VALUES ('%s', '%s', %d, '%s');",
mysql_real_escape_string($image_filename),
mysql_real_escape_string($image_mime_type),
mysql_real_escape_string($image_size),
mysql_real_escape_string($image_data));
mysql_query($insert_image_sql)
or die(mysql_error());
You can guess what %d means to sprintf: replace that type specifier with a decimal
number, like 1024 or 92048. Thus, this code builds up an INSERT, executes it, and
escapes your values in the process.
POWER USERS’ CLINIC
sprintf Is Your New Best Friend
Most PHP programmers use
sprintf
initially because it lets
them do things like use
mysql_real_escape_string
on variables before they’re inserted into a query string. But
those same programmers discover something else, just as
you will: using
sprintf
lets you write a lot more robust
and flexible code.
Using
sprintf
, you can do calculations on your data, escape
values, and do just about anything else you want to your data,
as you’re inserting into or selecting from your database. You no
longer need to calculate things and then assign the results of
those calculations to a variable (or, even worse, a new variable,
based upon some old variable) and then—and only then—use
those variables as part of a SQL construction.
sprintf
lets you do all that in a single step. In general, you
should use
sprintf
as your default means of creating SQL
strings that are executed as queries against your database.
Now, try this out. Head over to
create_user.php
once again, find a new friend to fill
out the form, let her choose an image, and then submit the form. Your new version
of
create_user.php
should run, and you’ll get to
show_user.php
.
This time you
won’t
see the user’s profile, because that’s not code you’ve written.
In fact, you might see an entirely incorrect user being loaded. You’ll fix that soon.
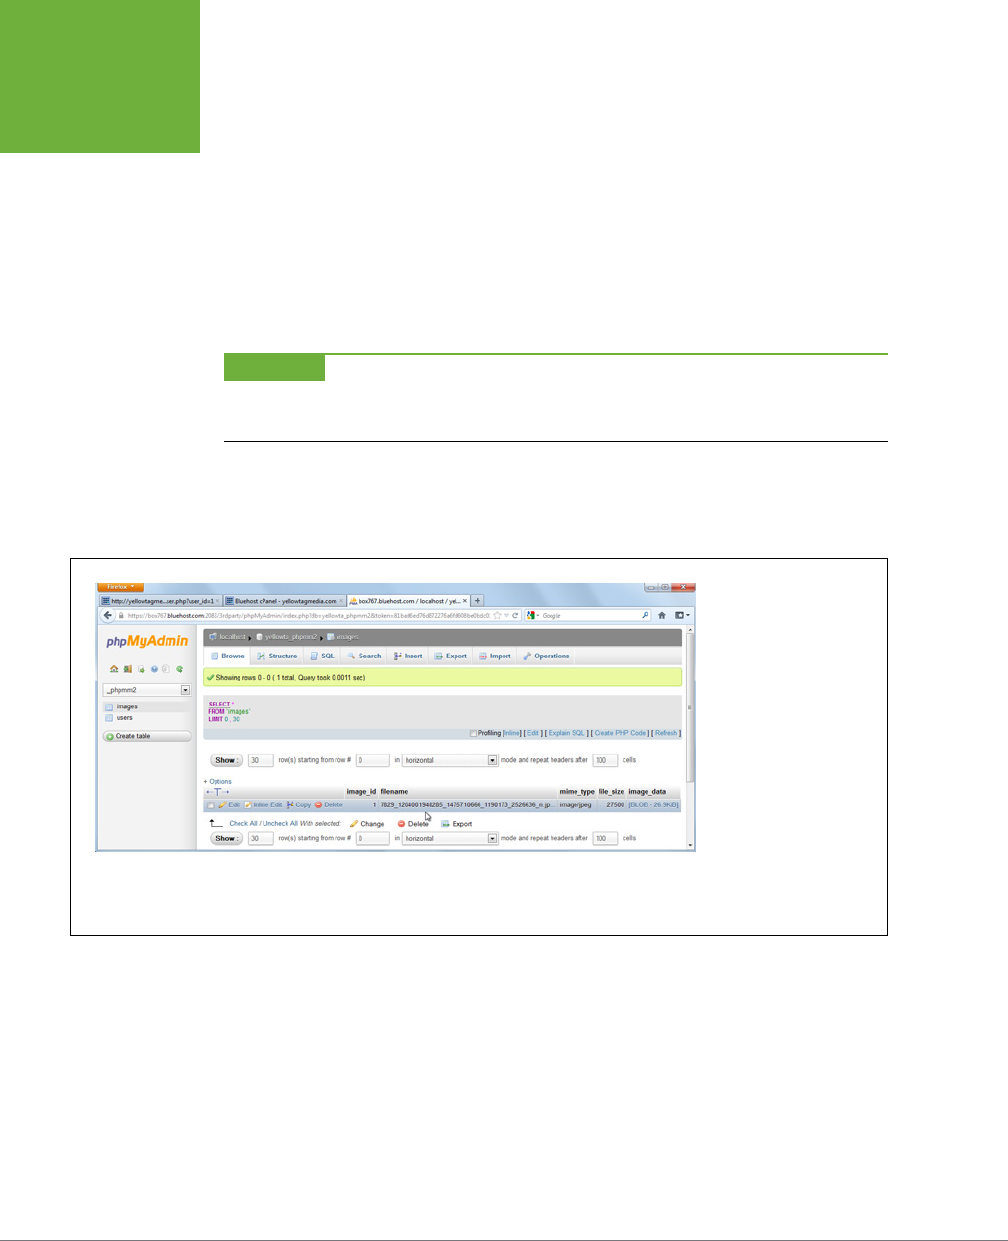
PHP & MYSQL: THE MISSING MANUAL
300
You should, however, be able to dig into your new
images
table and see an entry
for the uploaded image:
mysql> SELECT image_id, filename FROM images;
+----------+-----------------------------------------------------+
| image_id | filename |
+----------+-----------------------------------------------------+
| 1 | 7829_1204001948285_1475710666_1190173_2526636_n.jpg |
+----------+-----------------------------------------------------+
1 row in set (0.43 sec)
WARNING You most definitely do
not
want to do a SELECT * here, because you’ll get MySQL’s attempt to
load your actual image data, which might be a few hundred (or a few thousand) kilobytes. But, at least you can
see that an image is indeed in your table.
You can also access your table by using phpMyAdmin (see the box on page 55) if
you’ve got that running, and extract a little extra information about your entries in
images
. Figure 10-1 shows you what to expect.
FIGURE 10-1
PhpMyAdmin reports BLOB
columns—regardless of
what type of BLOB you
used—as BLOB and a size.
In this case, you can see
that the file size, at 27500
bytes, matches up with
the size of the data in
the BLOB column, which
is 26.9 KB. This is a good
way to verify that things
are working: your script is
correctly getting the size
of the image it’s inserting
into your database table.
Getting the Correct ID Before Redirecting
Unfortunately, there’s still a problem. You might have noticed something like Figure
10-2 when you got your image insertion working. You could see a blank screen, or
even a totally dierent user, as in this scenario.
YOUR BINARY
DATA ISN’T
SAFE TO
INSERT...YET
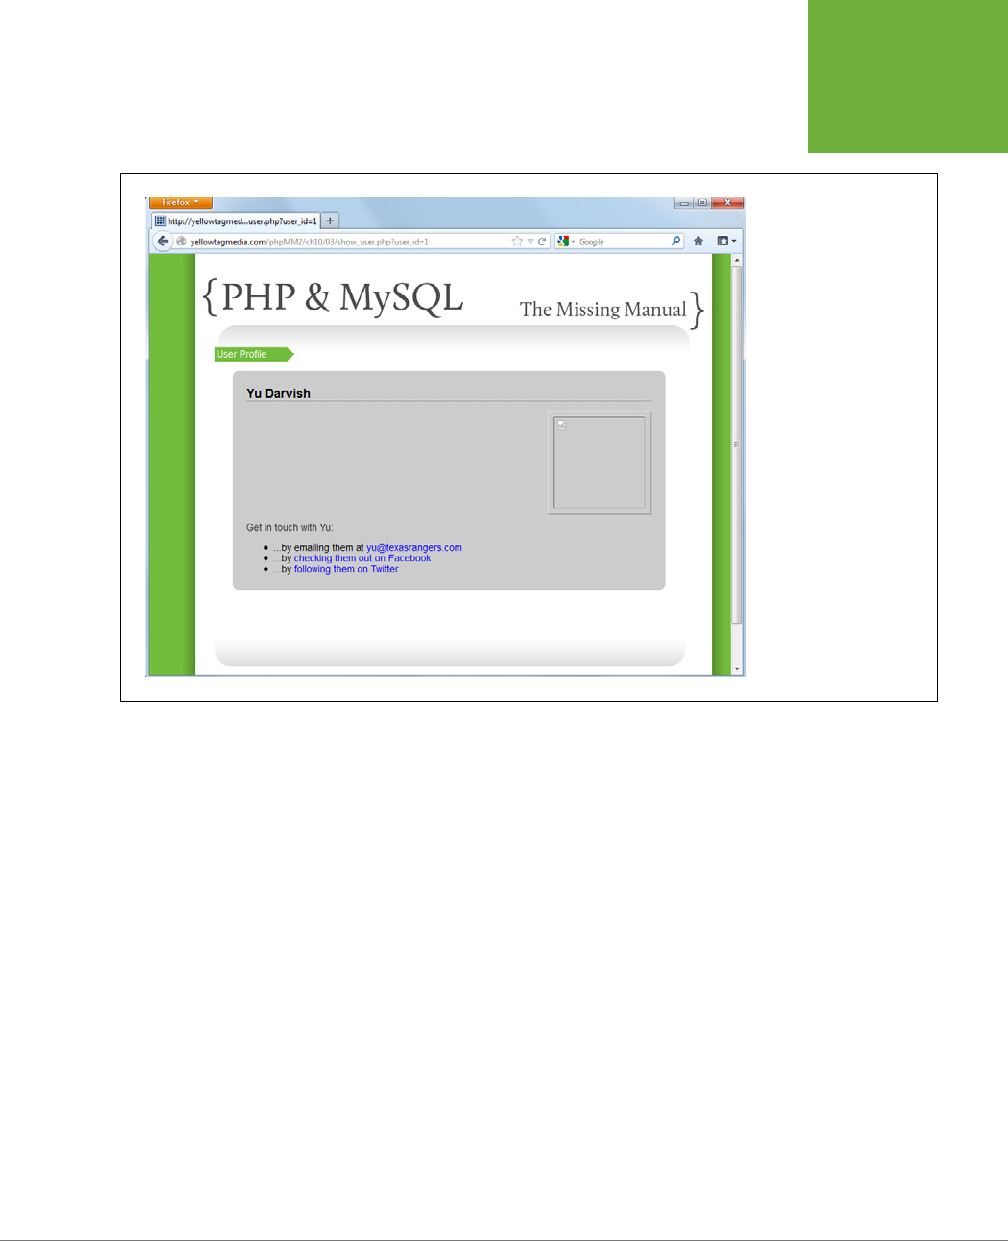
CHAPTER 10: BINARY OBJECTS AND IMAGE LOADING 301
YOUR BINARY
DATA ISN’T
SAFE TO
INSERT...YET
FIGURE 10-2
This screen is hardly what
you want to see after
all that work on getting
images into your database.
So, what gives?
This isn’t as much of a mystery as it first seems. Here’s the last bit of your code from
create_user.php
:
// This replaces the older assignment to $insert_sql
$insert_sql = sprintf("INSERT INTO users " .
"(first_name, last_name, email, " .
"bio, facebook_url, twitter_handle) " .
"VALUES ('%s', '%s', '%s', '%s', '%s', '%s');",
mysql_real_escape_string($first_name),
mysql_real_escape_string($last_name),
mysql_real_escape_string($email),
mysql_real_escape_string($bio),
mysql_real_escape_string($facebook_url),
mysql_real_escape_string($twitter_handle));
// Insert the user into the database
mysql_query($insert_sql)
or die(mysql_error());

PHP & MYSQL: THE MISSING MANUAL
302
$insert_image_sql = sprintf("INSERT INTO images " .
"(filename, mime_type, " .
"file_size, image_data) " .
"VALUES ('%s', '%s', %d, '%s');",
mysql_real_escape_string($image_filename),
mysql_real_escape_string($image_mime_type),
mysql_real_escape_string($image_size),
mysql_real_escape_string($image_data));
mysql_query($insert_image_sql)
or die(mysql_error());
// Redirect the user to the page that displays user information
header("Location: show_user.php?user_id=" . mysql_insert_id());
exit();
What’s the problem? It’s in that second-to-last line. Remember, mysql_insert_id
returns the ID of the
last
INSERT query, which is no longer the INSERT for your
users
table; it’s your new INSERT for
images
. The redirect to
show_user.php
is in fact work-
ing, but it’s sending the ID of the image inserted rather than the user. Fortunately,
you can easily fix that:
// This replaces the older assignment to $insert_sql
$insert_sql = sprintf("INSERT INTO users " .
"(first_name, last_name, email, " .
"bio, facebook_url, twitter_handle) " .
"VALUES ('%s', '%s', '%s', '%s', '%s', '%s');",
mysql_real_escape_string($first_name),
mysql_real_escape_string($last_name),
mysql_real_escape_string($email),
mysql_real_escape_string($bio),
mysql_real_escape_string($facebook_url),
mysql_real_escape_string($twitter_handle));
// Insert the user into the database
mysql_query($insert_sql);
$user_id = mysql_insert_id();
$insert_image_sql = sprintf("INSERT INTO images " .
"(filename, mime_type, " .
"file_size, image_data) " .
"VALUES ('%s', '%s', %d, '%s');",
mysql_real_escape_string($image_filename),
mysql_real_escape_string($image_mime_type),
mysql_real_escape_string($image_size),
mysql_real_escape_string($image_data));
YOUR BINARY
DATA ISN’T
SAFE TO
INSERT...YET
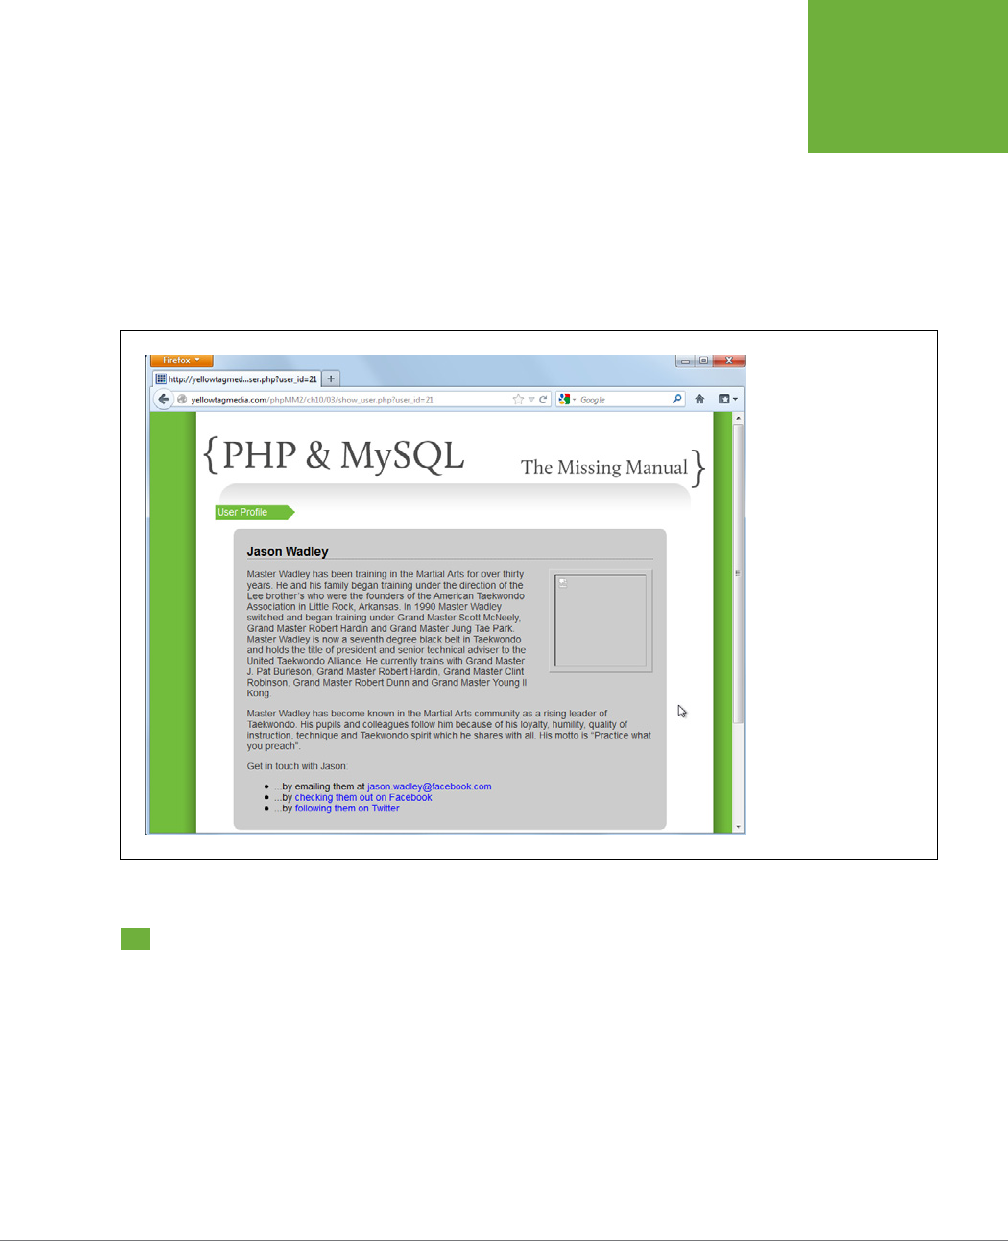
CHAPTER 10: BINARY OBJECTS AND IMAGE LOADING 303
CONNECTING
USERS AND
IMAGES
mysql_query($insert_image_sql);
// Redirect the user to the page that displays user information
header("Location: show_user.php?user_id=" . $user_id);
exit();
?>
Try this out again, and you should be back to what you expect: a slightly broken
version of
show_user.php
, but broken in the way that you expect (see Figure 10-3).
FIGURE 10-3
As odd as it seems, you
sometimes want things to
be broken. In this case, you
want to see a missing im-
age because you haven’t
written any code to display
the image just INSERTed.
What you don’t want to
see—and what you just
fixed—is the missing user
information other than the
image.
Connecting Users and Images
At this point, you have two tables—
users
and
images
—but no connection between
them. That’s your next challenge. When you load a user from the
users
table and
display his profile by using
show_user.php
, how do you determine which image in
the
images
table you should display?
Clearly, you need some linkage between those two tables. You already have a unique
ID for each entry in
users
(user_id) and in
images
(image_id), which is a good
starting place. The question becomes, does a user reference an image, or does an
image reference a user?

PHP & MYSQL: THE MISSING MANUAL
304
Here’s the fundamental question you’ll ask over and over when you’re connecting
two tables in a database: how are the two tables related? Better still, how are the
two objects that your tables represent related?
NOTE You can find the finished example code for this section on this book’s Missing CD page at
www.
missingmanuals.com/cds/phpmysqlmm2e
.
For example, does a user have an image? Does a user have
lots
of images? In this case,
a single user has a single profile image. In database terms, that’s called a
one-to-one
(or
1-1
)
relationship
. One user is related to one image. As a result, you can create
a new column in your
users
table, and in that column you can store the image_id
of that user’s profile image. You can make that change to your database like this:
mysql> ALTER TABLE users
-> ADD profile_pic_id int;
Query OK, 6 rows affected (0.11 sec)
Records: 6 Duplicates: 0 Warnings: 0
DESIGN TIME
Foreign Keys and Column Names
The
profile_pic_id
column in the code above is setting
up what’s called a
foreign key relationship
. This column is a
foreign key because it relates to the key in a different, “foreign”
table:
images
.
In most databases, you not only define a column in your table
that relates to the referenced table’s primary key, you also
define a FOREIGN KEY at the database level. That way, your
database knows that
profile_pic_id
is storing IDs that
are in the
images
table’s
image_id
column.
You can use foreign keys in MySQL, but you have to use the
MySQL InnoDB table engine, which you haven’t seen yet. This
requires some extra setup, and not all hosting providers sup-
port InnoDB. Besides, programmers have been using MySQL
without foreign key support for years, so if you write your code
properly, you can work around this limitation. If you want to
use InnoDB and foreign key support at the database level, start
with this command on your tables:
ALTER TABLE [table-name]
ENGINE = InnoDB;
Then Google “MySQL foreign keys” and you’ll find a wealth of
information at your fingertips.
Regardless of whether you use foreign keys through your
programming or add support at the database level by using
InnoDB, naming your foreign key columns is a big deal. The
typical practice here is to name the foreign key
[singular-
table-name]_id
. For example, for a foreign key connecting
users
to
images
, you’d typically take the singular name of
the table you’re connecting to—“image” from
images
—and
append “_id”. This results in get
image_id
for your foreign
key column name.
Why use
profile_pic_id
in
users
? Because you could
very well store more than just profile pictures in
images
. You
might store several images for a user, only one of which is a
profile picture. You might keep up with user’s candid photos,
or icons for logging in, or images for companies to which your
users connect.
In all of these cases, then,
image_id
in
users
doesn’t
provide enough specificity. In these cases—where you’re
not just setting up a foreign key, but setting up both a for-
eign key
and
indicating a particular type of usage—using
a different name makes sense. For instance, you could end
up with a
profile_pic_id
column in
users
, and then
perhaps a
company_logo_id
in a potential
companies
table, and who knows what other images you’ll use? By using
profile_pic_id
now, you’re indicating that you’re relating
to an image and the specific purpose for which that image is
being used.
CONNECTING
USERS AND
IMAGES

CHAPTER 10: BINARY OBJECTS AND IMAGE LOADING 305
CONNECTING
USERS AND
IMAGES
WARNING You’ve already made changes to your scripts to accommodate storing images in your database,
rather than on your file system. With the ALTER in the preceding example, you’re now making the same sort of
changes to your database. These changes reflect a deviation in how your application works. To be safe, you want
to back things up at this point in your database.
Of course, backing up a script is a lot easier than backing up a database. You might want to give your hosting
company a call and see if and how you can backup your database. Or, you can just figure out how to undo these
changes if you decide that you want to go back to storing images on your file system.
Either way, you’re going to get some PHP and MySQL practice switching between the two approaches. That’s a
good thing no matter what solution you end up using.
Inserting an Image and then Inserting a User
Once an image is in
images
, you need to get that image’s ID and insert it into a
user’s profile_pic_id column. At the moment, though, your script inserts into
users
before inserting into
images
:
// This replaces the older assignment to $insert_sql
$insert_sql = sprintf("INSERT INTO users " .
"(first_name, last_name, email, " .
"bio, facebook_url, twitter_handle) " .
"VALUES ('%s', '%s', '%s', '%s', '%s', '%s');",
mysql_real_escape_string($first_name),
mysql_real_escape_string($last_name),
mysql_real_escape_string($email),
mysql_real_escape_string($bio),
mysql_real_escape_string($facebook_url),
mysql_real_escape_string($twitter_handle));
// Insert the user into the database
mysql_query($insert_sql)
or die(mysql_error());
$user_id = mysql_insert_id();
$insert_image_sql = sprintf("INSERT INTO images " .
"(filename, mime_type, " .
"file_size, image_data) " .
"VALUES ('%s', '%s', %d, '%s');",
mysql_real_escape_string($image_filename),
mysql_real_escape_string($image_mime_type),
mysql_real_escape_string($image_size),
mysql_real_escape_string($image_data));
mysql_query($insert_image_sql)
or die(mysql_error());

PHP & MYSQL: THE MISSING MANUAL
306
// Redirect the user to the page that displays user information
header("Location: show_user.php?user_id=" . $user_id);
exit();
?>
At this point, you could look up the ID of the user you inserted using mysql_
insert_id and store that in a variable. Then, you could get the image ID by using
mysql_insert_id again. Finally, you could update the profile_pic_id column of
the new user’s row in
users
. That would work, and you’d end up with three dierent
database interactions:
1. An INSERT to put the user’s information into
users
.
2. An INSERT to put the image information into
images
.
3. An UPDATE to drop the new image’s ID into
users
.
These three steps might not seem like much, but every interaction with your database
consumes time and resources. As a general principle, you want to interact with your
database as little as possible. That’s not to say you don’t work with a database; you
just don’t make three or four calls if you can pull o the same task with one or two.
In this case, you can reduce the number of MySQL interactions from three to two:
1. INSERT the image into the
images
table (and get the ID of that image in
the process).
2. INSERT the new user into
users
, and use the image ID you just grabbed as
part of the data you put into that INSERT.
Going from three MySQL interactions to two might sound like a minor issue. Then
again, you just cut your database interactions by a third. If you can make fewer
calls, do it.
Go ahead and wire up your INSERT statements accordingly:
// Get image data
$insert_image_sql = sprintf("INSERT INTO images " .
"(filename, mime_type, " .
"file_size, image_data) " .
"VALUES ('%s', '%s', %d, '%s');",
mysql_real_escape_string($image_filename),
mysql_real_escape_string($image_mime_type),
mysql_real_escape_string($image_size),
mysql_real_escape_string($image_data));
mysql_query($insert_image_sql)
or die(mysql_error());
CONNECTING
USERS AND
IMAGES

CHAPTER 10: BINARY OBJECTS AND IMAGE LOADING 307
CONNECTING
USERS AND
IMAGES
// This replaces the older assignment to $insert_sql
$insert_sql = sprintf("INSERT INTO users " .
"(first_name, last_name, email, " .
"bio, facebook_url, twitter_handle) " .
"VALUES ('%s', '%s', '%s', '%s', '%s', '%s');",
mysql_real_escape_string($first_name),
mysql_real_escape_string($last_name),
mysql_real_escape_string($email),
mysql_real_escape_string($bio),
mysql_real_escape_string($facebook_url),
mysql_real_escape_string($twitter_handle));
// Insert the user into the database
mysql_query($insert_sql)
or die(mysql_error());
// Redirect the user to the page that displays user information
header("Location: show_user.php?user_id=" . $user_id);
exit();
?>
NOTE There’s no additional code here. It’s just a wholesale move of the insertion creation and
mysql_
query
call related to a user from
before
the image-related code to
after
that code.
But you can remove some code. Now that you have the insertion into
users
coming second, you can go back to
using
mysql_insert_id
in your redirection.
From here, it’s just a matter of getting the ID from your
images
INSERT and using it in
the
users
INSERT. But you know how to do that: you can use mysql_insert_id to grab
the ID of the row inserted into
images
and then add that to your INSERT for
users
:
// Get image data
$insert_image_sql = sprintf("INSERT INTO images " .
"(filename, mime_type, " .
"file_size, image_data) " .
"VALUES ('%s', '%s', %d, '%s');",
mysql_real_escape_string($image_filename),
mysql_real_escape_string($image_mime_type),
mysql_real_escape_string($image_size),
mysql_real_escape_string($image_data));
mysql_query($insert_image_sql)
or die(mysql_error());

PHP & MYSQL: THE MISSING MANUAL
308
// This replaces the older assignment to $insert_sql
$insert_sql = sprintf("INSERT INTO users " .
"(first_name, last_name, email, " .
"bio, facebook_url, twitter_handle, " .
"profile_pic_id) " .
"VALUES ('%s', '%s', '%s', '%s', '%s', '%s', %d);",
mysql_real_escape_string($first_name),
mysql_real_escape_string($last_name),
mysql_real_escape_string($email),
mysql_real_escape_string($bio),
mysql_real_escape_string($facebook_url),
mysql_real_escape_string($twitter_handle),
mysql_insert_id());
// Insert the user into the database
mysql_query($insert_sql)
or die(mysql_error());
// Redirect the user to the page that displays user information
header("Location: show_user.php?user_id=" . mysql_insert_id());
exit();
?>
NOTE Remember, because the ID of the image you’re inserting into
profile_pic_id
is an
int
, not
a string, you need to use
%d
as your type specifier for
sprintf
. You don’t need to include that value in single
quotes.
Put everything together, and your updated version of
create_user.php
should look
like this:
<?php
require_once '../scripts/app_config.php';
require_once '../scripts/database_connection.php';
$upload_dir = HTTP_WWW_ROOT . "uploads/profile_pics/";
$image_fieldname = "user_pic";
// Potential PHP upload errors
$php_errors = array(1 => 'Maximum file size in php.ini exceeded',
2 => 'Maximum file size in HTML form exceeded',
3 => 'Only part of the file was uploaded',
4 => 'No file was selected to upload.');
$first_name = trim($_REQUEST['first_name']);
$last_name = trim($_REQUEST['last_name']);
CONNECTING
USERS AND
IMAGES

CHAPTER 10: BINARY OBJECTS AND IMAGE LOADING 309
CONNECTING
USERS AND
IMAGES
$email = trim($_REQUEST['email']);
$bio = trim($_REQUEST['bio']);
$facebook_url = str_replace("facebook.org", "facebook.com", trim($_
REQUEST['facebook_url']));
$position = strpos($facebook_url, "facebook.com");
if ($position === false) {
$facebook_url = "http://www.facebook.com/" . $facebook_url;
}
$twitter_handle = trim($_REQUEST['twitter_handle']);
$twitter_url = "http://www.twitter.com/";
$position = strpos($twitter_handle, "@");
if ($position === false) {
$twitter_url = $twitter_url . $twitter_handle;
} else {
$twitter_url = $twitter_url . substr($twitter_handle, $position + 1);
}
// Make sure we didn't have an error uploading the image
($_FILES[$image_fieldname]['error'] == 0)
or handle_error("the server couldn't upload the image you selected.",
$php_errors[$_FILES[$image_fieldname]['error']]);
// Is this file the result of a valid upload?
@is_uploaded_file($_FILES[$image_fieldname]['tmp_name'])
or handle_error("you were trying to do something naughty. Shame on you!",
"Uploaded request: file named '{$_FILES[$image_fieldname]
['tmp_name']}'");
// Is this actually an image?
@getimagesize($_FILES[$image_fieldname]['tmp_name'])
or handle_error("you selected a file for your picture that isn't an image.",
"{$_FILES[$image_fieldname]['tmp_name']} isn't a valid image
file.");
// Name the file uniquely
$now = time();
while (file_exists($upload_filename = $upload_dir . $now .
'-' .
$_FILES[$image_fieldname]['name'])) {
$now++;
}
// Insert the image into the images table
$image = $_FILES[$image_fieldname];
$image_filename = $image['name'];

PHP & MYSQL: THE MISSING MANUAL
310
$image_info = getimagesize($image['tmp_name']);
$image_mime_type = $image_info['mime'];
$image_size = $image['size'];
$image_data = file_get_contents($image['tmp_name']);
$insert_image_sql = sprintf("INSERT INTO images " .
"(filename, mime_type, file_size, image_data) " .
"VALUES ('%s', '%s', %d, '%s');",
mysql_real_escape_string($image_filename),
mysql_real_escape_string($image_mime_type),
mysql_real_escape_string($image_size),
mysql_real_escape_string($image_data));
mysql_query($insert_image_sql)
or die(mysql_error());
$insert_sql = sprintf("INSERT INTO users " .
"(first_name, last_name, email, " .
"bio, facebook_url, twitter_handle, " .
"profile_pic_id) " .
"VALUES ('%s', '%s', '%s', '%s', '%s', '%s', %d);",
mysql_real_escape_string($first_name),
mysql_real_escape_string($last_name),
mysql_real_escape_string($email),
mysql_real_escape_string($bio),
mysql_real_escape_string($facebook_url),
mysql_real_escape_string($twitter_handle),
mysql_insert_id());
// Insert the user into the database
mysql_query($insert_sql)
or die(mysql_error());
// Redirect the user to the page that displays user information
header("Location: show_user.php?user_id=" . mysql_insert_id());
exit();
?>
Try your code out by creating another user. Then, check to see what the last and
highest inserted image ID is from your
images
table:
mysql> select image_id from images;
+----------+
| image_id |
+----------+
| 2 |
CONNECTING
USERS AND
IMAGES

CHAPTER 10: BINARY OBJECTS AND IMAGE LOADING 311
CONNECTING
USERS AND
IMAGES
| 3 |
| 4 |
+----------+
2 rows in set (0.45 sec)
This ID should be the same one that was inserted into your last inserted user in
users
:
mysql> select user_id, first_name, last_name, profile_pic_id from users;
+---------+------------+-----------+----------------+
| user_id | first_name | last_name | profile_pic_id |
+---------+------------+-----------+----------------+
| 1 | Yu | Darvish | NULL |
| 10 | David | Ramirez | NULL |
| 19 | Ryan | Geyer | NULL |
| 21 | Jason | Wadley | NULL |
| 24 | Robert | Powell | 4 |
+---------+------------+-----------+----------------+
5 rows in set (0.00 sec)
You can see that when an image is inserted, the ID of that image is dropped into
users
, which demonstrates that you have a connection between a user and an image.
Joining Tables by Using WHERE
Now that you have a connection between and image and a user, you need a way
to get an image for that user. First, utilize the user ID to select the user you want:
// Build the SELECT statement
$select_query = sprintf("SELECT * FROM users WHERE user_id = %d",
$user_id);
This variable is just a sprintf version of code from
show_user.php
. Make this change
in your own version of
show_user.php
.
Notice that you get more than just user information, now. You also get the
profile_pic_id for that user. This means that you can use this ID to get the image
for that user:
// Run the query
$result = mysql_query($select_query);
if ($result) {
$row = mysql_fetch_array($result);
$first_name = $row['first_name'];
$last_name = $row['last_name'];
$bio = preg_replace("/[\r\n]+/", "</p><p>", $row['bio']);
$email = $row['email'];
$facebook_url = $row['facebook_url'];
$twitter_handle = $row['twitter_handle'];
$profile_pic_id = $row['profile_pic_id'];

PHP & MYSQL: THE MISSING MANUAL
312
$image_query = sprintf("SELECT * FROM images WHERE image_id = %d",
$profile_pic_id);
$image_result = mysql_query($image_query);
// Turn $twitter_handle into a URL
$twitter_url = "http://www.twitter.com/" .
substr($twitter_handle, $position + 1);
} else {
handle_error("There was a problem finding your " .
"information in our system.",
"Error locating user with ID {$user_id}");
}
NOTE You can remove any code in
show_user.php
that involves the profile image’s file path because you’re
not longer using that approach for dealing with images.
This code works, but it’s actually turning what is potentially one step into two. What
you’re doing here is joining two tables: you have a piece of information—profile_
pic_id in
users
and image_id in
images
—that connects the two tables.
CONNECT YOUR TABLES THROUGH COMMON COLUMNS
You also have a way to get only certain rows from a table: the WHERE clause. Putting
this all together, you can get a user from
users
and an image from
images
where
the user’s profile_pic_id matches the image’s image_id:
SELECT first_name, last_name, filename
FROM users, images
WHERE profile_pic_id = image_id;
Run this in MySQL, and you should see a result like the following example:
mysql> SELECT first_name, last_name, filename
-> FROM users, images
-> WHERE profile_pic_id = image_id;
+------------+-----------+--------------------+
| first_name | last_name | filename |
+------------+-----------+--------------------+
| Robert | Powell | powell-kicking.png |
+------------+-----------+--------------------+
1 row in set (0.44 sec)
For the first time, you’re connecting your tables together. In a single query, you’ve
joined
information in one table to corresponding information in another table. That’s
a big deal!
CONNECTING
USERS AND
IMAGES

CHAPTER 10: BINARY OBJECTS AND IMAGE LOADING 313
SHOW ME THE
IMAGE!
ALIAS YOUR TABLES (AND COLUMNS)
As cool as this query is, it’s a bit confusing. Take a look again:
SELECT first_name, last_name, filename
FROM users, images
WHERE profile_pic_id = image_id;
It’s obvious that first_name and last_name are columns from
users
. But, unless
you really know your database structure, it’s not immediately clear where filename
comes from. (Of course, you
are
intimately familiar with your database, so you know
that filename is a column in
images
.)
The same is true with profile_pic_id and image_id. Both are column names, but
which column belongs to which table?
You can make this clear, though, by using table prefixes on your columns. For ex-
ample, you can convert this query to something a bit more descriptive:
SELECT users.first_name, users.last_name, images.filename
FROM users, images
WHERE users.profile_pic_id = images.image_id;
You’ll get the same result, but the query itself is a lot less ambiguous. Still, there’s
another important fact to keep in mind here: programmers are lazy. Yup, it’s true;
most programmers would rather type a single character—or at most two—if they
can avoid typing five or ten. And SQL is happy to accommodate. You can alias a
table by providing a letter or two after the table name and then using that letter as
your prefix in the rest of the query:
SELECT u.first_name, u.last_name, i.filename
FROM users u, images i
WHERE u.profile_pic_id = i.image_id;
Once again, there’s nothing functionally dierent about this query, but it’s now both
clear and succinct: a programmer’s best-case situation.
Show Me the Image!
At this point, you have all your data, and you can even get the image for a particular
user. All that’s left is to actually show the image, right?
Yes, but you have an entirely dierent situation than when you had the image on
a file system and just needed to point at that file. In this case, you must load the
actual raw image data from your database and then somehow let the browser know,
“Hey, this is an image, not just text. Display it like an image.” That’s not particularly
dicult, but it’s dierent from what you’ve been doing.
NOTE You can find the finished example code for this section on this book’s Missing CD page at
www
.missingmanuals.com/cds/phpmysqlmm2e
.

PHP & MYSQL: THE MISSING MANUAL
314
Displaying an Image
First, you need a script that can load and display an image. Once that’s done, it’s
easy to reference that display script in
show_user.php
. Therefore, the script is the
important piece, with all the new code.
Create a new script, and call it
show_image.php
. You can start out with the basic
script shell that all your scripts now have:
<?php
require_once '../scripts/app_config.php';
require_once '../scripts/database_connection.php';
?>
MAKE A GAME PLAN FOR YOUR SCRIPT
Map out the exact steps that need to happen:
1. Get an image ID from the request.
2. Build a SELECT query from the
images
table by using that image ID.
3. Run the SELECT query and get the results.
4. Grab what should be the only row from those results.
5. Inform the browser that it’s about to receive an image.
6. Inform the browser what kind of image it’s about to receive.
7. Give the browser the image data.
With the exception of these last few steps, you’re probably already whirring away,
figuring out exactly what sort of code you need to write. But, there’s a lot of error
handling that has to happen along the way, too:
1. Ensure that an image ID was sent to the script.
2. Ensure that the ID maps to an image in the
images
table.
3. Deal with general problems that occur while loading or displaying the
image data.
Again, though, none of this is particularly hard. Time to get to work.
GET THE IMAGE ID
First up, you need to get an ID to use for loading the image from the database. This
step is also where you can do some initial error handling: if no ID comes in as part
of the request, something’s gone wrong.
<?php
require_once '../scripts/app_config.php';
SHOW ME THE
IMAGE!

CHAPTER 10: BINARY OBJECTS AND IMAGE LOADING 315
SHOW ME THE
IMAGE!
require_once '../scripts/database_connection.php';
if (!isset($_REQUEST['image_id'])) {
handle_error("No image to load was specified.");
}
$image_id = $_REQUEST['image_id'];
?>
Simple enough, and a lot like code you’ve written before in
show_user.php
. Once
again, handle_error makes dealing with problems, if they do occur, a piece of cake.
BUILD AND RUN A SELECT QUERY
Next, you can use your new friend, sprintf, to construct a SQL query, and an older
friend, mysql_query, to get a result set:
<?php
// require statements
// Get the image ID
// Build the SELECT statement
$select_query = sprintf("SELECT * FROM images WHERE image_id = %d",
$image_id);
// Run the query
$result = mysql_query($select_query);
?>
Nothing new here, either.
GET THE RESULTS, GET THE IMAGE, AND DEAL WITH
POTENTIAL ERRORS
Now, you can grab the data from $result. In the past, you’ve done that in a few
ways. Early on, you looped over all of the rows returned from a query:
if ($return_rows) {
// We have rows to show from the query
echo "<p>Results from your query:</p>";
echo "<ul>";
while ($row = mysql_fetch_row($result)) {
echo "<li>{$row[0]}</li>";
}

PHP & MYSQL: THE MISSING MANUAL
316
echo "</ul>";
} else {
// No rows. Just report if the query ran or not
echo "<p>The following query was processed successfully:</p>";
echo "<p>{$query_text}</p>";
}
NOTE This code is from way back in Chapter 6 (page 160). Hard to believe how much more advanced your
PHP scripts have become in a few short chapters, isn’t it?
You also used an if statement if you expected only a single result:
if ($result) {
$row = mysql_fetch_array($result);
// Deal with the single result
} else {
handle_error("there was a problem finding your information in our system.",
"Error locating user with ID {$user_id}");
}
This statement assumes that as long as $result is valid, you have a row. Further, it
ignores any rows other than the first one, knowing that the SQL query that gener-
ated these results can only return a single row.
In
show_image.php
, you want something similar to this latter approach. But it’s pos-
sible to check and ensure that you have a result without encasing everything in an if:
<?php
// require statements
// Get the image ID
// Build and run the query
// Get the result and handle errors from getting no result
if (mysql_num_rows($result) == 0) {
handle_error("we couldn't find the requested image.",
"No image found with an ID of " . $image_id . ".");
}
$image = mysql_fetch_array($result);
?>
This approach is cleaner because it keeps your code moving along once the error
has been dealt with. (For more on why this sequence is more natural, read the box
on page 317.)
SHOW ME THE
IMAGE!

CHAPTER 10: BINARY OBJECTS AND IMAGE LOADING 317
SHOW ME THE
IMAGE!
DESIGN TIME
Sequential Code Is Usually Clearer Code
There’s almost always more than one way to accomplish any
task in programming. In fact, there are usually multiple good
ways to get a job done. But, there’s usually a clearest way, and
that’s what you want to work toward. You want good, working
code that’s also clear and easy to understand.
Writing clear code becomes harder as your code grows more
complex. You often have multiple decision points (with
if
statements), error handling, loops, and all sorts of other
constructs that take your code all over the place. Because of
all this complexity, you want to make as much of your code
as you can
sequential
. In other words, you want to be able to
read that code more or less from beginning to end and be able
to follow the flow.
With that in mind, take a look again at the earlier code from
show_user.php
:
if ($result) {
$row = mysql_fetch_array($result);
// Deal with the single result
} else {
handle_error("there was a problem find-
ing your " .
"information in our system.",
"Error locating user with " .
"ID {$user_id}");
}
This code works, and it’s even pretty solid. But, is it sequential?
Well...sort of. If there’s a result, get that result, and work with
it. If there’s no result, deal with errors. But, what’s the
real
sequence of the process?
First, you want to see if there’s a result, and if not, handle
the error. Then—and only after you’re sure it’s safe to carry
on—you want to work with the results and continue with the
script. Thinking along that line, the
else
at the end handling
the error is out of sequence. It’s something you want to deal
with
before
going on to work with the row.
That’s why the newer sequence in
show_image.php
on page
316, in which errors are handled and
then
the results are used, is
a better solution for your code’s readability. Same functionality,
but easier to understand and maintain.
TELL THE BROWSER WHAT’S COMING
You have the information you want from
images
, but you can’t just toss that to the
browser. Well, you
could
, but the browser would become confused. It’s used to
dealing with HTML; but raw binary data is something else altogether.
There are a couple of things about which you need to apprise the browser:
• What kind of content is coming? This information is passed to the browser
through a MIME type. It is usually something like
text/html
or
text/xml
, or in
the case of images,
image/jpeg
or
image/gif
or
image/png
.
• If that type is binary—as images are—what amount or size of information is
coming? The browser needs to know so it can figure out when it’s done receiv-
ing information.
You already have the tools you need to communicate with the browser. Remember
this line from page 248?

PHP & MYSQL: THE MISSING MANUAL
318
header("Location: " . HTTP_WWW_ROOT . "scripts/show_error.php?" .
error_message={$user_error_message}&" .
system_error_message={$system_error_message}");
This line communicates directly to the browser. It’s sending a header called Location
to the browser. The value of that header is a location, a URL, and the browser knows
that when it gets a Location header, go to the URL specified by theheader’s value.
The PHP header function is the mechanism by which you can speak directly to the
browser. As for the two pieces of information you need to send—the content type
and the size of that content—browsers have specific headers for both:
• Content-typeUse this to alert a browser to what the MIME type is of the
content you’re about to send.
• Content-lengthUse this to provide the size (the “length” in bytes) of the
information you’re about to send.
At this point, you have both of these pieces of information in your
images
table, in
the mime_type column and the file_size column.
Put all this together, and you have two lines of code to add to
show_image.php
:
<?php
// require statements
// Get the image ID
// Build and run the query
// Get the result and handle errors from getting no result
// Tell the browser what's coming with headers
header('Content-type: ' . $image['mime_type']);
header('Content-length: ' . $image['file_size']);
?>
That’s it. The browser expects a certain type of information (in your case,
image/
jpeg
or
image/gif
in most cases), it knows the size of the information and now it just
needs the actual information itself.
WARNING As with other headers you’ve sent (such as the
Location
header, which causes a redirect),
you must send headers before any other output. Therefore, ensure that
show_image.php
doesn’t echo or spit
out any HTML before it calls
header
.
SEND THE IMAGE DATA
All that’s left is one easy step. You need to set up an echo statement to send the
image to the browser:
SHOW ME THE
IMAGE!

CHAPTER 10: BINARY OBJECTS AND IMAGE LOADING 319
SHOW ME THE
IMAGE!
<?php
// require statements
// Get the image ID
// Build and run the query
// Get the result and handle errors from getting no result
// Tell the browser what's coming with headers
echo $image['image_data'];
?>
That’s it. This data is not a string of text; it’s the raw binary information pulled from
a BLOB column in your
images
table, sent out bit by bit. But the magic isn’t in this
line. The magic is you telling the browser that this is a certain kind of information
and a certain size. Those details let the browser know, “This is an image coming.
Treat it like one.”
Handling Errors with
try
and
catch
At this point, you’ve knocked out your list of things to do to show an image:
1. Get an image ID from the request.
2. Build a SELECT query from the
images
table using that image ID.
3. Run the SELECT query and get the results.
4. Grab what should be the only row from those results.
5. Inform the browser that it’s about to receive an image.
6. Tell the browser what kind of image it’s about to receive.
7. Give the browser the image data.
All done; excellent. And, the script is short, too; clean and easy to follow. That’s a
win by every account.
You’ve also taken care of most of your error handling:
1. Ensure that an image ID was sent to the script.
2. Ensure that the ID maps to an image in the
images
table.
3. Deal with general problems that occur while loading or displaying the
image data.
The first two are done, but what about those so-called general problems? What
happens if, for example, there’s an error sending the Content-type header? Or per-
haps sending the Content-length header? And what about echoing out the image
data? Doesn’t that seem like something that can go bad? What if the image data is
corrupt, or something happens in pulling data from the result set, or if the browser
can’t handle a particular type of image that your script tries to send?

PHP & MYSQL: THE MISSING MANUAL
320
In all of these cases, you receive an error that’s unaccounted for. And when you
have these general sort of errors—errors that don’t fit into the black-and-white, “I
can check ahead of time and make sure there’s no problem” mold—you need a way
to deal with them.
The rub here is that you can’t pin these things down. You need a way to say, “While
this entire chunk of code is running, if a general problem happens, do this...” The
good news is that you have a “do this” in handle_error. PHP provides a way to do
just this with something called a try/catch block.
The try part of a try/catch block defines a segment (a block) of your error-prone
code to which you would like to pay special attention. Essentially, you’re saying, “Try
this code.” The catch path of the try/catch block is run only if an error occurs. If
anything goes wrong within the try block, the catch part of the block runs.
Not only that, but in the catch, an object is handed o: an Exception. This Exception
has information about what went wrong, so you can report on that—say to a custom
function such as handle_error.
To put this into place in
show_image.php
, first, surround all your error-prone code
with a try and curly braces, like this:
<?php
require_once '../scripts/app_config.php';
require_once '../scripts/database_connection.php';
try {
if (!isset($_REQUEST['image_id'])) {
handle_error("No image to load was specified.");
}
$image_id = $_REQUEST['image_id'];
// Build the SELECT statement
$select_query = sprintf("SELECT * FROM images WHERE image_id = %d",
$image_id);
// Run the query
$result = mysql_query($select_query);
// Get the result and handle errors from getting no result
if (mysql_num_rows($result) == 0) {
handle_error("we couldn't find the requested image.",
"No image found with an ID of " . $image_id . ".");
}
$image = mysql_fetch_array($result);
SHOW ME THE
IMAGE!

CHAPTER 10: BINARY OBJECTS AND IMAGE LOADING 321
SHOW ME THE
IMAGE!
// Tell the browser what's coming with headers
header('Content-type: ' . $image['mime_type']);
header('Content-length: ' . $image['file_size']);
echo $image['image_data'];
}
?>
Whenever anything goes wrong, the PHP interpreter will throw out an Exception
object, reporting the problem, and then go to the catch block:
<?php
require_once '../scripts/app_config.php';
require_once '../scripts/database_connection.php';
try {
// code that may cause an error
} catch (Exception $exc) {
}
?>
You can see that this line almost looks like a function: the catch code takes control,
and it receives an Exception object. $exc is the variable name of the exception, so
you can reference that exception if you need to.
Finally, you should do something useful in this catch block:
<?php
require_once '../scripts/app_config.php';
require_once '../scripts/database_connection.php';
try {
// code that may cause an error
} catch (Exception $exc) {
handle_error("something went wrong loading your image.",
"Error loading image: " . $exc->getMessage());
}
?>
With this code, anytime there’s an error, handle_error comes to the rescue. As
usual, you pass handle_error a friendly string as well as some extra information
for the programmers who might be looking on. In this case, that message comes
from exc, and the getMessage method. An object in PHP doesn’t have functions; it
has methods. You reference a method by using ->, that weird arrow character you
first met on page 109.
D

PHP & MYSQL: THE MISSING MANUAL
322
When this code runs, it reports any error that might have occurred and stops PHP
from trying to continue on in the try block.
Here’s what you should have for
show_image.php
:
<?php
require_once '../scripts/app_config.php';
require_once '../scripts/database_connection.php';
try {
if (!isset($_REQUEST['image_id'])) {
handle_error("No image to load was specified.");
}
$image_id = $_REQUEST['image_id'];
// Build the SELECT statement
$select_query = sprintf("SELECT * FROM images WHERE image_id = %d",
$image_id);
// Run the query
$result = mysql_query($select_query);
// Get the result and handle errors from getting no result
if (mysql_num_rows($result) == 0) {
handle_error("we couldn't find the requested image.",
"No image found with an ID of " . $image_id . ".");
}
$image = mysql_fetch_array($result);
// Tell the browser what's coming with headers
header('Content-type: ' . $image['mime_type']);
header('Content-length: ' . $image['file_size']);
echo $image['image_data'];
} catch (Exception $exc) {
handle_error("something went wrong loading your image.",
"Error loading image: " . $exc->getMessage());
}
?>
All that’s left is some testing to verify that things work.
SHOW ME THE
IMAGE!
CHAPTER 10: BINARY OBJECTS AND IMAGE LOADING 323
SHOW ME THE
IMAGE!
Test, Test, Always Test
First, start MySQL and find an image that’s been inserted. Make a note of that
image’s ID.
mysql> select image_id, filename from images;
+----------+-----------------------------------------------------+
| image_id | filename |
+----------+-----------------------------------------------------+
| 2 | 7829_1204001948285_1475710666_1190173_2526636_n.jpg |
| 4 | powell-kicking.png |
+----------+-----------------------------------------------------+
2 rows in set (0.00 sec)
Next, open your browser and type the URL for
show_image.php
, but don’t press
Enter; if you do, you should get the error shown in Figure 10-4 because you didn’t
supply an ID.
FIGURE 10-4
It’s not completely neces-
sary, but it’s probably a
good idea to even test
your errors. In this case,
by not specifying an
image ID, you’re verifying
that errors are handled
properly, and in particular
that the case where no
image ID is provided is
handled.
Now, add the image ID to the URL like this:
show_image.php?image_id=4
. Put that
in your browser’s address bar (along with the rest of your domain name and path),
and you should see something similar to Figure 10-5.
PHP & MYSQL: THE MISSING MANUAL
324
FIGURE 10-5
This is what all this work is
about: getting a browser
to show an image. In
fact, this is a lot like
right-clicking an image
on another web page, and
selecting View Image. It
shows you just the image,
without any other text.
Embedding an Image Is Just Viewing
an Image
Finally, it’s back to
show_user.php
. Remember,
show_image.php
was actually a bit
of a diversion. It’s a necessary one, but the point isn’t a script that displays an image.
Instead, it’s a script that displays a user, and that just happens to mean you have to
show that user’s image. But, you have all the work done now to make this happen,
so
show_user.php
is back into the fold, ready for you to piece it all together.
NOTE You can find the finished example code for this section on this book’s Missing CD page at
www.
missingmanuals.com/cds/phpmysqlmm2e
.
All You Need Is an Image ID
Your first thought might be to rewrite that SQL query that grabs an entry from
images
based on a user from
users
:
SELECT u.first_name, u.last_name, i.filename
FROM users u, images i
WHERE u.profile_pic_id = i.image_id;
EMBEDDING AN
IMAGE IS JUST
VIEWING AN
IMAGE

CHAPTER 10: BINARY OBJECTS AND IMAGE LOADING 325
EMBEDDING AN
IMAGE IS JUST
VIEWING AN
IMAGE
But, do you need to do this? No, because all that
show_image.php
requires is an
image ID, and you have that in the
users
table, in profile_pic_id. You don’t need
to do a join on
users
and
images
.
As a result, when you’re getting the results from your SQL query, you just need to
grab the profile image ID:
<?php
require_once '../scripts/app_config.php';
require_once '../scripts/database_connection.php';
// Get the user ID of the user to show
// Build the SELECT statement
// Run the query
if ($result) {
$row = mysql_fetch_array($result);
$first_name = $row['first_name'];
$last_name = $row['last_name'];
$bio = preg_replace("/[\r\n]+/", "</p><p>", $row['bio']);
$email = $row['email'];
$facebook_url = $row['facebook_url'];
$twitter_handle = $row['twitter_handle'];
$image_id = $row['profile_pic_id'];
// Turn $twitter_handle into a URL
} else {
handle_error("there was a problem finding your information in our system.",
"Error locating user with ID {$user_id}");
}
?>
<!-- HTML -->
NOTE This line of new code replaces the older line with which you grabbed the URL to the image, in the
version that stored just a path to the image in your
users
table.
A Script Can Be an Image
src
With this ID, you’re ready to deal with the missing image. However, what’s about to
happen might seem a bit odd, so some explanation is in order.
Think about your typical HTML <img> element:
<img src="/images/powell_kicking.jpg" />

PHP & MYSQL: THE MISSING MANUAL
326
What’s really happening here? The <img> tag itself informs the browser to expect an
image, and the src attribute provides the browser with the location of that image.
But, that location will just trigger another browser request—in this case, to
/images/
powell_kicking.jpg
. And, what does the browser get from that location? A bunch of
bits that makes up the image
powell_kicking.jpg
.
Yet, there’s nothing magical about
powell_kicking.jpg
, or that URL. It’s just a loca-
tion, and as long as that location returns an image to the browser, the image is
displayed. Thus, it’s perfectly okay to supply anything to the src, as long as that
anything returns an image. You might supply it, for example, a script that displays
an image. You might just hand it something like this:
<img src="show_image.php?image_id=4" />
Because
show_image.php
with a valid ID returns an image, the browser happily
displays that image in place of the <img> tag in your web page.
From here, it’s a breeze to change your HTML in
show_user.php
to do just this:
<?php
// Lots of PHP goodness
?>
<html>
<head>
<link href="../css/phpMM.css" rel="stylesheet" type="text/css" />
</head>
<body>
<div id="header"><h1>PHP & MySQL: The Missing Manual</h1></div>
<div id="example">User Profile</div>
<div id="content">
<div class="user_profile">
<h1><?php echo "{$first_name} {$last_name}"; ?></h1>
<p><img src="show_image.php?image_id=<?php echo $image_id; ?>"
class="user_pic" />
<?php echo $bio; ?></p>
<p class="contact_info">Get in touch with <?php echo $first_name; ?>:
</p>
<ul>
<!-- Connect links -->
</ul>
</div>
</div>
<div id="footer"></div>
</body>
</html>
EMBEDDING AN
IMAGE IS JUST
VIEWING AN
IMAGE

CHAPTER 10: BINARY OBJECTS AND IMAGE LOADING 327
EMBEDDING AN
IMAGE IS JUST
VIEWING AN
IMAGE
That’s all there is to it! The src attribute of your <img> tag is now a link to your script,
with the correct ID. When you take all of
show_user.php
together, you should have
something like this:
<?php
require_once '../scripts/database_connection.php';
// Get the user ID of the user to show
$user_id = $_REQUEST['user_id'];
// Build the SELECT statement
$select_query = sprintf("SELECT * FROM users WHERE user_id = %d",
$user_id);
// Run the query
$result = mysql_query($select_query);
if ($result) {
$row = mysql_fetch_array($result);
$first_name = $row['first_name'];
$last_name = $row['last_name'];
$bio = preg_replace("/[\r\n]+/", "</p><p>", $row['bio']);
$email = $row['email'];
$facebook_url = $row['facebook_url'];
$twitter_handle = $row['twitter_handle'];
$image_id = $row['profile_pic_id'];
$image_query = sprintf("SELECT * FROM images WHERE image_id = %d",
$profile_pic_id);
$image_result = mysql_query($image_query);
// Turn $twitter_handle into a URL
$twitter_url = "http://www.twitter.com/" .
substr($twitter_handle, $position + 1);
} else {
handle_error("There was a problem finding your " .
"information in our system.",
"Error locating user with ID {$user_id}");
}
?>

PHP & MYSQL: THE MISSING MANUAL
328
<html>
<head>
<link href="../../css/phpMM.css" rel="stylesheet" type="text/css" />
</head>
<body>
<div id="header"><h1>PHP & MySQL: The Missing Manual</h1></div>
<div id="example">User Profile</div>
<div id="content">
<div class="user_profile">
<h1><?php echo "{$first_name} {$last_name}"; ?></h1>
<p><img src="show_image.php?image_id=<?php echo $image_id; ?>"
class="user_pic" />
<?php echo $bio; ?></p>
<p class="contact_info">Get in touch with <?php echo $first_name; ?>:
</p>
<ul>
<li>...by emailing them at
<a href="<?php echo $email; ?>"><?php echo $email; ?></a></li>
<li>...by
<a href="<?php echo $facebook_url; ?>">checking them out
on Facebook</a></li>
<li>...by <a href="<?php echo $twitter_url; ?>">following them
on Twitter</a></li>
</ul>
</div>
</div>
<div id="footer"></div>
</body>
</html>
You can see the final result in Figure 10-6.
Nice work! Whoever thought before you closed this chapter that you’d be manually
loading bits and bytes from a database and displaying them as an image on demand?
EMBEDDING AN
IMAGE IS JUST
VIEWING AN
IMAGE
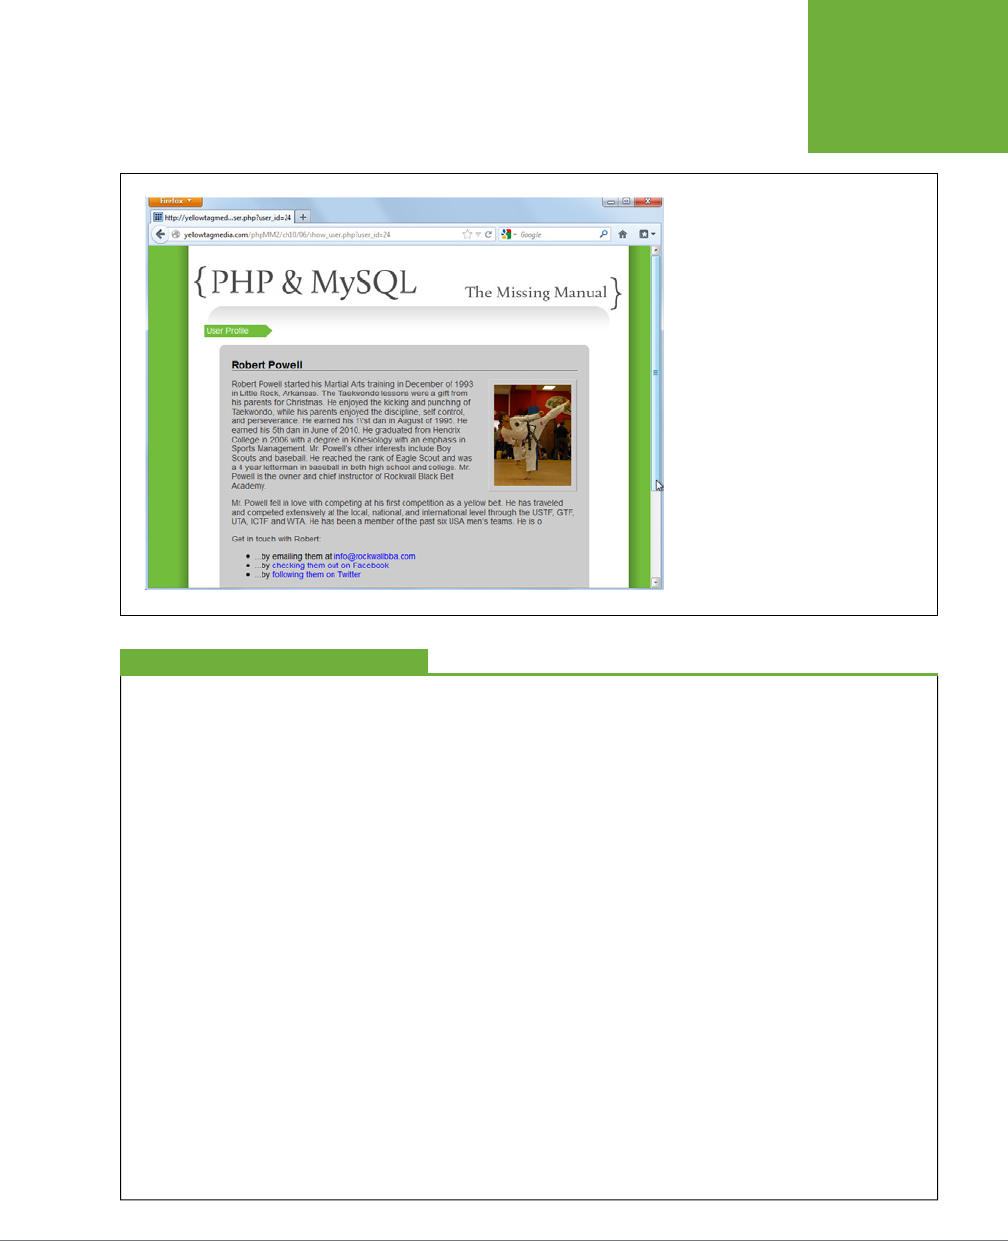
CHAPTER 10: BINARY OBJECTS AND IMAGE LOADING 329
EMBEDDING AN
IMAGE IS JUST
VIEWING AN
IMAGE
FIGURE 10-6
This reward has been a long time coming.
Just a few hundred lines of code ago,
you were referencing an image on a file
system. Cool, yes; but loading an image
from a database? That’s something else
altogether. Now, you have a new script,
a new approach, and yet another way to
show a user’s smiling face (or perhaps, his
cat’s face) in full color.
FREQUENTLY ASKED QUESTION
Knowledge Is Power
Couldn’t I have learned this code in, say, a quick online tutorial?
If you’ve spent much time on the Internet, you know what a
force Google is. Spend just a few minutes on its search engine
and you’ll find at least 20 or 30 tutorials on image uploads,
in PHP, for both storing paths to the image in your database
and for storing the images themselves in your database.
Heck, there are even frameworks that take care of all this
programming for you!
So, why is it worth plowing through some of the trickiest PHP
material you’ve run across yet, just to do this yourself? There
are two important reasons why this sort of code—and in fact
this exact code—is important not for you to just type into your
editor, but to actually understand.
First, you can do
lots
of things using frameworks floating around
on the Internet. And, truth be told, many of the frameworks,
especially when you get them from reputable sources, do what
your code would do, better, faster, and with greater efficiency.
But that doesn’t mean it’s not important to understand what’s
going on. In fact, once you understand how this code works,
you’re
much
better prepared to make good choices about which
frameworks to use, and why those frameworks might be better
than writing your own...
after
you’ve written your own and are
ready to move to a more advanced usage.
Second, as you write more and more web applications, you’ll
often find your needs are more and more specific. Sure, you
need image uploading, but you need it with some particular
wrinkle or tweak specific to your application. Maybe you only
want to accept JPGs and not GIFs; or you want to impose a
server-side restriction on size, rather than relying on the HTML
input field that sets a maximum size.
If you have no idea how this sort of code works, you’re not
equipped to make adjustments like this. Whether it’s your
code or someone else’s, you need to be able to make those
sort of adjustments that personalize a piece of code. That
requires knowledge, and knowledge comes from trying things
out for yourself.

PHP & MYSQL: THE MISSING MANUAL
330
So, Which Approach Is Best?
Here you are, with two totally dierent approaches to getting users’ images into
your database (or at least the paths to those images). In fact, you’ve probably spent
as much time working through this code as any other code you’ve run across in your
PHP journey. Now, one question begs to be answered: which approach is best?
The most accurate answer to that is, “It depends.” Or maybe, “It’s up to you.” Those
are frustrating answers and probably completely dissatisfying. That’s because the
sort of questions you’re getting into—storing images or handling errors or interacting
with other frameworks and other people’s code—you’re not always going to have
clear “right” answers.
For example, you have to consider questions like the following: Do you have a par-
ticularly small file system with which to work? Are you charged based on the space
your web server’s files take up? Is that charge greater or lesser than the charges
you’re assessed for the size of your database? Is your database locally accessible
and blistering fast? Or, is it a slow connection to another machine?
Yet, at the end of the day, you sometimes have to say, “I’m not sure...I just like this
approach better...or that approach better.” That’s okay. You might just need to pick
something, try it out, and get moving. There are plenty of cases in which the only
real
wrong
solution is to wait around analyzing the options for hours (days! weeks!)
instead of moving forward.
OK, If You Insist on an Answer...
If you’re not sure, store your images on a file server, and store just the path to that
image in your database. The fact is, although you can write good code that both
stores an image in a database and displays that image, it’s a lot tougher to do things
right. Every time a SELECT runs against your
images
table and grabs the contents
of the image_data column, you’re selecting the entire size of that image’s data. You
might have 100 rows each with an image of an average size of 1 MB and 100 MB of
image data clogging up your network and database trac. When in doubt, you’ll
probably stick with a path in your database, like the example in Chapter 9. But now,
you have a firm handle on just what goes on with images, whether they’re stored
in the database or not.
SO, WHICH
APPROACH IS
BEST?

CHAPTER 10: BINARY OBJECTS AND IMAGE LOADING 331
SO, WHICH
APPROACH IS
BEST?
FREQUENTLY ASKED QUESTION
Back on the Path
So how do I get my database back in order?
All things being equal, going with images stored on the file
system is the better solution. (To be clear, though, all things
are
never
equal!) Because that’s a good default option, the
examples in the rest of this book will assume that’s your setup.
So how do you get back to that solution?
First, you should have backed up your scripts. If you didn’t,
you might want to redownload the sample files again
from the Missing CD page (
www.missingmanuals.com/cds/
phpmysqlmm2e
), and use the versions that don’t store images
in the database.
Second, you need to remove the
profile_pic_id
column
in your
users
table. Here’s the SQL to make that change:
ALTER TABLE users
DROP COLUMN profile_pic_id;
You can then delete the
images
table easily enough:
DROP TABLE images;
That’s it. You’re back in action.

333
CHAPTER
11
For quite a while now, you’ve been focusing on some basic details: a user, the
user's information, and as an extension of that information, the user's profile
picture. You’ve become familiar with PHP and MySQL, figured out not just one
but two ways to deal with one of the most common PHP issues—image loading—
and you’ve managed to keep things looking good throughout. These aren’t small
accomplishments; they’re very much big ones.
As a user, you can set up a profile and specify some basic information. If you’re an
administrator, you might want to see how many users are in your system, delete
a malicious user, or update a picture because it’s not quite socially palatable. You
can do all that through your MySQL command line, but in the real world of web
applications, most administrators aren’t keeping a MySQL terminal running in the
corner of their monitor.
Instead, they have administrative interfaces. They can list all the users in a system;
check some boxes here and there and mass delete users; and see any user they
want, all through a nice, clean web interface. You can give your web application the
same nice features.
When you start thinking about an administrative interface, you run into all sorts of
interesting problems. You need to use dierent types of SQL queries. You have to
mix together a lot more PHP and MySQL with your HTML because you’ll have to list
every user from the database, one at a time. You have to deal with DELETE state-
ments and a lot more WHERE statements.
Listing, Iterating, and
Administrating
PHP & MYSQL: THE MISSING MANUAL
334
THINKING
ABOUT WHAT
YOU NEED AS
AN ADMIN
In this chapter, you’ll take everything you know and push further. There are not
many radically new techniques to learn, but there are lots of important variations
on what you already do know. So why wait any longer, or settle for MySQL as your
admin interface? Time to set up a better, more visual way to keep up with your users.
NOTE If you are just salivating for something completely new and different, work through this chapter in
anticipation of the next. There, you’ll secure all these nice administrative pages, and then you will need—and
learn—a whole new bag of tricks.
Thinking about What You Need as an Admin
As usual, the first step is to lay out what you need and rough out the broad strokes
of how things look and interact. You can start with a few bullet points, figure out the
screens you’re going to need, and throw together some mock-ups, either in HTML
or even a tool such as Photoshop.
Because your app is straightforward, all you’ll need for the moment is the following:
• A form that lists all the users in the system
• A link to each user’s profile page
• The ability to delete a user
• The ability to update or change a user’s information
• A means of giving other users administrative privileges
That last one is going to take quite a bit of work and create some unique headaches
with which you’ll have to deal, so let's save it for a bit later (that is, the next chapter).
But you can get started on the rest, right now.
NOTE You can find the finished example code for this section on this book’s Missing CD page at
www
.missingmanuals.com/cds/phpmysqlmm2e
.
(User Interface) Brevity Is Still the Soul of Wit
You could build up a complex system of pages that let you manage all these inter-
actions.
show_user.php
could figure out if you’re an admin and selectively show a
Delete button; you could build up an entire administrative menu, in fact. Then again,
sometimes the simple things are the best things. On top of that, the Web rewards
fewer clicks as a general rule. If you
can
provide a single page that accommodates the
major required functionality, you probably should
keep
things to just that single page.

CHAPTER 11: LISTING, ITERATING, AND ADMINISTRATING 335
THINKING
ABOUT WHAT
YOU NEED AS
AN ADMIN
In this case, you keep it concise. You can list users in a simple sequence, turn the
name of each user into a link to her profile page, and even add a delete button after
each user. You’ll still have to deal with changing a user’s information, but three items
on one form is a good start.
Figure 11-1 shows an example of what your admin page might look like.
FIGURE 11-1
This design isn’t going
to win any awards. The
delete image needs to
be better aligned, the
little default bullets look
cheesy, and as a whole,
this page is in need of
some serious help. But you
can handle that later. Right
now, this mock-up gives
you some idea of what you
need to get started, and
that’s all you need at this
stage: a starting point and
a blueprint.
Looking at the HTML for this page is instructive. You can immediately see that there’s
a lot of duplication, and PHP is good at reducing duplication:
<html>
<head>
<link href="../css/phpMM.css" rel="stylesheet" type="text/css" />
</head>
<body>
<div id="header"><h1>PHP & MySQL: The Missing Manual</h1></div>
<div id="example">Current Users</div>
<div id="content">
<ul>
<li>
<a href="show_user.php?user_id=1">Yu Darvish</a>
(<a href="mailto:yu@texasrangers.com">yu@texasrangers.com</a>)
<a href="delete_user.php?user_id=1">
<img class="delete_user" src="../images/delete.png" width="15" />
</a>

PHP & MYSQL: THE MISSING MANUAL
336
THINKING
ABOUT WHAT
YOU NEED AS
AN ADMIN
</li>
<li>
<a href="show_user.php?user_id=10">David Ramirez</a>
(<a href="mailto:shane@77mgmt.com">shane@77mgmt.com</a>)
<a href="delete_user.php?user_id=10">
<img class="delete_user" src="../images/delete.png" width="15" />
</a>
</li>
<li>
<a href="show_user.php?user_id=19">Ryan Geyer</a>
(<a href="ryan.geyer@facebook.com">ryan.geyer@facebook.com</a>)
<a href="delete_user.php?user_id=19">
<img class="delete_user" src="../images/delete.png" width="15" />
</a>
</li>
<li>
<a href="show_user.php?user_id=21">Jason Wadley</a>
(<a href="jason.wadley@facebook.com">jason.wadley@facebook.com</a>)
<a href="delete_user.php?user_id=21">
<img class="delete_user" src="../images/delete.png" width="15" />
</a>
</li>
<li>
<a href="show_user.php?user_id=24">Robert Powell</a>
(<a href="info@rockwallbba.com">info@rockwallbba.com</a>)
<a href="delete_user.php?user_id=24">
<img class="delete_user" src="../images/delete.png" width="15" />
</a>
</li>
</ul>
</div>
<div id="footer"></div>
</body>
</html>
Wish Lists Are Good, Too
So far, you’ve gone directly from a mock-up to code. That’s not altogether bad, but
it does mean that when you bring that mock-up to life in code, anything you want
to add is a bit of a mystery. Will it work well with the way you’ve built your pages
and scripts? Or, will you have to do some redesign to get your new ideas into your
existing framework?
Obviously, you could spend some serious time with your mock-ups. You could get
those little red Xs just right, and you could nail down spacing; you could basically
spend significant time in Photoshop. Of course, nothing in HTML and CSS ever looks
just like a Photoshop mock-up, but you could get things close. However, you don’t

CHAPTER 11: LISTING, ITERATING, AND ADMINISTRATING 337
LISTING ALL
YOUR USERS
want to spend a
lot
of time on the front end before you’ve done any code. Decisions
you make as you work on your code might aect future decisions and functionality.
The answer? Create a short list of features you hope to implement in the future.
This doesn’t need to be anything fancy; a text document or even something on your
iPad or iPhone sitting next to your workstation are all fine. Then, add to or update
that list as you go and as features and functionality change. Hopefully, just having
these “next version” features handy will help you think clearly about how decisions
you make today might help you—or hurt you—when you get around to writing more
code tomorrow, next week, or next month.
For now, here are just a few things that might be nice to add once the basic func-
tionality is in place:
• Improve the user interface, setting up the dierent “columns” of data in a more
intuitive fashion and getting those delete “X” buttons to align.
• Add user profile pictures so that you can get a little better graphical view of
each user in the admin interface.
• Allow for multiple user selection and deletion on one screen.
• Add a confirmation dialog box or pop-up message when a user is selected for
deletion to avoid accidental deletions.
You can add your own ideas to this list, but this is certainly a good starting point.
Maybe you’ll code these up, and maybe you won’t, but now at least you can make
decisions that will help allow for these features, rather than get in the way of them.
NOTE Sometimes, no matter how well you plan ahead, current features require you to make decisions that
are going to make wish list features harder down the road. That’s okay. It’s much more important you get the
things you need to get done
now
completed on time.
Listing All Your Users
First things first: before you can add delete buttons and profile pictures and worry
about alignment, you need a list of all your users. This isn’t too hard; all you need is
a simple SQL query. You could do something like this:
SELECT *
FROM users;
Of course, that’s a bit of a brute force approach. There’s some refinement you can
make to improve performance, make your code clearer, and generally be a good PHP
and MySQL citizen. Again, first things first: you should get that query into shape.
NOTE You can find the finished example code for this section on this book’s Missing CD page at
www
.missingmanuals.com/cds/phpmysqlmm2e
.

PHP & MYSQL: THE MISSING MANUAL
338
LISTING ALL
YOUR USERS
SELECTing What You Need (Now)
The thing about SELECT * is that it retrieves everything in a table. Even worse, if
you’re joining tables, it retrieves everything in
all
the tables that are joined. In the
case of the
users
table, that’s not a particular problem, because there’s not much
to it. Here are all the columns you’re going to grab with a SELECT *.
mysql> describe users;
+----------------+---------------+------+-----+---------+----------------+
| Field | Type | Null | Key | Default | Extra |
+----------------+---------------+------+-----+---------+----------------+
| user_id | int(11) | NO | PRI | NULL | auto_increment |
| first_name | varchar(20) | NO | | NULL | |
| last_name | varchar(30) | NO | | NULL | |
| email | varchar(50) | NO | | NULL | |
| facebook_url | varchar(100) | YES | | NULL | |
| twitter_handle | varchar(20) | YES | | NULL | |
| bio | varchar(1000) | YES | | NULL | |
| user_pic_path | varchar(200) | YES | | NULL | |
| profile_pic_id | int(11) | YES | | NULL | |
+----------------+---------------+------+-----+---------+----------------+
9 rows in set (0.10 sec)
NOTE Depending on how closely you’ve been following along, you might have the
user_pic_path
column, but not the
profile_pic_id
. In fact, that’s probably where you want your database to be, so you
don’t have to worry about a foreign key with an
images
table that you’re no longer using.
You can get rid of that column with this:
ALTER TABLE users
DROP COLUMN profile_pic_id;
Before moving on, take a look back again at Figure 11-1. You don’t need all this infor-
mation. Realistically, you need first_name, last_name, the user_id for a hyperlink to
show_user.php
, and the user’s email. That SELECT * is grabbing several unnecessary
columns: facebook_url, twitter_handle, bio, and user_pic_path.
Why is this a big deal? Every time you select all the entries from the
users
table,
you’re getting one more row. And every column in that row is space, bandwidth on
your network, and resources. Suppose that you have 100 users, or 1,000 users, or
10,000 users, each with 20-paragraph bios. Just by
not
selecting * (and thereby
not
selecting bio) from
users
, you’re saving a lot of trac and resource consump-
tion. Getting only the information you need saves time and resources, especially
over the life of your application. (For more detail on deciding what to select, see
the box on page 339.)
All you need is a few of the columns from
users
:
SELECT user_id, first_name, last_name, email
FROM users;

CHAPTER 11: LISTING, ITERATING, AND ADMINISTRATING 339
LISTING ALL
YOUR USERS
FREQUENTLY ASKED QUESTION
Look Ahead (But Not Too Far)
What if I know I eventually want to use more columns from my
table, just not in the current incarnation of my admin page.
Should I SELECT what I’ll need later, too?
Here’s one of those situations for which looking ahead creates
a dilemma. It would be nice to add profile pictures of users to
the admin page, and you already know there’s a column with
the path to those pictures in
users
:
user_pic_path
. Because
you’re going to want that down the line, you might be tempted
to SELECT that column now.
On the one hand, it would be nice to have a SELECT that’s
already set up for a future feature that you know you'll want.
On the other hand, you’re not implementing that feature yet;
it’s just that you’d have the data available when you
do
write
that code.
In general, you should think about the implications of what
you’re doing on future features, but focus on
writing
code that
solves current problems, not future ones. Think about how
slippery a slope this can become. You might start selecting the
bio because one day you want to excerpt that on the admin
page; you might go ahead and select social information to
build more links to contact the user. Before you know it, you’re
back to a
SELECT *
and grabbing far more information than
you’re actually using.
The good news is that you know it will be easy to add function-
ality (such as grabbing a user's picture) when the time comes.
It’s a simple change to your SELECT. So, stop there, and focus on
writing code for existing work. Leave future work for the future.
If at some point in your programming career you want to start
charging for your work, you’ll have to start quoting estimates.
You’ll have to consider how long (in hours or days) will it take
you to implement each feature that your customer wants. You
typically bill at least partly based on these estimates, so this is
important stuff. If you start calculating based on current and
future functionality, those estimates stop making much sense.
You end up overcharging, or worse, undercharging because
you’re not doing one thing at a time.
Building a Simple Admin Page
Now that you’ve configured a good SELECT statement, it’s time to create another
script. Before you do that, though, there’s another important decision to make: what
to call this script. The name
admin.php
might seem like a good idea because it’s for
your admin page, but take a moment to think through the implications of that choice.
Look back at the other script names you’ve used:
•
create_user.php
creates a new user
•
show_user.php
shows a user for a given user ID
•
app_config.php
configures your application
•
database_connection.php
connects to your database
Each of these names describes what the script does. That’s very helpful because it's
immediately clear how to use these scripts and even how they might interact. For
example, if you were looking at these scripts for the first time, you would probably
conclude that
create_user.php
creates a user and then likely hands over control to
show_user.php
.

PHP & MYSQL: THE MISSING MANUAL
340
LISTING ALL
YOUR USERS
What does this script
do
? Well, it lists all the users. Using the same naming logic
as other scripts,
show_users.php
(note the plural “users” here) is a better, more
descriptive name. Remember, listing and deleting users isn’t the only administrative
function you’re going to have. What if you eventually need to add a form and script
so that an admin can change a user’s password? You’ll need to come up with a name
for that script, and
admin.php
still won’t be specific enough.
Start a new file, call it
show_users.php
, and begin by selecting all the users, with
just the information you need:
<?php
require_once '../scripts/app_config.php';
require_once '../scripts/database_connection.php';
// Build the SELECT statement
$select_users =
"SELECT user_id, first_name, last_name, email " .
" FROM users";
// Run the query
$result = mysql_query($select_users);
?>
NOTE Because you’re not inserting anything into the SELECT query, there’s no reason to use
sprintf
.
You can just create the query directly with a string.
You should also go ahead and set up the shell of the HTML page (the parts that you
know won’t be generated by your script):
<?php
// Get all the users
?>
<html>
<head>
<link href="../css/phpMM.css" rel="stylesheet" type="text/css" />
</head>
<body>
<div id="header"><h1>PHP & MySQL: The Missing Manual</h1></div>
<div id="example">Current Users</div>
<div id="content">
<ul>
<!-- All the users will go here, in <li> tags. -->
</ul>
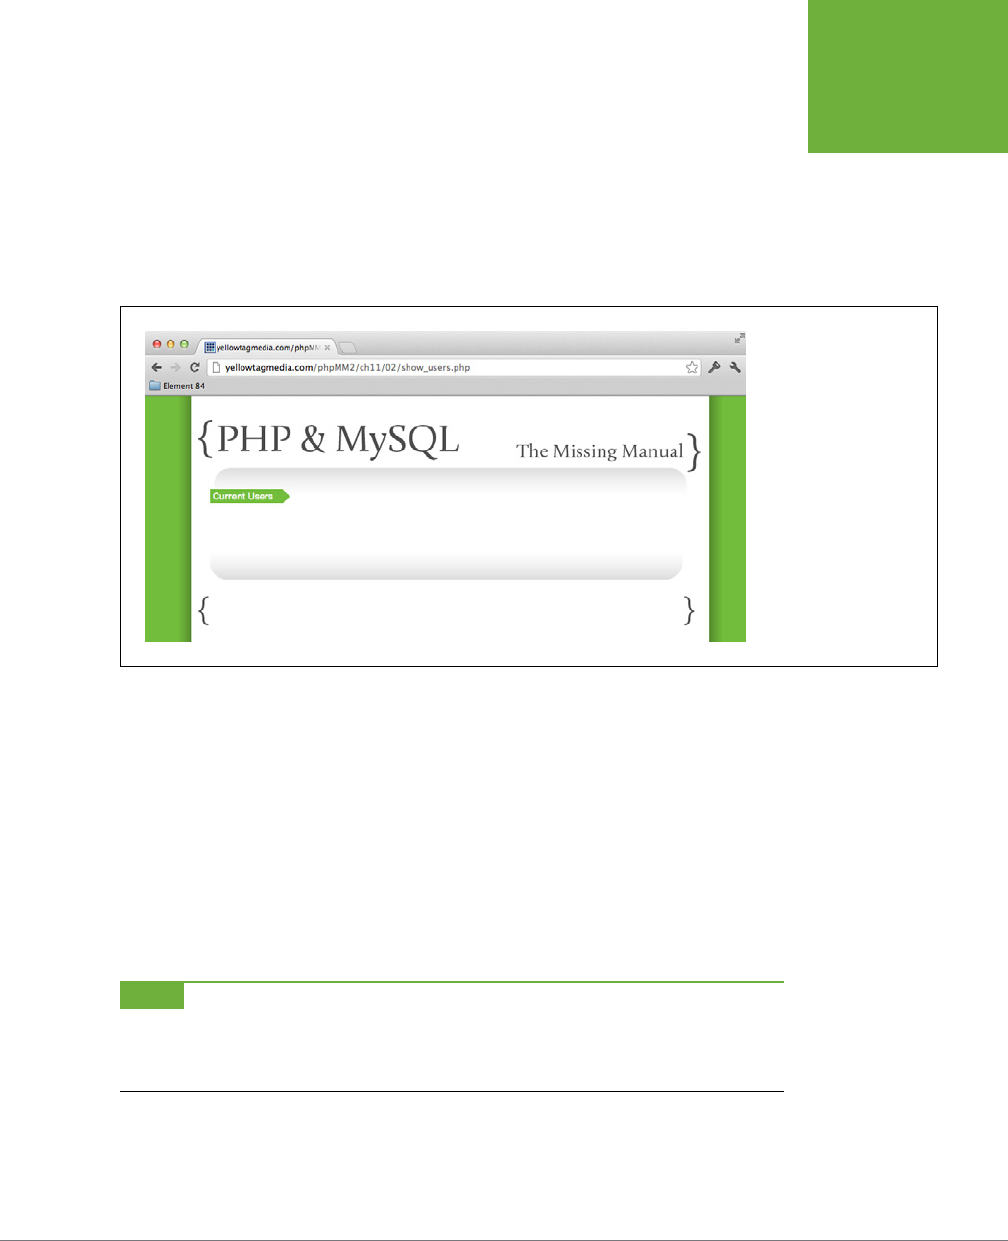
CHAPTER 11: LISTING, ITERATING, AND ADMINISTRATING 341
LISTING ALL
YOUR USERS
</div>
<div id="footer"></div>
</body>
</html>
There’s not much to see yet, but you can still test to verify that you don’t have
any errors in your PHP or HTML. Figure 11-2 shows the empty—but errorless—
show_users .php
in action.
FIGURE 11-2
Even when there’s nothing
to see on a page, there
might be things you don’t
want to see. Here, you can
ensure that no errors oc-
curred while connecting to
your database or execut-
ing your SELECT statement.
It’s worth a few minutes
to test at every stage of
development. When you’re
creating a new script, test
even more.
Iterating Over Your Array
Now, you need to fill in a list item (<li>) for every user. You can build up the entire
HTML string by using sprintf again:
$user_row = sprintf(
"<li><a href='show_user.php?user_id=%d'>%s %s</a> " .
"(<a href='mailto:%s'>%s</a>) " .
"<a href='delete_user.php?user_id=%d'><img " .
"class='delete_user' src='../images/delete.png' " .
"width='15' /></a></li>",
// information to fill in the values);
NOTE There’s not a significant advantage here to using
sprintf
over a string via quotation marks and
curly braces with variables within those braces. Still, once you start using
sprintf
, you’ll often find you use it
almost everywhere you need to insert variables within strings. It becomes a default tool, and it’s quite a handy
tool at that.
That’s a big string, but ultimately, it should result in something like this:
<li><a href="show_user.php?user_id=21">Jason Wadley</a>
(<a href="jason.wadley@facebook.com">jason.wadley@facebook.com</a>)

PHP & MYSQL: THE MISSING MANUAL
342
LISTING ALL
YOUR USERS
<a href="delete_user.php?user_id=21">
<img class="delete_user" src="../images/delete.png" width="15" />
</a></li>
All you need to do now is to loop over each result from your query. But that’s easy;
you’ve done that before with code like this:
while ($row = mysql_fetch_row($result)) {
echo "<li>{$row[0]}</li>";
}
Then, of course, you can get each piece of data in the returned query with this:
while ($row = mysql_fetch_row($result)) {
echo "<li>{$row['col_name']}</li>";
}
This statement gets a specific value—whatever is associated with col_name—from
$row.
If you make that specific to your
users
table and the columns that you know are
being returned and then insert
that
into your HTML, you end up with this:
NOTE The following HTML refers to a script that’s not yet been written:
delete_user.php
, which is coming
up soon. You’re working in anticipation of what other work you know you have to complete.
<?php
// Get all the users
?>
<html>
<head>
<link href="../css/phpMM.css" rel="stylesheet" type="text/css" />
</head>
<body>
<div id="header"><h1>PHP & MySQL: The Missing Manual</h1></div>
<div id="example">Current Users</div>
<div id="content">
<ul>
<?php
while ($user = mysql_fetch_array($result)) {
$user_row = sprintf(
"<li><a href='show_user.php?user_id=%d'>%s %s</a> " .
"(<a href='mailto:%s'>%s</a>) " .
"<a href='delete_user.php?user_id=%d'><img " .
"class='delete_user' src='../images/delete.png' " .
"width='15' /></a></li>",

CHAPTER 11: LISTING, ITERATING, AND ADMINISTRATING 343
LISTING ALL
YOUR USERS
$user['user_id'], $user['first_name'], $user['last_name'],
$user['email'], $user['email'], $user['user_id']);
echo $user_row;
}
?>
</ul>
</div>
<div id="footer"></div>
</body>
</html>
That’s a long sprintf, but take a second look. You’re simply putting a lot of things
together; there’s nothing here particularly tricky or dicult.
POWER USERS’ CLINIC
Your HTML Is Getting Dangerously Cluttered
Something is subtly happening as you write more and more
complex PHP. Early on, you had scripts that were all PHP and
perhaps used
echo
to throw out a few lines of text. Then, you
started writing scripts that had a block of PHP at the beginning
and a bunch of PHP at the end. Then, there were scripts that
inserted a little PHP here and there into the HTML at the end
of the script.
Now, you have
show_users.php
. There’s a block of PHP, some
HTML, and then it gets messy. You have PHP that does a good
bit of HTML printing. Now, you could probably write that same
bit of output that churns out HTML and then has lots of tiny
PHP bits inserted here and there, but it’s basically the same
issue. No matter how you cut it, you’re going to end up with a
real mixture of HTML and PHP.
You've just found one of the real dangers of PHP: you’re going
to end up mixing your code and your markup frequently. As
you start this sort of mixing, the separation between your
code and your
view
—the markup that displays something to
your user—becomes thin, if not non-existent. It’s easy to just
drop a big block of PHP in the middle of some HTML, but in this
case, easy isn’t good. As much as you can, keep the bulk of
your PHP at the beginning of your script, and then just insert
data as you need it.
You’re ready to see how things look. Pull up
show_users.php
and verify that ev-
erything is where it belongs. Figure 11-3 shows you what you’re going for. Granted,
your page is still not a work of art, but it’s a significant step forward. Click any of
the users, and ensure that you’re taken to the correct
show_user.php
for that user,
as shown in Figure 11-4.
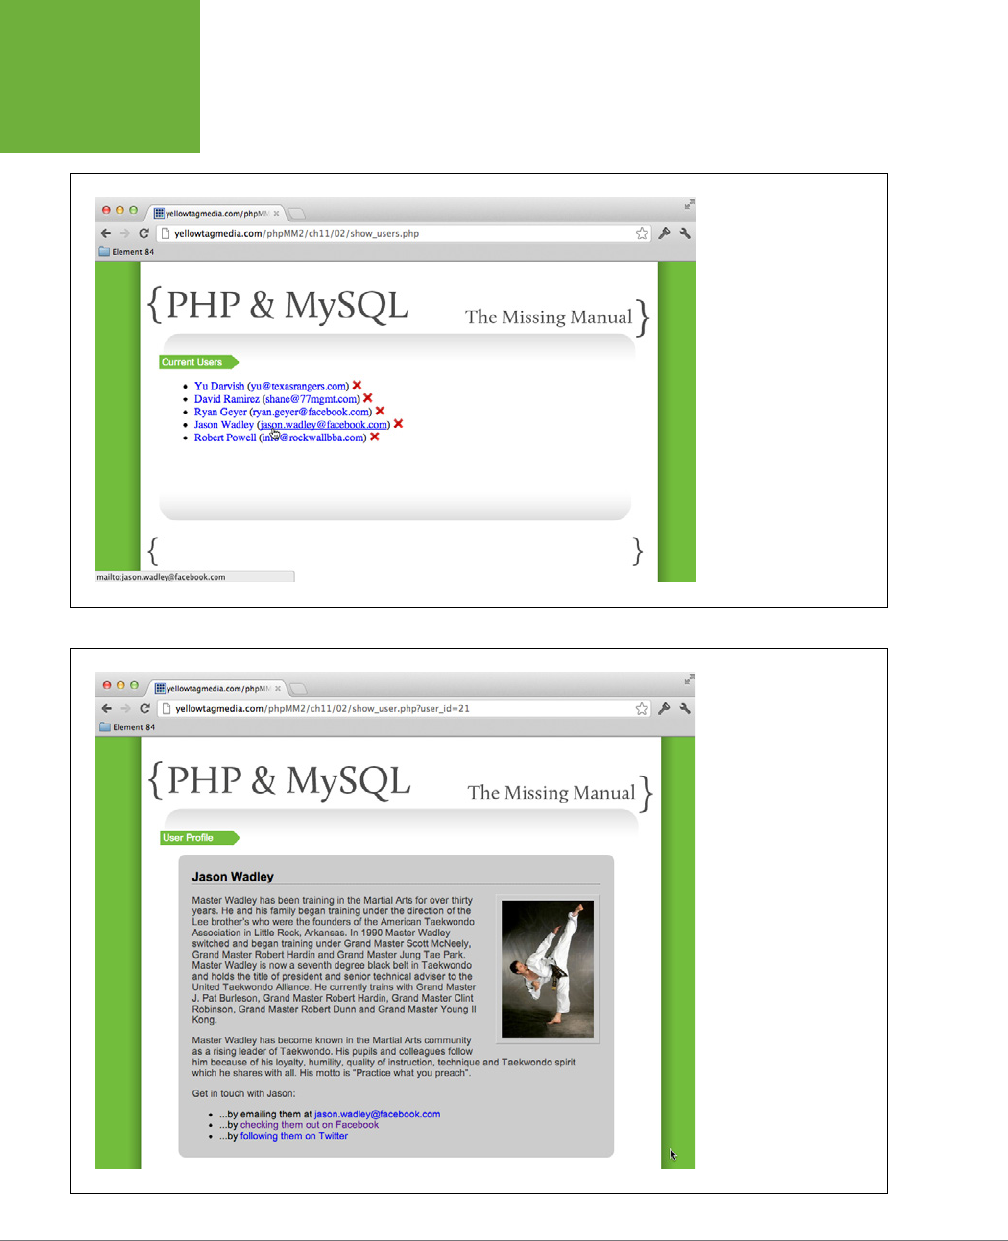
PHP & MYSQL: THE MISSING MANUAL
344
LISTING ALL
YOUR USERS
FIGURE 11-3
One of the things you’ll do
over and over in PHP apps
is list things. Whether it’s
users, groups, or products,
listing is just one of those
common tasks. This means
that you really need to
understand how to iterate,
or loop, over a list of
results from SQL. Master
that, and you’ve got the
core to about a third of all
the common things you’ll
ever do in PHP web apps.
FIGURE 11-4
You’re probably still get-
ting used to scripts calling
scripts, which in turn build
links to other scripts. Take
your time because you’re
going to be doing this a lot
in your PHP programming
career. Believe it or not,
there are large-scale PHP
apps that don’t use any
straight HTML files at all.
WordPress, for example, is
100 percent PHP.

CHAPTER 11: LISTING, ITERATING, AND ADMINISTRATING 345
DELETING A
USER
Deleting a User
In programming, a new problem often presents new challenges; new techniques
that must be grasped; new language features that must be absorbed. Those are fun
times, but they can also be frustrating. Your pace slows to a crawl, and it’s often at
least a few hours—and sometimes a few days—before it seems like you make real
progress. Then, there are times that your accumulated pile of tricks, knowledge, and
experience stand higher than the new task, which is where you are now. This is one
of those easy tasks: deleting a user.
NOTE You can find the finished example code for this section on this book’s Missing CD page at
www
.missingmanuals.com/cds/phpmysqlmm2e
.
Surveying the Individual Components
You already know the query for deleting a user from the
users
table:
DELETE FROM users;
Add to this a WHERE clause to target a particular user:
DELETE FROM users
WHERE user_id = [some_user_id];
Nothing new here. But, how do you get that user_id? Well, you can get it from what-
ever script calls your script. And you already have that in place in
show_users.php
:
<?php
while ($user = mysql_fetch_array($result)) {
$user_row = sprintf(
"<li><a href='show_user.php?user_id=%d'>%s %s</a> " .
"(<a href='mailto:%s'>%s</a>) " .
"<a href='delete_user.php?user_id=%d'><img " .
"class='delete_user' src='../images/delete.png' " .
"width='15' /></a></li>",
$user['user_id'], $user['first_name'], $user['last_name'],
$user['email'], $user['email'], $user['user_id']);
echo $user_row;
}
?>
Once this code is converted to HTML, you’ll get this:
<a href='delete_user.php?user_id=22'>...</a>
This should look similar to something you’ve done before, when you sent a user_id
to the
show_user.php
script:
// Redirect the user to the page that displays user information
header("Location: show_user.php?user_id=" . mysql_insert_id());
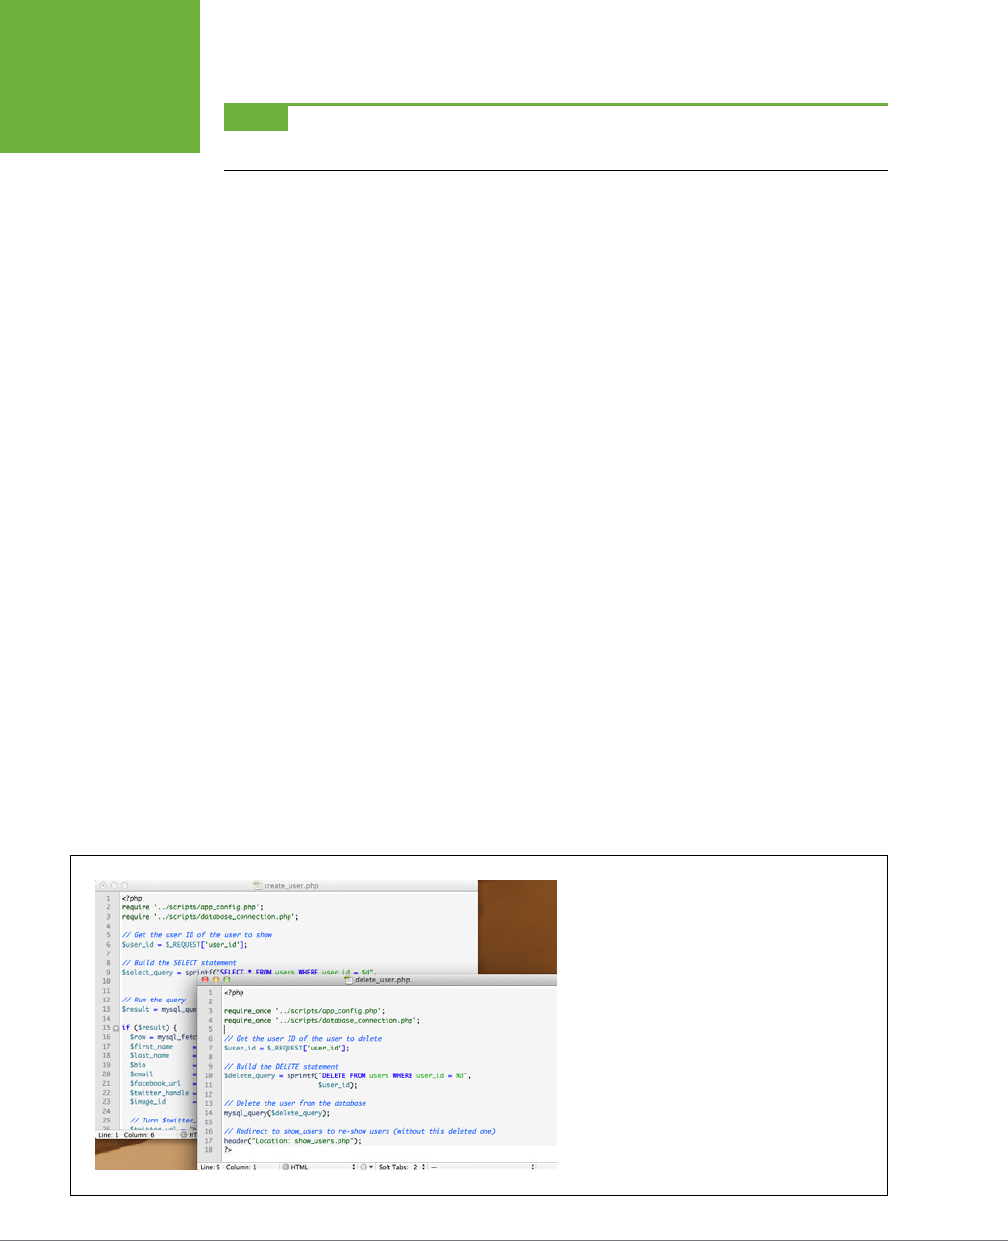
PHP & MYSQL: THE MISSING MANUAL
346
DELETING A
USER
NOTE This code was in
create_user.php
(page 214). The user was redirected after her information was stored
in the database.
Once you’ve grabbed a user_id and deleted the user, you can just redirect back
to your
show_users.php
script, which will re-SELECT from
users
, but this time, the
deleted user will simply be gone. Perfect!
Putting It All Together
At this point, it’s just a matter of retyping various bits from your other scripts and
changing a few things here and there. The result?
delete_user.php
, shown here:
<?php
require_once '../scripts/app_config.php';
require_once '../scripts/database_connection.php';
// Get the user ID of the user to delete
$user_id = $_REQUEST['user_id'];
// Build the DELETE statement
$delete_query = sprintf("DELETE FROM users WHERE user_id = %d",
$user_id);
// Delete the user from the database
mysql_query($delete_query);
// Redirect to show_users to re-show users (without this deleted one)
header("Location: show_users.php");
exit();
?>
FIGURE 11-5
If you have the screen real estate, there’s nothing
better than being able to see two pieces of code side
by side when you’re cutting, copying, and pasting.
You don’t have to remember anything; it’s all right
there in front of you. And an editor like TextMate
even gives you some nice visual clues like syntax
highlighting. Your chances of making a mistake in
this setup go way, way down.
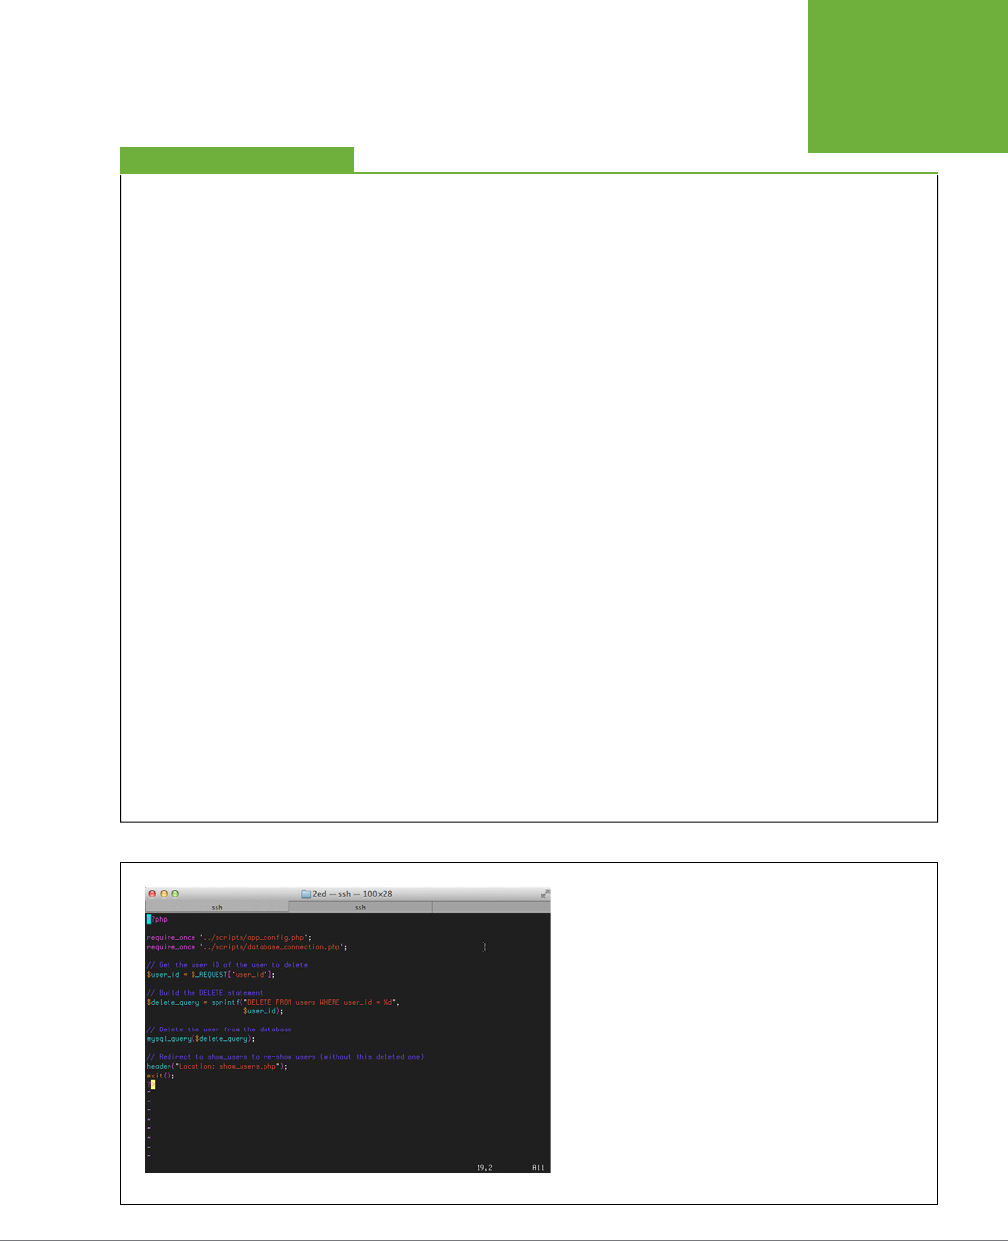
CHAPTER 11: LISTING, ITERATING, AND ADMINISTRATING 347
DELETING A
USER
POWER USERS’ CLINIC
Real Programmers Cut and Paste All the Time
In
delete_user.php
, you’ve written your first script that
involves almost a complete reuse of code that you’ve already
written. But this code doesn’t really belong in
app_config.php
,
so it’s not a case where you need to abstract out bits of code
here and there and put them into utility functions, as was the
case with handling errors or setting up database connections.
At this point, if you’ve read many programming books, you’re
ready for a tongue-lashing, or at least some mild finger-
wagging: don’t cut and paste! Cutting and pasting code is evil;
cutting and pasting code will lead to annoying, difficult-to-find
mistakes; cutting and pasting will cause you to gain 10 pounds
and hamper your sex life. (Well, maybe not that last one.)
Despite all the warnings, every programmer who spends more
than a few hours a day writing code knows the shortcut keys to
copy, cut, and paste and uses them liberally. If they’re making
their living coding, they probably know the shortcuts not just
on a Mac or in Windows, but in
emacs
and
vi
and any other
editor they might use.
So, why all the dire warnings? It’s true, some of the hardest bugs
to track down are the ones caused by cutting, copying, and past-
ing code and the little inconsistencies introduced as a result. For
example, in one bit of copied code a variable might be called
$insert_sql
and in another it’s called
$insert_query
.
Things go haywire, PHP doesn’t always do a great job reporting
what the problem is, and you’re left to sort out the mess. Realisti-
cally, though, that’s not a copying and pasting problem; that’s an
inconsistency-in-naming-variables problem.
So, here come the common-sense warnings:
• Know that you’re adding risk when you copy, cut, or paste.
Be careful and take your time.
• When possible, cut and copy from as few sources as
possible. You’re less likely to end up with mismatches
between variable names and the like.
• Consider having two windows open (see Figure 11-5
on preceding page) or two tabs open (Figure 11-6) and
moving between them, rather than copying, closing a
file, opening the new file, and pasting. This arrangement
makes it easier to compare code; you can simply move
back and forth between open windows.
•
Immediately
test your code after you’ve pasted
something. That way, you catch potential errors quickly
and can track them down while you still remember which
code you just dropped in.
That’s it! Keep those things in mind, and don’t be afraid to cut
and paste. They’re important tools in your arsenal.
FIGURE 11-6
If you’re pressed for screen space or just like things a little
more compact, using tabs in your editor (Terminal on the Mac
is shown here) is a poor man’s version of keeping two windows
open. You still have to keep a bit more context in your head,
but it’s far better than closing one file, opening another, and
so on. You can copy in one window, tab to the second window,
and then paste.
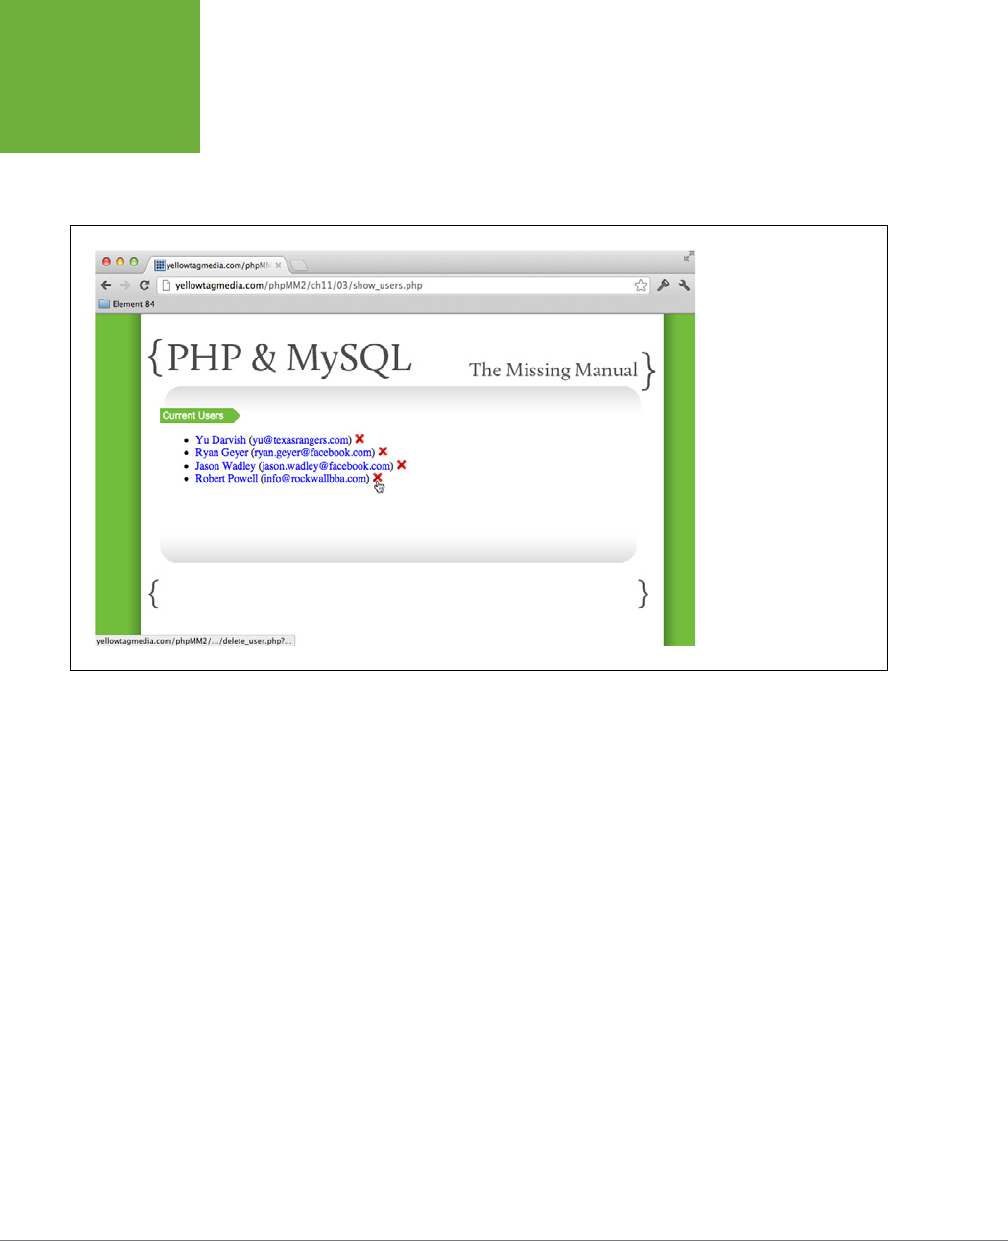
PHP & MYSQL: THE MISSING MANUAL
348
DELETING A
USER
So try it out. You already have
show_users.php
with the correct links; open it, and
pick an unlucky user to delete. Click the “X” icon, and you should get back something
like Figure 11-7—which looks just like Figure 11-3, minus poor David Ramirez. (Don’t
worry, he’ll write another heart-breaking sad song about his deletion if he finds out.)
FIGURE 11-7
Poof! The deleted user is
no more. And, with
show_
users.php
, you don’t need
to resort to digging out
your MySQL command-line
tool. It shows, clearly, that
you’re one man down.
Deleting Users Shouldn’t Be Magical
The functionality that you have in place for deleting users is perfect. There are no
hitches, no pauses, nothing but a quick request to
delete_user.php
, a deletion in
your database, and a return to
show_users.php
. And that perfection—that minimal
pause and nothing else—is exactly why you’re not at all done with deleting users.
Deletion is a big deal. You’re trashing information, never to be heard from again.
What's really concerning is that you’re doing it based on one mouse click, with no
further warning or second thought. That’s a problem.
In fact, think about your own web usage. Have you ever managed to delete anything
with one click? Most of the time, you’re inundated by pop-up windows asking, “Are
you sure?” and “You’ll never get to use this file again” and even “Be careful! Your
information will be gone forever!” All these warnings are a nuisance, but they’re there
to prevent you from accidentally deleting something that you can never get back.
With that in mind, you need to add a little more to the deletion process. You must give
the user a chance to rethink her decision before you pass things on to
delete_user.
php
. So, it’s back to
show_users.php
.

CHAPTER 11: LISTING, ITERATING, AND ADMINISTRATING 349
DELETING A
USER
START WITH A LITTLE JAVASCRIPT
When it comes to things like confirmation boxes, you’re firmly in the world of browsers
and clients. Although you could build some sort of confirmation in PHP, it wouldn’t be
pretty. You’d essentially need to send a request to the server for deletion; the server
would run a PHP script that creates a new HTML form and asks for confirmation; the
browser would return that to the user, and the user would click “OK.” Then, another
request would go to the browser, at which point you’d finally get to perform deletion.
Even if you used Ajax to avoid lots of page refreshing, this is way too much server
interaction for a simple confirmation. That’s especially true because JavaScript oers
you a built-in, all-client means of doing this by using confirm.
Open
show_users.php
and add some JavaScript:
<?php
// SELECT all users
?>
<html>
<head>
<link href="../css/phpMM.css" rel="stylesheet" type="text/css" />
<script type="text/javascript">
function delete_user(user_id) {
if (confirm("Are you sure you want to delete this user?" +
"\nThere's really no going back!")) {
window.location = "delete_user.php?user_id=" + user_id;
}
}
</script>
</head>
<body>
<!-- HTML body -->
</body>
</html>
In a nutshell, you’re simply creating a function that asks for user confirmation before
passing control over to
delete_user.php
. There’s a little extra work involved here
because the user_id has to be passed to this function, which then shues it along
to
delete_user.php
by using the JavaScript version of a redirect: window.location.
NOTE If this code freaks you out a bit, or if you’re rusty on your JavaScript, check out
JavaScript: The Missing
Manual
by David Sawyer McFarland (O’Reilly Media). It’s a really solid JavaScript book that will break this and a
lot more JavaScript down. In fact, it might be the perfect complement to a PHP book: it covers what you need on
the client side to let your server-side scripts run smoothly and without error.
For now, if you feel unsettled by the use of JavaScript in this page—rather than it being referenced through an
external JavaScript file—read the box on page 350.

PHP & MYSQL: THE MISSING MANUAL
350
DELETING A
USER
FREQUENTLY ASKED QUESTION
In or Out JavaScript
Isn’t it evil not to use an external file for JavaScript functions ?
Almost as common as the scolding you’ll get for copying and
pasting is the admonition to never, ever use JavaScript in the
head of your page such as this code from page 349:
<head>
<link href="../css/phpMM.css"
rel="stylesheet" type="text/css"
/>
<script type="text/javascript">
function delete_user(user_id) {
// code for confirmation
// and redirection
}
</script>
</head>
In fact, most books deal with the problem a bit like this:
1. Learn how to write a little JavaScript.
2. Learn how to write some cool JavaScript.
3. Now that you’re “advanced,” set up that JavaScript as
external files.
4. Teach all your beginner JavaScript friends to do the same.
Sounds reasonable, but take a look at the source for pages like
Amazon.com, Google, or Apple. Every one of these Web giants
has
<script>
tags that have code in the
head
of the page!
Surely, the high-paid folks at powerhouses such as these know
what they’re doing. The truth is that there are plenty of times
when you want some well-placed JavaScript in the head of your
page. Most notably, this is true for JavaScript that is specific
to
that page on which you’re working
.
If you have utility functions, such as creating generic dialogs in
jQuery (stay tuned for more on that) or handling validation for
certain data types, put those things in a script file and reference
it in all your pages. That’s the same sort of thing that you’ve
done with a site-wide CSS file as well as on the server, with
app_config.php
and
database_connection.php
.
But,
delete_user
, the JavaScript function you just wrote, is
only useful for this one page. It doesn’t belong in a site-wide
utility script, and only adds to the clutter if that’s where you
put it. You could create external scripts for every page on your
site, but that would be way too much of a mess.
That’s not to say you should have lots of JavaScript littering
your page, stuck between
<p>
elements and in the crevices
between adjacent
<td>
tags. Just don’t be scared to write
some JavaScript in your page. Just like copy-and-paste, it’s a
tool for you to use wisely and judiciously.
FINISH WITH A CHANGE IN LINKING
You have your JavaScript in place, and now it’s time for the big finish: just change
the link that previously went directly to
delete_user.php
in your page to call your
new JavaScript function:
<?php
while ($user = mysql_fetch_array($result)) {
$user_row = sprintf(
"<li><a href='show_user.php?user_id=%d'>%s %s</a> " .
"(<a href='mailto:%s'>%s</a>) " .
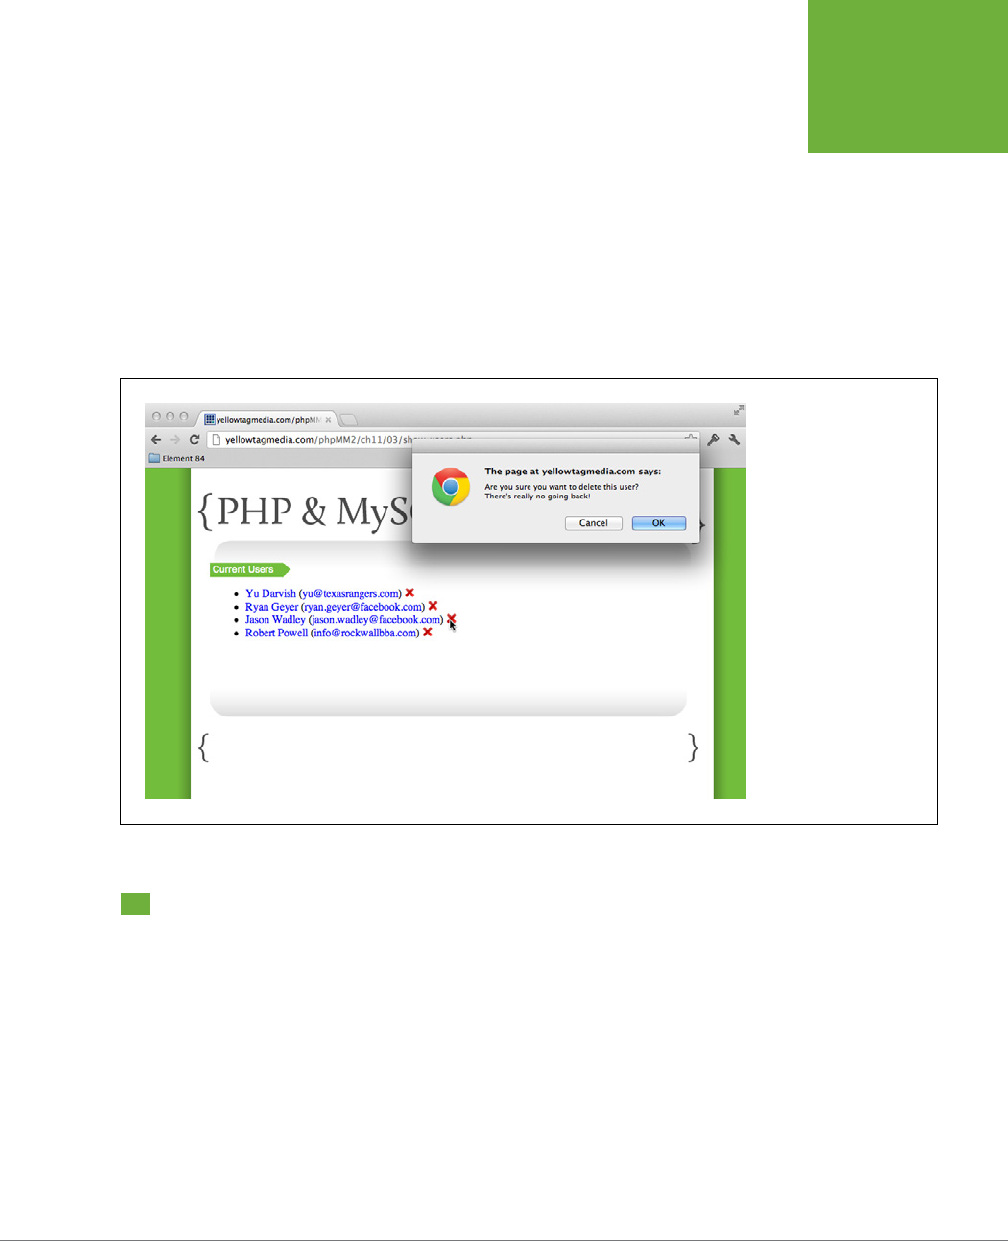
CHAPTER 11: LISTING, ITERATING, AND ADMINISTRATING 351
TALKING BACK
TO YOUR
USERS
"<a href='javascript:delete_user(%d);'><img " .
"class='delete_user' src='../images/delete.png' " .
"width='15' /></a></li>",
$user['user_id'], $user['first_name'], $user['last_name'],
$user['email'], $user['email'], $user['user_id']);
echo $user_row;
}
?>
Try it out, and you’ll finally get a handy warning before you push Master Jason
Wadley down the deletion black hole, as shown in Figure 11-8.
FIGURE 11-8
The
confirm
function is
right up there with alert
as part of the grab bag of
user intervention dialogs
you get from JavaScript.
In this case, it gives the
user that extra opportunity
to think about what he’s
doing.
Talking Back to Your Users
The addition of an alert confirmation box goes a long way on the front end of dele-
tion. It lets a user think twice about removing data and provides a mechanism to
cancel the operation if she’s dissatisfied or concerned. Yet, that’s only half of the
equation; not only do you need to confirm that deletion is indeed the intent, but
then you need to verify that deletion was in fact accomplished.
Obviously, for you, the programmer, you’ve written code, you’ve run the code, and
you might have even gone back to the database and done your own manual SELECT
to ensure that results were deleted in
delete_user.php
. And, as expected, the user
is gone from
show_users.php
.

PHP & MYSQL: THE MISSING MANUAL
352
TALKING BACK
TO YOUR
USERS
For a user, that’s not enough. Just as she will often want to confirm a deletion
before
the deletion goes through, she usually wants to know—beyond any shadow
of doubt—that the deletion
has
gone through. This means that at the end of the
process, she gets some sort of message that confirms what just transpired. Your
flow should look something like this:
1. A user selects another user to delete by clicking the red “X” in
show_users
.php
next to that user.
2. The user confirms that the deletion is intended.
3.
delete_user.php
handles the deletion of the selected user.
4. A message something like, “Yup, they’re gone, gone, gone.” is supplied
to the user.
5.
show_users.php
displays the users list again, minus the deletion.
It’s step 4 here that’s new and requires a little thought.
redirect
Has Some Limitations
Just looking at this flow, it seems like the natural place to handle confirmation—and
display a post-deletion confirmation pop-up window—is within
delete_user.php
.
That’s the script that handles deletion, and it also comes before
show_users.php
lists all the users again.
For example, you might present a status message or display an alert pop-up window
once deletion is complete. But, take a look at the last line from
delete_user.php
:
header("Location: show_users.php");
Redirection in PHP is done by using HTTP headers, which means that this line sends
the browser a raw Location header. The browser gets the Location header and
moves the HTTP response to the URL specified. No big deal, and it works great.
But (and this is a big but), header can only be called before PHP sends any output.
You can’t use echo or HTML, blank lines, or anything else in a file. The browser can
only get the headers, and then it shifts the request. So in reality, you can’t send
anything before calling header, and once you’ve called header, you’re not supposed
to send anything after that. Of course, bugs are made when things that
shouldn’t
happen
do
happen, and that’s why every call to a Location header is followed by
that little exit() statement to ensure that nothing else tries to execute.
In other words, a script like
delete_user.php
can do work on the database and other
PHP objects, but it can’t do any output. It just deletes a user and then redirects
output to a view script, like
show_users.php
. Therefore, you have to figure out a
way to interact with
show_users.php
and let that script handle letting the user know
that a deletion’s gone down.

CHAPTER 11: LISTING, ITERATING, AND ADMINISTRATING 353
TALKING BACK
TO YOUR
USERS
DESIGN TIME
Model-View-Controller (Well, Sort Of...)
You’re starting to see an important web application pattern.
This pattern is called the MVC pattern, which stands for “model-
view-controller.” In this pattern, you have three categories
of operation: models, views, and controllers. In a strict MVC
pattern, these three categories never overlap.
First, there’s the
model
, which interacts with the database. The
model represents—or
models
—your app’s information. In your
application, a script like
delete_user.php
uses MySQL directly.
In a more formal MVC approach, you’d have PHP objects like
User.php
with methods such as
delete()
or
remove()
. So
you might write code like this:
User user_to_delete = User.find_by_
id($user_id);
user_to_delete.delete();
This example is a little beyond what you’re doing. Still, you
can see that the model part of MVC is what interacts with the
database. For your code, you don’t have a clear model, but
you’re doing plenty of database interaction.
Second, there’s the
view
; this is what displays the informa-
tion to the user. In your app, scripts like
show_user.php
and
show_users.php
are, to some degree, views. They’re full of
HTML and information. The reason they’re only views “to
some degree” is that they also share some controller behavior.
Controllers
are the third category in an MVC architecture. A
controller directs traffic. It uses the model to get information
from the database or data store, and it passes that information
along to view classes or scripts that display that information.
Your
delete_user.php
script is a lot like a controller. Even
though it directly accesses the database rather than using
a model, it does something and then hands off control to a
view,
show_users.php
.
In most PHP web applications, you won’t have a strict MVC
setup. In fact, it’s quite a lot of work to go full-on MVC with PHP.
You usually have a more hybrid approach, where controller-
oriented scripts like
delete_user.php
hand off information to
view-oriented scripts like
show_users.php
. But
delete_user.
php
also has aspects of a model, in that it talks directly to
the database. Additionally,
show_users.php
has aspects of a
controller and a model, because it figures out what to show,
and it grabs information directly from the database.
So, if you can’t do pure MVC in PHP, why present this entire box
about it? Two good reasons. First, you’ll hear about MVC all
the time, and you’ll be a lot more popular at the geeky water
cooler or your buddy’s
Lord of the Rings
costume party if you
can relate what you’re doing on the Web to MVC and what your
friends might be doing. And second (and possibly a bit more
useful), if you can identify what your scripts do, you’ll often
be able to figure out more quickly how to do those things.
In the case of
delete_user.php
, you see that it’s mostly a
controller. Thus, makes perfect sense to hand some informa-
tion to a script that’s mostly a view, like
show_users.php
, and
let that script handle display of that information to the user.
So,
delete_user.php
needs to provide a message (because it knows that deletion has
occurred) but it must let something else handle the actual display. Therefore, you
can add a message to your redirect. Go ahead and connect this new message to a
new request parameter, success_message, at the end of
delete_user.php
:
<?php
// require code
// Get the user ID of the user to delete
// Build the DELETE statement
// Delete the user from the database
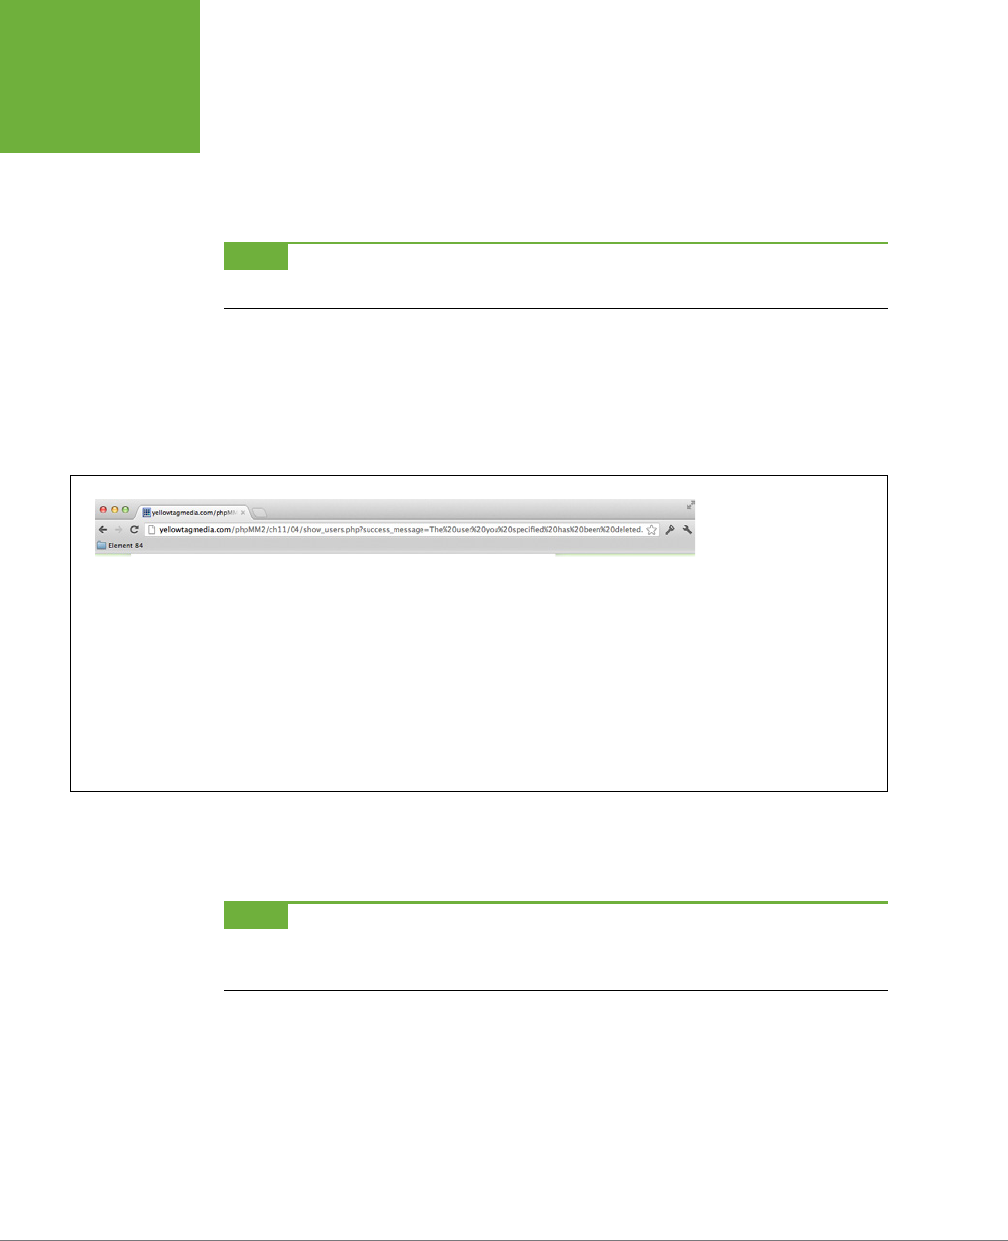
PHP & MYSQL: THE MISSING MANUAL
354
TALKING BACK
TO YOUR
USERS
// Redirect to show_users to re-show users (without this deleted one)
$msg = "The user you specified has been deleted.";
header("Location: show_users.php?success_message={$msg}");
exit();
?>
NOTE If you’re already thinking that it might be nice to have an
error_message
parameter, too, you’re
on the right track.
Even before you go back to working on your view code in
show_users.php
, you
can test this out. Visit
show_users.php
, delete a user, and then look closely at
the browser bar when you’re taken back to
show_users.php
. You should see the
success_message request parameter with the value set to your message, as shown
in Figure 11-9.
FIGURE 11-9
The message that
delete_user.php
appended
to the URL sent to the
browser contains a handy
value: the exact text you’d
want to see in a nice alert
or status message. That’s
perfect; now you can have
your view code handle
displaying that message
to your user, and you’re in
great shape.
JavaScript
alert
Redux
Here you are, back to
show_users.php
, and you have an incoming message.
NOTE Actually, you
potentially
have an incoming message. When
show_users.php
is called normally, it
does
not
have a message. It’s only when it’s the target of a redirect after deletion (or some similar operation)
that it has information coming via request parameters.
What needs to happen when that message is received? Probably the easiest option
is to go back to JavaScript and use an alert dialog box. This is the equivalent of the
confirmation dialog box you used before deletion (page 349), so it’s a nice symmetry.

CHAPTER 11: LISTING, ITERATING, AND ADMINISTRATING 355
TALKING BACK
TO YOUR
USERS
AN ALL-JAVASCRIPT APPROACH
One approach would be to write a JavaScript function that you can add to
show_
users.php
. JavaScript doesn’t directly support reading request parameters, so you’d
have to do a little parsing to get at them. You’d need something that uses regular
expressions to pick apart the window.location.href property, which is the URL
the browser has:
function get_request_param_value(param_name) {
param_name = param_name.replace(/[\[]/,"\\\[").replace(/[\]]/,"\\\]");
var regexS = "[\\?&]" + param_name + "=([^&#]*)";
var regex = new RegExp(regexS);
var results = regex.exec(unescape(window.location.href));
if (results == null)
return "";
else
return results[1];
}
NOTE This code might not make much sense to you right now, and that’s OK. But if you take a few minutes
to work through it line by line, you’ll step up your JavaScript game significantly. It also demonstrates once again
that although regular expressions can look weird at first, they’re an essential part of your programming toolkit. And
just think, every bit of what you learned about regular expressions in this PHP book translates over to JavaScript.
You could then call this function in the following way to get at the success_message
parameter (probably in another JavaScript function):
msg = get_request_param_value("success_message");
if (msg.length > 0) {
// let the user know
}
Then (after uncrossing your eyes from all the forward and backslashes in get_
request_param_value), you could issue an alert:
msg = get_request_param_value("success_message")
if (msg.length > 0) {
alert(msg);
}
There’s certainly nothing wrong with that approach. It works fine, and you’ll see
something similar to the message shown in Figure 11-10 if you add this code in to
the head section between script tags in
show_users.php
.
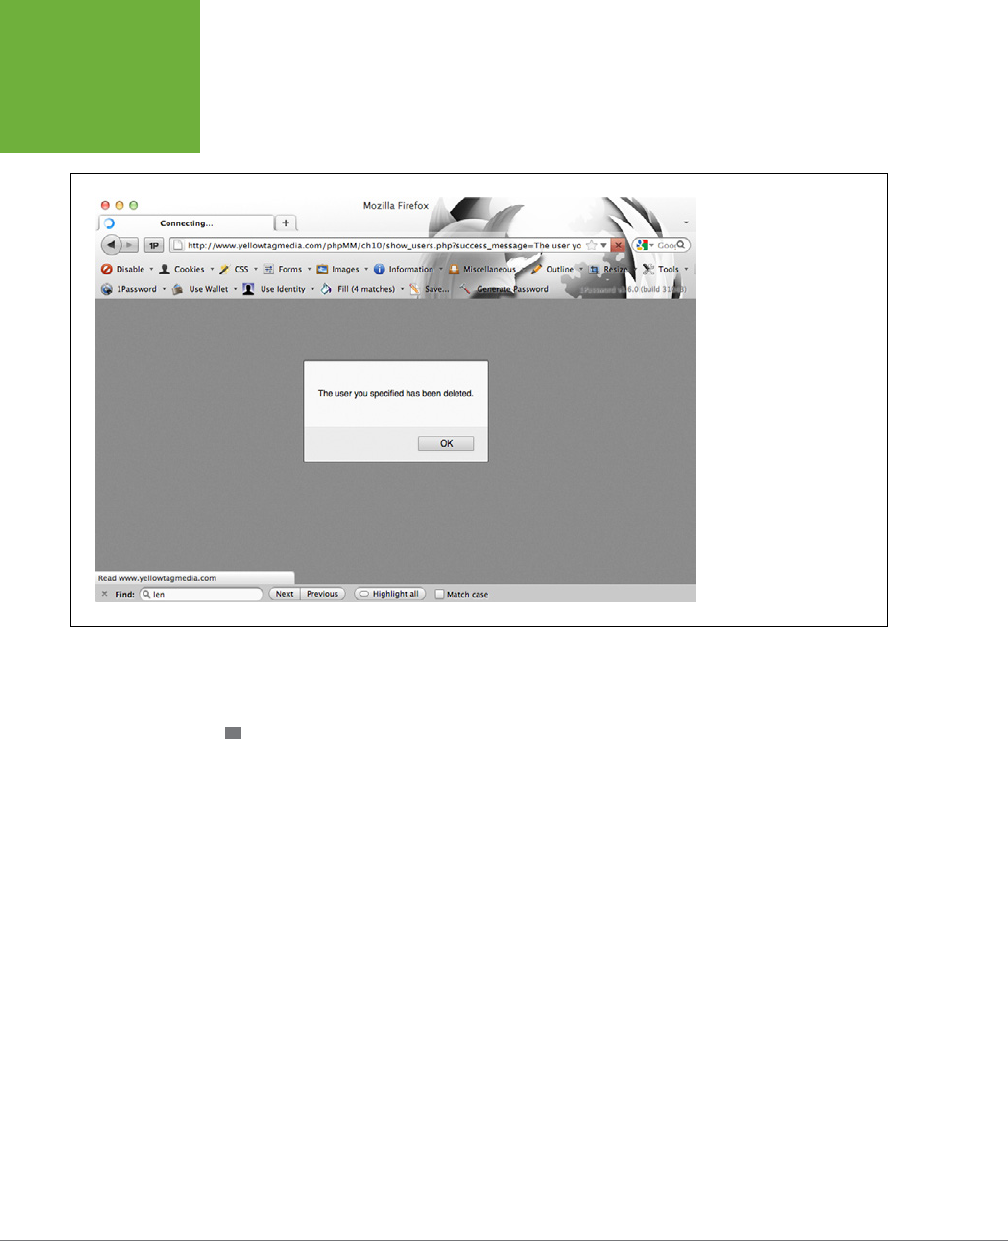
PHP & MYSQL: THE MISSING MANUAL
356
TALKING BACK
TO YOUR
USERS
FIGURE 11-10
The gray background you
see here is an artifact of
where
alert
is called.
You’d probably want
to improve the user
experience further by
not running the
alert
until the document loads.
You can use the
window
.onload
property, the
onload
event on body,
or jQuery’s various ways
to run code on document
load and achieve a much
better user experience.
Before you start wondering how to piece all this together, though, there might just
be a better way.
YOUR PHP CONTROLS YOUR OUTPUT
The all-JavaScript approach discussed in the previous section makes a subtle but
important assumption: the page—the HTML, CSS, and JavaScript delivered to the
user via his browser—has to make all the decisions about what to do, what to show,
and how to act. This means that there’s JavaScript that must figure out whether
the success_message parameter was passed along, JavaScript to parse the request
URL and find the value of that parameter, and JavaScript that conditionally displays
an alert.
Here’s the thing:
show_users.php
isn’t limited in the same way that the page it out-
puts is. Just because the HTML and JavaScript that’s ultimately output is unaware of
whether there’s a request parameter doesn’t mean that your script that
generates
that output is unaware. In fact, it’s simple to get a request parameter in
show_users
.php
; you’ve done it tons of times:
$msg = $_REQUEST['success_message'];
In that one line, you’ve eliminated all of this JavaScript:
function get_request_param_value(param_name) {
param_name = param_name.replace(/[\[]/,"\\\[").replace(/[\]]/,"\\\]");
var regexS = "[\\?&]" + param_name + "=([^&#]*)";

CHAPTER 11: LISTING, ITERATING, AND ADMINISTRATING 357
TALKING BACK
TO YOUR
USERS
var regex = new RegExp(regexS);
var results = regex.exec(unescape(window.location.href));
if (results == null)
return "";
else
return results[1];
}
That’s a win by any measure of accounting.
NOTE On the other hand, it’s not a bad idea to add a function like
get_request_param_value
to your
basic JavaScript utilities and have it around for situations in which you
don’t
have PHP generating your output.
Here’s something big to sink your teeth into: you’re in control of what goes to the
client. Your script can make decisions about what to output. As a result, in your PHP,
you can do something like this:
// See if there's a message to display
if (isset($_REQUEST['success_message'])) {
$msg = $_REQUEST['success_message'];
}
That’s all taking place on the server, before you’ve done any output. Then, if you
have a message to show—and only if you have a message to show—you can simply
add a few lines of JavaScript into your HTML output:
<script type="text/javascript">
function delete_user(user_id) {
if (confirm("Are you sure you want to delete this user?" +
"\nThere's really no going back!")) {
window.location = "delete_user.php?user_id=" + user_id;
}
}
<?php if (isset($msg)) { ?>
window.onload = function() {
alert("<?php echo $msg ?>");
}
<?php } ?>
</script>
Put all this together, and here’s the new, improved
show_users.php
:
<?php
require_once '../scripts/app_config.php';
require_once '../scripts/database_connection.php';

PHP & MYSQL: THE MISSING MANUAL
358
TALKING BACK
TO YOUR
USERS
// Build the SELECT statement
$select_users =
"SELECT user_id, first_name, last_name, email " .
" FROM users";
// Run the query
$result = mysql_query($select_users);
// See if there's a message to display
if (isset($_REQUEST['success_message'])) {
$msg = $_REQUEST['success_message'];
}
?>
<html>
<head>
<link href="../css/phpMM.css" rel="stylesheet" type="text/css" />
<script type="text/javascript">
function delete_user(user_id) {
if (confirm("Are you sure you want to delete this user?" +
"\nThere's really no going back!")) {
window.location = "delete_user.php?user_id=" + user_id;
}
}
<?php if (isset($msg)) { ?>
window.onload = function() {
alert("<?php echo $msg ?>");
}
<?php } ?>
</script>
</head>
<body>
<div id="header"><h1>PHP & MySQL: The Missing Manual</h1></div>
<div id="example">Current Users</div>
<div id="content">
<ul>
<?php
while ($user = mysql_fetch_array($result)) {
$user_row = sprintf(
"<li><a href='show_user.php?user_id=%d'>%s %s</a> " .
"(<a href='mailto:%s'>%s</a>) " .
"<a href='javascript:delete_user(%d);'><img " .
"class='delete_user' src='../images/delete.png' " .
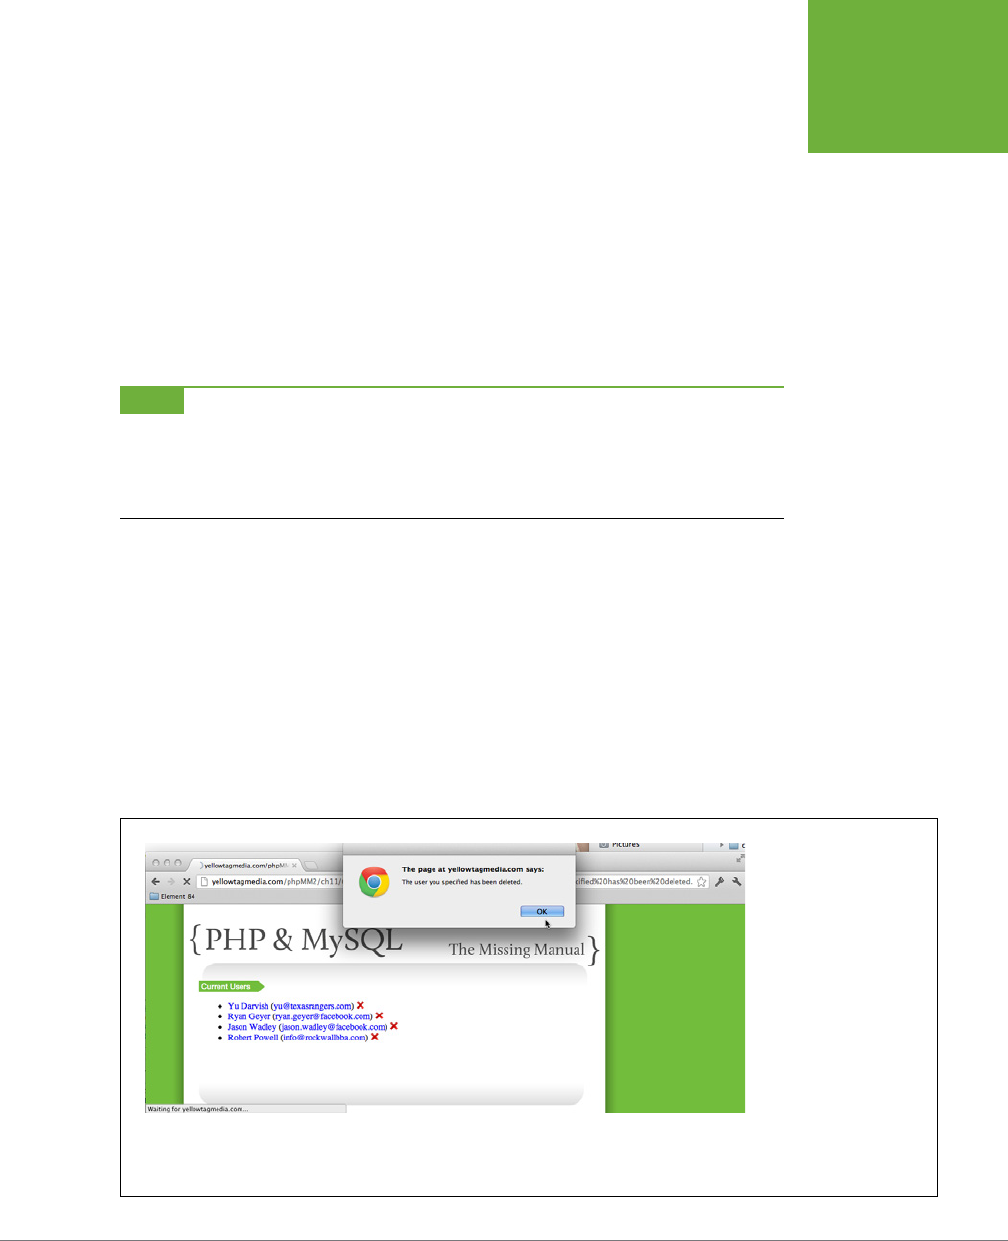
CHAPTER 11: LISTING, ITERATING, AND ADMINISTRATING 359
TALKING BACK
TO YOUR
USERS
"width='15' /></a></li>",
$user['user_id'], $user['first_name'], $user['last_name'],
$user['email'], $user['email'], $user['user_id']);
echo $user_row;
}
?>
</ul>
</div>
<div id="footer"></div>
</body>
</html>
NOTE At this point, it might be getting hard to keep up with all the changes to
show_user.php
and
show_users.php
as well as
app_config.php
. If you find yourself getting some weird errors or unusual results, you
might want to hop over to
www.missingmanuals.com/cds/phpmysqlmm2e
and download this chapter’s examples.
That will get you a clean, current set of files that are up to date, and you can focus on new changes, rather than
old debugging.
What you’ve done here is a big accomplishment in PHP programming. Instead of
relying on your output to make complicated decisions, you’re making most of the
decisions in your PHP and then tailoring your output as a result. Thus, one script—
depending on the decisions it makes—might push out two, three, four, or even more
variations of the same output.
First, then, take your script out for a test drive. If you still have a browser up with a URL
like
yellowtagmedia.com/phpMM/ch11/show_users.php?success_message=The%20
user%20you%20specified%20has%20been%20deleted
, just reload that page to get
the new changes to
show_users.php
. You should see a nice pop-up window with
the message passed through the URL, as shown in Figure 11-11.
FIGURE 11-11
With the code on page
358, the output is fixed, it
shows an alert message,
and that alert is exactly
equal to the specific mes-
sage passed to this script,
this one time it’s being
executed. Of course, that’s
all fixed because your PHP
isn’t
fixed. It is running
each time and creating
slightly different versions
of the output. You’re
now accomplishing truly
dynamic programming.
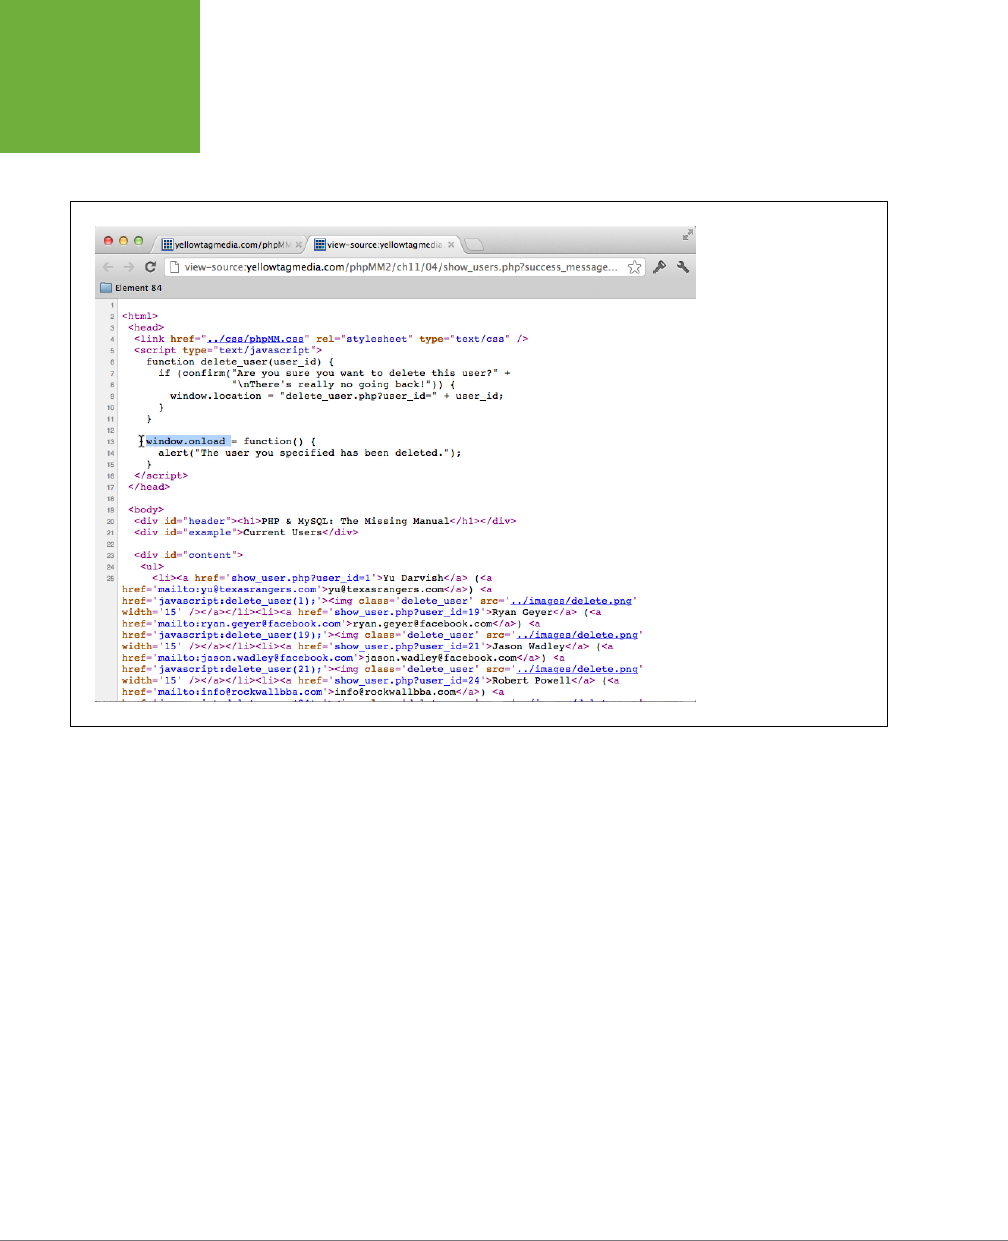
PHP & MYSQL: THE MISSING MANUAL
360
TALKING BACK
TO YOUR
USERS
Take a look at this page’s source code to see what’s so cool about it. Figure 11-12
shows that there’s a hard-coded alert for the message passed along. Change the
message in the request URL, and you’ll see the HTML change to match.
FIGURE 11-12
You’d never know that
this source is perfectly
matched to this particular
message. It simply looks
like there’s an alert that
triggers every time you
access
show_users.php
.
However, that’s not true;
what is true is that every
time you access
show_
users.php
, you actually get
a different variant of this
basic HTML page.
Now, delete all of the request parameters from
show_users.php
in your URL bar
and then go to the page again. The alert box should go away, and so should the
JavaScript in the HTML page that
show_users.php
generates. Figure 11-13 shows the
resulting source code: the window.onload function has vanished.
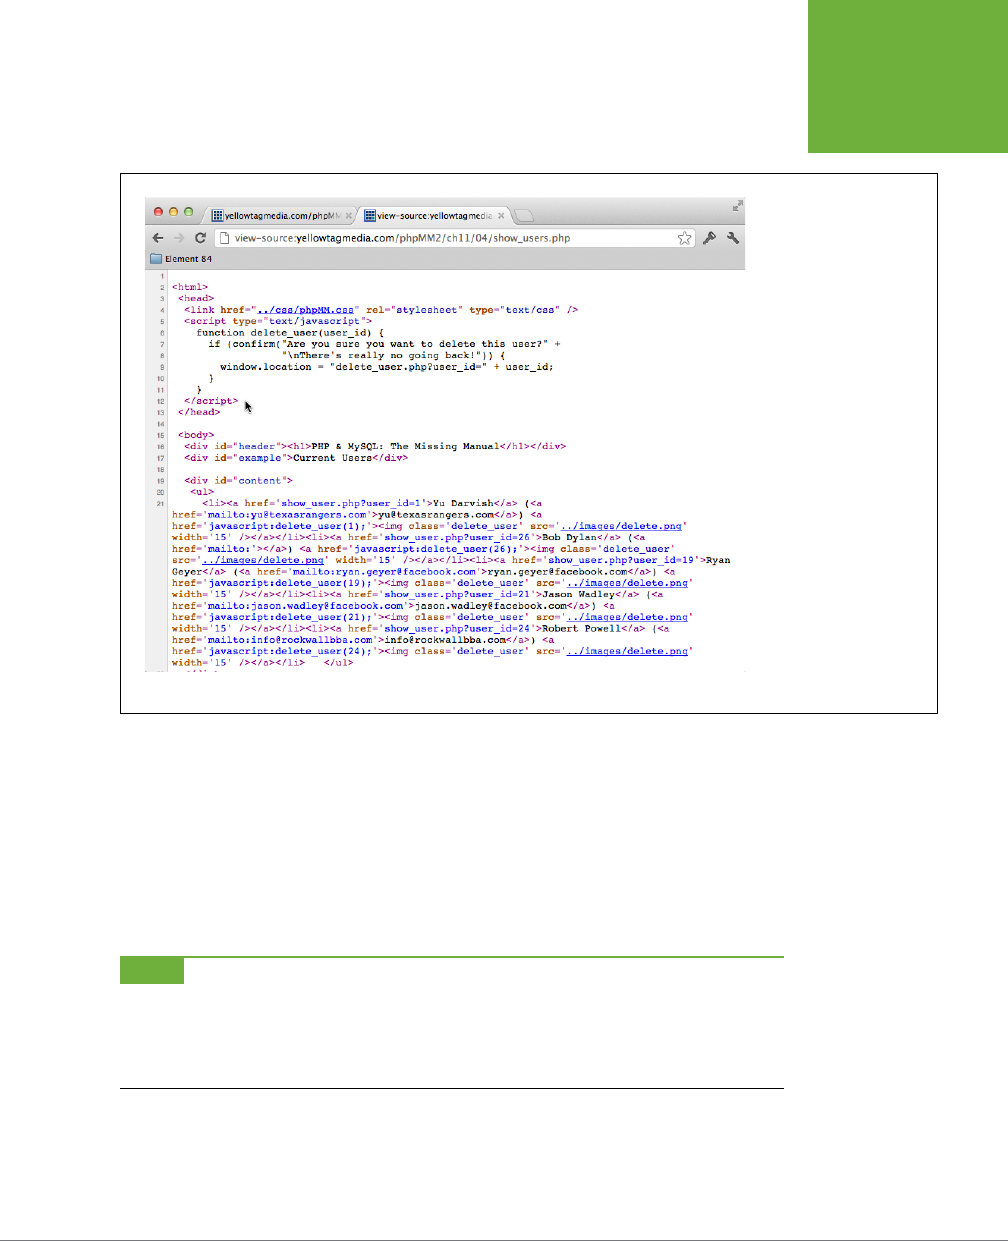
CHAPTER 11: LISTING, ITERATING, AND ADMINISTRATING 361
TALKING BACK
TO YOUR
USERS
FIGURE 11-13
Here’s something to
think about with your
current approach: how
does bookmarking work?
Because the request
parameter for the message
is part of the URL (or
in this case, not part of
the URL), the browser’s
bookmarking feature will
attach a certain variant
of that message to the
bookmarked URL. This
means that you’ve got to
think through what would
happen if, say, someone
bookmarks this page on
a pass when a message
was shown. Every time he
pulls up the bookmark,
he would see a message
again...and an inaccurate
one at that.
alert
Is Interruptive
You have a nice bookend of notifications now. A confirmation box requires a user’s
OK before deleting a user, and another alert informs her once that deletion’s done.
So, from a functional point of view, you’re ready to move on.
This is one of those moments when you have to move a bit beyond web program-
ming and start thinking about web design, or better, web
usability
. Usability is just
a high-end way of saying, “What’s the user experience like?”
NOTE You’ll also often hear terms like UX (for user experience) and UI (user interface) in this discussion.
To some degree, the two terms aren’t that different, although a UX designer might get ruffled if you confused
her with a UI designer. Still, the basic goal is the same: create a natural, compelling online experience for a user.
You’re taking into account not just functionality, but aesthetics, accessibility, and overall feel of a website or web
application.
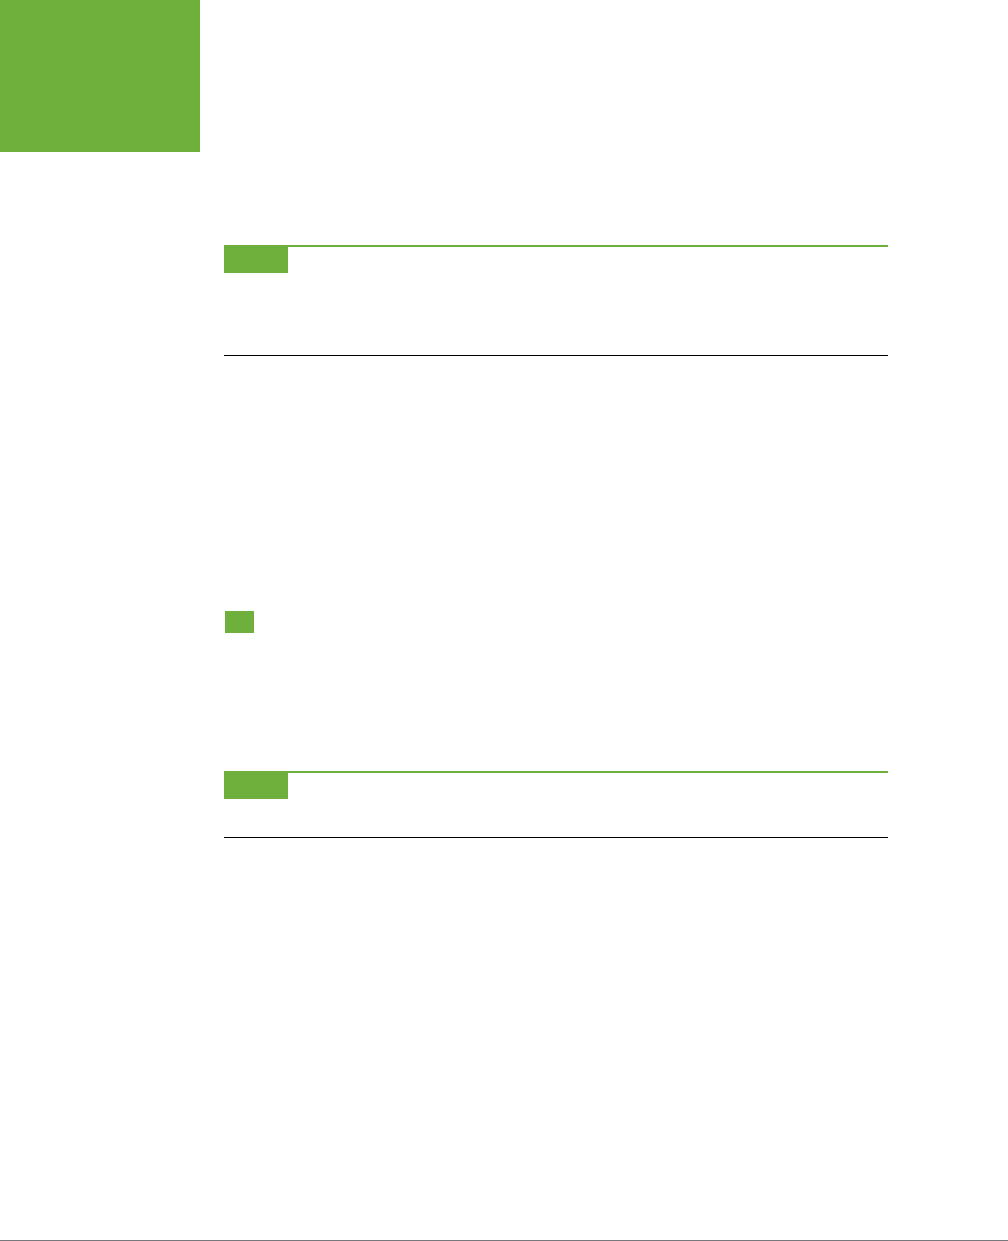
PHP & MYSQL: THE MISSING MANUAL
362
STANDARDIZING
ON MESSAGING
With regard to deleting a user deleting a user, you’re doing well. Although you might
use something like jQuery to present a better looking dialog box, you’re doing all
the right things: interrupting the user to ensure that she truly wants to delete a user,
and you’re requiring a double-action (click once to select delete; and click once more
to ensure that’s the intention).
NOTE If you’d like a prettier jQuery-style dialog and confirmation box, check out jQuery UI and its dialog
boxes at
www.jqueryui.com/demos/dialog
. In particular, look at the option for a
Modal
confirmation window.
It’ll take you 10 minutes to download and install jQuery UI and another 5 to move from your
confirm
call to a
call to the jQuery confirmation dialog. But those 15 minutes are worth it.
What about
after
deletion? Yes, you need to let the user know that the deletion has
occurred. But, do you need to eectively shut them down until she clicks OK? Ideally,
you’d let her know about deletion, but make it a little less interruptive.
And that’s a general principle for web usability: if you’re going to make your user
take her hands o the keyboard and click a button, make sure it’s worth her while.
In this case, there’s a risk you’re being annoying. “Why do I have to click again? I
just clicked twice to delete the user in the first place!”
Standardizing on Messaging
There’s another issue to consider: Is a success message the only type of message
you might need to display? What if you have an error that doesn’t rise to the level
of requiring handle_error? What if you need a status message, perhaps something
like “Please log in before attempting to delete a user.”
NOTE Logging in before deleting a user? Hmmm...that does sound like a good idea. You’ll get to that in
Chapter 13.
These are all similar cases: you want to present a message to the user, but you don’t
want to interrupt his flow. You want to add content to the page, but JavaScript’s
alert and confirm aren’t the best choices.
Additionally, you’d ideally make this a generic functionality. You don’t want every
script to have to output 5 or 10 lines of code. It would be nice to have your output
do something like this:
<body>
<?php display_messages($_REQUEST); ?>
<!-- All the rest of the HTML output you want -->
</body>
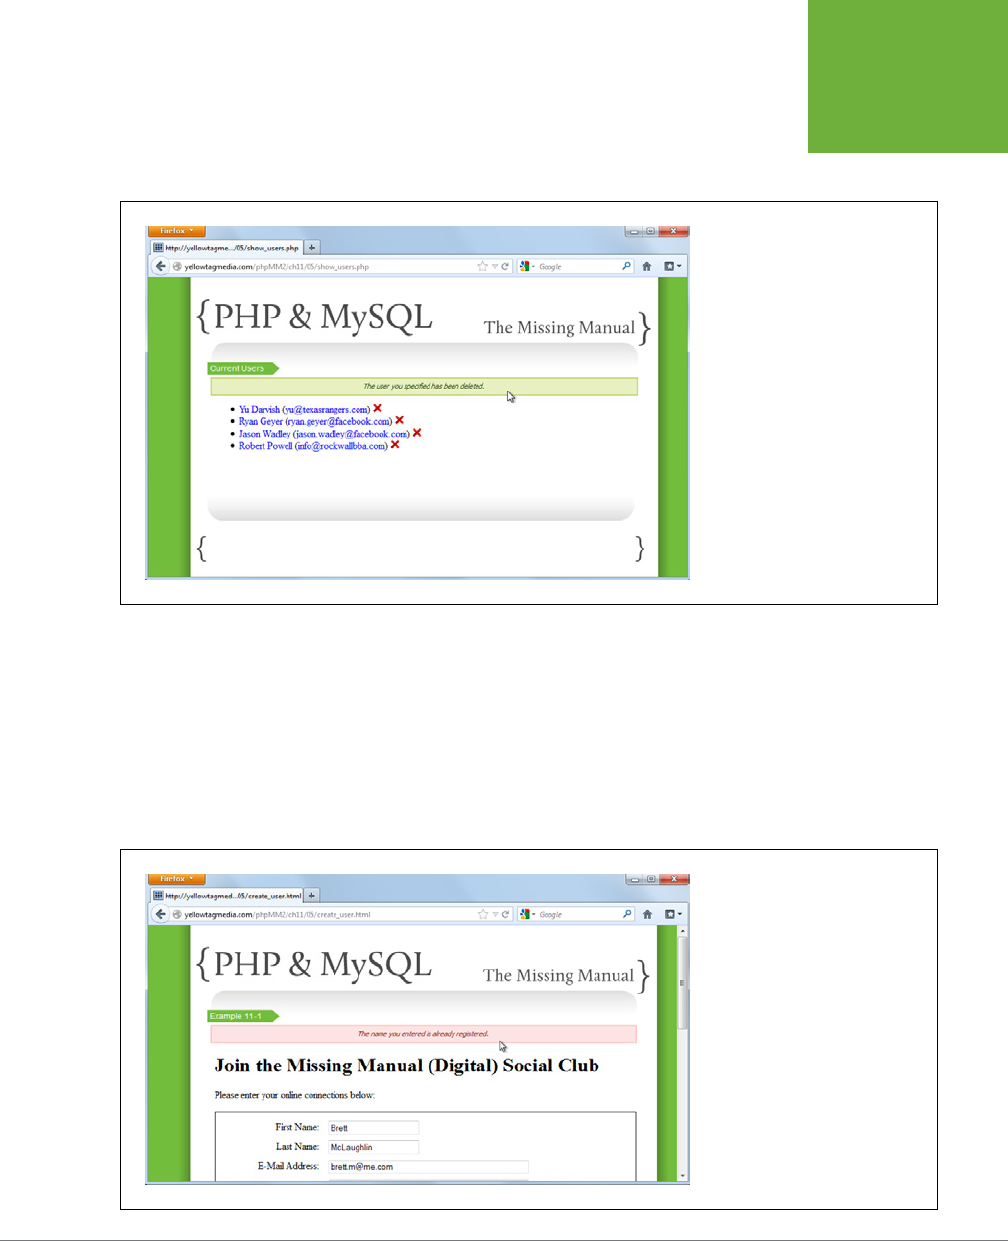
CHAPTER 11: LISTING, ITERATING, AND ADMINISTRATING 363
STANDARDIZING
ON MESSAGING
Then, this function would simply “take care of things,” whatever that ends up being.
For example, for a success message, you might get a banner message across the
top of a page, as shown in Figure 11-14.
FIGURE 11-14
This page won’t win any design
awards, but that’s what you have
designers for. They take rough ideas
from programmers and give them
subtle style and grace. The advance-
ment here is in how non-intrusive
this message is. It communicates
with the user without making him
click or confirm anything.
The HTML for success messages is simple:
<div id="messages">
<div class="success">
<p>The user you specified has been deleted.</p>
</div>
</div>
Errors could be shown in similar fashion, à la Figure 11-15.
FIGURE 11-15
Here’s an error message that
certainly doesn’t cross the threshold
of needing its own error page. It lets
the user know something he’ll prob-
ably need to correct. You could see
a similar style error used for valida-
tion—although most good JavaScript
validation frameworks will take care
of that for you. Still, it’s nice to know
that you now have multiple ways to
report errors, depending upon the
severity of the individual error.

PHP & MYSQL: THE MISSING MANUAL
364
STANDARDIZING
ON MESSAGING
NOTE You might have noticed that these rough mock-ups are done with
create_user.html
and
show_us-
ers.php
. Those were simply the handiest pieces of HTML and PHP when it came to trying out a look for these
messages. It’s not relevant what page you use for testing these things out. Remember, the goal is to have every
page automatically display, or not display, messages sent to it.
Here’s the HTML for the error. It’s identical to the success message with a dierent
class on the inner <div>:
<div id="messages">
<div class="error">
<p>The name you entered is already registered.</p>
</div>
</div>
Building a New Utility Function for Display
Once again, it’s back to thinking generic. Rather than worrying about the specific
success message passed into
show_users.php
by
delete_user.php
, what’s the more
general form of a success message?
It’s something like this:
<div id="messages">
<div class="success">
<p>$msg</p>
</div>
</div>
That’s not real PHP, of course; you’d really want to do this:
<div id="messages">
<div class="success">
<p><?php echo $msg; ?></p>
</div>
</div>
That’s easy! You just need a new function that takes in the message:
function display_success_message($msg) {
echo "<div id='messages'>\n";
echo " <div class='success'>\n";
echo " <p>{$msg}</p>\n";
echo " </div>\n";
echo "</div>\n\n";
}

CHAPTER 11: LISTING, ITERATING, AND ADMINISTRATING 365
STANDARDIZING
ON MESSAGING
FREQUENTLY ASKED QUESTION
The Right to Readability
What about
sprintf
? And, why the \n’s?
There are about as many ways to write a function like
display_success_message
as there are letters in the
alphabet. You could use
sprintf
to insert the message. You
could combine the multiple
echo
calls into a single line (using
echo
or
sprintf
). You could output raw HTML and interrupt
that HTML with PHP by using
<?php
and
?>
. In each case, your
solution would be just fine.
The
\n
’s are another curiosity. They’re just to make the viewed
source a little cleaner. Without them, the output would look
something like this:
<div id='messages'> <div class='success'>
<p>{$msg}</p> </div></div>
It would be just one big line of HTML. With the line feeds, the
user sees nothing different. HTML doesn’t care a bit about
those feeds. But if you viewed the source, you’d see a much
nicer bit of HTML:
<div id='messages'>
<div class='success'>
<p>{$msg}</p>
</div>
</div>
Are the
\n
’s necessary? Not at all. Do they help the user? Nope.
But, they definitely do make debugging and readability a bit
simpler. So, should you use them or not, and do they go with
echo
, or
sprintf
, or both?
You’re at the place in your PHP journey where style and per-
sonal preference are more important than right andwrong.
You can use
sprintf
everywhere, for queries and output
and everything in between. You can use
echo
for output and
sprintf
for queries. Or, more likely, you’ll use whatever
comes to mind when you’re writing the particular script you’re
writing.
The same is true with
\n
and line feeds. Sometimes you’ll work
hard so that the HTML output is nice and clean and easy to read.
Other times, you’ll realize that you could spend hours trying to
get things to look good for that rare person who Views Source.
(Then again, you’re that rare person, so sometimes the effort
makes perfect sense.)
As it stands, this function works well. How about error messages? You could use
something similar:
function display_error_message($msg) {
echo "<div id='messages'>\n";
echo " <div class=error>\n";
echo " <p>{$msg}</p>\n";
echo " </div>\n";
echo "</div>\n\n";
}
Look closely: both of these are outputting the messages <div>. That’s no good. You
need something that can handle
both
error types. Then, that sort of “parent” func-
tion can pass the individual messages to smaller functions, each of which handles
success
and
errors:
function display_messages($success_msg, $error_msg) {
echo "<div id='messages'>\n";
display_success_message($success_msg);

PHP & MYSQL: THE MISSING MANUAL
366
STANDARDIZING
ON MESSAGING
display_error_message($error_msg);
echo "</div>\n\n";
}
function display_success_message($msg) {
echo " <div class='success'>\n";
echo " <p>{$msg}</p>\n";
echo " </div>\n";
}
function display_error_message($msg) {
echo " <div class='error'>\n";
echo " <p>{$msg}</p>\n";
echo " </div>\n";
}
That looks better. But again, look closely. Does it seem like you might be seeing
double?
Duplicate Code Is a Problem Waiting to Happen
The problem with the code you just completed is a bit subtle, which is why it can be
so nasty. Look how close these two functions are to each other:
function display_success_message($msg) {
echo " <div class='success'>\n";
echo " <p>{$msg}</p>\n";
echo " </div>\n";
}
function display_error_message($msg) {
echo " <div class='error'>\n";
echo " <p>{$msg}</p>\n";
echo " </div>\n";
}
That’s a
lot
of identical code all for just one change—in this case, the class of the
<div> in each. Anytime you see code that’s this similar, you should immediately be
thinking “Uh oh. That’s fragile code.” That’s something you want to avoid. For a much
more stern lecture on why this is important, see the box on page 367.

CHAPTER 11: LISTING, ITERATING, AND ADMINISTRATING 367
STANDARDIZING
ON MESSAGING
POWER USERS’ CLINIC
Writing DRY Code
As you progress further into programming, you’ll hear people
talking about “dry code,” or “drying up your code.” Both of
these expressions are using DRY as an acronym, which stands
for “Don’t Repeat Yourself.” So far in this book, you’ve been
doing a good job of that. Remember back in Chapter 5 (page
133) when you moved some basic application-wide constants
into
app_config.php
? You avoided repeating those constants
(or yourself) in multiple files. You put them in a single place,
and then all your other scripts referenced that single place.
The same was true of
database_connection.php
(page 140).
Again, instead of repeating your connection code over and
over, you pulled that code out of multiple places and located
it in a single place. That’s DRYing up your code: making it DRY,
and removing duplicate code whenever and wherever possible.
With
display_success_message
and
display_
error_message
, you’re at a more microscopic level. It’s
just three lines of code, right? Still, if you can write those three
lines of code in one place and reference them in two, you’ve
improved your overall project. You’ve ensured that if you need
to change how messages are output, you have just one place
to investigate rather than two. This is good programming, it
results in DRY code, and all your peers will think you’re cool.
(Well, maybe not that last bit, but you
will
be cool...even if
they don’t realize it.)
Because there’s so much repeated code, you can consolidate these functions:
function display_message($msg, $msg_type) {
echo " <div class='{$msg_type}'>\n";
echo " <p>{$msg}</p>\n";
echo " </div>\n";
}
That’s much better. It’s clear, succinct, and very DRY. In fact, you can take things
even further and define the allowed message types as constants to make your code
even neater:
define("SUCCESS_MESSAGE", "success");
define("ERROR_MESSAGE", "error");
function display_messages($success_msg, $error_msg) {
echo "<div id='messages'>\n";
display_message($success_msg, SUCCESS_MESSAGE);
display_message($error_msg, ERROR_MESSAGE);
echo "</div>\n\n";
}
function display_message($msg, $msg_type) {
echo " <div class='{$msg_type}'>\n";
echo " <p>{$msg}</p>\n";
echo " </div>\n";
}

PHP & MYSQL: THE MISSING MANUAL
368
STANDARDIZING
ON MESSAGING
Using this, you don’t have to remember whether the message type for an error was
“ERROR” or “error” or “errors” or something else altogether. The constant handles
that mapping for you.
You can start to put this all together. Create a new script and call it
view.php
in
your
scripts/
directory, alongside
app_config.php
and
database_connection.php
.
Then, drop in all of the following code, along with a require_once for the obligatory
app_config.php
:
<?php
require_once 'app_config.php';
define("SUCCESS_MESSAGE", "success");
define("ERROR_MESSAGE", "error");
function display_messages($success_msg, $error_msg) {
echo "<div id='messages'>\n";
display_message($success_msg, SUCCESS_MESSAGE);
display_message($error_msg, ERROR_MESSAGE);
echo "</div>\n\n";
}
function display_message($msg, $msg_type) {
echo " <div class='{$msg_type}'>\n";
echo " <p>{$msg}</p>\n";
echo " </div>\n";
}
?>
NOTE You’re not actually using anything from
app_config.php
in
view.php
. Still, because that’s where all
your core information resides, it’s probably a good bet that you’ll need information from it sooner or later. Might
as well
require_once
it now so that it’s available.
View and Display Code Belongs Together
You now have another script:
view.php
. Remember, you’re creating not just utility
code but nicely organized code. Even though you could put display_messages and
display_message in
app_config.php
, that’s not good organization.
Taking time now to build groups of functions in scripts that are usefully named is
well worth your while. When you’re writing a script like
show_users.php
that handles
display, you immediately know you can include
view.php
and get helpful functions.
On the other hand, in a script like
delete_user.php
that doesn’t do any display, you
can skip
view.php
.

CHAPTER 11: LISTING, ITERATING, AND ADMINISTRATING 369
INTEGRATING
UTILITIES,
VIEWS, AND
MESSAGES
NOTE Of course, this same principle is true of
database_connection.php
. If you don’t need a database con-
nection, you don’t need to
require_once
database_connection.php
. If you do, well, then you do. It becomes
simple when you have scripts that are organized and named according to their function.
Integrating Utilities, Views, and Messages
You’re finally ready to put all of this together. Let’s revisit
show_users.php
and the
less refined messaging that started the entire journey that led to
view.php
:
<head>
<link href="../css/phpMM.css" rel="stylesheet" type="text/css" />
<script type="text/javascript">
function delete_user(user_id) {
if (confirm("Are you sure you want to delete this user?" +
"\nThere's really no going back!")) {
window.location = "delete_user.php?user_id=" + user_id;
}
}
<?php if (isset($msg)) { ?>
window.onload = function() {
alert("<?php echo $msg ?>");
}
<?php } ?>
</script>
</head>
This code is no longer needed, so you can remove it, now and forever. Time to get
a lot more elegant.
Calling Repeated Code from a View Script
First, add in the require_once for your new view-related function script:
<?php
require_once '../scripts/app_config.php';
require_once '../scripts/database_connection.php';
require_once '../scripts/view.php';
// and so on...
?>

PHP & MYSQL: THE MISSING MANUAL
370
INTEGRATING
UTILITIES,
VIEWS, AND
MESSAGES
WARNING Be sure to delete the PHP code interjected into the
head
section of the HTML output by
show_users.php
that pops up an alert message. You might not have even noticed that it’s been deleted from
the preceding because…well, it’s been deleted.
Next, add a call to the display_messages function in your HTML:
<body>
<div id="header"><h1>PHP & MySQL: The Missing Manual</h1></div>
<div id="example">Current Users</div>
<?php display_messages($msg); ?>
There’s a bit of a problem here. display_messages takes two parameters: a success
message and an error message. Therefore, you need some way to pass in an empty
message, and then display_messages needs to handle an empty message on the
receiving end.
By whatever means the issue with errors is resolved, this structure should become
a standard part of all your HTML. Anytime you’re displaying HTML, you want to
allow for message handling. That means you’re back to repeat code: every single
view-related script has started out with the same basic HTML (although occasionally
you’ve needed to insert some JavaScript, as in
show_users.php
):
<html>
<head>
<link href="../css/phpMM.css" rel="stylesheet" type="text/css" />
<script type="text/javascript">
function delete_user(user_id) {
if (confirm("Are you sure you want to delete this user?" +
"\nThere's really no going back!")) {
window.location = "delete_user.php?user_id=" + user_id;
}
}
</script>
</head>
Now, you have your body tag, the same header—more repeated code—and then a
page title. Also, you have messages to display. Here’s another chance to take code
that you’ve been typing into your scripts, over and over, pull that repeated code
out, and then drop it into yet more utility functions. Your
view.php
script is about
to get a lot bigger and a lot more useful.
Flexible Functions Are Better Functions
You now have a list of interrelated things with which you must manage, most of
which involve updates to
view.php
:
• display_messages should handle empty or non-existent messages for the suc-
cess and the error message. If either message isn’t set, the <div> related to that
message shouldn’t be output.

CHAPTER 11: LISTING, ITERATING, AND ADMINISTRATING 371
INTEGRATING
UTILITIES,
VIEWS, AND
MESSAGES
• You need a new function—call it display_header—that handles outputting the
head section of each page’s HTML. This function should take in JavaScript that
can be added to the document’s head, but should also handle the case in which
there’s no extra JavaScript needed.
• You need another new function—call this one display_title—that prints out
the page title; the page’s subtitle, which is passed in by each script; and any
message, which also should be passed in by the calling script.
None of these functions are particularly dicult, so it’s time to get back to work.
USE DEFAULT ARGUMENT VALUES IN
DISPLAY_MESSAGES
Returning to
view.php
, display_messages needs to be able to accept a non-value
for a message. Recall from Chapter 5, on page 125, that in PHP, this is handled by
the special keyword NULL, which means “non-value.”
NOTE You’ll see
NULL
in nearly every programming language, although usually with slight variations. For
example, in Ruby, it’s
nil
; In Java, it’s
null
; PHP uses
NULL
, as does C++. They always mean the same thing,
though: the absence of a value.
Now, because NULL is a non-value, you can’t compare it to a value. So, this code
doesn’t make sense in PHP:
if ($value == NULL) // do something
What you need to use is another PHP helper, is_null. You pass a value to is_null,
and PHP informs you about what you have.
Now, it’s possible to make an update to display_messages. If a message passed in is
NULL, there’s no need to call the individual display_message for that type of message:
function display_messages($success_msg, $error_msg) {
echo "<div id='messages'>\n";
if (!is_null($success_msg)) {
display_message($success_msg, SUCCESS_MESSAGE);
}
if (!is_null($error_msg)) {
display_message($error_msg, ERROR_MESSAGE);
}
echo "</div>\n\n";
}
There’s just one thing missing: what if a script—like
show_users.php
—doesn’t have a
value to pass in for $error_msg or $success_msg? In these cases, you want display_
messages to have a
default
value. This is a value that’s used if nothing else is passed in.
You can assign the default value for function’s argument like this:
function do_something(this_value = "default value") {
// do something with this_value
}

PHP & MYSQL: THE MISSING MANUAL
372
INTEGRATING
UTILITIES,
VIEWS, AND
MESSAGES
Thus, for display_messages, the default values should be NULL (no value):
function display_messages($success_msg = NULL, $error_msg = NULL) {
echo "<div id='messages'>\n";
if (!is_null($success_msg)) {
display_message($success_msg, SUCCESS_MESSAGE);
}
if (!is_null($error_msg)) {
display_message($error_msg, ERROR_MESSAGE);
}
echo "</div>\n\n";
}
Your display_messages function is finally ready for use by the other functions you
need to add to
view.php
.
OUTPUT A STANDARD HEADER WITH HEREDOC
Next, you need to deal with the standard HTML output for a page in your app.
That’s basically the opening <HTML>, the <title>, the <head>, and any page-specific
JavaScript that needs to be added. Of course, with
view.php
in place, your knowledge
of functions, default arguments, and everything else you’ve already done, this step
should be a piece of cake.
You can create a new function, and because it’s possible that some scripts need to
pass in JavaScript to add to the <head> section, but others might not, using a default
value for a function argument is again the way to go:
function display_head($page_title = "", $embedded_javascript = NULL) {
This function, by the way, sets a default value for the $page_title, too. That’s not
completely necessary, but again, it’s a bit of extra protection. This way, if someone
calling this function forgets to send in the title, the HTML output can be constructed
regardless.
The body of this function is just some echo work and a conditional for the potential
JavaScript:
function display_head($page_title = "", $embedded_javascript = NULL) {
echo "<html>";
echo " <head>";
echo " <title>{$page_title}</title>";
echo ' <link href="../css/phpMM.css" rel="stylesheet" type="text/css" />';
if (!is_null($embedded_javascript)) {
echo "<script type='text/javascript'>" .
$embedded_javascript .
"</script>";
}
echo " </head>";
}

CHAPTER 11: LISTING, ITERATING, AND ADMINISTRATING 373
INTEGRATING
UTILITIES,
VIEWS, AND
MESSAGES
Notice that the link line uses single quotes around the HTML. This is so you can use
double-quotes for the href, rel, and type attributes. Unfortunately, you’re going
to have to either use multiple quote styles like this or escape a lot of your quotes
with \" and \'. Neither solution is particularly pretty, so pick your own poison (see
the box on page 158).
Of course, programmers aren’t used to limitations like this, and you should immedi-
ately be thinking, “Wait a second. I’m a programmer. Why am I stuck with two bad
solutions?” Well, you’re not. What you need is a way to deal with multiline strings,
and PHP doesn’t disappoint. In fact, multiline strings are such a common issue in
PHP that it gives you a couple of ways to deal with them.
The most common solution is to use something called
heredoc
. The heredoc method
gives you a way to mark the beginning and the end of a piece of text. Everything
between those beginning and end markers is treated as text, without you needing
to surround things in quotation marks.
You start a string of heredoc by inserting three less-than signs (<). You then add a
sequence that you’ll use to mark the end of the string:
$some_text = <<<EOD
In this example, you’re saying, “I’m starting some text and the text will end when
you run across EOD.”
NOTE You can use any ending sequence you want. The most typical choices are EOD and EOT, though, so
it’s best to stick with these unless you have a good reason for going with a different sequence.
Having done this, you can put as much text as you want in the string. You can use
multiple lines, single quotes, double quotes, and even the {$var_name} syntax. It’s
all fair game:
<html>
<head>
<title>{$page_title}</title>
<link href="../css/phpMM.css" rel="stylesheet" type="text/css" />
</head>
Finally, you end the text with your end sequence:
EOD;
All together, you get this:
$some_text = <<<EOD
<html>
<head>
<title>{$page_title}</title>
<link href="../css/phpMM.css" rel="stylesheet" type="text/css" />
</head>
EOD;

PHP & MYSQL: THE MISSING MANUAL
374
INTEGRATING
UTILITIES,
VIEWS, AND
MESSAGES
WARNING You
cannot
indent the ending sequence. It must be the first thing on a line, all by itself, with
no spacing before it. Thus, this code will not be treated as an ending sequence:
EOD;
Just as dangerous is having whitespace after the ending sequence. There’s no way to illustrate that in a book, or
course, but even a single space after the closing semicolon will do you in.
The best way to recognize these things is to watch out for the dreaded “unexpected T_SL” error. That’s usually
PHP’s ultra-cryptic way of letting you know that you have whitespace where it doesn’t belong, either before or
after the ending sequence, in most cases.
Put all of this together, and you can clean up the look of display_head quite a bit:
function display_head($page_title = "", $embedded_javascript = NULL) {
echo <<<EOD
<html>
<head>
<title>{$page_title}</title>
<link href="../css/phpMM.css" rel="stylesheet" type="text/css" />
EOD;
if (!is_null($embedded_javascript)) {
echo "<script type='text/javascript'>" .
$embedded_javascript .
"</script>";
}
echo " </head>";
}
Go ahead and add this into your
view.php
script now.
You probably noticed that in this version of display_head, there was no need to
assign the string created by using heredoc to a variable. You can directly output
the multiline string and save a step. The result is actually a hodgepodge of echo,
heredoc, conditional logic, and potentially some JavaScript. Nonetheless, it’s becom-
ing increasingly easy to read, and that’s a good thing.
UPDATE YOUR SCRIPT(S) TO USE
DISPLAY_HEAD
Now, you can head back to
show_users.php
(and
show_user.php
if you like) and
remove lots of HTML. Replace the HTML for the head of your document with a call
to display_head. While you’re at it, you might want to use a little more heredoc
in the process, particularly in
show_users.php
, which sends some JavaScript to be
embedded:

CHAPTER 11: LISTING, ITERATING, AND ADMINISTRATING 375
INTEGRATING
UTILITIES,
VIEWS, AND
MESSAGES
<?php
// code to get all the user data
?>
<?php
$delete_user_script = <<<EOD
function delete_user(user_id) {
if (confirm("Are you sure you want to delete this user? " +
"There's really no going back!")) {
window.location = "delete_user.php?user_id=" + user_id;
}
}
EOD;
display_head("Current Users", $delete_user_script);
?>
<body>
<div id="header"><h1>PHP & MySQL: The Missing Manual</h1></div>
<div id="example">Current Users</div>
<?php display_messages($msg); ?>
<!-- Remaining HTML markup -->
</body>
</html>
NOTE You could just as easily keep all of the PHP that gets the users in the same
<?php ?>
block as the
code that calls
display_head
. That’s up to you. Some programmers prefer to keep the data gathering and
the actual view display separate, and some prefer to avoid duplicating
<?php
. The choice is yours.
This code uses heredoc, so creating a string of JavaScript to pass to display_head
doesn’t involve lots of escaping single or double quotes. In fact, you’ll find that
heredoc is almost as handy to have around as sprintf (page 298), and you’ll use
both liberally for outputting HTML or other long stretches of text.
There’s still the issue of displaying messages, but before you get to that, try out your
changes to
show_users.php
. You should see something like Figure 11-16.
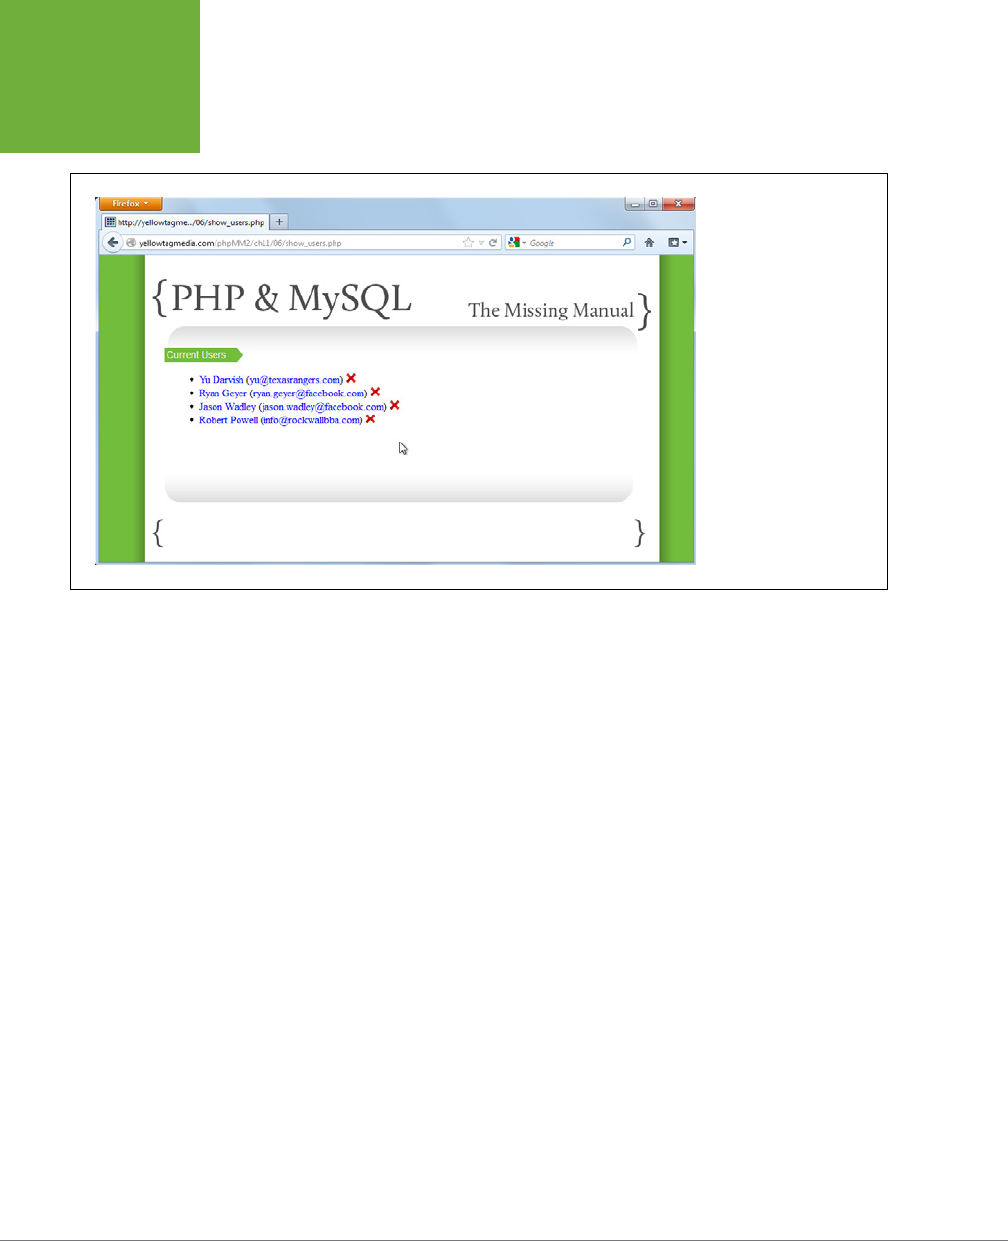
PHP & MYSQL: THE MISSING MANUAL
376
INTEGRATING
UTILITIES,
VIEWS, AND
MESSAGES
FIGURE 11-16
Here’s another one of
those cases for which you
do a lot of work and then
hope that things look the
way they always have.
You want
show_users .php
to look like it always has.
However, it’s now using
functions in
view .php
rather than outputting
HTML itself. The result
is that this header is
going to look exactly like
every other page header
because they’re all using
display_head
now.
Standardizing and Consolidating Messaging in the View
All that’s left is messaging. You have a display_messages function, but it’s not inte-
grated into the HTML that’s typically around those messages. Just as display_head
output HTML with some potential embedded JavaScript, the first part of your page
should output some standard HTML, the page title (again), and potentially success
and error messages. The final output should look a bit like this:
<html>
<head>
<title>Current Users</title>
<link href="../css/phpMM.css" rel="stylesheet" type="text/css" />
<script type='text/javascript'>function delete_user(user_id) {
if (confirm("Are you sure you want to delete this user? " +
"There's really no going back!")) {
window.location = "delete_user.php?user_id=" + user_id;
}
}</script>
</head>
<body>
<div id="header"><h1>PHP & MySQL: The Missing Manual</h1></div>
<div id="example">Current Users</div>
<div id='messages'>
<div class='success'>

CHAPTER 11: LISTING, ITERATING, AND ADMINISTRATING 377
INTEGRATING
UTILITIES,
VIEWS, AND
MESSAGES
<p>The user you specified has been deleted.</p>
</div>
</div>
<div id="content">
<!-- HTML content -->
</div>
</body>
</html>
This is a piece of cake now. Go ahead and create display_title in
view.php
:
function display_title($title, $success_msg = NULL, $error_msg = NULL) {
echo <<<EOD
<body>
<div id="header"><h1>PHP & MySQL: The Missing Manual</h1></div>
<div id="example">$title</div>
EOD;
display_messages($success_msg, $error_msg); ?>
}
How easy is that? You’d call this like so, say in
show_users.php
:
display_title("Current Users", $msg);
But, you already know how messages come across: through request parameters,
accessible via $_REQUEST. So, why worry about whether they’re set in your view?
Just pass them in to display_title, even if the values are NULL:
display_title("Current Users",
$_REQUEST['success_message'], $_REQUEST['error_message']);
NOTE You can also remove the code in
show_users.php
that gets the
success_message
request
parameter from
$_REQUEST
explicitly, because that’s now handled by this new call to
display_title
.
Things are looking good: display_head and display_title are both great, and you
already have calls to display_head in place. However, before you go adding in a
call to display_title in all your scripts, take a moment to think about what you’ve
done (and read the box on page 378).

PHP & MYSQL: THE MISSING MANUAL
378
INTEGRATING
UTILITIES,
VIEWS, AND
MESSAGES
FREQUENTLY ASKED QUESTION
Don’t Call Display Title
Why not pass
$_REQUEST
into
display_title
?
It might have occurred to you that you could actually pass the
$_REQUEST
variable wholesale into
display_title
. Then,
display_title
could pull out
$_REQUEST['success_
message']
and
$_REQUEST['error_message']
.
That’s not a bad idea. It certainly would mean that your view
scripts would not need to worry about which request parameter
was which, or even if those particular request parameters
came across.
The potential downside is that it does begin to tie your view
code—the functions in
view.php
that basically churn out
HTML—to how the data for that view is received. Now, your view
is interacting with the user’s request itself rather than letting a
controller handle that and pass along information, as needed.
As you can see yet again, trying to pull off a clean MVC architec-
ture in PHP just isn’t possible. You’re going to constantly make
choices that represent tradeoffs between a clean separation
between view and controller, and ease of coding. In this case,
you can leave things the way they are—and let
view.php
just
output information—or let
view.php
do a little more work and
pass it
$_REQUEST
.
Building a Function to Call Two Functions
Remember, the idea here was to create another function, display_title, to handle
outputting the starting portion of every HTML page’s body. But now that you have
that function, there are a few things to think about:
• The HTML from display_title will
always
directly follow the HTML output
from display_head.
• The title used in display_head should typically match the title used in
display_title.
So, if this HTML always follows the HTML from display_head, and the title in both
is the same, why are there two calls? In your scripts, you’d always have something
like this:
<?php
// Code like crazy
?>
<?php display_head($title, $javascript); ?>
<?php display_title($title,
$_REQUEST['success_message'], $_REQUEST['error_message']);
?>
<!-- More HTML -->
</html>

CHAPTER 11: LISTING, ITERATING, AND ADMINISTRATING 379
INTEGRATING
UTILITIES,
VIEWS, AND
MESSAGES
But are two calls necessary? Wouldn’t the following be cleaner:
<?php
// Code like crazy
?>
<?php page_start($title, $javascript,
$_REQUEST['success_message'], $_REQUEST['error_message']) ?>
<!-- More HTML -->
</html>
Not only is this a simpler call, but now you don’t need to pass in $title twice. It
goes in a single time and is applied across all the opening HTML.
Doing it this way, you don’t need to start messing around with display_title,
display_head, or display_messages. Instead, just build a function for your script to
call that handles all the smaller functions:
function page_start($title, $javascript = NULL,
$success_message = NULL, $error_message = NULL) {
display_head($title, $javascript);
display_title($title, $success_message, $error_message);
}
NOTE Put this function in
view.php
, along with all your other display functions.
Just Pass That Information Along
What’s left? Removing calls to display_head; avoiding another call to display_
title; and finally, one call to rule them all. In fact, take a look at the new, improved
show_users.php
. This script is shorter and a lot clearer. Even with the bit of indenta-
tion clutter that heredoc introduces, this is a pretty sleek script:
<?php
require_once '../scripts/app_config.php';
require_once '../scripts/database_connection.php';
require_once '../scripts/view.php';
// Build the SELECT statement
$select_users =
"SELECT user_id, first_name, last_name, email " .
" FROM users";

PHP & MYSQL: THE MISSING MANUAL
380
INTEGRATING
UTILITIES,
VIEWS, AND
MESSAGES
// Run the query
$result = mysql_query($select_users);
// Display the view to users
$delete_user_script = <<<EOD
function delete_user(user_id) {
if (confirm("Are you sure you want to delete this user? " +
"There's really no going back!")) {
window.location = "delete_user.php?user_id=" + user_id;
}
}
EOD;
page_start("Current Users", $delete_user_script,
$_REQUEST['success_message'], $_REQUEST['error_message']);
?>
<div id="content">
<ul>
<?php
while ($user = mysql_fetch_array($result)) {
$user_row = sprintf(
"<li><a href='show_user.php?user_id=%d'>%s %s</a> " .
"(<a href='mailto:%s'>%s</a>) " .
"<a href='javascript:delete_user(%d);'><img " .
"class='delete_user' src='../images/delete.png' " .
"width='15' /></a></li>",
$user['user_id'], $user['first_name'], $user['last_name'],
$user['email'], $user['email'], $user['user_id']);
echo $user_row;
}
?>
</ul>
</div>
<div id="footer"></div>
</body>
</html>
At this point, take it out for a spin. Verify that error messages work. Confirm that
success messages work. Change your other scripts to also use page_start. You can
even add more functions to
view.php
. Maybe you want a page_end that outputs the
closing <div>, the footer, and some contact text. You could add a sidebar function.
With this modular approach, you can do anything you want. Well, except for control-
ling just who gets to delete users. That’s a problem for the next chapter.

CHAPTER 11: LISTING, ITERATING, AND ADMINISTRATING 381
INTEGRATING
UTILITIES,
VIEWS, AND
MESSAGES
DESIGN TIME
Two Functions Are Better Than One...Kinda
One of the things you’ve seen over and over is this idea
of moving smaller and smaller bits of code into their own
functions. This means that you have a little bit of HTML in
a function in
view.php
. You have
database_connection.php
doing database connection, and even though it doesn’t define
a custom function, it’s basically called like a function through
require_once
. The same has been true a number of times:
take small pieces of behavior or functionality and put them
into small, easy-to-call functions.
It might be easy to think that the goal is lots of individual
function calls. That’s partially true. What is true is that you
want lots of building blocks that you can assemble into bigger
useful pieces. But, when it comes to using those functions, do
you really want to make 20 or 30 individual calls?
Probably not.
Instead, you’ll likely want to make as few function calls as you
need in your scripts...at least in the ones with which the user
interacts. Therefore, it’s preferable to call something like this:
display_page($title, $javascript, $content);
than this:
display_head($title, $javascript);
display_messages($msg);
display_content($content);
display_footer();
Of course, the way you get around this isn’t to reverse field and
throw all your code across ten functions into one. But it might
be that you want one function that then calls these functions
for you. That’s still using building blocks, but it’s reducing
the number of things your top-level scripts need to do to get
things working properly.
Just think about it: is it easier to remember to call
display_page
, and then have to look up the arguments to
pass, or is it easier to remember to call
display_head
, and
then
display_messages
, and then
display_content
,
and then...what was that next one again? Of course, it’s easier
to make the one function call.
That’s why you want to move toward a hybrid of small func-
tions with groupings or higher-level functions that assemble
those small functions in useful ways. Your scripts should make
simple calls rather than lots of calls. And then, those simple
calls can do whatever is needed, even if that means calling lots
of smaller functions behind the scenes.
The result should be simpler, easier-to-read code. As a bonus,
you’ll also get a nice set of functions that you can combine in
a variety of useful ways.


385
CHAPTER
12
Something important arises at just about this point in your application design
and creation. You have four, five, maybe more core pieces of functionality in
place to add users, upload photos, and so on. You have a few tables set up in
which to store data. You have most of your application’s central components built,
and even though it’s still a simple application, you have a sense of where you’re
going. And then, in the previous chapter, you added a new piece of functionality:
the ability to delete users. It seems like just another feature; just another user re-
quirement to tick o the list. But, wait a second...deleting users? Is that something
that you want to oer to all of your users? Of course not. That’s an administrative
feature. (You might even remember from page 339 that an early candidate for the
name of
delete_user.php
was
admin.php
.)
An administrator, of course, is someone who has the responsibility—and more im-
portantly, the capability (and authority)—to manage user accounts and take care
of the application on an overarching level. Unfortunately, your application doesn’t
know that yet. As far as it’s concerned, there’s no such thing as an administrator.
Right now, anyone can hop over to
delete_user.php
and nuke poor Ryan Geyer, or
Robert Powell, or whoever else has signed up through
create_user.html
, with nothing
more than a confirmation box standing between them and digital oblivion. What’s
worse, that tempting little red “X” is visible to anyone who goes to
show_users.php
.
With the addition of this one piece of functionality, you to realize you need several
other things, and you need them soon. Here’s the quick list of problems that you
need to solve:
• Viewing all users (done)
• Deleting users (you have this, with way too much freedom)
Authentication and
Authorization

PHP & MYSQL: THE MISSING MANUAL
386
BASIC
AUTHENTICATION
• A way to identify users on your system (you kind of have this, through
create_user.html
, but there’s no way for users to log in and out right now)
• A way to indicate that a user is an administrator
• A way that users can log in and verify who they are (for example, with a password)
• A way to only show certain functionality—like deleting a user—if the person who
is viewing the functionality is an administrator
Your system needs
authentication—
a way to let it know who’s who. Users should be
required to log in, and then your system should know whether the user is a certain
type, like an administrator. Based on that type, the user sees (or doesn’t see) certain
things. This selective display of resources is authentication’s bed fellow,
authoriza-
tion
. These two terms are often confused for one another, or even casually used
interchangeably.
NOTE There are people that would rather be tarred and feathered than mistake authentication for autho-
rization, or vice versa. Then again, those people probably have separate sock drawers for each color they own.
It’s good to know the difference, but you don’t have to sweat the details.
It’s certainly not surprising that you need to add these features. Logging in is com-
mon to almost every site you regularly visit online, not just Twitter and Facebook.
Even YouTube and Google give you more sophisticated options when you create
and log in to a user account. All of them use authentication to establish who is who.
It’s time that your application joined the party.
Basic Authentication
Authentication, like everything else, can be done simply or with tremendous com-
plexity. Also, like nearly everything else, it’s best to start with the basics and add
complexity as needed. For a simple application, you don’t need thumbprint readers
and lasers scanning a user’s face. (Granted, it might be fun, but it’s not necessary.
James Bond almost certainly isn’t going to fill out your
create_user.html
form.)
NOTE You can find the finished example code for this section on this book’s Missing CD page at
www.
missingmanuals.com/cds/phpmysqlmm2e
.
Using HTTP Headers for Basic Authentication
Basic authentication
, also known as
HTTP authentication
, is a means of supplying a
user name and password in a web application through HTTP headers. You’ve already
worked with headers a bit. Remember this bit of code from
scripts/app_config.php
(page 249)?

CHAPTER 12: AUTHENTICATION AND AUTHORIZATION 387
BASIC
AUTHENTICATION
function handle_error($user_error_message, $system_error_message) {
header("Location: " . get_web_path(SITE_ROOT) .
"scripts/show_error.php" .
"?error_message={$user_error_message}" .
"&system_error_message={$system_error_message}");
}
This handle_error function is using an HTTP header—the Location header—to send
a redirect to the browser. You’ve also used the Content-type and Content-length
headers in displaying an image in
show_image.php
(page 318):
header('Content-type: ' . $image['mime_type']);
header('Content-length: ' . $image['file_size']);
With basic authentication, there are a couple of other HTTP headers you can send.
The first doesn’t have a key value such as Content-type or Location. You simply
send this:
HTTP/1.1 401 Unauthorized
When a browser receives this header, it knows that a requested page requires
authentication to be displayed. 401 is a special status code, along with lots of oth-
ers, that informs the browser about the request. 200 is the code used to indicate
“Everything is OK,” for example, and 404 is the HTTP error code for “Not Found.”
NOTE You can read up on all the HTTP status codes at
w3.org/Protocols/rfc2616/rfc2616-sec10.html
. Anything
from 400 up indicates an error of some kind.
It’s one thing to tell the browser that access to a page is restricted, but at some point
you’ll want to make that page
unrestricted
. The answer is to send a second header:
WWW-Authenticate: Basic realm="The Social Site"
This header WWW-Authenticate alerts the browser that authentication needs to happen.
Specifically, the browser should pop up a dialog box and ask for some credentials.
You specify what type of authentication to require; in this example, it’s Basic. Then,
you identify a realm to which that authentication should be applied. In this case, it’s
"The Social Site". As long as dierent pages use this same realm, authentication
to one of those pages applies to other pages in that same realm.
Basic Authentication Is...Well, Basic
It’s time to apply authentication to your own application. Open your
show_users
.php
script.
NOTE As usual, you might want to think about making a backup of this script, or copying all your scripts
into a new
ch12/
directory. That way you have all your older, working scripts to fall back on in case something
goes wrong.
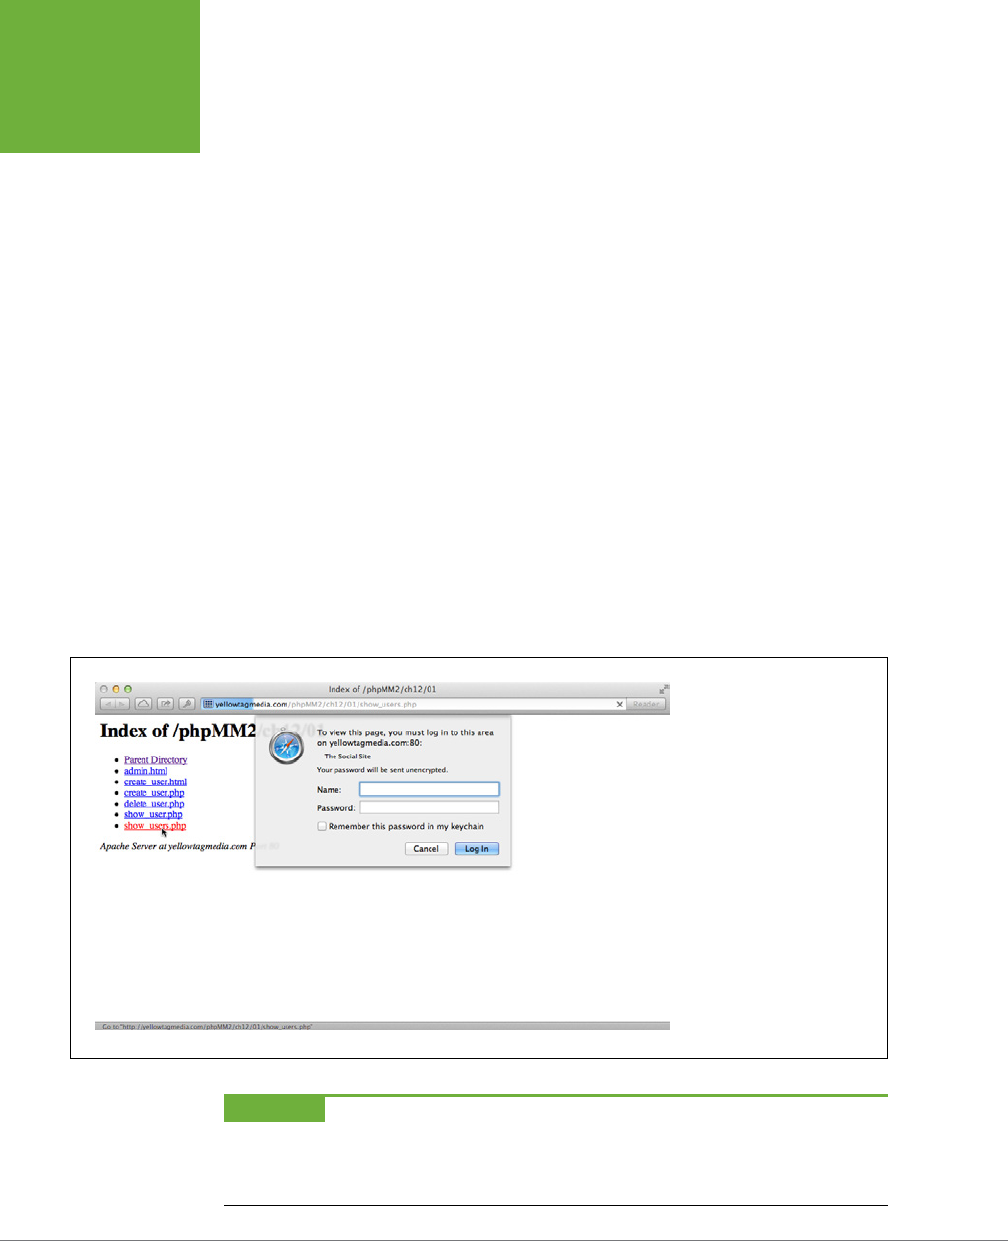
PHP & MYSQL: THE MISSING MANUAL
388
BASIC
AUTHENTICATION
Enter these two header lines near the top of the script:
<?php
require_once '../scripts/app_config.php';
require_once '../scripts/database_connection.php';
require_once '../scripts/view.php';
header('HTTP/1.1 401 Unauthorized');
header('WWW-Authenticate: Basic realm="The Social Site"');
// Build the SELECT statement
$select_users =
"SELECT user_id, first_name, last_name, email " .
" FROM users";
// Remaining PHP
?>
Navigate over to
show_users.php
. You should see a nice pop-up window asking you
to log in, like Figure 12-1. Well, it’s not
that
nice, but it does the trick. Basic authen-
tication, pure and simple.
FIGURE 12-1
It’s battleship gray, it’s forbid-
ding, it’s terse. In other words,
it’s everything you could want
a fence around your application
to be. However, you almost
never see forbidding and terse
these days in web applica-
tions, so this is just the first
in a series of steps toward the
current professional standard in
authentication.
WARNING If your web server is using a
.htaccess
file (popular particularly on Apache web servers) to
restrict certain directories from web access, you could have problems here.
.htaccess
doesn’t always play nicely
with PHP’s basic authentication. Your best bet would be to call your provider and ask it to not use any
.htaccess
files on the directories in which you’re working.
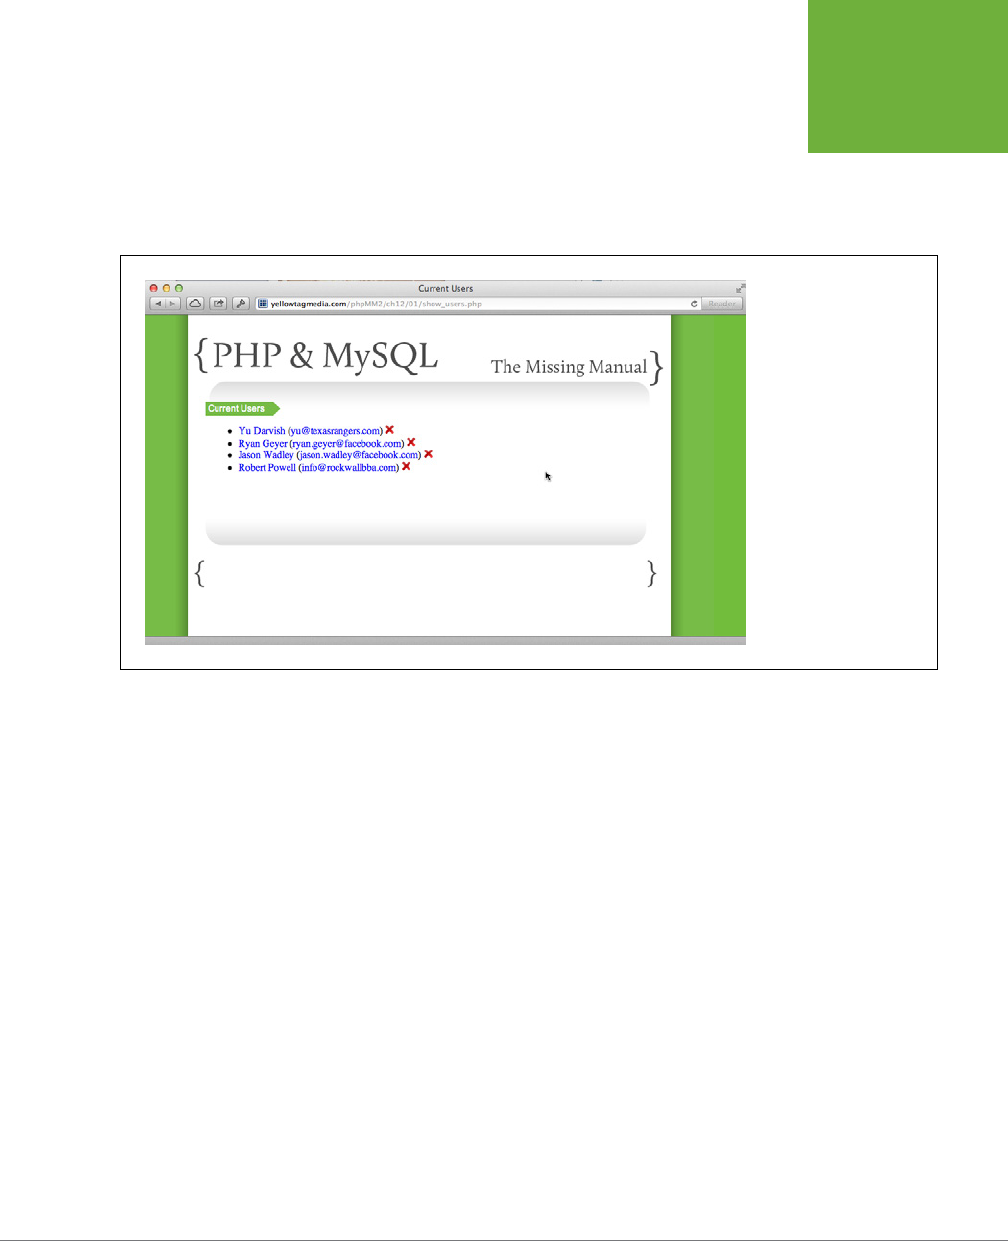
CHAPTER 12: AUTHENTICATION AND AUTHORIZATION 389
BASIC
AUTHENTICATION
The Worst Authentication Ever
With the addition of the two headers on page 388, there’s still a gaping hole in
your security. Navigate to
show_users.php
if you’re not there already, and leave
both the Name and Password fields blank. Then, simply click Cancel. Figure 12-2
shows the result.
FIGURE 12-2
Of all things you might
have expected to see when
you canceled out of a login
dialog box, the secure
page probably wasn’t one
of them. So far, you’re
triggering a login request,
but you’re not actually
doing anything with that
request.
As if that’s not enough, enter
any
user name and password and then click Log In.
There you go: Figure 12-2 again. In fact, spend some time trying to get anything
other than the normal
show_users.php
page. You won’t be able to.
Pretty poor security, isn’t it? Canceling should
not
take you on to the supposedly
secure page. What you need to do is get the user name and password, check them
against acceptable values, and
then
show the page. In every other case, the user
should not see
show_users.php
.
Getting Your User’s Credentials
To check the user name and password against any values, you need to make some
changes to your script. Your current code doesn’t extract those values, let alone
compare them against any other values. There’s clearly some work to do here.
Fortunately, because HTTP authentication is defined in a standard way, it’s easy for
PHP to interact with users who enter their credentials into a basic authentication
pop-up dialog box. In fact, PHP gives you access to both the user name and password
entered via two special values in a superglobal variable you’ve used before, $_SERVER:
• $_SERVER['PHP_AUTH_USER'] gives you the entered user name.
• $_SERVER['PHP_AUTH_PW'] gives you the entered password.

PHP & MYSQL: THE MISSING MANUAL
390
BASIC
AUTHENTICATION
NOTE
$_SERVER
is used in
app_config.php
to define the
SITE_ROOT
constant as well as in the
get_web_path
utility function.
You might expect your flow to proceed something like this:
1. At the beginning of a script, send the HTTP headers that trigger authen-
tication.
2. Once the authentication code is complete, check $_SERVER['PHP_AUTH_USER']
and $_SERVER['PHP_AUTH_PW'] for values and compare those values to some
constants or a database.
3. Decide whether to let the user see the content your script normally outputs.
That makes a lot of sense, but turns out to be wrong. Here’s what really happens:
1. Your script is called.
2. Authentication headers (actually, a header that says a user is unauthorized
and should be allowed to sign in) are sent.
3. Once the user enters in a user name and password, the browser
recalls
your
script from the top once again.
Clearly, you need to determine if there are any available credentials
before
au-
thentication headers are sent. If there are credentials, check them against allowed
values. Finally, if the credentials don’t match or don’t exist,
that’s
when you send
the authentication headers.
Once again, then, isset (page 235) becomes your friend. Start with code like this:
if (!isset($_SERVER['PHP_AUTH_USER']) ||
!isset($_SERVER['PHP_AUTH_PW'])) {
header('HTTP/1.1 401 Unauthorized');
header('WWW-Authenticate: Basic realm="The Social Site"');
}
Yet, all this does is pop up the login box if the user name and password haven’t
previously been set. It still allows access to your page through a couple dierent
avenues. So you need to not only pop up a login box, but also ensure that any preset
user names and passwords match an allowed set of values.
Cancel Is Not a Valid Means of Authentication
Before you deal with checking user names and passwords, though, there’s something
more pressing to deal with. Even worse than accepting any credentials is accepting
a click of the Cancel button.
This situation is easy to deal with, albeit not intuitively. Here’s your code right now:
if (!isset($_SERVER['PHP_AUTH_USER']) ||
!isset($_SERVER['PHP_AUTH_PW'])) {
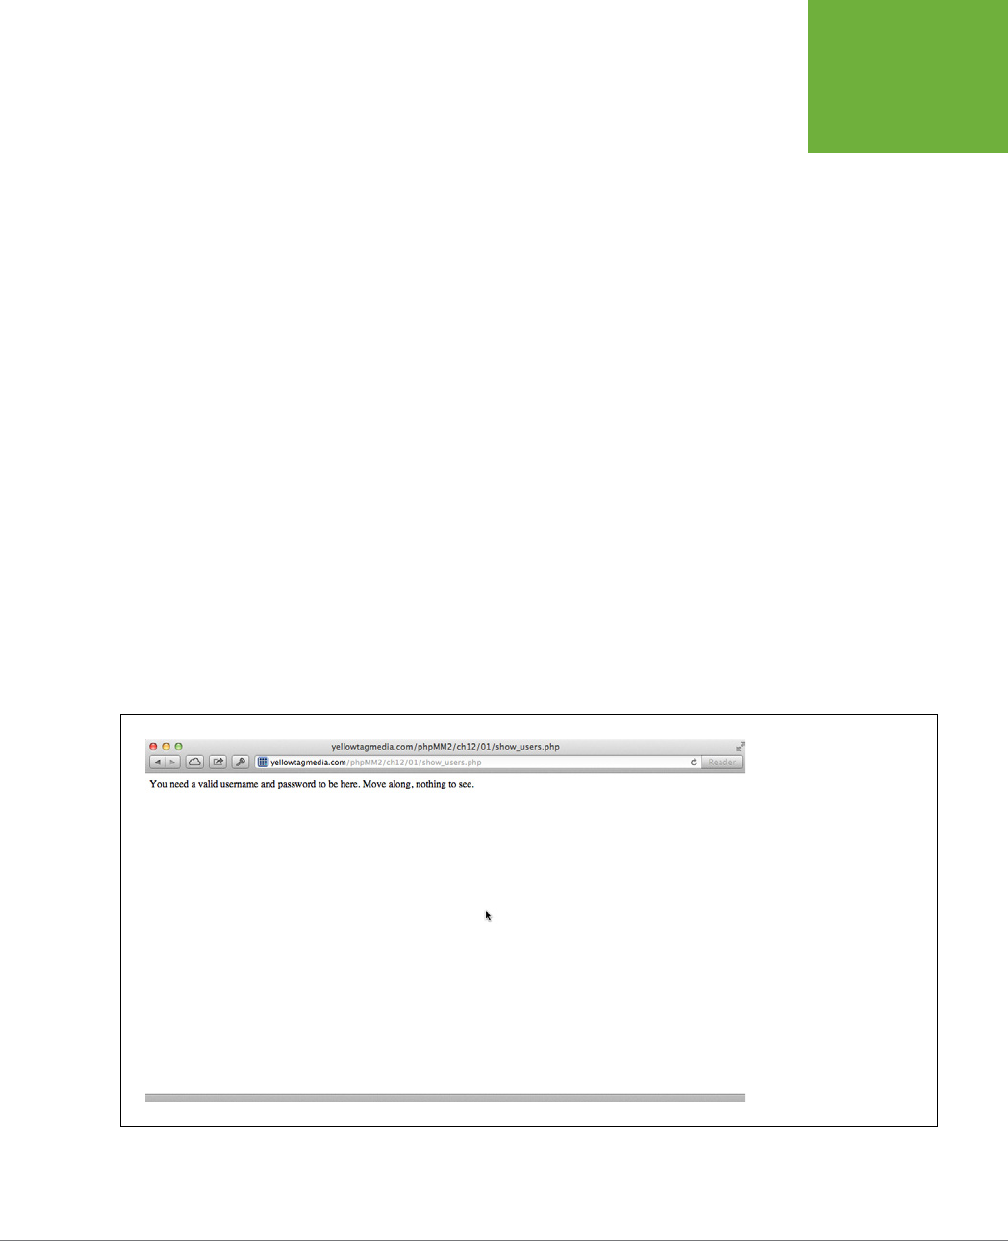
CHAPTER 12: AUTHENTICATION AND AUTHORIZATION 391
BASIC
AUTHENTICATION
header('HTTP/1.1 401 Unauthorized');
header('WWW-Authenticate: Basic realm="The Social Site"');
}
The login dialog box is prompted by the two calls to the header:
header('HTTP/1.1 401 Unauthorized');
header('WWW-Authenticate: Basic realm="The Social Site"');
When a user clicks Cancel, your PHP continues to run, directly from after the second
header line:
header('HTTP/1.1 401 Unauthorized');
header('WWW-Authenticate: Basic realm="The Social Site"');
// This line is run if Cancel is clicked
Taking the simplest possible path, you could simply bail out of the script:
if (!isset($_SERVER['PHP_AUTH_USER']) ||
!isset($_SERVER['PHP_AUTH_PW'])) {
header('HTTP/1.1 401 Unauthorized');
header('WWW-Authenticate: Basic realm="The Social Site"');
exit("You need a valid username and password to be here. " .
"Move along, nothing to see.");
}
That way, if a user clicks Cancel, the script runs the exit command—which is a lot
like die—and bails out with an error message, as shown in Figure 12-3.
FIGURE 12-3
With the
exit
code
above, if a user tries the
ever-so-clever Cancel-
without-signing-in trick,
your script handles the
situation. Then again, this
method is rather crude,
and doesn’t exactly live
up to your application’s
standard in user-friendly
views and web pages.
You’ll be able to improve
this, but not until the next
chapter.
PHP & MYSQL: THE MISSING MANUAL
392
BASIC
AUTHENTICATION
Getting Your User’s Credentials
Let’s get back to seeing what your user actually supplies to the login dialog box.
Remember, the flow here isn’t what you might expect. Once the user has entered a
user name and password, your script is basically recalled. It’s almost as though the
server is giving you a free while loop, similar to this:
while (username_and_password_are_wrong) {
ask_for_username_and_password_again();
}
NOTE This isn’t actually running, working PHP. It’s something called
pseudocode
. For more on what
pseudocode is—and why it’s your friend—check out the following box.
UP TO SPEED
Pseudocode: The Code Before You Write Code
Lots of times you’ll find that you need a happy medium
before writing full-on working code—syntactically accurate,
debugged, ready to run—and scribbling a list of steps to fol-
low in a notebook. You want to think about the details of how
things will work without getting bogged down by minutiae of
syntax. As a bonus, pseudocode is language-neutral, so you
can write pseudocode and later implement that code in any
programming language you choose.
That said, when you write pseudocode, you usually know which
language you have in mind and use that syntax. For example,
if you’re writing pseudocode that you’ll eventually turn into
PHP, you might use an
if
, a
while
, an
else
, and throw in
curly braces or angle brackets. That’s why this
while (username_and_password_are_wrong) {
ask_for_username_and_password_again();
}
is a great example of pseudocode that will later become
PHP. But, in the case below, it’s not helpful to type out all
the
$_SERVER
stuff, because it’s long, full of little commas
and apostrophes, and you already know the basic idea. So,
whether you’re explaining to a coworker what you’re doing or
just planning out your code, this is a perfectly good stand-in:
while (username_and_password_are_wrong) {
In your head, you might be translating that to something
like this:
if (($_SERVER['PHP_AUTH_USER'] != VALID_
USERNAME) ||
($_SERVER['PHP_AUTH_PW'] != VALID_
PASSWORD)) {
What will you do once you make that determination? Some-
thing...you’re not sure what yet. You know basically what has
to happen, but the details are still up in the air. That leaves
you with this:
ask_for_username_and_password_again();
It’s clear, it’s understandable, but it’s not bogged down by PHP
semantics. It’s pseudocode. It’s great for getting an idea going,
or communicating about code. It’s also great for a situation like
this in which something tells you the way you’re doing things
might need to change. And, if change is coming, the less work
you put into a solution that isn’t permanent, the better.
Right now, you have an if statement that confirms whether the user name and
password have been set. If not, send the headers, and if Cancel is clicked, bail out.
if (!isset($_SERVER['PHP_AUTH_USER']) ||
!isset($_SERVER['PHP_AUTH_PW'])) {

CHAPTER 12: AUTHENTICATION AND AUTHORIZATION 393
BASIC
AUTHENTICATION
header('HTTP/1.1 401 Unauthorized');
header('WWW-Authenticate: Basic realm="The Social Site"');
exit("You need a valid username and password to be here. " .
"Move along, nothing to see.");
}
In an else part of this script (yet to be written) you could check the user name and
password against the acceptable values. If they match, display the output from
show_users.php
. If not, you want to resend the headers that cause the browser to
prompt the user to log in again. Therefore, you want something like this:
if (!isset($_SERVER['PHP_AUTH_USER']) ||
!isset($_SERVER['PHP_AUTH_PW'])) {
header('HTTP/1.1 401 Unauthorized');
header('WWW-Authenticate: Basic realm="The Social Site"');
exit("You need a valid username and password to be here. " .
"Move along, nothing to see.");
} else {
if (($_SERVER['PHP_AUTH_USER'] != VALID_USERNAME) ||
($_SERVER['PHP_AUTH_PW'] != VALID_PASSWORD)) {
header('HTTP/1.1 401 Unauthorized');
header('WWW-Authenticate: Basic realm="The Social Site"');
exit("You need a valid username and password to be here. " .
"Move along, nothing to see.");
}
}
NOTE Technically, the
if
block is supplying an incorrect message to
exit
. That
exit
deals with the case
in which the user pressed Cancel rather than entering a wrong user name and password. As a rule, though, you
want to provide minimal information to users on security failures, so a generic “one size fits all” message is the
better approach here.
Given that, you can actually consolidate things a bit. Whether the user has never
attempted to log in, or incorrectly entered her user name or password, the script
needs to send HTTP headers to force authentication. It’s only if the user has entered
information and it matches the appropriate values that the rest of the page’s action
should be taken and the output should be displayed. Thus, what you really want is this:
if (!isset($_SERVER['PHP_AUTH_USER']) ||
!isset($_SERVER['PHP_AUTH_PW']) ||
($_SERVER['PHP_AUTH_USER'] != VALID_USERNAME) ||
($_SERVER['PHP_AUTH_PW'] != VALID_PASSWORD)) {
header('HTTP/1.1 401 Unauthorized');
header('WWW-Authenticate: Basic realm="The Social Site"');
exit("You need a valid username and password to be here. " .
"Move along, nothing to see.");
}
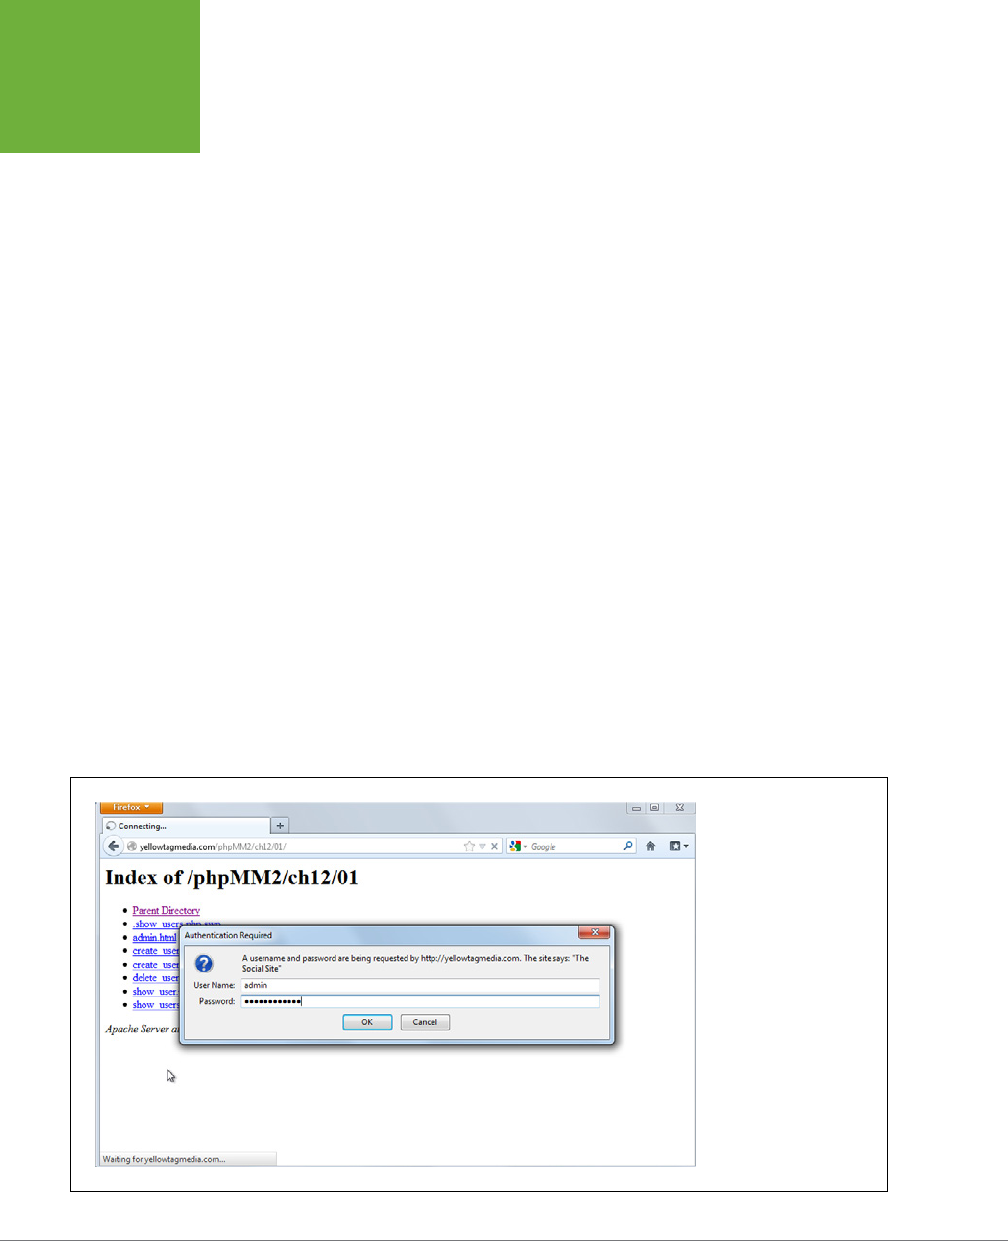
PHP & MYSQL: THE MISSING MANUAL
394
BASIC
AUTHENTICATION
Go ahead and add this code to your version of
show_users.php
. Then, go up to the
top of
show_users.php
—make sure it’s before your new if statement—and add a
few new constants:
<?php
require_once '../scripts/app_config.php';
require_once '../scripts/database_connection.php';
require_once '../scripts/view.php';
define(VALID_USERNAME, "admin");
define(VALID_PASSWORD, "super_secret");
if (!isset($_SERVER['PHP_AUTH_USER']) ||
!isset($_SERVER['PHP_AUTH_PW']) ||
($_SERVER['PHP_AUTH_USER'] != VALID_USERNAME) ||
($_SERVER['PHP_AUTH_PW'] != VALID_PASSWORD)) {
header('HTTP/1.1 401 Unauthorized');
header('WWW-Authenticate: Basic realm="The Social Site"');
exit("You need a valid username and password to be here. " .
"Move along, nothing to see.");
}
Try visiting
show_users.php
again and typing
admin
and
super_secret
for the user
name and password, respectively, as shown in Figure 12-4. You should be greeted
by the normal
show_users.php
view (see Figure 12-5). Otherwise, you’ll just get the
authentication pop-up over and over. (If that “over and over” bothers you, you’ve
got the right idea; see the box on page 395.)
FIGURE 12-4
Finally, entering a user
name and password
actually matters. The
browser responds to your
headers with a login
dialog box, and reports the
values to PHP through the
$_SERVER
superglobal
variable.

CHAPTER 12: AUTHENTICATION AND AUTHORIZATION 395
ABSTRACTING
WHAT’S THE
SAME
FIGURE 12-5
Once you’ve made it through
security, you’re back to see-
ing users again. And that’s
the point: authentication is
separate from the core content
of your pages.
FREQUENTLY ASKED QUESTION
Infinity and Beyond
Isn’t an infinite number of login attempts bad?
Yes. Absolutely. Alas, at the moment, that’s exactly what you’re
providing in
show_users.php
: the opportunity to try, over and
over and over, to get a valid user name and password. Truth
be told, the sample code and patterns you’ll see all over the
Web for using basic authentication look just like what you have
in
show_users.php
.
There certainly are ways to get around this, but they’re not
as easy as you might hope. Because the browser is making
multiple requests to your script, you’d have to figure out a way
to pass the number of requests that have been made to your
script from your script. If that sounds tricky, it is.
There are ways to handle multiple requests, and you’ll learn
about them (although for a much better purpose) in the next
chapter on sessions. For now, realize that the basic authentica-
tion approach is temporary anyway, and all of this code is a
starting point, not an end point.
Abstracting What’s the Same
Once again, you find yourself with some code in
show_users.php
that probably
doesn’t belong in
show_users.php
. Why is that? Because the same authorization
and authentication you have in
show_users.php
belongs in every other script that
should require logging in, such as
delete_user.php
. You don’t want to write that code
over and over; it becomes just like other repeated code you now have in
app_config.
php
and
database_connection.php
. You should take it out of individual scripts and
place it somewhere that all your scripts can use.

PHP & MYSQL: THE MISSING MANUAL
396
ABSTRACTING
WHAT’S THE
SAME
NOTE You can find the finished example code for this section on this book’s Missing CD page at
www.
missingmanuals.com/cds/phpmysqlmm2e
.
Another Utility Script:
authorize.php
Fire up your editor once more; this time, create a file called
authorize.php
. You can
start by adding that valid user name/password combination:
<?php
define(VALID_USERNAME, "admin");
define(VALID_PASSWORD, "super_secret");
?>
At this point, you’d usually write a function: maybe authorize or get_credentials
or something like that. But is that really what you want? Do you want to have to
require_once authorize.php, and then explicitly call a function?
More likely, you want to identify scripts that require authorization with a single line:
require_once "../scripts/authorize.php;"
Then, ideally, the authorization would all just magically happen for you.
Given that, you
don’t
want a function that has to be called. You just want some
PHP code in the main part of
authorize.php
. That way, by requiring
authorize.php
,
thatcode runs and handles authentication, and your script doesn’t have to do any-
thing to get the benefits of authentication and authorization.
In a lot of ways, authorization here is like having JavaScript inside a set of <script>
tags with no function:
<script type="text/javascript">
dashboard_alert("#hits_count_dialog");
$("#hits_count_dialog").dialog("open");
query_results_tables();
</script>
As soon as a browser encounters that JavaScript, it runs it. The same is true of
PHP outside of a function, so you can drop your authorization code right into
authorize.php
:
<?php
define(VALID_USERNAME, "admin");
define(VALID_PASSWORD, "super_secret");

CHAPTER 12: AUTHENTICATION AND AUTHORIZATION 397
ABSTRACTING
WHAT’S THE
SAME
if (!isset($_SERVER['PHP_AUTH_USER']) ||
!isset($_SERVER['PHP_AUTH_PW']) ||
($_SERVER['PHP_AUTH_USER'] != VALID_USERNAME) ||
($_SERVER['PHP_AUTH_PW'] != VALID_PASSWORD)) {
header('HTTP/1.1 401 Unauthorized');
header('WWW-Authenticate: Basic realm="The Social Site"');
exit("You need a valid username and password to be here. " .
"Move along, nothing to see.");
}
?>
Now, any script that has a require_once for
authorize.php
will cause
authorize.php
to be processed, which in turn will run the authorization code. That, in turn, will en-
sure that users are either logged in or are forced to log in. So, things look quite nice.
Remove this code from
show_users.php
and add a require_once for
authorize.php
:
<?php
require_once '../scripts/app_config.php';
require_once '../scripts/authorize.php';
require_once '../scripts/database_connection.php';
require_once '../scripts/view.php';
// Authorization code is no longer in this script
// Build the SELECT statement
$select_users =
"SELECT user_id, first_name, last_name, email " .
" FROM users";
// and so on...
?>
The next time you go to
show_users.php
, you get a nice login dialog box. But, that’s
not all this change buys you. Add a similar line into
delete_user.php
:
<?php
require_once '../scripts/app_config.php';
require_once '../scripts/authorize.php';
require_once '../scripts/database_connection.php';
// and so on...
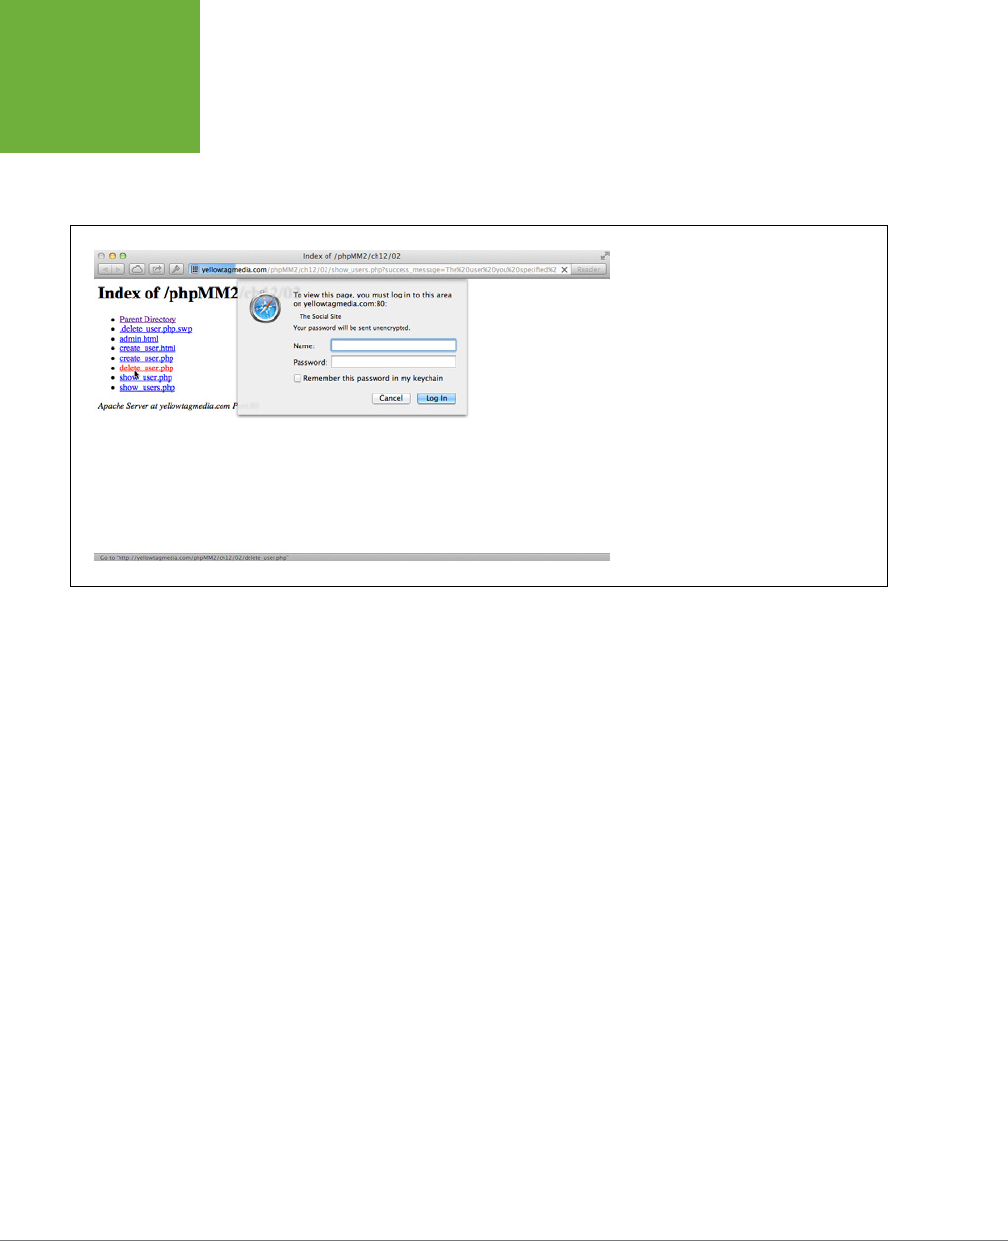
PHP & MYSQL: THE MISSING MANUAL
398
ABSTRACTING
WHAT’S THE
SAME
To test it out, close out your browser so that any passwords are lost. Then, open
your browser again and navigate directly to
delete_user.php
. You’ll be greeted with
a login dialog box (see Figure 12-6). What’s significant about this? Most obviously,
all it took was a single line of PHP to add security to another page.
FIGURE 12-6
Once you’ve made it through security,
you’re back to seeing users again. That, of
course, is the point: authentication is sepa-
rate from the core content of your pages.
But there’s more! If you’ve logged in, close out your browser again and head over to
show_users.php
. As you’d expect, you need to log in. After you’ve logged in, click
the Delete icon on one of your users. This will take you to
delete_user.php
, and the
PHP in
authorize.php
will be triggered. However, because you’ve already logged
in to the realm identified as “The Social Site,” you’re not prompted to log in again.
Remember your code that specifies a realm (page 387):
header('WWW-Authenticate: Basic realm="The Social Site"');
Any page that uses this realm, in eect, shares credentials with other pages in the
same realm. Because you logged in to access
show_users.php
, and that realm is
identical to the realm for
delete_user.php
, your delete request goes through without
a problem. Figure 12-7 shows the result—no login dialog box in sight.
There’s still a glaring problem, though. At this point, it’s easy to forget that behind
every good script lies a great database. It’s a horrible idea to have a PHP script—
even a utility script like
app_config.php
or
authorize.php
—contain a few constants
defining allowable user names and passwords. Storing bits of information like this
is the job of the database; hence the title of the next section.
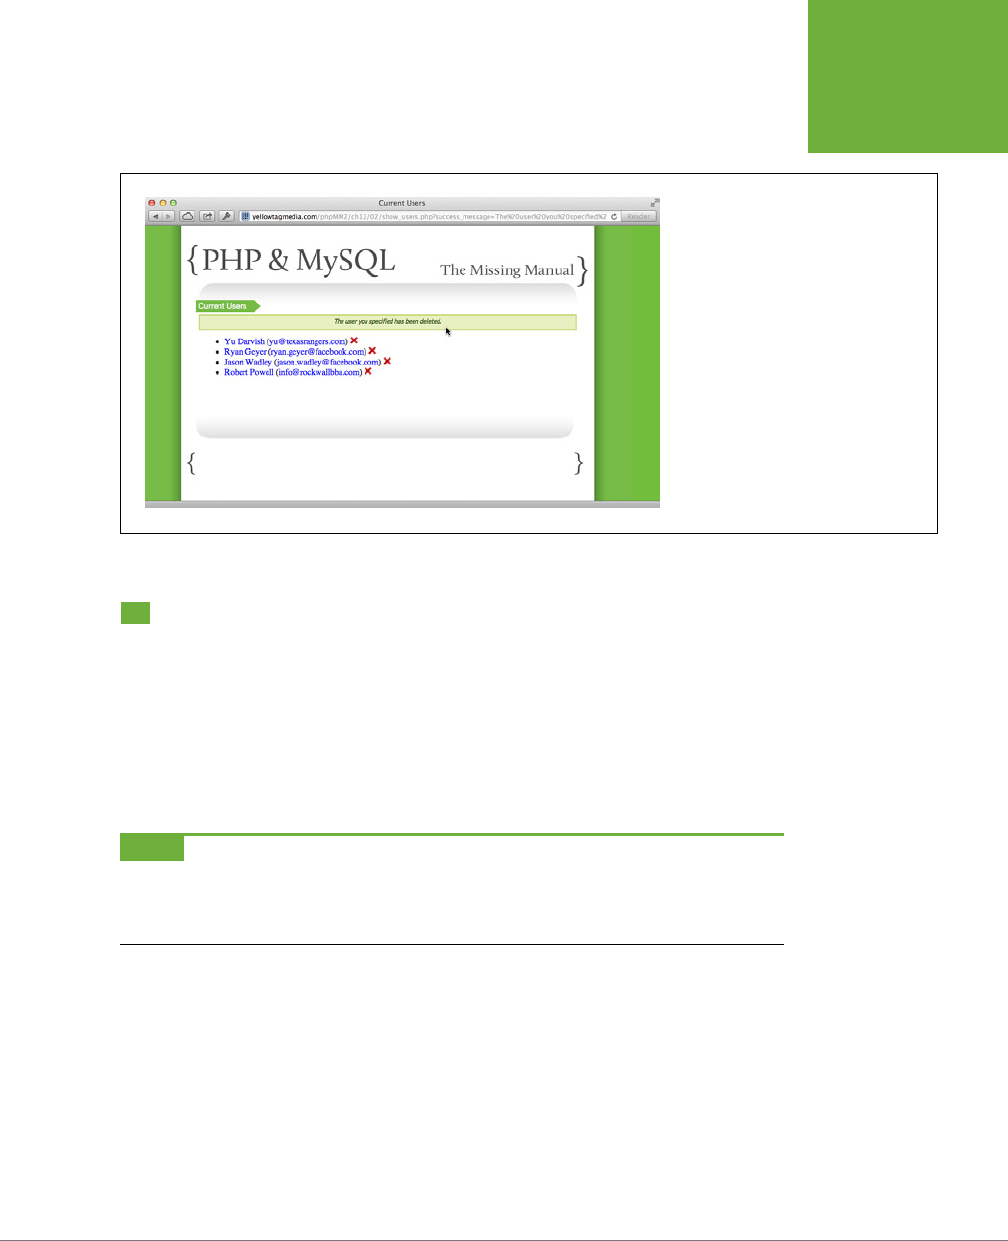
CHAPTER 12: AUTHENTICATION AND AUTHORIZATION 399
PASSWORDS
DON’T BELONG
IN PHP SCRIPTS
FIGURE 12-7
Sharing credentials works only if the realm
is the same for these two pages. That’s
yet another reason to pull authentication
and authorization code out of individual
scripts and put it in one single place that’s
referenced by your other scripts. Your
realm will be identical across all those
referencing scripts.
Passwords Don’t Belong in PHP Scripts
Databases are better for storing passwords because, among other reasons, they’re
typically more dicult to access than your scripts, which are to some degree web-
accessible. Your database, on the other hand, is generally at least a layer further
removed from the typical web user. Additionally, your database and SQL require
structural knowledge to be useful. Scripts are just files that can be browsed, and
often the information in those files is just text. Clearly, a database is a safer place
for passwords than
authorize.php
.
NOTE You can do a few things to make your scripts—especially utility ones—less accessible from the Web.
To be certain, you can also make bad decisions that make your database
more
accessible from the Web. But in
their default states, scripts are meant to be accessed by a browser, and raw database columns and rows are not,
apart from a healthy authentication system.
There’s yet another reason to place your passwords into a database: You’re already
storing user information there. You can connect that information to a password
by adding a column. Moreover, as you’ll see soon, groups of users aren’t far away,
either. Before you get too comfortable, though, you need to dig back into MySQL
and improve that authentication situation.

PHP & MYSQL: THE MISSING MANUAL
400
PASSWORDS
DON’T BELONG
IN PHP SCRIPTS
NOTE You can find the finished example code for this section on this book’s Missing CD page at
www
.missingmanuals.com/cds/phpmysqlmm2e
.
Updating the
users
Table
The first thing you need to do is update
users
. It’s been a while since you’ve been
poking around in there, so here’s a refresher as to what you should have at this
point (page 276):
mysql> describe users;
+----------------+---------------+------+-----+---------+----------------+
| Field | Type | Null | Key | Default | Extra |
+----------------+---------------+------+-----+---------+----------------+
| user_id | int(11) | NO | PRI | NULL | auto_increment |
| first_name | varchar(20) | NO | | NULL | |
| last_name | varchar(30) | NO | | NULL | |
| email | varchar(50) | NO | | NULL | |
| facebook_url | varchar(100) | YES | | NULL | |
| twitter_handle | varchar(20) | YES | | NULL | |
| bio | varchar(1000) | YES | | NULL | |
| user_pic_path | varchar(200) | YES | | NULL | |
+----------------+---------------+------+-----+---------+----------------+
8 rows in set (0.02 sec)
There’s nothing wrong here, but there are some omissions: notably a user name
and a password. Those are the two essential pieces of information that your basic
authentication requires.
Use the following to add two columns to your table:
mysql> ALTER TABLE users
-> ADD username VARCHAR(32) NOT NULL
-> AFTER user_id,
-> ADD password VARCHAR(16) NOT NULL
-> AFTER username;
NOTE The AFTER keyword specifies to MySQL exactly where to add a column. This helps to prevent important
columns—and
username
and
password
are certainly important columns—from becoming stuck at the end of
a table’s structure. You can leave this off, but it tends to make for more organized tables, especially when you’re
using DESCRIBE.
Take a moment to verify that these changes are in place now:

CHAPTER 12: AUTHENTICATION AND AUTHORIZATION 401
PASSWORDS
DON’T BELONG
IN PHP SCRIPTS
mysql> describe users;
+----------------+---------------+------+-----+---------+----------------+
| Field | Type | Null | Key | Default | Extra |
+----------------+---------------+------+-----+---------+----------------+
| user_id | int(11) | NO | PRI | NULL | auto_increment |
| username | varchar(32) | NO | | NULL | |
| password | varchar(16) | NO | | NULL | |
| first_name | varchar(20) | NO | | NULL | |
| last_name | varchar(30) | NO | | NULL | |
| email | varchar(50) | NO | | NULL | |
| facebook_url | varchar(100) | YES | | NULL | |
| twitter_handle | varchar(20) | YES | | NULL | |
| bio | varchar(1000) | YES | | NULL | |
| user_pic_path | varchar(200) | YES | | NULL | |
+----------------+---------------+------+-----+---------+----------------+
10 rows in set (0.03 sec)
Dealing with Newly Invalid Data
As was the case when you added columns before, you now have a table full of in-
valid rows. Because both user name and password are required (NOT NULL), and
none of the existing rows have values in those columns, all of your table’s rows are
in violation of that table’s rules.
You can fix this by using some more SQL. For example, to update Jason Wadley,
you’d use something like this:
mysql> UPDATE users
-> SET username = "jwadley",
-> password = "chung_moo"
-> WHERE user_id = 21;
You can confirm that these changes were made, as well:
mysql> SELECT user_id, username, password, first_name, last_name
-> FROM users
-> WHERE user_id = 21;
+---------+----------+-----------+------------+-----------+
| user_id | username | password | first_name | last_name |
+---------+----------+-----------+------------+-----------+
| 21 | jwadley | chung_moo | Jason | Wadley |
+---------+----------+-----------+------------+-----------+
1 row in set (0.00 sec)
You should make similar changes to your own
users
table so all the users you’ve
added have a user name and password.

PHP & MYSQL: THE MISSING MANUAL
402
PASSWORDS
DON’T BELONG
IN PHP SCRIPTS
FREQUENTLY ASKED QUESTION
What’s in a (User) Name?
Why not just let people use an email address as the user
name? It’s easier for them, and it eliminates the need for an
additional, new column.
It seems like every time you turn around, a new social website
is popping up—a site that you simply
must
join. More and more
of those sites are using email addresses as your login name.
There’s a lot to like about this approach:
• Most people remember their email address more readily
than one of 50 different user names floating around.
• Email addresses like
tommy.n@dbc.org
are a lot more
readable (and typeable) than a user name like
tn1954a
.
• It’s one less piece of information to store in your database.
So, if that’s the way the wind is blowing, why create a user
name column in
users
? Why not just use the email address?
First, a lot of people have just as many email addresses as
they have user names these days. With GMail, Apple’s iCloud,
at least one business email, and perhaps a personal domain or
two, individuals can still have a hard time remembering which
email address to use for login.
Second, plenty of people don’t like using their email addresses
as their user name. A user name seems more anonymous,
whereas your email address is a way to get something into
your inbox. It might seem odd, but lots of people are fine
with supplying an email as part of signup, but they’re not
comfortable typing it into a lot of login boxes.
Perhaps the most important reason is that, if an email is the
user name, how do you retrieve a user’s password? Typically,
with a user name system, you require a user to supply his user
name when a password is lost as some sort of verification.
When the user’s email
is
his user name, you need to come up
with a different method of verification.
Even though there’s nothing wrong with using an email ad-
dress, it’s still a bit better to require a dedicated user name.
Besides, fantastic programs like 1Password (
www.agilebits
.com/products/1Password
) make it easy for your users (and
you) to manage multiple logins. (Seriously, although it might
seem a bit pricey at $59.99, go buy 1Password
today
. It’s a
web-life changer.)
NOTE If something at the back of your neck tickles as you look at the user passwords, that’s a good thing.
It’s a bad idea to store passwords in this way, where anyone with access to your database can see everyone’s
passwords. Don’t worry, though, you’re going to fix that before much longer.
Getting an Initial User Name and Password
At this juncture, you’ve got to go back...way back. Remember
create_user.html
?
That was the rather simple HTML form that gathers the user’s initial information.
To be able to go forward, it needs some improvement: a user name and password
field, for starters.
Here’s a significantly updated version of
create_user.html
, which adds—among a
lot of other things—a field in which new users can enter a user name and two fields
that combine to get a password.

CHAPTER 12: AUTHENTICATION AND AUTHORIZATION 403
PASSWORDS
DON’T BELONG
IN PHP SCRIPTS
<html>
<head>
<link href="../css/phpMM.css" rel="stylesheet" type="text/css" />
<link href="../css/jquery.validate.password.css" rel="stylesheet"
type="text/css" />
<script type="text/javascript" src="../js/jquery-1.8.1.min.js"></script>
<script type="text/javascript" src="../js/jquery.validate.min.js"></script>
<script type="text/javascript"
src="../js/jquery.validate.password.js"></script>
<script type="text/javascript">
$(document).ready(function() {
$("#signup_form").validate({
rules: {
password: {
minlength: 6
},
confirm_password: {
minlength: 6,
equalTo: "#password"
}
},
messages: {
password: {
minlength: "Passwords must be at least 6 characters"
},
confirm_password: {
minlength: "Passwords must be at least 6 characters",
equalTo: "Your passwords do not match."
}
}
});
});
</script>
</head>
<body>
<div id="header"><h1>PHP & MySQL: The Missing Manual</h1></div>
<div id="example">User Signup</div>
<div id="content">
<h1>Join the Missing Manual (Digital) Social Club</h1>
<p>Please enter your online connections below:</p>
<form id="signup_form" action="create_user.php"
method="POST" enctype="multipart/form-data">
<fieldset>

PHP & MYSQL: THE MISSING MANUAL
404
PASSWORDS
DON’T BELONG
IN PHP SCRIPTS
<label for="first_name">First Name:</label>
<input type="text" name="first_name" size="20" class="required" /><br />
<label for="last_name">Last Name:</label>
<input type="text" name="last_name" size="20" class="required" /><br />
<label for="username">Username:</label>
<input type="text" name="username" size="20" class="required" /><br />
<label for="password">Password:</label>
<input type="password" id="password" name="password"
size="20" class="required password" />
<div class="password-meter">
<div class="password-meter-message"> </div>
<div class="password-meter-bg">
<div class="password-meter-bar"></div>
</div>
</div>
<br />
<label for="confirm_password">Confirm Password:</label>
<input type="password" id="confirm_password" name="confirm_password"
size="20" class="required" /><br />
<label for="email">E-Mail Address:</label>
<input type="text" name="email" size="30" class="required email" /><br />
<label for="facebook_url">Facebook URL:</label>
<input type="text" name="facebook_url" size="50" class="url" /><br />
<label for="twitter_handle">Twitter Handle:</label>
<input type="text" name="twitter_handle" size="20" /><br />
<input type="hidden" name="MAX_FILE_SIZE" value="2000000" />
<label for="user_pic">Upload a picture:</label>
<input type="file" name="user_pic" size="30" /><br />
<label for="bio">Bio:</label>
<textarea name="bio" cols="40" rows="10"></textarea>
</fieldset>
<br />
<fieldset class="center">
<input type="submit" value="Join the Club" />
<input type="reset" value="Clear and Restart" />
</fieldset>
</form>
</div>
<div id="footer"></div>
</body>
</html>

CHAPTER 12: AUTHENTICATION AND AUTHORIZATION 405
PASSWORDS
DON’T BELONG
IN PHP SCRIPTS
In addition to the two new fields, this version of the form adds in some jQuery,
which is available from
www.jquery.com
. jQuery is a free, downloadable JavaScript
library that makes almost everything in JavaScript a lot easier. In addition to the core
jQuery library, there are two jQuery plug-ins, which you can see near the top of the
code: one for general validation (
jquery.validate.min.js
) and another specifically for
password validation (
jquery.validate.password.js
). You can download both of these
plug-ins from
www.jquery.bassistance.de
.
Save this updated version of
create_user.html
and check it out. The initial page looks
the same (see Figure 12-8), but now you get validation of most of the form fields
(Figure 12-9) and a nifty password-strength indicator, too (Figure 12-10).
FIGURE 12-8
The new version of
create_user.html
looks
largely the same. It adds a password strength bar,
although that’s not apparent until the user tries to
enter a password. Most important, this form adds
in a user name and two places to enter a password:
an initial entry, and a place to confirm that entry.
Make sure these fields are the “password” type to
hide the user’s typing, too.
NOTE
If you’re completely new to jQuery, pick up
JavaScript and jQuery: The Missing Manual
by David Sawyer
McFarland (O’Reilly Media). You’ll get up to speed on how to use jQuery, and a whole host of reasons—besides
the nifty validation plug-ins now used by
create_user.html
—that’s why it’s worth your time to learn.
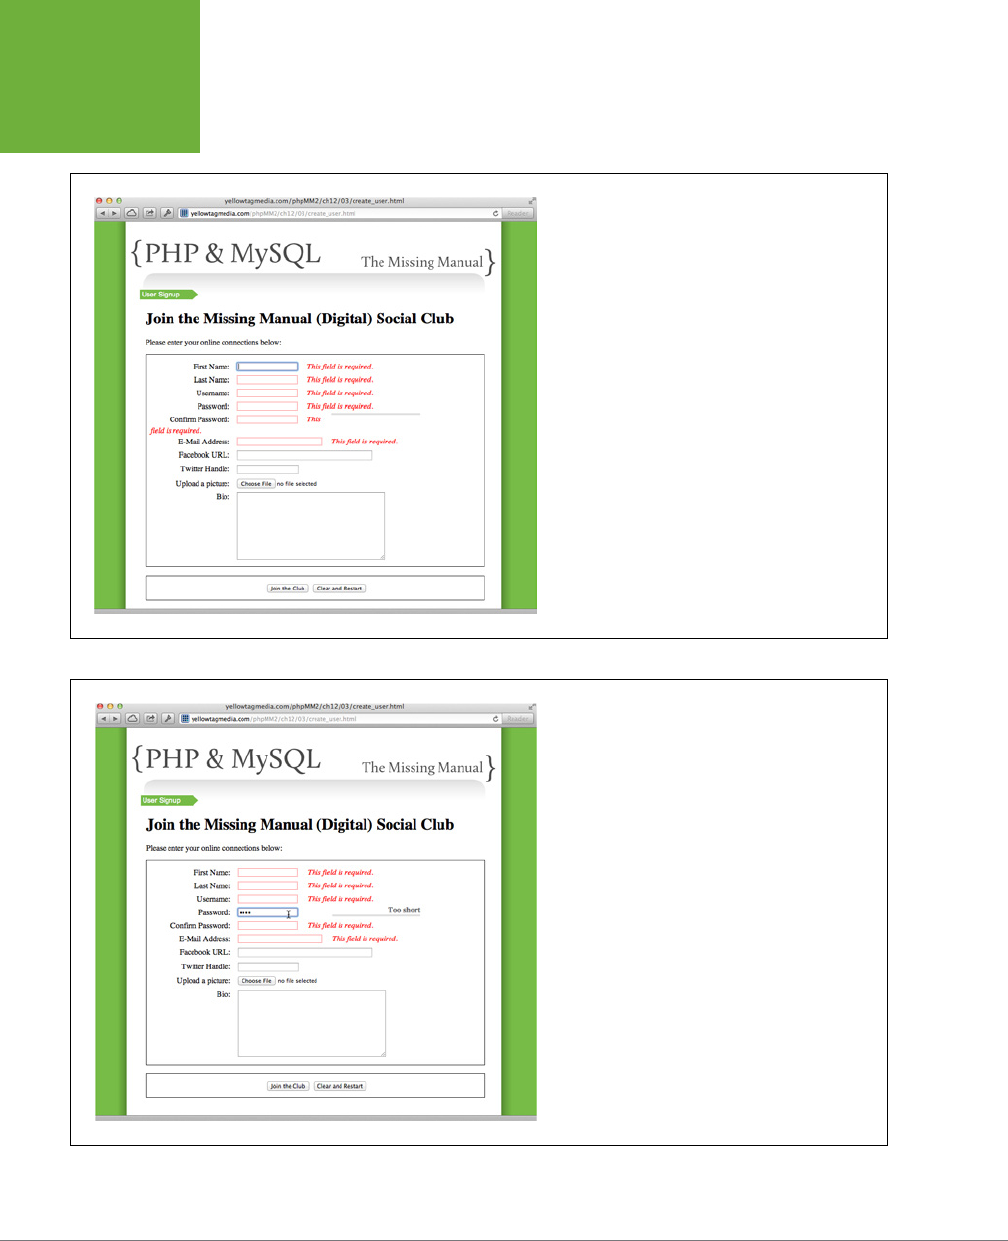
PHP & MYSQL: THE MISSING MANUAL
406
PASSWORDS
DON’T BELONG
IN PHP SCRIPTS
FIGURE 12-9
jQuery and the jQuery validation plug-in makes field
validation a piece of cake. With minimal work, you get
type validation, length validation, optionally customized
error messages, and more. You can also validate emails,
zip codes, and phone numbers. All that for a quick
download and a few lines of JavaScript.
FIGURE 12-10
The password validator is an add-on for the jQuery vali-
dation plug-in. It adds a strength indicator that requires
“strong” passwords. It’s a nice feature, and best of all, it
doesn’t increase your work load at all. You get all this for
free, before data ever makes it to your PHP scripts.

CHAPTER 12: AUTHENTICATION AND AUTHORIZATION 407
PASSWORDS
DON’T BELONG
IN PHP SCRIPTS
Now, you’re getting the right information from your users. It’s time to update your
PHP to do something with this.
Inserting the User Name and Password
At this point, you can update
create_user.php
, as well. This update is straightfor-
ward and certainly requires a lot less work, although the result of these changes is
significant.
<?php
require_once '../scripts/app_config.php';
require_once '../scripts/database_connection.php';
$upload_dir = SITE_ROOT . "uploads/profile_pics/";
$image_fieldname = "user_pic";
// Potential PHP upload errors
$php_errors = array(1 => 'Maximum file size in php.ini exceeded',
2 => 'Maximum file size in HTML form exceeded',
3 => 'Only part of the file was uploaded',
4 => 'No file was selected to upload.');
$first_name = trim($_REQUEST['first_name']);
$last_name = trim($_REQUEST['last_name']);
$username = trim($_REQUEST['username']);
$password = trim($_REQUEST['password']);
$email = trim($_REQUEST['email']);
$bio = trim($_REQUEST['bio']);
$facebook_url = str_replace("facebook.org", "facebook.com", trim($_
REQUEST['facebook_url']));
$position = strpos($facebook_url, "facebook.com");
if ($position === false) {
$facebook_url = "http://www.facebook.com/" . $facebook_url;
}
$twitter_handle = trim($_REQUEST['twitter_handle']);
$twitter_url = "http://www.twitter.com/";
$position = strpos($twitter_handle, "@");
if ($position === false) {
$twitter_url = $twitter_url . $twitter_handle;
} else {
$twitter_url = $twitter_url . substr($twitter_handle, $position + 1);
}
// Make sure we didn't have an error uploading the image
($_FILES[$image_fieldname]['error'] == 0)

PHP & MYSQL: THE MISSING MANUAL
408
PASSWORDS
DON’T BELONG
IN PHP SCRIPTS
or handle_error("the server couldn't upload the image you selected.",
$php_errors[$_FILES[$image_fieldname]['error']]);
// Is this file the result of a valid upload?
@is_uploaded_file($_FILES[$image_fieldname]['tmp_name'])
or handle_error("you were trying to do something naughty. Shame on you!",
"Uploaded request: file named '{$_FILES[$image_fieldname]
['tmp_name']}'");
// Is this actually an image?
@getimagesize($_FILES[$image_fieldname]['tmp_name'])
or handle_error("you selected a file for your picture that isn't an image.",
"{$_FILES[$image_fieldname]['tmp_name']} isn't a valid image
file.");
// Name the file uniquely
$now = time();
while (file_exists($upload_filename = $upload_dir . $now .
'-' .
$_FILES[$image_fieldname]['name'])) {
$now++;
}
// Finally, move the file to its permanent location
@move_uploaded_file($_FILES[$image_fieldname]['tmp_name'],
$upload_filename)
or handle_error(
"we had a problem saving your image to its permanent location.",
"permissions or related error moving file to {$upload_filename}");
$insert_sql = sprintf("INSERT INTO users " .
"(first_name, last_name, username, " .
"password, email, " .
"bio, facebook_url, twitter_handle, " .
"user_pic_path) " .
"VALUES ('%s', '%s', '%s', '%s', '%s',
'%s', '%s', '%s', '%s');",
mysql_real_escape_string($first_name),
mysql_real_escape_string($last_name),
mysql_real_escape_string($username),
mysql_real_escape_string($password),
mysql_real_escape_string($email),
mysql_real_escape_string($bio),
mysql_real_escape_string($facebook_url),
mysql_real_escape_string($twitter_handle),
mysql_real_escape_string($upload_filename));
CHAPTER 12: AUTHENTICATION AND AUTHORIZATION 409
PASSWORDS
DON’T BELONG
IN PHP SCRIPTS
// Insert the user into the database
mysql_query($insert_sql)
or die(mysql_error());
// Redirect the user to the page that displays user information
header("Location: show_user.php?user_id=" . mysql_insert_id());
?>
NOTE Even though only a few lines have changed, this is a good chance for you to check your current
version of
create_user.php
(along with
create_user.html
). Make sure they’re current, especially with respect to
all the changes from Chapters 9 and 10 related to image handling. If you feel your code is hopelessly out of date,
you can always download these scripts again from this book’s Missing CD page (
www.missingmanuals.com/cds/
phpmysqlmm2e
).
As usual, try entering some sample data and confirm that you get a normal
show_
user.php
response as a validation that all your changes work. Also, ensure that you
do not add
authorize.php
to your scripts list of require_once statements. You can
hardly require users to log in to the form with which they tell your application about
the user name and password they want to use for those logins.
FREQUENTLY ASKED QUESTION
There’s No One Quite Like You
Shouldn’t create_user.php verify that no one’s already using
the requested user name?
Yes. You should put the book down and write that code, right
now.
In the current version of
create_user.php
, users are inserted
into the database without checking whether their user names
are unique. Certainly, you could enforce that at the database
level, but then you’d just get a nasty error.
In its simplest form, you could do a SELECT on the desired user
name, and if any users are returned, redirect the user to an
error page by using
handle_error
. That’s pretty primitive,
though. It completely shuts down any flow, and the user—if
she doesn’t bail from your application completely—will have
to enter all of her information into the user sign-in form again.
A better approach would be to convert
create_user.html
to a
script, or even roll it into the current version of
create_user
.php
. In either case, if the user name is already taken, the
user should be redirected back to the sign-in form, with all
her previous information filled in, and a message should tell
her to try another user name. Then, if you want to move into
the deep end of the pool, do everything above, but do it with
Ajax so that the sign-in page never reloads.
So, where’s the code for this? It’s in your head and at your
fingertips. At this stage of your PHP journey, you’re increas-
ingly ready to tackle problems like this yourself. Use a book or
the Web as a resource for new techniques—like authentication
in this chapter or sessions in Chapter 14—but you’re plenty
capable of working out new uses for things you already know
on your own.
In fact, tweet a link to your solution to preventing multiple
user names to
@missingmanuals
on Twitter or post it on
the Missing Manuals Facebook page at
www.facebook.com/
MissingManuals
. Free books, videos, and swag are always
available for clever and elegant solutions.

PHP & MYSQL: THE MISSING MANUAL
410
PASSWORDS
DON’T BELONG
IN PHP SCRIPTS
Connect
authorize.php
to Your
users
Table
At this point, there’s just one glaring hole to plug:
authorize.php
. Right now, there
is only one user name and one password accepted, and they’re here in this rather
silly bit of constant work:
define(VALID_USERNAME, "admin");
define(VALID_PASSWORD, "super_secret");
Now, however,
authorize.php
has a
users
table from which to pull user names
and passwords. Fortunately, fixing up
authorize.php
requires simply stringing to-
gether things you’ve already done. First, remove those two constants and add in
require_once for
database_connection.php
, which you’ll need for interacting with
the
users
table.
<?php
require_once 'database_connection.php';
// define(VALID_USERNAME, "admin"); DELETE THIS LINE
// define(VALID_PASSWORD, "super_secret"); DELETE THIS LINE
if (!isset($_SERVER['PHP_AUTH_USER']) ||
!isset($_SERVER['PHP_AUTH_PW']) ||
($_SERVER['PHP_AUTH_USER'] != VALID_USERNAME) ||
($_SERVER['PHP_AUTH_PW'] != VALID_PASSWORD)) {
header('HTTP/1.1 401 Unauthorized');
header('WWW-Authenticate: Basic realm="The Social Site"');
exit("You need a valid username and password to be here. " .
"Move along, nothing to see.");
}
?>
That big, burly if statement needs to be trimmed some. The first portion still works;
if the $_SERVER superglobal has no value for PHP_AUTH_USER or PHP_AUTH_PW, headers
should still be sent to the browser, instructing it to pop up a login dialog box. But
now, there’s no VALID_USERNAME or VALID_PASSWORD constant to which the user’s
values should be compared, so that part of the if statement has to go. Here’s what
should be left:
if (!isset($_SERVER['PHP_AUTH_USER']) ||
!isset($_SERVER['PHP_AUTH_PW'])) {
header('HTTP/1.1 401 Unauthorized');
header('WWW-Authenticate: Basic realm="The Social Site"');
exit("You need a valid username and password to be here. " .
"Move along, nothing to see.");
}

CHAPTER 12: AUTHENTICATION AND AUTHORIZATION 411
PASSWORDS
DON’T BELONG
IN PHP SCRIPTS
NOTE Everything after the
if
is effectively an
else
, even though there’s no
else
keyword. If the body of
the
if
executes, it will call
exit
, ending the script. As a result, it’s only if there is a value for
PHP_AUTH_USER
and
PHP_AUTH_PW
in
$_SERVER
that the rest of the script runs.
The next thing the script needs to do is to get anything the user entered—and if the
script gets this far, the user
did
enter something—and compare it to values in the
database. This is something you’ve done a number of times. It’s just more sprintf
and mysql_real_escape_string, both of which you’ve used before:
<?php
require_once 'database_connection.php';
if (!isset($_SERVER['PHP_AUTH_USER']) ||
!isset($_SERVER['PHP_AUTH_PW'])) {
header('HTTP/1.1 401 Unauthorized');
header('WWW-Authenticate: Basic realm="The Social Site"');
exit("You need a valid username and password to be here. " .
"Move along, nothing to see.");
}
// Look up the user-provided credentials
$query = sprintf("SELECT user_id, username FROM users " .
" WHERE username = '%s' AND " .
" password = '%s';",
mysql_real_escape_string(trim($_SERVER['PHP_AUTH_USER'])),
mysql_real_escape_string(trim($_SERVER['PHP_AUTH_PW'])));
$results = mysql_query($query);
?>
There’s nothing particularly new here; you know how to get the results. But this time,
before worrying about the actual values from the response, the biggest concern is
seeing whether there
are
any results. If a row matches the user name and password
provided, the user is legitimate. (Or, he’s borrowed someone else’s credentials. And
“borrowed” is being used loosely here.)
The first thing to do is to see whether there are any results. If there are none, the
script has reached the same point as the earlier version, when the user name and
password weren’t valid. This means sending those headers again:
if (mysql_num_rows($results) == 1) {
// Everything's ok! Let this user through
} else {
header('HTTP/1.1 401 Unauthorized');

PHP & MYSQL: THE MISSING MANUAL
412
PASSWORDS
DON’T BELONG
IN PHP SCRIPTS
header('WWW-Authenticate: Basic realm="The Social Site"');
exit("You need a valid username and password to be here. " .
"Move along, nothing to see.");
}
NOTE Move to the head of the class if it bothers you that the code that sends these headers here is identical
to the code earlier in the script. Go ahead and do the right thing before moving on: create a function that outputs
those headers, takes in a message to pass to
exit
, and then call that function twice in
authorize.php
.
There’s just one more thing to do, and it’s a bit of a nicety. Because the user has
just logged in, go ahead and let any script that calls
authorize.php
have access to
that newly logged-in user:
if (mysql_num_rows($results) == 1) {
$result = mysql_fetch_array($results);
$current_user_id = $result['user_id'];
$current_username = $result['username'];
} else {
header('HTTP/1.1 401 Unauthorized');
header('WWW-Authenticate: Basic realm="The Social Site"');
exit("You need a valid username and password to be here. " .
"Move along, nothing to see.");
}
The entire script, new and certainly improved, looks like this:
<?php
require_once 'database_connection.php';
if (!isset($_SERVER['PHP_AUTH_USER']) ||
!isset($_SERVER['PHP_AUTH_PW'])) {
header('HTTP/1.1 401 Unauthorized');
header('WWW-Authenticate: Basic realm="The Social Site"');
exit("You need a valid username and password to be here. " .
"Move along, nothing to see.");
}
// Look up the user-provided credentials
$query = sprintf("SELECT user_id, username FROM users " .
" WHERE username = '%s' AND " .
" password = '%s';",
mysql_real_escape_string(trim($_SERVER['PHP_AUTH_USER'])),
mysql_real_escape_string(trim($_SERVER['PHP_AUTH_PW'])));
$results = mysql_query($query);

CHAPTER 12: AUTHENTICATION AND AUTHORIZATION 413
PASSWORDS
CREATE
SECURITY, BUT
SHOULD BE
SECURE
if (mysql_num_rows($results) == 1) {
$result = mysql_fetch_array($results);
$current_user_id = $result['user_id'];
$current_username = $result['username'];
} else {
header('HTTP/1.1 401 Unauthorized');
header('WWW-Authenticate: Basic realm="The Social Site"');
exit("You need a valid username and password to be here. " .
"Move along, nothing to see.");
}
?>
Test it out. Create a user (or add a user name and password to an existing user in
your database), and then close and re-open your browser to reset any saved creden-
tials. Go to
show_users.php
or any other page in which you’ve required
authorize.
php
. You should get a login dialog box, be able to enter database values, and see
the page you requested.
Passwords Create Security, But
Should Be Secure
With your new database-driven login facility, you have lots of new possibilities.
First and foremost, you can create groups in the database, and grant users access
to certain parts of your application based on their group membership. For example,
instead of letting just anyone into
show_users.php
, you can grant access only to
users that are members of an administrator’s group.
NOTE You can find the finished example code for this section on this book’s Missing CD page at
www.
missingmanuals.com/cds/phpmysqlmm2e
.
Before you do all of that, take a second look at a sample SQL statement and its results:
mysql> SELECT user_id, username, password, first_name, last_name
-> FROM users
-> WHERE user_id = 45;
+---------+----------+-------------+------------+-----------+
| user_id | username | password | first_name | last_name |
+---------+----------+-------------+------------+-----------+
| 45 | jroday | psych_rules | James | Roday |
+---------+----------+-------------+------------+-----------+
1 row in set (0.00 sec)
Anything odd there? Well, other than James Roday’s lousy choice of password. (Sure,
Psych is a good show, but it’s not exactly a hard-to-crack password.)

PHP & MYSQL: THE MISSING MANUAL
414
PASSWORDS
CREATE
SECURITY, BUT
SHOULD BE
SECURE
All the same, the more glaring issue is that the password just sits there in the data-
base. It’s plain-old text. Even if you’re new to the world of authentication and autho-
rization, you probably have heard the term
encryption
. Encryption is simply taking
a piece of information, usually something valuable like a password, and making it
unreadable for the normal mortal. The idea is that other than the user who “owns”
a password, nobody—even you, the all-wise, all-knowing programmer—should see
a user’s password in normal text. What you need is a means of encrypting that
password into something unreadable. And, you know what’s coming: PHP has a
function for that.
Encrypting Text by Using the
crypt
Function
First, you need to convert the password to something that’s non-readable. You can
do that using PHP’s crypt function. This function takes a string (and an optional
second parameter you’ll need shortly) and produces what looks like gibberish:
$encrypted_password = crypt($password);
To see this in action, make this change to
create_user.php
:
$insert_sql = sprintf("INSERT INTO users " .
"(first_name, last_name, username, " .
"password, email, " .
"bio, facebook_url, twitter_handle, " .
"user_pic_path) " .
"VALUES ('%s', '%s', '%s', '%s', '%s',
'%s', '%s', '%s', '%s');",
mysql_real_escape_string($first_name),
mysql_real_escape_string($last_name),
mysql_real_escape_string($username),
mysql_real_escape_string(crypt($password)),
mysql_real_escape_string($email),
mysql_real_escape_string($bio),
mysql_real_escape_string($facebook_url),
mysql_real_escape_string($twitter_handle),
mysql_real_escape_string($upload_filename));
Create a new user, allow
create_user.php
to save that user, and then check out that
user in your
users
table:
mysql> SELECT user_id, username, password, last_name
-> FROM users
-> WHERE user_id = 51;
+---------+----------+------------------+-----------+
| user_id | username | password | last_name |
+---------+----------+------------------+-----------+
| 51 | traugott | $1$qzifqLu4$0C88 | Traugott |
+---------+----------+------------------+-----------+
1 row in set (0.00 sec)

CHAPTER 12: AUTHENTICATION AND AUTHORIZATION 415
PASSWORDS
CREATE
SECURITY, BUT
SHOULD BE
SECURE
That’s quite an improvement. In fact, you should probably increase the size of the
password field because crypt adds a good bit of length to the originally entered
password.
ALTER TABLE users
CHANGE password
password VARCHAR(50) NOT NULL;
NOTE That doubled
password
field name is intentional. When you’re changing a column, you first give the
original name of the column. Then, you provide the new column name, the new column type, and any modifiers
(like
NOT
NULL
). In this instance, because the original name and new name are identical, you simply double
password
.
That gets the password
into
your database…but what about getting it out?
crypt
Is One-Way Encryption
The crypt function, by definition, is one-way encryption. This means that once a
password has been encrypted, it can’t be unencrypted. While that presents you
some problems as a programmer, it’s a good thing for your users. It means that even
the administrators of the applications they use can’t go digging into databases and
pulling out their passwords.
Well, to be accurate, they
can
, but they’ll only get an encrypted version. And there’s
no special formula or magical command that lets them get at the original password.
Users are protected. And, ultimately, you, as an administrator, are protected. If you
can’t get at an encrypted password, for example, you can’t very well be blamed
for identity fraud.
But, how do you see whether a user has entered a valid password if you can’t decrypt
their password value in the database?
Easy: you can encrypt his supplied password, and compare that encrypted value
to the encrypted value in the database. If the encrypted values match, things are
good—and you still haven’t seen that user’s real password. You want something like
this in
authorize.php
, in which passwords are checked:
// Look up the user-provided credentials
$query = sprintf("SELECT user_id, username FROM users " .
" WHERE username = '%s' AND " .
" password = '%s';",
mysql_real_escape_string(trim($_SERVER['PHP_AUTH_USER'])),
mysql_real_escape_string(
crypt(trim($_SERVER['PHP_AUTH_PW']))));
WARNING Take your time with all of those closing parentheses. It can get hairy, and the last thing you
want is a nasty, hard-to-find bug because you’re one parenthesis shy.
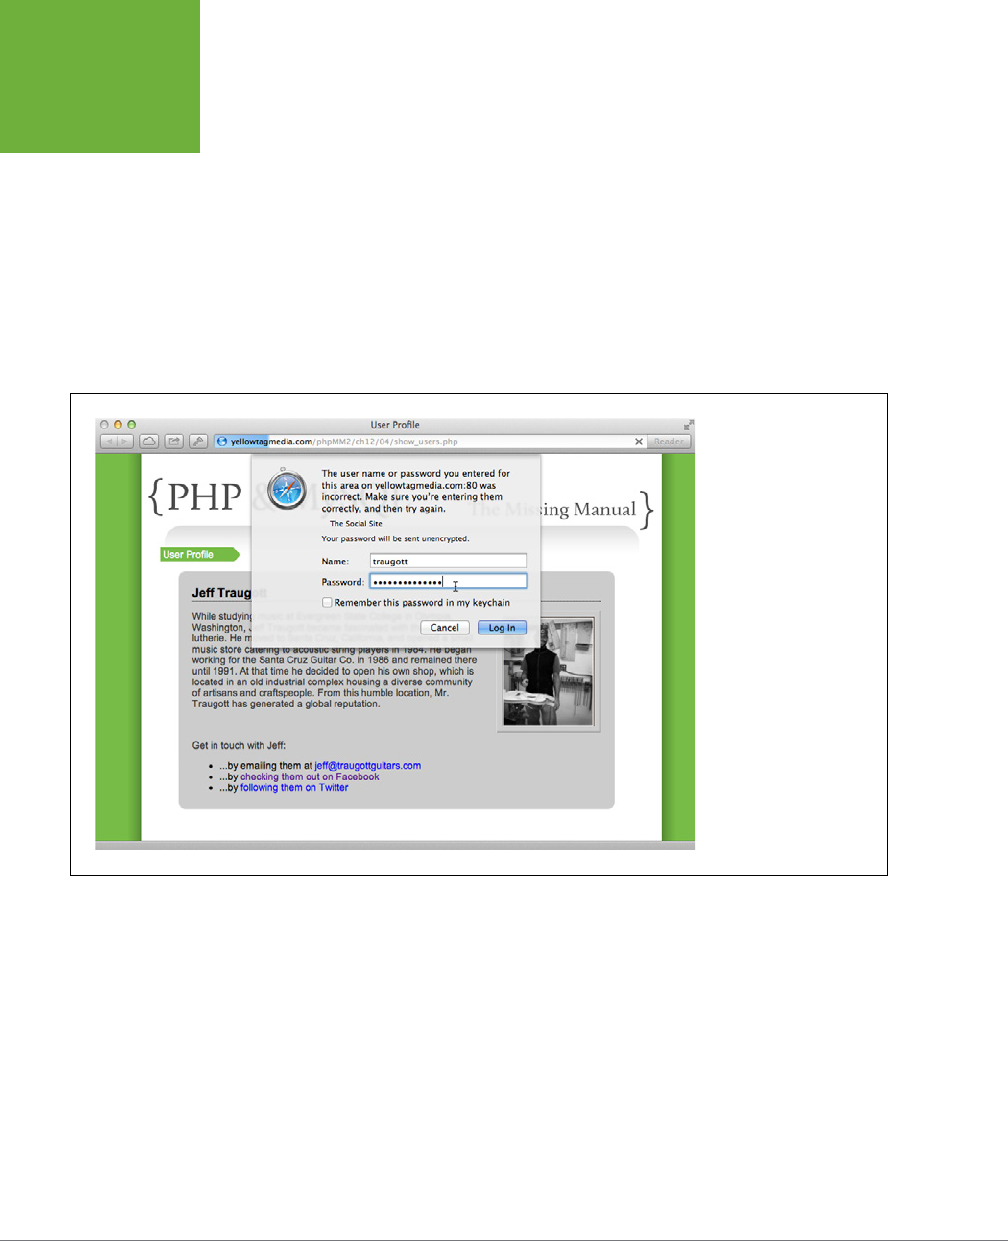
PHP & MYSQL: THE MISSING MANUAL
416
PASSWORDS
CREATE
SECURITY, BUT
SHOULD BE
SECURE
At this point, you should be able to try things out. You’re encrypting passwords on
user creation, and you’re encrypting the value to compare with that password on
user login.
Unfortunately, try as you might, you’re going to be stuck with Figure 12-11—a failed
login because the password doesn’t match.
So, what gives? Remember that briefly-mentioned second argument to crypt
(page 415)? It’s called a
salt
. A salt is a key—usually a few characters—that’s used
in generating the one-way encryption used by functions like crypt. The salt helps
ensure the randomness and security of a password, and unless the salt matches,
the encrypted password values won’t match.
FIGURE 12-11
No, it’s not groundhog
day. It seems that no
matter how many users
you create, you’ll never
get past this forbidding
login dialog box. There’s
one thing missing, and it
has to do with the inner
workings of
crypt
.
Encryption Uses Salt
So far, by not providing a salt, you’ve been letting crypt figure one out on its own.
But unless the salt provided in two dierent calls to crypt is identical, the resulting
encryption
will not match
. In other words, calling crypt on the same string two times
without providing a salt will give you two dierent results.
To see it in action, create a simple script called
test_salt.php
:
<?php
$input = "secret_string";
$first_output = crypt($input);
$second_output = crypt($input);

CHAPTER 12: AUTHENTICATION AND AUTHORIZATION 417
PASSWORDS
CREATE
SECURITY, BUT
SHOULD BE
SECURE
echo "First output is {$first_output}\n\n";
echo "Second output is {$second_output}\n\n";
?>
Run this script in your command-line terminal:
yellowta@yellowtagmedia.com [~/www/phpMM/ch11]# php test_salt.php
Content-type: text/html
First output is $1$9Jp.b9bG$6rLQRuAkG34msBkO9MoN51
Second output is $1$n845Ptys$Mv9s11qzZJj/xjSPSj20S0
Run it again, and you’ll get two dierent results from those two.
With one change, though, things get back to what you’d expect:
<?php
$input = "secret_string";
$salt = "salt";
$first_output = crypt($input, $salt);
$second_output = crypt($input, $salt);
echo "First output is {$first_output}\n\n";
echo "Second output is {$second_output}\n\n";
?>
Now, run this updated version and smile at the results:
yellowta@yellowtagmedia.com [~/www/phpMM/ch11]# php test_salt.php
Content-type: text/html
First output is sazmIw2D3KJ/M
Second output is sazmIw2D3KJ/M
As you can see, you need to ensure that both calls to crypt in your application’s
scripts use the same salt. Of course, you could just create a new constant, but there’s
an even better solution: use the user’s user name itself as the salt! This actually
means you could completely lose your scripts and any constant that defines a salt,
and your authentication would still work.
The user name always stays with the password, so you’re essentially ensuring that
they are truly a united combination.
First, update
create_user.php
(yes, one more time!) to utilize the supplied user
name as a salt:

PHP & MYSQL: THE MISSING MANUAL
418
PASSWORDS
CREATE
SECURITY, BUT
SHOULD BE
SECURE
$insert_sql = sprintf("INSERT INTO users " .
"(first_name, last_name, username, " .
"password, email, " .
"bio, facebook_url, twitter_handle, " .
"user_pic_path) " .
"VALUES ('%s', '%s', '%s', '%s', '%s',
'%s', '%s', '%s', '%s');",
mysql_real_escape_string($first_name),
mysql_real_escape_string($last_name),
mysql_real_escape_string($username),
mysql_real_escape_string(crypt($password, $username)),
mysql_real_escape_string($email),
mysql_real_escape_string($bio),
mysql_real_escape_string($facebook_url),
mysql_real_escape_string($twitter_handle),
mysql_real_escape_string($upload_filename));
Now, make the exact same change in
authorize.php
. Remember in this script, the
user name comes in through the $_SERVER superglobal:
// Look up the user-provided credentials
$query = sprintf("SELECT user_id, username FROM users " .
" WHERE username = '%s' AND " .
" password = '%s';",
mysql_real_escape_string(trim($_SERVER['PHP_AUTH_USER'])),
mysql_real_escape_string(
crypt(trim($_SERVER['PHP_AUTH_PW']),
$_SERVER['PHP_AUTH_USER'])));
Finally, create a new user (hopefully you’re not running out of friends yet!). Then,
try to log in by using that user’s user name and password.
And voilà! Getting that same old
show_users.php
screen means you’ve got a lot
more than the ability to delete users. It means you’ve got a solid, working authenti-
cation system. Congratulations. You’ve got one more big hurdle left to overcome—
controlling user login with cookies.

419
CHAPTER
13
It’s time to start winding down. You’ve gone from seeing PHP as some strange,
cryptic arrangement of angle brackets and dollar signs to building your own ap-
plication, including integration with a MySQL database, authentication, redirec-
tion, and a decent set of utility functions. You might not be able to sell your modest
application for a million dollars. But you should have a good sense of how to think
in PHP, and how scripts are structured to solve problems.
Before you can twist and bend this application and your new skills to other purposes,
there are still some lingering issues that you need to handle. A few of these are nice-
to-haves; and some are downright necessities if you’re going to spend your career
writing web applications.
Here are just a few things that you could give your application needs to round out
both its usefulness and your skills:
• A better login screen. Nobody likes a bland, gray pop-up dialog box; they want
a branded, styled login form.
• Better messaging to indicate whether a user is logged in.
• A way to log out.
• Two levels of authentication: one to get to the main application, and then
administrator-level authentication to get to a page like
show_users.php
or
delete_user.php
.
• Some basic navigation. That navigation should change based on a user’s login
and the groups to which that user belongs.
Cookies, Sign-
Ins, and Ditching
Crummy Pop-Ups
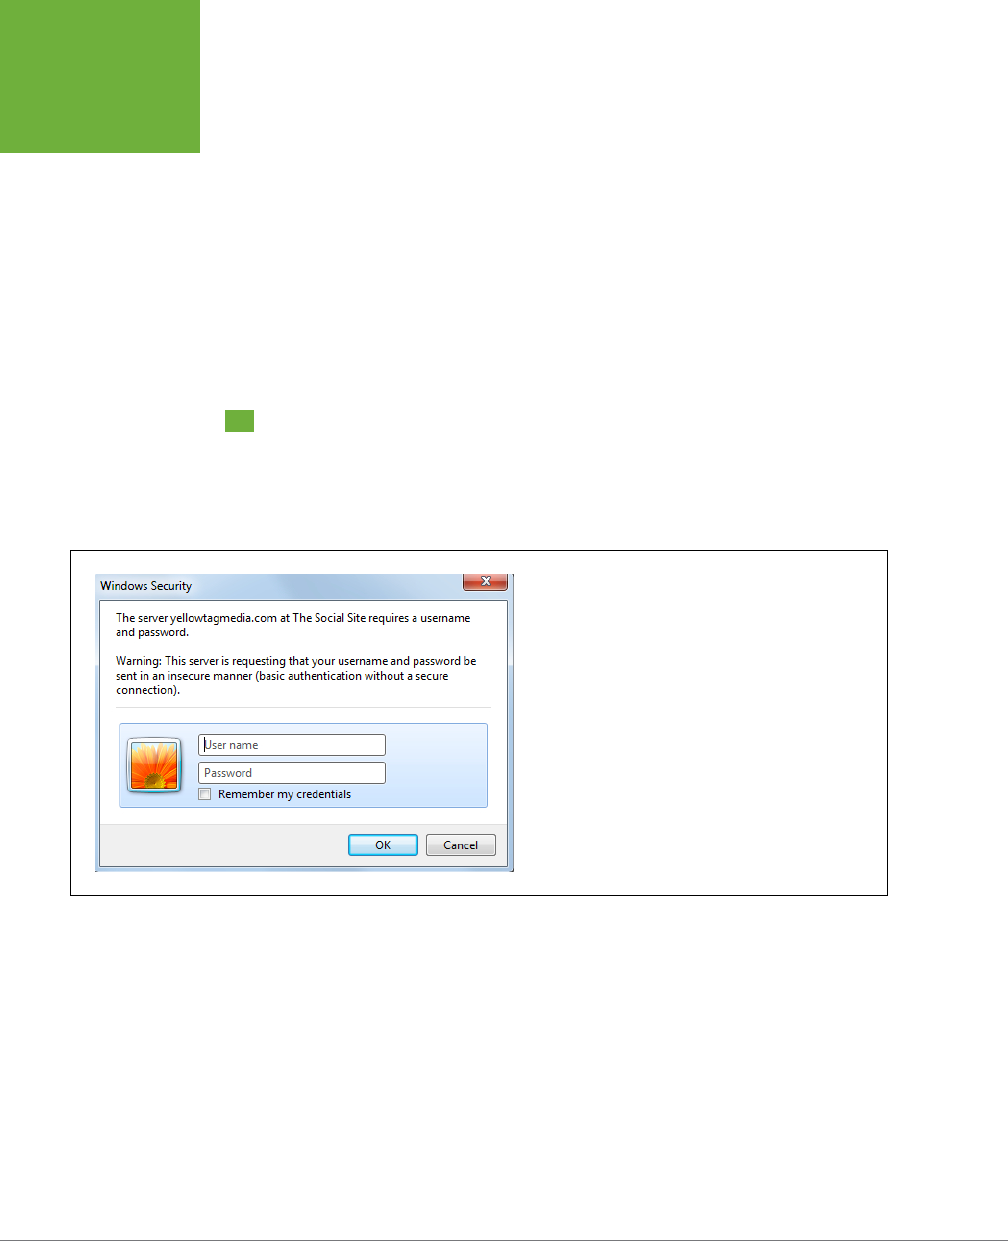
PHP & MYSQL: THE MISSING MANUAL
420
MOVING
BEYOND BASIC
AUTHENTICATION
These are mostly related to the idea of logging in, and that’s no accident. Whether
it’s a good-looking login screen or the ability to group users, you’ll probably spend
as much time on the authentication and authorization of your web applications as
you do on anything else. Even if you have boilerplate code to get a user name and
password, most web pages are structured as components that are only selectively
accessible. In other words, a web application shows users dierent things and gives
users dierent functionality based upon their login.
It’s time to get a handle on how to store user credentials, move users around your
site, and the issues that underlie keeping up with a user’s information. You’re ready
to take your programming into the real world.
Moving Beyond Basic Authentication
Right now, your authentication uses the browser’s built-in HTTP capabilities. Unfor-
tunately, as useful as HTTP authentication is, it leaves you with a lame visual; check
out Figure 13-1 for the sad reminder.
FIGURE 13-1
The biggest issue with this HTTP login feature isn’t its awful
look and feel. It’s that you don’t have as much control as
you’ll ultimately want. For example, you can’t provide a
customized message if the user login fails: you have to cause
the user to request a page to fire the login headers off. And
ultimately, that’s way too little control for someone who’s
comfortable with PHP—and that’s definitely you by now.
Keep in mind: other than signing up initially or seeing a generic home page, this
HTTP login dialog box is the doorway to much of your application. So any work you
do with a top-tier designer; any nice CSS and color scheming; any clever HTML5
and SVG is all lost because it’s hidden behind that annoying, gray dialog box. Even
worse, when the user doesn’t get in, it
keeps
popping up.

CHAPTER 13: COOKIES, SIGN-INS, AND DITCHING CRUMMY POP-UPS 421
MOVING
BEYOND BASIC
AUTHENTICATION
But changing that takes more than changing one thing. It’s going to require a com-
plete rework of how users access your site.
NOTE You can find the finished example code for this section on this book’s Missing CD page at
www.
missingmanuals.com/cds/phpmysqlmm2e
.
Starting with a Landing Page
Any site that requires a login has to give users somewhere to land before they hit
the login page. To build out your site, you need something simple and eective as
a central location for your users to begin. From this starting point they should be
able to log in or create a new login.
Here’s a simple version of just that. Call it
index.html
so that it can eventually be
your site’s default landing page:
<html>
<head>
<link href="../css/phpMM.css" rel="stylesheet" type="text/css" />
</head>
<body>
<div id="header"><h1>PHP & MySQL: The Missing Manual</h1></div>
<div id="content">
<div id="home_banner"></div>
<div id="signup">
<a href="create_user.html"><img src="../images/sign_me_up.png" /></a>
<a href="signin.html"><img src="../images/sign_me_in.png" /></a>
</div>
</div>
<div id="footer"></div>
</body>
</html>
You can see what the page looks like in Figure 13-2.
Signing up users is easy: just point them over to
create_user.html
and let the work
you’ve already done take eect. But that link to
signin.html
creates a new set of
questions to answer, first and foremost among them: What exactly needs to happen
there to sign a user in?
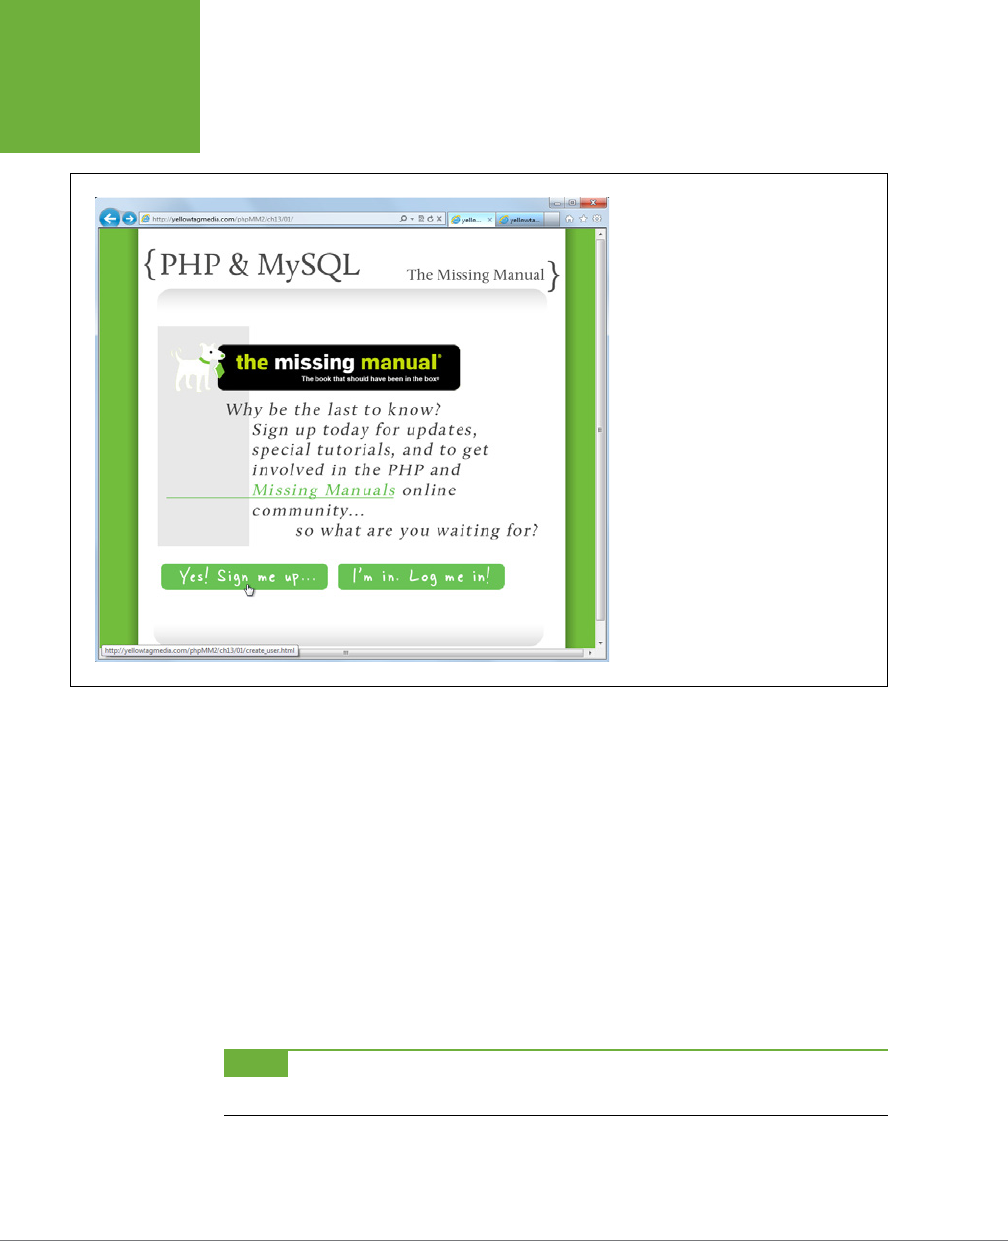
PHP & MYSQL: THE MISSING MANUAL
422
MOVING
BEYOND BASIC
AUTHENTICATION
FIGURE 13-2
No, you probably shouldn’t submit this site
to any web design contests. Still, it gets
the basic point across: you want users to
either sign up or log in. You have a sign-in
page, but logging in is going to require
a new page or two, some PHP, and the
demise of that HTTP authentication login
dialog box.
Taking Control of User Sign Ins
Obviously, there needs to be a form into which users can enter information. And the
way things have been going, that form should submit to a script, which checks the
user name and password. Already, that’s dierent from what you have: currently,
authentication happens as a sort of side eect of requesting a page that requires
authorize.php
. So far, there’s no explicit login form, but now there needs to be one.
Then, this script that receives information from the form login has to check the
user’s credentials. That’s easy;
authorize.php
already does that, and even though
it currently uses $_SERVER, it’s easy to change to accept input from a sign-in form.
Wait, though, here’s another wrinkle: if the credentials aren’t good, then you need
to display the sign-in form again, preferably with the user’s original input for user
name, or at a minimum, a message stating that there was an error logging in.
NOTE There’s nothing as frustrating as a login form that sits staring blank-faced at you, never telling you
that it’s received your credentials and that they were rejected. User feedback is critical in any good login system.
So here’s the basic flow:
1. Sign-in form (HTML): Takes in the user name and password. Submits to...

CHAPTER 13: COOKIES, SIGN-INS, AND DITCHING CRUMMY POP-UPS 423
MOVING
BEYOND BASIC
AUTHENTICATION
2. Authentication script (PHP): Verifies the user name and password against
the database. If there’s a match take the user to a secure page, like the user’s
profile (
show_user.php
), and let her know that she’s logged in. If her credentials
are not valid, take her back to...
3. Sign-in form (HTML)
Here’s a problem: How can an HTML form display an error message on a particular
condition or pre-insert the contents of a user name field?
Having that sign-in form as HTML limits you, not on its initial display, but for the
situation in which there’s a login failure. It’s then that you want PHP on your side.
The obvious solution is to convert the sign-in page to PHP, and you’d end up with a
flow like the following (the changes are highlighted in bold Italic):
1. Sign-in form (PHP): Takes in the user name and password. Submits to...
2. Authentication script (PHP): Verifies the user name and password against
the database. If there’s a match take her to a secure page, like the user’s profile
(
show_user.php
), and let her know that she’s logged in. If her credentials are
not valid, take her back to...
3. Sign-in form (PHP): Now this form displays a customized error and reloads
the user name.
Why not take this even further? What if instead of two scripts, you had a single
script that submitted to itself, and either redirected the user on successful login, or
displayed itself again if the login was unsuccessful? (If the idea of a script submit-
ting to itself sounds like something you’d see in the movie
Inception
, see the box
on page 424.)
By the way, you’ll need to make a quick change to your site’s new home page before
you forget. Because you’re using a script not just for processing logins, but for creat-
ing the login page itself, do that now before you’re neck deep into PHP:
<html>
<head>
<link href="../css/phpMM.css" rel="stylesheet" type="text/css" />
</head>
<body>
<div id="header"><h1>PHP & MySQL: The Missing Manual</h1></div>
<div id="content">
<div id="home_banner"></div>
<div id="signup">
<a href="create_user.html"><img src="../images/sign_me_up.png" /></a>
<a href="signin.php"><img src="../images/sign_me_in.png" /></a>
</div>
</div>

PHP & MYSQL: THE MISSING MANUAL
424
MOVING
BEYOND BASIC
AUTHENTICATION
<div id="footer"></div>
</body>
</html>
POWER USERS’ CLINIC
PHP Loves to Self-Reference
Up until now, you’ve had a strong distinction between forms—
created in HTML files—and the scripts to which they submit—
PHP. But, you’ve torn down that distinction in view pages. You
have lots of scripts that do some programming—logging in a
user; getting all the current users; or looking up a particular
user—and then outputting a bunch of HTML.
Why not blow that distinction away in forms, too?
A script could output a form and set the action of that form
as itself. Then, when the form is recalled, it would determine
whether there’s any submitted data. If so, this means that
it’s receiving a form submission and can do what it needs to
programmatically. There’s no real magic here; all you need is
an
if
statement that directs traffic. Inside that
if
, you could
even output a completely different page, perhaps letting the
user know that his data has been accepted.
What if there’s no submission data? Well, then it’s just a normal
initial request for the form, so the form should be shown. But
you get some nice benefits here, too. You can check whether
there might be error messages or existing data from a previ-
ous submission, and drop those values right into your form.
This technique is extremely common in PHP. It’s something with
which you want to become comfortable. Even though it’s a bit
of heavy lifting the first few times, you’ll soon find that in a
PHP-driven application, there are very few times when you’re
not
going to use a PHP script. Forms, error pages, login pages,
even welcome pages...you’ll get hooked on having the ability
to use PHP and be hard-pressed to go back.
At this point, you might be dying inside—well, that is if you
love or have bought into the Model-View-Controller (MVC) pat-
tern, that is. HTML inside a script that submits to itself means
you’ve completely eradicated a wall (or even a large overgrown
hedge) between the model, the view, and the controller. But as
you’ve already seen, you’re not going to get a true MVC pattern
working well in PHP, anyway. You can get an approximation
(and don’t shy away from that approximation), but you’re just
not going to get the really clean separation that’s possible in
languages like Ruby or Java (and you can still make just as
big a mess in those languages, in case you were wondering).
Given that, you might need to simply accept that PHP is often
going to cause you to sacrifice really clean MVC at the altar of
getting things done.
From HTTP Authentication to Cookies
Before you can dive into writing this sign-in script—call it
signin.php
—there’s another
glaring issue to work out. How do you actually let the user log in? By abandoning
that HTTP login dialog box, you’re taking logging into your own hands.
Getting the user name and password and checking them against the database is
not a big deal. You can do that; and you will do that in
signin.php
. The big problem,
however, is keeping that information around. With HTTP authentication, the browser
kept up with all your pages being in one realm and whether the user was logged
into that realm. As a result, after logging in and accessing
show_users.php
, a user
did not have to log in to get to
delete_user.php
; she would already have done that
for another page in the same realm.
This is where cookies come into play.

CHAPTER 13: COOKIES, SIGN-INS, AND DITCHING CRUMMY POP-UPS 425
MOVING
BEYOND BASIC
AUTHENTICATION
NOTE Here’s where you usually get the obligatory baked-goods joke.
Cookies
is a strange term, one that
refers back to something called
magic cookies
. That was a term old-school Unix hackers used for little bits of data
passed back and forth between programs.
Well, it stuck, so if you’re new to cookies in the programming world, feel free to snicker as you read the rest of
this chapter.
WHAT IS A COOKIE?
A cookie is nothing magical at all. It’s simply a means by which you can store a single
piece of information on your user’s computer. A cookie has a name, a value—that
single piece of information—and a date on which the cookie expires. When the cookie
expires, it’s gone; you can no longer retrieve the value.
You can have a cookie with a name “username” and a value “my_username,” and
perhaps another cookie named “user_id” with a value of “52.” Then, your scripts can
check whether there’s a “username” cookie, and if so, assume the user’s logged in.
In the same manner, your login script can set a “username” cookie.
In other words, other than setting the cookie in the first place, you get the same
sort of eect as you were getting with basic authentication. Of course, creation of
cookies is within your control, so you can create them with your own form, delete
them with your scripts (say, on a user logout), and issue messages based on the
status of cookies.
WARNING Although you can control the creation of cookies, your users can easily modify them, delete
them, and even create cookies of their own. Because of that, cookies aren’t ideal for the sort of information you’re
storing in them for our purposes here: secure user name and passwords.
That’s why there’s a Chapter 14. Have no fear; even though you’ll change the manner in which you use cookies,
everything you’re learning here will be important in your final authentication solution. Besides, there are plenty
of times when cookies are helpful, and they’ll be a staple of your programming toolkit.
CREATE AND RETRIEVE COOKIES
You’re almost ready to jump into scripting again, and that’s where all the fun is. (It’s
certainly not as much fun reading about code as it is writing code.) All that’s left is
to learn how to write cookies and then look them up and get their values. Thank-
fully, PHP makes this as simple as working with the superglobals with which you’ve
already become accustomed: $_SERVER and $_REQUEST.
To set a cookie, you simply call setcookie and supply the cookie’s name and value:
setcookie("username", "my_username");
Once a cookie is set, you retrieve the value you just set with the $_COOKIE superglobal:
echo "You are signed in as " . $_COOKIE['username'] . ".";

PHP & MYSQL: THE MISSING MANUAL
426
LOGGING IN
WITH COOKIES
It’s that simple. Sure, there are some wrinkles here and there, and you’ll add a bit
of nuance to your cookie creation, but if you have setcookie and $_COOKIE down,
you’re ready to roll.
NOTE One of those nuances that you might already be thinking about is the cookie’s expiration value. You
can pass that as a third value to
setcookie
, but for now, don’t concern yourself with it.
Logging In with Cookies
You know what cookies are, and you know the flow of the sign-in form. Now, it’s time
to write some code. Create
signin.php
and start with the basic outline:
<?php
require_once '../scripts/database_connection.php';
require_once '../scripts/view.php';
// If the user is logged in, the user_id cookie will be set
if (!isset($_COOKIE['user_id'])) {
// See if a login form was submitted with a username for login
if (isset($_REQUEST['username'])) {
// Try and log the user in
$username = mysql_real_escape_string(trim($_REQUEST['username']));
$password = mysql_real_escape_string(trim($_REQUEST['password']));
// Look up the user
// If user not found, issue an error
}
// Still in the "not signed in" part of the if
// Start the page, and we know there's no success or error message
// since they're just logging in
page_start("Sign In");
?>
<html>
<div id="content">
<h1>Sign In to the Club</h1>
<form id="signin_form" action="signin.php" method="POST">
<fieldset>
<label for="username">Username:</label>
<input type="text" name="username" id="username" size="20" />

CHAPTER 13: COOKIES, SIGN-INS, AND DITCHING CRUMMY POP-UPS 427
LOGGING IN
WITH COOKIES
<br />
<label for="password">Password:</label>
<input type="password" name="password" id="password" size="20" />
</fieldset>
<br />
<fieldset class="center">
<input type="submit" value="Sign In" />
</fieldset>
</form>
</div>
<div id="footer"></div>
</body>
</html>
<?php
} else {
// Now handle the case where they're logged in
// redirect to another page, most likely show_user.php
}
?>
NOTE Did you notice that
database_connection.php
is required for logging the user in but
app_config.php
isn’t? You can include
app_config.php
because there’s a good chance that you’ll need it at some point, but you
might also remember that
database_connection.php
actually requires
app_config.php
itself. So, if you require
database_connection.php
, you really get a
require_once
for
app_config.php
for free.
This script is far from complete and has several problems, but it’s still a lot of code.
Let’s take it piece by piece.
NOTE You can find the finished example code for this section on this book’s Missing CD page at
www
.missingmanuals.com/cds/phpmysqlmm2e
.
Determining Whether the User Is Already Signed In
Even if a user comes to your sign-in page explicitly, you shouldn’t make him sign
in if he’s already in. So the first thing to do (other than a few require_once lines)
is establish whether the “user_id” cookie is set. If it’s not, the user is not logged in,
and everything flows from there.
<?php
require_once '../scripts/database_connection.php';
require_once '../scripts/view.php';
// If the user is logged in, the user_id cookie will be set
if (!isset($_COOKIE['user_id'])) {

PHP & MYSQL: THE MISSING MANUAL
428
LOGGING IN
WITH COOKIES
Here’s your first clue that cookies aren’t much dierent than what you’ve already
been using: you can use isset to see if it’s already created and then you just pass
in the cookie name. Piece of cake.
Is the User Trying to Sign In?
If the “user_id” cookie isn’t set, the user is not logged in. The next thing to check,
then, is whether he’s
trying
to log in. This would mean that you have some request
information. In fact, the user might have filled out the HTML form already (later in
this script) and submitted that form back to this script.
However, that’s not the same as trying to access this script without any information.
In that case, the user should just get the regular HTML sign-in form. As a result you
can see whether there’s a submission by checking if there’s anything in the $_REQUEST
superglobal for “username,” a field from the sign in form:
// See if a login form was submitted with a username for login
if (isset($_REQUEST['username'])) {
// Try and log the user in
$username = mysql_real_escape_string(trim($_REQUEST['username']));
$password = mysql_real_escape_string(trim($_REQUEST['password']));
// Look up the user
// If user not found, issue an error
}
If there’s request data, you can get the user name and password that have been
submitted, and (in a moment) look up the user and deal with any problems.
Before you do that, though, there’s a nice change you can make. So far, you’ve been
using $_REQUEST for everything. It takes in GET requests—which are requests where
information is passed through the URL—and POST requests, like the ones that most
of your forms have issued. But, you already know that the only way information
should get to this stage is by a submission from your own form, which will use a
POST request.
It would probably be better to replace $_REQUEST with a more specific superglobal:
$_POST, which only has request data from a POST request.
NOTE As you’ve probably already guessed,
$_POST
has a counterpart for GET requests:
$_GET
. For more
detail on the differences, see the box on page 429.
It’s a good idea to begin moving toward the more specific $_POST when possible.
POST data prohibits parameters on the request URL, and it’s generally a bit more
secure.

CHAPTER 13: COOKIES, SIGN-INS, AND DITCHING CRUMMY POP-UPS 429
LOGGING IN
WITH COOKIES
WARNING The emphasis here is on “bit.” POST data is a little harder to get at than GET data, but not by
much. Never think that a form that POSTs data is secure in and of itself. That’s by no means the case.
Make that small change to your script:
// See if a login form was submitted with a username for login
if (isset($_POST['username'])) {
// Try and log the user in
$username = mysql_real_escape_string(trim($_REQUEST['username']));
$password = mysql_real_escape_string(trim($_REQUEST['password']));
// Look up the user
// If user not found, issue an error
}
FREQUENTLY ASKED QUESTION
Post It or Get It?
$_REQUEST, $_POST, and $_GET all seem to do the same thing:
take in a value. How do I know which one to use?
Ahh, yes, another quibble over which programmers can argue,
demonize, and distort. No matter what you hear, there’s just
no functional difference between
$_REQUEST
,
$_GET
, and
$_POST
in terms of getting request information.
$_REQUEST
will always have what’s in both
$_GET
and
$_POST
, but if
you know you’ve got a POST request, you don’t gain or lose
anything by using
$_REQUEST
over
$_POST
.
In fact, not only does
$_REQUEST
have the combined values
from
$_GET
and
$_POST
, it has the contents of
$_COOKIE
in it too (at least by default). Technically, you could do this in
signin.php
:
// If the user is logged in, the
// user_id cookie will be set
if (!isset($_REQUEST['user_id'])) {
In other words, you could use
$_REQUEST
and totally ditch
$_GET
,
$_REQUEST
, and
$_COOKIE
. But, think back to all
the programming principles you’ve been learning: make your
code clear and readable; be specific over being just generic; and
think about what those who have to work with your code after
you will see. For all of those reasons, although
$_REQUEST
isn’t bad, it’s often helpful to use
$_GET
and
$_POST
and
$_COOKIE
when that’s what you’re dealing with.
In the case of
signin.php
, you know you’re getting a POST
request. Given that, use
$_POST
when you can. If you know
you’re getting a GET request, use
$_GET
. And if you’re looking
for a cookie, use
$_COOKIE
. Your code will be clearer and
more specific, and most of all, you’ll know exactly what it’s
intended to do.
Displaying the Page
Whether the user got to this page by submitting incorrect credentials or by submitting
no credentials at all, she should see a form. You’re now ready to display some HTML.

PHP & MYSQL: THE MISSING MANUAL
430
LOGGING IN
WITH COOKIES
NOTE If the user logs in successfully, your code will need to redirect her elsewhere. Therefore, that code
block that checks user names and passwords needs to eventually forward the user on to another location if her
login is successful.
// Still in the "not signed in" part of the if
// Start the page, and we know there's no success or error message
// since they're just logging in
page_start("Sign In");
?>
<html>
<div id="content">
<h1>Sign In to the Club</h1>
<form id="signin_form" action="signin.php" method="POST">
<fieldset>
<label for="username">Username:</label>
<input type="text" name="username" id="username" size="20" />
<br />
<label for="password">Password:</label>
<input type="password" name="password" id="password" size="20" />
</fieldset>
<br />
<fieldset class="center">
<input type="submit" value="Sign In" />
</fieldset>
</form>
</div>
<div id="footer"></div>
</body>
</html>
Don’t miss that opening comment block; it’s an important one. This code, including
the HTML, is all still part of the opening if block:
// If the user is logged in, the user_id cookie will be set
if (!isset($_COOKIE['user_id'])) {
In other words, all of this HTML is shown if, and only if, the user is not logged in.
There’s another small improvement you can make here, in the same vein as using
$_POST instead of $_REQUEST. Take a look at this line:
<form id="signin_form" action="signin.php" method="POST">
This line instructs the form to submit to the same script that’s generating the form.
There’s nothing wrong with it, but what if you were to rename
signin.php
? It might
be a remote possibility, but all the same, it’s not unrealistic. (It wasn’t that long ago

CHAPTER 13: COOKIES, SIGN-INS, AND DITCHING CRUMMY POP-UPS 431
LOGGING IN
WITH COOKIES
that you moved away from calling a script
admin.php
and instead went with the
more functionally named
delete_user.php
and
show_users.php
.)
Remember that PHP loves this script-submitting-to-script paradigm. In fact, just to
make it a bit easier, there’s a property in $_SERVER that furnishes the current script
name. No, it’s not there just for self-referential scripts, but it sure does help. Update
signin.php
to take advantage of $_SERVER['PHP_SELF']:
<form id="signin_form"
action="<?php echo $_SERVER['PHP_SELF']; ?>"
method="POST">
With this addition, the form submits, literally, to itself. A small change, but a good
one, and one you’ll find yourself coming back to over and over again.
Redirecting as Needed
The only thing left, at least in this pseudocode version, is to redirect the user if she’s
logged in:
<?php
} else {
// Now handle the case where they're logged in
// redirect to another page, most likely show_user.php
}
?>
You have the basic flow, but there’s loads of stu missing. Time to dig in and start
piecing this code into a usable form. (For more advice on how to get started, see
the following box.)
POWER USERS’ CLINIC
Pseudocode with Comments and Real Code
It might seem strange to think of
signin.php
as it currently
exists as pseudocode, but that’s just what it is. It’s certainly not
a complete working script; there are numerous holes through
which you could drive a truck. Fortunately, those holes are
generally indicated with a helpful, clear comment. Although
those comments don’t do anything programmatically, they do
remind you of
what
you need to do and
where
you need to do it.
Truth be told, pseudocode is often best done in just this way.
You’re not wasting time writing non-existent function names
like
check_the_user_credentials()
. But you’re ac-
complishing the same goal with comments like:
// Look up the user
// If user not found, issue an error
Those comments are just as useful, and they can stay put as
you write code
under
each comment that fills out the script’s
functionality.
Before you begin, though, you can already get a good idea of this flow. Right now,
a non-logged-in user will get the HTML output, without all the PHP that runs when
there’s a user name coming in through a POST request. As a result, Figure 13-3 is
the default view, so to speak.
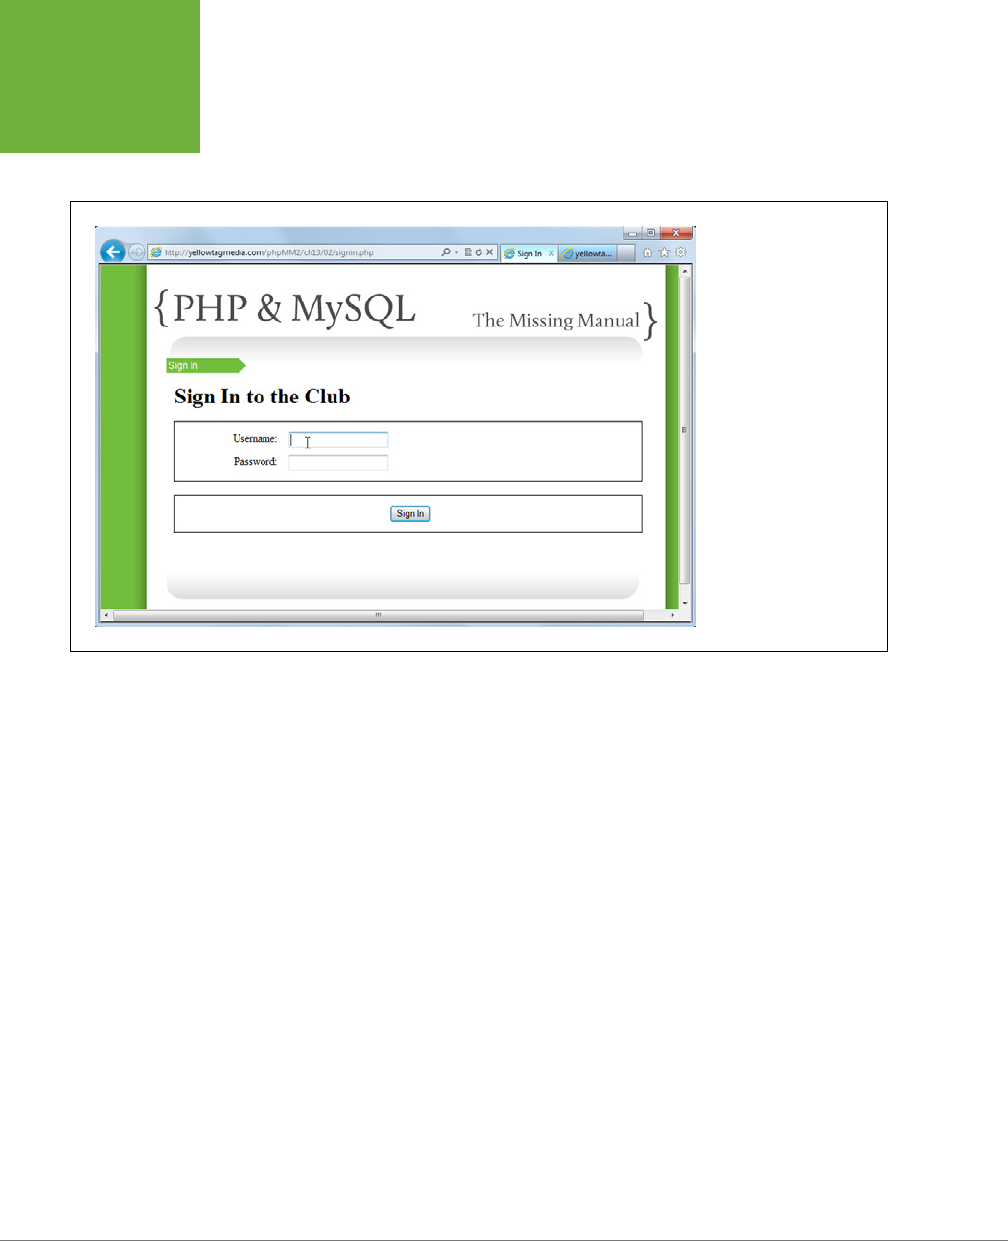
PHP & MYSQL: THE MISSING MANUAL
432
LOGGING IN
WITH COOKIES
When you try to submit the form—with a good or bad user name—you get the same
form over again. Not so great, but it’s a place to start, and you can begin to tackle
each individual piece of functionality.
FIGURE 13-3
It might seem a bit odd,
but the same PHP script
that checks login creden-
tials now grabs them from
your users. This is just a
simple HTML form, because
there’s no
user_id
cookie and no user name
in the POST data.
Logging In the User
The next bit of code is nothing more than a copy-paste-and-modify job from
authorize.php
. Here’s where that script left o:
// Look up the user-provided credentials
$query = sprintf("SELECT user_id, username FROM users " .
" WHERE username = '%s' AND " .
" password = '%s';",
mysql_real_escape_string(trim($_SERVER['PHP_AUTH_USER'])),
mysql_real_escape_string(
crypt(trim($_SERVER['PHP_AUTH_PW']),
$_SERVER['PHP_AUTH_USER'])));
$results = mysql_query($query);
if (mysql_num_rows($results) == 1) {
$result = mysql_fetch_array($results);
$current_user_id = $result['user_id'];
$current_username = $result['username'];
} else {
header('HTTP/1.1 401 Unauthorized');
header('WWW-Authenticate: Basic realm="The Social Site"');

CHAPTER 13: COOKIES, SIGN-INS, AND DITCHING CRUMMY POP-UPS 433
LOGGING IN
WITH COOKIES
exit("You need a valid username and password to be here. " .
"Move along, nothing to see.");
}
Pretty good, although it all depends on HTTP authentication. Now, you can drop
that into
signin.php
, change the successful block to set some cookies, and redirect
somewhere useful:
<?php
require_once '../scripts/database_connection.php';
require_once '../scripts/view.php';
// If the user is logged in, the user_id cookie will be set
if (!isset($_COOKIE['user_id'])) {
// See if a login form was submitted with a username for login
if (isset($_POST['username'])) {
// Try and log the user in
$username = mysql_real_escape_string(trim($_REQUEST['username']));
$password = mysql_real_escape_string(trim($_REQUEST['password']));
// Look up the user
$query = sprintf("SELECT user_id, username FROM users " .
" WHERE username = '%s' AND " .
" password = '%s';",
$username, crypt($password, $username));
$results = mysql_query($query);
if (mysql_num_rows($results) == 1) {
$result = mysql_fetch_array($results);
$user_id = $result['user_id'];
setcookie('user_id', $user_id);
setcookie('username', $result['username']);
header("Location: show_user.php");
exit();
} else {
// If user not found, issue an error
}
}
// Still in the "not signed in" part of the if
// Start the page, and we know there's no success or error message
// since they're just logging in
page_start("Sign In");
?>
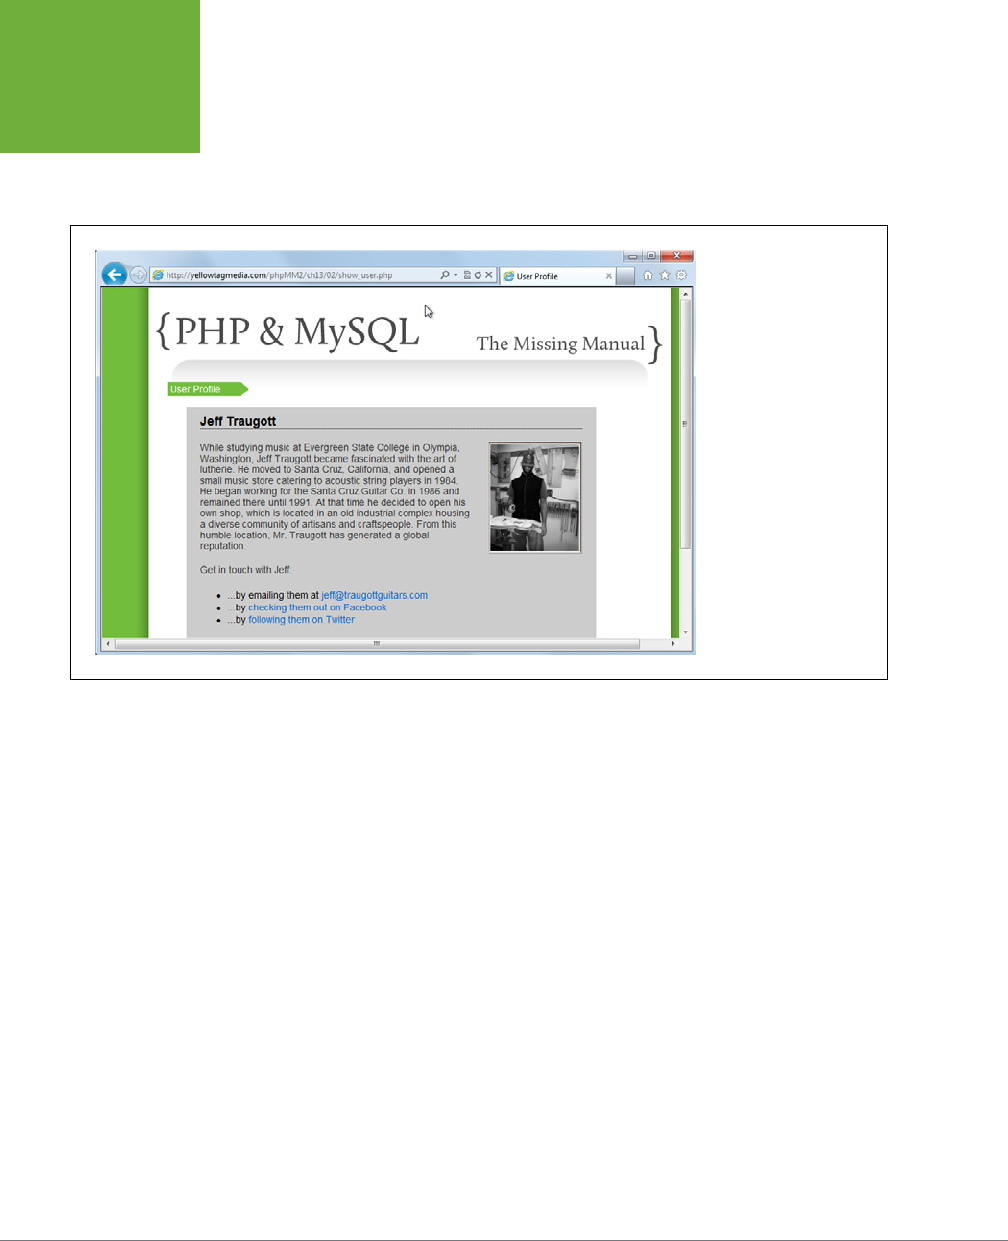
PHP & MYSQL: THE MISSING MANUAL
434
LOGGING IN
WITH COOKIES
Open up
signin.php
, and you should see the login form (refer back to Figure 13-3 to
ensure that you’re on the right page with the right HTML). Use some valid creden-
tials, and you should successfully log in, have a cookie set, and be passed over to
show_user.php
(see Figure 13-4).
FIGURE 13-4
Once again, victory is sig-
nified by getting to a page
you’ve long since com-
pleted. Here, it’s getting to
show_user.php
with the
user who just logged in.
There’s no browser magic
here (well, not in the
authentication bit), and
no HTTP authentication.
Just good old-fashioned
PHP, MySQL, and some help
from cookies.
Did you notice anything odd in that last bit of redirection? Here’s the line where the
redirect is sent to the browser:
if (mysql_num_rows($results) == 1) {
$result = mysql_fetch_array($results);
$user_id = $result['user_id'];
setcookie('user_id', $user_id);
setcookie('username', $result['username']);
header("Location: show_user.php");
exit();
} else {
// If user not found, issue an error
}
If no bells are ringing, check out
create_user.php
(page 214). That script creates a
user and redirects her to
show_user.php
. Here’s the relevant line:
header("Location: show_user.php?user_id=" . mysql_insert_id());
Here, additional information is sent: the user_id of the user to display, sent as a
GET parameter within the request URL. However, in
signin.php
, there’s no user_id
parameter. Figure 13-4 confirms that things work.
CHAPTER 13: COOKIES, SIGN-INS, AND DITCHING CRUMMY POP-UPS 435
LOGGING IN
WITH COOKIES
All the same,
show_user.php
expects that information:
// Get the user ID of the user to show
$user_id = $_REQUEST['user_id'];
So, how does this work in
signin.php
? The answer lies in how $_REQUEST works and
what information it contains. For starters, read the box on page 429 if you haven’t
already. You’re setting a cookie in
signin.php
, and that cookie is accessible through
the $_COOKIE superglobal. But, $_REQUEST also contains what’s in $_COOKIE—along
with what’s in $_POST and $_GET. As a result, this
$user_id = $_REQUEST['user_id'];
is actually just as good as the following for getting the value in a cookie:
$user_id = $_COOKIE['user_id'];
NOTE The obvious question is, “Which should you use:
$_COOKIE
or
$_REQUEST
? As usual, it depends.
Here, if you switch to
$_COOKIE
, you’ll need to update
create_user.php
. It might be best to leave this as
$_REQUEST
, at least for now, because it makes
show_user.php
a little more flexible. It accepts request parameters
and cookies, and that’s a nice thing. Later, if you move to using only cookies, you can update
show_user.php
to
use
$_COOKIE
and be more specific.
Blank Pages and Expiring Cookies
At some point as you’re trying things out, you might get a strange response. You
enter in
signin.php
in your URL bar, you press enter, and you end up with a blank
page, like the one in Figure 13-5.
FIGURE 13-5
Nobody said that testing authentica-
tion wasn’t a hassle. This blank screen
actually means that your login and
cookie setting are working. Clearly,
this can’t be right. The answer lies in
the fact that you’re once again stuck
in a loop, as you’ll see on the next
few pages.

PHP & MYSQL: THE MISSING MANUAL
436
LOGGING IN
WITH COOKIES
You try it again. You try to reload. You try to clear your cache. Nothing! Finally, you
restart your browser, and things start to behave. But no sooner have you signed in
through
signin.php
than it’s happening again. What’s up?
Actually, this is a sign that things are working
correctly
. Remember that in your
script, the first conditional checks for a cookie:
// If the user is logged in, the user_id cookie will be set
if (!isset($_COOKIE['user_id'])) {
If this cookie is set, the script jumps all the way down to this bit at the bottom of
your file:
<?php
} else {
// Now handle the case where they're logged in
// redirect to another page, most likely show_user.php
}
?>
There’s nothing there, so you get a blank browser. You can fix this (kind of) by setting
up a default action for users who are sent to
signin.php
and yet are already logged in.
In fact, it’s the same thing you did earlier for a login: redirect them to
show_user.php
:
} else {
// Now handle the case where they're logged in
header("Location: show_user.php");
exit();
}
Now, there’s no more blank screen. Your
show_user.php
script picks up on the
“user_id” cookie and shows the currently logged-in user. Good, right?
Well, sort of. It still leaves you in an endless loop. It’s just that now you’re looping
on the nice looking
show_user.php
rather than a crummy-looking blank page. You’ll
need to completely close out your browser to stop the madness—which is exactly
as it should be. Just as when you logged in via HTTP authentication, logging in and
setting a cookie sets that cookie to exist until the browser is closed.
NOTE The default value for the third parameter of
setcookie
is “0”. This means that the cookie expires
at the end of the user’s session, which is when the user closes his browser.
If you need to get out of this loop, just close your browser. Be sure to close the pro-
gram, not just the current tab or window. This will cause a cookie that has a default
expiration value to expire.
To set the cookie to last longer (or shorter), just pass a third parameter to setcookie.
That third parameter should be expressed in the number of seconds from what
Unix and Linux systems call the
epoch
, January 1, 1970, at 0:00 GMT. You usually
pass in time, which gives the current time—also in seconds since the epoch—and

CHAPTER 13: COOKIES, SIGN-INS, AND DITCHING CRUMMY POP-UPS 437
LOGGING IN
WITH COOKIES
then add to that. Thus, time() + 10 would be 10 seconds in the future, as reckoned
from the epoch.
Here are just a few examples of setcookie with a set expiration time:
// Expire in an hour (60 seconds * 60 minutes = 3600)
setcookie('user_id', $user_id, time() + 3600);
// This actually deletes the cookie, since it indicates an
// expiration in the past
setcookie('user_id', $user_id, time() - 3600);
// The default: expire on browser close
setcookie('user_id', $user_id, 0);
You can also supply a time via mktime, which takes an hour, date, second, month,
day, and year, and returns the number of seconds since the epoch (again); therefore
setcookie('user_id', $user_id, mktime(0, 0, 0, 2, 1, 2021);
sets a cookie to expire on February 1, 2021, GMT. That’s a little far away, wouldn’t you
say? In general, the default value is perfectly reasonable. Most users are comfort-
able signing in again when their browser closes. In fact, many users would
not
be
comfortable with their login lasting on and on, potentially in perpetuity.
NOTE The notable exceptions here are sites like Facebook and Twitter that don’t contain a lot of valuable
user information. By contrast, most financial sites like banks don’t even wait for your browser to close; they’ll
force your session to expire every 10 minutes or so.
Close your browser, which will terminate your cookies, and open
signin.php
again
for some more improvement.
Errors Aren’t Always Interruptive
At this juncture, you have a potential error with which you must deal: the else
that’s run when the user’s user name and password don’t match that which is in
the database:
if (mysql_num_rows($results) == 1) {
// set a cookie and redirect to show_user.php
} else {
// If user not found, issue an error
}
Your typical error handling so far has been via handle_error. But that’s no good;
you don’t want to short-circuit the login process by throwing the user out to an er-
ror page. She would have to get back to the login page, try again, and potentially
go to the error page yet again.

PHP & MYSQL: THE MISSING MANUAL
438
LOGGING IN
WITH COOKIES
What you need is a means by which you can show any errors without interrupting
the application’s overall flow. When something goes badly wrong, handle_error
makes perfect sense; a major error deserves to interrupt your application. But here,
you need a non-interruptive way to show errors.
You
do
in fact have another way to show errors: the page_start function in
view
.php
. Right now, you’re calling this function in
signin.php
, but without anything apart
from the page title:
page_start("Sign In");
Back in
view.php
(page 379), you can see the complete set of arguments this
method takes:
function page_start($title, $javascript = NULL,
$success_message = NULL, $error_message = NULL) {
Normally, you’ve been passing in any request parameters as the values for
$success_message and $error_message, but that’s not a requirement. You can create
a new variable called $error_message, fill it with text as your script progresses, and
then hand it o to page_start as the HTML output commences.
Here’s what you need to add:
<?php
require_once '../scripts/database_connection.php';
require_once '../scripts/view.php';
$error_message = "";
// If the user is logged in, the user_id cookie will be set
if (!isset($_COOKIE['user_id'])) {
// See if a login form was submitted with a username for login
if (isset($_POST['username'])) {
// Try and log the user in
// Look up the user
if (mysql_num_rows($results) == 1) {
$result = mysql_fetch_array($results);
$user_id = $result['user_id'];
setcookie('user_id', $user_id);
setcookie('username', $result['username']);
header("Location: show_user.php");
exit();
} else {
// If user not found, issue an error
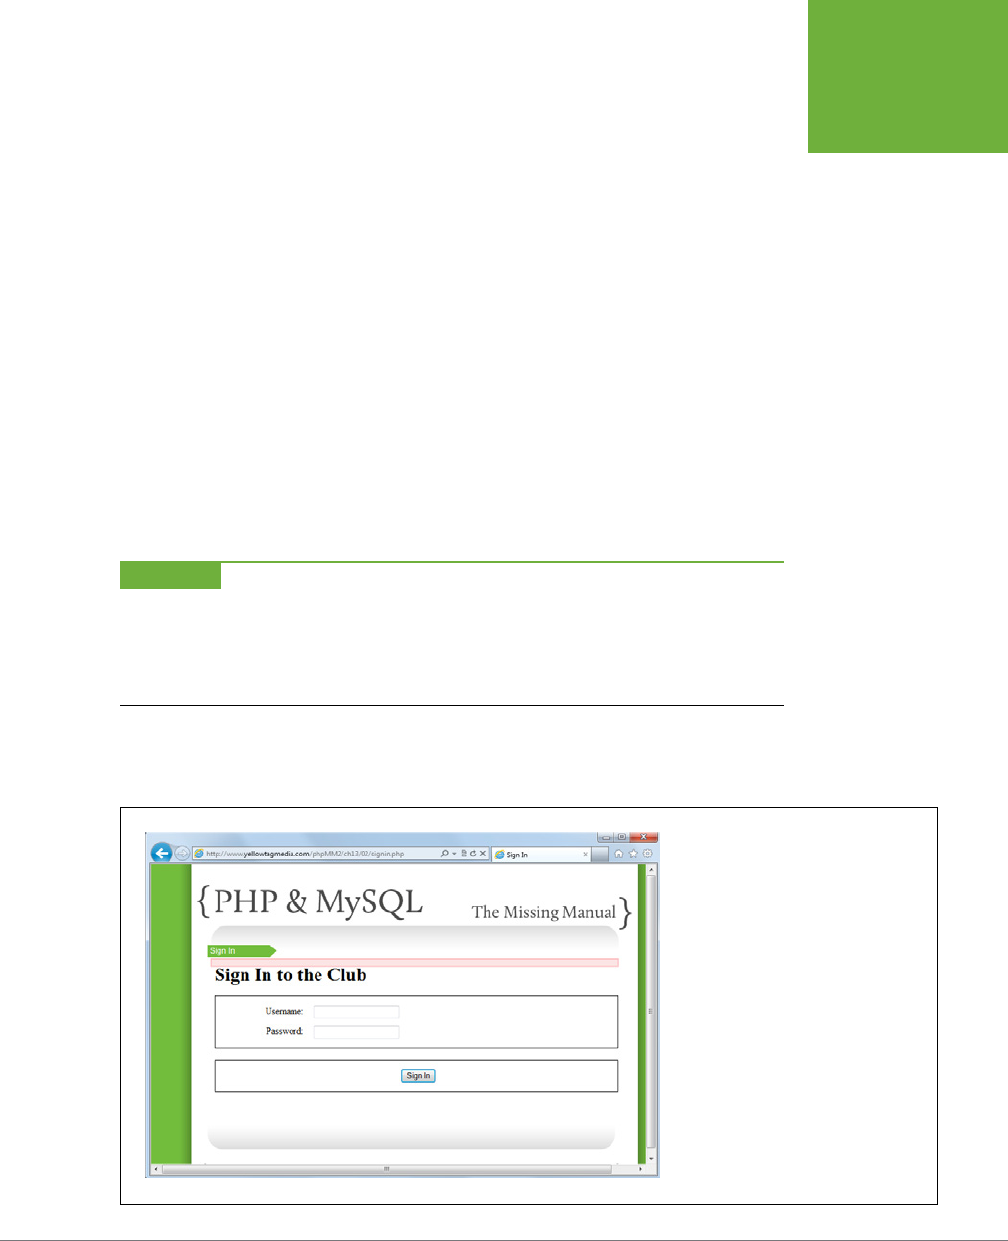
CHAPTER 13: COOKIES, SIGN-INS, AND DITCHING CRUMMY POP-UPS 439
LOGGING IN
WITH COOKIES
$error_message = "Your username/password combination was invalid.";
}
}
// Still in the "not signed in" part of the if
// Start the page, and pass along any error message set earlier
page_start("Sign In", NULL, NULL, $error_message);
?>
<!-- Rest of HTML output -->
<?php
} else {
// Now handle the case where they're logged in
// redirect to another page, most likely show_user.php
header("Location: show_user.php");
exit();
}
?>
WARNING Remember, this cookie-based solution is a step toward a final solution, but it is not the final
solution itself. In the next chapter, you’ll add support for sessions and move information like a user name and
user ID out of a user’s cookie and onto the server.
Whatever you do, keep reading! You’ll need the cookie skills you’re learning here, but you’ll add session support to
those skills in the next chapter. Woe be the PHP programmer who uses cookies, and only cookies, for authentication.
Now visit
signin.php
(or
index.html
and click the Sign Up button). Uh oh! Figure 13-6
reveals there’s still a problem somewhere.
FIGURE 13-6
That’s a strange sight: an error-less error.
But, because this is probably the second
screen all of your users will ever see, it’s
a big issue. Still, by now, you’re probably
already thinking about what the problem
is and how you’ll fix it quickly.

PHP & MYSQL: THE MISSING MANUAL
440
LOGGING IN
WITH COOKIES
This predicament is typical of application work. You take a function you wrote ages
ago—the code in
view.php
that shows an error, in this case—and then use it in a
dierent way later. That’s when the bugs appear.
In this case, the problem is that you’re calling page_start with $error_message, but
in some cases, $error_message is blank. It’s an empty string, "", so nothing should
be shown. Check out
view.php
, and find display_message:
function display_messages($success_msg = NULL, $error_msg = NULL) {
echo "<div id='messages'>\n";
if (!is_null($success_msg)) {
display_message($success_msg, SUCCESS_MESSAGE);
}
if (!is_null($error_msg)) {
display_message($error_msg, ERROR_MESSAGE);
}
echo "</div>\n\n";
}
In this case, $error_message
isn’t
null. It’s an empty string that the if block lets pass,
causing a blank error message to appear in a red box: not so good.
The fix is no problem, though. Simply determine whether $error_message is not
null, and whether it has a length greater than 0. While you’re at it, make the same
improvement to the handling of success messages:
function display_messages($success_msg = NULL, $error_msg = NULL) {
echo "<div id='messages'>\n";
if (!is_null($success_msg) && (strlen($error_msg) > 0)) {
display_message($success_msg, SUCCESS_MESSAGE);
}
if (!is_null($error_msg) && (strlen($error_msg) > 0)) {
display_message($error_msg, ERROR_MESSAGE);
}
echo "</div>\n\n";
}
Now you should see a proper sign in form, as demonstrated in Figure 13-7.
Try to enter an incorrect user name or password, and you should see a nice, clear
error that doesn’t pull you out of the login process. Figure 13-8 shows this message.
Better still, your user can immediately re-enter her information.

CHAPTER 13: COOKIES, SIGN-INS, AND DITCHING CRUMMY POP-UPS 441
LOGGING IN
WITH COOKIES
FIGURE 13-7
It makes no sense to pres-
ent a user with an error
the first time she sees
the sign in form. But after
she’s tried an incorrect
user name or password,
that’s when you want to
let her know there’s a
problem.
FIGURE 13-8
Now this is a solid
non-interruptive error.
It’s impossible to miss, it
creates a change that lets
the user know something
needs her attention, but
it’s not over the top. The
user can try again...and
again...and again.
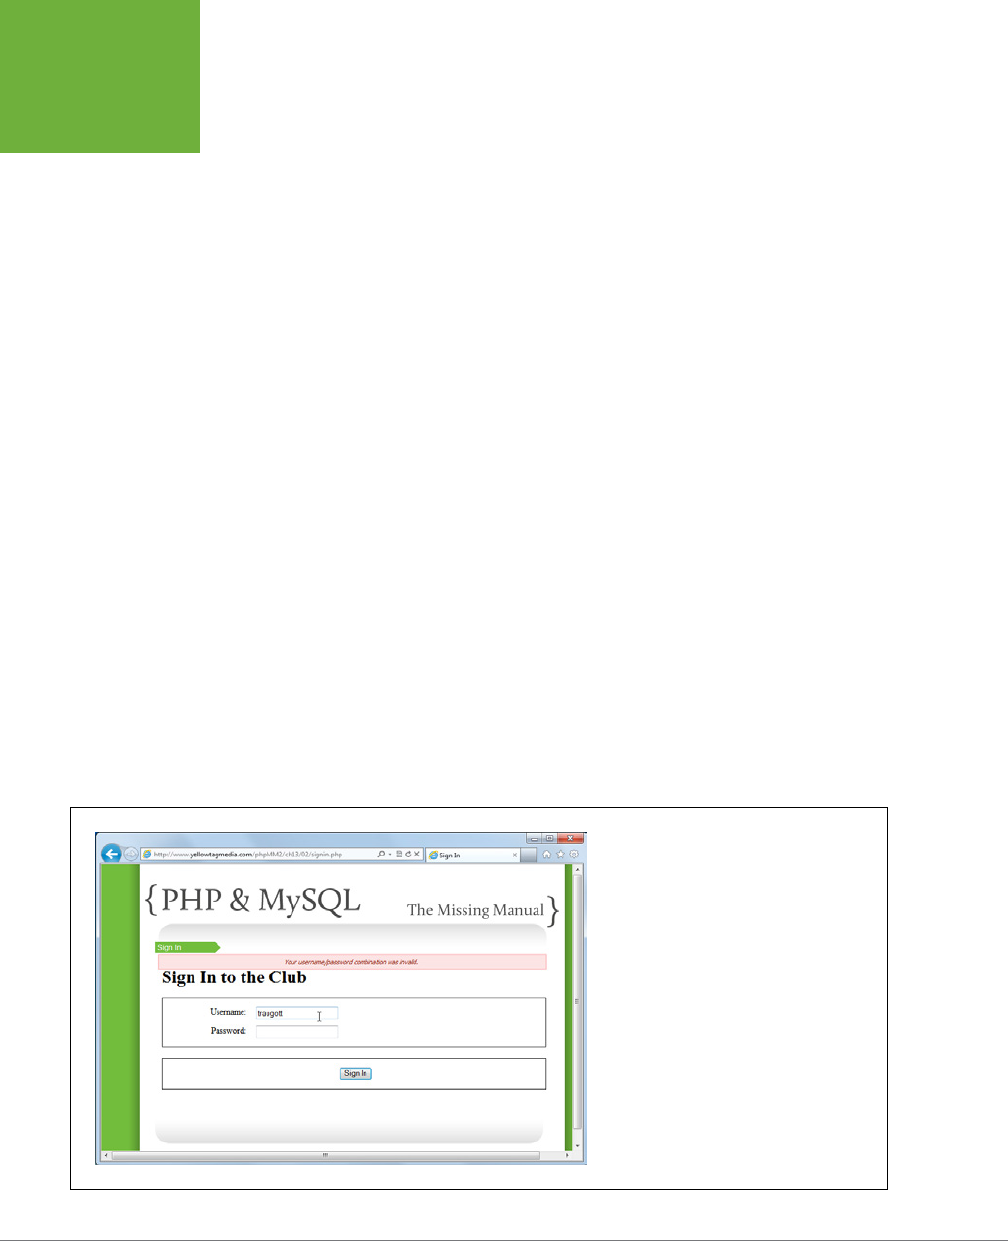
PHP & MYSQL: THE MISSING MANUAL
442
LOGGING IN
WITH COOKIES
An Option for Repeat Attempts
At this point, your sign-in page is functionally complete. However, there’s one more
option that you can provide to your users: reloading their user name on login failure.
Some sites do this, and some don’t. It’s a matter of opinion, but even if you choose
not to implement this feature, you should know
how
to implement it.
If you need to display a user name, this means that the user has already submitted
the form at least once before. That places you squarely in this portion of
signin.php
:
if (isset($_POST['username'])) {
// Try and log the user in
$username = mysql_real_escape_string(trim($_REQUEST['username']));
$password = mysql_real_escape_string(trim($_REQUEST['password']));
// and so on...
}
The user name has been sent, but the login failed. However, you still have the
$username variable ready to display.
Now, move into the HTML. You can set the value of a form field with the value at-
tribute, and you’ve got the attribute value in $username. Put that together, and you’ll
end up with something like this:
<label for="username">Username:</label>
<input type="text" name="username" id="username" size="20"
value="<?php if (isset($username)) echo $username; ?>" />
That’s all there is to it. Enter a user name, submit the sign-in page, and you should
see an error, but now you’ll also see the previously entered user name. Take a look
at Figure 13-9 for the details.
FIGURE 13-9
You’ll have to decide for yourself whether you
want to reshow previously entered user names.
On the one hand, it’s a nice feature. On the
other hand, though, the user name might be
part of the problem. By displaying it again,
you might be implying that the user name is
correct when it’s not.

CHAPTER 13: COOKIES, SIGN-INS, AND DITCHING CRUMMY POP-UPS 443
ADDING
CONTEXT-
SPECIFIC
MENUS
Adding Context-Specific Menus
Menus and navigation deserve a lot more than a brief mention in a chapter. There’s
a ton of user interface design and usability to discuss; there are the considerations
regarding; and there’s the ever-raging argument over horizontal versus vertical
menus. Still, these are all non-PHP issues. For you, PHP programmer extraordinaire,
the concern is building out links and options that change based upon whether a
user is logged in.
You already have a sense of this. You can just check the “user_id” cookie:
if (isset($_COOKIE['user_id'])) {
// show options for logged in users
} else {
// show options for non-logged in users
}
That’s all there is to it.
NOTE You can find the finished example code for this section on this book’s Missing CD page at
www.
missingmanuals.com/cds/phpmysqlmm2e
.
Putting a Menu into Place
Go back to
view.php
, which is where all the code that controls the header of your
page resides. Having some of your core view code tucked away in scripts that the
rest of your pages can reference makes a huge dierence. The display_title func-
tion handles the first bits of a displayable page right now.
Find that function, and you can add a simple if: if the “user_id” cookie exists, show
a profile link to
show_user.php
and a
signout.php
link (more on that in a bit). If he’s
not signed in, show him a Sign In link. Of course, you can add a Home link that ap-
pears regardless:
function display_title($title, $success_message = NULL, $error_message = NULL)
{
echo <<<EOD
<body>
<div id="header"><h1>PHP & MySQL: The Missing Manual</h1></div>
<div id="example">$title</div>
<div id="menu">
<ul>
<li><a href="index.html">Home</a></li>
EOD;
if (isset($_COOKIE['user_id'])) {
echo "<li><a href='show_user.php'>My Profile</a>";
echo "<li><a href='signout.php'>Sign Out</a></li>";
} else {

PHP & MYSQL: THE MISSING MANUAL
444
ADDING
CONTEXT-
SPECIFIC
MENUS
echo "<li><a href='signin.php'>Sign In</a></li>";
}
echo <<<EOD
</ul>
</div>
EOD;
display_messages($success_message, $error_message);
}
There’s a twofold beauty to this. First, this menu is now available to all scripts via
view.php
. This means that you don’t need to go rooting through all your files and
insert new HTML and if statements to get a site-wide menu. Second, because
you dropped this code into display_title, any of your scripts that already call
display_title automatically get the menu code. Nothing to change in those at all.
Also, once again, the fact that $_REQUEST will return anything in $_COOKIE makes
this script simple:
if (isset($_COOKIE['user_id'])) {
echo "<li><a href='show_user.php'>My Profile</a>";
echo "<li><a href='signout.php'>Sign Out</a></li>";
} else {
echo "<li><a href='signin.php'>Sign In</a></li>";
}
You’re not worried about passing a user’s ID into
show_user.php
, because there’s a
cookie set, and you’ve already seen that
show_user.php
is happy to grab that value
through $_REQUEST['user_id'], just as though you’d explicitly passed in a user ID
through a request parameter.
FREQUENTLY ASKED QUESTION
Signing Out
Does anyone actually sign out these days?
It’s true: unless people are on a financial site—their bank
or perhaps a stock trading site—logging and signing out is
largely never touched. Most Internet users are not very security
conscious, and there’s also an expectation that a website will
simply remember them when they return later. Signing out
would prevent that, so why do it?
There are good reasons to add sign-out capabilities to any app.
First, if users are accessing your app on a public computer or
shared laptop, you want to ensure that they can protect their
credentials by signing out
before
letting anyone else use the
computer. Second, just because most users aren’t security
conscious doesn’t mean that none are. Give someone the
option to sign out, and if he doesn’t avail himself of it, no big
deal. If he does, he’ll be glad your app gives him that control.
And last but not least, you know how to create cookies. It would
be a good thing to know how to delete them, as well. Thus,
adding a sign-out link forces you to get a handle on that, too.

CHAPTER 13: COOKIES, SIGN-INS, AND DITCHING CRUMMY POP-UPS 445
ADDING
CONTEXT-
SPECIFIC
MENUS
To test this out, open your various scripts that display HTML:
show_user.php
,
show_
users.php
, and
signin.php
. Each should call page_start rather than display HTML
explicitly. Otherwise, you’ll lose the menu code that you just added to page_start
in
view.php
. Here, for example, is what
show_user.php
should look like:
<?php
require '../scripts/database_connection.php';
require '../scripts/view.php';
// Lots of PHP to load the user ID from a request parameter or
// a cookie, look up that user, and set some values.
page_start("User Profile");
?>
<div id="content">
<div class="user_profile">
<h1><?php echo "{$first_name} {$last_name}"; ?></h1>
<p><img src="<?php echo $user_image; ?>" class="user_pic" />
<?php echo $bio; ?></p>
<p class="contact_info">Get in touch with <?php echo $first_name; ?>:</p>
<ul>
<li>...by emailing him at
<a href="<?php echo $email; ?>"><?php echo $email; ?></a></li>
<li>...by
<a href="<?php echo $facebook_url; ?>">checking him out on
Facebook</a></li>
<li>...by <a href="<?php echo $twitter_url; ?>">following him
on Twitter</a></li>
</ul>
</div>
</div>
<div id="footer"></div>
</body>
</html>
Now, sign in. You should automatically land on
show_user.php
and see something
like Figure 13-10. There’s a nice, simple menu on the right that appears, thanks to
start_page, display_title,
view.php
, and the cookies you set in
signin.php
.
PHP & MYSQL: THE MISSING MANUAL
446
ADDING
CONTEXT-
SPECIFIC
MENUS
FIGURE 13-10
The menu at the upper
right gives you only three
basic options. Still, it’s
easy to build this script
now that you have a basic
mechanism for displaying
the page for authenticated
users, and hiding it for
others. You can add all
the links and sublinks that
your application needs;
and as long as they’re in
the portion of the
if
block
in
display_title
that
requires a cookie, you’re
good to go.
From HTML to Scripts
You might have noticed that even once you’ve fixed up
show_user.php
,
show_users
.php
, and
signin.php
, there are still HTML web pages left in your application. There’s
index.html
, the initial page, as well as
create_user.html
. But, these pages don’t get
the benefit of start_page and
view.php
, because they’re HTML, not PHP. For
index
.html
, that probably makes sense. The only two places you want users to go is the
sign-in page or the sign-up page; both are clearly accessible through those big
green buttons.
However, that’s not the case with
create_user.html
. Suppose that someone clicks
through to that form and then wants to return to the main page. Or, more likely,
she might want to sign in rather than sign up. This becomes even more the case as
you add other options to the menu, such as an About page. Clearly,
create_user
.html
needs that menu.
ANY HTML FILE CAN BE CONVERTED TO PHP
In essence, all you have to do is convert
create_user.html
to PHP. You could call it
create_user.php
—apart from the fact that
create_user.php
already exists. So, as a
starting point, rename
create_user.html
to
signup.php
. After all, it’s a form for sign-
ing up users, and the name doesn’t clash with any other file names.
[~/www/phpMM/ch13]# cp create_user.html create_user.html.orig
[~/www/phpMM/ch13]# mv create_user.html signup.php

CHAPTER 13: COOKIES, SIGN-INS, AND DITCHING CRUMMY POP-UPS 447
ADDING
CONTEXT-
SPECIFIC
MENUS
NOTE There’s never a bad time to back things up, create copies of original files, and ensure that you can
reverse any change you make. You can accomplish that through a full-fledged, site-wide backup strategy, or just
a duplicate of a file with a clear backup-related name.
Then, you can simply cut out the opening HTML and replace it with a PHP-driven
call to page_start. You’ll have to pass through all that inline validation JavaScript,
but that’s easy now; you can just use
heredoc
.
<?php
require_once "../scripts/view.php";
$inline_javascript = <<<EOD
$(document).ready(function() {
$("#signup_form").validate({
rules: {
password: {
minlength: 6
},
confirm_password: {
minlength: 6,
equalTo: "#password"
}
},
messages: {
password: {
minlength: "Passwords must be at least 6 characters"
},
confirm_password: {
minlength: "Passwords must be at least 6 characters",
equalTo: "Your passwords do not match."
}
}
});
});
EOD;
page_start("User Signup", $inline_javascript);
?>
<div id="content">
<h1>Join the Missing Manual (Digital) Social Club</h1>
<p>Please enter your online connections below:</p>
<form id="signup_form" action="create_user.php"
method="POST" enctype="multipart/form-data">
<!-- Form content -->

PHP & MYSQL: THE MISSING MANUAL
448
ADDING
CONTEXT-
SPECIFIC
MENUS
</form>
</div>
<div id="footer"></div>
</body>
</html>
This is also a good time to update
view.php
to include the jQuery, validation scripts,
and CSS that
signin.php
needs. There’s no reason to not make those available to
all your site’s pages:
function display_head($page_title = "", $embedded_javascript = NULL) {
echo <<<EOD
<html>
<head>
<title>{$page_title}</title>
<link href="../css/phpMM.css" rel="stylesheet" type="text/css" />
<link href="../css/jquery.validate.password.css" rel="stylesheet"
type="text/css" />
<script type="text/javascript" src="../js/jquery-1.8.1.min.js"></script>
<script type="text/javascript" src="../js/jquery.validate.min.js"></script>
<script type="text/javascript"
src="../js/jquery.validate.password.js"></script>
EOD;
if (!is_null($embedded_javascript)) {
echo "<script type='text/javascript'>" .
$embedded_javascript .
"</script>";
}
echo " </head>";
}
Update your links in
index.html
to reference
signup.php
rather than
create_user.html
:
<div id="content">
<div id="home_banner"></div>
<div id="signup">
<a href="signup.php"><img src="../images/sign_me_up.png" /></a>
<a href="signin.php"><img src="../images/sign_me_in.png" /></a>
</div>
</div>
Take a break to check out the new page—and what should be a new menu. The
results are shown in Figure 13-11. This is the “not logged in” version of the menu, so
now you’ve tested both versions.
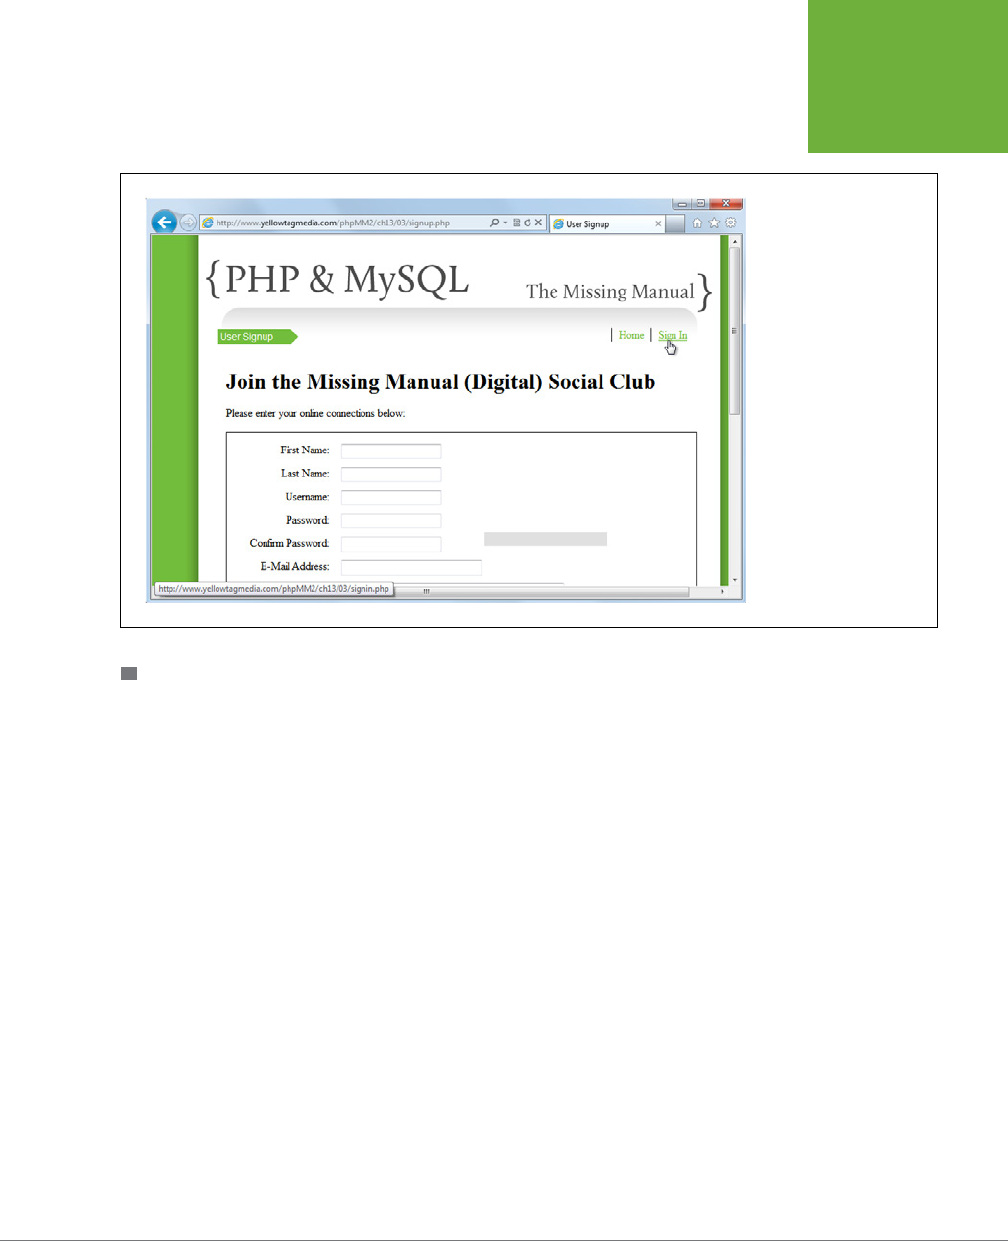
CHAPTER 13: COOKIES, SIGN-INS, AND DITCHING CRUMMY POP-UPS 449
ADDING
CONTEXT-
SPECIFIC
MENUS
FIGURE 13-11
The menu in its current
state doesn’t offer a ton
of new functionality. Still,
lots of users forget they’re
signed up for a site and
need a simple way to get
to the sign-in page rather
than the sign-up page.
In addition, you can add
About information, Contact
information, and anything
else you want that might
not require authentication,
and it all becomes avail-
able to this form now.
CHALLENGE: BE SELF-REFERENTIAL WITH USER CREATION
By now, you realize that you don’t
need
two scripts to handle user creation. You could
create a single script that submits to itself. That lets you not only do the client-side
validation already in place with jQuery and JavaScript, but also check user names
and emails against the database and return errors if there are duplicates.
At this stage, though, you don’t need to see another painfully long code listing. You
have all you need to do it yourself. Set this book down and start combining
signin
.php
and
create_user.php
. As always, there’s swag to be had by tweeting your solu-
tion to
@missingmanuals
or hopping on Facebook at
http://www.facebook.com/
MissingManuals
.
Logging Users Out
Your login now works, but don’t forget to add logging out. Whether you set your
cookie’s expiration value to a short few minutes or a long one, always let users control
their own authentication. They should be able to log in and log out when they want.
Logging in involves setting a cookie name, value, and optionally, a time for expiration:
setcookie('user_id', $user_id); // Defaut expiration:
setcookie('username', $result['username']); // Log out on browser close

PHP & MYSQL: THE MISSING MANUAL
450
ADDING
CONTEXT-
SPECIFIC
MENUS
Logging out is much the same, but inverted. Just set the cookie’s value to an empty
value, and set the expiration to a point in the past:
// Expire the user_id cookie with a date a year in the past
setcookie('user_id', '', time()-(60*60*24*365));
In this case, the value of the cookie’s user_id is set to nothing (an empty string),
and the expiration date is set to a year in the past.
NOTE Be sure to set the expiration well into the past. That way, if the system time on your server is off by
a few minutes or even days, it doesn’t affect your code. (Then again, if the system time is more than a year off,
well, you have much bigger issues.)
Turning this into a script is awfully simple. Just expire the two cookies your app uses
(user_id and username) and redirect the user back to a home page or sign-in page.
Create this script and save it as
signout.php
.
<?php
setcookie('user_id', '', time()-(365*24*60*60));
setcookie('username', '', time()-(365*24*60*60));
header('Location: signin.php');
?>
Try it out. Visit your app (after closing your browser and clearing any cookies) and
sign in as a known user. You should be able to visit
show_user.php
,
show_users.php
,
and delete users. That’s all working as it should.
NOTE Well, it’s kind of working. Any old user shouldn’t be able to see all the users and delete users, but
you’ll fix that shortly.
Now, click the Sign Out link on the menu. You should be redirected to the sign-in
page. You also can visit pages that require a user ID, and you’ll not see your user’s
profile. That’s good—but the result isn’t. Check out Figure 13-12.
Signing out appears to be working, but it’s revealed a nasty hole in the app: pages
that shouldn’t be accessible at all
are
accessible. They just error out, which is argu-
ably worse than just letting unauthorized users see them. No matter how you cut
it, there’s an issue to be resolved.
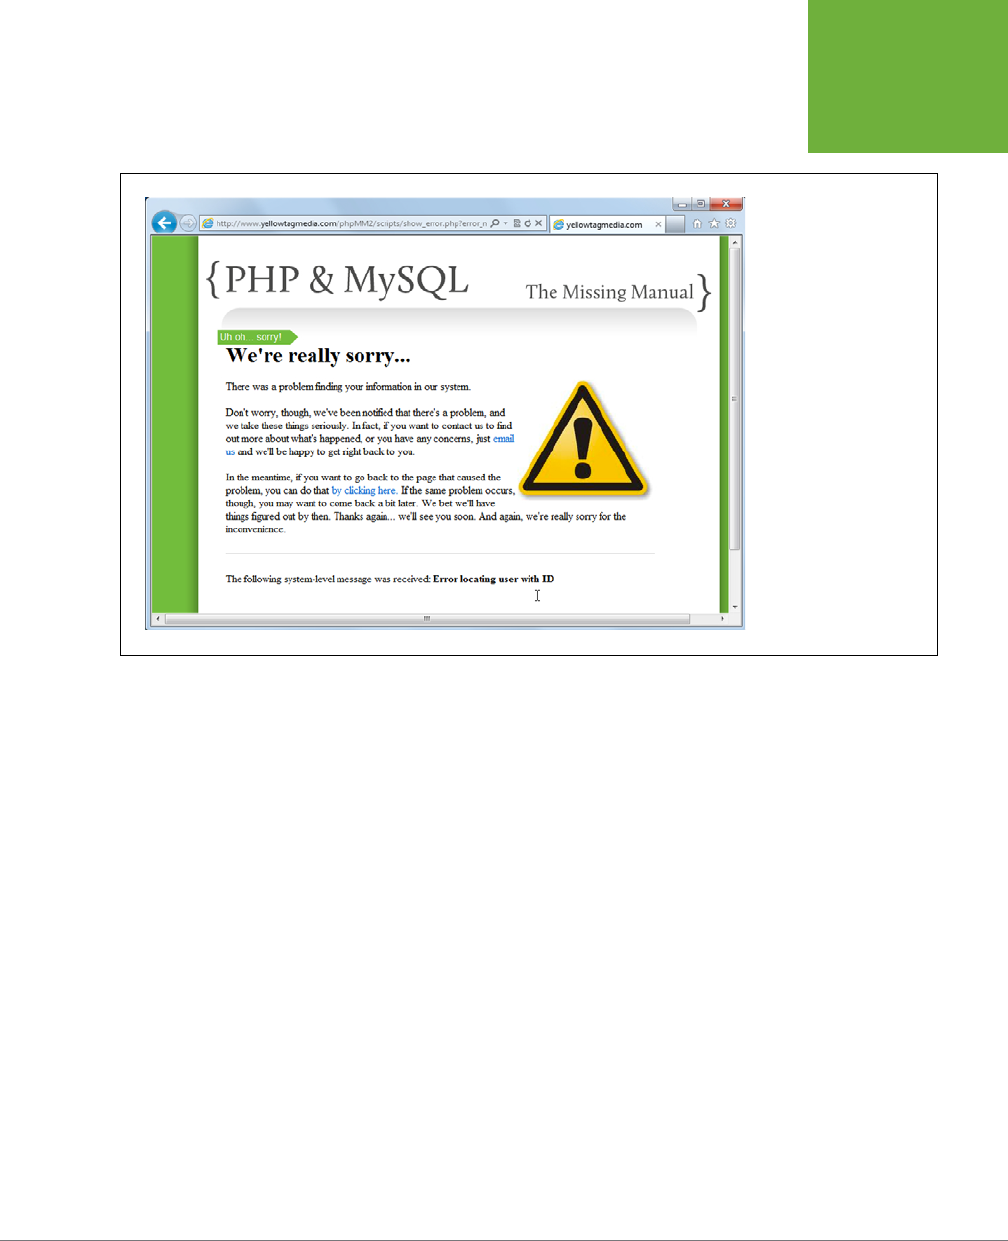
CHAPTER 13: COOKIES, SIGN-INS, AND DITCHING CRUMMY POP-UPS 451
ADDING
CONTEXT-
SPECIFIC
MENUS
FIGURE 13-12
Well, there’s definitely no
value in the
user_id
cookie. But, this error page
is no help to the users see-
ing it. Instead, they should
see some sort of error
about not being logged in.
Or, even better, the sign-in
page should be displayed
so that users can sign in
and access your system.
Requiring the Cookie to Be Set
Fortunately, the issue of error pages showing up at the wrong time isn’t hard to fix.
Earlier,
show_user.php
and other restricted scripts required
authorize.php
(page
396), which did all sorts of database work to determine whether a user could log in, all
using basic HTTP authentication. As a result, you got a nice wall around your scripts.
By removing
authorize.php
, it became possible to have
signin.php
handle logins. In
the process, though, you knocked down that wall around your other scripts. You need
the wall, but you still need to let
signin.php
handle authentication. That’s not hard.
First, you can drastically simplify
authorize.php
. Chop it down to do little more than
check for a valid cookie:
<?php
if ((!isset($_COOKIE['user_id'])) ||
(!strlen($_COOKIE['user_id']) > 0)) {
}
?>
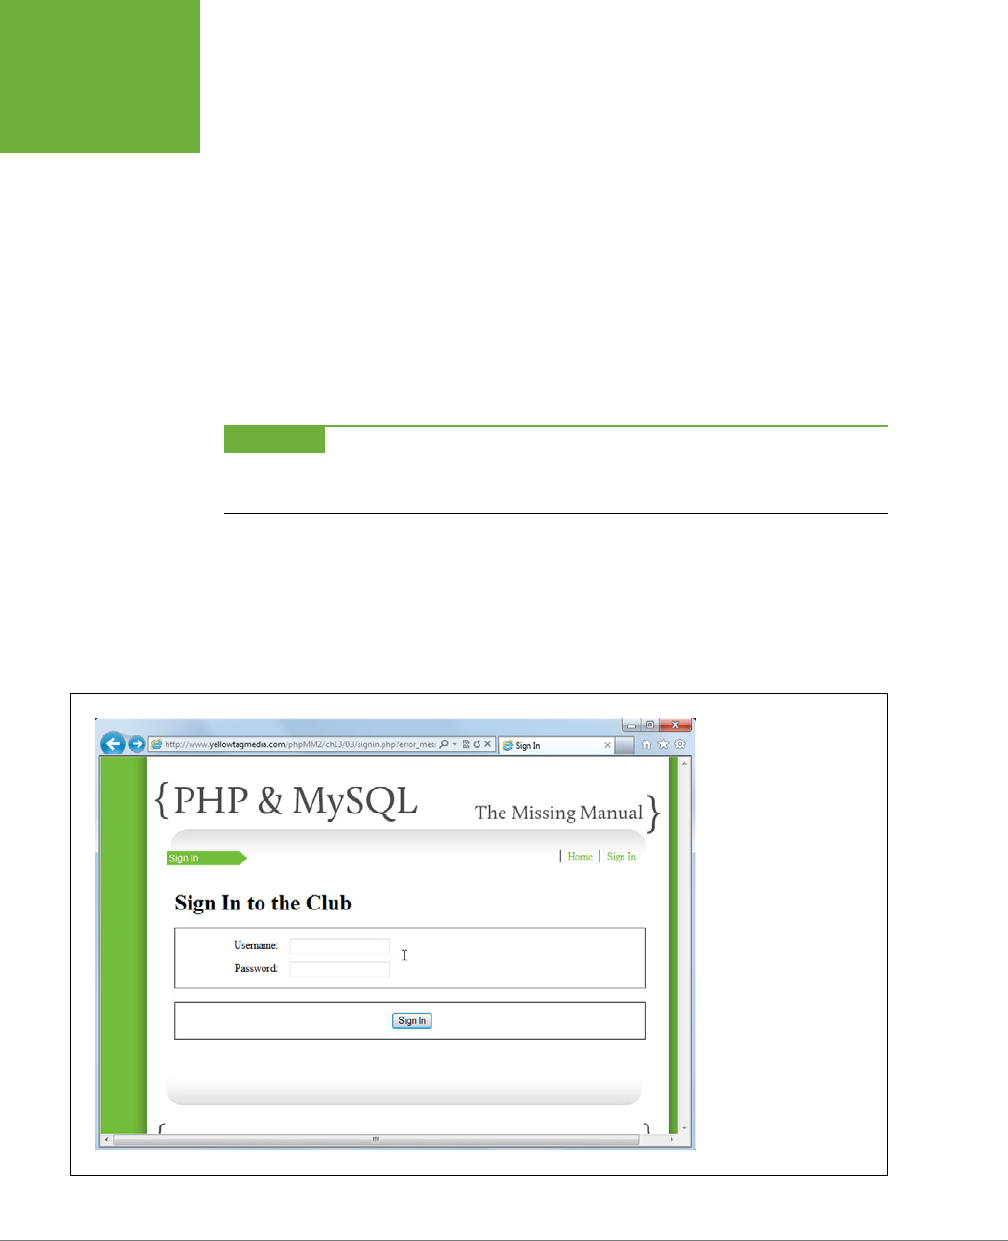
PHP & MYSQL: THE MISSING MANUAL
452
ADDING
CONTEXT-
SPECIFIC
MENUS
If there’s no cookie, or if the cookie has an empty value, just redirect the user to the
sign-in page with a message that explains what’s going on:
<?php
if ((!isset($_COOKIE['user_id'])) ||
(!strlen($_COOKIE['user_id']) > 0)) {
header('Location: signin.php?' .
'error_message=You must login to see this page.');
exit();
}
?>
WARNING The
exit
here is important. Because this code will run and then pass control back to the
calling script—
show_user.php
,
delete_user.php
, or whatever else—you need to ensure that those scripts don’t
continue to try to run. Send the redirect headers and bail out of any further action.
Next, you can add the require_once back in to
show_user.php
,
show_users.php
,
and
delete_user.php
.
Test it. Make sure that you’re signed out (
signout.php
via the menu link makes that a
breeze now). Then, try to access
show_user.php
. You see signs of progress, although
things aren’t perfect yet. Figure 13-13 is a good start, though.
FIGURE 13-13
Attempts to access secure
pages are sent to the sign-
in page. That’s good, but
where’s the helpful mes-
sage? Notice that it’s in the
request URL, but doesn’t
show up on the page.

CHAPTER 13: COOKIES, SIGN-INS, AND DITCHING CRUMMY POP-UPS 453
ADDING
CONTEXT-
SPECIFIC
MENUS
The missing message in Figure 13-13 is due to the fact that there’s nothing in
signin
.php
that deals with a potential message on the request URL. Happily, you actually
have the mechanics for this in place. Open
signin.php
and check out the opening
section:
require_once '../scripts/view.php';
$error_message = "";
// If the user is logged in, the user_id cookie will be set
if (!isset($_COOKIE['user_id'])) {
This is great! You have a variable to hold the error message in place. And, you already
have code to display $error_message as an error:
// Still in the "not signed in" part of the if
// Start the page, and pass along any error message set earlier
page_start("Sign In", NULL, NULL, $error_message);
Now, you just need to see whether there’s a request parameter back up at the top
rather than automatically assigning $error_message an empty string:
<?php
require_once '../scripts/database_connection.php';
require_once '../scripts/view.php';
$error_message = $_REQUEST['error_message'];
// If the user is logged in, the user_id cookie will be set
if (!isset($_COOKIE['user_id'])) {
Go ahead and try things one more time. Go to
show_user.php
without having a
cookie, and you should see something like Figure 13-14.
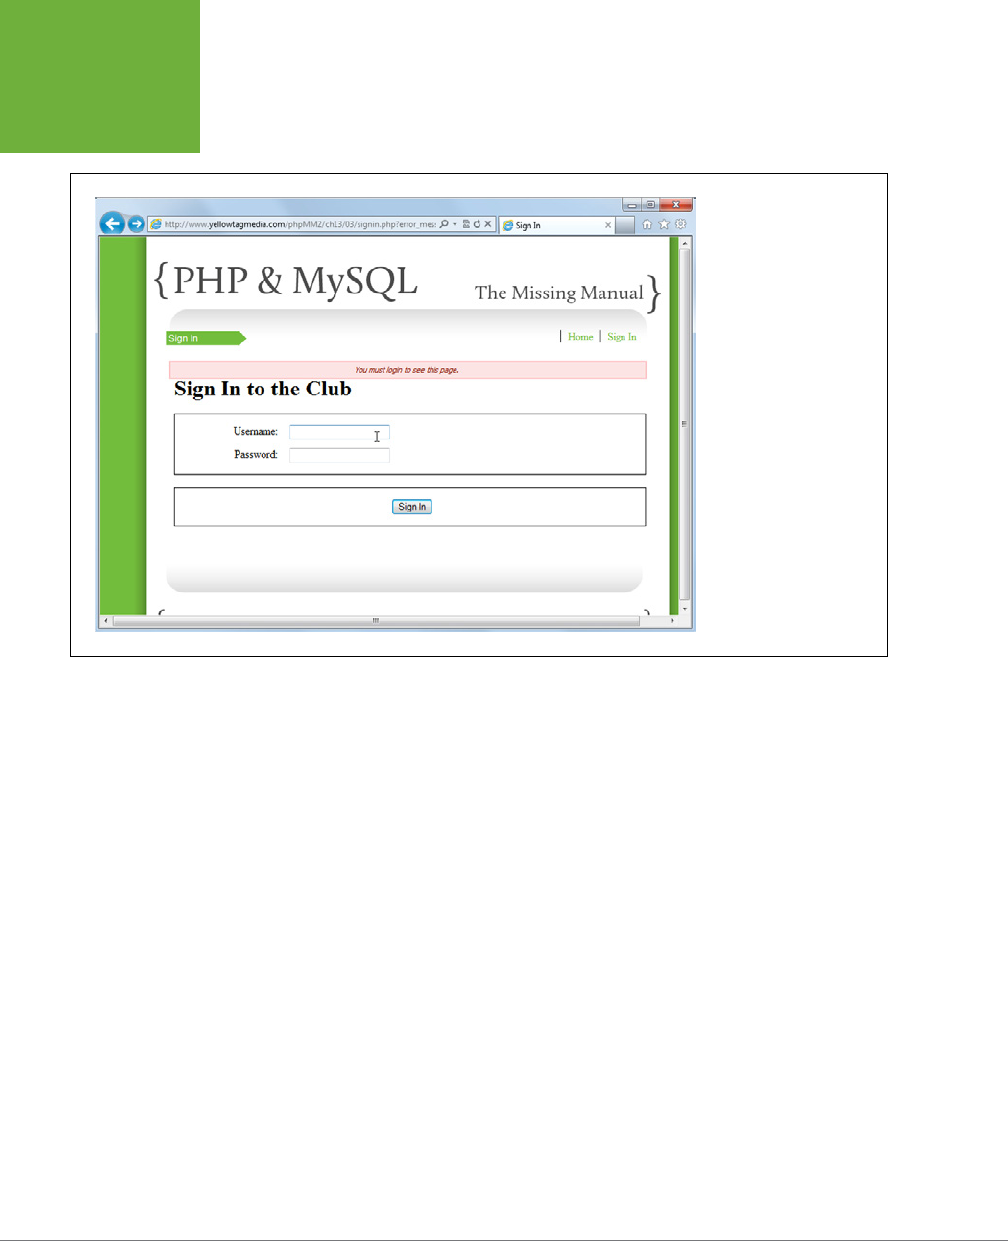
PHP & MYSQL: THE MISSING MANUAL
454
ADDING
CONTEXT-
SPECIFIC
MENUS
FIGURE 13-14
Perfect! Blocked access,
a helpful error message,
and an immediate chance
to sign in. That’s just what
you want. Things are look-
ing good.
So, what’s left? Take a look back at your original list:
• A better login screen. Folks don’t like a bland, gray pop-up dialog box; they
want a branded, styled login form. (Done!)
• Better messaging to indicate whether a user is logged in. (Done!)
• A way to log out. (Done!)
• Two levels of authentication: one to get to the main application, and then admin-
level authentication to get to a page like
show_users.php
and
delete_user.php
.
(Hmmm, nothing here yet at all.)
• Some basic navigation. That navigation should change based on a user’s login
and the groups to which the user belongs. (Sort of done...)
Take a quick breath and get ready for the home stretch: group-based authentica-
tion and the reason that cookies are cool, but maybe not your final authentication
destination.

455
CHAPTER
14
It’s time to add some refinement to the authentication and navigation systems
you built in the last couple of chapters. You’ve created an attractive login screen
as well as added authentication to let users into and out of your application. It’s
time to go further:
authorize.php
needs to be improved. It should take in a group
(or, better, a list of groups) for the user and only allow access if the user is in the
permitted group, such as an administrator group.
You also have basic navigation, but again, there are some needed improvements:
users in certain groups should see an option to administrate users and get a link to
show_users.php
(in addition to the standard link to
show_user.php
).
And then...there’s a problem with cookies. In Chapter 13, you learned how to go
beyond basic authentication by using cookies, and that’s a good thing. But, there
are some very real concerns surrounding a high-end application using cookies, and
only cookies, for authentication. In this chapter, you’ll do all of the above and more.
Modeling Groups in Your Database
Before you can look up the groups to which a user belongs, you need to have some
groups in your database. You need a table to store groups and some means by
which you can connect a user to a group. Also, you need to be able to connect one
user to multiple groups.
Authorization
and Sessions

PHP & MYSQL: THE MISSING MANUAL
456
MODELING
GROUPS
IN YOUR
DATABASE
There are a few distinct steps here:
1. Create a table in the database to store groups.
2. Map a user to zero, one, or more groups.
3. Build PHP to look up that mapping.
4. Restrict pages based on any login, or a particular set of groups.
First things first: It all begins with a database table.
Adding a Groups Table
Creating a new table is a trifling thing for you as a PHP and MySQL programmer.
You can easily create a new table, name it (
groups
), give MySQL a few columns,
specify which are NOT NULL, and bang; you’re quickly past database table creation.
mysql> CREATE TABLE groups (
-> id INT NOT NULL AUTO_INCREMENT PRIMARY KEY,
-> name VARCHAR(30) NOT NULL,
-> description VARCHAR(200)
-> );
Query OK, 0 rows affected (0.03 sec)
mysql> DESCRIBE groups;
+-------------+--------------+------+-----+---------+----------------+
| Field | Type | Null | Key | Default | Extra |
+-------------+--------------+------+-----+---------+----------------+
| id | int(11) | NO | PRI | NULL | auto_increment |
| name | varchar(30) | NO | | NULL | |
| description | varchar(200) | YES | | NULL | |
+-------------+--------------+------+-----+---------+----------------+
3 rows in set (0.03 sec)
As usual, each group needs an ID and a name. The description column is optional—
it’s not NOT NULL, which is bad grammar but good database design—and that’s
all you need.
It’s hard to do much testing without some group information, so go ahead and add
a few groups into your new
groups
table:
mysql> INSERT INTO groups
-> (name, description)
-> VALUES ("Administrators",
-> "Users who administrate the entire application.");
Query OK, 1 row affected (0.04 sec)
mysql> INSERT INTO groups
-> (name, description)
-> VALUES ("Luthiers",
-> "Guitar builders. They make the instrument that makes the music.");

CHAPTER 14: AUTHORIZATION AND SESSIONS 457
MODELING
GROUPS
IN YOUR
DATABASE
Query OK, 1 row affected (0.00 sec)
mysql> INSERT INTO groups
-> (name, description)
-> VALUES ("Musicians",
-> "Play what you feel, they say. And they feel it.");
Query OK, 1 row affected (0.00 sec)
mysql> INSERT INTO groups
-> (name, description)
-> VALUES ("Martial Artists",
-> "Friendship with these folks is like a kick in the head.");
Query OK, 1 row affected (0.00 sec)
NOTE Create whichever groups that pertain to your own users. Just be sure to create an Administrators group.
If you call that group something else, swap that group name in whenever this chapter refers to “Administrators.”
As usual, test before moving on:
mysql> SELECT id, name FROM groups;
+----+----------------+
| id | name |
+----+----------------+
| 1 | Administrators |
| 2 | Luthiers |
| 3 | Musicians |
| 4 | Martial Artists |
+----+----------------+
4 rows in set (0.01 sec)
The Many-to-Many Relationship
Next, establish how you’re going to connect users to groups. Before you can start
worrying about SQL, you need to think clearly about how these two tables are related.
Relationships help you to determine in what manner tables are linked.
ONE-TO-ONE, ONE-TO-MANY, MANY-TO-MANY
You’ve already seen an example of a one-to-one relationship. For example, when
you were storing images in your database (page 303), you had a single entry in
users
that was related to a single entry in
images
. This is a
one-to-one relationship
between
users
and
images
.
With groups, that’s not the case. You’ve already seen that a single user can be in
zero groups, one group, or many groups. Certainly Michael Greenfield can be a
luthier, musician, and administrator. You might have another user who is in none of
those groups.
PHP & MYSQL: THE MISSING MANUAL
458
MODELING
GROUPS
IN YOUR
DATABASE
From that perspective, you have a
one-to-many relationship
: one user can be related
to many groups. “Many” doesn’t have a strict literal meaning here, either. It means
more like “as many as you want.” So, “many” can mean 0, 1, 1,000, or anything in
between or above.
However, that’s only part of the story. You must also consider the point of view of
the
groups
table. A group can have many users. For example, the Administrators
group might have 4, 5, or 20 users. This means that there’s a one-to-many relation-
ship on the groups-to-users side of things as well as on the users-to-groups side.
What you have here is a
many-to-many relationship
between users and groups (or,
if you like, between groups and users). One user can be in many groups; one group
can have many users. It’s a multi-sided relationship, which is a bit more complex
to model at the database level but just as important in the real world of data as a
one-to-one relationship or a one-to-many relationship.
NOTE A good example of a true one-to-many relationship is a user who might have a gallery of images. A
user can have many images, but that user’s images can’t be related to multiple users. It’s a one (user)-to-many
(images) relationship.
POWER USERS’ CLINIC
Lots of Programmers Are Secretly Math Geeks
It’s true: most programmers have at least a little love for math,
often buried somewhere deep down. One proof of this is that
many programming concepts share naming ideas from math.
For example, you might hear about one-to-one (1-to-1, or
even, sometimes, 1:1) relationships. You’ll also hear about
one-to-many relationships. But, just as often, you’ll hear about
a 1-to-N relationship. N is a mathematical term; it’s usually
written as lowercase n in math, but it’s more often capital N in
programming. That N is just a stand-in for a variable number.
So N could be 0, or 1, or some large number.
In that light, then, a one-to-many relationship is the same as
a 1:N relationship. It’s just that 1:N is a shorter, more concise
way to say the same thing. You know that programmers—like
you—tend to favor short and concise. So, on database diagrams
you’ll often see 1:N, which just tells you that relationship
between two tables is one-to-many.
And then, of course, you have N:N, which is just saying that
many items in one table are related to many items in another.
That said, an N:N relationship (and the many-to-many relation-
ship that it represents) is a conceptual or virtual idea. It takes
two relationships at the database level in most systems to
model an N:N relationship, as you’ll see on page 459.
JOINS ARE BEST DONE WITH IDS
When you related a user to a profile image, you used an ID. Each image had its own
ID, uniquely identifying it. It also had a user_id, which connected the image to a
particular user in the
users
table. That made it easy to grab an image for a user by
using something like this:
SELECT *
FROM images
WHERE user_id = $user_id;

CHAPTER 14: AUTHORIZATION AND SESSIONS 459
MODELING
GROUPS
IN YOUR
DATABASE
Or, you can join the two tables like this:
SELECT u.username, u.first_name, u.last_name, i.filename, i.image_data
FROM users u, images i
WHERE u.id = i.user_id;
In both cases, the IDs are the connectors. That works fine in a one-to-one relationship,
as it does in a one-to-many relationship. The “many” side just adds a column that
references the ID of the “one” side. Therefore, many images all have a user_id column
that references a user with the ID 51 (or 2931 or whatever else you have in
users
).
But with users and groups, you don’t have a one-to-one or a one-to-many relation-
ship. You have a many-to-many. How do you handle that?
USE A JOIN TABLE TO CONNECT USERS WITH GROUPS
It’s easy to model a one-to-many relationship by using the ID as a connector. When
you’re modeling a many-to-many relationship, connecting the IDs is more complex.
You need a sort of matrix: a set of user IDs and group IDs that are connected.
Think about the many-to-many relationship. In its simplest form, it’s two one-to-
many relationships; users and groups have a many-to-many relationship going in
each direction. You started with one side: users. Then you figured out it was one-
to-many. Then, the other side: groups. Also one-to-many.
You construct a many-to-many relationship at the database level the same way. You
have a table like
users
that connects to an intermediary table. Call it
user_groups
, and
assume that it has a user_id and a group_id. A user_id might appear in two rows:
in the first row along with the ID for the “Administrators” group, and again with the
ID of the “Musicians” group. That gives you the one-to-many from
users
to
groups
.
But then you also have the one-to-many from groups to users. The ID for “Admin-
istrators” might appear in five dierent rows within
user_groups
, once for each of
the five users to which that group relates.
To give this idea a concrete form, create the following table:
mysql> CREATE TABLE user_groups (
-> user_id INT NOT NULL,
-> group_id INT NOT NULL
-> );
Query OK, 0 rows affected (0.03 sec)
This table becomes a bridge: each row connects one user to one group. So, for “Je
Traugott” with an ID of 29, and a group “Luthiers” with an ID of 2, you’d add this
row to
user_groups
.
mysql> INSERT INTO user_groups
-> (user_id, group_id)
-> VALUES (29, 2);
Query OK, 1 row affected (0.02 sec)

PHP & MYSQL: THE MISSING MANUAL
460
MODELING
GROUPS
IN YOUR
DATABASE
mysql> select * from user_groups;
+---------+----------+
| user_id | group_id |
+---------+----------+
| 29 | 2 |
+---------+----------+
1 row in set (0.00 sec)
On their own, the
users
and
groups
tables aren’t connected. But this additional table
establishes the many-to-many relationship.
Testing Group Membership
To see whether a user is in a group, you need to determine whether there’s an entry
in
user_groups
with both the ID of the ID you want, and the ID of the group you want.
mysql> SELECT COUNT(*)
-> FROM users u, groups g, user_groups ug
-> WHERE u.username = "traugott"
-> AND g.name = "Luthiers"
-> AND u.user_id = ug.user_id
-> AND g.id = ug.group_id;
+----------+
| COUNT(*) |
+----------+
| 1 |
+----------+
1 row in set (0.00 sec)
Bingo! This query looks a little complex at first blush, but it’s straightforward if you
walk through it step by step.
First, you use COUNT(*) to return a count on the rows returned from the query. And
then there are the three tables involved:
users
,
groups
, and
user_groups
.
SELECT COUNT(*)
FROM users u, groups g, user_groups ug
Next, you indicate the name of the user you want (using any column you want; first
name, last name, or user name), and the name of the group you want. This will cause
exactly one (or zero, if there’s no match) row in both
users
and
groups
to be isolated.
SELECT COUNT(*)
FROM users u, groups g, user_groups ug
WHERE u.username = "traugott"
AND g.name = "Luthiers"
Now, you need to connect those individual rows—each with an ID—to
user_groups
.
This is just a regular join. You use the IDs in each table to match up with the ID
columns in
user_groups
:

CHAPTER 14: AUTHORIZATION AND SESSIONS 461
CHECKING
FOR GROUP
MEMBERSHIP
SELECT COUNT(*)
FROM users u, groups g, user_groups ug
WHERE u.username = "traugott"
AND g.name = "Luthiers"
AND u.user_id = ug.user_id
AND g.id = ug.group_id;
This query connects zero or one row in
users
to
user_groups
, which is also con-
nected to zero or one row in
groups
. The result? Either a single row with a COUNT
value of 1, meaning that there’s a connection from a user in
users
to the group in
groups
you indicated
+----------+
| COUNT(*) |
+----------+
| 1 |
+----------+
or a row with a COUNT value of 0, meaning there’s no connection:
mysql> SELECT COUNT(*)
-> FROM users u, groups g, user_groups ug
-> WHERE u.username = "traugott"
-> AND g.name = "Administrators"
-> AND u.user_id = ug.user_id
-> AND g.id = ug.group_id;
+----------+
| COUNT(*) |
+----------+
| 0 |
+----------+
1 row in set (0.05 sec)
WARNING Watch out! With this particular expression (using COUNT) you do get a single row each time.
The important information is the
value
in the row, not that there
is
a row.
The task now is to turn this into PHP code.
Checking for Group Membership
By replacing basic authentication with your own authentication scheme, you have
the makings of good, solid authentication. Authentication simply lets users into your
application when they log in. They authenticate in some manner that confirms to
your system that they are who they say they are.

PHP & MYSQL: THE MISSING MANUAL
462
CHECKING
FOR GROUP
MEMBERSHIP
But now, it’s time to add
authorization
: the ability to give access only to certain
pages, based on more specific criteria. At its simplest, you do have some level of
authorization through
authorize.php
in that you only authorize users who are au-
thenticated. Typically, authorization goes a lot further than that. It’s more detailed;
you can control access based on, say, group membership.
At this point, you have the users, you have the groups, and you have the connection
between the two. You need to enhance
authorize.php
to work these groups into
your authorization scheme.
authorize.php
Needs a Function
At the moment,
authorize.php
runs automatically when it’s required by a script. The
code in
authorize.php
isn’t in a function; it’s just dropped into the body of the PHP file:
<?php
if ((!isset($_COOKIE['user_id'])) || (!strlen($_COOKIE['user_id']) > 0)) {
header('Location: signin.php?' .
'error_message=You must login to see this page.');
exit;
}
?>
That’s worked fine up until now. But now, you need a means by which you can pass
in a group, or a list of groups, to
authorize.php
, and then
authorize.php
has to run
through those groups and see whether there’s a connection with the current user.
That situation—a block of code that should take in a piece of information with which
to work—screams “function.” There are some other options, but they’re less easy
to understand and maintain. (If you’re curious about those options, check out the
box on page 464.)
Create that new function in
authorize.php
. Eventually, it should take an array of
groups that allow access. For now, you can set a default value for the parameter the
function takes and use that default value to keep the current functionality: allowing
access to any authorized user.
<?php
function authorize_user($groups = NULL) {
// No need to check groups if there aren't cookies set
if ((!isset($_COOKIE['user_id'])) ||
(!strlen($_COOKIE['user_id']) > 0)) {
header('Location: signin.php?' .
'error_message=You must login to see this page.');
exit;
}
}
?>
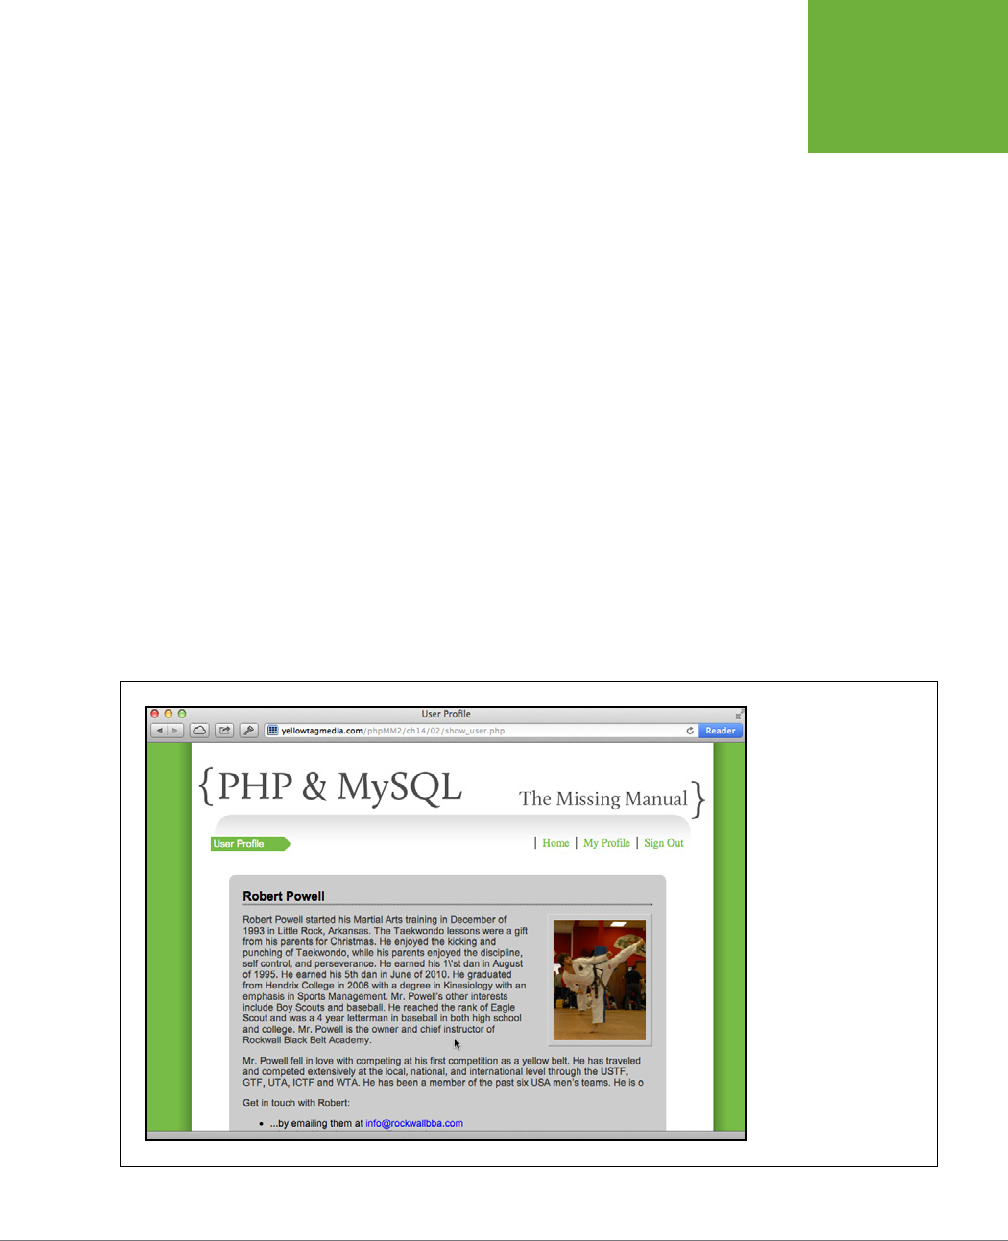
CHAPTER 14: AUTHORIZATION AND SESSIONS 463
CHECKING
FOR GROUP
MEMBERSHIP
Jump back into
show_user.php
and add an explicit call to this function. You don’t
need to pass in any group names.
show_user.php
should be open to any logged-in
user.
<?php
require_once '../scripts/authorize.php';
require_once '../scripts/database_connection.php';
require_once '../scripts/view.php';
// Authorize any user, as long as they're logged in
authorize_user();
// Get the user ID of the user to show
$user_id = $_REQUEST['user_id'];
// Build the SELECT statement
// and so on...
Take a moment to test this script. Because the default functionality should be just
what you already have, verify that you can’t access
show_user.php
without first
logging in. Enter the URL into your browser, and you should see your sign-in page,
as shown in Figure 14-1.
FIGURE 14-1
One of the first steps to
any new bit of functional-
ity is to ensure that old
functionality still works.
It’s no good to code for
an hour or two adding
new features if you end
up breaking all the old
features in the process.
Test the new stuff, but
start by testing the old
stuff first.

PHP & MYSQL: THE MISSING MANUAL
464
CHECKING
FOR GROUP
MEMBERSHIP
DESIGN TIME
On Functions and Non-Functions
In
authorize.php
, you’ve got a function that takes in zero or
more groups via a parameter. Yet, that’s just one way to handle
the issue. There are other approaches: you could, for example,
set a variable and then use that variable in the required file.
Take, for example, a simple script like this:
<?php
$message = "hello\n\n";
require_once "print.php";
?>
You can call this script
test.php
. Suppose, then, that
print.php
,
the referenced script, looks like this:
<?php
echo $message;
?>
When
print.php
is required, it’s like the code in
print.php
is
inserted in place of the
require_once
line. When you run
this script, PHP essentially sees this:
<?php
$message = "hello\n\n";
echo $message;
?>
Run
test.php
, and you’d get this result:
yellowta@yellowtagmedia.com [../ch14]# php
test.php
Content-type: text/html
hello
You can “pass” information into a required script in this manner.
This approach is perfectly easy to implement, but it’s not
terribly clear.
Here’s what the authorization code would look like:
$allowed_groups = array("Musicians",
"Luthiers");
require_once "../scripts/authorize.php";
Again, there’s nothing overtly wrong here. It’s just re-
ally unclear that the
$groups
variable is required before
the
require_once
to
authorize.php
, and that in fact
authorize.php
makes use of that variable. So, although an
authorize_user
function is a bit clumsy, it’s clear and
better than the alternative: code that’s difficult to understand
unless you already know what it does.
Take in a List of Groups
It’s time to get to the point of all this work. Start by sending a list of groups—through
a PHP array—to authorize_user. You can do this in
show_users.php
and
delete_user
.php
, both of which should require the Administrators group for access.
<?php
require_once '../scripts/app_config.php';
require_once '../scripts/authorize.php';
require_once '../scripts/database_connection.php';
require_once '../scripts/view.php';
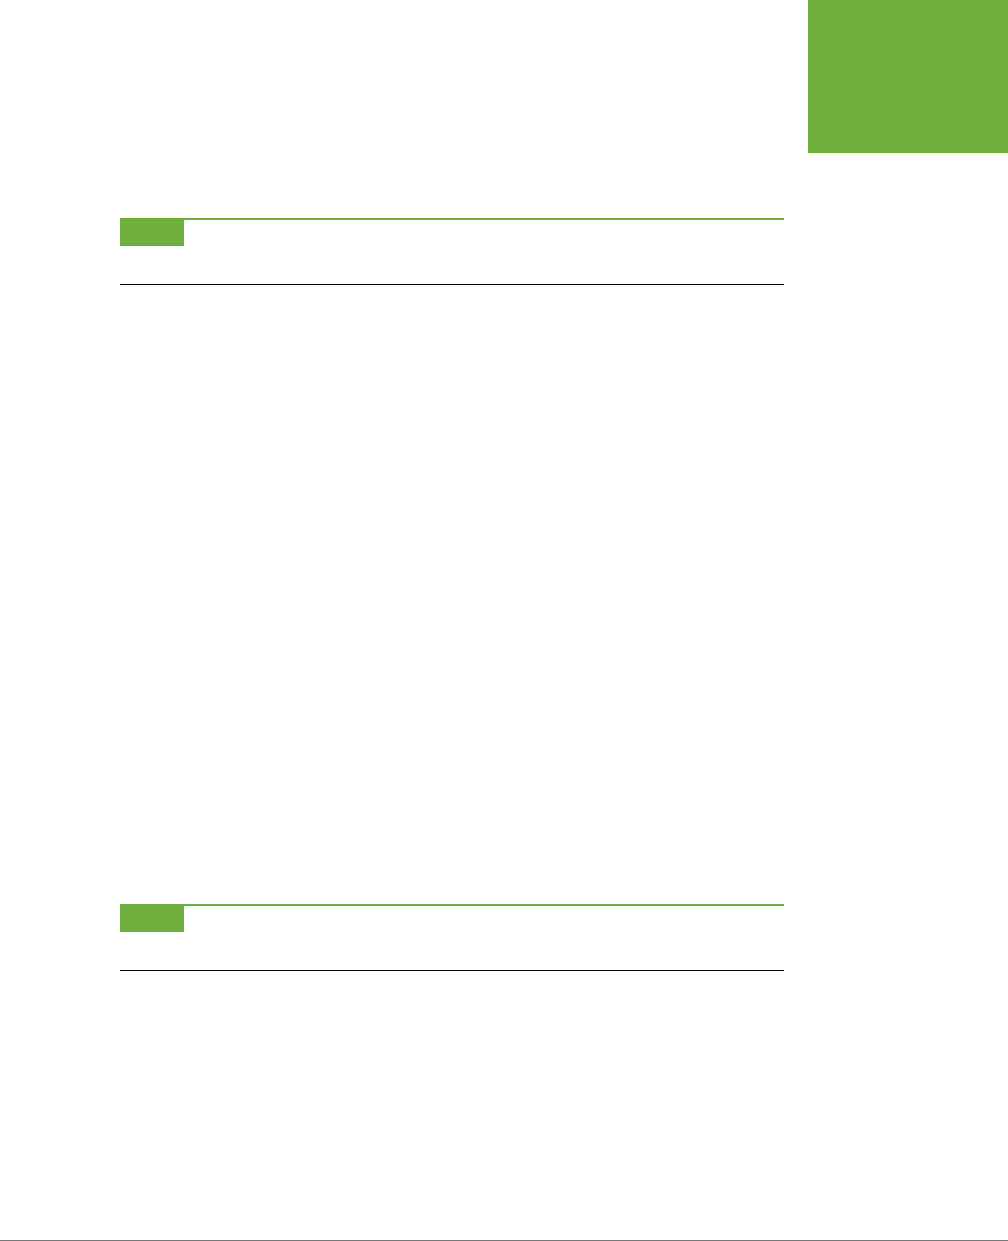
CHAPTER 14: AUTHORIZATION AND SESSIONS 465
CHECKING
FOR GROUP
MEMBERSHIP
// Only Administrators can access this page
authorize_user(array("Administrators"));
// Rest of the PHP code and HTML output
NOTE The preceding change is shown in
show_users.php
. Make the same change in
delete_user.php
so
that it can’t be directly accessed.
Using an array is about the simplest means in PHP of getting a list to a function.
Currently, in
authorize.php
, you’re getting either nothing or a list of allowed group
names. So you can start to do some work with those groups.
First, though, if the parameter passed to authorize_user is either an empty list or
NULL, you should have the function bail out. There’s no need to do any database
searching in those two cases.
<?php
function authorize_user($groups = NULL) {
// No need to check groups if there aren't cookies set
if ((!isset($_COOKIE['user_id'])) ||
(!strlen($_COOKIE['user_id']) > 0)) {
header('Location: signin.php?' .
'error_message=You must login to see this page.');
exit;
}
// If no groups passed in, the authorization above is enough
if ((is_null($groups)) || (empty($groups))) {
return;
}
}
?>
NOTE The
empty
function takes just about any PHP type and figures out what “empty” means, and then
returns either
true
or
false
. For an array,
empty
returns
true
if there aren’t any items in the array.
When you use return, you’re instructing PHP to give control back to the calling
script. It lets the script run, which means letting the user see the page he requested.
Iterating Over Each Group
Take a step back to the case in which you
do
get a list of groups, as in
show_users
.php
and
delete_user.php
. In those cases,
authorize.php
should loop over each group,
and for each group, build a SQL query.

PHP & MYSQL: THE MISSING MANUAL
466
CHECKING
FOR GROUP
MEMBERSHIP
Start out by just looping over the $groups array. You can use a for loop, but in
this case, there’s a better choice: foreach. foreach lets you loop over an array and
automatically assign a variable to the current item in the array:
$my_array = array("first", "second", "third");
foreach ($my_array as $item) {
echo $item;
}
For $groups, you could set the loop up like this:
foreach ($groups as $group) {
// do a SQL search for the current $group
}
Think through what happens inside the loop. You want something similar to the
original SQL you used to connect users to groups:
SELECT COUNT(*)
FROM users u, groups g, user_groups ug
WHERE u.username = "traugott"
AND g.name = "Luthiers"
AND u.user_id = ug.user_id
AND g.id = ug.group_id;
This query is actually
more
complex than what you need in
authorize.php
. First, you
don’t need the
users
table at all. That table is only part of the query to connect a
username to a user_id. However, your app already has the user’s user_id, so things
simplify to this:
SELECT COUNT(*)
FROM user_groups ug, groups g
WHERE g.name = mysql_real_escape_string($group)
AND g.id = ug.group_id
AND ug.user_id = mysql_real_escape_string($_COOKIE['user_id']);
NOTE As usual, you’ll want to use
mysql_real_escape_string
to ensure that your database gets
clean values. In fact, you might as well get into the habit now: use
mysql_real_escape_string
on anything
that originates in your scripts and is sent to MySQL.
There’s another improvement you can make, too. In the preceding query, you’d need
to get the result row and see if the value is 0 (no membership) or 1 (membership).
But, that’s an additional step. Better to just check and see whether there’s a result
at all. In other words, you want a query that returns a result row only if there’s a
match; therefore, make another change:
SELECT ug.user_id
FROM user_groups ug, groups g
WHERE g.name = mysql_real_escape_string($group)

CHAPTER 14: AUTHORIZATION AND SESSIONS 467
CHECKING
FOR GROUP
MEMBERSHIP
AND g.id = ug.group_id
AND ug.user_id = mysql_real_escape_string($_COOKIE['user_id']);
The particular column you select from
user_groups
doesn’t matter; you could use
ug.group_id, as well. You either get a result when there’s a match or you get no
result, so that’s one less step your code needs to take.
Put this together, and you end up with something like this in your foreach loop:
foreach ($groups as $group) {
// do a SQL search for the current $group
$query = "SELECT ug.user_id" .
" FROM user_groups ug, groups g" .
" WHERE g.name = '" . mysql_real_escape_string($group) . "'" .
" AND g.id = ug.group_id" .
" AND ug.user_id = " .
mysql_real_escape_string($COOKIE['user_id']) . "';";
mysql_query($query);
// Deal with results
}
This query works, and it doesn’t require the
users
table. The downside is that you’re
constructing this string, over and over again. For every group, this string is recre-
ated, and that’s wasteful.
Here’s where you rekindle your friendship with sprintf (page 298). With sprintf,
you can construct a single string, give it an escape character or two, and insert val-
ues for each escape character into the string. The string remains unchanged; you’re
modifying only the data within that string that’s variable.
As a result, you can construct the query string outside of the foreach, like this:
// Set up the query string
$query_string =
"SELECT ug.user_id" .
" FROM user_groups ug, groups g" .
" WHERE g.name = '%s'" .
" AND g.id = ug.group_id" .
" AND ug.user_id = " . mysql_real_escape_string($_COOKIE['user_id']);
foreach ($groups as $group) {
// do a SQL search for the current $group
// Deal with results
}
Then, within the foreach, use sprintf to supply the values to drop into the string
for a particular group:

PHP & MYSQL: THE MISSING MANUAL
468
CHECKING
FOR GROUP
MEMBERSHIP
// Set up the query string
$query_string =
"SELECT ug.user_id" .
" FROM user_groups ug, groups g" .
" WHERE g.name = '%s'" .
" AND g.id = ug.group_id" .
" AND ug.user_id = " . mysql_real_escape_string($_COOKIE['user_id']);
foreach ($groups as $group) {
// do a SQL search for the current $group
$query = sprintf($query_string, mysql_real_escape_string($group));
$result = mysql_query($query);
// Deal with results
}
In addition to using sprintf, this code assigns the current user ID—from $_COOKIE—to
the string assembled outside of the loop. There’s no need to feed that to sprintf,
because it won’t change as you loop.
Allow, Deny, Redirect
With a solid query in place, it’s time to deal with the results. You can check the
number of rows to know all you need: if no rows were returned, the user isn’t a
member of the group indicated by $group, and your loop should continue, going to
the next $group in $groups.
If there is a row returned from a query, not only is the user in an allowed group, but
authorize_user needs to stop. There’s no need to continue looping over $groups;
just return control to the calling script so that the PHP and HTML of that script can
take over.
And then, the final case: all the groups have been checked, and there’s never been
a result row. This is the case when the foreach loop ends. If that’s the case, it’s not
okay to send control back to the calling script, because that would be letting the user
“in,” and that’s exactly the
opposite
of what should happen. It’s also not appropriate
to redirect the user back to the sign-in page. He
is
signed in, at least in most cases;
he just doesn’t have the right level of permissions to access the current page.
So, what’s left? In the simplest case, just use handle_error one more time. You might
want to build this out yourself, though. Perhaps you could redirect the user to the last
page he viewed and set an error message. Or, you could build a customized page to
let the user request permissions for a certain page. No matter how you cut it, though,
you’re going to be sending him somewhere else; the current page is never shown.

CHAPTER 14: AUTHORIZATION AND SESSIONS 469
CHECKING
FOR GROUP
MEMBERSHIP
FREQUENTLY ASKED QUESTION
Better, Faster, Easier
Don’t all of the queries on page 467 match up a user with the
groups she belongs to? Why keep finding different ways to
do the same thing?
Yes, they indeed all get the job done. As you’ve come to real-
ize, though, there are solutions to problems and then there
are
better
solutions to problems. When you’re working with
databases, “better” usually means “faster,” and “faster” usu-
ally means “less work for the database to do.”
In the case of looking up a group and establishing whether
a user is a member, there’s nothing
functionally
wrong with
the following query:
SELECT COUNT(*)
FROM users u, groups g, user_groups ug
WHERE u.username =
mysql_real_escape_string(
$_COOKIE['username'])
AND g.name = mysql_real_escape_
string($group)
AND u.user_id = ug.user_id
AND g.id = ug.group_id;
You’re doing a
lot
more work than you need to. There’s an entire
extra table involved (
users
) that you can cut out because you
already have the user’s ID in a cookie.
You can cut down on dealing with results by moving from a
COUNT in the SELECT—which will require you to always examine
the results in a row—for a column in
user_groups
. With that
done, you only need to see if there are rows returned; the
values in those result rows become irrelevant.
And, you can improve on general execution time by creating a
string only once and using
sprintf
to modify just a small part
of that string every time you go to a new group. Again, this is a
small improvement, but an important one that’s easy to make.
All of these small changes can add up to noticeable improve-
ments in your app. It will simply “feel” more responsive. This is
even more important because the authorization script is going
to run every time a user visits your page. This means that a
script that’s sloppy or slower than it needs to be creates a lag
in every single page access.
Most users don’t like—and many won’t put up with—slow-
loading sites. This isn’t a pause while you secure your user
concert tickets or look up shipping information. It’s simply
them navigating to a new page. A little work on your script
to keep things peppy makes a huge difference in your users’
experience, especially as you have more and more users ac-
cessing your site, which means more and more hits against
your database to verify group membership.
Here’s a version of
authorize.php
that takes all of this into account:
<?php
require_once 'database_connection.php';
require_once 'app_config.php';
function authorize_user($groups = NULL) {
// No need to check groups if there aren't cookies set
if ((!isset($_COOKIE['user_id'])) || (!strlen($_COOKIE['user_id']) > 0)) {

PHP & MYSQL: THE MISSING MANUAL
470
CHECKING
FOR GROUP
MEMBERSHIP
header('Location: signin.php?' .
'error_message=You must login to see this page.');
exit;
}
// If no groups passed in, the authorization above is enough
if ((is_null($groups)) || (empty($groups))) {
return;
}
// Set up the query string
$query_string =
"SELECT ug.user_id" .
" FROM user_groups ug, groups g" .
" WHERE g.name = '%s'" .
" AND g.id = ug.group_id" .
" AND ug.user_id = " . mysql_real_escape_string($_COOKIE['user_id']);
// Run through each group and check membership
foreach ($groups as $group) {
$query = sprintf($query_string, mysql_real_escape_string($group));
$result = mysql_query($query);
if (mysql_num_rows($result) == 1) {
// If we got a result, the user should be allowed access
// Just return so the script will continue to run
return;
}
}
// If we got here, no matches were found for any group
// The user isn't allowed access
handle_error("You are not authorized to see this page.");
exit;
}
?>
It’s been a long time coming, but you can finally try this out. Ensure that you’ve got
a user in
users
who is a member of Administrators (through
user_groups
) and one
who’s not. The former should be able to navigate to
show_users.php
without any
problems; the latter should be kicked to the error page, as shown in Figure 14-2.
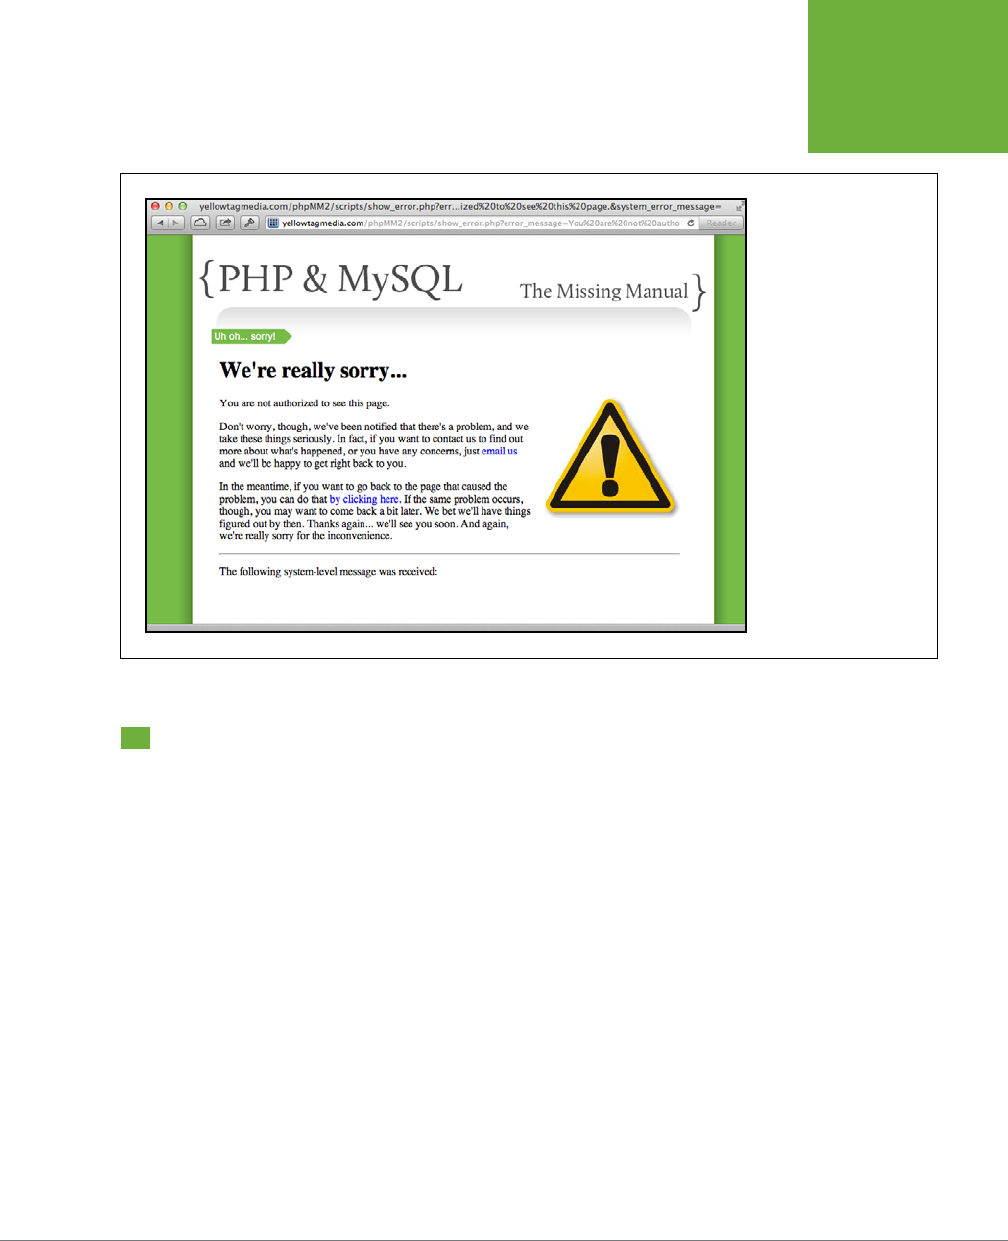
CHAPTER 14: AUTHORIZATION AND SESSIONS 471
GROUP-
SPECIFIC
MENUS
FIGURE 14-2
You should see this page
as a first step toward
authorization rather than
a last one. Full-page
errors should be serious
things, rarely shown
without a lot of thought,
and in this case you can
come up with a better,
less interruptive way to let
users know that they’ve
ended up somewhere they
shouldn’t be. Take them
back to a page they
can
access, if possible.
Group-Specific Menus
Right now, you can use authorize_user to check a user against a list of groups and
either reject access to a page or allow the user to see a page. That means you have
the logic to handle group-specific menus, but the actual implementation might take
a bit of refactoring.
Take a look at your menu system as it stands, in
view.php
:
function display_title($title, $success_msg = NULL, $error_msg = NULL) {
echo <<<EOD
<body>
<div id="header"><h1>PHP & MySQL: The Missing Manual</h1></div>
<div id="example">$title</div>
<div id="menu">
<ul>
<li><a href="index.html">Home</a></li>
EOD;
if (isset($_COOKIE['user_id'])) {
echo "<li><a href='show_user.php'>My Profile</a>";
echo "<li><a href='signout.php'>Sign Out</a></li>";

PHP & MYSQL: THE MISSING MANUAL
472
GROUP-
SPECIFIC
MENUS
} else {
echo "<li><a href='signin.php'>Sign In</a></li>";
}
echo <<<EOD
</ul>
</div>
EOD;
display_messages($success_msg, $error_msg);
}
You can't just drop the authorize_user function in here; it either gives a user access
a page or disallows it. It’s not a fine-grained tool with which you can check group
membership and get back a true or false value.
What you want is something like this:
function display_title($title, $success_msg = NULL, $error_msg = NULL) {
echo <<<EOD
<body>
<div id="header"><h1>PHP & MySQL: The Missing Manual</h1></div>
<div id="example">$title</div>
<div id="menu">
<ul>
<li><a href="index.html">Home</a></li>
EOD;
if (isset($_COOKIE['user_id'])) {
echo "<li><a href='show_user.php'>My Profile</a>";
if (user_in_group($_COOKIE['user_id'], "Administrators")) {
echo "<li><a href='show_users.php'>Manage Users</a></li>";
}
echo "<li><a href='signout.php'>Sign Out</a></li>";
} else {
echo "<li><a href='signin.php'>Sign In</a></li>";
}
echo <<<EOD
</ul>
</div>
EOD;
display_messages($success_msg, $error_msg);
}
NOTE You’ll also need to add a
require_once
for
authorize.php
to
view.php
for this to eventually work.
Then, that function would check group memberships and show the Manage Users link
to Administrators. In fact, you have all the relevant code already in
authorize_user
.php
:

CHAPTER 14: AUTHORIZATION AND SESSIONS 473
GROUP-
SPECIFIC
MENUS
// Set up the query string
$query_string =
"SELECT ug.user_id" .
" FROM user_groups ug, groups g" .
" WHERE g.name = '%s'" .
" AND g.id = ug.group_id" .
" AND ug.user_id = " . mysql_real_escape_string($_COOKIE['user_id']);
// Run through each group and check membership
foreach ($groups as $group) {
$query = sprintf($query_string, mysql_real_escape_string($group));
$result = mysql_query($query);
if (mysql_num_rows($result) == 1) {
// If we got a result, the user should be allowed access
// Just return so the script will continue to run
return;
}
}
This code just needs to be adapted to a new function that takes in a user’s ID and a
group. First, add the following function to
authorize.php
in your
scripts/
directory:
function user_in_group($user_id, $group) {
$query_string =
"SELECT ug.user_id" .
" FROM user_groups ug, groups g" .
" WHERE g.name = '%s'" .
" AND g.id = ug.group_id" .
" AND ug.user_id = %d";
$query = sprintf($query_string, mysql_real_escape_string($group),
mysql_real_escape_string($user_id));
$result = mysql_query($query);
if (mysql_num_rows($result) == 1) {
return true;
} else {
return false;
}
}
Nothing here is new. This is just a new ri on an old hit: the code you’ve already got
in
authorize.php
, in the authorize_user function.
Get this code in place and then try it out. First, log in as a user who’s not in Admin-
istrators. Visit a page like
show_user.php
, and your menu options should not have
a Manage Users options, as shown in Figure 14-3.
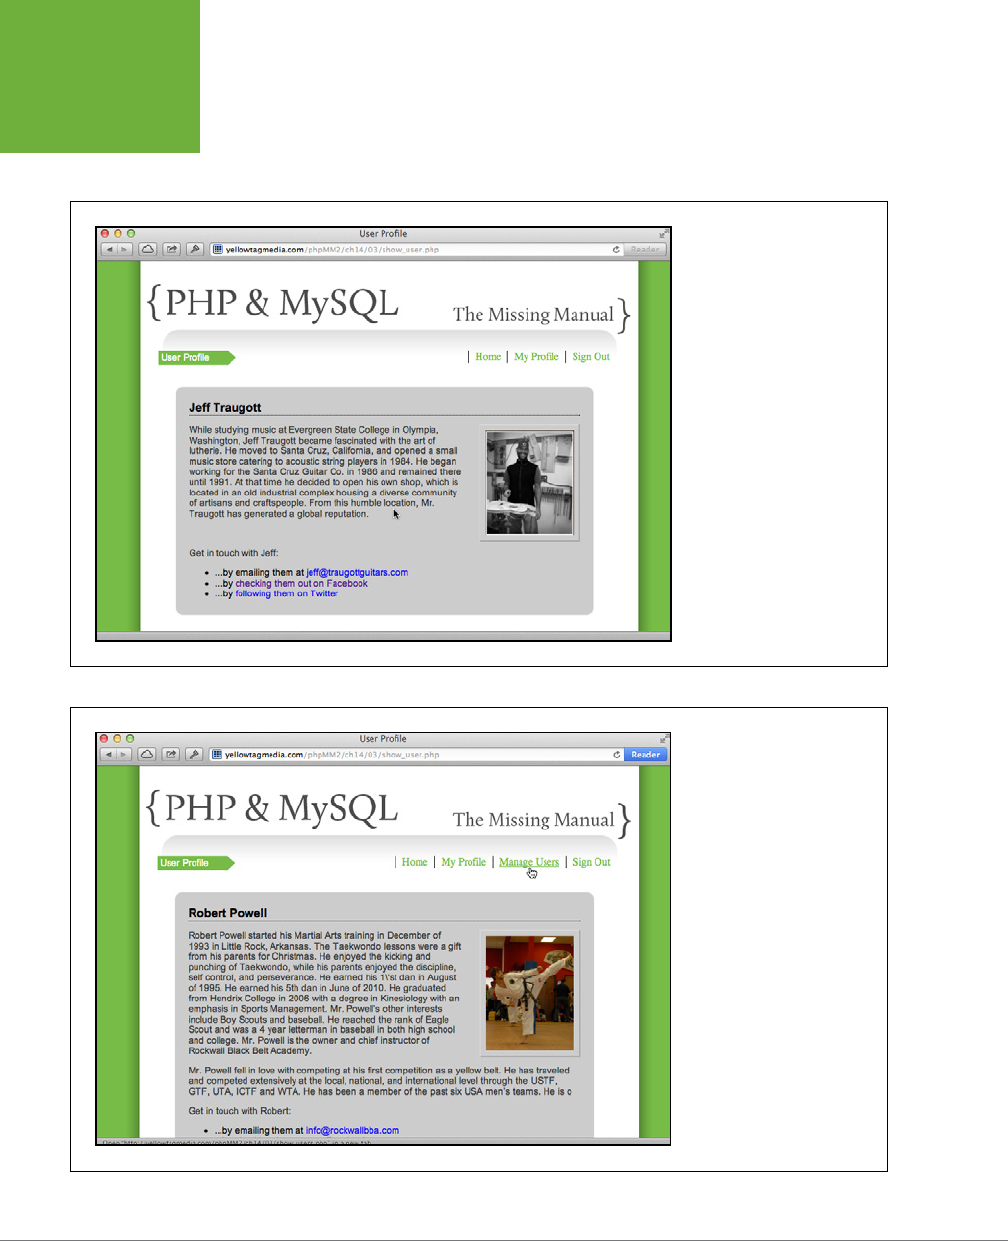
PHP & MYSQL: THE MISSING MANUAL
474
GROUP-
SPECIFIC
MENUS
Now, sign out and do exactly the same thing again, this time with an administrative
user. Magically—at least from the non-PHP programmer’s point of view—a new menu
option appears. You can see the Manage Users link in Figure 14-4.
FIGURE 14-3
Ahh, pity the users who aren’t
Administrators. They see no
Manage Users option—but,
that’s a good thing. You don’t
want users to see options they
can’t access. That’s the heart of
good authorization: as impor-
tant as it is to control access,
it’s equally important to avoid
letting people see options that
they can’t use anyway. Out of
sight, out of mind.
FIGURE 14-4
Administrators get additional
menu options, such as Manage
Users, so you have to ensure
that they can see those op-
tions. One thing to think about,
though: you’re repeating the
“Administrators” group in
several places in your script.
You might want to think
about a constant or even an
is_admin
function to make
remembering how to spell
“Administrators” unnecessary.

CHAPTER 14: AUTHORIZATION AND SESSIONS 475
ENTERING
BROWSER
SESSIONS
FREQUENTLY ASKED QUESTION
Refactoring Redux
In the code on page 473, shouldn’t
authorize_user
call
user_in_group
, because it’s using that same code?
Major refactoring points if you thought of this question, or if
it felt a bit like you might be duplicating code in
user_in_
group
, and that bothered you. It’s true; there’s a lot
similar
(but not quite the same) about the code in
user_in_group
and the code that iterates over
$groups
and looks up each
group within
authorize_user
.
One way to take advantage of
user_in_group
and
remove this similar code would be to rework the
foreach
in
authorize_user
:
// Remove the initial query string before
the loop
// Run through each group and check mem-
bership
foreach ($groups as $group) {
if (user_in_group($_COOKIE['user_id'],
$group) {
// Just return so the script will con-
tinue to run
return;
}
}
It’s true, there’s a lot less code, and you’ve done some nice
refactoring. Unfortunately you’ve actually gone back toward
the original code in
authorize_user
(page 472) from
which you were trying to move away. Now, there’s a query
string created every time through the loop (hidden away
within
user_in_group
). That string is being created over
and over, and continually assigned the same user ID with each
group in
$groups
. By moving away from that approach,
you (if only in some small ways) sped up the performance of
authorize_user
.
Here’s where you have to make a tough decision. Is the
clean, refactored approach here worth the loss in speed that
requires some nearly-duplicate code? In the case of a bit of
code that’s potentially called on most, if not every page—
authorize_user
—it might be worth not refactoring. That
little bit of improved speed times one hundred page views
(or one thousand or one million) it starts to seriously add up.
Entering Browser Sessions
So far, cookies have been the secret to much of your authentication and authoriza-
tion success. But, there are many programmers who really, really hate a cookie-only
solution to storing a user’s information. The biggest issue with cookies is that they
are entirely
client-side
entities. This means that anything you store in a cookie resides
in that cookie, on the user’s computer (the client device).
In your case, the user’s ID and user name are stored on your computer. In fact, on
most web browsers, you can easily look at your cookies. In Firefox, for example,
you can click Preferences, select the Privacy tab, and then click “Remove individual
cookies.”
Figure 14-5 shows the cookies related to your social networking app.
PHP & MYSQL: THE MISSING MANUAL
476
ENTERING
BROWSER
SESSIONS
FIGURE 14-5
You can see the
user_id
and the
user name cookies as well as (in
most cases) several others, usually
related to codes the browser uses
for keeping up with your app’s
cookies. This data is stored on
every client’s personal computer.
NOTE In Safari for the Mac, cookies are under Safari→Preferences. Click the Privacy tab and then click
the Details button. In Chrome, go to Preferences→Under the Hood→Content Settings→All Cookies and Site
Data. In Internet Explorer, go to View→Internet Options→General tab, and then under Browser History, select
Settings. Then, under Temporary Internet Files And History Settings, select View Files. All of these options get
you the same information, although in each case it looks a bit different.
This client-side storage is the main reason some developers don’t like cookies.
Whether the client computer is a public device in a library in a home there’s just
something that seems unsafe about leaving what amounts to a system-level value
like a user ID on any old computer. After all, that user ID uniquely identifies a user
in your database. On top of that, most applications that use cookies add additional
information to a client’s computer, rather than lessening it. You might speed up
user and group searches by storing cookies with the user’s groups (or the IDs of
those groups) in cookies; you might store personal information you don’t want to
constantly look up in cookies.

CHAPTER 14: AUTHORIZATION AND SESSIONS 477
ENTERING
BROWSER
SESSIONS
All of this information ends up residing on your users’ computers until those cookies
expire. So, what’s a security-conscious programmer to do? Keep user IDs and similar
information on the server, not the client side.
Sessions Are Server-Side
Sessions are generally considered the answer to the vulnerability of cookies. Ses-
sions are similar to cookies in that they can store information. However, sessions
have two big dierences:
• Sessions are stored on the server rather than the client computer. People can’t
view session data in a browser because there’s nothing to view, except perhaps
a non-readable ID that connects a particular browser with a session.
• Because sessions are stored on the server, you can use them to store much
bigger chunks of data than cookies. You can store a user’s profile picture on
the server in a session, for example, and not worry about taking up space on
a user’s computer.
Because you’re not storing potentially sensitive information on the user’s computer,
many programmers prefer sessions.
Sessions Must Be Started
The biggest change in dealing with sessions isn’t lots of new syntax. In fact, you’ll
quickly see that changing from using cookies to sessions is pretty simple. But there’s
one significant dierence: before you can do any work with sessions, you must call
session_start:
// Start/resume sessions
session_start();
// Now do work with session information
If you’re already thinking you can call session_start in
signin.php
, you’re right.
That’s exactly where you should first call session_start:
<?php
require_once '../scripts/database_connection.php';
require_once '../scripts/view.php';
$error_message = $_REQUEST['error_message'];
session_start();
// Rest of PHP and HTML...
Calling session_start here kicks o the PHP machinery that makes sessions
available.

PHP & MYSQL: THE MISSING MANUAL
478
ENTERING
BROWSER
SESSIONS
From $_COOKIE to $_SESSION
This is where it gets easy: instead of using the superglobal $_COOKIE, you use the
superglobal $_SESSION. Yes, it’s that easy; simply make this change in
signin.php
:
<?php
require_once '../scripts/database_connection.php';
require_once '../scripts/view.php';
$error_message = $_REQUEST['error_message'];
session_start();
// If the user is logged in, the user_id in the session will be set
if (!isset($_SESSION['user_id'])) {
// and so on...
Then, there’s one other small change. With sessions, you don’t use setcookie. Instead,
you directly set values in $_SESSION, providing a key and a value:
if (!isset($_SESSION['user_id'])) {
// See if a login form was submitted with a username for login
if (isset($_POST['username'])) {
// Try and log the user in
$username = mysql_real_escape_string(trim($_REQUEST['username']));
$password = mysql_real_escape_string(trim($_REQUEST['password']));
// Look up the user
$query = sprintf("SELECT user_id, username FROM users " .
" WHERE username = '%s' AND " .
" password = '%s';",
$username, crypt($password, $username));
$results = mysql_query($query);
if (mysql_num_rows($results) == 1) {
$result = mysql_fetch_array($results);
$user_id = $result['user_id'];
// No more setcookie
$_SESSION['user_id'] = $user_id;
$_SESSION['username'] = $username;
header("Location: show_user.php");
} else {
// If user not found, issue an error
$error_message = "Your username/password combination was invalid.";
}
}
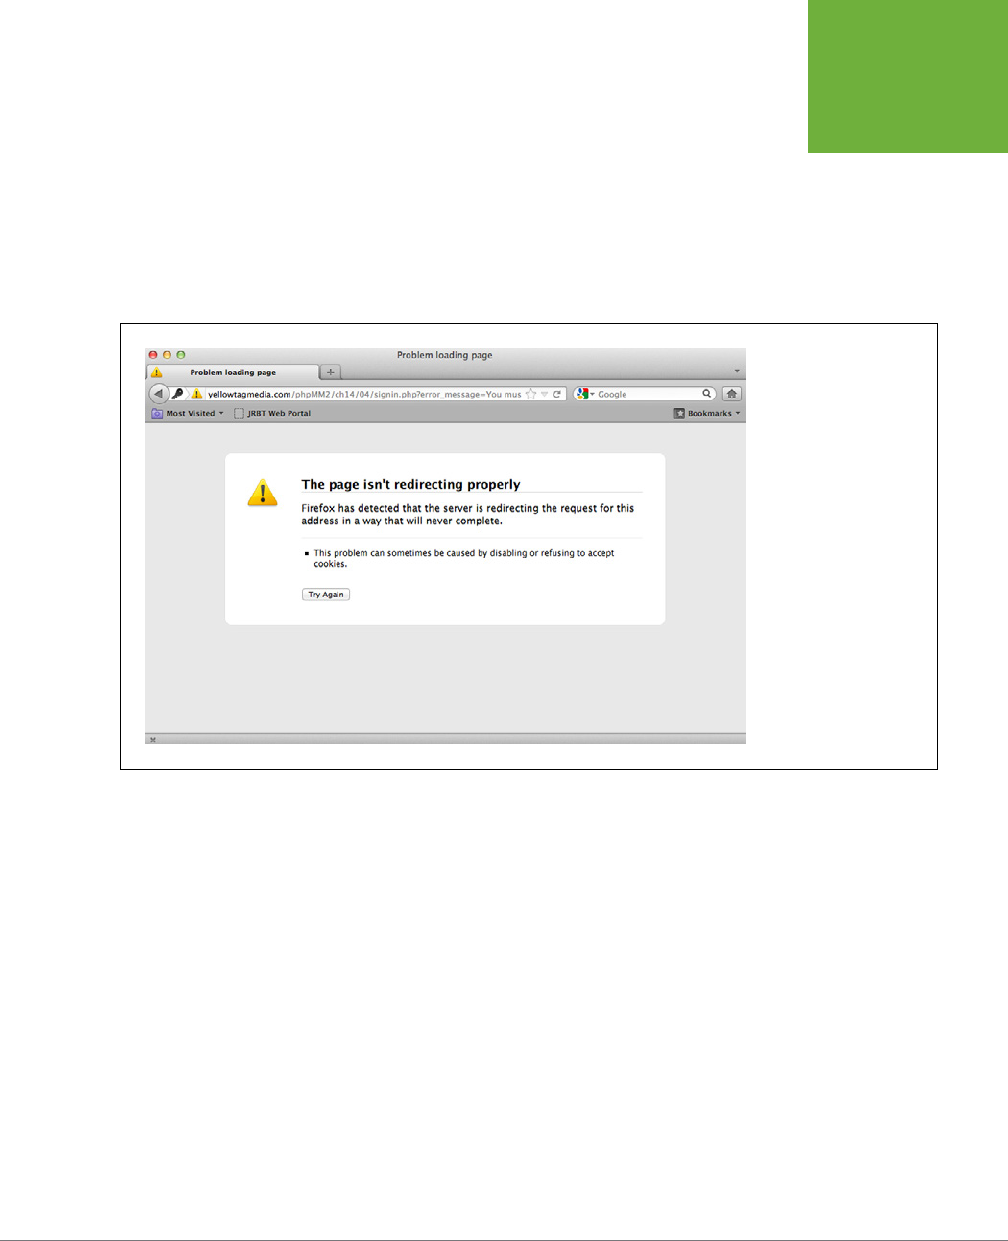
CHAPTER 14: AUTHORIZATION AND SESSIONS 479
ENTERING
BROWSER
SESSIONS
Now you use $_SESSION to both retrieve values from the session and insert values
into the session. All the while, behind the scenes, all this information is stored on
the server, rather than the client.
Sessions Must Be Restarted, Too
Here’s something a little strange. Try to sign in by using a good user name/password
combination. You’re not going to see what you expect. Instead, you’ll get the error
about not being logged in that’s illustrated in Figure 14-6.
FIGURE 14-6
It looks like changing to
sessions wasn’t quite as
painless as it might have
first appeared. Where is
this error coming from?
Does it mean that sessions
don’t work?
What’s going on? Think carefully; you might even want to search through
signin.php
.
Is this an error related to sessions as well as the obvious cookie-related issue? Well,
kind of, but it’s generated by
show_user.php
, not
signin.php
. In fact, it’s actually an
issue in authorize_user, which resides in
authorize.php
; that function is called at
the beginning of
show_user.php
:
<?php
require '../scripts/authorize.php';
require '../scripts/database_connection.php';
require '../scripts/view.php';
// Authorize any user, as long as they're logged in
authorize_user();

PHP & MYSQL: THE MISSING MANUAL
480
ENTERING
BROWSER
SESSIONS
When you think about it, it makes perfect sense that things aren’t behaving.
authorize_user (in
authorize.php
) is expecting to find a user ID in $_COOKIE:
<?php
require_once 'database_connection.php';
require_once 'app_config.php';
function authorize_user($groups = NULL) {
// No need to check groups if there aren't cookies set
if ((!isset($_COOKIE['user_id'])) || (!strlen($_COOKIE['user_id']) > 0)) {
header('Location: signin.php?' .
'error_message=You must login to see this page.');
exit();
}
// And so on...
This is another easy change. $_COOKIE just has to become $_SESSION:
<?php
require_once 'database_connection.php';
require_once 'app_config.php';
function authorize_user($groups = NULL) {
// No need to check groups if there aren't cookies set
if ((!isset($_SESSION['user_id'])) || (!strlen($_SESSION['user_id']) > 0)) {
header('Location: signin.php?' .
'error_message=You must login to see this page.');
exit;
}
// And so on...
Don’t forget to make a similar change later in the function, when the query string
used for group searching is constructed:
// Set up the query string
$query_string =
"SELECT ug.user_id" .
" FROM user_groups ug, groups g" .
" WHERE g.name = '%s'" .
" AND g.id = ug.group_id" .
" AND ug.user_id = " . mysql_real_escape_string($_SESSION['user_id']);

CHAPTER 14: AUTHORIZATION AND SESSIONS 481
ENTERING
BROWSER
SESSIONS
This looks better. Unfortunately, you’re going to get the exact same result. Sign in
again, and you’ll get Figure 14-7, yet another error. What’s going on now?
FIGURE 14-7
You changed out
$_COOKIE
for
$_SESSION
, but obvi-
ously, there’s still a big
problem here.
NOTE You might see a different response, depending on your browser. You might see a timeout, or your
browser just might hang. In all these cases, it’s not good.
The secret is in the rather poorly named session_start function. That function
sounds like it starts a new session. In that case, you should call it once—as you did—in
signin.php
. However, PHP scripts each run on their own, without connection to any
other script. As a result, when
show_user.php
is called, it has no idea that a session
was started back in
signin.php
.
In fact, there’s no connection at all between two scripts; they’re just two calls from
a browser out there somewhere, hooked to the Internet via Wi-Fi or an Ethernet
cable. So, how do two scripts—or an entire application’s worth of scripts—share this
session data? The truth is a bit surprising: calling start_session actually creates a
cookie on the client. Yes, you’re back to cookies!
Unlike other cookies you’ve seen so far, though, this one holds a fairly cryptic value
(see Figure 14-8). This value refers to where a particular user’s data is stored on the
server. It’s a way to say, “Look up this code in all the server’s session data. What-
ever’s there... that’s mine.”
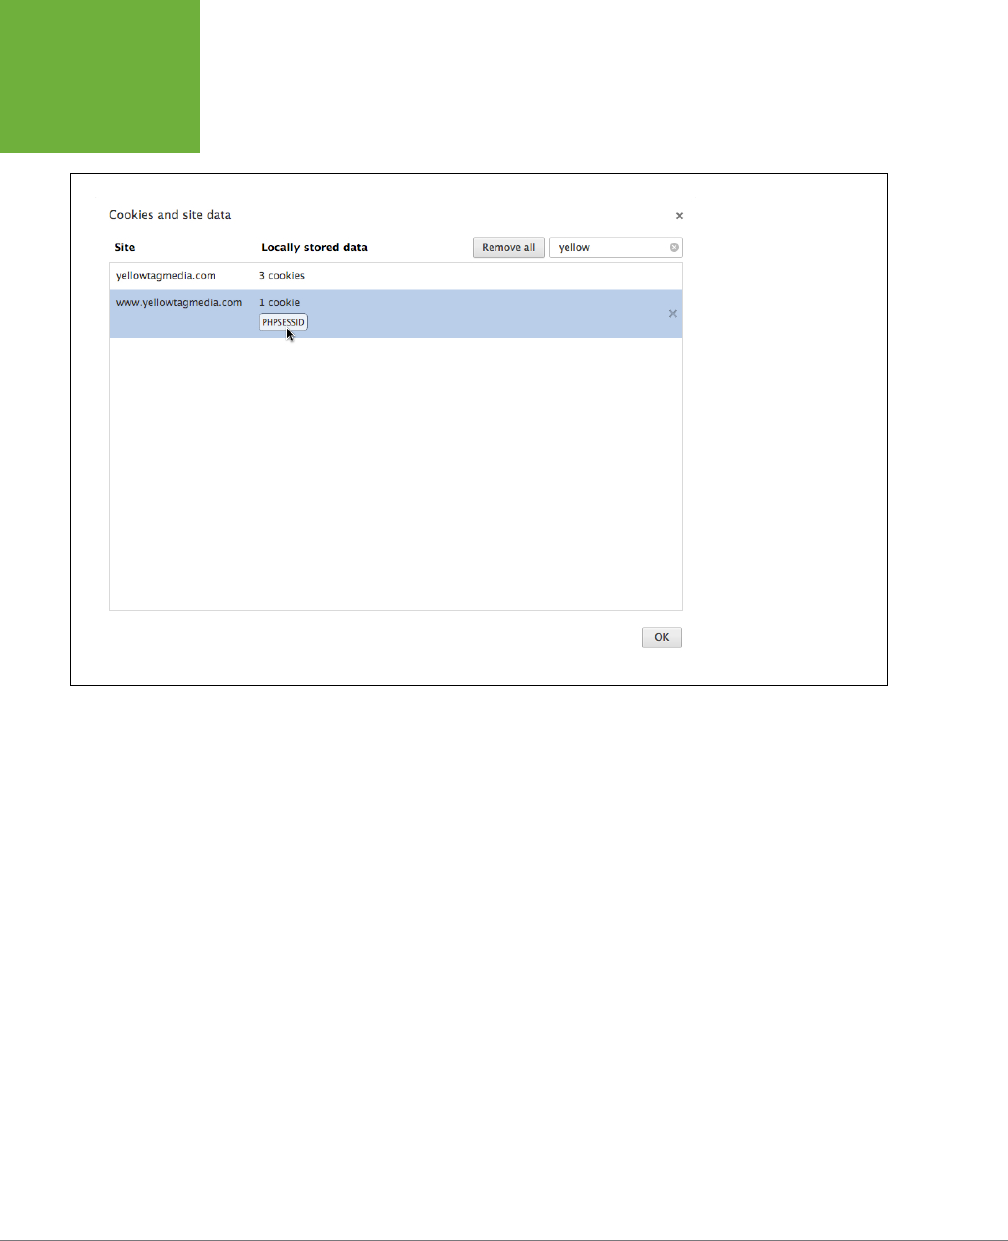
PHP & MYSQL: THE MISSING MANUAL
482
ENTERING
BROWSER
SESSIONS
FIGURE 14-8
All the work you’ve been
doing in this section to
move away from cookies
actually requires cookies.
Still, you’re avoiding any
valuable information
being stored on the client.
The unique key isn’t useful
to anyone who doesn’t
have access to your server,
and that’s a good, secure
thing.
What all of this means is that session_start does a lot more than start a one-time
session. It looks up a user’s cookie, and if it’s there,
restarts
the session that ID
references, so every script that wants to use $_SESSION has to call session_start.
Fixing the problem in
show_user.php
means two things: first, you need to call
session_start in
authorize.php
, to ensure that session data is available to
authorize_user and the other functions in
authorize.php
.
<?php
require_once 'database_connection.php';
require_once 'app_config.php';
session_start();
function authorize_user($groups = NULL) {
// an so on...
}
?>
Try this out, and you’ll see an error pointing you to the second thing you’ve got to
do. That error is a familiar one, and you can see it in Figure 14-9.
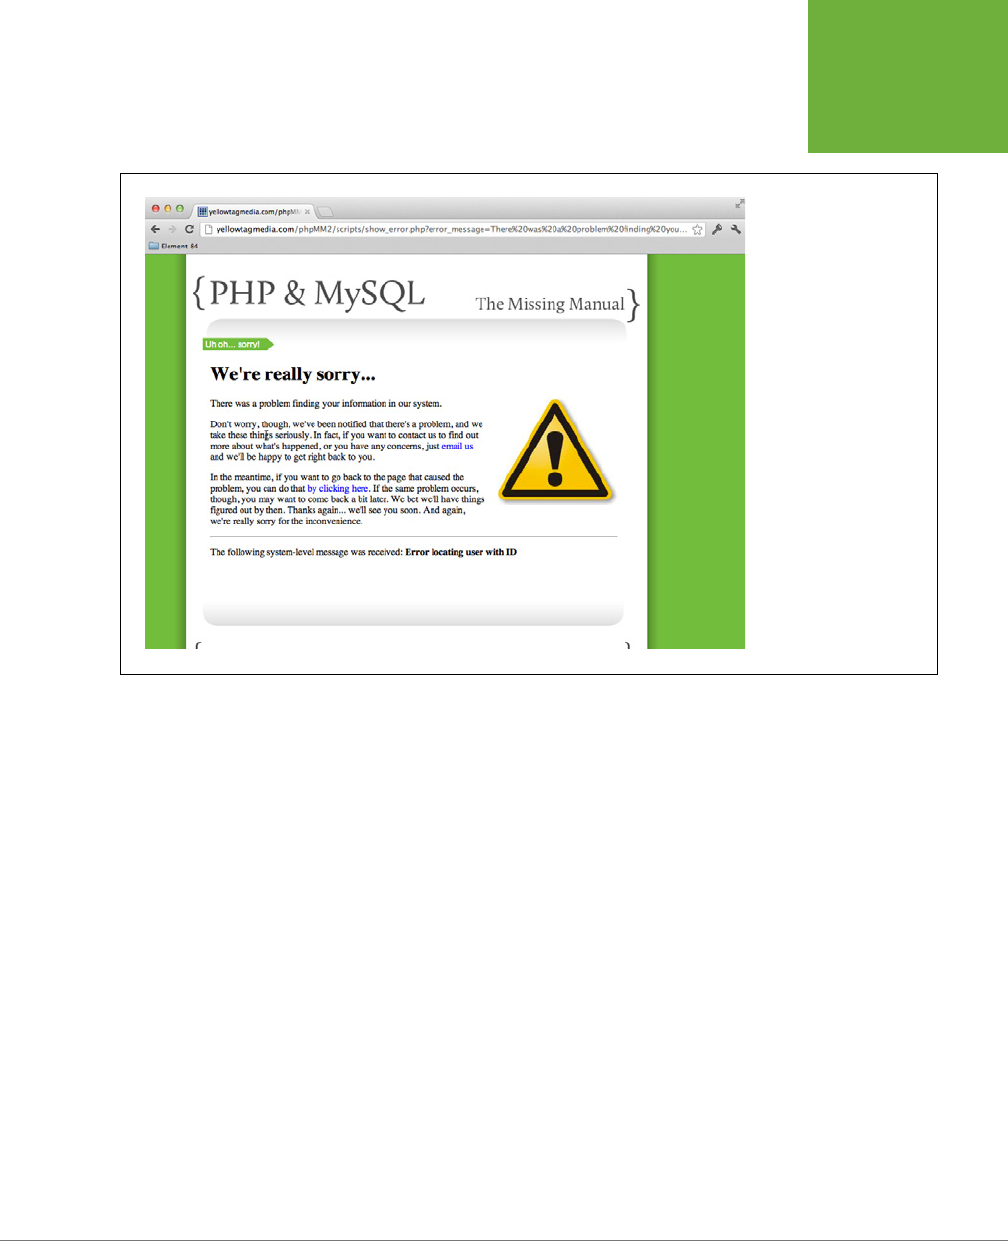
CHAPTER 14: AUTHORIZATION AND SESSIONS 483
ENTERING
BROWSER
SESSIONS
FIGURE 14-9
You’ve seen this a few
times, such as on page
244. What’s going on in
this particular case? For
some reason, the code that
looks up the user’s ID isn’t
working, and it’s kicking
the user out with this error
about his information not
being found.
$_REQUEST Doesn’t Include $_SESSION
Here’s the line in
show_user.php
that’s causing the problem:
// Get the user ID of the user to show
$user_id = $_REQUEST['user_id'];
This worked when you were using cookies for authorization (page 424) because
whether the user’s ID was in $_REQUEST, $_GET, $_POST, or $_COOKIE didn’t matter.
All of these bubble up to $_REQUEST. Now, however, you’re passing the user ID in a
dierent superglobal, one not included in $_REQUEST: $_SESSION.
Not only that, you still have code in
show_users.php
that passes the user ID in a
request parameter:
$user_row = sprintf(
"<li><a href='show_user.php?user_id=%d'>%s %s</a> " .
"(<a href='mailto:%s'>%s</a>) " .
"<a href='javascript:delete_user(%d);'><img " .
"class='delete_user' src='../images/delete.png' " .
"width='15' /></a></li>",
$user['user_id'], $user['first_name'], $user['last_name'],
$user['email'], $user['email'], $user['user_id']);
echo $user_row;

PHP & MYSQL: THE MISSING MANUAL
484
ENTERING
BROWSER
SESSIONS
NOTE This code is deep into the middle of
show_users.php
. Look for the
while
loop within the HTML and
you’ll find it.
Clearly, you can’t just switch $_REQUEST to $_SESSION and call it a day. Instead, you
need to check both $_SESSION and $_REQUEST to cover all your bases:
<?php
require '../scripts/authorize.php';
require '../scripts/database_connection.php';
require '../scripts/view.php';
// Authorize any user, as long as they're logged in
authorize_user();
// Get the user ID of the user to show
$user_id = $_REQUEST['user_id'];
if (!isset($user_id)) {
$user_id = $_SESSION['user_id'];
}
// Look up user using $user_id
Now, if there’s no user ID found in $_REQUEST, the $_SESSION is checked. And then,
last but not least, you need to call session_start before you can do any work with
the session:
<?php
require '../scripts/authorize.php';
require '../scripts/database_connection.php';
require '../scripts/view.php';
session_start();
// Authorize any user, as long as they're logged in
authorize_user();
// Get the user ID of the user to show
$user_id = $_REQUEST['user_id'];
if (!isset($user_id)) {
$user_id = $_SESSION['user_id'];
}
// Look up user using $user_id

CHAPTER 14: AUTHORIZATION AND SESSIONS 485
ENTERING
BROWSER
SESSIONS
Finally, you can get back to viewing user profiles.
NOTE You’re actually now calling
session_start
twice in the
show_user.php
flow: once in
authorize
.php
, pulled in through
require_once
; and a second time, in the body of
show_user.php
.
Still, that extra call doesn’t do much beyond causing PHP to issue a notice, and there’s no guarantee that other
scripts that bring in
authorize.php
will also call
session_start
. Thus, the duplicate in
show_user.php
won’t
always happen. It’s a better bet to treat each script as self-contained. Use
session_start
every time
you’re
working with sessions, even if it might have been called somewhere else.
Menu, Anyone?
All that’s left is the menu that’s created in
view.php
. It still uses $_COOKIE, but you
know exactly what to do now. First, add the all-important call to session_start:
<?php
require_once 'app_config.php';
require_once 'authorize.php';
define("SUCCESS_MESSAGE", "success");
define("ERROR_MESSAGE", "error");
session_start();
// And then functions follow...
?>
Then, replace $_COOKIE with $_SESSION in display_title:
unction display_title($title, $success_msg = NULL, $error_msg = NULL) {
echo <<<EOD
<body>
<div id="header"><h1>PHP & MySQL: The Missing Manual</h1></div>
<div id="example">$title</div>
<div id="menu">
<ul>
<li><a href="index.html">Home</a></li>
EOD;
if (isset($_SESSION['user_id'])) {
echo "<li><a href='show_user.php'>My Profile</a>";
if (user_in_group($_SESSION['user_id'], "Administrators")) {
echo "<li><a href='show_users.php'>Manage Users</a></li>";
}
echo "<li><a href='signout.php'>Sign Out</a></li>";
} else {
echo "<li><a href='signin.php'>Sign In</a></li>";

PHP & MYSQL: THE MISSING MANUAL
486
MEMORY LANE:
REMEMBER
THAT PHISHING
PROBLEM?
}
echo <<<EOD
</ul>
</div>
EOD;
display_messages($success_msg, $error_msg);
}
Be sure to check your menu; when you’re logged in, you should see Sign Out and
My Profile. When you’re signed out, you shouldn’t.
And Then, Sign Out...
That leads you back to signing out. With cookies, you set the expiration value to
a time in the past. With $_SESSION, you need to call unset on the session variable.
And, as odd as it might seem, you can’t work with $_SESSION—even if that work is
to unset values—without calling session_start. Here’s what
signout.php
should
look like:
<?php
session_start();
unset($_SESSION['user_id']);
unset($_SESSION['username']);
header('Location: signin.php');
?>
The cookies are gone, and once
signout.php
runs, so will your user’s sessions variables.
And just like that, with less than 20 lines of code changed, you’ve moved out of cook-
ies and into sessions. Nice work! Your security-conscious users will thank you for it.
Memory Lane: Remember That Phishing
Problem?
There’s just one little annoyance left to which you should attend. Remember the
phishing problem back in Chapter 8 on page 236? It had to do with your use of
error_message as a request parameter to
show_error.php
.
show_error.php
takes
in the error message it displays from a request parameter:
if (isset($_REQUEST['error_message'])) {
$error_message = preg_replace("/\\\\/", '', $_REQUEST['error_message']);
} else {
$error_message = "something went wrong, and that's how you ended up here.";
}
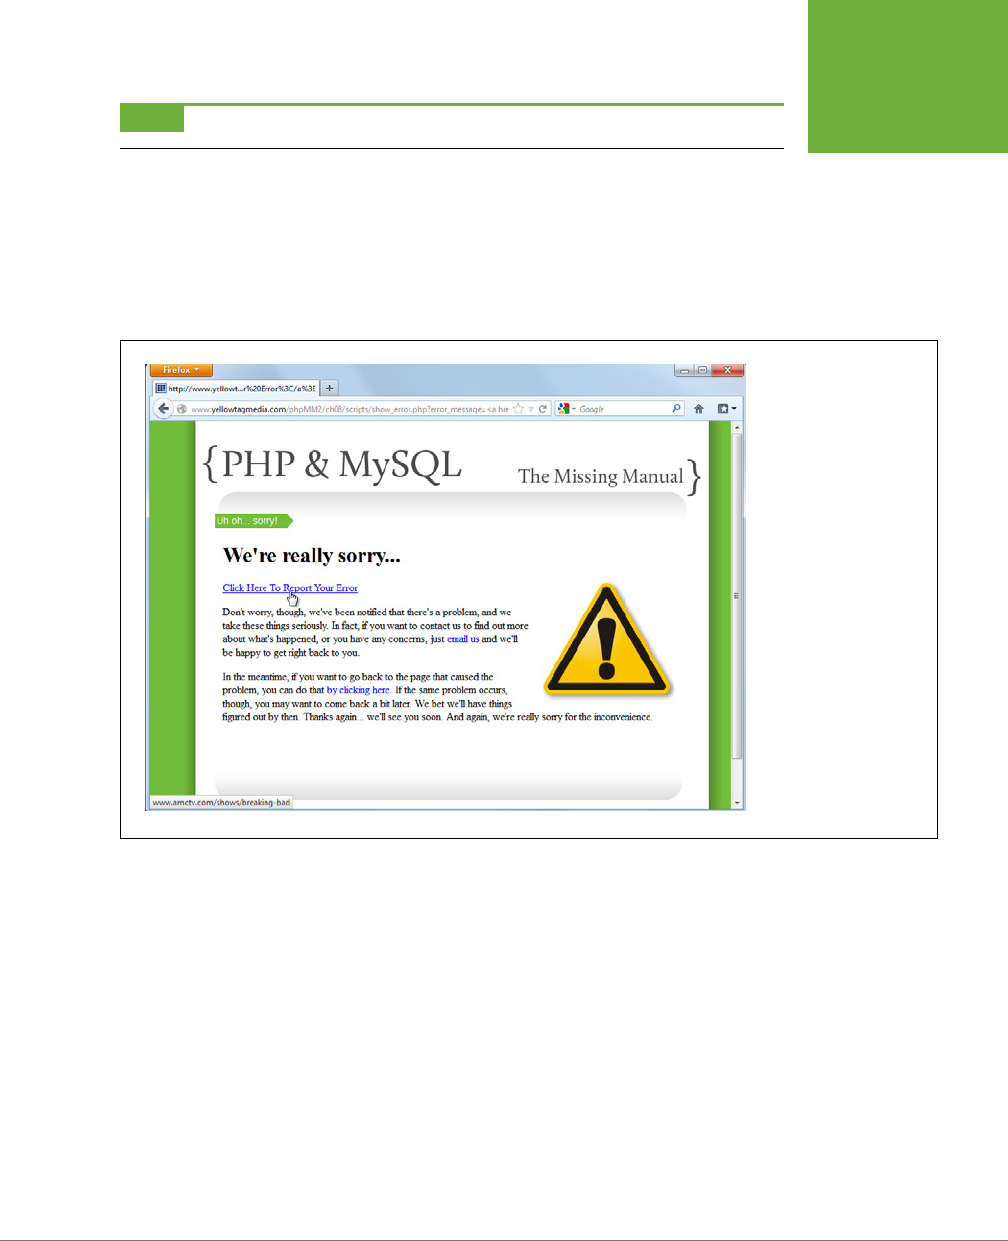
CHAPTER 14: AUTHORIZATION AND SESSIONS 487
MEMORY LANE:
REMEMBER
THAT PHISHING
PROBLEM?
NOTE This code is in
scripts/show_error.php
.
And you saw that a URL like this:
http://yellowtagmedia.com/phpMM2/ch08/scripts/show_error.
php?error_message=%3Ca%20href=%22http://www.amctv.com/shows/
breaking-bad%22%3EClick%20Here%20To%20Report%20Your%20Error%3C/a%3E
could create a page that looks like Figure 14-10. It seems safe, but it’s not.
FIGURE 14-10
Remember this example
of a phishing scam? Click
the innocent-looking
link, and you end up on a
totally different website.
All a bad guy has to do is
write some CSS to match
your site and a form to
take in information, and
your users are going to get
scammed.
With sessions, you don’t have to settle for this security hole. The security problem
stemmed from the fact that you were letting a request parameter handle the error
message payload. But now, with sessions, you can remove those errors from view.
This way, a hacker can’t possibly force-feed in a bad request parameter because
you’re no longer using those parameters for that purpose.
Hop back over to
scripts/app_config.php
, and look at handle_error:
function handle_error($user_error_message, $system_error_message) {
header("Location: " . SITE_ROOT . "scripts/show_error.php?" .
"error_message={$user_error_message}&" .
"system_error_message={$system_error_message}");
exit();
}

PHP & MYSQL: THE MISSING MANUAL
488
MEMORY LANE:
REMEMBER
THAT PHISHING
PROBLEM?
That’s the code that turns a PHP-supplied error into a request parameter. But now,
you can rework this code using sessions:
function handle_error($user_error_message, $system_error_message) {
session_start();
$_SESSION['error_message'] = $user_error_message;
$_SESSION['system_error_message'] = $system_error_message;
header("Location: " . SITE_ROOT . "scripts/show_error.php");
exit();
}
It’s a simple change. In fact, it makes handle_error a lot clearer.
Open
show_error.php
and make the accompanying change to pull values from the
session:
<?php
require 'app_config.php';
session_start();
if (isset($_SESSION['error_message'])) {
$error_message = preg_replace("/\\\\/", '', $_SESSION['error_message']);
} else {
$error_message = "something went wrong, and that's how you ended up here.";
}
if (isset($_SESSION['system_error_message'])) {
$system_error_message = preg_replace("/\\\\/", '',
$_SESSION['system_error_message']);
} else {
$system_error_message = "No system-level error message was reported.";
}
?>
NOTE The HTML portion below the PHP stays exactly the same.
Next, update the problematic URL to reflect the new location of
show_user.php
(in
your
scripts/
directory). So it might look something like this:
http://yellowtagmedia.com/phpMM2/ch14/scripts/show_error.php?
error_message=%3Ca%20href=%22http://www.amctv.com/shows/
breaking-bad%22%3EClick%20Here%20To%20Report%20Your%20Error%3C/a%3E

CHAPTER 14: AUTHORIZATION AND SESSIONS 489
WHY WOULD
YOU EVER USE
COOKIES?
NOTE You should be able to replace the domain name and update the path but leave the file name and
request parameters the same.
Now, visit that page in your browser. You should see a response like that shown in
Figure 14-11.
FIGURE 14-11
Sessions protect you,
and in many cases,
actually simplify your
code. A session is often a
better choice for passing
data between scripts, and
it certainly beats using
request parameters in
most cases.
This time, that phishing message is gone. Because the error message is stored in
the session, it’s resistant to someone coming along and controlling the message via
the URL. It’s a tiny change with huge implications for your users.
Why Would You Ever Use Cookies?
It’s easy to think that sessions are the answer for everything. They’re not, though.
Probably the biggest limitation with sessions is that when the browser closes, the
session’s over. There’s no way to get around that limitation. If you want to oer users
the ability to remain logged in across browser closings, sessions aren’t an option.
You’ve got to use cookies.

PHP & MYSQL: THE MISSING MANUAL
490
WHY WOULD
YOU EVER USE
COOKIES?
Second, just because cookies can be used poorly doesn’t mean you
have
to use
them poorly. You can expire your cookies more frequently. You can store only very
small bits of information in your cookies. In addition, you can avoid storing much
meaningful data in cookies. In fact, you might choose to do a few extra database
lookups—even causing your app to run a little slower—to avoid storing much useful
information on your users’ computers.
Of course, like almost everything at this stage of the game, you’re going to have to
make a good decision for
your
application. But, that’s no problem. You know what
you’re doing now, and you know the tools at your disposal. Use them wisely, play
around...and most important, learn.


493
APPENDIX
A
In Chapter 1, you installed 7 either MAMP for Mac OS X or WAMP for Windows.
That collection of programs, all conveniently bundled together, gave you not just
PHP but also MySQL, plus an Apache web server and a few other goodies like
phpMyAdmin and SQLiteManager. It’s easy to install and lets you control all your
programs from a centralized manager.
On the other hand, convenience almost always costs you control. In the case of
WAMP, you lose the ability to pick a specific version of PHP. In fact, you’re often
going to end up with a version of PHP that’s several months behind the latest stable
release, simply because that’s the amount of time it takes the good folks at WAMP
to update their bundle to that release. (For more information on releases, see the
box on page 30.)
Most of the time, none of this is an issue. But, as you become more familiar with PHP
(and more advanced) you might want to take back some of the control you gave
up for the convenience of WAMP. If that’s the case, then you’ll want to install PHP
manually, and this appendix instructs you how.
Installing PHP
on Windows
Without WAMP
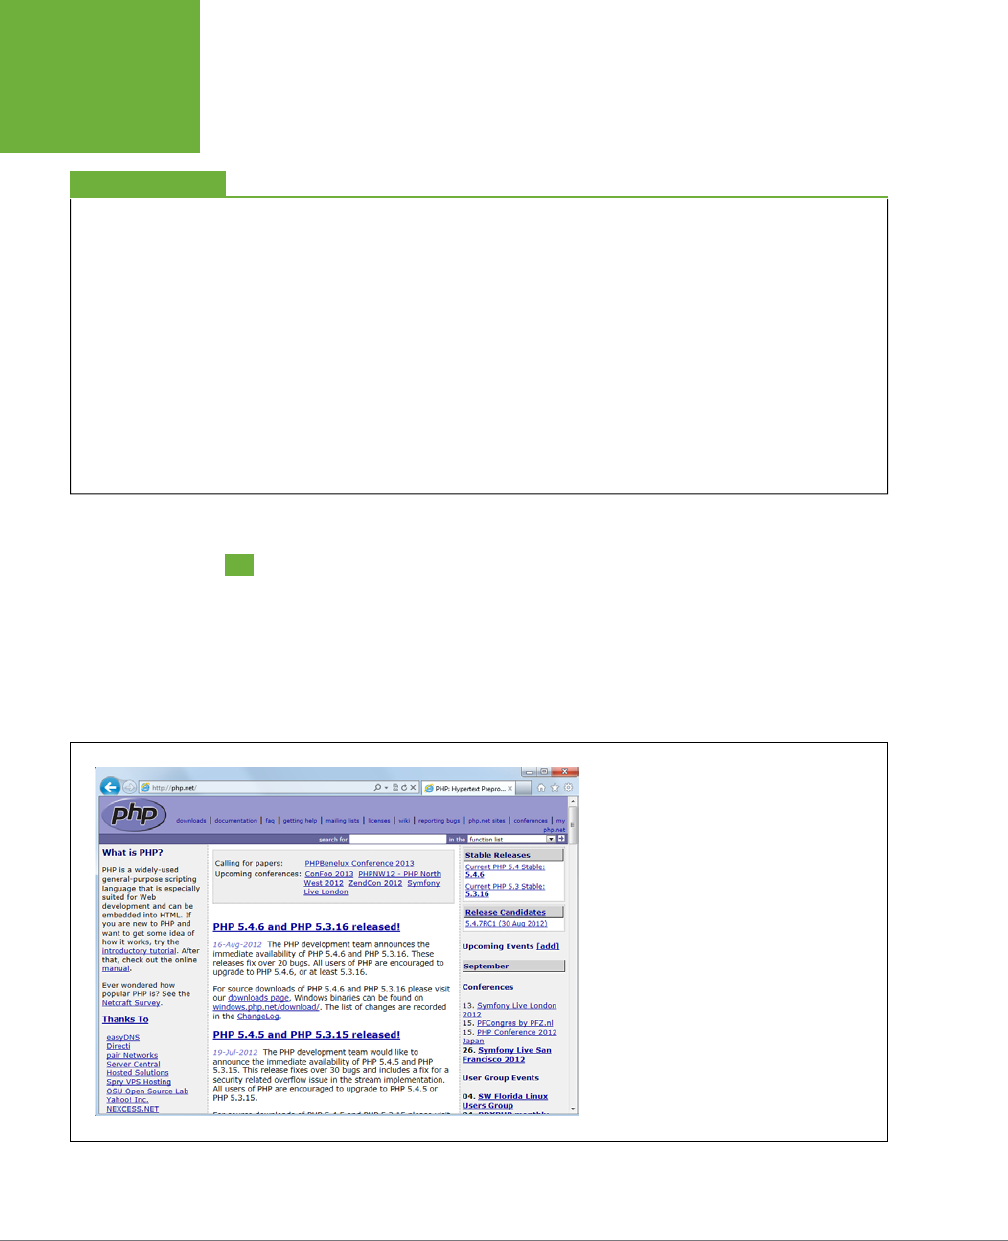
PHP & MYSQL: THE MISSING MANUAL
494
INSTALLING
PHP FROM
WWW.PHP.NET
UP TO SPEED
Release the Version Within
If you’ve never worked with software that comes in versions or
releases, don’t worry; it’s easy. A software
version
or
release
is simply a program (or, more often than not, a package of
programs that work together) that’s ready to install on your
computer.
Because software changes frequently, though, the folks that
make software need a way to say, “Hey, our software has some
new cool bells and whistles! There’s a new package available!”
Software companies use
version numbers
(or
release numbers
)
to do that. Generally, software starts out at version 1.0, and that
number increments higher as the software adds new features.
Thus, version 2.2 of PHP is newer than version 1.1, and probably
will have some cool new features, too.
Sometimes, as on the PHP website, you’ll see several different
packages or downloads, each with a different version number.
Most of the time, you want to download the most recent ver-
sion. Most important, ensure that you’re downloading the
correct version for the operating system you’re using.
Installing PHP from
www.php.net
Open your favorite web browser and head to
www.php.net
. This website is the online
home of PHP, and it’s where you’ll download your own version of the PHP language,
along with all the tools you need to write and run PHP programs. Look along the
right side of the PHP home page for the Stable Releases heading; you can see it on
the right of Figure A-1.
FIGURE A-1
If you ever want to download a new version of
PHP or update the version you already have,
www.php.net
is the place to visit. To download
the most recent version, look for it under the
Stable Releases heading on the right of the
screen (5.4.6 in this example).
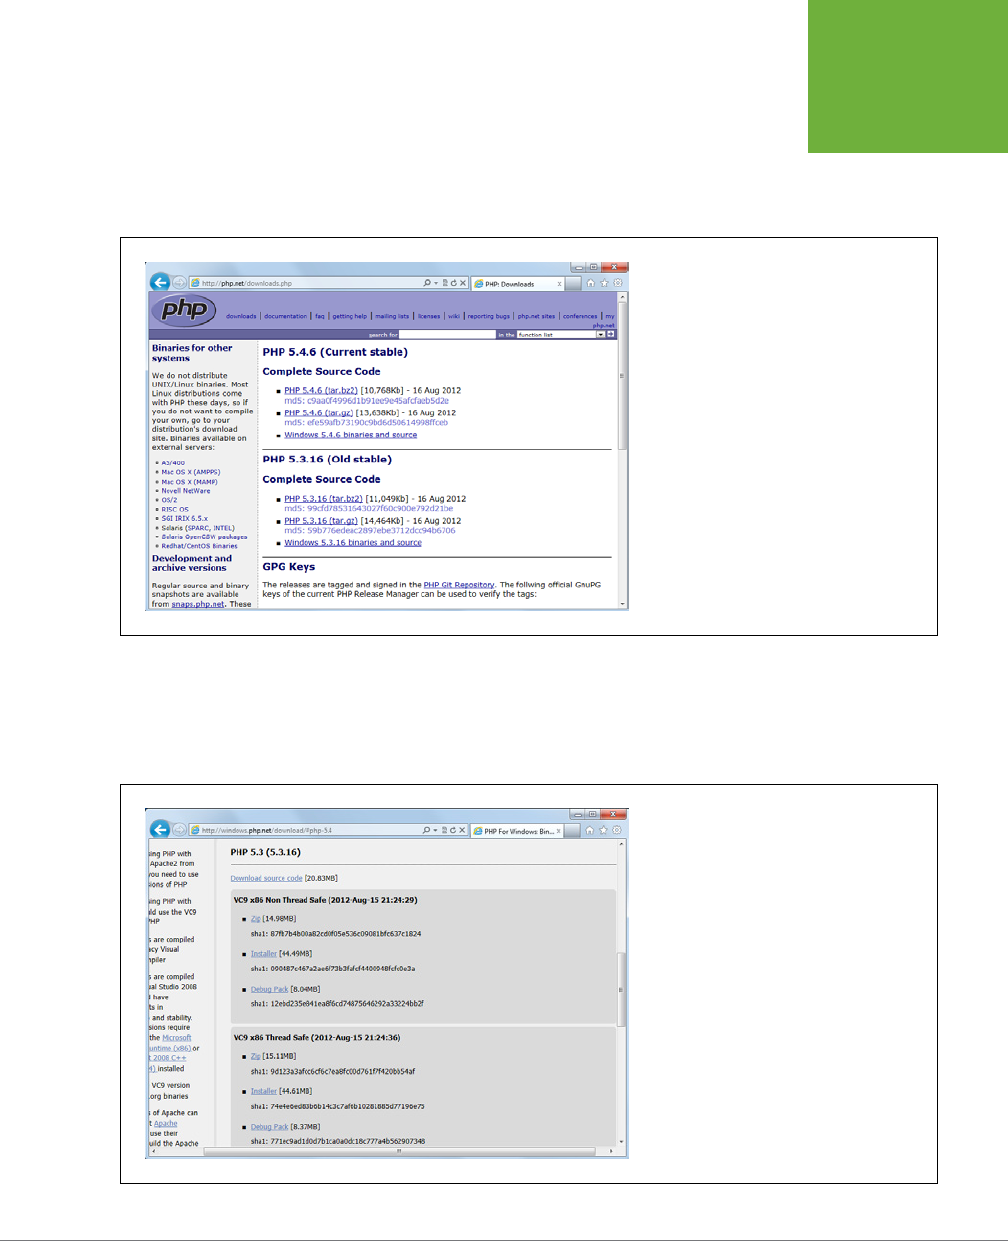
APPENDIX A: INSTALLING PHP ON WINDOWS WITHOUT WAMP 495
INSTALLING
PHP FROM
WWW.PHP.NET
Click the link for the version with the highest number.
Once you’ve chosen a PHP version link, you’ll see a screen similar to Figure A-2, with
links for the current version of PHP as well as at least one older version (which you
can identify by the lower version number).
FIGURE A-2
The PHP site always has at least the latest stable
version and the previous stable version available
for download. Unless you’ve got a good reason
to do otherwise, always go with the latest stable
version, which is the one listed at the top.
Before you download PHP, though, look for a link called Windows Binaries; that’s your
ticket to getting PHP up and running on your Windows-based computer. Clicking
this link takes you to another site,
http://windows.php.net/download/
, which should
look something like Figure A-3.
FIGURE A-3
PHP has a page dedicated to downloads for
Windows-based computers. There are still a
lot of options, but don’t get distracted by all
the choices. You’re looking for a single word:
Installer.

PHP & MYSQL: THE MISSING MANUAL
496
INSTALLING
PHP FROM
WWW.PHP.NET
This page has options for the latest version and well as several older versions. For
the newest version, there will be two big, gray blocks: the first for the Non Thread
Safe version, and the second for the Thread Safe version. You want to download the
Non Thread Safe version. To learn why, read the following box.
UNDER THE HOOD
PHP on Windows: Fast or Safe?
PHP first appeared in a Windows-friendly version back in 2000.
In those early releases, PHP came in only one flavor: Thread
Safe. Whereas Mac OS X and Unix/Linux systems use something
called
processes
to run multiple things at one time, Windows
systems use
threads
. Those Windows threads can interact with
each other. To prevent them from messing one another up, PHP
came in a version that was
thread safe
.
Unfortunately, keeping those threads out of each other’s way
takes a lot of time. Yes, thread-safe PHP on Windows is slow,
and PHP programmers flocked away from Windows whenever
possible. A few clever PHP programmers figured out ways to
recycle threads, and a lot of web servers that run on Windows
now come preinstalled with a PHP version that can recycle
threads right from the start.
Still, not everyone likes installing PHP and then having to
install a tweaked web server or make manual changes to PHP
to get it running at tip-top speed. As a result, there’s now a
non–thread safe
option. This option doesn’t worry about other
threads, and the result is a pretty significant performance
increase, ranging anywhere from 10 to 40 percent, depending
on your applications.
Chances are that if you don’t have a strong opinion or idea
about which version of the PHP binaries you need, you’ll do
great with the non–thread safe binaries, and you’ll get a nice
snappy performance. If you have real concerns about the
non–thread safe version, you can certainly choose the thread-
safe binaries and tweak your own installation as you see fit.
Just look for the Installer option and click the link. The download is usually large,
but includes a nice Windows installer that will make getting PHP running a breeze.
Click this link and then grab a cup of coee while you’re waiting for your download
to complete.
NOTE If you’re wondering whether you could have just gone directly to
http://windows.php.net/download
—
you’re right. You could have. Six months from now, you might forget that longer URL, but remember
www.php
.net
. On top of that, a good old-fashioned Google search for PHP takes you to
www.php.net
, so it’s a good idea
to know how to get to the Windows installer from the main PHP home page.
Once your download is done, find the downloaded file and double-click it. Let
Windows run the installer and then click Next on the pop-up screen to start the
installation.
You have to accept a license agreement and then select an installation directory.
Going with the suggested directory,
C:\Program Files\PHP\
, is a good idea unless
you have a specific reason not to. Next, the installer asks you about configuring a
web server, as shown in Figure A-4. For now, you’ll be using PHP on your computer
to test programs and then upload those programs to a web server, so you can select
“Do not setup a web server.” If you want to add a web server later, you can always
come back and add or change this option.
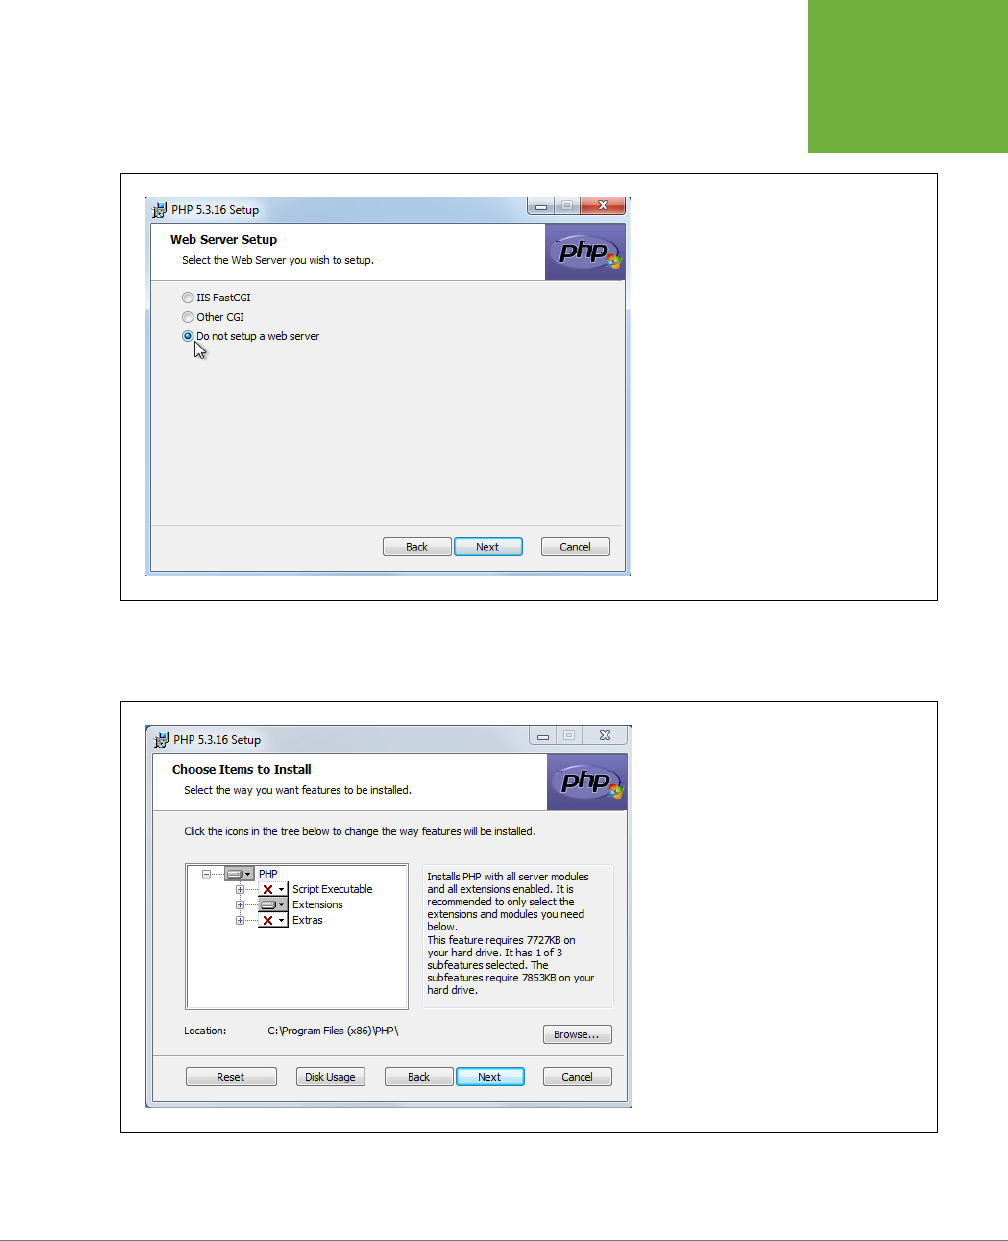
APPENDIX A: INSTALLING PHP ON WINDOWS WITHOUT WAMP 497
INSTALLING
PHP FROM
WWW.PHP.NET
FIGURE A-4
If you want to install a local web server to test
your entire web applications on your computer,
in the Web Server Setup window, select the
IIS FastCGI or Other CGI option. But for getting
started, “Do not setup a web server” is the
simplest option.
Next, you’ll be prompted about which items to install. The default options shown in
Figure A-5 are fine for now. Just click Next to go to the next screen.
FIGURE A-5
The Windows installer comes with the basic PHP
installation, but you can also add several extra
by clicking the white + box next to Extras and
selecting individual features.
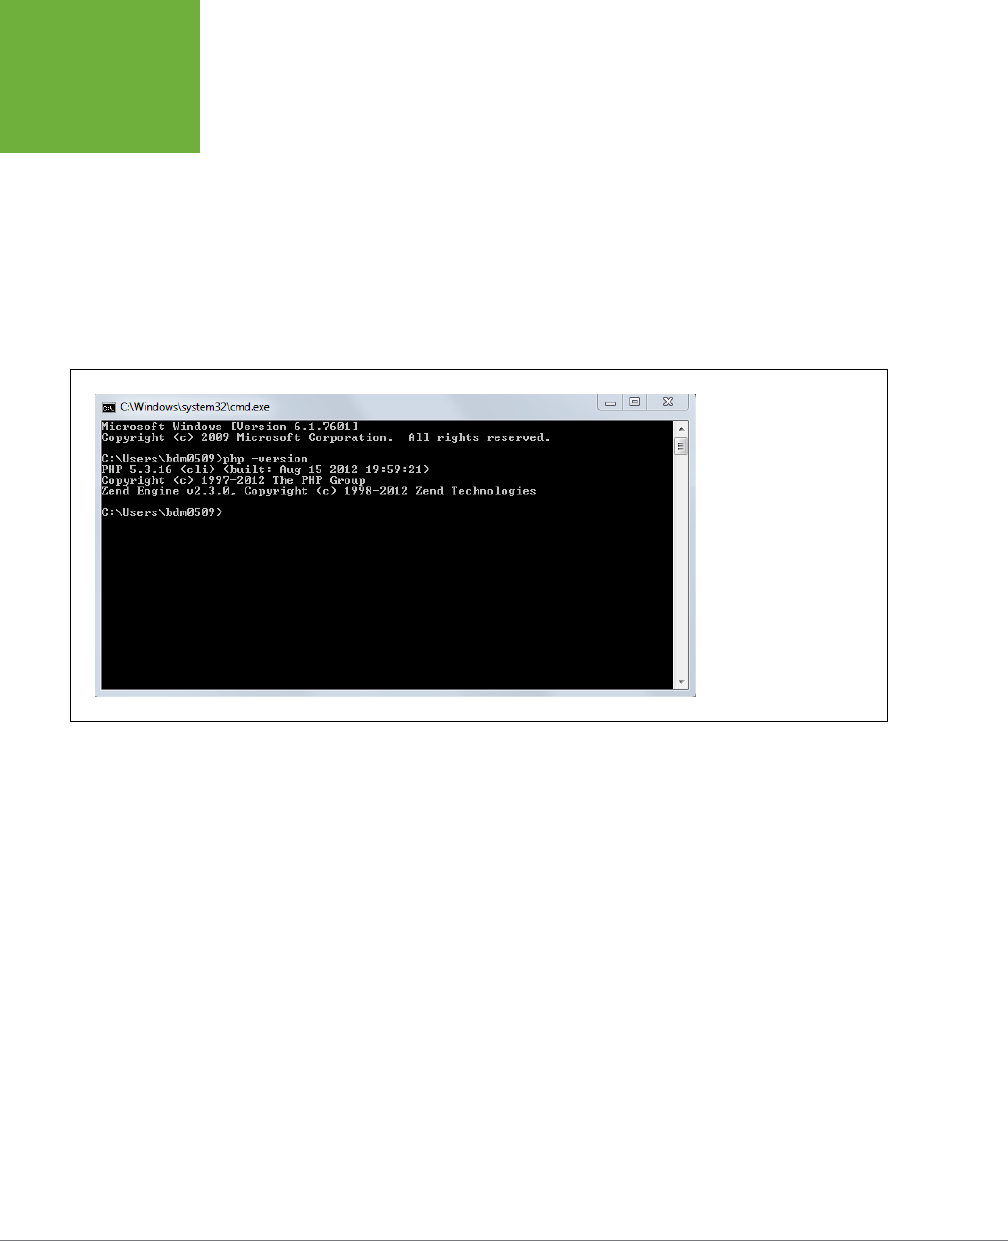
PHP & MYSQL: THE MISSING MANUAL
498
INSTALLING
PHP FROM
WWW.PHP.NET
Finally, click Install and then let your progress indicator march to full. That’s it! You’ve
got PHP running on your computer.
To check out PHP, open a command prompt and type php_version, as you see in
Figure A-6.
Even though it doesn’t look like much, that blank line and empty command prompt
means PHP is installed correctly. Now, you’re ready to get into your first program—
or if you’ve already worked through this book, your twentieth…or your hundredth!
And anytime you want to update your PHP installation, just revisit
www.php.net
and download a new version.
FIGURE A-6
You won’t spend a lot of
time running PHP from the
command prompt, but it’s
a great, quick way to test
things out. The Windows
installer makes sure you
can run PHP from any-
where on the command
line, from any directory.

499
APPENDIX
B
Just as you might find it useful to install PHP apart from the WAMP stack on a
Windows-based computer as described in Appendix A, you might similarly find
it useful to install MySQL without using WAMP (Windows) or MAMP (Mac OS X).
By installing MySQL manually, you can control the versions you’re using, the paths
MySQL and related programs use, and all the MySQL-specific environment variables.
Of course, manual installation isn’t for everyone. Avoiding MAMP or WAMP doesn’t
make MySQL work any better, per se; installing MySQL yourself is mostly an exer-
cise in getting a better handle on what’s going on with your system. On the other
hand, that’s a good goal in and of itself and can actually help you become a better
programmer.
Installing MySQL
The MySQL database is easy to get, easy to install, and easy to use, even without the
convenience of WAMP and MAMP. The process is slightly dierent for Windows and
Mac OS X, but the end result is the same: an installation of MySQL that’s separate
from the web server and from your computer’s copy of PHP.
Installing MySQL
Without MAMP or WAMP
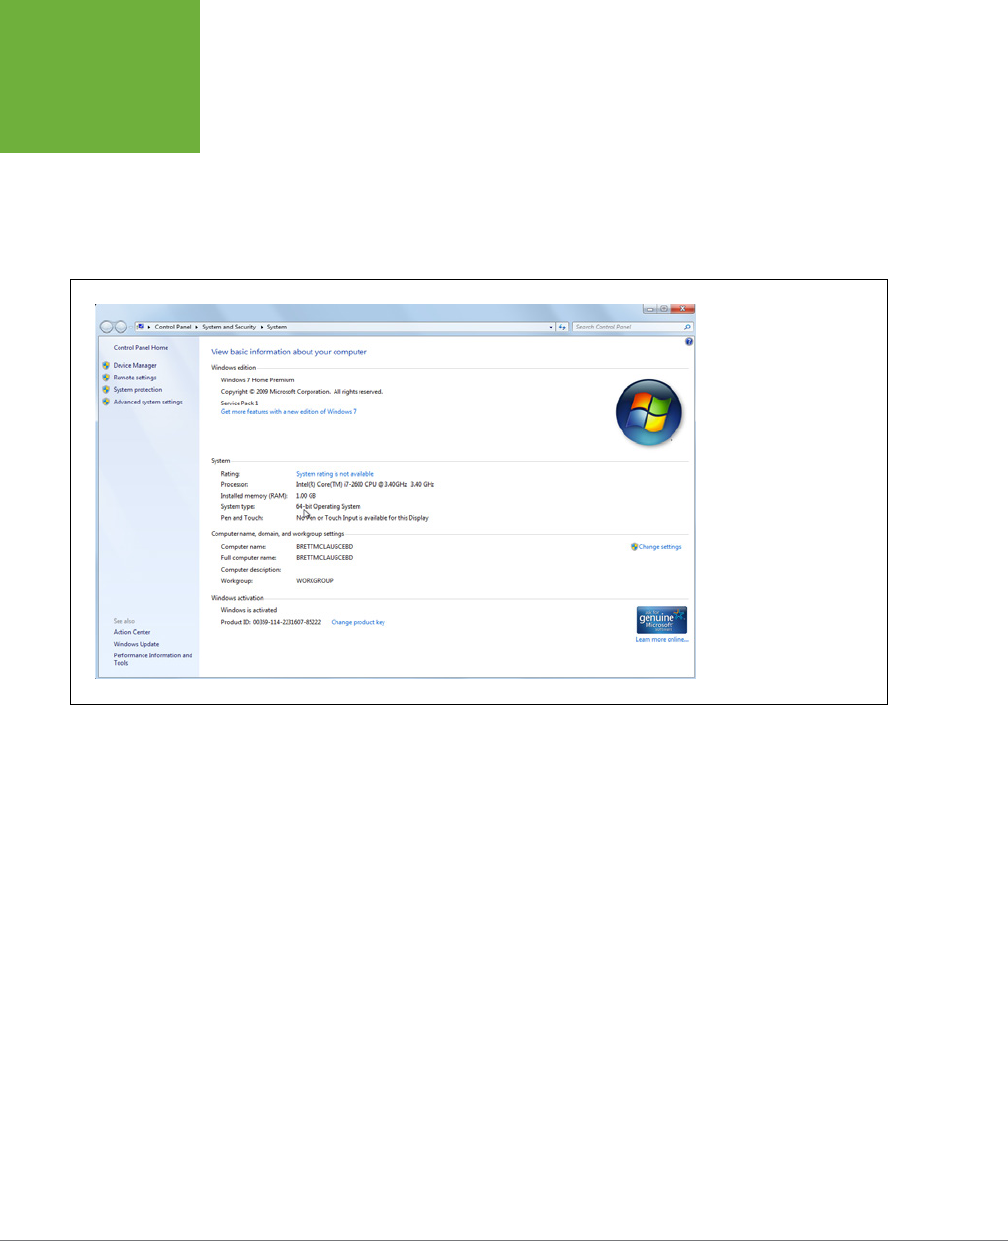
PHP & MYSQL: THE MISSING MANUAL
500
INSTALLING
MYSQL
MySQL on Windows
Installing MySQL on Windows is straightforward. You just need to know one thing:
whether your computer is running the 32-bit or 64-bit version of Windows. For
example, in Windows 7 you can determine this by clicking your Start menu, right-
clicking Computer, and then selecting Properties from the pop-up menu. You should
see something like Figure B-1.
FIGURE B-1
The computer shown
here is a 64-bit system,
running Windows 7 Home
Premium. Whether you
have 32-bit or 64-bit is
determined partly by the
Windows version you have
installed, but also by what
your computer is capable
of. Both 32-bit and 64-bit
systems can run MySQL
with no problems, so
either works great.
Under the System section, Look for “System type.” It will be either “32-bit Operating
System” or “64-bit Operating System.” Remember which one it is, because you’ll
need this information in a minute.
Next, start your web browser and visit
www.mysql.com
. A page opens, similar to
in Figure B-2, showing you lots of introductory information about MySQL. You can
skip all that and click the big “Downloads (GA)” tab to get right to the software. A
page appears that presents information about a few dierent versions of MySQL.
You want the first one—MySQL Community Server—so click the DOWNLOAD link
under that option.
This page auto-detects that you’re running Windows and presents you several
choices (see Figure B-3). You want the version that oers you an MSI installer and
matches your system type (32-bit or 64-bit). Select the correct version. You’re then
asked to register on the MySQL website. If you’re worried that the MySQL folks
might one day use your street address to stage a government coup, you can skip
this option and go straight to the download servers.

APPENDIX B: INSTALLING MYSQL WITHOUT MAMP OR WAMP 501
INSTALLING
MYSQL
FIGURE B-2
A few years back, MySQL
moved from a completely
open-source project to a
company-backed project.
The database is still free,
but now there’s a much
more professional support
system behind it. That’s
much of what
www.
mysql.com
website offers:
professional support and
documentation.
FIGURE B-3
Just as with PHP, you
have lots of choices about
which version and release
of MySQL to download.
Generally, the best option
is the MSI Installer that
matches your system. The
Zip archive options aren’t
packed up nearly so nicely.
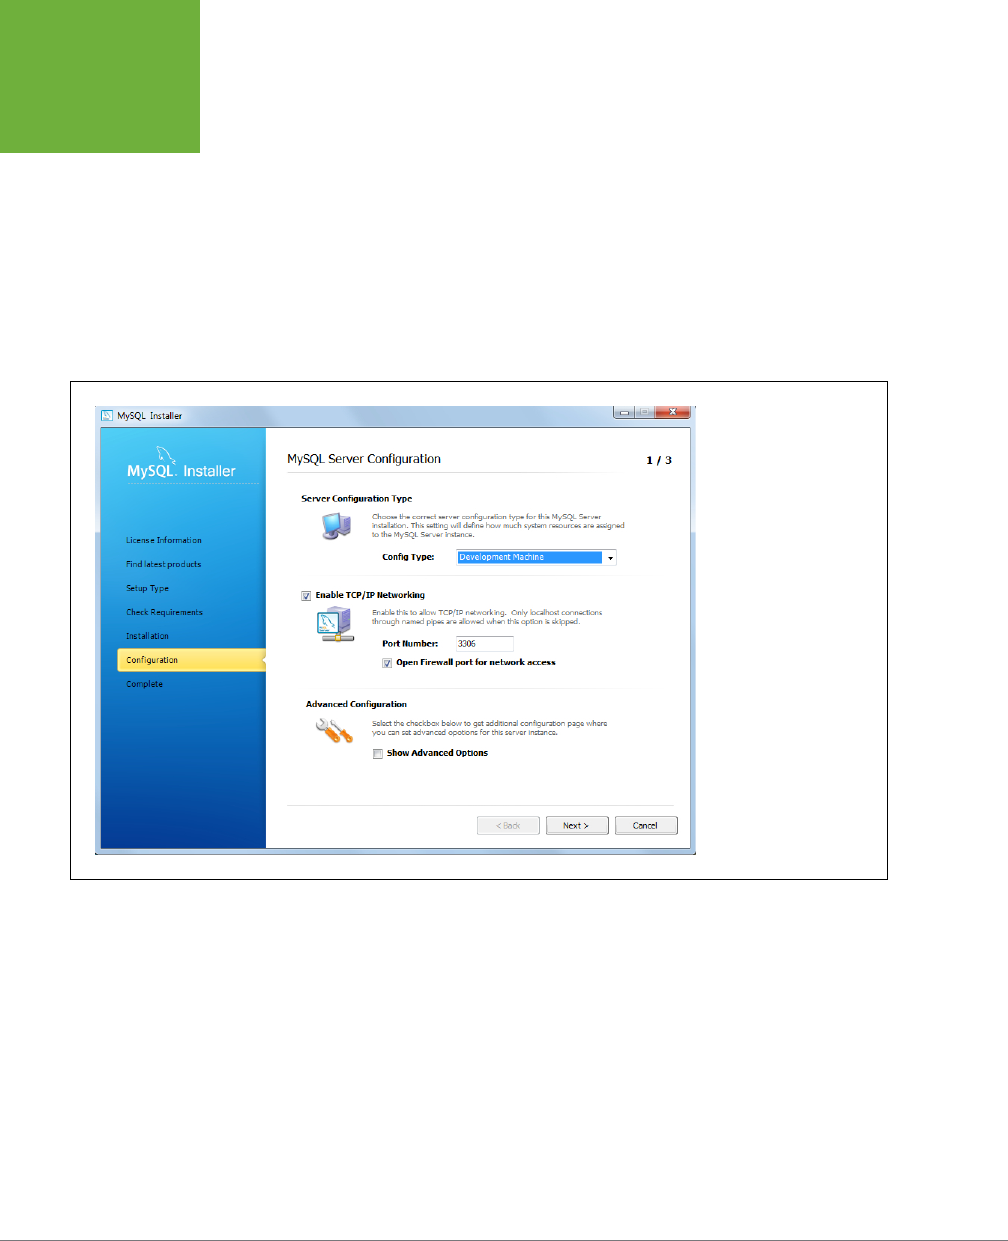
PHP & MYSQL: THE MISSING MANUAL
502
INSTALLING
MYSQL
Once your download is complete, you have a file called something like
mysql-
5.5.27.2.msi
. Double-click this file to run the installer. The installation wizard prompts
you to select “Install MySQL Products”; requires you to accept a license agreement;
gives you a chance to fetch the latest components from the Internet, which you
should do; and finally, lets you choose the setup type. Select Developer Default,
and then let the installation process whir along.
Next, you must click through the installation of a secondary set of programs and
then the installation will finish. When it’s done, you see several Server Configura-
tion options (Figure B-4). Take this opportunity to get your computer and MySQL
playing nicely together.
FIGURE B-4
MySQL is worth a thick
book on its own. There
are literally hundreds of
options you can tweak to
make it run better, faster,
and with less strain on
your system. For your
purposes, though, these
aren’t the issue; you just
want a local database
in which you can store
information.
In the configuration wizard, unless there’s something specific about your system
to change, accept the standard configuration. For the Config Type, though, choose
Development Machine and then click Next.
Next, you must enter a
root password
, which is basically a master password. If this
were a real database running on a server for, say, Amazon or Zappos, here’s where
you’d come up with some wild, 22-character password that the most powerful com-
puter couldn’t crack. Of course, you’re just running MySQL on your own computer,
so something a little less intimidating is fine; try myqsl_root if you’re stumped.
You should also create at least one user who has MySQL access privileges. Figure
B-5 shows a user called bdm0509, with a password and administrative privileges.
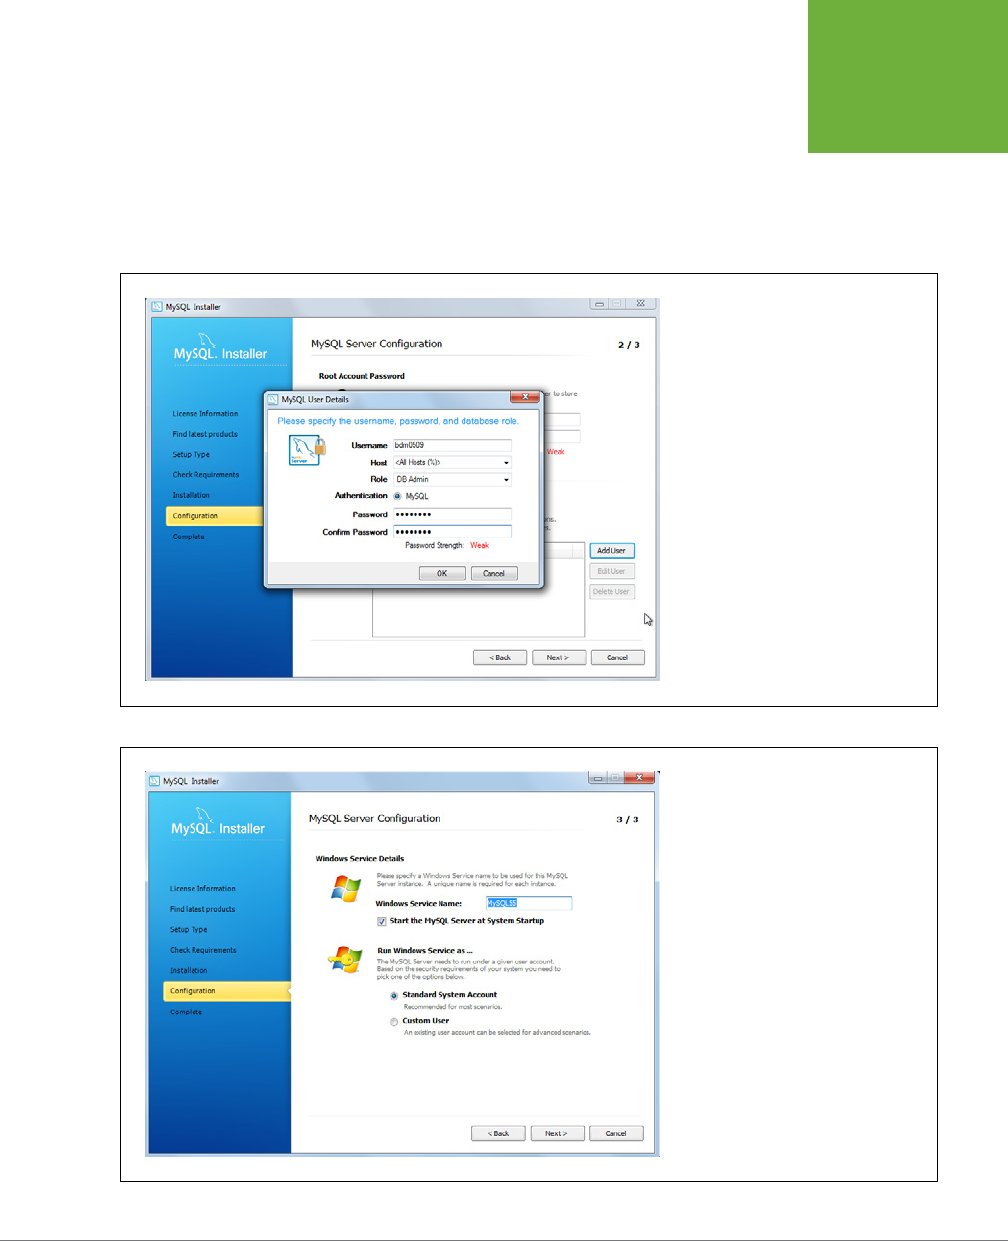
APPENDIX B: INSTALLING MYSQL WITHOUT MAMP OR WAMP 503
INSTALLING
MYSQL
Then, be sure to let MySQL set itself up as a Windows service. This simply means
that your Windows installation can access and control MySQL directly. Configure
your setup so that MySQL starts automatically when your computer is turned on.
Also, turn on the checkbox to add the MySQL bin directory to your Windows path
(see Figure B-6), which means that when you start up a command prompt, you can
run MySQL programs.
FIGURE B-5
The users you create when you set up
MySQL are not the same as the users on
your Windows system. These user accounts
are purely for the connection to MySQL.
FIGURE B-6
MySQL comes ready to run as a Windows
service. One benefit is that MySQL auto-
matically starts up every time you start
Windows. Also, your MySQL settings are
right there in your Windows Control Panel.
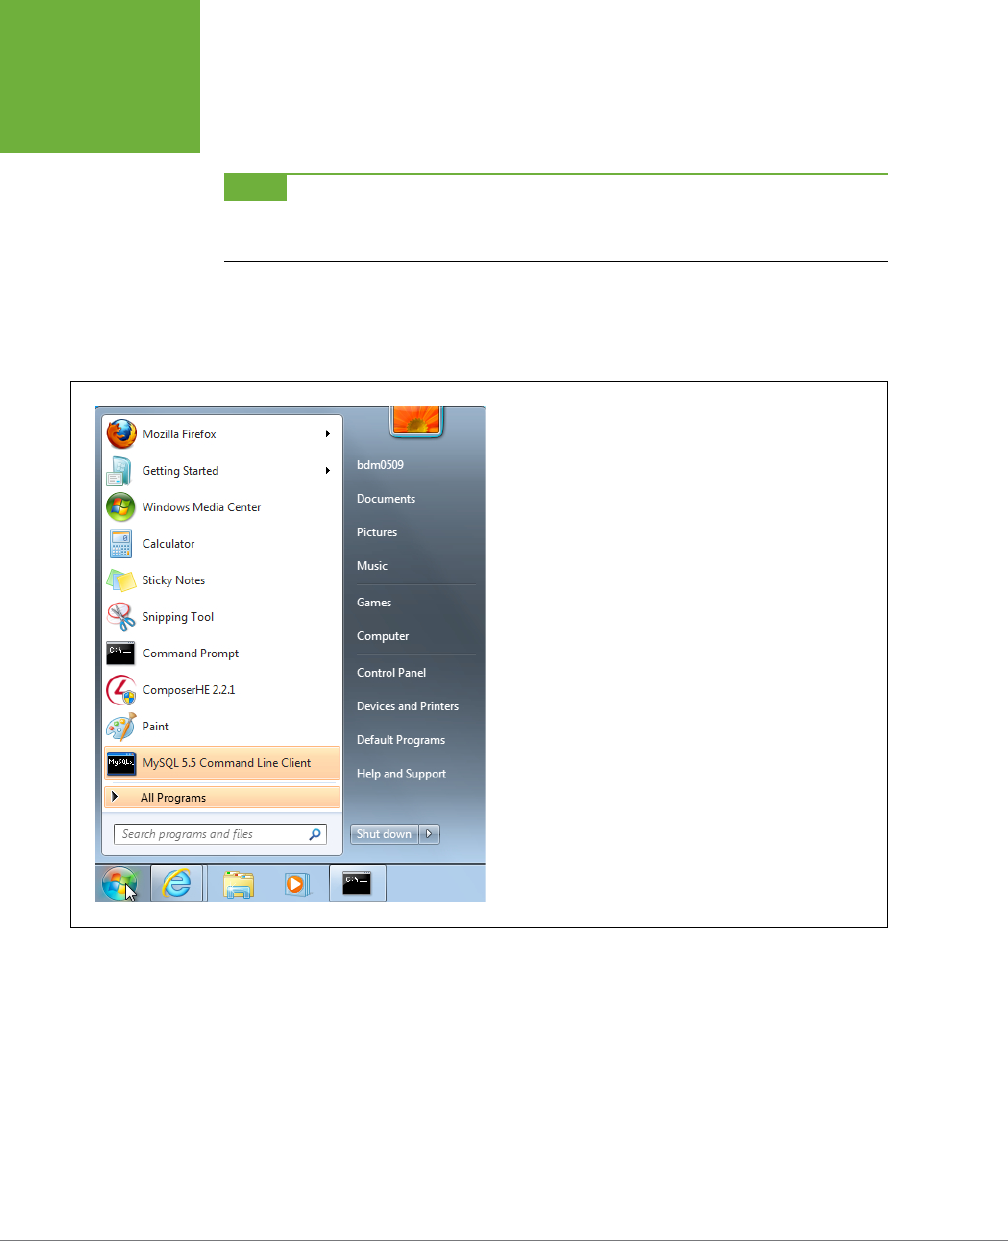
PHP & MYSQL: THE MISSING MANUAL
504
INSTALLING
MYSQL
At last, the MySQL installer is ready to execute your setup. Click Next and let the
installer spin away.
NOTE You’re starting to get a handle on why most of the programmers you might have met are impatient, a
bit jittery, and drink a lot of coffee. There’s a lot of waiting around when it comes to installing software, and a lot
more waiting when it comes to running your programs and making sure they behave the way they’re supposed to.
When the wizard closes, your MySQL database is installed. When you click the
Start menu, you see a new program available, the MySQL Command Line Client, as
shown in Figure B-7.
FIGURE B-7
If you ever lose track of the MySQL command-line client, you can
just open up a command prompt and type mysql. This command
starts the command-line client, as long as you were careful to add
the MySQL bin directory to your Windows PATH during installation
of MySQL.
Start the command-line client and enter your super-secret password. You should
see something similar to Figure B-8.
That’s it: if you can log into MySQL, you’ve got a running database, and you’re ready
to start working with that database and shoving information into it.
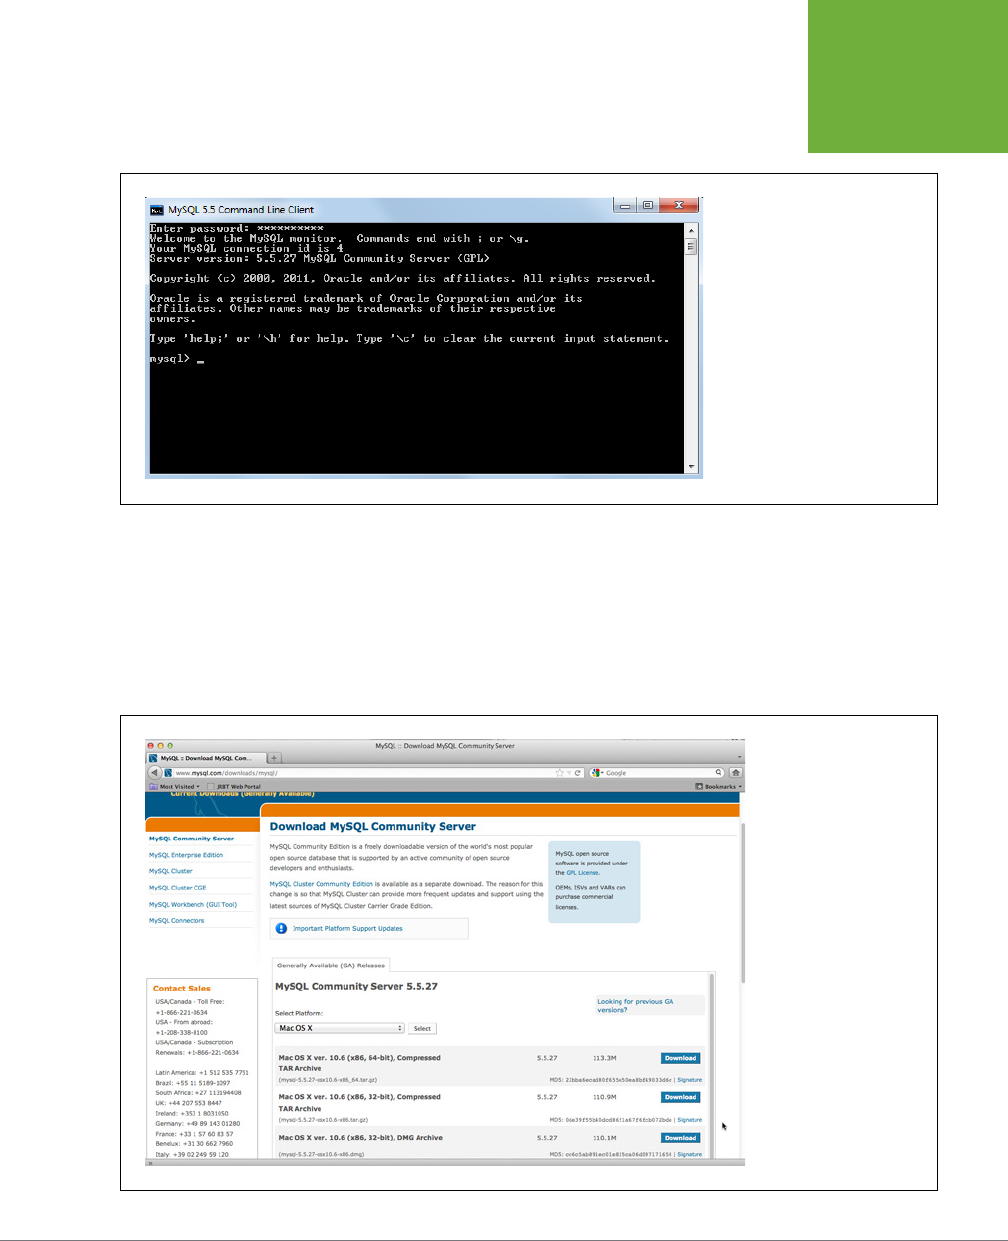
APPENDIX B: INSTALLING MYSQL WITHOUT MAMP OR WAMP 505
INSTALLING
MYSQL
FIGURE B-8
The command-line program
always starts by asking you
for your password. That’s not
trivial; you can do everything from
creating and deleting structures to
messing around with MySQL’s data
from this command line. It’s like
a direct line of access to MySQL,
which is exactly what you’ll need
for testing out the PHP code you’ll
be writing soon.
MySQL on Mac OS X
The MySQL installation process on Mac OS X is similar to the installation on Win-
dows. Visit
www.mysql.com
and select the Downloads (GA) tab near the top of the
page. Then, select the “MySQL Community Server” link to get to the downloads.
The site should autodetect that you’re on Mac OS X and present options like those
shown in Figure B-9.
FIGURE B-9
As with the Windows
versions, you have plenty
of options from which to
choose for Mac OS X. The
developers that work on
MySQL tend to favor the
Compressed TAR Archive
options, because those
give you the actual MySQL
code. Because you’re not
planning on working on
the actual MySQL code,
that’s a lot more than you
need.
PHP & MYSQL: THE MISSING MANUAL
506
INSTALLING
MYSQL
Scroll down and find the DMG links. These are easy-to-install versions of MySQL that
provide a (graphic user interface) and a nice setup. First, though, you must determine
whether you have a 32-bit or 64-bit system. This is a multistep process on Macs.
First, choose a→About This Mac. Click the “More Info” button, which opens a
window like the one in Figure B-10. Look for the line that reads “Processor” or
“Processor Name”.
FIGURE B-10
There’s no one-step process for
figuring out whether your system
is 32-bit or 64-bit on Macs. That’s
because that decision is based on
your computer’s processor, so you
need to establish which type of
processor your computer is using.
Look up your processor in Table B-1; this will let you know whether your Mac is 32-
bit or 64-bit.
TABLE B-1
Fortunately, you don’t have to worry about tons of options. Macs have one choice (32-bit or 64-bit) for
each processor.
PROCESSOR NAME 32-BIT OR 64-BIT
Intel Core Solo 32-bit
Intel Core Duo 32-bit
Intel Core 2 Duo 64-bit
Intel Quad-Core Xeon 64-bit
Dual-Core Intel Xeon 64-bit
Quad-Core Intel Xeon 64-bit
Core i3 64-bit
Core i5 64-bit
Core i7 64-bit
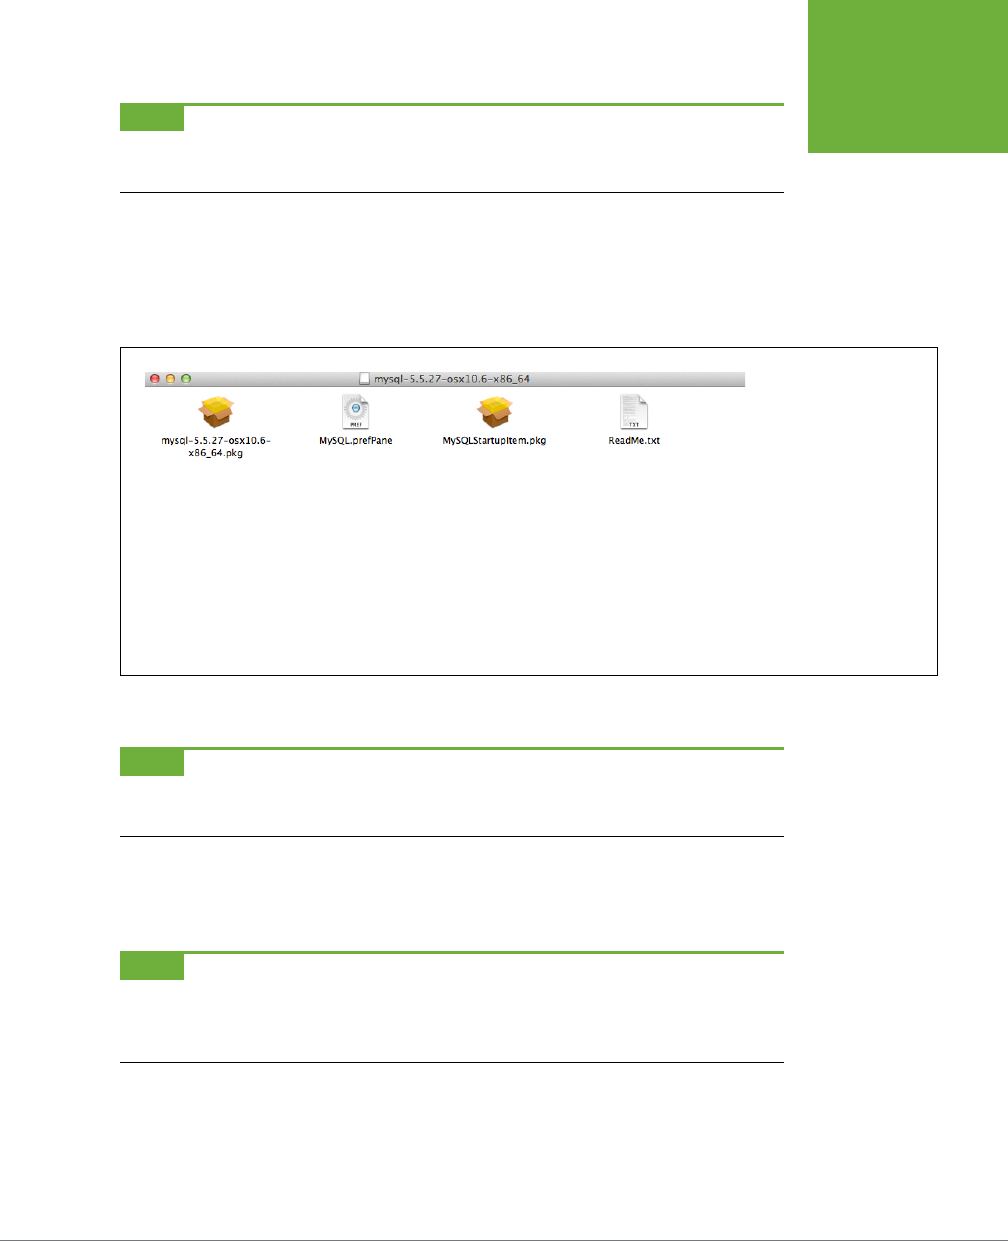
APPENDIX B: INSTALLING MYSQL WITHOUT MAMP OR WAMP 507
INSTALLING
MYSQL
NOTE Macs, PCs, are constantly coming out with new hardware. If you can’t find your processor in Table B-1,
visit
http://support.apple.com/kb/HT3696
, which usually has an updated list of processor names and whether
they’re 32-bit or 64-bit.
Now, select the DMG download for MySQL that matches your processor. You can
then register (or skip registration), select a download site, and start your download.
Once the DMG is downloaded, it opens automatically. You should see several files,
as shown in Figure B-11.
FIGURE B-11
Most DMGs have a single
file and, if you’re lucky,
some poorly written
instructions. MySQL is a
little more heavyweight,
though, so you get the
core installation, a prefer-
ence pane (which you’ll
install in a few minutes),
a program to handle
automatic startup, and a
helpful
ReadMe.txt
file.
Select the main file, which is called something like
mysql-5.5.27-osx10.6-x86_64.pkg
.
NOTE On Mac OSX Mountain Lion, you must Control-click, click Open, and then click Open again in the result-
ing warning box. This procedure gets you past Mountain Lion’s restrictions on opening files from an unidentified
developer.
Double-click this file to begin installation. You’ll have to agree to a license and select
an installation location. You then must type an administrator password for your
computer to launch the installation itself.
NOTE If you’re on your own Mac, this password is most likely the password you normally use for login.
Macs with only a single user set that user up as an administrator. Otherwise, go make some cookies and bribe the
computer’s owner to give you an admin account and let you turn her Mac OS X computer into a PHP and MySQL
powerhouse.
Installation doesn’t take long. While it’s proceeding, you see a screen like the one
in Figure B-12.
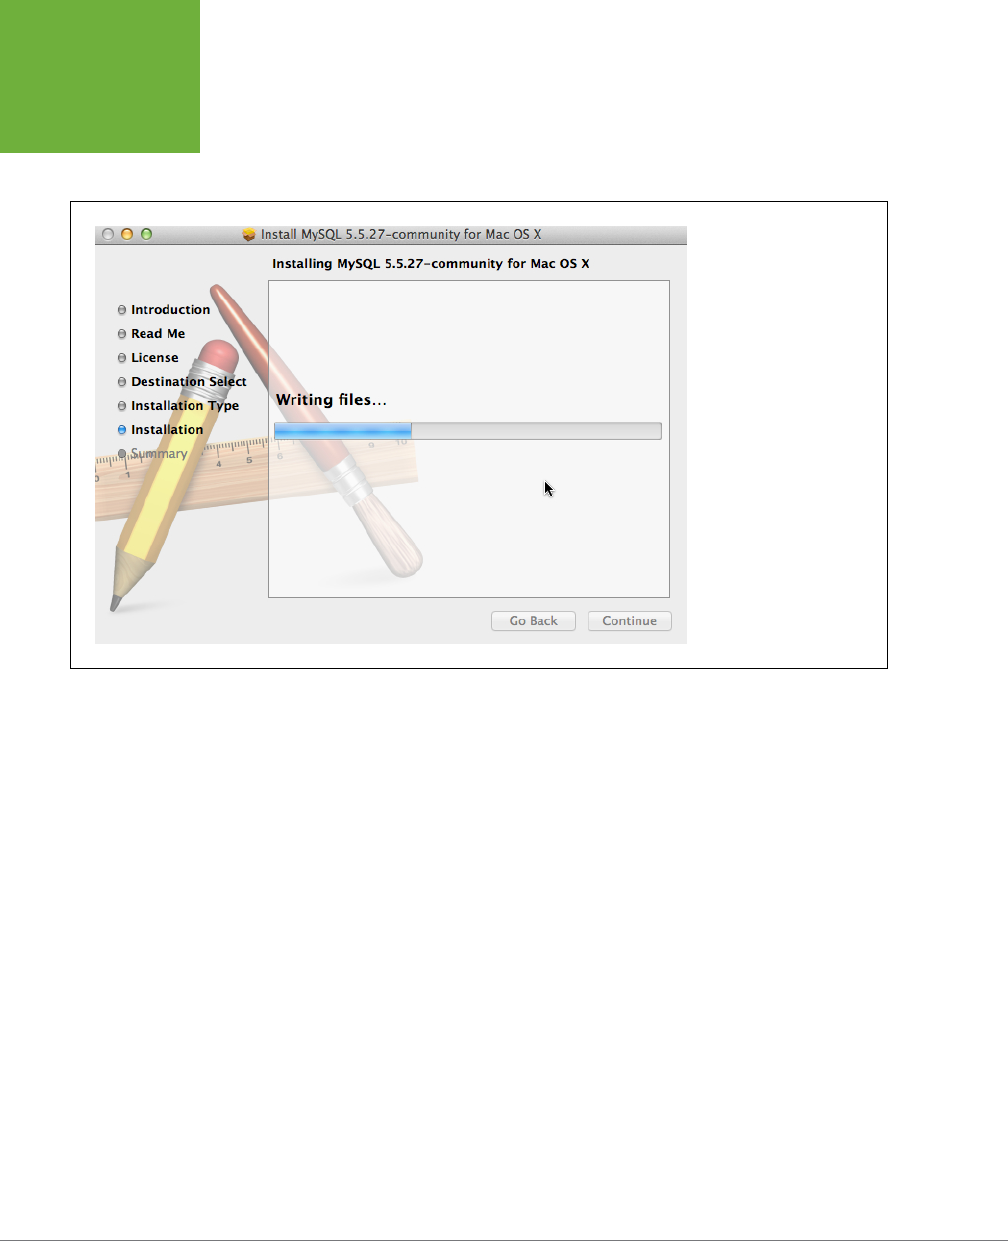
PHP & MYSQL: THE MISSING MANUAL
508
INSTALLING
MYSQL
Don’t get too excited, though. There are a few steps left. Go back to the DMG,
double-click it to reopen it if necessary so that you can see its contents again (which
you saw back in Figure B-11).
FIGURE B-12
MySQL is installed not just as
a program, but at a system
level. It must to be able to
not just write to your files,
but allow access to your
Mac’s command line, grab
system resources, and a
lot more.
Double-click the file named
MySQL.prefPane
. System Preferences opens, showing
you a new pane just for controlling MySQL. It also asks you whether you want to install
this pane for you alone, or all users. (You can probably keep the pane to yourself,
unless there’s a line behind you of other database-hungry users.)
Once the pane is installed, it’s automatically opened, as shown in Figure B-13. Turn
on the checkbox to have MySQL startup automatically and then enter your pass-
word one more time. When you’re done, start up MySQL to verify that things are
working as they should.
And with that, you have an installed, running database on your Mac. Now, start a
new Terminal window (Applications→Utilities→Terminal). (If you haven’t done so
already, drag that Terminal icon into your dock where you can get to it easily.) In
the Terminal window, type the following command:
$ /usr/local/mysql/bin/mysql
This command is a bit long, unfortunately. That’s because one thing the installa-
tion
doesn’t
do is set up your path so that you can easily call the MySQL tools and
programs. Still, you’ll probably do most of your MySQL work on your web server,
so it isn’t a huge deal.
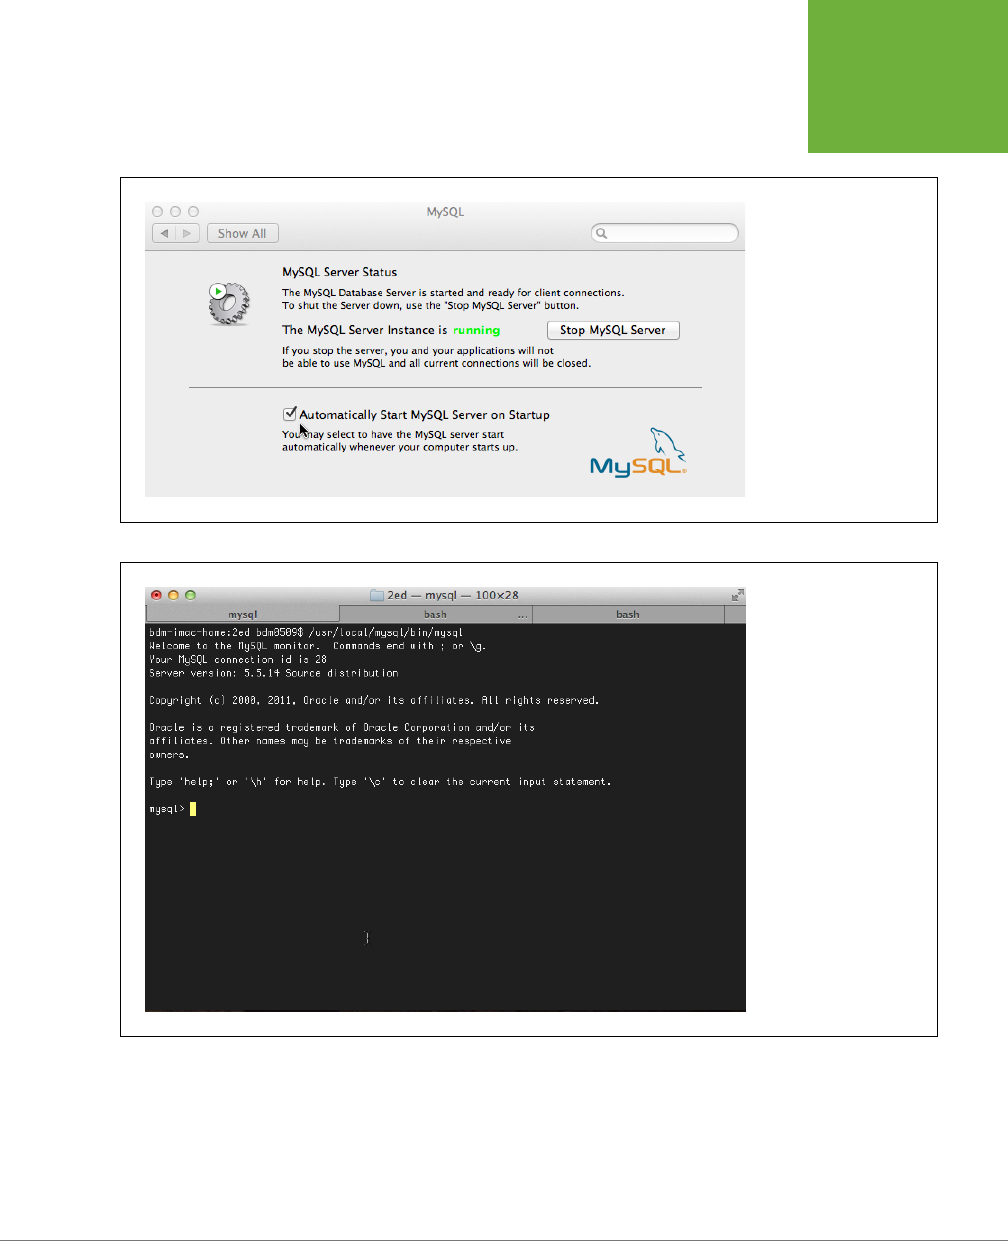
APPENDIX B: INSTALLING MYSQL WITHOUT MAMP OR WAMP 509
INSTALLING
MYSQL
This command starts the MySQL command prompt. You should see output like that
shown in Figure B-14.
FIGURE B-13
The Preferences Pane is a
feature of MySQL on Mac
OS X. You can start and
stop the database, and
if you have problems,
this is a quick convenient
place to go figure out why
something is going wrong:
it can be as simple as your
MySQL installation isn’t
running.
FIGURE B-14
There are graphical tools
to let you work with your
database, and you’ll want
to check those out. But
for getting to the root of a
tricky problem, or learning
how to work with MySQL
from PHP, nothing beats
learning the commands
that you can use from a
MySQL command prompt
in Terminal to interact di-
rectly with your database.
If you’re seeing something similar on your Mac, you have a running installation of
MySQL, and you’re ready to start working with your database.

PHP & MYSQL: THE MISSING MANUAL
510
INSTALLING
MYSQL
POWER USERS’ CLINIC
Update Your PATH to Include the MySQL Programs
It’s a bit disappointing that after you went to all the trouble
of downloading MySQL and installing it—including a handy
Preferences pane—you still can’t just type
mysql
at a Terminal
window and get off to the races. Still, if you’re not afraid of a
little work, you can fix this problem yourself.
The secret to all these programs that run—and don’t run—in
your Terminal is your computer’s PATH. That’s a special variable
(just like the variables discussed on page 52) that tells your
computer where to look when you enter a command. When
you type
mysql
, if your PATH includes
/usr/local/mysql/bin
,
your computer looks in that directory, sees a program called
mysql
, and runs it. Perfect!
But, what about when your PATH doesn’t include a directory
you want? You can update the PATH, but it involves editing a
file that’s normally hidden. First, go back to Terminal and enter
these two commands:
$ defaults write com.apple.finder Apple-
ShowAllFiles TRUE
$ killall Finder
The first line instructs the Finder—the program that shows you
directories on a Mac—to show hidden files, including the one
you need to edit. The second line restarts Finder and puts this
change into action. Next, open a Finder window and go to your
home directory. You’ll see a bit of a weird view of your normal
directory window; it probably looks something like Figure B-15.
You’ll see tons of files that are light gray, and seem faded or
nearly invisible. These files are normally hidden from your
view, and you might notice that most of them begin with a
dot (
.
), which is why they’re hidden.
Scroll until you find a file called
.profile
, and open that file in
a text editor like Mac OS X’s TextEdit. If you’ve never worked
with PATHs before, you might not have this file at all, and that’s
okay, too. Just open TextEdit to a new file.
You want to add two lines to this file:
MYSQL_HOME=/usr/local/mysql
export PATH=$MYSQL_HOME/bin:$PATH
If you’re creating a new file, just make these the first lines. If
you already have a
.profile
, add these lines at the very bottom
of whatever else is in the file.
The first line creates a new variable called
MYSQL_HOME
,
and sets it to where you installed MySQL. This way, if you ever
change your MySQL installation location, you can just update
this variable, just like you updated the
$facebook_url
variable in your PHP script. The second line then sets the
PATH variable to be the current PATH, but it adds the
bin
directory under
MYSQL_HOME
to the beginning of that path.
The
export
keyword instructs Mac OS X to make this updated
PATH variable available to all the programs on your computer.
Finally, save your file. If you’re creating a new file, be careful to
name it correctly, beginning the file name with a dot (
.
). You
also need to ensure that the file doesn’t have an extension. If
you accidentally save the file with an extension, just remove
that extension in Finder.
When you’re done, you should have a file in your home direc-
tory called
.profile
. It should be grayed out, too, because it’s
hidden. Now, you can open up a new Terminal window and
type mysql. You should see the MySQL command line program
open right up.
Finally, before you hang up your new system-editing ninja
skills, set Finder to hide all those files again:
$ defaults write com.apple.finder Apple-
ShowAllFiles FALSE
$ killall Finder
You can always unhide them if you need to access them later.

APPENDIX B: INSTALLING MYSQL WITHOUT MAMP OR WAMP 511
INSTALLING
MYSQL
FIGURE B-15
Most programs that update
and work on your system
itself create hidden files,
all starting with a dot (.).
So, git, a version control
system, creates .gitconfig,
and DropBox, a popular
file-sharing system, creates
.dropbox.

513
! (exclamation point), bang (negation)
operator, 127–128
/ (forward slash)
in regular expressions, 157
Root (Home) Directory, 56
-h option vs. --host option, 107
--host option vs. -h option, 107
<i> tags, HTML, 63
\n (line feed character), 166–167,
216–217, 365
@ operator, suppressing errors
using, 268–269
.org and .com, mixing up in domain
names, 79
( ) parentheses, mixing up square
brackets ([ ]) and, 266
--password option vs. -p option,
106–107
. (period), in regular expressions, 159
<?php...?>, 78
.php file extension
about, 46–47
opening files in browsers, 49–51
| (pipe), in regular expressions, 159
+ (plus) sign, in regular
expressions, 165
-p option
in MAMP, 99
vs. --password option, 107
<p> tags, HTML, 63
\r (carriage return), 166–167, 216–217
; (semicolon), in MySQL, 109
Index
Symbols
0 (zero)
arrays counting from, 84
functions counting from, 76
using in programming languages, 74
1:1 relationships, 458
1Password, 402
$ (dollar sign)
in regular expressions, 162–163
in variables, 53
< > (angle brackets), 78
=> (arrows), in arrays, 264
* (asterisk)
using with \r and \n characters, 167
\ (backslash), in escaping
characters, 158–159
^ (carat), in regular expressions,
162–163
{ } (curly braces)
in loops, 86
in printing out constants, 137
printing to strings inside, 297
surrounding variables, 137
. (dot), adding constants using, 137
== (double-equals sign), regular
expressions and, 163
|| (double-pipe), 154
" (double quotes)
alternating single and, 78
in regular expressions, 157
using in searching text, 80
using in web form, 70–71
vs. single quotes ('), 158

INDEX
514
SINGLE
QUOTES
applying authorization
changing script for checking users
credentials, 422–424
checking group
membership, 461–471
connecting authorize script to
users table, 410–413
entering browser sessions,
475–485
group-specific menus, 471–475
show_users script in, 395–396
writing script, 396–398
deleting users, 345–351
Applications folder (Mac OS X),
finding, 28–29
arrays
$_FILES[$image_fieldname],
294–295
$_REQUEST variable as, 85–89, 205,
264
about, 83–85
arrows (=>) in, 264
associative, 264
counting from zero (0), 84
getimagesize(), 295
getting lists to functions using, 465
mysql_fetch_array(), 204
using to handle PHP uploading
errors, 263
arrows (=>), in arrays, 264
associative arrays, 264
asterisk (*)
using with \r and \n characters, 167
authentication. See alsocookies
about, 386
basic
applying to application, 387–395
using HTTP headers, 386–387,
389–390
beyond basic, 420–426
Cancel button and, 390–391
of passwords. Seepasswords
of user name. Seeuser name
show_users script in, 395–396
testing, 435
using cookies, 424–426
authorization
changing script for checking users’
credentials, 422–424
' (single quotes)
alternating double and, 78
vs. double quotes (" "), 158
[ ] (square brackets), mixing up
parentheses ( ) and, 266
=== (triple-equals sign)
in If statements, 147
regular expressions and, 163
\t (tab characters), 168
-u option
in MySQL command-line program
in MAMP, 98–99
in WampServer, 97
vs. --user option, 107
A
absolute path, relative and, 249
administrative interfaces
about, 333
about talking back to users, 351–352
deleting users
about, 345–351
interrupting user during
delete, 352, 362–363
listing all users, 337–344
looking ahead at needs, 339
standardizing on messaging, 362
thinking about need for, 334–336
administrator. Seedatabase
administrator
AFTER keyword, 400
alert() function, 354–362
alias, tables, 313–314
allowing, denying or redirecting
users, 468–471
ALTER command, 194
AND keyword, 109
angle brackets (< >), 78
Apache, allowing access to public
networks, 25
application, creating
applying authentication in, 387–395
basic, 387–395
beyond basic, 420–426
Cancel button and, 390–391
of passwords. Seepasswords
of user name. Seeuser name
testing, 435
using cookies, 424–426

INDEX 515
CODE, PHP
checking group membership,
461–471
connecting authorize script to users’
table, 410–413
entering browser sessions, 475–485
group-specific menus, 471–475
show_users script in, 395–396
writing script, 396–398
authorize_user() function, 462–463
AUTO_INCREMENT column, 177–179
B
backslash (\), in escaping
characters, 158–159
backups, hard drive, 92
bang (negation) operator (!), 127–128
BBEdit, as text editor
about, 36
syntax colored highlighting in, 39
binary objects
best approach for loading, 330–331
connecting users and images,
303–313
displaying images, 314–323
embedding images, 324–329
inserting data into table, 296–303
inserting into table raw images,
292–296
testing scripts, 323–324
blank screen, in testing cookies login
script, 435
blob (binary large object) column
types, 291
blocks of PHP code, creating, 67
Bluehost hosting provider, 55
browsers
coding URLs for, 232
confirmation boxes in, 349
displaying .html pages, 16–17
entering sessions using, 475–485
about, 477–478
creating menu, 485–486
restarting sessions, 479–483
signing out of sessions, 486
installing MySQL in Mac OS X from
website using, 505
installing MySQL in Windows from
website using, 500
installing PHP from website,
494–495
interacting with PHP, 19–20
JavaScript as browser-based
technology, 17–18
opening PHP files in, 49–51
PHP interpreter and, 6
preparing for images, 317
referencing CSS stylesheets, 16
relationship to PHP program, 58
storage of cookies in, 476
uploading images to, 266
using input file type impact on, 259
versions of JavaScript in, 18
viewing source code from, 82
C
Cancel button, in login box and
authentication, 390–391
capitalization
of constants, 136
using in SQL, 108–109
carat (^), in regular expressions,
162–163
carriage return (\r), 166–167
case-sensitivity, of request
parameters, 207
C++ extensions, WampServer
requiring, 22–25
chaining, method, 81
changing, text, 75–77
characters, searching sets of, 166–169
Chrome, managing cookies in, 476
client-server interaction, 256
code, PHP
about writing, 128, 137
angle brackets (< >), 78
arrays in. Seearrays
breaking down chains of action in, 81
cleaning up, 132–137
curly braces ({ })
in loops, 137
surrounding variables, 137
cutting and pasting, 347
dependency in, 241
display and view code, 368–369
doing away with redundancy
in, 67–68
double-pipe (||), 154
DRY, 367
ending sequence, 374

INDEX
516
COLUMNS,
TABLE
error pages
about, 229
adding debugging to, 237–242
creating, 230–232
making assumptions about,
233–235
phishing scams in, 237
planning, 223–228
redirect as path-insensitive,
247–251
redirecting on error, 242–245
simplifying code, 245–247
testing scripts, 232–233
escaping characters, 158
functions counting from, 76
organizing, 67
pasting and cutting, 347
placing side by side, 346
readability of, 161, 365
refactoring, 68, 475
resource in, 129
sequential, 317
sleep and impact on
programming, 267
sprintf() function, 299
using bang (negation) operator
(!), 127–128
using zero (0)
about, 74
arrays counting from, 84
writing tests for, 137
columns, table
about, 176
alias, 313–314
AUTO_INCREMENT, 177–179
blob types in, 291, 300
creating to store image
location, 275–279
dropping, 338
foreign keys and, 304
ID columns, 176–179, 300–303, 306,
324–325, 458–459
impact on old rows in adding, 195
looking ahead at needs for, 339
matching names to variable
names, 218
NOT NULL, 180
profile_pic_id, 304, 325, 331, 338
size of, 111
using ALTER command for
adding, 194
using table prefixes in, 313–314
.com and .org, mixing up in domain
names, 79
command line (Windows)
dir command, 41
finding in WampServer, 96–97
finding MySQL command line
client, 504
launching, 40
reusing prior commands, 113
running PHP from, 3, 498
using tabs, 347
compiled languages, 5
concatenation, 69–70, 131
confirmation boxes, 349
constants
capitalizing, 136
defining, 136
using, 135–137
content-length, 318
content-type, 318
context-specific menus, 443–454
converting from HTML to PHP
scripts, 446–449
logging out users, 449–450
putting into place, 443–446
requiring cookie to be set, 451–454
controllers, 353
$_COOKIE variable, 425–426, 429,
435, 478–479
cookies
about, 425
about using, 489
client-side storage of, 475–476
from HTTP authentication to,
424–426
logging in with
about signin script for, 426–427
adding context-specific
menus, 443–454
determining if user is already
signed in, 427–428
determining if user is trying to
sign in, 428–429
displaying page after, 429–431
expiring cookies, 436–437
handling errors in script, 435–441
logging user in, 432–435

INDEX 517
DLR COMMAND
(WINDOWS)
redirecting user if logged in,
431–432
reloading page on failed
login, 442
COUNT(*), 460–461
CREATE statement
making tables using, 109–112
translating image data into
table, 290
creating
application
applying authentication
in. Seeauthentication
applying authorization
in. Seeauthorization
deleting users, 345–351
logging in with
cookies. Seecookies
logging out users, 449–450
blocks of PHP code, 67
column to store image location,
275–279
empty box in HTML form, 138–139
flexible functions, 370
local web server, 22–27
tables using CREATE
statement, 109–112, 290
users in in MySQL, 503
credentials, getting user, 389–390,
392–395
CRUD, 183
crypt() function, 414–415
CSS Directory (css/), 56
CSS stylesheets
purpose on web page for, 46
referencing, 16
using on web form, 63
curly braces ({ })
in loops, 86
in printing out constants, 137
printing to strings inside, 297
surrounding variables, 137
cutting and pasting code, 347
Cyberduck, 8
D
data
dealing with humans entering, 150–
151
inserting into table, 113
data, as permanent, 92
database. See alsoMySQL;See
alsoweb server
about, 91–94
adding constraints in, 179–181
expensive, 95
modeling groups in, 455–461
primary keys, 178–179
relational, 94–95
replication of, 92
selecting with use command, 108
show command for, 100–103
storing passwords in, 399–401
use command for, 101
database administrator
about, 385
about talking back to users, 351–352
interfaces for
about, 333
deleting users, 345–351
interrupting user during
delete, 352, 362–363
listing all users, 337–344
thinking about need, 334–336
looking ahead at needs, 339
standardizing on messaging, 362
database tables. Seetables
data structures, 83
debugging
adding to application, 237–242
bypassing, 269
DEBUG_MODE, 239, 244, 266
debug_print, 239
delete_user() (function), 349–351
deleting
tables, 112–113
users
interrupting user during
delete, 352, 362–363
task of, 345–351
denying, redirecting or allowing
users, 468–471
dependency in code, 241
DESCRIBE (DESC) command, 112
descriptive variable names, using on
web form, 66
Desktop Search, Google, 93
die statements, 121–122, 124–125, 185
dir command (Windows), 41

INDEX
518
DIRECTORIES
directories
organizing on hosting provider,
55–56
scripts/, 208, 232
display_error_message()
function, 366–368
display_head() function, 372–376,
378–379
display_messages() function,
370–372
display_success_message()
function, 366–368
display_title() function, 371, 377–380,
443–444
DNS (Domain Name Service), 54
dollar sign ($)
in regular expressions, 162–163
in variables, 53
Domain Name Service (DNS), 54
domain names, mixing up .org and
.com in, 79
dot (.), adding constants using, 137
double-equals sign (==), regular
expressions and, 163
double-pipe (||), 145–150
double quotes (")
alternating single and, 78
in regular expressions, 157
using in searching text, 80
using in web form, 70–71
vs. single quotes ('), 158
DROP command, 112–113, 181
dropping, table columns, 338
DRY code, 367
E
echo statements, removing, 170–171
Eclipse PHP, as text editor, 38
Eloquent JavaScript (Haverbeke), 128
Eloquent Ruby (Olsen), 128
else statements
error handling using, 437–439
in writing pseudocode, 392–394
email addresses, using as user
name, 402
embedding images, 324–329
empty functions, 465
encryption, 413–418
ending sequence, 374
Engine Yard hosting provider, 55
entries, table, 176. See alsorows, table
error handling. See alsoreporting
problems
#1075 MySQL error, 179
about, 251
expiring cookies and blank
pages, 435–441
messaging, 365–366
PHP uploading errors, 263
suppressing errors, 268–269
try/catch block in, 319–322
using bang (negation) operator
(!), 127–128
using else statements, 437–439
$error_message variable, 440
error pages
adding debugging to, 237–242
creating, 229–232
making assumptions about, 233–235
phishing scams in, 237
planning, 223–228
redirect as path-insensitive, 247–251
redirecting on error, 242–245
showing up at wrong time, 451–454
simplifying code, 245–247
testing scripts, 232–233
escaping, 158, 184, 297
Examples Directory (ch01/, ch02/,
etc.), 56
exclamation point (!), bang (negation)
operator, 127–128
extensions. Seefile extensions
F
$facebook_url variable, 71–73,
272–274
fatigue and impact on
programmer, 267
field names, matching names to
variable names, 218
fields, table, 176. See alsocolumns,
table
field validation, 405
file extensions
about, 35
in text editors, 39
.php
about, 46–47
opening files in browsers, 49–51
file_get_contents() function, 295

INDEX 519
GROUPS
files. See alsoscripts, PHP
determining if file is image, 269–270
getimagesize() return on image, 295
identifying uploaded files, 267–268
limiting size of uploaded files, 258,
266
moving uploaded files to permanent
location, 270–275
on hosting provider, 59
organizing on hosting provider,
55–56
saving, 38
security
adding to files containing special
values, 137
protecting files of
passwords, 133–135
$_FILES[$image_fieldname]
variable, 268, 294–295
file system, 256
Firefox, managing cookies in, 475
foreach() function, 86, 88
foreach loops, 467–468
foreign keys, column names and, 304
forms. Seeweb forms
forward slash (/), in regular
expressions, 157
FROM keyword
capitalizing, 109
FTP programs, 8
functions
about, 122, 125
about writing, 365, 381
alert(), 354–362
authorize_user(), 462–463
counting from zero, 74, 76
crypt(), 414–415
custom, 239
delete_user(), 349–351
display_error_message(), 366–368
display_head(), 372–376, 378–379
display_messages(), 370–372
display_success_message(),
366–368
display_title(), 371, 377–380,
443–444
empty, 465
file_get_contents(), 295
flexible, 370
foreach(), 86, 88
getimagesize(), 292–295
get_request_param_value(),
355–357
getting lists to, 465
get_web_path(), 285, 287
handle_error(), 248–250, 265–267,
320–322, 437–438, 468
header(), 213
isset(), 234–235, 428
is_uploaded_file(), 268
JavaScript, 350
list of what can be done with text
using, 82
ltrim(), 79
mktime(), 437
mysql_connect(), 135
mysql_fetch_array(), 204–205
mysql_fetch_row(), 129–130, 204
mysql_insert_id(), 213–214, 302, 306
mysql_query(), 126–130, 141–142
mysql_real_escape_string(),
296–297, 466
mysql_select_db(), 125
non-functions and, 464
phpinfo(), 26
preg_match(), 156–157, 215
preg_match_all(), 158
rtrim(), 79
setcookie(), 425–426, 436–437
sprintf(), 298–299, 311, 340–343,
365, 467–468
strpos(), 72–75, 81, 156
str_replace(), 80
strtoupper(), 161, 163–166
substr(), 76
trim(), 79, 81, 151–154, 163–166
vs. variables, 464
G
getimagesize() function, 292–295
get_request_param_value()
function, 355–357
$_GET variable, 429
get_web_path() function, 285, 287
Google Desktop Search, 93–94
Google search engine, tutorials
on, 329
groups
authorization group-specific
menus, 471–475

INDEX
520
HANDLE
ERROR()
FUNCTION
checking authorization of
membership in, 461–471
connecting users and, 459–460
creating table for, 456–457
modeling in database, 455–461
testing membership in, 460–461
H
handle_error() function, 248–250,
265–267, 320–322, 437–438, 468
handling errors. See alsoerror
pages;See alsoreporting problems
#1075 MySQL error, 179
about, 251
expiring cookies and blank
pages, 435–436
messaging, 365–366
PHP uploading errors, 263
suppressing errors, 268–269
try/catch block in, 319–322
using bang (negation) operator
(!), 127–128
using else statements, 437–439
hard drive backups, 92
Haverbeke, Marijn, Eloquent
JavaScript, 128
header() function, 213
helper variables, setting up, 261–265
heredoc method, 373–374
Heroku hosting provider, 55
hidden files, 511
Home (Root) Directory (/), 56
hosting provider
about, 54
choosing, 55
granting phpMyAdmin access, 181
privileges on, 108
HOST_WWW_ROOT
about, 263
setting up, 261–263
.htaccess file, web server using, 388
HTML
checking scripts locally, 53–54
confirmation boxes in, 349
converting to PHP scripts, 446–449
downloading sample files in, 48
echo statements and, 171
from display_title() and display_
head(), 378–379
img element, 325–329
making semantically meaningful, 63
opening PHP files as, 49–51
outputting standard header, 372–374
purpose on web page for, 46
response in PHP scripts, 47–49
signing into, 422–424
tags, 63
writing scripts, 51–52
HTML5, support for regular
expressions, 170
HTML5: The Missing Manual
(MacDonald), 49
HTML forms
creating empty box in, 138–139
setting up for images, 256–259
HTML scripts vs. PHP scripts, 424
HTTP (Hypertext Transfer
Protocol), 213
authentication, 389–390
issues with login feature, 420–421
using HTTP headers in
authentication, 386–387
I
icons
Terminal, 28
WampServer, 26
ID columns, 176–179, 300–303, 306,
324–325, 458–459
if statements
error handling, 142, 148–149
in writing pseudocode, 392–394
triple-equals sign (===) in, 147
without using if, 266
IIS FastCGI option, for installing local
web server, 497
$image_data variable, 296–297
images
about, 254–255
as binary data, 256
creating table for, 290–291
identifying uploaded files, 267–268
limiting size of file, 258, 266
loading
best approach for, 330–331
connecting users and
images, 303–313
displaying, 314–323
embedding images, 324–329

INDEX 521
LOCAL
INSTALLATION
OF PHP
inserting binary data into
tables, 296–303
inserting into table raw
images, 292–296
return on getimagesize(), 295
testing scripts, 323–324
scripts as, 325–329
setting up HTML forms for, 256–259
uploading users image to web server
checking for errors, 265–267
determining if file is image,
269–270
moving file to permanent location
uploaded, 270–275
setting up helper variables,
261–265
storing image location in,
275–279
user profile, 209, 210
viewing
converting file system paths to
URLs, 282–286
displaying user image
embedding images and, 324–329
using SELECT statement to get all
information for user, 279–281
$image_size variable, 297
img src, 325–327
include command, 135
index, database, 178
InnoDB, using with foreign keys, 304
input type, 258–259
INSERT statement
connecting images to users, 305–311
inserting
binary data, 296–297
raw images, 295–296
rows, 113
user information, 183–187
updating user creation using, 211–212
integer (int) keyword, 111
Internet Explorer, managing cookies
in, 476
Internet Service Provider (ISP)
about, 54
choosing, 55
granting phpMyAdmin access, 181
privileges on, 108
interpreter, PHP, 5
ISP (Internet Service Provider)
about, 54
choosing, 55
granting phpMyAdmin access, 181
privileges on, 108
uploading PHP scripts to, 21
isset() function, 234–235, 428
is_uploaded_file() function, 268
J
JavaScript
about writing, 128
alert() function, 354–362
as browser-based technology, 18
functions, 350
purpose on web page for, 46
support for regular expressions, 170
using for confirmation boxes, 349
versions of, 18
vs. PHP, 5
JavaScript and jQuery: The Missing
Manual (McFarland), 405
JavaScript Directory (js/), 56
JavaScript: The Missing Manual
(McFarland), 349
join tables
many-to-many relationship, 457–460
using IDs, 458–459
with WHERE clause, 311
jQuery
about, 405–406
dialog and confirmation box, 362
K
Kattare hosting provider, 55
keyboard, using Up arrow key on
command line, 113
$key variable, 88–90
L
landing page, 421–422
leading spaces, 162, 164–168
limiting size of uploaded files, 258
line feed character (\n), 166–167
Linux system
\n (line feed character) in, 166–167
processes in, 496
localhost, 22, 121
local installation of PHP, 21

INDEX
522
LOCAL,
MEANING IN
COMPUTER
PROGRAMMING
local, meaning in computer
programming, 22
local web server. SeeMAMP
(Mac OS X);SeeWampServer
(WAMP);Seeweb server
logging out, 444, 486
login box, 388, 390–391, 398, 416, 420
logins. See alsopasswords
controlling user signins, 422–424
managing multiple, 402
using cookies for
about signin script, 426–427
adding context-specific
menus, 443–454
determining if user is already
signed in, 426–427
determining if user is trying to
sign in, 428–429
displaying page after login,
429–431
expiring cookies, 436–437
handling errors in script, 435–441
logging user in, 432–435
redirecting user if logged in,
431–432
reloading page on failed
login, 442
longblob type, 291
loopback network interfaces, 22
loops
curly braces ({ }) in, 86
foreach, 467–468
while, 130–131
ls command (Mac OS X), 41
ltrim() function, 79
M
MacDonald, Matthew, HTML5: The
Missing Manual, 49
Mac OS X
determining 32-bit or 64-bit version
of, 506–507
installing MySQL without
MAMP, 505–509
PHP on
default installation, 28–30
MAMP installation, 30–34
seeing installed version, 30
processes in, 496
\r (carriage return) in pre-, 166–167
starting MySQL automatically, 508
Mac OS X command line. SeeTerminal
(Mac OS X)
MAMP (Mac OS X)
about, 30
about installing local server, 104
accessing, 48
configuring, 32–33
control panel for, 34
ignoring “unidentified developer”
message, 31
installing MySQL without, 505–509
installing PHP with, 30–34
setting up MySQL user profile, 98
space needed for installation of, 32
starting MySQL on, 96
start page, 99
website, 30
many-to-many relationship, 457–460
master password, 500
McFarland, David Sawyer
JavaScript and jQuery: The Missing
Manual, 405
JavaScript: The Missing Manual, 349
mediumblob type, 291
megabyte (MB), 258
messaging
standardizing, 362
standardizing and consolidating in
view, 376–378
method chaining, 81
Microsoft Windows
determining 32-bit or 64-bit version
of, 22, 500
installing MySQL without
WampServer, 499–511
installing PHP on PC, 22–27
installing PHP without
Wampserver, 493–498
\r (carriage return) and \n (line feed
character) in, 166–167
threads in, 496
mismatching quotes, 78
Missing Manual Twitter address, 195
Missing Manual website, 9
mktime() function, 437
mock up page for user profile, 190–
194, 254
models, 353

INDEX 523
ORGANIZING
multiple logins, managing, 402
MVC (Model-View-Controller)
pattern, 353, 424
MySQL. See alsoSQL;database; web
server
about, 7
AFTER keyword, 400
checking uploading users image
program on, 279–281
connecting PHP to. Seescripts, PHP
avoid changing user input,
151–154
building SQL query runner,
138–142
cleaning up code, 132–137
dealing with humans entering
data, 150–151, 154
entering first web-based
query, 143–145
handling queries not selecting
data, 145–150
creating users in, 503
error #1075, 179
finding setting in Windows, 503
foreign key relationship in, 304
installing, 95–103
installing MySQL without
MAMP, 505–509
installing on Windows without
WampServer, 500–505
modeling groups in, 455–461
storing passwords in, 399–401
vs. expensive databases, 95
vs. SQL, 115
MySQL command line client, 504
MySQL command-line program
finding in WampServer, 96–97
-u option in, 97
mysql_connect command, 121–122
mysql_connect() function, 133–135
mysql console program, 96
mysql_fetch_array() function,
204–205
mysql_fetch_row() function, 129–130,
204
mysql_insert_id() function, 213–214,
302, 306
mysql_query, 213–214
mysql_query() function, 126–131,
141–142
mysql_real_escape_string()
function, 296–297, 466
mysql_select_db() function, 125
mysql tool
about, 96
giving user and password to
in MAMP, 98–100
in WampServer, 97
running, 105–107
running first SQL query, 100–103
running on MAMP, 98–100
running on WampServer, 96–97
N
naming
variables, 66
web pages, 183
negation (bang) operator (!), 127–128
NIL (NULL) keyword, 125, 180, 371–372
N:N relationships, 458
non-functions, functions and, 464
Notepad, as text editor
about, 35, 37
defaulting to plain text, 40
NOT NULL keyword, 180, 194, 456
$now variable, 271
NULL (NIL) keyword, 125, 180, 371–372
NuSphere PhpED, as text editor
about, 35
syntax colored highlighting in, 39
O
Object-Oriented Database
Management Systems
(OODBMS), 95
Olsen, Russ, Eloquent Ruby, 128
one-to-one relationships vs. many-to-
many relationships, 457–458
OODBMS (Object-Oriented Database
Management Systems), 95
operators
bang (negation) (!), 127–128
using @ sign to suppress
errors, 268–269
.org and .com, mixing up in domain
names, 79
organizing
directories on hosting provider,
55–56
PHP code, 67

INDEX
524
OTHER CGI
OPTION
Other CGI option
for installing local web server, 497
P
parentheses ( ), mixing up square
brackets ([ ]) and, 266
partial URLs, making clickable, 75
passwords
encrypting, 413–418
field validation of, 405
getting initial user name and,
402–404
inserting into create script user name
and, 407–408
protecting files of, 133–135
storing in database, 399–401
pasting and cutting code, 347
paths
relative and absolute, 249
setting up MySQL, 510
storing in database web, 287
PC installation of PHP, 22–27
period (.), in regular expressions, 159
permanent data, 92
Personal Home Page. SeePHP
phishing scams, 235–237, 486–488
Photoshop, administrator using,
336–337
PHP
about, 2–6
installing on PC, 21
installing without WampServer,
493–498
Mac OS X vs. Windows, 8
on Mac OS X
default installation, 28–30
going to previous version, 33
MAMP installation, 30–34
resource, 129
running from command prompt, 498
scripts. See alsoscripts, PHP
about, 5
running, 21
writing, 20
website for installing, 494–495
PHP apps, about, 344
PHP code
about writing, 128, 137
angle brackets (< >), 78
arrays in. Seearrays
breaking down chains of action in, 81
cleaning up, 132–137
curly braces ({ })
in loops, 137
surrounding variables, 137
cutting and pasting, 347
dependency in, 241
doing away with redundancy
in, 67–68
double-pipe (||), 154
DRY, 367
ending sequence, 374
error pages
about, 229
adding debugging to, 237–242
creating, 230–232
making assumptions about,
233–235
phishing scams in, 237
planning, 223–228
redirect as path-insensitive,
247–251
redirecting on error, 242–245
simplifying code, 245–247
testing scripts, 232–233
escaping characters, 158
functions counting from, 76
organizing, 67
pasting and cutting, 347
placing side by side, 346
readability of, 161, 365
refactoring, 68, 475
resource in, 129
sequential, 317
sleep and impact on
programming, 267
sprintf() function, 299
using bang (negation) operator
(!), 127–128
using zero (0)
about, 74
arrays counting from, 84
writing tests for, 137
php command, 41, 83
PHP Directory (scripts/), 56
PHP: Hypertext Preprocessor. SeePHP
phpinfo() function, 26
PHP interpreter
about, 5
browser and, 6

INDEX 525
RELEASES
(VERSIONS)
running programs using, 42
web server interacting with, 19–20
phpMyAdmin
accessing table using, 300
using, 187
web hosting provider granting
access, 181
PHP programmers
good vs. great, 90
sleep and impact on
programming, 267
PHP programs
running first, 40–41
writing first, 38–40
writing on text editor, 35–38
pipe (|), in regular expressions, 159
plain text
defaulting to, 40
saving program files in, 38
plus (+) signe, in regular
expressions, 165
position markers, 72–73
$_POST variable, 428–429
Preferences Pane, on Mac OS X for
MYSQL, 509
preg_match_all() function, 158
preg_match() function, 156–157, 215
primary keys, columns IDs and,
178–179
printing
error messages, 239
SQL results, 129–131
strings to variables, 297–300
privileges on hosting provider, 108
processes, in Mac OS X and Unix/Linux
systems, 496
profile_pic_id column, 304, 325, 331,
338
pseudocode, 392, 431
Q
queries
not selecting data, 145–150
running first SQL query, 101–102
speeding up, 469
query runner, building
avoid changing user input, 151–154
building SQL
combining knowledge of SQL and
PHP, 141–142
connecting to database, 139–141
creating HTML form of big empty
box, 138–139
entering first web-based
query, 143–145
handling queries not selecting
data, 145–150, 154
Quicksilver, 93
R
raw images, inserting into table,
292–296
RDBMS (Relational Database
Management System) model, 95
readability
of code, 161, 365
of error messages, 224–228
records, table, 176. See alsorows,
table
redirecting, allowing or denying
users, 468–471
redirection
JavaScript code for, 350
limitation of, 352–354
refactoring code, 68, 475
regular expressions (regex)
about, 155–156
carat (^) in, 162–163
cleaning up output using, 215–217
dollar sign ($) in, 162–163
double-equals sign (==) and, 163
double quotes (") in, 157
forward slash (/) in, 157
mastering, 169
period (.) in, 159
pipe (|) in, 159
plus (+) sign in, 165
searching sets of characters, 166–169
searching strings, 156–161
triple-equals sign (===) and, 163
relational databases, 94–95
relative path
absolute and, 249
web path as, 287
releases (versions)
going to previous releases of PHP on
Mac OS X, 33
of JavaScript, 18
of PHP for Mac OS X, 30
of software, 494

INDEX
526
REMOTE
SERVER
remote server. Seehosting provider
replacing characters in text, 80
replication, database, 92
reporting problems. See alsoerror
handling
If statements for, 142, 148–149
using die statements, 121–122,
124–125, 185
request parameters
case-sensitivity of, 207
dangers of, 237
$_REQUEST variable
about, 52
accessing parameters directly, 62–66
as array, 83–89, 205, 264
determining if user is trying to sign in
using, 428
in creating error pages, 231, 233
passing into display_title(), 378
$_SESSION and, 483–485
testing script using, 206–207
vs. $_COOKIE, 429, 435
vs. $_GET and $_POST, 429
require command, 135
require_once, 241–242, 369, 397,
427–428, 472
resource, in PHP, 129
$result variable, 127–129, 203–204
romote servers. Seeweb server
Root (Home) Directory (/), 56
root password, 500
rows, table
about, 176
adding columns and impact on
old, 195
inserting into table, 113
inserting user information, 183–187
$row variable, 205
rtrim() function, 79
Ruby, about writing, 128
S
Safari Books Online, 11
Safari, managing cookies in, 476
sample files, downloading, 48
saving files, 38
scripts/ directories, 208, 232
scripts, PHP. See alsofiles
about, 5, 46–47
as images, 325–329
authorize
changing for checking users
credentials, 422–424
connecting to users table,
410–413
creating, 396–398
calling repeated code from
view, 369–370
converting from HTML, 446–449
displaying images, 314–323
HTML scripts
checking scripts locally, 53–54
generating HTML response, 47–49
writing, 51–52
mock up page for user profile, 254
on hosting provider, 59
opening PHP files in browsers, 49–51
running, 21
running remotely, 54–57
showing user information
building script, 195–200
getting user ID into script,
206–207
mock up page for user
profile, 190–194, 254
selecting user from
database, 201–203
show_users script in authorization
and authentication, 395–396
testing error page, 232–233
updating user creation, 211–214
updating user signup form, 208–211
vs. HTML form, 424
writing, 20
writing connection
about, 120
for selecting database, 125–126
to MySQL, 120–124
to show tables, 126–131
scripts/ (PHP Directory), 56
searching
and replacing, 80
for data, 93–94
sets of characters, 166–169
text (strings), 71–73, 156–161
security
adding to files containing special
values, 137
authentication
about, 386

INDEX 527
SQL
applying to application, 387–395
basic, 386–395
beyond basic, 420–426
Cancel button and, 390–391
of password and user
name. Seeuser name
show_users script in, 395–396
using cookies, 424–426
using HTTP headers, 386–387,
389–390
authorization
changing script for checking users
credentials, 422–424
checking group
membership, 461–471
connecting authorize script to
users table, 410–413
entering browser sessions,
475–485
group-specific menus, 471–475
show_users script in, 395–396
writing script, 396–398
cookies
about signin script for logging in
with, 426–427
adding context-specific
menus, 443–454
determining if user is already
signed in, 427–428
determining if user is trying to
sign in, 428–429
displaying page after login,
429–431
expiring cookies, 436–437
from HTTP authentication
to, 424–426
handling errors in script, 435–441
logging user in, 432–435
redirecting user if logged in,
431–432
reloading page on failed
login, 442
passwords
encrypting, 413–418
field validation of, 405
getting initial user name
and, 402–404
inserting into create script user
name and, 407–408
storing in database, 399–401
phishing scams, 235–237, 486–488
security certificates, ignoring
message for MAMP, 31
SELECT statement
capitalization in, 108–109
listing all users in, 337–344
using to get all information for
user, 279–281
semicolon (;), in MySQL, 109
sequential code, 317
Server Configuration page, phpinfo()
link on, 26
servers. Seeweb server
$_SERVER variable, 389–390
sessions
about, 477–478
creating menu, 485–486
restarting, 479–483
signing out of, 486
solving phishing problem
using, 486–488
$_SESSION variable, 478–479,
483–485
setcookie() function, 425–426,
436–437
SHOW command
for databases, 100–103
for tables, 126–131
signing out, 444, 486
signins. See alsologins
controlling user, 422–424
single quotes (')
alternating double and, 78
vs. double quotes ("), 158
sleep and impact on programmer, 267
software releases (versions), 494
source code, viewing web page, 74, 82
Spotlight, 93–94
sprintf() function, 298–299, 311,
340–343, 365, 467–468
SQL
building query runner
avoid changing user input,
151–154
combining knowledge of SQL and
PHP, 141–142
connecting to database, 139–141
creating HTML form of big empty
box, 138–139

INDEX
528
SQUARE
BRACKETS
([]), MIXING UP
PARENTHESES
() AND
entering first web-based
query, 143–145
handling queries not selecting
data, 145–150, 154
CREATE keyword in, 109–112
creating tables, 109–112
DESCRIBE (DESC) command, 112
fixing typos in, 110
FROM keyword
capitalizing, 109
printing out results, 129–131
reusing prior commands, 113
running first query, 101–102
speeding up queries, 469
using capitalization in, 108–109
vs. MySQL, 115
WHERE clause, 108–109
square brackets ([ ]), mixing up
parentheses ( ) and, 266
src, img, 325–327
ssh programs, 105
strings (text)
about working with, 69
changing, 75–77
combining, 69–71
encrypting, 414–418
list of what can be done with, 82
printing to variables, 297–300
removing extra whitespace, 79
searching, 71–73, 156–161
searching and replacing, 80
using plain language in web
forms, 70
varchar keyword and, 111
strpos() function, 72–75, 81, 156
str_replace() function, 80
strtoupper() function, 161, 163–166
substr() function, 76
T
tab characters (\t), 168
tables
about, 176
accessing using phpMyAdmin, 181,
187, 300
alias, 313–314
columns
alias, 313–314
AUTO_INCREMENT, 177–179
blob types used in, 291, 300
creating to store image
location, 275–279
dropping, 338
foreign keys and, 304
ID, 176–179, 300–303, 306,
324–325, 458–459
impact on old rows in adding, 195
looking ahead at needs for, 339
matching names to variable
names, 218
NOT NULL, 180
profile_pic_id, 304, 325, 331, 338
size of, 111
using ALTER command for
adding, 194
using table prefixes in, 313–314
connecting authorize script to users
table, 410–413
creating groups, 456–457
deleting, 112–113
inserting binary data into, 296–303
inserting image path into, 276
inserting raw image into, 292–296
join
many-to-many relationship,
457–460
using IDs
with WHERE clausee, 311–313
planning, 175–181
primary keys in, 178–179
rows
adding columns and impact on
old, 195
inserting, 113
inserting user information,
183–187
showing, 101–102, 126–131
users, storing objects in dierent
tables about, 290–291
using CREATE statement to
create, 109–112, 290
telnet, 105
Terminal (Mac OS X)
finding MySQL command line
client, 504
icon, 28
launching, 28–29
ls command, 41
reusing prior commands, 113
running PHP from, 3, 498

INDEX 529
USE COMMAND
setting up in MAMP for MySQL user
profile, 98
setting up MySQL path, 510
using tabs, 347
testing
authentication, 435
code after cutting and pasting, 347
error page scripts, 232–233
group membership, 460–461
new functionality, 285
scripts, 207
show images scripts, 323–324
writing code for, 137
TextEdit, as text editor
about, 35, 37
defaulting to plain text, 40
saving files in plain text, 38
text editors
about, 37
defaulting to plain text, 40
saving files in plain text, 38
syntax colored highlighting in, 39
writing PHP on, 35–38
TextMate, as text editor
about, 36
syntax colored highlighting in, 39
text (strings)
about working with, 69
changing, 75–77
combining, 69–71
encrypting, 414–418
escaping characters, 158
list of what can be done with, 82
printing to variables, 297–300
removing extra whitespace, 79
searching, 71–73, 156–161
searching and replacing, 80
using plain language in web
forms, 70
varchar keyword and, 111
Thread Safe, in Windows
systems, 496
tight coupling, 289
tinyblob type, 291
trim() function, 79, 81, 151–154, 163–166
triple-equals sign (===)
in If statements, 147
regular expressions and, 163
troubleshooting
logging into web server, 105–107
typos in SQL command, 110
trusted URLs, phishing scams
using, 235–237
try/catch block, in error
handling, 319–322
trying things out, value of, 329
Twitter address, for Missing
Manual, 195
Twitter handle, turning into clickable
link, 75–77
$twitter_handle variable, 75–77, 188,
272–274
typos, fixing MySQL, 110
U
UI (User Interface) vs. UX (User
Experience), 361
ul (unordered list), 130
Unix system
\n (line feed character) in, 166–167
processes in, 496
unordered list (ul), 130
Up arrow key on keyboard using in on
command line, 113
uploading files
limiting size of files, 258
of images to web server
checking for errors, 265–267
determining if file is image,
269–270
identifying uploaded files,
267–268
setting up helper variables,
261–265
setting up HTML forms for
images, 256–259
URLs
coding, 232
converting file system paths to,
282–286
making clickable partial, 75
phishing scams using trusted,
235–237, 486–488
use command
for databases, 101
on hosting provider server, 108

INDEX
530
USER
EXPERIENCE
(UX) VS. USER
INTERFACE (UI)
User Experience (UX) vs. User
Interface (UI), 361
user_id, 176–179, 181, 290
$user_image variable, 206
user information
focusing on what users want to
see, 189
getting, 174–175
inserting into table, 183–187
saving, 182–188
showing
building script, 195–200
cleaning up output, 215–217
getting user ID into script,
206–207
mock up page for user
profile, 190–194, 254
pulling values, 203–206
selecting user from
database, 201–203
setting up HTML forms for
images, 256–259
updating user creation script,
211–214
updating user signup form,
208–211
uploading users image to web
server. Seeimages
using ALTER command for adding
columns, 194
storing objects in dierent
tables, 290–291
using, 88
user interface, for administrator,
334–336
User Interface (UI) vs. User Experience
(UX), 361
user name
checking in create user script for
duplicate, 409
getting initial password and,
402–404
inserting into create script password
and, 407–408
using email addresses as, 402
user_pic, 258
user profile
images, 209–210
mock up page for, 190–194, 254
setting up HTML forms for
images, 256–259
uploading users image to web
server. Seeimages
setting up in MAMP for MySQL, 98
users
allowing, denying, or
redirecting, 468–471
checking credentials of, 422–424
connecting groups and, 459–460
connecting images and, 303–313
deleting
interrupting user during
delete, 352, 362–363
task of, 345–351
getting credentials for, 389–390,
392–395
getting to function list of, 465
listing all, 337–344
planning error pages for, 223–228
user signup form, updating, 208–211
users machine vs. web server, 256
users table, connecting authorize
script to, 410–413
UX (User Experience) vs. UI (User
Interface), 361
V
$value variable, 88–90
varchar keyword, 111
variables
about, 52
$_COOKIE, 425–426, 429, 435,
478–479
dollar sign ($) in, 53
$error_message, 440
$facebook_url, 71–73, 272–273
$_FILES[$image_fieldname],
294–295
$_FILES[$image_fieldname]
variable, 268
$_GET, 429
$image_data, 296–297
$image_filename, 297
image_size, 297
$key, 88–90
matching names to column
names, 218
naming, 66
$now, 271
$_POST, 428–429

INDEX 531
WEB HOSTING
PROVIDER
printing strings to variables,
297–300
replacing hand-typed values
with, 133
$_REQUEST
about, 52
accessing parameters
directly, 62–66
as array, 83–89, 205, 264
determining if user is trying to
sign in using, 428
in creating error pages, 231, 233
passing into display_title(), 378
$_SESSION and, 483–485
testing script using, 206–207
vs. $_GET and $_POST, 429
$result, 127–128, 203–204
$row, 205
$_SERVER, 389–390
$_SESSION, 478–479, 483–485
setting up helper, 261–265
$twitter_handle, 75–77, 188
$user_image, 206
using constants instead of, 135–137
$value, 88–90
vs. functions, 464
versions (releases)
going to previous version of PHP on
Mac OS X, 33
of JavaScript, 18
of PHP for Mac OS X, 30
of software, 494
viewing images
converting file system paths to
URLs, 282–286
displaying user image, 286–287
embedding images and, 324–329
using SELECT statement to get all
information for user, 279–281
views, 353, 376–378
View Source, 82
W
WampServer (WAMP)
about, 22
about installing local server, 104
accessing, 48
icon, 26
installation of PHP, 22–27
installing MySQL without, 500–505
installing PHP without, 493–498
options, 26
requiring C++ extensions, 22–25
running mysql tool on, 96–97
starting MySQL on, 96
website, 23
web applications, about building, 175
web browsers
coding URLs for, 232
confirmation boxes in, 349
displaying .html pages, 16–17
entering sessions using, 475–485
about, 477–478
creating menu, 485–486
restarting sessions, 479–483
signing out of sessions, 486
installing MySQL in Mac OS X from
website using, 505
installing MySQL in Windows from
website using, 500
installing PHP from website, 494
interacting with PHP, 19–20
JavaScript as browser-based
technology, 17–18
opening PHP files in, 49–51
PHP interpreter and, 6
preparing for images, 317
referencing CSS stylesheets, 16
relationship to PHP program, 58
storage of cookies in, 476
uploading images to, 266
using input file type impact on, 259
versions of JavaScript in, 18
viewing source code from, 82
web forms
adding space in, 70–71
getting information from, 62–68
issues in people filling out, 78, 80
naming variables, 66
viewing source code, 74
using plain language in, 70
using user information in, 90
web hosting provider
about, 54
choosing, 55
granting phpMyAdmin access, 181
privileges on, 108
uploading PHP scripts to, 21

INDEX
532
WEB PAGES
web pages
focusing on what users want to
see, 189
getting user information, 174–175
HTML output for, 372–374
landing page for login, 421–422
naming web pages, 183
planning database tables, 175–181
saving user information, 182–188
showing user information
building script, 195–200
cleaning up output, 215–217
getting user ID into script,
206–207
mock up page for user
profile, 190–194, 254
pulling values, 203–206
selecting user from
database, 201–203
setting up HTML forms for
images, 254
updating user creation script,
211–214
updating user signup form,
208–211
uploading users image to web
server. Seeimages
using ALTER command for adding
columns, 194
web paths, storing in database, 287
web server
about installing local, 104
accessing local, 22, 48
creating local, 22–27
interacting with PHP interpreter,
19–20
logging into, 105–107
running programs without, 42–43
running scripts on remote, 54–57
uploading users image to
checking for errors, 265–267
determining if file is image,
269–270
moving uploaded file to
permanent location, 270–275
setting up helper variables,
261–265
storing image location in,
275–279
using .htaccess file, 388
vs. users machine, 256
wasting resources on, 67–68
Web Server Setup window, for
installing local web server, 497
website
installing MySQL in Mac OS X
from, 505
installing MySQL in Windows
from, 500
installing PHP from, 494–498
MAMP, 30
Missing Manual, 9
WampServer, 23
WHERE clause
about, 108–109
joining tables with, 311–313
while loop, 130–131
while statements, in writing
pseudocode, 392
whitespace, removing extra, 79,
151–154, 163–166
Windows
determining 32-bit or 64-bit version
of, 22, 500
installing MySQL without
WampServer, 500–505
installing PHP on PC, 22–27
installing PHP without
WampServer, 493–498
\r and \n characters in, 166–167
threads in, 496
WordPress, 208, 344
writing
authorization script, 396–398
connection script
for selecting database, 125–126
to MySQL, 120–124
to show tables, 126–131
first PHP program, 38–40
functions, 365, 381
HTML scripts, 51–52
JavaScript, 128
PHP
code, 128, 137
on text editors, 35–38
scripts, 20
pseudocode, 392
Ruby, 128
test code, 137


Don’t miss a thing!
Sign up for the free Missing
Manual email announcement
list at missingmanuals.com.
We’ll let you know when we
release new titles, make
free sample chapters available,
and update the features and
articles on the Missing Manual
website.
PHP & MySQL
T
H
E
M
I
S
S
I
N
G
C
D
There’s no
CD with this book;
you just saved $5.00.
Instead, every single Web address, practice file, and
piece of downloadable software mentioned in this
book is available at missingmanuals.com
(click the Missing CD icon).
There you’ll find a tidy list of links,
organized by chapter.
