PowerLogic™ PM5300 Series Power And Energy Meter User Guide
User Manual: PM5300
Open the PDF directly: View PDF ![]() .
.
Page Count: 118 [warning: Documents this large are best viewed by clicking the View PDF Link!]
- Introduction
- Safety Precautions
- Hardware Reference
- Front panel display and meter setup
- Viewing Meter Data
- Input / Output
- Alarms
- Data Logs
- Measurements and calculations
- Multi-tariff feature
- Power quality
- Verifying accuracy
- Meter resets
- Maintenance and Upgrades
- MID Compliance
- MID overview
- MID compliance for the meter
- Specifications relevant to MID
- Safety precautions
- Installation and wiring
- Installing the terminal covers
- PM5331/PM5341 default screen
- Meter firmware version
- MID-protected setup parameters
- Lock-protected setup parameters
- Lock-protected functions
- Setting up the PM5331/PM5341
- Initializing the meter
- Locking or unlocking the meter
- Glossary
P
Q
S
PowerLogic™ PM5300 Series Power and
Energy Meter
User Guide
EAV15107 - EN04
05/2015
Safety Information
Important Information
Read these instructions carefully and look at the equipment to become
familiar with the device before trying to install, operate, service or maintain it.
The following special messages may appear throughout this manual or on
the equipment to warn of potential hazards or to call attention to information
that clarifies or simplifies a procedure.
The addition of either symbol to a “Danger” or “Warning” safety label indicates that
an electrical hazard exists which will result in personal injury if the instructions are
not followed.
This is the safety alert symbol. It is used to alert you to potential personal injury
hazards. Obey all safety messages that follow this symbol to avoid possible injury
or death.
Please note
Electrical equipment should be installed, operated, serviced and maintained only by
qualified personnel. No responsibility is assumed by Schneider Electric for any
consequences arising out of the use of this material.
A qualified person is one who has skills and knowledge related to the construction,
installation, and operation of electrical equipment and has received safety training
to recognize and avoid the hazards involved.
DANGER indicates a hazardous situation which, if not avoided, will result in
death or serious injury.
WARNING indicates a hazardous situation which, if not avoided, could result in
death or serious injury.
CAUTION indicates a hazardous situation which, if not avoided, could result in
minor or moderate injury.
NOTICE is used to address practices not related to physical injury.

PowerLogic™ PM5300 series user guide Table of Contents
© 2015 Schneider Electric All Rights Reserved 5
Chapter 1: Introduction Power and Energy Meter Hardware ................................................................................. 9
Parts and Accessories .................................................................................................. 9
Box Contents ................................................................................................................ 9
Firmware .......................................................................................................................... 9
Chapter 2: Safety Precau-
tions Before You Begin ........................................................................................................... 11
Notices ........................................................................................................................... 11
Chapter 3: Hardware Refer-
ence Models, Features and Options ....................................................................................... 13
Functions and Characteristics ........................................................................................ 13
Technical Specifications ................................................................................................. 15
Before you begin ............................................................................................................ 17
Safety precautions .......................................................................................................... 17
Dimension ......................................................................................................................18
Meter mounting .............................................................................................................. 18
Mounting the PM5300 ................................................................................................. 18
Meter wiring .................................................................................................................... 19
Recommended cables ................................................................................................ 21
Wiring Diagrams ............................................................................................................. 22
Power system ................................................................................................................. 23
Direct connect voltage limits ....................................................................................... 23
Voltage and current input wiring ................................................................................. 25
Balanced system considerations ................................................................................ 26
Control power wiring ....................................................................................................... 26
Communications ............................................................................................................. 26
Serial communications ................................................................................................ 26
Ethernet communications ........................................................................................... 28
Digital outputs ................................................................................................................. 28
Status inputs ................................................................................................................... 29
Relay outputs ................................................................................................................. 29
Chapter 4: Front panel dis-
play and meter
setup
LED indicators ................................................................................................................ 31
Heartbeat / communications LED ............................................................................... 31
Alarm / energy pulsing LED modes ............................................................................ 31
Notification icons ............................................................................................................ 32
Meter screen menus ....................................................................................................... 32
Menu tree .................................................................................................................... 33
Meter setup screen navigation .................................................................................... 34
Front panel meter setup ................................................................................................. 34
Configuring the basic setup parameters ..................................................................... 34
Communications setup ................................................................................................... 36
Setting up serial communications ............................................................................... 36
Setting up Ethernet communications .......................................................................... 37
HMI settings ...................................................................................................................38
Setting up the display .................................................................................................. 38
Setting up regional settings ......................................................................................... 39
Setting up the screen passwords ................................................................................... 39
Lost password ............................................................................................................. 40
Setting the clock ............................................................................................................. 41
Advanced setup .............................................................................................................. 41
Setting up the alarm / energy pulsing LED ..................................................................... 42
Input / output setup ......................................................................................................... 43
Demand setup ................................................................................................................ 43
Multi-tariff setup .............................................................................................................. 44
Alarms setup .................................................................................................................. 44
Remote Meter Setup ...................................................................................................... 44
Chapter 5: Viewing Meter
Data Viewing meter data from the front panel ........................................................................ 45
Meter data display screens ............................................................................................ 45

PowerLogic™ PM5300 series user guide Table of Contents
© 2015 Schneider Electric All Rights Reserved6
Using ION Setup to view or modify configuration data ................................................... 48
Using software to view meter data .................................................................................. 48
Chapter 6: Input / Output Status input applications ................................................................................................. 49
Status input setup ........................................................................................................ 50
Digital output applications ............................................................................................... 52
Digital output setup ...................................................................................................... 52
Relay output applications ................................................................................................ 57
Relay output setup ......................................................................................................57
Alarm / energy pulsing LED setup .................................................................................. 60
Chapter 7: Alarms About Alarms ..................................................................................................................63
1-Second Alarms .........................................................................................................63
Digital Alarms .............................................................................................................. 65
Unary Alarms ............................................................................................................... 66
Alarm Priorities ............................................................................................................ 66
Using an Alarm to Control a Relay and Digital Output ................................................ 66
Alarm Setup ...................................................................................................................66
Setting Up 1-Second Alarms ....................................................................................... 67
Setting Up Unary Alarms ............................................................................................. 69
Setting Up Digital Alarms ............................................................................................ 70
Viewing Alarm Activity and History ................................................................................. 72
Viewing Active Alarms and Alarm Counters ................................................................ 72
Viewing Unacknowledged Alarms and the Alarm History Log .................................... 73
Chapter 8: Data Logs Data Logs ....................................................................................................................... 75
Memory Allocation for Log Files ..................................................................................... 76
Alarm Log ....................................................................................................................... 76
Alarm Log Storage ...................................................................................................... 76
Chapter 9: Measurements
and calculations Real-time readings .......................................................................................................... 77
Energy ............................................................................................................................ 77
Min/max values ............................................................................................................... 77
Power factor .................................................................................................................... 77
Power factor min/max convention ............................................................................... 78
Power factor sign convention ...................................................................................... 78
Demand .......................................................................................................................... 79
Power demand calculation methods ........................................................................... 79
Current demand .......................................................................................................... 81
Predicted demand ....................................................................................................... 81
Peak demand .............................................................................................................. 82
Chapter 10: Multi-tariff feature Multi-tariff feature example ............................................................................................. 83
Multi-tariff feature overview ............................................................................................. 83
Command mode overview ........................................................................................... 84
Time of day mode overview ........................................................................................ 84
Input mode overview ...................................................................................................86
Configuring tariffs using the front panel .......................................................................... 87
Configuring time of day mode tariffs using the front panel ..........................................87
Configuring input mode tariffs using the front panel .................................................... 88
Chapter 11: Power quality Harmonics overview ....................................................................................................... 89
Total Harmonic Distortion and Total Demand Distortion ............................................. 89
Displaying harmonics data .............................................................................................. 90
Viewing harmonics using the front panel ..................................................................... 90
Viewing TDD ............................................................................................................... 91
Viewing THD/thd using the front panel ........................................................................ 91

PowerLogic™ PM5300 series user guide Table of Contents
© 2015 Schneider Electric All Rights Reserved 7
Chapter 12: Verifying accura-
cy Testing overview ............................................................................................................ 93
Accuracy test requirements ........................................................................................ 93
Verifying accuracy test ................................................................................................... 95
Energy pulsing considerations .................................................................................... 97
Test points .................................................................................................................. 98
Typical sources of test errors ...................................................................................... 98
Chapter 13: Meter resets Front panel meter reset screens .................................................................................... 99
Global resets ..................................................................................................................99
Single resets ................................................................................................................. 100
Chapter 14: Maintenance and
Upgrades Power Meter Memory ................................................................................................... 103
Identifying the Firmware Version, Model, and Serial Number ...................................... 103
Additional Meter Status Information ............................................................................. 104
Downloading Firmware ................................................................................................. 104
Troubleshooting ............................................................................................................ 105
Heartbeat/Comms LED ............................................................................................. 105
Getting Technical Support ............................................................................................ 106
Register List ................................................................................................................. 106
Chapter 15: MID Compliance MID overview ................................................................................................................ 107
MID compliance for the meter ...................................................................................... 107
Specifications relevant to MID ...................................................................................... 107
Safety precautions ........................................................................................................ 108
Installation and wiring ................................................................................................... 108
Installing the terminal covers ........................................................................................ 109
PM5331/PM5341 default screen .................................................................................. 109
Meter firmware version ................................................................................................. 110
MID-protected setup parameters .................................................................................. 110
Lock-protected setup parameters ................................................................................. 110
Lock-protected functions .............................................................................................. 110
Setting up the PM5331/PM5341 .................................................................................. 111
Basic setup menu ..................................................................................................... 111
Advanced setup menu .............................................................................................. 111
Clock setup menu ..................................................................................................... 111
Tariff setup menu ...................................................................................................... 111
Passwords setup menu ............................................................................................. 111
Initializing the meter ..................................................................................................... 111
Locking or unlocking the meter .................................................................................... 112
Setting up lock password .......................................................................................... 112
Glossary Terms ........................................................................................................................... 113
Abbreviations ................................................................................................................ 115

PowerLogic™ PM5300 series user guide Table of Contents
© 2015 Schneider Electric All Rights Reserved8
PowerLogic™ PM5300 user guide Chapter 1—Introduction
© 2015 Schneider Electric All Rights Reserved 9
Chapter 1—Introduction
This user guide explains how to operate and configure a PowerLogic™ PM5300 Series
Power and Energy Meter.
Power and Energy Meter Hardware
Parts and Accessories
Box Contents
1. Power and Energy Meter (1)
2. Installation Guide (1)
3. Calibration Certificate (1)
4. Connectors
5. Retainer Clips (2)
Firmware
This user guide is written to be used with firmware version 01.00.0 and higher. See
“Identifying the Firmware Version, Model, and Serial Number” on page 103 for
instructions on determining the firmware version.
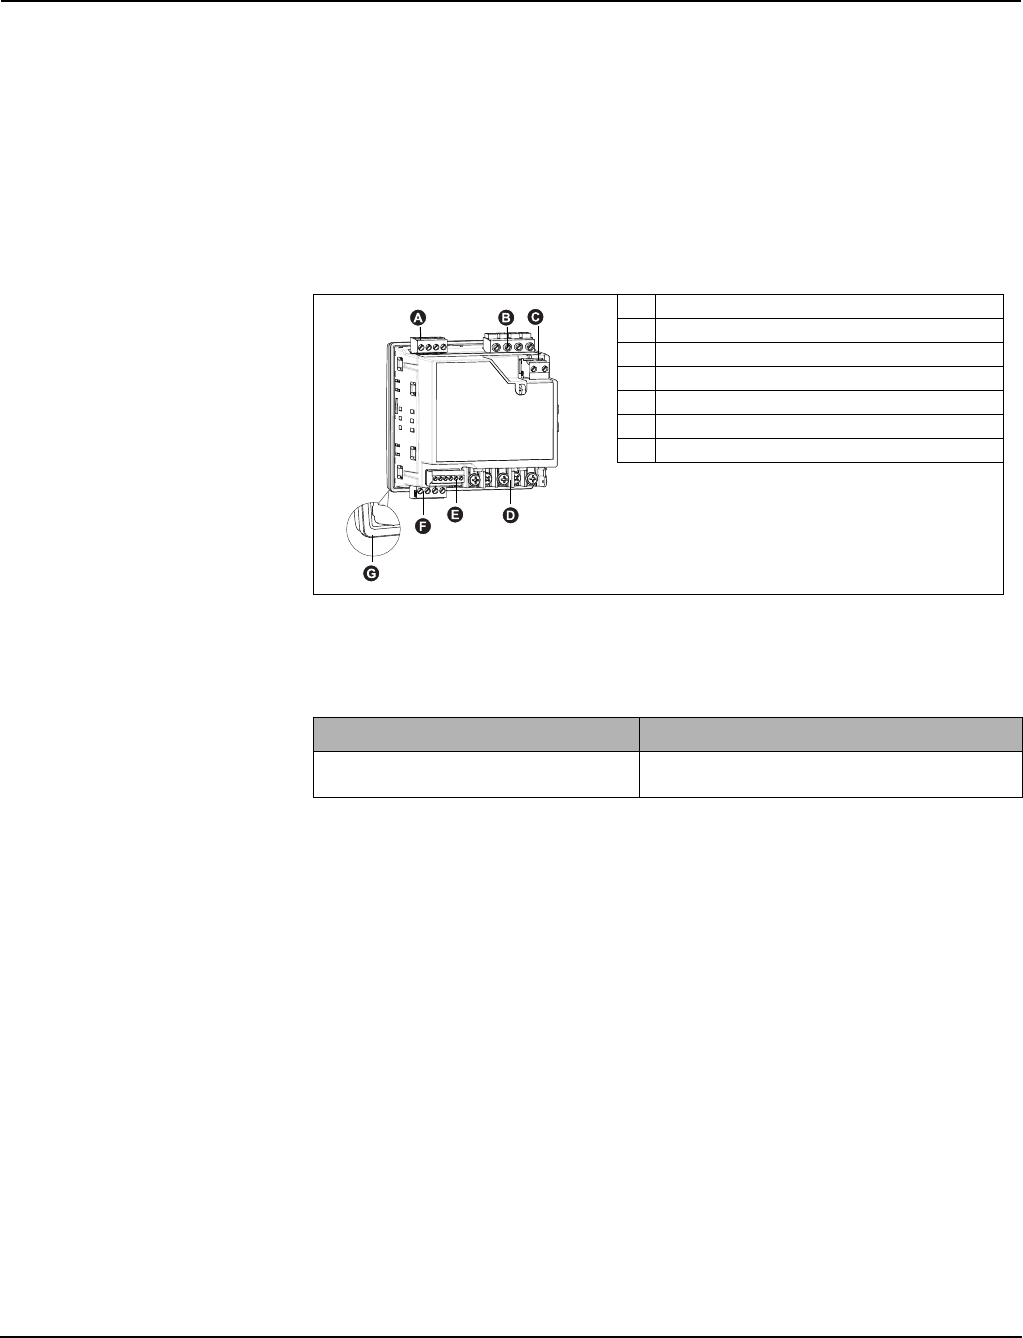
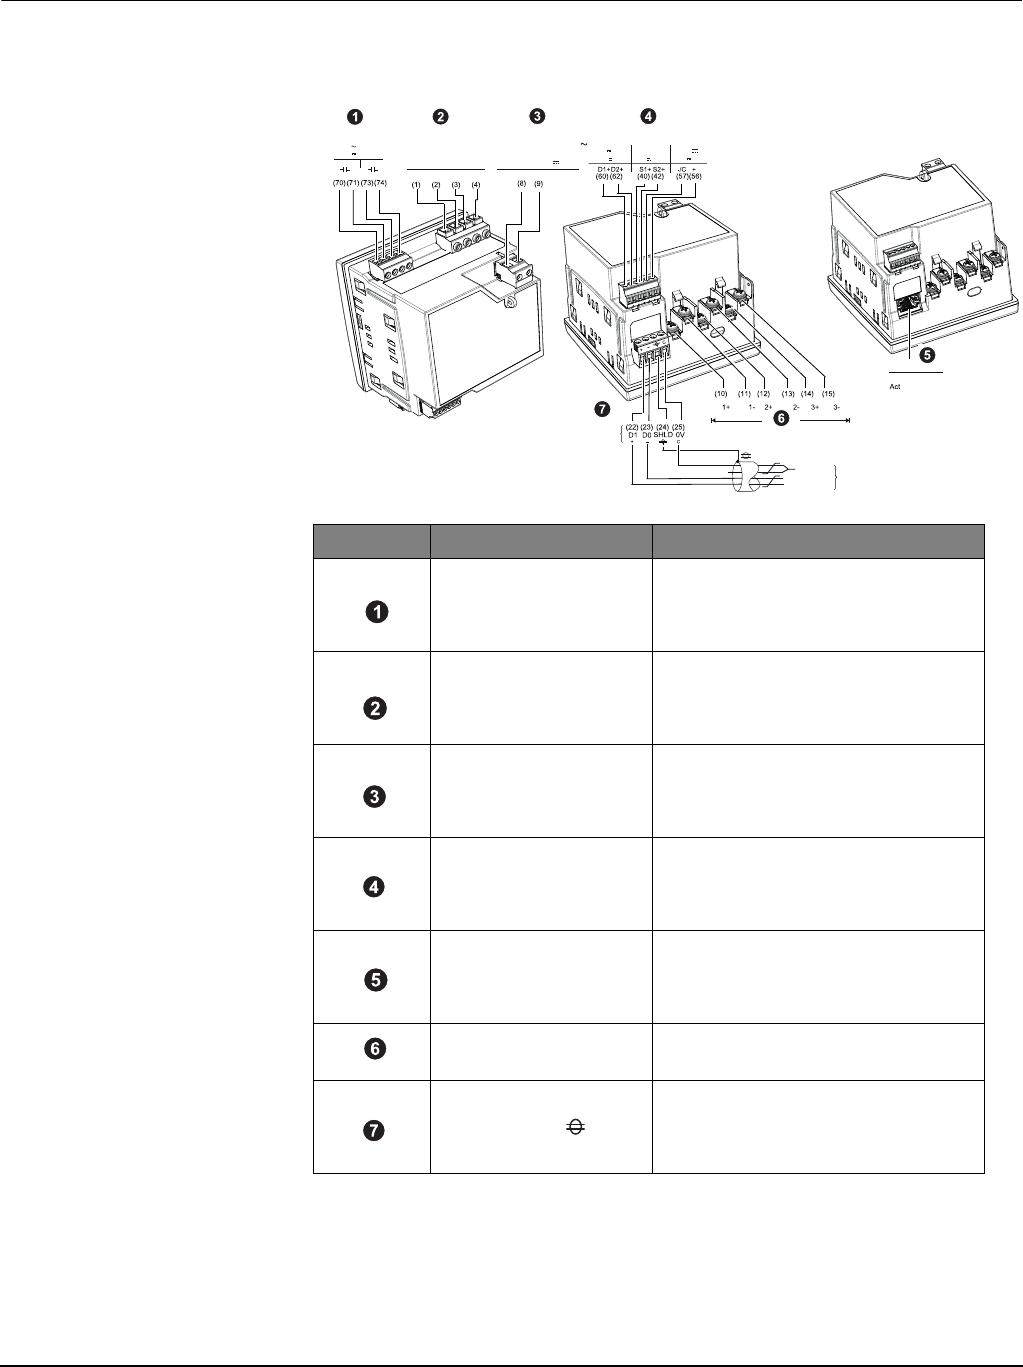
Parts of the meter (rear view)
A Relay outputs
B Voltage inputs
C Control power
D Current inputs
E Status inputs/Digital outputs
F Communications port (Ethernet or RS-485)
GGasket
Table 1– 1 Meter Models
Description Model Numbers
Power and Energy meter with Integrated Display PowerLogicTM PM5310, PM5330, PM5331, PM5320,
PM5340, and PM5341

PowerLogic™ PM5300 user guide Chapter 1—Introduction
© 2015 Schneider Electric All Rights Reserved10

PowerLogic™ PM5300 series user guide Chapter 2—Safety Precautions
© 2015 Schneider Electric All Rights Reserved 11
Chapter 2—Safety Precautions
Before You Begin
Installation, wiring, testing and service must be performed in accordance with all local and
national electrical codes.
This section contains important safety precautions that must be followed before
attempting to install, service, or maintain electrical equipment. Carefully read and follow
the safety precautions outlined below.
Notices
FCC PART 15 NOTICE This equipment has been tested and found to comply with the limits for a Class B digital
device, pursuant to part 15 of the FCC Rules. These limits are designed to provide
reasonable protection against harmful interference in a residential installation. This
equipment generates, uses, and can radiate radio frequency energy and, if not installed
and used in accordance with the instructions, may cause harmful interference to radio
communications. However, there is no guarantee that interference will not occur in a
particular installation. If this equipment does cause harmful interference to radio or
television reception, which can be determined by turning the equipment off and on, the
user is encouraged to try to correct the interference by one or more of the following
measures:
•Reorient or relocate the receiving antenna.
HAZARD OF ELECTRIC SHOCK, EXPLOSION, OR ARC FLASH
• Apply appropriate personal protective equipment (PPE) and follow safe electrical
work practices. In the USA, see NFPA 70E or CSAZ462.
• Only qualified electrical workers should install this equipment. Such work should be
performed only after reading this entire set of instructions.
• If the equipment is not used in a manner specified by the manufacturer, the protection
provided by the equipment may be impaired.
• NEVER work alone.
• Before performing visual inspections, tests, or maintenance on this equipment,
disconnect all sources of electric power. Assume that all circuits are live until they
have been completely de-energized, tested, and tagged. Pay particular attention to
the design of the power system. Consider all sources of power, including the
possibility of back feeding.
• Turn off all power supplying the meter and the equipment in which it is installed before
working on it.
• Always use a properly rated voltage sensing device to confirm that all power is off.
• Before closing all covers and doors, inspect the work area for tools and objects that
may have been left inside the equipment.
• When removing or installing panels, do not allow them to extend into the energized
bus.
• The successful operation of this equipment depends upon proper handling,
installation, and operation. Neglecting fundamental installation requirements may
lead to personal injury as well as damage to electrical equipment or other property.
• Before performing Dielectric (Hi-Pot) or Megger testing on any equipment in which the
energy meter is installed, disconnect all input and output wires to the energy meter.
High voltage testing may damage electronic components contained in the meter.
• This equipment should be installed in a suitable electrical enclosure.
Failure to follow these instructions will result in death or serious injury.

PowerLogic™ PM5300 series user guide Chapter 2—Safety Precautions
© 2015 Schneider Electric All Rights Reserved12
•Increase the separation between the equipment and receiver.
•Connect the equipment to an outlet on a circuit different from that to which the receiver
is connected.
•Consult the dealer or an experienced radio/TV technician for help.
This Class B digital apparatus complies with Canadian CAN ICES-3 (B) /NMB-3(B).

PowerLogic™ PM5300 series user guide Chapter 3—Hardware Reference
© 2015 Schneider Electric All Rights Reserved 13
Chapter 3—Hardware Reference
This section supplements the meter’s installation sheet and provides additional
information about the meter’s physical characteristics and capabilities.
Models, Features and Options
Table 3 –1: PM5300 Series - Models, Features and Options
Functions and Characteristics
Table 3 –2: Functions and Characteristics
Features and Options
PM5300 Series
PM5310 PM5320 PM5330
PM5331 PM5340
PM5341
Installation
Fast installation, panel mount with integrated
display
Accuracy Cl 0.5S Cl 0.5S Cl 0.5S Cl 0.5S
Display
Backlit LCD, multilingual, bar graphs, 6 lines, 4
concurrent values
Power and energy metering
3-phase voltage, current, power, demand,
energy, frequency, power factor
Multi-tariff 4 4 4 4
Power quality analysis
THD, thd, TDD
Harmonics, individual (odd) up to 31st 31st 31st 31st
I/Os and relays
I/Os 2SI/2DO 2SI/2DO 2SI/2DO 2SI/2DO
Relays 0 0 2 2
Alarms and control
Alarms 35 35 35 35
Set point response time, seconds 1 1 1 1
Single and multi-condition alarms
Communications
Serial ports with modbus protocol 1 - 1 -
Ethernet port with Modbus TCP protocol - 1 - 1
MID ready compliance,
EN50470-1/3, Annex B and Annex D
Class C
PM5331 PM5341
General PM5300 Series
Use on LV and MV systems
Basic metering with THD and min/max readings
Instantaneous rms values
Current (per phase and neutral)
Voltage (total, per phase L-L and L-N)

PowerLogic™ PM5300 series user guide Chapter 3—Hardware Reference
© 2015 Schneider Electric All Rights Reserved14
Frequency
Real, reactive, and apparent power (Total and per phase) Signed, Four Quadrant
True Power Factor (Total and per phase) Signed, Four Quadrant
Displacement PF (Total and per phase) Signed, Four Quadrant
% Unbalanced I, V L-N, V L-L
Energy Values*
Accumulated Active, Reactive and Apparent Energy Received/Delivered; Net and absolute
Demand Values*
Current average Present, Last, Predicted, Peak, and Peak
Date Time
Active power Present, Last, Predicted, Peak, and Peak
Date Time
Reactive power Present, Last, Predicted, Peak, and Peak
Date Time
Apparent power Present, Last, Predicted, Peak, and Peak
Date Time
Demand calculation (Sliding, fixed and rolling block, thermal
methods)
Synchronization of the measurement window to input,
communication command or internal clock
Settable Demand intervals
Other Measurements*
I/O timer
Operating timer
Load timer
Alarm counters and alarm logs
Power Quality Measurements
THD, thd (Total Harmonic Distortion) I, V L-N, V L-L per phase I, V L-N, V L-L
TDD (Total Demand Distortion)
Individual harmonics (odds) 31st
Data Recording
Min/max of instantaneous values, plus phase identification*
Alarms with 1s timestamping*
Data logging
Up to two fixed parameters (e.g., kWh and
kVAh) with configurable interval and duration
(e.g., 2 parameters for 60 days at 15 minutes
interval)
Memory capacity 256 kB
Min/max log
Maintenance, alarm and event logs
Inputs/Outputs/Relays
Digital inputs 2
Digital outputs 2
Form A Relay outputs 2
Timestamp resolution in seconds 1
Whetting voltage
NOTE: *Stored in non-volatile memory

PowerLogic™ PM5300 series user guide Chapter 3—Hardware Reference
© 2015 Schneider Electric All Rights Reserved 15
Technical Specifications
Electrical Characteristics
Type of measurement: True rms on three-phase
(3P, 3P + N), zero blind 64 samples per cycle
Measurement accuracy
IEC 61557-12 1PMD/[SD|SS]/K70/0.5
Active Energy 2Class 0.5S as per IEC 62053-22
Reactive Energy 2Class 2S as per IEC 62053-23
Active Power Class 0.5 as per IEC 61557-12 1
Reactive Power Class 2 as per IEC 61557-12 1
Apparent Power Class 0.5 as per IEC 61557-12 1
Current, Phase Class 0.5 as per IEC 61557-12 1
Voltage, L-N Class 0.5 as per IEC 61557-12 1
Frequency Class 0.05 as per IEC 61557-12 1
Power Factor Class 0.5 as per IEC 61557-12 1
Voltage Harmonics Class 5 as per IEC 61557-12 1
Voltage THD/thd Class 5 as per IEC 61557-12 1
Current Harmonics Class 5 as per IEC 61557-12 1
Current THD/thd Class 5 as per IEC 61557-12 1
MID Directive (2004/22/EC) Annex B and Annex D (PM5331 and PM5341)
Class C
Input-voltage (up to 1.0 MV AC max, with voltage transformer)
Nominal Measured Voltage range
UL: 20-347 V L-N/35-600 V L-L
IEC: 20-400 V L-N/35-690 V L-L
(absolute range 35 V L-L to 760 V L-L)
Impedance 5 M Ω
F nom 50/60 Hz
Input-current (configurable for 1 or 5 A secondary CTs)
I nom 5 A
Measured Amps with over range and Crest Factor Starting current: 5mA
Operating range: 50mA to 8.5A
Withstand Continuous 20 A,10s/hr 50 A, 1s/hr 500 A
Impedance < 0.3 mΩ
F nom 50/60 Hz
Burden <0.026VA at 8.5A
Frequency measurement
Measurement range 45 to 65 Hz
AC control power
Operating range 100 - 277 V AC L-N / 415 V L-L +/-10%
CAT III 300V class per IEC 61010
Burden <5 W,11 VA at 415V L-L
Frequency 45 to 65 Hz
Ride-through time
80 mS typical at 120V AC and maximum burden.
100 mS typical at 230 V AC and maximum burden
100 mS typical at 415 V AC and maximum burden
DC control power
Operating range 125-250 V DC ±20%
Burden <4 W at 250 V DC
Ride-through time 50 mS typical at 125 V DC and maximum burden
Outputs
Mechanical
Max output frequency 0.5 Hz maximum (1 second ON /
1 second OFF - minimum times)
Switching current
250 V AC at 8.0 Amps, 25 k cycles, resistive
30 V DC at 2.0 Amps, 75 k cycles, resistive
30 V DC at 5.0 Amps,12.5 k cycles, resistive
Isolation 2.5 kV rms
Digital outputs
Max load voltage 40 V DC
Max load current 20 mA
On Resistance 50 Ω max

PowerLogic™ PM5300 series user guide Chapter 3—Hardware Reference
© 2015 Schneider Electric All Rights Reserved16
Meter constant
from 1 to 9,999,999 pulses per k_h (k_h = kWh,
kVARh or kVAh depending on the energy
parameter selected)
Pulse width for Digital Output 50% duty cycle
Pulse frequency for Digital Output 25 Hz max.
Leakage current 0.03 micro Amps
Isolation 5 kV rms
Optical outputs
Pulse width (LED) 200 s
Pulse frequency 50 Hz. max.
Meter constant from 1 to 9,999,999 pulses per k_h
Status Inputs
ON Voltage 18.5 to 36 V DC
OFF Voltage 0 to 4 V DC
Input Resistance 110 k Ω
Maximum Frequency 2 Hz (T ON min = T OFF min = 250 ms)
Response Time 20 ms
Opto Isolation 5 kV rms
Whetting output 24 V DC/ 8mA max
Input Burden 2 mA @ 24 V DC
Mechanical Characteristics
Product weight 430 g
IP degree of protection (IEC 60529) IP52 front display, IP30 meter body
Dimensions W x H x D [protrusion from cabinet] 96 x 96 x 72mm (depth of meter from housing
mounting flange) [13mm]
Mounting position Vertical
Panel thickness 6 mm maximum
Environmental Characteristics
Operating temperature
Meter -25 °C to +70 °C
Display (Display functions to -25º with reduced
performance) -25 °C to +70 °C
Storage temp. -40 °C to +85 °C
Humidity range 5 to 95 % RH at 50 °C (non-condensing)
Pollution degree 2
Altitude 2000 m CAT III / 3000 m CAT II
For indoor use only
Electromagnetic Compatibility 3
Electrostatic discharge IEC 61000-4-2
Immunity to radiated fields IEC 61000-4-3
Immunity to fast transients IEC 61000-4-4
Immunity to surge IEC 61000-4-5
Conducted immunity 150kHz to 80MHz IEC 61000-4-6
Immunity to magnetic fields IEC 61000-4-8
Immunity to voltage dips IEC 61000-4-11
Radiated emissions FCC part 15, EN 55022 Class B
Conducted emissions FCC part 15, EN 55022 Class B
Safety
Europe CE, as per IEC 61010-1 (3rd Edition), IEC 62052-
11 & IEC61557-121
U.S. and Canada cULus as per UL61010-1 (3rd Edition)
CAN/CSA-C22.2 No. 61010-1 (3rd Edition)
Measurement category (Voltage and Current inputs) CAT III up to 400 V L-N / 690 V L-L
Dielectric As per IEC/UL 61010-1 (3rd Edition)
Protective Class II, Double insulated for user accessible parts
Communication
RS-485 port Modbus RTU, Modbus ASCII (7 or 8 bit), JBUS
2-Wire, 9600,19200 or 38400 baud, Parity - Even,
Odd, None, 1 stop bit if parity Odd or Even, 2 stop
bits if None; (Optional)
Ethernet port: 10/100 Mbps; Modbus TCP/IP 1 (Optional)
Firmware and language file update Meter firmware update via the communication
ports

PowerLogic™ PM5300 series user guide Chapter 3—Hardware Reference
© 2015 Schneider Electric All Rights Reserved 17
Before you begin
Carefully read and follow the safety precautions before working with the meter.
Safety precautions
Installation, wiring, testing and service must be performed in accordance with all local and
national electrical codes.
1. Turn off all power supplying this device before working on it.
2. Always use a properly rated voltage sensing device to confirm that all power is off.
Isolation 2.5 kVrms, double insulated
Human Machine Interface
Display type Monochrome Graphics LCD
Resolution 128 x 128
Backlight White LED
Viewable area (W x H) 67 x 62.5 mm
Keypad 4-button
Indicator Heartbeat / Comm activity Green LED
Energy pulse output / Active alarm indication (configurable) Optical, amber LED
Wavelength 590 to 635 nm
Maximum pulse rate 2.5 kHz
1 For firmware version 1.1.1 and higher
2 For 1A nominal CT when I > 0.15A
3 Tests are conducted as per IEC 61557-12 (IEC 61326-1), 62052-11 and EN50470
HAZARD OF ELECTRIC SHOCK, EXPLOSION OR ARC FLASH
• Apply appropriate personal protective equipment (PPE) and follow safe electrical
work practices. See NFPA 70E in the USA or applicable local standards.
• Turn off all power supplying this device before working on it.
• Always use a properly rated voltage sensing device to confirm that all power is off.
• Do not exceed the device’s ratings for maximum limits.
• Always use grounded external CTs for current inputs.
Failure to follow these instructions will result in death or serious injury.
DANGER
PowerLogic™ PM5300 series user guide Chapter 3—Hardware Reference
© 2015 Schneider Electric All Rights Reserved18
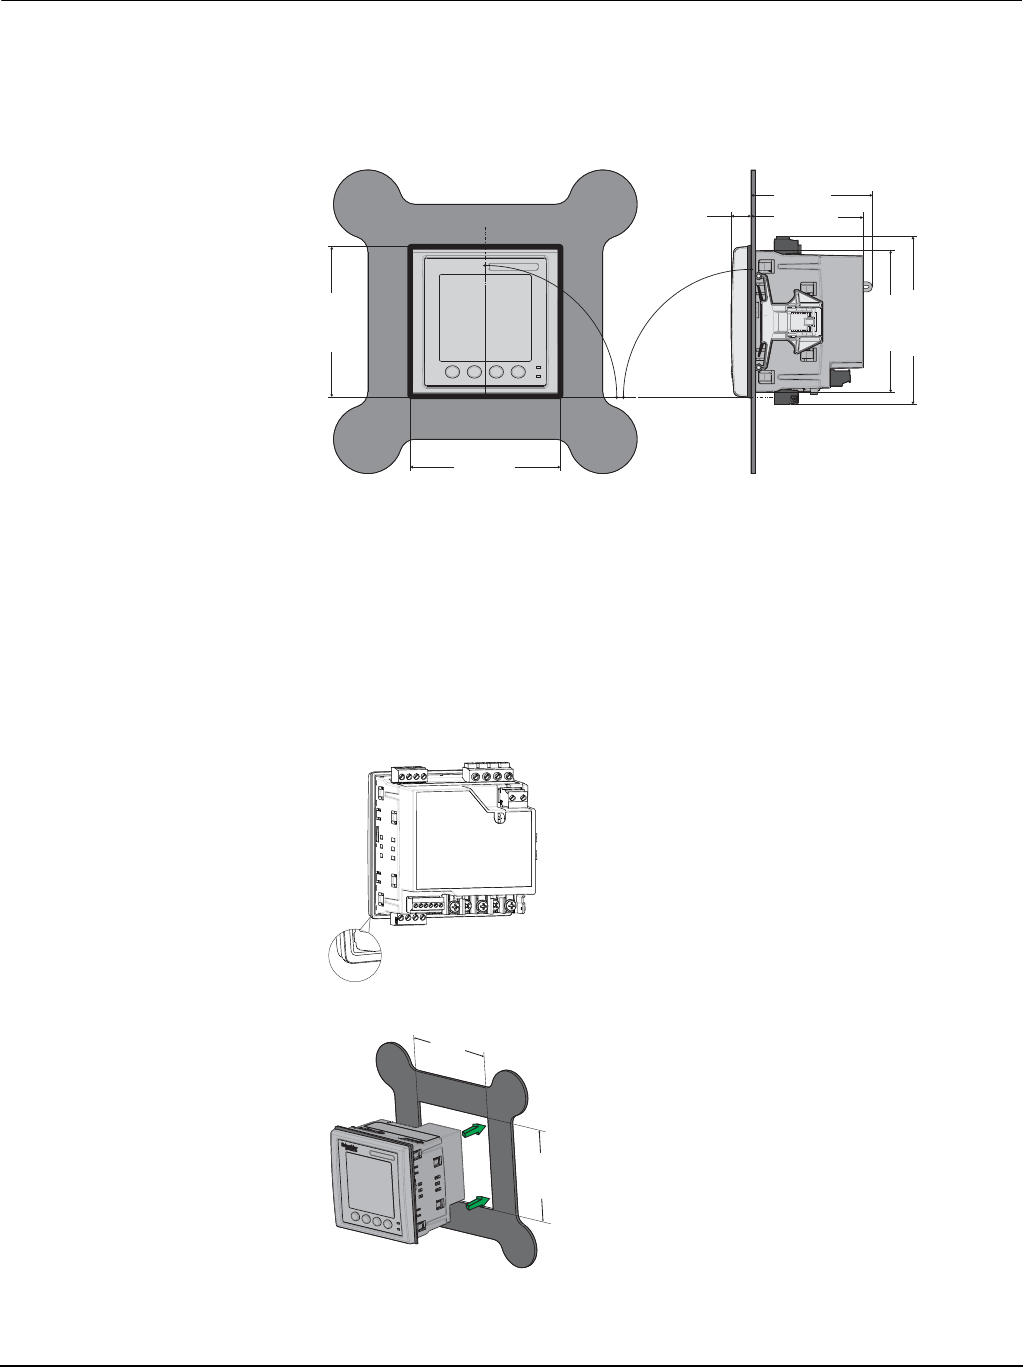
Dimension
Figure 3–1: Dimension
Meter mounting
This section describes how to mount the meter.
Mounting the PM5300
The meter is designed to be mounted inside a 1/4-DIN panel cutout.
1. Inspect the gasket (installed around the perimeter of the front display) and make sure
it is secured properly and not damaged.
2. Insert the meter through the mounting hole.
3. Line up the tabs of the retainer clips with the slots on either side of the meter. While
holding the retainers at a slight angle, push the retainers in and forward to position
90.00°
90.00°
96.00mm
96.00mm
78.5 mm
12.8 mm
107.4mm
90.6mm
72.00 mm
92.0 mm
+0.8
-0.0
92.0 mm
+0.8
-
0.0

PowerLogic™ PM5300 series user guide Chapter 3—Hardware Reference
© 2015 Schneider Electric All Rights Reserved 19
them in place. In situations where the spacing between meters is tight, use a flat-head
screwdriver with a long, narrow shaft to help secure the clips.
4. Push the middle of the clip assembly to lock the retainer in place and secure the
meter.
Meter wiring
For wiring instructions and safety precautions, see the meter installation sheet that was
shipped with your meter, or download a copy at www.schneider-electric.com.
•Wire connections to the meter’s voltage inputs, control power, digital outputs, digital
(status) inputs and RS-485 communications are terminated using the supplied
pluggable wire connectors.
•When wiring the meter’s current inputs, terminate the wire ends with ring or split-ring
crimp connectors.
Use the meter installation sheet when wiring the meter.
CLICK
CLICK
PowerLogic™ PM5300 series user guide Chapter 3—Hardware Reference
© 2015 Schneider Electric All Rights Reserved20
Serial No. Description Specification
Relay (Relay1, Relay2)
•Wire size: 0.33 - 3.31 mm2 (22 - 12 AWG)
•Wire strip length: 0.24 in (6 mm)
•Torque: 0.5 - 0.6 N·m (4.4 - 5.3 in·lb)
•Screw driver type: M3
Voltage Inputs (V1, V2, V3, VN)
•Wire size: 0.82 - 3.31 mm2 (18 - 12 AWG)
•Wire strip length: 0.28 in (7 mm)
•Torque: 0.5 - 0.6 N·m (4.4 - 5.3 in·lb)
•Screw driver type: M3
Control Power (L1, L2)
•Wire size: 0.82 - 3.31 mm2 (18 - 12 AWG)
•Wire strip length: 0.28 in (7 mm)
•Torque: 0.5 - 0.6 N·m (4.4 - 5.3 in·lb)
•Screw driver type: M3
Digital Output / Status Input (D1+,
D2+, S1+, S2+, -/C, +)
•Wire size: 0.33 - 3.31 mm2 (22 - 12 AWG)
•Wire strip length: 0.24 in (6 mm)
•Torque: 0.5 - 0.6 N·m (4.4 - 5.3 in·lb)
•Screw driver type: M2
Current Inputs
(I1+, I1-, I2+, I2-, I3+, I3-)
•Wire size: 0.82 - 3.31 mm2 (18 - 12 AWG)
•Wire strip length:0.28 in (7 mm)
•Torque: 0.9 - 1.0 N·m (8.0 - 9.0 in·lb)
•Screw driver type: PH1
Ethernet RJ-45
Modbus RS-485 (+,-, ,C)
•Wire size: 0.33 - 3.31 mm2 (22 - 12 AWG)
•Wire strip length: 0.24 in (6 mm)
•Torque: 0.5 - 0.6 N·m (4.4 - 5.3 in·lb)
•Screw driver type: M3
(30)
Modbus
RS-485
II
IIII
D1 = Rx+, Tx+ RS-485
D0 = Rx-, Tx- Modbus
0V
(CAT II) UL: CAT III
20-347VLN/35-600VLL
IEC: CAT III
20-400VLN/35-690VLL
24V
$$120$
8mA MAX
100-277VLN/415VLL ± 10%
50/60 ± 5 Hz < 11VA
125-250V ± 20% < 4W
Modbus TCP/IP
Link
10/100
40V MAX
20mA MAX 36V MAX
250V/8A
30V/5A RESISTIVE
NO NO
RELAY1 RELAY2 V1 V2 V3 VN L1 L2

PowerLogic™ PM5300 series user guide Chapter 3—Hardware Reference
© 2015 Schneider Electric All Rights Reserved 21
Recommended cables
Communication Make Part code Description
RS-485 Belden 3105A Multi-Conductor - EIA Industrial RS-485 PLTC/CM
3106A Multi-Conductor - EIA Industrial RS-485 PLTC/CM
Ethernet Schneider Electric
DC6PCSRJ01-GY DIGILINK Patch Cord CAT at 6 SFTP Gray 1m
DC6PCSRJ02-GY DIGILINK Patch Cord CAT 6 SFTP Gray 2m
DC6PCSRJ03-GY DIGILINK Patch Cord CAT 6 SFTP Gray 3m
DCECASTP4P3X DIGILINK Solid Cable CAT 5e, 4 pair, SFTP-305m
NOTE: According to Blondel's theorem, in an N wire system a minimum of N-1 measuring elements are required for correct measurement.
PowerLogic™ PM5300 series user guide Chapter 3—Hardware Reference
© 2015 Schneider Electric All Rights Reserved22
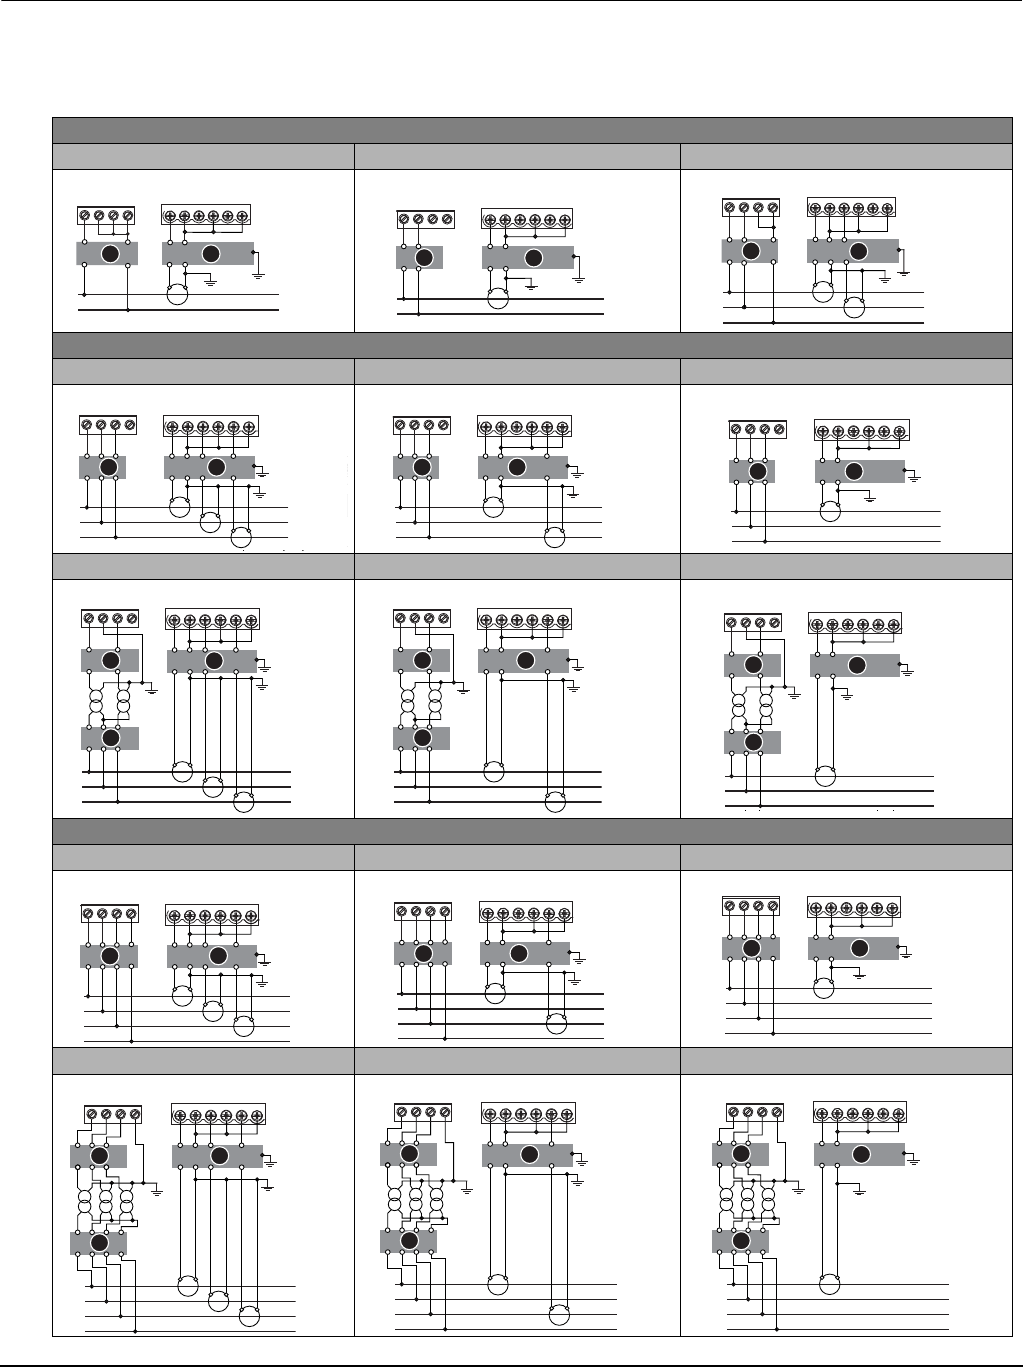
Wiring Diagrams
1PH
1PH2WLN 1PH2WLL 1PH3WLL with N
3PH3W
3CT 2CT 1CT *
2VT, 3CT 2VT, 2CT 2VT, 1CT *
3PH4W
3CT 2CT *1CT *
3VT, 3CT 3VT, 2CT *3VT, 1CT *
L
N
B
A
(I1) (I2) (I3)
V1 V2 V3 VN
+-+-+-
+
L
N
B
A
(I1) (I2) (I3)
V1 V2 V3 VN
+-+-+-
+
A
L1
L2
(I1) (I2) (I3)
V1 V2 V3 VN
B
+-+-+-
+
L
N
B
A
(I1) (I2) (I3)
V1 V2 V3 VN
+-+-+-
+
A
L1
L2
(I1) (I2) (I3)
V1 V2 V3 VN
B
+-+-+-
+
B
A
L1
L2
N
V1 V2 V3 VN (I1) (I2) (I3)
+
-
+
-
+
-
+
+
L
B
A
(I1) (I2) (
V1 V2 V3 VN
+-+-+
+
L1
L2
L3
A B
V1 V2 V3 VN (I1) (I2) (I3)
+-+-+-
+
+
+
L
N
B
A
(I1) (I2) (I3)
V1 V2 V3 VN
+-+-+-
+
L1
L2
L3
A B
V1 V2 V3 VN (I1) (I2) (I3)
+-+-+-
+
+
L1
L2
L3
A B
V1 V2 V3 VN (I1) (I2) (I3)
+-+-+-
+
C
L1
L2
L3
AB
V1 V2 V3 VN (I1) (I2) (I3)
+-+-+-
+
+
+
C
L1
L2
L3
A
V1 V2 V3 VN
B
(I1) (I2) (I3)
+-+-+-
+
+
C
L1
L2
A
V1 V2 V3 VN
B
(I1) (I2) (I3)
+-+-+-
+
C
L1
L2
L3
A
V1 V2 V3 VN
B
(I1) (I2) (I3)
+
+-+-+-
L1
L2
L3
N
AB
V1 V2 V3 VN (I1) (I2) (I3)
+-+-+-
+
+
+
L1
L2
L3
B
V1 V2 V3 VN (I1) (I2) (I3)
N
A
+
-
+
-
+
-
+
+
L1
L2
L3
N
B
V1 V2 V3 VN (I1) (I2) (I3)
A
+-+-+-
+
L1
L2
L3
N
A
C
V1 V2 V3 VN
B
(I1) (I2) (I3)
+
+
+
+-+-+-
L1
L2
L3
N
A
C
V1 V2 V3 VN
B
(I1) (I2) (I3)
+-+-+-
+
+
L1
L2
L3
N
A
C
V1 V2 V3 VN
B
(I1) (I2) (I3)
+-+-+-
+
PowerLogic™ PM5300 series user guide Chapter 3—Hardware Reference
© 2015 Schneider Electric All Rights Reserved 23
NOTE:
•Clearly label the device’s disconnect circuit mechanism and install it within easy reach
of the operator.
•The fuses / circuit breakers must be rated for the installation voltage and sized for the
available fault current.
•Fuse for neutral terminal is required if the source neutral connection is not grounded.
Power system
This section outlines typical requirements for wiring the voltage and current inputs of the
meter to the electrical power system.
For wiring instructions and safety precautions, see the meter installation sheet that was
shipped with your meter, or download a copy at www.schneider-electric.com.
Direct connect voltage limits
You can connect the meter’s voltage inputs directly to the phase voltage lines of the
power system if the power system’s line-to-line or line-to-neutral voltages do not exceed
the meter’s direct connect maximum voltage limits. The meter's voltage measurement
inputs are rated by the manufacturer for up to 400 V L-N / 690 V L-L. However, the
maximum voltage allowed for direct connection may be lower, depending on the local
electrical codes and regulations. In US and Canada the maximum voltage on the meter
voltage measurement inputs may not exceed 347 V L-N / 600 V L-L.
If your system voltage is greater than the specified direct connect maximum voltage, you
must use VTs (voltage transformers) to step down the voltages.
Symbol Description
500 mA fused disconnect / circuit breaker (not supplied)
Shorting block (not supplied)
PT primary fuses and disconnect switch (not supplied)
*Indicates wiring for a balanced system
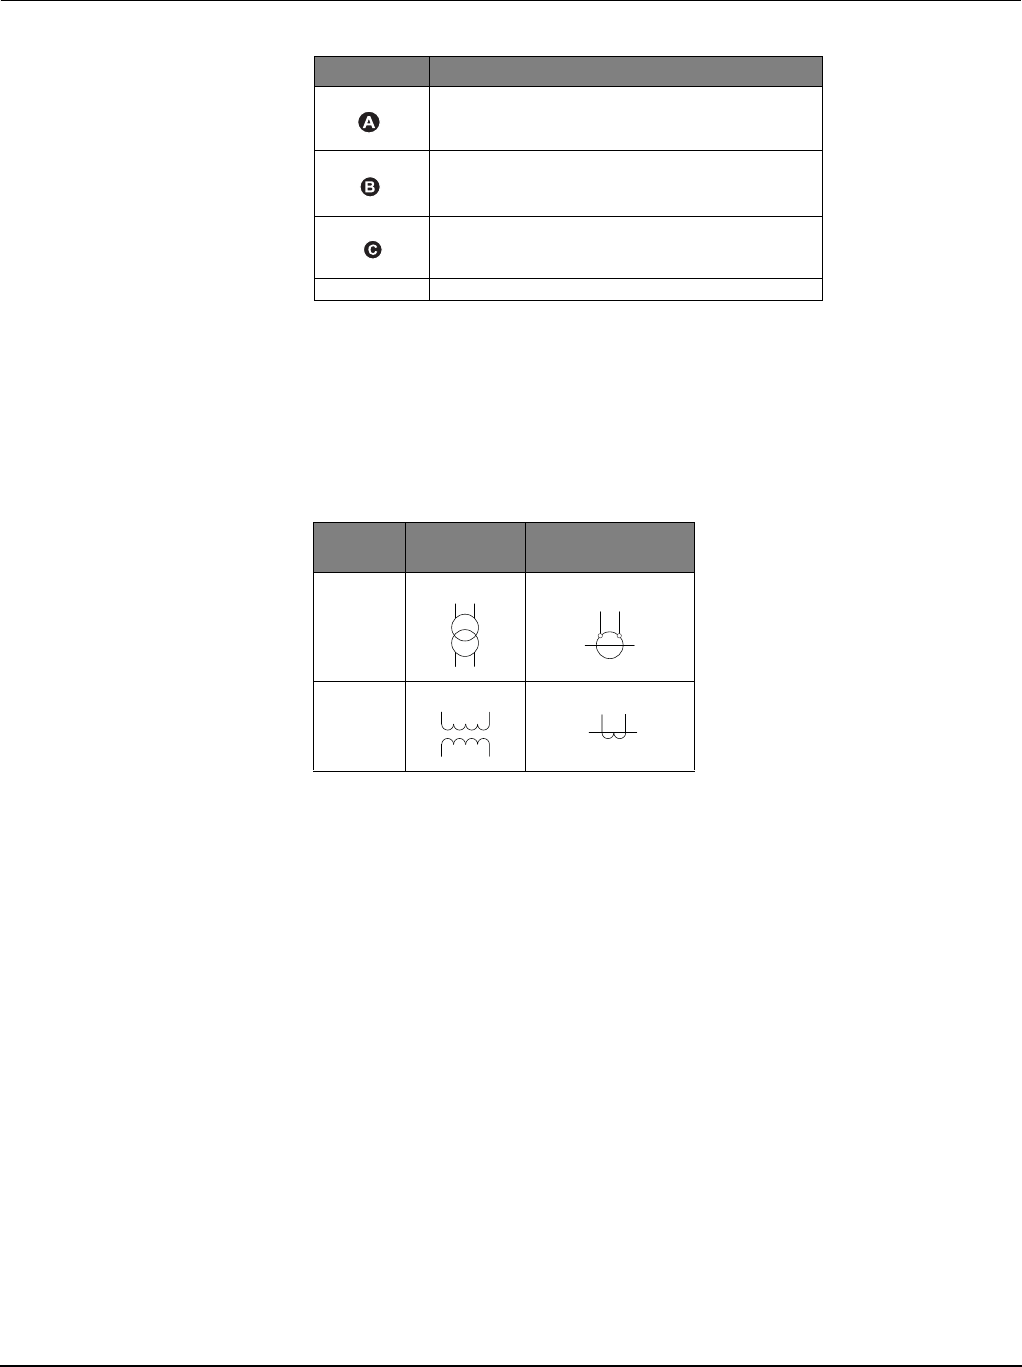
Potential
Transformer Current Transformer
IEC
ANSI
PowerLogic™ PM5300 series user guide Chapter 3—Hardware Reference
© 2015 Schneider Electric All Rights Reserved24
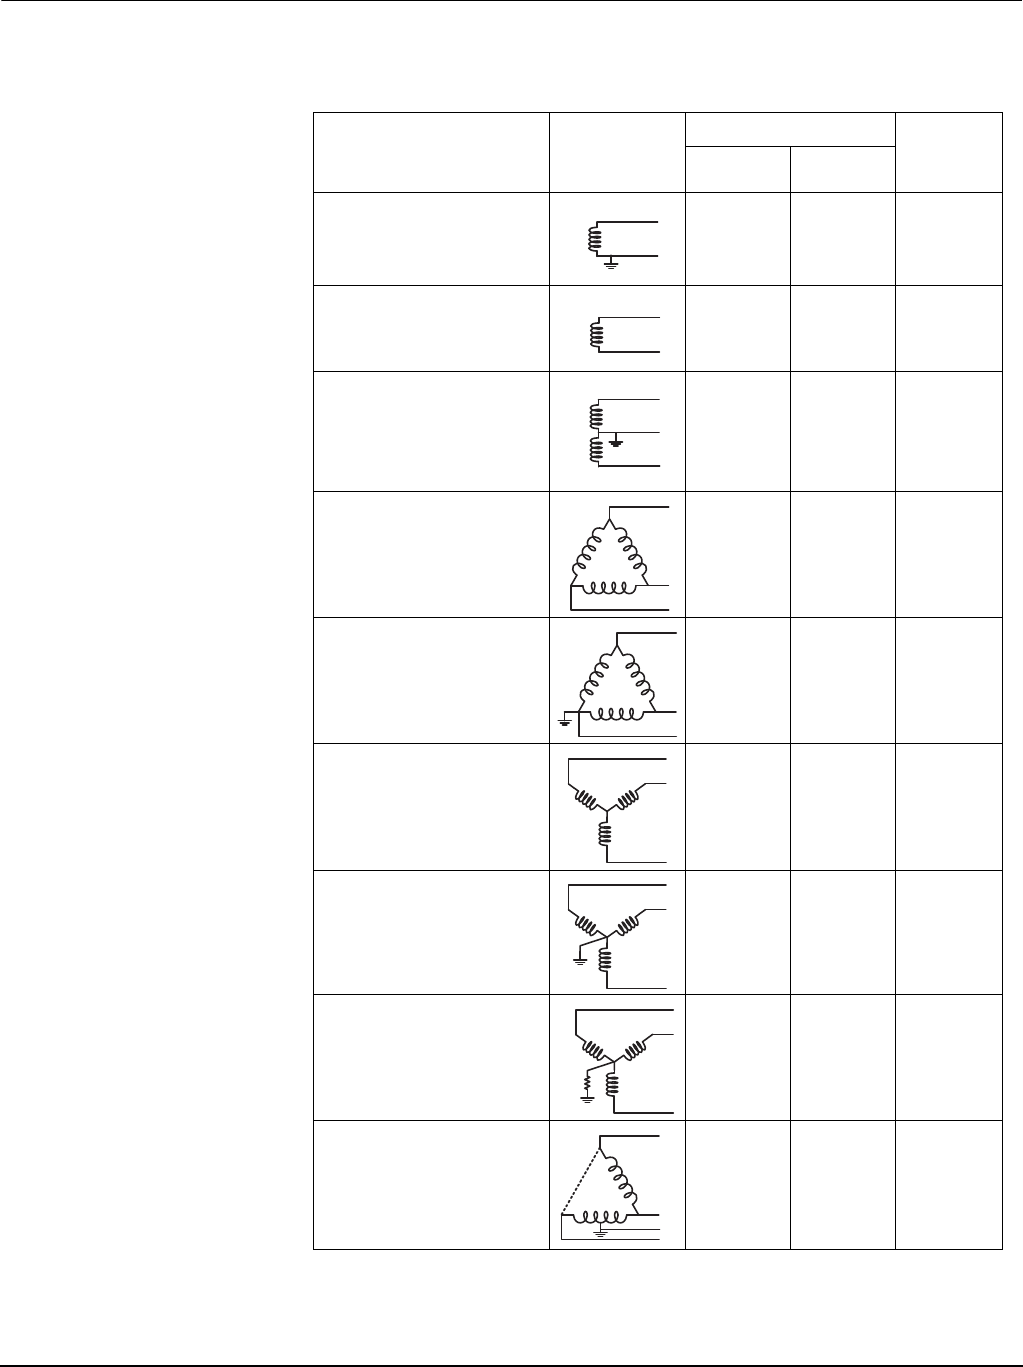
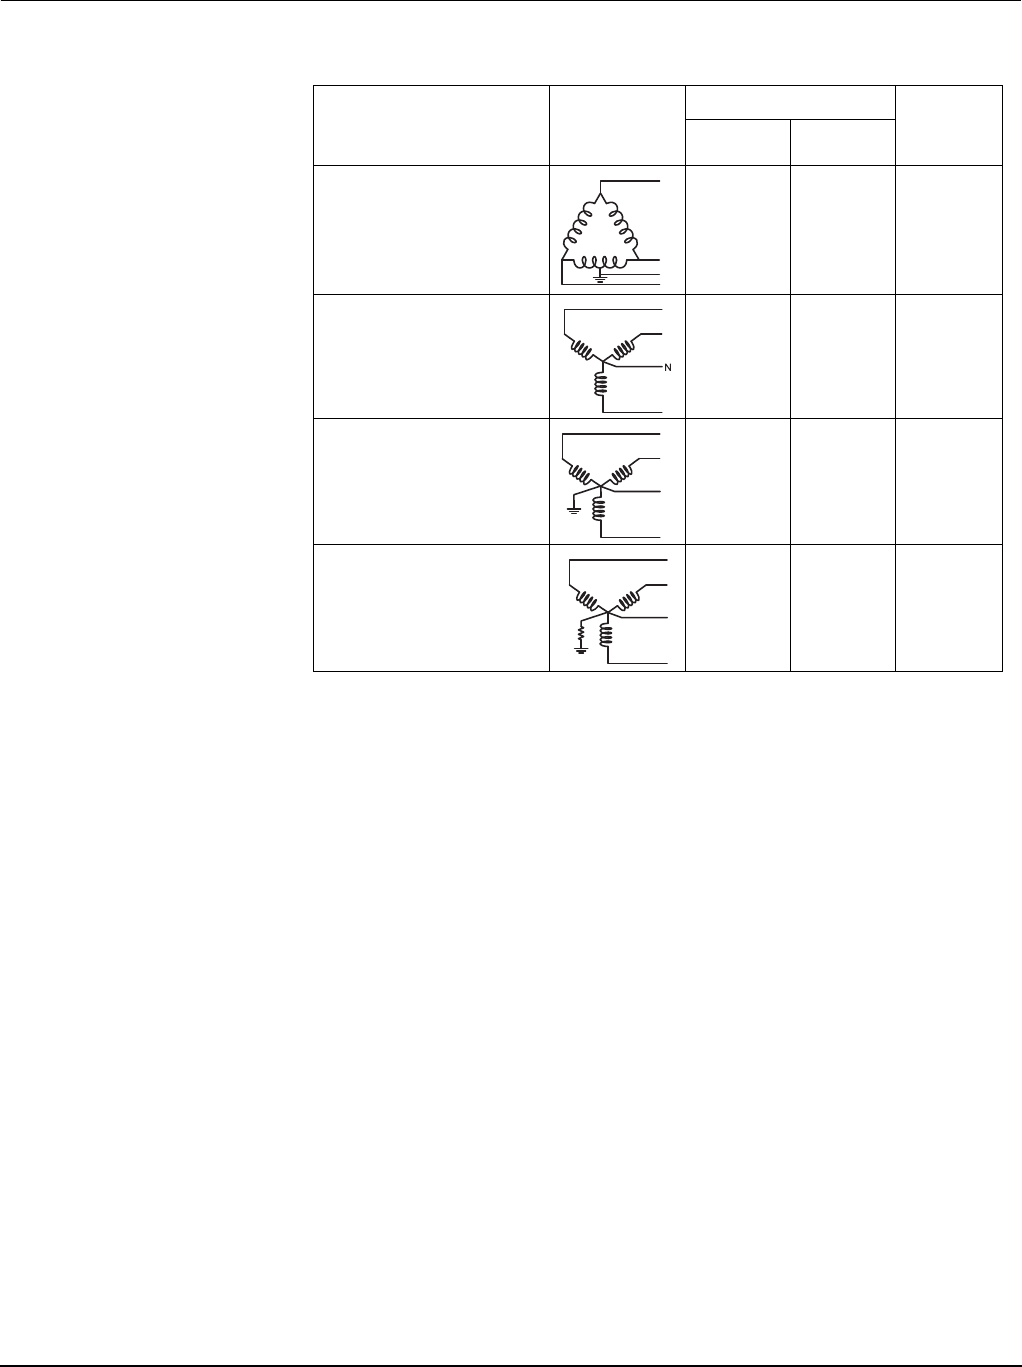
Power system setup parameters
Power system description
—
Meter setting Symbol
Direct connect maximum # of VTs
(if required)
UL IEC
Single-phase 2-wire line-to-neutral
—
1PH2W LN
347 V L-N 400 V L-N 1 VT
Single-phase 2-wire line-to-line
—
1PH2W LL
600 V L-L 600 V L-L 1VT
Single-phase 3-wire line-to-line with
neutral
—
1PH3W LL with N
347 V L-N /
600 V L-L
400 V L-N /
690 V L-L 2VT
3-phase 3-wire Delta ungrounded
—
3PH3W Dlt Ungnd
600 V L-L 600 V L-L 2 VT
3-phase 3-wire Delta corner
grounded
—
3PH3W Dlt Crnr Gnd
600 V L-L 600 V L-L 2 VT
3-phase 3-wire Wye ungrounded
—
3PH3W Wye Ungnd
600 V L-L 600 V L-L 2 VT
3-phase 3-wire Wye grounded
—
3PH3W Wye Gnd
600 V L-L 600 V L-L 2 VT
3-phase 3-wire Wye resistance-
grounded
—
3PH3W Wye Res Gnd
600 V L-L 600 V L-L 2 VT
3-phase 4-wire open Delta center-
tapped
—
3PH4W Opn Dlt Ctr Tp
240 V L-N /
415 V L-N /
480 V L-L
240 V L-N /
415 V L-N /
480 V L-L
3 VT
N
PowerLogic™ PM5300 series user guide Chapter 3—Hardware Reference
© 2015 Schneider Electric All Rights Reserved 25
Voltage and current input wiring
For wiring instructions and safety precautions, see the meter installation sheet that was
shipped with your meter, or download a copy at www.schneider-electric.com.
Voltage input protection
The meter’s voltage inputs must be wired to fuses/breakers and a disconnect switch. If
using a voltage transformer (VT), both primary and secondary sides of the VT must be
wired to fuses/breakers and disconnect switches.
•Clearly label the device’s disconnect circuit mechanism and install it within easy reach
of the operator.
•The fuses / circuit breakers must be rated for the installation voltage and sized for the
available fault current.
•Fuse for neutral terminal is required if the source neutral connection is not grounded.
See the meter installation sheet for fuse ratings.
Current input protection
For all connected current inputs, use a CT shorting block to short-circuit the secondary
leads of the CTs before removing the current input connections to the meter.
NOTE: Ground any unused current inputs.
3-phase 4-wire Delta center-tapped
—
3PH4W Dlt Ctr Tp
240 V L-N /
415 V L-N /
480 V L-L
240 V L-N /
415 V L-N /
480 V L-L
3 VT
3-phase 4-wire ungrounded Wye
—
3PH4W Wye Ungnd
347 V L-N /
600 V L-L
347 V L-N /
600 V L-L 3 VT or 2 VT
3-phase 4-wire grounded Wye
—
3PH4W Wye Gnd
347 V L-N /
600 V L-L
400 V L-N /
690 V L-L 3 VT or 2 VT
3-phase 4-wire resistance-grounded
Wye
—
3PH4W Wye Res Gnd
347 V L-N /
600 V L-L
347 V L-N /
600 V L-L 3 VT or 2 VT
Power system setup parameters (continued)
Power system description
—
Meter setting Symbol
Direct connect maximum # of VTs
(if required)
UL IEC
N
N
N

PowerLogic™ PM5300 series user guide Chapter 3—Hardware Reference
© 2015 Schneider Electric All Rights Reserved26
Balanced system considerations
In situations where you are monitoring a balanced 3-phase load, you may choose to
connect only one or two CTs on the phase(s) you want to measure, and then configure
the meter so it calculates the current on the unconnected current input(s).
NOTE: For a balanced 4-wire Wye system, the meter’s calculations assume that there is
no current flowing through the neutral conductor.
Balanced 3-phase Wye system with 2 CTs
The current for the unconnected current input is calculated so that the vector sum for all
three phase currents equal zero.
Balanced 3-phase Wye or Delta system with 1 CT
The currents for the unconnected current inputs are calculated so that their magnitude
and phase angle are identical and equally distributed, and the vector sum for all three
phase currents equal zero.
NOTE: You must always use 3 CTs for 3-phase 4-wire center-tapped Delta or
center-tapped open Delta systems.
Control power wiring
For wiring instructions and safety precautions, see the meter installation sheet that was
shipped with your meter, or download a copy at www.schneider-electric.com.
The meter can be powered from an AC or DC power source.
•L1 and L2 are non-polarized. If using an AC power supply with neutral, connect
neutral to the meter’s L2 terminal.
•Always use a fuse on L1. Fuse L2 when connecting an ungrounded neutral to the
control power.
•If using a control power transformer, fuse both primary and secondary sides of the
transformer.
•The fuses / circuit breakers must be rated for the installation voltage and sized for the
available fault current.
Communications
This section provides additional information about the communications ports and
topologies supported by the meter. You must wire and configure the RS-485 port or the
Ethernet port in order to communicate with the meter.
Serial communications
The meter supports serial communications through the RS-485 port. Up to 32 devices can
be connected on a single RS-485 bus.
In an RS-485 network, there is one master device, typically an Ethernet to RS-485
gateway. It provides the means for RS-485 communications with multiple slave devices
(for example, meters). For applications that require only one dedicated computer to
PowerLogic™ PM5300 series user guide Chapter 3—Hardware Reference
© 2015 Schneider Electric All Rights Reserved 27
communicate with the slave devices, an RS-232 to RS-485 converter can be used as the
master device.
RS-485 wiring
Connect the devices on the RS-485 bus in a point-to-point configuration, with the (+) and
(-) terminals from one device connected to the corresponding (+) and (-) terminals on the
next device.
RS-485 cable
Use a shielded 1.5 twisted pair or 2 twisted pair RS-485 cable to wire the devices. Use
one twisted pair to connect the (+) and (-) terminals, and use the other insulated wire to
connect the C terminals.
RS-485 maximum cable length
The total distance for devices connected on an RS-485 bus should not exceed 1200 m
(4000 ft).
RS-485 network configuration
After you have wired the RS-485 port and powered up the meter, you must configure the
serial communications port in order to communicate with the meter.
Each device on the same RS-485 communications bus must have a unique address and
all connected devices must be set to the same protocol, baud rate, and parity (data
format).
NOTE: To communicate with the meter using ION Setup, you must set the parity to
“None” for all devices in the RS-485 network.
For meters that do not have a display, you must first wire and configure each one
separately before connecting these meters to the same RS-485 bus.
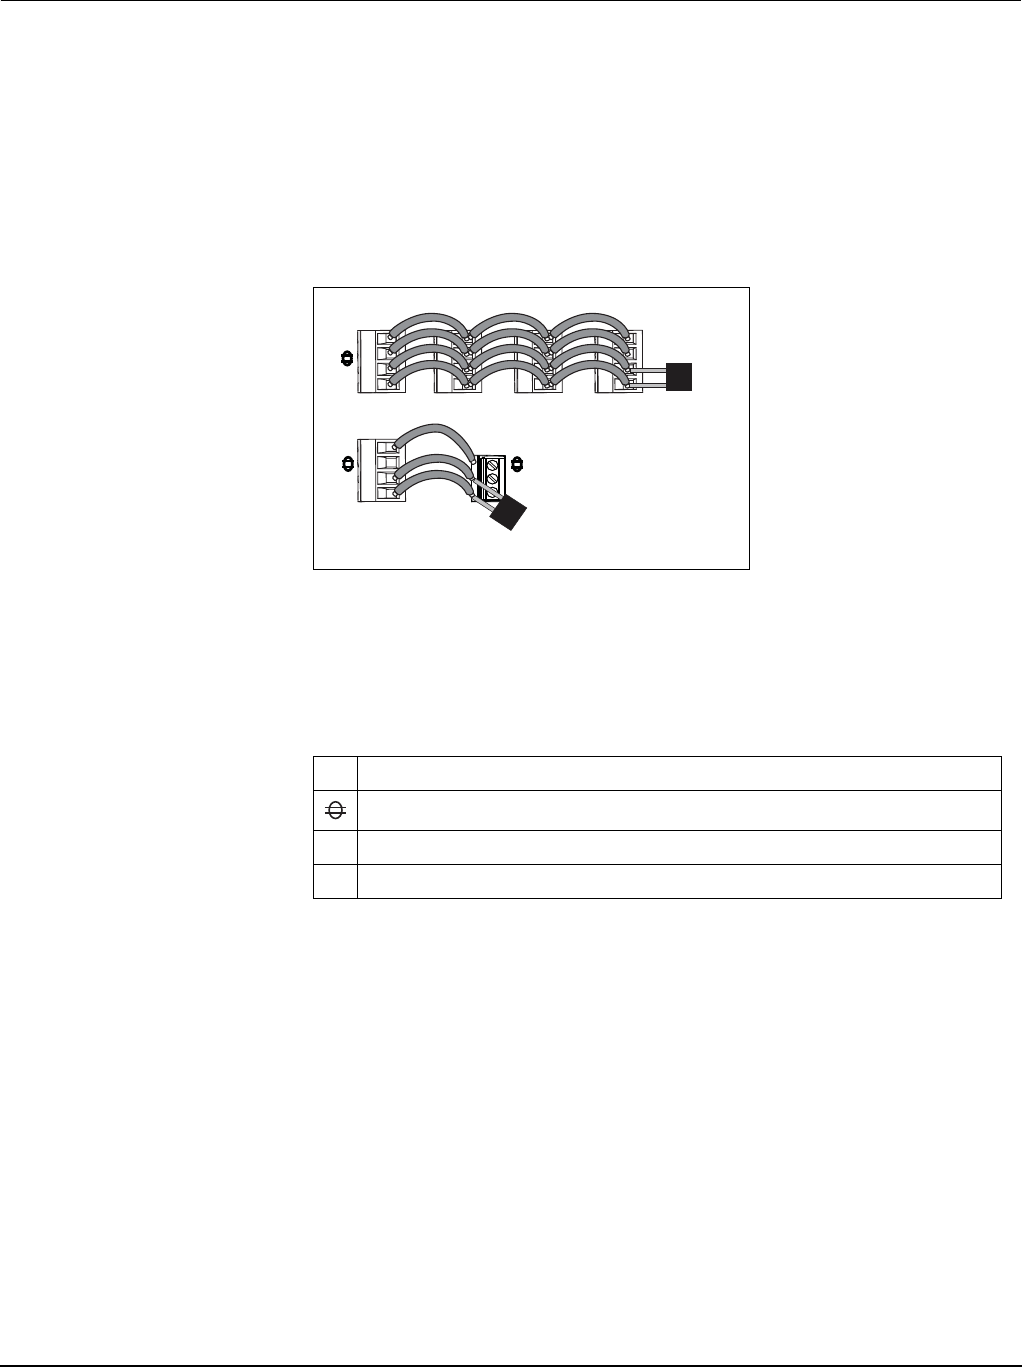
RS-485 wiring
RS-485 terminals
CCommon. This provides the voltage reference (zero volts) for the data plus and data minus signals.
Shield. Connect the bare wire to this terminal to help suppress signal noise that may be present.
Ground the shield wiring at one end only (either at the master or the last slave device, but not both).
-Data minus. This transmits/receives the inverting data signals.
+Data plus. This transmits/receives the non-inverting data signal.
+
-
C
D1 (+)
D0 (-)
+
-
C
120 Ω
120 Ω
Master Slaves

PowerLogic™ PM5300 series user guide Chapter 3—Hardware Reference
© 2015 Schneider Electric All Rights Reserved28
Related topics
•To configure RS-485 communications, see “Setting up serial communications” on
page 36.
Ethernet communications
The meter uses Modbus TCP protocol to communicate at data speeds up to 100 Mbps
through its Ethernet communications port.
Use a shielded Ethernet cable to connect the meter’s Ethernet port. Ground terminal is
not available on meter, shield should be connected to Ground at the other end. Ethernet
connection source should be installed in a location that minimizes the overall Ethernet
cable routing length.
Ethernet configuration
To communicate with the meter through Ethernet, all devices must have a unique IP
address and be set to the same subnet mask and gateway.
•To configure Ethernet communications, see “Setting up Ethernet communications” on
page 37.
Digital outputs
The meter is equipped with two digital output ports (D1, D2). You can configure the digital
outputs for use in the following applications:
•switching applications, for example, to provide on/off control signals for switching
capacitor banks, generators, and other external devices and equipment
•demand synchronization applications, where the meter provides pulse signals to the
input of another meter to control its demand period
•energy pulsing applications, where a receiving device determines energy usage by
counting the k_h pulses (k_h = kWh, kVARh or kVAh depending on the energy
parameter selected) coming from the meter’s digital output port
The digital outputs can handle voltages less than 40 V DC. For higher voltage
applications, use an external relay in the switching circuit.
Ethernet wiring
ETHERNET
ETHERNET
SWITCH / HUB
ETHERNET
Ethernet
Switch / hub
Ethernet Ethernet
PowerLogic™ PM5300 series user guide Chapter 3—Hardware Reference
© 2015 Schneider Electric All Rights Reserved 29
Related topics
•See “Digital output applications” on page 52 for digital output use and configuration
details.
Status inputs
The meter is equipped with two status input ports (S1 and S2). You can configure the
status inputs for use in status monitoring applications.
The meter’s status inputs require an external voltage source to detect the status input’s
on/off state. The meter detects an ON state if the external voltage appearing at the status
input is within its operating range.
The external voltage can be derived from either the whetting output provided by the meter
or by a voltage source up to 36 V DC external to the meter.
Relay outputs
The meter is equipped with two Form A mechanical relay output ports (Relay 1 and Relay
2). Relay outputs can be configured to be used switching applications, for example, to
provide on/off control signals for switching capacitor banks, generators, and other
external devices and equipment.
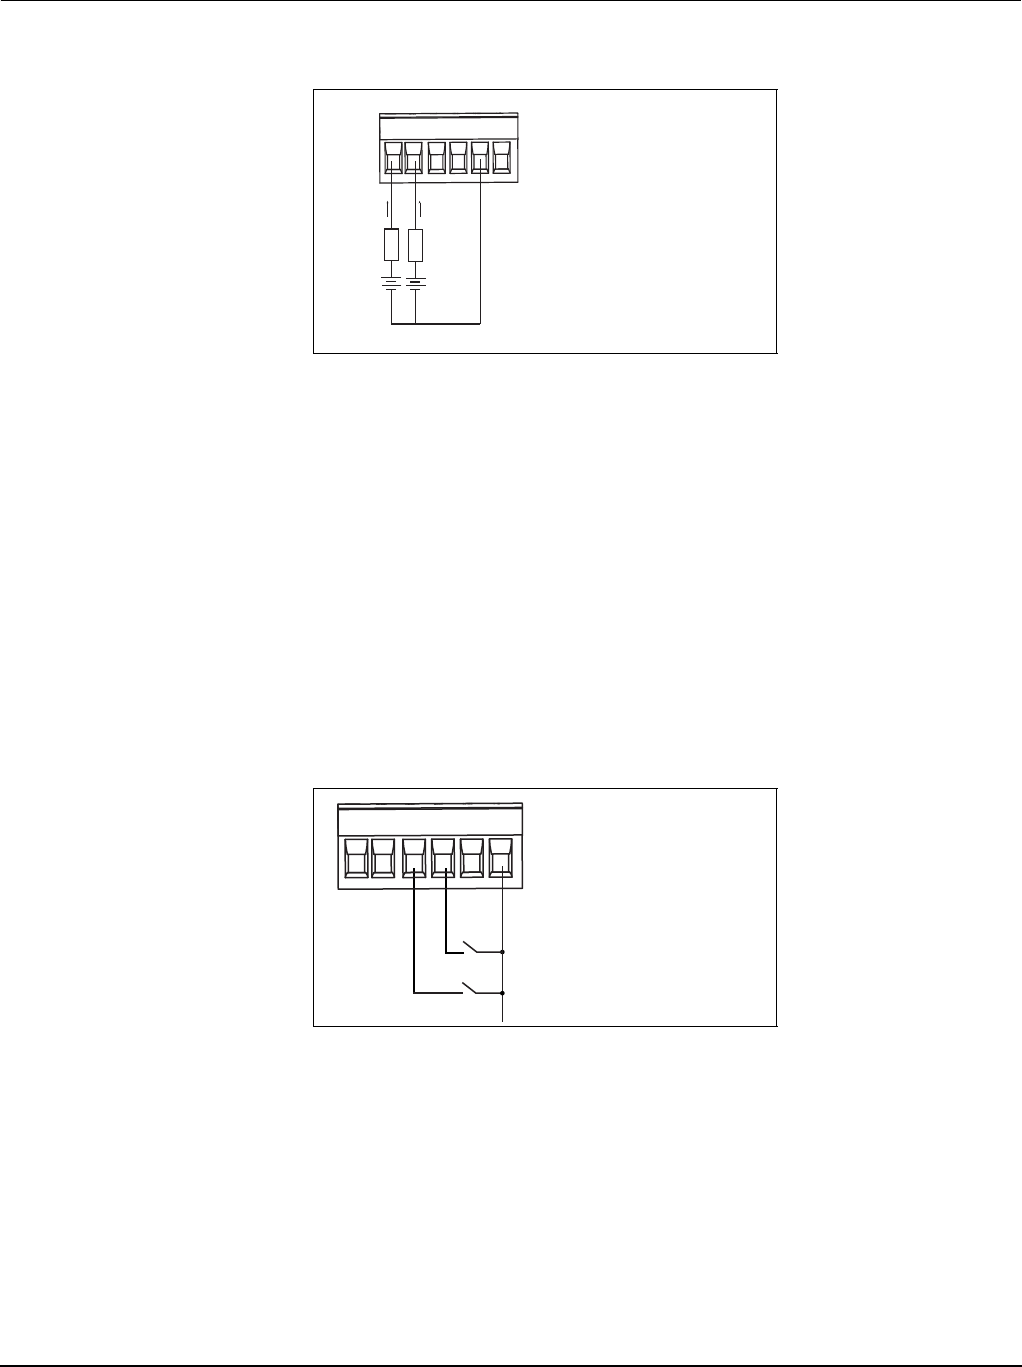
Digital output connections
S1 S2D1 D2 -/C +
(60) (62) (40) (42) (57) (56)
LOAD
LOAD
< 20mA
< 20mA
< 40Vdc < 40Vdc
Status input connections
S1 S2D1 D2 -/C +
(60) (62) (40) (42) (57) (56)

PowerLogic™ PM5300 series user guide Chapter 3—Hardware Reference
© 2015 Schneider Electric All Rights Reserved30
* The overcurrent protective device must be rated for the short-circuit current at the connection point.
Relay output connections
LOAD
LOAD
30 Vdc, 5A
250 Vac, 8A Cos
=1
250 Vac, 6A Cos
=0.4
*
RELAY 1 RELAY 2
(70)(71)(73)(74)
NO NO
~
=
PowerLogic™ PM5300 series user guide Chapter 4—Front panel display and meter setup
© 2015 Schneider Electric All Rights Reserved 31
Chapter 4—Front panel display and meter setup
The front panel display lets you use the meter to perform various tasks such as setting
up the meter, displaying data screens, acknowledging alarms, or performing resets.
LED indicators
The meter has two LED indicators on the front panel.
Heartbeat / communications LED
The (green) heartbeat / communications LED blinks at a slow, steady rate to indicate
the meter is operational. The LED flashes at a variable, faster rate when the meter is
communicating over a Modbus serial communications port.
You cannot configure this LED for other purposes.
NOTE: A heartbeat LED that remains lit and does not blink (or flash) indicates a
possible hardware problem. In this case, power down the meter and reapply power. If
the LED still does not blink or flash, contact Technical Support.
Alarm / energy pulsing LED modes
The (orange) alarm / energy pulsing LED can be configured for alarm notification or
energy pulsing.
•When configured for alarm notification, this LED flashes when a high, medium or
low priority alarm is active. This provides a visual indication of an active alarm
condition, or an inactive but unacknowledged high priority alarm.
•When configured for energy pulsing, this LED flashes at a rate proportional to the
amount of energy consumed. This is typically used to verify the meter’s accuracy.
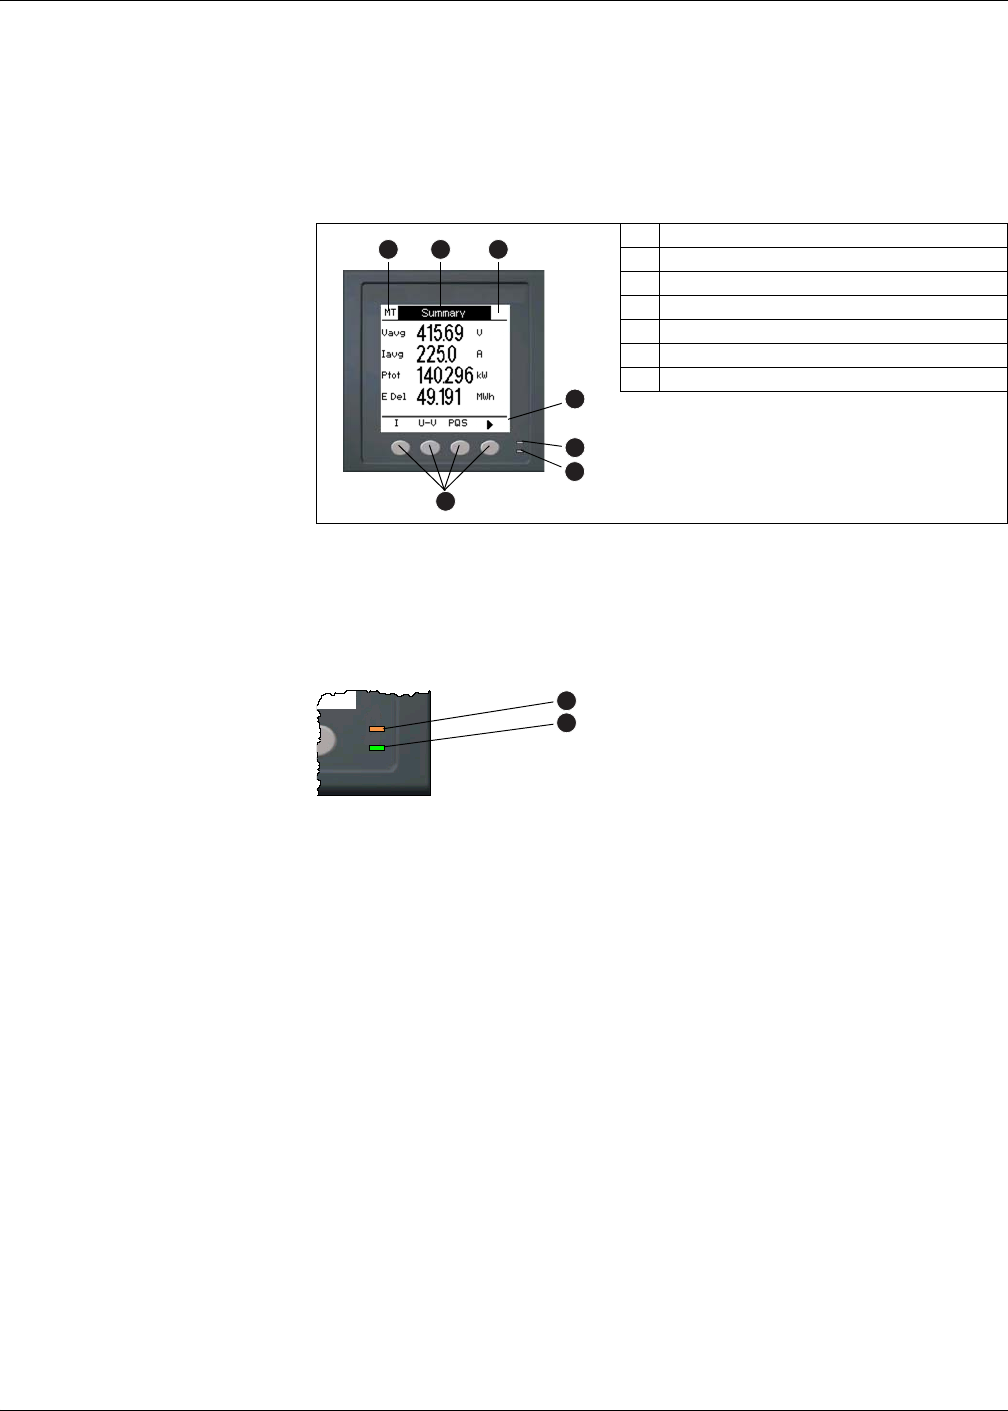
Parts of the display
A Navigation / menu selection buttons
B Heartbeat / communications LED (green)
C Alarm / energy pulsing LED (orange)
D Navigation symbols or menu options
E Right notification area
F Screen title
G Left notification area
B
A
C
G
E
F
D
Front panel LEDs
Alarm / energy pulsing LED (orange)
Heartbeat / communications LED (green)
C
B
32 © 2015 Schneider Electric All Rights Reserved
Chapter 4—Front panel display and meter setup PowerLogic™ PM5300 series user guide
Related topics
•See “Setting up the alarm / energy pulsing LED” on page 42 for details on using the
front panel to switch the LED mode for alarming or energy pulsing applications.
•See “Alarm / energy pulsing LED setup” on page 60 for details on using ION Setup
to switch the LED mode for alarming or energy pulsing applications.
•See “Alarm Priorities” on page 66 for a detailed description on the alarm / energy
pulsing LED’s behavior when it is configured for alarm notification.
Notification icons
To alert you about meter state or events, notification icons appear at the top left or top
right corner of the display screen.
Meter screen menus
All meter screens are grouped logically, according to their function. You can access any
available meter screen by first selecting the Level 1 (top level) screen that contains it.
Use the buttons to navigate the different meter screens. The navigation symbols and
their functions are explained below:
When you reach the last screen, press again to cycle through the screen menus.
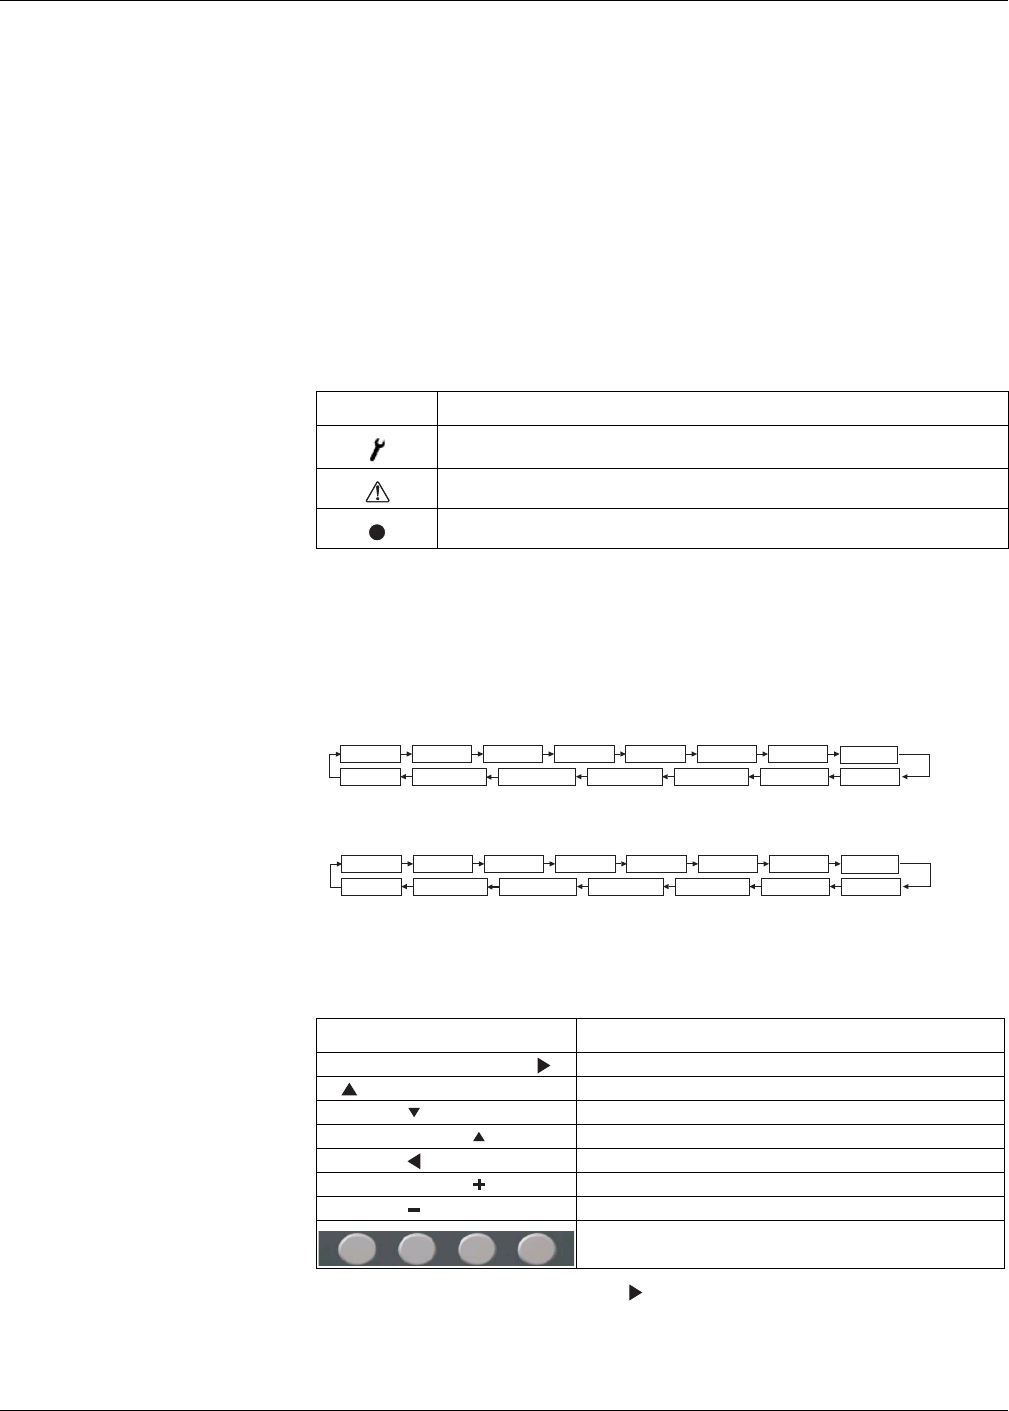
Notification icons
Icon Description
The wrench icon indicates that the power meter requires maintenance. See “Maintenance
and Troubleshooting” on page 103.
The alarm icon indicates an alarm condition has occurred. See “About Alarms” on page 63
and “Alarm Priorities” on page 66.
The blinking heartbeat icon indicates that the power meter is in normal operating condition.
Level 1 screen menus - IEEE display mode
Level 1 screen menus - IEC display mode
Navigation symbols
Symbol Description
Scroll right and display more menu items
Exit screen and go up one level
Move cursor down the list of options or display more items below
Move cursor up the list of options or display more items above
Move cursor one character to the left
Increase the highlighted value or show the next item in the list
Show the previous item in the list
Front panel buttons
Maint
Amps Volts PF Hz
Clock
Energy
Unbal
MnMx
Alarm
I/O
Timer
THD Harm
Power
Maint
IU-V PQS PF F
Clock
E
Unbal
MnMx
Alarm
I/O
Timer
THD Harm
PowerLogic™ PM5300 series user guide Chapter 4—Front panel display and meter setup
© 2015 Schneider Electric All Rights Reserved 33
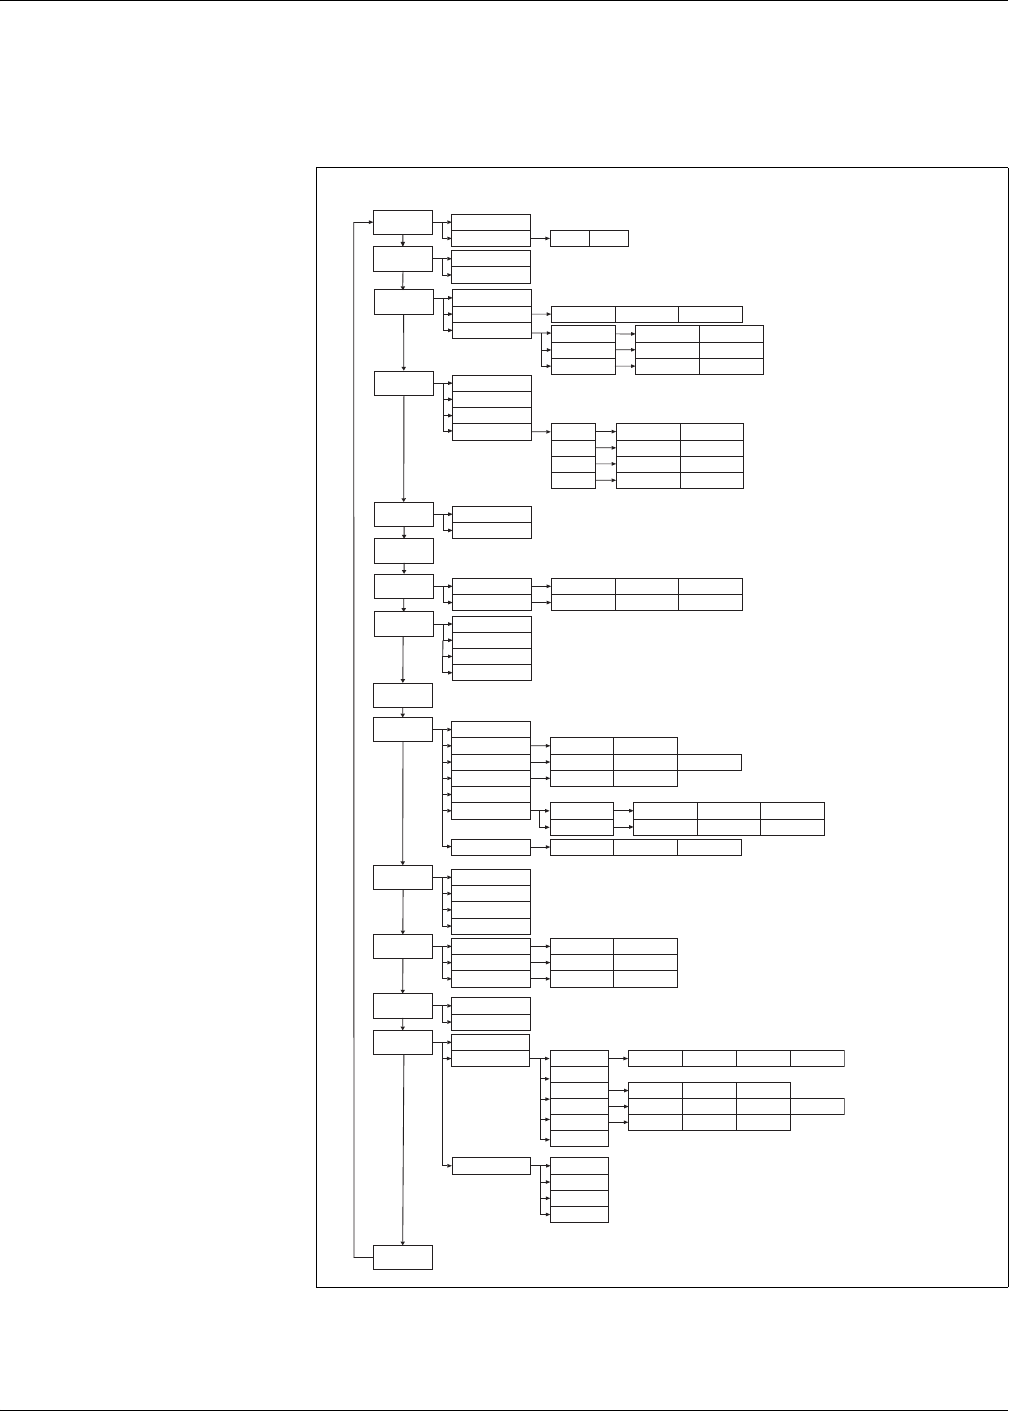
Menu tree
This summarizes the meter screens (IEEE menus shown, with the corresponding IEC
menus in parentheses — see “Setting up regional settings” on page 39).
PM5300 display screen menus
R1
R2
S1
S2
Volts (U-V)
Maint Reset
Setup Meter
Comm
Alarm
I/O
HMI
Clock
Basic Advan Dmd Tari f f
1-Sec Unary Dig
LED SIn DOut Relay
Displ Region Pass
Amps
(I)
Dmd Iavg
Volts
(U-V) V L-L (U)
V L-N (V)
Power (PQS)
Phase
Power
(PQS)
Dmd Wd (Pd)
VARd (Qd)
VAd (Sd)
Wh
VAh
Energy
(E)
VARh
Active (P)
Reac (Q)
Appr (S)
T1
T2
T3
T4
True
Disp
PF
Hz
(F)
THD
thd
THD
Tariff
Unbal
Amps (I)
Power (PQS)
Unbal
MnMx
PF
Hz (F)
THD
Hist
Active
Count
Alarm
Unack
Diag Info
Clock
DOut
I/O
Oper
Load
Timer
Level 1 Level 2 Level 3
Pk DT
V L-L (U)
V L-N (V)
Harm
Amps (I)
Amps (I)
V L-L (U)
V L-N (V)
Amps (I)
V L-L (U)
V L-N (V)
(% volts line-to-line, volts line-to-neutral, )amps
(frequency, average voltage, average current, power factor)
V L-L (U)
V L-N (V)
Active (P)
Reac (Q)
Appr (S)
True
Disp
THD
Amps (I)
V L-L (U)
V L-N (V)
Amps (I)
Relay
Wd (Pd)
Pk DT
Pk DT
Pk DT
VARd (Qd)
VAd (Sd)
TDD
thd
Amps (I)
V L-L (U)
V L-N (V)
Amps (I)
V L-L (U)
V L-N (V)
S In
D1
D2
Meter
Cl Pwr
PhAng
Rec
Del
Rec
Del
Rec
Del
Rec
Del
34 © 2015 Schneider Electric All Rights Reserved
Chapter 4—Front panel display and meter setup PowerLogic™ PM5300 series user guide
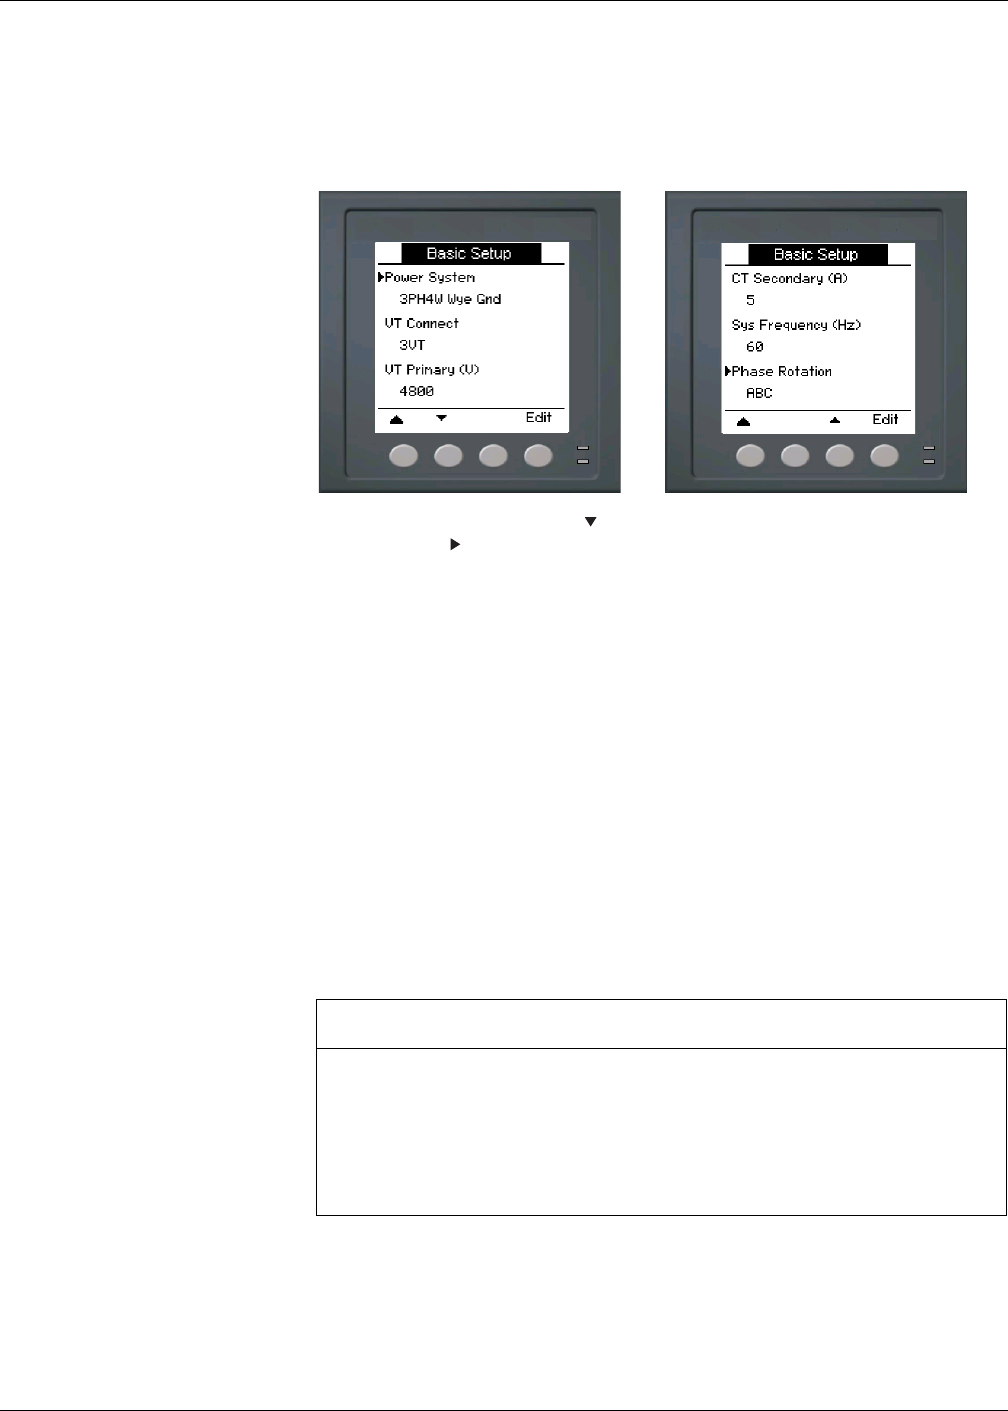
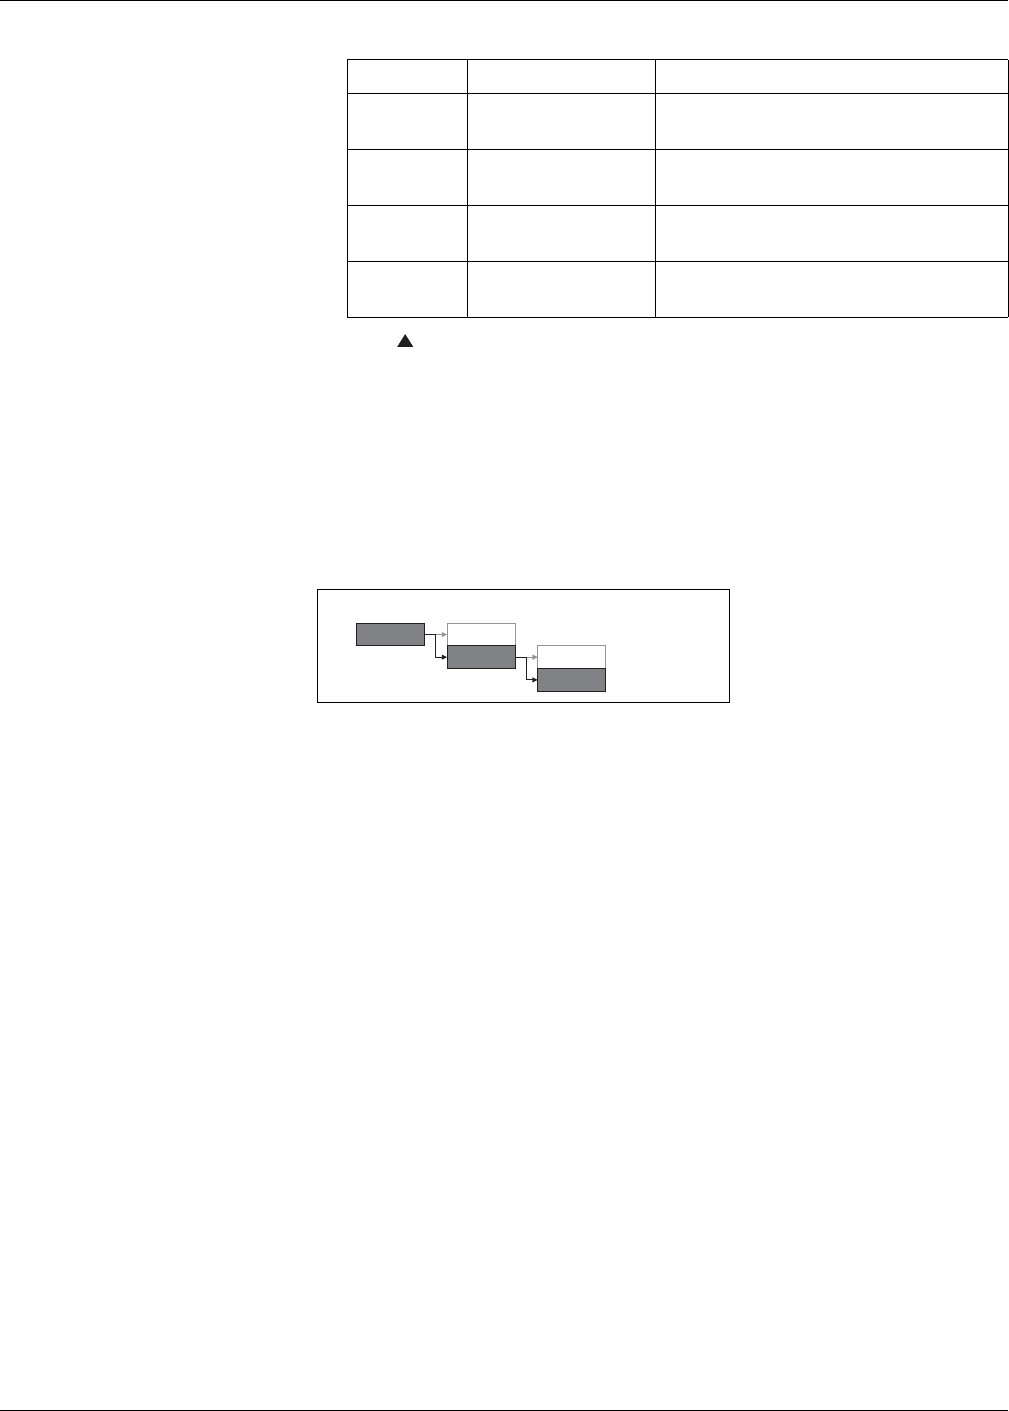
Meter setup screen navigation
The meter’s front panel buttons and display screen allow you to navigate and configure
the meter’s setup parameters. The following illustration shows one of the meter setup
screens.
In this example, the down arrow ( ) indicates there are more parameters below the
selected option ( ). Press the down arrow button to display additional parameters. The
down arrow disappears when the last item in the list is selected, and there are no more
parameters to display.
Front panel meter setup
Meter configuration can be performed directly through the front panel buttons or
remotely through software. This section contains instructions on setting up the meter
using the front panel.
Related topics
•See “Remote Meter Setup” on page 44 for remote meter setup details.
Configuring the basic setup parameters
Proper configuration of the meter’s basic setup parameters is essential for accurate
measurement and calculations. Use the Basic Setup screen to define the electrical
power system that the meter is monitoring.
If standard (1-sec) alarms have been configured and you make subsequent changes to
the meter’s basic setup, all alarms are disabled to prevent undesired alarm operation.
After saving the changes, confirm all configured standard alarm settings are still valid,
reconfigure them as required, and re-enable the alarms.
Basic setup screen
NOTICE
UNINTENDED EQUIPMENT OPERATION
After modifying any basic setup parameter:
• Verify all standard alarms settings are correct and make adjustments as necessary.
• Re-enable all configured alarms.
Failure to follow these instructions can result in incorrect alarm functions.

PowerLogic™ PM5300 series user guide Chapter 4—Front panel display and meter setup
© 2015 Schneider Electric All Rights Reserved 35
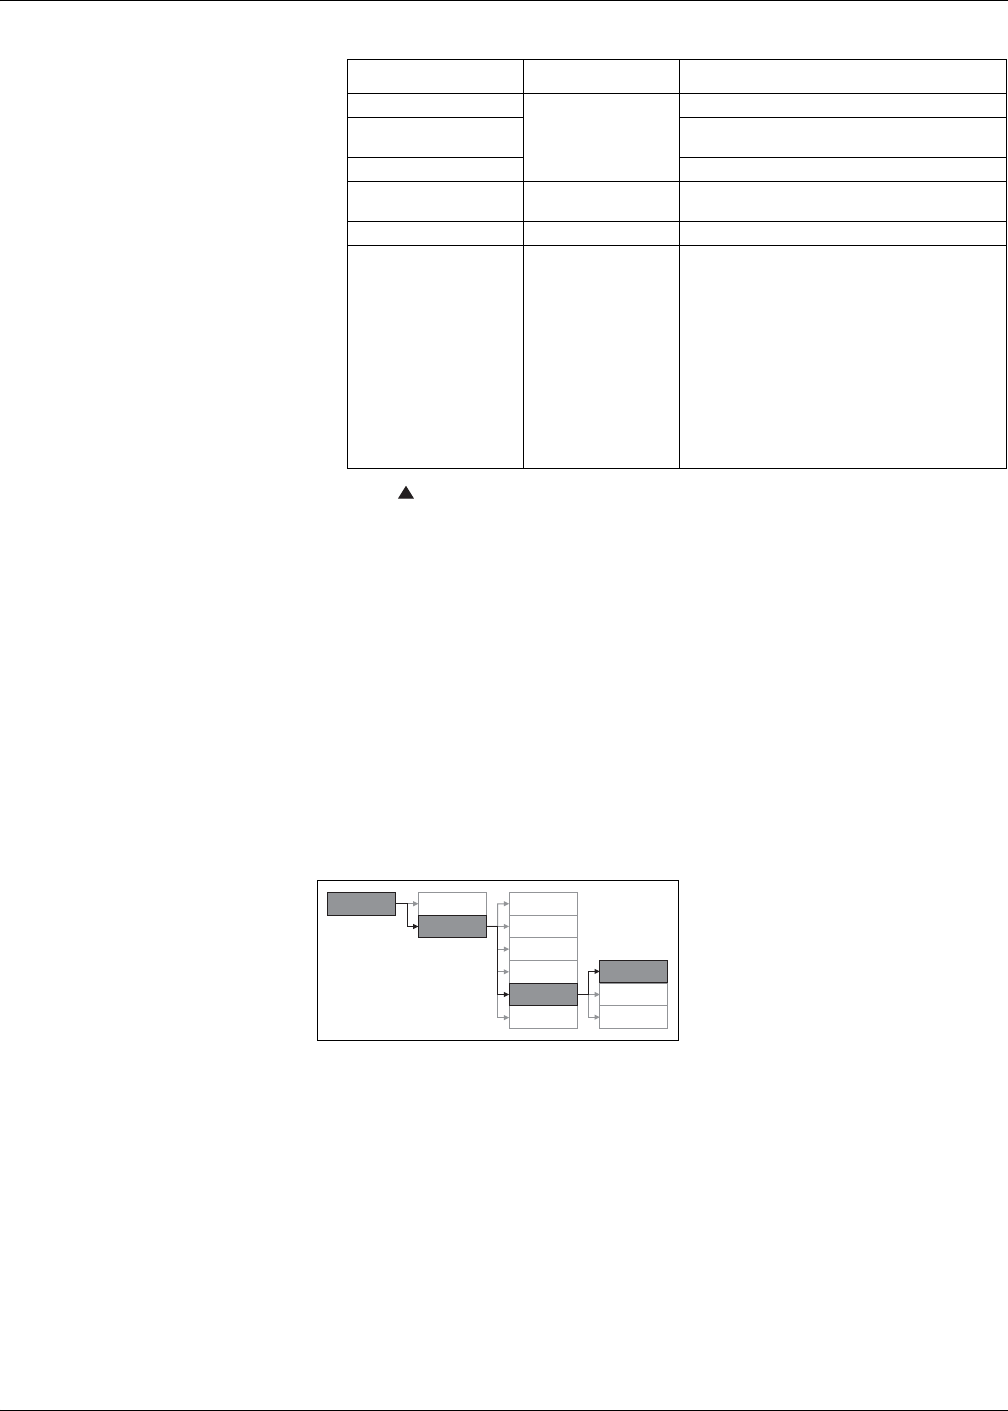
1. Navigate to Maint > Setup.
2. Enter the setup password (default is “0000”), then press OK.
3. Navigate to Meter > Basic.
4. Move the cursor to point to the parameter you want to modify, then press Edit.
5. Modify the parameter as required, then press OK.
6. Move the cursor to point to the next parameter you want to modify, press Edit,
make your changes, then press OK.
7. Press to exit. Press Yes to save your changes.
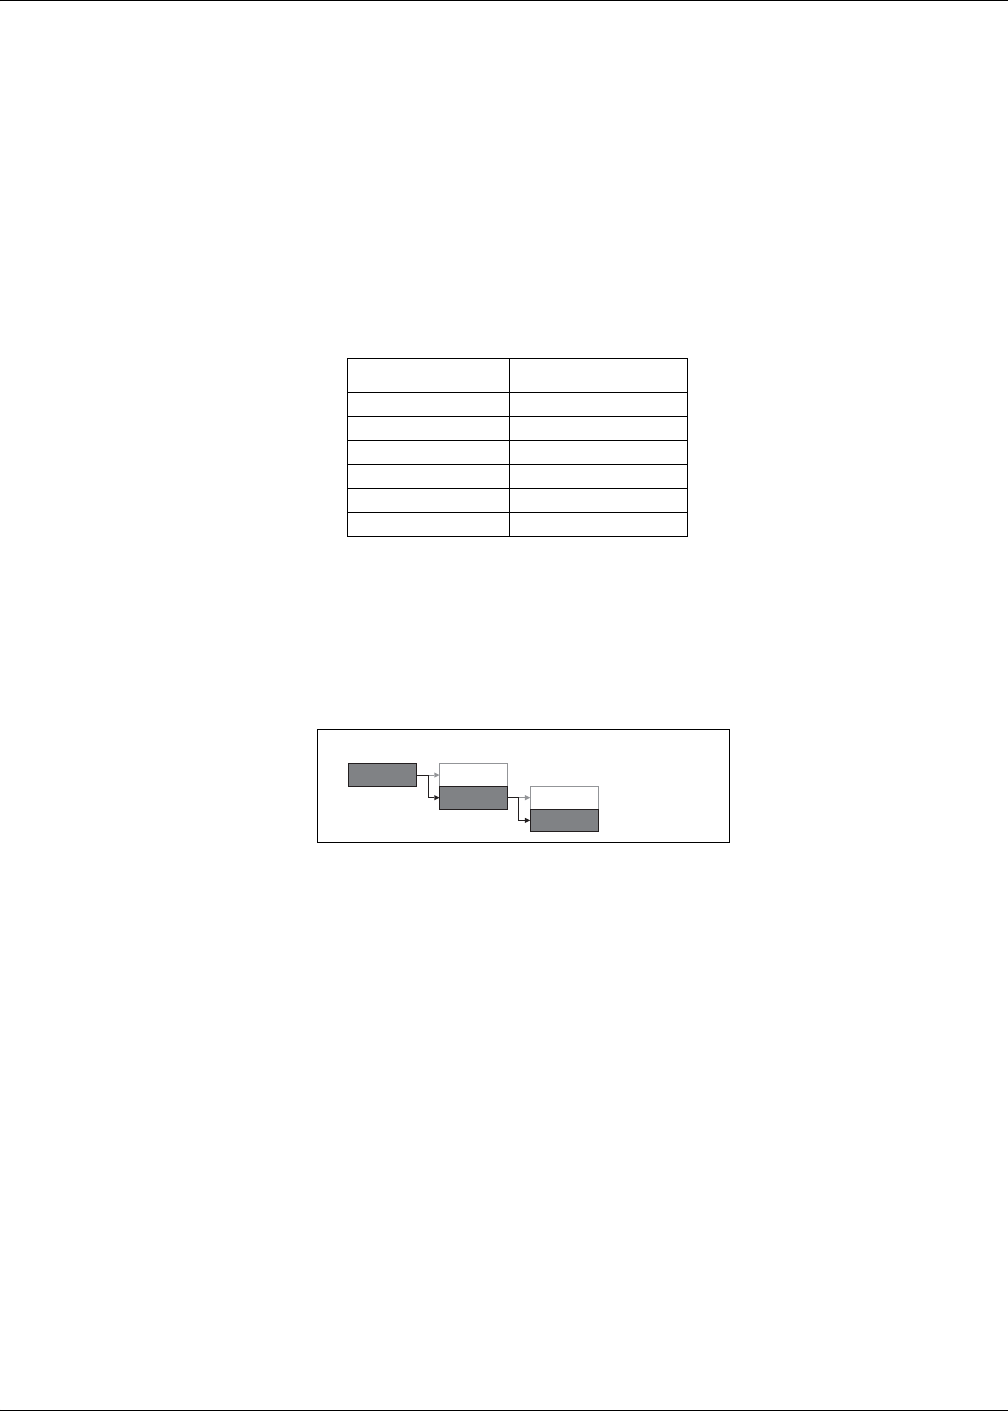
Basic setup menu tree
Basic setup parameters
Parameter Values Description
Power System
Select the power system type (power transformer) the meter is wired to.
1PH2W LN Single-phase 2-wire line-to-neutral
1PH2W LL Single-phase 2-wire line-to-line
1PH3W LL with N Single-phase 3-wire line-to-line with neutral
3PH3W Dlt Ungnd 3-phase 3-wire ungrounded delta
3PH3W Dlt Crnr Gnd 3-phase 3-wire corner grounded delta
3PH3W Wye Ungnd 3-phase 3-wire ungrounded wye
3PH3W Wye Gnd 3-phase 3-wire grounded wye
3PH3W Wye Res Gnd 3-phase 3-wire resistance-grounded wye
3PH4W Opn Dlt Ctr Tp 3-phase 4-wire center-tapped open delta
3PH4W Dlt Ctr Tp 3-phase 4-wire center-tapped delta
3PH4W Wye Ungnd 3-phase 4-wire ungrounded wye
3PH4W Wye Gnd 3-phase 4-wire grounded wye
3PH4W Wye Res Gnd 3-phase 4-wire resistance-grounded wye
VT Connect
Select how many voltage transformers (VT) are connected to the electrical power
system.
Direct Con Direct connect; no VTs used
2VT 2 voltage transformers
3VT 3 voltage transformers
VT Primary (V) 1 to 1000000 Enter the size of the VT primary, in Volts.
VT Secondary (V) 100, 110, 115, 120 Select the size of the VT secondary, in Volts
CT on Terminal
Define how many current transformers (CT) are connected to the meter, and
which terminals they are connected to.
I1 1 CT connected to I1 terminal
I2 1 CT connected to I2 terminal
I3 1 CT connected to I3 terminal
I1 I2 2 CT connected to I1, I2 terminals
I1 I3 2 CT connected to I1, I3 terminals
I2 I3 2 CT connected to I2, I3 terminals
I1 I2 I3 3 CT connected to I1, I2, I3 terminals
CT Primary (A) 1 to 32767 Enter the size of the CT primary, in Amps.
CT Secondary (A) 1, 5 Select the size of the CT secondary, in Amps.
Sys Frequency (Hz) 50, 60 Select the frequency of the electrical power
system, in Hz.
Phase Rotation ABC, CBA Select the phase rotation of the 3-phase system.
Maint Reset
Setup Comm
Meter Basic
36 © 2015 Schneider Electric All Rights Reserved
Chapter 4—Front panel display and meter setup PowerLogic™ PM5300 series user guide
Related topics
•See “Configuring the basic setup parameters” on page 34 for meter basic setup
instructions.
Communications setup
After wiring the meter’s serial and Ethernet communications ports, you can configure
these ports so you can connect to the meter remotely and use device configuration
software such as ION Setup to configure the meter.
Based on the reference model, the meter is equipped with the following communication
ports:
Communication ports
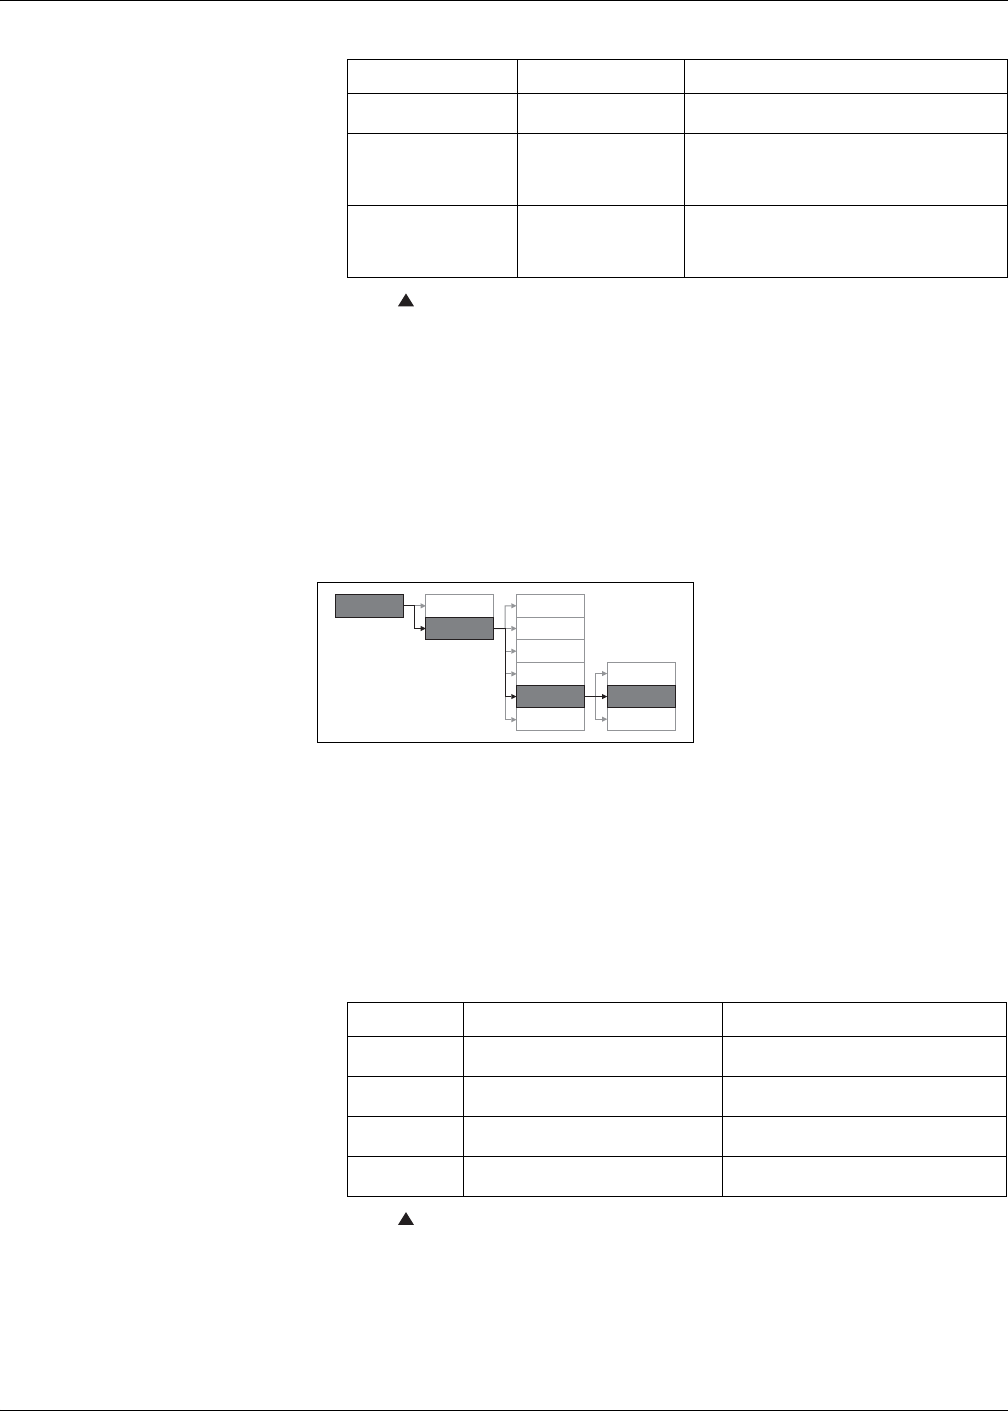
Setting up serial communications
The Serial Port setup screen allows you to configure the meter’s RS-485
communications port so you can use software to access the meter’s data or configure
the meter remotely.
1. Navigate to Maint > Setup.
2. Enter the setup password (default is “0000”), then press OK.
3. Press Comm.
4. Move the cursor to point to the parameter you want to modify, then press Edit.
5. Modify the parameter as required, then press OK.
6. Move the cursor to point to the next parameter you want to modify, press Edit,
make your changes, then press OK.
Reference Models Communication
PM5310 RS-485
PM5320 Ethernet
PM5330 RS-485
PM5331 RS-485
PM5340 Ethernet
PM5341 Ethernet
Serial communications setup menu tree
Maint Reset
Setup Meter
Comm
PowerLogic™ PM5300 series user guide Chapter 4—Front panel display and meter setup
© 2015 Schneider Electric All Rights Reserved 37
7. Press to exit. Press Yes to save your changes.
Setting up Ethernet communications
The Ethernet Port setup screen allows you to assign the meter a unique IP address so
you can use software to access the meter’s data or configure the meter remotely
through the Ethernet port. Before configuring the Ethernet parameters, make sure you
obtain your meter’s IP address information from your network administrator or IT
department.
1. Navigate to Maint > Setup.
2. Enter the setup password (default is “0000”), then press OK.
3. Press Comm.
4. Move the cursor to point to the parameter you want to modify, then press Edit.
5. Modify the parameter as required, then press OK.
6. Move the cursor to point to the next parameter you want to modify, press Edit,
make your changes, then press OK.
Communications setup parameters
Parameter Values Description
Protocol Modbus
The communications format used to transmit data. The
protocol must be the same for all devices in a
communications loop.
Address 1 to 247
Set the address for this device. The address must be
unique for each device in a communications loop. For
Jbus protocol, set the device ID to 255.
Baud Rate 9600, 19200, 38400
Select the speed for data transmission. The baud rate
must be the same for all devices in a communications
loop.
Parity Even, Odd, None
Select None if the parity bit is not used. The parity
setting must be the same for all devices in a
communications loop.
Ethernet communications setup menu tree
Maint Reset
Setup Meter
Comm
38 © 2015 Schneider Electric All Rights Reserved
Chapter 4—Front panel display and meter setup PowerLogic™ PM5300 series user guide
7. Press to exit. Press Yes to save your changes.
HMI settings
The HMI (human-machine interface) setup screens allow you to:
•control the general appearance and behavior of the display screens,
•change the regional settings, or
•change the meter passwords.
Setting up the display
You can change the display screen’s contrast or the screen backlight and timeout
settings.
1. Navigate to Maint > Setup.
2. Enter the setup password (default is “0000”), then press OK.
3. Navigate to HMI > Displ.
4. Move the cursor to point to the parameter you want to modify, then press Edit.
5. Modify the parameter as required, then press OK.
6. Move the cursor to point to the next parameter you want to modify, press Edit,
make your changes, then press OK.
Ethernet port settings
Parameter Values Description
IP Address
Contact your local
network administrator
for parameter values.
The internet protocol address of your device.
Subnet The Ethernet IP subnetwork address of your
network (subnet mask).
Gateway The Ethernet IP gatway address of your network.
HTTP Server Disabled Controls whether your device’s webserver and
webpages are active or not.
Device Name N/A This parameter is read-only for reference purposes.
IP Method DHCP, BOOTP,
Stored, Default
This controls the network protocol for your device
(what the meter uses to obtain its IP address).
• DHCP: Dynamic Host Configuration Protocol
• BOOTP: Bootstrap Protocol
• Stored: Use the static value programmed in the
IP Address setup register
• Default: Use 85.16 as the first two values of the
IP address, then convert the last two
hexadecimal values of the MAC address to
decimal and use this as the last two values of
the IP address.
Example: MAC address = 00:80:67:82:B8:C8
Default IP = 85.16.184.200
Display setup menu tree
Maint Reset Meter
Comm
Alarm
I/O
Clock
Region
Pass
Displ
Setup
HMI
PowerLogic™ PM5300 series user guide Chapter 4—Front panel display and meter setup
© 2015 Schneider Electric All Rights Reserved 39
7. Press to exit. Press Yes to save your changes.
Setting up regional settings
You can change the regional settings to localize the meter screens and display data in
a different language, using local standards and conventions.
NOTE: In order to display a different language other than those listed in the Language
setup parameter, you need to download the appropriate language file to the meter
using the appropriate firmware upgrade tool such as DLF3000. See “Downloading
Firmware” on page 104.
1. Navigate to Maint > Setup.
2. Enter the setup password (default is “0000”), then press OK.
3. Navigate to HMI > Region.
4. Move the cursor to point to the parameter you want to modify, then click Edit.
5. Modify the parameter as required, then press OK.
6. Move the cursor to point to the next parameter you want to modify, press Edit,
make your changes, then press OK.
7. Press to exit. Press Yes to save your changes.
Setting up the screen passwords
This can only be configured through the front panel. The factory-default setting for all
passwords is “0000”. Changing the default password for screens that are password-
Display setup parameters
Parameter Values Description
Contrast 1 - 9 Increase or decrease the value to increase or
decrease the display contrast.
Backlight Timeout (min) 0 - 60
Set how long (in minutes) before the backlight
turns off after a period of inactivity. Setting this to
“0” disables the backlight timeout feature (i.e.,
backlight is always on).
Screen Timeout (min) 0 - 60
Set how long (in minutes) before the screen turns
off after a period of inactivity. Setting this to “0”
disables the screen timeout feature (i.e., display is
always on).
Regional settings menu tree
Regional settings setup parameters
Parameter Values Description
Language English US, French, Spanish, German,
Italian, Portuguese, Chinese, Russian
Select the language you want the meter to
display.
Date Format MM/DD/YY, YY/MM/DD, DD/MM/YY Set how you want the date to be displayed,
e.g., month/day/year.
Time Format 24Hr, AM/PM Set how you want the time to be displayed,
e.g., 17:00:00 or 5:00:00 PM.
HMI Mode IEC, IEEE Select the standards convention used to
display menu names or meter data.
Maint Reset Meter
Comm
Alarm
I/O
Clock
Displ
Pass
Region
HMI
Setup
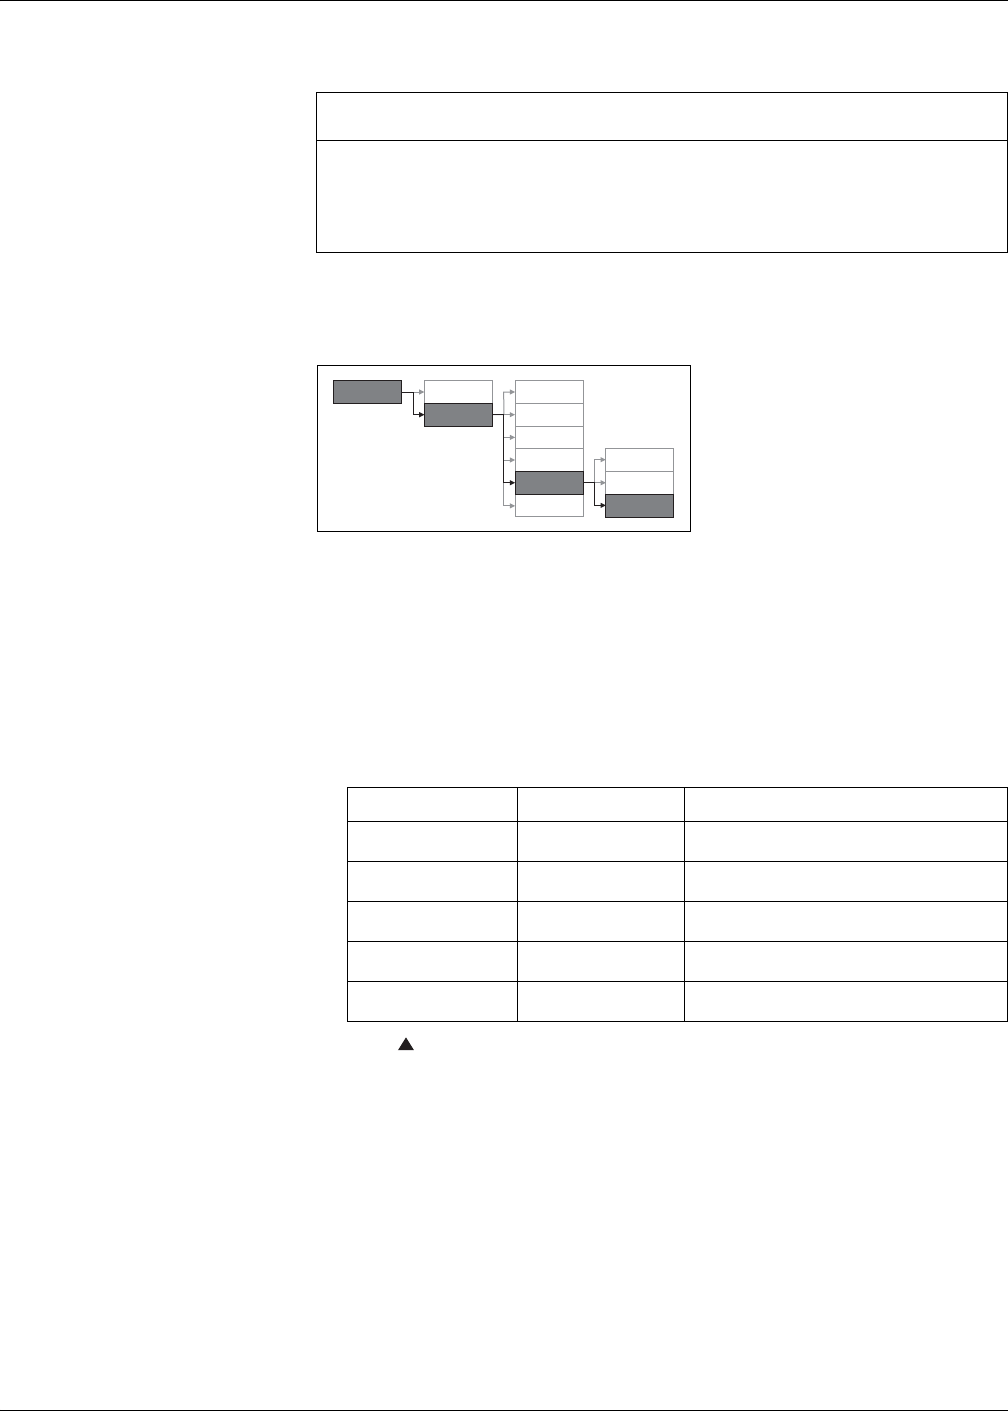
40 © 2015 Schneider Electric All Rights Reserved
Chapter 4—Front panel display and meter setup PowerLogic™ PM5300 series user guide
protected prevents unauthorized personnel from accessing certain screens such as the
diagnostics and reset screens.
If you lose your password, you must return the meter for factory reconfiguration, which
resets your device to its factory defaults and destroys all logged data.
1. Navigate to Maint > Setup.
2. Enter the setup password (default is “0000”), then press OK.
3. Navigate to HMI > Pass.
4. Move the cursor to point to the parameter you want to modify, then press Edit.
5. Modify the parameter as required, then press OK.
6. Move the cursor to point to the next parameter you want to modify, press Edit,
make your changes, then press OK.
7. Press to exit. Press Yes to save your changes.
Lost password
Visit www.schneider-electric.com for support and assistance with lost passwords or
other technical problems with the meter.
Make sure you include your meter’s model, serial number and firmware version in your
email or have it readily available if calling Technical Support.
NOTICE
LOST DATA
Record your meter's screen password information in a secure location.
Failure to follow these instructions can result in data loss.
Password setup menu tree
Password setup parameters
Parameter Values Description
Setup 0000 - 9999 Sets the password for accessing the meter setup
screens (Maint > Setup).
Energy Resets 0000 - 9999 Sets the password for resetting the meter’s
accumulated energy values.
Demand Resets 0000 - 9999 Sets the password for resetting the meter’s
recorded peak demand values.
Min/Max Resets 0000 - 9999 Sets the password for resetting the meter’s
recorded minimum and maximum values.
Diagnostics 0000 - 9999 Sets the password for accessing the meter’s
diagnostics screens.
Maint Reset Meter
Comm
Alarm
I/O
I
Clock
Displ
Region
Pass
HMI
Setup
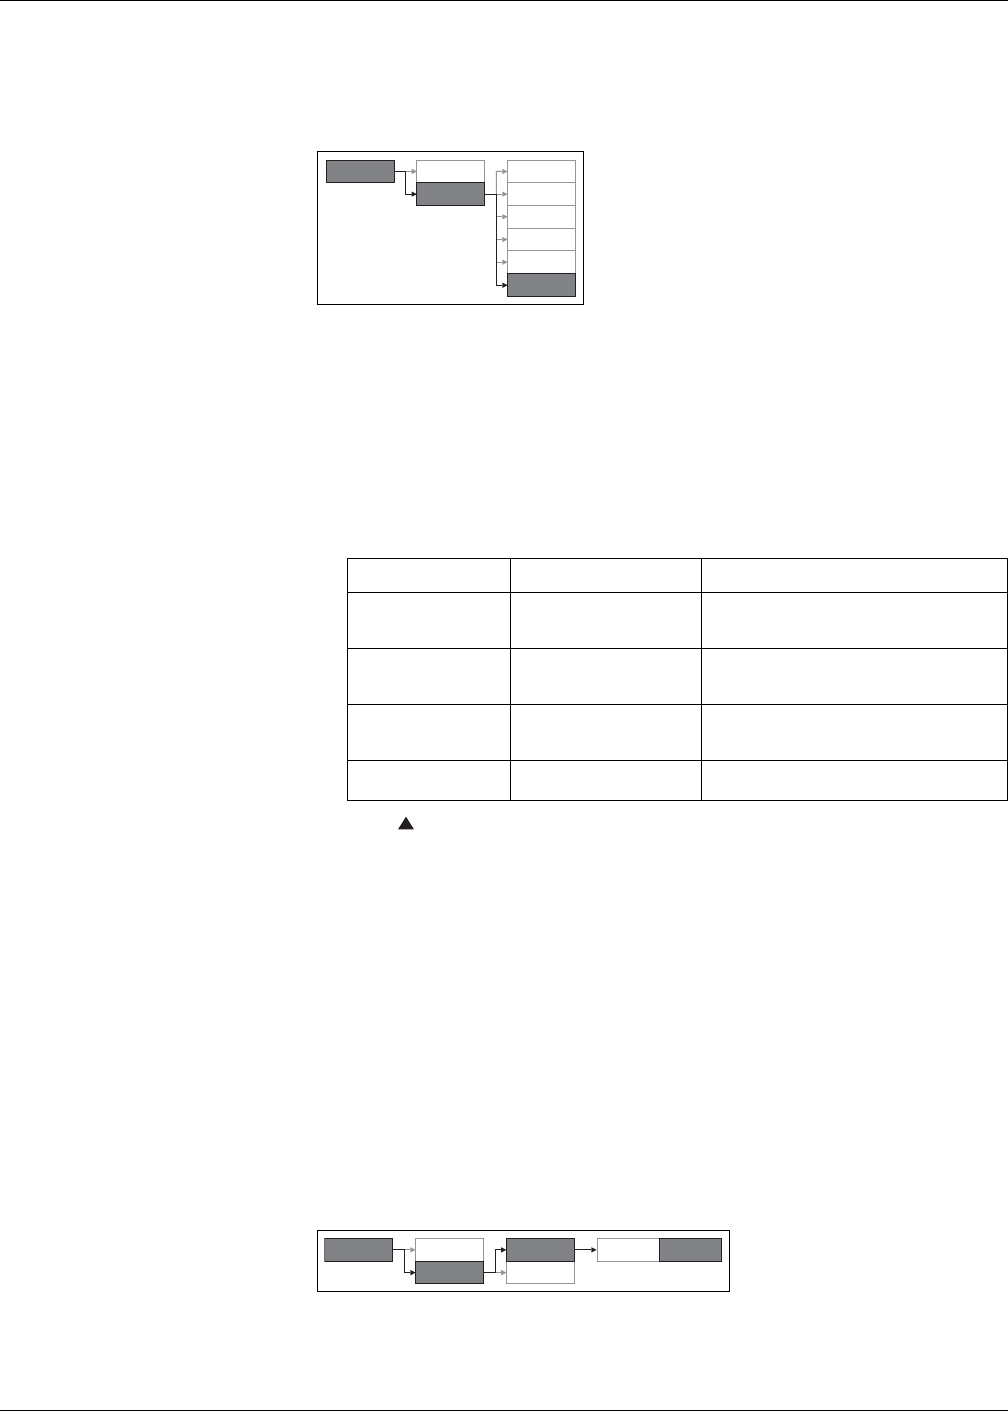
PowerLogic™ PM5300 series user guide Chapter 4—Front panel display and meter setup
© 2015 Schneider Electric All Rights Reserved 41
Setting the clock
The Clock setup screens allow you to set the meter’s date and time.
1. Navigate to Maint > Setup.
2. Enter the setup password (default is “0000”), then press OK.
3. Navigate to Clock.
4. Move the cursor to point to the parameter you want to modify, then press Edit.
5. Modify the parameter as required, then press OK.
6. Move the cursor to point to the next parameter you want to modify, press Edit,
make your changes, then press OK.
7. Press to exit. Press Yes to save your changes.
Related topics
•See “Setting up regional settings” on page 39 for instructions on changing the
format of the displayed date and time.
Advanced setup
The advanced setup screens let you change the meter name, set up a timer for
monitoring load current, and specify the minimum demand current for total demand
distortion calculations.
•Load Timer Setpt: specifies the minimum current at the load before the timer starts.
•Pk I dmd for TDD: specifies the minimum current demand value to consider for total
demand distortion calculations.
1. Navigate to Maint > Setup.
2. Enter the setup password (default is “0000”), then press OK.
Clock setup menu tree
Clock setup parameters
Parameter Format Description
Date MM/DD/YY
Set the current date using the format displayed
on screen, where MM = month, DD = day and
YY = year.
Time HH:MM:SS (24 hour format),
Use the 24-hour format to set the current time
(GMT or local) in hours (HH), minutes (MM) and
seconds (SS).
Meter Time GMT, Local
Select GMT if you set the current time to
Greenwich Mean Time zone. Otherwise, select
Local.
GMT Offset (h) - Set the GMT Offset between ± 00.0 and ± 12.0
hrs.
Maint Reset
Setup
Meter
Comm
Alarm
I/O
HMI
Clock
Advanced setup menu tree
Basic
Maint Reset
Setup Comm
Meter Advan
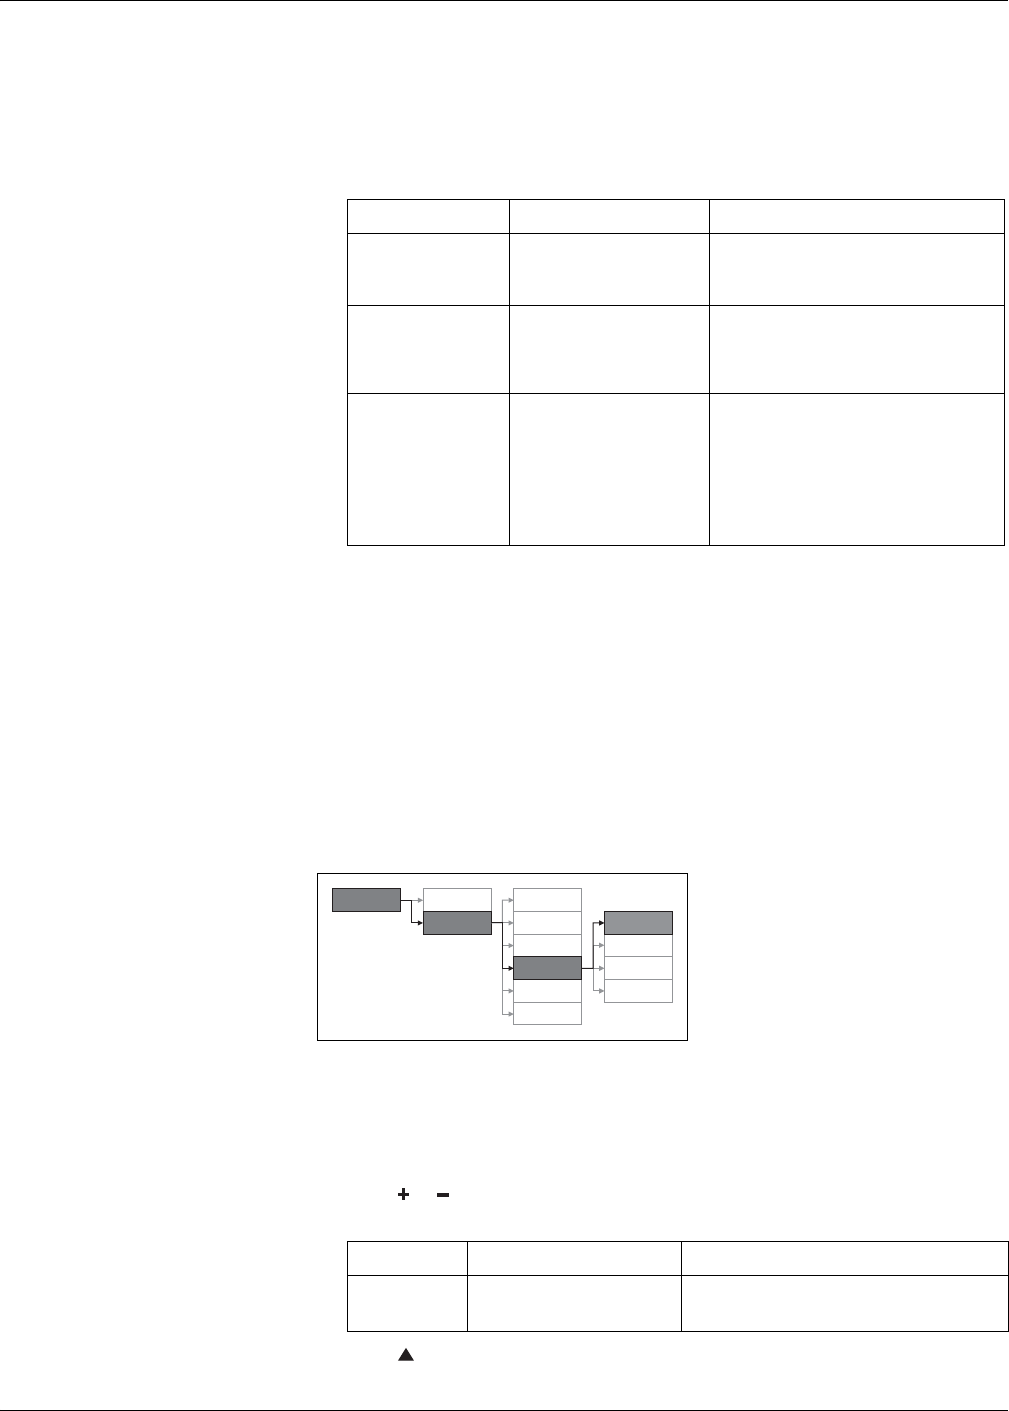
42 © 2015 Schneider Electric All Rights Reserved
Chapter 4—Front panel display and meter setup PowerLogic™ PM5300 series user guide
3. Navigate to Meter > Advan.
4. Move the cursor to point to the parameter you want to modify, then press Edit.
5. Modify the parameter as required, then press OK.
6. Move the cursor to point to the next parameter you want to modify, press Edit,
make your changes, then press OK.
7. Press Yes to save your changes.
Related topics
•See“Total Harmonic Distortion and Total Demand Distortion” on page 89 for details
on how the meter calculates TDD.
Setting up the alarm / energy pulsing LED
The LED setup screen allows you to configure the alarm / energy pulsing LED for
alarming or energy pulsing application.
1. Navigate to Maint > Setup.
2. Enter the setup password (default is “0000”), then press OK.
3. Navigate to I/O > LED.
4. Press Edit.
5. Press or to modify the parameter as required, then press OK.
6. Press to exit. Press Yes to save your changes.
Advanced setup parameters
Parameter Values Description
Label -----
This label identifies the device, e.g., “Power
Meter”. You cannot use the front panel to edit
this parameter. Use ION Setup to change the
device label.
Load Timer Setpt (A) 0 - 99999
Specifies the minimum average current at the
load before the timer starts. The meter begins
counting the operating time whenever the
readings are equal to or above this average
current threshold.
Pk I dmd for TDD (A) 0 - 99999
Specifies the minimum peak current demand
at the load for inclusion in total demand
distortion (TDD) calculations. If the load
current is below the minimum peak current
demand threshold, the meter does not use the
readings to calculate TDD. Set this to “0”
(zero) if you want the power meter to use the
metered peak current demand for this
calculation.
Alarm / energy pulsing LED settings menu tree
LED setup parameter
Parameter Values Description
Mode Off, Alarm, Energy
Off disables the LED.
Alarm sets the LED for alarm notification.
Energy sets the LED for energy pulsing.
Maint Reset
Setup
Meter
Comm
Alarm
HMI
Clock
LED
Relay
I/O D Out
S In
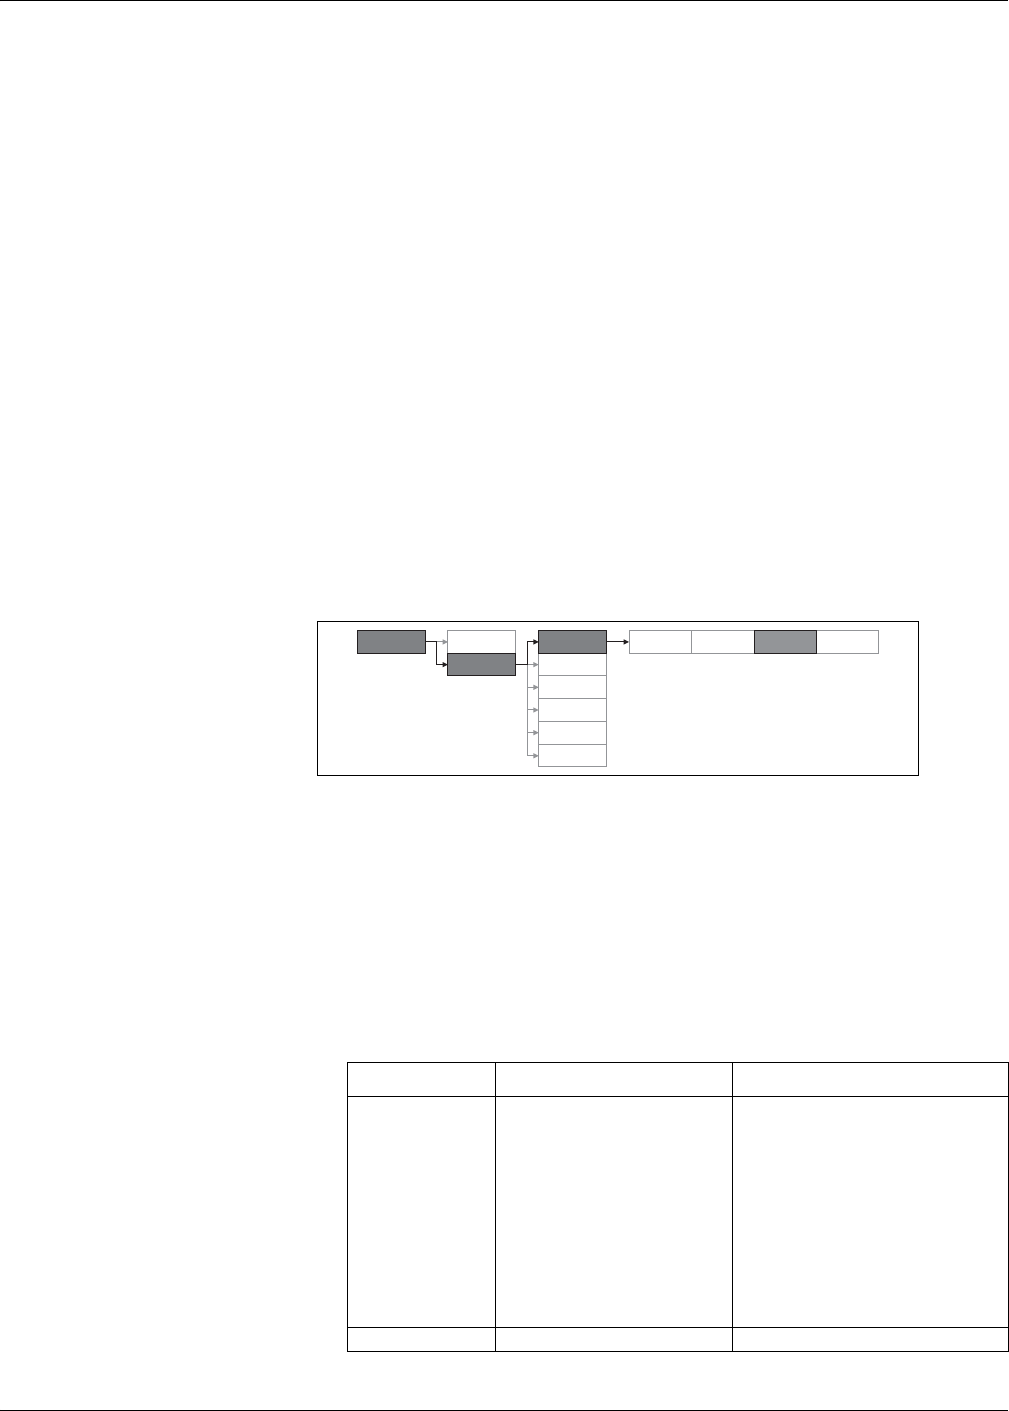
PowerLogic™ PM5300 series user guide Chapter 4—Front panel display and meter setup
© 2015 Schneider Electric All Rights Reserved 43
Related topics
•See “Setting up the alarm / energy pulsing LED” on page 42 for details on setting up
the LED for alarms.
Input / output setup
The meter’s input/output (I/O) ports extend the capabilities of the meter. The I/O ports
can be configured using the front panel or ION Setup.
Related topics
•See “Input / Output” on page 49 for a comprehensive description and setup
instructions using the front panel.
•See “Technical Specifications” on page 15 for electrical characteristics and limits of
meter’s I/O ports.
Demand setup
Demand is a measure of average consumption over a fixed time interval.
Use the Demand setup screens to define power demand, current demand or input
metering demand.
1. Navigate to Maint > Setup.
2. Enter the setup password (default is “0000”), then press OK.
3. Navigate to Meter > Dmd.
4. Move the cursor to select Power Demand or Current Demand.
5. Move the cursor to point to the parameter you want to modify, then press Edit.
6. Modify the parameter as required, then press OK.
7. Move the cursor to point to the next parameter you want to modify, press Edit,
make your changes, then press OK.
Demand setup menu tree
Power or current demand setup parameters
Parameter Values Description
Method
Timed Sliding Block
Timed Block
Timed Rolling Block
Cmd Sync Block
Cmd Sync Roll Block
Clock Sync Block
Clock Sync Roll Block
Input Sync Block
Input Sync Roll Block
Thermal
See “Demand” on page 79 for details.
Interval (min) 0 - 60 Set the demand interval, in minutes.
Advan Tar if f
Dmd
Maint Reset
Setup Comm
Alarm
I/O
HMI
Clock
Meter Basic

44 © 2015 Schneider Electric All Rights Reserved
Chapter 4—Front panel display and meter setup PowerLogic™ PM5300 series user guide
8. Press Yes to save your changes.
Multi-tariff setup
The meter’s multi-tariff feature allows you to use up to 4 different tariff “containers” to
store accumulated energy data. The Tariff setup screens allow you to configure how
and when to apply the different tariffs.
Related topics
•See “Configuring tariffs using the front panel” on page 87 for a comprehensive
description and setup instructions using the front panel.
Alarms setup
An alarm is the meter’s means of notifying you when an alarm condition is detected,
such as an error or event that falls outside of normal operating conditions.
Related topics
•See “Alarms” on page 63 for a comprehensive description and detailed setup
instructions.
Remote Meter Setup
You can use ION Setup to remotely access the meter.
For more information on the ION setup configuration, please refer to ION Setup 3.0
Device configuration guide.
Subinterval (min) 0 - 60
Applies only to rolling block methods.
Define how many subintervals the demand
interval should be equally divided into.
Select Dig Output None, Digital Output D1, Digital
Output D2
Select which digital output the end of
demand interval pulse should be sent to.
Select S Input None, Status Input S1, Status Input
S2
Applies only to input block methods.
Select which status input is used to monitor
input metering demand.
Clock Sync Time 0 - 2359
Applies only to clock sync methods (these
synchronize the demand interval to the
meter’s internal clock).
Define what time of day you want to
synchronize the demand
Power or current demand setup parameters (continued)
Parameter Values Description
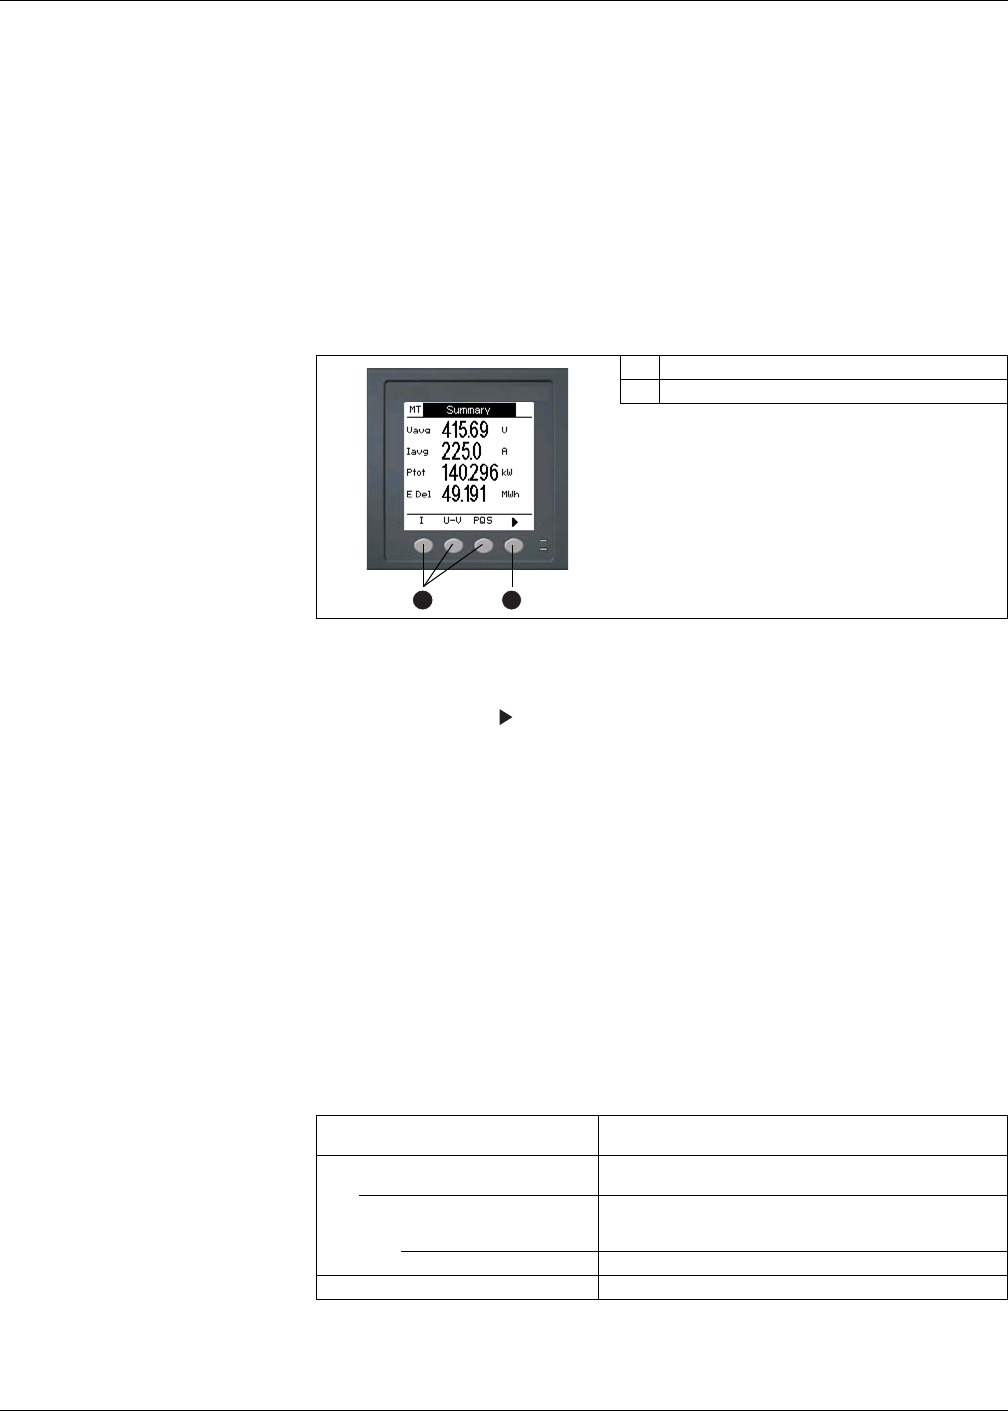
PowerLogic™ PM5300 series user guide Chapter 5—Viewing Meter Data
© 2015 Schneider Electric All Rights Reserved 45
Chapter 5—Viewing Meter Data
You can view meter data from the meter’s front panel display, a web browser, or
through software.
Viewing meter data from the front panel
The Summary screen displays real-time values for average voltage and current (Vavg,
Iavg), total power (Ptot) and energy consumption (E Del).
Displaying data screens
To display data screens, press the button below the appropriate menu. To see more
menu items, press the navigation button.
Related topics
•See “Front panel display and meter setup” on page 31 for information on front panel
menu navigation.
Meter data display screens
The screen menu items are listed below. The titles listed are for the HMI mode in IEEE,
with the corresponding titles in IEC mode in square brackets [ ].
Related topics
•See “Setting up regional settings” on page 39 for details on changing the HMI
mode.
Summary screen
A Menu selection buttons
B Scroll right navigation button
B
A
Amps [I]
Phase Instantaneous current measurements for each phase and
neutral.
Dmd Summary of peak current demand values at the last demand
interval for each phase and neutral.
IAvg, Ia [I1], Ib [I2], Ic [I3], In, Ig
Real-time demand (Pres), peak demand (Peak) and predicted
demand (Pred) for the present interval. Average demand for the
previous interval (Last).
Pk DT Date and timestamp for the peak demand readings.
Ig Average (Iavg), neutral (In) and residual/ground (Ig) current

46 © 2015 Schneider Electric All Rights Reserved
Chapter 5—Viewing Meter Data PowerLogic™ PM5300 series user guide
Related topics
•See “Current demand” on page 81.
Related topics
•See “Power quality” on page 89.
Related topics
•See “Demand” on page 79.
Related topics
•See “Multi-tariff feature overview” on page 83.
Volts [U-V]
V L-L [U] Line-to-line voltage for each phase.
V L-N [V] Line-to-neutral voltage for each phase.
Harm
V L-L [U] Line-to-line voltage harmonics data: Numeric magnitude and
angle for the fundamental harmonic, and graphical
representation of harmonics for the 3rd to 11th, 13th to 21st, and
23rd to 31st odd harmonics for each line-to-line phase voltage.
Fund, 3-11, 13-21, 23-31
V L-N [V] Line-to-neutral voltage harmonics data: Numeric magnitude and
angle for the fundamental harmonic, and graphical
representation of harmonics for the 3rd to 11th, 13th to 21st, and
23rd to 31st odd harmonics for each line-to-neutral phase
voltage.
Fund, 3-11, 13-21, 23-31
Amps [I] Current harmonics data: Numeric magnitude and angle for the
fundamental harmonics, and graphical representation of
harmonics for the 3rd to 11th, 13th to 21st, and 23rd to 31st odd
harmonics for each phase current.
Fund, 3-11, 13-21, 23-31
TDD Total demand distortion for each phase voltage.
Power [PQS]
Power [PQS]
Summary of real-time power consumption values for total active
power [Ptot] in kW, total reactive power [Qtot] in kVAR, and total
apparent power [Stot] in kVA.
Phase Per phase (A [P1], B [P2], C [P3]) and total (Total [Ptot]) power
values for active power in kW, reactive power in kVAR and
apparent power in kVA.
Active [P], Reac [Q], Appr [S]
Dmd
Summary of peak power demand values in the previous (Last)
demand interval period for active power in kW, reactive power in
kVAR and apparent power in kVA.
Wd [Pd], VARd [Qd], VAd [Sd]
Total and per phase (A [1], B [2], C [3]) peak power demand
values in the previous (Last) demand interval for active power
demand (Wd [P]), reactive power demand (VARd [Q]) and
apparent power demand (VAd [S]).
Tot, A [P1], B [P2], C [P3]
Each of these sub-screens (total and per phase demand) display
power demand values for the current (Pres) demand interval,
predicted (Pred) demand based on the current power
consumption rate, demand for the previous (Last) demand
interval period, and the recorded peak (Peak) power demand
value.
Pk DT Date and timestamp for the peak (Peak) power demand value.
Energy [E]
Wh Delivered (Del), received (Rec), delivered minus received (D+R)
and delivered minus received (D-R) accumulated values for real
energy (Wh), apparent energy (VAh) and reactive energy
(VARh).
VAh
VARh
Tariff Displays the available tariffs (T1 through T4).
T1, T2, T3, T4
Del Real (Wh), reactive (VARh) and apparent (VAh) energy delivered
values for the selected tariff.
Rec Real (Wh), reactive (VARh) and apparent (VAh) energy received
values for the selected tariff.

PowerLogic™ PM5300 series user guide Chapter 5—Viewing Meter Data
© 2015 Schneider Electric All Rights Reserved 47
Related topics
•See “Power quality” on page 89.
Related topics
•See “Alarms” on page 63.
Related topics
•See “Input / Output” on page 49.
PF
True Per phase and total true power factor values and sign.
Disp Per phase and total displacement power factor values and sign.
Hz [F]
Frequency (Freq), average voltage and current (Vavg, Iavg) and power factor (PF) values.
THD
THD THD (ratio of harmonic content to the fundamental) for current,
line-to-line voltage, and line-to-neutral voltage.
Amps [I], V L-L [U], V L-N [V]
thd thd (ratio of harmonic content to the rms value of total harmonic
content) for current, line-to-line voltage, and line-to-neutral
voltage.
Amps [I], V L-L [U], V L-N [V]
Unbal
Percent unbalance readings for line-to-line voltage (V L-L [U]), line-to-neutral voltage (V L-N [V]) and current
(Amps [I]).
MnMx
MnMx Summary of maximum values for line-to-line voltage, line-to-
neutral voltage, phase current and total power.
Amps [I] Minimum and maximum values for phase current.
Volts Minimum and maximum values for line-to-line voltage and line-
to-neutral voltage.
VL-L, VL-N
Power Minimum and maximum values for active, reactive, and apparent
power.
Active, Reac, Apr
PF Minimum and maximum values for true and displacement PF and
PF sign.
True, Disp
Hz Minimum and maximum values for frequency.
THD Minimum and maximum values for total harmonic distortion (THD
or thd).
THD, thd
Amps, VL-L, VL-N THD or thd minimum and maximum values for phase or neutral
current, line-to-line voltage and line-to-neutral voltage.
Unbal Minimum and maximum values for current unbalance, line-to-line
voltage unbalance and line-to-neutral voltage unbalance..
Amps, VL-L, VL-N
Alarm
Active, Hist, Count, Unack
Lists all active alarms, past alarms (Hist), the total number each
standard alarm has been tripped (Count), and all
unacknowledged alarms.
I/O
D Out Current status (on or off) of the selected digital output, status
input or relay. Counter shows the total number of times an off-to-
on change of state is detected. Timer shows the total time (in
seconds) that a digital output, status input or relay is in the on
state.
S In
Relay

48 © 2015 Schneider Electric All Rights Reserved
Chapter 5—Viewing Meter Data PowerLogic™ PM5300 series user guide
.
Related topics
•See “Meter resets” on page 99.
•See “Front panel display and meter setup” on page 31.
•See “Maintenance and Troubleshooting” on page 103.
Using ION Setup to view or modify configuration data
You can use ION Setup to view or modify the meter setup parameters.
For more information on configuration, see ION Setup 3.0 Device configuration guide.
Using software to view meter data
You can view meter data using energy management software such as Struxureware
Power Monitoring Expert or Struxureware Power SCADA. Refer to the software
documentation for details.
Timer
Load
Real-time counter that keeps track of the total number of days,
hours, minutes and seconds an active load is connected to the
meter inputs.
Oper Real-time counter for the total number of days, hours, minutes
and seconds the meter has been powered.
Maint
Reset Screens to perform global or single resets.
Setup Setup screens for meter configuration.
Meter, Comm, Alarm, I/O, HMI, Clock
Diag Diagnostic screens provide meter information, status and event
data for troubleshooting. The PhAng screen displays a graphical
representation of the power system the meter is monitoring.
Info, Meter, Cl Pwr, PhAng
Clock
Meter date and time (local or GMT).
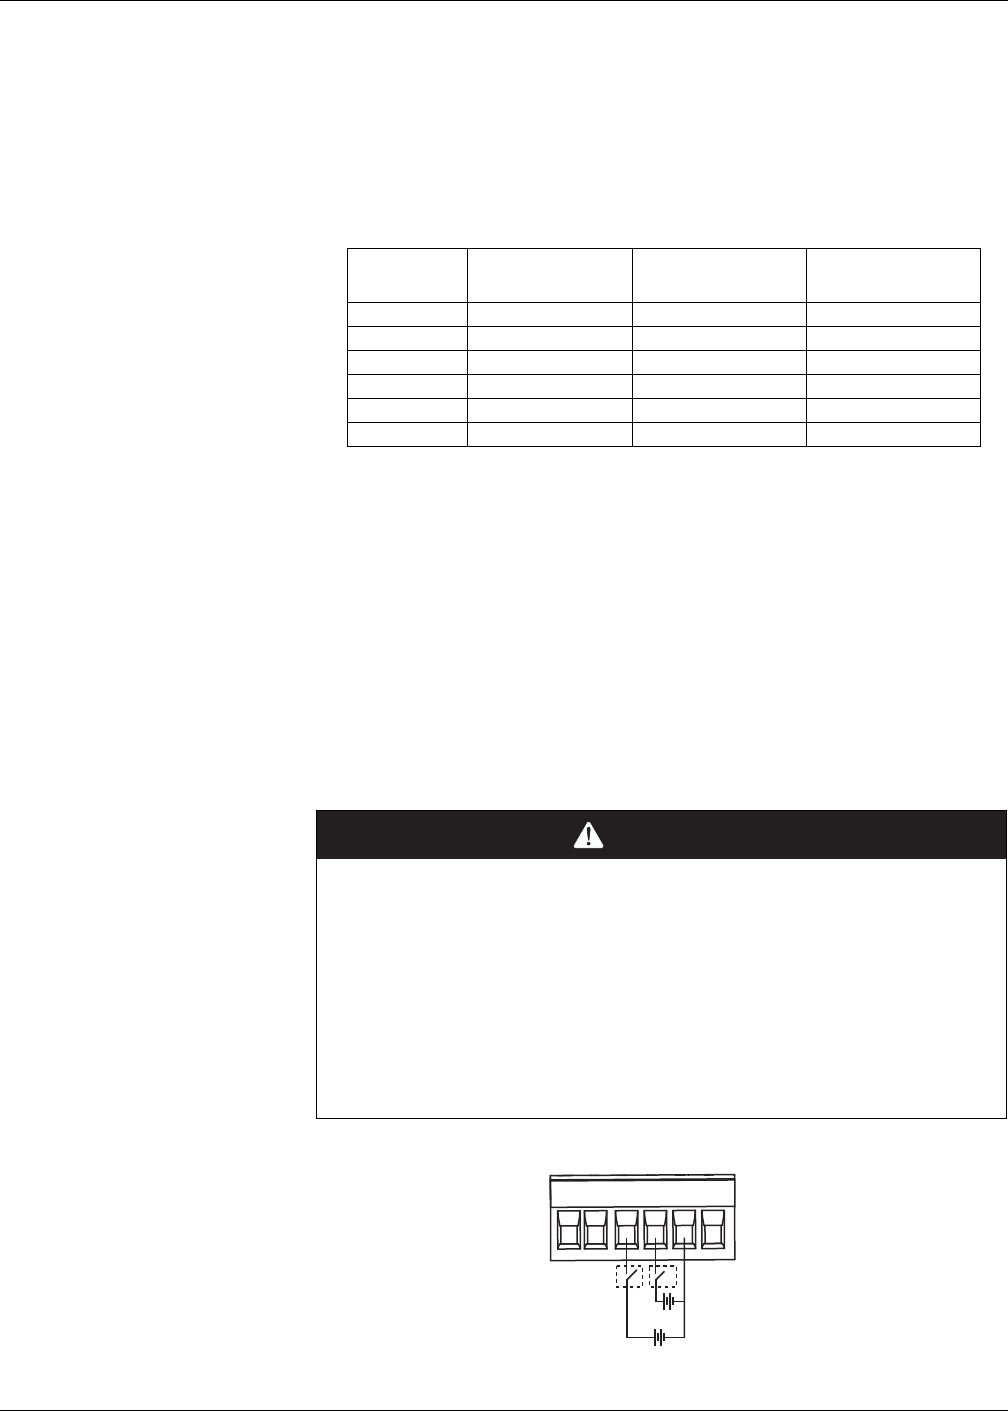
PowerLogic™ PM5300 series user guide Chapter 6—Input / Output
© 2015 Schneider Electric All Rights Reserved 49
Chapter 6—Input / Output
This section describes the meter’s I/O (input/output) features.
Based on the reference model, the meter is equipped with the following status input,
digital output and relay output ports:
Status Input, Digital Output Ports and Relay Output Ports
NOTE: Relay = Form A relay
After you wire the meter’s I/O ports, you can configure these ports so you can use the
meter to perform I/O functions.
Status input applications
Status inputs are typically used for monitoring the status of external contacts or circuit
breakers.
The meter’s status inputs require either an external voltage source or whetting voltage
(provided in the meter) to detect the status input’s ON/OFF state. The meter detects an
ON state if the external voltage appearing at the status input is within its operating
range.
Reference
Models Status Input Ports Digital Output Ports Relay Output Ports
PM5310 2 (S1+, S2+) 2 (D1+, D2+) -
PM5320 2 (S1+, S2+) 2 (D1+, D2+) -
PM5330 2 (S1+, S2+) 2 (D1+, D2+) 2 (Relay 1, Relay 2)
PM5331 2 (S1+, S2+) 2 (D1+, D2+) 2 (Relay 1, Relay 2)
PM5340 2 (S1+, S2+) 2 (D1+, D2+) 2 (Relay 1, Relay 2)
PM5341 2 (S1+, S2+) 2 (D1+, D2+) 2 (Relay 1, Relay 2)
DANGER
HAZARD OF ELECTRIC SHOCK, EXPLOSION, OR ARC FLASH
• Apply appropriate personal protective equipment (PPE) and follow safe electrical
work practices. See NFPA 70E in the USA or applicable local standards.
• Turn off all power supplying this device before working on it.
• Always use a properly rated voltage sensing device to confirm that all power is off.
• Do not exceed the device’s ratings for maximum limits.
• Do not use this device for critical control or protection applications where human or
equipment safety relies on the operation of the control circuit.
Failure to follow these instructions will result in death or serious injury.
Wiring the status inputs
S1 S2D1 D2 -/C +
18-36 Vdc
(60) (62) (40) (42) (57) (56)
18-36 Vdc

50 © 2015 Schneider Electric All Rights Reserved
Chapter 6—Input / Output PowerLogic™ PM5300 series user guide
Related topics
•See “Technical Specifications” on page 15 for electrical characteristics and limits for
the status inputs.
Status input setup
The status input ports (S1 and S2) can be configured using the front panel or
ION Setup software.
NOTE: It is recommended you use ION Setup to configure the status inputs, as setup
parameters that require text entry can only be modified using ION Setup.
Configuring status inputs using ION Setup
You can use ION Setup to configure the status inputs.
1. Start ION Setup.
2. Connect to your meter.
3. Navigate to I/O configuration > I/O Setup.
4. Select a status input to configure and click Edit. The setup screen for that status
input is displayed.
5. Enter a descriptive name for the status input’s Label.
6. Configure the other setup parameters as required.
7. Click Send to save your changes.
Status input setup parameters available through ION Setup
Parameter Values Description
Label — Use this field to change the default label and assign a
descriptive name to this status input.
Control Mode Normal, Demand Sync, Input
Metering
This field displays how the status input functions.
• Normal: the status input is not associated with
another meter function. The meter counts and
records the number of incoming pulses normally.
• Demand Sync: the status input is associated with
one of the input sync demand functions. The meter
uses the incoming pulse to synchronize its demand
period with the external source.
• Input Metering: the status input is associated with
one of the input metering channels. The meter
counts and records the number of incoming pulses
and related consumption data associated with the
pulses.
Debounce 0 to 9999
Debounce is the time delay that compensates for
mechanical contact bounce. Use this field to set how
long (in milliseconds) the external signal must remain in
a certain state to be considered a valid state change.
Associations — This field displays additional information if the status
input is already associated with another meter function.

PowerLogic™ PM5300 series user guide Chapter 6—Input / Output
© 2015 Schneider Electric All Rights Reserved 51
Configuring status inputs using the front panel
You can use the front panel to configure the status inputs.
1. Navigate to Maint > Setup.
2. Enter the setup password (default is “0”), then press OK.
3. Navigate to I/O > S In.
4. Move the cursor to point to the status input you want to set up, then press Edit.
5. Move the cursor to point to the parameter you want to modify, then press Edit.
NOTE: If Edit is not displayed, it means the parameter is either read-only or can
only be modified through software.
6. Modify the parameter as required, then press OK.
7. Move the cursor to point to the next parameter you want to modify, press Edit,
make your changes, then press OK.
8. Press to exit. Press Yes to save your changes.
Related topics
See “Technical Specifications” on page 15 for electrical characteristics and limits for the
status inputs.
Status input setup menu tree
Status input setup parameters available through the front panel
Parameter Values Description
Label — This can be modified only through software. Use this
field to assign names to the status inputs (S1 and S2).
Debounce Time
(ms) 0 to 1000
Debounce is the time delay that compensates for
mechanical contact bounce. Use this field to set how
long (in milliseconds) the external signal must remain in
a certain state to be considered a valid state change.
Control Mode Normal
This field displays how the status input functions.
Normal: the status input is not associated with another
meter function. The meter counts and records the
number of incoming pulses normally.
Maint Reset
Setup
Meter
Comm
Alarm
HMI
Clock
LED
Relay
I/O DOut
SIn
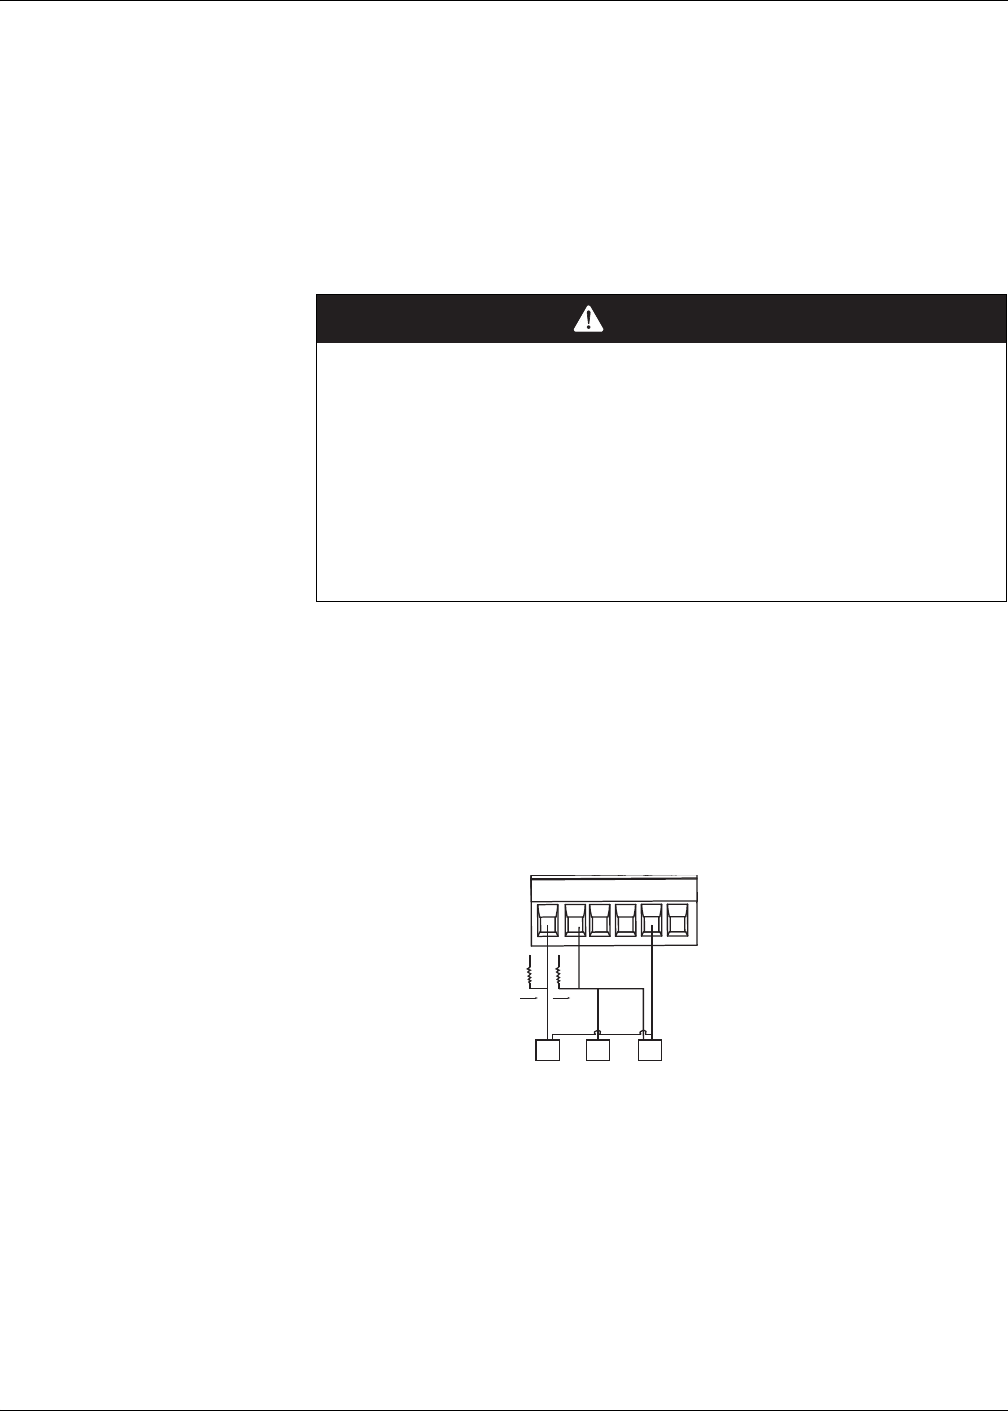
52 © 2015 Schneider Electric All Rights Reserved
Chapter 6—Input / Output PowerLogic™ PM5300 series user guide
Digital output applications
Digital outputs are typically used in switching applications, for example, to provide
on/off control signals for switching capacitor banks, generators, and other external
devices and equipment. They can also be used in demand synchronization
applications, where the meter provides pulse signals to the input of another meter to
control its demand period.
The digital output can also be used in energy pulsing applications, where a receiving
device determines energy usage by counting the kWh pulses coming from the meter’s
digital output port.
NOTE: Be aware that an unexpected change of state of the digital outputs may result
when the supply power to the meter is interrupted or after a meter firmware upgrade.
Digital output application example
You can connect your meter’s digital outputs to other meters to send a demand sync
pulse. In the following example, the first meter (Meter 1) controls and sets the demand
period of the other meters (Meter 2, Meter 3, Meter 4) through the output pulse
occurring at the end of the first meter’s demand interval.
Related topics
•See “Technical Specifications” on page 15 for electrical characteristics and limits for
the digital outputs.
Digital output setup
The digital output ports (D1 and D2) can be configured using the front panel or
ION Setup.
NOTE: It is recommended you use ION Setup to configure the digital outputs, as setup
parameters that require text entry can only be modified using software.
DANGER
HAZARD OF ELECTRIC SHOCK, EXPLOSION, OR ARC FLASH
• Apply appropriate personal protective equipment (PPE) and follow safe electrical
work practices. See NFPA 70E in the USA or applicable local standards.
• Turn off all power supplying this device before working on it.
• Always use a properly rated voltage sensing device to confirm that all power is off.
• Do not exceed the device’s ratings for maximum limits.
• Do not use this device for critical control or protection applications where human or
equipment safety relies on the operation of the control circuit.
Failure to follow these instructions will result in death or serious injury.
Digital output wiring example
S1 S2D1 D2 -/C +
(60) (62) (40) (42) (57) (56)
S1 -/C S1 -/C S1 -/C
< 20mA
< 40Vdc < 40Vdc
< 20mA
Meter 2 Meter 3 Meter 4
Meter 1

PowerLogic™ PM5300 series user guide Chapter 6—Input / Output
© 2015 Schneider Electric All Rights Reserved 53
Configuring digital outputs using ION Setup
You can use ION Setup to configure the digital outputs (D1 and D2).
1. Start ION Setup.
2. Connect to your meter
3. Navigate to I/O configuration > I/O Setup.
4. Select a digital output to configure and click Edit. The setup screen for that digital
output is displayed.
5. Enter a descriptive name for the digital output’s Label.
6. Configure the other setup parameters as required.
7. Click Send to save your changes.
Digital output setup parameters available through ION Setup
Parameter Values Description
Label — Use this field to change the default label and assign a
descriptive name to this digital output.
Control Mode External, Demand Sync,
Alarm
This field displays how the digital output functions.
• External: the digital output is controlled remotely
either through software or by a PLC using
commands sent through communications.
• Demand Sync: the digital output is associated
with one of the demand systems. The meter
sends a pulse to the digital output port at the end
of every demand interval.
• Alarm: the digital output is associated with the
alarm system. The meter sends a pulse to the
digital output port when the alarm is triggered.
Behavior Mode Normal, Timed, Coil Hold
• Normal: this mode applies when control mode is
set to External or Alarm. The digital output
remains in the ON state until an OFF command is
sent by the computer or PLC.
• Timed: the digital output remains ON for the
period defined by the On Time setup register.
• Coil Hold: this mode applies when control mode
is set to External or Alarm. For a unary alarm that
is associated with a digital output, you must set
Behavior Mode to Coil Hold. The output turns on
when the “energize” command is received and
turns off when the “coil hold release” command is
received. In the event of a control power loss, the
output remembers and returns to the state it was
in when control power was lost.
On Time (s) 0 to 9999 This setting defines the pulse width (ON time) in
seconds.
Select Dmd System Power, Current Applies when Control Mode is set to Demand Sync.
Select the demand system to monitor.
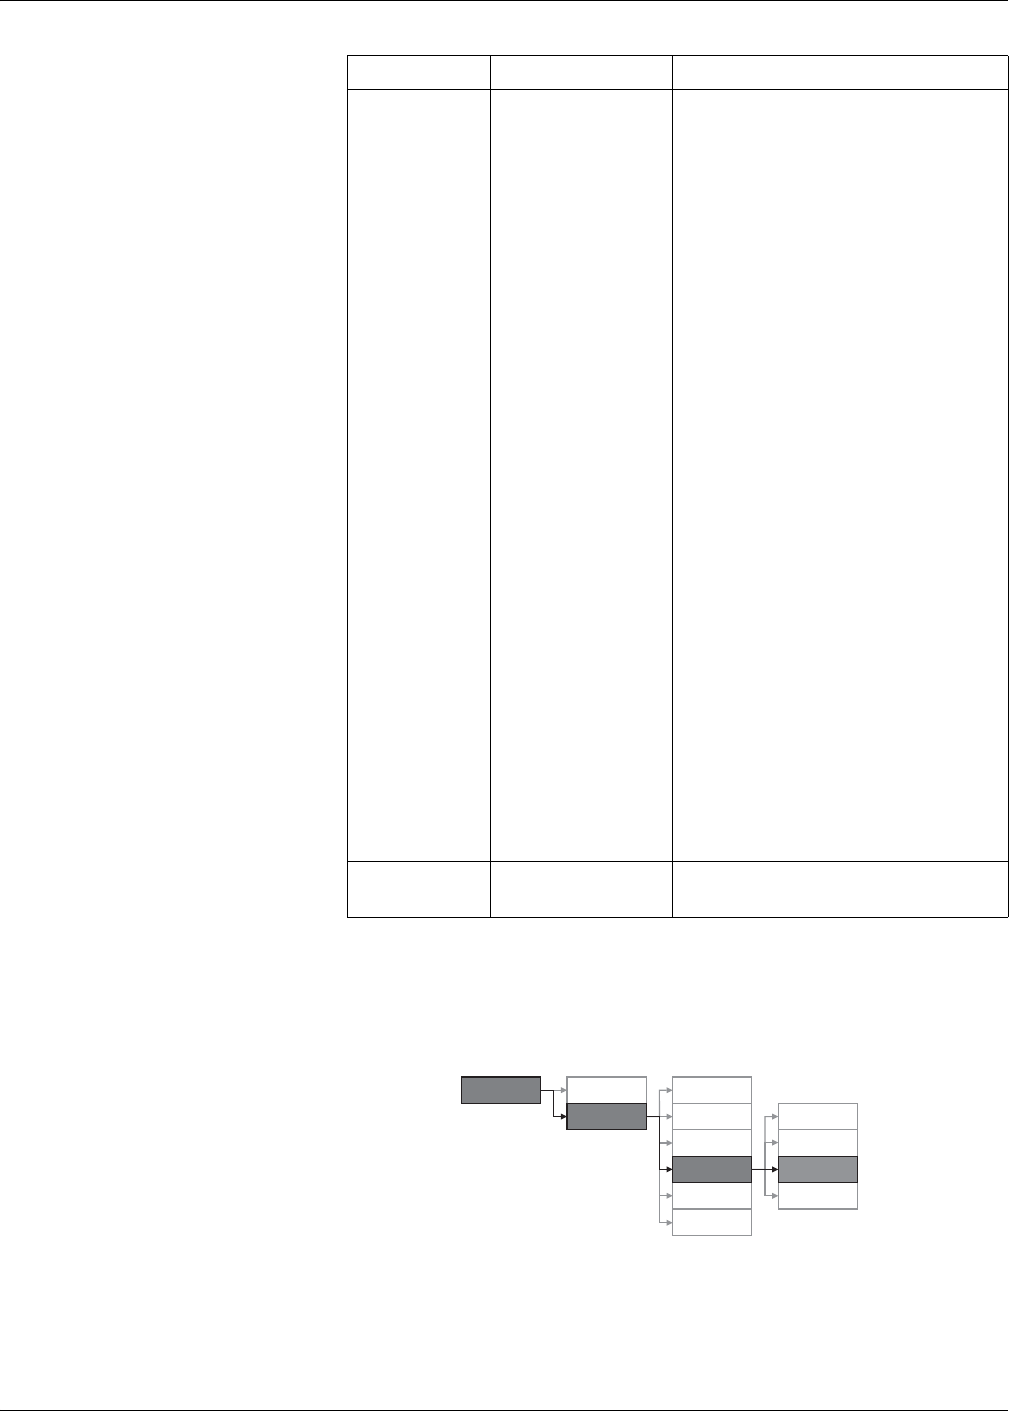
54 © 2015 Schneider Electric All Rights Reserved
Chapter 6—Input / Output PowerLogic™ PM5300 series user guide
Configuring digital outputs using the front panel
You can use the front panel to configure the digital outputs.
1. Navigate to Maint > Setup.
2. Enter the setup password (default is “0000”), then press OK.
3. Navigate to I/O > D Out.
Select Alarms
1. Over Current, Ph;
2. Under Current, Ph;
3. Over Current, N;
4. Over Current Gnd;
5. Over Voltage, L-L;
6. Under Voltage, L-L;
7. Over Voltage, L-N;
8. Under Voltage L-N;
9. Over kW;
10. Over kVAR;
11. Over kVA;
12. Lead PF, True;
13. Lag PF, True;
14. Lead PF, Disp;
15. Lag PF, Disp;
16. Over kW Dmd, Pres;
17. Over kW Dmd, Last;
18. Over kW Dmd, Pred;
19. Over kVAR Dmd,Pres;
20. Over kVAR Dmd,Last;
21. Over kVAR Dmd,Pred;
22. Over kVA Dmd, Pres;
23. Over kVA Dmd, Last;
24. Over kVA Dmd, Pred;
25. Over Frequency;
26. Under Frequency;
27. Over Voltage Unbal;
28. Over Voltage THD;
29. Phase Loss;
30. Meter Powerup;
31. Meter Reset;
32. Meter Diagnostic;
33. Phase Reversal;
34. Digital Alarm S1;
35. Digital Alarm S2;
Applies when Control Mode is set to Alarm. Select
one or more alarms to monitor.
Associations —
This field displays additional information if the digital
output is already associated with another meter
function.
Digital output setup menu tree
Digital output setup parameters available through ION Setup (continued)
Parameter Values Description
Maint Reset
Setup
Meter
Comm
Alarm
HMI
Clock
LED
Relay
I/O
SIn
DOut

PowerLogic™ PM5300 series user guide Chapter 6—Input / Output
© 2015 Schneider Electric All Rights Reserved 55
4. Move the cursor to point to the digital output you want to set up, then press Edit.
5. Move the cursor to point to the parameter you want to modify, then press Edit.
NOTE: If Edit is not displayed, it means the parameter is either read-only or can only
be modified through software.
6. Modify the parameter as required, then press OK.
7. Move the cursor to point to the next parameter you want to modify, press Edit,
make your changes, then press OK.
8. Press to exit. Press Yes to save your changes.
Digital output setup parameters available through the front panel
Parameter Values Description
Label -----
This can be modified only through software. Use this
field to change the default label and assign a
descriptive name to this digital output.
Control Mode External, Demand Sync,
Alarm
This displays how the digital output functions.
• External: the digital output is controlled remotely
either through software or by a PLC using
commands sent through communications.
• Demand Sync: the digital output is associated
with one of the demand systems. The meter
sends a pulse to the digital output port at the end
of every demand interval.
• Alarm: the digital output is associated with the
alarm system. The meter sends a pulse to the
digital output port when the alarm is triggered.
Behavior Mode Normal, Timed, Coil Hold
• Normal: this applies when control mode is set to
External or Alarm. The digital output remains in
the ON state until an OFF command is sent by
the computer or PLC.
• Timed: the digital output remains ON for the
period defined by the On Time setup register.
• Coil Hold: this applies when control mode is set to
External or Alarm. For a unary alarm that is
associated with a digital output, you must set
Behavior Mode to Coil Hold. The output turns on
when the “energize” command is received and
turns off when the “coil hold release” command is
received. In the event of a control power loss, the
output remembers and returns to the state it was
in when control power was lost.
On Time (s) 0 to 9999 This defines the pulse width (ON time) in seconds.

56 © 2015 Schneider Electric All Rights Reserved
Chapter 6—Input / Output PowerLogic™ PM5300 series user guide
Select Dmd System Power, Current Applies when Control Mode is set to Demand Sync.
Select the demand system to monitor.
Select Alarms
1. Over Current, Ph;
2. Under Current, Ph;
3. Over Current, N;
4. Over Current Gnd;
5. Over Voltage, L-L;
6. Under Voltage, L-L;
7. Over Voltage, L-N;
8. Under Voltage L-N;
9. Over kW;
10. Over kVAR;
11. Over kVA;
12. Lead PF, True;
13. Lag PF, True;
14. Lead PF, Disp;
15. Lag PF, Disp;
16. Over kW Dmd, Pres;
17. Over kW Dmd, Last;
18. Over kW Dmd, Pred;
19. Over kVAR Dmd,Pres;
20. Over kVAR Dmd,Last;
21. Over kVAR Dmd,Pred;
22. Over kVA Dmd, Pres;
23. Over kVA Dmd, Last;
24. Over kVA Dmd, Pred;
25. Over Frequency;
26. Under Frequency;
27. Over Voltage Unbal;
28. Over Voltage THD;
29. Phase Loss;
30. Meter Powerup;
31. Meter Reset;
32. Meter Diagnostic;
33. Phase Reversal;
34. Digital Alarm S1;
35. Digital Alarm S2;
Applies when Control Mode is set to Alarm. Select
one or more alarms to monitor.
Digital output setup parameters available through the front panel (continued)
Parameter Values Description

PowerLogic™ PM5300 series user guide Chapter 6—Input / Output
© 2015 Schneider Electric All Rights Reserved 57
Relay output applications
Relay outputs are typically used in switching applications, for example, to provide on/off
control signals for switching capacitor banks, generators, and other external devices
and equipment.
NOTE: Be aware that an unexpected change of state of the relay outputs may result
when the supply power to the meter is interrupted or after a meter firmware upgrade.
Relay output setup
The relay output ports (Relay 1 and Relay 2) can be configured using the front panel or
ION Setup.
NOTE: It is recommended you use ION Setup to configure the relay outputs, as setup
parameters that require text entry can only be modified using software.
Configuring relay outputs using ION Setup
You can use ION Setup to configure the relay outputs (Relay 1 and Relay 2).
1. Start ION Setup.
2. Connect to your meter
3. Navigate to I/O configuration > I/O Setup.
4. Select a relay output to configure and click Edit. The setup screen for that relay
output is displayed.
5. Enter a descriptive name for the relay output’s Label.
6. Configure the other setup parameters as required.
7. Click Send to save your changes.
DANGER
HAZARD OF ELECTRIC SHOCK, EXPLOSION, OR ARC FLASH
• Apply appropriate personal protective equipment (PPE) and follow safe electrical
work practices. See NFPA 70E in the USA or applicable local standards.
• Turn off all power supplying this device before working on it.
• Always use a properly rated voltage sensing device to confirm that all power is off.
• Do not exceed the device’s ratings for maximum limits.
• Do not use this device for critical control or protection applications where human or
equipment safety relies on the operation of the control circuit.
Failure to follow these instructions will result in death or serious injury.
Relay output setup parameters available through ION Setup
Parameter Values Description
Label — Use this field to change the default label and assign a
descriptive name to this relay output.
Control Mode External, Alarm
This field displays how the relay output functions.
• External: the relay output is controlled remotely
either through software or by a PLC using
commands sent through communications.
• Alarm: the relay output is associated with the
alarm system. The meter sends a pulse to the
relay output port when the alarm is triggered.

58 © 2015 Schneider Electric All Rights Reserved
Chapter 6—Input / Output PowerLogic™ PM5300 series user guide
Behavior Mode Normal, Timed, Coil Hold
• Normal: this mode applies when control mode is
set to External or Alarm. The relay output
remains in the ON state until an OFF command is
sent by the computer or PLC.
• Timed: the relay output remains ON for the period
defined by the On Time setup register.
• Coil Hold: this mode applies when control mode
is set to External or Alarm. For a unary alarm that
is associated with a relay output, you must set
Behavior Mode to Coil Hold. The output turns on
when the “energize” command is received and
turns off when the “coil hold release” command is
received. In the event of a control power loss, the
output remembers and returns to the state it was
in when control power was lost.
On Time (s) 0 to 9999 This setting defines the pulse width (ON time) in
seconds.
Select Alarms
1. Over Current, Ph;
2. Under Current, Ph;
3. Over Current, N;
4. Over Current, Gnd;
5. Over Voltage, L-L;
6. Under Voltage, L-L;
7. Over Voltage, L-N;
8. Under Voltage L-N;
9. Over kW;
10. Over kVAR;
11. Over kVA;
12. Lead PF, True;
13. Lag PF, True;
14. Lead PF, Disp;
15. Lag PF, Disp;
16. Over kW Dmd, Pres;
17. Over kW Dmd, Last;
18. Over kW Dmd, Pred;
19. Over kVAR Dmd,Pres;
20. Over kVAR Dmd,Last;
21. Over kVAR Dmd,Pred;
22. Over kVA Dmd, Pres;
23. Over kVA Dmd, Last;
24. Over kVA Dmd, Pred;
25. Over Frequency;
26. Under Frequency;
27. Over Voltage Unbal;
28. Over Voltage THD;
29. Phase Loss;
30. Meter Powerup;
31. Meter Reset;
32. Meter Diagnostic;
33. Phase Reversal;
34. Digital Alarm S1;
35. Digital Alarm S2;
Applies when Control Mode is set to Alarm. Select
one or more alarms to monitor.
Associations —
This field displays additional information if the relay
output is already associated with another meter
function.
Relay output setup parameters available through ION Setup (continued)
Parameter Values Description

PowerLogic™ PM5300 series user guide Chapter 6—Input / Output
© 2015 Schneider Electric All Rights Reserved 59
Configuring relay outputs using the front panel
You can use the front panel to configure the relay outputs.
1. Navigate to Maint > Setup.
2. Enter the setup password (default is “0”), then press OK.
3. Navigate to I/O > Relay.
4. Move the cursor to point to the relay output you want to set up, then press Edit.
5. Move the cursor to point to the parameter you want to modify, then press Edit.
NOTE: If Edit is not displayed, it means the parameter is either read-only or can only
be modified through software.
6. Modify the parameter as required, then press OK.
7. Move the cursor to point to the next parameter you want to modify, press Edit,
make your changes, then press OK.
8. Press to exit. Press Yes to save your changes.
Relay output setup menu tree
Relay output setup parameters available through the front panel
Parameter Values Description
Label -----
This can be modified only through software. Use this
field to change the default label and assign a
descriptive name to this relay output.
Control Mode External, Alarm
This displays how the relay output functions.
• External: the relay output is controlled remotely
either through software or by a PLC using
commands sent through communications.
• Alarm: the relay output is associated with the
alarm system. The meter sends a pulse to the
relay output port when the alarm is triggered.
Behavior Mode Normal, Timed, Coil Hold
• Normal: this applies when control mode is set to
External or Alarm. The relay output remains in
the ON state until an OFF command is sent by
the computer or PLC.
• Timed: the relay output remains ON for the period
defined by the On Time setup register.
• Coil Hold: this applies when control mode is set to
External or Alarm. For a unary alarm that is
associated with a relay output, you must set
Behavior Mode to Coil Hold. The output turns on
when the “energize” command is received and
turns off when the “coil hold release” command is
received. In the event of a control power loss, the
output remembers and returns to the state it was
in when control power was lost.
Maint Reset
Setup
Meter
Comm
Alarm
HMI
Clock
LED
Relay
I/O D Out
S In

60 © 2015 Schneider Electric All Rights Reserved
Chapter 6—Input / Output PowerLogic™ PM5300 series user guide
Related topics
•See “Demand setup” on page 43 for details on configuring a digital output to send
demand sync pulses to another connected device.
Alarm / energy pulsing LED setup
The meter’s LED can be configured for alarm indication or energy pulsing.
When set to detect alarms, the LED blinks to indicate an alarm condition. See “Alarm
Priorities” on page 66 for a description of the LED behavior based on different alarms.
When the LED is set to energy pulsing, the meter sends a readable pulse or signal
based on the measured energy. This pulse can be used for accuracy verification or as
an input to another energy monitoring system. The meter uses the pulse constant
setting in pulses per k_h to determine the frequency and number of pulses sent to the
LED (where k_h = kWh, kVARh or kVAh depending on the energy parameter selected).
The LED setup screen allows you to configure the alarm / energy pulsing LED for
alarming or energy pulsing applications.
On Time (s) 0 to 65535 This defines the pulse width (ON time) in seconds.
Select Alarms
1. Over Current, Ph;
2. Under Current, Ph;
3. Over Current, N;
4. Over Current, Gnd;
5. Over Voltage, L-L;
6. Under Voltage, L-L;
7. Over Voltage, L-N;
8. Under Voltage L-N;
9. Over kW;
10. Over kVAR;
11. Over kVA;
12. Lead PF, True;
13. Lag PF, True;
14. Lead PF, Disp;
15. Lag PF, Disp;
16. Over kW Dmd, Pres;
17. Over kW Dmd, Last;
18. Over kW Dmd, Pred;
19. Over kVAR Dmd,Pres;
20. Over kVAR Dmd,Last;
21. Over kVAR Dmd,Pred;
22. Over kVA Dmd, Pres;
23. Over kVA Dmd, Last;
24. Over kVA Dmd, Pred;
25. Over Frequency;
26. Under Frequency;
27. Over Voltage Unbal;
28. Over Voltage THD;
29. Phase Loss;
30. Meter Powerup;
31. Meter Reset;
32. Meter Diagnostic;
33. Phase Reversal;
34. Digital Alarm S1;
35. Digital Alarm S2;
Applies when Control Mode is set to Alarm. Select
one or more alarms to monitor.
Relay output setup parameters available through the front panel (continued)
Parameter Values Description

PowerLogic™ PM5300 series user guide Chapter 6—Input / Output
© 2015 Schneider Electric All Rights Reserved 61
Configuring the LED or digital output for energy pulsing using
ION Setup
You can use the ION Setup to configure your meter’s LED or digital output for energy
pulsing.
1. Start ION Setup.
2. Connect to your meter
3. Navigate to I/O configuration > Energy Pulsing.
4. Select the LED or a digital output to configure and click Edit. The setup screen is
displayed.
5. Enter a descriptive name for the digital output’s Label.
6. Configure the other setup parameters as required.
7. Click Send to save your changes.
Related topics
•See “Alarm Priorities” on page 66 for a detailed description on the alarm / energy
pulsing LED’s behavior when it is configured for alarm notification.
Configuring the alarm / energy pulsing LED using the front panel
You can use the front panel display to configure your meter’s LED for alarming or
energy pulsing application.
1. Navigate to Maint > Setup.
2. Enter the setup password (default is “0”), then press OK.
3. Navigate to I/O > LED.
Alarm / energy pulsing LED setup parameters available through ION Setup
Parameter Values Description
Mode Off, Alarm, Energy
Off disables the LED.
Alarm sets the LED for alarm notification.
Energy sets the LED for energy pulsing.
Pulse Wt. (p/k_h) 1 to 9999999
When configured for energy pulsing, this
defines how many pulses are sent to the LED
for every 1 kWh, 1 kVARh or 1kVAh of
accumulated energy.
Channel
Active Energy Delivered
Select which accumulated energy channel to
monitor and use for energy pulsing.
Active Energy Received
Active Energy Del+Rec
Reactive Energy Delivered
Reactive Energy Received
Reactive Energy Del+Rec
Apparent Energy Delivered
Apparent Energy Received
Apparent Energy Del+Rec
Alarm / energy pulsing LED settings menu tree
Maint Reset
Setup
Meter
Comm
Alarm
HMI
Clock
LED
Relay
I/O D Out
S In

62 © 2015 Schneider Electric All Rights Reserved
Chapter 6—Input / Output PowerLogic™ PM5300 series user guide
4. Move the cursor to point to the parameter you want to modify, then press Edit.
5. Press or to modify the parameter as required, then press OK.
6. Press to exit. Press Yes to save your changes.
Alarm / energy pulsing LED parameters available through the front panel
Parameter Values Description
Mode Off, Alarm, Energy
Disabled turns off the LED completely.
Alarm sets the LED for alarm notification.
Energy sets the LED for energy pulsing.
Pulse Wt. (p/k_h) 1 to 9999999
When configured for energy pulsing, this setting defines
how many pulses are sent to the LED for every 1 kWh,
1 kVARh or 1kVAh accumulated energy.
Parameter
Active Del
Select which accumulated energy channel to monitor and
use for energy pulsing.
Active Rec
Active Del + Rec
Reactive Del
Reactive Rec
Reactive Del + Rec
Apparent Del
Apparent Rec
Apparent Del + Rec
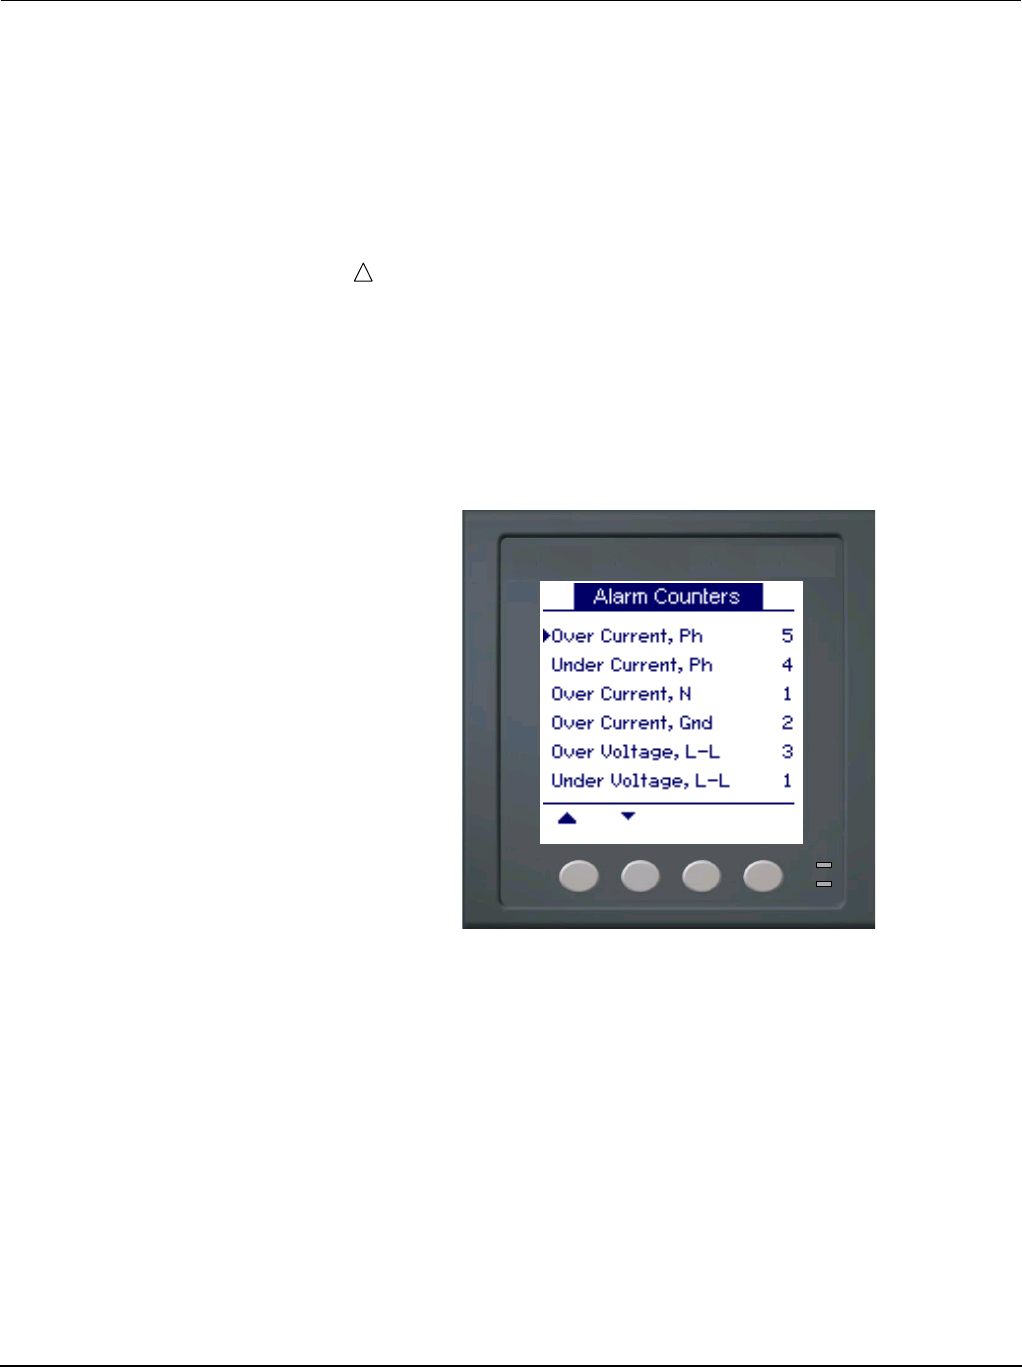
PowerLogic™ PM5300 series user guide Chapter 7—Alarms
© 2015 Schneider Electric All Rights Reserved 63
Chapter 7—Alarms
This section describes the alarm features on PM5300 series Power and Energy meters.
About Alarms
The icon appears in the upper-right corner of the meter display when an alarm is
active.
If the energy/alarm LED has been configured for alarms, the energy/alarm LED flashes
when an alarm is active. See “Alarm / energy pulsing LED setup” on page 60 for more
information.
The power meter maintains a counter for each alarm to help keep track of the total
number of occurrences (see Figure 7–1).
If you make changes to the basic power meter setup, all alarms are disabled to prevent
undesired alarm operation. Confirm alarm configuration and enable required alarms.
NOTE: Only alarms that apply to the selected power system configuration can be
enabled.
The available alarms for this power meter are described in the following sections.
1-Second Alarms
The power meter has 29 standard 1-second over/under alarms. See Table 7–1 for a
complete list.
Use the display to configure 1-second alarms with the following values:
•Enable—disable (default) or enable
•Pickup Setpoint (magnitude)
•Pickup Time Delay (in seconds)
Figure 7–1: Alarm Counters
!

PowerLogic™ PM5300 series user guide Chapter 7—Alarms
© 2015 Schneider Electric All Rights Reserved64
•Dropout Setpoint (magnitude)
•Dropout Time Delay (in seconds)
Table 7–1: List of Standard 1-Second Over/Under Alarms
Alarm
Number Alarm
Label
01 Over Current, Phase
02 Under Current, Phase
03 Over Current, Neutral
04 Over Current, Ground
05 Over Voltage, L-L
06 Under Voltage, L-L
07 Over Voltage, L-N
08 Under Voltage L-N
09 Over kW
10 Over kVAR
11 Over kVA
12 Lead PF, True
13 Lag PF, True
14 Lead PF, Disp
15 Lag PF, Disp
16 Over kW Dmd, Pres
17 Over kW Dmd, Last
18 Over kW Dmd, Pred
19 Over kVAR Dmd, Pres
20 Over kVAR Dmd, Last
21 Over kVAR Dmd, Pred
22 Over kVA Dmd, Pres
23 Over kVA Dmd, Last
24 Over kVA Dmd, Pred
25 Over Frequency
26 Under Frequency
27 Over Voltage Unbal
28 Over Voltage THD
29 Phase Loss
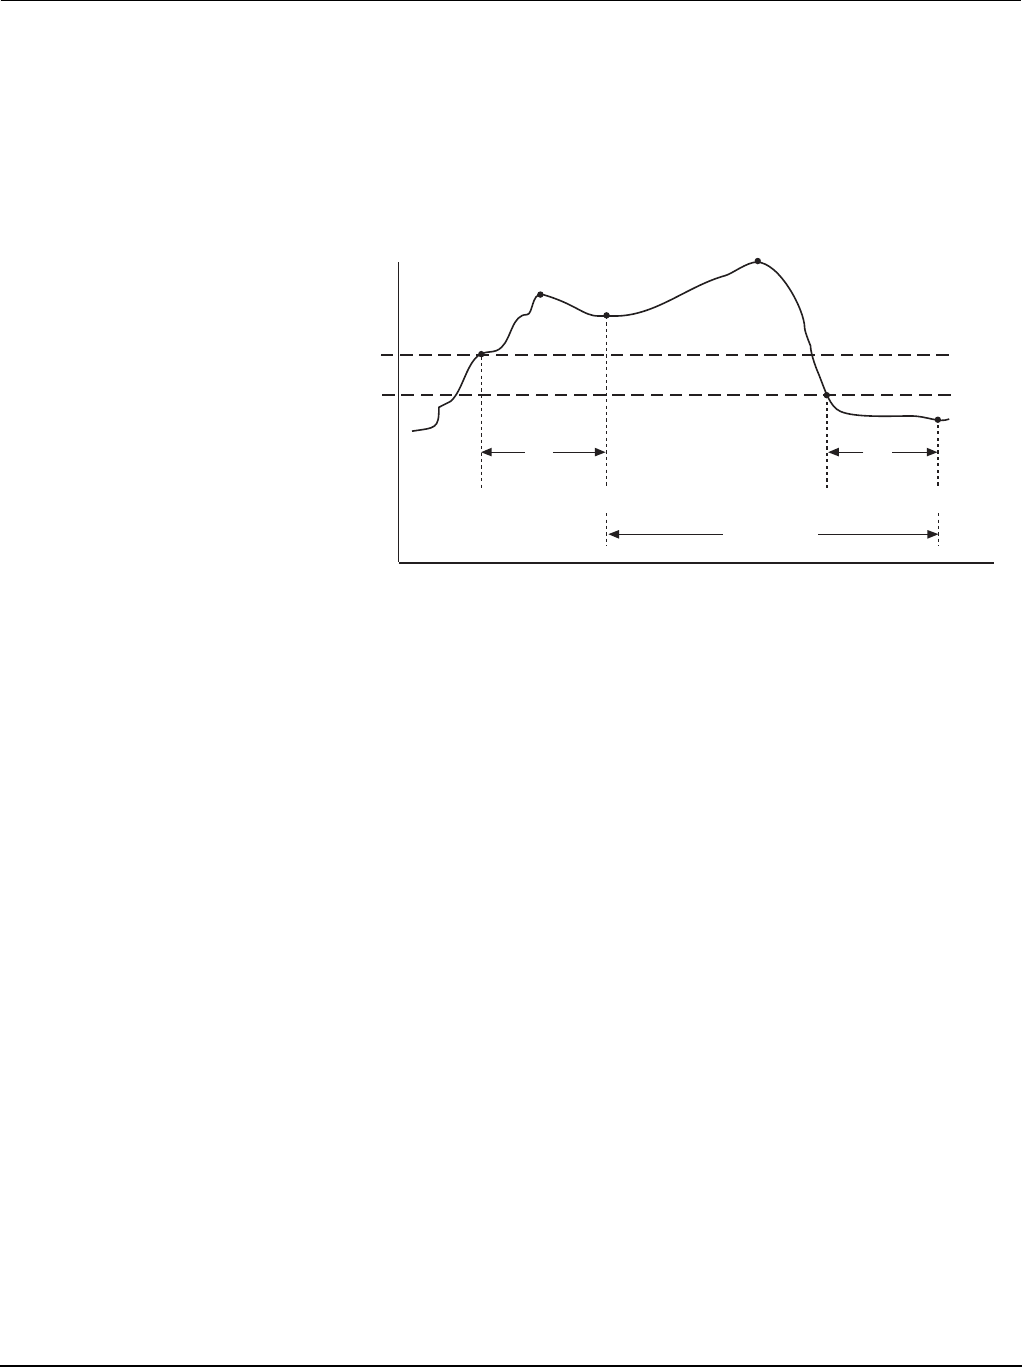
PowerLogic™ PM5300 series user guide Chapter 7—Alarms
© 2015 Schneider Electric All Rights Reserved 65
Many of the 1-second alarms are three-phase alarms. Alarm setpoints are evaluated for
each of the three phases individually, but the alarm is reported as a single alarm. The
alarm pickup occurs when the first phase exceeds the alarm pickup magnitude for the
pickup time delay. The alarm is active as long as any phase remains in an alarm state.
The alarm dropout occurs when the last phase drops below the dropout magnitude for the
dropout time delay. See Figure 7–2 below.
EV1—The power meter records the date and time that the pickup setpoint and time delay
were satisfied, and the maximum value reached (Max1) during the pickup delay period
(T). Also, the power meter performs any tasks assigned to the event such as operation
of a digital output.
EV2—The power meter records the date and time that the dropout setpoint and time
delay were satisfied, and the maximum value reached (Max2) during the alarm period.
Digital Alarms
The power meter has two digital alarms for alarming on status input status. By default, the
digital alarms are active when the associated status input is ON. The pickup and dropout
time delays are configured in seconds.
Figure 7–2: How the power meter handles setpoint-driven alarms
ΔTΔT
Max1
Max2
Pickup
Setpoint
Dropout
Setpoint
Pickup Delay Dropout Delay
EV1 EV2
Alarm Period

PowerLogic™ PM5300 series user guide Chapter 7—Alarms
© 2015 Schneider Electric All Rights Reserved66
Unary Alarms
The power meter has four unary alarms. These alarms help to alert you when the meter
powers on after a control power loss, when the meter resets for any reason, when the
meter self-diagnostic feature detects a problem, or when the meter detects a phase
rotation different than expected.
Alarm Priorities
Each alarm has a priority level. Use priorities to help distinguish between events that
require immediate action and those that do not require action. See “Setting up the alarm /
energy pulsing LED” on page 42 for information on configuring the alarm LED for alarm
mode.
•High priority—if a high priority alarm occurs, the display informs you in two ways: the
alarm LED on the display flashes until you acknowledge the alarm, and the alarm icon
blinks while the alarm is active. An alarm message is displayed while the alarm is
active. See “Viewing Unacknowledged Alarms and the Alarm History Log” on page 73
for information on acknowledging alarms.
•Medium priority—if a medium priority alarm occurs, the alarm LED and the alarm
icon blink only while the alarm is active. An alarm message is displayed while the
alarm is active.
•Low priority—if a low priority alarm occurs, the alarm LED and the alarm icon blink
only while the alarm is active. No alarm message is displayed.
•No priority—if an alarm is set up with no priority, no visible representation appears on
the display. Alarms with no priority are not entered in the alarm Log.
If multiple alarms with different priorities are active at the same time, the display shows
the alarms in the order they occurred.
When a pickup event occurs, the active alarm list appears. Press “Detail” to see more
event information. See “Alarm Setup” on page 66 for more information.
Using an Alarm to Control a Relay and Digital Output
Relays can be configured as external, and alarm. Digital Outputs can be configured as
external, demand sync, and alarm. See the “Setting Up Alarms” sections in this chapter
and “Digital output setup” on page 52.
Alarm Setup
Evaluation of all alarms is temporarily suspended while alarm setup screens are
displayed. Evaluation resumes immediately upon exit from alarm setup screens.
To set up standard alarms:
To set up standard alarms:
1. Navigate to Maint > Setup.
2. Enter the setup password (default is “0000”), then press OK.
3. Press Alarm.
Use the directions in the following sections to set up alarms.
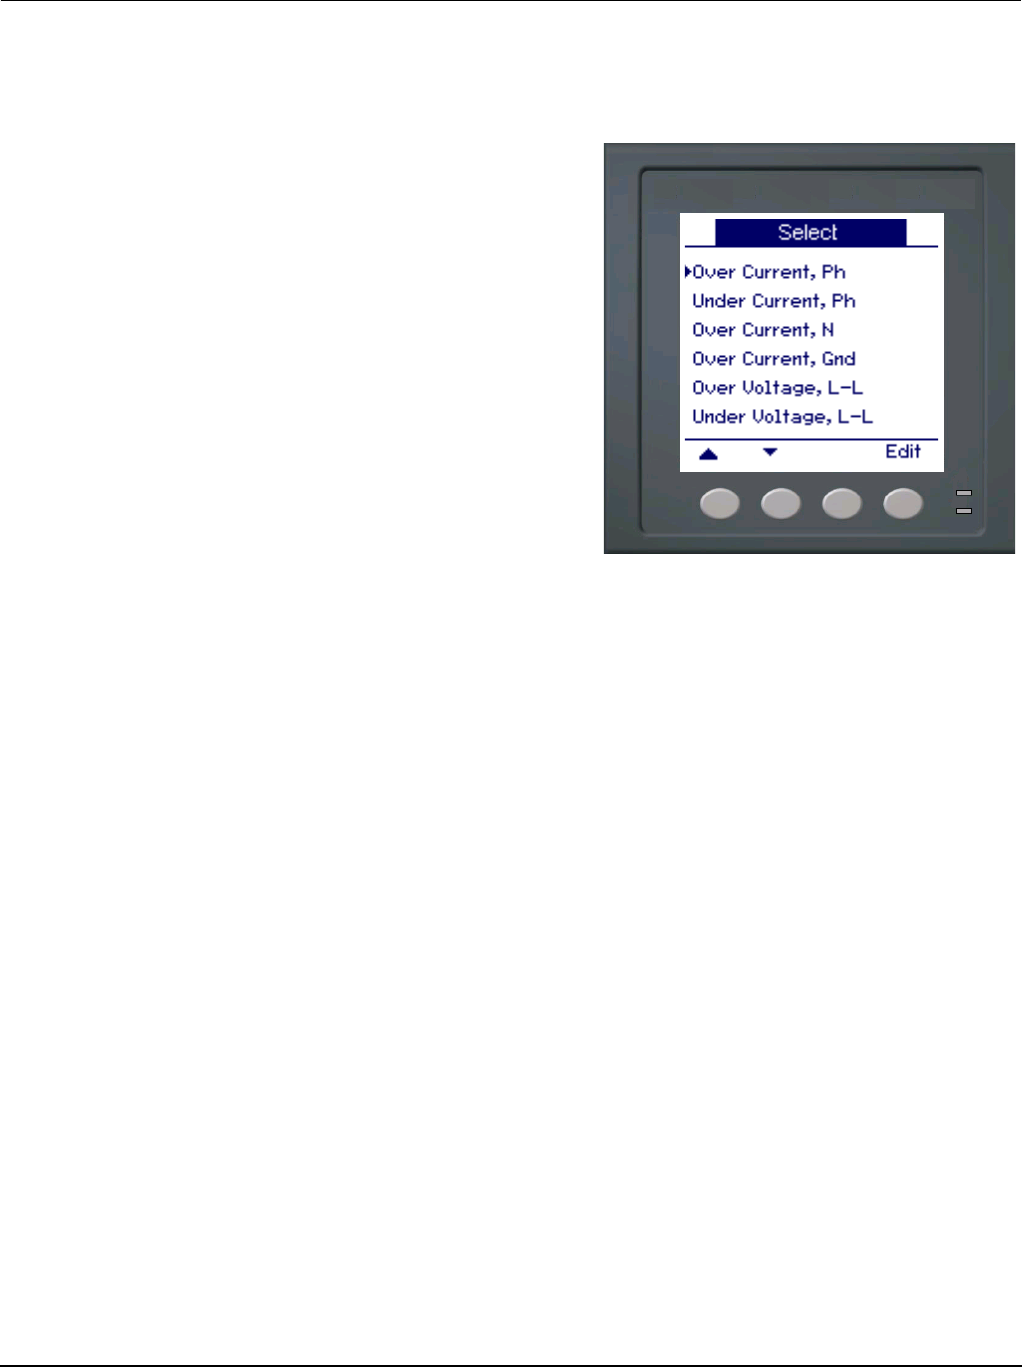
PowerLogic™ PM5300 series user guide Chapter 7—Alarms
© 2015 Schneider Electric All Rights Reserved 67
Setting Up 1-Second Alarms
To set up a standard alarm:
1. Press 1-Sec. The 1-second
alarm Select screen appears.
2. Press ▼ and ▲ to scroll
through the list of standard 1–
second alarms.
3. Press Edit to select an alarm to
be configured.
4. Press Edit to select Pickup
Setpoint.
5. Press + to increment the active
digit through the numerals 0-9.
6. Press to enter the selected
value for the active digit and
move to the next digit to the left.
7. Continue until all values are
selected, then press OK to
enter the selected number for
the pickup setpoint.
8. For power factor alarms (Lead
PF, True; Lag PF, True; Lead
PF, Disp; and Lag PF, Disp)
press ▼ to select PU Set Point
Lead/Lag, then press Edit. For
other alarms, skip to Step 11.
9. Press + and - to scroll between
Lead and Lag.
10. Press OK to set the pickup set
point lead or lag.
11. Press ▼and follow Steps 4 to
7 for Pickup Time Delay and
Dropout Setpoint.
12. For power factor alarms, press
▼to select DO Set Point
Lead/Lag and follow Steps 10
and 11. For other alarms,
proceed to Step 14.
13. Press ▼and follow Steps 4 to
7 for Dropout Time Delay.
14. Press ▼ to select Enable, then
press Edit.
15. Press + and - to scroll between
Yes and No.
16. Press OK to enable or disable
the alarm.
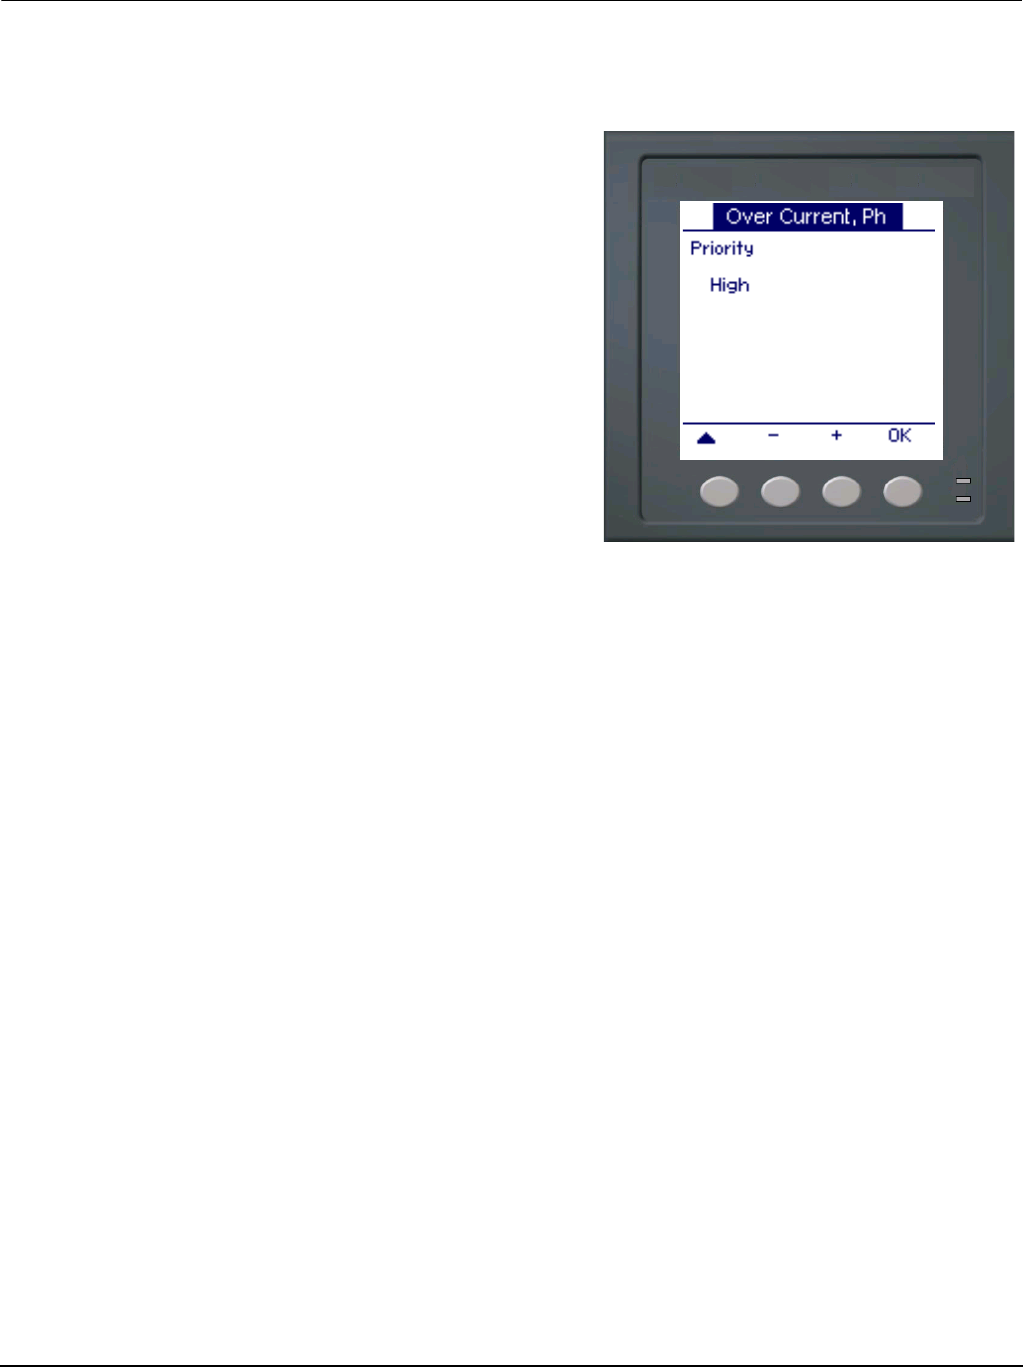
PowerLogic™ PM5300 series user guide Chapter 7—Alarms
© 2015 Schneider Electric All Rights Reserved68
Setting Up 1-Second Alarms (continued)
NOTE: The Over Demand alarms are applicable for systems in which the energy is
delivered to the customer only.
17. Press ▼ to select Priority, then
press Edit.
18. Press + and - to scroll through
priority options None, High,
Medium, or Low.
NOTE: See “Alarm Priorities”
on page 66 for more
information.
19. Press OK to set the priority.
20. Press ▼ to select Select
Digital Output, then press Edit.
21. Press + and - to scroll through
the list of digital outputs to
associate with the alarm.
22. Press OK to select a digital
output to be associated with the
selected alarm.
23. If the selected digital output
already has an association that
will be lost by making the new
selection, a confirmation screen
appears.
— Press Yes to accept the
changes and return to the
previous screen.
— Press No to keep the
existing configuration in use
and return to the previous
screen.
24. Press ▲ to save all alarm
selections and return to the
previous screen.
25. Press ▲ to save all 1-second
alarm selections.
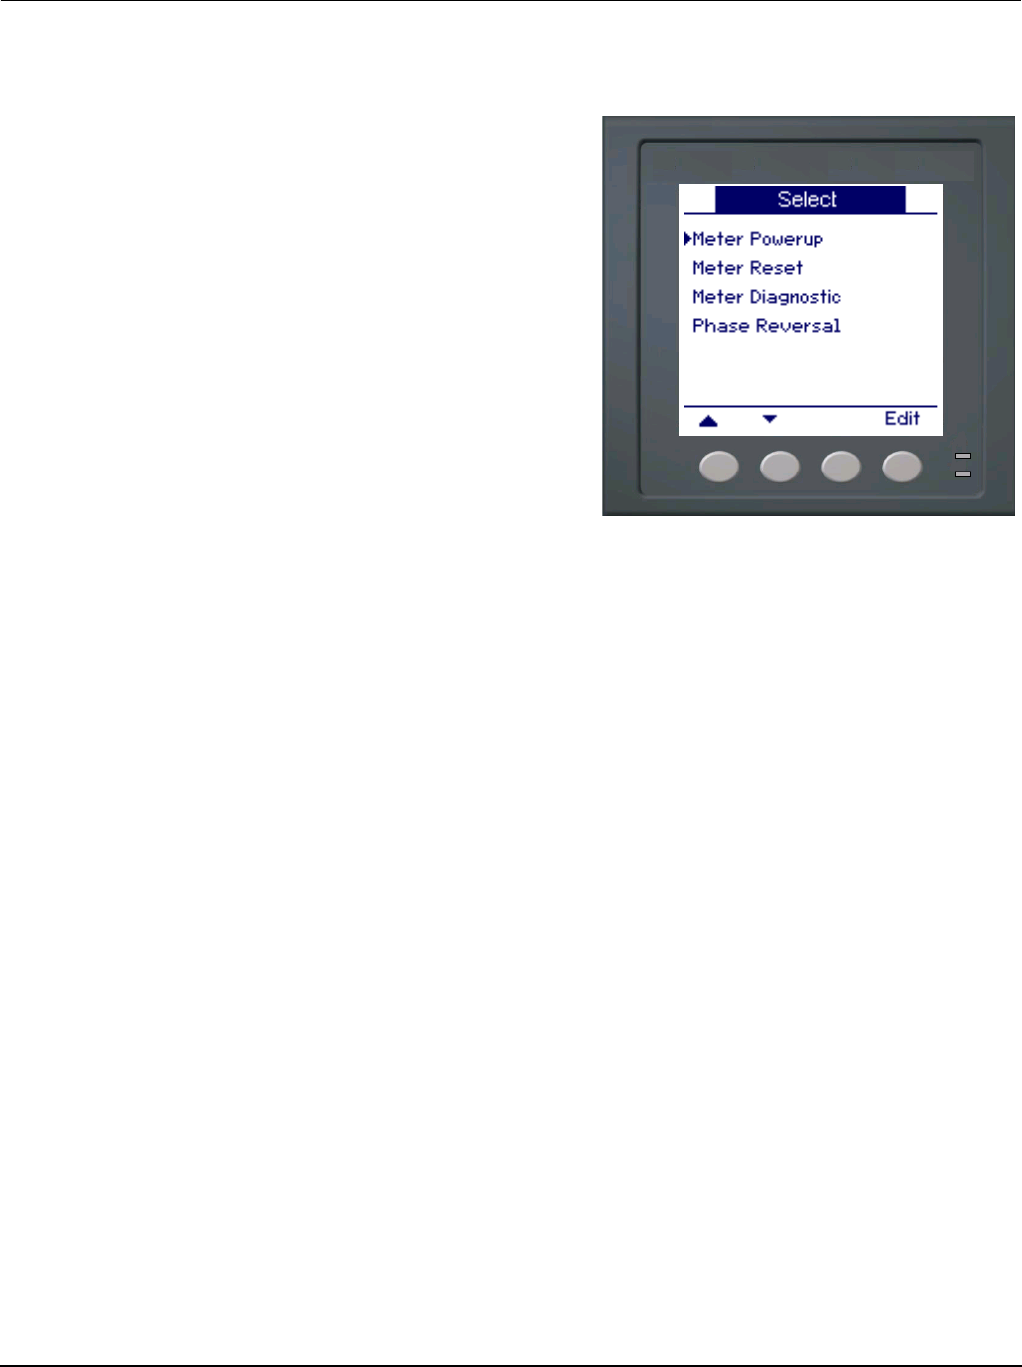
PowerLogic™ PM5300 series user guide Chapter 7—Alarms
© 2015 Schneider Electric All Rights Reserved 69
Setting Up Unary Alarms To set up unary alarms:
1. Press Unary. The unary alarm
Select screen appears.
2. Press ▼ and ▲ to scroll
through the list of unary alarms.
3. Press Edit to select an alarm to
be configured.
4. Press Edit to select Enable.
5. Press + and - to scroll between
Yes and No.
6. Press OK to enable or disable
the alarm.
7. Press ▼ to select Priority.
8. Press + and - to scroll through
priority options Low, None,
High, or Medium.
NOTE: See “Alarm Priorities”
on page 66 for more
information.
9. Press OK to set the priority.
10. Press ▼ to select Select
Digital Output, then press Edit.
NOTE: The digital output
behavior mode must be Timed
or Coil Hold to turn on when a
unary alarm event occurs.
11. Press + and - to scroll through
the list of digital outputs to
associate with the alarm.
12. Press OK to select a digital
output to be associated with the
selected alarm.
13. If the selected digital output
already has an association that
will be lost by making the new
selection, a confirmation
screen appears.
— Press Yes to accept the
changes and return to the
previous screen.
— Press No to keep the
existing configuration in use
and return to the previous
screen.
14. Press ▲ to save all alarms
selections and return to the
previous screen.
15. Press ▲ to save all unary
alarm selections.
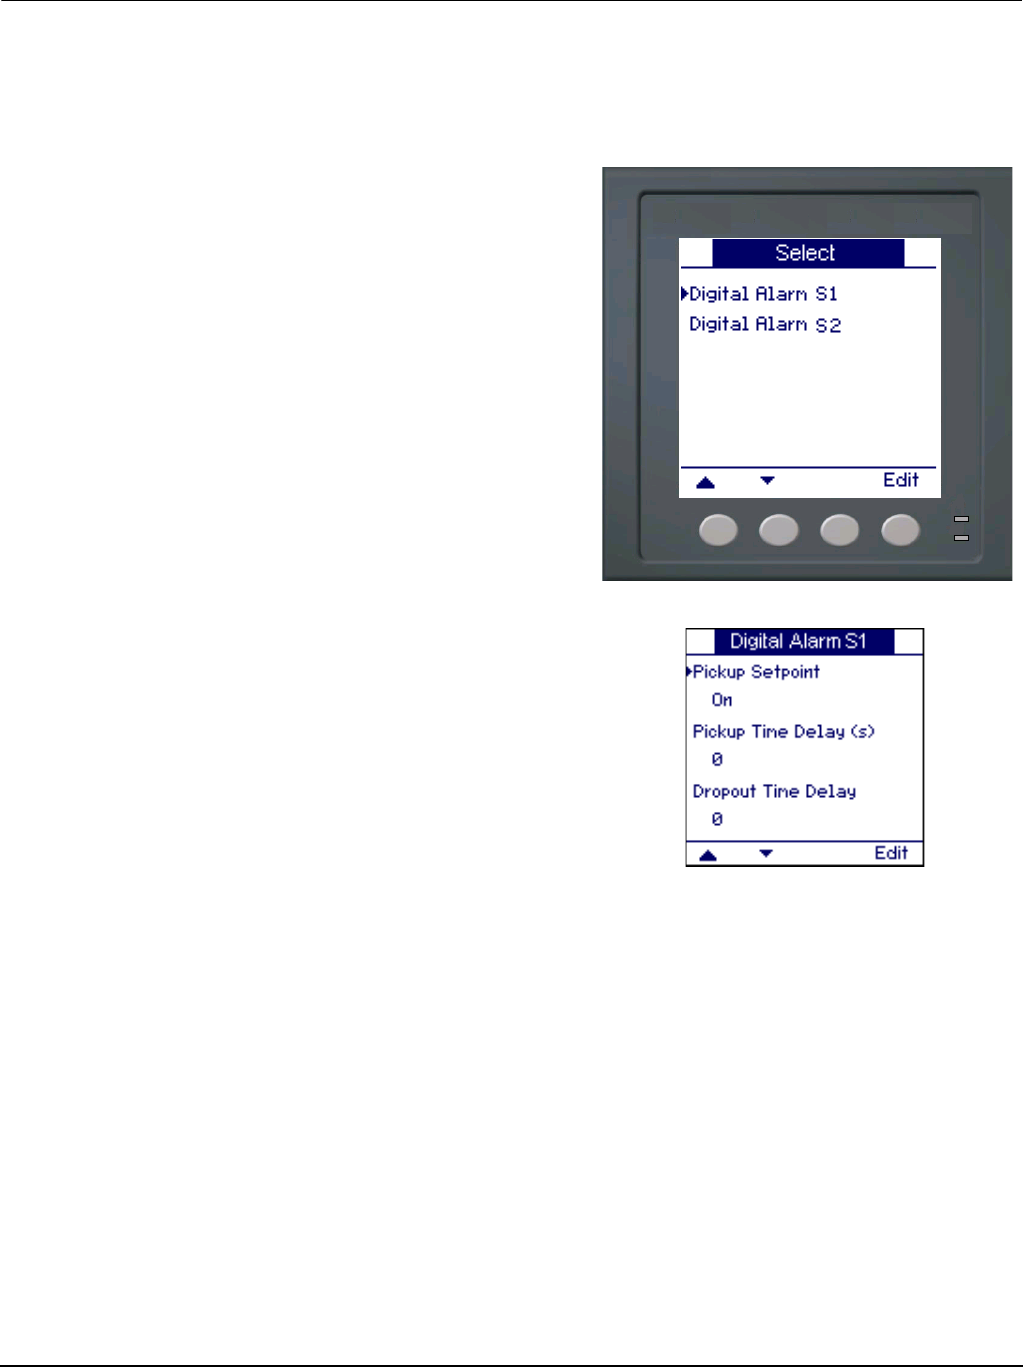
PowerLogic™ PM5300 series user guide Chapter 7—Alarms
© 2015 Schneider Electric All Rights Reserved70
Setting Up Digital Alarms
To set up digital alarms:
1. Press Dig. The digital alarm
Select screen appears.
2. Press ▼ and ▲ to scroll
through the list of digital
alarms.
3. Press Edit to select an alarm to
be configured.
4. Press Edit to select Pickup
Setpoint, then press Edit.
5. Press + and - to scroll between
On and Off.
6. Press OK to enter the pickup
setpoint.
7. Press ▼ to select Pickup Time
Delay, then press Edit.
NOTE: If the selected status
input mode is Demand Sync or
Input Metering, a confirmation
screen appears warning that if
an alarm is enabled for this
status input, the existing
association will be broken.
8. Press + to increment the active
digit through the numerals 0-9.
NOTE: Units for time delays
are set in seconds.
9. Press to enter the selected
value for the active digit and
move to the next digit to the
left.
10. Continue until all values are
selected, then press OK to
enter the pickup time delay.
11. Press ▼ to select Dropout
Time Delay, then press Edit.
12. Follow Steps 8 to 11 for the
dropout time delay.
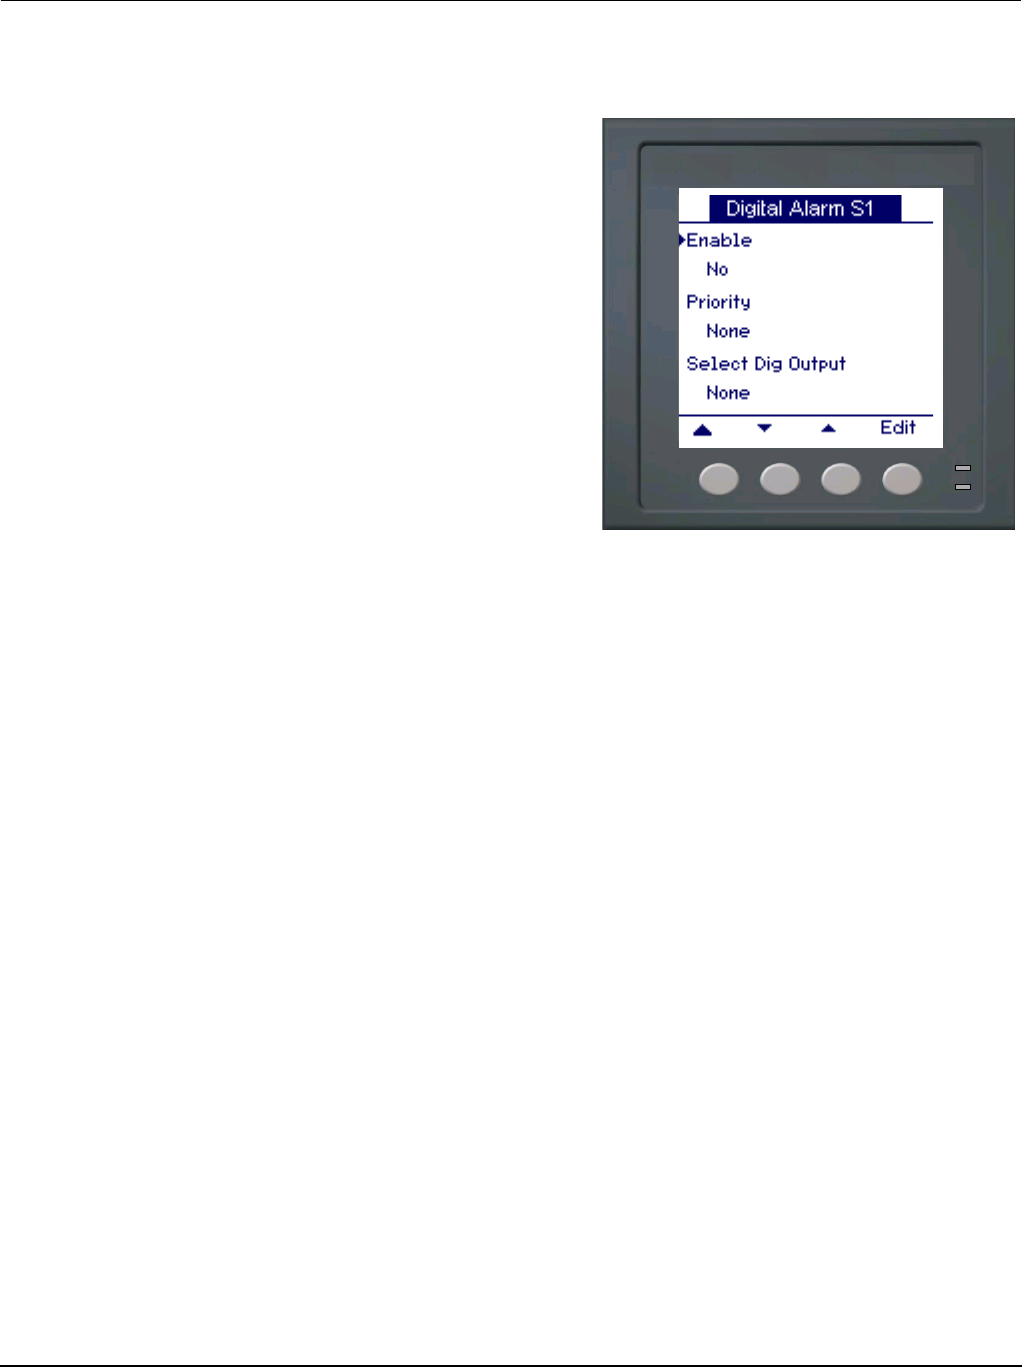
PowerLogic™ PM5300 series user guide Chapter 7—Alarms
© 2015 Schneider Electric All Rights Reserved 71
Setting Up Digital Alarms (continued)
13. Press ▼ to select Enable,
then press Edit.
14. Press + and - to scroll between
Yes and No.
15. Press OK to enable or disable
the alarm.
16. Press ▼ to select Priority,
then press Edit.
17. Press + and - to scroll through
priority options None, High,
Medium, or Low.
NOTE: See “Alarm Priorities”
on page 66 for more
information.
18. Press OK to set the priority.
19. Press ▼ to select Select
Digital Output, then press Edit.
20. Press + and - to scroll through
the list of digital outputs to
associate with the alarm.
21. Press OK to select a digital
output to be associated with the
selected alarm.
22. If the selected digital output
already has an association that
will be lost by making the new
selection, a confirmation
screen appears.
—Press Yes to accept the
changes and return to the
previous screen.
— Press No to keep the
existing configuration in use
and return to the previous
screen.
23. Press ▲ to save all alarm
selections and return to the
previous screen.
24. Press ▲ to save all digital
alarm selections.
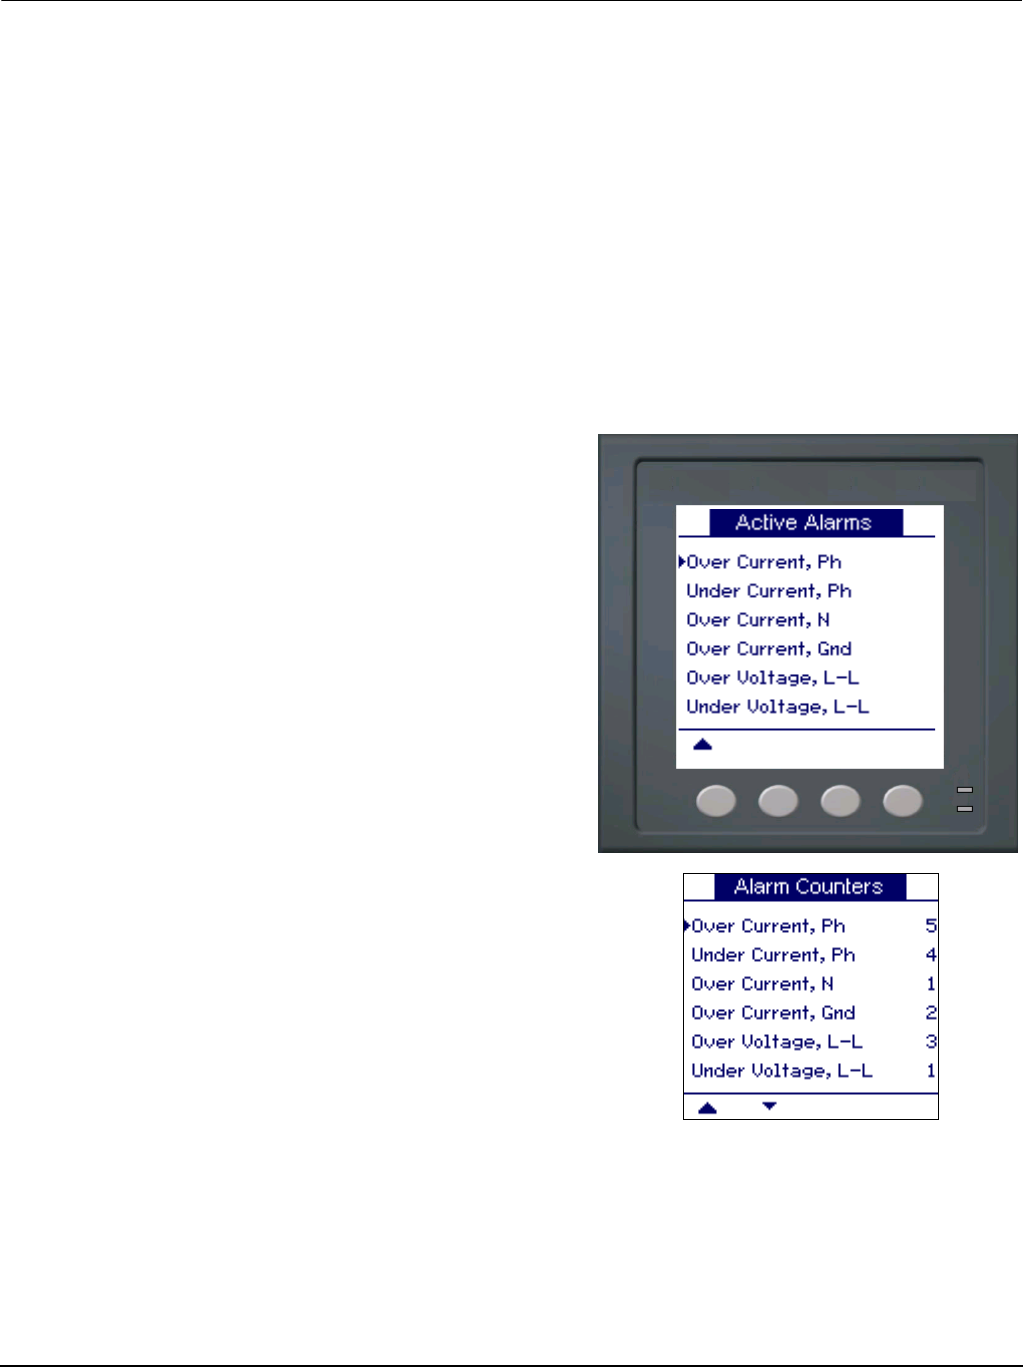
PowerLogic™ PM5300 series user guide Chapter 7—Alarms
© 2015 Schneider Electric All Rights Reserved72
Viewing Alarm Activity and History
There are two types of alarm entries: primary and secondary. The primary entry identifies
the alarm. The secondary entries provide pickup and dropout information.
The active alarm list holds 40 entries at a time. The list works as a circular buffer,
replacing old entries as new entries over 40 are entered into the alarm event queue. The
information in the alarm event queue reinitializes when the power meter resets.
The alarm history log holds 40 entries. The log also works as a circular buffer, replacing
old entries with new entries. This information is nonvolatile.
Viewing Active Alarms and Alarm Counters
To view active alarms or alarm counters:
1. Scroll through the menu list at
the bottom of the screen until
you see Alarm.
2. Press Alarm.
3. Press the button beneath
Active or Count.
4. Press ▼ and ▲ to scroll
through the alarm list.
5. Press ▲ to return to the
previous screen.
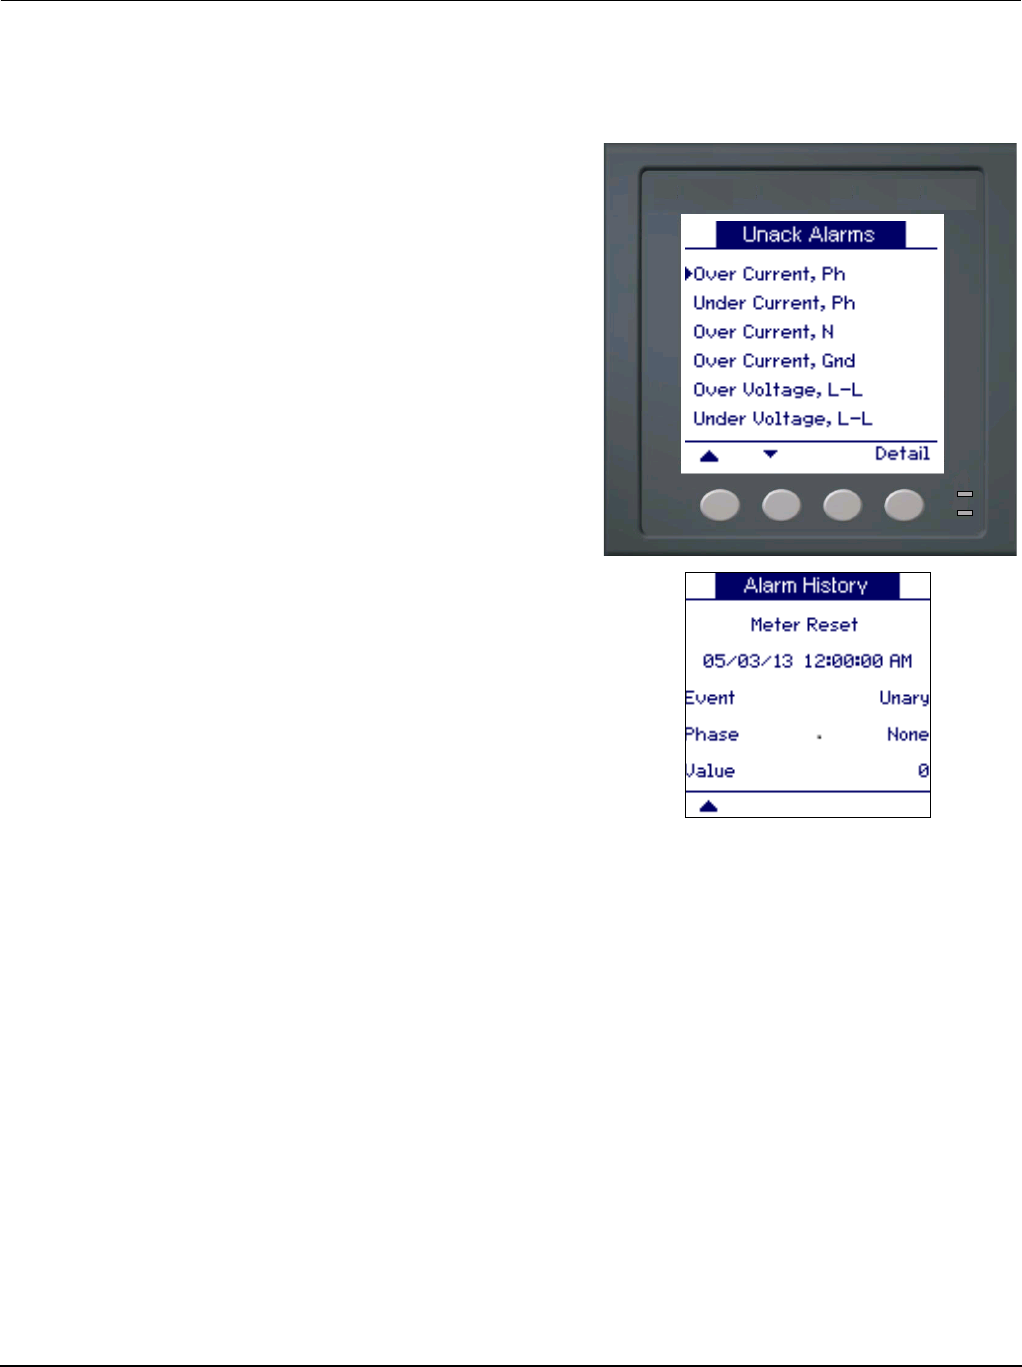
PowerLogic™ PM5300 series user guide Chapter 7—Alarms
© 2015 Schneider Electric All Rights Reserved 73
Viewing Unacknowledged Alarms and the Alarm History Log
To view the unacknowledged alarms or the alarm history log:
1. Scroll through the menu list at
the bottom of the screen until
you see Alarm.
2. Press Alarm.
3. Press the button beneath
Unack or Hist.
4. Press ▼ and ▲ to scroll
through the list of primary alarm
events.
5. Press Detail to view pickup and
dropout event details.
6. Press ▼ and ▲ to scroll
through the pickup and dropout
event details.
7. For unacknowledged alarms,
press Ack to acknowledge the
alarm.
8. Press ▲ to return to the
alarm list on the previous
screen.
9. For unacknowledged alarms,
follow Steps 4 to 7 until all
alarms are acknowledged.

PowerLogic™ PM5300 series user guide Chapter 7—Alarms
© 2015 Schneider Electric All Rights Reserved74

PowerLogic™ PM5300 series user guide Chapter 8—Data Logs
© 2015 Schneider Electric All Rights Reserved 75
Chapter 8—Data Logs
This chapter briefly describes the following logs of the power and energy meter:
•Alarm Log
•User-defined data log
Logs are files stored in the non-volatile memory of the power and energy meter and are
referred to as “on-board logs”.
Data Logs
The PM5300 series records and stores readings at regularly scheduled intervals in one
independent data log. This log will be in disabled state from the factory. You can set up
the data log to store the following information.
•Time Interval: 15, 30, 60 minutes
•First-in-first-out (FIFO) or Fill and Hold
•Values logged - up to 2 registers along with data and time of each log entry
The registers list for configuring the data logs
Description Number of Registers Data Type Register Number
Active energy delivered 4 Integer 3204
Active energy received 4 Integer 3208
Reactive energy delivered 4 Integer 3220
Reactive energy received 4 Integer 3224
Apparent energy delivered 4 Integer 3236
Apparent energy received 4 Integer 3240
Status input 1 counter 1 Integer 8915
Status input 2 counter 1 Integer 8919

PowerLogic™ PM5300 series user guide Chapter 8—Data Logs
© 2015 Schneider Electric All Rights Reserved76
Memory Allocation for Log Files
Each file in the power and energy meter has a maximum memory size. Memory is not
shared between the different logs, so reducing the number of values recorded in one log
will not allow more values to be stored in different log. The following table lists the
memory allocated to each log.
Alarm Log
By default, the power and energy meter can log the occurrence of any alarm condition.
Each time an alarm occurs it is entered into the alarm log. The alarm log in the power and
energy meter stores the pickup and dropout points of alarms along with the date and time
associated with these alarms. With PowerLogic software, user can view and save the
alarm log to disk, and reset the alarm log to clear the data out of the power and energy
meter’s memory.
Alarm Log Storage
The power and energy meter stores alarm log data in non-volatile memory. The size of
the alarm log is fixed at 40 records.
Log Type Max. Records
Stored Storage
(Bytes)
Power and
Energy Meter
Model
Alarm Log 100 2,200 All models
Data Log 5760 256k All models

PowerLogic™ PM5300 series user guide Chapter 9—Measurements and calculations
© 2015 Schneider Electric All Rights Reserved 77
Chapter 9—Measurements and calculations
This section describes how the meter processes measured and calculated data.
Real-time readings
The power and energy meter measures currents and voltages, and reports in real time
the RMS (Root Mean Squared) values for all three phases and neutral. The voltage and
current inputs are continuously monitored at a sampling rate of 64 points per cycle. This
amount of resolution helps enable the meter to provide reliable measurements and
calculated electrical values for various commercial, buildings and industrial
applications.
Related topics
•To learn how to navigate to the data screens using the front panel, see “Viewing
Meter Data” on page 45.
Energy
The power and energy meter calculates and stores accumulated energy values for real,
reactive, and apparent energy.
You can view accumulated energy from the display. The energy value units
automatically change, based on the quantity of energy accumulated (e.g., from kWh to
MWh, from MWh to GWh, then from GWh to TWh, from TWh to PWh).
Related topics
•To view energy readings from the front panel display, see “Meter data display
screens” on page 45.
Min/max values
The meter’s real-time readings are updated once every 50 cycles for 50 Hz systems, or
once every 60 cycles for 60 Hz systems. When the readings reach their lowest or
highest value, the meter updates and saves these min/max (minimum and maximum)
quantities in non-volatile memory.
Power factor
Power factor (PF) is the ratio of active power (P) to apparent power (S), and is a
number between zero (0) and one (1). In a purely resistive circuit, PF is equal to 1 (unity
PF). Inductive or capacitive loads increase the reactive power (Q) component in the
circuit which causes the PF to become less than 1.
Power factor can have a positive or negative sign, depending on the type of load or
direction of power flow. See “Power factor sign convention” on page 78.

78 © 2015 Schneider Electric All Rights Reserved
Chapter 9—Measurements and calculations PowerLogic™ PM5300 series user guide
Power factor min/max convention
The meter uses the following convention for power factor minimums and maximums:
•For negative PF readings, the minimum PF value is the measurement closest to -0
for PF readings between -0 to -1. For positive PF readings, the minimum PF value is
the measurement closest to +1 for PF readings between +1 to +0.
•For negative PF readings, the maximum PF value is the measurement closest to -1
for PF readings between -0 to -1. For positive PF readings, the maximum PF value
is the measurement closest to +0 for PF readings between +1 to +0.
Power factor sign convention
You can set the power factor sign (PF sign) convention by changing the HMI mode to
either IEC or IEEE.
IEC mode
In IEC mode, the PF sign follows the direction of power flow. PF sign is positive (+) for
positive (normal) power flow. PF sign is negative (-) for negative (reverse) power flow.
Power factor minimum and maximum
1.0
-0.4 .4
.6
.8
-0.6
-0.8
+0
.2
-0
-0.2
-1.0
Maximum PF [ + ]
Negative PF values
[ - ]
Minimum PF [ - ]
Positive PF values
[ + ]
Power factor sign convention
Real
Power
In
watts negative (–)
vars positive (+)
power factor (–)
watts positive (+)
vars positive (+)
power factor (+)
watts negative (–)
vars negative (–)
power factor (–)
watts positive (+)
vars negative (–)
power factor (+)
Reverse
Power Flow
Normal
Power Flow
Reactive
Power In
Quadrant
2
Quadrant
1
Quadrant
3
Quadrant
4
IEC mode
Real
Power
In
watts negative (–)
vars positive (+)
power factor (+)
watts positive (+)
vars positive (+)
power factor (–)
watts negative (–)
vars negative (–)
power factor (–)
watts positive (+)
vars negative (–)
power factor (+)
Reverse
Power Flow
Normal
Power Flow
Reactive
Power In
Quadrant
2
Quadrant
1
Quadrant
3
Quadrant
4
IEEE mode

PowerLogic™ PM5300 series user guide Chapter 9—Measurements and calculations
© 2015 Schneider Electric All Rights Reserved 79
IEEE mode
In IEEE mode, the PF sign is determined by the type of load (inductive or capacitive)
contributing to the reactive power component of apparent power. PF sign is positive (+)
for capacitive loads (leading power factor). PF sign is negative (-) for inductive loads
(lagging power factor).
Related topics
•To change the HMI mode, see “Setting up regional settings” on page 39.
•To learn how the meter calculates power factor, see “Power factor” on page 77.
Demand
Demand is a measure of average consumption (typically power or current) over a fixed
programmed time interval.
The meter measures instantaneous consumption and can calculate demand using
various methods.
Related topics
•For instructions on configuring demand using the front panel, see “Demand setup”
on page 43
Power demand calculation methods
Power demand is calculated by dividing the energy accumulated during a specified
period by the length of that period. How the power meter performs this calculation
depends on the method and time parameters you select (for example, timed rolling
block demand with a 15-minute interval).
To be compatible with electric utility billing practices, the power meter provides the
following types of power demand calculations:
•Block interval demand
•Synchronized demand
•Thermal demand
You can configure the power demand calculation method from the front panel or using
ION Setup.
Block interval demand
For block interval demand method types, you specify a period of time interval (or block)
that the power meter uses for the demand calculation. Select/configure how the power
meter handles that interval from one of these different methods:
•Timed Sliding Block: Select an interval from 1 to 60 minutes (in 1-minute
increments). If the interval is between 1 and 15 minutes, the demand calculation
updates every 15 seconds. If the interval is between 16 and 60 minutes, the
demand calculation updates every 60 seconds. The power meter displays the
demand value for the last completed interval.
•Timed Block: Select an interval from 1 to 60 minutes (in 1-minute increments). The
power meter calculates and updates the demand at the end of each interval.
•Timed Rolling Block: Select an interval and a subinterval. The subinterval must
divide evenly into the interval (for example, three 5-minute subintervals for a
15-minute interval). Demand is updated at the end of each subinterval. The power
meter displays the demand value for the last completed interval.
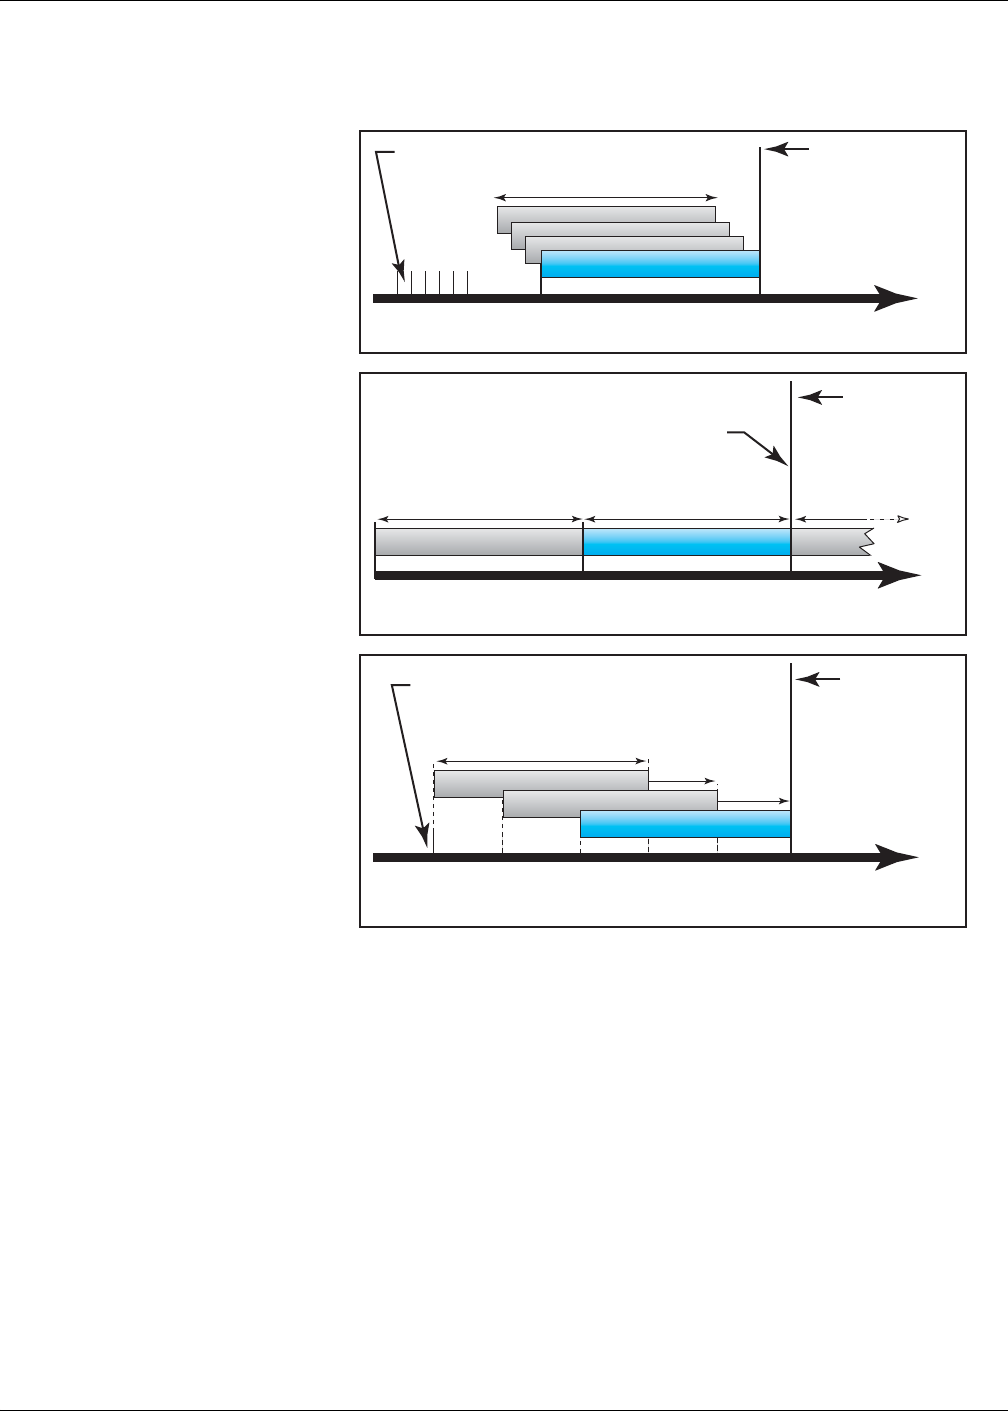
80 © 2015 Schneider Electric All Rights Reserved
Chapter 9—Measurements and calculations PowerLogic™ PM5300 series user guide
The following illustration shows the different ways power demand is calculated using
the block interval method. In this example, the interval is set to 15 minutes.
Synchronized demand
You can configure the demand calculations to be synchronized using a command sent
over communications or the device’s internal real-time clock.
•Input synchronized demand: This method allows you to synchronize the demand
interval of your meter with an external digital pulse source (such as another power
meter’s digital output) connected to your meter's digital input. This helps
synchronize your meter to the same time interval as the other meter for each
demand calculation. When setting up this type of demand, you can choose Input
Sync Block (input-synchronized block demand) or Input Sync Roll Blk (input-
synchronized rolling block demand). Input Sync Roll Blk requires that you specify
a subinterval.
•Command synchronized demand: This method allows you to synchronize the
demand intervals of multiple meters on a communications network. For example, if
a programmable logic controller (PLC) input is monitoring a pulse at the end of a
demand interval on a utility revenue meter, you can program the PLC to issue a
command to multiple meters whenever the utility meter starts a new demand
interval. Each time the command is issued, the demand readings of each meter are
calculated for the same interval. When setting up this type of demand, you can
Block interval demand example
15 30 45
1 5 30 45
60 . . .
15 30 45
20 35 4025
Demand value is the
average for the last
completed interval
Demand value is
the average for
the last
completed
interval
Demand value is
the average for
the last
completed
interval
Time
(sec)
Time
(min)
Time
(min)
Calculation updates
every 15 seconds
Calculation updates at
the end of the interval
Calculation updates at the end of
the subinterval (5 minutes)
Timed Sliding Block
Timed Block
Timed Rolling Block
15-minute interval
15-minute interval
15-minute interval 15-min
15-minute interval
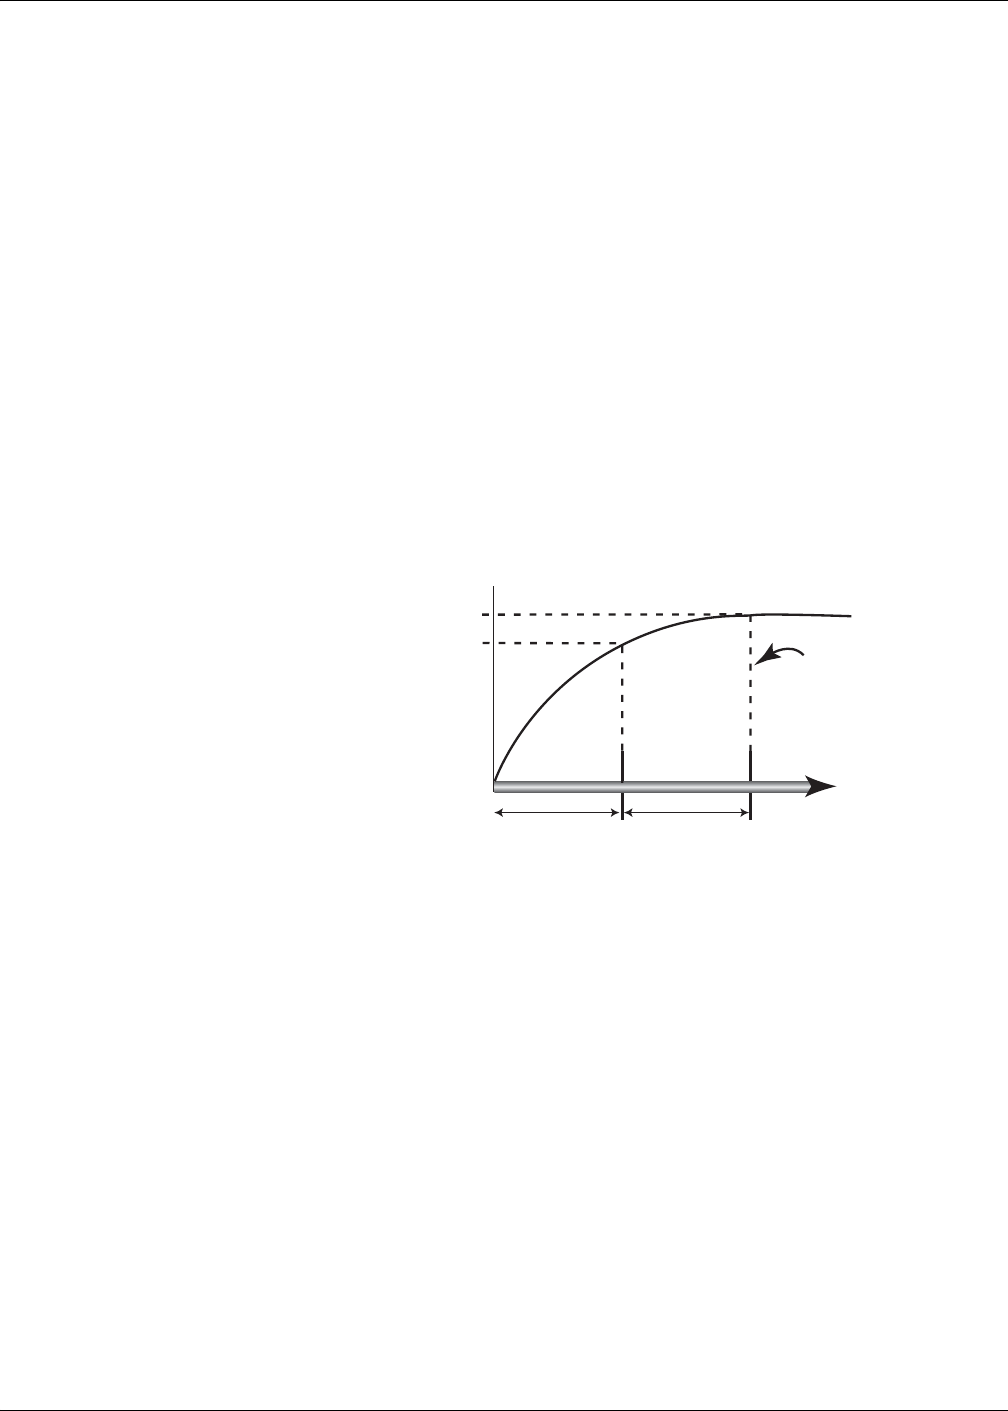
PowerLogic™ PM5300 series user guide Chapter 9—Measurements and calculations
© 2015 Schneider Electric All Rights Reserved 81
choose Cmd Sync Block (command-synchronized block demand) or Cmd Sync
Roll Block (command-synchronized rolling block demand). Cmd Sync Roll Blk
requires that you specify a subinterval.
•Clock synchronized demand: This method allows you to synchronize the demand
interval to the power meter’s internal real-time clock. This helps you synchronize the
demand to a particular time, typically on the hour (for example, at 12:00 am). If you
select another time of day when the demand intervals are to be synchronized, the
time must be specified in minutes from midnight. For example, to synchronize at
8:00 am, select 0800 (in hhmm format). When setting up this type of demand, you
can choose Clock Sync Block (clock-synchronized block demand) or Clock Sync
Roll Blk (clock-synchronized rolling block demand). Clock Sync Roll Blk requires
that you specify a subinterval.
Thermal demand
Thermal demand calculates the demand based on a thermal response, which imitates
the function of thermal demand meters. The demand calculation updates at the end of
each interval. You can set the demand interval from 1 to 60 minutes (in 1-minute
increments).
The following illustration shows the thermal demand calculation. In this example, the
interval is set to 15 minutes.
Current demand
The power meter calculates current demand using one of the methods described in
“Power demand calculation methods” on page 79. You can set the demand interval
from 1 to 60 minutes in 1-minute increments (for example, 15 minutes).
Predicted demand
The power meter calculates predicted demand for the end of the present interval for
kW, kVAR, kVA and Amps demand. This prediction takes into account the energy
consumption so far within the present (partial) interval and the present rate of
consumption.
Predicted demand is updated every second.
The following illustration shows how a change in load can affect predicted demand for
the interval. In this example, the interval is set to 15 minutes.
Thermal demand example
The interval is a window of time that moves across the timeline
15-minute
interval
next
15-minute
interval
Time
(minutes)
Last completed
demand interval
Calculation updates at the end of each interval
% of Lead
0%
90%
99%

82 © 2015 Schneider Electric All Rights Reserved
Chapter 9—Measurements and calculations PowerLogic™ PM5300 series user guide
Peak demand
The maximum values for the kWD, kVARD, kVAD power, and amps (or peak demand)
is maintained in the meter’s non-volatile memory. The peak for each value is the
highest average reading since the meter was last reset. The power meter also stores
the date and time when the peak demand occurred. In addition to the peak demand, the
power meter also stores the coinciding average 3-phase power factor. The average 3-
phase power factor is defined as “demand kW/demand kVA” for the peak demand
interval.
Related topics
•To reset peak demand values from the power meter display, see “Single resets” on
page 100.
Predicted demand example
1:00 1:06 1:15
15-minute interval
Predicted demand if load is
added during interval;
predicted demand increases
to reflect increased demand
Predicted demand if no load
is added.
Time
Change in Load
Demand
for last
completed
interval
Beginning
of interval
Partial Interval
Demand
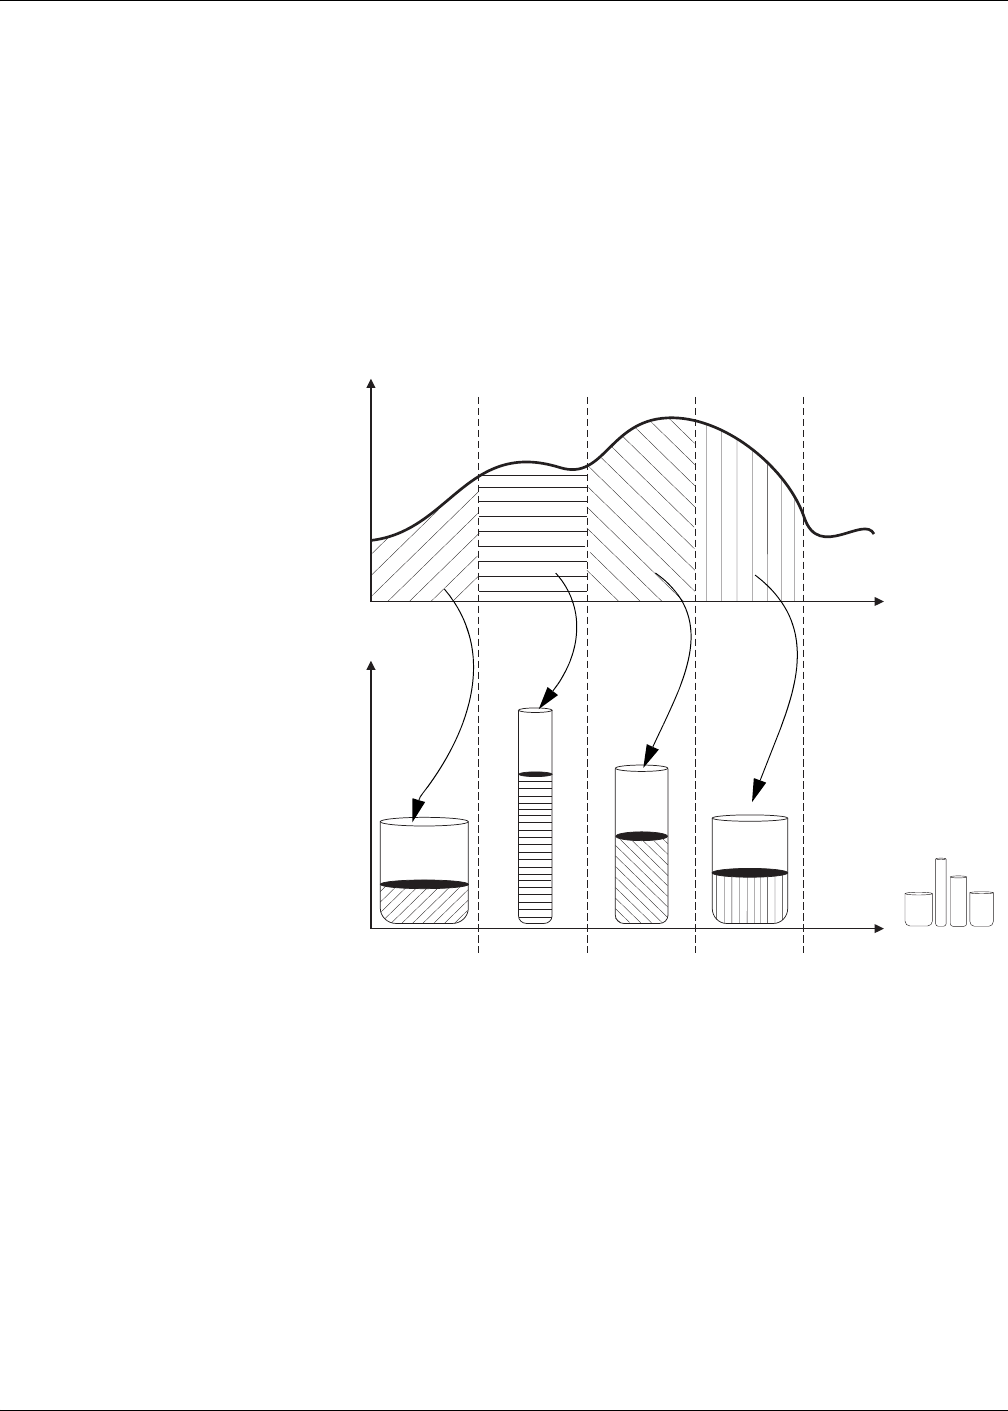
PowerLogic™ PM5300 series user guide Chapter 10—Multi-tariff feature
© 2015 Schneider Electric All Rights Reserved 83
Chapter 10—Multi-tariff feature
This section describes how to set up different tariffs for storing energy values in
registers that correspond to each of those tariffs. An example of when this feature can
be used is when a utility has set up tariff schedules with different rates based on what
day or time of day energy is consumed.
The meter supports configuration of up to 4 different tariffs.
Multi-tariff feature example
In the above illustration, the area under the power curve equals the energy consumed.
Typically, the utility sets tariff schedules so the cost of energy is higher during high
demand or high energy consumption times. How these “tariff energy containers” are
configured determines how fast these containers fill, which correlates to increasing
energy costs. The price per kWh is lowest at tariff T1 and highest at tariff T2.
Multi-tariff feature overview
The meter supports multiple tariffs to measure and monitor energy usage that can be
used in billing or cost applications. There are different tariff modes you can use to
determine what tariff is applied and when: Command mode, Time of Day mode, and
Input mode.
Power
Time
Cost
T1 T2 T3 T4
T1 T2 T3 T4 Tariff energy
containers

84 © 2015 Schneider Electric All Rights Reserved
Chapter 10—Multi-tariff feature PowerLogic™ PM5300 series user guide
Command mode overview
You can use this mode to send a Modbus command to the device which sets the active
tariff. This tariff is applied to the measured energy until you send another Modbus
command that sets a different tariff.
Related topics
•Search PM5300 Modbus register list at www.schneider-electric.com to download
the Modbus map.
Time of day mode overview
You can use this mode to create a tariff schedule that specifies where the meter stores
energy or input metered data, based on the time of year (month, day), the type of day
(every day, weekend, weekday or a specific day of the week), or time of day. The data
collected from the different tariffs can then be used in energy audits or similar costing
and budget planning purposes.
Time format
Multi-tariff configuration using the front panel uses this date and time format:
NOTE: Use ION Setup if you want to configure Time of Day tariff using the 12-hour
clock (i.e., 12:00 am to 11:59 pm).
Tariff validity
A valid tariff has certain conditions and limitations:
•Each tariff must cover a unique time period (tariffs cannot overlap) but there can be
periods with no tariff.
•Any number of tariffs, from none to the maximum number of tariffs, can be applied.
•Time of day tariffs do not adjust for daylight savings time.
•Time of day tariffs include February 29th in leap years (however, it is not
recommended to have February 29th as a start or end date, as that tariff would be
invalid for non-leap years.
•Except for leap years, tariff dates are not year-specific; if you wanted to create a
tariff that starts on the first Monday in August, you need to enter the date for that
year, then manually update the tariff information for the subsequent years.
Front panel date and time format
Parameter Values Description
Month 1 to 12
The calendar month, where 1 = January, 2 = February, 3 = March,
4 = April, 5 = May, 6 = June, 7 = July, 8 = August, 9 = September,
10 = October, 11 = November, 12 = December.
Day 1 to 31 The calendar day of the month.
Time 0000 to 2359 The time in 24-hour clock format, where 0000 = 00:00 (12:00 am) and
2359 = 23:59 (11:59 pm).

PowerLogic™ PM5300 series user guide Chapter 10—Multi-tariff feature
© 2015 Schneider Electric All Rights Reserved 85
Tariff creation method
Your device performs validation checks as you enter tariff information; it prompts you to
change the information that you have entered or set the tariff to disabled if the tariff
configuration is invalid. These checks can include:
•Start and end times must be different (for example, you cannot create a tariff that
starts at 02:00 and also ends at 02:00).
•Start time can only be earlier than end time for tariffs that are applied every day.
You can create a daily tariff that starts at 06:00 and ends at 02:00, but these times
are only valid for the Everyday tariff and invalid for the other tariff types.
•Start day must be earlier than end day if the days are in the same month. You
cannot create a tariff that starts June 15 and ends June 12.
There are two methods of creating tariffs:
•Time of year tariffs divide the year into multiple sections (usually seasons), where
each section has one or more day types. For example, a four tariff configuration
using this method could have Summer and Winter seasons that also use different
weekend and weekday tariffs.
•Daily tariffs can divide days by day of the week, a weekday, a weekend, or every
day, and can specify the time of day. For example, a four tariff configuration could
have every day in the year divided into six-hour tariff periods or could have two
tariffs for weekends and two tariffs for weekdays.
You can combine these methods if, for example you wanted to create a tariff that
applies on Mondays from January 1 to June 30, from 09:00 to 17:00. However, since
only one tariff can be applied at any time, you cannot use an everyday or weekday tariff
type because you already specified a tariff for the time periods 09:00 to 17:00.
Depending on how you configure the tariffs and the maximum number of tariffs
supported by your meter, you may not be able to assign tariffs for the entire year,
potentially leaving time gaps that do not have any tariff assigned to them.
Example tariff configurations for a four-tariff system
In these examples, four tariffs are used to cover the entire year (there are no time
periods that do not have an associated tariff).
All weekend days fall into one of two different tariffs, depending on the date. All week
days fall into one of two different tariffs, depending on the date. This configuration does
not use tariffs based on the time of day, or any day types other than weekend or
weekday.
Example dates and corresponding tariffs:
•Friday, June 29 = tariff 3
•Sunday, November 18 = tariff 1
Configuration 1: four tariffs with weekdays and weekends
Tariff Type Start date End date Start time End time1
1End time of 23:59 is actually 23:59:59, or just before midnight.
1 Weekend June 21 December 20 00:00 23:59
2 Weekend December 21 June 20 00:00 23:59
3 Weekday June 21 December 20 00:00 23:59
4 Weekday December 21 June 20 00:00 23:59

86 © 2015 Schneider Electric All Rights Reserved
Chapter 10—Multi-tariff feature PowerLogic™ PM5300 series user guide
All days have a tariff applied between 23:00 and 04:59, corresponding to off-peak
hours. All weekend days have a tariff applied from 05:00 to 22:59, corresponding to
shoulder hours. All weekdays fall into one of two seasons (summer or winter), and have
two tariffs applied throughout the day. Example dates and corresponding tariffs:
•Wednesday, March 21, 08:00 = tariff 3
•Tuesday, January 10, 21:00 = tariff 3
•Sunday, June 24, 14:00 = tariff 4
•Friday, August 17, 00:00 = tariff 1
Input mode overview
You can use this mode to have the device’s digital inputs set which tariff is applied to
the energy that is presently being consumed. If a digital input is used for multi-tariff, it
cannot be used for an exclusive association (such as Demand Sync or Input Metering),
but digital inputs can be shared with a non-exclusive association (such as Alarms). To
make a digital input available for setting tariffs, any conflicting associations must be
manually removed at the source of the original association.
The number of different tariffs that can be applied is determined by the number of
available digital inputs and the total number of tariffs supported by your device. The
digital inputs are used as binary counters to identify the appropriate tariff, where off = 0
and on = 1, and most significant bit (MSB) is digital input 2 and least significant bit
(LSB) is digital input 1. By this definition, digital input 1 must be associated with the
multi-tariff feature in order to set the tariff to Input mode.
Configuration 2: one season for weekends, with off-peak and shoulder hours,
two seasons for weekdays, with shoulder hours
Tariff Type Start date End date Start time End time
1 Every day January 1 December 31 23:00 04:59
2 Weekdays May 1 September 30 05:00 22:59
3 Weekdays October 1 April 30 05:00 22:59
4 Weekends January 1 December 31 05:00 22:59
Digital input requirements for required number of tariffs
Number of
tariffs required
Digital inputs required
Configuration 1 Configuration 2
1 1 (digital input 1) 1 (digital input 1)
2 1 (digital input 1) 2 (digital input 1 and 2)
3 2 (digital input 1 and 2) 2 (digital input 1 and 2)
4 2 (digital input 1 and 2) 2 (digital input 1 and 2)
Configuration 1: 2 tariff assignment using 2 digital inputs1
1There is no inactive tariff with this configuration.
Tariff Digital input 2 Digital input 1
T1 0 0
T2 0 1
Configuration 2: 2 tariff assignment using 2 digital inputs
Tariff Digital input 2 Digital input 1
None1
1This digital input configuration (00) means there are no active
tariffs (all tariffs are disabled)
00
T1 0 1
T2 1 0

PowerLogic™ PM5300 series user guide Chapter 10—Multi-tariff feature
© 2015 Schneider Electric All Rights Reserved 87
Configuring tariffs using the front panel
This section explains how to use the front panel to set up tariffs.
You can change the tariff mode using the front panel.
When the meter is set to command mode for tariffs, the active tariff is controlled by
Modbus commands sent from your energy management system or other Modbus
master.
Related topics
•Search PM5300 Modbus register list at www.schneider-electric.com to download
the Modbus map.
Configuring time of day mode tariffs using the front panel
When the meter is set to time of day for tariffs, the active tariff is determined by the day
type, the start and end times, and the start and end dates. The time of day tariff is not a
calendar; the meter does not calculate the corresponding day of the week to a specific
date, but February 29th is considered a valid date if you are programming the meter
during a leap year.
When you enter tariff times using the front panel, be aware that the displayed minute
value includes the entire minute. For example, an end time of 01:15 includes the time
from 01:15:00 through 01:15:59. To create a tariff period that starts right after this, you
must set the next tariff’s start time to 01:16. Although it may appear that there is a gap
between these tariffs, there is not.
1. Navigate to Maint > Setup.
2. Enter the setup password (default is “0”), then press OK.
3. Navigate to Meter > Tariff.
4. With the cursor pointing to Mode, press Edit.
5. Press or to change the setting to Time of Day, then press OK.
6. Move the cursor to point to the tariff (Tariff 1 to Tariff 4) you want to modify, then
press Edit.
Tariff setup menu tree
Advan
Maint Reset
Setup Comm
Alarm
I/O
HMI
Clock
Meter Basic Dmd Ta ri ff
Time of day mode tariff setup
Parameter Values Description
Day Type
Everyday, Weekday, Weekend,
Monday, Tuesday, Wednesday,
Thursday, Friday, Saturday or Sunday
Select which day the tariff is active. Only
tariffs that are Everyday can have a tariff that
includes midnight (for instance, from 11pm
to 2am).
Start Time 0000 to 2359
Set the time when the tariff period starts,
using the 24 hour clock format (00:00 to
23:59). The Start Time cannot equal the End
Time.
End Time 0000 to 2359
Set the time when the tariff period ends,
using the 24 hour clock format (00:00 to
23:59). The End Time cannot equal the Start
Time.

88 © 2015 Schneider Electric All Rights Reserved
Chapter 10—Multi-tariff feature PowerLogic™ PM5300 series user guide
7. Modify each parameter as required, then press OK to set. Press or to move
between parameters.
8. Press to exit, then Yes to save your changes. Repeat for the other tariffs as
required. The meter checks the configuration and display a message if any tariffs
have conflicting settings (i.e., overlapping tariff periods).
Configuring input mode tariffs using the front panel
When you set the tariff type to Input, the active tariff is determined by the status of the
digital inputs.
Digital inputs are available for tariffs if they are not used, or if they are only associated
with alarms (Normal). To make a digital input available, you must manually disconnect
the conflicting association before configuring tariffs.
You cannot configure any digital input tariff if digital input 1 is not available for
association. Likewise, digital input 2 must be available to select more than two tariffs.
The status of the digital inputs is used to calculate the binary value of the active tariff,
where off = 0 and on = 1. The calculation of the number of tariffs value can differ,
depending on the number of digital inputs that can be selected (i.e., inputs that can be
associated with multi-tariff).
To configure input mode tariffs using the front panel:
1. Navigate to Maint > Setup.
2. Enter the setup password (default is “0”), then press OK.
3. Navigate to Meter > Tariff.
4. With the cursor pointing to Mode, press Edit.
5. Press or to change the setting to Input, then press OK.
NOTE: If a digital input association error prompt displays, you must exit from the tariff
setup screens and remove the digital input association.
6. Navigate to Tariffs, then press Edit.
7. Press or to change the number of tariffs you want to set up. The maximum
number of tariffs that you can apply is determined by the number of available digital
inputs, as described in the table, “Digital input requirements for required number of
tariffs” on page 86. Press OK.
8. Navigate to Inputs, then press Edit.
9. If applicable, press or to change how many digital inputs you want to use to
control which tariff is selected (active). Press OK.
10. Press to exit, then Yes to save your changes.
Start Month 1 to 12
Set the month that the tariff period starts,
where 1 = January, 2 = February, 3 = March,
4=April, 5=May, 6=June, 7=July,
8 = August, 9 = September, 10 = October,
11 = November, 12 = December.
Start Day 1 to 31
Set the day of the Start Month that the tariff
period starts. The Start Day must be earlier
than End Day if Start Month equals End
Month.
End Month 1 to 12
The month that the tariff period ends, where
1 = January, 2 = February, 3 = March,
4=April, 5=May, 6=June, 7=July,
8 = August, 9 = September, 10 = October,
11 = November, 12 = December.
End Day 1 to 31 The day of the End Month that the tariff
period ends.
Time of day mode tariff setup (continued)
Parameter Values Description

PowerLogic™ PM5300 series user guide Chapter 11—Power quality
© 2015 Schneider Electric All Rights Reserved 89
Chapter 11—Power quality
This section describes the meter’s power quality features and how to access power
quality data.
The meter measures voltage and current harmonics up to the 31st harmonic, and
calculates Total Harmonic Distortion (THD) and Total Demand Distortion (TDD and
tdd).
Harmonics overview
Harmonics are integer multiples of the fundamental frequency of the power system.
Harmonics information is valuable for power quality analysis, determining properly
rated transformers, maintenance and troubleshooting.
Harmonics measurements include per-phase magnitudes and angles for the
fundamental and higher harmonics relative to the fundamental frequency. The meter’s
power system setting defines which phases are present and determines how line-to-line
or line-to-neutral voltage harmonics and current harmonics are calculated.
Harmonics data provide information to determine how non-linear loads affect the power
system. For example, power system harmonics can cause current flow on the neutral
conductor, increase heating in electric motors, and eventually damage connected
equipment. Power conditioners or harmonic filters can be used to minimize unwanted
harmonics.
Total Harmonic Distortion and Total Demand Distortion
Total Harmonic Distortion (THD) is a measure of the total per-phase voltage or current
harmonic distortion present in the power system. It provides a general indication of the
quality of a waveform. THD is calculated for each phase of both voltage and current.
Total Demand Distortion (TDD) is the per-phase harmonic current distortion against the
full load demand of the electrical system. TDD indicates the impact of harmonic
distortion in the system. For example, if your system is showing high THD values but a
low demand, the impact of harmonic distortion on your system might be insignificant.
However at full load, the THD value for the current harmonics is equal to TDD, so this
could negatively impact your system.
The meter uses the following series of equations to calculate THD and TDD.
Harmonic content calculations
1. Calculate harmonic content (HC).
HC (harmonic content) is equal to the RMS value of all the non-fundamental harmonic
components in one phase of the power system.
2. Calculate the harmonic content for current (HCI).
HCI (harmonic content current) is equal to the RMS value of all the non-fundamental
current harmonic components (HI2…HIn) in one phase of the power system.
HC H2
2H3
2H4
2++=
HCI HI2
2HI3
2HI4
2++=

90 © 2015 Schneider Electric All Rights Reserved
Chapter 11—Power quality PowerLogic™ PM5300 series user guide
THD and thd calculations
The meter supports two methods of calculating total harmonic distortion: THD and thd.
THD is a quick measure of the total distortion present in a waveform and is the ratio of
harmonic content to the fundamental. The meter uses the following equation to
calculate THD:
Where H1 is equal to the fundamental harmonic.
thd is an alternate method for calculating total harmonic distortion. It uses the RMS
value for the total harmonic content rather than the fundamental content. The meter
uses the following equation to calculate thd:
TDD calculation
TDD (total demand distortion) evaluates the harmonic currents between an end user
and a power source. The harmonic values are based on a point of common coupling
(PCC), which is a common point where each user receives power from the power
source. The meter uses the following equation to calculate TDD:
Where ILoad is equal to the maximum demand load on the power system.
Displaying harmonics data
The meter displays the numeric magnitude and angle of the fundamental (first)
harmonic.
Viewing harmonics using the front panel
You can view harmonics data using the front panel.
1. Navigate to Harm. The Harmonics % screen displays, with the following menu
options:
2. Press the voltage or current harmonics you want to view. The fundamental (1st)
harmonic’s numeric magnitudes and angles for all phases are displayed.
3. Press 3-11, 13-21, or 23-31 to view the graphs for the 3rd to 11th, 13th to 21st, or
23rd to 31st harmonics, respectively. For example, to display the 13th to 21st
harmonics screen, press 13-21.
THD HC
H1
-------- 100=
thd HC
H1
2HC
2
+
----------------------------------------- 100=
TDD HCIA
2HCIB
2HCIC
2
++ILoad100=
Harmonics % display screens
IEEE mode IEC mode Description
V L-L U Line-to-line voltage harmonics data
V L-N V Line-to-neutral voltage harmonics data
Amps I Current harmonics data
TDD TDD Total demand distortion
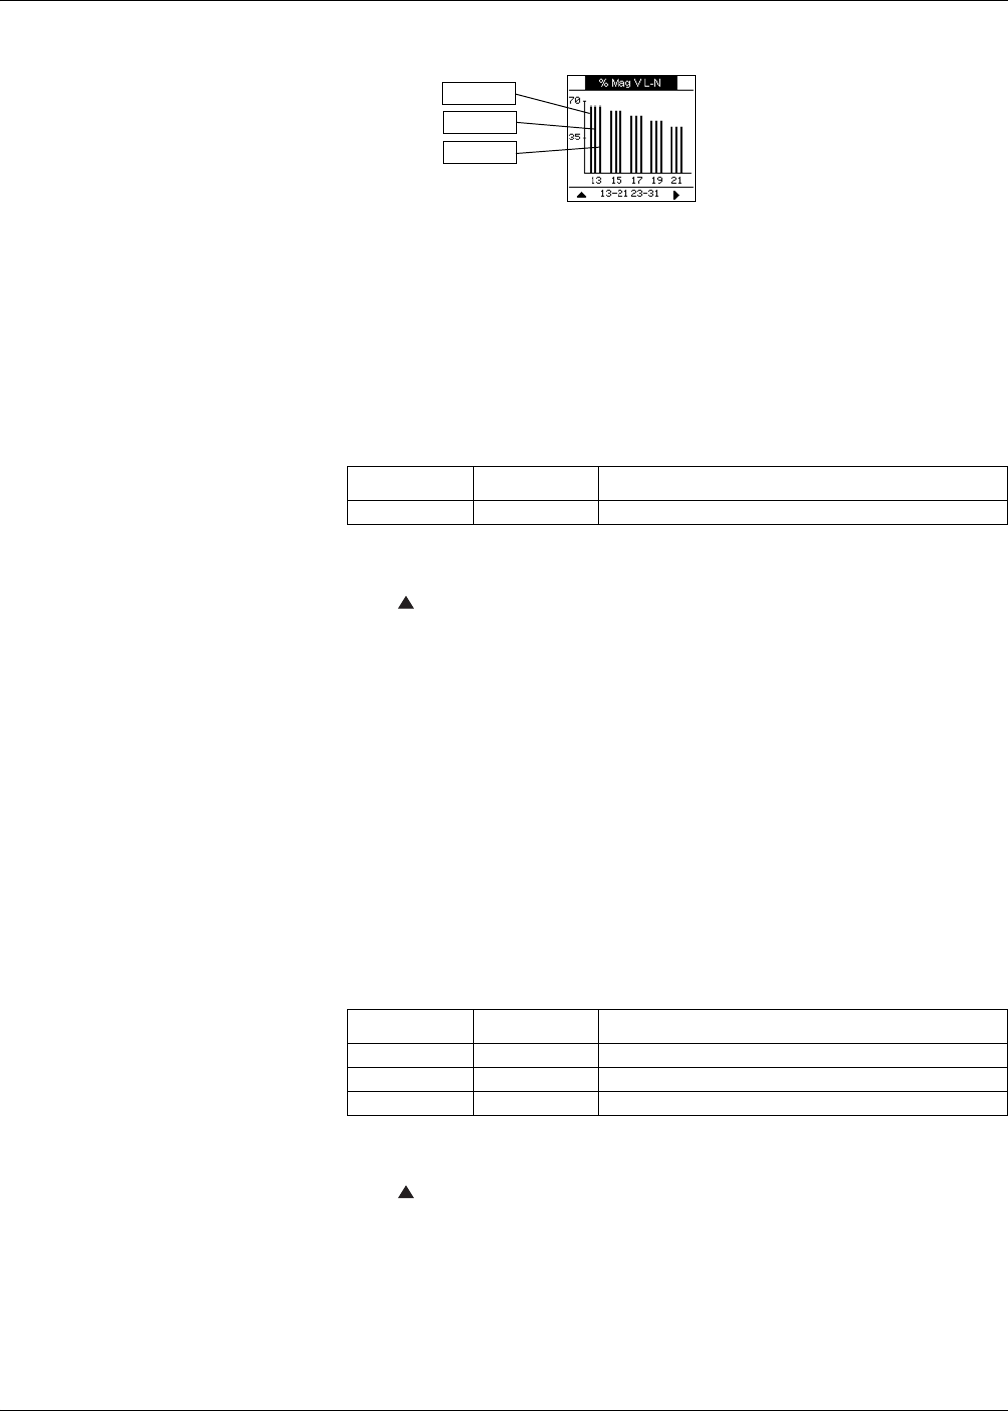
PowerLogic™ PM5300 series user guide Chapter 11—Power quality
© 2015 Schneider Electric All Rights Reserved 91
The vertical axis of the harmonics graph indicates the harmonic’s magnitude as a
percentage of the fundamental harmonic, and is scaled based on the largest
harmonic displayed. At the top of each vertical bar is a marker that shows the
maximum value of the harmonic. If the harmonic is greater than the fundamental
harmonic, this marker is triangular-shaped to show that the value is out of range.
Viewing TDD
1. Navigate to Harm > TDD. The Total demand distortion information displays.
NOTE: Your meter’s Modbus map includes registers for harmonics data for
integration into your power or energy management system.
2. Press to return to the main display screens.
Related topics
•See “Front panel display and meter setup” on page 31 for front panel menu
navigation details.
•Search PM5300 Modbus register list at www.schneider-electric.com to download
the Modbus map.
Viewing THD/thd using the front panel
You can view THD/thd data using the front panel.
1. Navigate to THD. On the THD/thd Select screen, press THD to display values that
use the calculation method based on the fundamental harmonic, or thd to display
values that use the calculation method based on the RMS value of all harmonics in
that phase (including the fundamental).
2. Press the current or voltage THD or thd values you want to view. The total harmonic
distortion percentage values are displayed.
3. Press to return to the main display screens.
NOTE: Your meter’s Modbus map includes registers for total harmonic distortion data
for integration into your power or energy management system.
Example: 13th to 21st harmonics for line-to-neutral voltage
Phase A
Phase B
Phase C
Power Quality display screen
IEEE mode IEC mode Description
TDD TDD Total demand distortion
THD (or thd) display screens
IEEE mode IEC mode Description
Amps I Total harmonic distortion data for per phase and neutral currents.
V L-L U Total harmonic distortion data line-to-line voltage.
V L-N V Total harmonic distortion data line-to-neutral voltage.

92 © 2015 Schneider Electric All Rights Reserved
Chapter 11—Power quality PowerLogic™ PM5300 series user guide
Related topics
•See “Front panel display and meter setup” on page 31 for front panel menu
navigation details.
•Search PM5300 Modbus register list at www.schneider-electric.com to download
the Modbus map.

PowerLogic™ PM5300 series user guide Chapter 12—Verifying accuracy
© 2015 Schneider Electric All Rights Reserved 93
Chapter 12—Verifying accuracy
All meters are tested and verified at the factory in accordance with International
Electrotechnical Commission (IEC) and American National Standards Institute (ANSI)
standards.
Your digital power meter does not require re-calibration. However, in some installations
a final accuracy verification of the meters is required, especially if the meters will be
used for revenue or billing applications.
Testing overview
The most common method for testing meter accuracy is to apply test voltages and
currents from a stable power source and compare the meter’s readings with readings
from a reference device or energy standard.
Accuracy test requirements
Signal and power source
The meter maintains its accuracy during voltage and current signal source variations
but its energy pulsing output needs a stable test signal to help produce accurate test
pulses. The meter’s energy pulsing mechanism needs approximately 10 seconds to
stabilize after every source adjustment.
The meter must be connected to control power in order to conduct accuracy verification
testing. Refer to your meter’s installation documentation for power supply
specifications.
Control equipment
Control equipment is required for counting and timing the pulse outputs from the alarm /
energy pulsing LED or the digital outputs.
•Most standard test benches have an arm equipped with red light sensors to detect
LED pulses.
•The reference device or energy standard typically has digital inputs that can detect
and count pulses coming from an external source (i.e., the meter’s digital output).
NOTE: The optical sensors on the test bench can be disrupted by strong sources of
ambient light (such as camera flashes, florescent tubes, sunlight reflections, floodlights,
etc). This can cause test errors. Use a hood, if necessary, to block out ambient light.
Environment
The meter should be tested at the same temperature as the testing equipment. The
ideal temperature is about 23 °C (73 °F). Make sure the meter is warmed up sufficiently
before testing.
DANGER
HAZARD OF ELECTRIC SHOCK, EXPLOSION OR ARC FLASH
Verify the device’s power source meets the specifications for your device’s power
supply.
Failure to follow these instructions will result in death or serious injury

94 © 2015 Schneider Electric All Rights Reserved
Chapter 12—Verifying accuracy PowerLogic™ PM5300 series user guide
A warm-up time of 30 minutes is recommended before beginning energy accuracy
verification testing. At the factory, the meters are warmed up to their typical operating
temperature before calibration to help ensure that the meters will reach their optimal
accuracy at operating temperature.
Most high precision electronic equipment requires a warm up time before it reaches its
specified performance levels. Energy meter standards allow the manufacturers to
specify meter accuracy derating due to ambient temperature changes and self-heating.
Your meter complies with and meets the requirements of these energy metering
standards.
For a list of accuracy standards that your meter complies to, contact your local
Schneider Electric representative or download the meter brochure from
www.schneider-electric.com.
Reference device or energy standard
To help ensure the accuracy of the test, it is recommended that you use a reference
device or reference energy standard with a specified accuracy that is 6 to 10 times
more accurate than the meter under test. Before you start testing, the reference device
or energy standard should be warmed up as recommended by its manufacturer.
NOTE: Verify the accuracy and precision of all measurement equipment used in
accuracy testing (for example, voltmeters, ammeters, power factor meters).
Energy pulsing
You can configure the meter’s alarm /energy LED or one of the digital outputs for
energy pulsing.
•The meter is equipped with an alarm / energy pulsing LED. When configured for
energy pulsing, the LED emits pulses that are then used to determine the accuracy
of the meter’s energy measurements.
•The meter is equipped with digital outputs. When you configure a digital output for
energy pulsing, the meter sends voltage pulses to the digital output port, which are
then used to determine the accuracy of the meter’s energy measurements.
Location of energy pulsing LED
PM5300
Alarm / energy pulsing LED
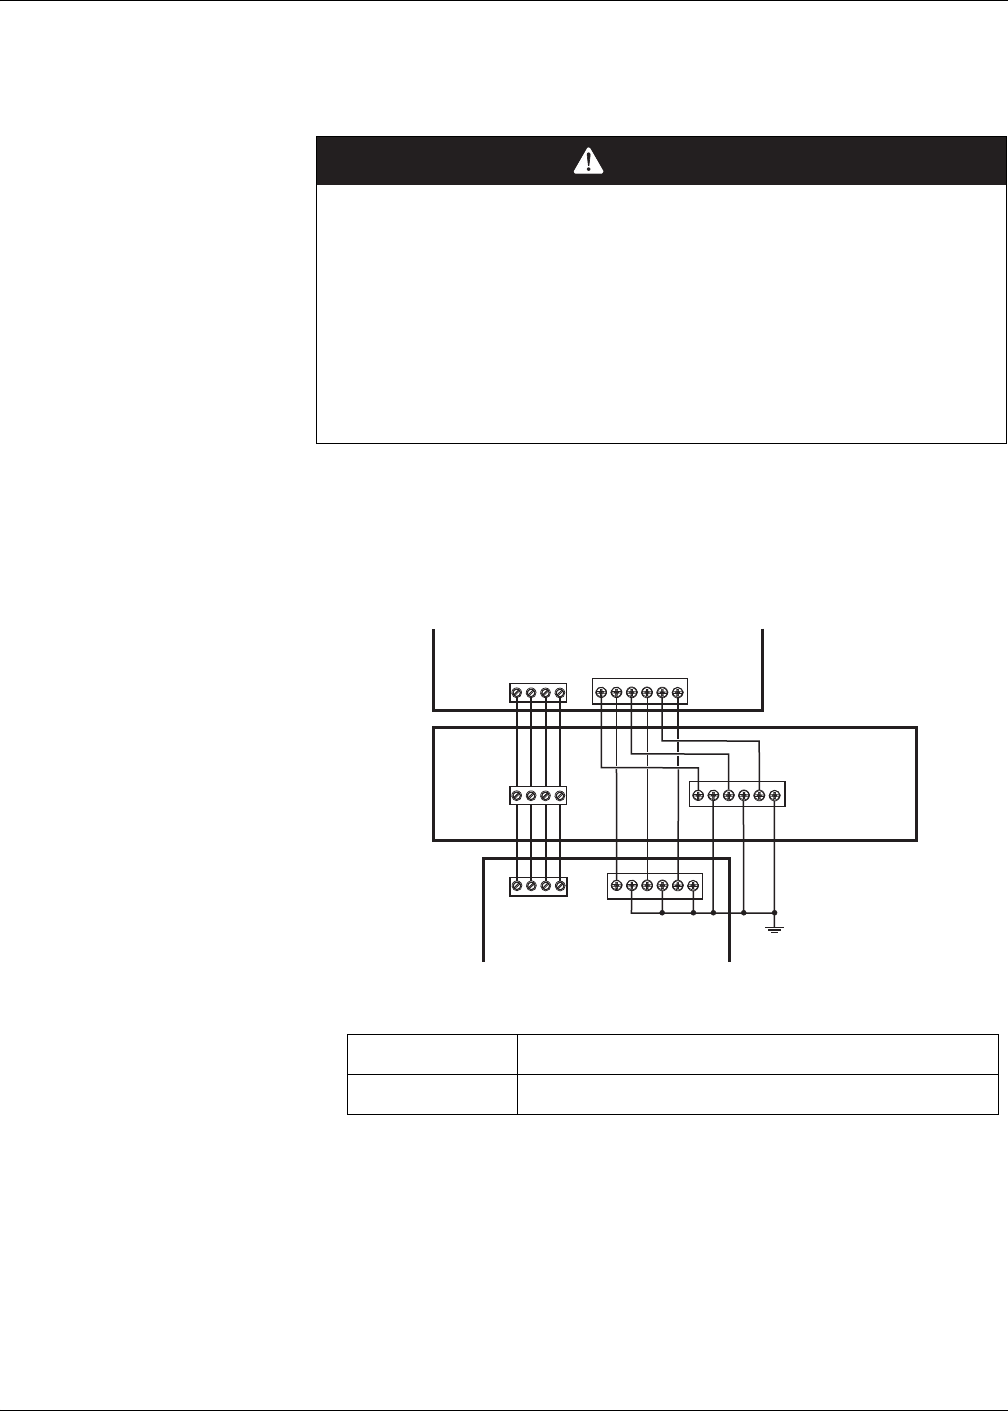
PowerLogic™ PM5300 series user guide Chapter 12—Verifying accuracy
© 2015 Schneider Electric All Rights Reserved 95
Verifying accuracy test
The following are guidelines for testing the meter; your meter shop may have specific
testing methods.
1. Turn off power to all test equipment. Use a properly rated voltage sensing device to
confirm power is off.
2. Connect the test voltage and current source to the reference device or energy
standard. Ensure all voltage inputs to the meter under test are connected in parallel
and all currents inputs are connected in series.
3. Connect the control equipment used for counting the standard output pulses using
one of these methods:
NOTE: When selecting which method to use, be aware that the Alarm / energy LED
and digital outputs have different pulse rate limits. See “Energy pulsing
considerations” on page 97 for details.
4. Before performing the verification test, let the test equipment power up the meter
and apply voltage for at least 30 seconds. This helps stabilize the internal circuitry of
the meter.
5. Set the meter’s power system to 3PH4W Wye Gnd (3-phase, 4 wire Wye with
ground).
DANGER
HAZARD OF ELECTRIC SHOCK, EXPLOSION OR ARC FLASH
• Apply appropriate personal protective equipment (PPE) and follow safe electrical
work practices. See NFPA 70E in the USA or applicable local standards.
• Turn off all power supplying this device before working on it.
• Always use a properly rated voltage sensing device to confirm that all power is off.
• Do not exceed the device’s ratings for maximum limits.
• Verify the device’s power source meets the specifications for your device’s power
supply.
Failure to follow these instructions will result in death or serious injury.
Connecting the meter to the reference standard and test equipment
Alarm / energy LED Align the red light sensor on the standard test bench armature over the front
panel alarm / energy LED.
Digital output Connect the meter’s digital output to the standard test bench pulse counting
connections.
V1V2 V3 VN
I1 I2 I3
+-+-+-
V1 V2 V3 VN I1 I2 I3
+-+-+-
V1 V2 V3 VN I1 I2 I3
+-+-+-
Reference device or energy standard
Meter under test
Test voltage and
current source

96 © 2015 Schneider Electric All Rights Reserved
Chapter 12—Verifying accuracy PowerLogic™ PM5300 series user guide
6. Depending on the method selected for counting the energy pulses, configure the
meter’s alarm / energy LED or one of the digital outputs to perform energy pulsing.
Set the meter’s energy pulse constant so it is in sync with the reference test
equipment.
7. Perform accuracy verification on the test points. Run each test point for at least 30
seconds to allow the test bench equipment to read an adequate number of pulses.
Allow 10 seconds of dwell time between test points.
Calculating the number of required pulses
The reference test equipment typically requires you to specify the number of pulses
required for a test duration of “t” seconds.
Use the following formula to calculate the required number of pulses:
Where:
•Ptot = total instantaneous power in kilowatts (kW)
•K = the meter’s pulse constant setting, in pulses per kWh
•t = test duration, in seconds (typically greater than 30 seconds)
Calculating total power
The test voltage and current source supplies the same test signals to both the energy
reference/standard and the meter under test. Total power is calculated as follows:
For a balanced 3-phase Wye system:
NOTE: A balanced 3-phase system assumes the voltage, current and power factor
values are the same for all phases.
For a single-phase system:
Where:
•Ptot = total instantaneous power in kilowatts (kW)
•VLN = test point line-to-neutral voltage in volts [V]
•I = test point current in amps [A]
•PF = power factor
The result of the calculation is rounded up to the nearest integer.
Percent error calculation
For every test point:
Number of pulses Ptot Kt
3600
------------
=
Ptot 3 VLN I PF 1 kW
1000 W
-------------------
=
Ptot VLN IPF 1 kW
1000 W
-------------------
=
Energy Error EM ES–
ES
----------------------100%=

PowerLogic™ PM5300 series user guide Chapter 12—Verifying accuracy
© 2015 Schneider Electric All Rights Reserved 97
Where:
•EM = energy measured by the meter under test
•ES = energy measured by the reference device or energy standard.
NOTE: If accuracy verification reveals inaccuracies in your meter, they may be caused
by typical sources of test errors. If there are no sources of test errors present, please
contact your local Schneider Electric representative.
Energy pulsing considerations
The meter’s alarm / energy LED and digital outputs are capable of energy pulsing within
the following limits:
The pulse rate depends on the voltage, current and PF of the input signal source, the
number of phases, and the VT and CT ratios.
If Ptot is the instantaneous power (in kW) and K is the pulse constant (in pulses per
k_h), then the pulse period is:
VT and CT considerations
The test points are always taken at the secondary side, regardless of whether VTs or
CTs are used. Ptot is derived from the values of the voltage and current inputs at the
secondary side, and takes into account the VT and CT ratios.
If VTs and CTs are used, you must include their primary and secondary ratings in the
equation. For example, in a balanced 3-phase Wye system with VTs and CTs:
Total power limit for alarm / energy LED
Given the maximum pulse constant (Kmax) you can enter is 9,999,999 pulses per kWh,
and the maximum pulse frequency for the alarm / energy LED is 83 Hz, the maximum
total power (Max Ptot) the alarm / energy LED’s energy pulsing circuitry can handle is
29.88 Watts:
Total power limit for digital output
Given the maximum pulse constant (Kmax) you can enter is 9,999,999 pulses per kWh,
and the maximum pulse frequency for the digital output is 25 Hz, the maximum total
power (Max Ptot) the digital input’s energy pulsing circuitry can handle is 9 Watts:
Energy pulsing limits
Description Alarm / energy LED Digital output
Maximum pulse frequency 50 Hz 25 Hz
Minimum pulse constant 1 pulse per k_h
Maximum pulse constant 9,999,999 pulses per k_h
Pulse period (in seconds) 3600
KPtot
--------------------1
Pulse frequency (Hz)
---------------------------------------------------==
Ptot 3 VLN VT primary
VT secondary
---------------------------------
ICT primary
CT ondarysec
-----------------------------------PF 1 kW
1000 W
-------------------
=
Maximum Ptot 3600 (Maximum pulse frequency)
Kmax
---------------------------------------------------------------------------------------3600 83
9,999,999
------------------------ 0.02988 kW===

98 © 2015 Schneider Electric All Rights Reserved
Chapter 12—Verifying accuracy PowerLogic™ PM5300 series user guide
Test points
The meter should be tested at full and light loads and at lagging (inductive) power
factors to help ensure testing over the entire range of the meter. The test amperage and
voltage input rating are labeled on the meter. Refer to the installation sheet or data
sheet for your meter’s nominal current, voltage and frequency specifications.
Typical sources of test errors
If excessive errors are observed during accuracy testing, examine your test setup and
test procedures to eliminate typical sources of measurement errors:
•Loose connections of voltage or current circuits, often caused by worn-out contacts
or terminals. Inspect terminals of test equipment, cables, test harness and the meter
under test.
•Meter ambient temperature is significantly different than 23 °C (73 °F).
•Floating (ungrounded) neutral voltage terminal in any configuration with unbalanced
phase voltages.
•Inadequate meter control power, resulting in the meter resetting during the test
procedure.
•Ambient light interference or sensitivity issues with the optical sensor.
•Unstable power source causing energy pulsing fluctuations.
•Incorrect test setup: not all phases connected to the reference device or the energy
standard. All phases connected to the meter under test should also be connected to
the reference meter/standard.
•Moisture (condensing humidity), debris or pollution present in the meter under test.
Maximum Ptot 3600 (Maximum pulse frequency)
Kmax
---------------------------------------------------------------------------------------3600 25
9,999,999
------------------------ 0.009 kW===
Watt-hour test points example
Watt-hour test point Sample accuracy verification test point
Full load 100% to 200% of the nominal current, 100% of the nominal voltage and nominal
frequency at unity power factor or one (1).
Light load 10% of the nominal current, 100% of the nominal voltage and nominal frequency
at unity power factor or one (1).
Inductive load (lagging
power factor)
100% of the nominal current, 100% of the nominal voltage and nominal frequency
at 0.50 lagging power factor (current lagging voltage by 60° phase angle).
Var-hour test points example
Var-hour test point Sample accuracy verification test point
Full load 100% to 200% of the nominal current, 100% of the nominal voltage and nominal
frequency at zero power factor (current lagging voltage by 90° phase angle).
Light load 10% of the nominal current, 100% of the nominal voltage and nominal frequency
at zero power factor (current lagging voltage by 90° phase angle).
Inductive load (lagging
power factor)
100% of the nominal current, 100% of the nominal voltage and nominal frequency
at 0.87 lagging power factor (current lagging voltage by 30° phase angle).

PowerLogic™ PM5300 series user guide Chapter 13—Meter resets
© 2015 Schneider Electric All Rights Reserved 99
Chapter 13—Meter resets
Reset commands clear the meter’s onboard data logs and related registers. Meter
resets are typically performed after you make changes to the meter’s basic setup
parameters (such as power system, frequency, or PT/CT settings), to clear invalid or
obsolete data in preparation for putting the meter into active service.
The meter reset commands are grouped into two categories: Global Resets and Single
Resets.
Front panel meter reset screens
To access the meter reset screens, navigate to Maint > Reset.
Global resets
Global resets allow you to clear all data of a particular type, such as all energy values or
all minimum/maximum values.
Meter Initialization is a special command that clears the meter’s recorded logged data,
counters and timers. It is common practice to initialize the meter after its configuration is
completed, before adding it to an energy management system.
1. Navigate to Maint > Reset.
2. Move the cursor to point to Global Reset, then press Select.
3. Move the cursor to point to the parameter you want to reset, then press Reset.
4. Enter the reset password (default is “0000”), then press OK.
NOTICE
LOST DATA
Record all important data before performing meter resets.
Failure to follow these instructions can result in data loss.
Reset menu tree
Maint Reset
Setup
Diag
Global reset options
Parameter Description
Meter Initialization Clears all data listed in this table (energy, demand, min/max values,
counters, logs, timers, and input metering data).
Energies Clears all accumulated energy values (kWh, kVARh, kVAh).
Demands Clears all the demand registers.
Min/Max Clears all the minimum and maximum registers.
Alarm Counts & Logs Clears all the alarm counters and alarm logs.
I/O Counts & Timers Clears all the I/O counters and resets all the timers.

100 © 2015 Schneider Electric All Rights Reserved
Chapter 13—Meter resets PowerLogic™ PM5300 series user guide
5. Press Yes to confirm the reset or No to cancel and return to the previous screen.
Single resets
Single resets allow you to clear data only in a specific register or register type.
1. Navigate to Maint > Reset.
2. Move the cursor to point to Single Reset, then press Select.
3. Move the cursor to point to the parameter you want to reset, then press Reset. If
there are additional options for the parameter, press Select, move the cursor to
point to the option you want, then press Reset.
4. Enter the reset password if prompted (default is “0000”), then press OK.
5. Press Yes to confirm the reset or No to cancel and return to the previous screen.
Single reset options
Parameter Option Description
Energy Accumulated Clears all accumulated energy values (kWh,
kVARh, kVAh).
Demand Power, Current
Select which demand registers to clear
(power demand, current demand or input
metering demand).
Alarms
Event Queue Clears the alarm event queue register.
History Log Clears the alarm history log.
Counters
All Alarm Counts,
(various alarm
counters) — see the
next table
Select “Counters”, then select which counter
to clear (choose all or individual alarm
counters listed in the “Alarm counter options”
table below).
Status Inputs
Timers
All Dig In Timers,
Status Input S1,
Status Input S2
Select “Timers”, then select which status
input timer to clear (choose all or individual
status input timers).
Counters
All Dig In Counters,
Status Input S1,
Status Input S2
Select “Timers”, then select which status
input counter to clear (choose all or individual
status input counters).
Digital Outputs
Timers
All Dig Out Timers,
Digital Output D1,
Digital Output D2,
Relay R1,
Relay R2
Select “Timers”, then select which digital
output timer to clear (choose all or individual
digital output timers).
Counters
All Dig Out Counters,
Digital Output D1,
Digital Output D2,
Relay R1,
Relay R2
Select “Timers”, then select which digital
output counter to clear (choose all or
individual digital output counters).
Active Load Timer Clears and restarts the load operation timer.
Multi-Tariff Clears accumulated values in all tariff
register.
Alarm counter options
Alarm counter Option Description
Current
Over Current, Ph
Select which alarm counter register to reset from
the current alarm condition counters.
Under Current, Ph
Over Current, N
Over Current, Gnd
Voltage
Over Voltage, L-L
Select which alarm counter register to reset from
the voltage alarm condition counters.
Under Voltage, L-L
Over Voltage, L-N
Under Voltage, L-N
Over Voltage Unbal
Over Voltage THD
Phase Loss

PowerLogic™ PM5300 series user guide Chapter 13—Meter resets
© 2015 Schneider Electric All Rights Reserved 101
Power
Over kW
Select which alarm counter register to reset from
the power alarm condition counters.
Over kVAR
Over kVA
Power Factor
Lead PF, True
Select which alarm counter register to reset from
the power factor alarm condition counters.
Lag PF, True
Lead PF, Disp
Lag PF, Disp
Demand
Over kW Dmd, Pres
Select which alarm counter register to reset from
the demand alarm condition counters.
Over kW Dmd, Last
Over kW Dmd, Pred
Over kVAR Dmd, Pres
Over kVAR Dmd, Last
Over kVAR Dmd, Pred
Over kVA Dmd, Pres
Over kVA Dmd, Last
Over kVA Dmd, Pred
Frequency Over Frequency Select which alarm counter register to reset from
the frequency alarm condition counters.
Under Frequency
Unary
Meter Powerup
Select which alarm counter register to reset from
the unary alarm condition counters.
Meter Reset
Meter Diagnostic
Phase Reversal
Status Inputs Digital Alarm S1 Select which alarm counter register to reset from
the digital input alarm condition counters.
Digital Alarm S2
Alarm counter options (continued)
Alarm counter Option Description

102 © 2015 Schneider Electric All Rights Reserved
Chapter 13—Meter resets PowerLogic™ PM5300 series user guide
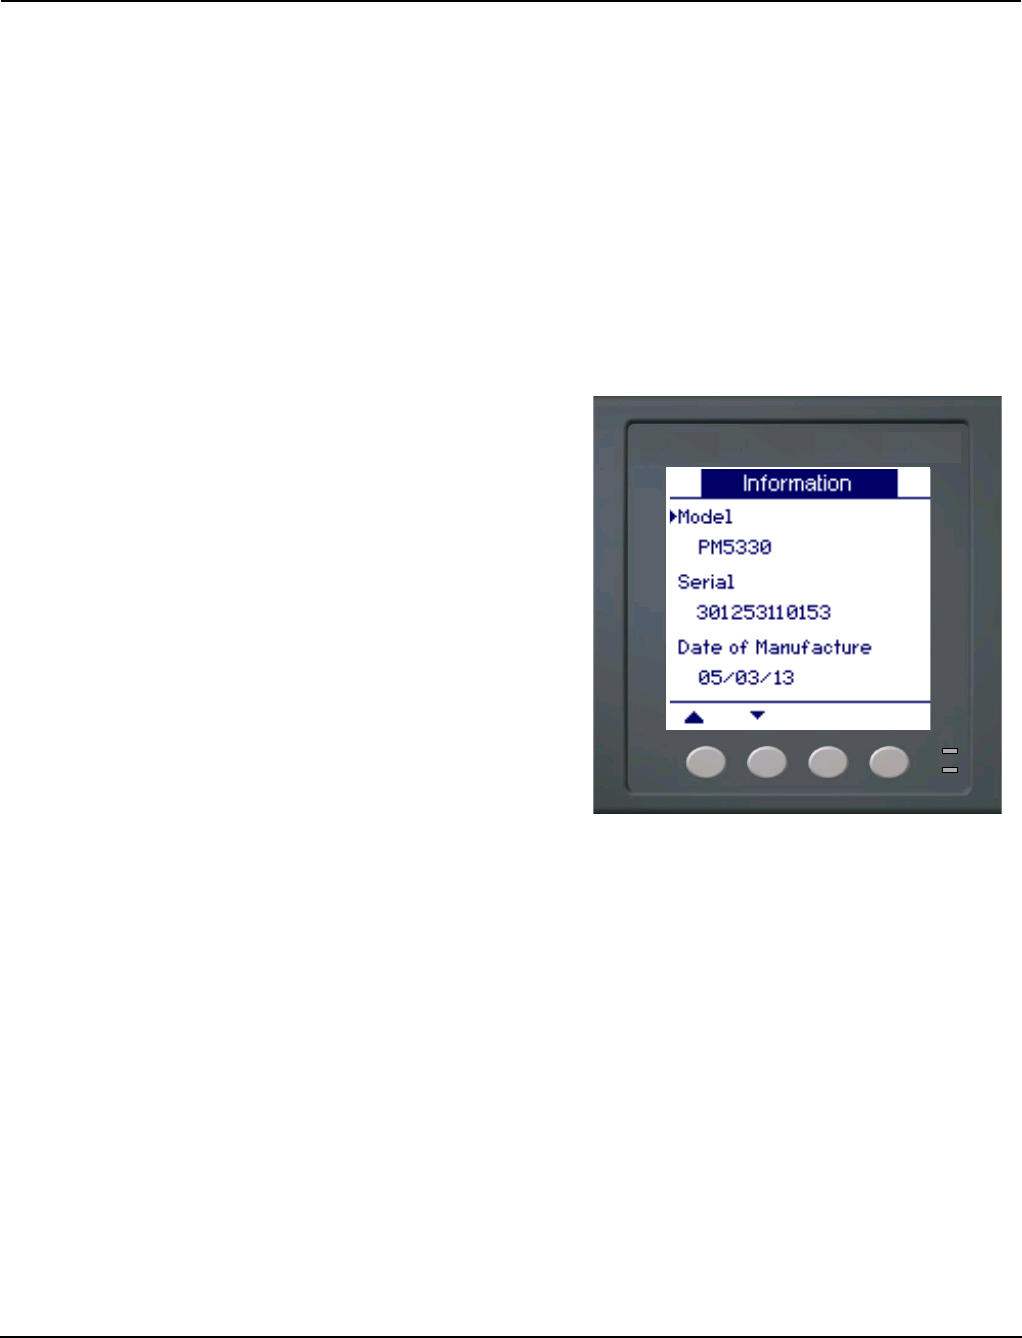
PowerLogic™ PM5300 User Guide Chapter 14—Maintenance and Upgrades
© 2015 Schneider Electric All Rights Reserved 103
Chapter 14—Maintenance and Upgrades
Alarms
Chapter 14 — Maintenance and Troubleshootin g
Power Meter Memory
The power meter users its nonvolatile memory to retain all data and metering
configuration values. Under the operating temperature range specified for the power
meter, this nonvolatile memory has an expected life of at least 45 years.
NOTE: Life expectancy is a function of operating conditions and does not constitute any
expressed or implied warranty.
Identifying the Firmware Version, Model, and Serial Number
1. Scroll to Maint in the menu
list.
2. Press Maint.
3. Press Diag.
4. Press Info.
5. Press ▼ and ▲ to view
the model, firmware (OS)
version, serial number, and
other power meter
information.
6. Press ▲ to return to the
Maintenance screen.
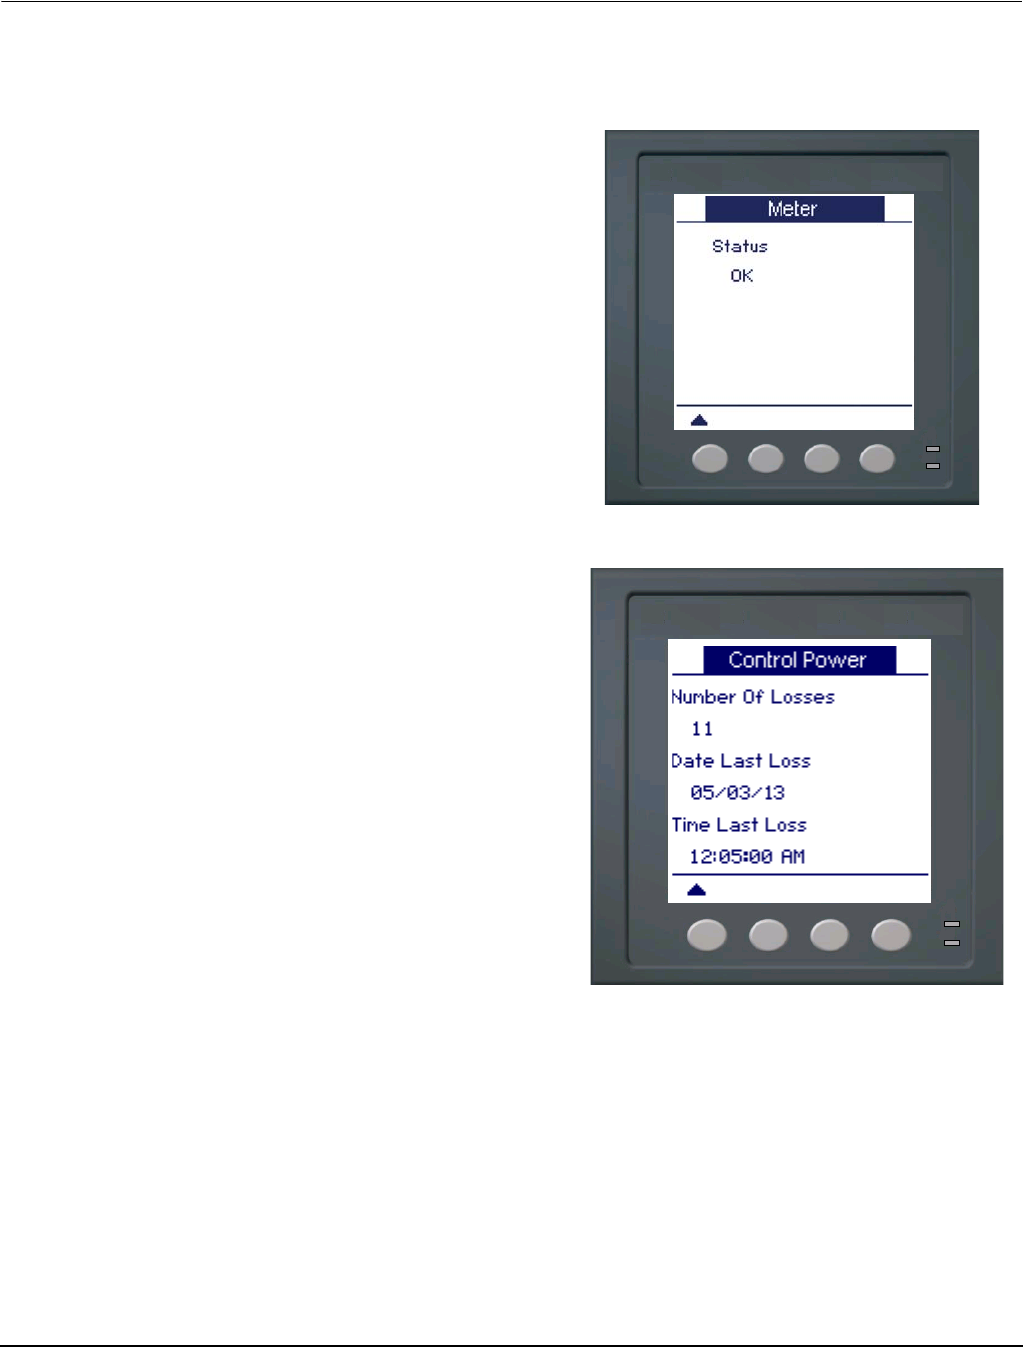
PowerLogic™ PM5300 series user guide Chapter 14—Maintenance and Upgrades
© 2015 Schneider Electric All Rights Reserved104
Additional Meter Status Information
Downloading Firmware
The power meter supports the downloading of new firmware and language files over the
communications link. This requires the free DLF3000 software, which is available at
www.schneider-electric.com. The DLF3000 offers an extensive Help file with information
on operating the software. The most recent firmware and language files are also available
on the website. Recommended baud rate for firmware download through communications
link is 19200.
Meter
1. Scroll to Maint in the menu
list.
2. Press Maint.
3. Press Diag.
4. Press Meter.
5. View the power meter status.
6. Press ▲ to return to the
Maintenance screen.
Control Power
1. Scroll to Maint in the menu
list.
2. Press Maint.
3. Press Diag.
4. Press Cl Pwr.
5. View control Power
information.
6. Press ▲ to return to the
Maintenance screen.

PowerLogic™ PM5300 User Guide Chapter 14—Maintenance and Upgrades
© 2015 Schneider Electric All Rights Reserved 105
Troubleshooting
The information in Table 14–1 on page 106 describes potential problems and their
possible causes. It also describes checks you can perform or possible solutions for each.
After referring to this table, if you cannot resolve the problem, contact your local
Schneider Electric sales representative for assistance.
Heartbeat/Comms LED
The heartbeat/comms LED helps to troubleshoot the power meter. The heartbeat/comms
LED works as follows:
•Normal operation — the LED flashes at a steady rate during normal operation.
•Communications — the LED flash rate changes as the communications port
transmits and receives data. If the LED flash rate does not change when data is sent
from the host computer, the power meter is not receiving requests from the host
computer.
•Hardware — if the heartbeat LED remains lit and does not flash ON and OFF, there is
a hardware problem. Perform a hard reset of the power meter (turn OFF power to the
power meter, then restore power to the power meter). If the heartbeat LED remains lit,
contact your local sales representative.
•Control power and display — if the heartbeat LED flashes, but the display is blank,
the display may not be functioning properly or may have timed out (see “Setting Up
the Display” on page 8). If the display is blank and the LED is not lit, verify that control
power is connected to the power meter.
HAZARD OF ELECTRIC SHOCK, EXPLOSION, OR ARC FLASH
• Apply appropriate personal protective equipment (PPE) and follow safe electrical
practices. For example, in the United States, see NFPA 70E.
• This equipment must be installed and serviced only by qualified personnel.
• Turn off all power supplying this equipment before working on or inside.
• Always use a properly rated voltage sensing device to confirm that all power is off.
• Carefully inspect the work area for tools and objects that may have been left inside
the equipment.
• Use caution while removing or installing panels so that they do not extend into the
energized bus; avoid handling the panels, which could cause personal injury.
Failure to follow these instructions will result in death or serious injury.

PowerLogic™ PM5300 series user guide Chapter 14—Maintenance and Upgrades
© 2015 Schneider Electric All Rights Reserved106
The power meter does not contain any user-serviceable parts. If the power meter requires
service, contact your local sales representative. Do not open the power meter. Opening
the power meter voids the warranty.
Getting Technical Support
Please refer to the Technical Support Contacts provided in the power meter shipping
carton for a list of support phone numbers by country, or go to
www.schneider-electric.com, then navigate to Support area for contact information.
Register List
To download the latest version of the power meter PM5300 Modbus register list, go to
www.schneider-electric.com. Type PM5300 in the search field.
Table 14–1: Troubleshooting
Potential Problem Possible Cause Possible Solution
The maintenance (wrench)
icon is illuminated on the
power meter display.
When the maintenance (wrench) icon
is illuminated, it indicates an event
has occurred which may require
attention.
Go to [Maint] > [Diag]. Event messages
display to indicate the reason the icon is
illuminated. Note these event messages and
call the Technical Support or contact your
local sales representative for assistance.
The display is blank after
applying control power to
the power meter.
The power meter may not be
receiving the necessary power.
The display may have timed out.
Verify that the power meter line and terminals
are receiving the necessary power.
Verify that the heartbeat LED is blinking.
Press a button to see if the display timed out.
The data being displayed is
inaccurate or not what you
expect.
Incorrect setup values.
Check that the correct values have been
entered for power meter setup parameters
(CT and VT ratings, Nominal Frequency, and
so on). See “Configuring the basic setup
parameters” on page 34 for setup
instructions.
Incorrect voltage inputs.
Check power meter voltage input terminals (1,
2, 3, 4) to verify that adequate voltage is
present.
Power meter is wired improperly.
Check that all CTs and VTs are connected
correctly (proper polarity is observed) and that
they are energized. Check shorting terminals.
See the recommended torque in the Wiring
section of the installation manual.
Cannot communicate with
power meter from a remote
personal computer.
Power meter address is incorrect.
Check to see that the power meter is correctly
addressed. See “Communications setup” on
page 36 for instructions.
Power meter baud rate is incorrect.
Verify that the baud rate of the power meter
matches the baud rate of all other devices on
its communications link. See
“Communications setup” on page 36 for
instructions.
Communications lines are improperly
connected.
Verify the power meter communications
connections. Refer to the “Communications”
on page 26 section for instructions.
Communications lines are improperly
terminated.
Check to see that a multi-point
communications terminator is properly
installed.
Incorrect route statement to power
meter.
Check the route statement. Contact Global
Technical Support for assistance.
Energy/Alarm LED not
working. May have been disabled by user. See “Setting up the alarm / energy pulsing
LED” on page 42.

© 2015 Schneider Electric All Rights Reserved 107
Chapter 15—MID Compliance
This section applies only to PM5331/PM5341(referred to in the section as the meter)
and contains descriptions and procedures that supplement the meter installation sheet.
The information contained here supports the meter’s declaration of compliance with the
Measuring Instruments Directive (2004/22/EC).
MID overview
Directive 2004/22/EC is the Measuring Instruments Directive (“MID”) from the
European Parliament & Council that harmonises many aspects of legal metrology
across the EU states.
Scope
Although MID applies to various measuring instruments, the scope of this section is
limited only to the MID standards that apply to AC electricity metering equipment:
•EN 50470-1:2006
Electricity metering equipment (a.c.) — Part 1: General requirements, tests and test
conditions - Metering equipment (class indexes A, B and C)
•EN 50470-3:2006
Electricity metering equipment (a.c.) — Part 3: Particular requirements - Static
meters for active energy (class indexes A, B and C)
Related topics
•Search the Internet for “Measuring Instruments Directive” or “Directive 2004/22/EC”
for more information.
•The CE declaration document is available from the website. Search for
ECDPM5000.
MID compliance for the meter
The meter complies to these MID standards and class indexes:
•EN 50470-1:2006 Class C
•EN 50470-3:2006 Class C
The meter achieves MID compliance through application of Annex B (Type
Examination) and Annex D (Declaration of Conformity to Type Based on Quality
Assurance of the Production Process).
Specifications relevant to MID
The meter meets all specifications listed in “Technical Specifications” on page 15. See
that section for mechanical and electrical specifications such as IP rating, rated
operating conditions, protective class and environmental conditions.
In addition, the following specifications, function limitations and specific conditions are
relevant to MID:
Applicable MID standards and class index • EN 50470-1:2006 Class C
• EN 50470-3:2006 Class C
Type of measuring equipment Static watt-hour meter
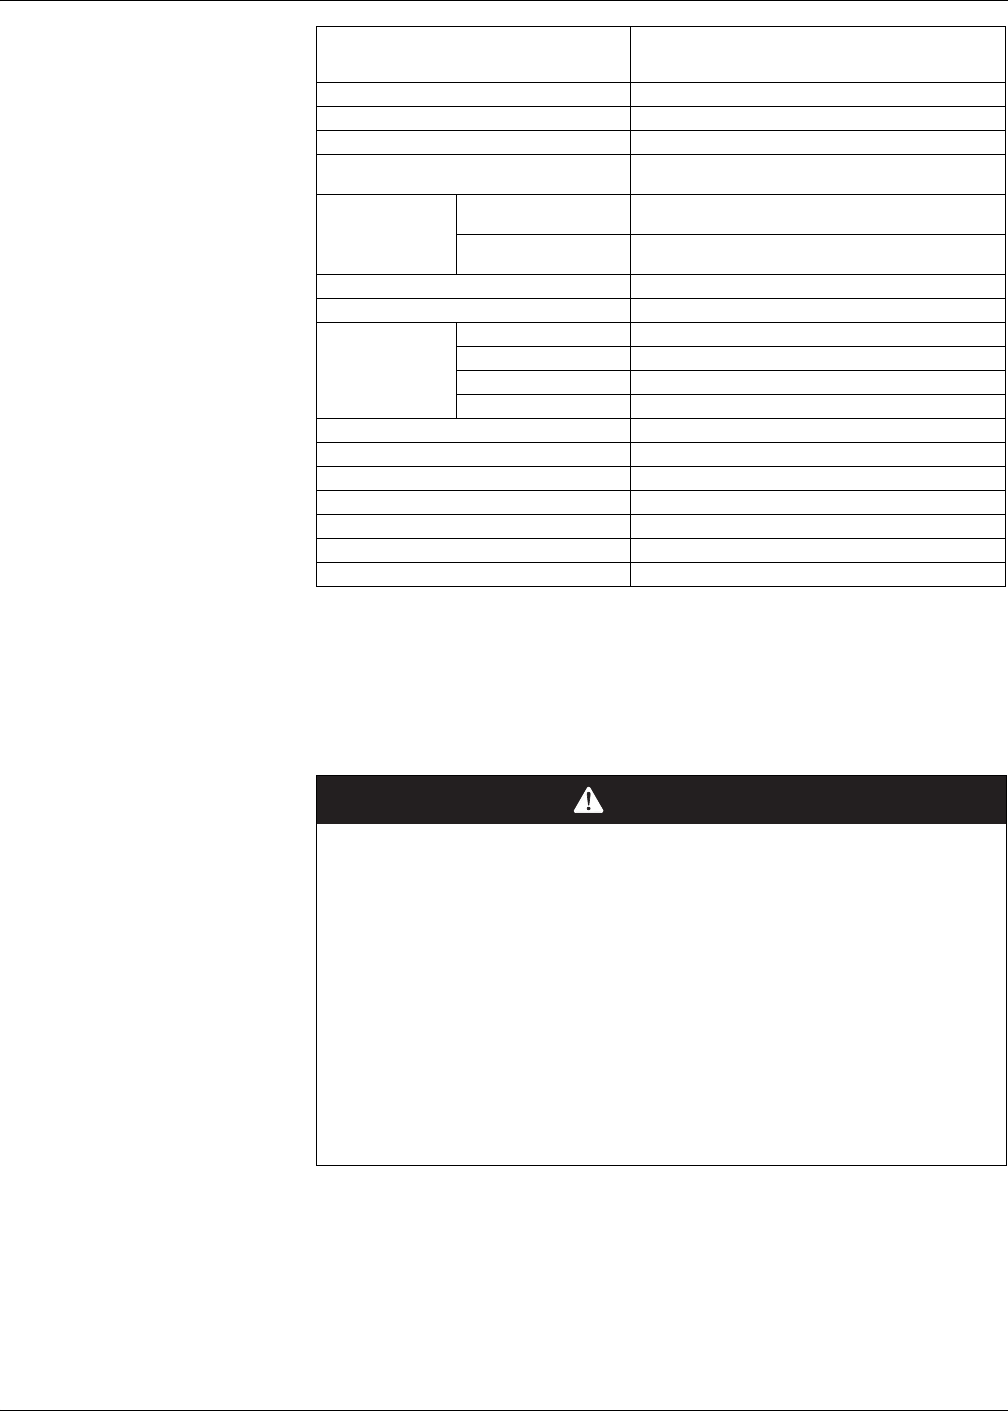
108 © 2015 Schneider Electric All Rights Reserved
Chapter 15—MID Compliance PowerLogic™ PM5300 series
Safety precautions
Installation, wiring, testing and service must be performed in accordance with all local
and national electrical codes.
1. Turn off all power supplying this device before working on it.
2. Always use a properly rated voltage sensing device to confirm that all power is off.
Installation and wiring
Refer to the installation sheet that shipped with your meter for meter installation and
wiring instructions.
Intended use
Indoor use only, permanently mounted in residential,
commercial or light industrial applications, where levels of
vibration and shock are of low significance
Mechanical environment M1
Electromagnetic (EMC) environment E2
Active Accuracy Class (kWh) C(kWh)
System types (for MID-compliant applications) • 3-phase 4-wire Wye grounded
• 3-phase 3-wire Wye ungrounded
Voltage at voltage
terminals
3-phase 4-wire Wye
grounded 3 x 63.5(110) to 3 x 277(480) V AC
3-phase 3-wire Wye
ungrounded 3 x 110 to 3 x 480 V L-L
Current Rating (Imin – Iref (Imax)) 0.05-5(6) A
Electrical network frequency 50 Hz
Optical pulse output
(energy pulsing LED)
Location Meter front panel
Frequency 50 Hz maximum
Pulse constant110,000 pulses per kWh
Wavelength 590 to 635 nm
Temperature Range -25°C to +70°C
IP Rating IP51
Insulation Protective Class Class II
Impulse Voltage Rating 6kV
AC Voltage Rating 4kV
Main Cover Sealing Type Wire and Crimp
Intended Location of the Meter Indoor
1See “MID-protected setup parameters” on page 110 for additional details.
DANGER
HAZARD OF ELECTRIC SHOCK, EXPLOSION OR ARC FLASH
• Apply appropriate personal protective equipment (PPE) and follow safe electrical
work practices. See NFPA 70E in the USA or applicable local standards.
• Turn off all power supplying this device before working on it.
• Always use a properly rated voltage sensing device to confirm that all power is off.
• Do not exceed the device’s ratings for maximum limits.
• Do not use this device for critical control or protection applications where human or
equipment safety relies on the operation of the control circuit.
• Never short the secondary of a voltage transformer (VT).
• Never open circuit a current transformer (CT).
• Always use grounded external CTs for current inputs.
Failure to follow these instructions will result in death or serious injury.
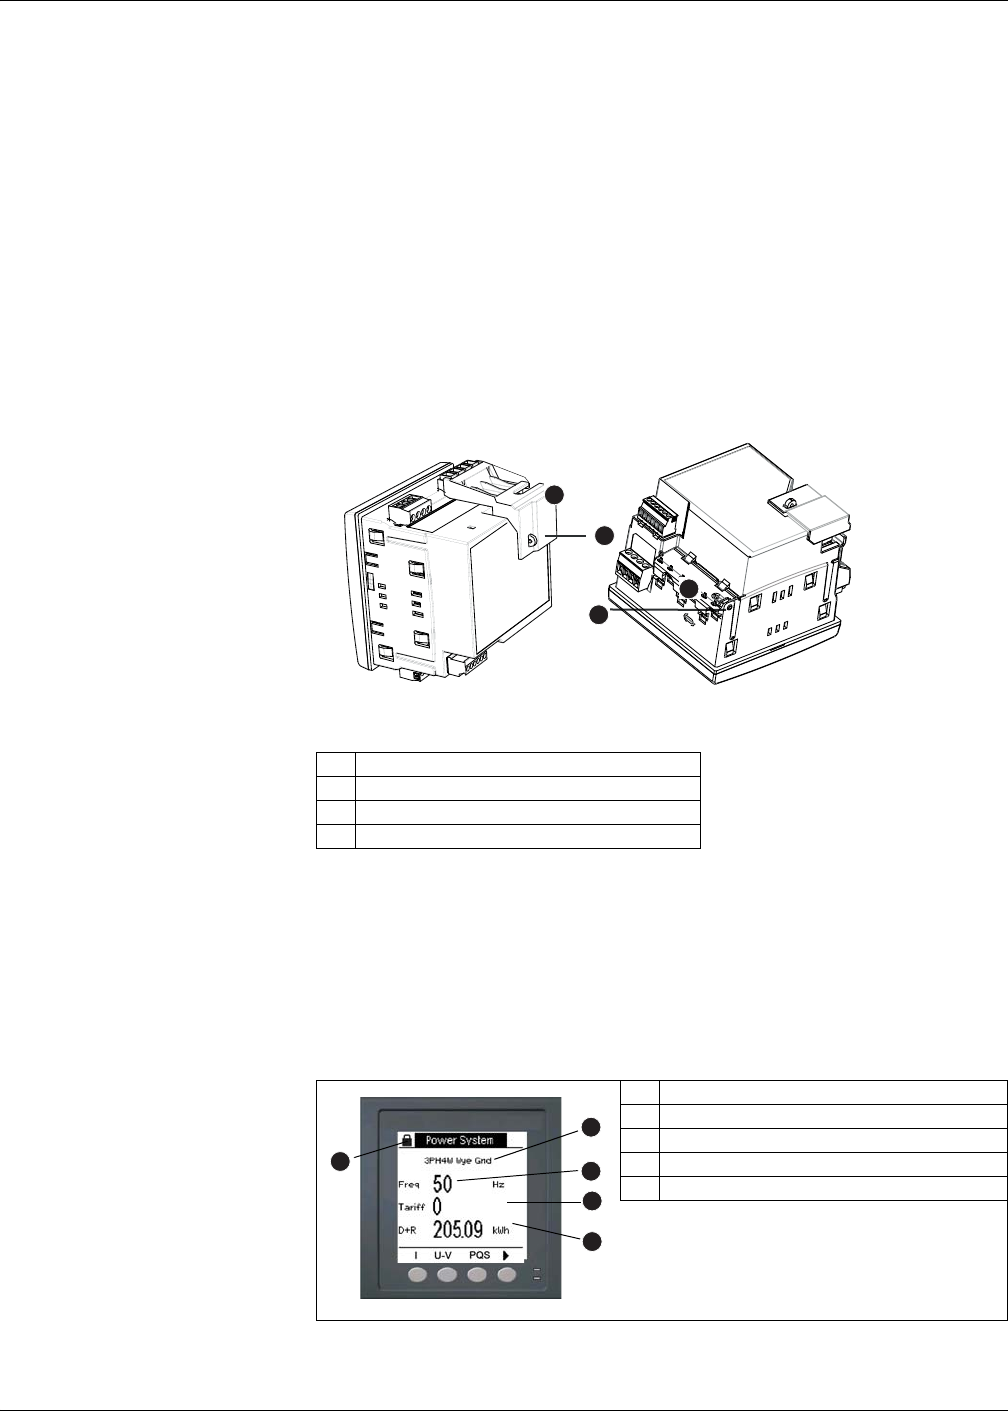
PowerLogic™ PM5300 series Chapter 15—MID Compliance
© 2015 Schneider Electric All Rights Reserved 109
Related topics
•See “Meter mounting” on page 18 and “Meter wiring” on page 19 for additional
information.
Installing the terminal covers
The voltage and current terminal covers help prevent tampering with the meter’s
voltage and current measurement inputs. The terminal covers enclose the terminals,
the conductor fixing screws and a suitable length of the external conductors and their
insulation. The terminal covers are secured by tamper-resistant meter seals.
The meter terminal covers must be installed by a qualified installer. The installation of
both the voltage and current terminal covers is required to provide tamper evidence for
MID installations.
Location of terminal covers
1. Install the voltage terminal cover (A) and apply the seal at the sealing point (B).
2. Install the current terminal cover (C) and apply the seal at the sealing point (D).
PM5331/PM5341 default screen
The meter’s default home screen displays the following information.
A Voltage terminal cover
B Voltage terminal sealing point
C Current terminal cover
D Current terminal sealing point
A
D
C
B
Default PM5331/PM5341 display screen
A Accumulated real energy (delivered + received)
BActive tariff
C System frequency
D Power system setting
E Locked / unlocked icon
A
E
C
B
D
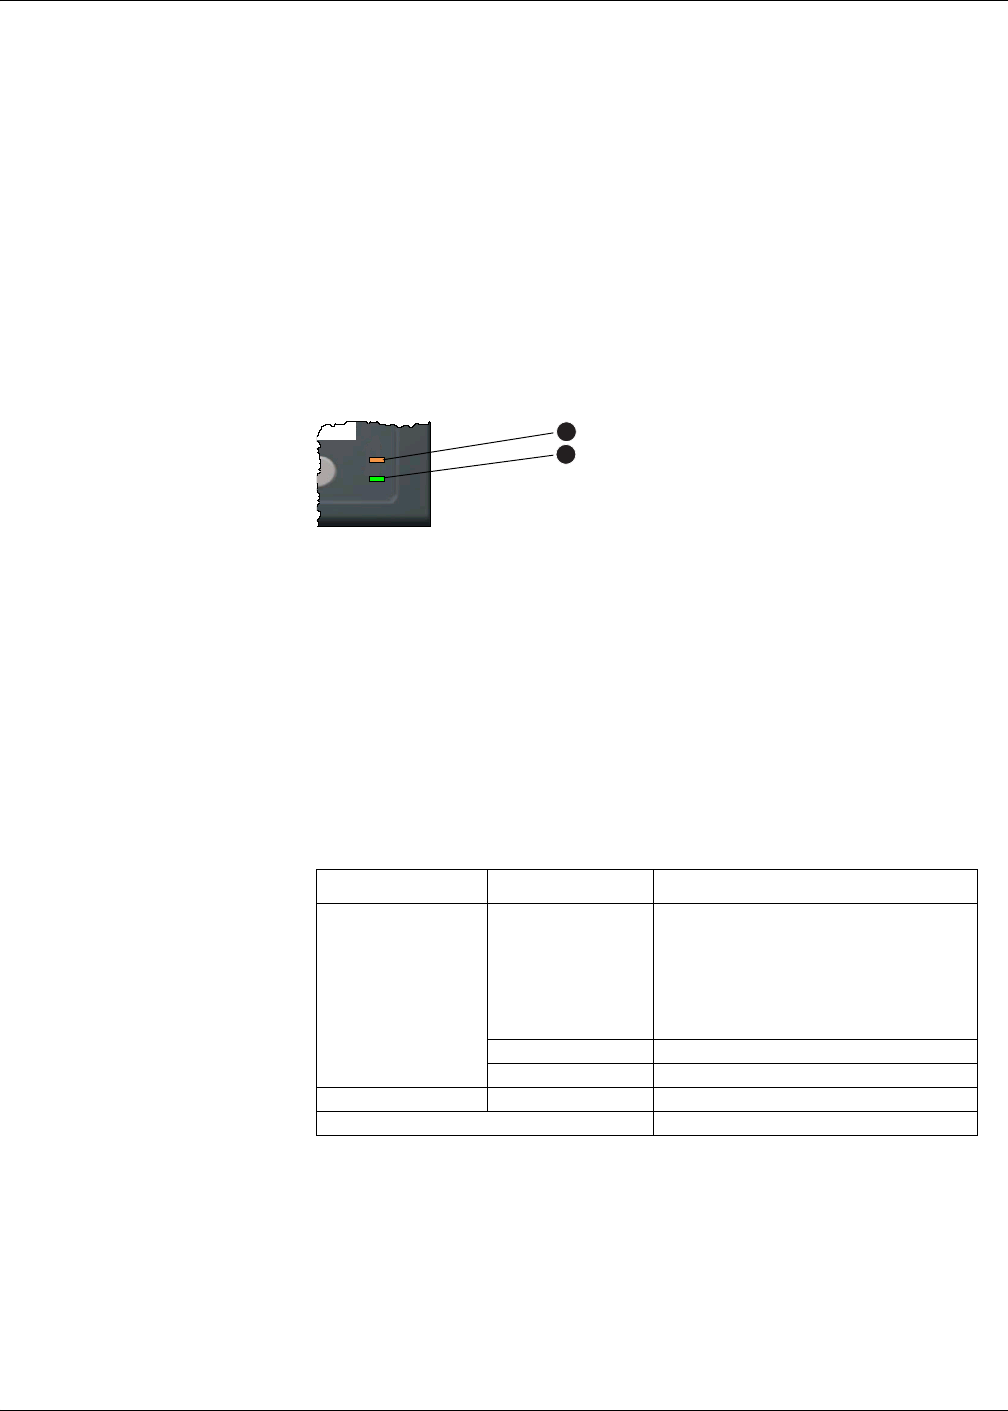
110 © 2015 Schneider Electric All Rights Reserved
Chapter 15—MID Compliance PowerLogic™ PM5300 series
Related topics
•See “Front panel display and meter setup” on page 31 for detailed information on
front panel menu navigation, LED indicators and display screen notification icons.
Meter firmware version
You can access information about the meter’s OS and RS firmware versions by
navigating to Maint > Diag > Info.
MID-protected setup parameters
This section describes the setup parameters that are permanently set at the factory and
cannot be modified, regardless of the lock or unlock settings.
The alarm / energy pulsing LED on the meter is permanently set for energy pulsing and
cannot be disabled or used for alarms. All other setup parameters for the energy
pulsing LED are also permanently set and cannot be modified.
Lock-protected setup parameters
This section lists the meter’s lock-protected setup parameters for MID compliance. After
the meter is locked, these setup parameters are protected and cannot be edited.
The setup parameters can be accessed from the maintenance menu screen. Use the
front panel buttons to navigate to the Maint > Setup menu.
Lock-protected functions
This section lists the meter’s lock-protected functions for MID compliance. After the
meter is locked, these functions are disabled.
These functions can be accessed from the maintenance menu screen. Use the front
panel buttons to navigate to the Maint > Reset menu.
Front panel LEDs
Alarm / energy pulsing LED (orange)
Heartbeat / communications LED (green)
A
B
Lock-protected setup parameters
Setup menu Setup sub-menu Lock-protected setup parameter
Meter
Basic
• Power System
• VT Connect
• VT Primary (V) and VT Secondary (V)1
• CT on Terminal
• CT Primary (A)
• CT Secondary (A)
• Sys Frequency
• Phase Rotation
1If using VTs (i.e., if VT Connect is set to 3VT or 2VT)
Advanced • Label
Tariff • Mode
HMI User Passwords • Energy Resets
Clock • Date

PowerLogic™ PM5300 series Chapter 15—MID Compliance
© 2015 Schneider Electric All Rights Reserved 111
Setting up the PM5331/PM5341
You must configure all the lock-protected setup parameters before locking the meter.
When the meter is locked, those setup parameters cannot be edited.
Basic setup menu
See “Configuring the basic setup parameters” on page 34 to perform basic setup.
For MID compliance, the Power System must be set to one of the following settings:
•3PH4W Wye Gnd (three-phase 4-wire wye grounded)
•3PH3W Wye Ungnd (three-phase 3-wire wye ungrounded)
Advanced setup menu
See “Advanced setup” on page 41 to perform advanced setup.
You must use ION Setup to edit the device label.
Clock setup menu
See “Setting the clock” on page 41 to change the meter time using the display.
You can also use ION Setup to set or sync the meter time.
Tariff setup menu
See “Multi-tariff feature overview” on page 83 to configure the energy tariffs.
Passwords setup menu
See “Setting up the screen passwords” on page 39 to change the meter screen
passwords.
Initializing the meter
Initializing the meter clears the meter’s logged data, counters and timers. It is common
practice to initialize the meter after its configuration is complete, before adding it to an
energy management system.
1. After configuring all the meter setup parameters, navigate through the different
meter display screens and make sure the displayed data is valid.
2. See “Meter resets” on page 99 for instructions on clearing the meter’s recorded
logged data, counters and timers.
3. Select Meter Initialization to clear all recorded data.
Lock-protected functions
Menu Sub-menu Lock-protected function
Resets
Global Resets • Meter Initialization (all)
•Energies
Single Resets •Energy
• Multi-Tariff

112 © 2015 Schneider Electric All Rights Reserved
Chapter 15—MID Compliance PowerLogic™ PM5300 series
Locking or unlocking the meter
After you initialize the meter, you must lock it in order to conform to MID standards.
1. Navigate to Maint > Setup > Meter >Lock.
2. Press Edit to activate or deactivate the lock.
3. Enter your lock password.
NOTE: The default password is 0000. To set up a new password see “Setting up
lock password” on page 112.
4. Press + and - to scroll between Active and Inactive.
5. Press OK to select the option.
6. Select Yes to confirm the selected option, and exit the screen.
On activating the lock, a lock icon appears on the upper left corner of the screen.
7. Make sure you record and store the lock password in a secure location. A lost lock
password cannot be recovered.
Setting up lock password
To set up a new lock password, perform the below procedure. To change the
password, make sure the lock is inactive and perform the below procedure.
NOTE: You cannot change the lock password when the lock is active.
1. Navigate to Maint > Setup > HMI > Pass.
2. Press to scroll to Revenue Lock in the Passwords screen.
3. Press Edit to select a password.
4. Press + to increment the active digit through the numerals 0-9.
5. Press to move to the next digit to the left.
6. Continue until all values are selected, and then press OK to set the password.
7. Press Yes to save the changes.
NOTICE
IRRECOVERABLE PASSWORD
Record your meter's lock password information in a secure location.
Failure to follow this instruction can result in a permanently locked meter.

PowerLogic™ PM5300 series user guide Glossary
© 2015 Schneider Electric All Rights Reserved 113
Glossary
Terms
accumulated energy—energy accumulates as either delivered to the customer or
received from the customer.
active alarm—an alarm that has been set up to trigger the execution of a task or
notification when certain conditions are met. An icon in the upper-right corner of the
power meter indicates that an alarm is active (!).
ASCII—American Standard Code for Information Interchange
baud rate—specifies how fast data is transmitted across a network port.
block interval demand—demand calculation method for a block of time; includes sliding
block, fixed block, or rolling block method.
communications link—a chain of devices connected by a communications cable to a
communications port.
current transformer (CT)—current transformer for current inputs.
debounce time—amount of time an input must be consistently on before the transition is
accepted as valid.
demand—average value of a quantity, such as power, over a specified interval of time.
device address—used to identify a device on the Modbus communications link; defines
where the power meter resides in the power monitoring system.
energy delivered—the utility delivers energy to the facility; energy in.
energy received—the utility receives energy from the facility; the customer provides
power to the utility; energy out.
event—the occurrence of an alarm condition, such as Undervoltage Phase A, configured
in the power meter.
firmware—operating system within the power meter.
fixed block—a demand calculation method using an interval selected from 1 to 60
minutes (in 1-minute increments). The power meter calculates and updates the demand
at the end of each interval.
frequency—number of cycles in one second.
GMT—Greenwich Mean Time
k_h— kWh, kVARh or kVAh depending on the energy parameter selected.
lagging current (I)—current is lagging voltage up to 180°.
leading current (I)—current is leading voltage up to 180°.
lagging power factor (PF) —active and reactive power flowing in the same directions.
leading power factor (PF) —active and reactive power flowing in opposite directions.
line-to-line voltages—measurement of the rms line-to-line voltages of the circuit.
line-to-neutral voltages—measurement of the rms line-to-neutral voltages of the circuit.
maximum value—highest value recorded of the instantaneous quantity such as Phase
A Current, Phase A Voltage, etc., since the last reset of the minimums and maximums.
minimum value—lowest value recorded of the instantaneous quantity such as Phase A
Current, Phase A Voltage, etc., since the last reset of the minimums and maximums.
nominal—typical or average.
parity—refers to binary numbers sent over the communications link. An extra bit is
added so that the number of ones in the binary number is either even or odd, depending
on your configuration. Used to detect errors in the transmission of data.

PowerLogic™ PM5300 series user guide Glossary
© 2015 Schneider Electric All Rights Reserved114
partial interval demand—equal to energy accumulated thus far in the interval divided
by the length of the complete interval.
peak demand current—highest demand current measured in amperes since the last
reset of demand.
peak demand real power—highest demand real power measured since the last reset of
demand.
peak demand—highest demand measured since the last reset of demand.
phase currents (rms)—measurement in amperes of the rms current for each of the
three phases of the circuit.
phase rotation—refers to the order in which the instantaneous values of the voltages or
currents of the system reach their maximum positive values. Two phase rotations are
possible: A-B-C or A-C-B.
potential transformer (PT)—also known as a voltage transformer (VT).
power factor (PF)—power factor is the degree to which voltage and current to a load are
out of phase. Total power factor is the difference between the total power your utility
delivers and the portion of total power that does useful work. True power factor is the
ratio of real power to apparent power using the complete harmonic content of real and
apparent power. Calculated by dividing watts by volt amperes. Displacement power
factor is the cosine of the angle between the fundamental components of current and
voltage, which represents the time lag between fundamental voltage and current.
real power—calculation of the real power (3-phase total and per-phase real power
calculated) to obtain kilowatts.
rms—root mean square. Power meters are true rms sensing devices.
rolling block—a selected interval and subinterval that the power meter uses for demand
calculation. The subinterval must divide evenly into the interval. Demand is updated at
each subinterval, and the power meter displays the demand value for the last completed
interval.
sliding block—an interval selected from 1 to 60 minutes (in 1-minute increments). If the
interval is between 1 and 15 minutes, the demand calculation updates every 15 seconds.
If the interval is between 16 and 60 minutes, the demand calculation updates every 60
seconds. The power meter displays the demand value for the last completed interval.
thermal demand—demand calculation based on thermal response.
Total Demand Distortion (TDD)—indicates the harmonic currents between an end user
and a power source.
Total Harmonic Distortion (THD or thd)—indicates the degree to which the voltage or
current signal is distorted in a circuit.
total power factor—see power factor.
true power factor—see power factor.
unary alarm—an alarm based on singular events or specific conditions for which
setpoints are not appropriate.
voltage transformer (VT)—also known as a potential transformer (PT).

PowerLogic™ PM5300 series user guide Glossary
© 2015 Schneider Electric All Rights Reserved 115
Abbreviations
A—Ampere
Amps—Amperes
Comms—Communications
CPT—Control Power Transformer
CT—Current Transformer
D In—Digital Input
D Out—Digital Output
DMD—Demand
DO—Drop Out
F—Frequency
GMT—Greenwich Mean Time
Hz—Hertz
I—Current
I/O—Input/Output
Imax—Current maximum demand
k_h— kWh, kVARh or kVAh depending on the energy parameter selected
kVA—Kilovolt-Ampere
kVAD—Kilovolt-Ampere demand
kVAR—Kilovolt-Ampere reactive
kVARD—Kilovolt-Ampere reactive demand
kVARH—Kilovolt-Ampere reactive hour
kW—Kilowatt
kWD—Kilowatt demand
kWH—Kilowatthours
kWH/P—Kilowatthours per pulse
kWmax—Kilowatt maximum demand
Mag—Magnitude
Maint—Maintenance
Min—Minimum
MnMx—Minimum and maximum values
MSec—Milliseconds
MVAh—Megavolt ampere hour
MVARh—Megavolt ampere reactive hour
MWh—Megawatt hour
OS—Operating System (firmware version)
P—Real power
Pd—Real power demand
PF—Power factor
PM—Power meter
PQS—Real, reactive, apparent power
PQSd—Real, reactive, apparent power demand
Prim—Primary
PT—Potential Transformer (also known as VT–Voltage Transformer)
PU—Pick Up

PowerLogic™ PM5300 series user guide Glossary
© 2015 Schneider Electric All Rights Reserved116
Pulse—Pulse output mode
Pwr—Power
Q—Reactive power
Qd—Reactive power demand
RS—Firmware reset system version
S—Apparent power
SN—Power meter serial number
Sd—Apparent power demand
Sec—Secondary
Sub-I—Subinterval
TDD—Total Demand Distortion
THD—Total Harmonic Distortion
U—Voltage line to line
V—Volts
VT—Voltage Transformer (also known as PT–Potential Transformer)
VAR—Volt ampere reactive
Vmax—Maximum voltage
Vmin—Minimum voltage

EAV15107 - EN04 © 2015 Schneider Electric. All rights reserved. 02/2015
Schneider Electric
35, rue Joseph Monier
CS 30323
F - 92506 Rueil Malmaison Cedex
www.schneider-electric.com
Contact your local Schneider Electric sales
representative for assistance or go to
www.schneider-electric.com
PowerLogic and Schneider Electric are trademarks or registered trademarks of Schneider
Electric in France, the USA and other countries.
• This product must be installed, connected and used in compliance with prevailing standards and/or
installation regulations.
• If this product is used in a manner not specified by the manufacturer, the protection provided by the product
may be impaired.
• The safety of any system incorporating this product is the responsibility of the assembler/installer of the
system.
As standards, specifications and designs change from time to time, always ask for confirmation of the
information given in this
publication.
