POSitive Retail Manager User Guide
User Manual: POSitive Retail Manager User Guide user guide pdf - FTP File Search (12/20)
Open the PDF directly: View PDF ![]() .
.
Page Count: 352 [warning: Documents this large are best viewed by clicking the View PDF Link!]

Copyright ©2007 POSitive Software Company
POSitive Retail Manager
User Guide

POSitive Retail Manager
Making Retail Easier
All rights reserved. No parts of this work may be reproduced in any form or by any means - graphic, electronic, or
mechanical, including photocopying, recording, taping, or information storage and retrieval systems - without the written
permission of the publisher.
Products that are referred to in this document may be either trademarks and/or registered trademarks of the respective
owners. The publisher and the author make no claim to these trademarks.
While every precaution has been taken in the preparation of this document, the publisher and the author assume no
responsibility for errors or omissions, or for damages resulting from the use of information contained in this document
or from the use of programs and source code that may accompany it. In no event shall the publisher and the author be
liable for any loss of profit or any other commercial damage caused or alleged to have been caused directly or indirectly
by this document.
POSitive Retail Manager User Guide
Copyright ©2007 POSitive Software Company

5Contents
5
Copyright ©2007 POSitive Software Company
Table of Contents
Foreword 9
Part I Contents 12
................................................................................................................................... 121Features Of Interest
................................................................................................................................... 132System Requirements
Part II Getting Started 16
................................................................................................................................... 171Creating Your Company
.......................................................................................................................................................... 18Choose Company
.......................................................................................................................................................... 19New Company Wizard
.......................................................................................................................................................... 31New Company Setup
.......................................................................................................................................................... 33Adding New Employees
................................................................................................................................... 372Company Setup Summary
................................................................................................................................... 393Basic Hardware For Workstations
.......................................................................................................................................................... 54Sample: Generic Receipt Printer Setup
.......................................................................................................................................................... 59Additional Pole Display Setup Info
.......................................................................................................................................................... 60Additional Cash Drawer Setup Information
.......................................................................................................................................................... 61Editing & Using Inventory Labels
Part III Master Menus Ready Reference 64
................................................................................................................................... 661Customers
................................................................................................................................... 672Inventory
................................................................................................................................... 693 Vendors
................................................................................................................................... 704 Purchasing
................................................................................................................................... 725 Accounting
................................................................................................................................... 756 E-Commerce
................................................................................................................................... 767 Management
................................................................................................................................... 788 Maintenance
................................................................................................................................... 829Service
................................................................................................................................... 8310 Multistore
Part IV Primary Databases 86
................................................................................................................................... 871Customer Center
.......................................................................................................................................................... 90Customer Account
.......................................................................................................................................................... 93Invoice History
................................................................................................................................... 942Inventory Center
.......................................................................................................................................................... 99Inventory Listing
......................................................................................................................................................... 99Inventory Record
......................................................................................................................................................... 103Find
......................................................................................................................................................... 104Filter (Dept/Category)
......................................................................................................................................................... 105Search UDF
......................................................................................................................................................... 106Copy

POSitive Retail Manager User Guide6
Copyright ©2007 POSitive Software Company
......................................................................................................................................................... 107Add
.......................................................................................................................................................... 107Access Panel
......................................................................................................................................................... 108Summary
......................................................................................................................................................... 110Details
......................................................................................................................................................... 115Promo Pricing
......................................................................................................................................................... 117Price Breaks
......................................................................................................................................................... 118Stock Management
......................................................................................................................................... 120Transaction Log
......................................................................................................................................... 120Stock Location
......................................................................................................................................... 122Links
......................................................................................................................................... 125Used Items
......................................................................................................................................... 126Seasonal Levels
......................................................................................................................................................... 127Item Notes
......................................................................................................................................................... 128Vendors
......................................................................................................................................................... 130SKU Management
......................................................................................................................................................... 133Item History
......................................................................................................................................................... 135Picture Management
......................................................................................................................................................... 137Customer Orders
......................................................................................................................................................... 138MultiStore
......................................................................................................................................................... 139To Order List
......................................................................................................................................................... 139Change Dept/Catg
......................................................................................................................................................... 140Add To Label List
......................................................................................................................................................... 141Dept/Catg Manager
......................................................................................................................................................... 142Coupon Manager
......................................................................................................................................................... 143Promo Manager
......................................................................................................................................... 145Promotional Pricing Information
......................................................................................................................................................... 145Used Items Manager
......................................................................................................................................................... 146Mix & Match Manager
......................................................................................................................................................... 146Reports
................................................................................................................................... 1473 Vendor Center
.......................................................................................................................................................... 150Vendor Account
.......................................................................................................................................................... 152PO History By Vendor
.......................................................................................................................................................... 154Vendor Inventory List
................................................................................................................................... 1604Report Center
Part V Purchasing 170
................................................................................................................................... 1721 Order List
................................................................................................................................... 1732Using The Order List
................................................................................................................................... 1773Purchase Order Center
................................................................................................................................... 1794Place PO Screen
................................................................................................................................... 1835Receive PO Screen
Part VI Sales Invoices 188
................................................................................................................................... 1891Invoice History
................................................................................................................................... 1912Pending Transactions
Part VII Appendix A 196
................................................................................................................................... 1961POSitive Setup Form
.......................................................................................................................................................... 200Transactions

7Contents
7
Copyright ©2007 POSitive Software Company
.......................................................................................................................................................... 209Customer Options
.......................................................................................................................................................... 210Inventory
.......................................................................................................................................................... 217Purchase Orders
.......................................................................................................................................................... 220Tax Options
.......................................................................................................................................................... 224Accounts Receivable
.......................................................................................................................................................... 226Accounts Payable
.......................................................................................................................................................... 227E-Mail Setup
.......................................................................................................................................................... 227Consignments
.......................................................................................................................................................... 228Commissions
.......................................................................................................................................................... 228Pharmacy Setup
.......................................................................................................................................................... 228Replicated Registers
................................................................................................................................... 2282 Credit Card Setup
................................................................................................................................... 2303Station Detail - General
.......................................................................................................................................................... 232Station Settings
.......................................................................................................................................................... 234Transaction Settings
.......................................................................................................................................................... 237Register Balance
.......................................................................................................................................................... 238Credit Card Processing
.......................................................................................................................................................... 239Stations - Devices
......................................................................................................................................................... 240Cash Drawer
......................................................................................................................................................... 240Pole Display
......................................................................................................................................................... 243Portable Scanner
......................................................................................................................................................... 244Multi-Monitor Support
......................................................................................................................................................... 245RMS Pump Interface
......................................................................................................................................................... 246Com Ports
................................................................................................................................... 2464 Editors
................................................................................................................................... 2485Company Information
................................................................................................................................... 2516Policy Statements
................................................................................................................................... 2527PRM Security Options
.......................................................................................................................................................... 258Security Groups
.......................................................................................................................................................... 258Security Group Settings
................................................................................................................................... 2598Employees
.......................................................................................................................................................... 260Employee File
.......................................................................................................................................................... 264Employee Time Cards
.......................................................................................................................................................... 266Service Time Cards
.......................................................................................................................................................... 267My POSitive
......................................................................................................................................................... 268POSitive Mail
......................................................................................................................................................... 270Mail Groups
Part VIII Key Concepts 274
................................................................................................................................... 2741Categories
.......................................................................................................................................................... 274What Categories Can Do
.......................................................................................................................................................... 275Category Defaults
.......................................................................................................................................................... 278Category Defaults (Listing)
.......................................................................................................................................................... 278Category Detail Form
......................................................................................................................................................... 279Detail [F6]
......................................................................................................................................................... 280Options [F7]
......................................................................................................................................................... 289Defaults [F8]
......................................................................................................................................................... 290AutoSKU Setup [F9]
......................................................................................................................................................... 290POSitive Commerce
.......................................................................................................................................................... 291Category Listing
.......................................................................................................................................................... 294Freight Category

POSitive Retail Manager User Guide8
Copyright ©2007 POSitive Software Company
................................................................................................................................... 2952Customer Categories
.......................................................................................................................................................... 297Customer Categories Form
................................................................................................................................... 3003 Customer Find
................................................................................................................................... 3014 Customer Message List
................................................................................................................................... 3025Departments
................................................................................................................................... 3076Edit Unposted Inventory Items
................................................................................................................................... 3087Gift Cards & Certificates
................................................................................................................................... 3088Inactive Inventory
................................................................................................................................... 3109 Mix & Match Manager
................................................................................................................................... 31210 Saved Queries
................................................................................................................................... 31511 Using Inventory Labels
.......................................................................................................................................................... 315Advanced Inventory Label Printing Tutorial
.......................................................................................................................................................... 329A Demonstration of Label Printing
Index 333
9
Copyright ©2007 POSitive Software Company
Streamline your retail business.
Become more efficient.
Increase profits.
Work smarter!

Part I
POSitive Retail Manager User Guide12
Copyright ©2007 POSitive Software Company
1Contents
Welcome to POSitive Retail Manager
1.1 Features Of Interest
1. The opening screen is clean and simple. The Master Menus Tool Bar at the top provides ready
access to nearly all features of PRM (POSitive Retail Manager). This toolbar replaces the old
Manager Console of POSitive For Windows by providing views of data and links to procedures.
2. List Views - more columns are visible; you may re-arrange column sequence with drag & drop;
you may save and recall multiple Views.
3. Send To Window - whatever list you are viewing can be sent to the printer, a file, included in an
e-mail,
4. Report Preview - in addition to printing the report, it can be converted to PDF, HTML, or a TEXT
file.
5. On Line Registration - simply choose the Registration feature under Maintenance and you will get
the "unlock" codes automatically through a web site.
6. Check For Updates - select the option under Maintenance and you will be notified if a newer
version is available. You may download a new PRMSetup.exe file onto your desktop and run it when
convenient.
7. Built-In Touchscreen - PRM includes a touchscreen designer program and selective employees
will operate PRM through a touchscreen interface upon logging in. Can be used with or without a true
touchscreen monitor.
8. POSitive Choice - the ability to change a QuickSale invoice to Customer sale by entering or

Contents 13
Copyright ©2007 POSitive Software Company
scanning phone number, rewards card, or lookup code.
9. Stock Counts Per Bin Location - manage stock counts per bin location; updated when purchase
order received and stock sold.
10. Enhanced picture management - import, capture, and modify inventory and customer pictures
11. Speedy Searches - in the Locate field enter beginning or partial characters and press Enter or
Ctrl-Enter
12. Advanced Search - while invoicing, enter customer phone number, frequent buyer ID, or lookup
code to select customer
13. Divisions - is an accounting organization. A workstation can be designated to process
transactions for a division. All Sales and GL Transactions made at this designated computer will be
reported under the division name. The station can also be set to use a specific price level. For
example, an Internet Sales Division will always use a specific price level and report all sales made on
the internet in a separate set of Chart of Accounts.
14. General Ledger Journal - can now post selective transactions. Each transaction needs to be
check marked for posting. A separate Chart of Accounts is maintained for each Division.
15. Combine Same SKU Items On Transaction - if scanning the same item multiple times, rather
than making a separate line entry on the invoice for each item, all same-SKU items will be combined
as one entry with the quantity field being updated each time.
16. Multi-Store SQL replicates all data at each location, yet only displays data based upon the
permissions of the store running PRM.
17. Purchase Order Form now uses an HTML file for a template in order to create the PO layout.
1.2 System Requirements
•Hardware Minimums
–Modern Processor
–1024x768 (1280x1024)
–512mb Dedicated Register (nothing else running)
–1gb workstation
–1gb server (more is better)
–2gb if combo workstation & server
–BACKUP Solutions
•Software
–Get all of the current Windows Updates
–PRM will be installed and can install SQL servers automatically as follows:

POSitive Retail Manager User Guide14
Copyright ©2007 POSitive Software Company
–MSSQL 2005 or later (any edition) on server
Important! - Install in MIXED MODE
–MSSQL Native Client (on each workstation)
If you are using Vista Windows Operating System, contact your dealer for special instructions.

Part II

POSitive Retail Manager User Guide16
Copyright ©2007 POSitive Software Company
2Getting Started
Install POSitive Retail Manager
From a CD or from a downloaded file, you will be running an installation program which will create the
needed directories, sub-directories, program files and support files. It will create a shortcut on the
computer desktop for launching POSitive Retail Manager. The whole process is automated; follow
the directions on screen.
The CD installation disk will determine if you need to install an SQL Server, a Native Client, as well as
install or merely upgrade the PRM program files.
Create Your Own Company
A special database for your company needs to be created. It will eventually contain a listing of all of
your customers, employees, inventory, and vendors. It will also track all sales transactions,
purchases from your vendors, and generate useful reports. You have two options:
·Starting From Scratch - A new company wizard will guide you through each step of the process.
At the outset, there are some things you will need to know, but you may make corrections to these
initial selections at any time in the future. (see Creating Your Company)
·Migrating PRM data - If you are already a user of POSitive For Windows you do not need to start
from scratch. There is a process to convert all of your current data to PRM. This conversion may
take a few hours to complete, but you will save much time and retain the historical information for
generating useful reports.
Registration
Run PRM and select your company name. Your new company data will be in Demo Mode with some
limitations. To gain full functionality, you should choose the Register On-Line button when it
appears. Your computer will need internet access. If you get an Invalid Code message, please
contact your dealer or POSitive Software Company.
Activate System and Station Settings
If you converted your PFW to PRM the settings are still intact. However, there are new options in
System Setup. And if you are new to PRM, this is an important area for management to review
because it reflects your business style and practices. These settings will control how PRM is to be
used for making sales and purchases and granting employee access to features of PRM.
Station Setting options are hardware related to assure that printers, scanners, and cash drawers are
performing properly from each computer workstation. Preferences for operations at the station are
also defined.
Using PRM
Now what? There are no customers, or inventory, or vendors, or anything else in this new installation
of PRM. We suggest that you take time to experiment using the sample company data, or follow
these suggestions to get a better feel for the PRM program. If you have questions, ask your dealer.
Consider joining some on-line classes.

Getting Started 17
Copyright ©2007 POSitive Software Company
Create Some Inventory
Most importantly and by far the biggest project is the creation of your inventory list. This should done
right away; as systematically as possible. In this manual you will learn how to create a few inventory
items to teach you the concepts. Some tips and tricks for speeding up the work will also be
introduced.
Make A Sale
What the clerk sees on screen, how items are added to the invoice, and what to do to meet special
needs of invoicing are important setup and training issues. This is an adjunct to Station Setting
options discussed earlier.
Learn How To Process Purchase Orders
Placing and receiving purchase orders automatically updates your stock counts. There is a smooth
flow from determining what to order, contacting the vendor, and receiving products as they arrive.
2.1 Creating Your Company
Creating a company is easy in PRM. You will be prompted through each step of the process. You
will be asked specific questions about your company name, address, etc. and given options for
functionality of PRM. Do not worry too much about your selections because they can be modified
later as needed.
Some things you will need to know:
SQL Server, name and password
A Data Password
Your company name, address, etc.
Starting numbers for invoices and orders and Price Level Descriptions
Number of workstations (network seats), main printer type
Local tax rate
Getting Started
The following topics give you step by step instructions for:
1) Launching PRM and accessing the Create Company screen (Choose Company),
2) Creating a new company (New Company Wizard),
3) Defining the system and station settings to match your business philosophies (New Company
Setup),
4) Adding and authorizing employees (Adding New Employees).
POSitive Retail Manager User Guide18
Copyright ©2007 POSitive Software Company
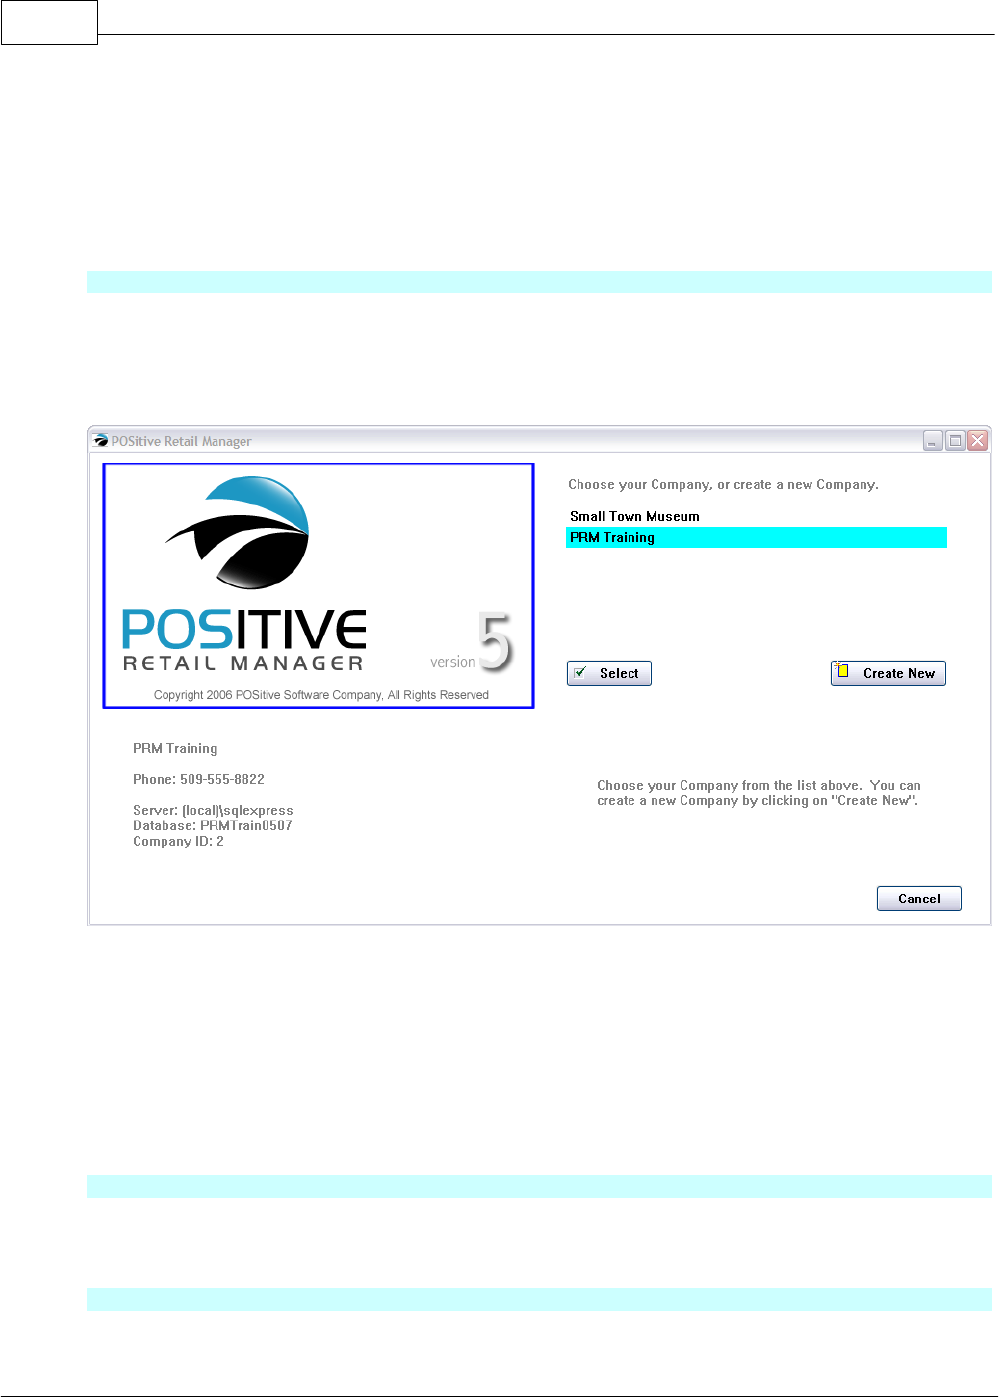
2.1.1 Choose Company
PRM may install with sample data, Blink's Video Game Emporium, for you to use for practice and
reference. You may be tempted to remove it from the list, but we recommend retaining it for future
reference. There are some ways the sample company can be less intrusive (see below).
PRM will add your company to this Choose Company window and additional companies if you wish to
keep them all under one software program.
Purpose
This screen serves as an access to
·Selecting sample data for testing purposes
·Selecting or creating you own company data
Company List - All companies available through this installation of PRM.
Description - Your company name.
Select - After highlighting the desired company, this will launch PRM using this data.
Create New - Creates a new data set utilizing a New Company Wizard.
Company Details, Server & Database Name - In the lower left corner is the name, address and
phone number of the highlighted company at right. Also displayed is the name of your SQL server,
the name of the database, and an ID number for the company.
How To Choose A Company
1) Highlight the company in the list.
2) Double Click, choose Select, or press "Enter".
How To Create A New Company
1) Click on the "Create New" button.
Getting Started 19
Copyright ©2007 POSitive Software Company
2) A New Company Setup Wizard will walk you through the basics.
3) When you have finished with the Setup Wizard be sure to review the New Company Setup topic.
2.1.2 New Company Wizard
PRM makes it easy for you to set up your own company. The New Company Wizard prompts you
through several critical setup screens. Remember that anything you select can be changed very
easily later.
Some Things You Will Need To Know
SQL Server, name and password
A Data Password
Your company name, address, etc.
Starting numbers for invoices and orders and Price Level Descriptions
Number of workstations (network seats), main printer type
Local tax rate
How To Create A New Company
1) Start PRM running.
2) At the Choose Company dialog box, click on the Create New Company button. Read what is on
the screen and follow the prompts.
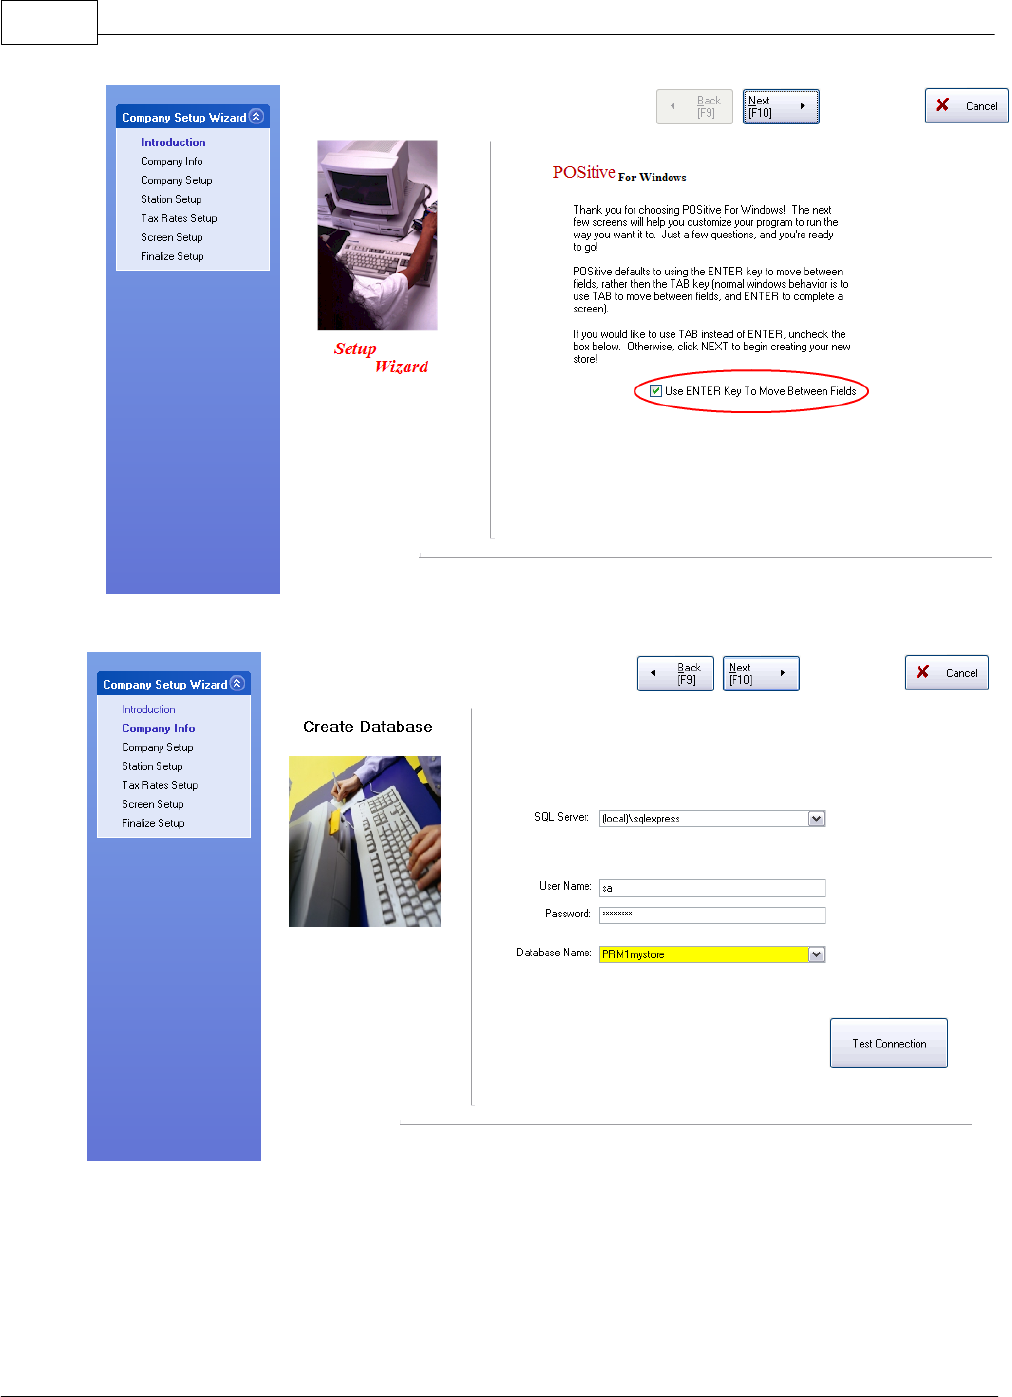
Company Setup Wizard - Introduction
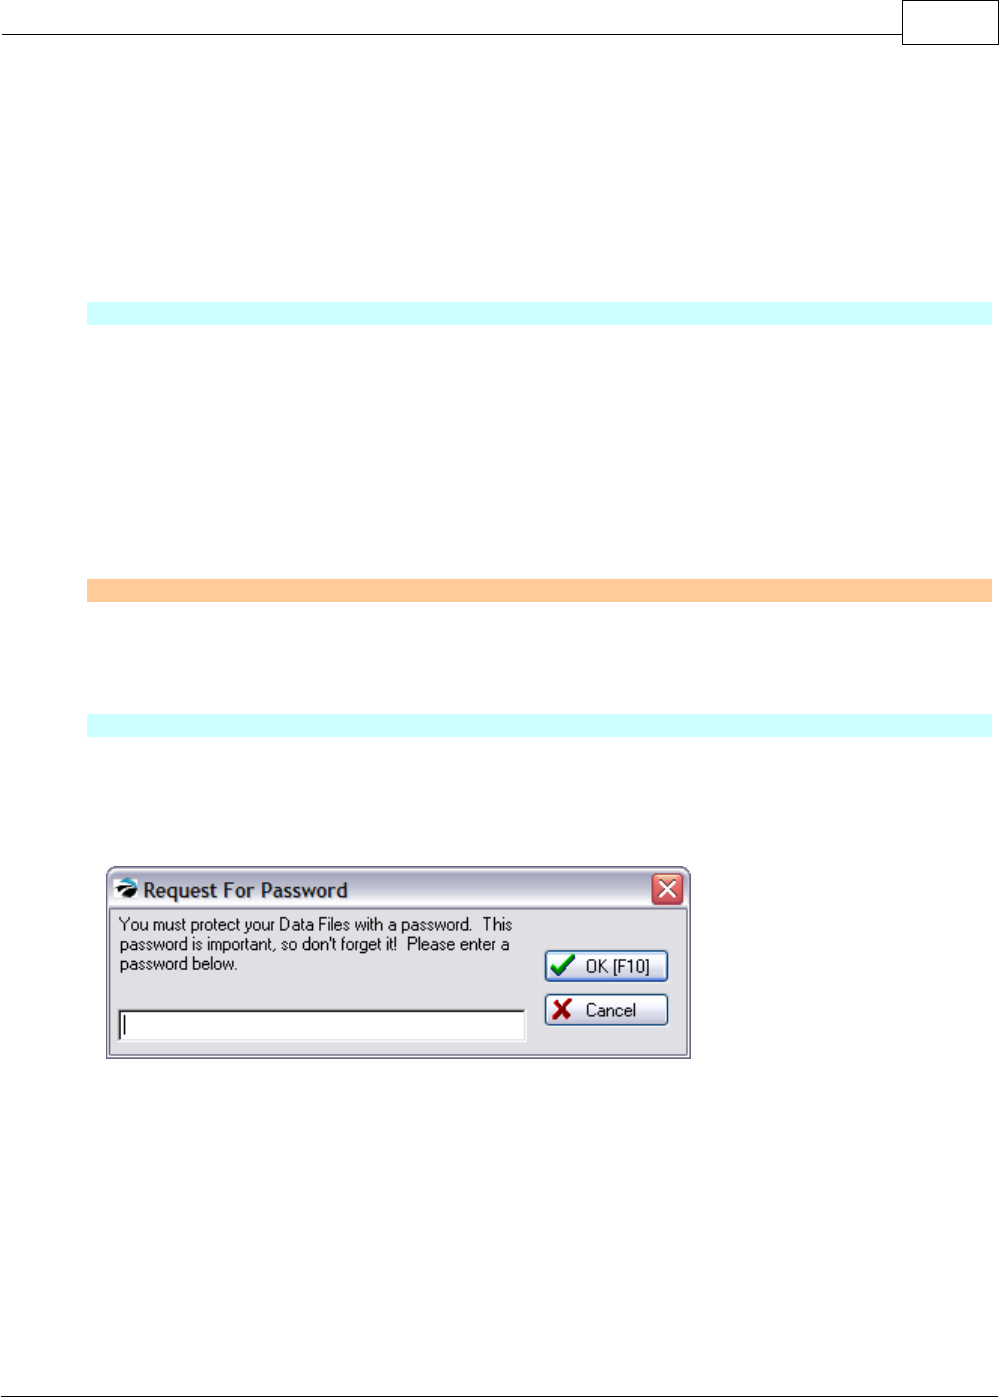
·Enter a DATA PASSWORD. This password (one word only) is required to continue. It is used for
encryption of credit card and other sensitive data. Do not choose a password which will be obvious
to employees, yet do not make it too difficult to remember. Only rarely will you ever need to
remember this password. Click on OK.
·Select "Use ENTER Key To Move Between Fields" (Recommended)
POSitive Retail Manager User Guide20
Copyright ©2007 POSitive Software Company
·
·Create Database
SQL Server - the name of your SQL server
User Name - the user name you use to log in to your SQL server, typically "sa" (system administrator)
Password - the password associated with your user name
Database Name - typically your company name (this should always be a unique name)
Getting Started 21
Copyright ©2007 POSitive Software Company
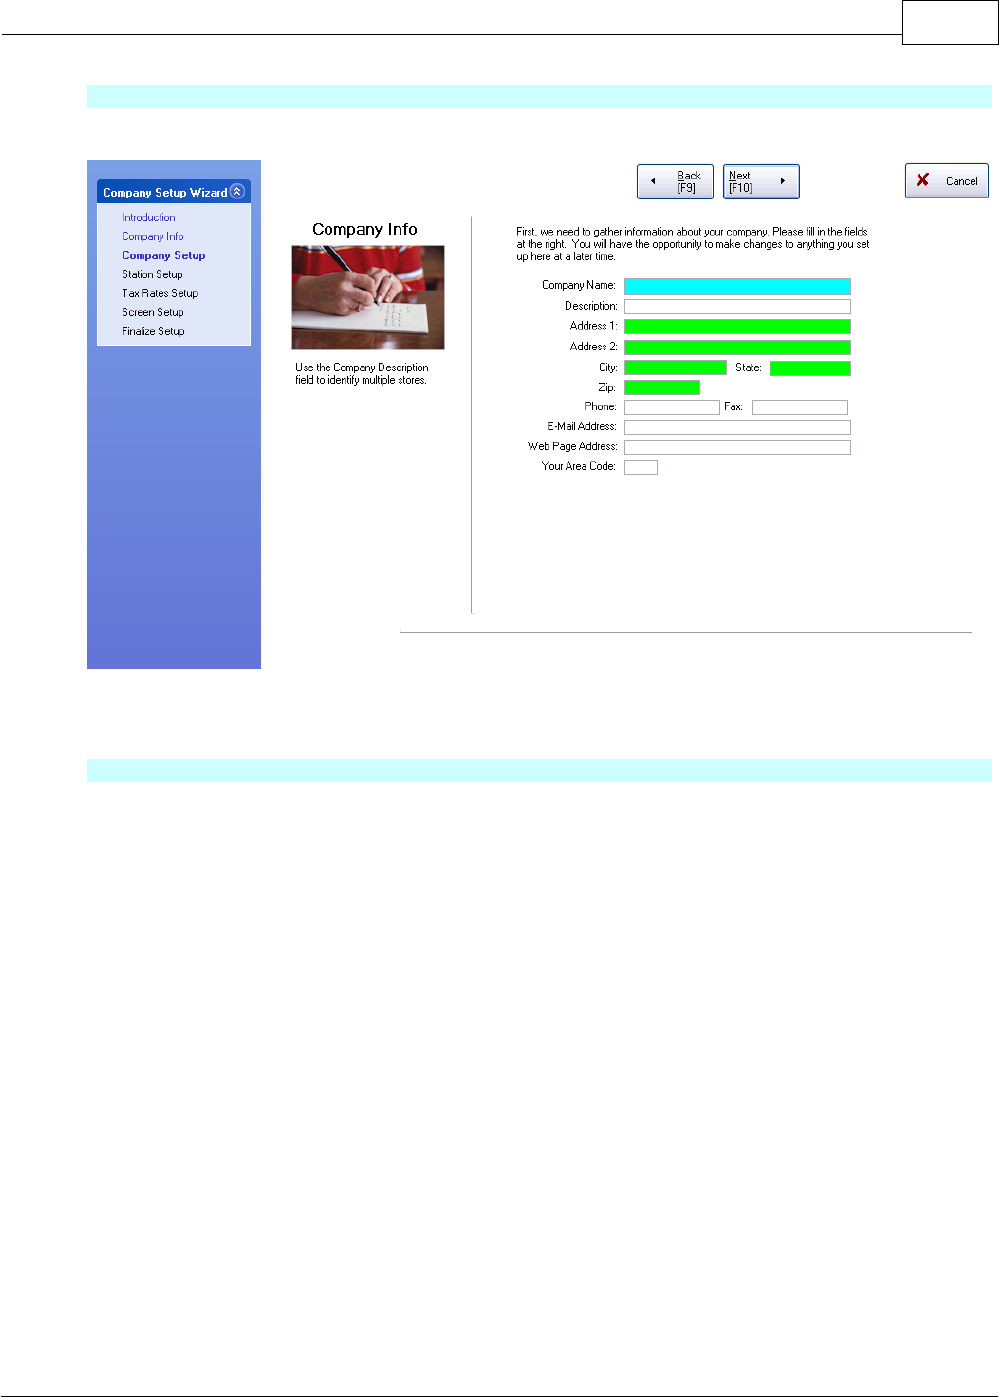
Company Setup Wizard - Company Info
Enter your company information.
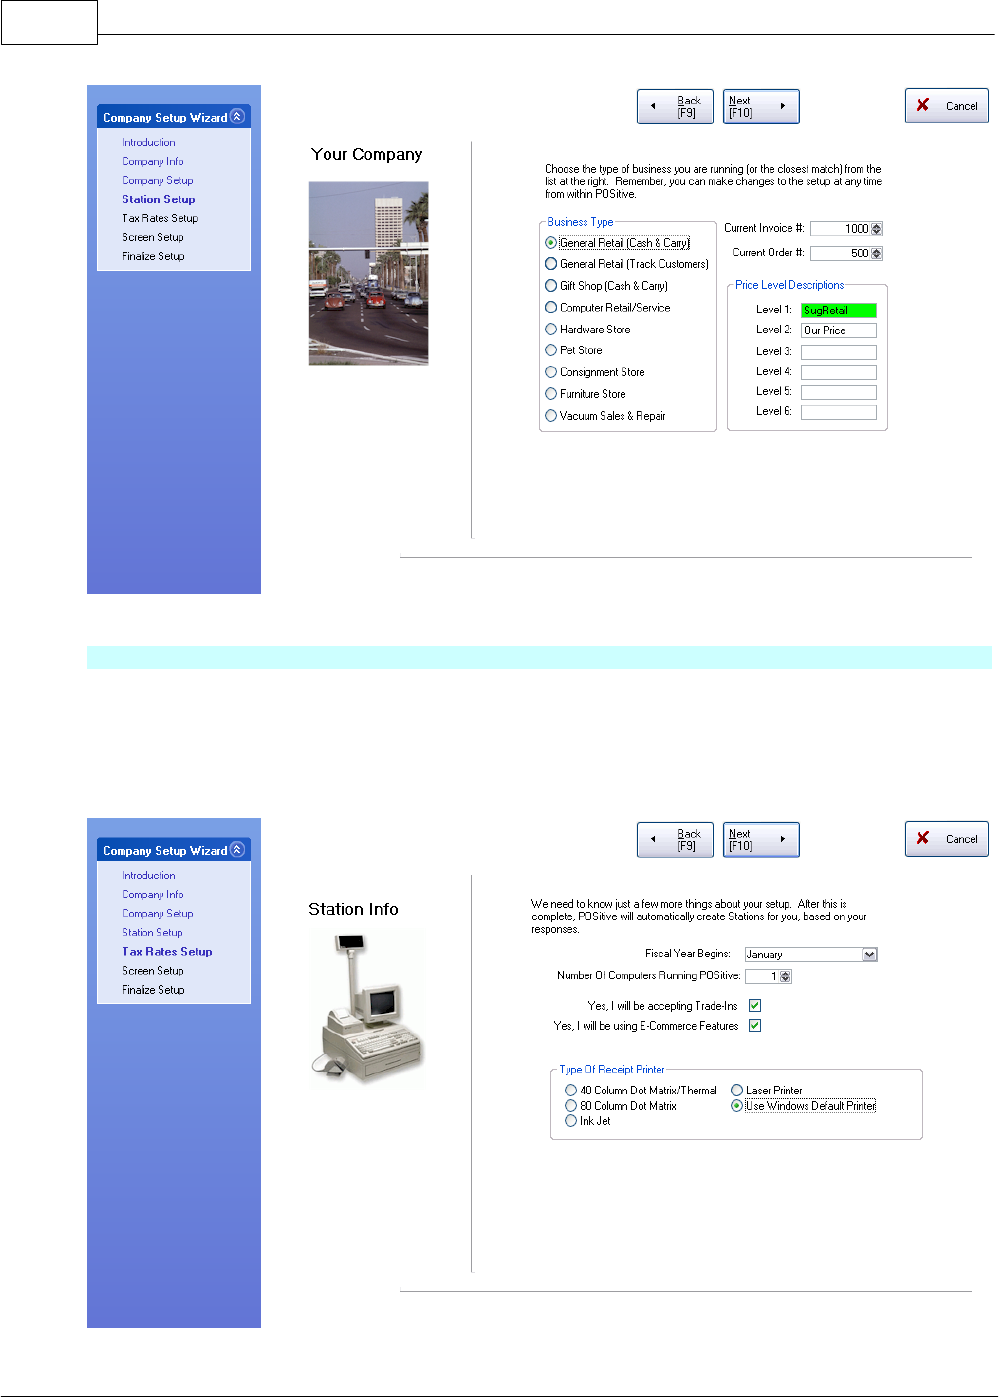
Company Setup Wizard - Company Info - Business Type
Select a Business Type.
Enter starting numbers for Invoices and Orders.
Change or add names of Price Levels 1-6
POSitive Retail Manager User Guide22
Copyright ©2007 POSitive Software Company
Company Setup Wizard - Station Info
Complete some hardware setups. Enter the number of computers which will be using PRM.
Activate options for Trade-Ins and E-Commerce as needed.
Select your main type of invoice printer from the list of types. (Note: you will have additional options
for printer selection later.)
Getting Started 23
Copyright ©2007 POSitive Software Company
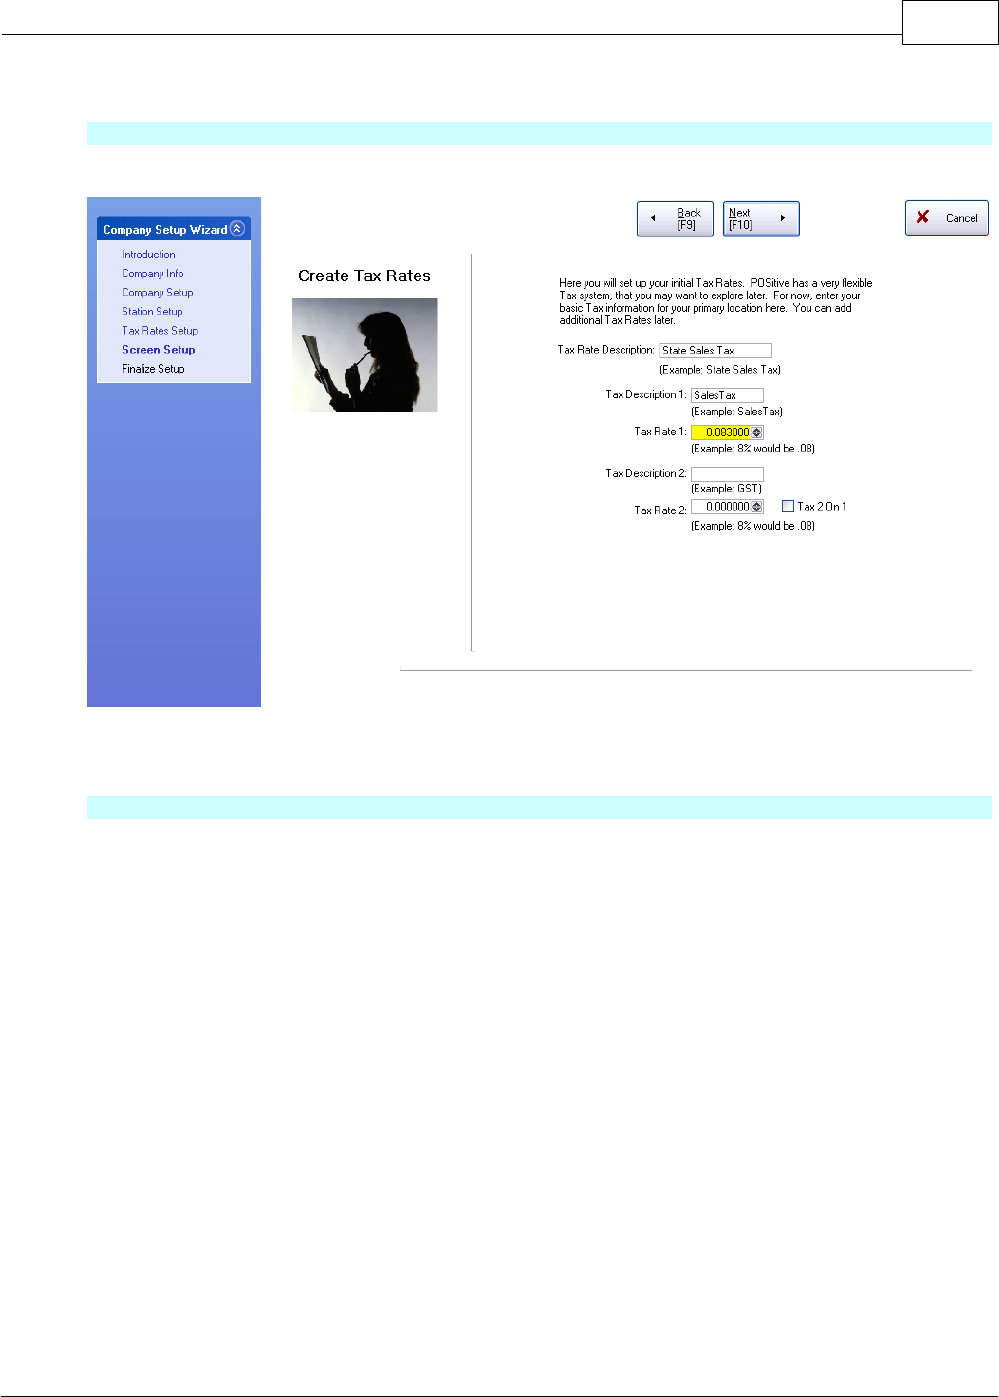
Company Setup Wizard - Create Tax Rates
Define your Basic Tax Rate. (Additional information about tax setup will be given later.)
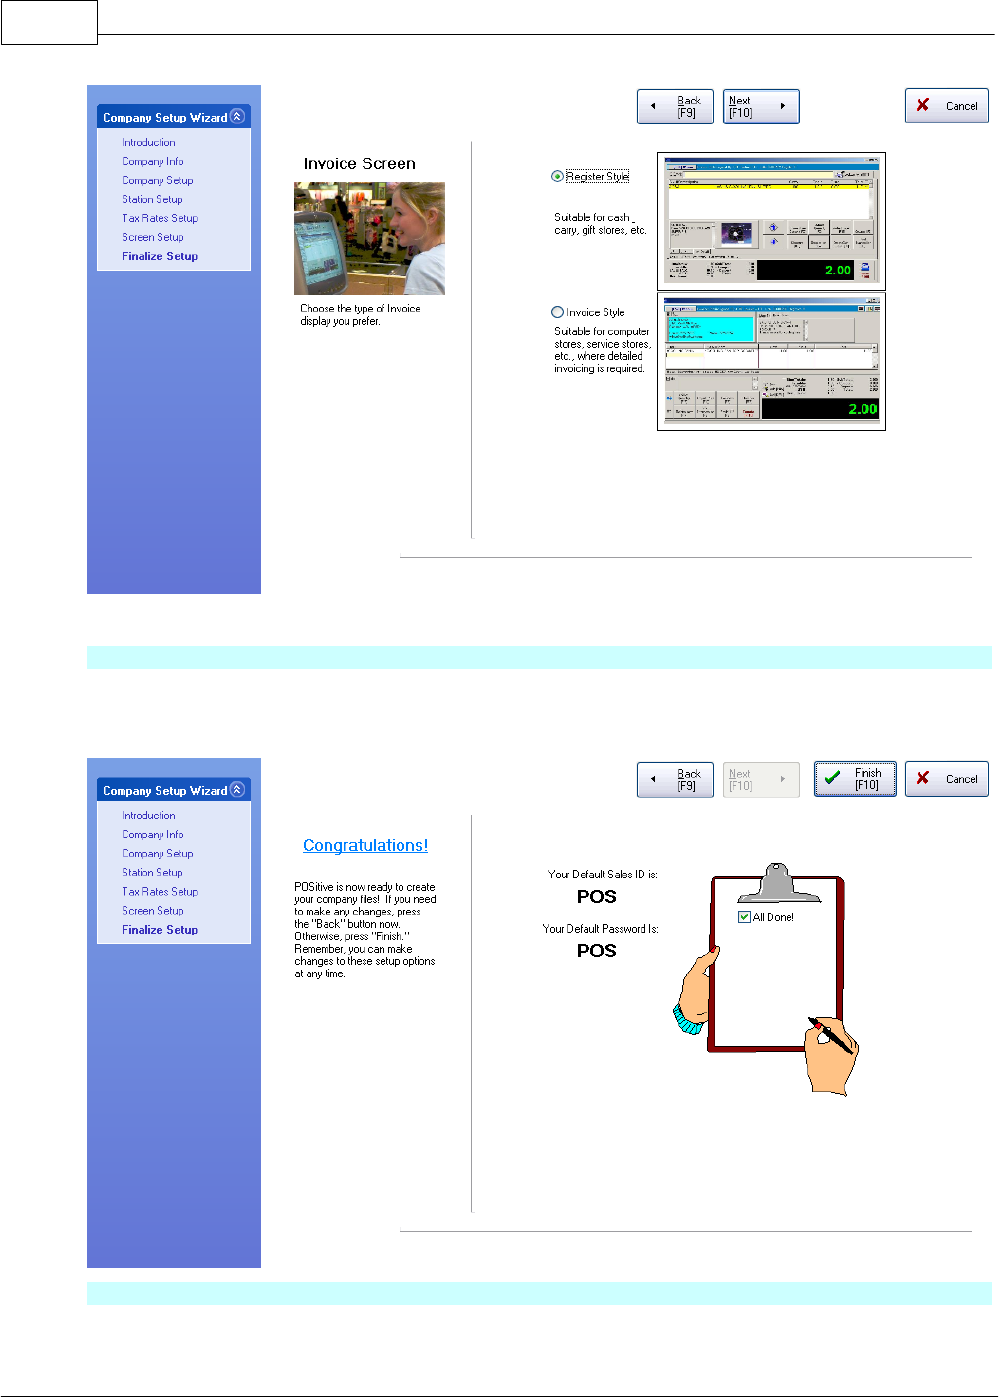
Company Setup Wizard - Invoice Screen
Choose an invoice screen style.
POSitive Retail Manager User Guide24
Copyright ©2007 POSitive Software Company
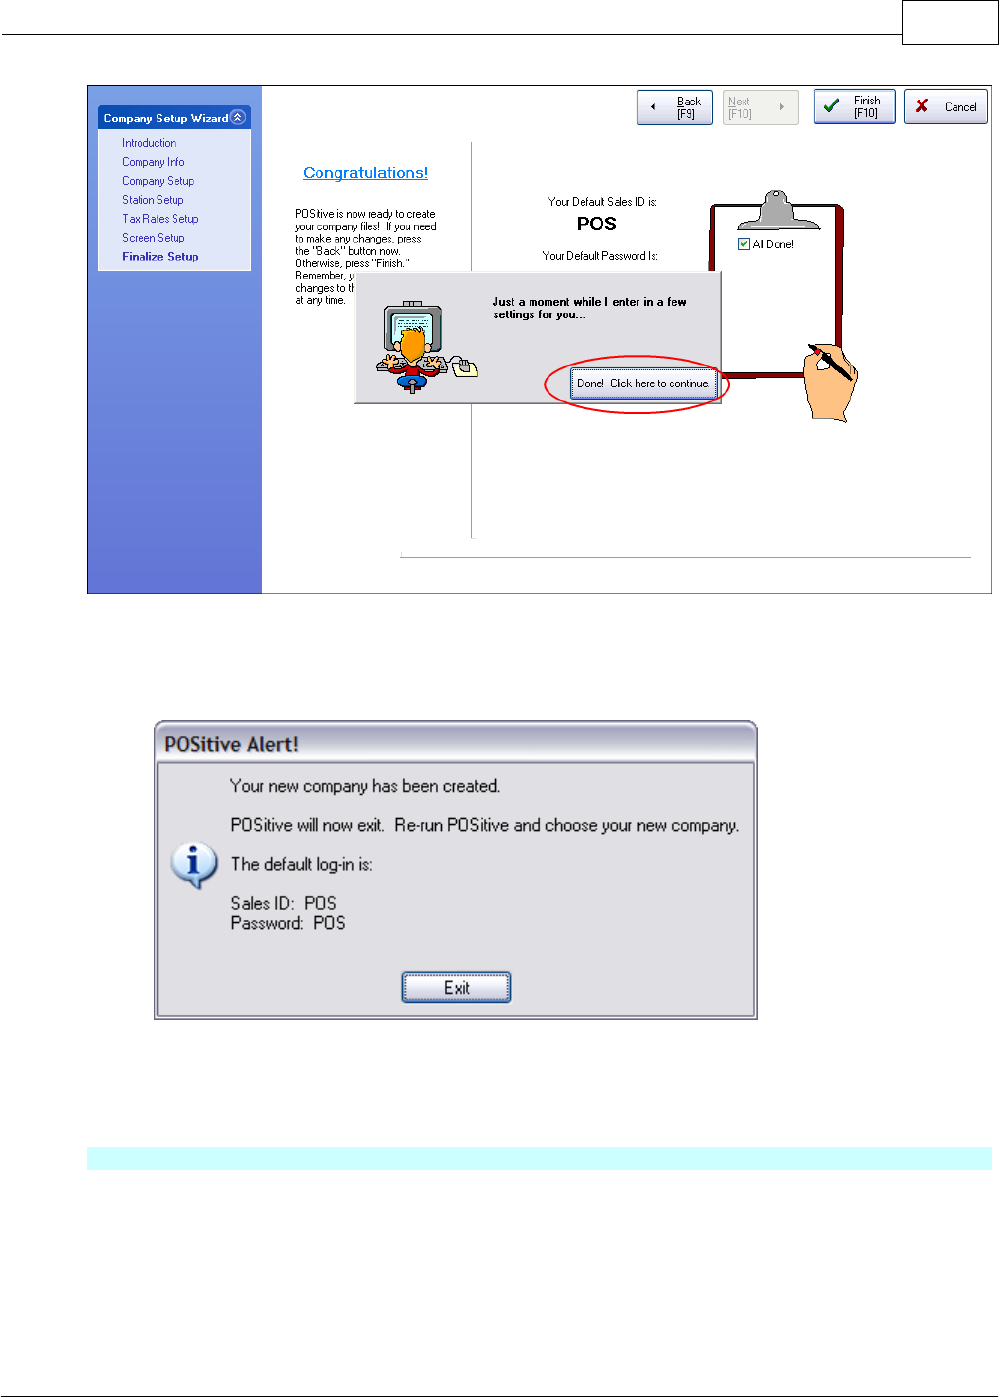
Company Setup Wizard - Finalize Setup "Congratulations"
You will be using POS and POS as your Sales ID and Password until you begin to add employees.
If you want to make any corrections, choose Back [F9]. Otherwise, choose FINISH [F10].
Done! Click Here to Continue.
When prompted click on the Done button.
Getting Started 25
Copyright ©2007 POSitive Software Company
Verifying Data Files - opening tables
PRM will automatically shut down.
Run PRM again and your new Company will be in the list.
"Choose Station" - If prompted, be sure to select a station before clicking on OK. There will be only
one station number initially. You will need to create enough station numbers for the number of
computers which will be running POSitive Retail Manager.
Log on "Enter Sales ID and Password"
- Use POS and POS for now. You can change this later.
POSitive Retail Manager User Guide26
Copyright ©2007 POSitive Software Company
Additional Prompts
Respond to any additional prompts on updates and other information.
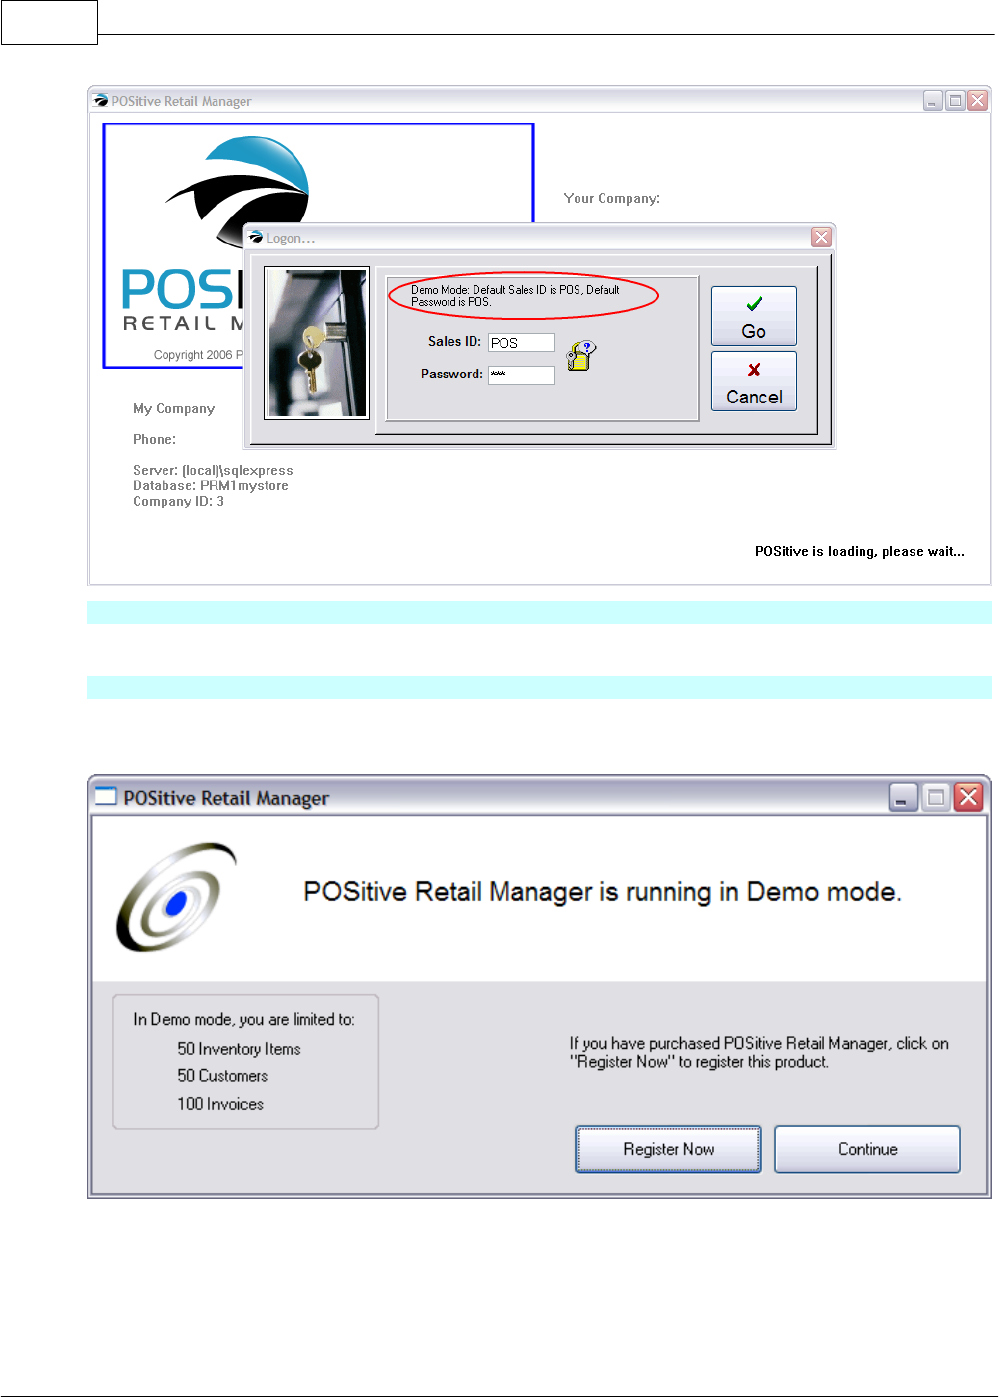
Company Setup Wizard - POSitive Retail Manager is running in DEMO mode.
By default, your new company setup is in Demo mode and is limited in the number of inventory items,
customers, and invoices. Registered versions have no such limitations.
Continue - Choose "Continue" if you are simply evaluating the program or if you are unsure about
registration at this time. PRM will skip the next screens and verify data and prompt for an ID and
Password. Enter POS and POS. You will be able to use PRM in demo mode.
Register Now - If you have purchased PRM, then you may choose to license the program now.

Getting Started 27
Copyright ©2007 POSitive Software Company
Company Setup Wizard - Registration
POSitive Retail Manager Registration allows you to get activation codes from the Web. You need to
be connected to the internet.
Automatic Registration - your company information has been pre-registered when you purchased the
software. Choose the Register On-Line button.
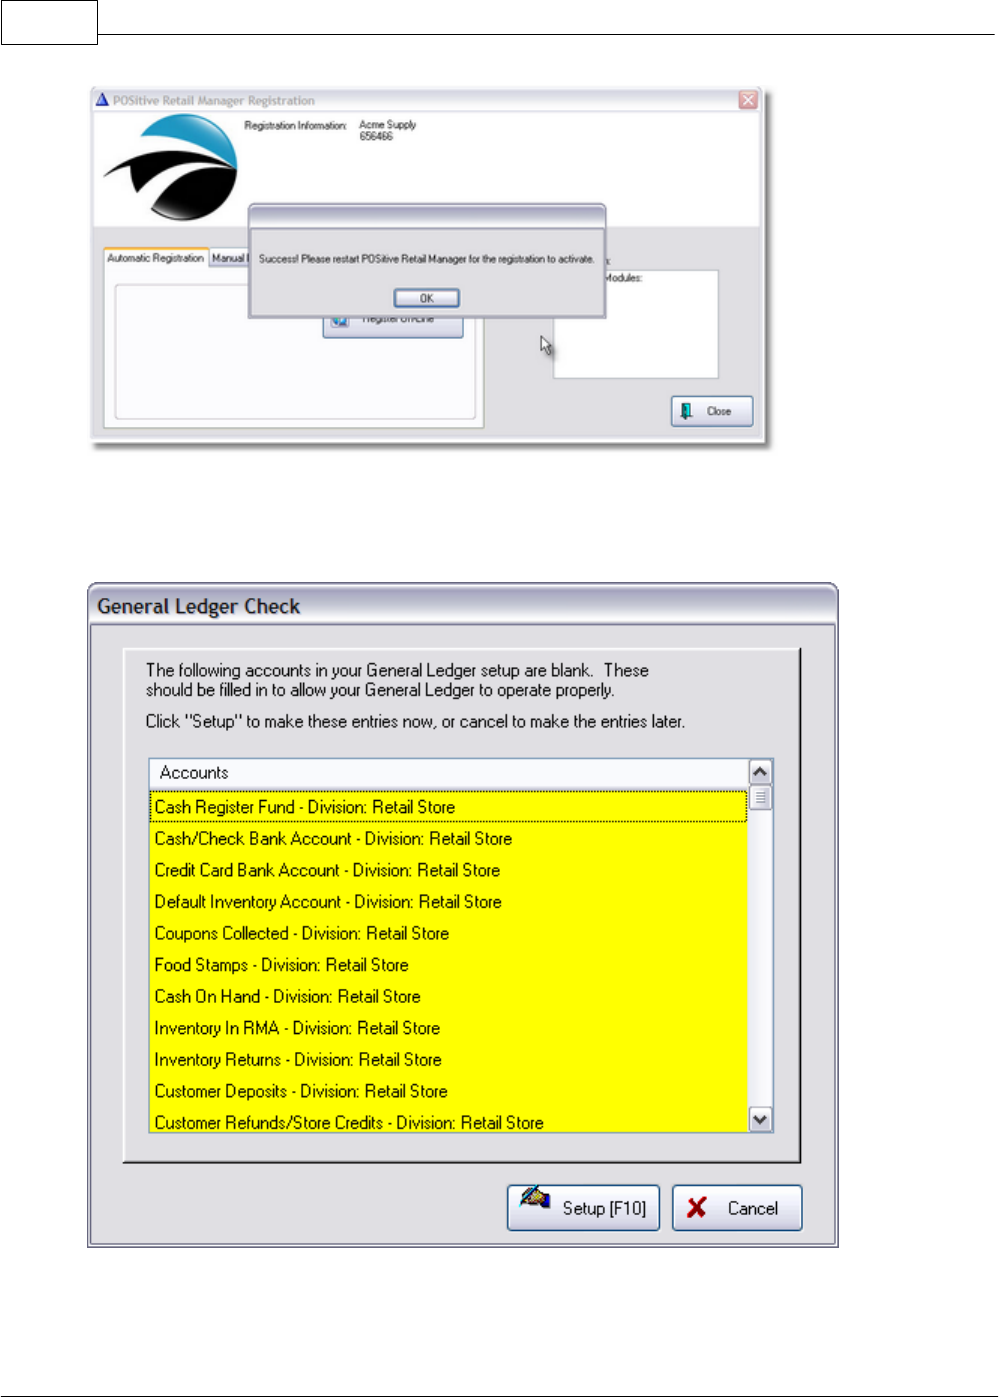
Company Setup Wizard - Success! Please Restart
POSitive Retail Manager User Guide28
Copyright ©2007 POSitive Software Company
"Success! Please restart POSitive Retail Manager for the registration to activate."
You will be immediately launched into PRM where you can begin to work.
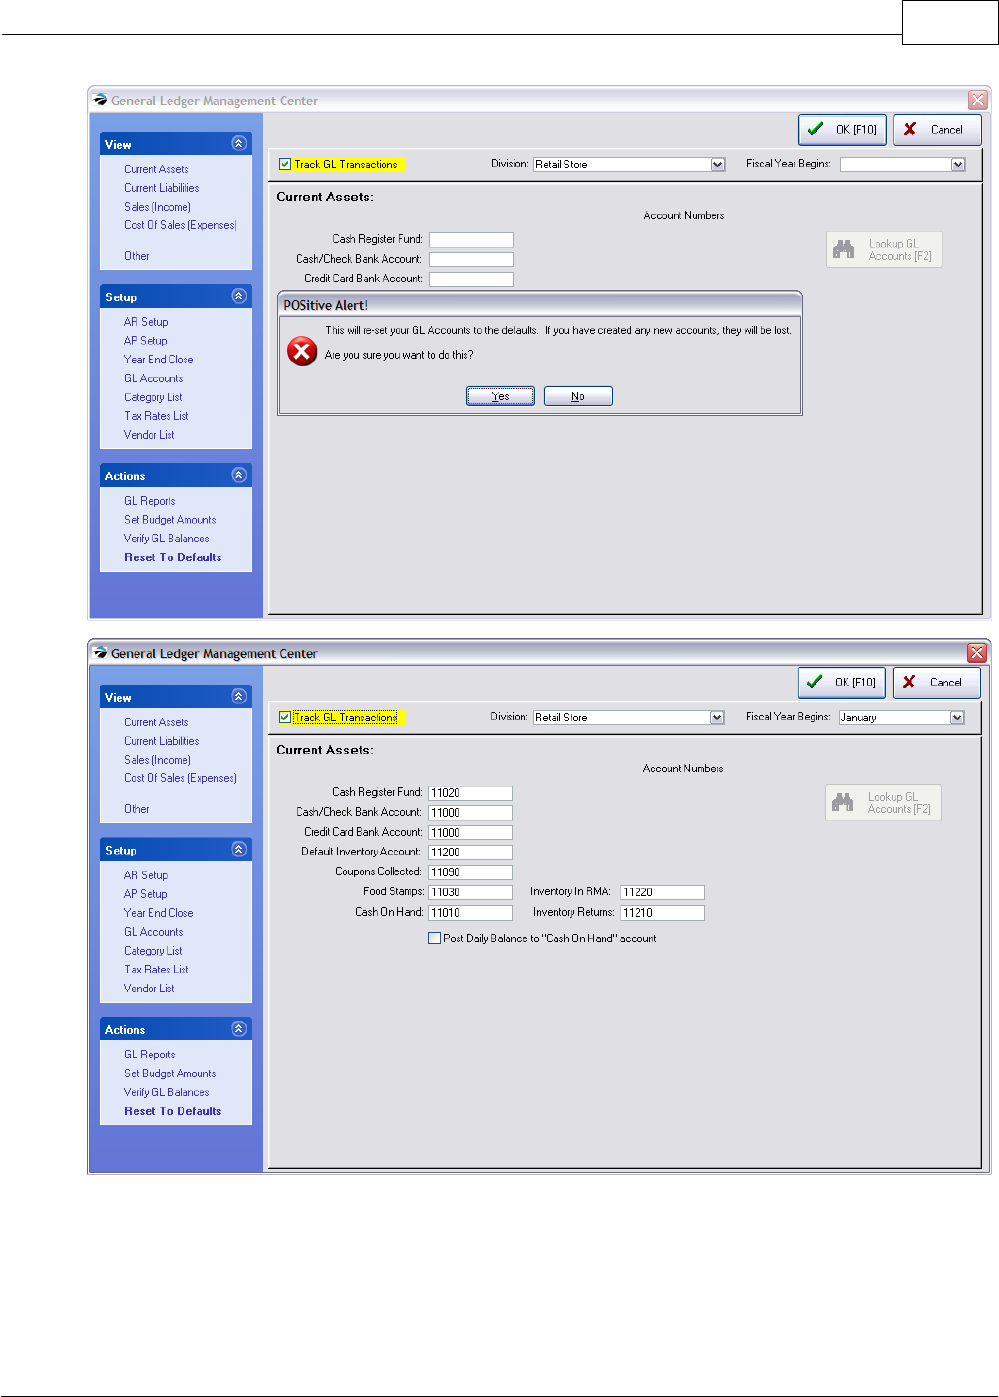
General Ledger Check
Getting Started 29
Copyright ©2007 POSitive Software Company
NOTE: You do not need to restart your computer; nor the PRM program (a future release will
eliminate this notification.)
POSitive Retail Manager User Guide30
Copyright ©2007 POSitive Software Company
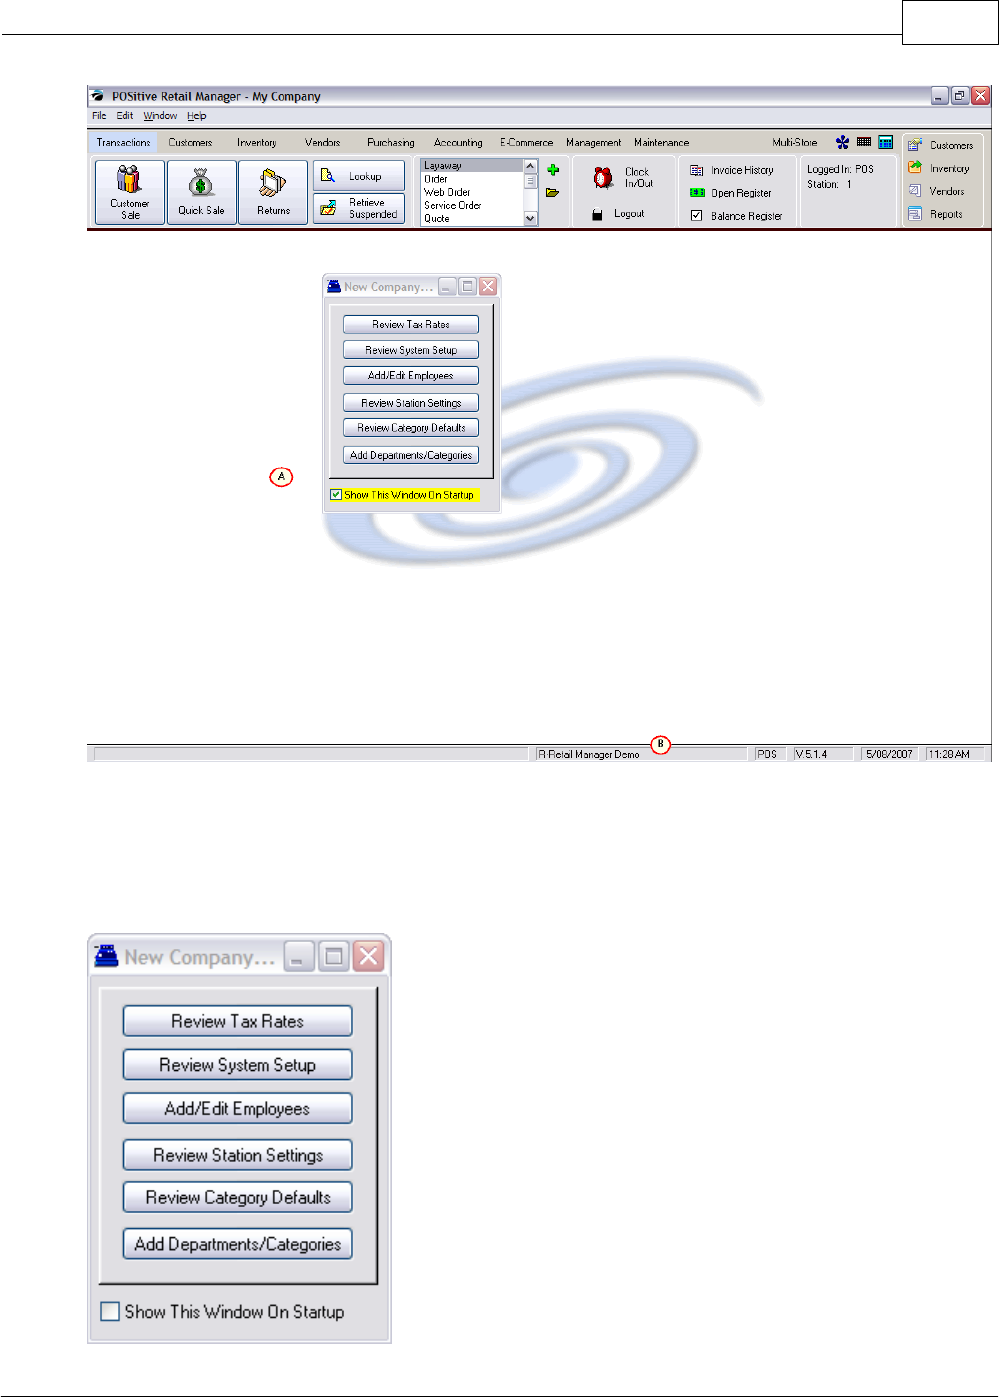
Where To Begin
The New Company Setup Window lists links to major setup features of PRM. It is highly
recommended that you review each one.
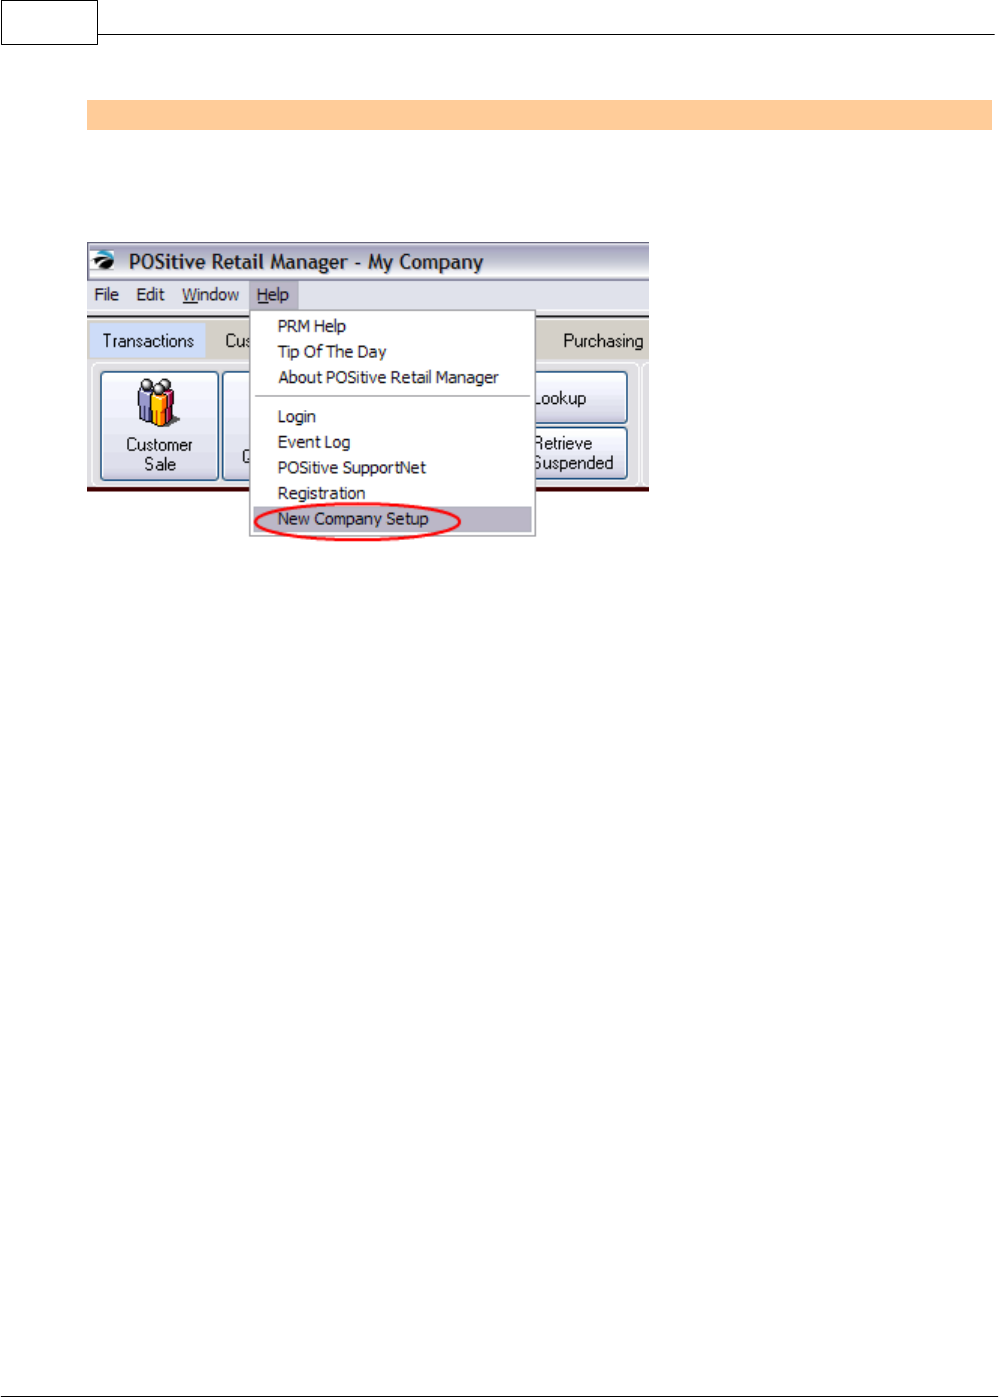
Go to Help: and select New Company Setup
(A) At this time, make sure the "Show This Window On Startup" is activated. You will be using this
tool until no longer needed.
(B) Your company is now setup. On the status bar down by the date and time, if the program says
Demo Mode, you have not yet successfully registered PRM. Review Help: Registration or consult
with your PRM dealer.
Getting Started 31
Copyright ©2007 POSitive Software Company
Next Step: New Company Setup
2.1.3 New Company Setup
When you first created your company, this floating window will be displayed as a quick link to vital
setup screens of PRM.

POSitive Retail Manager User Guide32
Copyright ©2007 POSitive Software Company
It is highly recommended that you take the time to review each one. (*Optional Path = If you do not
wish to access the option through this New Company Setup window, you can go to the same setup by
following the directions given to the appropriate master menus.)
If you uncheck "Show This Window On Startup" this reminder will not be displayed each time you
start PRM. If you want to review it you can reopen this window by going to Help: New Company
Setup.
Basic Settings
·Review Tax Rates - Proper taxation is always a critical consideration. Detailed help is available
On-Line. After selecting the Review Tax Rates button, press F1 for on-line help. (Optional Path*:
Maintenance: Tax Rates)
·Review System Setup - These settings will control the overall operation of PRM. Many choices
are available so that you can tailor PRM to meet your business style and philosophy. After select
the button, press F1 for on-line help. (Optional Path: Maintenance: System Setup)
·Add/Edit Employees - As you add employees, you may set security lockouts for individuals. After
select the button, press F1 for on-line help. (Optional Path: Management: Employees)
DO NOT edit or delete POS Manager at this time. POS Manager gives you general access to the
program and should remain unedited for about a week or more as you set up your company. You
may change the password of POS Manager to lock out unauthorized users.
One of the first things you should do is add yourself as an employee. The New Employee topic will
guide you in this step.
·Review Station Settings - Each computer using PRM is a workstation. Each station can act
differently than other stations. For example, it will have different hardware to configure such as
printers, cash drawers, pole displays, etc. After you select the button, press F1 for on-line help.
(Optional Path: Maintenance: Station Settings.) Note: It is best to make the changes for Station
Settings while operating the workstation.
·Review Category Defaults - Before adding any inventory and even before creating categories of
inventory, you need to understand Category Defaults. Categories are a very significant tool in
PRM. They can be as simple or as detailed as you would like. The more you understand them, the
more of a tool and time saver they will be. After you select the button, press F1 for on-line help.
(Optional Path: Maintenance: Category Defaults: Master)
Note: The Master category is used as the basis for creating new categories and category defaults. It
may be edited as often as you wish to populate of the new categories you are creating.
·Add Departments/Categories - In brief, all inventory is assigned to a category. A department is a
group of categories. After you select the button, press F1 for on-line help. (Optional Path:
Maintenance: Departments)
Additional Settings
Definitions - (Optional) As part of your setup of PRM, you may want to review a standardized list of
definitions used in PRM and make changes to those areas which are of interest to you. To access
these settings go to Maintenance: Definitions and select the appropriate options.
Customer Terms - You will be prompted to create at least one, after that you may choose to create
additional terms of payment. Go to Customer Center: Customer Terms under Actions.
Customer Categories - (Optional) You can leave this blank, but by creating at least one you can

Getting Started 33
Copyright ©2007 POSitive Software Company
have customer information filled in automatically with standard settings and user defined fields. Go to
Customer Center: Customer Categories under Actions.
Vendor Terms - You will be prompted to create at least one, others can be created in advance. Go
to Vendor Center: Vendor Terms under Actions.
General Ledger Setup - (Optional) This is already setup with default settings. Only if you wish to
change the chart of accounts will you need to make any changes. Go To Accounting: GL Setup.
Transaction Screen Editor - (Optional) If you choose to track backordered inventory on an invoice
and are not seeing a backorder column on screen, use this editor to enhance the screen to show
backorders. Go to Maintenance: Editors: Transaction Screen Editor. For more information see
Standard/Cost Format.
2.1.4 Adding New Employees
You should add your employees to this list to enhance accountability and initiate program security.
When PRM is first installed, only one employee is included to allow you access to the program for
setup and experimentation.
Benefits
If your business is a one-man operation, you could still benefit from entering your own name.
·You can personalize your invoices with your own name or initials as the sales person rather than
the title of manager.
·You can shorten your ID and Password to just one letter, making entry easier.
If you have other employees, there are additional benefits.
·You can enhance accountability. Key activities such as making sales, receiving inventory,
balancing the register, can always be traced back to the individual who logged in.
·You can restrict access for some employees to selected areas and limit rights to perform some of
PRM's transactions.
·You will have a handy list of employee names and addresses.
·You can leave 'e-mail' messages globally for all employees, selected groups of employees, or
individual employees.
Editing Employee Information
You may edit employee information or change the password for security reasons. There is also a
view for Notes for any comments you choose to write regarding the employee.
POSitive Retail Manager User Guide34
Copyright ©2007 POSitive Software Company
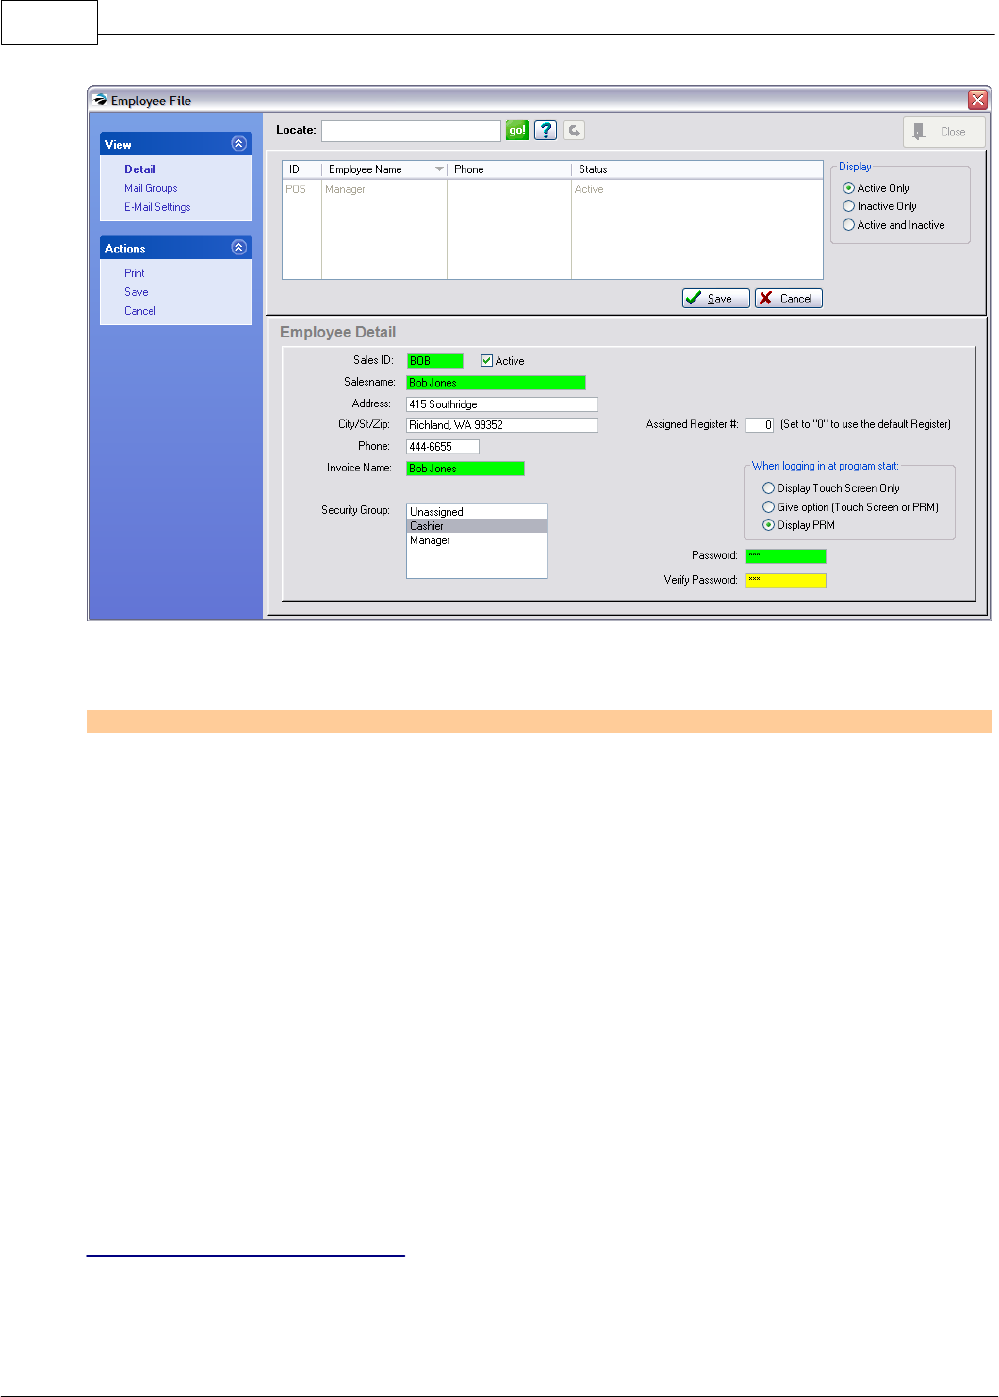
The top of the Employee File screen gives a quick summary of each employee. The Locate and
Query options assist in finding an employee if the list is extensive.
How To Add New Employees
From the Employee File screen, choose the ADD button just below the Employee Listing and fill in the
employee information fields.
Employee Detail
Sales ID - A unique code of up to 3 characters in length. This can be any combination of letters and
numbers. It is frequently the initials of an employee. If security is not a major issue, it could be just
one character to speed up entry into PRM.
Active - Currently able to use PRM
Salesname - Full name of employee: First and Last Name.
Address - This will be used for internal purposes only.
City, State, Zip - Employee's city, state, and zip code
Phone - Employee home phone
Invoice Name - This entry will be printed on the customer invoice. For privacy reasons, you may
choose to print only the first name or an employee number on invoices.
Security Group Assignment
Security Group - A preset assignment of security settings. Select one of the presets or make the
entry Unassigned. See Security Groups.

Getting Started 35
Copyright ©2007 POSitive Software Company
Special Assignments (optional)
·Assigned Register # - This should always be set to 0. Only in rare instances would you want to
use any other number. (see Employee File for more information)
·Service Tech - If this employee will be serving as a service technician at times, then this box
should be checked. The employee will then be included in the Service Order module and will be
listed with in the Service Scheduler. If service work is not part of your business, then this can be left
blank.
·When Logging In At Program Start
·Display Touch Screen Only - Do NOT USE yet. (see PRM Touch Screen)
·Give Option (Touch Screen or PRM - Do NOT USE yet. (see PRM Touch Screen)
·Display PRM - (Recommended) ALWAYS use this
Password Authorization
Password - A code of up to 6 characters using any combination of letters and numbers. This code
should remain confidential. If security is a major issue, it can be changed as often as needed. As you
type, the code characters will only be displayed as asterisks.
Verify Password - Re-enter the password to verify that the original entry is correct. As you type, the
code characters will only be displayed as asterisks.
SAVE CHANGES NOW
Before selecting any other options be sure to click on the SAVE button.
Be sure to complete all 4 of the following Views listed on the left.
Mail Groups
All Groups - a listing of common teams of employees such as Sales, Management, Techs, etc.
Choose the Mail Group Manager button to add or edit.
Groups Belonged To - This employee is automatically included in the ALL group and can be
included as a member of any other available Mail Group. If groups have not yet been created, you
may designate them now using Group Manager button below the All Groups list. (see Group
Manager)
Mail Group Manager - Create new groups and assign specific employees to each group.
TIP: To send messages: see My POSitive
Security
Already Assigned - Displays the message: "Security has been set using a Global Security Setting:"
with the name of the Security Group at the end. If changes need to be made, edit the employee
record and set to a different security group.
Security UNASSIGNED - A list of settings for each Access Module can be individually customized for
an employee. At this stage, it is best to just continue on with Next because you already chose the
security group at the beginning of the Employee Wizard.
See List Of Security Options for details.
POSitive Retail Manager User Guide36
Copyright ©2007 POSitive Software Company
Notes
You can record the hire date, performance reviews, and any other useful information about this
employee on the Notes tab at this time.
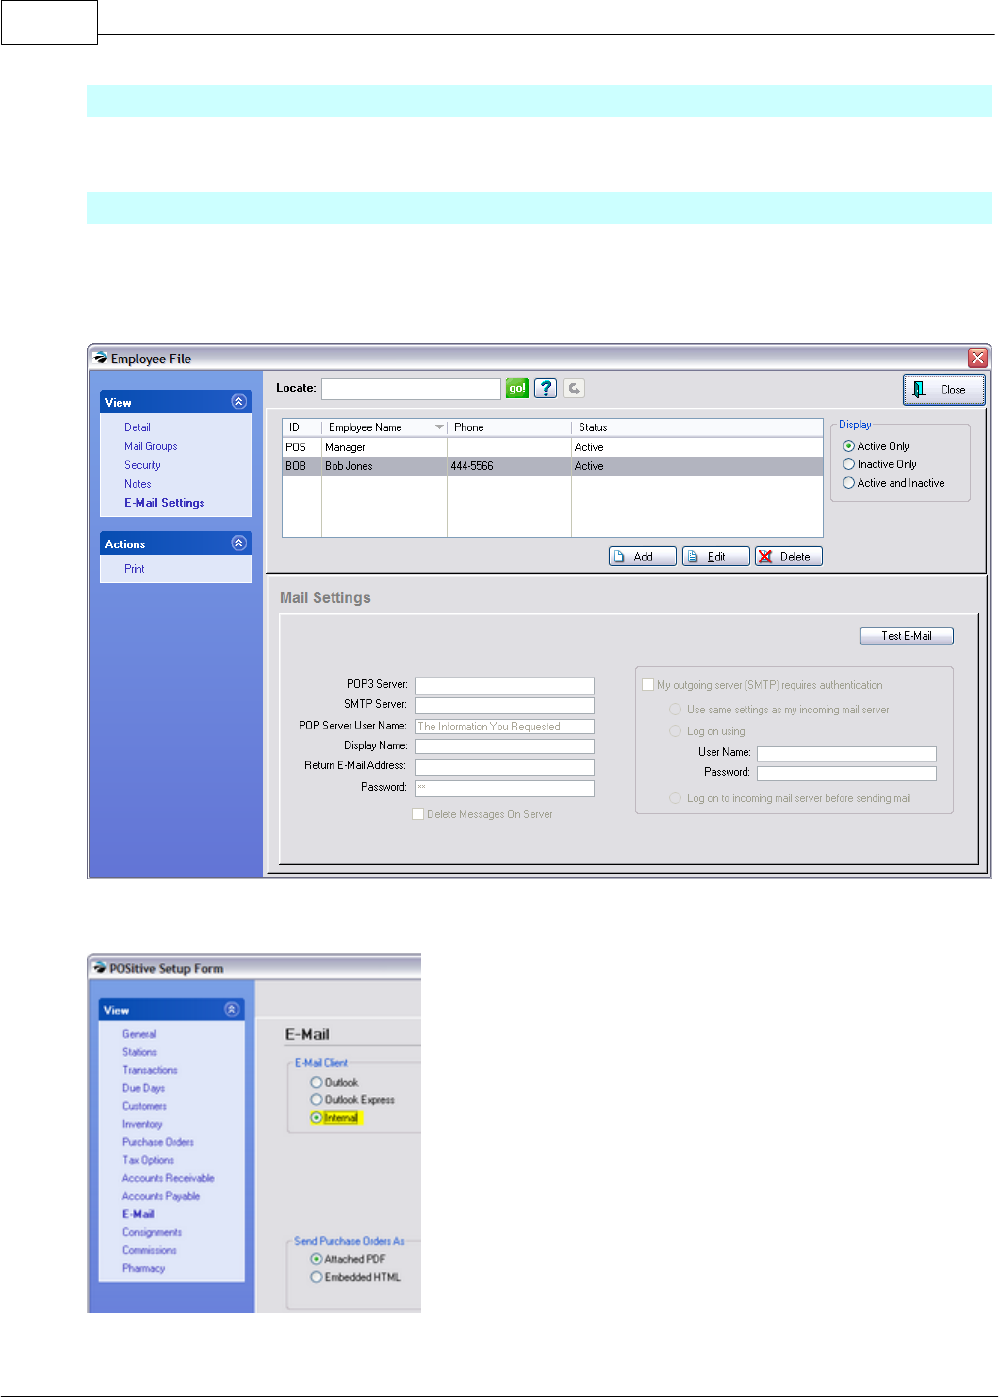
E-Mail Settings
By default, PRM uses your Windows default e-mail client, such as Outlook, when you e-mail copies of
invoices, quotes and etc., to your customers. PRM can also function as a e-mail client, allowing
employees to send and receive personal e-mail through the My POSitive section. Define the e-mail
settings for each employee.
To set-up internal employee e-mail, go to Management, System Setup and put a check next to "Use
Internal E-Mail To Send Orders/Quotes/Etc."
Then go to Management, Employees. Select the employee, then click on E-Mail Settings. This is

Getting Started 37
Copyright ©2007 POSitive Software Company
where you will enter the information that pertains to your e-mail service and will have to be done for
each employee. Because each business is different, there are no standard settings to use for this
section. You probably need to consult with your e-mail provider, IT support person or POSitive dealer
for assistance with setup.
2.2 Company Setup Summary
You have now created your company and have activated selected features. Those features can be
reviewed and changed as needed.
The PRM Toolbar's Maintenance menu lists the following sections which are basic for your company
setup.
THE BASICS
Company - your company name and address; create company Divisions if needed (see Company
Information)
Registration - unlock codes for your company data (see POSitive Retail Manager Registration)
System Setup - access to global options for overall operation of PRM. (see POSitive Setup Form)
Tax Rates - opens the tax setup (see Tax Rates)
Category Defaults - access to Master Defaults which are applied to a newly created category (see
Categories With Defaults)
Departments - opens the Department / Category setup (see Departments)
Categories - opens a simple list of categories. (see Category Listing)
Station Settings - access to workstation options. (see Station Detail - General and Basic Hardware)
Definitions - review the following two topics and any others which are of interest to your company
Policy Statements - disclaimers at the bottom of invoices and pending transactions (see Policy
Statements)
Security Groups - define employee access limitations (see Security Groups)
ADVANCED FUNCTIONS
Import - consider using these importers to speed up data entry. These are all accessible from the
Maintenance: Import button.
Inventory, Customers, Vendors, Chart Of Accounts, Quickbooks Chart of Accounts, MYOB Chart Of
Accounts, Microbiz, Zip Codes
Printers - if special printer drivers are needed (see List of Registered Printers in Basic Hardware For
Workstations)
POSitive SupportNET - ask questions of the POSitive technical support staff
General Ledger Setup - use default settings, or define you own (see Accounting: Setup)

POSitive Retail Manager User Guide38
Copyright ©2007 POSitive Software Company
PRM Checkbook (see Accounting: Checkbook)
Definitions (usually no changes are necessary, but your business might benefit from these)
Tender - edit the list of payment methods available when processing an invoice
Currency - define any Foreign Currency which you will be handling
Exchange Rates - access current exchange rates for foreign currencies
Policy Statements - enter messages defining your policies regarding layaways, invoices, internet
orders.
Finance Companies - also known as third-party billing, defines companies and organizations you
work with
Barcode Types - barcode symbologies
User Defined Fields - the ability to track additional information about inventory items
Security Groups - limitations of what selected employees can and cannot do while running PRM
Mail Groups - not e-mail, but an internal messaging system for communicating with individual and
groups of employees.
Countries - define which country standards will be used
Employee Shifts - set cash register operation times as needed
Customer Returns - define reasons why products are being returned
RMA Returns - setup actions for processing returns to your vendors
Call-Log - messaging notes used by the service department to record communication with
customers
Zip Codes - a listing of all areas within your marketing area. These are cumulative as you add new
customers.
Warranty List - various warranty programs for products and services which are applied to
individual items.
Editors (usually no changes are necessary, but you may make some modifications as needs arise)
Transaction Screen - the layout of the screen which the clerk views while creating an invoice or
layaway.
Invoice Buttons - shortcut buttons for the transaction screen - use the defaults or create more of
your own
Touch Screen - a special interface wherein you design colors, buttons, and layout for the touch
screen monitor

Getting Started 39
Copyright ©2007 POSitive Software Company
2.3 Basic Hardware For Workstations
BASIC HARDWARE SET-UP
POSitive Retail Manager can work with many popular brands of point of sale hardware. The purpose
of this chapter is to help you with the set-up of your POS equipment.
PRINTING SET-UP
Other than a computer, the next most important piece of equipment in any POS system is a good
printer, which can be used for printing receipts, reports and labels. POSitive Retail Manager can work
entirely through your default Windows printer, but you may want to use other printing options typically
available in point-of-sale software.
Since PRM can support different printers for different functions, the first thing you’ll need to do is
make sure a Printer Driver is installed for each printer you’ll be using. Most printer manufacturers
include a printer driver disc in the box, but the exception is the small receipt printers, such as those
made by Epson, Star, Ithaca and others. You’ll need to download the appropriate driver from the
manufacturer’s web site, or ask your dealer to provide it. Once all your printer drivers are installed and
working, you can proceed with setting up printing in PRM.
TRANSACTION PRINTING
Transaction printing is used for forms that are given to your customers and ranges from invoices to
packing slips. On the Maintenance, Station Settings, Printers/E-Mail screen you select printers and
forms for the following transactions:
Each workstation selects which printer will be used for each type of PRM transaction:
Invoice Internet Orders Contract Pricing
Alternate Invoice Service Orders Recurring Invoices
Layaway Quotes Packing Slips
Orders Quotes with Costs
In addition, Printing Options allows for selection of packing slips, customer labels, and handling of
purchase order.
Also from this screen, forms are selected for printing a deposit receipt, an accounts receivable receipt,
and the consignment agreement.
We’re going to skip Printing Options for now and start with Invoice.
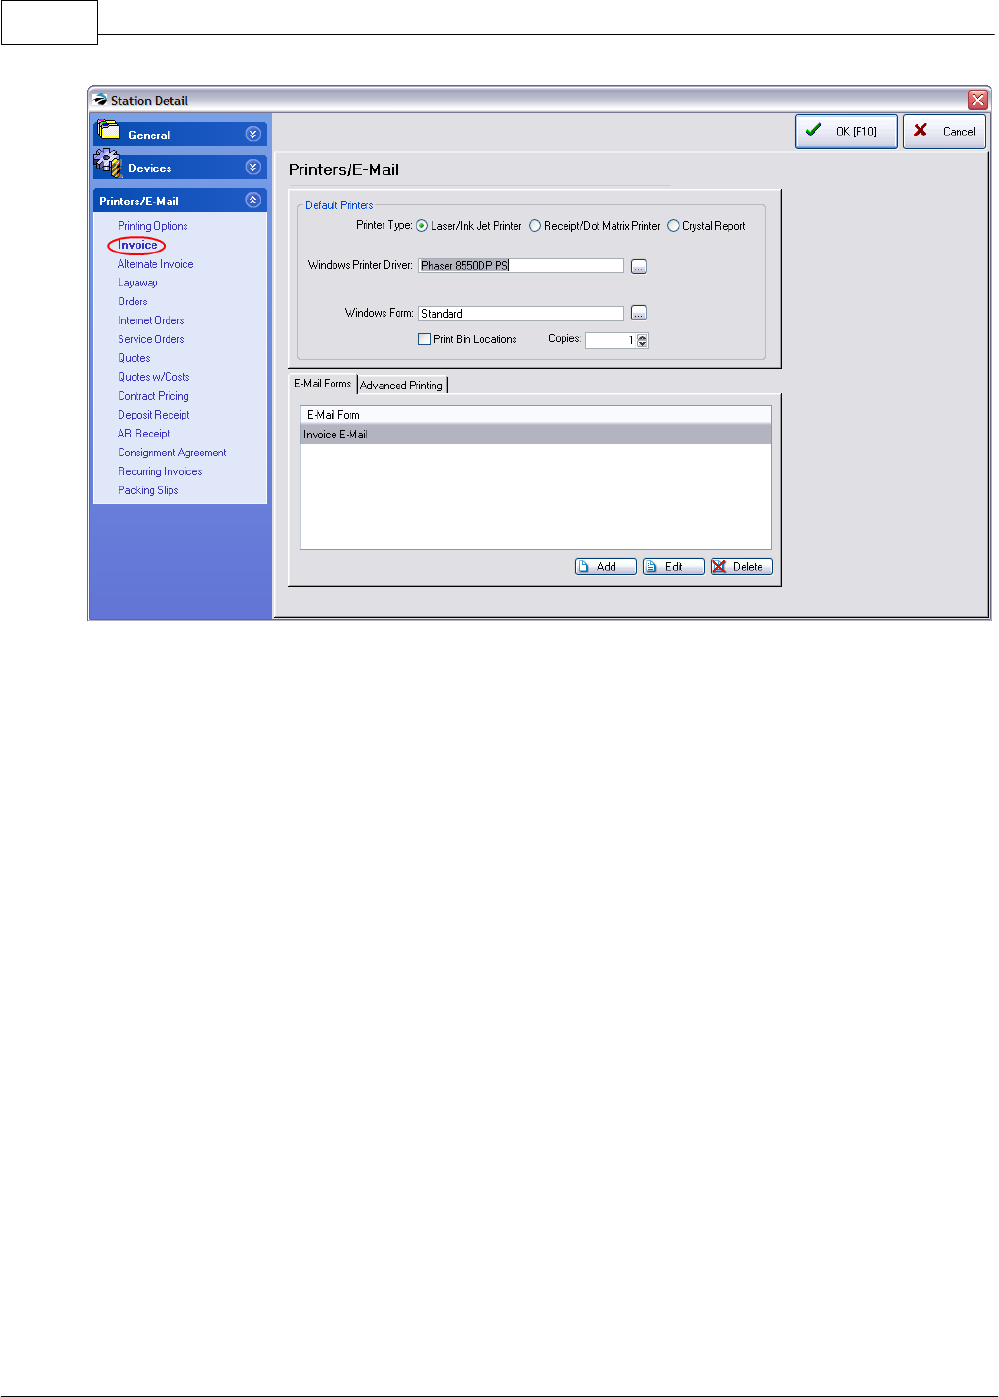
POSitive Retail Manager User Guide40
Copyright ©2007 POSitive Software Company
This screen is where you select the printer and form you wish to use for the transactions listed on the
left. When you select a transaction for the first time, PRM will automatically select your Printer Type
as Laser/Ink Jet Printer, Windows Printer Driver will be your default Windows printer and Windows
Form is Standard. If this is the printer you want to use, you’re already done! But what if you want to
use a different printer? Well, let’s do some exploring.
Getting Started 41
Copyright ©2007 POSitive Software Company
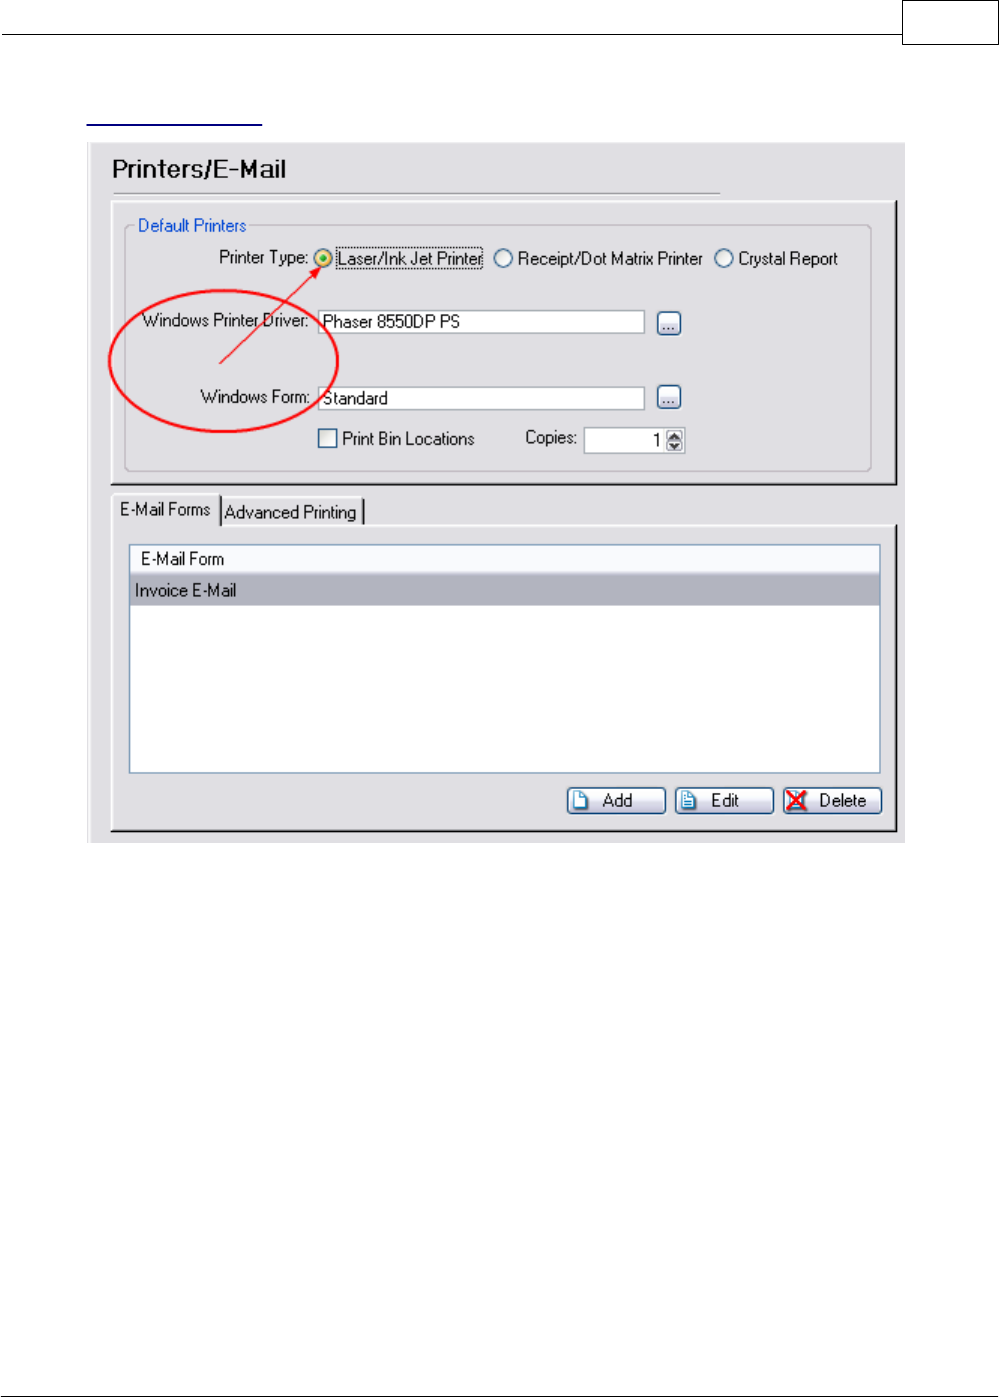
PRINTER TYPE
Printer Type determines what kind of forms you’ll be able to use for the transaction. Laser/Ink Jet
Printer uses a predefined Windows Form called Standard which can incorporate a company logo and
looks very nice when printed on a laser or inkjet printer. It is possible to edit this form if you are an
advanced user, but we don’t recommend it. Go ahead and click on Receipt/Dot Matrix Printer and
notice how your options change.
POSitive Retail Manager User Guide42
Copyright ©2007 POSitive Software Company
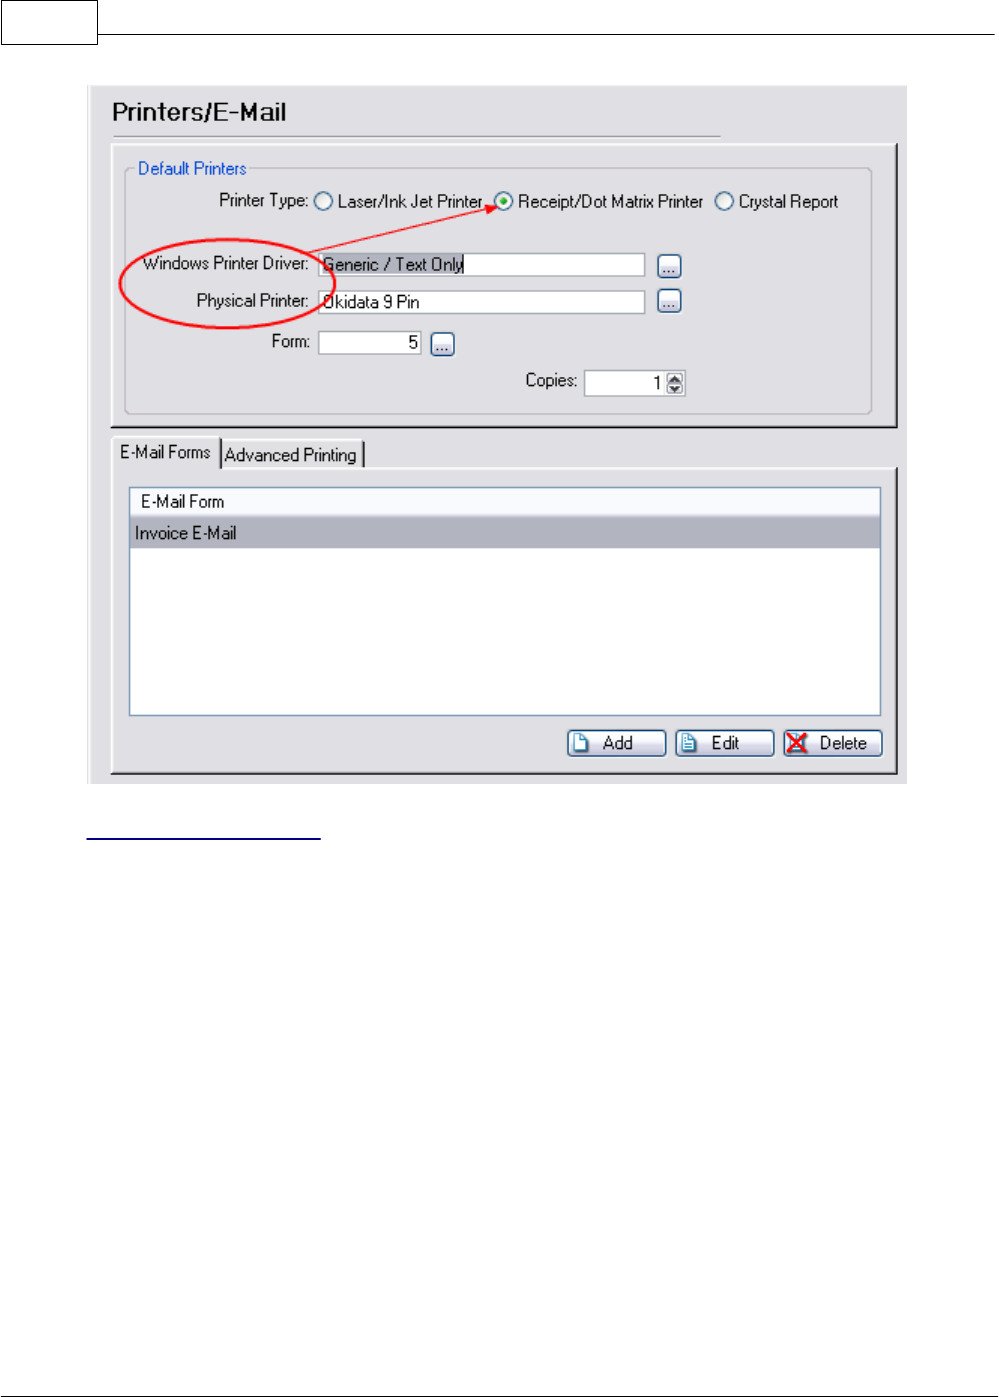
PHYSICAL PRINTER
Notice that you can now select a Physical Printer and Windows Form has changed to Form.
Click on the box next to Physical Printer to see a list of Registered Printers.
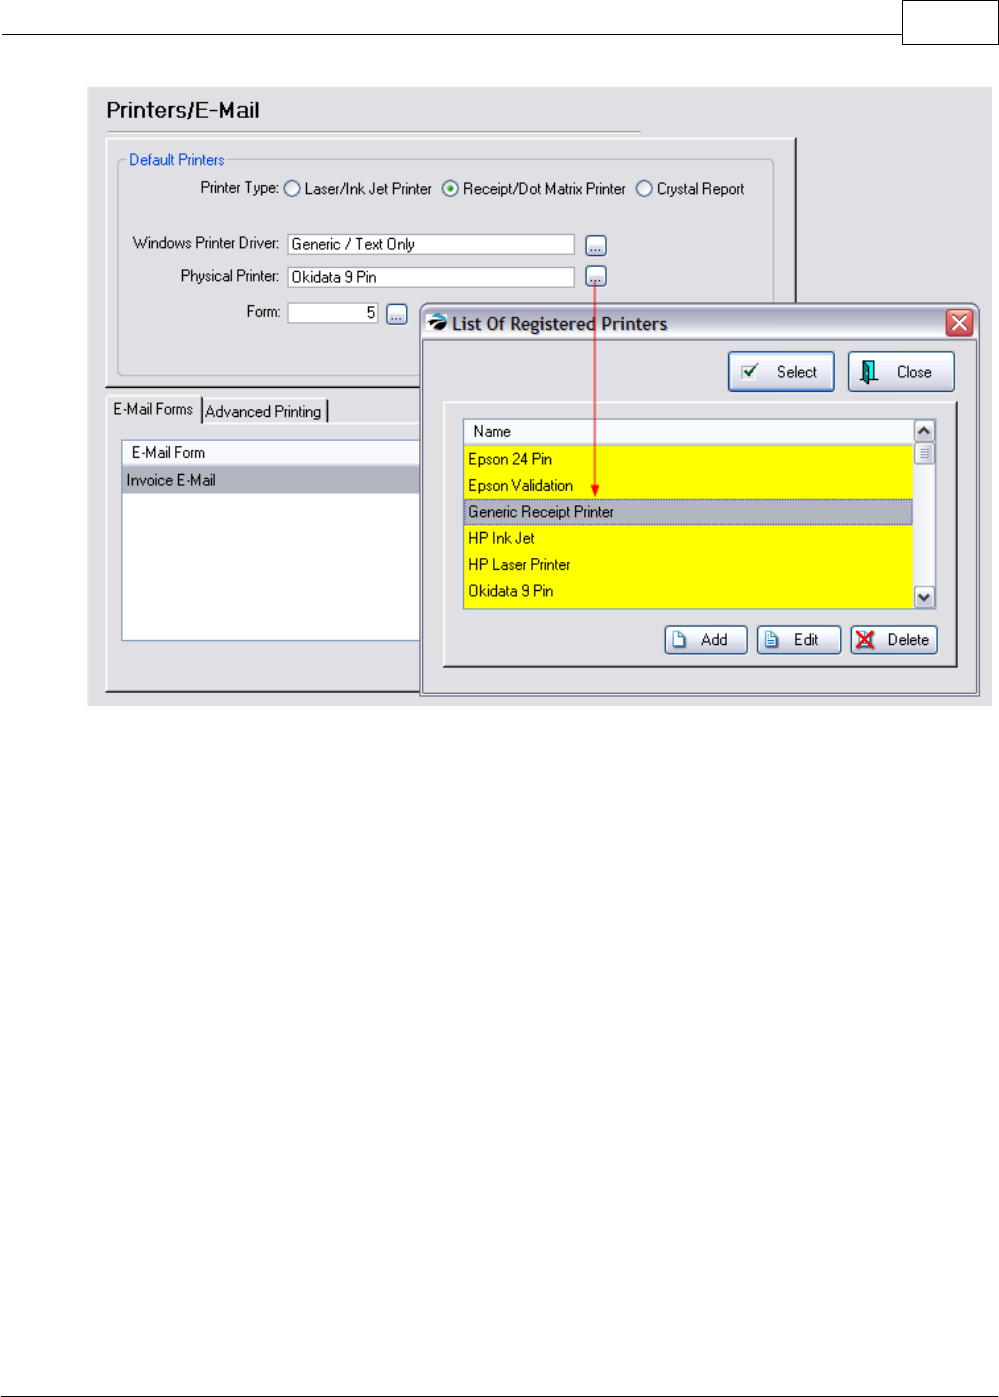
Getting Started 43
Copyright ©2007 POSitive Software Company
This is a list of pre-defined printers that are used primarily for receipt and invoice printing.
Epson 24 Pin - A standard printer definition for printing to most makes and brands of 80 column
dot-matrix printers.
Epson Validation - A receipt printer which will print check cancellation information on the back of the
check.
Generic Receipt Printer - A standard printer definition for printing to most makes and models of 40
column receipt printers.
HP Ink Jet - A standard printer definition for printing to most makes and brands of ink jet printers.
HP Laser Printer - A standard printer definition for printing to most makes and brands of Laser
Printers.
Okidata 9 Pin - A standard printer which may not emulate the Epson printer.
Windows - (not shown) - PRM will print directly to the Default Windows printer as defined under
Windows.
You can edit the definition on all of them except the Windows printer, adding control codes for printer
functions, font sizes and etc. You can also add your own printer definition for special applications,
such as check validation or slip printing.
We’ll cover making changes to the printer definitions a little later in Station - Devices. Consult with
your dealer who will be able to give you specific guidance if you need to make changes or additions to
this list.
Remember, use the Add or Edit buttons only as necessary. Do NOT use Delete without having a good
backup of the program and data files. The Select button will be active only when appropriate to the
POSitive Retail Manager User Guide44
Copyright ©2007 POSitive Software Company
task.
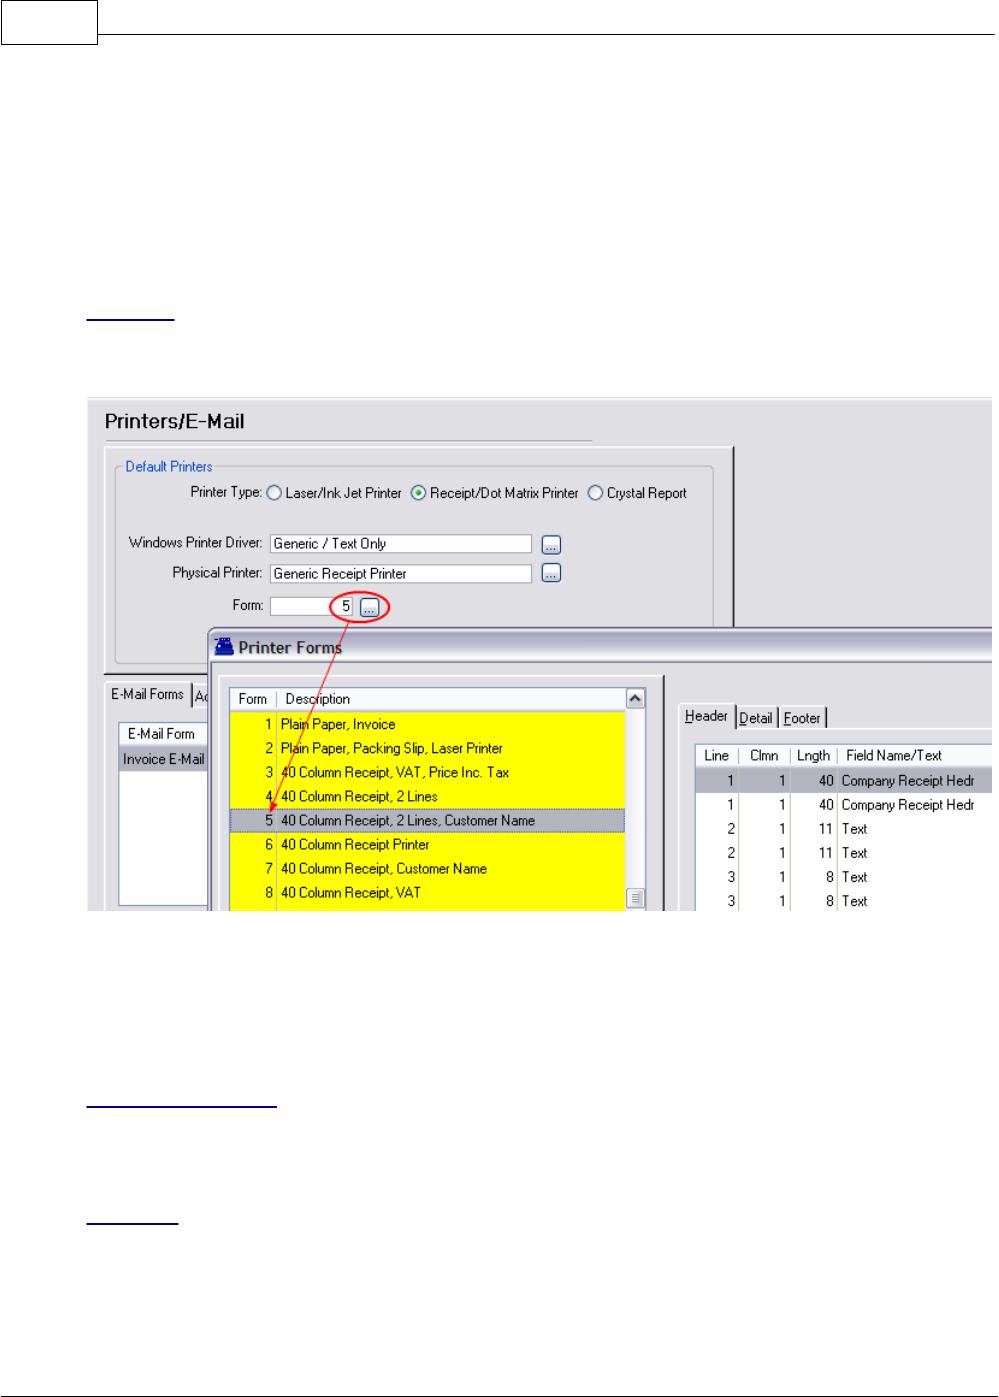
40 Column Receipt Printer
The main reason for selecting a Receipt/Dot Matrix printer is to utilize a 40 column Receipt Printer
(prints to a roll of paper.)
For this discussion, we have switched the Windows Printer Driver to GENERIC / TEXT ONLY and the
Physical Printer to GENERIC RECEIPT PRINTER
FORMS
Now we’re back to our set-up screen. Click on the box next to Forms to see our list of predefined
forms.
We’ve already created nearly 100 forms for you to choose from, ranging from letter size invoices to 40
column layaway receipts. We also let you edit these forms, which we’ll cover later. (see Printer Forms
)
By the way, “column” is simply a way to measure the width of a form. A letter size sheet of paper is 80
columns wide and a small 3” receipt is 40 columns wide.
BIN LOCATIONS
If you are using a Laser/Ink Jet Printer type, you will be able to choose to print Bin Locations on your
invoices and packing slips. Check mark the option. (see Bin Locations)
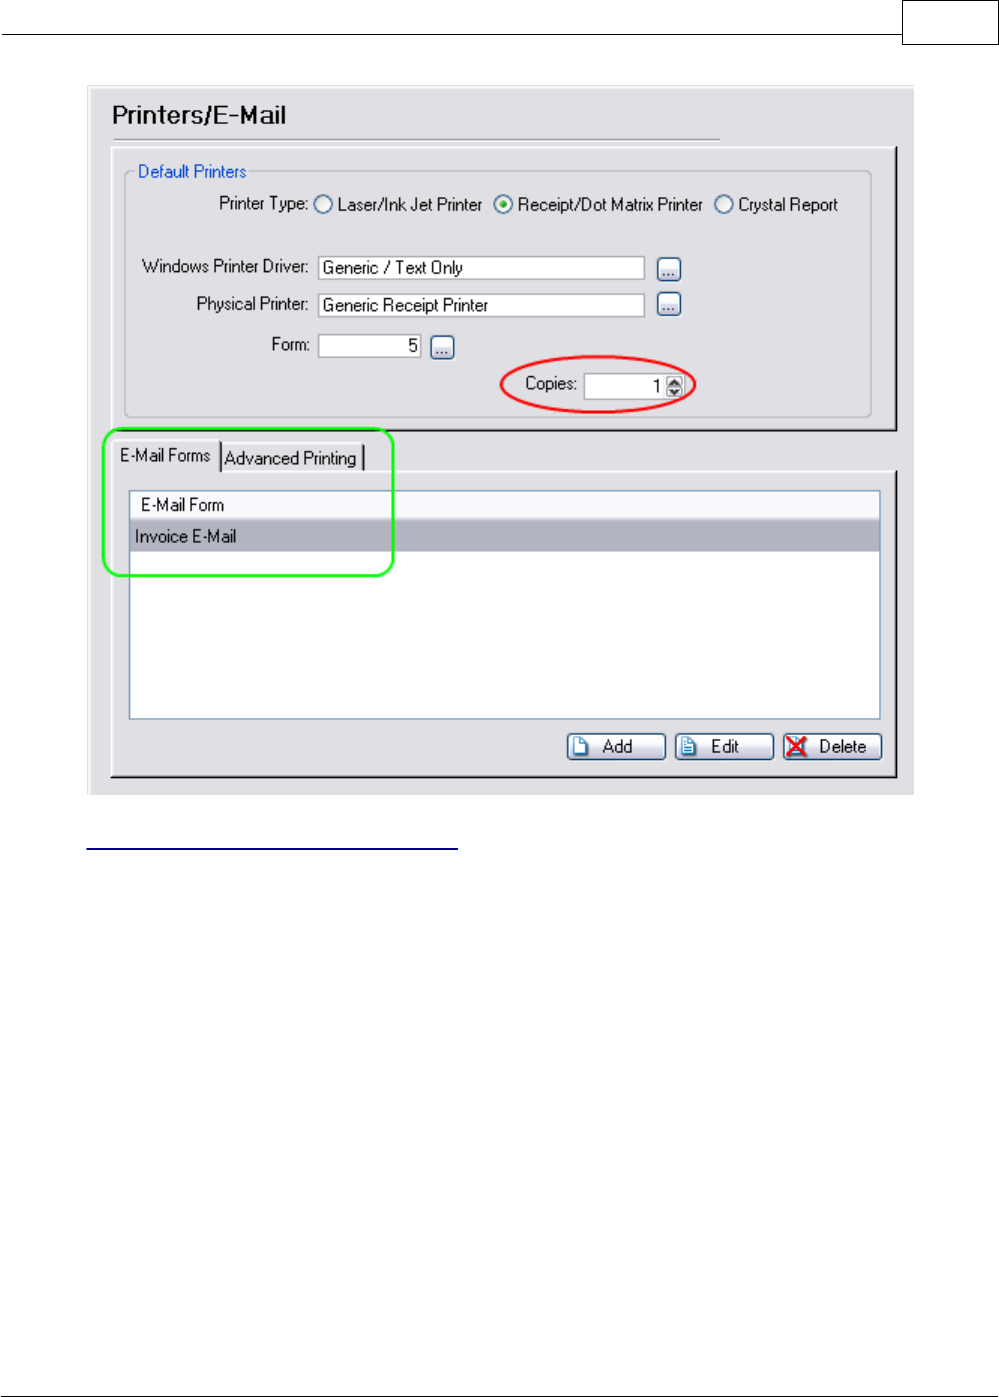
COPIES
We’re back to the set-up screen again. Next, select the number of copies you would like to print.
When you process an invoice, PRM will automatically print the number of copies designated here.
Getting Started 45
Copyright ©2007 POSitive Software Company
E-MAIL & ADVANCED PRINTING
You’ll see tabs for E-Mail Forms and Advanced Printing. Don’t worry about these since they’re not
needed by most of our customers. Refer to your dealer for more information. (see Advanced Printing
through On-Line Help)
Repeat The Process of Printer Selection
Remember that each workstation selects which printer will be used for each type of PRM transaction:
Invoice Internet Orders Contract Pricing
Alternate Invoice Service Orders Recurring Invoices
Layaway Quotes Packing Slips
Orders Quotes with Costs
Continue down the list on the left hand side and finish selecting your printer and form for the other
transactions you’ll be performing. For an example of how to set up a typical receipt printer see
Sample: Generic Receipt Printer Setup.
CASH DRAWER SETUP
A typical POS system will have a cash drawer and this section will show you how to set it up in PRM.
POSitive Retail Manager User Guide46
Copyright ©2007 POSitive Software Company
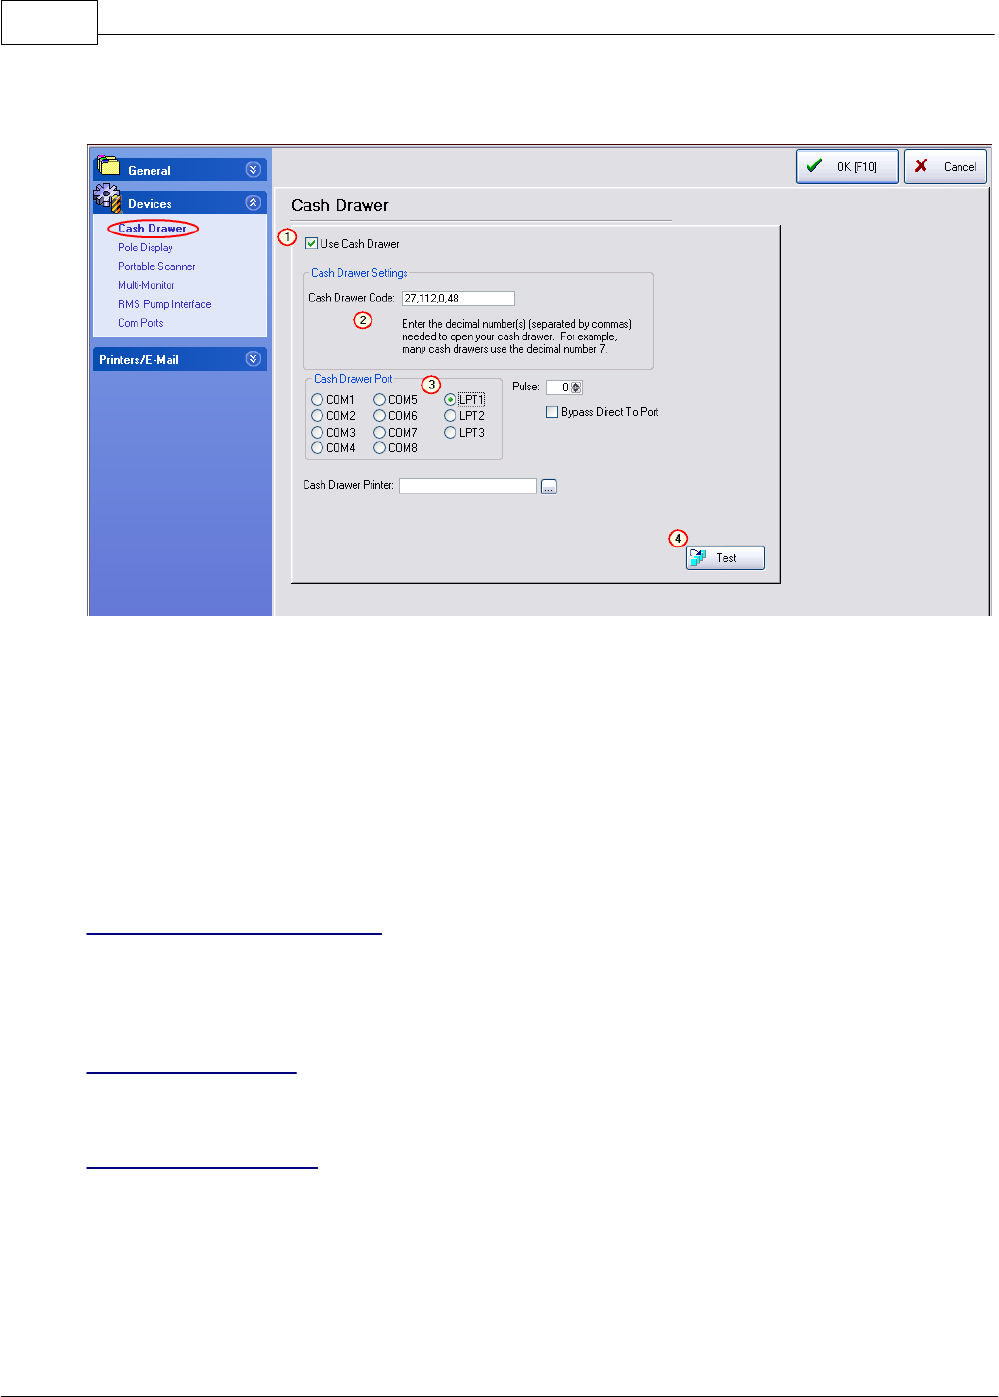
Go to Maintenance, Station Settings, click on the down arrow next to Devices and select Cash
Drawer.
You should now see the cash drawer setup screen. The most common way to connect a cash drawer
to a POS system is through a connector on the receipt printer, which we’ll discuss here.
You can also connect a cash drawer directly to the computer through either a serial or USB port.
(1) Click on "Use Cash Drawer" to activate this option.
(2) Next, you must enter a Cash Drawer Code, which is the command PRM will send to the printer to
make it open the drawer. Different brands of printers use different codes and in our example we’re
using a typical Epson control code of 27,112,0.48.
(3) Next, if your receipt printer connects through a serial (COM) or parallel (LPT) port, you would
select that port number as your Cash Drawer Port.
CASH DRAWER PRINTER
If your printer connects to the computer with a USB cable, you must select that printer’s Windows
Printer Driver as your Cash Drawer Printer. (See, that’s why we said you should install all the
necessary printer drivers before you started.) This setting overrides any Cash Drawer Port selection.
PULSE & BYPASS
The Pulse and Bypass Direct to Port settings are normally NOT used and should be left alone.
TEST THE DRAWER
(4) Finally, if your cash drawer is connected and the receipt printer is turned on, click on the Test
button and the drawer should open.
If it does not open, review the hardware connections and/or contact your dealer.
At this point you can continue on down the list of Devices in the blue area, or you can click on OK to
close this window.
Getting Started 47
Copyright ©2007 POSitive Software Company
POLE DISPLAY SETUP
A pole (or customer) display is a device which allows the customer to view the products and prices
being purchased. PRM supports several brands of pole displays. Check with your dealer for a current
list and choose one which will best suit your purposes. Pole displays are typically connected to either
a serial or USB port and for our example, we’re going assume the display has a serial interface.
TEST THE EQUIPMENT
You should first test to make sure the pole display is functional. Turn off power to the pole display
and turn power back on. Most models will run through a self test and display its standard setup.
If it does not look like it is functioning properly, check the manual and or manufacturer. If the pole
checks out, you may continue.
SETUP
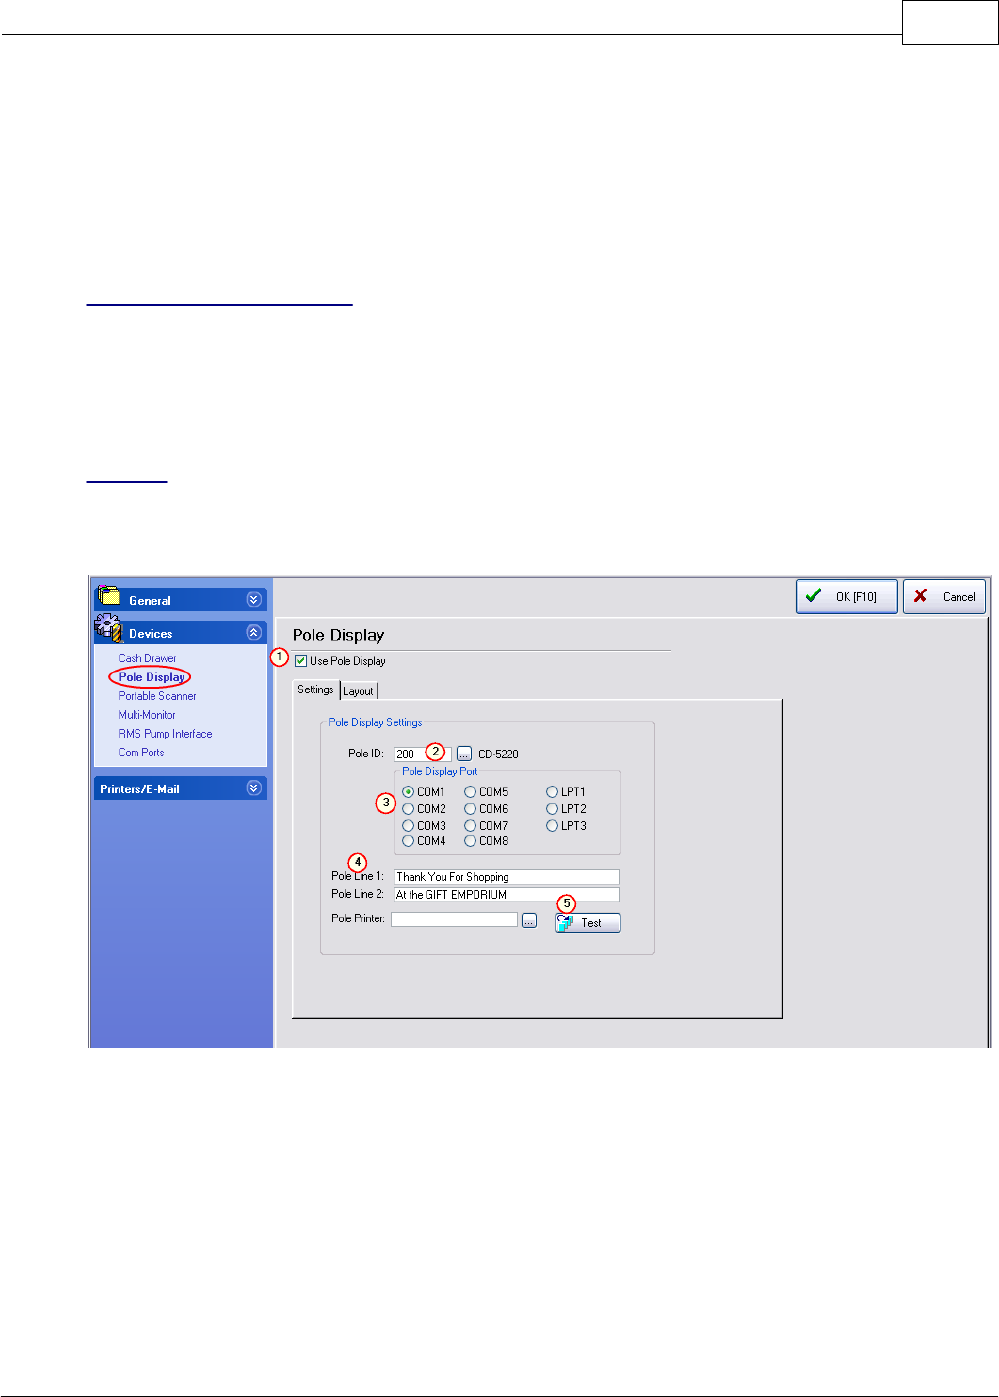
To setup your pole display, go to Maintenance, Station Settings, Devices, Pole Display.
(1) Click on Use Pole Display to active the other settings.
(2) Next, you need to select a Pole ID. You’ll notice some predefined ID’s, such as CD-5220 (Partner
Tech), Logic Controls, Epson and UTC, which cover most popular poles. You’ll also see Undefined,
which is used if you need to create a custom ID. In our example above, we selected Pole ID 200,
CD-5220.
(3) Next, you will need to select the Pole Display Port, which in our example is COM1. If your pole
uses a USB interface, please contact your dealer for instructions.
(4) Next, you’ll need to enter the message to be displayed between sales transactions on Pole Line 1
and 2. Since a typical pole display can only display 20 characters on each line, make sure your
message takes no more that 20 spaces on each line, as shown in our example above.
Leave Pole Printer blank for now.
POSitive Retail Manager User Guide48
Copyright ©2007 POSitive Software Company
(5) Click on Test. Your message should appear on the display.
At this point you can continue on down the list of Devices in the blue area, or you can click on OK to
close this window.
MULTI-MONITOR SUPPORT
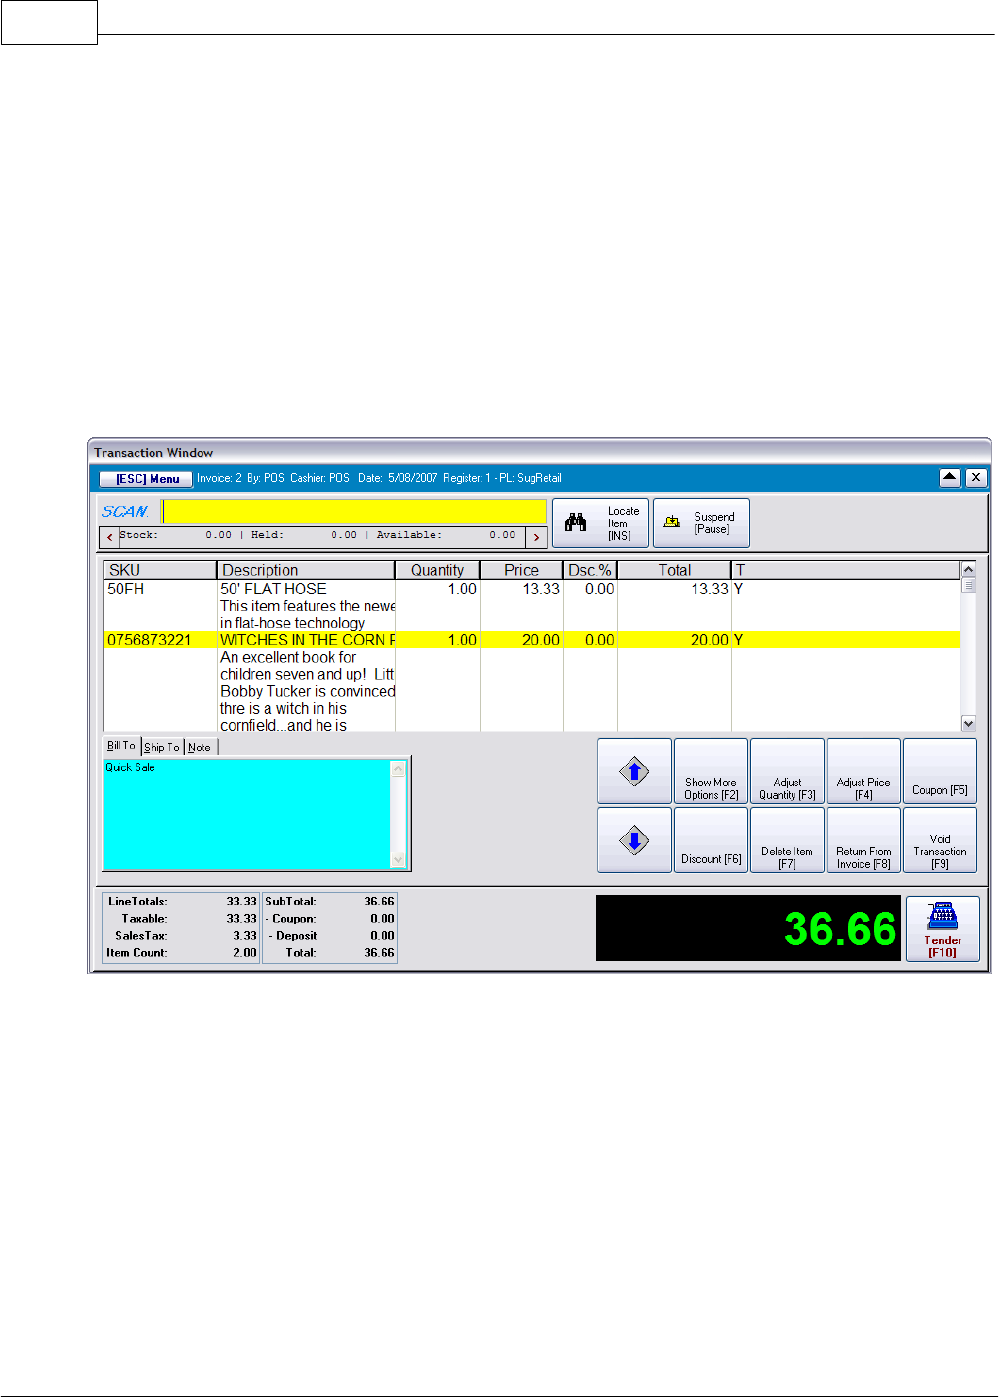
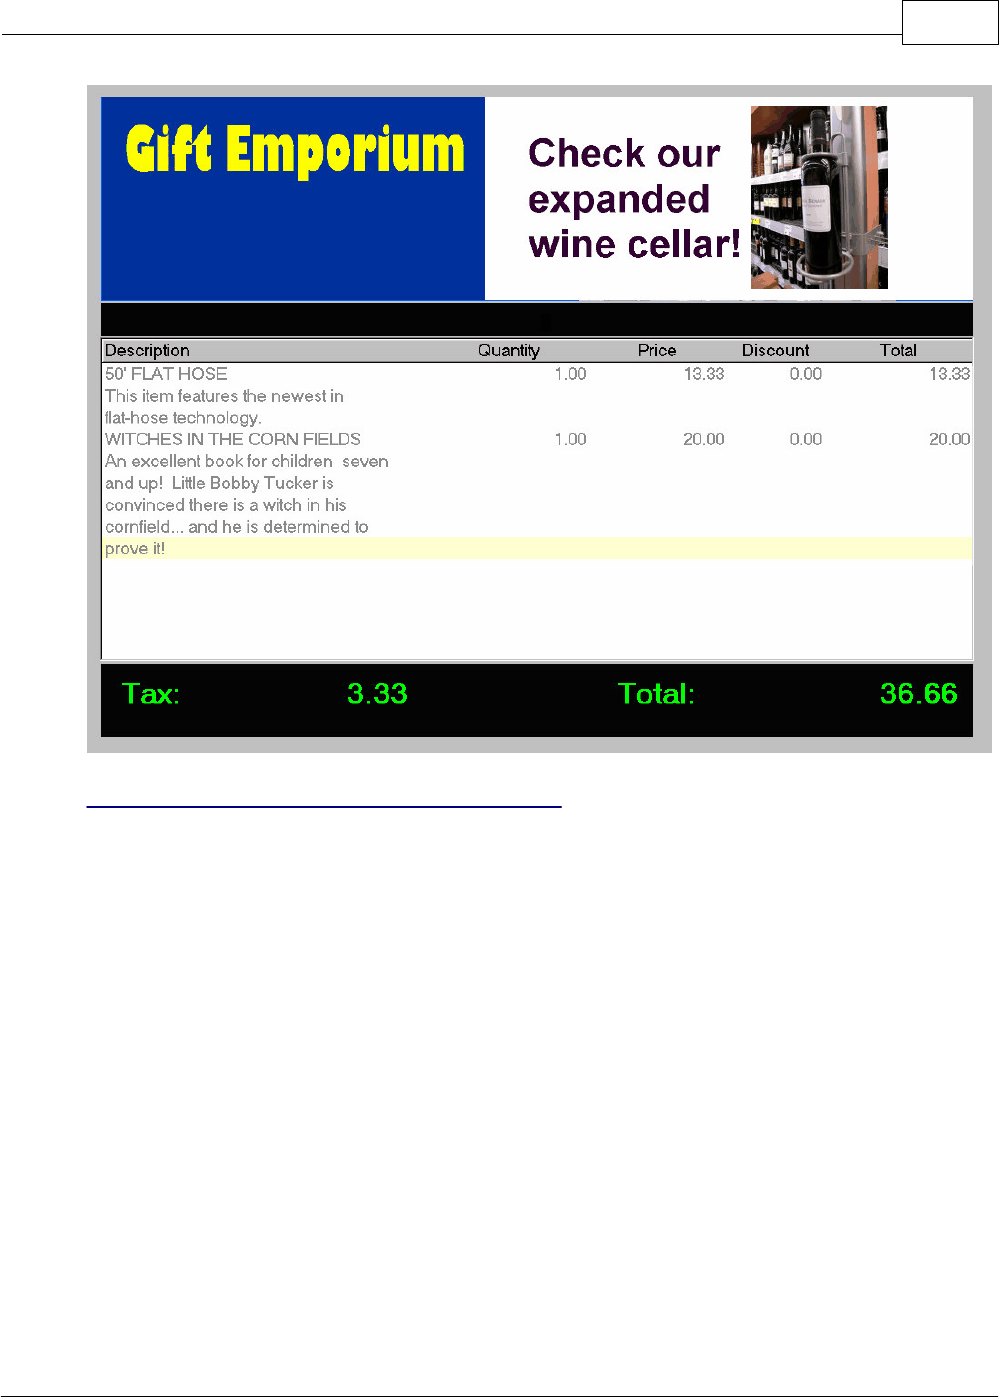
Instead of using a Pole Display, as described above, PRM can support two monitors; one that faces
your cashier for ringing up the sale, and one that faces your customer.
The customer display acts like a pole display, yet it displays much more information. Each individual
item is displayed as the sale is being rung up, plus the tax, total, and tender are displayed at the end
of the sale.
This is what your cashier sees.
This is what your customer sees.
Getting Started 49
Copyright ©2007 POSitive Software Company
Hardware Requirements for Multi-Monitor
In order to use Multi-Monitor support, you must have two monitors. We recommend using a
dual-display card, such as the Matrox dual-head card. A flat-panel screen makes an excellent second
monitor.
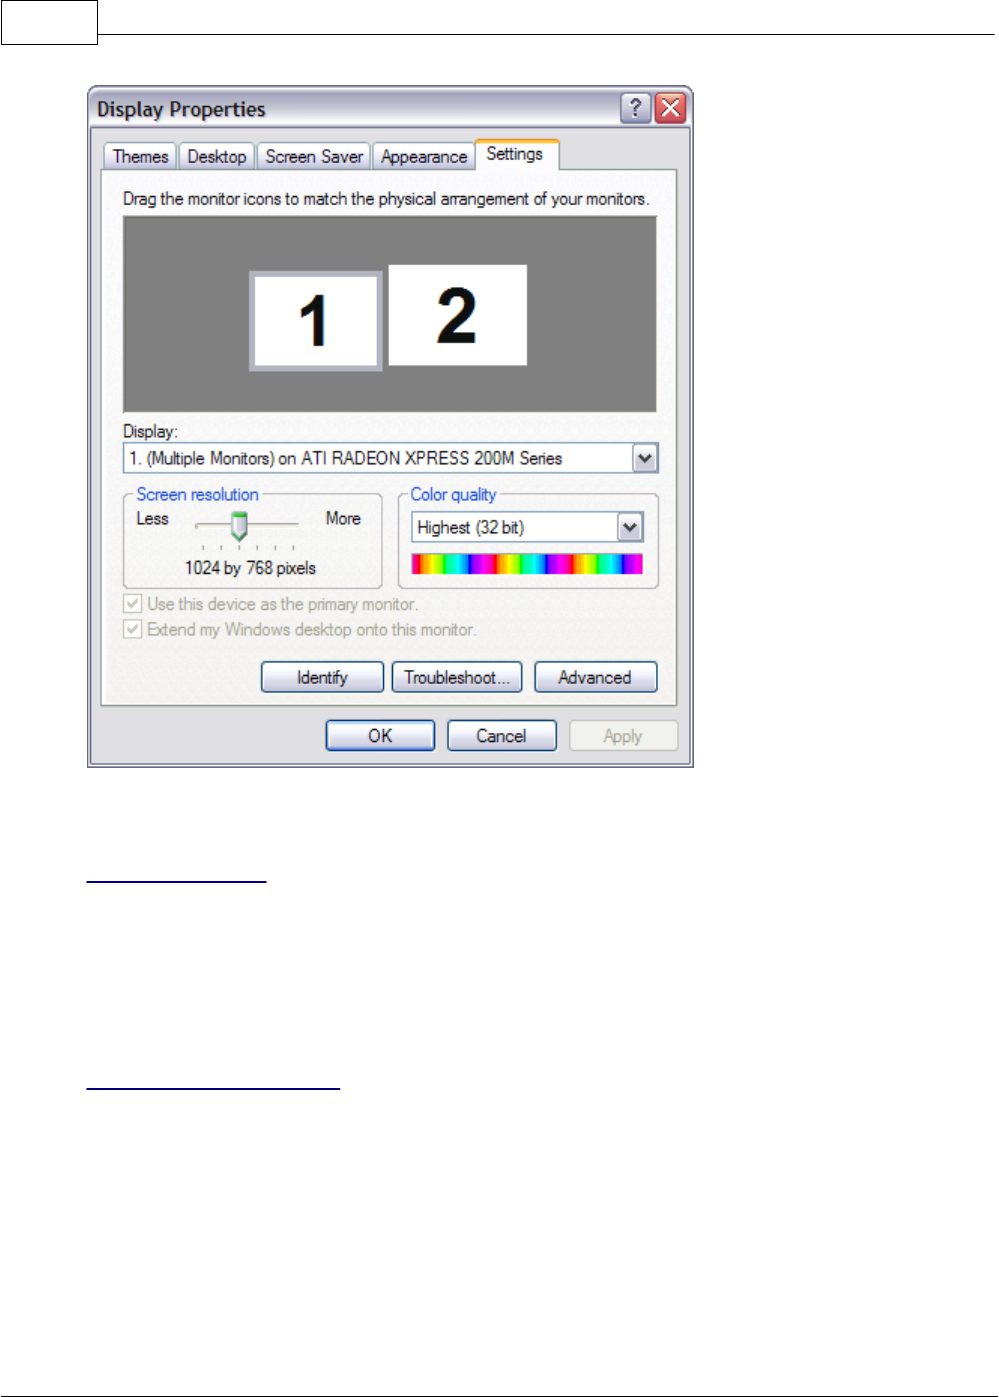
Once you have installed your second monitor, it is important that PRM is running on Monitor 1, and
the customer display is on Monitor 2. To see which monitor is which, right-click on your desktop and
select “Properties” and then “Settings”. You should see a screen similar to this:
POSitive Retail Manager User Guide50
Copyright ©2007 POSitive Software Company
In the example above, when you run PRM it should display on the monitor on the left. Your second
monitor should be set at 1024 X 768 resolution.
Data Structures
Next, you need to create a directory in your PRM data directory called MIMAGES (typically,
C:\PRM\DATA2\MIMAGES). This is where you will store graphics that will be displayed on the
second monitor. When the register is idle (you are not creating an invoice), full-screen images will be
displayed. We use Dots per Inch (DPI) as our unit of measure and full-screen images should be set
at 1024 X 768 resolution. When an invoice is being created, a picture (or banner) at the top of the
screen is displayed and should be 960 X 225 resolution.
Activate Multi-Monitor
Finally, you need to turn on multi-monitor support.
(1) Under Maintenance, Station Settings, Devices, Multi-monitor, check the “Activate Multi-Monitor
Mode” switch.
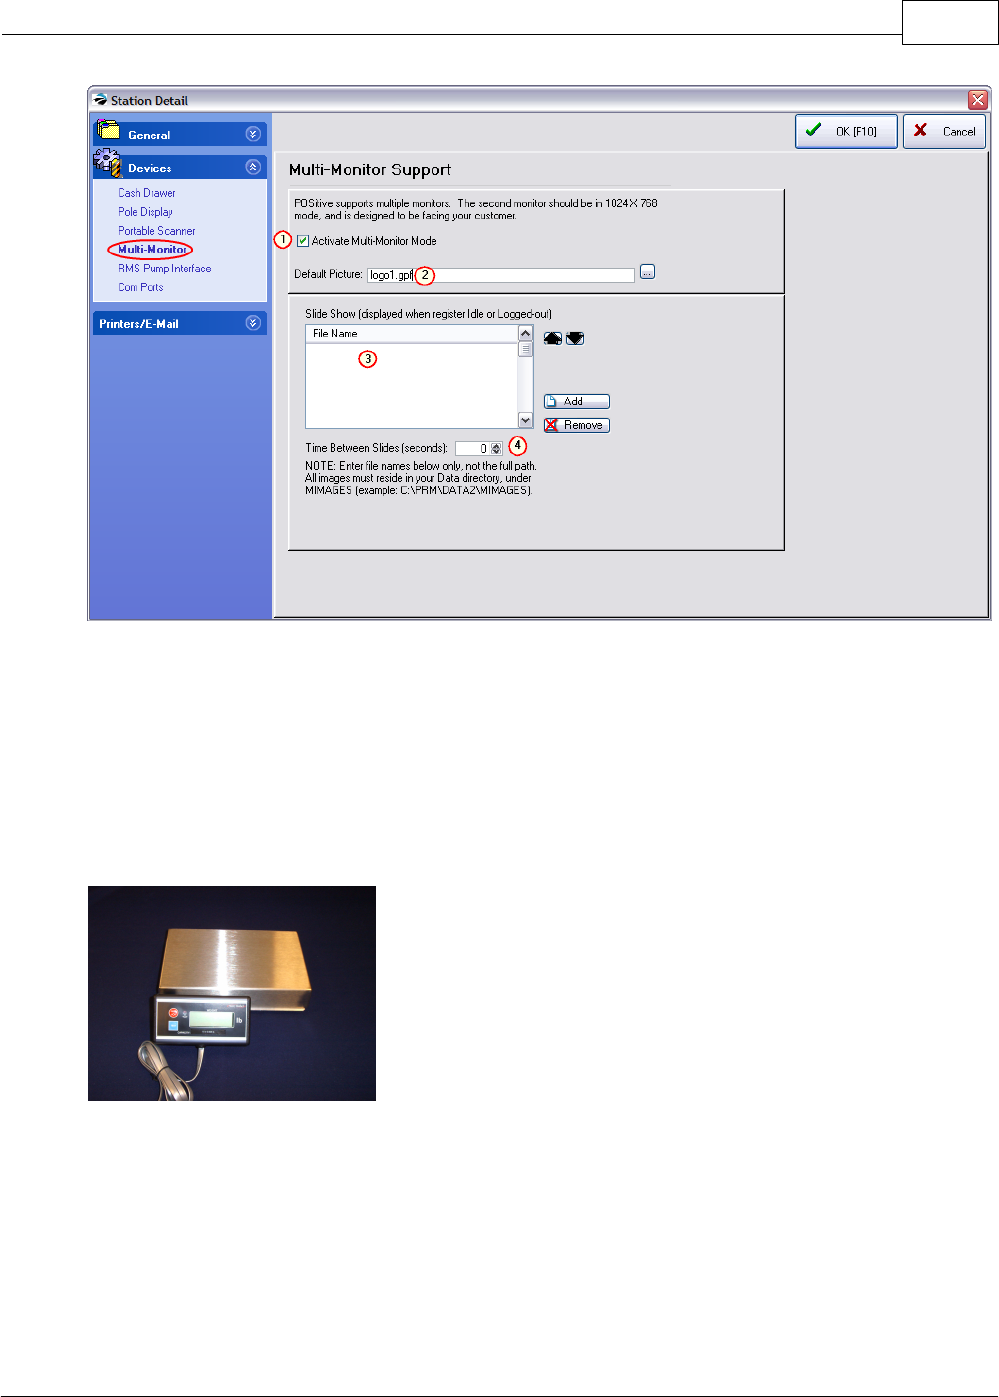
Getting Started 51
Copyright ©2007 POSitive Software Company
(2) Select the picture you will use for the top of the customer display (the Default Picture).
(3) Add pictures that will be displayed when the register is idle. Remember, these pictures should be
stored in the MIMAGES directory.
(4) Finally, set the default time in seconds for the pictures to change. Five seconds is recommended.
When you click on OK, the second monitor will be activated.
SCALE SETUP
POSitive Retail Manager is compatible with CAS, NCI, Toledo Mettler and other brands of scales,
when used with an appropriate interface, such as the Plexis xWedge serial to keyboard conversion
software. The reading of the scale is triggered by a specific or “hot” key on the keyboard, such as F11
or F12. Contact your dealer for specific information on the interface included with your system.

POSitive Retail Manager User Guide52
Copyright ©2007 POSitive Software Company
When entering an inventory item sold by weight, make sure you select Prompt To Read Scale. This
setting can also be automatically included by category. Whenever you sell an item by weight, you will
be prompted to place the item on the scale and then to press the designated hot key to read the
weight.
BARCODE SCANNER SETUP
PRM works with most barcode scanners that use either USB or keyboard wedge (“Y” cable)
interfaces. USB interfaces must be HID (Human Interface Device) compatible and not POS or OPOS
compatible. No special drivers are required, just connect the barcode scanner to your computer.
MAGNETIC STRIPE READER (CREDIT CARD SWIPER) SETUP
PRM works with most magnetic stripe readers that use either USB or keyboard wedge (“Y” cable)
interfaces. USB interfaces must be HID (Human Interface Device) compatible and not POS or OPOS
compatible. No special drivers are required, just connect the barcode scanner to your computer.
INVENTORY LABELS - LABEL PRINTING
PRM has several pre-defined inventory and customer labels. However, you may create more and
define them to suit your needs. (see Advanced Inventory Label Printing Tutorial)
Printing Inventory Labels
PRM prints prices and barcodes on labels and there are several pre-designed sizes included with the
program. You can even create your own labels with our built-in designer. A label can include special
pricing, colorization (if supported by the printer), and can even include a picture of the product.
And you can choose to print shelf tags, print labels as inventory arrives, reprint missing labels, and

Getting Started 53
Copyright ©2007 POSitive Software Company
promotional labels, and much more. (see A Demonstration of Label Printing)
REPORT PRINTING
All reports are printed to your Windows Default printer. You will need a standard letter size (80
column) printer. A laser printer is recommended, however an inkjet printer or a dot matrix printer can
generally give suitable results.
Most reports are hard coded into the program and cannot be changed. The following Windows
reports can be edited using Editors:
·Invoices - a smart form used for all windows printing of invoices, orders, service orders, quotes,
etc. You may clone and design the form for each type of transaction.
·POHistory - a reprint of a received purchase order
·Purchase Order - a printout of a current purchase order
·WorkOrders - a service department printout for on-site repair work
·ServiceWorkSchedule - printout of service work assignments
·CustomerList - customer listing
·ARStatement - statement for accounts receivable
·Inventory Price List - a catalog for customers
·Physical Stock Count - report of inventory stock levels
·Print Promo Pricing - a list of items with promotional dates
·Balance Cash Drawer Reports - When balancing the drawer, the following reports can be printed
automatically. You can reprint the reports at any time on demand.
Invoice Transactions
Tender Summary
Credit Card Summary
Category Summary
Note: The Invoice Transactions report is too detailed for printing on a 40 column printer. But the other
reports can be printed to a 40 column receipt printer. This is activated by selecting Print End-Of-Day
Report To Receipt Printer on the Station Detail: Register Balance. (see next topic "End Of Day
Reports - 40col Printer)
·AR Statements - PRM prints AR Statements with or without reprints of invoices. Reprinting of
invoices is determined on a per customer basis. There is an option to consolidate the invoices as
line item details on the statement rather than print full page invoices. This can save paper and is
activated on the POSitive Setup Form: Accounts Receivable.
END OF DAY REPORTS - 40col Printer
As a rule, all reports in PRM will print to a full page printer. But some businesses would like some
reports to print to a 40 column receipt printer, especially when you balance the cash drawer at the end
of the day.

POSitive Retail Manager User Guide54
Copyright ©2007 POSitive Software Company
Go to Station Settings: Register Balance
Highlight Register Balance
Choose which reports you want to print.
Tender Summary
Credit Card Summary
Category Summary
Note: Invoice Transactions Report will never print to the 40 Col printer because of its excessive
detail. It may be printed later to an 80 column printer.
Activate "Print End-Of-Day Report To Receipt Printer"
In field Receipt Printer, select a Generic / Text Only Printer.
If the Generic / Text Only Printer is not in your listing of Windows Printers, follow these steps.
Go to the Start Button
Choose Settings
Choose Printers
Click on Add Printer
From the list, select Generic / Text Only Printer and follow the instructions for installation. Note: Do
NOT set this as your Windows Default printer.
2.3.1 Sample: Generic Receipt Printer Setup
SETTING UP A TYPICAL RECEIPT PRINTER IN PRM
In this example, we’re referring to a small printer that uses 3” wide paper and the first thing you’ll need
to do is install a Windows printer driver for your model. Since most receipt printers do not ship with a
driver disk you’ll need to download one from the manufacturer’s web site, or ask your dealer. You can
also use the Generic/Text Only driver that is included with Windows.
Once you’ve installed a Windows printer driver, start POSitive Retail Manager and go to Maintenance,
Station Settings, Printers/E-Mail, Invoice

Getting Started 55
Copyright ©2007 POSitive Software Company
Above is the set-up screen for your invoice (receipt) printer.
(1) Next to Printer Type, select Receipt/Dot Matrix.
(2) Windows Printer Driver is the Windows driver you installed for your receipt printer. Make changes
by clicking on the box with three little dots.
In our example we’re using a Generic/Text Only, but yours could be an Epson TM-T88iii printer.
(3) Next, your Physical Printer should be Generic Receipt Printer. The Epson receipt printer has a
automatic paper cutter, which is activated with a special control code, and in the next section, we’ll
show you how to enter that code in the List of Registered Printers.
(4) Then, you need to designate a Form to use. For example:
Form 4 - prints 2 lines per item sold, the SKU on one line and the Description on the following line.
Form 5 - prints 2 lines and includes the customer name at the top of the receipt.
Form 6 - prints just one line with the Description in abbreviated form (recommended form)
Form 7 - prints just one line, and includes the customer name at the top of the receipt.
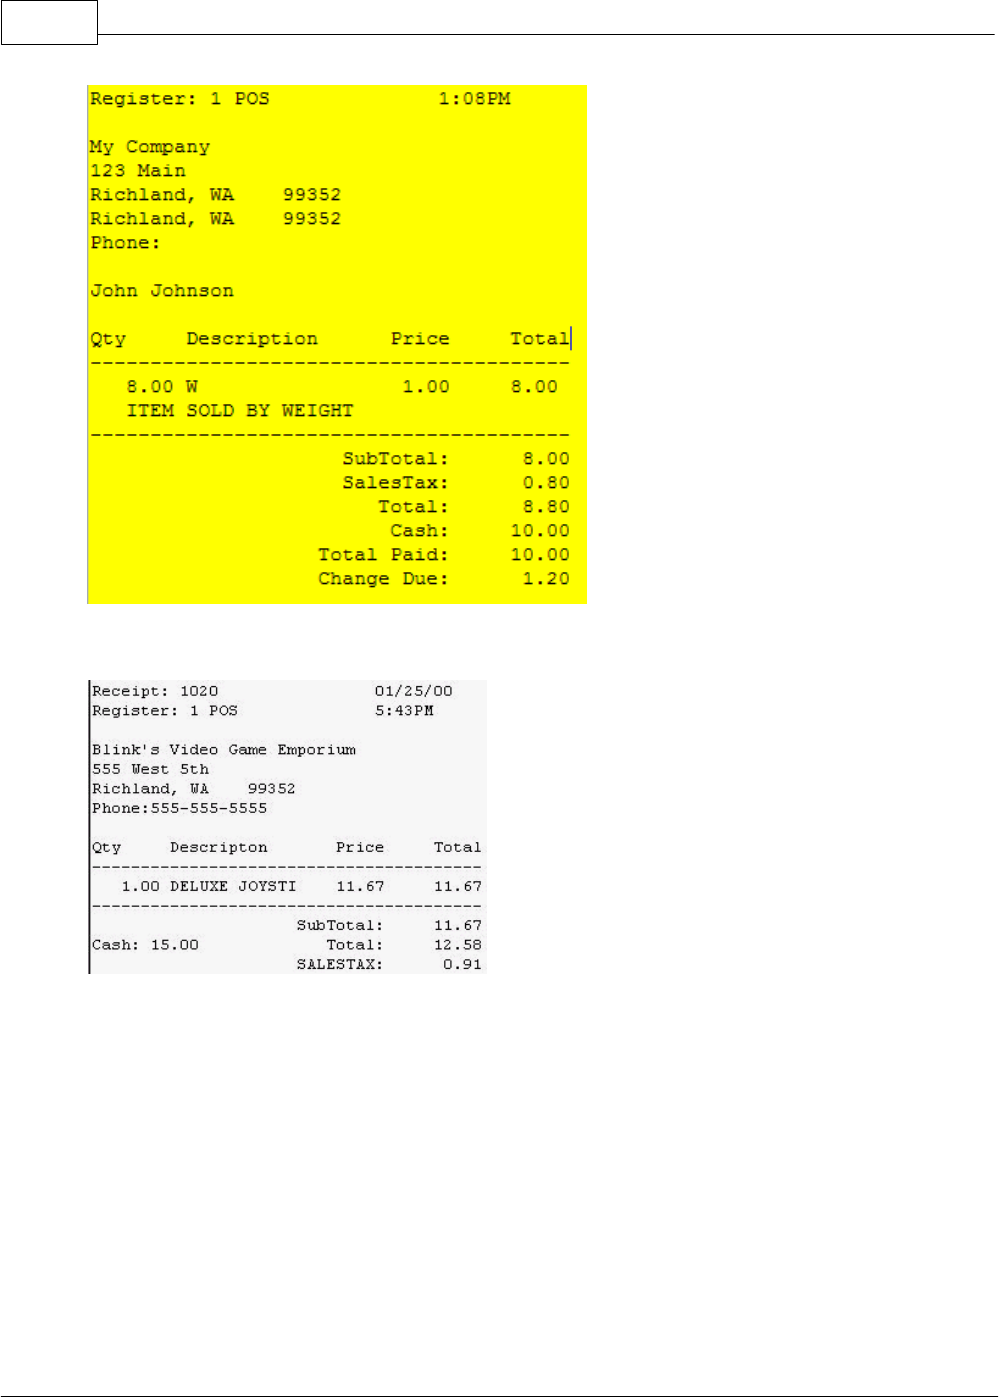
POSitive Retail Manager User Guide56
Copyright ©2007 POSitive Software Company
For Example: This Form 5 includes a customer name and uses 2 lines per inventory item sold.
For Example: This Form 6 does not have a customer name and uses only 1 line per inventory item
sold.
(5) Finally, once you have selected your Form, choose the number of copies you’ll need printed.
At this point, you can click on OK to save your settings.
LIST OF REGISTERED PRINTERS
This is a list of pre-defined printers that are used primarily for receipt and invoice printing. (Open this
list by choosing the lookup button for Physical Printer.)

Getting Started 57
Copyright ©2007 POSitive Software Company
Epson 24 Pin - A standard printer definition for printing to most makes and brands of 80 column
dot-matrix printers.
Epson Validation - will frank a customer check by imprinting company name, deposit only, etc. on the
back of a check.
Generic Receipt Printer - A standard printer definition for printing to most makes and models of 3”
width (40 column) receipt printers.
HP Ink Jet - A standard printer definition for printing to most makes and brands of ink jet printers.
HP Laser Printer - A standard printer definition for printing to most makes and brands of Laser
Printers.
Windows - PRM will print directly to the Default Windows printer as defined under Windows.
You can edit the definition on all of them except the Windows printer, adding control codes for printer
functions, font sizes and etc. You can also add your own printer definition for special applications,
such as check validation or slip printing.
Printer Definition
After highlighting the printer name, choose the Edit button at the bottom of the screen if it is necessary
to edit a printer definition, you will be asked to enter the following information:
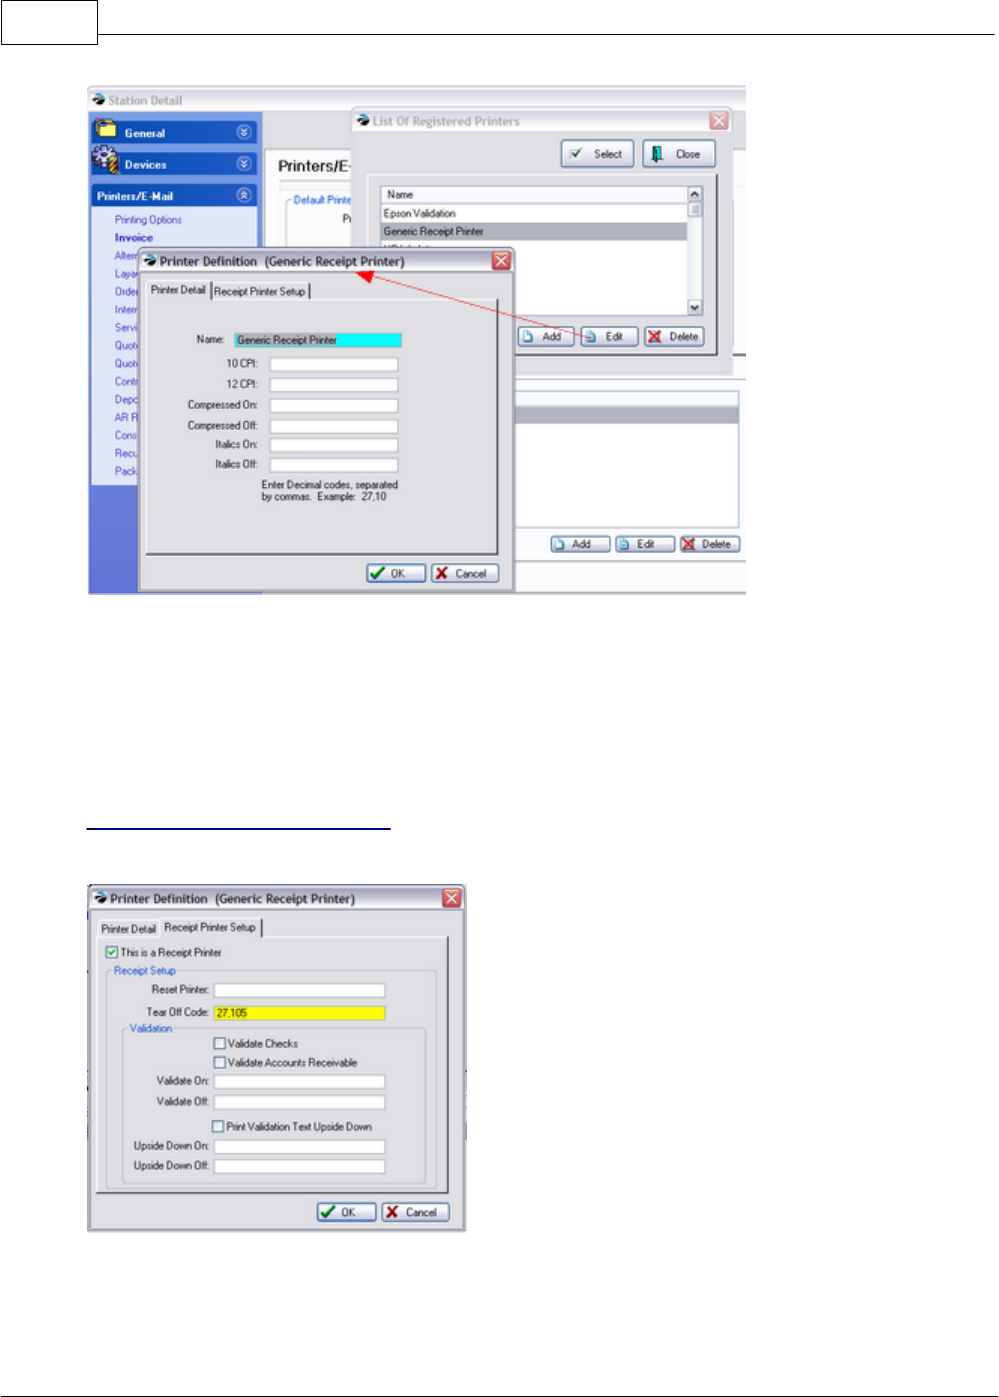
POSitive Retail Manager User Guide58
Copyright ©2007 POSitive Software Company
Printer Detail (tab)
Printer Name - Enter the make and/or model number.
-- Code Settings -- These are print command codes specific to the make and model of the printer as
defined by the manufacturer. These codes should be available in the printer manual and their
purpose is to issue font changes while printing. Enter the decimal code(s) separated by commas,
such as 27,10. Most small receipt printers don’t require any codes here.
Receipt Printer Setup (tab)
This is where you’ll enter specialized control codes if need for your receipt printer.
This is a Receipt Printer - This is checked if it is a 40 column receipt printer.
Reset Printer – Used only for special applications and is normally kept blank.
Tear Off Code - To execute a paper cutter in the printer. (Typically the code for Epson printers is

Getting Started 59
Copyright ©2007 POSitive Software Company
27,105. For Star, 27,100,48. Consult your printer manual or dealer for assistance.)
Click OK to save your settings.
Validation Printer ONLY
DO NOT put anything in the following fields if you a using a regular receipt printer. Contact your
dealer or POSitive support for more information.
Some receipt printers can "validate”, meaning it can print bank and purchase information on the back
of a check. If the transaction is on account, it will print on a posting receipt. (Go to System Setup:
Transactions: Printing and choose commands)
Validate Checks - Will print endorsement on the back of a check.
Validate Accounts Receivable - Will print on a posting receipt.
Validate On - Triggers printing on the back of a check or posting receipt.
Validate Off – Releases check or posting receipt after printing.
Print Validation Text Upside Down – Activates upside down printing.
Upside Down On – Turns upside down printing on.
Upside Down Off – Turns upside down printing off.
Click OK to save your settings.
2.3.2 Additional Pole Display Setup Info
You will need to enter the manufacturers’ codes for activating the 1st and 2nd lines of the display.
Each pole display requires codes to display text. You will need to enter the codes as provided by the
manufacturer of the pole display.
If you have a Partner Tech model CD-5220
Select Pole ID: 200
Choose the Port
Enter your messages on Pole Line 1 and Pole Line 2
Click the Test button.
If you have a different brand and model, you will need to create and define a new Pole ID.
Description - The model of the pole display.
Codes For Line 1 the code numbers separated by commas
Codes For Line 2 the code numbers separated by commas
Characters/Line - the number of characters per line.
For example, if you have a Logic Controls model PD3000:
Click on the button and the end of the Pole ID line.
Highlight ID #251 and click on Edit.
For a Description type PD3000

POSitive Retail Manager User Guide60
Copyright ©2007 POSitive Software Company
For Codes for Line 1 type 31,30
For Codes for Line 2 type 10,13
For Characters per line type 20
Then Click on OK.
If you have any other brand and model, check with the manual for codes to enter.
Pole Display Port - Choose the port to which the pole display will be attached.
Message Lines - When the pole display is not showing products and prices, you may choose a
greeting or message for display. The message can be changed as often as you wish. The length of
the message is dependent upon the brand of pole display.
Pole Line 1
Pole Line 2
Test Button - Sends a signal to the pole display to confirm that settings are correct and to display the
message lines.
2.3.3 Additional Cash Drawer Setup Information
Most cash drawers will be connected to the receipt printer, but in some installations this is not
possible, so you’ll need to use a drawer with a serial or USB cable that connects directly to the
computer.
You must activate the option to use the cash drawer by entering codes for the cash drawer. It is
assumed that the cash drawer connects to the printer with a small cable.
Use Cash Drawer - Must be checked if a cash drawer is being used with this station.
Cash Drawer Code - The decimal numbers provided by the cash drawer manufacturer which activate
the drawer to open. If more than one number is required, use a comma as a separator.
If the printer is an Epson or compatible brand, use code 27,112,0,48 or 27,112,48,40,40.
If the printer is a Star brand, use code 7.

Getting Started 61
Copyright ©2007 POSitive Software Company
If the printer is a Ithaca brand, use code 27,120,1.
Cash Drawer Port - Choose the port to which the cash drawer is attached. If the cash drawer is
plugged into a receipt printer, use the port of the receipt printer.
Pulse - The signal to open the cash drawer can be extended by increasing the pulse setting from 0 to
a 1, 2, or 3. This is often needed for older models of cash drawers. Another option is to set the baud
rate for older drawers to just 300 baud.
Test Button - Pressing the test button will transmit the cash drawer codes and open the drawer.
2.3.4 Editing & Using Inventory Labels
Because of space limitations, go to On-Line Help for information on:
Advanced Inventory Label Printing Tutorial
A Demonstration of Label Printing

Part III

POSitive Retail Manager User Guide64
Copyright ©2007 POSitive Software Company
3Master Menus Ready Reference
The opening screen of PRM is clean and simple. The Tool Bar at the top provides ready access to all
features of PRM (POSitive Retail Manager). This toolbar replaces the old Manager Console in
POSitive For Windows.
The Tool Bar is divided into Master Menus with individual links and actions.
Transactions
OVERVIEW
·create invoices and return invoices
·create layaways, orders, and other pending transactions
·lookup the selling price of an item, the status of a gift certificate, or run an age
verification
·employee clock in an out; logout from system
·review old invoices; review pending service appointments
·open cash drawer; balance the cash drawer at the end of the day
·ready access to Centers: customers, inventory, vendors, and reports
·set reminders with My POSitive
MENU OPTIONS
Customer Sale
Creates an invoice for a named customer
Quick Sale
Creates an invoice for a walk-in customer; name not known
Returns
Creates an invoice which automatically prompts for an
original invoice number. Includes search options for finding
an invoice. Allows for return of an inventory item, even if
original invoice is not found.
Lookup
Price Check
Scan a barcode to learn the selling price, stock status.
Include the customer name to view special pricing.
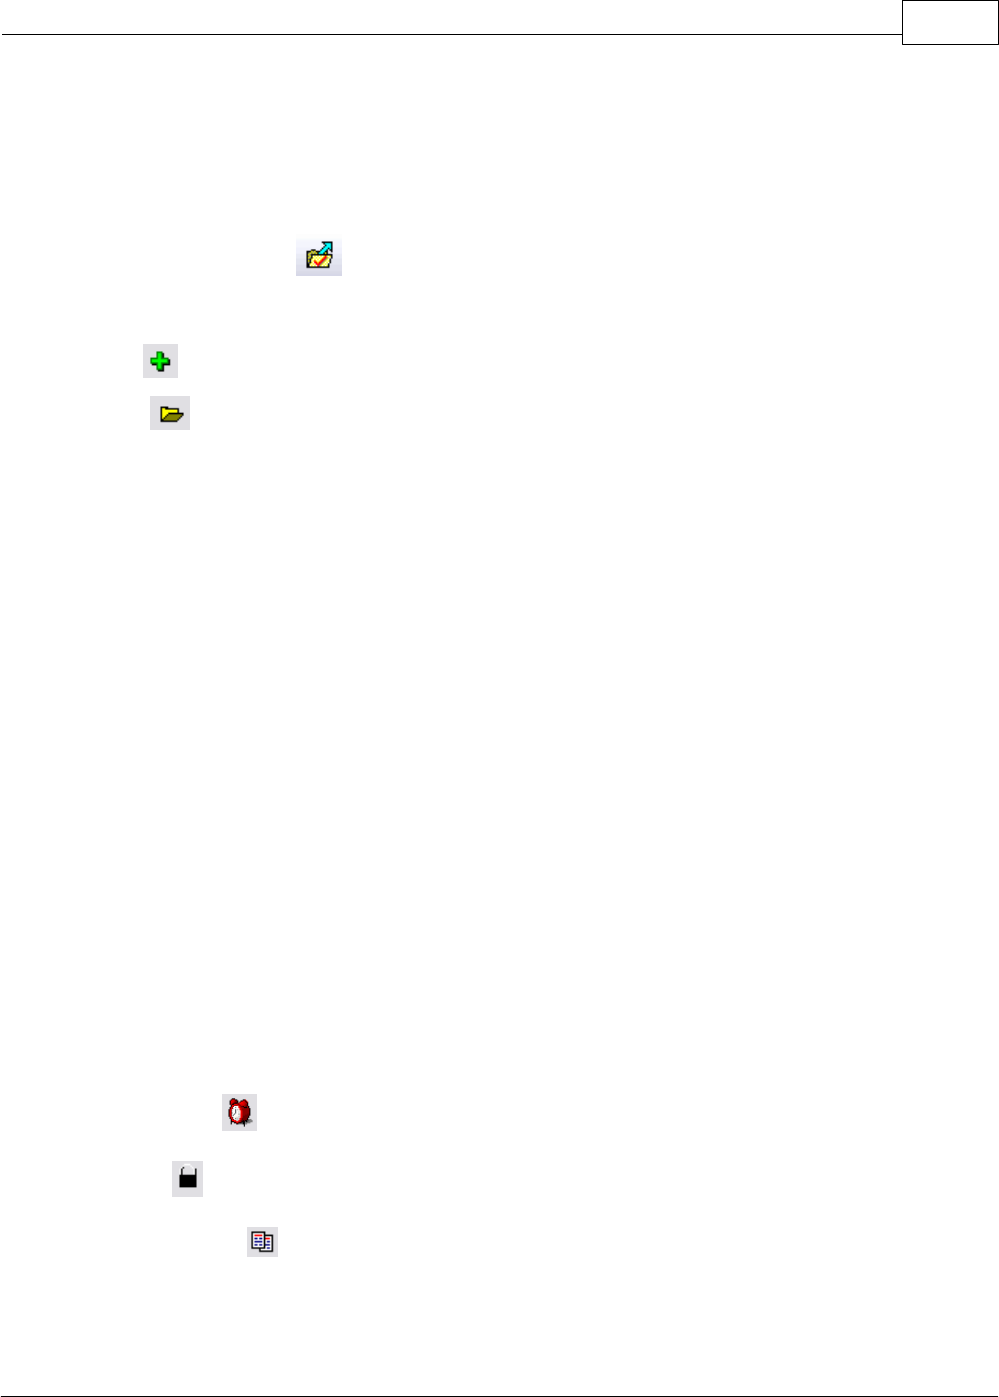
Master Menus Ready Reference 65
Copyright ©2007 POSitive Software Company
Gift Certificate Check
Scan or enter a gift certificate number to learn the value of
the card.
Age Verification
Scan driver’s licence or enter birthdate to confirm that
customer is of legal age to purchase designated products.
Retrieve Suspended
Find an invoice which was temporarily suspended and
resume processing the invoice.
(Pending Transactions)
Add
View
The following transaction types can be created by:
1) highlighting the type of transaction. and
2) clicking on the plus icon.
To View transactions in process, click on the folder icon.
Layaway
Customers make regular payments towards purchase of
items. The layaway is converted to an invoice for final
payment and delivery of products to the customer.
Order
Used for special orders of inventory. Payment is received
as a deposit in full or in part. Once the items are in stock
and can be delivered to the customer, the order is
converted to an invoice.
Web Order
Lists Internet Orders generated by POSitive Commerce.
Payment is made in full by pre-approved credit cards, but
cards are not charged until the web order is converted to an
invoice.
Service Order
Products and services are added to a transaction which
require technical assistance. Tracks products being
serviced and employee notes of work done and time spent.
Quote
Lists products being considered for purchase. The quote
employs special tools for “packaging,” creating variations of
the quote, and follow up.
Recurring Invoice
Used for scheduled billing for services and products sold on
a repeat basis. Processed in batches, payment is made by
credit cards on file or by placing on store account.
Clock In/Out
Employee time clock.
Logout
Employee sign out and sign in.
Invoice History
A listing of all invoices processed. Invoices can be
reprinted, cloned, researched, and voided.
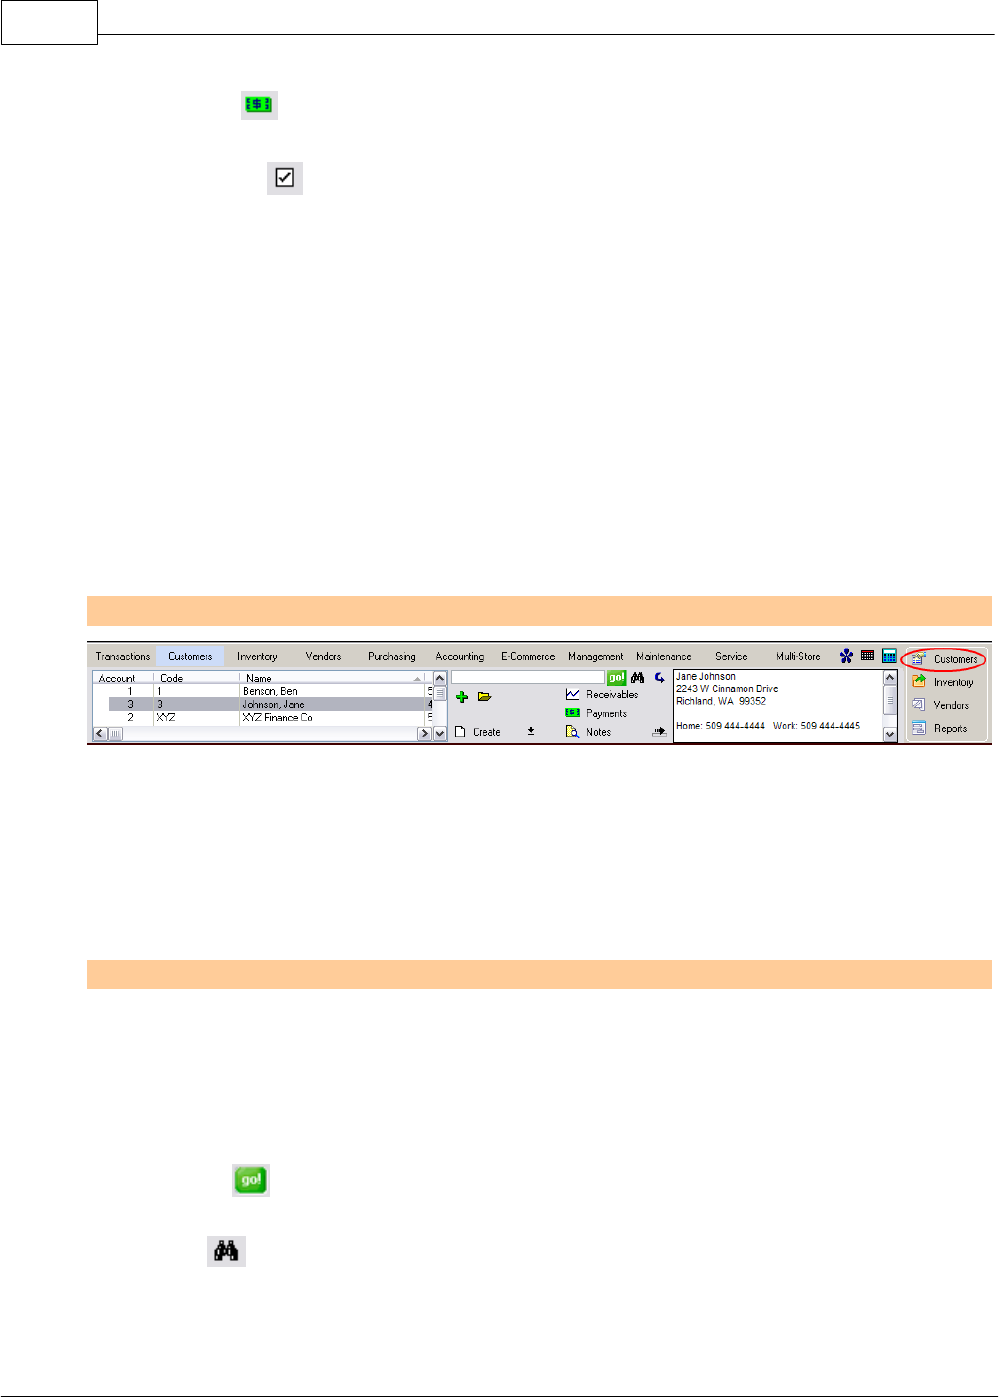
POSitive Retail Manager User Guide66
Copyright ©2007 POSitive Software Company
Open Register
Prompts for sales ID and reason for opening the cash
drawer.
Balance Register
Provides a cash drawer count down and procedure for
reporting all monies collected.
(Logged In: )
Sales ID of employee using the workstation
(Station:)
Workstation number
3.1 Customers
If your business consists primarily of Quick Sale invoicing, then you will not need to build up this
customer section. Consider, however, entering your employees as customers and track their
purchases.
Customers
OVERVIEW
·quick find customer(s) who meet specific criteria
·create an invoice, order, layaway or other pending transaction
·review AR activity and take AR Payments
·append a note to a customer record
MENU OPTIONS
Customer List
The list of all customers which includes the
Account Number - (automatically generated by PRM)
Code - a unique alternate name/number
Name - displayed as last, first name or company name
Click on the column title to sort the list
Lookup - GO!
First select the column, then type search characters and
press CTRL-Enter or click GO!
Quick Find
Search for all customers which have matching information in
any of the following fields: First/Last Name, Company,
Address, City, State, Zip, E-Mail, Phone, and User Defined
Fields.
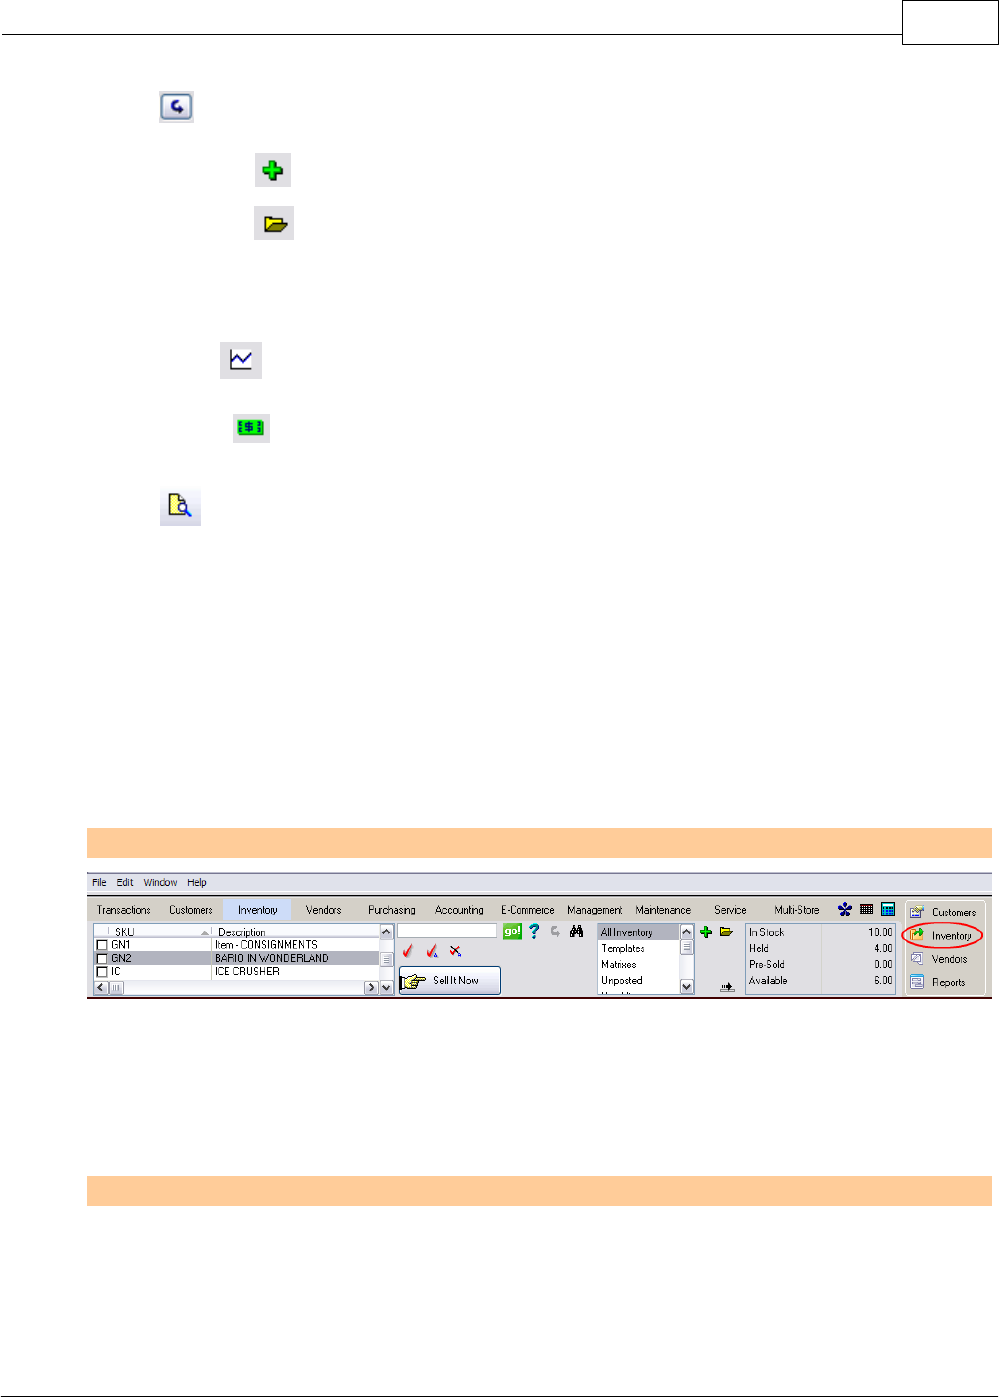
Master Menus Ready Reference 67
Copyright ©2007 POSitive Software Company
Reset
View all customers again.
Add (Customer)
Edit (Customer)
Create a new customer.
Open the Customer Lookup screen and choose to Edit
customer contents.
Create (New Transaction)
After highlighting the customer at left, choose the Create
icon and select a transaction type.
Receivables
Shows the Accounts Receivable status and history of the
highlighted customer.
AR Payments
Take payment towards an existing invoice on accounts
receivable. Can also take an Advance Payment.
Notes
Add, Edit, and Delete notes automatically created through
invoices. Notes can be used to document special
agreements and considerations. An attached picture of the
customer is visible.
Customer Bill To Information
A display of more detail.
3.2 Inventory
Whether you sell products or services, have a little inventory or a lot, PRM will provide much useful
information.
Inventory
OVERVIEW
·quick find inventory item(s); review stock status
·focus on select types of inventory
·select item(s) for invoice or pending transaction
MENU OPTIONS
Inventory List
Displays the SKU and Description of all inventory items.
Click on the column title to sort the list.
POSitive Retail Manager User Guide68
Copyright ©2007 POSitive Software Company
Lookup GO!
First select the column. Enter search text and press
CTLR-Enter. All items with matching search text will be
displayed.
Tag Items
Items can be "tagged" or check marked for inclusion on an
invoice or pending transaction: Tag Individual, Tag All,
Untag All. This is often used in conjunction with Saved
Queries.
Sell It Now
First, highlight the item at left. This will create an invoice
(Quick Sale or Customer Sale) with the item added to the
invoice.
Queries
A filter to display only inventory which meet certain criteria.
Once defined, the Query can be saved and used again.
Reset
Display all inventory again.
Find
Search for all inventory which have matching information in
any of the following fields: SKU, Description, Department,
Manufacturer Part Number
Inventory Types
Inventory items are classified by some unique properties as
follow:
All Inventory
All inventory items are displayed.
Templates
Templates are groups of inventory sold together by using
one SKU. Variations of templates are called Packages, Kits,
and Assemblies.
Matrixes
Inventory grouped together by a common style which come
in multiple colors and/or sizes.
Unposted
Inventory items which have been quickly added to an order
or an invoice with just minimal information. These should be
edited and assigned a cost, a vendor, and a category.
Used Items
Inventory items taken in on trade which are in various states
of condition compared to like products sold new.
Consignments
Inventory items being sold for or in behalf of a third party.
Contract Pricing
A specialized price list with an expiration date or contract
period which takes precedence over normal sales prices.
Stock Count
Shows number of units of the highlighted inventory item.
In Stock
Number of units on the shelf.
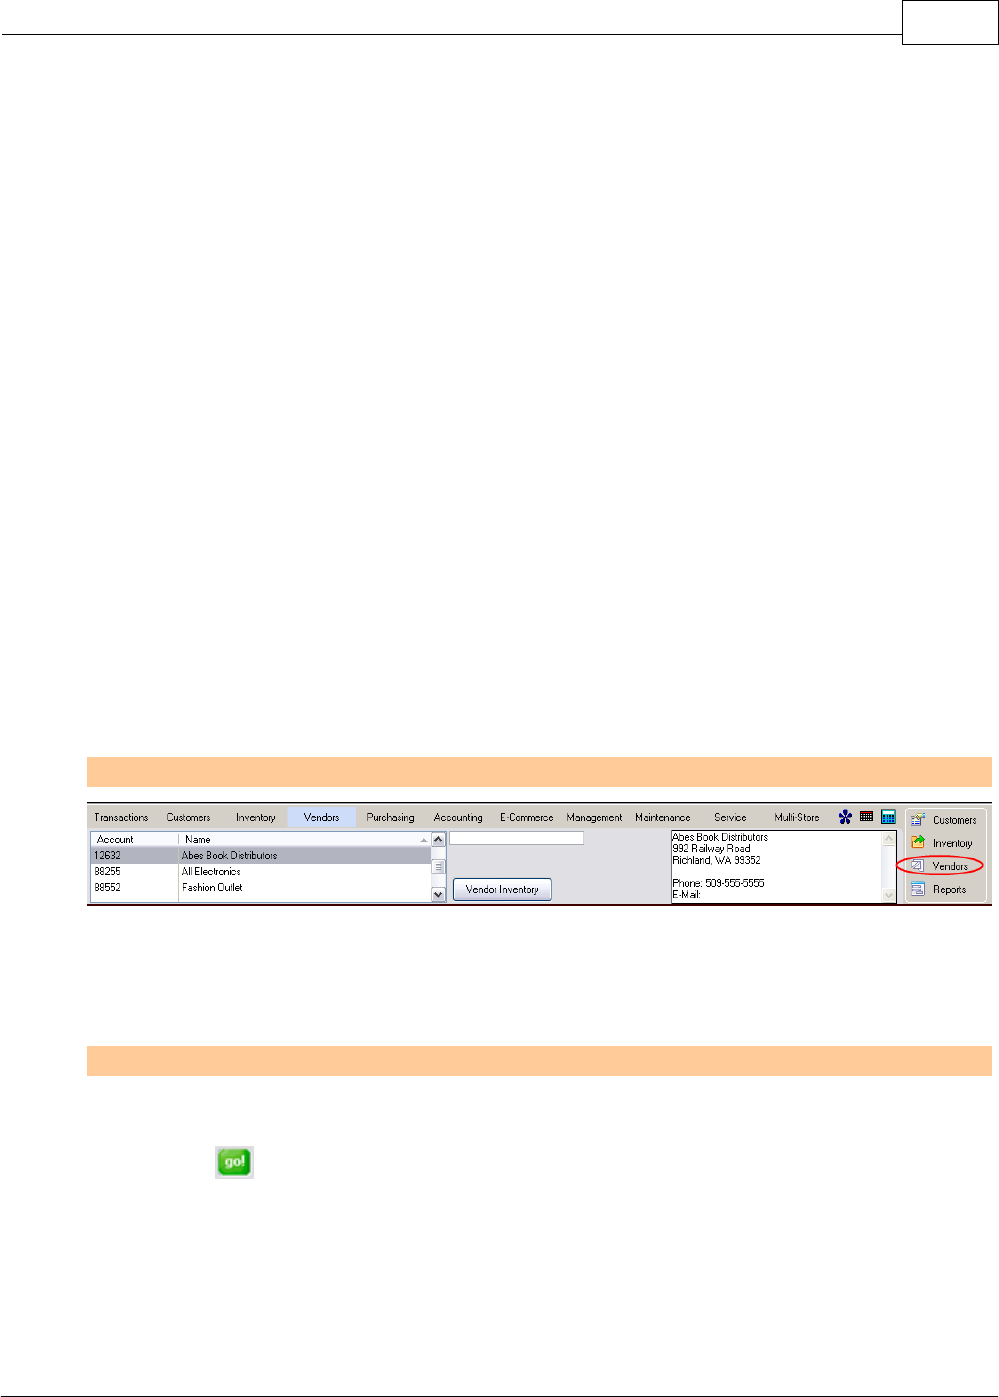
Master Menus Ready Reference 69
Copyright ©2007 POSitive Software Company
Held
Number of units on the shelf but reserved for customer
orders, layaways, internet orders, and service orders.
Pre-Sold
Number of units sold on invoice before purchase orders
have been processed.
Available
Number of units still available for sale after deducting Held
and Pre-Sold units.
(click More Arrow at left)
On Order
Number of units pending arrival of purchase orders from
vendors.
Committed
Number of units pending arrival which are pre-claimed on
customer orders, layaways, internet orders, and service
orders.
Extra
Number of units pending arrival which are available for sale
after deducting On Order and Committed.
3.3 Vendors
Your vendors provide you with products and services. PRM keeps records on purchases, payments,
and special agreements.
Vendors
OVERVIEW
· find a specific vendor; review general status
·review vendor inventory
MENU OPTIONS
Vendor List
Click on the column title to sort by Account or Vendor Name
Lookup (Go)
First select the column. Enter search text and press
CTLR-Enter. All items with matching search text will be
displayed.
Vendor Inventory
Opens the list of items available from the highlighted vendor.
Vendor Information
A brief display of vendor name, address, and phone number.
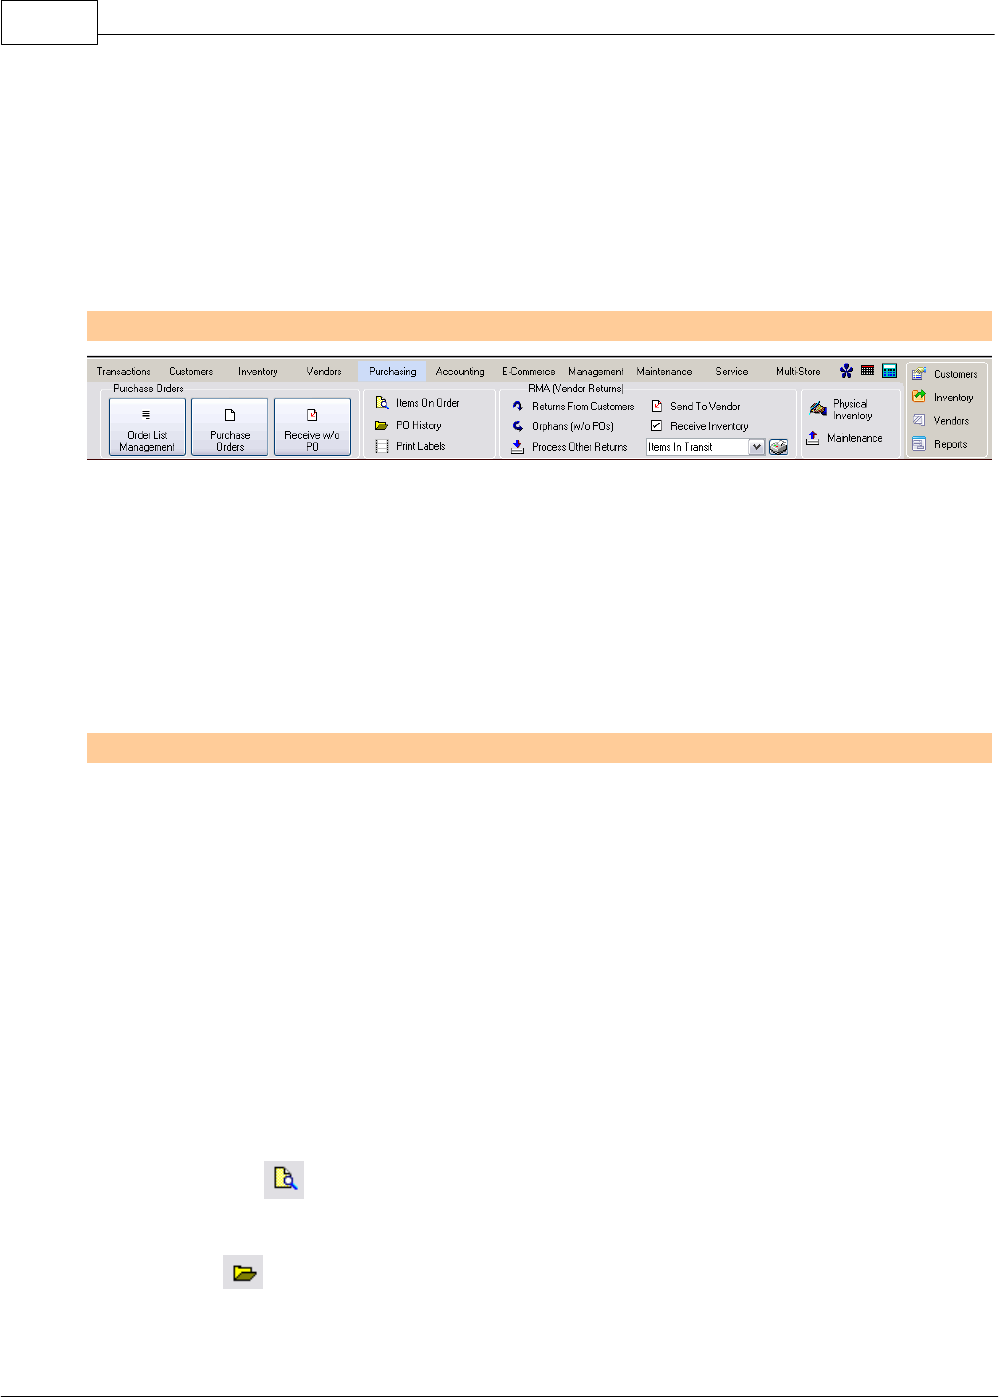
POSitive Retail Manager User Guide70
Copyright ©2007 POSitive Software Company
(See Vendors at the far right of the toolbar to gain full access to each vendor record.)
3.4 Purchasing
PRM handles inventory purchases from your vendors from the point of generating lists of items to be
ordered to receiving the products into stock. PRM also has an RMA function for returning damaged
and unwanted inventory items. Two utilities are available for maintaining databases and adjusting
inventory stock counts.
Purchasing
OVERVIEW
·handle all phases of purchases from vendors: preparing a list of items to order, placing
the purchase order with the vendor, receiving products from vendors
·review pending items on order; review past purchase orders
·print inventory labels
·process customer returns and return products to vendors
·execute physical inventory reviews, run inventory maintenance routines
MENU OPTIONS
Purchase Orders
(see Purchasing for fuller explanation)
Order List Management
Generates a listing of inventory needing to be ordered from
vendors. The list includes special order items for customers
and items which have fallen below minimum stock settings.
Several options are available for viewing and updating the
list.
Purchase Orders
Displays all purchase orders in process. Purchase orders
yet to be placed or called in to the vendor are separate from
purchase orders waiting to be received.
Receive w/o PO
A quick method of generating and receiving items on a
purchase order when a PO has not been created in advance
of the items arriving at the store.
Items On Order
A listing of inventory items which are part of purchase
orders. Shows the quantity, cost, and status of each item:
Pending placement or In Transit.
PO History
Lists each vendor and the purchase orders received from
the highlighted vendor. Purchase orders can be reviewed
and edited.
Master Menus Ready Reference 71
Copyright ©2007 POSitive Software Company
Print Labels
Items received on a purchase order are placed in a queue
for printing pricing labels. Labels can be printed en masse
or selectively.
RMA (Vendor Returns)
PRM handles inventory returns from customers, processes
those returns back to stock or back to a vendor. Full
tracking of an inventory item in each step of the process.
Returns From Customers
Items once sold and returned by the customer will be listed
here for proper dispersion back to stock, to the vendor, or to
be discarded.
Orphans (w/o POs)
Items returned by the customer for which there is no linked
vendor purchase order can be processed after entering
pertinent vendor information.
Process Other Returns
Selects and processes items which have never been sold
but are being returned to the vendor.
Send To Vendor
After contacting the vendor and recording an RMA (return
merchandise authorization) number, items being shipped to
the vendor are flagged and the paperwork generated.
Receive Inventory
Items which are replacements for previous RMA's are
processed and stock counts are updated.
Printer
Sends the highlighted report at left to the printer.
Items In Transit
Items which have been sent to the vendor but not yet
processed are reported
RMA Aging
This report shows the number of days since items were sent
back as RMA's.
RMA History
A record of RMA's processed and received back into PRM.
Physical Inventory
Displays the current stock count of all inventory items.
Adjustments can be made to the physical stock counts
manually or through an update of a scanner. Reports of
Stock Exceptions and Inventory Lists can be printed.
Maintenance
Access screens and utilities for inventory items.
Global Changes
Change selling prices and costs en masse.
Verify
A maintenance procedure for re-calculating the number of
items Held, On Order, and In Stock. This should not be
used until all Pre-Sold items are processed first.
Serial Numbers
A listing of all serial numbers with the ability to edit and track
those inventory items.
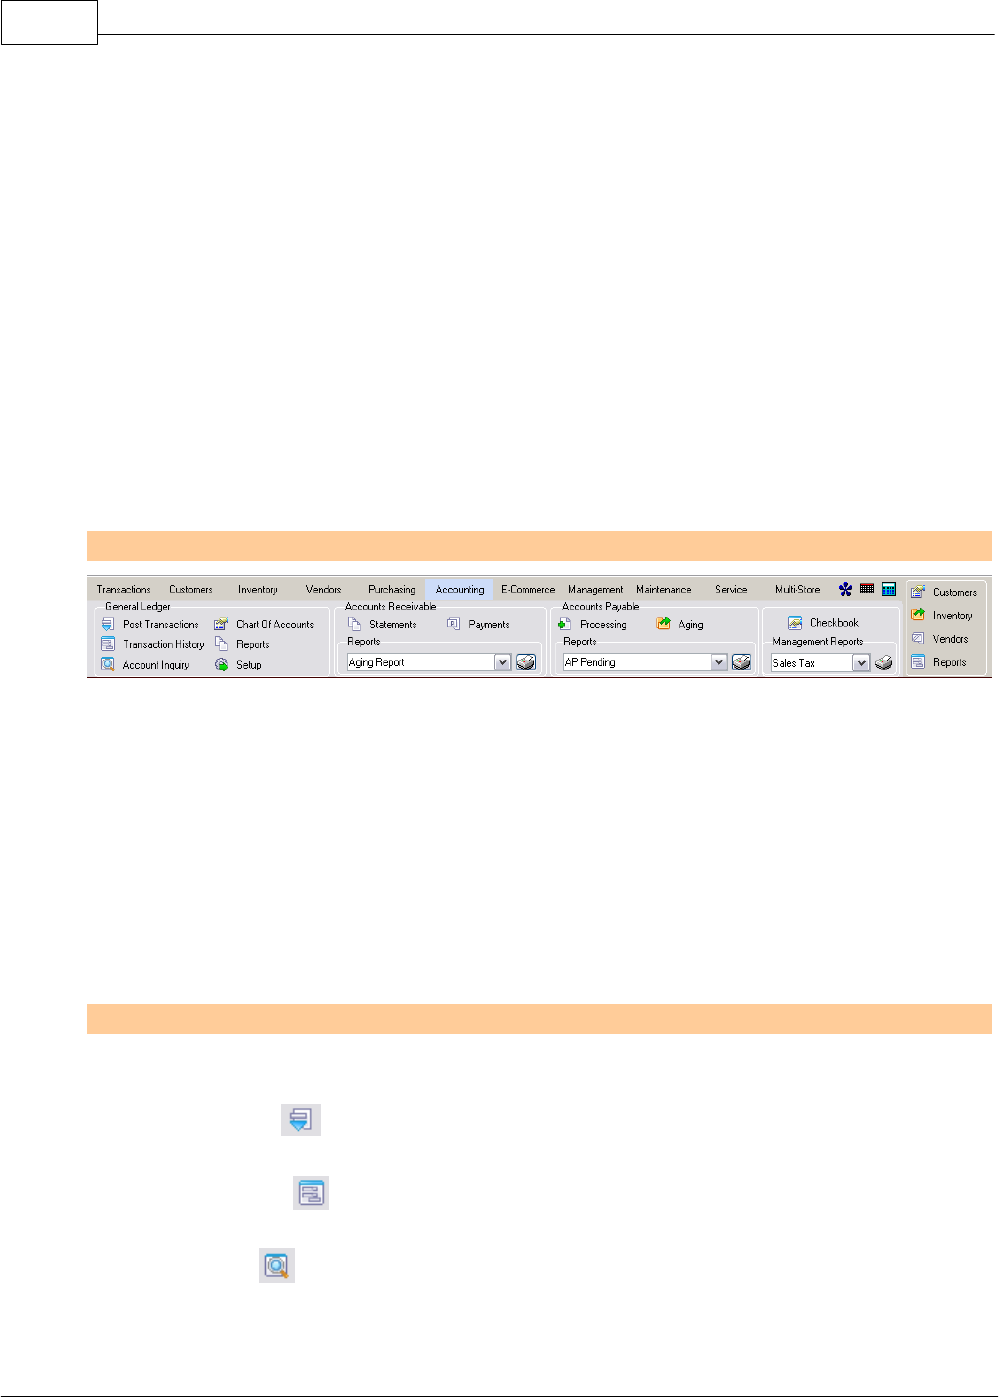
POSitive Retail Manager User Guide72
Copyright ©2007 POSitive Software Company
Matrix Headers
Matrix style sheets used in creating Matrix inventory. The
style layouts can be edited and cloned.
Manufacturers
Create and maintain a list of manufacturers.
Bin Locations
Maintain a list of shelves, sections, drawers, etc. in which
inventory is stored.
Cost Verifier
Review sales invoices for costs and profits. Adjustments
can be made.
3.5 Accounting
PRM has a fully integrated accounting function. Here you setup the General Ledger, track and
process Accounts Receivable and Accounts Payable, maintain the checkbooks, and print various
reports.
Accounting
OVERVIEW
·access General Ledger transactions to be posted; review historical GL Journal entries
·run GL related reports; inquiries on specific GL Account(s)
·define the chart of accounts and confirm proper GL Account setups
·run Accounts Receivable Statements; take AR payments
·process Accounts Payable transactions
·operate the PRM Checkbook
·run various tax reports
MENU OPTIONS
General Ledger
Post Transactions
Review, add, edit, General Ledger Journal. Then Post to
Transaction History.
Transaction History
Batches of posted journal entries can be reviewed, queried,
and exported. Various report generators are available.
Account Inquiry
Select a GL account
Master Menus Ready Reference 73
Copyright ©2007 POSitive Software Company
Chart of Accounts
Review, add, edit General Ledger Chart of Accounts
Reports
General Ledger specific reports.
Setup
Assign General Ledger Chart of Accounts to various
processes and activities. This has already been done by
default, but you can modify it as needed.
Accounts Receivable
Statements
Print AR Statements en masse or selectively.
Payments
Take customer payments by cash, check, or credit card
towards Accounts Receivable charges. Can also apply
earned store credits towards AR charges.
Reports
Choose one of the reports listed below and then select the
Printer icon at the right. You will be prompted with various
options for printing.
Aging Report
Prints all customers on accounts receivable with open
charges. The list is sorted alphabetically by customer name.
Charges are totaled by periods of 30 Days, 60 days, 90
days, and Over 90 and a line Total for the customer. The
report can be filtered to show only past-due accounts.
Optionally, one can choose to see invoices. A Query can be
applied to filter the results of the report to target specific
customers.
Activity By Date
Lists all Invoices tendered on Store Account for the date
range specified with a grand total amount. It will show the
customer name and account number, invoice number, and
amount of invoice.
Store Credits
Lists all store credits still active. The report includes
customer name, account number and lookup code and
credit amount with a grand total credits outstanding.
Payments By Date
Lists all payments received towards open AR charges within
the date range specified. It includes the customer name,
account number, and lookup code and the invoice number
being paid.
Transactions By Date
Every customer with AR history is included in this date range
defined report. It shows each customer's Open, Closed, and
Processed transactions with date, invoice or transaction
number, type of transaction and comment. The difference is
calculated between charges and paid amounts with a
subtotal. There is a Grand Total at the end of the report.
POSitive Retail Manager User Guide74
Copyright ©2007 POSitive Software Company
Cash Forecast
Grouped into weeks based on due dates, the open AR
charges are subtotaled and totaled
Uncollectable Debts
Accounts receivable for a specified time period which have
been flagged as uncollectable are listed with the customer
account number, customer name, lookup code, date of
purchase and amount of purchase. A total of charges is
listed.
Accounts Payable
Processing
A listing of Accounts Payable entries of various types:
·Unposted - final paperwork is not yet available from the
vendor
·Posted - paperwork has arrived and payment is ready to
be made
·In Process - the purchase order is still pending and not
yet received
·History - paid purchase orders and other AP charges.
Aging
A report showing current, 30, 60, and 90 day status.
Reports
Choose one of the reports listed below and then select the
Printer icon at the right. You will be prompted with various
options for printing.
AP Pending
A summary of current accounts payable can be sorted by
vendor or by week due. If sorted by vendor the report gives
the vendor name, vendor invoice number, invoice date,
amount due, and date payment is due. The list is subtotaled
by vendor with a grand total at the end. If sorted by week, all
vendors with payments due during the week are subtotaled.
Report options allows for including items posted for payment
or not posted or both.
AP Aging
Lists all vendors with open invoices and totals amounts due
in groups of Current, Over 30 days, Over 60 days, and Over
90 days with grand totals for each period.
AP History
Lists all payments to all or selected vendors for a given time
period. Payment amounts are subtotaled per vendor with a
page break separating vendors. The report includes vendor
name, account number, invoice number, date, date due,
amount due, discounted amount, date paid and amount
paid.
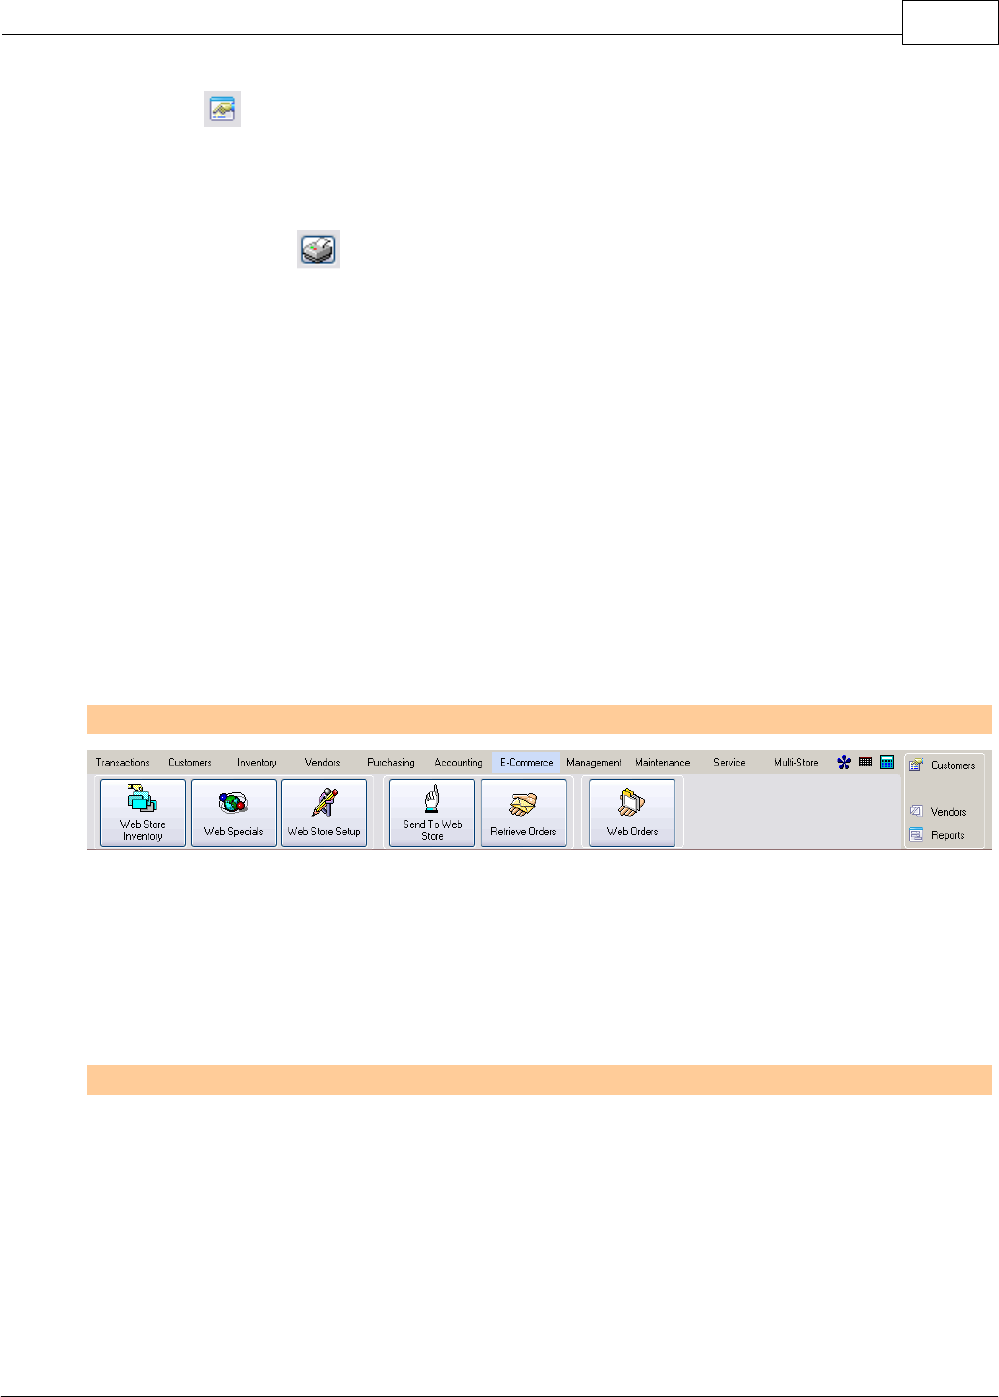
Master Menus Ready Reference 75
Copyright ©2007 POSitive Software Company
Checkbook
An integrated check writing and check register function of
PRM. Supports multiple bank accounts, has a check layout
editor so that PRM will print to your favorite check stock.
Checks can be manually created or are an automated part
of Accounts Payable.
Management Reports
Choose one of the reports listed below and then select the
Printer icon at the right. You will be prompted with various
options for printing.
Sales Tax
Prints a Sales Tax report for any given time period
PO Tax (Pending)
(optional) prints a tax report for pending purchase orders
PO Tax (Paid)
(optional) prints a tax report for paid transactions
Sales
Access various reports on sales with focus on: Invoices,
Departments, Inventory, Vendor, Customer, Employee,
Sorted Lists, and Weekly Summary
3.6 E-Commerce
Sell on the internet. POSitive Commerce provides you with a web-site and shopping cart and simple
tools for managing products available on the web site.
E-Commerce
OVERVIEW
·setup web-site operations
·manage inventory being posted to the web-site
·establish special pricing
·retrieve customer on-line orders
MENU OPTIONS
Web Store Inventory
A listing of all items flagged with "Post To Internet" status.
Full utilities for editing items, adding pictures, and extended
descriptions.
Web Specials
Establish global and selective special pricing for items within
departments and categories.
Web Store Setup
Identify web site and shopping cart controls.
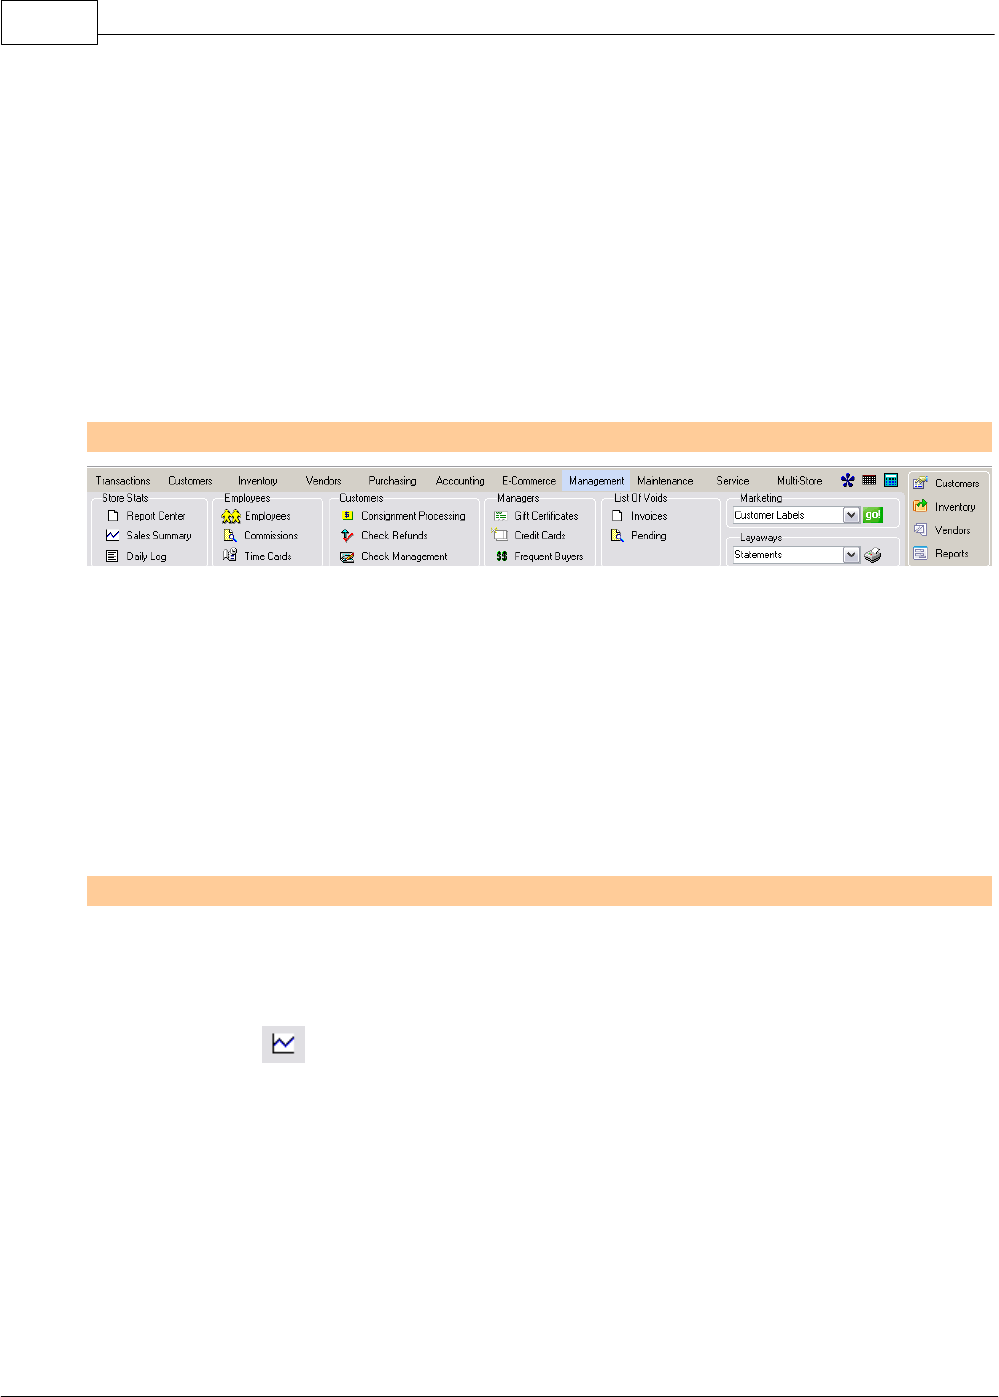
POSitive Retail Manager User Guide76
Copyright ©2007 POSitive Software Company
Send To Web Store
Uploads and updates inventory, pictures, pricing, to your
web site.
Retrieve Orders
Download internet orders on demand for processing and
delivery.
Web Orders
A listing of internet orders in process which have been
downloaded but not yet fully delivered.
3.7 Management
Various setups and reports which are maintained only by management personnel.
Management
OVERVIEW
·access the complete report center; review a thumbnail view of sales
·check the log of employee activities; manage employee records
·process commissions, consignment payouts, and check refunds
·review checks tendered, gift certificates issued and redeemed, credit cards processed,
and frequent buyer activities
·prepare marketing materials
·print accounts receivable statements and reports
MENU OPTIONS
Store Stats
Report Center
Access to the majority of reports available in PRM
Sales Summary
Each day's totals are tabulated and displayed in this
consolidated screen. This screen includes a running total of
Month To Date sales. You will see the number of invoices,
total of sales, returns, and net after returns. Also a total of
cost, profit and margin % for the day's receipts.
Daily Log
The Activity Log showing primary changes per workstation.
Employees
Employees
For adding employees and establishing security limits and
primary functions of each employee.

Master Menus Ready Reference 77
Copyright ©2007 POSitive Software Company
Commissions
Commissions earned by employees are tabulated here and
await processing.
Time Cards
Access and report on the number of hours worked.
Customers
Consignment Processing
Process payments for Consignments sold for individual
customers
Check Refunds
Process refund monies to be paid to the customer by check.
Check Management
A listing a checks received in payment from all customers
with the ability to focus on just one customer.
Managers
Gift Certificate Manager -
Gift Certificates which have been issued and used are
tracked through this section of PRM.
Credit Card Manager
Setup of credit card processing starts here and is completed
at the station level. Once credit cards are received and
tendered, batch settlement and credit card reports are
generated from here.
Frequent Buyers
Create loyalty type programs which reward customers with
store credits or points for making purchases of selected
products.
List of Voids
Invoices
Lists invoices which were voided after the sale was made.
Pending
Lists pending transactions which were voided before being
converted to invoices. There is an option to recover or
"un-void" these pending transactions.
Marketing
Choose one of the activities listed below and then select the
GO! icon at the right. You will be prompted with various
options.
Customer Labels
Print a filtered list of customer labels sorted by zip code or
customer name. Various filters (queries) can be created,
saved, and applied which focus on purchases, last visits,
location, and many other criteria.
Print Customer List
A filtered listing of customers can be printed.
Export Customers
Choose to extract a filtered customer database into a
Microsoft spreadsheet to include selective bits of information
from the customer record.
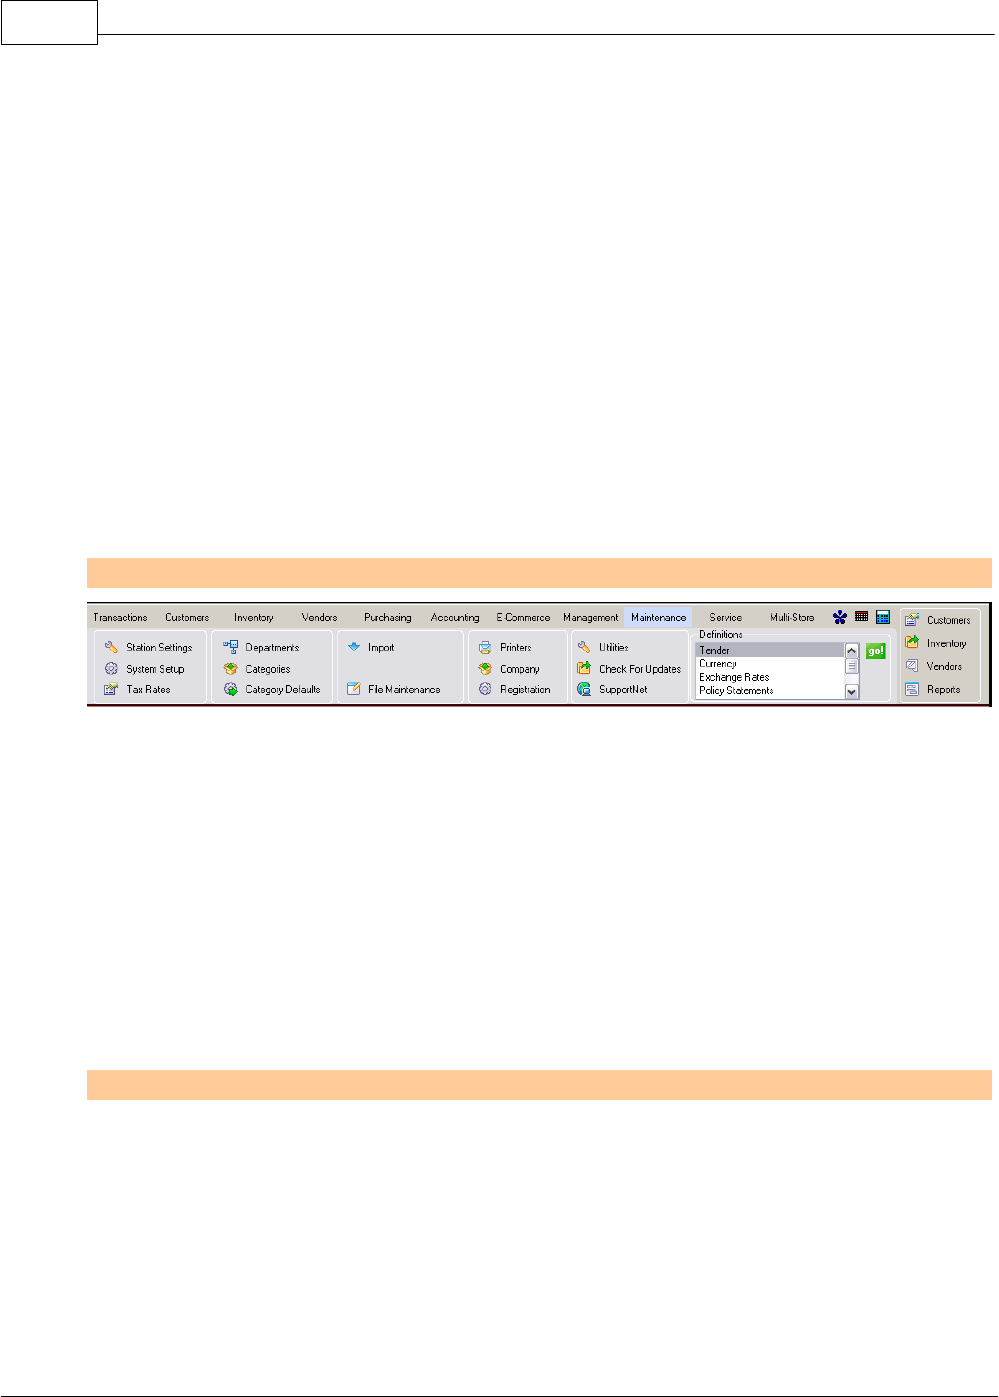
POSitive Retail Manager User Guide78
Copyright ©2007 POSitive Software Company
E-Mail Manager
E-mail marketing messages and offers to a filtered customer
list based upon purchases or other criteria.
Layaways
Choose one of the reports listed below and then select the
Printer icon at the right. You will be prompted with various
options for printing.
Statements
Print a collection notice for open layaways.
Reports
Print a filtered list of layaways in process.
Printer
3.8 Maintenance
Establishes default settings, pop-up lists, and software maintenance.
Maintenance
OVERVIEW
·access system wide controls of PRM
·access local computer operational controls
·define tax rates
·manage inventory department and category classification
·import and export data; run file maintenance utilities
·establish printers, company information and software registration
·contact SupportNET for technical Help
·define general settings
MENU OPTIONS
Station Settings
Edit workstation options for the currently running
workstation.
System Setup
Access to global options for overall operation of PRM. Can
create new workstations and edit existing ones without
having to be at the physical equipment.
Master Menus Ready Reference 79
Copyright ©2007 POSitive Software Company
Tax Rates
Defines tax rates per inventory type. Defines types of
customers such as local, wholesale, and non-taxable
organizations and assigns appropriate tax rates.
Departments
Opens the Department / Category structure. Allows for
creation of new departments and categories as well as tools
for modifications of assignments.
Categories
Opens the Category Listing. Create and edit categories, set
defaults on a category level.
Category Defaults
A controlling set of category settings under the title of Master
Defaults which are applied to a newly created category
Import
Access to importing routines to match a comma or tab
delimited file containing raw data into PRM.
Inventory
Import inventory items into PRM, update existing items, and
create new items simultaneously.
Customers
Import customer information into PRM and create new
customer records.
Vendors
Import vendor information into PRM and create new vendor
records. (TIP: importing inventory can also create vendor
information.)
Chart Of Accounts
Import a chart of accounts list.
Quickbooks Chart of Accounts
Import a chart of accounts list as exported from Quickbooks
MYOB Chart Of Accounts
Import a chart of accounts compatible with MYOB software
Microbiz
Automatically Import inventory and customers from the
Microbiz data folder.
Zip Codes
Import a list of zip codes.
(Export is not listed here)
Access to exporting routines is done from the respective
database. It is the Send Displayed List option at the top of
the Customer and Inventory screens.
Choose the icon and follow the prompts.
File Maintenance
Verify Data
Verify invoices, orders, vendor purchases, and accounts
receivable. Rarely used, but available if needed.
Purge Data
Reduce the size of some files by purging unnecessary data
from those files.

POSitive Retail Manager User Guide80
Copyright ©2007 POSitive Software Company
Printers
List of Registered Printers
Company
Define company name, address, phone, and internet
address. Optionally define store divisions.
Registration
Download the Activation Code from the Web and Register
PRM
Utilities
Some routines which might be needed after upgrading to a
new version of PRM.
Set Common Path
Makes sure that data is easily found by program commands
and searches.
Update Report Layouts
Recovers standard report layouts.
Verify Security Settings
Checks for new security features and updates PRM.
Verify Customer Phone Numbers
Reads customer database to assure that phone numbers
are in their proper format. Primarily used after converting
data in an older version.
Check For Updates
Compares current version with available upgrades; prompts
for downloading of new install program PRMSETUP.exe.
Launch install.
SupportNet
For registered users on support, create and track messages
to POSitive Software Company for how to information and
software problems.
Definitions
Customizing the use of PRM for your business can be
accomplished through defining various aspects of PRM.
These are edited only as special needs arise. For your
convenience, a brief description is provided here with a link
to more information in the help topics.
NOTE: Of primary interest will likely be POLICY
STATEMENTS and SECURITY GROUPS.
Tender
Establishes the list of methods of payment when tendering
invoices. For example, if you do not accept American
Express cards you could remove it; and add other tender
types as needed for your store. (see Tender Definitions)
Currency
Establishes the list of tender denominations when counting
down the cash drawer. For example, you may wish to
delete the $2 Bill from the list. When adding a new
denomination, for Currency Type enter the name to be
displayed. For Multiplier enter a number which when
multiplied by 1.00 will equal the value of the denomination

Master Menus Ready Reference 81
Copyright ©2007 POSitive Software Company
Exchange Rates
Establishes a current monetary exchange rate for foreign
currency. The My Country rate should always be 1.000000.
This should never be removed. Foreign exchange rates can
be added. (see Foreign Currency)
Policy Statements
Defines the greeting and or store policies regarding returns,
refunds, or work performed, which will be printed a the
bottom of transactions. A separate message can be used
for invoices, orders, internet orders, etc. When an order is
converted to an invoice, the policy statement will change.
(see Policy Statements)
Finance Companies
Define Third-Party Billing organizations which pay on behalf
of individual customers such as insurance companies or
co-pay partners.. Finance Company will be in the tender list.
See Finance Company Detail.
Barcode Types
A list of barcode label layouts (symbologies) used by various
manufacturers.
User Defined Fields
A master list of inventory user defined fields. When
assigning user defined fields to specific categories, all items
in this list will be available for selection. Note: This list can
be added to while in the category setup. (see User Defined
Fields)
Security Groups
Security options can be defined for employee types such as
management, cashier, stockroom, etc. Once defined these
groups and security settings are readily assigned to new
employees. See Security Groups and Security Group
Settings.
Mail Groups
Define groups of employees for sending PRM messages
which are independent of e-mail systems. (see Mail Groups)
Countries
(Optional) For international customers, adding the names of
countries will be linked to label printing.
Employee Shifts
Set time periods during the day on which some sales reports
can be filtered.
Customer Returns
Reasons for returns from customers which also control how
return inventory will be processed.
RMA Returns
A listing of actions you would like your vendors to take when
processing items you return to them.
Service Order Status
When closing a service order you are prompted to select the
status of the service order. You may add, edit, and arrange
these status options as needed.
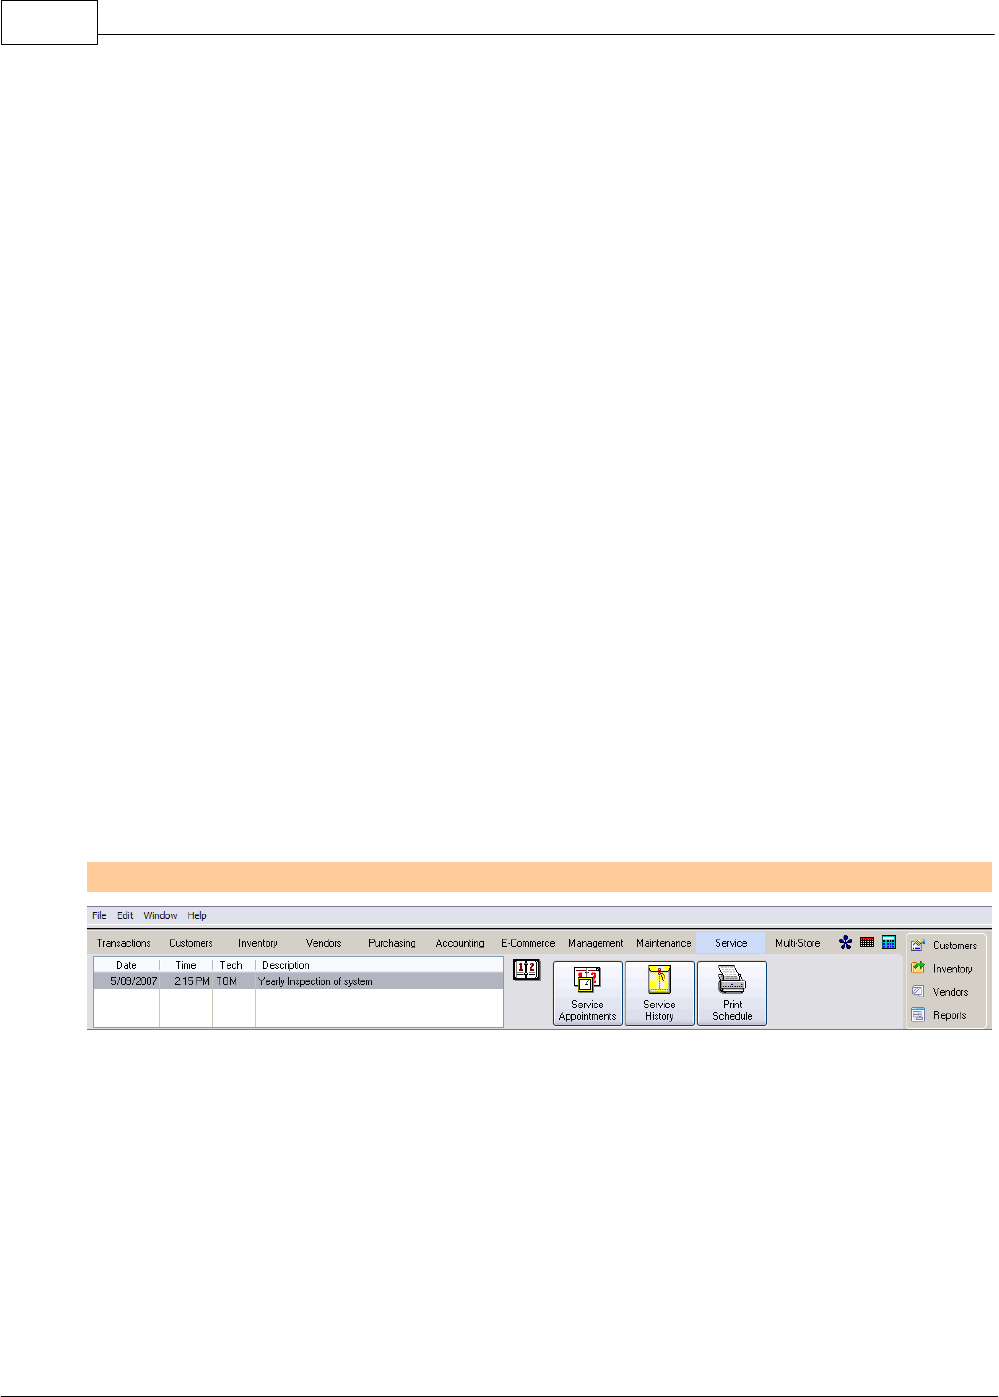
POSitive Retail Manager User Guide82
Copyright ©2007 POSitive Software Company
Call-Log
When making a call to a customer regarding a pending
service order, you may choose one of these pre-defined
responses.
Zip Codes
A list of zip codes and the appropriate tax rates per zip code
area. This is especially needed if you are taxing based upon
point of delivery instead of point of purchase.
Warranty List
A general listing of Warranty programs which can be applied
to specific inventory items. Used primarily for service work.
Transaction Screen
Edit the layout and information displayed on screen as
clerks create orders and layaways.
Invoice Buttons
Define the buttons visible on multiple rows of the invoice
screen. The buttons can perform actions, add products or
link to other buttons.
Touch Screen
Design a button layout for a touch screen monitor. Gives
total control of button color and size and position as well as
"jumps" to additional screens.
Note: you should be running a 1280 x 1024 monitor
resolution when choosing to design or edit the touch screen
layout.
3.9 Service
PRM supports a service department function allowing for tracking work done on equipment. Prior to
creating service orders, Service Appointments can be scheduled. Service Orders are then converted
to invoices.
Service
OVERVIEW
·Review currently scheduled service work
·Create new service appointments
·Review service work done per piece of equipment
·Print a Work Order form or summary report
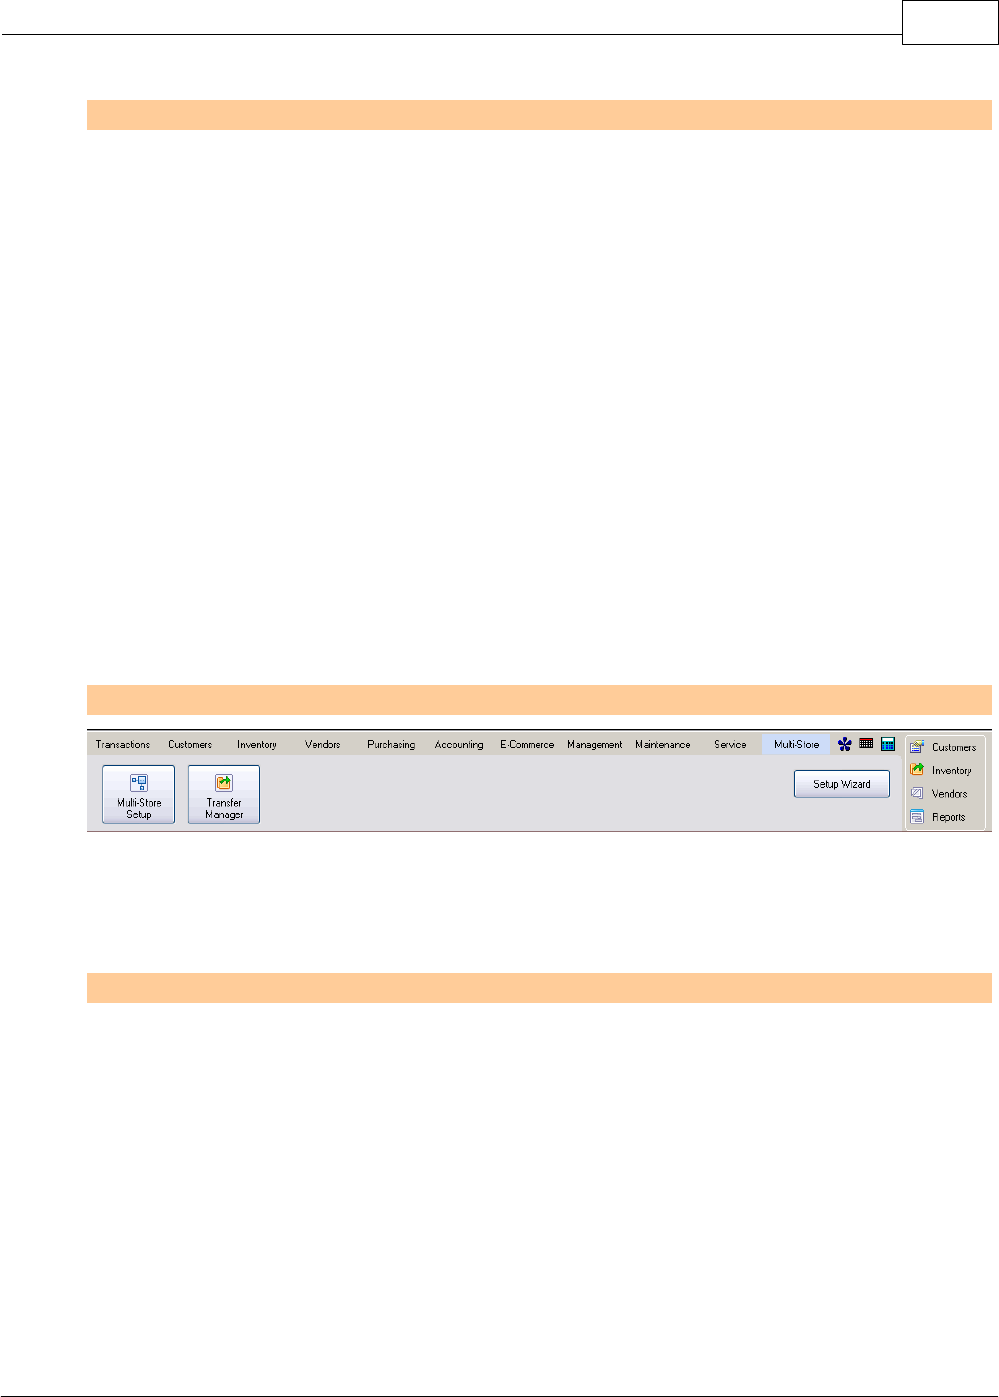
Master Menus Ready Reference 83
Copyright ©2007 POSitive Software Company
MENU OPTIONS
Scheduled Appointments
A listing of service appointments for the current date.
Shows date and time, assigned technician, and description
of work..
Date Selection
To choose a date other than the current date.
Service Appointments
Create new service appointments by selecting a date and
choosing ADD.
Service History
A listing of all service preformed.
Print Schedule
Generates a Work Order form for each service appointment
of the day. Full or Summary forms.
3.10 Multistore
PRM supports operation of multiple stores using common data. One store is designated as the
master store which has control of inventory sharing. Other stores function as remote stores which are
independent, but still tied to the master store.
Multistore
OVERVIEW
·Multi-Store Setup for establishing master and remote stores
·Transfer products between stores
MENU OPTIONS
Multi-Store Setup
A listing of service appointments for the current date.
Shows date and time, assigned technician, and description
of work..
General [F2]
Identifying relationship of this store to the multistore
Interstore Invoicing [F5]
Designate a store to fulfill backorders encounted at this local
store.
Inventory [F6]
How to handle inventory added at the remote store. Locally
added Items can be shared with the master for inclusion into
the whole system.

POSitive Retail Manager User Guide84
Copyright ©2007 POSitive Software Company
Stores [F7]
Listing of all stores in the multi-store group
Transfer Manager
Ability to add and manage items being transferred from on
store to another
Pending Transfers
All items needing to be transferred. Will create separate
purchase orders for each listed store.
Company View
A list of all items being transferred to a specific store.
Inventory View
A list of all inventory, current stock counts at each store and
the ability to transfer "your" inventory to another store.
Cannot commit items of a different store to be transferred.
Serial Numbered Items
Select specific items for transfer by entering the product
serial number.
Receive Transfers
Transfers are handled as purchase orders. Select a
transferred PO and process normally.
Transfer History
A record of transfers made between stores

Part IV
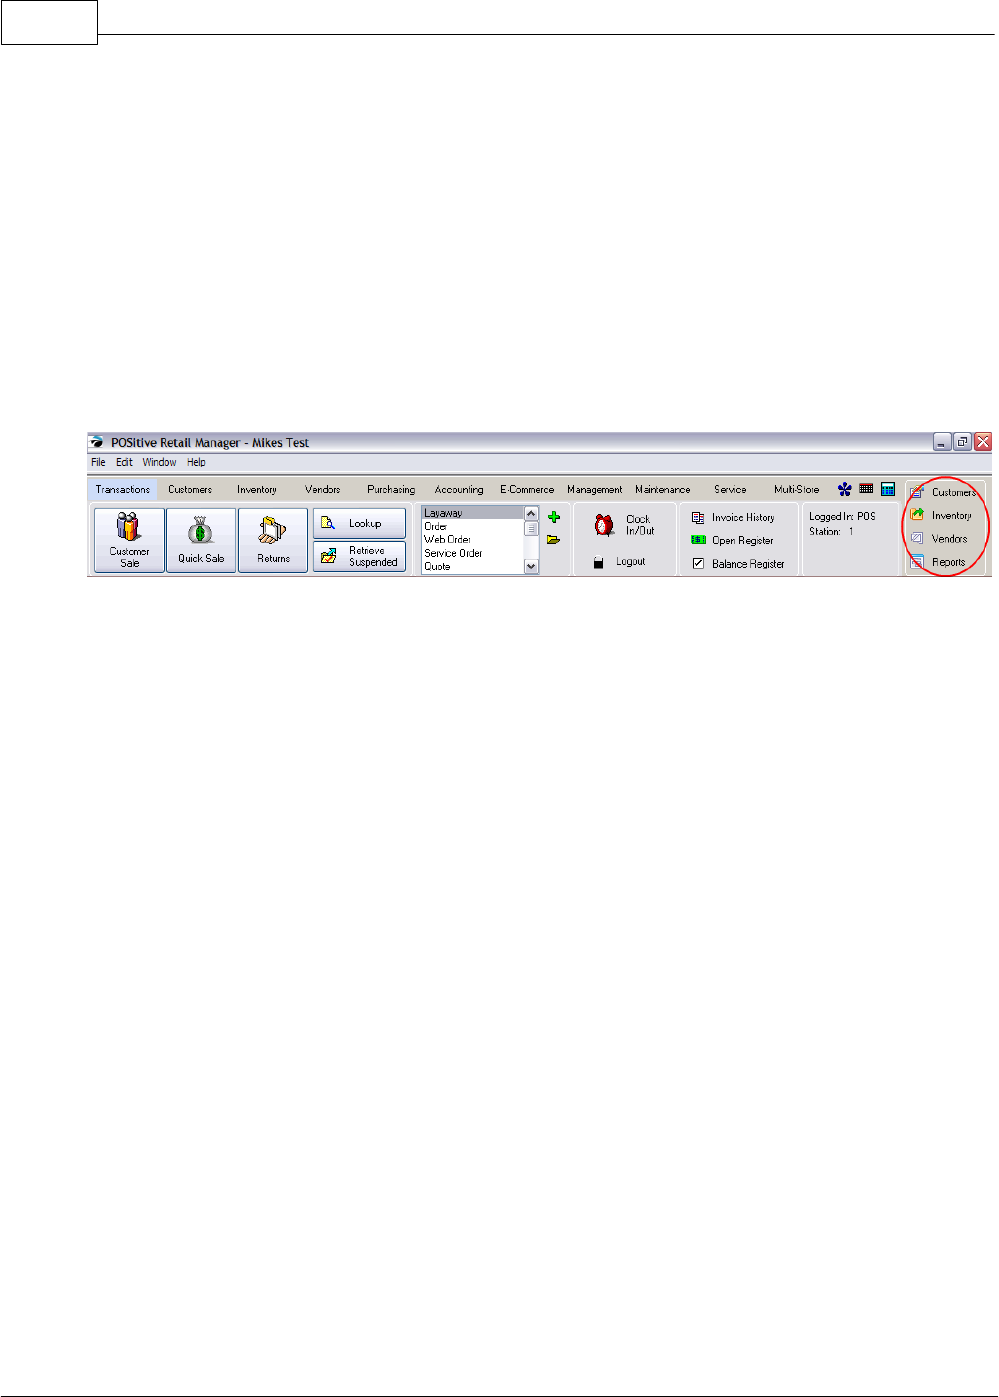
POSitive Retail Manager User Guide86
Copyright ©2007 POSitive Software Company
4Primary Databases
Now that your company has a name for itself, you need to enhance your company's primary
databases.
·CUSTOMERS - specific name and address records to whom you sell.
·INVENTORY - the items and services you will be selling,
·VENDORS - your sources of inventory, and
·Reports - access to over 300 reports and tools.
The far right of the PRM toolbar gives you access to these four (4) major centers. Each center is
described below.
Customer Center
Customers are the heart of your business. If you choose to create lists of customers by name, you
can track purchase history, market to them, and provide them with incentives to shop regularly in your
store. (see Customer Center)
Inventory Center
Since creating inventory records is your biggest project and will take the most time, this should be
started right away. You will want to learn how to create an inventory record and understand each
element available to you. (see Inventory Center)
Once you have learned these basics, there are tools for importing inventory to make the project of
creating inventory items easier. (see Maintenance: Import)
Vendor Center
As you are creating your inventory records, it is a very natural step to build the vendor center
simultaneously. The Vendor Center lists all of your vendors with contact information, shipping
addresses, links to purchase orders in process, and histories of payables and purchased items.
Your vendors are providers of inventory for sale, but you can also include your phone, rent, and
janitorial services as vendors. (see Vendor Center)
Report Center
The primary function of the Report Center is to give you sales and inventory summations in a format
you understand. Over 300 reports are built into PRM and you will find tools here to create some
customized reports of your own.
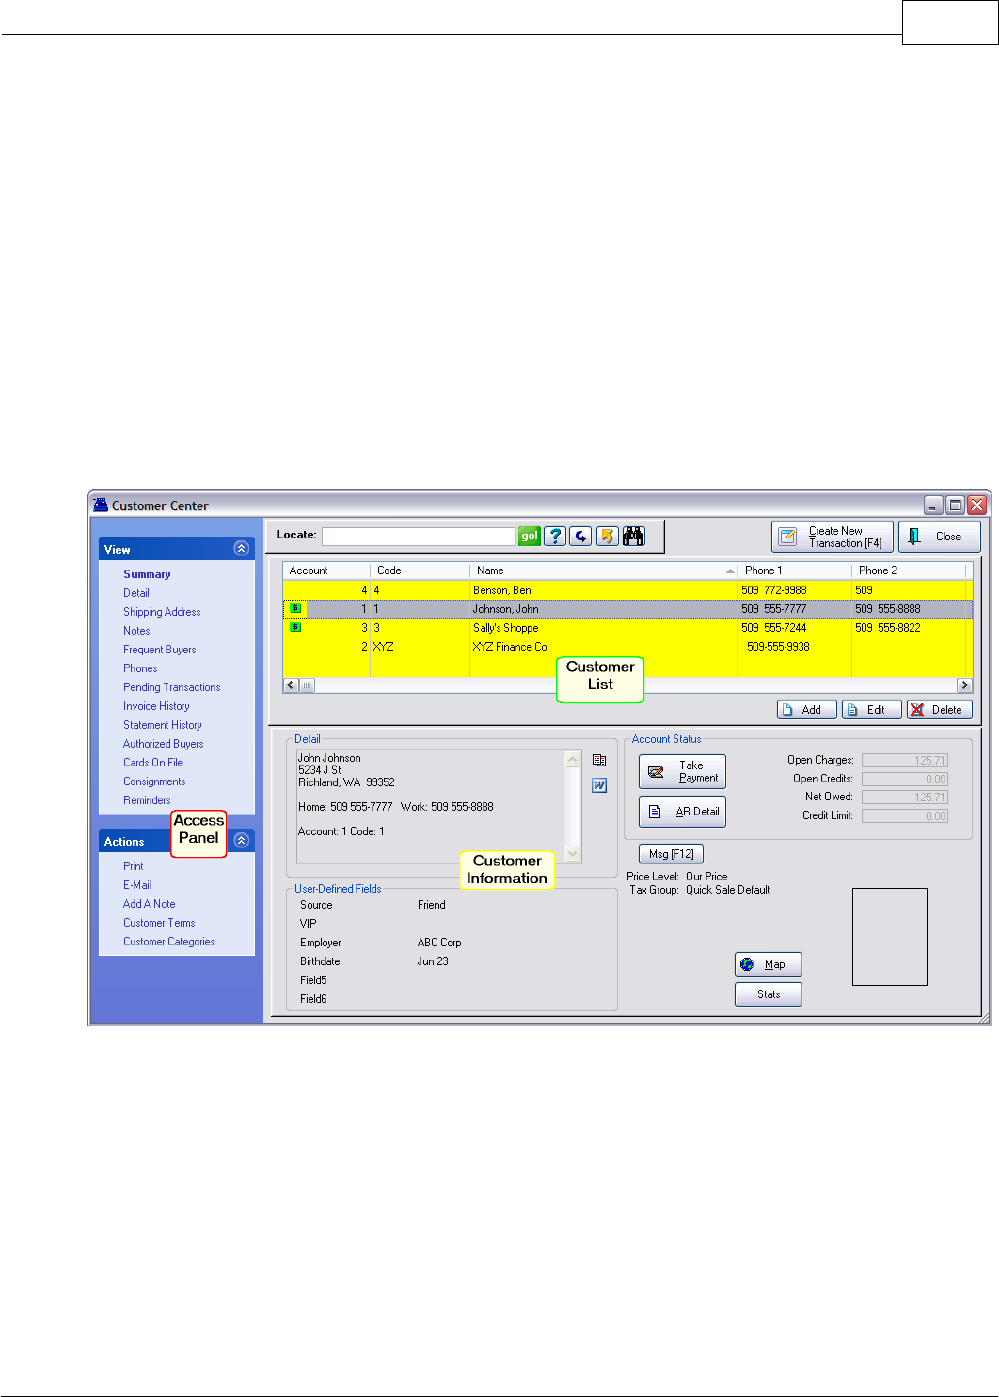
Primary Databases 87
Copyright ©2007 POSitive Software Company
4.1 Customer Center
This is an all-inclusive feature and function menu for your customers.
It is divided into 3 main parts:
Customer List
The list of all of your customer records. Various tools such as
Locate, Query, Find, and Filter quickly focus on the item(s) meeting
certain criteria.
Access Panel
Lists various views, properties, and actions relative to the
highlighted customer account.
Customer Information
Displays specific detail or other information about the highlighted
customer. The contents of this section will change as various
properties on the Access Panel are selected.
(1) Choose to Add or Edit a customer.
Customer Listing
All customers are listed in this group. The columns can be sorted by clicking on the column title.
To find customers, the Locate field can find strings of characters in a given column. Press CTRL-
Enter to find that string of characters anywhere in the field. Pressing Enter will find the characters you
typed at the beginning of the field.
The number of columns visible and the sequence of the columns can be changed by Right-Mouse-
Click and choosing Define Views. You determine a name for the view and what elements will be
contained.
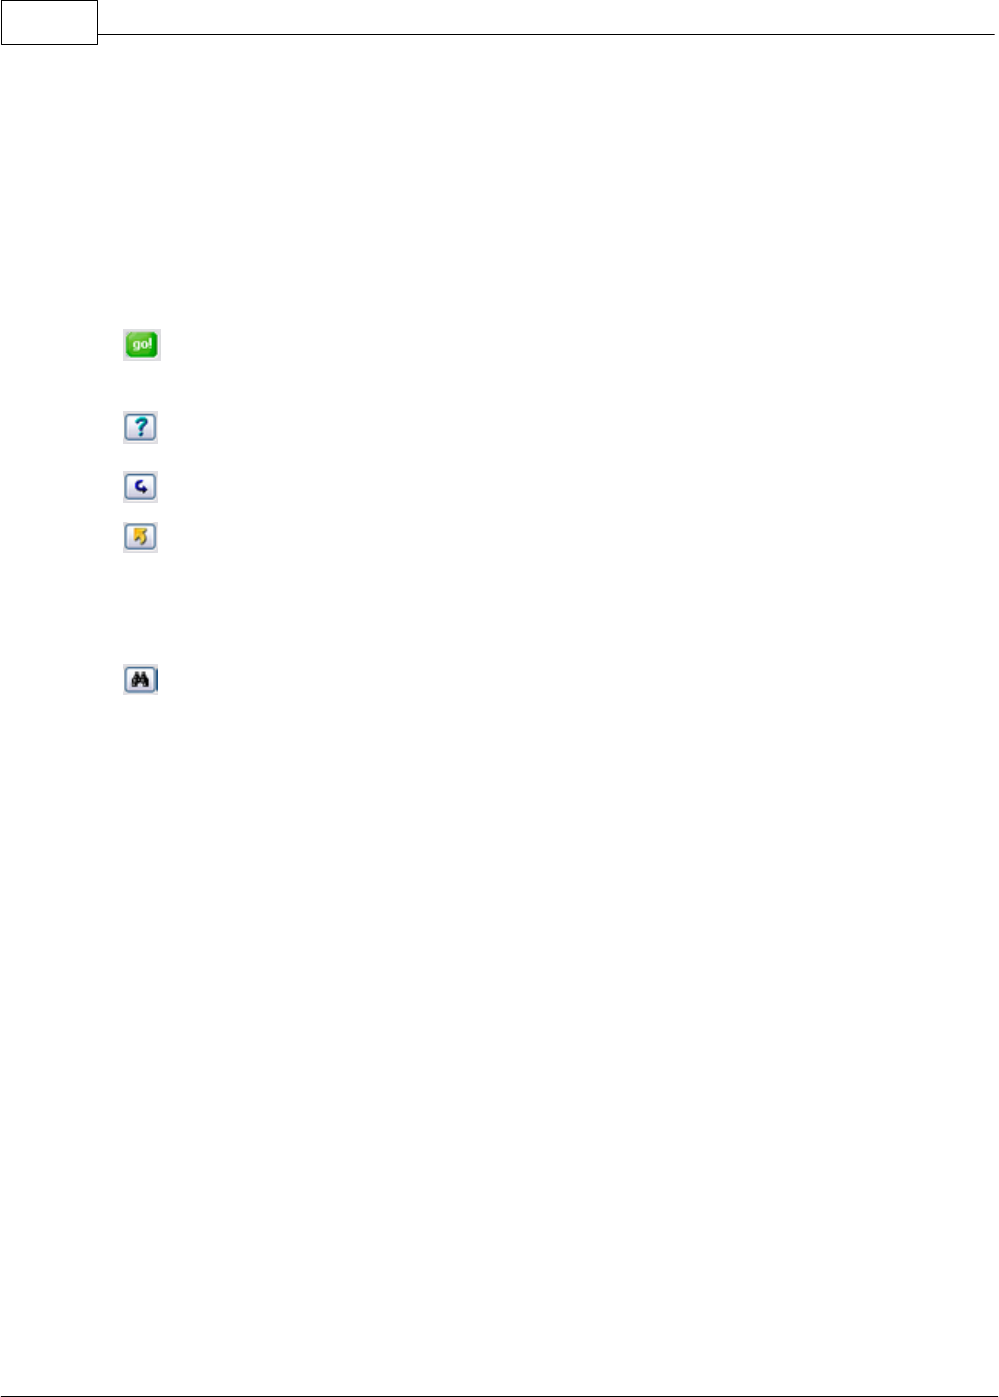
POSitive Retail Manager User Guide88
Copyright ©2007 POSitive Software Company
SELECTION OPTIONS
Locate
1) Select the column to be sorted by clicking on the column title.
2) Begin typing search characters. (You do not have to click into the
Locate field.)
·Press Enter - will find the first item beginning with the search
characters
·Press CTRL-Enter - will find all items with the search characters
somewhere in the field.
go!
This starts the search for the information in the "Locate" field. Instead of
clicking on "Go!" you can save time by just pressing Enter or Control-
Enter after entering something in the Locate field.
Query
Select from an unlimited number of saved queries or filters which you can
create and modify as needed. (see Query)
Reset
Restores the list to show all records.
Send
Sends displayed listing to HTML, Excel, Word, etc. All visible entries in
the Listing can be exported or copied out to some other destination.
Make choices as prompted.
Note: This function is not just for Customers, but for any other type of list.
(See Send To Window)
Quick Find
Search and display all inventory items containing the characters in a
specific field or combination of fields. (see Customer Find)
First Name
Last Name
Company
Address 1
Address 2
City
State
Zip
E-Mail
Phone
User Defined Fields
Click the Quick Find button again to restore the full list.
Create New
Transaction [F4]
After highlighting a customer, select this option. You will be able to create
an invoice, layaway, order, service order, quote, and internet order.
NOTE: "Invoice" indicates the products will be taken by the customer at
this time; the other options are pending type transactions.
Customer Record
Each line represents a separate customer. Click on the column title to set
the sort order of the customer list.
The columns of information displayed can be rearranged. Click on the
value of one item and drag the field to another location and the whole
column is moved.

Primary Databases 89
Copyright ©2007 POSitive Software Company
Access Panel
VIEW
Summary
Shows Name, Address & Phone; User Defined Fields; Customer Picture
Take Payment - Accept payment towards Accounts Receivables for the
highlighted customer.
AR Detail - Displays all open, closed, and processed Accounts Receivable
transactions for the highlighted customer.
Message Code - an option which acts as an alert to the cashier when
creating an invoice for the customer. Typically used as a warning for
problems with the customer's account but can be used with any message.
The text of the message is displayed at right. (see Customer Message)
Map - Opens Yahoo Maps for exact driving directions to the customer
address. Need Internet access.
Stats - counts the number of customer records
Detail
Customer record information. Choose Edit to make changes. (see
Customer Account)
Shipping Address
Listing of all approved shipping addresses with one set as the default ship-
to address. see Ship To Addresses
Notes
Notes about the highlighted customer. Automated notes capture
information about invoices. Manual notes can be about any topic or detail.
These notes can be printed.
Frequent Buyers
The loyalty or rewards program(s) the highlighted customer is subscribed
to. Lists status of rewards and sources of change. (see Frequent Buyer)
Phones
Additional phone numbers as needed.
Pending
Transactions
Layaways, Orders, Quotes which are currently open. Displays transaction
numbers, deposits, total amount, and line items on the transaction. Can be
edited, e-mailed, reprinted, and converted to an invoice.
Invoice History
Consolidated listing of all invoices; shows contents, charges and tax
amounts. Individual transactions can be printed, e-mailed, and cloned.
Summary of all purchases and returns as well as tools for adjusting costs.
Statement History
Summary view of current outstanding balance.
Authorized Buyers
Individuals authorized to make purchases on Account in behalf of the
highlighted customer. Note: this field is only visible when the company
name field is activated.
Picture Manager
Include a photo of the customer or customer's location.
Cards On File
Credit Cards which can be used for purchases.
Consignments
Items owned by the highlighted customer to be sold as consignments.
Reminders
Tasks list for or about the customer

POSitive Retail Manager User Guide90
Copyright ©2007 POSitive Software Company
ACTIONS
Print
Choose from the following:
Mailing Labels
Prints groups of ship-to or mailing labels grouped by zip code or customer
name. A filter (query) can be applied to limit which labels will be printed.
Report
A collection of "custom designed" reports about your customers. You
create and save the report layouts and run them when needed.
Export
Creates a spreadsheet file with customer information. A filter (query) can
be applied to limit which customers are reported upon.
Customer File
Basic information about the customer plus a printout of all notes linked to
the customer.
Bill-To Label
Prints a group of labels based upon the customer billing address.
E-Mail
Launches your e-mail program so that you can send e-mail messages.
Add A Note
Create a note about or for the customer
Customer Terms
A general listing of finance terms for customers. Each customer is
assigned one of these terms in the customer record.
Customer
Categories
This can be left blank, however, you may create multiple customer
categories as fill in information for types of customers. Types could be
based on locale or business associations. (see Customer Categories)
4.1.1 Customer Account
Each customer has his or her own account or record. There are only a few required fields for
establishing a customer record. The other fields can be used whenever your store operations will
benefit from them.
TIP: As a time saving feature Customer Categories can fill in many of the fields for you automatically.
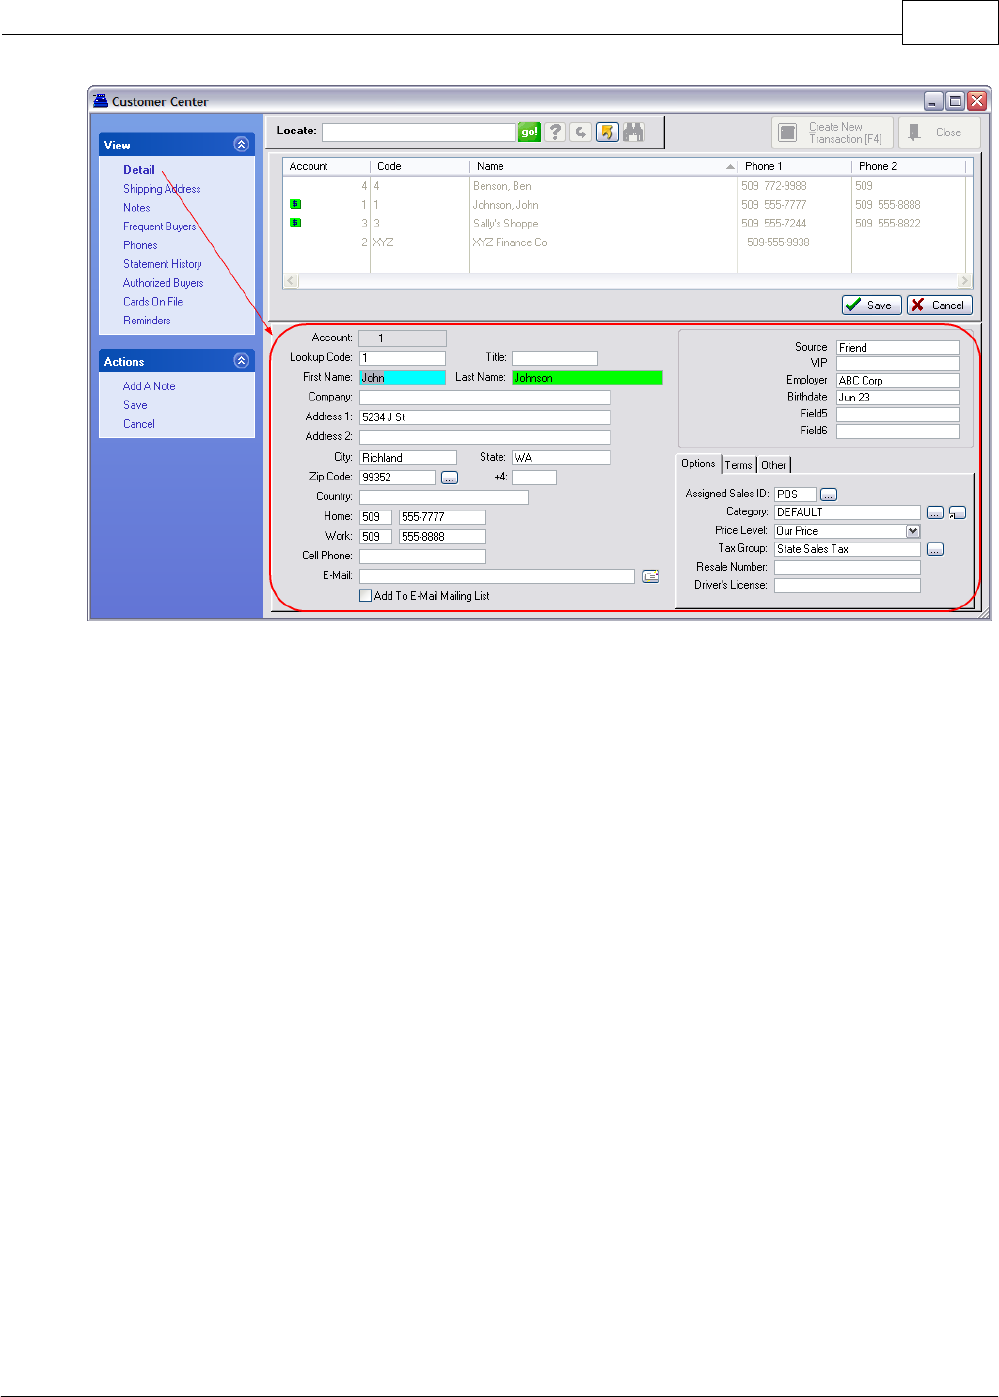
Primary Databases 91
Copyright ©2007 POSitive Software Company
Account Number - a permanently assigned number, automatically generated by PRM when the
customer is added.
Lookup Code - This field is editable. You may enter either an abbreviated name, a phone number, or
a previously established account number. If you choose, PRM will automatically fill in this field with
the customer's phone number.
NOTE: This code must be unique for each customer account. If you enter a code which is already in
use, you will be prompted to change it.
First Name - of primary contact
Last Name - of primary contact
Company Name - When a company name is entered, this account is considered a business account
and automatically activates the Authorized Buyers list and adjusts phone number options.
Address 1 - street address or postal box number
Address 2 - a secondary street address
City - name of the city
State - abbreviation of the state or province
Zip Code - If using Zipcode Lookup option, selection of a zip code will automatically fill in the city and
state fields.
+4 - additional Zip code identifier
Country - (optional) name of the country
Home/Work Phone - If the customer is a company, it will prompt for the work phone number
Work/Fax Phone - If the customer is a company, it will prompt for the fax phone number

POSitive Retail Manager User Guide92
Copyright ©2007 POSitive Software Company
Cell Phone - independent of other phones listed.
E-Mail - An exceptionally valuable bit of information. If this field is activated, then you will be able to
automatically compose e-mail copies of quotes, orders, invoices, etc. At the Change Due screen,
when processing an invoice, you can choose E-Mail [F5] to instantly send a copy of the invoice via
e-mail. PRM intuitively links directly to your current e-mail software for broadcasting e-mail
messages. The button at the end of the line will generate an e-mail message.
Add To E-Mail Mailing List - When ON the above e-mail address is included in a bulk e-mail option
of PRM.
User Defined Fields - Optional (upper right corner) six blank fields for your use to record special
information about the customer. These are defined and activated through the Customer Category.
Options
Assigned Sales ID - Store employee who created this record or who is assigned to this account.
Category - Assigned Customer Category which has filled in the defaults. There is a lookup button to
select a different Customer Category and an Apply Settings button to simply update if changes had
been made and the same Customer Category is to be used.
Price Level - Assigned pricing level which will be used whenever purchases are made.
Tax Group - Assigned tax rate which will be applied to purchases.
Resale Number - A place to record a business resale license number to qualify for tax exemption.
This could also be used for documention of an out-of-state customer for tax exempt status.
Driver's License - A place to record individual's driver's license as verification for checks tendered.
This field can be automatically filled in upon the first purchase paid for by check.
Terms
Terms - Default payment term to be applied to new invoices placed on account. At the time of sale,
the term can be reselected.
Credit Limit - A ceiling amount for AR purchases. Note that PRM authorizes credit limits to the limit
of actual purchases placed on AR. The limit can be raised only by authorized sales clerks as they are
ringing up new invoices for the customer.
Discount % - Permanent discount percentage to be applied to ALL items on invoices equally.
Button Discount % - Discounts on a per Category basis. See Customer Discounts By Category.
Print Statements - When ON AR statements for this customer will be printed.
Print Invoices With Statements - When ON copies of outstanding invoices will be printed at the time
of printing of the AR Statement.
Other
Address Format - select a Country
Require PO Number When Invoicing - If this customer will be ordering and purchasing on behalf of
a company and will be providing PO numbers for purchases, this option will ensure that they provide
the PO Number before a sale can be completed.

Primary Databases 93
Copyright ©2007 POSitive Software Company
4.1.2 Invoice History
A list of all invoices belonging to the highlighted customer.
·List of Invoices (Header Information)
·List of Items on the Invoice
Summary - (at the far right)
Purchases - Total dollar amount of purchases.
# Of Invoices - Total number of invoices created.
# Of Returns - Total number of return invoices.
First Date - Date of first invoice.
Last Date - Date of last invoice.
Actions
·E-Mail Invoice - send a copy of the invoice to customer
·Print Invoice - reprint the invoice
·Return - Create a return invoice for an item or items on the highlighted invoice.
·Clone - Create a new invoice based upon this invoice.
·Adjust Cost - If you observe discrepancies in your profit reports which show an exaggerated profit
from some sales, this is most likely due to a cost of 0.00 for an item being reported on an invoice.
The actual cost reported on the highlighted invoice may be in error because of an incorrect
purchase order or an oversight when the inventory item was defined. This can be corrected at this
level, or more globally. (see Adjust Item Cost)
·Show Cost - Displays the cost of the inventory items sold
·Snapshot - A yearly synopsis of purchases. Totals per month, per year.
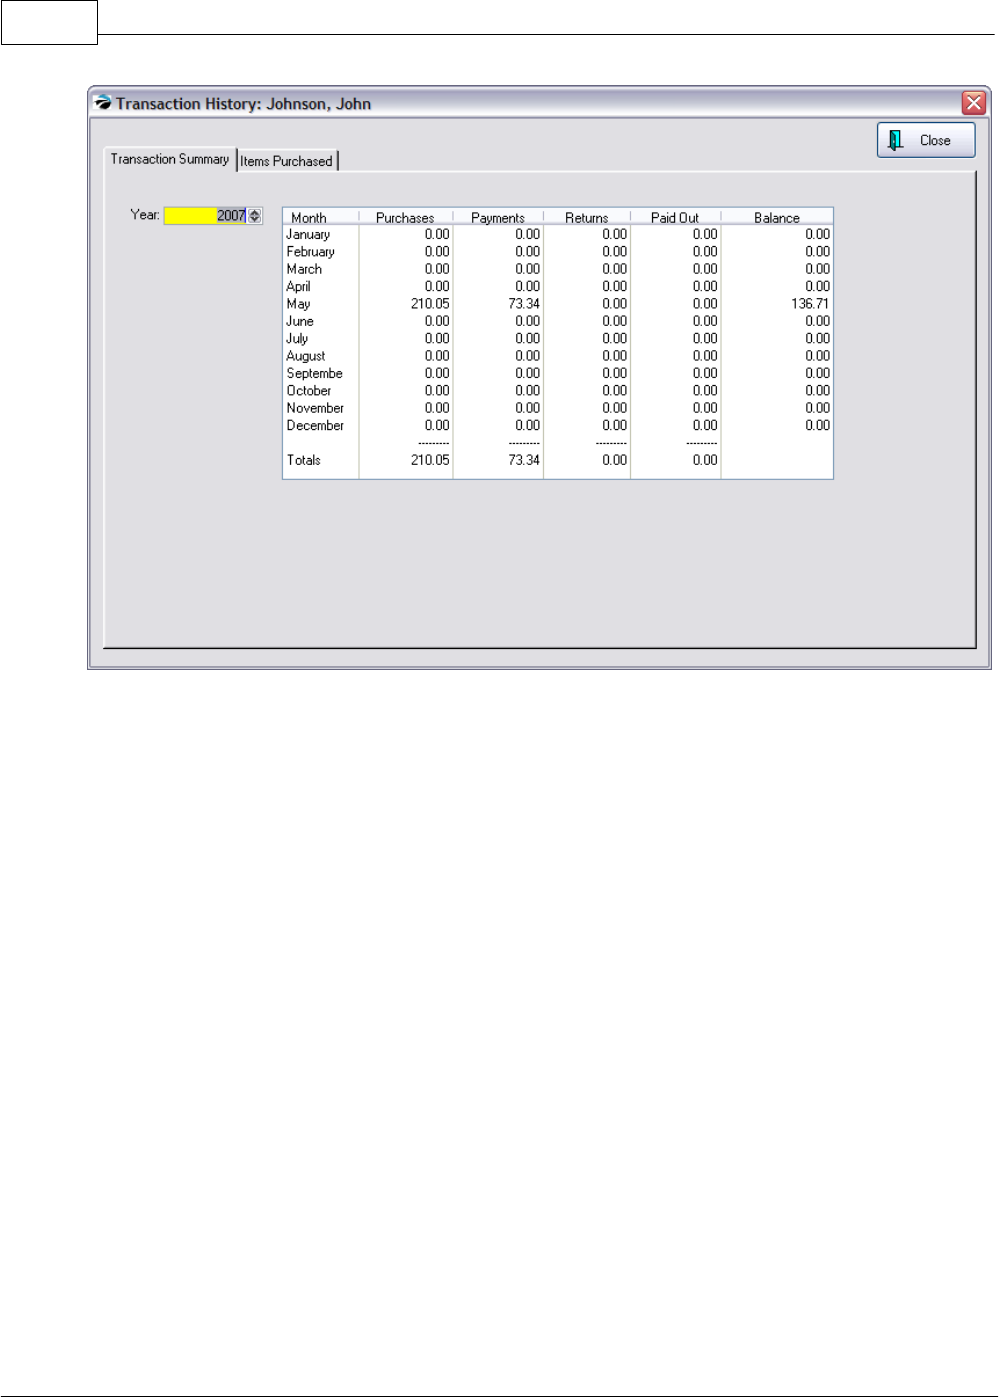
POSitive Retail Manager User Guide94
Copyright ©2007 POSitive Software Company
·Items Purchased - (select Items Purchased tab of Snapshot screen) A listing of individual items
on all invoices. The list can be sorted by clicking on a column title and printed. To search for a
specific item, click on the desired column and begin to type the first characters of the item desired.
·Print - Customer Invoices Report By Date Range
4.2 Inventory Center
This is an all-inclusive feature and function menu for your inventory.
It is divided into 3 main parts:
Inventory
Listing
The list of all of your inventory items. Various tools such as Locate, Query,
Find, and Filter quickly focus on the item(s) meeting certain criteria.
Access Panel
Lists various views, properties, and actions relative to the highlighted
inventory item.
Inventory
Properties
Displays specific detail or other information about the highlighted inventory
item. The contents of this section will change as various properties on the
Access Panel are selected.
(1) Choose to Add or Edit an inventory item.
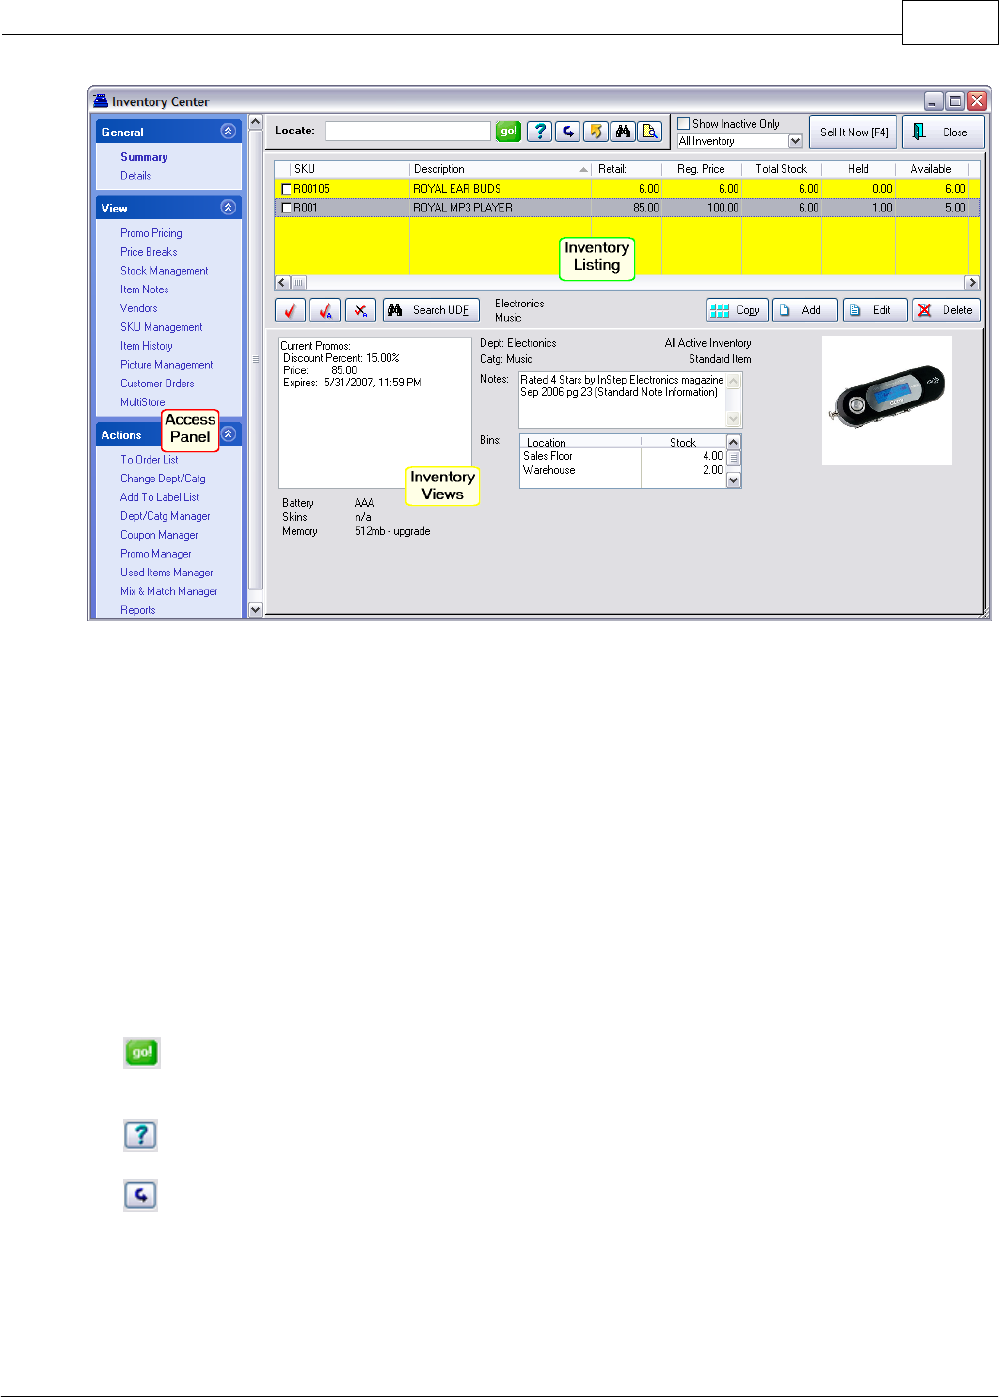
Primary Databases 95
Copyright ©2007 POSitive Software Company
Inventory Listing
SELECTION OPTIONS
Locate
1) Select the column to be sorted by clicking on the column title.
2) Begin typing search characters. (You do not have to click into the
Locate field.)
·Press Enter - will find the first item beginning with the search
characters
·Press CTRL-Enter - will find all items with the search characters
anywhere in the field.
TIP: If you cannot find a specific item, use the option "Show Inactive Only"
before attempting to create a new item. It could be that the item was
made inactive. (see Inactive Inventory)
go!
This starts the search for the information in the "Locate" field. Instead of
clicking on "Go!" you can save time by just pressing Enter or Control-
Enter after entering something in the Locate field.
Query
Select from an unlimited number of saved queries or filters which you can
create and modify as needed. (see Query)
Reset
Restores the list to show all records.
POSitive Retail Manager User Guide96
Copyright ©2007 POSitive Software Company
Send
Sends displayed listing to HTML, Excel, Word, etc. All visible entries in
the Listing can be exported or copied out to some other destination.
Make choices as prompted.
Note: This function is not just for Inventory, but for any other type of list.
(See Send To Window)
Quick Find
Search and display all inventory items containing the characters in a
specific field or combination of fields. (see Find)
SKU
Description
Department
Mfg. Part No.
Click the Quick Find button again to restore the full list.
Category Filter
Display all inventory assigned to a specific category. (see Filter
(Dept/Category))
Show Inactive Only
Displays inventory which has been hidden or made inactive. (see Inactive
Inventory)
Inventory Types
Filters the list by type of inventory. TIP: use hotkeys in bold print.
·Matrix - CTRL-M inventory which comes in color/size and are viewed
together in a matrix
·Templates - CTRL-T groups of items being sold together; kits
·Consignments - CTRL-C items being sold on behalf of another person
or company
·UnPosted - CTRL-U items added on the fly while creating an invoice;
Incomplete Items
·All Inventory - CTRL-A shows all inventory
Sell It Now!
Immediately creates an invoice screen and the highlighted inventory item
is added to the invoice. This is a useful feature when a customer has
simply inquired about an inventory item and you can immediately commit
the item for a sale.
Inventory Record
Each line represents an inventory item. Click on the column title to set
the sort order for the column.
Click on the Price title to scroll through the multiple price levels.
The columns of information displayed can be rearranged. Click on the
value of one item and drag the field to another location and the whole
column is moved.
(see Inventory Record)
Primary Databases 97
Copyright ©2007 POSitive Software Company
Tag/Untag
Tagging items in the inventory list is a method for
·adding multiple items to an invoice
·adding multiple items to the inventory label printer queue
·moving multiple items to a different category
·..and other procedures.
The easiest method of tagging items is to click into the box.
Another option is to use a lookup or query to display all the items of
interest and then use the Tag All button
Tag All
Checkmarks all displayed items. (Use: Locate, Query, Quick Find, or
Category Filter to display desired items.)
UnTag All
Unchecks all displayed items.
Search UDF
Lists all inventory with User Defined Field contents. Sorts on a content
field and then you can select the specific inventory item. (see Search
UDF)
Copy
Makes an exact copy of the highlighted inventory item, with the exception
of the SKU which must be different than the original SKU. (see Copy)
Add
You first select the type of inventory item, the dept/category to which it will
be assigned, and then fill in the details for Description, SKU, Cost, Prices,
etc. (see Add)
Edit
Change any details of the inventory record. (see Details)
Delete
You must confirm that you want to delete the inventory item. There is no
"undo" option.
If the item is on a pending order, you must make a substitution before you
can delete the item.
Access Panel
See linked topics to learn specifics about each screen.
GENERAL
Summary
Displays current Promo, standard note, stock counts and locations, user
defined fields, template contents, and picture of the highlighted inventory item.
(see Summary)
Details
Displays and allows editing of the inventory record's individual fields of
information. (see Details)
VIEW
Promo Pricing
Set and manage an automatic selling price effective for pre-set time periods
such as a sales event. (see Promo Pricing)
Price Breaks
Automatic price changes when selling multiples of an inventory item. (see
Price Breaks)

POSitive Retail Manager User Guide98
Copyright ©2007 POSitive Software Company
Stock
Management
The number and source of inventory items with the ability to add and track
locations. (see Stock) Automatic display of "suggested" and "tag-along items.
(see Item Links)
Item Notes
Manage five types of notes some of which are for in store reference and others
are visible on the web page. (see Item Notes)
Vendors
Any company or individual who provides you with this product for resale. (see
Vendors)
SKU
Management
Controls for multiple SKUs for the same inventory item. (see SKU Management
)
Item History
A record of purchase orders and invoices which included this item. (see Item
History)
Picture
Management
Assign pictures to inventory items using a wide variety of tools. (see Picture
Management)
Customer
Orders
Pending orders which include this inventory item. (see Customer Orders)
MultiStore
Pricing and Inventory Stock levels as reported by other stores of the multistore
group
ACTIONS
To Order List
Add this item to the Prepare Order List for purchasing more product. (see To
Order List)
Change
Dept/Catg
Re-assign an inventory item to a different department and category. (see
Change Dept/Catg)
Add To Label
List
Add to the list of inventory labels to be printed (see Add To Label List)
Dept/Catg
Manager
Create new departments and categories. Edit and re-assign categories.
Coupon
Manager
Create manufacturer and store coupons for specific products.
Promo Manager
Set promotional pricing for individual items, or all items per category,
department, and whole store. (see Promo Manager)
Used Items
Manager
Items taken in as trade-ins can be tracked and re-sold. There are two ways to
create and track Used Inventory. The simplest is to press CTRL-T while in an
invoice and identify the name of a trade-in item and it's value. When the
invoice is processed, the item is now accessible in the inventory list. (see One
Of A Kind Trade In)
A bit more useful is to activate a system setting (see System Setup: Inventory:
Used Items) to use the Used Item Manager. Pressing CTRL-T while in an
invoice prompts you to find a matching new inventory item, define it's condition,
and value. There are some additional steps before you can resell the trade in
item. (see Used Items Manager)
Mix & Match
Manager
Sets Price Breaks for multiple items which can be purchased in combination to
qualify for the price break. (see Mix & Match Manager)
Reports
Runs custom designed reports about inventory on hand. (see Reports)

Primary Databases 99
Copyright ©2007 POSitive Software Company
4.2.1 Inventory Listing
All of the things you sell, both your physical inventory products and billable services, are listed here.
As you add new items manually or by importing lists of items, they will appear here and can be
reviewed and edited.
This section will describe how to selectively find items and use this list to your best advantage.
4.2.1.1 Inventory Record
Each line in the Inventory Listing section of Inventory Center represents an inventory item.
When selling the item, you will highlight it and then double-click or use the Select button in the upper
right.
Sorting The List
Click on the column title of either SKU or Description to set sort order for the column. A dark colored
line will appear below the title of the column being selected by the mouse and a triangular symbol will
appear to show the column's sort order.
Click once to sort in Ascending Order (A-Z).
Click again to sort in Descending Order (Z-A).
Finding Products
There are several tools or methods available to find specific products. (see Selection Options)
Information Displayed
Most of the information displayed is extracted from the Details section which you can edit as needed.
(see Details)
Check Box
Used only when you want to select multiple items at the same time, clicking in
the box will add a checkmark. There are buttons for Tag, Tag All, and UnTag
All which can be used instead of the mouse.
If you only want the highlighted item, then clicking the Check Box is
unnecessary.
SKU
The product code or Stock Keeping Unit. Generally, there is only one SKU per
inventory item. However, if you choose to use secondary SKUs, sorting by this
column will display the item multiple times; once for each SKU. (see SKU
Management)
Description
The "brief" description of the inventory item. However, if there are secondary
SKUs using Alternate Display Information, then the Alternate description will be
visible. (see SKU Management)

POSitive Retail Manager User Guide100
Copyright ©2007 POSitive Software Company
Retail
(or any price
level)
The price displayed of the item depends upon the customer in focus. If you
open this Inventory Center while creating an invoice, then the price level
assigned to the customer is what will be displayed. If no customer has been
selected, then the price will be Price Level 1.
The title of the price level is controlled in System Setup under Pricing.
View Each Price Level
Click on the column title multiple times to scroll through the multiple price
levels.
This price will be in RED if there is a promotional price in effect today. (see
Promo Pricing)
Reg. Price
This is the "regular" or normal price of the item. It is also dependent upon the
customer in focus.
Bulk inventory items will show the Each price even if you are selling various
package sizes. (see Bulk Inventory)
Total Stock
The total number of items in the store.
Held
The number of items being reserved for specific customers. This is calculated
from pending layaways, orders, service orders, and internet orders. (see
Stock)
The symbol n/a is displayed if the item is not tracking stock counts. (see
Details)
Available
The number of items which are "unclaimed" and can be sold to the next
customer. This field is calculated by subtracting the number held or reserved
from the total in-stock count. (see Stock)
The symbol n/a is displayed if the item is not tracking stock counts. (see
Details)
On Order
The number of items being purchased from a vendor as listed in existing
purchase orders. (see Vendors and Stock)
Committed
The number of items being purchased from a vendor which are already
claimed for customer orders.
Extra
The number of items being purchased from a vendor which are "unclaimed"
and can be sold to the next customer.
Minimum Stock
The number of items to be on the shelf at all times. PRM will generate an
Order List and add this this item if the Total Stock is less than this minimum
number.
Maximum Stock
The maximum number of items to order from the vendor. There is a switch on
the Category which will prompt PRM to bring the order number up to the
maximum.
Minimum Order
A number imposed by the vendor as a minimum number they will ship.
Department
The name of the department to which the item's category is assigned.
Category
The name of the category to which the item is assigned. An item can only be
assigned to one category.
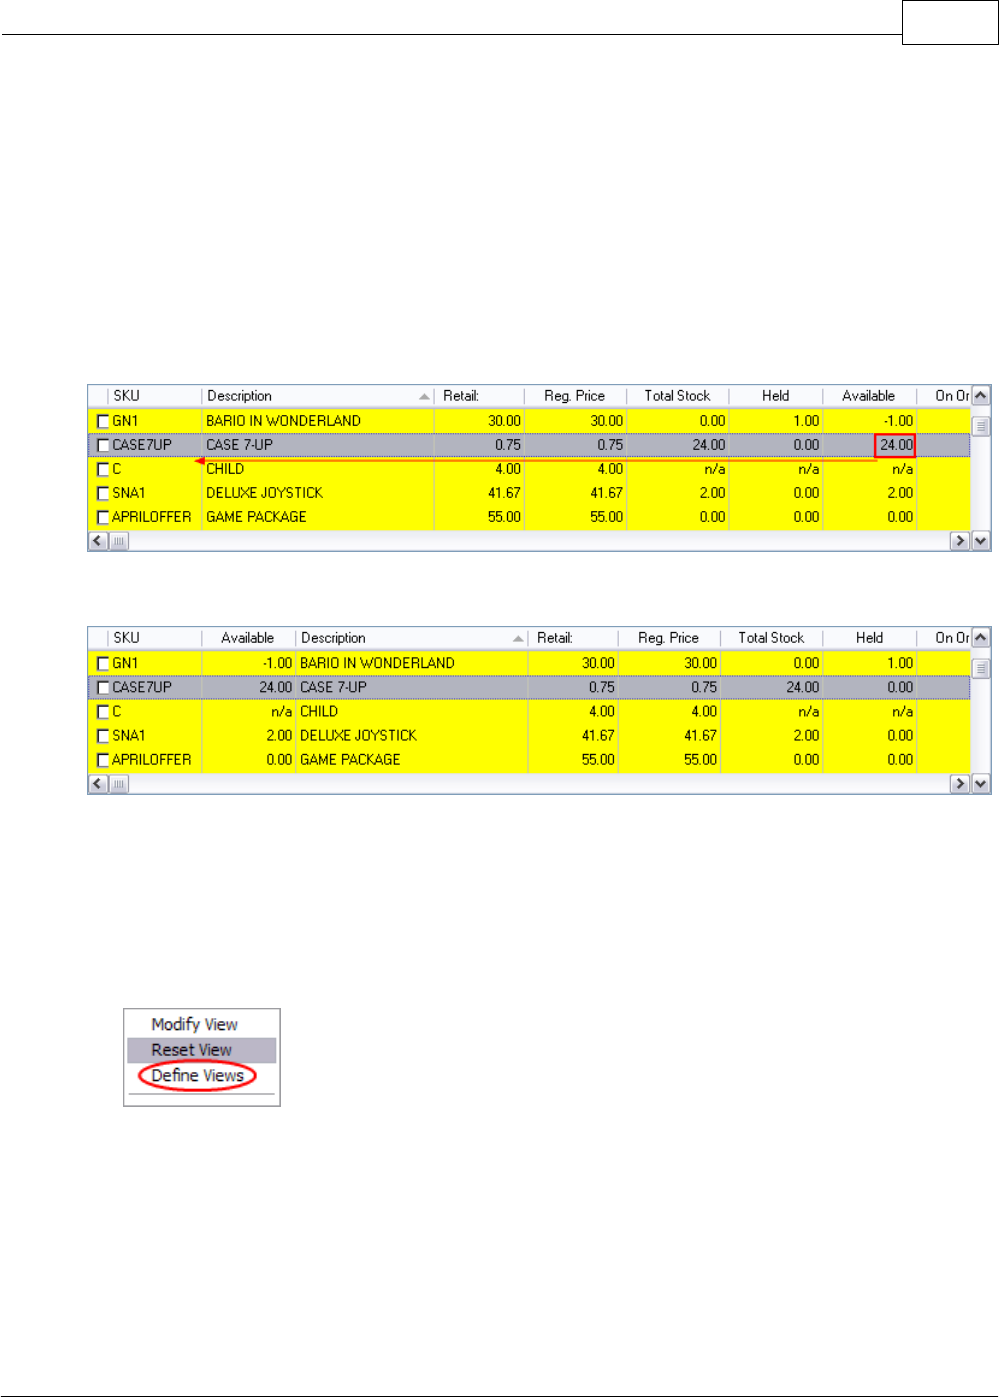
Primary Databases 101
Copyright ©2007 POSitive Software Company
Column Sequence
The columns of information displayed can be rearranged. This helps you focus on the most important
elements of the item and defines the output of your inventory list if you choose to Send it to an
external document. (see Send)
Drag & Drop Method
For example, if the number of items Available is very important to you, you could place the Available
column in front of the Description column.
Click on the value of one item and drag the field to another location and the whole column is moved.
Define View Method
In addition to determining the sequence of columns, you can choose to not display some columns.
You may create as many "Views" as you wish, save them, and recall them as needed.
·Right Mouse Click on a line item.
·Choose Define Views at the bottom of the list of options.
·Choose New and give it a name.
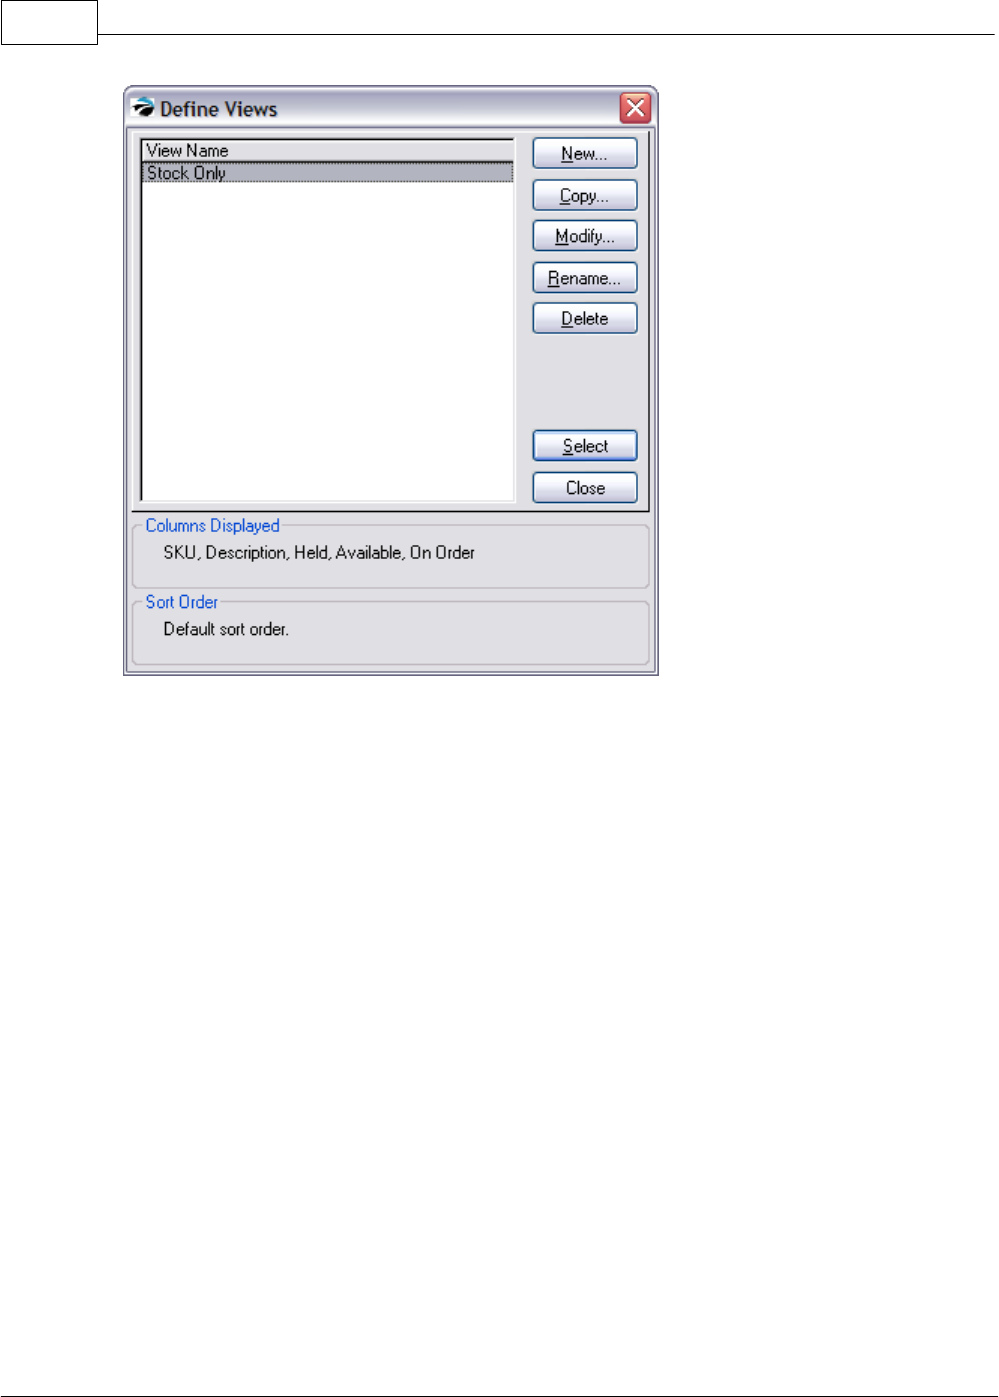
POSitive Retail Manager User Guide102
Copyright ©2007 POSitive Software Company
·The "Define the Column Layout" screen shows all the fields of information available.
·Using the Add / Remove and Reposition buttons, select which fields on the right will be utilized on
the left.
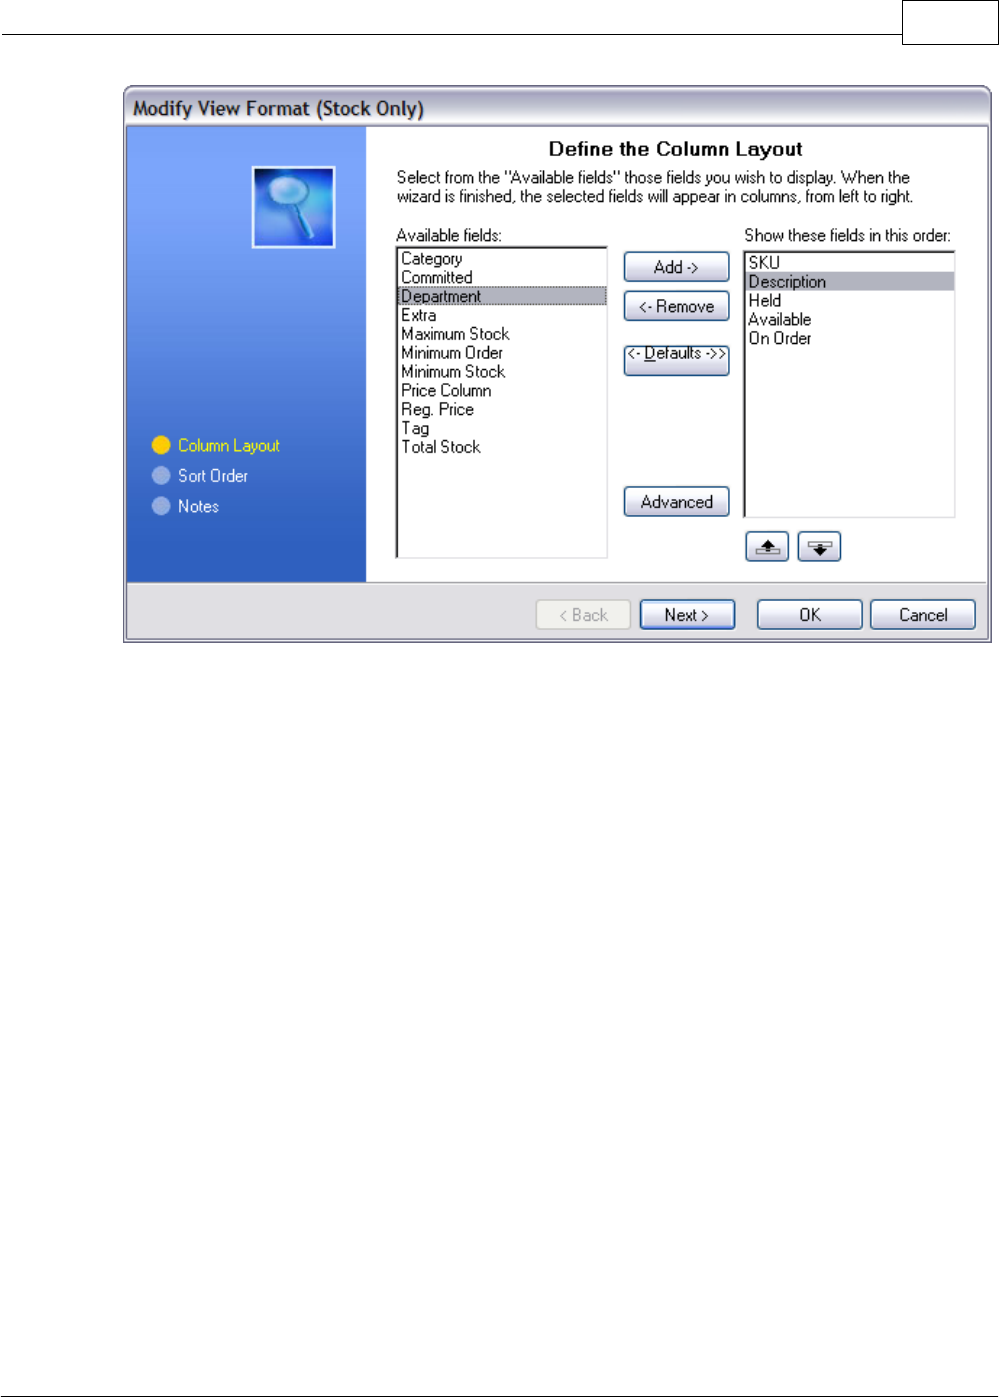
Primary Databases 103
Copyright ©2007 POSitive Software Company
·Choose OK and your selection is saved. (see Views for more detailed instructions)
Reset View
Reset View restores PRMs default layout.
4.2.1.2 Find
With Find, you can search through four (4) commonly used fields: SKU, Description, Department, and
Manufacturer Part Number.
This is similar to "Locate's" CTRL-ENTER option in that it will find a matching string anywhere in the
field.
In addition, you can combine searches. For example, if you are looking for all SKUs with 123
sequence, but only in a specific department then enter 123 in the SKU field and select the
department.
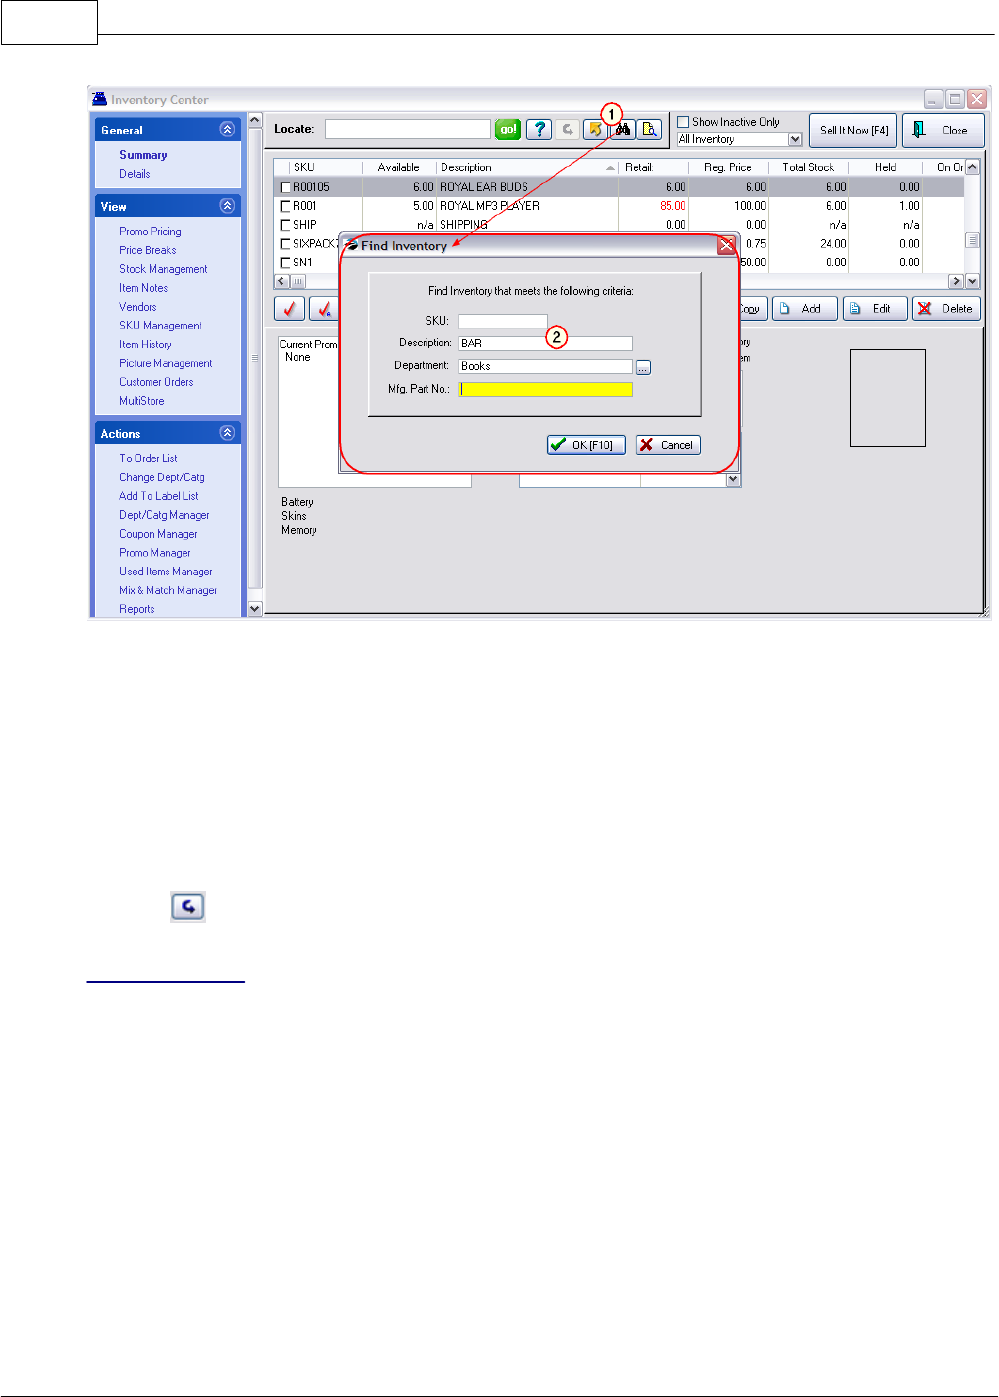
POSitive Retail Manager User Guide104
Copyright ©2007 POSitive Software Company
STEPS FOR USE
(1) Open the Find Inventory dialog box by selecting the Find icon.
(2) Enter a phrase, word, or letter combination in either the SKU, Description, or Department field.
The search is not case sensitive. Typing CAPS is not necessary. If desired, enter another "string" of
characters in another field.
(3) Click on OK.
All inventory which contain the search entry will be displayed.
Reset - After conducting a search, the Reset icon will display all items all inventory.
NOT FOUND?
TIP: If you cannot find a specific item, use the option "Show Inactive Only" before attempting to create
a new item. It could be that the item was made inactive. (see Inactive Inventory)
4.2.1.3 Filter (Dept/Category)
Every inventory item is assigned to a category. You can limit the display of inventory in the list to
items belonging to a specific category.
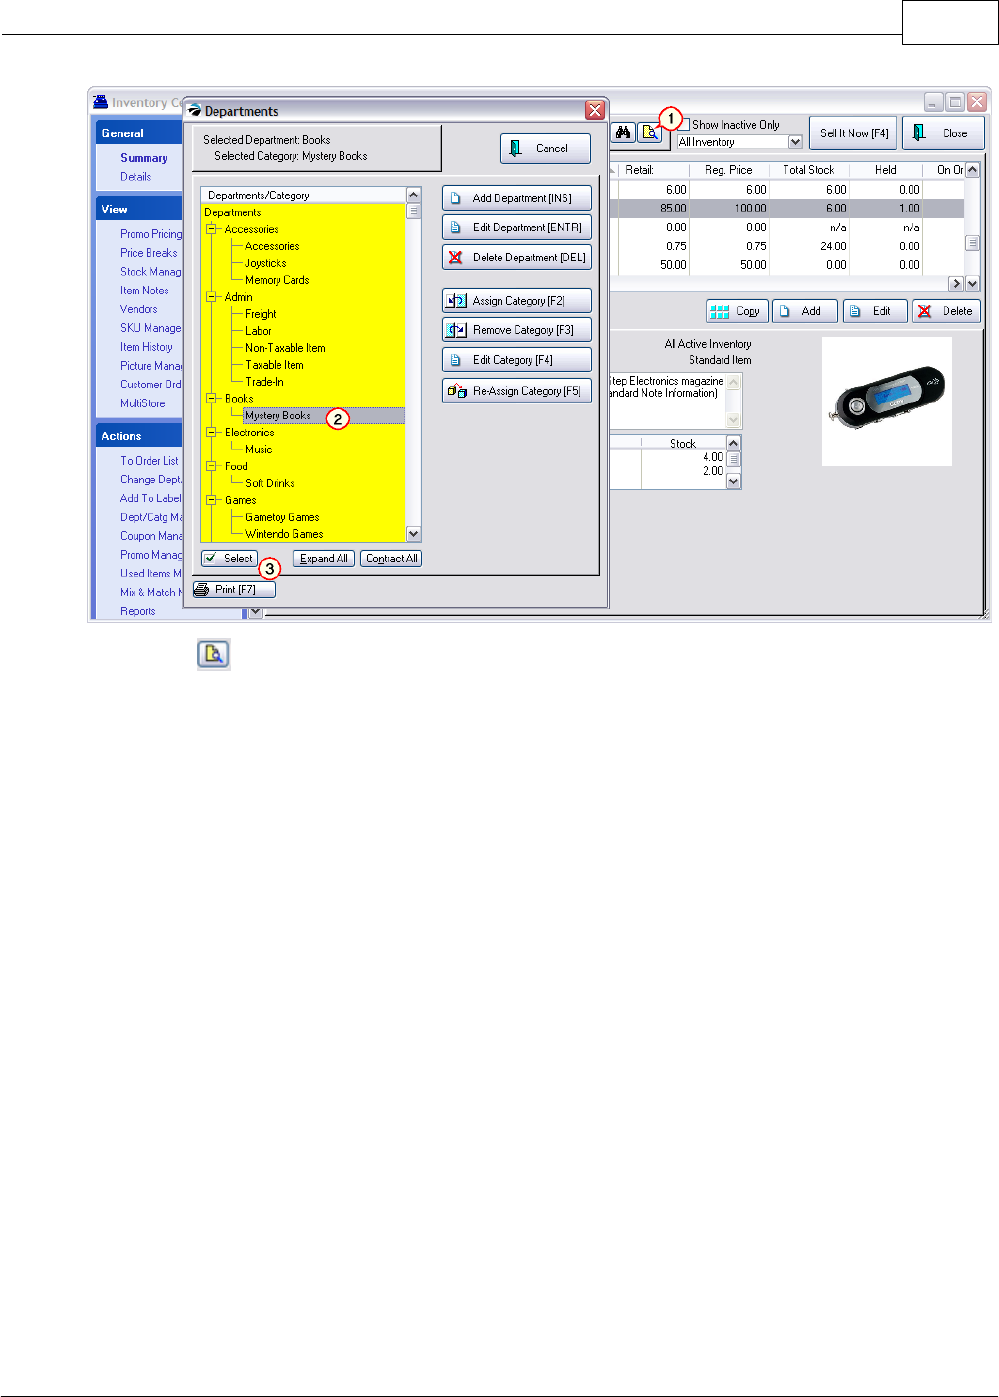
Primary Databases 105
Copyright ©2007 POSitive Software Company
(1) Choose Department Category Filter.
(2) From the List, highlight one Category.
(3) Choose Select.
All inventory assigned to that category are displayed.
Use Reset to remove this filter.
Note: if multiple categories need to be displayed, use Query.
4.2.1.4 Search UDF
Find an inventory item based upon specific content of a User Defined Field. User Defined Fields for
inventory are used to track additional information about an inventory item. (see User Defined Fields)
This "Search UDF" button will display all user defined fields and their contents.
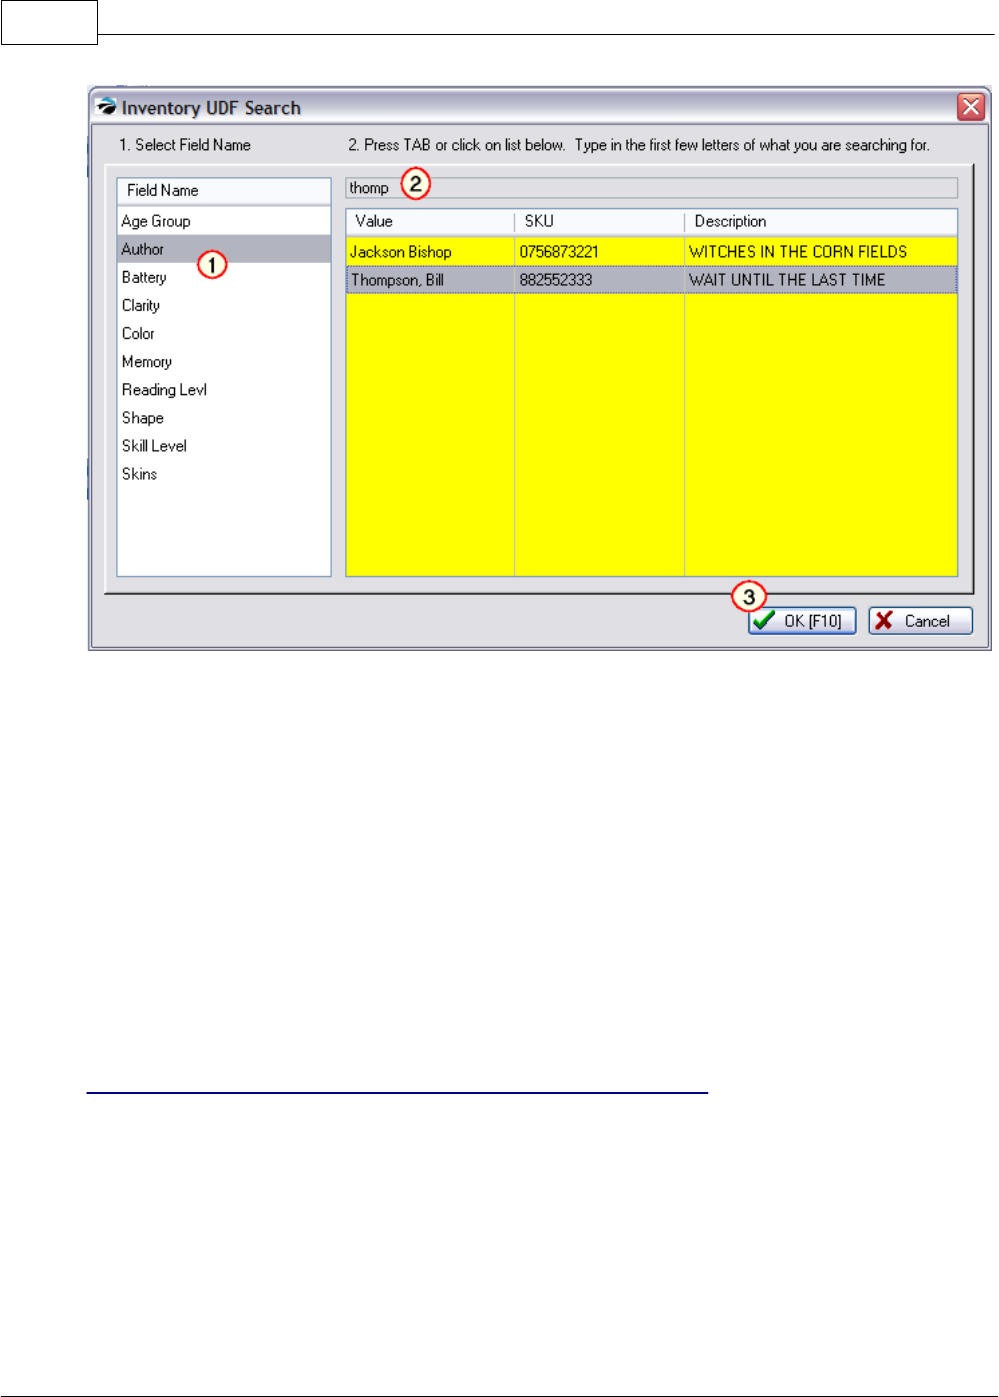
POSitive Retail Manager User Guide106
Copyright ©2007 POSitive Software Company
(1) Highlight the desired UDF named field.
(2) Press Tab to display all items using the field. Begin typing the first few characters of what you are
searching for.
(3) Once the desired item is highlighted, choose OK. The item will now be highlighted in the
inventory listing. You can then select it for an invoice or choose Sell It Now button.
4.2.1.5 Copy
As a tool for creating new inventory, you can highlight an existing inventory item very similar to a new
one to be created. Then choose this Copy button.
All of the properties and values of the original (except for the SKU) are copied into a new record.
Make changes to the description and enter a new SKU.
Make any other changes you wish, and choose OK.
Make the Long Description Match the Description field
·delete the Long Description contents,
·click on the Description field
·click on the Long Description field and it fills in the Long Description field.
TIP: In System Setup, you can choose to eliminate the use of the Long Description field.
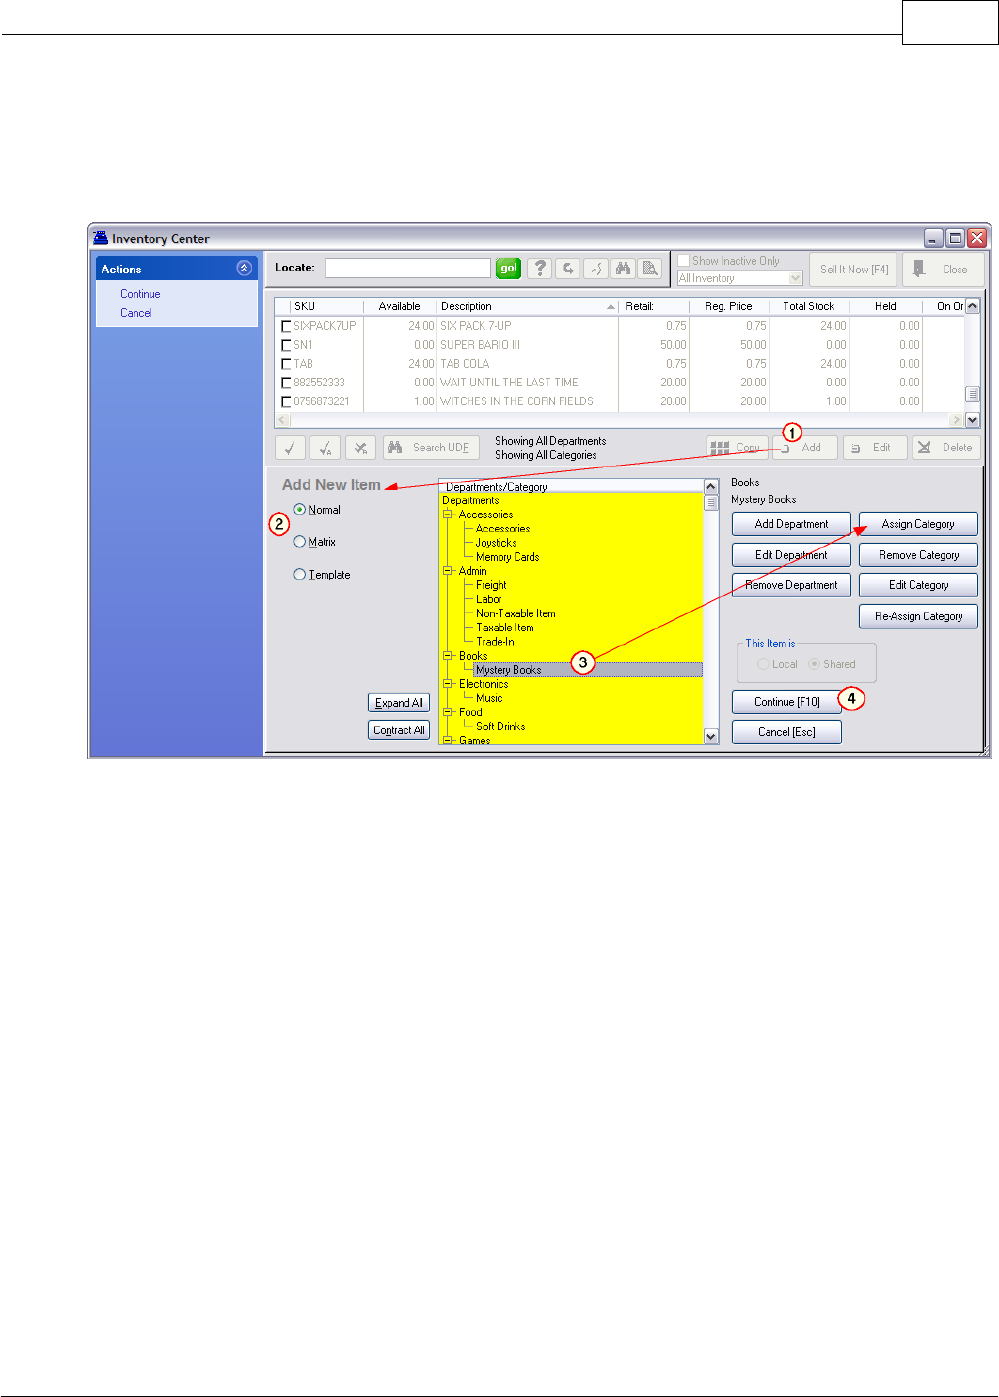
Primary Databases 107
Copyright ©2007 POSitive Software Company
4.2.1.6 Add
To create a new inventory item.
You will first select the type of inventory item, the dept/category to which it will be assigned, and then
fill in the details for Description, SKU, Cost, Prices, etc.
(1) After choosing the Add button, an Add New Item screen appears.
(2) Choose the type of inventory item: Normal, Matrix, or Template
(3) Highlight the category for the item. If necessary, choose to create and select a new department
or a new category. (see Departments)
(4) Choose Continue [F10]. A new inventory record will be opened in which you enter the
Description, SKU, Cost, Prices, etc.
To Add Departments and Categories
To Add a Department - just click on the button. Fill in a department code (a number or abbreviation)
and a name for the department. The Auto-SKU can be left blank.
To Add a Category - First, highlight the Department Name. Then choose Assign Category. If the
category does not yet exist, choose the Add button and you will fill in the category name and default
settings. Finally, when the desired category is visible in the list, choose Select. (see Departments)
4.2.2 Access Panel
On the left side of the Inventory Center are various Views and Options for the highlighted inventory
item in the list at right.

POSitive Retail Manager User Guide108
Copyright ©2007 POSitive Software Company
General
Summary - has no editable fields, but it displays much useful information controlled by other
properties
Details - all the fields defining the item
View
Promo Pricing - discounted or modified prices for given time periods
Price Breaks - automatic price changes when selling multiples of an inventory item
Stock Management - accesses current stock counts, stock locations, linked inventory, and
used items
Item Notes - creates up to five different note types
Vendors - sources of the inventory item and purchase orders currently in process
SKU Management - allows an inventory item to have multiple part numbers
Item History - displays both Purchase Order History and Sales History
Picture Management - for assigning and controlling a picture of the inventory item
Customer Orders - displays all pending orders for the highlighted item
MultiStore - display of Pricing and Stock levels of all stores in the multi-store group
Actions
To Order List - one method of ordering more product
Change Dept/Catg - to reassign an item to a different department and/or category
Add To Label List - one method to print inventory pricing labels
Dept/Catg Manager - to create, edit, and re-organize existing departments and categories
Coupon Manager - create specialized coupons for use in conjunction with items you sell
Promo Manager - apply discount percentages to more than one product at a time for a
given time period
Used Items Manager - controls condition and pricing of used items
Mix & Match Manager - lists groups of qualifying items
Reports
4.2.2.1 Summary
The Summary has no editable fields, but it displays much useful information controlled by other
property selections.
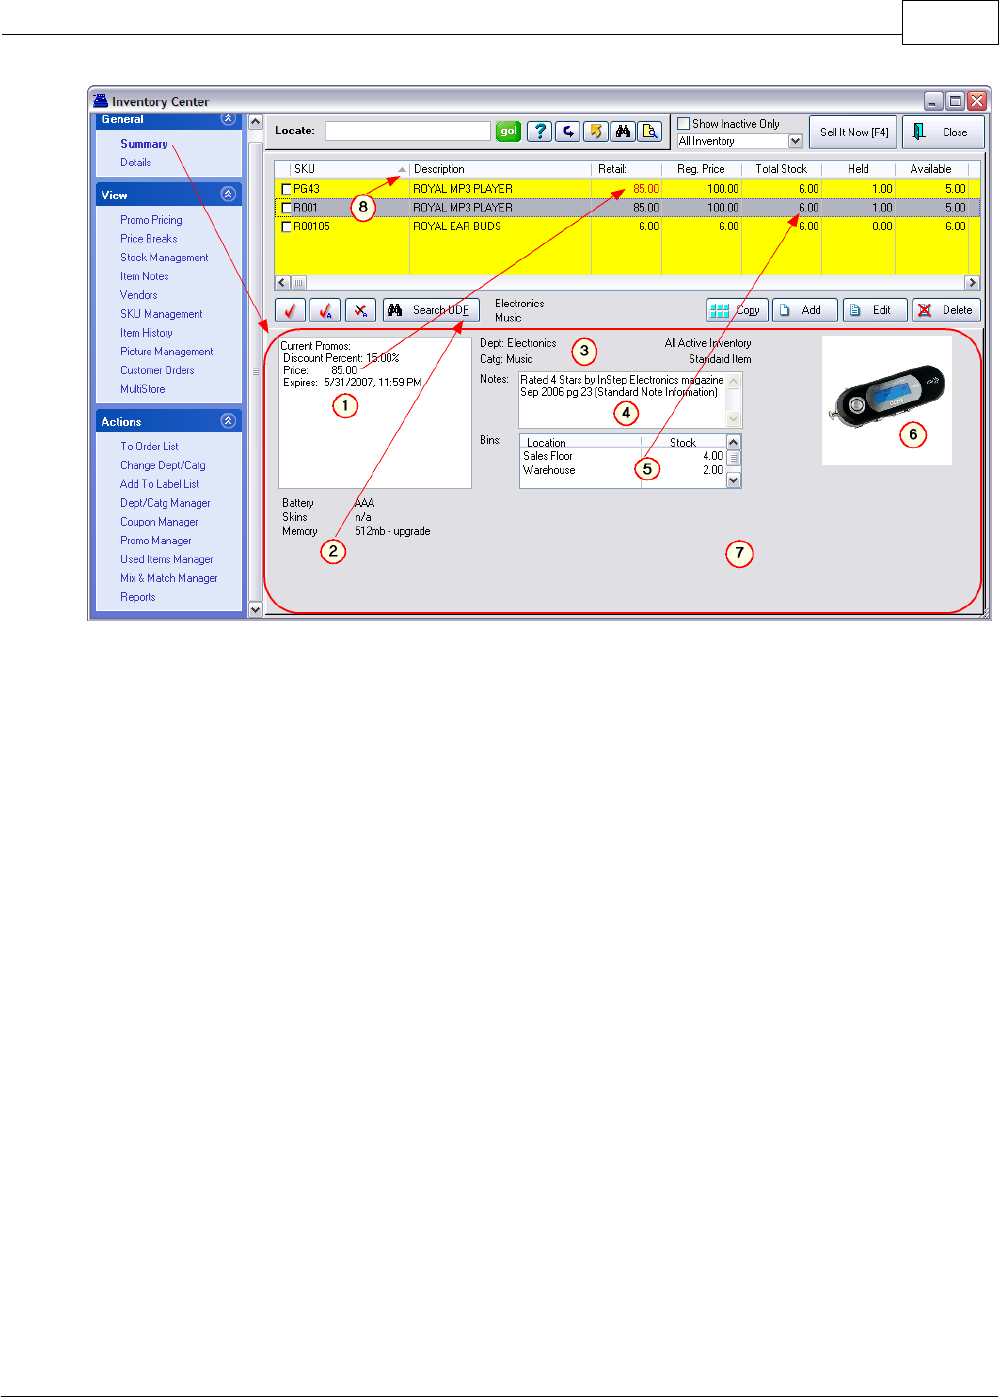
Primary Databases 109
Copyright ©2007 POSitive Software Company
(1) Current Promos - This information appears only if the promotional period is in effect today. The
Inventory Listing will show the promotional price in RED. After the promotional period ends, the
pricing will revert to the normal Regular Price. (see Promo Pricing)
(2) User Defined Fields - Up to six (6) bits of additional information can be tracked per inventory
item. These are called User Defined Fields and are part of the Category Definition to which the item
is assigned. There is a Search UDF button to find all items with a specific value in one of the fields.
(see Category and User Defined Fields)
(3) Department, Category, Active, Serialized - Displays the assigned status of the highlighted
inventory item. (see Change Dept/Catg and Details)
(4) Standard Note - A brief (120 characters) description about the item helps promote or more
specifically identify the item. This Standard note and four (4) other note types are readily editable.
(see Item Notes)
(5) Stock Count & Location - Displays the total stock counts and storage locations of the item. The
Inventory Listing will indicate if any of the items are held for customer orders and therefore the
number available for sale at the moment. (see Stock)
(6) Picture - Every inventory item can have a picture assigned to it. This image can be imported and
modified. It can be uploaded to your web site. (see Picture Management)
(7) (Template Contents) - If the highlighted item in the Inventory List were a template or kit, then the
contents and pricing of the template would be displayed in this section of the screen. (see Templates)
(8) SKU Management - When sorting the Inventory Listing by SKU, items with multiple SKU's will be
listed more than once. This was done to illustrate the Pricing change affected by the Current Promo.
These two items are one and the same inventory record and therefore show the same stock counts
and other properties; the use of multiple SKU's for an item has many benefits. (see SKU
Management)
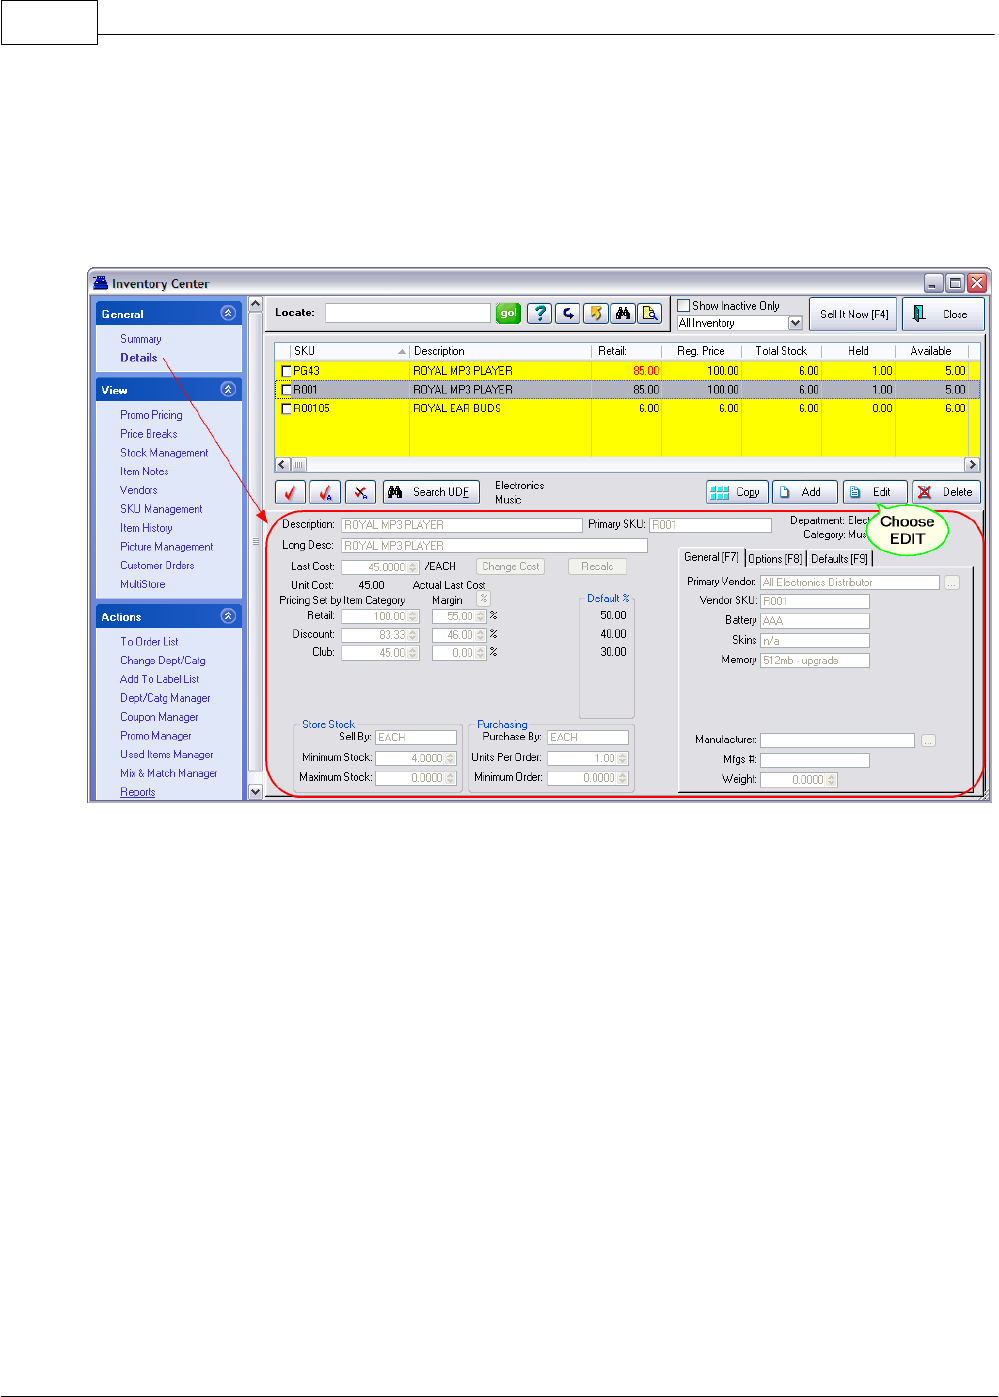
POSitive Retail Manager User Guide110
Copyright ©2007 POSitive Software Company
4.2.2.2 Details
At first view all of the information is grayed out. To make changes, choose the Edit button at right-
center of the screen.
SECURITY: This Edit button is password protected so that only authorized employees can make
changes.
45
Editing An Inventory Item
Any changes made to an inventory item will need to be Saved. Choosing Cancel will negate the
changes and the record will remain essentially unchanged. Change focus to a different inventory item
and then back again to see the restored details.
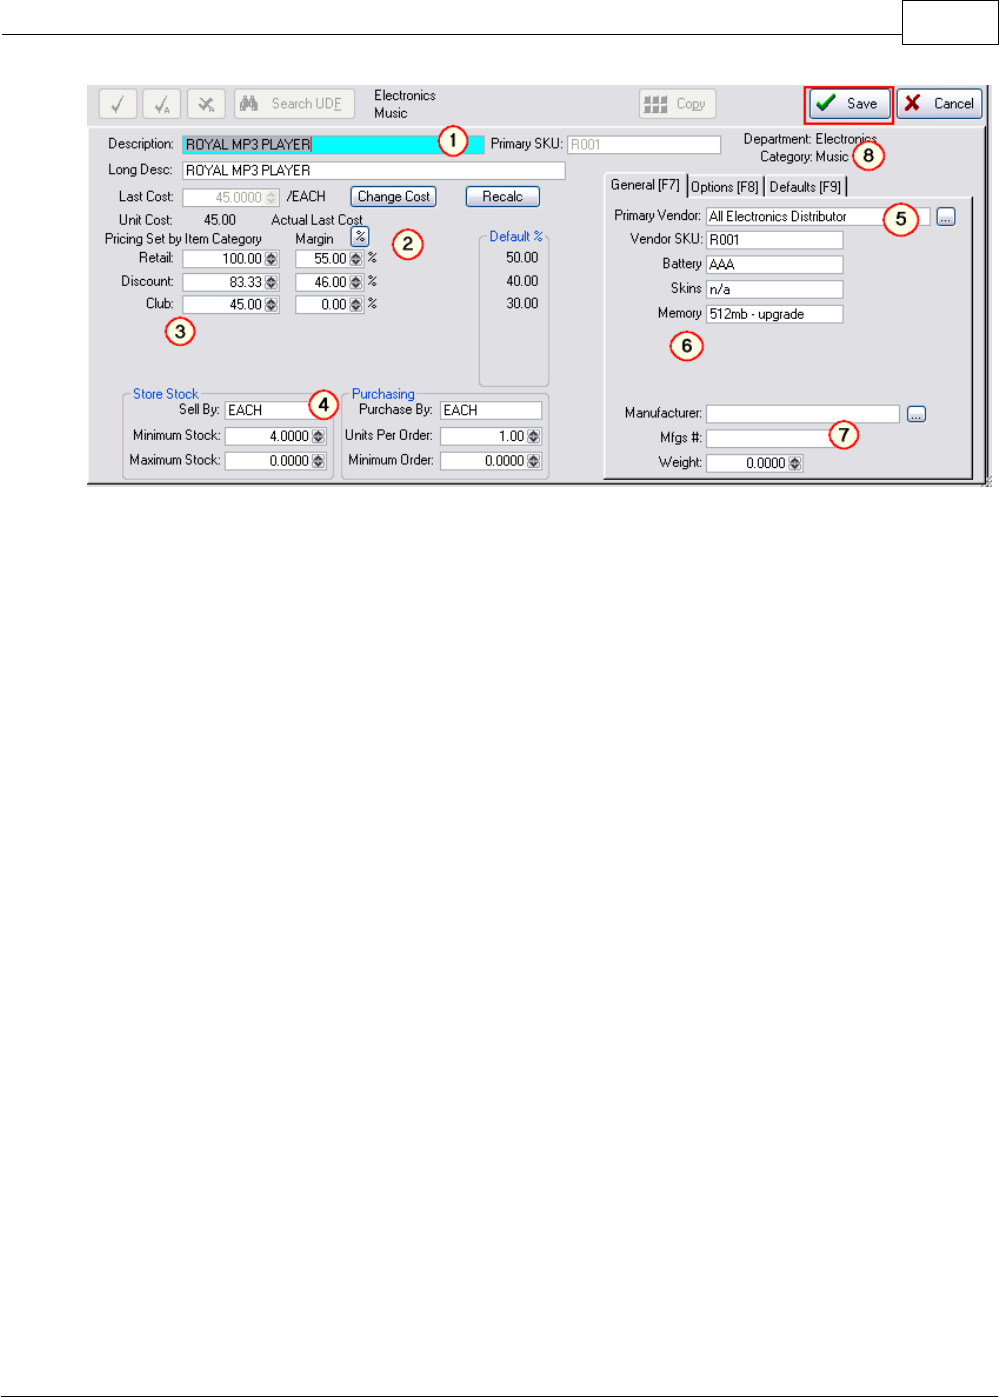
Primary Databases 111
Copyright ©2007 POSitive Software Company
(1) Descriptions & Primary SKU - The description will print on the customer invoice. It is limited to
32 characters and depending upon the invoice form, it could be truncated somewhat; abbreviate and
keep essential information at the forefront. It is recommended that each inventory item have a unique
description; do NOT use identical descriptions because it will make reports and web page postings
difficult to understand.
For Matrix Inventory, this Description should be kept very short because it will be automatically
appended with "row" and "column" titles. (see Matrix)
The Long Description field is longer with 46 characters, but it is primarily for internal store reference
and seldom prints anywhere. The Long Description is automatically filled in with the same information
in the Description field. TIP: A System Setup option can eliminate the field from view.
The Primary SKU is grayed out. It was created as the inventory item was first defined. You may
change the SKU or add additional alternate SKUs. (see SKU Management)
(2) Last Cost / Unit Cost - The Last Cost is what you pay your vendor for the item. It is grayed out
because it need not be manually changed; as you receive purchase orders, this Last Cost value will
be updated. However, the Change Cost button gives you editing capability. IMPORTANT: changing
the Last Cost value here will NOT change the cost of your "in-stock items."
The /EACH label following the Last Cost field is based upon the Purchase By value and the Unit Cost
is calculated by the Units Per Order value, as discussed in topic 4) below. The flag Actual Last Cost
will vary depending upon System settings. (see Maintenance: System: Inventory: Pricing tab)
(3) Selling Prices (6 Levels) - There is enough space here to display up to 6 price levels. Most
businesses use just one or two levels. The names of these price levels is defined in System settings.
(see Maintenance: System: Inventory: Pricing tab)
The actual selling prices are calculated based upon Default% set in the Category, but can be
manually changed by either entering a selling price or entering a margin percentage; changing one
will change the other. The Recalc button will apply the Default% values.
(4) Minimum Stock and Purchase Controls - PRM will prompt to reorder inventory from your
vendors based upon these settings. Some fields are titles for ease of review and reporting purposes.
Sell By: Each, Bottle, LB, Foot, Yard - this title will display on invoices and reports.
Minimum Stock: - The number of items you want on the shelf at all times. This number is used for
generating the Order List for preparing purchase orders. When the stock count drops below this

POSitive Retail Manager User Guide112
Copyright ©2007 POSitive Software Company
number, the PRM will prompt for reordering.
Maximum Stock: - The maximum number of items to have on hand at any given time. (Setting of
0.00 means unlimited.) This will help in the purchase order process. See Category Detail for the use
of this field when generating an order list.
Purchase By: Each, Case12, Case24, Dozen - this title will display on purchase orders and reports.
Units Per Order (Units Per Case): - Almost always the value in this field should be 1.00. This is
NOT the number of items on a purchase order, but rather the number of selling units in one
purchased case. See Bulk Inventory for an explanation of when this field would be a number other
than 1.00. If you change this number, you will be prompted to recalculate the selling prices.
Generally, you would say "Yes" and the selling price will be based on the unit cost of the item.
Minimum Order: - When preparing a purchase order, this number will be automatically selected as
the number to order. Normally, this number should be 1.00 and will be multiplied to equal the
minimum stock number (or the maximum stock number if the Category option is set.) NOTE: If the
inventory item is a Bulk item (the Units Per Order is greater than 1.00) then be sure the minimum
order is only 1.00. PRM will interpret this to mean "order 1 case which contains x number of units in
the case."
(5) Primary Vendor - Choose a vendor of the product and enter the vendor's SKU which is the order
number from the vendor's catalog of inventory. This vendor will be the preferred vendor of the item.
Additional vendors can be assigned to this product and re-selection of the primary vendor can be
done at any time. (see Vendors)
(6) User Defined Fields - Inventory items may track up to six (6) additional fields of information.
These fields are named by you, the user, hence the term User Defined Fields. The field titles are
created and assigned by editing the category (see Category Options). These fields can be filled in as
the inventory item is created. A Search UDF button on the Inventory Center finds all inventory items
with a common value in one of these fields. (see User Defined Fields)
(7) Manufacturer - This information can be imported or manually added. However, you need to
understand that the effort to fill in these fields may not warrant the limited use of this information.
Mfg ID - (Optional) A code for the name of the product manufacturer.
Mfg's # - (Optional) The manufacturer's part number which is other than the SKU or Vendor SKU.
Weight: - This is an approximate gross shipping weight. Entering the gross weight of the item takes
time, but this value can be used to calculate shipping charges when selling to customers and
calculate prorated freight charges when receiving products from the vendor.
(8) Dept/Category Defaults - Displayed is the department and category to which the inventory item is
assigned. The Category has default settings which are applied automatically to the inventory item as
the item is being created. These defaults can be displayed and changed for this one item by choosing
the Options [F8] and Defaults [F9] tabs.
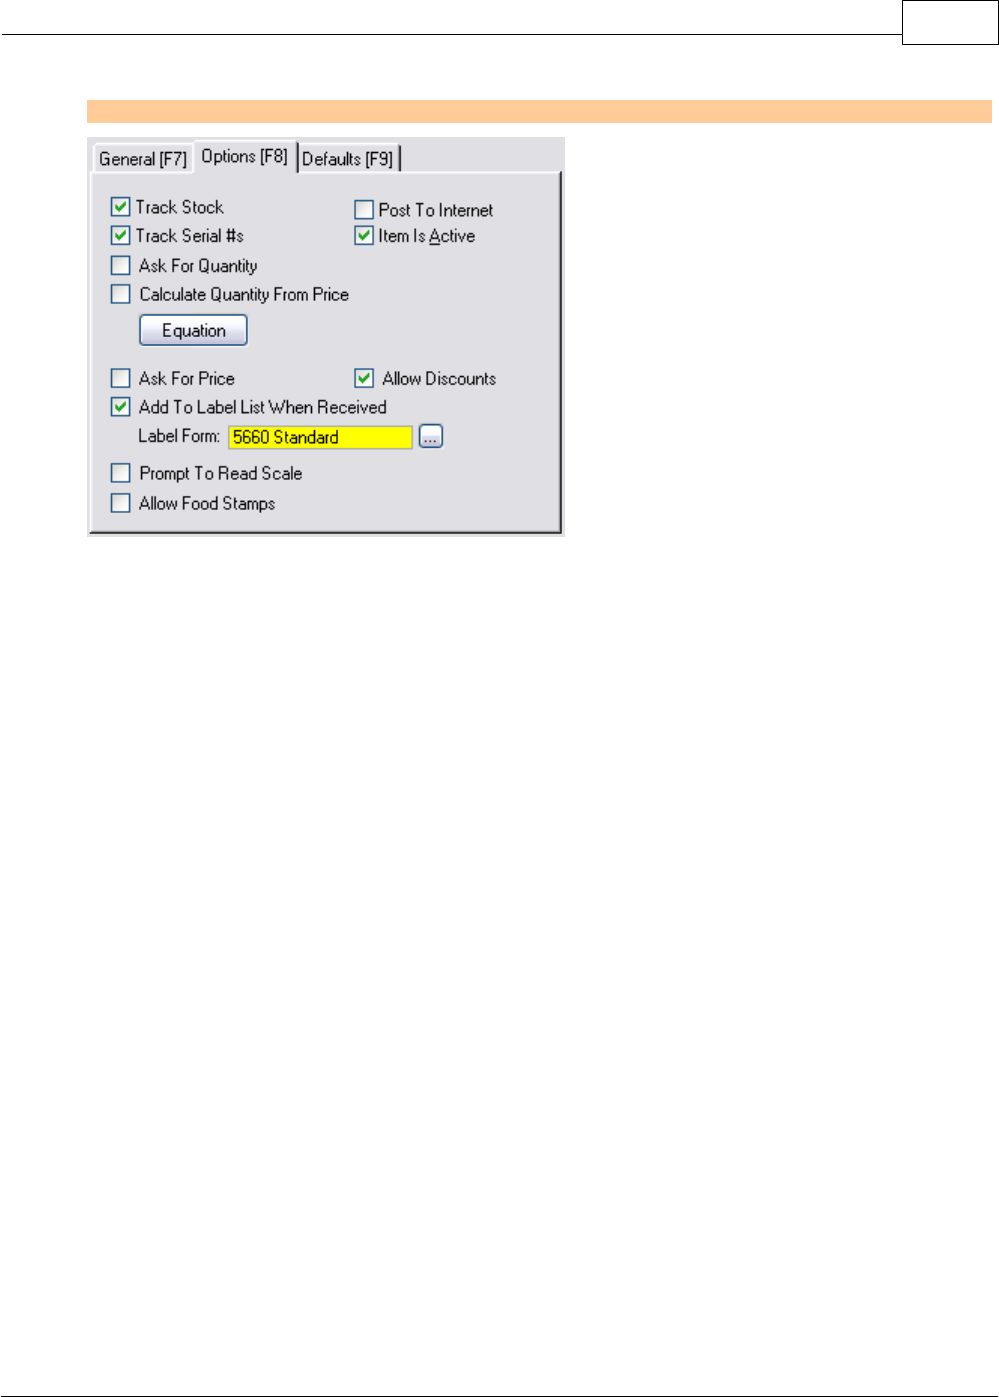
Primary Databases 113
Copyright ©2007 POSitive Software Company
Options [F8] tab
Track Stock (Quantities)
This option MUST be checked ON if you want PRM to give you stock counts. If it is unchecked, the
item will be reported as NON-STOCK.
Track Serial Numbers
If this item will be using serial numbers for each piece, then check this box. When adding stock
counts you can add the serial number of each item. (see Serialized Inventory)
Post To Internet
Checking this option will include this item in the transfer to your web page for POSitiveCommerce
sales.
Item Is Active
Active means that the item is listed in the Inventory List. Even if there is no stock count, the item can
be re-ordered and sold.
You may choose to make the item inactive, i.e., not visible in the list. This commonly done for
seasonal items such as Christmas inventory which you do not want to delete but would like to keep
out of sight.
Ask For Quantity
When the item is added to an invoice, the cursor will automatically go to the quantity field.
TIP: Rather than activating this setting, consider using this invoicing shortcut: If the customer is
buying 3 of an item, type 3/ (the number 3 followed by slash /) then choose the SKU and PRM will
automatically sell the 3 units of the item.
Calculate Quantity From Price
Activate this option only if this inventory item will be using a barcode with the price imbedded in the
barcode. (see Price/Weight In SKU) When the item is scanned into an invoice PRM will calculate the
quantity field by dividing the Price in the SKU by the defined selling price of the item. (Note: Do Not
Use this option if you are using "Prompt To Read Scale.")
Equation = None

POSitive Retail Manager User Guide114
Copyright ©2007 POSitive Software Company
Some products are sold by calculated units such as by the square foot or cubic foot. With this tool,
you can design an equation to include several variables and constant values. Click on the Equation
button to add and/or select an Equation. The title None will be changed to the title of the selected
equation. (see Equation Editor)
Ask For Price
When the item is added to an invoice, the cursor will automatically go to the price field. It will fill in the
set price, but allows you to immediately enter a different price.
Allow Discounts
When included on an invoice, the item can be discounted directly on the invoice or by using the
invoicing shortcut of CTRL-D or by a customer permanent discount.
Add To Label List When Received
When this item is received on a purchase order it will be automatically added to a listing of labels to
be printed for the same number of labels as were received.
Label Form - displays the name of the label used for this item. PRM has several pre-defined label
formats to choose from. Choose the Lookup button at the end of the list to change label form select.
TIP: You may design your own label layouts. (see Label Editing)
TIP: Since this is a category setting, you can change ALL inventory assigned to this category to use a
new label (see Reset Inventory)
Prompt To Read Scale
Activate this option only if the inventory item will be weighed on a scale as it is being sold.
When invoicing the item and you will be prompted to either press F12 to capture the weight or
manually enter the weight as the quantity field. (Note: Do Not Use this option if you are using
"Calculate Quantity From Price.")
Allow Food Stamps
This item can be paid for by food stamps and if it is included on an invoice it will also be totaled with
the Food Stamp total. Because of the Food Stamp designation, taxation will be removed even If the
item is normally taxed. (see Food Stamps)
Defaults [F9] tab
These settings are unique to the inventory item, but can be defined by the category. (see Category
Defaults)
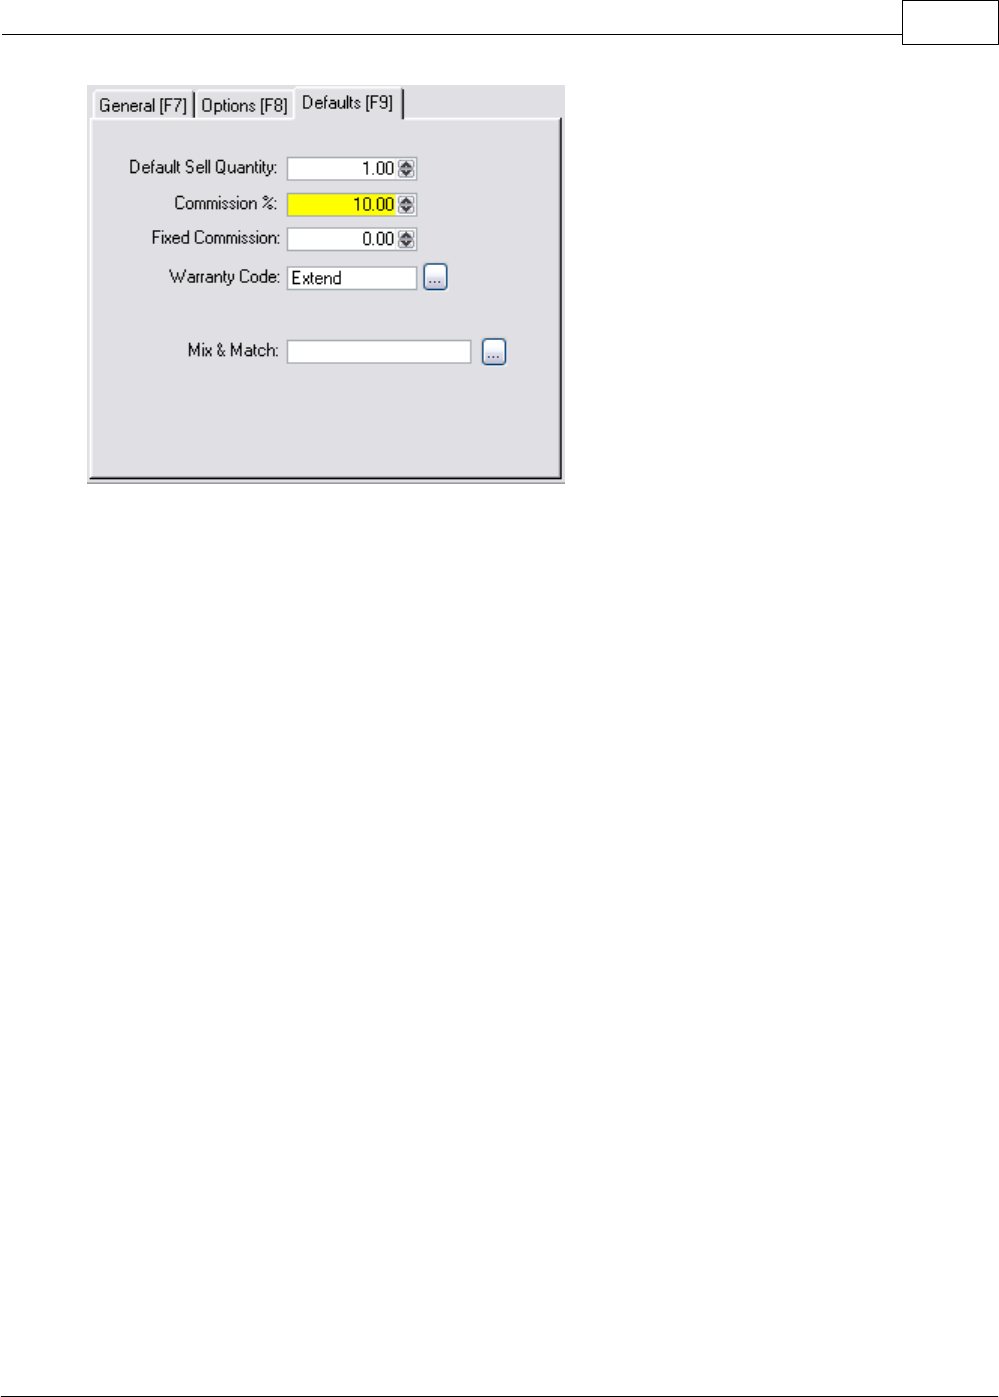
Primary Databases 115
Copyright ©2007 POSitive Software Company
Default Sell Quantity
Most always is a 1.00. It is the number of items to be added to the invoice automatically when the
item is sold. This still allows you to sell multiples of an item, but does not assume that a multiple of
the item will always be sold.
How To Sell A Negative Quantity
TIP: If you set this to -1 then the item will be sold as a credit amount rather than as a charge amount.
This is commonly used to make payouts such as bottle deposit refunds, lottery payouts, core charge
refunds, etc.
Commission %
When the item is sold a commission will be calculated at the given percentage. It is suggested that if
you have a variable commission for various employees, then set the commission rate at just 1% and
multiply by appropriate factors. This can be set at the category level and will be automatically applied
to all inventory in the category.
Fixed Commission
A set dollar amount or "spiff" to be paid to the salesperson when the item is sold. Unlike Commission
% this must be defined manually per inventory item.
Warranty Code
If the item is covered by any warranty, select a warranty code which defines the coverage. (see
Warranty)
Mix & Match
The group to which this item is assigned. Mix & Match is used for selling products at special price
breaks and allowing multiple SKUs to be valid for those price breaks. (see Mix & Match Manager)
4.2.2.3 Promo Pricing
Promotional prices are discounted or modified prices for given time periods. These can be
established days, even months, in advance of a sale. The prices can be valid for any length of time,
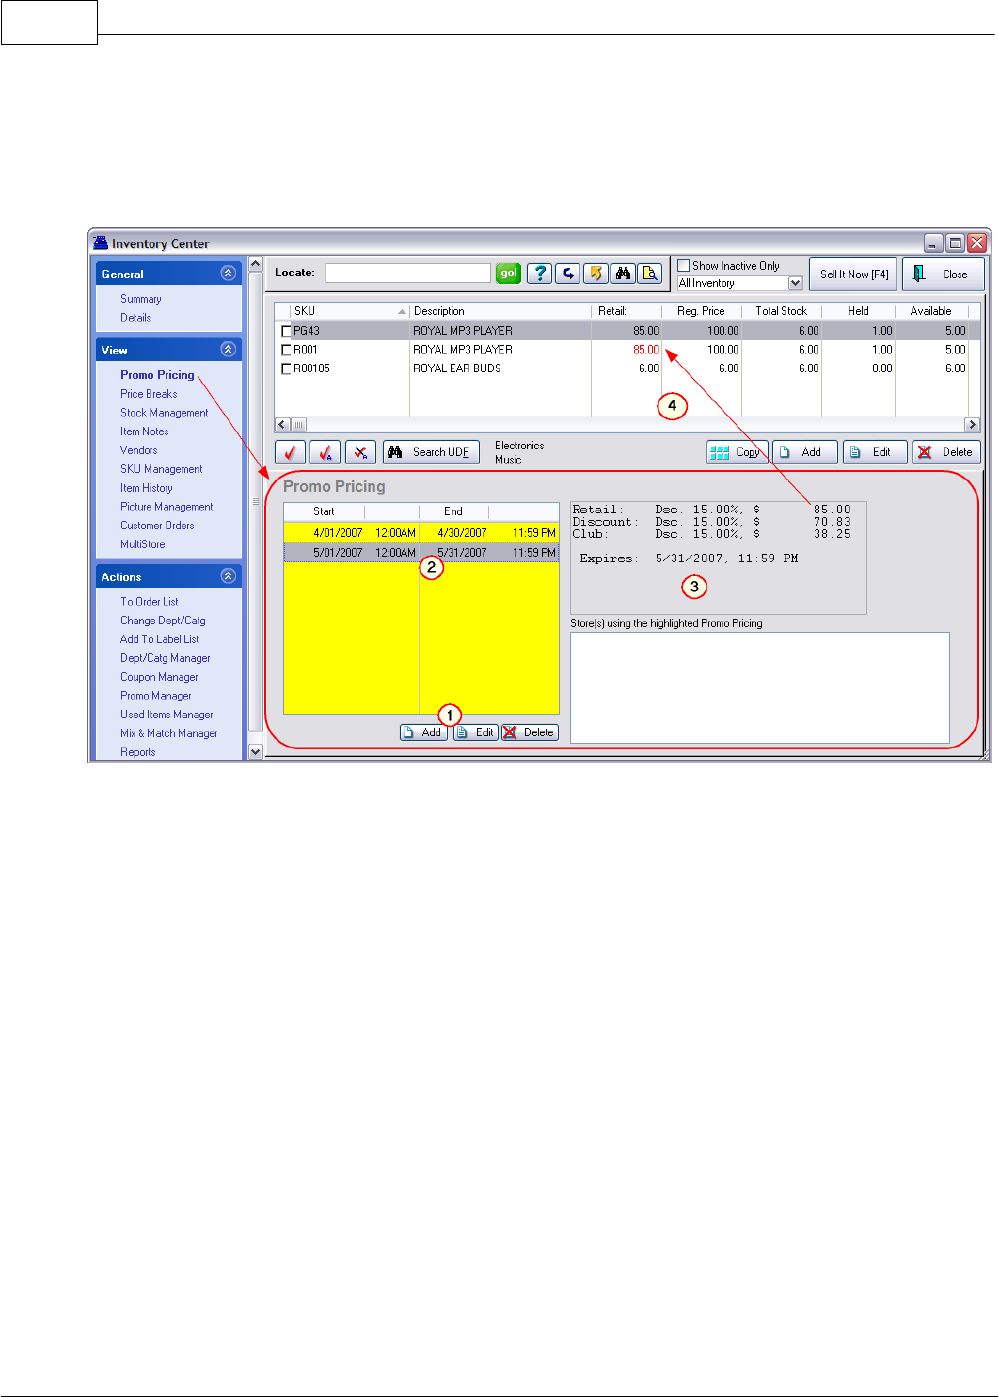
POSitive Retail Manager User Guide116
Copyright ©2007 POSitive Software Company
even for just 1 hour of one day. By setting a start date and end date, PRM will automatically apply the
sale prices when the item is added to an invoice, and revert to the regular prices once the promotion
expires. If you desire, you may make the promo open ended so that the prices will never expire.
Generally, promo pricing is assigned per inventory item, but you could set promo pricing for all items
per category, per department, or even the whole store using Promo Manager.
(1) Add, Edit, Delete - To create new or modify existing promotions for the highlighted inventory item.
(see Promotional Pricing Information)
(2) Multiple Promotions - Each inventory item can be assign to several promotions as long as they
do not overlap start and ending dates.
TIP: Instead of deleting an old promotion, you may retain promo settings after a promo event and use
them again another time. Simply assure that the dates are older than the current date and do not
delete the entry from the list.
(3) Promo Details - The details of the promotion are displayed for easy review without having to edit
the promo.
(4) Current Promo - A promotion currently in effect will display the pricing in RED on the Inventory
List.
Percentage or Fixed Price
For individual inventory items, you may adjust promo selling prices by a percentage off the regular
price or by defining a specific price.
For global promo prices applied to all items in a category or a department you are limited to setting a
percentage off the regular price.
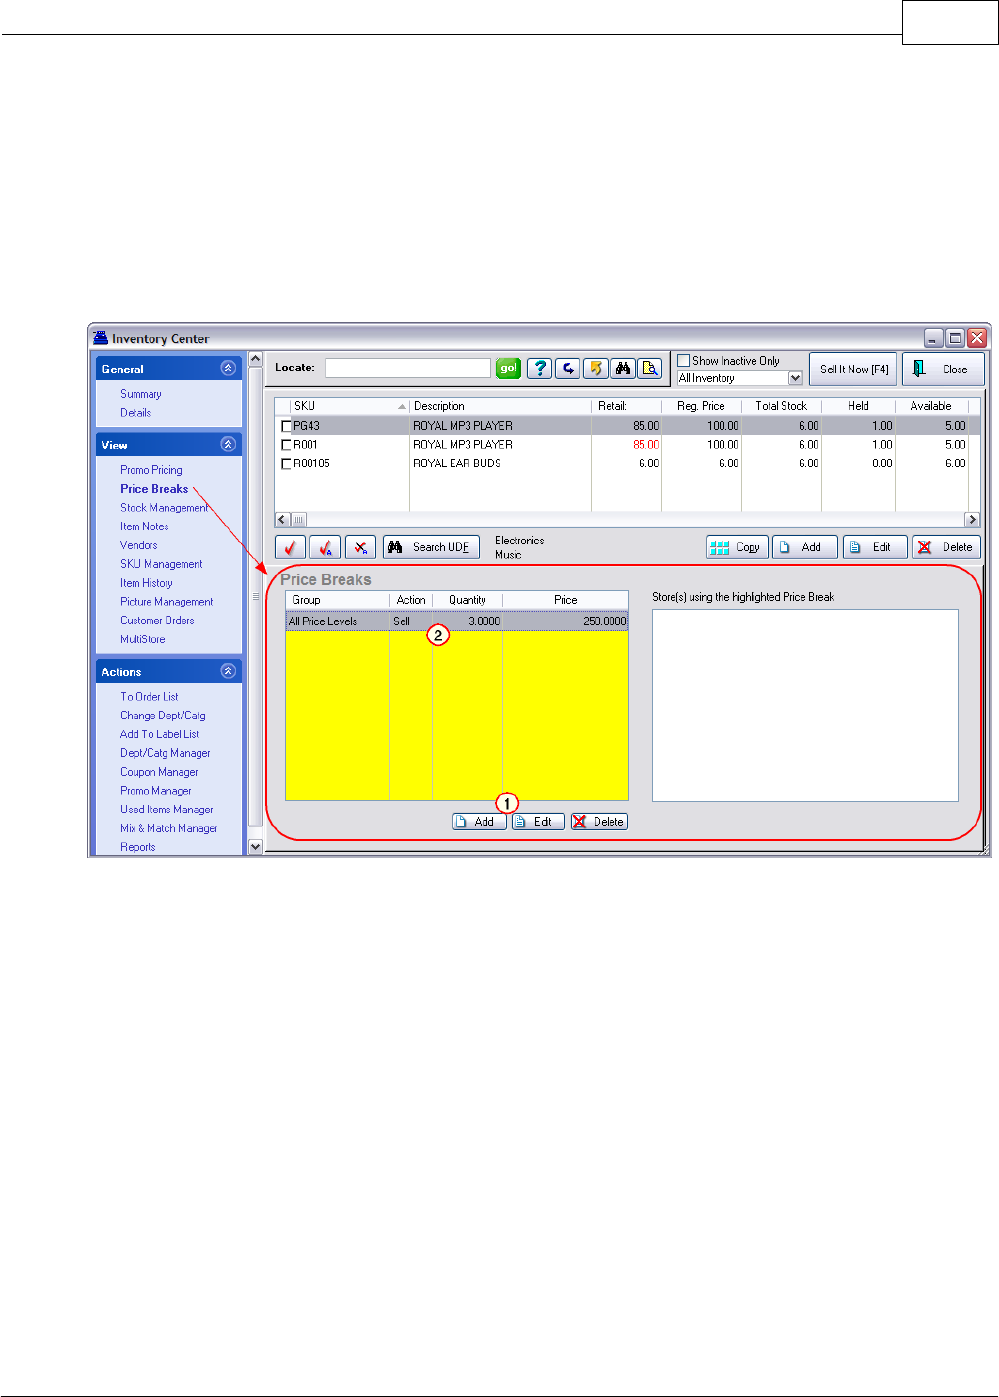
Primary Databases 117
Copyright ©2007 POSitive Software Company
4.2.2.4 Price Breaks
Price Breaks are automatic price changes when selling multiples of an inventory item. The customer
does not get the lower price unless the designated quantity is purchased.
PRM can handle two types of special pricing: Price Breaks are the 2fer, 3fer type of pricing and
Quantity Breaks give special prices if you buy over a specific number of items. Both of these pricing
groups are created in this section of the inventory item.
(1) Add, Edit, Delete - To create new or edit existing price break definitions.
(2) Current Price Break(s) - Generally speaking, there will be only one price break for an item; you
may create more than one, but they need to be defined so as to not clash with one another. (see
Price Breaks)
2fer, 3fer Price Breaks
In this example, the item normally sells for 100.00 each, but if you buy 3, it will cost only 250.00.

POSitive Retail Manager User Guide118
Copyright ©2007 POSitive Software Company
(A) Select a Price Level - If everyone will get the same price, then choose "All Price Levels;"
otherwise pick the specific price level. This allows you to create different price breaks for types of
customers.
(B) Select a Quantity and Price - Enter the number of items which need to be purchased in order to
get the price break. Then enter the price. DO NOT activate Quantity Break if the selling price is the
total amount for the group.
Quantity Break
This is a special usage option. A quantity break offers a different per each price for each quantity
level.
For example, a purchase of
10 or more is .70 each.
15 or more is .60 each
4.2.2.5 Stock Management
Stock counts for the highlighted inventory item are linked to purchase order history, pending orders,
bin locations, and retains a line by line documentation of the history of the inventory item called a
transaction log.
Stock Information has been grouped into three (3) sections which will be described in detail.
·Current Stock - Stock count numbers with reference to originating purchase order(s) and tools for
label printing and research.
·Transaction Log - A log of all processes affecting this inventory item. (see Transaction Log)
·Stock Location - (Optional) distribution of stock to select shelves or locations with the ability to
rotate stock from one location to another. (see Stock Location)
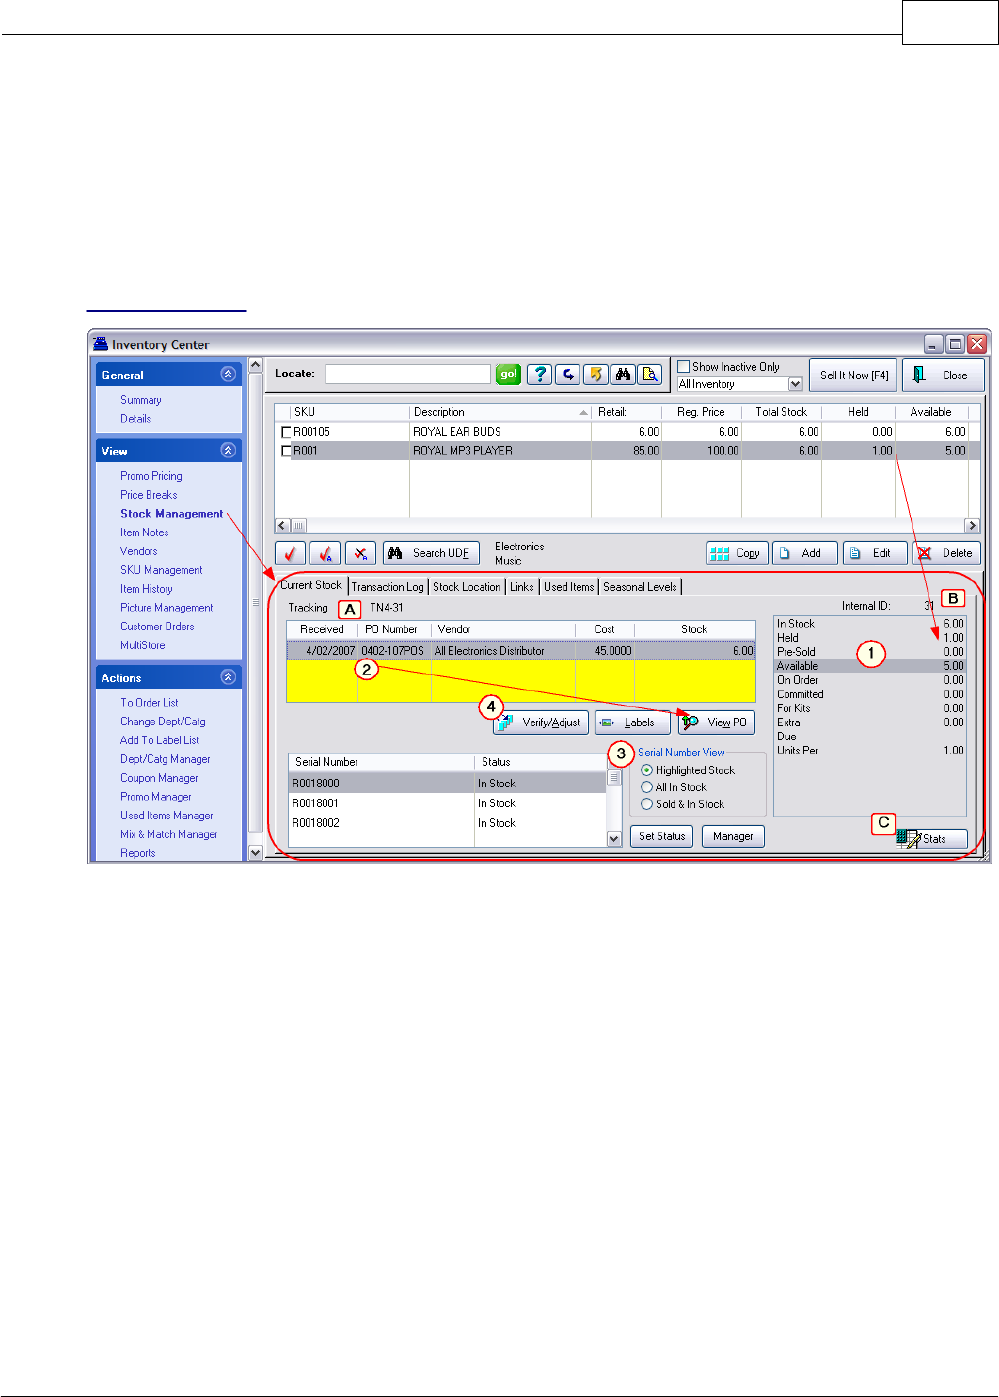
Primary Databases 119
Copyright ©2007 POSitive Software Company
·Links - the sale of one inventory item can prompt for the sale of additional suggested or required
items (see Links)
·Used Items - If using the trade-in option of PRM, items can be sold as new or used (see Used
Items Manager)
·Seasonal Levels - Set minimum and maximum stock quantities for a specific time period. (see
Seasonal Levels)
Current Stock
(1) Current Stock Counts -
·In Stock - total units in stock
·Held - number of units reserved or order, layaway, service order
·Pre-Sold - number sold when stock count was 0.00
·Available - sum of In Stock minus Held and Pre-Sold
·On Order - number of units expected on purchase order
·Committed - number of units promised for open order, layaway, service order
·For Kits - number of units which are In Stock which have been set aside for building kits
·Extra - sum of On Order minus Committed
·Due - anticipated arrival date
·Units Per - number of selling units per case/box
(2) Purchase Order Source - the purchase order from which the items were received. One can
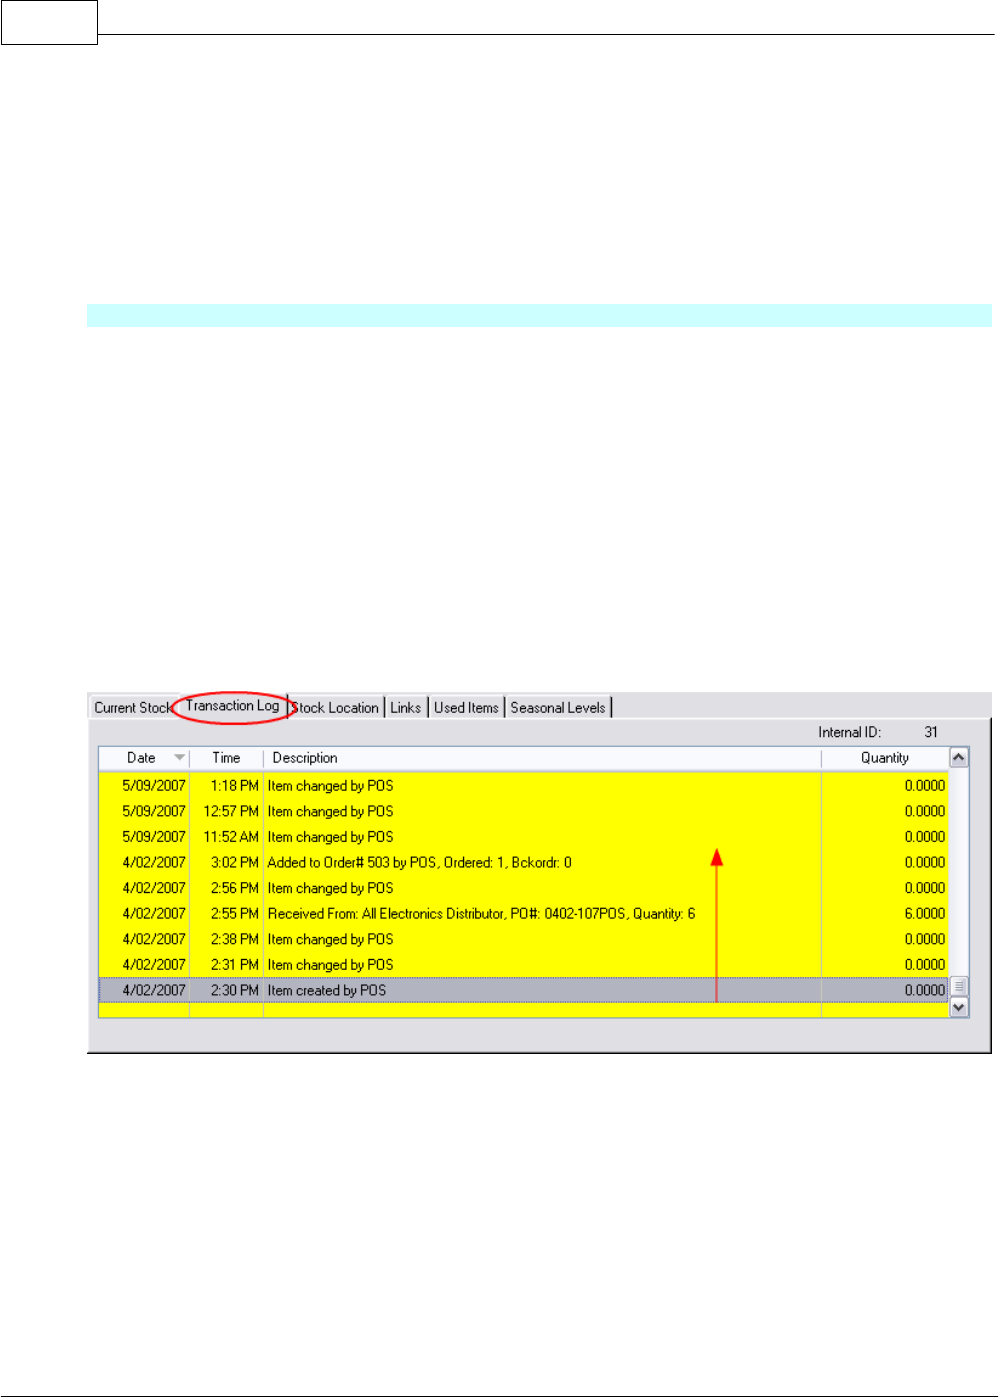
POSitive Retail Manager User Guide120
Copyright ©2007 POSitive Software Company
choose to View PO and even do some editing of quantities, costs, and freight charges.
(3) Label Printing & Serial Number Management - If inventory labels are needed, choosing the
Labels button will add the item to the Inventory Label List for printing. If an item is a serialized
product you can see the serial numbers of the items in stock, held, and sold. (see Serial Number)
(4) Verify / Adjust Stock Count - The option to manually override stock counts. This is sometimes
used in lieu of receiving a purchase order, but should only be used with discretion. (see Verify/Adjust)
Informational
(A) Tracking Number - A control number linked to the originating purchase order. This number can
be printed on inventory labels and used to determine the shelf age of the product.
(B) Internal ID - A control number assigned by PRM to this inventory product and used throughout all
the databases for accurate tracking of processes.
(C) Stats - The overall number of inventory products in the inventory list: active, matrix, and inactive.
4.2.2.5.1 Transaction Log
This is a journal of all processes which have affected this inventory item. The most current activity is
listed at the top.
The primary purpose of this log is for review only.
4.2.2.5.2 Stock Location
This is an optional feature of PRM. It allows for tracking of stock counts by storage location. If the
store has a warehouse or backroom as well as a showroom then stock counts can be controlled for
each location.
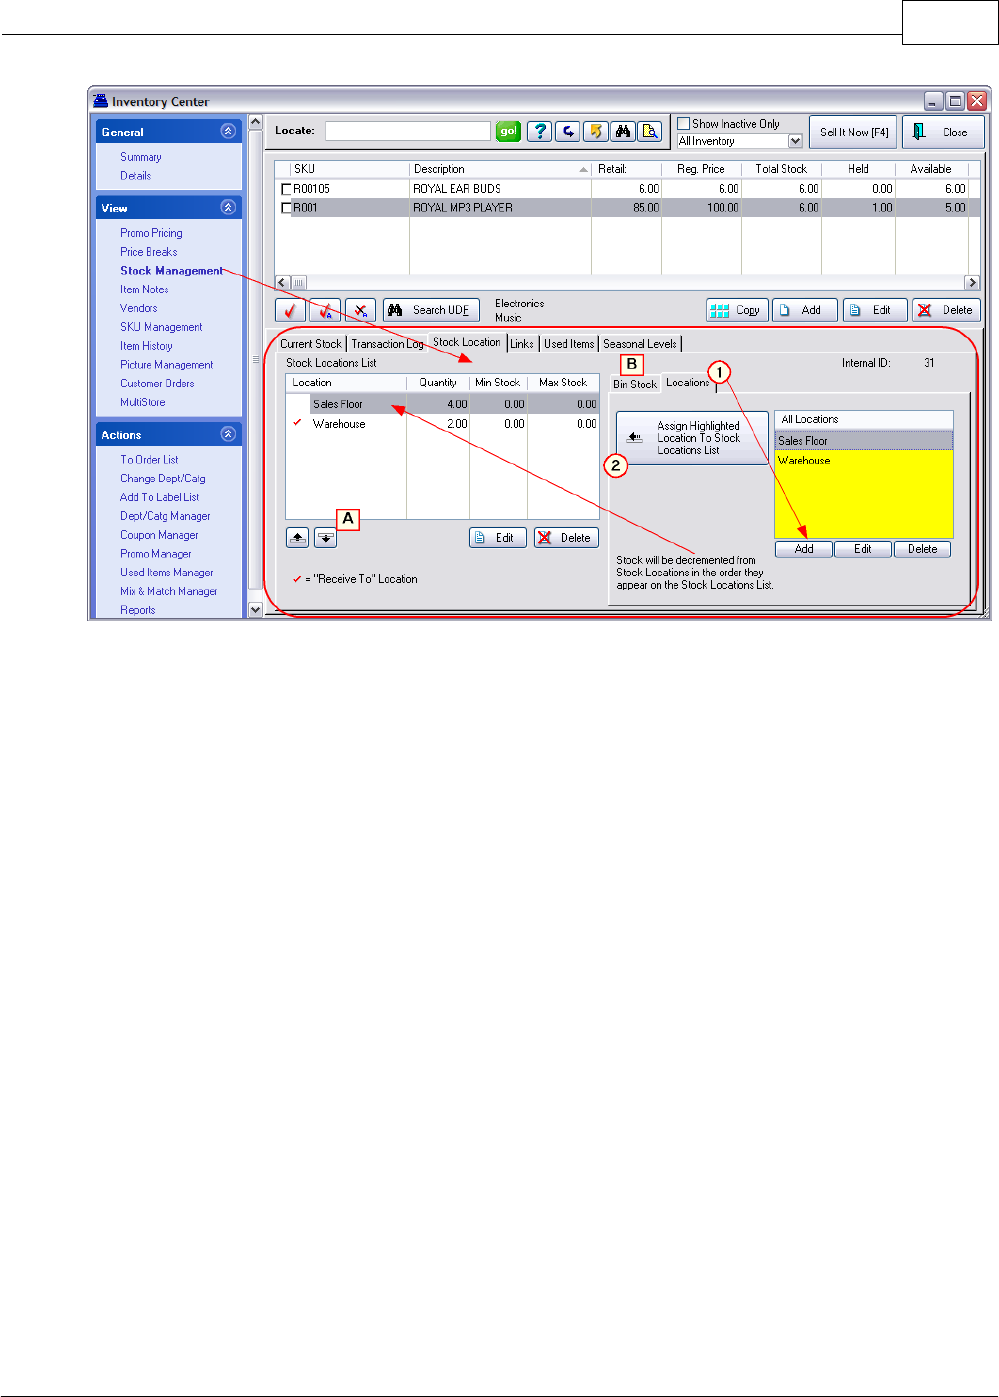
Primary Databases 121
Copyright ©2007 POSitive Software Company
(1) Define Location Names - On the Locations tab you add ALL buildings, shelves, rooms, walls,
sections, etc. in as much detail as you wish.
(2) Assign Relevant Location(s) - Using the "Assign Highlighted Location...To List" button, select only
those location names which apply to this inventory item.
TIP: the first location to be added will become the default "Receive To" Location.
When inventory is received through purchase orders, the stock counts automatically update this
"Receive To" location. To make a change, choose the Bin Stock tab to reassign which location will be
the receiving location.
(A) If there is more than one location for the inventory item, sequence the Locations for removal of
stock using the Up and Down Arrow buttons. By default, as items are sold, the stock count of the top
most location will be decremented first.
(B) When inventory needs to be moved from one location to another, select the Bin Stock tab.
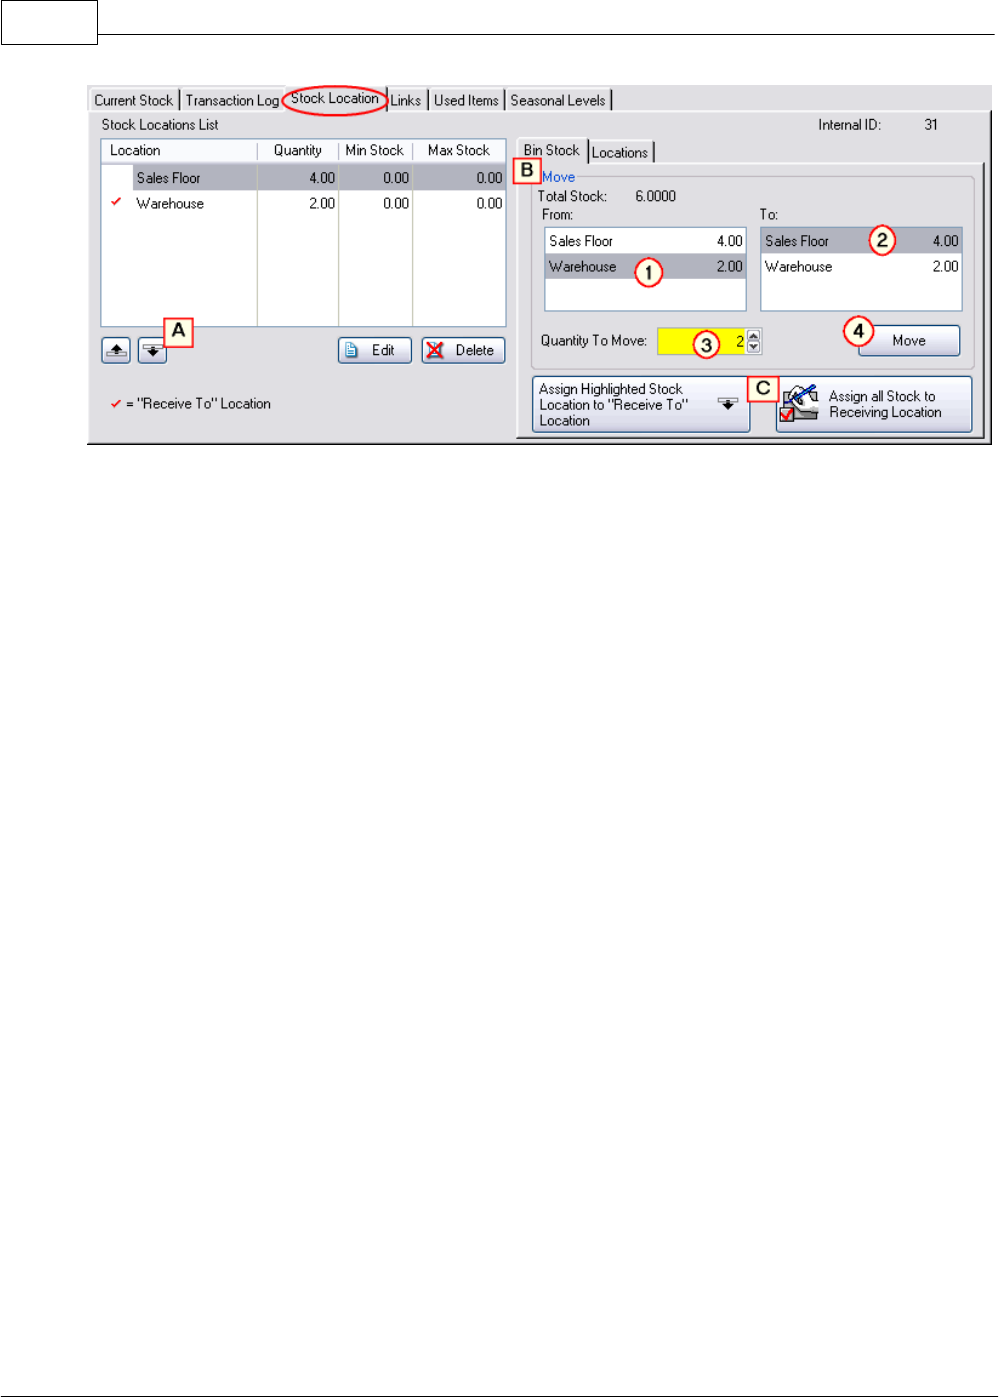
POSitive Retail Manager User Guide122
Copyright ©2007 POSitive Software Company
(1) FROM: Choose the location from which stock will be removed.
(2) TO: Choose the location to which stock will be moved.
(3) Enter the number of items to be moved.
(4) Choose the Move button.
(C) REORGANIZATION
If necessary, the "Receive To" location can be changed. Also, ALL stock counts for this inventory
item can be moved back to the Receiving Location and then redistributed following the steps above.
4.2.2.5.3 Links
Some inventory items require an additional item or are complemented by other inventory items. With
PRM you can select these accessory items to popup to remind the clerk to offer them to the customer.
This is an excellent way of increasing sales.
For example:
--- Suggested Accessories
As the clerk adds a computer game to an invoice, a popup window can remind the clerk to suggest a
joystick or a mouse pad with wrist rest. The item(s) can be selected or ignored.
--- Tag Alongs
As the clerk adds a printer to the invoice, a printer cable is automatically added to the invoice.
Without it the printer isn't of much use, but if the customer does not need it, the tag along item can be
deleted.
As another example, when selling bottled beverages, bottle deposits are automatically assessed for
the number of bottles purchased.
--- Similar/Related Items (Web)
As an on-line internet shopper finds an item such as a book by a particular author, a link suggests that
other customers who purchase the item are also interested in books by other authors. (see
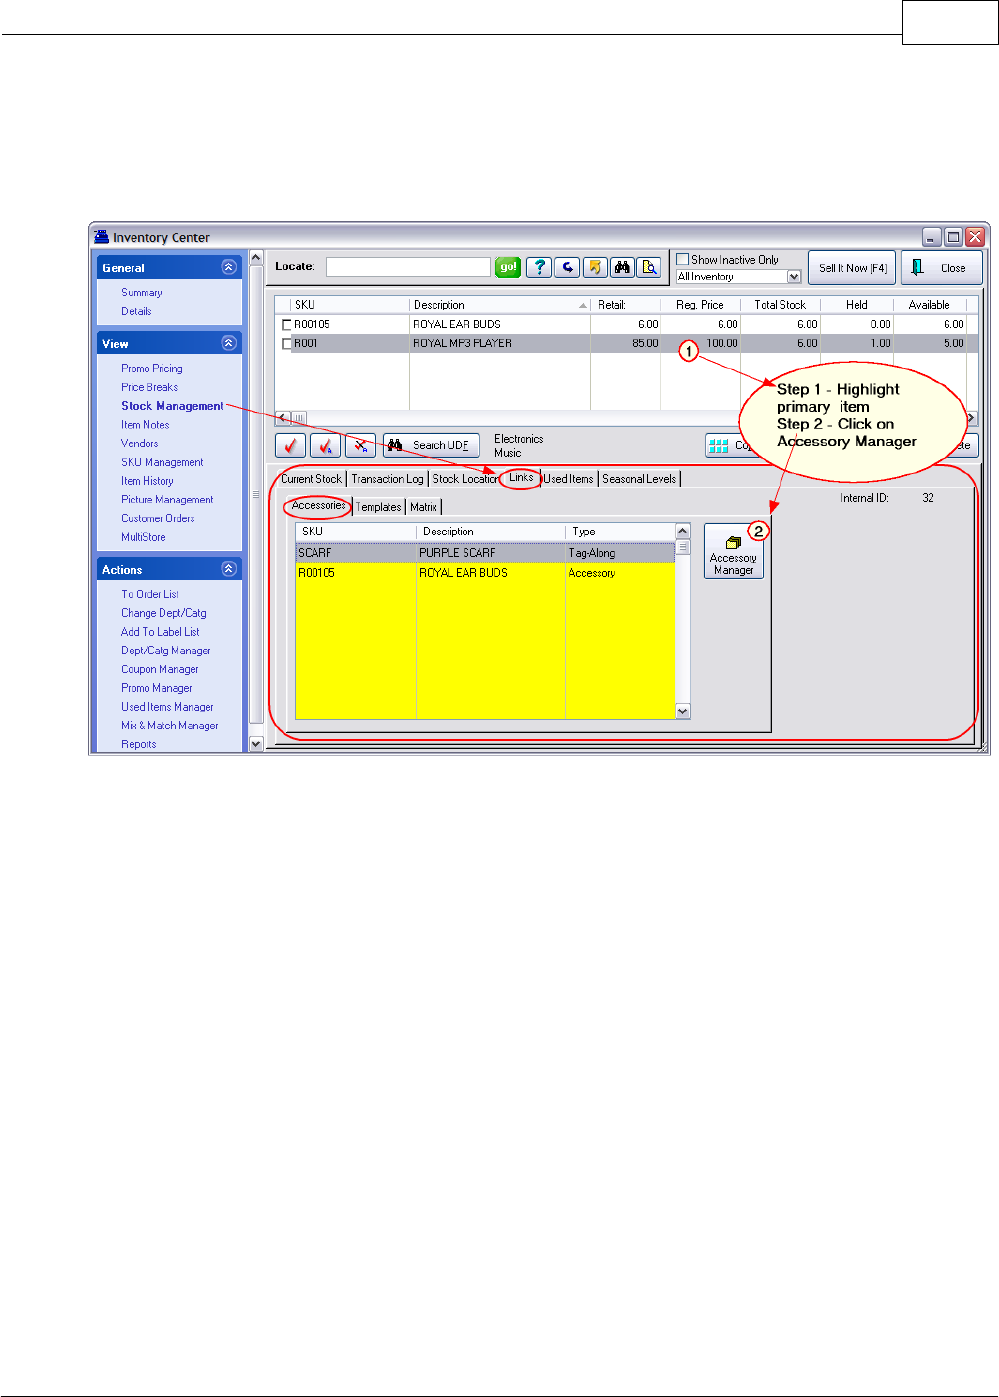
Primary Databases 123
Copyright ©2007 POSitive Software Company
E-Commerce, Account Wizard)
Tip: Successive Links - By assigning Links to successive items, one could create a "string" of
selections.
In this pictured example, when a customer purchases item R001 Royal MP3 Player, the SCARF item
will automatically be added to the invoice, and the R00105 Royal Ear Buds, will be a suggested
item for purchase.
How To Assign Accessories
(1) Highlight the primary item in the Inventory List.
(2) Open Stock Management Links tab and select the Accessory Manager button
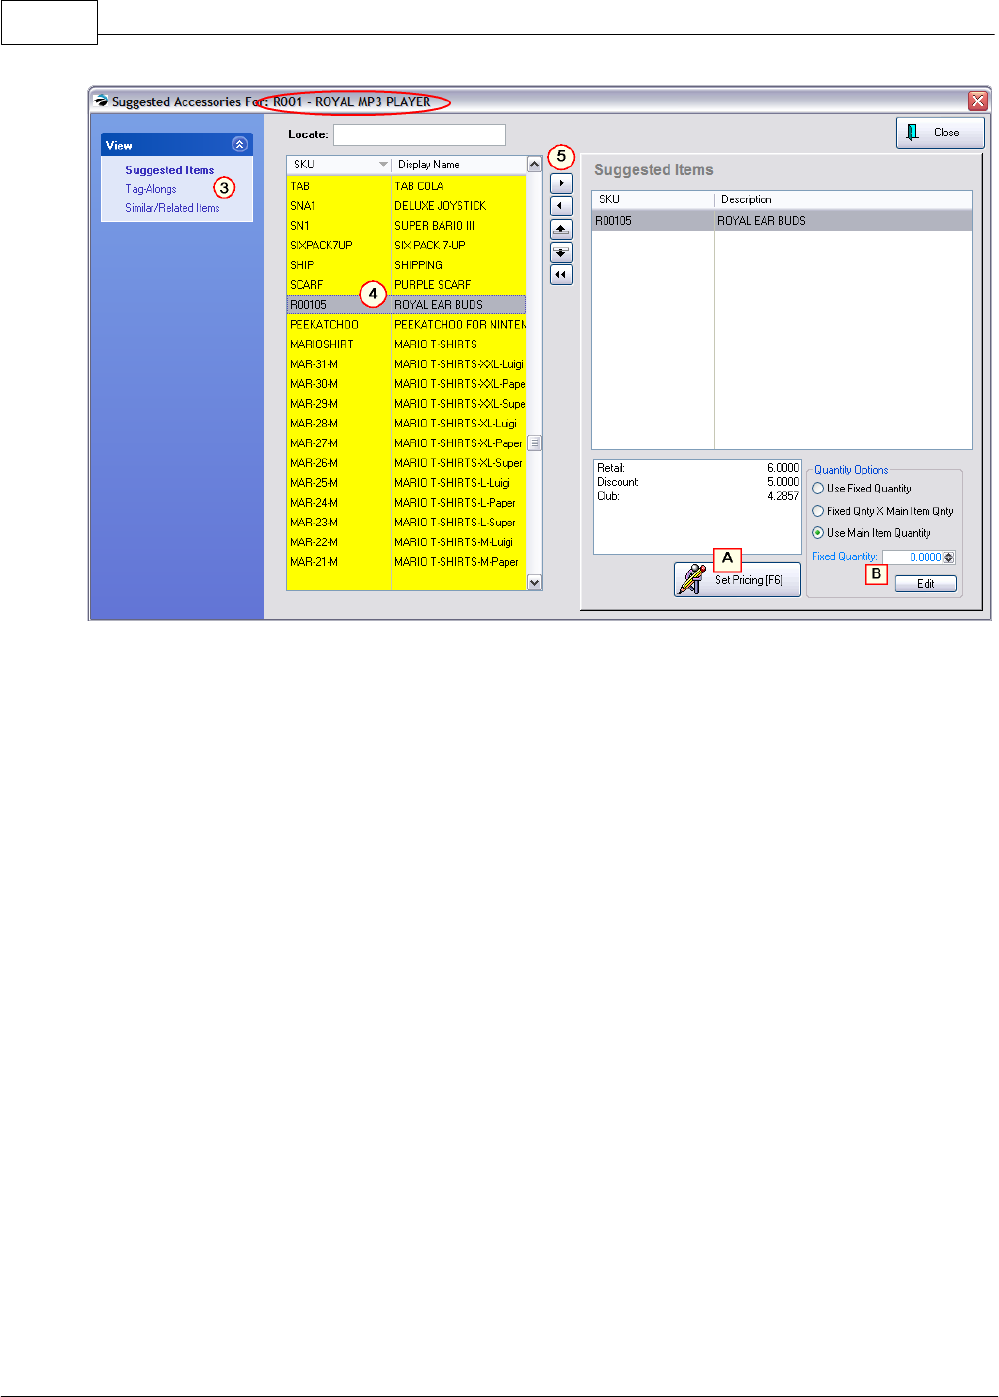
POSitive Retail Manager User Guide124
Copyright ©2007 POSitive Software Company
(3) On the far left, select the appropriate link type:
·Suggested Items - will display items to choose
·Tag-Alongs - will automatically add the item to the invoice
·Similar/Related Items (for Web Use Only) - will recommend additional items to purchase
(4) Highlight on the left side which item is to be linked to the primary inventory item (in the title bar).
TIP: sort the list by SKU or Description and begin to type the first characters.
On the left hand side is a listing of ALL of your inventory. Highlight the item which will accessorize the
item being sold (as indicated in the window title bar) and transfer
(5) Click on the Arrow button to transfer the item from the left to the right.
TIP: to remove an item, highlight it and transfer from the right to the left.
Additional Features
(A) Set Pricing - you can change the selling price of the Suggested or Tag-Along item. Only when
the item is sold in conjunction with the primary item will the customer get the new price. This new
price could be set to 0.00 to make it "free" or any other price you choose.
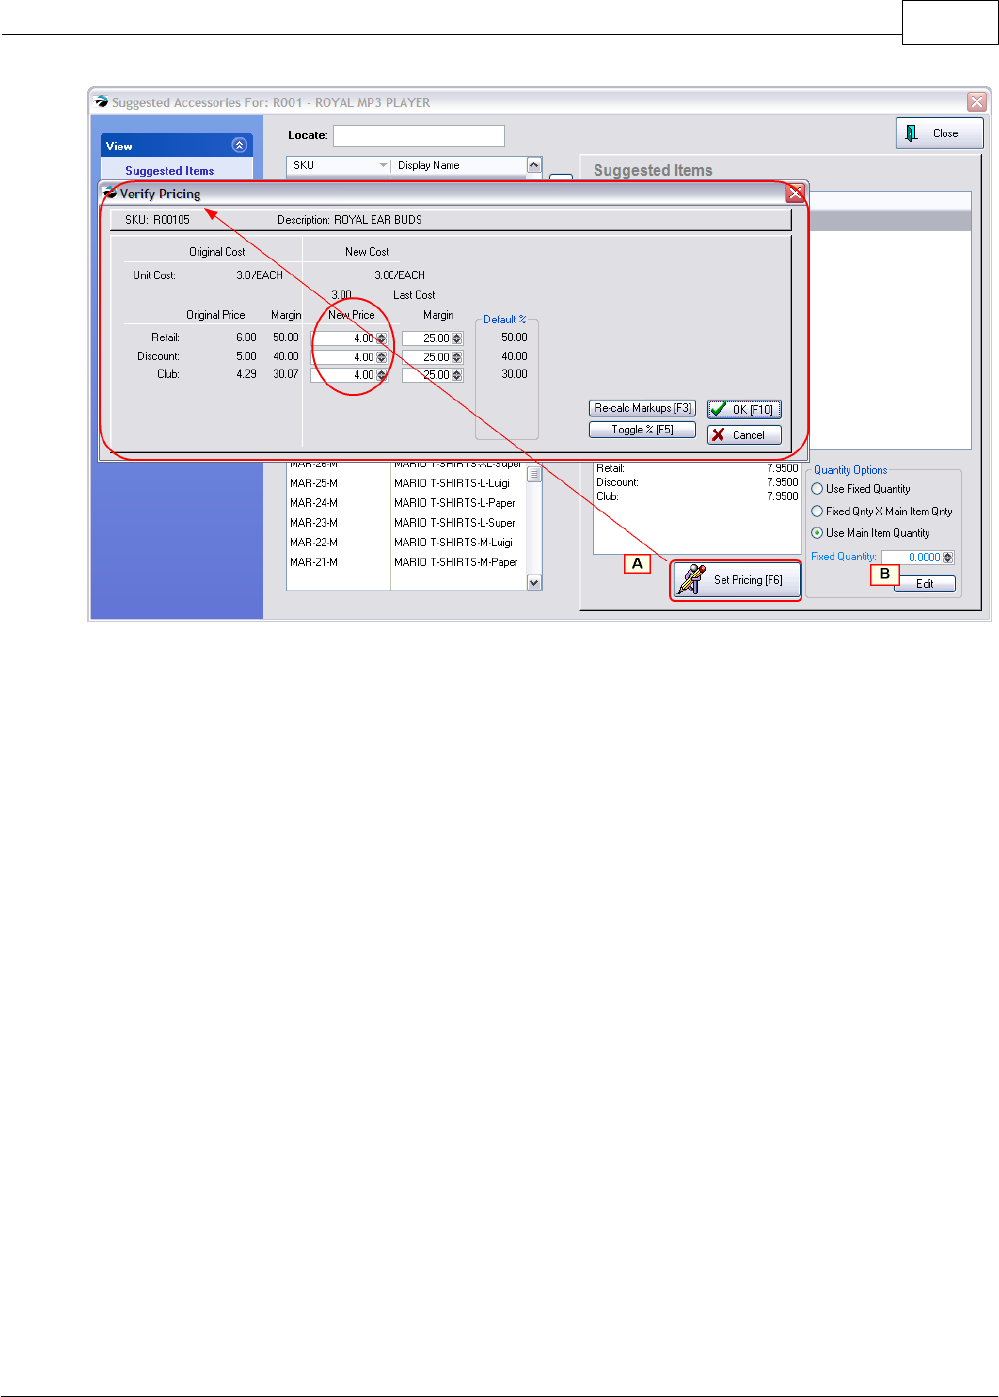
Primary Databases 125
Copyright ©2007 POSitive Software Company
(B) Set Quantity - Generally, "Use Main Item Quantity" is the best selection. By choosing the Edit
button you can set other rules for how many of the Suggested or Tag-Along item will be sold.
4.2.2.5.4 Used Items
Trade-In items can be treated as Used Items. The used items would be visible in this section. (see
Used Items Manager)
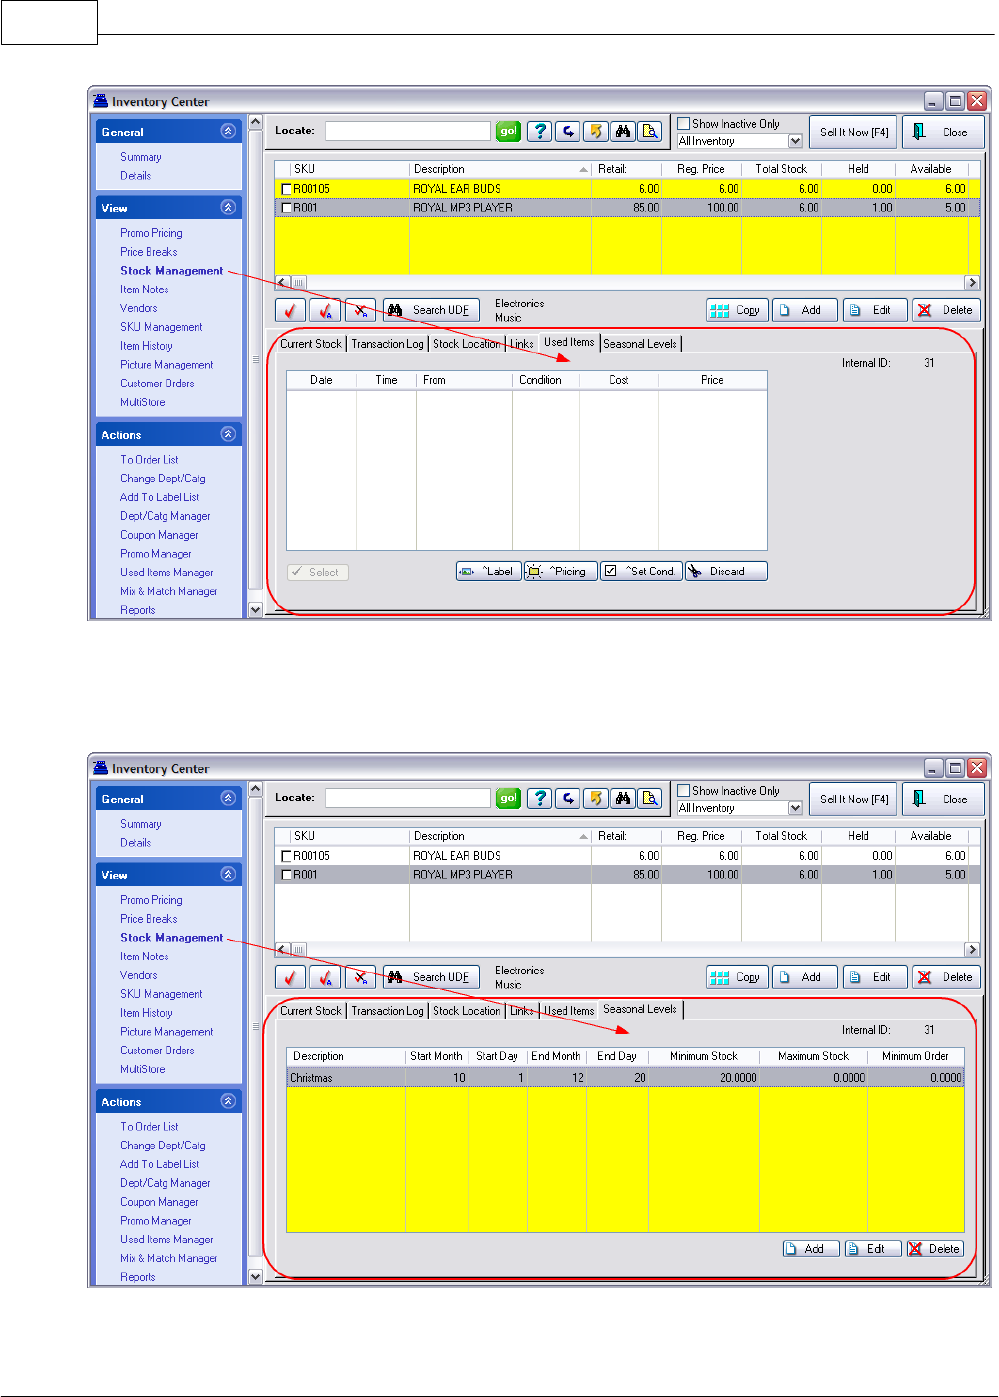
POSitive Retail Manager User Guide126
Copyright ©2007 POSitive Software Company
4.2.2.5.5 Seasonal Levels
The normal minimum, maximum, and minimum order stock levels can be superseded by seasonal
levels.
You name the season and identify starting and stopping dates. Set your desired stock levels and
PRM will prompt to order these stock levels during the season.
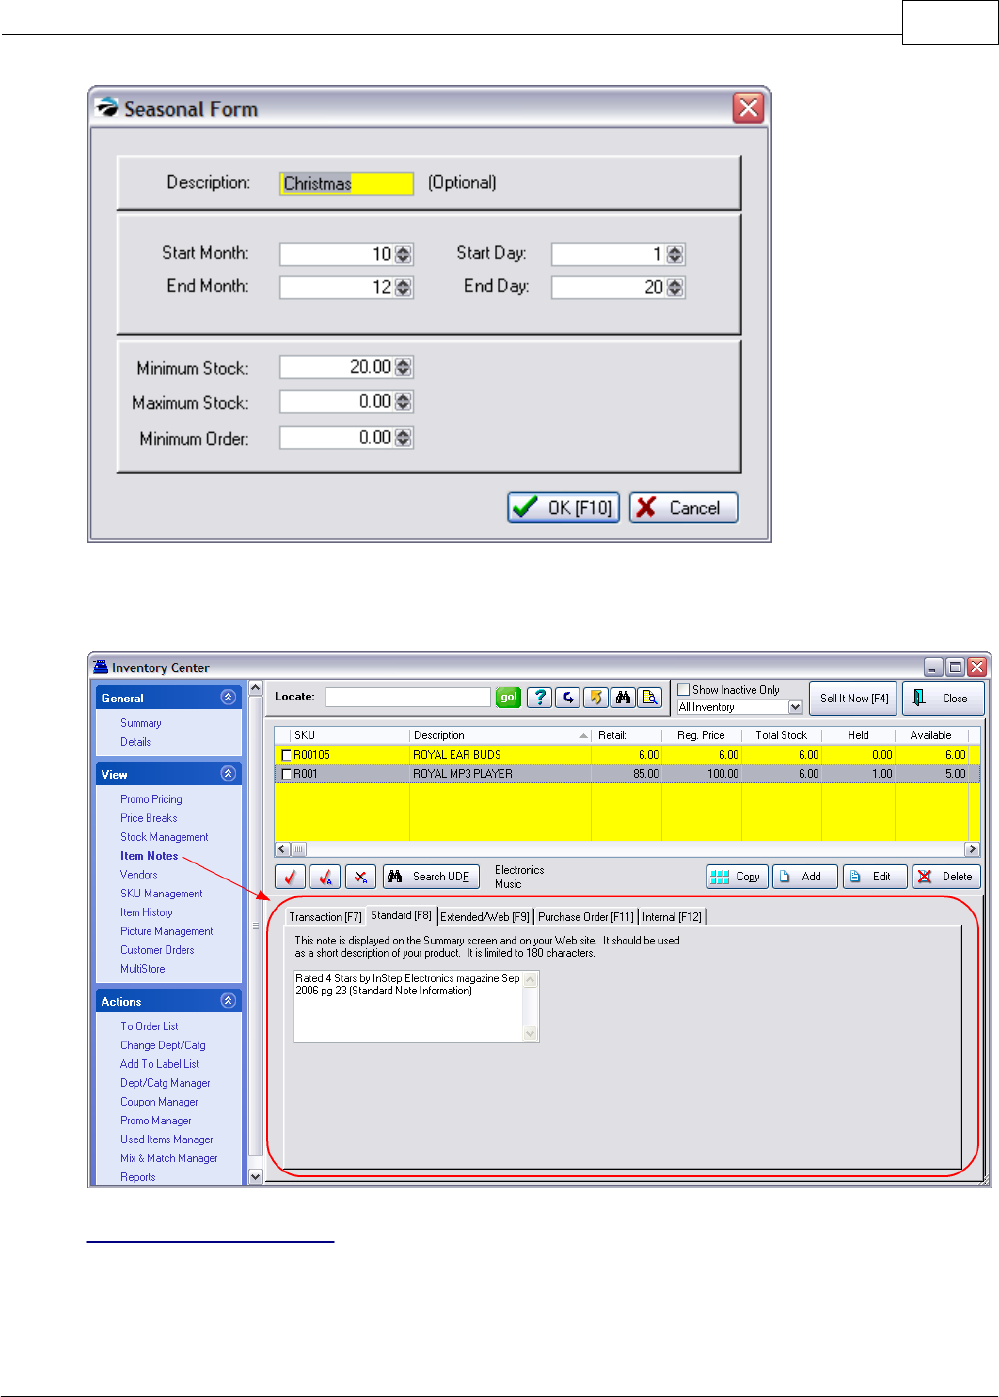
Primary Databases 127
Copyright ©2007 POSitive Software Company
4.2.2.6 Item Notes
Each inventory item can have five (5) different kinds of notes.
Transaction Note [F7]
Text typed here will be automatically attached to the invoice or order when the item is selected for
sale. It can include special directions or notification. This information can be imported with PRM
Importer.
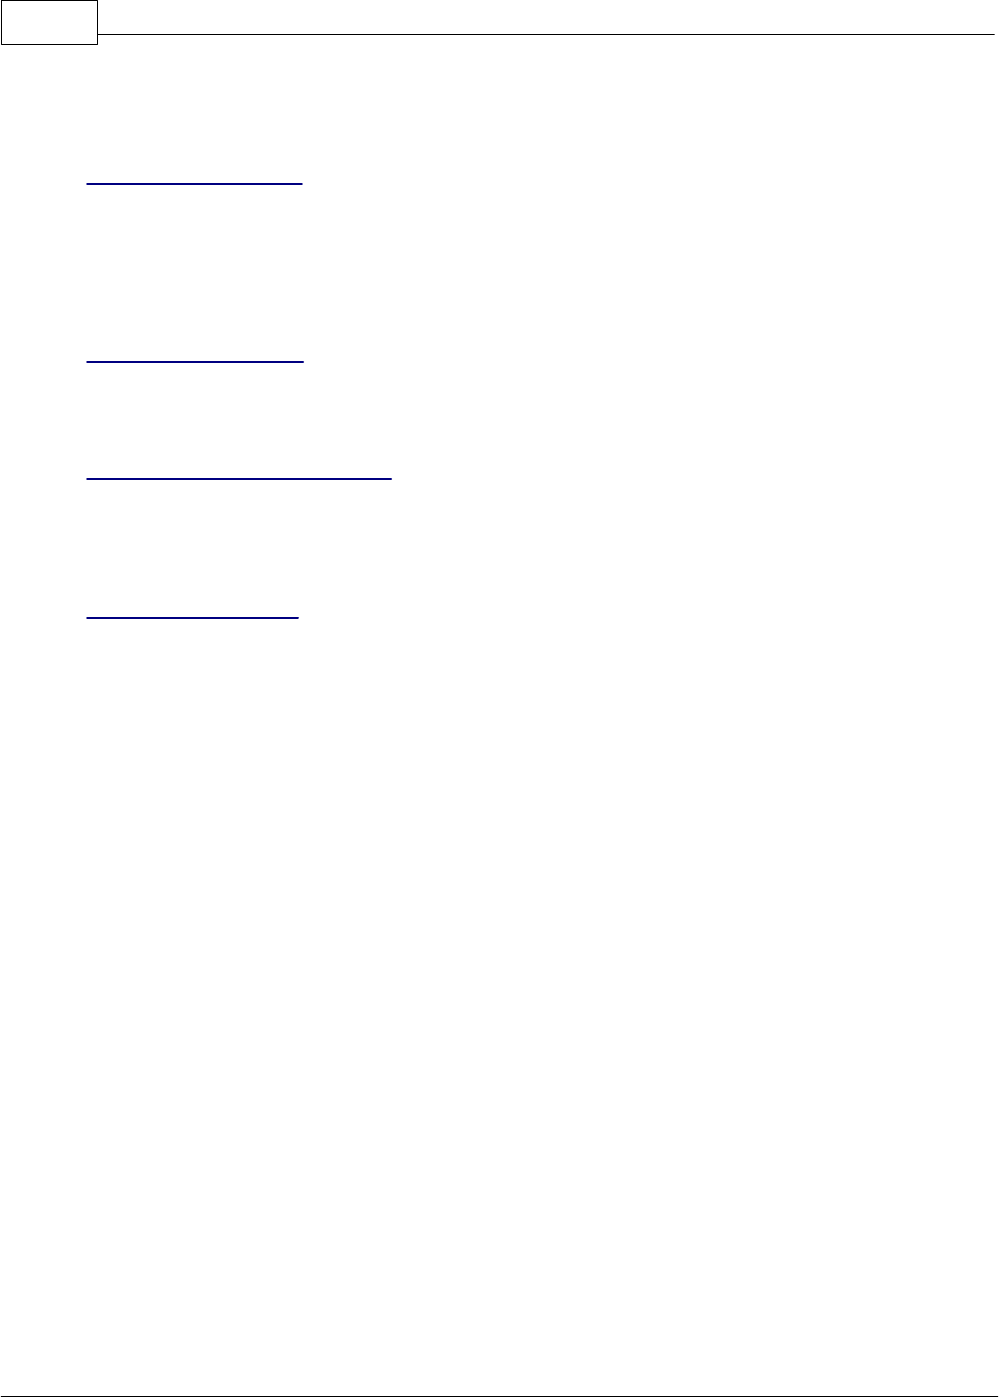
POSitive Retail Manager User Guide128
Copyright ©2007 POSitive Software Company
TIP: If your store sells Training Classes, include the date and time of the class and a list of supplies
to bring to class so the customer will have everything they need to know right on the receipt.
Standard Note [F8]
This note is used primarily with E-commerce to give customers a fuller description of an item. Sales
clerks can reference it for a bit more information about a product specifications which they can then
relay to customers. This information can be imported with PRM Importer.
This note can also be printed on inventory labels or a catalog printout. See Label Editing
Extended/Web [F9]
HTML codes can be used within this note for text enhancements, links, and inclusion of additional
pictures.
Purchase Order Note [F11]
Some inventory may require special handling requests when purchasing the product from the vendor.
This note will automatically be added to the purchase order on a line below the item name and
quantity to order.
Internal Note [F12]
This note is for employees only. It serves as a reference for salient selling points of the product.
These extensive notes can be added by a cut and paste method (ctrl-C and ctrl-V) to save time and
effort.
4.2.2.7 Vendors
PRM links one or more vendors to an inventory item. This screen shows which vendors can supply
the item and reports on pending purchase orders. From here you can add vendors and/or order more
stock.
Even more detailed information about the vendor can be accessed directly from this screen through
the Vendor Info button.
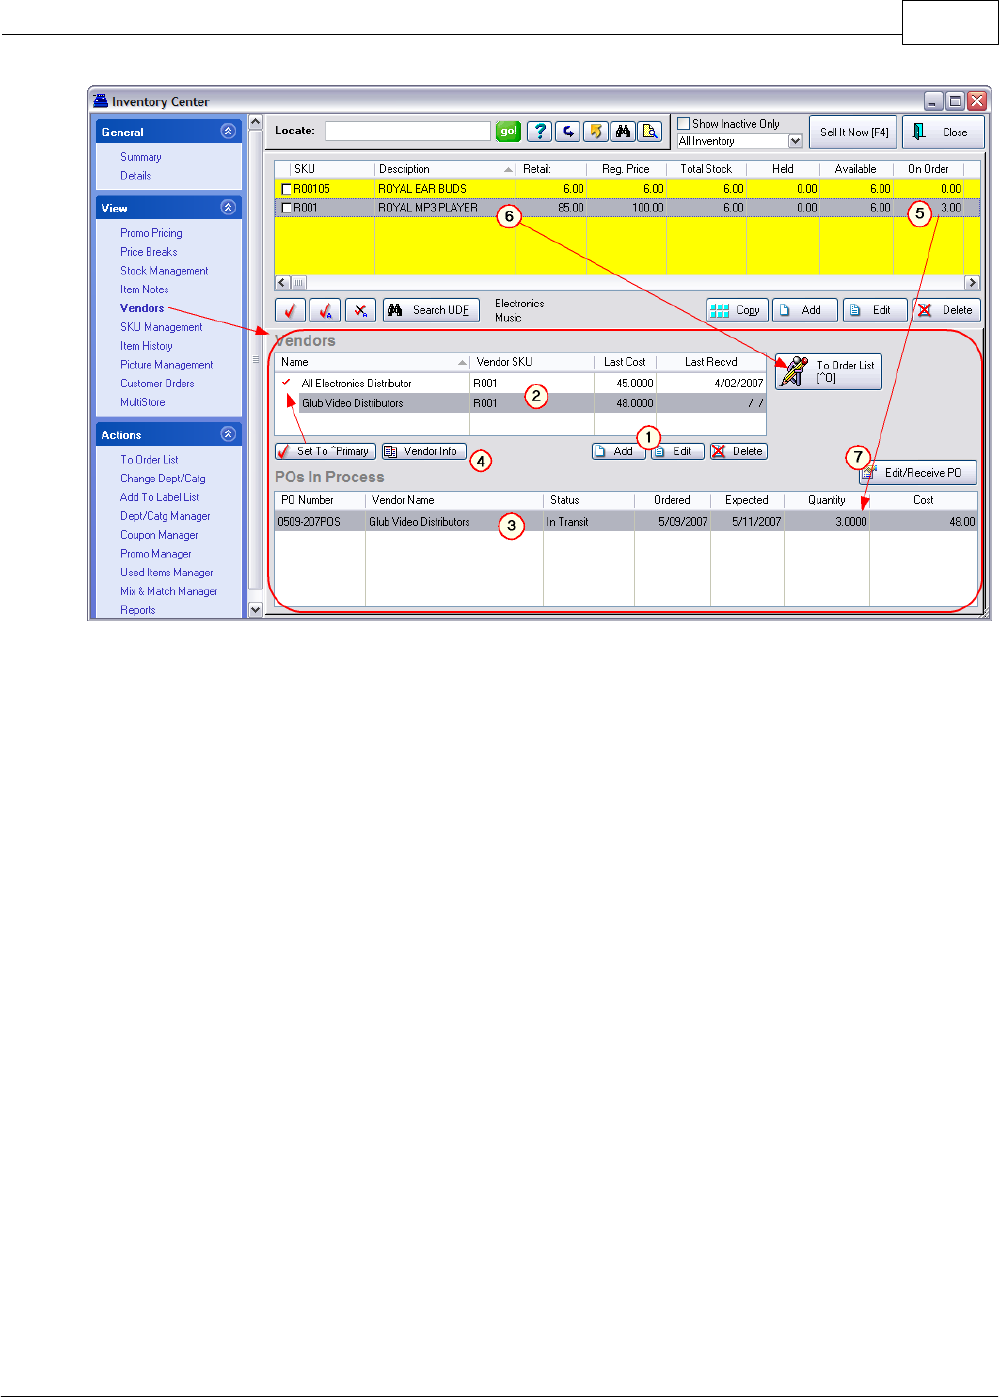
Primary Databases 129
Copyright ©2007 POSitive Software Company
(1) Add, Edit, Delete - To add a vendor for the highlighted inventory item; to change the vendor SKU
or vendor Cost; to remove a vendor as a source for the item.
(2) Vendor SKU - Last Cost - Last Received - The vendor SKU will print on purchase orders to
assure that the vendor knows precisely which item you want to purchase. Each vendor will have its
own vendor SKU. The Last Cost value will be updated as items are received on purchase orders.
(3) Purchase Orders In Process - All purchase orders to be placed with any vendor as well as
purchase orders in transit, waiting to be received are listed here for quick review.
(4) Edit Vendor Info - Opens the vendor record for changes to Name, Address, etc. Also provides
access to PO History, Payables, etc.
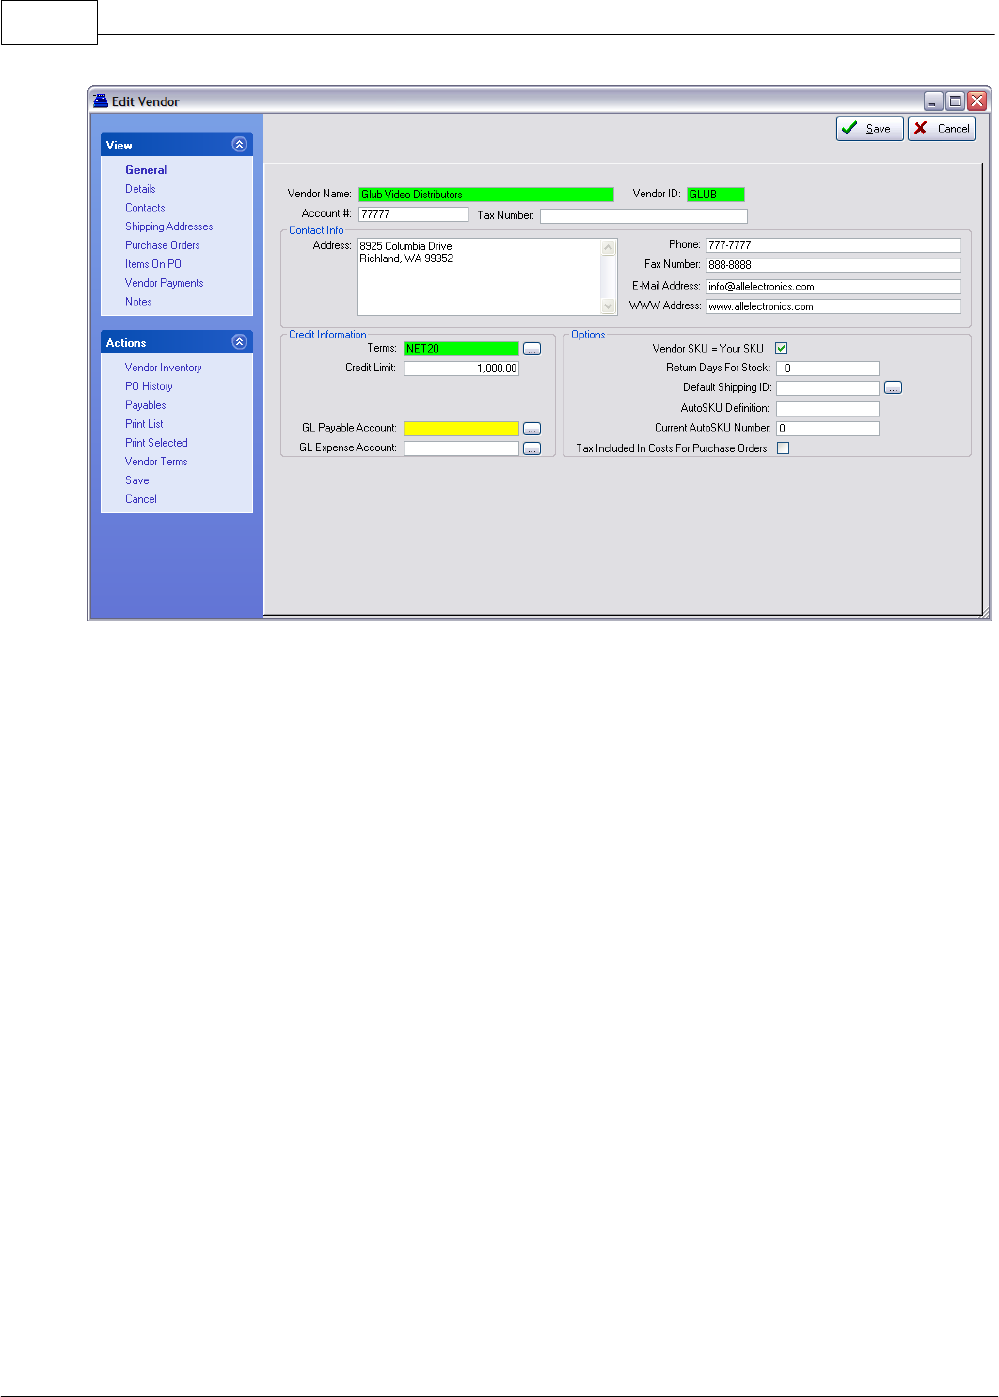
POSitive Retail Manager User Guide130
Copyright ©2007 POSitive Software Company
(5) On Order - If a purchase order is waiting to be received, the quantity ordered appears on the line
item record.
(6) To Order List - If you choose to order more of the highlighted inventory item, you will be
prompted if you really want to add it to the Order List. (see To Order List)
(7) Edit/Receive PO - You may edit the highlighted purchase order and receive it if necessary.
4.2.2.8 SKU Management
PRM allows an inventory item to have multiple part numbers. This is useful for tracking superseded
part numbers; although you order by a specific SKU, you can find the right item by entering old or out-
dated SKUs for the item. This feature can also be used for groupings of inventory, such as all items
on a specific catalog page number, or items which interconnect with each other but not with other
items.

Primary Databases 131
Copyright ©2007 POSitive Software Company
SKU List
(1) Asterisk - The asterisk * indicates that the SKU is the Primary SKU. You can change which SKU
is primary by adding/highlighting a different SKU and choosing "Set As Primary SKU".
(2) Secondary or Alternate SKU - Any other SKU in the list is a secondary SKU. A secondary SKU
can be a superseded part number, a common classifier, manufacturer part numbers, or vendor part
numbers.
IDEA: Some users of PRM publish a catalog and assign the catalog page number as an alternate
SKU to all items on that page. When taking phone orders, the store clerk simply asks for the page
number and then selects the appropriate item.
Alternate Information
(3) Alternate Information - Only a secondary SKU can utilize these features.
If the same product is sold in multiple package sizes, PRM provides an alternate SKU with an
alternate description printed on the invoice. For example, cigarettes are sold by the pack and the
carton; beverages are sold in single cans, 6-packs, half-cases, and full cases. These separate
packages may use the same SKU yet the selling price and quantity to reduce from stock will be
different.
IMPORTANT NOTE: Remember that after creating Alternate (Father/Child) SKUs, then you must also
set Price Breaks to charge the correct amount for each package.
An Example
Bottled Water - A single bottle of water sells for $1.00 and has a SKU of 12345678. The same bottle
of water is sold in a pack of 4 using a clear plastic wrap or a plastic loop binder to hold them together.
The SKU for the pack of 4 is the same 12345678 as the SKU on the bottle.

POSitive Retail Manager User Guide132
Copyright ©2007 POSitive Software Company
(A) Add the same SKU as an alternate SKU. (The alternate Display Description gets updated
automatically.)
(B) Activate "Use Alternate Info" - the description entered here will print on the customer invoice.
When this item is sold, you will reduce your stock count by 4.
(C) Select Apply Changes to save this definition.
(D) IMPORTANT: you MUST create a price break; otherwise you will be selling all 4 bottles for the
price of 1 bottle.
(see Price Breaks)
General Comments
BARCODES and SKUs
Although the terms are sometimes used interchangeably, the SKU is a series of numbers and/or
letters to identify a product. A Barcode is the product number printed in a series of dark lines or
stripes which can be read by scanners or barcode readers. If the product does not already have a
barcode printed on it, then PRM can print a barcode label using the Primary SKU product code.
Primary SKU
Short for Stock Keeping Unit, the SKU is a unique alphanumeric code for a product. Typically the
SKU is the same as the scanning barcode printed on the product, or it is a pattern of characters
designed to reveal information about the type, source, or status of the product, or it can be a
non-descript, almost random alphanumeric.
Each product must have a SKU and it must be different* from any other SKU. If you wish, PRM will
generate SKUs for you, using an AutoSKU option. (see Category)
Do NOT use any characters other than numbers, letters, or hyphens; the use of illegal characters will
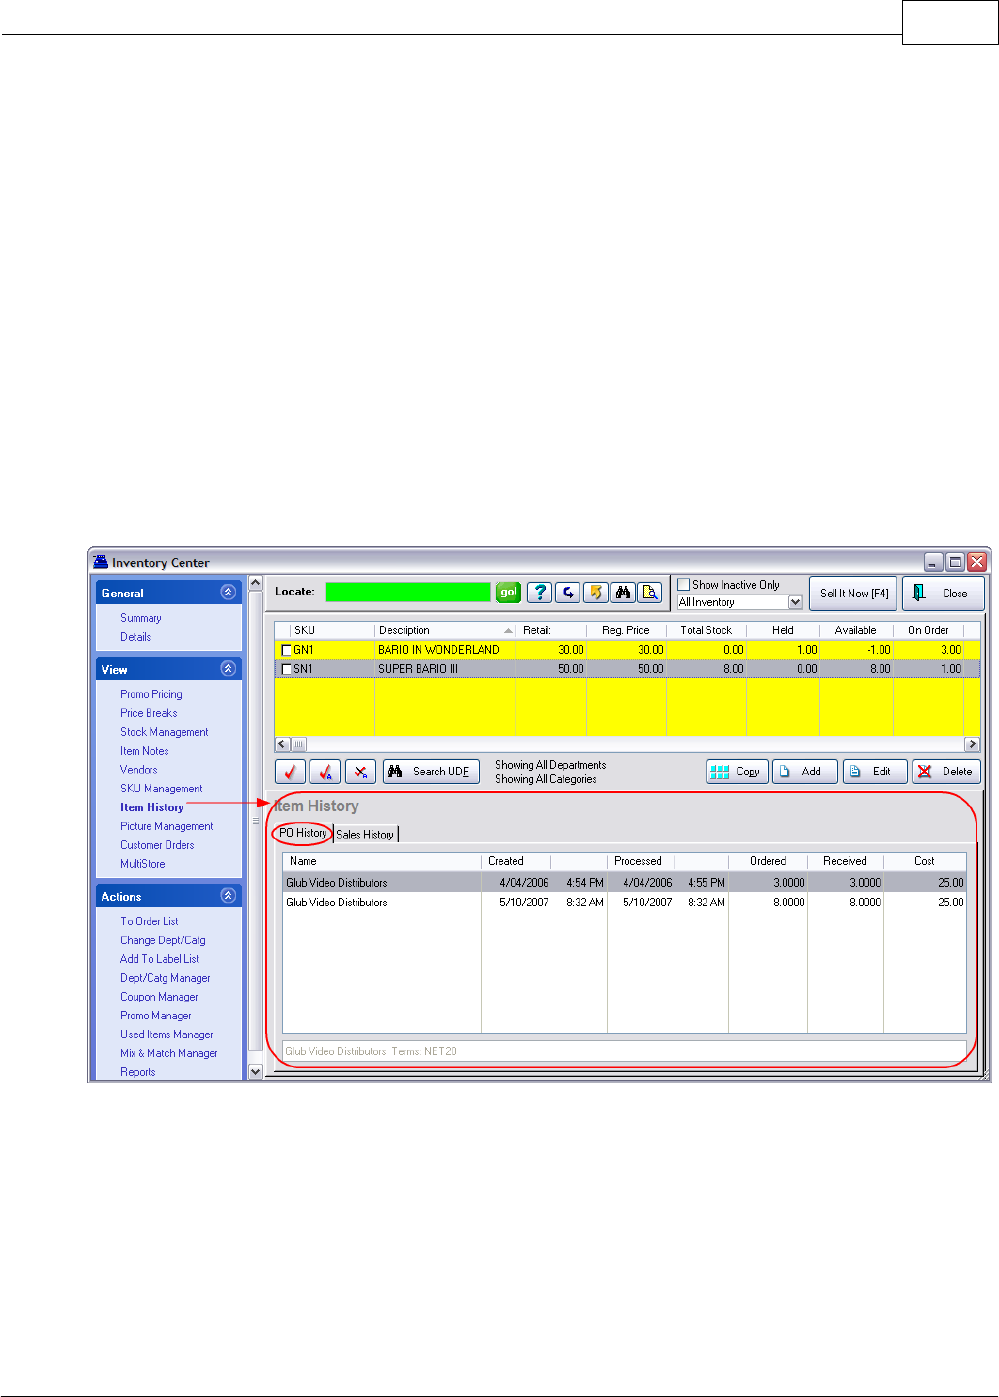
Primary Databases 133
Copyright ©2007 POSitive Software Company
prevent the barcode from being generated.
If you attempt to create a new inventory item using the same SKU you will be warned that the SKU is
already being used by another item; the description of the original item will be displayed.
You cannot delete a Primary SKU. You must first add a substitute SKU and make it primary, then
delete the original primary SKU.
LABEL PRINTING: Only the Primary SKU is used for printing a scannable barcode on labels.
4.2.2.9 Item History
Displays both Purchase Order History and Sales History of the highlighted inventory item.
PO History
(1) Lists the vendor date placed and received, quantities ordered and received and the cost on each
PO.
Sales History
Lists the most recent invoice as the top line. Shows cost, selling price, and profits per item
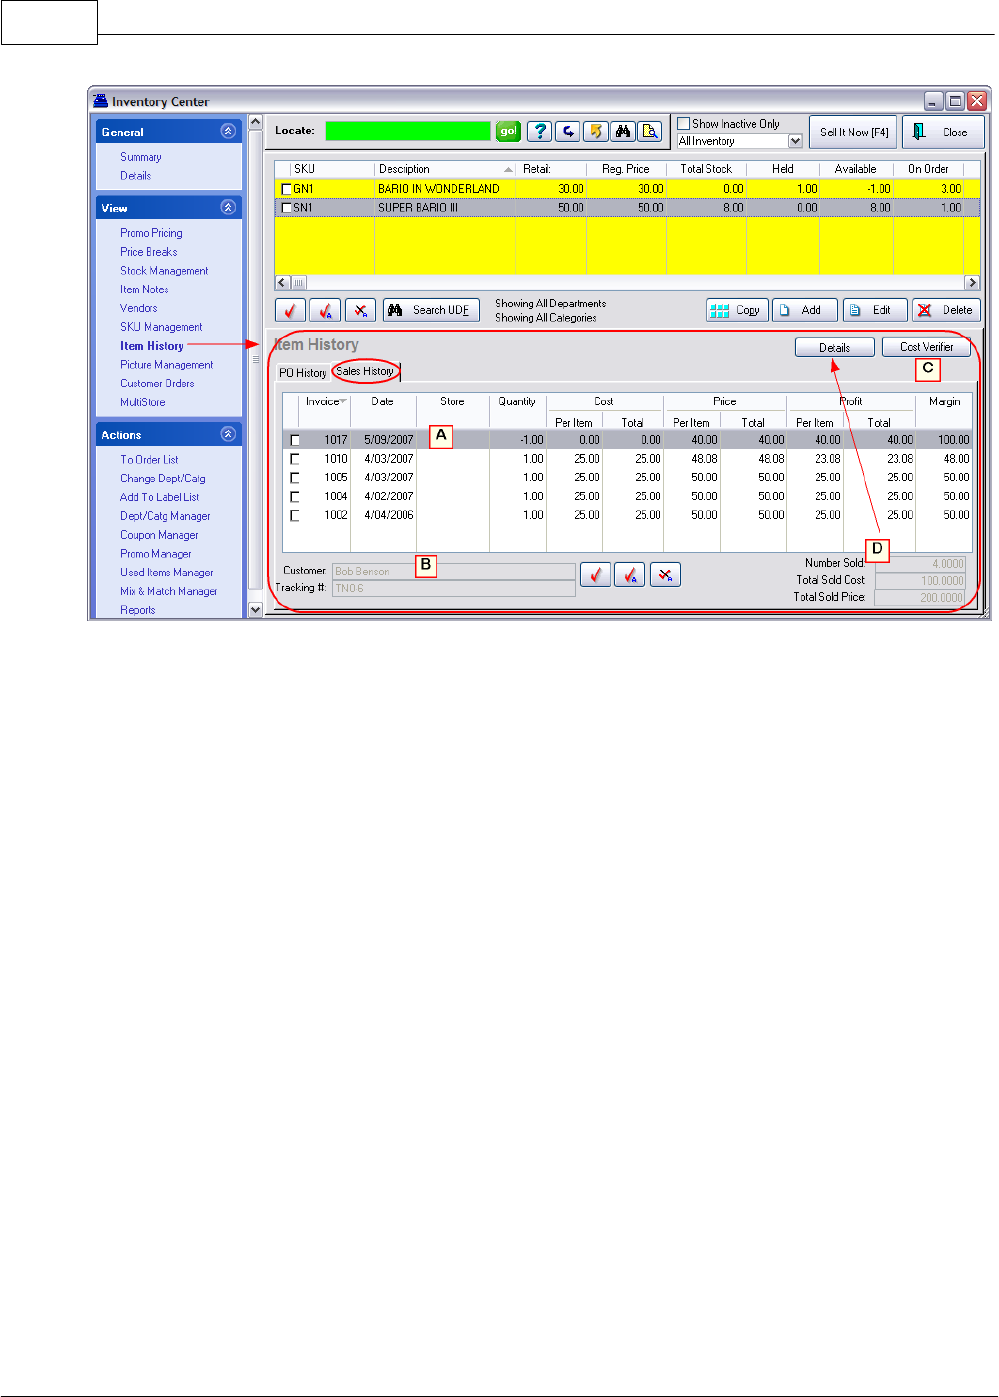
POSitive Retail Manager User Guide134
Copyright ©2007 POSitive Software Company
Invoices
(A) Listed in descending sequential order, each invoice displays the date, quantity, cost, price, and
profit on the sale.
(B) In the bottom left is the customer name on the invoice and a Tracking Number which can link the
item to the original purchase order.
Cost Correction
(C) Cost Verifier is used in the event that costs were not correctly entered when product stock
counts were recorded, one can choose to adjust costs of items already sold.
If you determine that a cost is inaccurate, you may highlight the item and change the cost with this
Cost Verifier button. Multiple items can be selected and changed by tagging two or more items, first,
and then using Cost Verifier to change all tagged items.
TIP: Highlight the lowest invoice date or number and then choose Tag All button. This will checkmark
items sold more recently than the tagged item.
Average Cost - If the invoice sold multiple units which drew upon First In-First Out items with different
costs, then cost will be averaged based on FIFO costs of each item sold.
Details - Tables and Graphs
(D) Grand totals of number sold, cost, and selling prices are displayed at the bottom right. In you
want to see this information in graphical form and broken down by years, choose the Details button at
the top. Then choose a view at the right.
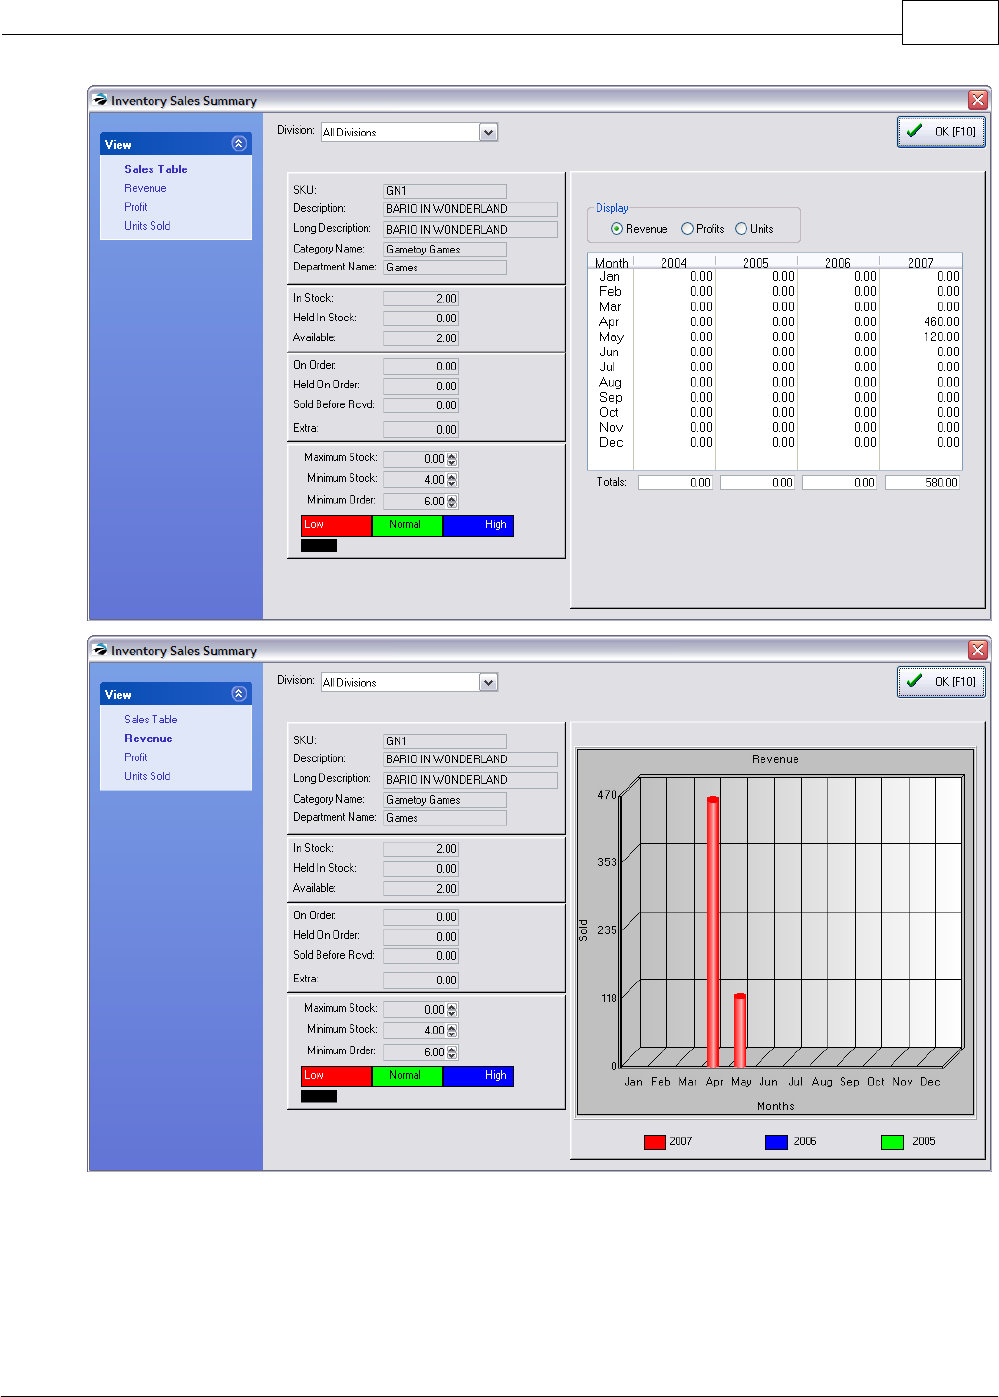
Primary Databases 135
Copyright ©2007 POSitive Software Company
4.2.2.10 Picture Management
Every inventory item can have a picture assigned to it.
This image can be imported and modified. It can be uploaded to your web site. It can be viewed
while on an invoice or from a number of other screens.
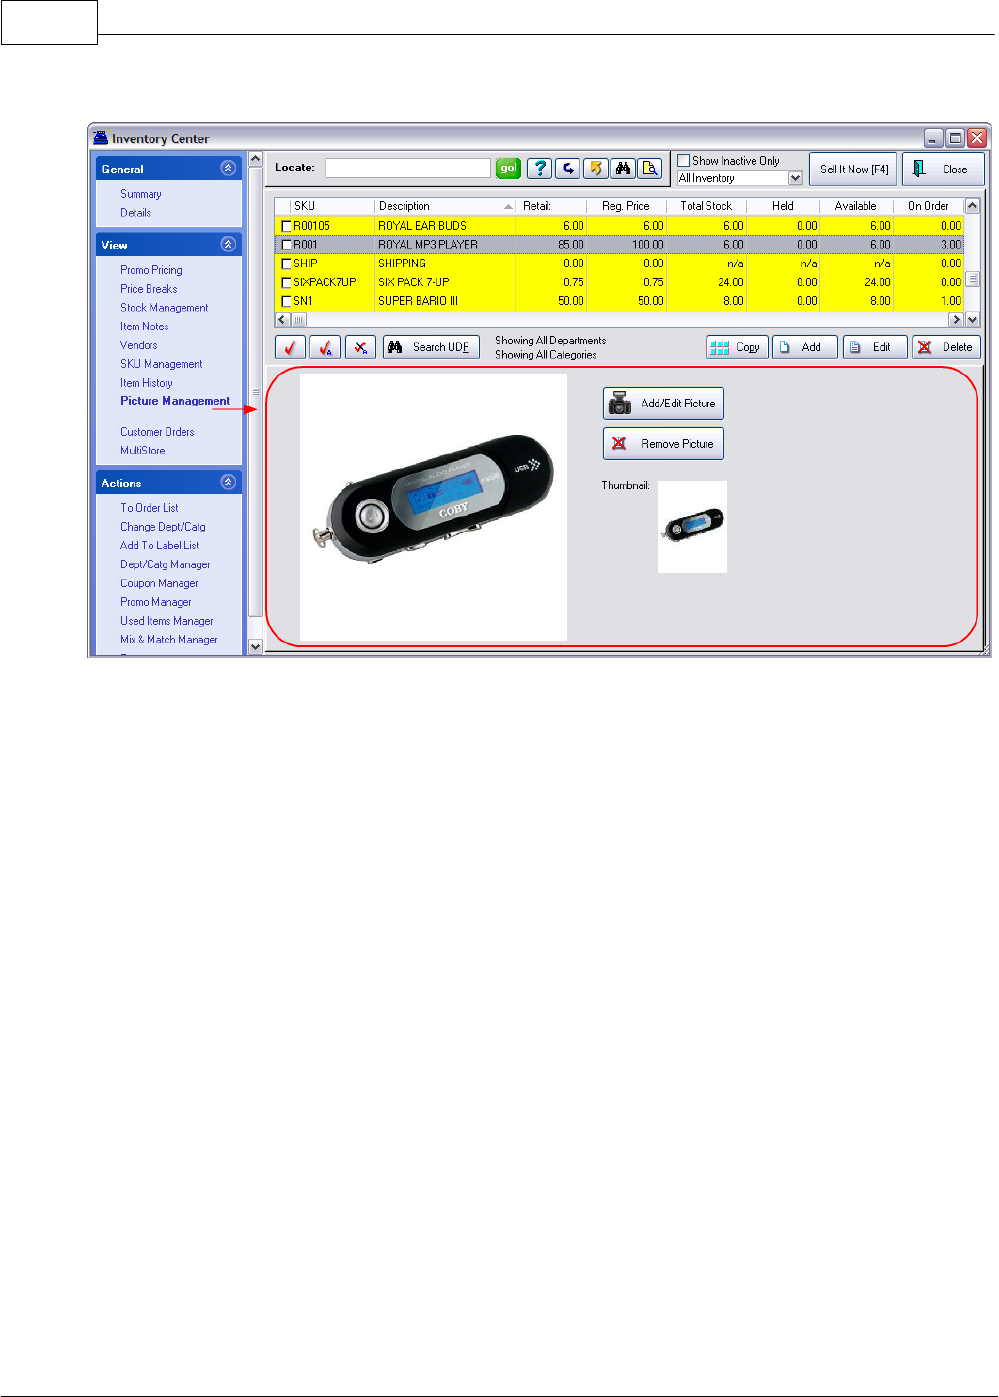
POSitive Retail Manager User Guide136
Copyright ©2007 POSitive Software Company
Images added to an inventory item are automatically saved in the data files.
(A) To add a picture to an inventory item, you can either:
Drag & Drop which means that if you can see the image on another window, perhaps the
manufacturer's web site, you can click on that image and drag it into PRM. (Drop the image in the
area which says: "Drag & Drop....to assign pictures.")
Add/Edit Picture opens the Image Editor allowing you to load an existing picture.
A thumbnail of the image should be generated automatically and will appear in the box titled
"Thumbnail:" Click on this button only if the thumbnail image is not visible or is distorted.
In addition to seeing the image twice on this screen, you can view the image in a window by itself for
more detail.
EDIT PICTURE These tools affect the display of the main image.
·Original size
·Zoom in
·Zoom out
·Best fit
·Fit width
·Fit height
·(and more)

Primary Databases 137
Copyright ©2007 POSitive Software Company
4.2.2.11 Customer Orders
Shows all pending orders for the highlighted item.
The "Held" column of the inventory item is the total of pending orders.
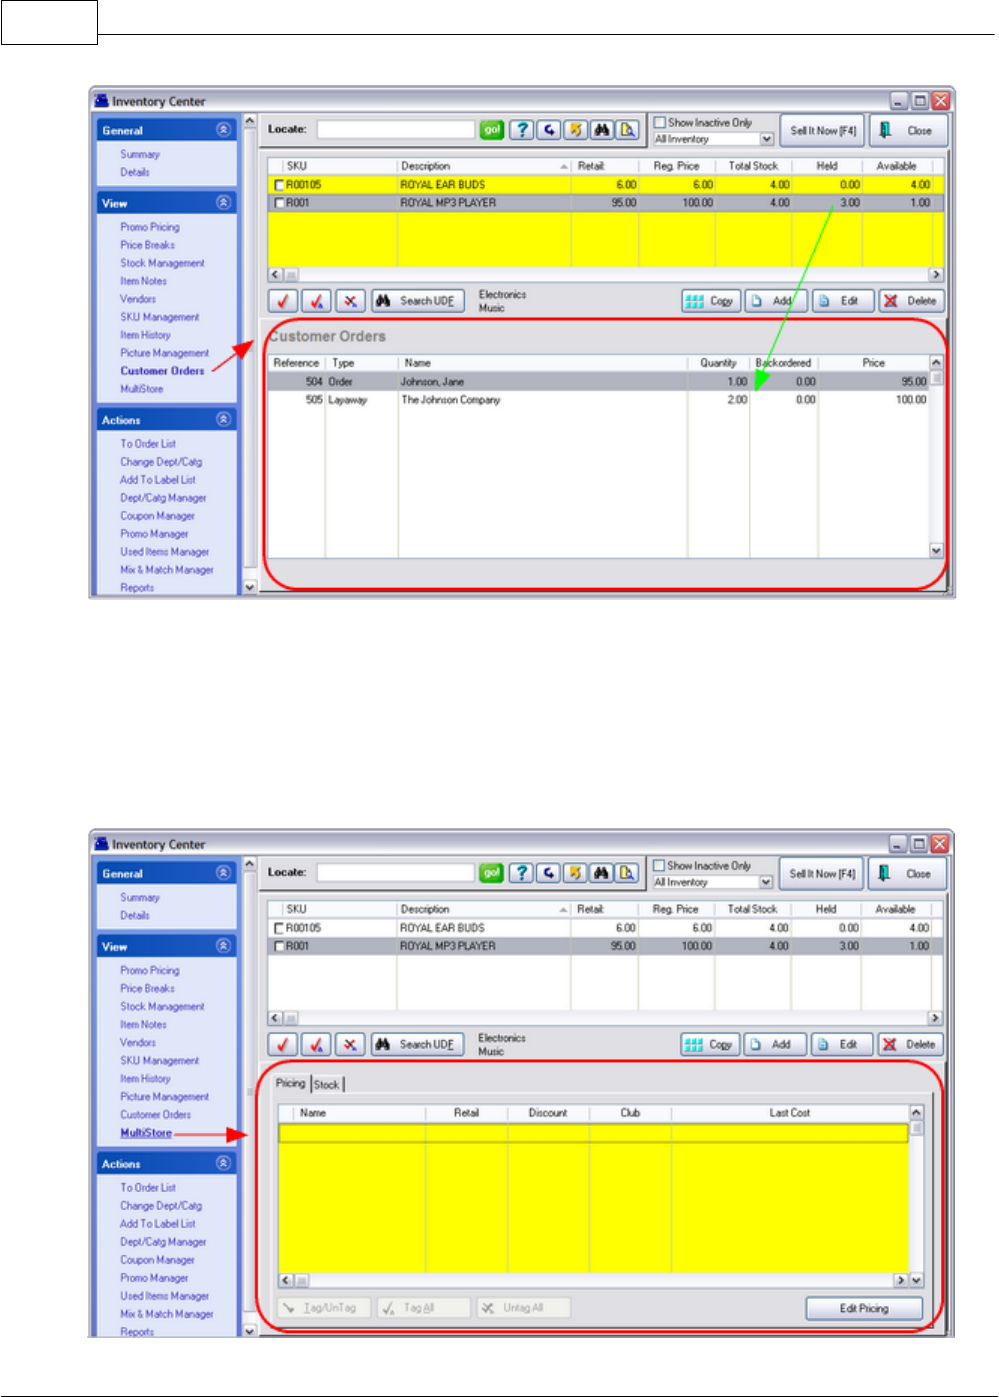
POSitive Retail Manager User Guide138
Copyright ©2007 POSitive Software Company
4.2.2.12 MultiStore
PRM supports sharing of information between multiple stores. Each store is a separate entity and
operates much the same as discussed in other topics of this help file. This section shows how each
store can have its own pricing structure and stock levels.
See Dealer for more information.
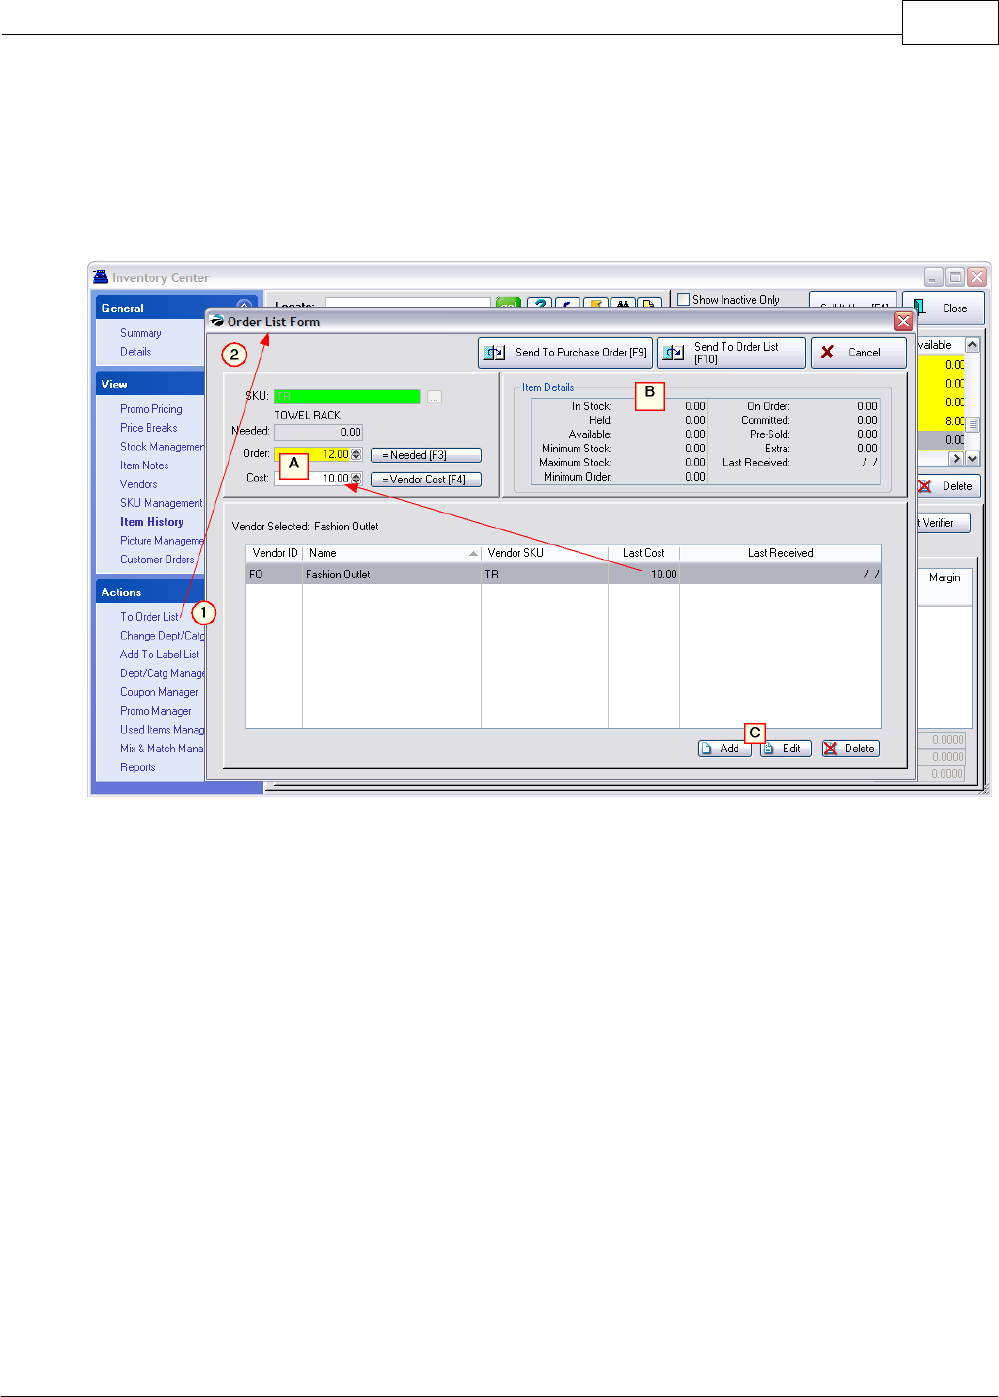
Primary Databases 139
Copyright ©2007 POSitive Software Company
4.2.2.13 To Order List
As you review your inventory, you may decided to order more product.
(1) Selecting this action, "To Order List," will warn you if there are pending purchase orders which you
can accept or ignore.
(2) PRM will then open this "Order List Form"
(A) Quantity & Cost - Enter the number of items desired based upon need or overall stock statistics.
Highlight the vendor and enter the cost of the item.
(B) Process Request - Choose how this selection will be processed:
·Send To Purchase Order [F9] - immediately creates a PO or appends the entry to an existing PO.
·Send To Order List [F10] - places the entry on the Order List to be ordered at a later time.
(C) Add, Edit, Delete - Assign an additional vendor, or change the Vendor SKU or Cost.
4.2.2.14 Change Dept/Catg
While reviewing an inventory item, you may decide that it would be better if it were assigned to a
different department and/or category.
Note: This procedure does NOT allow you to create NEW departments and categories. First go to
Maintenance: Departments to create what is needed.
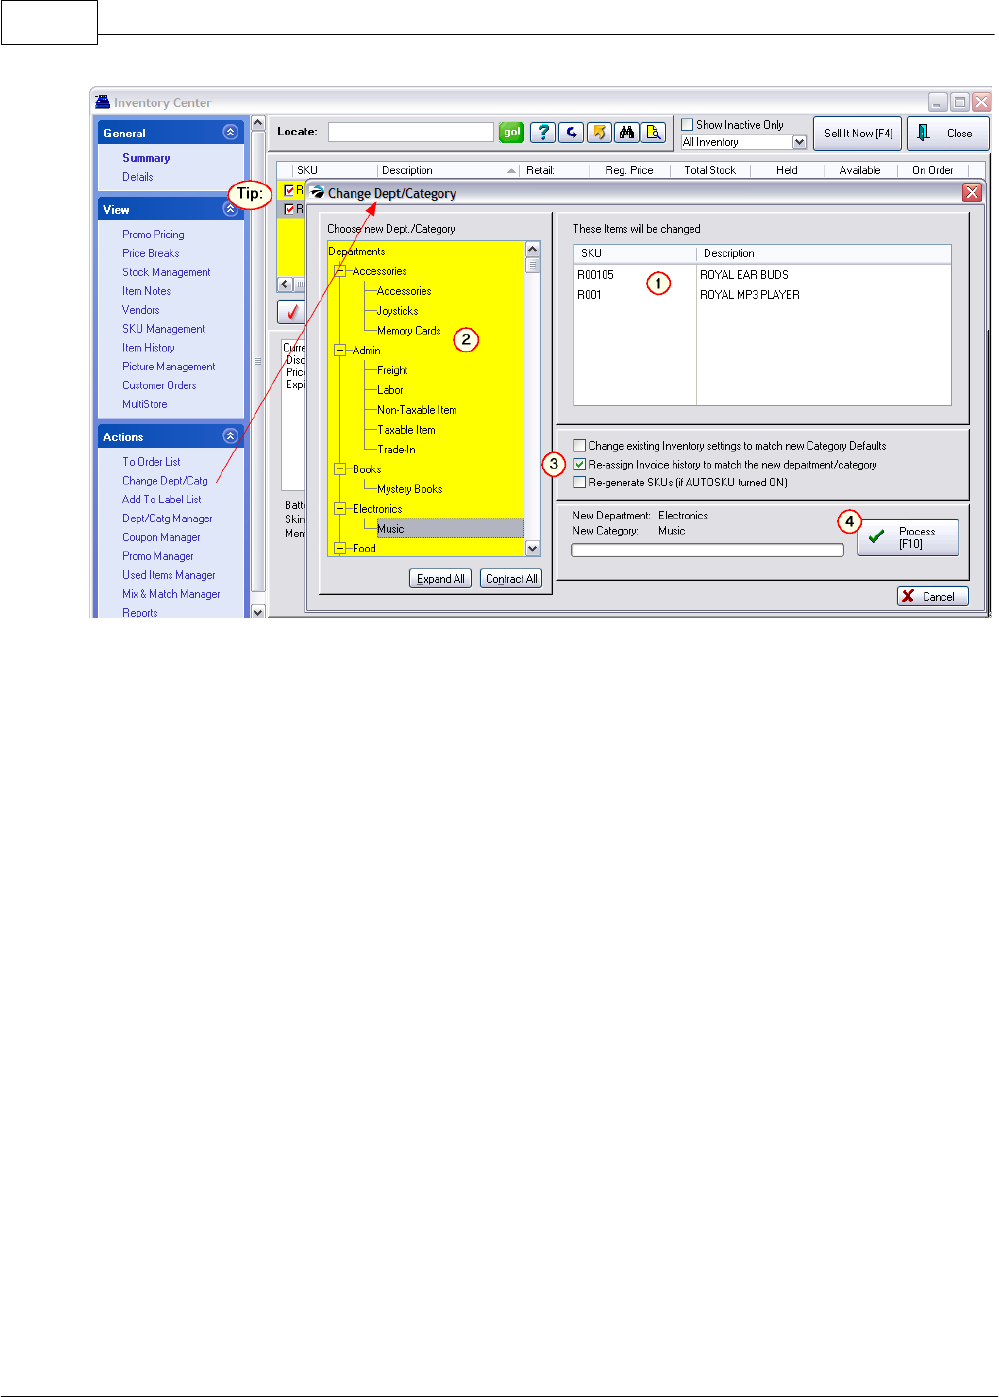
POSitive Retail Manager User Guide140
Copyright ©2007 POSitive Software Company
(1) When you choose "Change Dept/Catg" the window will display the SKU and Description of the
item in the upper right section of the screen. Also, the current Dept/Category is highlighted on the left.
(TIP:) This procedure can be done for multiple inventory items at the same time by first check
marking the desired items in the Inventory List section.
(2) Choose the new target department and category by highlighting an existing category.
(3) Select appropriate settings.
"Re-assign Invoice History To Match The New Department/Category" (RECOMMENDED) This
function will edit the invoice history table so that when you run a report on sales of the item it will be
reported in this new department/category instead of the old one.
"Change Existing Inventory Settings To Match New Category Defaults" (USE CAUTION) Every
category has some default settings. Choosing this option will change the settings of each individual
inventory item to the category settings of the new category. (see Category Defaults)
"Re-Generate SKUs (if AUTOSKU turned ON)" If the AutoSKU feature of PRM is applied to
categories, this might be a good choice, especially if the AutoSKU has indicators for department
and/or category assignments. Once Process [F10} is selected the new SKUs will be applied. (see
AutoSKU)
(4) Choose Process [F10]. This may take a few minutes, especially if the item has been sold quite
often and invoice history is being changed.
.
4.2.2.15 Add To Label List
While reviewing an inventory item, you can choose to print or re-print product labels.
(1) Click on "Add To Label List"
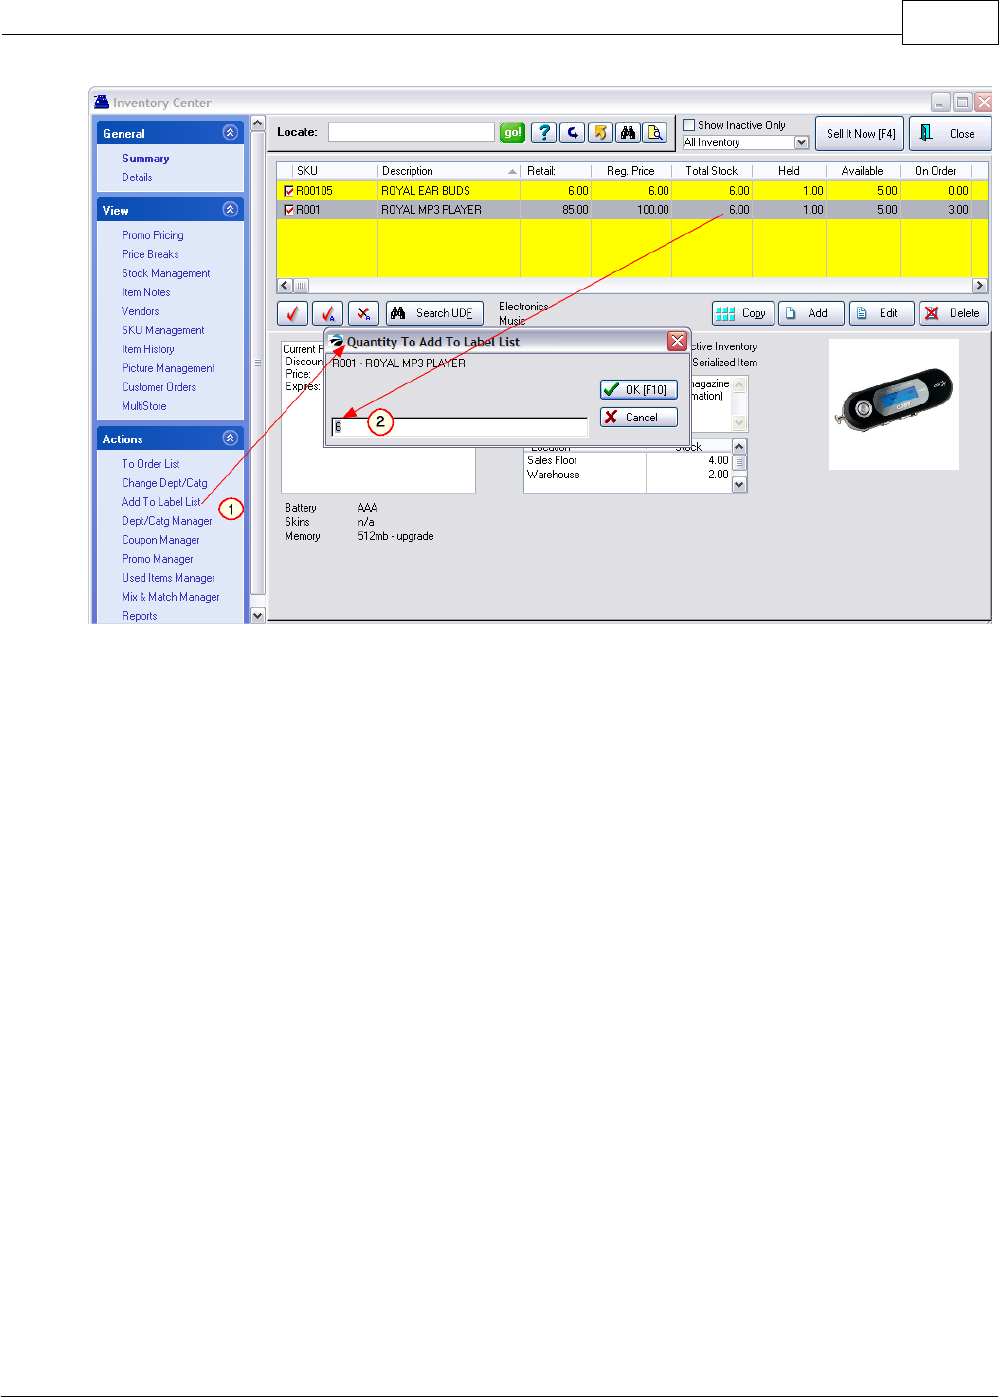
Primary Databases 141
Copyright ©2007 POSitive Software Company
(2) Choose the Quantity to Print. By default PRM will suggest your total in-stock quantity, but you
may print more or less than the suggested quantity.
If there are items being Held for customer orders, you may decide to print only the number available
for sale.
4.2.2.16 Dept/Catg Manager
This action is not linked to any inventory item; it is a convenient way to review and change your
department and category structure.
For specifics on using the buttons on this screen, see Departments.
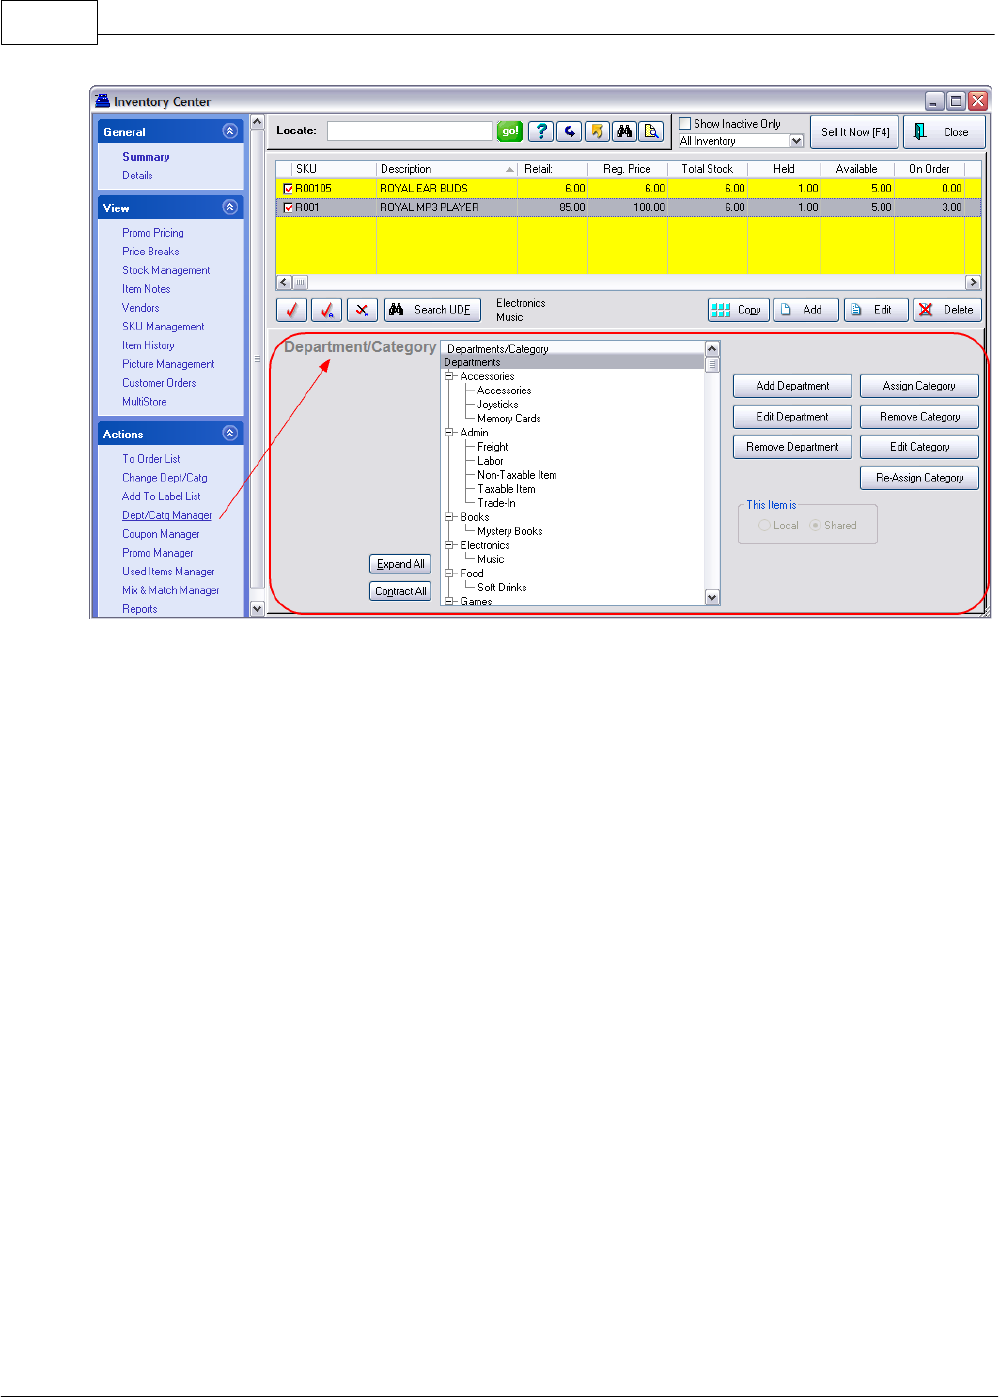
POSitive Retail Manager User Guide142
Copyright ©2007 POSitive Software Company
4.2.2.17 Coupon Manager
This action is not linked to any inventory item; it is a convenient way to review and change your in-
store and manufacturer coupons.
PRM allows you to create specialized coupons for use in conjunction with items you sell.
These coupons can be set
·to discount by a percentage or a dollar off value.
·to be valid for only specific inventory items based on department, category, or vendor, and can
exclude designated items
·to have an expiration date.
(1) Click on Coupon Manager. It is a listing of your defined coupons.
(2) Choose Add, Edit or Delete as needed. (see Coupon Form)

Primary Databases 143
Copyright ©2007 POSitive Software Company
How Coupons Are Used
When an invoice is created, you will enter the SKU of one or more coupons which are predefined in
this Coupon Manager list.
·The coupon SKU will automatically calculate its value from what is on the invoice.
·If qualifying items are not on the invoice, then there will be no discount.
·The coupon can be added at any time, and the line entry will be updated as more items are added
to the invoice.
4.2.2.18 Promo Manager
Promo Manager is an enhanced use of Promo Pricing, adding the ability to apply discount
percentages to more than just one product at a time for a given time period. Go to Inventory Center:
Promo Manager.
Use of Promo Pricing - When an item is sold during the stipulated date range the price setting will
automatically be applied to the invoice.
Pricing Options Of Promos
Items
can set Fixed Price, Discount, and Price Breaks
Category
can set Discount only to apply to all inventory in this category
Department
can set Discount only to apply to all inventory in all categories assigned to this
department
Whole Store
can set Discount only to all inventory
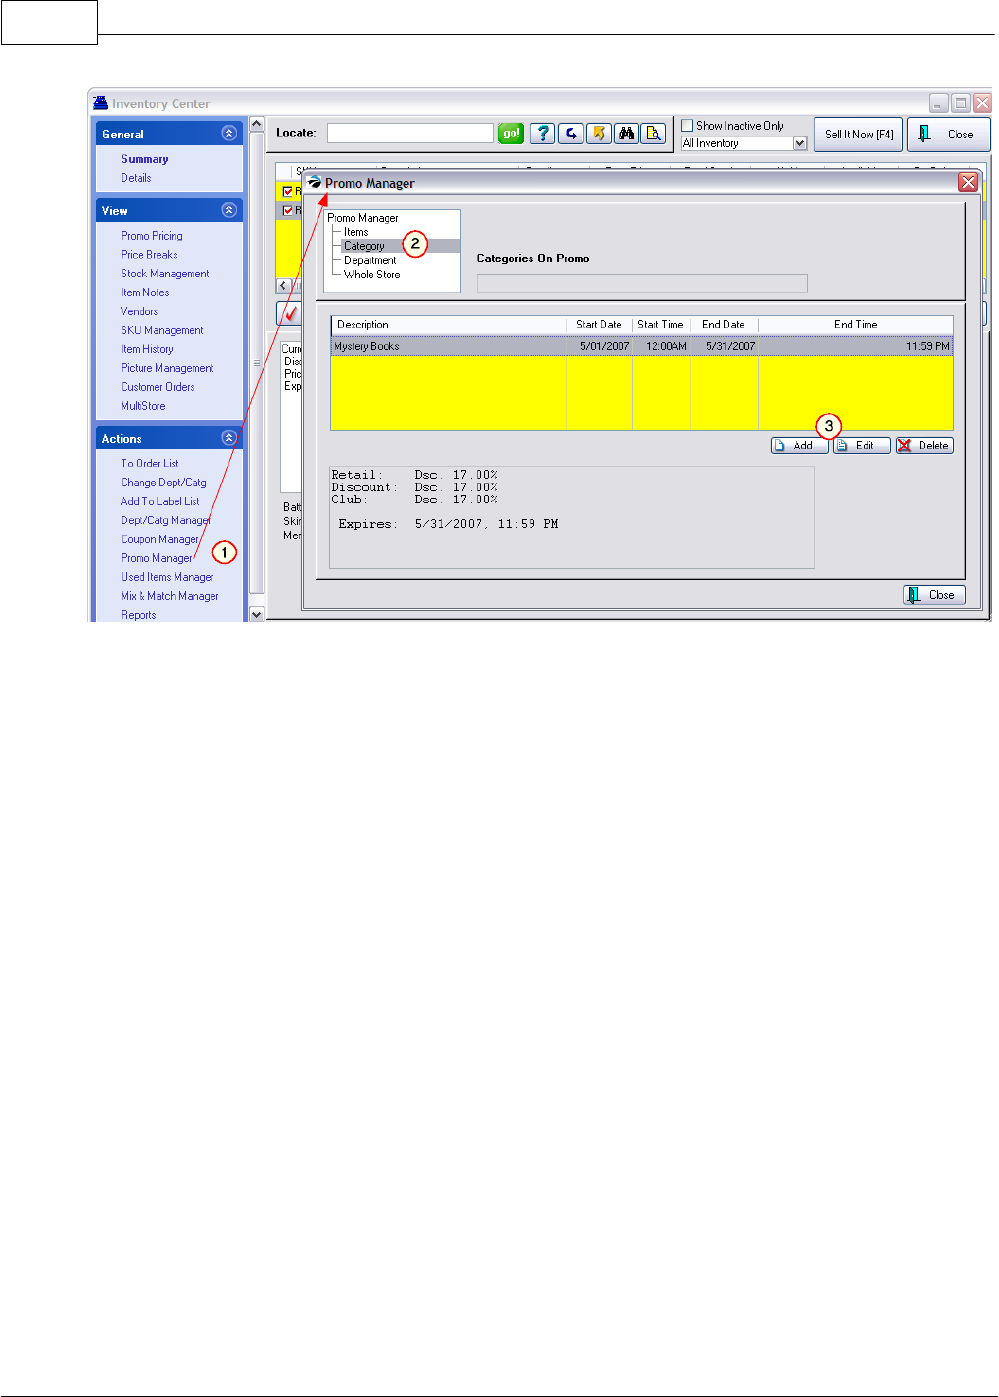
POSitive Retail Manager User Guide144
Copyright ©2007 POSitive Software Company
Promo Setup
(1) Open Promo Manager
(2) Highlight a type at the top.
(3) Choose Add to create the Promo definition. Fill in appropriate fields. (see Promo Pricing,)
(Optional) Choose Add again to create additional date ranges and prices. This allows you to create
sale events far in the future.
Print [F7] - (When "Items" is selected) Prints "Promo Pricing Report" which lists all items on promo
by SKU, Description, Start Date and Time, and End Date and Time.
Customer Return of Promo Priced Items
If a customer chooses to return an item, it is best to link to the original invoice so that the prorated
value of the item will be refunded rather than the normal selling price.
Promo Pricing Vs. Mix & Match (see Mix & Match Manager)
·Promo Pricing of an item has an automatic cutoff date whereas Mix & Match requires you to delete
the group.
·Promo Pricing can be created in advance of a sale with a starting and ending date. Mix & Match
takes effect as soon as it is defined.
·Promo Pricing is not contingent on the number of items purchased. For example, with Promo
Pricing one could purchase just one robe at $37.50 whereas Mix & Match requires purchase of two,
the designated quantity, before the price is in effect.
·Mix & Match takes precedence over Promo Pricing. If an inventory item is assigned to both Mix &
Match and Promo Pricing, the price set for Mix & Match will be used on an invoice.
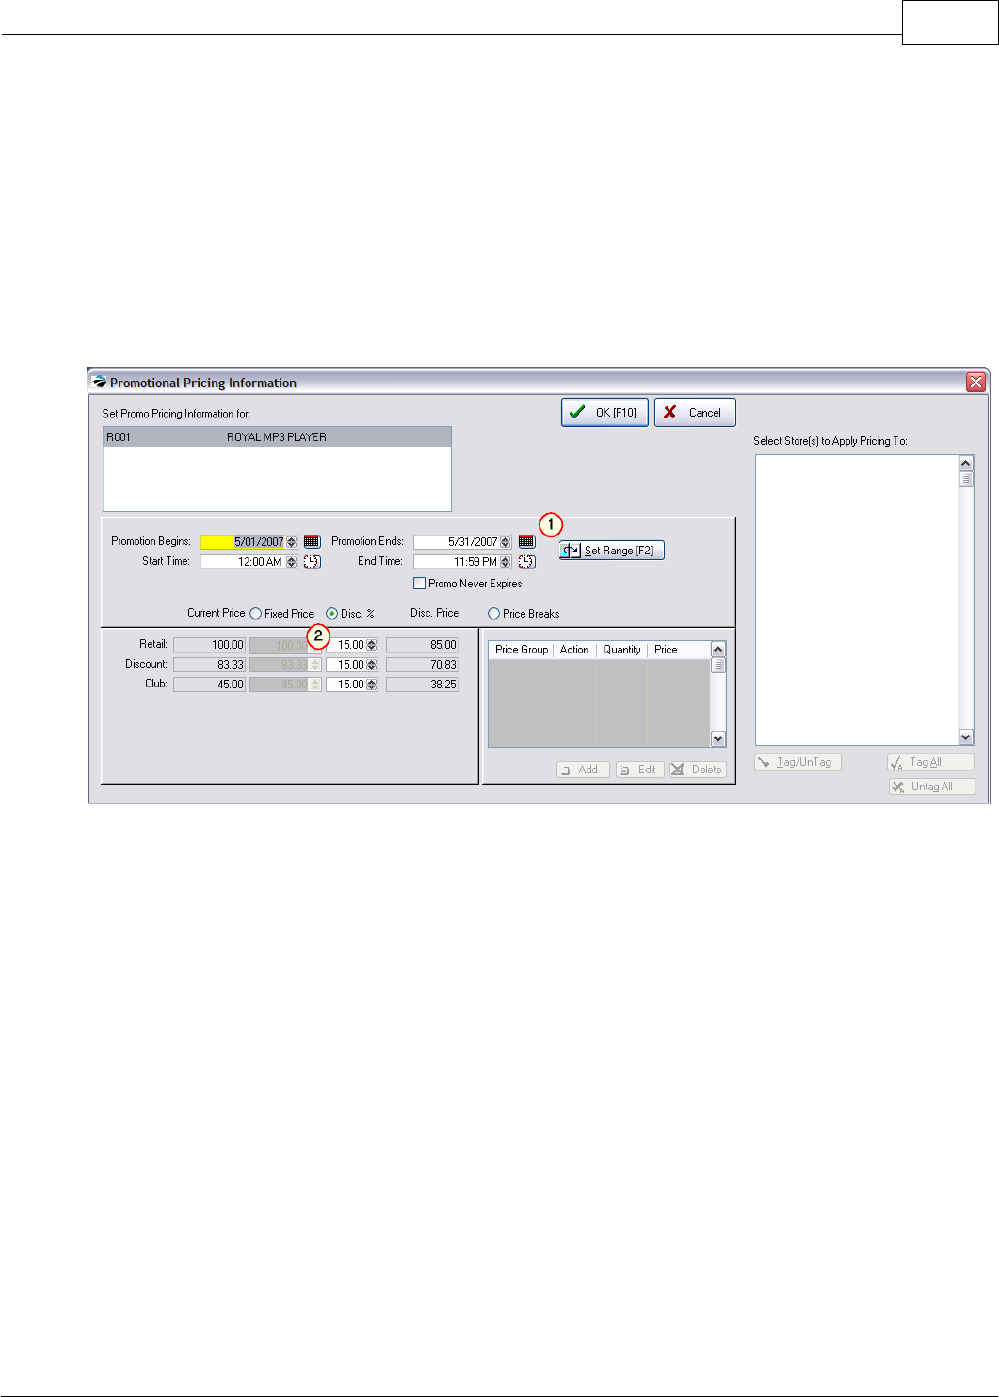
Primary Databases 145
Copyright ©2007 POSitive Software Company
4.2.2.18.1 Promotional Pricing Information
This screen displays the promo pricing setup of the listed inventory item(s).
From here, one can set
(1) the dates and times of the promotion,
(2) the new fixed selling price or a calculated selling price based on percentage off discounting.
Adding Multiple Items and Cloning Settings
This option is only available by going to the Promo Manager
1) Choose the Add button.
2) At the Inventory List, tag multiple items which will all have the same promo dates and pricing. Then
choose Select.
3) The tagged items will all appear in the upper left box.
4) Highlight one of the items and set the Date Range and Discount% (fixed prices are never
duplicated to multiple items)
5) Choose the Clone [F5] button. You will be prompted to proceed or not. If you choose yes, the
settings of the one item will be applied to all items in the list.
4.2.2.19 Used Items Manager
Items taken in as trade-ins can be tracked and re-sold. There are two ways to create and track Used
Inventory. The simplest is to press CTRL-T while in an invoice and identify the name of a trade-in
item and it's value. When the invoice is processed, the item is now accessible in the inventory list.
(see One Of A Kind Trade In)
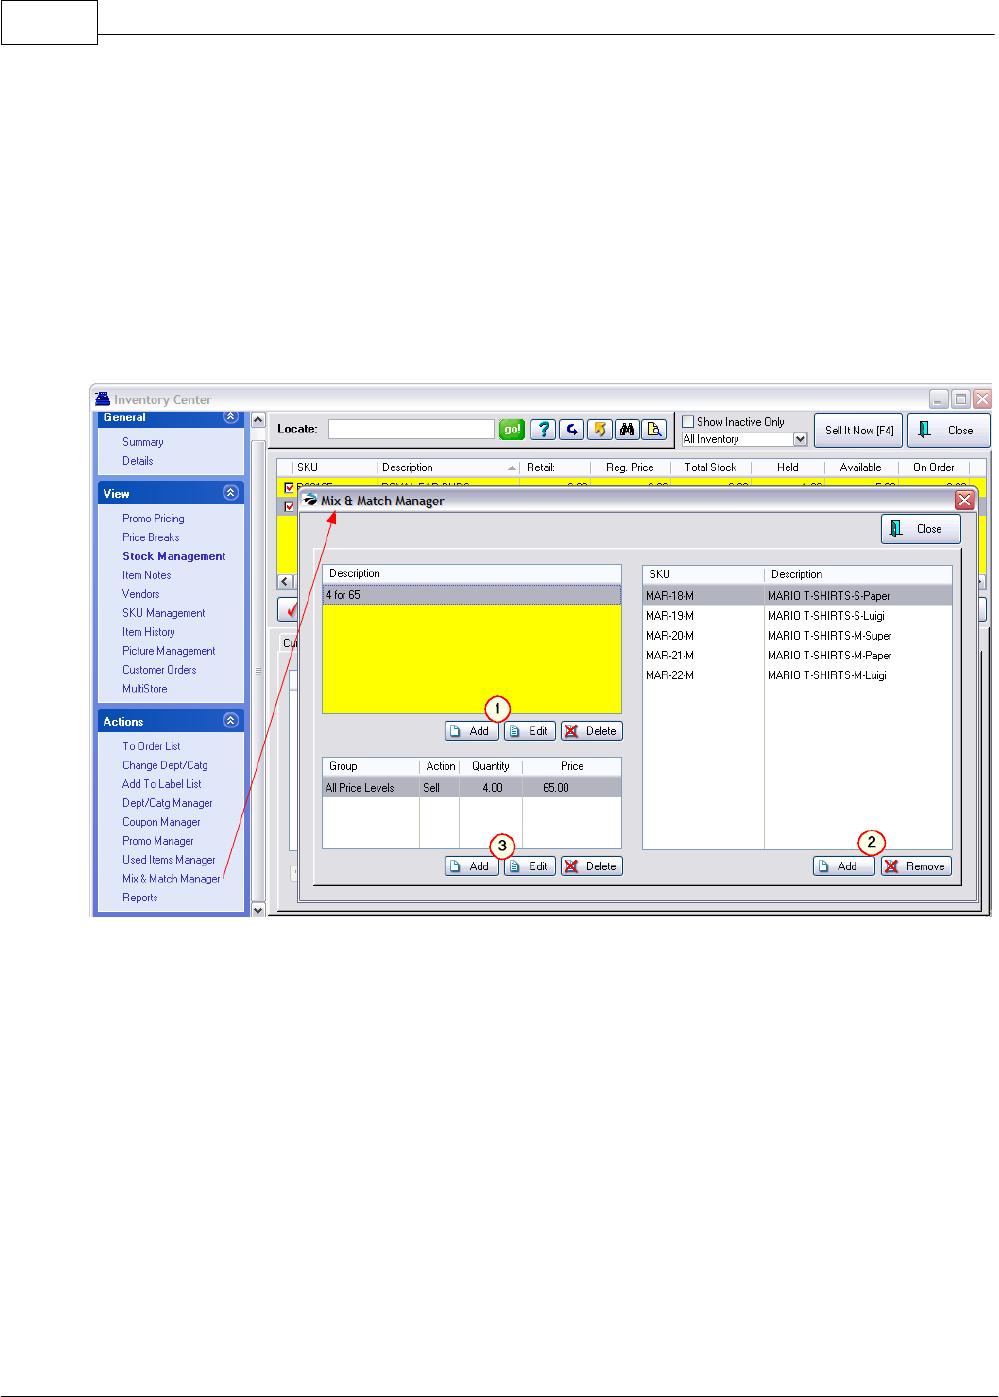
POSitive Retail Manager User Guide146
Copyright ©2007 POSitive Software Company
A bit more useful is to activate a system setting (see System Setup: Inventory: Used Items) to use the
Used Item Manager. Pressing CTRL-T while in an invoice prompts you to find a matching new
inventory item, define it's condition, and value. There are some additional steps before you can resell
the trade in item. (see Used Items Manager)
Contact your dealer for more information.
4.2.2.20 Mix & Match Manager
This action is not linked to any inventory item; it is a convenient way to review and change your price
breaks for multiple items.
Purchase of various items grouped under one price break will qualify for the special pricing.
(1) Create a price group name and pricing
(2) Add inventory items which belong to this Mix & Match group.
(3) (Optional) Add additional prices for different price levels
For detailed information see Mix & Match Manager in the Appendix.
4.2.2.21 Reports
This action is not linked to any inventory item; it is a convenient way to view customized reports. You
may create as many reports as you wish and access them whenever needed. (see Custom Reports)
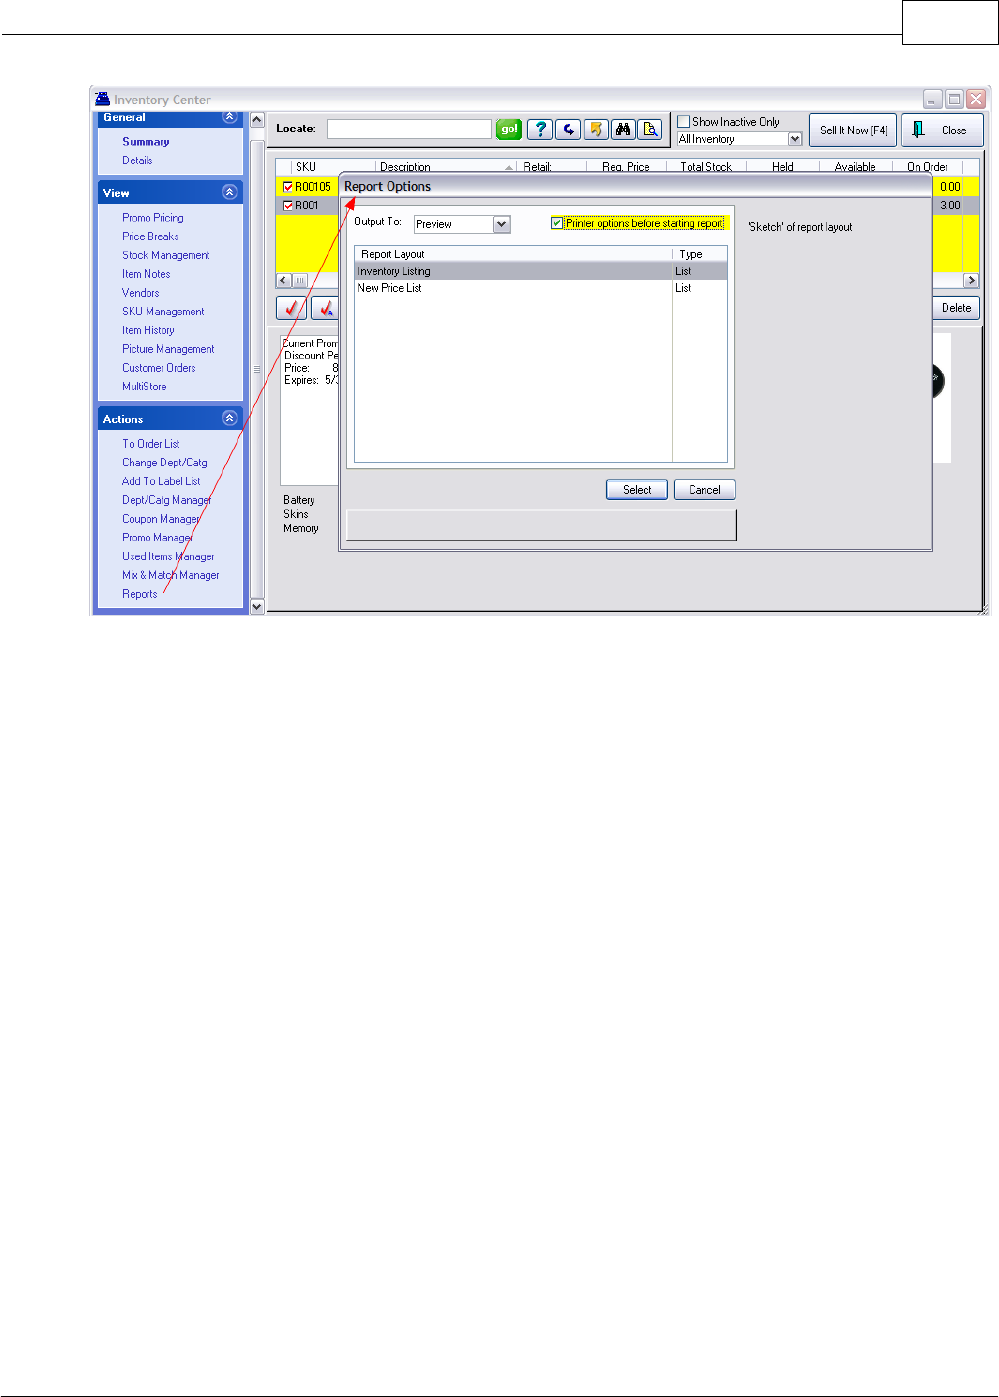
Primary Databases 147
Copyright ©2007 POSitive Software Company
When you Select a report and begin to run the report, you will then be able to apply queries or filters
to selectively display only data which meets the criteria. These queries can be defined and saved and
used as often as desired.
4.3 Vendor Center
This is an all-inclusive feature and function menu for your vendors. It is divided into 3 main parts:
Vendor List
The list of all of your vendor records. Various tools such as Locate,
Query, Find, and Filter quickly focus on the vendor(s) meeting certain
criteria.
Access Panel
Lists various views, properties, and actions relative to the highlighted
vendor account.
Vendor Information
Displays specific detail or other information about the highlighted
vendor. The contents of this section will change as various properties
on the Access Panel are selected.
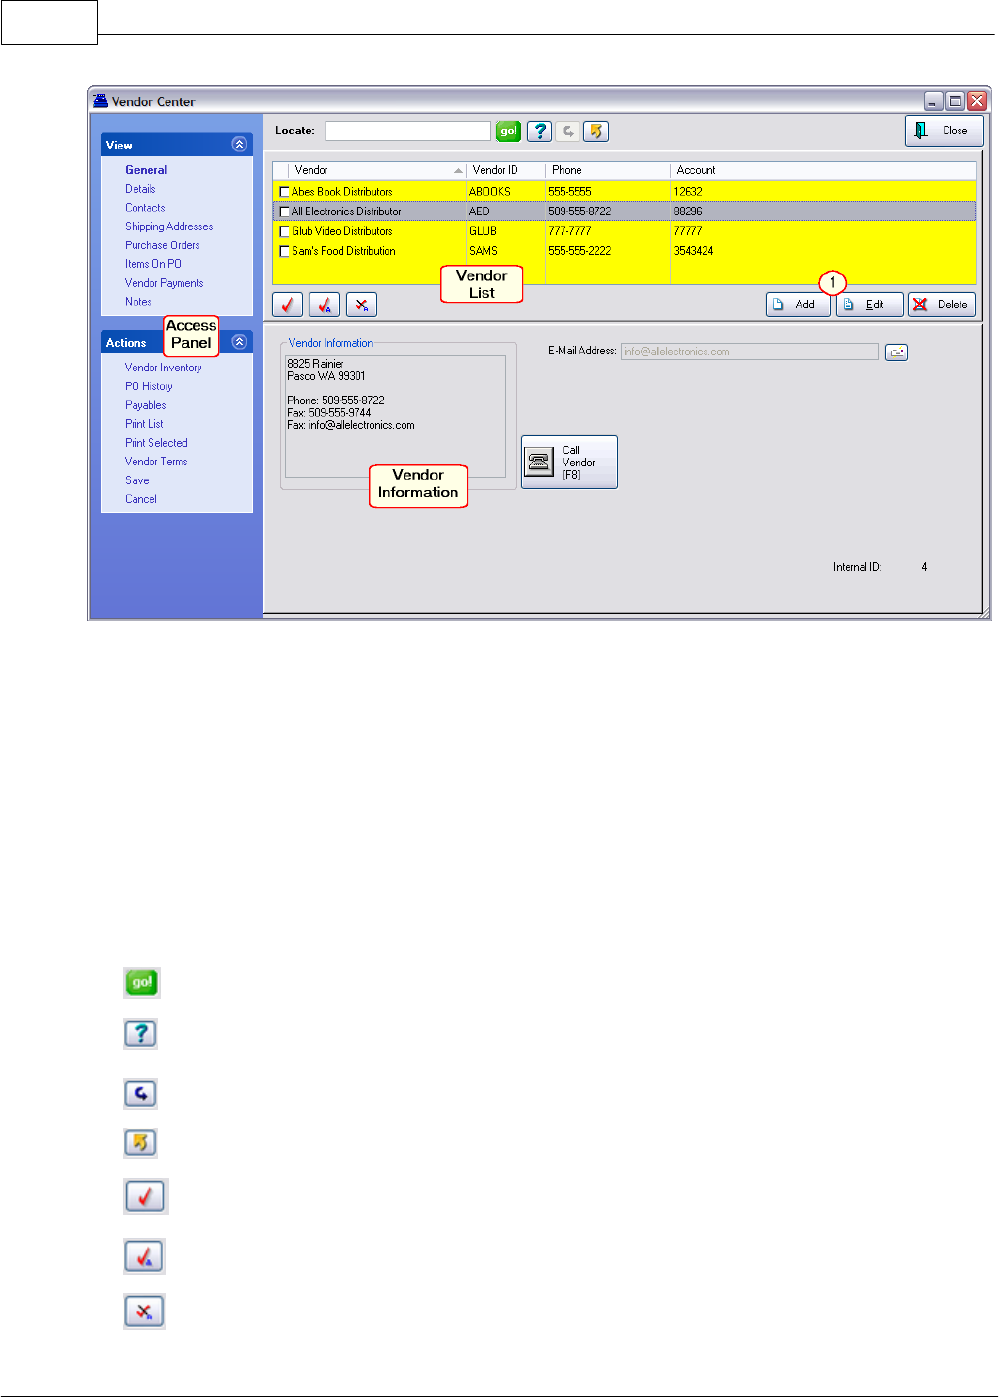
POSitive Retail Manager User Guide148
Copyright ©2007 POSitive Software Company
(1) Choose to Add or Edit a vendor.
Vendor List
SELECTION OPTIONS
Locate
First, select the column to be sorted by clicking on the column. Second,
begin typing search characters. (You do not have to click into the Locate
field.)
Press Enter - will find the first item beginning with the search characters
Press CTRL-Enter - will find all items with the search characters
somewhere in the field.
go!
The equivalent of Enter.
Query
Select from an unlimited number of saved queries or filters which you can
create and modify as needed. (see Saved Queries)
Reset
Restores the list to show all records.
Send
Sends displayed listing to HTML, Excel, Word, etc. (see Send)
Tag/Untag
Checkmarks the highlighted item. Clicking in the box beside the item will
also tag or untag the item.
Tag All
Checkmarks all displayed items.
UnTag All
Unchecks all displayed items.

Primary Databases 149
Copyright ©2007 POSitive Software Company
Add
Create a new vendor
Edit
Edit an existing vendor.
Delete
Warning: there is NO CONFIRMATION required and no "un-delete"
option.
Access Panel
VIEWS
General
Displays vendor address and phone, e-mail address, option to Call
Vendor, and vendor Internal ID number.
Details
A Vendor record can be edited to change address, phone, terms of
payment, credit limit, SKU controls, shipping and return options. (Optional
- assign unique GL Account numbers for Payable and Expense accounts.)
(see Vendor Account)
Contacts
Lists staff members' position, phone, and e-mail.
·Contact - Name of individual
·Description - Job title
·Phone - If the contact has multiple phone numbers, you may add the
contact multiple times.
·E-Mail Address - specific e-mail address for this individual. If the person
has more than one e-mail address, you may add the contact multiple
times.
Shipping Addresses
The vendor may have different offices and addresses for inquiries, returns,
and billing. Here you add as many addresses as apply and set an address
as a default address for RMA shipments and invoice payments. When an
entry is highlighted, the contents of the entry are displayed on the right for
easy viewing without editing.
·Description - A term to distinguish between RMA, Payables, and Other
shipping addresses.
·Contact - Name of individual to follow the ATTN: heading of the
correspondence.
·Default RMA - Check this box if the highlighted address is for shipping
return products. When an RMA is being sent to the vendor, this address
will be selected.
·Default Payables - Check this box if the highlighted address is for
mailing of payments. When a payment is being sent to the vendor, this
address will be selected.
Purchase Orders
Sort the list of purchase orders for the vendor by "To Place" and "To
Receive" (Placed).
Shows PO Number and total dollar value with line items on the PO. Can
choose to Edit the highlighted PO.

POSitive Retail Manager User Guide150
Copyright ©2007 POSitive Software Company
Items On PO
Displays all items currently on all purchase orders of the highlighted
vendor. Shows status of Ordered or Not Ordered.
Vendor Payments
Shows payment history.
Notes
A log of notes recorded about or for the vendor. These notes can include
summations of conversations, agreements made, disputes raised and
resolutions, or general information about the vendor and contacts. Each
recorded note logs the date and time and a synopsis line of the note
contents for easy selection. Notes can be edited or deleted as needed.
·Date - Creation date
·Time - Creation time
·Description - By default it says Vendor Note. It is suggested you change
this by entering a brief statement about the content or purpose of the
note.
·Note - The text. Up to 900 characters in length.
ACTIONS
Vendor Inventory
Opens a separate window of inventory assigned to the vendor. (see
Vendor Inventory List)
PO History
Opens a separate window of Purchase Order History By Vendor listing all
vendors. (see PO History)
Payables
Opens a separate window of Accounts Payable for all unposted and
posted transactions.
Print List
Prints a simple listing of all vendors showing vendor ID, name, city-state-
zip, and phone and fax numbers.
Print Selected
Prints general information about the highlighted vendor.
Vendor Terms
Opens a separate window of all vendor terms.
4.3.1 Vendor Account
To establish a vendor account you enter the vendor's name, address, credit terms, various options,
and names of contacts. You can keep a journal of notes regarding the vendor as well as review
yearly financial transactions. Changes can be made to this vendor record as needed.
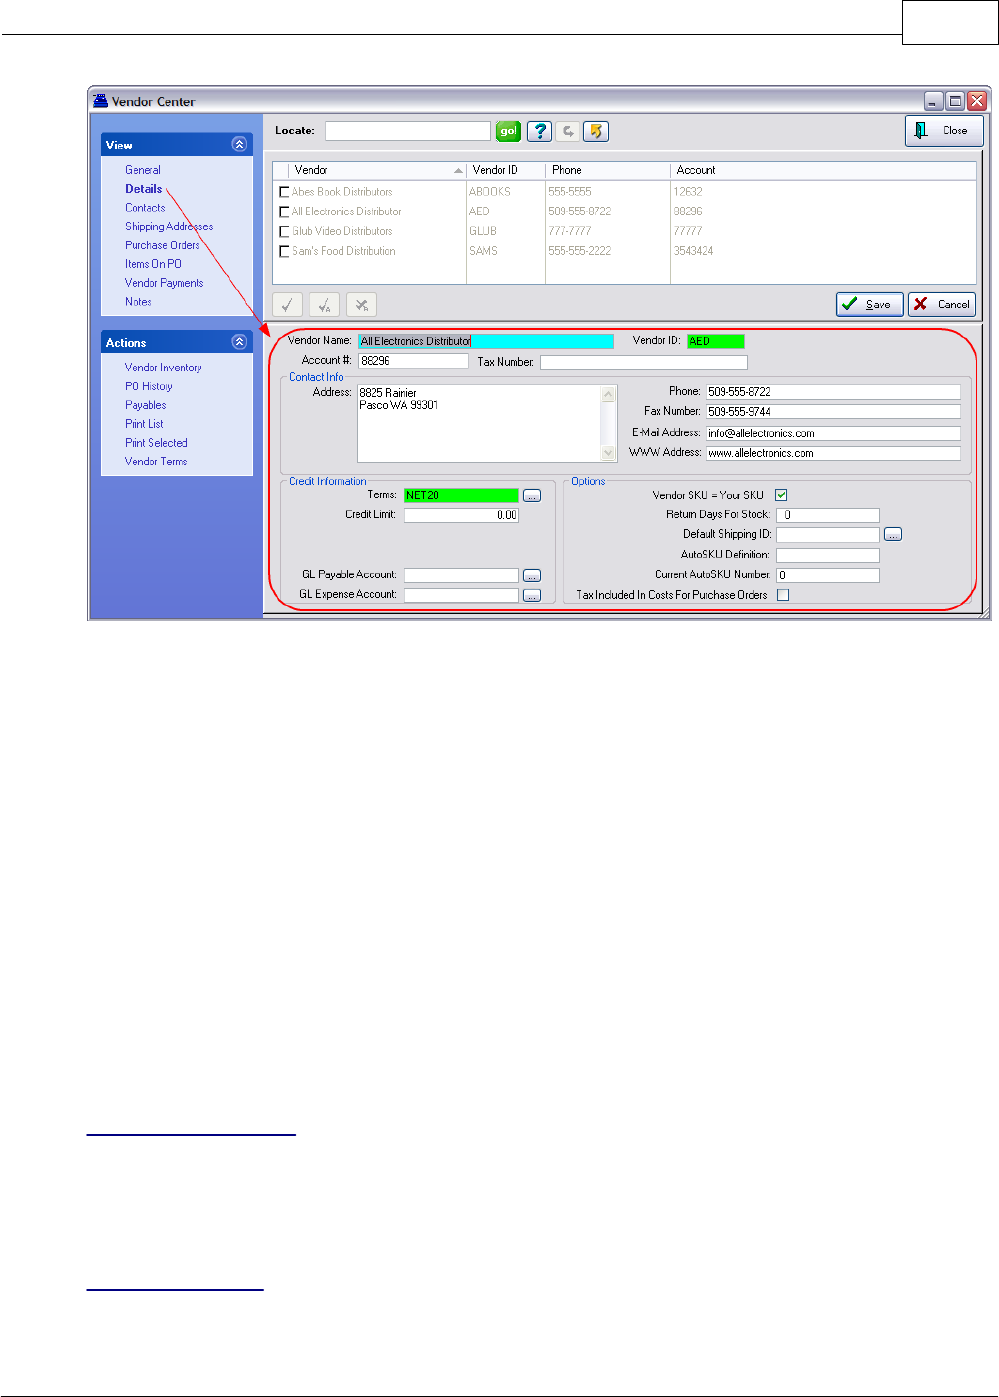
Primary Databases 151
Copyright ©2007 POSitive Software Company
Vendor Name - The company name. This entry will be used for address labels and other
correspondence.
Vendor ID - Your own code for identifying this vendor account. It can be a number system to match
your accounting program or an abbreviation of the name or any other code you wish to use.
Account # - Your account number by which you are known by the vendor. This entry will be included
on correspondence with the vendor.
Tax Number - vendor's license number
Address - free form field to include
·Address 1 - postal box or street address
·Address 2 - (a second line as needed)
·City, State, Zip, Country
Phone
Fax Number
E-mail Address
WWW Address
Credit Information
Terms -This field, Terms, is a required field. Choose a payment term preferred by the vendor. Use
the lookup button to find a term.
Credit Limit - The dollar limit allowed by the vendor.
General Ledger
Note: (Recommendation: Leave Blank) If these fields are left blank, then the default settings from GL

POSitive Retail Manager User Guide152
Copyright ©2007 POSitive Software Company
Interface Setup will be automatically applied.
GL Payable Account - The GL Account number you want to use for tracking liability transactions with
this vendor.
(Default is AP Setup: Default Accounts Payable)
GL Expense Account - The GL Account number you want to use for tracking expense transactions
with this vendor.
(Default is AP Setup: Invoice Expense Account)
Options
Vendor SKU = Your SKU - This option Vendor SKU = Your SKU is a shortcut feature to eliminate
duplicate typing. Typically, this option is used for small vendors who have an informal listing of
inventory or for vendors whose products are one of a kind and you are willing to use the same SKU as
the vendor's definition. If checked whenever you add inventory and link it to the vendor, both SKUs
will be identical.
Return Days For Stock - Some vendors allow for stock to be returned at no charge if it is returned
within a given time limit. Enter the number of days allowed by the vendor. If this field is active, PRM
will report which inventory items are nearing the cutoff date which is calculated from the invoice date
using this entry.
Default Shipping ID - The Default Shipping ID is the most common means of shipping used by the
vendor. The code includes the estimated number of days it takes for product in transit which will aid
you in determining order placements. From the opened window Vendor Shipping Options,
highlighting an entry and pressing Select sets a new default method for this vendor.
AutoSKU Definition - an identifying code for this vendor to be used when a Category AutoSKU is
activated. This is an optional setting which can be included automatically as part of your product
SKU.
Current AutoSKU Number - The next available SKU number for products from this vendor when a
Category AutoSKU is activated. (See AutoSKU Setup)
Tax Included In Costs For Purchase Orders - (visible only with International Setting - See Tax
Options) If the vendor's selling price on a purchase order includes taxes, then checking this option
will automatically calculate taxes on the PO.
4.3.2 PO History By Vendor
Old purchase orders can be reviewed by focusing on the vendor, serial number of the product, or
tracking number printed on the inventory label.
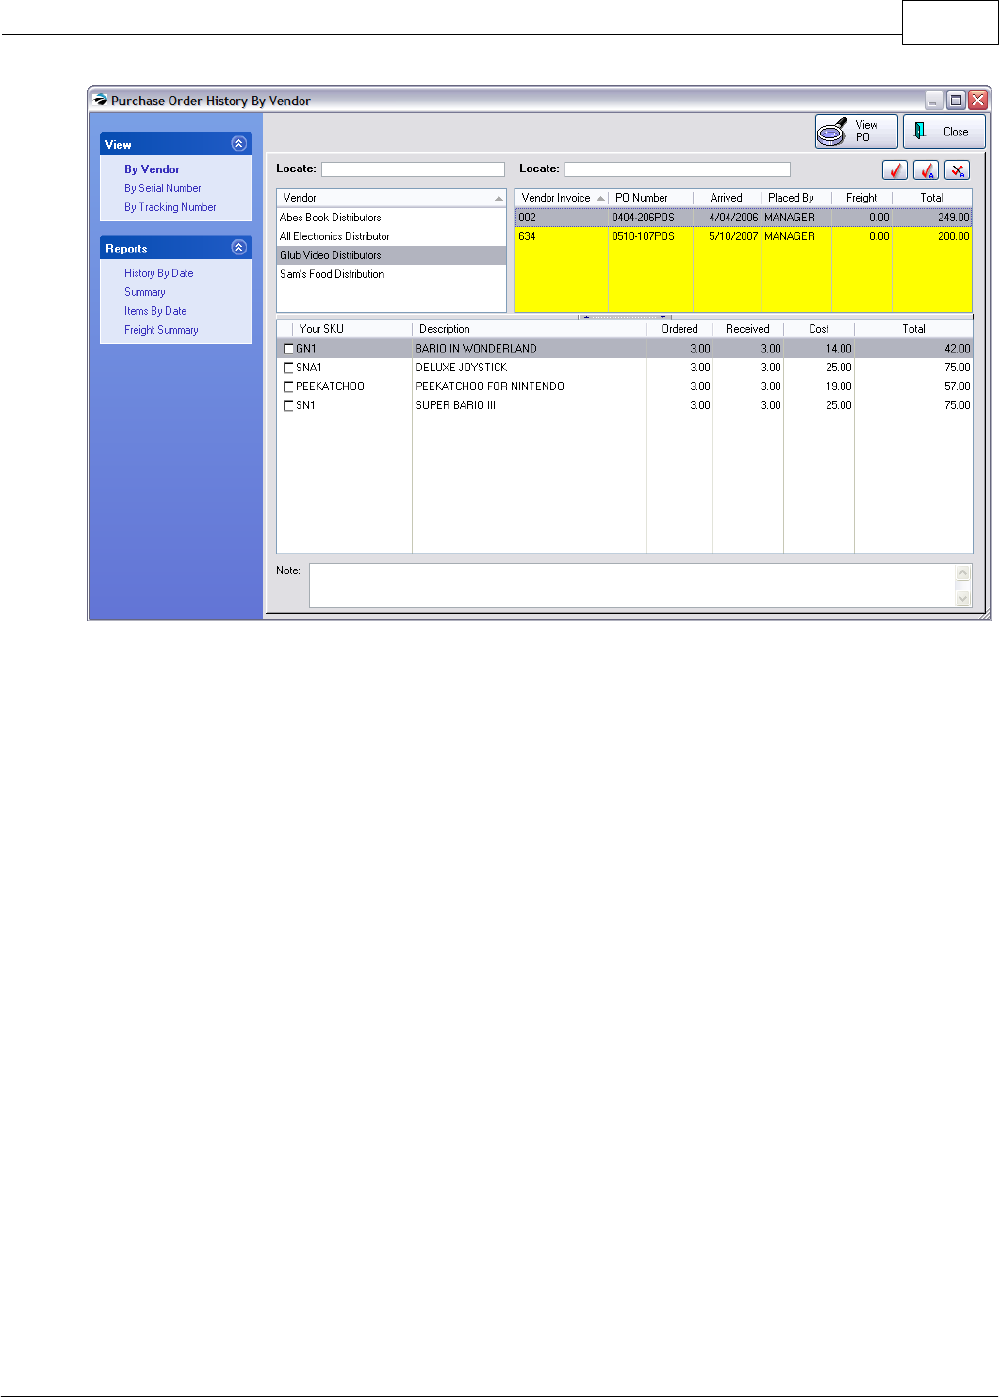
Primary Databases 153
Copyright ©2007 POSitive Software Company
By Vendor
Highlight a vendor name or use the Locate field above the list to search for the vendor. Use CTRL-
Enter if you only know a portion of the name.
On the far right are all of the purchase orders from that vendor. To find a specific purchase order, use
the Locate field above the list. You can change the sort and search function by clicking on the column
title: Vendor Invoice, PO Number, Arrived Date, Placed By.
At the bottom of the screen will be listed the items purchase.
View PO - click on the button in the upper right to view the highlighted purchase order. (see
Purchase Order History)
By Serial Number
All serial numbers are listed. Choose Locate to find the specific serial number.
The PO number is displayed as well as the line items on the PO.
By Tracking Number
PRM automatically generates a tracking number for each inventory item received on a purchase
order. The tracking number is linked to the PO and the specific line item on the PO. This tracking
number can be printed on inventory labels for easy reference.

POSitive Retail Manager User Guide154
Copyright ©2007 POSitive Software Company
History By Date
Enter a date range. Prints a report "Purchase Orders By Date" which can be saved to PDF or
exported to text.
Summary
Displays a table of monthly purchases, payments, credits and balance due.
Items By Date
Enter a date range. Choose to apply a Query or not.
Freight Summary
Generates a report to show how much freight was applied to each purchase order.
4.3.3 Vendor Inventory List
The purpose of the Vendor Inventory List is to list only items the selected vendor carries. This list is
separate from your complete listing of inventory. You will encounter this list whenever you create
purchase orders for the vendor.
You may Add, Edit, and Delete items in this Vendor Inventory List.
Vendor Inventory vs Your Inventory
An important concept that you should understand is that items in this list are NOT real inventory
items. The real inventory item is the definition you created with Your SKU in the All Inventory List.
The item in the vendor list is simply a Vendor SKU with a link to Your Item. You cannot have a vendor
inventory item independent of an item in your inventory list.
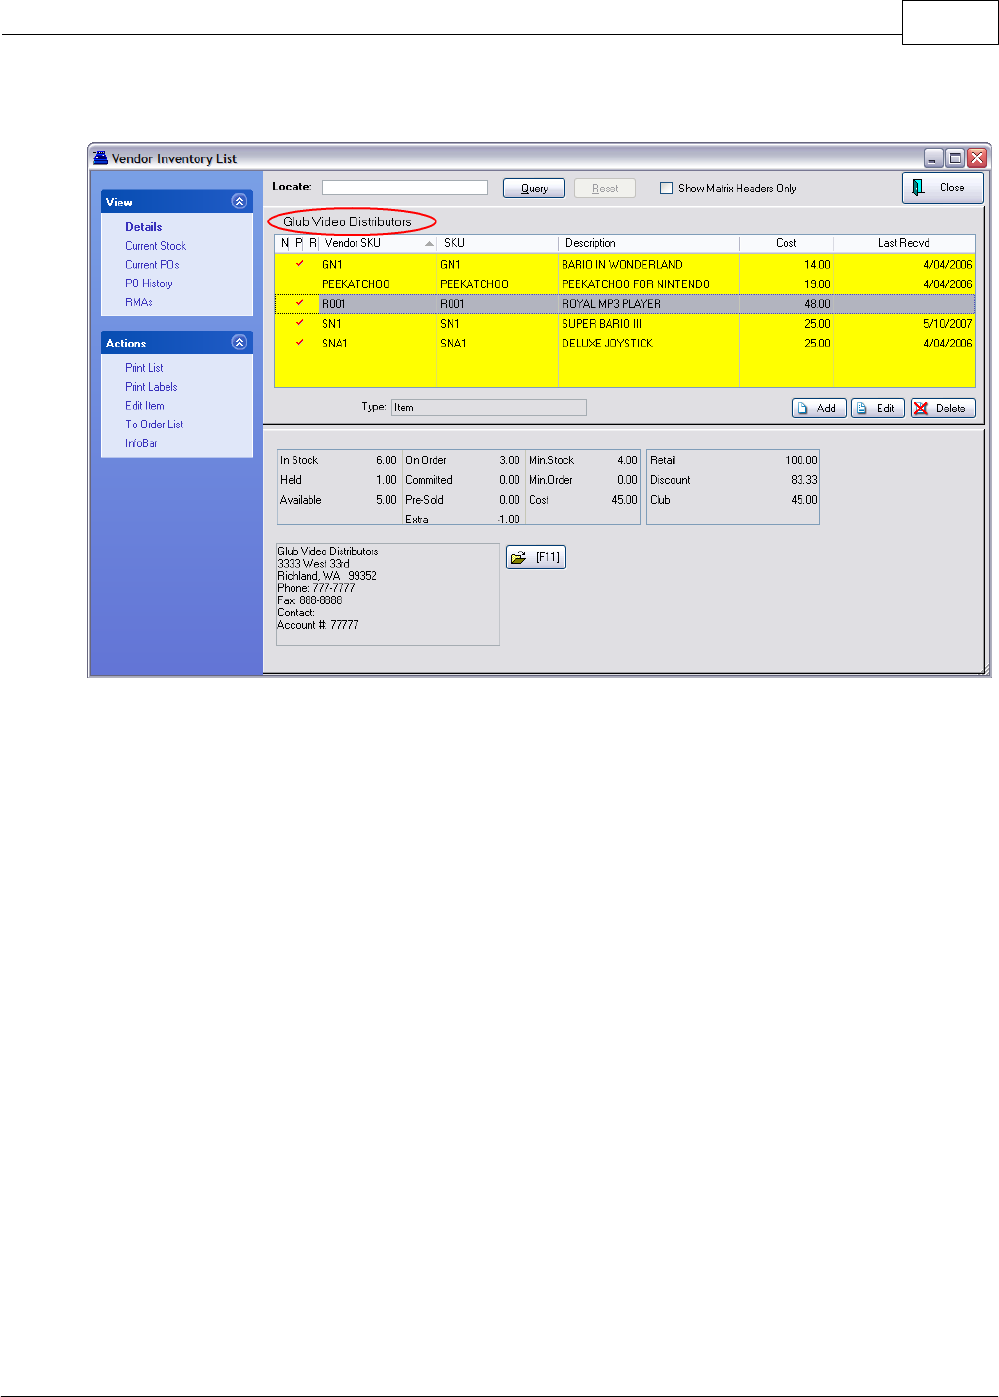
Primary Databases 155
Copyright ©2007 POSitive Software Company
Vendor Inventory List
Inventory items are listed with both a VENDOR SKU and YOUR
SKU.
The Cost is what the vendor sells the item for and could be different
than the Last Cost value of the inventory item itself.
Last Received - Date the product was purchased from this vendor
NPR Status (Red Checkmarks)
N = Needs To Be Re-Ordered
P = Purchase Order In Process
R = RMAs In Process
VIEW
Lists various views, and actions relative to the highlighted customer
account.
Details
Shows a summary of In Stock, Held, Available;
On Order, Committed, Pre-Sold, and Extra
Minimum Stock, Minimum Order, and cost of the highlighted item.
Current Stock
Shows the Purchase Order and Vendor Invoice number to linked to
the current stock count. Shows number received, number sold and
when last sold date. Can choose to view the PO.
Current POs
Shows both Pending and Placed purchase orders for the highlighted
inventory item. Choosing Edit opens the purchase order.
PO History
Displays each time the highlighted inventory item was ordered and
received on a PO.
POSitive Retail Manager User Guide156
Copyright ©2007 POSitive Software Company
RMAs
Displays any items in transit with the vendor.
ACTIONS
Print List
Prints a customizable report which you can define, save, and use
over and over.
Print Labels
Prints a babel for the highlighted inventory item. You will be asked if
you want to preview the label.
Edit Item
Opens the item editor so that description and tracking can be
changed as needed.
To Order List
Sends the highlighted item to the Order List. You are prompted to
enter the quantity to be ordered.
InfoBar
Launches a floating window which displays status of the highlighted
item, linked customer orders, purchase history, current open POs,
and Sales History.
Sort - Search List
With the Details tab selected, you can sort the list by Vendor SKU [F7], by your SKU [F8], or by
Description [F9].
At the end of each line is the cost of the item and the date the item was last received.
Add - Edit Items
Select or enter Your SKU.
Enter a vendor SKU (F5 button automatically copies Your SKU to become Vendor SKU)
Enter the cost of the item from this vendor..
Delete Items
If you delete an item from this vendor inventory list, you are not deleting the true item. However, if you
delete the item from the main Inventory Center, then it will also be deleted from this Vendor Inventory
List.
Print
If you wish, the list can be printed on paper or to the screen. This report is customizable to include
only the elements you want to report on. (see Custom Reports)

Primary Databases 157
Copyright ©2007 POSitive Software Company
Current PO's
(A) A red check mark in the "P" column indicates that the item is already on a purchase order. Click
on the Current PO's view and a bottom panel will show that the item is either on a purchase order still
pending (needs to be placed) or one that has been placed and already to receive.
(B) Place Order Now
While you are viewing the list you can send individual items to the Order List and from there to a
purchase order. (see To Order List)
(C) Editing Options - There is a critical distinction between the Edit Item and the Edit buttons in this
window.
·Edit Item - When you select the Edit Item button you will be taken to the familiar Inventory Detail
window. This is the real inventory item. You will be able to change pricing, SKU, description, and
any options of the item. (see Inventory Detail)
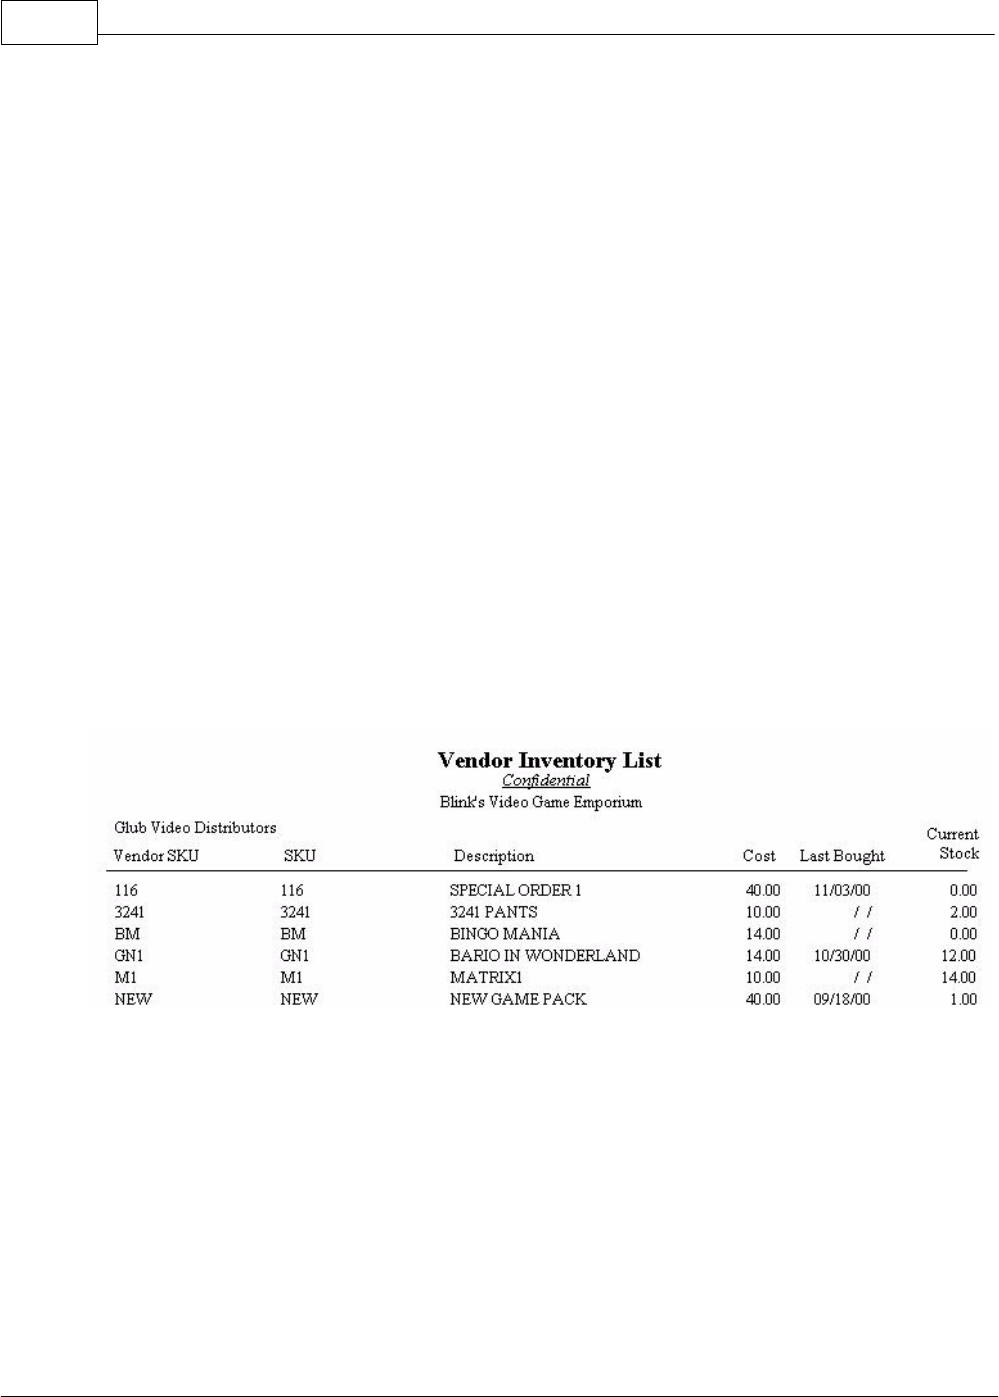
POSitive Retail Manager User Guide158
Copyright ©2007 POSitive Software Company
·Edit - When you select the Edit button you will only modify the entry on this list.
Vendor SKU - the vendor's catalog or item code.
Your SKU - the SKU you created for the product you are selling. This is the real inventory item.
In this dialog box, Vendor Inventory Form, you are simply including a vendor SKU to your real
inventory item.
The Item Description of Your SKU will be displayed so you can visually confirm that you have
selected the correct item.
Cost - the vendor's selling price to you.
--- If you change the cost you will be prompted with "Your Vendor cost has changed. Do you
want to update the cost of the Inventory Item as well?" If you answer Yes, then you will be able
to modify selling prices as well as the last cost of the item.
·Delete - When you select the Delete button you are NOT erasing the real inventory item. You will
only erase the vendor link to your inventory item.
You will be prompted to confirm the deletion.
Remember you are only removing the item from the vendor list, not from your All Inventory list.
·Add - When you select the Add button you are simply adding a vendor SKU and then linking it to
a real inventory item, Your SKU. The [F2] Lookup - allows you to find Your inventory item. You
will also add your Cost when buying this item, from this vendor.
Print - You may print a listing of the vendor inventory to include current stock counts and date last
purchased information. The report will print based upon the Sort Order of the listing.
Custom Reports
You may edit and create new report layouts to include or exclude some information. (see Custom
Reports)
For example, in this report you can see that although Bario In Wonderland has 2 in stock, none of
them came from this vendor.
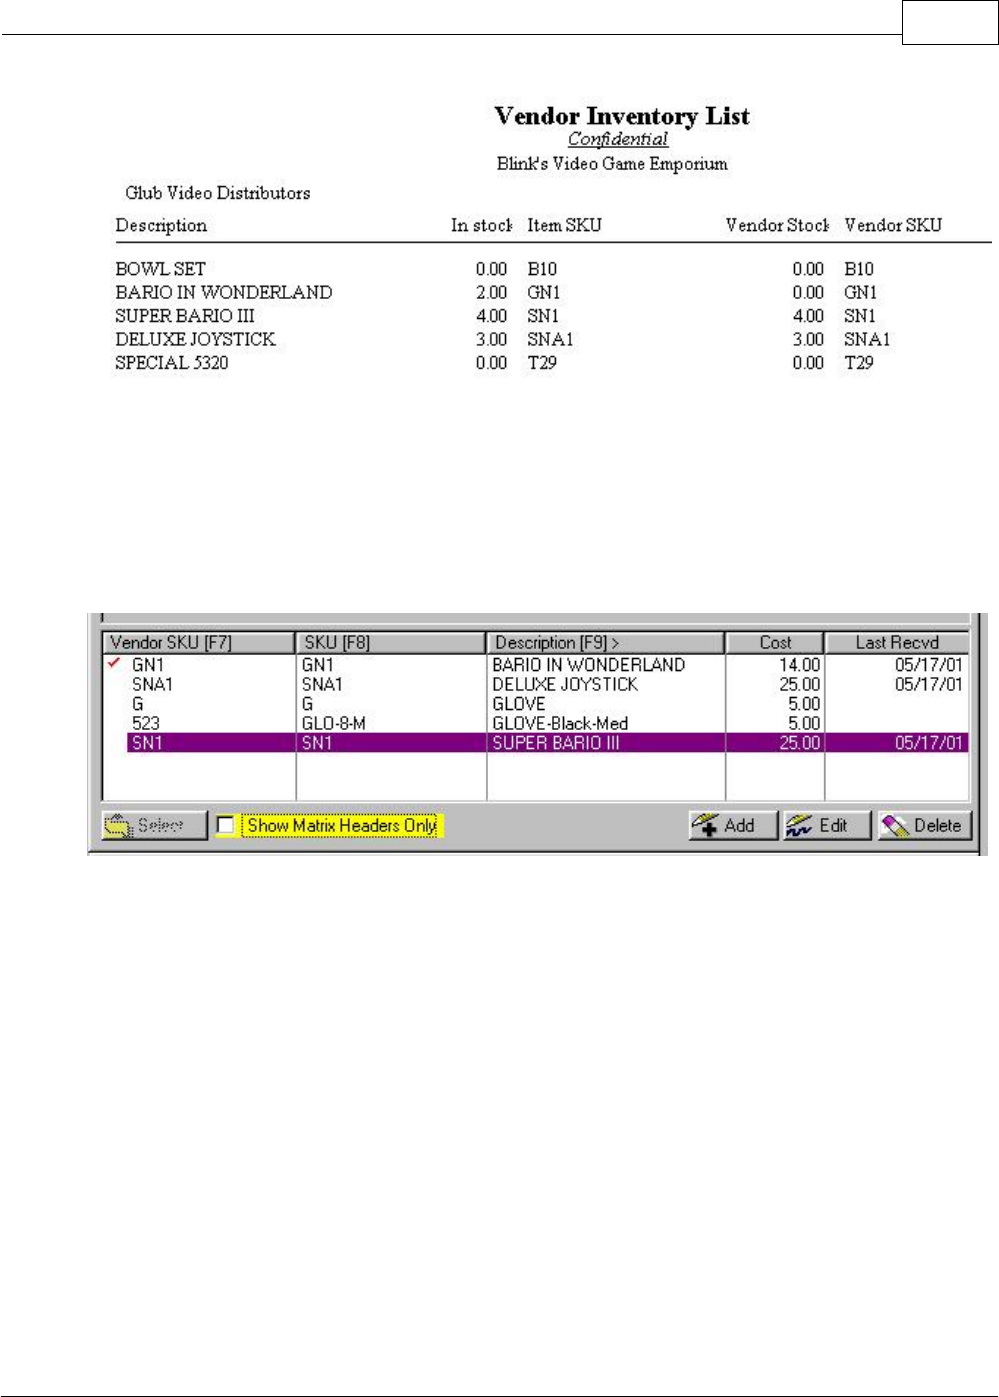
Primary Databases 159
Copyright ©2007 POSitive Software Company
Matrix Inventory
Normally, only a matrix header (the main matrix item) is listed in the vendor inventory list. However, if
you have added individual items from a matrix then the "Show Matrix Headers Only" option will hide
these individual items. For example, item 523 GLO-8-M Glove Black Med on this screen would be
hidden from view if this option were activated.
Vendor Info
The Vendor Info button displays the name and address of the vendor. If you wish to edit the vendor
information, press the F2 button.
Multiple Vendors
PRM allows you to add an unlimited number of vendor SKU links to Your SKU items. That means
that for any given inventory item, you can list as many sources for that item as you choose. When it is
time to purchase more stock, you can pick from the list of vendors. Your choice will likely be swayed
by costs, speed in delivery, or reliability of the vendor.
To add an item. Select the Add button.
1) Type in the Vendor SKU.
2) Type in Your SKU or use the [F2] Lookup option to find it.

POSitive Retail Manager User Guide160
Copyright ©2007 POSitive Software Company
3) Then enter the Cost of the item.
If Your SKU does not exist,
Most of the time, when you choose to add an item to the vendor list, it is highly likely that Your SKU
does not exist. In this case simply type the SKU you would like to use. If you wish, the SKU can be
the same as the Vendor SKU.
1) Press Enter. You will be greeted with a window to the effect that Your SKU does not exist.
Choose YES to create a new inventory item. (Choose No if you know the item is already in PRM and
you just need to find it.)
2) Select a category. (You may add one, if necessary.)
3) You will now be at a blank Inventory Detail window. Fill in all the fields and change Options [F7], if
necessary.
4) Select OK.
5) The Cost will already be filled in from the Inventory Detail window. Select OK.
4.4 Report Center
Certainly one of the most important features of any point-of-sale program is the availability of reports.
The Report Center [CTRL-R] on the Manager Console lists the most
commonly used reports.
Running A Report
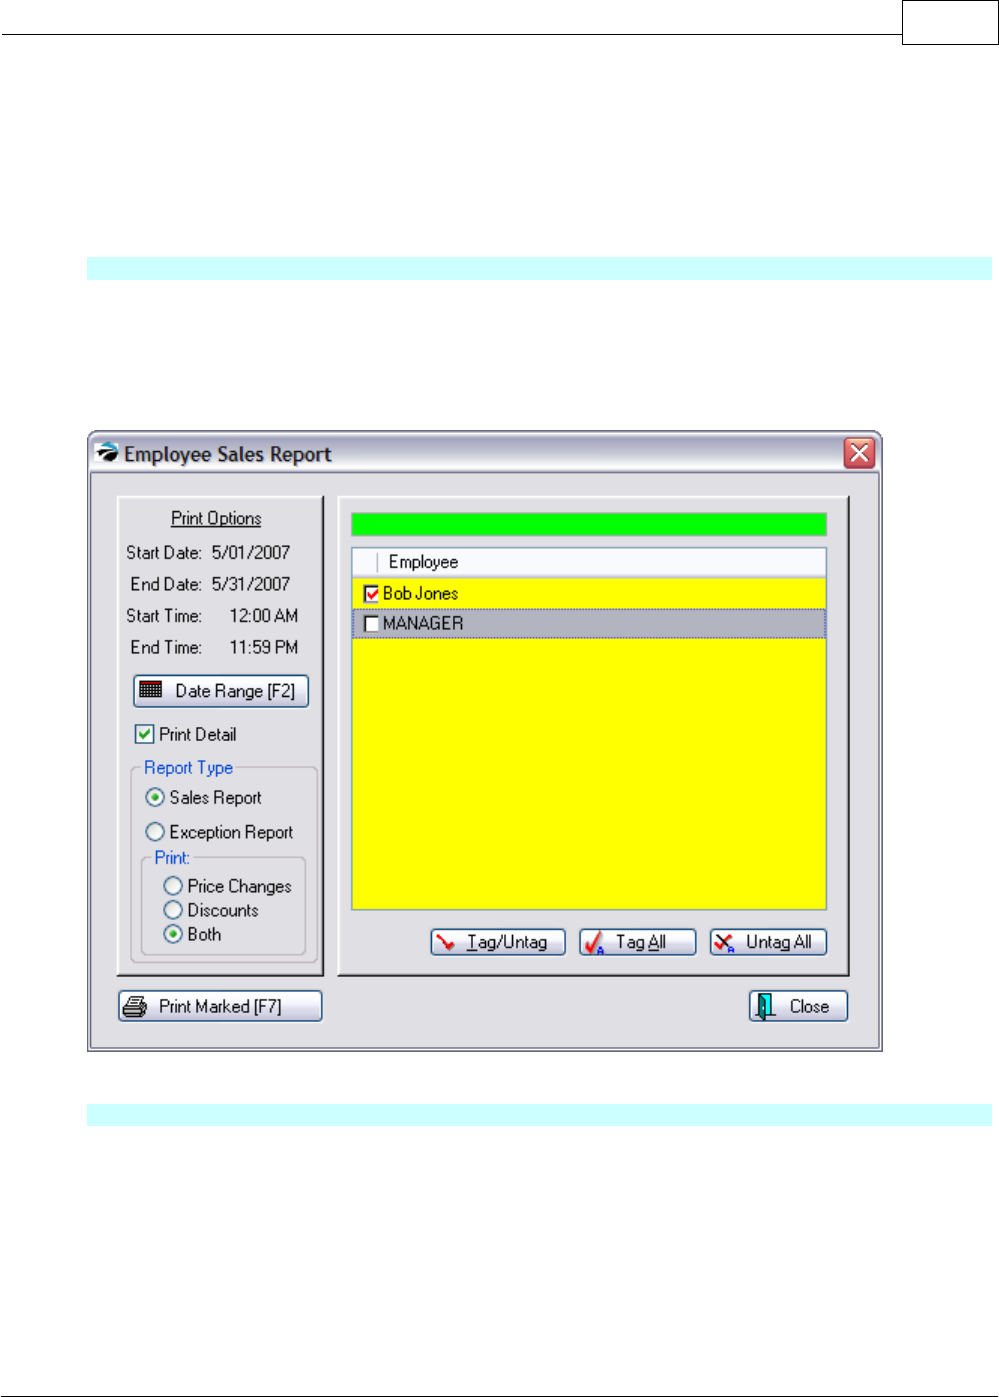
Primary Databases 161
Copyright ©2007 POSitive Software Company
To run a report, highlight a Report Type on the left and select the desired report on the right.
Choose Run Report [F7].
Depending upon the type of report you have selected, you will be prompted for a date range or
filtering options and a print or preview option.
Select Report Criteria
Depending upon the report, you will be able to choose
·Date Range
·Detail or Summary
·Selectable groups for inclusion or exclusion by tagging
·and more
Preview / Print (all or portions) of the Report
When you run the report, we recommend you choose to PREVIEW instead of Print to assure that...
·the information is what you were expecting before sending it to the printer
·find specific information somewhere in the report
·choose which portions of the report to print
·choose to export the report to a PDF file or to HTML
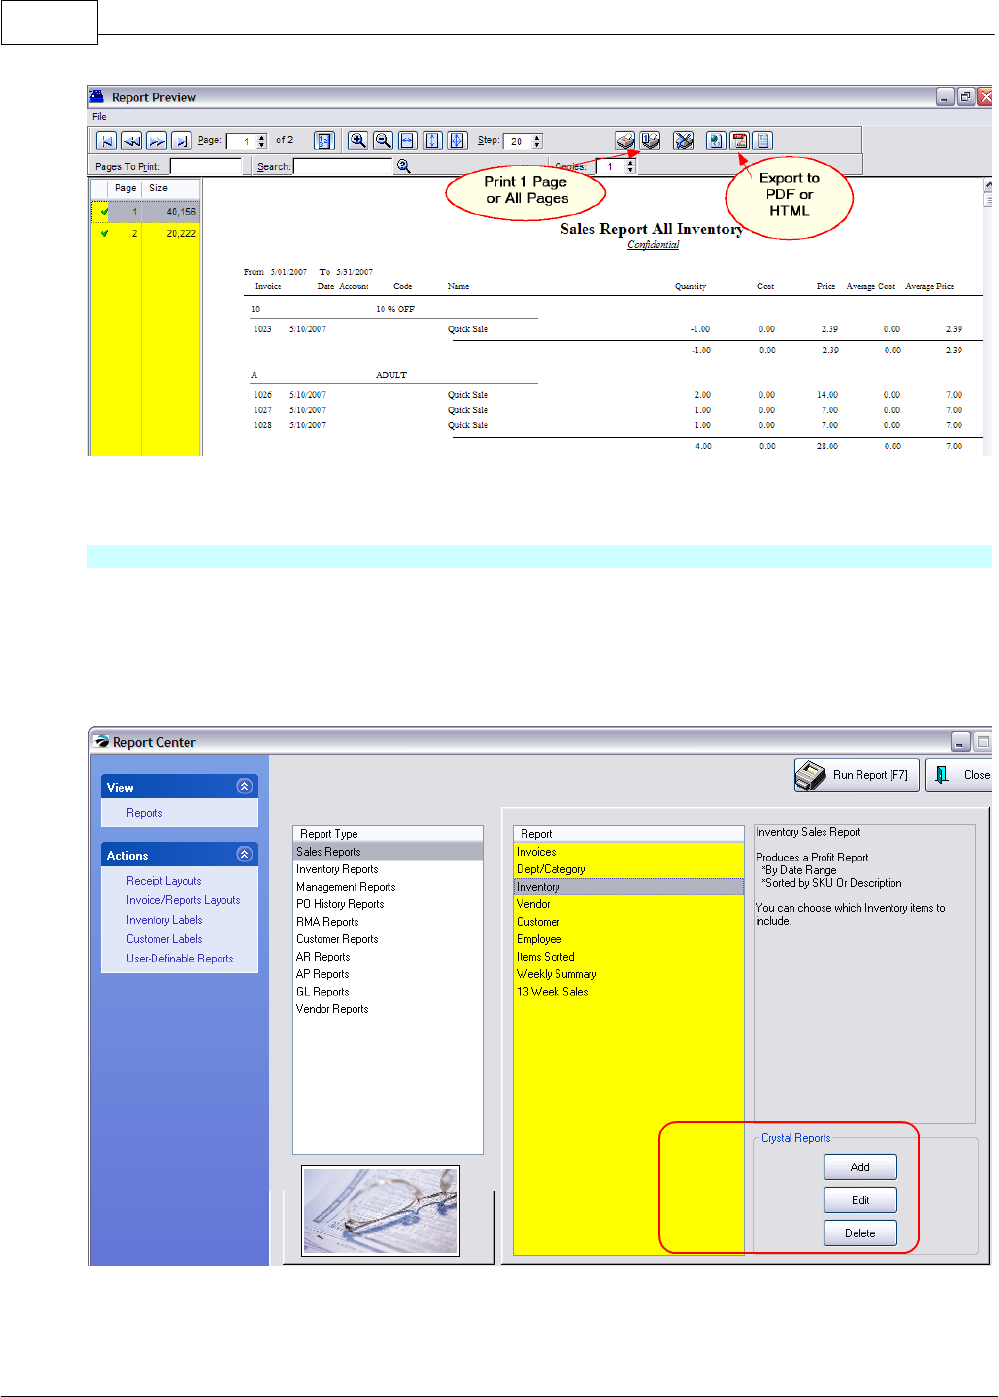
POSitive Retail Manager User Guide162
Copyright ©2007 POSitive Software Company
Add-On Reports
If you are not able to find the specific report you need, there is the possibility of creating your own
report and adding it to the PRM menu.
The Add - Edit - Remove buttons at the bottom of the Report Center screen allows you to add
specialized reports created by a third party program, Crystal Reports. Contact your dealer for more
information.
·First, you must obtain the report files from your programmer and place them in the
c:\PRM\reports directory.
·Then open Report Center, highlight the Report Type on the left which best suits the report

Primary Databases 163
Copyright ©2007 POSitive Software Company
information, and choose Add button.
·Enter the .TXR file name (stored in c:\PRM\reports.
·Fill in a description and details about what the report will do.
·Once this is done, then you will be able to run the report at will.
All Reports
Many reports can be found in the Report Center, but not all of them. This is an alphabetical listing of
PRM Reports. A path you can follow to generate them is listed below the report name.
13 Week Quantity Sold Report:
Report Center: Sales Reports: 13 Week Sales: : : Date
Accounts Receivable Activity:
Accounting: Accounts: AR Activity By Date: : : Date
Accounts Receivable Aging Report:
Accounting: Accounts: AR Aging Reports: : : Options Query
Accounts Receivable Payments Report:
Accounting: Accounts: AR Payments By Date: : : Date
AP Payment:
Accounting: Accounts Payable: AP History: : :
AR Statement:
Accounting: Accounts: AR Statements: : :
Customer List: Customer Record: AR Detail: Print Statement: :
Bad Checks Report:
Accounting: Accounts: Bad Checks: : :
Bin Location Report:
Inventory: Inventory Reports: Bin Report: : :
Cash Forecast Report:
Accounting: Accounts: AR Cash Forecast: : : Sum/Det
Chart of Accounts
Accounting: General Ledger: Chart Of Accounts: Print [F7]
Checks Tendered Report:
Accounting: Accounts: Checks Tendered: : Print: Query
Credit Card Detail:
Accounting: Reports: Register Balance/Tender History: Daily Balance History: Credit Card
Report:

POSitive Retail Manager User Guide164
Copyright ©2007 POSitive Software Company
Current AP Report:
Accounting: Accounts Payable: AP Report: : : Options
Customer Accounts Receivable Transactions:
Customer List: Customer Record: AR Detail: Print History: :
Customer Consignments:
Customer List: Consign [F9]: Print: : :
Customer Labels:
Marketing : Print Customer Labels
Customer List:
Marketing : Print Customer List (Report):
Customer File:
Customer List: CTRL-P: Customer File: : :
Customer Profit Report:
Accounting: Reports: Sales Reports: Customer: : Options
Customer Purchases List:
Customer List: History Tab: Snapshot: Items Purchased : Print:
Deposits On File:
Accounting: Reports: Deposits On File: : :
Employee Exception Report:
Accounting: Reports: Sales Reports: Employee: : Options
Employee File
Management: Employees: Print: Print Highlighted
Employee List
Management: Employees: Print: Print List
Employee Sales Report:
Accounting: Reports: Sales Reports: Employee: : Options
Employee Service Time Report
Management: Service Time Cards: Print Tagged
Employee Time Report
Management: Employee Time Cards: Print Tagged
Freight Summary Report:
Inventory: Purchase Order History: Reports: Freight Summary:
Frequent Buyer History Report
Management: Frequent Buyer Program: Print [F7]

Primary Databases 165
Copyright ©2007 POSitive Software Company
Frequent Buyer Report
Management: Frequent Buyer Program: Print [F7]
General Ledger:
Accounting: General Ledger: Reports: General Ledger: :
General Ledger Accounts:
Accounting: General Ledger: Chart Of Accounts: Print: :
General Ledger Balance Sheet:
Accounting: General Ledger: Reports: Balance Sheet: :
General Ledger Journal Entries:
Accounting: General Ledger: Add/Edit/Post: Print [F11]
General Ledger Operating Statement:
Accounting: General Ledger: Reports: Operating Statement: :
Gift Certificates Outstanding:
Accounting: Reports: Gift Certificates Outstanding: : :
Gift Certificate Sales Report:
Management: Gift Certificate Manager: Sales Reports
Hourly Sales Summary w/Graph:
Management: Sales Summary: Hourly Sales: Print: :
Inventory Discrepancy Report:
Inventory: Physical Inventory: Reconcile From File: Discrepancy Report: Print: :
Inventory Exception Report:
Inventory: Physical Inventory: Reconciliation Report: Print: :
Inventory Listing:
Inventory: Inventory Reports: Inventory Listing: : :
Inventory Matrix Report:
Inventory: Inventory Reports: Matrix Reports: : :
Inventory Price List:
Inventory: Inventory Reports: Inventory Price List: : :
Inventory Valuation Report:
Inventory: Inventory Reports: Inventory Valuation: : :
Invoice Sales Report:
Accounting: Reports: Sales Reports: Invoices: : Date Sum/Detail - (see Note Management)
Items Discarded Report:
Inventory: Inventory Reports: Items Discarded: : :

POSitive Retail Manager User Guide166
Copyright ©2007 POSitive Software Company
Items Not Ordered Since….:
Accounting: Reports: Stock Reports: Items Not Ordered Since: :
Items Not Sold Since…:
Accounting: Reports: Stock Reports: Items Not Sold Since: :
Items On Order
Inventory: Orders In Process: By Item: Print
Items On Order VS Stock Count:
Inventory: Inventory Reports: Orders Vs. Stock: : :
Items Purchased Report:
Inventory: Purchase Order History: Reports: Items Purchased By Date: :
Items Returnable To Vendor:
Accounting: Reports: Stock Reports: Items Returnable To Vendor: :
Journal Entries Detail Report:
Accounting: General Ledger: Transaction History: Print: : Sum/Det
Layaway Report:
Accounting: Accounts: Layaway Reports: : : Query
Layaway Statement:
Accounting: Accounts: Layaway Statements: : :
List of Vendors:
Utilities: Vendors: Print List [F6]
List of Voids
Management: List of Voids: Voided Invoices
Monthly Sales Summary w/Graph:
Management: Sales Summary: 13 Months: Print: :
Orders Arrived List:
Purchase Order: Receive: Orders Arrived Table: : Print List:
Order List:
Inventory: Prepare Order List: Print List
Paid Commissions Report
Management: Commission Processing: Sales Commissions History: Print
Physical Inventory - All Entries:
Inventory: Physical Inventory: Reconcile From File: Print: :
Physical Inventory - Exception Report:
Inventory: Physical Inventory: Reconcile From File: Print: :

Primary Databases 167
Copyright ©2007 POSitive Software Company
Physical Stock Count:
Inventory: Physical Inventory: Print Inventory List: : :
Physical Stock Count:
Inventory: Physical Inventory: Reconcile Inventory: Print: :
Profit By Week:
Accounting: Reports: Sales Reports: Weekly Summary: :
Profit Report Sorted By....:
Accounting: Reports: Sales Reports: Items Sorted: : Options
Purchase Order:
Purchase Order: Edit: Print: : :
Purchase Order Center: Receive POs [F3]: Print [F7]: Highlighted
Purchase Order By Date:
Inventory: Purchase Order History: Reports: Purchase Orders By Date: Summary/Detail:
Purchase Order Summary Report:
Purchase Order Center: Receive POs [F3]: Print [F7]: All
Purchase Order Tax Report (Pending):
Accounting: Reports: PO Tax Report (Pending): : : Sum/Det
Purchase Order Tax Report (Paid):
Accounting: Reports: PO Tax Report (Paid): : : Sum/Det
Register Activity Log Report:
Management: Daily Transaction Log: Print: : :
Register Balance Report - Detail:
Accounting: Reports: Register Balance/Tender History: Daily Balance History: Register Balance
Report:
Register Balance Report - Summary:
Accounting: Reports: Register Balance/Tender History: Daily Balance History: Register Balance
Report:
Register Balance Summary Report:
Accounting: Reports: Register Balance/Tender History: Daily Balance Summary: :
Register Sales Category Summary:
Accounting: Reports: Register Balance/Tender History: Daily Balance History: Category Report:
RMA Aging Report:
Inventory: RMA Reports: RMA Aging Report
Sales By Employee w/Graph:

POSitive Retail Manager User Guide168
Copyright ©2007 POSitive Software Company
Management: Sales Summary: Sales By Employee: Print: :
Sales Report All Inventory:
Accounting: Reports: Sales Reports: Inventory: : Options
Sales Report By Department:
Accounting: Reports: Sales Reports: Department: : Options
NOTE: While running this report you may be notified that an inventory item's category could not be
found. You should make note of the Item's SKU number, go to the inventory list, reassign the correct
dept/category, and then run this report again.
Sales Report By Vendor:
Accounting: Reports: Sales Reports: Vendor: : Options
Sales Tax Report:
Accounting: Reports: Sales Tax Report: : : Date Sum/Det
Sales vs Purchases (Cash Flow)
Accounting: Reports: Sales Vs Purchases
Store Credits List:
Accounting: Accounts: Store Credits Report: : :
Summary Of Tender Report:
Accounting: Reports: Register Balance/Tender History: Tender History Summary: : Sum/Det
Trial Balance:
Accounting: General Ledger: Reports: Trial Balance: :
Uncollectable Debts Report:
Accounting: Accounts: Uncollectable Debts: : : Date
Unpaid Commissions Report
Management: Commission Processing: Sales Commission Posting: Print [F7]
Unpaid Consignments Report
Management: Process Consignment Sales: Print List [F7]
Vendor Detail:
Utilities: Vendors: Print Selected [F7]
Vendor Inventory Sales History:
Report Center: Vendors: Run Report [F7]
Vendor Inventory Sales Summary:
Report Center: Vendors: Run Report [F7]
Vendor Stock Valuation Report:
Report Center: Vendors: Run Report [F7]

Part V

POSitive Retail Manager User Guide170
Copyright ©2007 POSitive Software Company
5Purchasing
An important part of your business is buying inventory from your vendors. PRM has a comprehensive
process for determining what needs to be ordered, placing the order with your vendor(s), and
receiving the purchase orders into inventory. In addition, there are tools for handling Accounts
Payable for vendors who provide products and for those who provide services only.
Benefits
PRM can and should manage your purchases from your vendors to give you better inventory control.
By using PRM purchase orders, you will be assured of accurate stock counts, purchase histories, and
profitability reports.
Whether you have a handful of vendors or hundreds, PRM provides several time saving features.
·Your SKU = Vendor SKU - You can use the same SKU as one of your vendors uses.
·Multiple Vendors - Each inventory item can be purchased from more than one vendor.
·Primary Vendor - even if you designate one vendor to be primary, you can still order from other
vendors
·Vendor Comparison - If an item can be purchased from more than one vendor, you can compare
pricing.
·Alternate SKUs - You may assign more than one SKU to an inventory item to make lookups easier.
When Not To Use A Purchase Order
There are times when you are justified in not using a purchase order.
·Initial Stock Counts - When you first begin using PRM, rather than trying to re-create old purchase
orders, you can manually set current stock counts. However, some users recommend the use of
purchase orders even for these items because they are able to capture more tracking information.
For example, Sales By Vendor reports will then be accurate from the beginning.
·Manufactured Items - If you are your own vendor, creating your own end products, then you may
choose not to use purchase orders.
·One Of A Kind Items - If you are selling antiques or other one of a kind items it may not be
practical to record your sources except on an "internal note."
The Recommended Way To Handle Purchase Orders
There is a logical progression for doing purchase orders, but you may start in the middle or jump right
to the end. The complete cycle consists of the following steps:
A) Prepare an Order List - The Order List itemizes all inventory items needing to be ordered. You
can manually add items to this list, or they can appear automatically based on minimum stock counts
and special orders by customers.
B) Post from the Order List - Choose which items in the list will be ordered at a given time. You tag
and post them to purchase orders for individual vendors.
C) Place the Purchase Order - Items from the order list are not actually ordered until you contact
the vendor and place the purchase order with the vendor. Before placing the order you can review
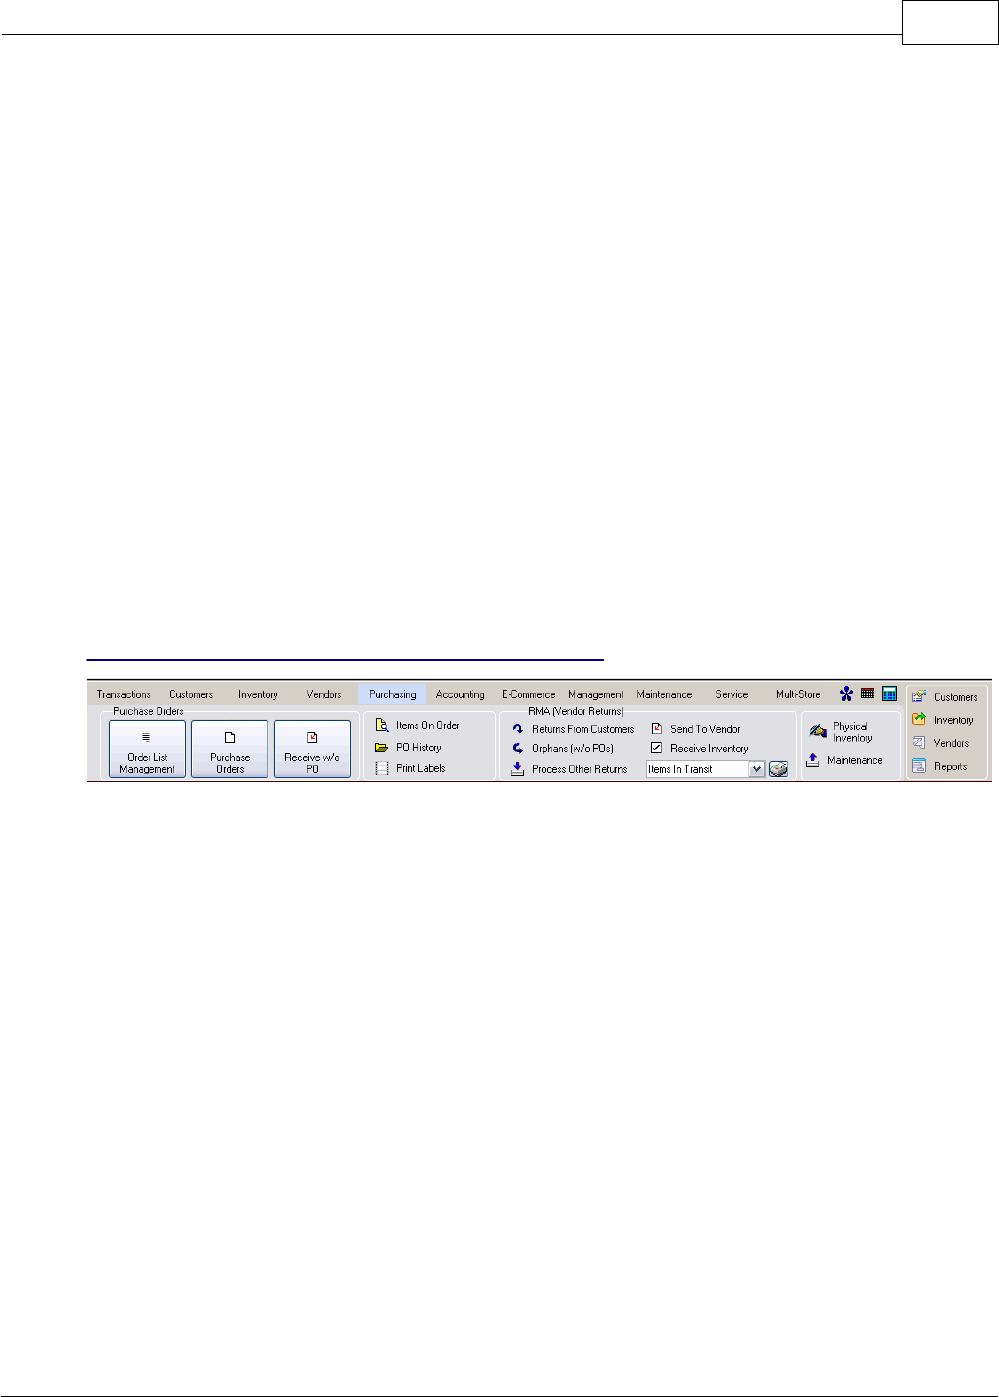
Purchasing 171
Copyright ©2007 POSitive Software Company
product availability, current costs, and even add new products to the PO.
D) Receive the Purchase Order - When the items finally arrive from the vendor, you receive the
purchase order. This automatically updates your stock counts, notifies you that customers waiting for
these products can be called, and prepares pricing labels to be printed for the items just received.
Getting Started With Purchase Orders
Before you begin to use PRM purchase orders:
·Consider your options in System Setup: Purchase Order Defaults. This can warn you when costs
have changed and alert you when items received are fulfilling customer orders.
·Create Vendors in PRM in advance, however, this can be done on the fly.
·Define categories to prompt for a vendor or automatically select a vendor when an inventory item is
created.
·Update the Vendor Inventory List so that your inventory items are linked to the vendor(s).
·Consider importing vendor inventory lists and allowing PRM to link your inventory to the vendor
inventory.
Special Help: If you need to track a Duty Tax on Purchase Orders see Tax On Purchase Orders.
Use the tools of the Purchasing master menu
Order List Management
This opens the Order List. This list includes items which are
·below minimum stock levels,
·special orders for customers, and
·manually added items in anticipation of an upcoming sale event.
You tag items to be ordered from vendors now and PRM generates purchase orders for each vendor.
You could have a choice to create new purchase orders or append the items to existing purchase
orders still waiting to be placed with the vendor.
Purchase Orders
Purchase orders in development are created and retained here in the Purchase Order Center. You
have easy access to
·POs To Place
Purchase orders listed here are those which are still being created; the order has not yet been sent to
the vendor. You may edit these POs until you are ready to submit them to your vendors. When you
finally place the PO, it will be removed from this section and transferred to the "POs To Receive" list.
·POs To Receive

POSitive Retail Manager User Guide172
Copyright ©2007 POSitive Software Company
Purchase orders listed here are those which have been sent to the vendor either by e-mail, fax, phone
call, or special transmittal and you are waiting for product to arrive.
Receive Without PO
Choose "Receive Without PO" whenever you are about to accept delivery of inventory without having
prepared a PRM purchase order in advance. This is a common occurrence in many businesses.
You will be creating and receiving a purchase order all at the same time, thereby saving some steps
as listed above.
Research Tools
The status of inventory currently on purchase orders yet to be placed or received. A review of
Purchase Order History. And the ability to print Inventory pricing labels on demand.
RMA (Vendor Returns)
RMA stands for Return Merchandise Authorization. There are some vendors who allow you to return
products to them for repair, replacement, or credit. RMAs are frequently done in batches to save time
and money. PRM can automate the procedures involved.
Other Utilities On This Purchasing Master Menu
Physical Inventory and Maintenance are tools used only occasionally as needs arise and are not
part of the Purchasing Process. (see )
5.1 Order List
Begin at the Purchasing Master Menu by selecting "Order List Maintenance"
Unposted Inventory
If you have created new inventory while preparing a customer order or invoice, those items are
considered unposted items and need to be edited. (see Edit Unposted Inventory Items)
Order List Options - Update
Whenever you open the Order List, you will be prompted to update the Order List.
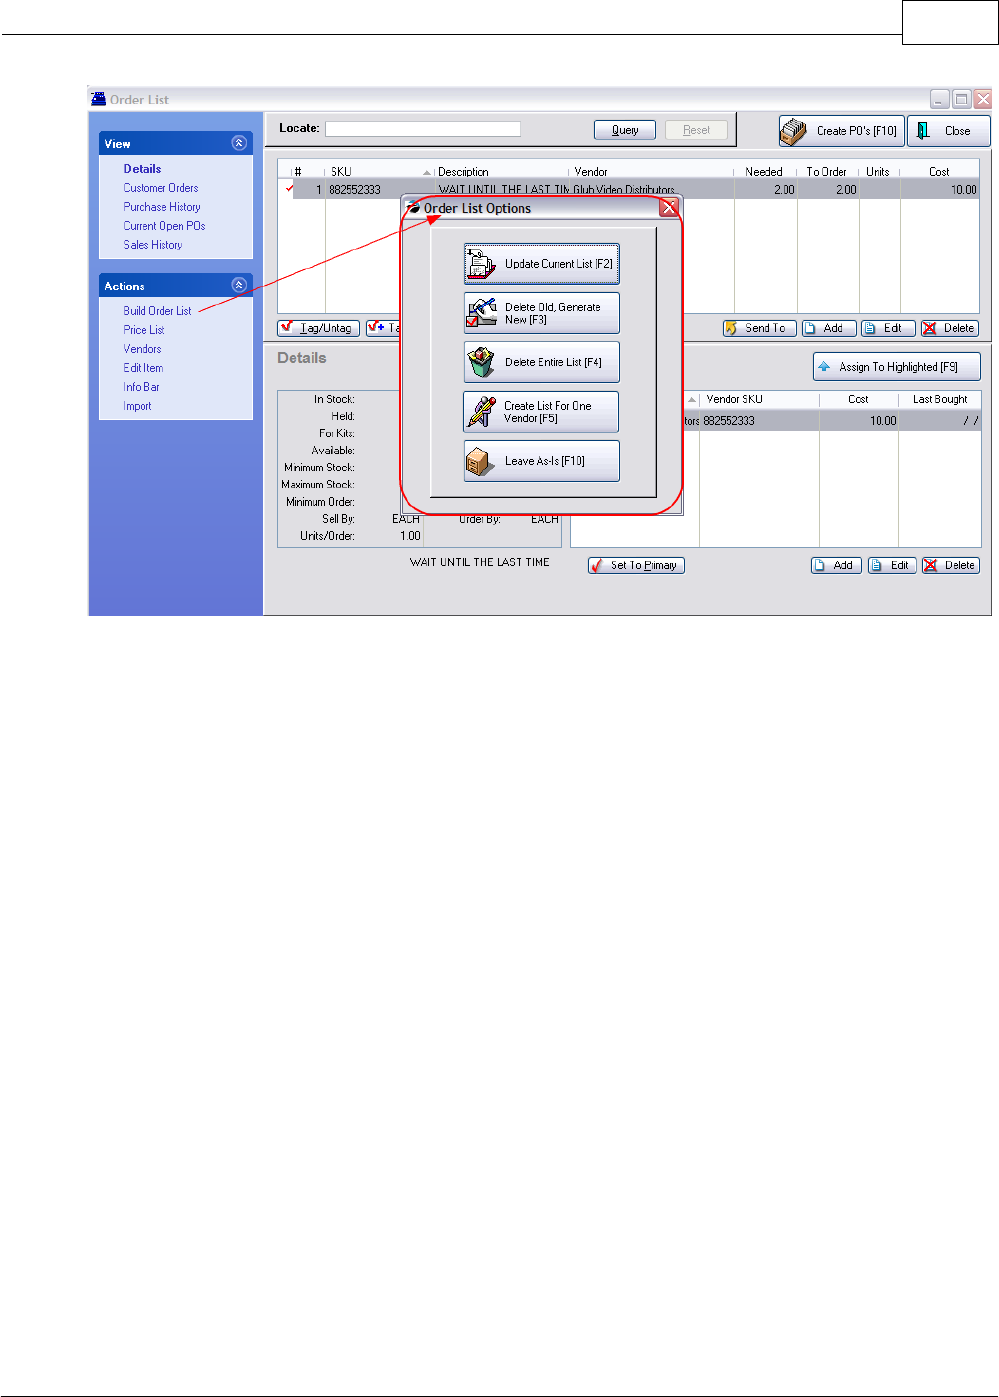
Purchasing 173
Copyright ©2007 POSitive Software Company
Select an Order List Option.
·Update Current List [F2] - The items on the list will be retained and additions made as necessary.
This is a safe method for making the list current because you will not lose items which were
manually entered.
·Delete Old, Generate New [F3] - The items on the list will be erased and an entirely new list will be
generated. You will lose any items added manually to the list.
·Delete Entire List [F4] - The items on the list will be erased. You can manually add items to the list
without being distracted by other items to be ordered.
·Create List For One Vendor [F5] - This will allow you to compile a list of items needed from one
particular vendor. All items needing to be ordered which this vendor carries will be added to the list
even if the item has a different vendor assigned as the primary vendor.
·Leave As Is [F10] - Makes no changes to the current list.
The Build Order List option under Actions on the left allows you to access this Options screen again
as needed.
5.2 Using The Order List
The Order List is a listing of inventory needing to be ordered. This list includes items which:
·have dropped below minimum stock levels,
·are special orders for customers, and
·have been manually added.
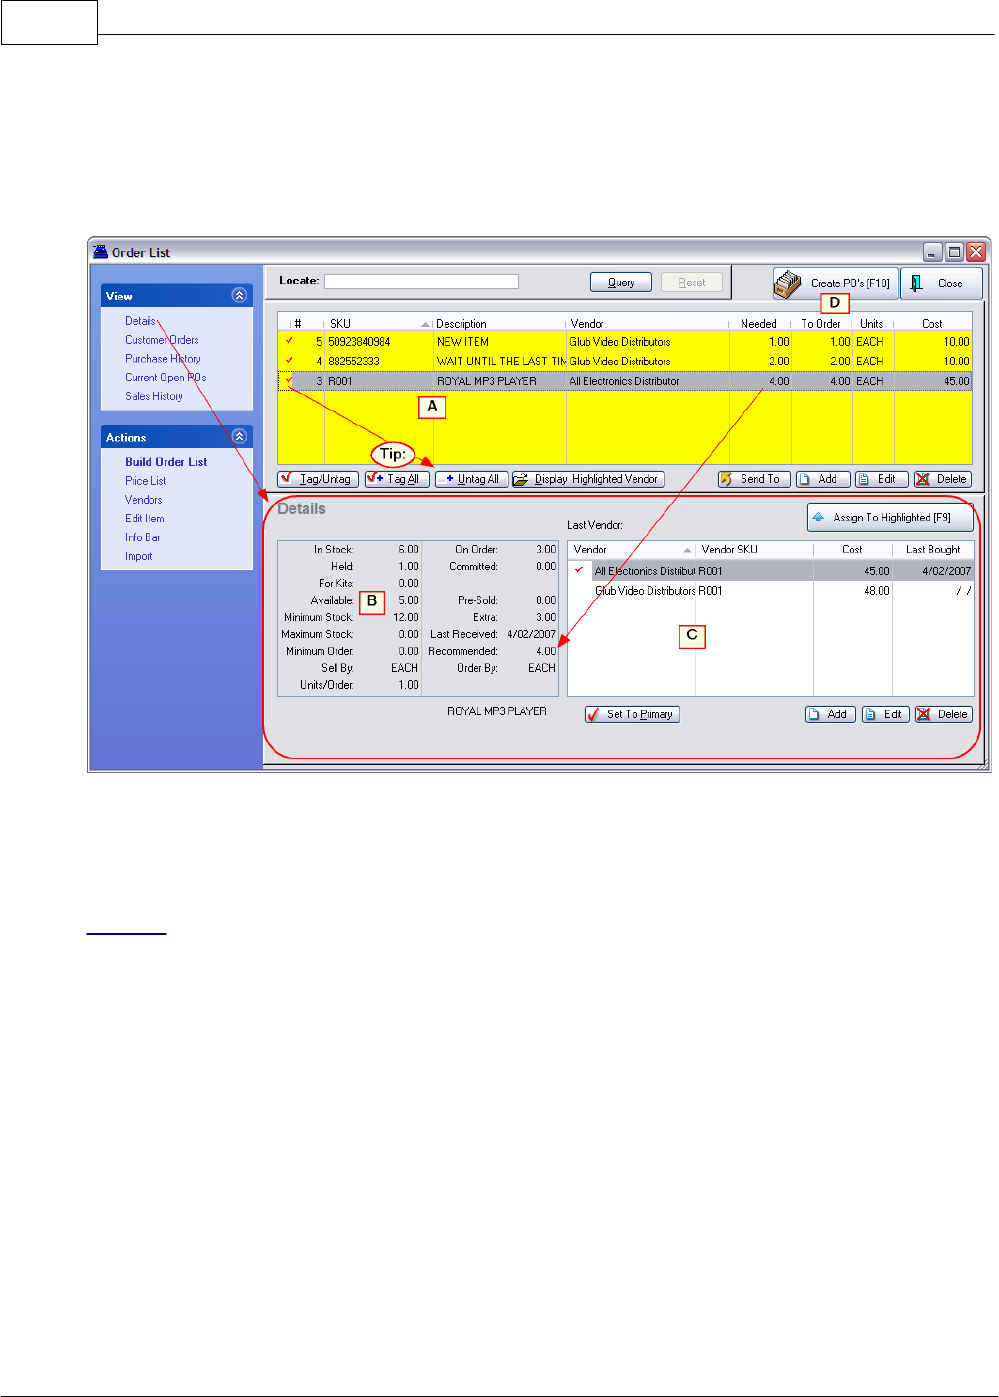
POSitive Retail Manager User Guide174
Copyright ©2007 POSitive Software Company
Tag Items To Be Ordered.
(A) Every item is TAGGED automatically for reorder.
(Tip:) If you wish to be more selective, choose the Untag All button.
What To Order
To help you in your determination of what to order at this time, you have various views as listed on the
left.
Details
(B) Current stock count and stock status of the highlighted item is readily visible.
In Stock:
current count on the shelf
Held:
number on the shelf reserved for customer orders
For Kits
number on the shelf reserved for kits being assembled
Available:
SUM total of uncommitted items which can be sold to new customers
Minimum Stock
number of items to be on the shelf at all times (see Glossary)
Maximum Stock:
maximum number of items on the shelf (see Glossary)
Minimum Order:
imposed stipulation of a minimum order (see Glossary)
Sell By
the package type when sold
Units/Order
number of selling units in the Order By package type from vendor (see Glossary)
Purchasing 175
Copyright ©2007 POSitive Software Company
On Order:
number currently on pending purchase orders
Committed:
number on incoming purchase orders which are reserved for customers (see
Glossary)
Pre-Sold:
number of units sold out of an unprocessed purchase order (see Glossary)
Extra:
SUM total of uncommitted items on pending purchase orders
Last Received
date this product was last received from vendor purchase order
Recommended
the SUM quantity to be ordered based upon above counts
Order By
the package type from the vendor
Vendors For This Item
(C) A listing of vendors carrying the item shows the last purchase date and cost. You may add a
vendor if desired. Normally the "Primary Vendor" will be chosen automatically. The "Select [F9]"
button at the top of the list will update the Vendor Name field from whom the item will be ordered this
time.
Customer Orders
A listing of pending customer orders for the item. You may review a customer order by choosing the
View Order button.
Purchase History
Review past purchases of the item. Choose View to see the full purchase order.
Current Open POs
If the highlighted inventory item is already being ordered from any vendor, you can see the status and
quantity ordered.
Sales History
Graphically displays how well an item is selling, thereby showing trends. The Detail button shows
Sales History Charts for multiple years, documenting the totals in the graph in terms of revenues,
profits, and units sold.
Create Purchase Orders
(D) When all items to be ordered have been tagged, select the "Create PO's [F10]" button at the top
right. The items will be removed from this list and become part of purchase orders for the specified
vendors. Depending upon various circumstances, you may encounter some additional prompts.
Ready To Proceed?
You will be prompted that you are about to create purchase orders.
"This procedure will take all items you have tagged and convert them into Purchase Orders. Tagged
items must have a Vendor chosen and the quantity to order must be greater than zero. Are you ready
to proceed? Yes. No."
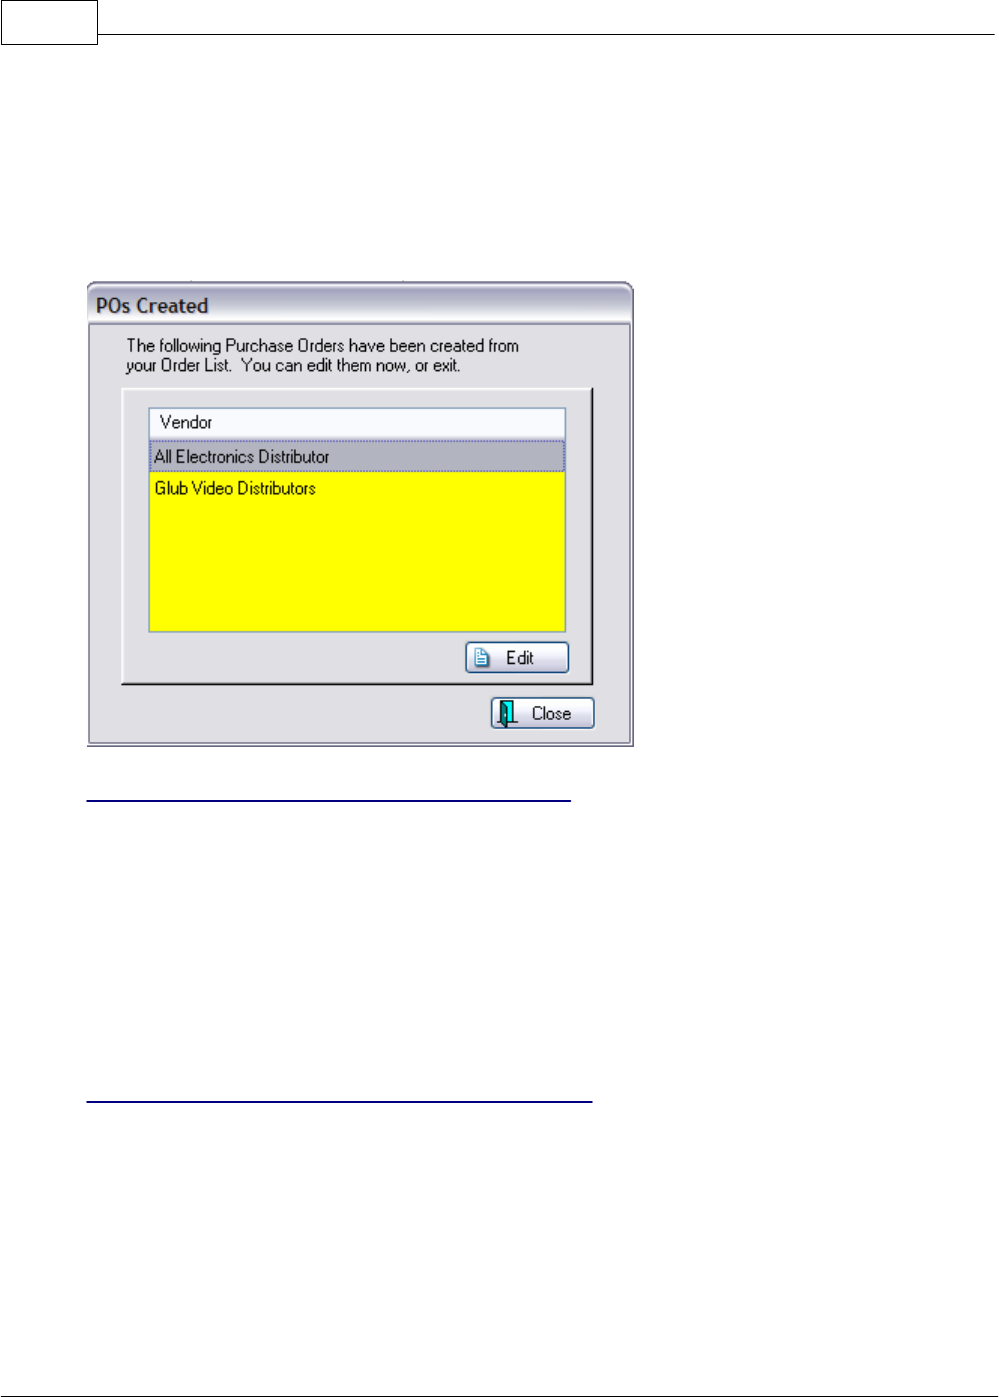
POSitive Retail Manager User Guide176
Copyright ©2007 POSitive Software Company
NOTE: See below if you encounter some additional prompts.
POs Created
Once the PO has been created you may choose to immediately edit the PO. Or you may close this
screen and edit the purchase orders later. They will be available in the Purchase Order Center for
editing and processing.
POSitive Alert - Open PO From the Vendor
"There is 1 open PO from the vendor: {vendor name} that the item {inventory item description} can be
added to. You can choose an existing PO to add this item to, or you can create a new Purchase
Order for this item."
·Existing - The item will be automatically appended to the open purchase order.
If you are prompted that there are 2 or more open POs from the vendor, and you choose Existing, you
will be taken to the Add Item To Purchase Order window to manually select which open PO the item
should be applied to.
·Create New - The item will be added to a new purchase order for the vendor.
POSitive Alert - All Vendor Items To This PO
"Would you like to assign all items in your Order List for this Vendor to the selected PO? Yes. No."
·Yes - All items in the order list from this vendor will be placed on the designated PO.
·No - You will be prompted for the next item as to whether it should also be on the designated PO.
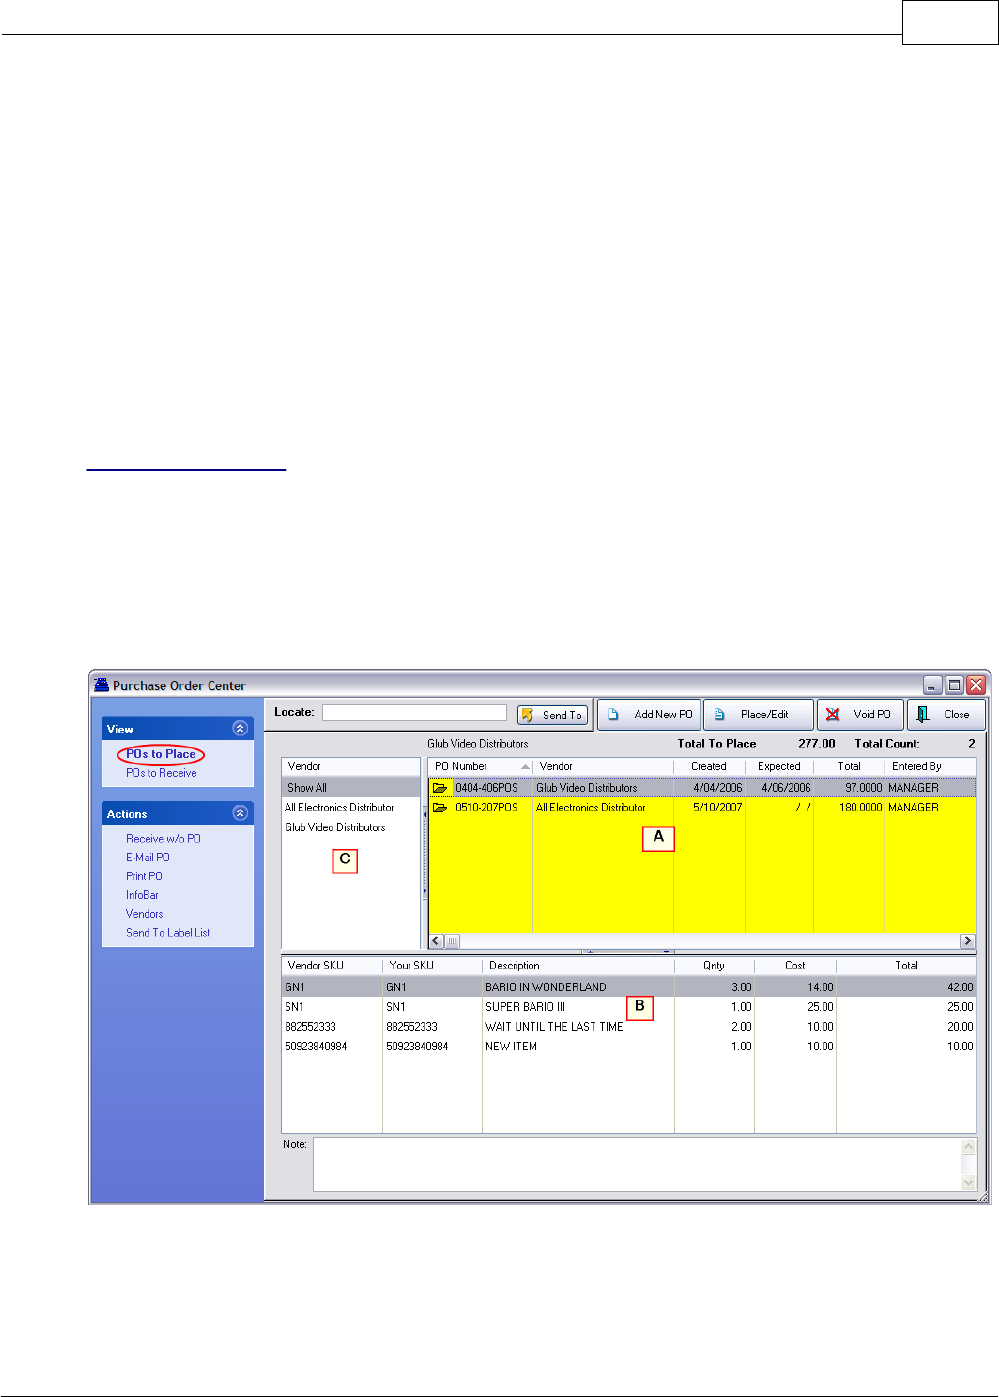
Purchasing 177
Copyright ©2007 POSitive Software Company
5.3 Purchase Order Center
The Purchase Order Center lists all purchase orders for all vendors. These purchase orders were
created either through the use of the Order List or by choosing to create purchase orders while on this
screen.
Two Types of Purchase Orders
All purchase orders have been grouped based upon the status of the purchase order and by vendor
name.
POs To Place - they have been created, but the vendor has not been notified.
POs To Receive - they are nearly complete, just waiting for the shipment from the vendor to arrive.
The Basic Layout
(A) Purchase Order Header - shows the name of the vendor, the PO number, dates created and
expected, and the estimated total amount.
(B) Shows the specific inventory items on the highlighted purchase order. Use the InfoBar for sales
information about these items.
(C) Lists the vendors with purchase orders. Highlighting a specific vendor will show only purchase
orders for that vendor in the A section.
POs To Place
Purchase orders listed here are those which are still being created; the order has not yet been sent to
the vendor. You may edit these POs until you are ready to submit them to your vendors.

POSitive Retail Manager User Guide178
Copyright ©2007 POSitive Software Company
(1) Highlight the PO to be edited.
(2) Choose the Place/Edit button. (see Place/Edit PO)
(Note: Add New PO button will create a new purchase order without generating one from the Order
List.)
When you are finished editing and finally place the PO, it will be removed from this section and
transferred to the "POs To Receive" list.
POs To Receive
Purchase orders listed here are waiting for product to arrive. The vendor has already been notified
either by e-mail, fax, phone call, or special transmittal.
(1) Highlight the PO to be edited. Use the Vendor Filter if necessary.
(2) Choose the Receive/Edit button. (See Receive/Edit PO)
NOTE: If you have received a shipment and a purchase order does not already exist, choose the
Receive w/o PO option on the left. This will create and process the PO all at once.
Actions
Receive w/o PO - Creates a new PO and allows you to receive product to inventory all at the
same time.
E-Mail PO - This will copy the contents of the highlighted PO into an e-mail message addressed to
the vendor.
Print PO - Prints a copy of the PO which can then be faxed to the vendor.
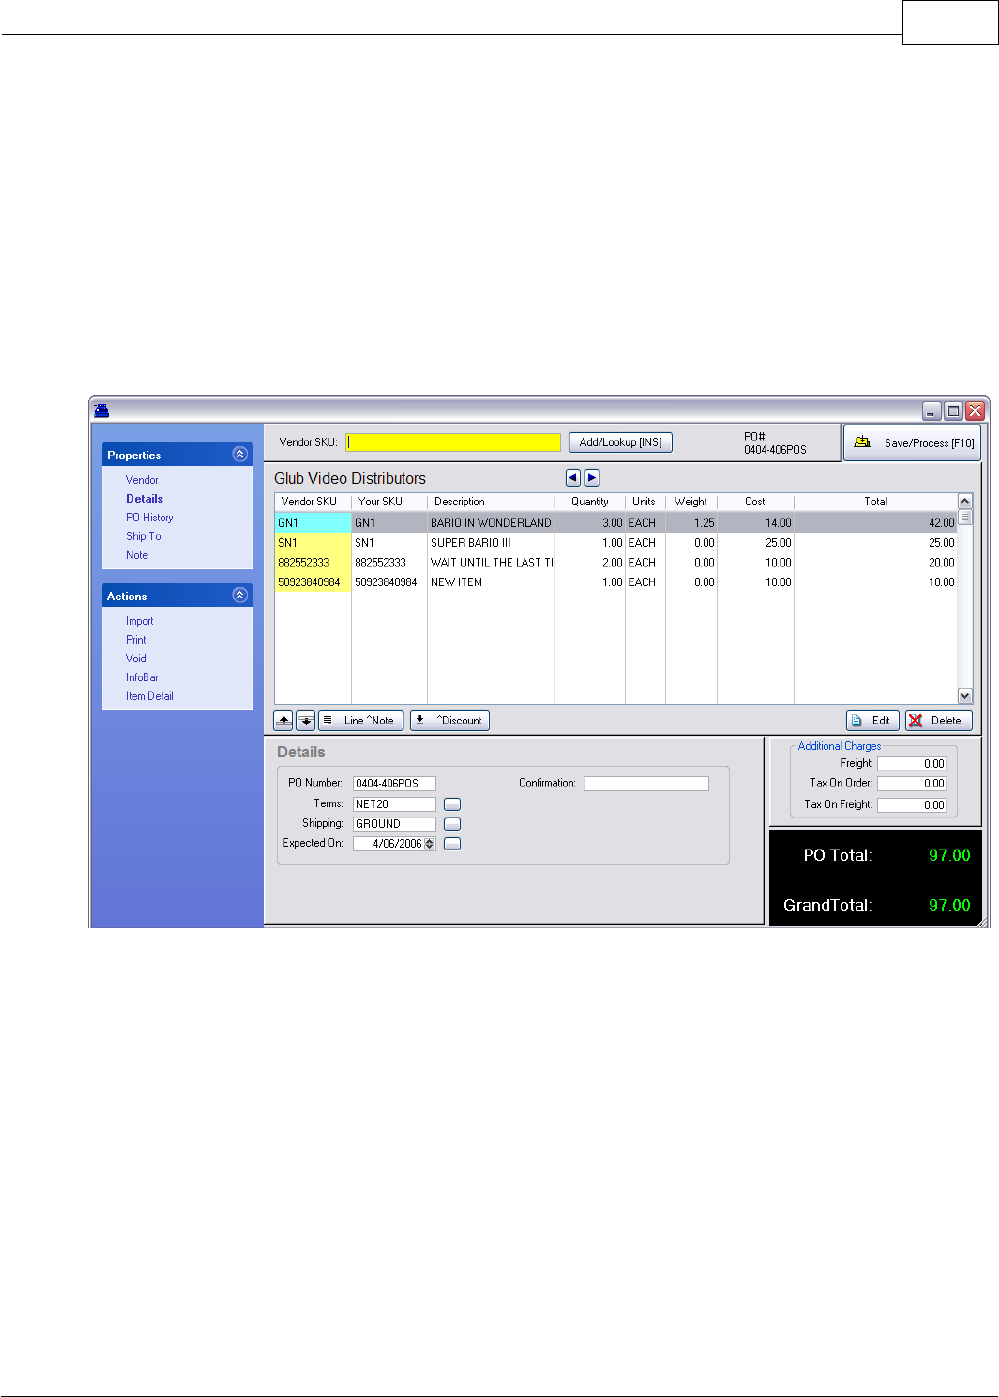
Purchasing 179
Copyright ©2007 POSitive Software Company
InfoBar - Displays sales information about inventory items on the highlighted PO. (see InfoBar)
Vendors - Opens the Vendor List for review or editing of vendor information (see Vendor Center)
Send To Label List - Places all items on the purchase order in the Label printing queue.
5.4 Place PO Screen
The primary purpose of the purchase order screen is to list inventory items being ordered.
For your convenience there are several options for control and review of the elements of the PO. For
example, you may modify vendor information or add notes about the vendor. As you select items to
order you may compare current prices with previous purchases. You may modify the PO number,
vendor terms, and designate drop shipping or alternate ship to addresses. Special instructions can
be added to the PO using line notes or general PO notes.
Vendor SKU
Type the vendor SKU and press Enter. If the SKU exists, you will be
prompted for a Quantity to order and the ability to change the vendor cost
of the item.
If the SKU is incorrect, you will be asked to create a new one or lookup
from the list. See information below.
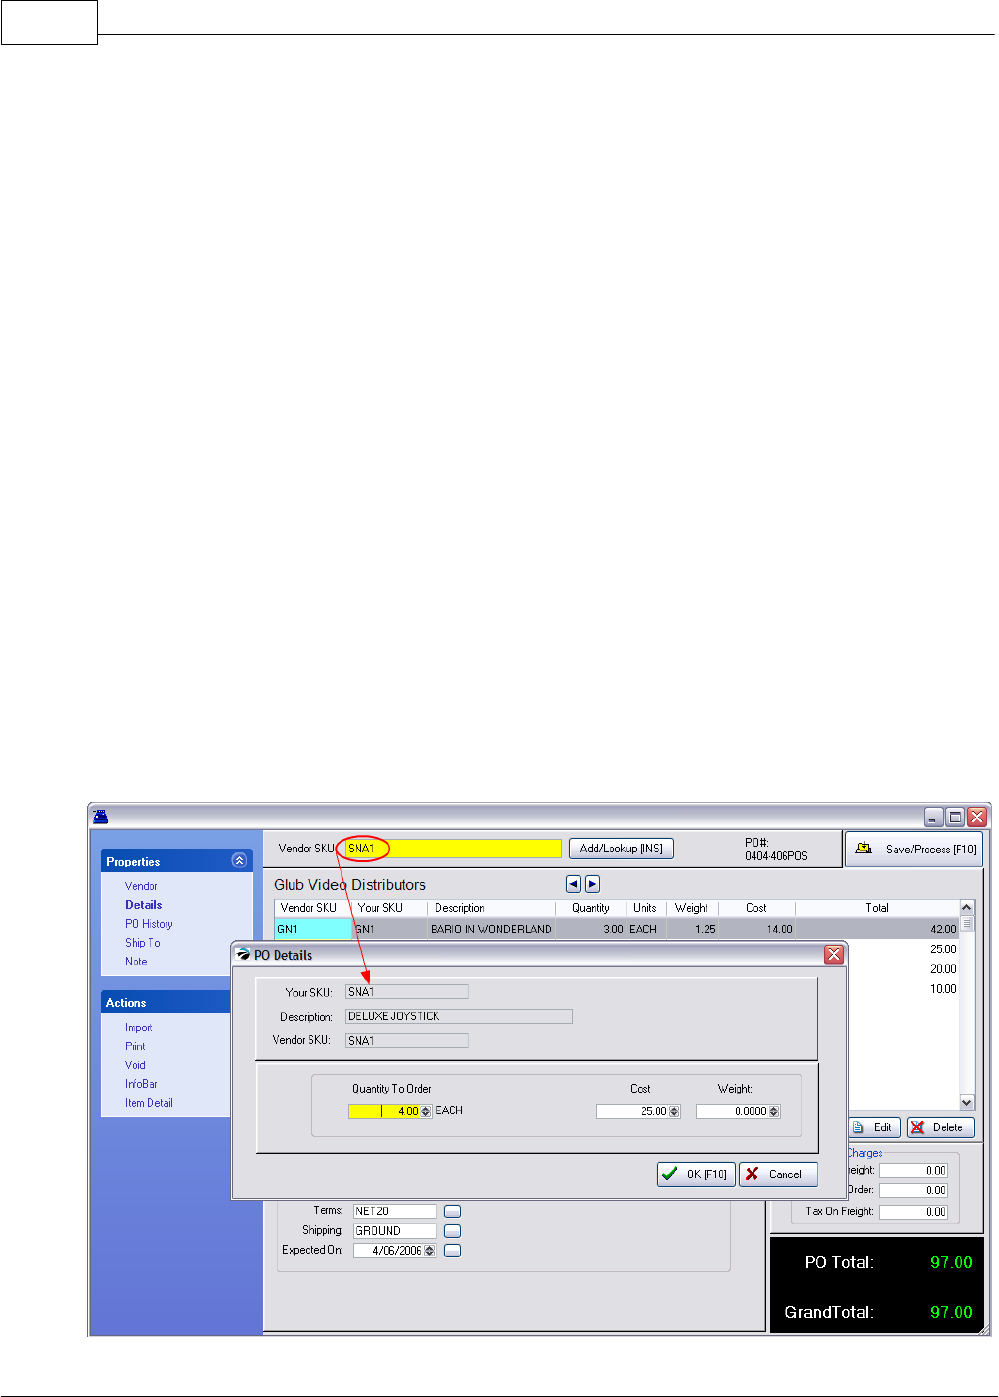
POSitive Retail Manager User Guide180
Copyright ©2007 POSitive Software Company
Add/Lookup [INS]
Opens the Vendor Inventory Lookup screen.
First, select the column to be sorted by clicking on the column. Second,
begin typing search characters. (You do not have to click into the Locate
field.)
Press Enter - will find the first item beginning with the search characters
Press CTRL-Enter - will find all items with the search characters
somewhere in the field.
When found, choose the SELECT button at the top of the screen.
Edit
The Edit button at right center allows you to change a line item on the
purchase order.
Delete
Removes a line item from the PO. You may be prompted to place the
item back onto the Order List for later purchases.
Save/Process [F10]
When you have finished entering all items to be ordered and you have contacted the vendor to
confirm availability and pricing, you may process the purchase order now or save it for later.
·Process Now. When you are preparing the order, this option allows you to send it into the
Receive PO list. It assumes that you are ready to notify the vendor of what you want to order.
Notification can be done by e-mail, fax, mail, or phone.
·Save For Later - If there are still corrections or additions to be made to this PO, Save For Later
will make it accessible either from Place PO or from Receive PO listings..
Three Scenarios When Adding an Item To The PO

Purchasing 181
Copyright ©2007 POSitive Software Company
When you add vendor inventory to a purchase order, you will encounter one of three situations:
A ) the item is in the vendor list, or
B ) the item is not in the vendor list, but is already in your master inventory list, or
C ) the item doesn't exist in PRM at all.
The steps for handling each of these cases are described as follows.
A ) The Item Is In Vendor Inventory
Each vendor has a separate list of items it can sell to you. Each item in the vendor list is identified by
a Vendor SKU, by your SKU, and by a Description.
Type the vendor SKU and press Enter.
Fill in the quantity being ordered.
Verify or change the cost and press Enter.
Or an alternate method,
Choose the Add/Lookup [INS] button
Search for the desired item and Select it.
Fill in the quantity being ordered.
Verify or change the cost and press Enter.
B ) The Item Is Not In Vendor Inventory, But Does Exist In PRM Inventory
In this case, you have already created the inventory item, but you have never purchased it from this
vendor. What you need to do is enter a vendor SKU and link it to your existing PRM item.
Type the vendor SKU and press Enter. You will be prompted that the vendor SKU does not
exist. Choose LOOKUP
Choose ADD (you are adding an existing item to the Vendor Inventory list.)
This opens the Locate Item screen and you can find it here. Choose Select,
Fill in the Vendor SKU and confirm the Cost. Then choose OK.
Now Choose Select at the top of the Locate Vendor Item screen. It will be added to the
purchase order.
Fill in the quantity being ordered.
Verify or change the cost and press Enter.
Error Message - Already In List
You will get an error message if the Your SKU item has already been included in this vendor list.
Press Enter and you will be returned to the inventory list. Press ESCape and Exit the list. Try again
with the vendor SKU, choose NO and carefully review the vendor list, sorting by SKU and Description
until you find the item. Then choose to select the item.
C ) The Item Does Not Exist in PRM Inventory
In this case the item is new to both the vendor list and to PRM. You will be creating a vendor SKU
and creating a new inventory item for PRM at the same time..
POSitive Retail Manager User Guide182
Copyright ©2007 POSitive Software Company
On a blank line of the PO, (press INSert if necessary)
Type the vendor SKU and press Enter. You will be prompted that the vendor SKU does not
exist
Choose CREATE since you know the product needs to be created.
Follow the prompts for selecting a department and category and finally adding the inventory
item. Press F10 when done.
It will be added to the purchase order.
Fill in the quantity being ordered.
Tools Available On The Purchase Order
Vendor
Review and edit Vendor name and address. Open the Vendor Inventory
List. Call the vendor.
Details
PO Number, Vendor Terms, Shipping, Expected Date
PO History
Shows past purchase orders for the highlighted inventory item.
Ship To
You may designate a drop ship address for a customer or an alternate
store address. On the panel at the bottom of the screen, there is a button
"Select Ship To [F12]. You will be prompted for Company or Customer
address.
Note
Select Note from the Properties section on the left. This is an extended,
paragraph type note for the Purchase Order. There can only be one PO
Note per purchase order, but you may add to this note as needed.
Line Note
Press CTRL-N (or choose the Line Note button) while highlighting an
inventory item. Type the contents of the note. This note is limited to the
width of the Description field and is typically used for a short notation
directly below an inventory item being purchased. You may add multiple
line notes until your message is complete. Highlight the last note, press
CTRL N and the line not will be added directly below the last note.
Discount
A "Dollars Off" value is added to the PO to reduce the overall charges on
the PO. If your vendor bills you at retail pricing, yet gives you a discount,
you will have to calculate the total discount amount and enter it here.
Reposition
Lines
If it will help you or your vendor, you may rearrange items on the list by
highlighting an item and then clicking on the Position Up or Position Down
buttons.
Import
Used for direct scanning of products to add them to the Purchase Order.
(See Purchase Order Importer)
Print
Print a preview or paper copy of the PO. If you have a fax card as a
printer option, you may choose to fax the document to the vendor.
Void
Cancel the purchase order.
InfoBar
A floating screen displays sales and stock status about the highlighted
inventory item.
Item Detail
Allows you to directly edit the highlighted inventory item.
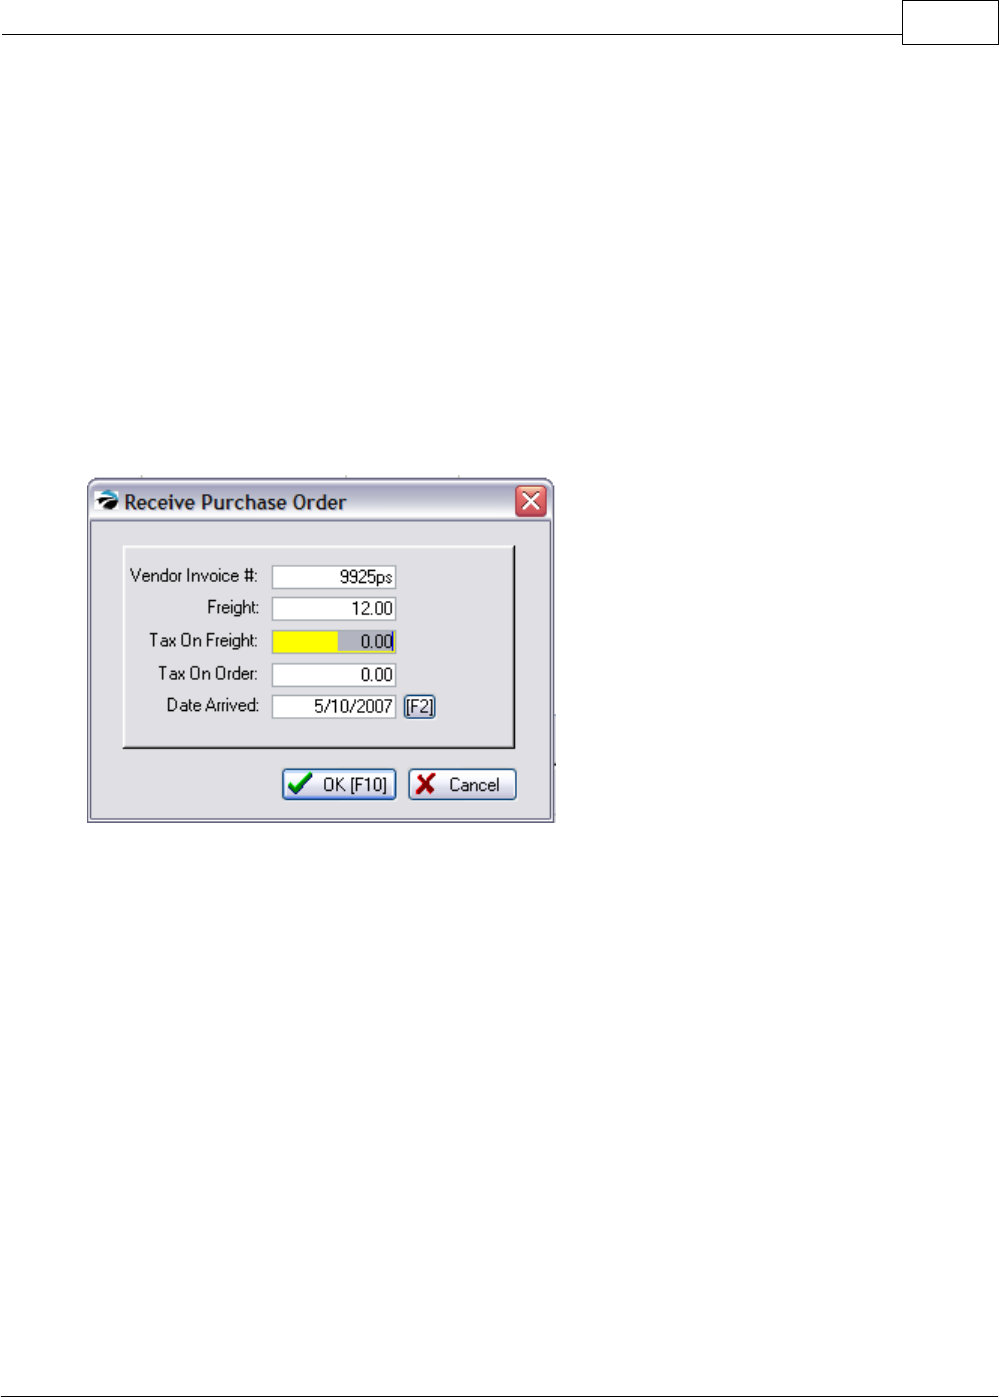
Purchasing 183
Copyright ©2007 POSitive Software Company
Additional Charges
Most likely you will not know freight or tax charges at this point. It can be
amended later.
-
5.5 Receive PO Screen
The primary purpose of the "Receive" purchase order screen is to confirm quantities of products being
received. Then PRM will update your inventory stock counts.
When receiving a PO you will be prompted to enter the Vendor Invoice information.
Invoice - The vendor's invoice number. If you only have a packing list, enter the number of the
packing list and the final invoice number can be entered later.
Freight - Call the vendor if the freight charges are not known.
Arrived - Today's date is automatically entered.
Purchase Order Layout
The layout of the purchase order is very much the same as described in the Place PO Screen.
However an additional field called Recv'd is visible. It is important to enter true quantities of items
received into this column.
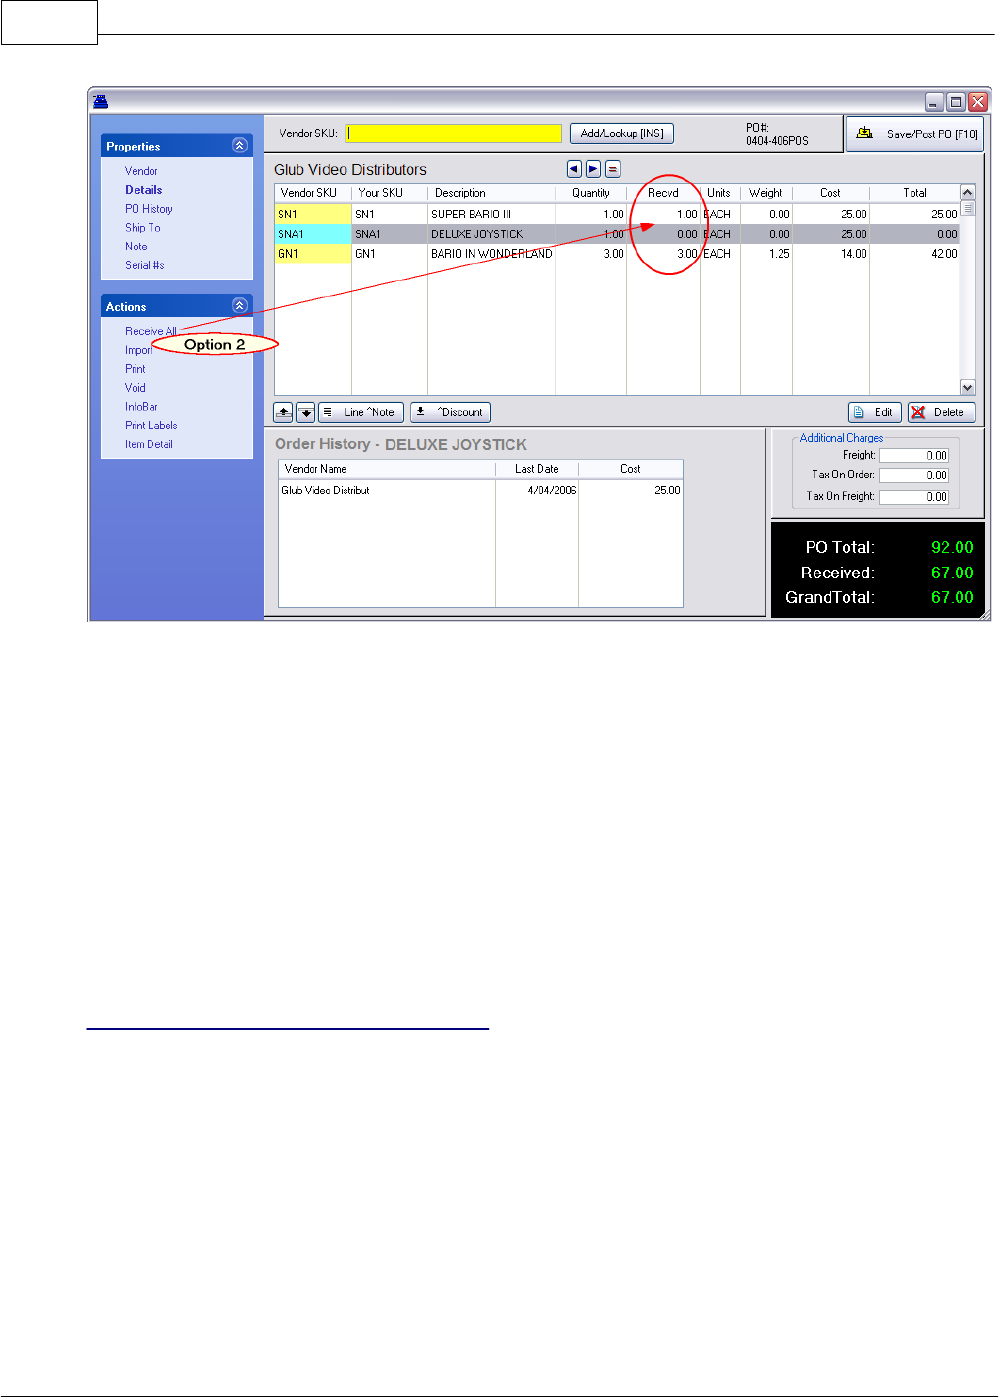
POSitive Retail Manager User Guide184
Copyright ©2007 POSitive Software Company
Enter The Quantity Received
There are several methods used to enter the received quantity.
Option 1 - Highlight the item and press Enter. The Received value will equal the order value.
Option 2 - Choose the "Receive All" option at the left. This will set all items on the PO as being
received in full.
Option 3 - Choose to Print Labels for the items before processing the PO. When you apply labels to
the products as they are removed from their boxes, you will be able to confirm that all products have
been received. If you run short or have extra labels, then some adjustments need to be made to the
purchase order.
Option 4 - Choose the Import option at the left. Use the Direct Scan tool.
How To Handle Vendor Backorders
If the vendor does not ship the entire order, PRM will track what has not yet been received.
1) When prompted, enter the ACTUAL quantity received even if it is less that the quantity ordered.
2) The PO extended total will only calculate the cost the items received.
3) Complete and process the PO in the normal fashion.
4) Inventory items will be posted to your inventory stock counts.
5) The items not received will be retained on the PO for later processing. Go To Receive PO. OR If
you know the items will never be shipped, you can then choose to Void the Purchase Order.

Purchasing 185
Copyright ©2007 POSitive Software Company
If The Cost Has Changed
If the cost from the vendor has changed, you should enter the new cost on this purchase order. PRM
is a First In- First Out program and will track the cost changes.
·Consider your options in System Setup: Purchase Order Defaults. This can warn you when costs
have changed and alert you when items received are fulfilling customer orders.

Part VI

POSitive Retail Manager User Guide188
Copyright ©2007 POSitive Software Company
6Sales Invoices
Selling products and services is a process. Some advanced planning is required as noted in each
section.
1) Open an Invoice screen.
From the Transaction master menu, choose the Customer Sale or Quick Sale button. This opens a
blank sales screen.
Advanced Planning: There are two invoice screen designs: Invoice and Register. One design is
selected during a workstation setup process. This setup also determines what printer and printer form
will be used for the sale and also controls, to a degree, how much restriction or freedom will be
allowed the sales clerk. (see Station Settings)
There is also a third sales screen option called Touch Screen which needs to be defined through
Maintenance: Definitions: Touch Screen and employees log in and out of PRM to access the touch
screen. (see Touch Screen)
2) Assign a purchaser to the invoice.
Choosing Quick Sale creates an invoice without any customer name. Choosing Customer Sale
opens a list of customers from which you add and select a customer.
Advanced Planning: Price levels for selling products are part of the inventory setup. Assigning a price
level to a customer is done on a per customer basis or can be done with the use of Customer
Categories. Typically, Quick Sale invoices charge the highest price and Customer Sale invoices use
any price level assigned to the customer record.
3) Add products and services to the invoice.
Products are added using a barcode scanner, by manually typing a product SKU, or by opening a list
of inventory and choosing the desired item. Once the item is on the invoice, the quantity, selling price,
and discount percentage can be changed.
Continue to add products to the invoice until all items to be purchased are listed.
Advanced Planning: Employee security settings control how much liberty an employee has in making
changes to the invoice.
4) Tender the invoice taking payment by cash, check, credit card.
Choose the Tender button, or press F10 on the keyboard. You may be prompted for more information

Sales Invoices 189
Copyright ©2007 POSitive Software Company
about the customer, but eventually you will determine how payment is to be made. Highlight the
payment type, press Enter, and fill in the amount if you are given more than the total charges.
Advanced Planning: Credit card processing needs to be activated before selection of credit card as a
payment type.
5) Print the invoice for the customer.
After entering enough monies in payment, PRM will print the invoice, display change to be given the
customer and the invoice closed. PRM is then ready to repeat the process.
Advanced Planning: Printer(s), cash drawer, and pole display need to be connected and tested prior
to invoicing. This is done through Station Settings.
Invoice History
Once the invoice has been created and processed, a re-print copy of the invoice is accessible through
Invoice History. (see Invoice History)
6.1 Invoice History
A record of all invoices ever created is saved. These invoices can be reprinted, e-mailed, and
analyzed.
Three Main Sections
This screen consists of three main sections:
(A) Header - includes invoice number date, customer name, and total

POSitive Retail Manager User Guide190
Copyright ©2007 POSitive Software Company
purchase value
By default, the Invoice number is being sorted in descending order; the most recent invoice is always
at the top of the list.
Locate
To find a specific invoice, type the invoice number and press Enter. To locate by another field, click
on the column title of Invoice#, Station, Date, or Time and enter desired information. Clicking twice
will reverse the sort order.
Clone
In the upper right corner you can choose to create a copy of the highlighted invoice. You will be
prompted for the Customer: Keep Original Customer, Customer Sale, Quick Sale or Cancel. A new
invoice is created with all the items listed.
Print
Re-print any invoice. Choose the default printer, another printer, or choose Preview and save the
invoice as a PDF file or HTML file.
View
At the far left, the following options can be used to focus on different aspects of this header area.
Reference # - (the default)
Date - opens a calendar button to find invoices of a specific date
Customer - shows all invoices for the currently highlighted customer invoice. Can choose the
Customer [F9] button at the top to select a different customer.
Purchase Order # - if the invoice prompted for the customer's purchase order number, that number
can be found here. If the PO number needs to be changed, highlight the invoice and choose the
Options button at the top of the screen and select Change PO.
Serial Number - if a serialized inventory item was sold, the invoice can be found by entering the serial
number of the item.
Order Number - (SERVICE MODULE ONLY) If the invoice originated as a service order (no other
kind) then the final invoice can be found by entering the original service order number.
NOTE: Invoices created from other pending transactions will display its original source at the top of
the screen in the area to the right of the Locate field.
(B) Detail - the items purchased includes SKU, Description, quantity,
price, discount percentage, and line total.
If there is a backordered quantity, then the invoice was split into a pending order for the customer and
includes all items which were not delivered.
Right-Mouse-Click on a line item provides options to
Adjust Cost - change the cost of the line item to the current cost or some other value
Properties - to review the source of the product, sales history, commissions, returns and other useful

Sales Invoices 191
Copyright ©2007 POSitive Software Company
information. (see Item Properties)
(C) Footer - additional information about the invoice based on the
selection of Properties at the far left.
Properties
General - shows cashier and sales person, how the invoice was tendered, and the taxes, subtotal
and grand total. There is an option based on security settings to
·Show Costs - displays profit and profit margins per invoice -
·Show Voids/Unused - Show invoices which were Voided or Unused (invoice was canceled before
completion)
Bill To / Ship To - customer's mailing address
Notes - any service notes, order or invoice notes.
Prompts - information gathered at the start or completion of the sale. (see System Setup:
Transactions: Prompts)
General Ledger - this will be blank until the cash drawer has been balanced, then it will display how
each item sold impacts the General Ledger accounts
Transaction Log - time stamped activities related to this invoice. Gives a total time for creation of the
invoice.
·Invoice - activity while in the Invoicing stage
·Pre-Invoice - activity prior to the Invoicing stage while it was an order, layaway, internet order, etc.
Actions
Make AR Payment - accept a payment towards a customer's store account. It is not necessary to
find the original invoice to take payment towards Accounts Receivable
E-Mail - send an e-mail copy of the highlighted invoice to the customer
Void - if the cash drawer has not be balanced nor on store account, then the invoice can be voided,
the monies returned, and the inventory stock updated.
Change PO Number - Add or Edit the customer's purchase order number
Service - shows the work performed on serialized inventory items of various customers (see Serial
Number)
Query - define and reuse filtered lists of invoices based upon criteria important to you
Reset - to restore the original list of invoices after using a query
6.2 Pending Transactions
An invoice transaction means a sale is made and the products have been delivered to the customer.
There are other types of sales transaction which are "pending" delivery.
Examples of such transactions are Layaways, Orders, Web Orders, Service Orders, and Quotes.
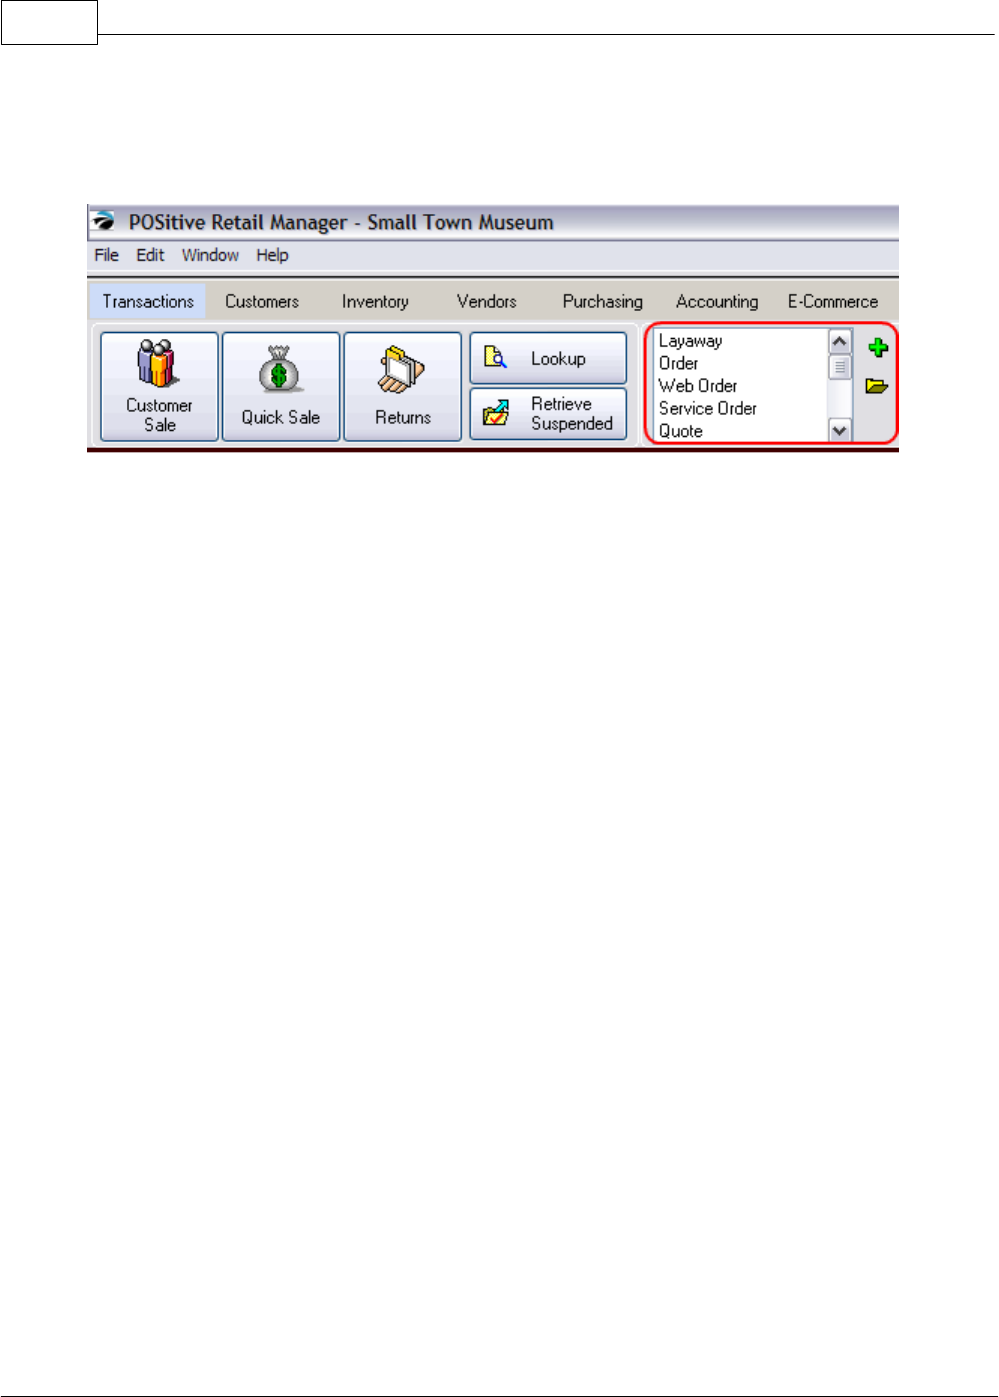
POSitive Retail Manager User Guide192
Copyright ©2007 POSitive Software Company
1) Open a PENDING Invoice screen.
From the Transaction master menu, highlight the type of transaction and then choose the PLUS or
FOLDER icon at the right of the list.
Plus Icon - Creates a NEW entry.
Folder Icon - Opens a list of pending transactions of the type highlighted. (See "... In Process")
2) Assign a purchaser to the invoice.
All Pending transactions must have a customer name assigned to it; Quick Sale is never an option.
Before the pending screen opens a list of customers will be displayed from which you add and select
a customer.
3) Add products and services to the invoice.
Products are added using a barcode scanner, by manually typing a product SKU, or by opening a list
of inventory and choosing the desired item. Once the item is on the pending invoice, the quantity,
selling price, and discount percentage can be changed.
Continue to add products to this pending invoice until all items to be purchased are listed.
4) Set a Delivery Date
Because this is a pending transaction, a due date or delivery date needs to be selected. A calendar
will allow you to select any date.
5) Take a Deposit payment by cash, check, or credit card.
Choose the Tender button, or press F10 on the keyboard. Because you are not delivering the
products at this time, you can determine how much the customer should pay if anything in advance for
these items. Highlight the payment type, press Enter, and fill in the amount if you are given more than
the total charges.
5) Print the Pending Order, Layaway, etc. for the customer.
After entering enough monies in payment, PRM will print the invoice, display change to be given the
customer and the invoice closed. PRM is then ready to repeat the process.
Advanced Planning: Specific Printer(s) and forms also need to be selected for Layaways, Orders,
Service Orders etc. This is done through Station Settings.
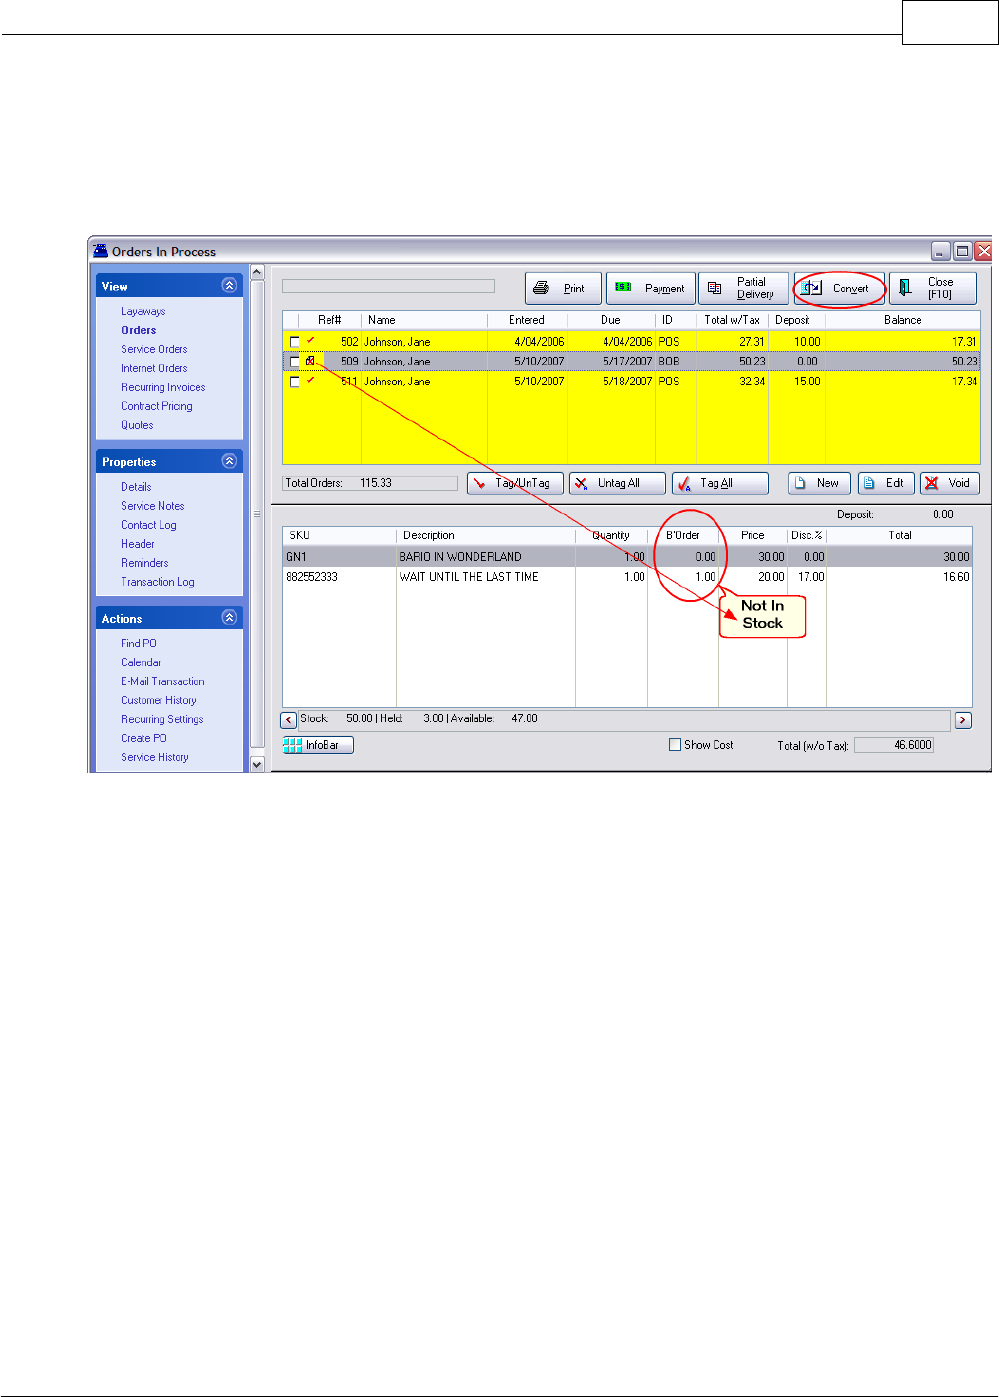
Sales Invoices 193
Copyright ©2007 POSitive Software Company
Convert To Invoice
Eventually, ALL pending transactions MUST be either converted to an invoice or voided.
Open the "... In Process" list. Highlight the customer transaction and choose the Convert button.
Before choosing the Convert button, check to make sure that all items are in stock and can be
delivered. If some items are not in stock, you can choose the Partial Delivery button to select which
items will be delivered at this time.
Again, ALL pending transactions MUST be either converted to an invoice or voided. Otherwise your
inventory will be flagged as held and your stock counts will not be correct. And, your sales tax
reports, which are based on invoices processed, will be inaccurate.

Part VII

POSitive Retail Manager User Guide196
Copyright ©2007 POSitive Software Company
7Appendix A
The following topics are important reference materials for creating your company. They are here in
the appendix so as not to be distracting as you learn the basics of PRM.
Appendix A - contains the following
POSitive Setup Form
Station Detail
Printers / E-Mail
Definitions
Editors
Company Information
Policy Statements
Invoice Button Definitions
PRM Security Options
Mail Groups
Zip Code Table
Employees
7.1 POSitive Setup Form
This is the main control center of POSitive Retail Manager (PRM). Settings made here affect the
entire store operation. Close attention should be paid to each option and setting.
Missing Some Features?
Some features described here may not be immediately available to you. These features are
dependent upon registration of various modules. Read through these features and options because
they may open new opportunities for your business which you may not have considered possible
before. Of course, some features simply will not be practical for your business environment and may
be ignored.
New Company Wizard
As you created your new company, you were prompted with the New Company Wizard to select
several of the options available. Choices made then can be modified from this setup form.
Need More Help?
If after reviewing the available help files you still have specific questions, please contact your local
dealer or POSitive Software Company.
-------------------------------------------
Left-hand side Topics are discussed in the sequence of the listing in POSitive Setup Form.
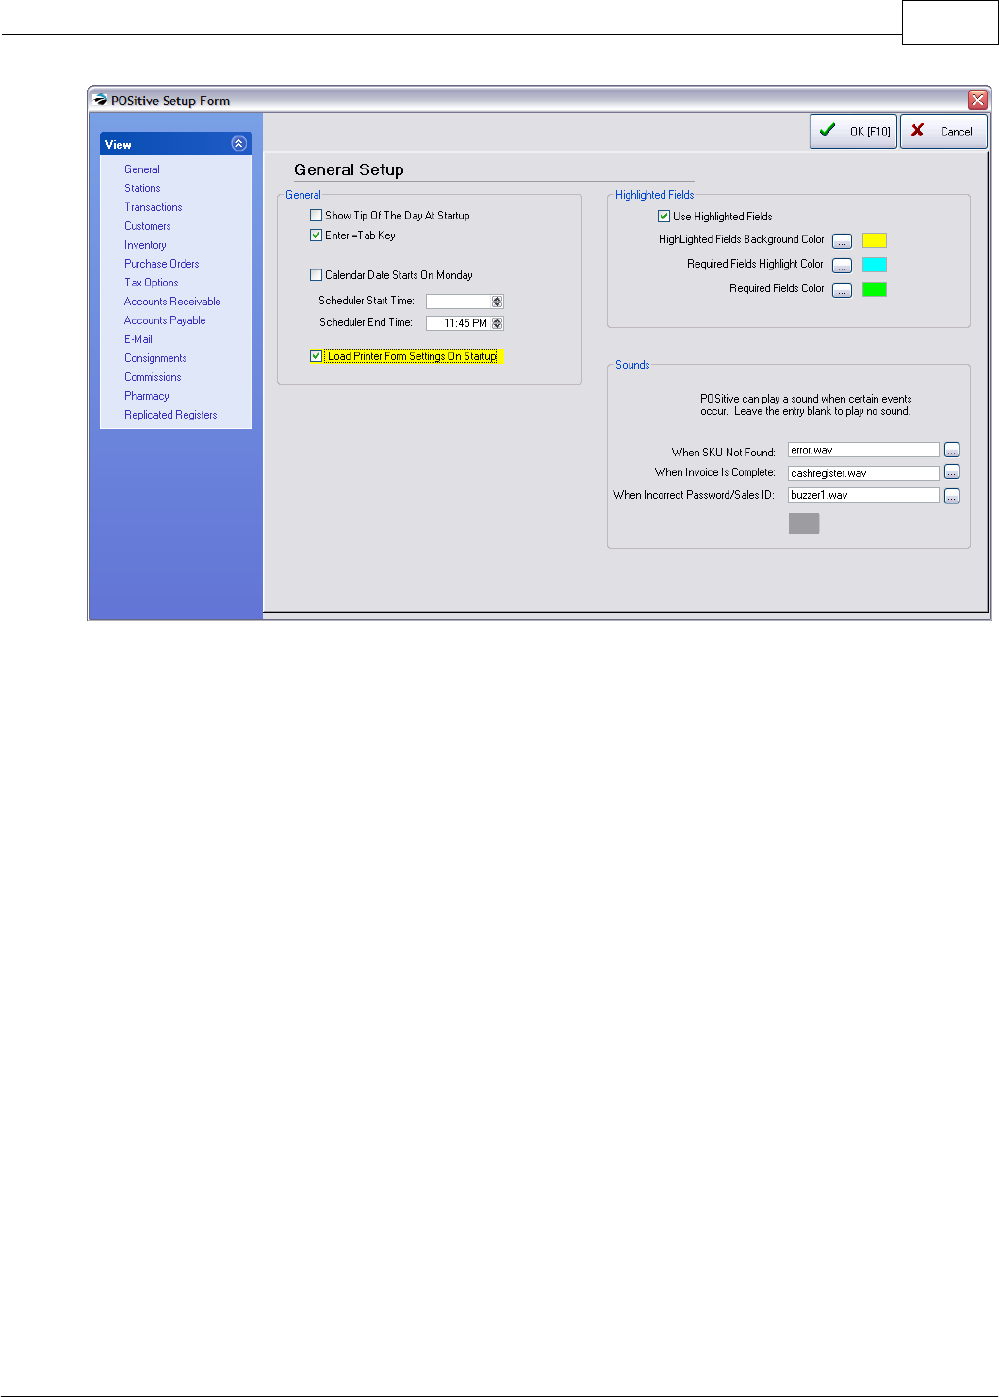
Appendix A 197
Copyright ©2007 POSitive Software Company
General Setup
Show Tip Of The Day At Startup - A handy feature of PRM to gradually initiate you to features and
procedures of PRM. Each time the program starts up, you will be given a tip which might otherwise
be overlooked. Recommendation=unchecked
·If checked, you will immediately see a Tip for using PRM.
·If unchecked, you will not see the Tip, but you can access it by going to Help: Tip of the Day
Enter = Tab Key - Unlike some Windows programs, PRM allows you to press the Enter Key to move
from field to field. This is a more natural way of entering data. Use of the Tab Key to move the cursor
from field to field will still be functional. Recommendation=checked
·If checked, you will be able to press Enter to move from field to field.
·If unchecked, you must use Tab to move from field to field.
Calendar Date Starts On Monday - Calendars displayed in PRM will show Monday as the first day of
the week. Recommendation=unchecked
·If checked, you will see Monday as the start of the week.
·If unchecked, you will see Sunday as the start of the week.
Business Hours For Service Dept - If you have the Service Module you will want to enter your
business hours so that the appointment scheduler will begin and end at appropriate times. (Service
Module required)
Scheduler Start Time:
Scheduler End Time:
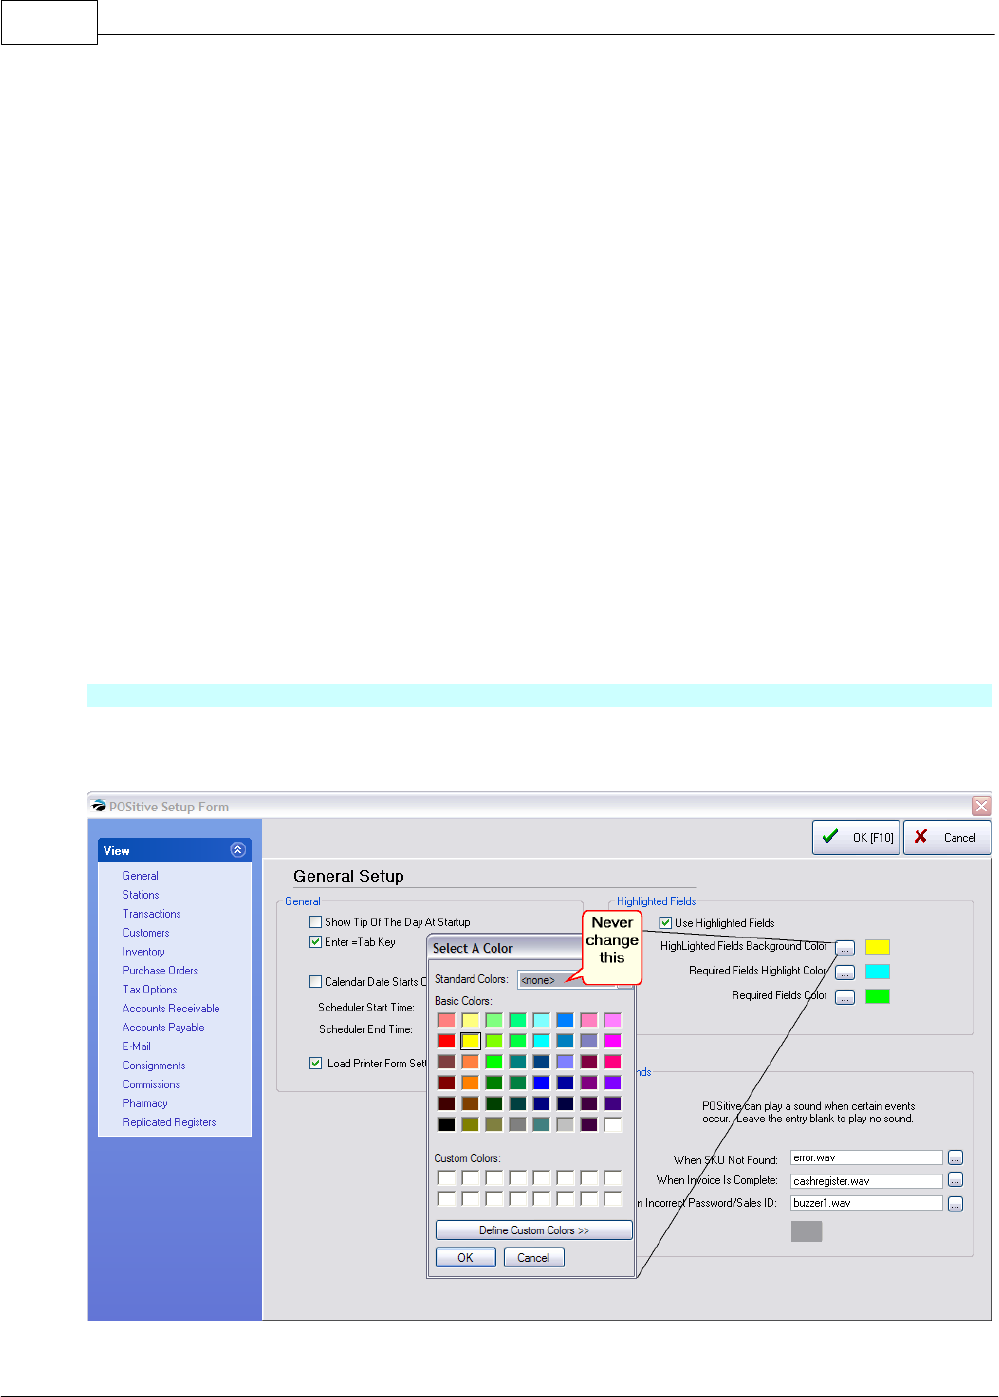
POSitive Retail Manager User Guide198
Copyright ©2007 POSitive Software Company
Load Printer Form Settings On Startup - This will speed up printing of the first invoice of the day if
you have selected to use forms other than the Standard laser from. Recommendation=checked
·If checked, the printer forms will be immediately available to the printer.
·If unchecked, the first invoice of the day will take a few extra seconds to load the form,
otherwise it will be fine.
Highlighted Fields
The use of color can enhance data entry by indicating which fields must be filled in and the current
cursor position. This is especially true when adding a new customer or vendor to PRM when you are
pressed for time.
Use Highlighted Fields - If left unchecked the following settings will be inactive.
·If checked, (recommended) the selected colors / settings will be in effect.
·If unchecked, all colors and settings are ignored.
You can create your own color scheme for the following fields.
·Highlighted Fields Background Color - The field currently active by the cursor will be this color.
·Required Fields Highlight Color - A required field which is also currently active by the cursor will
be this color
·Required Fields Color - Fields which must not be left blank will be this color.
COLORS
How To Change PRM Field Colors
·WARNING: NEVER make changes to the Standard Colors option on the Select A Color window.
Changes made there can be irreversible and can cause major problems with PRM and other
Windows programs.
·Click on the lookup button beside a field to access the Select A Color window.
Appendix A 199
Copyright ©2007 POSitive Software Company
·Highlight a color.
·Click OK.
·Repeat for each field.
SOUNDS
To alert a clerk that a particular activity has been executed, PRM now allows you to link sound files
(*.wav) to a few activities.
To Disable Sounds simply erase the .wav file entry from the field. It is not necessary to delete the
actual file from the directory. Note: these *.wav files are stored in the c:\prm\sounds\ directory.
Current Activities using sound are:
·When SKU NOT found.
·When Invoice Is Complete
·When an Incorrect SalesID / Password is entered
Test the Sound - click on the arrow button.
Other Sounds - if you choose, you can find additional sounds in the computer system or get more off
the internet and save them in the c:\prm\sounds\ directory and link to them.
Stations
Each networked computer (station) has it's own unique settings including printer links, hardware
attachments, and overall operations. From this window, you may add more stations and edit existing
station settings.
Single User Version of PRM.
If you only have one computer station you only need to setup Station 1 - Register 1.
Network Version of PRM.
If you have more than one computer using PRM, then each workstation needs to be defined. As part
of the Company Wizard, you selected the number of workstations you would be using. Choose to Edit
each one. If you need to add more, press the Add button and complete the setups.
NOTE to ICVerify Users: If you have a 4 station license of ICVerify, you will make the links on PRM
Stations 1, 2, 3 and 4. (You will not be able to use station 5 for ICVerify because of internal coding.)
-------------------------------------
Your Default Station = # - The computer you are currently using is operating as the station number
indicated.
Station # Name - Currently, the stations listed here have been created. There is no limit to the
number of stations you may create. You will be limited only by the capacity of your network. Each
computer (station) must use a unique station number.
Add - To add a new station.
Edit - To modify an existing station. First highlight the station to be edited.
Delete - To erase an existing station. Caution: If you will be using ICVerify do not delete station 1
through station 4. See ICVerify and PRM.
Clone Station - Creates a new station based upon the settings of the highlighted station. You may
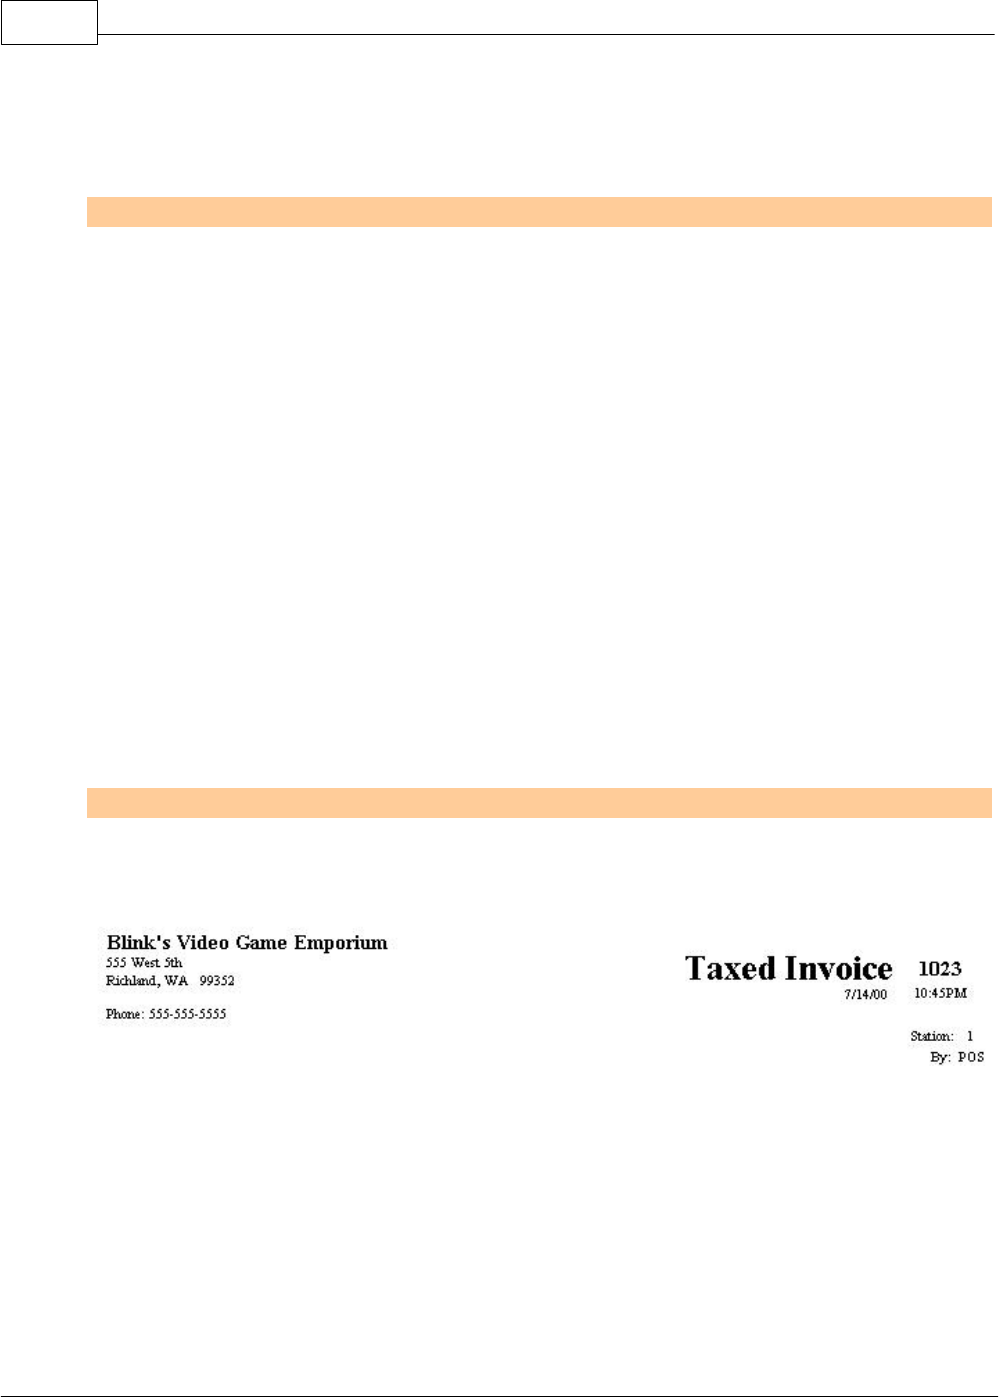
POSitive Retail Manager User Guide200
Copyright ©2007 POSitive Software Company
then make modifications as needed. You will be prompted to enter a new station number and name.
If the station number already exists, the settings will be overwritten.
-------------------------------------
MORE....See these corresponding sub-topics.
Transactions - general settings for invoices
Customer Options - selection of customer tracking options
Inventory - general inventory controls; fast add, pre-sold & backorder defaults
Purchase Orders - selection of purchase order number, handling of matrix inventory, report printing
Tax Options - activation of international tax settings
Accounts Receivable - selection of AR Statement style and controls
Accounts Payable - selection of checkbook for payments to vendors
Consignments - set store percentage on consignment sales
Commission - activation of commission tracking
Credit Card Setup - selection of credit card processing type moved to Manager: Credit Card Manager
Pharmacy Setup - a third party prescription tracking program
7.1.1 Transactions
Transaction Setup or Invoice Setup has been subdivided into seven tabs: Invoicing, Customers,
Quick Sale, Tender, Service Orders, Shipping, and Printing.
Invoicing tab
Invoice Header - Leave this Blank. It is a special option for international users of PRM who need to
annotate the name Invoice on Windows invoice receipts (dockets). For example, entering the words
"Taxed Invoice", will replace the title "Invoice".
Numbering - PRM uses two sets of numbers for all sales transactions.
·Current Invoice # - Enter a number for your first invoice. All PRM invoices, completed or not,
will be numbered sequentially for auditing purposes. An invoice number cannot be reused nor
modified. Invoice history will list all invoice numbers even if the invoice was voided or not
used. (see option "Assign Invoice Number At End Of Transaction)
·Current Order # - Enter a starting number for all other sales transactions. Sales transactions
such as Orders, Layaways, Service Orders, Internet Orders, and Quotes will draw upon this
other pool of numbers. Whenever a new transaction is created, the next available number is
selected. This number is retained even if the transaction is converted to another type, such as
converting a Quote to an Order. When the transaction is converted to an invoice, then the
next available invoice number is attached as the permanent reference number.

Appendix A 201
Copyright ©2007 POSitive Software Company
At Start Of Transaction
NOTE: Although one could activate any or all of these options the result may not be as satisfactory or
as efficient as using other methods for quickly adding customer information. Consider leaving these
options blank and using settings on Customer Options and Station Settings. Contact your dealer for
more information.
·Ask For E-Mail Address - For all sales you will be prompted to ask for the customer's first and last
name and an e-mail address. All other customer record information will be ignored, however it can
be added later. The intent is to expedite the gathering of information relative to e-commerce,
however if this feature is abused by ignoring it or entering nonsense information, it will clutter the
customer list. NOTE: Be sure to select SKIP [F7] if the customer does not want to give you the
information.
·Ask For Phone Number - (Not Generally Recommended) You will be prompted for a phone
number of the customer before any other customer information is taken. This includes cash sale
invoices and may not be suitable for your business.
·Ask For Zip Code - For every Quick Sale (no customer name) transaction, you will be prompted to
enter a zip code. The purpose is to compile statistics of sales to various locales so you can better
understand your clients and target your advertising.
Assign Invoice Number At End Of Transaction - Choosing this option, PRM waits until an invoice is
to be processed to assign the next sequential invoice number.
·If checked, an invoice which is voided before completion will not use a number from the
invoice sequencer. Also, if an order or layaway is converted to an invoice and then back to an
order or layaway an invoice number will not be missing in the invoice history screen.
·PROS/CONS - it will be more difficult to trace how often an invoice is voided.
·If unchecked, PRM selects the next sequential invoice number as soon as the invoice is
created. If the invoice is voided before completion, then the number is no longer available for
use, but it is recorded in the invoice history as Not Used. This adds an additional element of
managerial control to know which employee is frequently voiding invoices and to determine the
causes.
Skip Prompt For PO Number - When you are creating an invoice or an order for a business you are
normally asked for the customer's purchase order number.
·If checked, you will not be asked to select and enter a purchase order number.
·If unchecked, you will be prompted for the PO numbers from the business which is making
the purchases.
Allow Packages - a grouping of inventory items on an order or invoice so that individual items will
not display pricing, but rather be included in a blanket price entered on the package line.
·If checked, you can use the Package feature and the customer will see just one package price
for the list of items being purchased.
·If unchecked, the Package option of PRM will not be functional and you cannot hide line item
pricing from the customer.
Allow Backorders On Invoice - If your degree of inventory control includes monitoring backorder
status and generating special orders for backordered items, then this option needs to be checked.
Note To New Users: Some experienced users of PRM recommend waiting for 90 days

POSitive Retail Manager User Guide202
Copyright ©2007 POSitive Software Company
before activating this feature. Inventory entry and control is a big project and it will take
a period of time until all inventory and stock counts can be fully reconciled. Turning this
option on would merely add another level of complexity as you begin using the
program.
·If unchecked, no backorders will appear on the invoice, even if the item is not in stock. This
should not be an issue, because invoices aren't usually made unless you can deliver product
to the customer.
·If checked, the invoice will display backorders. When attempting to accept Tender, PRM will
warn that backordered items are included on the invoice. You will be given options for
handling the backorders which include overriding the backorder status or generating a
followup order for the customer.
·If you choose to Allow Backorders, then you need to select one of the following:
Pay When - The customer is expected to pay for backordered items when the items are
·Invoiced - Pay before backordered items are delivered. You only have to ask the customer
for money one time. And this will assure that your costs will be covered. If you are unable to
deliver the items, the money paid is held as a deposit which can be refunded or applied to
future purchases.
·Received - Pay at the time backordered items are delivered. The customer will be asked a
second time for money. If you are unable to deliver the items, no money will need to be
refunded.
Show Item Picture On Screen - When invoicing, PRM can display a picture of the item being sold.
This feature is useful if you suspect that customers are switching price tags because you will be able
to compare the item in hand to a picture of the item. In addition to the picture, you will be able to see
the item's notes.
·If unchecked, no pictures will be displayed. There will be a Item Detail window at the upper
right, but it will not be active.
·If checked, pictures will be displayed in the upper right corner of the screen in place of the
ship-to field. For Cash Sale invoices, the invoice layout must be changed manually by
pressing ALT-F2.
Automatically Add Decimal Point - When Entering Quantity/Price/Tender (Register/Touchscreen
Mode Only)
·If checked, whatever number is entered will automatically assume 2 decimal places.
·PROS/CONS - this is not always a desirable setting, especially if you intend to change
quantities.
·If unchecked, (recommended) you can enter full integers without using a decimal, but any
fractional amounts need you to type the decimal place.
Pop-up And Display Item's Price Levels When Changing Price - Limits a change in selling price to
predefined price levels by employees, but comes with a manager override. Security settings for
employees control access.
·If checked, when the clerk attempts to adjust price, all levels will be displayed.
·If unchecked, the clerk who has security clearance can enter any selling price.
·PROS/CONS - if your customer's can view the screen as you create invoices they will see
prices to which they are not entitled.

Appendix A 203
Copyright ©2007 POSitive Software Company
DUE DAYS
When an Order, Layaway, Service Order, or Quote is created, a Due Date or Expiration Date will be
added to the order. This helps the customer and your store staff to plan ahead.
The due dates can be calculated based upon the number of days entered here. Since seasonal
demands will vary, you may edit these numbers as often as necessary.
The calculated due dates are merely defaults. At the time of creating the order, you may select any
due date for that particular order, unless you activate the Auto-Set which skips the calendar prompt.
Set a number of days for each type.
·Default Layaway Due Days -
·Default Order Due Days -
·Default Service Due Days -
·Default Quote Expiration Days - Rather than a due date, an expiration date suggests that the
quoted prices may not be still valid. This is both a tool for expediting sales and a protection in a
market with rapid changes in costs.
Auto-Set Due Days - This is a time saving feature of PRM.
Turning on the Auto-Set switch will automatically apply the due date. The date due selection calendar
will NOT pop-up when completing a transaction, thereby saving you a few extra keystrokes. The due
date can still be manually changed.
Quantity Separator - Select a character to be used to indicate that the initial number is a quantity.
The character selected here should NEVER be used as part of a SKU. If your current inventory SKUs
include a / symbol then you will need to choose a different quantity separator or edit the SKUs to
remove it.
How To Use The Quantity Separator
When adding an inventory item to an invoice, order, layaway, or quote, you can designate the
Quantity being purchased before selecting the item. For example, if the customer is purchasing
4 of item ABC, then type 4/ and then choose the ABC item. The quantity will be automatically
added and an extended price calculated.
Note: An indication that there is a conflict with your SKUs and this quantity separator is the
inability to add an inventory item to an invoice, order, or quote. After selecting the item from the
inventory list, the item will NOT appear on the invoice whereas other items are readily added.
Customers tab
Customer Name Required On Returns - If product is being returned this requires that you record the
name and address of the customer making the return.
·If checked, you will have greater inventory control and will be able to provide the customer
with more services. For example, you will have the option of tendering the refund in cash,
check, credit card, or store credit. You will also have a fuller history for the customer and will
be able to make better decisions about your services for the customer in the future.
·PROS/CONS - This means a return invoice cannot be a Cash Sale invoice. It MUST be
created for a specific customer, by name.
·If unchecked, you can make returns on a Cash Sale invoice, but refunds will be by cash only,
not by check nor store credit. However, you may choose to change the Cash Sale invoice to a
customer sale invoice and receive the benefits of requiring customer names on returns.

POSitive Retail Manager User Guide204
Copyright ©2007 POSitive Software Company
Customer Name Required On Charge Cards - If the customer is making purchases by credit card,
you can require that the invoice be a customer invoice rather than a Cash Sale invoice.
·If checked, you will be reminded that Cash Sale invoices cannot accept credit cards. Your
choice is to then convert the invoice to a customer sale, adding the customer to PRM.
·PROS/CONS - You will be able to lookup credit card numbers.
·If unchecked, you will be able to complete transactions of Cash Sale invoices paid by credit
card. However, you will not be able to lookup credit card numbers.
Skip Prompt For Authorized Buyer - Customer's who are business accounts automatically prompt
for selection of an authorized buyer.
·If checked, you will not be asked to select an appropriate Authorized Buyer.
·If unchecked, you will be able to track the name of the individuals from the business who are
making the purchases.
Alert If Customer Has Pending Transactions When Starting Invoice - When begining to create an
invoice for a customer who already has layaways, orders, service orders or quotes on file, you will be
reminded of these pending transactions. You may review them with the customer to assure that no
duplication is being made.
·If checked, and the customer has pending transactions, a listing of all transactions will be
available for review or modification. Or you may press ESCape to continue with the new
transaction.
·If unchecked, there will be no notification of any pending transaction.
Default To Customer Assigned Sales ID When Invoicing - If your sales staff have been assigned
specific customer accounts, this option will automatically attach the ID of the customer's sales
representative to an invoice created for the customer. Even if the sales rep did not create the invoice,
s/he will be credited with the sale which could be an important factor in commissions earned. Note:
this option does not apply when creating a new order, quote, or layaway - it only works when creating
a new invoice.
·If checked, no matter which sales person creates the invoice for the customer, the assigned
sales clerk will be credited. If a new customer is added, the Sales ID of the current sales clerk
will become the customer's representative. The assignment of Sales ID can be adjusted at
any time.
·If unchecked, the customer assigned sales ID will be ignored.
Include Country In Bill-To Address - If you sell internationally, the customer address can include
the name or code for the country.
·Exclude Countries - Enter the country name exactly as it is spelled in the Country Definitions
screen (File: Definitions: Country Definitions). Entries do not require separate lines nor
commas, but spelling is important.
Tender tab
Tender Screen Always In Edit Mode - When completing an invoice the Tender screen will not fill in
the tender amount when pressing the Enter key.
·If checked, you will be expected to enter the amount of tender from the keyboard. This is
especially useful if you typically handle cash transactions and are always making change.
·If unchecked, pressing Enter will fill in the exact amount of the invoice. This is especially
useful if the customer typically pays by check or charge card. One extra keystroke is required

Appendix A 205
Copyright ©2007 POSitive Software Company
for tendering payments in cash.
Do Not Prompt For Change When Redeeming Gift Certificates (Internal Tracking) - This option
controls whether or not you will payout in cash if the full value of the certificate is not used.
·If unchecked, the unused value of the gift certificate will be refunded in cash (or you may
select by check, or put on store account.)
·If checked, PRM will automatically keep track of the Gift Certificate number and next time that
number is presented, the new value of the gift certificate will be applied.
Some businesses issue gift certificate cards with a barcode or number on it. Unlike a paper gift
certificate, there is no value on the card per se, but PRM will record and redeem the balance
value. (see Gift Certificates)
Require Driver's License For Checks - When payment is by check written for over a specified
amount, you will be prompted to enter a driver's license.
·The driver's license number will be retained in the customer or authorized buyer's file.
·The next time a purchase is made by check, the driver's license number will be recalled. You
will only need to confirm that the Customer's ID is accurate.
Over - Driver's license information will only be needed if the amount of the check is over the
amount specified here.
Do Not Prompt To Use Unused AR Credits When Tendering - A customer with store credits
(monies due to the customer because of over payment or refunds) can usually be used in payment of
current purchases.
·If unchecked, the value of the AR Credits will be displayed and useable for the transaction in
part or in full.
·If checked, PRM will skip that step of invoicing.
Service Orders tab
Support Sub-Owner When Creating Service Orders
When activated, every invoice will begin by gathering information defined here.
This allows a business to bring in multiple items to be serviced which belong to several of its own
customers, and then have all the billing for service under the business name. For example, Ace
Camera Repair is the POSitive store. Joe's Camera doesn't do their own repair, but brings in cameras
from their customers to Ace Camera. When Ace Camera receives the service order, it goes under
Joe's Camera account, but the sub-owner is Joe's customer. A report from the Service In Process
window will print out the status of all of Joe's customers.
·If checked, an area for entry of sub customer name, phone, and reference number appears as
a service order is created. There will also be a Sub-Owner button on the Service Orders In
Process screen.
·If unchecked, there is no area for entering the names and phone numbers of sub owners.
Do Not Print Service Notes On Invoices
When activated, Work To Do, Work Done notes created on the service order will not print when the
service order is converted to an invoice.
Default Status When Creating New Service Order - Select a Status for newly added service orders.
(To create a another status option, go to Maintenance: Definitions: Service Order Status)

POSitive Retail Manager User Guide206
Copyright ©2007 POSitive Software Company
Shipping tab
Activate Starship Interface - Starship is a third party Multi-Carrier shipping software program
designed for high volume shipment processing and automatically calculates shipping charges based
upon the carrier and the weights of the items being sold.
·If checked, PRM will link to Starship.which must be running in the background. On the invoice
or order, an invoice button titled Calc Shipping will use the customer's shipping address, the
weight of each piece being sold, and after selecting the shipping method, will calculate the
shipping charges and add it as a FREIGHT line on the invoice.
·If unchecked, no options will be in effect.
After Calling Starship --
·Update Shipping Charges On The Invoice Automatically
·Prompt To Update Shipping Charges On The Invoice
·Do Not Update Shipping Charges On The Invoice - only adds the shipping tracking number on
the invoice
Include Country In Ship-To Address - If you sell internationally, the customer address can include
the name or code for the country.
·Exclude Countries - Enter the country name exactly as it is spelled in the Country Definitions
screen (File: Definitions: Country Definitions). Entries do not require separate lines nor
commas, but spelling is important.
NOTE: There is documentation on POSitive Software Company's website which explains the
exact steps for setting up Starship with PRM.
Printing tab
Transaction Detail Order - Printing Options - you may control the printout of invoices, orders, etc in
the following ways. This could be an advantage if a pick list or packing list is printed and items need
to be pulled from stock in this sequence.
·Print As Displayed - prints the items on the invoice in the order they were entered on the
invoice, or as they have been manually positioned on the invoice.
·Sort By SKU - the printout will sort all items on the invoice by SKU as it is printed
·Sort By Description - the printout will sort all items on the invoice by Description as it is
printed.
Check Validation - Customer Checks can be validated by printing your bank name and account
number on the back of the check for deposit. Currently PRM supports the Epson TM-U325PD printer
and compatible printers. You can print up to 6 lines of information. Each line will print whatever is
typed plus insert data within the brackets
[Date] = Date of the invoice will be printed
lTime] = Time when the invoice was created will be printed
[Invoice] = Invoice number will be printed
[Station] = The register number
[Method] = The method or type of payment
[ID] = the sales ID of the employee
How To Setup Check Validation
Step 1

Appendix A 207
Copyright ©2007 POSitive Software Company
Choose the line and type desired text to be printed on the back of the check.
Include the brackets [ ] when a PRM value is desired.
For example
Line 1----For Deposit Only
Line 2----Your Bank Name
Line 3----Account Number
Line 4----[Date] [Time]
Line 5----[Invoice] Reg [Station] [ID]
Line 6 ---[Method]
Step 2
IMPORTANT: To complete the setup, you must also configure the printer definition.
1) Go to File: System: Printers
2) Edit "Generic Receipt Printer"
3) Select tab "Receipt Printer Setup" and enter the appropriate values as per manufacturer
instructions.
These are codes for the Epson TM-U325PD Please check the manual for codes for your
printer.
--- This is a Receipt Printer --- CHECKMARK this
--- Reset Printer --- 27,64
--- Tear Off Code --- 29,86,65,0
--- Validate Checks --- CHECKMARK this
--- Validate Accounts Receivable --- (OPTIONAL)
--- Validate On --- 27,99,48,8
--- Validate Off --- 27,99,48,1
--- Print Validation Text Upside Down --- (OPTIONAL)
--- Upside Down On --- 27,123,1-
--- Upside Down Off --- 27,123,0
Prompts tab
This is a GLOBAL setting for EVERY INVOICE. (Consider using Prompts on a per Category basis.)
When activated, every invoice will prompt, either at the start or end of the transaction, for the
information defined and will be printed and saved as part of the invoice. One application of this
feature is for use in airport Duty Free Stores which require documenting the customer's flight and seat
number to qualify for purchasing without paying tax.
Prompt - In the Prompt field enter a word or phrase to remind the cashier of the information needed.
Type - In the Format field select one of the following:
·Text - a single line of text
·Date - entry must be a date
·Note - (only available for the first prompt) an extended text field in paragraph form.
Display Invoice Prompt
·At Invoice Start - fill in prompts before adding products to the invoice
·When Tender Button Is Pressed - choosing to tender the invoice
·Prompt If Invoice Total Is Over: - enter a dollar value
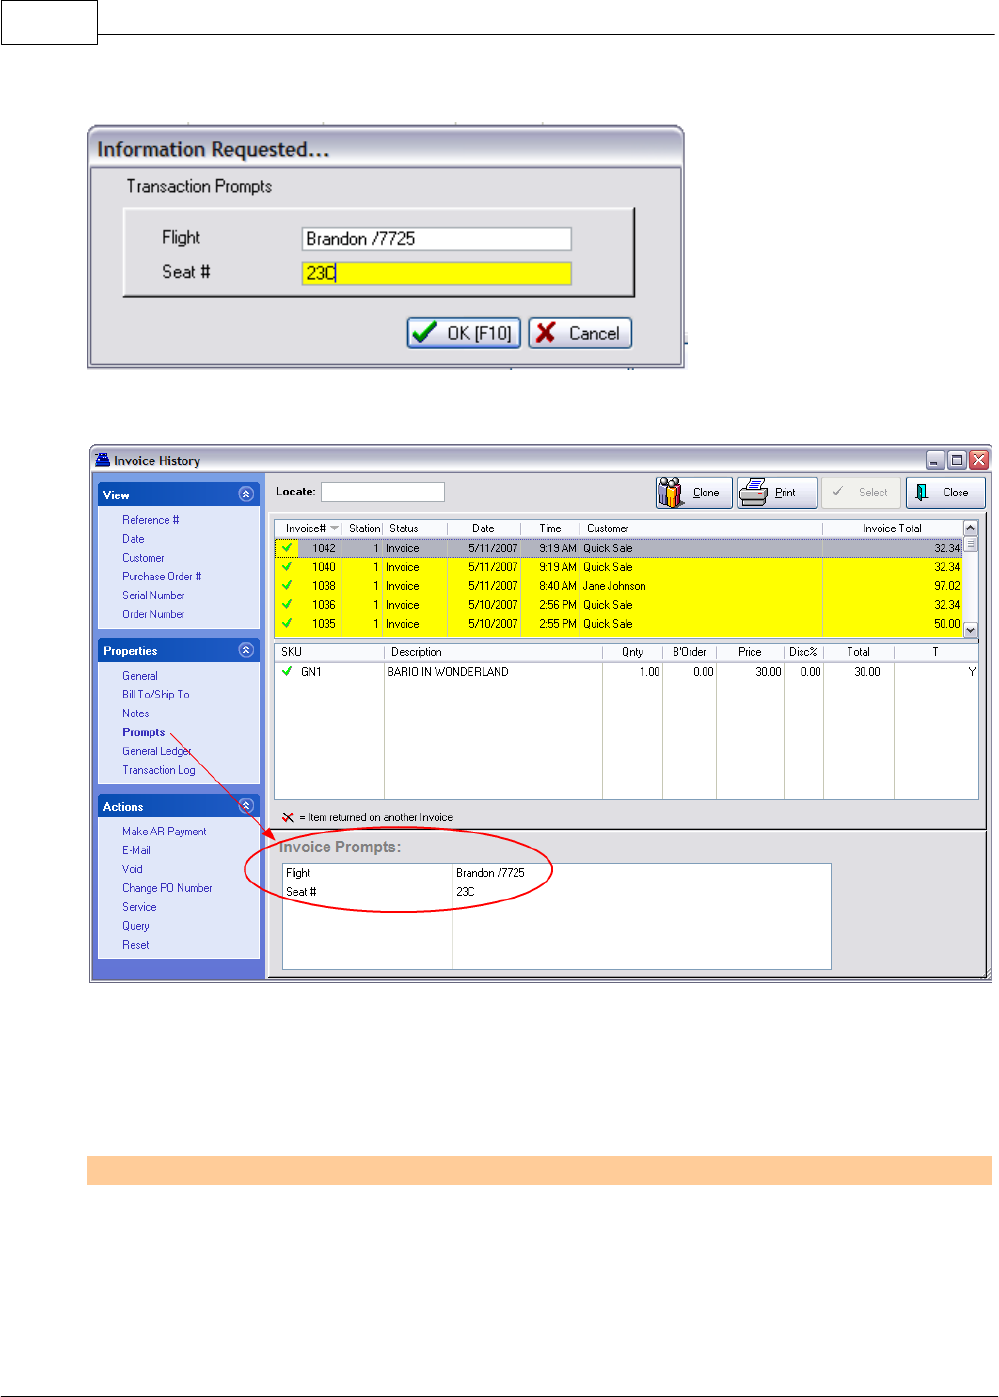
POSitive Retail Manager User Guide208
Copyright ©2007 POSitive Software Company
For example, when creating or tendering the invoice, one is prompted as follows:
When the invoice is processed, the information can be reviewed in Invoice History by selecting the
Prompts property at the left of the screen.
To include the information on the invoice printout, you will need modify an invoice form to include the
Invoice Prompt 1, 2, 3, 4, 5 information.
TIP: SETUP OPTION for Invoice Prompts - Consider creating an Invoice Button so that if the Invoice
Prompt is skipped or incorrectly entered you can re-open the Invoice Prompt. (see Invoice Button
Definitions)
Entry Options tab
Activate Advanced Search -
·If checked, invoice will be updated with customer information based upon settings below. For
example, while in the creation of an invoice, you may choose to scan a customer's loyalty card
or enter the customer phone number which can automatically set the invoice for that identified
customer.

Appendix A 209
Copyright ©2007 POSitive Software Company
·If unchecked, no advanced search options will apply.
Always Search For:
·Search Vendor SKU - if a scanned SKU is not found, PRM will search through the list of vendor
SKUs
·Search Customer Code - searches entries of the Lookup Code field
·Search Customer Phone - searches the customer phone number fields (NOTE: enter the
complete phone number with area code, but without spaces or hyphens)
·Confirm Customer On Found Entry - (Recommended) requires the clerk to select customer
manually as a confirmation that it is the correct customer
·Search Frequent Buyer Number - searches the rewards or loyalty program list for customer
numbers
When Entry Not Found:
·Do Not Display Inventory List If Entry is Blank Or Not Found - will issue a warning sound, but
nothing happens on the invoice.
·Jump Directly To Inventory Lookup - Opens the Locate Item screen. A new item can be added.
·Prompt To Add/Edit Item Or Customer - Opens POSitive Choice to lookup or create new item.
7.1.2 Customer Options
This is the primary area where general settings for customers are defined. However, there are other
tools for quickly adding customers. (See Invoice Setup: Quick Sale tab and Customer Categories)
Default Lookup
When opening a customer list, the names will be sorted using one of these options. Choose the one
which will serve you best.
Tip: At any time, click on the Column Header to temporarily switch the sort method..
·Name - Sorts on business name and an individual customer's last name
·Account - A permanent account number generated by PRM. This number cannot be edited.
·Code - A definable customer identification code. This code can be any alphanumeric, but is
often the customer's phone number which can be filled in automatically for you. (See Auto
Generate Customer Code as described below.) It is recommended that this code be unique
for each customer. This is especially necessary when running PRM E-Commerce so a
duplicate entry block has been added to the program.
Default Terms - Each customer must have a Term of Payment. The selected term here will be
automatically applied to a new customer entry (unless you have chosen to use Customer Categories).
If necessary, the individual customer's term of payment can be re-set on a per invoice basis. Use the
lookup button to find or add additional terms.
Use Titles (Mr/Mrs) - Activates an open field on the Customer Record screen. Includes this term of
address on invoices and correspondence.
Do Not Track Area Code - (Not Generally Recommended) If all of your customers are from the

POSitive Retail Manager User Guide210
Copyright ©2007 POSitive Software Company
same area code, you can choose to disable area code inclusion. This is also applicable to foreign
countries where area codes are not used.
Auto Generate Customer Code From Phone When Adding - You will be prompted to enter a
phone number even before you take any other information about the customer. The phone number
will be stored as the lookup code, but without any hyphens. (Related topic: Customer Found)
Taxation
Tax Group Based On Shipping Address - Some businesses are required to charge taxes based
upon the customer's delivery address. For this option to work, you will need to create tax groups for
each county or zipcode as needed. By selecting this option, items invoiced will be charged at the
appropriate ship to address. (see Tax Based On Ship To)
Use Zip Code Lookups When Entering Customer Information - This is feature will automatically
add a city and state to a customer record when the zip code is entered.
Skip City/State Field and Go To Zip Code Field When Adding Customer - If most of your
customers are not local, this is a quick solution.
TIP: Even while the cursor is in the city field, you may type the zip code for automatic fill-in.
Use Zip Plus Four - If this is checked an additional field will be available for entry of the extra four
characters.
Credit Cards
Retain Customer Credit Cards - PRM can keep a customer's credit card number on file for future
use. This is controlled with security settings for select employees.
Default Address Format
·US/Canada
·Great Britain
·South Africa
·Australia
7.1.3 Inventory
These store-wide master settings affect PRM inventory are subdivided into five tabs: General, Pricing,
Serial Numbers, Trade-Ins, and Invoicing.
General tab
Track Inventory Quantities - If you want a true picture of what is in stock, what is on backorder, and
what is pre-sold, then inventory quantities must be tracked. Tracking means to keep a stock count of
an item.
This is a Master switch. This must be turned ON if any items are to be tracked.
·If checked, individual inventory items can be either tracked or not tracked, based upon the
settings of the individual item.
·If unchecked, all inventory stock counts will be unaffected by sales and purchase orders. All

Appendix A 211
Copyright ©2007 POSitive Software Company
items will say Non-Track in the stock count field. You will still get profit reports, quantities sold,
etc., even if stock tracking is turned off, but you will not have actual inventory counts.
Allow Sales of Items Before Receiving On PO (Negative Inventory) - In brief, this option allows
PRM to make stock count adjustments to inventory being received on a purchase order if an item is
being sold prior to being counted as being in stock.
Note: The "Allow Backorders On Invoice" option MUST be activated or else Allow Negative
Inventory will not operate properly.
Allow Duplicate SKUs (Primary SKUs can never have duplicates) - Every inventory item must have
a primary SKU; optionally, any item can have additional alternate SKUs. These SKUs can not be
used more than once, unless this option is activated. (see Choose Item)
·If checked, a SKU can be used only once as a primary SKU, but more than once as an
alternate SKU
·If unchecked, any attempt to enter a SKU a second time, either as a primary or alternate SKU,
will result in a PRM alert message that the SKU is already in use and will not be accepted.
Allow Upper-Lower Case in Item Description - When creating an inventory item, the description
will be ALL CAPS. This makes typing easier. However, you can choose this switch and the first letter
of the description will be capitalized.
Hide Long Description on Inventory Form - When editing an inventory item, the field Long
Description is usually the same as the Brief Description field. Unless there is a need for your
business to use the Long Description, you can hide this feature.
Allow Spaces In SKUs (not recommended for e-commerce) - A SKU may include spaces. The
reason it is not recommended is because if you eventually choose to activate PRM e-commerce the
web page will have difficulty interpreting a SKU with spaces as one unit.
Use Departments - A department is a broad group consisting of several categories of inventory. With
departments you can get a better picture of consolidated sales and inventory.
If you are using or anticipate using PRM E-Commerce then inventory displayed on your web page will
be listed by Department and then by the Category under the department. This makes it easier for
customers to find specific products to purchase and makes your web page more professional looking.
·If checked, whenever you add inventory, you will be first prompted to select the department
and then select the category of the item being created. This is a mandatory setting if you are
using or anticipate using PRM E-Commerce.
·If unchecked, you will not be able to define departments and group categories together.
TIP: Because of the extra steps involved when departments have been activated, you may want
to uncheck this option temporarily when adding many new inventory items. Then activate it
again, making sure that newly created categories get assigned to appropriate departments. See
Departments.
Contract Department List Upon Entry - The department list is a two tier expandable table showing
the name of the department and the names of the categories
·If checked, when you open the department list, only the departments will be visible.
·If unchecked, when you open the department list, both departments and categories will be
visible

POSitive Retail Manager User Guide212
Copyright ©2007 POSitive Software Company
Prompt For Stock Count When Adding - When creating a new inventory item, PRM will ask for your
current stock count of the item.
Default Item Lookup - When you first view inventory in the Inventory List, the items will be sorted by
either the SKU or the Description. Choose one.
·SKU
·Description
Note: You will always be able to change the sort order at any time while in the inventory lookup
screen by pressing the corresponding [F5] or [F6] function keys.
Set Trade-Ins To Inactive When Adding - When you press CTRL-T on an invoice or order you are
creating a trade-in item. Normally it will be an active item and appear on your inventory list. With this
setting it is automatically set as inactive and will only be visible on the inventory list when you choose
"Show Inactive Only" from the Esc Menu. (see Used Items Manager for a different way of handling
trade-ins)
Enable Food Stamp Tracking - Must be activated if you honor Food Stamps as a tender type. (see
Food Stamps)
Use Pictures In Inventory - This turns on prompts for loading and viewing pictures on screen. This
option MUST be turned on if you will be using PRM E-Commerce which will automatically post
pictures of your inventory on your web page. You will want to be able to verify the picture being
posted matches the item for sale.
Thumbnail Size (Pixels)
The standard setting is Height = 98 and Width = 74. The purpose of this screen is to allow you to
control the size of the thumbnail images on your Account Wizard website. Enter the Maximum area in
pixels. Proper Aspect Ratio is always retained.
Matrix Controls
When creating Matrix inventory, BOTH the generated SKU and the generated description for the
matrix items can be controlled.
A matrix item's description automatically includes the content of the row and column. You may
choose which information you wish to come first, row then column, or column then row.
Matrix Item SKU Sequence
·Description - Item ID - M (original option)
·SKU - Column - Row
·SKU - Row - Column
Matrix Item Description Sequence
·Description - Row - Column
·Description - Column - Row
Pricing tab
PRM will support up to 4 decimal places for these numbers.
Pricing Decimal Places - The number of decimal places to display in the price field. Choose 0 (zero)
if you never sell fractional quantities. Two decimal places is recommended; use of 3 or 4 is
impractical.

Appendix A 213
Copyright ©2007 POSitive Software Company
Quantity Decimal Places - The number of decimal places to display in the quantity field. Two decimal
places is recommended; use of 3 or 4 is may be necessary.
Cost Decimal Places - The number of decimal places to display in the cost field. Two decimal places
is recommended; use of 3 or 4 is dependent upon your inventory costs.
Basis For Price Markups
PRM calculates selling prices with markups over cost. The cost of an item can be defined in four
ways. Choose the definition of cost which will best suit your business needs. (See Cost Examples)
Cost - Cost is the price you pay for the item from the vendor.
Average Cost - Average Cost is the sum total of the costs of items in stock divided by the
number of items in stock.
Each time an item is ordered, the true cost of the item is recorded. If the cost of an item changes
from purchase order to purchase order, then an average cost would be more reflective of the
item cost.
The average cost is based directly upon the number of items in stock. The downside of average
costing is that within hours you could see the 'cost' of an item change dramatically because, as
items are sold on a FIFO, first in first out, basis, the cost of the item will vary.
Landed Cost - Landed Cost is the price you pay for the item from the vendor plus a
proportionate amount of the shipping charges on the purchase order. Note: Shipping charges
are distributed over the number of pieces and not by any other factor.
NOTE: If you choose Landed Cost, be sure to make a selection on the Purchase Order section
to determine how to calculate the landed cost.
Include Landed in Average - Include Landed in Average Cost is of the same dynamics of
Average Cost but with the addition of proportionate shipping charges. Include Landed in
Average Cost is also subject to the same downside of average costing.
Notes:
·Your selection here, no matter which costing method you select, will affect the selling prices
which are based on a markup or margin over cost. It will also affect profit reports.
·If you have selected Landed Cost or Include Landed in Average be sure to activate Calculate
Landed Cost Based On in System Setup: Purchase Orders: Receive PO.
Use Current Cost If Cost Is Zero When Verifying - To prevent misreporting of profits, if stock items
have inadvertently been listed without a cost, then the Current Cost of the item will be used. Also
known as Last Order Cost on the inventory definition screen.
Price In SKU Setup - Also known as Random Weight or UPCB. Define the structure of a barcode
which will include a price or weight in the barcode. This option is often used in retail stores which sell
products by weight. In the packaging process the scale prints a barcode with the price embedded in
the barcode. (see Price In SKU Setup)
Price Descriptions
Price levels are titled. If there is no title, then there will be no access to the field when editing an
inventory item.
You may use up to six different pricing levels in PRM. Your titles can be codes or descriptive titles
such as Retail, OurPrice, Wholesale, Club, Employee etc.
Title each price level you want to use.

POSitive Retail Manager User Guide214
Copyright ©2007 POSitive Software Company
Price 1: (Example: Price, Retail, OurPrice)
Price 2: (Example: Wholesale, Discount, Club, Employee
Price 3: etc.
Default Quick Sale Price Level - Of the six available pricing levels, select the one which will be used
for Quick Sale - Walk-In Customers.
Default Customer Price Level - Of the six available pricing levels, select the one which will be used
for your Customers By Name.
Be aware that these titles can appear on inventory price labels so the names should be appropriately
worded. These price level names will also be displayed on your web page if you are using
POSitiveCommerce and in inventory definitions, in customer setups, and on various reports.
IMPORTANT NOTE: Do Not Skip Levels - All price levels must be sequential without skipping any
levels. In other words you cannot activate levels 1, 2, and 6, skipping levels 3, 4, and 5. If you try to
do it, level 6 will not be functional for invoicing purposes.
The actual selling prices for these price levels are determined by the inventory being sold, the
category markup percentages, and the customer's assigned price level.
Tip: If you find a need to sell product to yourself for your own consumption or for other reasons,
create a price level named Cost and choose no markup for this price level.
Tip: Even if you never sell at Retail, you may want to include it anyway. You can design your
inventory price labels to show both the Retail price and the Our Price levels so that customers
will know they are getting a bargain when shopping at your store.
Tip: Experienced users of PRM suggest that only one price level be used. Then, apply special
discounting for employee purchases through the use of coupons, permanent discounts, and
other discounting options.
Serial Numbers tab
Serial Numbers are an added level of inventory control. PRM can track serial numbers through the
whole cycle: from vendor to customer.
Serial Number Options
Track Serial Numbers In Service - The service department may choose to record and track serial
numbers of equipment worked on as well as tracking of items sold. Although this requires a little more
work initially, you will be able to provide your customers with a complete service history of equipment
repairs. It will also help your technicians to pinpoint or eliminate possible problems.
Enter Serial Numbers When Receiving {PO} - When a PO is received with serialized inventory, you
will be prompted to enter the serial numbers. The PRM SmartSerializer can be used to generate
serial numbers in a sequence to save you time. If you bypass entry of serial numbers at the time of
receiving, they can be entered later.
Allow Duplicate Serial Numbers - (Usually not activated) Normally one would think that serial
numbers would be very unique and there would never be a duplicate serial number. This should only
be turned on if you know that identical serial numbers will be used. (see Special Uses)
Prompt For Serial Numbers When Completing Transactions (Invoices, etc).- As you sell
serialized inventory, you will be prompted to record the serial number on the invoice. If the item's
serial number does not exist in PRM, you will be able to enter it for the first time as you are invoicing.
Prompt For Serial Numbers As Items Are Added For: --- Activate each needed type. If
checked, when you add a serialized inventory item you will be immediately prompted to select a serial

Appendix A 215
Copyright ©2007 POSitive Software Company
number. Otherwise, you will not be prompted until choosing to tender the order or invoice.
·Invoices
·Layaways
·Orders
·Service Orders
Serial Number Terminating Character(s) - Some packaging of products has multi-purpose
barcodes which have the SKU of the item first followed by other code numbers. Generally there is a
separator between the SKU and the additional information. By entering the separator character (more
than one character can be entered to handle various barcodes), PRM will automatically truncate any
information after the character. For example 12345678:901234567 has a colon as a separator. If the
colon were entered here and if the barcode were scanned into an invoice, only the first characters
12345678 will be selected because it is the SKU of the product being sold.
Trade-Ins (Used Items) tab
If you accept products from customers in trade for your products or services you may want to use this
feature of PRM. See Trade-In Manager for specifics.
Track Trade-Ins (Used Items) Under One SKU
·If checked, when you press CTRL-T on an invoice you will be prompted to select a SKU,
value, and condition of the item.
·If unchecked, when you press CTRL-T you will be prompted to enter only a description and value
of the item.
Prompt If Used Items Are Available When Selling New Stock
·If checked, when you sell a product by entering the primary SKU, you will be prompted to
select either the used or new items in stock.
·If unchecked, you will not be prompted.
SKU Prefix / Suffix - to easily distinguish used products, enter prefix and suffix information. This can
be alpha numeric. TIP: The letter U for both the Prefix and Suffix make products easy to identify.
Label Form - select a label to be printed for used items. TIP: the label can be specially formatted to
indicate warranty/return disclaimer or other information.
Invoicing tab - (Backorder & Fast Add)
When you are creating an invoice, order, layaway, service order, or quote and you need to access the
inventory list, PRM will use these settings.
Default Item Lookup
When creating a sales transaction and you choose to lookup inventory, the items will be initially
displayed in this selected sort order. Sort by Description is most commonly used because sales
people know the name of the item rather than the SKU of the item. Choose one.
·SKU
·Description
Invoice Prompt Behavior When Negative Stock is ON

POSitive Retail Manager User Guide216
Copyright ©2007 POSitive Software Company
If you have activated, "Allow Backorders on Invoice" (Invoice Setup) and "Allow Sales of Items Before
Receiving...(Negative Inventory)" then when creating an invoice and selling an inventory item which is
out of stock, PRM will prompt you in one of three ways. It is assumed that the product is in hand, that
the customer can take the item at time of invoicing.
·Item Is Always Here (skip prompt to backorder) - PRM will automatically flag the item being sold as
"Pre-sold." When the next purchase order is received, the PO received quantity will be reduced by
the number pre-sold. (See explanation below.)
·Prompt Defaults to "It's Here" - PRM wants to confirm that the item is truly in hand and that the
customer will be taking the product at the time of invoicing. The item will then be flagged as "
Pre-sold."
·Prompt Defaults to "Backorder It" - PRM assumes that the item cannot be delivered. When
processing the invoice, you will be prompted to create a "special order" for the customer so that the
product can be delivered later.
PRE-SOLD - What It Means and How It Works
Depending upon the above settings, if an item is sold with a stock count of 0.00, then the clerk will be
prompted with
...."The system shows that the item you have selected is out of stock. You have negative stock
tracking turned ON. Is this item really here or do you want to backorder it?" You then select one
of two options: "It's Here" or "Backorder It."
The first question should be, why does PRM think this item is out of stock? Have initial stock counts
not been entered? Has a purchase order not been received? Does the inventory need to be
"verified?" But at the time of the sale it is important to meet the customer needs first.
By definition, an Invoice means you are delivering the product; a pending Order or Layaway means
the product is not being taken by the customer at this time.
·If you activated the first or second option "It's Here", because the item is in the store but not
yet received into PRM inventory, then the item will be sold without being flagged as a
backorder.
However, PRM will consider the item pre-sold and when the purchase order from the vendor is
processed, the quantity pre-sold will be deducted from the quantity received.
For example, I have received a shipment of 10 widgets and have opened the box for pricing and
shelving, but have not yet processed the purchase order for the items in PRM. A customer
purchases the item. The sales clerk will respond that the item really is here. PRM will then
count the sale as quantity 1 pre-sold. When I get around to processing the purchase order, PRM
will deduct the 1 from the 10 normally being received and up my stock counts by just 9 items.
The this option works fine, however, if you do not understand it's use, it increases chances for
mistakes in stock counts. It is especially awkward if the inventory item is serialized and you are
tracking serial numbers.
·If you activated the third option, selling an item which is not in stock will force the item into a
backorder status and require you to fill the backorder before delivering the product (only if you
have Allow Backorders On Invoice activated).
Fast Add Settings
Auto-Assign SKU When Using Fast Add -When adding new inventory while creating an invoice or
order, you may wish to assign the SKU rather than accept a default SKU generated by PRM.

Appendix A 217
Copyright ©2007 POSitive Software Company
·If checked, you will be able to edit the generated SKU and replace it with a vendor SKU or
one of your own design. This will eliminate an extra step when posting inventory and save
time by not having to look the item up again. This is especially useful if you are also adding
costs of the item. The downside of checking this field is some loss of inventory control wherein
store practices of SKU definition are vulnerable to change.
·If unchecked, the SKU field cannot be edited while invoicing the item.
Enter Costs When Adding Inventory - When adding new inventory from the Register, you might find
it convenient to be able to add the cost of the item as you are defining it. Frequently you will know the
cost of the item, having looked it up in a vendor catalog.
·If checked, the cost field will be available. If you do not know the cost, the field can be left
blank and the cost entered at a later time.
·If unchecked, the cost field will not be visible. This might be a wise choice if you do not want
sales staff to have access to it.
Department / Category of Fast-Add Inventory
Set Default Department/Category [F5] - Inventory can be defined on-the-fly while creating a
customer invoice, but the definition of the item will not be complete and must be edited later. These
added inventory items take on characteristics of the category selected here. Use the [F5] button to
select or add the category you wish to use.
TIP: It is recommended that this "default" category be named UNPOSTED so you will know
which items need to be edited further and reassigned to a more useful category.
Auto Assign Dept/Catg (cannot be changed when adding) - Selecting this option provides more
control by preventing anyone from assigning the item to a different category while invoicing.
7.1.4 Purchase Orders
This controls much of how Purchase Orders are handled. The settings here will define defaults which
can be overridden, but also limit some functions which cannot be changed while working with
purchase orders.
Order List tab
The Order List is a generated recommendation list of inventory needing to be ordered. Items are
added to the list if stock counts fall below minimum stock levels and if the item is on special order for
customers.
Use Grid In Order List For Matrix Items -
Matrix inventory can be handled differently than other inventory items. (see Matrix Items and
Purchase Orders)
·If checked, when compiling the order list, individual matrix items to be ordered will be grouped
under the matrix header and viewed as a matrix table.
·If unchecked, when compiling the order list, each matrix item will be listed separately.
When Generating Order List, Choose
This is a default setting. Once the Order List is generated, you can override the selection.
·Last Vendor Ordered From - PRM will select the same vendor used last time the item was

POSitive Retail Manager User Guide218
Copyright ©2007 POSitive Software Company
purchased.
·Primary Vendor - Will select the vendor entered on the options tab of an inventory item.
Placing POs tab
Purchase orders still in the creation process are grouped together. Typically, the vendor has not yet
been notified of the order you wish to place. These settings control how the purchase order operates.
Auto-Fill Purchase Order
PRM will generate purchase orders and number them for each of your vendors as needed. Your
purchase order number can be one of three formats. Choose a format. This is a default setting.
Once the purchase order is created you may change the number.
Date/#/SalesID - The PO number will consist of the date of creation, plus a sequential number, plus
the sales ID of the person creating the purchase order.
·All of these elements are generated automatically.
·This format is very helpful because future questions about the PO will be easily traced to the
staff member who created the PO.
Sequential - You may enter a starting number and each subsequent Purchase Order will be one
number higher than the previous one.
·If sequential is selected then the following field is opened.
·Current PO # - When activated this displays the current purchase order number. Change the
number to a starting sequence number.
No Autofill - If you choose not to have a purchase order number generated, you can choose No
Autofill.
·The number will be replaced with the term No P.O.
·If you wish to record your own PO number as generated from another accounting program,
choose No Autofill because you will be given the opportunity to manually change the PO
number.
If Not Assigning Multiple Vendors
If your inventory is always so unique that it could never be purchased from more than one vendor, this
option will eliminate the Vendor SKU field from the purchase order.
Omit Vendor SKU Field In PO -
·If checked, when you create a purchase order you will not have to enter a vendor SKU.
However, your Vendor SKU must be and will be the same as your SKU. NOTICE: do not use
this option if your vendors will use a SKU which is different than your own.
·If unchecked, you will be prompted to enter the vendor SKU when creating purchase orders.
This is the way PRM has done it in the past.
Duplicate Items on Purchase Order
Do Not Allow Duplicate Items On PO - To assure that your are not inadvertently adding the same
inventory item twice to a PO checkmark this item. There may be times, however, when you would
want this unchecked.
·If checked, adding the same SKU to the PO will pop up a message that the item already
exists.
·If unchecked, you will be able to add the same SKU to the PO more than once. This is an
acceptable setting if you sometimes receive free or reduce priced items in addition to standard
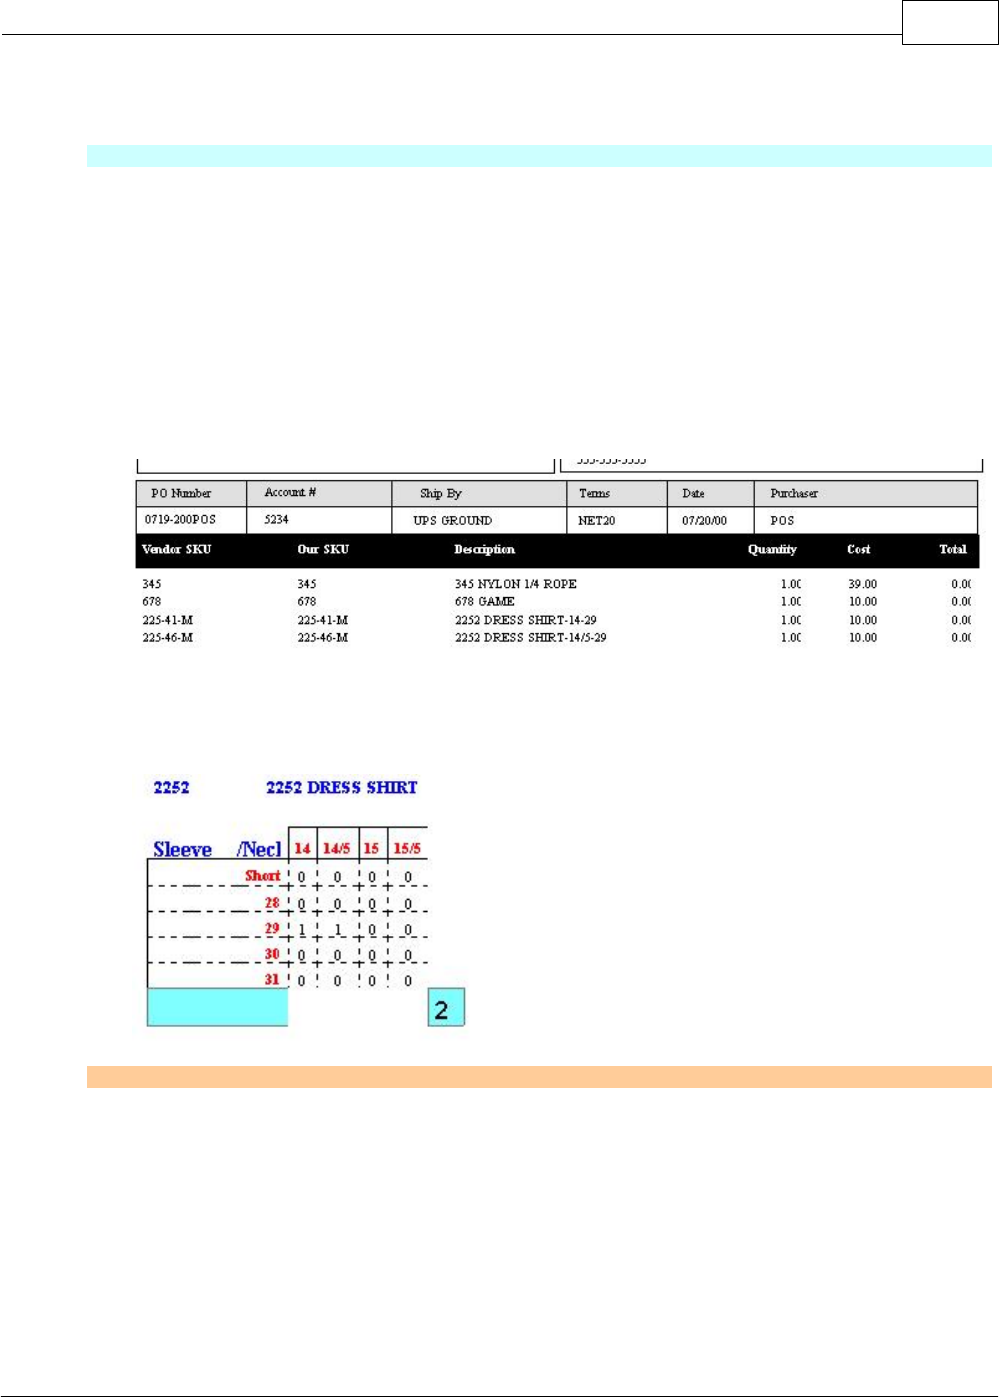
Appendix A 219
Copyright ©2007 POSitive Software Company
priced items on the same purchase order.
Matrix Items
Use Grid In Purchase Orders For Matrix Items - When selecting a matrix header for a purchase
order, the matrix display of multiple cells. (see Matrix Items and Purchase Orders)
·If checked, matrix items on the purchase order will have a graphic display and are grouped as
a unit.
·If unchecked, matrix items will be listed on a purchase order in the traditional line item format.
Print Standard-Style PO When Printing Matrix Items - The standard style is a line by line list of
matrix children inventory and are not incorporated in a grid.
·If checked, when you print the PO, each matrix child item will be listed on a separate line.
·If unchecked, when you print the PO, a box for the matrix items will be generated showing a
consolidated group of items sorted by color/size.
Receiving POs
Once the vendor has been contacted and the purchase order placed, purchase orders are grouped
together in a section indicating the items are in transit. When the products have arrived at your store,
you receive the purchase order. These settings control what will happen at that time.
Prompt Immediately For Serial Number Upon Entering "Received" Quantity - If checked, when
receiving an item flagged to track serial numbers you will be prompted to enter the serial numbers for
that item before going on to another item. This is most useful if you are manually confirming that the
number received is correct, rather than choosing the Receive All option.
Prompt Immediately To Confirm Price When Receiving If Cost Has Changed -

POSitive Retail Manager User Guide220
Copyright ©2007 POSitive Software Company
This feature is a more demanding reminder that products have had cost changes and therefore may
warrant price changes.
·If checked, when you receive a PO, each item with a cost different from the Last Order Cost of
the item will open a verify Price screen so that you can review and edit selling prices. (Note: If
"Landed Cost" option on System Setup: Inventory: Pricing tab has been activated, then this
option is not valid and you will not be prompted.)
·If unchecked, you will still be able to adjust selling prices at the PO Summary screen
Price/Cost Review section.
Alert When Backorders Have Arrived - The alert is in the form of a listing of customers awaiting
inventory. The incoming inventory will automatically fill the backorders, but you may want to be able
to print a list of customers to call and inform them their order has arrived.
·If checked, when you receive a PO, a listing of customers for whom the parts are promised
will be displayed on screen and may be printed so you can notify the customers.
·If unchecked, the customer orders will be automatically filled, but you will not see the listing.
Default Option For Updating Costs When Completing PO
When receiving a purchase order, PRM normally changes costs recorded in the Vendor Inventory List
and also the Last Order Cost field of the inventory item. This feature allows you to receive special
offer inventory from your vendors without PRM assuming the special pricing should be used in the
future. See PO Receive Summary
Select an update option to be used as a default. When you receive a purchase order, you can
manually determine how each item on the purchase order will update costs.
·Vendor & Item Costs - (suggested setting) the cost of the product is recorded in Inventory
Detail Last Cost and Vendor Inventory
·Vendor Cost Only - only recorded in Vendor Inventory List
·Item Cost Only - only recorded in Inventory Detail: "Last Order Cost" field
·Skip Update - not recorded at all
Calculate Landed Cost Based On
If you have selected Landed Cost or Include Landed In Average as the basis for price markups in the
POSitive Setup Form (see Inventory: Pricing: Basis For Price Markups ) then you will see the effect of
distributing freight charges on items received.
Choose one of the following
·Weight
·Cost
·Number Of Items
TIP: For automatic calculations, select Cost or Number of Items. Unless you specifically define a
weight for each item in your inventory list, the weight will be assumed as 0.00 and no landed costs will
be calculated.
7.1.5 Tax Options
Tax rates are defined under Maintenance: Tax Rates. Those tax rates are applied to customers and
inventory items. These settings determine how tax rates will be applied when invoicing.

Appendix A 221
Copyright ©2007 POSitive Software Company
General tab
When you installed PRM, a selection was automatically made for each option. As a general rule,
these selections are good as they stand. However, if you have gone to Utilities> Tax Rates and made
changes by deleting or renaming entries, then you may need to reset these.
·Quick Sale Tax Group - This is the tax group and tax rates applied to customers who make
purchases with the Quick Sale invoice.
·Package Sales Tax - If you are using the Package option on an invoice, you could have a mix of
inventory at different tax rates. This designates the tax to be applied to all items within the package
if there is ever such a mix.
·"No Tax" Tax Category - Select an exempt or non-taxable tax category. This is for those rare
times when a customer should not be charged tax on just one line item on the invoice, yet other
items need to be taxed. Once this is defined, then CTRL-X while highlighting an item on an invoice
will remove or activate the taxation of the line item. Actually, CTRL-X will allow you to select any
other previously defined tax category, not just NoTax. This is especially useful if GST and/or PST
taxes have been defined. (see Adjusting Tax Per Invoice)
Always Round Sales Tax Up - This setting assures that you are collecting enough sales tax and
never "shortchanged." (see Sales Tax Rounding)
Tip: The ? button will open the help information about Sales Tax Rounding
Note: If you are using two tax rates (e.g. State Tax and City Tax) as separate calculations per
inventory item, you should NOT use this option. Rounding is done per tax rate and the combined
tax total will cause GL Transactions to be out of balance. (see Sales Tax Rounding for a sample
screen shot)
Base Tax On Invoice Total (Rather Than Individual Line Items) - This setting will calculate taxes
on the invoice total (after all line items are added to the invoice.) If you have chosen the previous
option "Always Round Sales Tax Up," then this option should also be activated.
·If checked, PRM will total the sales on the invoice for all line items, then calculate the tax.
You should check with your state tax authority to see if this is appropriate.
·If unchecked, (recommended) because most states base tax on individual line items, not the
total.
Tax Inclusive tab
WARNING: The following options are specifically for Australian and British users and normally
should not be invoked by any other users. They will dramatically affect the operation of PRM.
·Display Price Includes Tax On Invoice - When entering the price of an item on an invoice, PRM
will assume the price includes tax and will back out tax charges on the line item. IMPORTANT
NOTE: be sure to select a taxable option for "Tax Rate For Including Tax In Price (GST)" on the
Australia tab, otherwise this feature will not work.
·Tax Included In Windows Invoice Print - If you use the Standard Form for printing invoices, then
the form will include the pricing which includes tax.
NOTE: Be sure to enter appropriate tax group in the Tax Rate For Including Tax In Price (GST)
field below

POSitive Retail Manager User Guide222
Copyright ©2007 POSitive Software Company
·Price Entered Includes Tax When Using Fast Add - When creating an inventory item on the fly
with Fast Add, the selling price is assumed to include tax.
·Enable "Display VAT Pricing" Option on Inventory Screen - When looking up inventory the
selling price will include GST tax.
·Pole Display Shows Price Including Tax - When placing an item on an invoice for sale the Pole
Display shows the SKU and selling price of the item. With this option checked, then the price will
also include applicable sales taxes.
·Tax Group For Including Tax In Price - Select the tax structure which best suits most customers.
NOTE: Used mainly by Britain and Australia, the selling price throughout PRM and on the label of
the product will include the taxes applicable to the item. The tax for the item is based upon this
selected Tax Group. IMPORTANT NOTE: be sure to select a taxable option for "Tax Rate For
Including Tax In Price (GST)" on the Australia tab, otherwise the "Tax Included" feature will not
work.
International Settings tab
Unique settings for various countries.
-- Australia --
·Round To Nearest 5 Cents When Cash Tender - (Australian option) When a customer is paying
with cash, the amount due will be rounded to the nearest 5 cents. The difference will be reported to
a GL account for tracking purposes.
A bit of trivia: Australia has no coin equivalent to the US penny. Cheques and credit cards can
be for any amount, but cash transactions must be paid to the nearest five cents.
·If checked, the tender screen will show and record the rounded amount due on the Cash
entry.
Rounding GL Account - The GL Account number to track adjustments in rounding.
·Goods Received On PO Have Tax - Used mainly in Australia and Canada, this option assumes
that the cost of each line item inventory item being received has the tax calculated into the cost.
·By setting the Tax Percent, PRM will use this number to determine the Tax On Order value in
the purchase order.
·The Purchase Order will display the Tax Column and CTRL-X will allow for toggling tax on or
off for the highlighted line item.
-- United Kingdom --
Support Settlement Discounts ("Price Including Tax" must be disabled)
This feature is only intended for United Kingdom users of PRM.
A Settlement Discount allows the end-user to offer their customers a discount on goods paid before a
certain number of days, with the tax calculated on the discounted amount. For example, an item might
sell for 50.00, with a VAT amount of 8.75. With a 20% discount if paid within 14 days, the VAT would
be calculated on the discounted amount. So, the discounted amount would be 40.00, with VAT
calculated to 7.00. The total invoice would show 57.00. If paid within 14 days, the amount is 47.00. If
paid after that, the amount owed is 57.00.
Here are instructions for using this feature:
1. Under System Setup, Tax Options, International Settings, all tax options having to do with Tax

Appendix A 223
Copyright ©2007 POSitive Software Company
Inclusive should be OFF. Under new tab, United Kingdom, there is a new switch "Support Settlement
Discounts". This should be turned on.
2. Under Utilities/Customer Terms, click ADD to add new a new term. For example, SD14 might be
Settlement Discount, 14 Days or similar. Under Options, Enter the Discount Rate (20.00 for 20%) and
the Days, and check the "This is a Settlement Discount" checkbox. Optionally, you can add an Invoice
Description that might say something like "This Invoice is subject to a 20% discount if paid within 14
days".
3. Under File/Editors/Transaction Reports Editor, clone or create the form you are going to use for
your receipt. In the Footer, make space for a couple of lines near the bottom (I cloned Form 4 for my
testing. I right-clicked on line 24 and selected "ShiftDown" twice to clear up two lines". Now, add the
"Terms Full Desc." under Column 1, Length 40, and on the Instructions line click the "..." button and
select "Settlement Discount". This means, this line will only print if the terms include a settlement
discount.
Next, add a line with Field Name "Text" Column 1 length 18 with the words "Settlement Amount:", and
also select "Settlement Discount" for the Instructions line. On the same line, Column 20, select
"Settlement Disc. Amnt" and the same Instruction line.
To test, assign the customer to these terms. Assign the cloned form as your invoice printer. You can
now create an invoice using the Settlement Discount, and the totals should be correct. The invoice
should have the correct information, and when you go to pay within the 14 days, the correct discount
should be applied. After 14 days, the discount won't be available.
-- Philippines --
Show Cumulative Totals On End-Of-Day Closing Report -
Governing laws require that various calculations appear at the bottom of the report after balancing the
cash drawer.
When balancing the cash drawer and printing the Register Balance Report to a 40col receipt printer
(not a full page printer), the following information is reported.
·Last Invoice # - number on the last invoice created
·Total Amt of Voids - When an invoice is voided from the Invoice History screen.
·Total Discounts - Only calculates Dollar Discount values not percentage discounts created by
pressing CTLR-D or ALT-D on the invoice.
·Total Returns - Value of returned items. The item is counted if one creates a return to the original
invoice and/or changes the quantity of an item to -1 on the invoice.
·Total # Of Invoices - the number of invoices created since the last time the cash drawer was
balanced
-- VAT --
Businesses operating under Value Added Tax controls will likely need to activate the following
options. Taxes paid on a purchase order can then be deducted from sales tax collected when
products are sold.
·Assign Tax Paid On PO To Liability Account -
·PO Tax Liability Account - (GL account)
·Collect VAT On Deposits - some localities need to calculate VAT even on deposits towards

POSitive Retail Manager User Guide224
Copyright ©2007 POSitive Software Company
pending transactions.
7.1.6 Accounts Receivable
Accounts Receivable allows you to sell to your customers and bill them later for their purchases.
These settings will control how AR Statements are generated and printed.
AR Aging Options
There is an AR Aging report to show how long it has been since the purchase was placed on
Accounts Receivable. This Aging information is also included at the bottom of the customer's AR
Statement if you are using Transaction Based statements rather than Balance Forward Statements.
·By Month - Aging of an invoice on AR will begin on the last day of the month of the invoice. The
number of days as defined in the terms on the invoice will be counted from month's end.
·By Number Of Days Due - Aging of an invoice on AR will be calculated based on the Customer
Terms selected at the time of invoicing. The number of days as defined in the terms on the
invoice will be counted from the date the invoice was created. (This has been the standard
method in PRM.)
Statement Selections
Do Not Print AR With Zero Balance - If a customer has a zero balance PRM will not print AR
Statements during batch printing. You will still be able to manually print an AR Statement for the
customer.
Note: If the customer has a store credit and no charges, the statement will print with a negative
amount owed.
Statement Batch Printing
·Include ALL Transactions on Statements Whenever Printed - all active charges and credits will
be printed on the statement.
·Include ONLY Transactions for the Statement Period Being Printed - only the active charges
and credits up to the designated cut off date will be printed on the statement. (see "AR Statements
Close On The...Day Of Month" below)
Statement Printing Options
There are two basic AR Statement styles. Transaction Based and Balance Forward. Each has
various controls.
·Transaction-Based Statement - an AR Statement will print details of active invoice charges and
payment
·Balance Forward Statement - an AR Statement will print details of invoice charges and payment
for the current time period. The previous period will be reflected only as a balance forward amount.
·Days After Statement Close That Payment Is Due - Printed on the invoice will be the
calculated payment due.
·Minimum Payment (Percent of Total Due) - enter 100 if you expect full payment.
Integrate Invoices Into Statements When Printing Invoices with Statements - Rather than
printing separate invoices with the AR Statement, this option saves paper by printing line item details
for each open invoice. A Customer's Account allows for a setting "Print Invoices With Statements"
which governs this option.
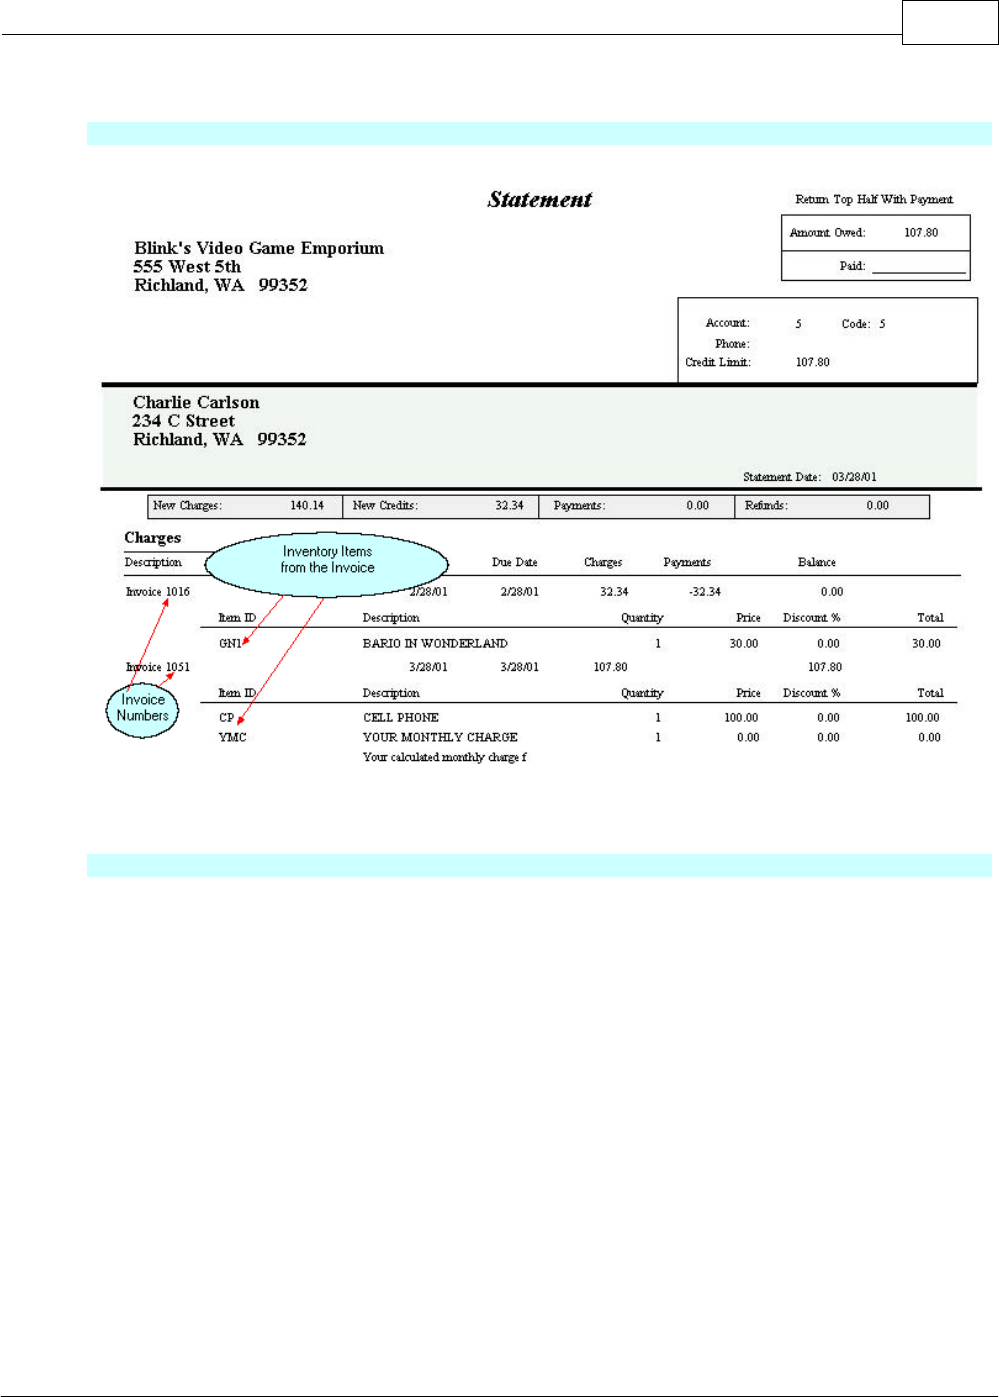
Appendix A 225
Copyright ©2007 POSitive Software Company
For Example - A Statement With Integrated Invoices
For Example - A Statement Without Integrated Invoices
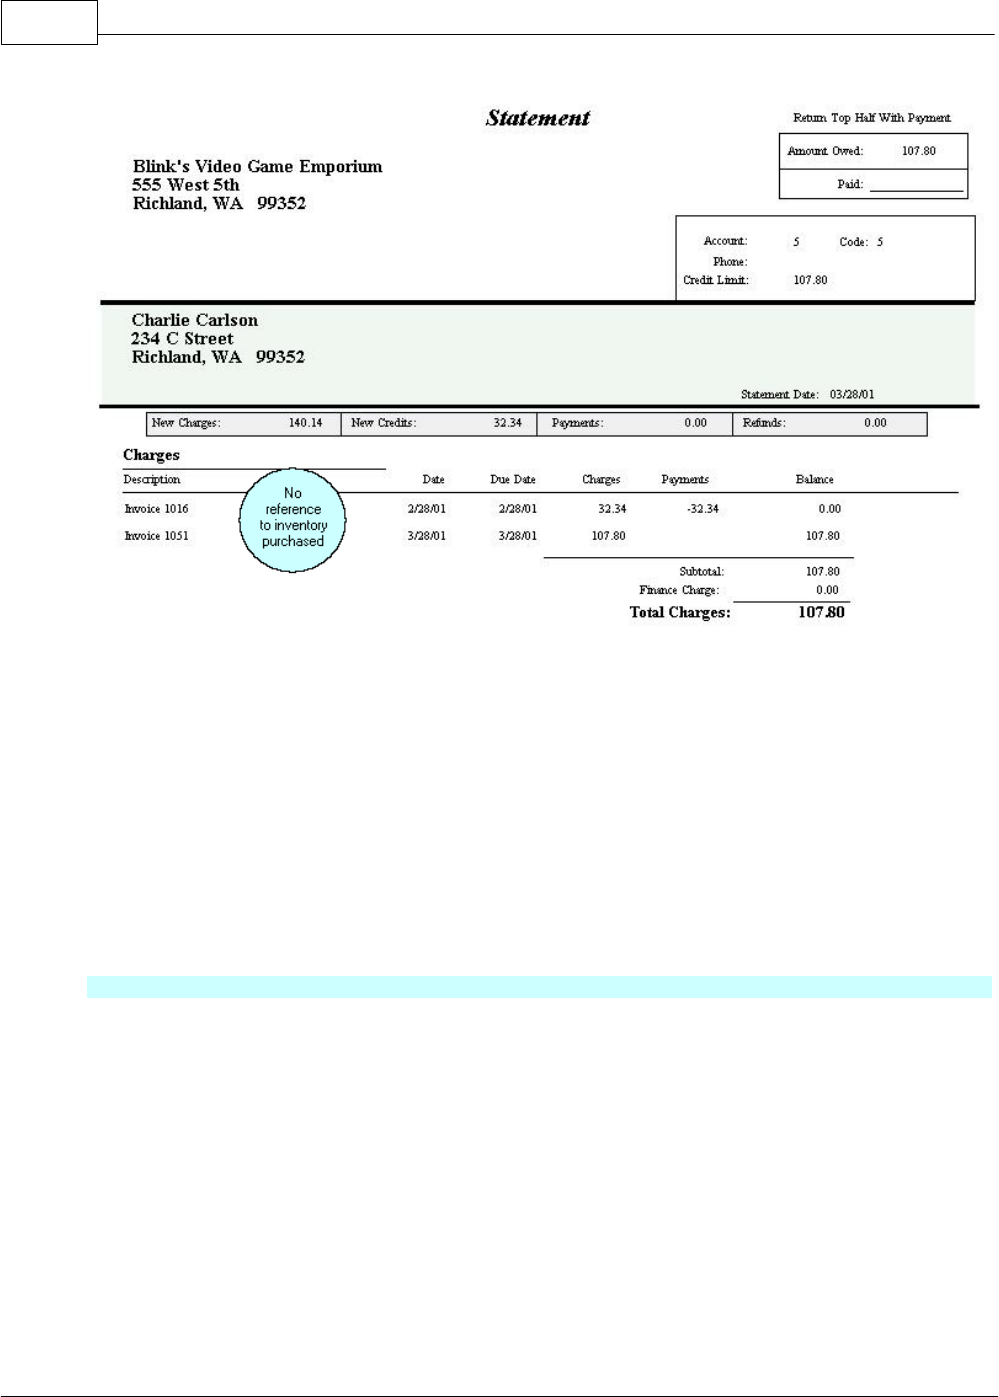
POSitive Retail Manager User Guide226
Copyright ©2007 POSitive Software Company
AR Statements Close On The ____ Day Of Month
Enter a cut-off date for AR Activity to be included on the Statement. If you wish statements to close
on the 10th of the month, choose 10. To make the cutoff date the last day of the month, enter a 1 and
PRM will make adjustments for the 28th, 30th, and 31st as needed.
7.1.7 Accounts Payable
This is primarily for defining how checks for your vendors will be handled.
Check Options - Choose ONE
·Prompt For Check Number (Using External Account) - Allows you to enter the number of a
handwritten check or of the check being printed from a check writing program other than
PRM's checkbook feature.
·Generate Checks When Processing AP - When you select and process vendor invoices for
payment through PRM's Accounts Payable, a check will be automatically printed for the vendor
and drawn from the designated account.
Checking Account - Select the name of the checking account setup in PRM for paying AP.
See Accounting: Checkbook
·Do Neither

Appendix A 227
Copyright ©2007 POSitive Software Company
7.1.8 E-Mail Setup
E-Mail Client
·Outlook
·Outlook Express
·Internal
Send Purchase Orders As
·Attached PDF
·Embedded HTML
You can choose to send with outlook, outlook express, or internal (although internal does not handle
PDF or HTML yet, so should not be chosen as yet). You will always get the outlook security message.
But, there is a way around that. For documentation:
A free tool that provides a proper set of security tools for Outlook is listed below:
* Advanced Security for Outlook 1.4 is a free plug in for Outlook that provides proper security alerts
and allows you to set which applications can access Outlook, so you only need to authorize an
application once. Note that this is not a POSitive product and we do not provide support for it. Please
visit the MapiLab website for more information: http://www.mapilab.com/outlook/security/.
7.1.9 Consignments
Consignments are products which you have not purchased, but which you have agreed to sell for
another party. They become part of your inventory, but are handled in a special way. They can be
sold as any other item, but they will also track commission type payments to the consignee. See
Consignments.
Consignment Defaults
Select Dept/Category [F5] - Select a department and category to which the consignment item will be
automatically assigned when adding consignments. Consigned items can be reassigned to a more
appropriate category, especially if you are posting any of these items for sale on the internet with
PRM E-Commerce.
Store Percent - A default store percentage to be automatically applied when accepting
consignments. This can be changed on an individual consignment items as needed.
Edit Windows Consignment Form [F9] - The consignment agreement consists of several
paragraphs stating terms and responsibilities. These paragraphs can be edited to match your
business needs. (Note: if you are not using the Windows form of the consignment agreement, the
form to be edited can be found under File: Editors: Transaction Report Editor.)

POSitive Retail Manager User Guide228
Copyright ©2007 POSitive Software Company
7.1.10 Commissions
PRM provides a simple tool for tracking commission sales for employees. See Commissions.
Track Commissions - This is a module of PRM and must be active for commission functions to work
in PRM.
·If checked, PRM will track commissions, but only for inventory items set to pay a commission.
Be sure to edit individual inventory and assign commission percentages. As a time saver, this
can be done individually or through category defaults
·If unchecked, commissions will not be in effect, you will not have the split commission
function, nor will you be able to do a commission settlement.
Commissions Based On
·Profit - After the cost has been deducted from the selling price, the commission will be
calculated on the profit.
·Selling Price - Regardless of the profit, the commission will be calculated on the selling price,
even if the item was sold below cost.
7.1.11 Pharmacy Setup
PRM can integrate with a special third-party program called CarePoint which maintains a
pharmaceutical database for your customers. This is a specialized program. Please contact your
dealer.
7.1.12 Replicated Registers
This is a Multi-Store setup screen
Activate Replicated Registers - must be activated in order for replication to function properly
Master Database Settings
·Master SQL Server -
·Master Database -
·Master Login Name -
·Master Password -
7.2 Credit Card Setup
PRM can simplify invoice transactions by automatically dialing out for credit card authorization. To do
this you must have the necessary software and hardware. PRM supports payment by credit card with
some built-in verification and confirmation options. PRM supports Averacharge and several well
known third-party credit card processing software programs: ICVerify, X-Charge, and PC Charge.
To setup credit cards, go to Management: Credit Cards: Setup.
Credit Card Interface
Choose a credit card processing Type and fill in required details.
Do Not Allow Charges To Exceed Transaction Total - When tendering a credit card, PRM will not
allow entry of a value greater than the total on the invoice.

Appendix A 229
Copyright ©2007 POSitive Software Company
SUPPORTED CREDIT CARD PROCESSORS
None
Choose this option if you are using a separate credit card processing terminal and/or if you will not be
using any integrated credit card processing software.
Scenario: When you process an invoice and the customer pays with a credit card, you
will go to your separate credit card processing terminal and get an approval number.
Then return to PRM and complete tendering of the invoice. Depending upon the
following settings, you will be prompted in PRM to enter an approval number manually.
At the end of the day, the credit card charges will be totaled and you will be able to
compare the numbers with those generated by the terminal.
·Activate Credit Card Confirmation Message - allows you to choose Approved or Declined status
as reported by the credit card processing terminal
·Prompt For Approval Number - allows you to record the approval number from the credit card
processing terminal.
AveraCharge
This is POSitive's own credit card processor. It requires very little setup, it is internet based, and
supports debit card, food stamp/EBT (electronic benefits transfer) cards, and gift cards.
Choose this option if you have signed up for AveraCharge and have received and installed a required
file.
Scenario: When you tender invoices with a credit card, PRM will quickly get approval
through an internet connection, and process the transaction. If the credit card is
declined, you will have options to manually submit an approval number. At the end of
the day, you will settle the credit card batch with PRM's Credit Card Manager.
·Merchant ID - (select from the list available. If no list is available contact your dealer.)
·Debit Cards - Cash Back Limit - set the limit of how much cash can be withdrawn per debit card
transaction.
ICVerify/X-Charge
This is a third-party credit card processing program supported by PRM. You must purchase and
install ICVerify according to the manufacturer's instructions. Once you have confirmed that ICVerify is
functional, then you will proceed with the PRM Setup.
Scenario: When you tender an invoice using a credit card, PRM places a "request" file
into ICVerify's working directory. ICVerify then processes the transaction and gets
approval. PRM then reads the "answer" file and completes the customer invoice. At the
end of the day you will need to settle the batch and run reports with ICVerify's interface.
For more information see ICVerify And PRM.
·Merchant Code - IMPORTANT: enter your merchant code found in ICVerify
·Merchant ID# - IMPORTANT: Generally, leave this blank. (Only if your copy of ICVERIFY allows
for multiple merchant processing, then enter the appropriate code.
·Report Path - This report path designates the working directory being used by ICVerify to read and

POSitive Retail Manager User Guide230
Copyright ©2007 POSitive Software Company
answer processing requests. In other words, this is the path from the server to the ICVerify
directory. This directory is usually designated when ICVerify is installed. Be sure to enter the drive
and directory into this field. This information will be used with Credit Card Manager.
PC Charge
Choose this option if you have installed PC Charge software following the manufacturer's instructions.
Once you have confirmed that PC Charge is functional, then you will proceed with the PRM Setup.
Enter the Merchant code. (This is a 3 or 4 letter code also referred to as the processor abbreviation.
[eg. NOVA, VISA, MVRK, etc.)
Then enter the Merchant ID#. (This is the number listed as the Credit Card Company number in PC
Charge--typically this number is 8-20 digits.)
For the Report path you would put c:\program files\active-charge (default location of PC Charge).
Next, under station settings, choose credit card processing and check Electronic Credit Card Capture.
Path to processor would be the path to the directory in which PC Charge is installed on the server
(\\server\active-charge).
Local Processor settings are if you want a station to override the settings and use a different merchant
number.
Next you need to set up tender definitions. Go to file, definitions, tender definitions either add or edit
your credit card settings. There is a check box for use electronic credit card capture, make sure this is
checked.
That's all you need in POSitive.
PC CHARGE SETUP
In PC Charge you need to edit users.
The users need to be as follows User1 (for station 1) User2 (for station 2) etc.
PC Charge needs the sale window to be left open. If you have a report window or even have it on
credit it will not process the sale.
Tender Retail
You must be a subscriber and follow its installation procedures.
YesPay - (United Kingdom)
You must be a subscriber and follow its installation procedures. (see YesPay)
Debit Card Setup
Debit Card - use of debit cards is only supported by AveraCharge and PC Charge
PinPad - PRM only supports the Verifone 1000SE model
Recommended: Create a Tender Definition for Debit Cards. Select the Debit Card Type. When used
PRM will prompt for a PIN number which can only be entered through the Verifone 1000SE PinPad.
7.3 Station Detail - General
Each workstation (computer) using PRM needs to have its own setup for printers, cash drawer, pole
display and general operations. This section will require some knowledge of your computer hardware
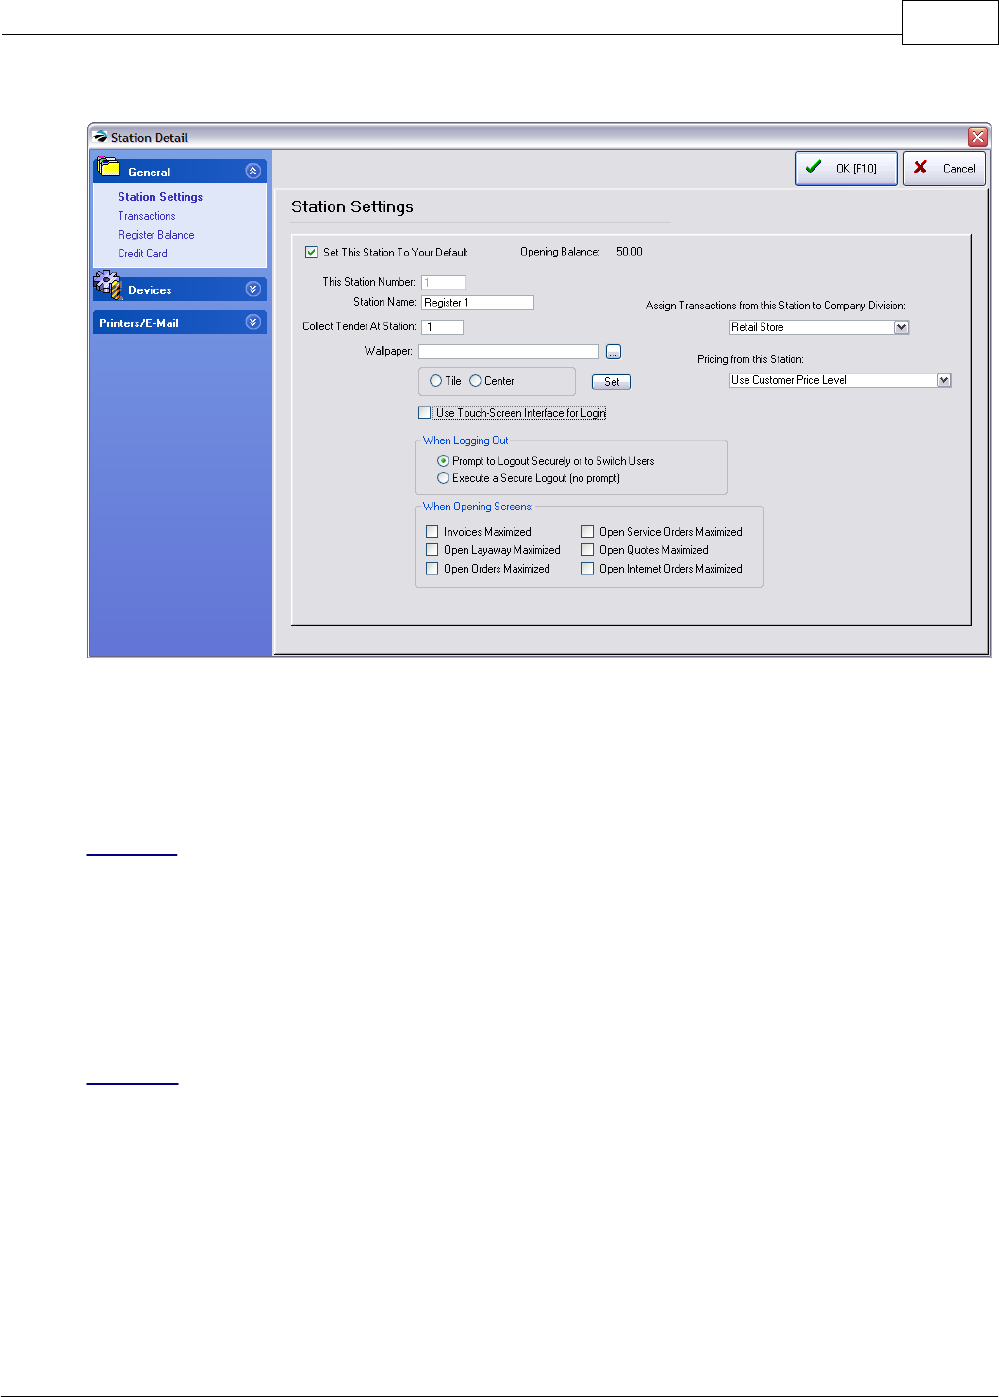
Appendix A 231
Copyright ©2007 POSitive Software Company
and network.
First Time Setup (an Overview)
It is recommended that station numbers be created from the main or server computer first. Then the
station settings and default selections be defined while physically operating the designated
workstation (computer).
General
Station Settings - Identifies this Station name, number, and default use
Transactions - How this workstation will operate when invoices are created: invoice screen layout,
prompts for type of sale, employee login, inventory lookups, etc.
Register Balance - What this workstation will print when the cash drawer is balanced.
Credit Card - Authorizes this workstation to accept and process credit card transactions.
Devices
POSitive Retail Manager can work with many popular brands of point of sale hardware. The purpose
of this chapter is to help you with the set-up of your POS equipment.
Cash Drawer - to assure that cash drawer responds to signals to open
Pole Display - to assure that invoicing information is displayed
Portable Scanner - to connect to a hand-held data collector
Multi-Monitor - to assure that a second computer monitor displays invoicing information as well as a
pre-defined slide show

POSitive Retail Manager User Guide232
Copyright ©2007 POSitive Software Company
RMS Pump Interface - to assure that gas pump information is relayed to PRM
Com Ports - for control of computer com ports
Printers/E-Mail
PRINTING SET-UP
Other than a computer, the next most important piece of equipment in any POS system is a good
printer, which can be used for printing receipts, reports and labels. POSitive Retail Manager can work
entirely through your default Windows printer, but you may want to use other printing options typically
available in point-of-sale software.
Since PRM can support different printers for different functions, the first thing you’ll need to do is
make sure a Printer Driver is installed for each printer you’ll be using. Most printer manufacturers
include a printer driver disc in the box, but the exception is the small receipt printers, such as those
made by Epson, Star, Ithaca and others. You’ll need to download the appropriate driver from the
manufacturer’s web site, or ask your dealer to provide it. Once all your printer drivers are installed and
working, you can proceed with setting up printing in PRM.
·Printing Options - Packing Slips, Customer Labels, Purchase Orders
·Invoice - printer designated for printing of invoices
·Alternate Invoice - printer designated for printing of invoices which are sold as On Store Account
·Layaway - printer designated for printing of layaways
·Orders - printer designated for printing of orders
·Internet Orders - printer designated for printing of internet orders
·Service Orders - printer designated for printing of service orders
·Quotes - printer designated for printing of quotes
·Quotes with Costs - printer designated for printing of quotes with cost and profit
·Contract Pricing - printer designated for printing of contract pricing lists
·Deposit Receipt - printer designated for printing of a receipt of deposits received
·AR Receipt - printer designated for printing of an accounts payable payment receipt
·Consignment Agreement - printer designated for printing of the consignment agreement
·Recurring Invoices - printer designated for printing of batches of recurring invoices
·Packing Slips - printer designated for printing of invoice or order without pricing information
7.3.1 Station Settings
General settings controlling operations.
·Set This Station To Your Default - Each workstation (computer) must have its own station
number. By checking this box, the computer you are using now will operate according to the
settings of this station. You will need to exit PRM before the changes take effect.
·Opening Balance - The amount shown here is the current cash in the drawer to be used for

Appendix A 233
Copyright ©2007 POSitive Software Company
making change. As you balance the cash drawer and opt to leave cash in the drawer to be carried
over to the next day, the amount selected will be displayed here. This value cannot be edited.
·This Station Number - PRM generates the station number when you choose to add a workstation.
This number cannot be edited.
·NOTE: ICVerify uses this station number as well. Depending upon your ICVerify license, you
should should reserve the first 4 or 8 stations for use with ICVerify. See ICVerify and PRM for
more information.
·Station Name - You may name this station to reflect the location or the user of the station: Front
Register, Bobs Desk, etc.
·Collect Tender At Station - If this computer station will be making sales transactions and will be
balancing its own cash drawer, this number should match the station number above.
If you are running a network, this option allows you to process invoices at this station, but assign
a different station or cash drawer for keeping the money. Indicate the station number where the
money will be kept. When the cash drawer of the other station is balanced, the transactions
made at this station will be included. This option is used to help you in balancing your cash
drawer(s).
·Assign Transactions from this Station to Company Division - This will be set to Retail
automatically if you have not created any Divisions under the Company Information screen. (See
Divisions)
·Pricing From this Station - Choose "Use Customer Price Level" - Only if this station is doing work
as a specialized Division would you consider using any other price level listed.
·Wallpaper - The background in PRM can be set to whatever picture or pattern you would like. Use
the browse button to find your graphic file. Choose to either tile or center the graphic. And then
use the Set button to confirm the selection.
·Use Touch-Screen Interface for Login - (leave unchecked) When this station starts to run PRM it
will open the touchscreen login for sales ID and password.
When Logging Out
For security purposes, when you are finished working with PRM, you should logout. This will require
the next employee to log in and PRM will then limit that employee's activity and view to pre-authorized
settings.
·Prompt To Logout Securely Or To Switch Users - the open windows will still be visible
·Execute A Secure Logout (No Prompt) - no open windows are displayed.
When Opening Screens
Maximizing an invoice, layaway, order, screen makes the transaction fill the entire computer screen,
thereby placing the focus on the transaction. If it is left unchecked, the transaction will be opened as
a smaller window. Select options as desired.
·Invoices Maximized
·Open Layaway Maximized
·Open Orders Maximized
·Open Service Orders Maximized
·Open Quotes Maximized
·Open Internet Orders Maximized
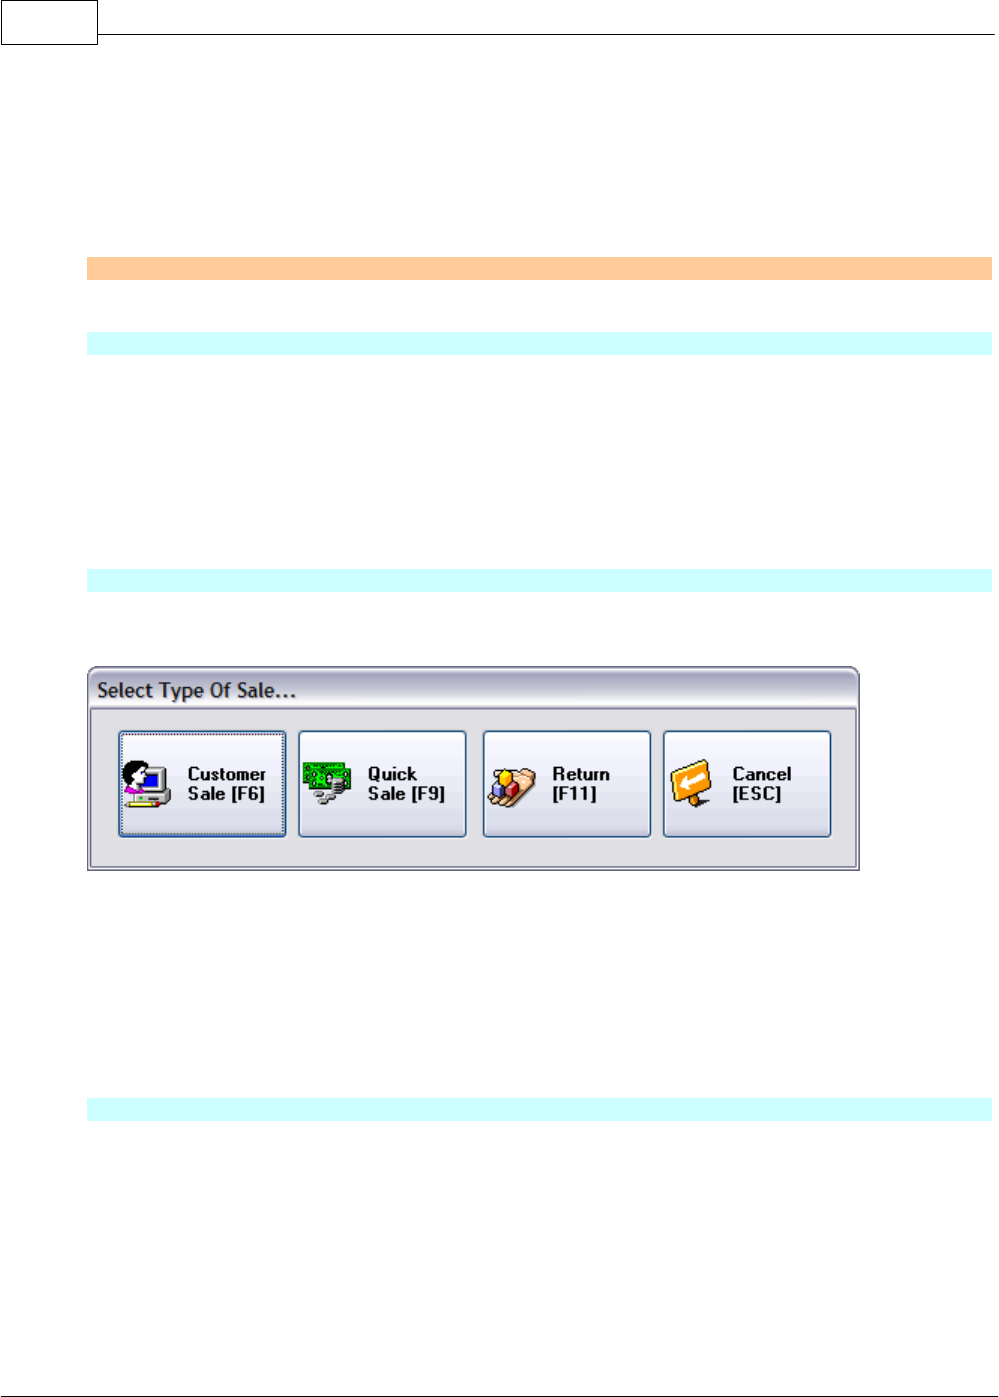
POSitive Retail Manager User Guide234
Copyright ©2007 POSitive Software Company
7.3.2 Transaction Settings
All of these options will be in effect when you are creating invoices, orders, layaways, etc. Select
those which are most appropriate for this workstation.
Invoicing tab
Controls selection of customer, log-in requirements, and some printing options.
Invoice Style - Choose ONE
Depending upon how you want your workstation to display invoice creation invoice , you may select
from two Invoice Styles:
·Invoice screen layout suitable for computer stores, service stores needing detailed invoices.
The "ESCape" menu is open on the side panel instead of being hidden.
·Register - screen layout suitable for cash-carry, gift stores, etc.
Note: Register style is typically not selected in businesses needing the "Allow Backorders On
Invoice" option as defined in System Setup
Transactions - Select Type of Sale
When you start an invoice, one or more of four options will be visible. Depending upon the type of
business you may choose which option(s) will work best for you.
Select one or more options
·Show "Customer Sale" - opens the Locate Customer window.
·Show "Quick Sale" - assumes "No Name" on the invoice; ideal for walk-in customers.
·Show "Return" - if you will be processing customer returns.
·Show "Cancel" - if you are likely to not create an invoice after all.
·If no options are selected, the "Select Type Of Sale" screen will not be shown, and a Quick
Sale will be assumed.
Transactions
·Ask For (Cashier) ID When Creating Transaction (Orders, Layaways, Etc.) - A security setting
which controls access to critical functions.
·Ask For Commissioned Sales ID When Invoicing - if you are tracking commissions, you will be
asked who should receive the commissions for items sold on the invoice.
·Stay On Invoice After Sale - An ideal setting for workstations on checkout lanes because it
remains poised for creating a new invoice. When creating an new invoice you will first be prompted
New Invoice/Close Invoice.

Appendix A 235
Copyright ©2007 POSitive Software Company
·Force Cashier Login When Invoicing - every time an invoice is created, PRM will ask for the
person's ID and password. This option gives better tracking of who is using a common
computer for making sales.
·Skip " New Invoice/Close Invoice" Prompt - immediately opens new invoice. To end the loop,
you must void an open invoice.
·Ask To Print Before Finalizing Invoices/Layaways - If this is checked, you will be prompted to
print or not, rather than automatically printing an invoice upon completion. At this time, you may
choose to print to a different printer.
·Combine Same-SKU Items On Transactions - when an item is added to an invoice again, PRM
will
·If checked, update the original line item by increasing the quantity of the item.
·If unchecked, the newly added item will have a separate line entry
·Use "Fast Tender" for Touch Screen Checkout - PRM will
·If checked, use an abbreviated procedure for handling monies on the Tender screen.
·If unchecked, use the standard procedure for handling monies.
Inventory tab
While invoicing, you may create new inventory in one of two ways. Choose ONE.
·Prompt To Display Lookup List or Add New If SKU Not Found - If you are using a barcode
scanner for adding items to an invoice you may set PRM to warn you that the scanned item was not
found in inventory. If the scanned barcode does not exist, you will be given the options to
Quick-Add, Search, or cancel. (see Item Not Found)
Tip: DO NOT turn this on if you are not using a barcode scanner because it will require extra
keystrokes.
·Fast-Add Inventory When Adding At Register - A shortcut option to minimize customer delay at
the checkout station. Only essential elements of a new inventory item are recorded. The other
elements must be done later. (see System Setup: Inventory: Invoicing)
Printing tab
Several printing options are available. These are strictly station specific.
·Skip Printing Of Invoice/Receipt (can print from "Change Due" screen) For the business which
does not normally print invoices or receipts for most sales, you can activate this option. After
tendering the invoice, the Change Due window will give you the option [F7] to choose to print the
invoice if the customer requests a copy.
·Always Prompt To Choose Printer When Invoicing - (Not Generally Recommended) Gives the
operator more control of printing options for invoices at the time the sale is made, but is an extra
step in the process.
·Always Prompt To Preview When Invoicing - Some printing processes skip the "preview option.
By selecting this you will always get to preview first.
·Use Alternate Printer When On Account - If you choose, you may automatically route an invoice
to the alternate printer whenever an invoice is placed on store account. This option is often
selected when a 40 column receipt printer is the primary invoice printer and an 80 column printer is
preferred for filing invoices on AR.
·If you check this option, be sure to activate the Alternate Printer settings on the left under

POSitive Retail Manager User Guide236
Copyright ©2007 POSitive Software Company
Printers/E-mail of the Station Detail setup.
·When you create an invoice and choose F5 Store Account as the method of payment, the
invoice will automatically be printed on the Alternate Printer selected.
·Prompt To Print Pick List When Completing Orders - A pick list or packing slip is a list of item on
the order without pricing. This list is often give to the shipping department for gathering the items to
be shipped.
Electronic Journal
PRM can create a captured copy of every invoice as a text file. This text file can be printed if there are
questions about invoices in PRM Invoice History, for example, if PRM were unable to save data and
line items are missing. All invoices are saved in a directory named by the date to make lookup easier.
·Activate Station Electronic Journal (saves copy of receipt to specified location)
·Journal Path - the drive could be the local hard drive and a folder named receipts
(C:\RECEIPTS)
Age Verification tab
Some businesses sell controlled products which are not to be sold to underage customers. The Age
Verification feature of PRM will help document proper sales and deter improper sales.
Age Verification Options
·No Age Verification Prompts - select this option if you have no inventory restrictions; can be sold
to anyone of any age
·Prompt To Check ID - the clerk will be reminded to ask to see some identification. The clerk will
then choose Approve or Decline.
·Prompt To Enter Birthdate - the clerk will be asked to enter the customer's birthdate. PRM will
then compare the date entered with the computer system date and calculate to see if the minimum
age is reached. This is a more dynamic method for verifying because requires the clerk to be more
interactive.
·Prompt To Scan Driver's License - some states issue a driver's license which has a magnetic
stripe. Using the same magnetic stripe reader used for credit cards, PRM can read the data on the
driver's license and extract birthdate information for verification purposes.
·Assure that your card reader will be able to read swipes.
-------- Card Reader (choose one) --------
If a driver's license in your state includes a magnetic stripe, you can choose to swipe the driver's
license to extract the bearer's birthdate. You need to choose the format of the magnetic stripe.
·Does not put a CR/LF between track 1 and 2
·Does put a CR/LF between track 1 and 2
TIP - click on the TEST button for an explanation and test of your Mag Stripe Reader
Note: Mag Stripe readers typically read tracks 1 and 2 from a credit or debit card. Some
readers break the two tracks into two line, while others do not separate the two tracks.
Scan a driver's license into a non-word wrap text box and observe how it is displayed in the text
box. If it displays as one continuous line, choose the first option. If it displays as two lines
choose the second option.

Appendix A 237
Copyright ©2007 POSitive Software Company
AR tab
·Skip Prompt For Password when taking AR Payments - if this station will typically process many
AR Payments, you could save time and effort by not having to enter Sales ID and Password each
time.
Misc tab
·Show Costs When Entering Quote - If this is checked costs and profits will be visible. This is
generally a preferred setting unless customers will be able to view the screen.
·Hide Customer Info Box On Scheduling Calendar - If using the service order module, you can
choose to hide the customer information box on the scheduling calendar and then manually activate
it as needed.
7.3.3 Register Balance
When Balancing Register
When balancing the cash drawer for this station, you may indicate which reports to print.
·Invoice Transactions - "Register Balance Report" (Not available in 40 col format)
·Tender Summary - "Register Balance Report - Summary"
·Credit Card Summary - a grouping of like credit card types with subtotals and total
·Category Summary - cost and profit totals per inventory category.
Note: To see SAMPLES of these reports see Daily Balance History
Print End-Of-Day Report To Receipt Printer - If you are using a 40 Col Receipt Printer for printing
your invoices, you could have the above reports printed on the same cash register type paper.
·Windows Printer Driver - If you have checked the above option, you must select the printer
from your Windows Printers list. Click on the lookup button and select a Generic / Text
Only Printer.
·Physical Printer - Select the Generic Receipt Printer which should always work.
ADD A Generic / Text Only PRINTER
If the Generic / Text Only Printer is not in your listing of Windows Printers, follow these steps.
· Go to the Start Button of Windows
· Choose Settings
· Choose Printers
· Click on Add Printer
· From the list, select Generic / Text Only Printer.
Note: Do NOT set this as your Windows Default printer.
Notes: These reports will be printed in a 40 column format to include the same detail. However, the
Invoice Transactions Report will never print to the 40 Col printer because of its excessive detail. It
may be printed later to an 80 column or full-page printer.
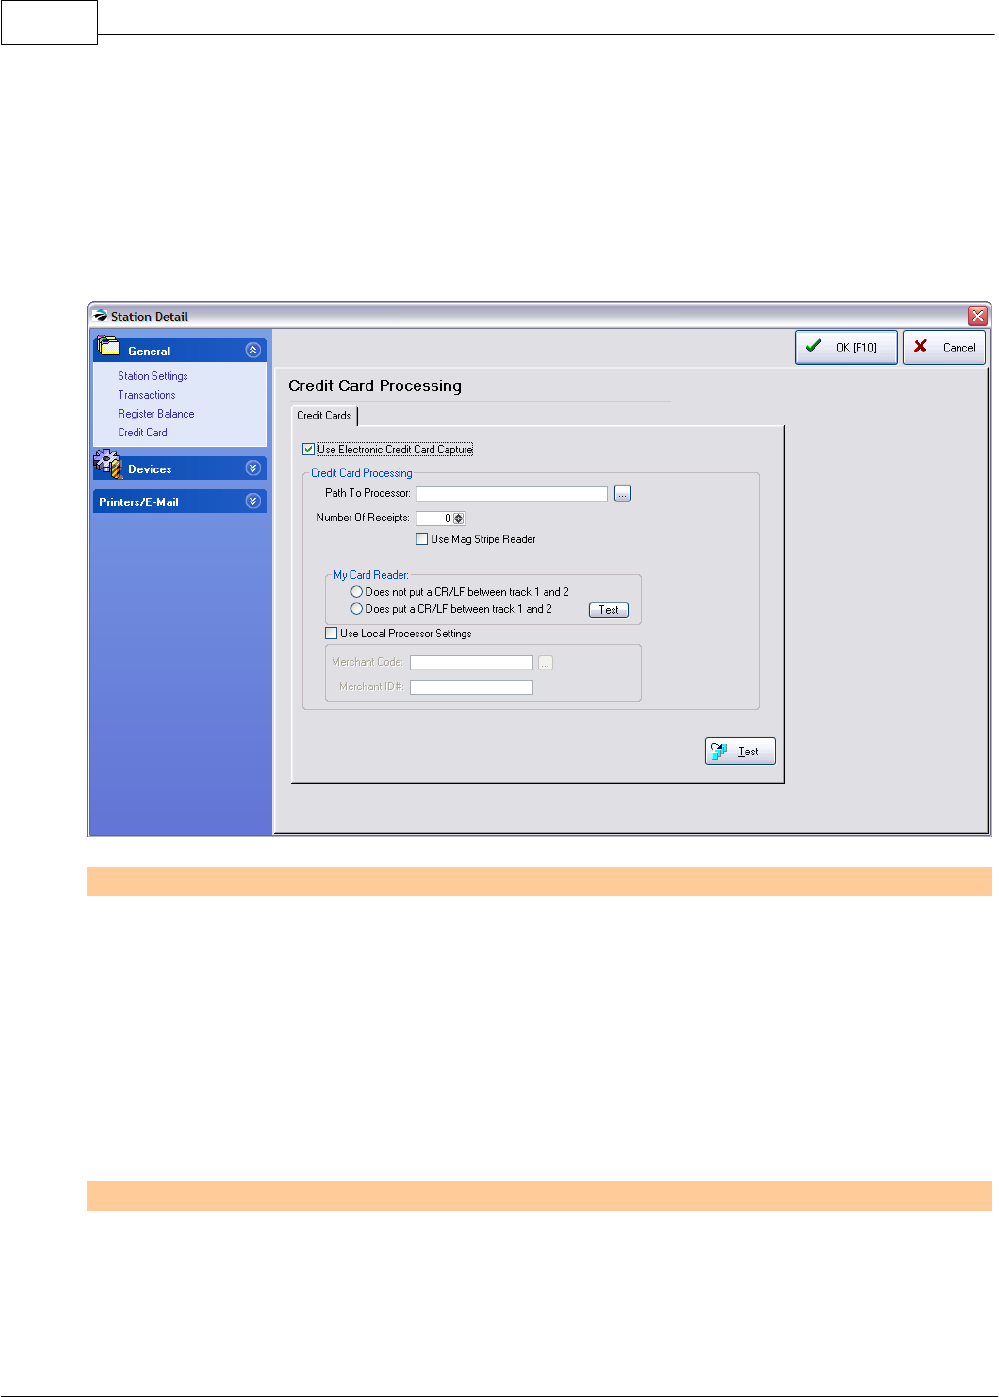
POSitive Retail Manager User Guide238
Copyright ©2007 POSitive Software Company
7.3.4 Credit Card Processing
ADVANCE SETUP: Credit cards can be processed in PRM by first preparing the Credit Card Setup
under Management: Credit Cards: Setup.
Then the individual workstation needs to be activated.
Station Settings For Processing Credit Cards
Credit Card Processors
PRM supports several credit card processing providers who sell licensed software.
AveraCharge is fully integrated into PRM.
ICVerify, X-Charge, and PCCharge are third party software programs for processing credit card
purchases. They are purchased separately from PRM. Check with your local dealer.
Before you can activate these settings, you must have a licensed copy of ICVerify or PCCharge
installed and operational. Operational means that you have the internet or modem dialing to a credit
card processing service and the service is properly processing transactions to your bank account.
See ICVerify and PRM for installation instructions.
Activation of Station
Use Electronic Credit Card Capture - This setting must be checked for this workstation to
communicate with the selected credit card processor. (see System Setup: Credit Card Setup)
Path To Processor - Enter the name of the directory, including the drive letter, where PCCharge or
ICVerify is storing the request files to be processed. You may use the Browse Button to the right of

Appendix A 239
Copyright ©2007 POSitive Software Company
the field to find the directory.
Number of Receipts - Generally, the number should be zero (0) because PRM will do all of the
printing.
Use Mag Stripe Reader - This setting must be checked if you are using a magnetic swipe device to
read the credit card information.
Setting Up The Mag Stripe Reader
You need to make sure the Mag Stripe Reader is reading credit cards in the correct format. The
easiest way to do this is to open a word processor (Window's Start button: Programs: Accessories:
NotePad) and scan a credit card. PRM needs to read tracks 1 and 2 on the credit card.
When you scan the card, you should get a group of numbers and letters similar to this:
%B40030101010123456789^JOHN ROBERT
DOE^940310101002?,54800109639335702=94031016
It does not matter if there is more information than that. The important thing to look for is that there is
a '^' surrounding the name on the card. PRM finds these '^' characters and uses them to determine
the location of the account number.
If you are NOT seeing this information, then your scanner is not reading the proper tracks on the card.
-- My Card Reader -- (choose one)
·Does not put a CR/LF between track 1 and 2
·Does put a CR/LF between track 1 and 2
TIP - click on the ? button for an explanation and a test your Mag Stripe Reader
Note: Mag Stripe readers typically read tracks 1 and 2 from a credit or debit card. Some readers
break the two tracks into two line, while others do not separate the two tracks.
Scan a credit card into a non-word wrap text box and observe how it is displayed in the text box. If it
displays as one continuous line, choose the first option. If it displays as two lines choose the second
option.
Use Local Processor Settings (Optional)
With ICVerify, X-Charge, PCCharge, and AveraCharge each workstation can use a merchant code
other than the one set in System Setup. This is activated only if you have two merchant accounts and
want to use a specific one at a particular workstation.
Test Credit Card Processing button - This will send out a test transaction to assure that IC Verify
settings and PRM settings are synchronized.
ICVerify Operations
Preparation: ICVMLT32.EXE must be running in the background and have the /O /D switches active
in its initialization string. See ICVerify and PRM.
7.3.5 Stations - Devices
Each workstation will require connections to printers, cash drawer, pole display, and other hardware.
For general information see Basic Hardware For Workstations. The following topics give more
precise information.

POSitive Retail Manager User Guide240
Copyright ©2007 POSitive Software Company
7.3.5.1 Cash Drawer
You must activate the option to use the cash drawer by entering codes for the cash drawer. It is
assumed that the cash drawer connects to the printer with a small cable.
·Use Cash Drawer - Must be checked if a cash drawer is being used with this station.
Cash Drawer Settings
·Cash Drawer Code - The decimal numbers provided by the cash drawer manufacturer which
activate the drawer to open. If more than one number is required, use a comma as a separator.
-- Possible Codes --
code 27,112,0,48 - If the printer is an Epson or Samsung brand. (Use 27,112,0,57 for a
longer signal, if necessary)
code 7 - If the printer is a Star brand, use code 7.
·Cash Drawer Port - Choose the port to which the cash drawer is attached. If the cash drawer is
plugged into a receipt printer, use the port of the receipt printer.
·Pulse - The signal to open the cash drawer can be extended by increasing the pulse setting from 0
to a 1, 2, or 3. This is often needed for older models of cash drawers. Another option is to set the
baud rate for older drawers to just 300 baud.
·Bypass Direct To Port - (Not Generally Required) Some cash drawers need to have the signal to
open the cash drawer handled differently. Try this option only if other options fail.
·Test Button - Pressing the test button will transmit the cash drawer codes and open the drawer.
·Cash Drawer Printer - (Not Generally Required) The purpose of this field is to link cash drawer
operations when the cash drawer is not plugged into the printer. For example, a serial cash drawer
is not plugged into a printer or when the printer is plugged into a USB port instead of a COM or LPT
port or for other special scenarios such as a pole display plugged into a receipt printer.
-- Setting Up A Serial Cash Drawer --
If your cash drawer is serial and plugs directly into a com port on the computer, follow these steps.
Go to Windows Start: Settings: Printers and add a Generic/Text Only printer driver. Set this imaginary
printer to use the cash drawer com port. Select this special Generic/Text Only printer driver in the
Cash Drawer Printer field.
7.3.5.2 Pole Display
A pole display or customer display device allows the customer to view the products and prices being
purchased.
PRM supports several brands of pole displays. Check with your local dealer for a current list and
choose one which will best suit your purposes. Select one of the following or similar types.
·Ultimate Technology
·UTS PD220XL
·Pioneer
·Partner Tech CD-5220
NOTE: Some newer pole displays are designed to accept a printer plug in. The setup will be
different. Please refer to special instructions for Pass Through Pole Display

Appendix A 241
Copyright ©2007 POSitive Software Company
Test The Display First
You should first test to make sure the Pole Display is functional as described in the owner's manual.
Turn off power to the pole display and turn power back on. It will run through a self test and display
it's standard setup. If it does not look like it is functioning properly, refer to the manual and/or the
manufacturer.
Pole Display Setup
·Use Pole Display - If you are using a pole display on this computer, this setting must be checked.
Settings tab
·Pole ID - This is a PRM code number to identify up to 6 different pole displays. PRM has
pre-defined two common pole displays and allows you to define up to four others. Defining a pole
display means to enter the manufacturer's codes for activating the 1st and 2nd lines of the display.
This information is available in the owner's manual.
·Pole ID 200 - contains the settings for a Partner Tech model CD-5220
·Pole ID 251 - contains the settings for a generic pole display
·Pole ID 252 - 255 are undefined. You may configure one to match your pole display.
How to define a pole ID
1) Select or create a Pole ID
·Click on the Lookup button to the right of the ID number.
·Highlight an undefined entry and choose Edit
·Enter a description (model number of the pole display)
·Enter codes for lines 1 and 2 as provided in the pole display manual.
·Enter number of characters per line (typically 18).
For example, a Logic Controls model DP3000
2) Pole Display Port - Choose the port to which the pole display will be attached.

POSitive Retail Manager User Guide242
Copyright ©2007 POSitive Software Company
3) Enter your messages on Pole Line 1 and Pole Line 2
Message Lines - When the pole display is not showing products and prices, you may choose a
greeting or message for display. The message can be changed as often as you wish. The
length of the message is dependent upon the brand of pole display.
Pole Line 1: Welcome To
Pole Line 2 Blink's Video Store
4) Click the Test button and watch the display. If it works, then you are finished here. If nothing is
displayed consider selecting a Pole Printer.
Pole Printer - (Not Required except when the printer is plugged into a USB port instead of a COM or
LPT port or for other special scenarios such as a pole display plugged into a receipt printer.)
Test Button - Sends a signal to the pole display to confirm that settings are correct and to display the
message lines.
If the test is NOT successful, turn off the power (unplug) on the pole display, wait 10 seconds and
plug the pole display in again. The pole display will go through a self test. Then try the Test button
again.
Layout tab
A pole display is usually two lines of text with the description on the top line and the quantity and price
of the item being sold on the bottom line. You may customize what information is displayed by
selecting an element, a line, starting position and length.
Advance Setup
First, make the pole display functional using the instructions above.
Activate Use Custom Layout
Line: 1= top line 2= bottom line
Position: (1-20) Starting character position (some pole displays only use 18 characters)
Length: number of characters to display
Example settings pictured below results in the following pole display information
Line1 Description Price
Line2 Qty Total Price
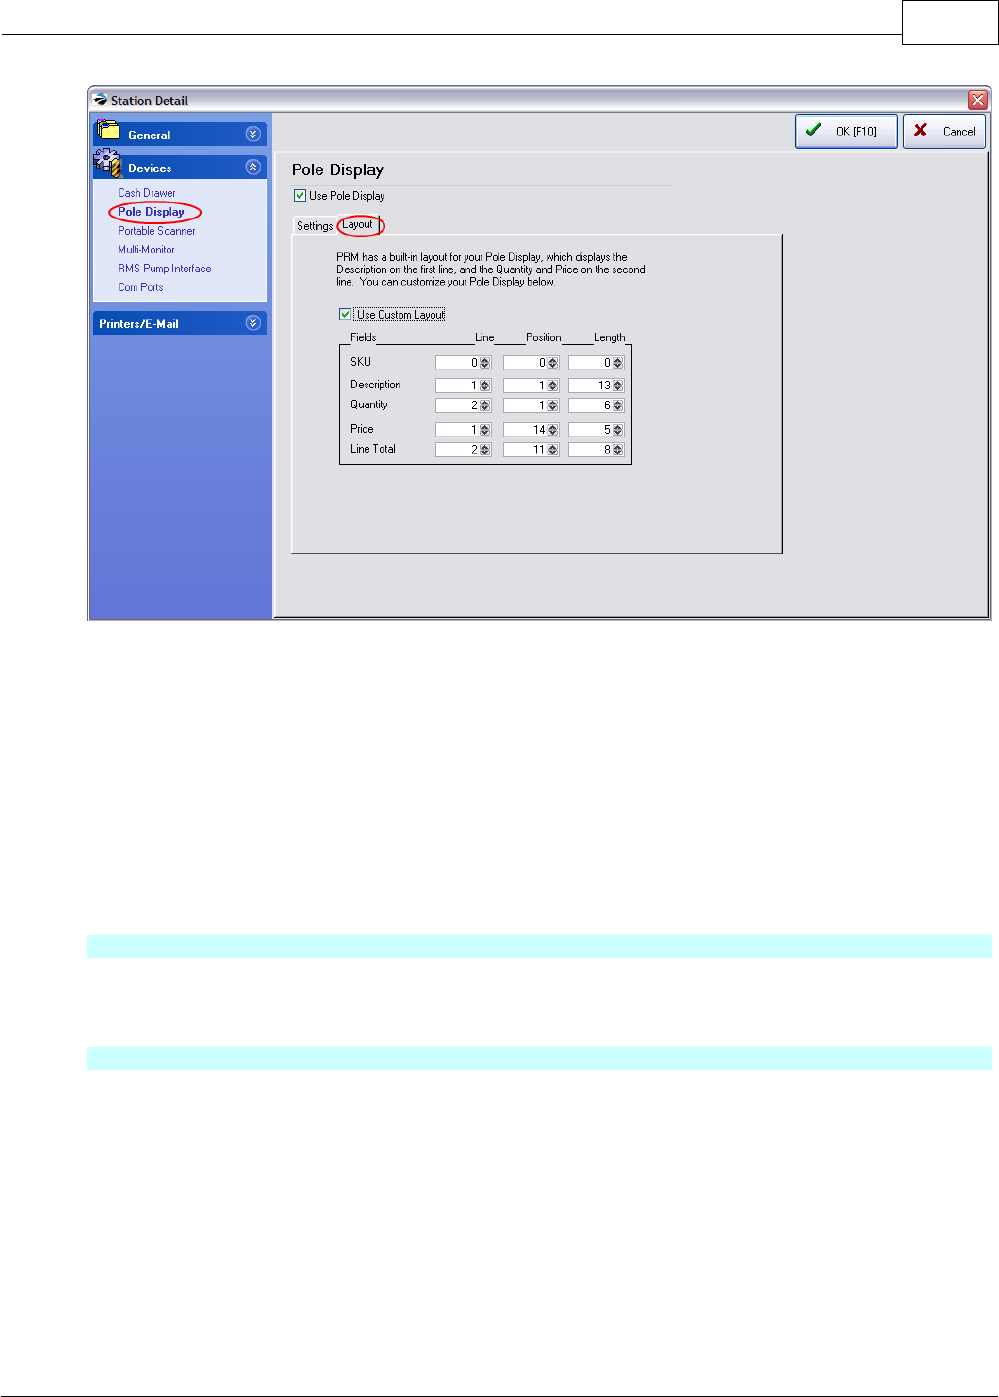
Appendix A 243
Copyright ©2007 POSitive Software Company
line-1: 0,0,0
line-2: 1,1,13
line-3: 2,1,6
line-4: 1,14,5
line-5: 2,11,8
7.3.5.3 Portable Scanner
PRM can directly import data files from your portable data collector at this workstation for doing
invoicing, purchase orders, and inventory control.
What You Need To Know
1) How to program and operate the data collector. See manufacturers instructions.
2) Know which port the data collector is plugged into
How To Select The Port For The Data Collector
You should know how to operate your data collector. Turn it on, load SKUs and quantities.
1) Connect the data collector to a serial port (usually COM1)
2) In PRM, select the port for the portable scanner.
3) Click on the COM Port Setup in the lower right corner and set the proper port, baud rate (9600),
parity (none), data bits (8), and stop bits (1).
4) Click on the Test button. Choose the option on the data collector to "dump" the data. If the data
collector is communicating with the computer, you should see the SKU's and quantities of the items in
the data collector listed on the Scanner Test screen. See Data Collector for explanations of where to
use the data collector with PRM.

POSitive Retail Manager User Guide244
Copyright ©2007 POSitive Software Company
If Your Data Collector Is Not Supported By PRM
If you determine that the data collector is not capable of connecting directly, you can still use the data
collector in conjunction with PRM.
Learn how to transfer data from the data collector to a file on your hard drive. Make note of the file
name. Then, when PRM needs to get data, you can create an import setup and import the saved file
on the hard drive.
7.3.5.4 Multi-Monitor Support
As an alternative to use of a Pole Display, PRM can support two monitors; one that faces the cashier
for ringing up the sale, and one that faces your customer.
Do Not Activate this option until you have completed the preliminary steps. See Multi-Monitor
Support
There are several advantages to using Multi-Monitor Support
·Default Picture - When the computer is not processing an invoice, a slide show of pictures will be
presented.
·Slide Show - File Name - Pictures which are displayed when the workstation is idle or logged out.
·Time Between Slides (seconds)
SAMPLE SCREENS
When you are processing an invoice or order, the customer can see much more detail than a
standard pole display.
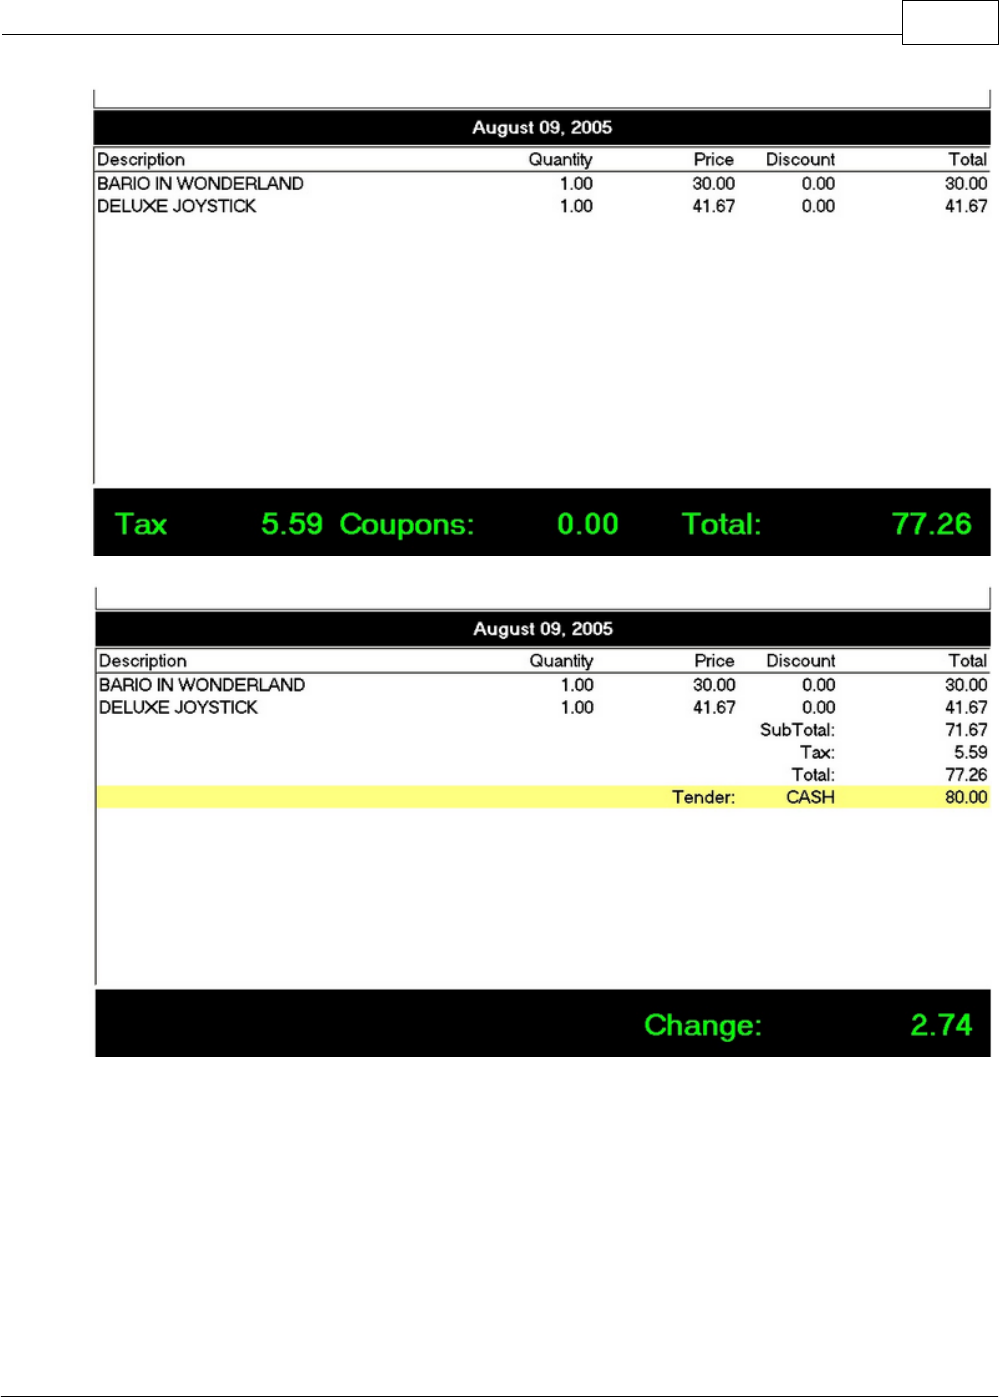
Appendix A 245
Copyright ©2007 POSitive Software Company
7.3.5.5 RMS Pump Interface
PRM can support monitoring of gas pumps which have the RMS software and hardware. Contact
your dealer for more information.
·Activate RMS Interface -
·Data Path to RMS - location where the RMS software data is stored

POSitive Retail Manager User Guide246
Copyright ©2007 POSitive Software Company
7.3.5.6 Com Ports
COM Ports Setup
The COM Ports Setup has already been done by default. However, if you need to make modifications
click on this button. See COM Ports Setup for more information.
7.4 Editors
PRM provides you with editors which are used only as special needs arise to meet your company
objectives. You can edit Invoice Forms, Inventory Labels, Customer Labels, and create customized
reports.
On the toolbar choose the Reports link at the far right and the Actions section on the left.
For your convenience, a brief description is provided here with a link to more information in the help
topics.
Receipt Layouts (Transaction Reports)
PRM comes with a wide selection of form layouts for invoices, orders, service orders, and quotes.
These forms are typically selected on the Printers Tab of the Station Settings window. Editing of
these forms is accessible from Report Center by choosing Actions: Receipt Reports. (In PRM these
were called Transaction Reports.)
Because there are two types of forms, Windows and Direct To Printer, you should first experiment
with the forms to determine which will best suit your needs. (see Printer Forms)
Invoice / Reports Layouts (Report Designer)
PRM allows editing of the following forms:
·AR Balance Forward - one of two AR statement forms
·AR Statement - transaction based, pay per invoice style
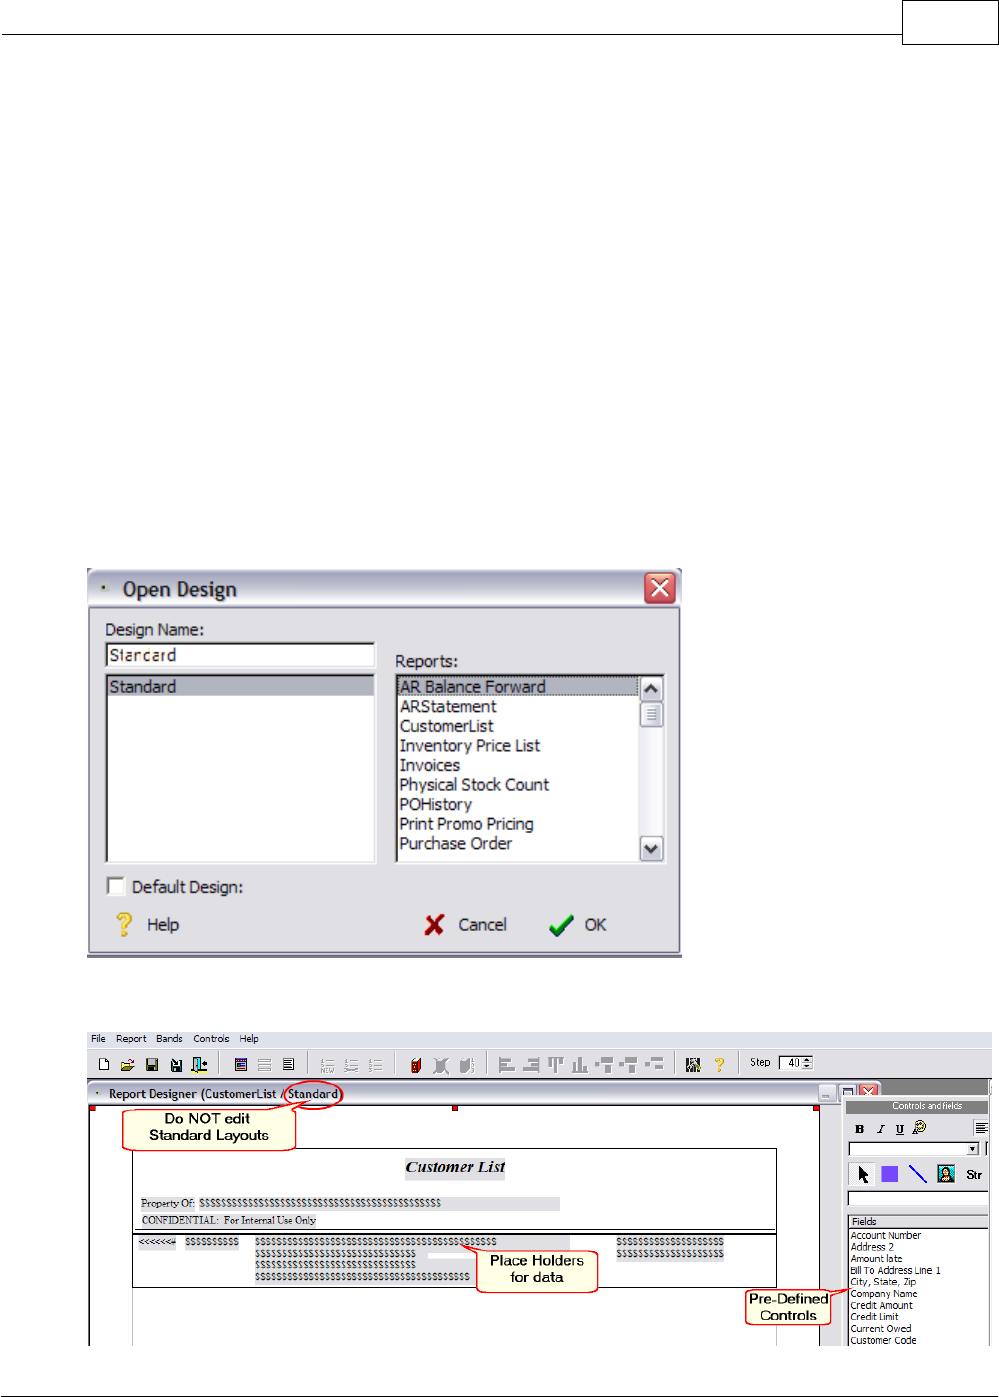
Appendix A 247
Copyright ©2007 POSitive Software Company
·Customer List - this can be enhanced to do much more than just list names and addresses
·Inventory Price List - often used as a catalog
·Invoices - a dynamic form which is used for invoices, layaways, orders, service orders, quotes, etc.
·Physical Stock Count - a listing of inventory and on hand counts
·PO History - not to be confused with "Purchase Order" this is used for reprinting of purchase orders
received
·Print Promo Pricing - a report of items on promo
·Purchase Order - the form used for printed purchase orders which can then be sent by fax, pdf, or
e-mail
·Service Work Schedule - listing of service appointments
·Work Orders - individual notes for work to be done
WARNING: Before you Edit the "Standard" layouts for invoice forms and other reports, be sure to
save the layout with a name other than standard so that your work will not be overwritten during
software upgrades. You may choose to open and edit several forms:
Once the layout is open and saved under a different name, you can edit for form replacing $$$$$$
strings from the available list of controls and fields.

POSitive Retail Manager User Guide248
Copyright ©2007 POSitive Software Company
Inventory Labels
The labels for inventory items can be fully edited to include or exclude certain characteristics. (see
Labels List)
Customer Labels
The bill-to and ship-to address labels for customers can be fully edited. (see Customer Labels Editor)
User-Definable Reports
Design your own reports by selecting variable data fields.
7.5 Company Information
When you create your own company, PRM runs a New Company Setup Wizard. You may edit your
company information on this screen.
Some of the information entered here will be used to create your registration or unlock codes. Your
company name and address will be printed on your invoices as it appears here.
Making Changes
Once PRM is registered or unlocked the name and address information will be grayed out and cannot
be edited. You may need to get new unlock codes before you can make changes to this information.
Call your dealer or POSitive Software Company.

Appendix A 249
Copyright ©2007 POSitive Software Company
General tab
Tax Number - Your Federal ID or ANB number. This will be printed on invoices and purchase
orders.
POSitive Account # - For technical support reference. When calling for technical support you may
be asked for this number.
Name - The name and address of your company, as you want it to appear on your invoices.
Description - A restatement of your company name or an identifier to help you distinguish between
multiple stores: such as 12th Street Store, Store #1, Dallas Store, etc. NOTE: this should not be left
blank because this field appears on the Choose Company screen to aids in the selection of the
correct company data.
Address Block - a free-form field for international use.
Address 1
Address 2
City, State, Zip
Phone - (include area code)

POSitive Retail Manager User Guide250
Copyright ©2007 POSitive Software Company
Fax - (include area code)
E-Mail Address - (Optional) This should be a general e-mail address.
Web Page Address - (Optional) If you have a web page, enter it here. If you do not yet have a web
page, ask your dealer of POSitive Software how you can get one very economically.
Invoice Line - (Optional) This is a "teaser" line which will appear directly below your company phone
numbers on an invoice. You could enter your company slogan, "Greatest Deals On Earth," or list your
e-mail and web page addresses, or anything else of your choosing.
Credit Card Merchant ID - (Optional) Strictly for reference only. If you are using a credit card
processing program, this is a handy place to record such information with easy access when you
need it.
Verify Credit Card Phone # -(Optional) Strictly for reference only. Enter your credit card processor's
voice phone number. If you had been trying to process a credit card which is unable to be verified via
modem, this is the number you have been told to call to get voice verification of the card's
acceptance.
Select A Company At Startup - Displays the Choose Company screen on startup of PRM. One
option available to you from the Choose Company screen is to select a company from the list and
always launch the company data automatically, thereby skipping the Choose Company screen. From
time to time, you may find it necessary to restore the Choose Company screen. By placing a check
here, and then exiting PRM, it will be restored.
Software Registration
Copy To Clipboard - Registering your software is an automated process. However, if there are
problems with the registration, you may be asked by technical support for the company information
listed here. As a convenience, click on this button and the relevant information will be placed on the
Windows clipboard, which can then be pasted into an e-mail or or word processing document to fax to
your dealer. Note: You will not see any indication that it has been copied to the clipboard; just know
that it has been done.
Company Headers (OPTIONAL)
Two tabs on the Company Information screen allow you to add extra information to your invoices and
end of day reports such as Tax Numbers, VAT, etc. to conform with governing requirements.
Receipt Header
Open the tab and type the information you would like at the top of your 40-column invoices.
End-Of Day Receipt Header
Open the tab and type the information you would like at the top of your 40-column End-Of-Day
Report.
Divisions (OPTIONAL)
This optional setting allows the company to monitor sales based upon internal accounting
organizations (Divisions) within the company: Retail, Wholesale, Internet Sales, Service, etc.
After naming the various divisions, be sure to review the GL Chart of Accounts and make appropriate
changes for each division. (see General Ledger Management Center)
The use of a Division is controlled by the Station. A computer will be designated to function as a
Division point of operations. Transactions made at the computer station will be logged under the
selected Division. (see Station Settings)

Appendix A 251
Copyright ©2007 POSitive Software Company
Logo
How To Load Your Company Logo Into PRM
Load Pic - A company logo would be an appropriate picture to load here. It will be printed on your
"windows" invoices.
Delete Pic - Remove the picture loaded as a company logo.
1) Click on Load Pic
2) Select the proper folder and company graphic. You may need to change the picture format filter to
find your specific logo. Note: For best results the graphic should be small and if you are running
multiple computers, the graphic must be saved in the c:\PRM\dataX\IMAGES directory so that all
computers will have access to the file.
3) Choose OK.
Guidelines:
The logo in PRM will auto size to about a 1.5x1.5 inches. You can use bmp, wmf, and perhaps jpg.
GIF may work also.
In any event if you make a logo about 1.5- 2 inches square and use a WMF format, your logo will
definitely print on your invoices. And in color, if you have a color logo and printer. You can always
experiment with different designs and file types.
Obviously the smaller the file size the better. My logo is a color WMF file and is about 7k I created it
in Corel Draw and saved it as a WMF.
Final point to remember, our logo for invoice printing has no relationship to our POSitive Commerce
system. If you DO get into e-commerce, the only file formats that are supported are JPG and GIF.
WMF and BMP are not valid file types for web images.
7.6 Policy Statements
At the bottom of each invoice, layaway, order, service order, etc. you can print your store policy
statement regarding returns, refunds, or work performed. These statements can vary according to the
type of receipt being printed.
TIP: Change your invoice policy statement frequently to include greetings, announcements, and
promotions.

POSitive Retail Manager User Guide252
Copyright ©2007 POSitive Software Company
How To Create A Policy Statement
1) Go to Maintenance: Definitions: Policy Statements
2) Highlight a receipt type. You may print a different policy statement on each of the following receipt
types: Invoice, Layaway, Order, Service Order, Quote, Contract Pricing, and Internet Order.
3) Type your statement in the box provided. Layaways, for example, could include policies about
cancellations, unclaimed items, fees and refunds.
Length Of Statement
Your policy statement will be printed at the bottom of the customer receipt. Your statement will word
wrap if you are printing on a 40 column receipt. If you are printing to a Windows default form, you will
be limited to 3 lines of compressed print, approximately 300 characters.
Pre-Printed Forms With Policy Statements
You may wish to deactivate printing of policy statements in PRM forms and use pre-printed forms with
your company logo and policy statement on the reverse or at the bottom of the form. See Printer
Forms for more information.
Converted Receipts
The receipt type determines the policy statement being printed. When a receipt is created the policy
statement for that receipt type is printed at the bottom of the form. When a Layaway, for example, is
converted to an Invoice, then the policy statement for the Layaway is replaced with the policy
statement of the Invoice.
7.7 PRM Security Options
As the number of employees in your business increases, your desires for heightened controls in your
point-of-sale program may also increase. PRM has many security lockout and transaction tracking

Appendix A 253
Copyright ©2007 POSitive Software Company
features. These are either automatically functional in the program or need to be activated on a per
employee basis. The use of Security Groups can assist in rapidly applying security settings.
Although these security options will help, the ultimate responsibility for monitoring abuses rests with
your store management and not with PRM software.
Security Controls
Each employee using PRM is assigned a unique ID and Password and can also be granted various
access rights to portions or procedures within PRM.
PASSWORDS - The passwords may be changed on a regular basis to minimize compromises in the
program.
SALESID - Once an employee is assigned a SalesID, it can not be edited.
Keys To Effective Security
For PRM Security to be effective, the following must be in place.
1) Each employee must have and use his/her own ID and Password. Consider changing passwords
every few months so that passwords are not compromised.
2) For maximum security, each workstation must have the option "Ask For ID Each When Creating
New Transactions" turned on. This will mean the employee will have to log on much more frequently,
but in order to assure access rights, this must be set.
·To check each workstation setting, go to Maintenance: System Setup: and select Stations.
·In turn, edit each workstation in the list
·Choose Transactions under General.
·Place a checkmark on Ask For ID When Creating New Transactions. For even tighter security,
activate "Force Cashier Login Between Invoices
·Choose OK to save and quit.
3) For each employee, grant rights and limits for each of the module settings. This is on the
Employee File: Security tab. (If the employee does not display a security tab, then the employee is
currently assigned to a security group. You will need to change the security group setting to
"unassigned" to be able to make individual changes to the employee's security rights.)
4) For each employee, set appropriate invoicing and refunding limits. This is on the Employee File:
Options tab.
When an employee is added to PRM, the employee is granted access to ALL portions and procedures
of PRM. No limits are in place unless management sets those limits.
To Change Or Review Employee Security Settings
·Go to Main Menu: Management: Employees
·Highlight an Employee
·Choose Security View at the left. If you have access to changing security options it is because
the employee record selected the Unassigned Group. If the employee is already assigned to a
specific group, you will see the statement: "Security has been set using a Global Security Setting:"
followed by the name of the Group.
·If you want to manually adjust security for the employee, edit the employee and select the
Unassigned Security Group to gain access.

POSitive Retail Manager User Guide254
Copyright ©2007 POSitive Software Company
An Alphabetical List of Security Options
Accounting
Access To GL Setup
Access to Checkbook
Allow To View Credit Card Numbers
Access To AR Section
Able To Accept AR Payments
Access To AP Section
Admin
Access To Manager Module
Access Employee Records
Access Daily Routines
Access Company Setup
Access File Integrity
Access To Time Cards
Access To Commissions
Access To Cost Verifier
Able To Delete Companies
Able To Access System Setup
Able To Access Station Setup
Able To Access Printers
Able To Add/Edit Tax Rates
Access To E-Mail Marketing
See Costs On Screen/Reports
Access To Registration
Control Center
Access To Transaction Menu
Access To Management Menu
Access To Inventory Menu
Access To Purchase Menu

Appendix A 255
Copyright ©2007 POSitive Software Company
Access To RMA Functions
Access To E-Commerce Menu
Customers
Access To Customer Records
Add Customer Notes
Edit Customer Notes
Change Customer Credit
Can Set Customer Defaults
E-Commerce
Able To Access E-Comm Setup
Add/Edit Internet Orders
Void Internet Orders
Retrieve E-Commerce Orders
Access To Internet Inventory
Files
Able To Import Files
Able To Export Files
Able To Access Definitions
Able To Access Editors
Access To Purge Data
Access Verify Routines
Access File Verification
Inventory
Access To Inventory Menus
Able To Add/Edit Inventory
Add/Edit Promo Pricing
Able To Add/Edit Departments
Able To Add/Edit Categories
Access To Category Defaults
Add/Edit Serial Numbers
Adjust Physical Inventory
Change Stock Quantities

POSitive Retail Manager User Guide256
Copyright ©2007 POSitive Software Company
Access To Inventory Reports
Access To Print Labels
Access To Inventory Maintenance
Managers
Access Credit Card Manager
Access Gift Cert. Manager
Access Frequent Buyer Mgr.
Access To Price Manager
Access To Coupon Manager
Access Used Items Manager
Pending
Add/Edit Layaways
Able To Void Layaways
Add/Edit Orders
Able To Void Orders
Add/Edit Service Orders
Void Service Orders
Add Service Appointments
Able To Enter Quotes
Void Quotes
Change Markup In A Quote
Add/Edit Contract Pricing
Void Recurring Invoices
Access To Voids List
Allow Order To Be Saved
Purchasing
Allow Access To Order List
Able To Place POs
Allow To Receive POs
Able To View PO History
Reports
Access Reports Menu

Appendix A 257
Copyright ©2007 POSitive Software Company
Access Employee Sales Report
Access Vendor Sales Report
Access To Sales Summary
Access Daily Balance History
Access To Tender History
Access Report Center
Able To Edit Transaction Reports
RMA
Access To Customer Returns
Access To RMA Orphans
Able To Send RMAs
Able To Receive RMAs
Access To RMA Aging Report
Transactions
Add/Edit Invoices
Able To Void Invoices
Allow Price Changes
Allow Discounts On Invoice - Note: if this is to be disabled, must also disable "Allow Price Changes"
Allowed To Process Returns
Accept Tender
View Invoice History
Able To Open Cash Drawer
Able To Balance Cash Drawer
Able To Test Cash Drawer
Able To Delete Line Items
Able To Void Active Invoices
Vendors
Access To Vendor Info
Access To Vendor Inventory
Access To Vendor Terms
Access To Vendor Shipping

POSitive Retail Manager User Guide258
Copyright ©2007 POSitive Software Company
7.7.1 Security Groups
Security Groups are named sets of access privileges to be applied enmasse to specific types of
employees.
The reason for creating security groups and defining the security privileges for each group is to save
you time when adding a new employee. It also assures uniformity. However, as an employee's
responsibilities increase, you can change the employee's rights by either assigning the employee to a
different security group or removing security group settings and manually choosing security options.
Groups of employees, can be named by a job function or team assignment such as Service,
Accounting, Cashiers, Stock Room, Management share similar security privileges.
Go to Maintenance: Definitions: Security Groups
Related Topics
PRM Security Options
Security Group Settings.
7.7.2 Security Group Settings
Security settings can be pre-defined for specific types of employees based upon job description.
To access this screen, go to Maintenance: Definitions: Security Group Settings.
(1) All security groups are listed. More groups can be added. Groups can be edited. Any employees
assigned to a group being edited will be instantly updated.
(2) Choose an "Access" area
(3) Activate specific settings as desired.
(A) Tag All - Untag All applies only to the visible screen. Tag Global - Untag Global applies to all
Appendix A 259
Copyright ©2007 POSitive Software Company
sections.
See PRM Security Options for details about which options are available and an alphabetical list of
security statements.
General Information
When Adding A Group: Use a descriptive name for groups of employees, such as Service,
Accounting, Cashiers, Stock Room.
Check/Uncheck: Clicking on a setting in the Description box will alternately check or uncheck the
highlighted setting.
Access Groups
Security options have been grouped by types. Select the desired type and security settings are listed.
By default, all settings are turned on, giving a new employee access to all features and functions of
PRM. Turn off any settings as desired.
Access Options On/Off
Clicking on the Description of a security control will alternately check or uncheck the highlighted
setting.
Selection Buttons
·Tag All - will checkmark every item in the displayed group
·UnTag All - will remove checkmarks from every item in the displayed group
·Tag Global - will checkmark every item in every group
·UnTag Global - will remove checkmarks from every item in every group.
7.8 Employees
Assigning employees their own IDs and Passwords provides you with detailed information about
employee activity and can even limit employee access to selected areas of PRM.
THINGS TO DO
Add employees and assign Security Groups (see Adding New Employees)
Change the password of POS MANAGER, the default employee
Regularly change employee passwords
Assign employee to POSitive Mail groups for rapid communication (see POSitive Mail)
Enable internet e-mail capabilities for the employee
THINGS TO UNDERSTAND
Adding an employee to the Employee list entails filling in Details, assignment to Mail Groups,
assignment to a Security Group, and optionally adding Notes and enabling E-mail settings.

POSitive Retail Manager User Guide260
Copyright ©2007 POSitive Software Company
Mail Groups - POSitive Mail provides messaging to employees even without internet services. Mail
Groups are defined through File: Definitions, and assigned to an employee through the Employee
File.
Security Groups - Security options are available in PRM to limit access to various areas and
procedures. It is probably best to define Security Groups first, before adding employees. When an
employee is added to PRM using "Unassigned", the employee is granted access to ALL portions and
procedures of PRM. No limits are in place unless management sets those limits by returning to the
Employee list and editing the employee.
Notes - Employee notes and information should remain confidential. Access to the employee file
should be limited to only a few employees. The employee information and notes can be printed from
the Employee List.
E-Mail Settings - Employees who will be allowed to e-mail PRM reports need authorization. Edit the
Employee File and define E-mail settings.
Time Clock - Employees may use the Time Clock to punch in and out. Management can review and
edit times in and out.
RELATED TOPICS
Security Groups
Employee Time Cards
Service Time Cards
Sales Reports By Employee
POSitive Mail
E-Mail Authorization
7.8.1 Employee File
Employee Listing - Click on column to sort/search
·Locate - Find an employee record or all records with common data.
·Query - define presets for name, sales ID, or phone
·Reset - restores the list after query has been applied.
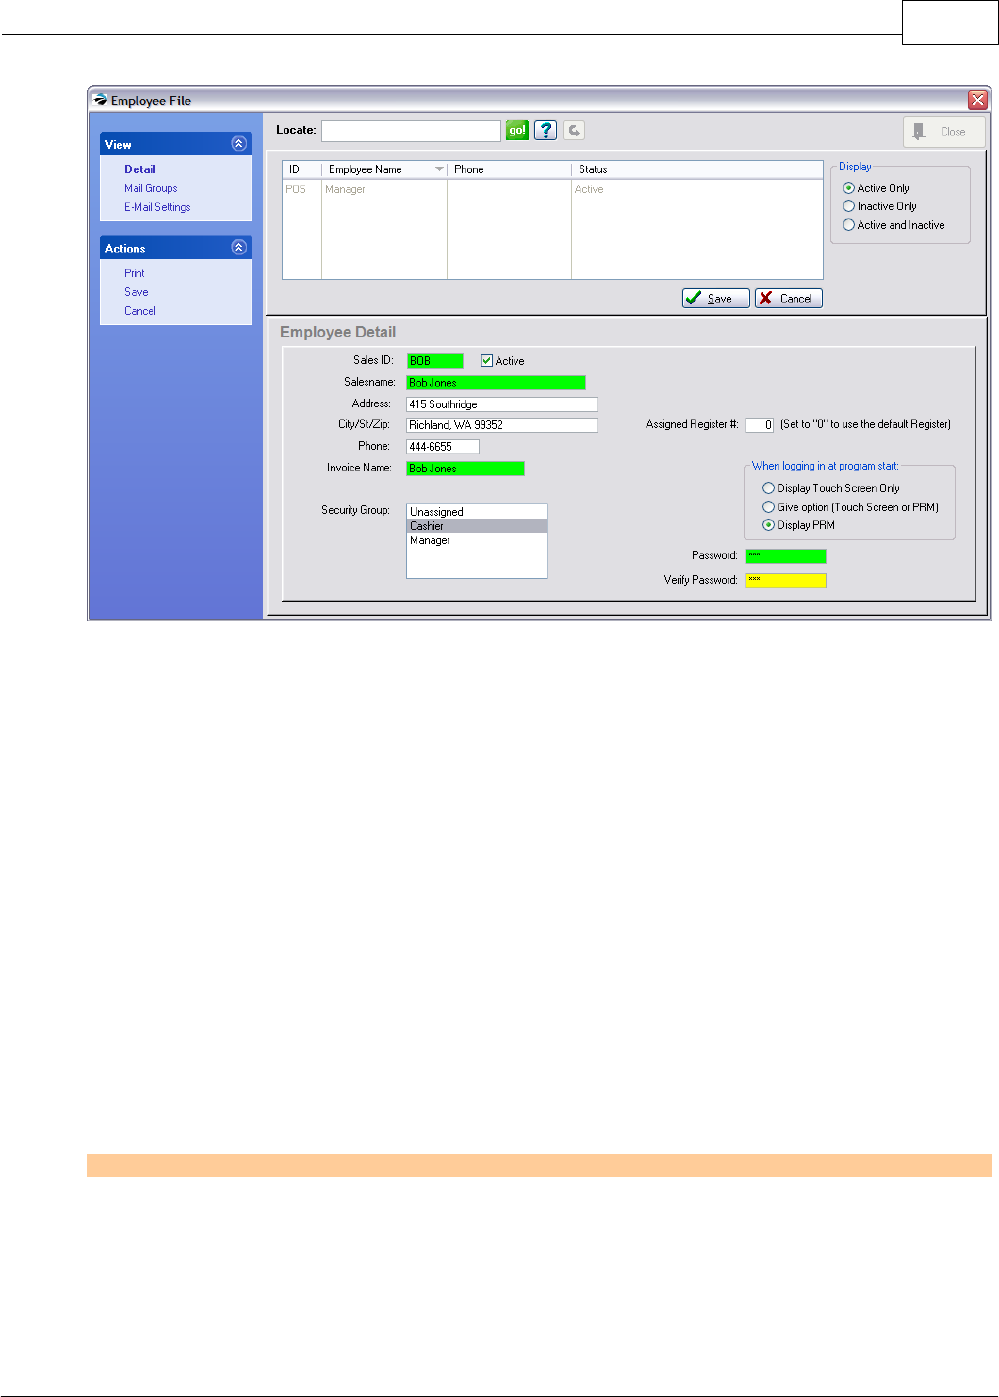
Appendix A 261
Copyright ©2007 POSitive Software Company
ID - up to 3 characters
Employee Name - Default column for searching
Phone
Status
Display Status - choose to display only Active, only Inactive, or all employees.
Buttons
Add - This button will launch PRM's New Employee Wizard to make it easy to fill in all necessary
fields.
Edit - Change an employee's information and or security rights.
Save - Retain changes. Cancel - Discard Changes
Delete - Remove a sales person.
TIP: Rather than deleting an employee, just change the password and/or security options. Deleting
an employee could exclude sales made by that employee from specialized reports. Generally, if you
ask for a report on ALL employees, even transactions of deleted employees will be included.
How To Add New Employees
From the Employee File screen, choose the ADD button just below the Employee Listing and fill in the
employee information fields. Be sure to complete all 5 Views listed on the left.
Employee Detail
Sales ID - A unique code of up to 3 characters in length. This can be any combination of letters and

POSitive Retail Manager User Guide262
Copyright ©2007 POSitive Software Company
numbers. It is frequently the initials of an employee. If security is not a major issue, it could be just
one character to speed up entry into PRM.
Active - Currently able to use PRM. If this is unchecked, then the employee will have no rights to
use PRM.
Salesname - Full name of employee: First and Last Name.
Address - (Optional) This will be used for internal purposes only. It can be a handy reference.
City, State, Zip
Phone
Invoice Name - This entry will be printed on the customer invoice. For privacy reasons, you may
choose to print only the first name or an employee number on invoices.
Security Group - A preset assignment of security settings. Select one of the presets or make the
entry Unassigned. See Security Groups.
Special Assignments
·Assigned Register # - This should always be set to 0. Only in rare instances would you want to
use any other number.
If you have a number of cashiers and wish to track transactions "per employee" more closely, you
can assign a permanent cash drawer number to that employee. Whenever the employee logs-in,
the Station number you assign here becomes active at the computer being operated.
Advance Setup: You need to create a station number for each employee. Then assign the station
number at this screen for this specific employee.
Benefits: A cashier can end his/her shift without having to count down the cash drawer before leaving
the sales lane. The cashier would remove the drawer and carry it to a back office workstation and
proceed with the count down and balancing of the drawer.
Potential Drawbacks: This creates more work for network administrators. Since All Station settings
will be applied as soon as the cashier logs in, the printers and cash drawer settings need to be
identical or accessible in the same way at all stations to be used by the employee.
·Service Tech - (Visible only if Service Option is active) If this employee will be serving as a service
technician at times, then this box should be checked. The employee will then be included in the
Service Order module and will be listed with in the Service Scheduler. If service work is not part of
your business, then this can be left blank.
When Logging In At Program Start
·Display Touch Screen Only - If this option has been activated, this employee will only be able to
run the touchscreen.
·Give Option (Touch Screen or PRM) If this option has been activated, this employee will only be
able to run the touchscreen or PRM.
·Display PRM Access To Register Mode Only - (Leave this unchecked) If the employee is only a
cashier and should not have access to any other feature of PRM except to run a special
TouchScreen interface for making sales.

Appendix A 263
Copyright ©2007 POSitive Software Company
Password Authentication
Password - A code of up to 6 characters using any combination of letters and numbers. This code
should remain confidential. If security is a major issue, it can be changed as often as needed. As you
type, the code characters will only be displayed as asterisks.
Verify Password - Re-enter the password to verify that the original entry is correct. As you type, the
code characters will only be displayed as asterisks.
-- How To Change Password --
It is recommended that employee passwords be changed frequently to avoid compromise. Simply
overwrite the existing password and Verify Password again.
Mail Groups
Select Mail Groups view at the far left. These are for internal classification of employees by job or
location or team assignments. These groups are utilized for internal mailings and reports. An
employee can be assigned to more than one group.
All Groups - a listing of common teams of employees such as Sales, Management, Techs, etc.
These are defined under Maintenance | Definitions | Mail Groups (see Group Manager)
Groups Belonged To - This employee is automatically included in the ALL group and can be
included as a member of any other available Mail Group. If groups have not yet been created, you
may designate them now using Group Manager button below the All Groups list. (see Group
Manager)
Security
Security - If the employee is already assigned to a security group, the message "Security has been
set using a Global Security Setting" followed by the name of the security group.
If the employee is not assigned to a security group, then a listing of security options can be reviewed
and edited. Upon closing this window, any changes made will be saved.
To Create New Security Groups - go to Maintenance: Definitions: Security Groups
See List Of Security Options for details.
Notes
You can record the hire date, performance reviews, and any other useful information about this
employee on the Notes tab at this time. You may keep multiple notes about the employee; they will
be printed by choosing the Print option under Actions on the left.
E-Mail Settings
(Recommended) This can be left blank. By default, PRM uses your Windows default e-mail client,
such as Outlook, when you e-mail copies of invoices, quotes and etc. to your customers.
PRM can function as an e-mail client, (through System Setup), allowing employees to send and
receive personal e-mail through the My POSitive section. (Screen shot of My POSitive.)
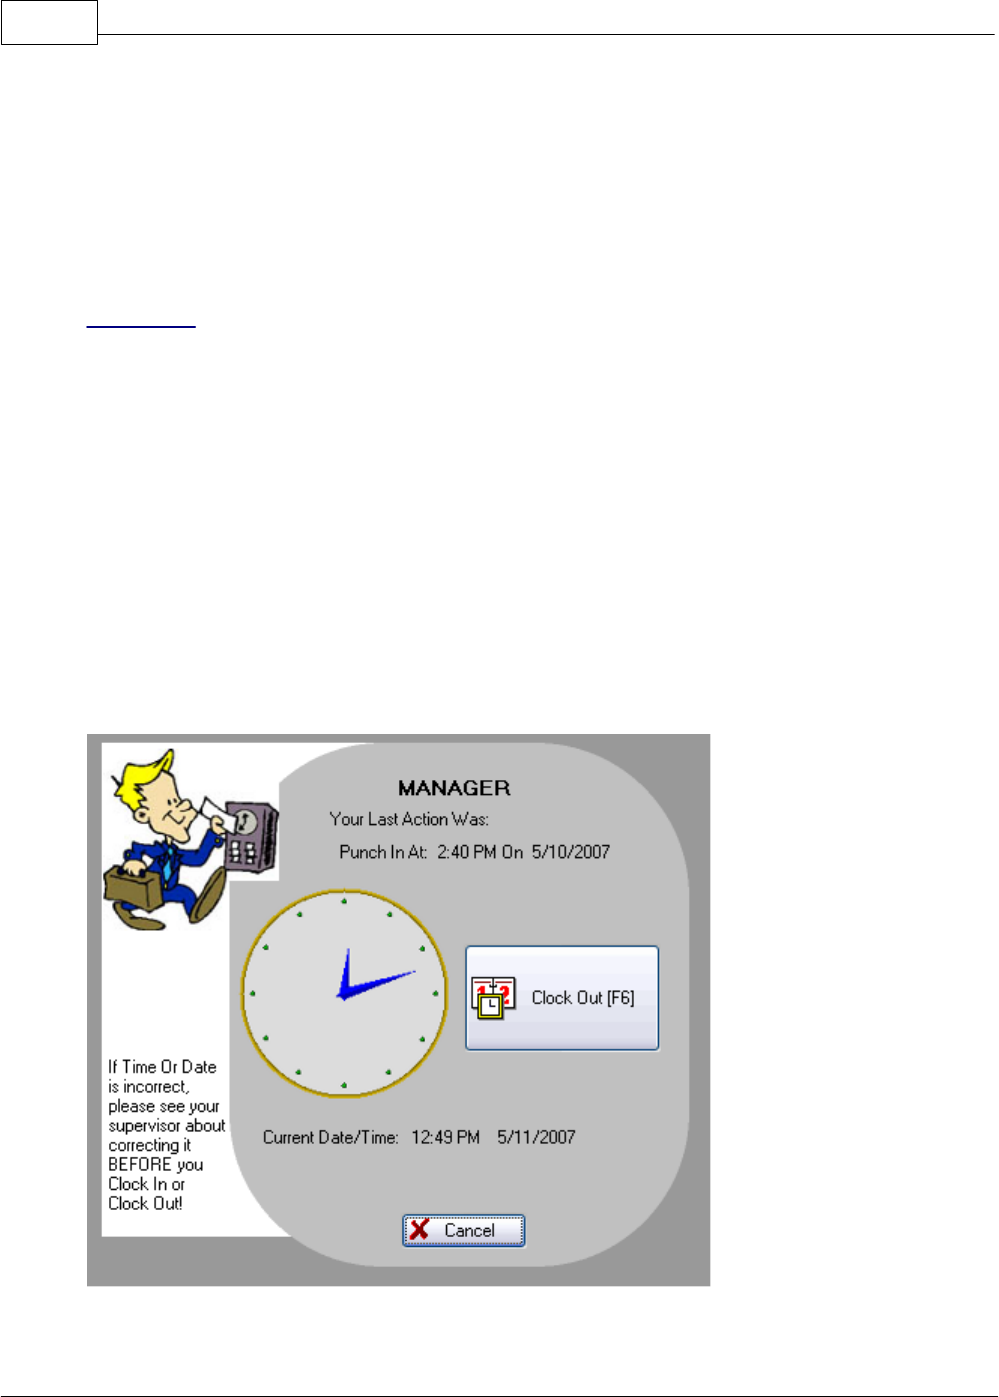
POSitive Retail Manager User Guide264
Copyright ©2007 POSitive Software Company
To set-up internal employee e-mail, go to Management, System Setup and E-Mail.
Click OK and go to Management, Employees, Edit the highlighted employee, then click on E-Mail
Settings. This is where you will enter the information that pertains to your e-mail service and will have
to be done for each employee. Because each business is different, there are no standard settings to
use for this section. You probably need to consult with your e-mail provider, IT support person or
POSitive dealer for assistance with setup.
Use the TEST E-MAIL button to assure that the entries are correct.
ACTIONS
Print - Will print the name and address of the employee along with any notes recorded on the Notes
tab.
7.8.2 Employee Time Cards
Employees may clock in and out of PRM. Their hours are recorded for management to review and
print.
Clock In - Clock Out
To clock in or out, the employee selects the Clock In/Out icon on the Transactions Master Menu
After entering a SalesID and Password, the employee should check to verify the correct Date and
Time displayed.
Then choose to Clock In [F6] or Clock Out [F9].
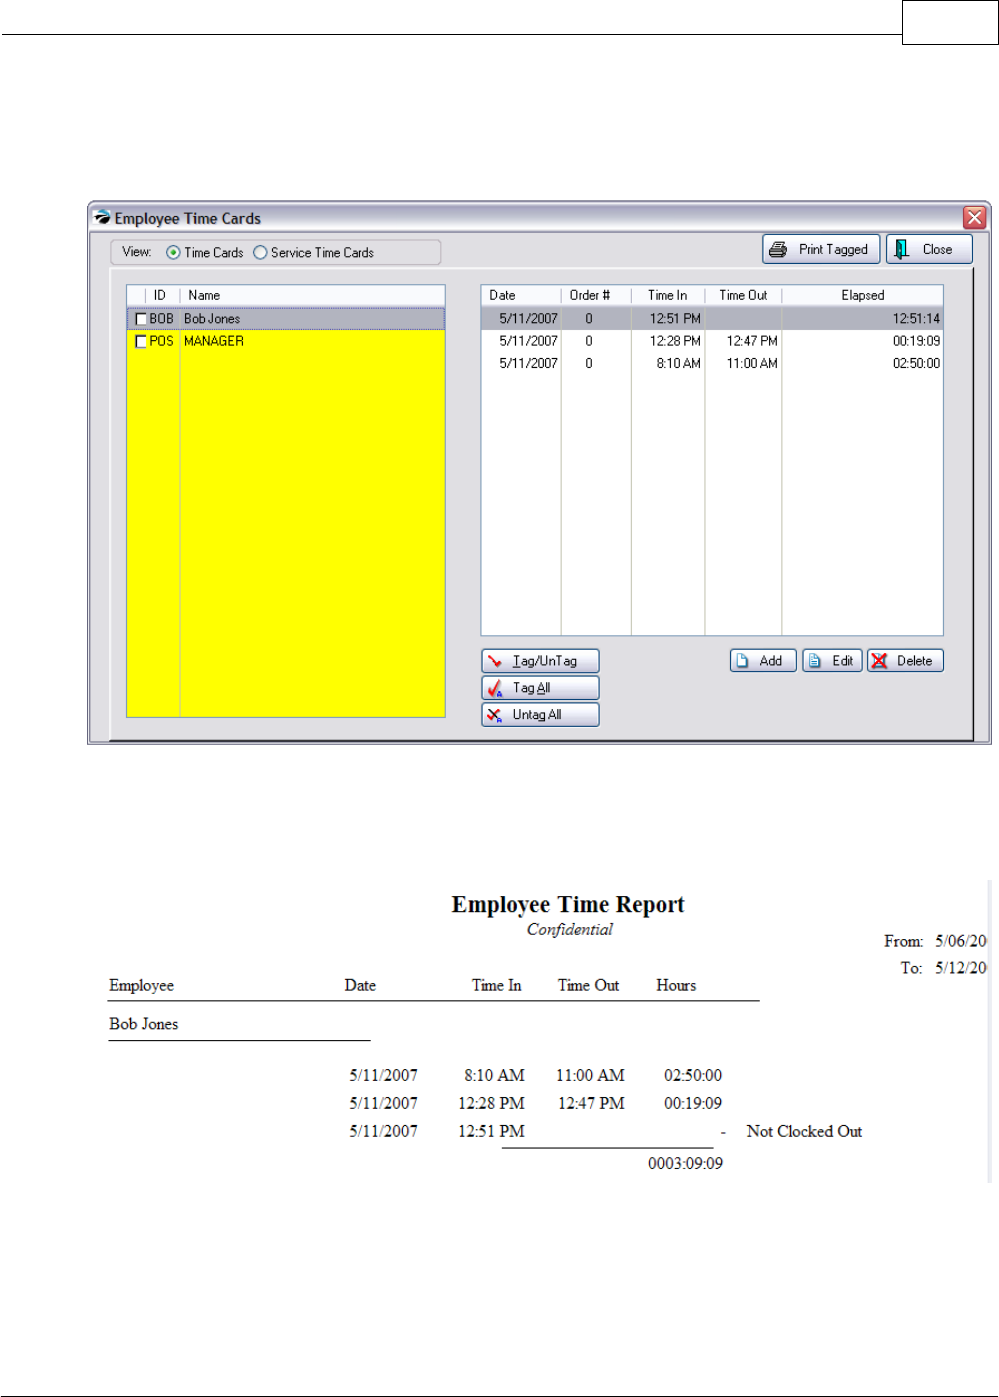
Appendix A 265
Copyright ©2007 POSitive Software Company
Employee Time Cards
The manager can review employee records by going to Management: Employee Time Cards.
Employee Time Report
Tag selected employees and then choose Print button. A printed report of an employee's hours looks
like this.
Service Time Cards
If you have the Service Option, technicians can clock in and out to track time spent working on a
service order. The above screen will list the options for Time Cards and Service Time Cards
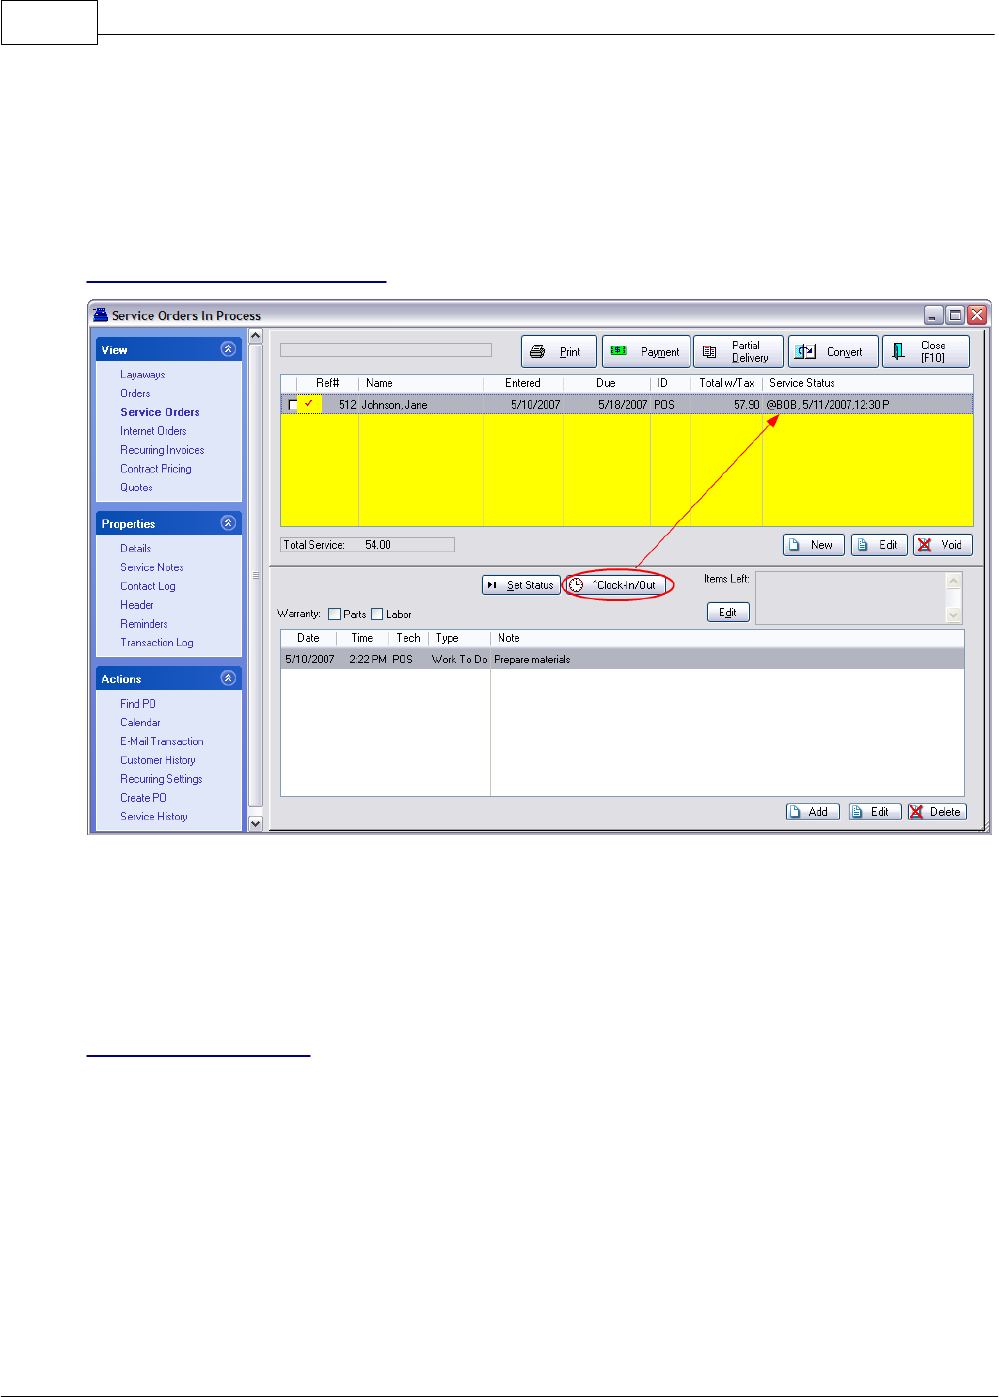
POSitive Retail Manager User Guide266
Copyright ©2007 POSitive Software Company
7.8.3 Service Time Cards
The Service module of PRM allows for creation of Service Orders. One of the special features of
service orders is a separate time clock for recording time spent on service work.
Service Orders In Process
·Clock In/Out - CTRL-C for recording technician start and stop times for a project. For each
service order, multiple service technicians can record how much time they spend on that particular
service order. Choosing Clock In/Clock Out will start and stop the clock. Management can then
access the total times by going to Management: Service Time Cards.
TIP: An employee who does service work will need access set on the Employee File - Details (see
Employee File)
Service Time Cards
Access to this screen is through Management: Time Cards and select Service Time Cards view at the
top.
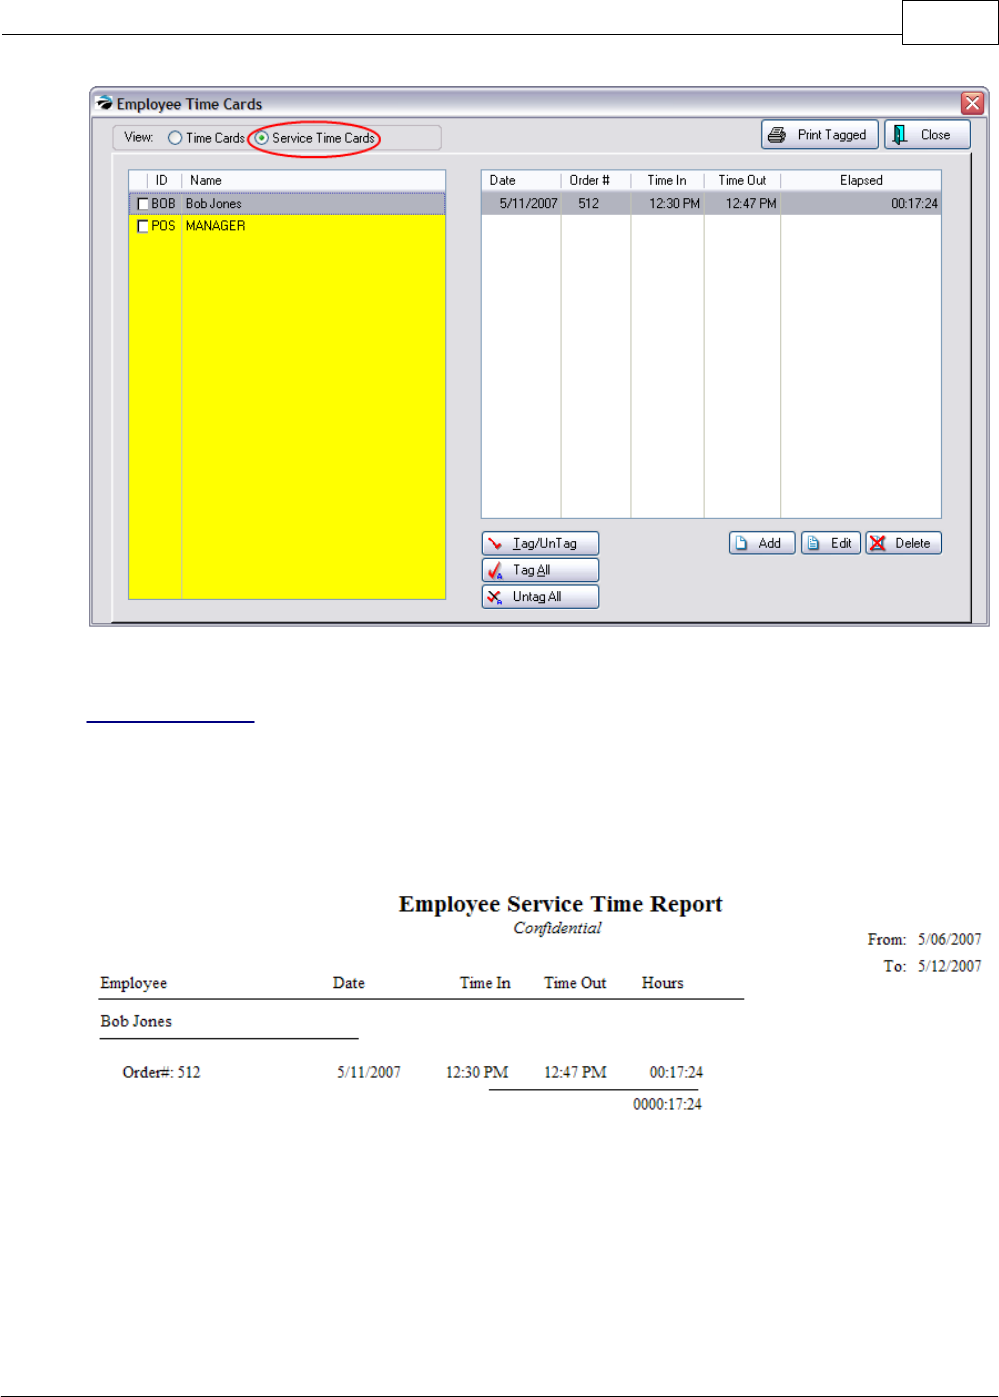
Appendix A 267
Copyright ©2007 POSitive Software Company
Editing of individual records can be done if the employee failed to log in or log out.
Printed Report
A report of time spent can be printed after tagging the employee(s) and choosing Print Tagged. A
date range allows for selection of a specific time period.
This report is printed one page per employee and includes the employee name, date of service,
service order number, time in and time out and hours worked per service order and totals for the date
range selected.
7.8.4 My POSitive
Displays REMINDER messages assigned to the employee currently logged in.
An employee should daily go to this screen. On the far left will be listed a summary of activities. In the
box in the middle is detailed information.
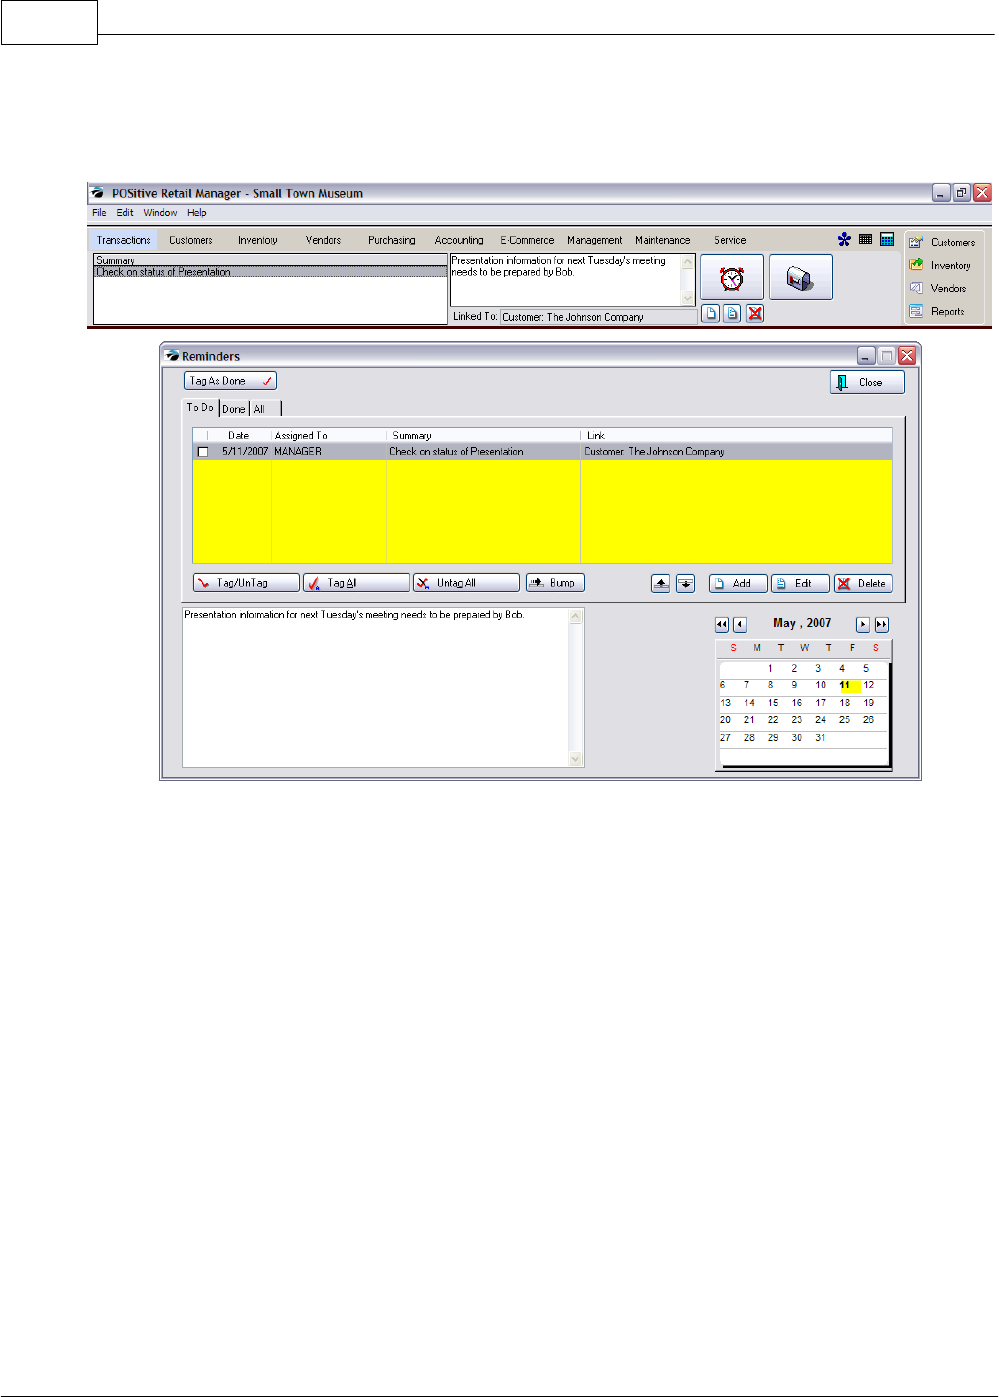
POSitive Retail Manager User Guide268
Copyright ©2007 POSitive Software Company
By choosing the Clock icon, messages can be viewed and new messages created for yourself or for
other employees. The message can be linked to a specific customer, vendor, or pending transaction.
The highlighted reminder can be edited or deleted with the smaller icons below the clock icon.
The Mailbox icon opens POSitive Mail.
7.8.4.1 POSitive Mail
An internal communication system sends mail messages to individuals or groups of employees.
When employees log in to POSitive, they are prompted to read new mail. The sender of the mail
message can review which messages have been read or not read.
This system works over a local network and does not require internet access.
How To Use POSitive Mail
To start a POSitive Mail, choose the My POSitive icon: then select the Mailbox Icon
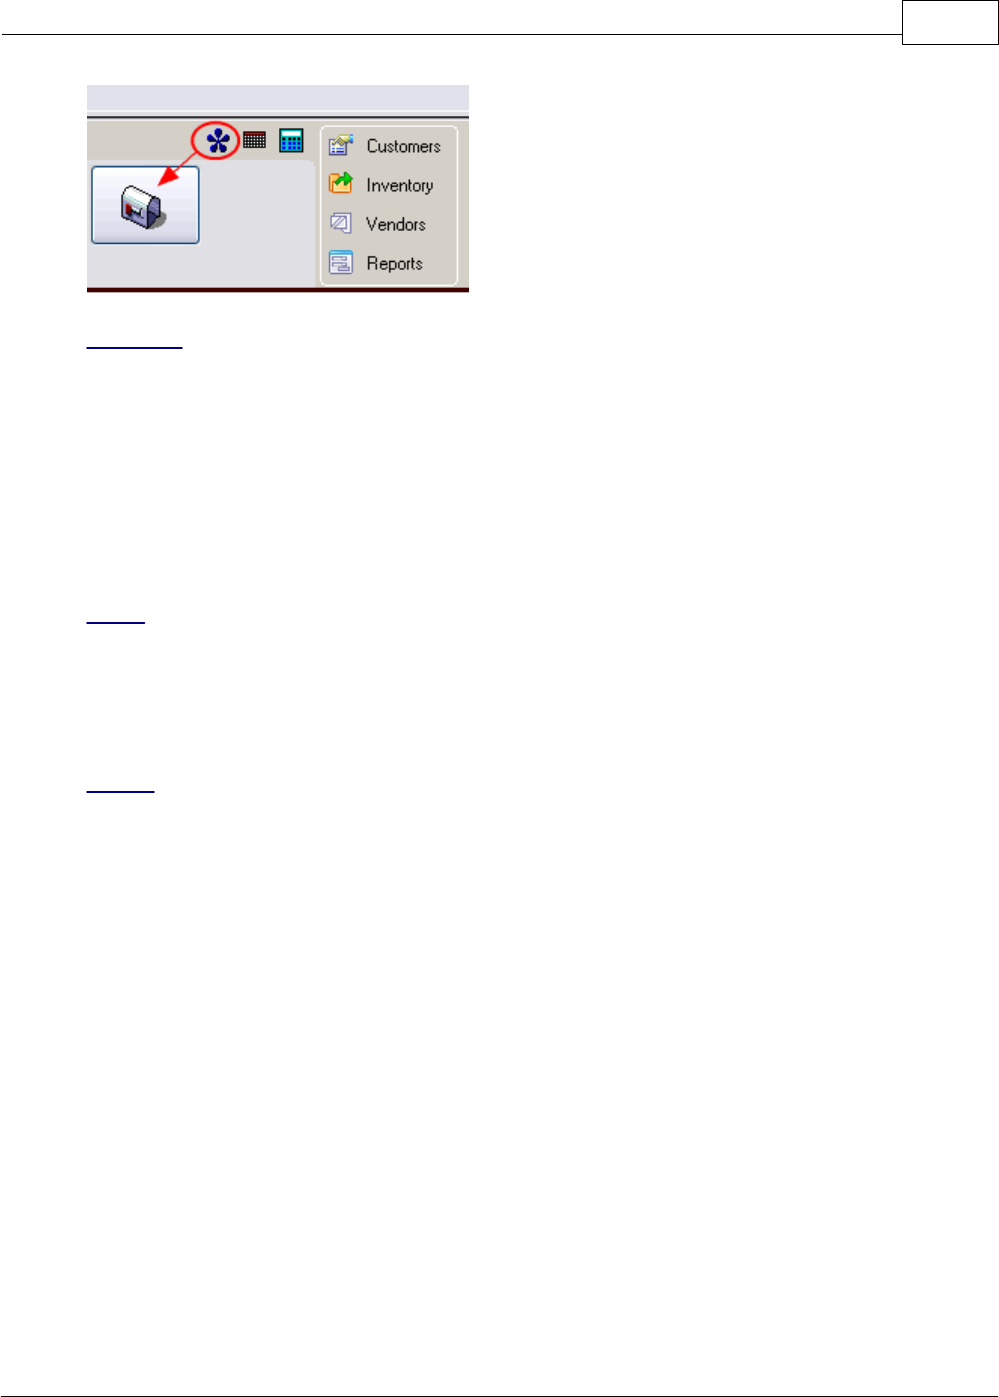
Appendix A 269
Copyright ©2007 POSitive Software Company
Benefits
Better communication. Targets individuals or groups to assure they are being informed of important
notices. When the employee logs in, the employee is notified that a message has not been read.
Leave messages for employees who come to work on a different shift.
Documentation of decisions made and instructions given.
Prepare communications well in advance of an event and then send at an appropriate time.
Does not require internet access. Messages are secure and used only internally on the network
through PRM.
Uses
Reminder notes for self or others
Project coordination
Announcement dissemination of meetings for specific individuals or groups
Setup
Define Employee Groups (Group Manager) by going to Maintenance: Definitions: Mail Groups
Assign Employees to various Groups
Choose Create New Message button
(1) Highlight either an individual employee or Group name and transfer to the Recipient(s) box on the
right.
(2) Enter a Subject
(3) Type your message in the box below Subject.
(4) Choose Send Message [F10]
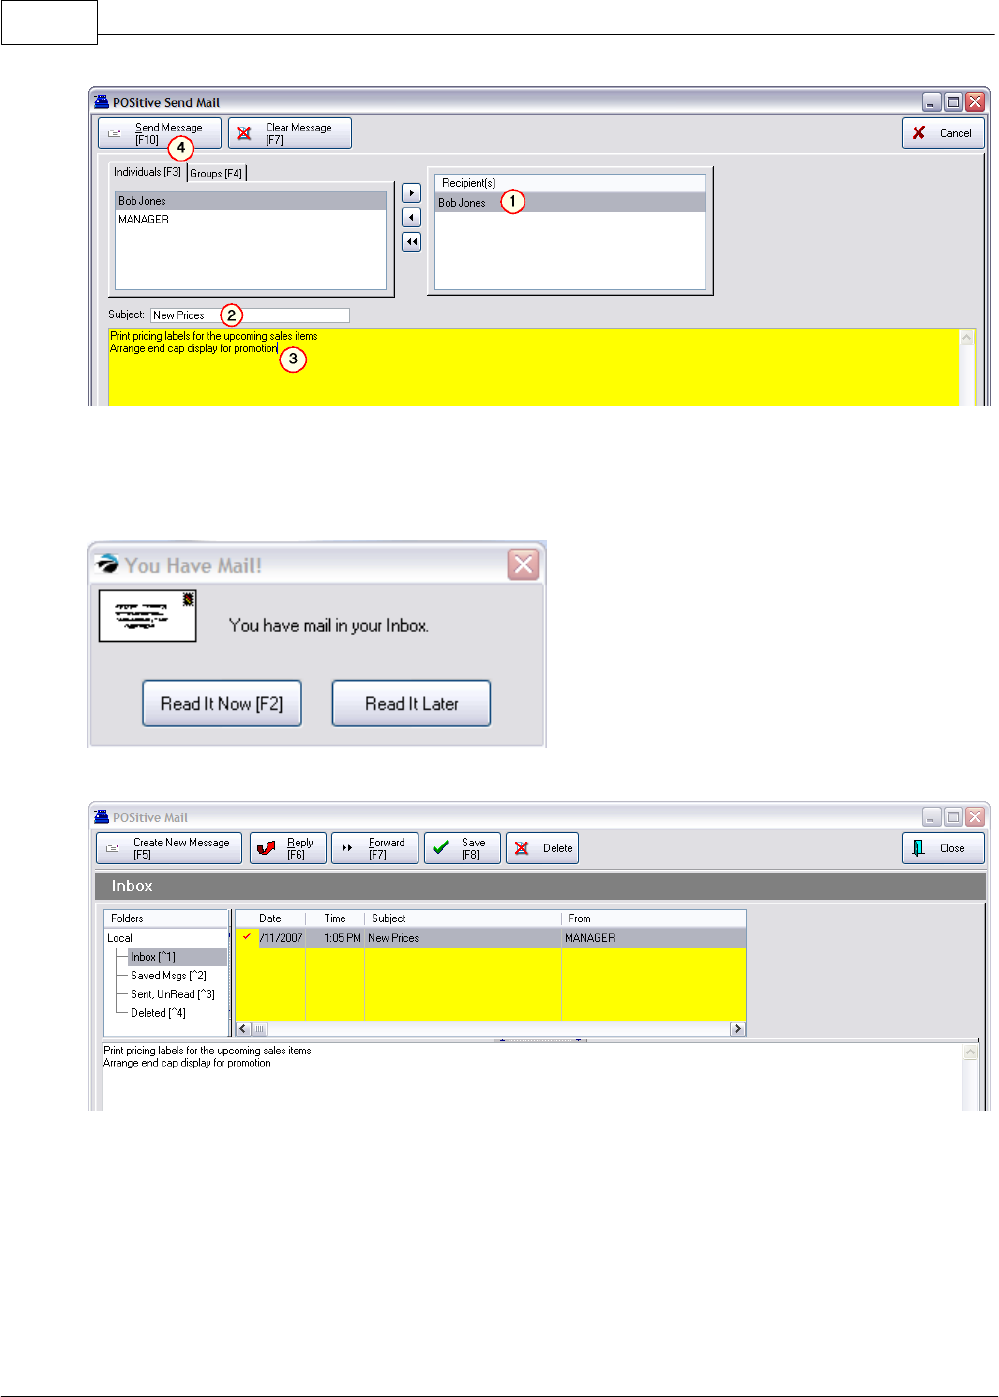
POSitive Retail Manager User Guide270
Copyright ©2007 POSitive Software Company
Employee Notification Alert
When an employee logs in, a message announcing New Mail gives the employee the option to read it
now or later.
Once the mail message is opened, the employee can Reply, Forward, Save, or Delete the message.
7.8.4.2 Mail Groups
Mail Groups is a PRM feature designed to reduce the number of internal mail messages having to be
written.
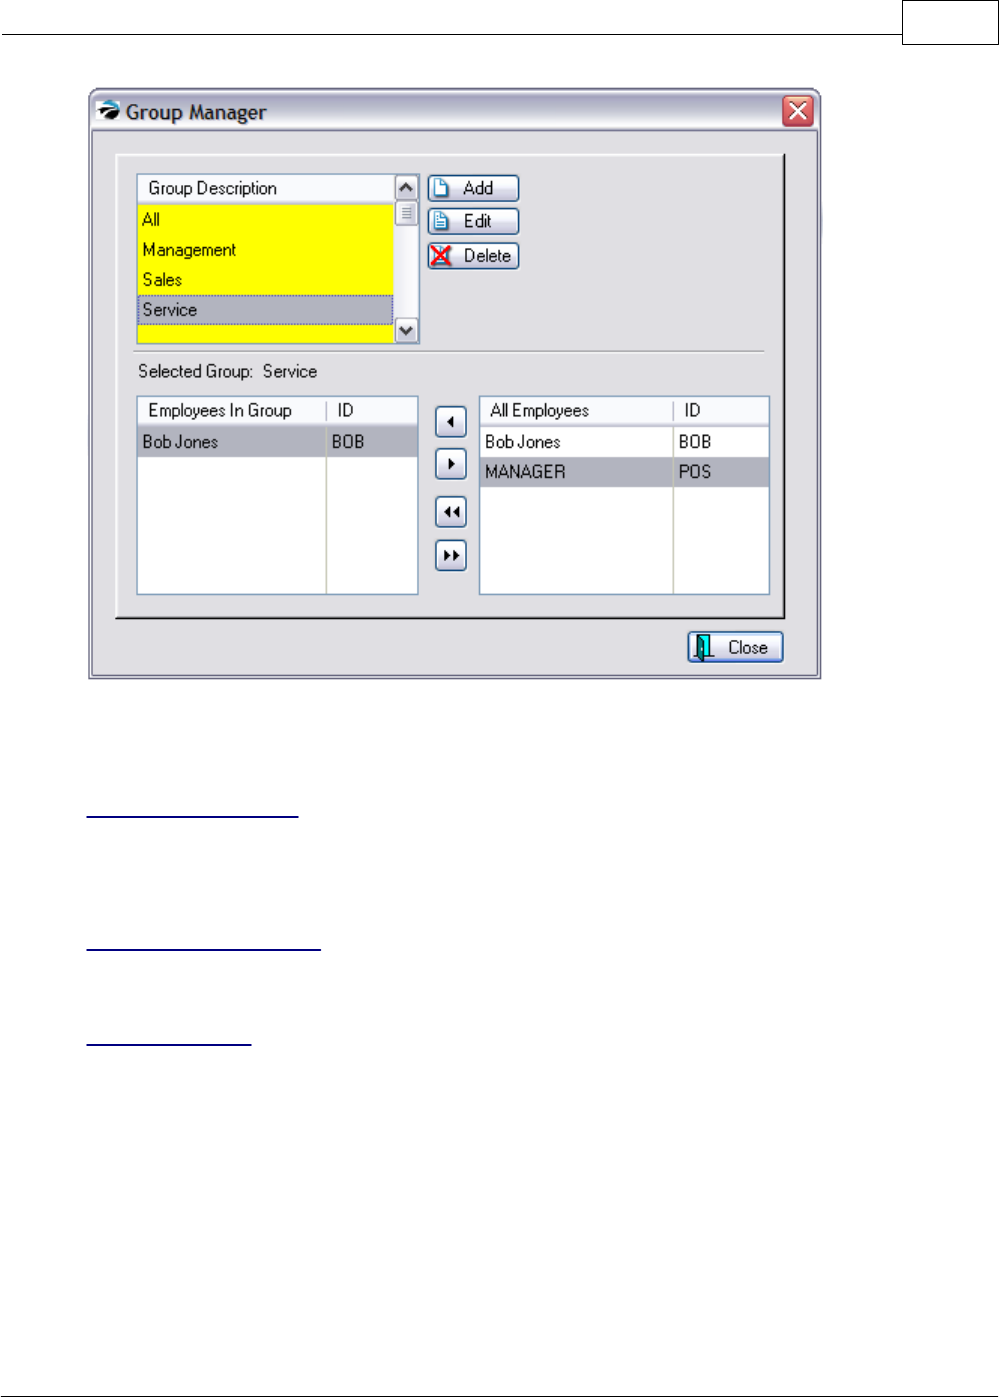
Appendix A 271
Copyright ©2007 POSitive Software Company
An employee can be a member of an unlimited number of groups. When a PRM e-mail message
needs to be broadcast to more than one employee, selecting a group will e-mail the same message to
all employees within the group.
Group Description
Names of groups could be descriptive of the job performed by members of the group.
Use the Add, Edit, or Delete buttons as necessary.
Employees In Group
Displays assigned members of the group being highlighted in the Group Description list.
All Employees
The names and sales ID of ALL employees will be listed. You must go to Main Menu: Management:
Employees to make any changes to this list.
How To Assign Employees To A Mail Group
1) Highlight a Group in the Mail Group Description
2) Highlight an Employee in the All Employees list
3) Click on the < button to copy the employee name into the Employees In Group list.

POSitive Retail Manager User Guide272
Copyright ©2007 POSitive Software Company
To Remove An Employee from a Group
1) Highlight an Employee in the Employees In Group list
2) Click on the > button to remove the employee name from the Employees In Group list.
To Assign or Remove ALL employees
Use the double arrow buttons.

PartVIII

POSitive Retail Manager User Guide274
Copyright ©2007 POSitive Software Company
8Key Concepts
Because the scope of this manual is limited this section will present key ideas and principles in
summary form.
References to Additional Help Topics will give detailed information. While running PRM, press F1 for
Online Help Then search for the titles listed.
8.1 Categories
All inventory items must be assigned to a category. The category is the primary controller of an
inventory item. Understanding the function and power of categories is very important.
This section lists what categories can do.
8.1.1 What Categories Can Do
The category is a pivotal feature of PRM. You may have as many or as few categories as you wish.
Every inventory item MUST be assigned to a category. You may reassign an item to another
category either singly or en masse.
As you begin to create categories for your inventory and services you should keep in mind the
multiple functions performed by the category.
·Affect Entry of an Item on an Invoice
·Affect Inventory Stock Count Reconciliation
·Assign Pricing Levels
·Assign Price Label Styles
·Assign Specialty User-Defined Fields and select which ones print on invoice
·Auto Assign a Vendor
·Auto Assign Tax Rates
·Auto Generate SKUs
·Automatically Define Inventory Settings
·Calculate quantities to reorder to reach maximum stock counts
·Control Freight Charges
·Define Departments
·Determine Price Basis as Markup or Margin
·Enable Food Stamp Tendering
·Enhance Inventory Import
·Establish Gift Certificate Operations
·Establish Separate GL Accounts for Sales and Purchases
·Establish Warranty Settings
·Exempt Inventory Items from a PO Tax
·Facilitate Lookups
·Facilitate Reports
·Globally Change Inventory Settings
·Initiate Price Calculation Factors to round or end in a specified number
·Manage Consignment Inventory
·Manage Trade In Inventory

Key Concepts 275
Copyright ©2007 POSitive Software Company
·Manage Unposted (On the Fly) Inventory
·Redefine titles of fields on Inventory Detail screen
·Set Commission Percentage
·Set Minimum Age Verification Restrictions
·Set Serial Number Tracking
·Speed Up Creation of Inventory Files
·Trigger Selling Prompts to Gather Specific Information when an item is sold
·Unilaterally Apply Global Pricing
·Unilaterally Apply Promotional Pricing
It is suggested that you first review and set the MASTER of Category Defaults (Listing) before adding
categories. This SmartFeature can save you much time.
8.1.2 Category Defaults
Each category can apply a wide variety of inventory settings automatically when a new inventory item
is added to PRM. This is a great time saver and reduces the chances for error.
To access these options go to Utilities: Categories. Highlight the desired category and select the
Defaults button.
General [F8] tab --Fifteen options which can be set for individual inventory items automatically upon
creation.
Track Stock Quantities

POSitive Retail Manager User Guide276
Copyright ©2007 POSitive Software Company
PRM will keep a count of items received and sold and report the number currently in stock. If the item
is out of stock, a backorder count will prompt re-order processes and could limit invoicing capabiliites.
If left unchecked no stock counts will be kept but will be assumed to be in stock at all times; the item
will never be backordered.
Track Serial Number
PRM will link a serial number to each item in stock. Optionally, the serial number will be recorded
when the item is received from the vendor and/or when sold to the customer. See System Setup:
Inventory tab.
Allow Discounts
Permits automatic reduction of selling price by an applied percentage either on the invoice or from a
customer setting. Turn this option off if the inventory item should never be sold for less than the
stated price.
Ask For Quantity When Selling
When adding an inventory item to an order or invoice, the cursor will stop on the quantity field and
allow you to change the quantity being sold. The quantity recorded in the "Default Sell Quantity" field
of the item will already be selected.
TIP: This setting could be become cumbersome and you may prefer to use the invoicing shortcut #/.
When prompted for a new SKU, first type the quantity, then a slash, and then the SKU of the item
being sold.
Ask For Price When Selling
When adding an inventory item to an order or invoice, the cursor will stop on the price field and allow
you to change the selling price. The normal selling price of the item will already be selected.
Post To Internet
When creating an inventory item in this category, automatically set it to be posted to your web page.
This is an E-Commerce option.
Prompt To Read Scale
Inventory which is sold by weight uses the weight as the quantity on an invoice. By turning this switch
on, whenever an item is sold you will be prompted to manually enter the weight or to press a key on
the keyboard to capture the weight from the attached scale.
Calculate Quantity From Price
Inventory can be sold by entering the total sales price and PRM will then calculate the quantity. For
example, sales of $10.00 worth of gas will divide the 10.00 by the unit selling price to determine the
number of gallons sold.
Allow Food Stamps
Inventory assigned to this category with this setting activated will qualify for purchase by food stamps.
When included on an invoice the tender screen will subtotal the value of qualifying items. (see Food
Stamps)
Add Vendor When Adding Inventory
When an inventory item is added to the list of inventory, upon completion of the details you will be
prompted to select a vendor of the item. Choosing a vendor must be done eventually and this can be
a time saver.

Key Concepts 277
Copyright ©2007 POSitive Software Company
ALTERNATIVE: If you are entering a significant number of items at the same time, then they could be
more readily added through the vendor inventory list.
Vendor ID [F2]
This field appears only when "Add Vendor When Adding Inventory" has been activated. You will be
able to assign a vendor ID as an automatic selection. This is useful if all items in the category will
only come from one vendor.
Warranty Code [F3]
For products covered by warranties, you can assign a warranty code which defines the limits of the
warranty.
Stock By
Generally, the default is EACH. Enter others as appropriate for the item: foot, yard, pound, six-pack,
case, roll, pair, etc. What unit of measure is used when you sell the item?
Order By
Generally, the default is EACH. Enter others as appropriate for the item: roll, bolt, pallet, case, barrel,
carton, etc. What unit of measure is used when you order the item from the vendor?
Stock/Order
Generally, the default entry should be 1.00. Entering a number greater than one will divide your cost
field and automatically adjust your selling prices. This is often called Units Per Order and is related to
Bulk Inventory.
Commission %
When this item is sold, the percentage of commission entered here will be credited to the sales
person. See commissions setup on the POS Setup Form.
Default Sell Quantity
Generally, the default is 1. When a customer purchases the item PRM will assume they are only
purchasing a quantity of one. If the selling quantity will fluctuate greatly, consider setting the option
"Ask For Quantity When Selling" or it's alternative method.
Add To Label List When Received
This option will automatically enter the inventory item into a label printing queue. The quantity of
labels will be the same as the number received. If the item is serialized and serial numbers are a part
of the label format, the appropriate serial numbers will be included.
Label ID [F4]
Choose the label type for the inventory item.
Related Topics
AutoSKU Setup - A SKU or barcode for an inventory item can be automatically generated with
detailed controls when a new inventory is added to the category.
Reset Inventory - Allows you to make setting changes to all existing inventory assigned to the
category.
Category Defaults (Listing) For a listing of only those Categories With Defaults assigned go to
Utilities: Category Defaults.
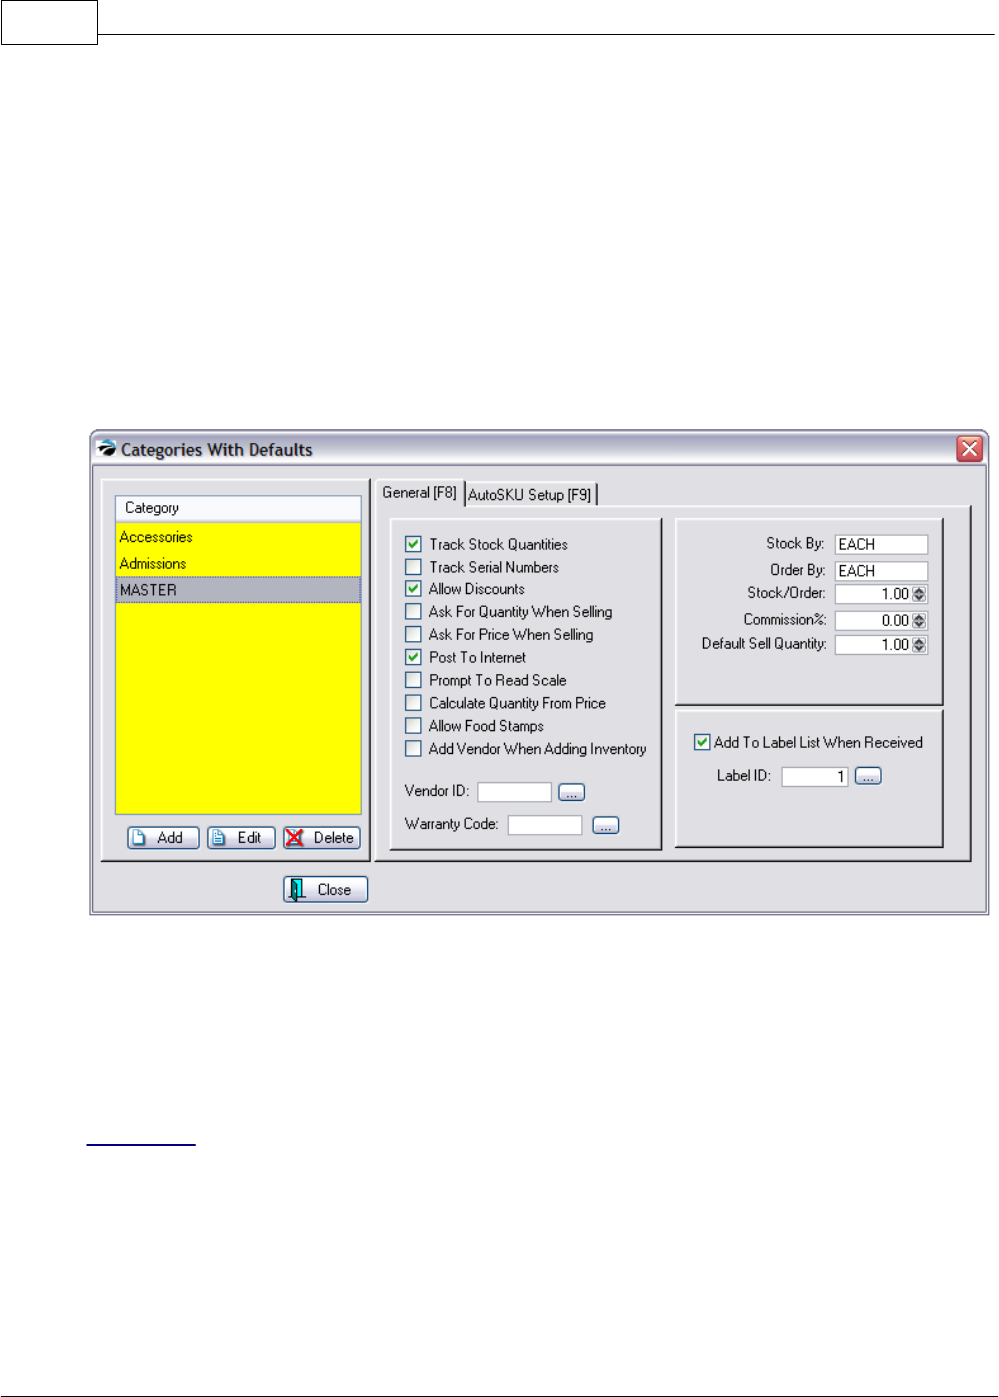
POSitive Retail Manager User Guide278
Copyright ©2007 POSitive Software Company
8.1.3 Category Defaults (Listing)
Only categories which have had Category Defaults defined will be listed here.. Simply creating a
category does not automatically activate the defaults. However, you may add categories to the list
and set the defaults at the same time.
MASTER
One category default is named MASTER because it can be used to change ALL existing inventory
settings. See Reset All Inventory.
It is also the basis for newly created categories. Whenever you add a new category it takes on the
settings of this master default.
TIP: If you know in advance that you will be creating several like categories, then set the Master first.
This will save you time and you can reset the Master as often as you need to.
Add - To select a category and define its defaults.
Edit - To change or review the defaults of the highlighted category.
Delete - This does NOT delete the category itself nor any items associated with the category. It
simply removes it from this list and blanks out the Category Defaults previously assigned to it.
Note: The Master must NEVER be deleted.
OPTIONS
For an explanation of the various settings, see Category Defaults
8.1.4 Category Detail Form
Each category maintains its own properties and interactive settings. These properties are applied to
inventory items automatically and many can be changed and re-applied to existing inventory assigned

Key Concepts 279
Copyright ©2007 POSitive Software Company
to the category.
Because of the inherent power of the category, you should spend some time considering how to
implement its features in your store. See What Categories Can Do and Freight Category.
The elements of the category are
Detail [F6] - Name & Pricing options
Options [F7] - Category Promos, User Defined Fields, Screen, Selling Prompts, Global Pricing, GL
Settings, Age Verification, Locations
Defaults [F8] - Switches for prompts and tracking
AutoSKU Setup [F9] - SKU generation rules
POSitive Commerce - Assign picture and descriptive paragraph about the category
8.1.4.1 Detail [F6]
The Category Detail Form provides several setup options.
Category Name - The name of the category should be descriptive of the inventory assigned to it. The
name can be changed without having to edit the attached inventory and reassigning categories
because PRM will automatically apply the name changes to assigned inventory. To change the
name, click in the field and edit as needed. (Note: it is best not to use anything but alphanumeric
characters. Use of an apostrophe, for example, is not supported by some PRM Queries.)
Tax Category - All inventory falls under a tax category. The inventory items in this category will be
taxed per the tax category assigned here. Press the down arrow or click on the lookup button and

POSitive Retail Manager User Guide280
Copyright ©2007 POSitive Software Company
select the appropriate tax category.
Price Basis - Selling prices for all inventory assigned to this category will be automatically calculated
based upon one of the following settings.
·Margin - the difference between the selling price and the cost as a percentage of the cost A
$10.00 item at 50% margin sells for $20.00
·Markup - the difference between the selling price and the cost as a percentage of the selling price
A $10.00 item at 50% markup sells for $15.00
Settings Per Price Level - For each defined price level set a percentage of increase.
TIP: you can add up to six price levels and change the names of existing price levels on File: System:
System Setup: Pricing.
Calculated Prices - The calculated price can be controlled to reflect a standardized amount. The
calculation formula consists of the TERM and VALUE as defined on this line. Select from one of the
following TERMS and enter an appropriate VALUE in the adjacent field.
·Not Rounded - The calculated price is as calculated out to four decimal places. Although two
decimal places are displayed on invoices, the full fractional amount is used for extended pricing.
·Are a Multiple Of - The resultant price will end in a multiple of the VALUE. For example, if the
value is .25, then the calculated selling price will be rounded to .25, .50, .75, or .00
·End in the Number - The resultant selling price will always be rounded to end in the VALUE. For
example, if the value is .97, then all selling prices will end in .97 such as 4.97, 24.97, 138.97.
Exempt From Tax On PO - (International Setting Only) If this is checked, then items assigned to this
category will be exempt from taxation on a vendor's purchase order. This is only applicable if Tax On
PO has been activated in the international settings of Tax Options. NOTE: this is a global setting. All
inventory items assigned to this category will be treated as exempt. There is no individual item setting
to activate nor negate this option. However, on a purchase order, you can press CTRL-X of a
highlighted item to remove taxation.
AutoSKU Label - As an inventory item is created and assigned to this category a distinguishing code
for the category can become a part of the SKU of the inventory item. The value of this feature is that
you will be able to tell at a glance, either in inventory lookup or on pricing labels, the category to which
the item is assigned.
1) Type a definitive code. The code can be a combination of letters and numbers. Consider making
the code just 3 characters in length.
2) This code can be placed at the beginning or ending of the SKU. Consider adding a hyphen at the
end or beginning of the code to serve as a separator from other SKU elements.
When Creating Order List, Order Enough to Bring to Maximum Quantity - Individual inventory
items have a Maximum Stock setting. If this is checked ON, the order list will suggest the quantity to
order by calculating the difference between the current count and the Maximum setting.
8.1.4.2 Options [F7]
Promo Pricing
WARNING: Promo prices set here will apply to ALL inventory items in the category. It might be
better to assign promo prices to individual items or create additional categories.
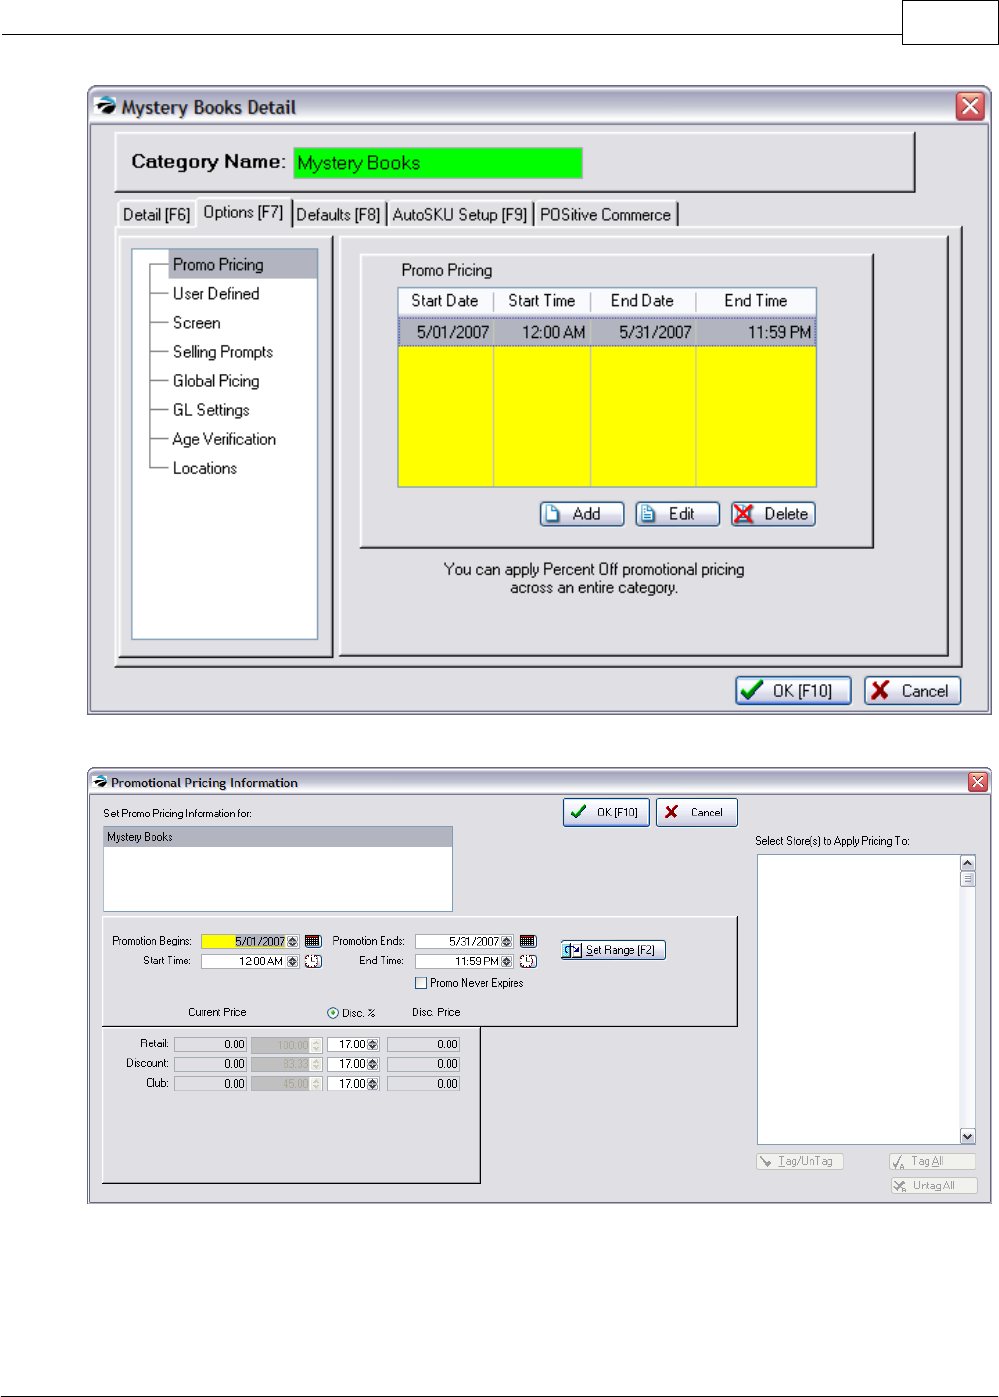
Key Concepts 281
Copyright ©2007 POSitive Software Company
Choose the Add or the Edit button to set dates, times, and discount percentages.
When assigning Promo Pricing for a category, the only logical option is to set discount percentages
because each individual item will have varying costs and selling prices.
See Promo Pricing of an individual item for more specific information.
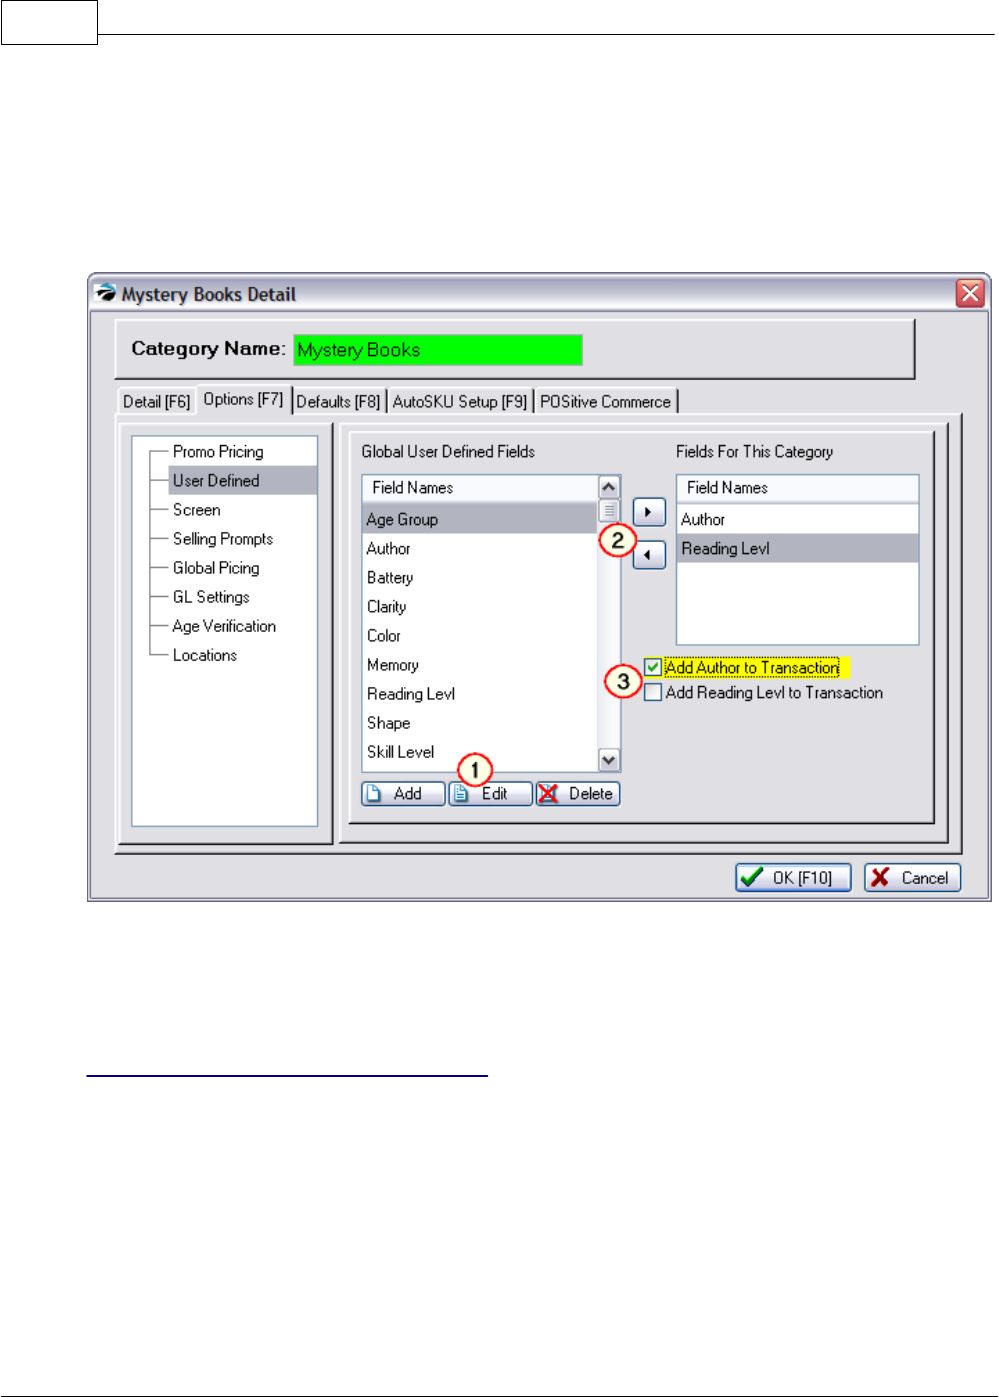
POSitive Retail Manager User Guide282
Copyright ©2007 POSitive Software Company
User Defined Fields
User defined fields are an advanced level of inventory tracking to record and report on special details
of the item. For example, if I sell books, the description field will only track the title of the book. With
the addition of user defined fields, I can also record and report on the Author, Publisher, Reading
Level, General Classification, etc. I can then query PRM to show all inventory available by a specific
user defined field, such as Author or Reading Level.
These fields are called User Defined because you create the fields as will best meet your needs.
You may create as many named fields as you wish and then assign only the appropriate fields to a
specific category. For example, I would not assign fields named Clarity, Shape, Color, to a Book
category but they would be appropriate for a Gems category.
How To Set Up User Defined Fields
(1) Highlight the User Defined option and search the list of fields already available under Global User
Defined Fields. Press the Insert button to add a field, if necessary.
(2) Highlight the field to be assigned to this specific category, and press the transfer (>>) button to
transfer the field to this category.
(3) Optional: checkmark which fields will print the contents on the invoice when the inventory item is
sold.
What To Expect
·An inventory item will have corresponding blank fields for recording the user defined name values.
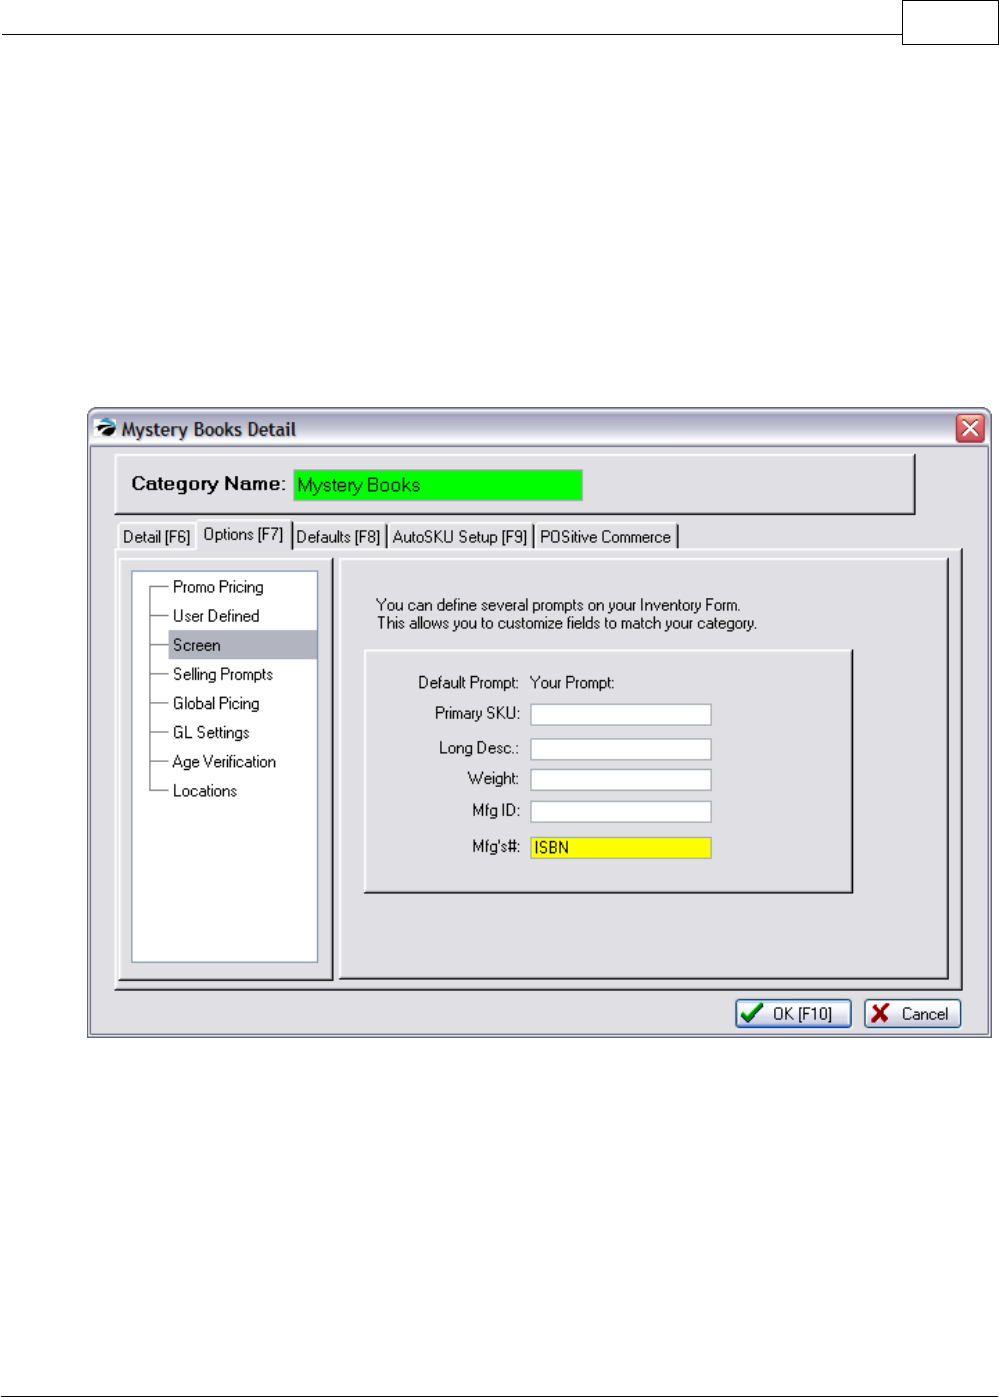
Key Concepts 283
Copyright ©2007 POSitive Software Company
·On the Inventory List you can choose the UDF button to lookup inventory items based on the
contents of the user defined fields.
·You will be able to report on a user defined field. For example, you could choose to see the titles
of books by a particular author or grouped by all authors.
·You will be able to include a user defined field on a price label, so that in addition to the
description and price, you could have the Reading Level.
·When the item is sold, the user defined field information will print on the invoice.
Screen
This gives you the ability to rename titles of fields on the inventory definition screen. When you edit
an inventory item you will see fields named Primary SKU, Long Desc., Weight, Mfg ID, and Mfg's #.
This feature makes the setup for Advanced Printing much easier.
Selling Prompts
When selling an inventory item assigned to a category with selling prompts, you will be prompted to
enter information about the customer or product. The information will then be added to the invoice.

POSitive Retail Manager User Guide284
Copyright ©2007 POSitive Software Company
In the Prompt field enter a word or phrase to remind the cashier of the information needed.
In the Format field select one of the following:
·Text - a single line of text
·Date - entry must be a date
·Note - (only available for the first prompt) an extended text field in paragraph form.
For example, when selling the book, the prompt could ask for the customer's school name and
teacher. This information will then be retained on the invoice. Reports can be run to find all
customer's with the same teacher.
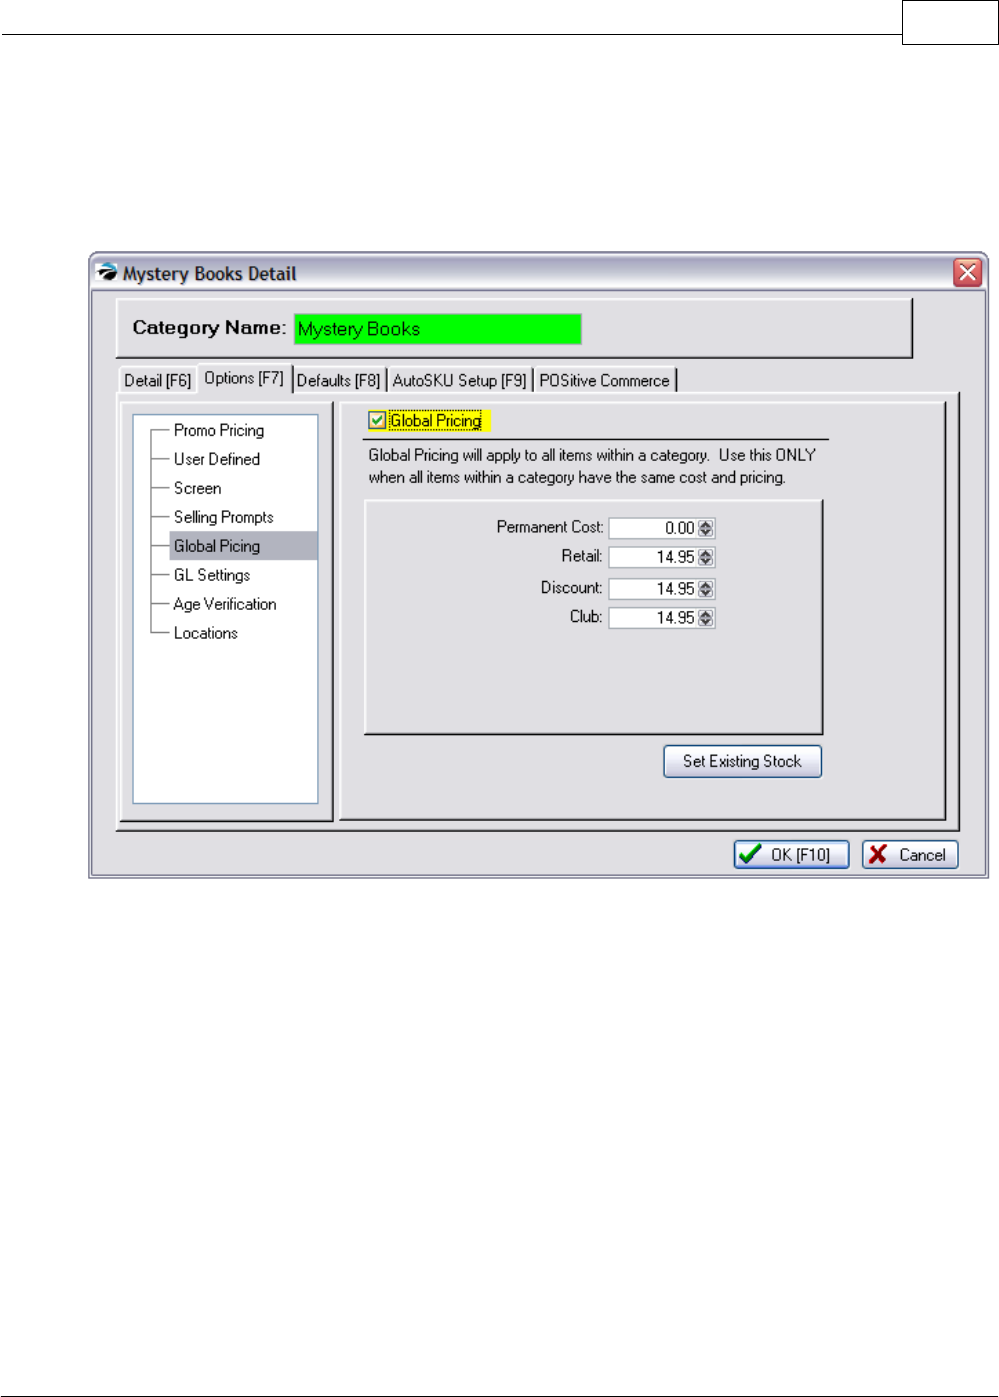
Key Concepts 285
Copyright ©2007 POSitive Software Company
Global Pricing
WARNING: Global pricing means that ALL inventory assigned to this category will sell for the SAME
price, no matter what your true costs are. Global pricing is best used for simple inventory such as
pencils and paper clips. Rather than hassle with fractions of pennies and charge more for red pencils
than yellow pencils, you can sell all pencils at the same price.
Global Pricing - Click in the box if you KNOW that you want to use the SAME PRICE for all inventory
items assigned to the category.
·It is suggested that you include a special indicator, for example PENCILS*** or PENCILS - GP, in
the category name This could prevent you from mistakenly assigning inappropriate inventory to
the category.
·If the box is unchecked then global pricing will not be applied.
Permanent Cost - To determine reasonable profit totals and margins, each inventory item in the
category will be assigned this PERMANENT COST no matter what the actual cost may be.
Pricing Levels - For each defined pricing level, enter the FIXED selling price.
Set Existing Stock - will apply these prices to existing inventory items.
GL Settings
(Optional) A category does not need separate GL account entries. If left blank, then all inventory
items assigned to the category will impact the account defined in the GL Interface Setup. Only if you
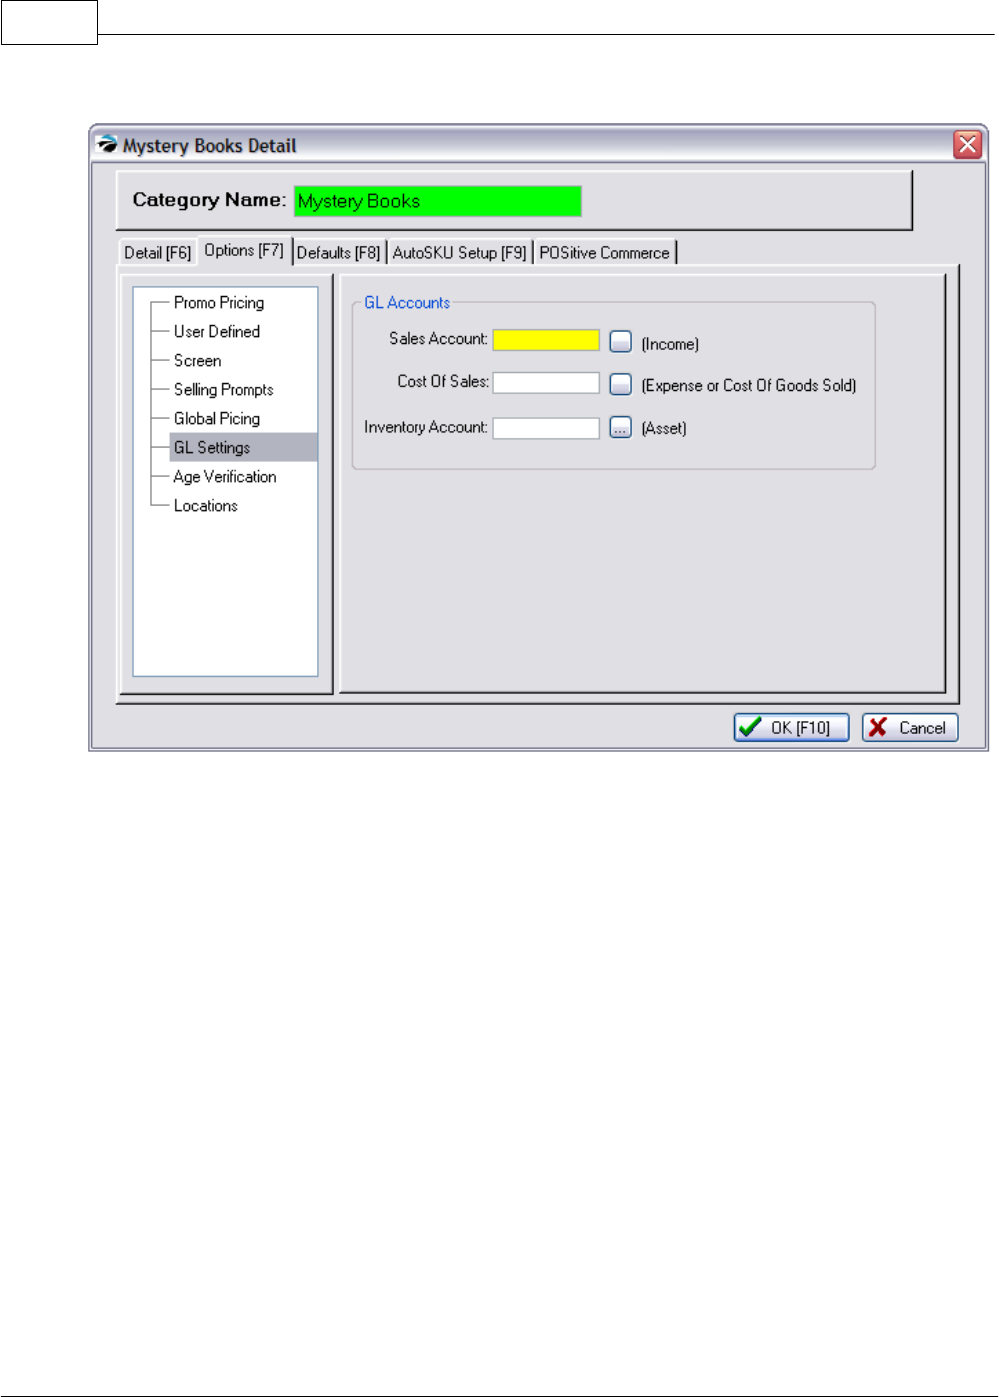
POSitive Retail Manager User Guide286
Copyright ©2007 POSitive Software Company
want a more itemized GL would you want to assign GL Account numbers to the category.
GL Accounts
Sales Account - (Income)
Cost Of Sales - (Expense or Cost of Goods Sold)
Inventory Account - (Asset)
Press the lookup button to view the GL Chart of Accounts.
Age Verification
By defining a minimum age limit on a category, the clerk will be prompted in one of several ways to
verify a customer's age in order to qualify to make the purchase. Verification of age will only be done
once per invoice per category. See Age Verification for setup details.
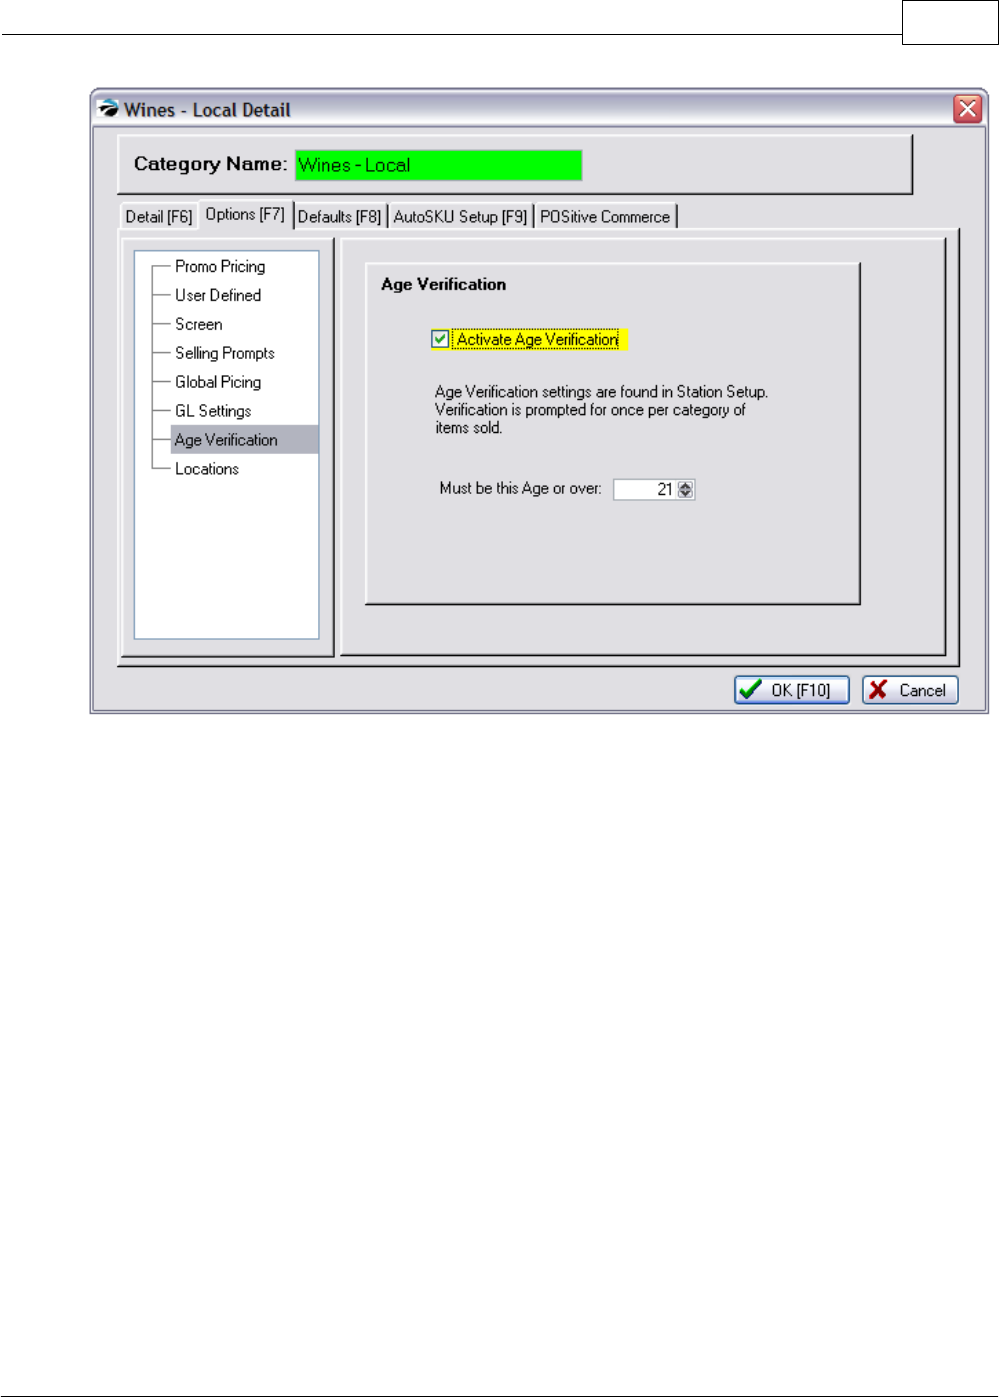
Key Concepts 287
Copyright ©2007 POSitive Software Company
Locations
With PRM an inventory item can track stock by location such as warehouse or a specific shelf. This
category selection is applied to all existing and new inventory.
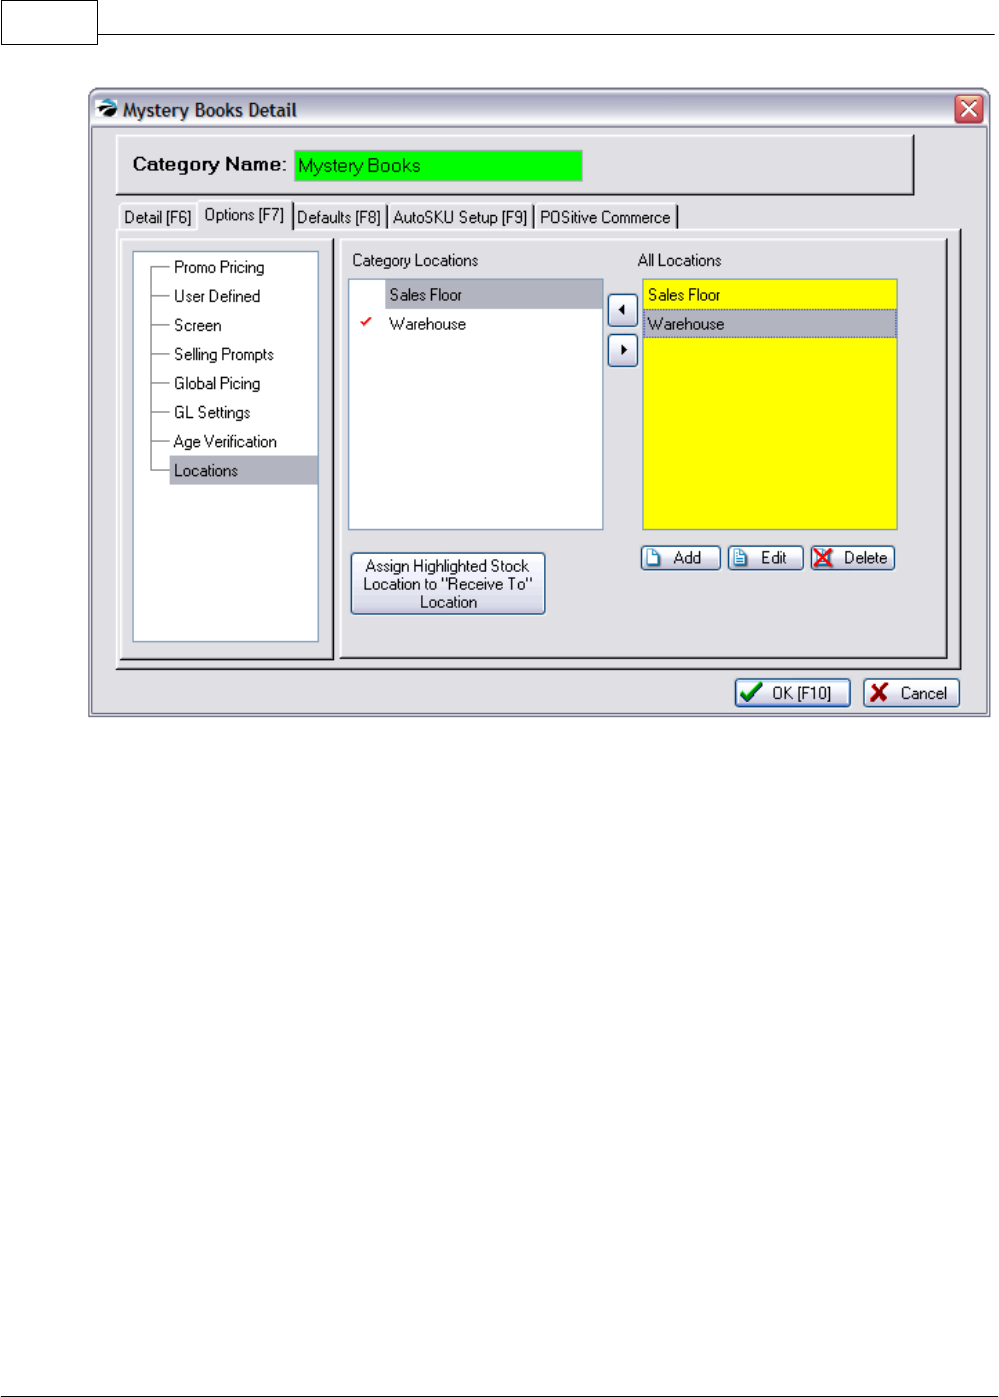
POSitive Retail Manager User Guide288
Copyright ©2007 POSitive Software Company

Key Concepts 289
Copyright ©2007 POSitive Software Company
8.1.4.3 Defaults [F8]
See Category Defaults for detailed information about the use and functions listed here.
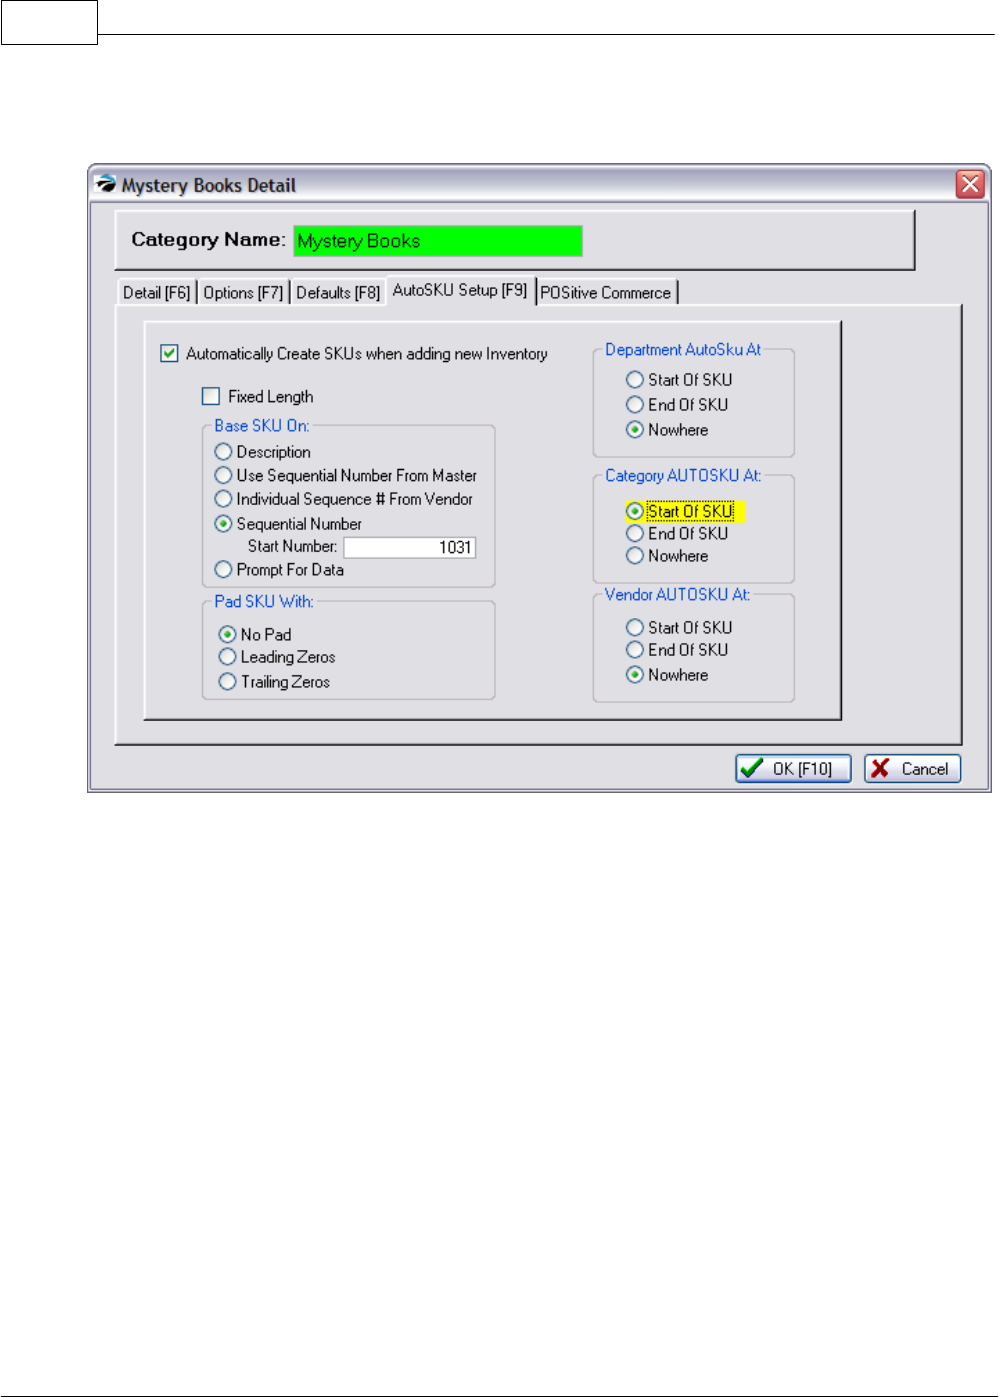
POSitive Retail Manager User Guide290
Copyright ©2007 POSitive Software Company
8.1.4.4 AutoSKU Setup [F9]
See AutoSKU Setup for detailed information about the use and functions listed here.
8.1.4.5 POSitive Commerce
Your website can be enhanced using a picture for each category and a general blurb about the items
in the category.
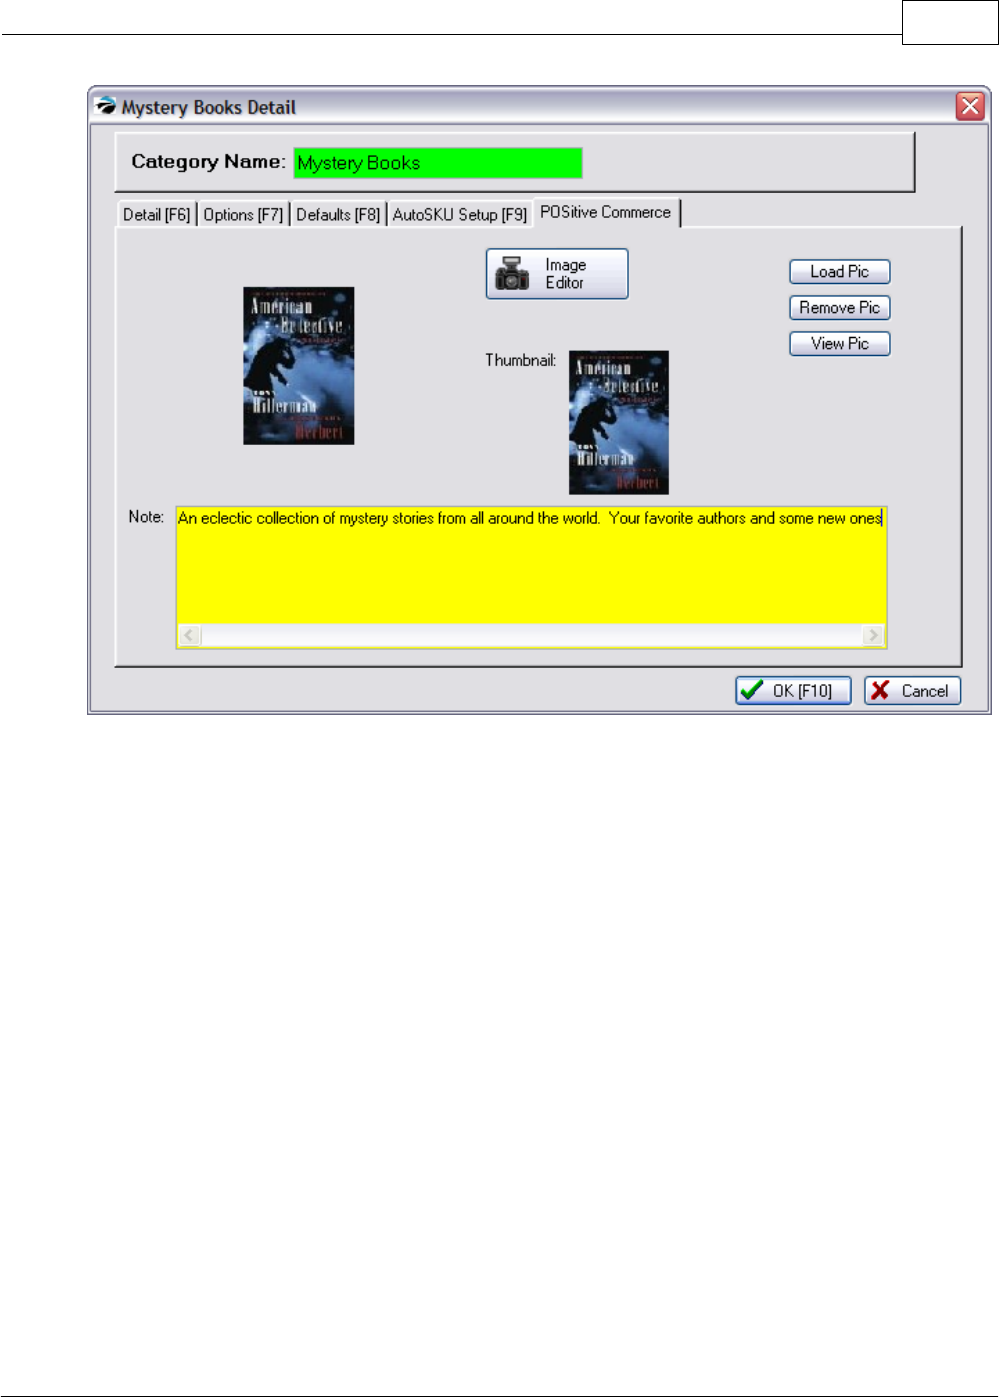
Key Concepts 291
Copyright ©2007 POSitive Software Company
8.1.5 Category Listing
The category is one of the most dynamic features of PRM. All inventory is assigned to a category.
Your listing of categories can be as general or as detailed as you need.
Because of the inherent power of the category, you should spend some time considering how to
implement its features in your store. See What Categories Can Do
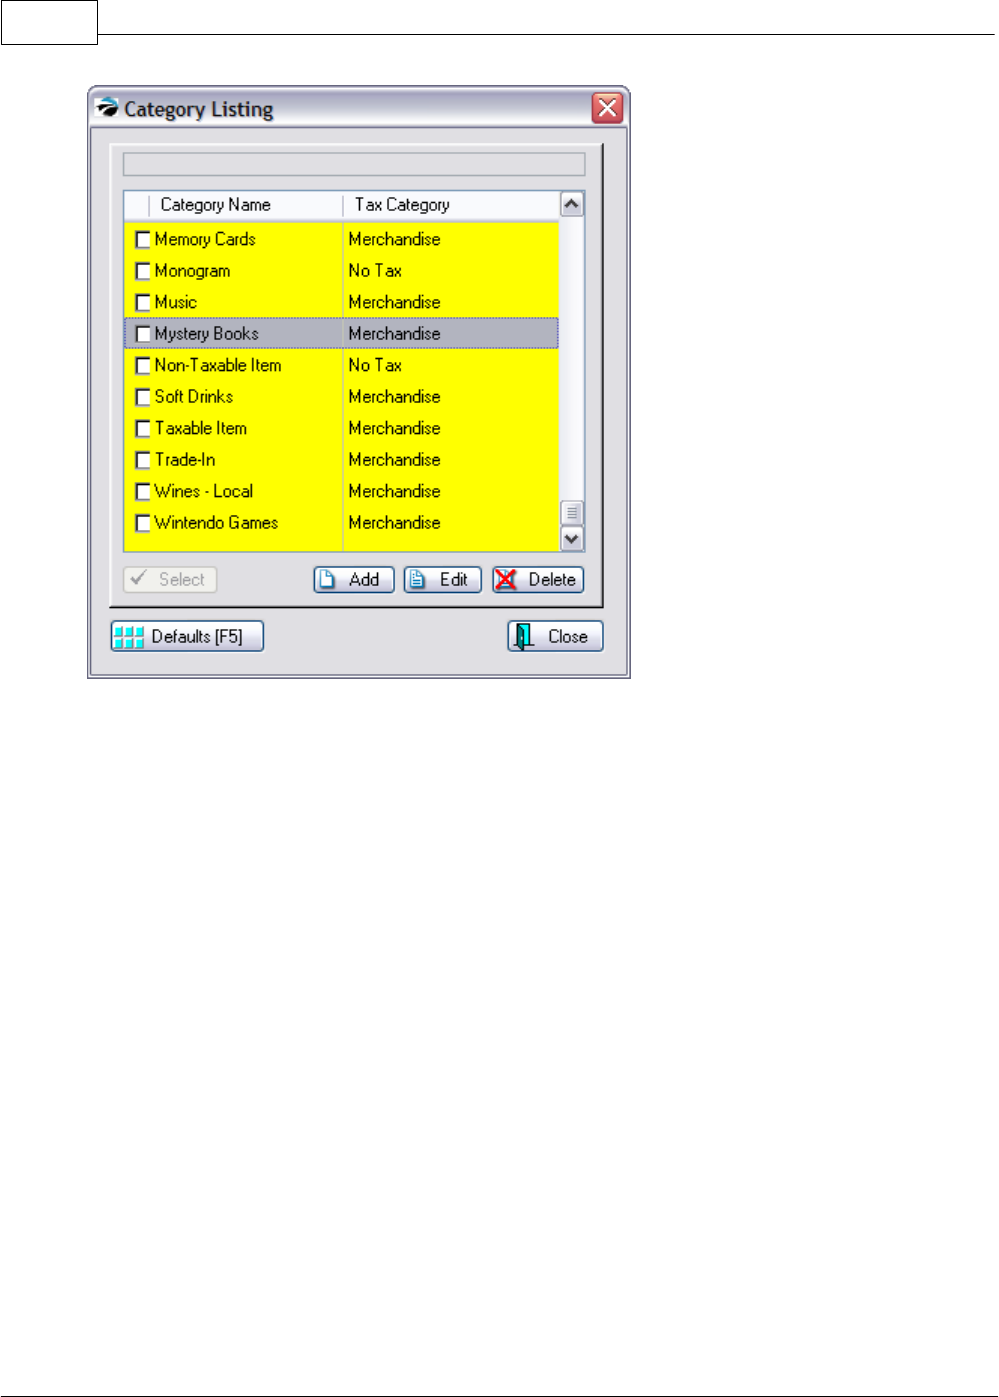
POSitive Retail Manager User Guide292
Copyright ©2007 POSitive Software Company
How To Create A Category
Click on Add and complete the category detail form. (See Category Detail Form.)
Edit A Category
Highlight a category. Click on Edit and make changes as necessary. (See Category Detail Form.)
Set Category Defaults
Category defaults are excellent time savers. When an inventory item is added to PRM the defaults
assigned to the category are automatically set on the new inventory item. See Default Settings for
detailed information about their use and functions.
How To Set Category Defaults
1) Highlight a category.
2) Choose Edit.
3) Click on the Defaults button. Each category can have unique inventory settings to be applied
automatically when creating a new inventory item under the category. To review or make changes to
the category defaults, select the Defaults button while highlighting the desired category.
DELETE BUTTON
Warning: Make a Backup. Deleting a category is a major modification of PRM data. Be sure you
make a backup before you begin.
Your options at this point are to Replace, Delete All, Cancel.
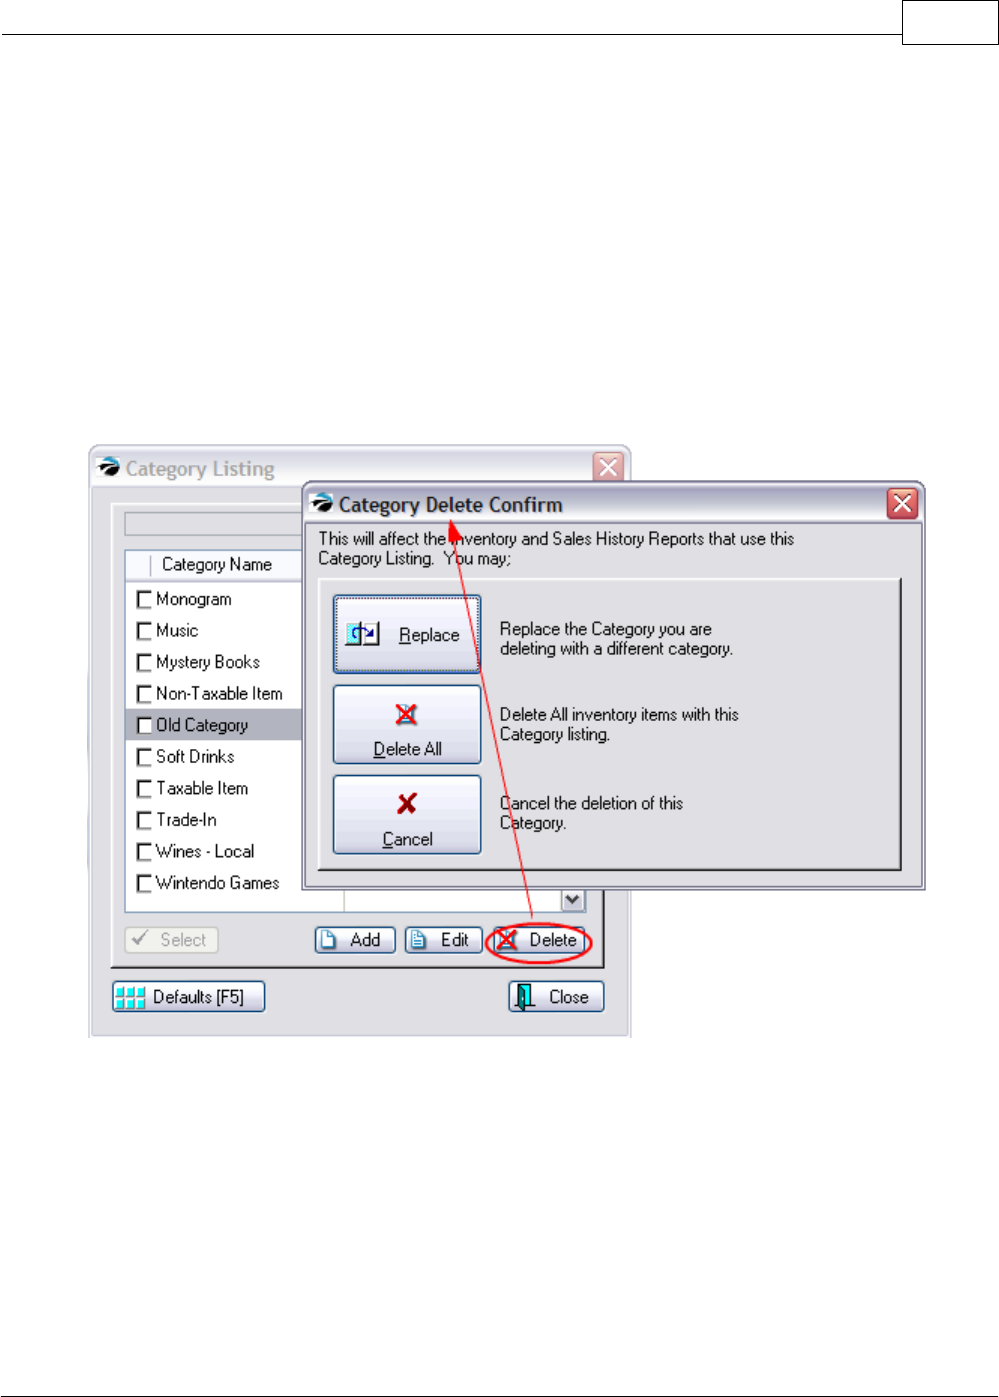
Key Concepts 293
Copyright ©2007 POSitive Software Company
·Replace - To Replace or merge is generally the best choice. This option transfers the items in the
category being deleted to another existing category.
Before proceeding you should create the target category first. Then choose Replace and enter
the name of the target category. Press F10 to process. The old category will be deleted and the
attached inventory items will be reassigned
·Delete All - To erase all inventory assigned to the category. When you click on Delete All, a
POSitive Alert gives you the option to cancel the process.
·Cancel - Cancel the deletion of the category
How To Delete A Category
1) Highlight a category.
2) Click on Delete.
3) Follow the prompts outlining your options. By selecting Replace you will be reassigning or
merging inventory from this category to another one you designate.
4) By selecting Delete All you can erase all inventory items as well as the category. You will be
prompted to confirm deletion of each individual item listed in the category.
Replace Categories
Warning: Replacing a category is a major modification of PRM data. Be sure you make a backup
before you begin.
The purpose is to transfer all inventory items assigned to one category and assign them to a different,
yet existing category.
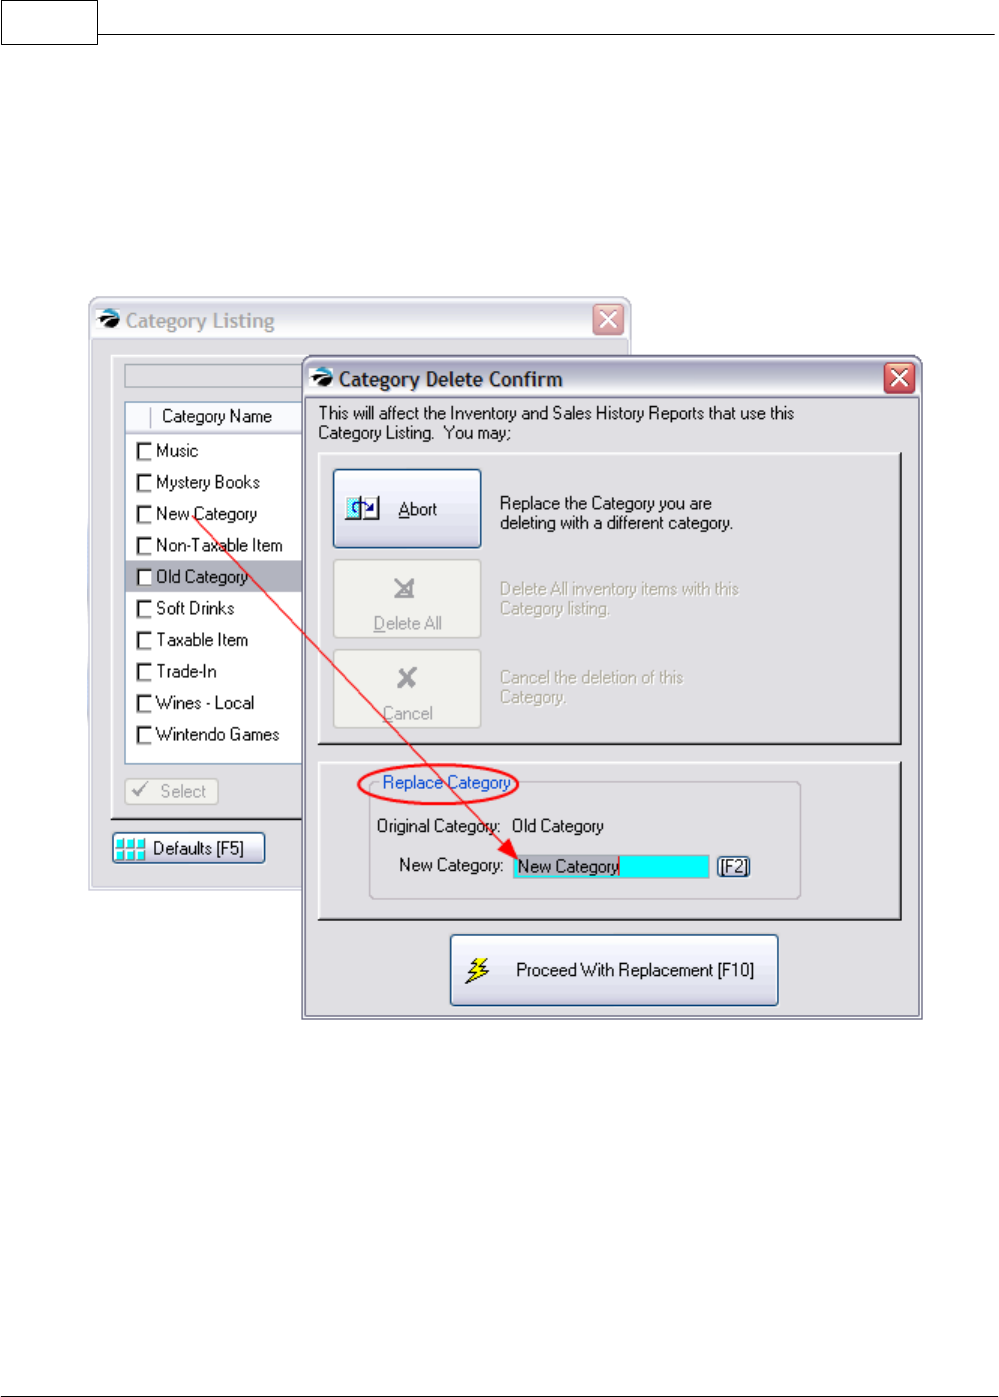
POSitive Retail Manager User Guide294
Copyright ©2007 POSitive Software Company
How To Replace A Category
1) First, be sure the new target category exists.
2) Highlight a category.
3) Click on Delete.
4) Select Replace, you are able to merge all inventory from one category into another which you
identify by name in the new category field.
See also Departments
8.1.6 Freight Category
The category named FREIGHT operates differently than other PRM categories.
When an item is assigned to this category, it is automatically considered to be a non-profit item and
will be reflected as such in PRM reports. When an invoice is created, the value of the freight charges
will appear as a separate entry.
Invoice History
In the lower right corner of the Invoice History window, the freight charge ($3.00, in this example) is
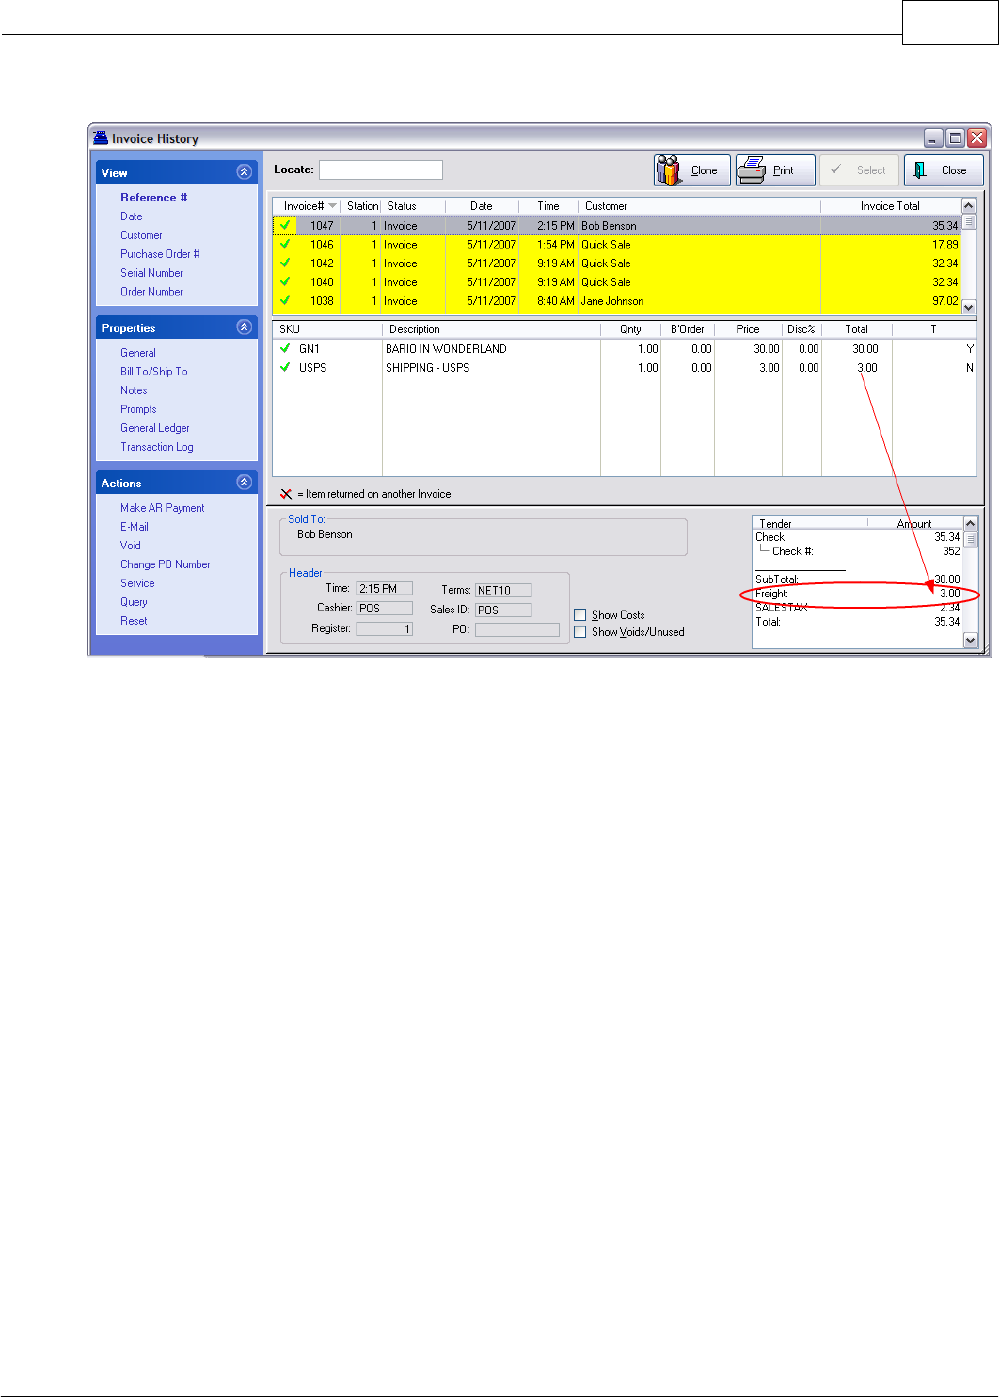
Key Concepts 295
Copyright ©2007 POSitive Software Company
displayed separately and is not include in the subtotal.
Sales Reports - Affected By Freight
--- Freight values will not appear in the Daily Sales Summary
--- The Invoice Sales Report has a Freight Column to total Freight for the time period of the report.
These numbers are not part of your price, cost, or profit fields.
--- The Profit By Week (Weekly Summary) report does not include Freight charges.
--- The Vendor Sales Report By Department does not include Freight.
--- The Sales Report By Department will include Freight values simply because it totals all tagged
categories. You will need to remember to untag the category if you do not want Freight to be included.
--- The Sales Report All Inventory will include Freight items and values. There is no way to exclude
Freight from this report.
--- The 13 Week Quantity Sold Report does include Freight .
8.2 Customer Categories
This is a listing of currently defined Customer Categories designed to minimize the number of
keystrokes and amount of time needed to add a new customer to your customer list.
Go to Customer Center: Customer Categories

POSitive Retail Manager User Guide296
Copyright ©2007 POSitive Software Company
Adding a new customer to the customer list requires you to fill in several data fields. By choosing an
appropriate customer category the most repetitious fields will be filled in automatically. After
selecting a category, you can still modify individual fields for the new customer.
Depending upon how you want to classify your customers, you can define as many customer
categories as you wish.
Your Best Options
Your business type may determine which of the following options will be best for you.
·No Categories - If you leave this window blank, i.e. no descriptions whatsoever, then every time
you enter a new customer, you will have to fill in all of the fields. This option would be well suited to
a mail order business which sells to individuals around the country.
·One Category - If you create only one category, the default settings will be used for EVERY
customer you add to the customer list. You will not be prompted, it will be automatic. This option
would be well suited if all of your clients are from the same local area. It would also be acceptable
for a mail order business which wants to use the User Defined Fields for advanced reporting and
marketing options.
·Multiple Categories - If you create more than one category, whenever you add a new customer to
the customer list, you will be prompted to select a category before proceeding. This option would
be well suited if your business is marketing to more than one region, perhaps across county or state
lines where taxation rates may vary, or if your customers qualify for different price levels or have
different area codes or zip codes.

Key Concepts 297
Copyright ©2007 POSitive Software Company
Possible Category Names
Customer Categories are based on specific criteria. As you create categories consider the following.
Local Area Code xxx Credit Rating xxx
Tax Exempt Zip Code xxxxx Customer Term xxx
Resale Price Level xxxxx State/Province xx
User Defined Fields
There are only six user defined fields. Be consistent in titling each user defined field on each
customer category.
Do NOT, for example, use Field 1 to record a birthdate for one category and use Field 2 for recording
a birthdate in a different category. PRM would not be able to report on ALL customers who have a
birthday in March because the information is split between two different fields.
As you highlight a category description, the default settings are displayed at the right. For an
explanation of each field as displayed on the right panel, see Customer Categories Form.
You may choose to Add, Edit, or Delete a customer category.
Actions
Apply To Unassigned Customers - If you have not been using Customer Categories from the start,
this button allows you to assign the highlighted Customer Category to all customers with no current
category assigned. This will not affect any customers with a category already assigned.
Update Existing Customers - Use this if you have decided to make a change to a customer category
and want to apply those changes to customers already assigned to the Customer Category.
8.2.1 Customer Categories Form
The following fields are part of a Customer Category definition. As you create customer categories
you determine which fields should be automatically filled into a customer record.
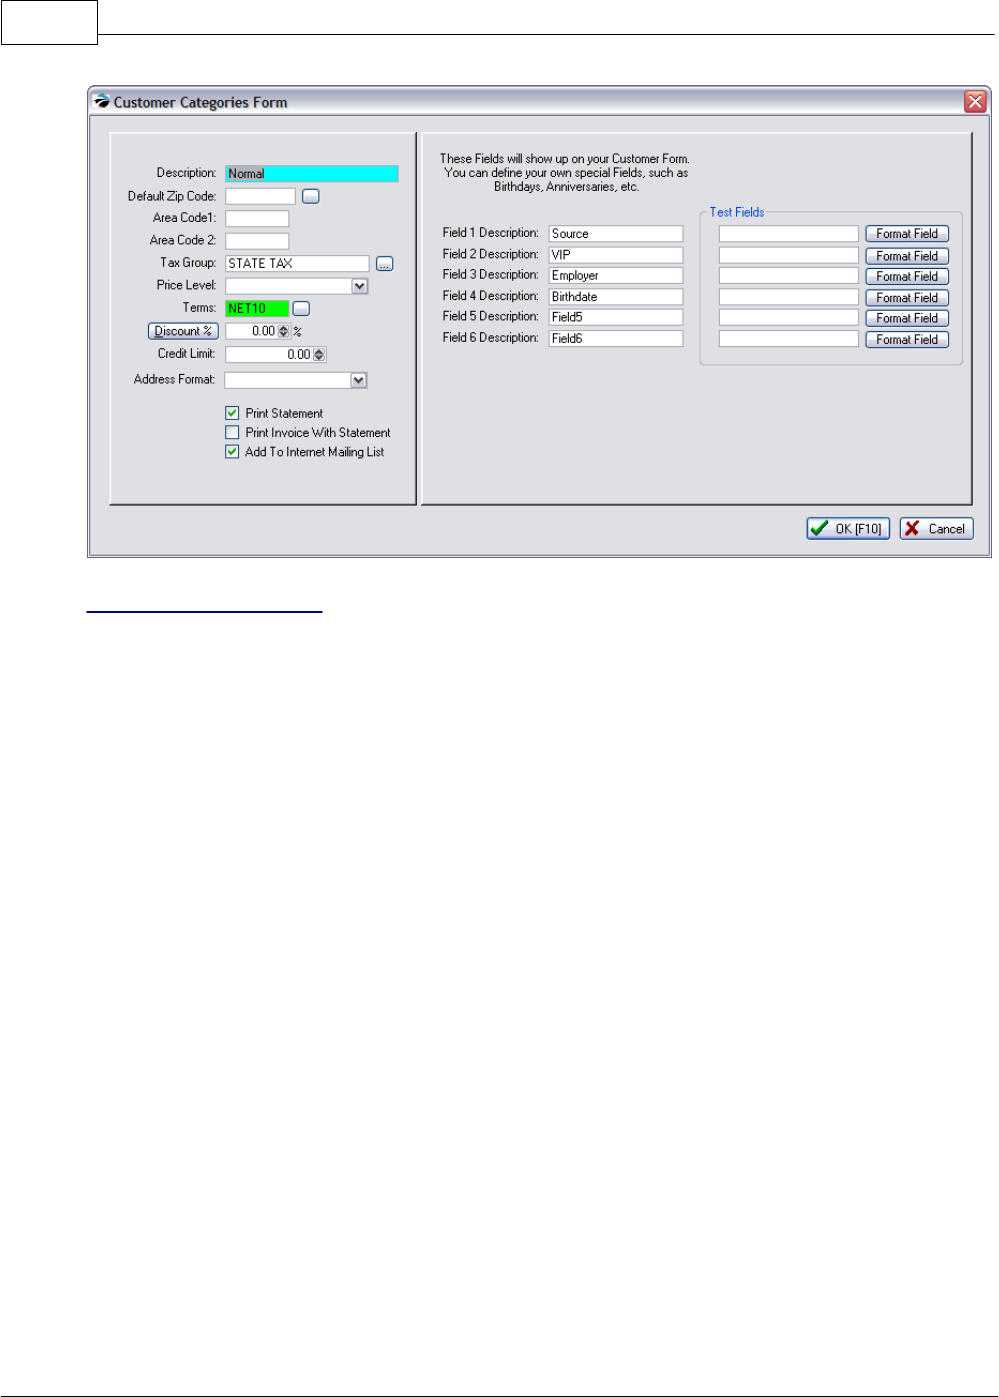
POSitive Retail Manager User Guide298
Copyright ©2007 POSitive Software Company
Which Fields To Use
You may use any combination of the listed fields. However, there are two required fields which must
be selected for every Customer Category and they are Description and Terms.
Description - Possible category names to reflect its overall purpose.
Local Area Code xxx
Tax Exempt Zip Code xxxxx
Resale Price Level xxxxx
Credit Rating xxx Customer Term xxx
State/Province xx
Default Zip Code - Enter the zip code to be used for all customers using this category
This field can be left blank, but you will need to manually add or edit this field when creating a new
customer record.
Area Code 1 - The phone area code for the first phone number.
Area Code 2 - The phone area code for the second phone number.
Tax Group - The tax rate the customer will be required to pay for purchases. Although this is a
necessary field, you do not have to choose it at this time but can do so when creating the individual
customer record.
Price Level - Select the price level the customer will be given.
Terms - The terms of purchase payment. This is a required field for every customer category.
Discount - An additional and permanent discount percentage to be taken off of the prices of the
assigned price level.
·When an item is sold on an order or invoice, the discount field will be filled with this percentage.
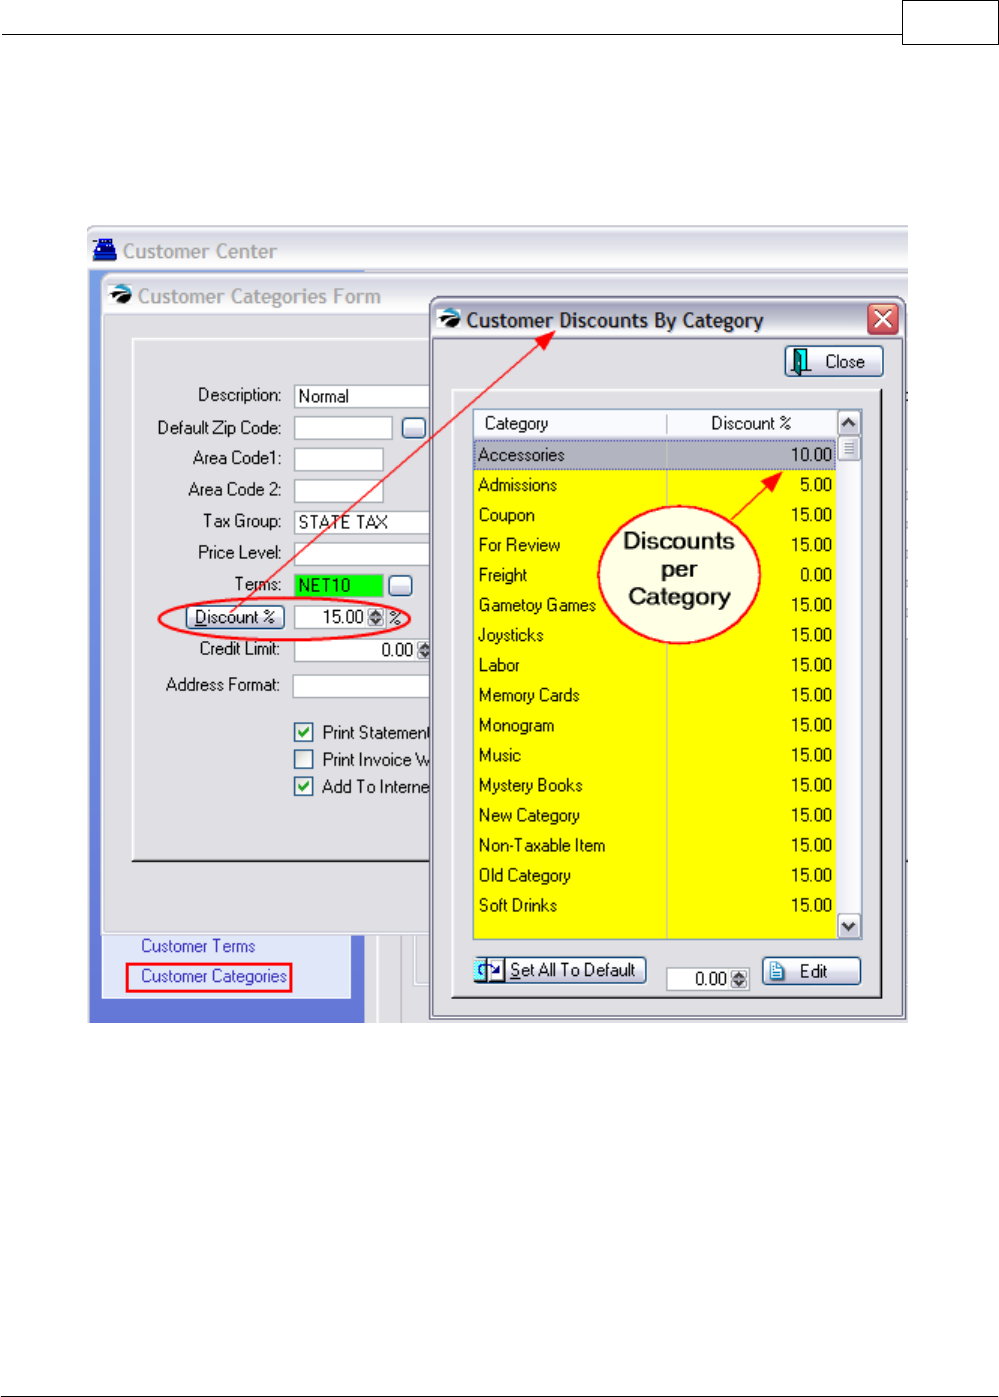
Key Concepts 299
Copyright ©2007 POSitive Software Company
The extended selling price will reflect the discounted selling price.
·This permanent discount will NOT be applied to individual inventory items which have been flagged
for No Discounting.
·Click on the Discount% button to set percentages on a per category basis.
Credit Limit - The maximum dollar amount of purchases accepted on Store Account. However, once
you are invoicing the customer, it is easy to change this credit limit.
Address Format - choose a Country
Print Statement - If the customer has open invoice charges, PRM will print a monthly AR Statement.
Print Invoice With Statement - While printing a monthly AR Statement, PRM will also reprint invoices
which are still open. Some customers prefer the detail, others may not.
Add To Internet Mailing List - can be used for marketing purposes
Customer User Defined Fields
There are only six user defined fields. Be consistent in titling each user defined field on each
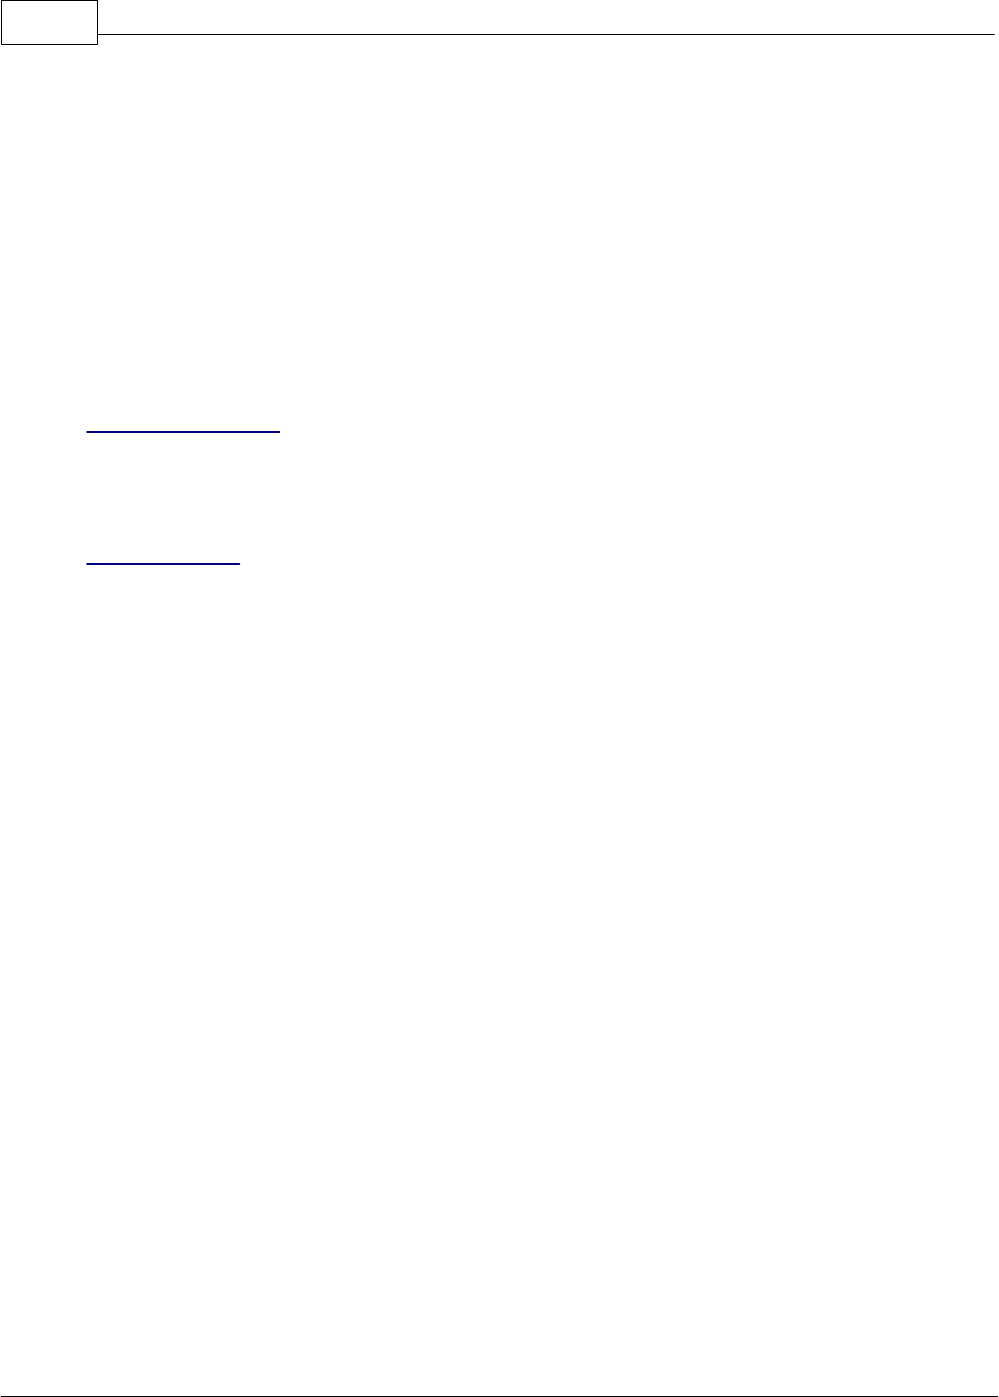
POSitive Retail Manager User Guide300
Copyright ©2007 POSitive Software Company
customer category.
Do NOT, for example, use Field 1 to record a birthdate for one category and use Field 2 for recording
a birthdate in a different category. PRM would not be able to report on ALL customers who have a
birthday in March because the information is split between two different fields.
Possible Field Names
Birthdate Spouse Name Club Mailings
Anniversary Decor Theme Referred By
Start Date Collects Portfolio
Preferences Salary Range Children's Ages
To Activate Field
Type in a field name and the field will become active.
If the field is left blank, then the field will be invisible on the customer record.
Show Format
Selecting this button will allow you to stipulate the format of entries. For example, if a user defined
field is to keep a date, the date format will assure that all dates will be entered in the same way.
8.3 Customer Find
If you know only a partial bit of information about a customer, such as first name only or just the street
address, you may choose the Find icon at the top of the Customer Center.
Then enter what you know in one of the fields and PRM will find all customers with that information.
For example, if you know a customer lives on Main Street, but you don't know who it is, PRM will find
all records with Main in the address line.
In addition to searching basic fields, you can also search customers with common User Defined Field
information.
(1) Select "Enter UDF" button
(2) Choose a user defined field from the list
(3) Enter a value to be found in the field and choose OK.
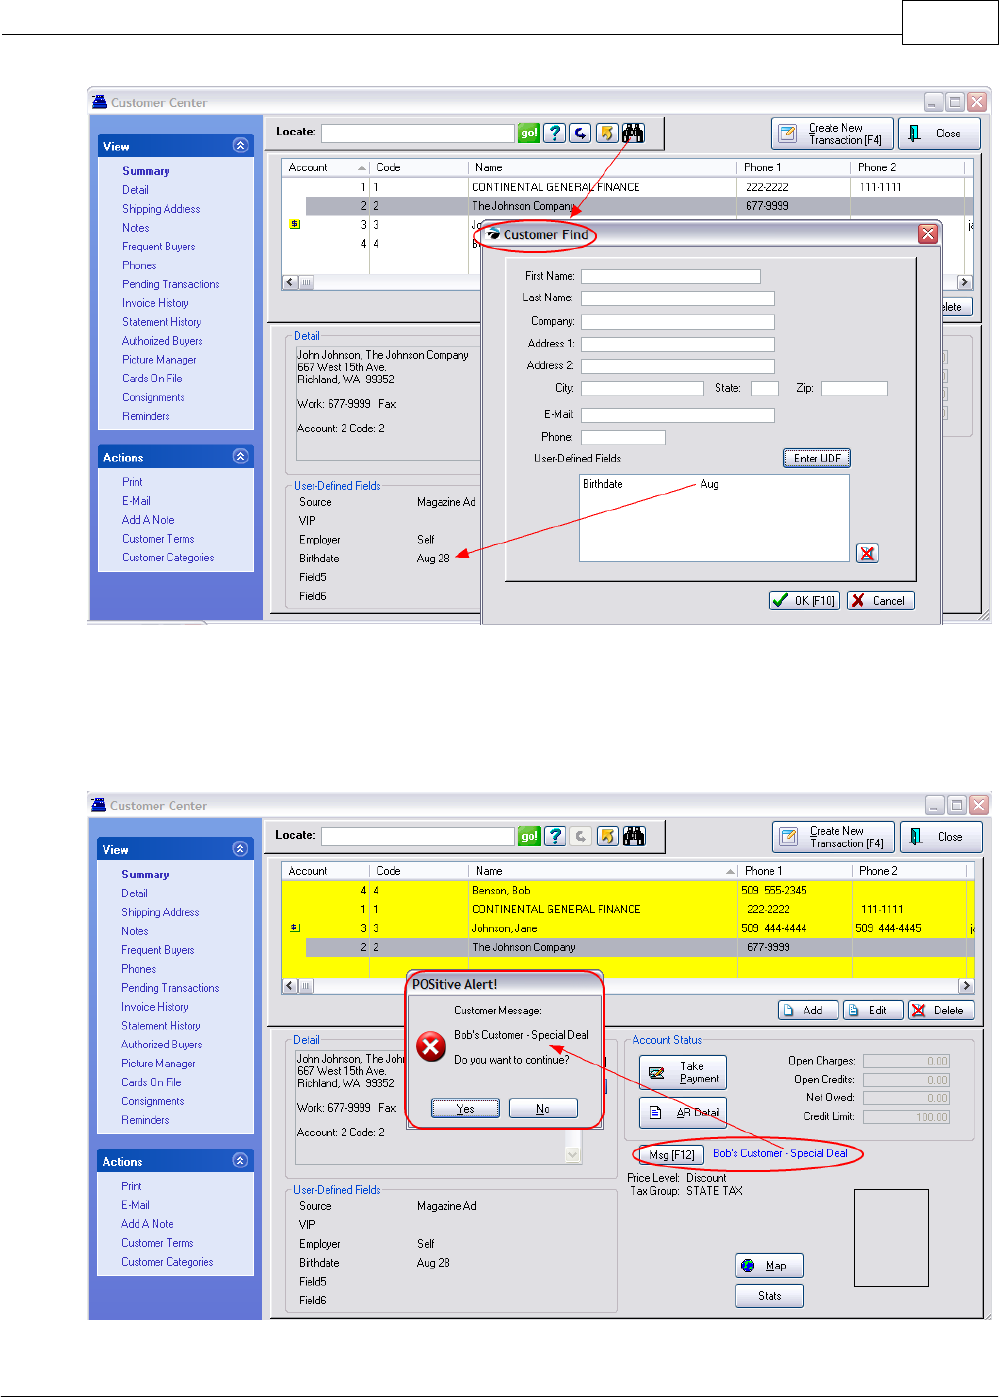
Key Concepts 301
Copyright ©2007 POSitive Software Company
8.4 Customer Message List
Customer Alert screens help clerks be aware of special needs when creating invoices or orders for a
particular customer. For example, when creating an invoice the following message will appear
because a message, MSG [F12] button, has been activated
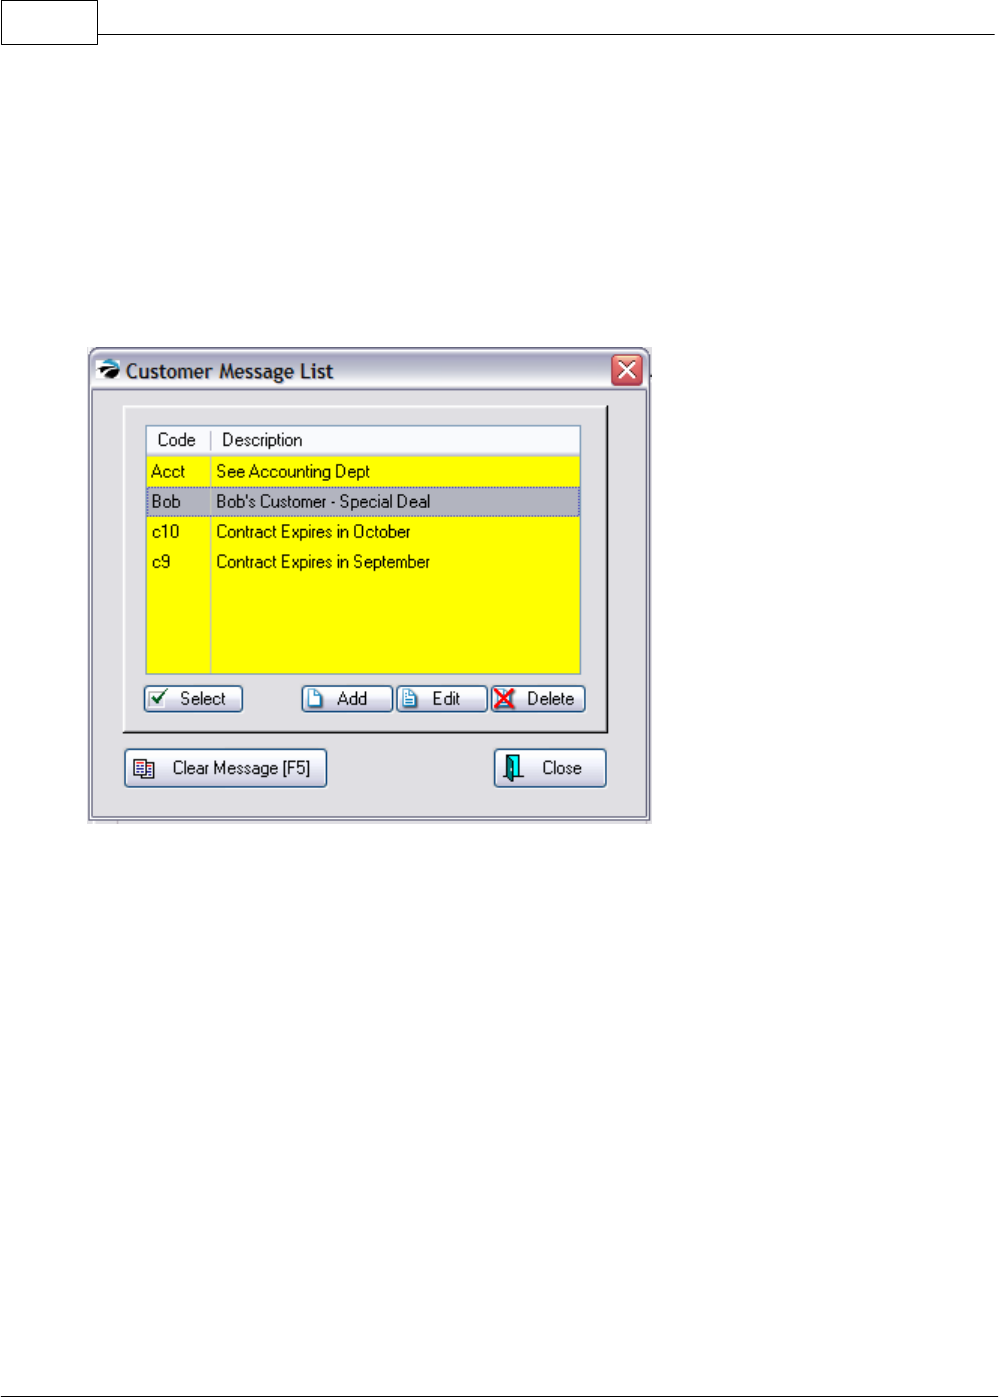
POSitive Retail Manager User Guide302
Copyright ©2007 POSitive Software Company
How To Create Alert Messages
Go to the Customer Center
Highlight any customer and open the Summary view.
Click on Msg [F12] button.
You will see the Customer Message List. Use Add/Edit/Delete to make corrections as desired.
An unlimited number of messages can be created and assigned to a customer as needed.
Clear Message [F5] - unselects any assigned message
8.5 Departments
A department is the top classification level; above categories. A department signifies a major section
of your store which can be broken down into smaller segments called categories.
But categories are ultimately more important because they do SO MUCH.
Before proceeding, please take a few moments to better understand What Categories Can Do and
how Master Category Defaults work.
How To Use Department Manager
A department groups one or more categories into a reporting unit. From this window, you can create
an unlimited number of departments and assign categories to those departments.
You may add, edit, and delete departments by choosing Departments under the Maintenance master
menu. Here you will also assign categories to specific departments.
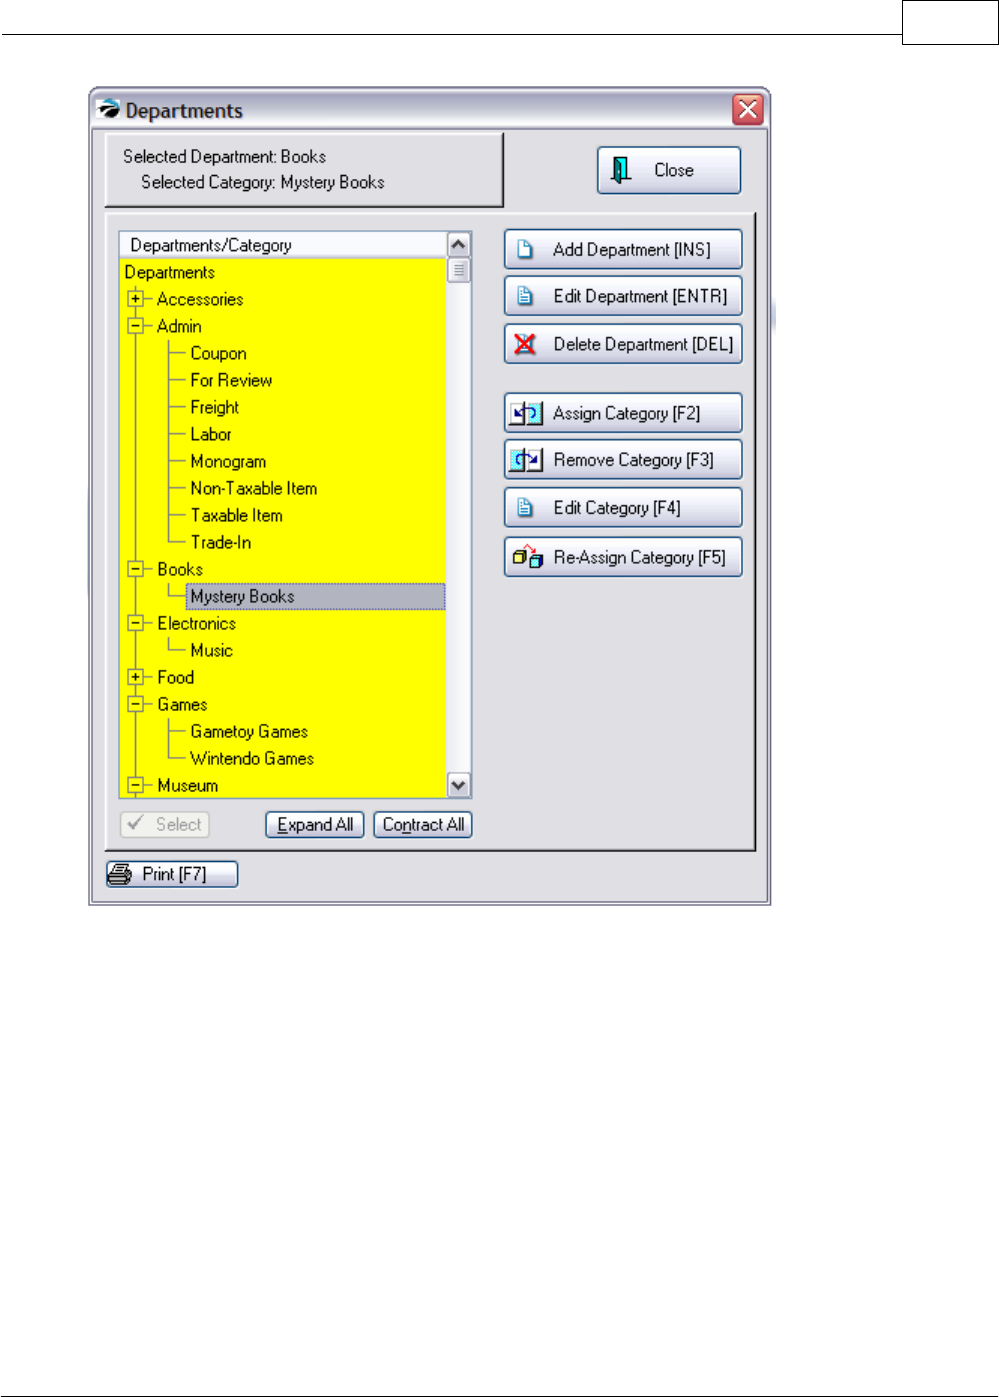
Key Concepts 303
Copyright ©2007 POSitive Software Company
1) First, highlight a department, then click on the Add Department button.
2) Enter a department code. The code can be any combination of numbers and letters. Note: The
department list will always be sorted by the description.
3) Enter a description.
4) (Optional) You may assign a code for AutoSKU. This code can be included in an automatically
generated SKU for the item. See AutoSKU Setup. Note: Most users find this option impractical.
Because you cannot have both a Dept and Category SKU assigned to an inventory item, the Category
SKU has proven to be more useful.
Print
Prints a listing of departments and categories.

POSitive Retail Manager User Guide304
Copyright ©2007 POSitive Software Company
Expand All / Contract All
The listing of departments and categories is done in a "tree" format. The + in the box indicates there
are categories not being displayed.
The buttons Expand All and Contract All will affect all departments and categories.
By clicking on the + or on the - in the box you will expand or contract the list respectively.
There is a System Setting: Inventory that automatically contracts all Departments upon opening this
Departments screen.
UNASSIGNED
The entry, Unassigned, is for catching lost categories. If there are categories listed below it, they
have not been properly assigned to a specific department.
If you feel this listing is inaccurate, rightmouseclick on a department name and choose "Verify
Department/Category Links." Then take steps to assign the category to an existing department.
How To Assign Categories To A Department
1) Highlight the desired Department.
2) Select the Assign Category button. This opens the Category Listing.
3) Highlight the desired category and choose Select.
NOTE: You can assign a category to more than one department. This is intentional because you can
do a report on a Department/Category, or just a Category.
For example, if you stock shoelaces in the Shoe department, and also in the Children's department,
you would want to know the total sold from the Shoelaces category. It would then show you how
much sold from each department.
How To Re-Assign A Category From One Department To Another
Department
If a category is to be assigned to a different department, first highlight the category.
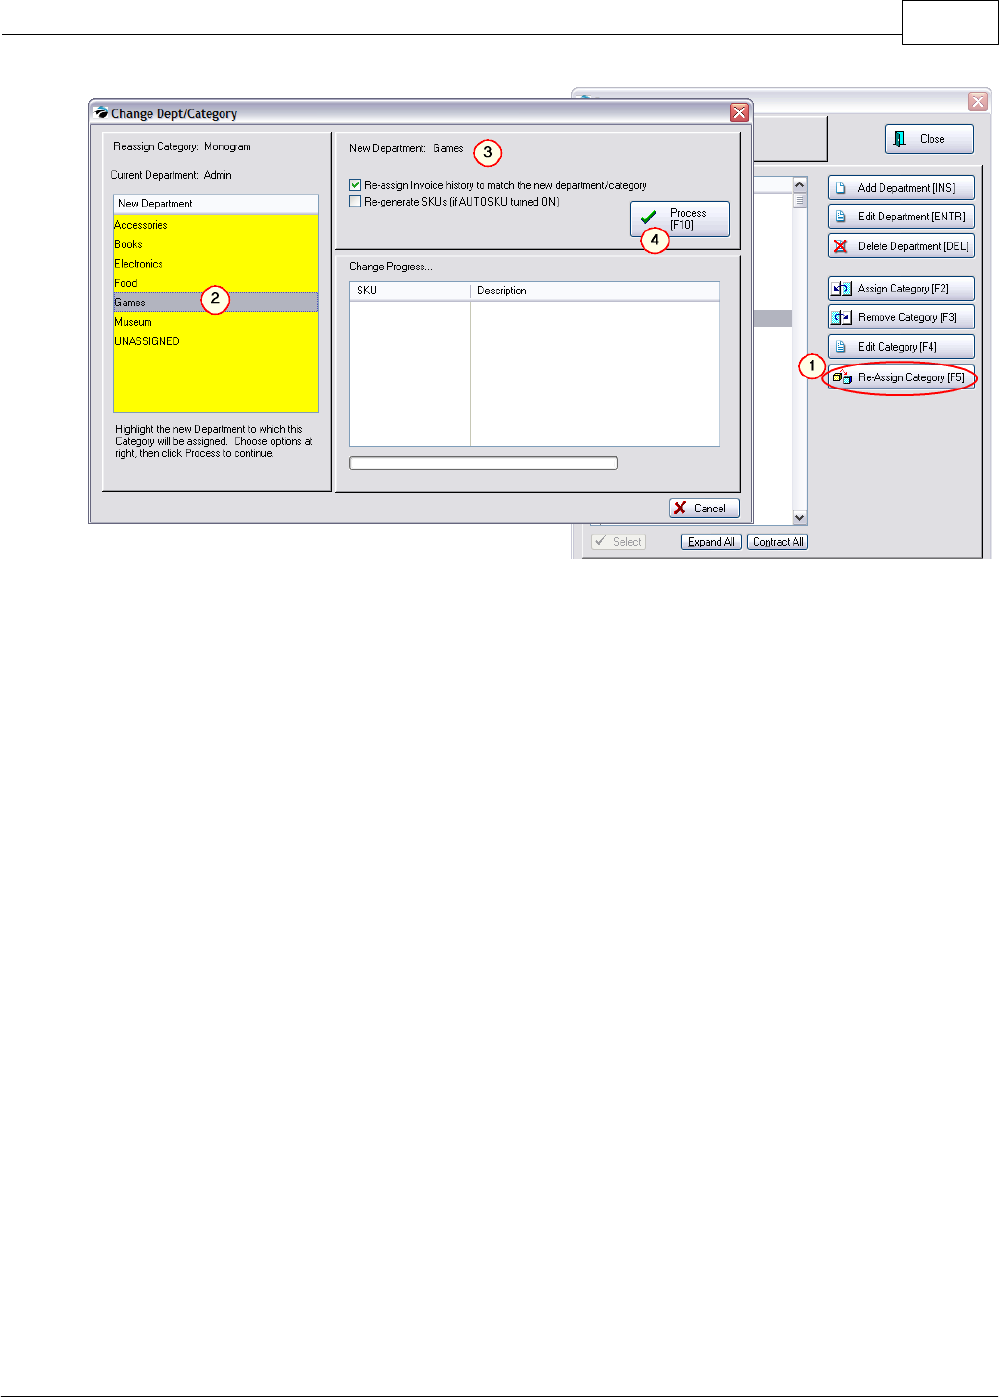
Key Concepts 305
Copyright ©2007 POSitive Software Company
(1) Click on Re-Assign Category [F5]
(2) On the left, select the new Department
(3) Activate the option "Re-assign Invoice History To Match The New Department/Category" This
function will edit the invoice history table so that when you run a report on sales of the item it will be
reported in this new department/category instead of the old one.
(4) Choose Process [F10] - A listing of all items affected by the change will be displayed.
How To Remove A Category From A Department
If there are any inventory items currently assigned to the category you will not be able to remove the
category.
1) Highlight the category.
2) Click on the Remove Category button.
If you are unable to remove the category because there are items assigned to it, go to Inventory List.
Choose Dept/Catg Filter [F8] and select this category.
All items assigned to the category will be displayed. Click on the General tab at the bottom of the
Inventory List and choose "Change Dept/Catg for the highlighted item. You may tag multiple items to
assign them to a different category.
Really Want to Delete the Category?
Note: You will not be deleting the category from PRM, you will just be removing the link to the
department. If you want to totally erase the category, go to Utilities: Categories, highlight the
category and choose Delete. You will then be given further options as described in Category Listing.

POSitive Retail Manager User Guide306
Copyright ©2007 POSitive Software Company
Re-Defining Departments
At some time you may want to rename and re-arrange departments and categories in PRM to make
them more functional or expressive of relationships. This is especially important to do if you will be
utilizing PRM's e-commerce feature.
You should always
1) make a plan - know what you want to accomplish -
You should have a good understanding of the relationship of departments and categories. You
should also create departments and categories with the "customer" in mind. If a new customer comes
to your web page, what will help the customer find the desired products most efficiently?
2) make a backup of PRM - if you make a mistake you will want to restore the backup
3) make time - the process will require PRM to be out of use, so you will need to do this when no one
else wants to use PRM. Each category change could take several minutes to do, depending upon the
size of your inventory.
Re-defining the Department List and the associated Categories needs to follow some simple steps so
that the inventory items are properly linked to the new departments.
First, consider the options of what can be done on the Department List. After reviewing your current
Dept/Category structure you may decide to....
1) Rename A Department - the categories under the department are fine, but the name of the
department needs to be changed.
2) Keep The Department, but Remove Some Categories From It -
3) Add A New Department - to the new department you will want to assign or re-assign some
categories
4) Delete A Department - the department is no longer useful. (OK, but be sure to follow correct
procedures, otherwise it may not do what you thought it would.)
Rename Dept
The categories under the department are fine, but the name of the department needs to be changed.
Open the Department List. (Utilities: Departments)
Highlight the Department Name and choose Edit.
Type in the new name for the department
Choose OK.
You will be prompted to confirm the change being made.If you choose OK, your computer will read all
your inventory files and make the appropriate changes. This will essentially freeze the computer from
doing anything else.
Keep Dept
The department name is good, but some categories need to be removed or more categories assigned
to it.
To remove a category, highlight the Category and choose the Remove Category button.

Key Concepts 307
Copyright ©2007 POSitive Software Company
You will be prompted to confirm the removal.
To Add a Category
1) make sure the category is first removed from any other department. (Exception to the rule: you
may want the category to be assigned to multiple departments.)
2) highlight the department name and choose the Assign Category button.
3) the category list will be opened. Find the category and choose Select. (If the category does not
exist, then you would first choose ADD, define the category, and then select it.)
4) you will be prompted to confirm re-assignment of inventory items.
NOTE: this means that only inventory items, which for some reason or another, belong to the
category, yet have no department be assigned to this department link. This would indicate that the
category and some items are already a part of another department and the department is still in the
active list.
Add Dept
To create a department, click on the Add Department button. Enter a code and a Description.
Remember that the description will be viewed by visitors to your web page and should be easily
understood.
You will then want to assign categories to the department.
Highlight the department name and choose Assign Category. Follow steps as described previously.
Delete Dept
IMPORTANT: You MUST remove a category from a department FIRST, even if the entire department
will be deleted.
For example, if you plan to remove the entire department called GAMES, the two categories Gametoy
Games and Wintendo Games must be removed first. (see first picture)
WARNING: If you simply highlight the department and choose delete without first removing the
categories, then ALL inventory items associated to the categories ARE NOT automatically changed
and will be wrong until EACH is manually corrected.
8.6 Edit Unposted Inventory Items
The following prompt may appear if you have Unposted inventory items. Unposted inventory items
are items that were added by "Fast Add" on the fly while creating a customer order or invoice..
If an unposted item is not edited it will not appear on the Order List.
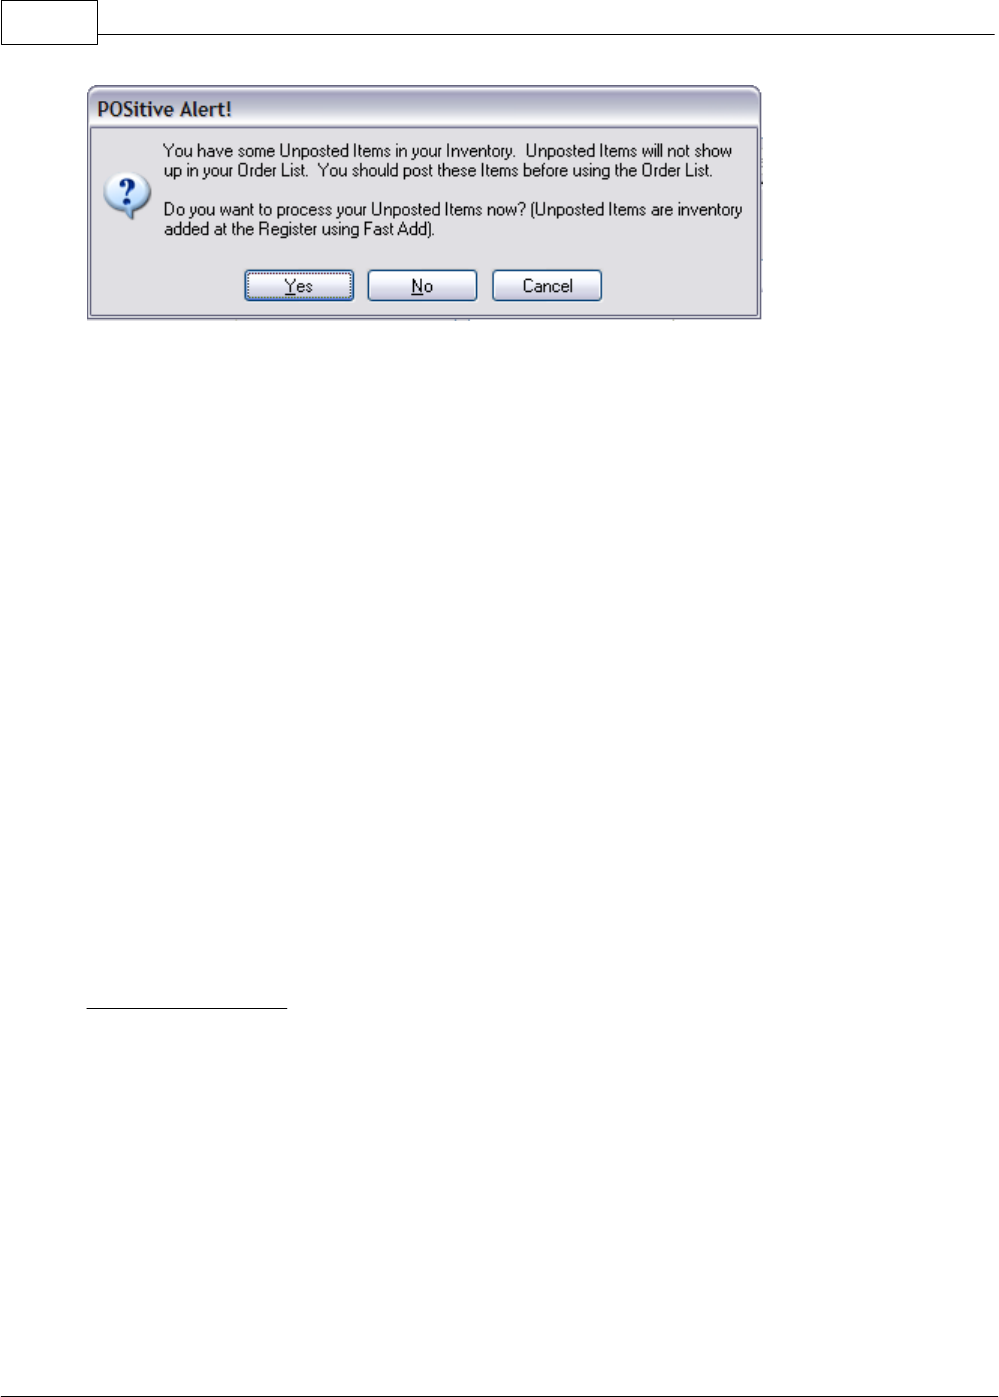
POSitive Retail Manager User Guide308
Copyright ©2007 POSitive Software Company
If you answer Yes, the Inventory Center will open and only display these few items. (Note: Trade-In
items will also appear in this list.)
IMPORTANT: Edit the item as you would any other unposted item. However, if you choose not to
edit the item, it will not be added to the Order List. When you have edited all needed items, chose
CLOSE.
8.7 Gift Cards & Certificates
PRM supports the use of Gift Certificates and Gift / Loyalty Cards. Certificates and cards must have
an imprinted number and may have a barcode or magnetic swipe.
For selling Gift Certificates/Cards you must create an inventory item with the primary SKU of
GIFTCERT which will trigger various procedures in PRM. When you sell one you will be prompted for
a number and a value. The number should be imprinted on the certificate or card. The value is
logged into Gift Certificate Manager but never recorded on the card.
For redeeming Gift Certificates/Cards you process an invoice and wait until the Tender screen; select
Gift Certificate and enter or scan the Certificate/Card number. PRM will then confirm the value of the
card.
Loyalty Cards are usually not sold. In the Gift Certificate Manager you can generate valid card
numbers and values for the cards which will be used later for tendering an invoice.
Various reports about sales and tendering of Gift Certificates / Cards are available in PRM.
Although Certificates and Cards are not normally "recharged" or "reused," PRM Touchscreen does
have the interface for doing such.
Additional Help Topics
Gift Certificates
Gift Certificate Manager
PRM Touch Screen
Inquiry (Price Check, Gift Certificate, Age Verification)
8.8 Inactive Inventory
"Active" inventory are items which you are currently selling, regardless of whether or not there is
current stock on hand.
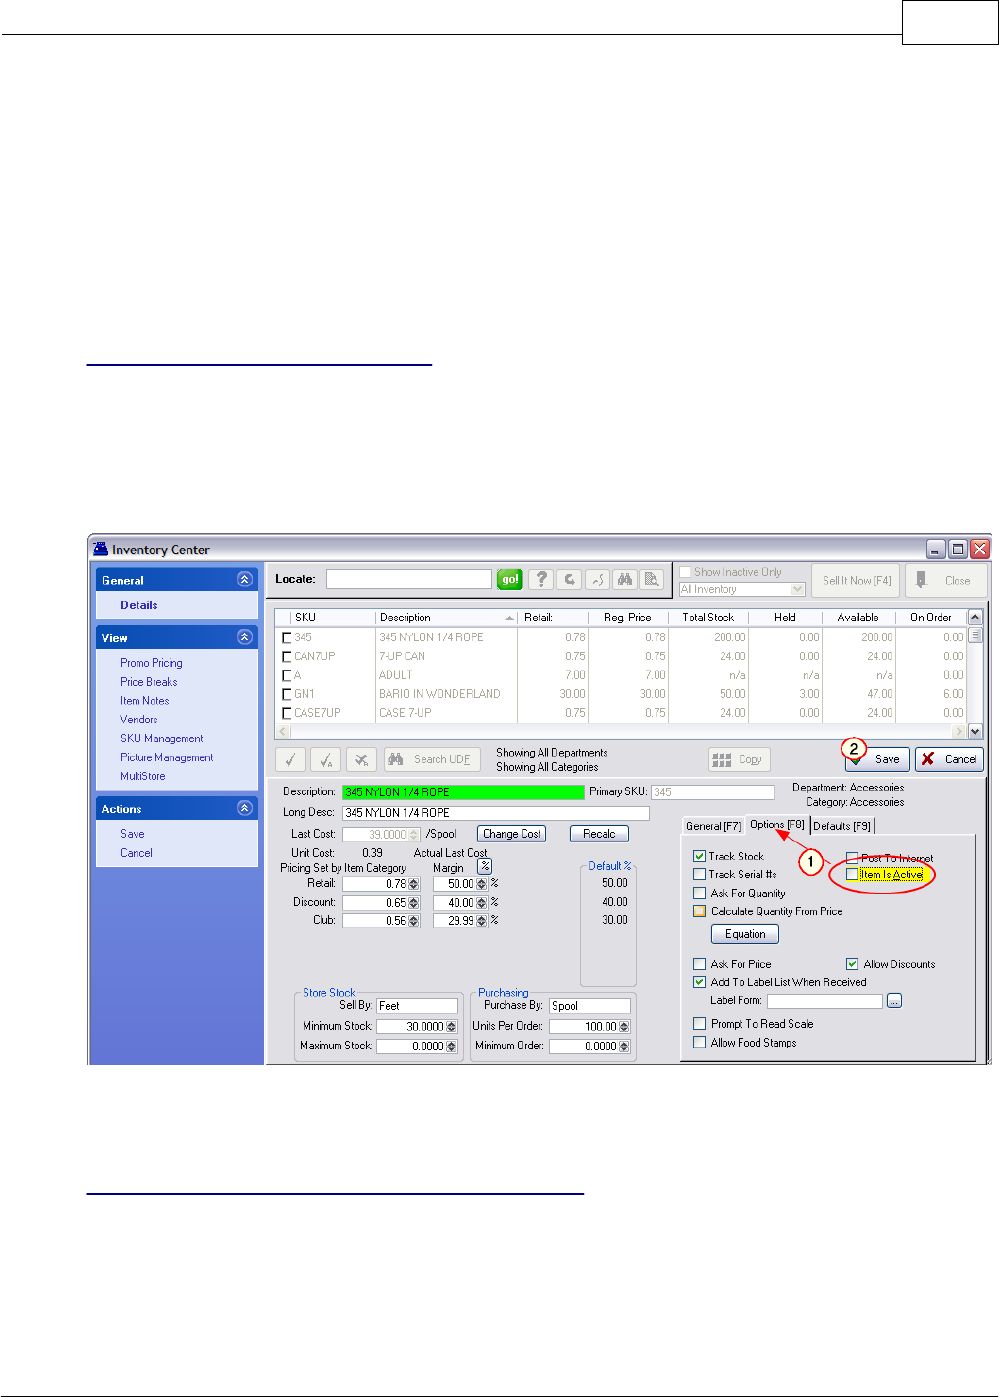
Key Concepts 309
Copyright ©2007 POSitive Software Company
"Inactive" inventory are items which you do not want to be visible in the Inventory List. This function
is useful for seasonal inventory items. If it is not visible, then staff will not have to sort through it and
cannot sell the product because it cannot be selected. For example, Christmas inventory can be
made inactive until it is time to order products from the vendor and then begin to sell products to the
public.
Display Inactive Inventory Items
Activate the option "Show Inactive Only" and all items which are currently inactive will be listed.
How To Make An Item Inactive
Find the item in the Inventory List,
Select Edit.
(1) Uncheck "Item is Active" on the Options tab and
(2) Save the change.
The item will immediately disappear from the list of inventory items.
TIP: You may want to assign available stock counts to a "warehouse" location. (see Stock Location)
How To Make An Inactive Item Active Again
Open the Inventory Center
Choose Show Inactive Only
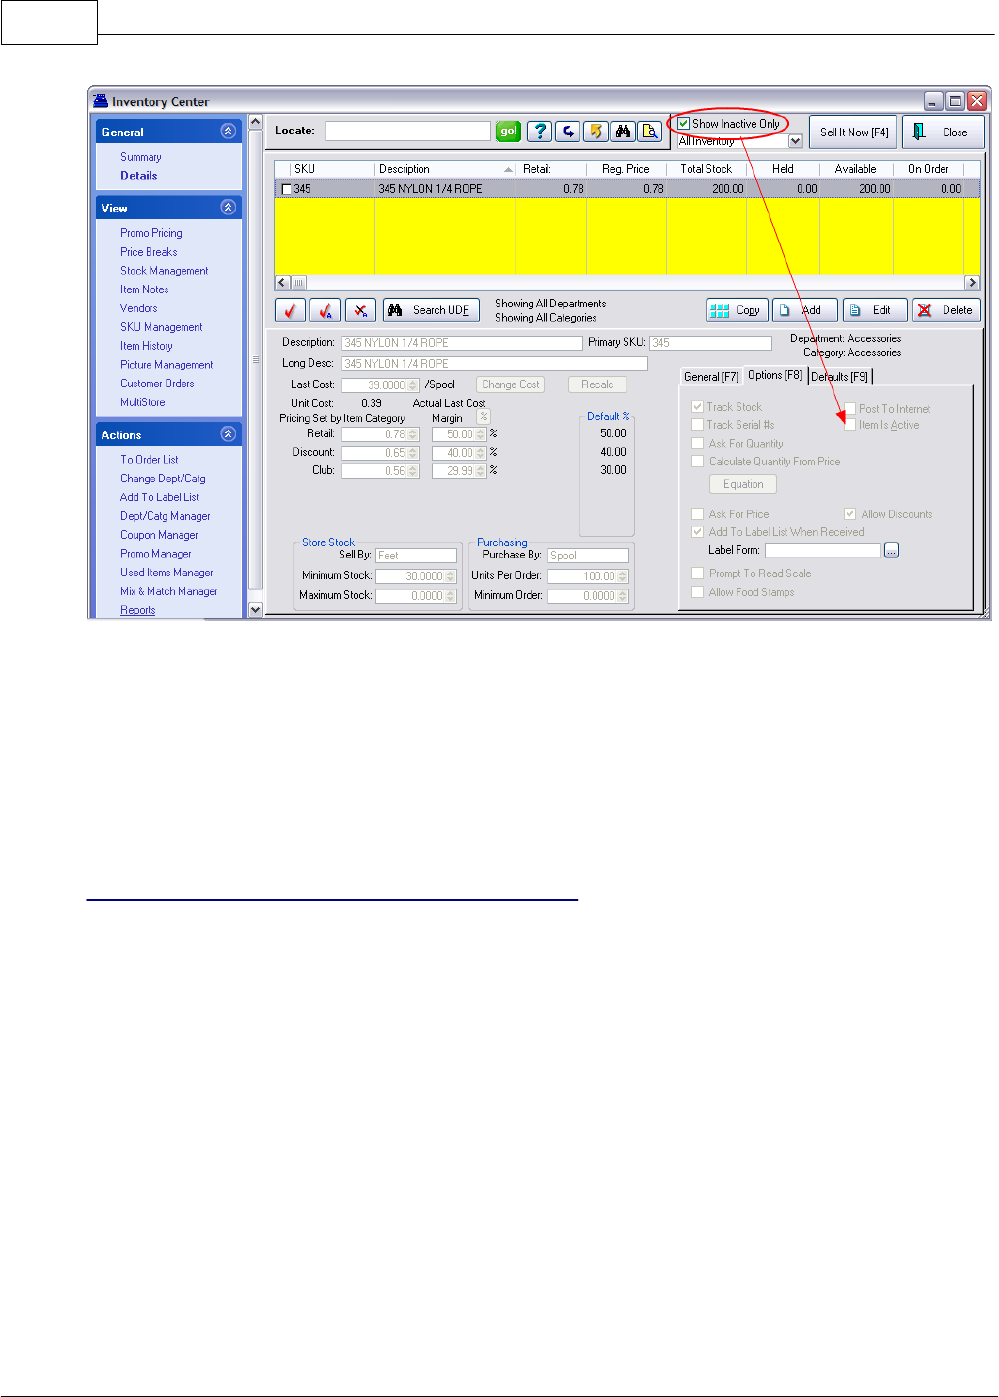
POSitive Retail Manager User Guide310
Copyright ©2007 POSitive Software Company
Find the item in the Inventory List,
Select Edit.
Checkmark "Item is Active" on the Options tab and save the change.
The item will immediately disappear from this list of inactive inventory items.
Now, Uncheck Show Inactive Only at the top of the Inventory Center.
You are now returned to the Active inventory list and the item will be visible.
Reports Include/Exclude Inactive Inventory
When running various inventory reports, there is an option to include Inactive Inventory. If you wish to
exclude inactive items, uncheck the option.
8.9 Mix & Match Manager
PRM allows you to create groups of inventory which will sell at a reduced price when a specified
number of items from the group are purchased. This is very similar to creating price breaks for
individual items, but is done instead for a group of items. For example, a product may sell for $60.00
individually, but if a customer purchases two, then the total price is only $75.00 for the two of them.
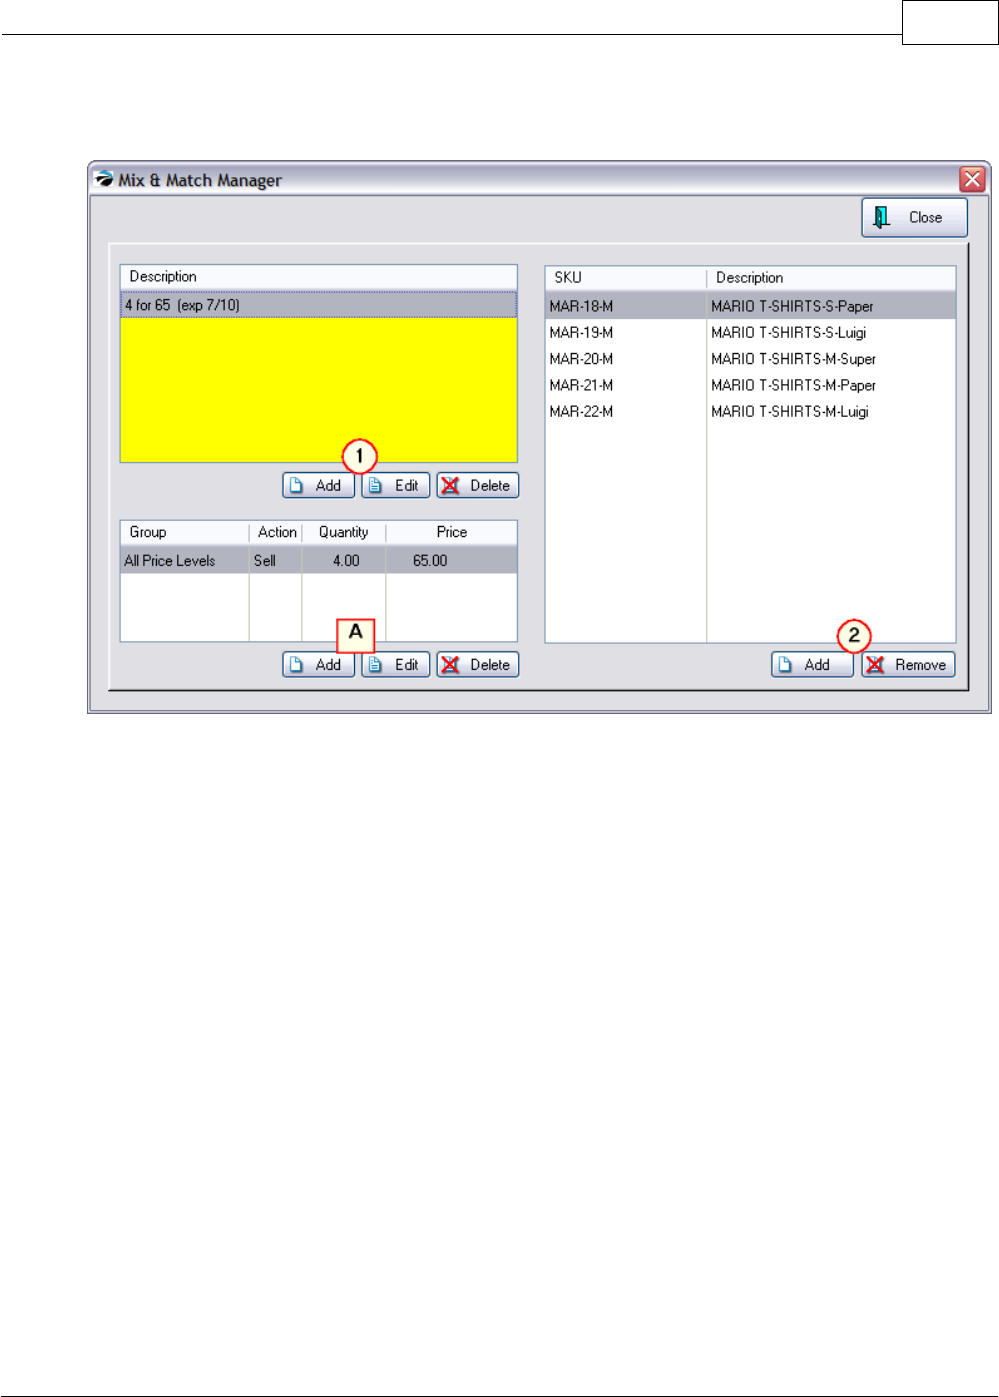
Key Concepts 311
Copyright ©2007 POSitive Software Company
Creating Mix & Match Items
(1) To create a Mix & Match group, you create a name for the group, set quantity and pricing. TIP:
There is a limit of 20 characters, so you may need to abbreviate the title, but include an expiration
date to help in knowing which to delete later. (see Price Breaks)
(2) Add specific SKUs to the group. Choose the Add button.
TIP: While viewing the inventory list, you could choose to filter your inventory by category or
description. Then tag multiple items belonging to the group and choose Select.
(A) Use the bottom set of Add, Edit buttons to create more than one price break per group
highlighted at the top if you did not choose to use All Price Levels.
You can create as many Mix & Match groups as you wish, however, an inventory item can only be
assigned to one group at a time.
Selling Mix & Match Items
To sell Mix & Match items just add any number of items to the invoice in any sequence and PRM will
recognize and match them. The regular price of the item will be charged until the governing number
of items are placed on the invoice. Then the prices of the items will be modified to total the
designated mix & match selling price.
TIP: As a Station Setting, you may want to activate "Combine Same-SKU Items on Transactions"
which will keep the number of line entries to a minimum.
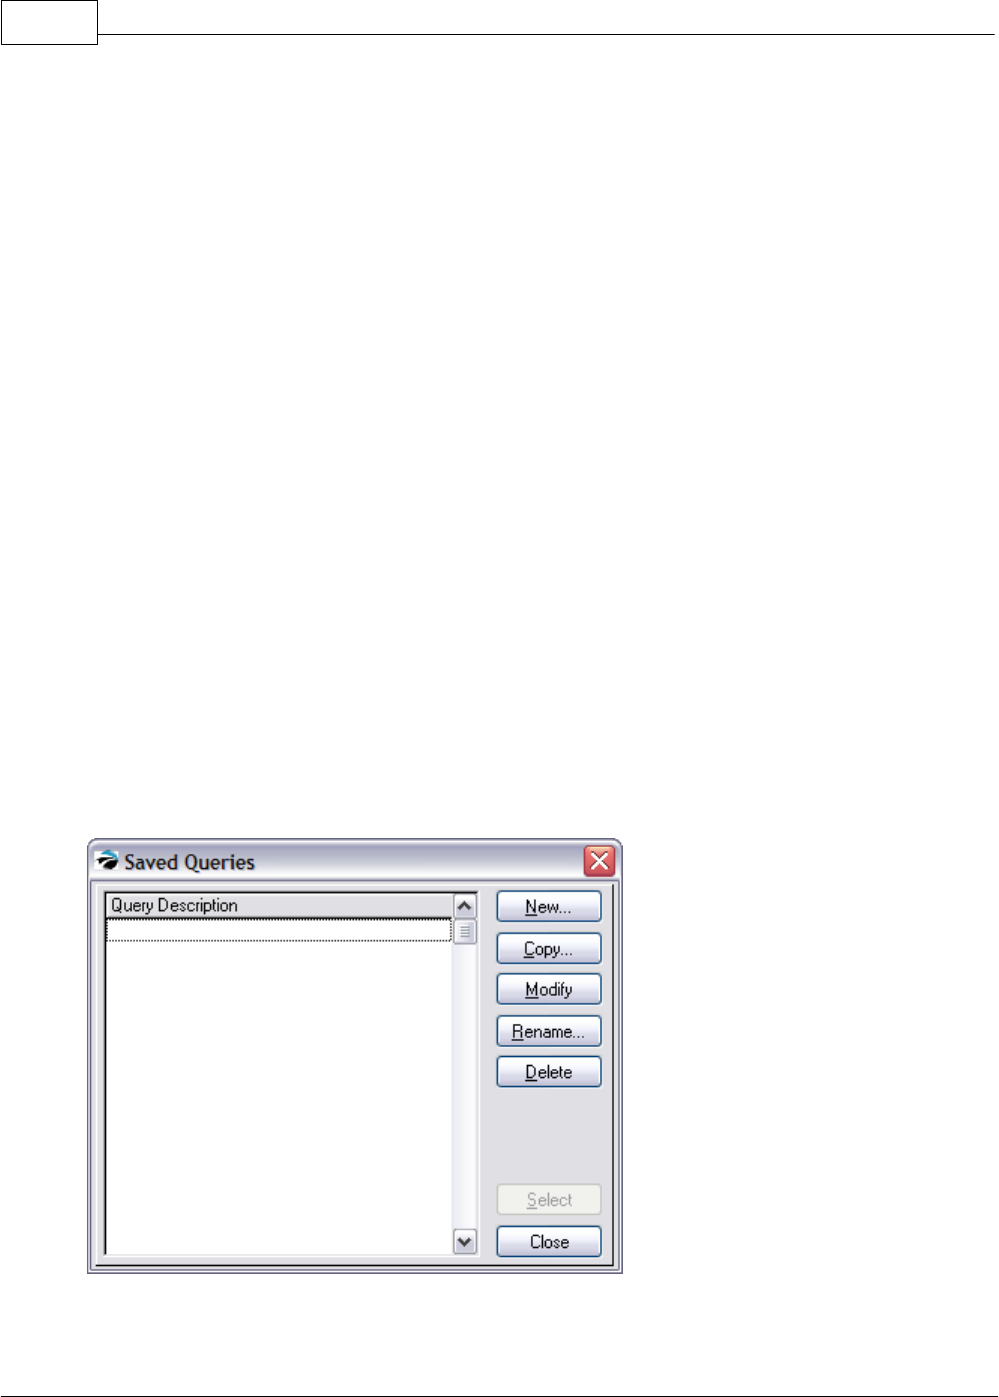
POSitive Retail Manager User Guide312
Copyright ©2007 POSitive Software Company
Ending a Mix & Match Special
Mix & Match setups are not date controlled. You need to open the Mix & Match Manager, highlight
the desired group, and choose the Delete button in the upper left section.
Promo Pricing Vs. Mix & Match (see Promo Manager)
·Promo Pricing of an item has an automatic cutoff date whereas Mix & Match requires you to delete
the group.
·Promo Pricing can be created in advance of a sale with a starting and ending date. Mix & Match
takes effect as soon as it is defined.
·Promo Pricing is not contingent on the number of items purchased. For example, with Promo
Pricing one could purchase just one robe at $37.50 whereas Mix & Match requires purchase of two,
the designated quantity, before the price is in effect.
·Mix & Match takes precedence over Promo Pricing. If an inventory item is assigned to both Mix &
Match and Promo Pricing, the price set for Mix & Match will be used on an invoice.
Customer Returns of Mix & Match Items
If a customer chooses to return an item, it is best to link to the original invoice so that the prorated
value of the item will be refunded rather than the normal selling price.
8.10 Saved Queries
Use this option If you are frequently searching for the same types of items or customers. You may
create an unlimited number of queries, save them, and use them later.
Unlike Locate on the Inventory Center, you can evaluate several fields of information at the same
time.
Query - a filtering device for limiting the results of a search or report. From several places in PRM
you can choose to "apply a query" to the work being done. The query can be simple: one field with

Key Concepts 313
Copyright ©2007 POSitive Software Company
one search criteria, or more complex involving multiple fields of information. The query can be named
and saved for future use.
1) Choose a Field from the List Of Fields
Here is an alphabetical listing of available INVENTORY fields:
Allow Discount - the item has been flagged to allow discounting
Category - the name of a category
Cost - the last order cost as displayed in the inventory record
Date PO Due - an expected date for purchase orders
Department - the name of the department
Description - the inventory item's description
Fixed Commission - not a percentage but a dollar amount
Held In Stock -
Held On Order (same)
Last Date Sold
Last Order Date
Last Price Change Date
Location
Long Description
Manufacturer Code
Manufacturer ID
Manufacturer Name
Minimum Order
Minimum Stock
Number Sold
On Order
Price Level 1
Price Level 2
Price Level 3
Price Level 4
Price Level 5
Price Level 6
SKU
Total In Stock

POSitive Retail Manager User Guide314
Copyright ©2007 POSitive Software Company
Type
Here is an alphabetical listing of available CUSTOMER fields:
Address 1
Address 2
Cell Phone
City
Company Name
Customer ID
Customer Name
E-Mail
First Name
Home Phone
Last Name
Lookup Code
State
User Defined Field 1 - 6
Work Phone
Zip Code
2) Select an operation
Enter the criteria appropriate to the field selected above.
Is Equal To
Is NOT Equal To
Is Greater Than
Is Less Than
Is Greater Than or Equal To
Is Less Than or Equal To
Begins With
Contains
Does NOT Begin With
Does NOT Contain
3) Enter a target Value
Finally, enter a value which will be used in the selection of records.

Key Concepts 315
Copyright ©2007 POSitive Software Company
4) Choose Next
You will be returned to the Query Wizard. Generally you will choose FINISH to execute the query. If
your search is complex, you may add additional criteria and conditions.
8.11 Using Inventory Labels
PRM comes with pre-defined inventory labels which will be adequate for most business uses. You
may edit or create new inventory labels.
8.11.1 Advanced Inventory Label Printing Tutorial
This tutorial should give you all the essential information you need to successfully print barcode labels
in POSitive Retail Manager.
In PRM the SKU field is what will be printed as a barcode if you print a label from the software. It is a
common misconception that a barcode contains lots of information about the product it represents.
For example we are asked all the time if the merchant wants to add a can of Pepsi into inventory can
he just scan the barcode to create the inventory definition. Unfortunately it’s not that easy. The
barcode does not contain detailed product information.
WHAT is a Barcode?
It’s simply a number – or alpha characters or a combination of alphanumeric characters represented
by the familiar bars of various widths found on many products. When you scan the barcode the
scanner converts the barcode into its characters and sends the converted information to the keyboard
port. Scanning a bar code is the SAME as typing the number with the keyboard. Try this experiment if
you have a barcode scanner connected to your POS system:
Open Notepad or Word, or other word processor. With that program active, scan a barcode and watch
the screen literally type the barcode one character at a time. Once the characters are entered the
cursor will move to a new line – that is a Carriage Return that takes it to the new line. The scanner is
programmed to add the carriage return at the end of the scanned characters.
Your scanner comes with a book of codes. You MUST NOT lose this book! You will rarely need it. But
when you do there is no substitute. The book is full of programming barcodes. If your scanner is
adding additional characters or is NOT sending the carriage return the scanner can be reprogrammed
using the codes in the book. These codes can also be used to reset the scanner to factory defaults,
which generally works well with PRM.
PRM System Requirement for Scanners
The PRM system requirement for scanners is any KEYBOARD WEDGE or USB style scanner. Check
with your dealer or contact POSitive if you are unsure of what to buy. We do not support SERIAL
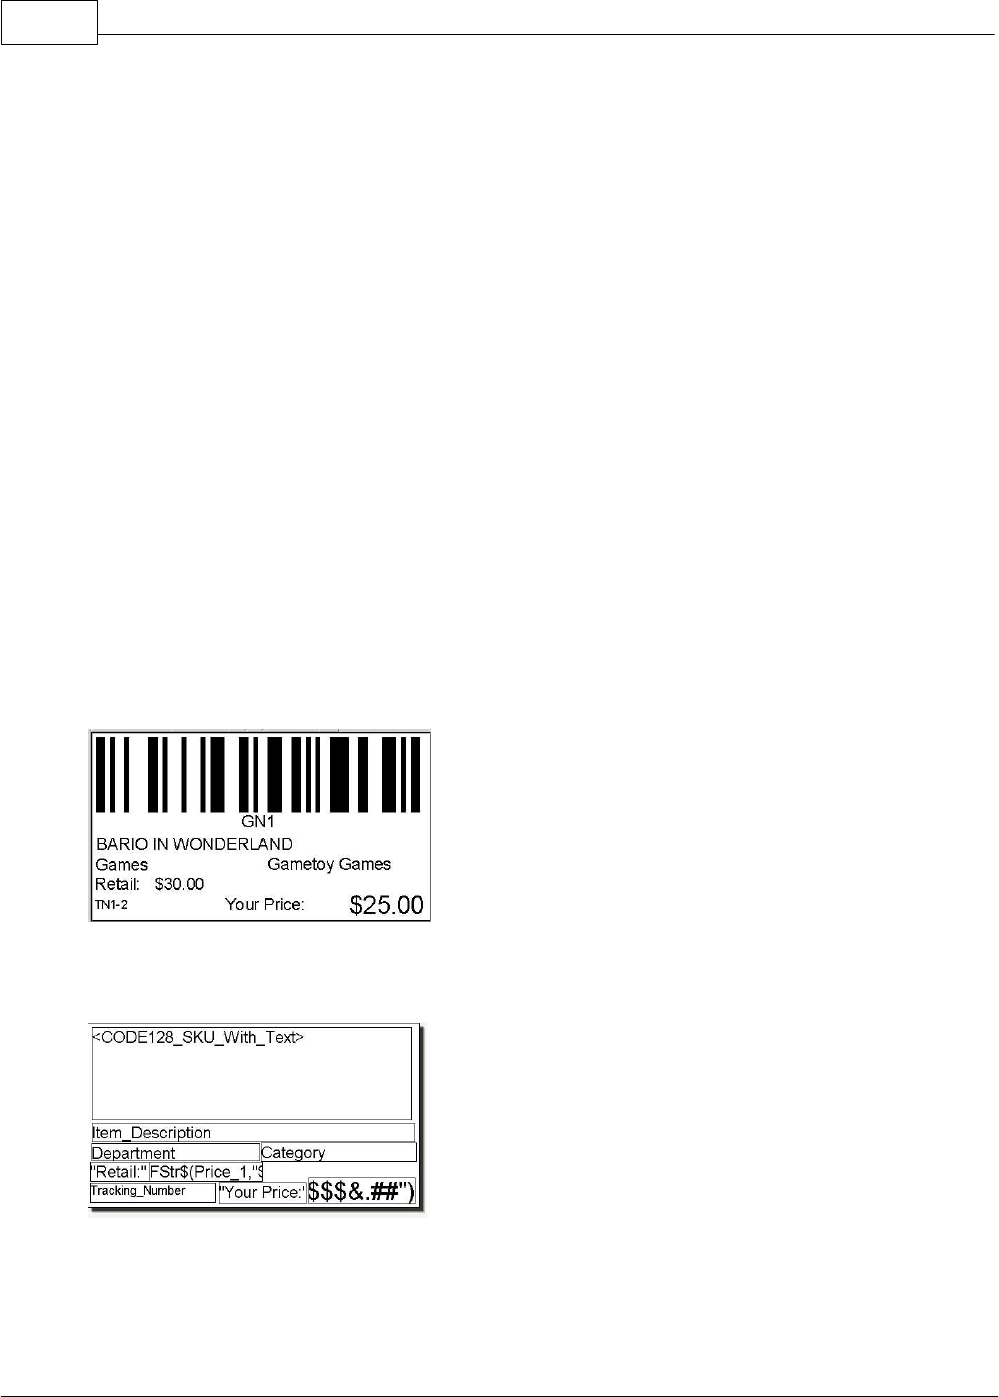
POSitive Retail Manager User Guide316
Copyright ©2007 POSitive Software Company
scanners – they simply will NOT work with PRM
A Note About Barcode Symbologies
Symbology is a fancy word for “symbol type”. More specifically the Symbology represents not only the
type but also the rules that must be followed in printing the barcode.
There are three barcode symbologies that allow both numbers and letters (Alpha- Numeric) SKU’s.
Since PRM allows Alpha-Numeric SKU’s we have found that most merchants choose to use them. If
you choose to use an Alpha-Numeric SKU you must limit your Barcode type to either:
Code 128
Code 3of9 (aka code 39)
2.5 Datalogic
Each of the above symbologies has rules to follow. There are illegal characters that will cause your
label not to print – or to print without the barcode. Generally don’t use the shifted number keys
(!@#$%^&*()) punctuation keys ({}[]|\:;”’<>,.?/~`). It’s OK to use a DASH (-). But avoid using the
slashes (\ / ). If you find you have an illegal character, simply edit it in your Inventory List.
There are perhaps some other more obscure rules but these cover the typical problems that most
people have with barcode symbologies.
An Occasional Misunderstanding
We have sometimes seen a merchant design a new label for each inventory item, “hard-coding” the
SKU and description directly into the label. The flaw in this is that you only have 100 labels that you
can design. If you make a label for each item then you can only have 100 inventory items.
Instead, you should generally make just ONE label. You use FIELDS like “DESCRIPTION” and “SKU”
in the layout. Then you assign the label layout to the inventory item. When you print a label PRM will
substitute the FIELD NAME with the corresponding data in the inventory item’s definition.
Label Editing
You can access the label editor by clicking on Reports and selecting Inventory Labels. Select a label
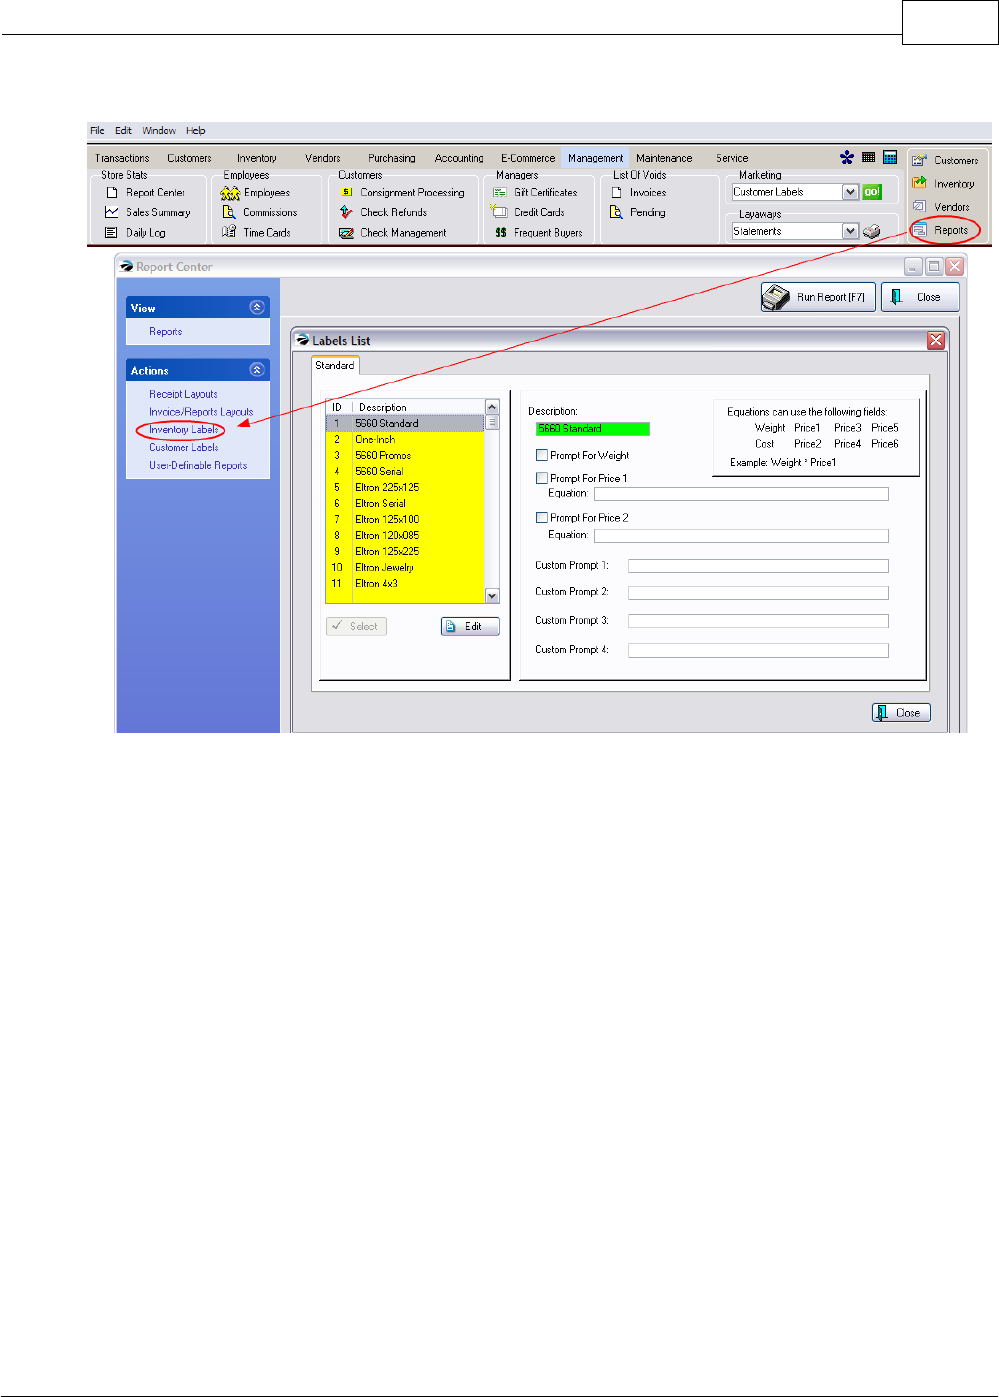
Key Concepts 317
Copyright ©2007 POSitive Software Company
and click on Edit.
TIP: By default all inventory items will be assigned to label design #1. If you design your label for label
#1 then it won’t be necessary later to re-assign your inventory items to your new design.
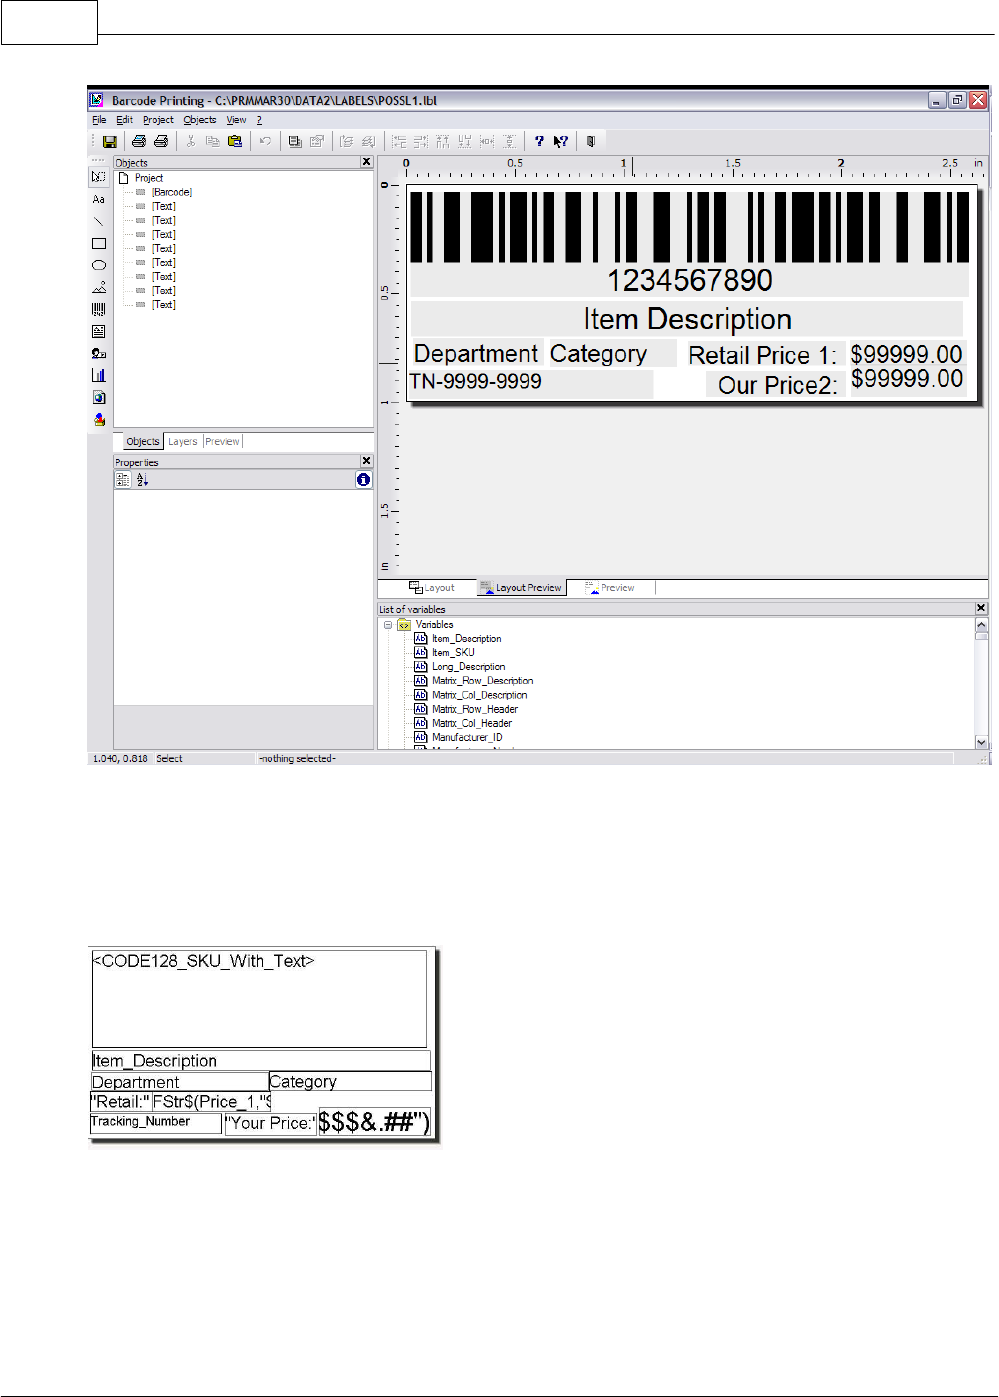
POSitive Retail Manager User Guide318
Copyright ©2007 POSitive Software Company
The label editor is flexible enough to accommodate any label size you would care to use. The only
real limit you should be aware of is that the smallest label size you should plan to use is at least 1.75
inches long. Alpha Numeric SKU’s print larger barcodes than numeric SKU’s and a smaller label will
“scrunch” the bars too closely together and thus be unreadable if you choose a shorter label.
This is the label layout of a typical barcode label. The boxes are DATA FIELDS that will be filled in by
the inventory item when the label prints.
Re-sizing and Moving Fields
You can re-arrange the fields, you can re-size them, and you can change the font style and size. You
can add new fields and remove unwanted fields. Notice the <30f9_SKU…> field is highlighted. The
hashed line (1) is the “highlighted field” indicator. You can resize the field by grabbing the black dots
(2) at the edges. Top and bottom dots allow you to re-size up and down. Those on the left and right
edges allow left to right re-sizing. Finally the corners allow you to enlarge or reduce the size both up
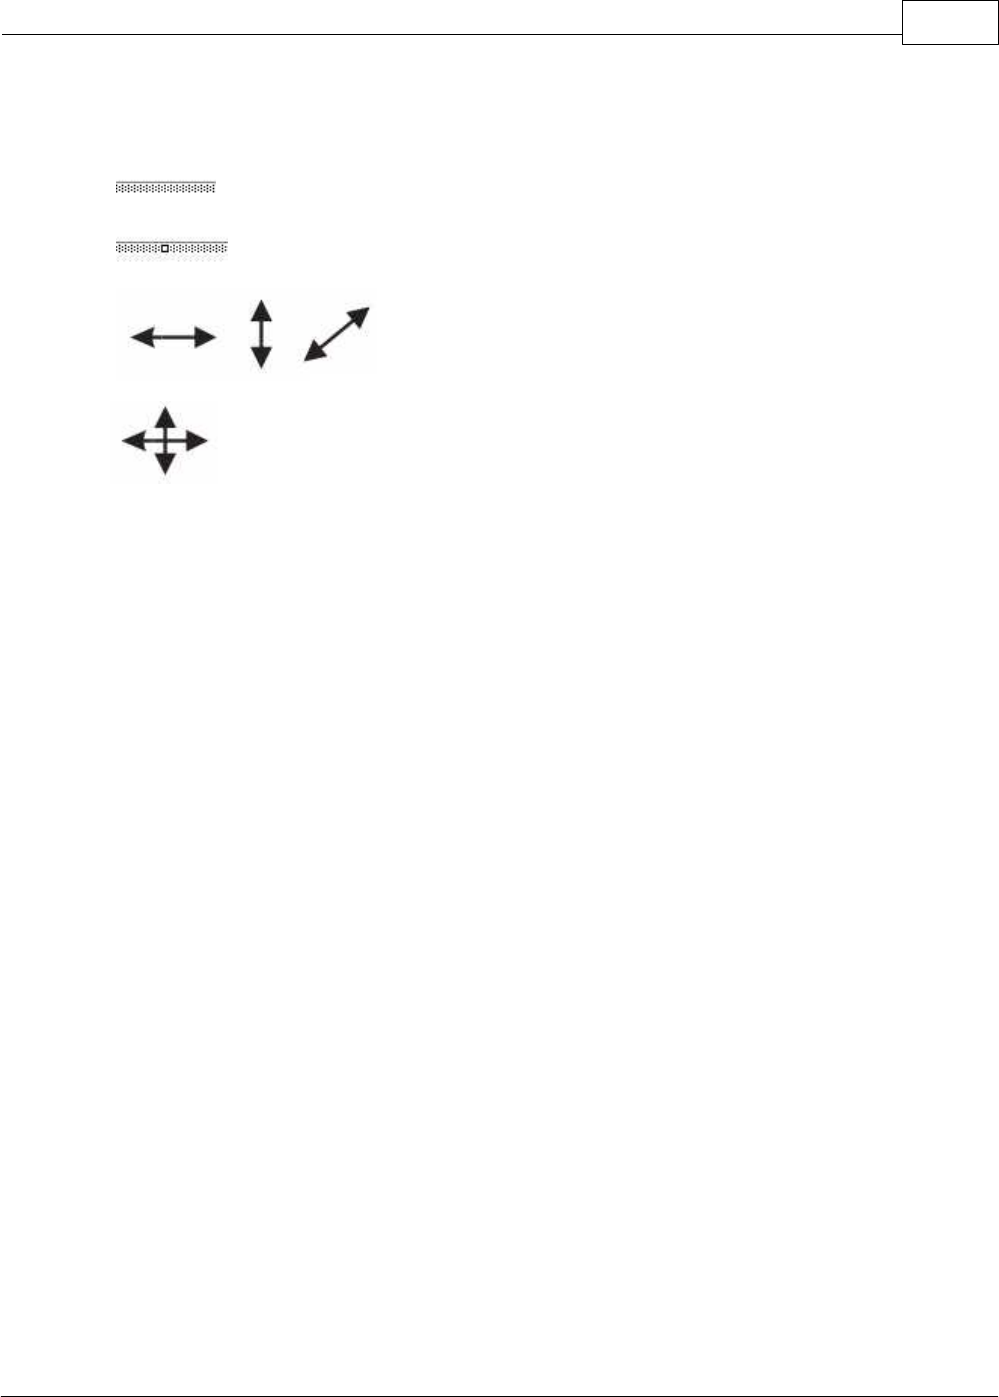
Key Concepts 319
Copyright ©2007 POSitive Software Company
and down and left to right. Hover your mouse over the dots and when the cursor changes from an
“open arrow pointer” to an icon like these (3), you can resize the field. Hover just over the hashed line
and the cursor changes to a four-point arrow (4). When that happens, you can move the field.
1.
2.
3.
4..
Deleting a Field
Delete a field by highlighting it and pressing the delete key on your keyboard.
Label Layout Set-up
Access the Layout screen by Choosing PROJECT MENU: PAGE LAYOUT. Review the printer setting
tab and click the CHOICE button. Be sure the correct printer driver and PAPER SIZE is selected.
Barcode Printers like the Eltron printers recommended by POSitive will have a variety of label sizes to
select in the paper size setting. Inkjets and laser printers will generally want the 8 ½ x 11 letter size
selected.
Printer Selection Tab
You need to use a Windows Printer to print barcode labels. You’ll need to install the correct driver for
your printer. See your printer’s user guide for details.
PRM supports laser printers, inkjets and dedicated barcode printers. Basically any of them should
work. We are most familiar with the Zebra line of barcode printers.
Inkjets are colorful but it will be expensive to print labels on an inkjet. The most economical are the
dedicated Zebras. The label stock costs much less than sheet labels. Since the Zebra printers are
thermal printers there are no ink cartridges or toners to buy.
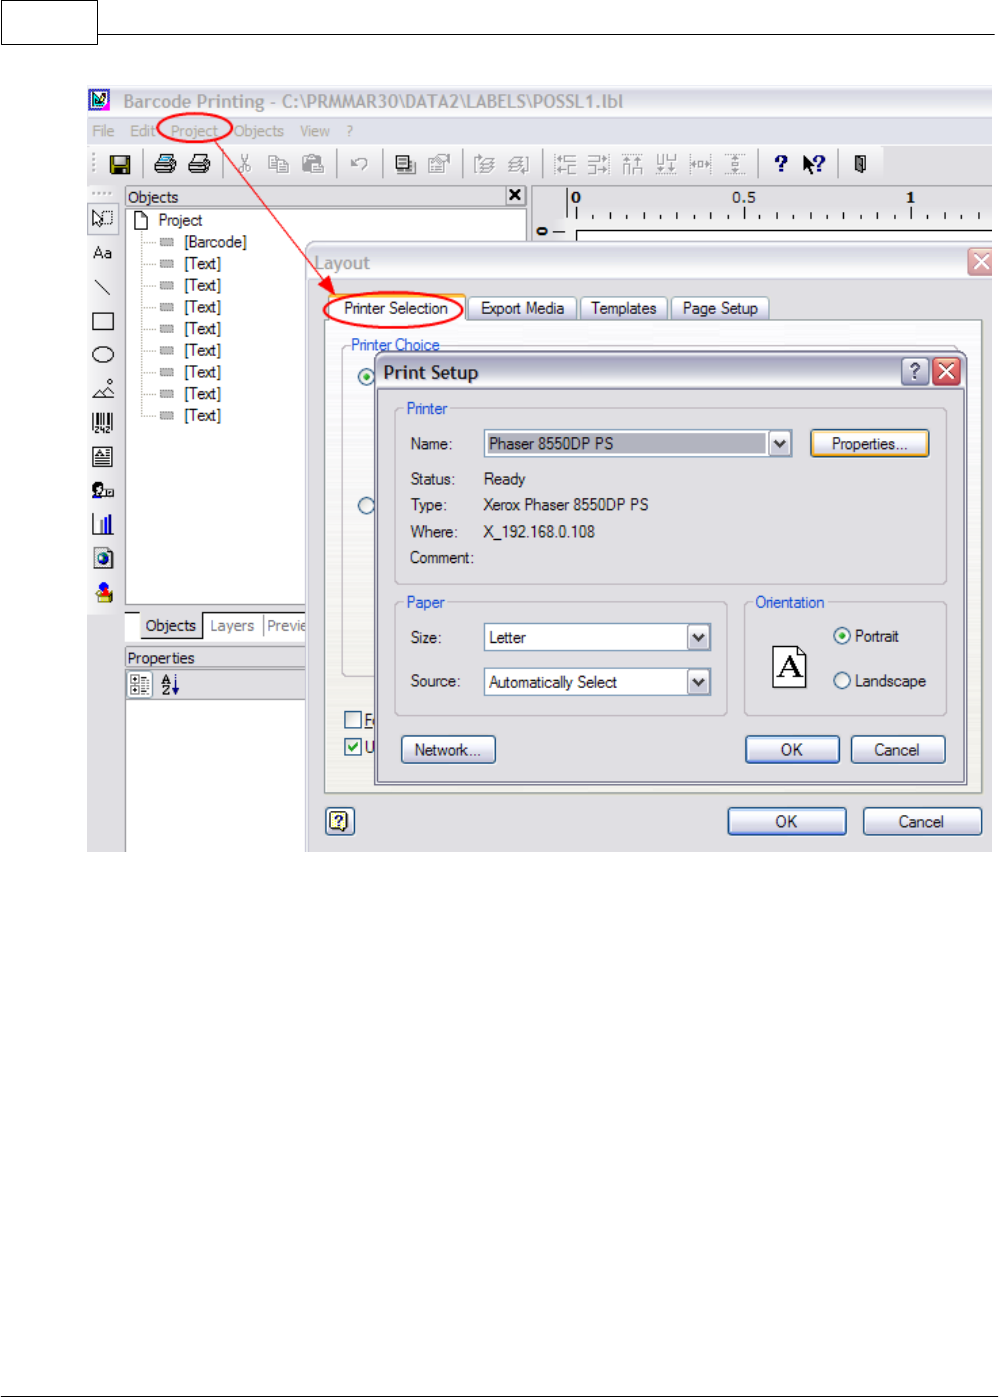
POSitive Retail Manager User Guide320
Copyright ©2007 POSitive Software Company
Page Setup Tab
The Page Setup Tab makes it EASY to custom define any label you wish. Grab a ruler and a
calculator and let’s break this down to its simple form.
First, it’s critical that you set up the printer as described in the previous section. Do it now if you haven
’t already.
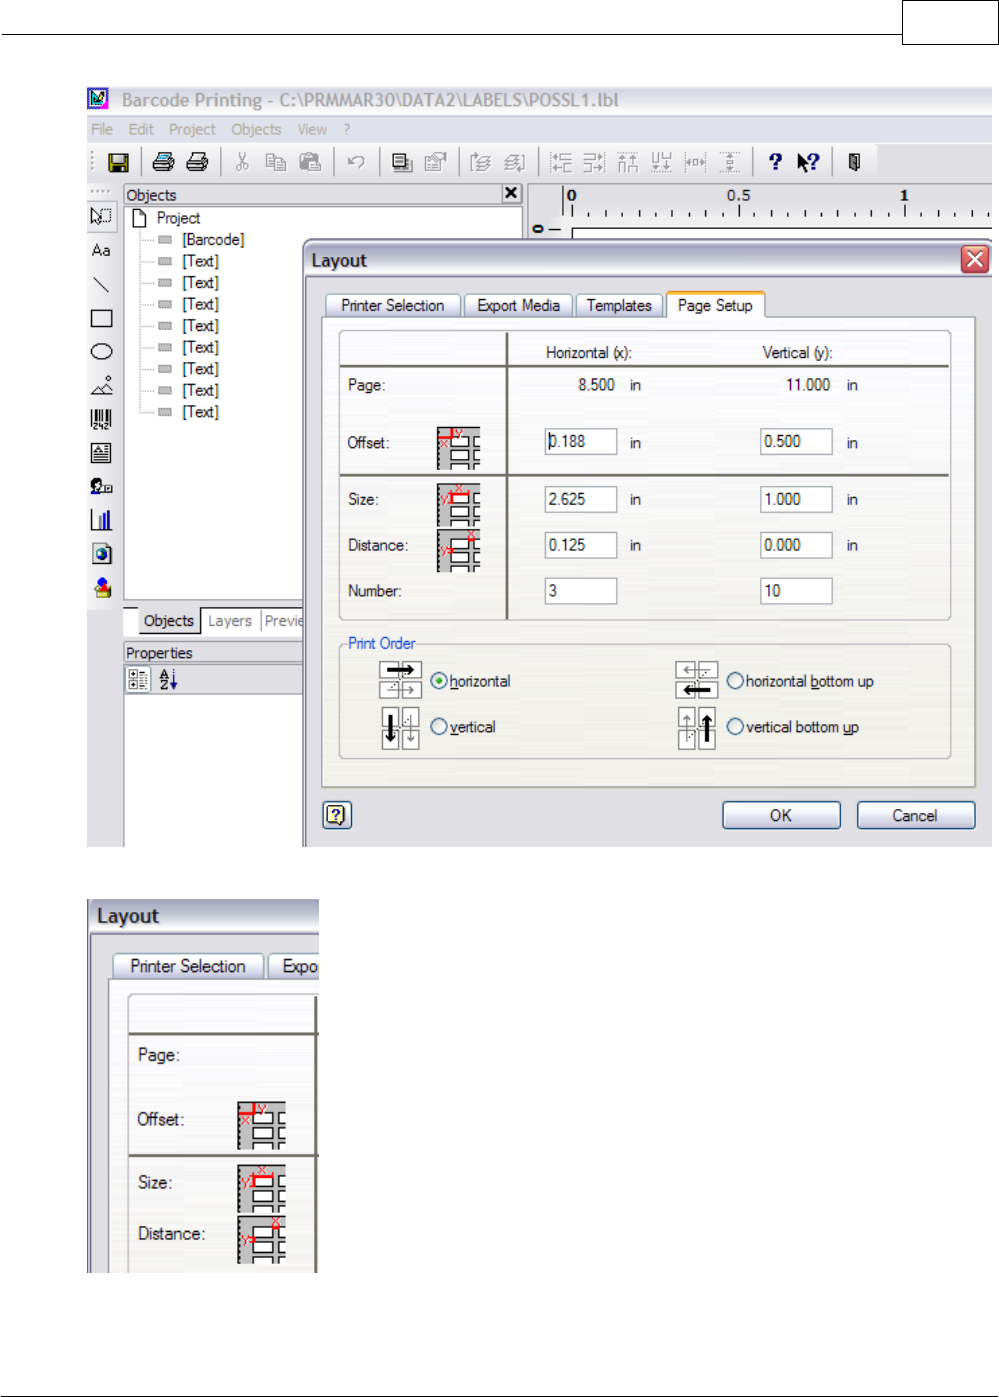
Key Concepts 321
Copyright ©2007 POSitive Software Company
Next, look closely at the icons. They describe the measurements the program is asking for.
The OFFSET fields want to know:
Y: how far it is from top edge of paper to top edge of first label.
POSitive Retail Manager User Guide322
Copyright ©2007 POSitive Software Company
X: how far it is from left edge of paper to left edge of first label.
TIP: Take your ruler and measure the distance from the top of the label sheet to the top of the first
label. ½ inch (1 divided by 2) would be expressed as .500. 5/8 (5 divided by 8) would be .625. (PRM
2.2 beta 12 and later will accept 3 decimal points – earlier versions require you to round off.) The main
thing to remember is you are converting the ruler measurement to a decimal number. Generally, if you
are converting a fraction you divide the top number by the bottom number.
The SIZE fields want to know:
Y: how tall is the label?
X: how wide is the label?
The DISTANCE fields want to know the distance between labels.
Finally the NUMBER fields want to know how many labels across the page by how many labels down
the page.
Once you have these settings entered click the OK button to save and close the window.
Common Variations
If you are creating labels on an inkjet or laser printer the most common labels are 3 across by 10
down - 30 labels to a sheet of labels. So in this case the NUMBER fields would be X=3, Y=10
If you are setting up labels on an Zebra Label printer use these settings:
X
Y
Offset
0
0
Size
(Measure Width)
(Measure Height)
Distance
0
0
Number
1
1
Here’s a fraction to decimal conversion chart for your convenience
Fraction
Decimal
Fraction
Decimal
Fraction
Decimal
1/4
0.25
1/8
0.125
1/16
.063
3/4
0.75
3/8
0.375
3/16
.188
5/8
0.625
5/16
.313
7/8
0.875
7/16
.438
9/16
.563
11/16
.688
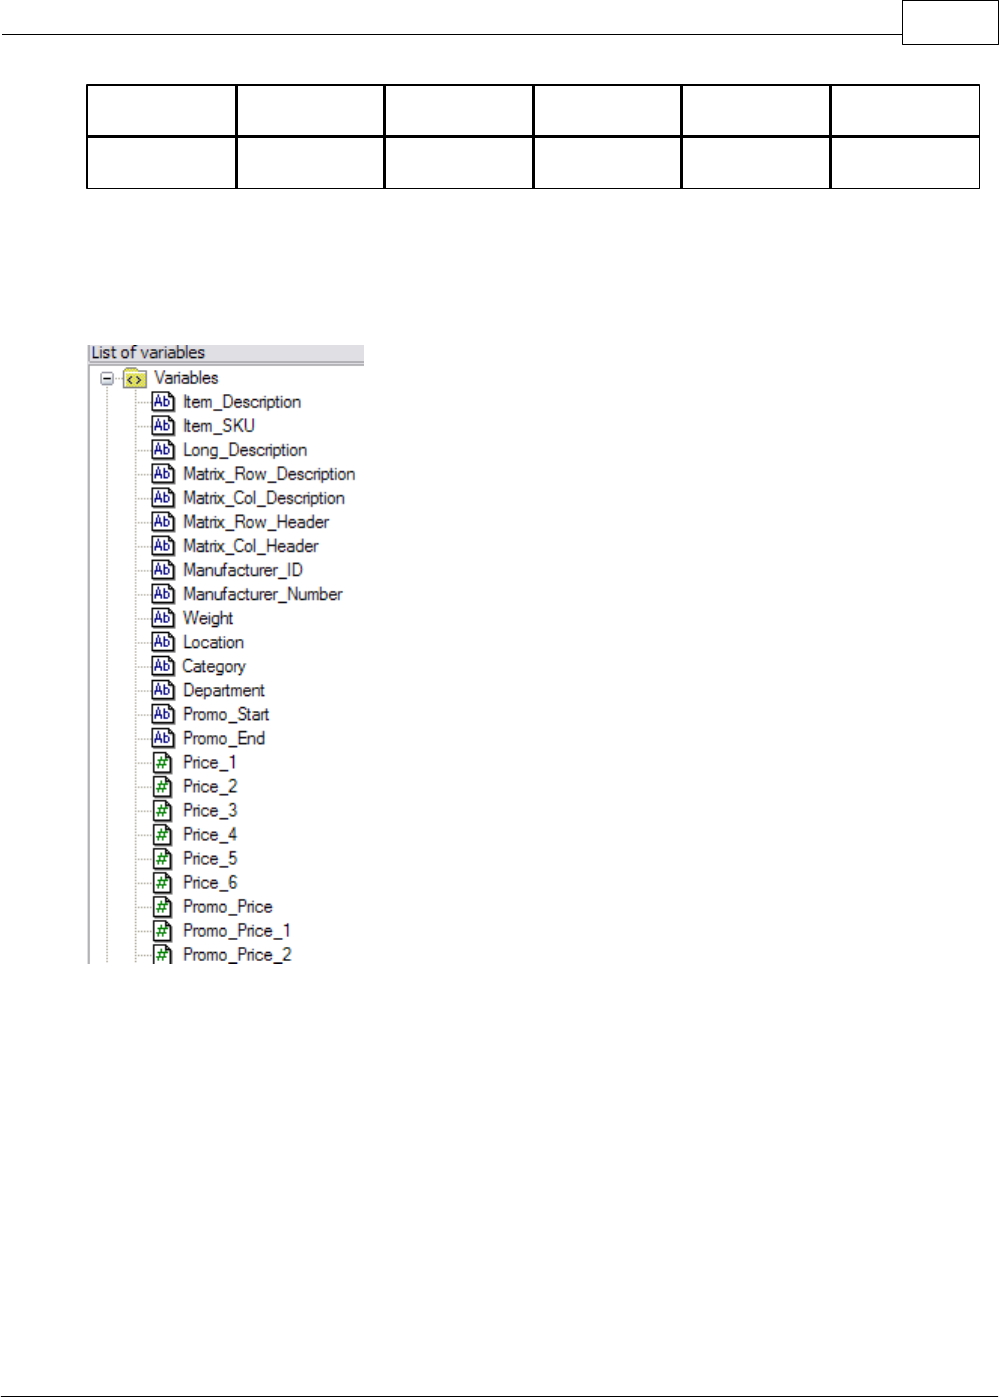
Key Concepts 323
Copyright ©2007 POSitive Software Company
13/16
.813
15/16
.938
Adding fields to the label
In brief review you should now understand how to move fields around in the label layout, how to
define your Page Setup including printer setting, paper size, and label page setup. If not, review the
previous sections.
In the Label Editor you can add fields to a layout in a couple of ways. The main way to add a
database field from PRM is to go to the VIEW MENU: WINDOWS: POPUP VARIABLES: Click on the
VARIABLES folder.
Here you have all the data fields available to put into a label. To add a field into the layout just DRAG
and DROP it into the layout. Then resize it and move it where you want it.
Formatting Text Fields
You can control the text size, justification, font, and more. To edit the text just double click the field.
The following screen appears giving you incredible formatting control from one screen.
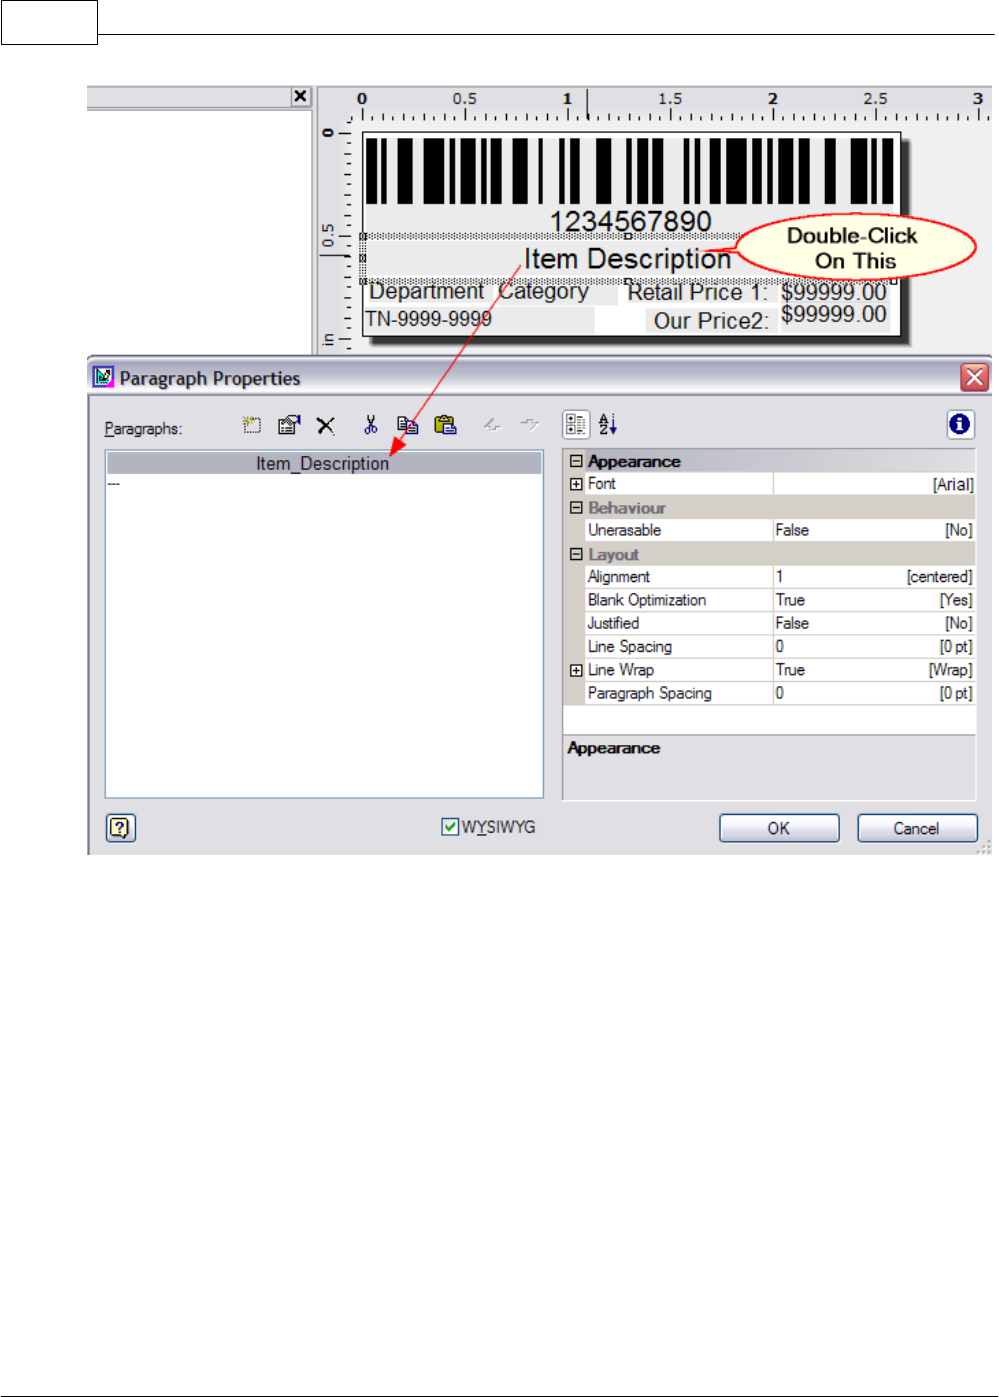
POSitive Retail Manager User Guide324
Copyright ©2007 POSitive Software Company
Formatting Barcode Fields
Simply double click on the barcode field to edit the details. Remember that Alpha Numeric SKU’s will
require 3OF9 (Code 3 of 9), CODE128, or 2.5DATALOGIC symbologies.
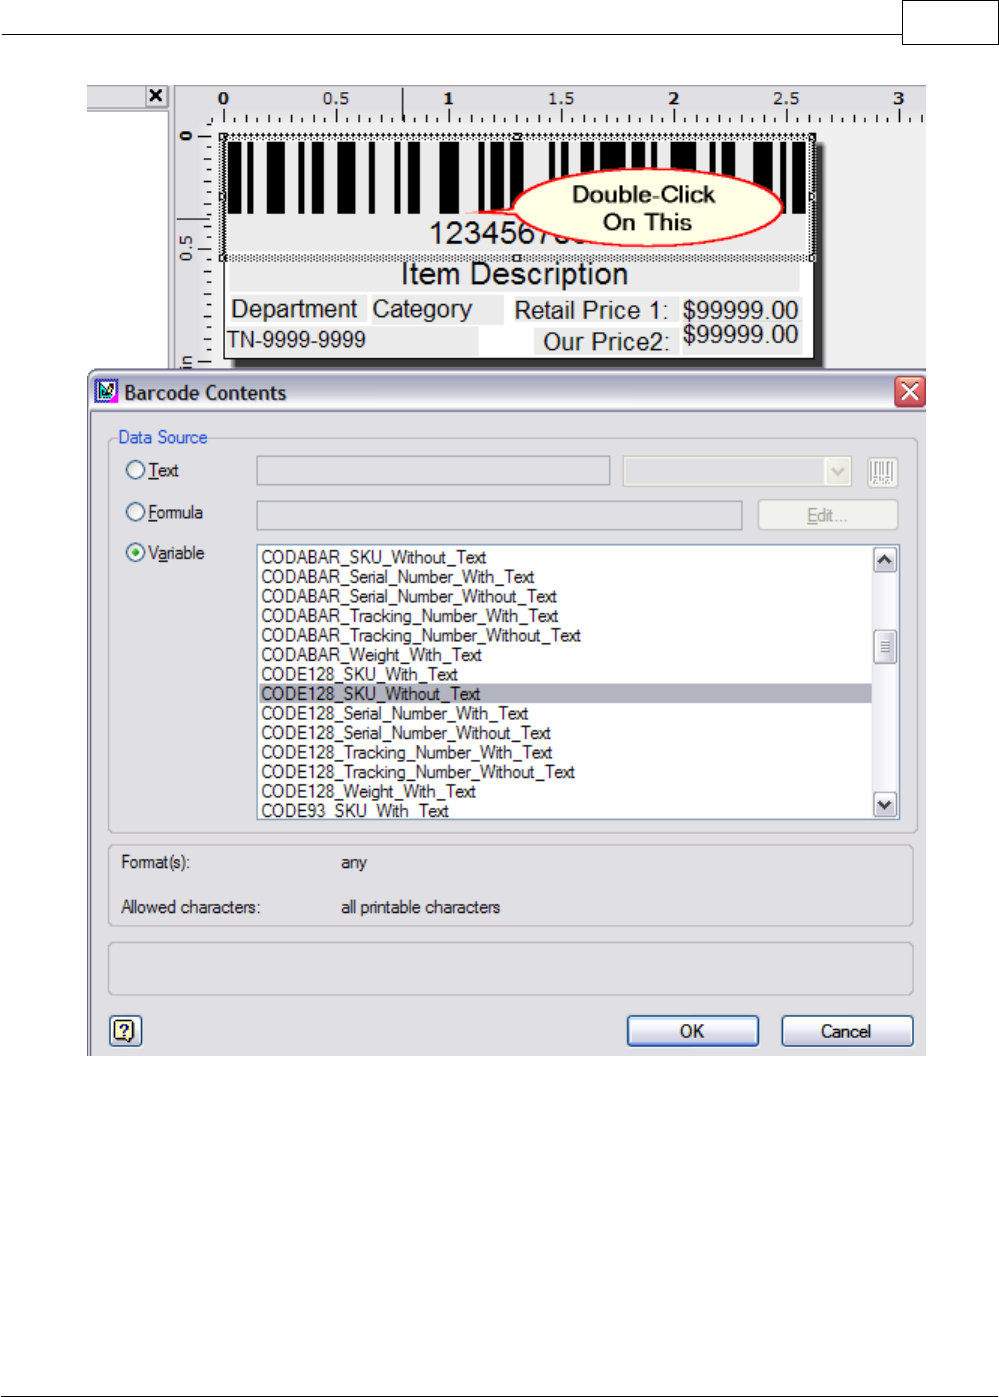
Key Concepts 325
Copyright ©2007 POSitive Software Company
Adding Fields – Some Other Options
The Tool Bar gives you other options for adding Text, Lines, Squares, Circles, Pictures, and
Barcodes. Just click the icon in the Tool Bar and draw a square in the design layout. Double click the
field and edit as necessary.
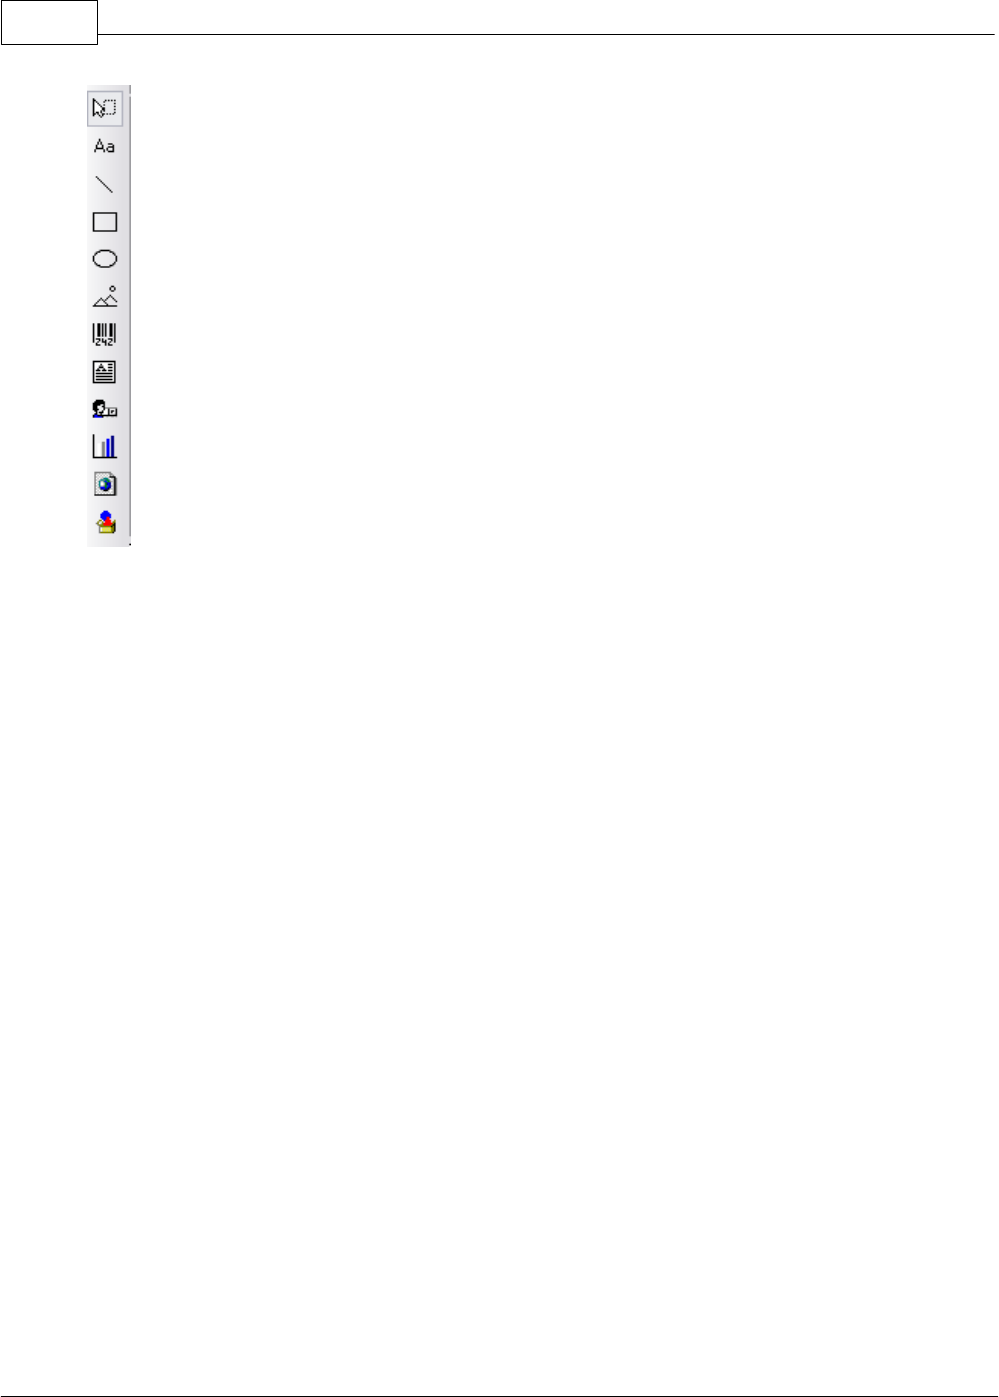
POSitive Retail Manager User Guide326
Copyright ©2007 POSitive Software Company
Add some “hard coded” text (That is to say text that is NOT a data field which will be replaced by data
from the software) by clicking the Aa icon and drawing a box in the layout. The box will be empty. Now
Double click the box. A BLANK text Properties screen appears. Double Click the “---“Add a line icon.
Click the TEXT tab. The next screen shows the process. Edit the text size and move the text field into
place.
Ideas for this hard-coded text field include… Store name and City/State, a Slogan, The word “PRICE:”
just before a field that fills in the price. “Our Price”, “Your Price”
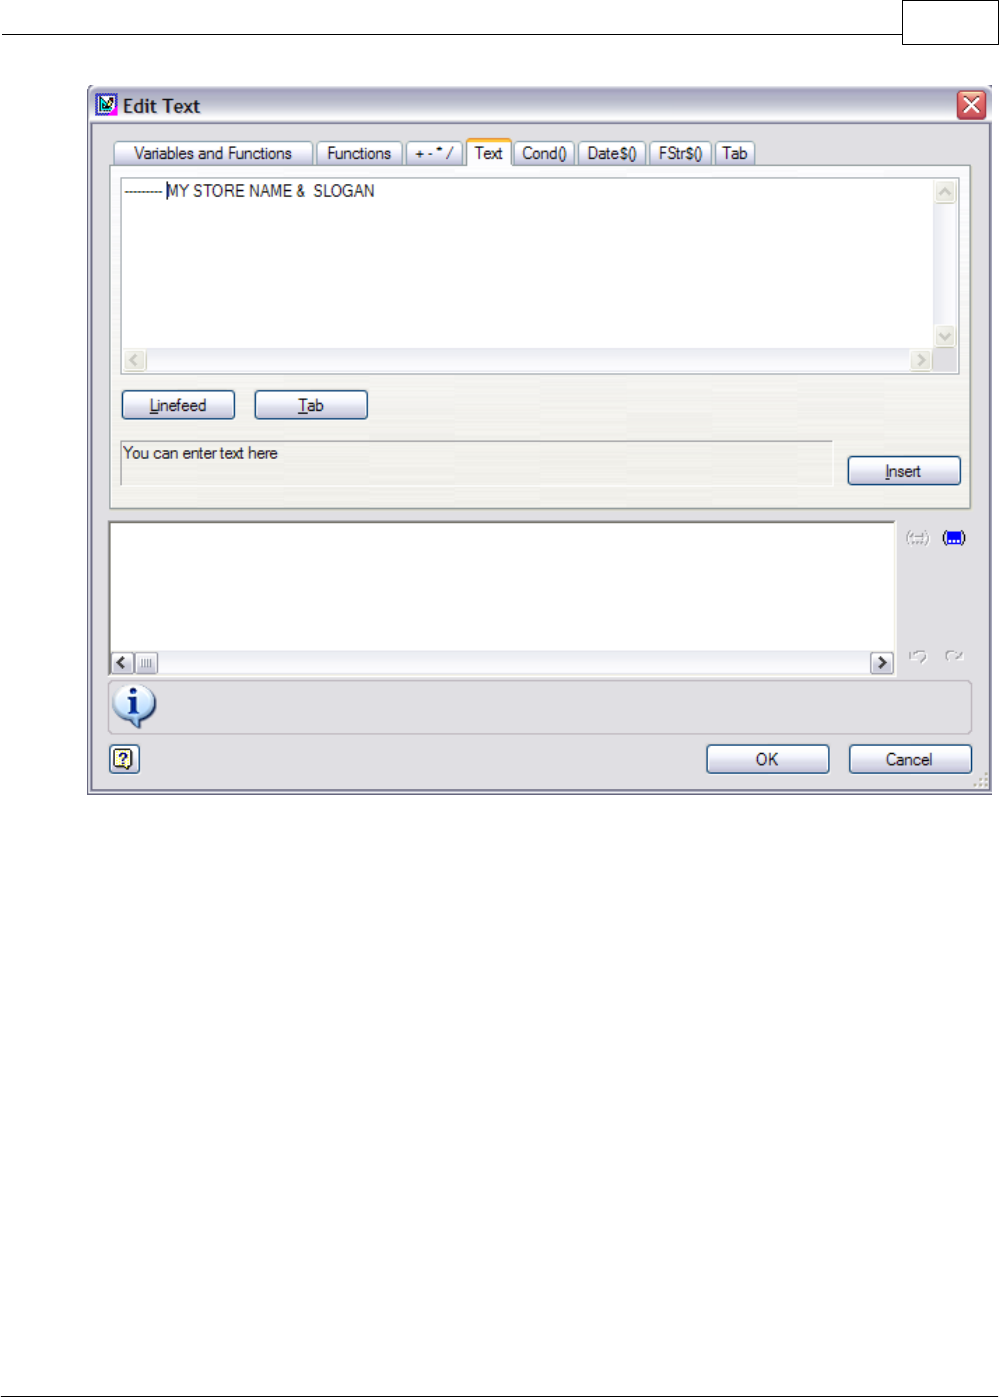
Key Concepts 327
Copyright ©2007 POSitive Software Company
Testing Your Label
FILE MENU: PRINT SAMPLE –
“Without frames” for roll label printers (Zebra).
If you are printing on a laser or Inkjet printer choose “with frames” to show a reference frame on plain
paper. Hold the test page over a label sheet to see that the data lines up correctly on the labels.
Saving Your Work
When you exit the label layout program be sure to save your work. Of course you can always go to
the file menu and choose SAVE every 5 or 10 minutes.
Assigning Inventory to a label
Now that the label is defined you can assign the label design to any or all of your inventory items.
Assigning one item at a time –
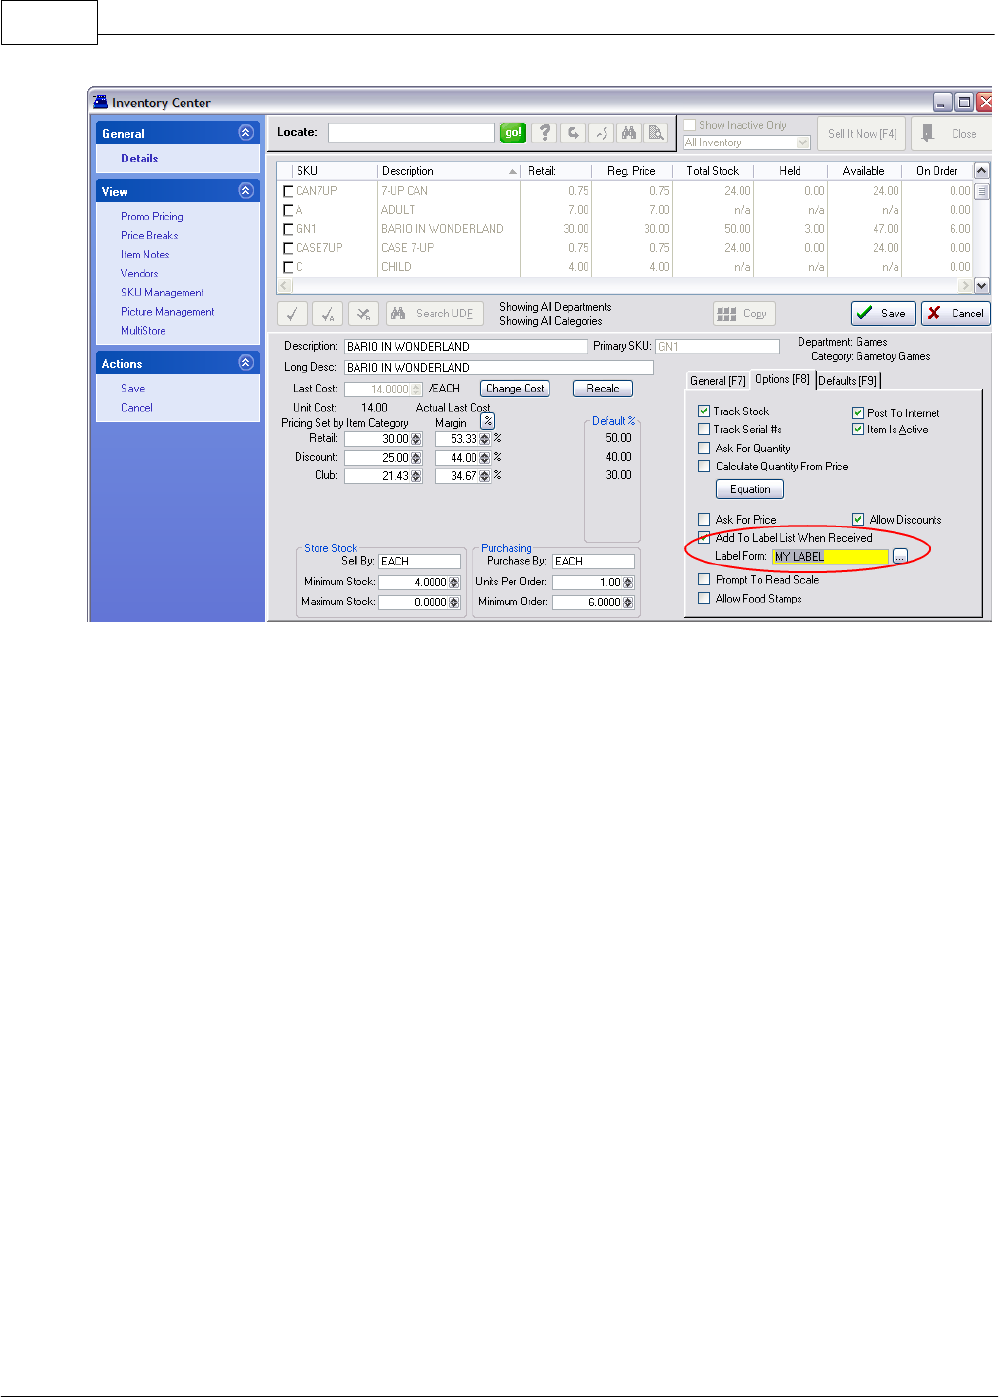
POSitive Retail Manager User Guide328
Copyright ©2007 POSitive Software Company
In PRM, edit an inventory item. Choose the OPTIONS [F7] Tab. The following screen gives you a
“Label Form” field. Type it in or choose it from a list.
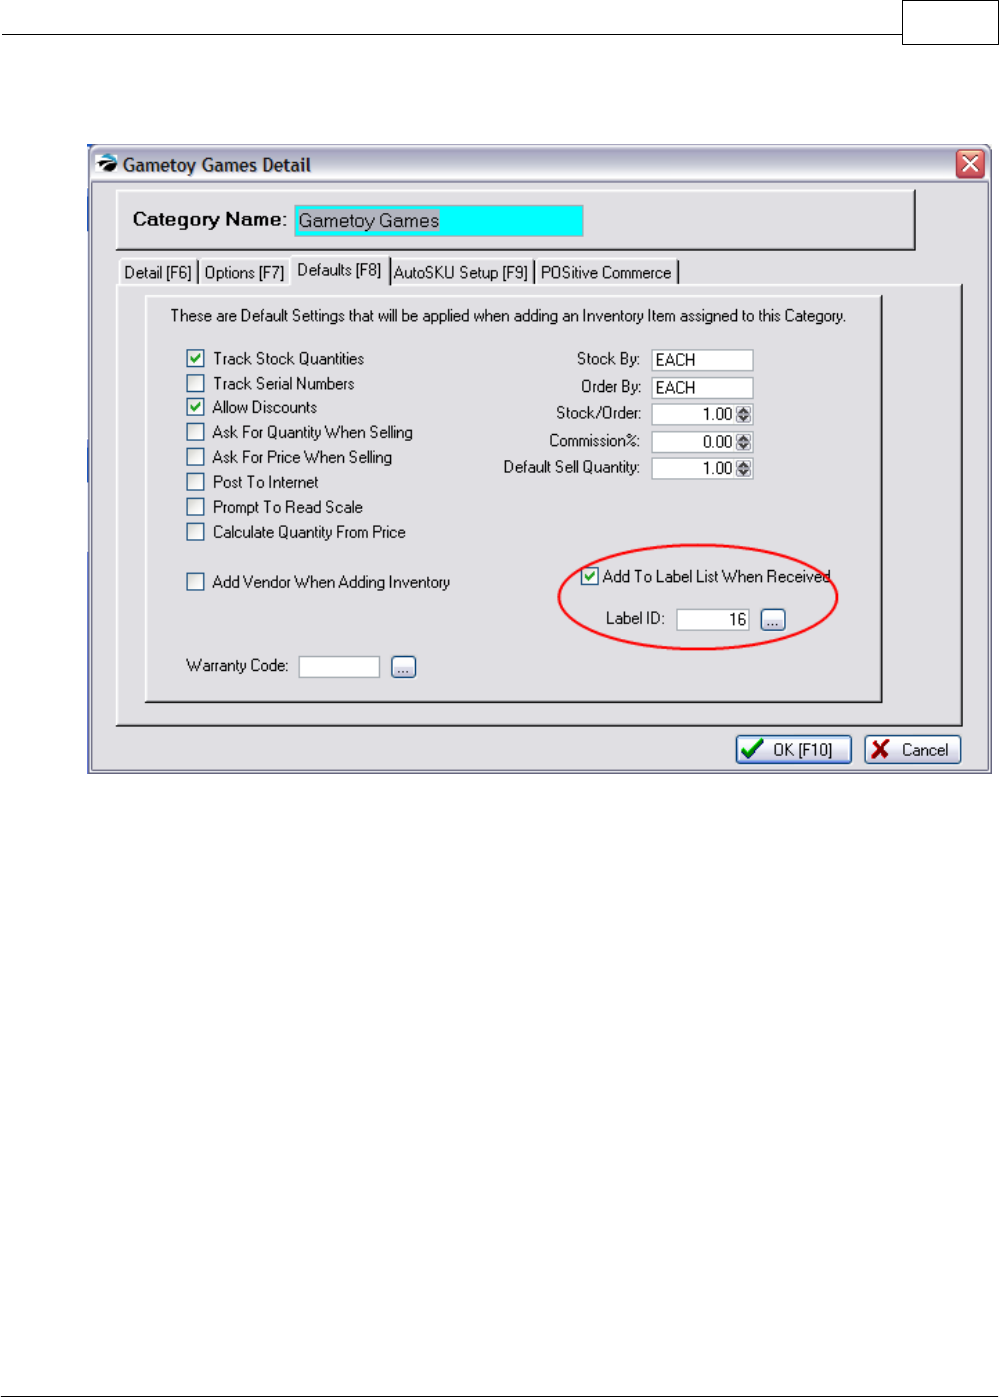
Key Concepts 329
Copyright ©2007 POSitive Software Company
Assigning to an entire category
In PRM, choose Maintenance, Categories, highlight a category and click the Defaults button. Edit the
Label ID number and choose whether to add this item to the list of labels to be printed when the item
is received on a PO. Finally you can re-assign all products in this category to the new label style by
clicking the RESET INVENTORY button in the lower left corner. Repeat for each category to
re-assign.
8.11.2 A Demonstration of Label Printing
The demo version of PRM has sample inventory which will be used for our example. (If you’ve already
set-up your company and entered inventory, you can us your own data.) You need to have a printer
attached to your computer, one that will print on full 8 1/2 x 11 inch sheets of paper. Next, you need to
select some inventory items for label printing.
There are several ways of getting labels to print from PRM, but here is an easy way:
First, open the Inventory Center, then select an inventory item or more than one item by clicking on
the white box on the left side of the SKU
(1) Choose "Add To Label List"
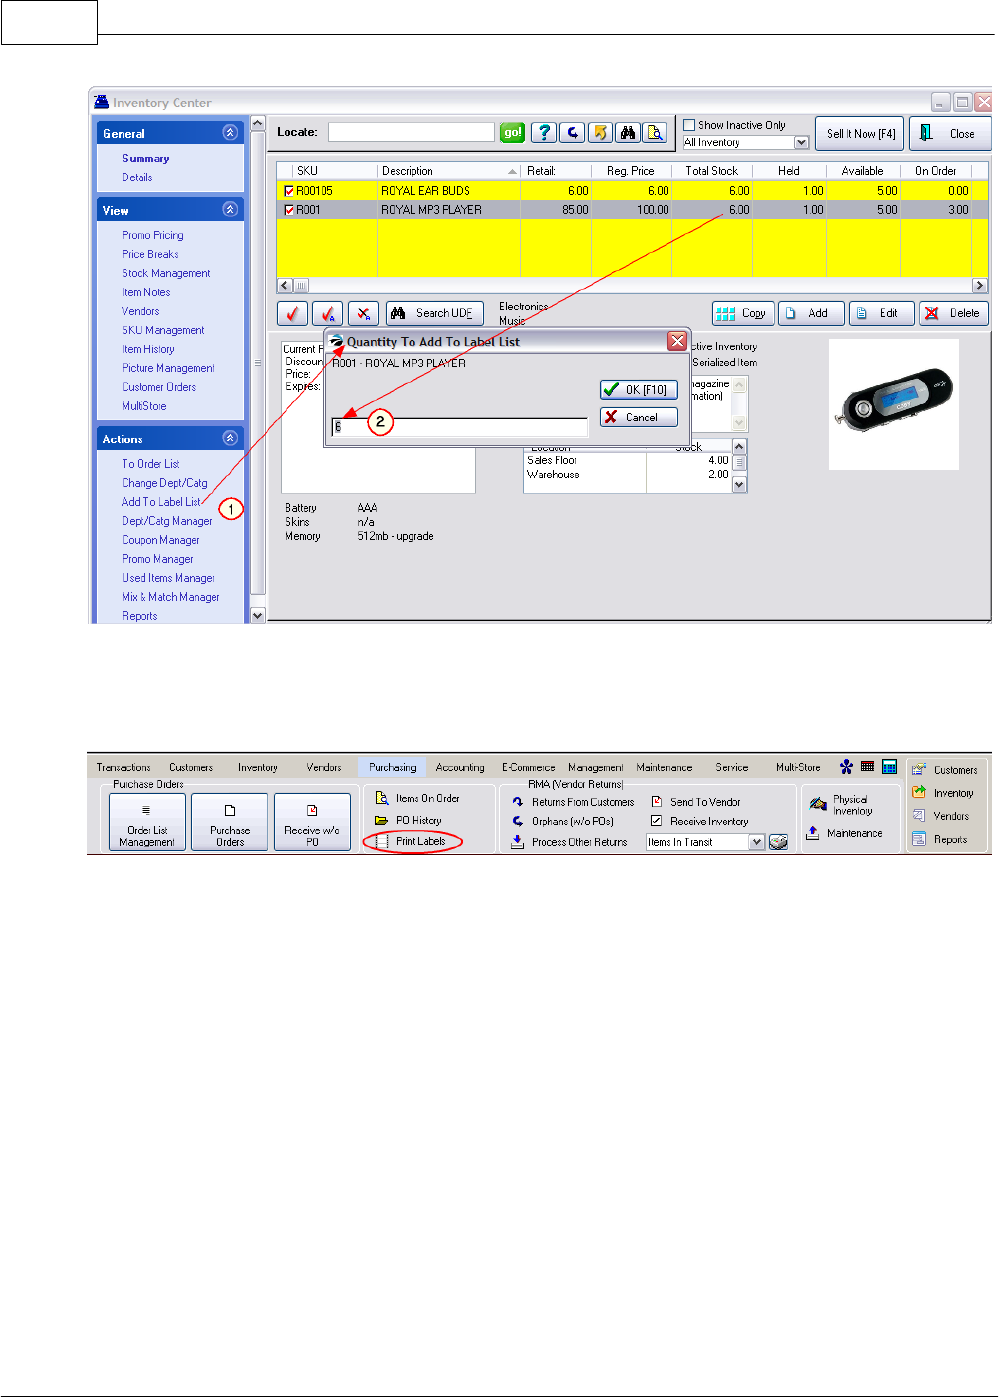
POSitive Retail Manager User Guide330
Copyright ©2007 POSitive Software Company
(2) You’ll be prompted to choose how many labels to print for this inventory item. Then choose OK.
You can add more items to the list, or start printing now.
Now, you will open the label list and print your labels. Click on Purchasing and click on Print Labels.
Inventory Labels List
Here you’ll see the item(s) you selected, the number of labels to be printed and the label type. You
can also Add additional items from this screen, Edit the number of labels to be printed for each item,
reassign the Label Type, among other option.
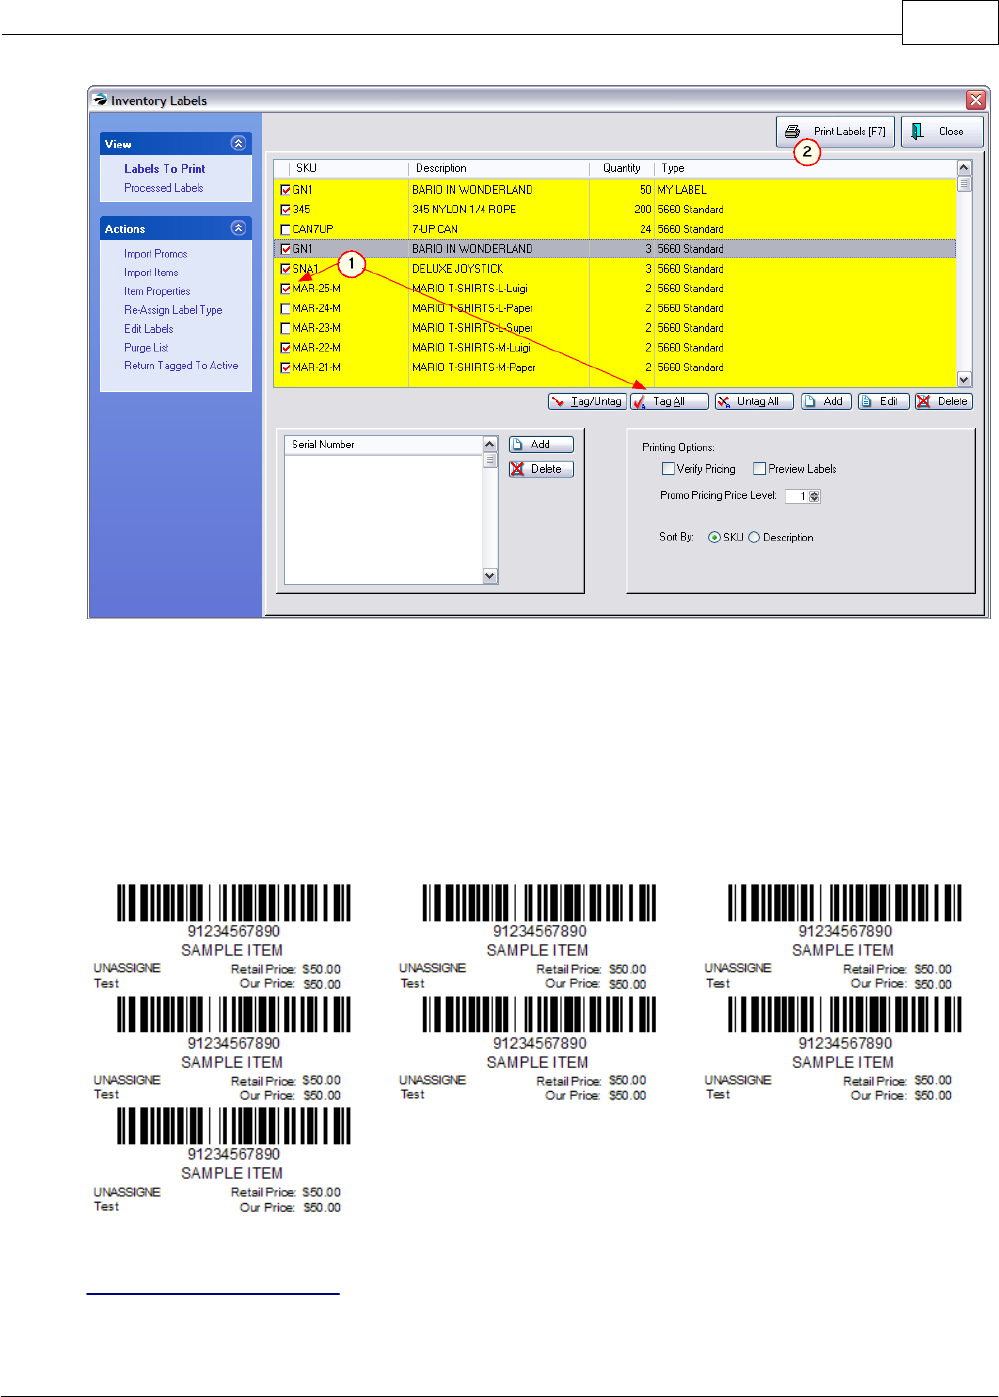
Key Concepts 331
Copyright ©2007 POSitive Software Company
(1) Tag each item in the list. (TIP: Click on the Tag All button).
STOP! Is your printer turned on? Do you have some paper in the printer? (Don't worry about using
label stock, we are just going to print to plain paper for this demonstration.)
(2) Click on the Print Labels button.
(3) Answer Yes when prompted if you are ready to print Standard labels.
If everything went correctly, you should see labels across the page looking something like these.
Reprinting The Labels
If your first attempt wasn't successful, or if the printer malfunctioned, you can reprint labels.

POSitive Retail Manager User Guide332
Copyright ©2007 POSitive Software Company
1) At the top of the Inventory Labels window choose the View named Processed Labels.
2) Select the label(s) that need to be reprinted.
3) Click on the "Return Tagged To Active" option.
4) Now click on the Labels To Print view at the top of the window. You are ready to reprint.
So, that's all there is to it. Now you should be able to do the basics of label printing.

Index 333
Copyright ©2007 POSitive Software Company
Index
- 4 -
40 Column Printer 54, 237
- 8 -
80 Column Printer 237
- A -
Access Panel 87
Accounting
Account Inquiry 72
Accounts Payable 72
Accounts Receivable 72
Activity By Date 72
Aging 72
Aging Report 72
AP Aging 72
AP History 72
AP Pending 72
Cash Forecast 72
Chart of Accounts 72
Checkbook 72
General Ledger 72
Management Reports 72
Payments 72
Payments By Date 72
PO Tax (Paid) 72
PO Tax (Pending) 72
Post Transactions 72
Processing 72
Reports 72
Sales 72
Sales Tax 72
Setup 72
Statements 72
Store Credits 72
Transaction History 72
Transactions By Date 72
Uncollectable Debts 72
Accounts Payable 196
Check Number 226
Accounts Receivable 196
Aging Options 224
Statement Setup 224
Add
Category 107
Department 107
New Inventory 107
Add To Label List 94, 140
Adding Items To The Order List 172
Adjust Cost 93
Adjust Stock Count 118
Advanced Search
POSitive Choice 12
Age Verification 278
Check ID 234
Enter Birtdate 234
None 234
Scan Driver's License 234
Alert When Backorders Have Arrived 217
Allow Duplicate SKUs 196
Alternate Description 130
Alternate SKU 94
AR Aging
By Month 224
By Number of Days Due 224
AR Payment
Skip Prompt for ID 234
AR Payment Due
Number of Days 224
AR Payment Minimum Amount 224
AR Statement
All Transactions 224
Balance Forward Style 224
Closing Date 224
Invoice Integrated Into 224
Only Period Transactions 224
Printing 224
Transaction Based 224
Understanding The Statement 224
With Copy of Invoice 224
Zero Balance 224
Assign Invoice Number At End 196
Australia
Goods Received Have PO Tax 220
Round To Nearest 5 Cents 220
Tax Rate For Including Tax In Price 220
Authorized Buyer 200
AutoSKU 130, 278

POSitive Retail Manager User Guide334
Copyright ©2007 POSitive Software Company
AveraCharge 228
Average Cost 210
Average Landed Cost 210
- B -
Backorder
Invoice 200
Payment 200
Backorders
Customer Orders Filled By PO 217
Balance Forward AR Statement 224
Balance Register
Print Category Summary 237
Print Credit Card Summary 237
Print End-Of-Day Report 237
Print Invoice Transactions 237
Print Options 237
Print Tender Summary 237
Barcodes 130
Basic Hardware
40 Column Printer 39
Advanced Printing 39
Barcode Scanner 39
Bin Locations 39
Cash Drawer Setup 39
Copies 39
Credit Card Swiper 39
Crystal Report 39
Dot-Matrix 39
E-Mail 39
End of Day Reports 39
Forms 39
Inventory Labels 39
Laser 39
Magnetic Stripe Reader 39
Multi-Monitor Support 39
Physical Printer 39
Pole Display Setup 39
Printer Types 39
Printing Setup 39
Report Printing 39
Transaction Printing 39
Weigh Scale 39
Bin Location
Stock Counts 12
Brief Description 210
- C -
Calculate Landed Cost Based On
Cost 217
Number of Items 217
Weight 217
Calculate Quantity From Price 275
Calculated Prices 278
Card Reader
Test 234
Cash Back Limit 228
Cash Drawer 60, 232
Assigning to Employee 33
Bypass Direct To Port 240
Code 240
Port 240
Printer 240
Pulse 240
Test 240
Catalog Page Number 130
Category 139
Assign 141
Create New 141
Edit 141
Re-Assign 141
Remove 141
Category Default Settings 278
Category Defaults 275
Category Defaults (Listing) 278
Category Detail Form 278
Category Listing 291
Category Picture 278
Category Summary 237
Centers
Customer 86
Inventory 86
Report 86
Vendor 86
Change Dept/Category 94
Changing Company Information
Grayed Out Lines 248
Registration Changes 248
Check Validation
Date 200
Employee Sales ID 200
Invoice Number 200
Payment Method 200

Index 335
Copyright ©2007 POSitive Software Company
Check Validation
Station 200
Time 200
Check Verification 228
Checkbook
Checking Account 226
Generate Checks 226
Choose Company 17
Company Name 18
Create New Company 18
Description 18
ID - Data Folder 18
Remove Company 18
Sample Company 18
Select Company 18
Clock In - Clock Out 264
Clone Invoice 93
Closing Date
AR Statement 224
COM Ports Setup 232
Commissions 196, 234
Company
Business type 19
Choose Company 19
Data Password 19
Information 19
New 31
Security Options 19
Tax Rate 19
Company Headers
End-Of-Day Receipt Header 248
Receipt Header 248
Tax Number 248
VAT 248
Company Information
Company Address 248
Company Name 248
Copy To Clipboard 248
Description 248
E-Mail Address 248
Fax 248
Invoice Line 248
Logo 248
Phone 248
Picture 248
POSitive Account Number 248
Tax Number 248
Web Page Address 248
Company Logo
Adding To Invoice Printout 248
Picture Format 248
Restrictions 248
Company Name
Data Password 17
Tax Rate 17
Company Setup - Advanced
Definitions 37
Editors 37
General Ledger Setup 37
Importer 37
Invoice Buttons 37
POSitive SupportNET 37
Printers 37
PRM Checkbook 37
Touch Screen 37
Transaction Screen 37
Company Setup - Basics
Categories 37
Category Defaults 37
Company Information 37
Definitions 37
Departments 37
Policy Statement 37
Registration 37
Security Groups 37
Station Settings 37
System Setup 37
Tax Rates 37
Compare/Choose Vendors [F7] 172
Confirm Pricing
Not if Landed Cost Activated 217
When Cost Changes 217
Consignments 196
Contents 12
Copy 94
Cost
Average 210
Basis of Price Markups 210
Landed 210
Landed Average 210
Landed Cost 217
Skip Update 217
Update Defaults 217
Update Item & Vendor Costs 217
Update Item Cost 217
Update Vendor Cost 217

POSitive Retail Manager User Guide336
Copyright ©2007 POSitive Software Company
Cost
Verifying 210
Zero 210
Cost Correction 133
Cost Verifier 133
Country
Bill To 200
Excluded 200
Ship To 200
Coupon
Dollars Off 142
Expiration Date 142
Manufacturer 142
Percentage Off 142
Store 142
Coupon Manager 94, 142
Create Company
Convert PFW to PRM 16
From Scratch 16
Credit Card
Approval Number 228
Confirmation 228
Local Processor 238
Mag Stripe Reader 238
Merchant ID 248
Number of Receipts 238
Path To Processor 238
Test Processing 238
Transaction Limit 228
Verify Phone Number 248
Credit Card Interface
Charge Limit 228
None 228
Credit Card Processing 232, 238
Credit Card Processors
AveraCharge 228
ICVerify 228, 238
PC Charge 228
PCCharge 238
Tender Retail 228
X-Charge 228, 238
YesPay 228
Credit Card Summary 237
Credit Cards
Retain Credit Card Number 209
Scan For Cards 209
CTRL-Enter 103
Current Stock 118
Custom Layout
Length 240
Line Number 240
Pole Display 240
Position 240
Customer
Account Number 90
Address 90, 300
AR Statement 90
Area Code 209
Assigned Sales ID 90
Authorized Buyer 200
Authorized Buyers 87
Bill To Address 200
Bill-To Label 87
Categories 87
Category 90
Checks 200
City, State, Zip 300
Company 90, 300
Consignments 87
Country 90, 200
Credit Cards On File 87
Credit Limit 90
Customer File 87
Detail 87
Discount Percentage 90
Driver's License 90, 200
E-Mail 87, 90, 300
Export 87
Find 300
First Name 300
Frequent Buyer 87
Information 87
Invoice History 87
Last Name 300
List 87
Lookup By 209
Lookup Code 90
Mailing Labels 87
Name 90
Notes 87
Pending Transactions 87, 200
Phone 90, 300
Phones 87
Picture 209
Picture Manager 87
Price Level 90

Index 337
Copyright ©2007 POSitive Software Company
Customer
Record 87
Reminders 87
Report 87
Requires PO Number 90
Resale Number 90
Setup 209
Shipping Address 87
Statement History 87
Summary 87
Tax Group 90
Terms 87, 90, 209
Titles (Mr/Mrs) 209
User Defined Fields 90, 300
Zip Code 209
Customer Center 86
Customer Display 240
Customer Info Box 234
Customer Label Editor 246
Customer Labels 232
Customer Message List 301
Customer Name Required On Returns 196
Customer Options 196
Customer Order 137
Customer Orders 94
Customer Orders [F8] 172
Customer User Defined Fields 297
Customers
Add / Edit (Customer) 66
AR Payments 66
Create (New Transaction) / View 66
Customer Bill To Information 66
Customer List 66
Lookup - GO 66
Notes 66
Quick Find 66
Receivables 66
Reset 66
- D -
Data Collector
Brand 243
Non-Supported 243
Port 243
Test 243
Date Range 264, 266
Days Due
Accounts Receivable 224
Debit Card
PinPad 228
Decimal Places
Cost 210
Pricing 210
Quantity 210
Decimal Point 200
Default
Customer Terms 209
Default Picture 244
Demo Mode 19
Department 139
Add 141
Contracted 210
Delete 141
E-Commerce 210
Edit 141
Departments 302
Dept/Category
Change 139
Invoice History 139
Reassign 139
Re-Generate AutoSKU 139
Dept/Category Manager 94
Description
Alternate 130
Description of Item
Brief 210
Long 210
Lookup By 210
Upper-Lower Case 210
Dial Phone Settings 232
Divisions 12
Due Days Setup 196
Duty Free
Validation 200
- E -
E-Commerce 278
Department 210
Inventory Picture 210
Pictures 210
Retrieve Orders 75
Send To Web Store 75
SKU 210
Web Specials 75

POSitive Retail Manager User Guide338
Copyright ©2007 POSitive Software Company
E-Commerce 278
Web Store Inventory 75
Web Store Setup 75
Edit Picture
Best Fit 135
Fit Height 135
Fit Width 135
Zoom In / Out 135
Editing Labels 61
Editors
Customer Label 246
Inventory Label 246
Invoice Layouts 246
Receipts 40-col 246
Receipts Full Page 246
Electronic Credit Card 196
Electronic Journal 234
E-mail
Employee access 33
E-Mail Address
Prompt For 200
E-Mail Forms 232
E-Mail Invoice 93
Employee
Able To 252
Access To 252
Address 33
Cash Drawer Assignment 33
E-mail options 33
Employee Service Time Report 266
Employee Time Report 264
Invoice Name 33
Mail Group 33
Name 33
New 33
Notes About 33
Password 33
Phone 33
Sales ID 33
Security 33, 252
Security Group 33
Service Orders 266
Service Tech 33
Service Time In - Out 266
Social Security Number 33
Time In - Out 264
Employee Time Cards 264
End-Of-Day Receipt Header 248
End-Of-Day Report 237
- F -
Fast-Add 234
Father Child SKUs 130
FIFO 210
Filter
By Category 104
First In First Out 210
Food Stamps 196, 228
Enable Tracking 210
FOR AUSTRALIAN USERS ONLY 196
Freight Category 294
Freight Summary Report 152
- G -
Gas Pump Interface 245
General Ledger Journal
Post Selective Transactions 12
General Setup 196
Generating The Order List 172
Generic / Text Only Printer 237
Generic Receipt Printer 54, 237
Generic Text Only Printer 240
Gift Cards 228
Gift Certificate
Internal Tracking 200
Pay Out in Cash 200
Refund 200
GL Accounts 278
Global Pricing 278
Graphs
Profits 133
Revenues 133
Units Sold 133
Grayed Out
Address 248
Name 248
- H -
Hardware
Resolution 1024 x 768 244
Second LCD Monitor 244
Second Video Card 244

Index 339
Copyright ©2007 POSitive Software Company
Hardware Requirements
Backup Solution 13
Screen Resolution 13
Server 13
Touch Screen Designer 13
Workstation 13
Hardware Settings 232
History
Graphs 133
Item 133
Numbers 133
PO 133
Sales 133
Hot Links
Calculator 64
Calendar 64
Customers 64
Inventory 64
My POSitive 64
Reports 64
Vendors 64
Hotkeys
Tax on/off 220
Hours 264, 266
How To
Activate Cash Drawer 240
Activate Multi-Monitor Mode 244
Activate Multi-Monitor Support 232
Activate Pharmacy Support 228
Activate Station To Process Credit Cards 238
Add A Printer 237
Assign Employees To a Mail Group 270
Choose Company 18
Choose Invoice Form 232
Create A New Company 18, 19
Create a Pole Display ID 240
Create a Policy Statement 251
Define New Display Layout 240
How to Use Hamacher Support 228
Open Cash Drawer 232
Print Company Logo On Invoices 248
Print Invoice Prompt Information 200
Print Packing Slip 232
Print Pick List 232
Remove Employees From a Mail Group 270
Select The Port For The Data Collector 232
Set Customer Label Printing 232
Set Wallpaper 232
Setup a Serial Cash Drawer 240
Setup Check Validation 200
Setup Mag Stripe Reader 232
Setup Pole Display 232
Setup Serial Cash Drawer 232
Test Card Reader 234
Test IC Verify 232
Test Mag Stripe Reader 234, 238
Test the Pole Display 240
Turn Off Invoice Printing 232
Understand the AR Statement Layout 224
Use The Alternate Invoice Printer 232
How To Activate The Use Of Departments 302
How To Add Departments 302
How To Assign Categories To A Department 302
How To Create A Category 291
How To Create A PO 173
How To Create, Edit
Internet Order 191
Layaway 191
Order 191
Quote 191
Service 191
How To Delete A Category 291
How To Merge A Category 291
How To Print A Listing Of Departments and Linked
Categories 302
How To Remove A Category From A Department
302
How To Set Category Defaults 291
- I -
ICVERIFY 228, 232
Importer
Standard Note 127
Transaction Note 127
Install
MS SQL 2005 16
POSitive Retail Manager 16
Internal ID 118, 120
INTERNATIONAL SETTINGS 196
Inventory 196
Add To Label List 107
All 94
All Inventory 67
Alternate SKU 210
Available 67

POSitive Retail Manager User Guide340
Copyright ©2007 POSitive Software Company
Inventory 196
Buy Now 67
Category 108, 210
Category Filter 94
Change Dept / Category 107
Committed 67
Consignments 67, 94
Contract Pricing 67
Coupon Manager 107
CTRL-Enter 94
Current Promos 108
Customer Orders 107
Department 108, 210
Dept/ Category Manager 107
Description 210
Details 107
Duplicate SKU 210
Enter 94
Extra 67
Find 67
General 210
Held 67
In Stock 67
Inactive Items 94
Inventory List 67
Inventory Types 67, 94
Item History 107
Item Notes 107
Listing 94
Locate 94
Location 108
Long Description 210
Lookup GO! 67
Matrix 94, 210
Matrixes 67
Mix & Match Manager 107
MultiStore 107
Negative Stock Count 210
Non-Tracking 210
On Order 67
Picture 108, 200
Picture Management 107
Pictures 210
Pre-Sold 67, 210
Price Breaks 107
Pricing 210
Promo Manager 107
Promo Pricing 107
Properties 94
Query 94
Quick Find 94
Reports 107
Reset 67
Saved Queries 67
Send 94
Serial Numbers 210
SKU 210
SKU Management 107, 108
Standard Note 108
Stock Count 67, 108
Stock Counts 210
Stock Management 107
Summary 107
Tag Items 67
Template Contents 108
Templates 67, 94
To Order List 107
Trade-Ins 210
UnPosted 67, 94
Used Items 67
Used Items Manager 107
User Defined Fields 108
Vendors 107
Inventory At Invoicing 196
Inventory Center 86
Inventory Details
Bulk Inventory 110
Dept/ Category Defaults 110
Description 110
Last Cost 110
Long Description 110
Maximum Stock 110
Minimum Order 110
Minimum Stock 110
Primary SKU 110
Primary Vendor 110
Purchase By 110
Security 110
Sell By 110
Selling Prices 110
Unit Cost 110
User Defined Fields 110
Inventory Label Editor 246
Inventory List
Description 99
Finding Products 99

Index 341
Copyright ©2007 POSitive Software Company
Inventory List
Price Level 99
Regular Price 99
SKU 99
Sorted 99
Total Stock 99
Inventory Record 94
Invoice
Backorders 200
Check Validation 200
Employee Name 33
Header 200
Numbering 200
Package 200
Payment 200
Printing Sequence 200
Prompts 200
Service Notes 200
Setup 200
Voided 200
Invoice Number
Starting 19
Invoice Settings 232
Invoice Setup 196
Invoice Style
Invoice 234
Register 234
Touchscreen 234
Invoice Transactions Report 237
Invoicing
Combine Same-SKU Items 12
Item History 94
Item Not Found 234
Item Notes 94
Items Purchased 93
- L -
Label
Trade In 210
Used Item 210
Label Printing 118, 130
Landed Cost 210
Landed Cost, Based On
Cost 217
Number of Items 217
Weight 217
Links 118
List Views 12
Locate 87, 103
Location
Change Sequence 120
Name 120
Receive To 120
Sequential Order 120
Stock 120
Storage 120
Long Description
Hide 210
Lookup By
Description 210
SKU 210
Lookup Customer By
Account Number 209
Customer Code 209
Customer Name 209
Lookup Code 209
Phone Number 209
Lookups
Simplified 12
- M -
Mag Stripe Reader
CR/LF 238
Number of Tracks 238
Sample Swipe 238
Mail Group
All Employees 270
Employee Assignments 270
Group Description 270
PFW Mail 270
Maintenance
Barcode Types 78
Call-Log 78
Categories 78
Category Defaults 78
Chart Of Accounts 78
Company 78
Countries 78
Currency 78
Customer Returns 78
Customers 78
Definitions 78
Departments 78
Employee Shifts 78

POSitive Retail Manager User Guide342
Copyright ©2007 POSitive Software Company
Maintenance
Exchange Rates 78
Export 78
File Maintenance 78
Finance Companies 78
Import 78
Inventory 78
Invoice Buttons 78
Invoices 78
Mail Groups 78
Microbiz 78
MYOB Chart Of Accounts 78
Policy Statements 78
Printers 78
Purge Data 78
Quickbooks Chart of Accounts 78
Registration 78
RMA Returns 78
Security Groups 78
Set Common Path 78
Station Settings 78
SupportChat 78
SupportNet 78
System Setup 78
Tax Rates 78
Tender 78
Touch Screen 78
Transaction Screen 78
Update Report Layouts 78
User Defined Fields 78
Utilities 78
Vendors 78
Verify Data 78
Verify Security Settings 78
Warranty List 78
Zip Codes 78
Management
Check Management 76
Check Refunds 76
Commissions 76
Consignment Processing 76
Credit Card Manager 76
Customer Labels 76
Customers 76
Daily Log 76
E-Mail Manager 76
Employees 76
Export Customers 76
Frequent Buyers 76
Gift Certificate Manager 76
Invoices 76
Layaways 76
List of Voids 76
Managers 76
Marketing 76
Pending 76
Print Customer List 76
Printer 76
Report Center 76
Reports 76
Sales Summary 76
Statements 76
Store Stats 76
Manager
Coupons 94
Dept/Category 94
Mix & Match 94
Promos 94
Used Items 94
Margin 133
Master Menus 12, 64
Matrix Inventory
Column Row 210
Grid 217
On Order List 217
On Purchase Orders 217
Row Column 210
Maximum Quantities 278
Merchant
Code 228
ID 228
Mix & Match
Compared to Promo Pricing 143, 146
Mix & Match Manager 94
Multi-Monitor Support 232, 244
MultiStore 138
Multi-Store 12, 94
- N -
New Company
Category Defaults 31
Definitions 31
Departments 31
Employees 31
Setup 31

Index 343
Copyright ©2007 POSitive Software Company
New Company
Stations 31
System Setup 31
Tax Rates 31
Transaction Screen Editor 31
New Company Setup 17
New Company Wizard 17
New Employees 17
New Transaction 87
New User of PRM 16
Not Found
Inactive Inventory 103
Notes
Cut & Paste 127
Employee 33
Internal 127
Purchase Order 127
Standard 127
Transaction 127
Web 127
- O -
Options
Add To Label List 110
Allow Discounts 110
Allow Food Stamps 110
Ask For Price 110
Ask For Quantity 110
Calculate Quantity From Price 110
Commission 110
Default Sell Quantity 110
Editor 110
Equation 110
Fixed Rate 110
Food Stamps 110
Item Is Active 110
Label Editor 110
Label Form 110
Mix & Match 110
Percentage 110
Post To Internet 110
Prompt To Read Scale 110
Track Serial Number 110
Track Stock 110
Warranty Code 110
Order
Numbering 200
Order List
Assign Vendor 173
Current Open POs 173
Customer Orders 173
Focus On Vendor 173
Matrix Inventory 217
Purchase History 173
Sales History 173
Stock Status of Each Item 173
Tag Items for PO Generation 173
Vendor Selection 217
Order List [F5] 172
Order List Form
Needed 139
Stock Status 139
Vendor Cost 139
Order Number
Starting 19
- P -
Package
Invoice Option 200
Packing Slips 232
PC Charge 228
Per Store
Pricing 138
Stock Count 138
Pharmacy Support
CarePoint 228
Third Party Software Support 228
Phillippines
Cumulative Totals On End-Of-Day Closing
Report 220
Phone Number
Area Code 209
Generate Customer Code 209
Prompt For 200
Physical Printer Driver 237
Picture
Company Logo 248
Drag & Drop 135
Edit Properties 135
File Name 244
Inventory 200
Invoice Screen 200
Load 248
MIMAGES directory 244

POSitive Retail Manager User Guide344
Copyright ©2007 POSitive Software Company
Picture
Multi-Monitor Default 244
Product 135
Remove 248
Slide Show 244
Thumbnail 135
Picture Management 12, 94
Pictures
E-Commerce 210
Inventory 210
Thumbnail 210
PinPad
Com Port 228
Placing Purchase Order 217
PLU 130
PO History
By Date - Report 152
By Serial Number 152
By Tracking Number 152
By Vendor 152
Freight Summary 152
Items By Date 152
Summary Values 152
PO Number
Customer 200
Pole Display 59
Brands Supported 240
Characters Per Line 240
Decimal Codes 240
Display Layout 240
Lines 1 and 2 240
Message Lines 240
Pass Through 240
Port 240
Printer 240
Setup 240
Substitute for 244
Test Button 240
Pole ID 240
Policy Statement
Announcement 251
Contract Pricing 251
Internet Order 251
Invoice 251
Layaway 251
Length Restriction 251
On Pre-Printed Forms 251
Order 251
Promotions 251
Quote 251
Return Policy 251
Seasons Greeting 251
Service Order 251
Portable Scanner 232
Brand 243
Non-Supported 243
Port 243
Test 243
POSitive Setup Form 196
Post To Internet 275
Preparing Order List 217
Price Break 130
Price Breaks 94
2fer, 3fer 117
Current Price Break 117
Quantity Break 117
Price Change
Pop-Up Price Levels 200
Price In SKU 210
Price Includes Tax
On Fast-Add 220
On Invoice Printout 220
On Pole Display 220
On Screen 220
Price Levels 19
Price Markup Basis
Average Cost 210
Cost 210
Include Landed In Average 210
Landed Cost 210
Pricing 196
Primary Vendor 217
Print
Category Summary 237
Credit Card Summary 237
End-Of-Day Report 237
Invoice Transactions 237
Options 237
Tender Summary 237
Print Invoice 93
Always Choose Printer 234
Always Preview 234
Automatic 234
Prompt 234
Select Another Printer 234
Skip Printing of Invoice 234

Index 345
Copyright ©2007 POSitive Software Company
Print Invoice 93
Text File 234
Use Alternate Printer When On Account 234
Print Report 93
Printer Driver
Physical 237
Windows 237
Printers / E-Mail 232
Processing Items On The List 172
Profit 133
Program Start 232
Promo Manager 94, 115
Promo Pricing 94, 115, 278
Promo Setup
Adding Multiple Items 145
Date Range 145
Discount Percentage 145
Fixed Price 145
Promo Never Ends 145
Promotional Pricing
Compared to Mix & Match 143
Date Range 143
Discount Percentage 143
Fixed Price 143
per Category 143
per Department 143
per Item 143
per Whole Store 143
Promotions
Fixed Price 115
Multiple 115
Percentage 115
Promo Details 115
Prompt For
Age Verification 234
Backorders Arrived 217
Cashier ID 234
Check Customer ID 234
Check Number 226
Commissioned Sales ID 234
Confirm Price When Cost Changes 217
Duty Free 200
E-Mail Address 200
Enter Birthdate 234
Fast-Add 234
Item Not Found 234
Lookup List 234
New Invoice/Close Invoice 234
Phone Number 200
Print Pick List for Orders 234
Ready To Print 234
Sales ID 234
Scan Driver's License 234
Serial Number 210
Serial Number on PO 217
Stock Count 210
Used Items 210
User Defined Information 200
Zip Code 200
Prompt To Read Scale 275
Pros/Cons
Customer Name on Returns 200
Decimal Point 200
Invoice Number At End 200
Pop-Up Price Levels 200
Purchase Order
Defaults 217
Edit / Receive 128
Matrix Grid 217
Number 217
Order List 217
Placing 217
Print 217
Receiving 217
Standard Style for Matrix Items 217
Vendor SKU, Omit 217
Purchase Order Defaults 196
Purchase Order E-mail
HTML 12
Purchase Order Number
AutoFill 217
Customer 200
Date/#/SalesID 217
Manual Entry 217
No AutoFill 217
Sequential 217
Purchase Order Status
Import PO 177
PO Items 177
PO Number 177
To Place 177
To Receive 177
Vendor 177
Purchase Orders
Benefits Of 170
Order List 170

POSitive Retail Manager User Guide346
Copyright ©2007 POSitive Software Company
Purchase Orders
Receive Without PO 170
Recommended Procedures 170
Research Tools 170
RMA 170
To Place 170
To Receive 170
Vendor Returns 170
When Not To Use Purchase Order 170
Purchasing
Items In Transit 70
Items On Order 70
Maintenance 70
Order List Management 70
Orphans (w/o POs) 70
Physical Inventory 70
PO History 70
Print Labels 70
Printer 70
Process Other Returns 70
Purchase Orders 70
Receive Inventory 70
Receive w/o PO 70
Returns From Customers 70
RMA (Vendor Returns) 70
RMA Aging 70
RMA History 70
Send To Vendor 70
- Q -
Quantity of Labels 140
Quantity Separator 200
Query 87
Quick Find 87
Quote
Show Cost 234
- R -
Random Weight 210
Receipt Header 248
Receiving Purchase Order 217
Re-Defining Departments 302
Register Balance 232
Registered Printers 54
Registration
On Line 12, 16
Report Center 86
Report Path 228
Report Preview
ASCII 12
HTML 12
PDF 12
Reports 94, 160
Category Summary 237
Credit Card Summary 237
End-Of-Day Report 237
Invoice Transactions 237
Tender Summary 237
Reset 87
Return 160, 196
Return Invoice 93
RMS Software
Data Path 245
- S -
Sample Screen Shots
Multi-Monitor Support 244
Scheduling Calendar
Hide Customer Info Box 234
Screen Settings 196, 232
Search UDF 94, 105
Searches
CTRL-Enter 12
Enter 12
Season 126
Seasonal Levels 118
Security 234
Effective, Keys To 252
Employee 33
File> Definitions 258
Group 252, 258
Group Name 258
Group Options 258
Options 252, 258
Password 33, 252
Print 258
Sales ID 33, 252
Security Group 33
Security Group
Access Groups 252
Creation 252
Unassigned 252

Index 347
Copyright ©2007 POSitive Software Company
Security Group Settings 258
Security Switches
Ask For ID Each Time 252
Sell It Now 94
Selling Prompts 278
Send 87
Send To 12
Serial Number
Duplicate 210
Prompt For 210
Prompt For on PO 217
Service Order 210
Terminating Character 210
Tracking 210
When Receiving PO 210
Serial Number Management 118
Service Order
Serial Number Tracking 210
Service Orders 266
Service Notes On Invoice 200
Sub-Owner 200
Set Pricing 122
Set Quantity 122
Settings For Employee E-Mail Options 260
Shipping
Starship 200
Show Cost 93
Similar / Related Items 122
Skip Prompt
For Password When Taking AR Payment 234
New Invoice/Close Invoice 234
SKU
Alternate 130, 210
AutoSKU 130
Delete 130
Duplicate 210
Duplicate On PO 217
E-Commerce 210
Father / Child 130
Lookup By 210
Prefix - Suffix 210
Price In 210
Primary 130, 210
Secondary 130, 210
Spaces In 210
UPCB 210
Vendor, Omit 217
Weight In 210
SKU Management 94
Slide Show
Picture List 244
Pole Display Substitute 244
Time Between Slides 244
SmartFeature 270
Snapshot 93
Software Requirements
Microsoft SQL 2005 or later 13
Microsoft SQL Native Client 13
Mixed Mode 13
Software Updates 12
Sounds 196
SQL Server
Name 17
Password 17
Starship Software 200
Start Up
Select Company 248
Station
Collect Tender At 232
Detail 232
Log Out 232
Name 232
Number 232
Opening Balance 232
Set As Default 232
Wallpaper 232
Station Detail -
Cash Drawer/ECC tab 232
E-Mail tab 232
General tab 232
Pole Display tab 232
Printers tab 232
Station Settings 232
Stations 196
Statoin Settings 16
Stats 118
Stock
Available 99
Committed 99
Extra 99
Held 99
Maximum 99
Minimum 99
On Order 99
Stock Count
Customer Name 137

POSitive Retail Manager User Guide348
Copyright ©2007 POSitive Software Company
Stock Count
Held 137
Verify / Adjust 118
Stock Counts
Inventory 210
Pre-Sold 210
Prompt For 210
Stock Level
Seasonal 126
Stock Location 118, 120
Stock Management
Current Stock 94
Links 94
Seasonal Levels 94
Serial Numbers 94
Stock Location 94
Transaction Log 94
Used Items 94
String of
Characters 103
Successive Links 122
Suggested Accessories 122
Summary of Customer
Invoices 93
Purchases 93
Returns 93
Superseded Part Number 130
System Settings 16
- T -
Tag Alongs 122
Tax
Base Tax On Invoice Total 220
Base Tax On Line Items 220
Category 220
Group 220
International Settings 220
No Tax 220
Package 220
Quick Sale 220
Rate 220
Round Sales Tax Up 220
Tax Included In Selling Price 220
VAT 220
Tax Category 220
Tax Group 220
Tax Group Based On Shipping Address 196
Tax Number
ANB Number 248
Federal ID 248
Tax Options 196
Tax Rates 220
Taxes
Based on Locality 209
Based on Shipping Address 209
Tender Retail 228
Tender Screen
Edit Mode 200
Tender Summary 237
Terms of Payment 209
Third Party Hardware Software 245
Third Party Software Support
CarePoint 228
Hamacher 228
Time In 264, 266
Time Out 264, 266
To Order List 94, 128
Tool Bar 12
Touch Screen 12
Touchscreen 234
Track Inventory 210
Tracking Number 118
Trade Ins
System Setup 145
Trade-Ins
Available When Selling 210
Inactive 210
Label Form 210
SKU 210
Used Items 210
Transaction Log 118, 120
Transaction Reports Editor 246
Transaction Types
Cancel 234
Customer 234
Quick Sale 234
Return Invoice 234
Transactions
Age Verification 64
Balance Register 64
Clock In/Out 64
Create New Pending 64
Customer Sale 64
Date and Time 64
Gift Certificate Check 64

Index 349
Copyright ©2007 POSitive Software Company
Transactions
Invoice History 64
Layaway 64
Logged In 64
Logout 64
Lookup 64
Open Register 64
Order 64
Pending - Add Edit 64
Price Check 64
Quick Sale 64
Quote 64
Recurring Invoice 64
Retrieve Suspended 64
Return 64
Service Order 64
Service Panel 64
View Pending 64
Web Order 64
- U -
United Kingdom
Settlement Discounts 220
UPCB 210
Updates
Check For 12
Used Items 118, 145
Condition 125
Discard 125
Labels 125
Pricing 125
Trade-Ins 210
Used Items Manager 94
User Defined Fields 94, 105, 278
User-Definable Reports Editor 246
Utilities
Maintenance 170
Physical Inventory 170
- V -
Validation Printer 54
VAT Value Added Tax
Assign Tax Paid On PO To Liability Account
220
Displayed On Inventory Screen 220
On Deposits 220
PO Tax Liability Account 220
Vendor 94
Account # 150
Add 139
Address 150
AutoSKU settings 150
Cost 139
Credit Limit 150
Default Shipping Method 150
E-mail Address 150
Fax Phone 150
GL Expense Account 150
GL Payable Account 150
ID - Code 150
Last Vendor Ordered From 217
Name 150
Phone 150
Primary 128
Primary Vendor 217
Purchase Orders 128
Return Days For Stock 150
SKU 139
Tax Included - Purchase Orders 150
Tax Number 150
Terms 150
Vendor Info 128
Vendor SKU 128
Vendor SKU = Your SKU 150
Web Address 150
Vendor Center 86
Vendor Inventory
Current POs 154
Matrix Headers Only 154
PO History 154
Re-Order Status 154
RMAs 154
Stock Status 154
Vendors
Call Vendor 147
Contacts 147
Items On PO 147
Locate 147
Lookup (Go) 69
Notes 147
Payables 147
Purchase Orders 147
RMA 147

POSitive Retail Manager User Guide350
Copyright ©2007 POSitive Software Company
Vendors
Send List 147
Shipping Addresses 147
Vendor Information 69, 147
Vendor Inventory 69, 147
Vendor List 69, 147
Vendor Payment History 147
Vendor Terms 147
Verification of Age 234
Verify / Adjust Stock Count 118
View
Define View 99
Drag & Drop 99
Reset View 99
- W -
Weight In SKU 210
What Categories Can Do 274
Windows Default Printer 237
Windows Printer Driver 237
Workstation 232
- X -
X-Charge 228
- Y -
YesPay 228
- Z -
Zero Cost 210
Zip Code
Lookup City 209
Plus Four 209
Prompt For 200
Skip City/State Field 209
Tip 209
Zip Code Setup 196

351
Copyright ©2007 POSitive Software Company

